

You’ve likely found that creating something with your hands offers a unique sense of peace. But perhaps you’re ready to move beyond simply following a pattern and want to infuse your work with a more personal, polished artistry.
Think of every small object around you, even a simple planter, as a potential canvas. This isn’t just about making a pot; it’s about exploring how texture, color, and form can transform a functional item into a piece of art that reflects your unique touch.
These ideas are invitations to refine your technique—whether it’s the perfect tension in a macrame knot, the crisp edge of a satin stitch, or the delicate impression of lace in clay. Let them guide you toward creating objects that are not just handmade, but thoughtfully and beautifully crafted.
1. Appliqué with a Raised Satin Stitch Edge

Give your fabric pot covers a clean, graphic look using felt appliqué.
Cut your monstera leaf shape from a sturdy felt, which won’t fray and provides instant dimension.
Secure it to the canvas with a tight, dense satin stitch around the entire perimeter.
This technique not only holds the appliqué firmly in place but also creates a raised, corded edge that makes the design pop, giving it a polished, almost patch-like finish.
For extra structure, insert a layer of heavy interfacing inside the fabric pot cover before sewing.
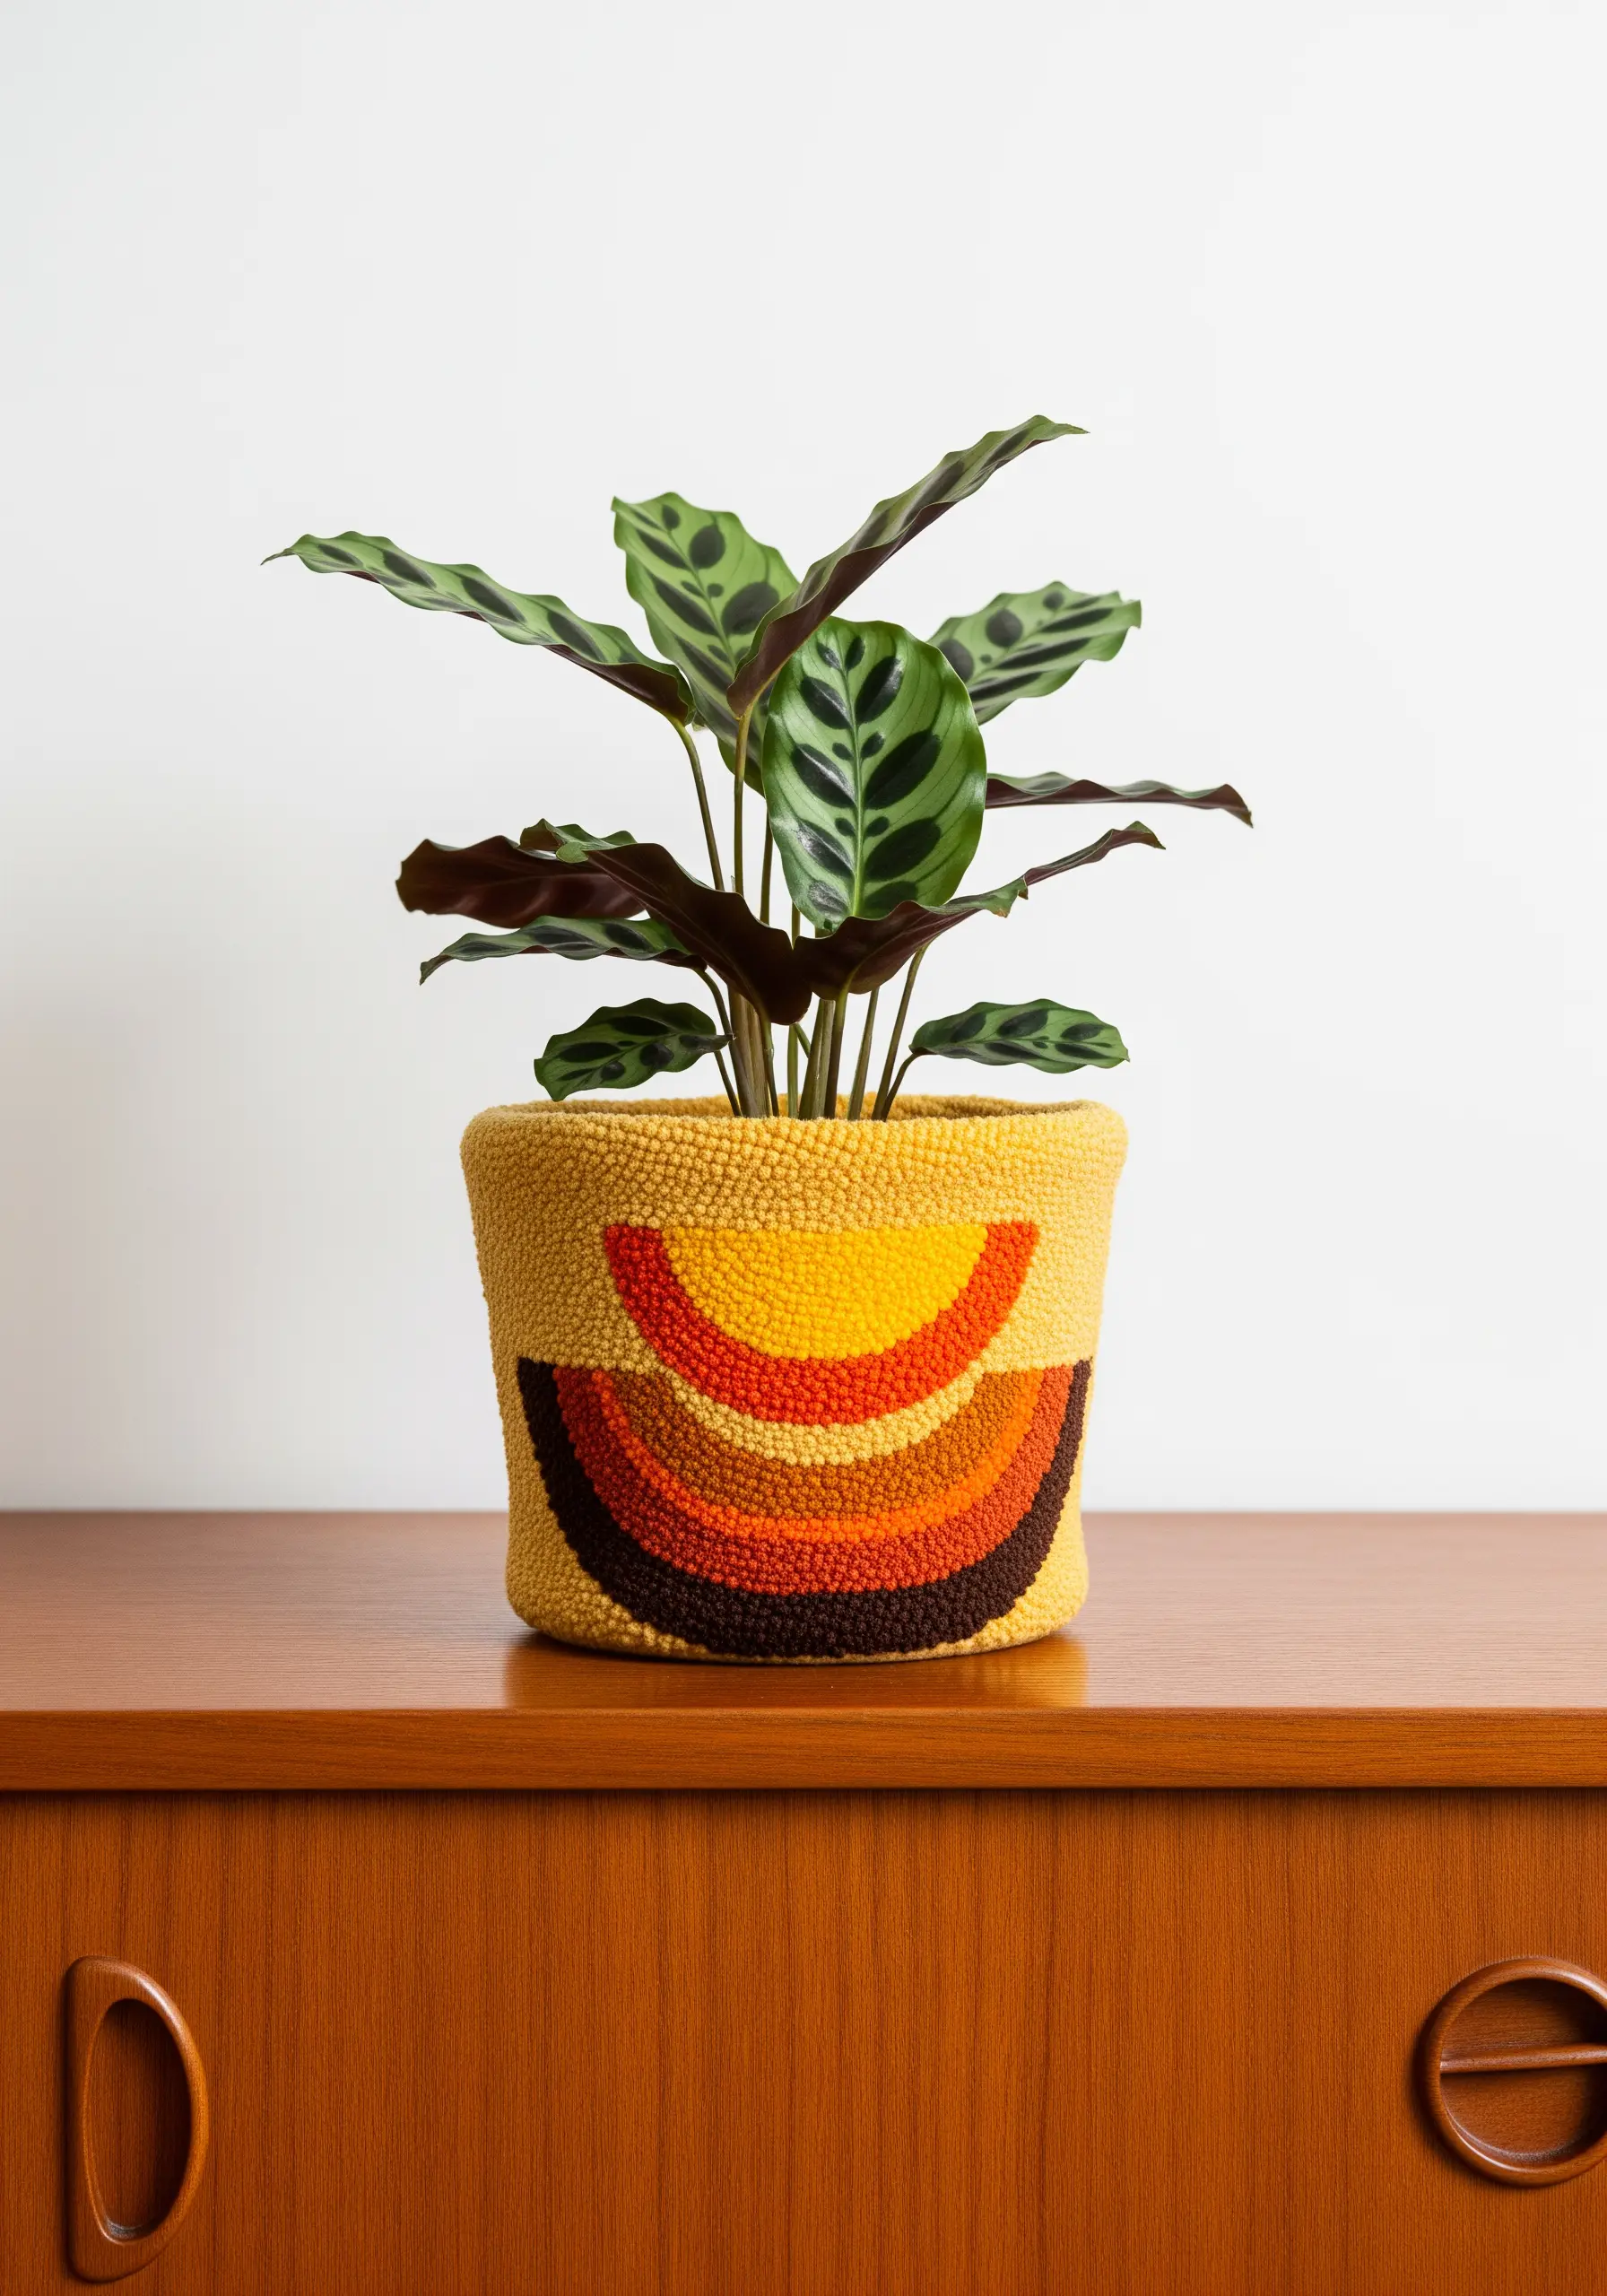
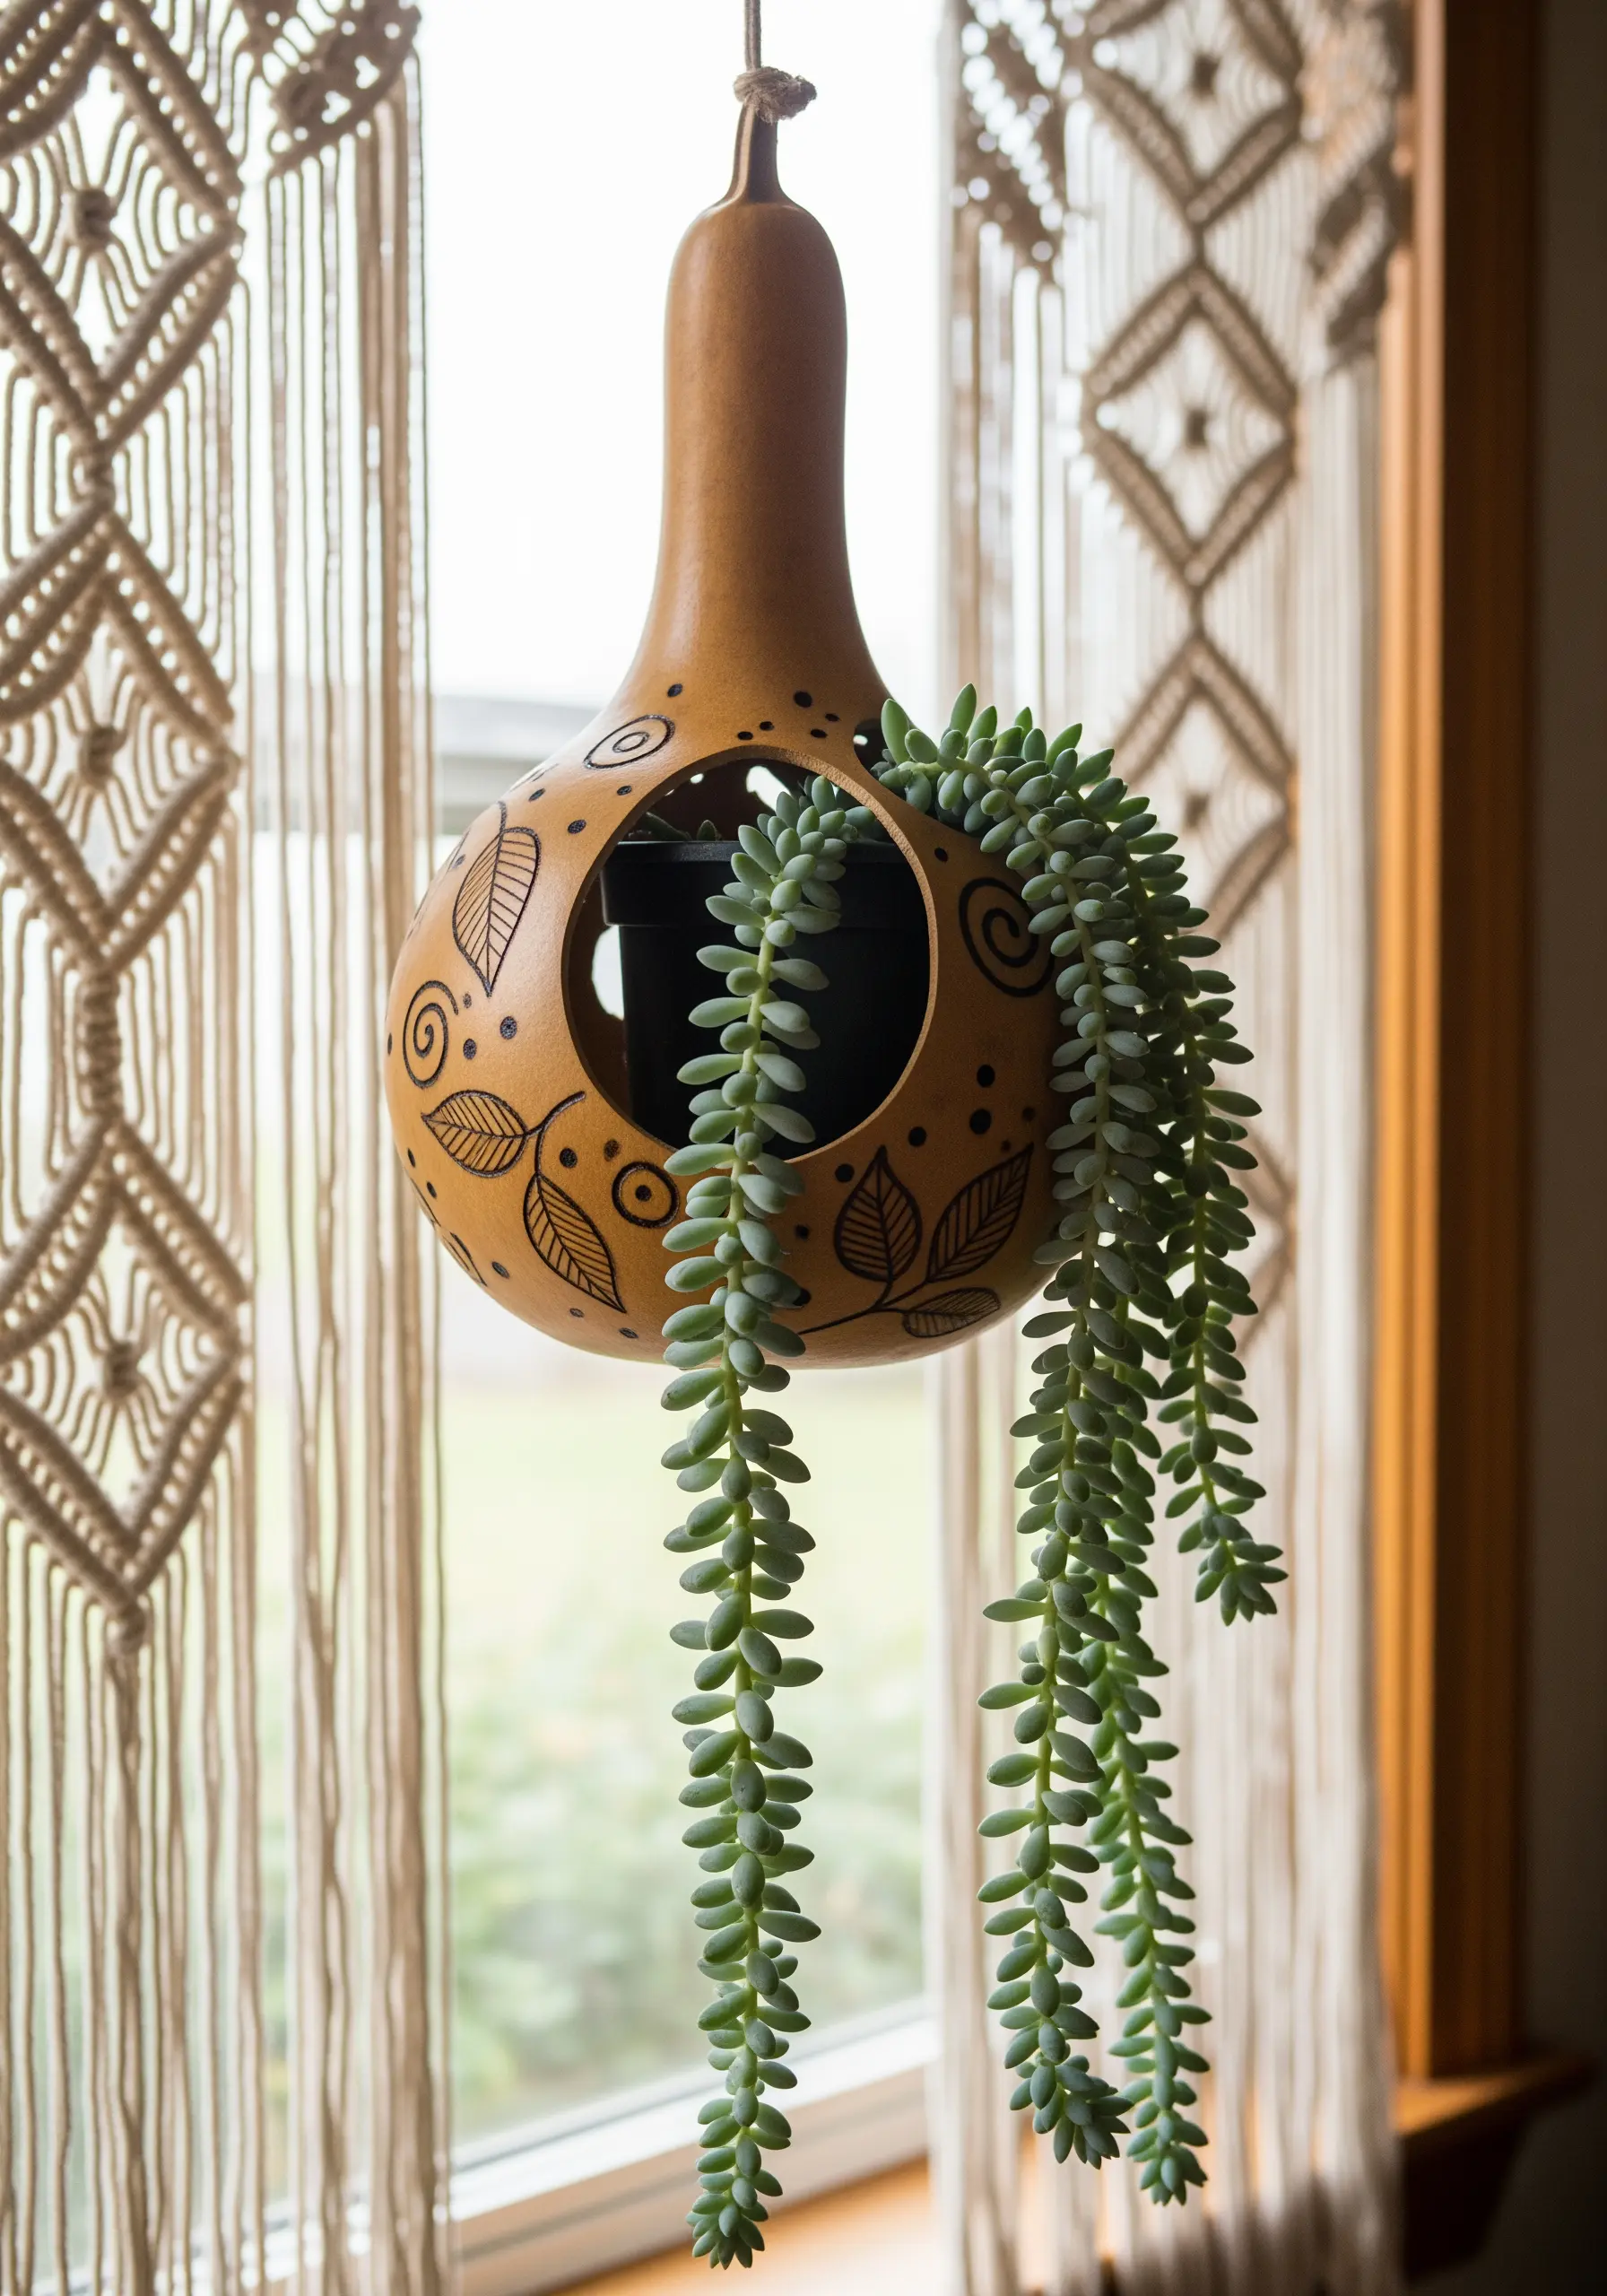
2. Frame Your Pot with Structured Macrame
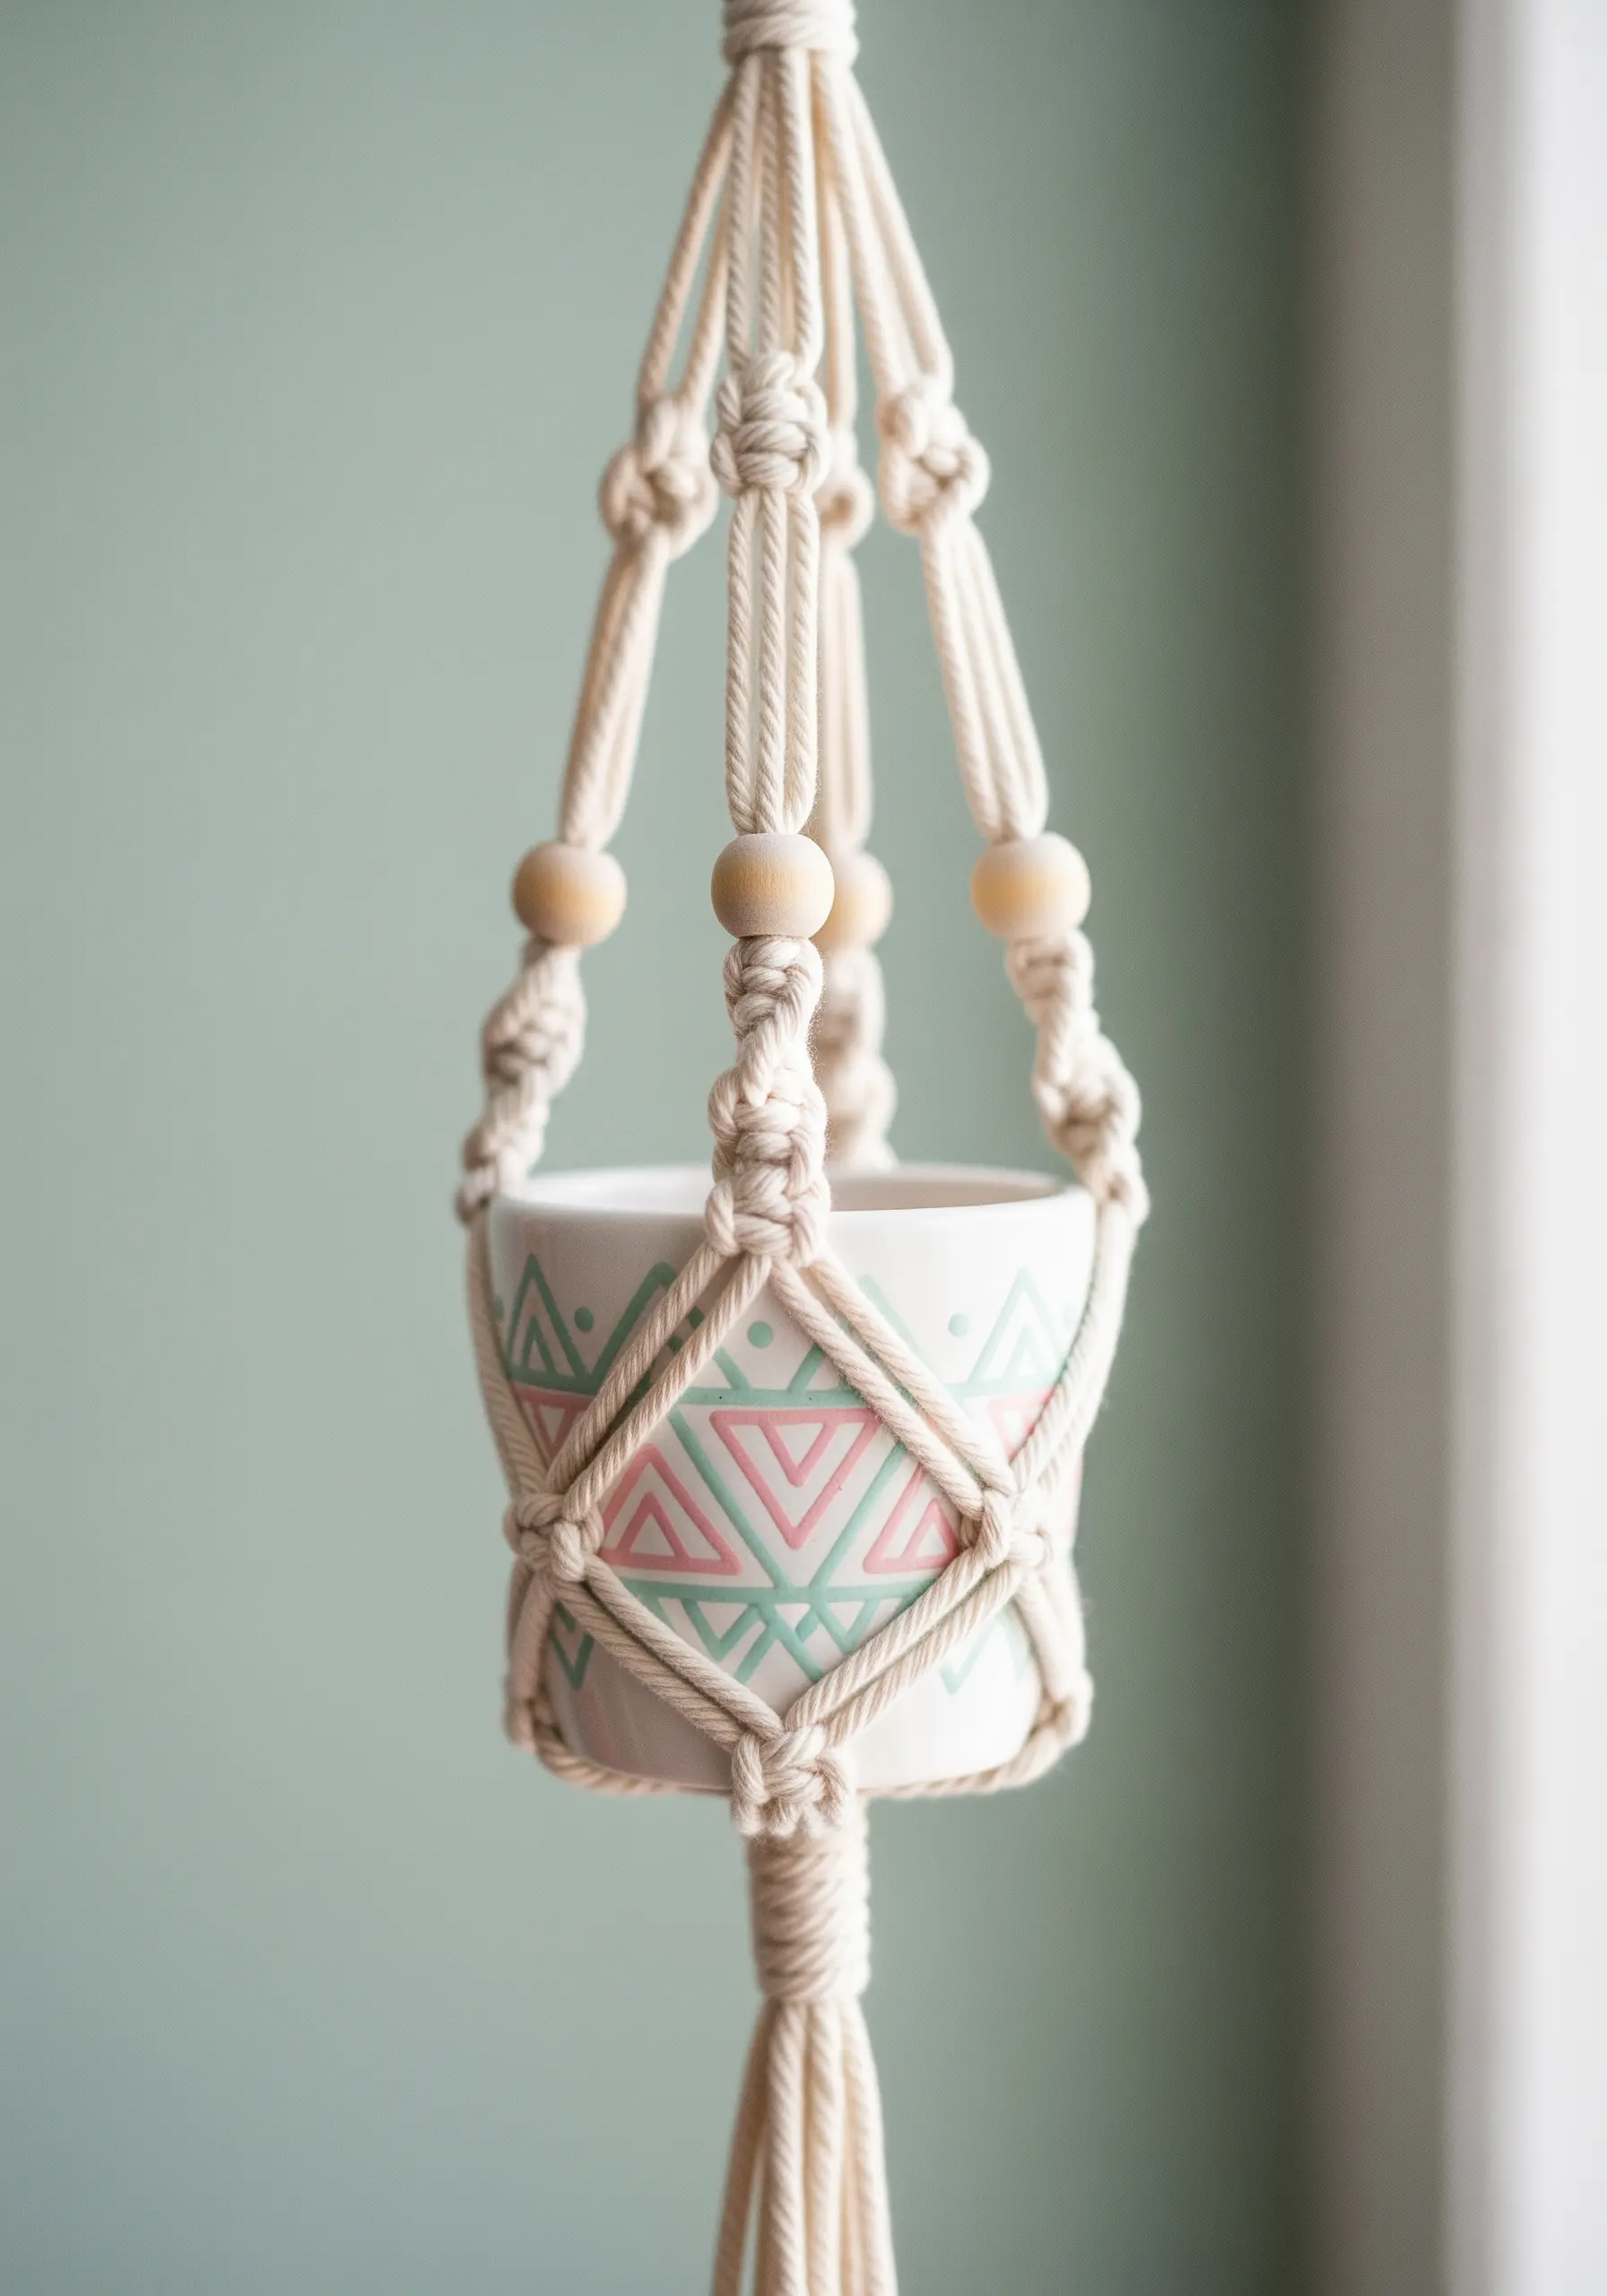
Think of a macrame hanger not just as a holder, but as an architectural frame for your plant.
Focus on creating a structured basket using a series of square knots, which form a stable, flat grid.
Alternate these with half-hitch knots to create spiraling details that add visual interest.
The choice of a simple, natural cotton cord allows the texture of the knots and the design of the pot to stand out without competing for attention.
Wooden beads are a classic touch that adds warmth and a polished finish to the overall design.
3. Gilded Motifs on a Matte Surface
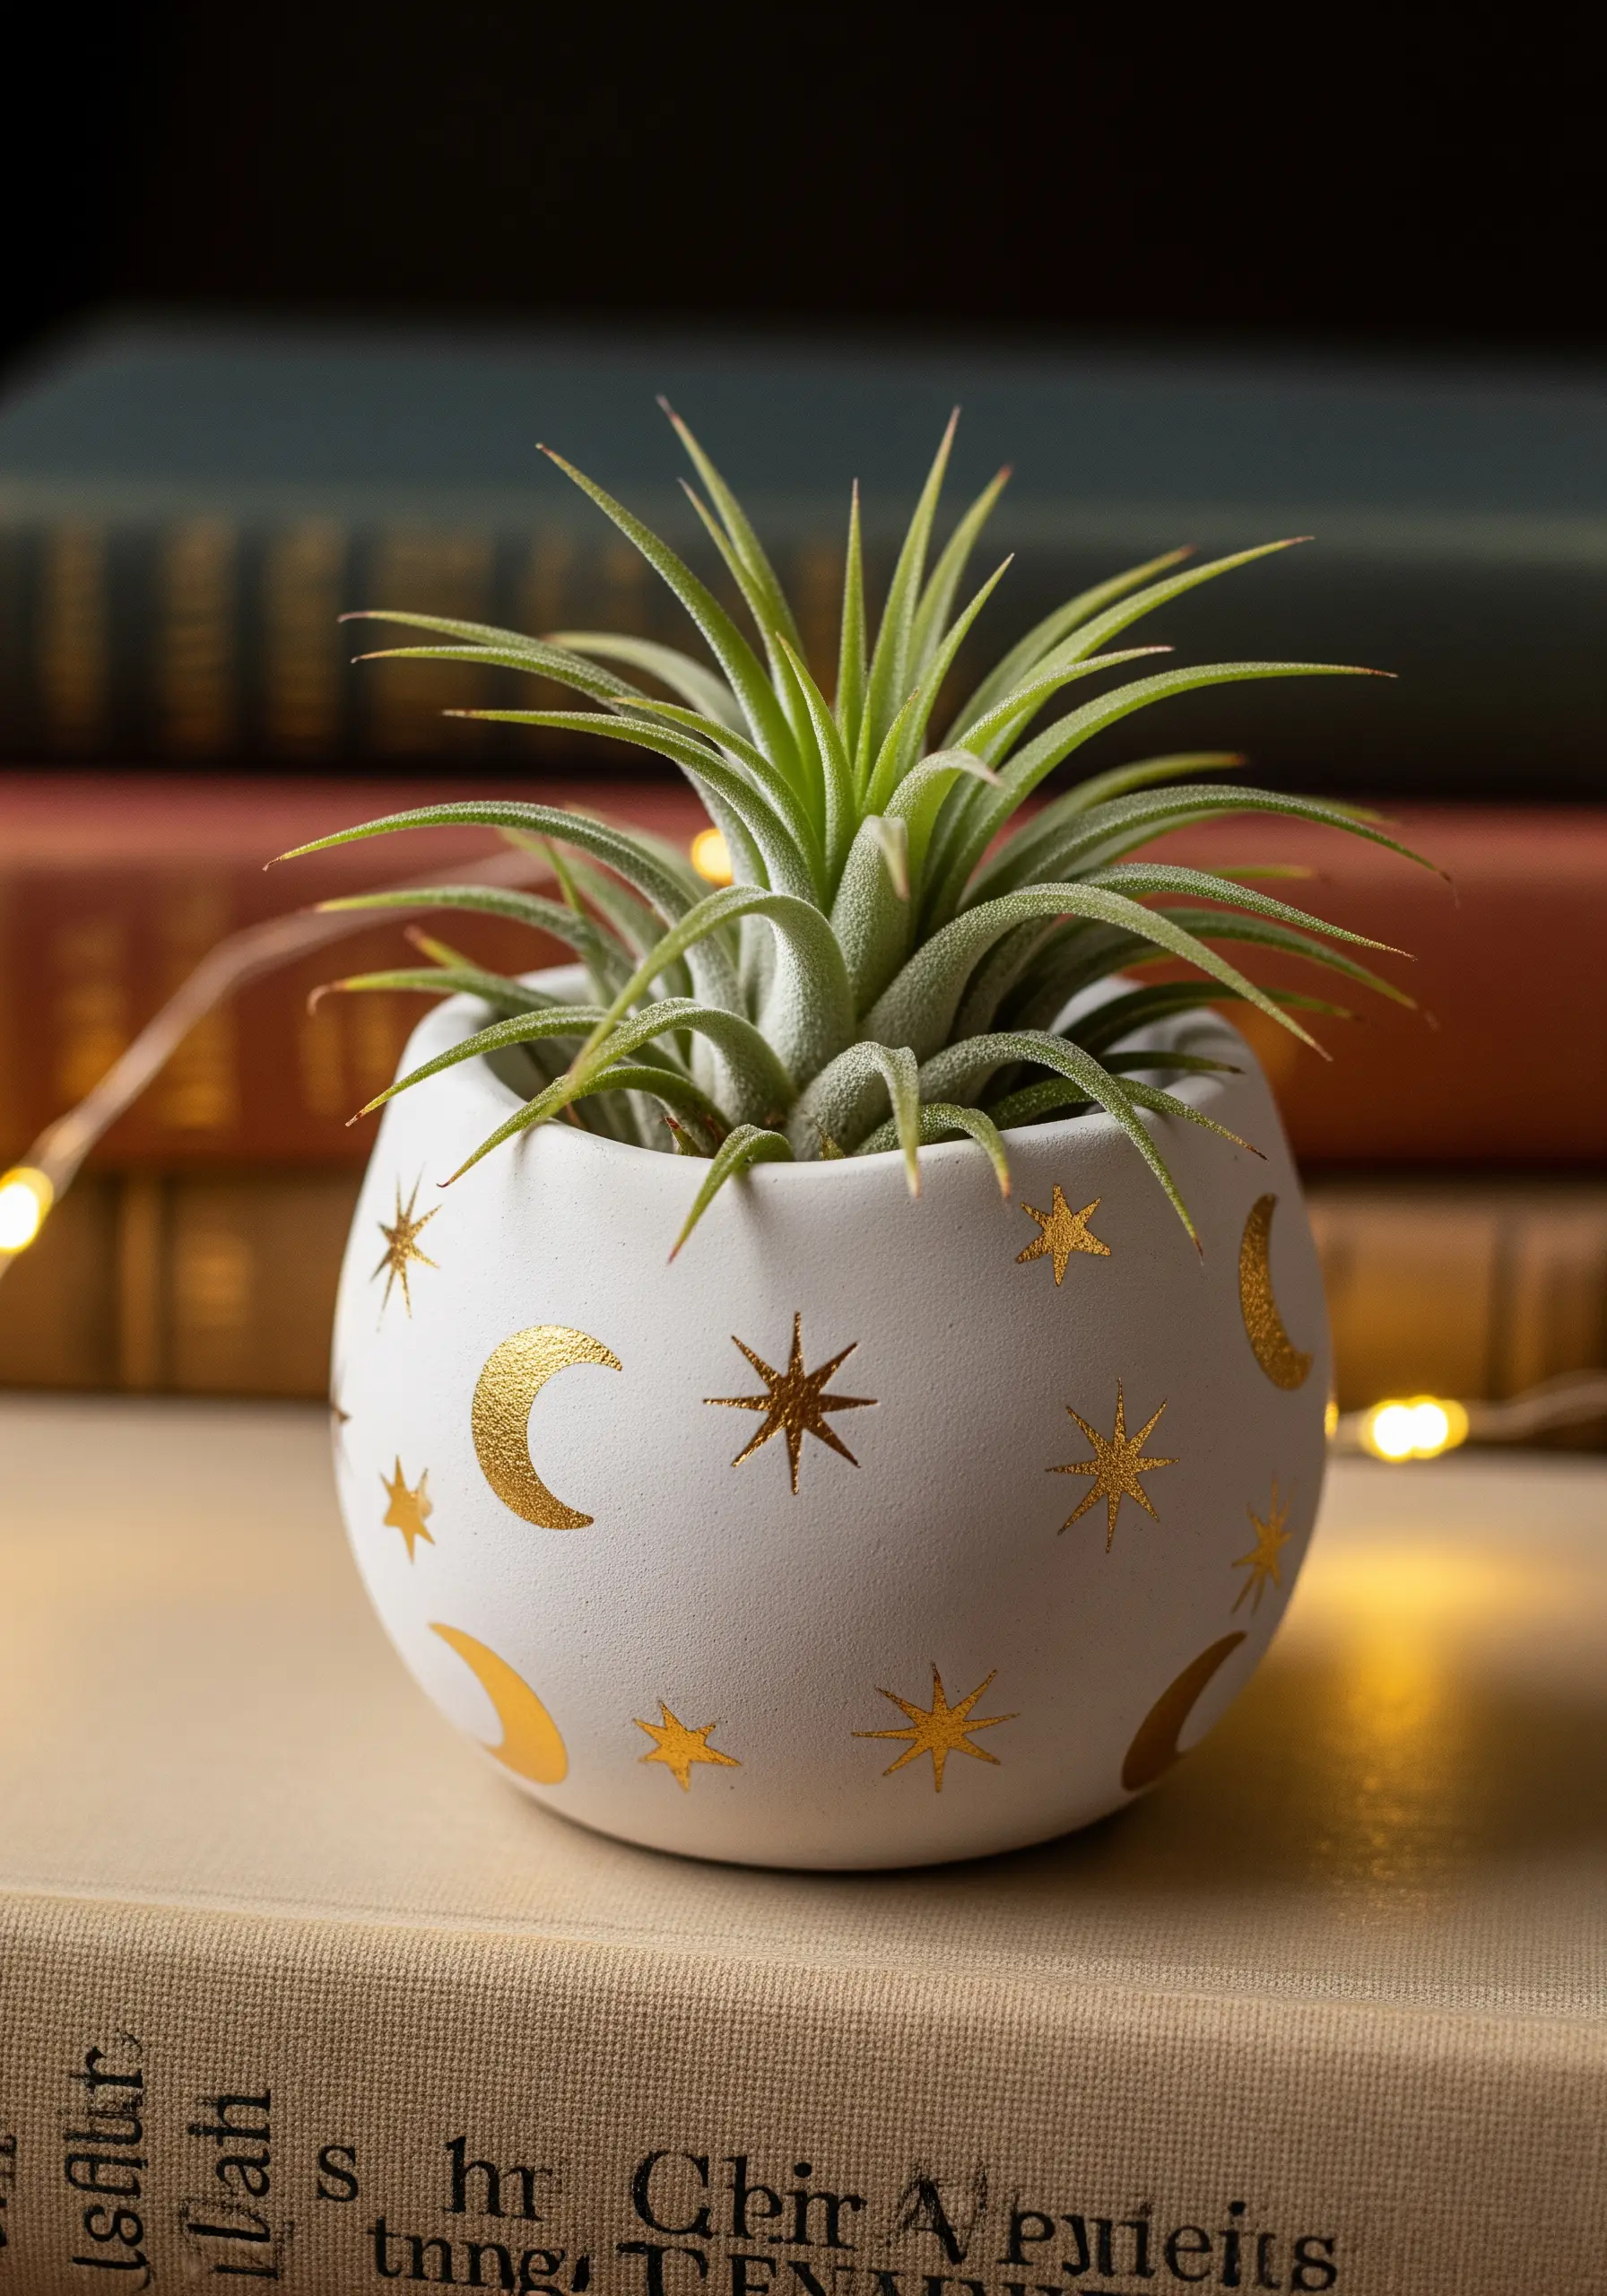
Create a striking contrast by applying metallic details to a matte-finish pot.
Start with a ceramic pot painted with chalky, non-glossy paint for a soft, absorbent surface.
Use gold leaf adhesive and foil sheets or a metallic gold pen to add delicate celestial motifs.
The interplay between the light-absorbing matte background and the light-reflecting gold makes the design feel both subtle and luxurious, much like using a single metallic thread in an embroidery piece.
4. Paint with Wool Using Needle Felting
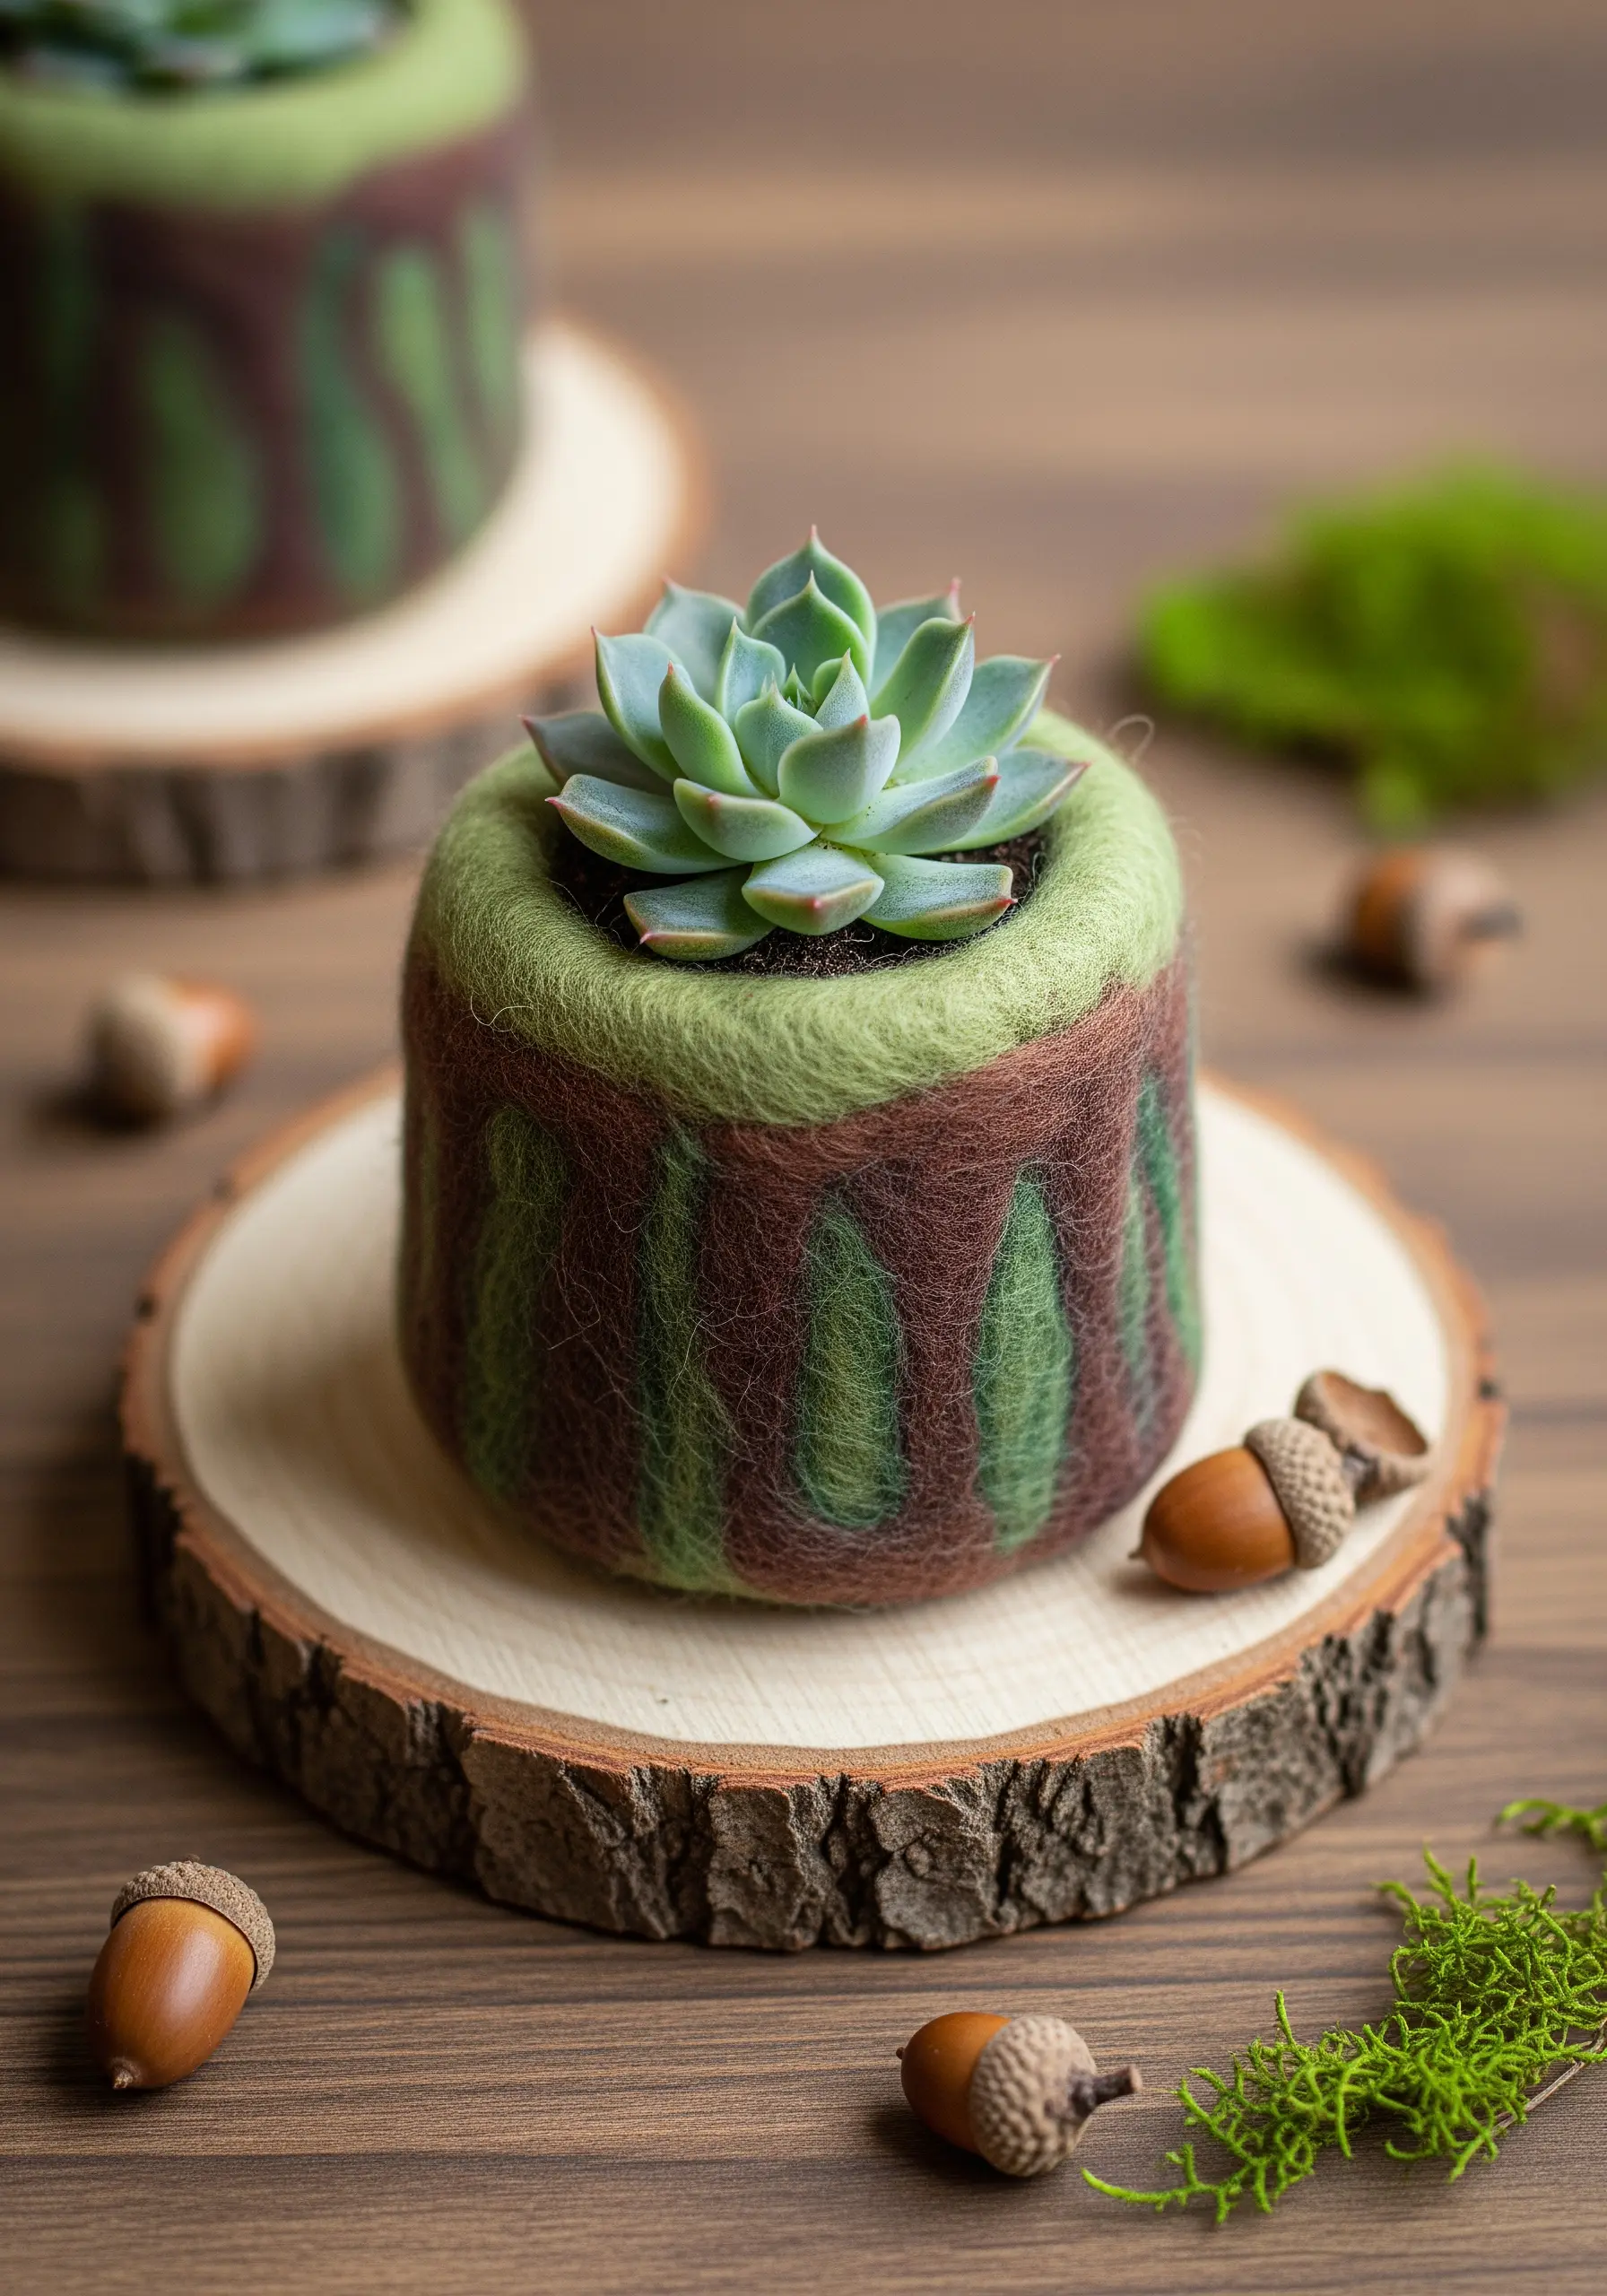
Use needle felting to create a soft, textural planter with painterly color blends.
Start with a base of brown wool roving wrapped around a foam form, then use a felting needle to poke and integrate wisps of green roving into the surface.
This technique allows you to build up color in soft, organic layers, creating a moss-like effect that feels completely seamless.
The resulting pot cover is not only decorative but also soft and tactile, adding a unique texture to your decor.
5. Juxtapose Raw Concrete with Gold Leaf
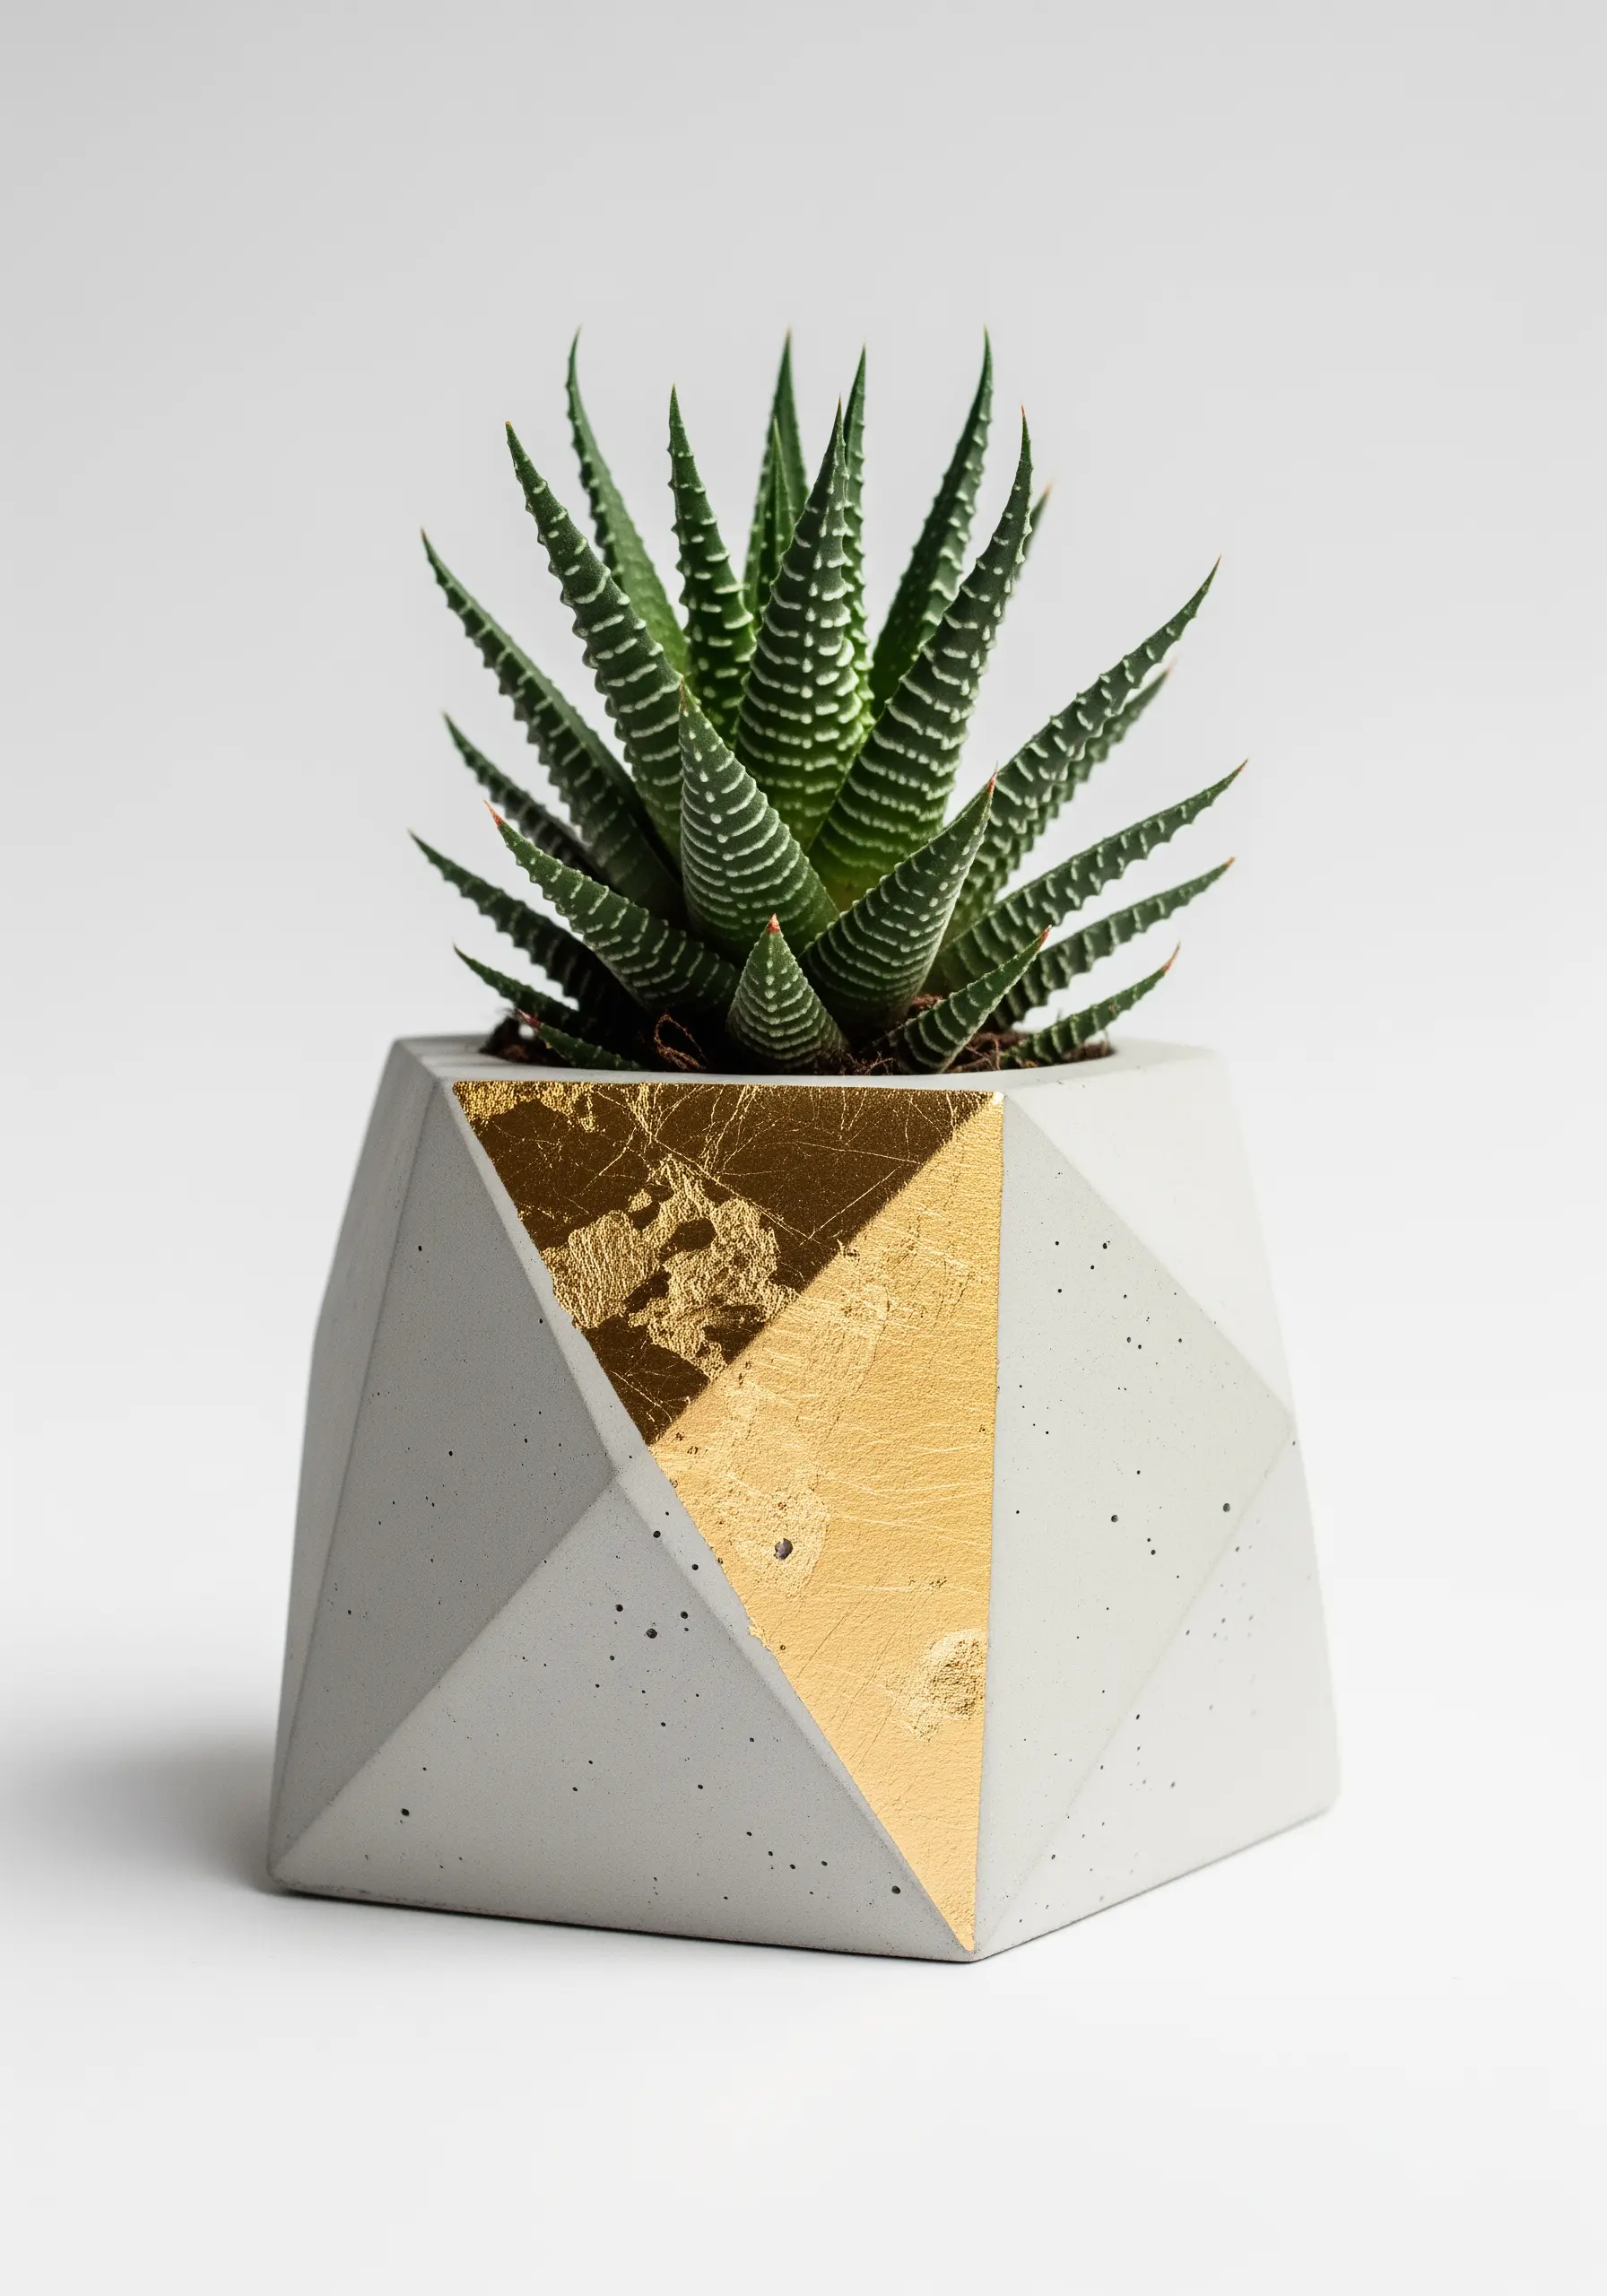
Elevate an industrial material like concrete with a touch of refined glamour.
On a geometric concrete planter, use low-tack painter’s tape to mask off a sharp, angular section.
Apply gold leaf adhesive within the taped area, let it get tacky, and press on the gold leaf sheets.
The contrast between the cool, raw texture of the concrete and the warm, luminous finish of the gold leaf creates a sophisticated and modern aesthetic that highlights the pot’s angles.
6. Frame a Seedling with a Stitched Floral Wreath
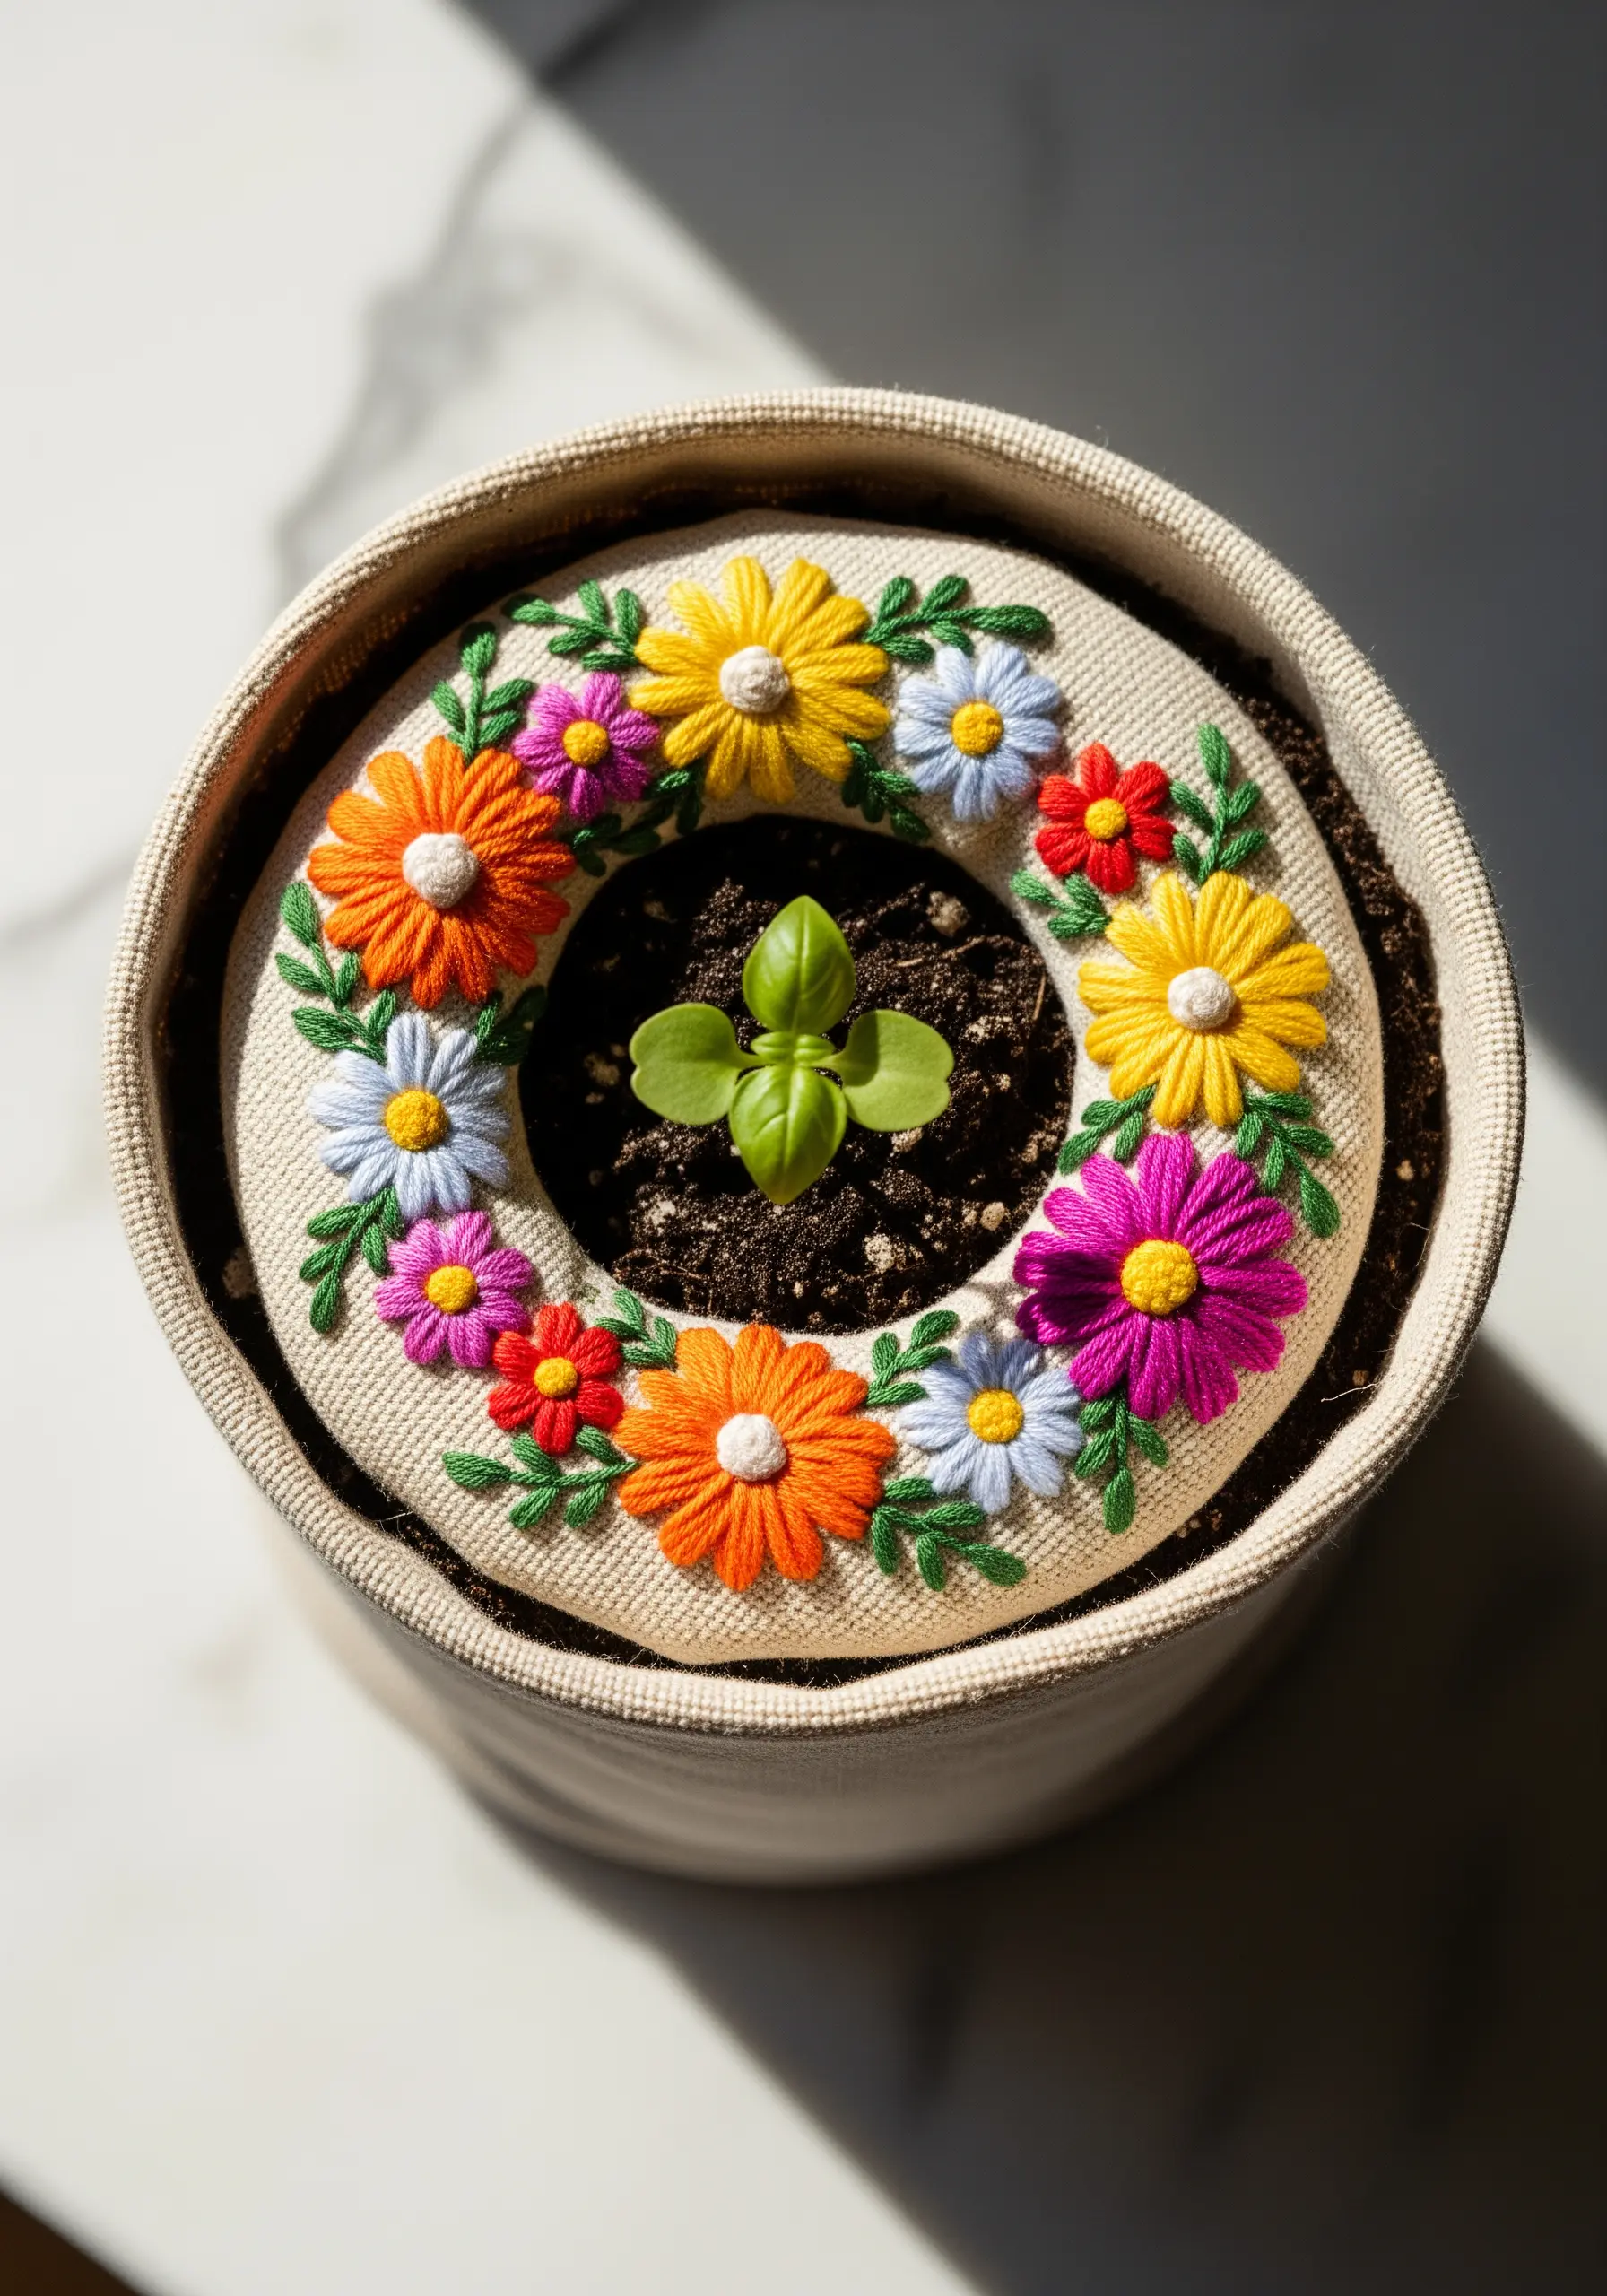
Turn a simple fabric planter into a celebration of new growth by embroidering a floral wreath around the opening.
Use dimensional stitches like the lazy daisy for petals and French knots for flower centers to add rich texture.
Vary your thread count—use three or four strands for bold satin-stitched petals and just one or two for delicate stems and leaves.
This variation in thread weight is one of the simplest ways to create depth in your embroidery, making the composition feel more dynamic and alive.
7. Elevate Rustic Twine with a Delicately Stitched Tag
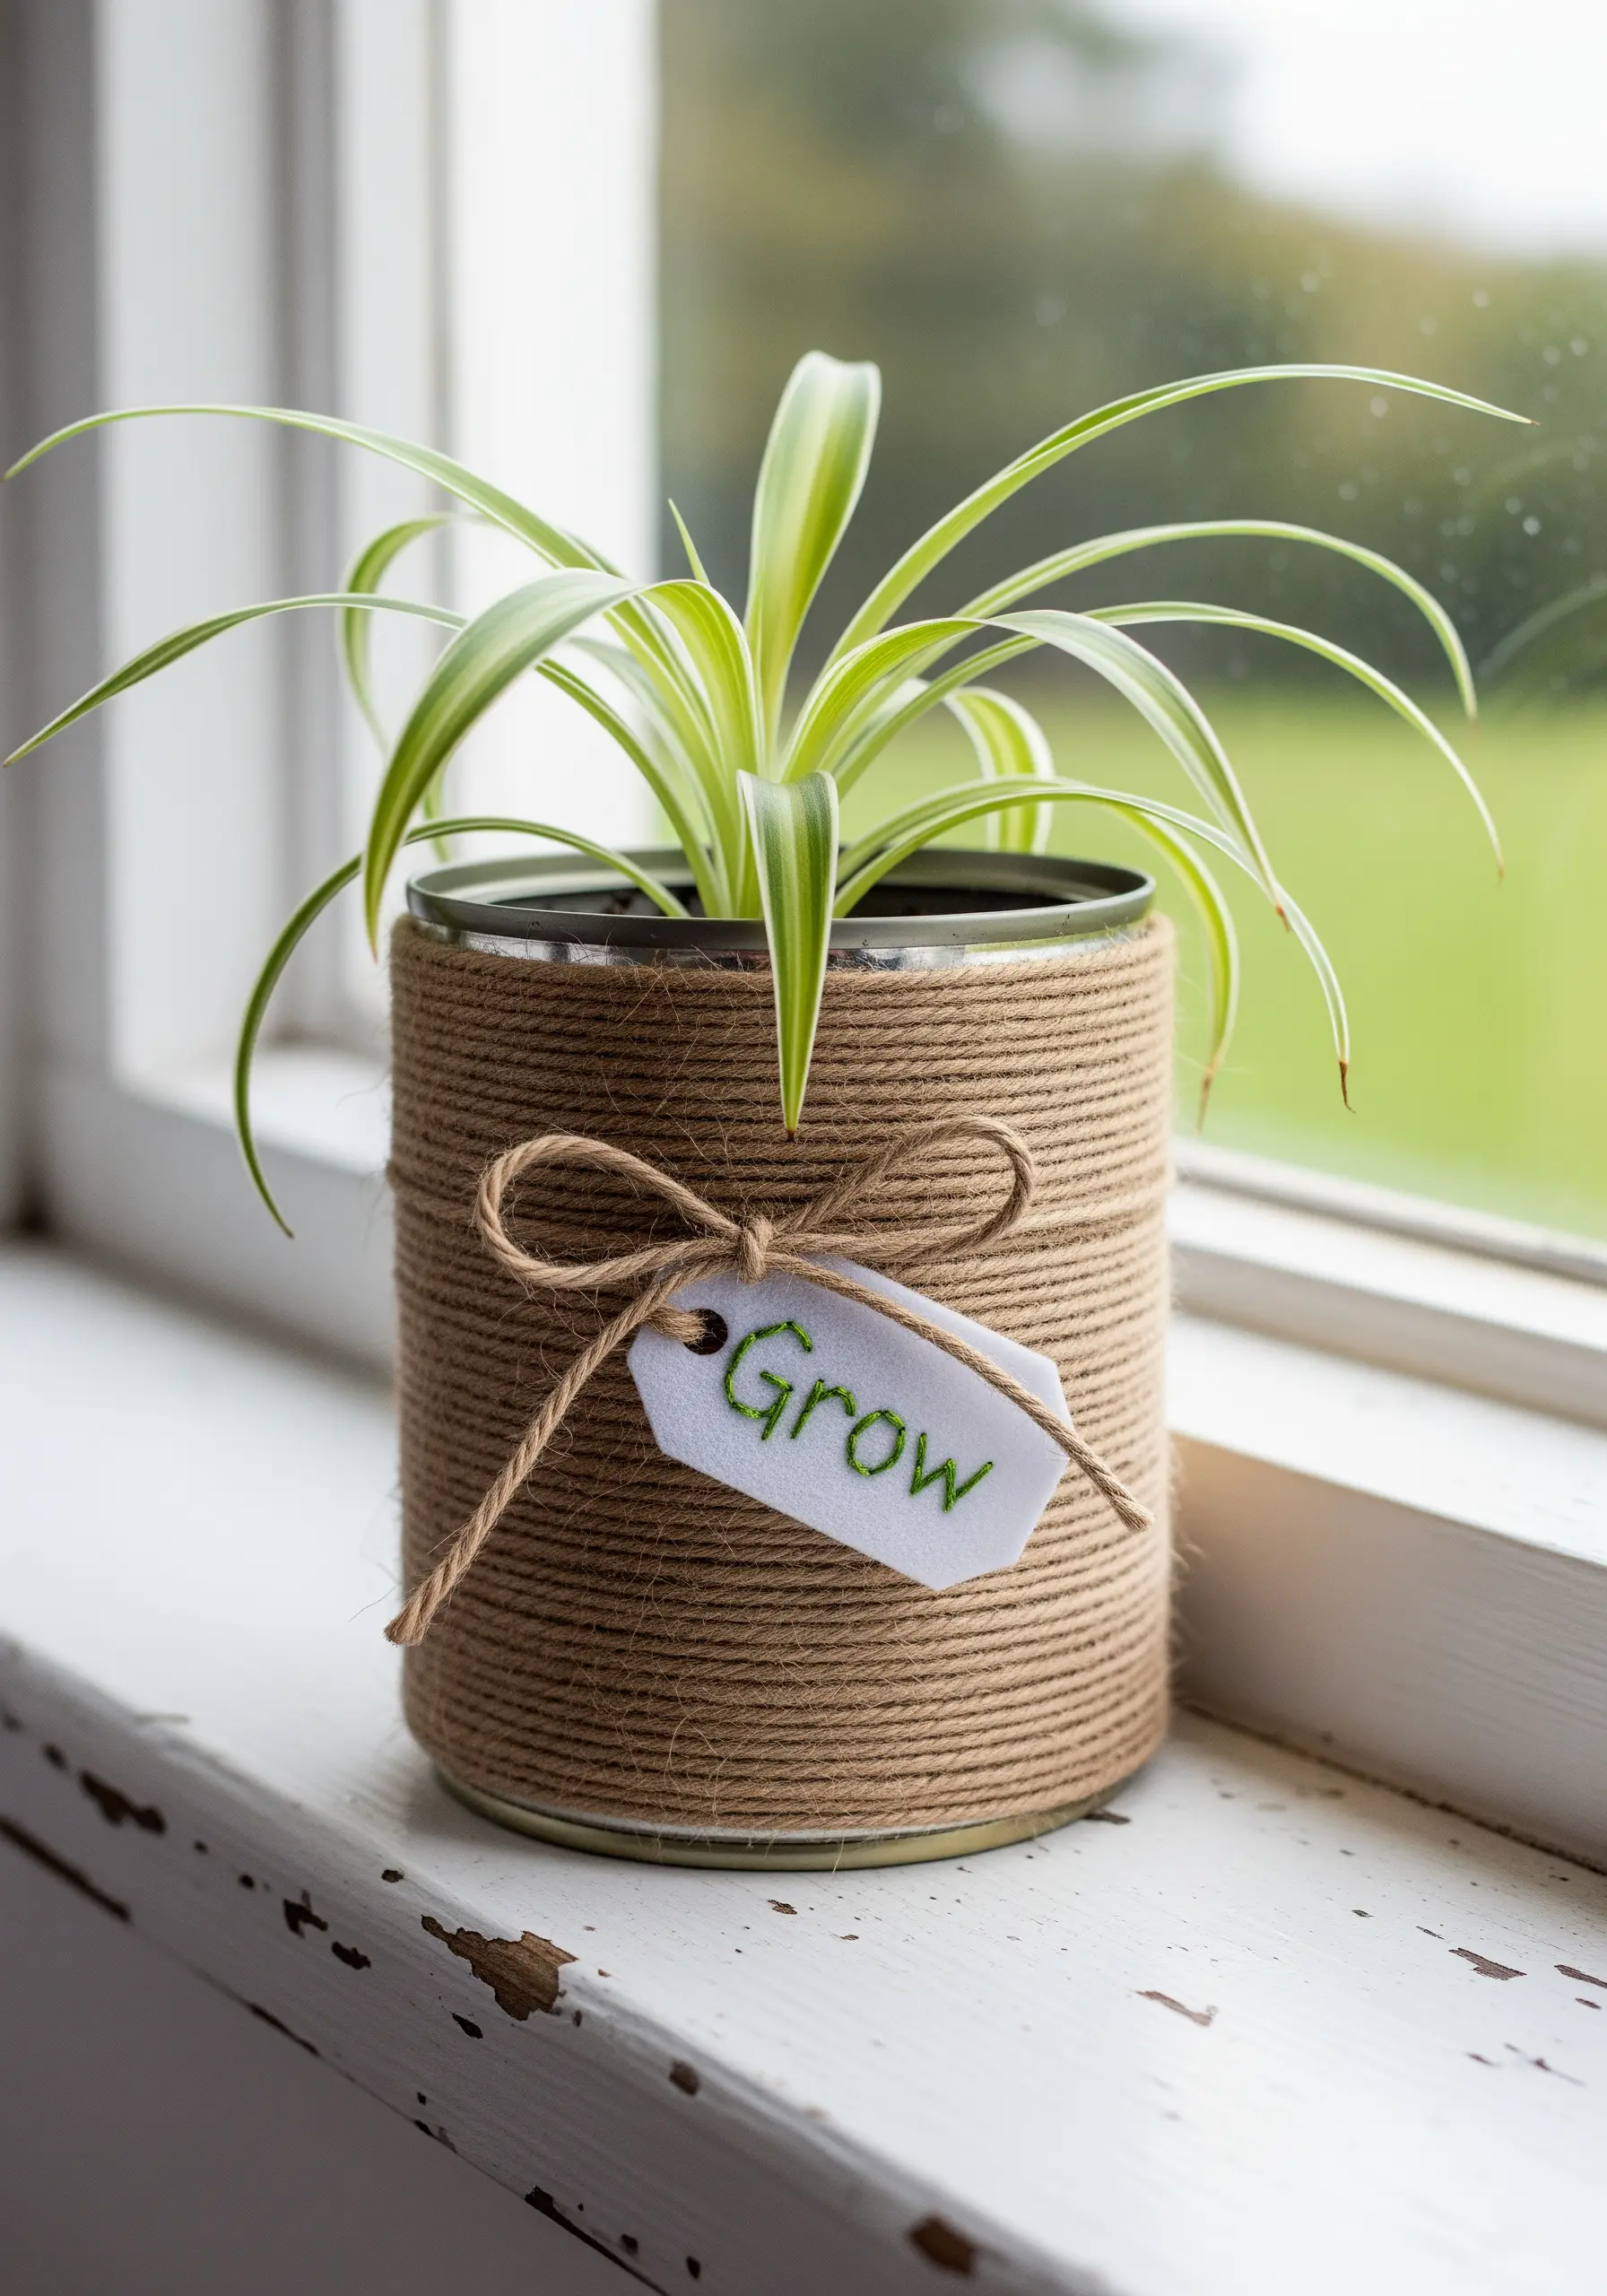
A tiny, thoughtful detail can transform a simple craft into a personalized gift.
Instead of writing on a tag, embroider a single word onto a piece of felt or heavy cardstock.
Use a simple backstitch with two strands of floss for clean, legible lettering.
If stitching on paper, pre-pierce your holes with a needle to prevent tearing and ensure even stitches.
This small act of stitching adds a touch of handmade elegance to the rustic twine-wrapped pot.
8. Create Fluid Patterns with Marbled Clay
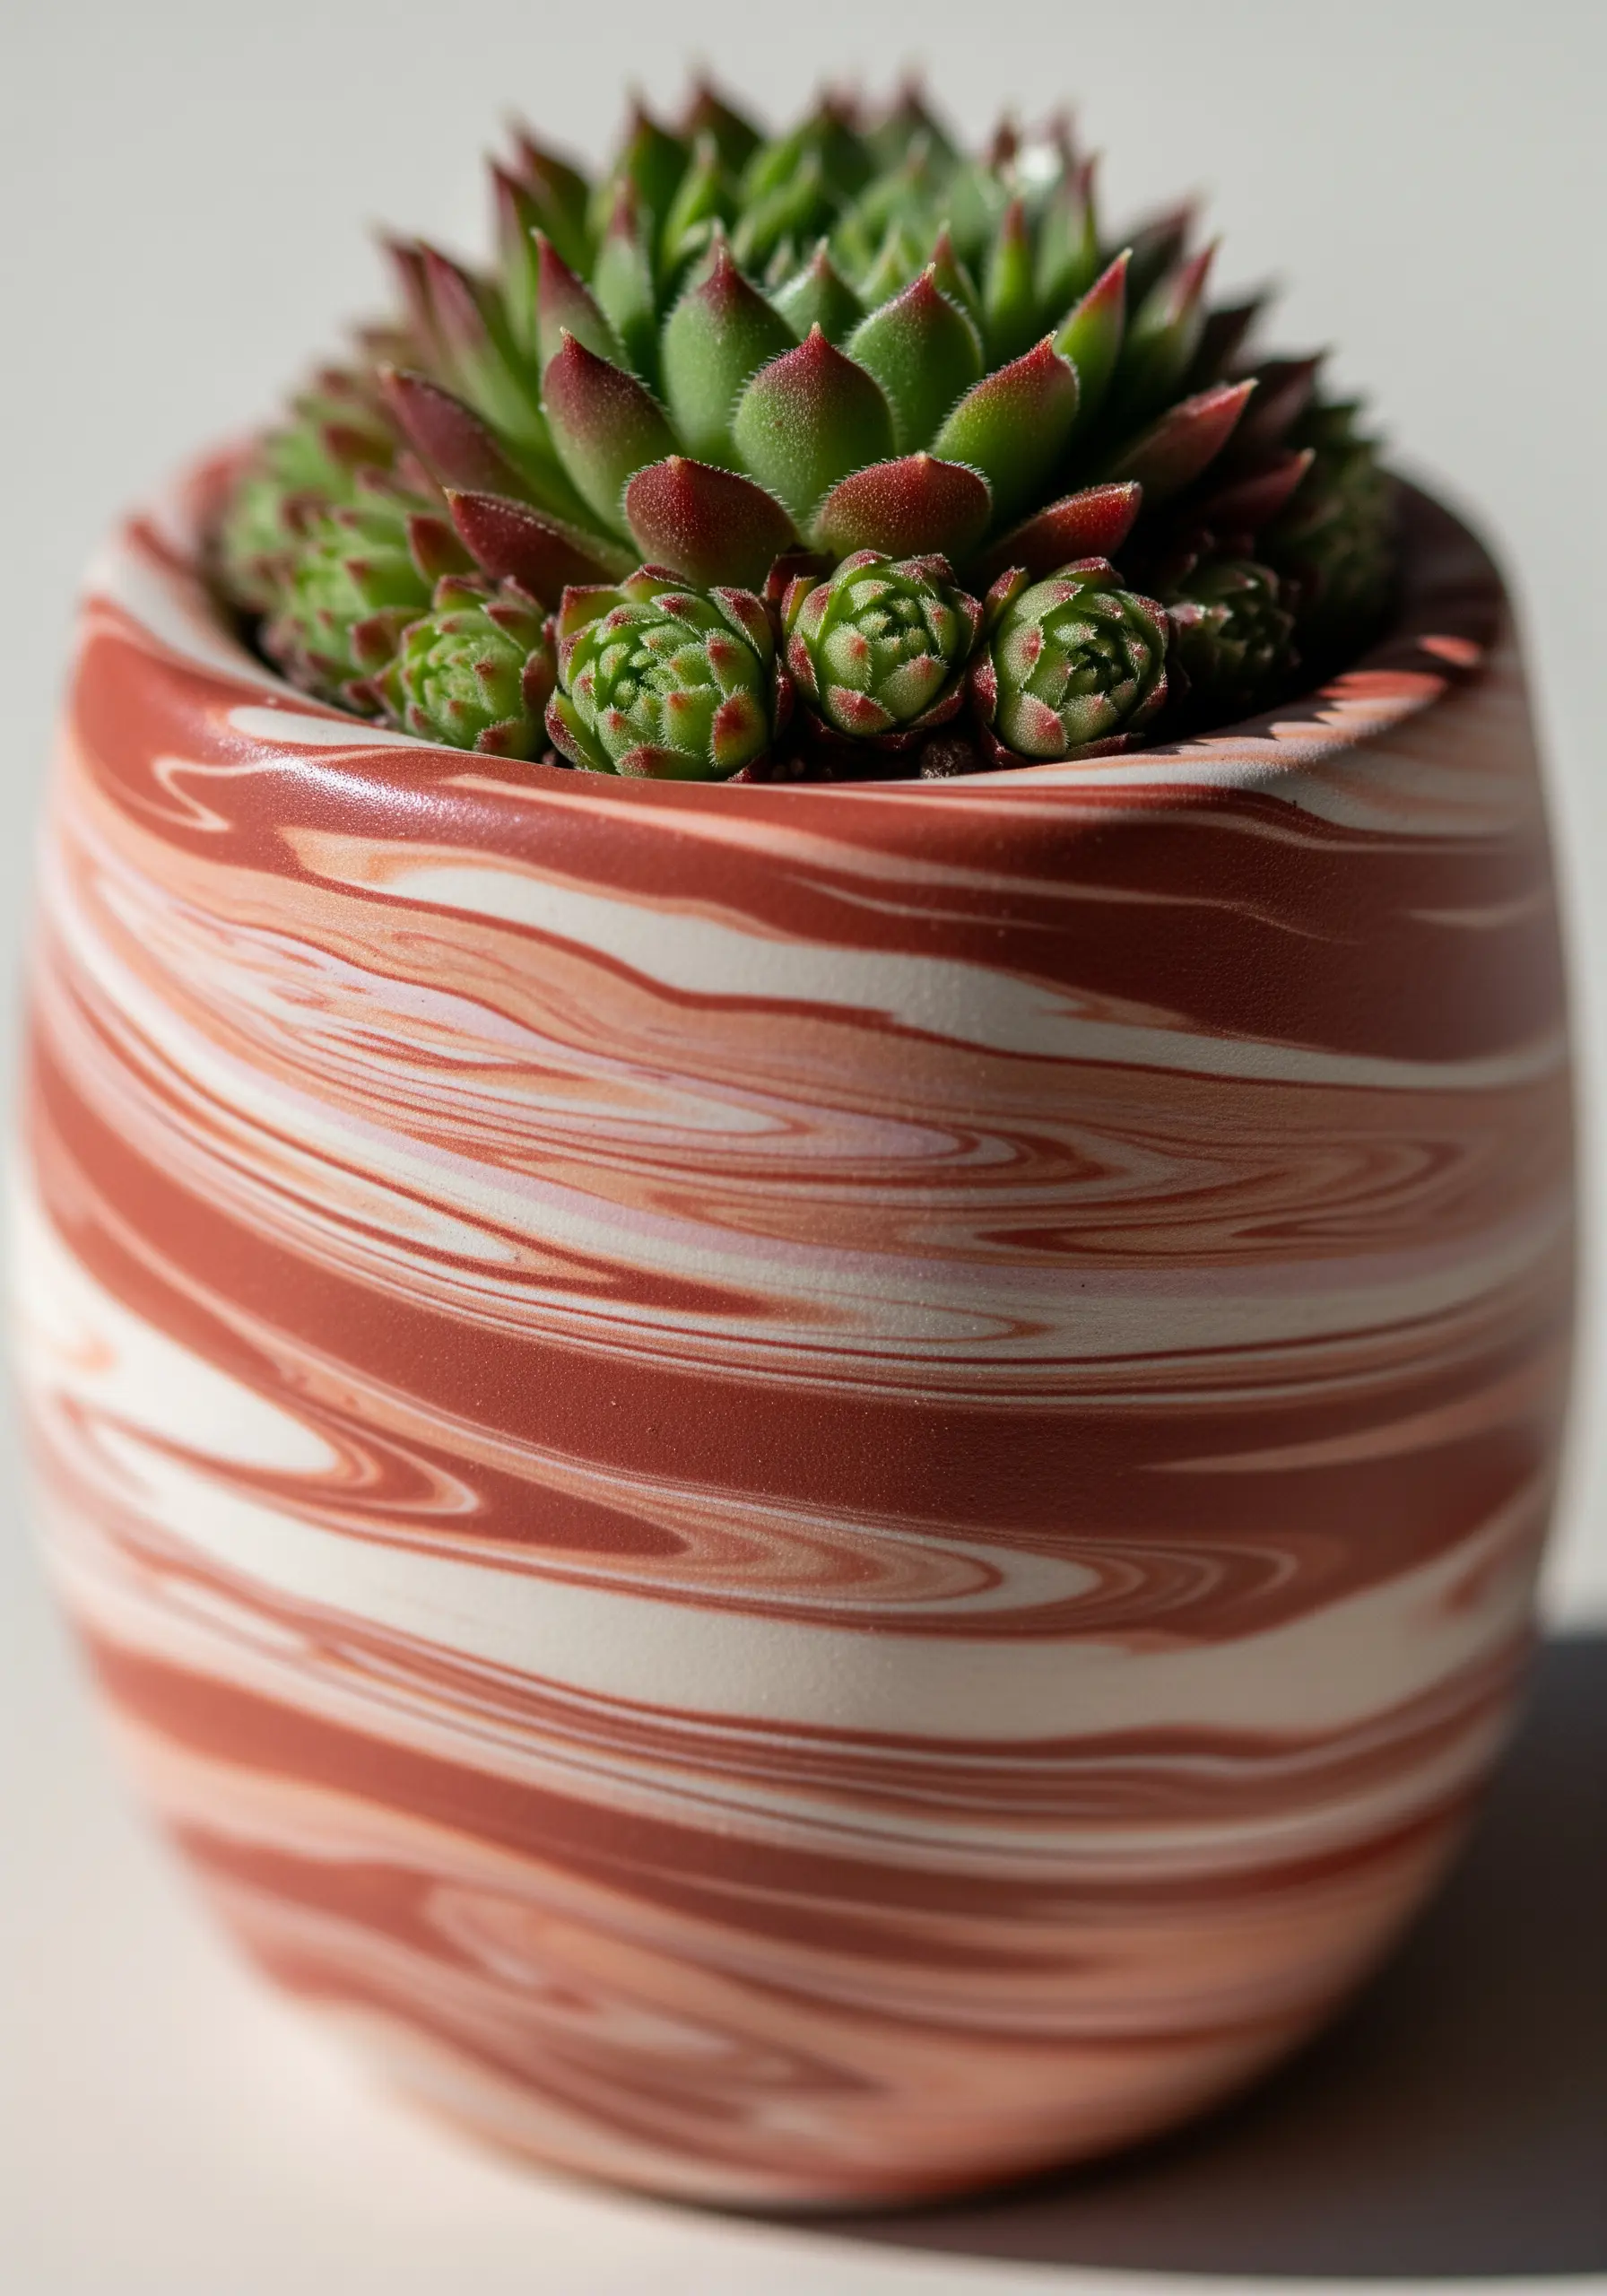
Achieve a sophisticated, organic pattern by marbling polymer or air-dry clay.
Choose two or three complementary colors and gently twist and fold them together without over-mixing.
The goal is to create distinct veins and swirls of color, rather than a muddy blend.
Roll the clay into a slab and form it around a pot or shape it by hand.
This technique gives each piece a unique, fluid pattern reminiscent of natural stone.
9. Etch Botanical Details onto Natural Wood
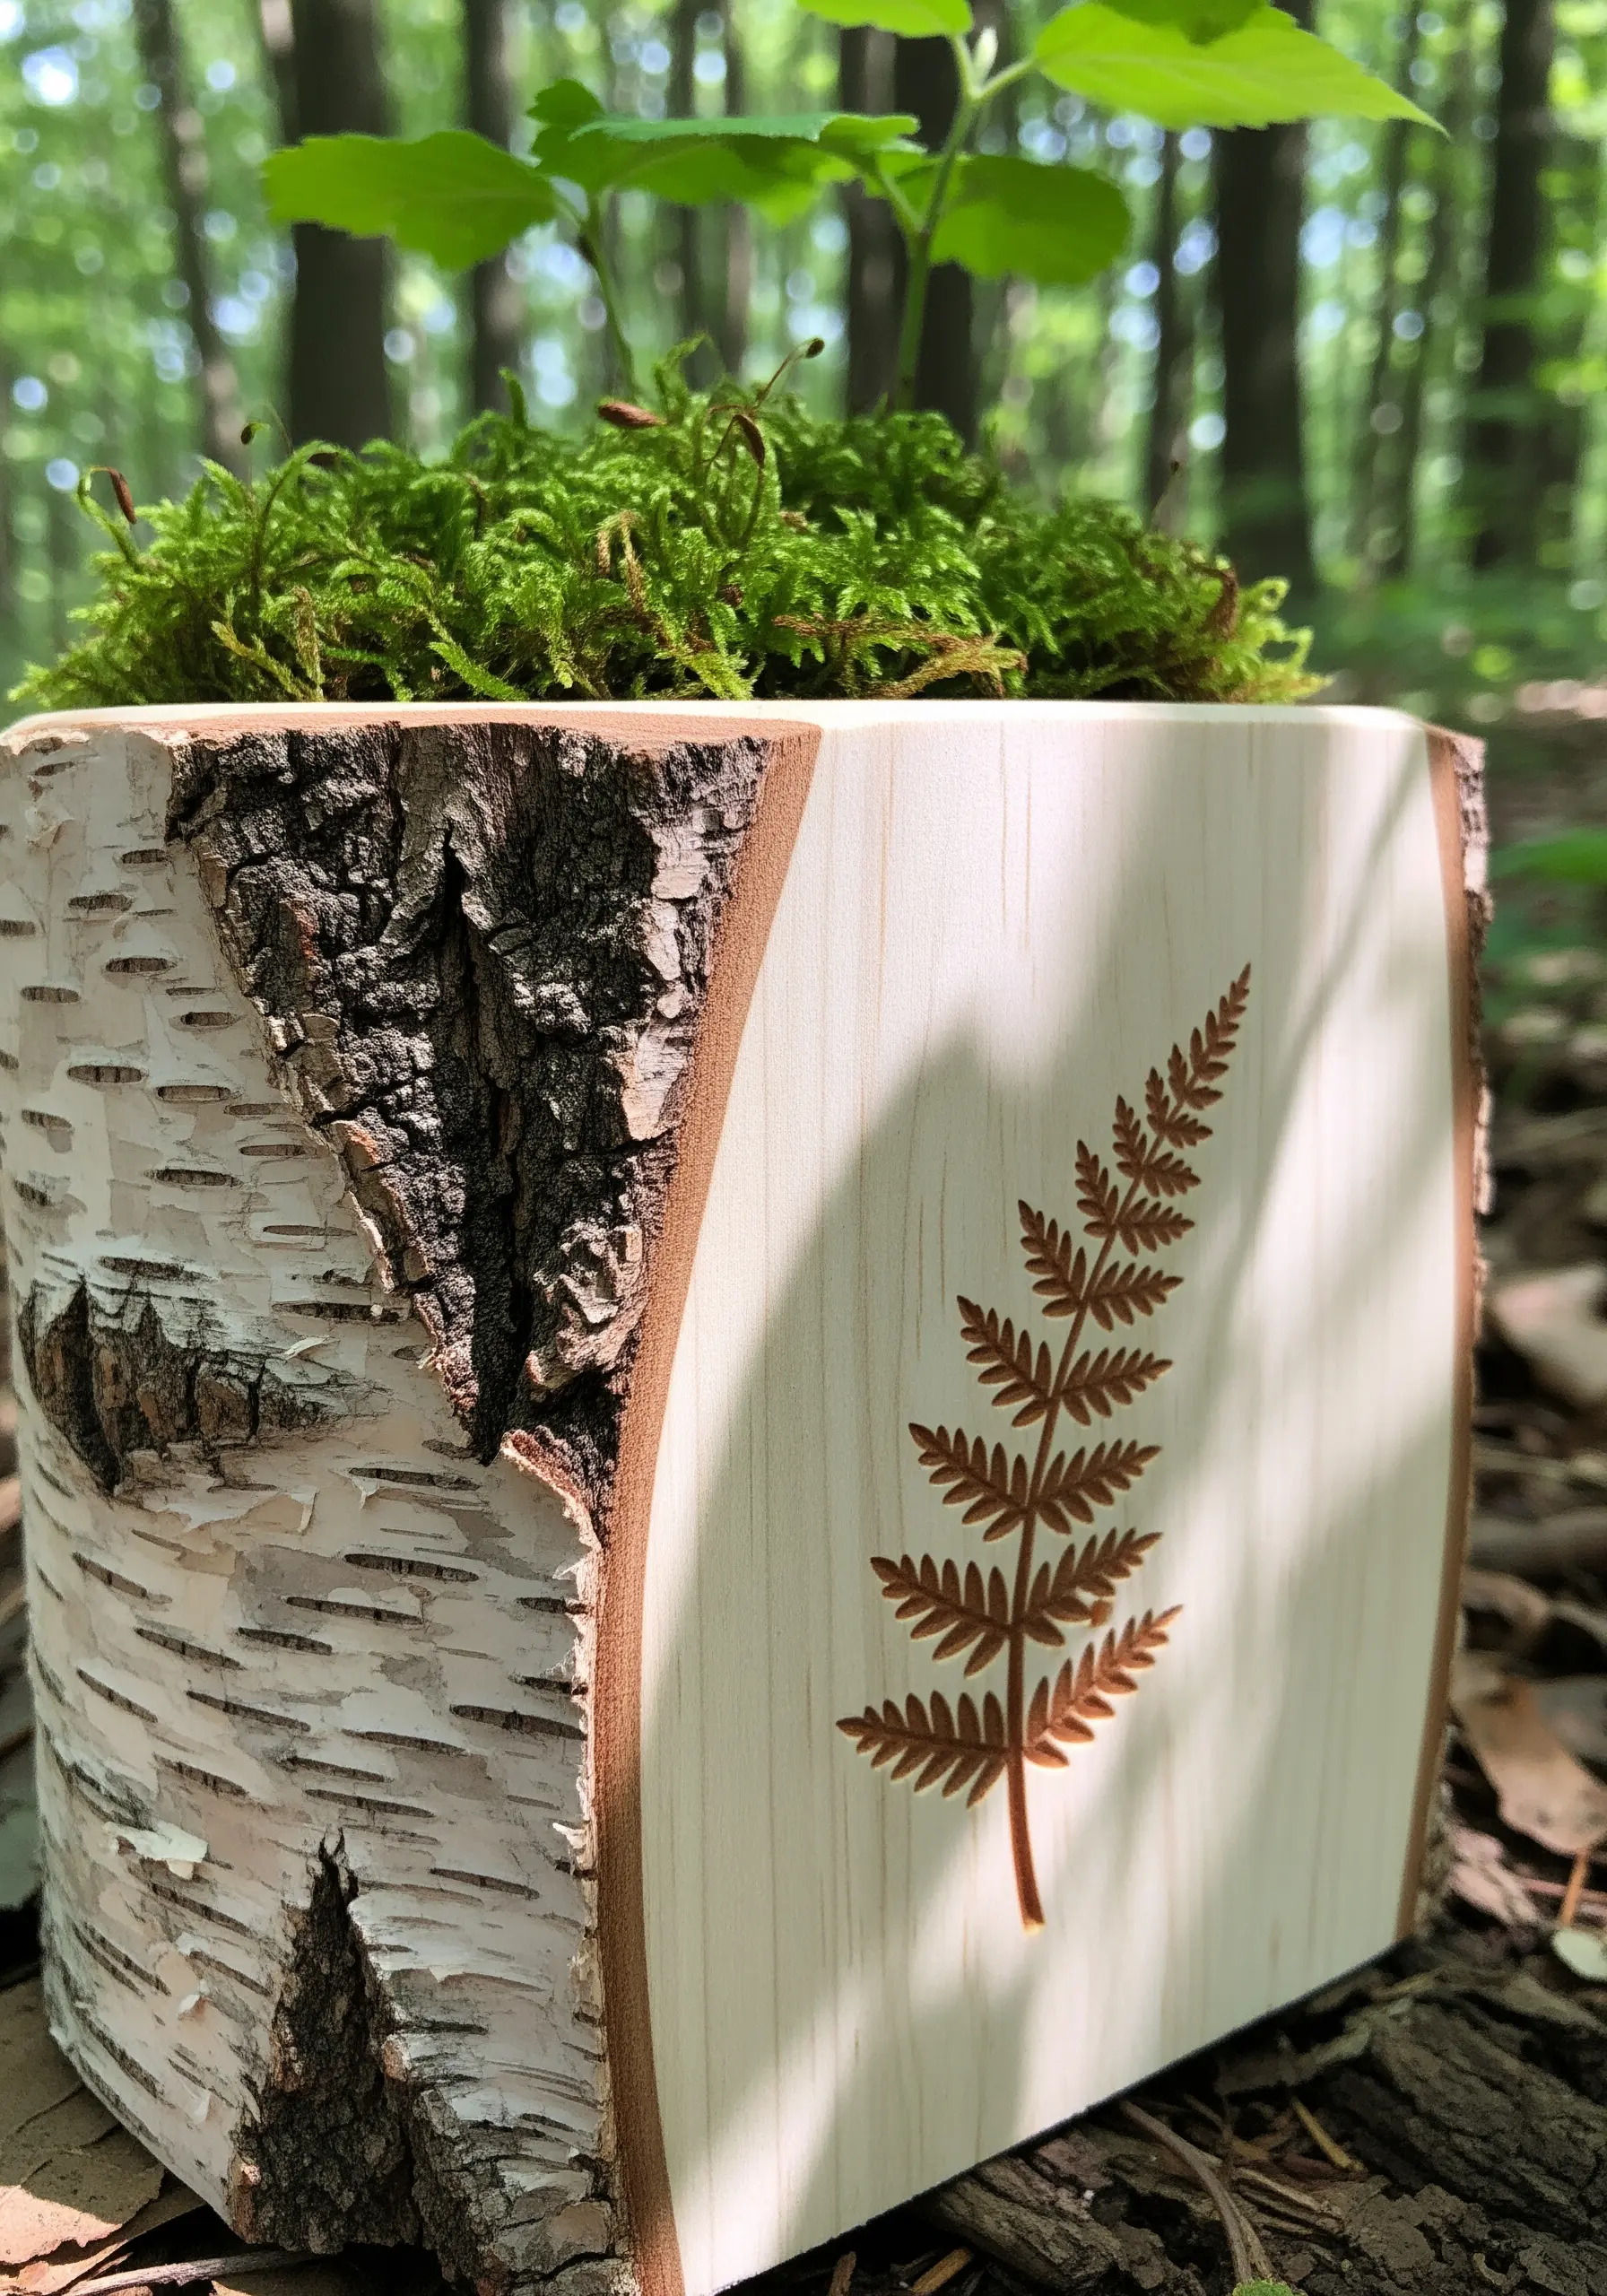
Contrast a raw, natural texture with a finely rendered illustration for a stunning effect.
On a planter made from birch, the smooth, pale inner wood provides the perfect canvas for pyrography (wood burning) or laser etching.
A delicate, detailed motif like a fern leaf adds a touch of elegance that honors the natural material.
The design becomes part of the wood itself, creating a subtle yet permanent piece of art.
10. Add a Gilded Edge to Natural Treasures

Transform a found object, like a beautiful shell, into a precious vessel with a single, simple detail.
Use a gold leaf pen or liquid gilding to carefully trace the natural edge of the shell.
This simple act highlights its organic shape and adds an unexpected touch of luxury.
It acts as a frame, drawing the eye to the iridescent interior and turning the natural form into a deliberate piece of decor.
11. Build Structure with Crocheted Colorwork
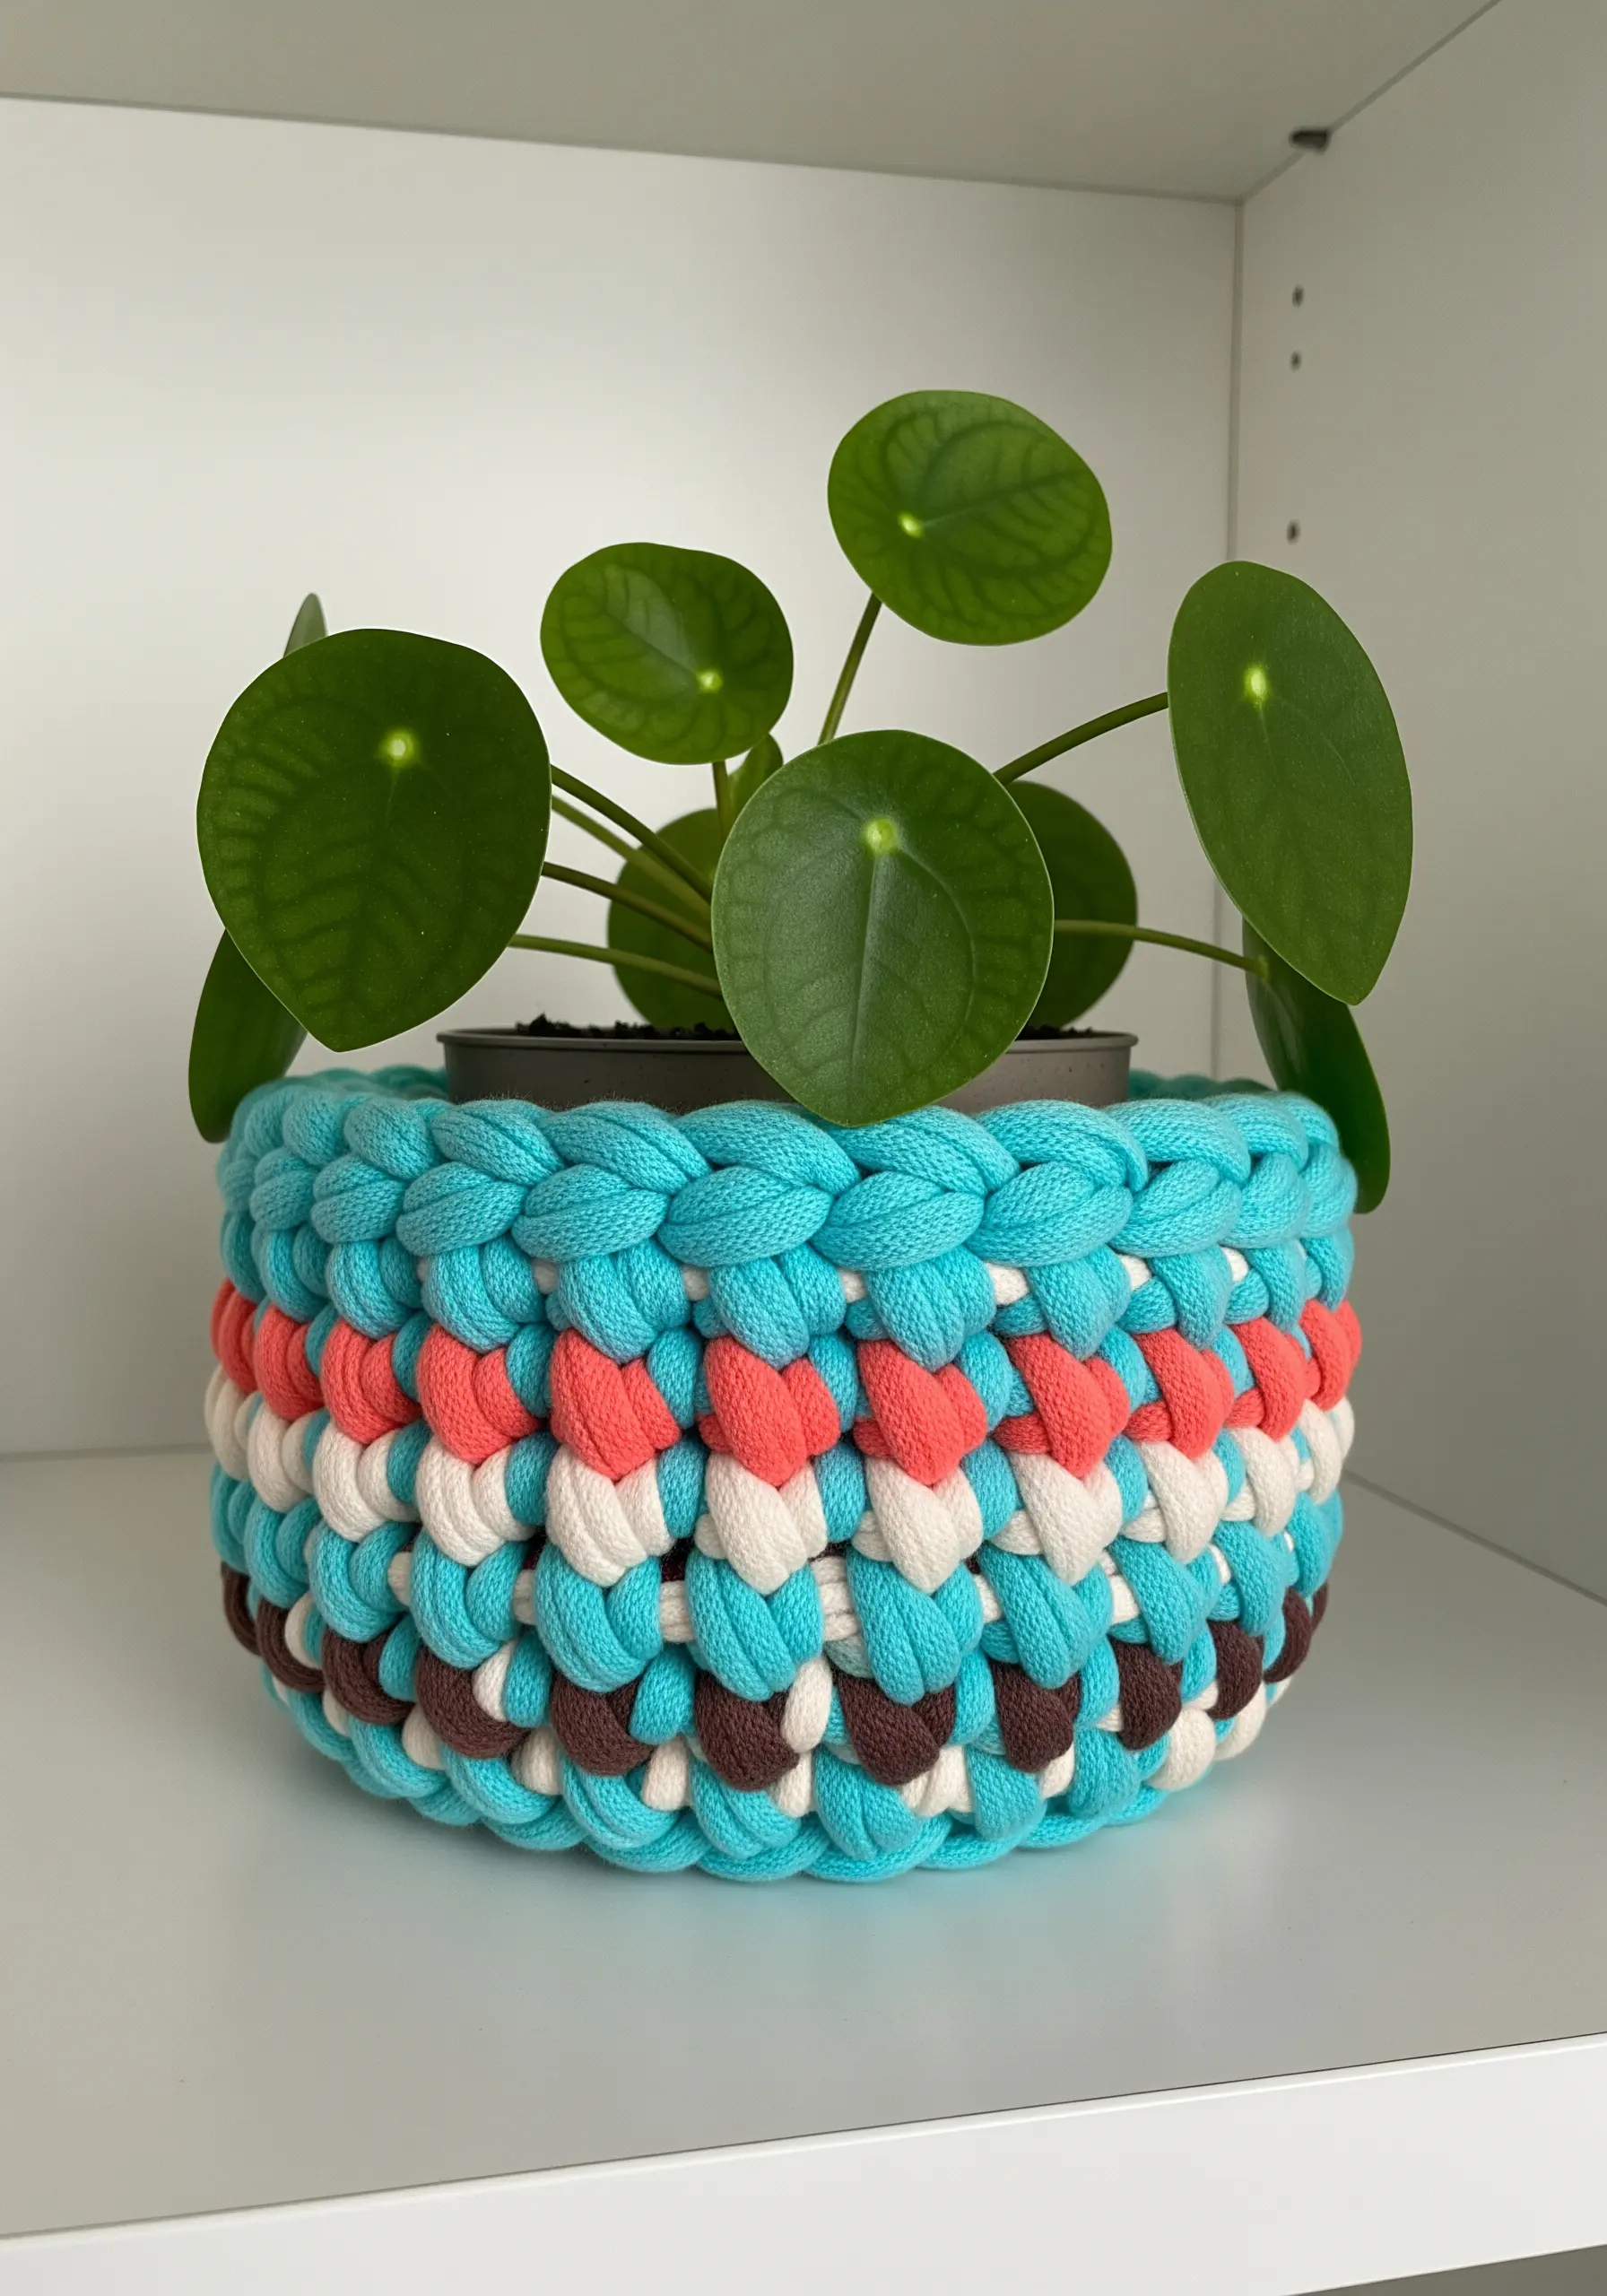
When crocheting a planter basket, use a thick t-shirt yarn and a tight stitch to ensure it holds its shape.
A simple single crochet stitch worked in the round creates a dense, sturdy fabric that won’t slouch.
Plan your color changes to create intentional, graphic blocks of color.
Changing colors every two or three rows results in clean, bold stripes that give the basket a modern, polished look.
12. Complete a Sculptural Pot with the Perfect Plant

When your planter is a work of art in itself, the plant you choose becomes the final touch.
For a whimsical face pot, a trailing plant like string of hearts or string of pearls is the ideal choice.
The cascading vines act as flowing hair, completing the character of the piece and bringing it to life.
The art here is in the thoughtful pairing of plant and vessel, creating a cohesive and charming composition.
13. Impress Fabric Textures into Clay or Concrete

Permanently capture the delicate detail of lace on a hard surface.
While your concrete or air-dry clay is still wet and pliable, gently but firmly press a piece of textured fabric, like lace, onto the surface.
Carefully peel it back to reveal a perfect impression of the pattern.
This technique creates a stunning textural contrast, fossilizing the softness of textiles onto a durable, modern planter.
14. Embellish Upcycled Denim with Botanical Stitches

Give an old pair of jeans a second life as a charming wall planter.
The sturdy denim fabric is an excellent base for embroidery, though you may want to use a thimble.
Use bright, contrasting colors like yellow and orange to make your stitches pop against the classic blue.
Textural stitches like satin stitch and French knots are perfect for creating vibrant, dimensional florals. These sunflower-inspired embroidery crafts are a wonderful way to add a rustic touch to your walls.
15. Design with Color Gradients in Mosaic
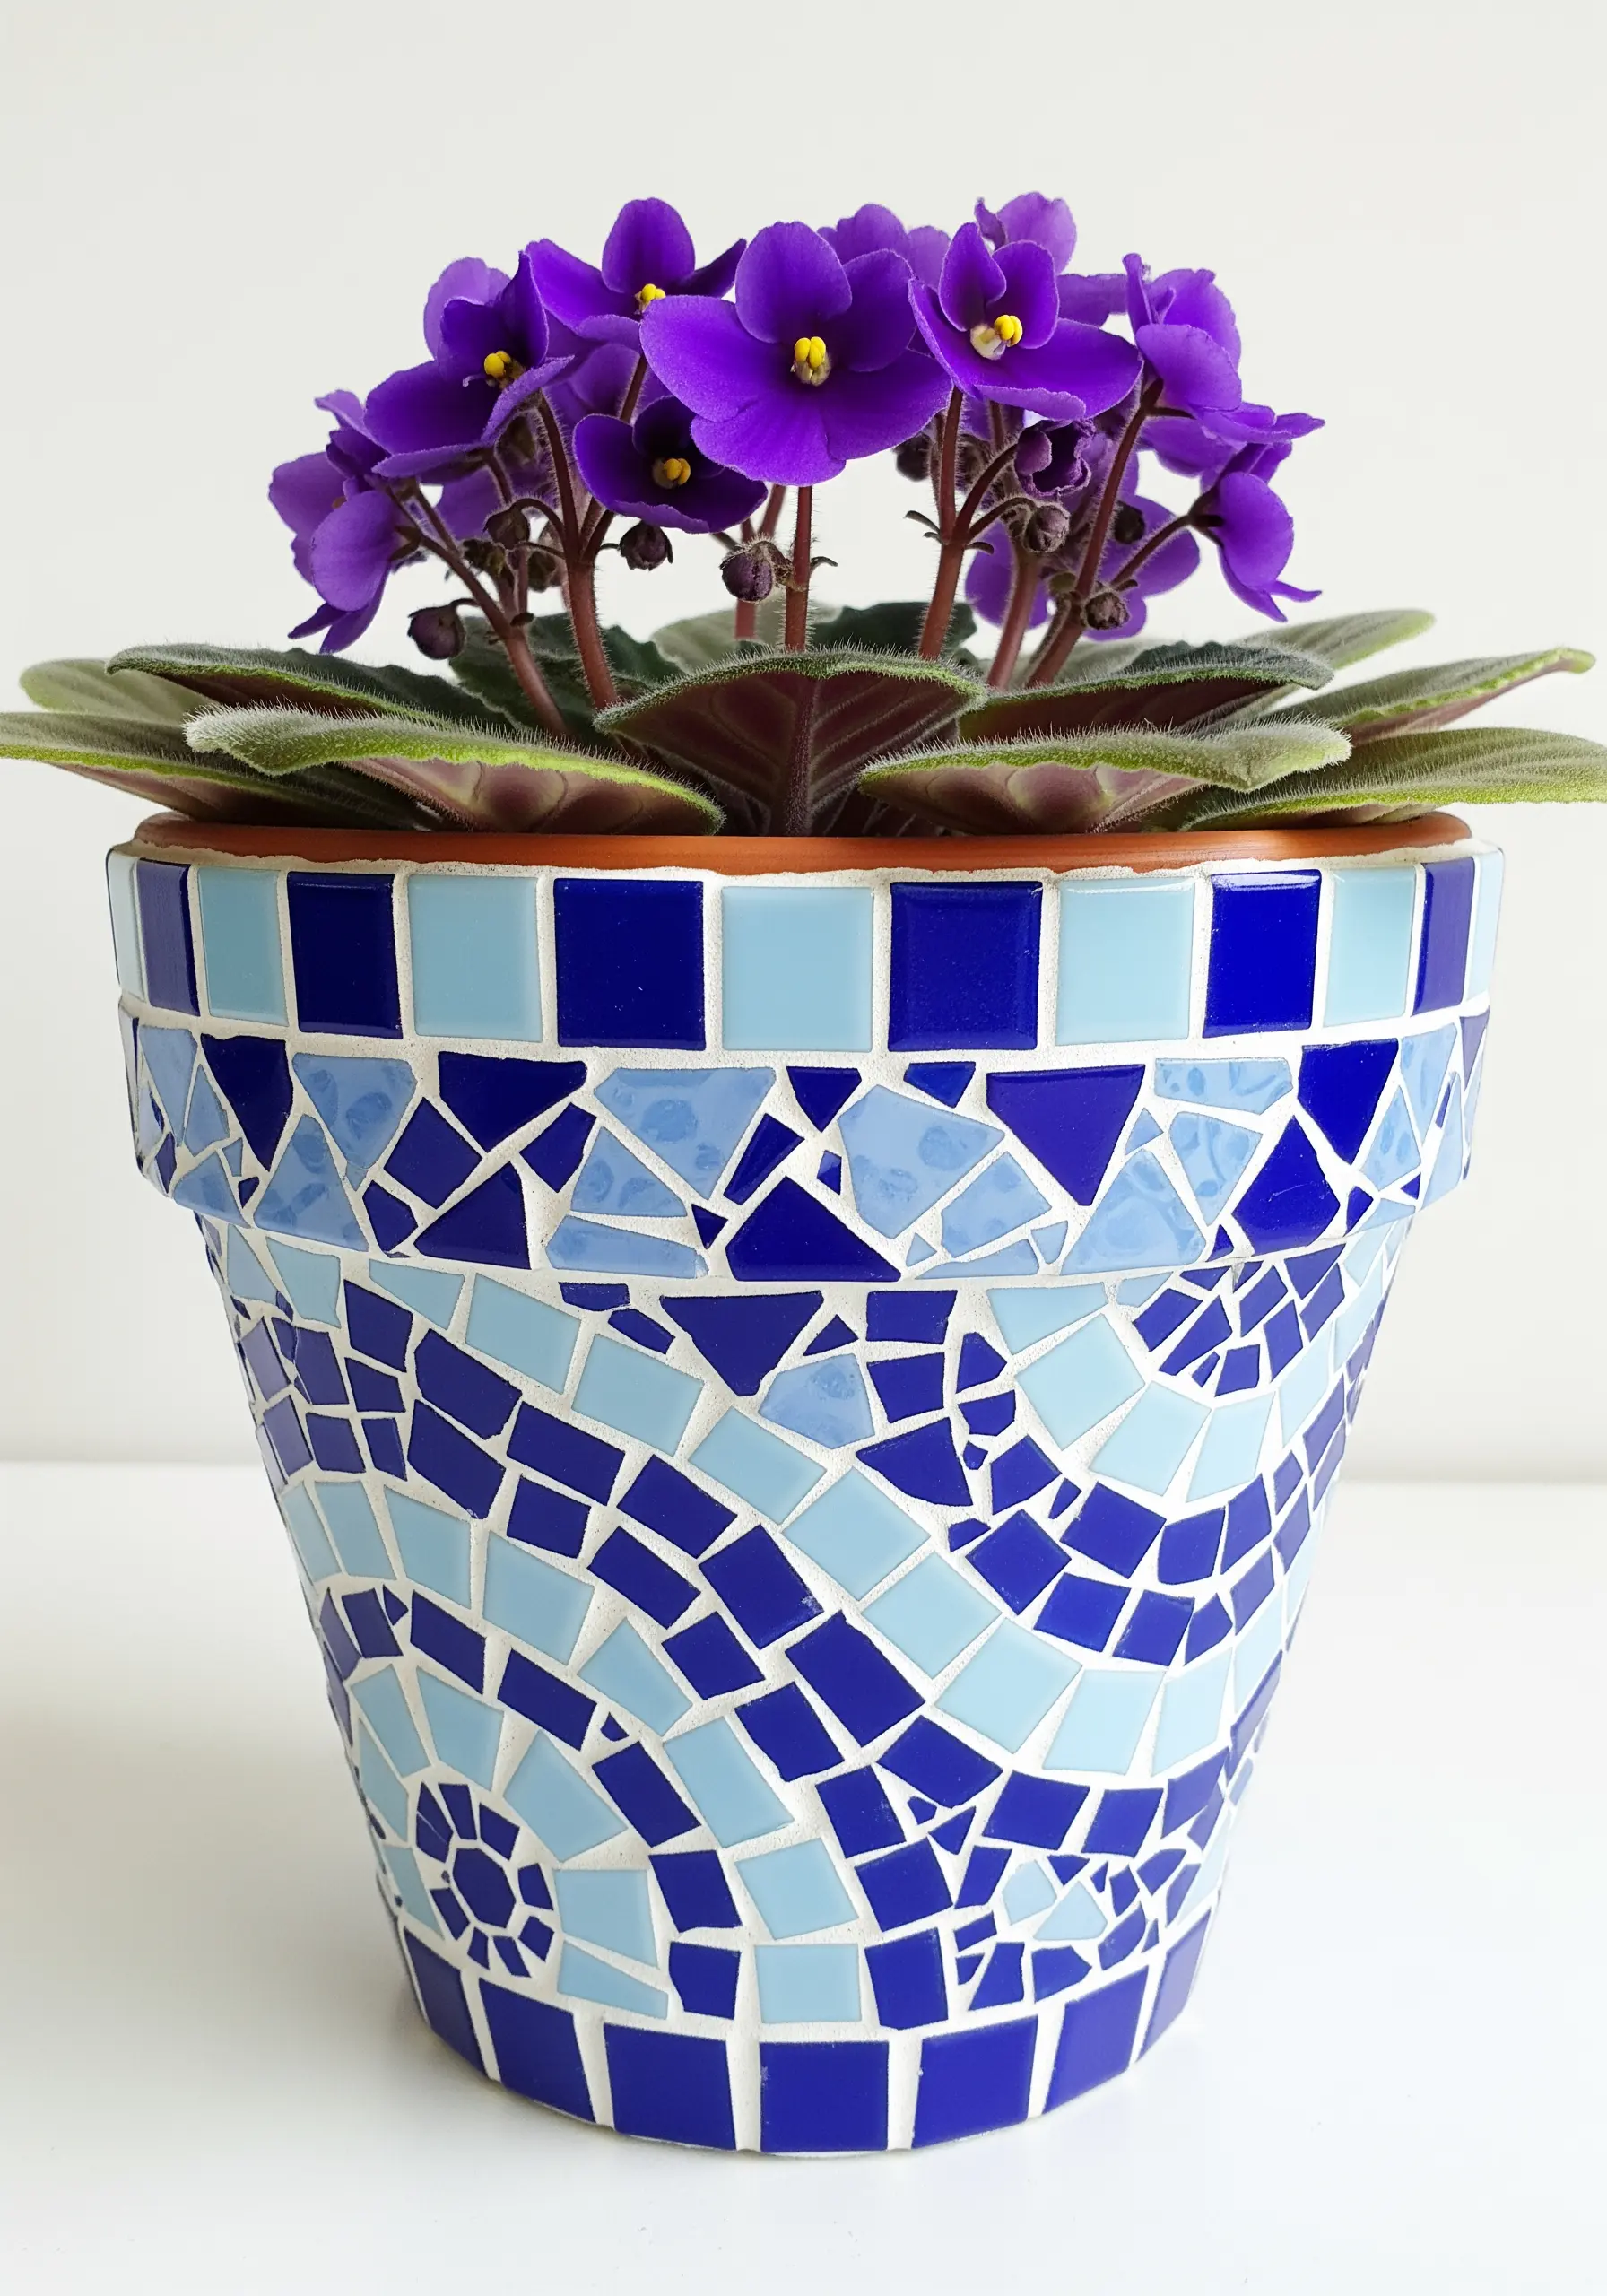
Approach your mosaic work with a painterly eye to create a more sophisticated finish.
Instead of using random colors, gather tiles in several shades of a single color family, from dark to light.
Arrange the broken pieces to create a subtle ombré effect, with the colors blending into one another.
This intentional use of color transforms a simple mosaic into a thoughtful, gradient design with depth and flow.
16. Layer Natural Textures for Simple Elegance
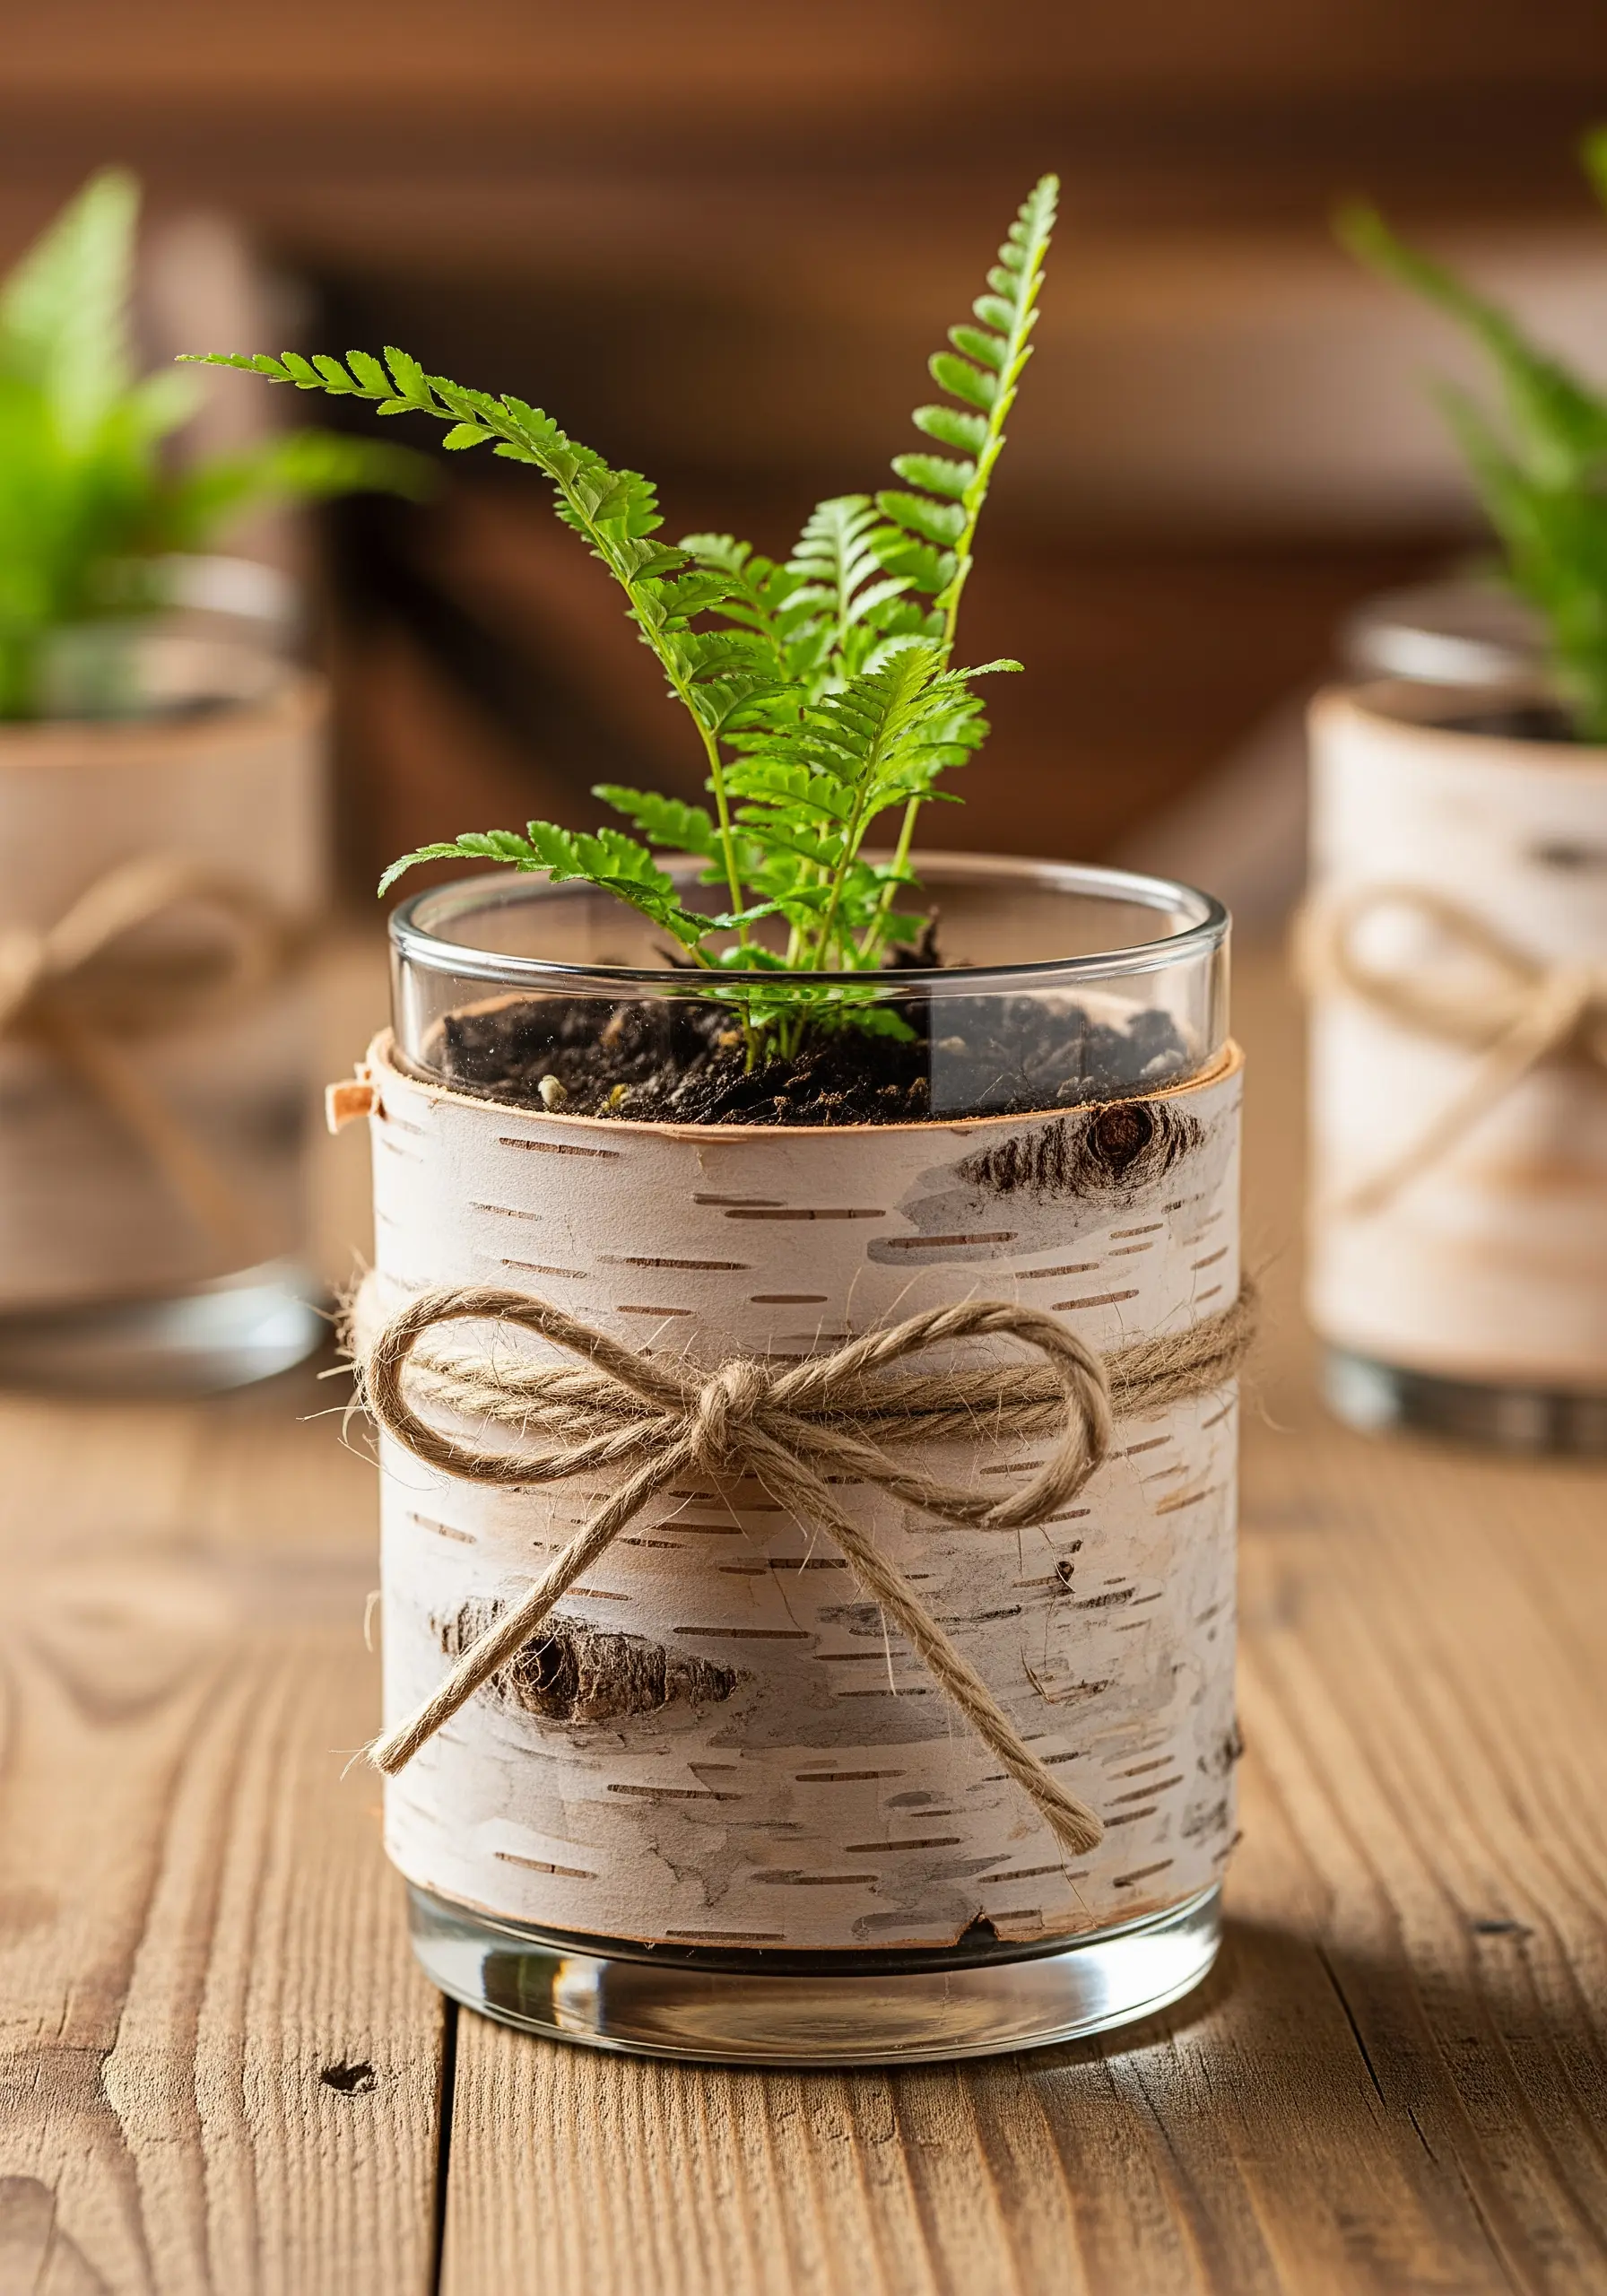
Create a beautiful, rustic planter in minutes by focusing on the interplay of textures.
Simply wrap a plain glass vessel or tin can with a sheet of real birch bark.
Secure it with a simple piece of natural jute twine tied in a bow.
The beauty of this design lies in its simplicity and the elegant contrast between the smooth, reflective glass and the papery, organic texture of the bark.
17. Construct Geometric Forms with Patterned Paper
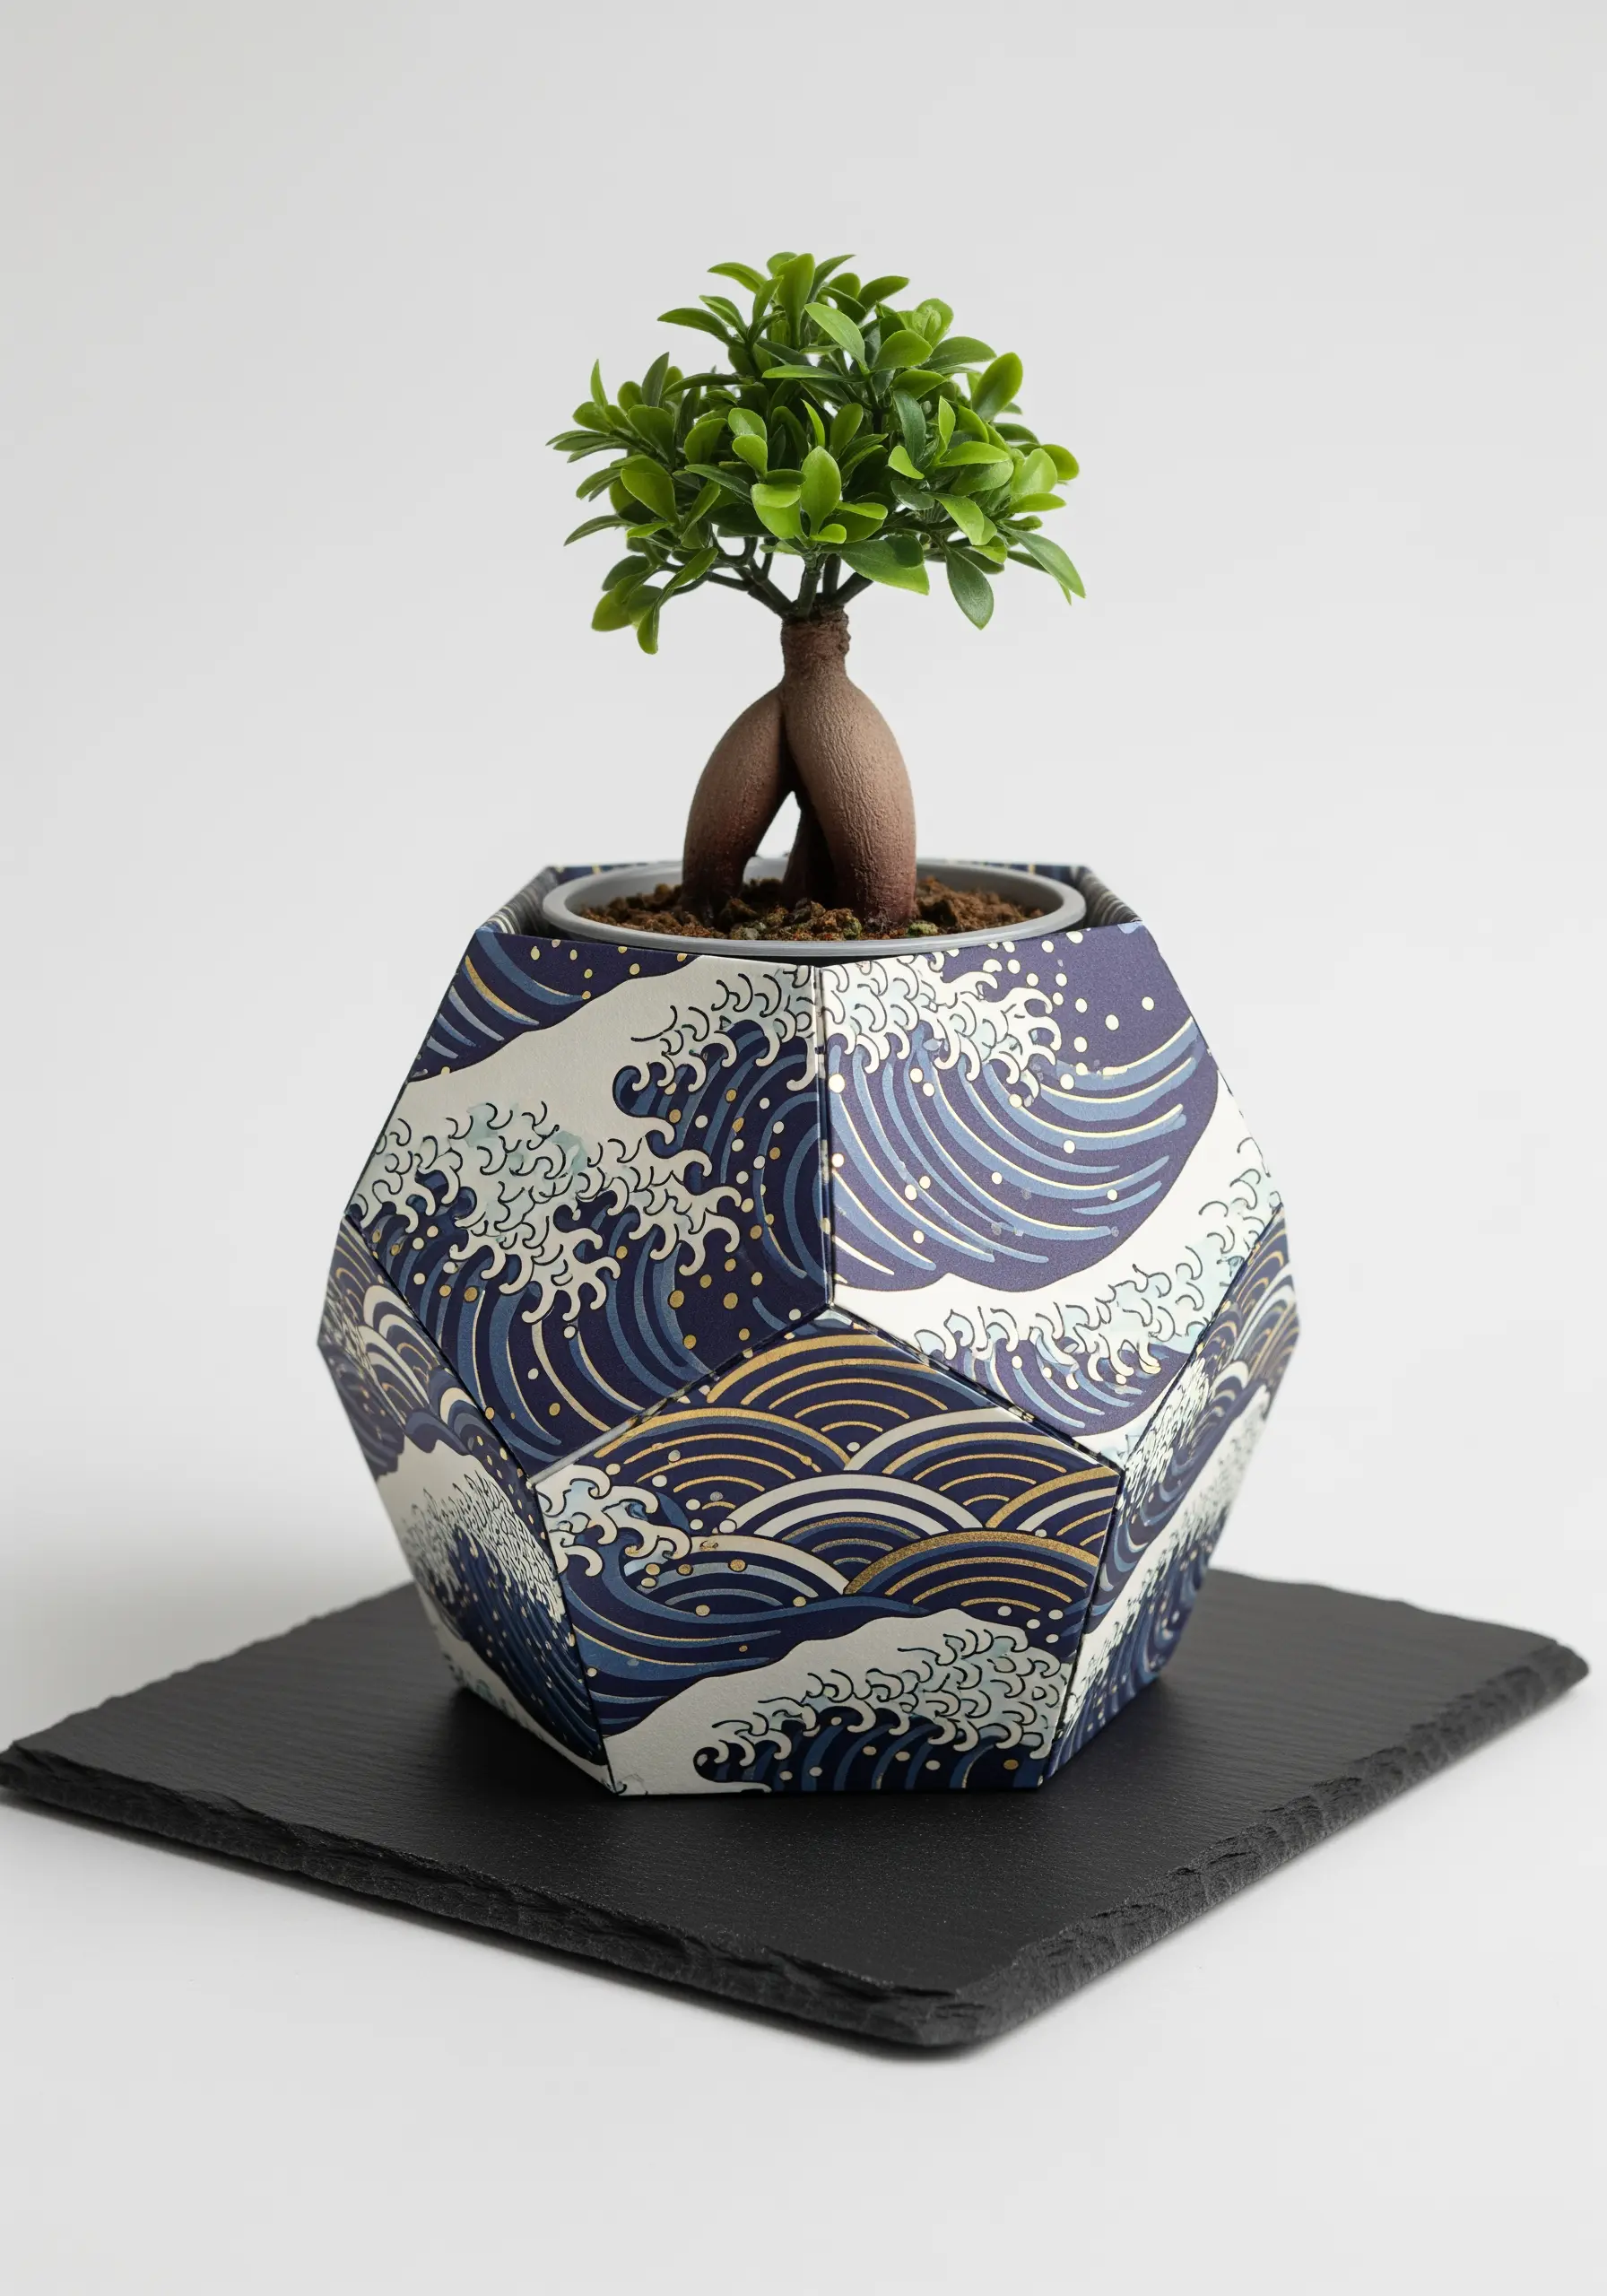
Explore the art of papercraft by creating a multifaceted planter cover.
Use a sturdy, waterproof, or laminated paper printed with a beautiful design, like this classic Japanese wave pattern.
Score the paper precisely before folding to ensure crisp, clean edges and sharp geometric angles.
The result is a lightweight, sculptural piece where the pattern interacts with the form in a dynamic way.
18. Frame Natural Crystal with a Gilded Edge

When working with a spectacular natural object like a geode, your role is to enhance, not overshadow, its beauty.
Nestle an air plant into the crystalline cavity of an amethyst geode.
Then, carefully apply gold leaf to the rough, rocky edge where the crystals meet the outer stone.
This gilded line acts as a frame, highlighting the transition of textures and elevating the entire piece. It is one of the most beautiful ways to turn natural textures into stunning embroidery art and decor.
19. Create Plush Texture with Punch Needle
Use the punch needle technique to create a fabric pot cover with a wonderfully plush, tactile surface.
Working on monk’s cloth, the punch needle creates dense loops of yarn that feel cozy and inviting.
Design with simple, bold shapes and a retro color palette, as the texture itself is the main feature.
This method is fast, satisfying, and turns yarn into a soft, sculptural fabric, much like playful yarn wall art crafts you can hold.
20. Achieve a Watercolor Effect on Ceramics

Capture the transparent, bleeding quality of watercolor painting on a ceramic surface.
Use alcohol inks or specialized ceramic paints that are designed to flow and blend.
Apply your colors to the pot and then use a brush with rubbing alcohol to gently blur the edges and encourage the colors to run into each other.
Allowing for intentional drips adds to the spontaneous, artistic feel of the finished piece.
21. Wrap and Coil for Precise Rainbow Stripes

For perfectly clean and vibrant stripes in a coiled rope basket, prepare your materials first.
Before you start sewing the coils together, tightly wrap sections of your cotton rope with colorful embroidery floss or yarn.
This method gives you complete control over the color placement, resulting in crisp, saturated bands of color.
The texture of the wrapped thread adds another layer of subtle detail to the finished basket.
22. Add Sophistication with a Hand-Stitched Leather Cuff
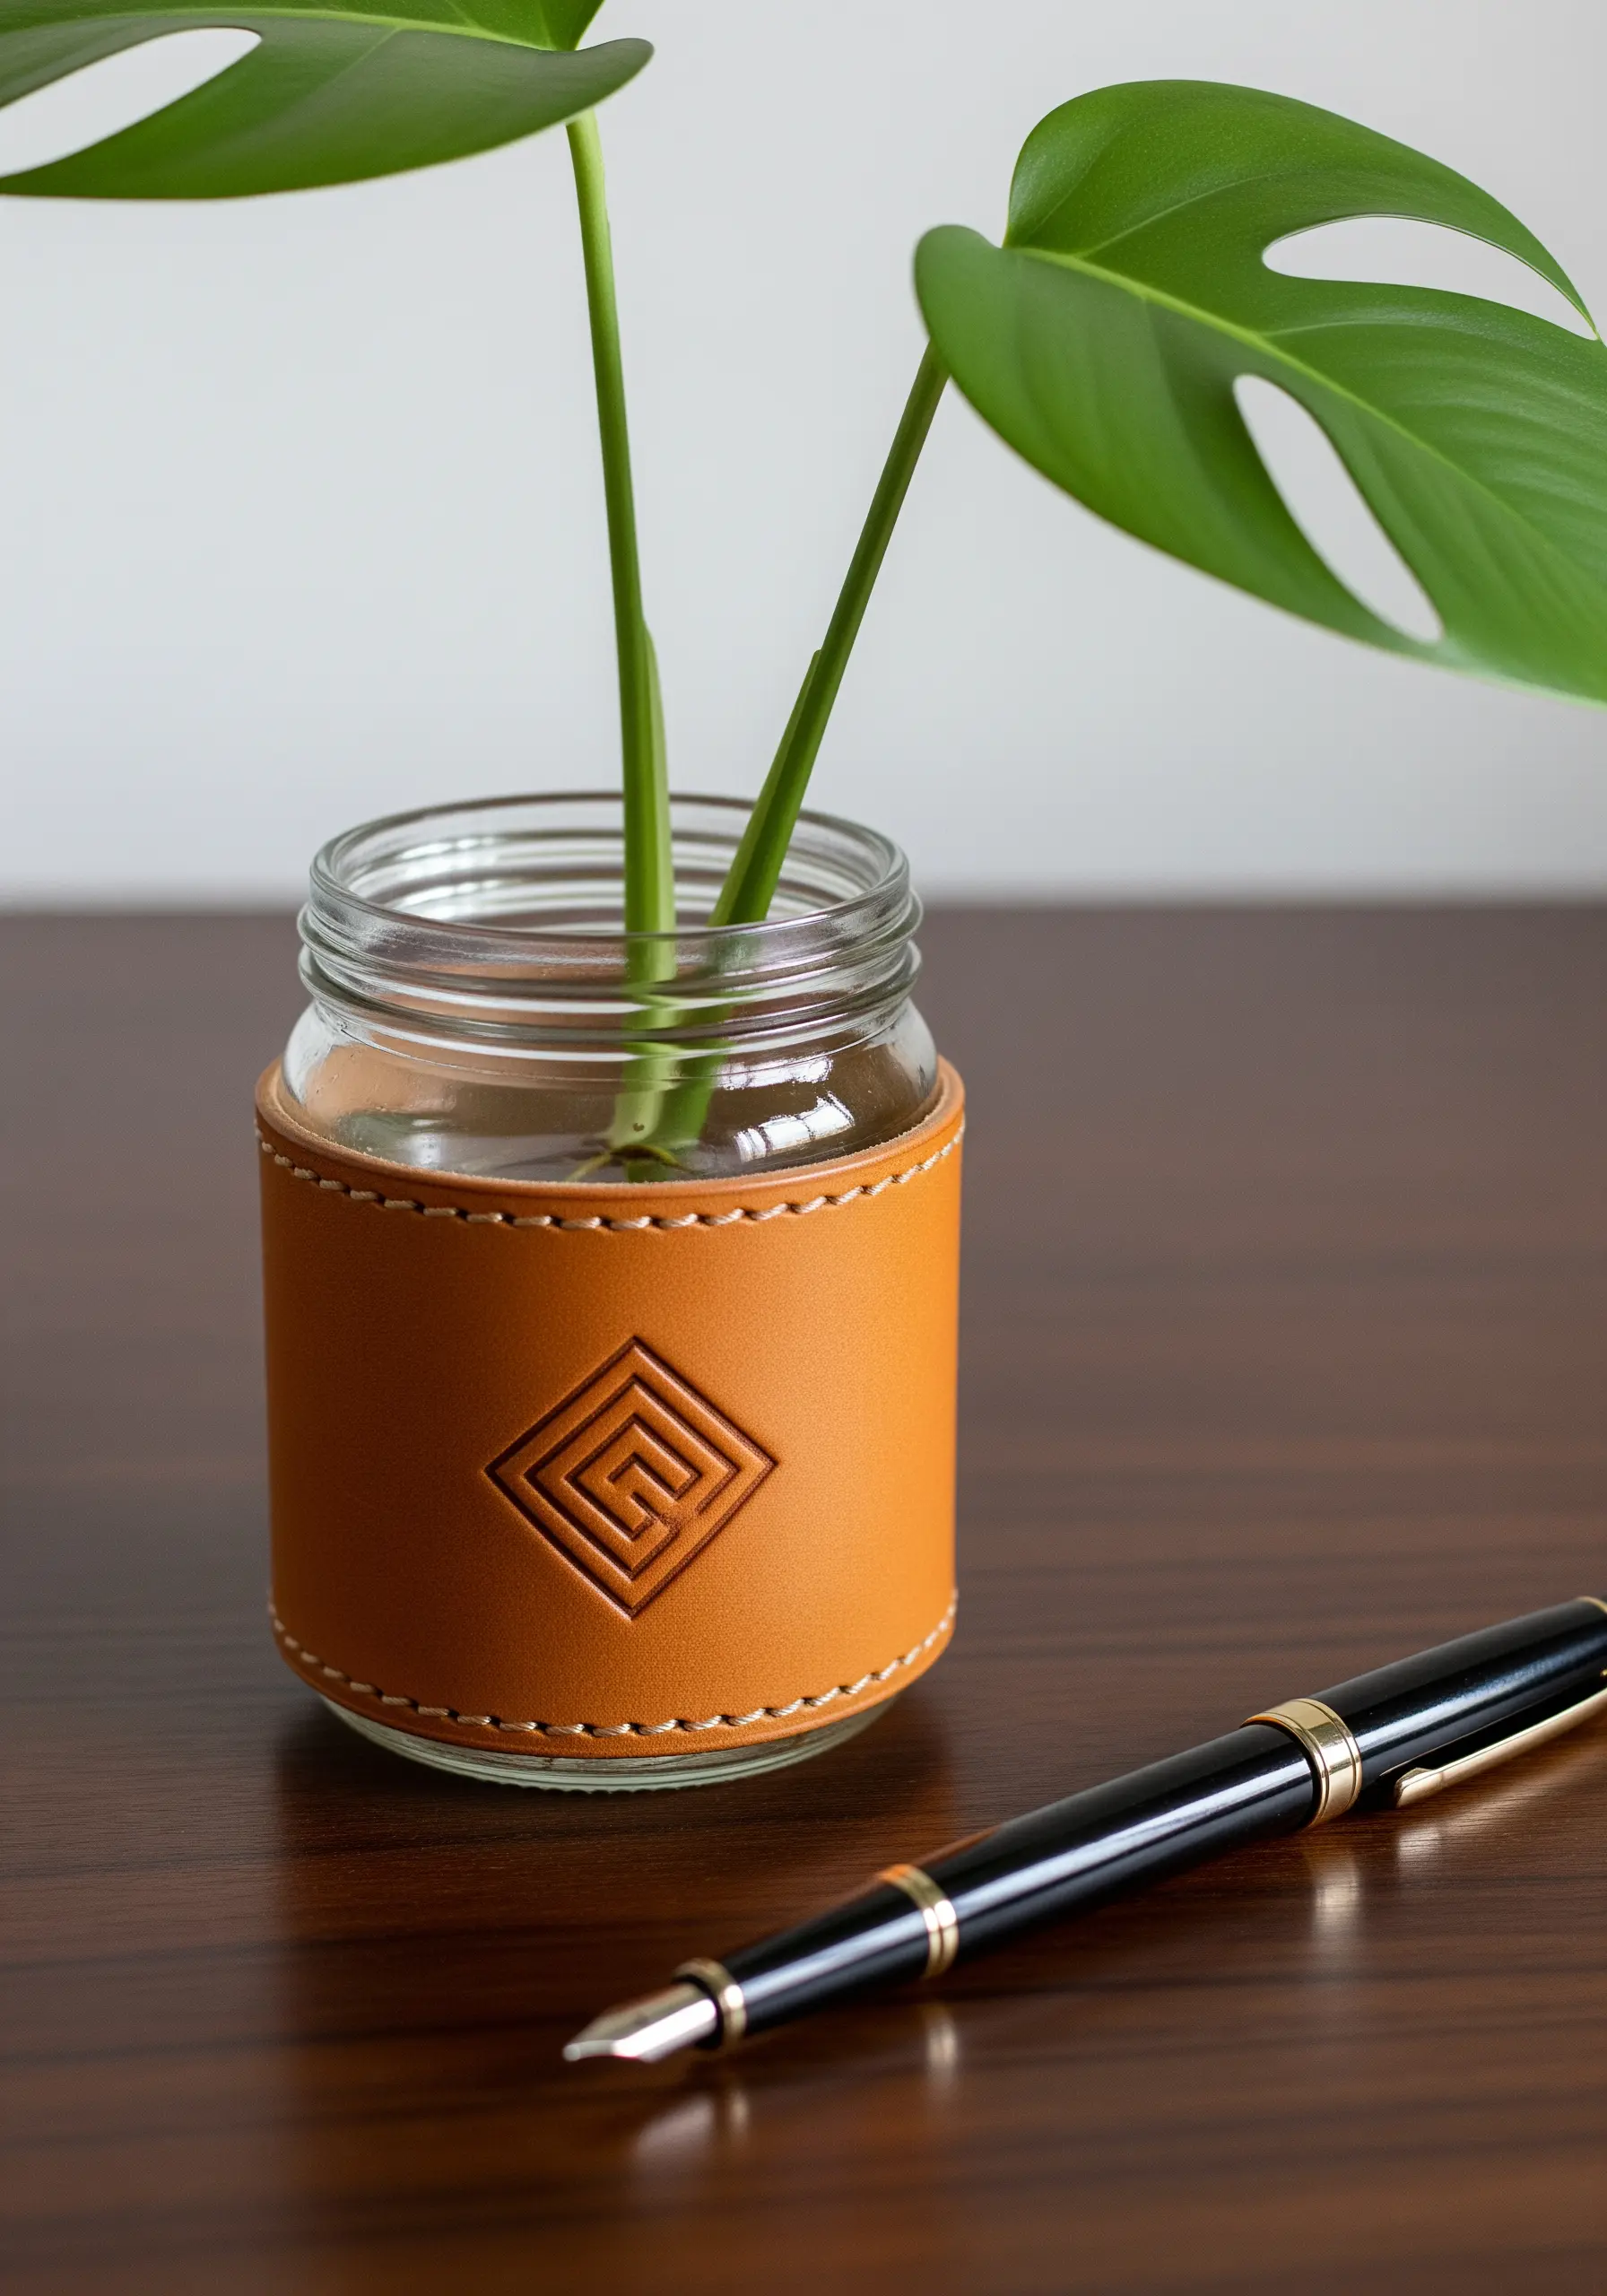
Instantly elevate a simple glass jar by wrapping it in a custom-fit leather cuff.
Cut a piece of vegetable-tanned leather, punch stitching holes, and use a contrasting waxed thread to sew a durable saddle stitch.
An embossed or stamped geometric pattern in the center adds a focal point.
The combination of warm leather, precise stitching, and cool glass creates a look of timeless, understated luxury.
23. Create Pixel Art with Playful Cross-Stitch
Use the natural grid of Aida cloth to create a charming, pixel-art style pot cover.
Cross-stitch is perfect for rendering simple, graphic characters with a retro, digital feel.
Choose a fun, simple pattern and use bright, cheerful colors to bring your character to life.
Once stitched, you can easily sew the Aida cloth into a simple cylinder to slip over any standard pot.
24. Tell a Story with Decoupaged Maps
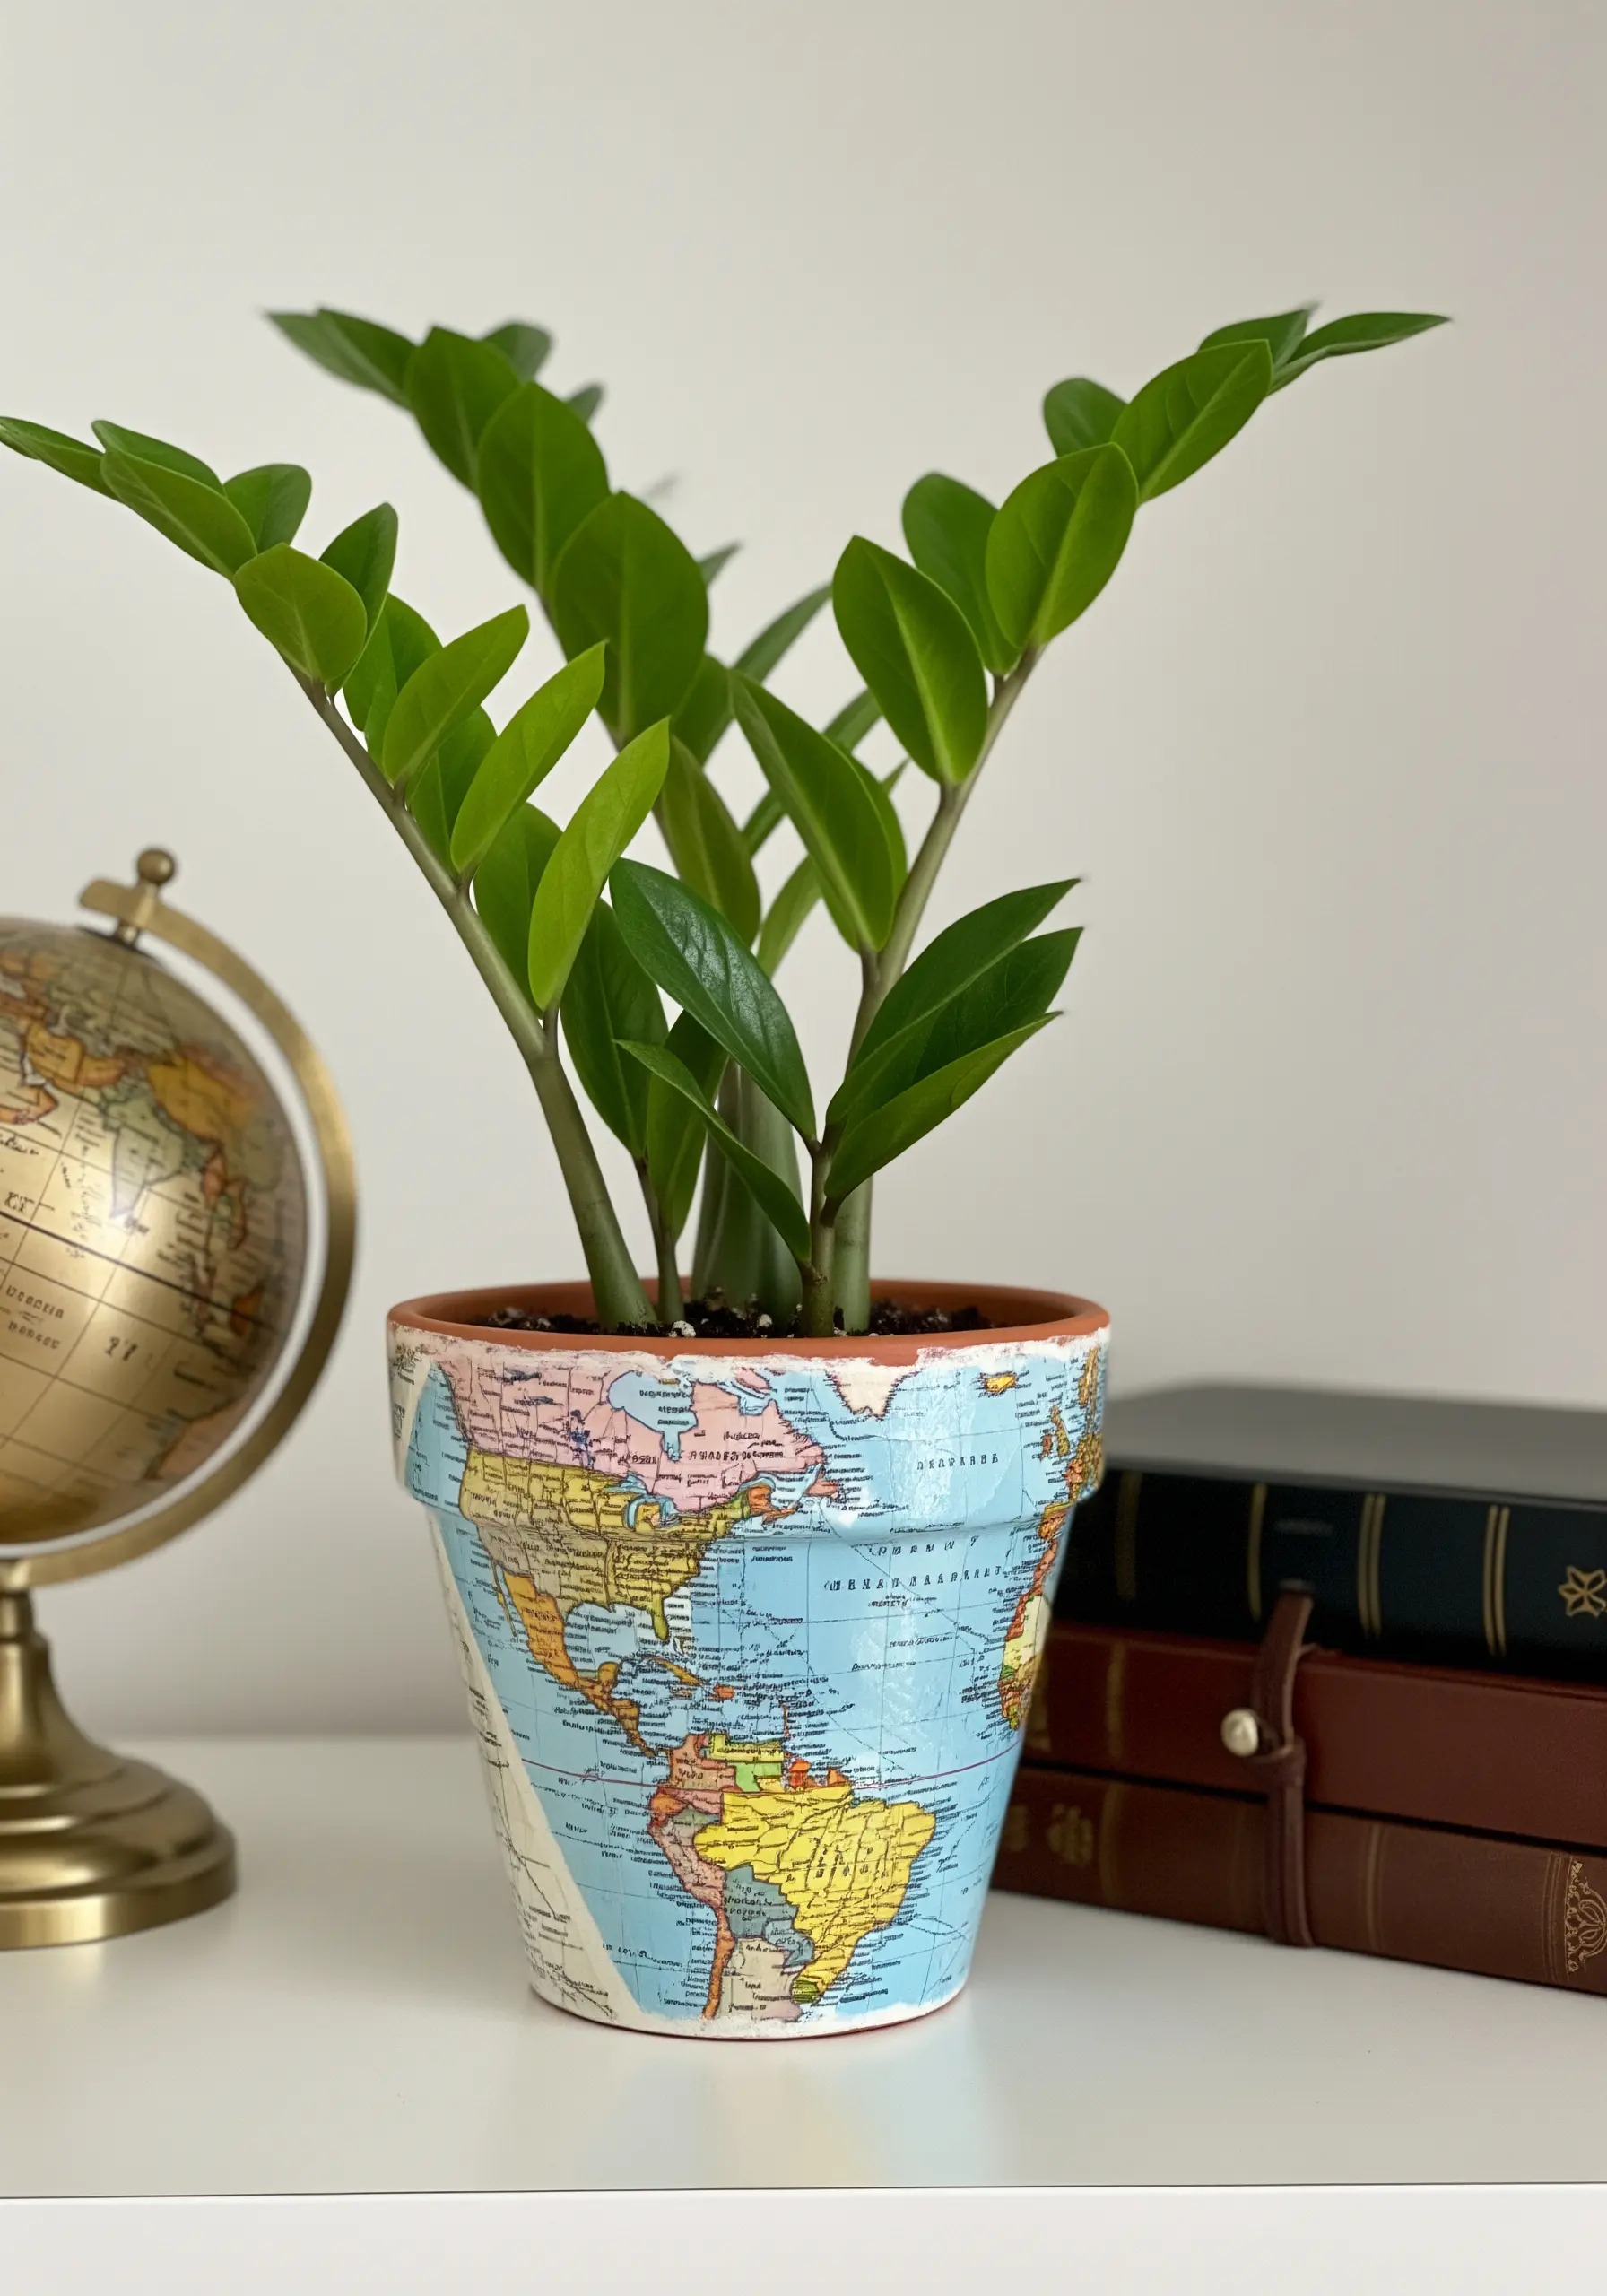
Turn a plain terracotta pot into a meaningful keepsake using the art of decoupage.
Select maps of places that are special to you—a hometown, a favorite travel destination, or a place you dream of visiting.
Tear the maps into small, overlapping pieces and apply them to the pot with decoupage glue.
The finished piece becomes more than just a planter; it’s a collage of your personal history and aspirations.
25. Appreciate the Artistry of Sculptural Form

Sometimes, the most beautiful decoration is the form of the object itself.
This terracotta pot needs no extra embellishment because its artistry lies in its graceful, fluted shape.
The soft, wavy rim and vertical scallops catch the light, creating a beautiful play of light and shadow that changes throughout the day.
It serves as a reminder to appreciate the elegance of pure form and silhouette in handmade objects.
26. Build a Miniature World in an Unexpected Vessel

Challenge your sense of scale by creating a tiny, self-contained terrarium inside a repurposed lightbulb.
After carefully hollowing out the bulb, add a layer of sand and arrange small pieces of moss and a miniature air plant inside.
The delicate glass enclosure magnifies the tiny details, turning the small botanical elements into a captivating, magical landscape.
It’s a perfect way to showcase the beauty of a single, tiny plant.
27. Replicate Natural Textures with Sculpting and Paint
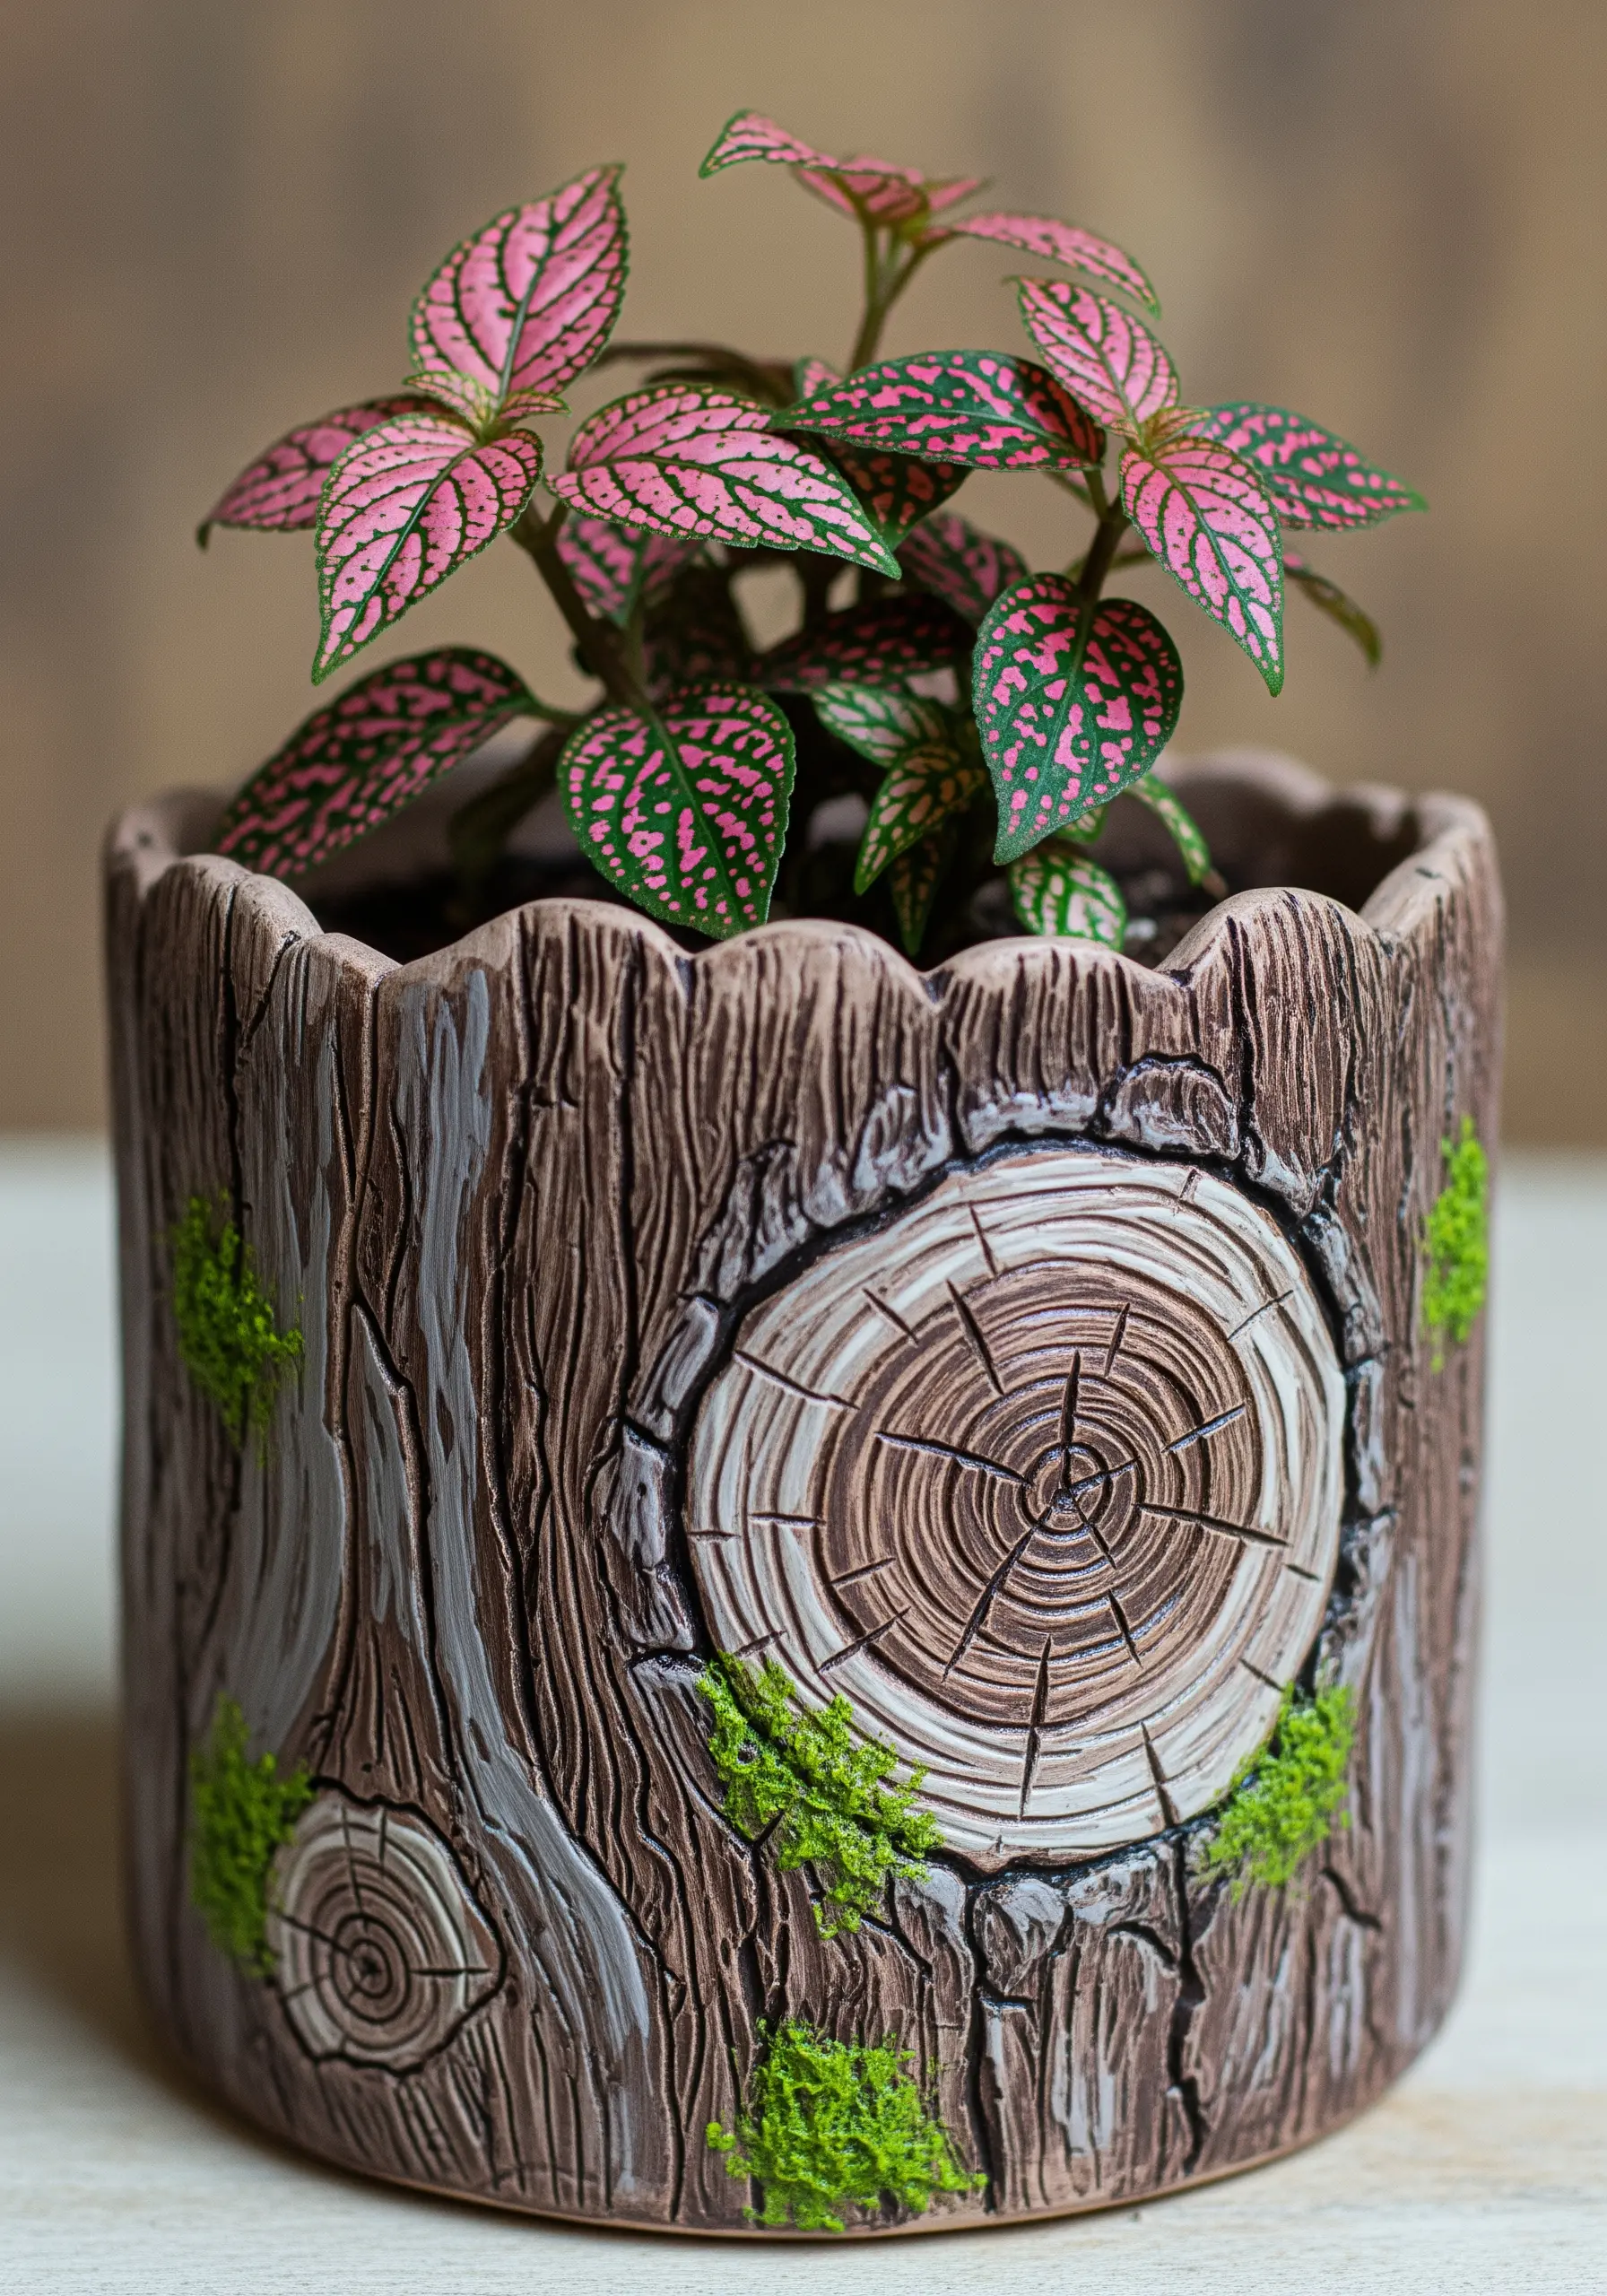
You can mimic the complex texture of tree bark on any plain pot.
Apply a thick layer of texturing paste or putty to the pot’s surface and use sculpting tools to carve vertical grooves and rough patches.
Once dry, layer washes of brown, black, and grey paint, letting the darker colors settle in the crevices.
Finish by dry-brushing a light color over the top to highlight the raised ‘bark’ texture, adding realism and depth.
28. Draw with Heat Using Pyrography
A dried, hollowed-out gourd offers a beautifully smooth and receptive canvas for pyrography.
This technique, also known as wood burning, uses a heated tool to etch permanent designs onto a surface.
Use different tips on your pyrography pen to create a variety of lines—fine tips for delicate details and shaded tips for filling in larger areas.
The burned lines create a rich, dark brown contrast against the gourd’s light, natural color.
29. Create Dramatic Texture with Arm Knitting

For a pot cover with maximum coziness and visual impact, try knitting with super jumbo yarn—no needles required.
Using just your hands and arms, you can create oversized stitches that result in a thick, plush, and highly textural fabric.
This technique works up incredibly quickly and celebrates the beauty of the material itself. It’s a perfect example of the cozy neutral decor ideas that add warmth to any space.
30. Preserve Delicate Botanicals in Resin

Create a luminous, ethereal planter by embedding pressed flowers in clear casting resin.
Carefully arrange your dried flowers and ferns against the wall of a mold, then slowly pour in the resin to encase them.
The resin magnifies their delicate details and preserves their color, creating a stunning, glass-like vessel that seems to glow from within.
This modern technique is one of the most inspiring pressed flower art projects, freezing a moment of nature in time.
31. Embrace the Beauty of Organic, Hand-Built Shapes

When working with clay, resist the urge to create a perfectly symmetrical pot.
Instead, use the pinch pot method or hand-form a slab into a vessel with a soft, irregular rim and gently undulating sides.
The subtle imprints of your fingers and the lack of perfect uniformity are what give the piece its character and warmth.
This approach celebrates the visible mark of the maker and the beauty of imperfection.
32. Create a Playful Faux Terrazzo Finish
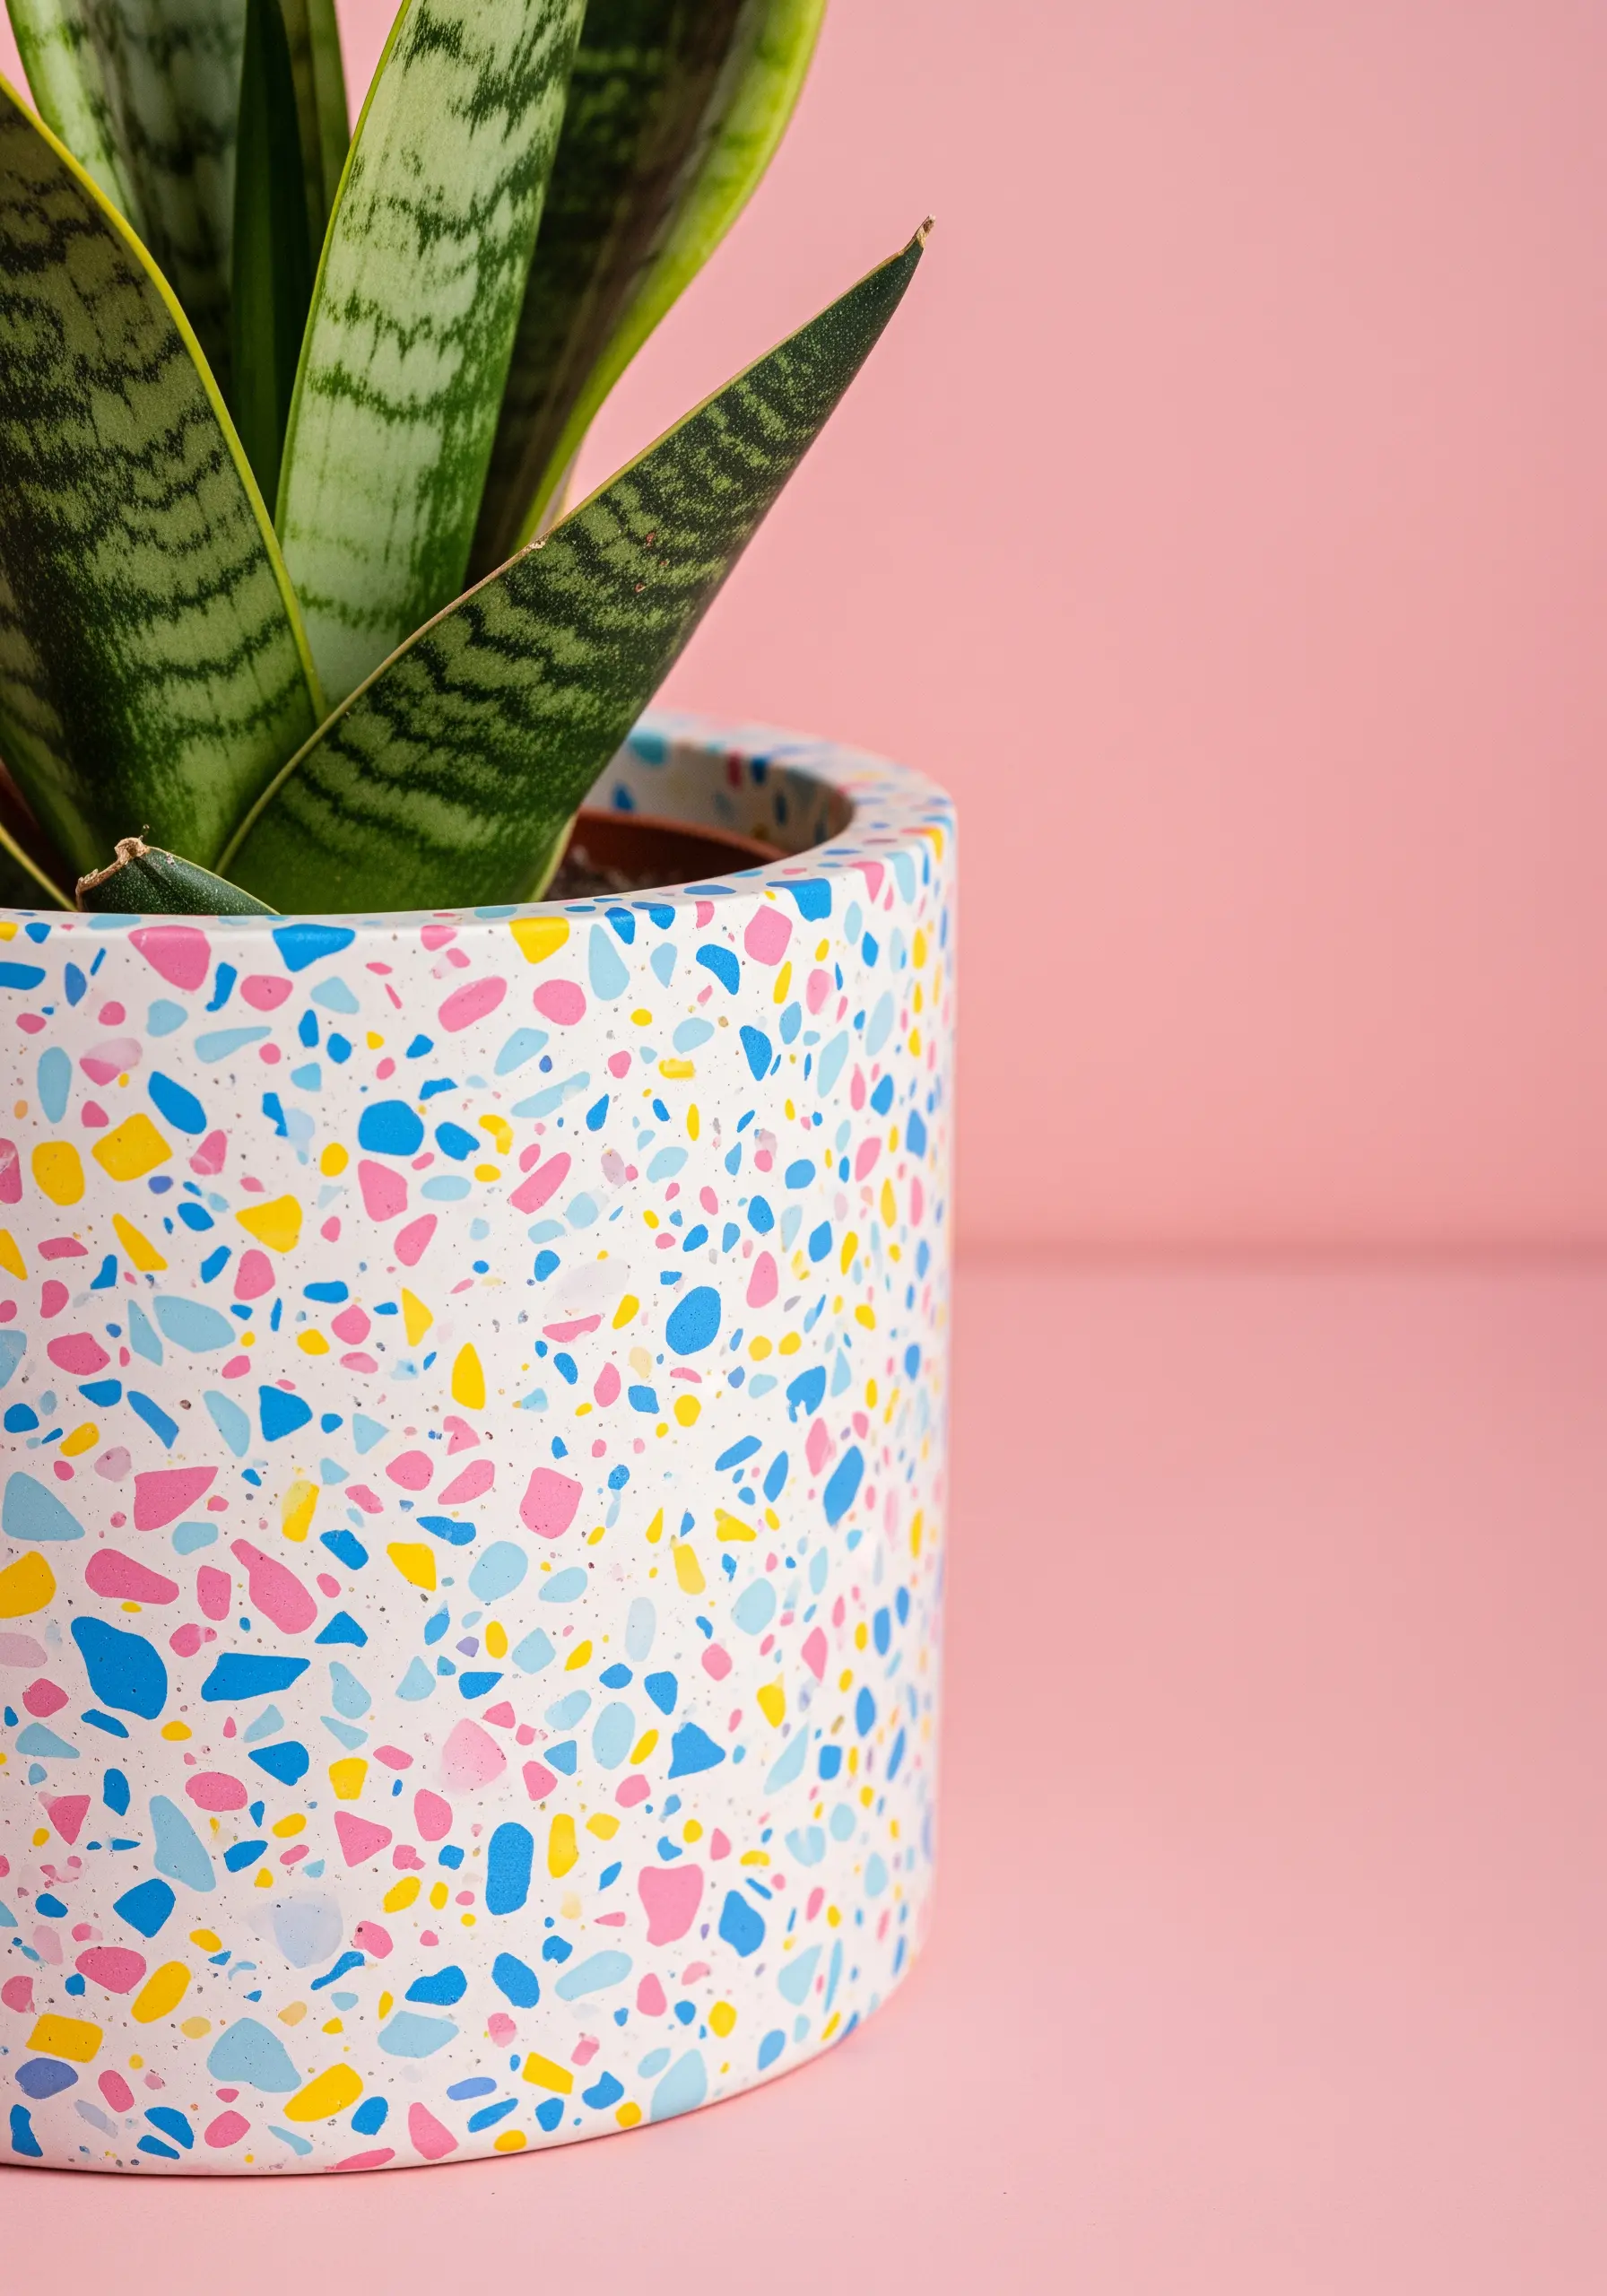
You can easily replicate the trendy and cheerful look of terrazzo on any pot.
For a painted version, use a small, stiff brush to apply flecks of several different colors onto a white or light-colored base.
Vary the size, shape, and direction of your flecks to create a random, dynamic pattern that looks authentic.
Seal with a matte or gloss varnish to protect your design. This is a simple way to add a burst of color and personality.


