

You have the yarn, the passion, and the desire to create something beautiful for your walls. But perhaps you feel stuck, wondering how to translate those materials into art that feels both personal and polished. It’s not about finding more complex patterns; it’s about rethinking the techniques themselves.
Think of yarn not just as a thread to be stitched, but as a sculptural element. You can wrap it, weave it, tuft it, and couch it to create pieces with incredible depth, texture, and modern appeal. The shift from following a pattern to understanding the material is where your unique artistry begins to emerge.
In these ideas, I want you to see the potential in combining simple methods to achieve extraordinary results. A macrame knot becomes a feather, a punch needle loop becomes a painterly mark, and simple wrapped cords become a minimalist masterpiece. Let’s explore these playful approaches together and refresh your space with art that truly feels like you.
1. Craft a Sculptural Cloud with Latch Hooking
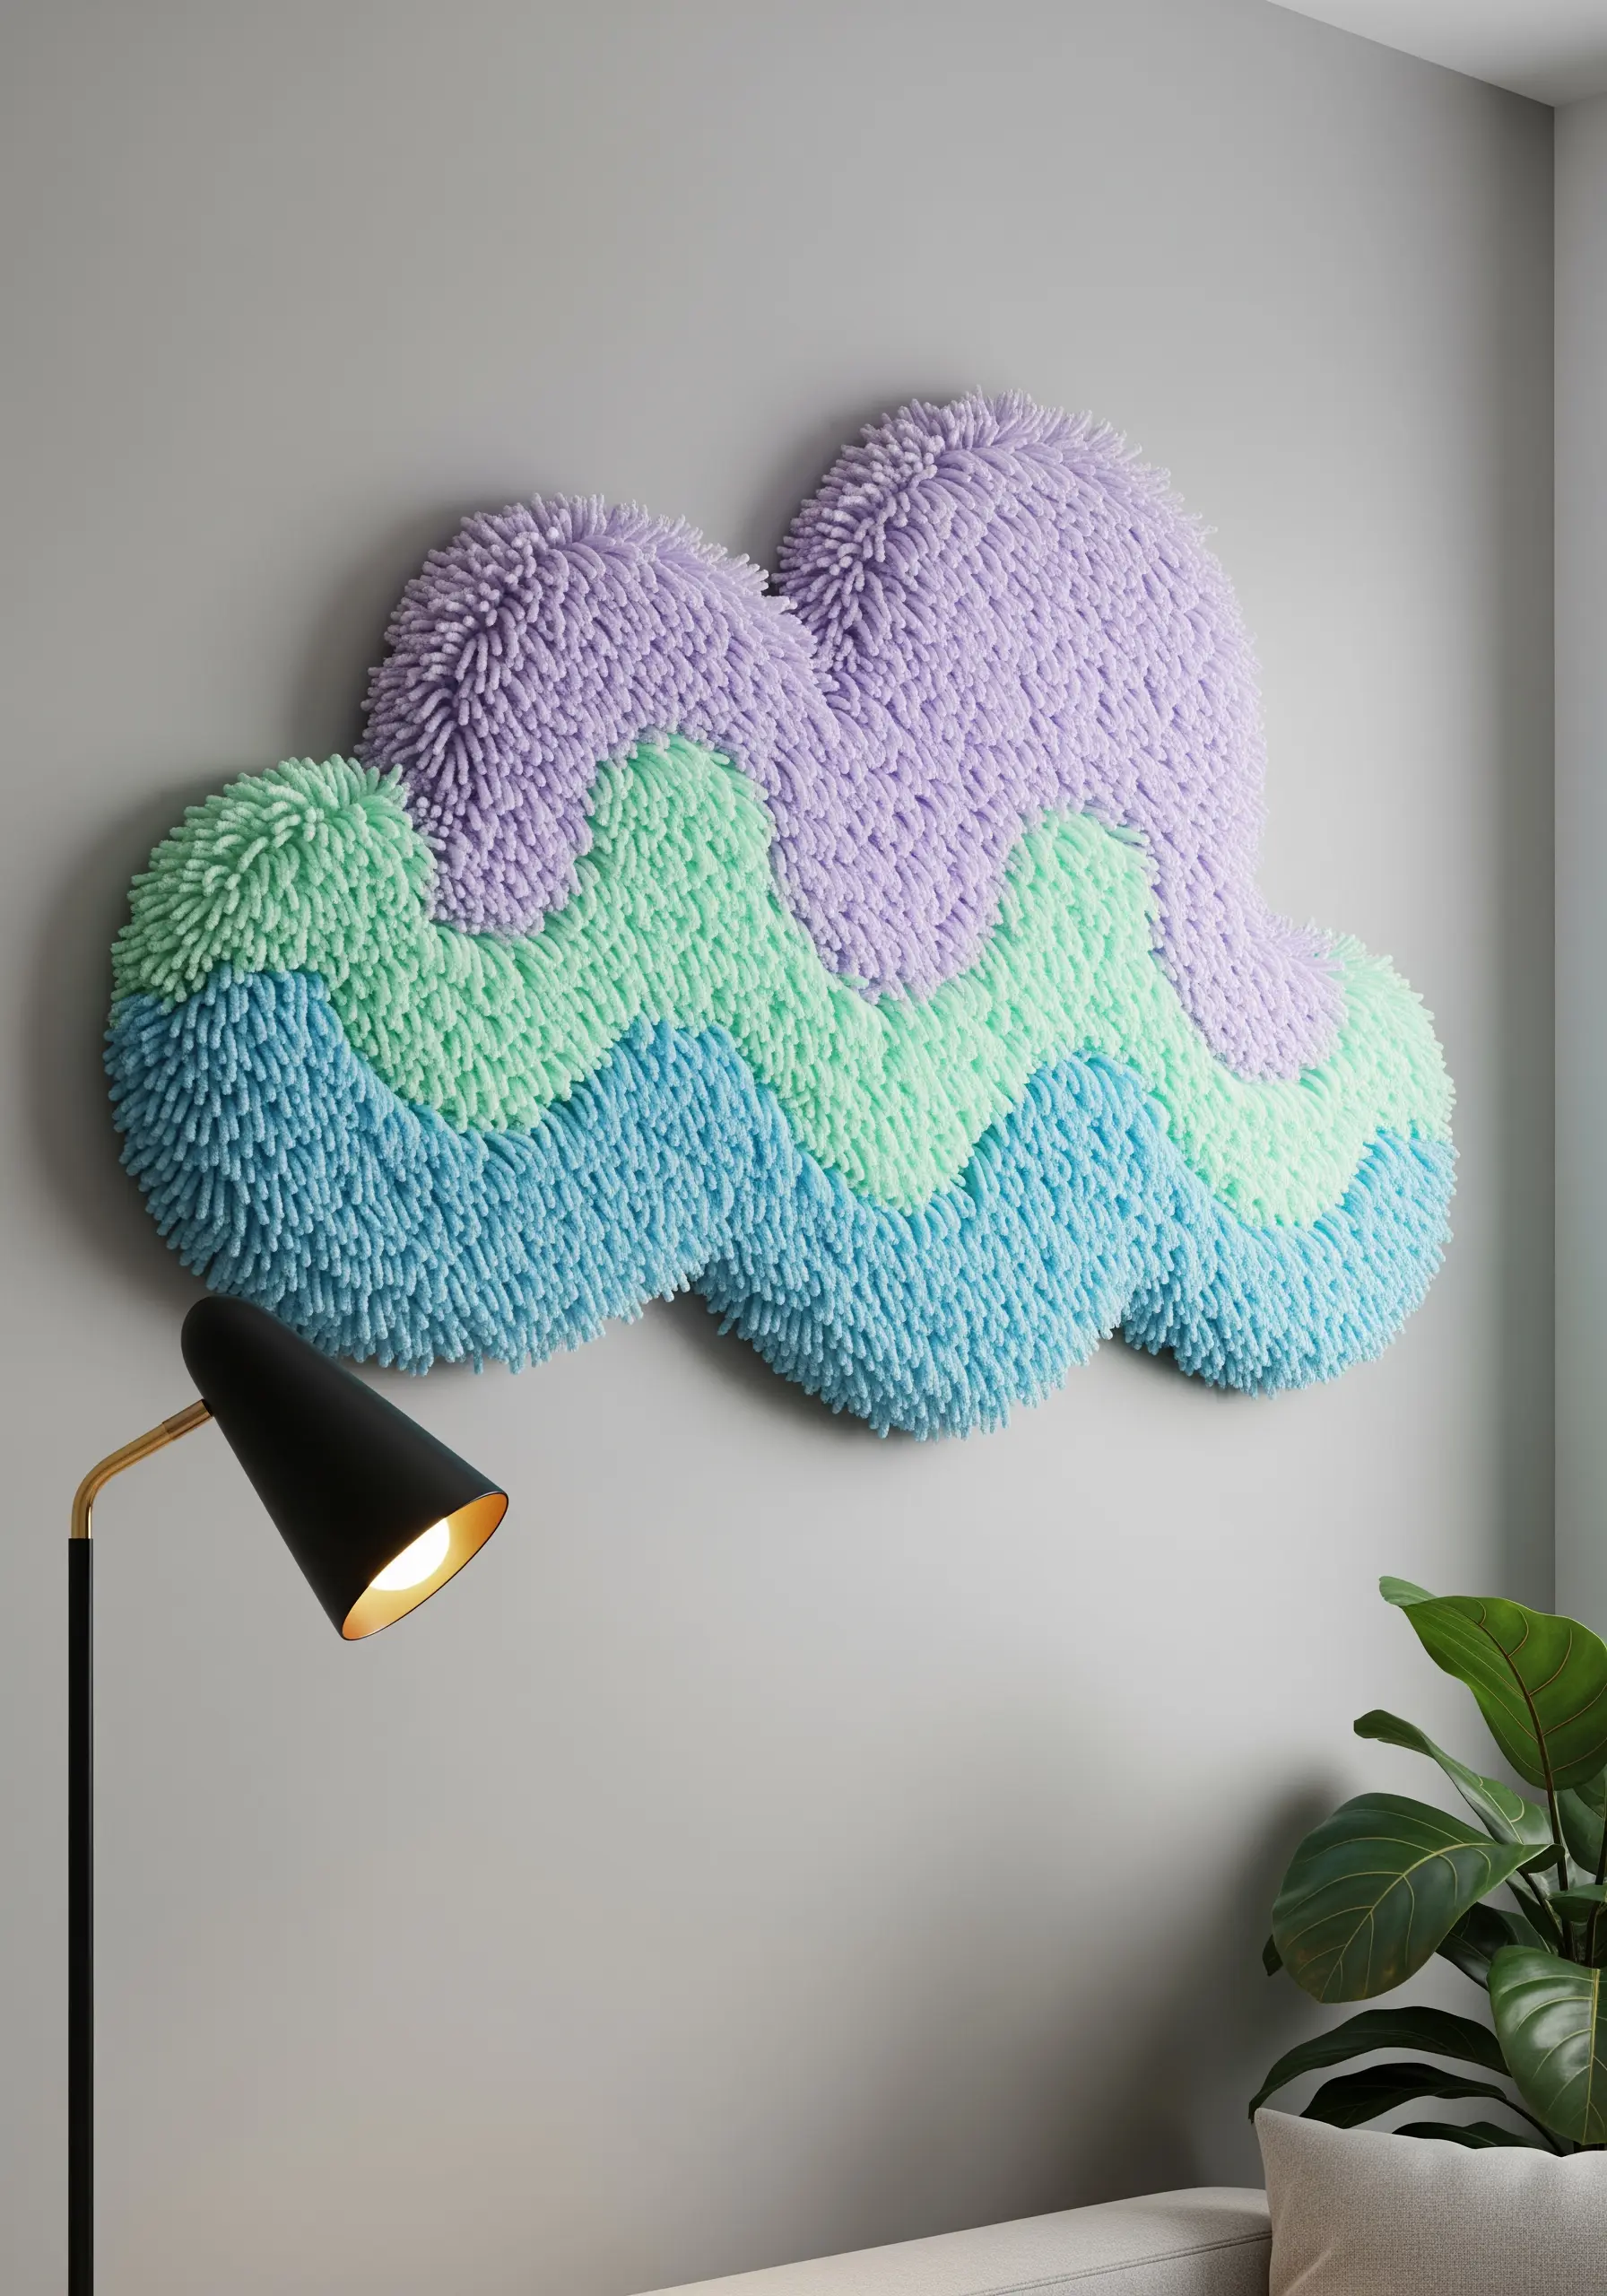
Create a high-texture, shaggy wall hanging by using a latch hook or tufting gun on a shaped canvas base.
To achieve this plush, cloud-like effect, cut your yarn into uniform 2-3 inch lengths and work in dense rows.
For the soft, wavy color transitions, blend your shades gradually rather than creating hard lines.
This method transforms simple yarn into a three-dimensional piece that invites touch, adding a soft, playful energy to your room.
2. Compose a Celestial Trio with Mixed Textures
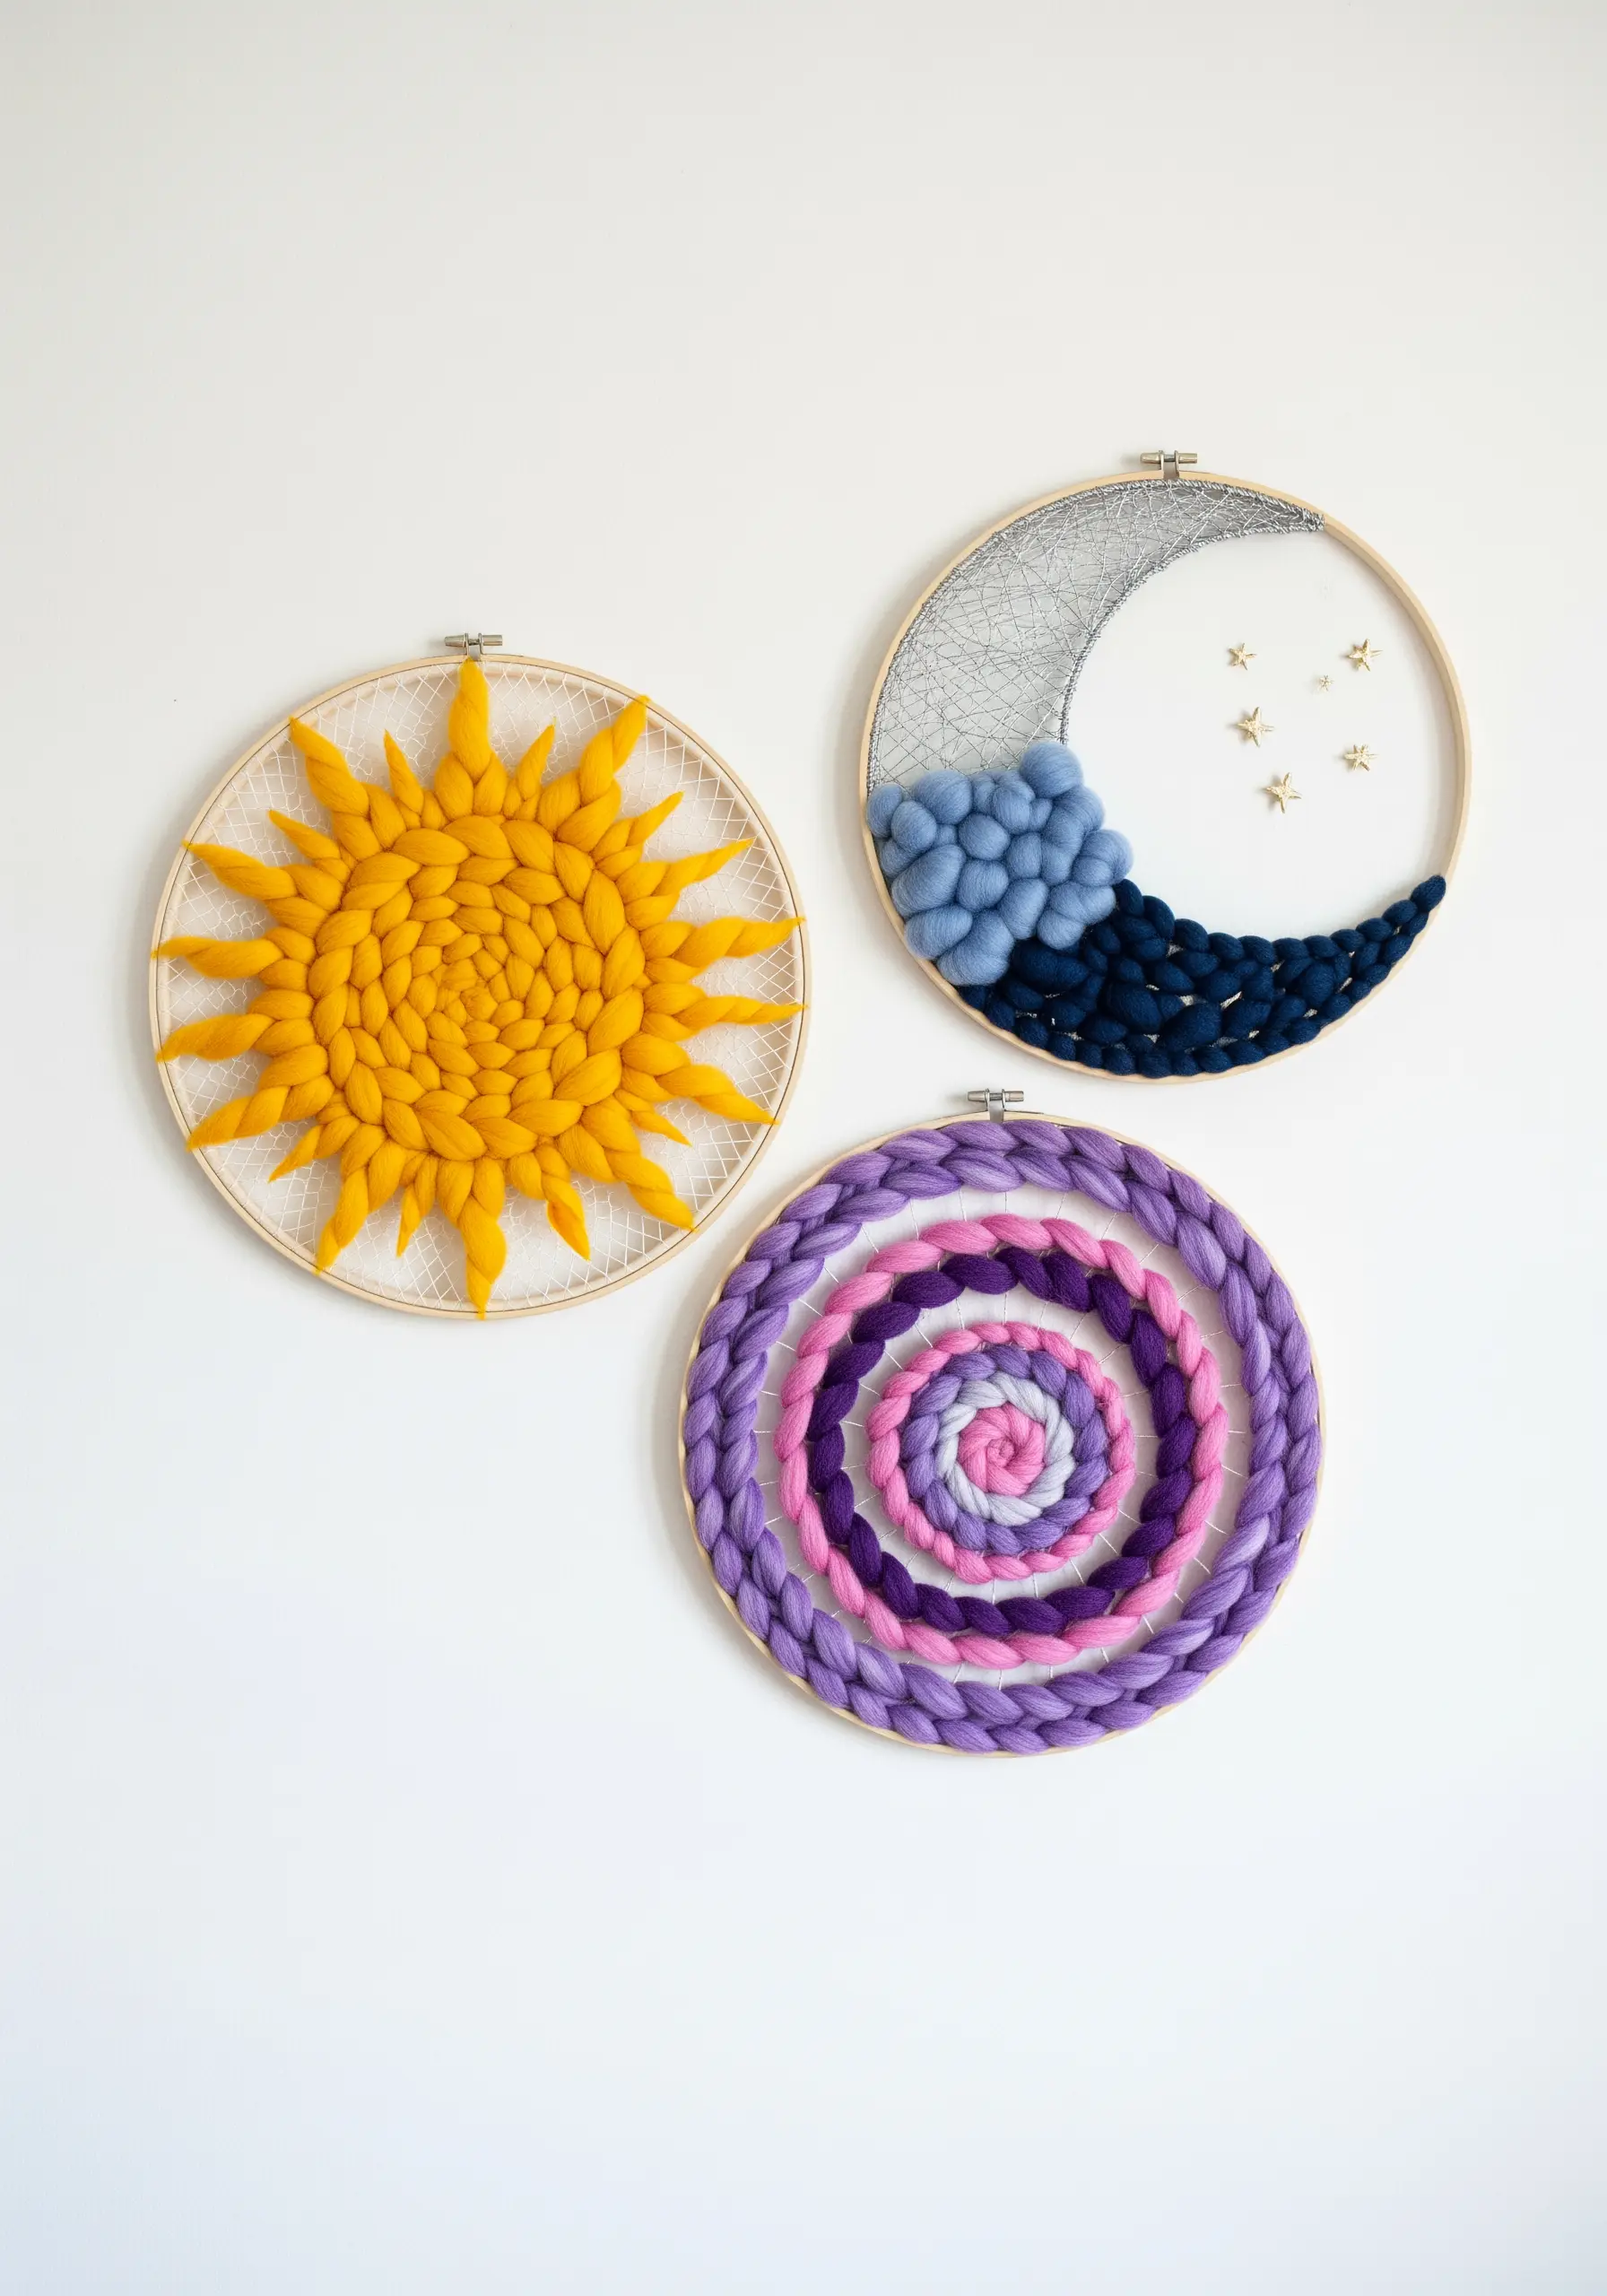
Elevate the simple embroidery hoop by treating it as a frame for mixed-media fiber art.
Combine different techniques within a single display: try weaving for a radiant sun, needle felting for fluffy clouds, and wrapping chunky yarn for a bold spiral.
Using a consistent color story—like the celestial blues, purples, and gold here—unifies the distinct textures into a cohesive gallery wall.
This approach allows you to explore multiple crafts without committing to a single large-scale project.
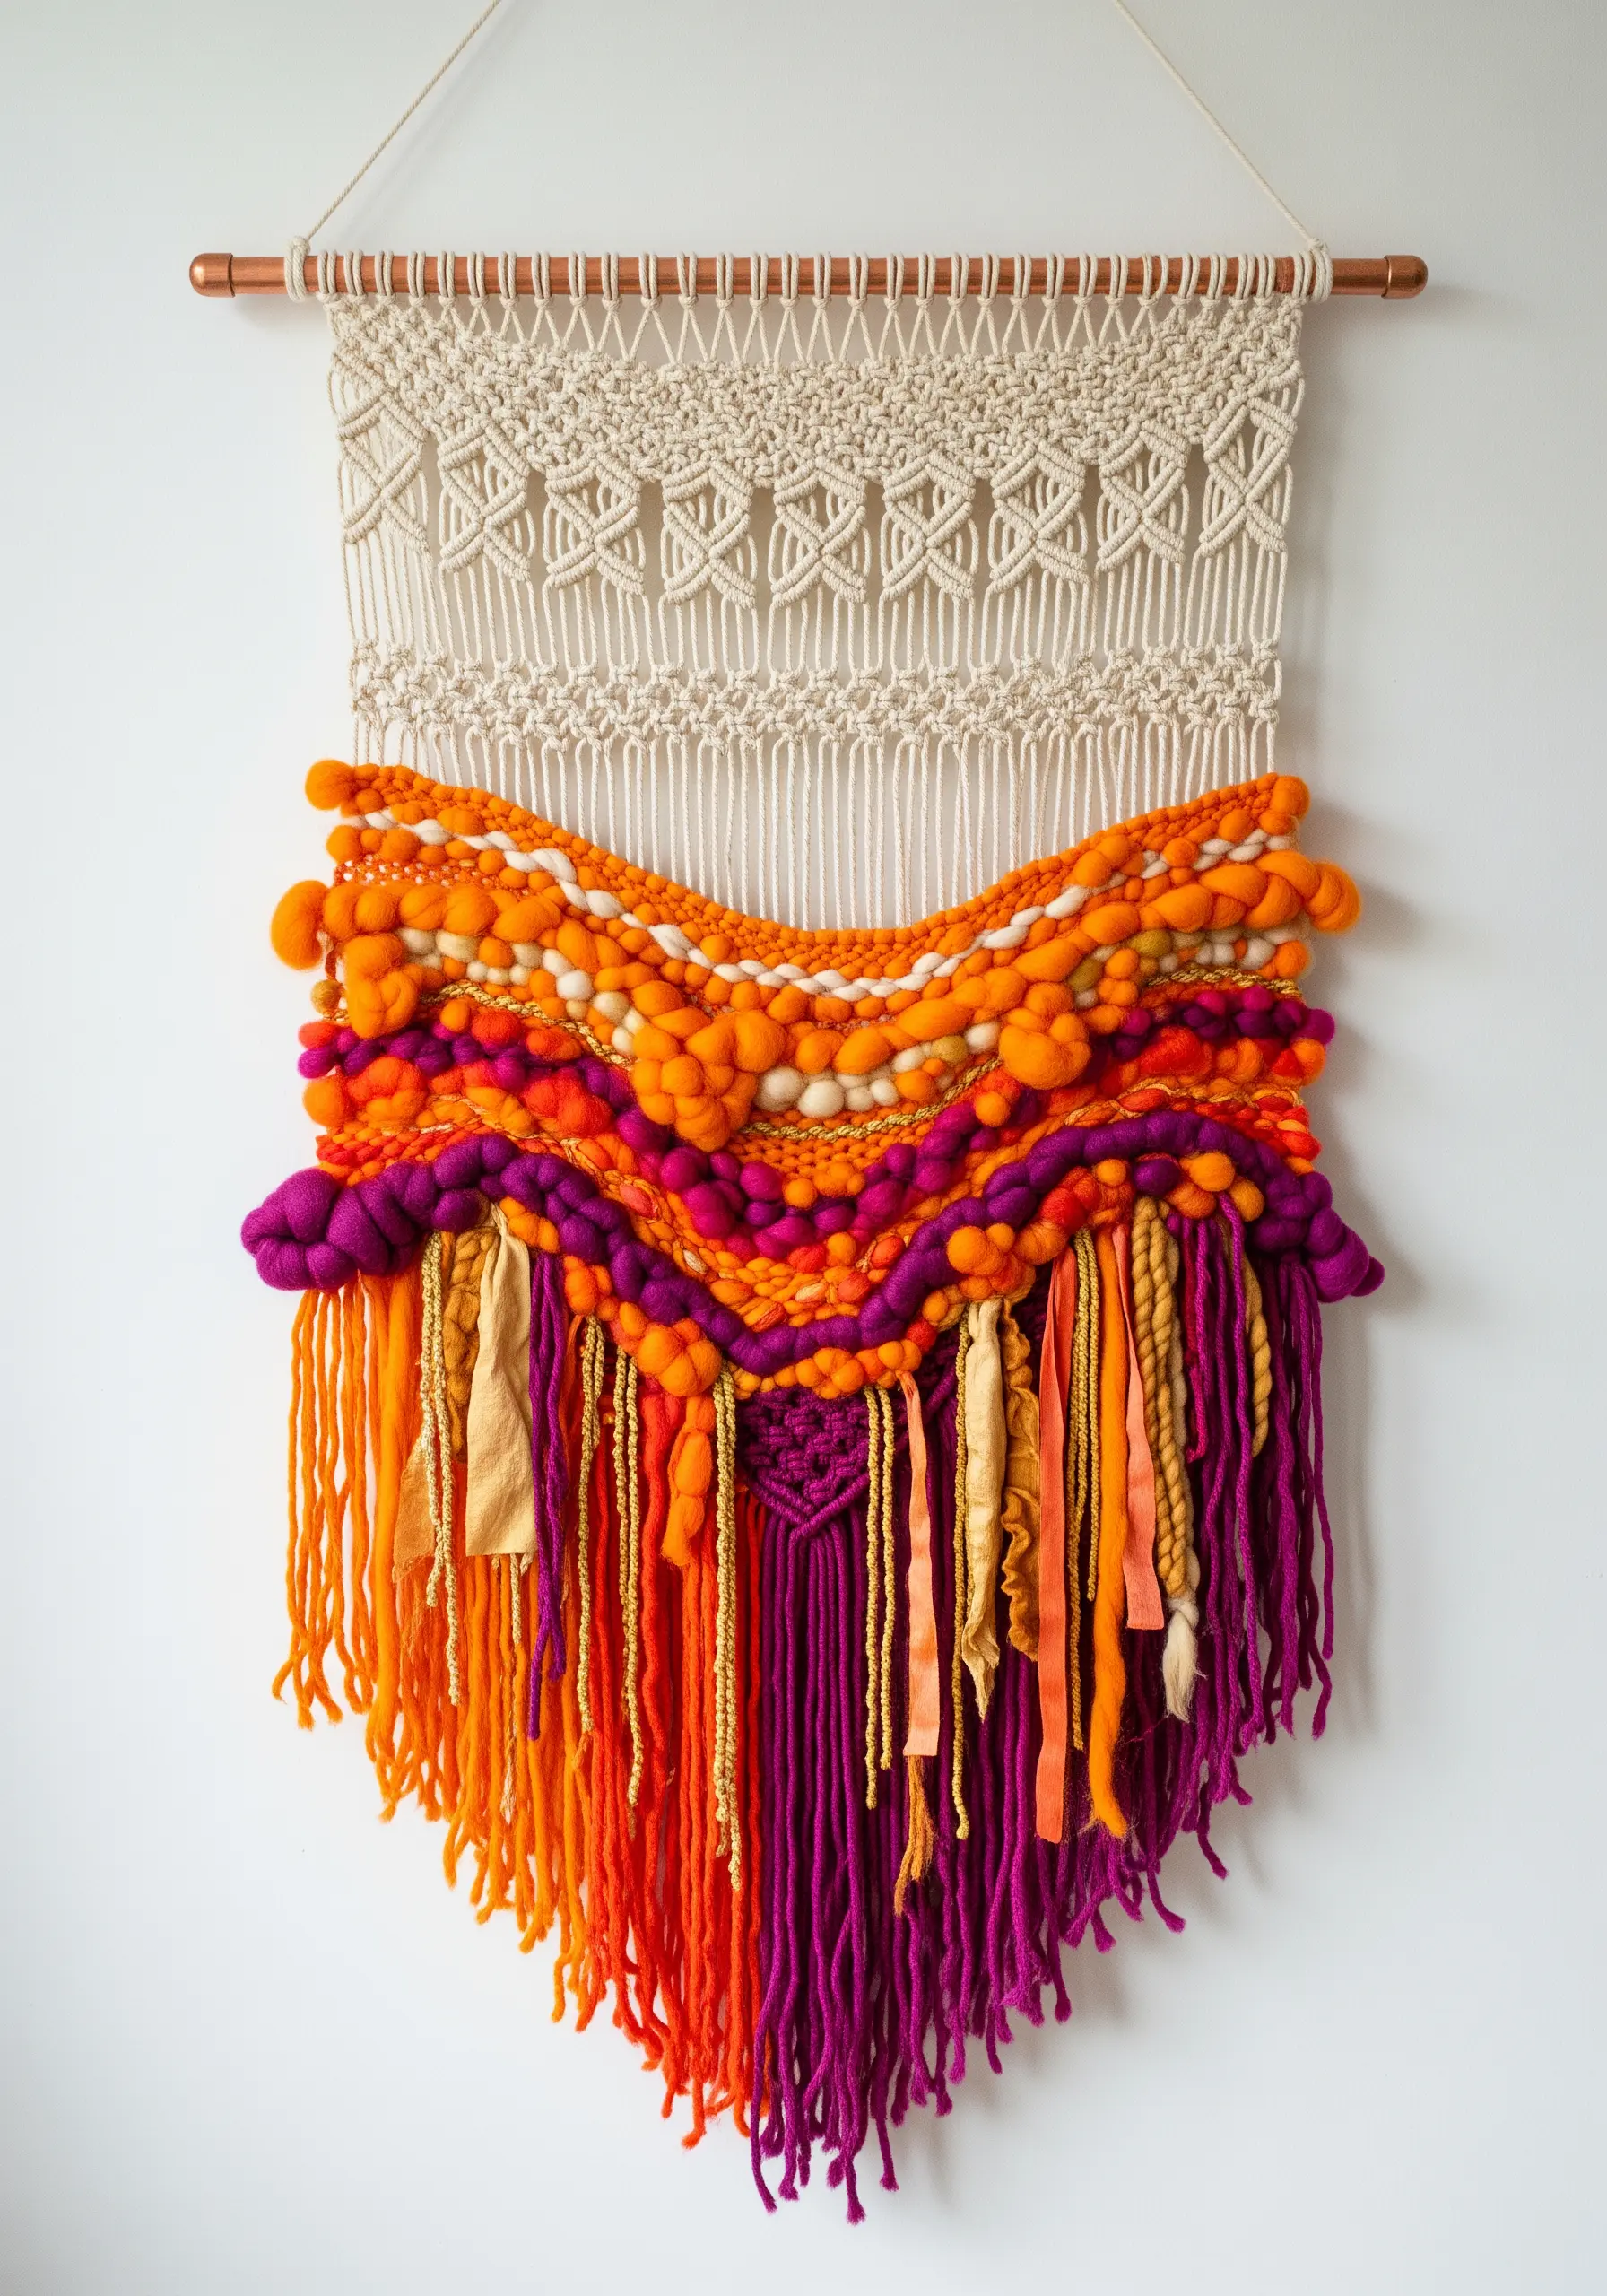
3. Refine Macrame with Perfectly Combed Feathers
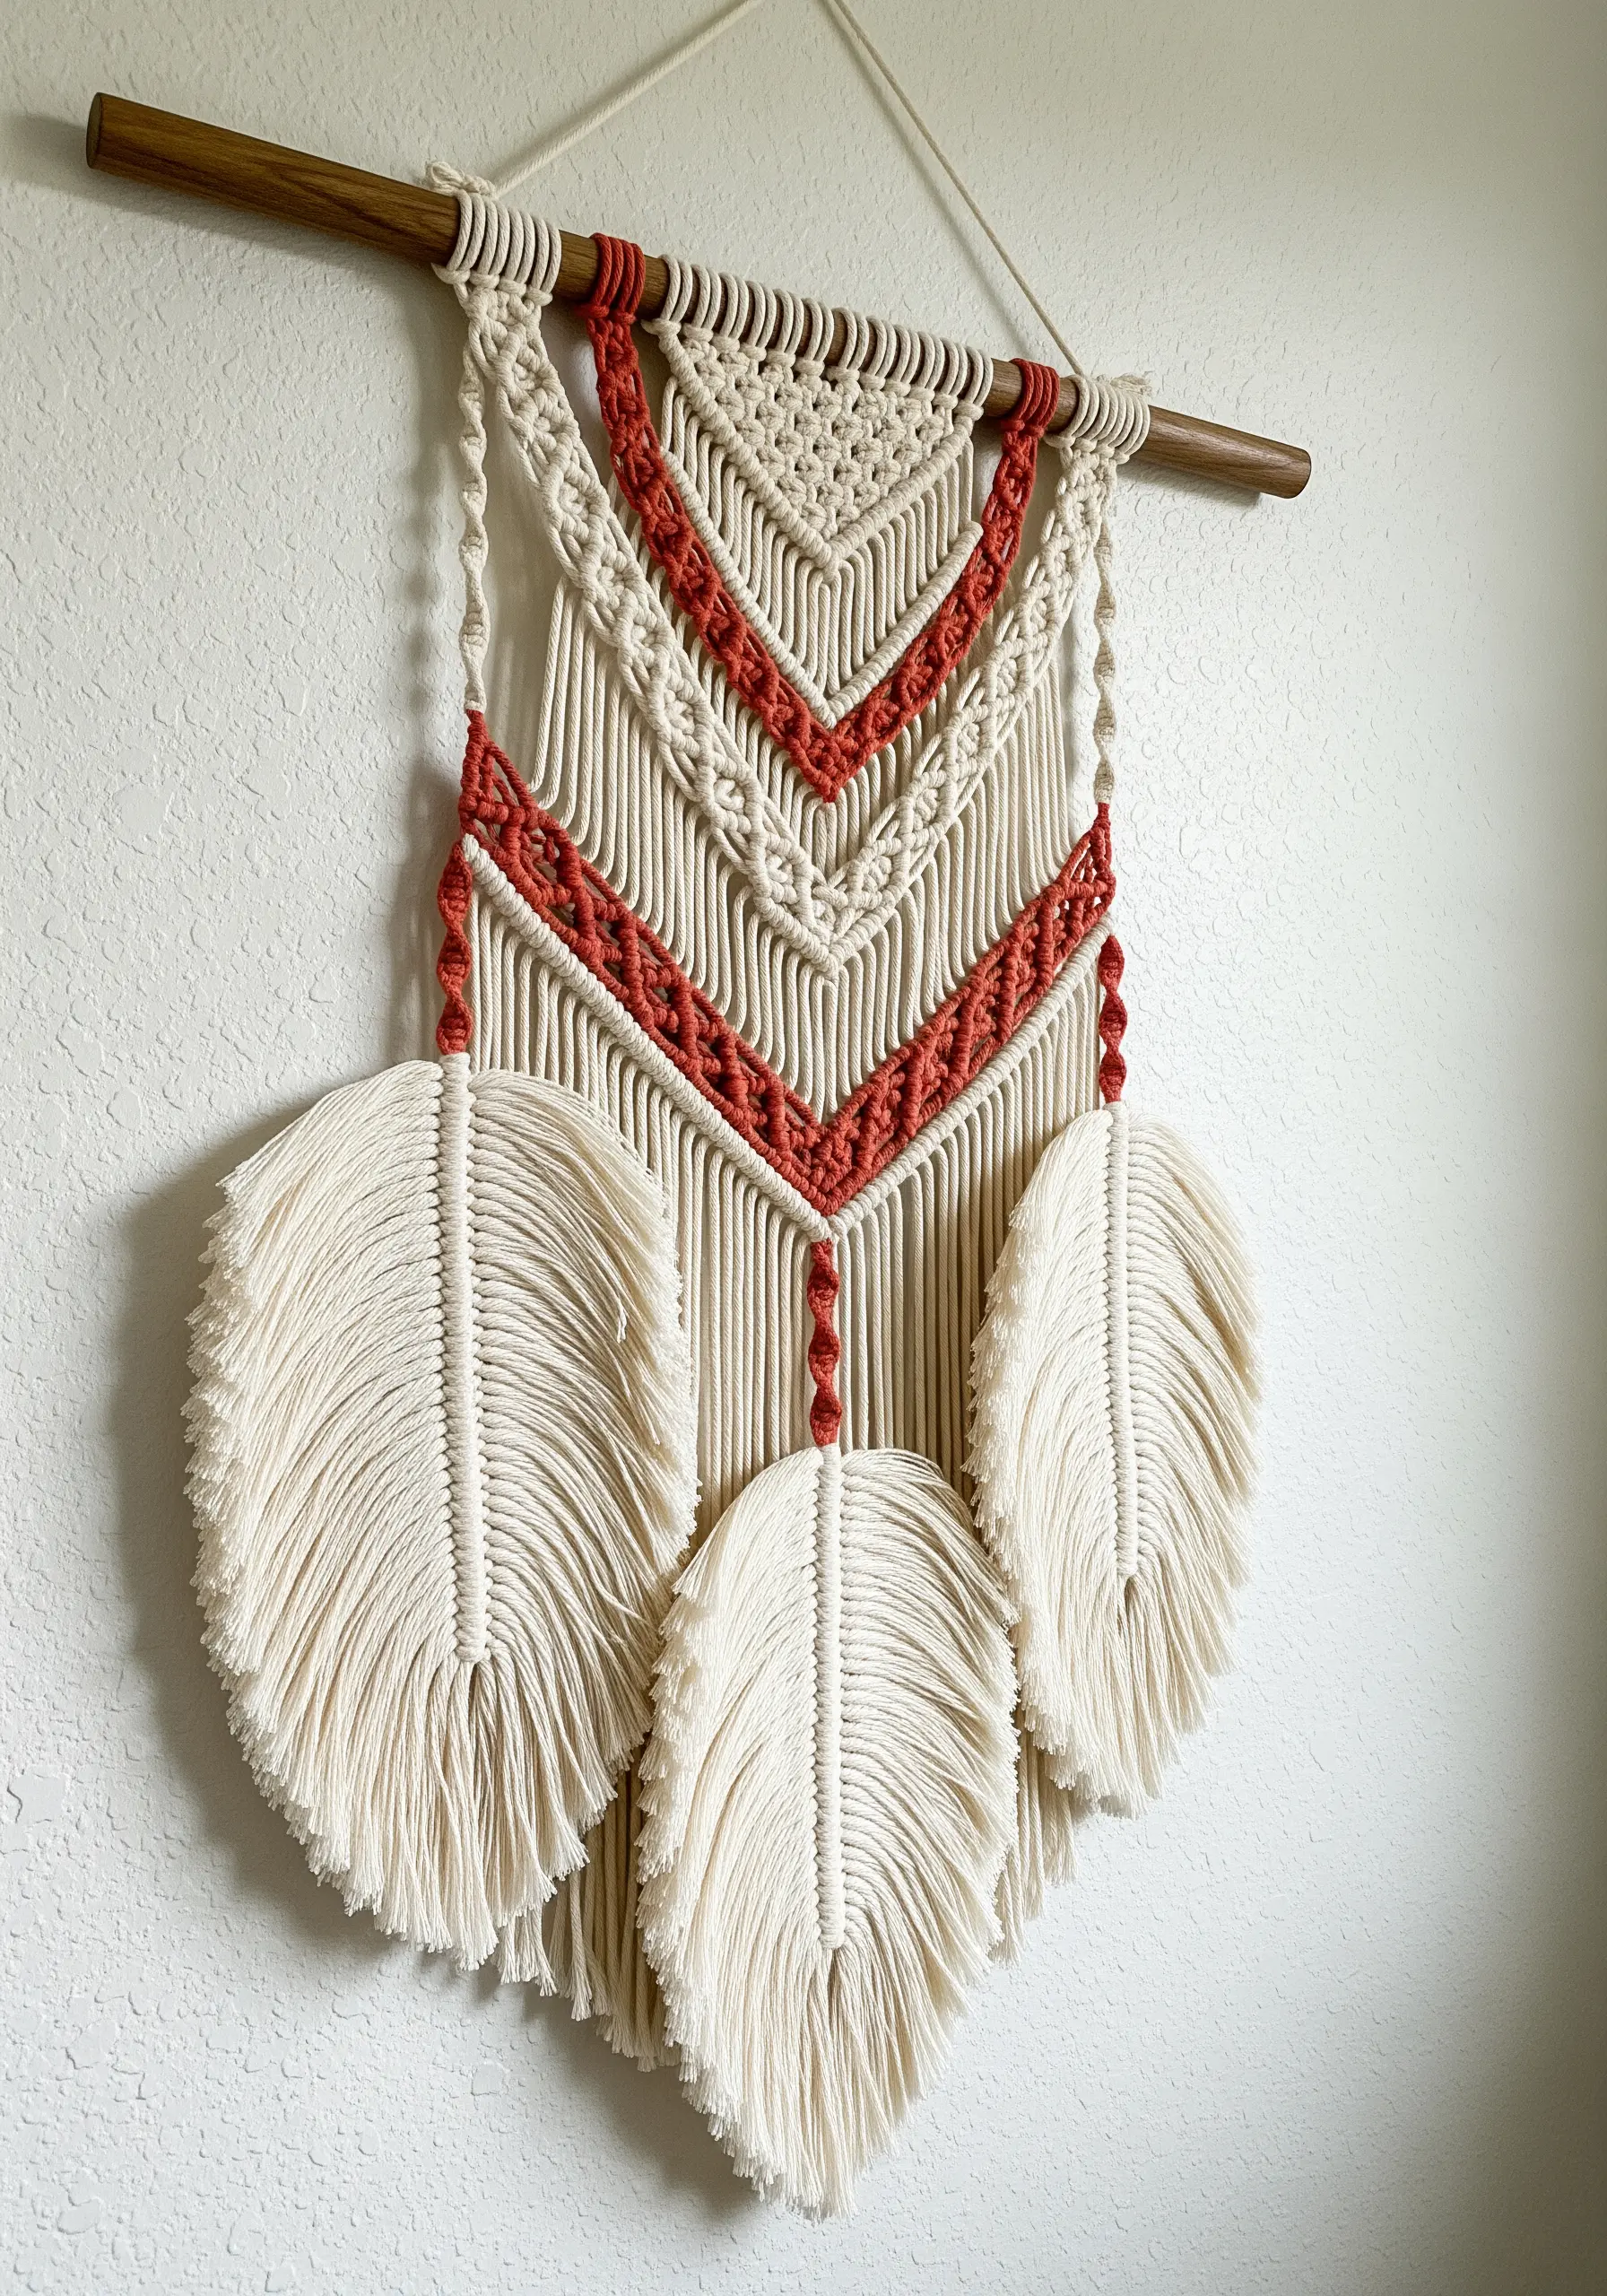
Move beyond basic macrame knots by mastering the art of the fiber feather.
Create these by tying short lengths of cotton cord onto a central spine using lark’s head knots, packed tightly together for fullness.
The secret to a polished look is combing the fibers out meticulously with a fine-tooth comb and trimming them into a sharp, clean shape.
Introduce a single accent color, like this terracotta, to add visual interest and guide the eye through the piece.
4. Create Graphic Punch Needle Art with Dense Loops

Use a punch needle to create artwork that feels like a plush, tactile illustration.
The key to achieving crisp, clear lines is to maintain a consistent loop height and work with high stitch density, especially around the outlines of your shapes.
Punch your outlines first with a dark color, like black, to define the design before filling in the larger color blocks.
This technique turns bold, graphic designs into stunning framed embroidery pieces with incredible texture.
5. Elevate Tassel Garlands with Ombré Color
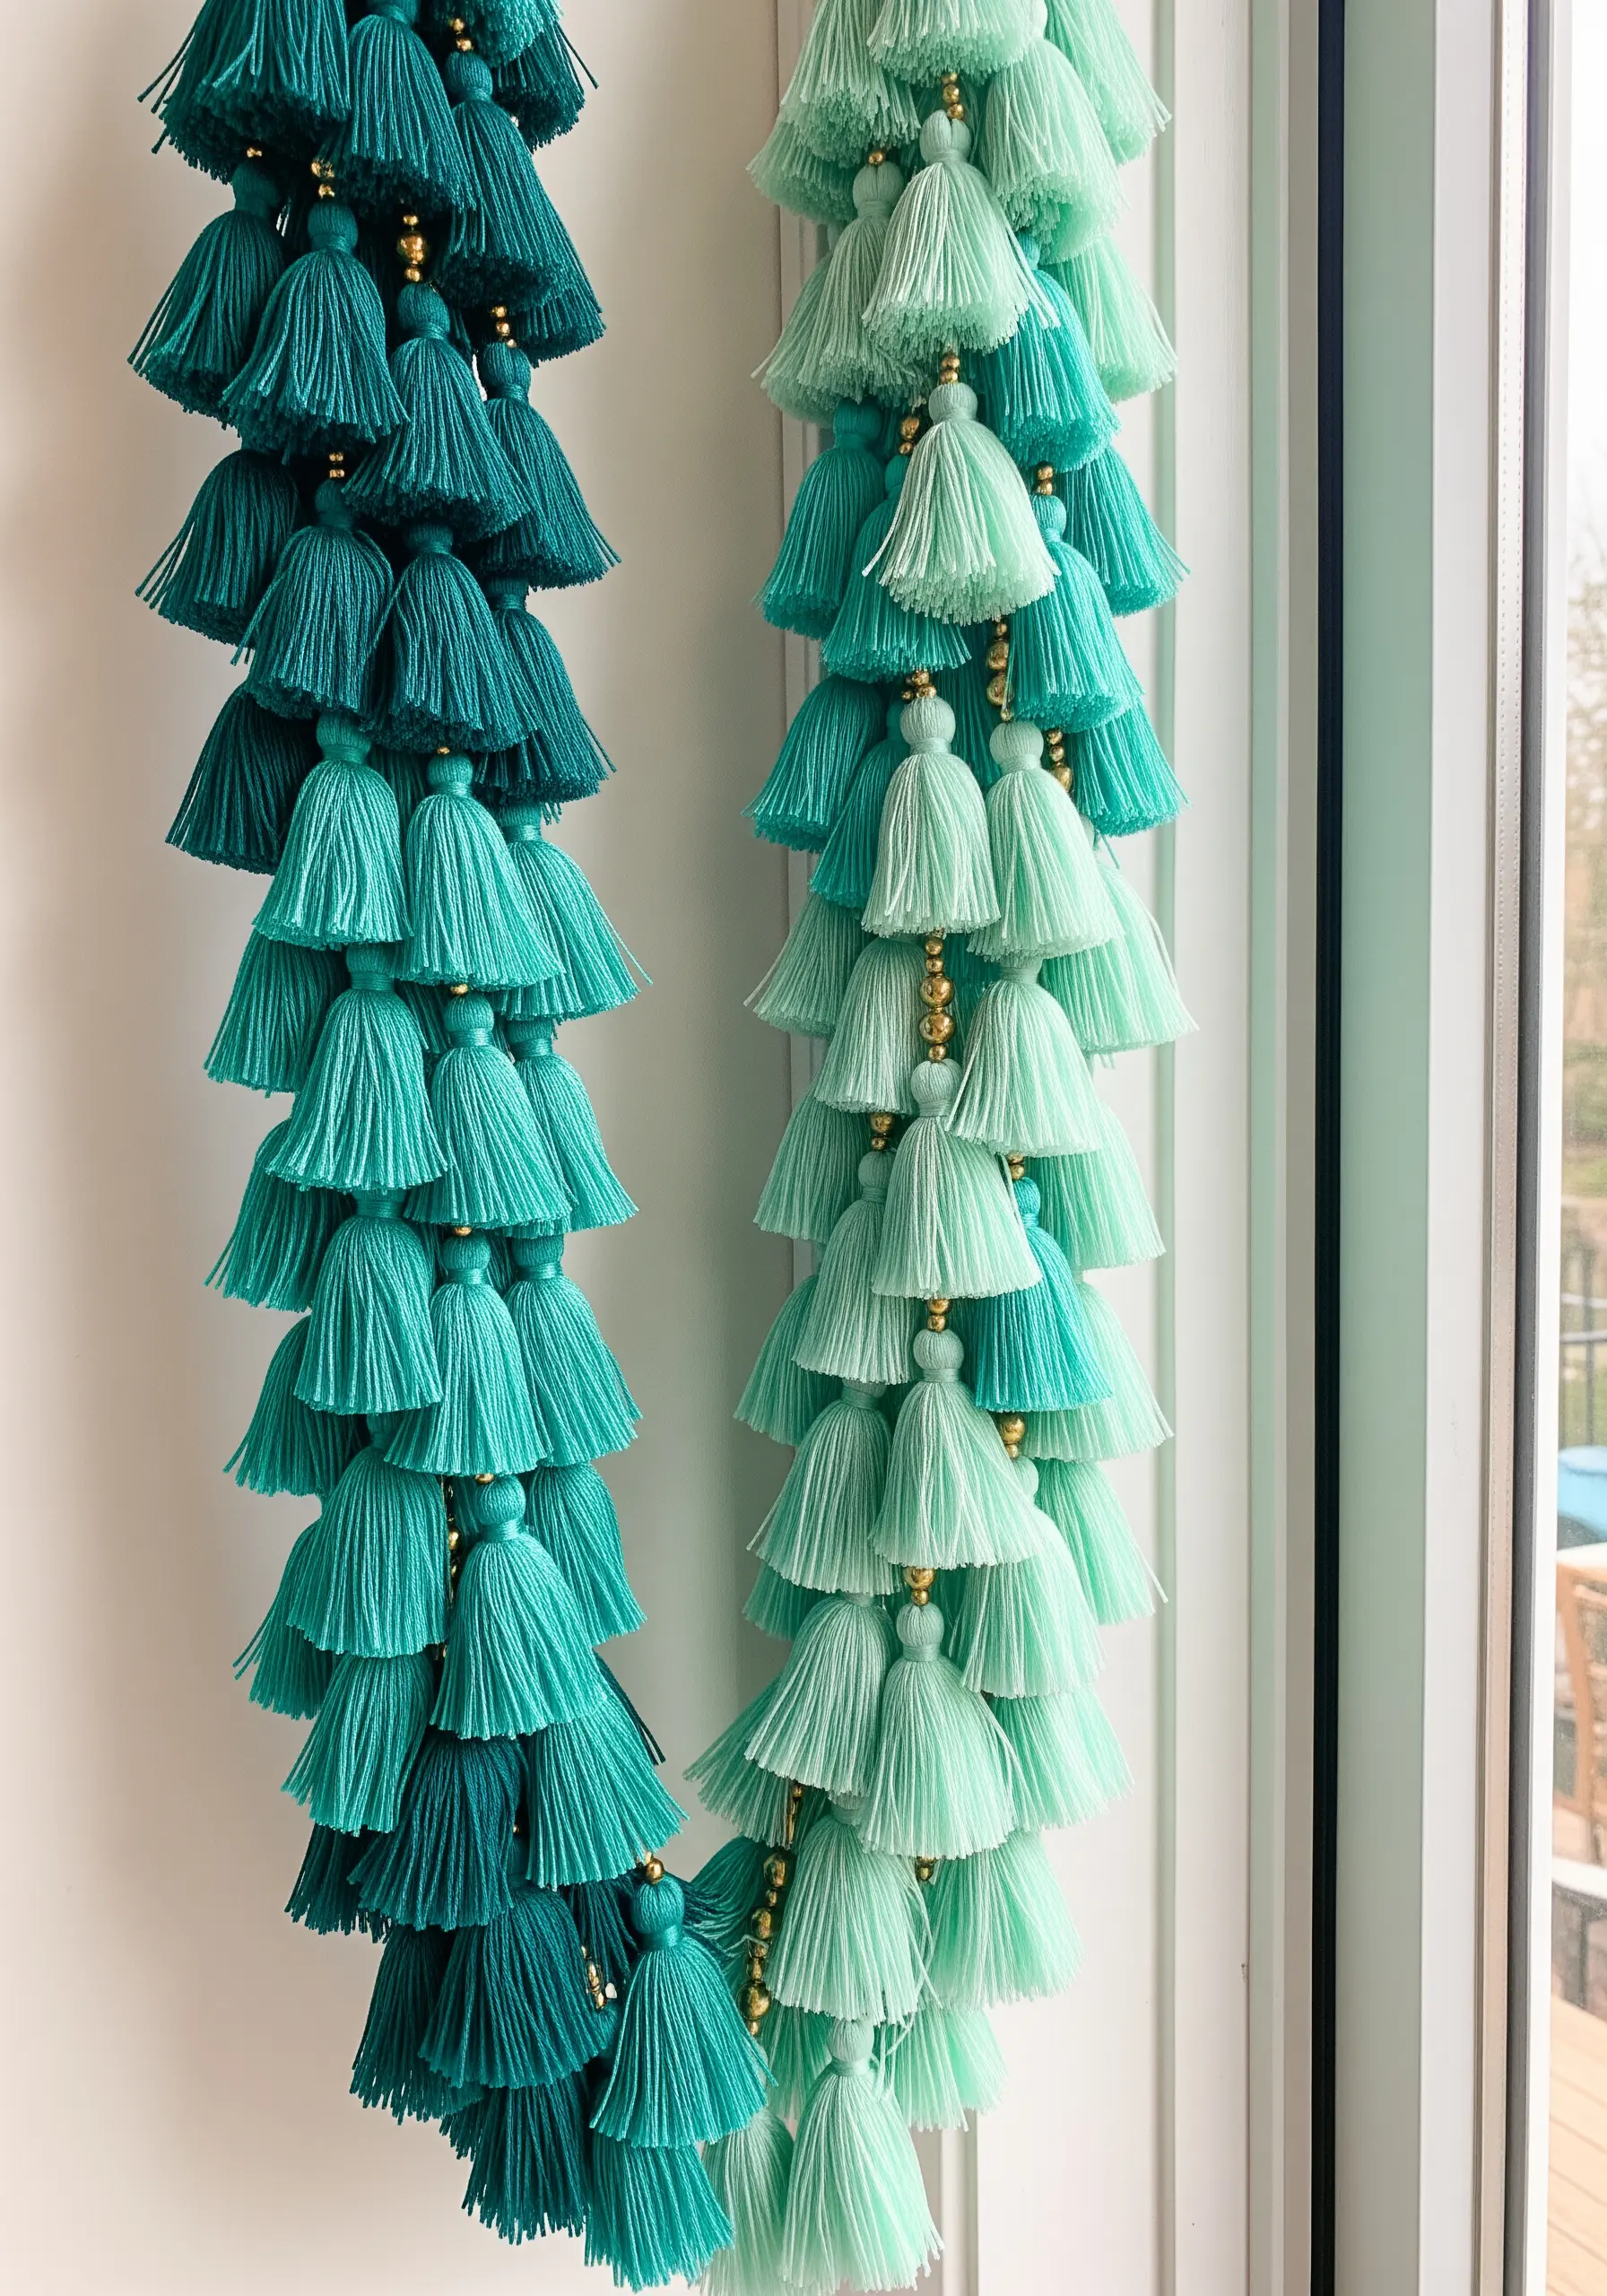
Transform a simple tassel garland into a sophisticated decor accent with a thoughtful color strategy.
Create an ombré effect by grouping tassels made from several shades of the same color, transitioning from dark to light.
For a professional finish, ensure every tassel is trimmed to the exact same length and add a small wooden or metallic bead at the top of each one.
This small detail conceals the knot and adds a touch of elegance, making the entire piece look more intentional.
6. Combine Macrame and Pom-Poms for Playful Shapes

Merge two beloved fiber crafts to create whimsical, sculptural wall art.
First, craft a structured base using basic macrame knots, like the square knots used here to form the waffle-cone pattern.
Next, make dense, tightly wound pom-poms with a pom-pom maker for a perfectly spherical shape.
Securely stitch the pom-poms onto the macrame backing to build your design, creating a delightful contrast between the flat, knotted texture and the fluffy, 3D forms.
7. Design Modern Art with Tightly Wrapped Yarn
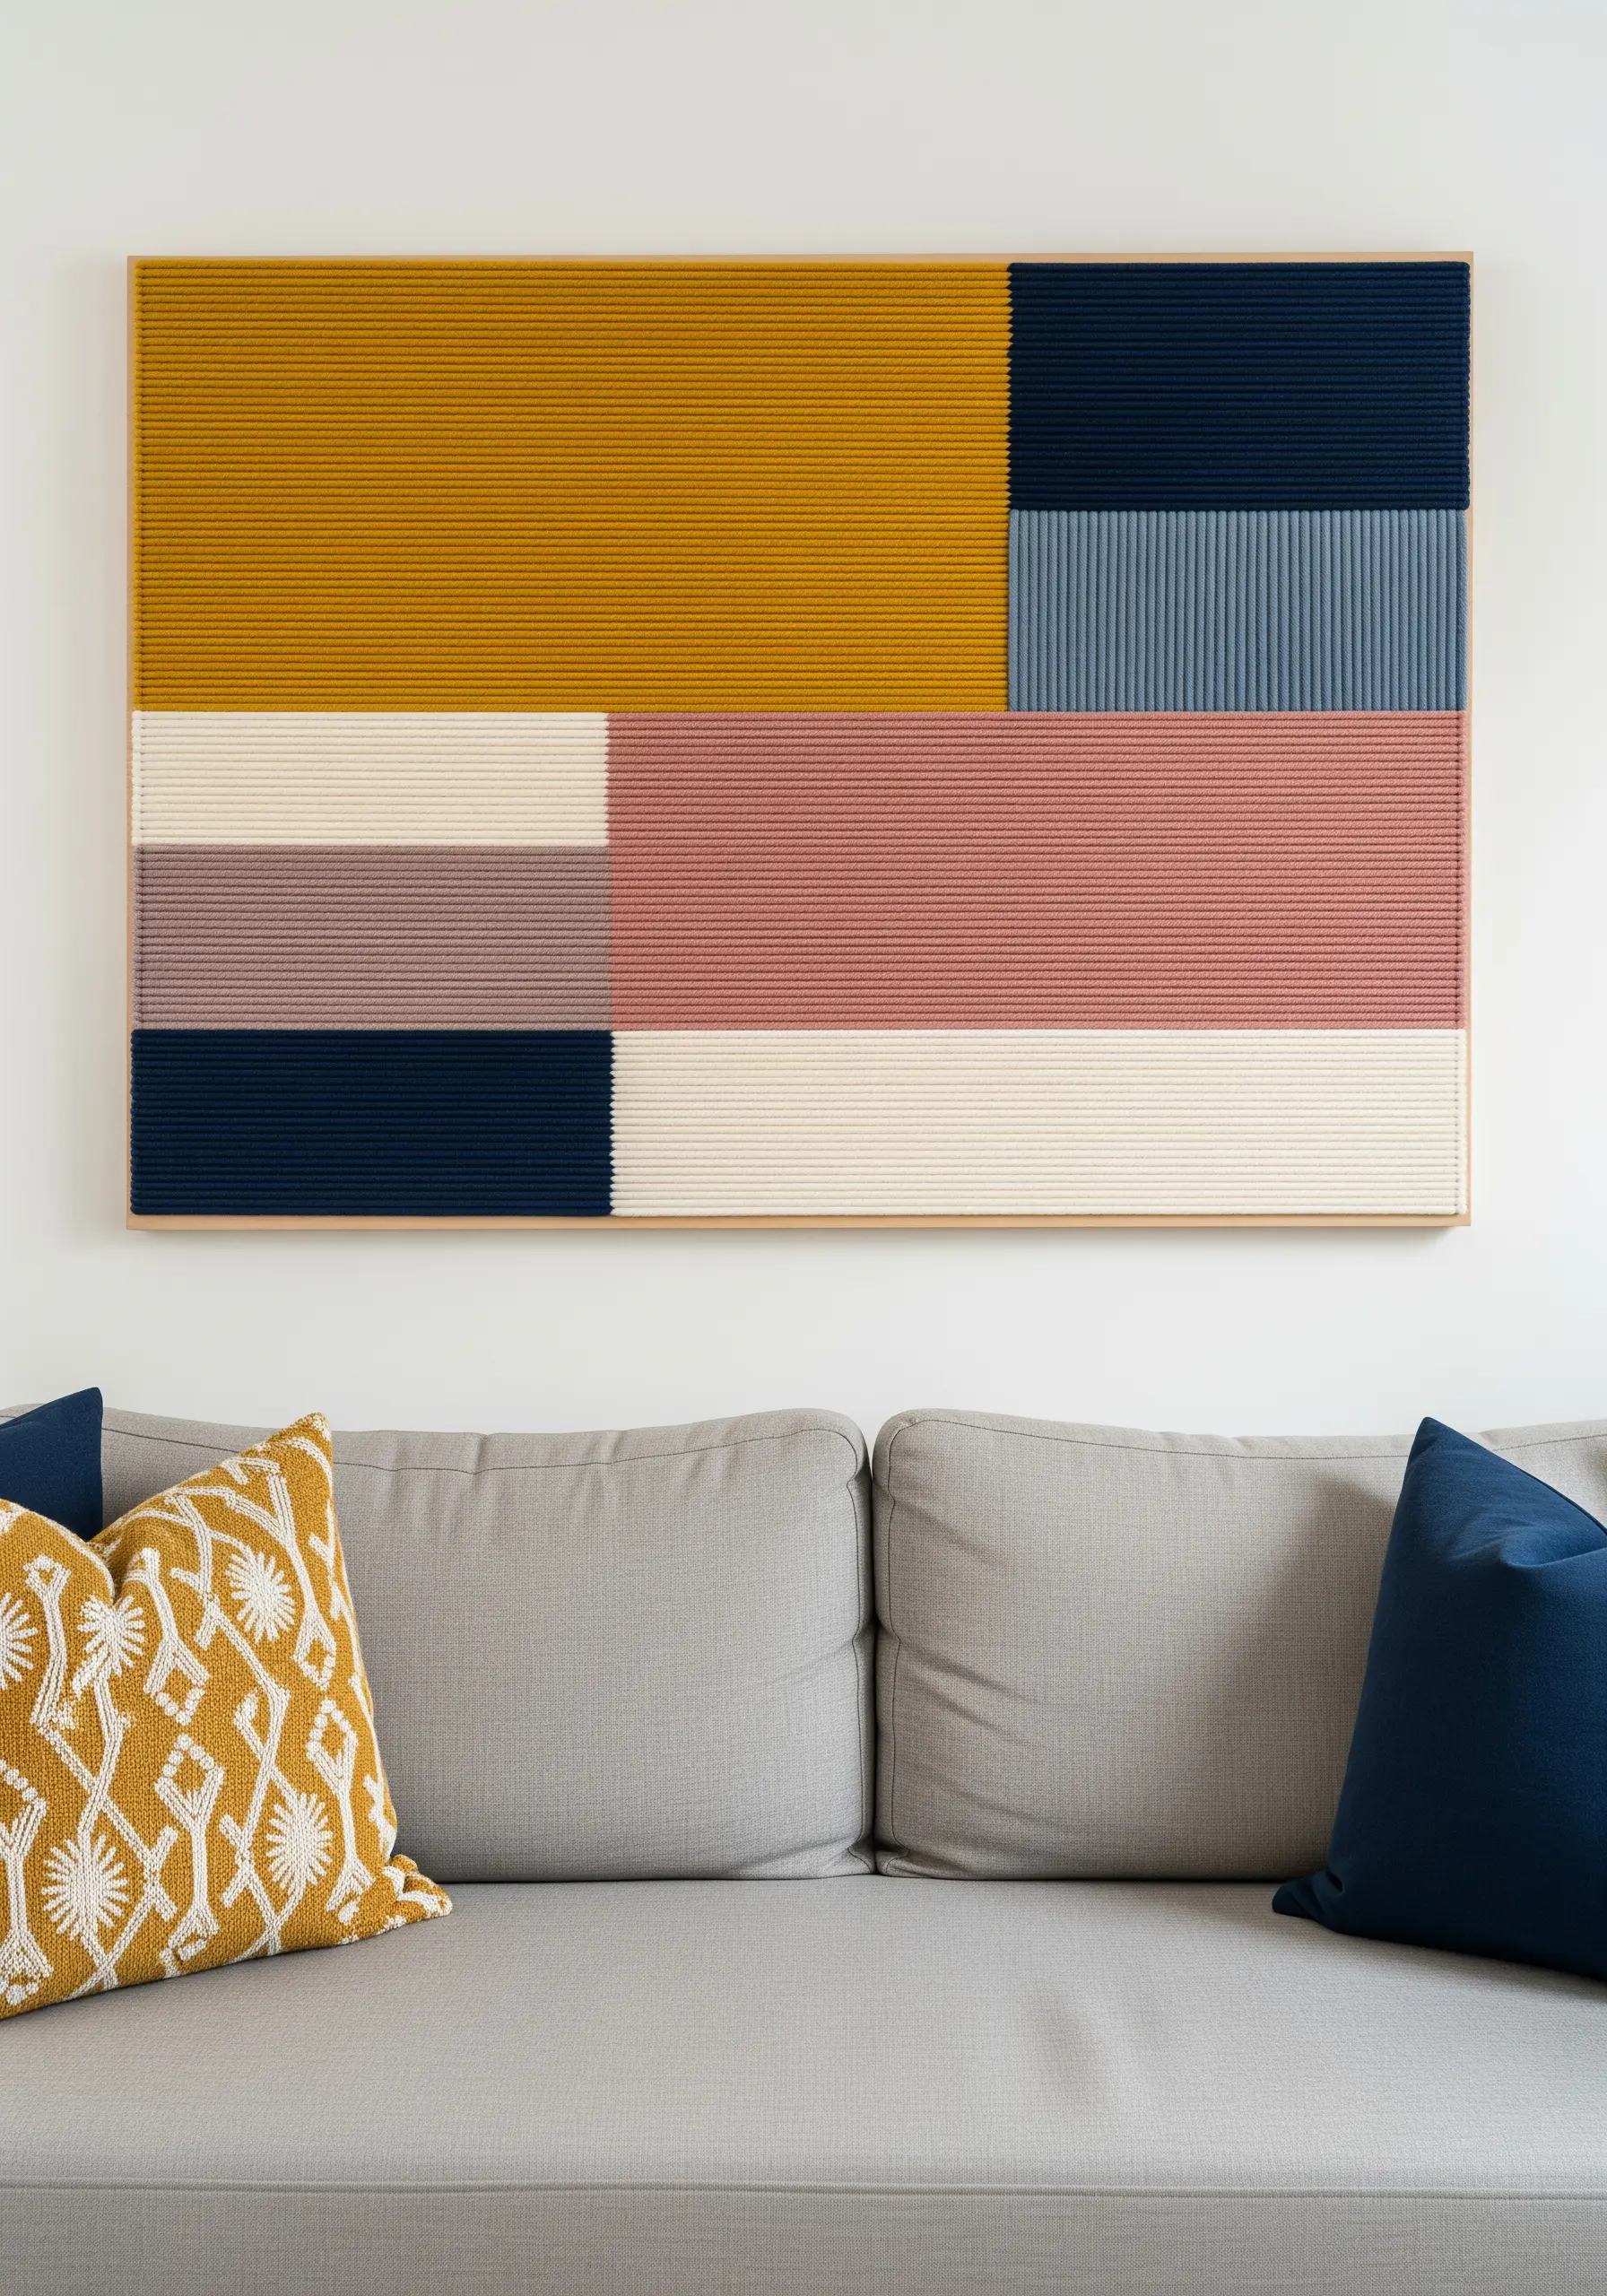
Create a piece of minimalist art by tightly wrapping yarn around a canvas or wooden board.
The technique’s success lies in precision: maintain consistent, high tension as you wrap to ensure there are no gaps and the lines remain perfectly parallel.
Map out your color blocks beforehand to create a balanced, geometric composition that feels intentional and modern.
This method turns yarn into a medium for clean lines and sophisticated color fields, perfect for contemporary spaces.
8. Weave a Gallery of Miniature Tapestries
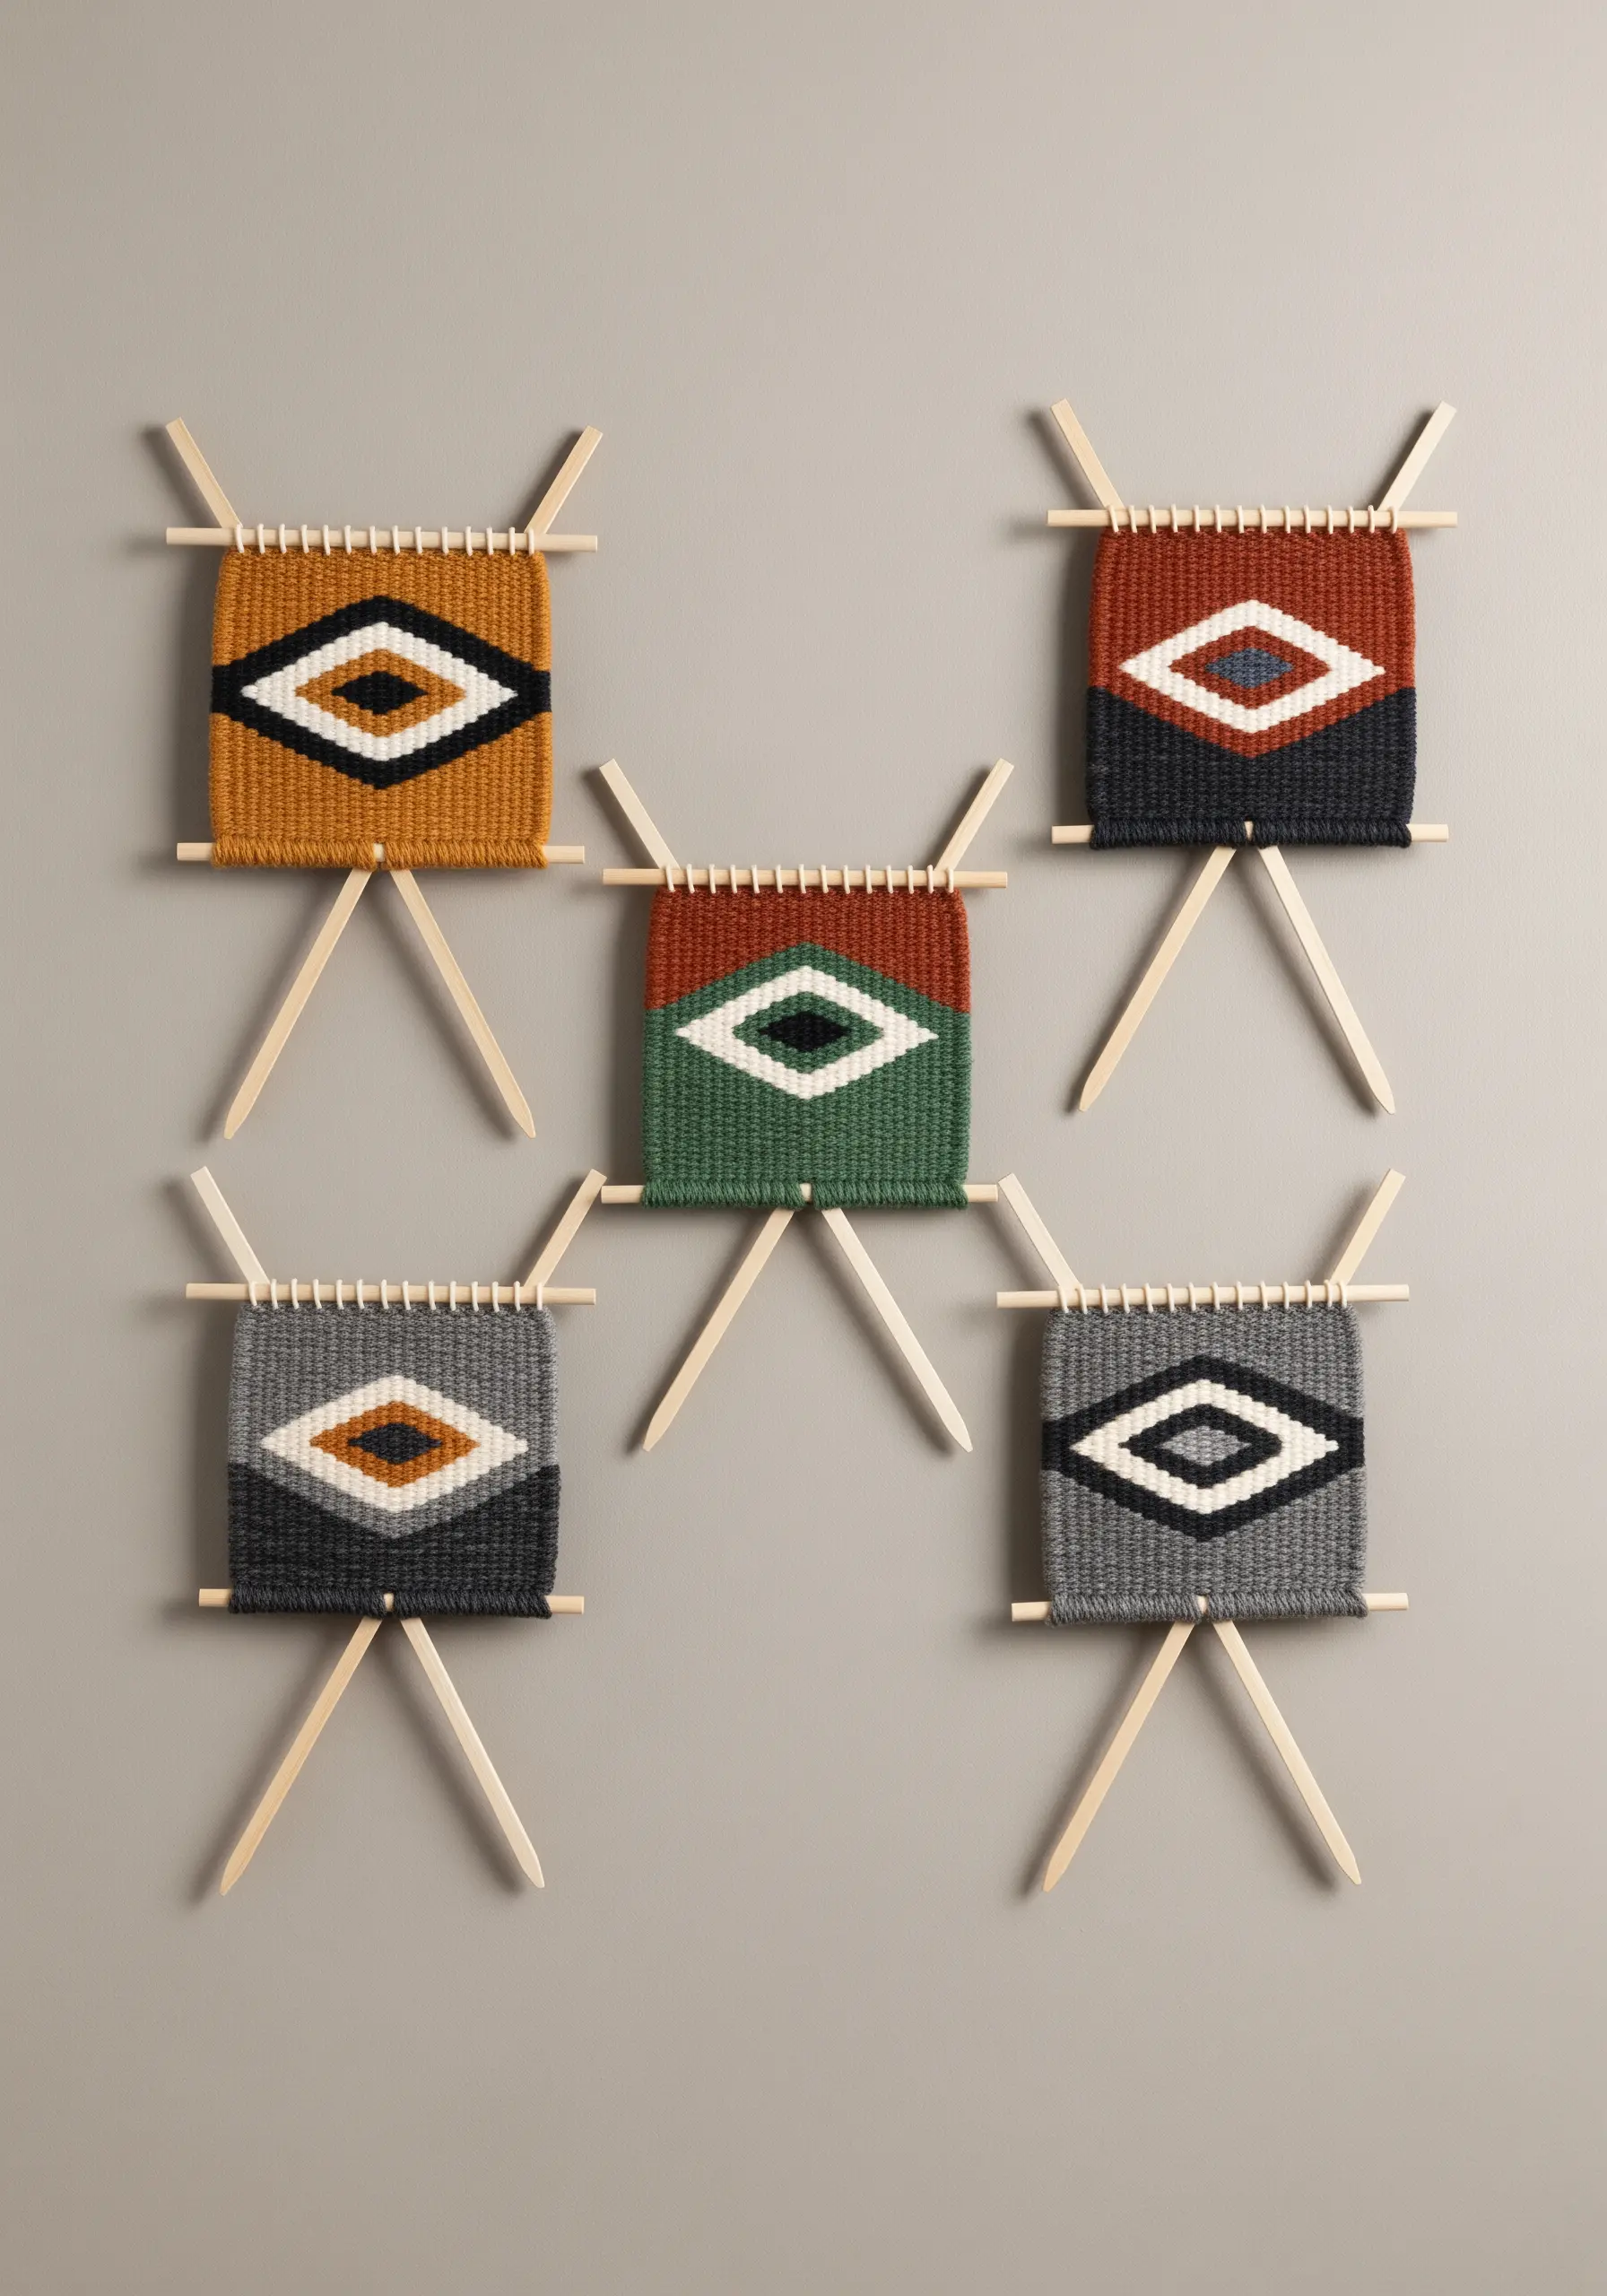
Explore tapestry weaving on a small scale by creating a series of miniature woven pieces.
Using small, handmade looms, you can experiment with different geometric patterns and color combinations without committing to a large project.
Display them as a group to create a cohesive gallery wall.
A unified color palette and consistent mounting—like these simple wooden dowels—will tie the individual weavings together into a single, impactful art installation.
9. Embrace Bold Texture with Chunky Arm Knitting
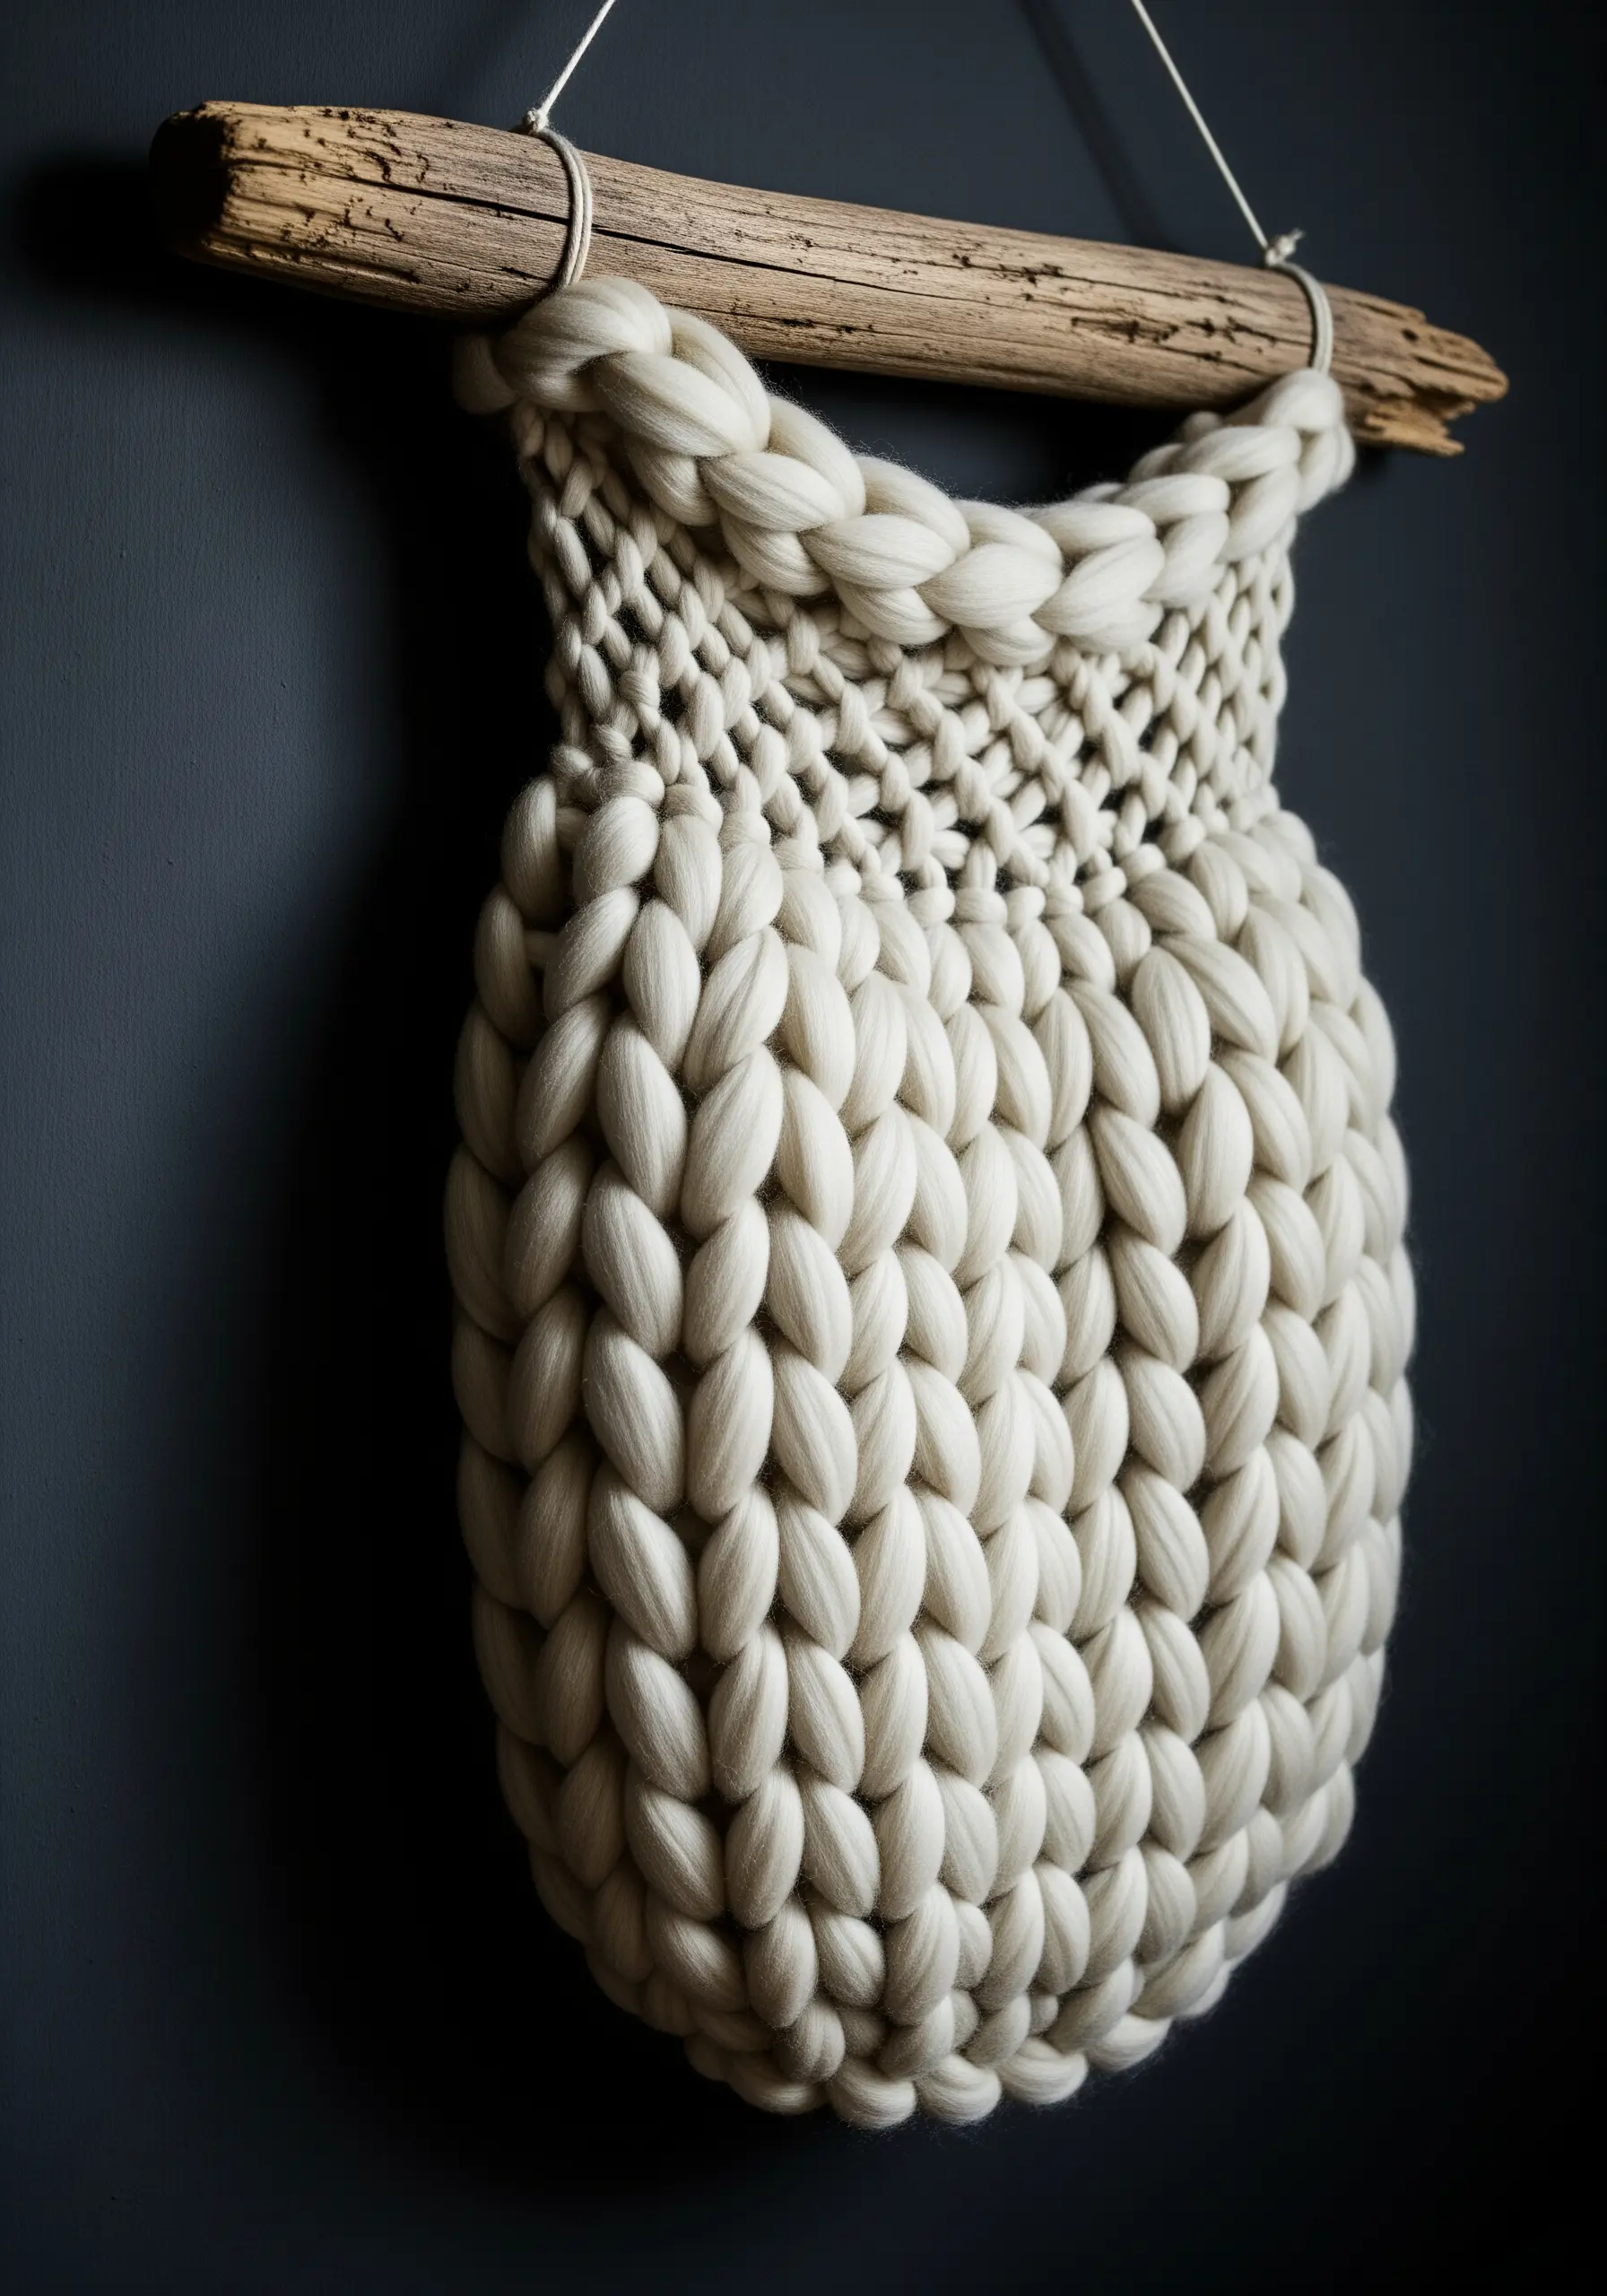
Use merino wool roving and arm knitting techniques to produce a wall hanging with dramatic, oversized texture.
Alternate between different stitches, like garter and stockinette, to create subtle shifts in the fabric’s surface.
Contrast the extreme softness of the wool by mounting your finished piece on a rough, natural element like a piece of driftwood.
This juxtaposition of textures makes the final artwork feel both rustic and luxurious.
10. Draw with Yarn for Minimalist Line Art
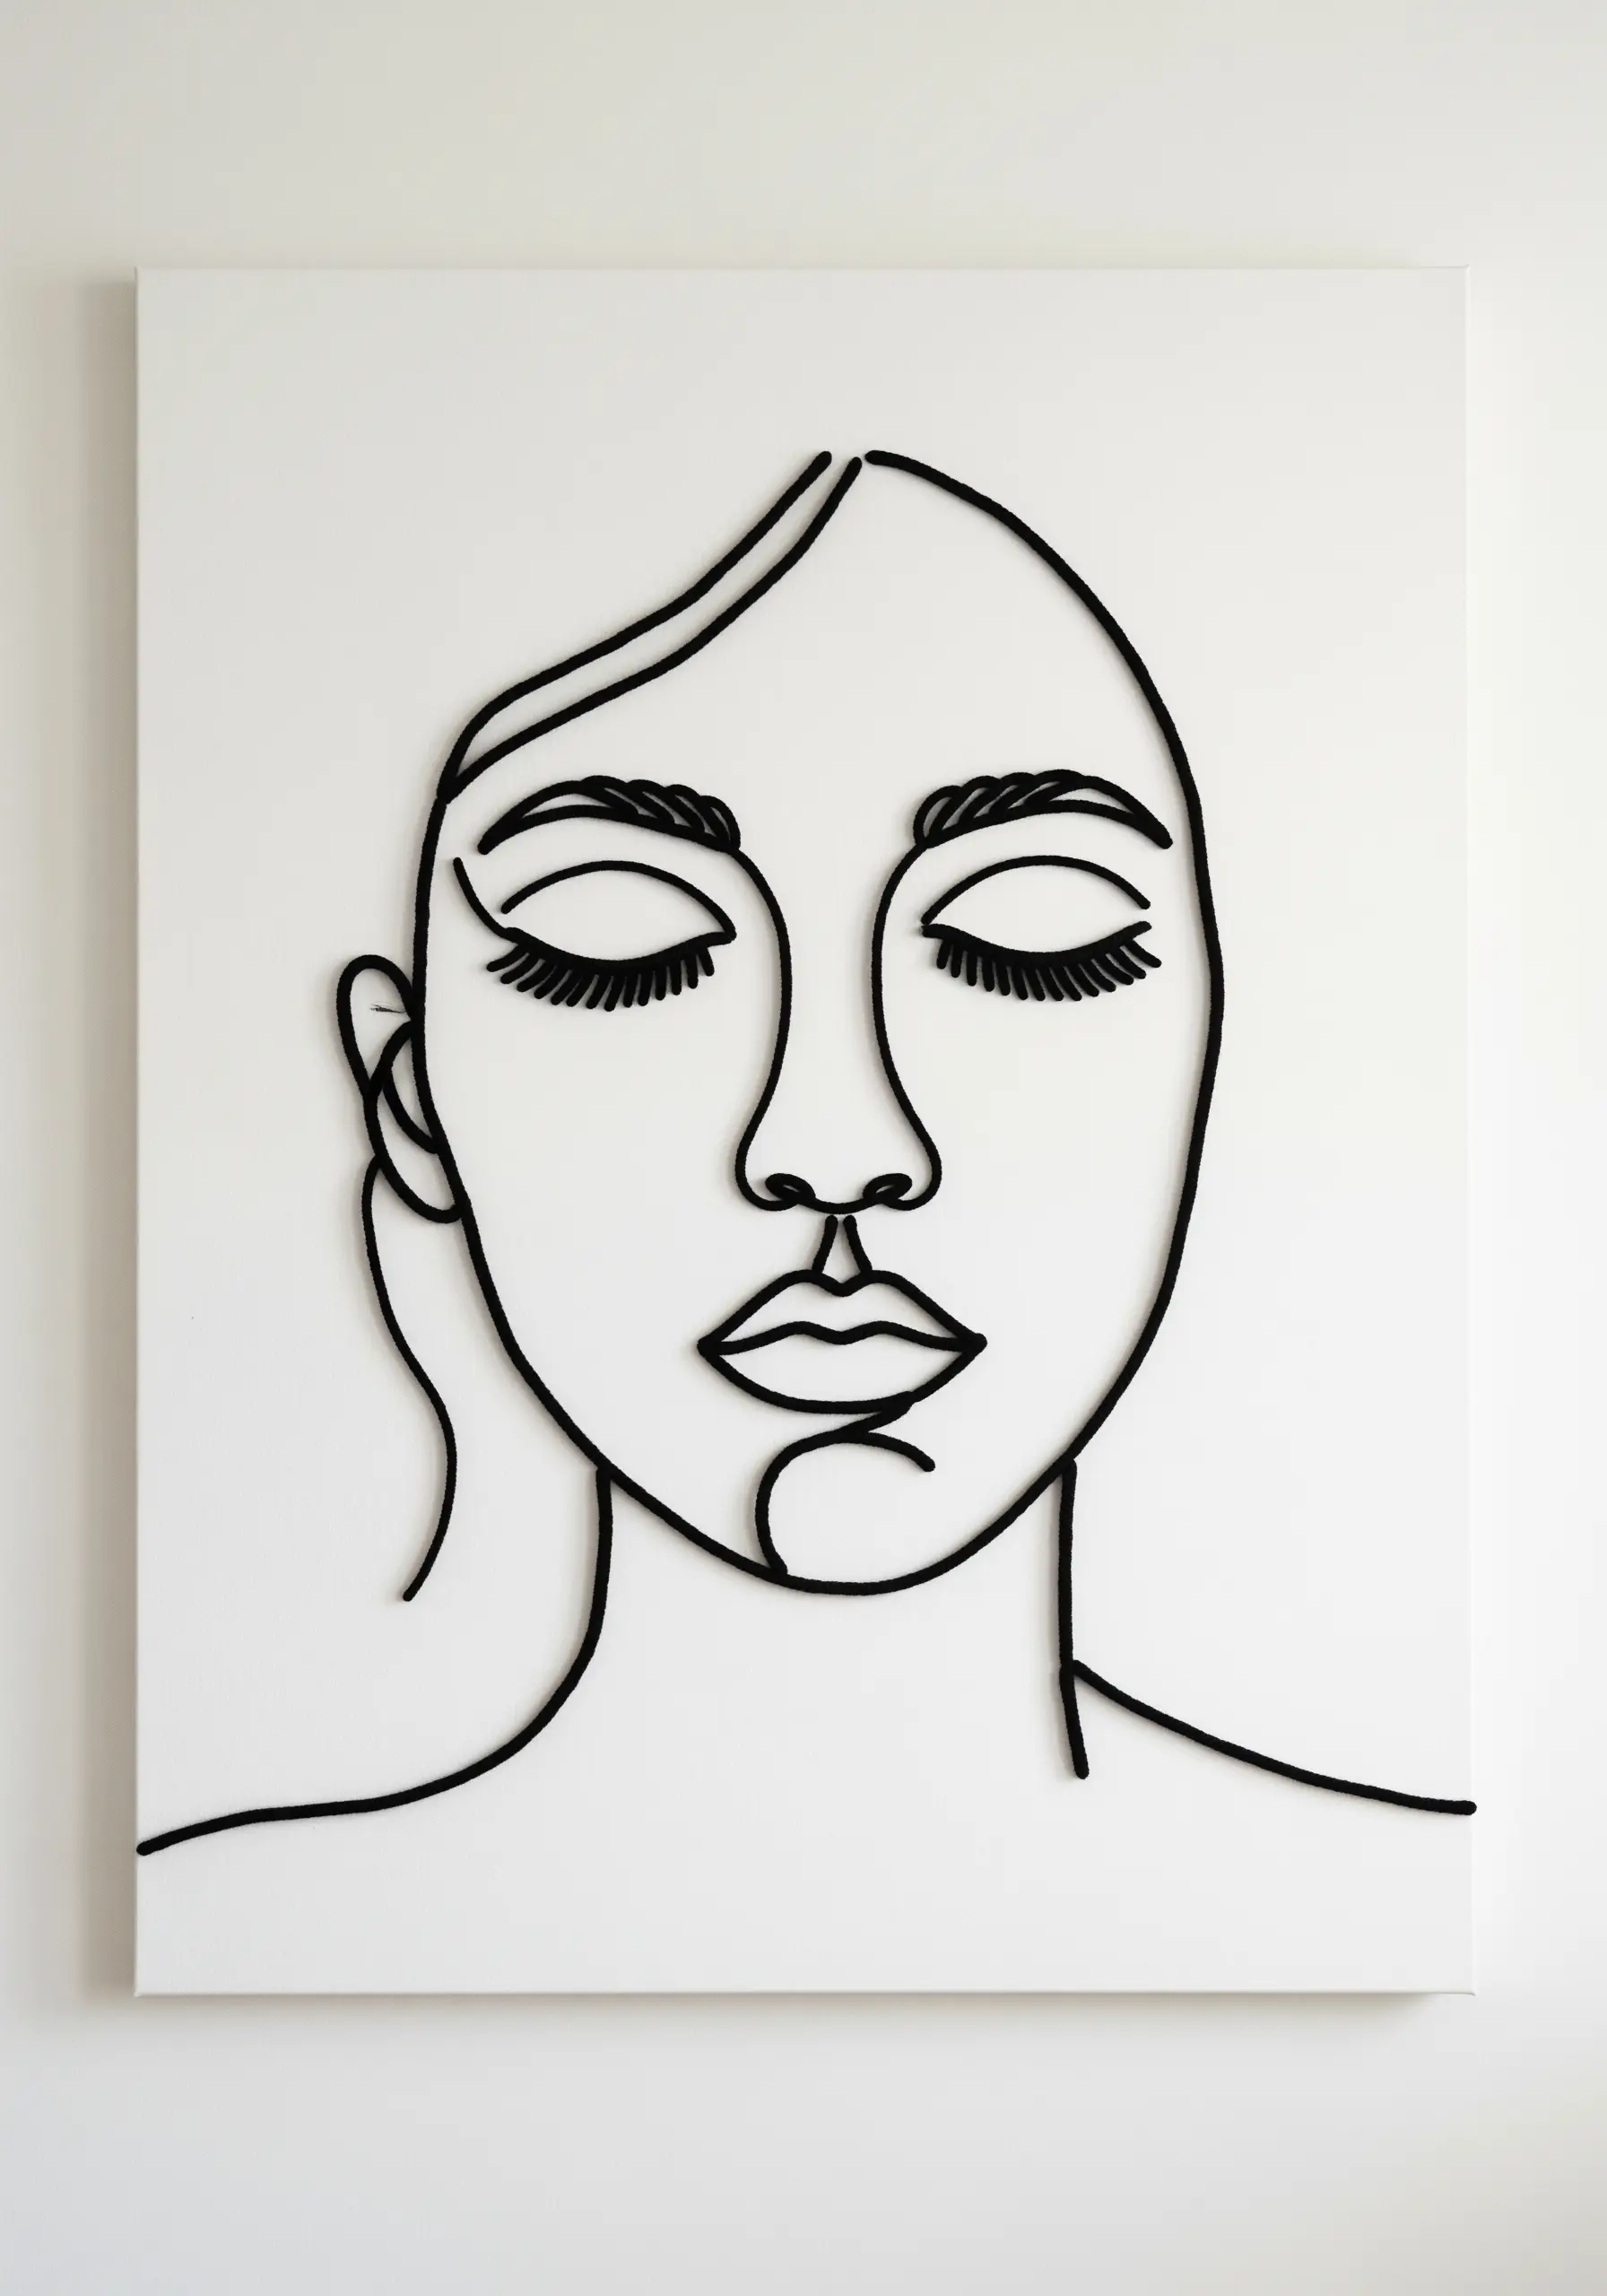
Recreate the elegance of single-line drawings using yarn or cord on a blank canvas.
First, lightly sketch your design onto the canvas with a pencil.
Then, carefully apply a thin bead of clear fabric glue along the lines and press your yarn firmly into place, working in sections.
This technique allows you to create gallery-style hoop art with a clean, graphic, and three-dimensional quality that simple drawing cannot replicate.
11. Weave a Tapestry with Uninhibited Texture
Create a free-spirited wall hanging by intentionally mixing a wide variety of yarn types and weaving techniques.
Incorporate chunky roving, thin cotton, and even strips of fabric to build layers of texture.
Experiment with soumak braids for raised lines, fluffy rya knots for shaggy sections, and a long, untamed fringe.
The key to making this style work is to embrace imperfection and allow the different materials to dictate the organic, flowing shape of the piece.
12. Paint a Landscape with Woven Stitches
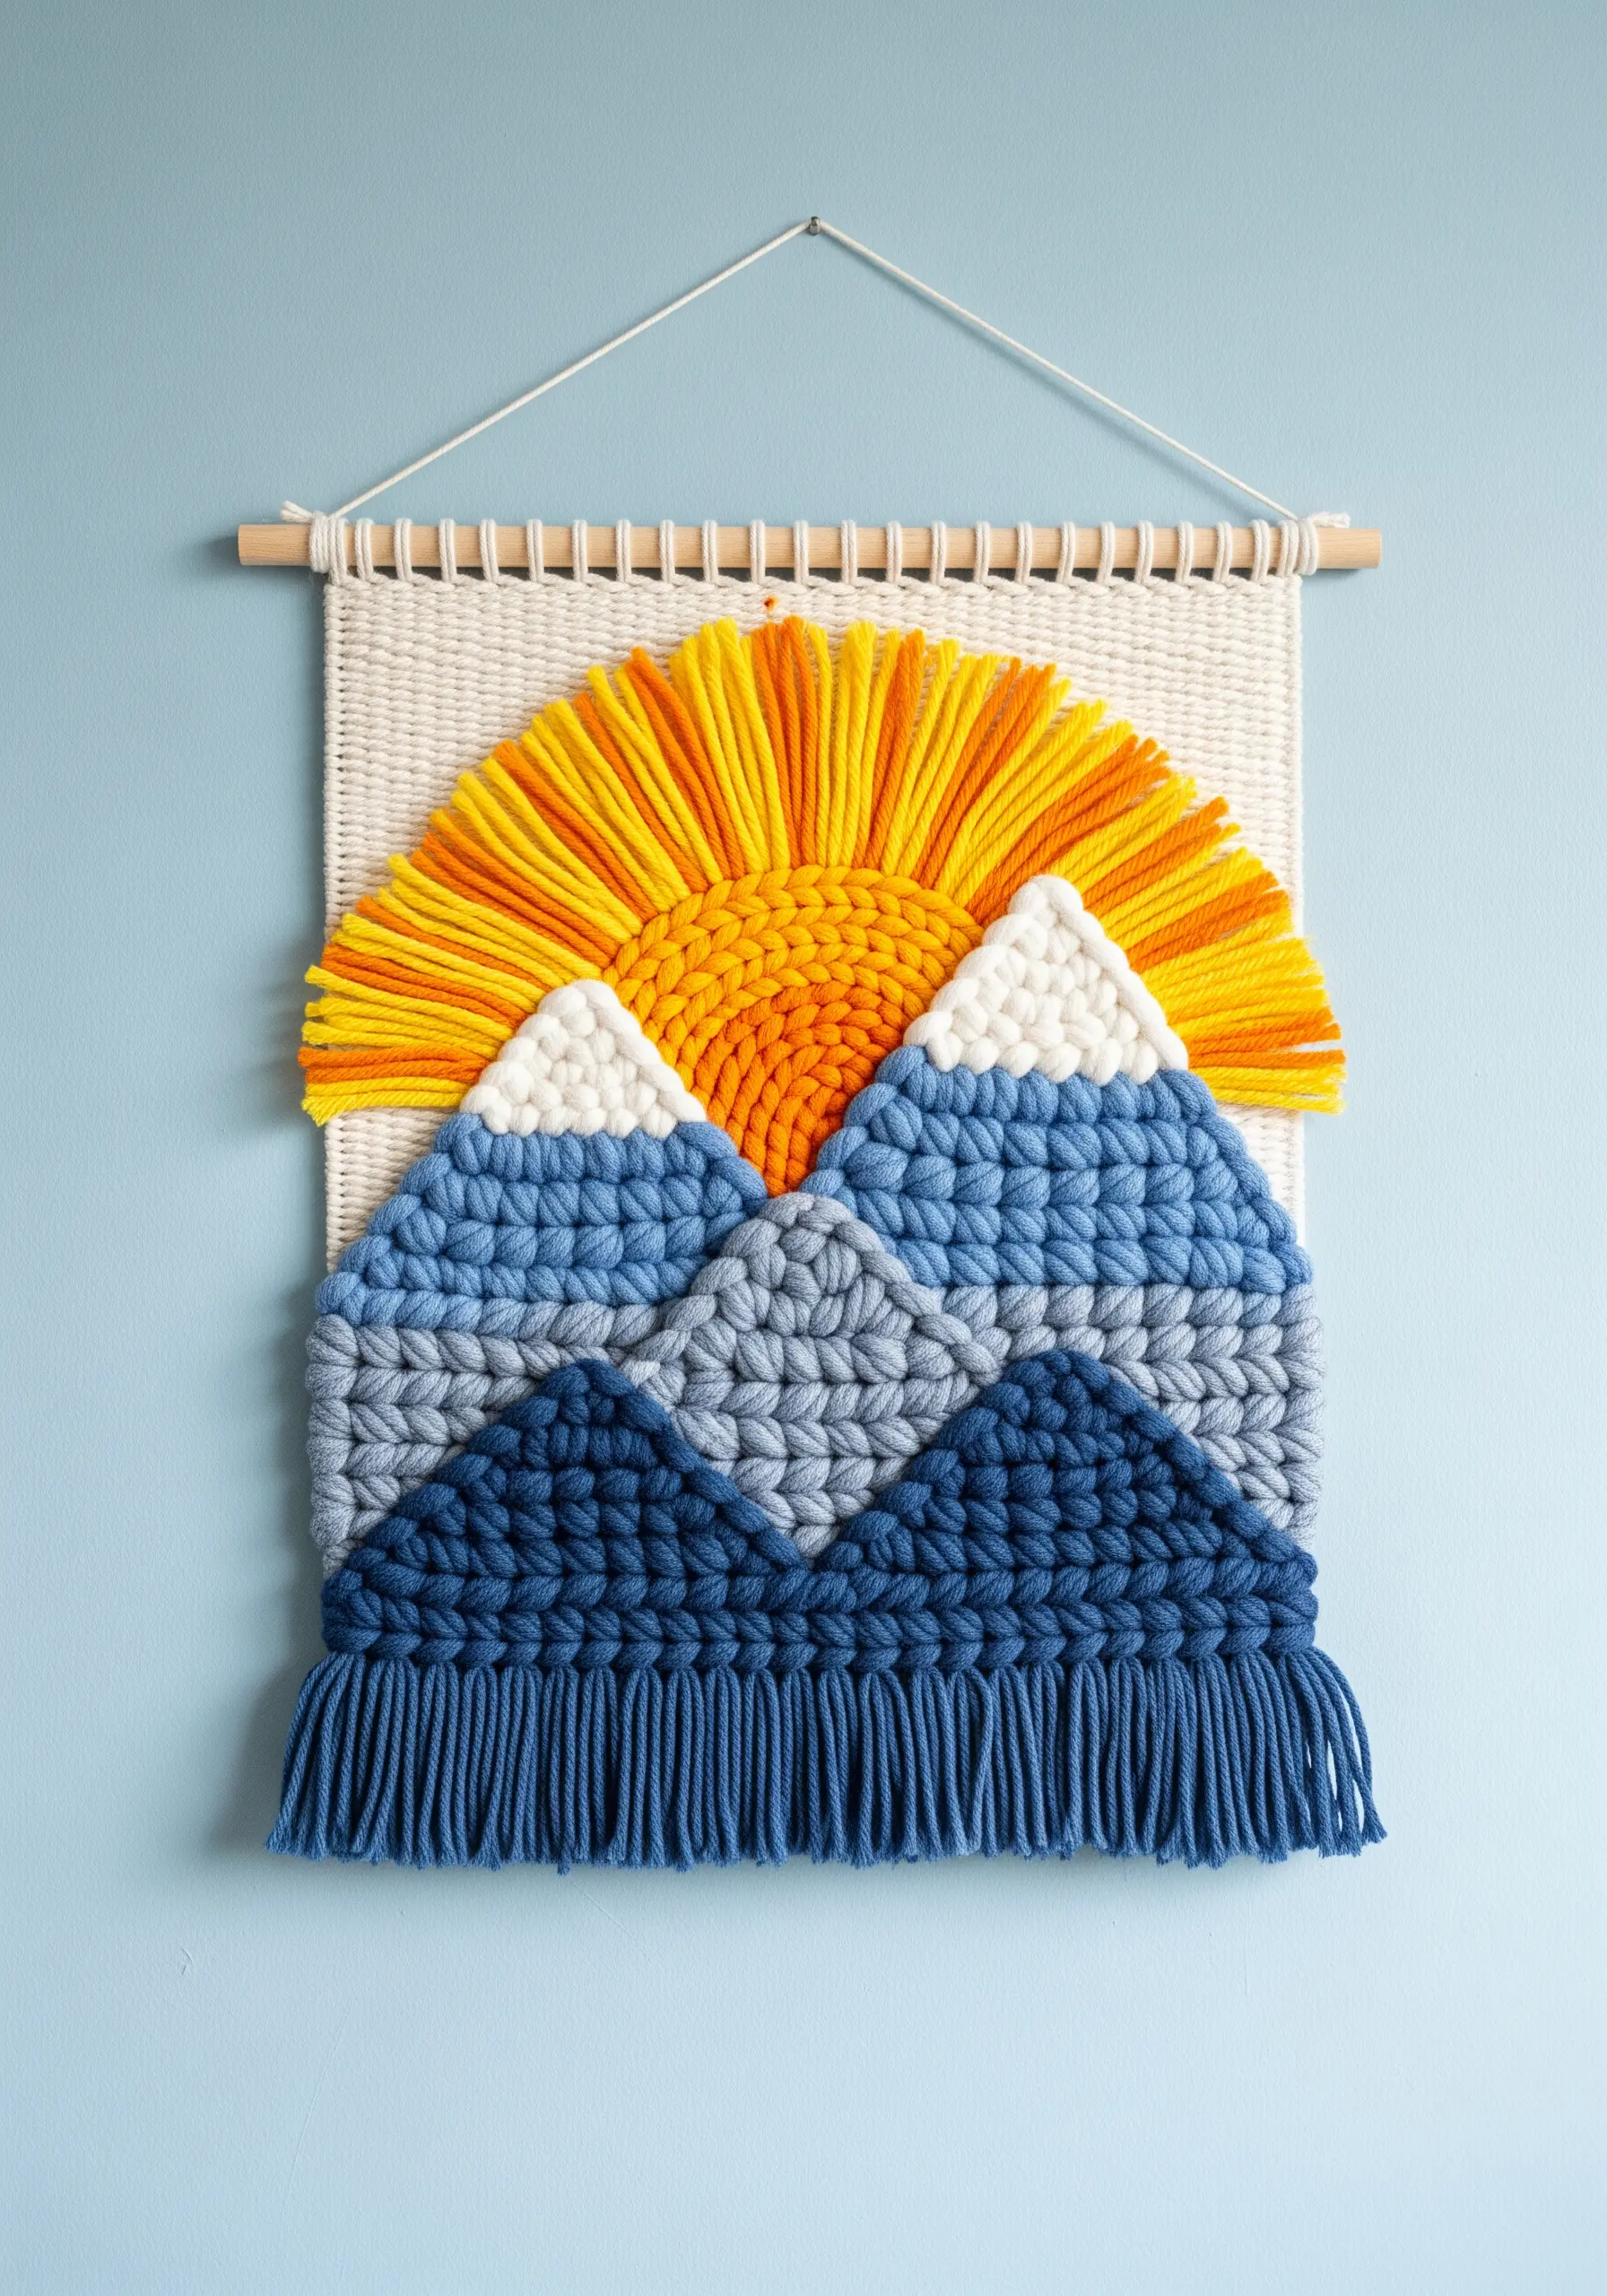
Use tapestry weaving techniques to ‘paint’ a scenic landscape with yarn.
Create distinct shapes, like mountains, by using interlocking or slit-weaving methods to manage color changes.
Incorporate different stitches to represent natural elements: use piled loops (like Turkey work) for a radiant sun and chunky braided stitches for snowy peaks.
This allows you to build a scene rich with depth and natural texture.
13. Create Topographic Lines with Yarn Couching
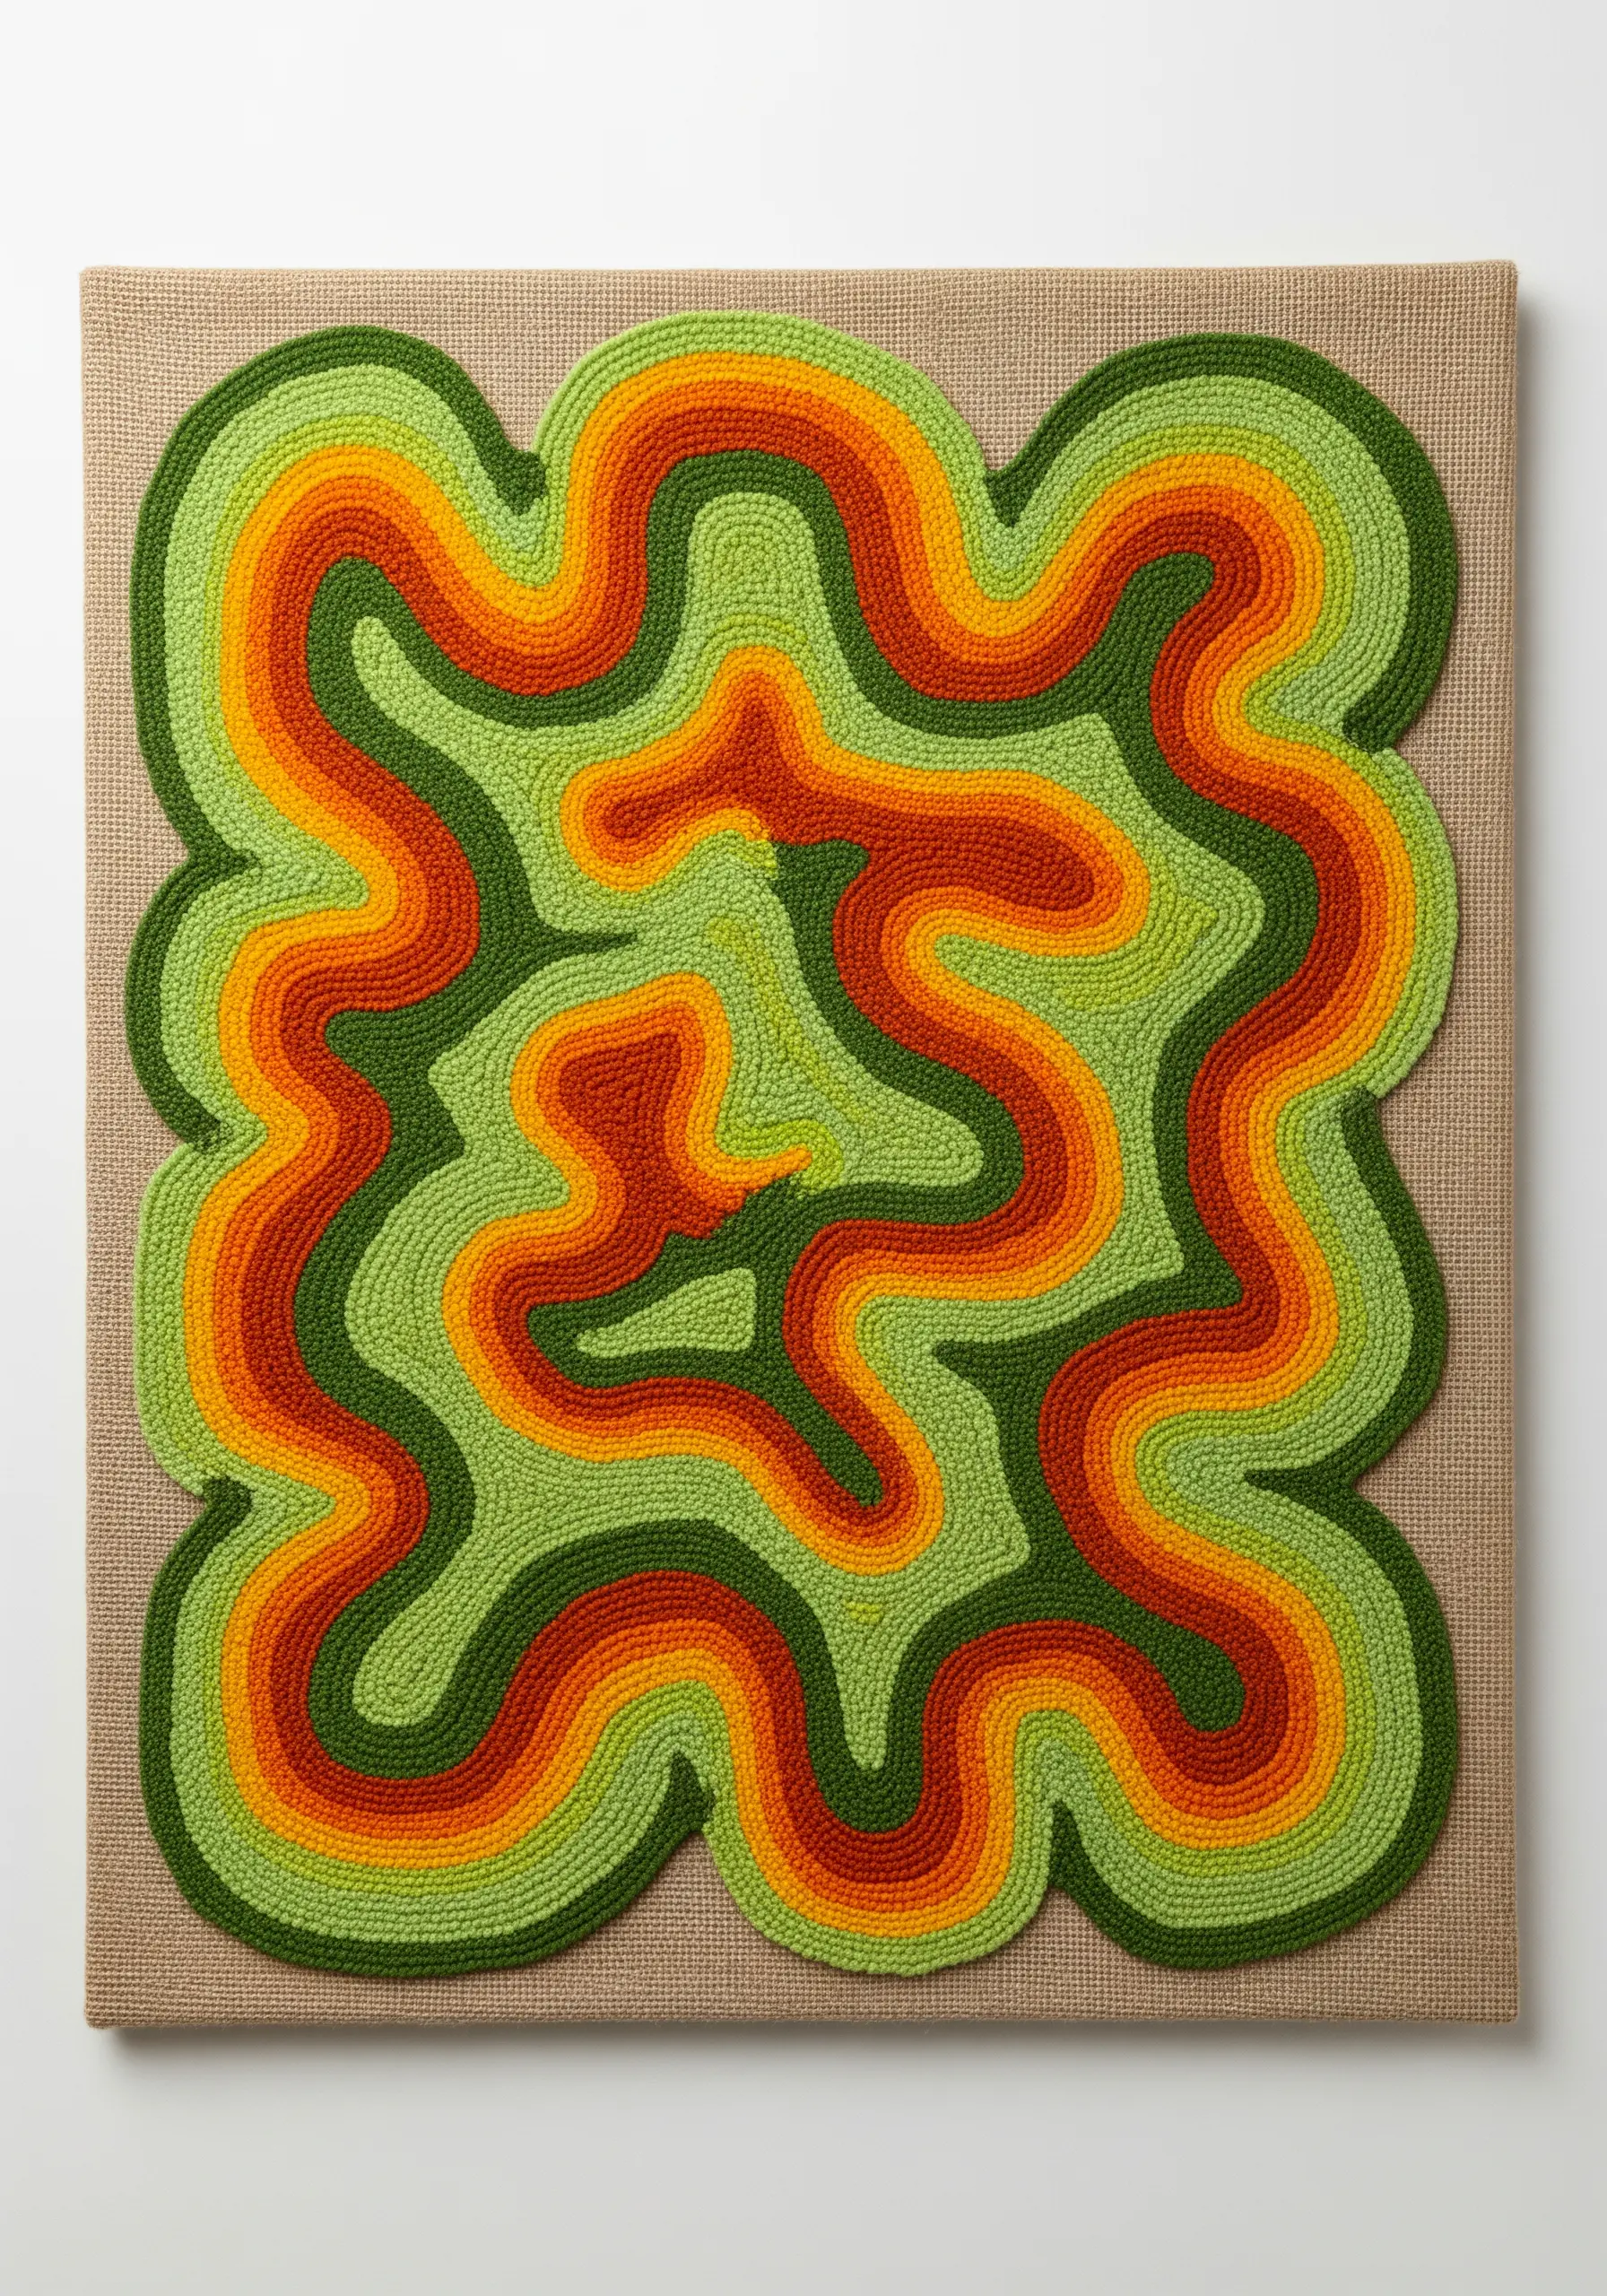
Achieve a clean, graphic, and dimensional effect by couching thick yarn onto a sturdy fabric base like canvas or burlap.
In this technique, you lay the thick yarn on the surface and secure it with small, invisible stitches made with a thinner thread.
Plan your swirling, organic lines to create a hypnotic, topographic pattern.
Using a gradient of colors enhances the sense of movement and creates a piece that feels both structured and fluid.
14. Construct a Modern Mobile with Wrapped Hoops
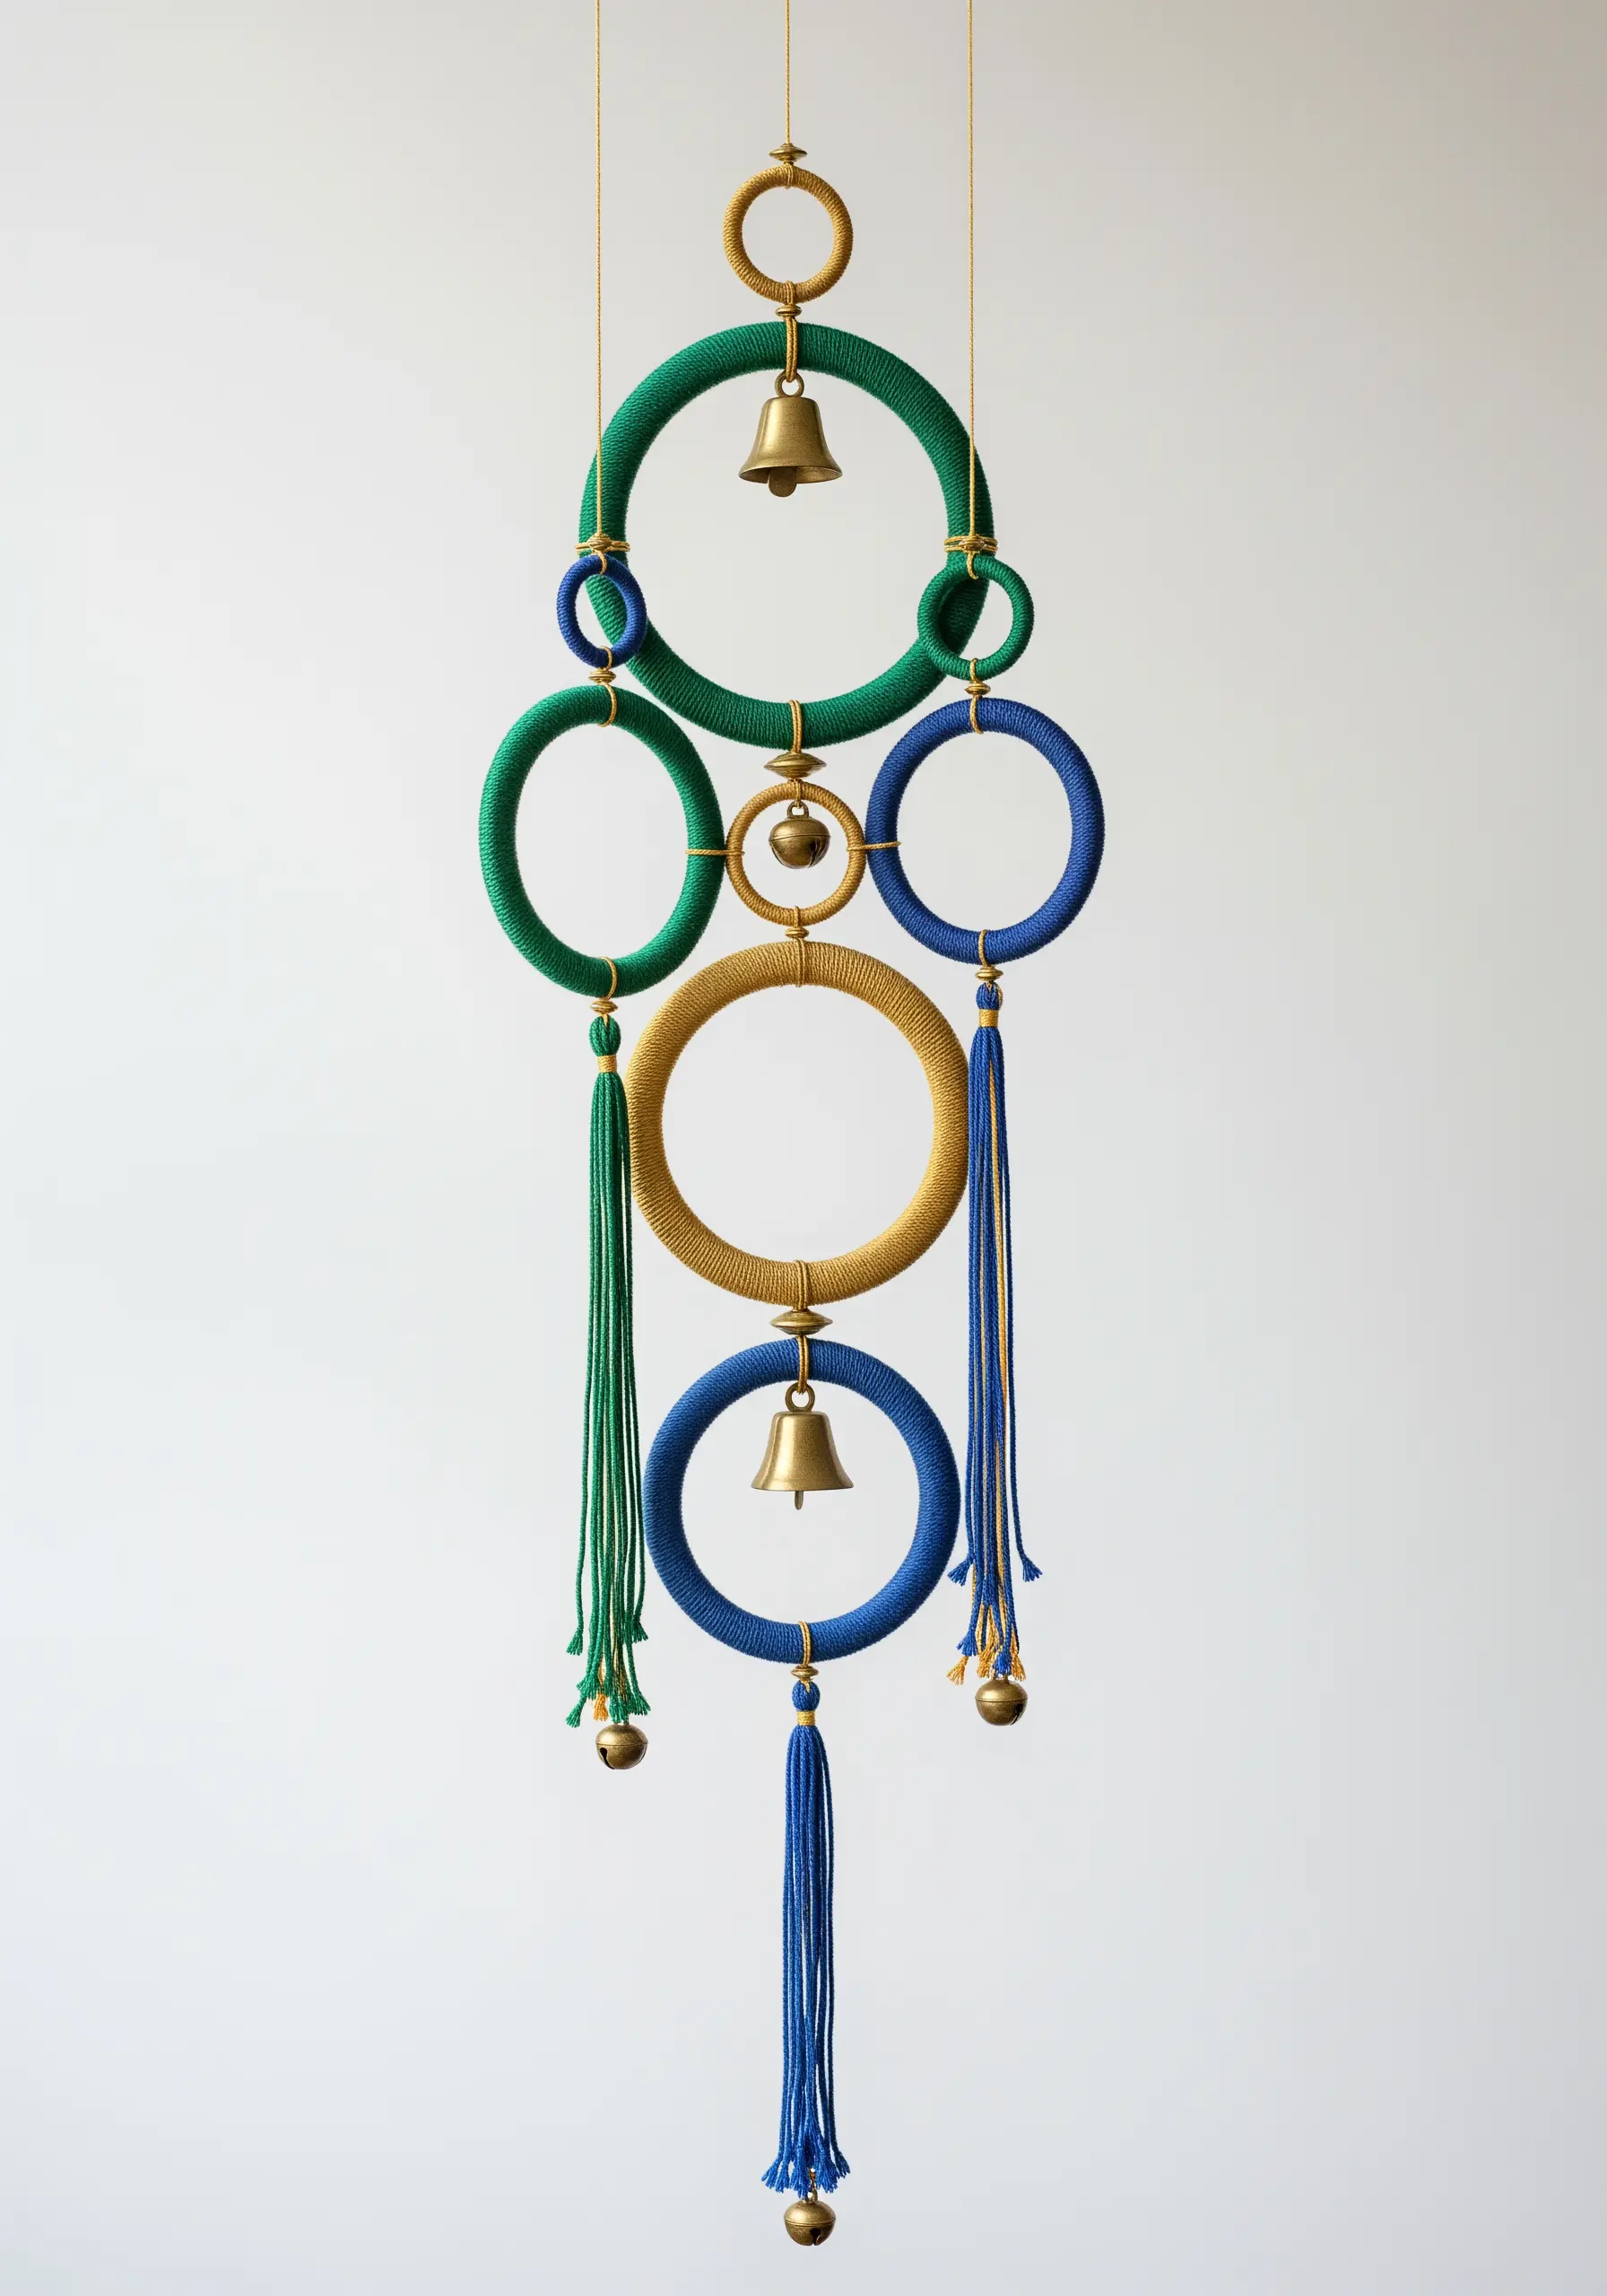
Repurpose simple wooden or metal hoops into a striking, modern mobile.
Start by wrapping each hoop tightly and neatly with yarn, ensuring no part of the original hoop shows through.
Use a sophisticated color palette of complementary shades, like gold, green, and blue, for an elegant result.
Assemble the hoops at different heights with fine thread or chain to create a balanced composition that moves gracefully with the air.
15. Build a Statement Rainbow with Wrapped Rope
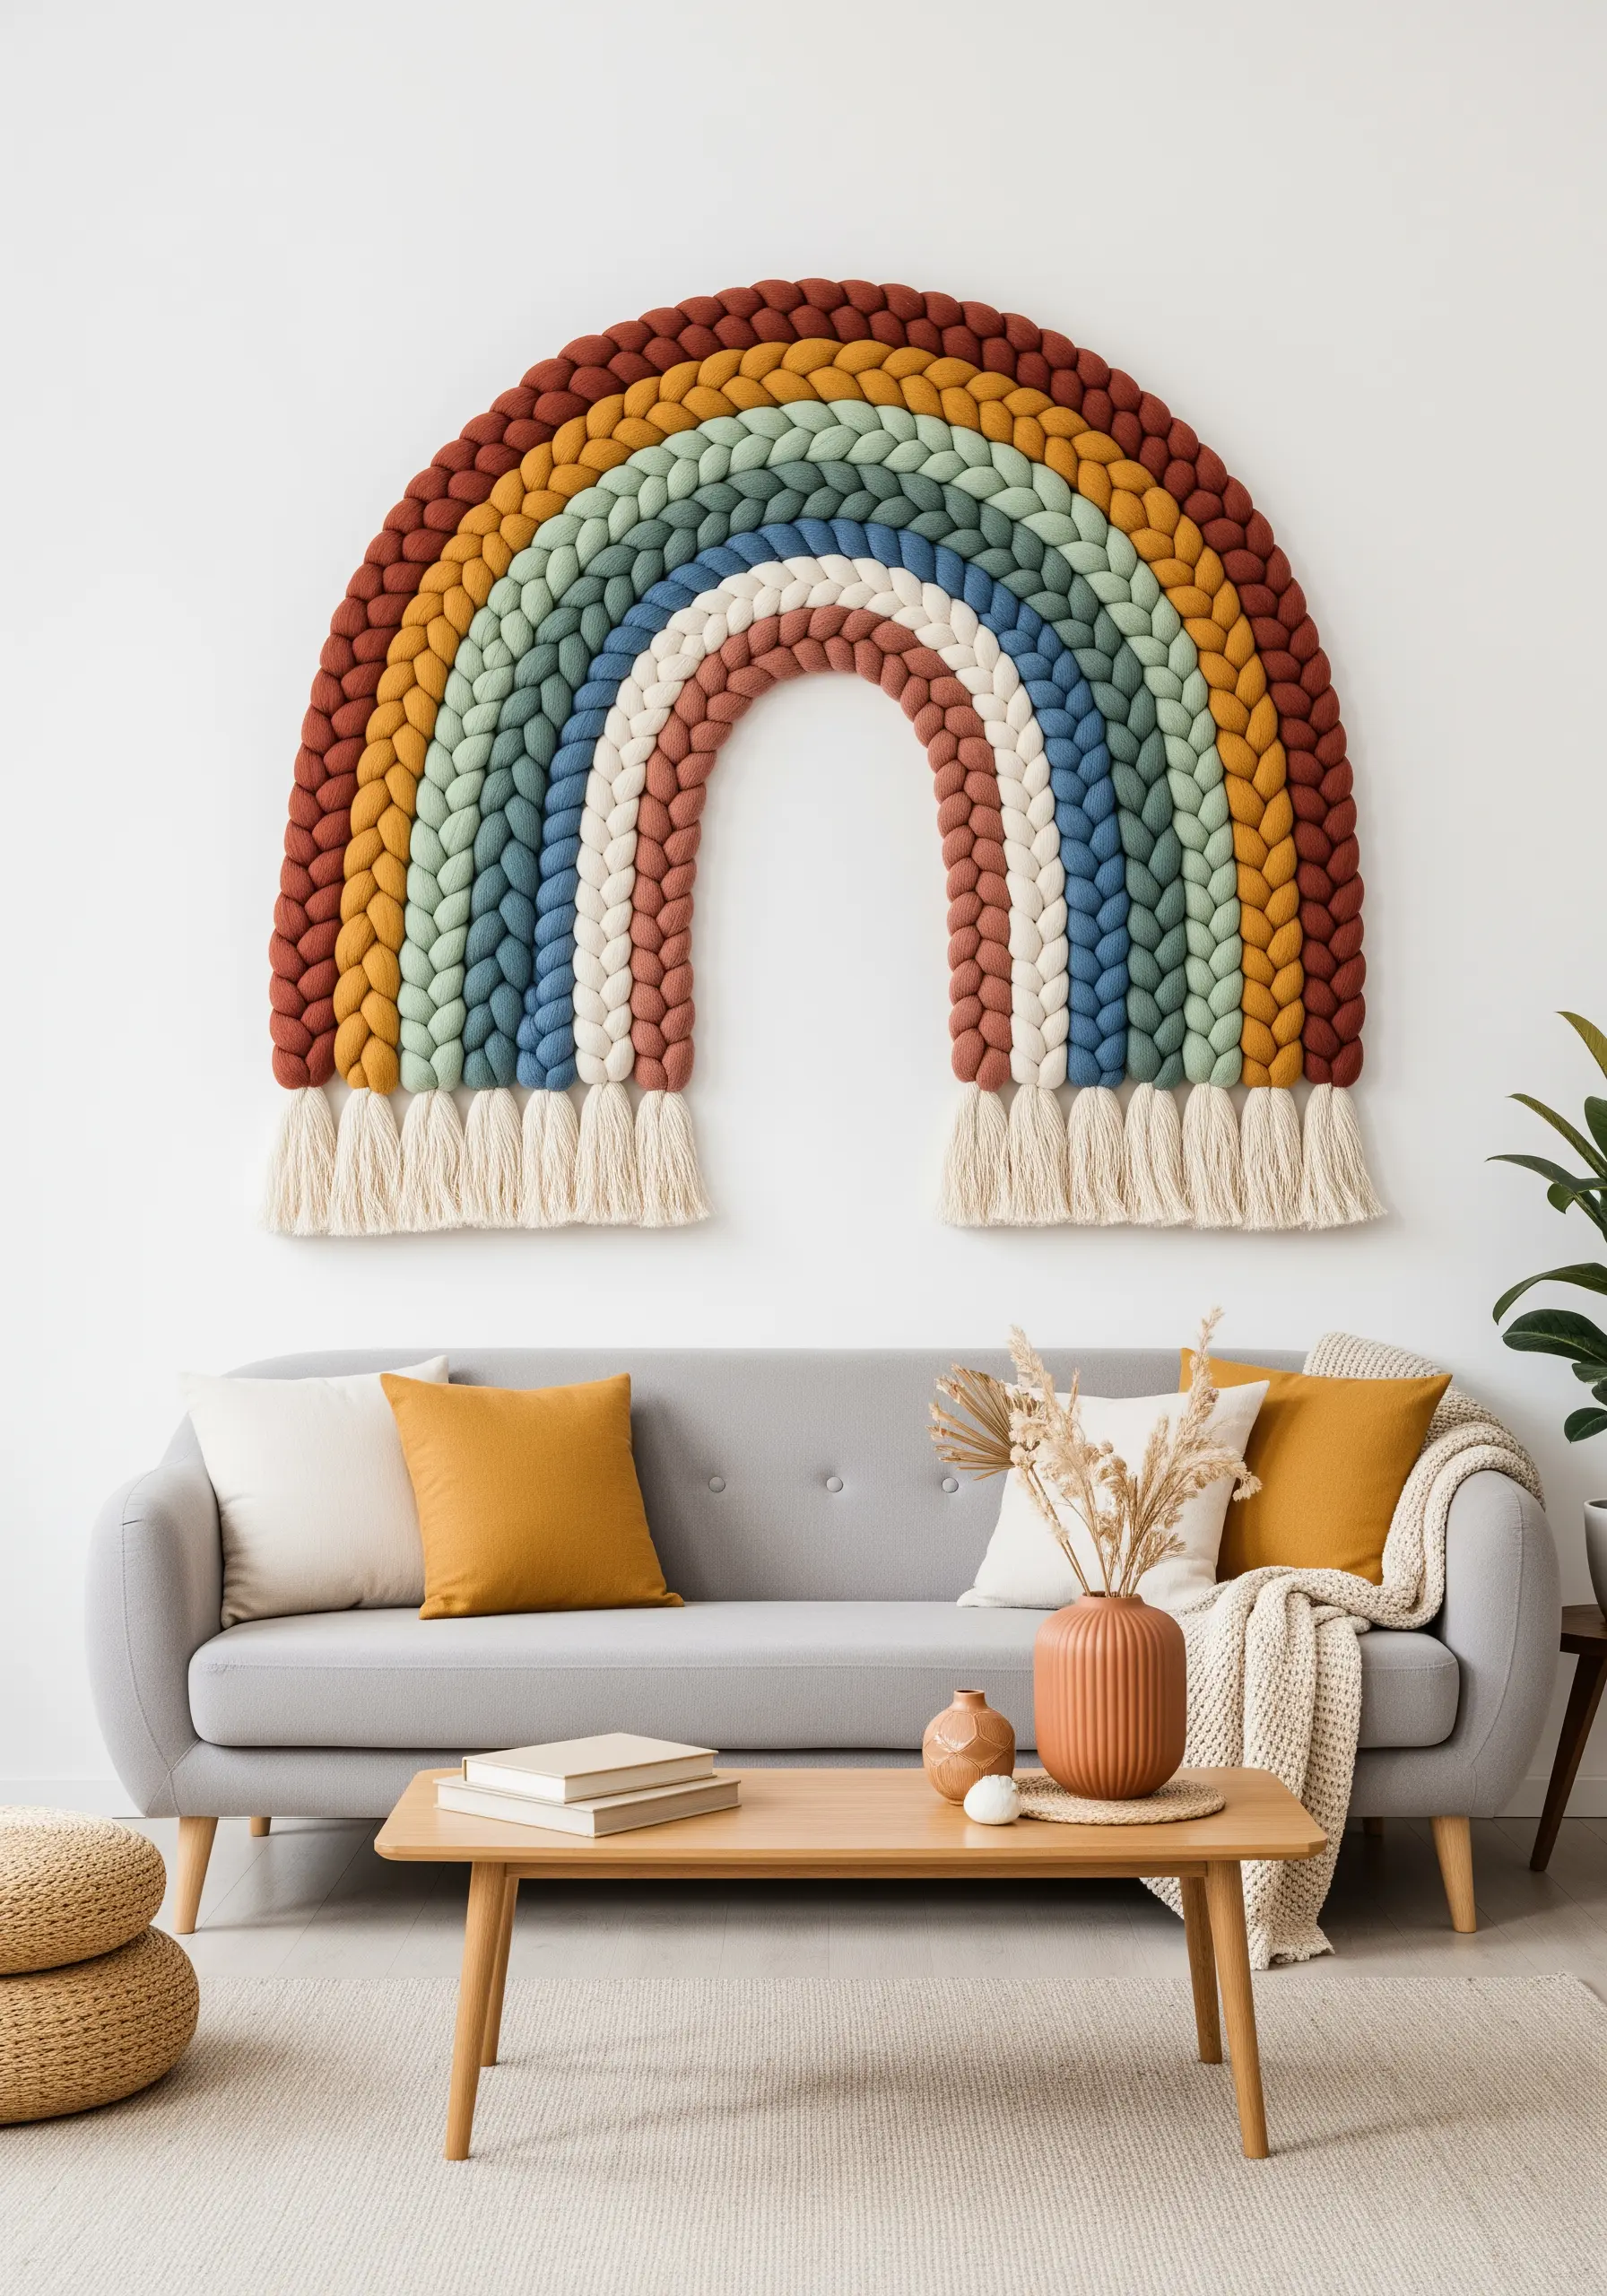
Create an oversized, textural rainbow that serves as a stunning focal point above a sofa or bed.
To construct it, wrap thick cotton rope sections with different colors of chunky yarn, securing the ends discreetly with a hot glue gun.
Carefully shape the wrapped ropes into arches and hand-sew them together from the back with a heavy-duty needle and thread.
Choosing an earthy, muted color palette gives this playful shape a calm, contemporary feel.
16. Install a Cascade of Yarn-Wrapped Orbs
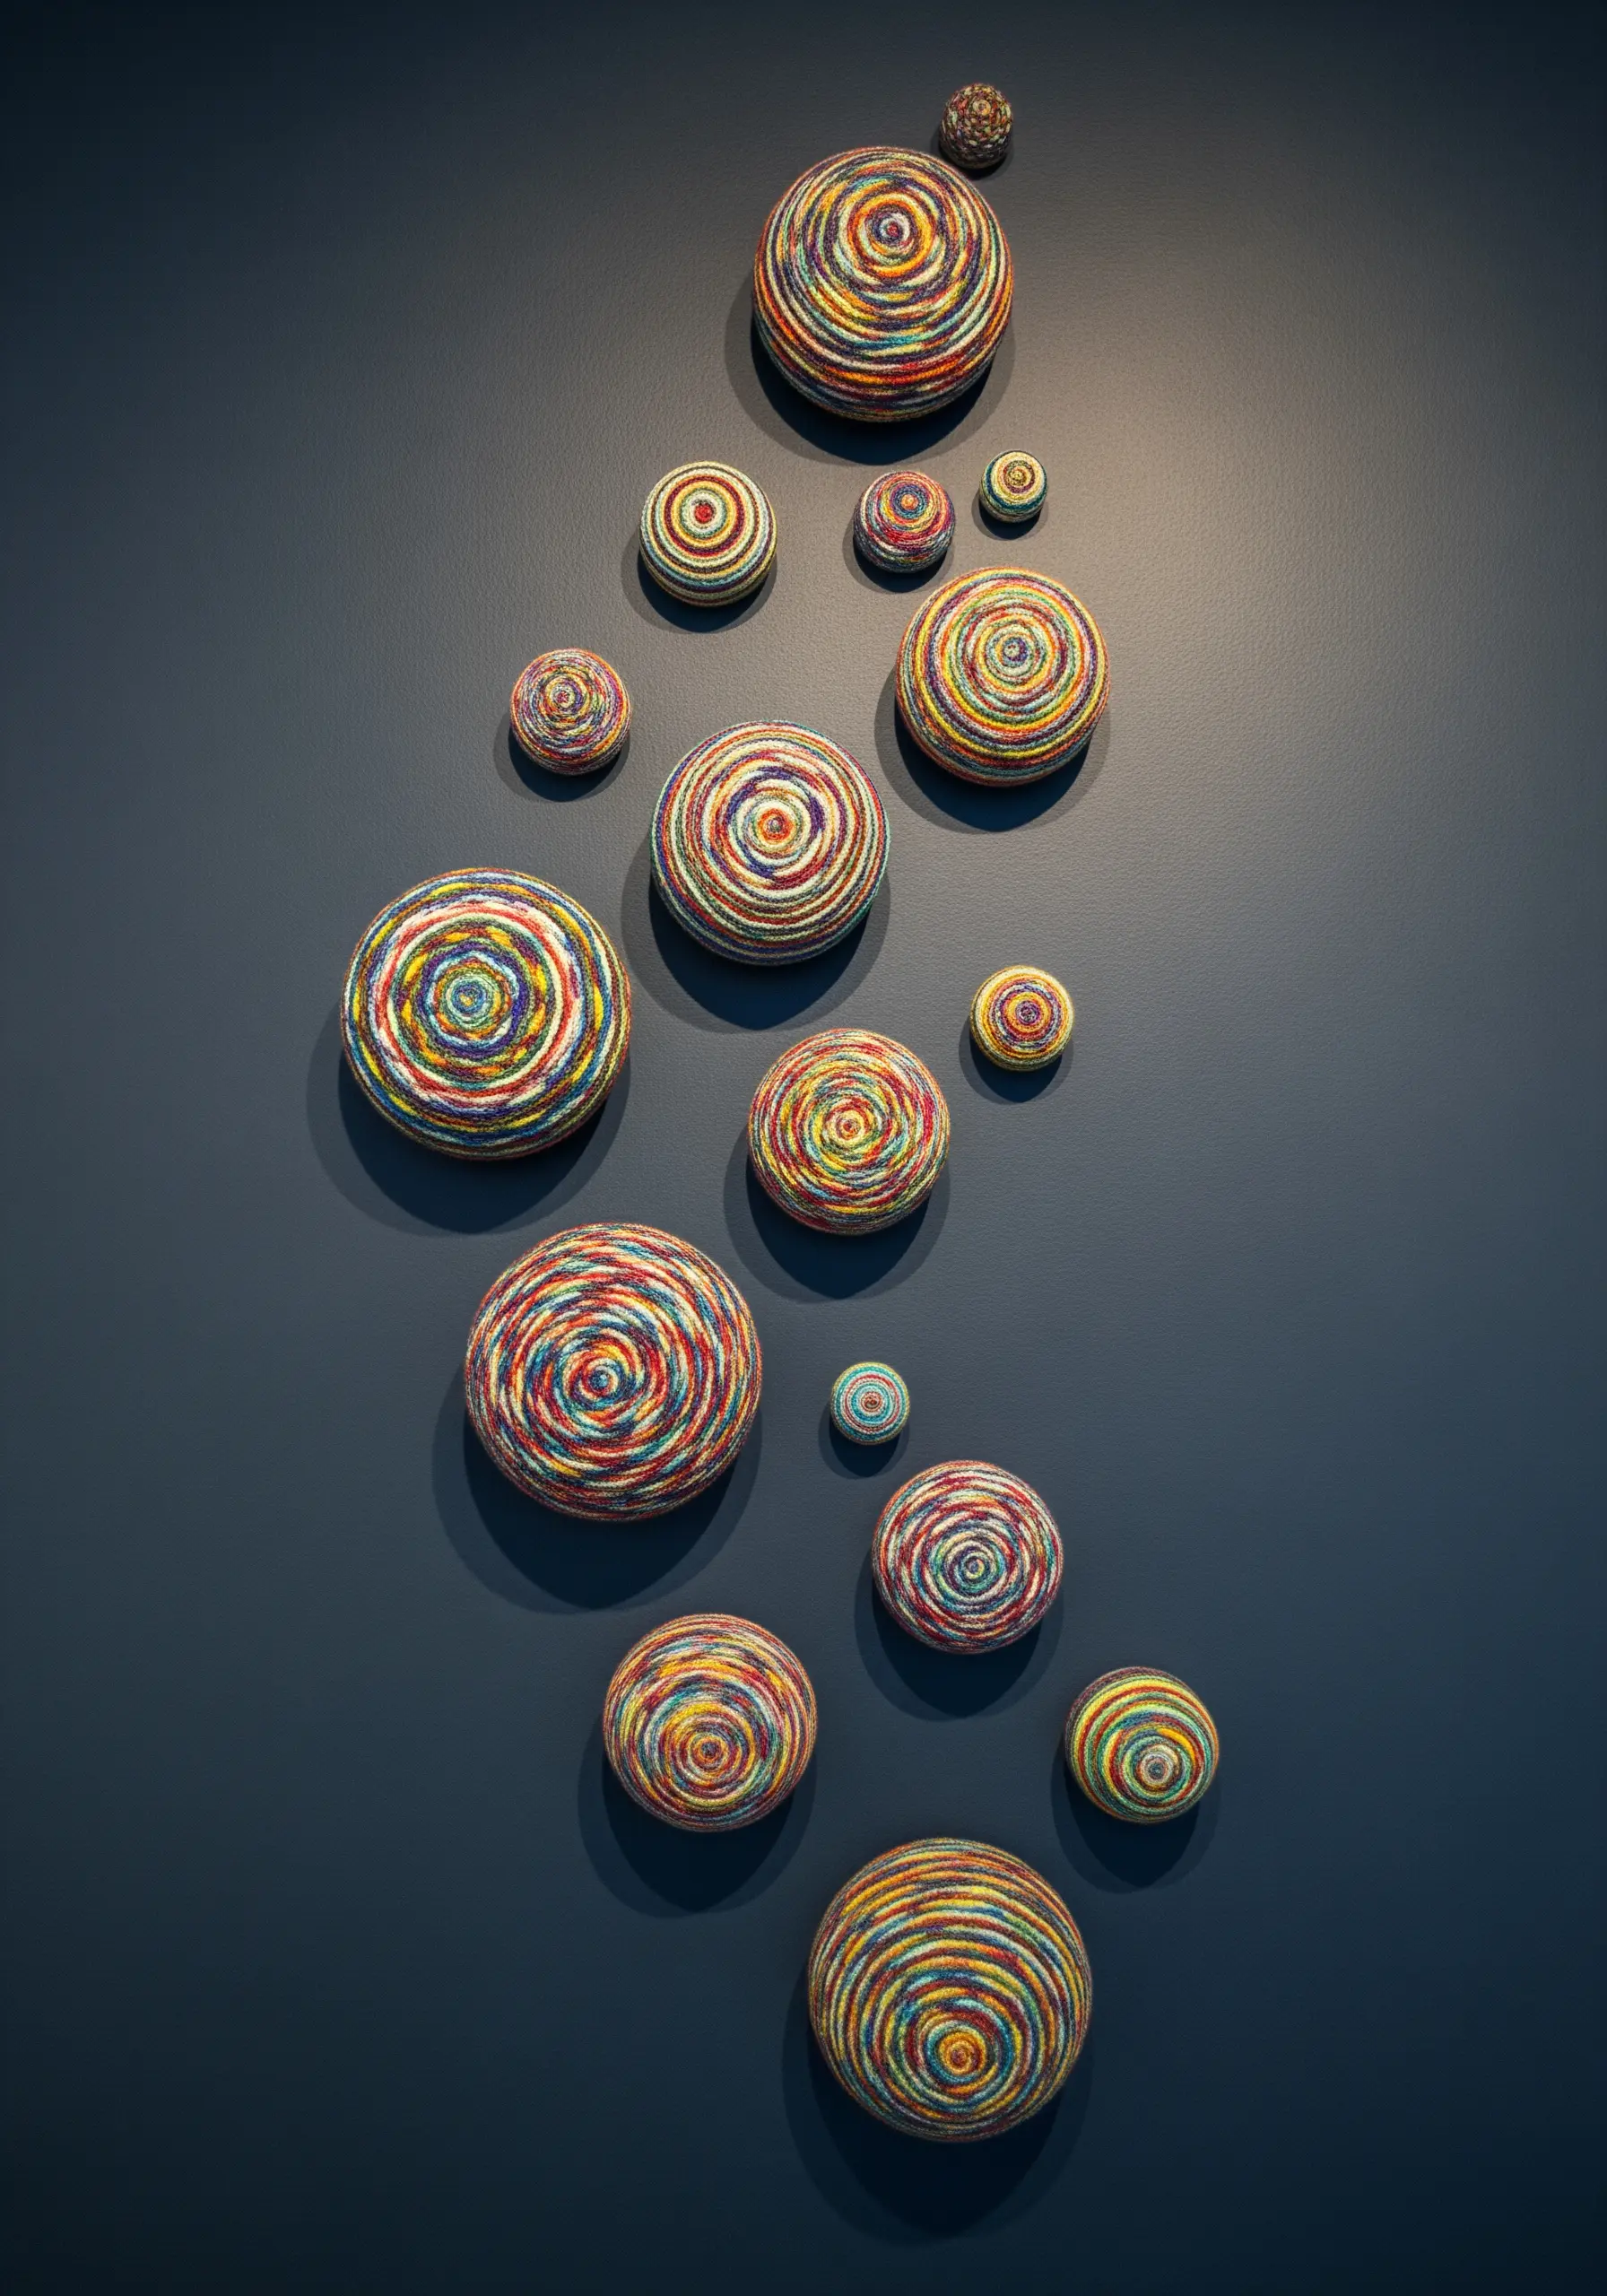
Turn styrofoam balls of various sizes into captivating art objects by wrapping them in colorful yarn.
Use variegated or scrap yarn to create intricate, random patterns as you wrap, securing the end with a dab of glue.
For a high-impact display, mount them in a floating, cascading arrangement on a dark, dramatic wall.
This installation method makes the orbs appear to float, creating a sense of wonder and movement.
17. Add Dimension with Needle-Felted Details
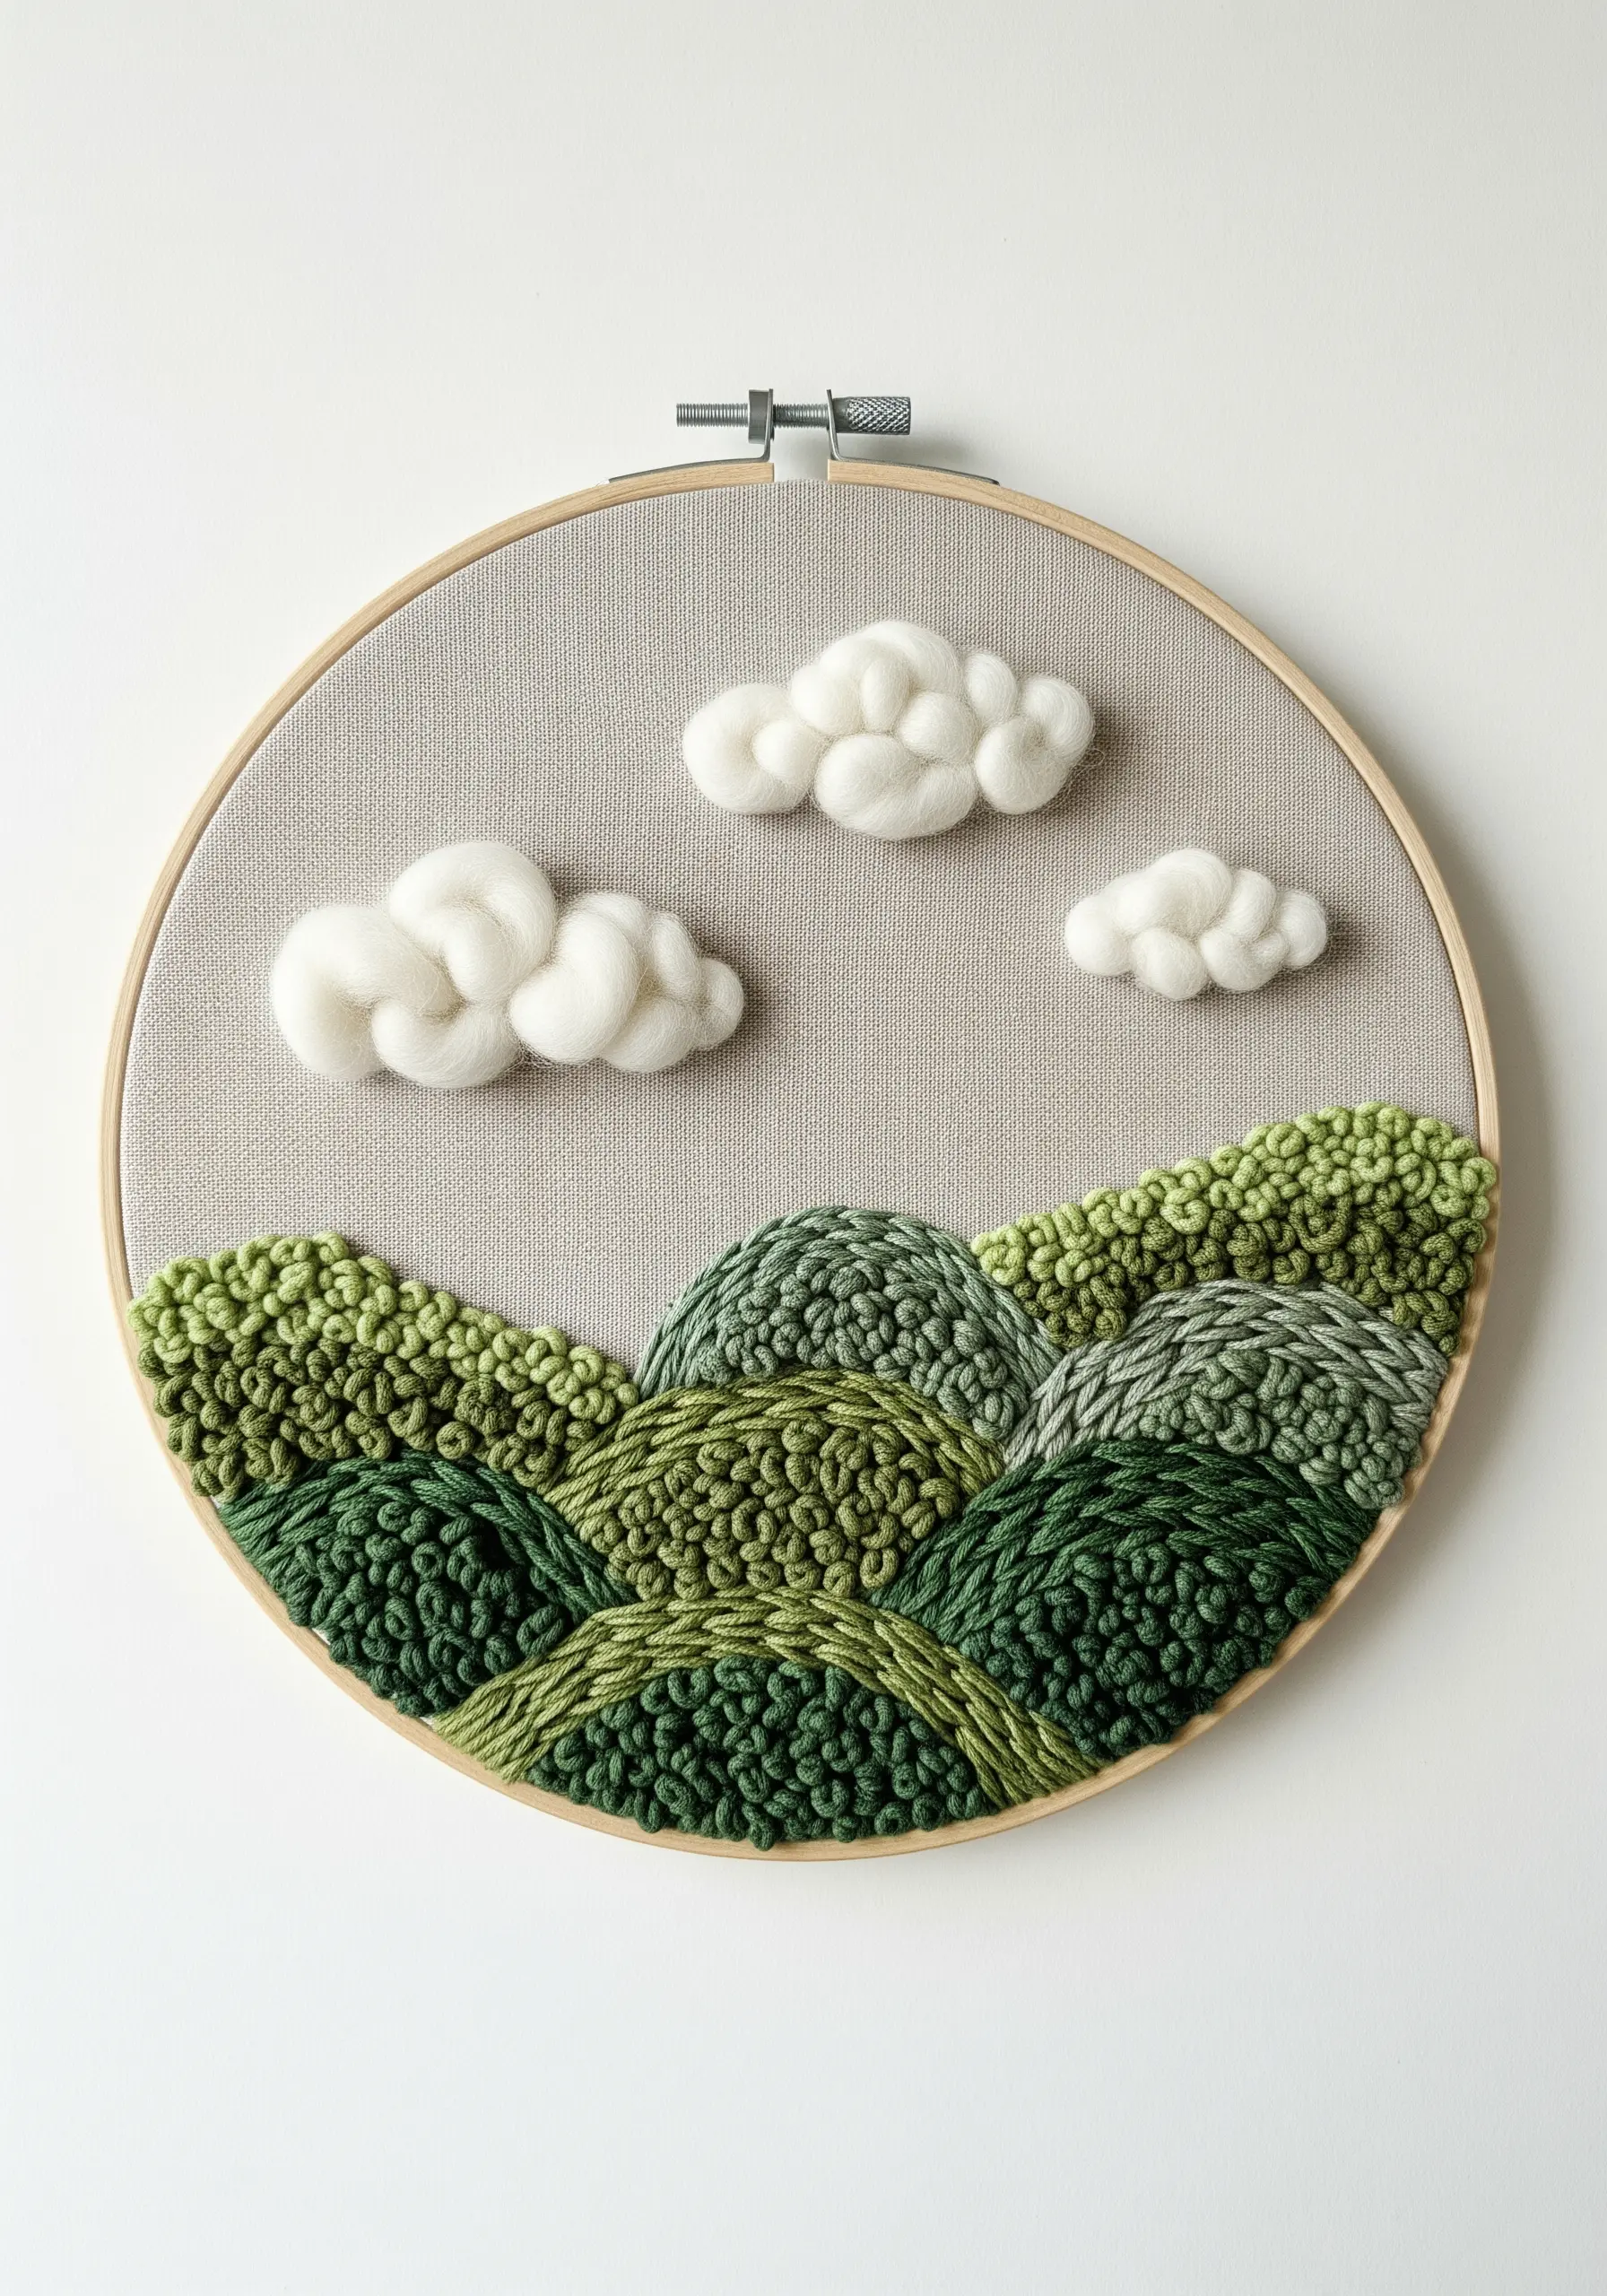
Combine looped stitches with needle felting to create a landscape with compelling depth and realism.
Use a punch needle or dense French knots with various shades of green yarn to form rolling, textured hills.
Then, create soft, three-dimensional clouds by needle felting wool roving directly onto the fabric background.
This mixed-media crafts with embroidery approach contrasts the uniform loops with the ethereal softness of the felt, making the piece visually dynamic.
18. Sculpt Whimsical Creatures with Wire and Yarn
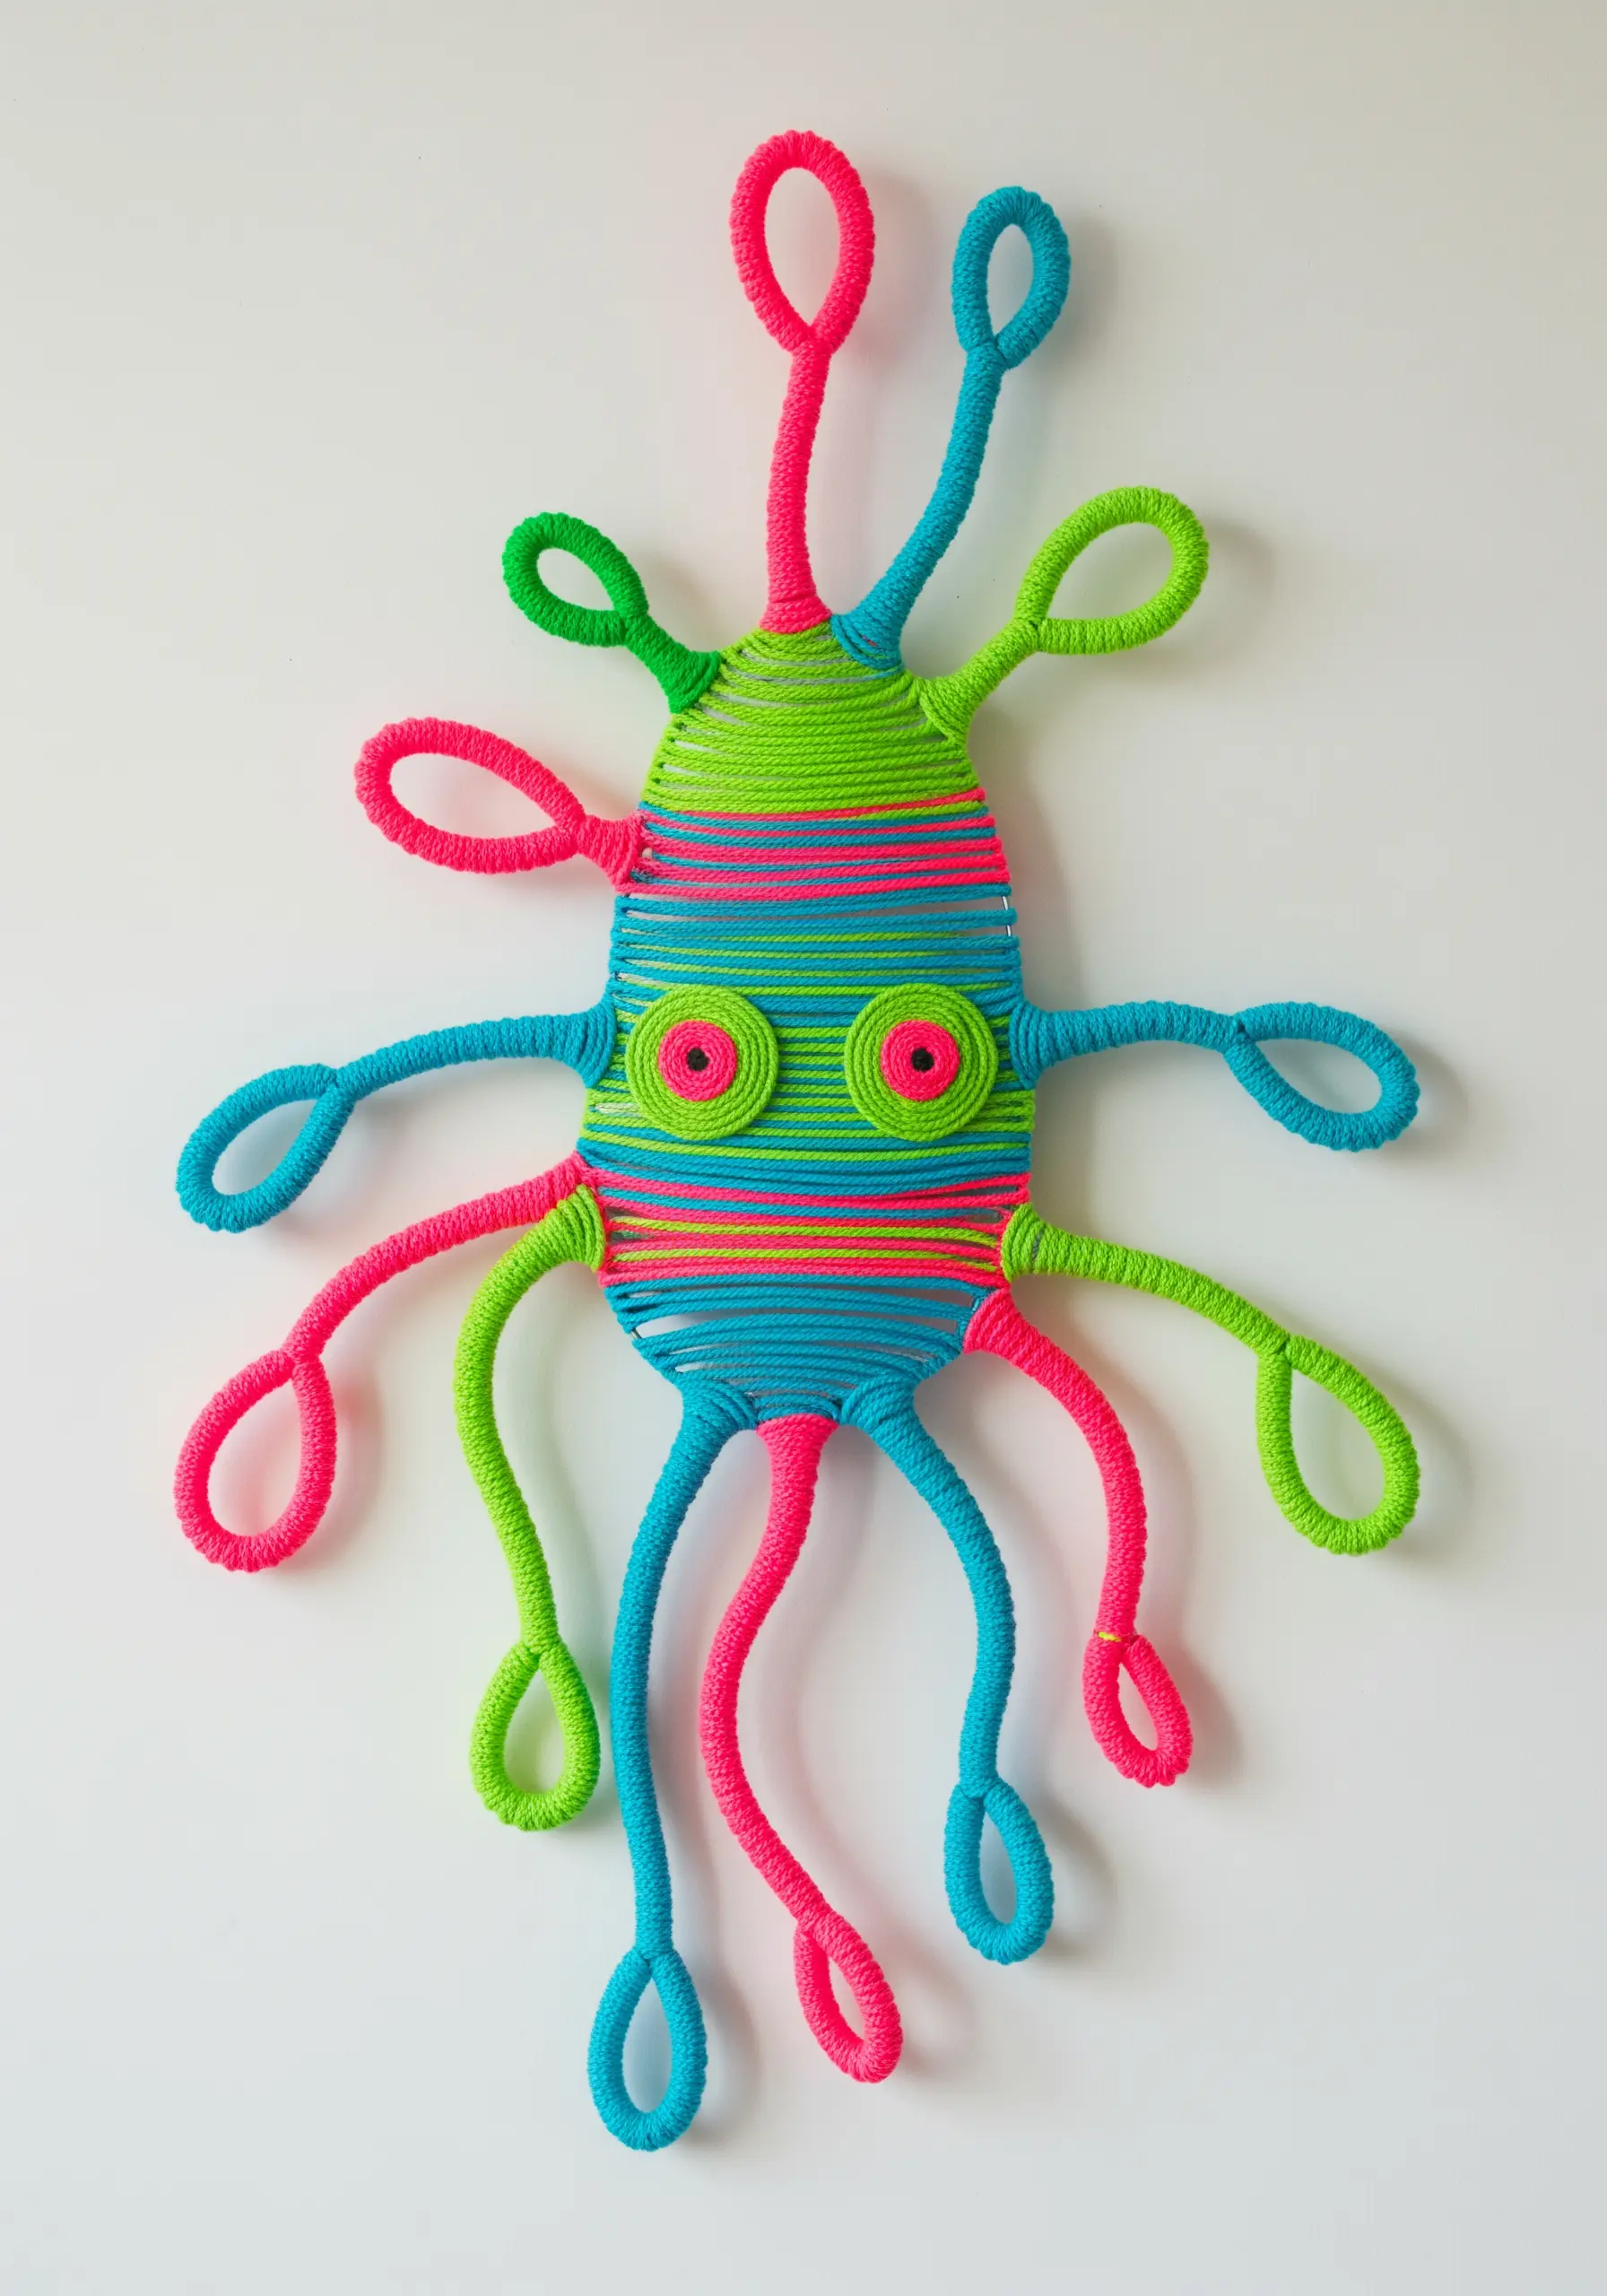
Give your yarn creations structure and personality by building them around a simple wire armature.
Bend sturdy craft wire into your desired shape, forming the skeleton of your creature.
Next, wrap the entire wire frame tightly with yarn, switching colors to define different features like eyes and limbs.
This method allows you to move beyond flat surfaces and create playful, three-dimensional sculptures that can be mounted on the wall.
19. Mimic Impasto Painting with Directional Stitches

Recreate the thick, textural strokes of an impasto oil painting using chunky yarn and embroidery techniques.
Instead of a traditional satin stitch, lay down thick strands of yarn and tack them in place, or use wide, directional stitches to mimic brushstrokes.
Layer different colors and vary your stitch direction to create a sense of light, shadow, and form.
This technique transforms a flat canvas into a highly tactile piece that brilliantly captures the energy of painting.
20. Explore Sacred Geometry with String Art
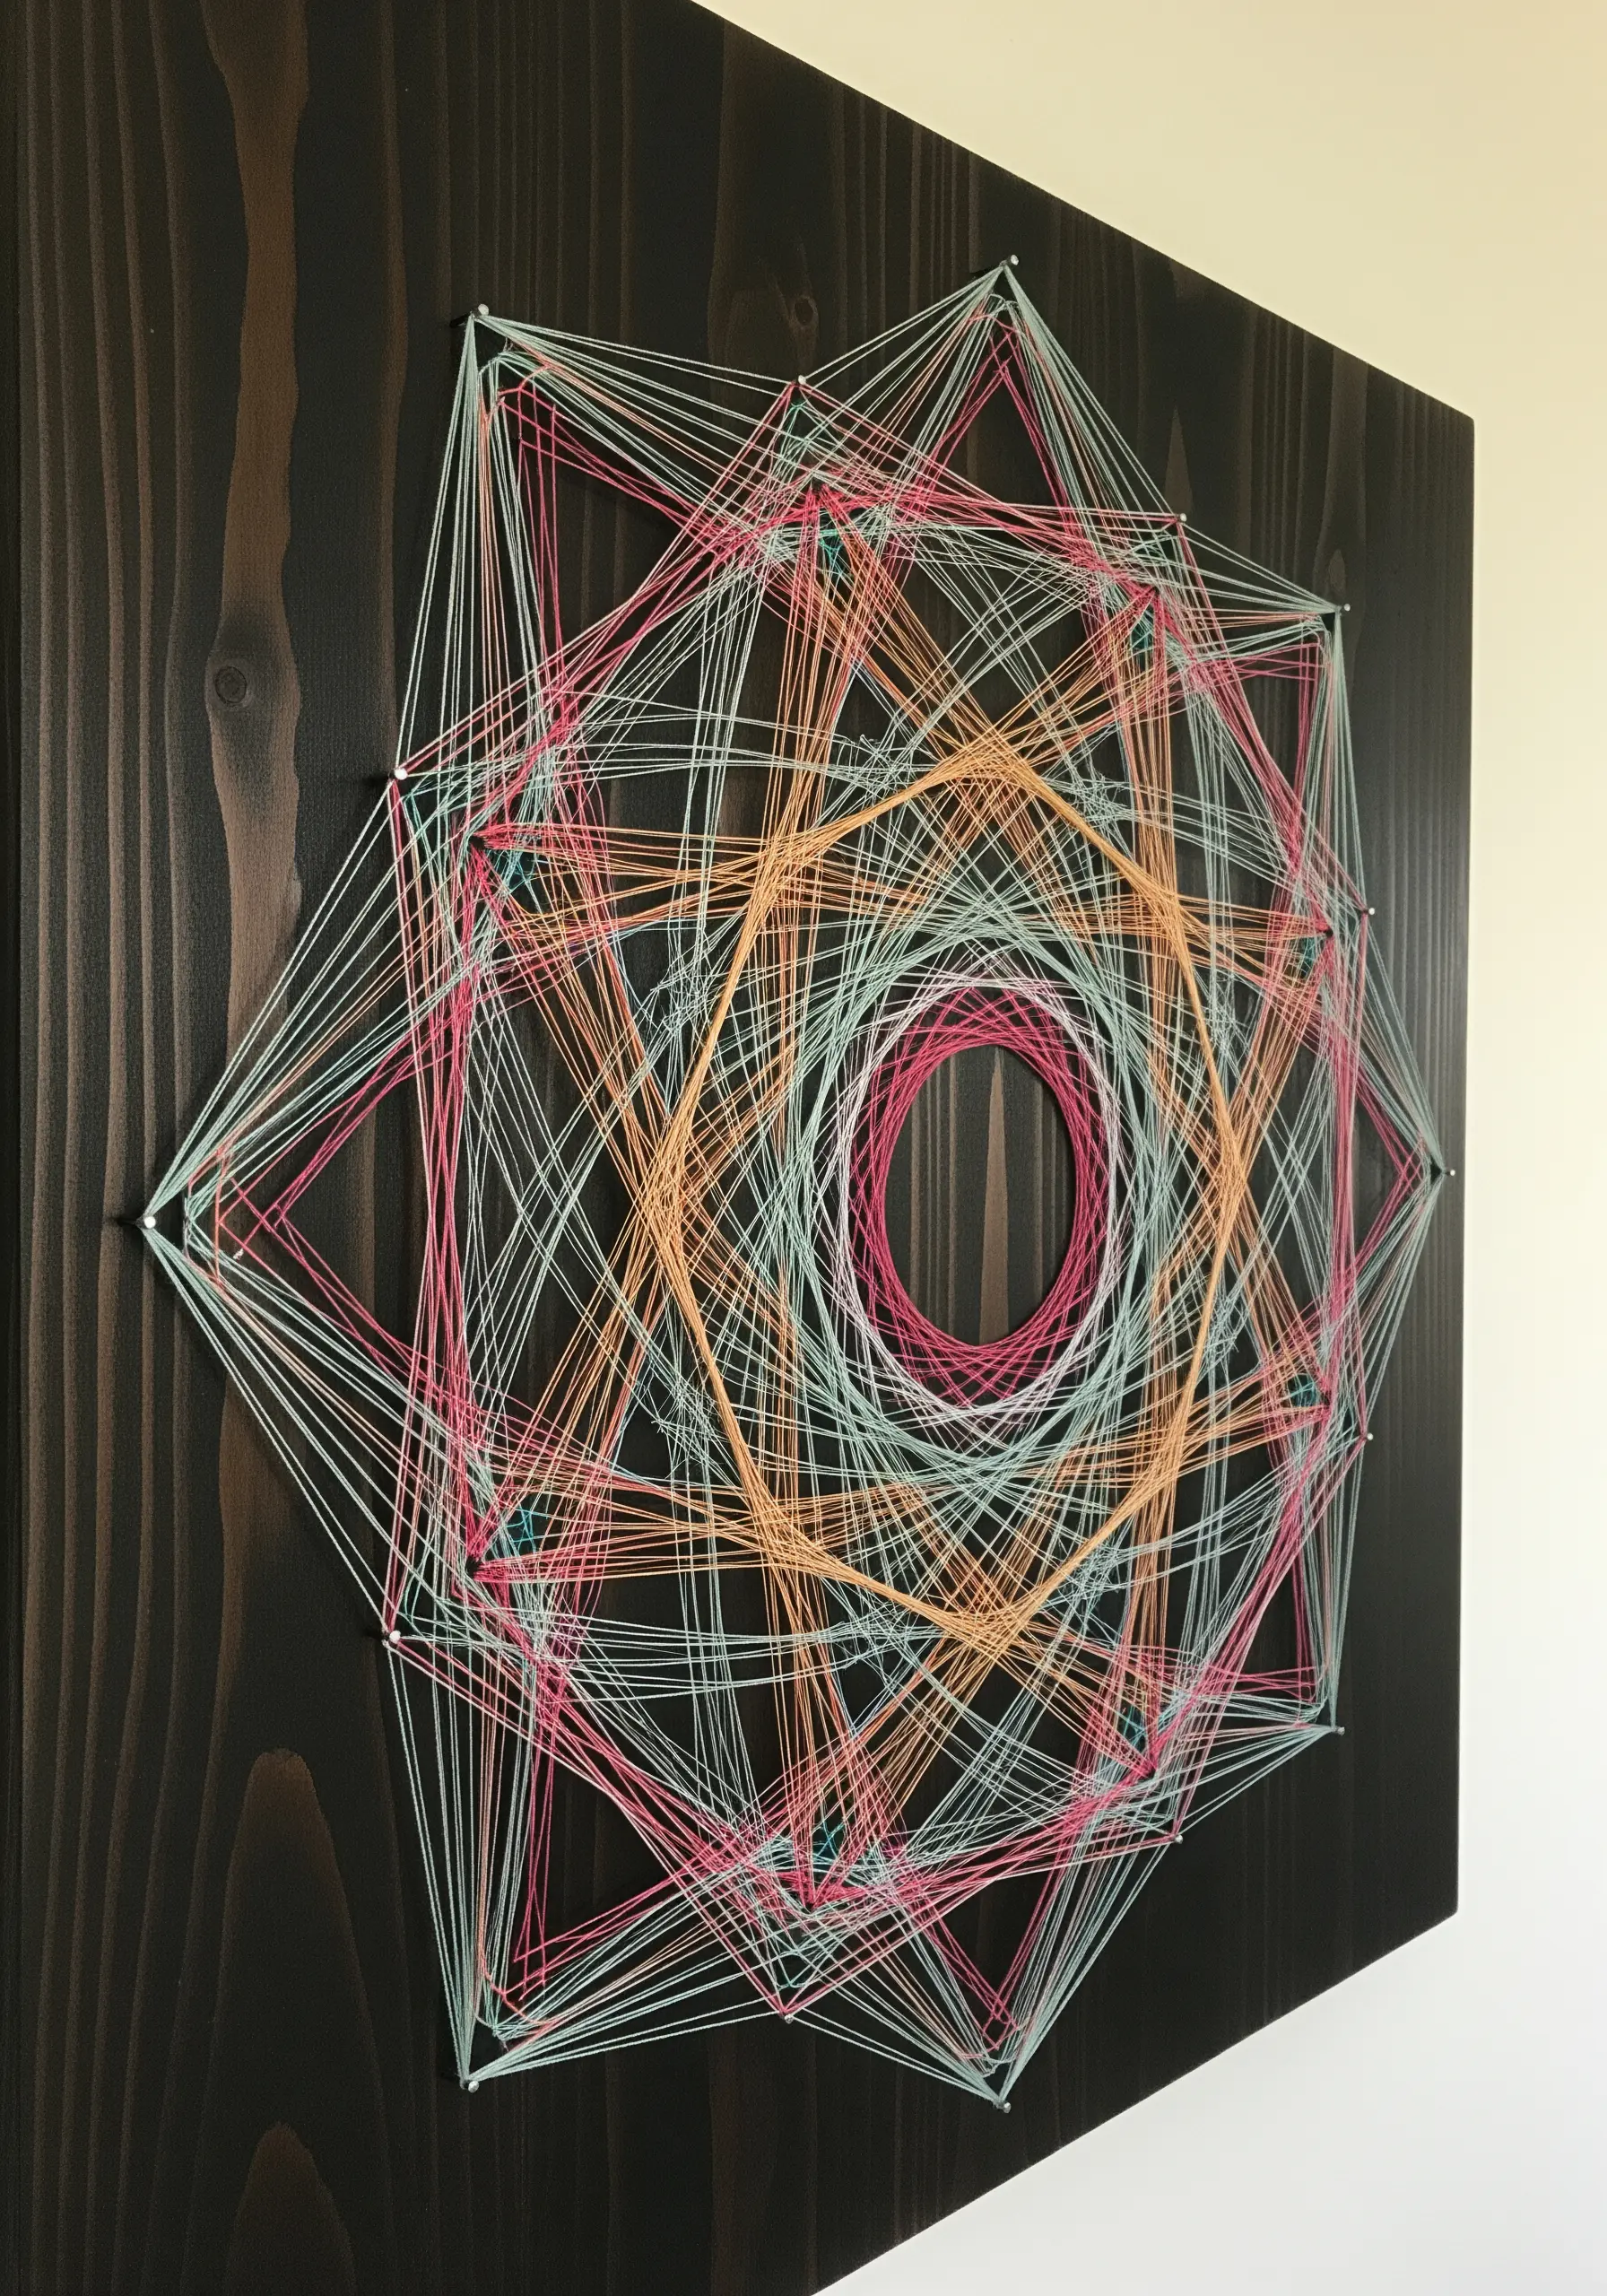
Use nails and thread to create intricate, geometric patterns that feel both mathematical and meditative.
Start by hammering small nails into a stained wood board in a precise geometric pattern, like a circle or star.
Then, stretch thread between the nails, layering different colors to create complex, overlapping shapes and optical effects.
The contrast between the rigid grid of nails and the delicate, translucent layers of thread is what gives inspirational quote string art designs their unique visual power.
21. Weave a High-Contrast Graphic Narrative
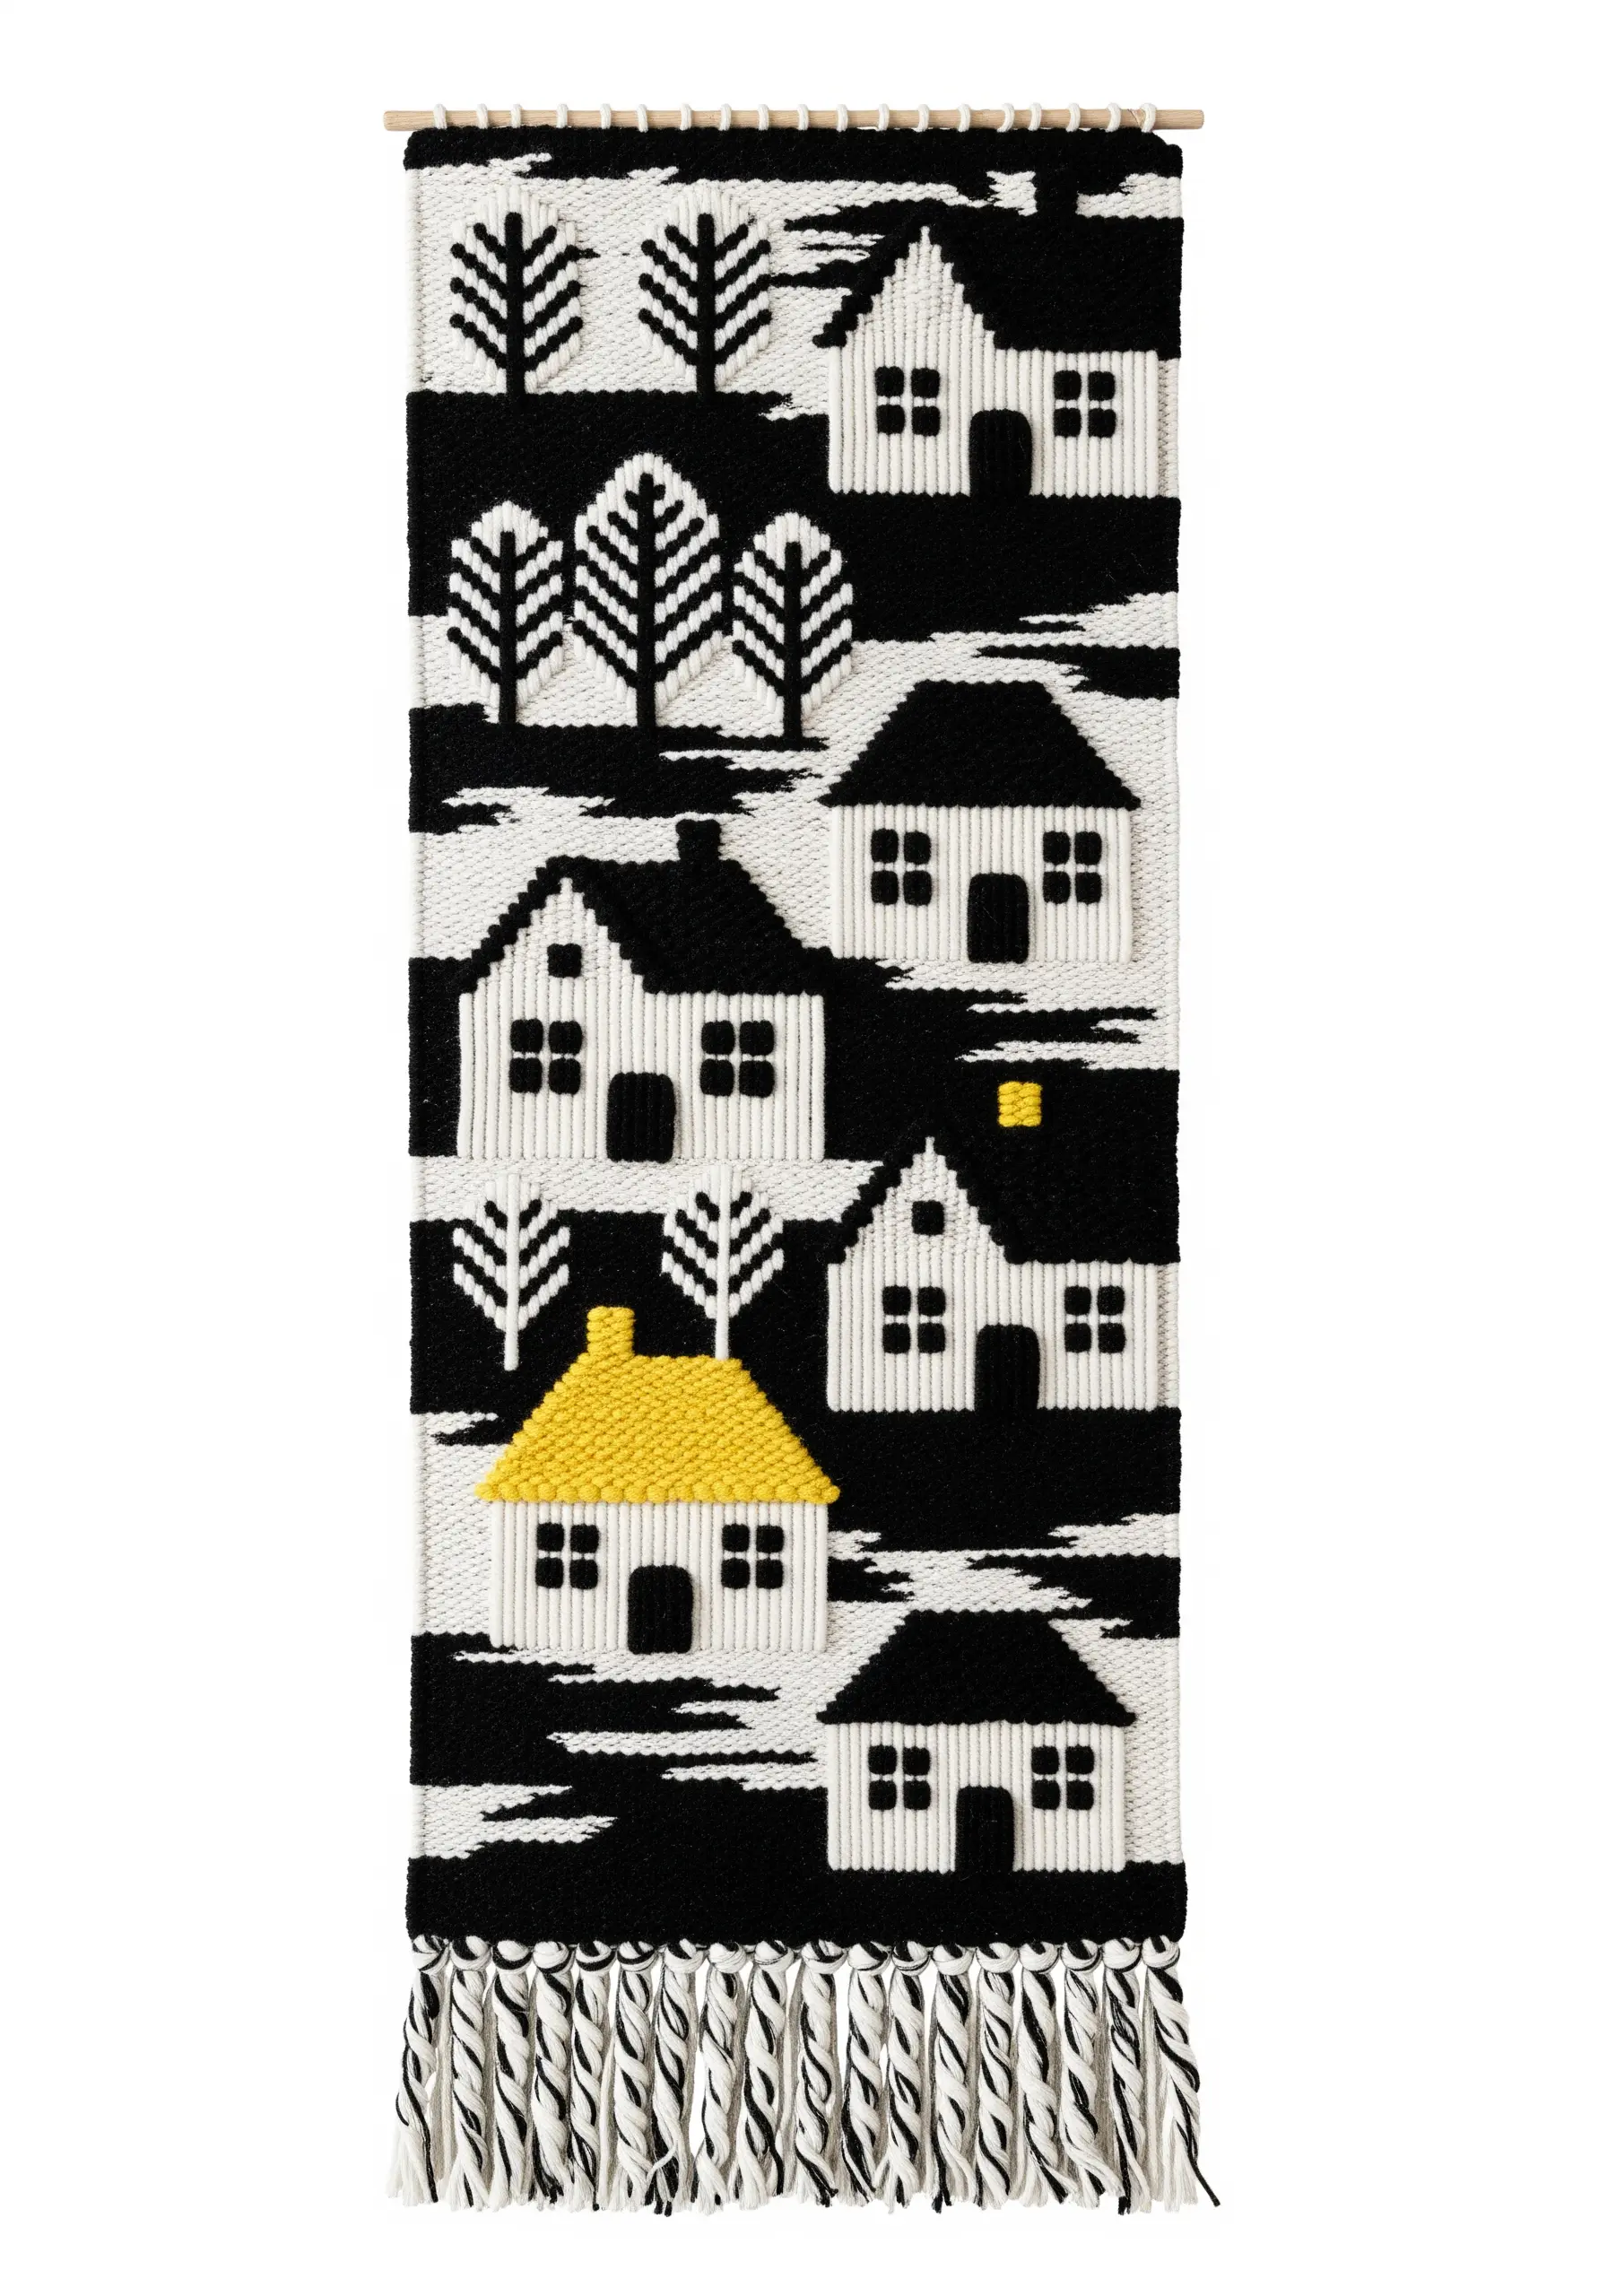
Tell a story with your weaving by using a stark, high-contrast color palette like black and white.
Use classic tapestry techniques to create sharp, graphic shapes that read clearly from a distance.
Introduce a single, unexpected pop of vibrant color—like the yellow roof—to serve as a powerful focal point and draw the viewer’s eye.
This minimalist approach to color allows the texture of the weave and the strength of the composition to take center stage.
22. Design a Floating Rainbow with Felted Wool Balls
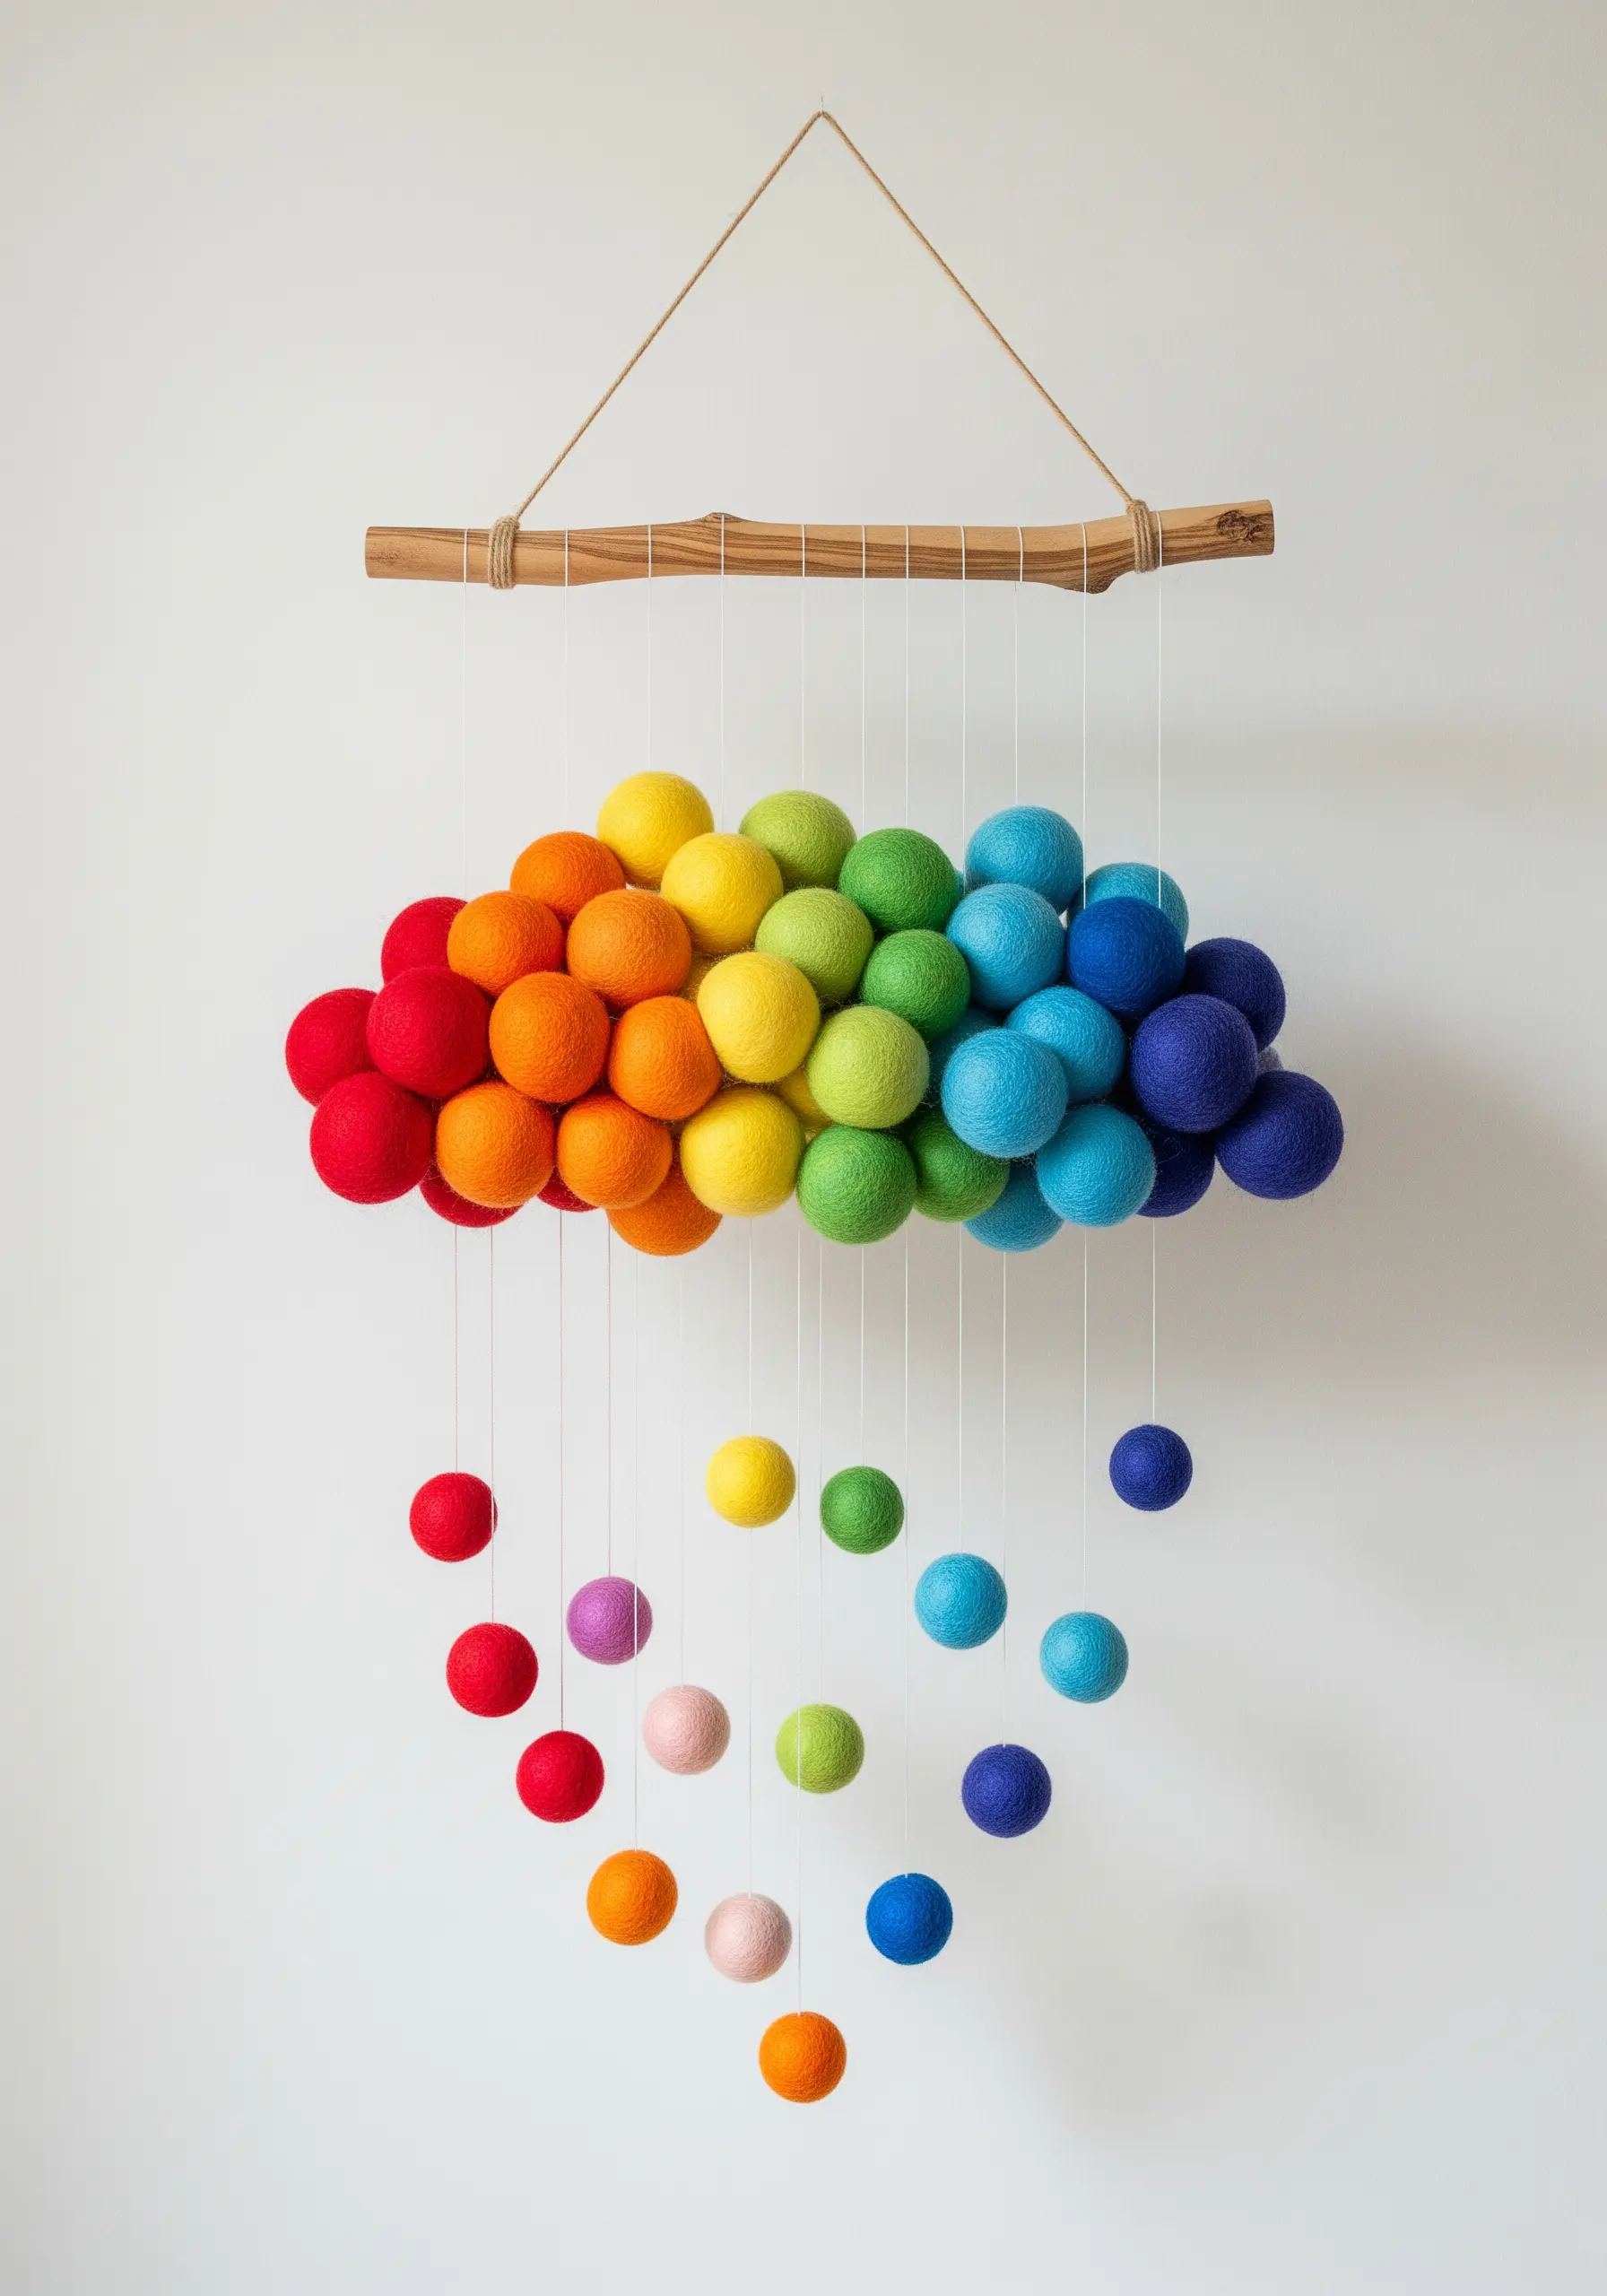
Craft a cheerful and delicate mobile using colorful felted wool balls.
Arrange the balls in a rainbow gradient to form the main cloud shape, stringing them tightly together so they hold their form.
For the ‘raindrops,’ suspend individual balls at varying lengths using fine, strong thread.
This creates a beautiful cascading effect and a sense of gentle movement, making it a perfect, calming addition to a nursery or quiet corner.


