

If you’ve ever felt that your embroidery, while beautiful, is missing a certain sense of harmony, you’re not alone. The secret to creating pieces that feel truly intentional and calming often lies in mastering the soft, blended effects of watercolor—but with thread.
It’s not about buying new tools or learning dozens of complex stitches. Instead, it’s about rethinking your approach. It’s about using fewer strands of floss to create transparency, directing your stitches to mimic the flow of water, and letting the fabric itself become part of your composition.
These techniques will help you transform pillowcases, blankets, and wall art into serene, cohesive elements that bring a quiet, painterly elegance to your bedroom. Let’s explore how a lighter touch can make the biggest impact.
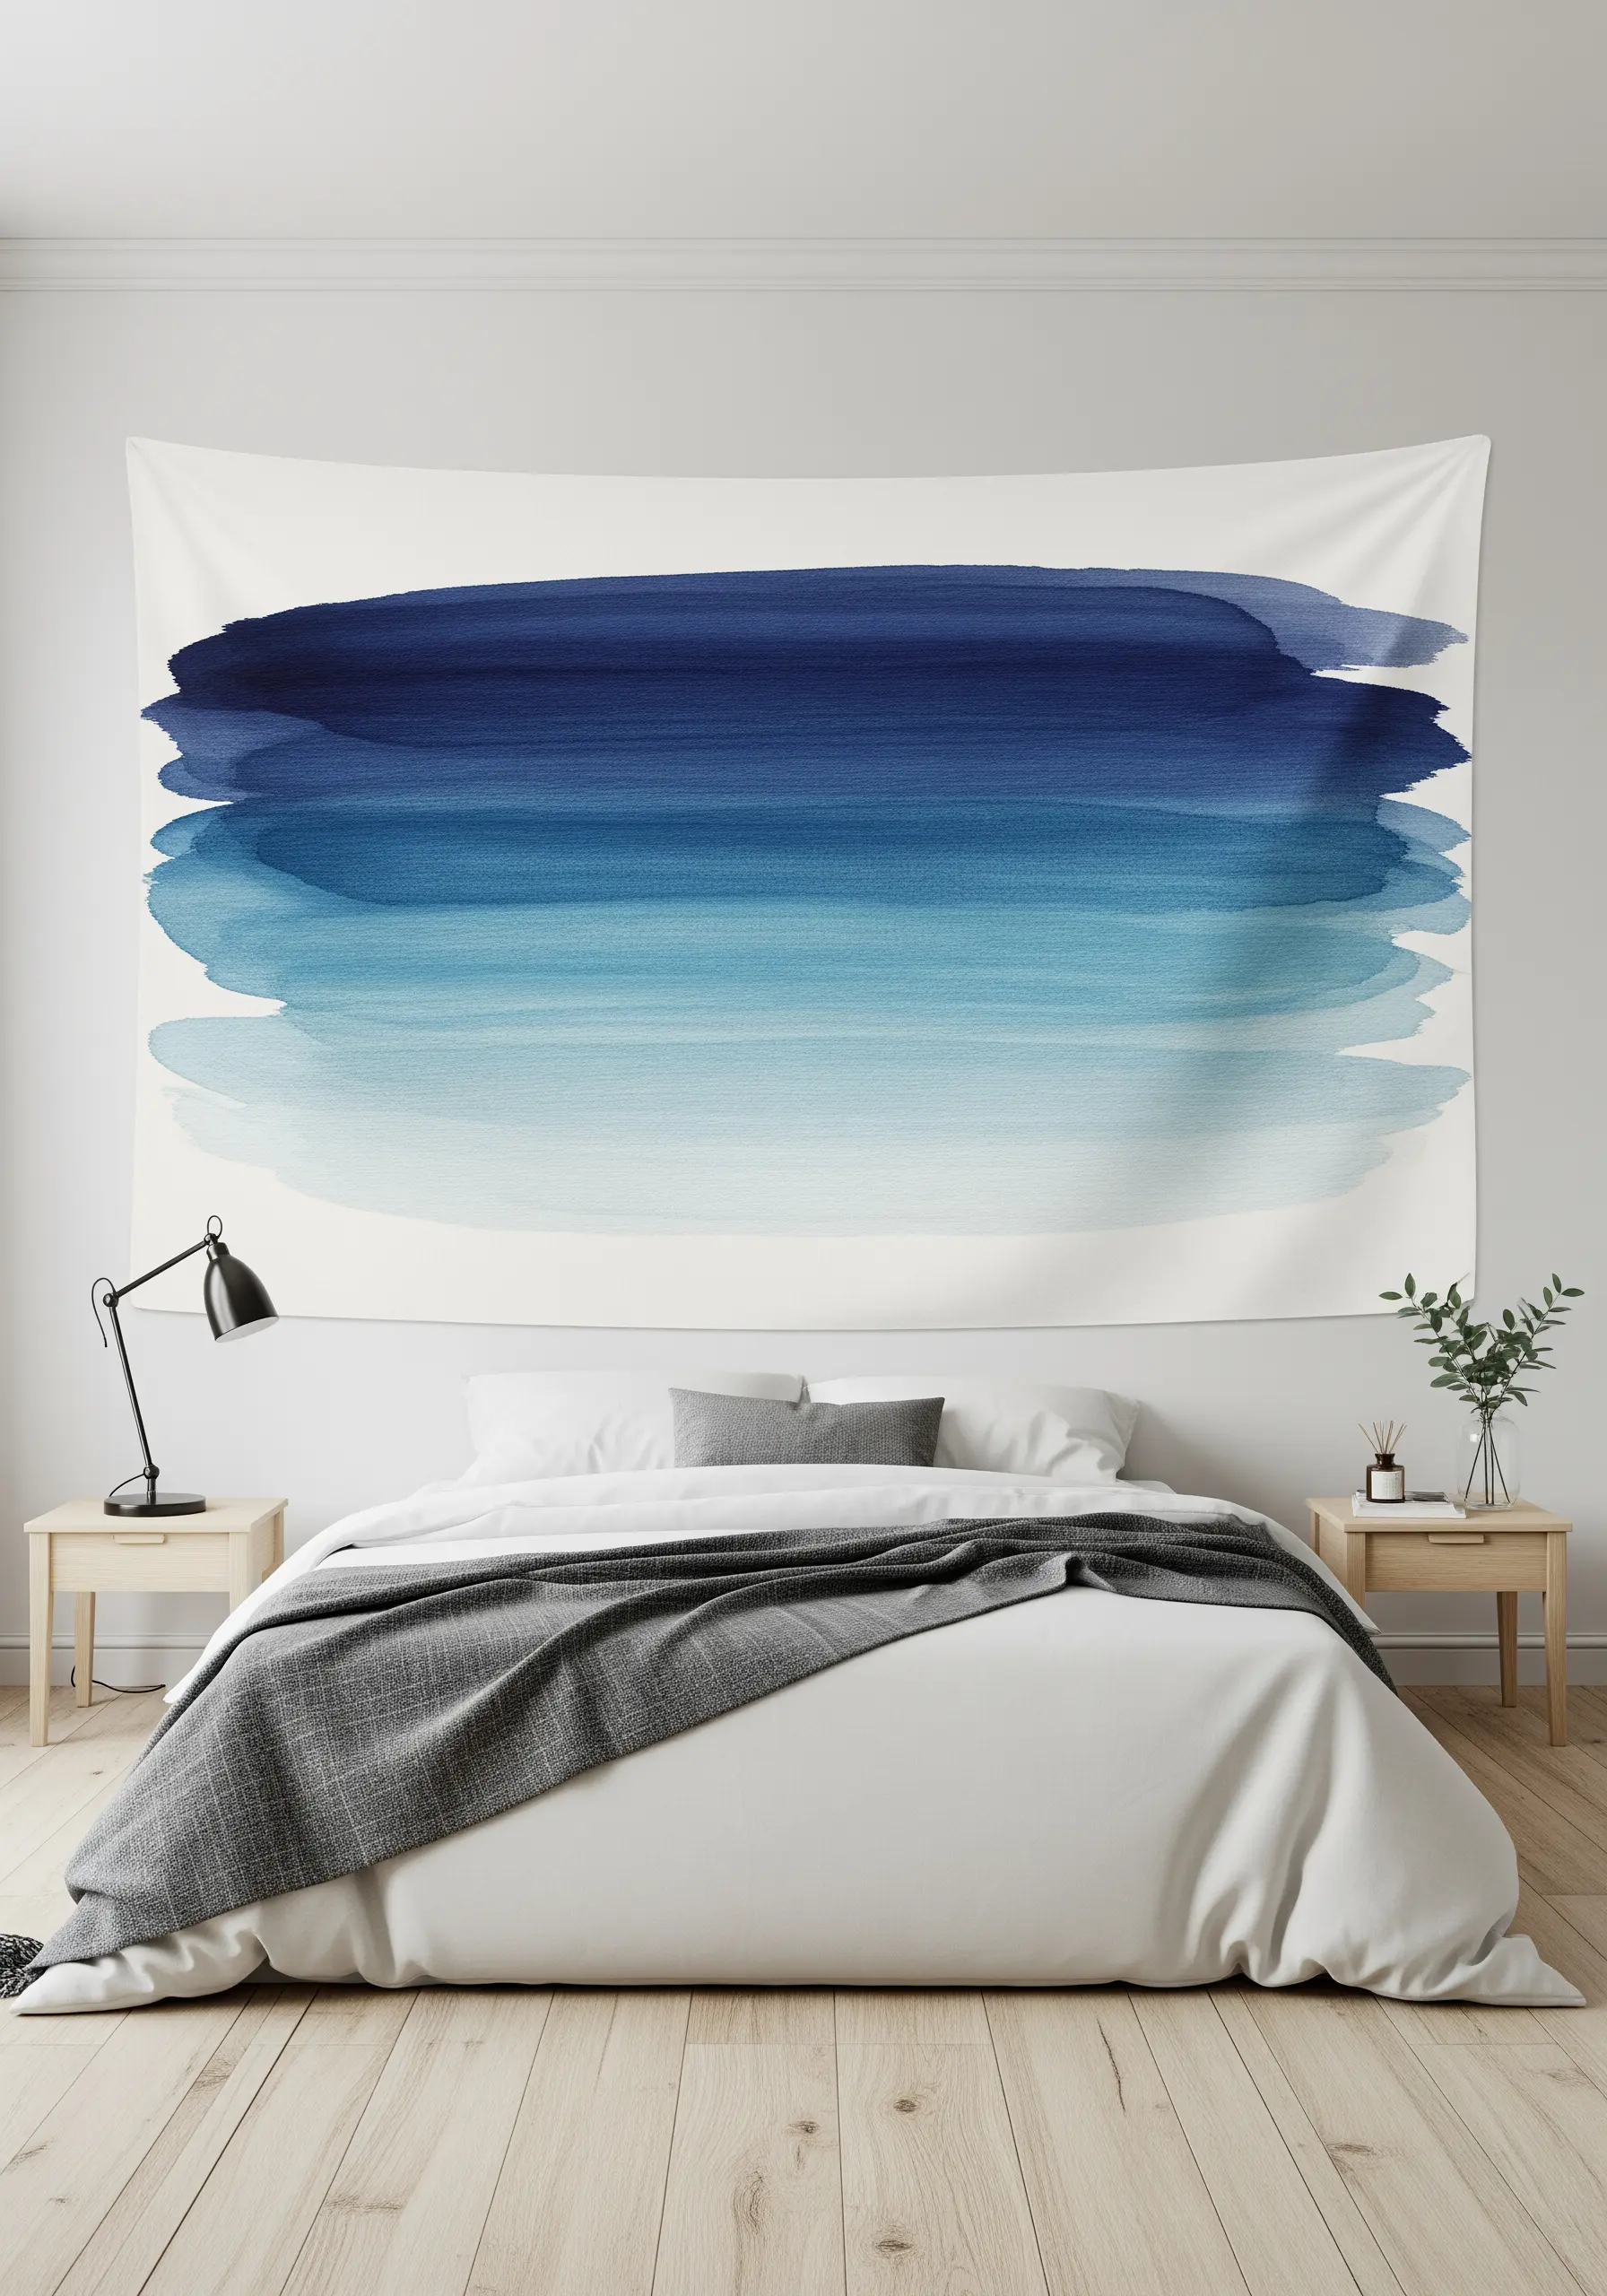
1. Create Depth with Layered Landscape Tapestries
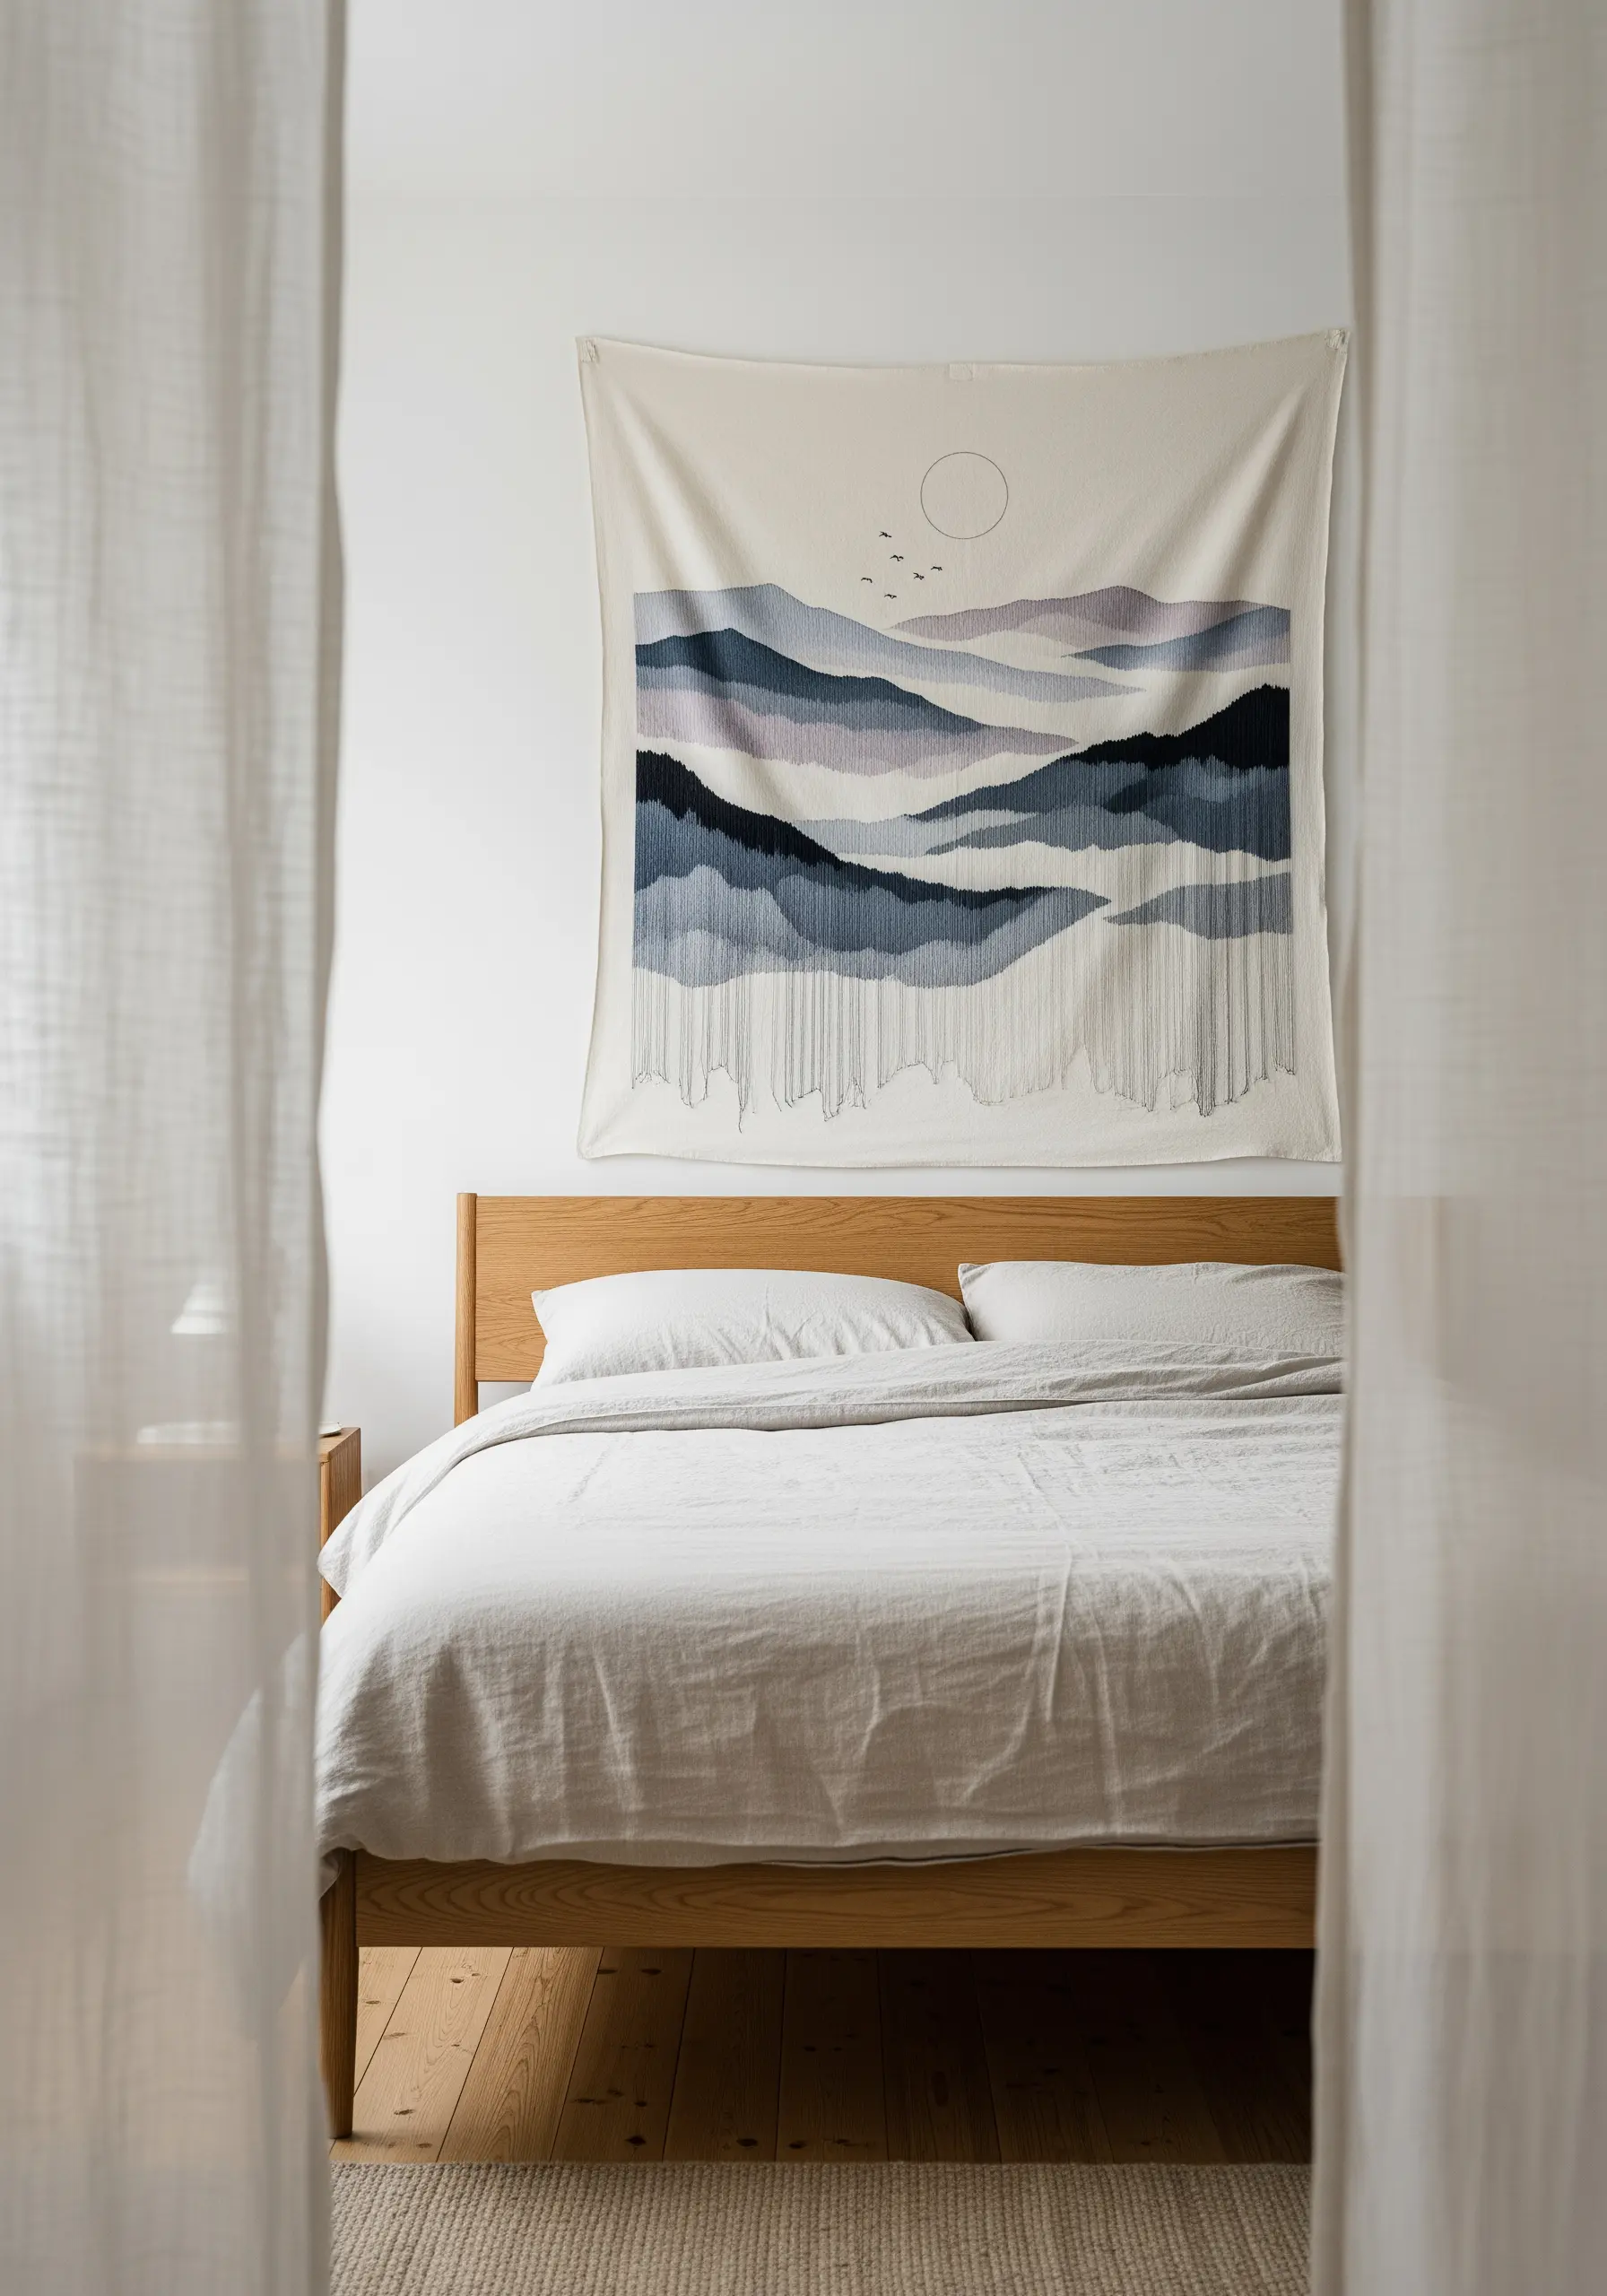
To achieve this serene, layered mountain effect on a large wall hanging, think in terms of foreground and background.
Use vertical satin stitches, varying the length of each stitch at the bottom edge to create a soft, dripping texture that mimics watercolor bleeds.
Work with a limited palette of blues, greys, and a single accent color, using darker, denser stitches for the mountains closest to the viewer.
Leave the bottom threads intentionally long and un-looped to add a textural fringe that completes the artistic, deconstructed look.
2. Stitch Delicate Lavender Sprigs on Pillowcases
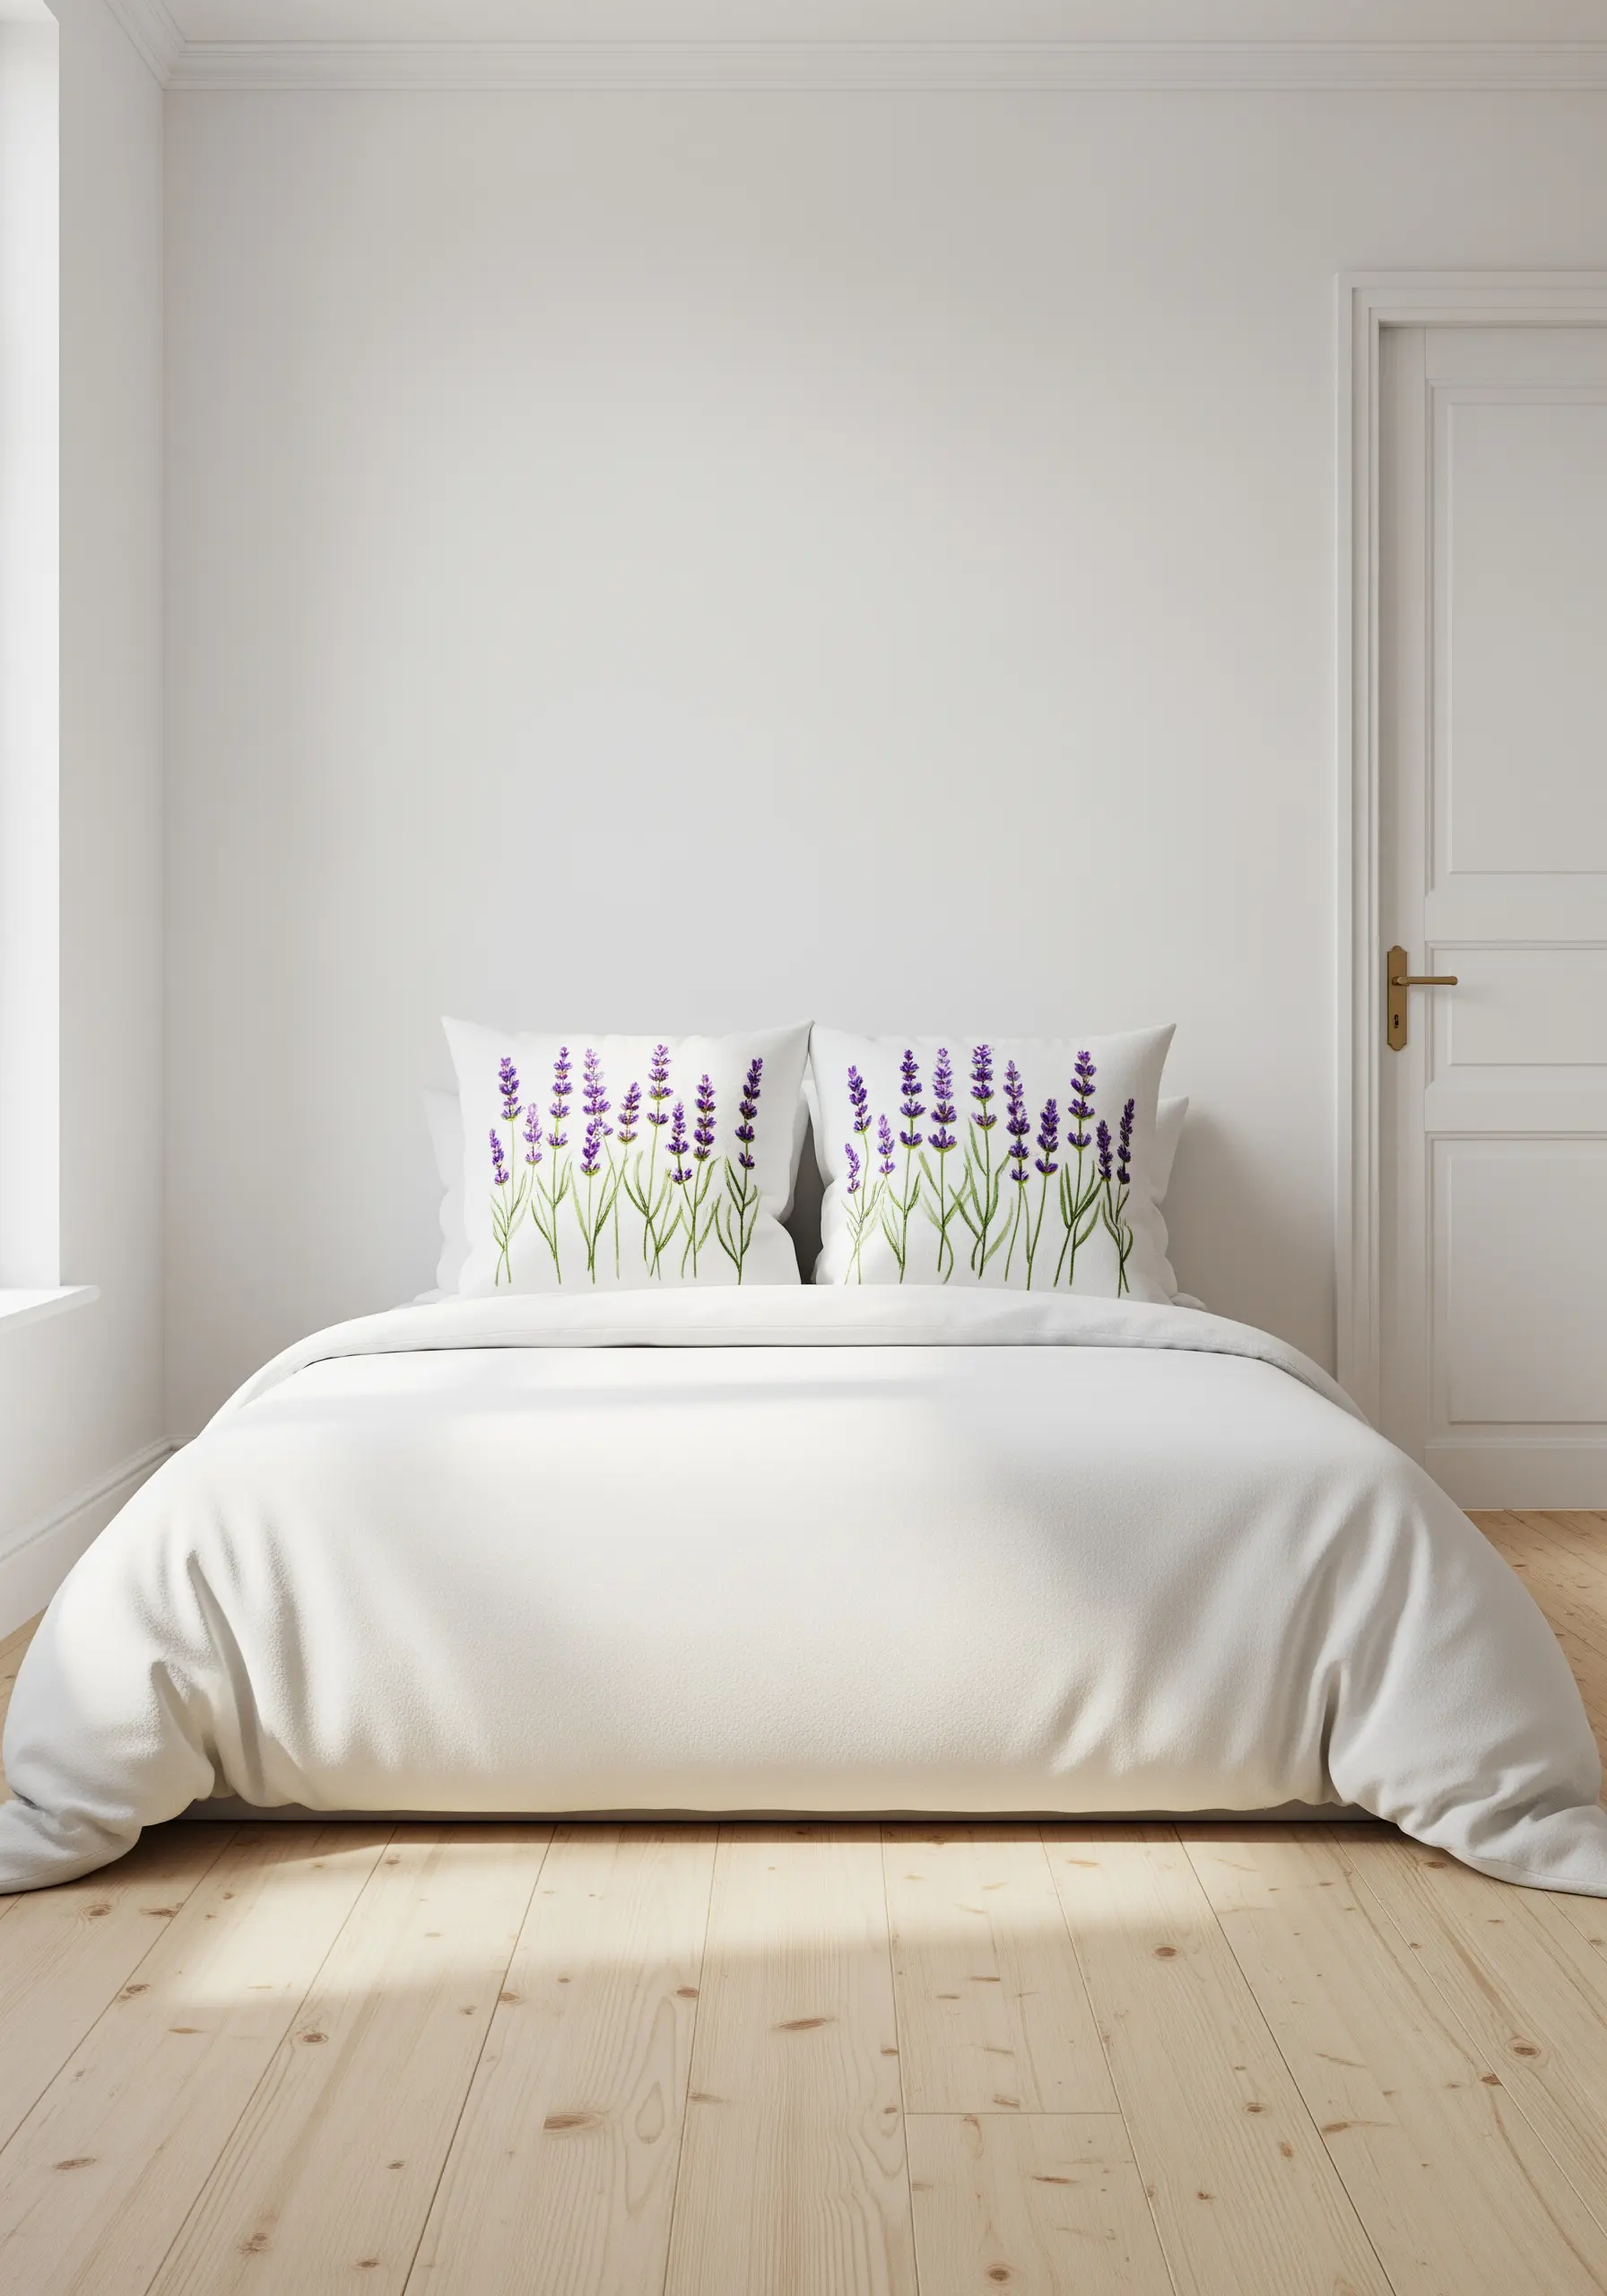
For a light, botanical touch on cotton pillowcases, use a single strand of floss to keep the design from feeling heavy or stiff.
Create the stems with a fine stem stitch or whipped backstitch in a fresh green, allowing the lines to be slightly irregular for an organic feel.
Form the lavender buds with tiny French knots or single straight stitches, clustering them more densely at the top and spacing them out toward the stem.
This sparse application of stitches is key to the watercolor aesthetic, letting the white fabric breathe and become part of the design.
3. Blend Abstract Washes with Metallic Accents
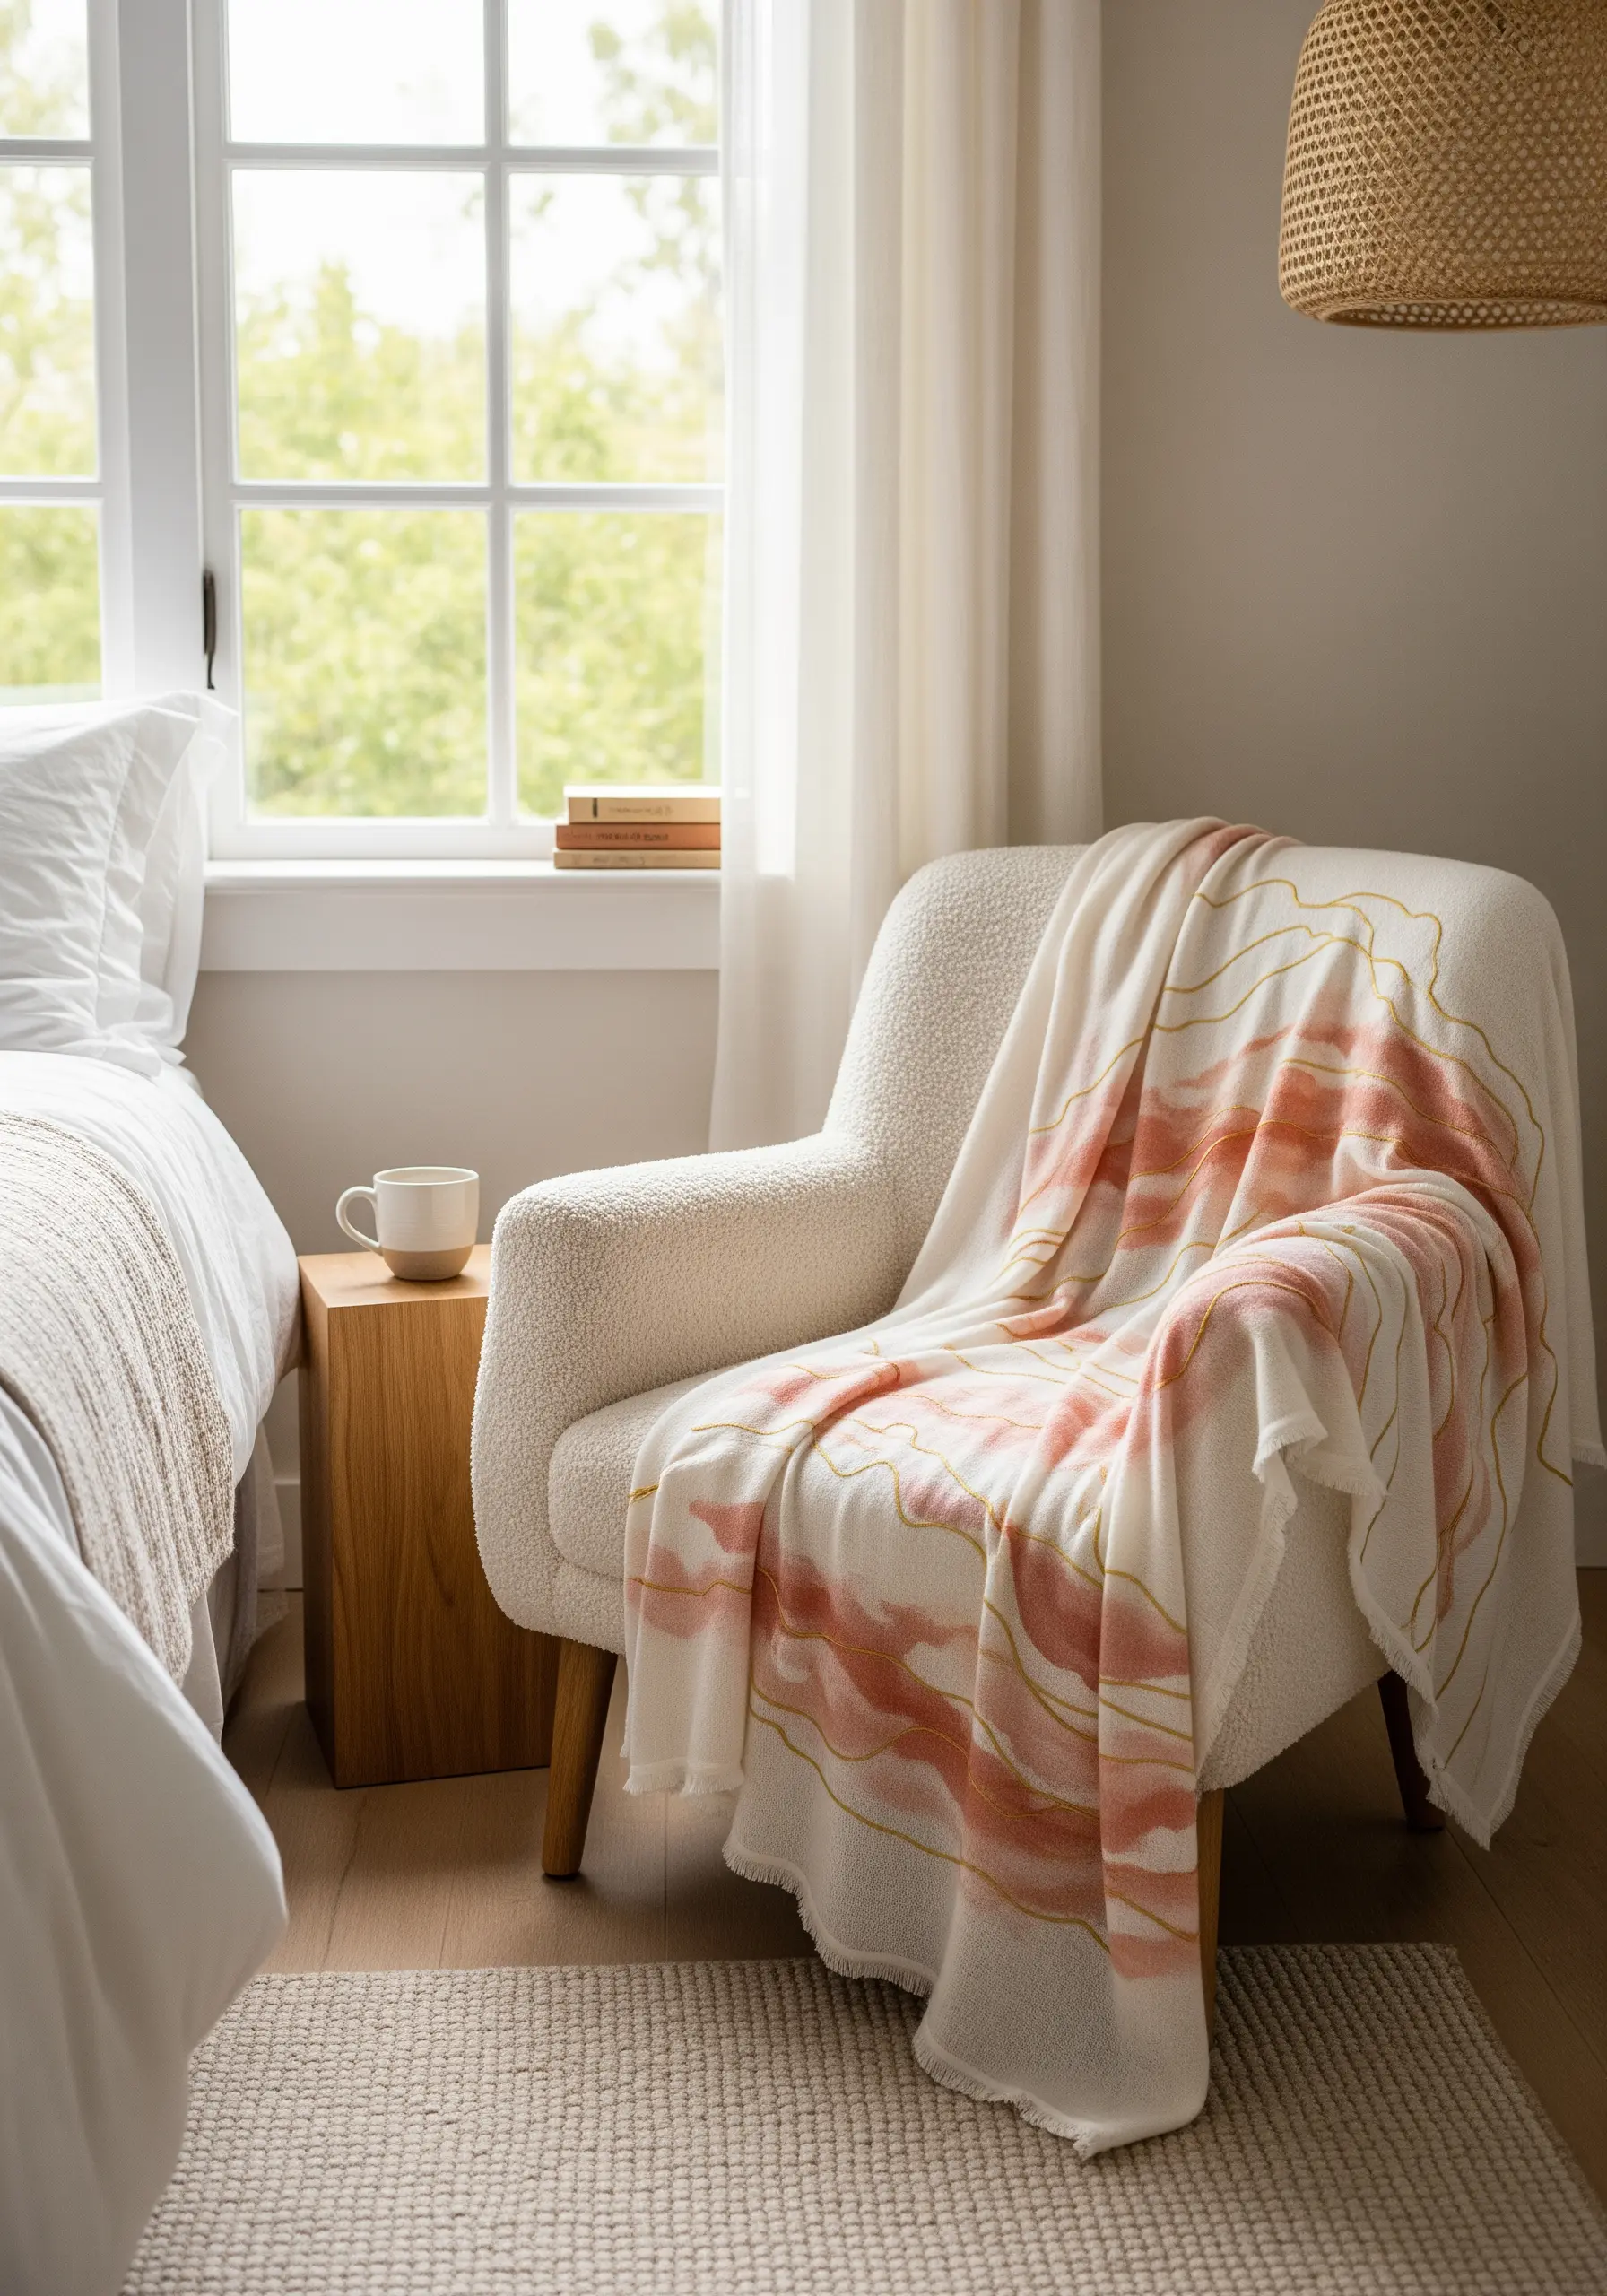
Transform a simple throw blanket by combining soft color fields with a sharp, elegant outline.
First, create the abstract ‘watercolor’ shapes using broad sections of long-and-short stitch, blending two or three harmonious shades like coral and blush.
Instead of a dense fill, keep the stitches light and slightly varied in direction to mimic the transparency of paint.
Then, add a single, flowing line of couched metallic thread along the edge of the color blocks to introduce a touch of light and definition.
4. Capture Fluid Motion in a Koi Pond Runner
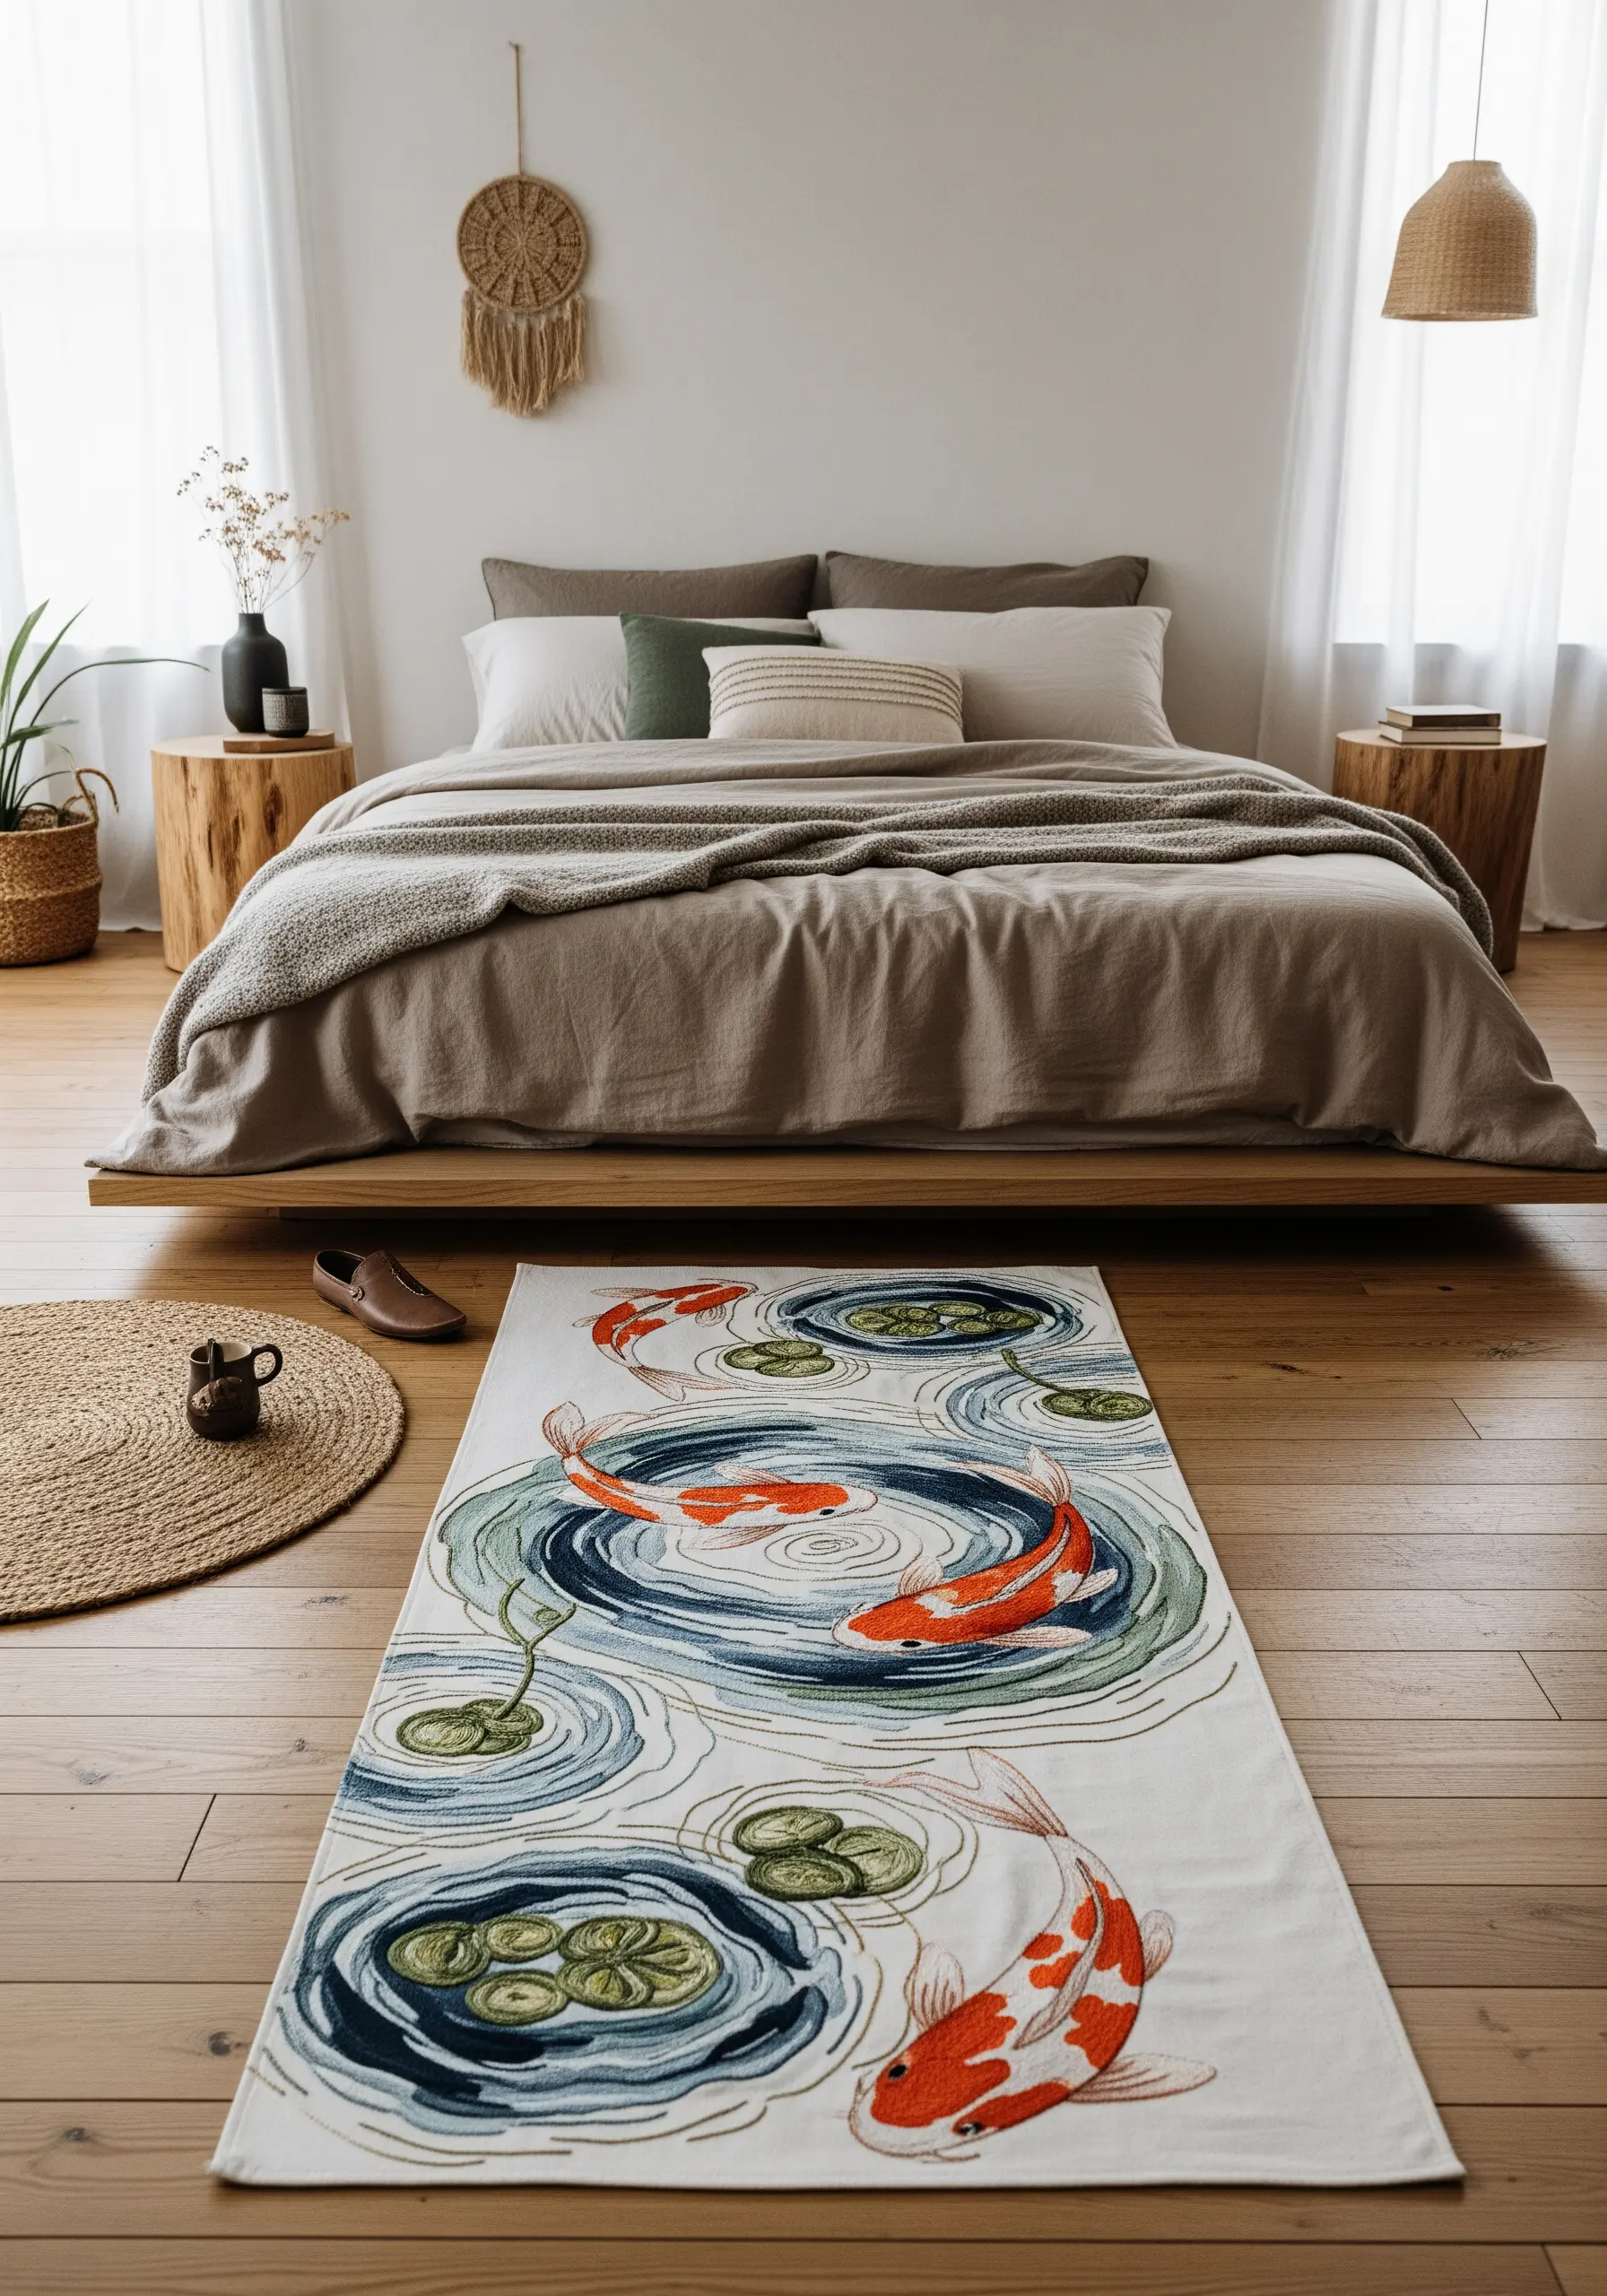
To create the illusion of rippling water on a floor runner, use concentric circles of split stitch or backstitch in varying shades of blue and grey.
Use a single strand of floss for the entire piece to maintain fine detail and prevent the texture from becoming too coarse underfoot.
For the koi fish, employ thread painting (long-and-short stitch) to blend oranges, whites, and blacks seamlessly, ensuring your stitches follow the natural curves of the fish’s body.
This directional stitching is what creates the sense of fluid movement and brings the scene to life.
5. Layer Colors with Transparent Stitching
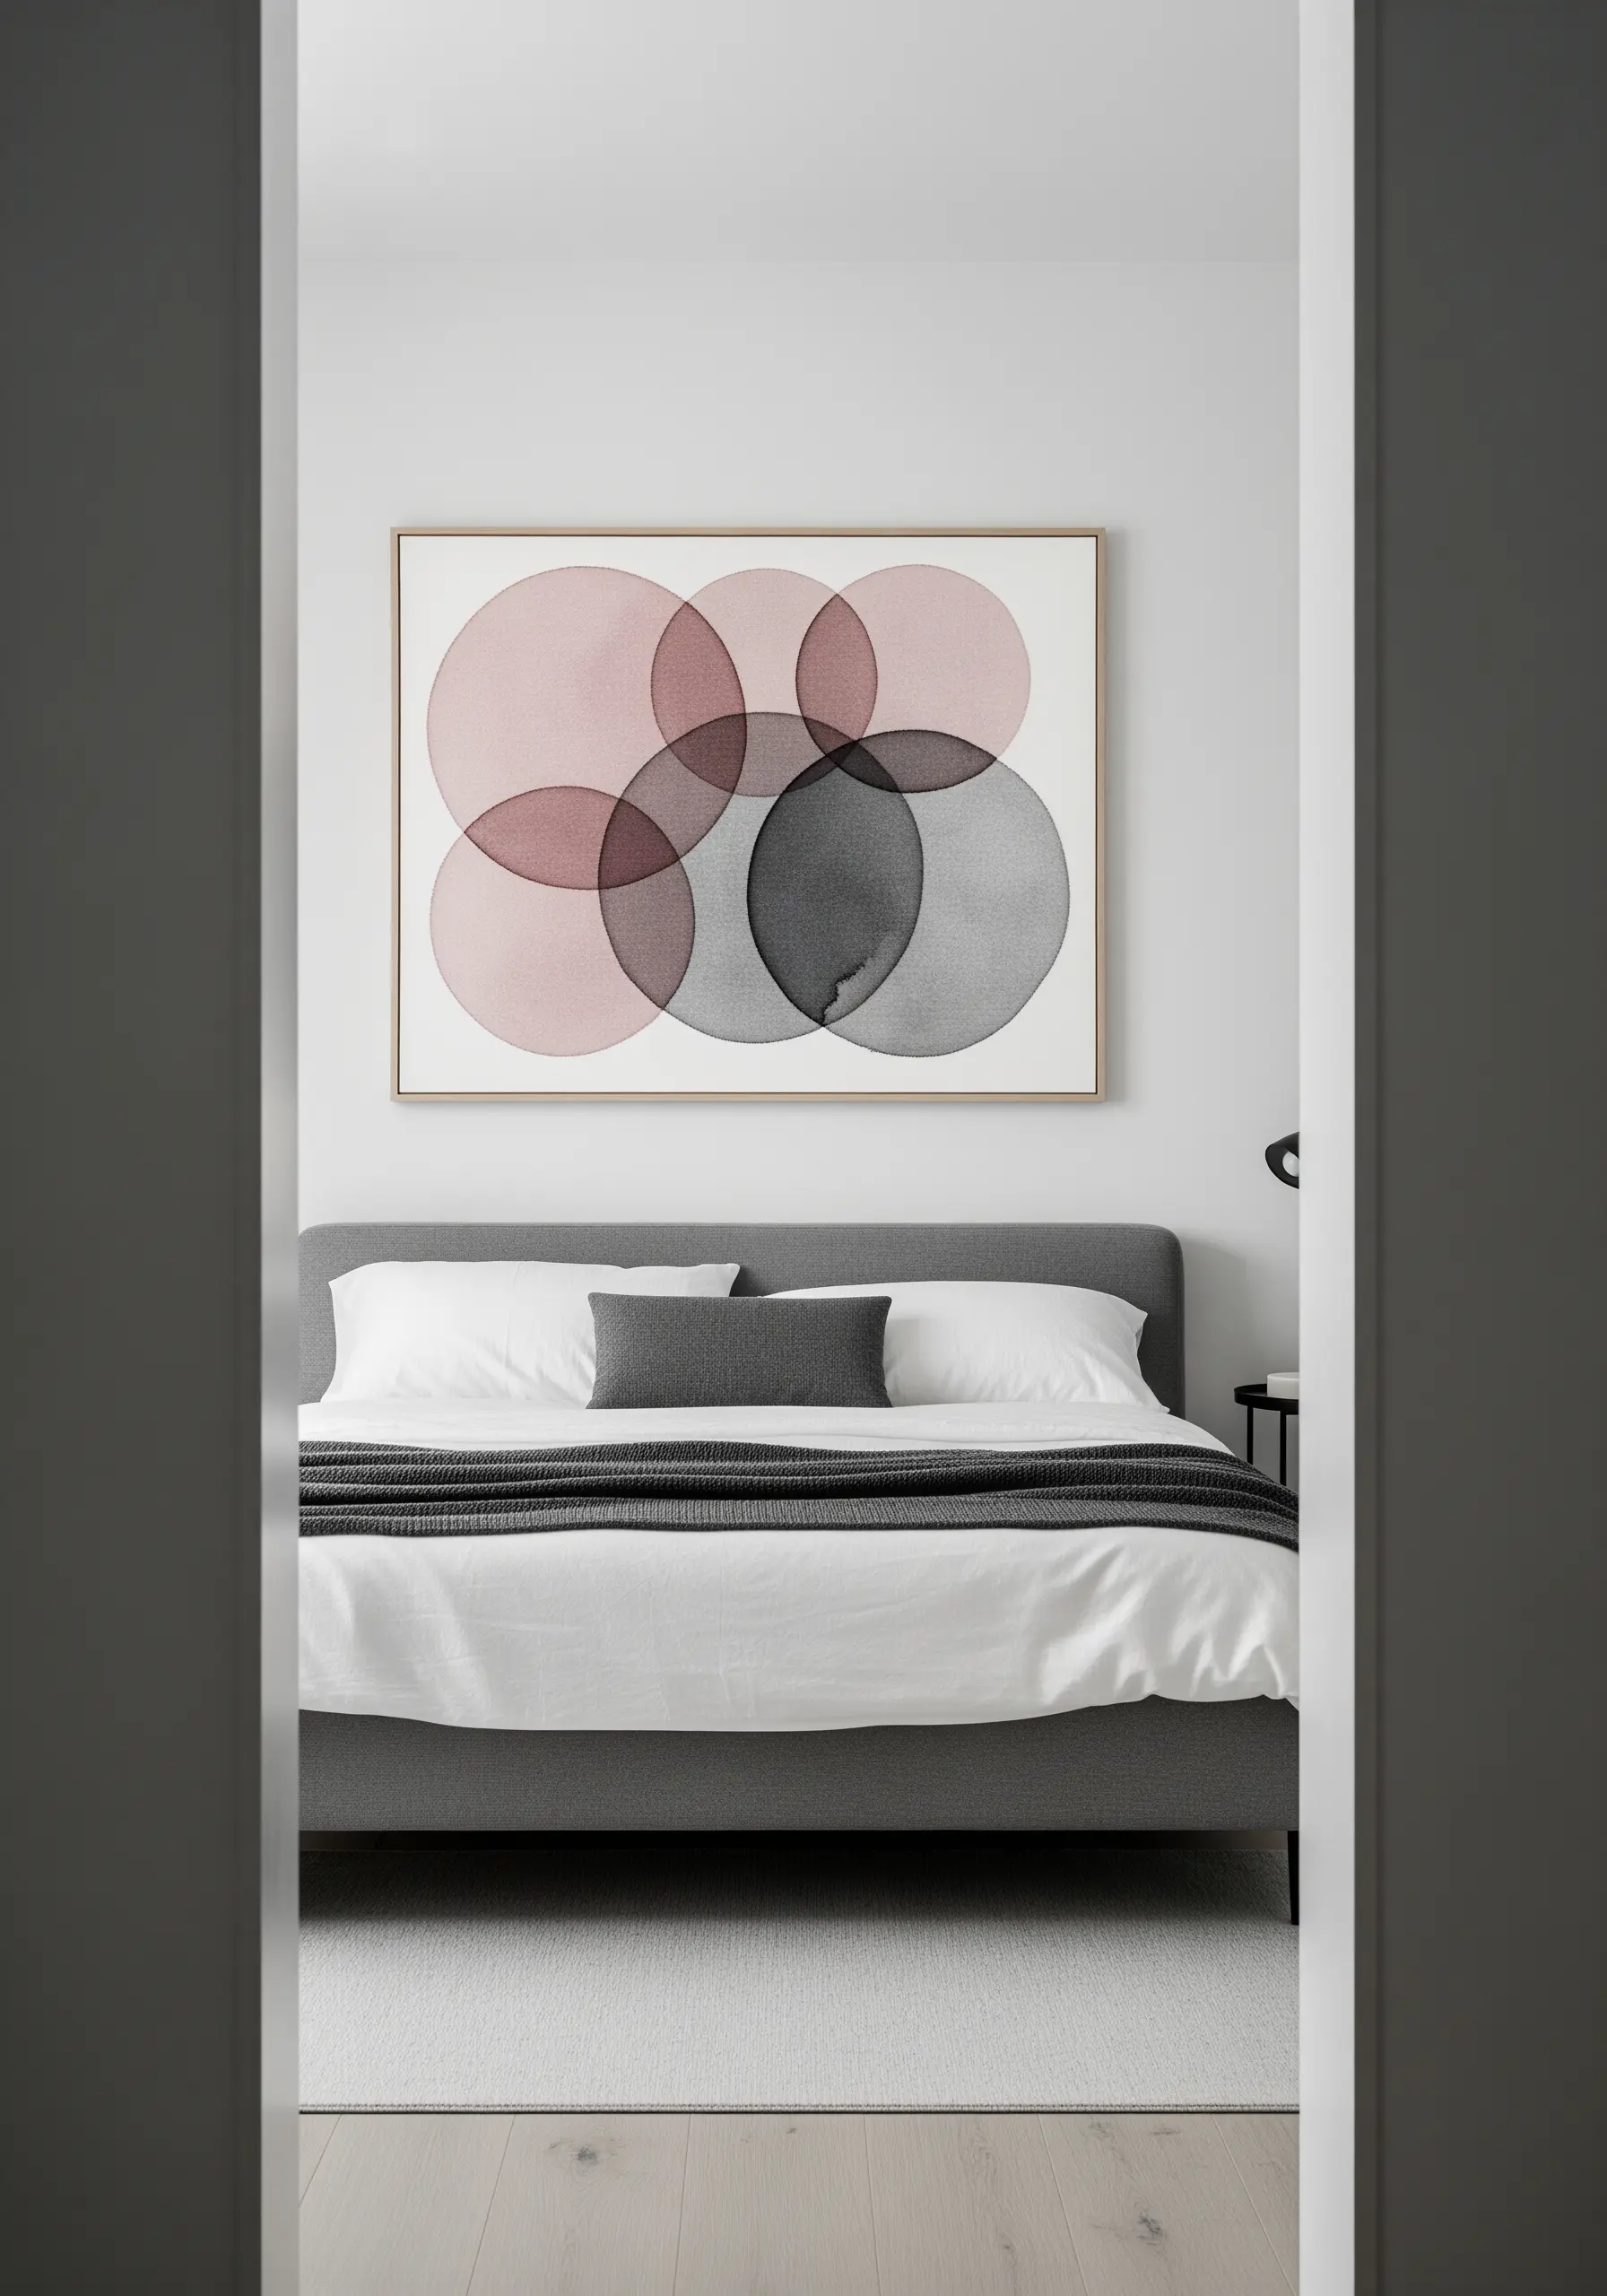
To replicate the overlapping transparency of watercolor circles, the key is not density, but direction and thread weight.
Use a single strand of floss and fill each circle with seed stitch or a very light long-and-short stitch.
In the overlapping sections, change the direction of your stitches—for example, stitch one circle vertically and the other horizontally.
This subtle shift in texture and the visual mixing of the two colors’ threads will create a convincing illusion of transparency without adding bulk.
6. Design a Coastal Set with Washed-Out Hues
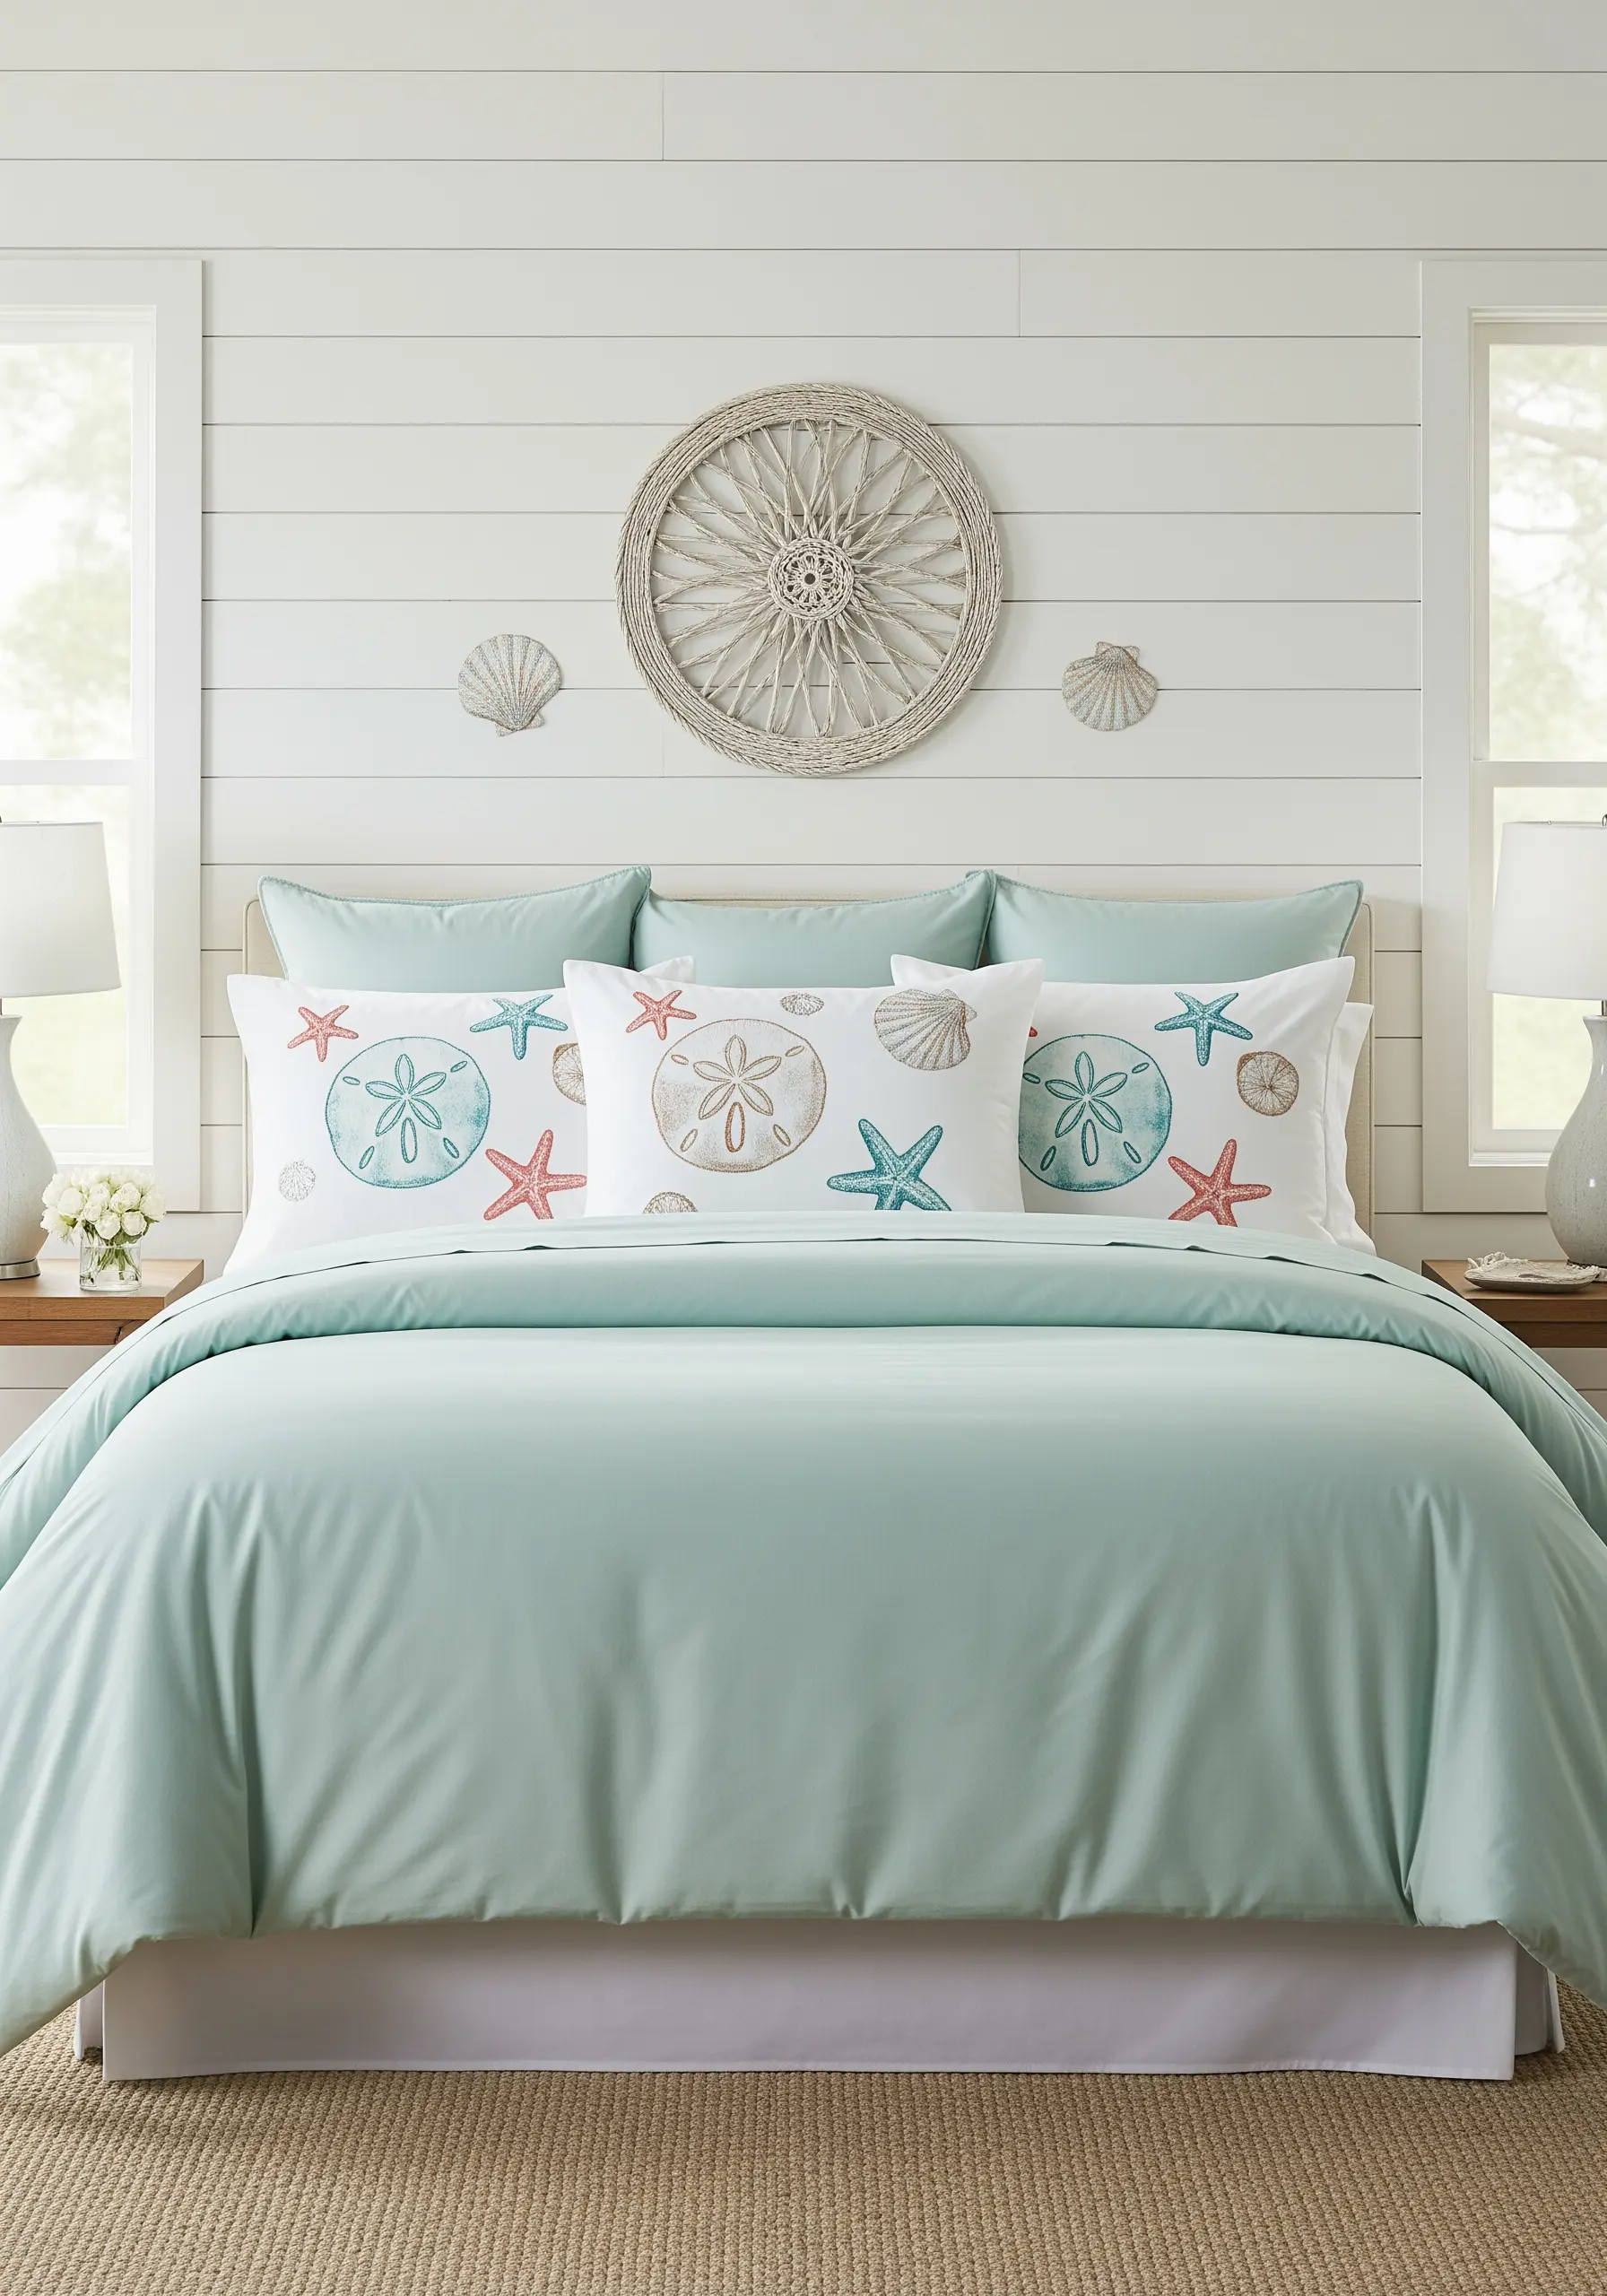
For a cohesive coastal theme, choose a muted palette of seafoam, coral, and sand, and use it across several pillowcases.
Achieve the washed-out, sun-bleached look by using only one or two strands of thread and keeping your fill stitches sparse.
Outline your motifs—sand dollars, starfish, shells—with a delicate backstitch, then add minimal seed stitches or short straight stitches inside, letting the white fabric show through.
This technique ensures the embroidery remains soft to the touch and visually light, perfect for nautical-themed decor.
7. Evoke a Winter Scene with Textural Stitches
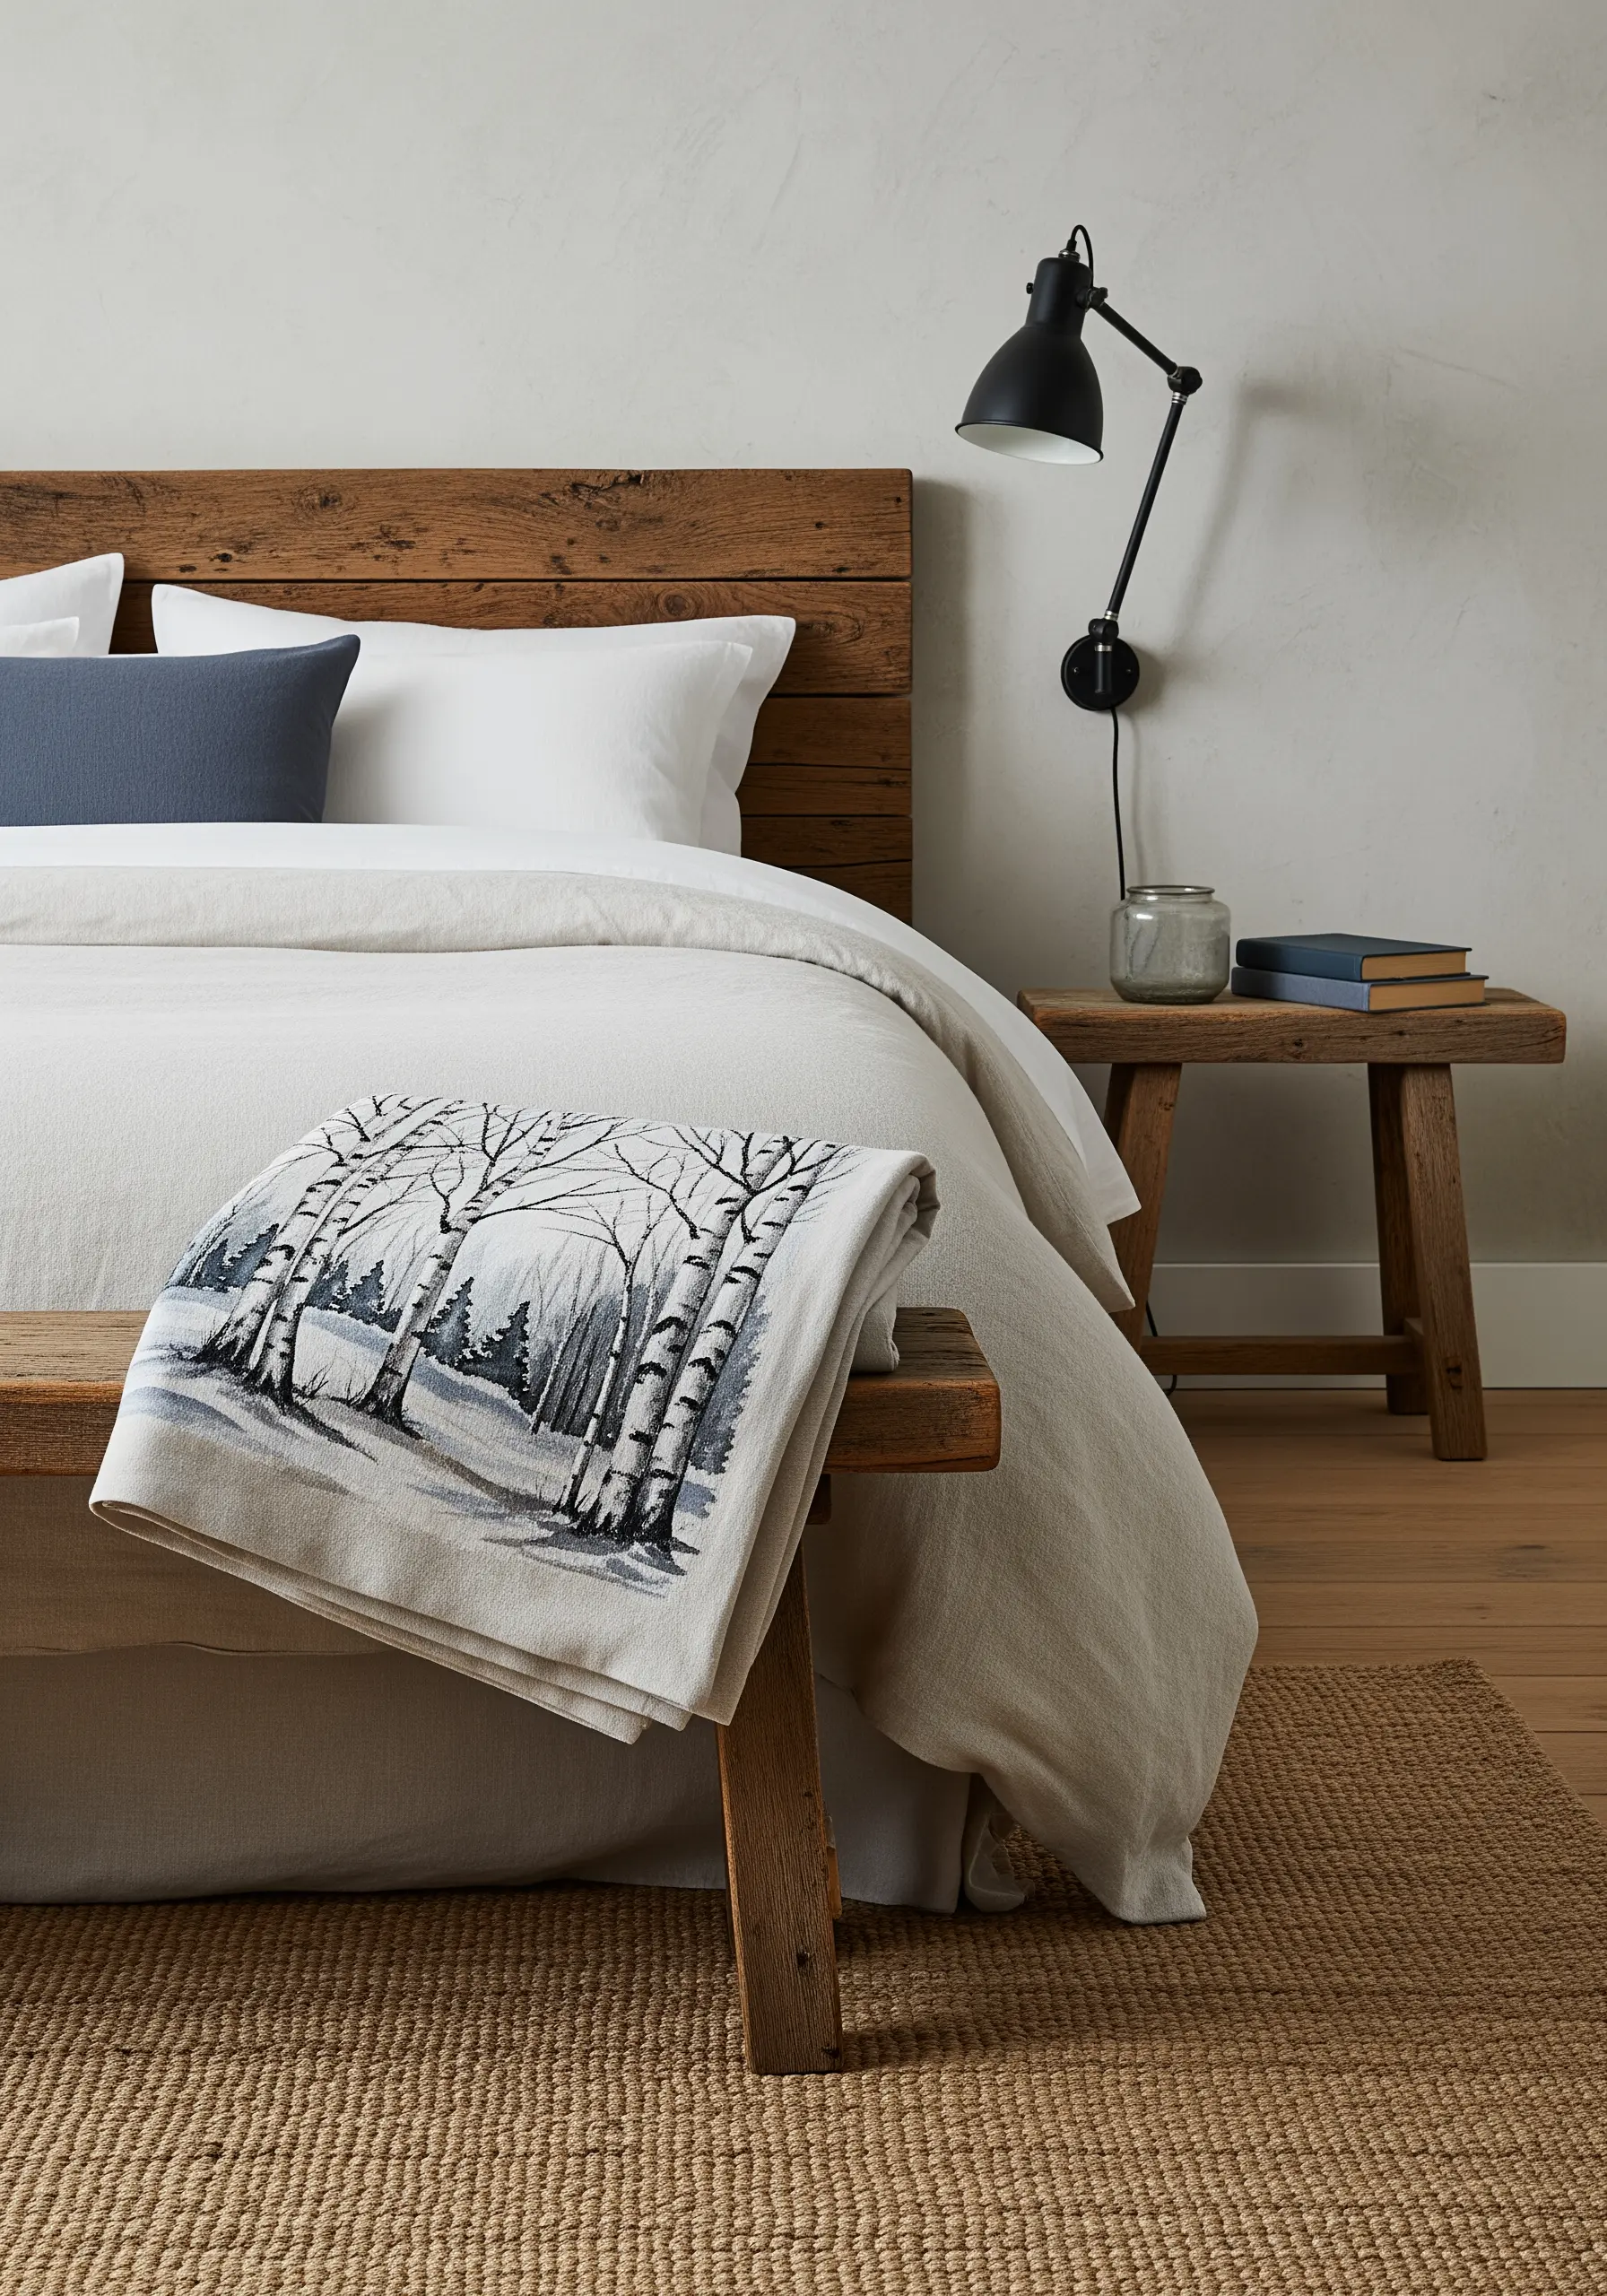
Capture the stark beauty of a winter forest by focusing on texture and a monochrome palette.
For the birch trees, use long vertical satin stitches in off-white and pale grey, then add tiny, irregular horizontal stitches in black to suggest the texture of the bark.
Create the distant forest with a soft fill of long-and-short stitches in shades of grey and slate blue, keeping the edges undefined.
This contrast between the sharp detail of the birch and the soft blur of the background creates incredible depth.
8. Cascade a Delicate Vine Down a Duvet
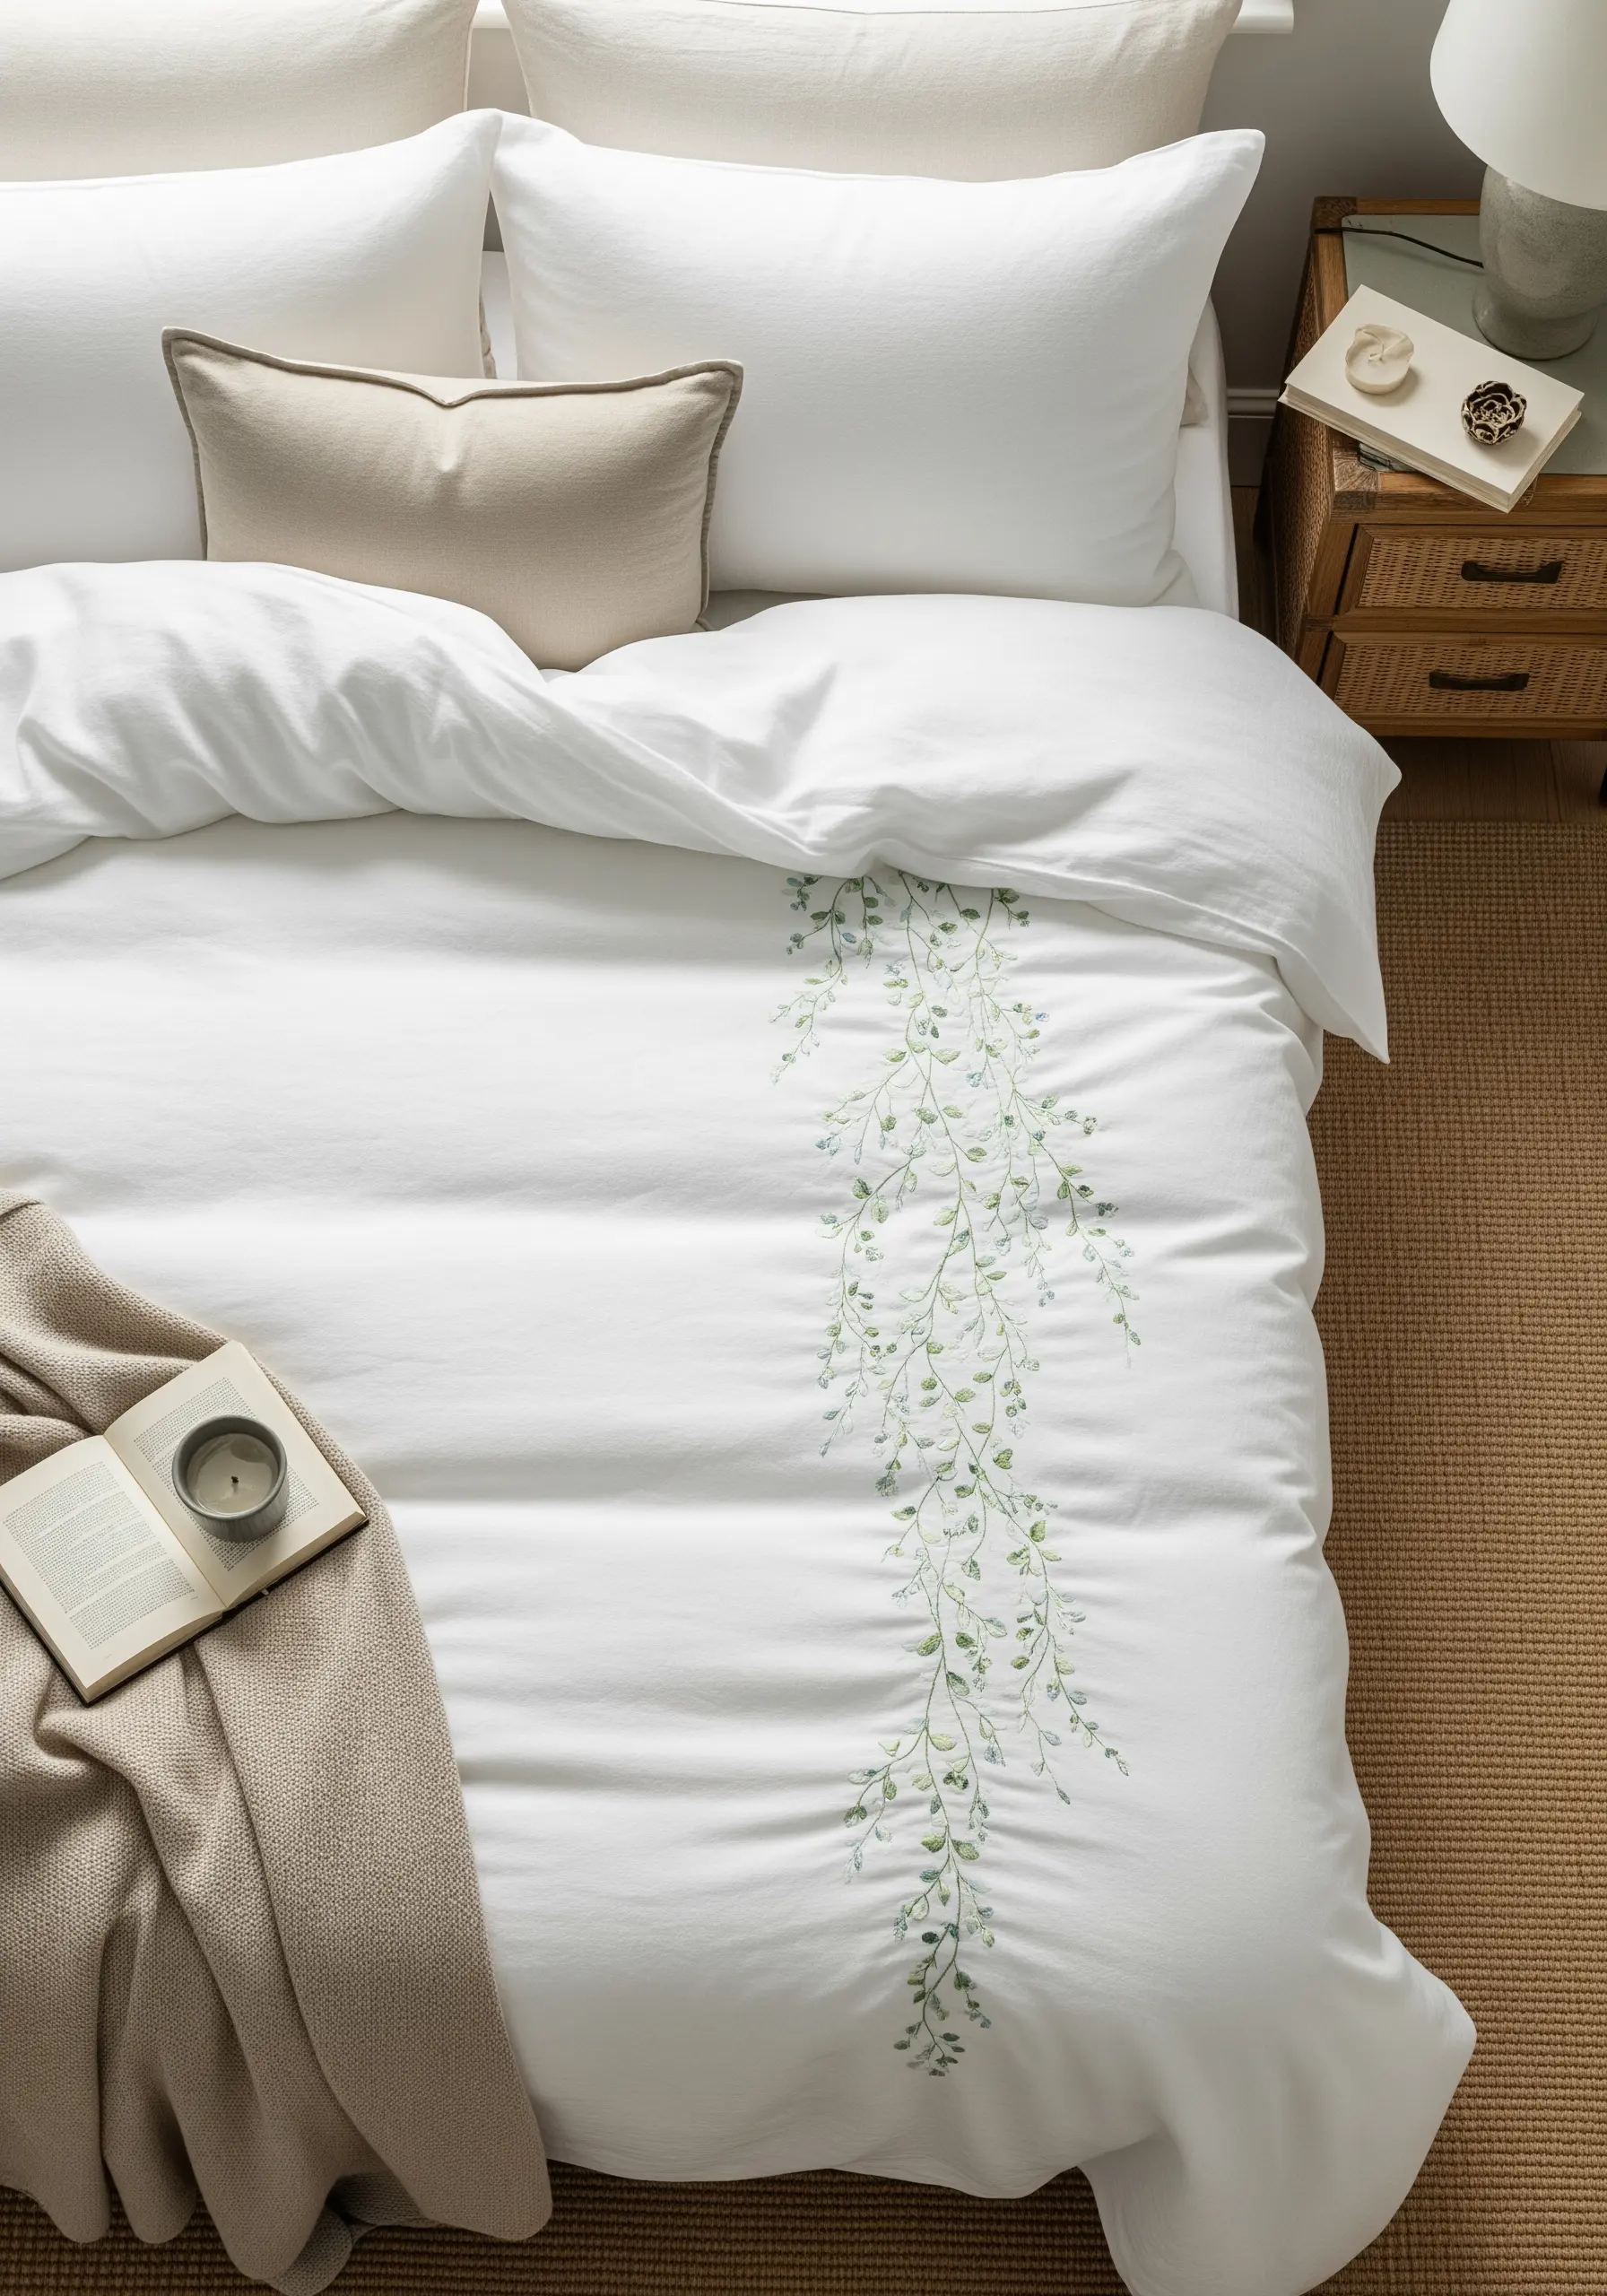
For an elegant design that flows down bedding, choose a simple, repeating botanical motif like a trailing vine.
Use a fine stem stitch for the main vine to create a continuous, graceful line.
For the leaves, alternate between detached chain stitches and fly stitches in several shades of soft green, scattering them organically.
By using only two strands of floss and varying the placement and angle of each leaf, you achieve a natural, hand-painted look that enhances the fabric’s drape.
9. Create a Statement Headboard with a Single Bloom
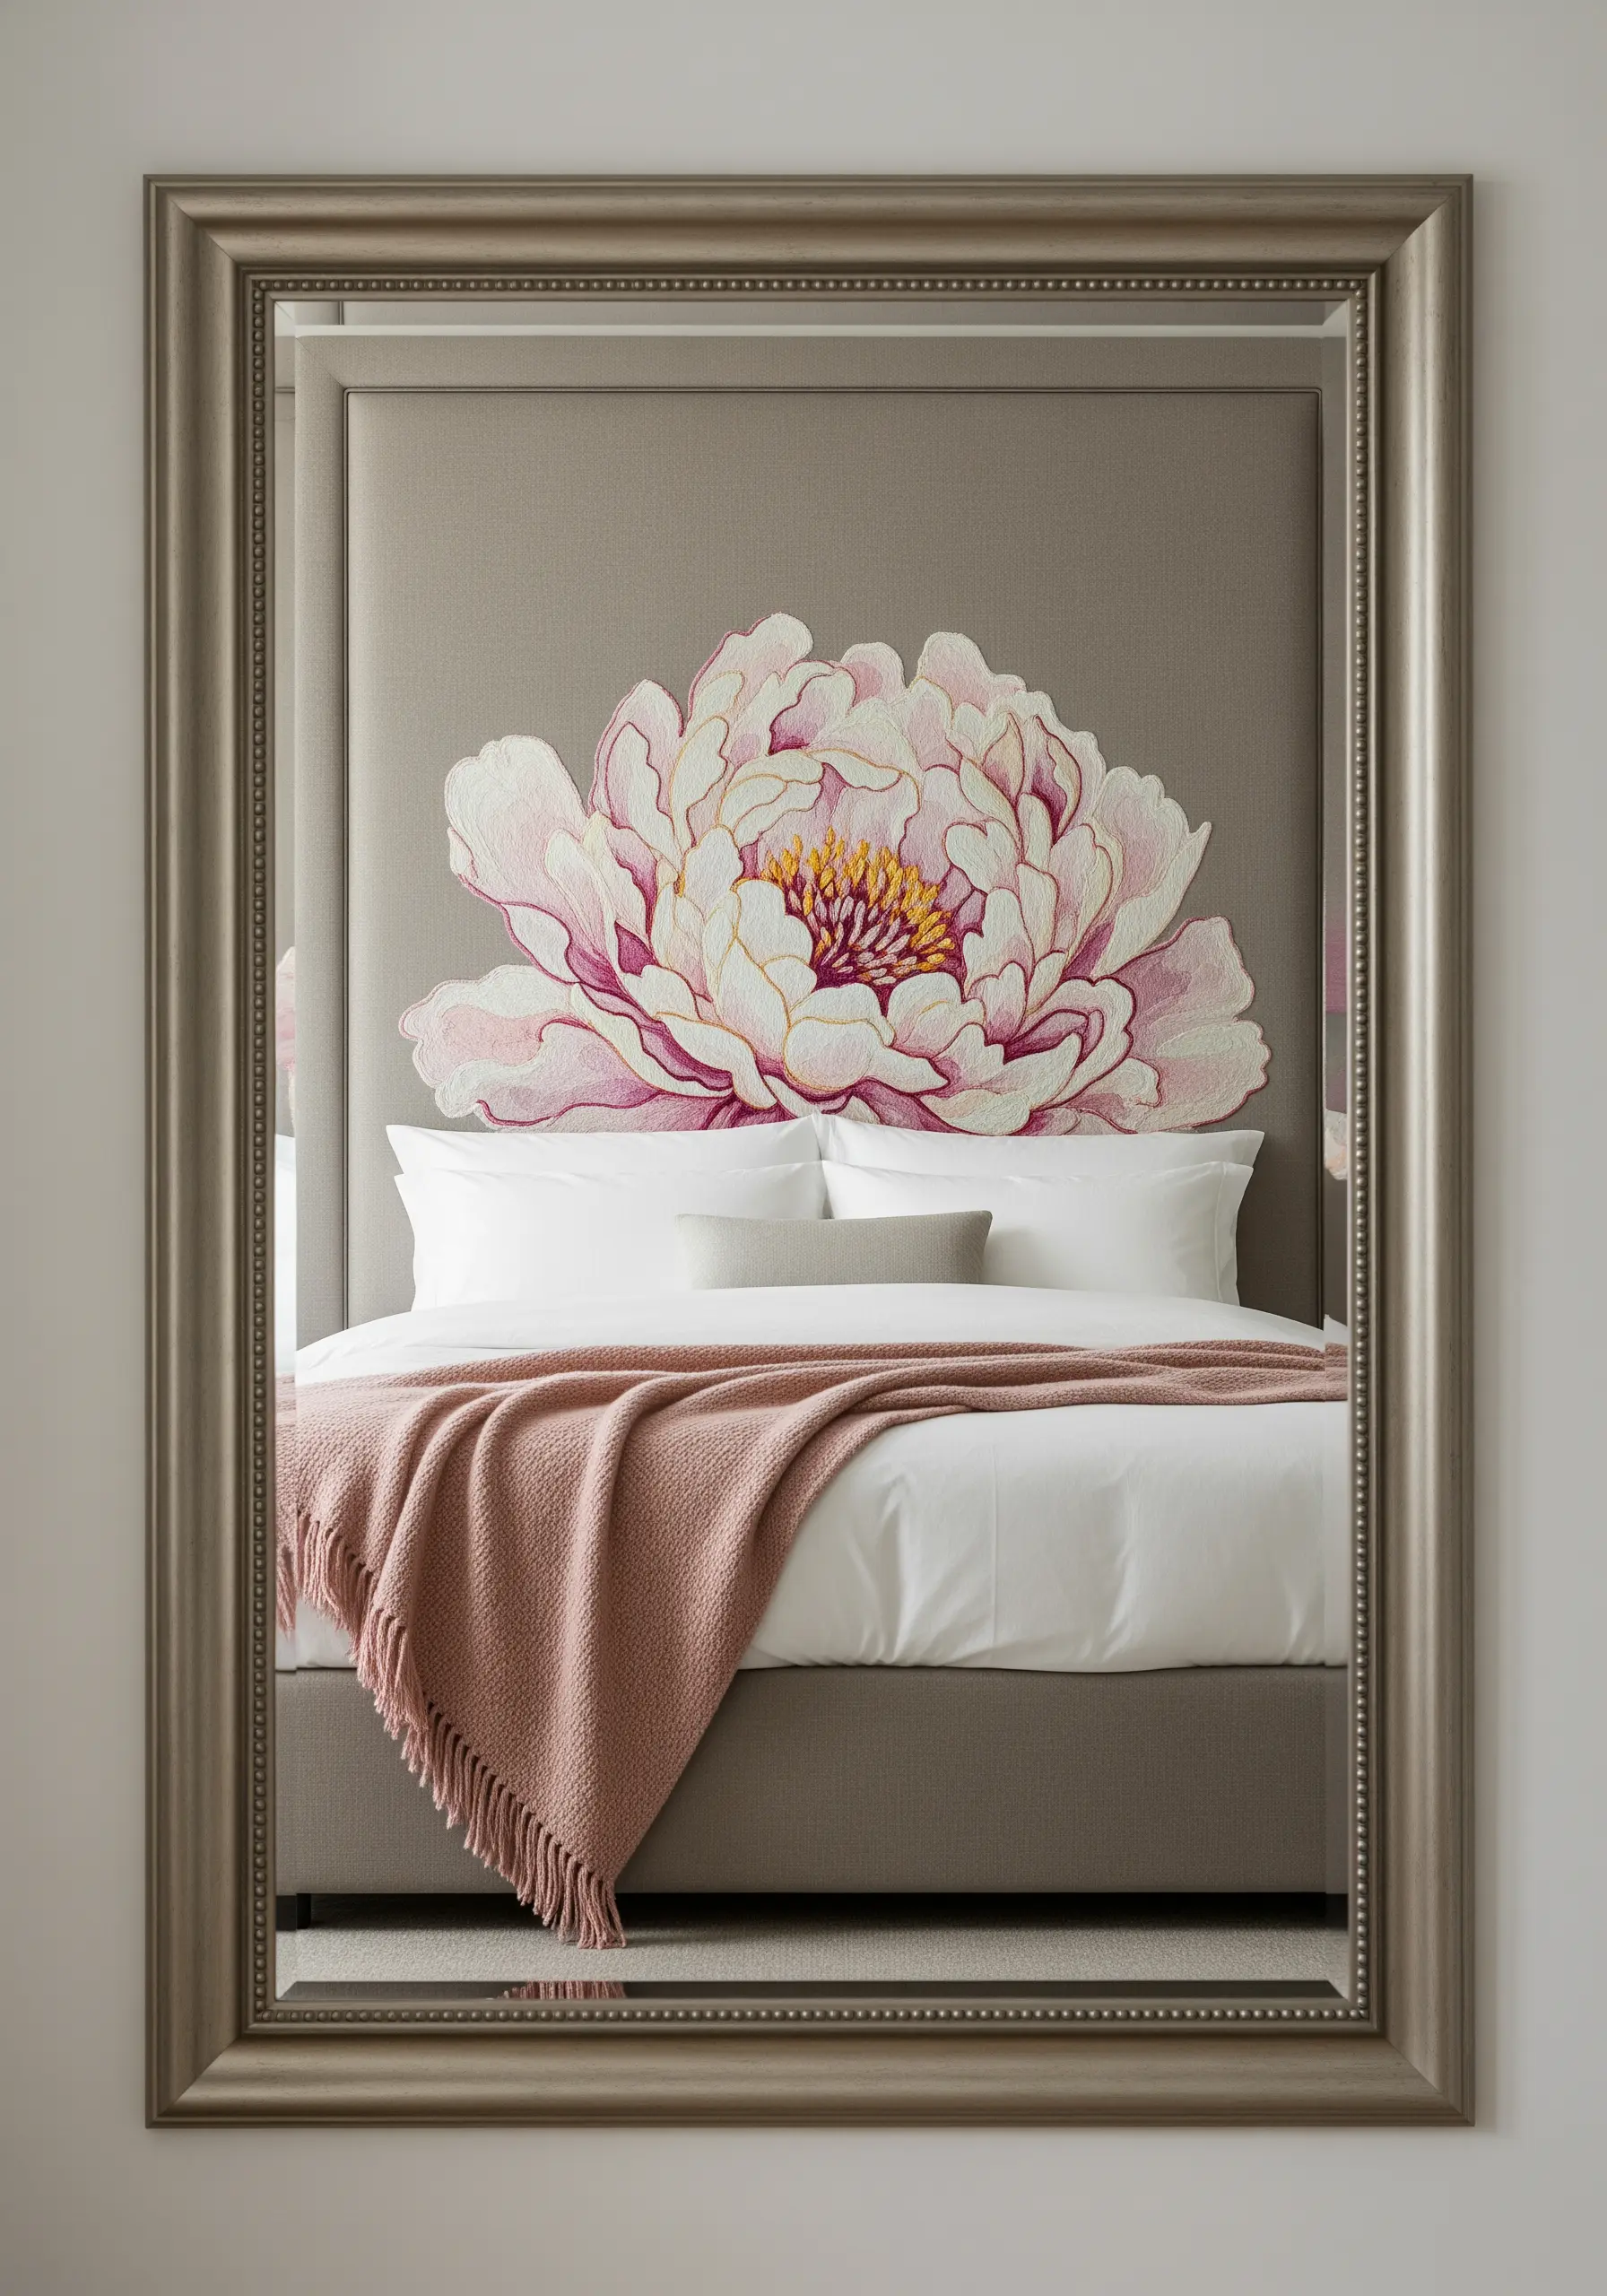
Transform an upholstered headboard into a piece of art with an oversized floral motif.
A large-scale peony is perfect for this, as its many petals offer an opportunity for beautiful color blending with thread painting.
Map out the direction of your stitches for each petal before you begin; they should radiate from the center and curve outwards to create a realistic, voluminous shape.
Using dozens of shades from deep magenta to pale pink and white is what will give the flower its photorealistic, watercolor depth.
10. Illuminate Celestial Motifs with Metallic Thread
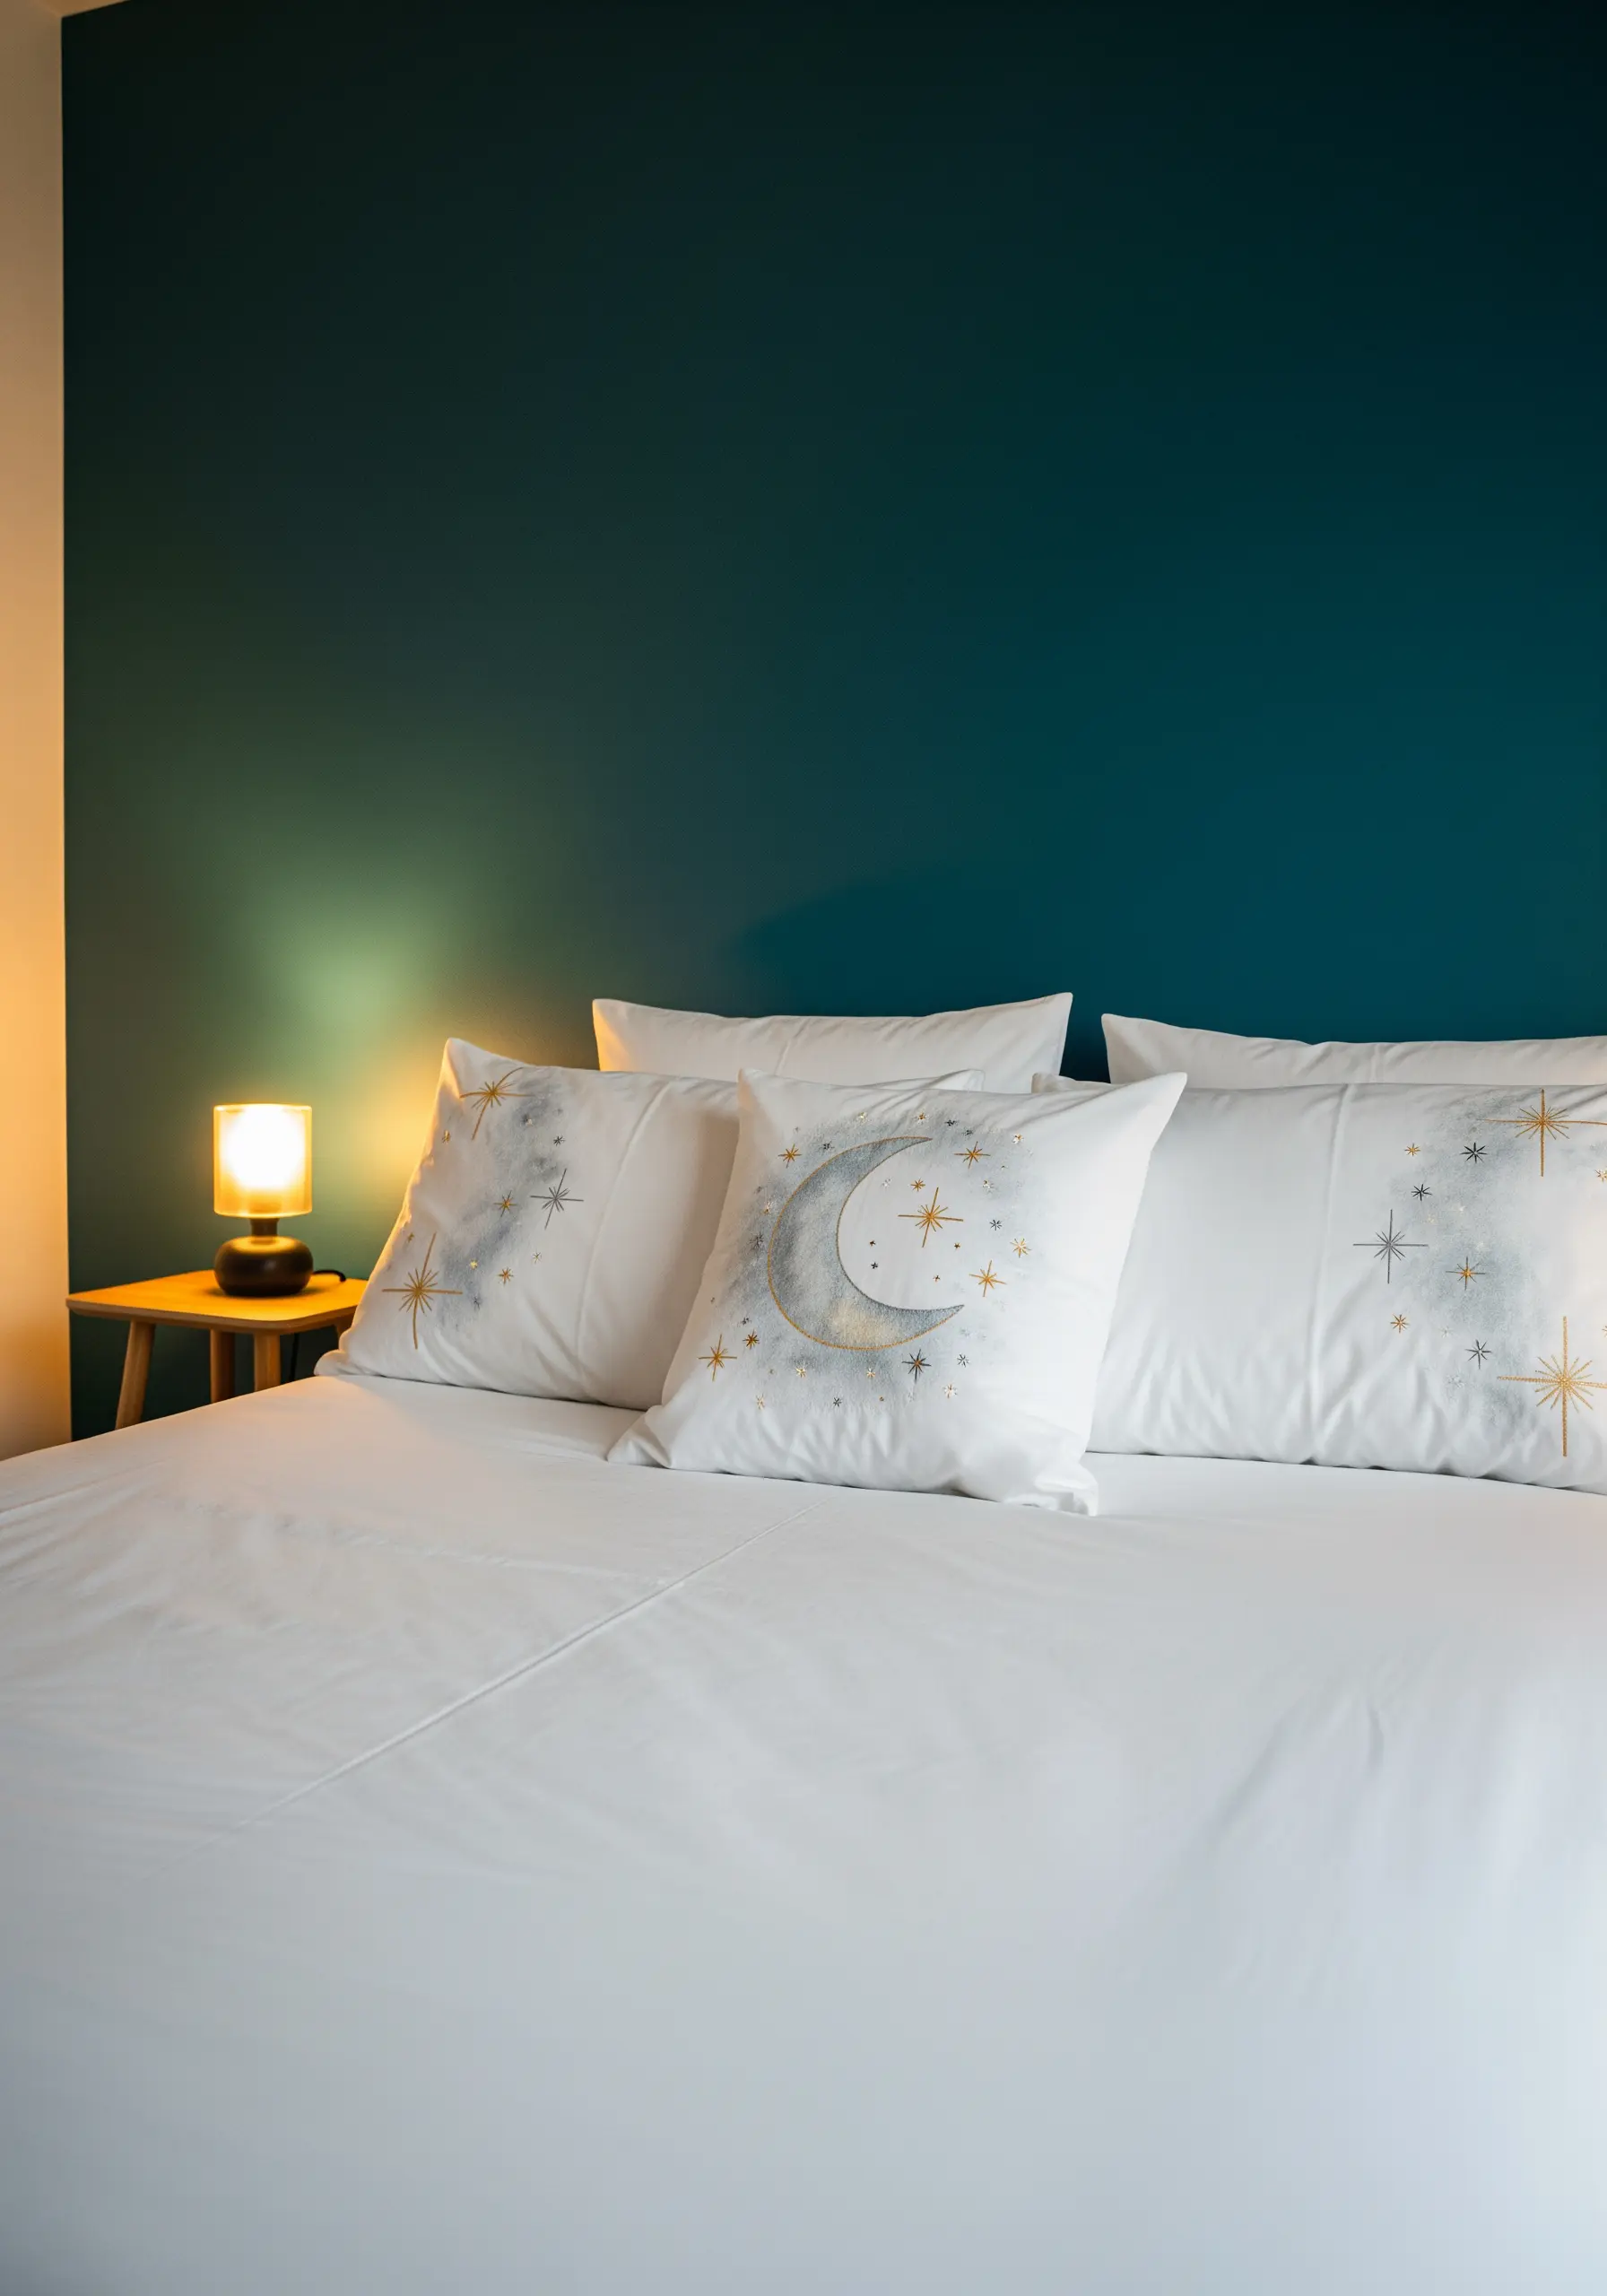
Give celestial designs a magical glow by subtly blending metallic and cotton floss.
For the crescent moon, use a single strand of silver metallic thread alongside two strands of grey cotton floss in your satin stitch.
This mutes the metallic shine, creating a soft, ethereal shimmer rather than a harsh glitter.
Stitch the stars using single, straight stitches in gold metallic thread, radiating from a central point to form delicate starbursts that catch the light beautifully.
11. Frame a Botanical Study in an Oversized Hoop
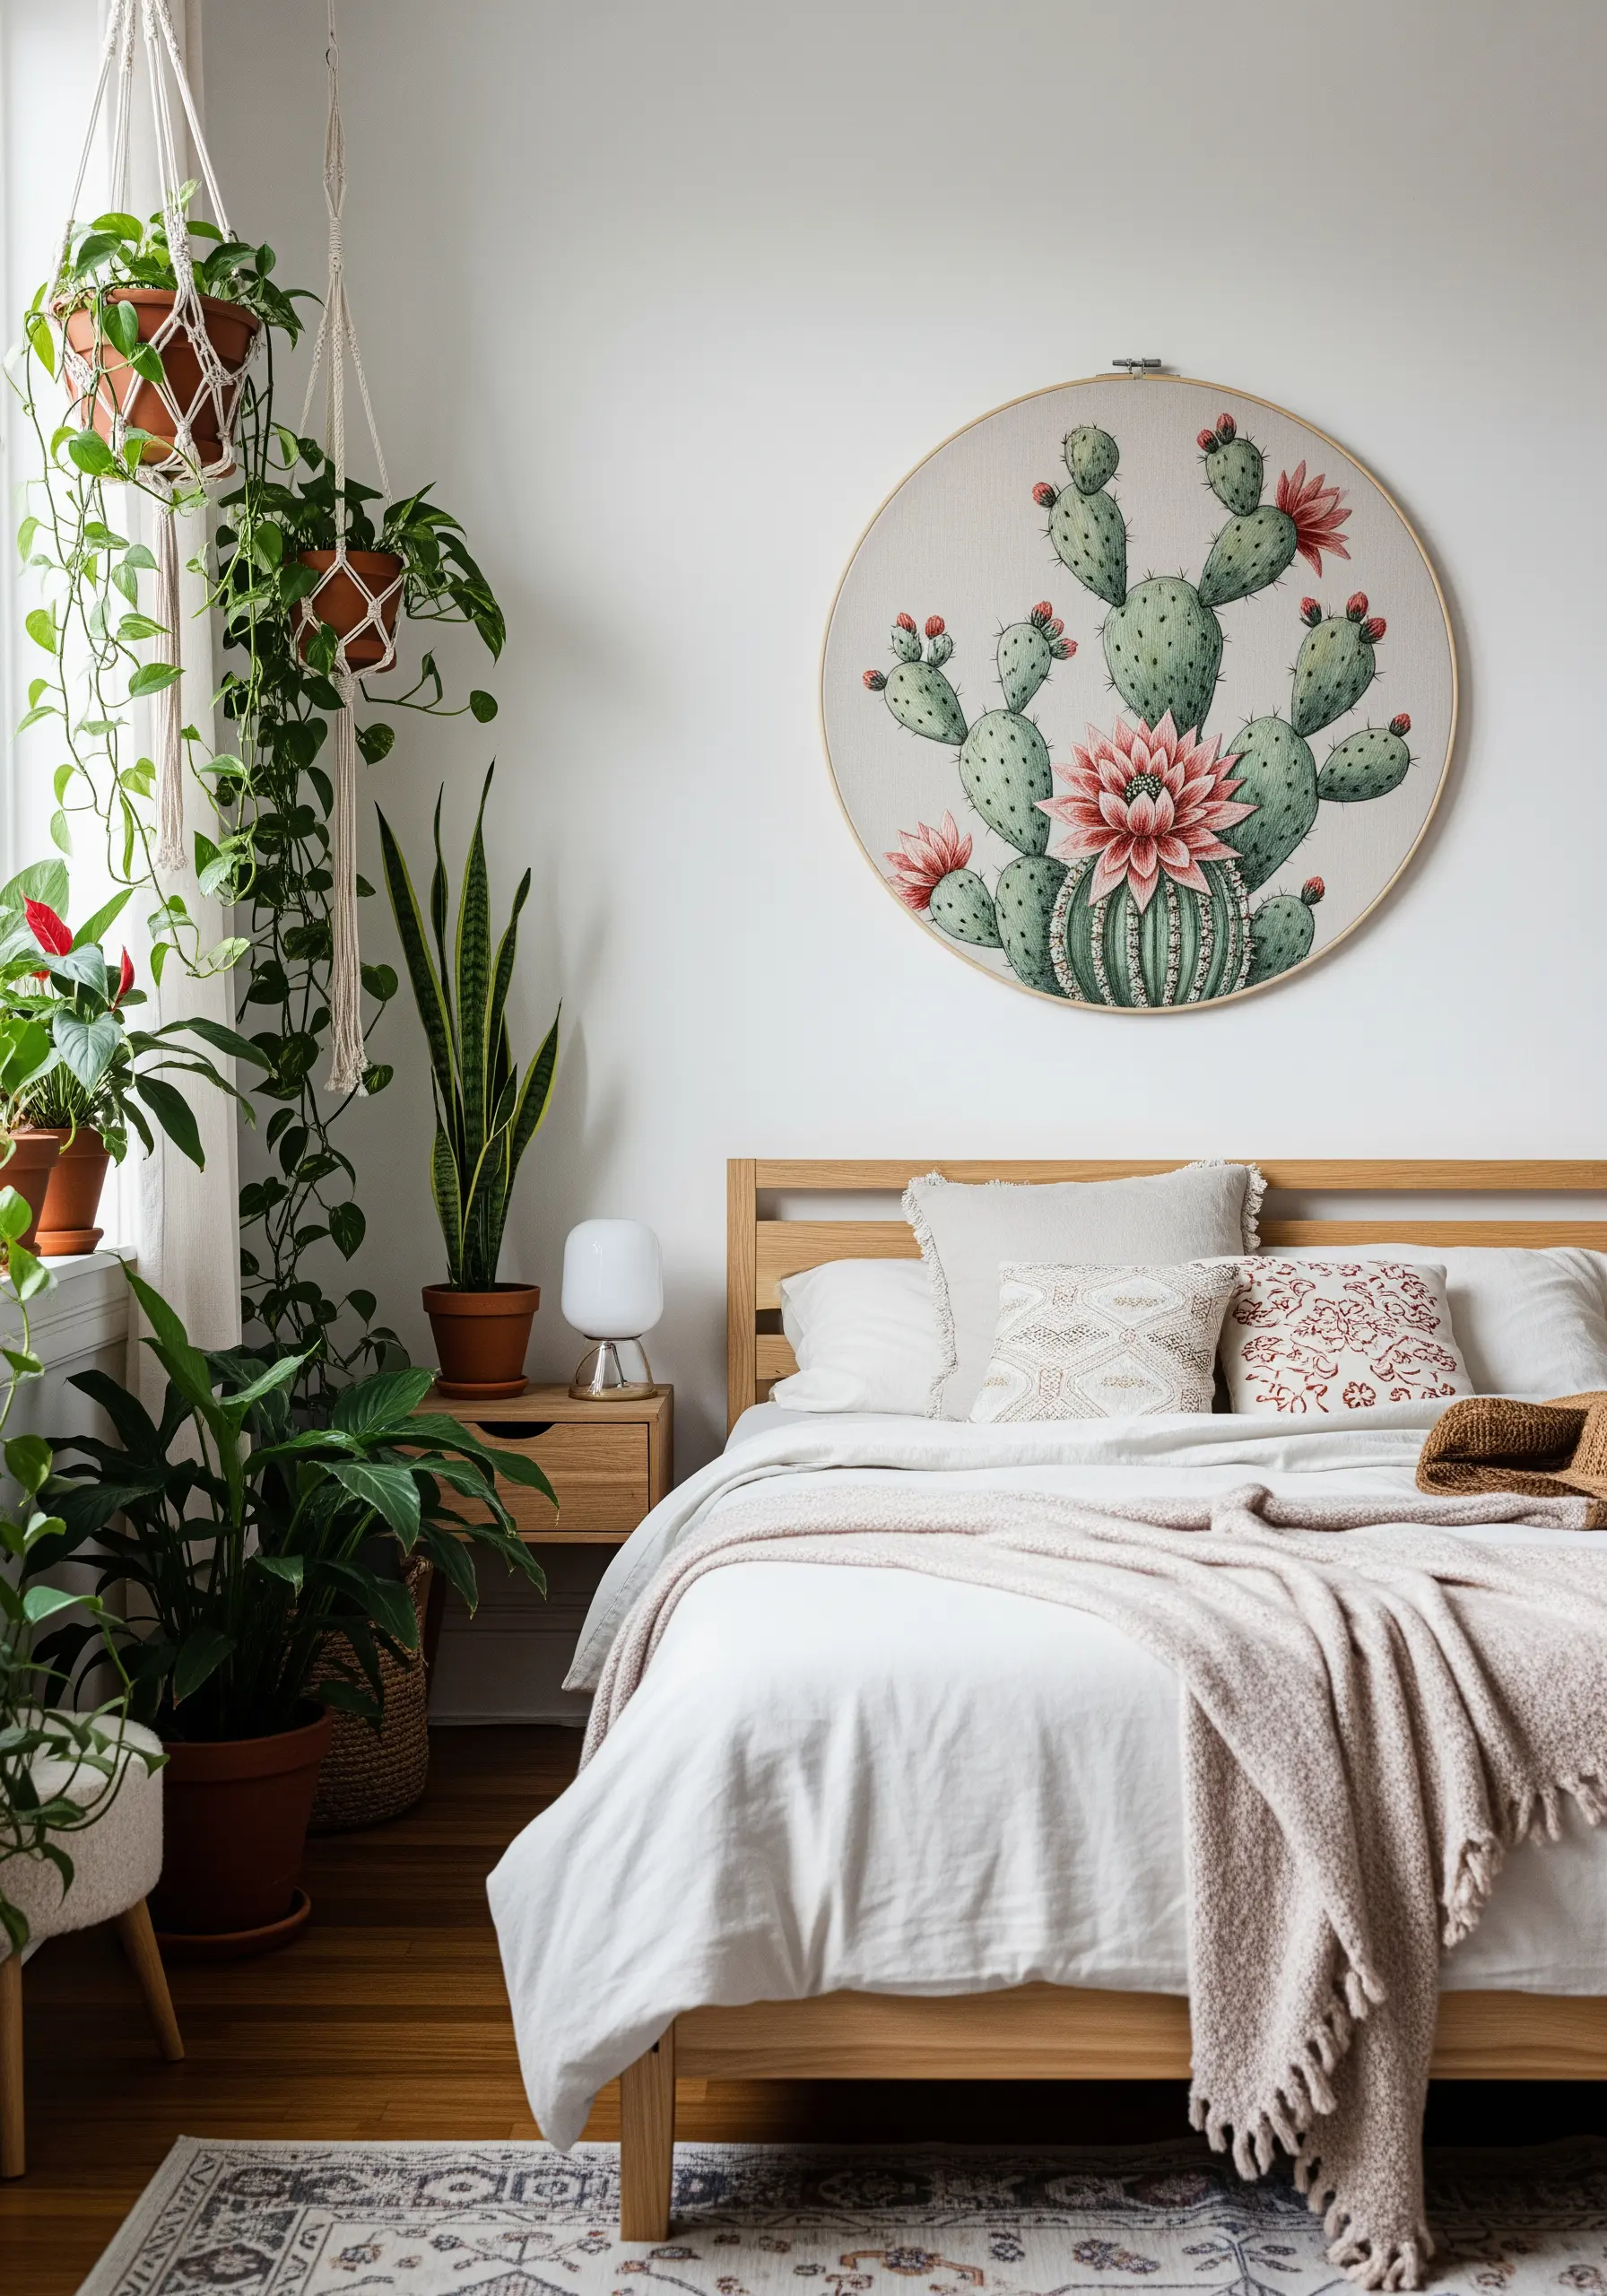
For large-scale hoop art, choose a subject with interesting shapes and textures, like a flowering cactus.
Use long-and-short stitch to create the soft, blended greens of the cactus pads, ensuring your stitches follow the plant’s rounded form to create dimension.
Add contrast by stitching the flowers with vibrant pink satin stitches and the sharp spines with tiny, precise straight stitches.
These oversized hoop wall displays create a modern and impactful botanical statement.
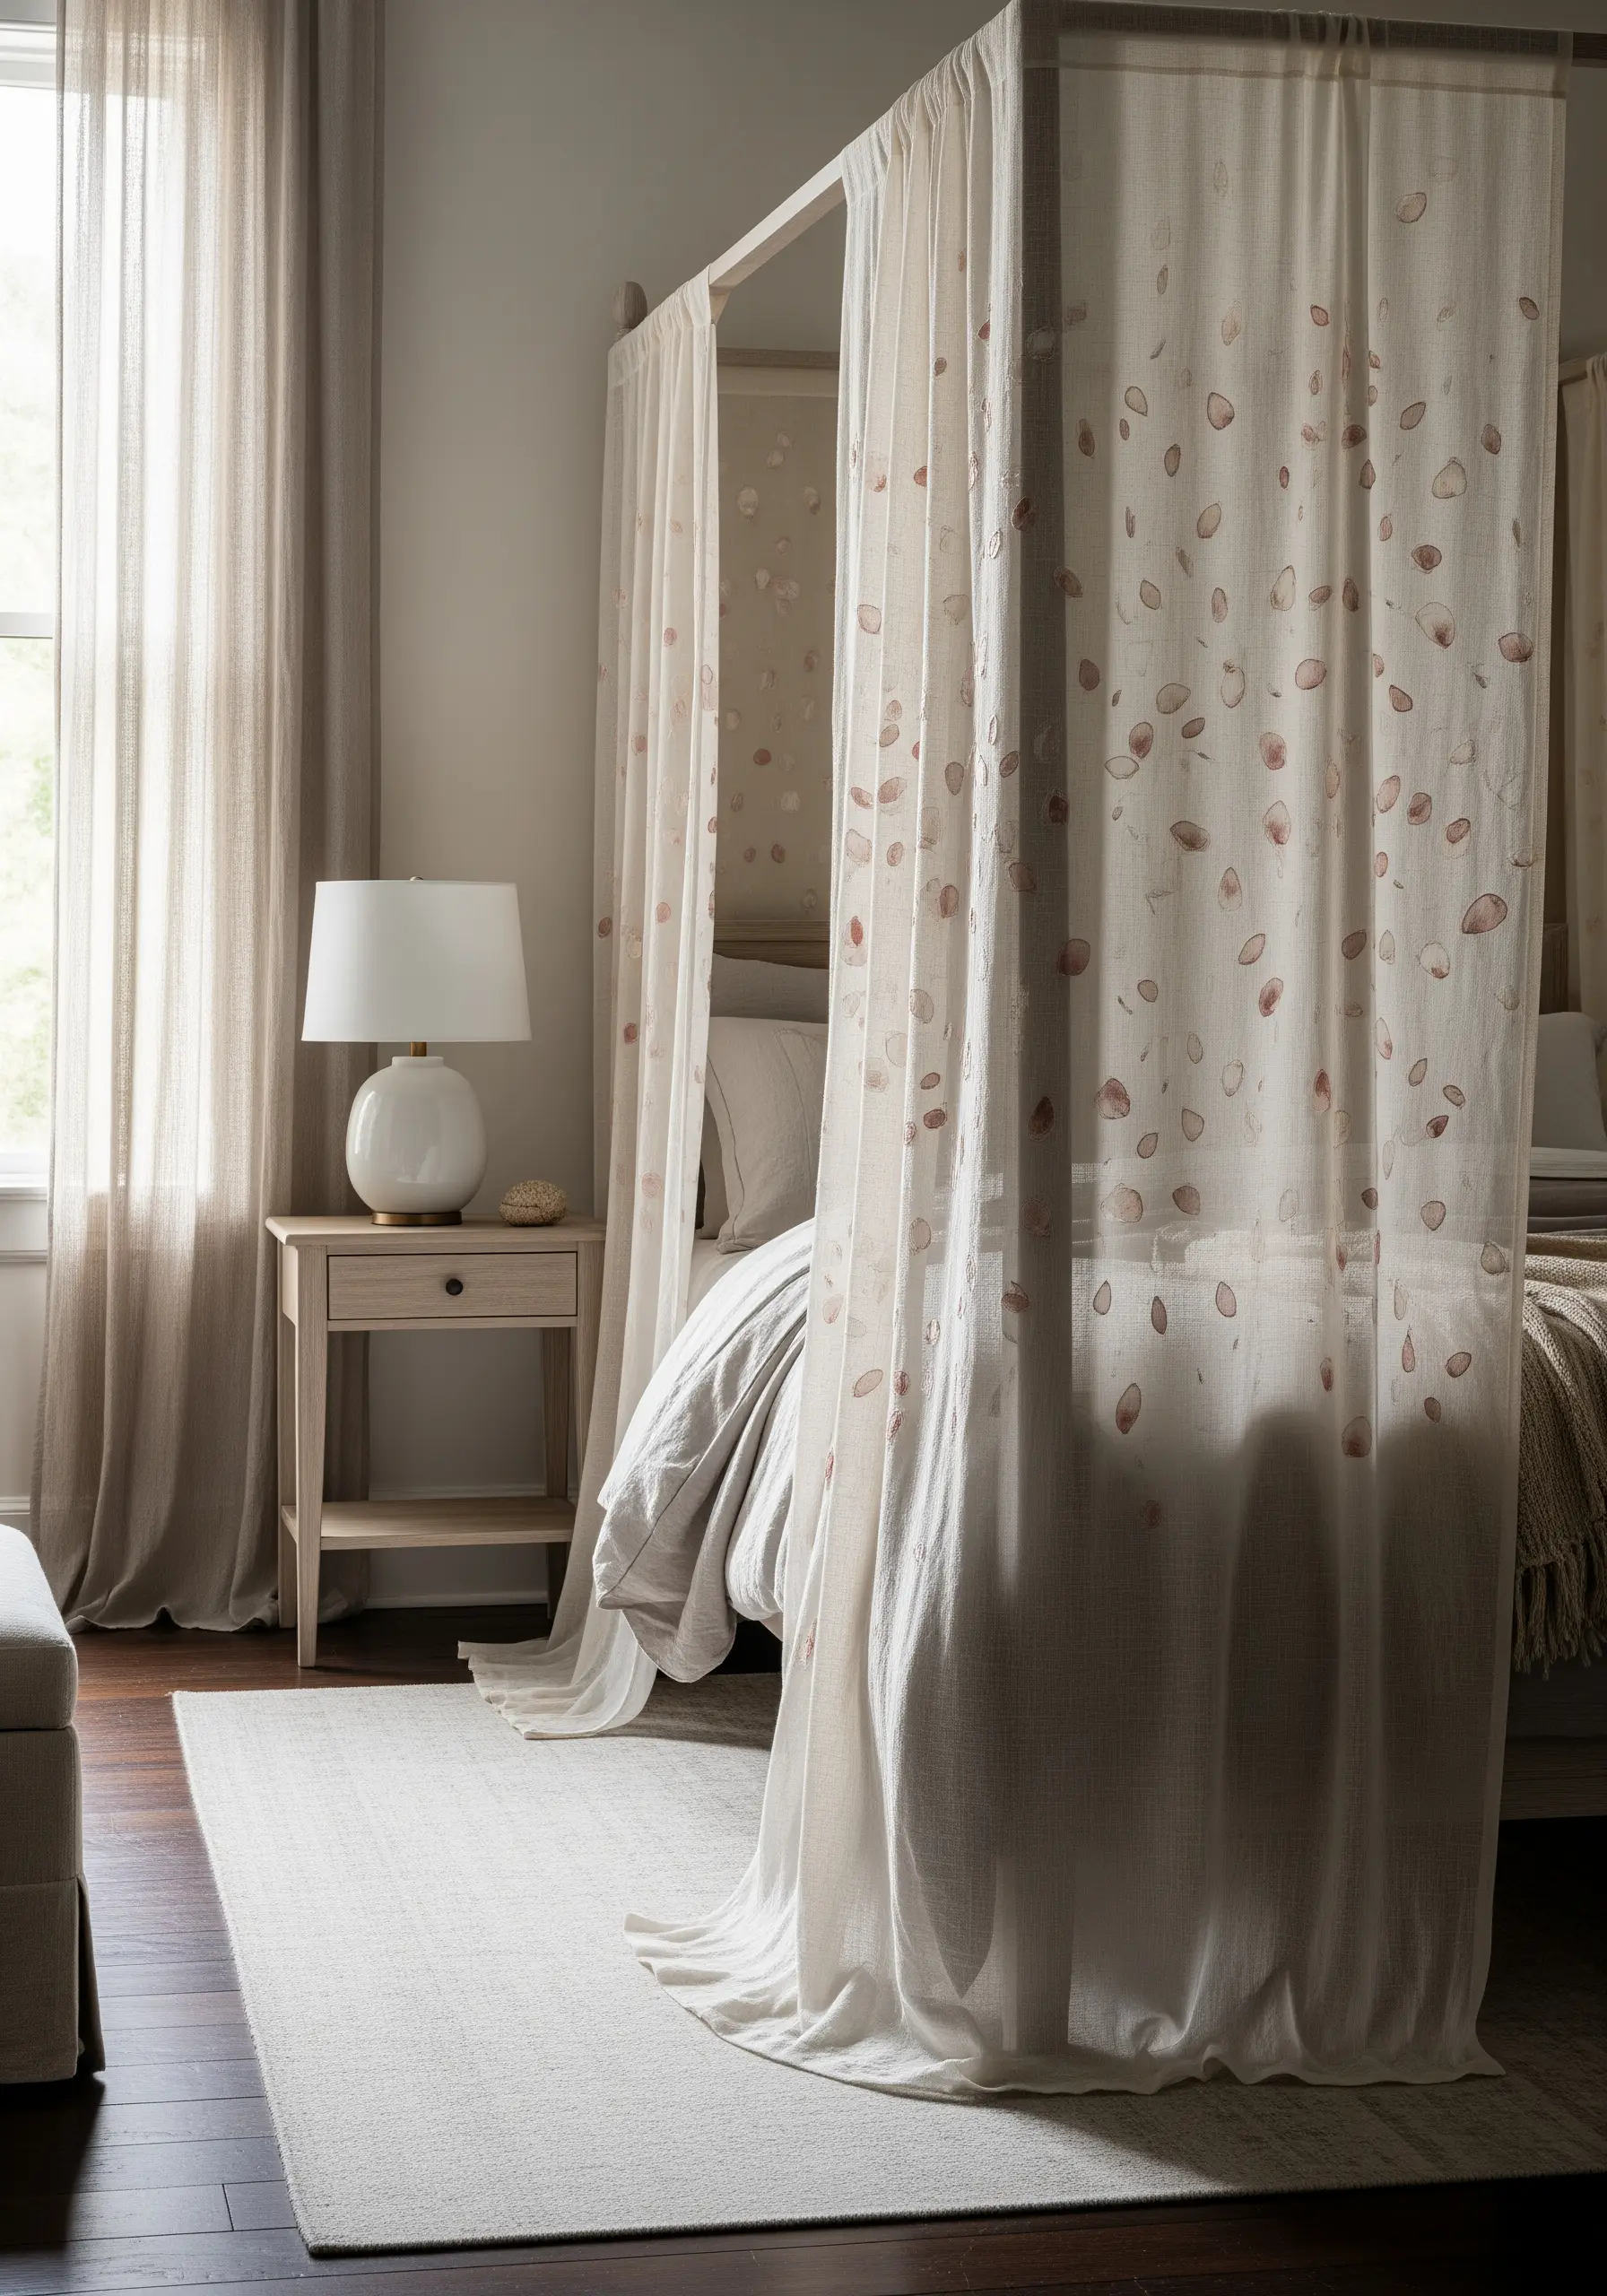
12. Stitch Pampas Grass on Sheer Curtains
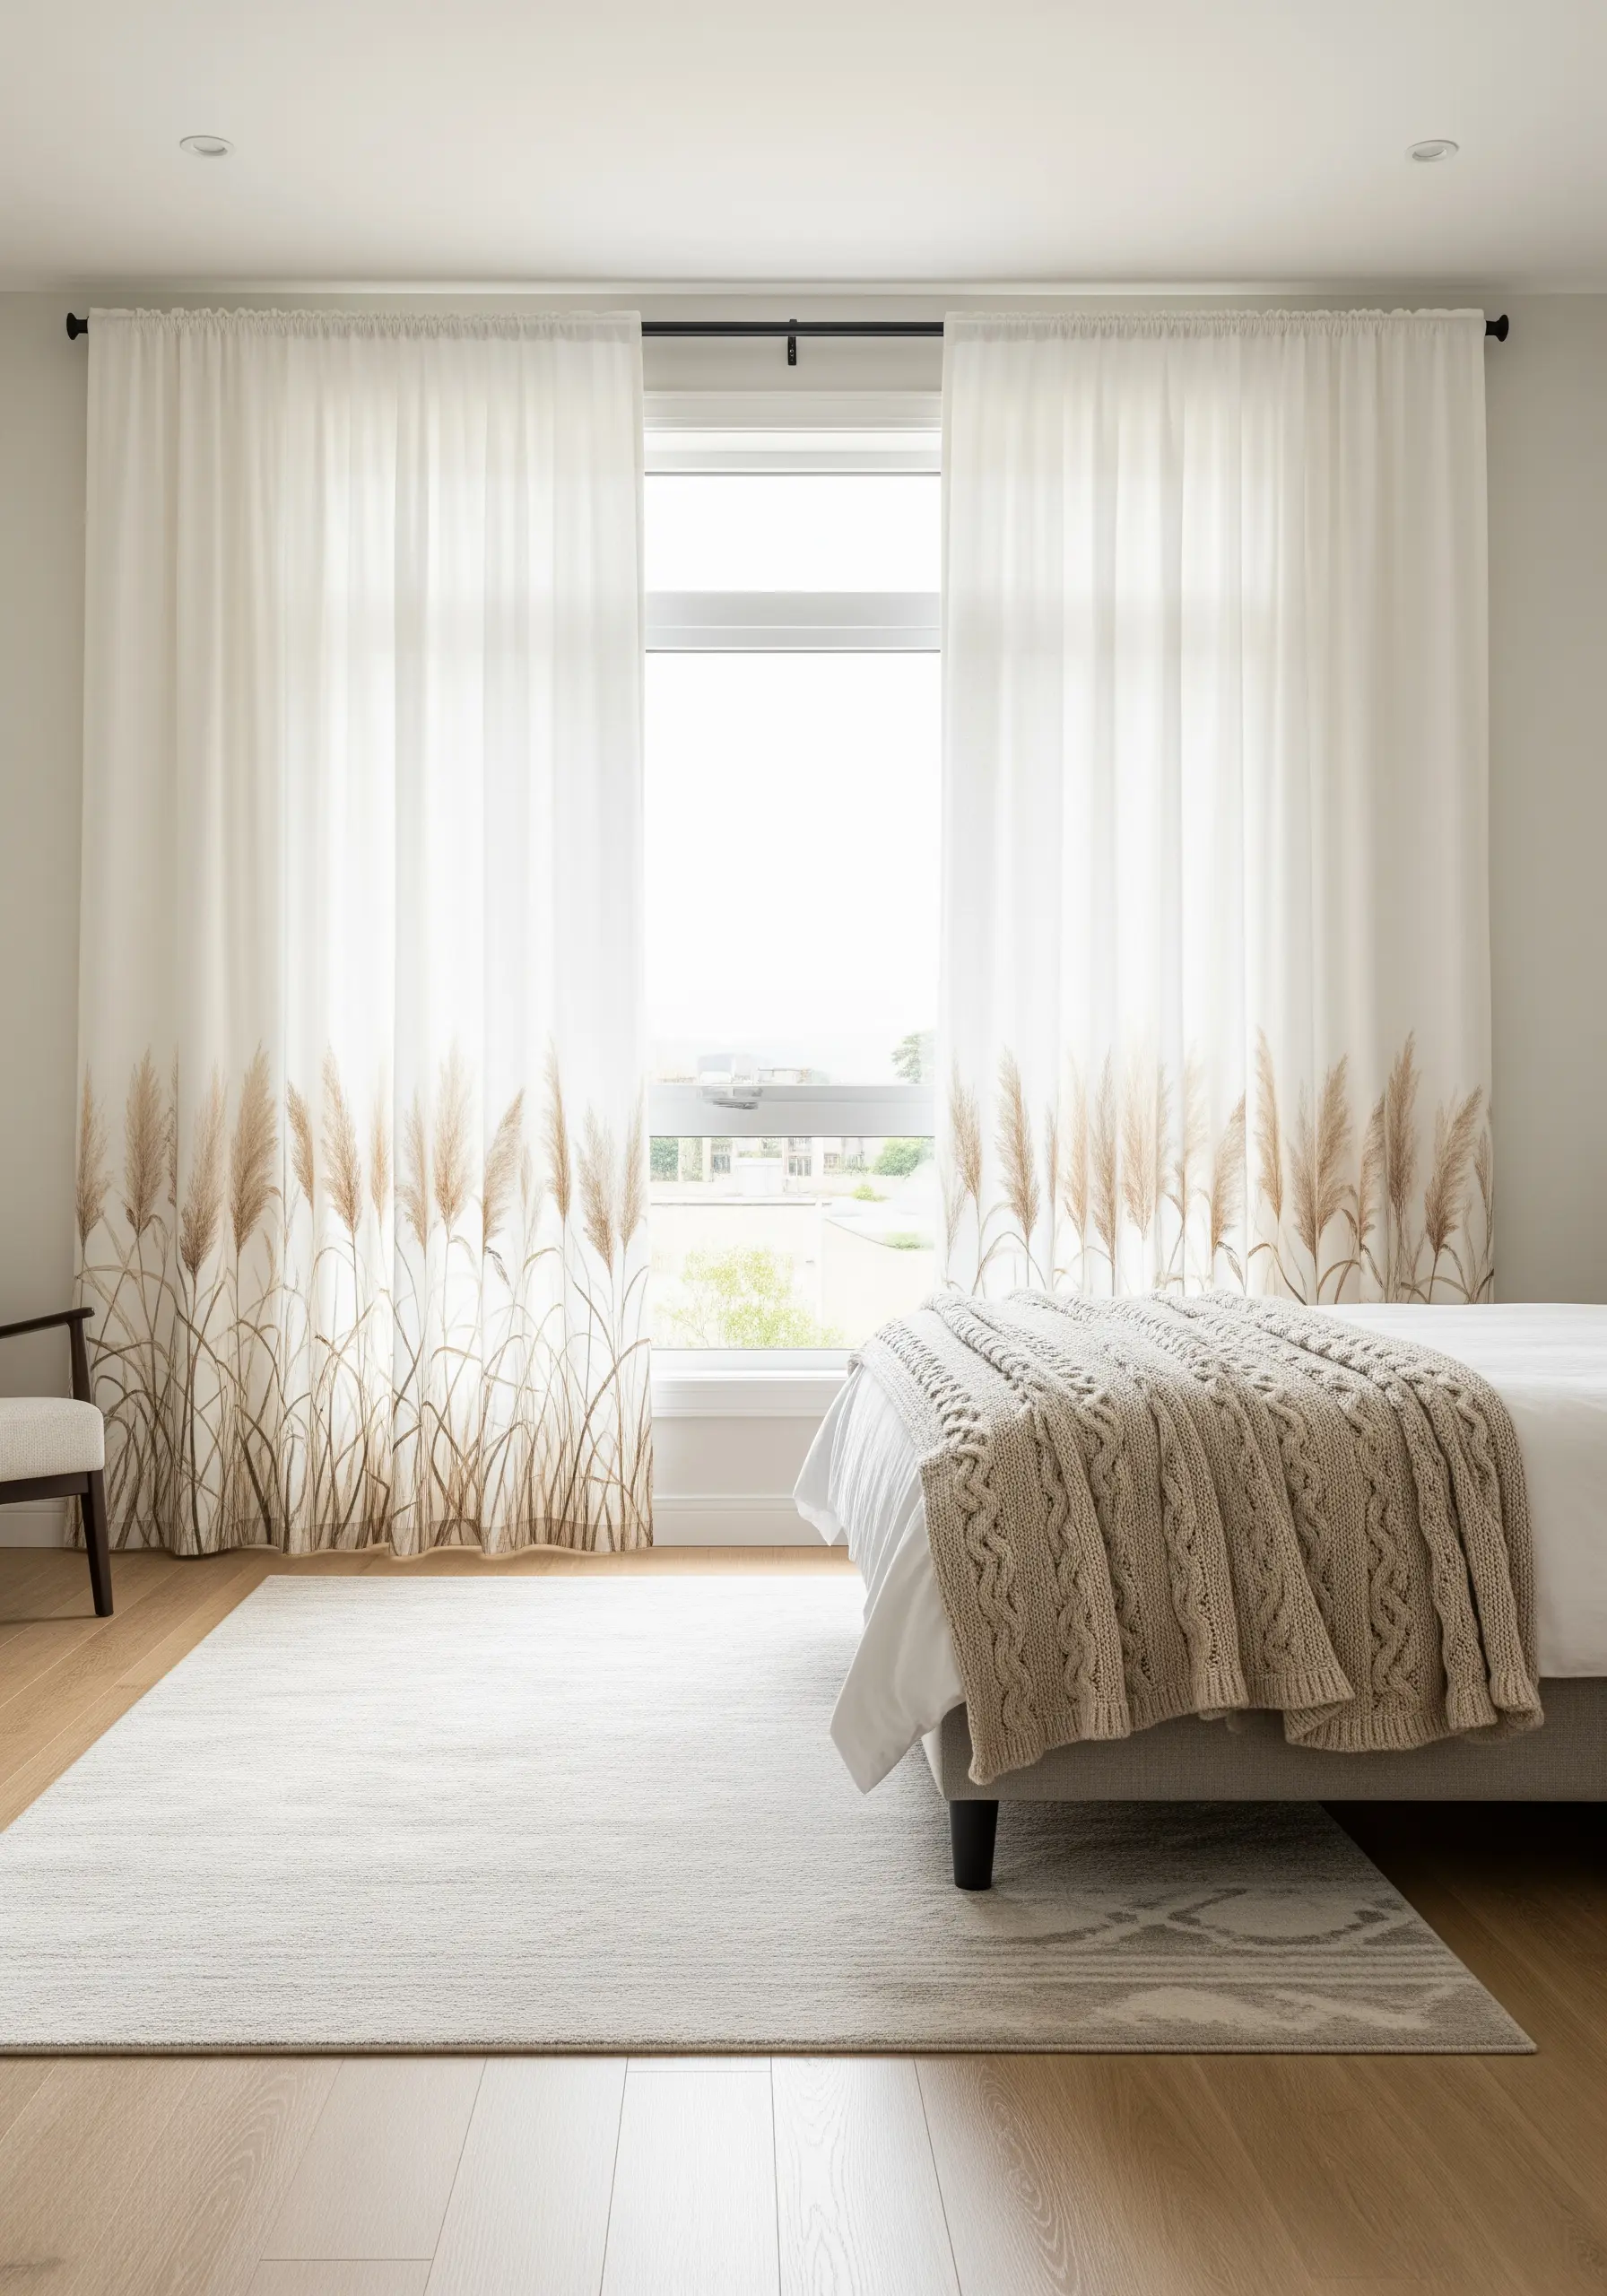
Embroidering on sheer fabric requires a light touch to preserve its airy quality.
Use a fine stem stitch in a neutral tone for the pampas grass stalks. For the fluffy plumes, switch to a silk or wool-blend thread and use long, straight stitches or turkey work loops that you can later trim and fluff.
Always use a lightweight, wash-away stabilizer on the back to support your stitches without adding permanent bulk.
The result is a design that appears to float on the fabric, adding texture and privacy without blocking light.
13. Capture a Flock in Flight on a Lumbar Pillow
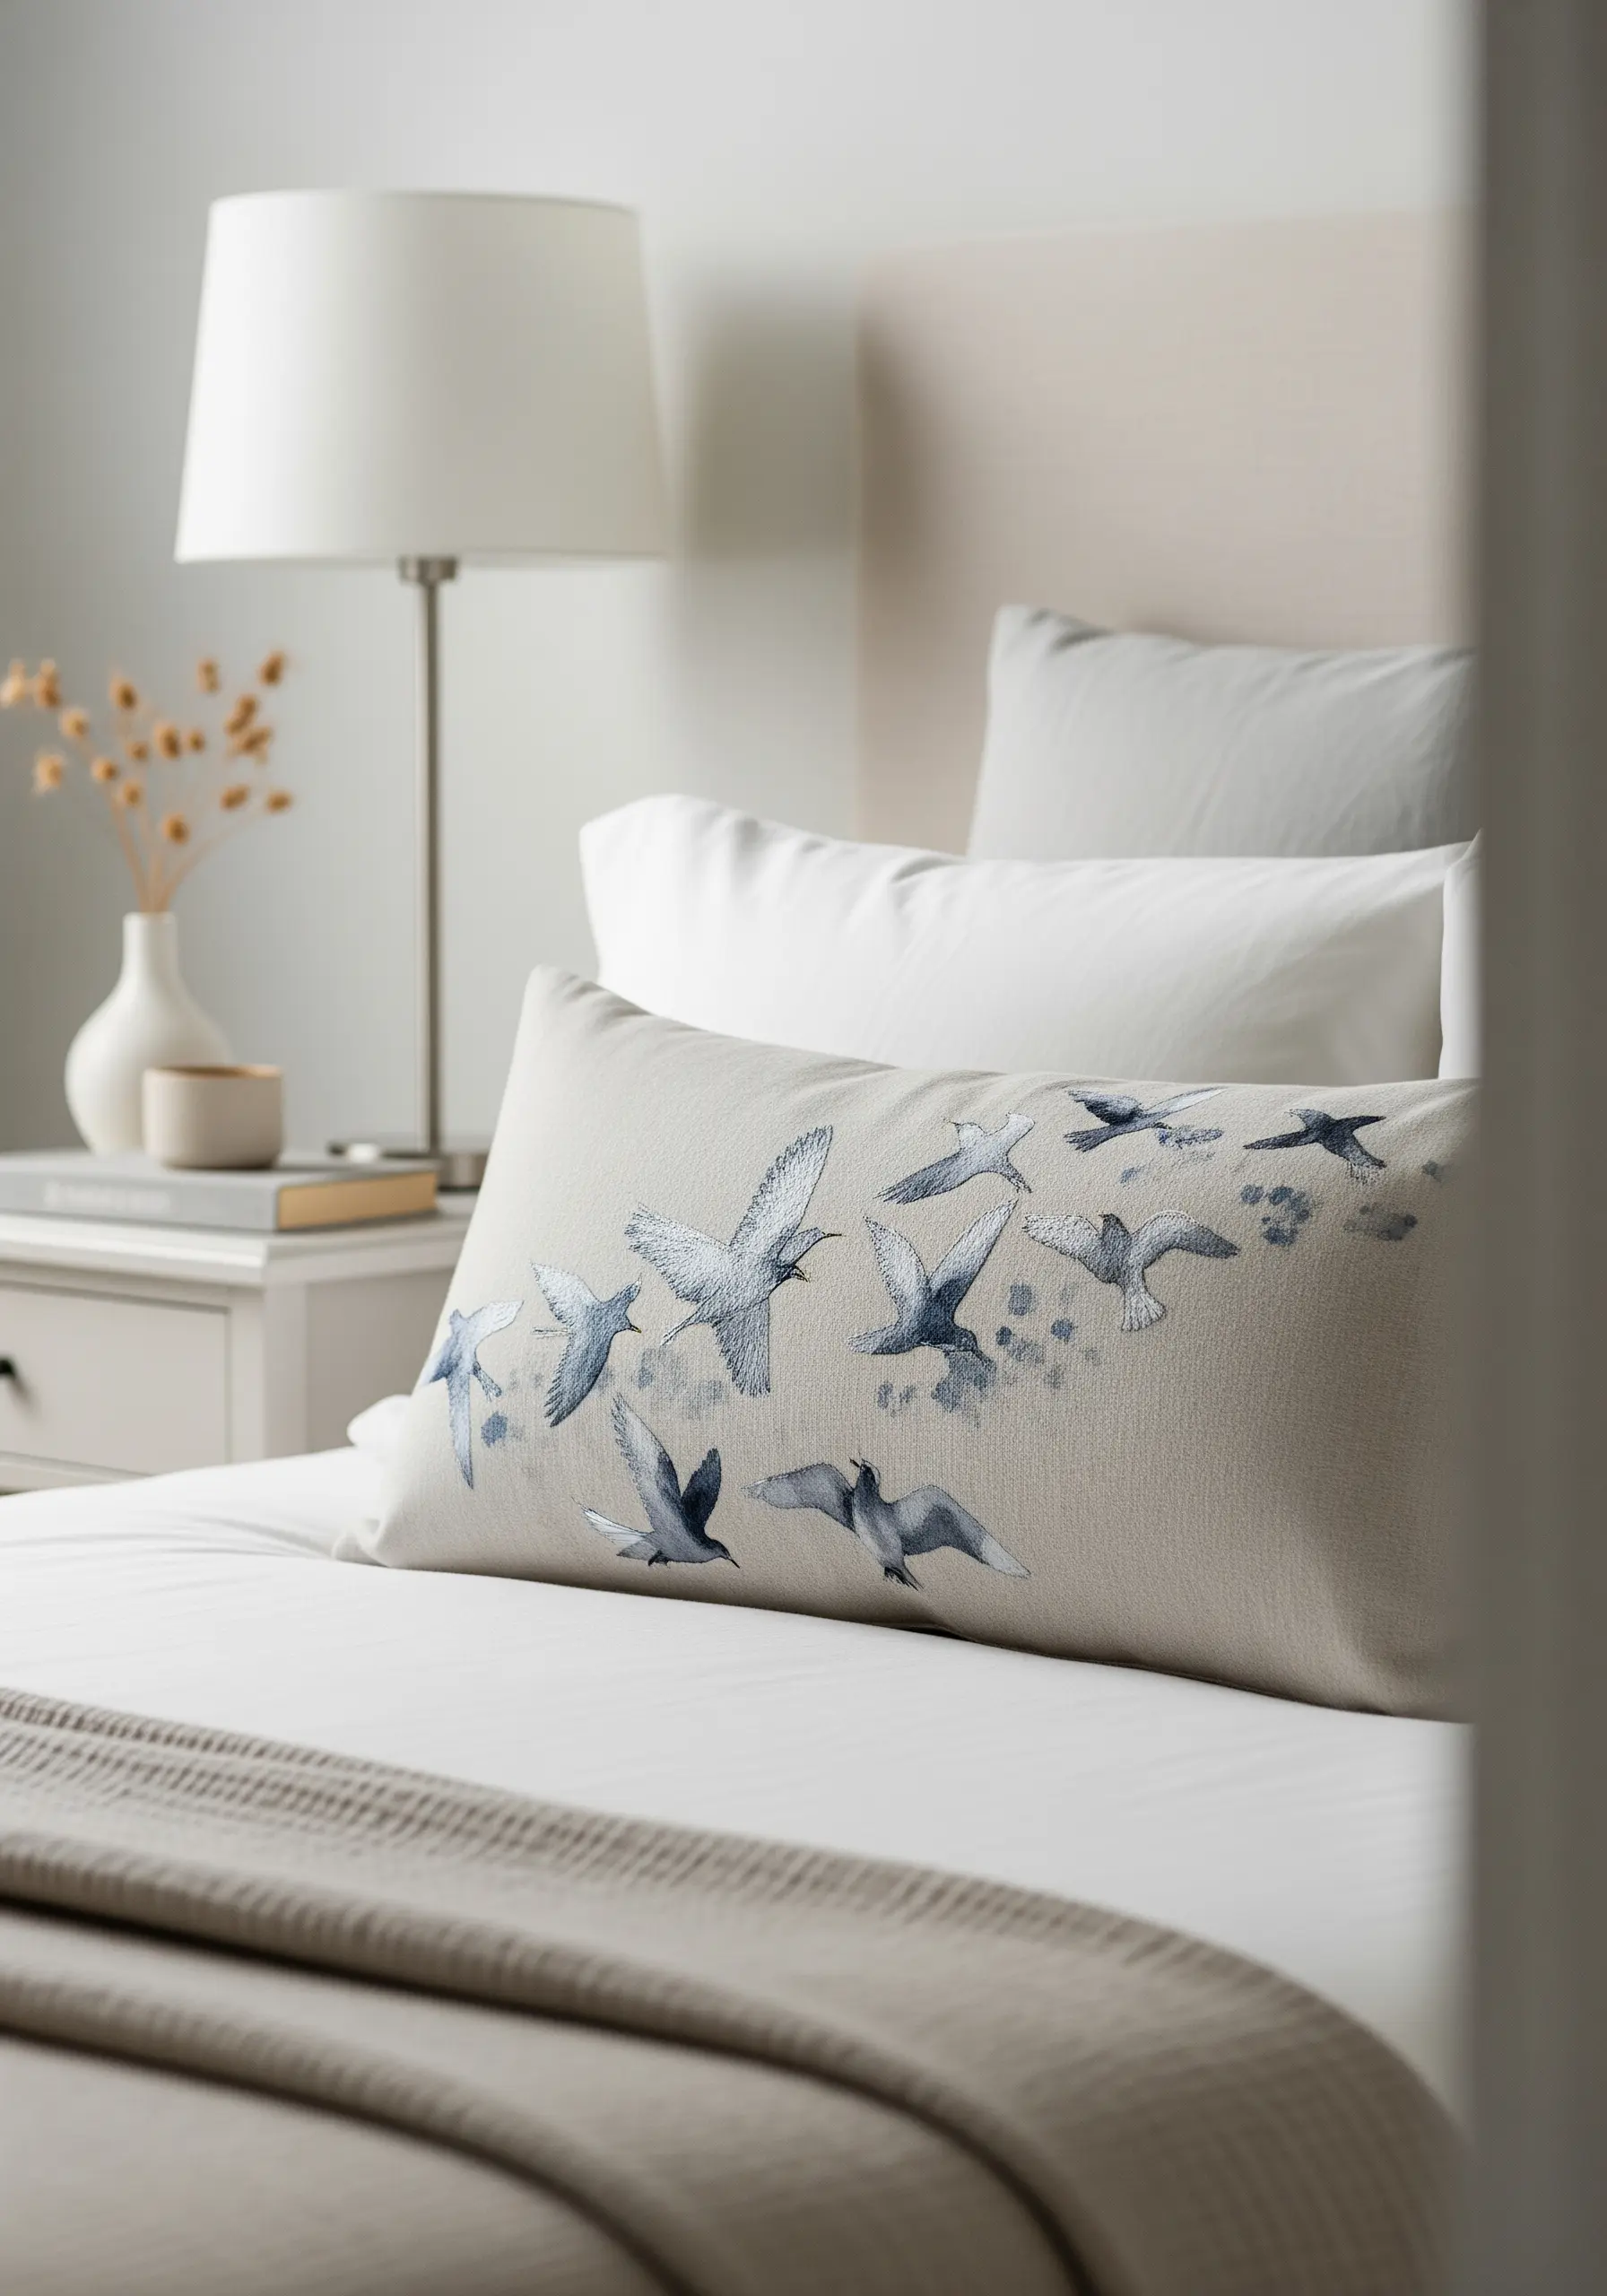
To convey the energy and movement of birds in flight, focus on dynamic composition and directional stitching.
Arrange the birds in an overlapping, upward sweep across the pillow to guide the eye and create a sense of motion.
Use a single strand of floss in shades of dusty blue and grey, and align your stitches to follow the shape of the wings and body.
Add a few splatters of color using tiny seed stitches to mimic the splash of watercolor paint and enhance the feeling of spontaneous movement.
14. Explore Organic Shapes with Contour Stitching
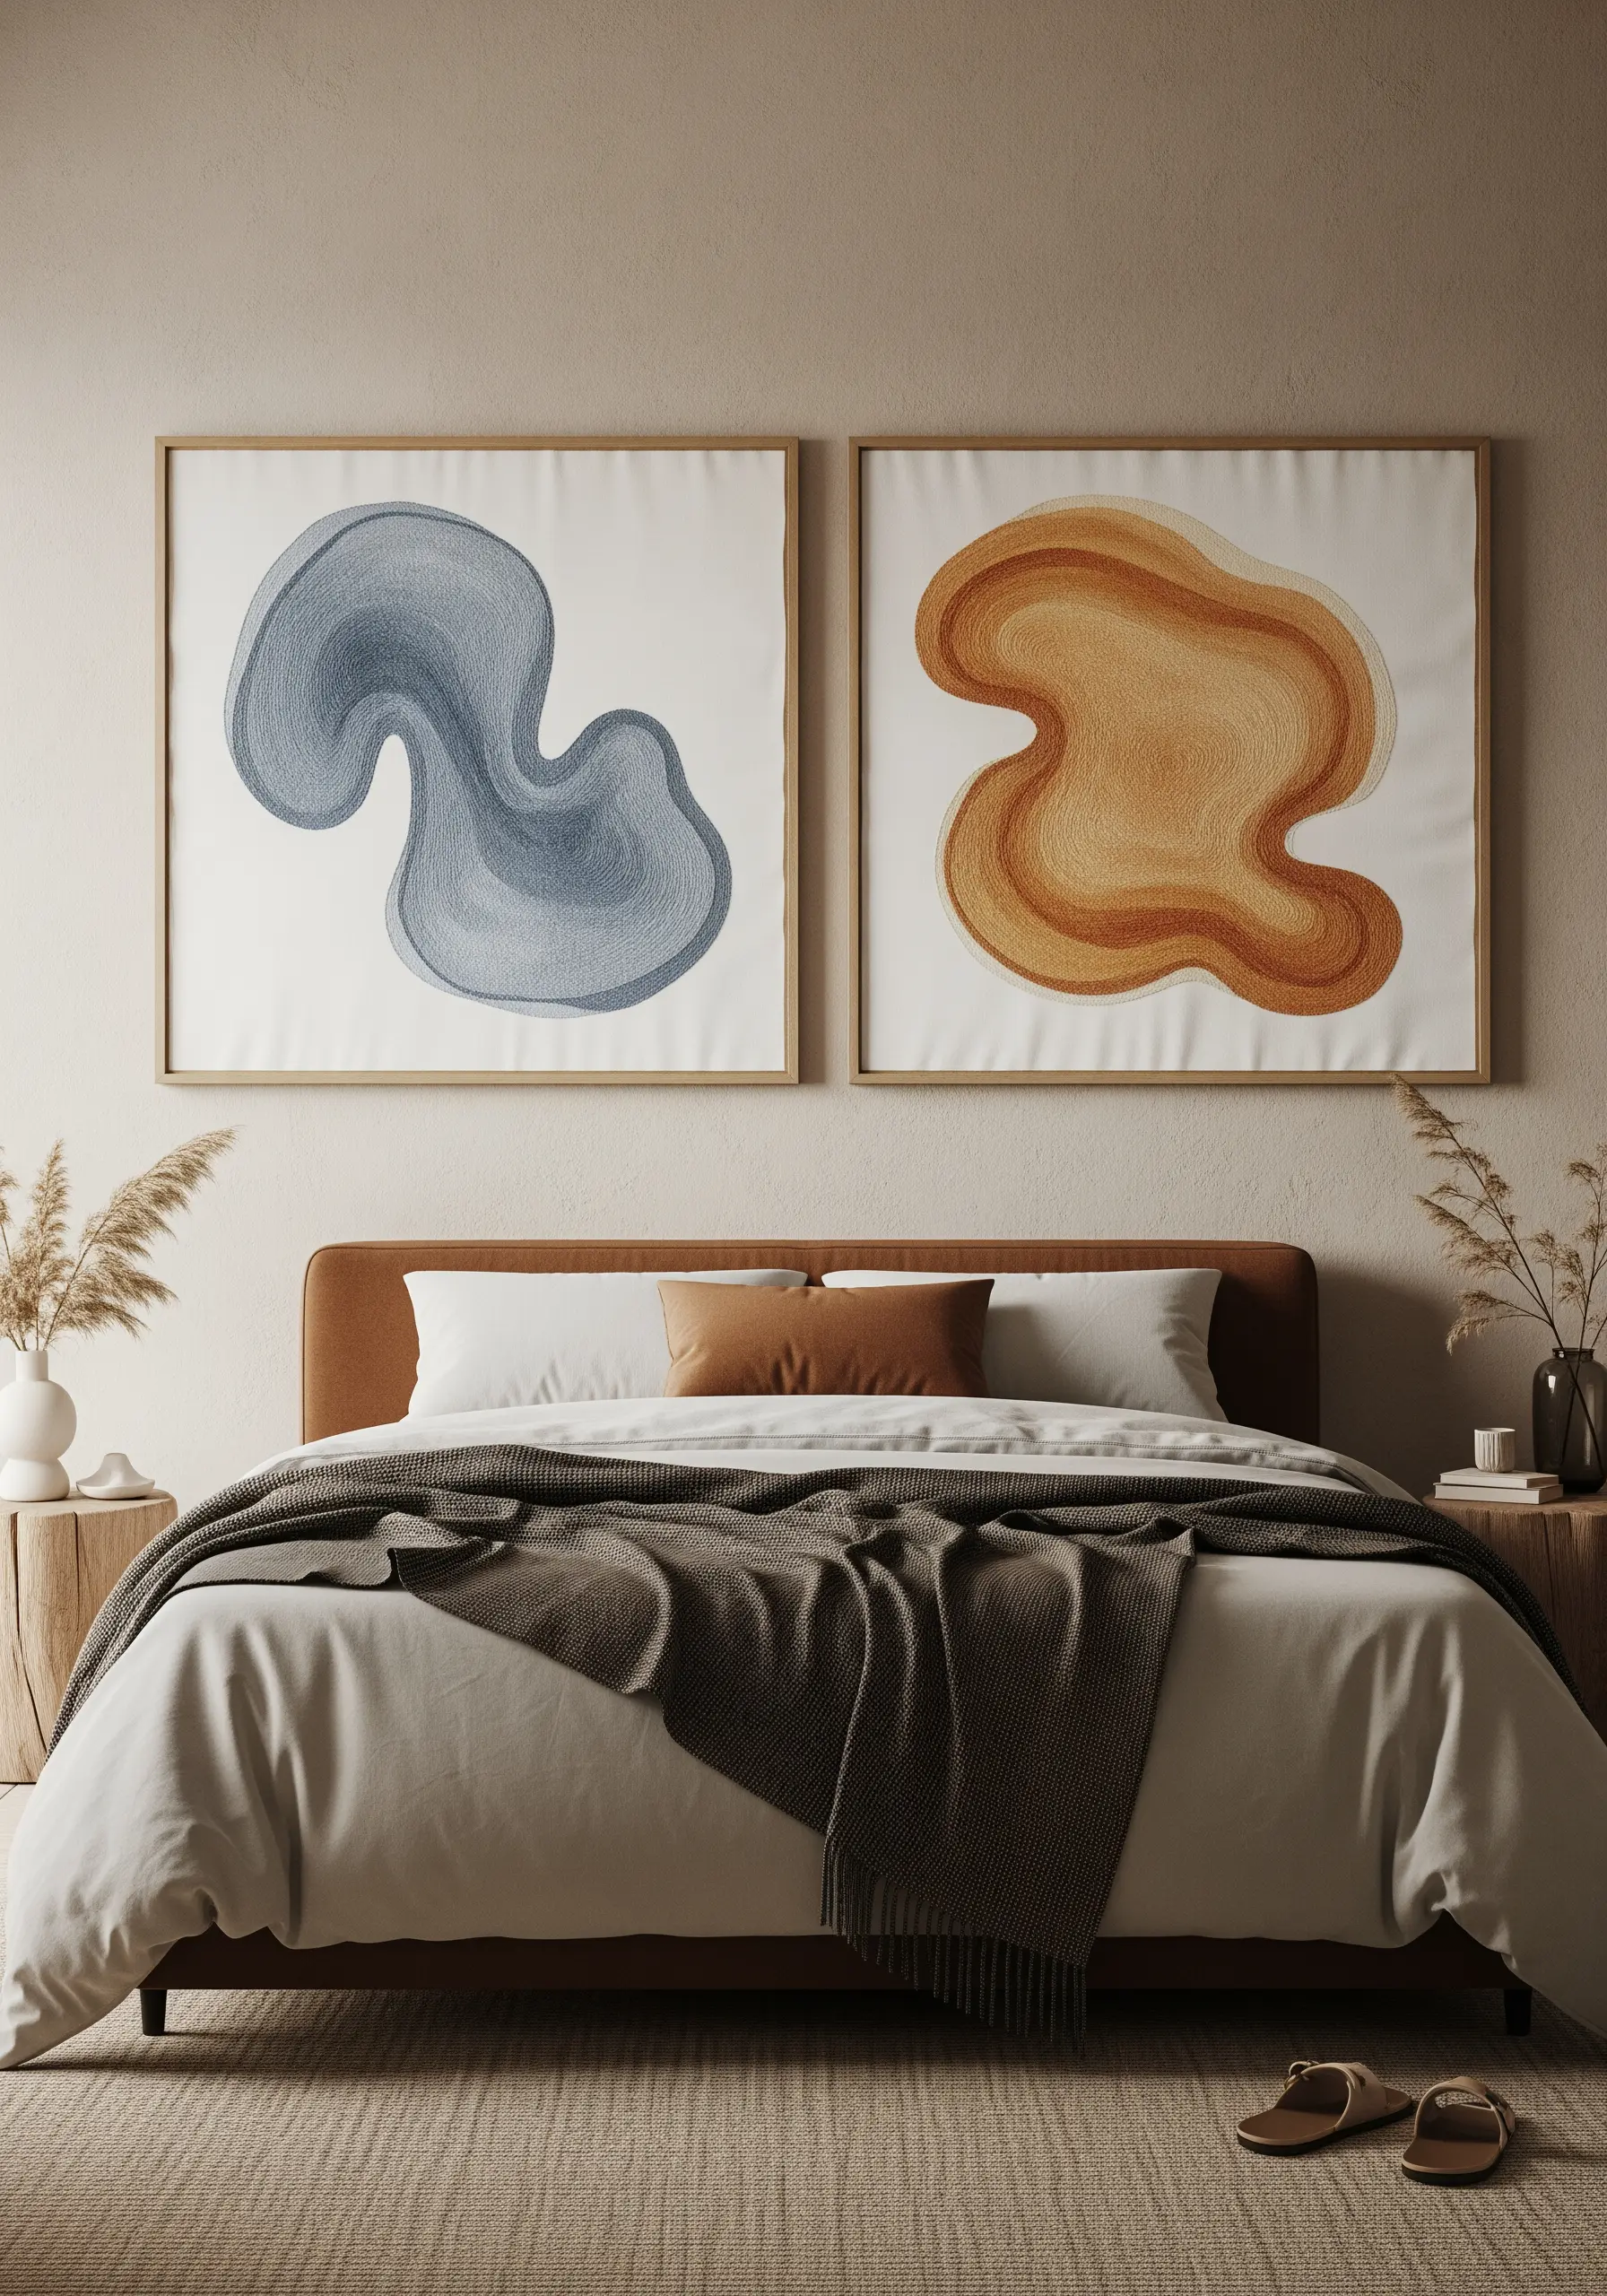
Create compelling abstract art by filling organic, amoeba-like shapes with contoured lines of stitching.
Outline your shape, then fill it with concentric, echoing rows of stem stitch or split stitch.
To achieve the smooth gradient effect, subtly change your thread color every few rows, moving from dark to light.
This technique turns simple shapes into topographical studies of color and texture, creating calm, meditative pieces for a minimalist bedroom.
15. Add Dimension to a Cherry Blossom Branch
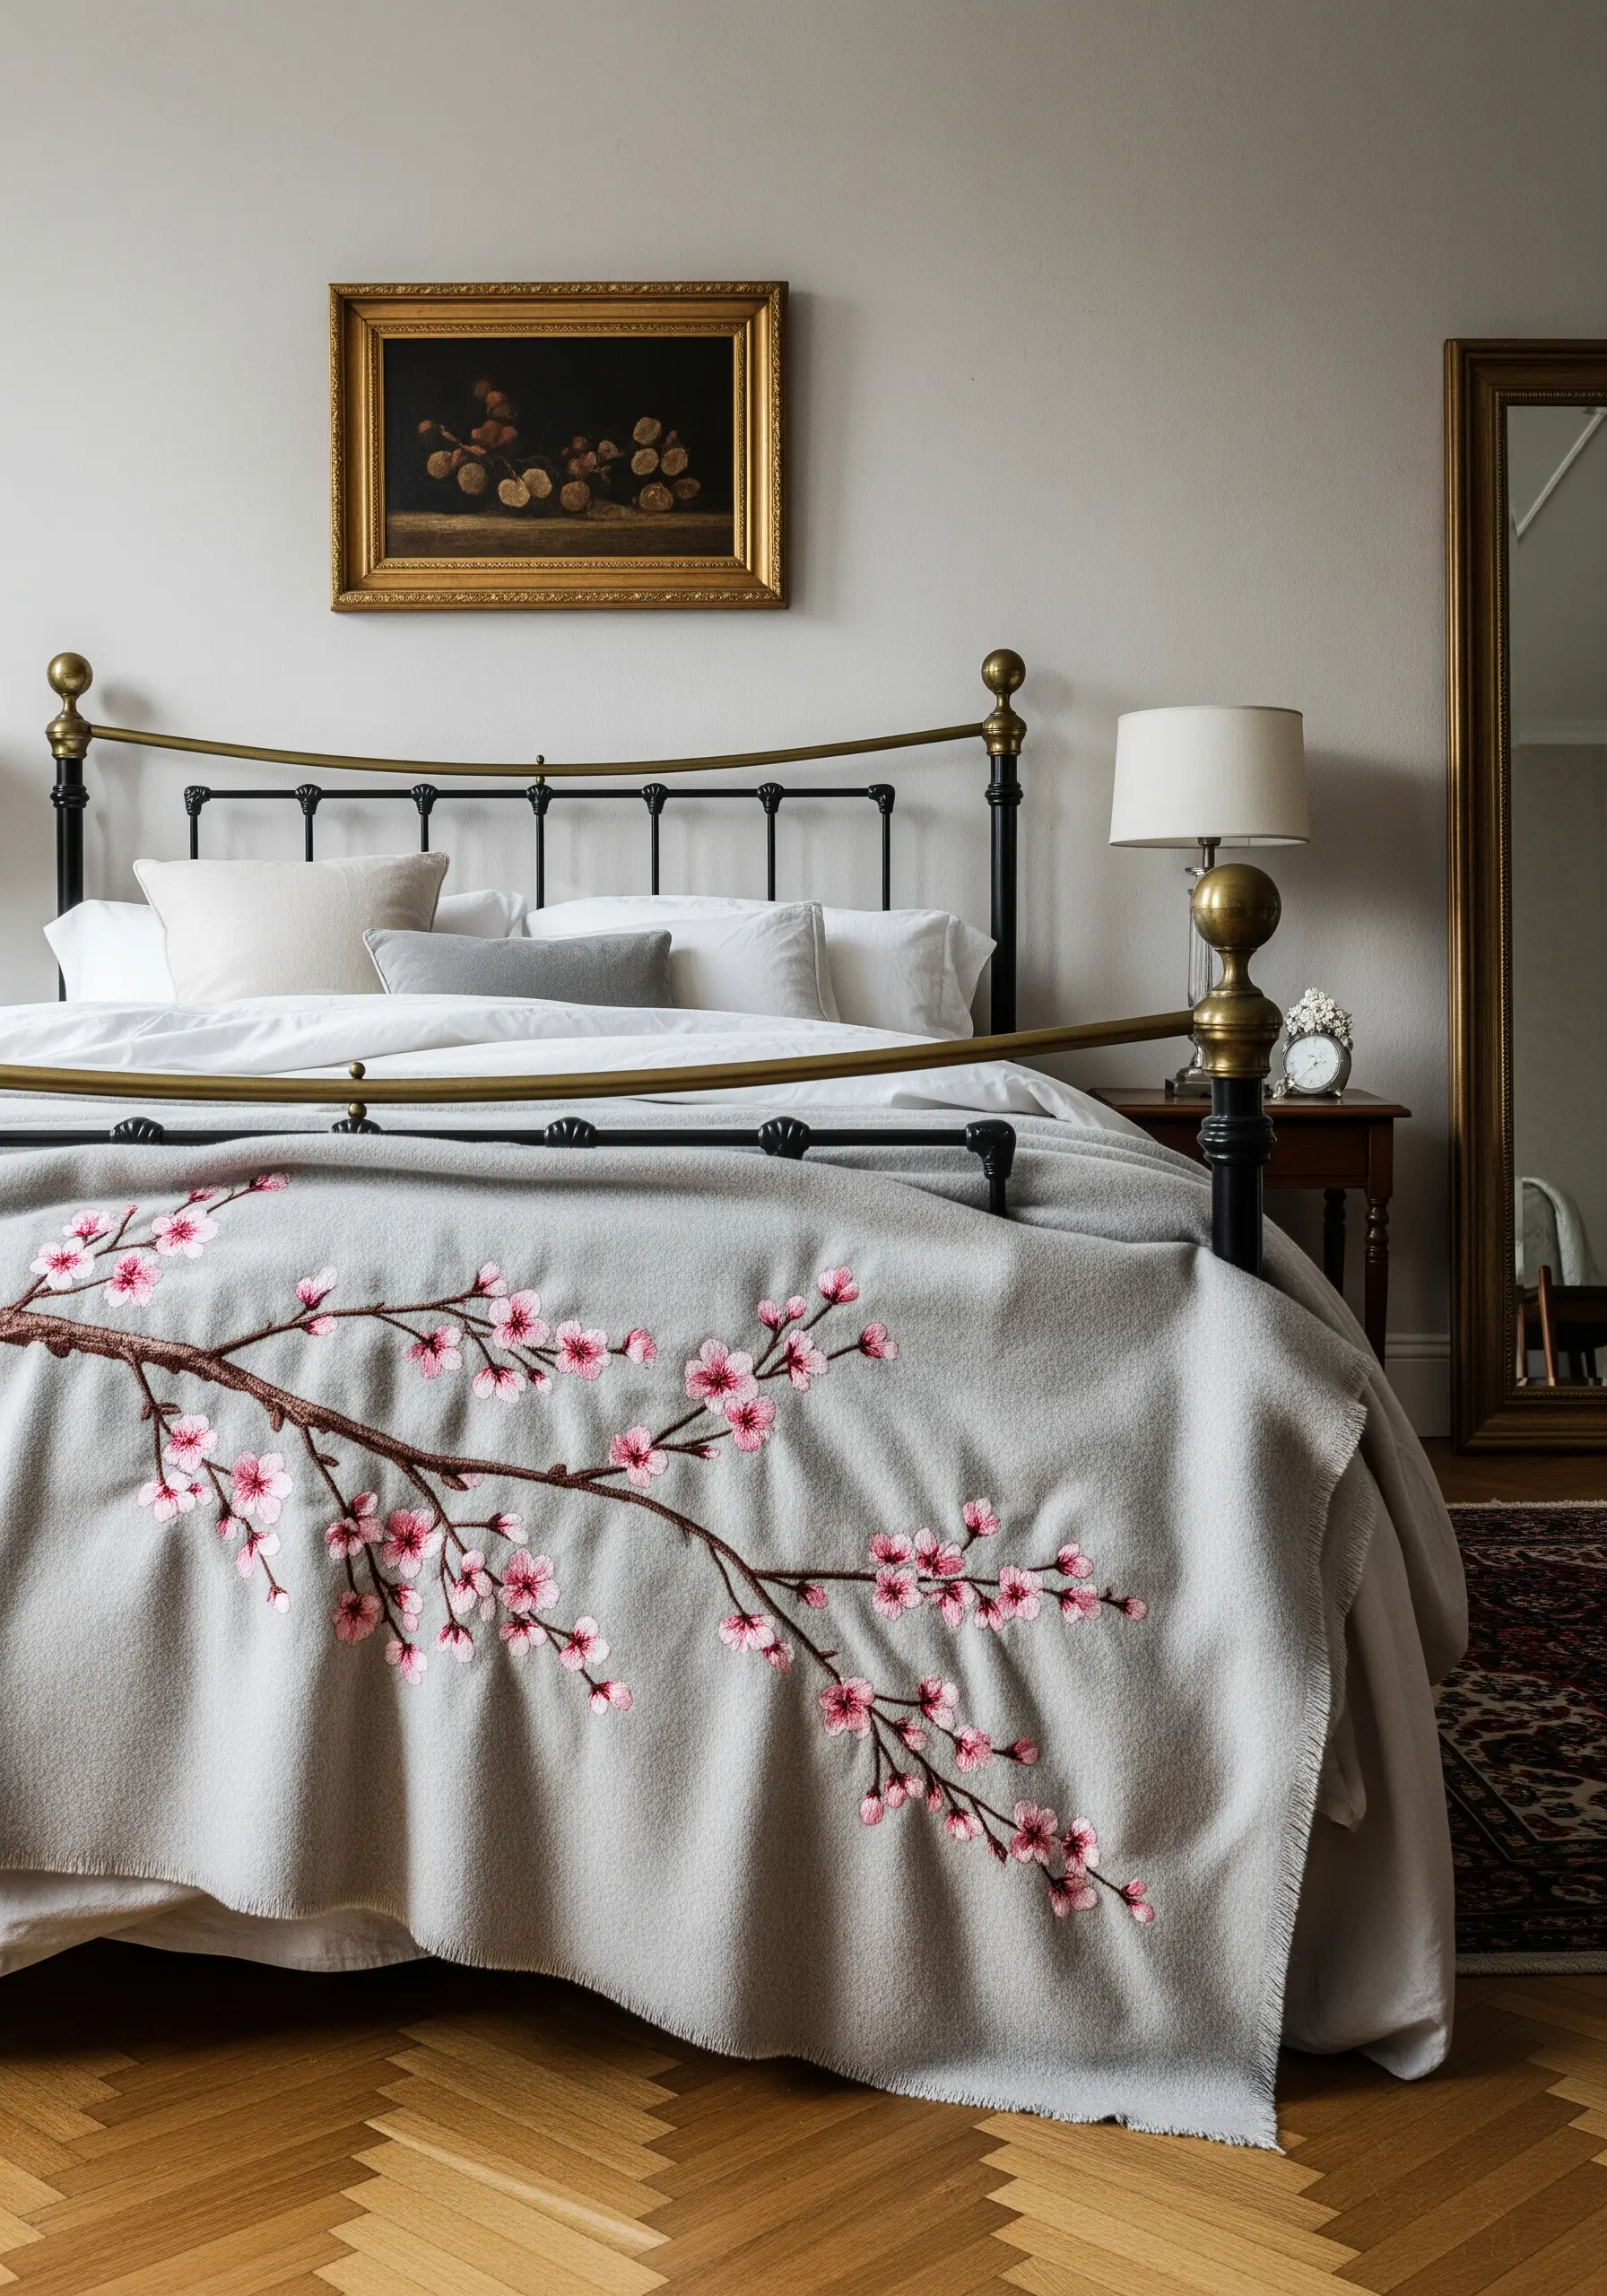
When embroidering on a thick, textured fabric like a wool blanket, you need to create details that stand out.
For the branch, use a thicker brown thread or couch a piece of yarn onto the surface to give it a strong, tactile presence.
Contrast this with delicate blossoms made from small detached chain stitches and French knots in shades of pink and white.
This interplay between the bold, rustic branch and the fine, delicate flowers makes the entire design pop.
16. Curate a Collection of Forest Floor Motifs
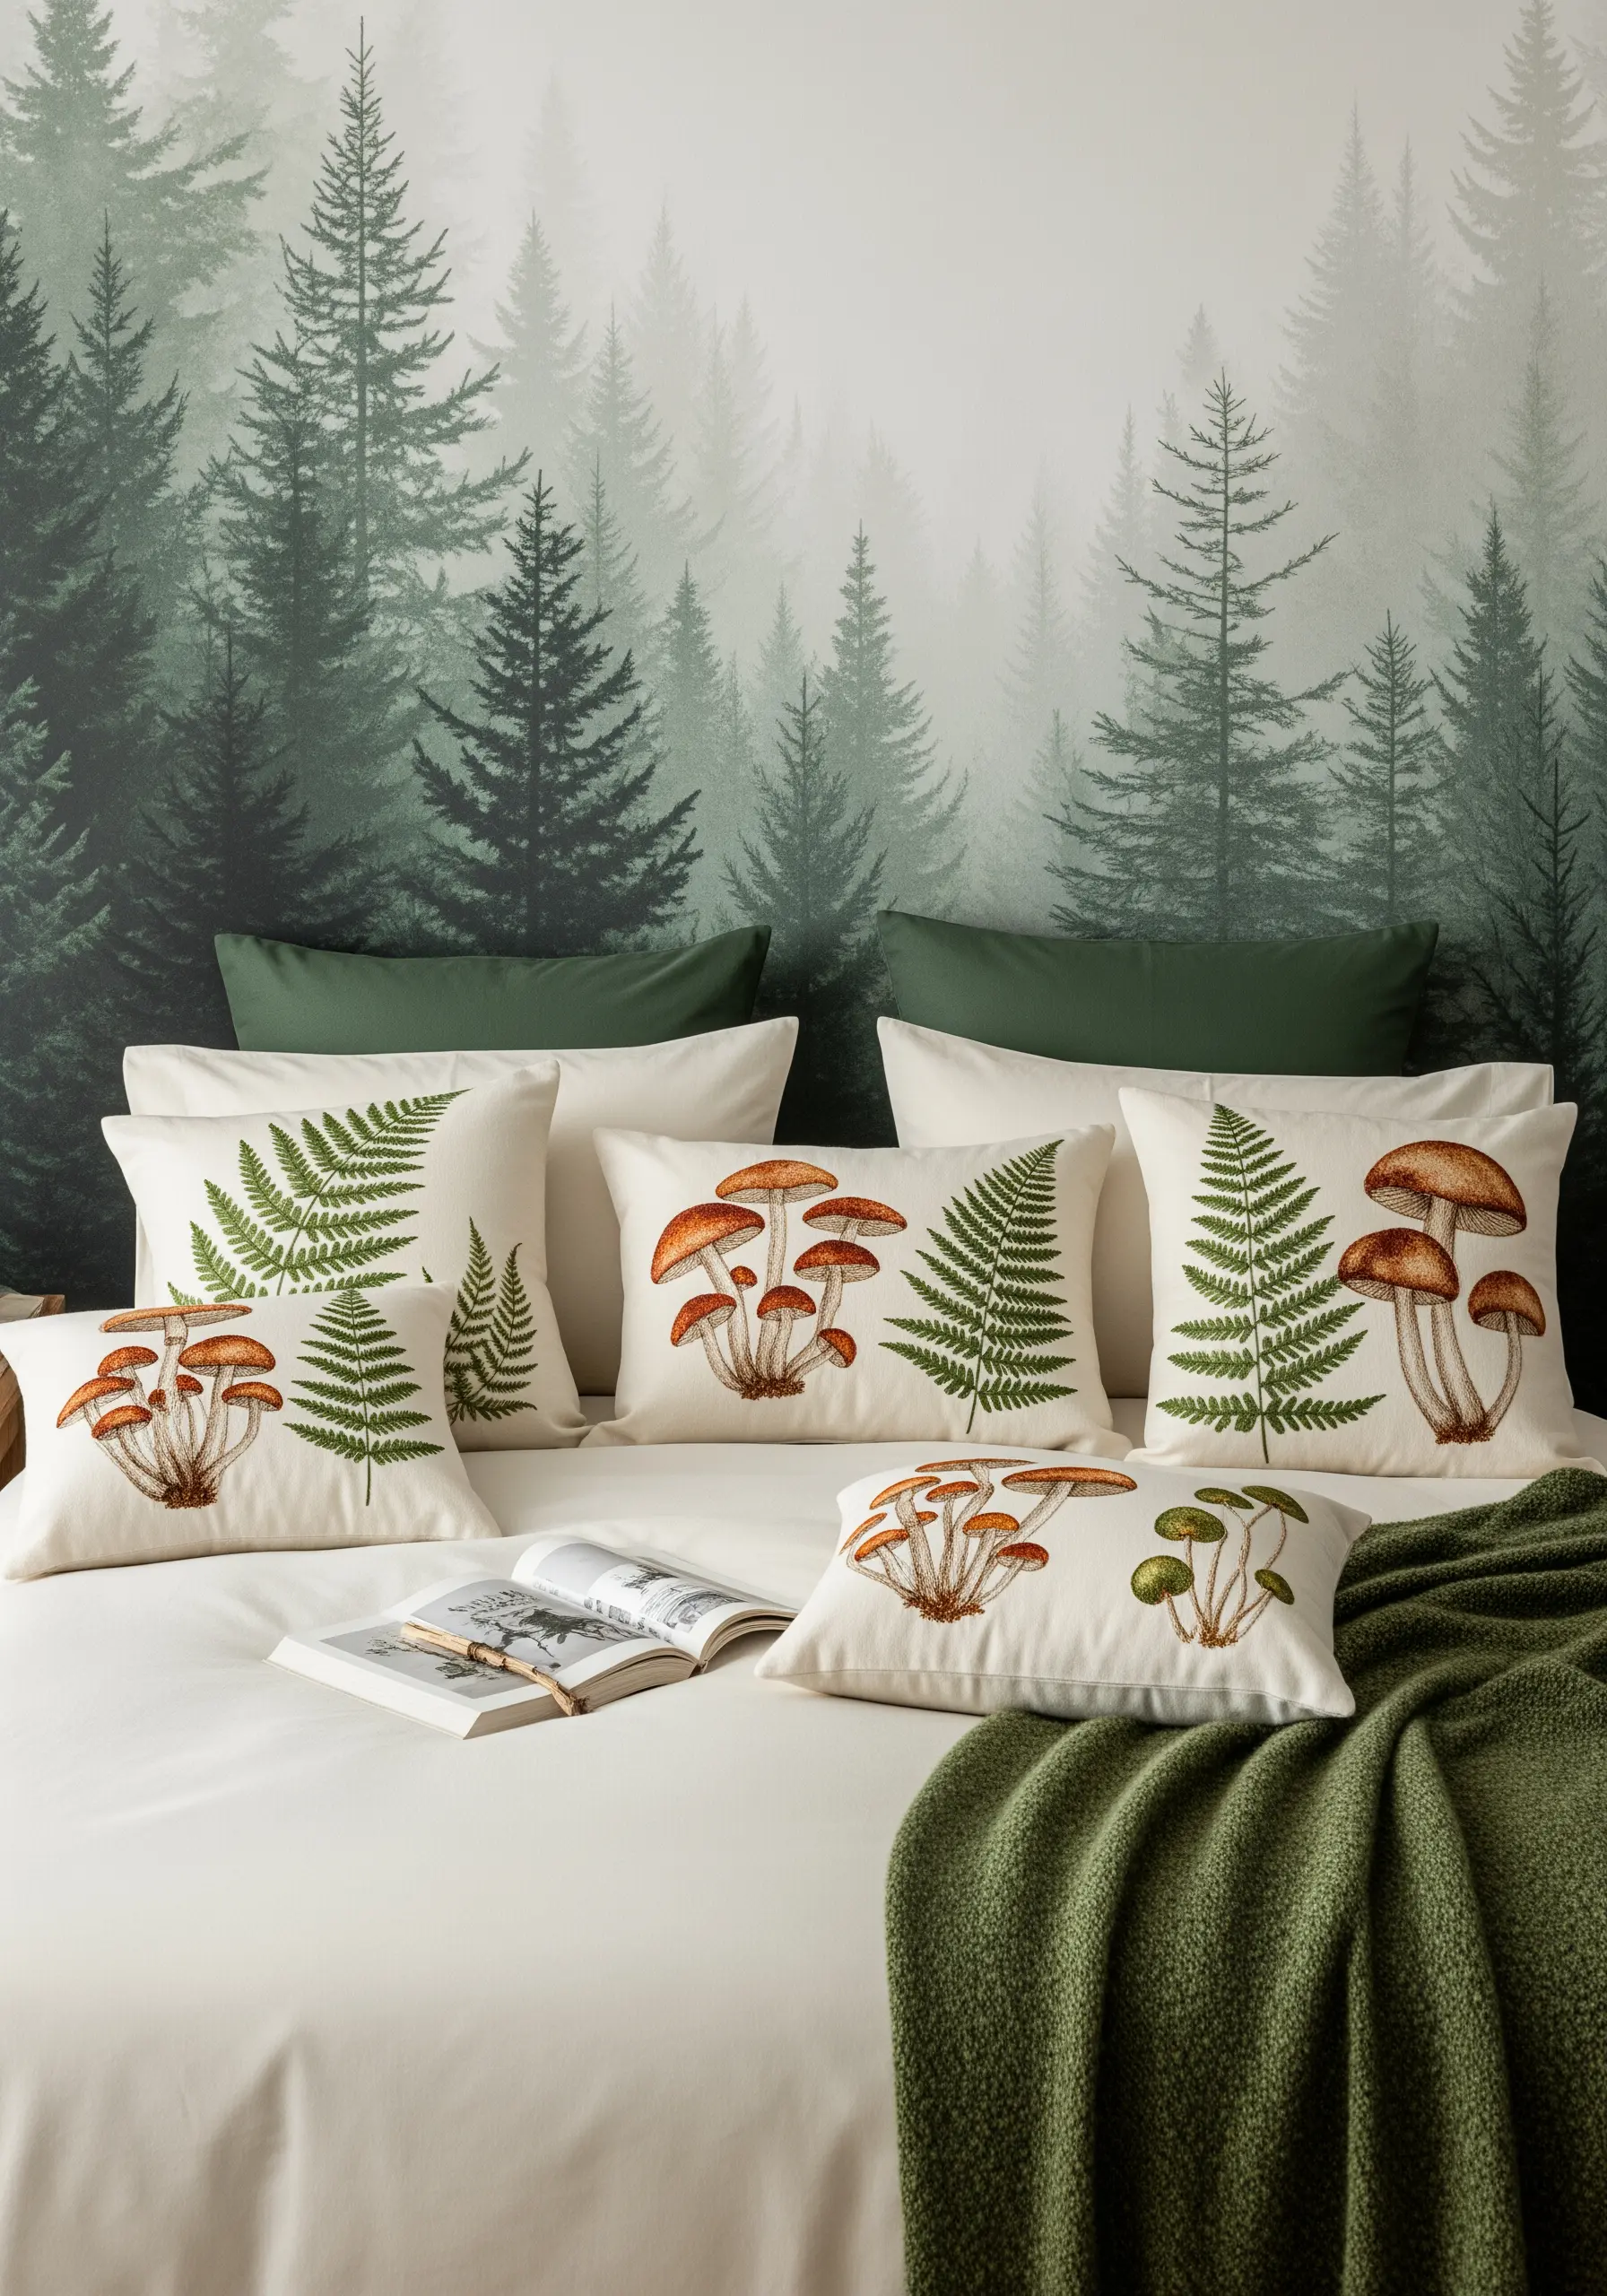
Create a sophisticated woodland theme by scattering detailed botanical illustrations across a set of pillows.
Focus on realistic shading and texture. Use long-and-short stitch to blend browns and tans on the mushroom caps, and add fine lines of backstitch underneath for the gills.
For the ferns, fishbone stitch is perfect for creating the intricate, feathery look of the fronds.
Stitching these moss and fern embroidery textures on an off-white cotton or linen allows the natural details to shine.
17. Upholster a Stool with a Blooming Hydrangea
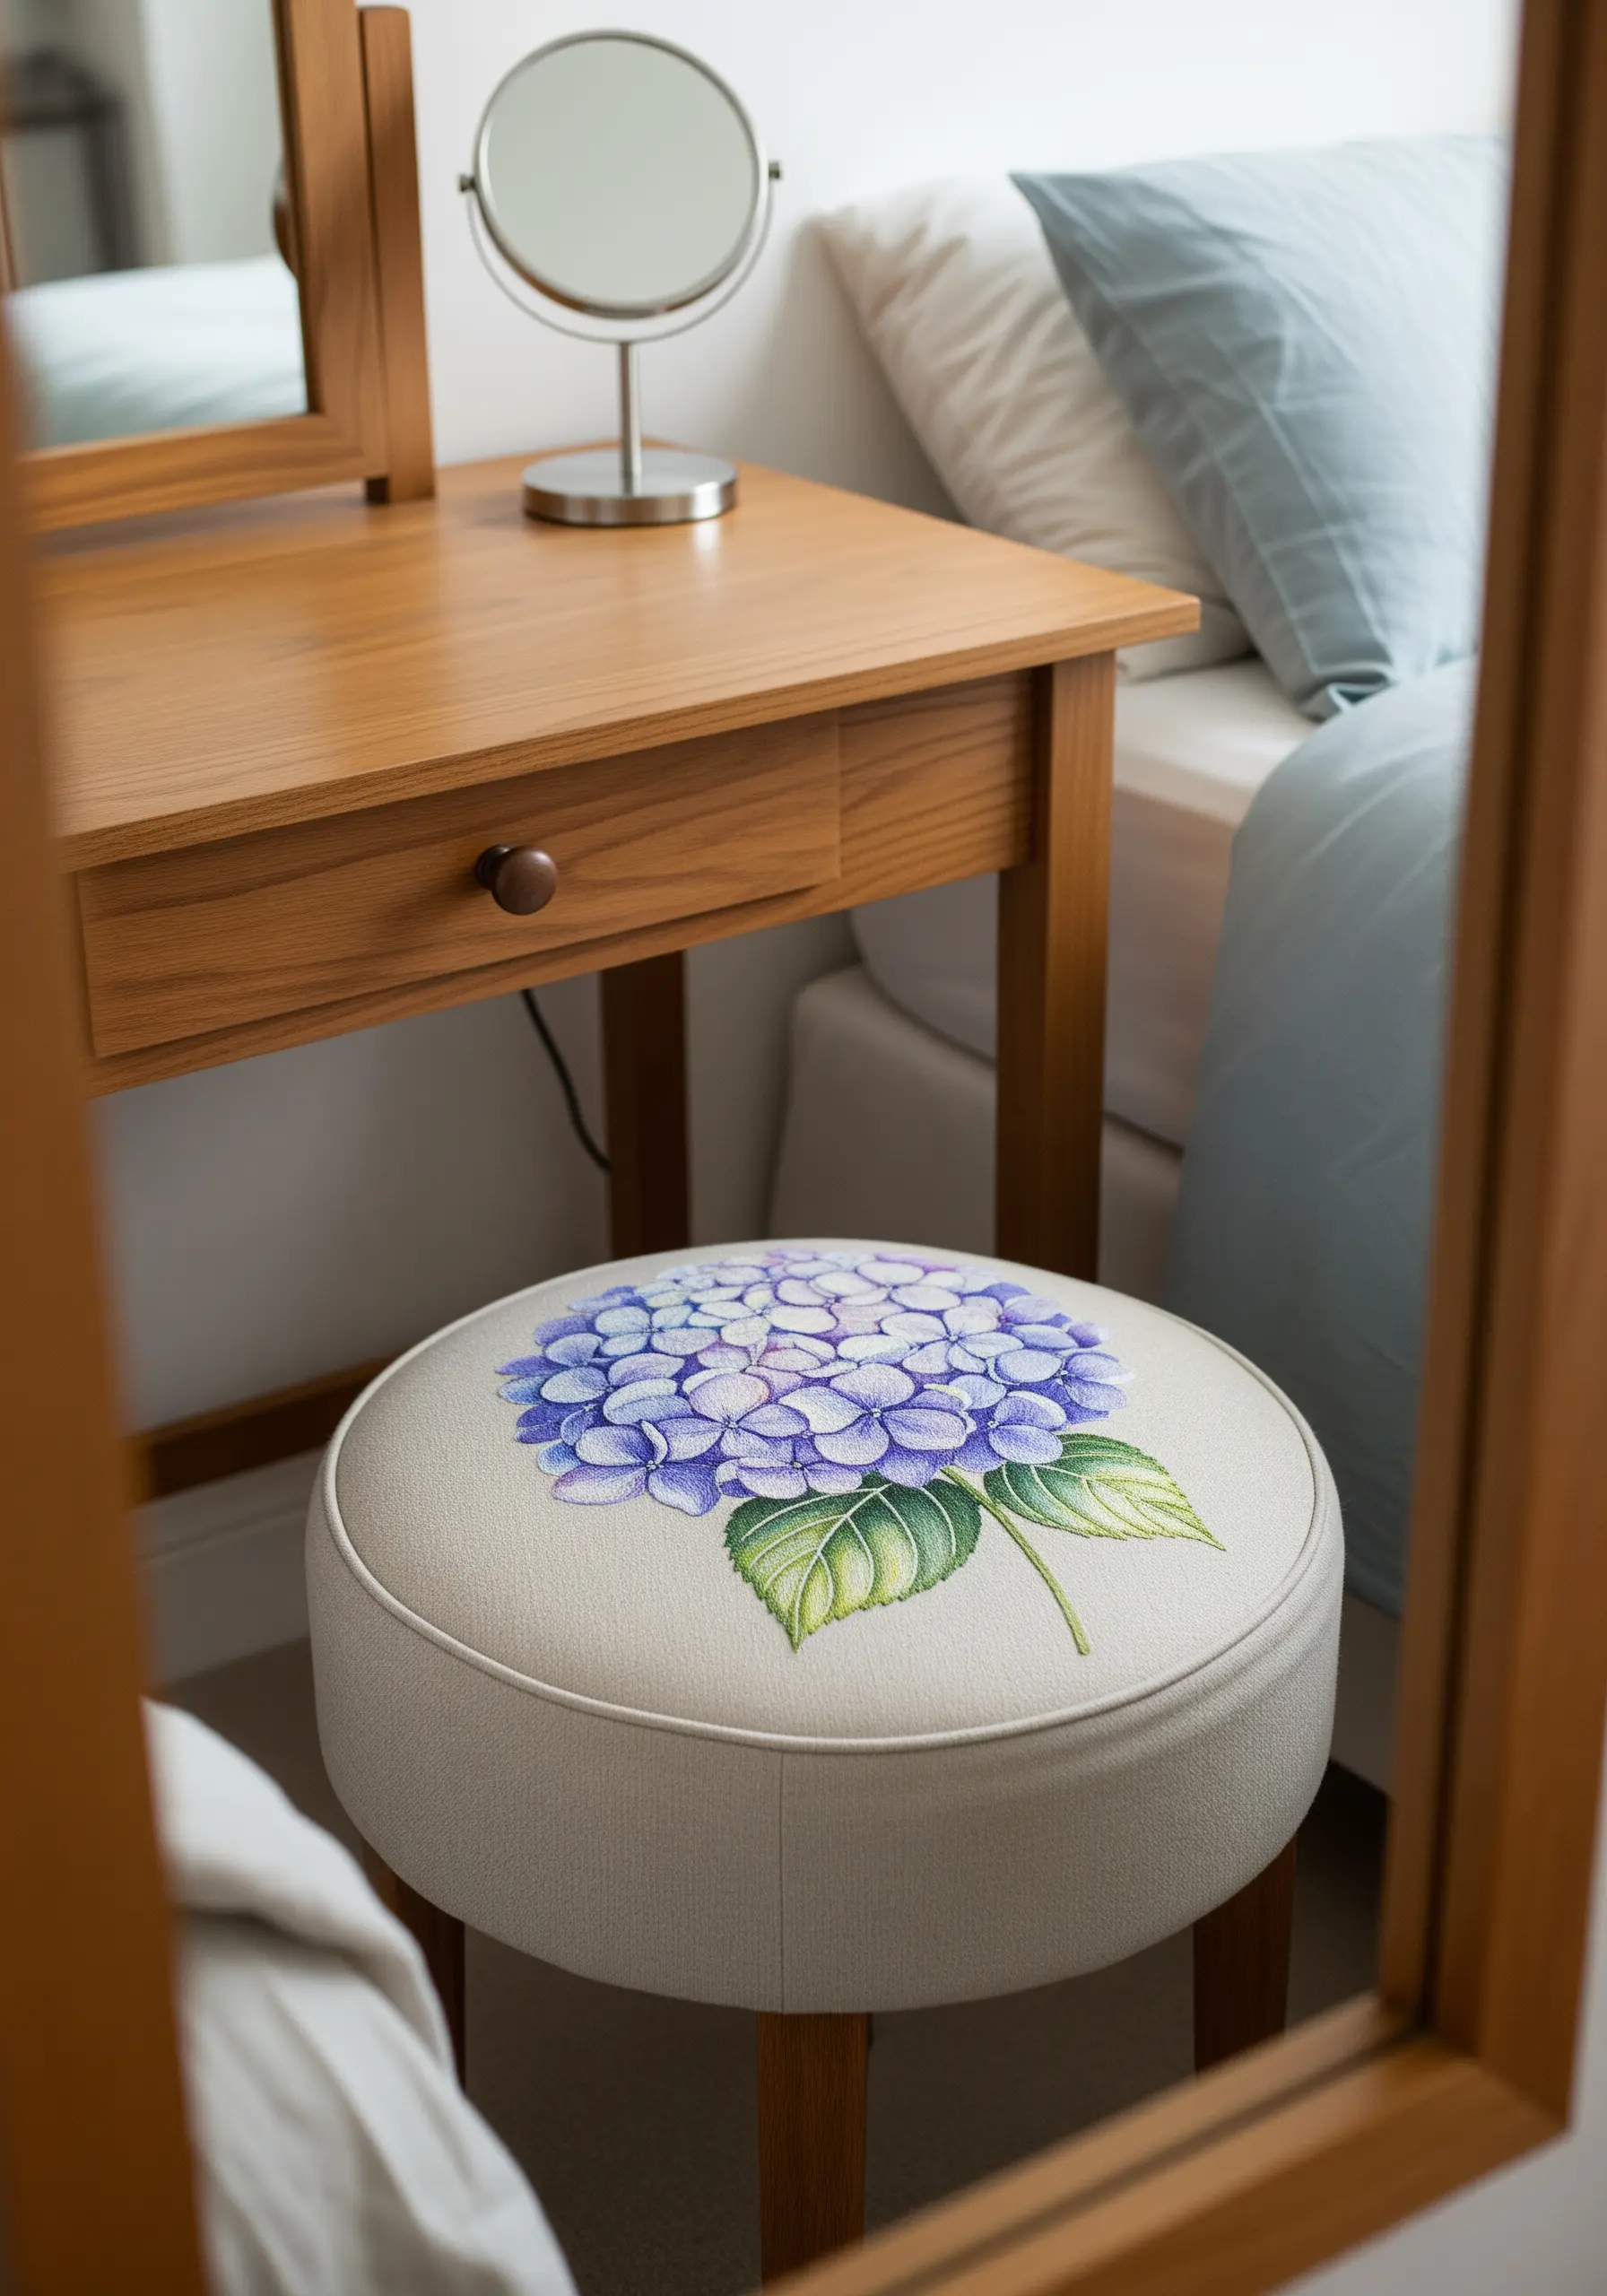
Turn a functional piece of furniture into a work of art by embroidering directly onto upholstery fabric.
The dense, clustered nature of a hydrangea is perfectly suited to French knots. Use a mix of periwinkle, lavender, and cream threads, packing the knots tightly together to create a lush, three-dimensional surface.
For the leaves, use a smooth satin stitch to provide a visual contrast to the highly textured flower head.
This technique creates a durable, tactile design that invites both sight and touch.
18. Weave a Seascape Tapestry with Blended Threads
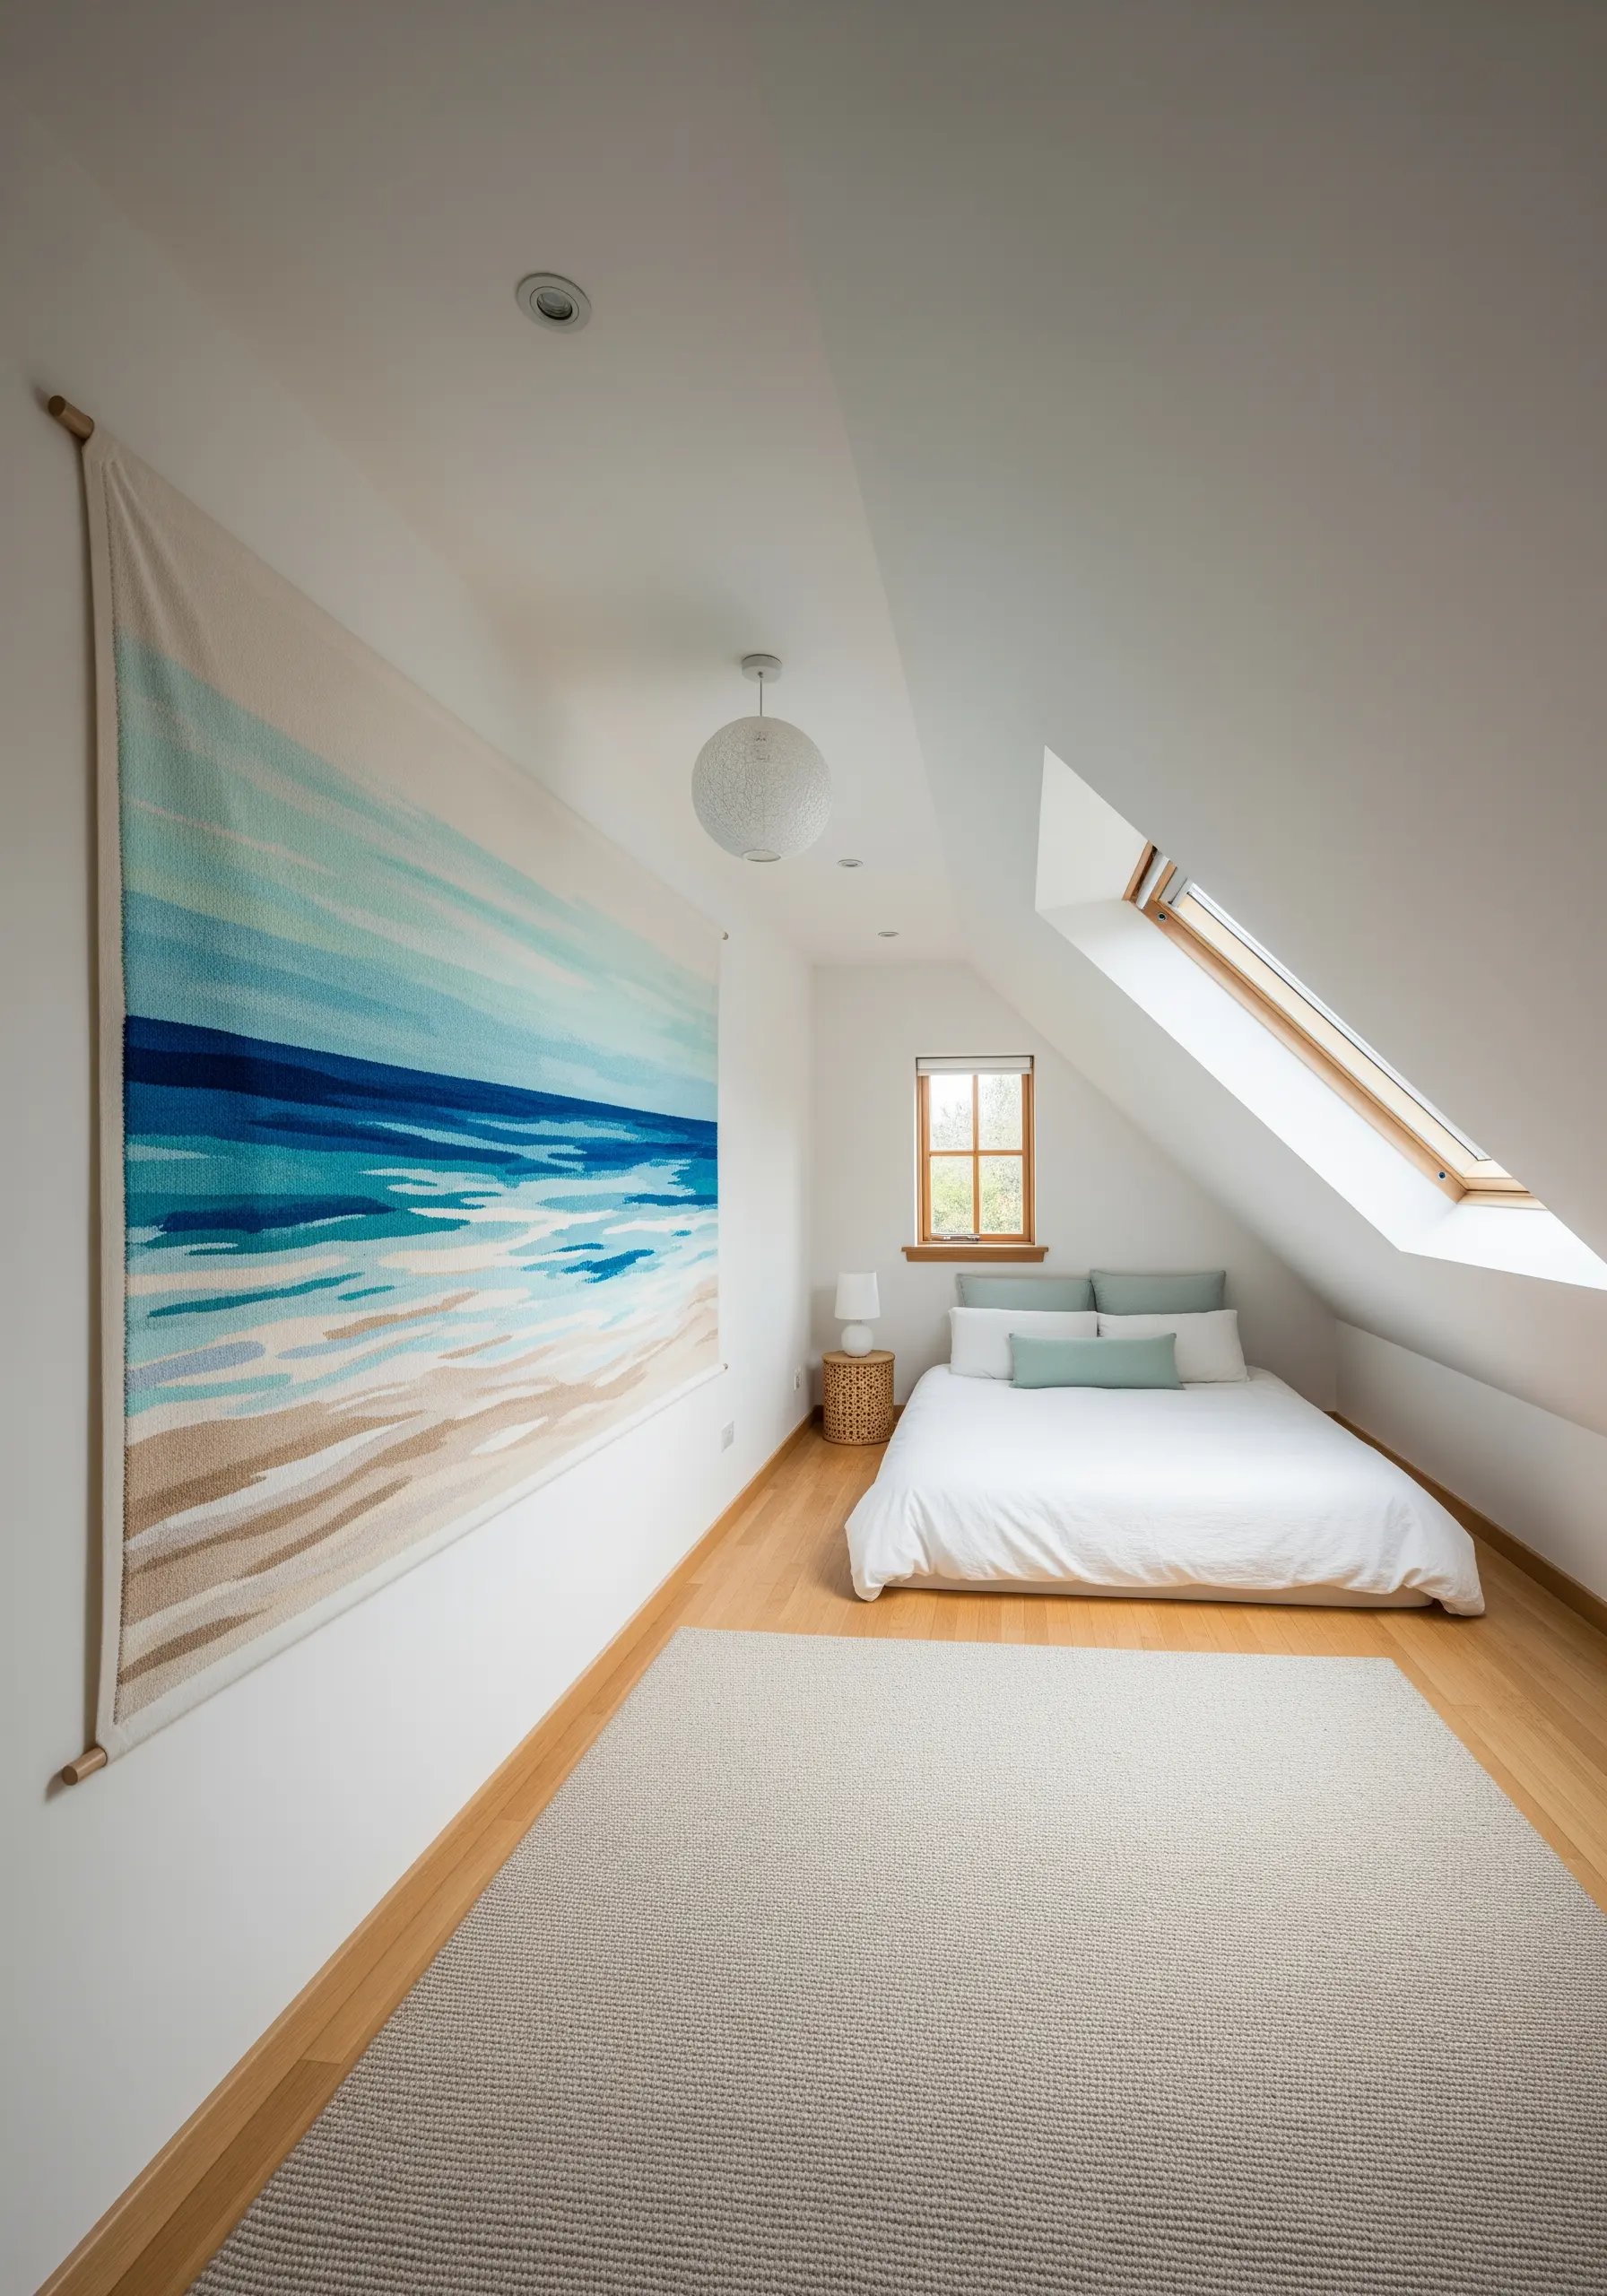
For a large-scale, painterly wall hanging, work in horizontal bands of color to build your seascape.
Use long-and-short stitch to seamlessly blend the sandy beige tones into the turquoise and deep blue of the ocean.
Incorporate single strands of white or pale silver thread into the water sections, using long, horizontal straight stitches to represent the glint of light on the waves.
The sheer scale and blended color create an immersive, calming effect perfect for an attic or loft bedroom.
19. Scatter Golden Ginkgo Leaves Across a Duvet
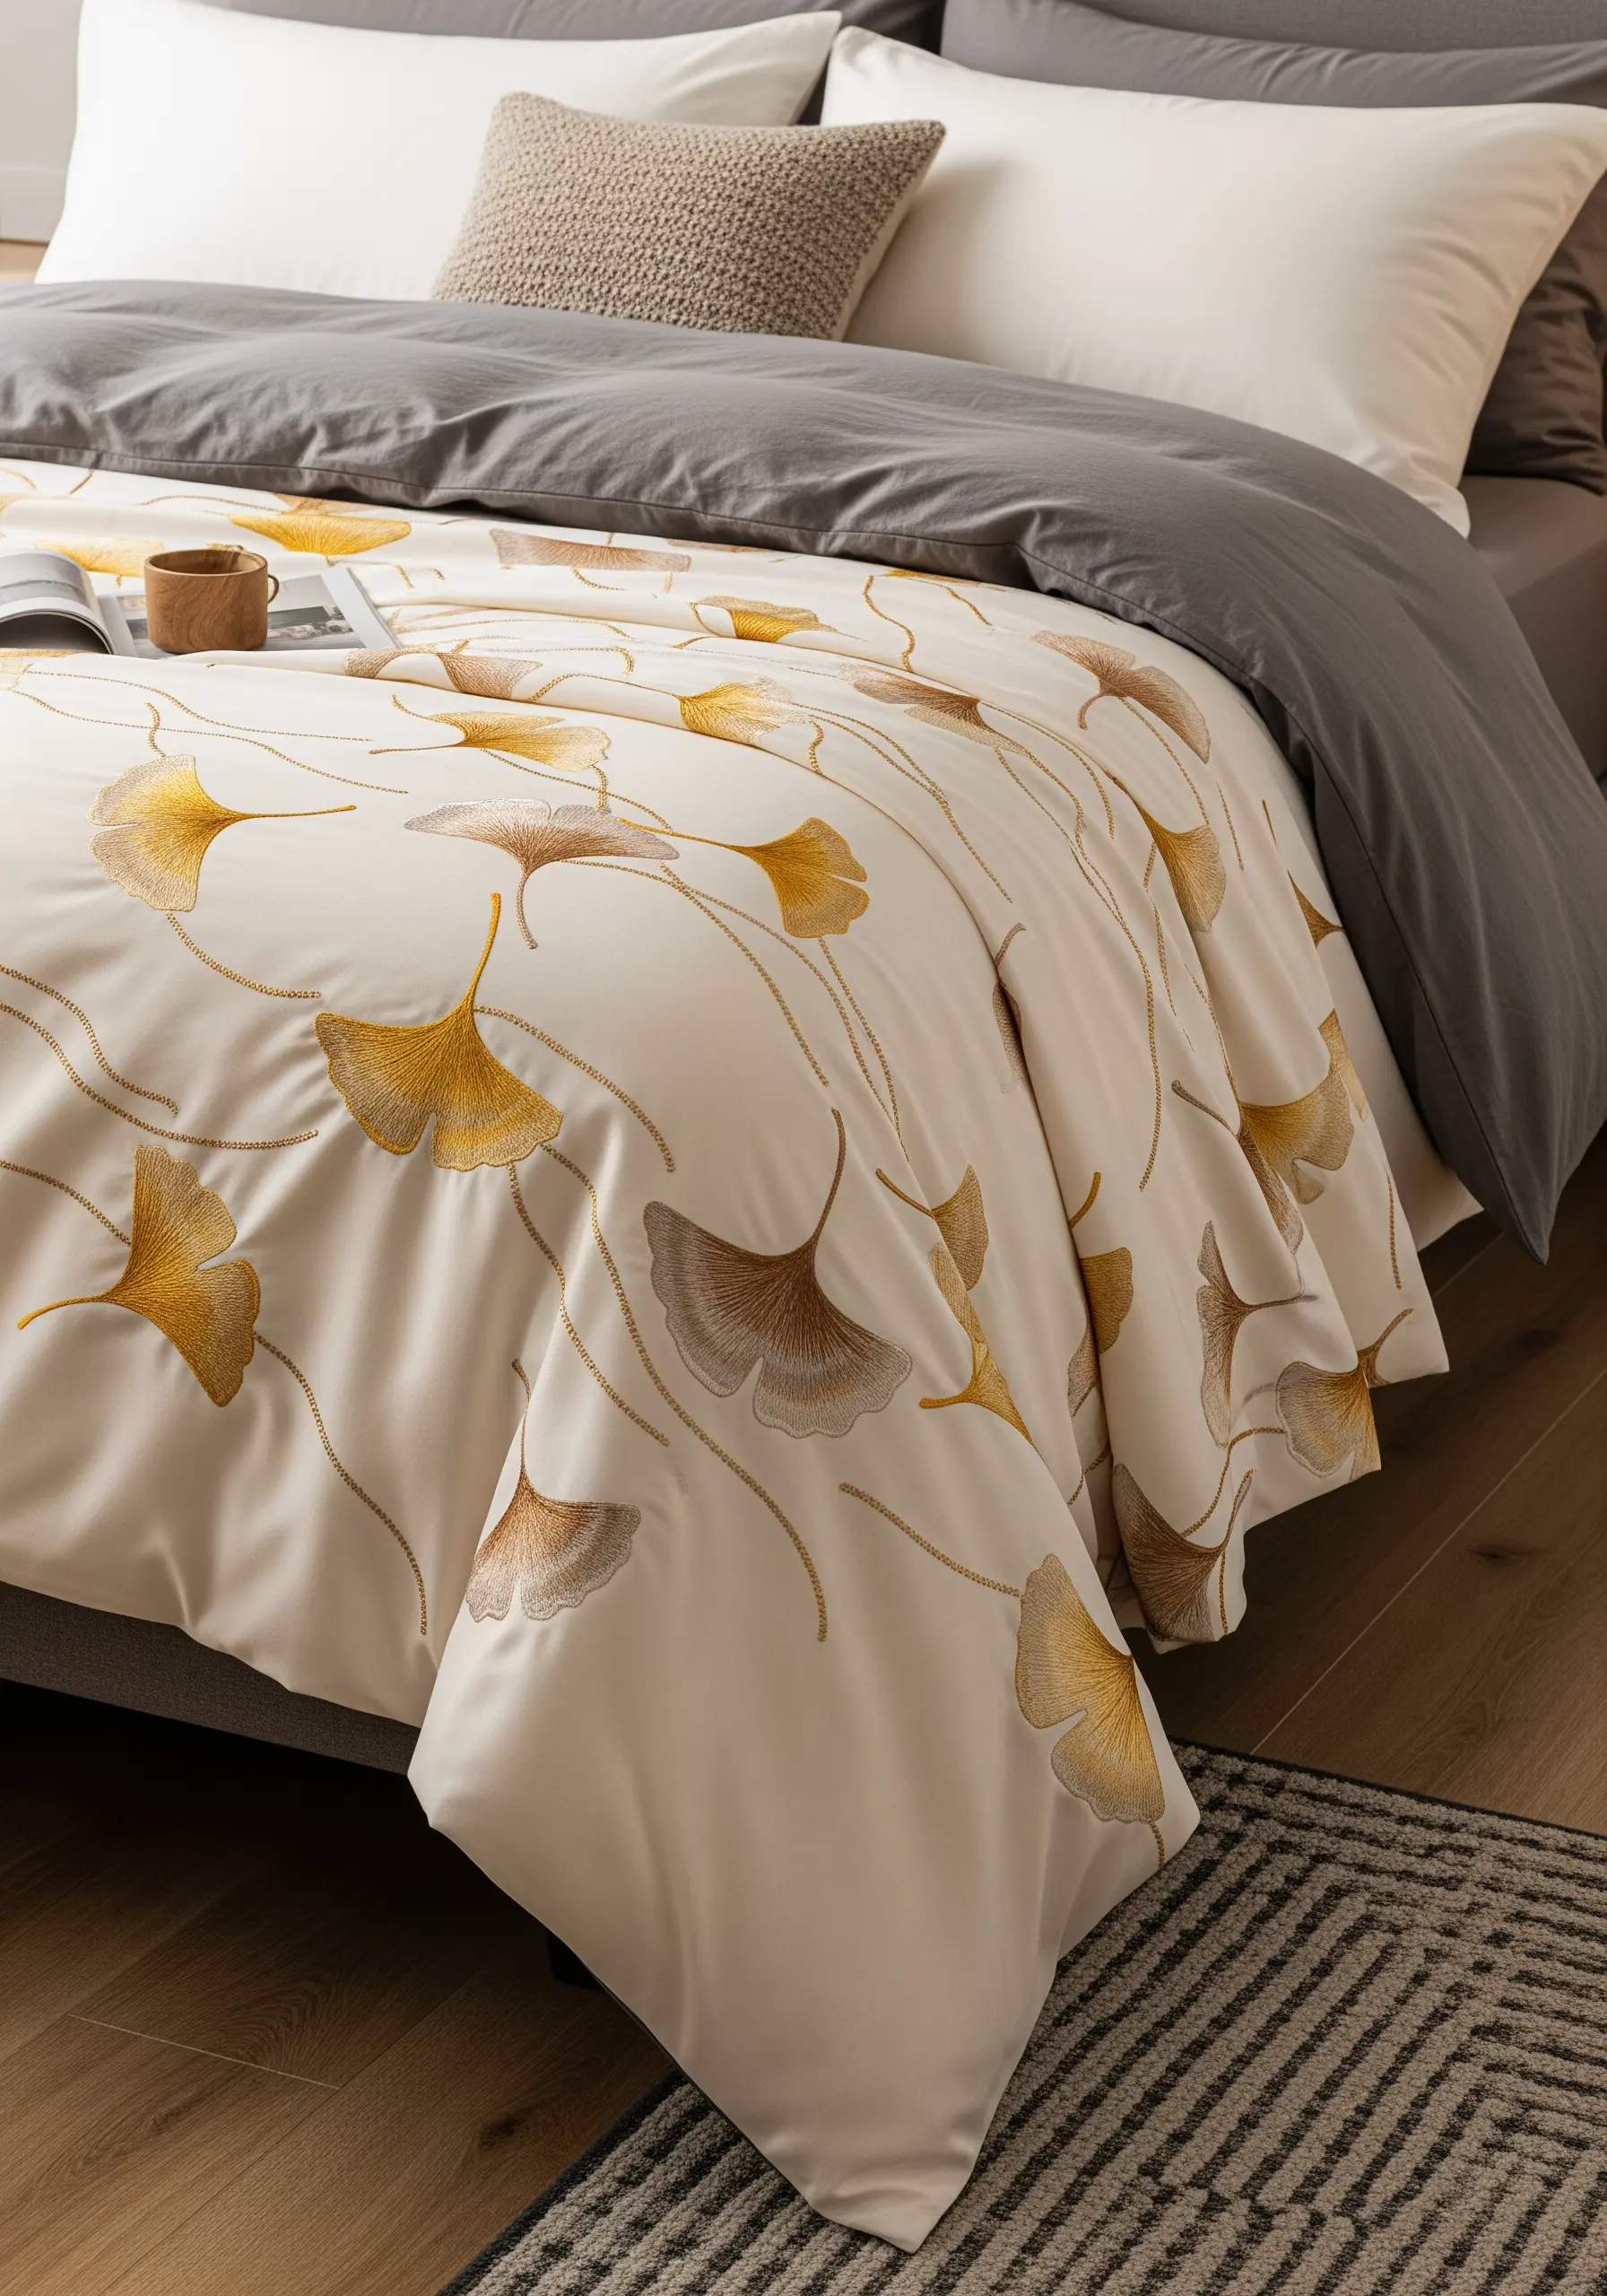
Create a sense of gentle movement on your bedding with a pattern of scattered, falling ginkgo leaves.
Use fishbone stitch for the leaves, as it naturally creates the central vein and fanned-out shape.
To get the watercolor effect, use a variegated thread in shades of gold and brown, or hold two different colored strands together in your needle.
Add delicate, trailing stems with a simple backstitch, connecting a few of the leaves to guide the eye across the fabric.
20. Arrange a Triptych of Zen Garden Hoops
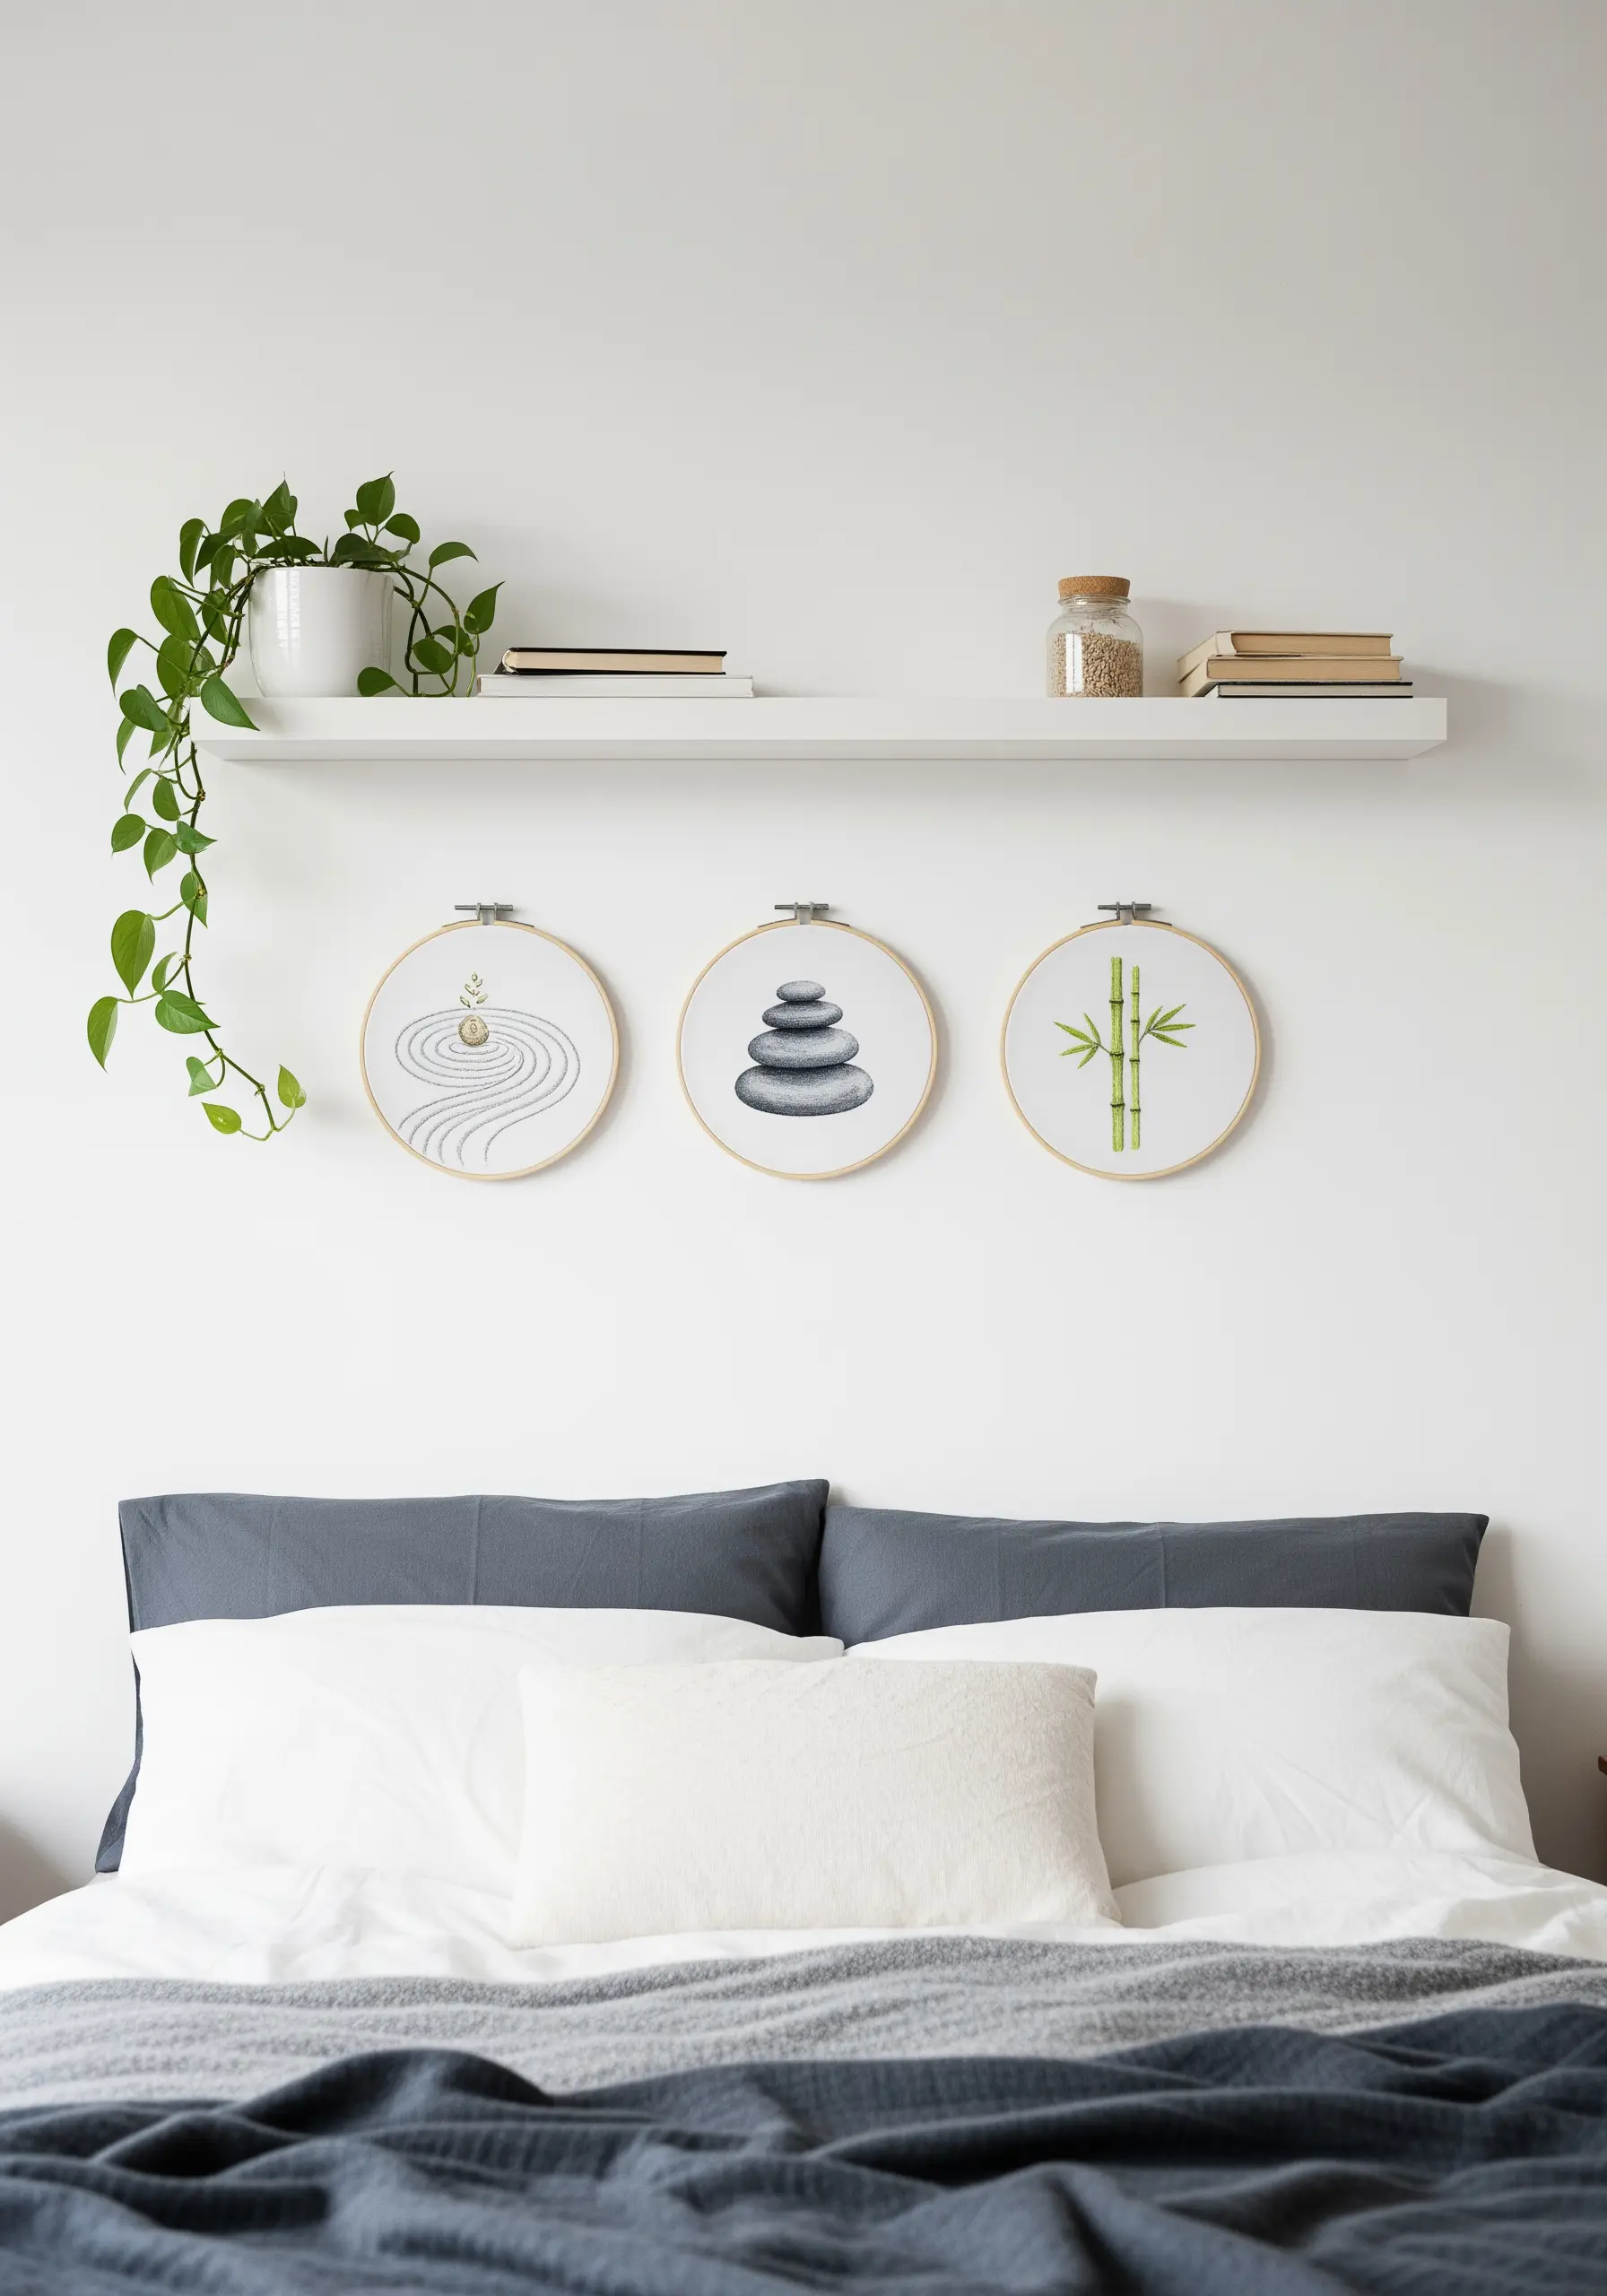
Groupings of small, themed hoops create a more impactful display than a single piece.
For a zen-inspired triptych, focus on simple elements: stacked stones, bamboo, and a raked sand garden.
Use smooth satin stitch for the stones, careful shading for the bamboo segments, and clean lines of running stitch for the raked sand.
Keeping the compositions minimal and the color palette restrained makes these minimal DIY embroidery pieces feel intentional and serene when displayed together.
21. Coordinate a Hummingbird Motif Across Linens
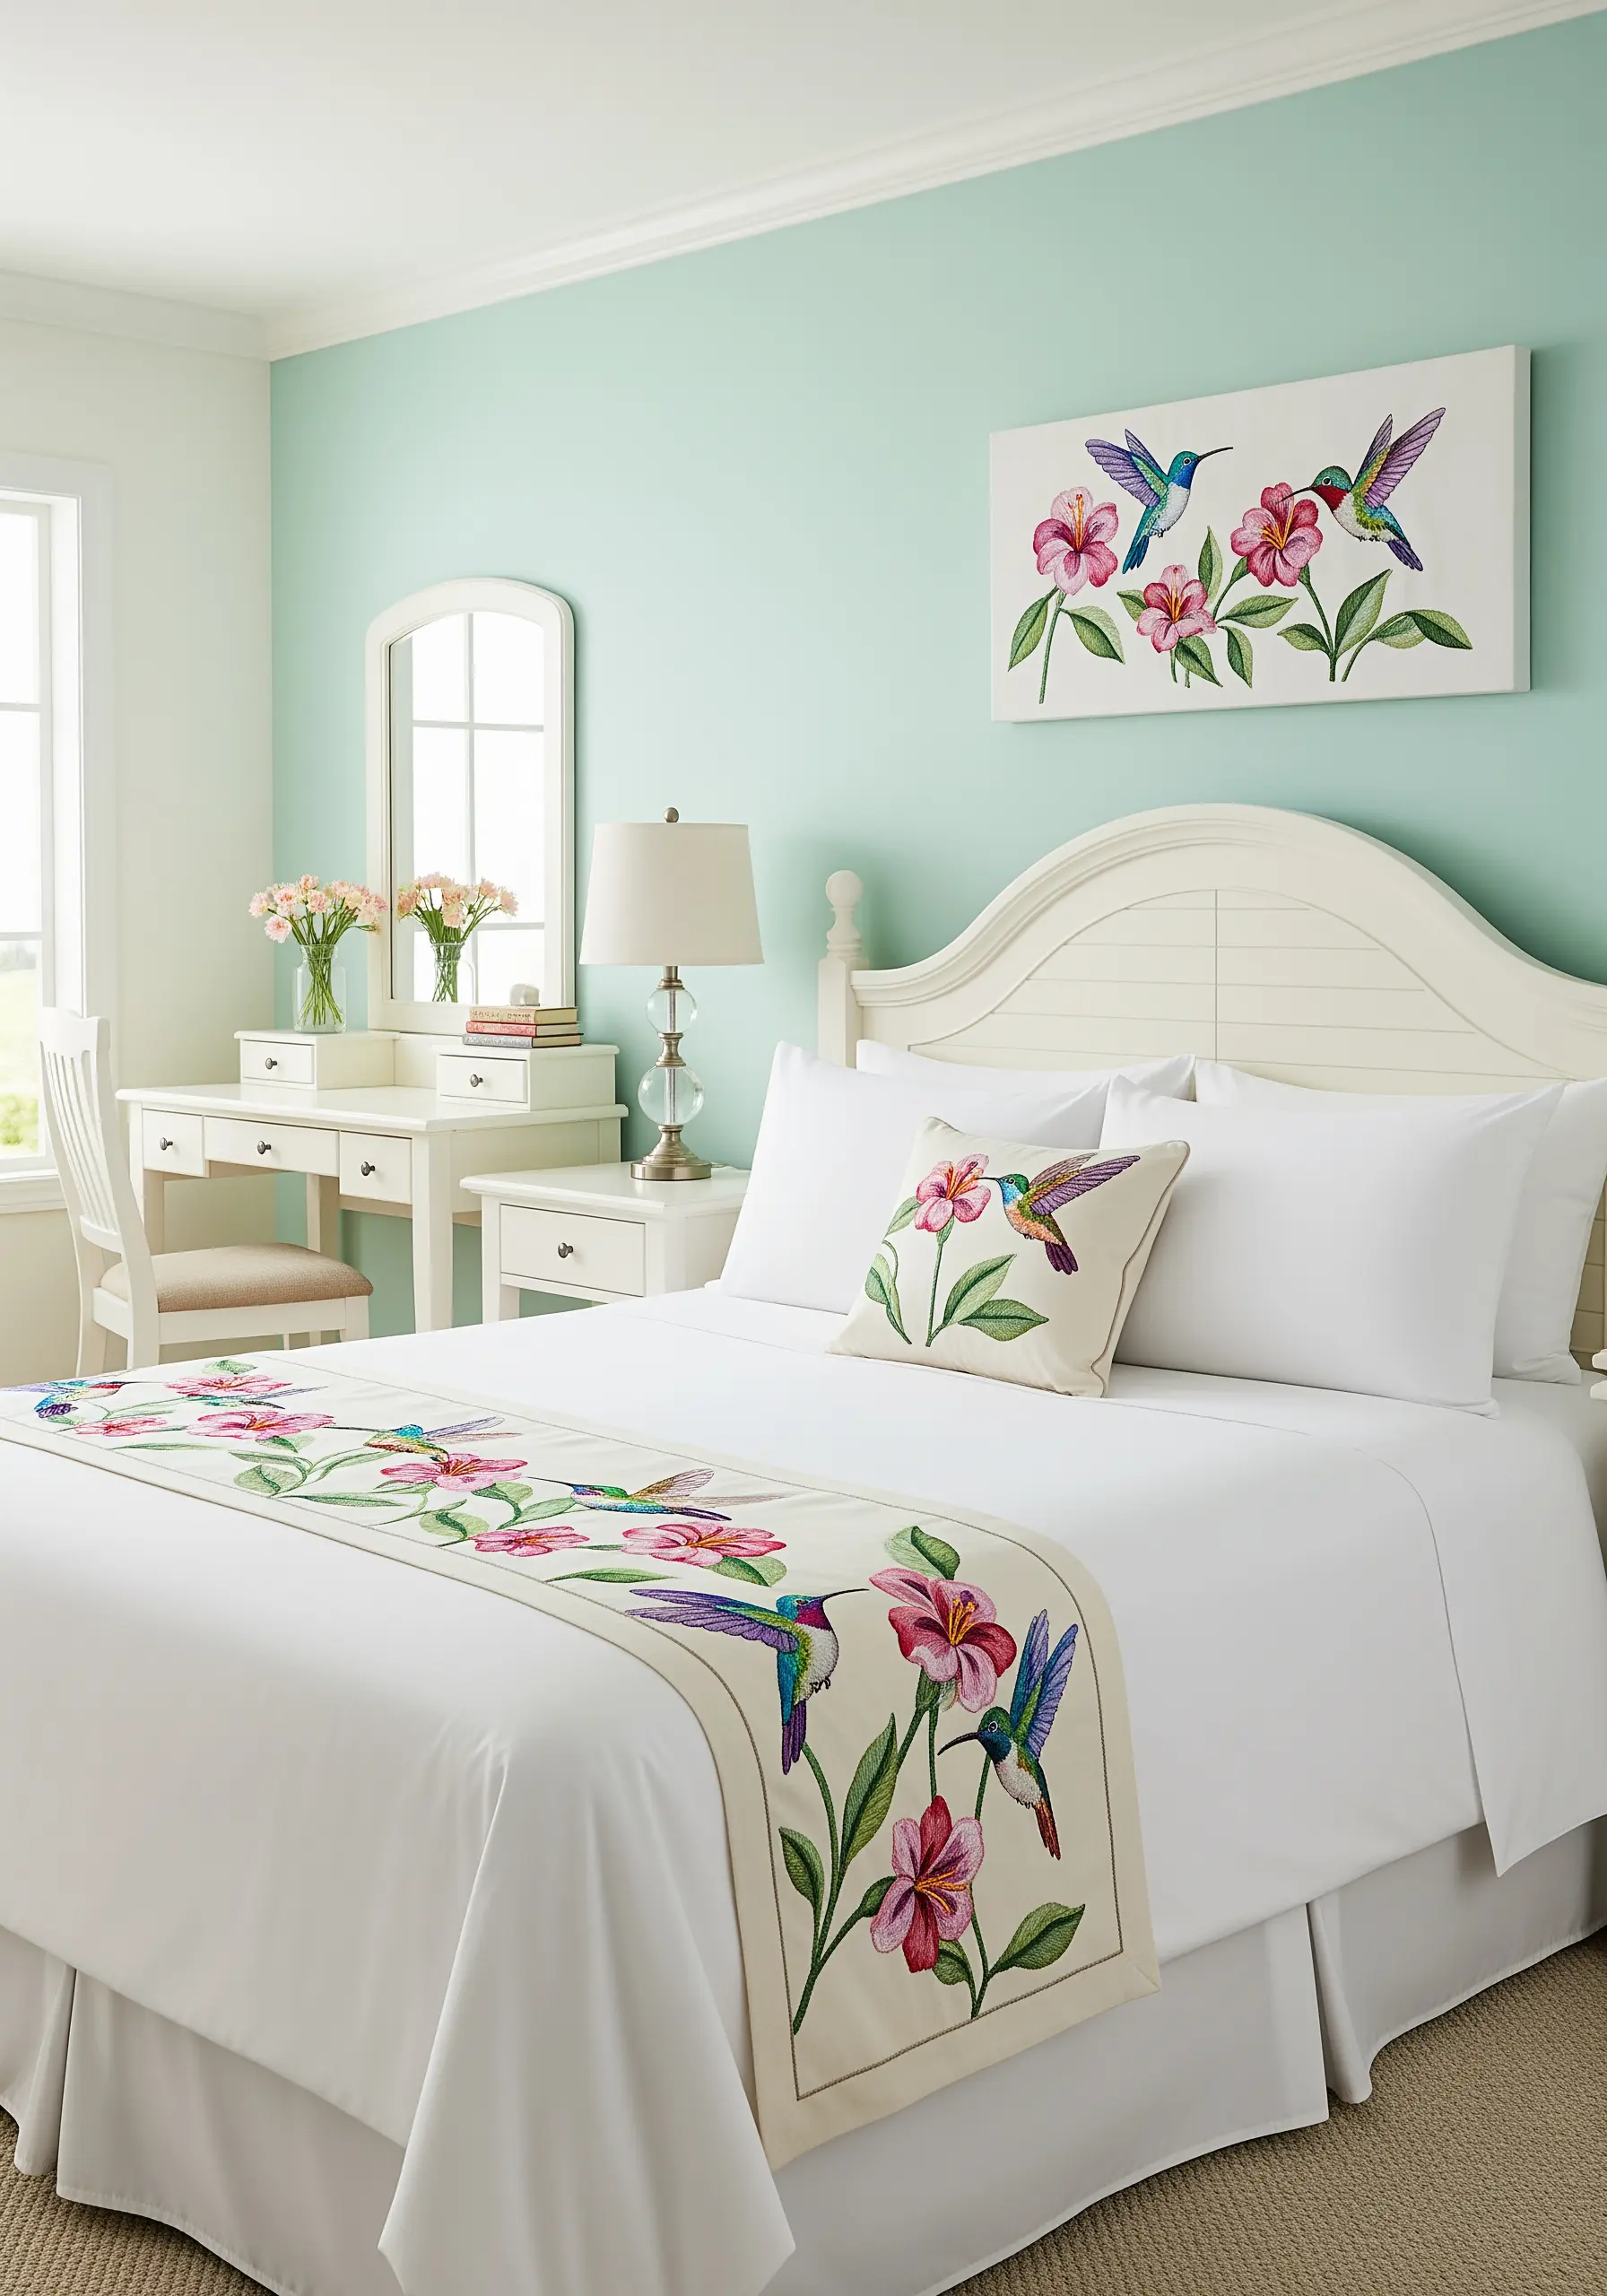
To create a cohesive bedroom look, repeat a single, dynamic motif on multiple items like a bed runner, pillow, and wall art.
The hummingbird’s iridescence is a perfect candidate for thread painting. Use single strands of silk or rayon floss in jewel tones—emerald, sapphire, magenta—to catch the light.
Keep the flowers simple with satin stitch to ensure the birds remain the focal point.
This repetition of a beautifully executed motif creates a custom, high-end feel throughout the space.
22. Recreate a Watercolor Mandala on a Cushion
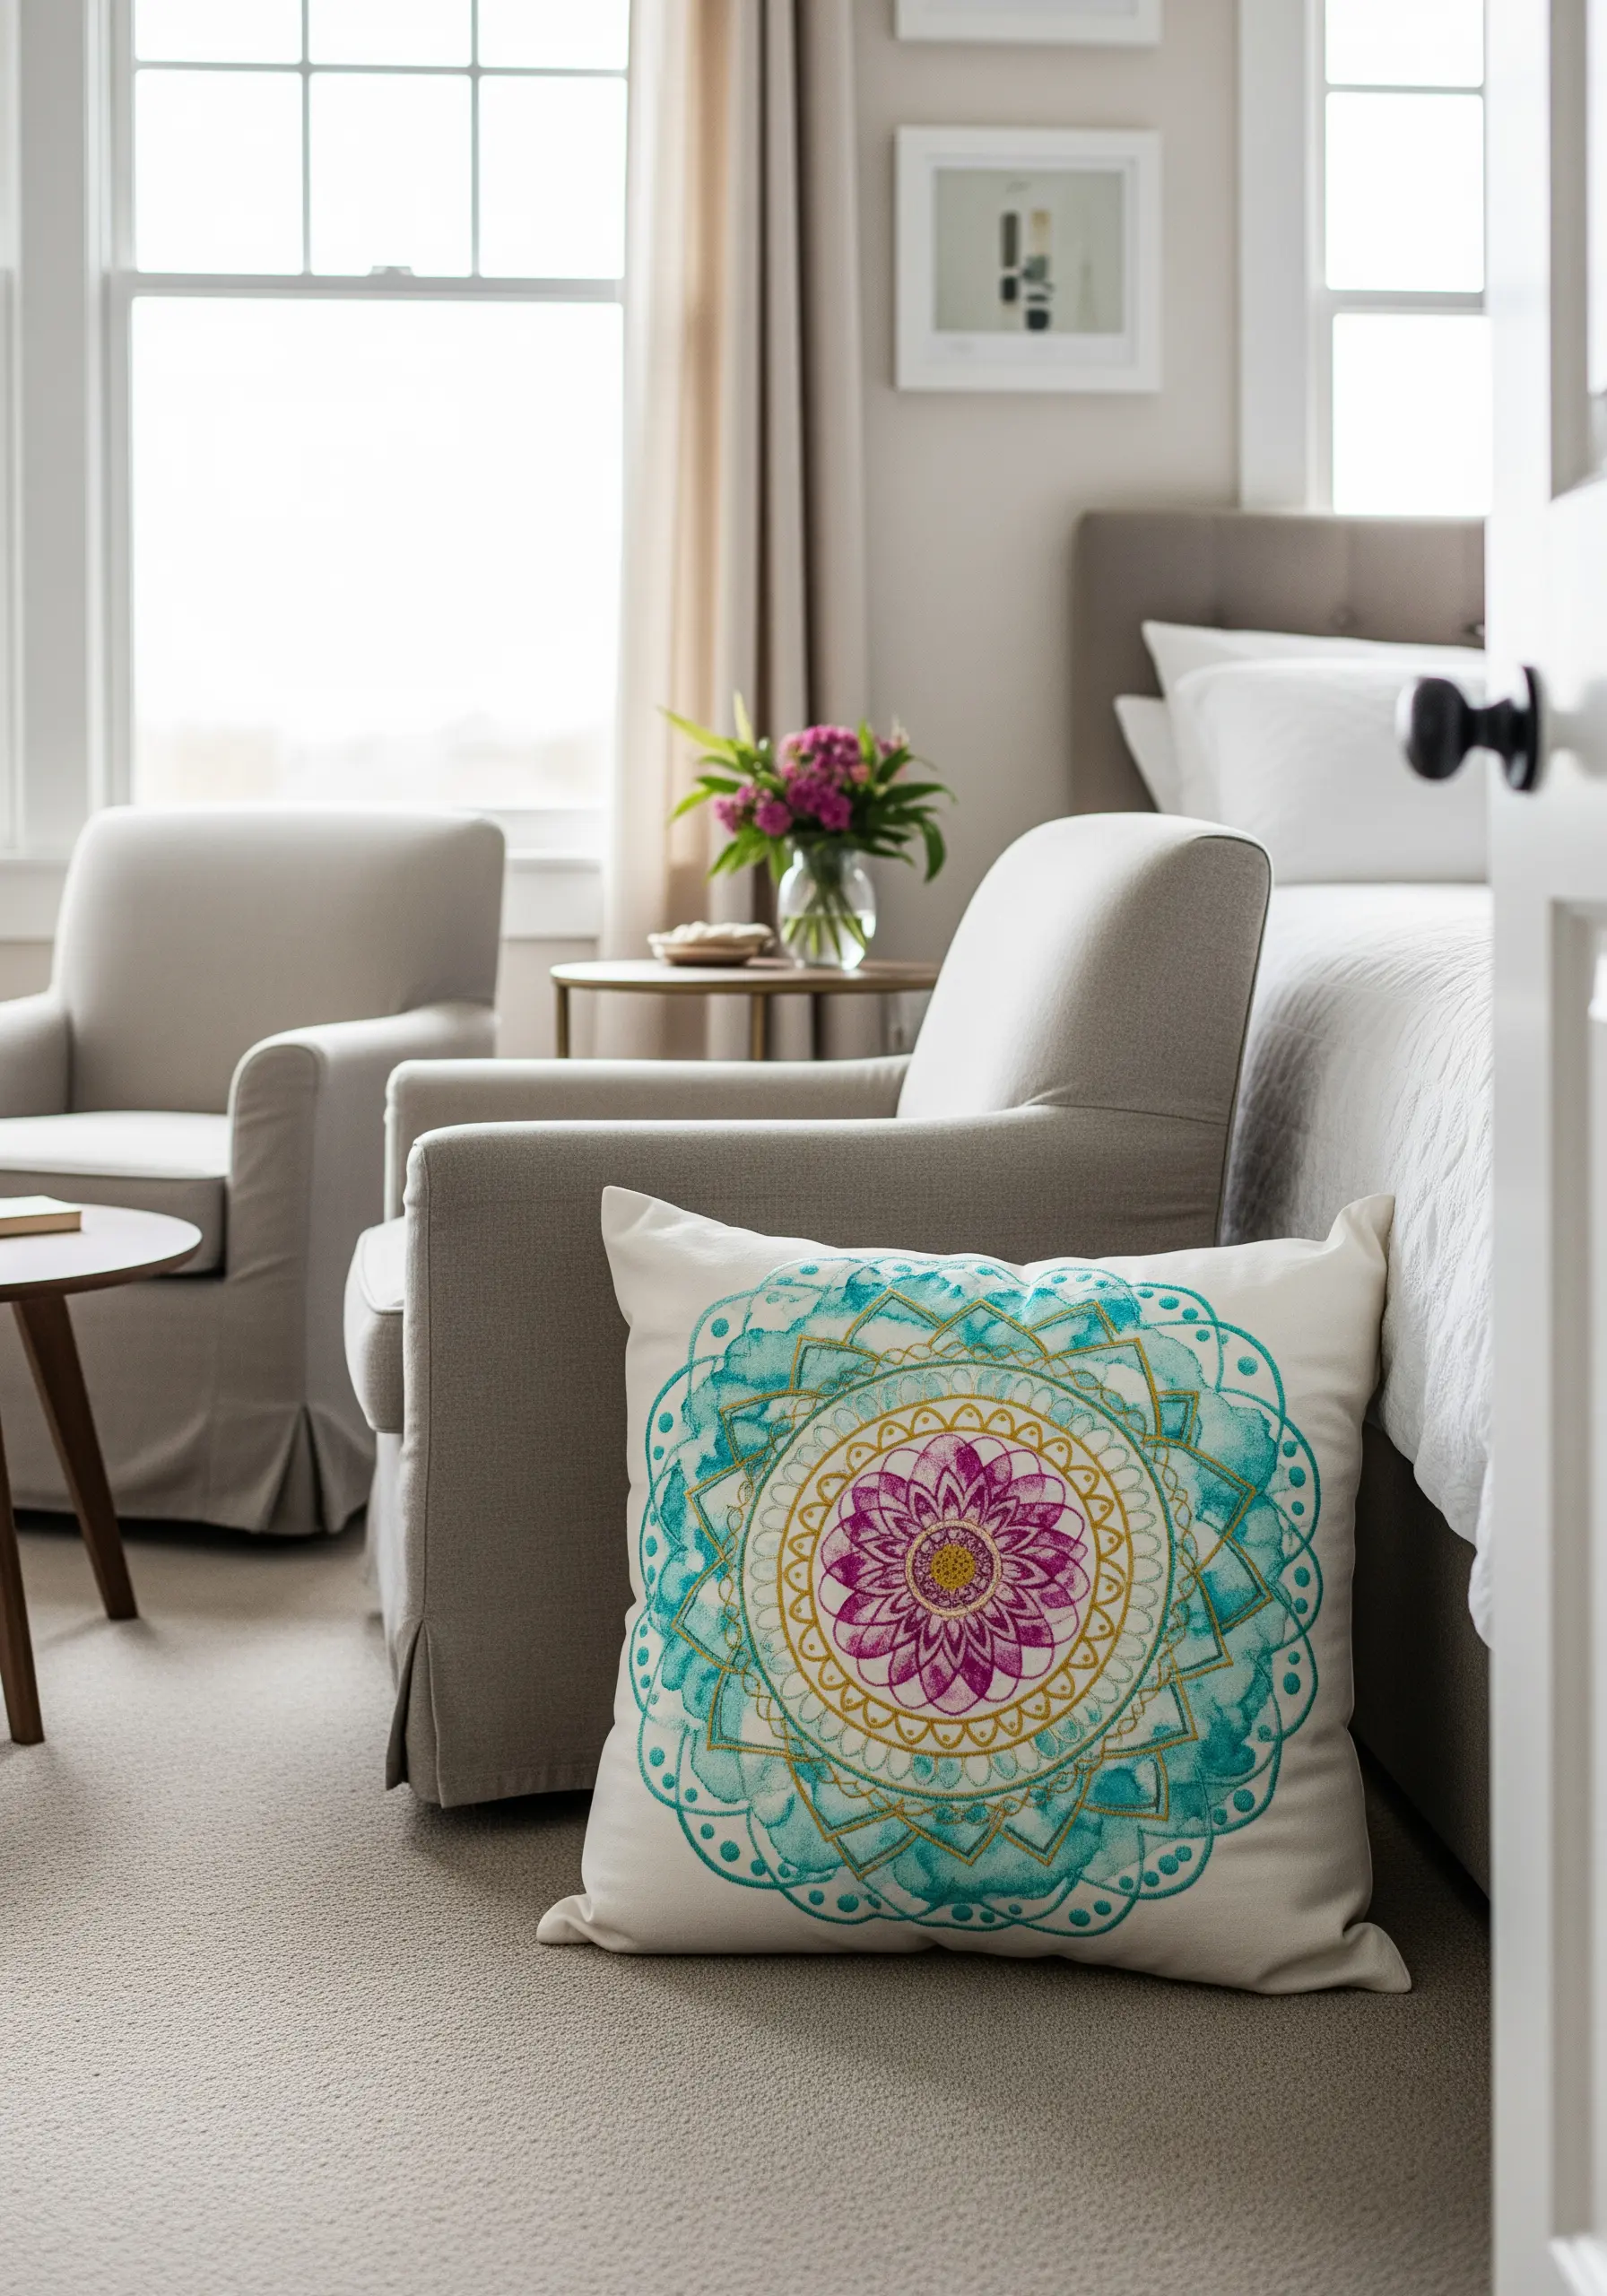
To capture the free-flowing feel of a watercolor mandala, combine precise stitching with a loose application of color.
First, stitch the gold outlines and central details using a fine backstitch or stem stitch to provide structure.
Then, fill the sections with a light wash of color using seed stitch. Use two or three similar shades (like turquoise and sea green) together in the needle, and keep the stitches sparse and irregular to mimic paint bleeding into paper.
This technique is perfect for mindful stitching and calm weekend projects.
23. Capture Golden Hour in an Embroidered Headboard
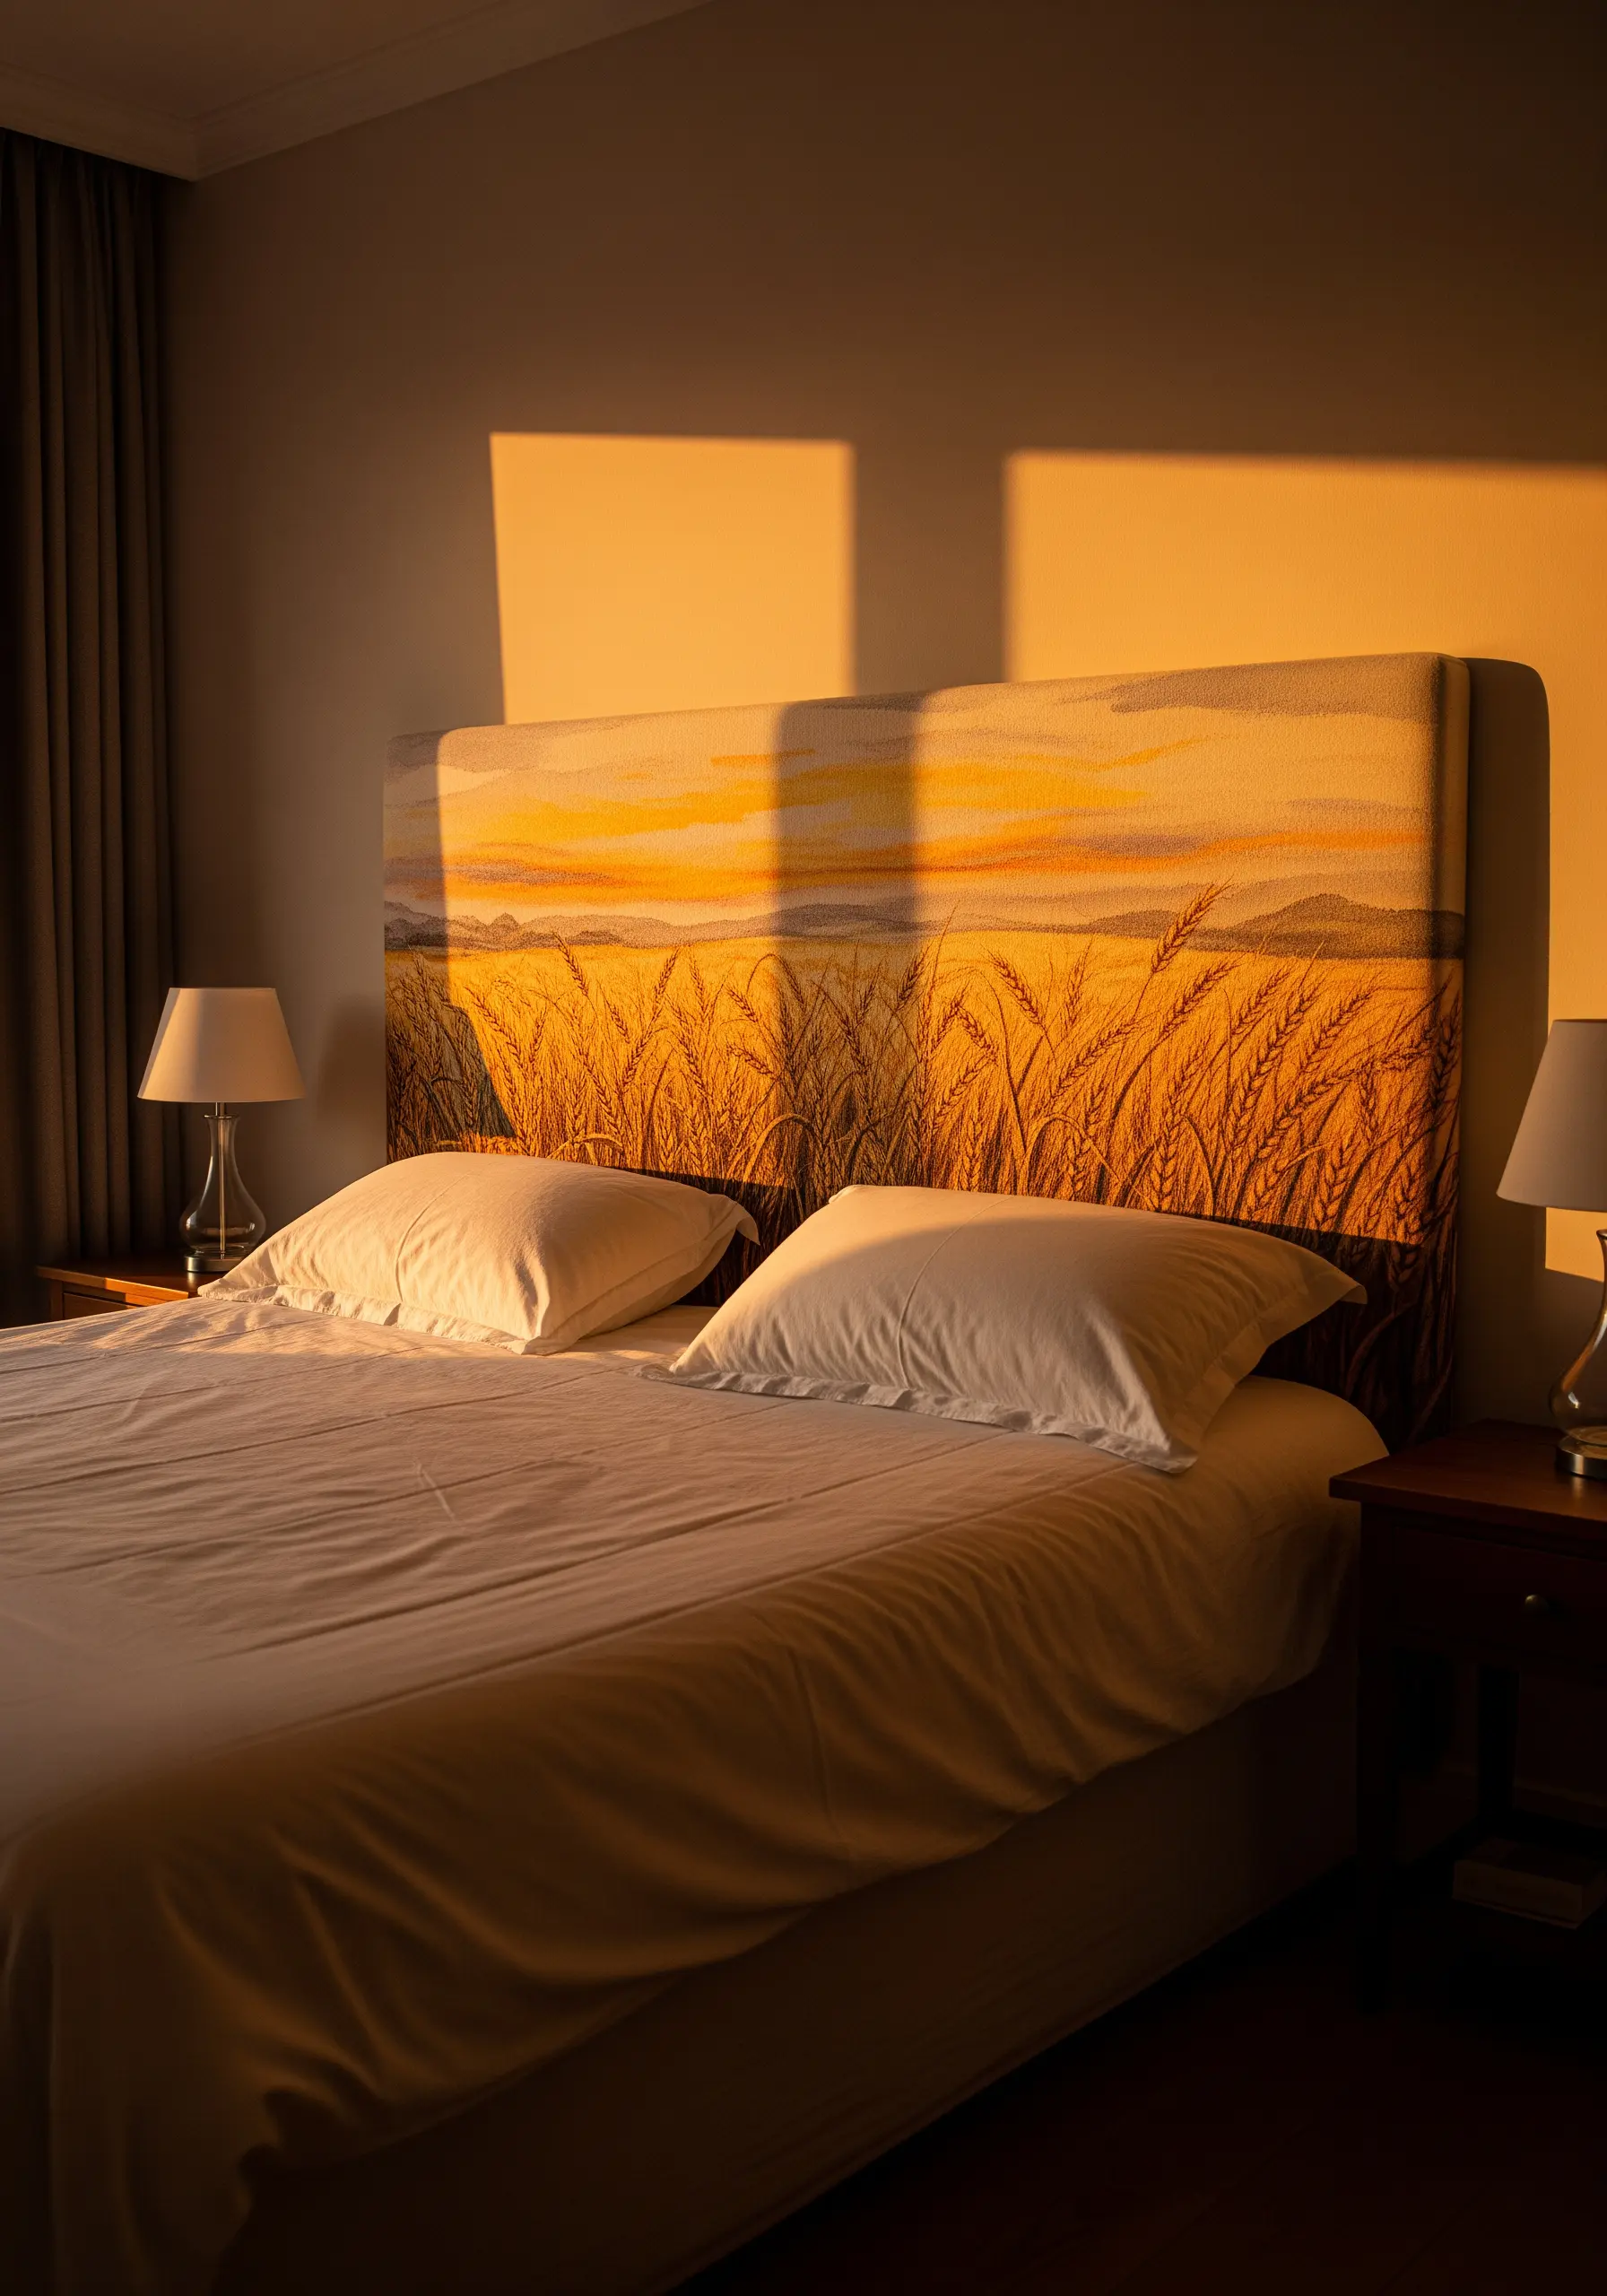
Evoke the warmth and glow of a sunset over a wheat field using a carefully selected color palette.
This design relies on layering thousands of vertical straight stitches in shades of gold, ochre, straw, and burnt orange.
Vary the height and density of the stitches to create the foreground wheat stalks and the softer, more distant field.
The key is the gradient effect in the sky, achieved by blending yellow, peach, and orange threads with long-and-short stitch to create a seamless, luminous glow.
24. Define Bedding with a Scalloped Cloud Border
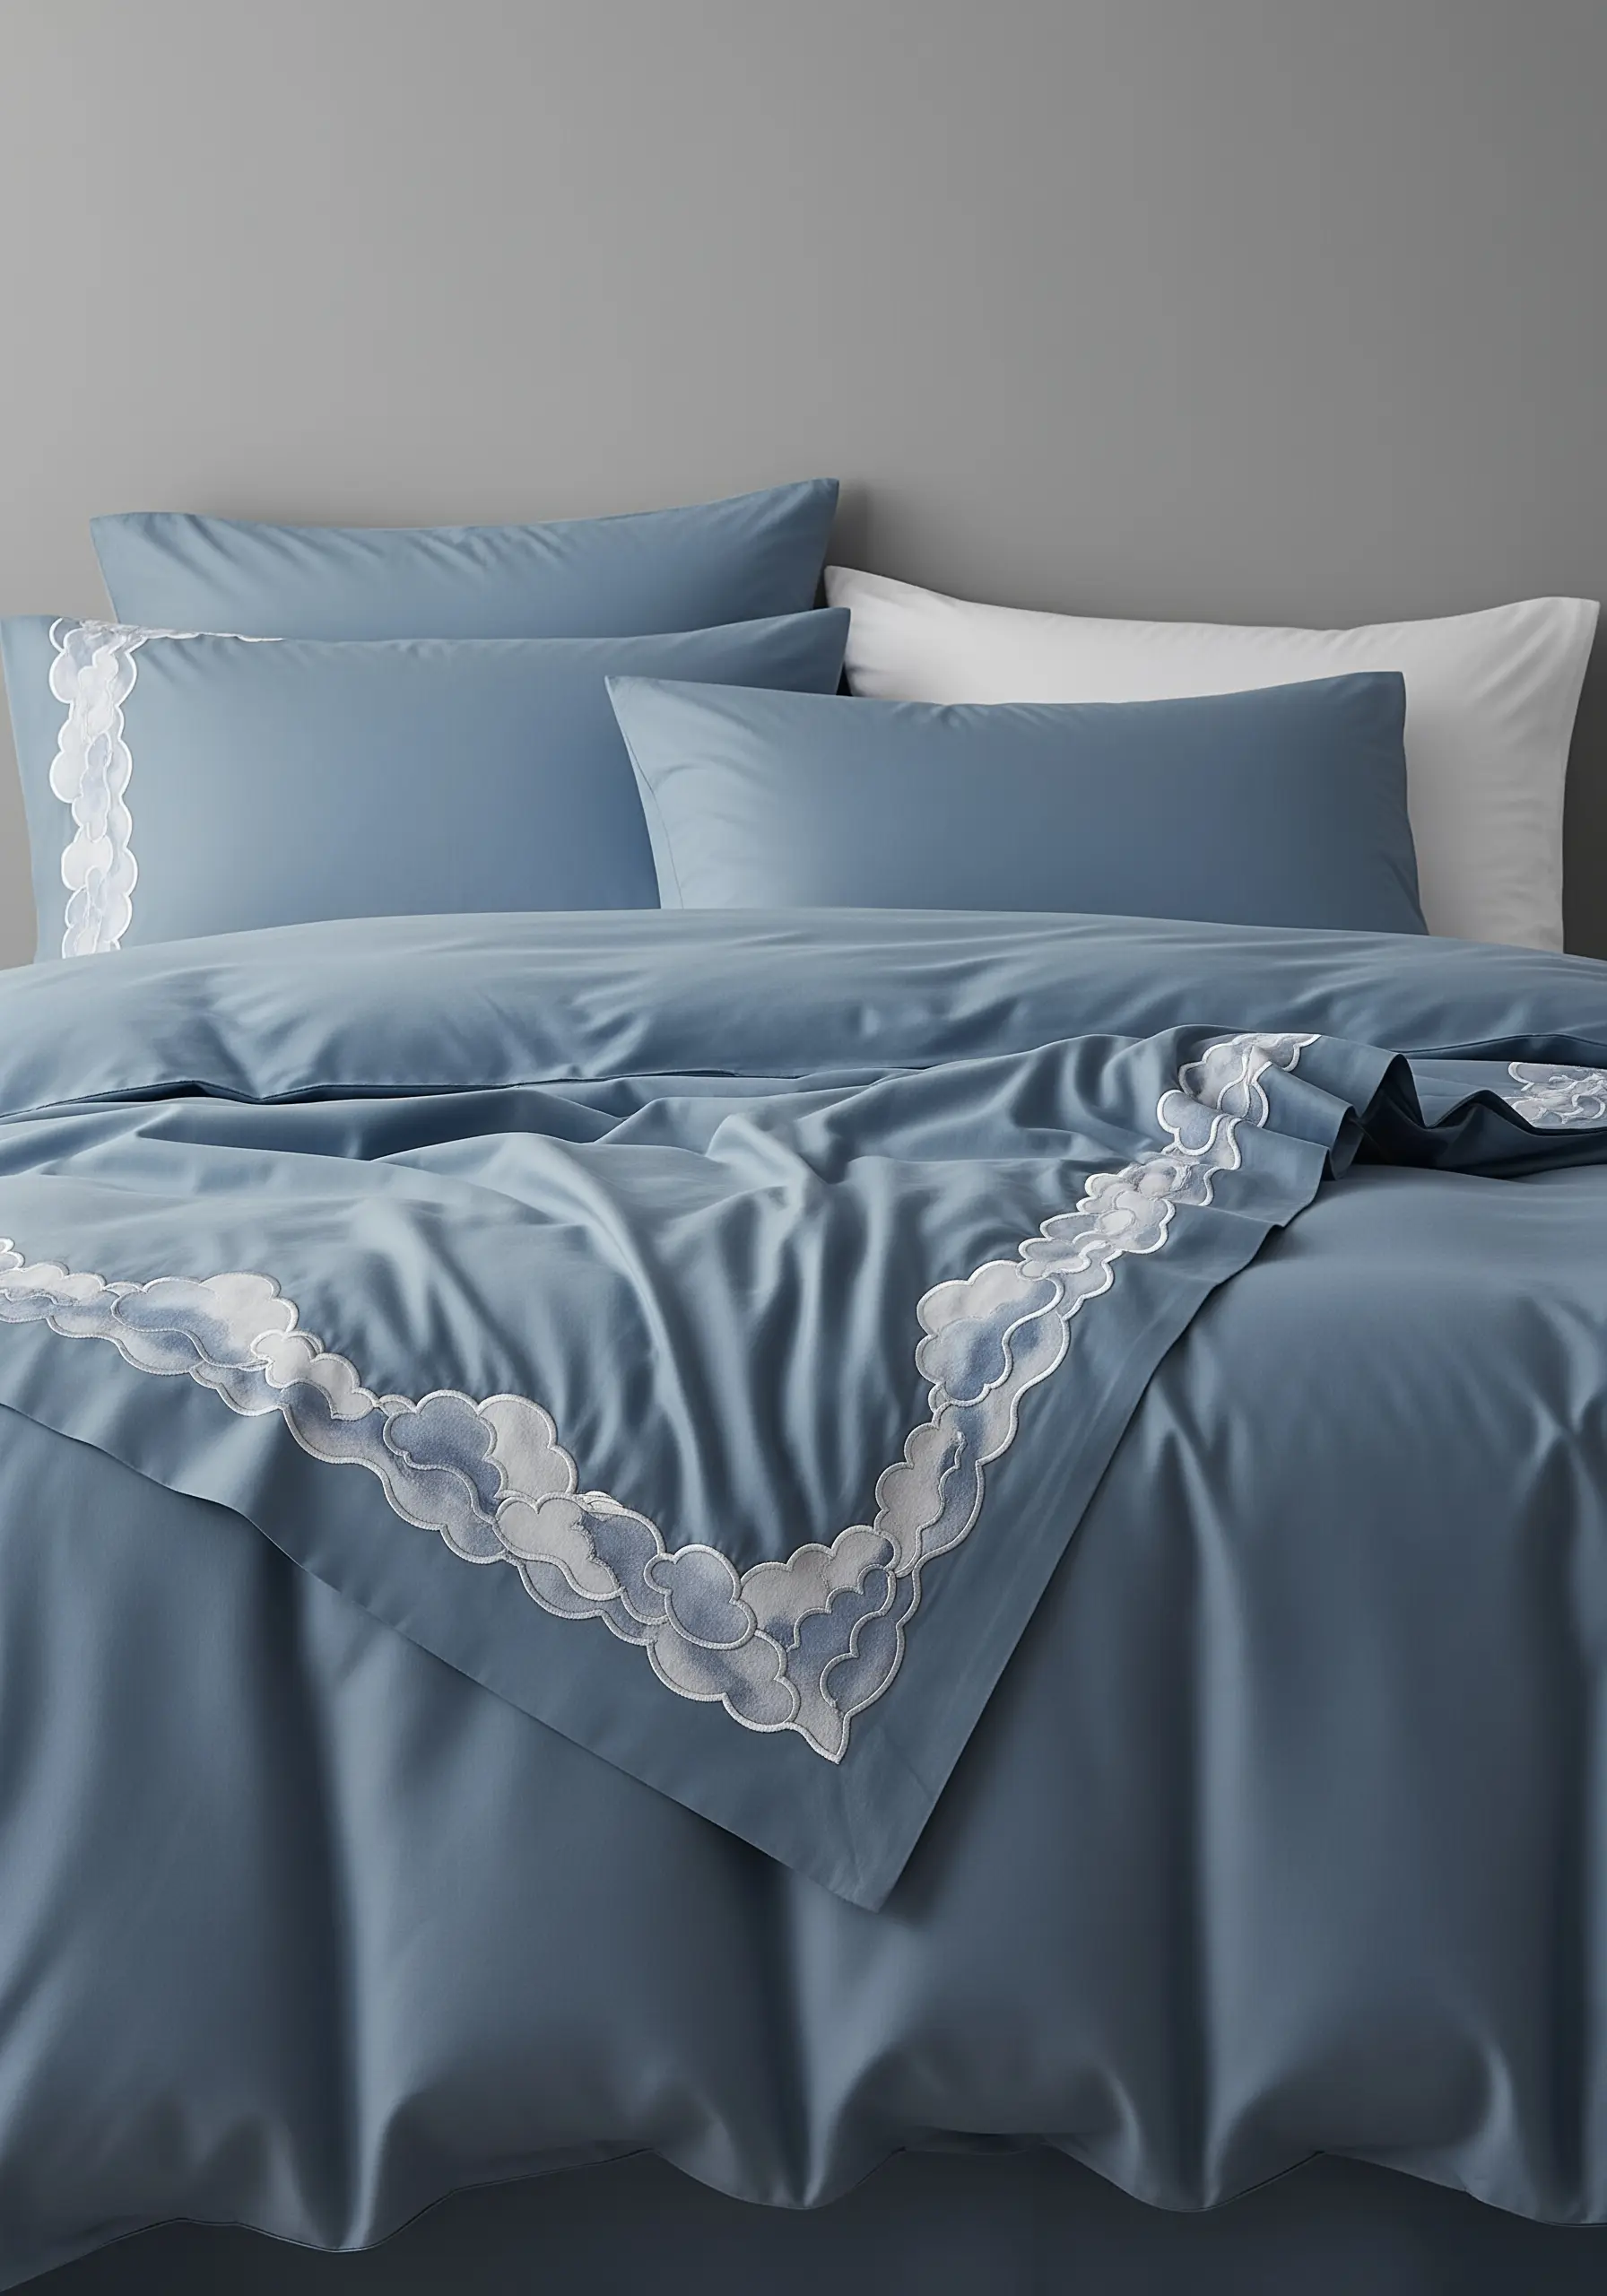
Elevate plain bedding with an elegant, appliqué-style border that mimics traditional Chinese cloud motifs.
Cut your cloud shapes from a sheer, white organza or voile fabric and pin them in place along the edge of the duvet and pillows.
Secure the shapes with a tight, smooth satin stitch border in a slightly darker thread, like silver-grey, to create definition.
Fill the interior of the clouds with a light scattering of seed stitch to add texture and complete the ethereal look.
25. Stitch a Bold, Abstract Color Wash Tapestry
Make a powerful statement with a tapestry that focuses purely on color and texture.
To create this broad, horizontal swatch of color, you will need to master the long-and-short stitch on a large scale.
Divide the design into horizontal bands and work with at least five shades of a single color, from darkest to lightest.
Overlap your stitches significantly between the color bands to ensure the transition is seamless and fluid, just like wet-on-wet watercolor painting.
26. Frame a View with a Landscape Lumbar Pillow
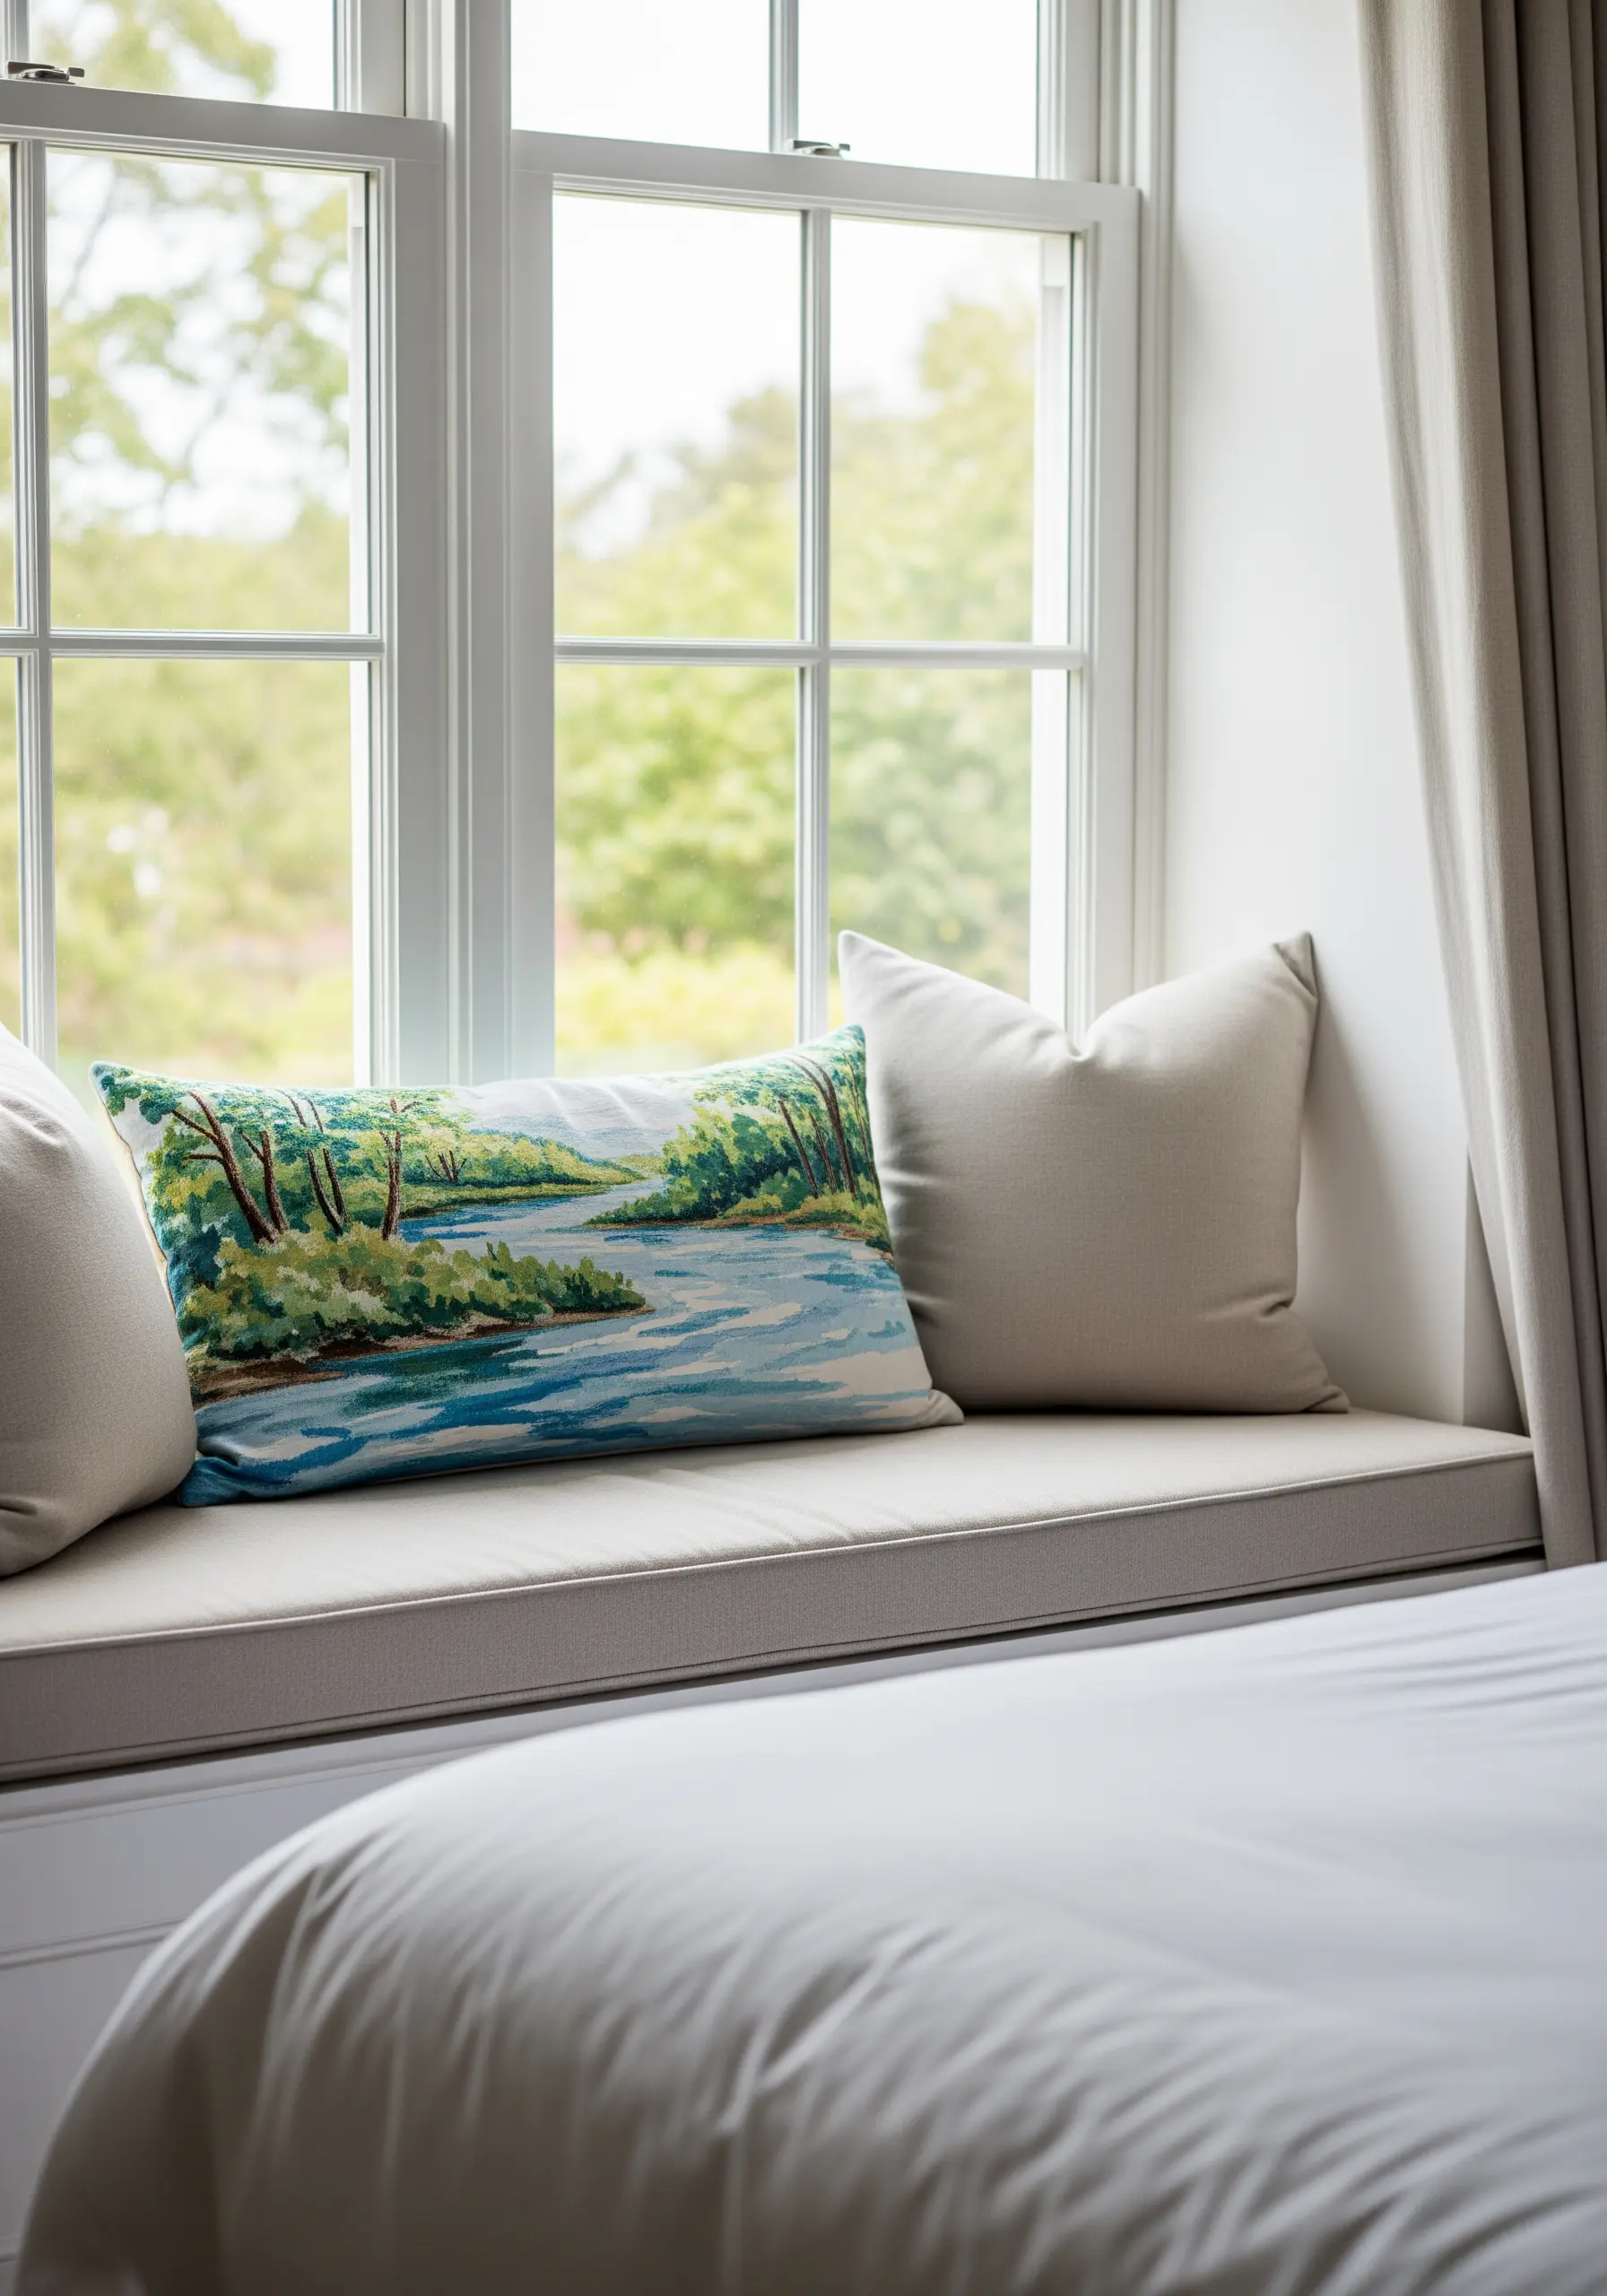
A lumbar pillow on a window seat becomes a piece of the view itself when stitched with a landscape.
Use short, choppy satin stitches in varied blues and whites to capture the reflective quality of the river’s surface.
For the trees and riverbank, build up texture with layers of French knots, detached chain stitches, and straight stitches in multiple shades of green and brown.
This textural contrast between the smooth water and the lush foliage is what gives the small scene its depth and realism.
27. Map the Night Sky on a Woven Blanket
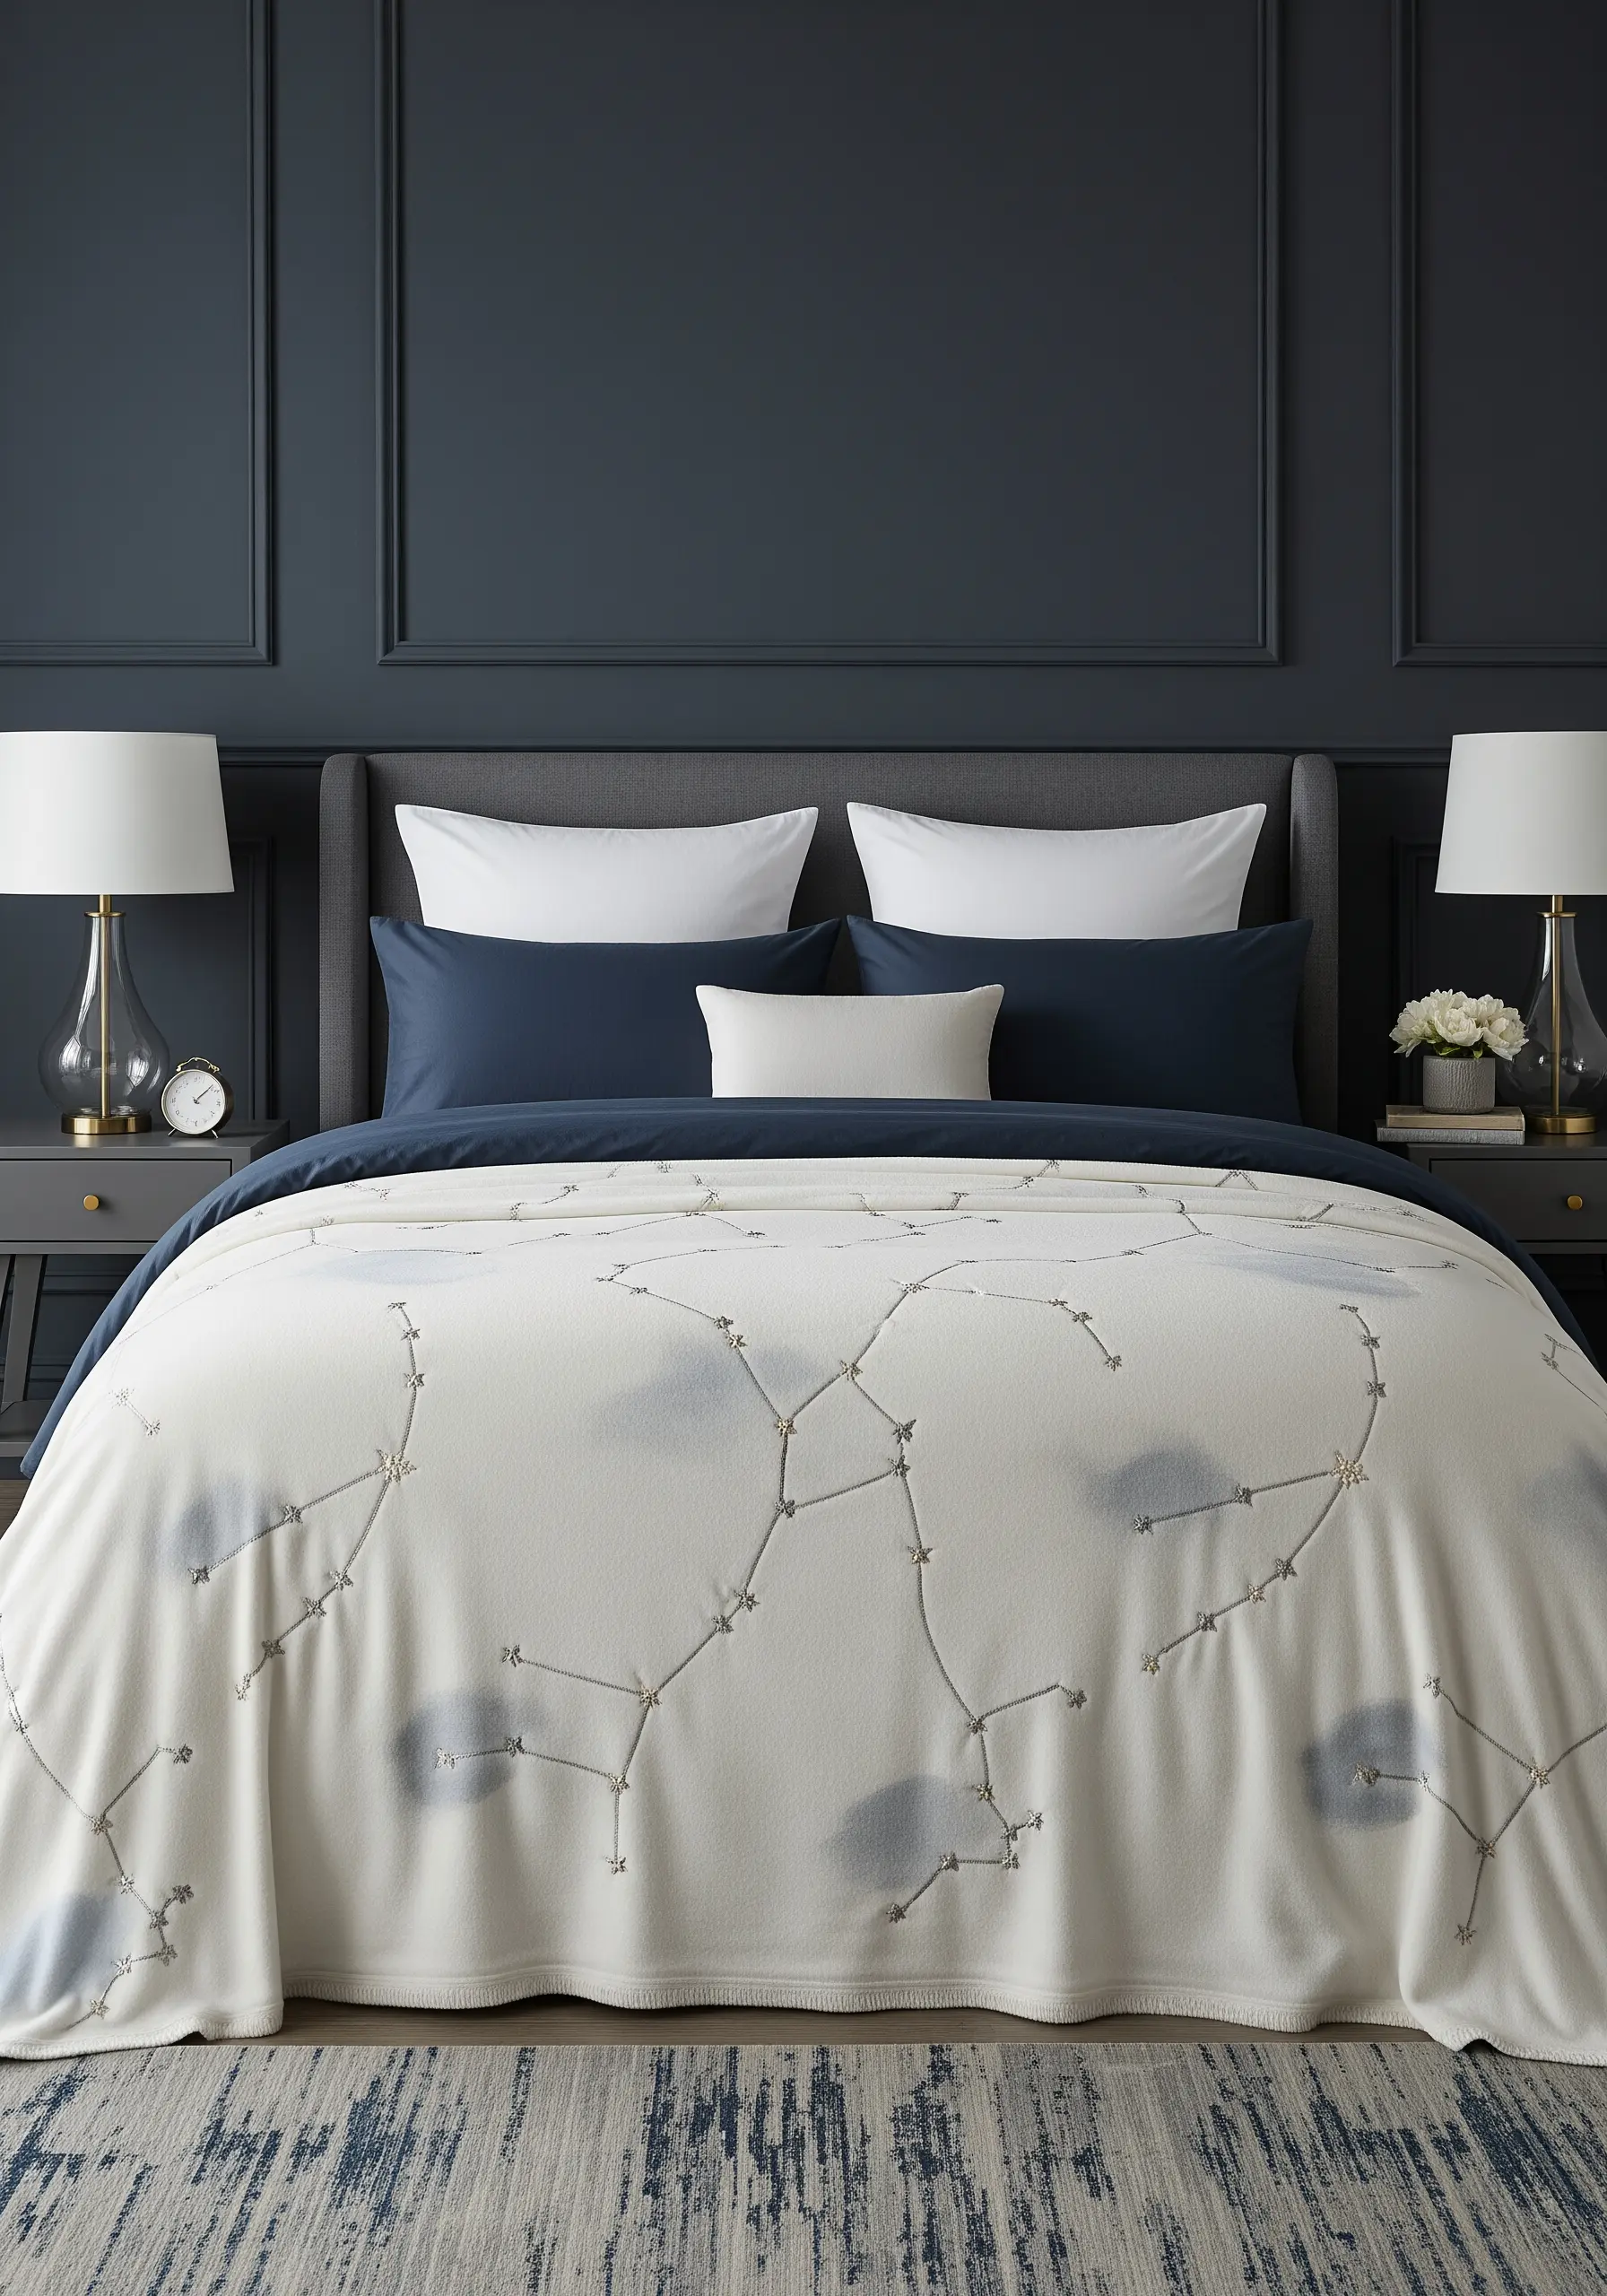
Add a touch of cosmic wonder to a blanket with an elegant constellation pattern.
Use a silvery-grey couched thread or a heavy chain stitch to create the distinct lines connecting the stars.
At each vertex, add a single, prominent French knot or a small cluster of seed stitches using a sparkly metallic or silk thread to represent the stars.
The soft, blurry ‘nebula’ patches can be achieved with loose clouds of single-strand seed stitch in a pale blue, providing a dreamy backdrop.
28. Create a Forest Scene on a Folding Screen
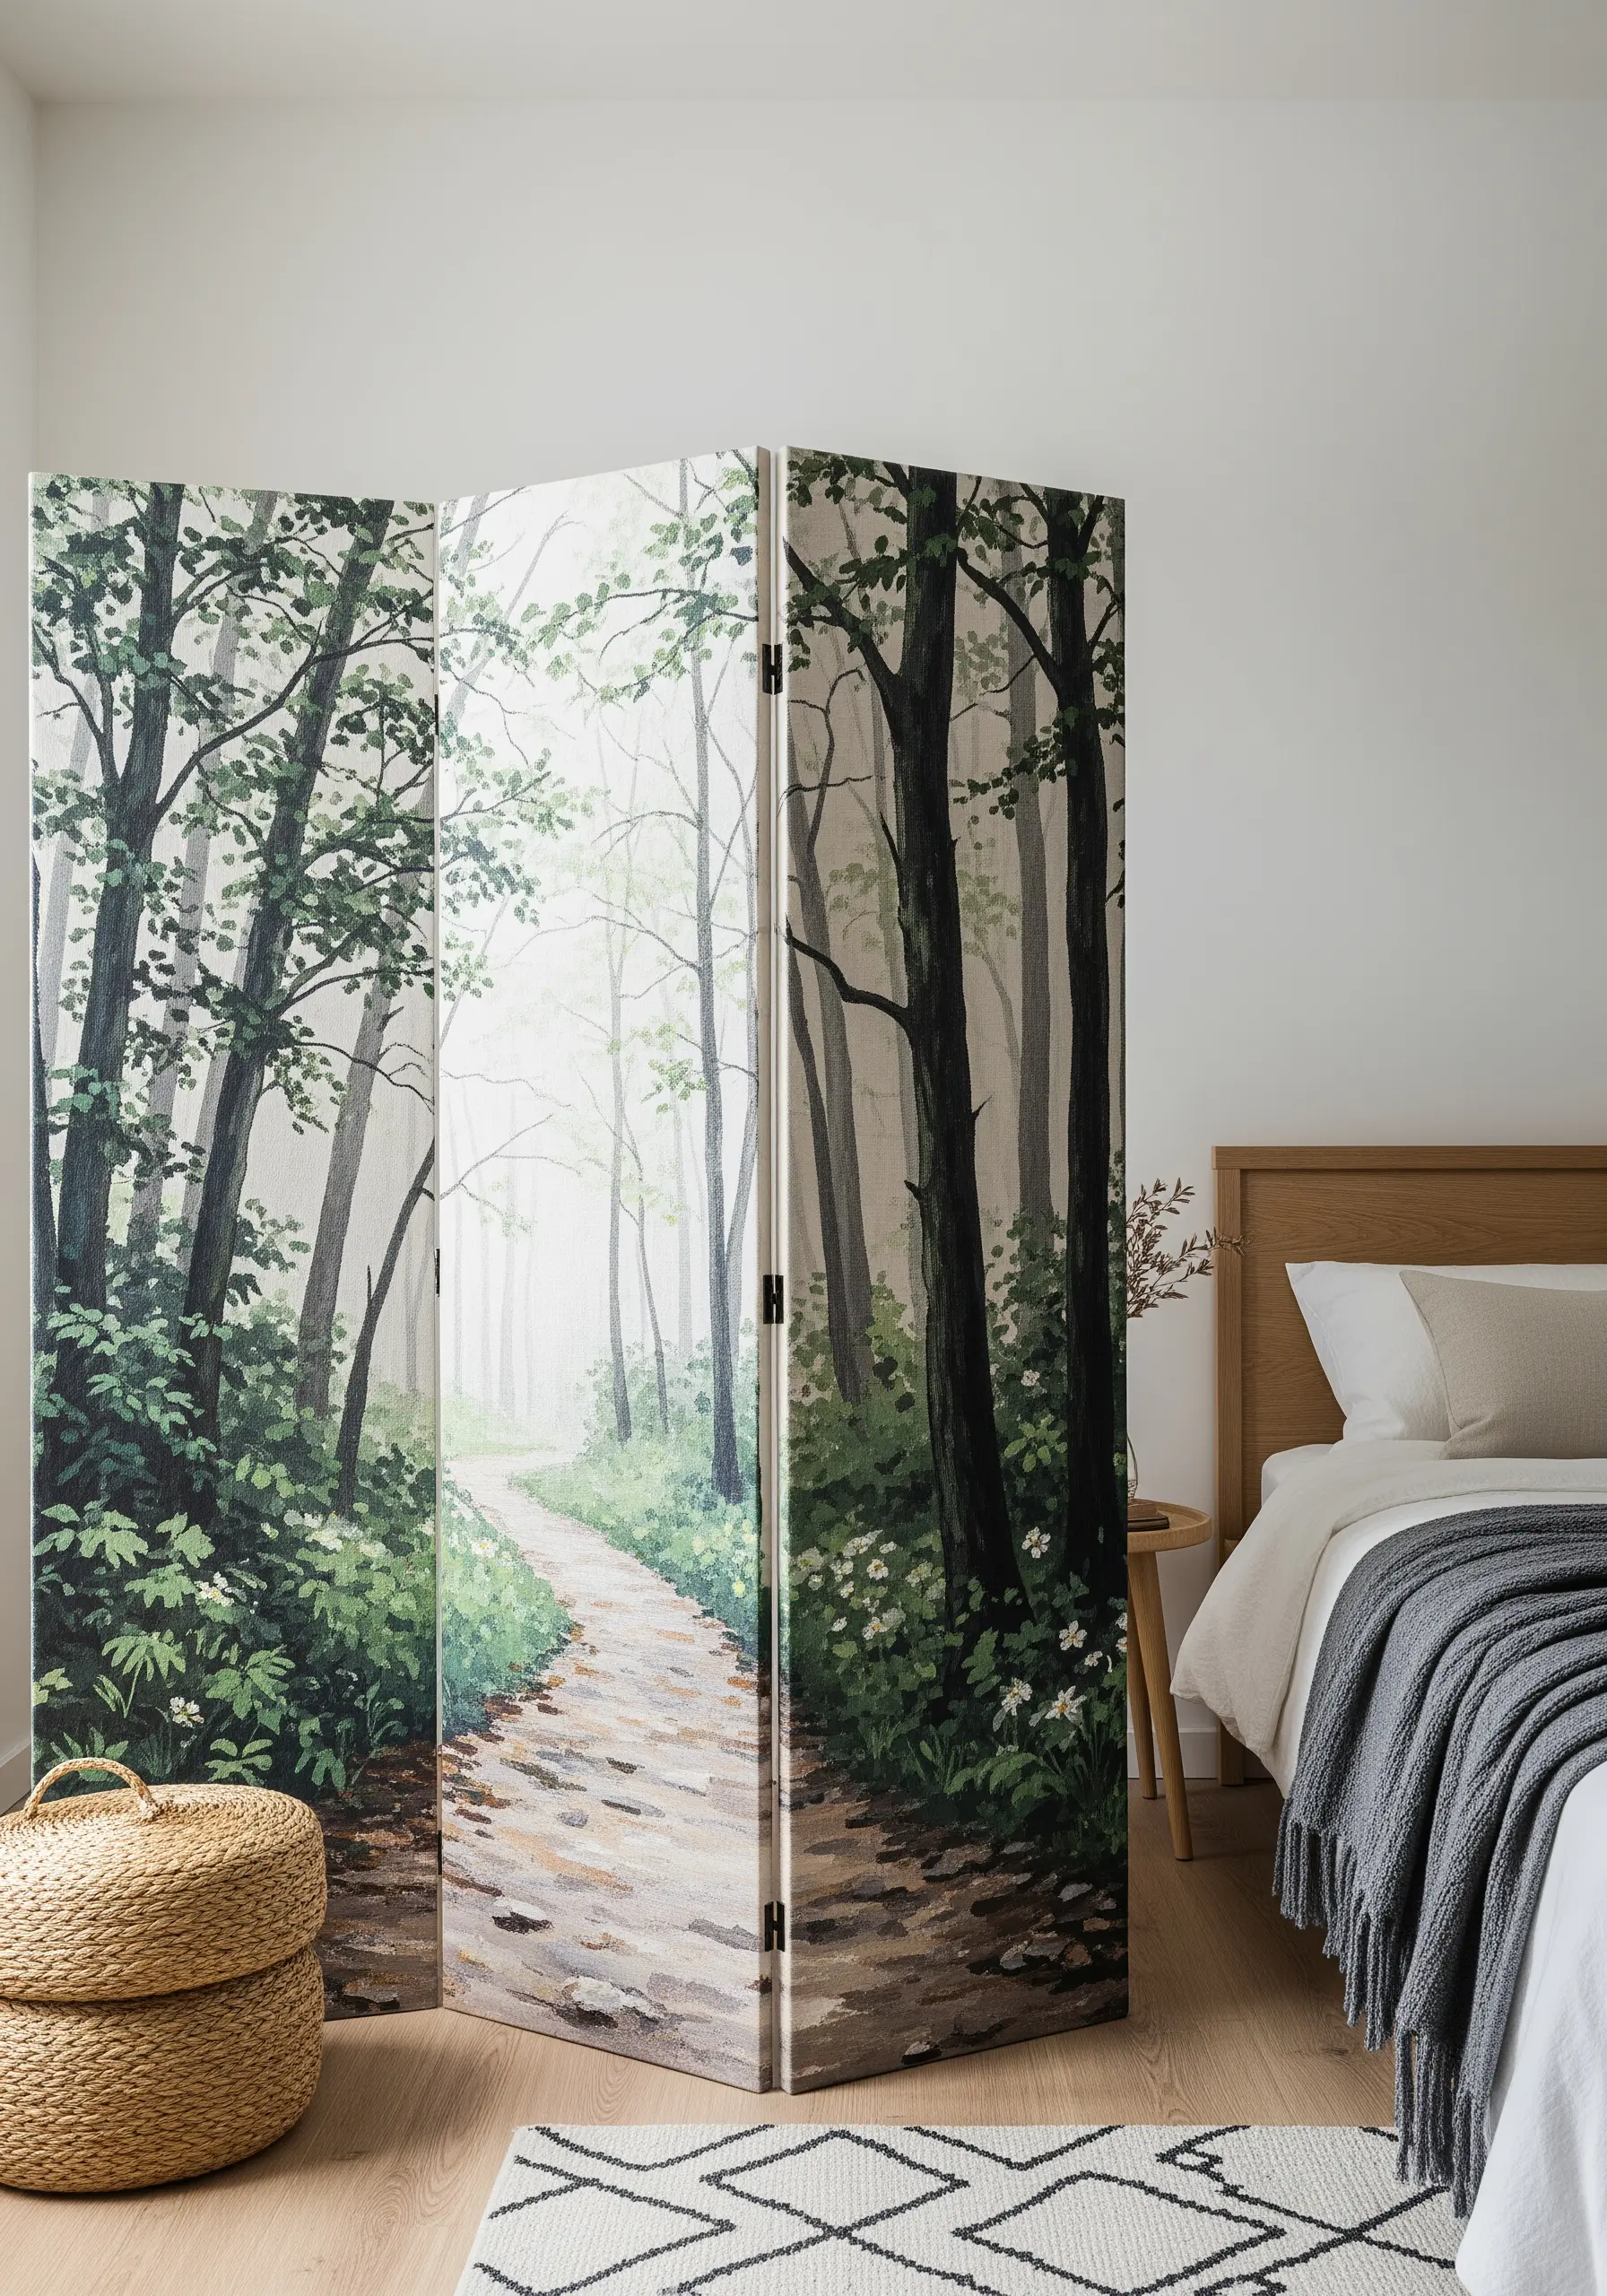
Turn a practical room divider into a captivating piece of fiber art by treating each panel as a canvas.
To tackle such a large area, simplify the design into blocks of color. Use vertical satin stitches for the tree trunks, varying the shades of grey and brown to suggest light and shadow.
For the foliage and forest floor, use a looser, more chaotic mix of straight stitches and seed stitches in various greens to create a sense of texture and depth.
This approach makes a monumental project manageable and visually effective.
29. Scatter Petals on a Sheer Bed Canopy
Embroidering on a very fine, sheer fabric like a canopy requires minimalism to avoid weighing it down.
Use a single strand of floss and a small needle. A water-soluble stabilizer is essential for support during stitching.
Create abstract, petal-like shapes using just a few strategically placed seed stitches or short straight stitches.
The beauty of this design lies in its subtlety and randomness, giving the impression of petals gently floating through the air.
30. Design an Ombré Effect for a Roman Blind
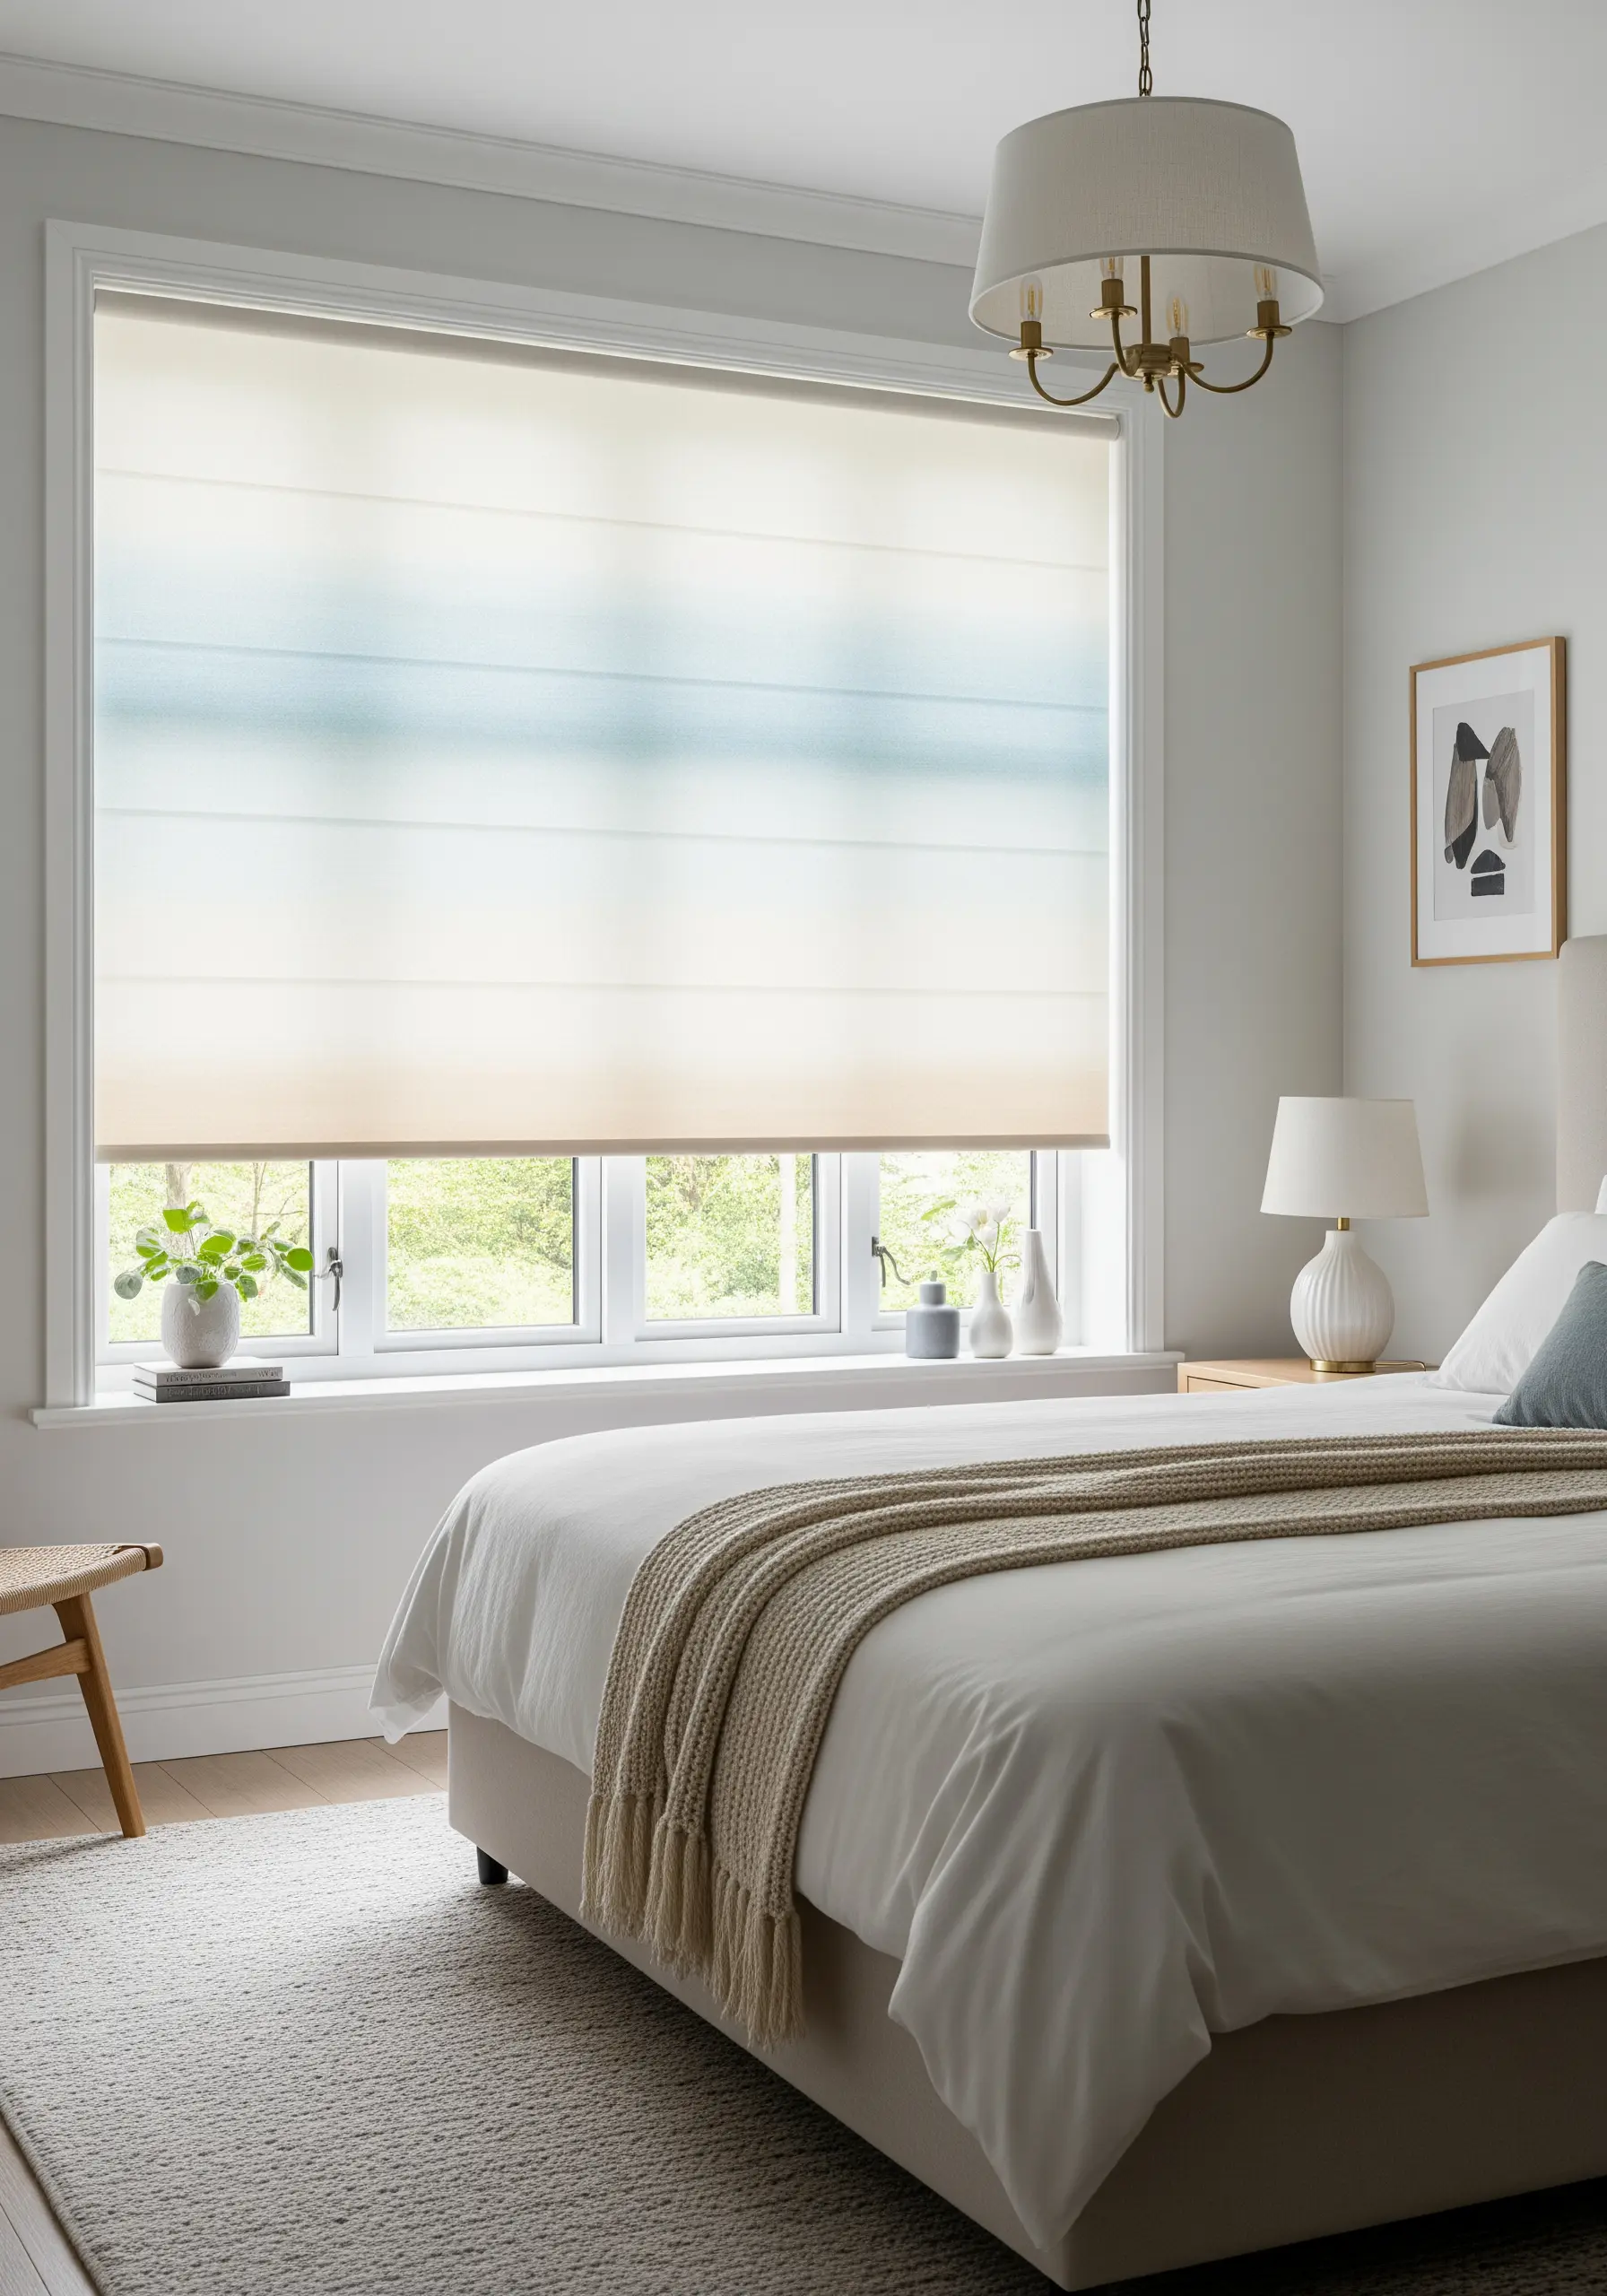
Add a custom touch to a plain Roman blind with a subtle, hand-stitched gradient.
Work in horizontal bands using a simple running stitch or backstitch. Start with a darker color at the bottom, then gradually introduce lighter threads as you move up.
To create a seamless blend, intersperse rows of the two meeting colors in the transition zones.
This creates a soft, diffused color effect that enhances the light filtering through the window without overwhelming the room.
31. Stitch a Dynamic Koi Fish in Motion
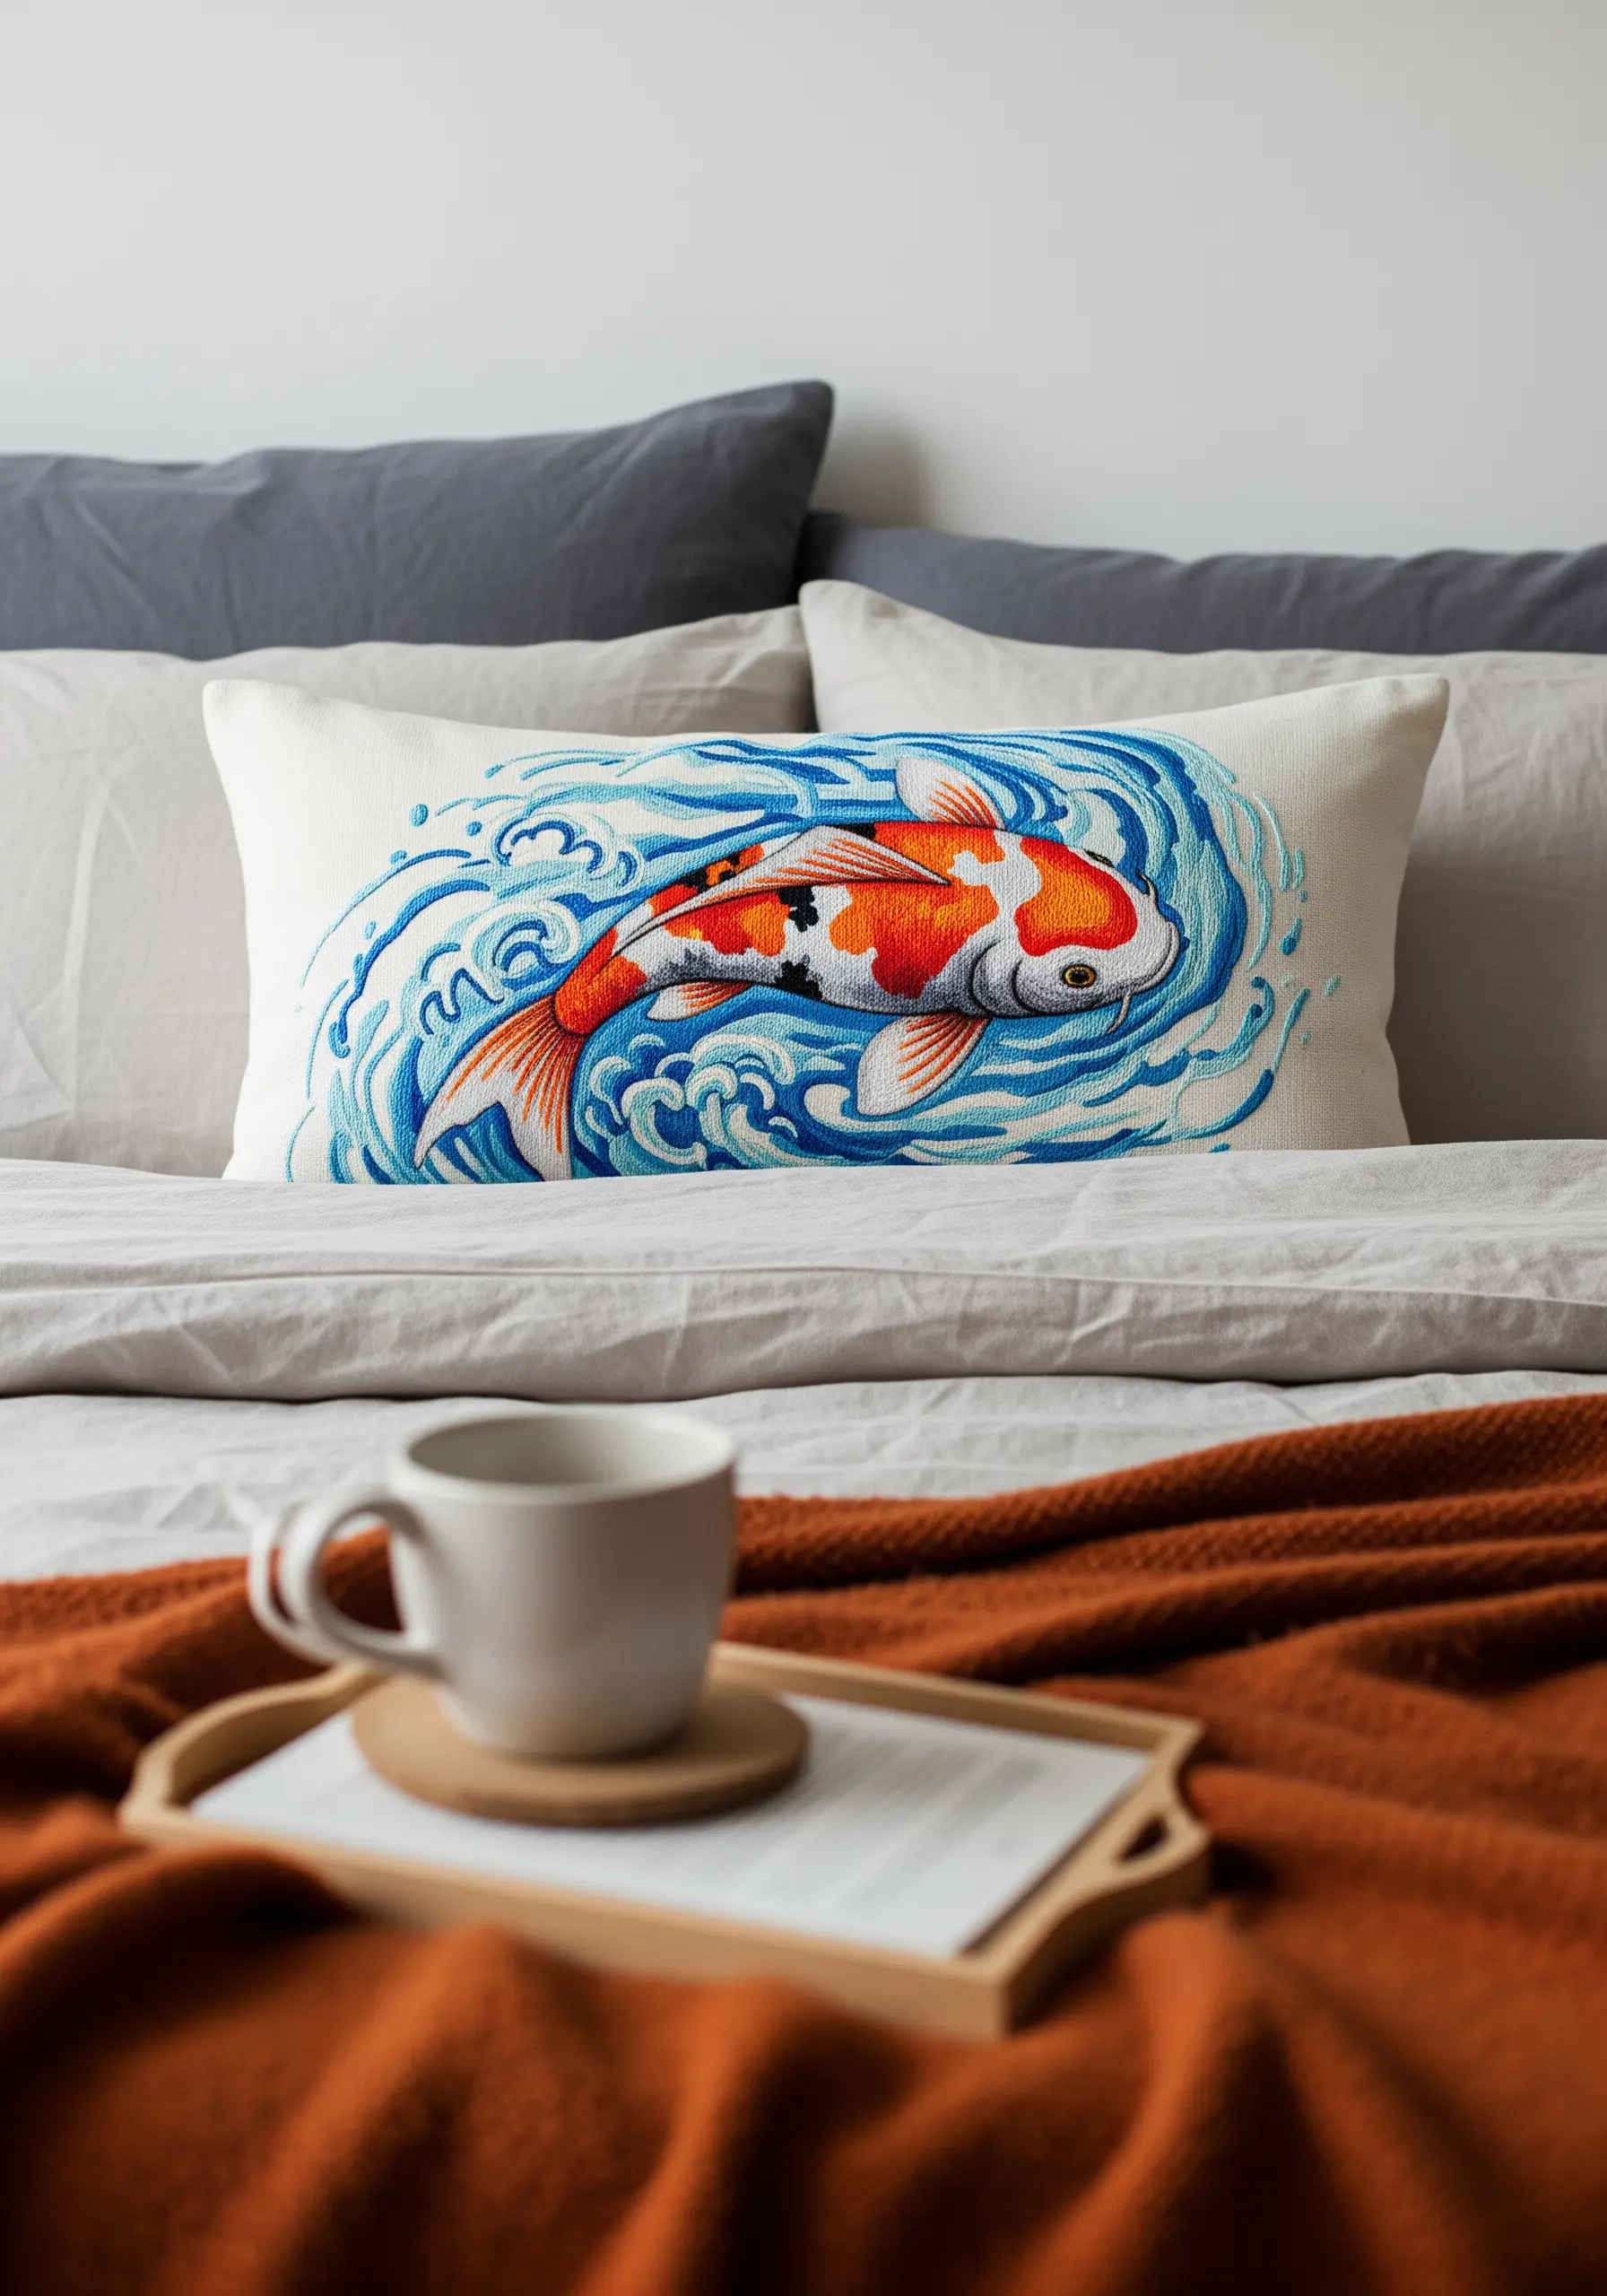
Capture the powerful, swirling movement of a koi fish by making your stitches follow the flow of water.
For the water, use curved lines of chain stitch or whipped backstitch in multiple shades of blue, overlapping them to create a sense of churning energy.
The fish itself should be rendered in vibrant long-and-short stitch, paying close attention to the direction of the stitches to define the scales and curve of the body.
This focus on directional stitching is what turns a static image into a dynamic scene.
32. Embellish a Lampshade with Graphic Swirls
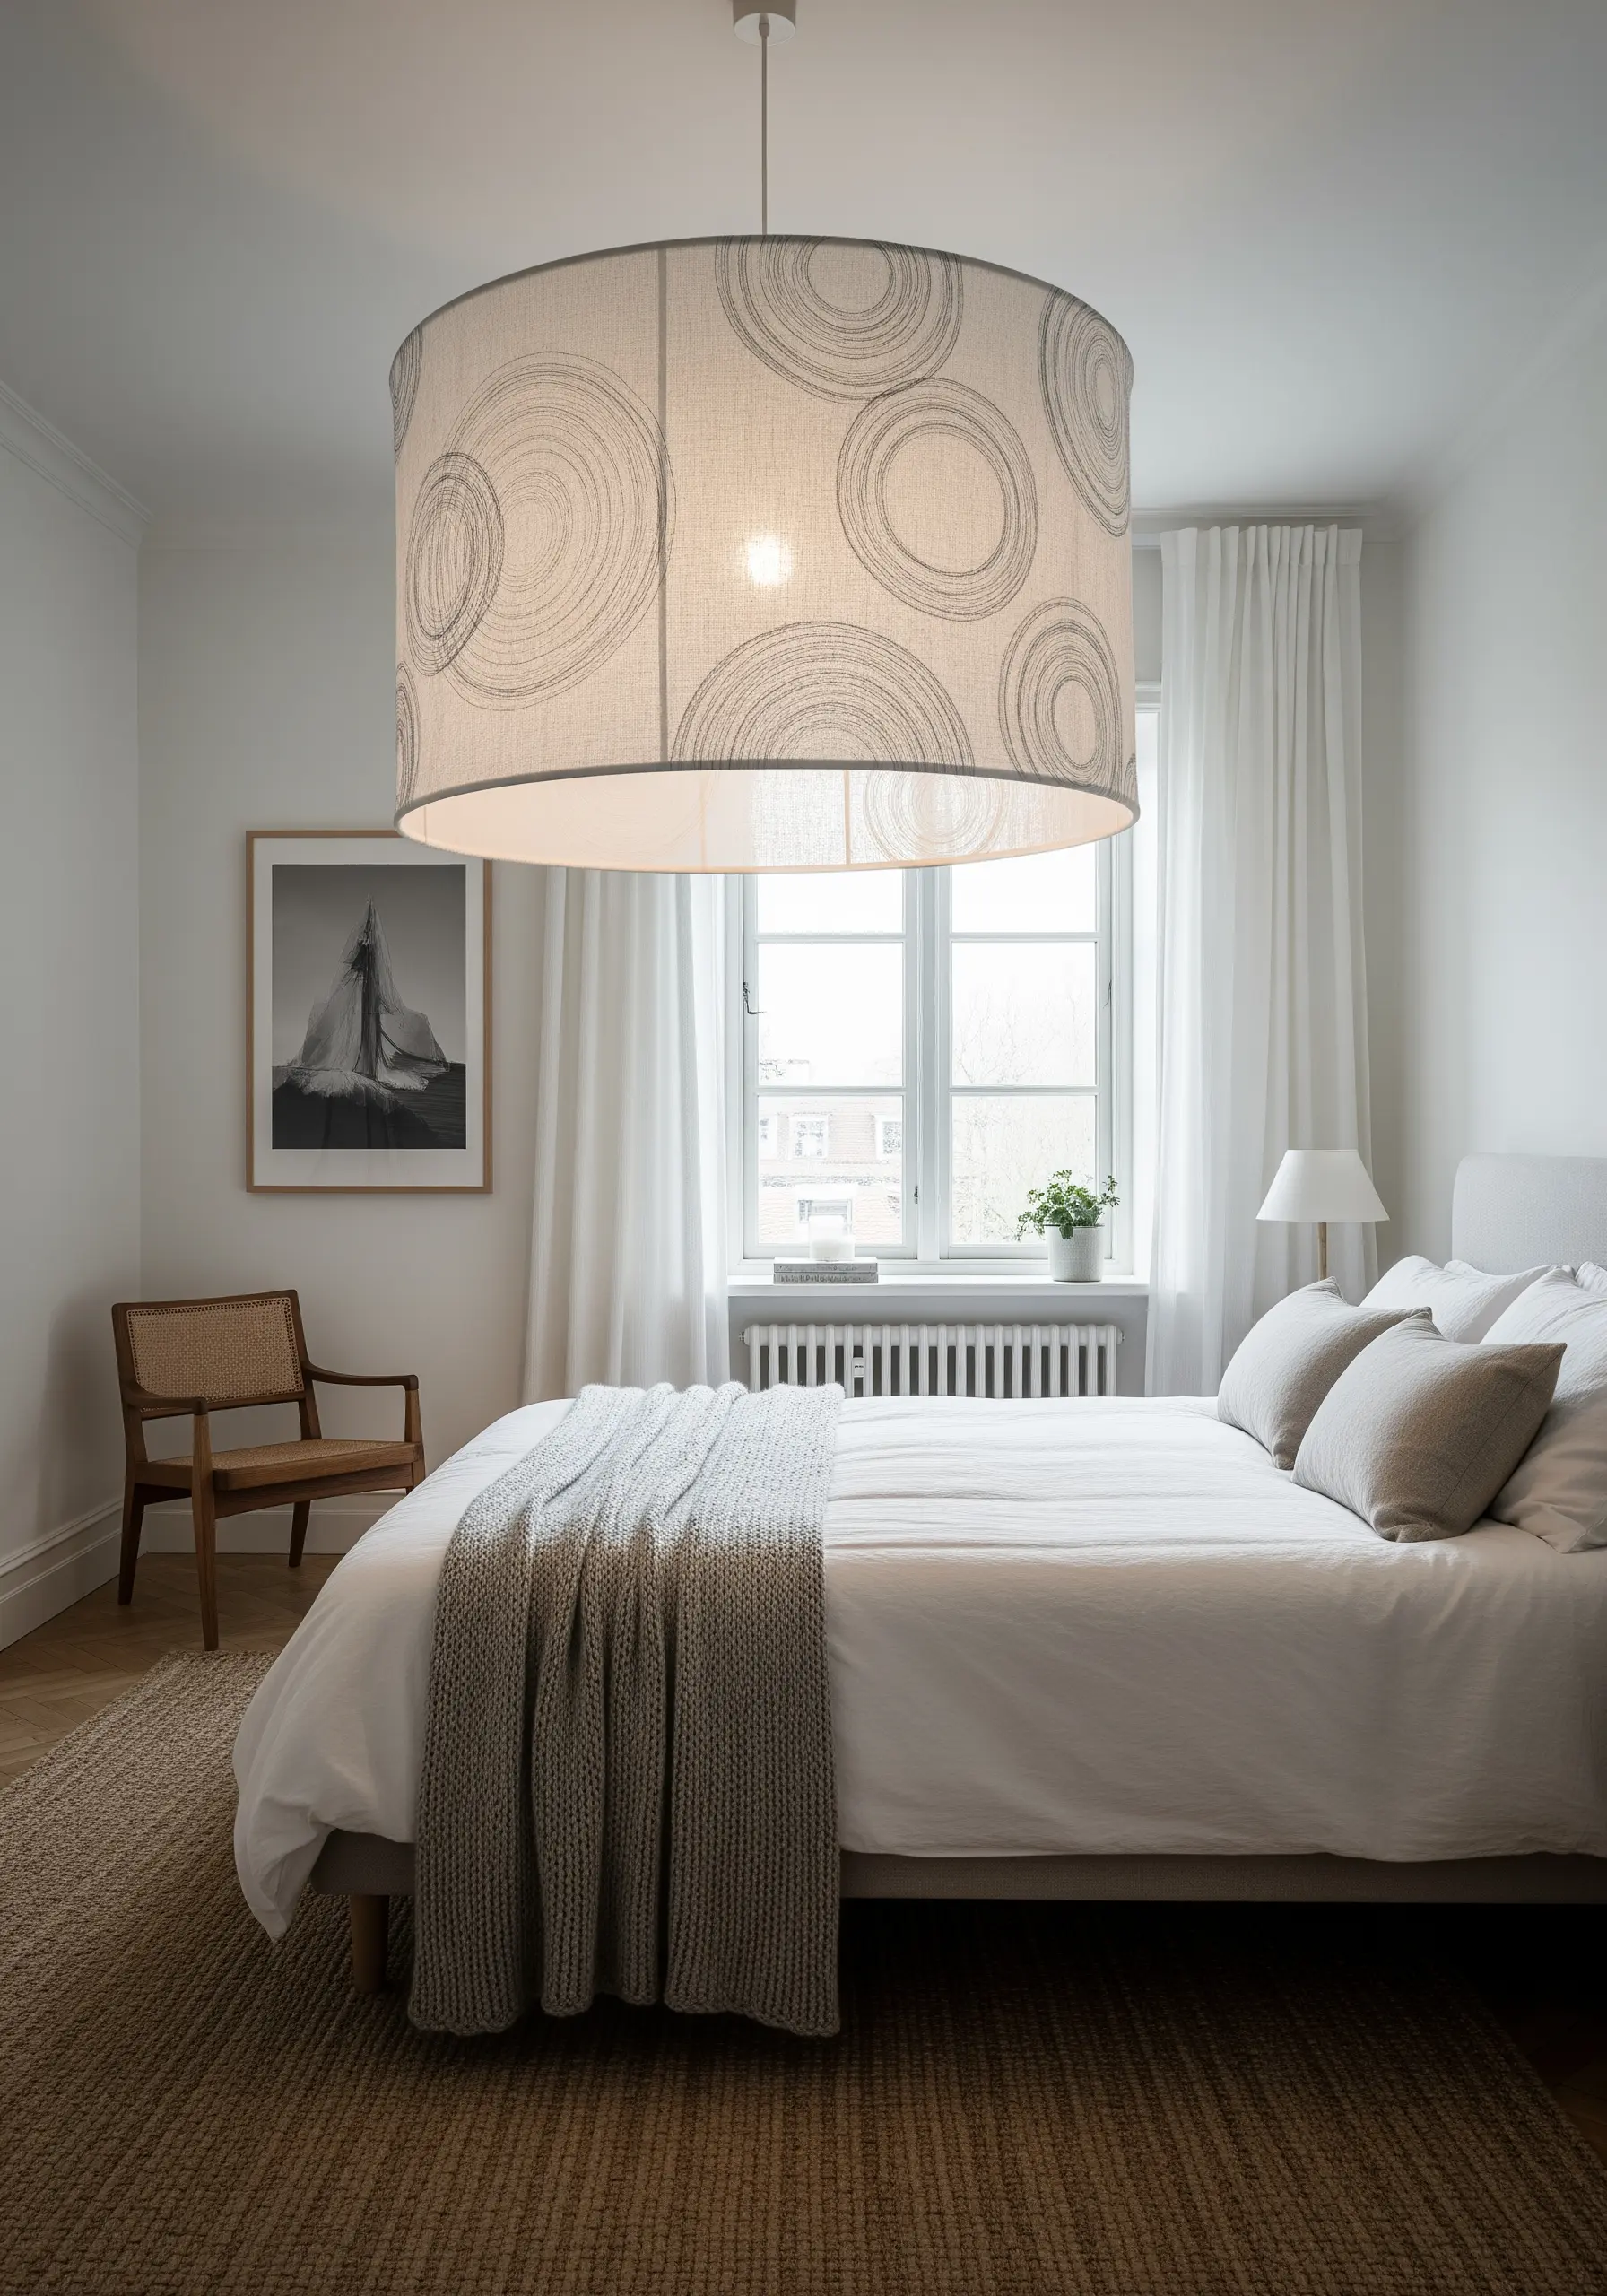
Embroidering on a lampshade transforms a simple light source into a decorative object.
Choose a simple, graphic pattern like these concentric, imperfect circles. The key is to work with the lamp off so you can see your stitches clearly.
Use a simple backstitch and a medium-weight thread that will create a distinct line when the lamp is on.
The hand-stitched quality adds a warm, personal texture, and the design will cast interesting, subtle shadows in the room.
33. Create Visual Flow with a Wavy Runner
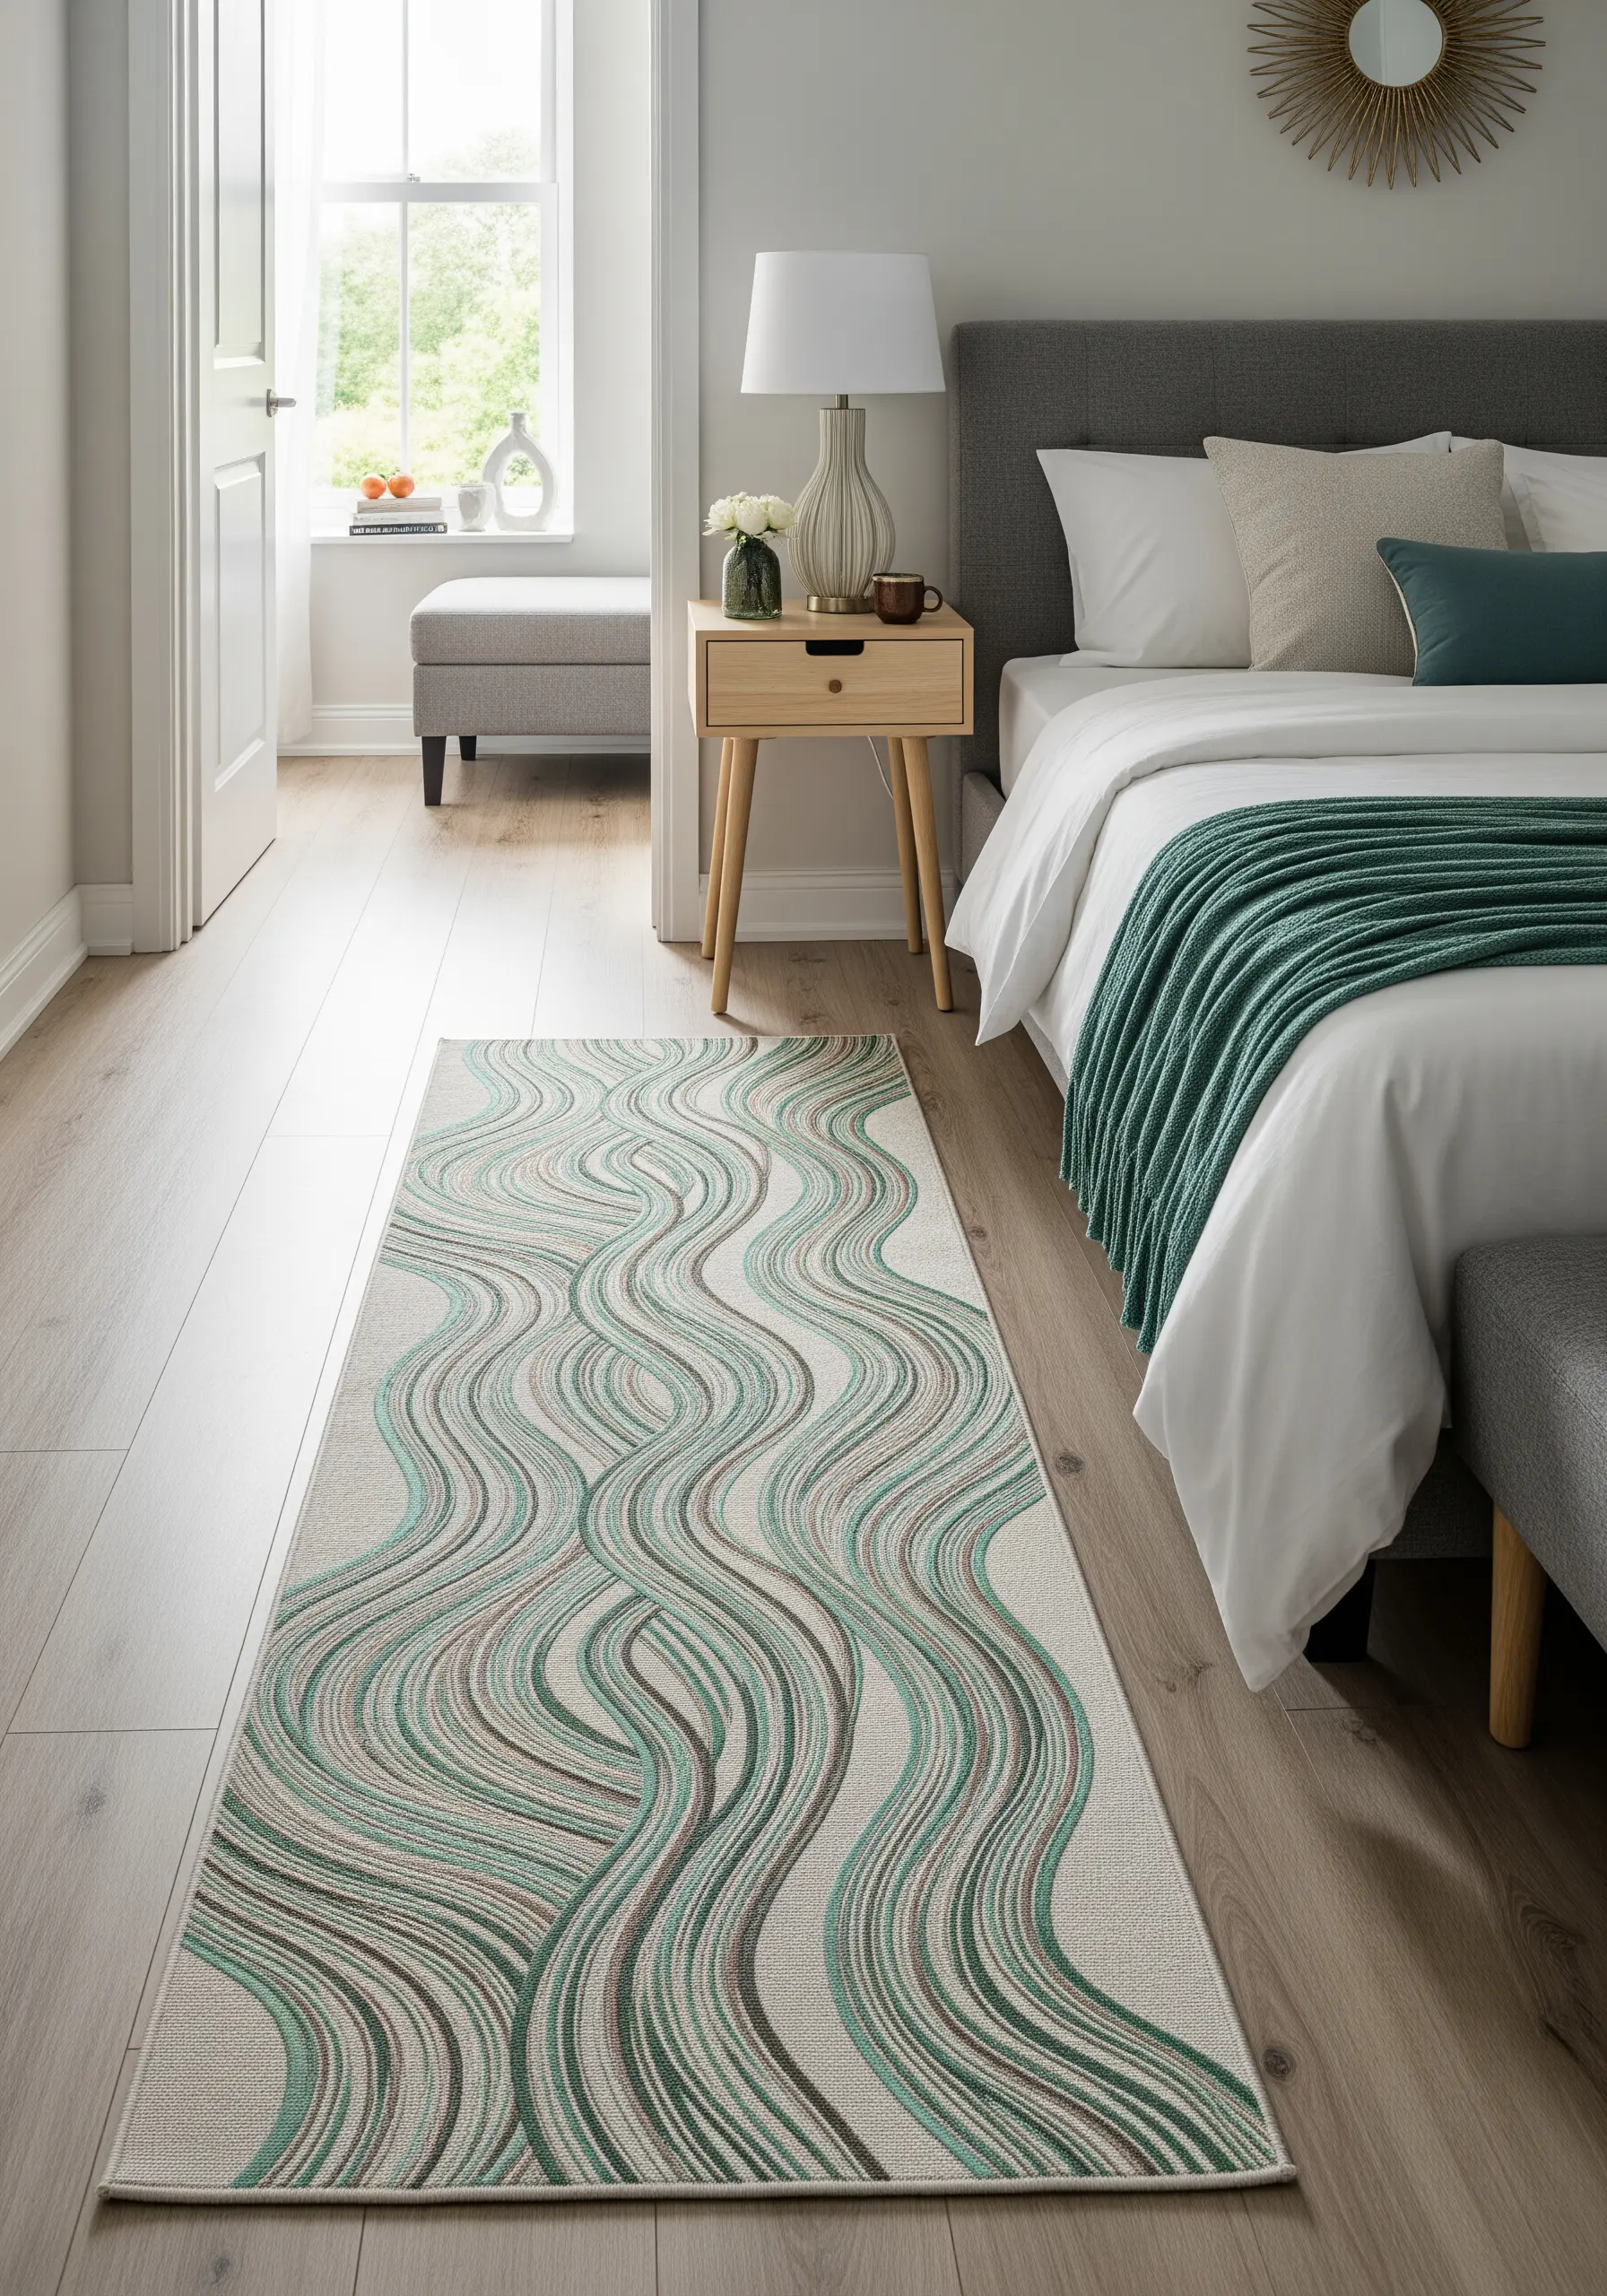
Guide the eye and add a sense of calm movement to a narrow space with a fluid, wave-patterned runner.
To achieve this look, use a variegated thread in a stem stitch or a heavy chain stitch to create the main flowing lines.
The thread’s natural color changes will produce a subtle, watercolor-like shift in tone along each wave.
Alternatively, couch different colored yarns side-by-side to build thicker, more defined waves. This creates a piece that is both visually soothing and texturally interesting.


