

You’ve mastered the basic stitches, but now you find yourself pausing, hoop in hand, wondering how to make your work feel less like a pattern and more like a piece of art. The secret isn’t in learning hundreds of new, complex stitches. It’s in learning to see thread, fabric, and texture as your true medium.
Texture is the language of embroidery. It’s what separates a flat image from a tactile experience. It’s the raised surface of a French knot, the smooth sheen of a satin stitch, the plush depth of a wool roving. By learning to layer these textures with intention, you can create drama, evoke emotion, and guide the viewer’s eye exactly where you want it to go.
This guide is designed to shift your perspective. We will move beyond simply filling in shapes and explore how to build surfaces that have character and depth. You will learn not just new techniques, but the ‘why’ behind them—why a certain stitch creates shadow, why a specific material adds light, and how their combination tells a more compelling story.
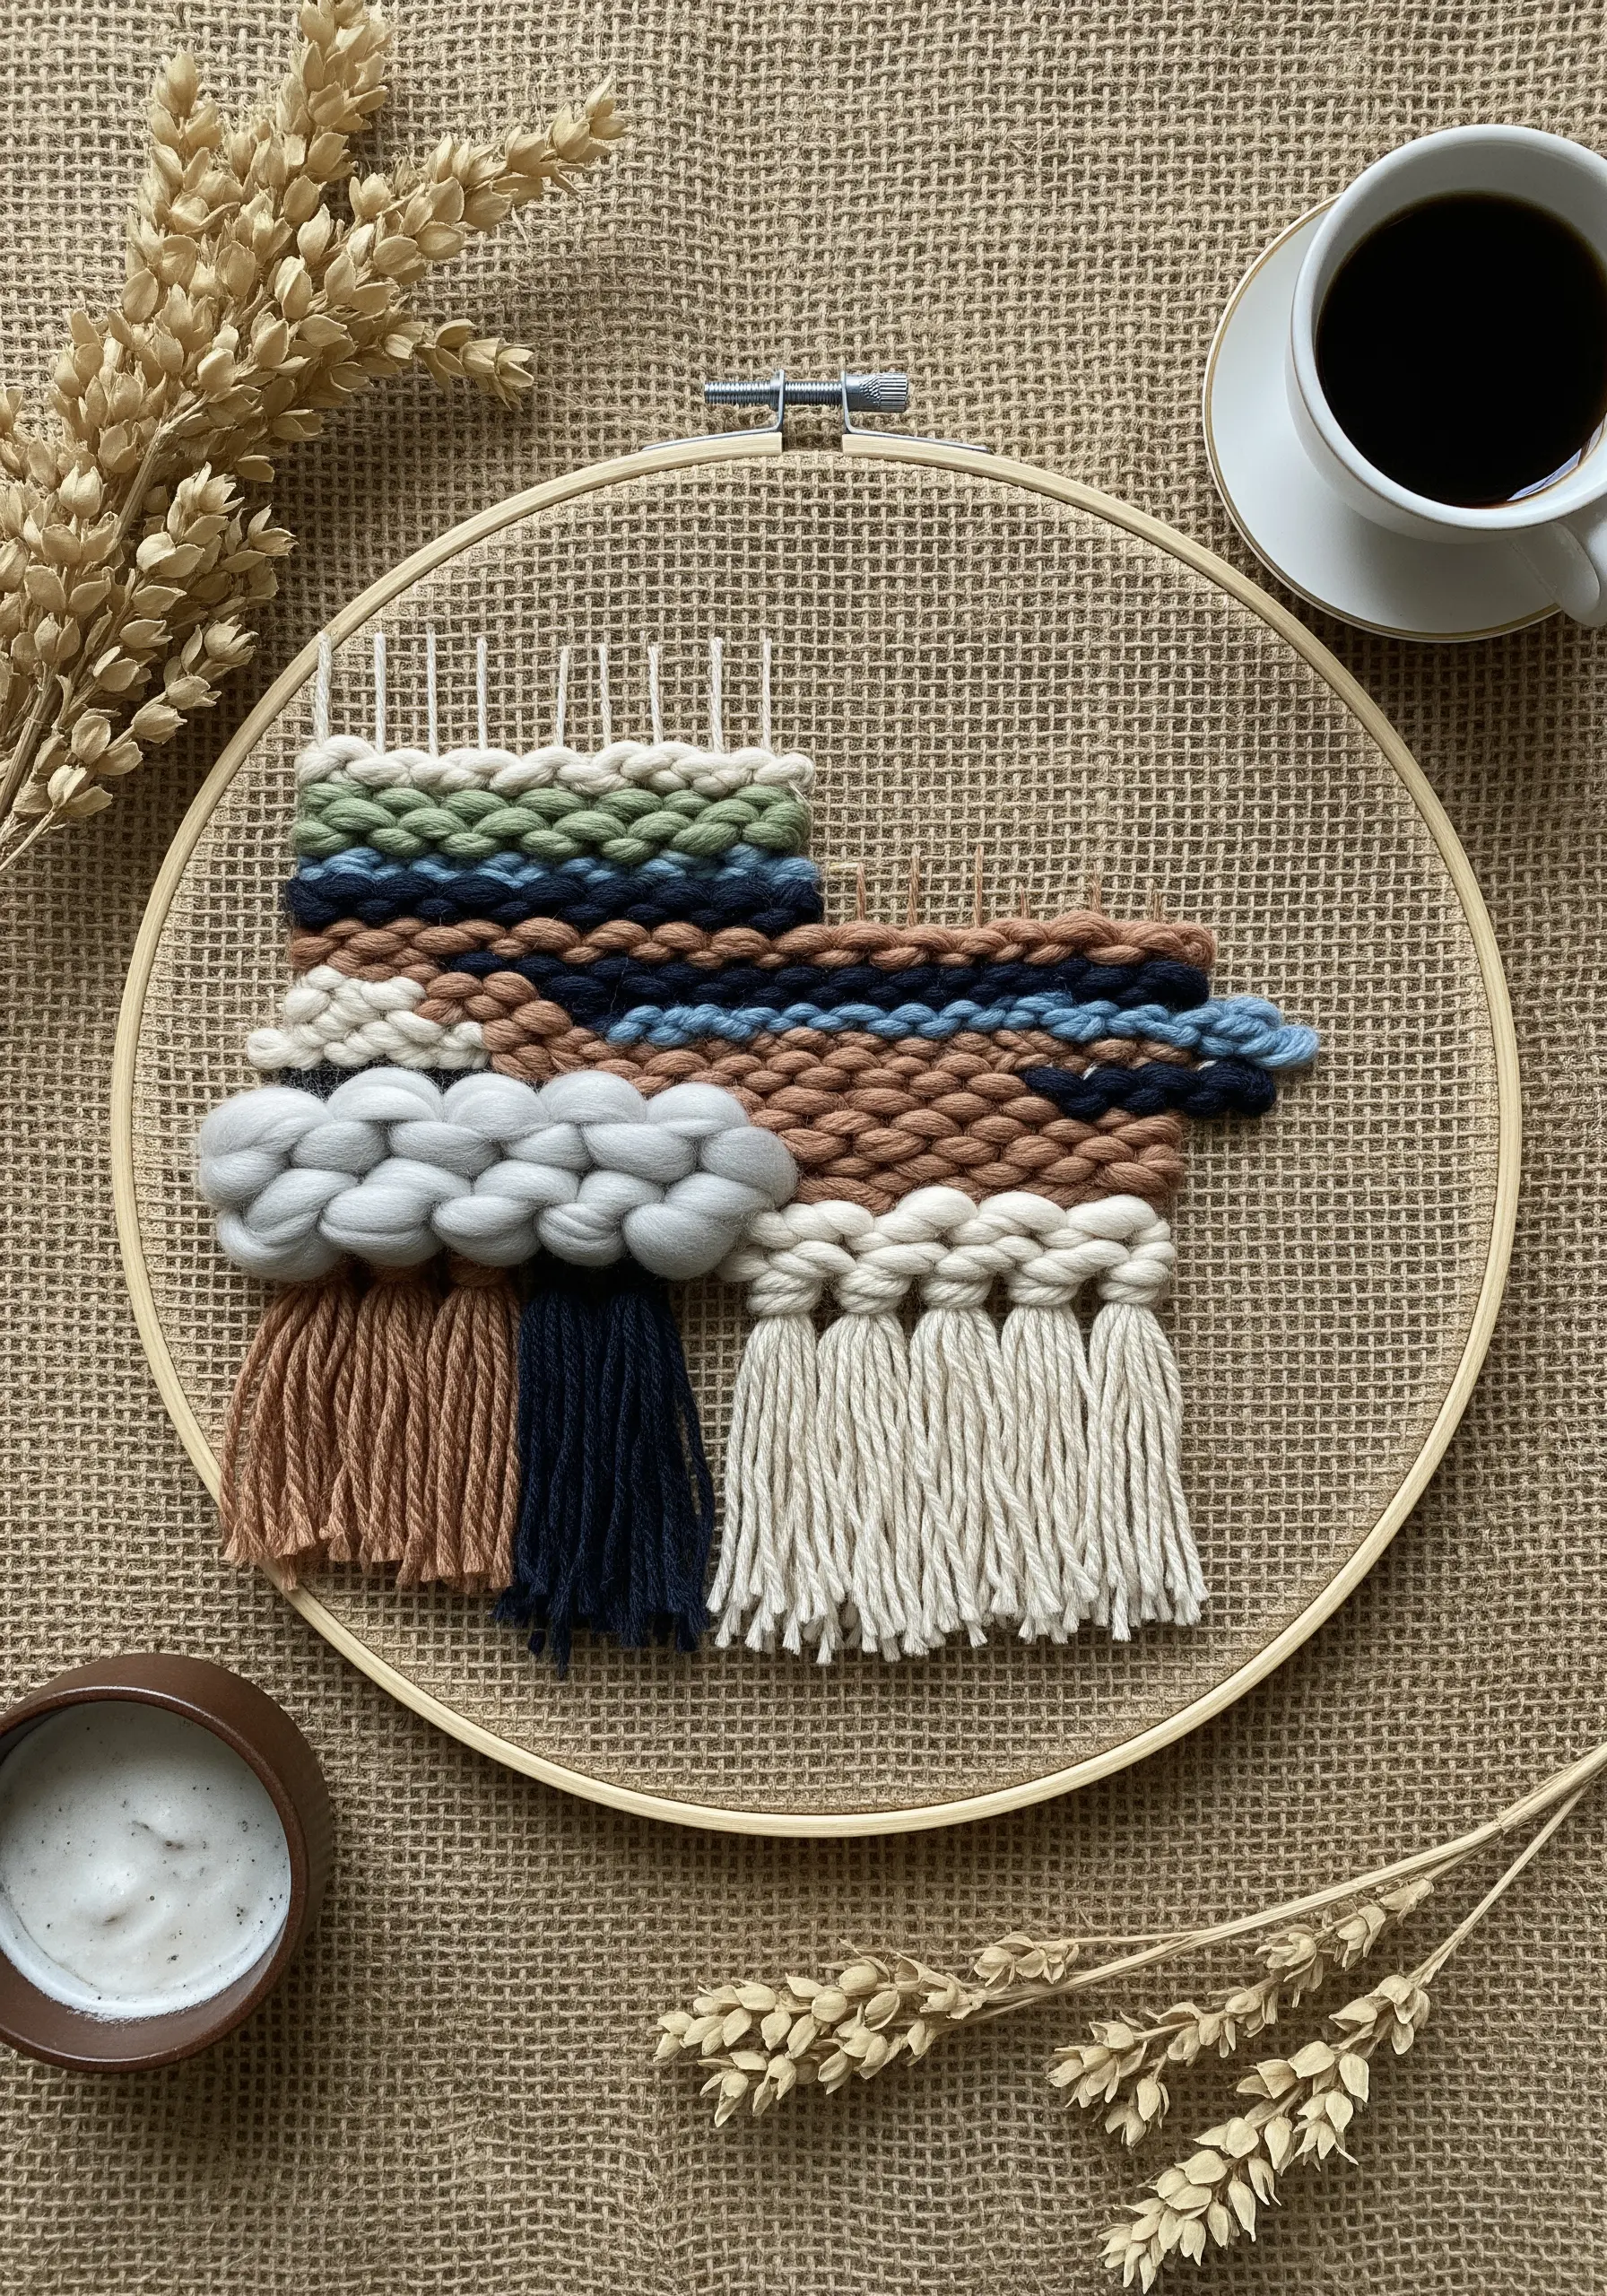
1. Sculptural Depth with Chunky Wool Roving
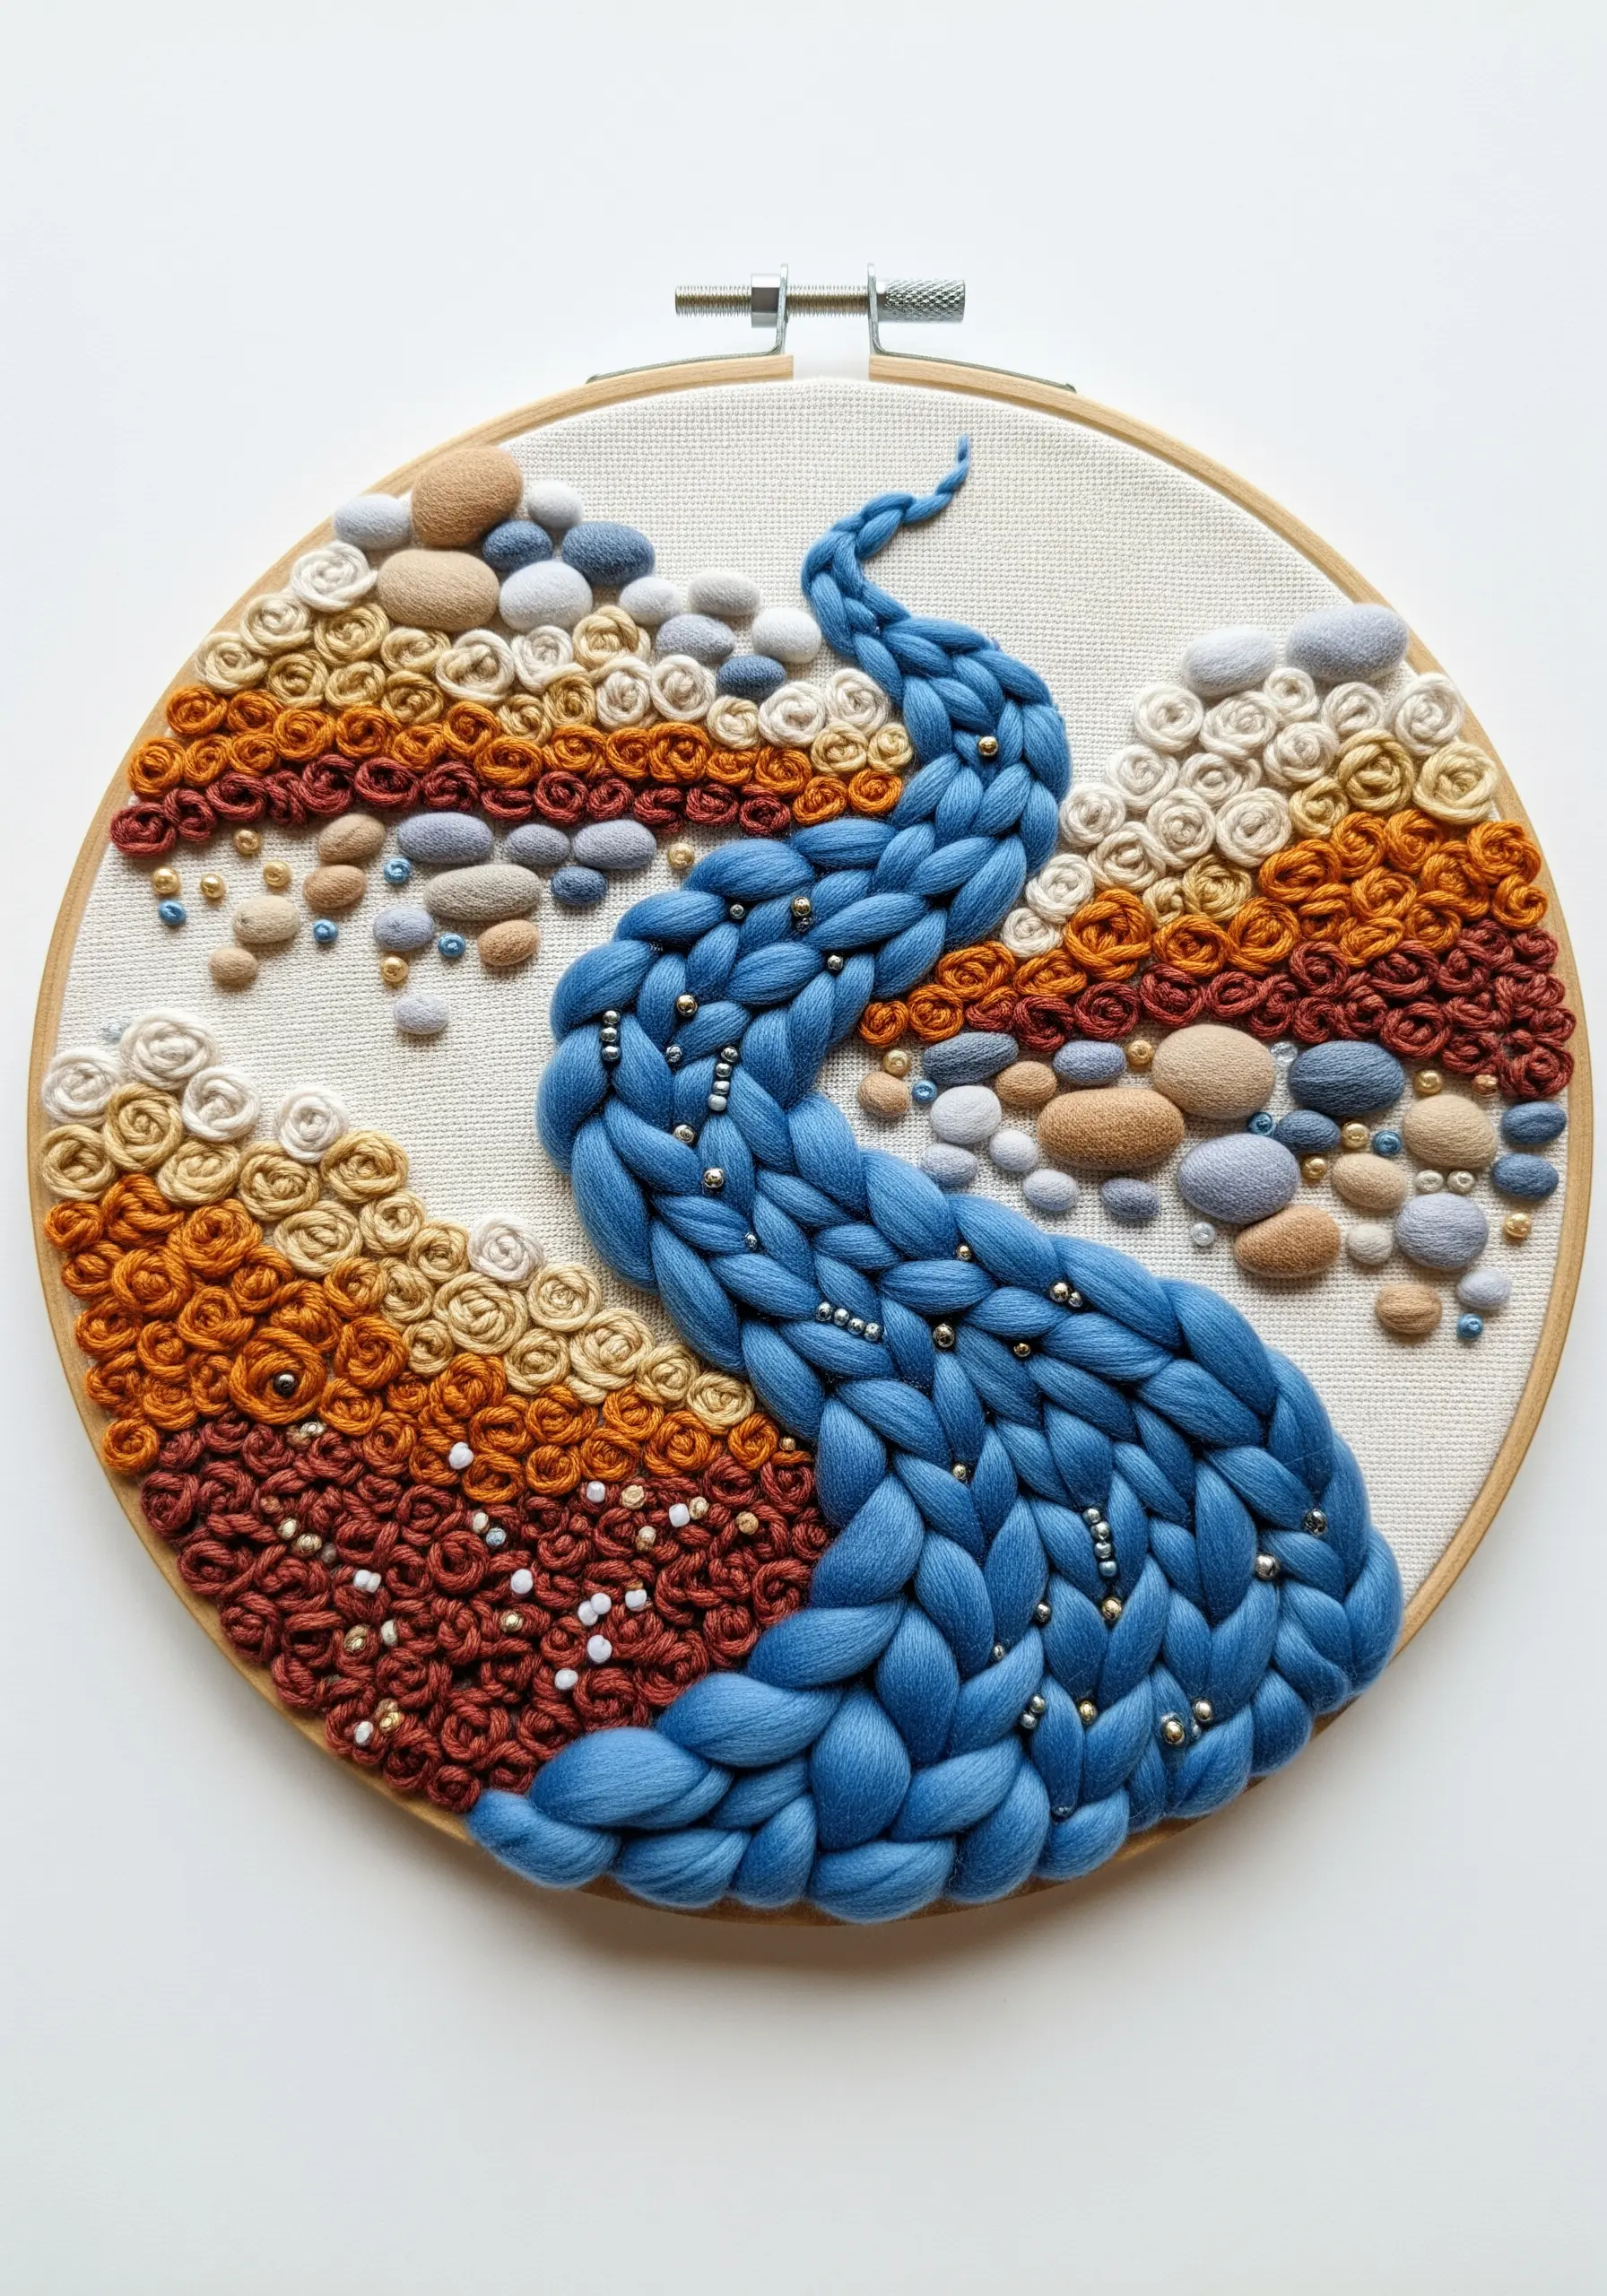
Move beyond standard floss by incorporating thick wool roving to create bold, dimensional forms like flowing water or rolling hills.
Use a large-eyed chenille or tapestry needle to gently couch the roving onto your fabric with a matching or contrasting standard thread.
This technique introduces a soft, sculptural quality that immediately draws the eye, contrasting beautifully with the tighter precision of traditional stitches like French knots or seed stitches.
For added sparkle, scatter glass beads along the roving’s path; this mimics light reflecting on a surface and enhances the sense of movement.
The key is to let the roving twist and turn naturally, creating organic volume that transforms a flat design into a tactile landscape.
2. Lifelike Petals with 3D Ribbon Stitching
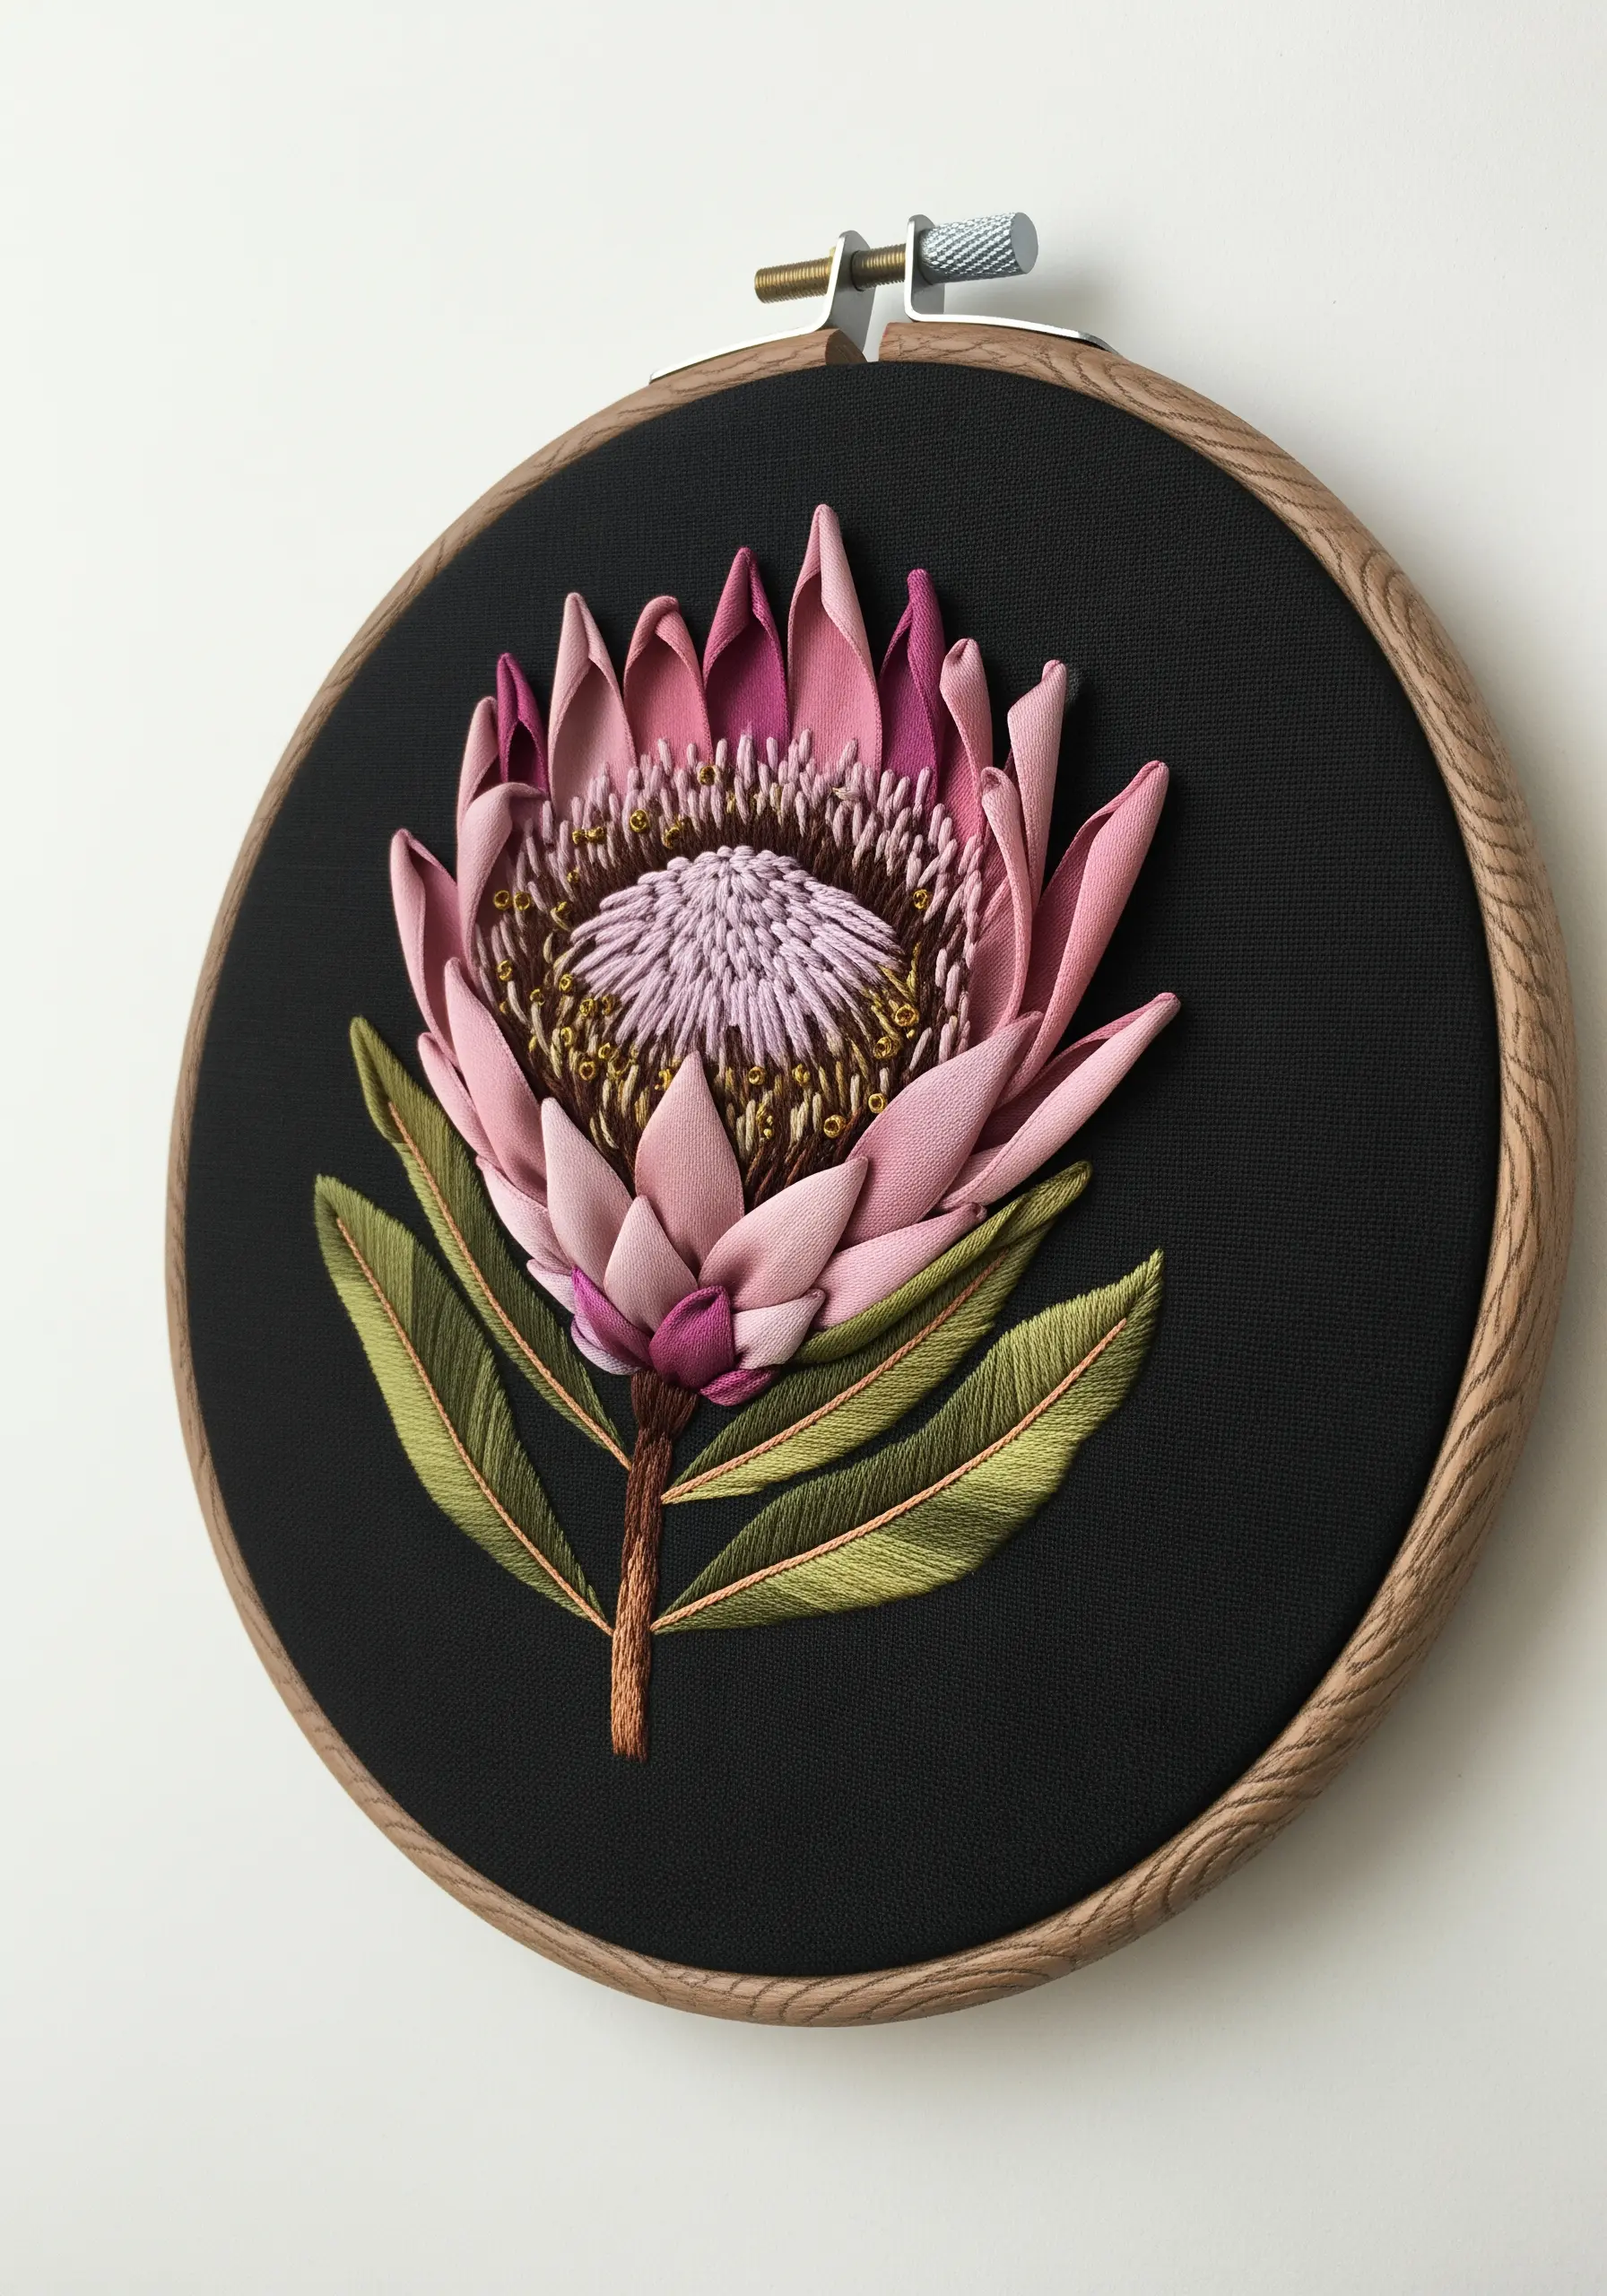
Achieve astonishing realism in botanicals by using silk or satin ribbon instead of thread.
Create individual petals by folding and shaping the ribbon, then securing each piece to the fabric with small, discreet stitches at its base.
This method allows you to build layers that lift off the surface, mimicking the delicate structure of a real flower.
For the center, combine dense French knots with straight stitches using metallic thread to replicate the texture of pollen.
Choose a dark, high-contrast fabric like black linen or cotton sateen to make the ribbon’s subtle sheen and vibrant color pop, turning your hoop into a striking piece of 3D floral embroidery.
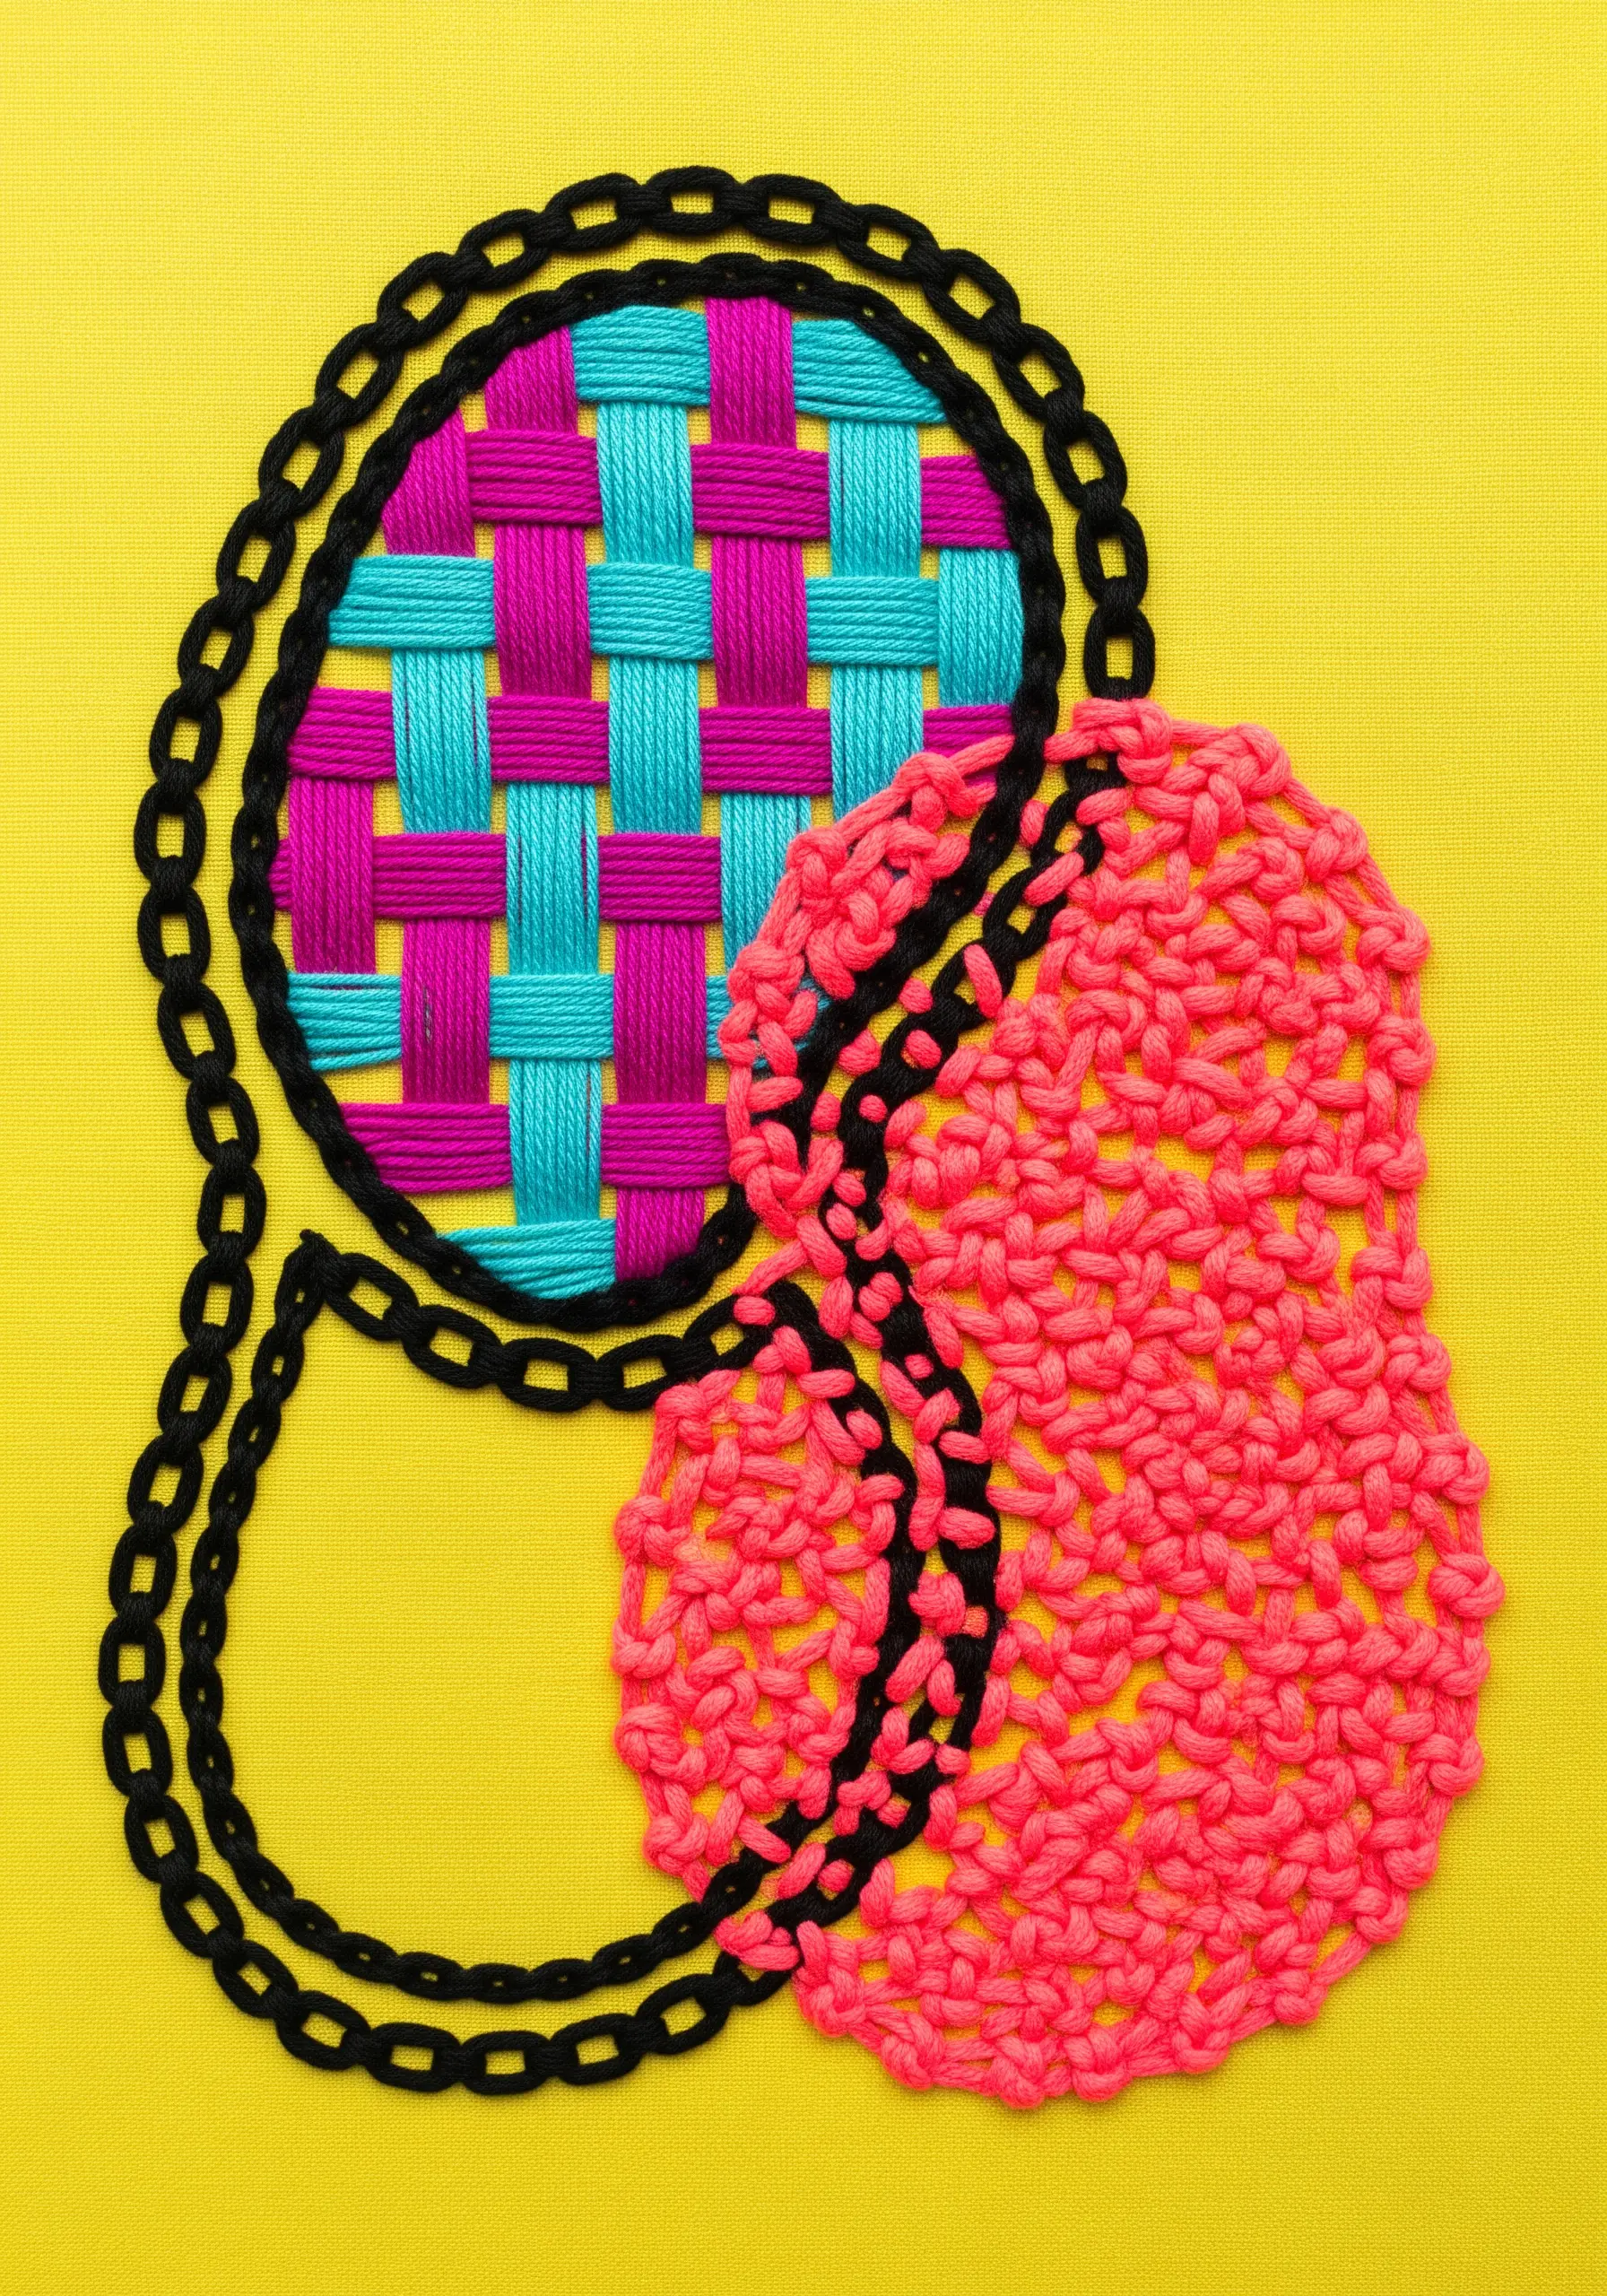
3. Abstract Compositions with Contrasting Materials
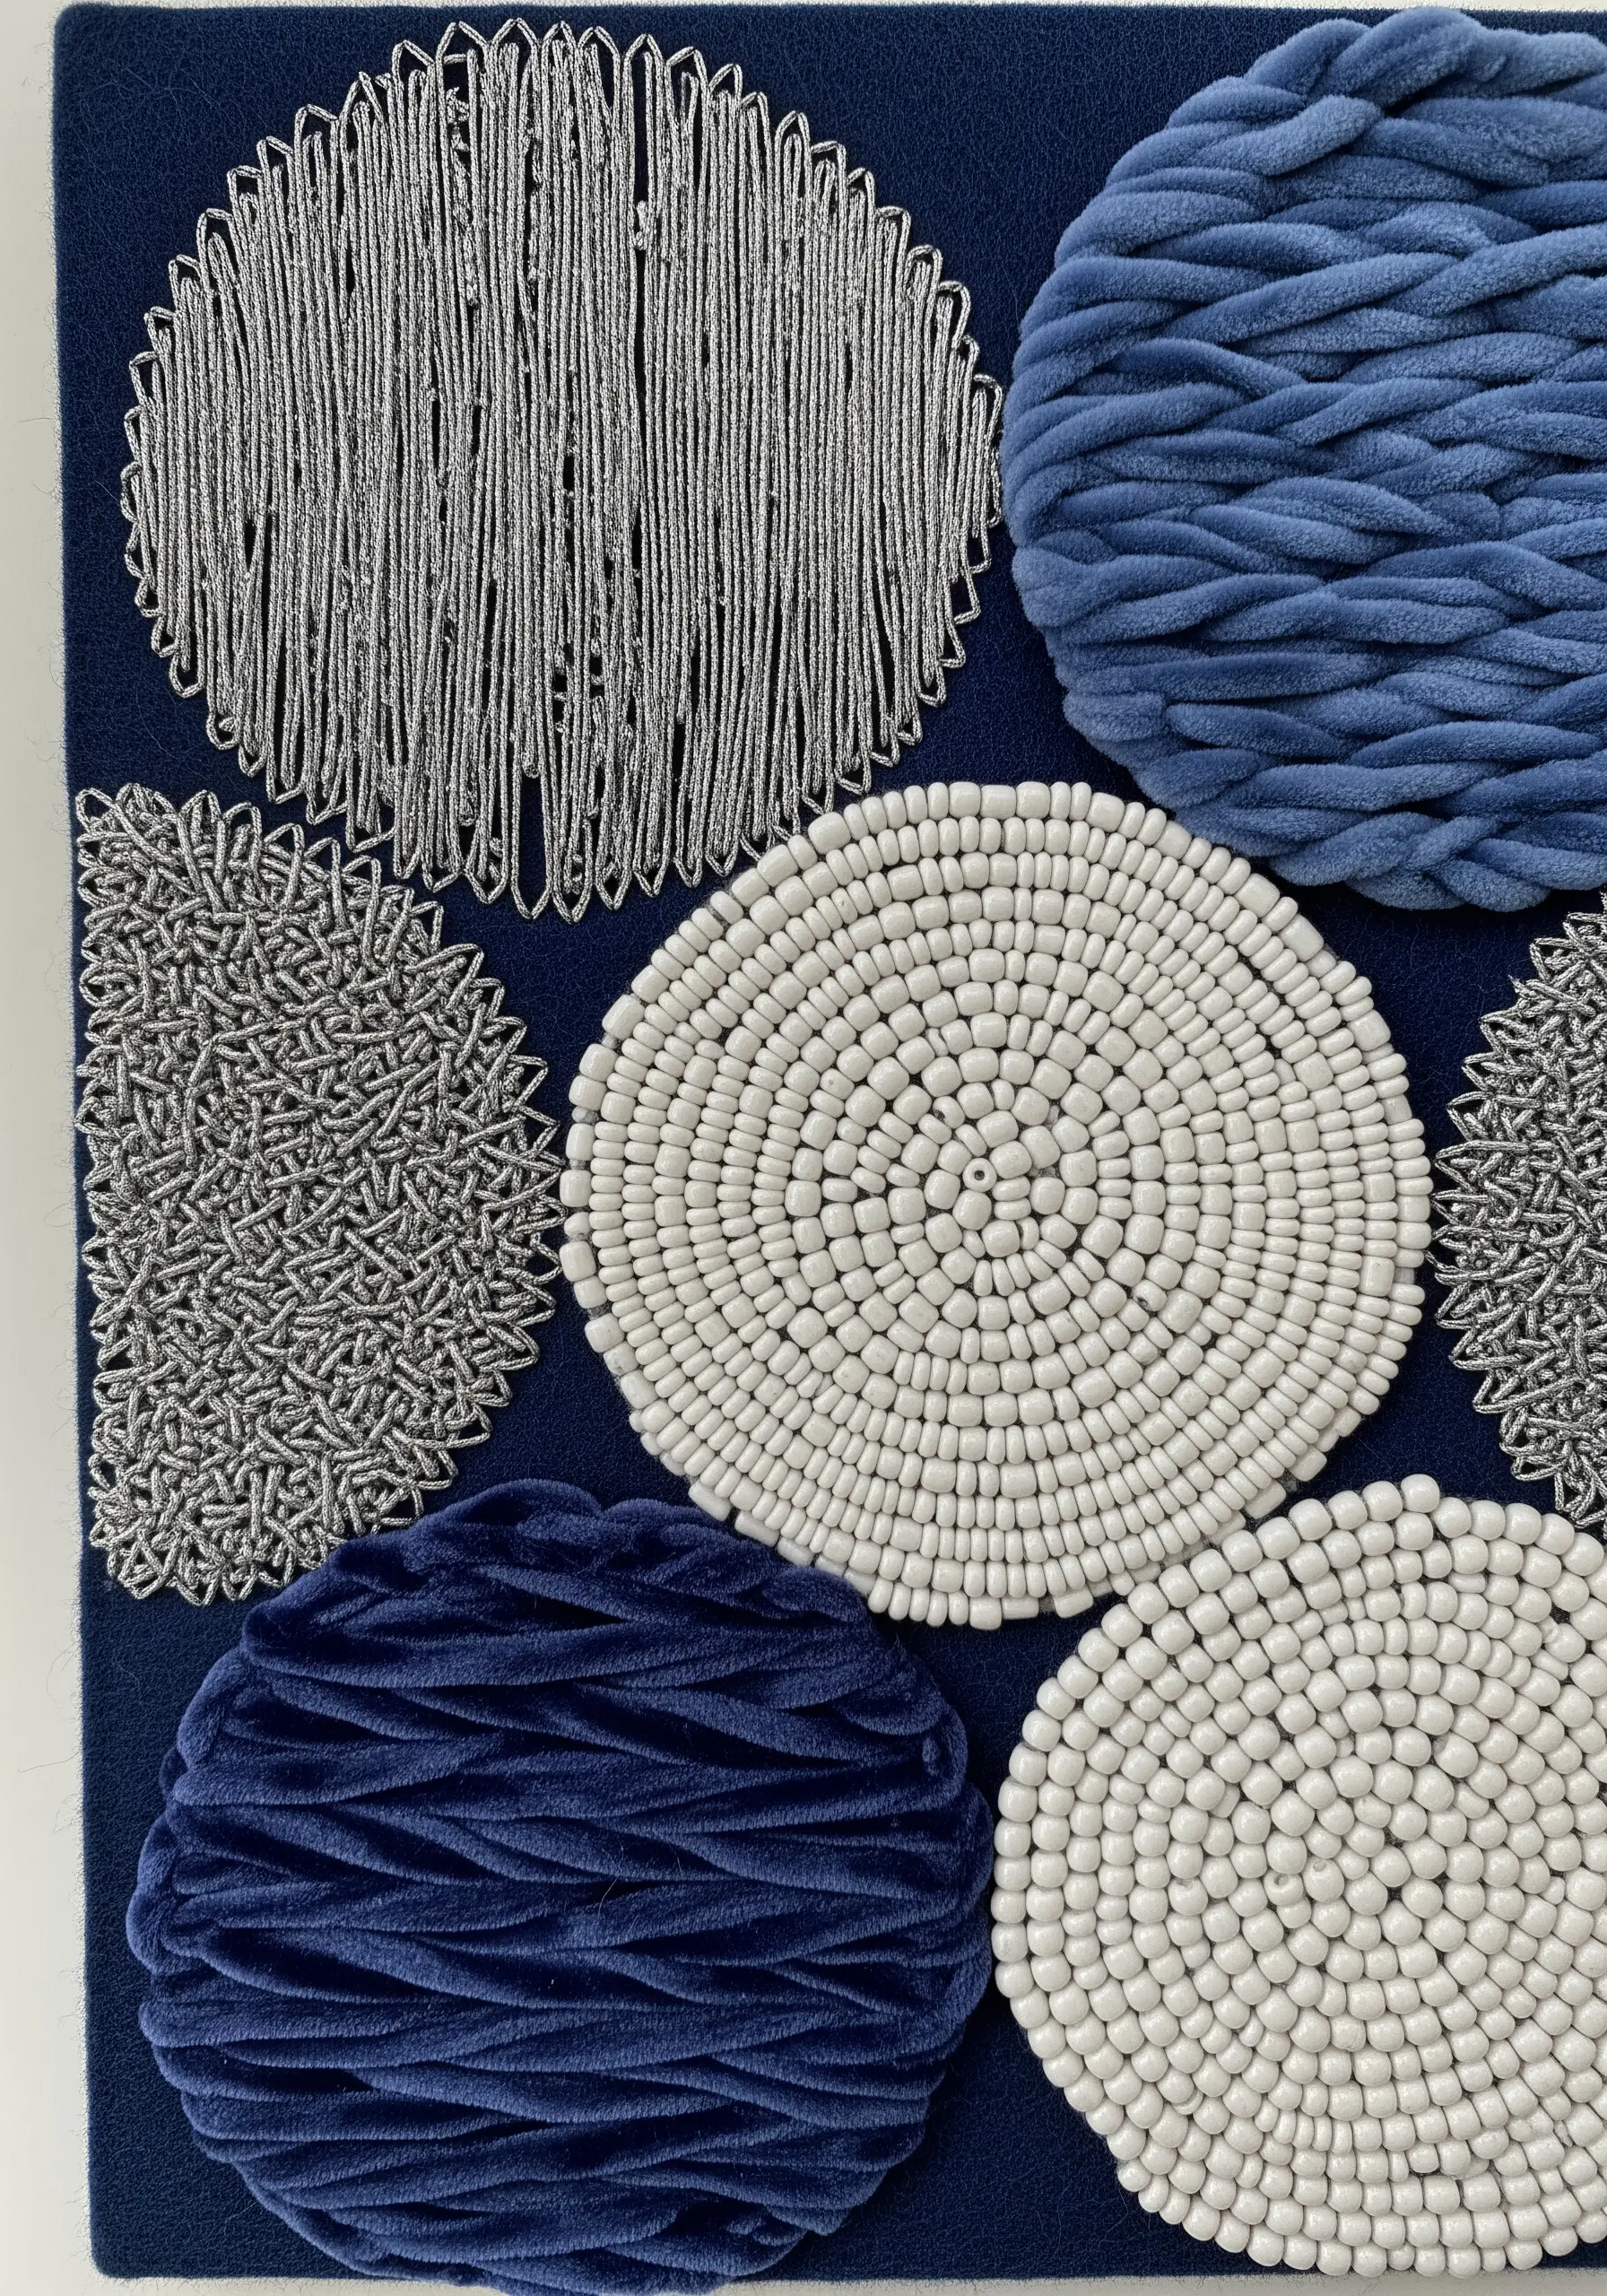
Elevate simple circular motifs by filling them with unexpected textures.
Juxtapose the plush softness of velvet yarn against the cool, uniform surface of tightly packed seed beads.
Introduce a third texture, like a metallic cording couched in a random pattern, to add a layer of graphic energy and light reflection.
This exercise in contrast—soft vs. hard, matte vs. shiny, organic vs. structured—is what gives the composition its modern, gallery-worthy feel.
By limiting your color palette, you allow the textures themselves to become the main focus of these abstract texture-play designs.
4. Raised Satin Stitch for Padded Celestial Bodies
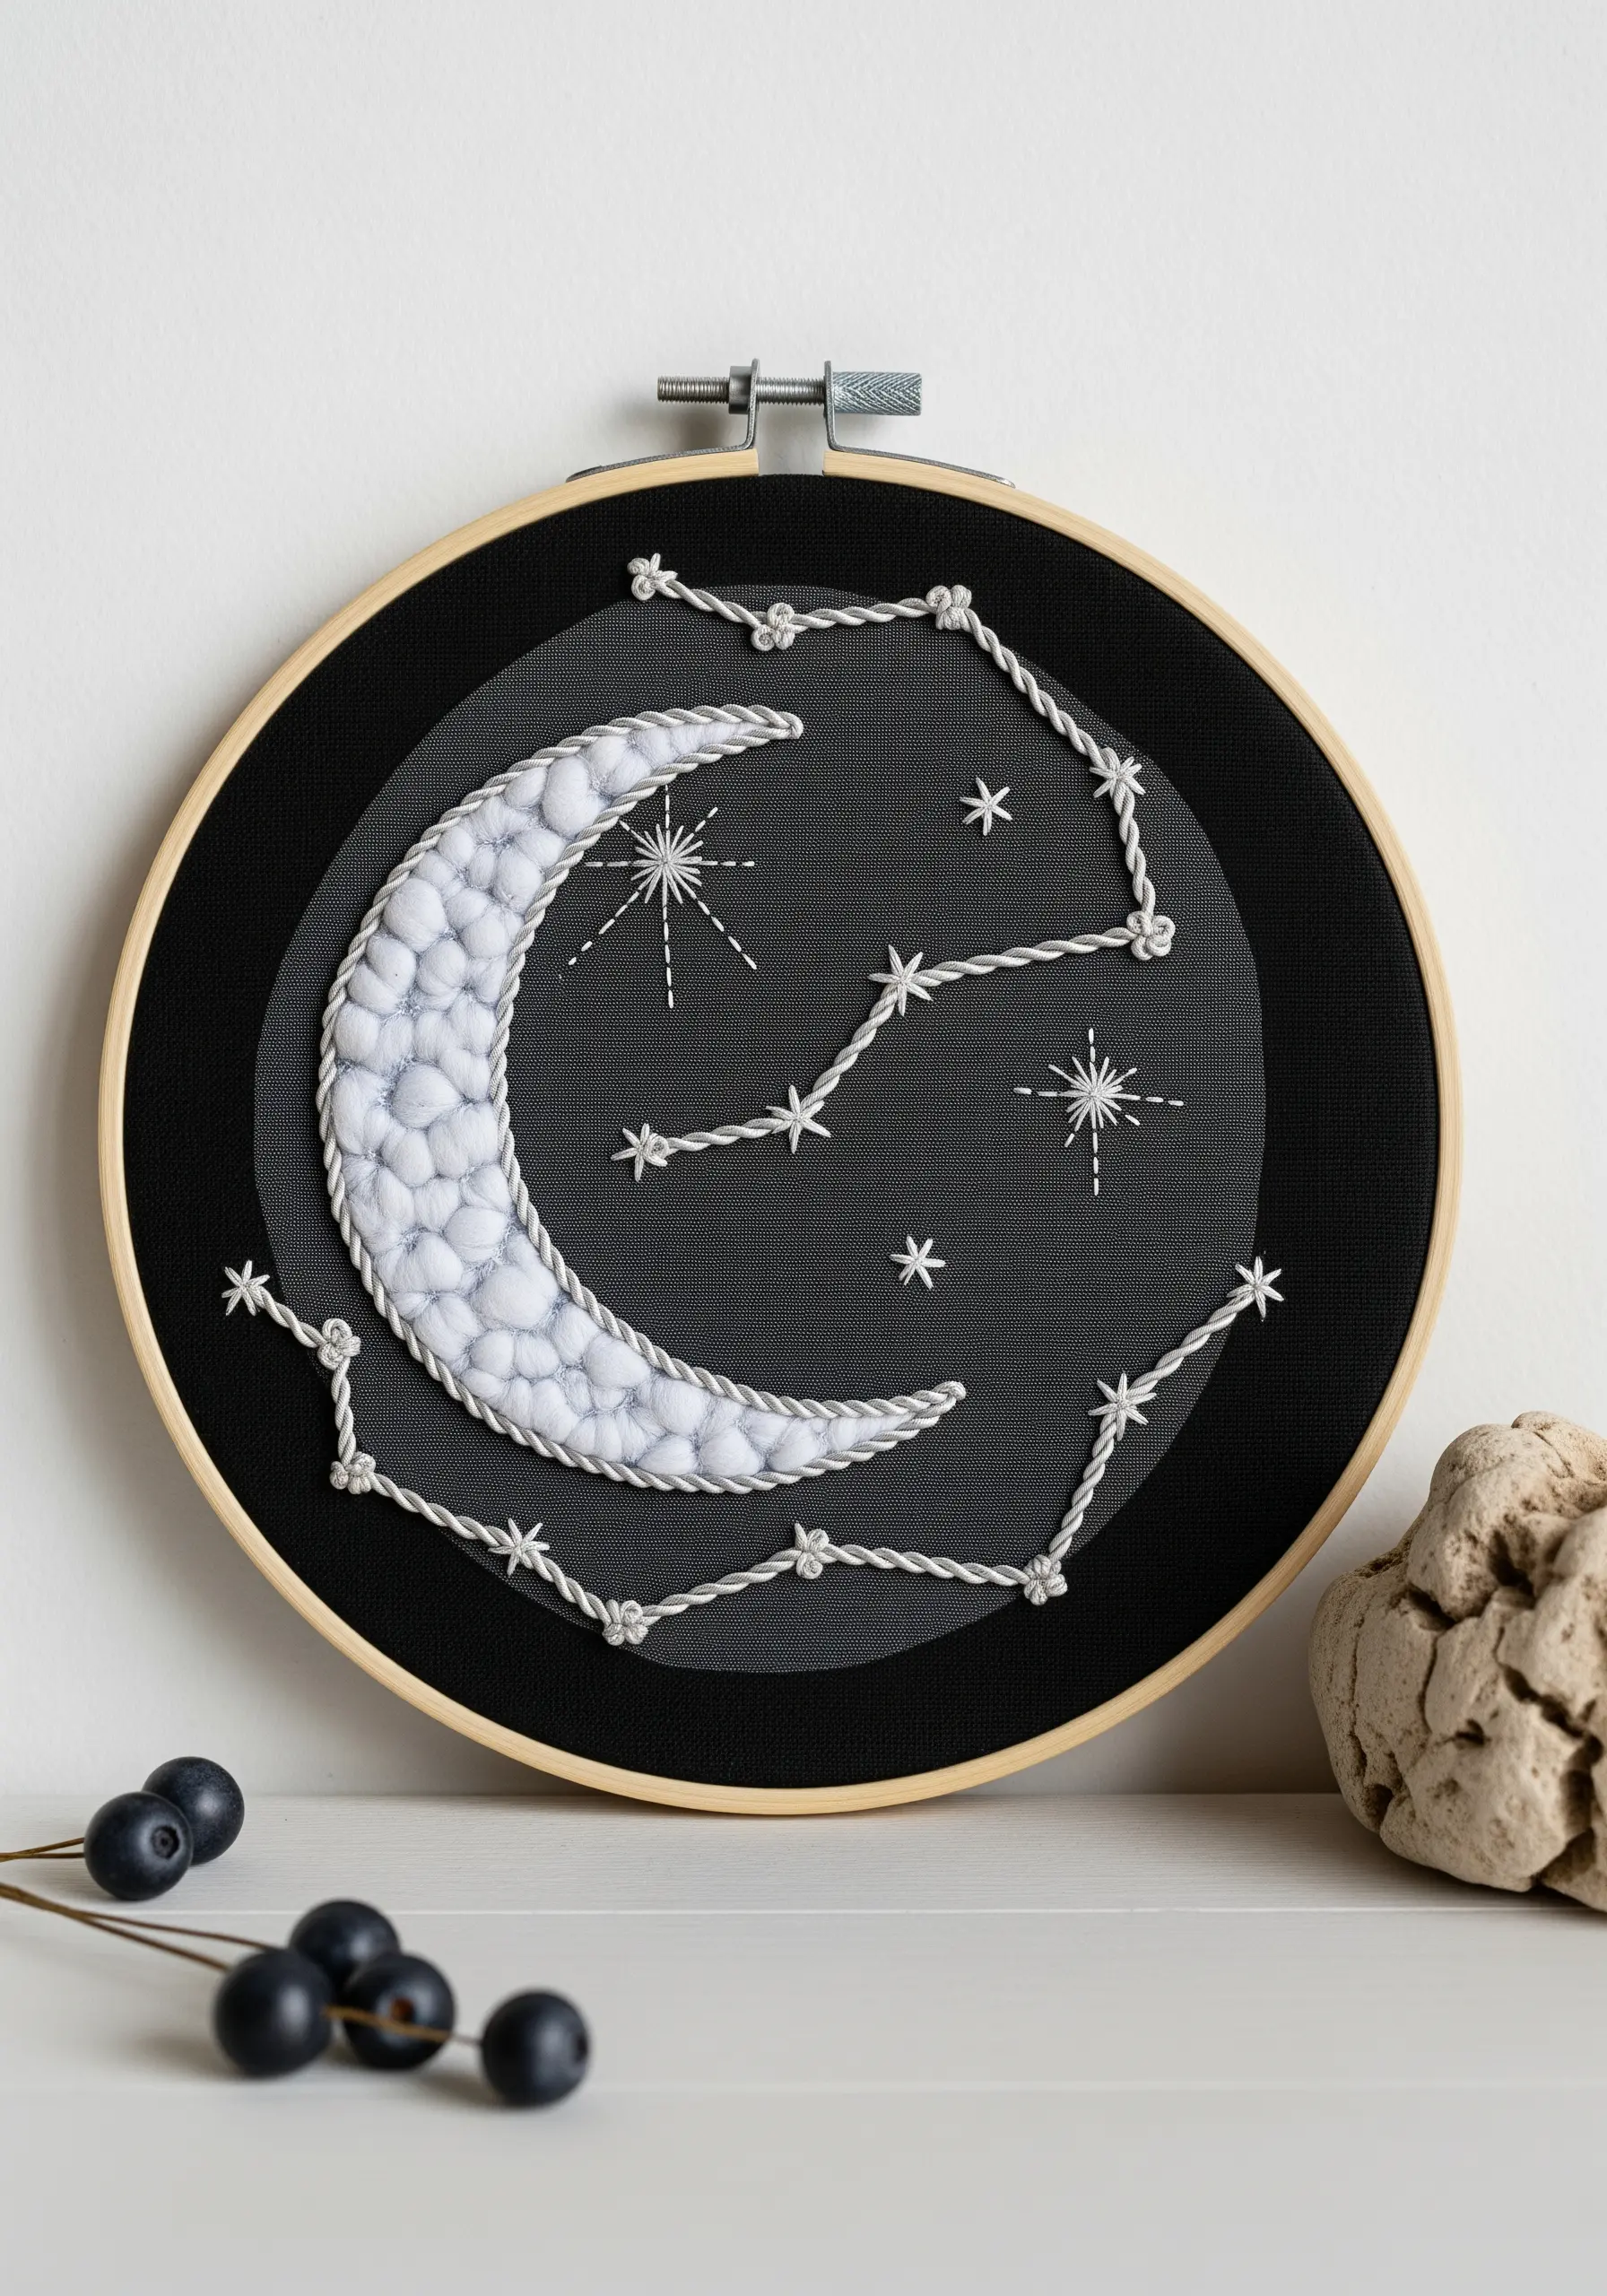
Give celestial elements like moons and planets a soft, raised dimension using a padding technique.
First, fill the shape with a base layer of small, dense seed stitches or felt padding cut to size.
Then, work your satin stitch over this padded foundation, ensuring your stitches extend just beyond the padding to create a smooth, rounded edge.
For the moon’s texture, use a variegated gray or white perle cotton; its gentle twist and sheen create a subtle cratered effect without extra work.
This technique transforms a simple shape into a focal point, perfect for tiny night-sky embroidery designs that feel both graphic and soft.
5. High-Density Woven Wheels for a Mosaic Effect
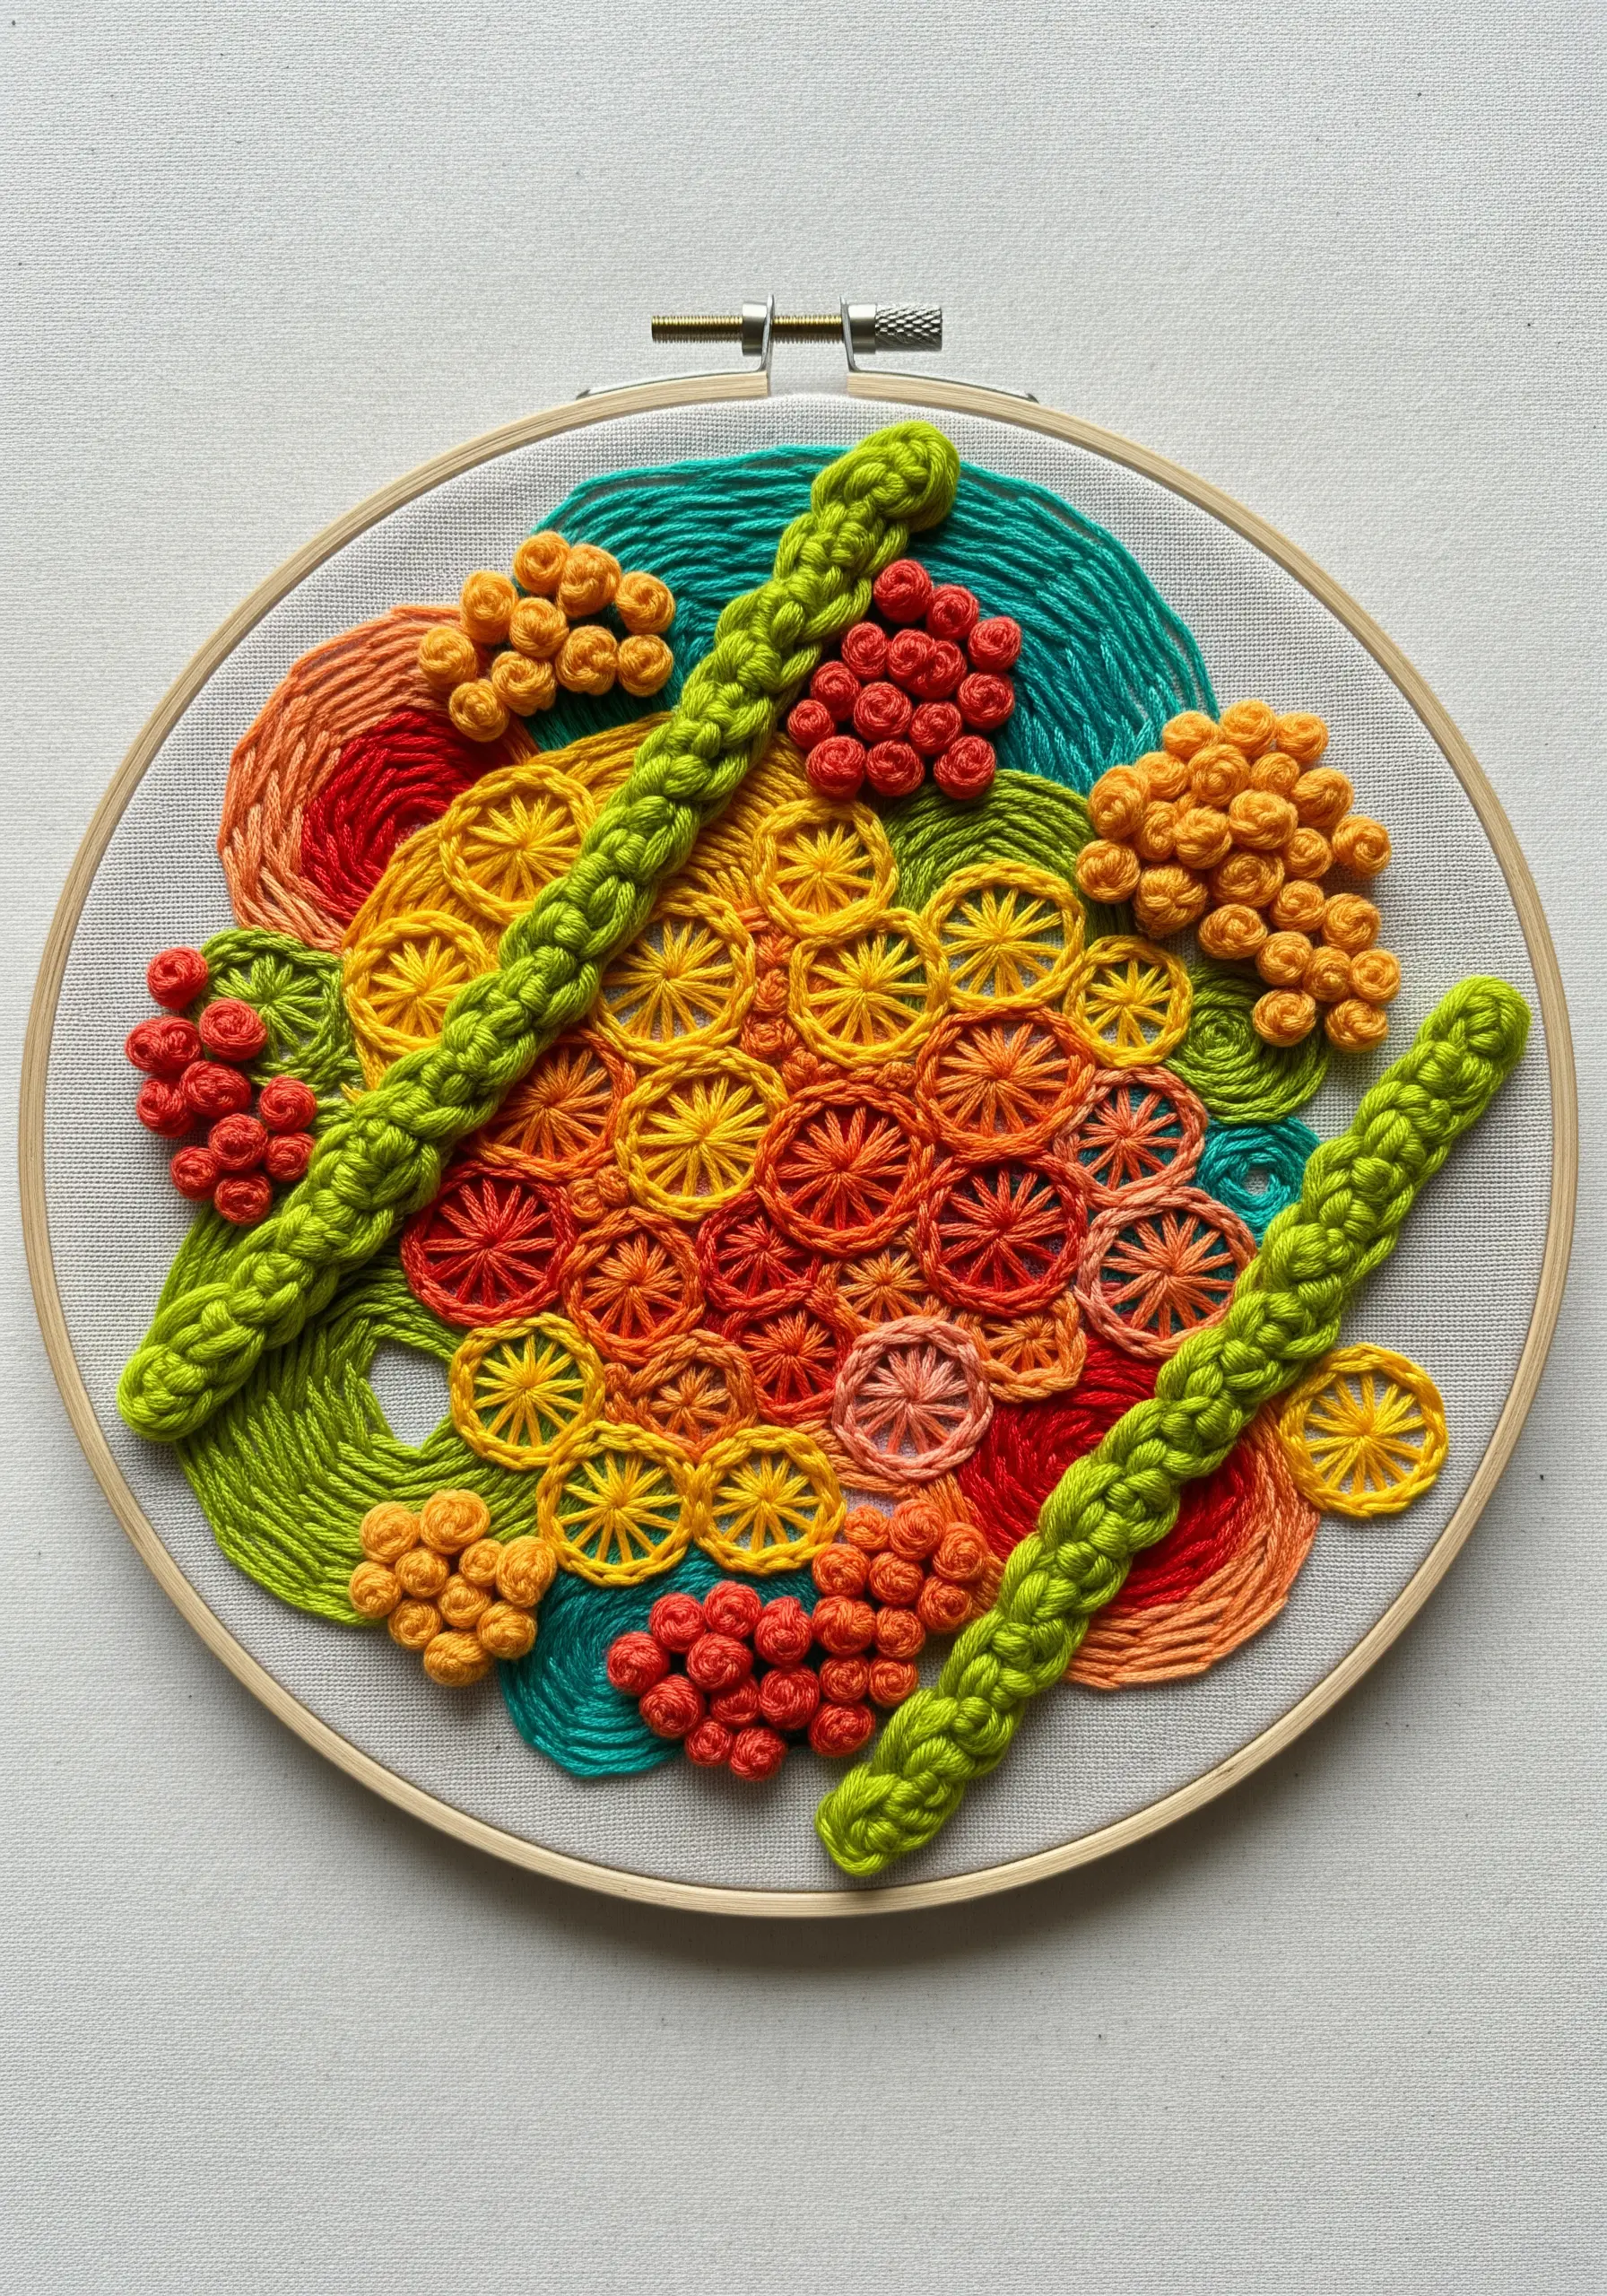
Create a vibrant, textured field by clustering woven wheel stitches (or spider web stitches) tightly together.
Instead of using them as standalone floral elements, overlap them and vary their sizes slightly to form a dense, mosaic-like surface.
Use a six-strand floss or a fine wool thread to maximize volume and coverage.
Play with an analogous color scheme—like yellows, oranges, and reds—to create a gradient effect that flows across the composition, making it feel cohesive and dynamic.
This approach turns a simple stitch into a powerful tool for building color fields in vibrant hoop art designs.
6. Layered Stitches to Mimic Abstract Brushstrokes
Recreate the energy of a painted brushstroke using layers of thread.
Start with a base of long, smooth satin stitches in a dark hue, laying them down like a first coat of paint.
Next, layer shorter, slightly looser stitches in a lighter shade on top, allowing the base color to show through at the edges.
Finish by scattering detached chain stitches or colonial knots in a contrasting, bright color along the top edge, suggesting splatters of paint.
This method creates abstract thread illusion techniques that capture a sense of movement and spontaneity rarely seen in embroidery.
7. Variegated Thread for Intricate Mushroom Gills
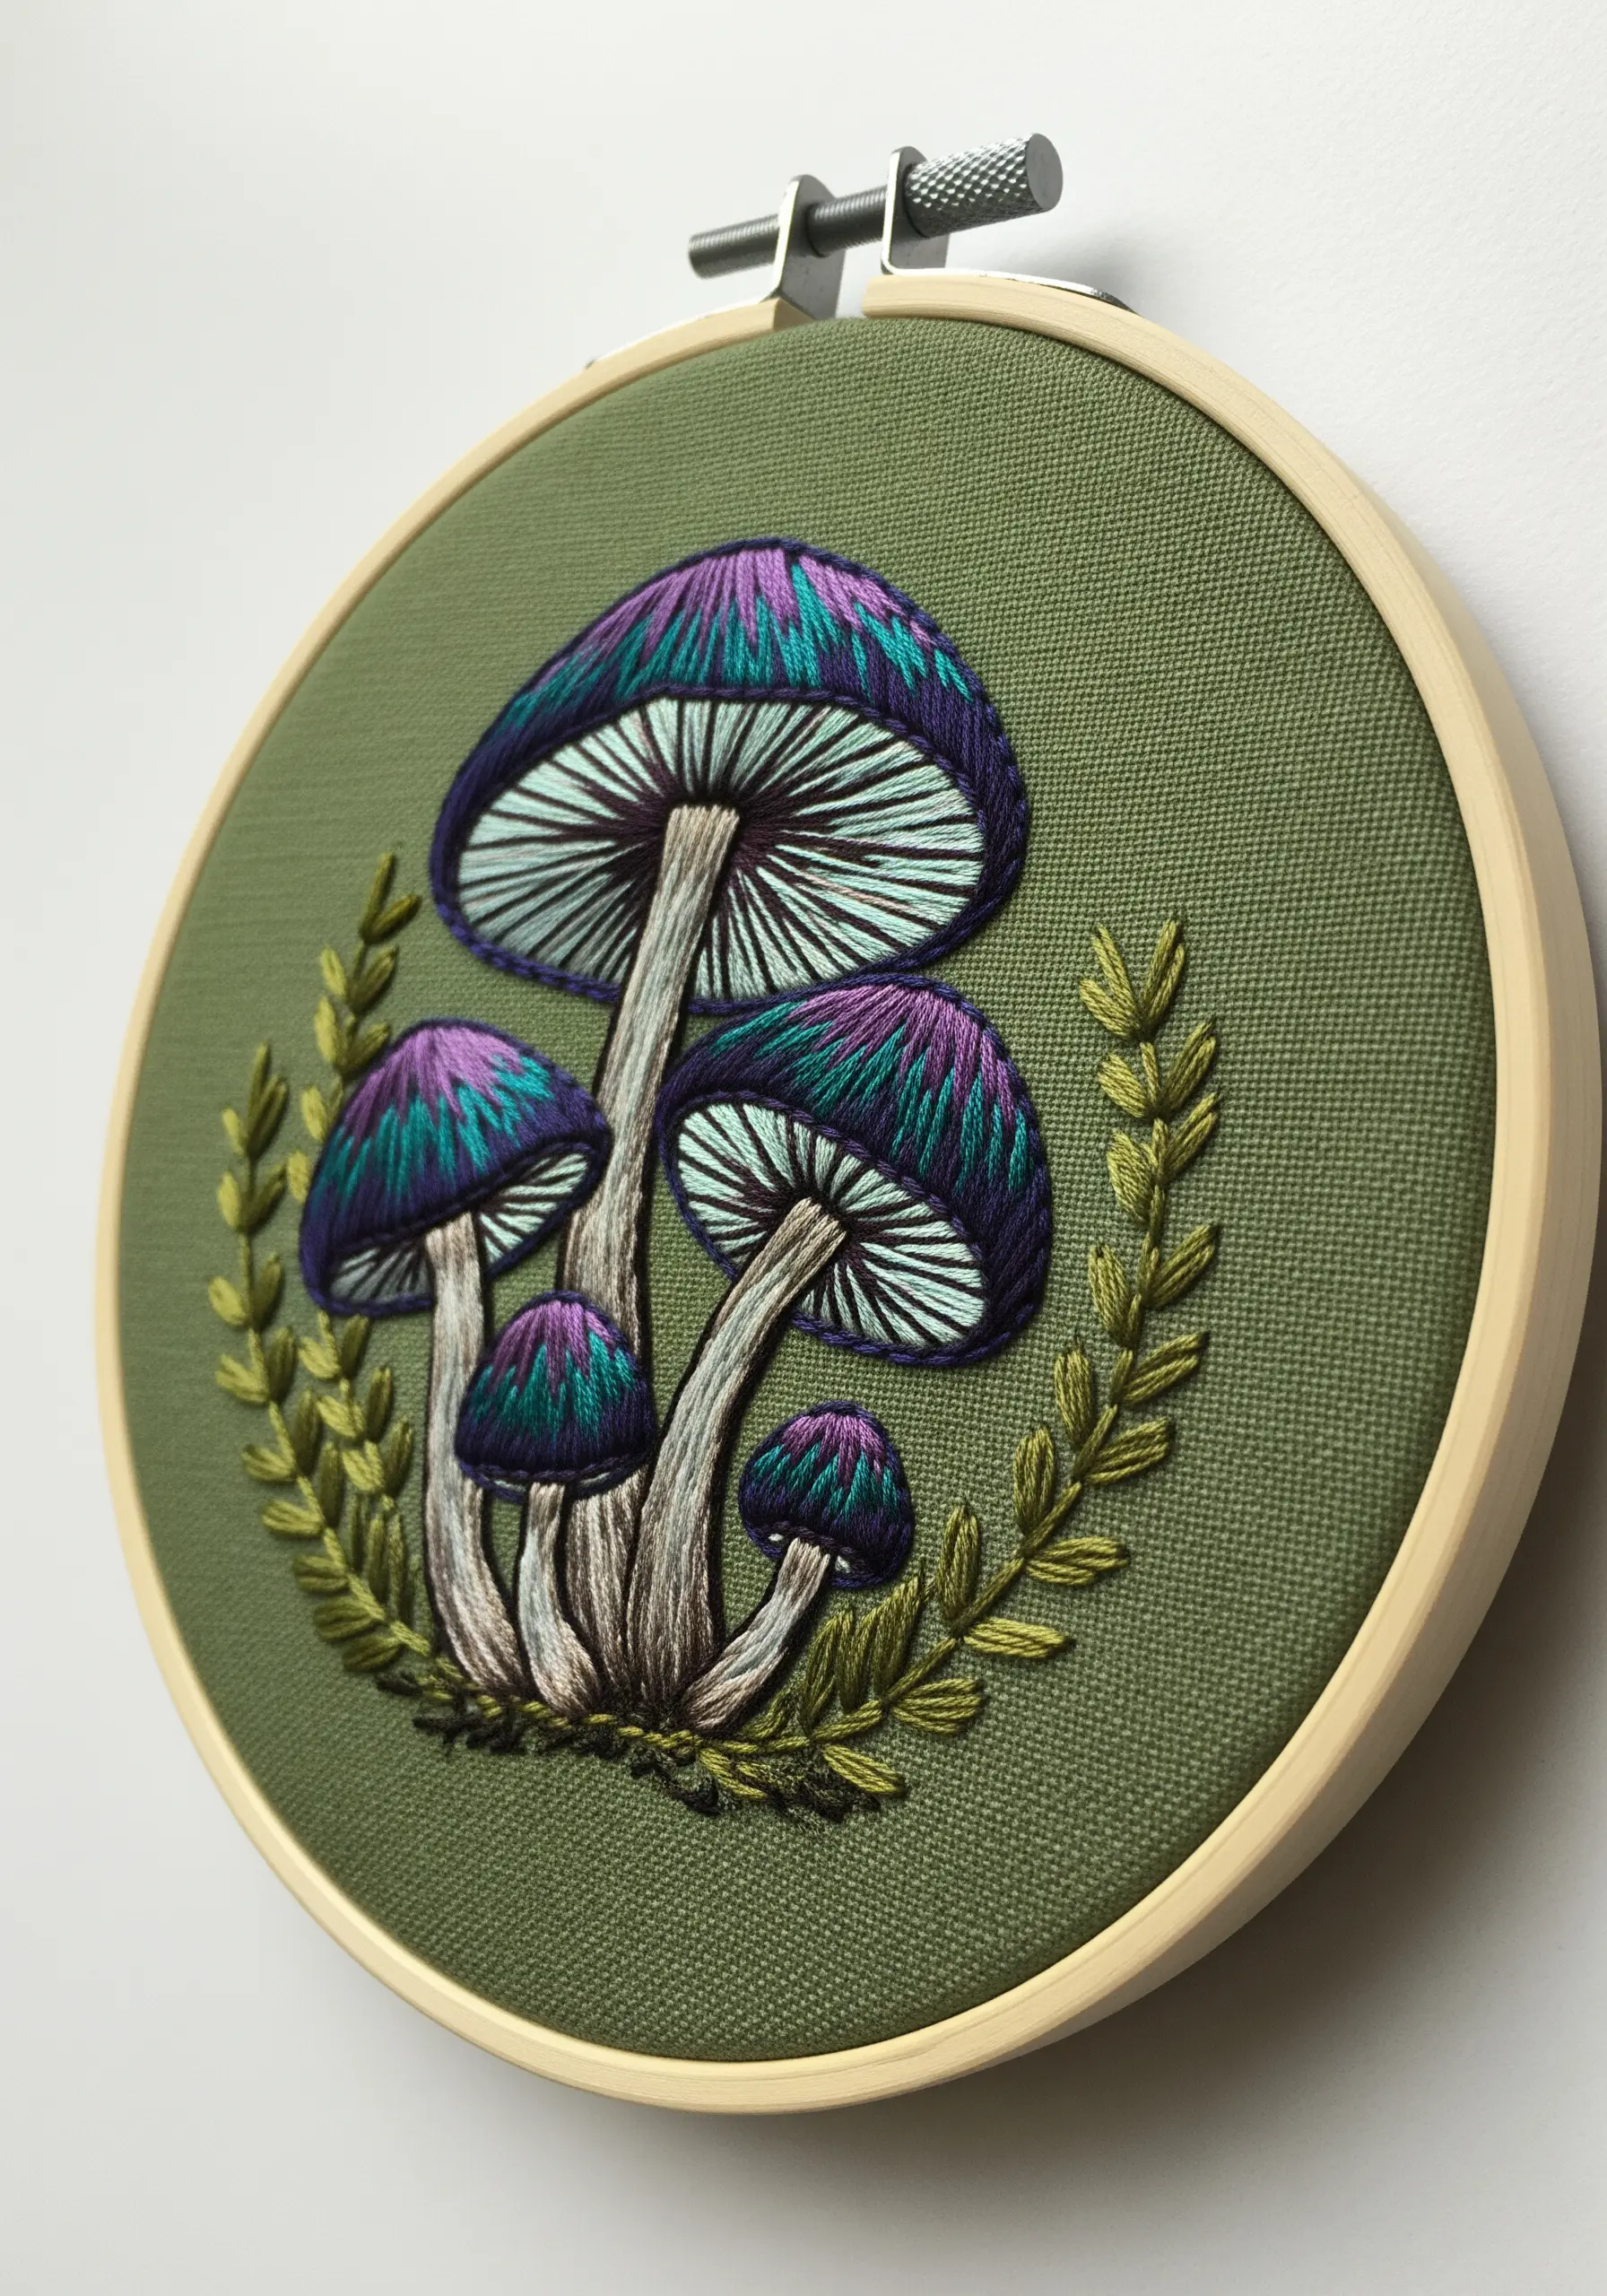
Effortlessly create complex color gradients and shading on natural motifs by choosing the right thread.
Use a variegated floss for the mushroom caps; its built-in color shifts will automatically generate depth and highlights as you fill with long-and-short stitch.
For the delicate gills underneath, use a single strand of a light-colored thread to stitch fine, radiating straight stitches.
This contrast between the multi-tonal, blended cap and the sharply defined gills adds a striking level of realism.
It’s an efficient way to achieve a professional, painted look in creative embroidery ideas inspired by tree bark and leaves without constantly changing colors.
8. Appliqué with High-Pile Textural Stitches
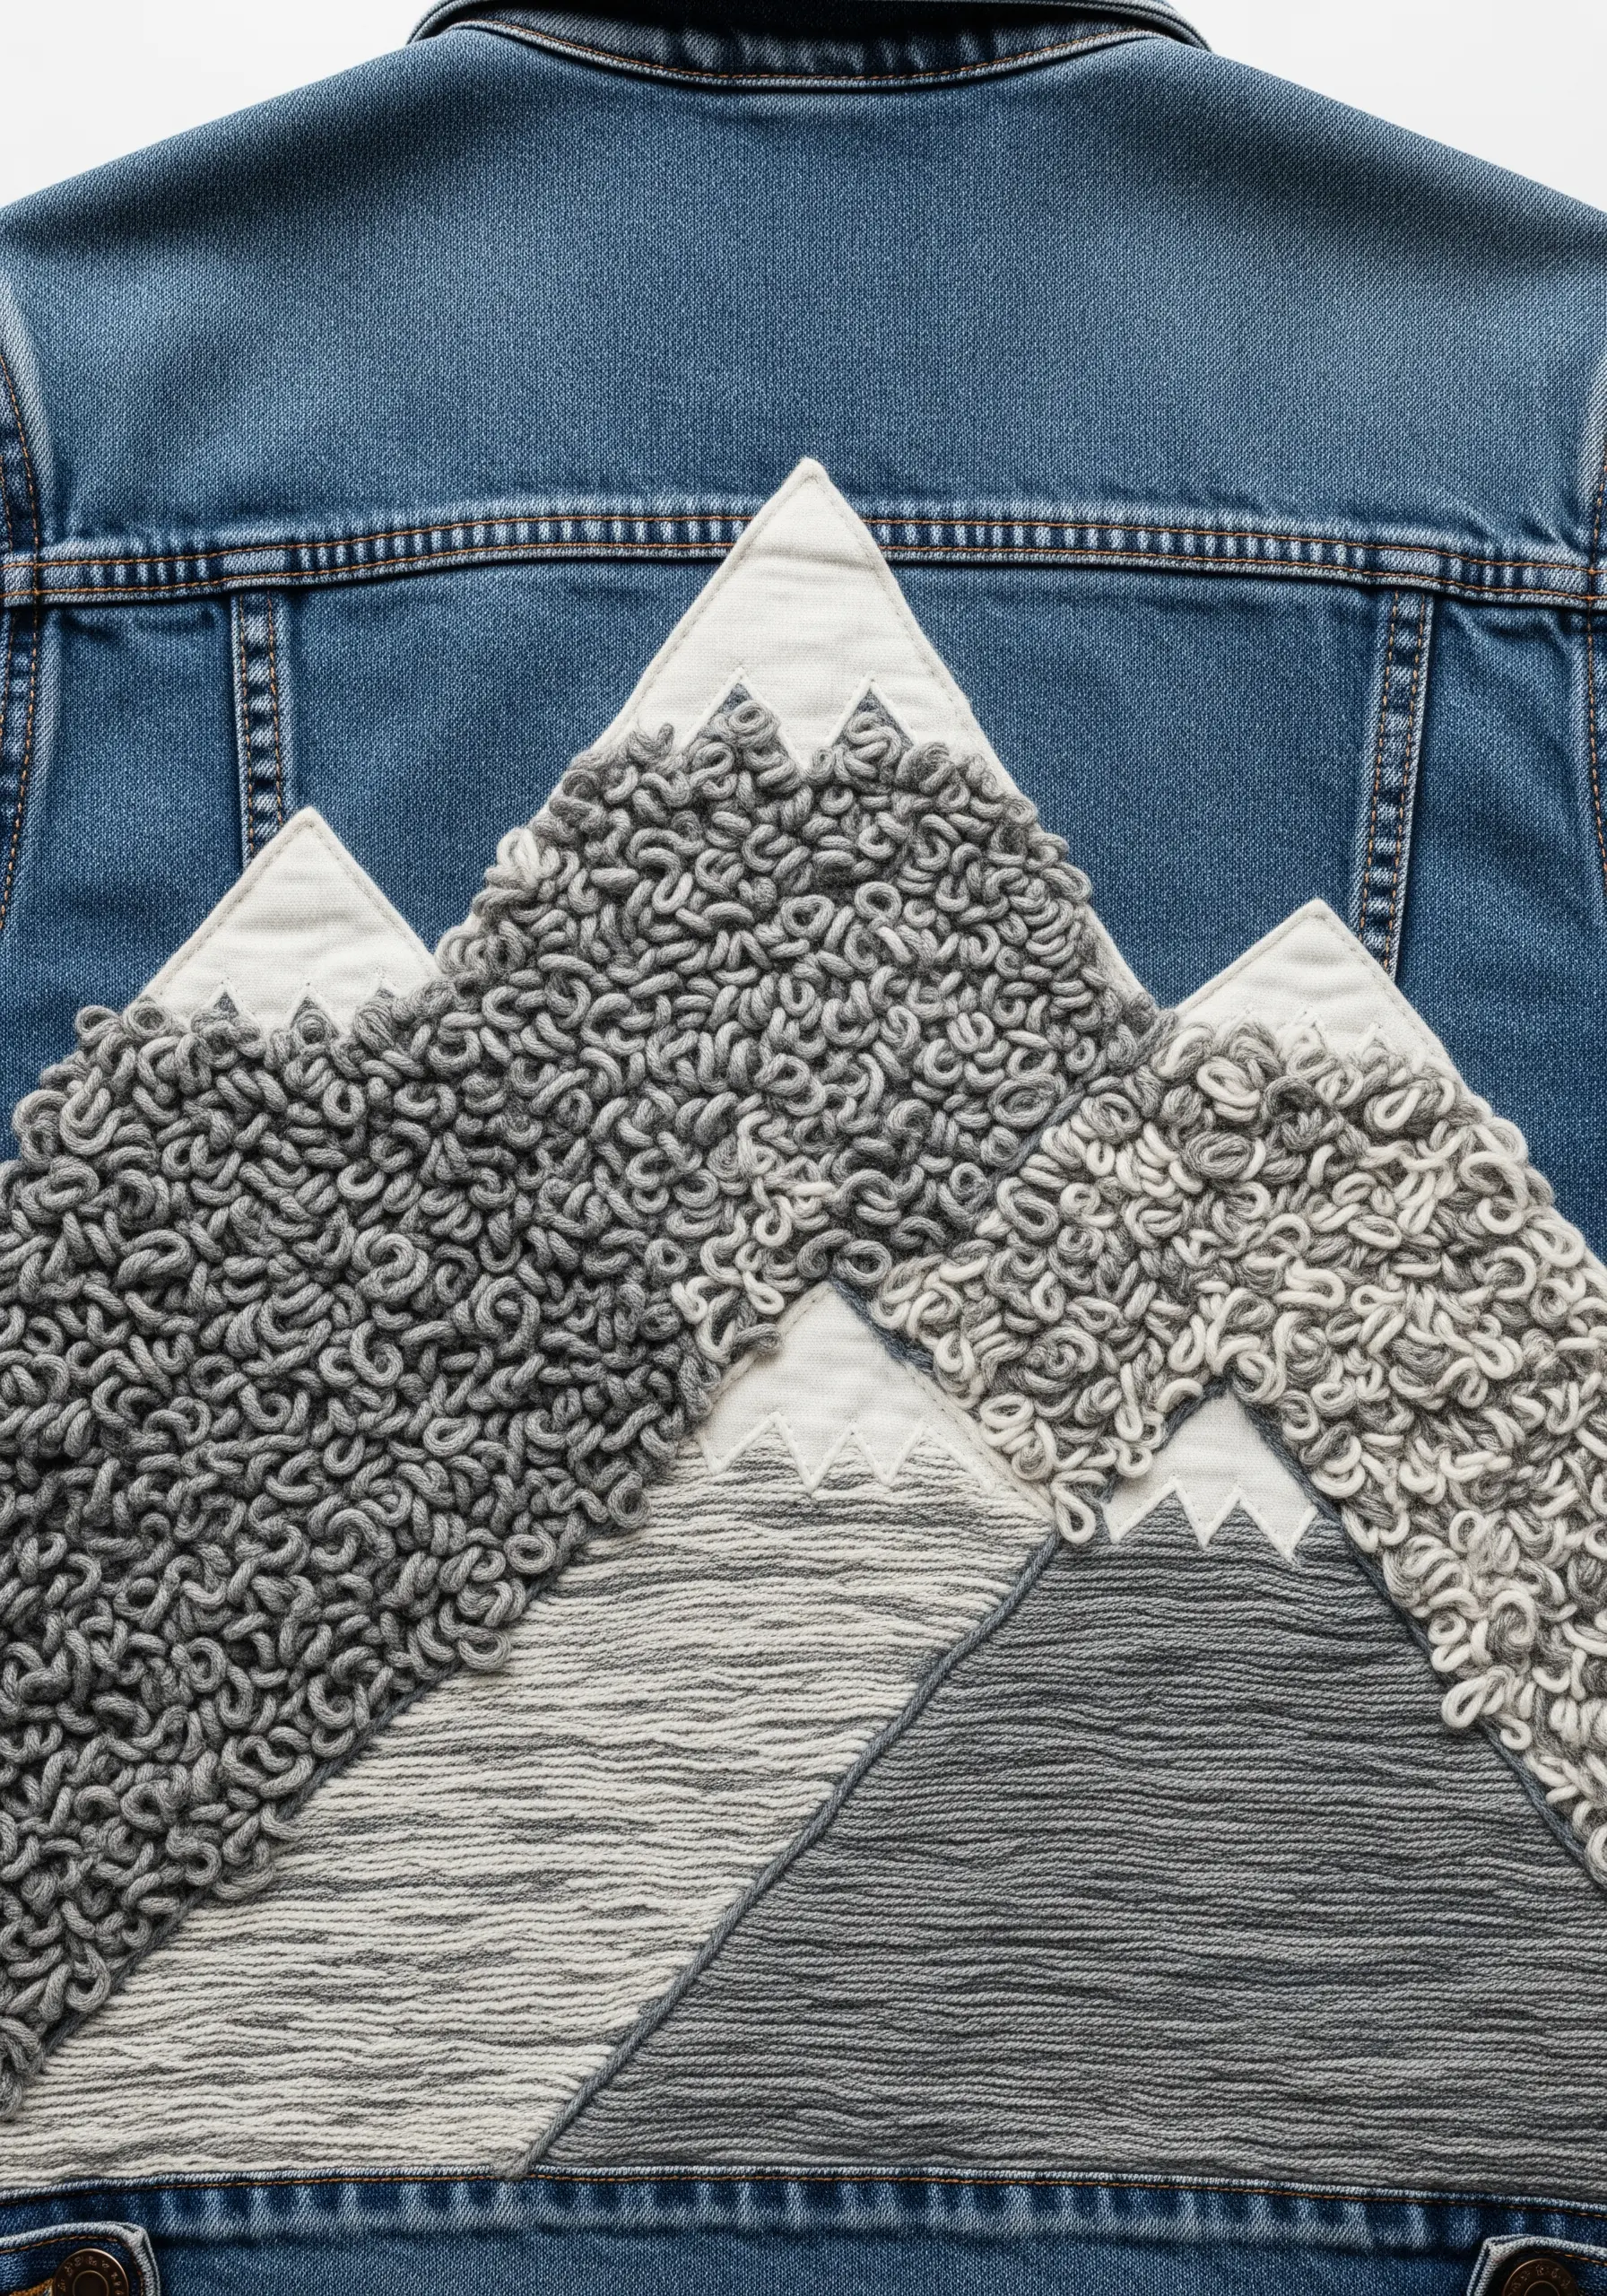
Combine fabric appliqué with dense, textural embroidery for a bold statement on apparel.
First, cut your base shapes—like mountains—from fabrics like felt or canvas and secure them to the garment with a simple running stitch.
Then, instead of traditional fills, cover the appliqué shapes with a high-pile stitch like the turkey stitch (or Ghiordes knot), trimming the loops to create a fuzzy, chenille-like surface.
For other areas, use couching with thick yarn to create a flatter, directional texture.
This mixed-media approach adds incredible depth and is far more durable on wearable items than delicate stitches, perfect for embroidery ideas inspired by national parks.
9. Beadwork Integration for Aquatic Scenes
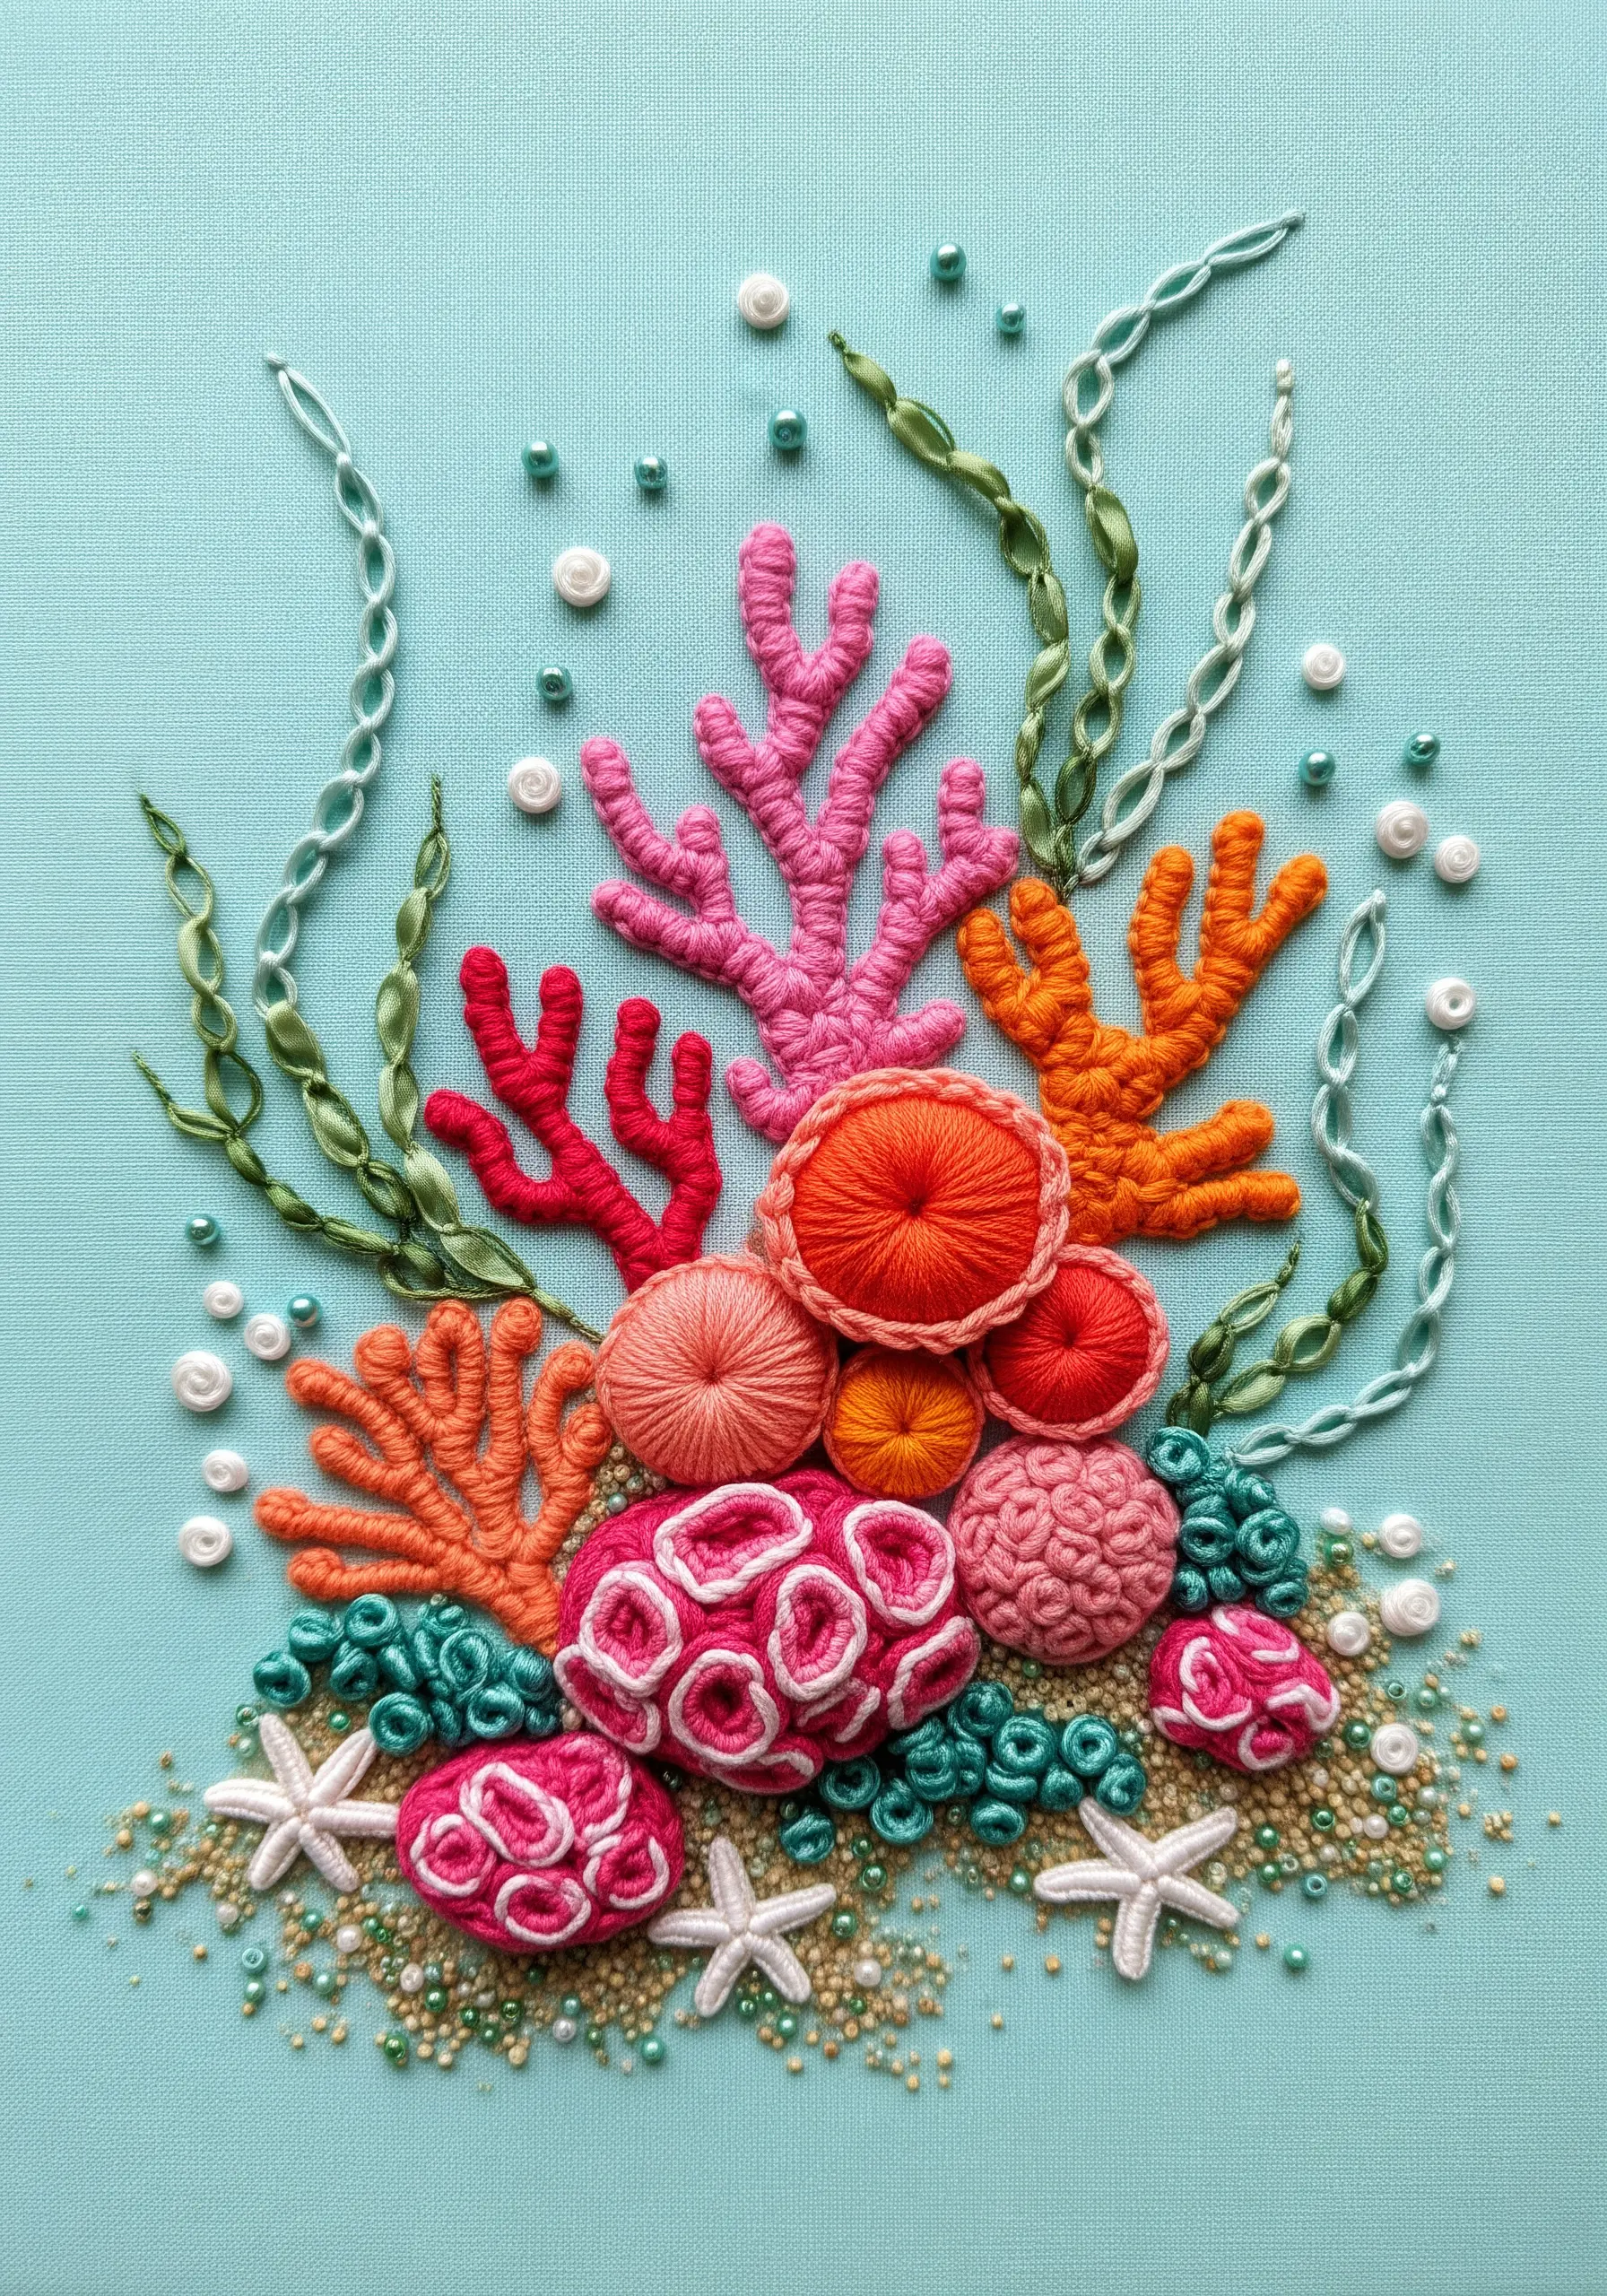
Evoke the sandy ocean floor and shimmering water by incorporating beads directly into your embroidery.
Use tiny seed beads in sandy tones, scattering them at the base of your design and securing them with a single stitch each to create a granular texture.
For water bubbles, cluster small white or iridescent pearls and beads of varying sizes.
Contrast these hard, reflective elements with soft, dimensional stitches like padded satin stitch for coral and twisted chain stitch for seaweed.
This combination of textures makes ocean-inspired hoop embroidery ideas feel immersive and alive.
10. Felt and Ribbon Weaving for Graphic Contrast
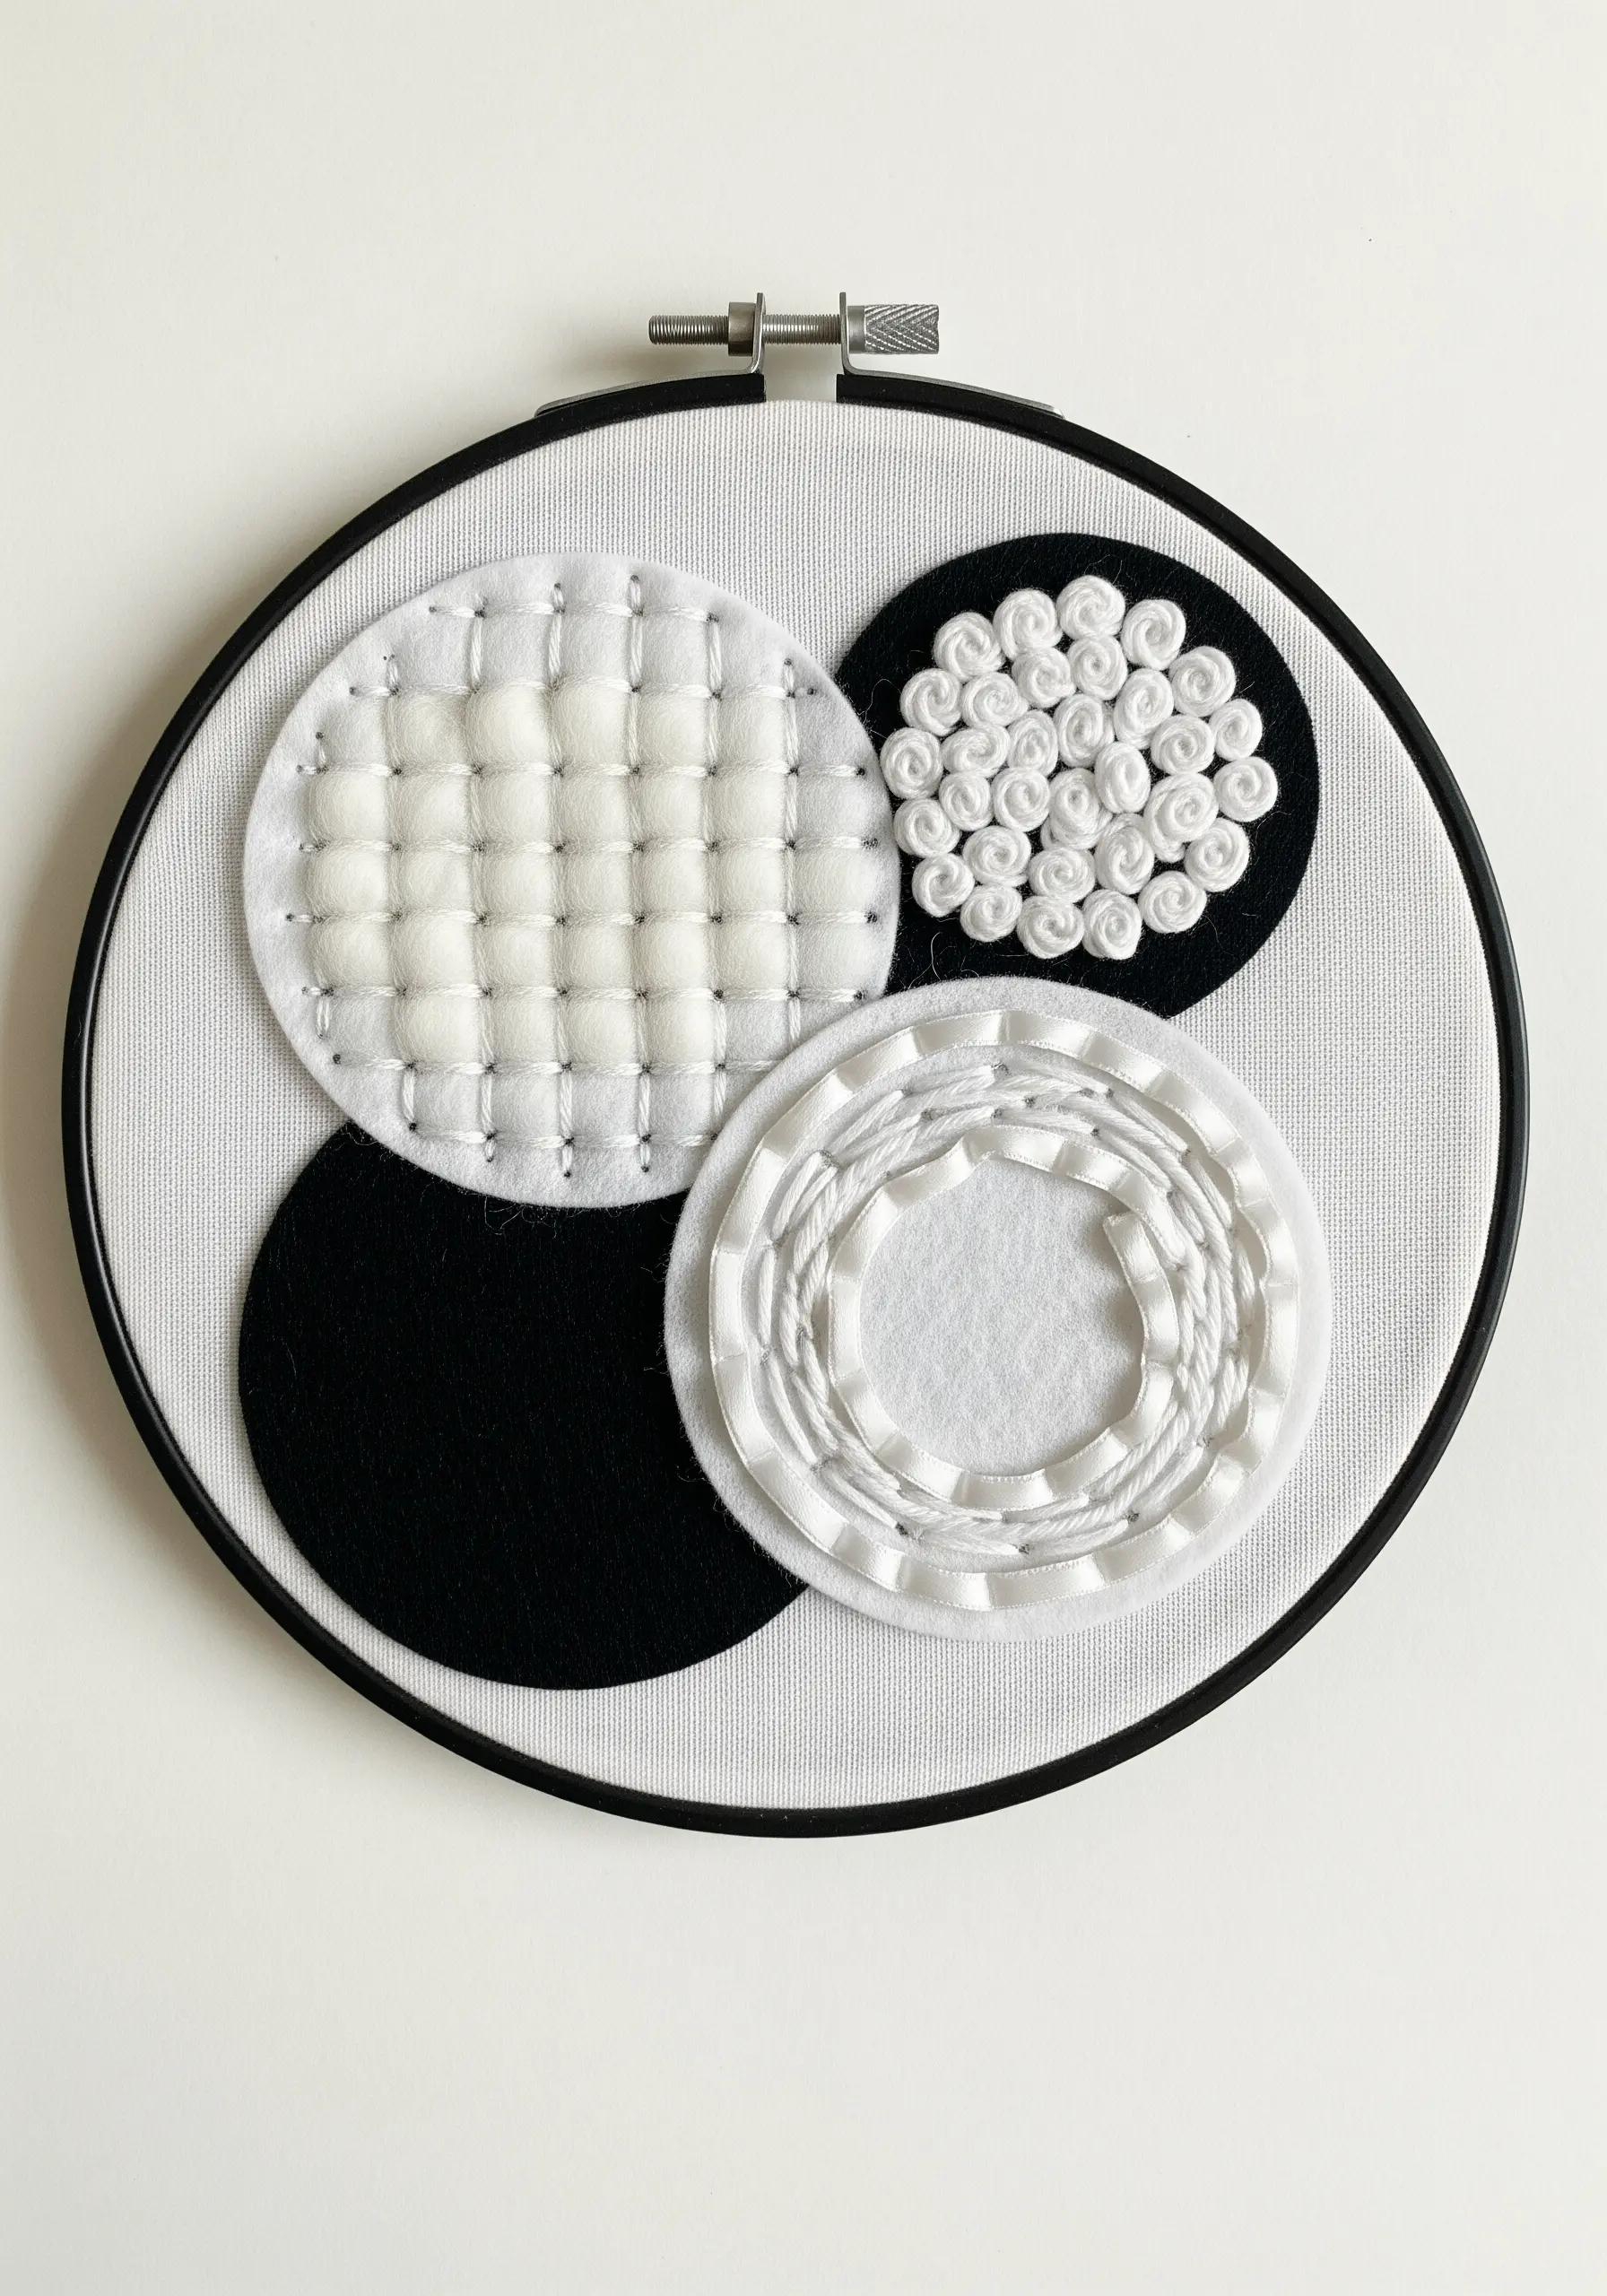
Explore texture within a minimalist palette by combining felt appliqué with woven and dimensional elements.
Cut circles from felt and use them as distinct zones for different techniques.
In one, create a padded grid by stitching over thin strips of felt, producing a soft, pillowy effect.
In another, weave satin ribbon through itself to build a concentric, low-profile texture.
Use simple bullion knots or rosette chain stitches for a third area.
This approach turns your hoop into a tactile study, proving that powerful monochrome black thread designs rely on texture, not just color.
11. Un-Spun Floss for Feathery Realism
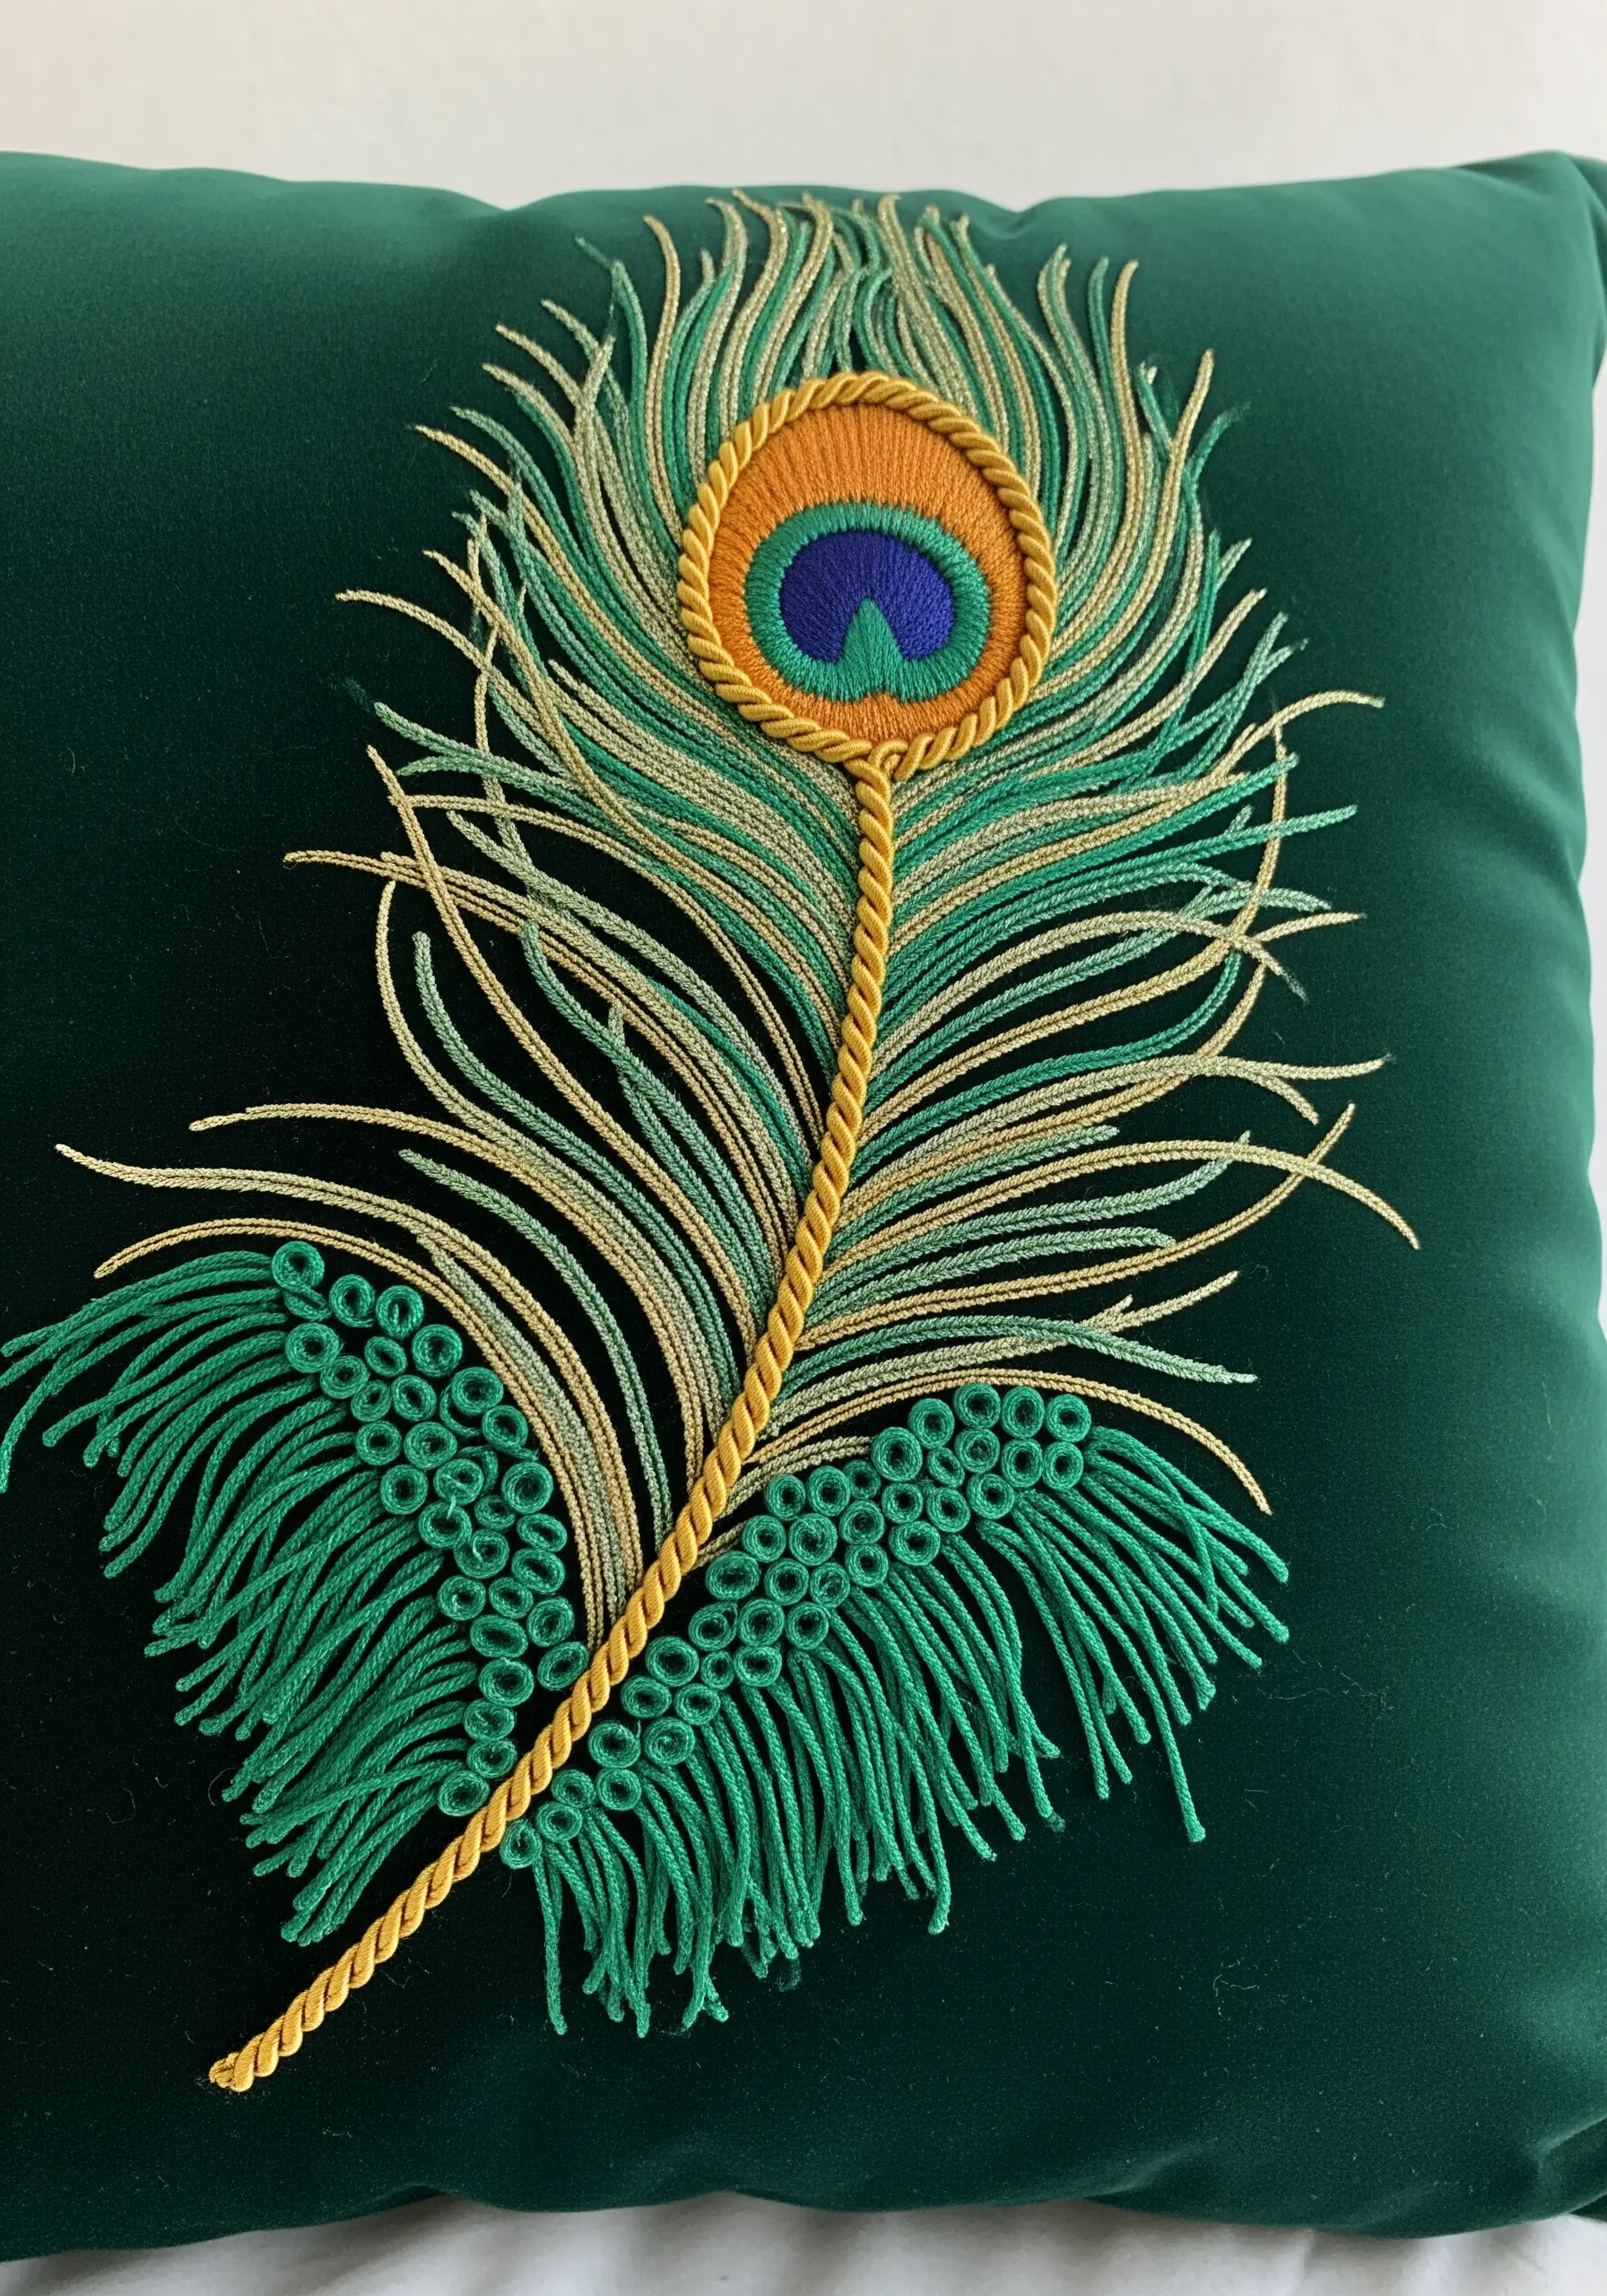
Create the delicate, airy quality of feathers by separating your embroidery floss into its individual plies.
Instead of using the full six strands, lay down single, un-twisted strands for your long straight stitches.
This allows the threads to lie flat and parallel, maximizing their sheen and creating a smooth, hair-like effect that closely mimics the barbules of a feather.
For extra definition, outline the feather’s eye with a fine gold cord using couching, and use bullion knots for the dense texture at the base.
This technique is essential for realistic feather embroidery techniques on luxurious fabrics like velvet.
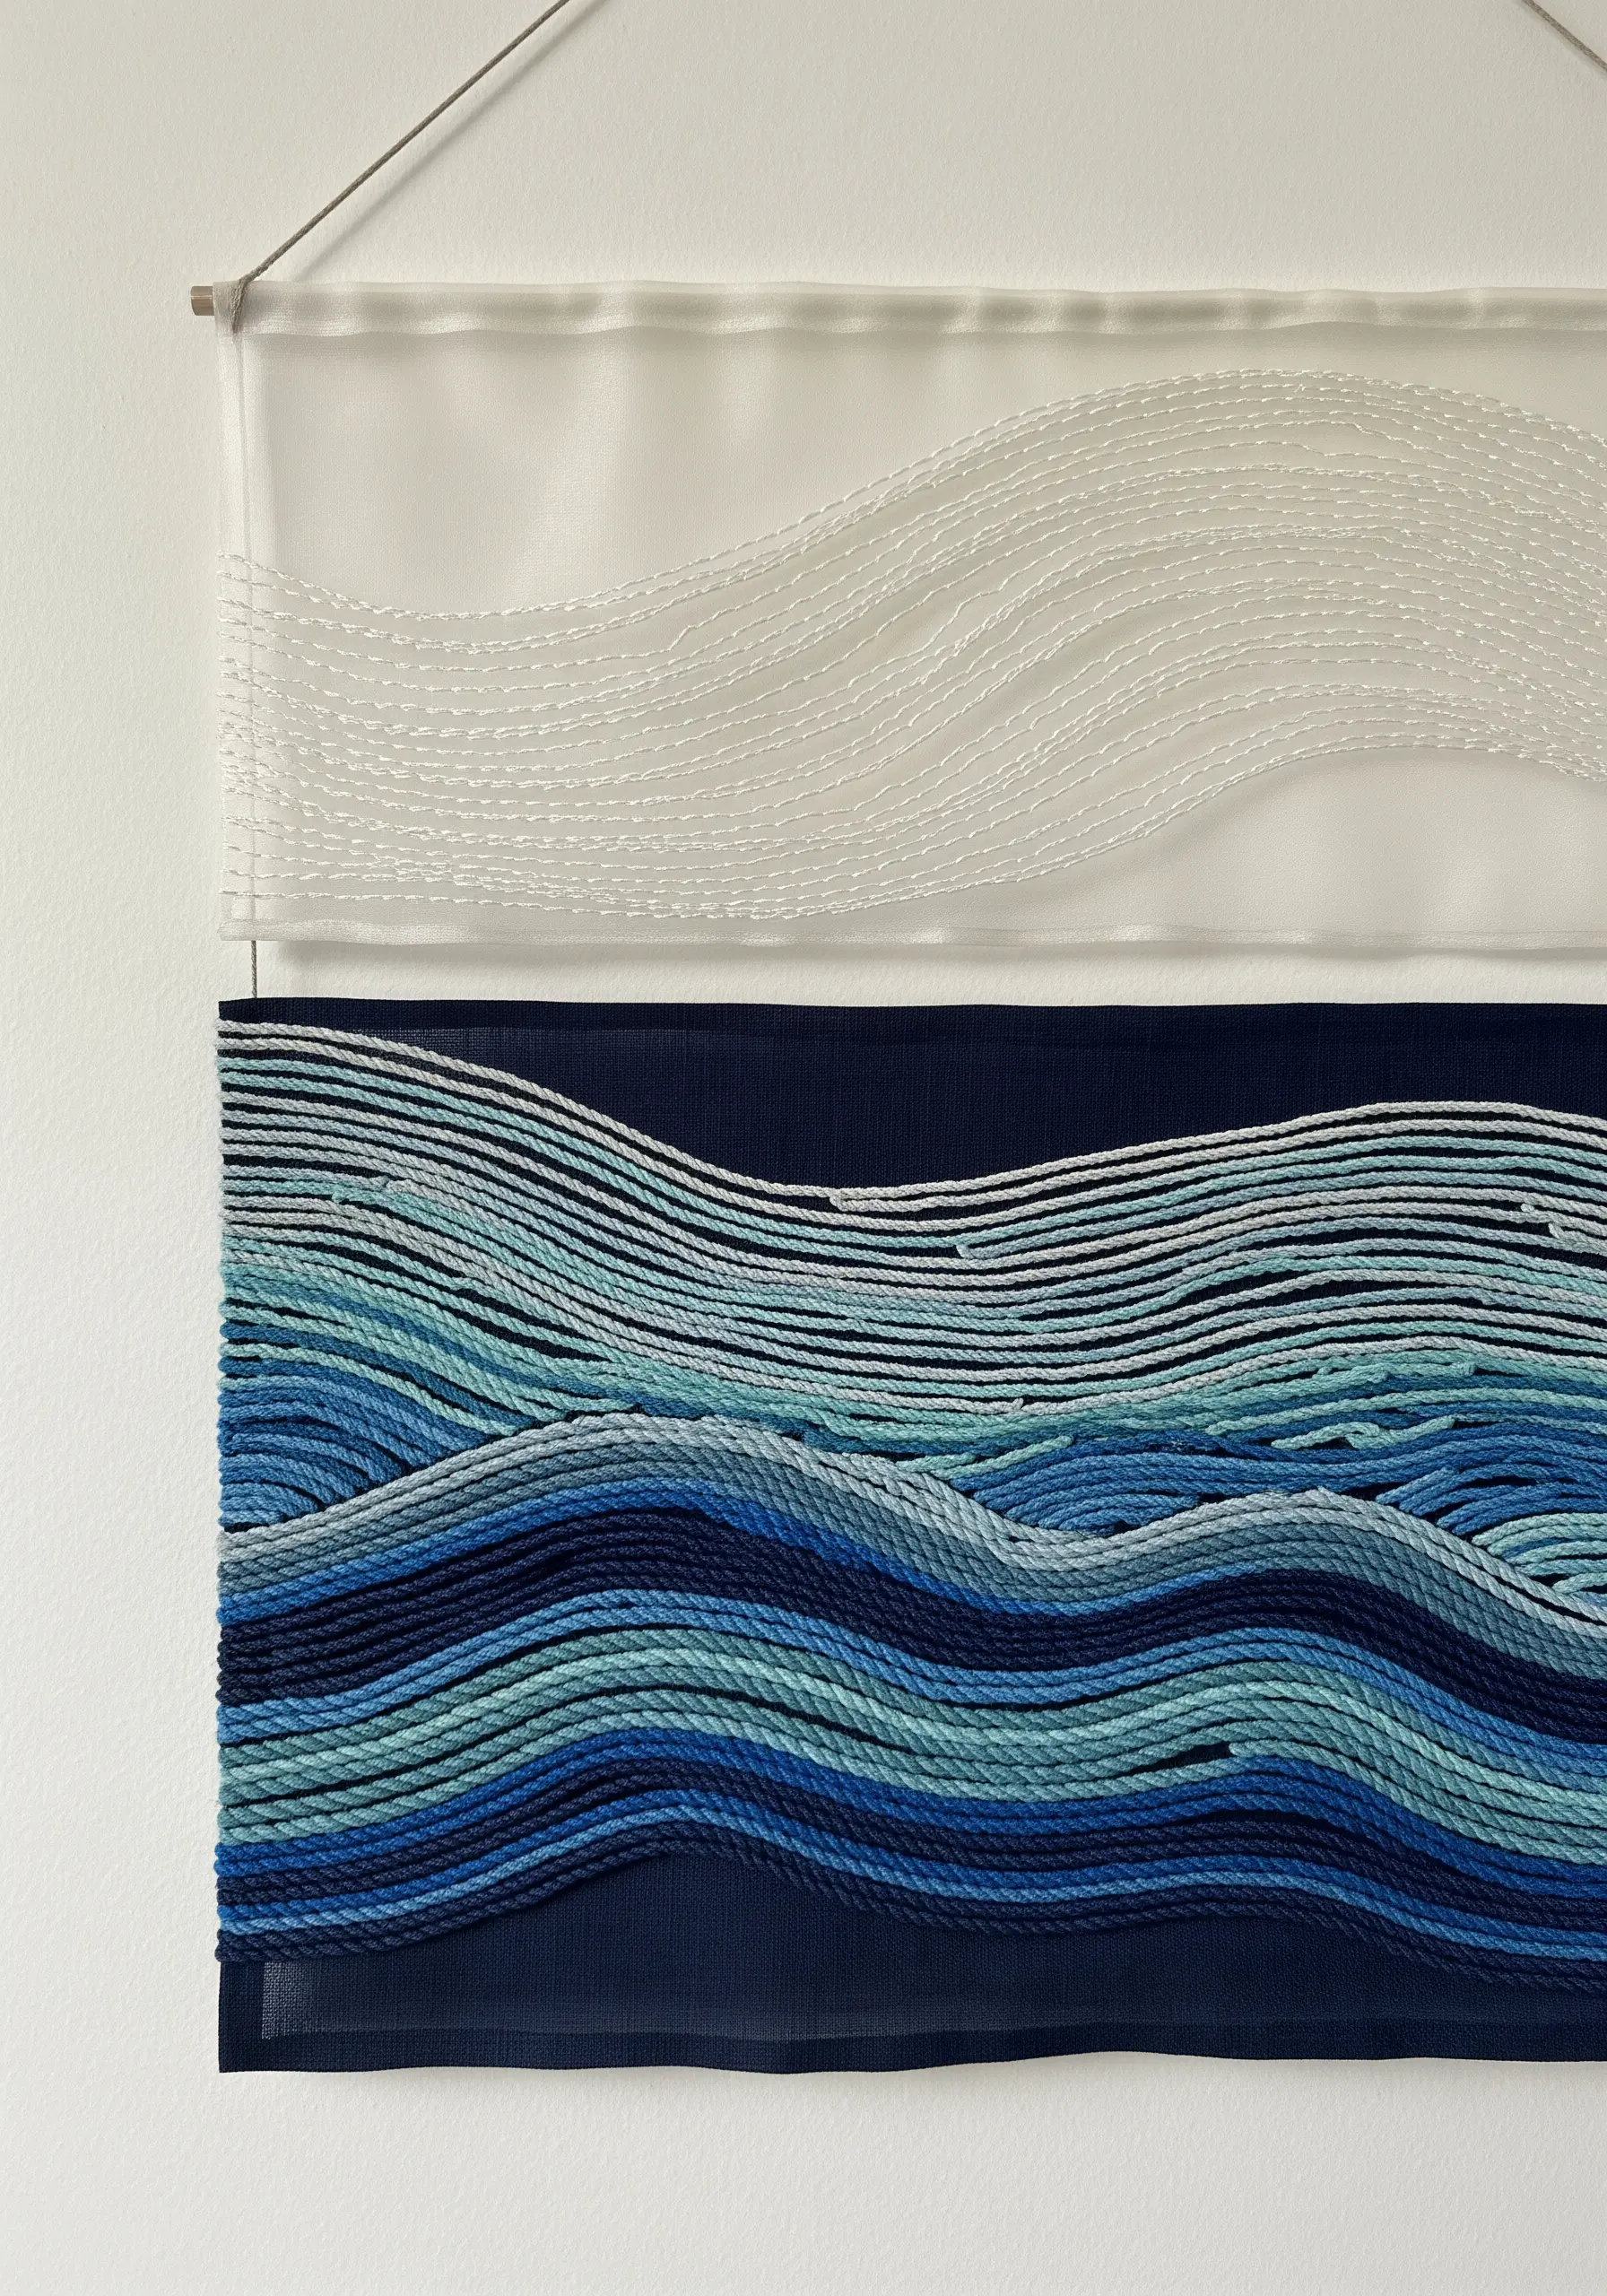
12. Layered Knots and Braids for Geological Textures
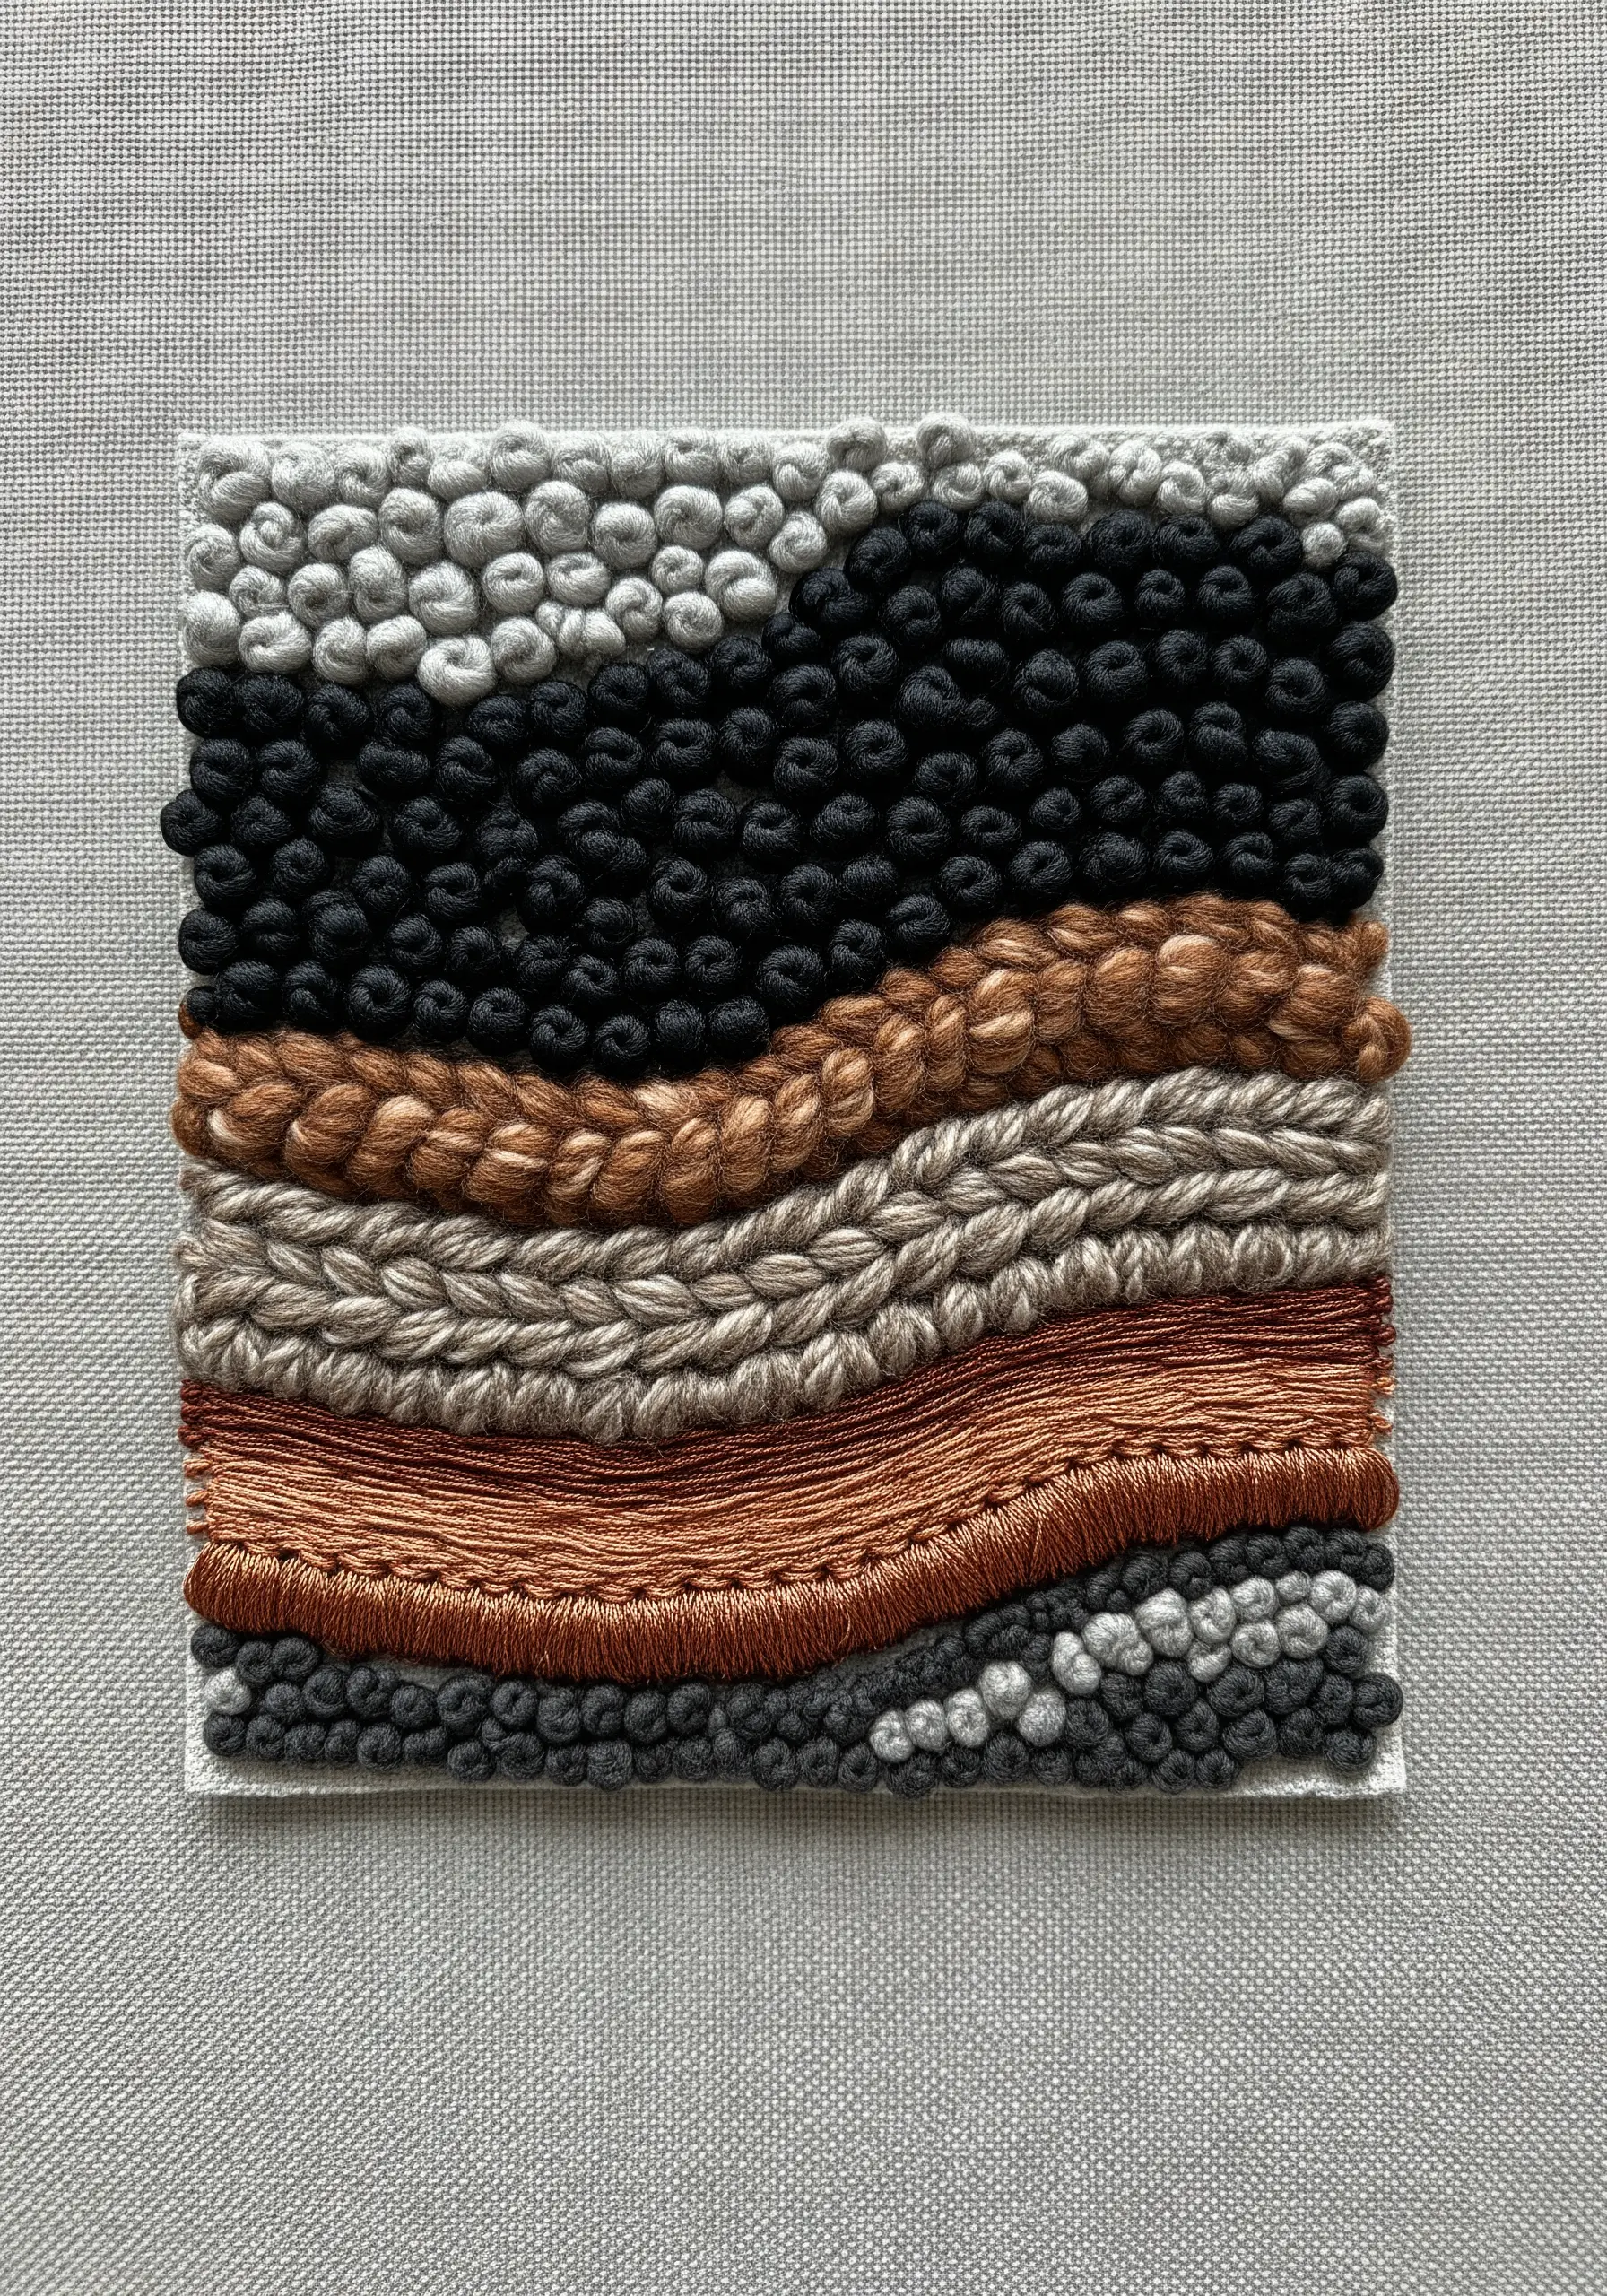
Build abstract landscapes that evoke rock strata by layering stitches with distinct textures.
Create dense bands of French or colonial knots for a pebbled, granular feel.
Contrast these with rows of chain stitch or Palestrina stitch, which create a braided, linear effect.
For a smoother layer, use a whipped backstitch or tightly packed satin stitches.
By varying the thickness of your thread (from perle cotton to wool) and the density of your stitches, you can mimic the diverse layers of earth and stone.
This is a perfect way to explore earth-tone patterns every handmade decor enthusiast needs to try in a tactile, expressive manner.
13. Geometric Weaving with Thread
Create a bold, graphic woven effect directly on your fabric without a loom.
First, lay down a grid of long, parallel straight stitches for your ‘warp’ threads.
Then, using a blunt tapestry needle and a contrasting color, weave your ‘weft’ thread over and under the warp threads to create a checkerboard or basket-weave pattern.
Frame this graphic element with a heavy outline, like a detached chain stitch border, to make it pop.
This is one of the most unexpected embroidery techniques that adds a modern, almost digital quality to your work.
14. Sheer Fabric Layering for Atmospheric Depth
Create a sense of distance and atmosphere by stitching on and through layers of sheer fabric like organza or tulle.
Embroider your background elements on a solid base fabric.
Then, stretch a layer of sheer fabric over the top and add foreground elements to this new surface.
The transparency of the top layer visually pushes the background back, creating an ethereal, misty effect.
Use fine, delicate threads on the sheer layer to maintain its lightness.
This technique is perfect for capturing movement, like in these abstract thread waves & swirls, or depicting fog in a landscape.
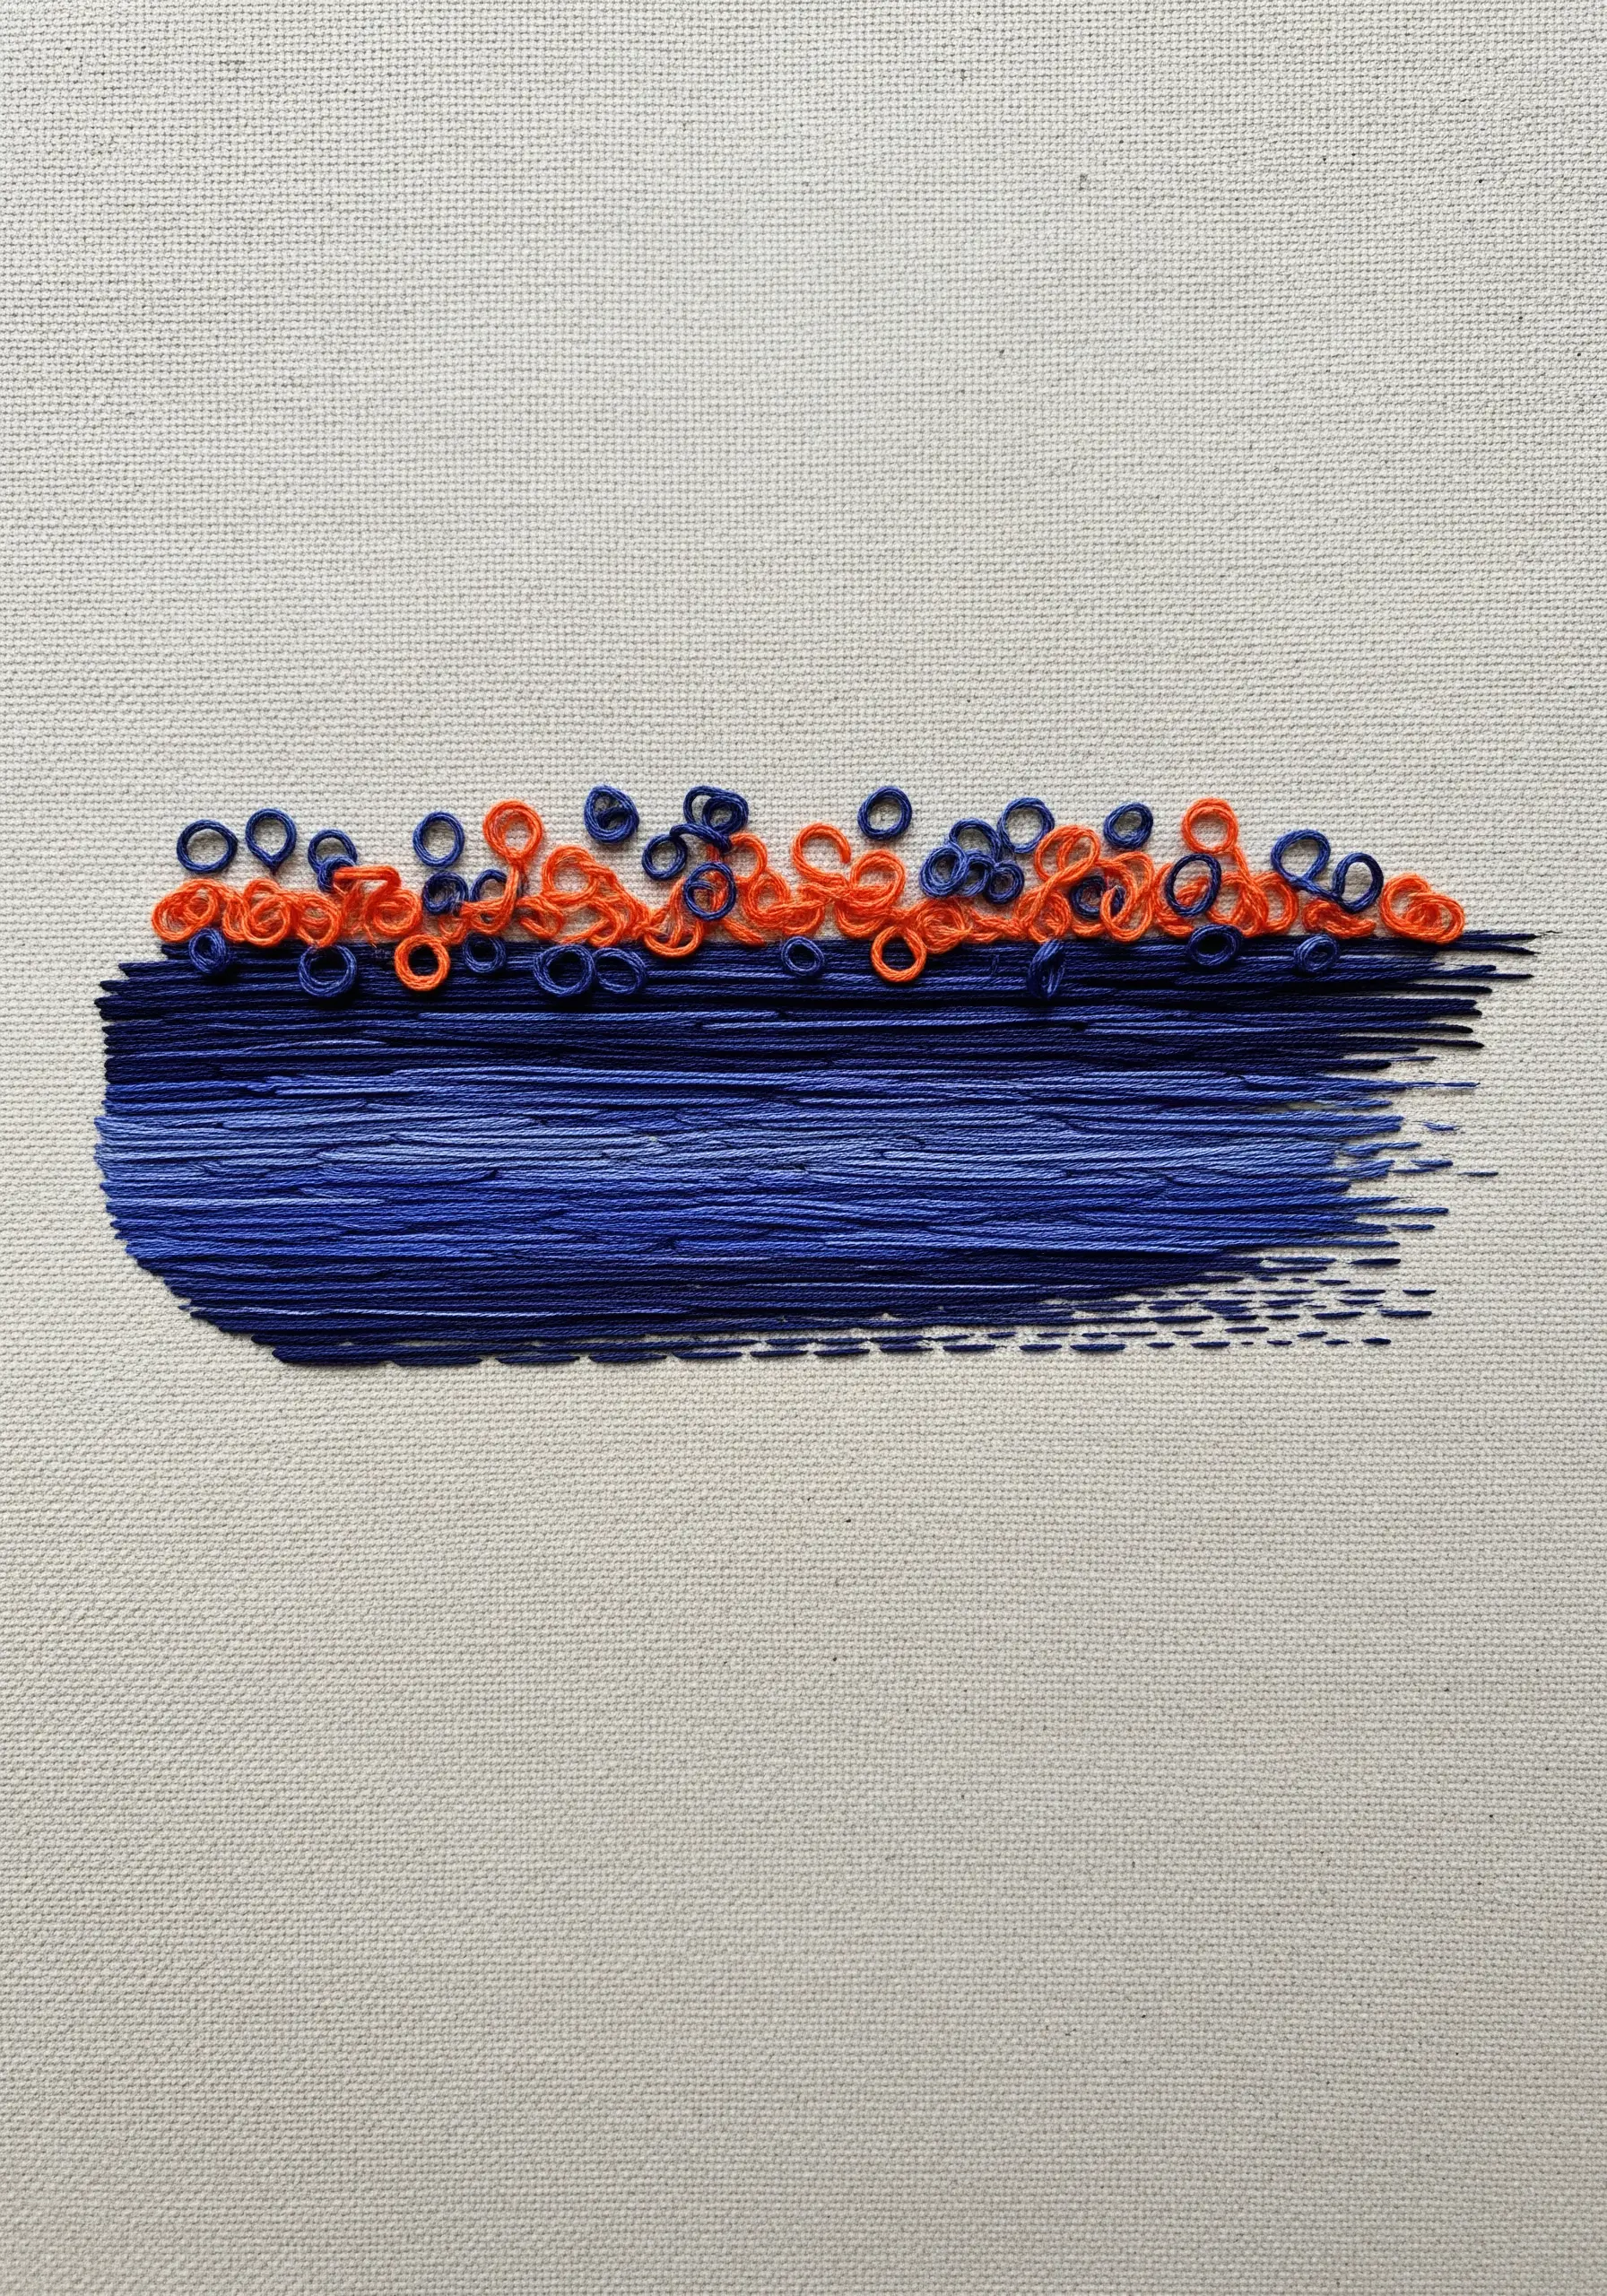
15. French Knots as Pointillist Light Sources
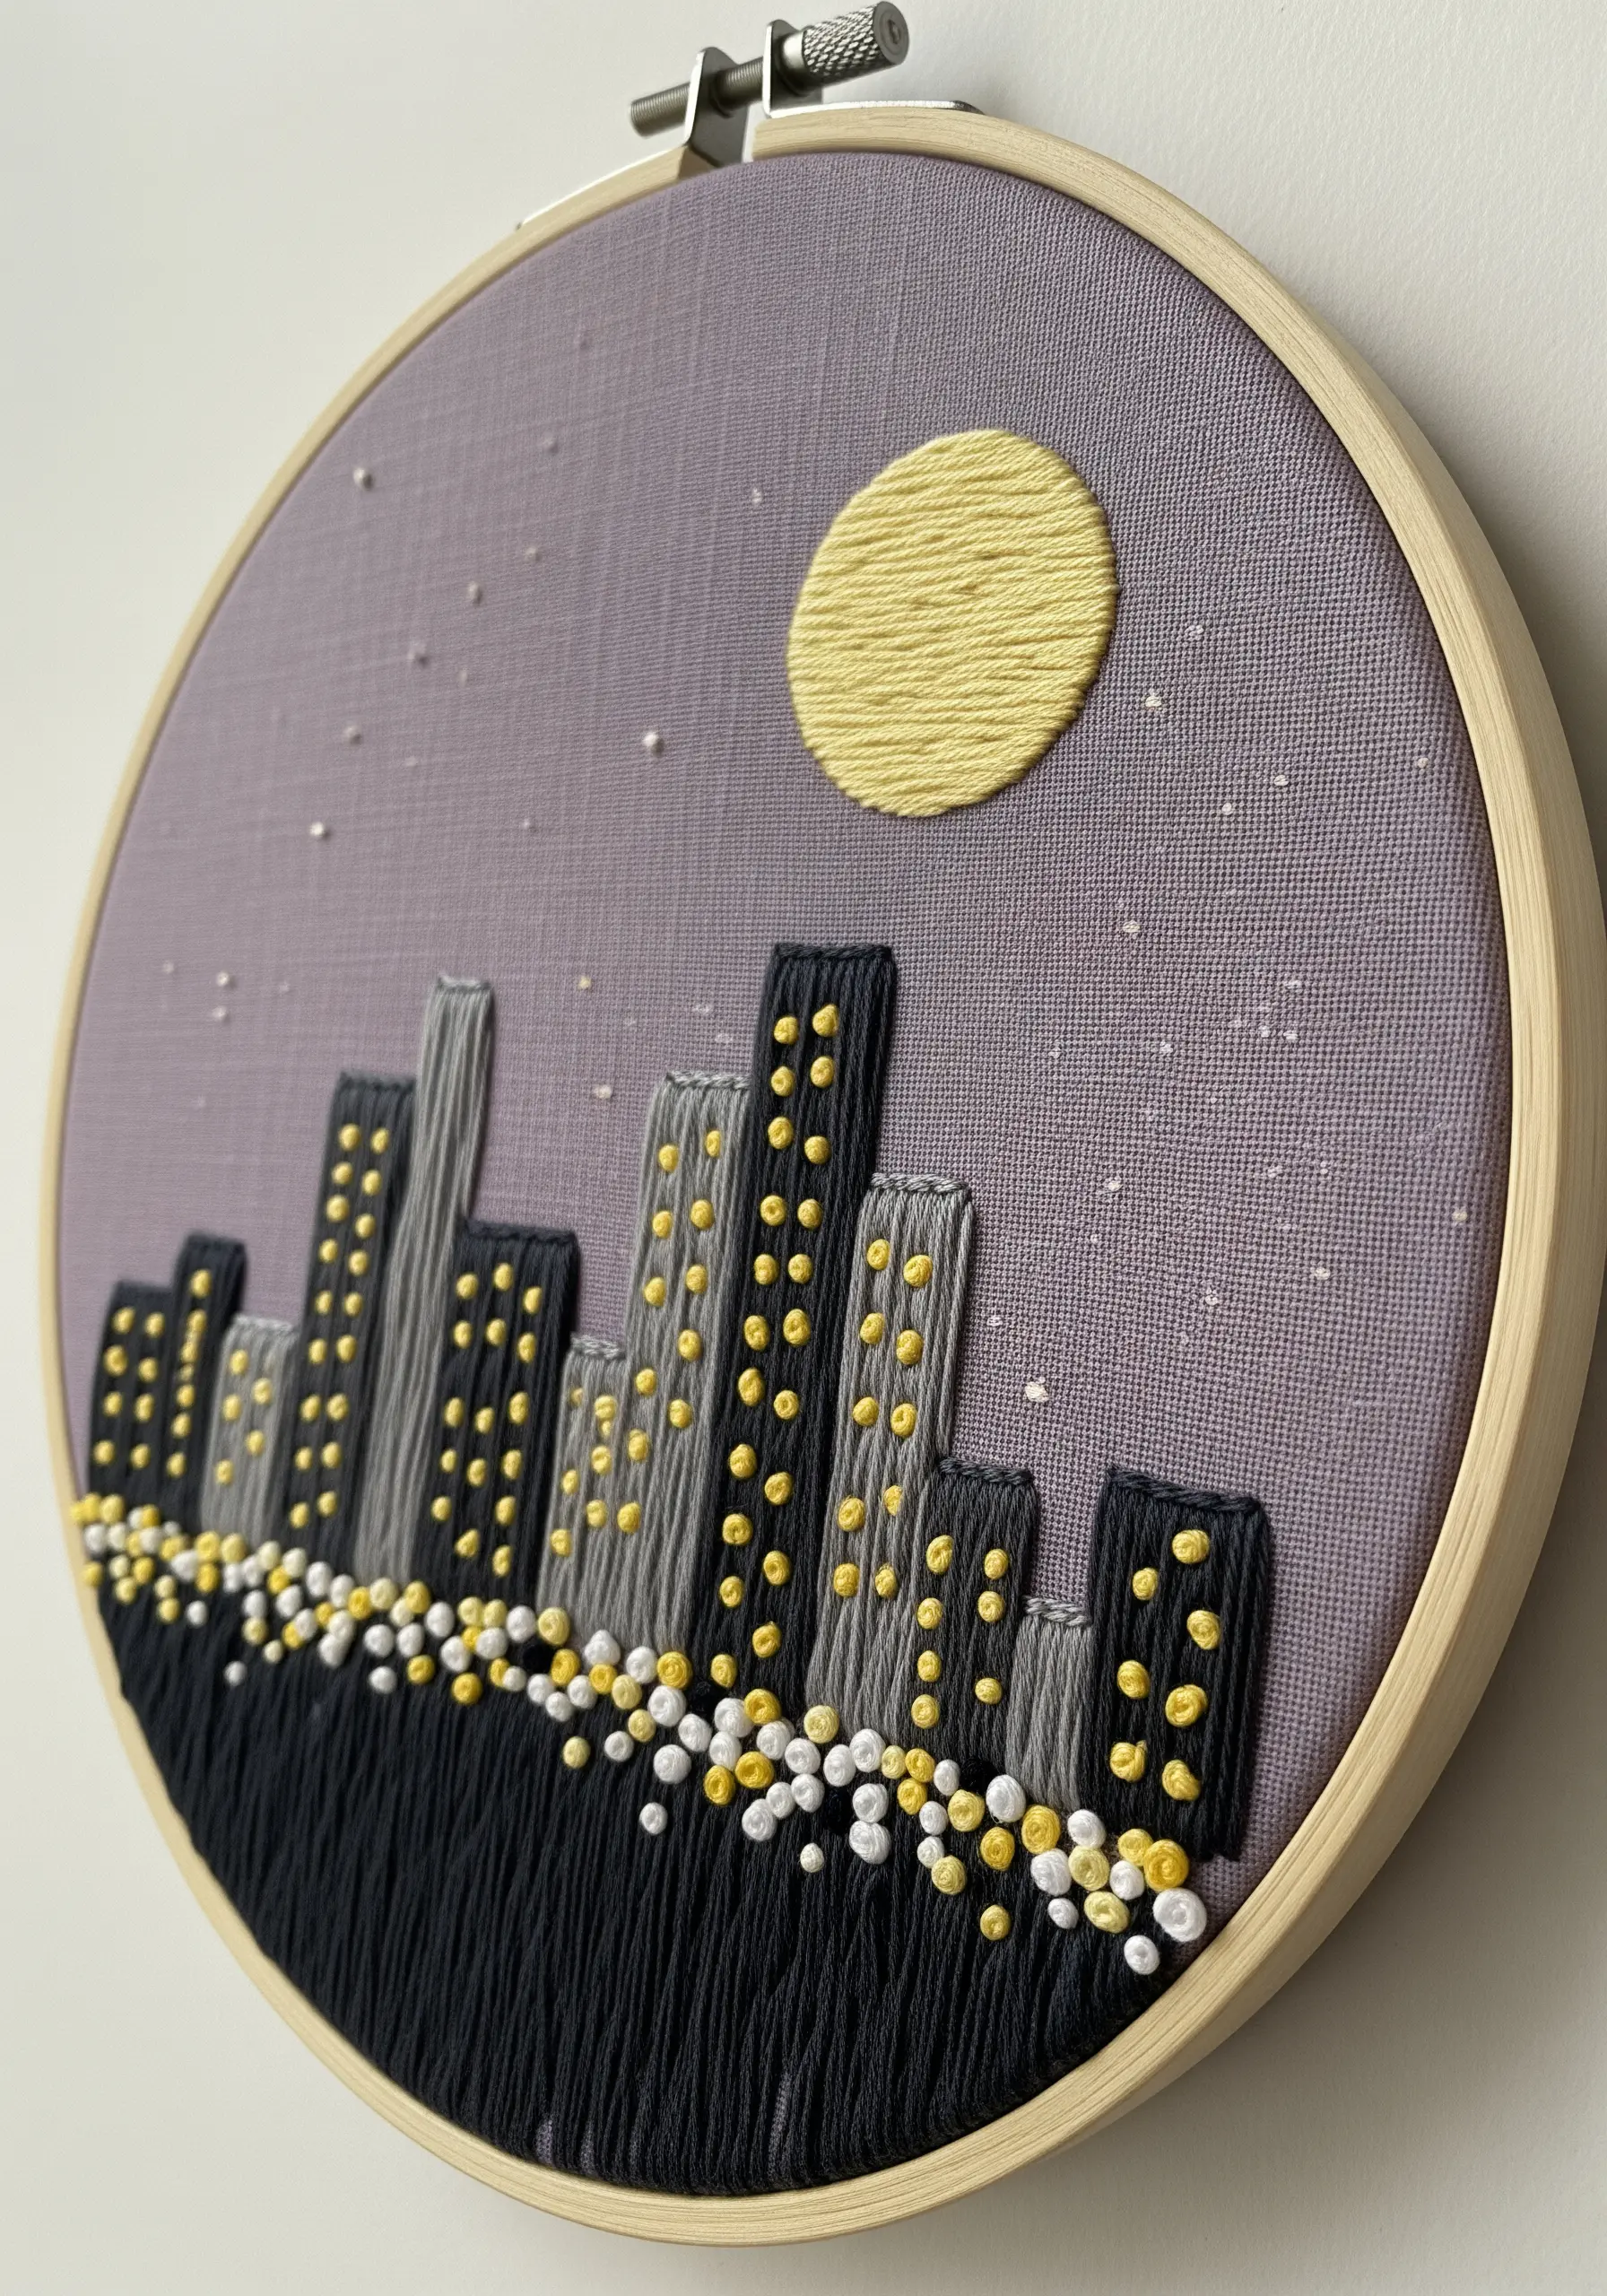
Instead of simply filling an area, use French knots to represent points of light in a cityscape or starry sky.
Vary the size of your knots by changing the number of times you wrap the thread around the needle (once for small, distant lights; two or three times for brighter, closer ones).
Use a mix of yellow, white, and even pale gold metallic threads to create a realistic, shimmering glow.
Placing them densely at the base and scattering them upwards creates the illusion of street-level activity and reflections, turning simple embroidery on canvas wall pieces into glowing night scenes.
16. Directional Satin Stitch for Botanical Form

Define the shape and veins of a leaf not with outlines, but with the direction of your satin stitches.
Divide the leaf into small, manageable sections along its natural veins.
Fill each section with satin stitches, angling them to follow the leaf’s growth pattern—pointing from the central stem outwards towards the edge.
Using several shades of green and blending them with a long-and-short stitch technique within these sections will add photorealistic depth.
This meticulous approach transforms a flat shape into a dynamic, sculptural object, ideal for delicate leaf embroidery stitches.
17. Ornate Embellishment with Ribbon and Sequins
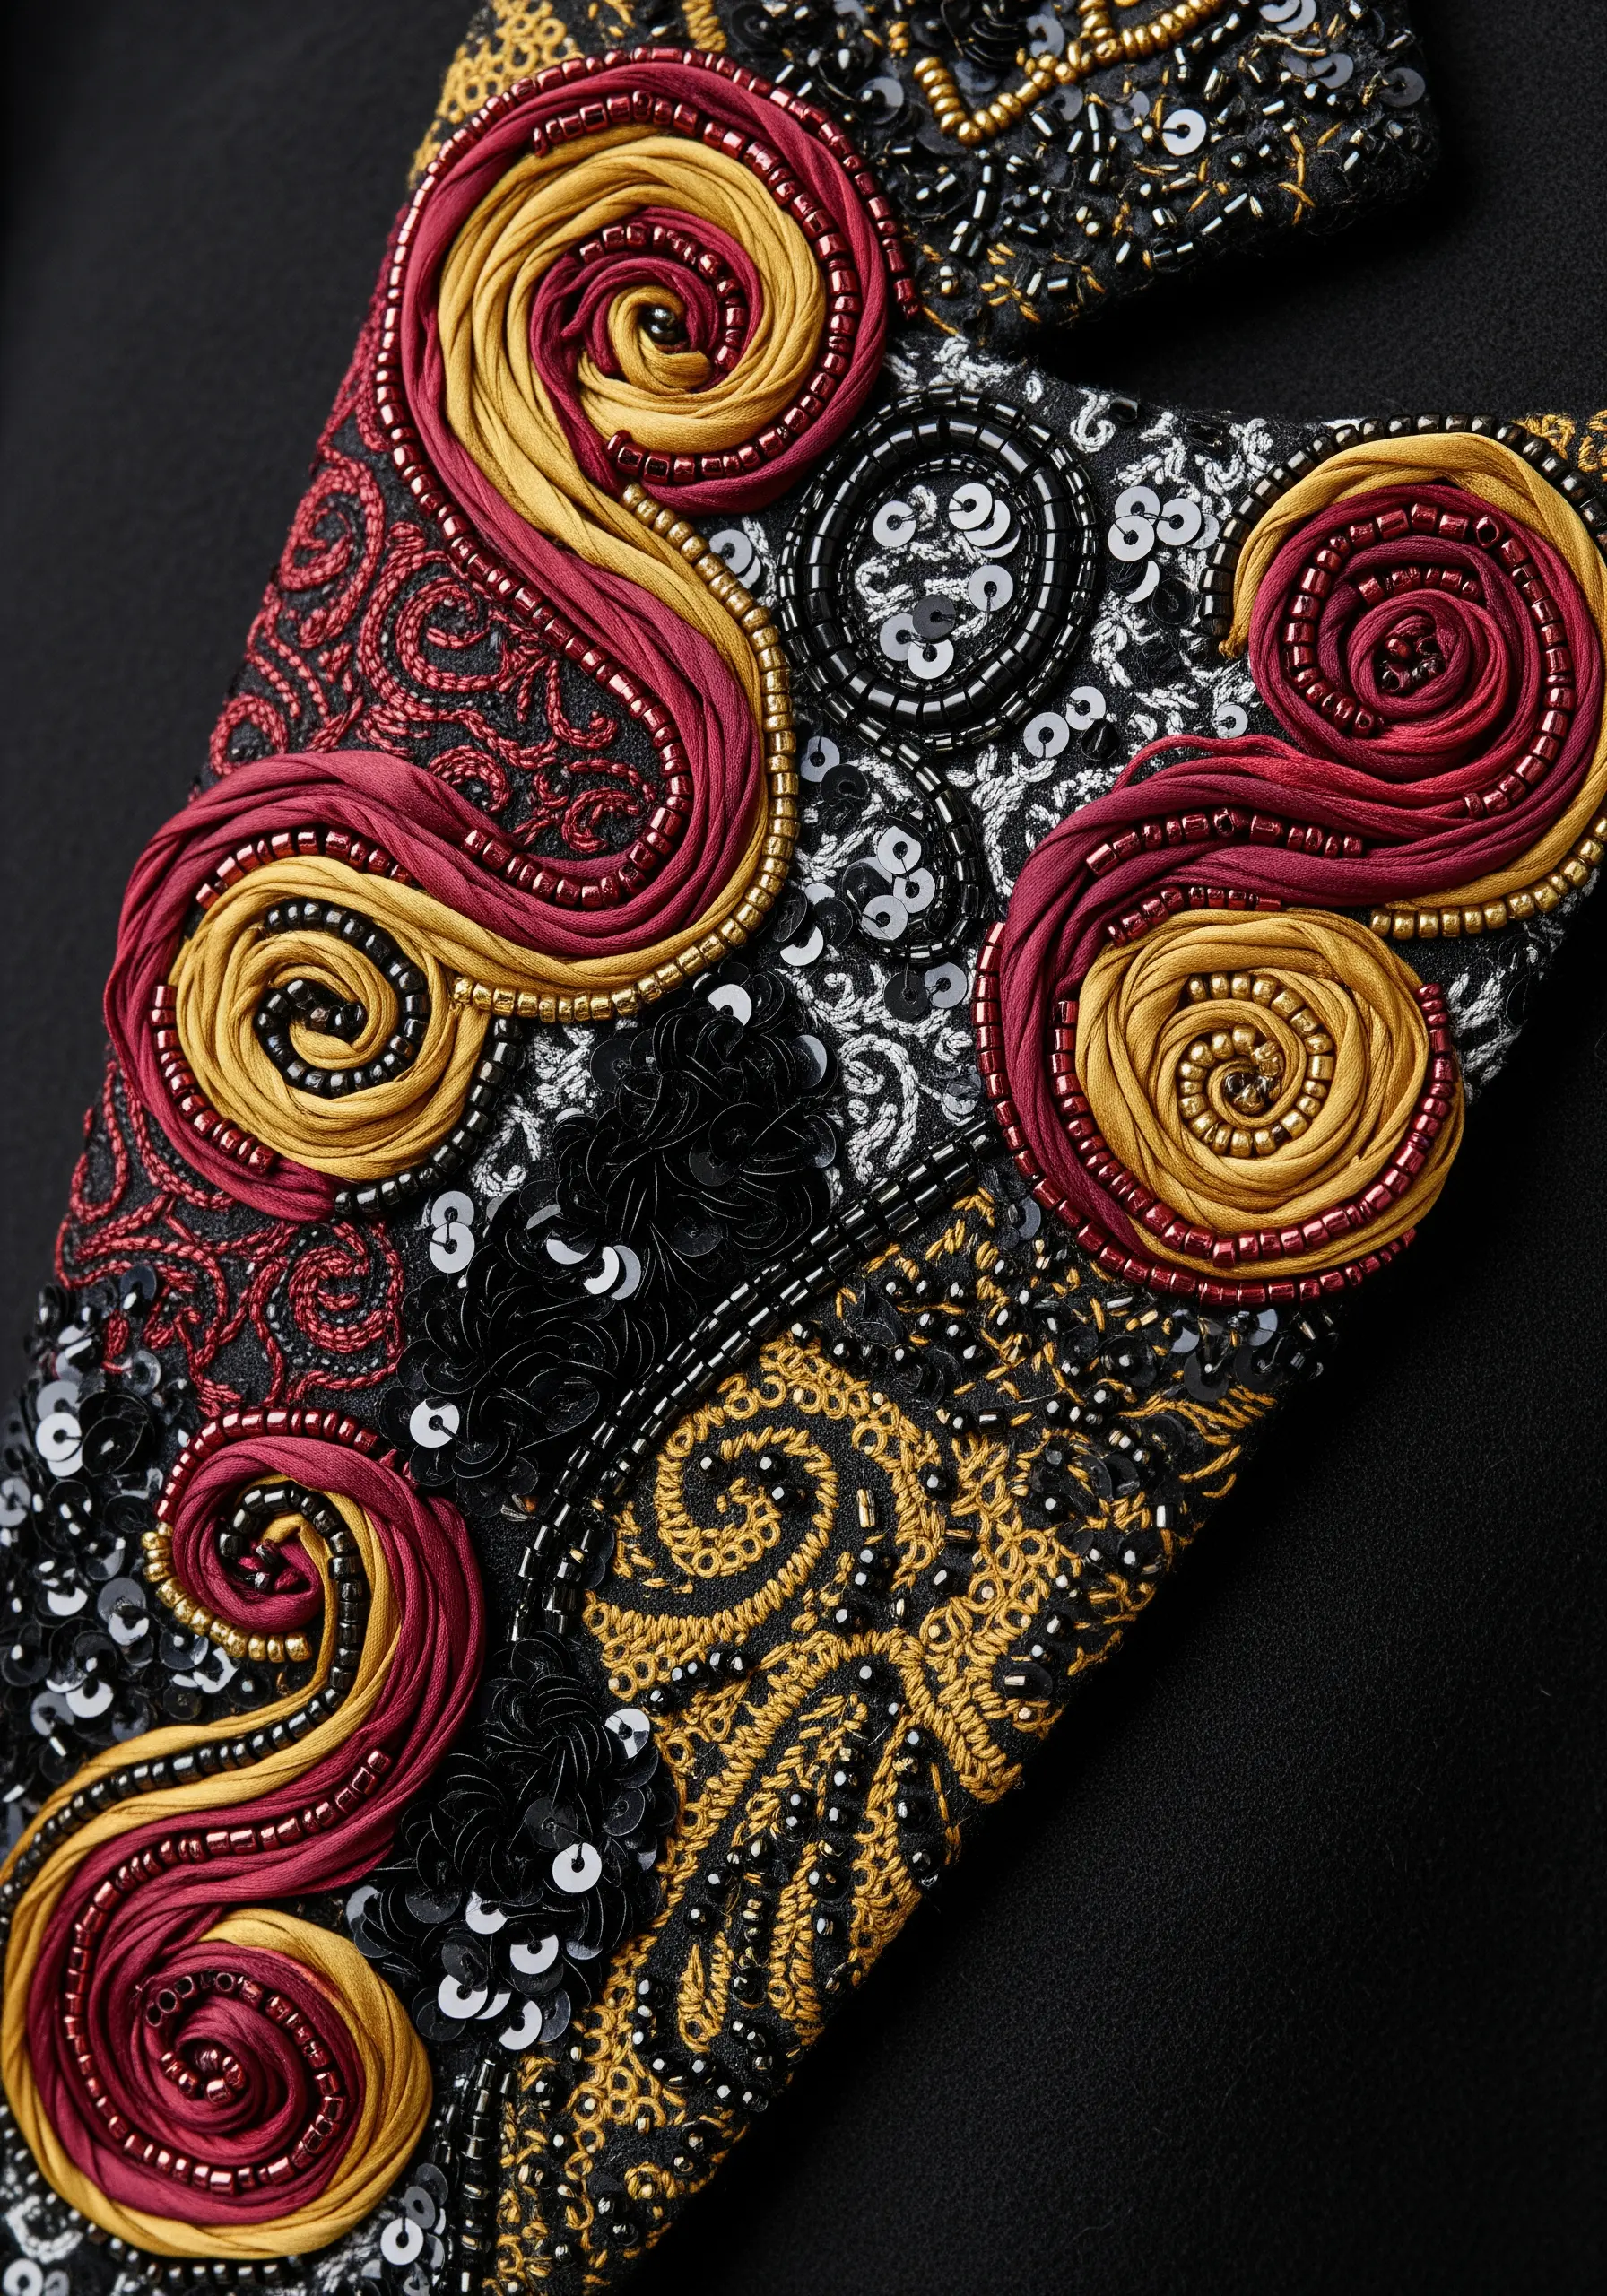
Create opulent, maximalist textures by combining multiple embellishment techniques.
Use silk ribbon to create dimensional rosettes, securing them with a central bead.
Fill surrounding areas with intricate seed stitch patterns or fine blackwork.
Add a layer of sparkle by attaching sequins—not flat, but on their edge with a seed bead to hold them in place, creating a shimmering, scale-like surface.
Outline key shapes with couched cords or rows of beads to define the composition.
These mixed-media contemporary embroidery designs transform fabric into a rich, wearable tapestry.
18. In-Hoop Weaving for a Rustic, Layered Look
Turn your embroidery hoop into a miniature loom to create woven, tapestry-style sections within your piece.
Create your warp by stretching vertical threads across a section of the hoop.
Then, use a tapestry needle to weave thick yarns, wool roving, or even fabric strips horizontally through the warp.
You can vary the weaving techniques—from a simple tabby weave to soumak knots for a braided effect—to add textural variety.
Leaving fringed tassels at the bottom adds a classic handmade touch to these modern mixed-fiber wall hangings.
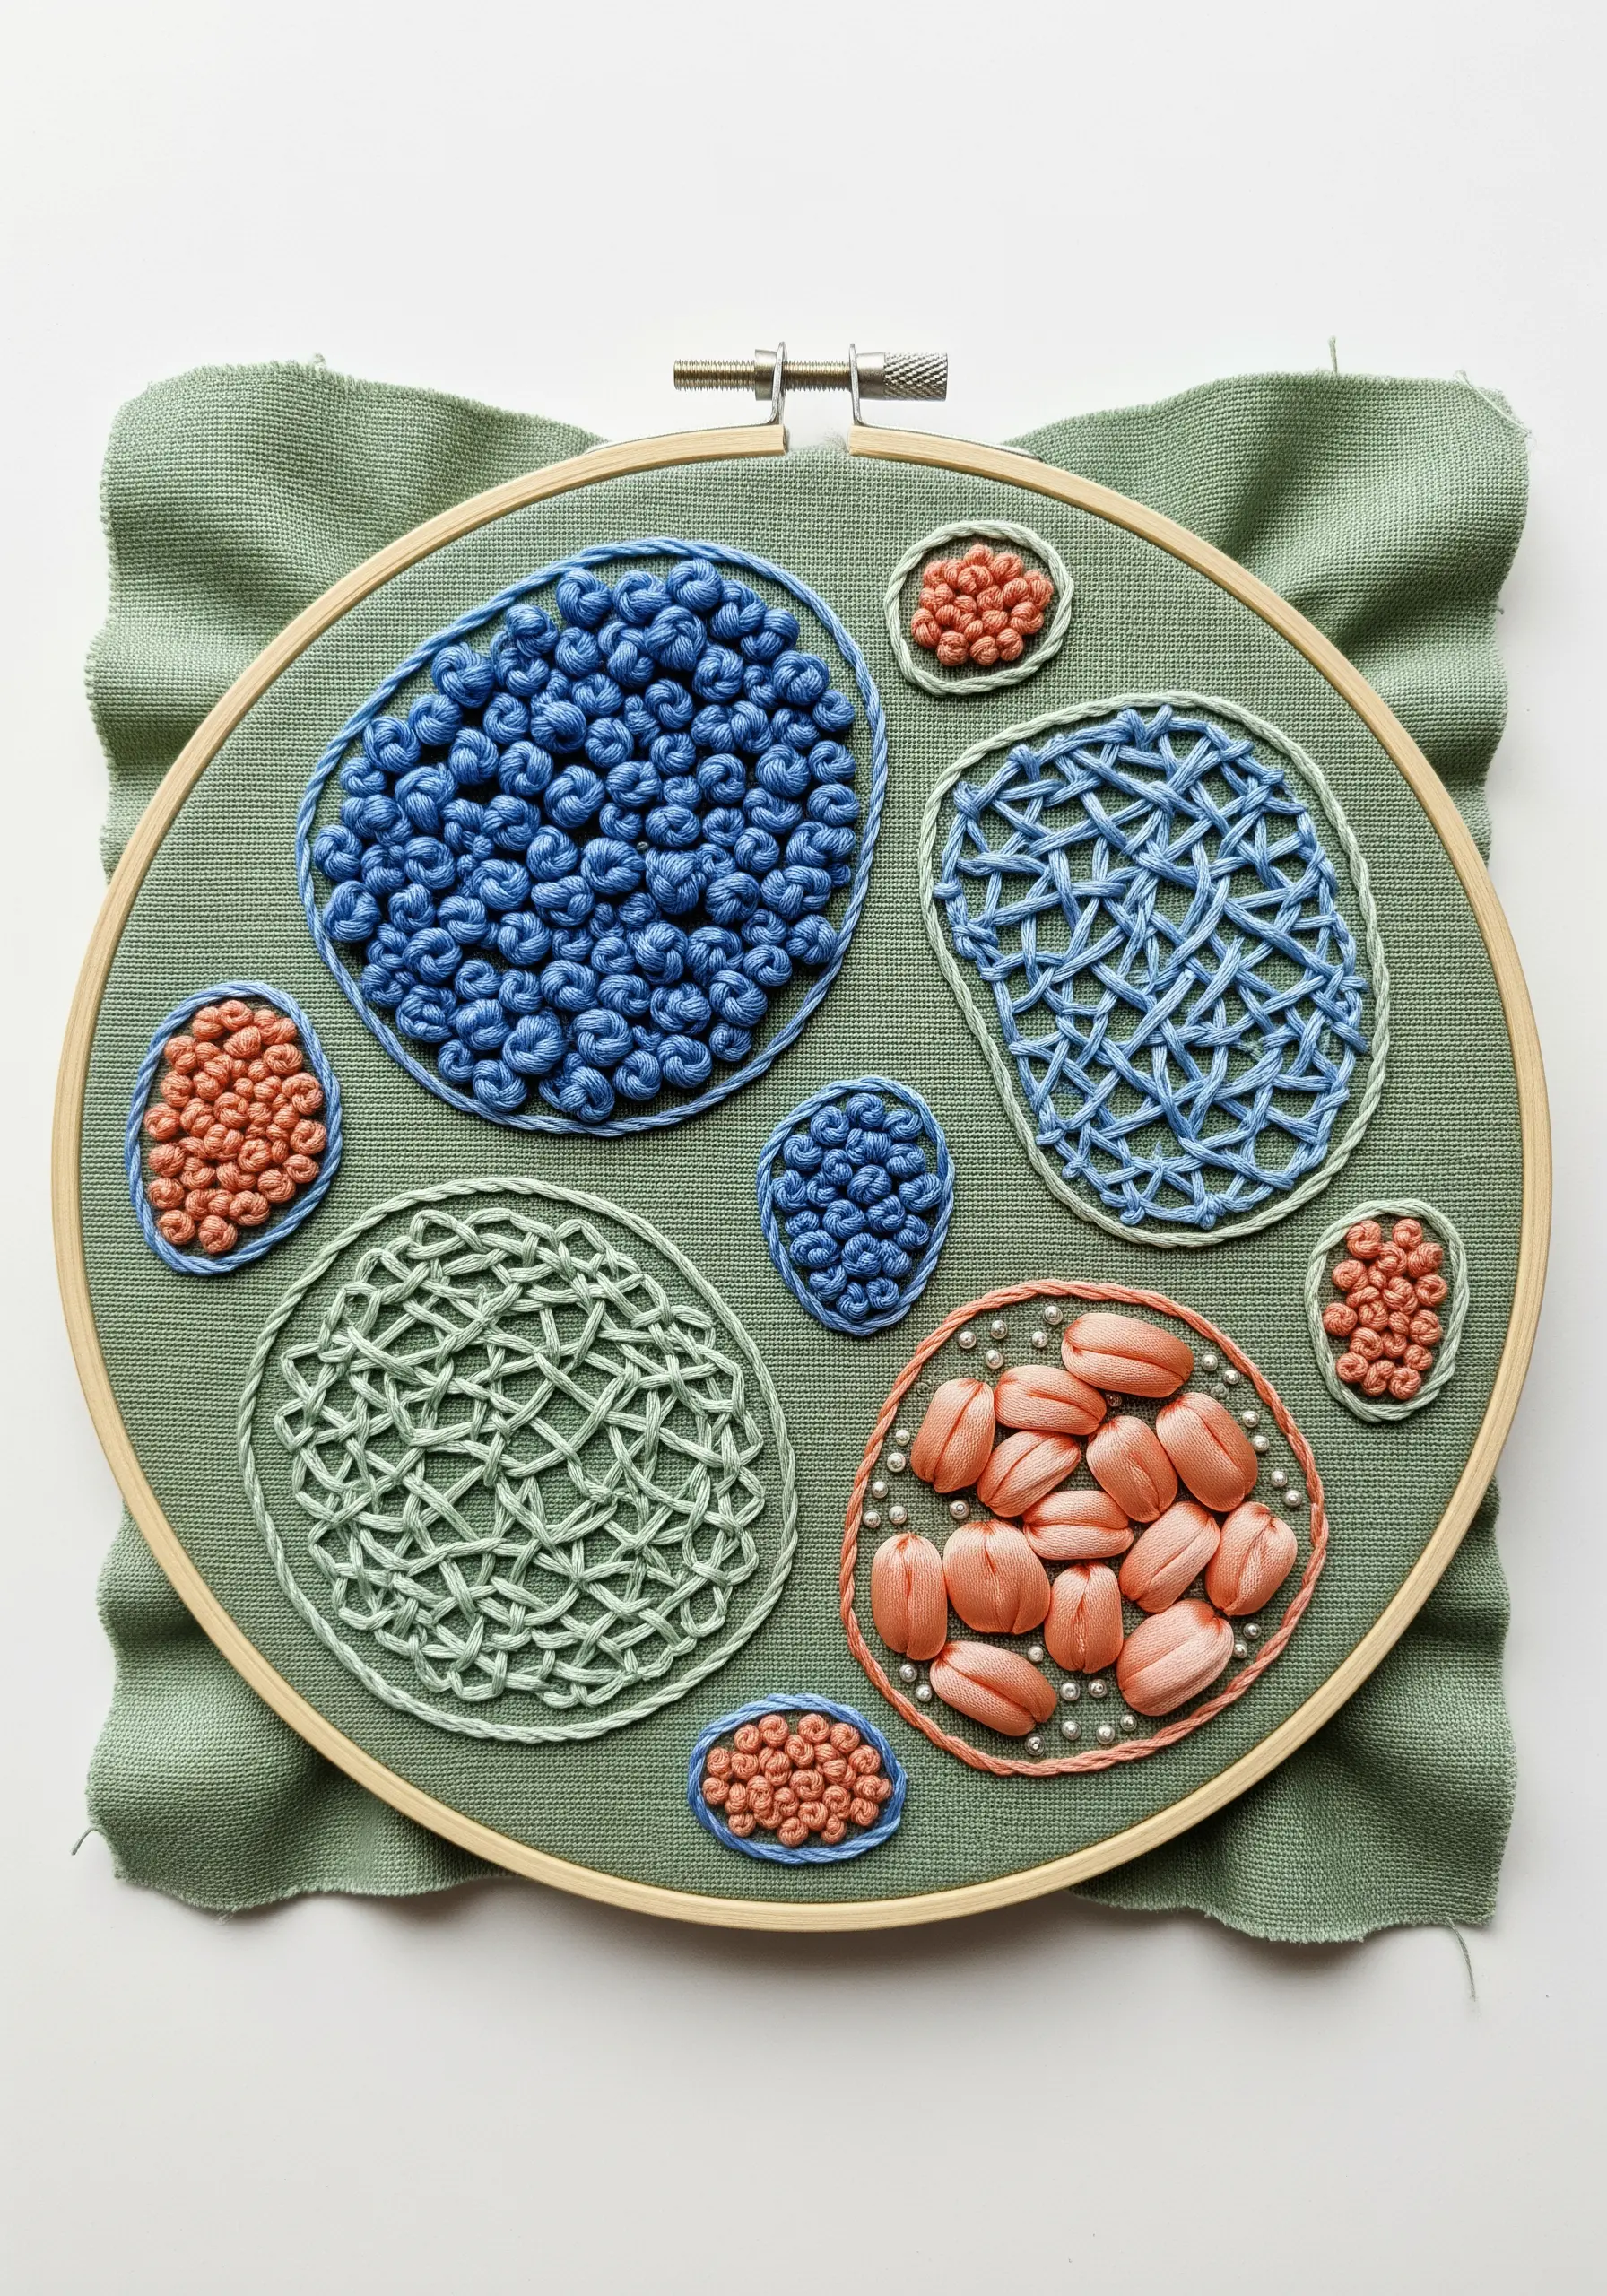
19. Segmented Fills for Abstract Color Studies
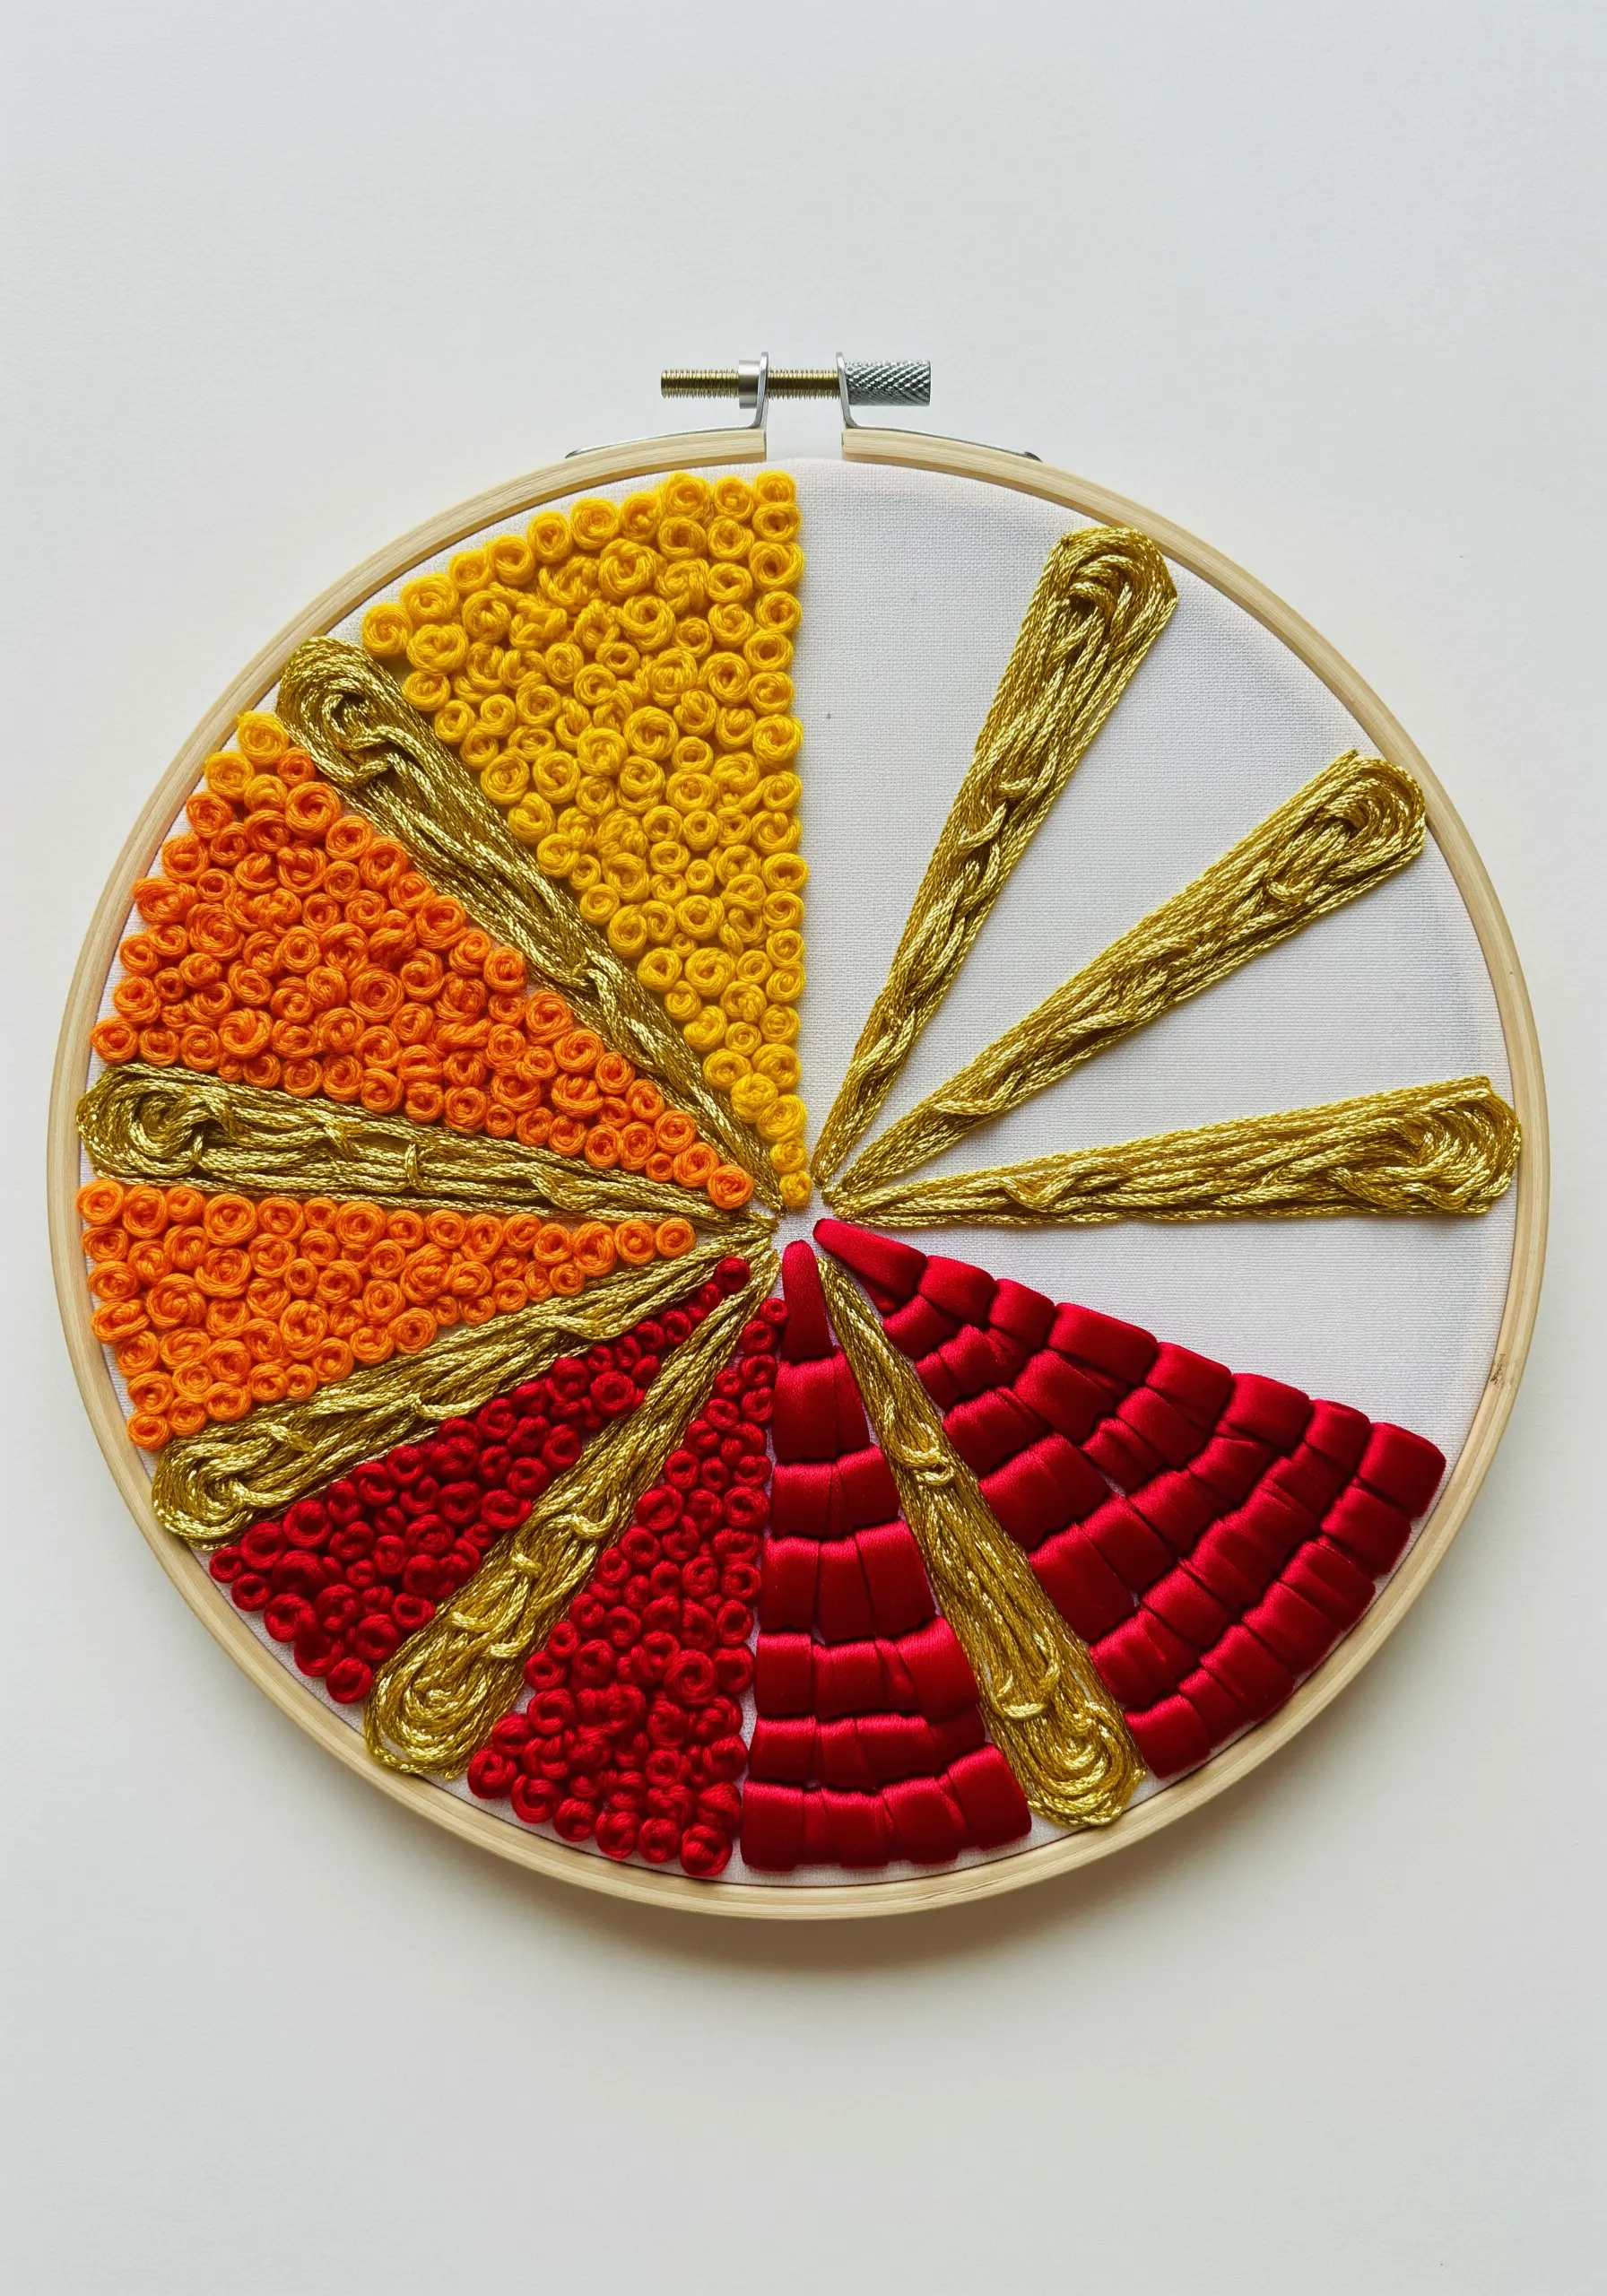
Divide a simple shape, like a circle, into segments and assign a different stitch or material to each one.
This technique turns a single project into a powerful texture sampler.
Fill one segment with dense French knots, another with smooth satin ribbon, and a third with couched metallic cord.
By keeping the shapes geometric and the color palette controlled (e.g., warm tones), the focus shifts entirely to the interplay of textures.
It’s an excellent way to practice different techniques and create stunning abstract color-blend stitch ideas that are both disciplined and expressive.
20. Tulle Overlay for a Dreamlike, Misty Effect
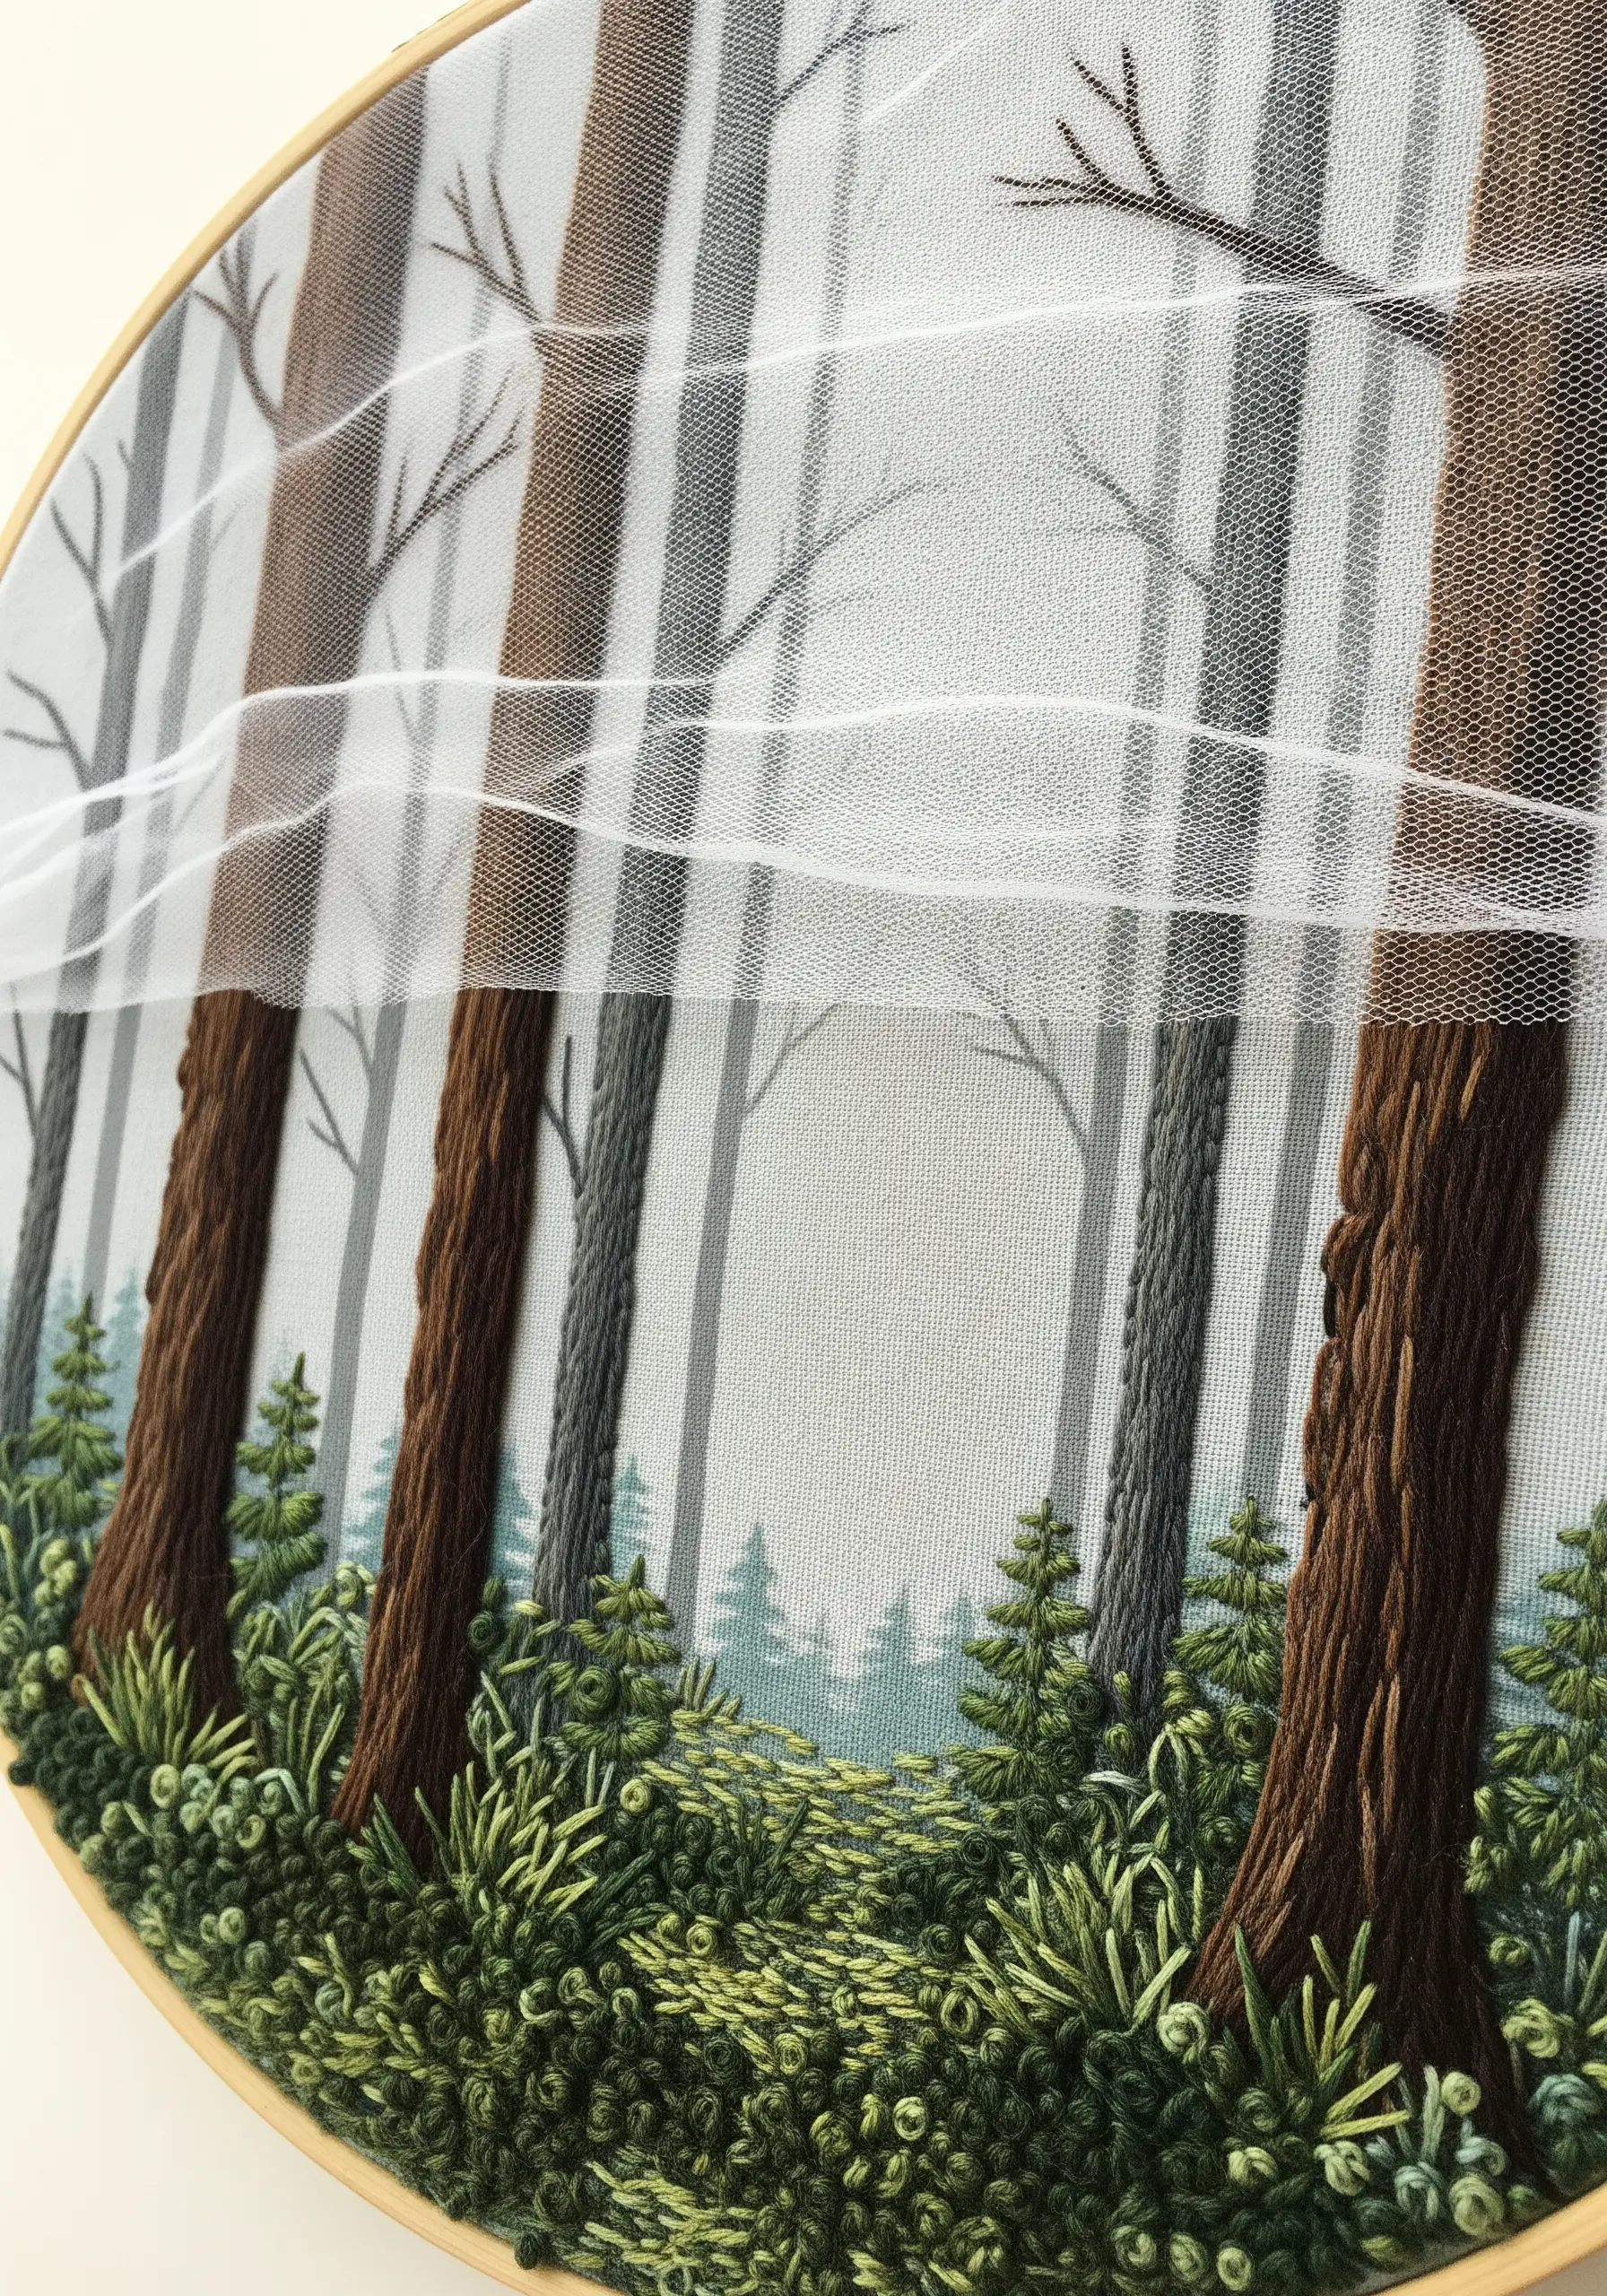
Add a layer of soft focus and depth to landscape embroidery by incorporating a tulle overlay.
First, complete your background scene with standard stitches on your base fabric.
Then, stretch a layer of fine, sheer tulle over the entire hoop, securing it along with the base fabric.
You can add subtle foreground details directly onto the tulle, but the primary effect is the soft, misty veil it casts over the scene behind it.
This is a masterstroke for creating atmosphere in forest scenes, making fabric collage embroidery projects using sheer fabrics feel layered and poetic.
21. Detached Elements for Dynamic Motion
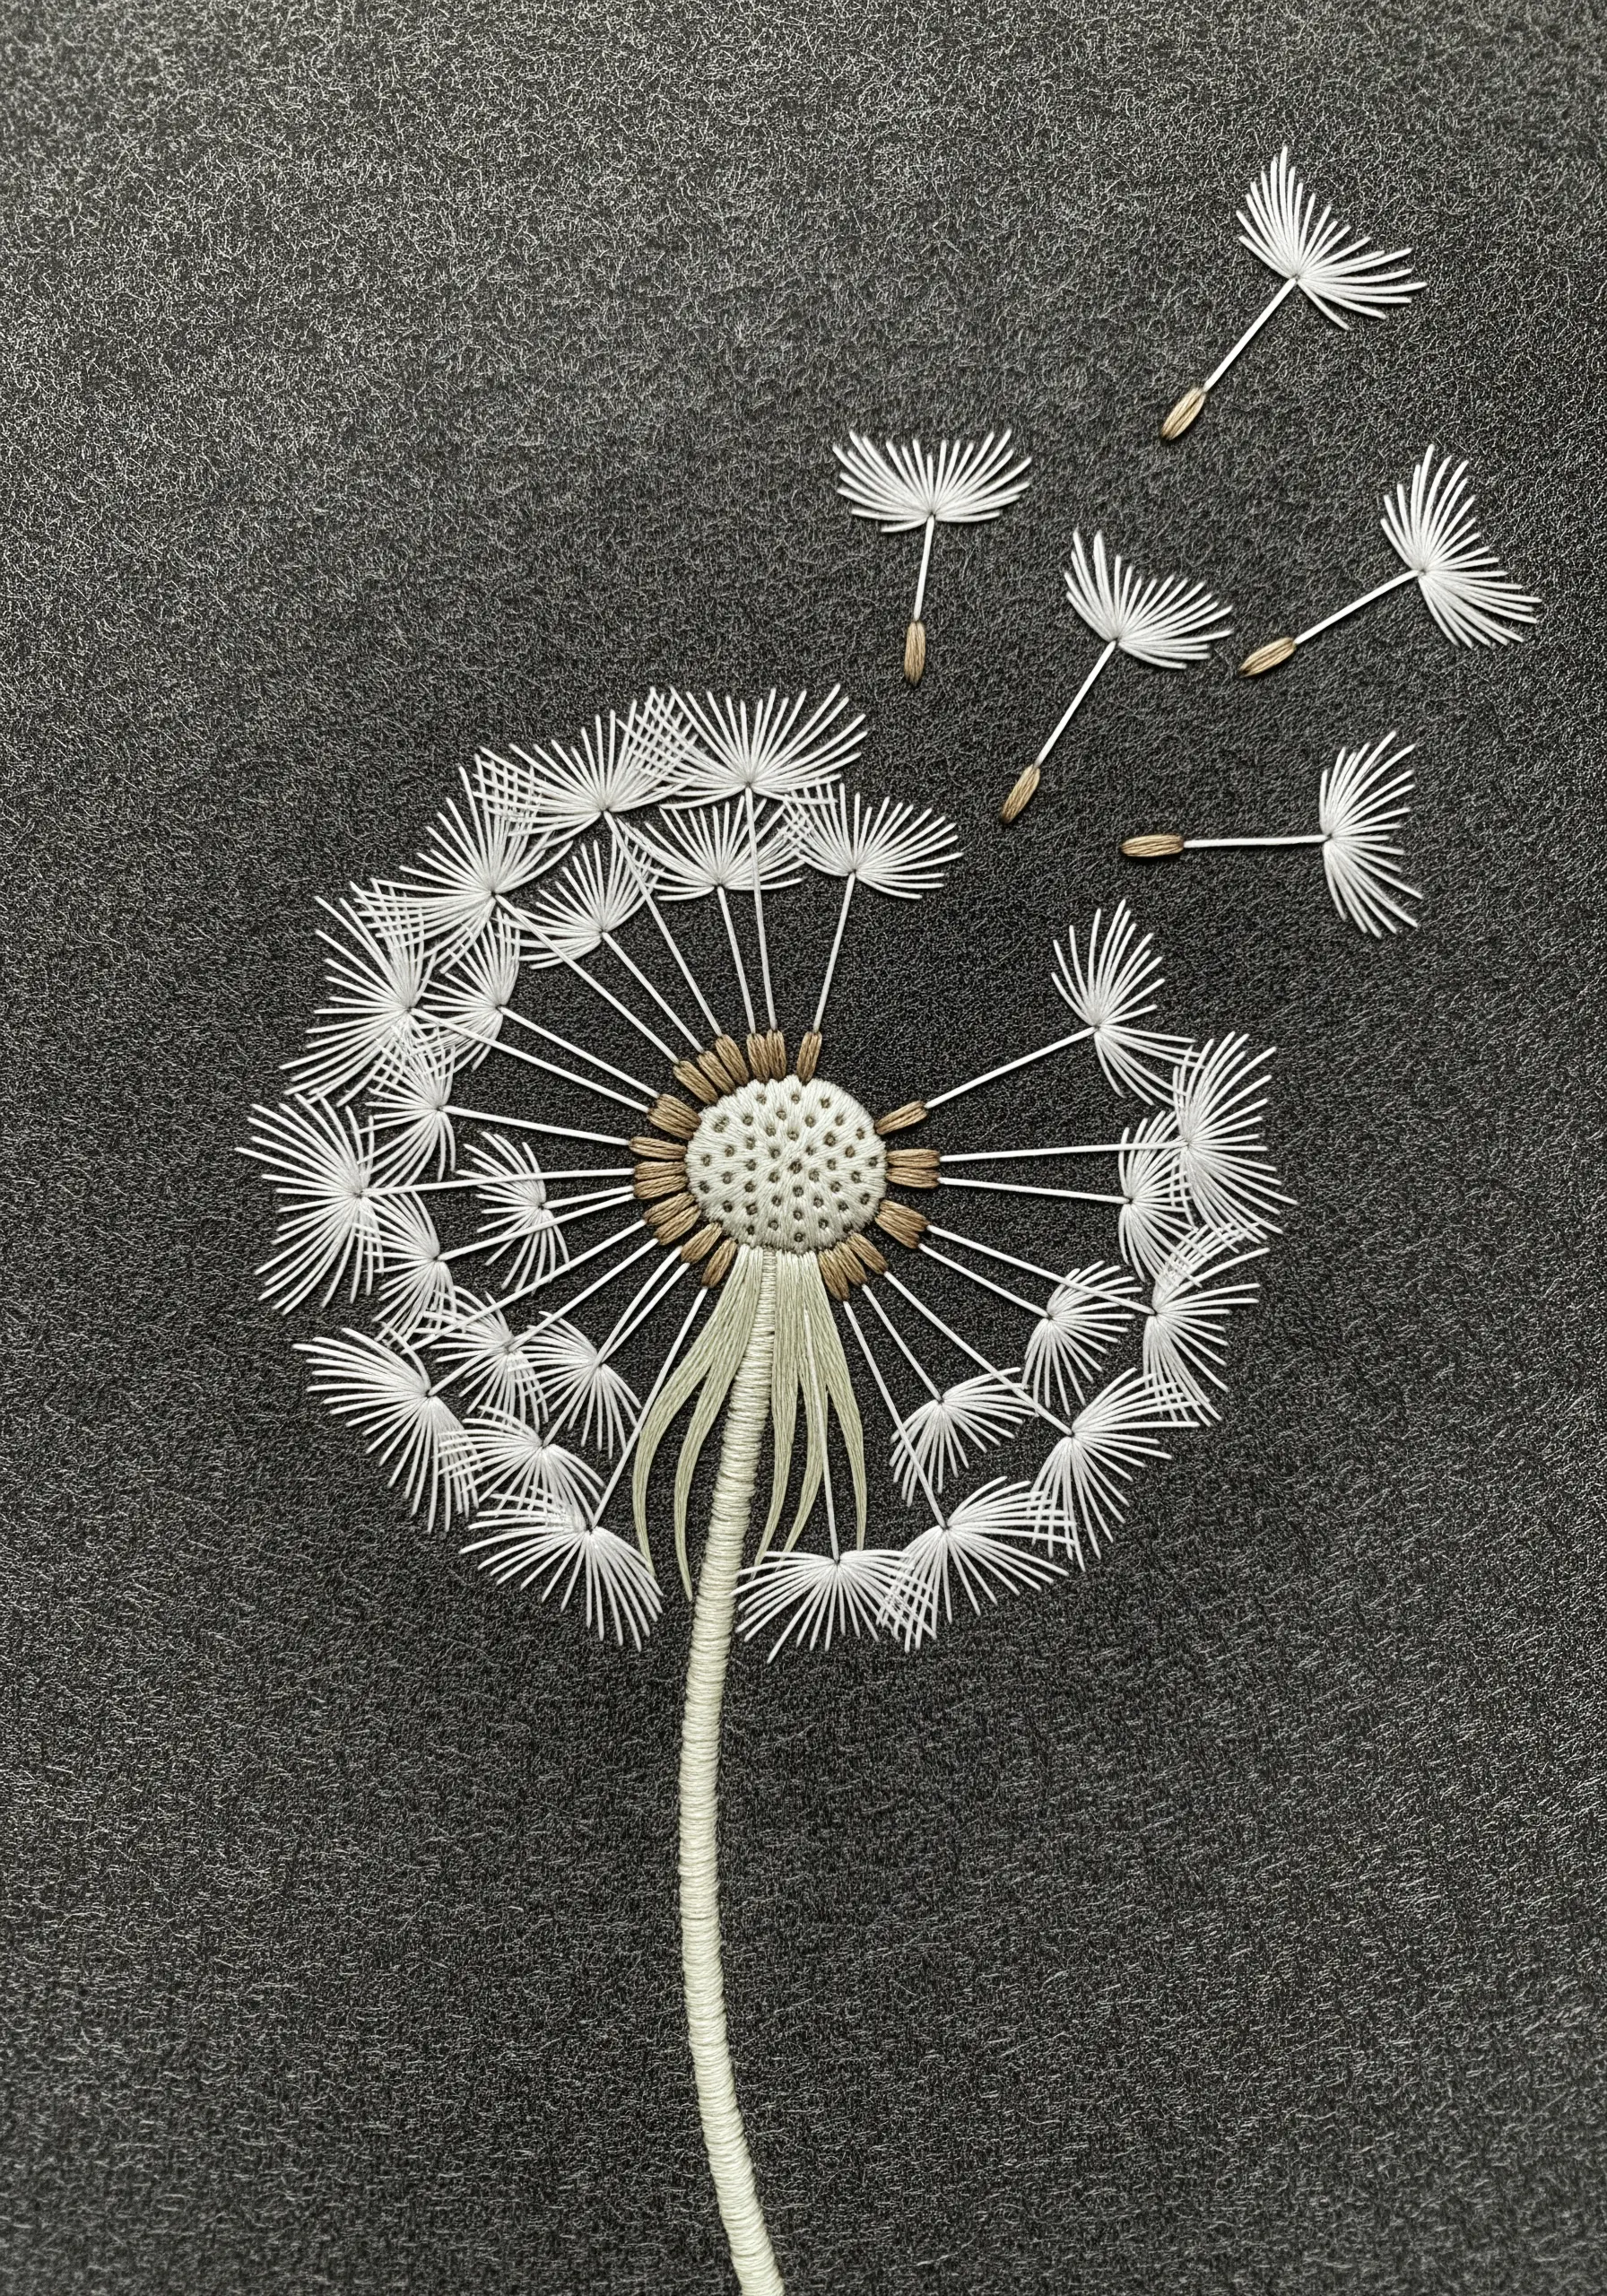
Capture the feeling of movement by creating stitches that are only partially attached to the fabric.
For dandelion seeds, use a detached straight stitch or a single, long bullion stitch for the stem.
Create the pappus (the fluffy part) with several tiny, fanned-out straight stitches that are anchored at one point but free at the ends.
This allows the elements to lift slightly from the surface, casting subtle shadows and giving the impression they are truly floating away.
It’s a delicate, advanced technique perfect for pressed-flower inspired embroidery stitches that feel dynamic and light.
22. Layering Non-Traditional Materials like Leather and Mesh
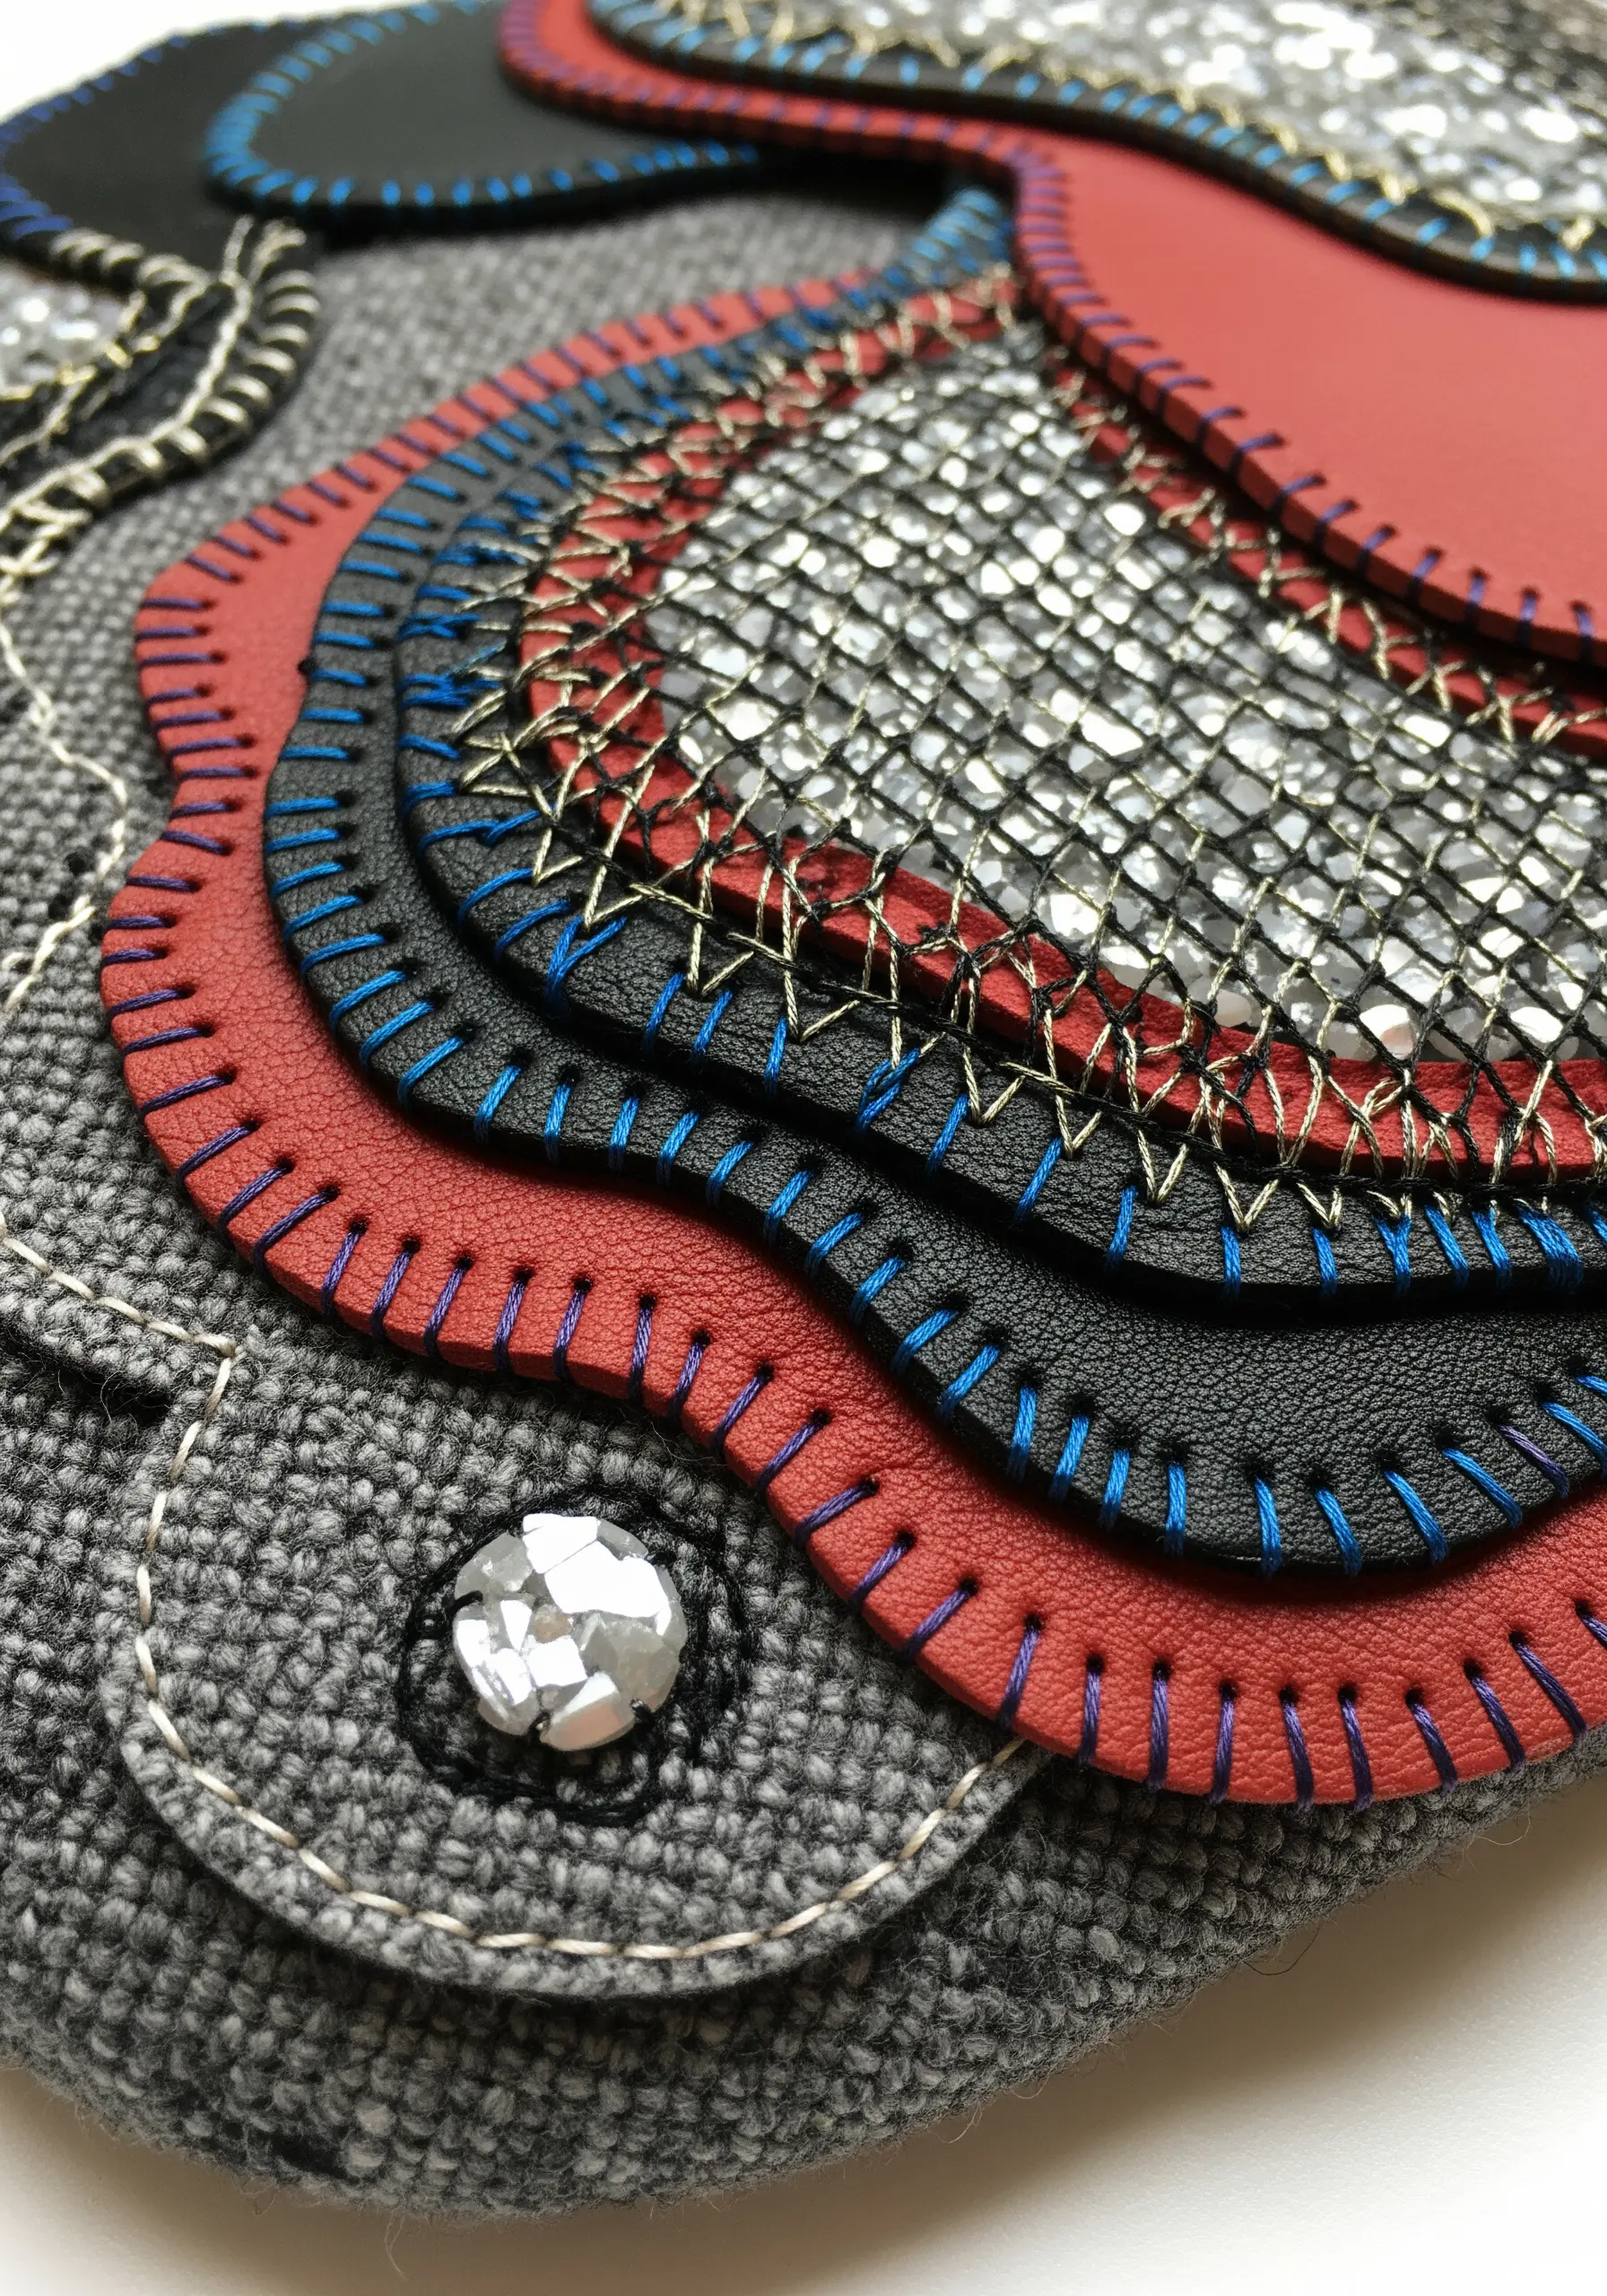
Push the boundaries of embroidery by incorporating materials like faux leather, metallic mesh, or vinyl.
Cut your shapes and use a sturdy needle to punch holes along the edges before stitching.
Layer these materials to create a sculptural, armor-like effect, using a simple blanket stitch or cross stitch with a thick, contrasting thread to join them.
The interplay between the smooth, tough leather and the open weave of the mesh creates a unique industrial-chic aesthetic.
These are clever ways to combine fabric and thread for functional art objects like bags or statement jewelry.
23. Contained Textural Studies in Organic Forms
Instead of a single large composition, create a series of small, organic ‘vignettes’ on one piece of fabric.
Outline several pebble-like shapes and fill each one with a different high-texture stitch: woven picot, bullion knots, cast-on stitches, or French knots.
Use a cohesive color palette to unify the disparate textures.
By containing each stitch study within a defined border (like a couched cord), you create a piece that feels like a collector’s specimen box, perfect for abstract hoop art concepts that are both playful and sophisticated.
24. Mixed-Media Wings for Explosive Texture
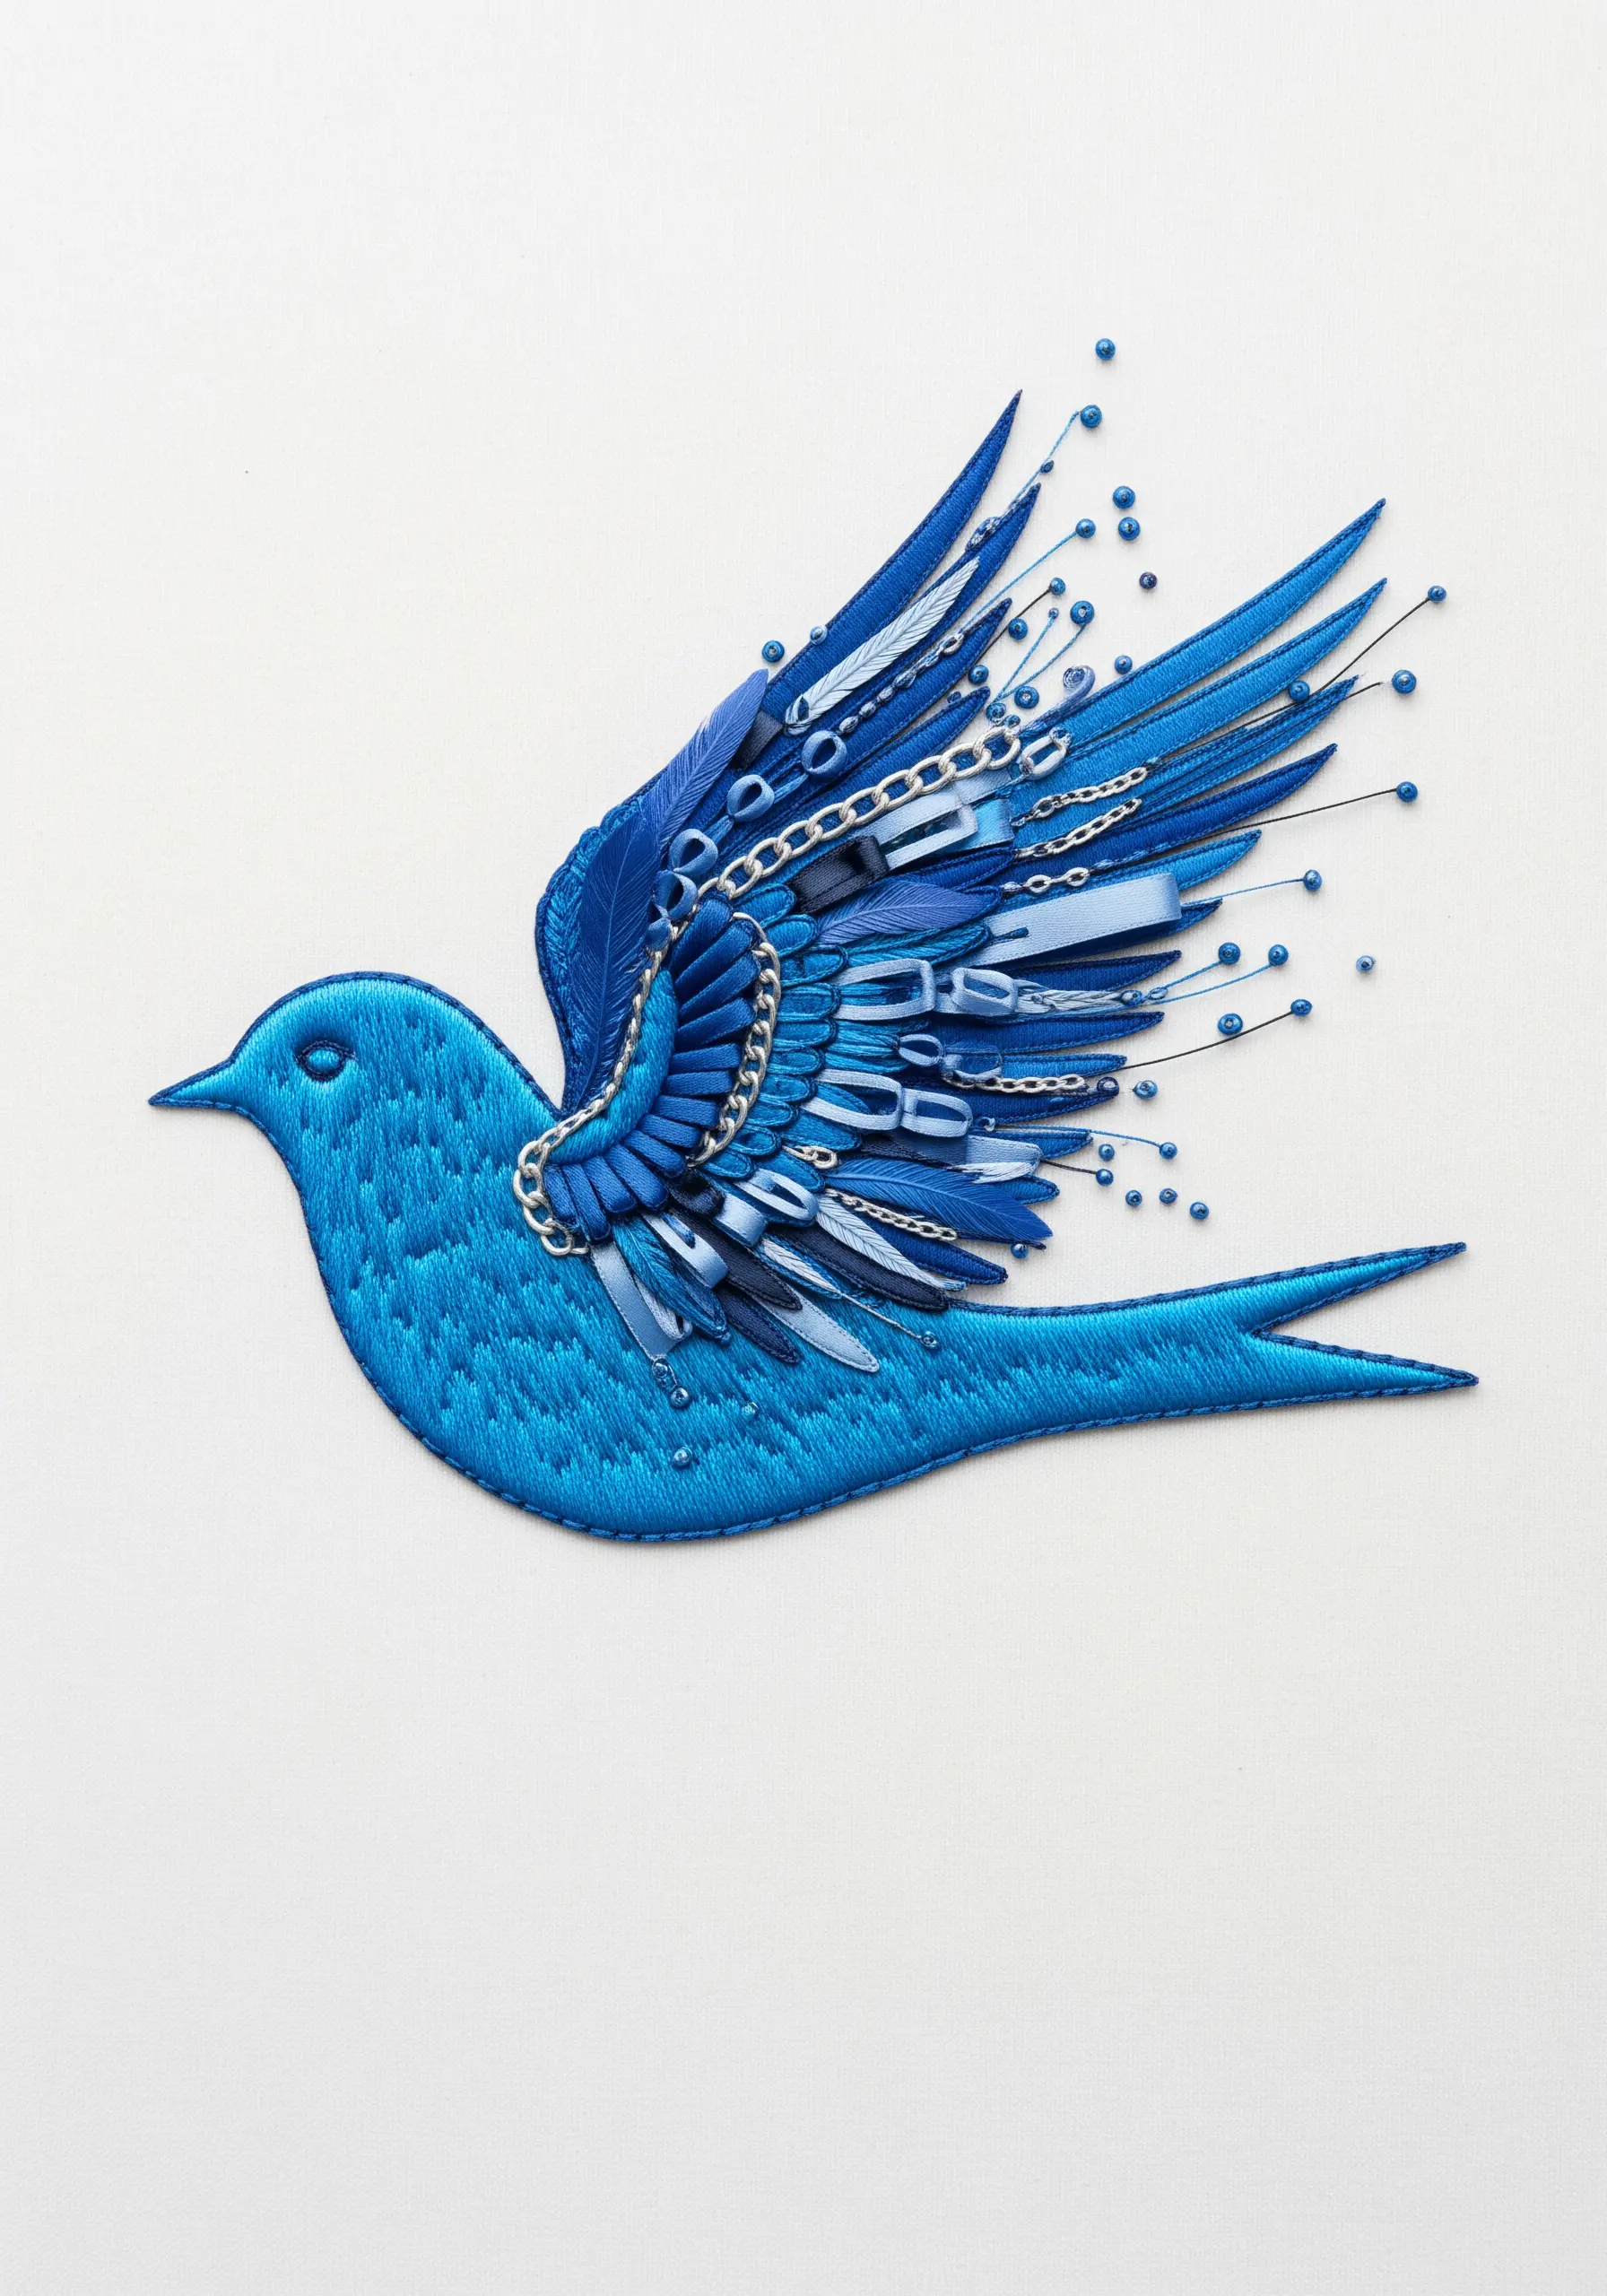
Transform a simple satin-stitched silhouette by adding explosive, textural wings made from non-thread materials.
Start with a smooth, perfectly executed satin stitch for the body of the bird to create a solid, stable base.
Then, build the wings by layering and stitching down found objects: tiny chain links, strips of folded ribbon, small plastic beads, or even cut pieces of other textiles.
This dramatic contrast between the flat, controlled body and the chaotic, dimensional wings turns the piece into a statement on freedom and form.
It’s a fantastic way to experiment with embroidered mixed-media ideas.
25. Combining Structural Grids with Patterned Fills
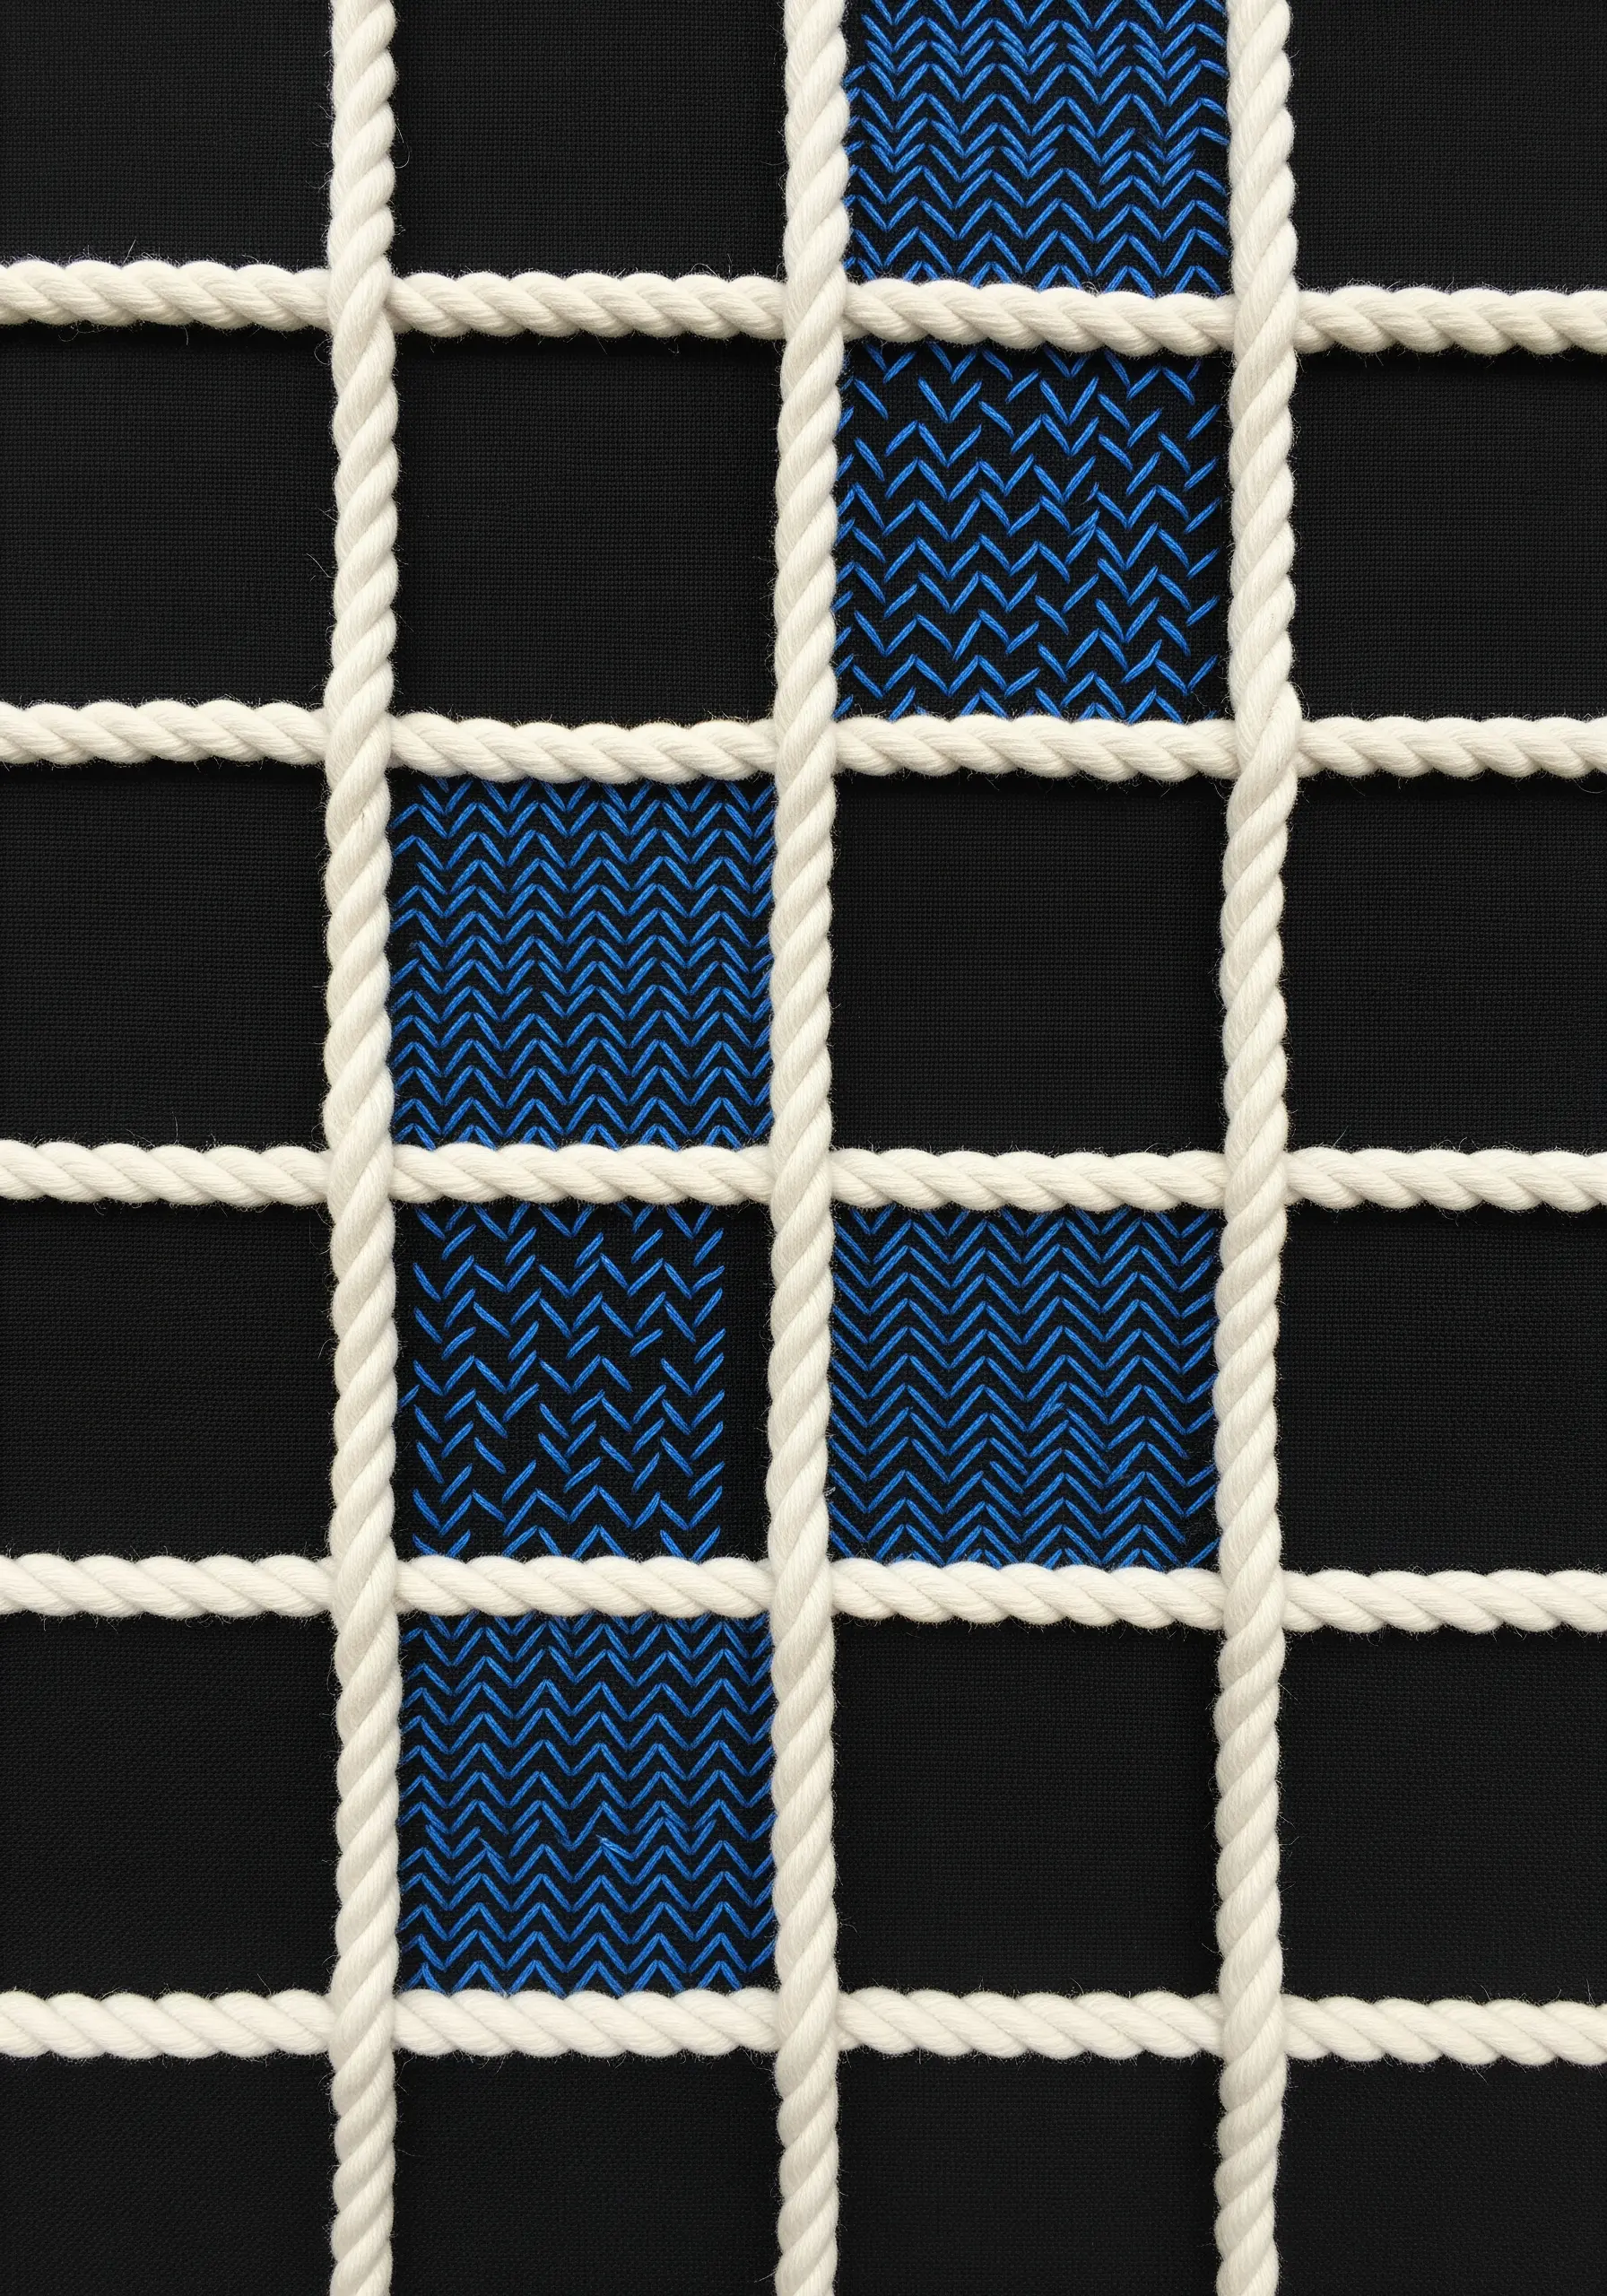
Create a powerful sense of order and depth by layering a physical grid over a stitched pattern.
First, fill areas of your fabric with a dense, repeating pattern like herringbone or chevron stitch.
Then, couch a thick, contrasting cord or rope over the top to form a clean, structural grid.
The visual tension between the rigid, overlying grid and the intricate, directional pattern beneath it creates a sophisticated optical effect.
This technique is a perfect match for modern grid & dot stitch concepts that feel architectural and intentional.
26. Thread Painting for Atmospheric Landscapes
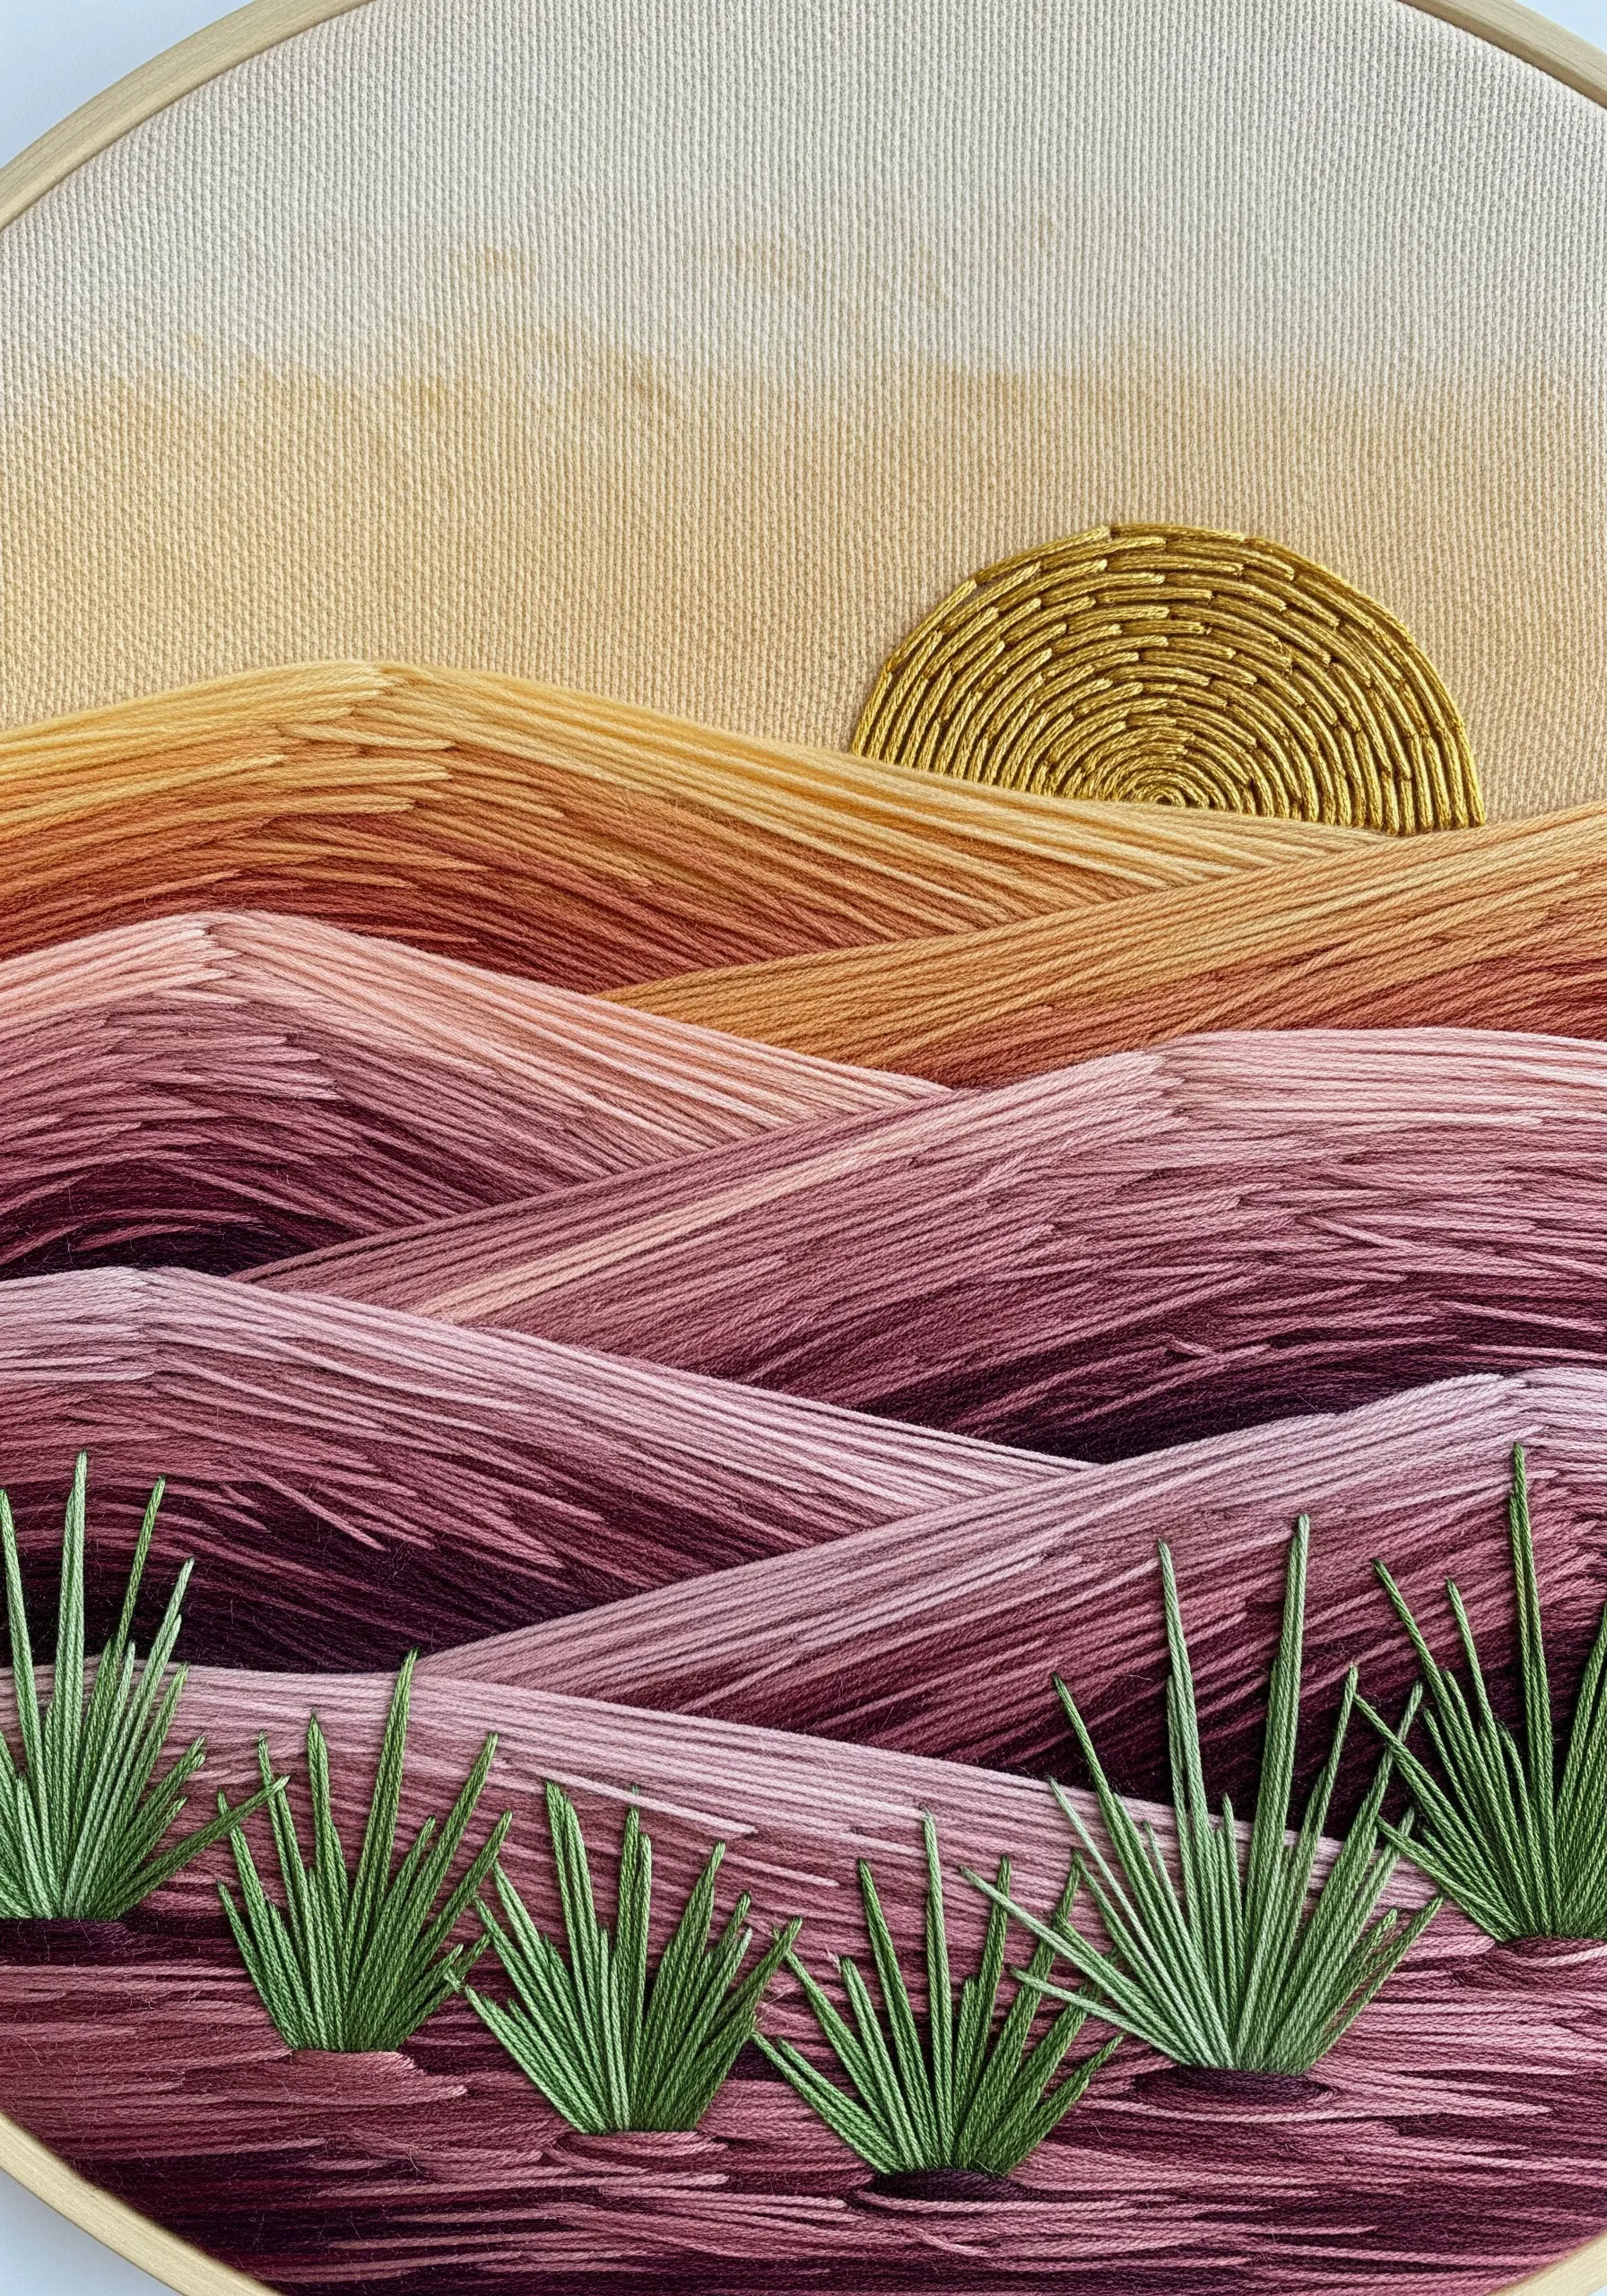
Use long-and-short stitch not just to fill shapes, but to paint entire scenes with thread.
Blend multiple shades of floss within each section to create soft, seamless color transitions that mimic the way light hits hills and skies.
Keep your stitches directional, following the contours of the landscape to enhance the sense of form and distance.
A background of simple, horizontal satin stitches can represent a hazy sky, providing a smooth canvas for the more detailed foreground.
This technique turns your needle into a paintbrush, ideal for creating dreamy and emotive abstract thread landscapes.
27. Juxtaposing Order and Chaos with Stitch Density
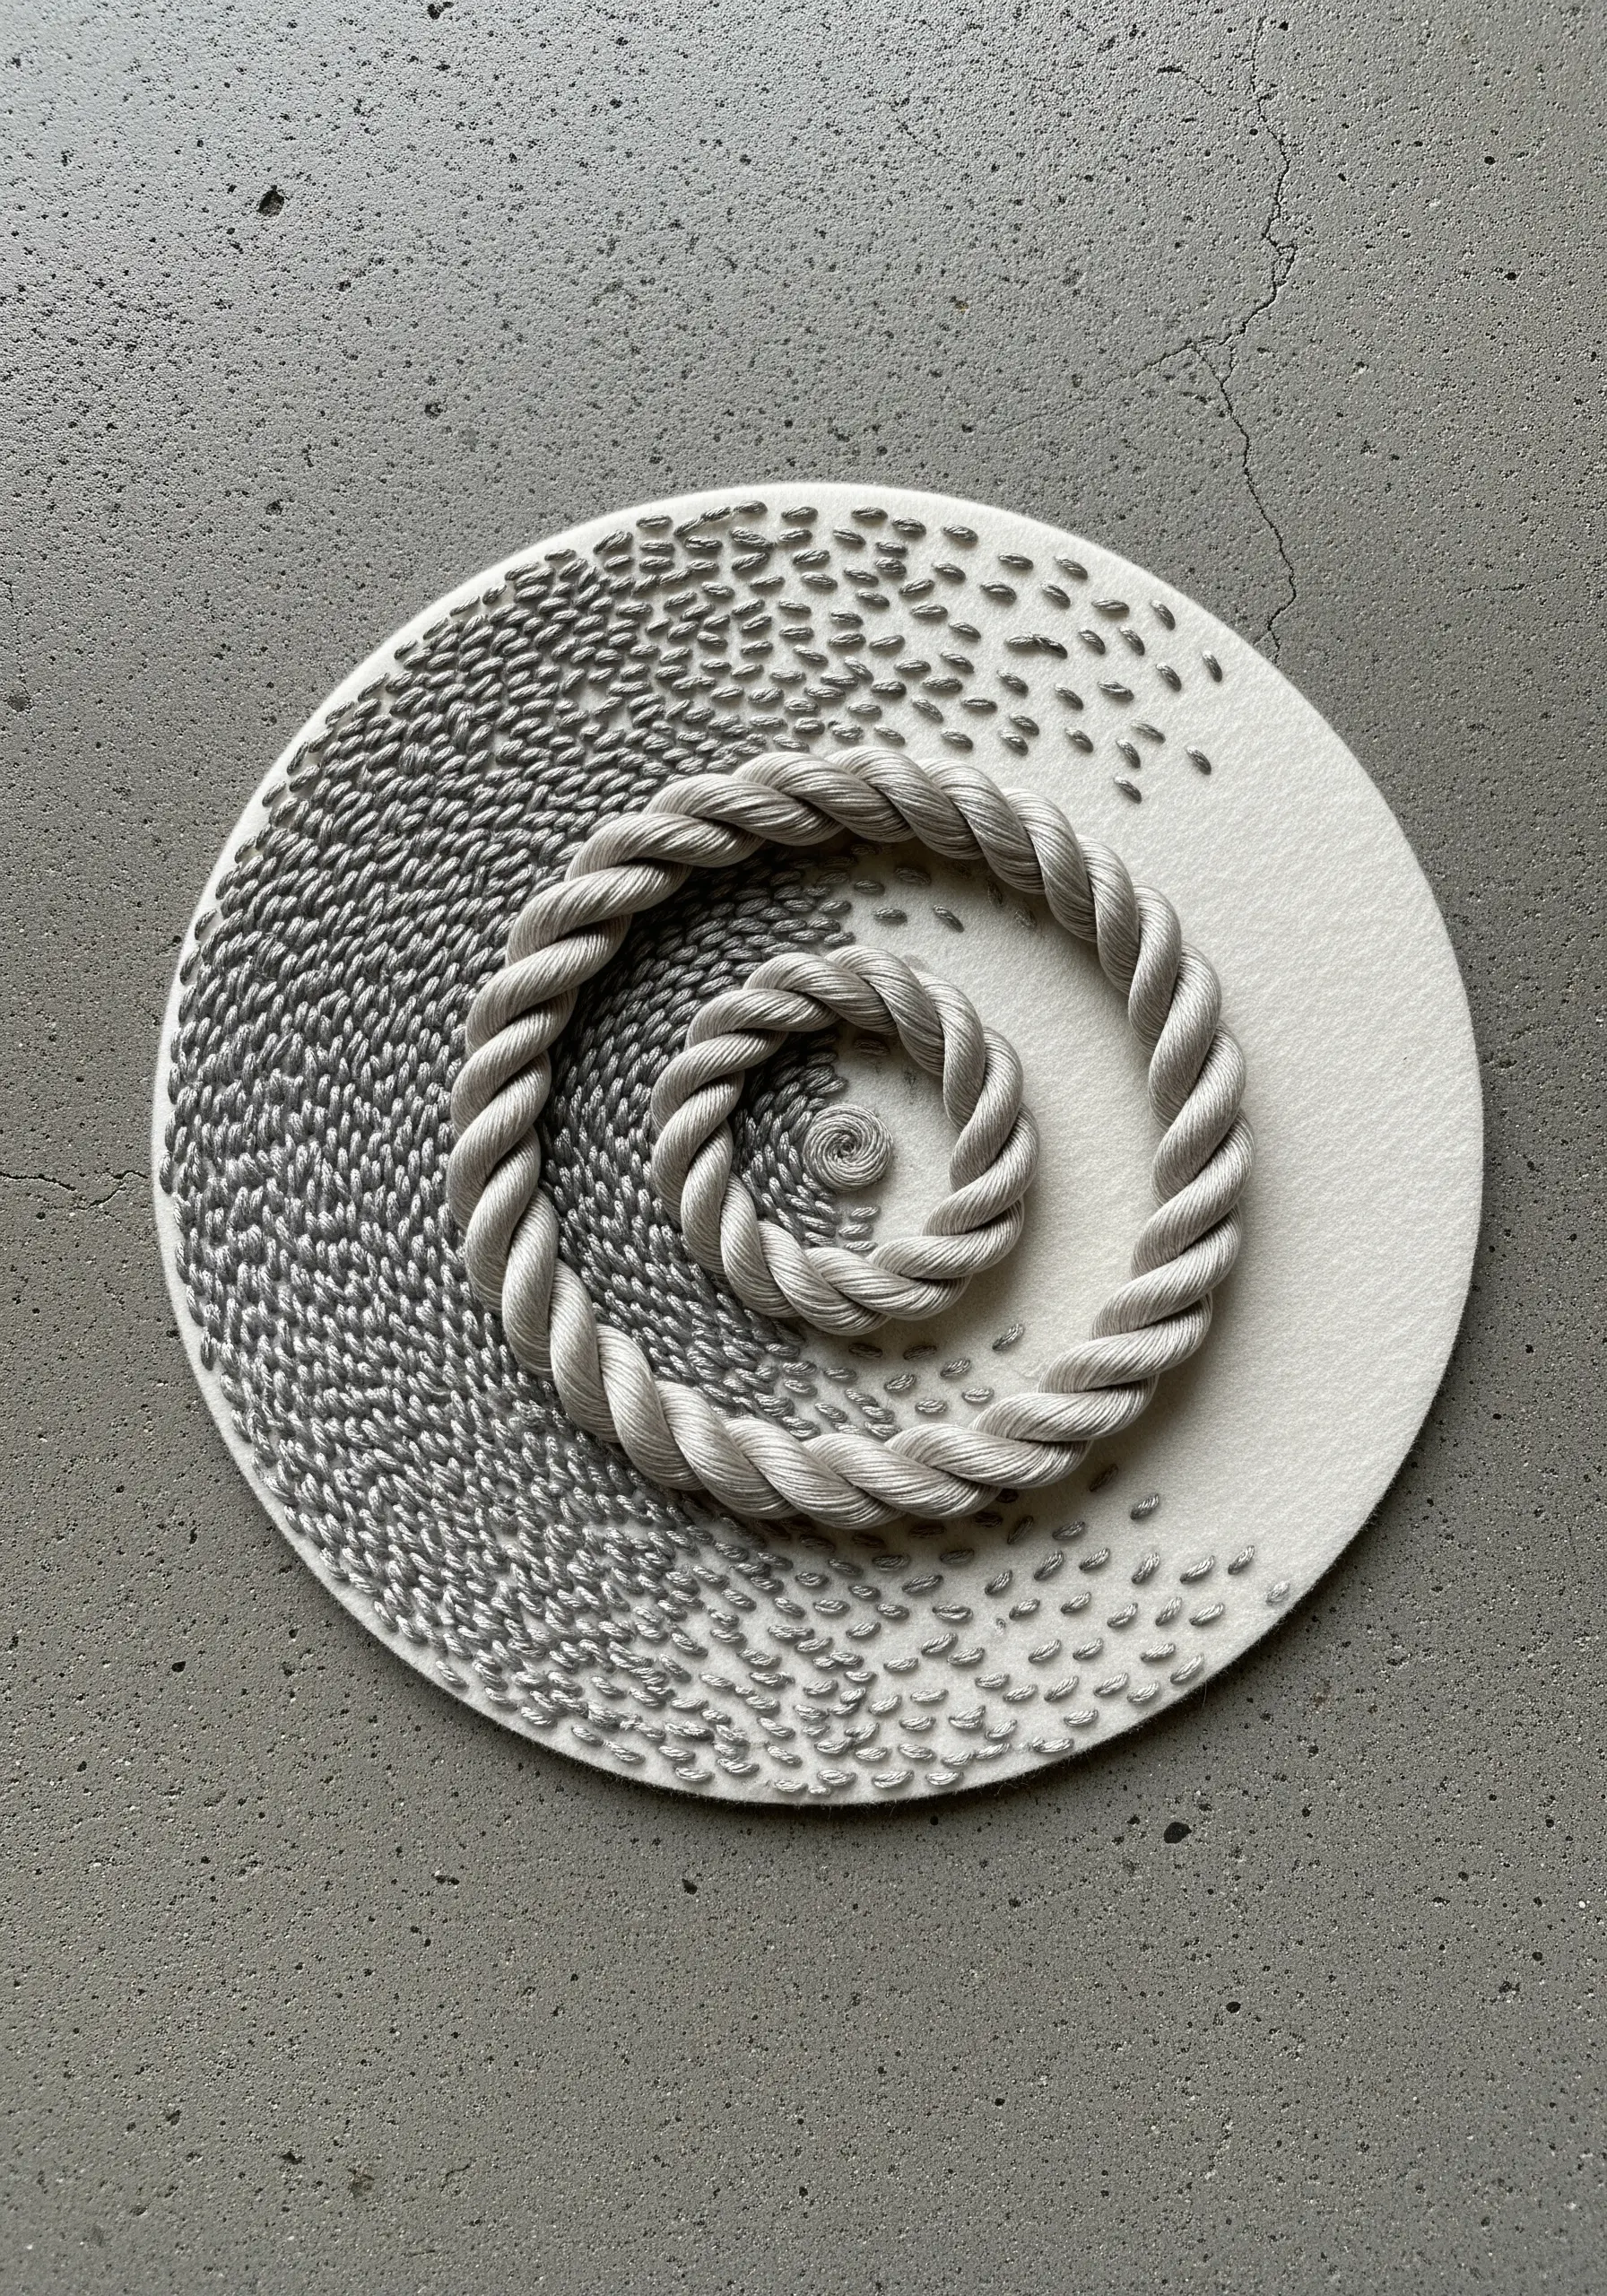
Create a compelling visual narrative by contrasting a highly structured element with a field of random, scattered stitches.
Form a central spiral using a thick, neatly couched cord or a perfectly executed whipped chain stitch.
Surround this ordered shape with a dense field of seed stitches, varying their direction and spacing to create a feeling of chaotic, organic texture.
The transition from the dense, scattered stitches to the clean, defined spiral tricks the eye and generates a sense of energy and movement.
This is a core principle behind powerful abstract optical illusion stitches.
28. The Ultimate Texture Sampler

Create a ‘stitch dictionary’ in a single hoop by combining as many different materials and techniques as you can.
Divide your hoop into a patchwork of colors and dedicate each patch to a unique texture: woven sections, turkey stitch loops, thick wool couching, bullion knots, and even plastic tubing or wire.
This is not about creating a cohesive picture, but about celebrating the materials themselves.
It’s an invaluable practice piece for mastering new stitches and discovering surprising textural combinations, a perfect way to explore mixed-fiber ideas to add a unique handmade touch to your repertoire.


