

You’ve mastered the satin stitch and your French knots are perfect. But you feel a pull toward something more, a desire to take your threads beyond the hoop and into the world around you. How do you make that leap from a beautiful object to a breathtaking experience?
The answer lies not in learning more complex stitches, but in reimagining scale, context, and material. The same simple techniques you already know—knotting, weaving, felting, wrapping—are the building blocks for creating art that can transform a room, a building, or even a forest.
These ideas are here to bridge that gap. They show you how to think like a sculptor, an architect, and a painter, all while using the familiar, tactile language of fiber. Let’s explore how to make your stitches breathe, move, and reshape the very space they inhabit.
1. Weave With Your Environment, Not Just on Fabric

Instead of a hoop, consider using natural structures like tree branches or an old window frame as your loom.
Use a simple macrame clove hitch or lark’s head knot to anchor your warp threads (the vertical strands) directly to your chosen structure.
This technique forces you to work with tension and asymmetry, creating organic, site-specific art that feels alive and integrated with its surroundings.
Select durable, weather-resistant yarns or cords if you plan to create an outdoor piece that interacts with the elements.
2. Master Visual Rhythm With Braids and Tassels

Create a powerful visual impact by grouping simple fiber elements like braids and chunky tassels.
Instead of mixing colors randomly, create thick, monochromatic braids and hang them in deliberate blocks of color to guide the eye.
The repetition of a single texture—the braid—creates a cohesive rhythm, while the bold color shifts provide energy and excitement.
This approach transforms simple yarn into a dynamic architectural element, perfect for temporary installations or dramatic yarn wall art pieces.
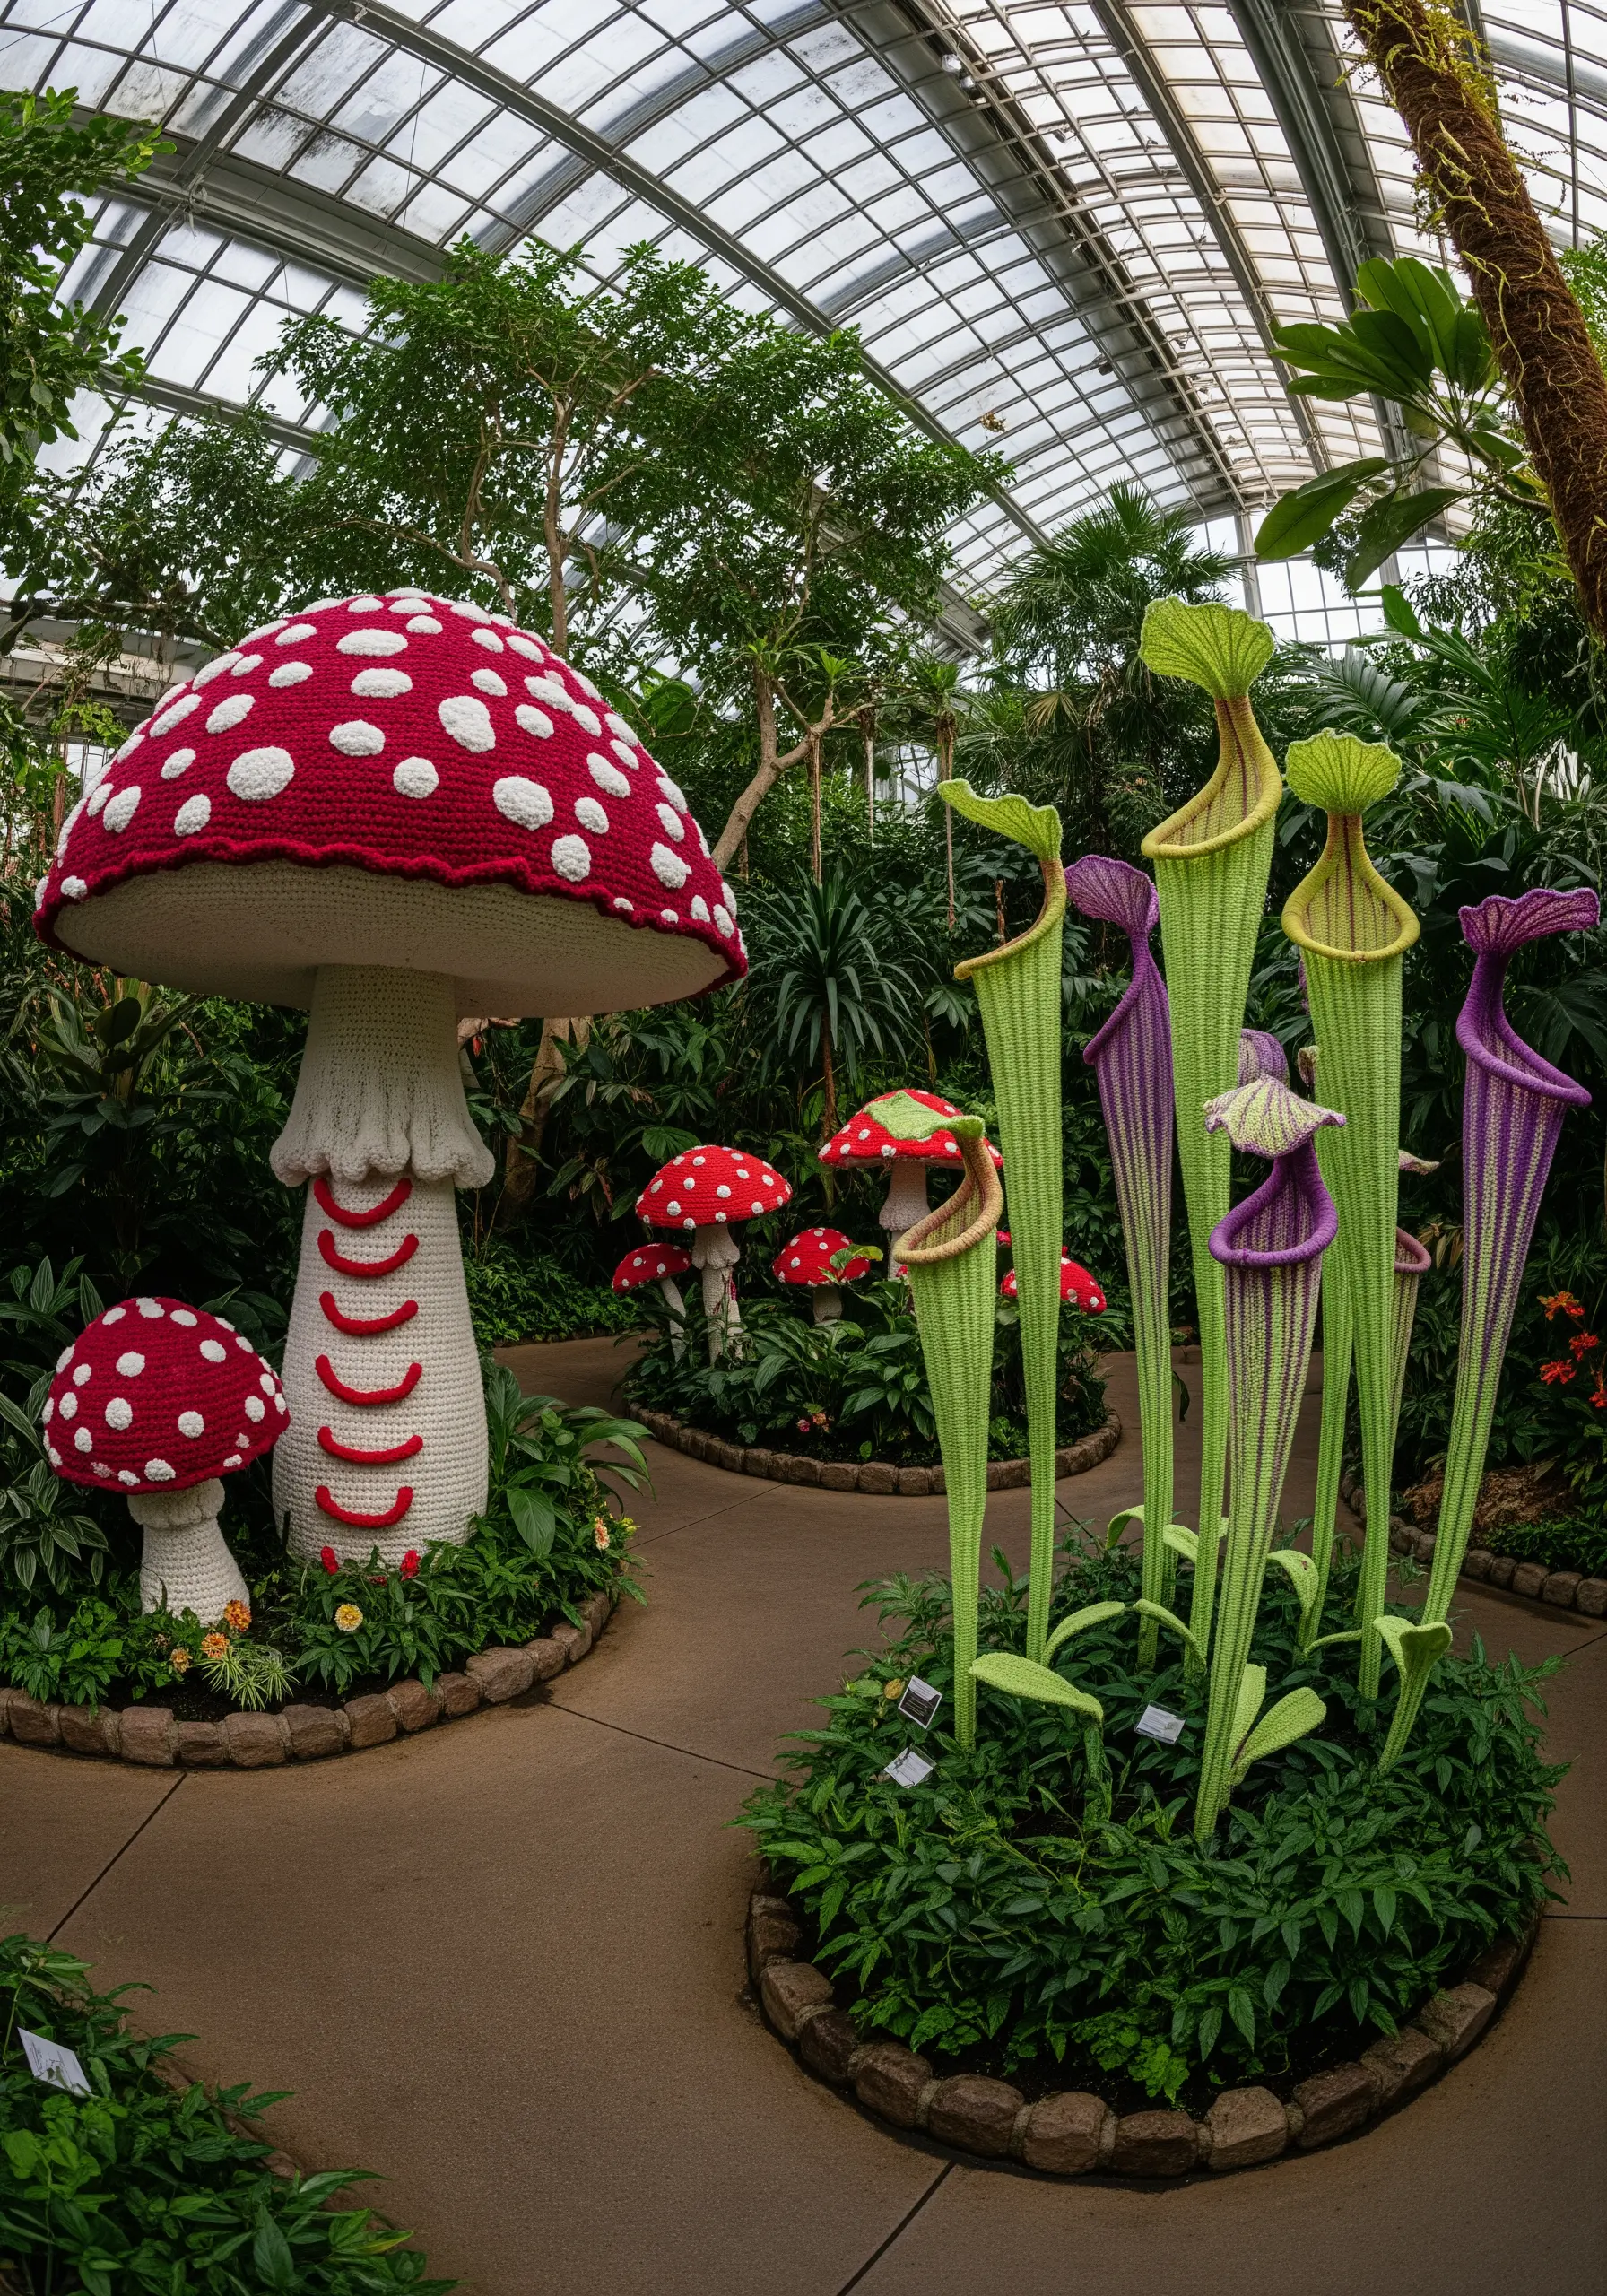
3. Sculpt with Wool Roving to Create 3D Forms

Move beyond flat surfaces by using needle-felting techniques to build three-dimensional sculptures.
Start with a core of tightly balled wool and gradually add thin layers of colored roving, using a felting needle to poke the fibers into place until they matt together.
To create blended surfaces like planets, lay down thin, overlapping wisps of different colors before felting them in; the fibers will tangle together, creating soft, painterly transitions.
This technique allows you to create solid, lightweight forms without any internal armature, relying solely on the structure of the compacted wool.
4. Scale Up Your Designs With Punch Needle Rug Hooking

Translate your small hoop designs into monumental sculptures using punch needle or rug hooking techniques.
Work on a large frame with monk’s cloth or linen, using chunky rug yarn to fill in large areas quickly.
Vary the loop height by adjusting your punch needle’s setting—use shorter loops for crisp outlines and taller, denser loops for plush, dimensional petals or backgrounds.
To create freestanding shapes, apply a strong backing adhesive and cut the form out once it’s dry, allowing your textile art to stand on its own.
5. Create Monochromatic Landscapes With Textural Stitches

Explore the power of a single color family by building a composition based entirely on texture.
Use a combination of French knots, loop stitches (boucle), and straight stitches in varying yarn weights to create an abstract, touchable landscape.
Arrange your stitches in flowing, organic waves rather than rigid rows to mimic natural contours.
This method proves that you don’t need a wide color palette to create depth and interest; the interplay of light and shadow across the different textures does the work for you, resulting in handmade organic pieces that feel sophisticated and serene.
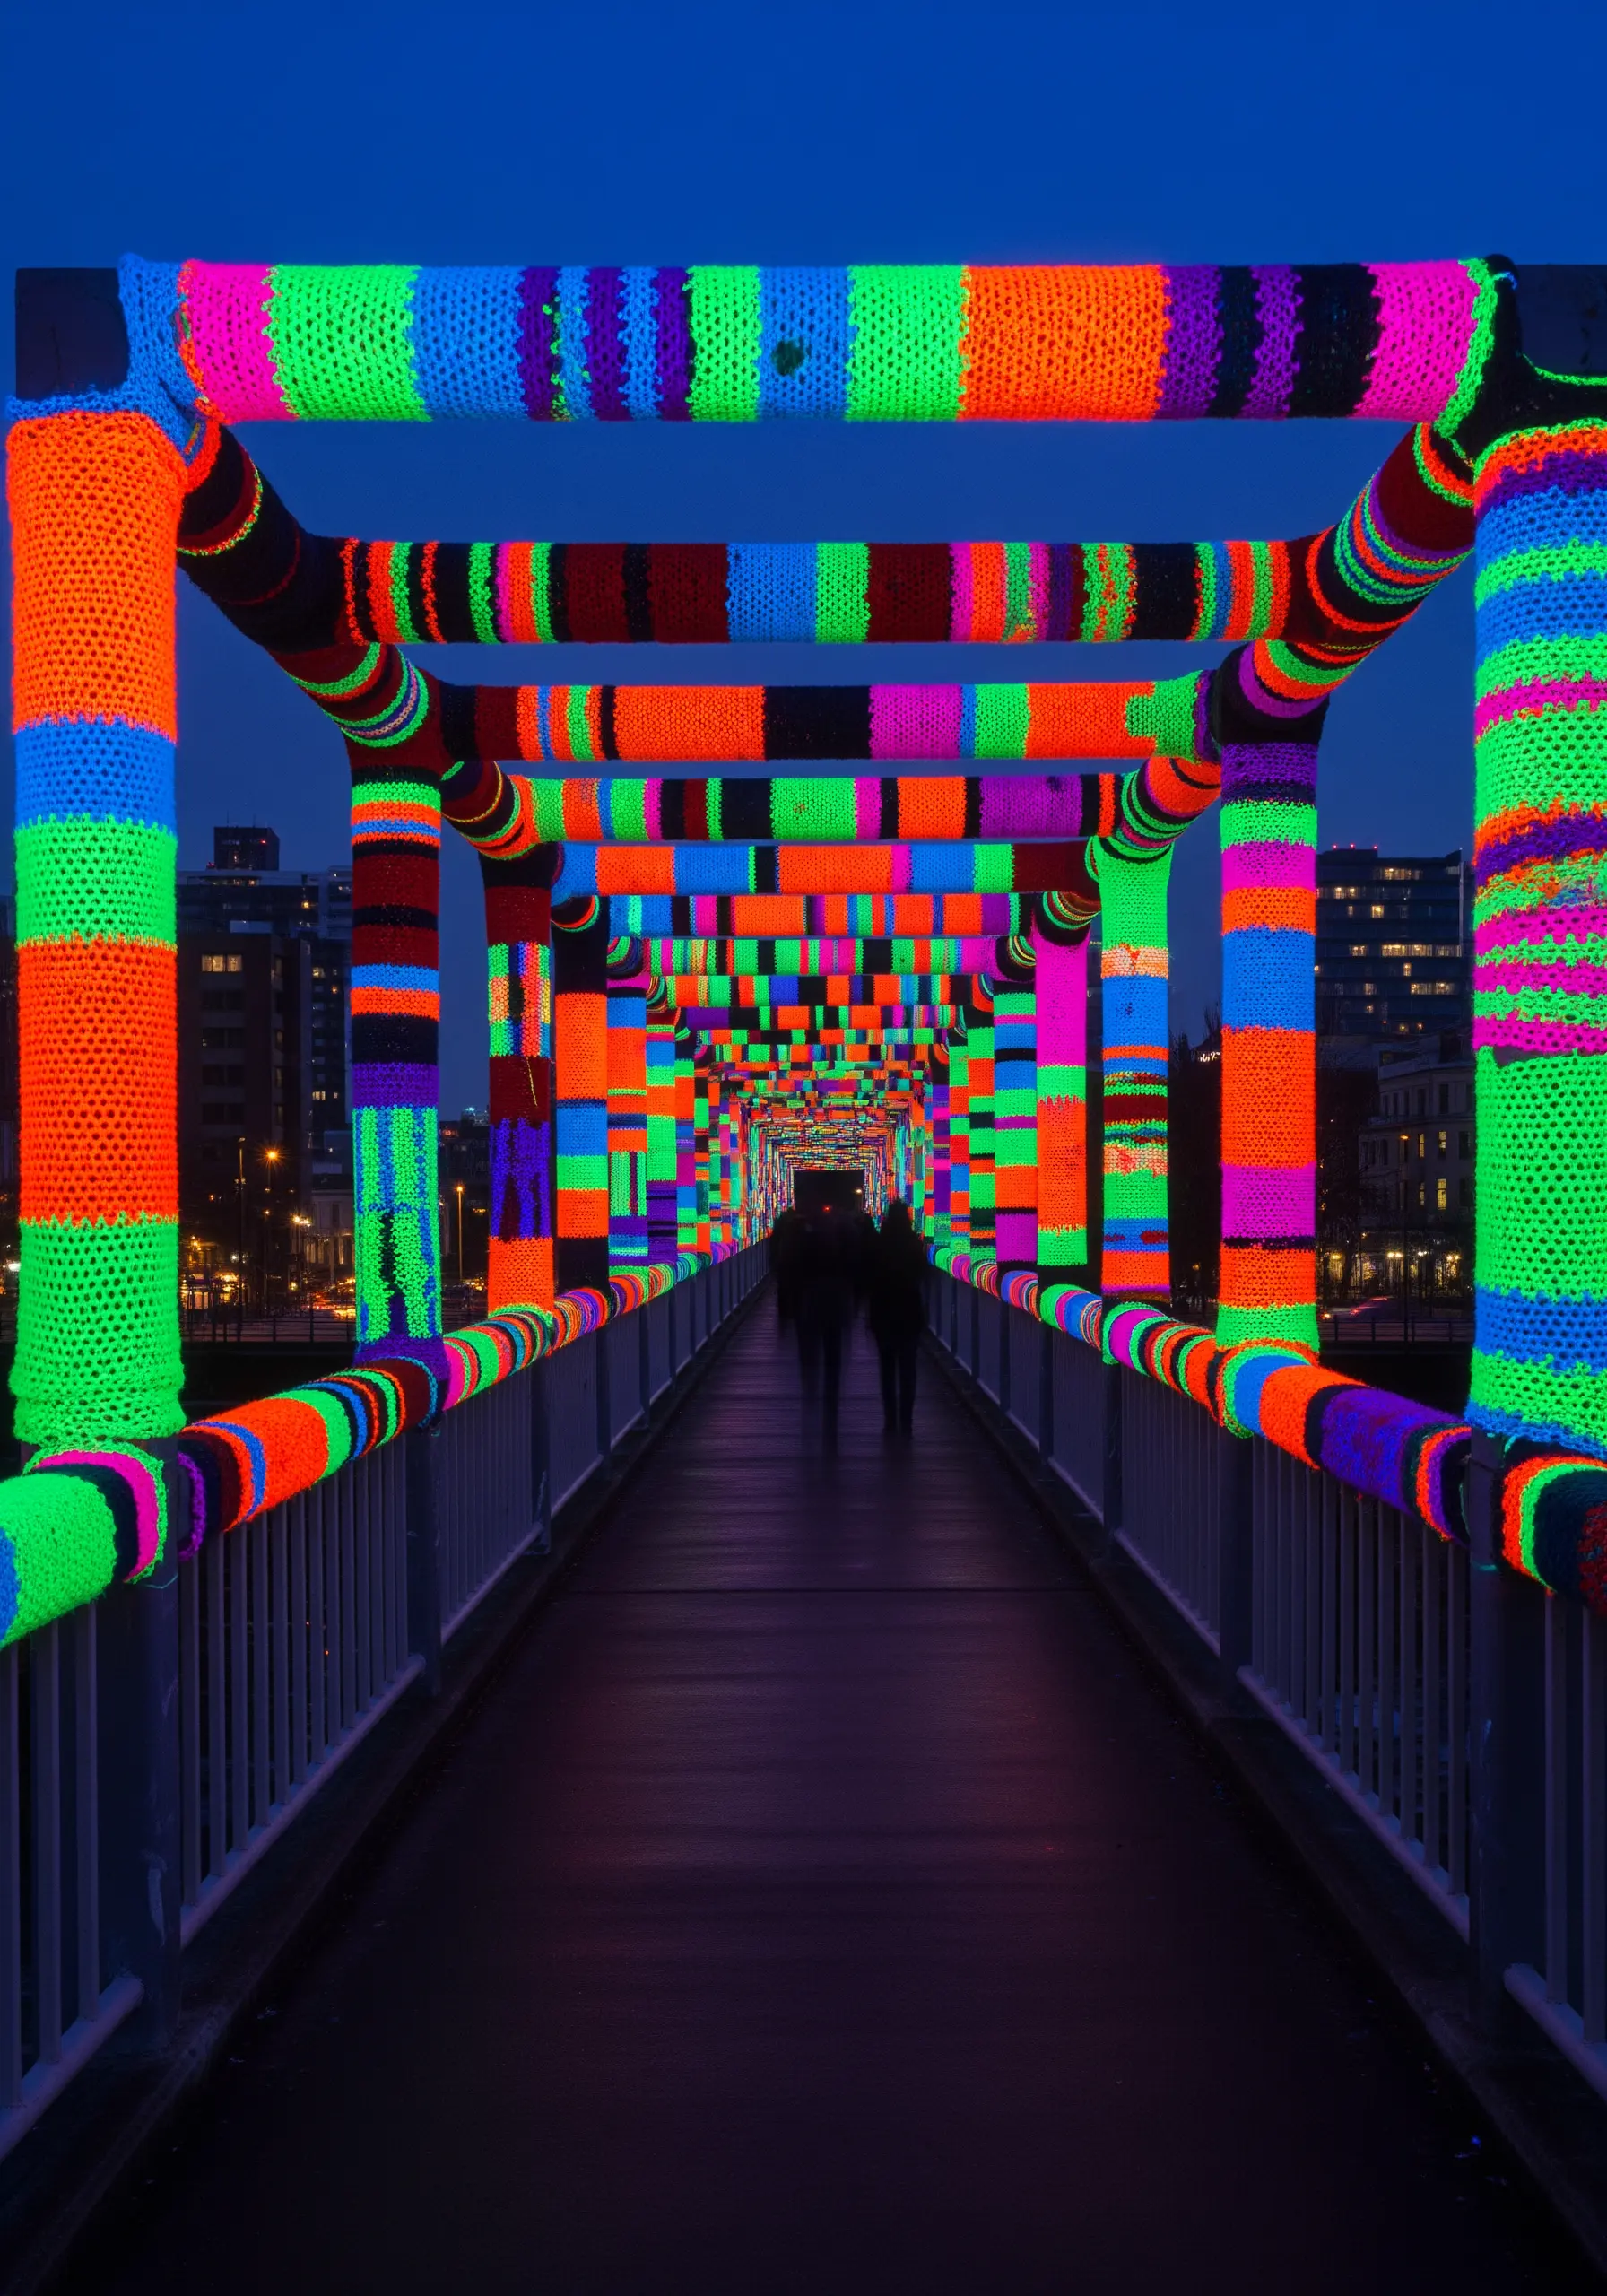
6. Transform Structures With Modular Crochet or Knitting

Use ‘yarn bombing’ techniques to temporarily cover an everyday object in a vibrant textile skin.
Instead of trying to knit a single giant tube, create smaller, manageable patches like granny squares or striped panels.
Stitch these modules together around the object—whether it’s a pillar, a bench, or a bike rack—for a custom fit.
This modular approach is less daunting and allows for greater creative flexibility, letting you mix patterns and colors to create a playful, collaborative masterpiece.
7. Build Oversized Amigurumi With Structural Yarn
Take the principles of small-scale amigurumi and apply them to large, sculptural forms.
Use a thick, rigid yarn like cotton rope or felted wool, along with a large crochet hook, to create dense, sturdy stitches that hold their shape.
For hollow forms, you may need to build a simple wire or PVC pipe frame inside to prevent sagging.
The key is maintaining tight, consistent tension in your stitches, ensuring the final piece is a firm sculpture, not a floppy toy.
8. Marry Fabric and Frame for Dynamic Sculptures

Explore the relationship between tension and draping by combining soft textiles with rigid frames.
Create a structure from bamboo, driftwood, or metal rods, then stretch and secure fabric panels across it.
Use a lightweight but durable fabric like cotton canvas or sailcloth that will catch the wind and light beautifully.
The negative space—the areas where the fabric is cut away—is just as important as the fabric itself, creating a sense of lightness and movement.
9. Guide the Eye With a Gradient ‘Yarnfall’

Create a sense of motion and direction in a large space by installing hundreds of strands of yarn in a color gradient.
Arrange your threads from light to dark or from one hue to another to create a powerful visual flow that draws people through the area.
The success of this technique relies on precision; each strand must be cut to the correct length and hung with care to create a smooth, cascading effect.
This is one of the simplest yet most effective fiber art installations that use color and texture to evoke emotion, turning threads into a flowing river of color.
10. Paint With Light Using Sheer, Layered Fabrics
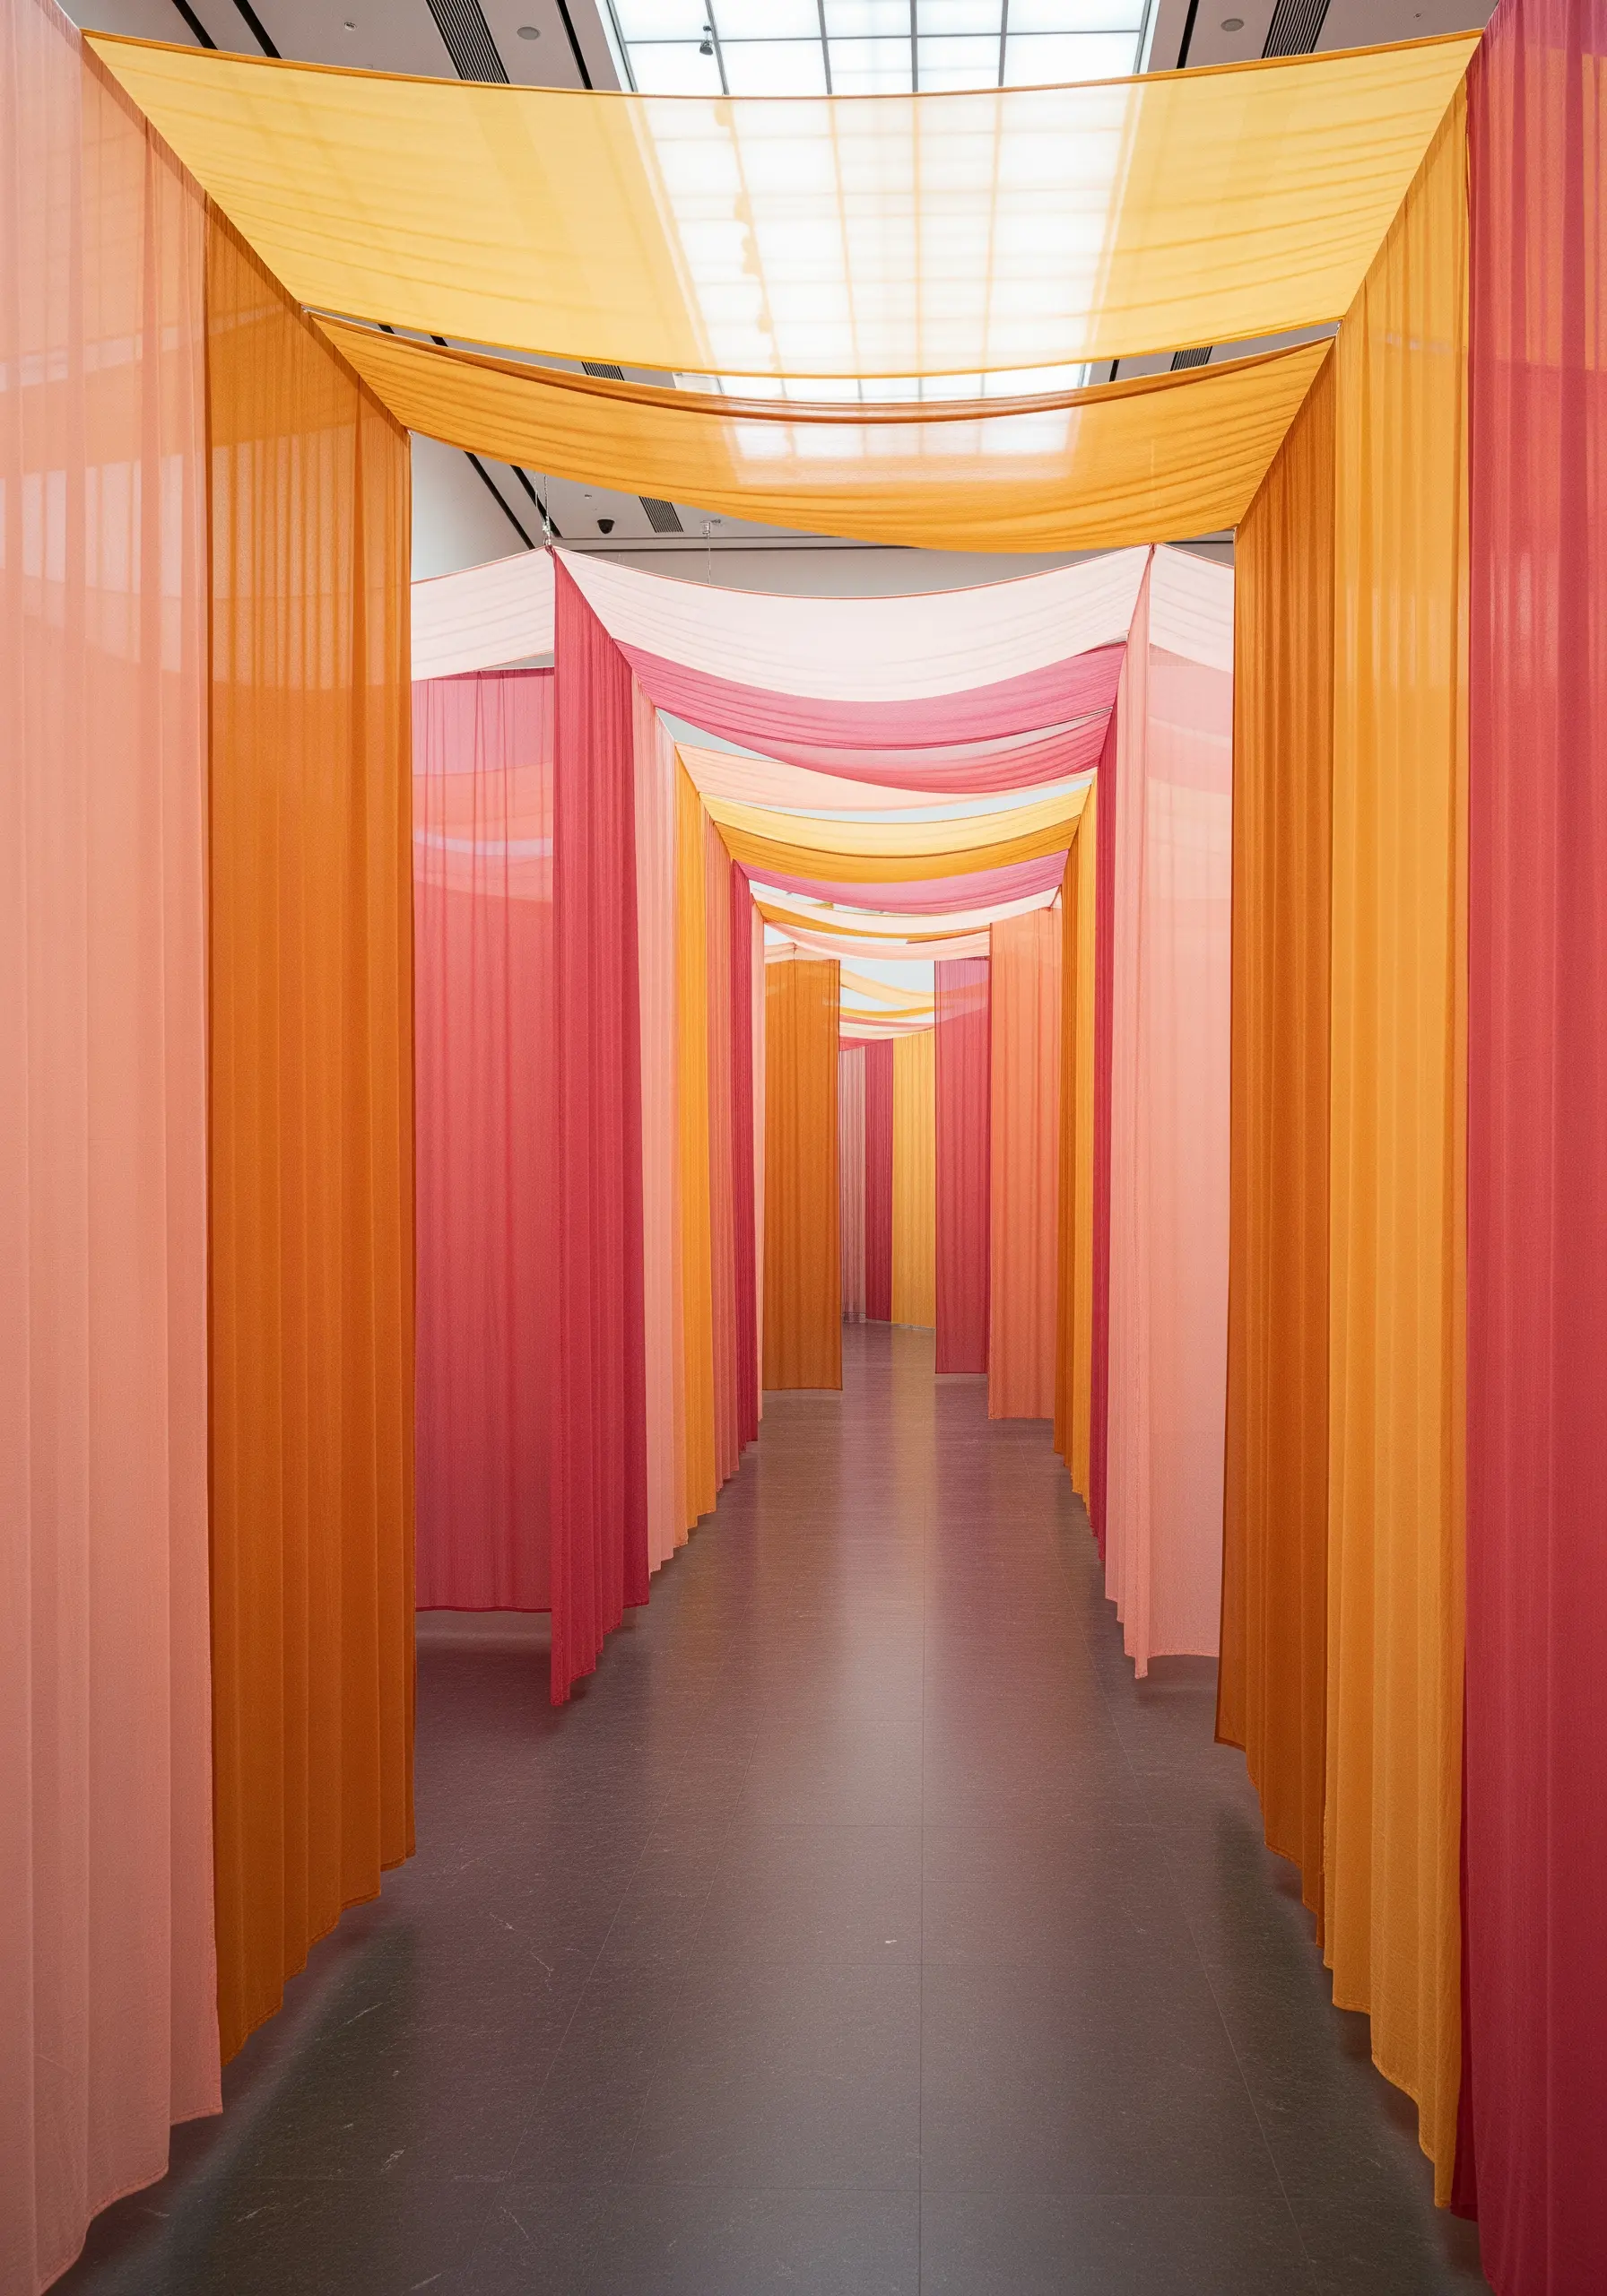
Manipulate a room’s atmosphere by creating a maze of translucent fabric panels.
Choose lightweight materials like organza or chiffon in a harmonious color palette.
By hanging panels in overlapping layers, you create new, blended colors where they intersect, essentially ‘mixing’ hues with light itself.
This immersive technique transforms a simple hallway into a dreamy, ethereal experience that changes as you move through it.
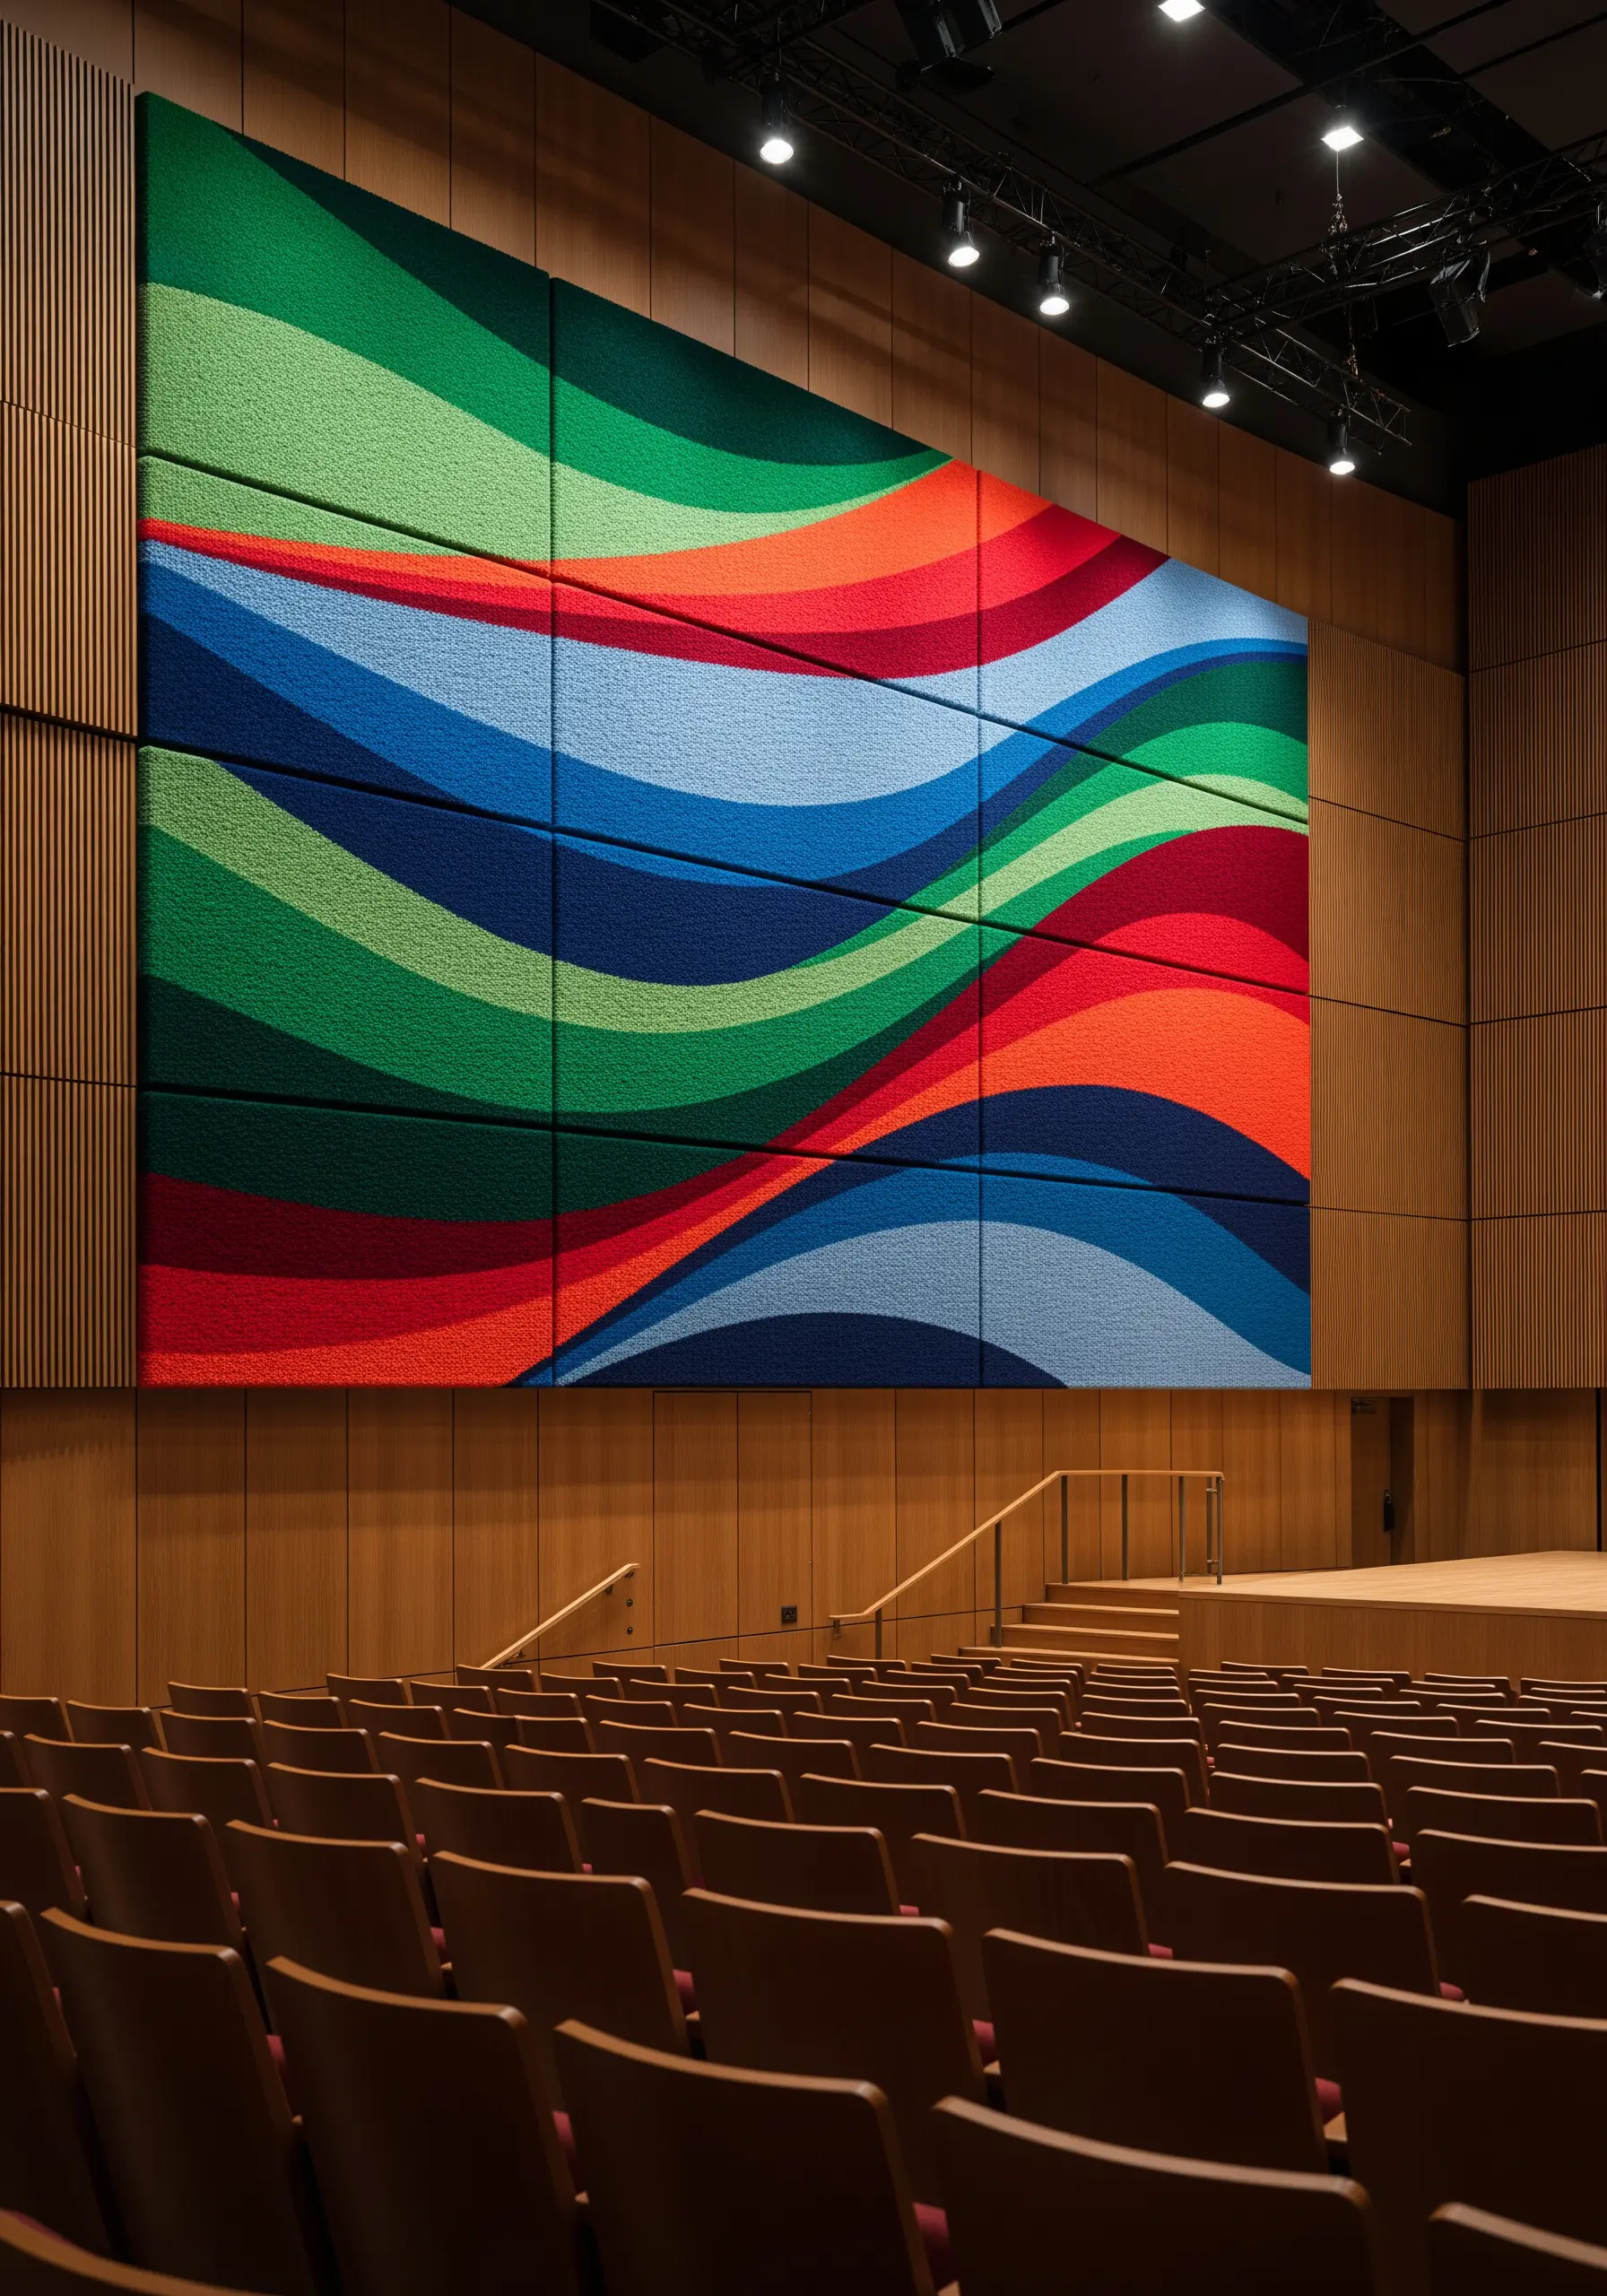
11. Translate Line Art to Architectural Scale

Reimagine embroidery as a graphic medium by applying line-based designs to large-scale textiles.
Instead of stitching, consider screen printing or digital printing on durable mesh or canvas for a crisp, clean look that’s visible from afar.
When designing, simplify your motifs and use bold, continuous lines. Intricate details that work in a small hoop will get lost on a building-sized facade.
This approach elevates simple line drawings into monumental public art, proving that the principles of embroidery design—line, shape, and composition—apply to any scale.
12. Create a Dual Reality With UV-Reactive Fibers
Design a piece that has two distinct personalities: one for daytime and one for night.
Use fluorescent or UV-reactive yarns, which appear bright in daylight but glow intensely under blacklight.
Alternate these specialty yarns with regular colored yarns in your knitting or crochet pattern.
In daylight, you’ll have a colorful, textured piece. At night, under a blacklight, a hidden, luminous pattern will emerge, transforming the entire mood and experience of the space.
13. Form Organic Shapes With Wet Felting

Use wet felting to create seamless, delicate, and durable shapes that mimic nature.
Lay down layers of wool roving on a textured surface like bubble wrap, wet it with hot, soapy water, and use friction to agitate the fibers until they lock together into a single piece of felt.
You can gently shape the felt as it forms, creating curved petals or ruffled edges.
This technique is perfect for making waterproof, floating sculptures or resilient outdoor art, as the resulting fabric is dense and naturally water-repellent.
14. Design Functional Art With Structural Knots

Think beyond decoration and create fiber art that serves a purpose, like a hammock or climbing structure.
Focus on strong, reliable knotting techniques from macrame and net-making, such as the square knot and double half hitch.
Use high-tensile rope made from nylon or polypropylene for durability and safety, especially for projects intended for play.
The beauty of functional art lies in its engineering; the pattern of the knots is not just aesthetic but integral to the piece’s strength and usability.
15. Weave Around Sculptural Forms

Instead of weaving on a flat loom, use a three-dimensional object as your base.
Build a simple frame from wicker, wire, or bamboo, then wrap your warp threads around it vertically.
Weave your weft threads in and out of the warp, following the contours of the form.
This technique allows you to create hollow, vessel-like sculptures and adds an incredible layer of texture and pattern to a pre-existing shape, merging the worlds of basketry and weaving.
16. Sculpt Space With Suspended Fabric Strips

Create an immersive architectural experience using nothing more than fabric strips and gravity.
Hang hundreds of ribbons or fabric lengths from the ceiling at varying heights to create a sense of depth and enclosure.
Choose a lightweight fabric that will move with the slightest air current, adding a dynamic, living quality to the installation.
The power of this technique is in its scale and repetition; a single ribbon is just a ribbon, but a thousand becomes a forest, a waterfall, or a cloud.
17. Design in Modules for Manageable Masterpieces
Break down a massive fiber art project into a series of smaller, interlocking panels.
Create individual square or rectangular frames and complete the texture work—like punch needle or tufting—on each one separately.
Once all the modules are complete, assemble them like tiles to form the final, large-scale composition.
This approach not only makes the project more portable and less intimidating but also allows for easy repairs or reconfigurations in the future, making it one of the most practical statement-size wall art ideas.
18. Mimic Nature’s Logic With Freeform Crochet

Embrace intuitive making by using freeform crochet to create complex, organic structures like a coral reef.
Start with a simple shape and add stitches, ruffles, and branches wherever feels right, without a pattern.
Use hyperbolic crochet—regularly increasing stitches in a round—to create the naturally curly, crenulated forms found in corals, fungi, and lettuces.
This method celebrates imperfection and allows you to build wonderfully complex, unique sculptures by following the internal logic of the stitches themselves.
19. Create an Enchanted Ceiling Canopy

Transform a room’s atmosphere by focusing on the space above.
Hang a variety of fiber elements—such as felted leaves, macrame vines, and chunky yarn moss—from a ceiling grid or suspended branches.
Intersperse small, warm-toned fairy lights to create a magical, dappled light effect that filters down through the textures.
By layering different materials and varying the hanging lengths, you can build a rich, immersive canopy that makes a space feel intimate and enchanting, turning a plain ceiling into the main feature.
20. Juxtapose Soft Textures With Hard Architecture

Create a surprising and delightful visual contrast by wrapping a hard, utilitarian structure in soft, chunky yarn.
Use oversized, plush fibers like chenille or merino wool roving to cover a fountain, statue, or bench.
The tension comes from the unexpected pairing: the yielding, warm texture of the yarn against the rigid, cold surface of stone or metal.
This playful intervention invites people to see a familiar landmark in a new way, adding warmth, color, and a touch of whimsy to the urban landscape.


