

Have you ever looked at a finished piece and felt that something was missing? You’ve mastered the stitches, chosen your colors carefully, but the result still feels… flat. It’s a common feeling, and the solution is often simpler and more exciting than you think.
The key to unlocking that next level of artistry isn’t about more complicated stitches; it’s about introducing texture. By thoughtfully combining traditional embroidery with other fibers like wool roving, chunky yarn, beads, and even natural elements, you give your work a voice and a physical presence that thread alone cannot achieve.
Think of this not as a departure from embroidery, but as an expansion of your creative language. These ideas are designed to show you how different materials can work in harmony to bring the richness of the natural world to life, turning a simple hoop into a tactile, dimensional landscape you can feel as well as see.
1. Sculptural Moss with French Knot Gradients

To create the lush, three-dimensional effect of moss, build up dense clusters of French knots using a heavy-weight crewel or wool yarn.
Work in gradients, starting with dark brown or deep green at the base of each mound and shifting to a vibrant chartreuse at the top to mimic new growth.
This technique creates a far more realistic texture than a flat satin stitch, inviting touch and adding physical depth.
For the forest floor, scatter loose straight stitches and smaller knots with single strands of floss to represent fallen leaves and soil, adding another layer to your textures you’d find on a nature walk.
2. Weaving a Three-Dimensional Coral Reef
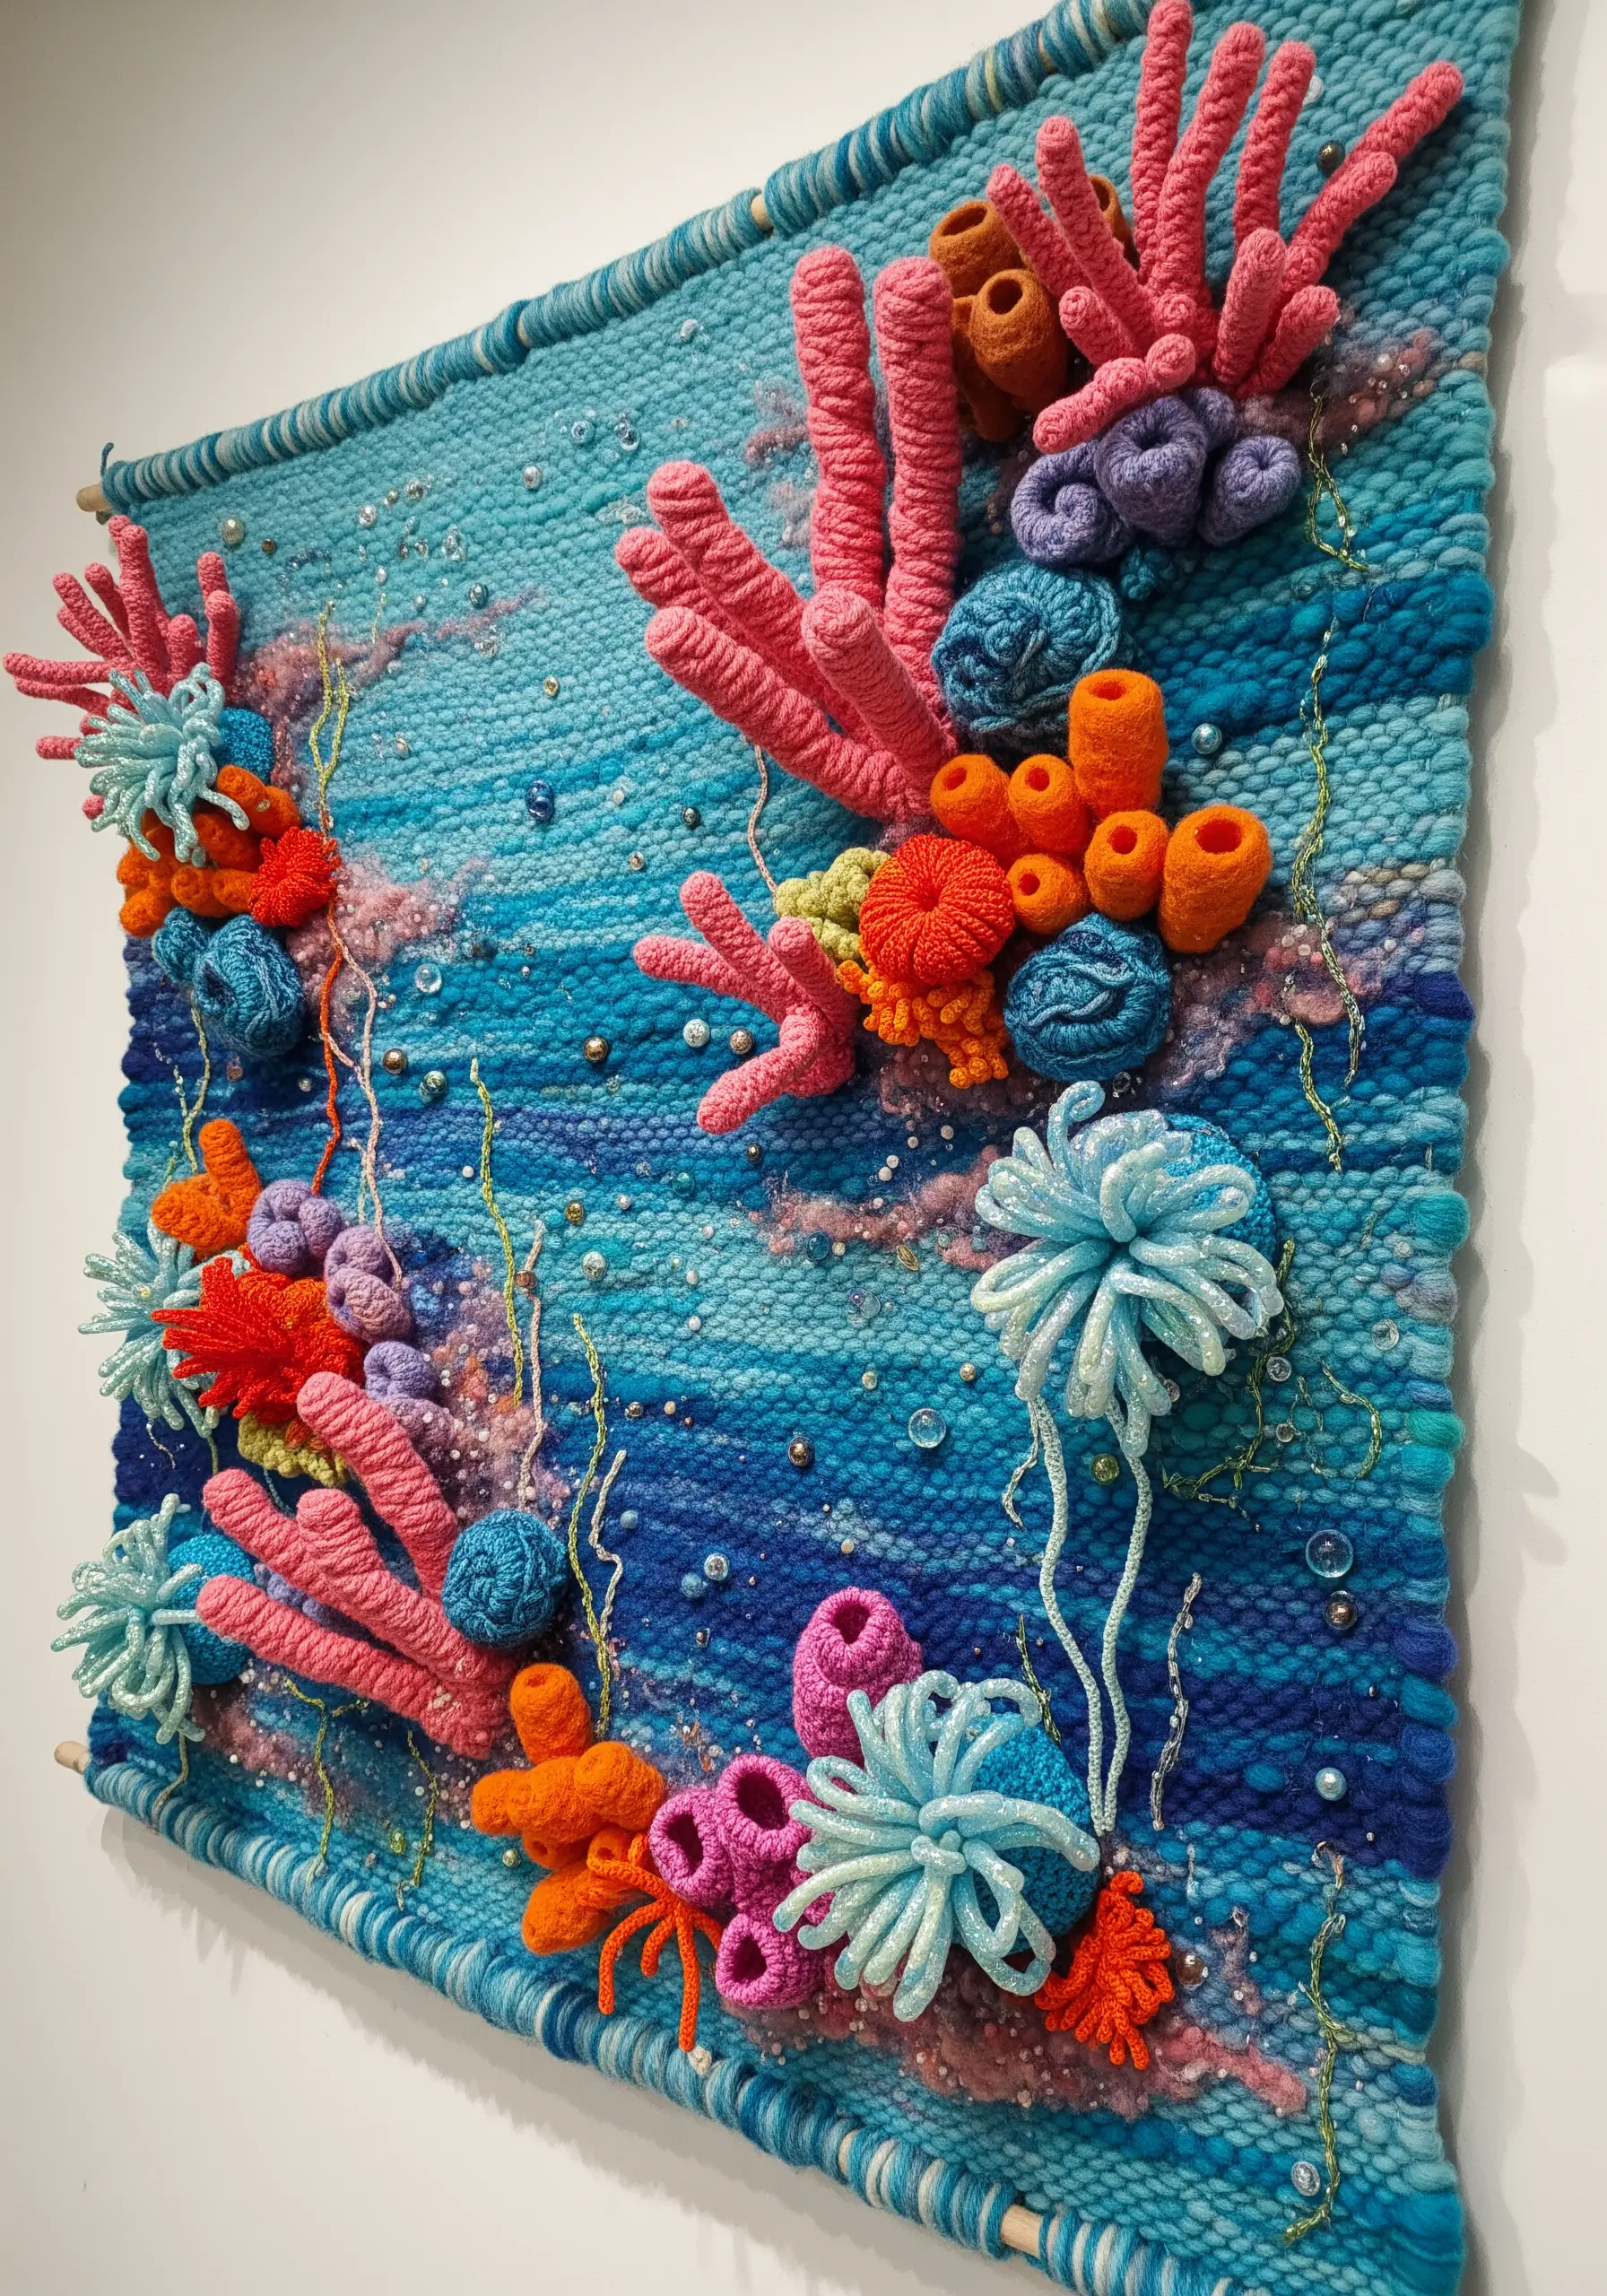
Move beyond the needle with a woven base that allows you to sculpt with yarn.
Create your ocean backdrop by weaving with variegated blue yarns to suggest the shifting light and depth of water.
For the coral, build up structures using dimensional fiber techniques like rya knots, soumak stitch, and needle-knitted tubes that you stitch directly onto the surface.
This combination of flat weaving and sculptural fiber art creates an immersive underwater scene that feels alive with texture and movement.
3. A Woven Mandala with Crystal Inclusions
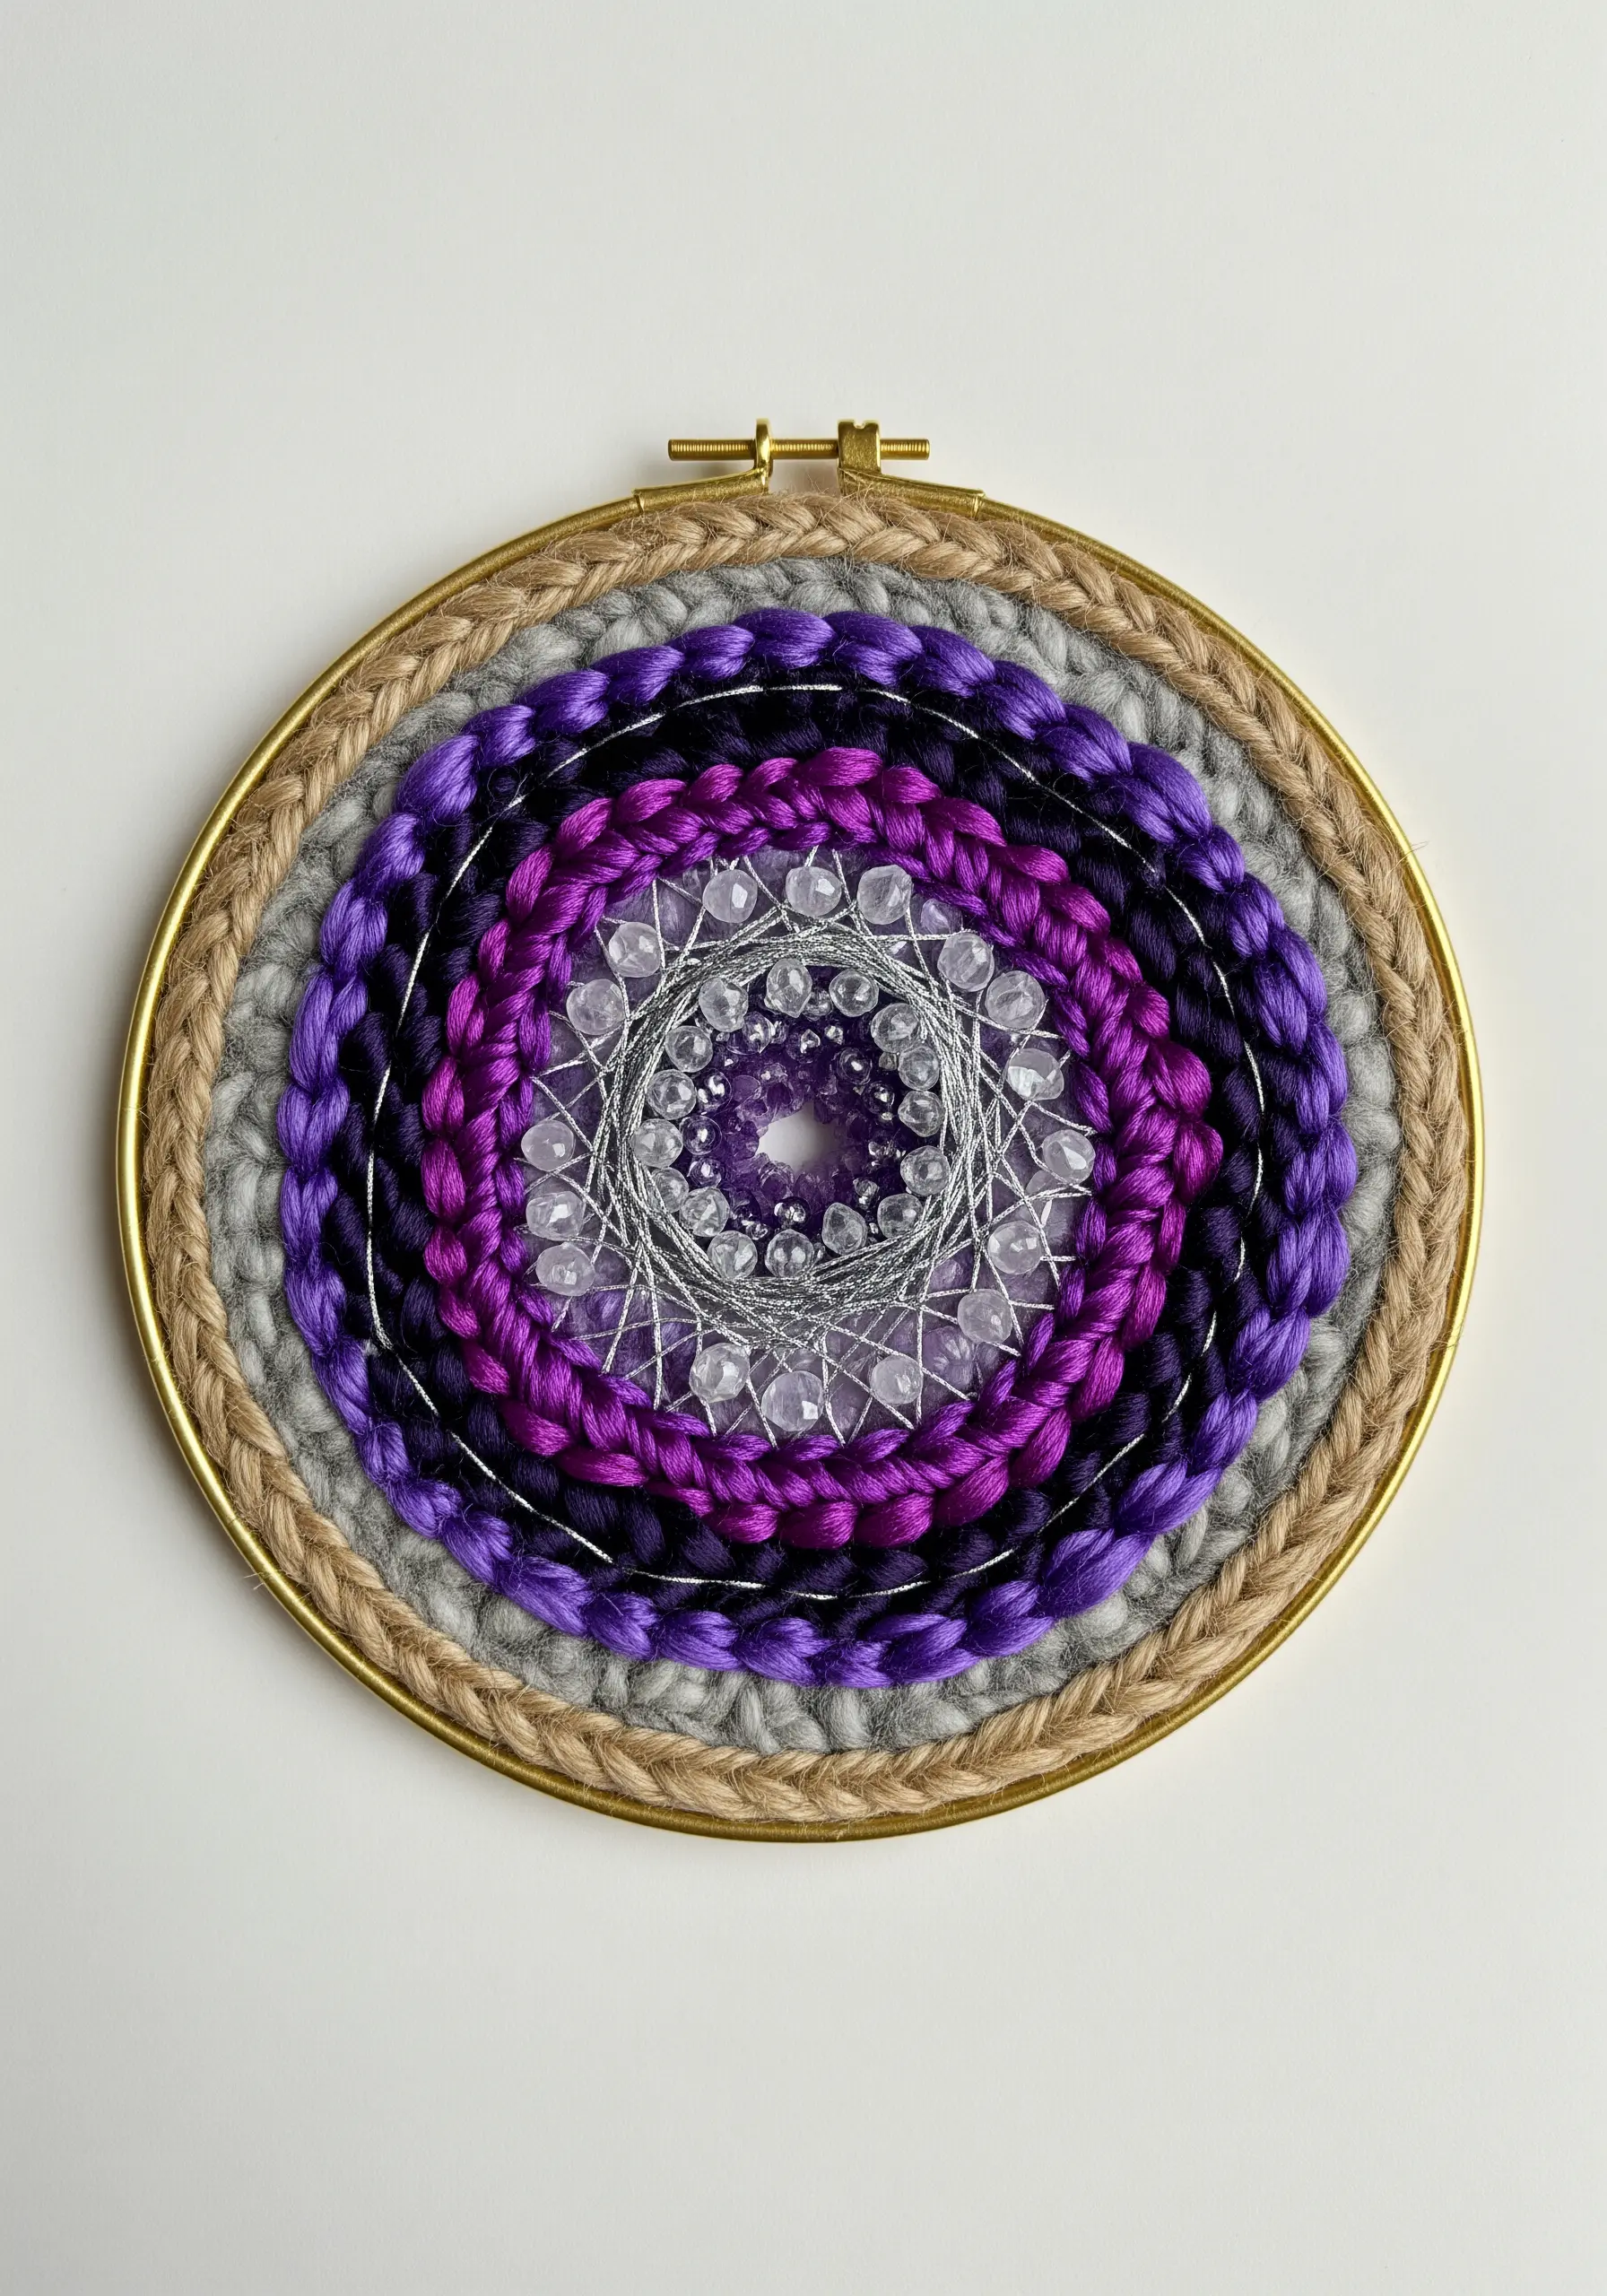
Transform an embroidery hoop into a small loom by creating a warp with strong cotton or linen thread.
Weave in concentric circles, alternating yarn textures—thick wool roving, braided jute, and smooth cotton floss—to create visual rhythm.
To embed crystals or beads, either couch them onto the finished piece or thread them directly onto a thin metallic warp thread before you begin weaving.
This technique introduces a hard, light-refracting element that contrasts beautifully with the softness of the yarn, making your embroidered mandala wall art a true focal point.
4. Weaving Mountain Textures with Braids and Roving
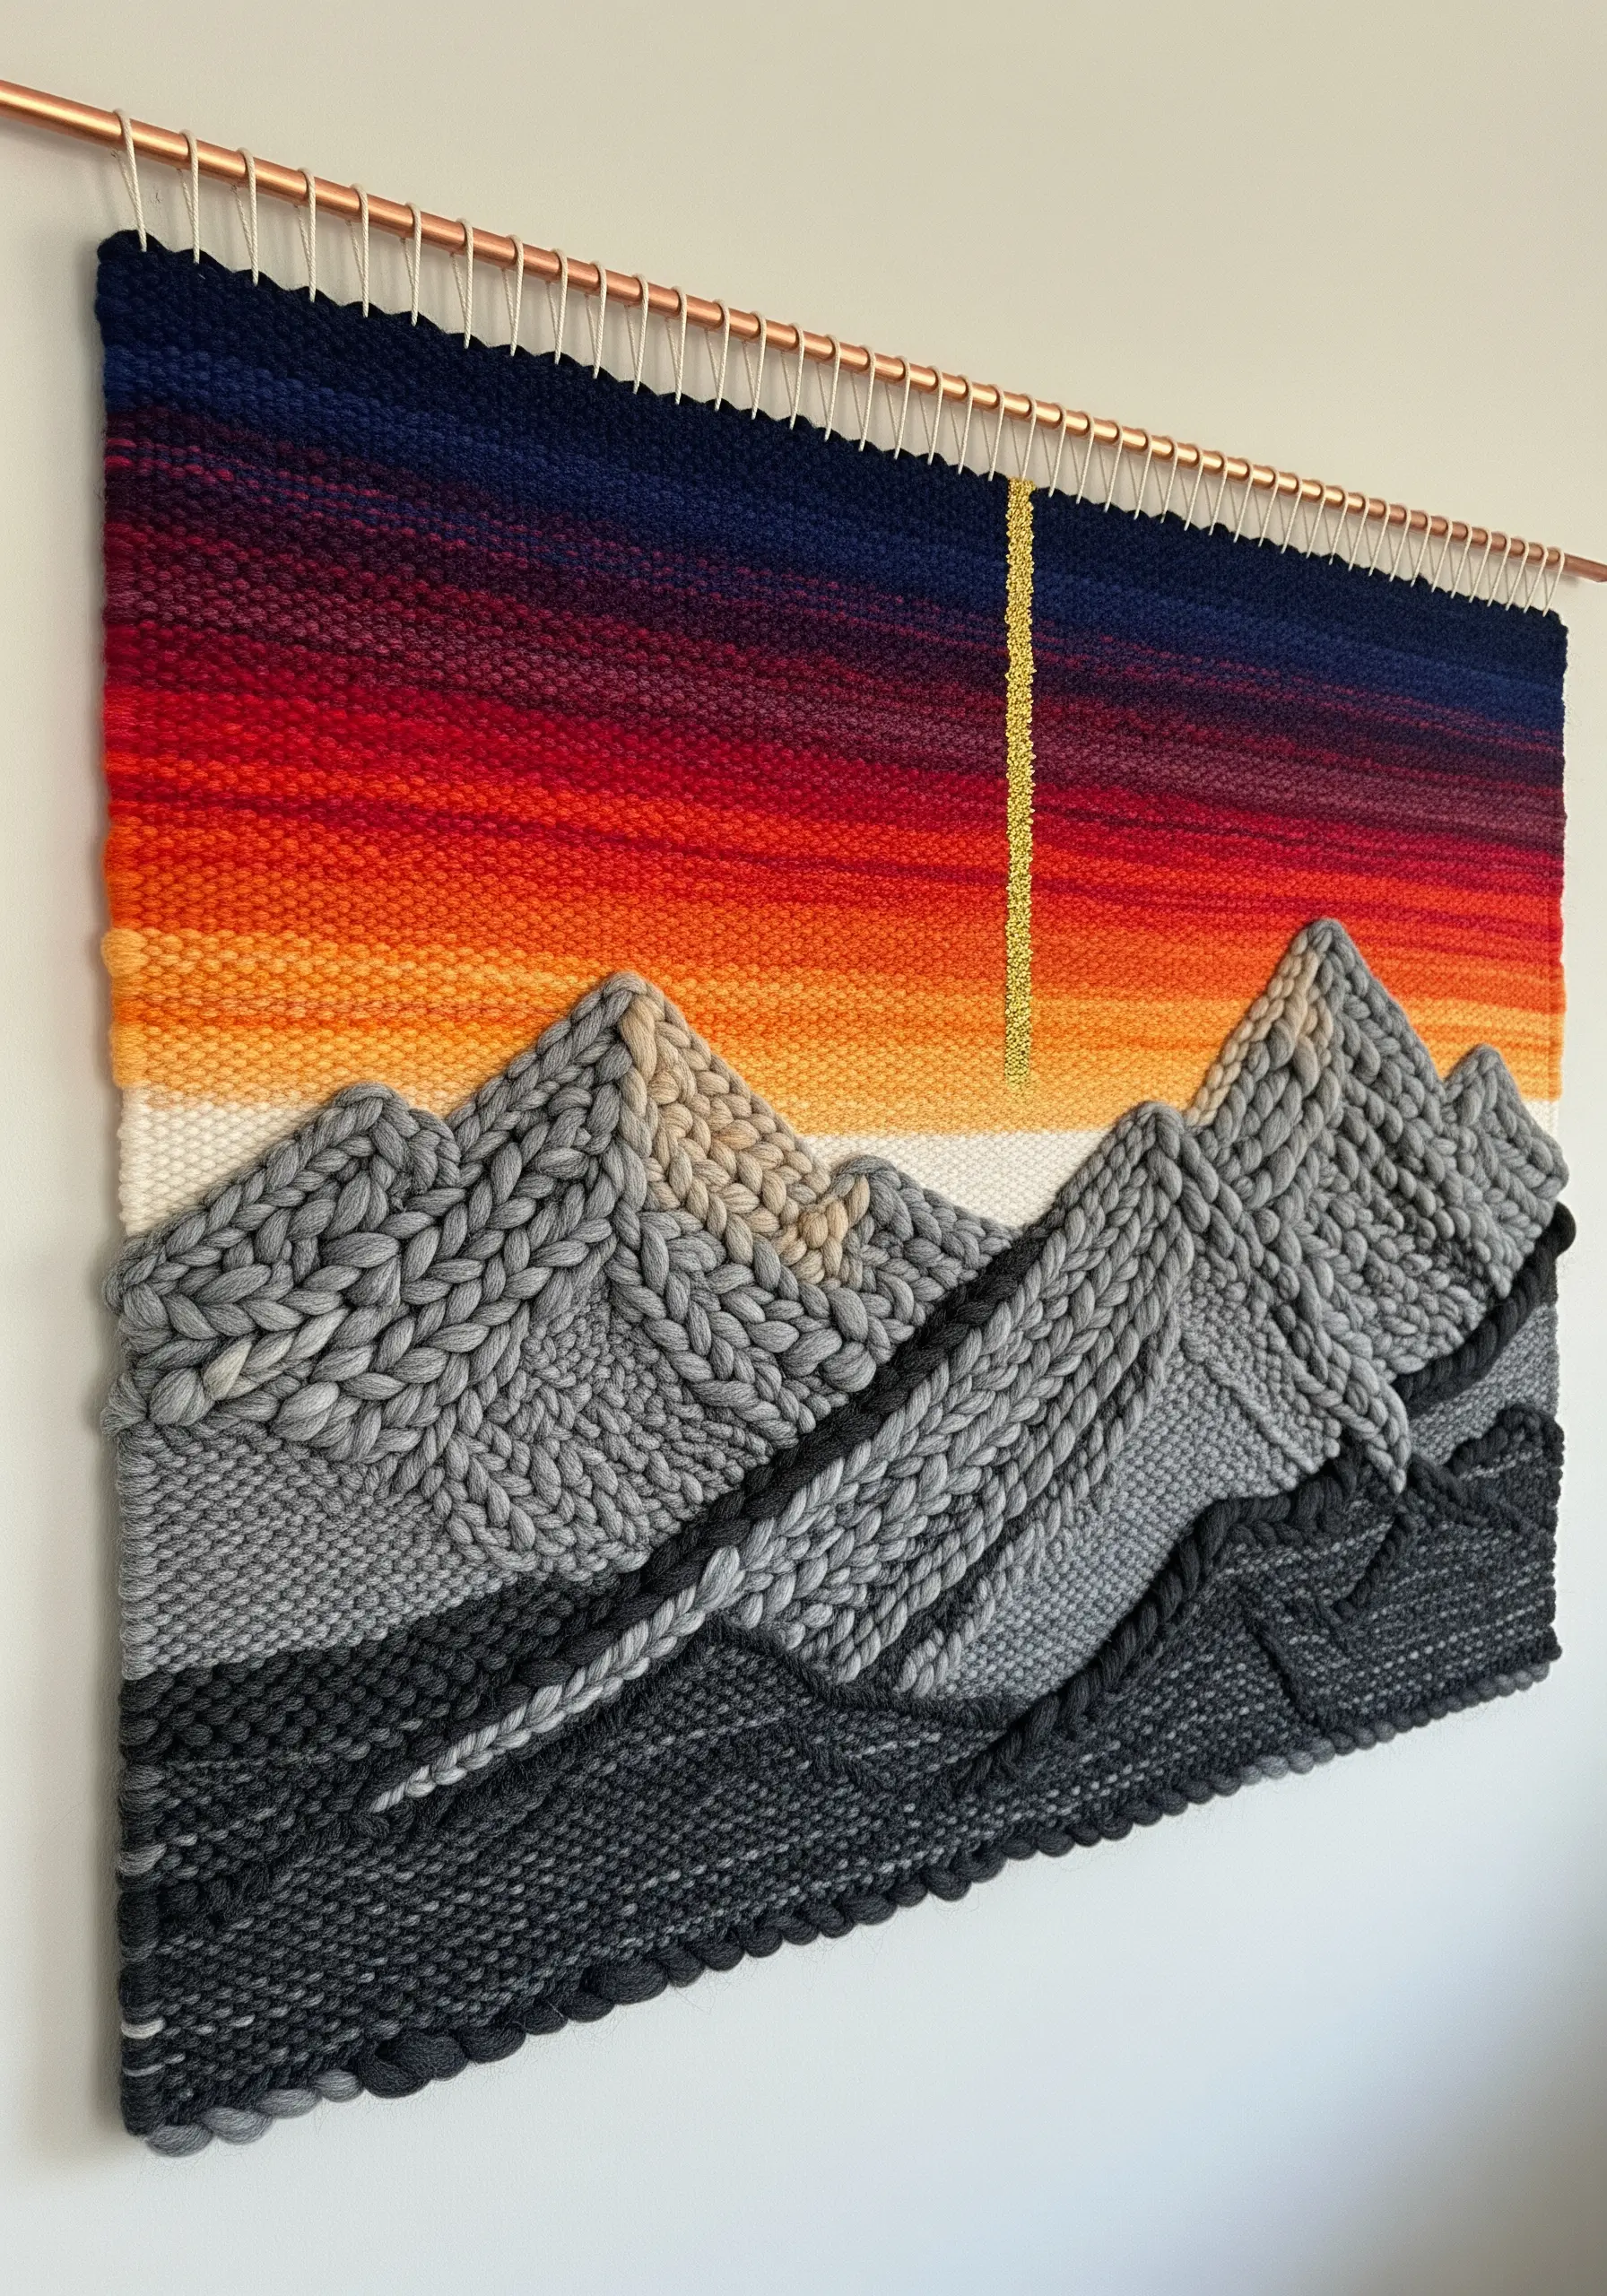
Convey the grand scale of a mountain range by contrasting smooth and rugged textures in your weaving.
Use a simple, flat tabby weave with blended color gradients for the sky to create a serene backdrop.
For the mountains, introduce chunky wool roving and thick, pre-made braids to define the dramatic ridges and peaks.
Use angled soumak stitches to suggest rocky slopes, allowing the textural difference to build a sense of immense depth and geological form.
5. Embellishing a Needle-Felted Landscape
Create a soft, painterly background for your embroidery by starting with a needle-felted wool base.
This method allows you to blend colors smoothly and cover large areas much faster than thread painting.
Once the landscape is formed, add sharp details with embroidery: use chunky yarn and bullion knots for textured bushes, and silk ribbon for vibrant flowers.
A simple lazy daisy stitch with ribbon creates instant, lustrous petals that stand out against the matte wool backdrop.
6. Cellular Structures with Chiffon and Beads
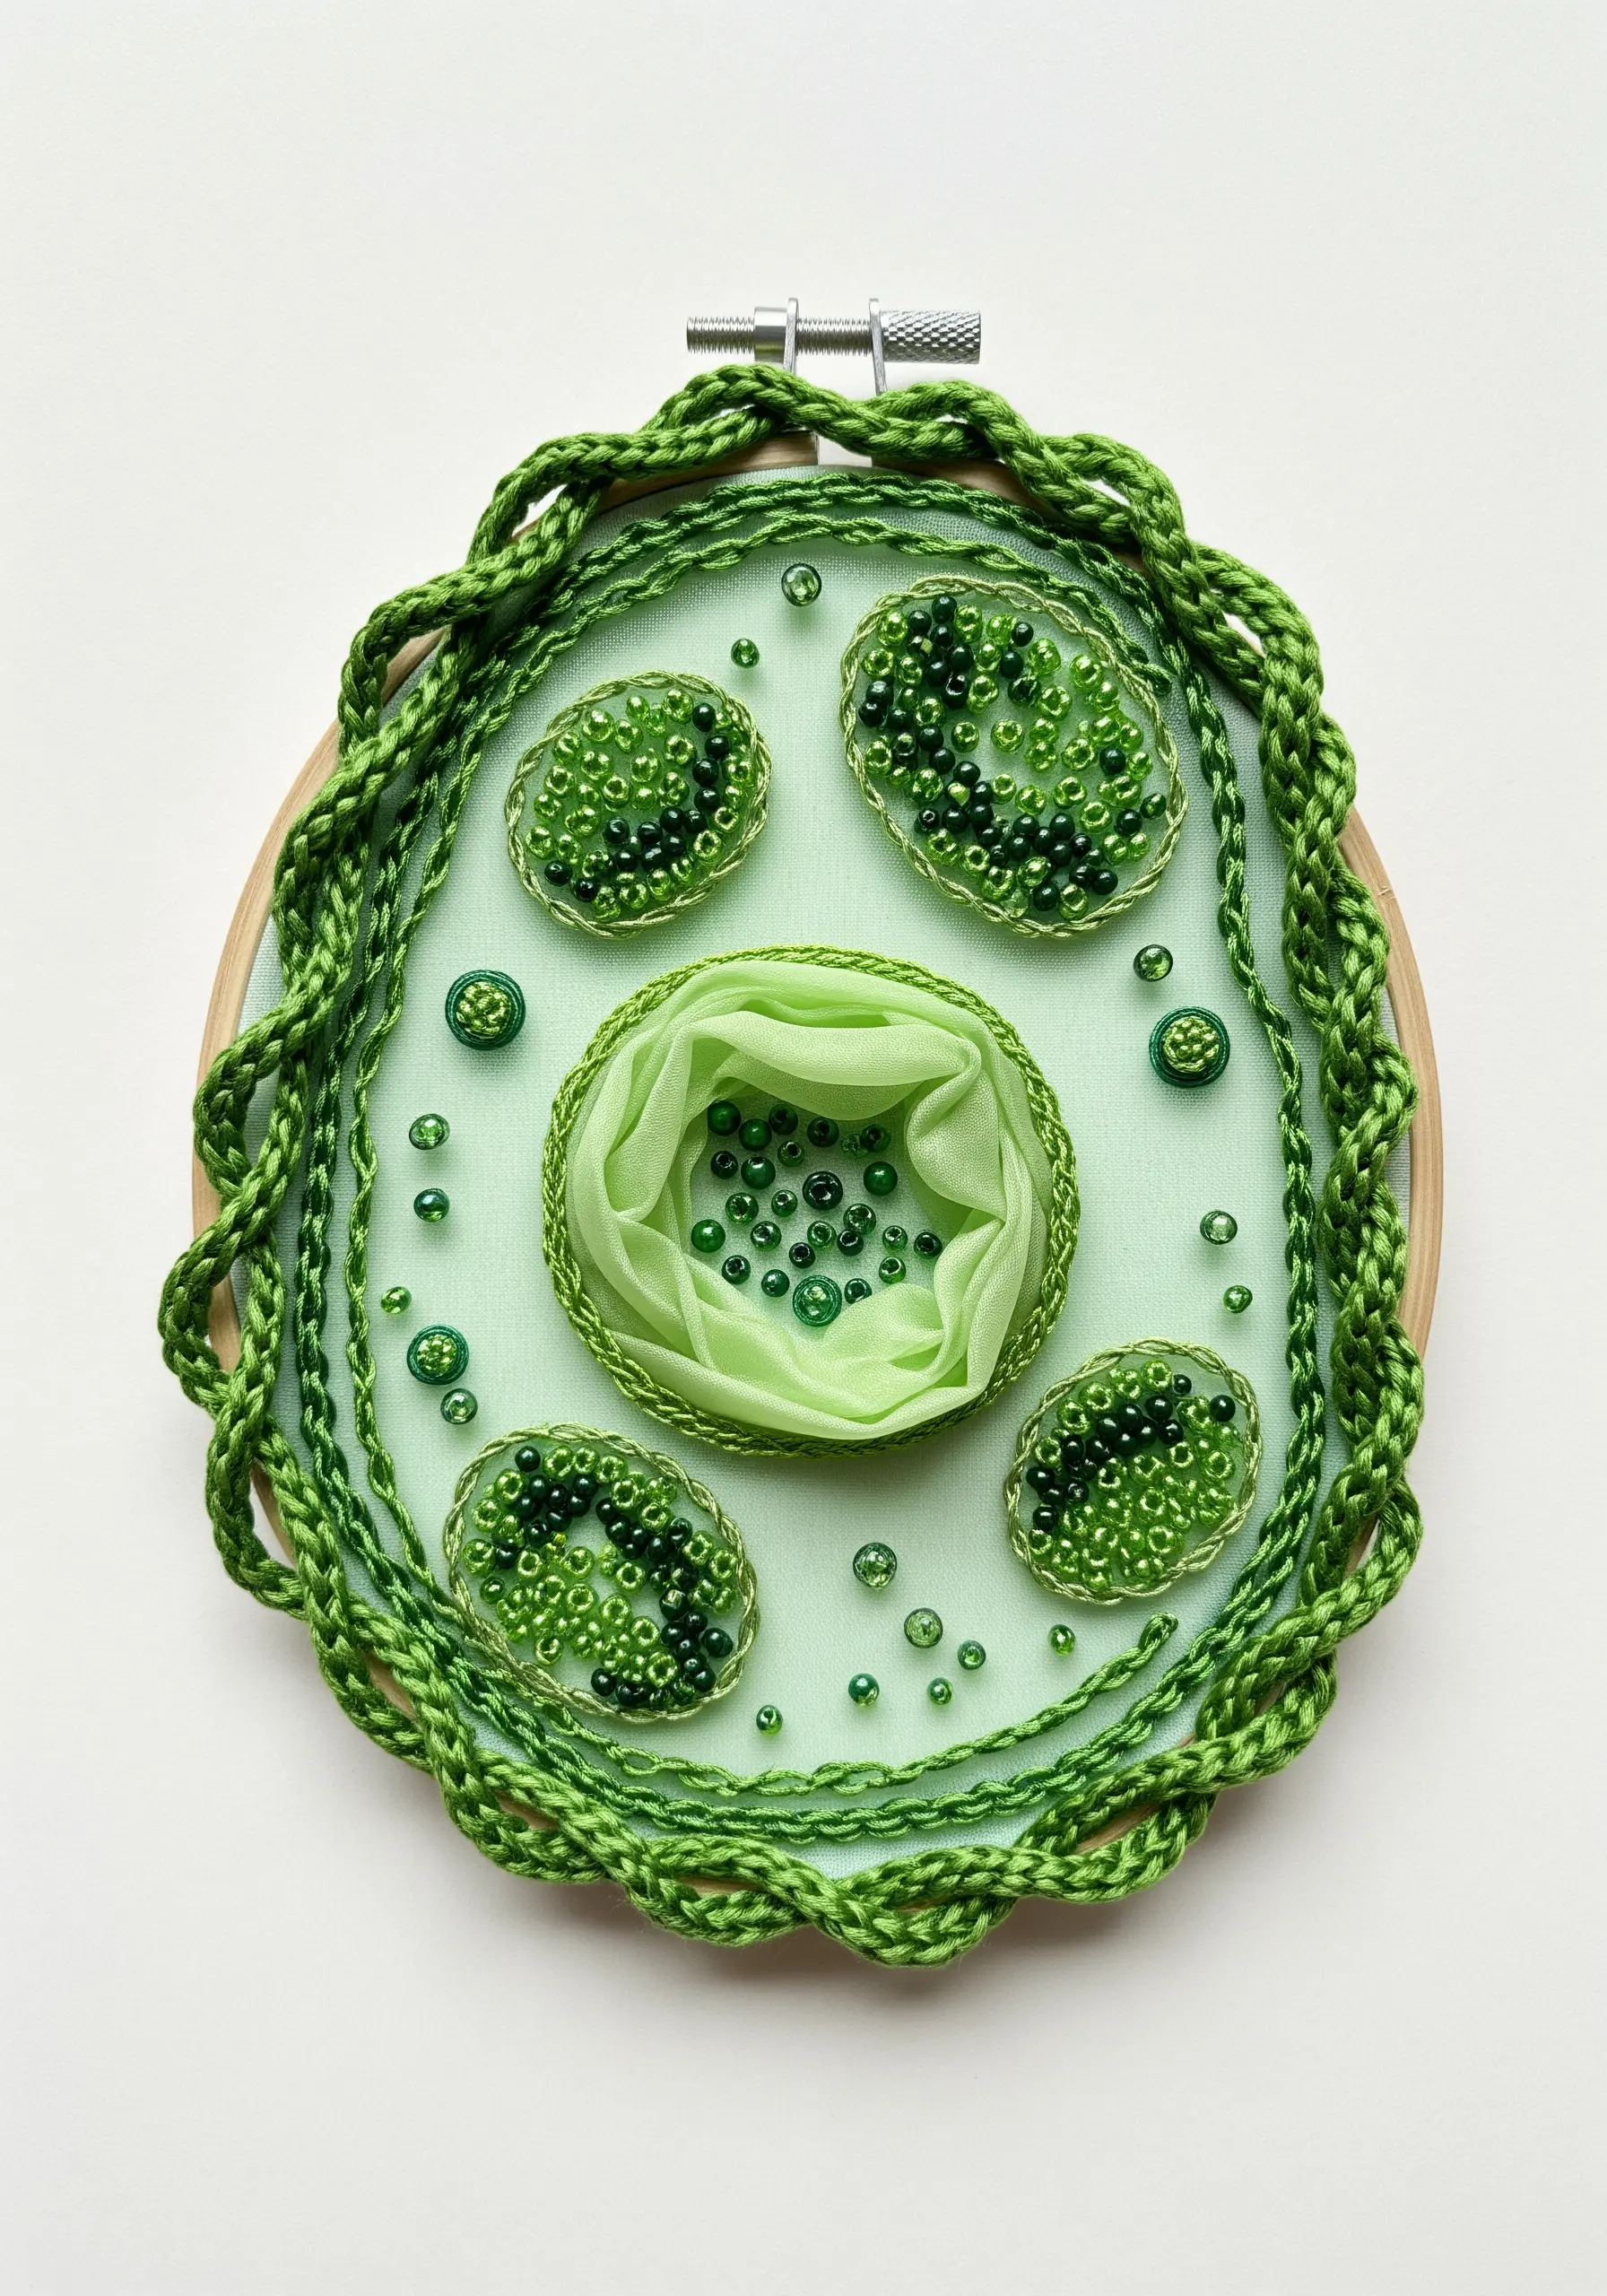
To interpret microscopic worlds, play with materials that suggest translucency and volume.
Use a thick, braided cord or raised stem stitch to define the cell walls, creating a firm boundary.
Fill the inner organelles with seed beads in a tight gradient to create a shimmering, dense texture.
For the central vacuole, gather a small piece of silk chiffon and stitch it down; its soft, semi-transparent quality adds a delicate volume that contrasts beautifully with the hard, reflective beads.
7. Painting with Yarn: The Tufted Tree
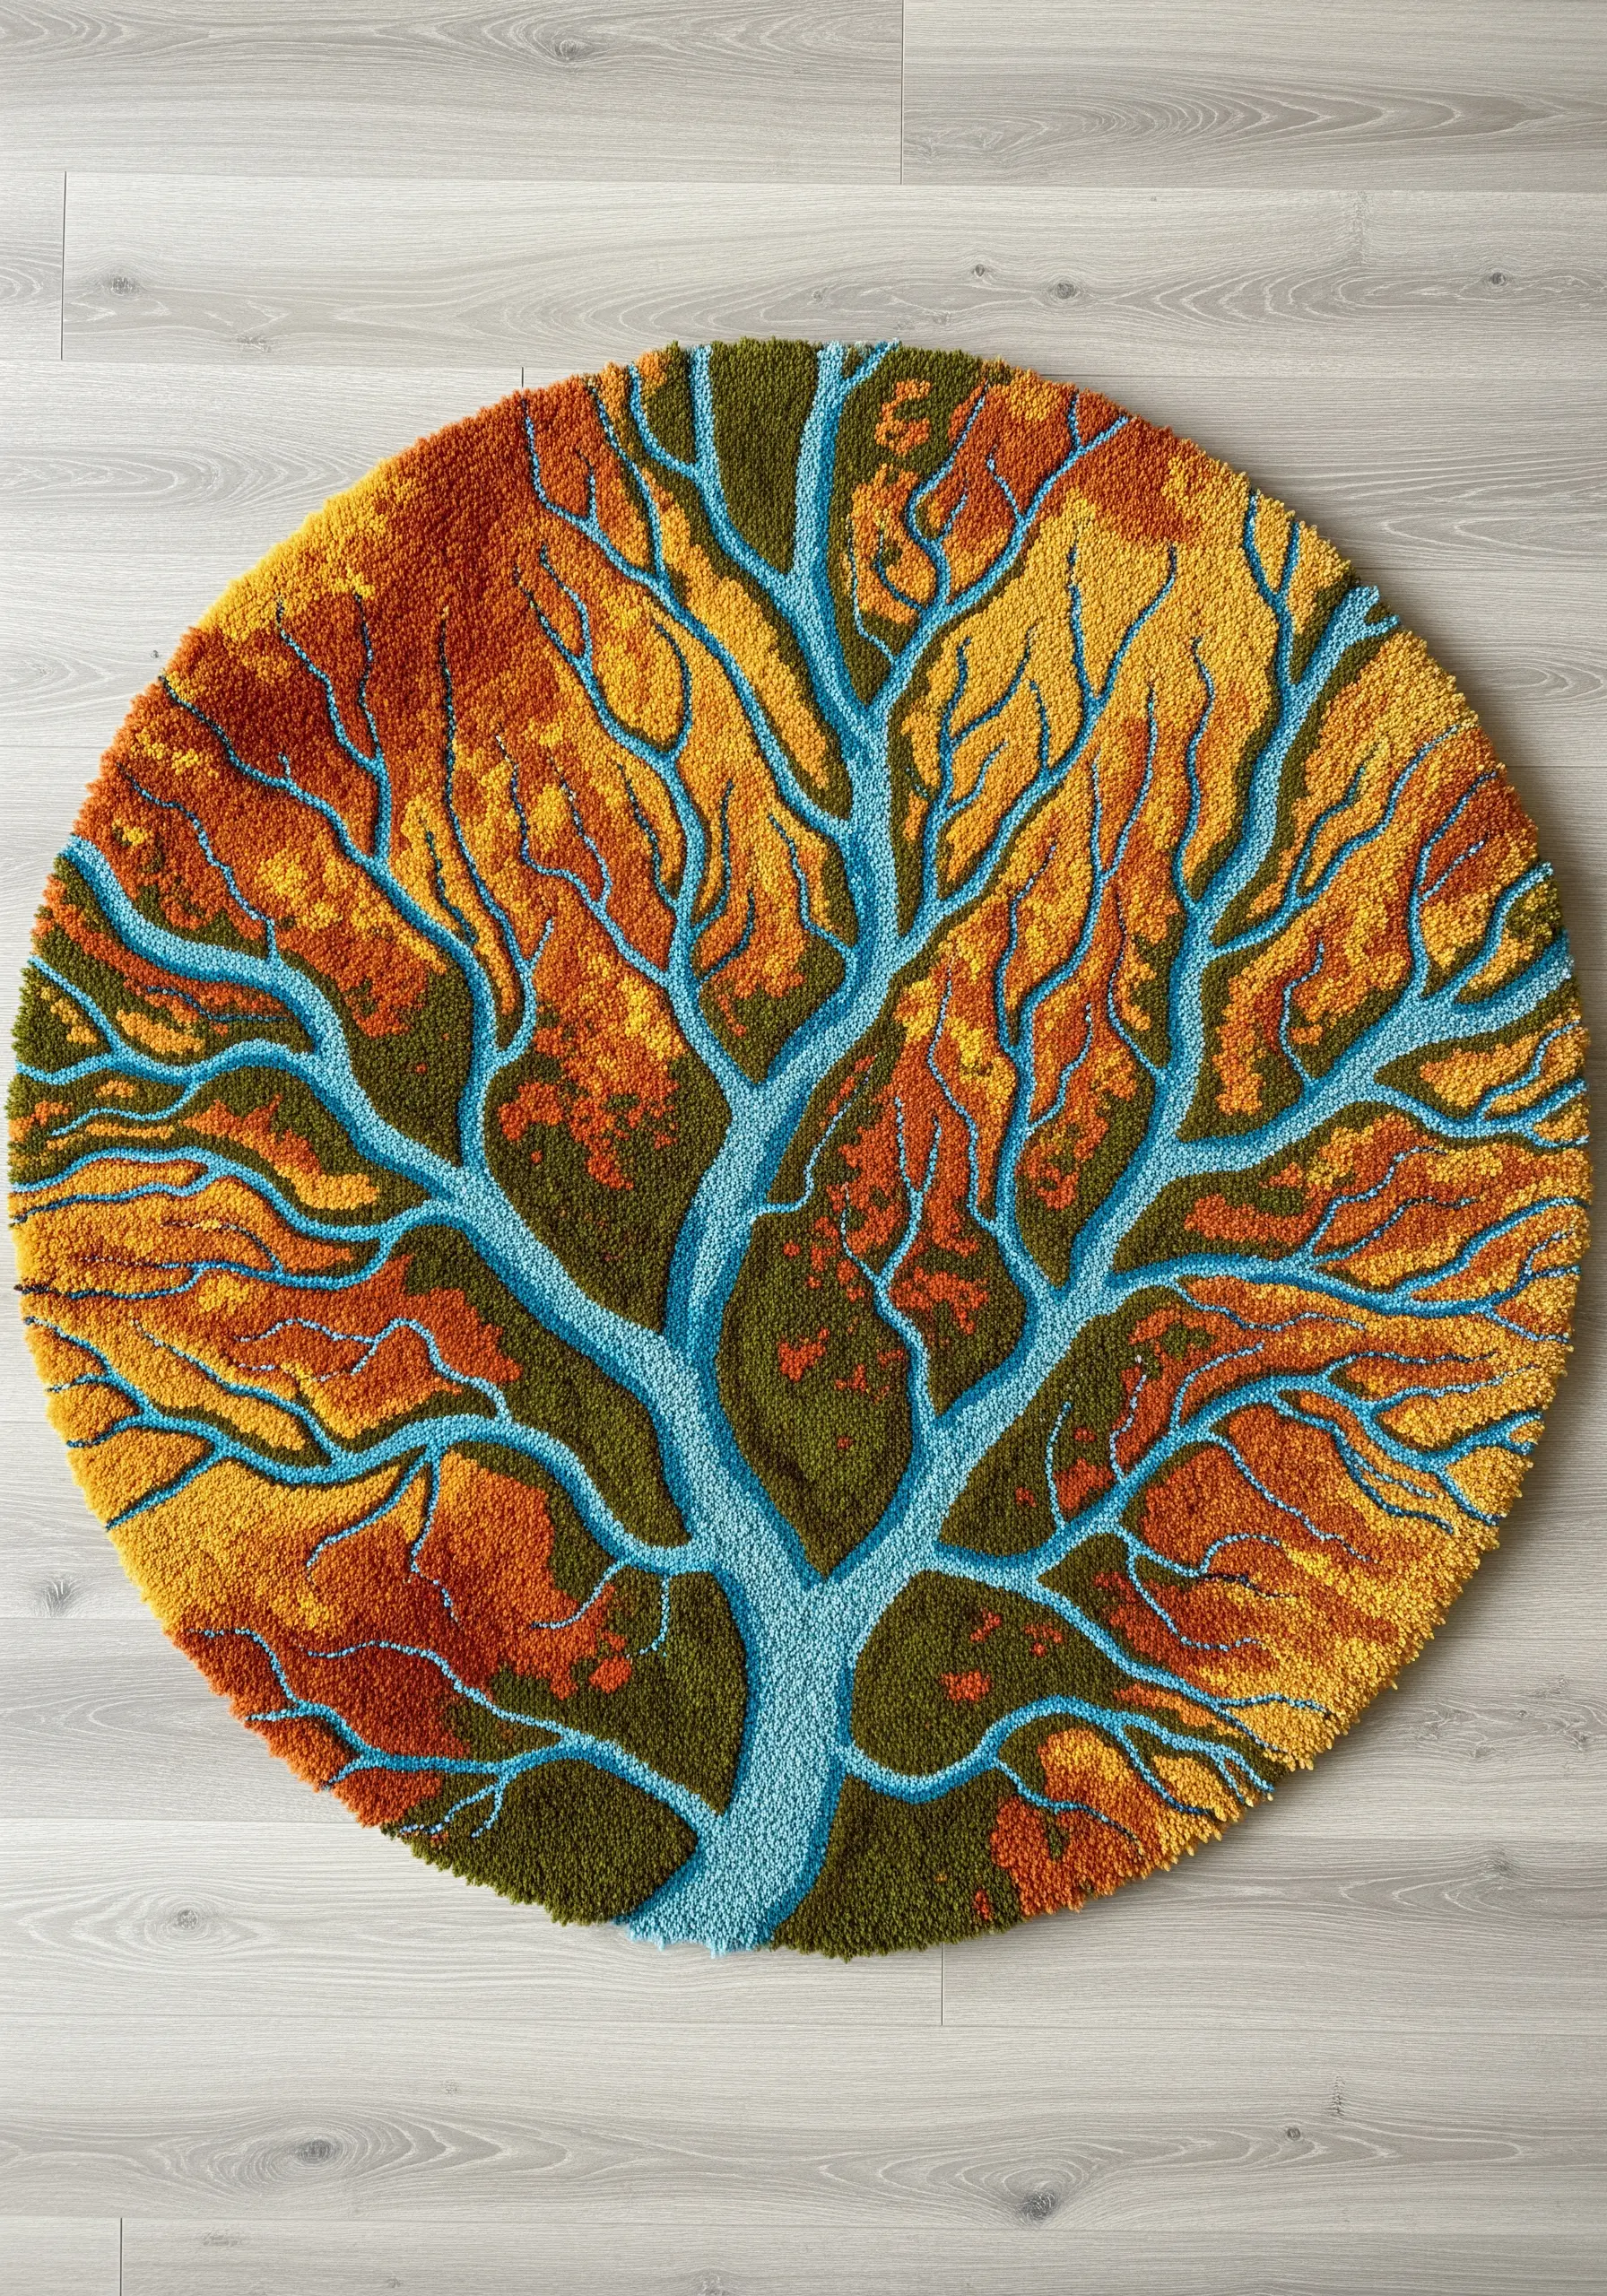
This vibrant piece is made with a tufting gun, which allows you to ‘paint’ with yarn by punching loops through a backing fabric.
To achieve the rich, blended foliage, approach your color planning like a pointillist painter, using small clusters of different autumnal shades to create an overall gradient effect.
The power of this design comes from the unexpected sky-blue branches; using a non-traditional color for a natural element instantly elevates the composition into a modern work of art.
8. Achieving Realism with Thread Painting and Beads

For hyper-realistic insect wings, precision is key. Begin by outlining the black veins with a tight, two-stranded split stitch to create a sharp, graphic frame.
Fill the cells using the long-and-short stitch technique, blending two or three shades of orange to create a seamless gradient that mimics natural coloration.
Instead of stitching the white spots, use small, opaque white beads or tight French knots with a glossy thread. This small material change adds a reflective quality that perfectly captures the light-catching scales of a real butterfly.
9. A Needle-Felted Galaxy with Cosmic Embroidery
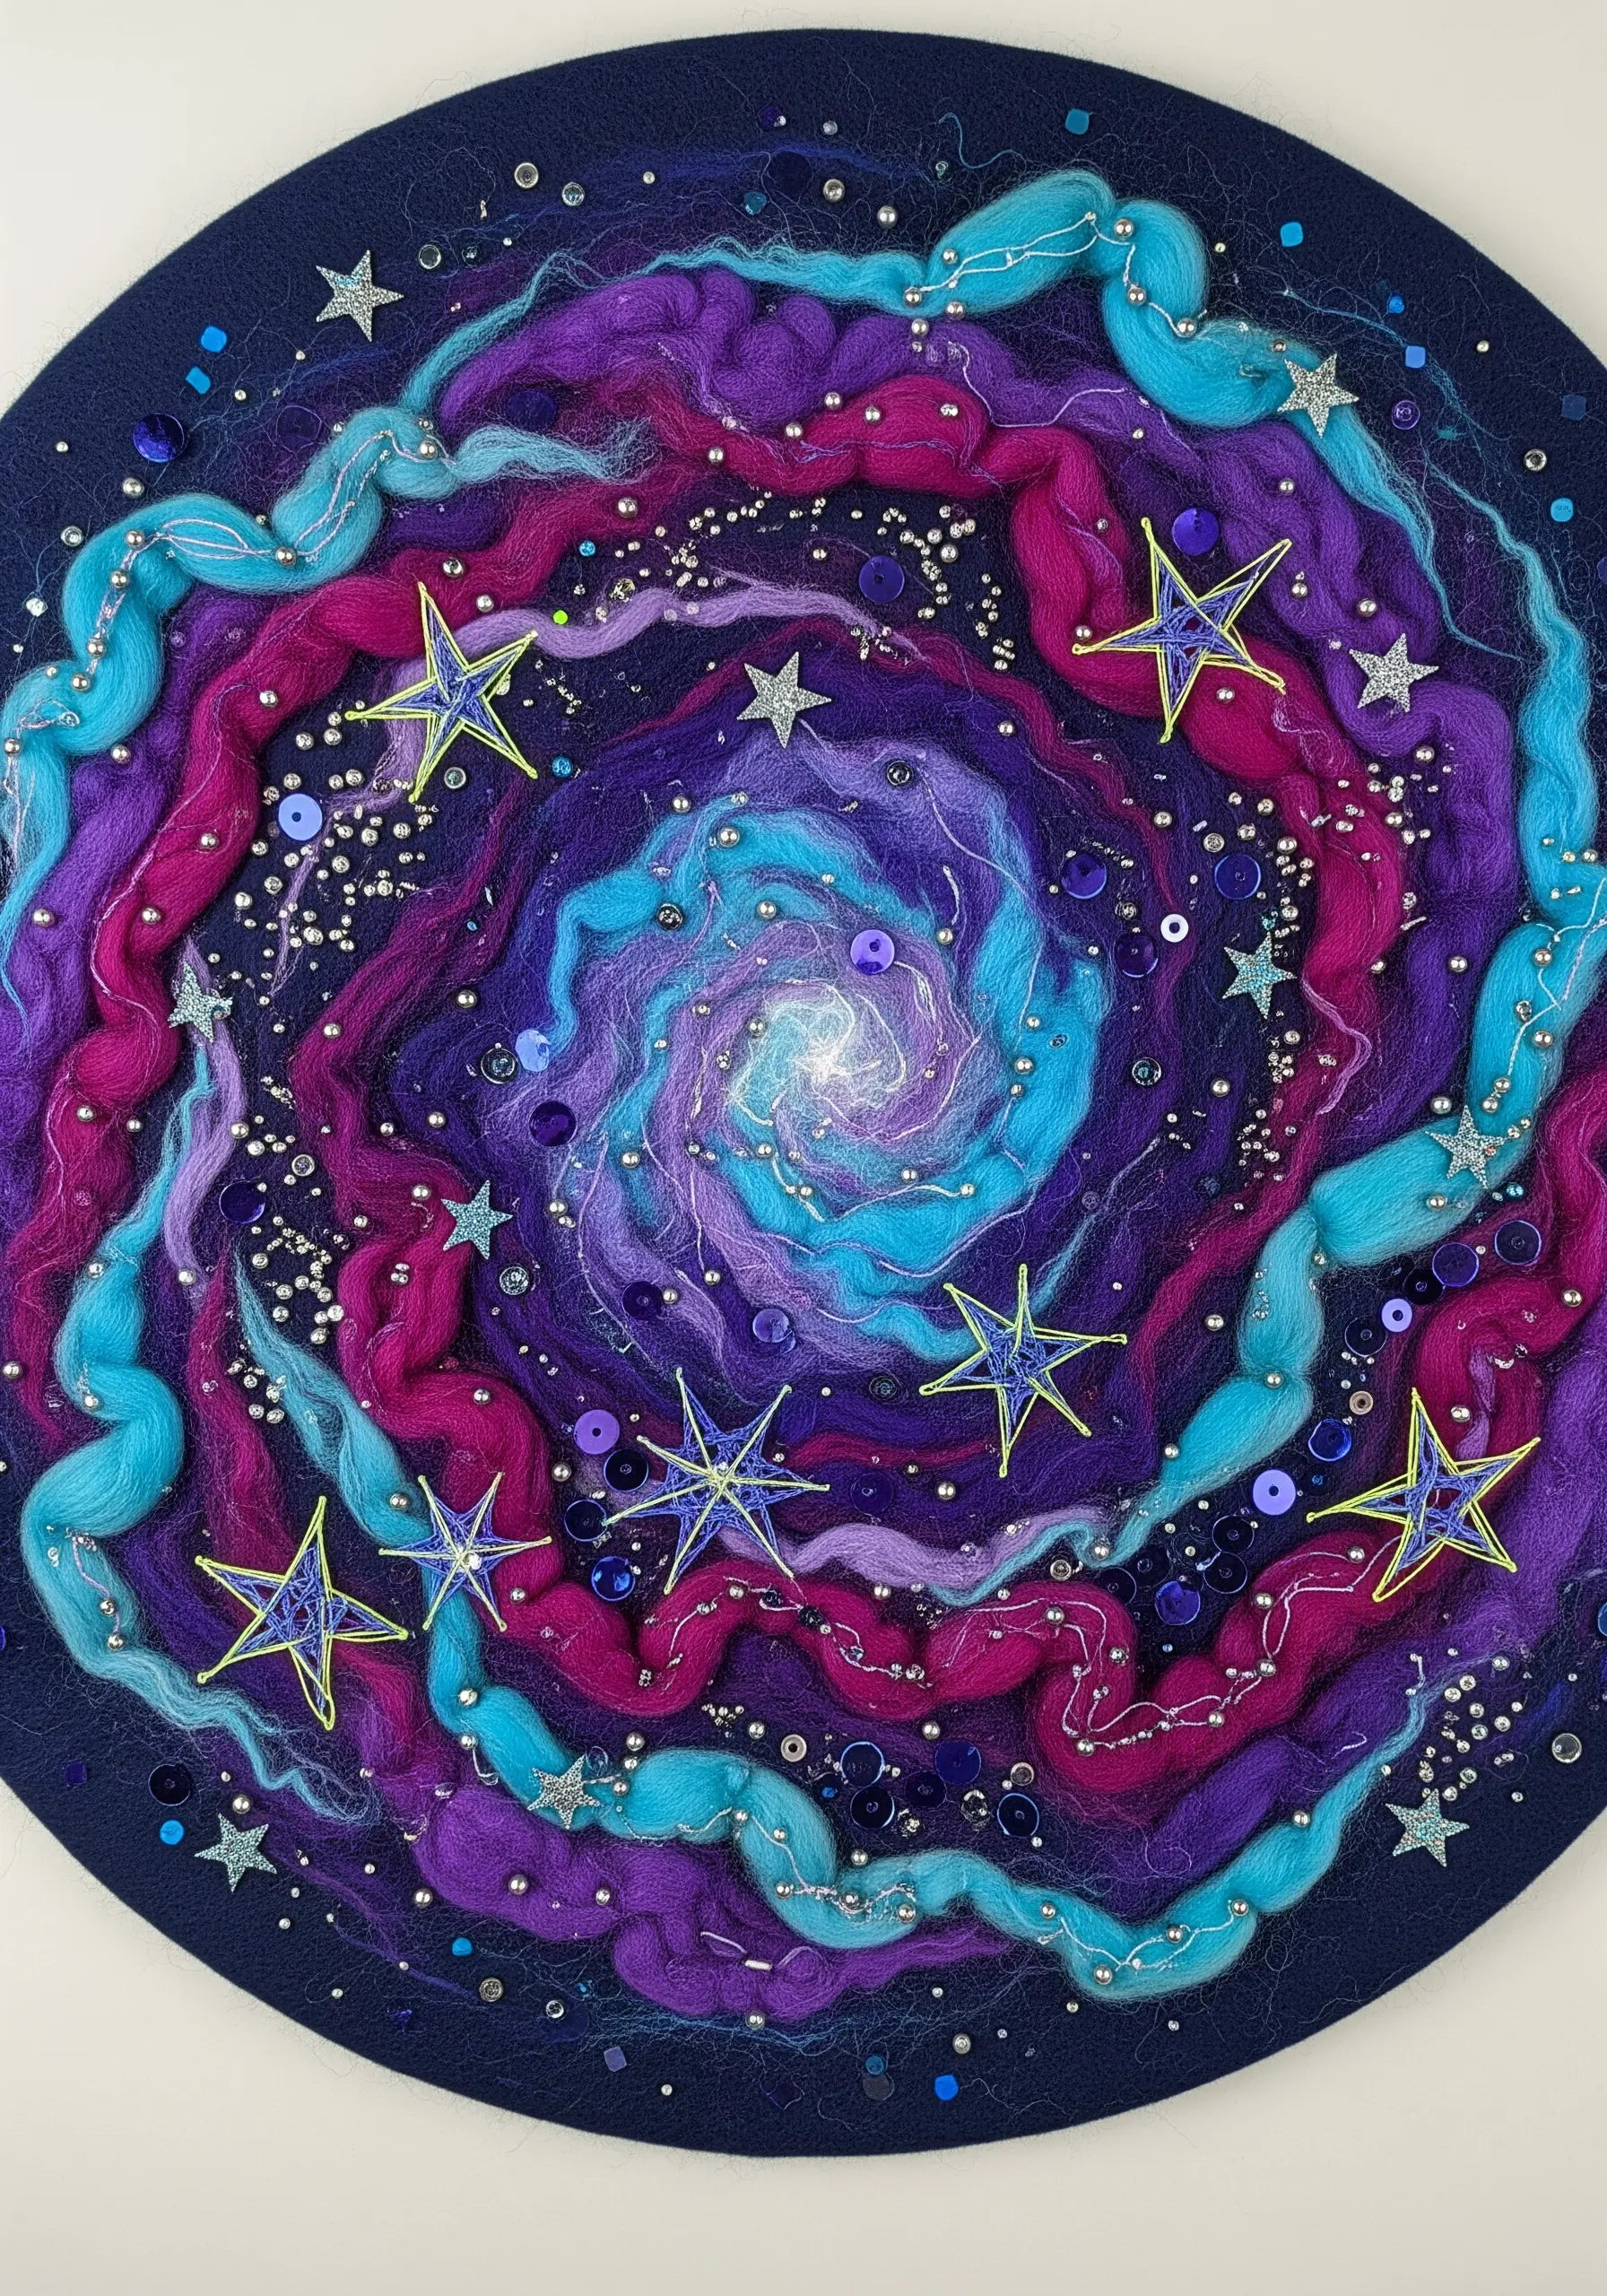
Create a soft, diffused background for your cosmic scene by needle-felting colorful wool roving onto a dark felt base.
Blend shades of purple, blue, and magenta to form swirling nebulas with a gentle, ethereal quality.
Once your felted canvas is ready, add sharp, glittering details. Couch down a textured silver yarn to define the spiral arms, then scatter sequins and tiny seed beads for distant stars.
This layering of soft wool and sharp sparkle creates a stunning textural contrast and a true sense of galactic depth.
10. Sculptural Needle-Felted Fungi

Take your fiber art off the fabric and into the third dimension with sculptural needle felting.
Create the mushroom stems and caps as separate pieces by tightly shaping wool roving with your felting needle until firm.
For the iconic spots on the Amanita cap, simply felt tiny wisps of white wool directly onto the red surface.
Assemble the final forms with a few more needle pokes or discreet stitches, and mount them on a felted moss base for a freestanding, hyper-realistic nature sculpture.
11. Ethereal Snowflake Stitches on Tulle

Stitching on a sheer fabric like tulle or organza gives your embroidery a magical, floating appearance.
To prevent the delicate fabric from puckering, always use a stabilizer—a water-soluble one is ideal as it will rinse away completely.
Construct the snowflake arms with fly stitches or detached chain stitches using a fine white floss, keeping the design open and airy.
Amplify the icy illusion by adding tiny, clear seed beads at the center and tips, creating minimal festive motifs that sparkle like real ice crystals.
12. Sculpting an Ocean Wave with Roving and Loops

Capture the powerful motion of a wave by creating a dramatic textural contrast in your weaving.
For the body of the wave, use a smooth, tight weave with various shades of blue and green yarn to suggest deep water.
To create the churning foam, switch to unspun wool roving and use high-pile techniques like rya knots or Ghiordes knots to build immense, chaotic volume.
The stark difference between the flat, controlled water and the wild, sculptural foam is what gives the piece its dynamic energy.
13. Incorporating Natural Elements into Weaving
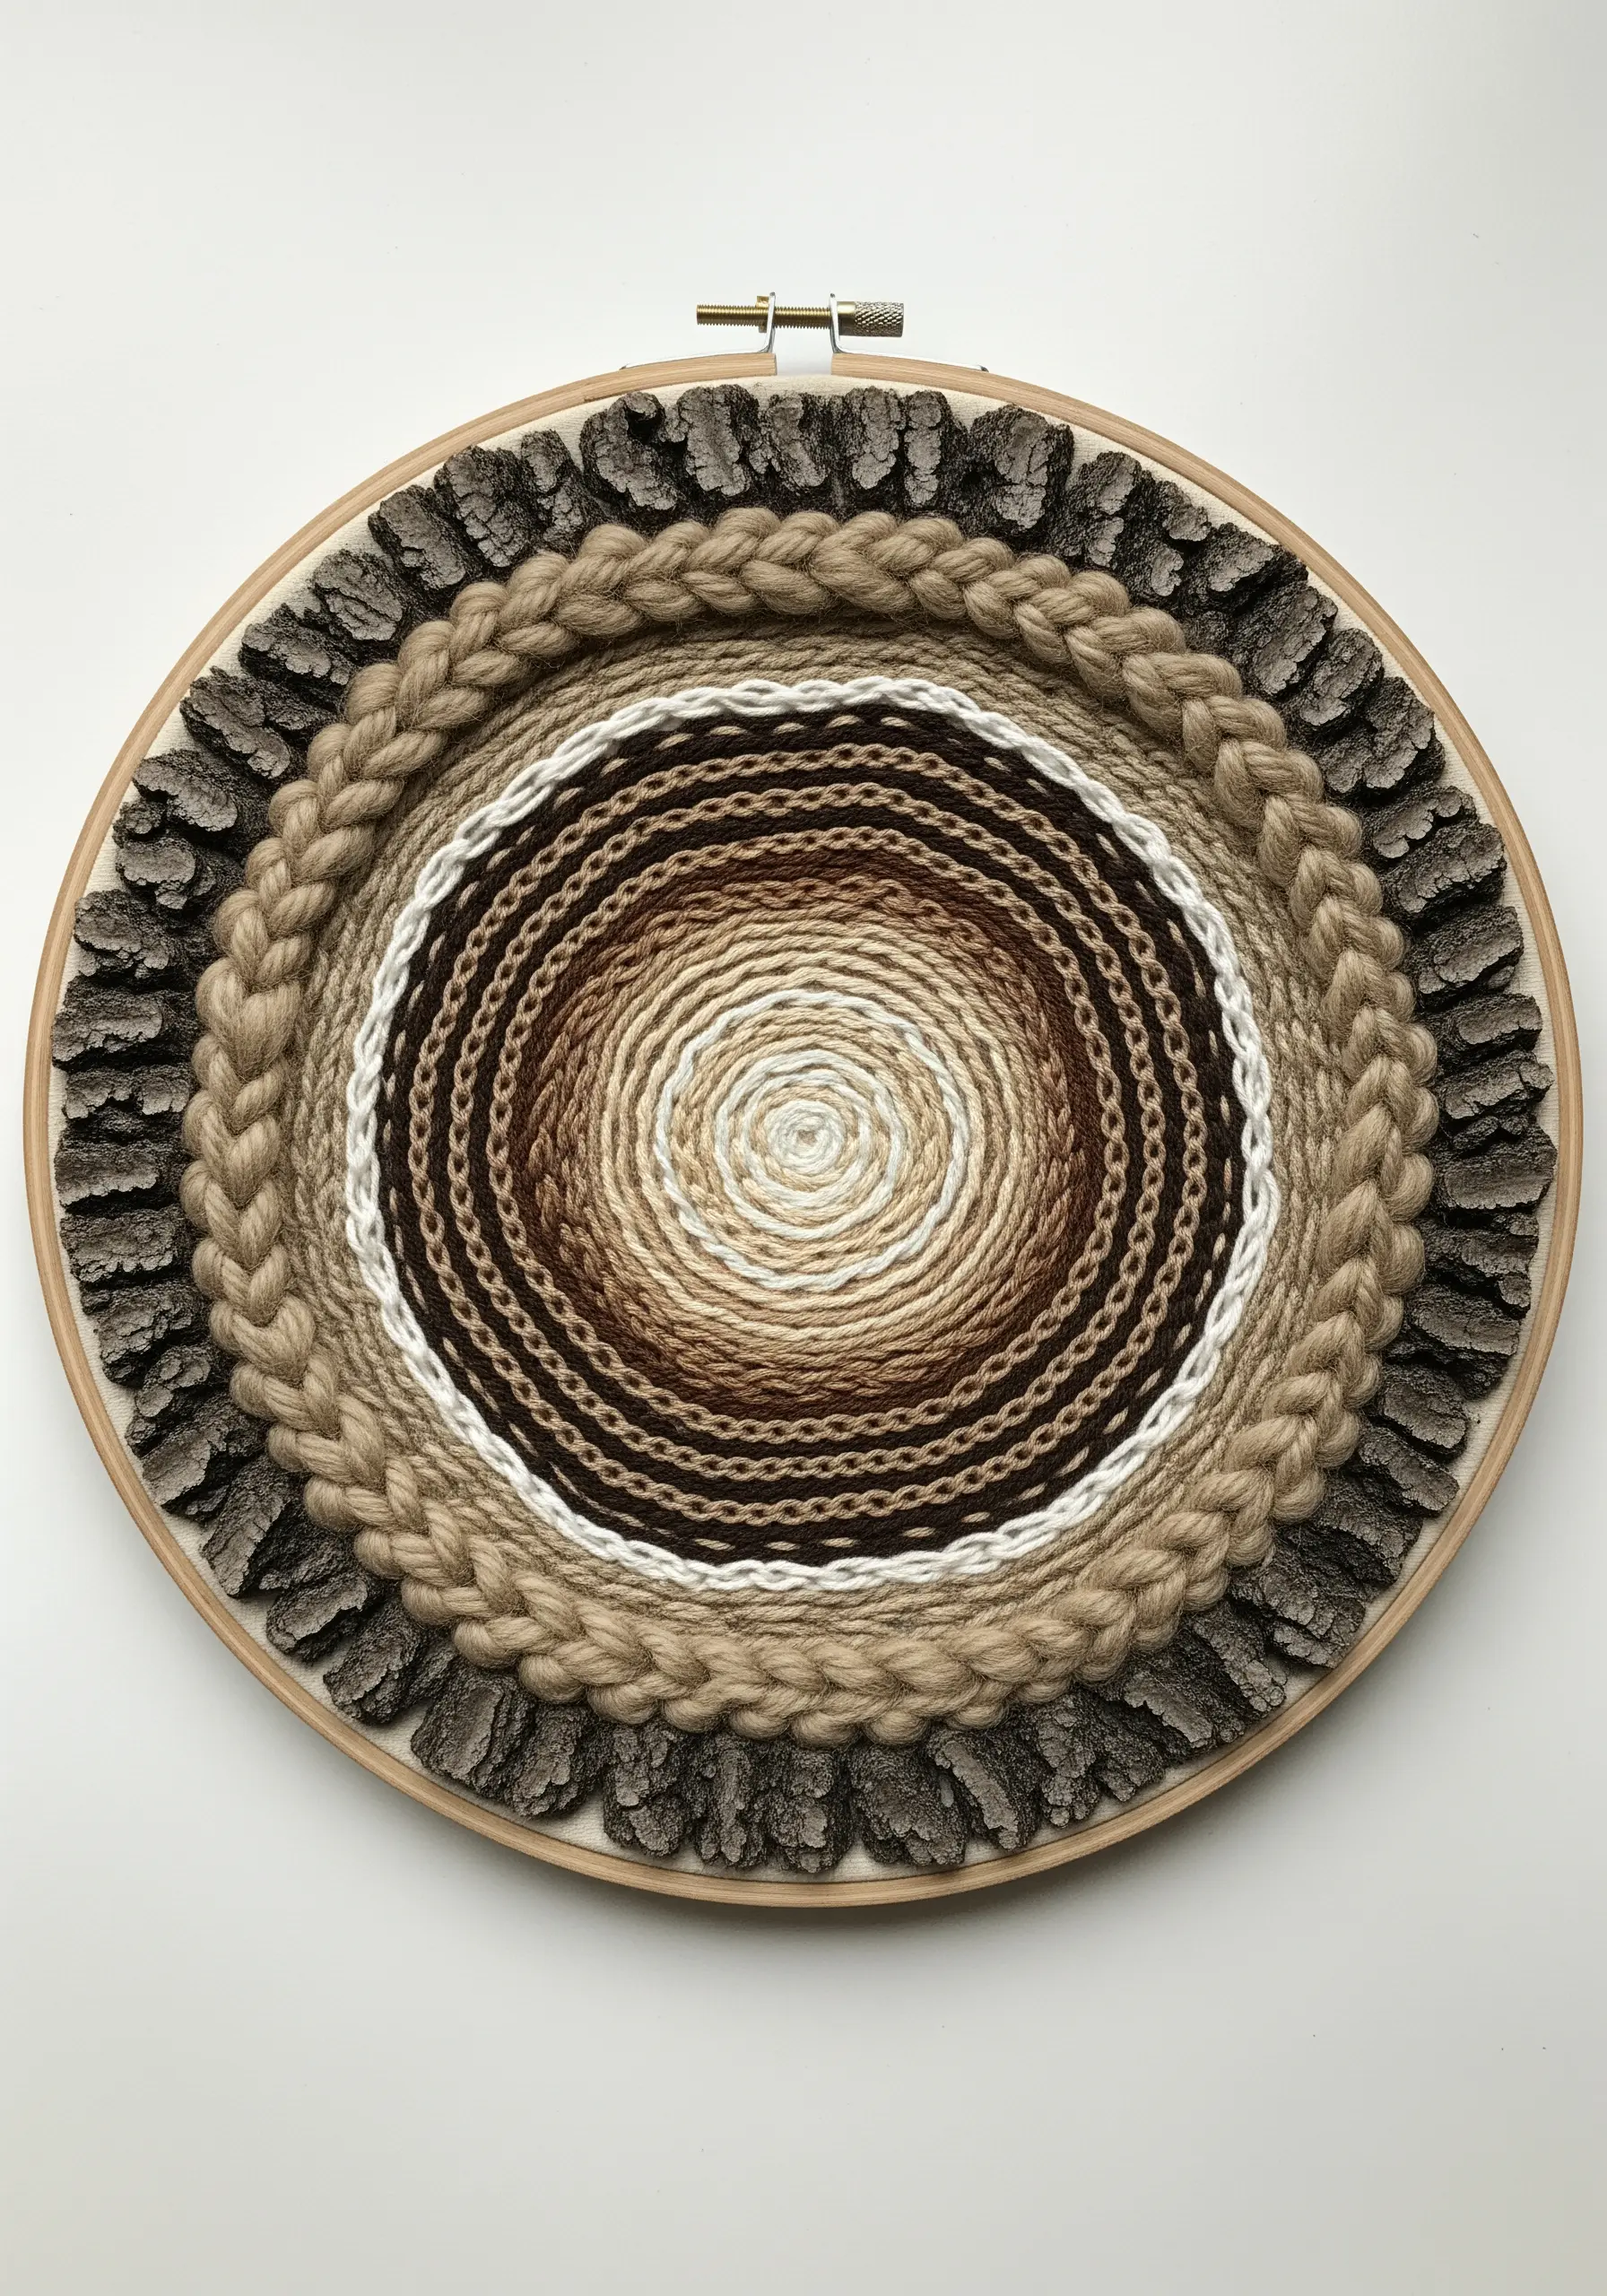
Connect your textile art directly to the natural world by weaving in organic materials.
In this piece, small, flat pieces of tree bark provide a rugged, earthy border.
To incorporate them, you can either drill tiny holes in each piece and thread them onto your outer warp threads, or you can stitch or glue them onto the finished woven edge.
This simple addition transforms standard framed embroidery ideas that pair perfectly with rustic interiors into unique, mixed-media statements.
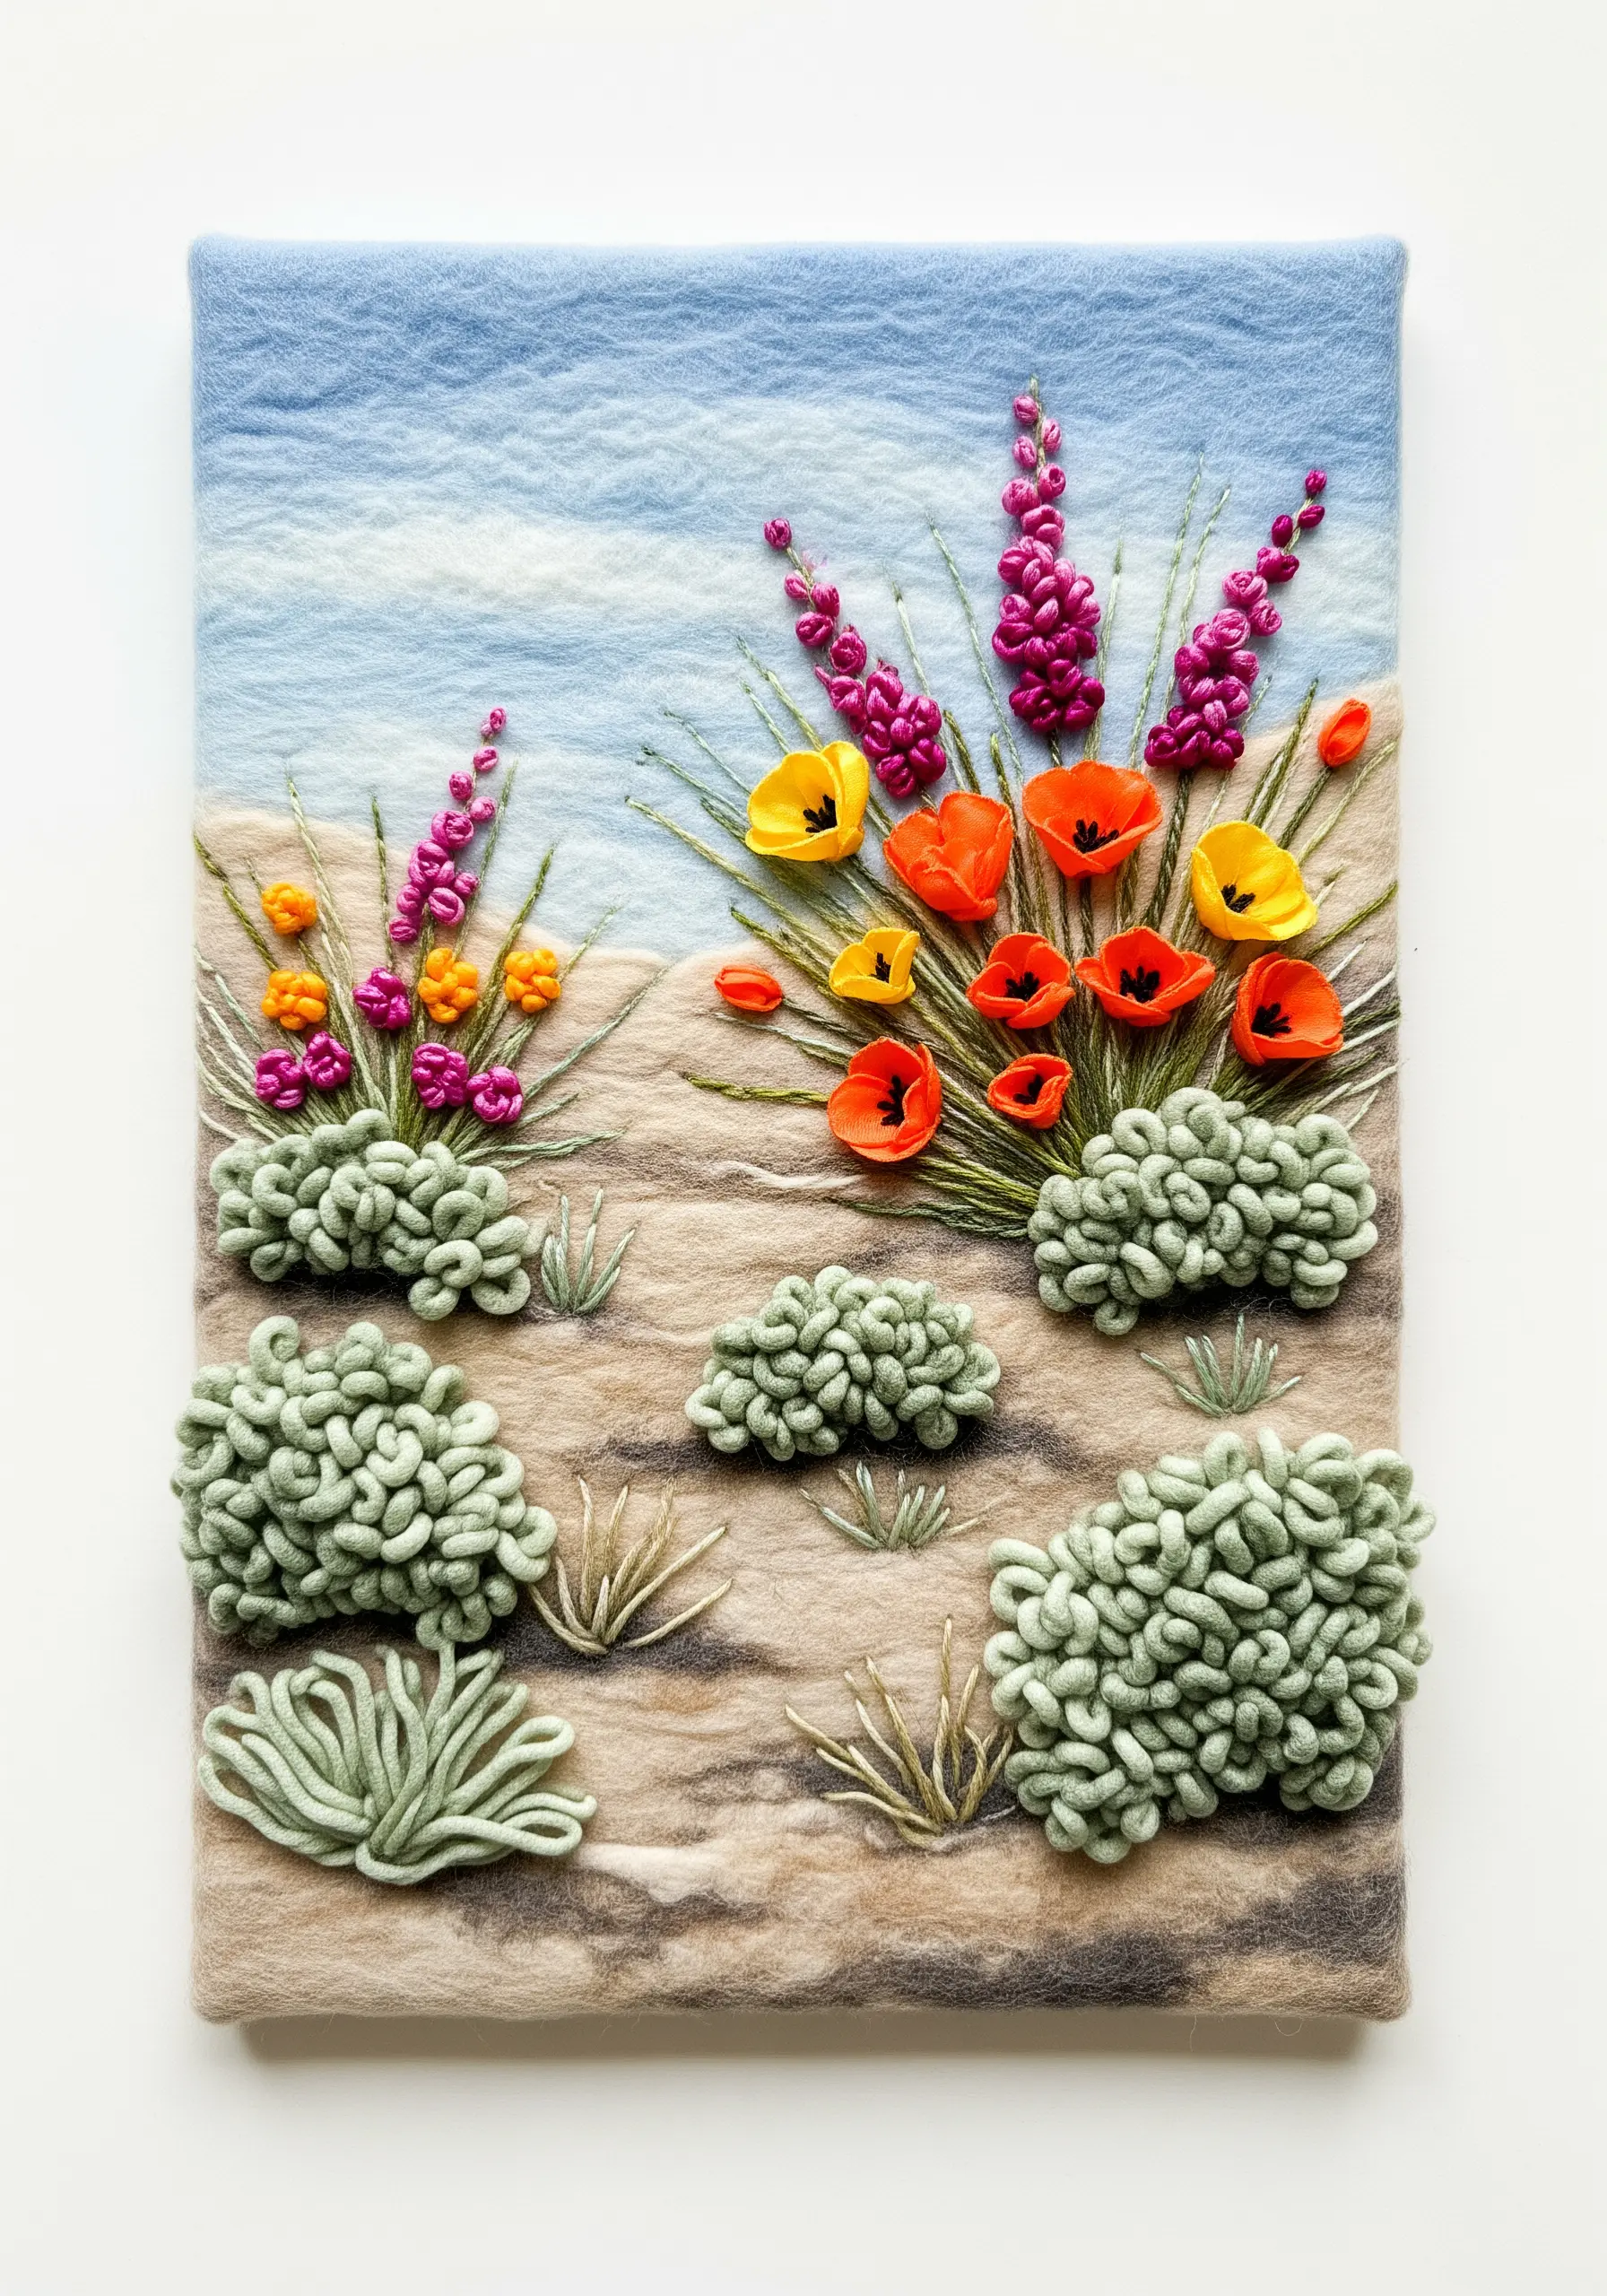
14. A Wildflower Meadow in Punch Needle

Punch needle is the perfect medium for creating lush, carpet-like textures that evoke a dense field of flowers.
By working from the back of the fabric, you create uniform loops on the front, resulting in a plush, tactile surface.
Create subtle dimension by varying your loop height—use shorter loops for the green background and slightly longer ones for the flower petals to make them pop.
To ensure crisp edges between colors, outline each flower shape first, then fill it in completely before moving to the next color block.
15. Capturing Iridescence with Strategic Stitching
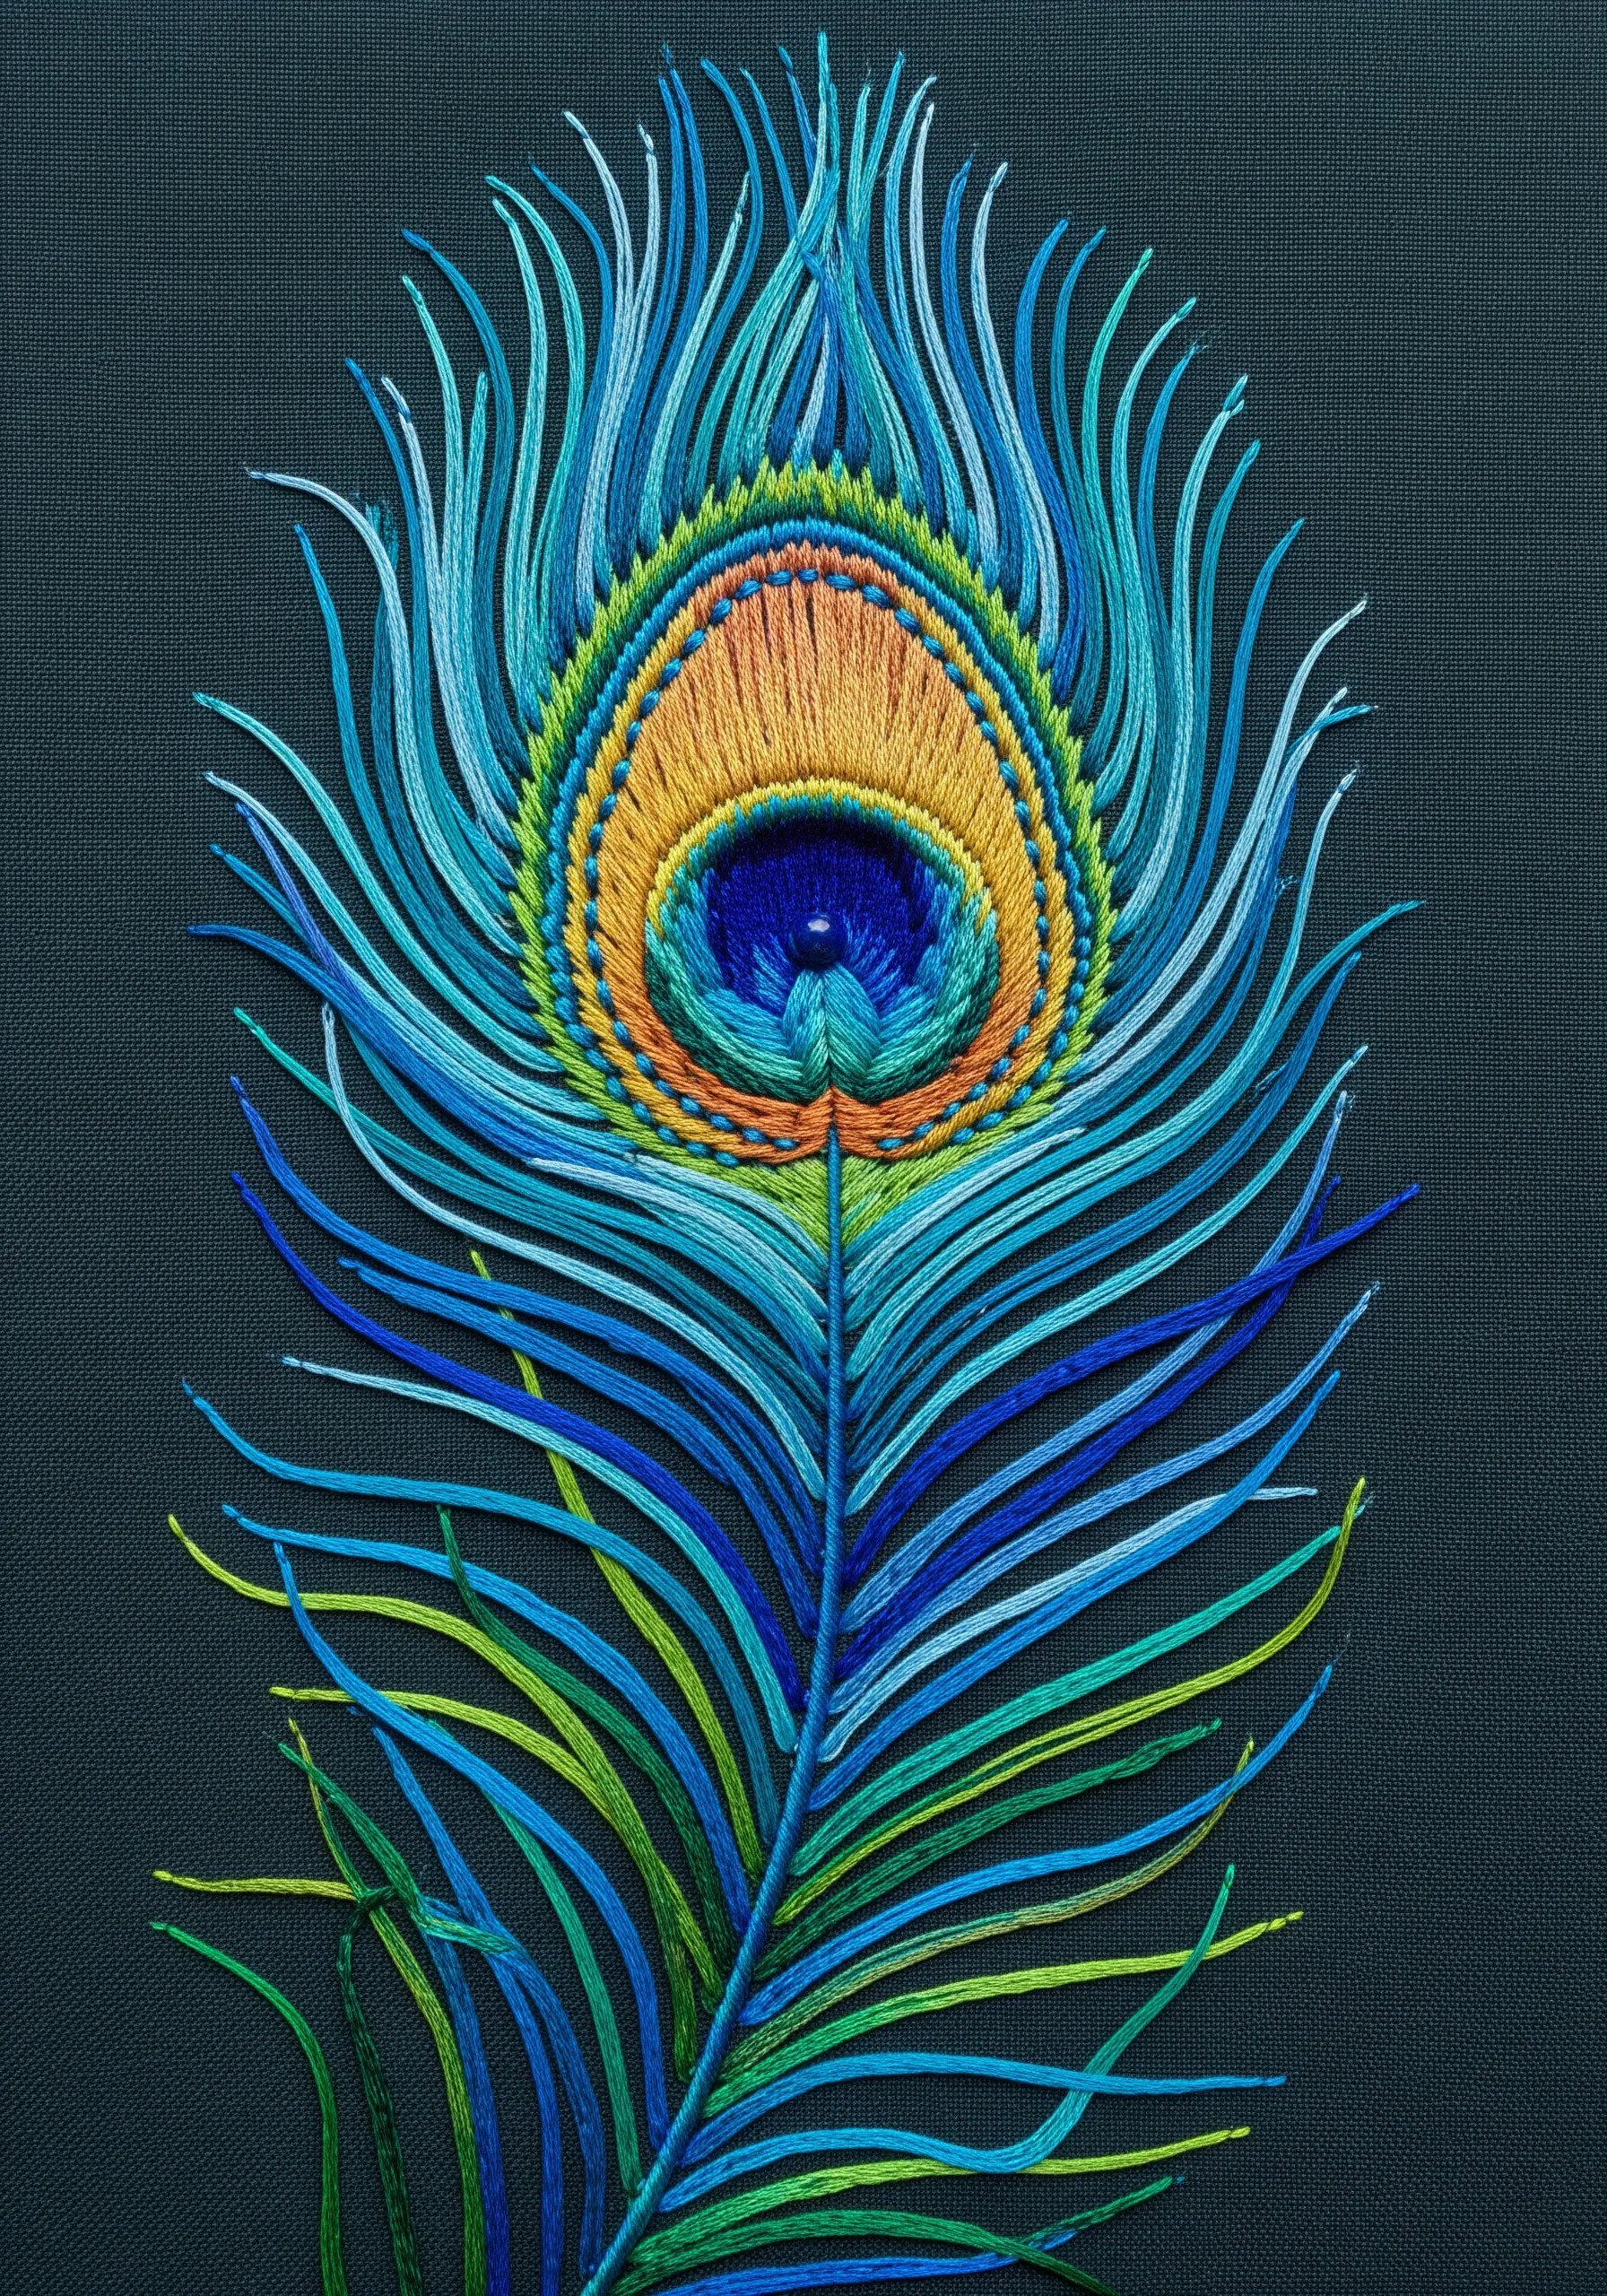
The key to embroidering a realistic peacock feather is mimicking its signature shimmer and flow.
Use a high-sheen thread like silk or rayon and fill the central ‘eye’ with concentric circles of satin stitch.
For the delicate barbs, use single, long straight stitches radiating from the central shaft.
Crucially, don’t pull these stitches too tight; allow them to arch gently off the fabric surface. Overlapping these slightly with a blend of blue and green threads will create the color-shifting, iridescent effect that makes the feather look alive.
16. Layered Felt and Thread for a Serene Water Scene

Build a dimensional pond scene by layering different textile applications on a wool felt base.
Create subtle ripples on the water’s surface using a fine metallic thread with a simple running stitch or free-motion machine stitching.
Cut lily pads from green felt, add stitched veins for detail, and appliqué them to the blue background.
For the water lily, construct a 3D blossom by cutting individual petals from stiffened fabric or ribbon and layering them, transforming a flat surface into one of the most tactile high-texture fabric collage embroidery projects.
17. Weaving a Volcanic Eruption with Unruly Fibers

Capture the raw, chaotic energy of an eruption by deliberately breaking the conventions of tidy weaving.
Use a traditional flat weave for the calm sky, then introduce unspun, cloud-like wool roving for the billowing smoke plume.
For the lava, use thick, braided yarns in fiery colors, and instead of weaving the ends in, let them hang loose and untamed.
This contrast between controlled technique and wild, free-hanging fibers creates a powerful sense of movement and explosive force.
18. Capturing the Aurora with Fiber and Fabric
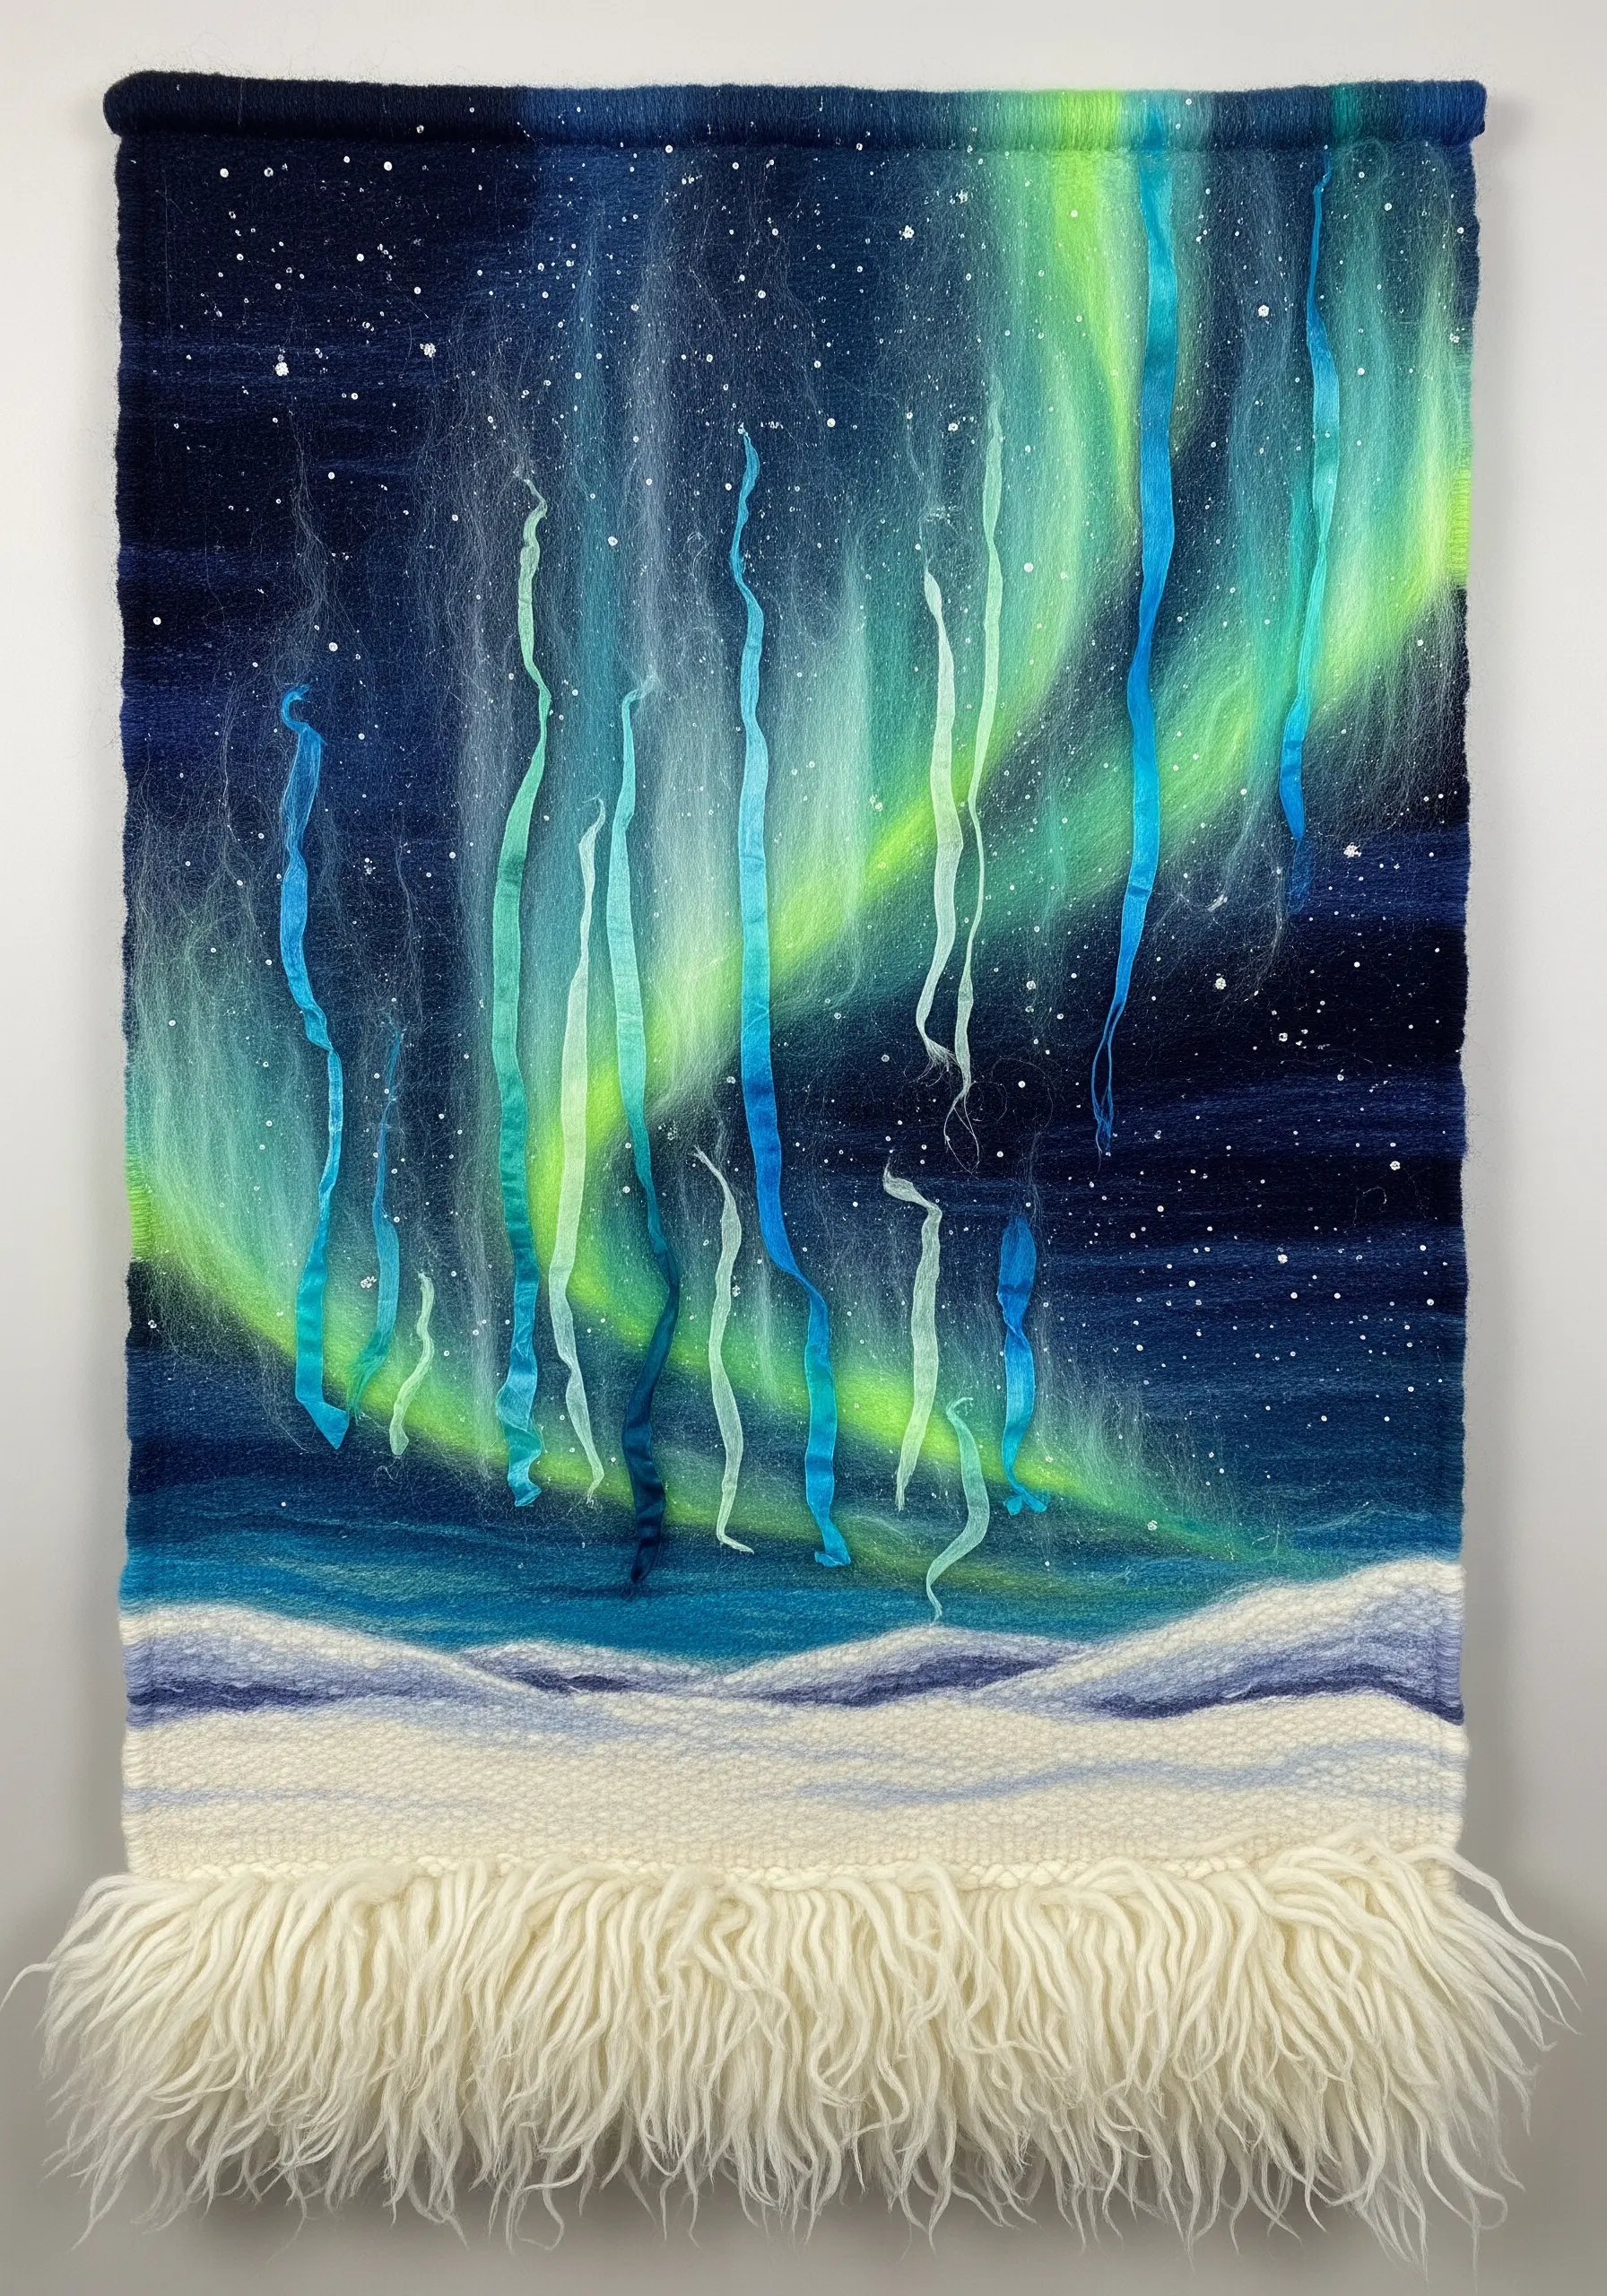
To depict the ethereal glow of the Northern Lights, you need to combine materials with different light-handling properties.
Start with a dark woven background for the night sky. Create the soft, diffused glow of the aurora by needle-felting wisps of brightly colored mohair or angora wool directly onto the surface of the weaving.
To add the signature dancing movement, integrate thin strips of iridescent silk ribbon that hang freely, catching the light as they move.
19. A Study in Monochromatic Texture
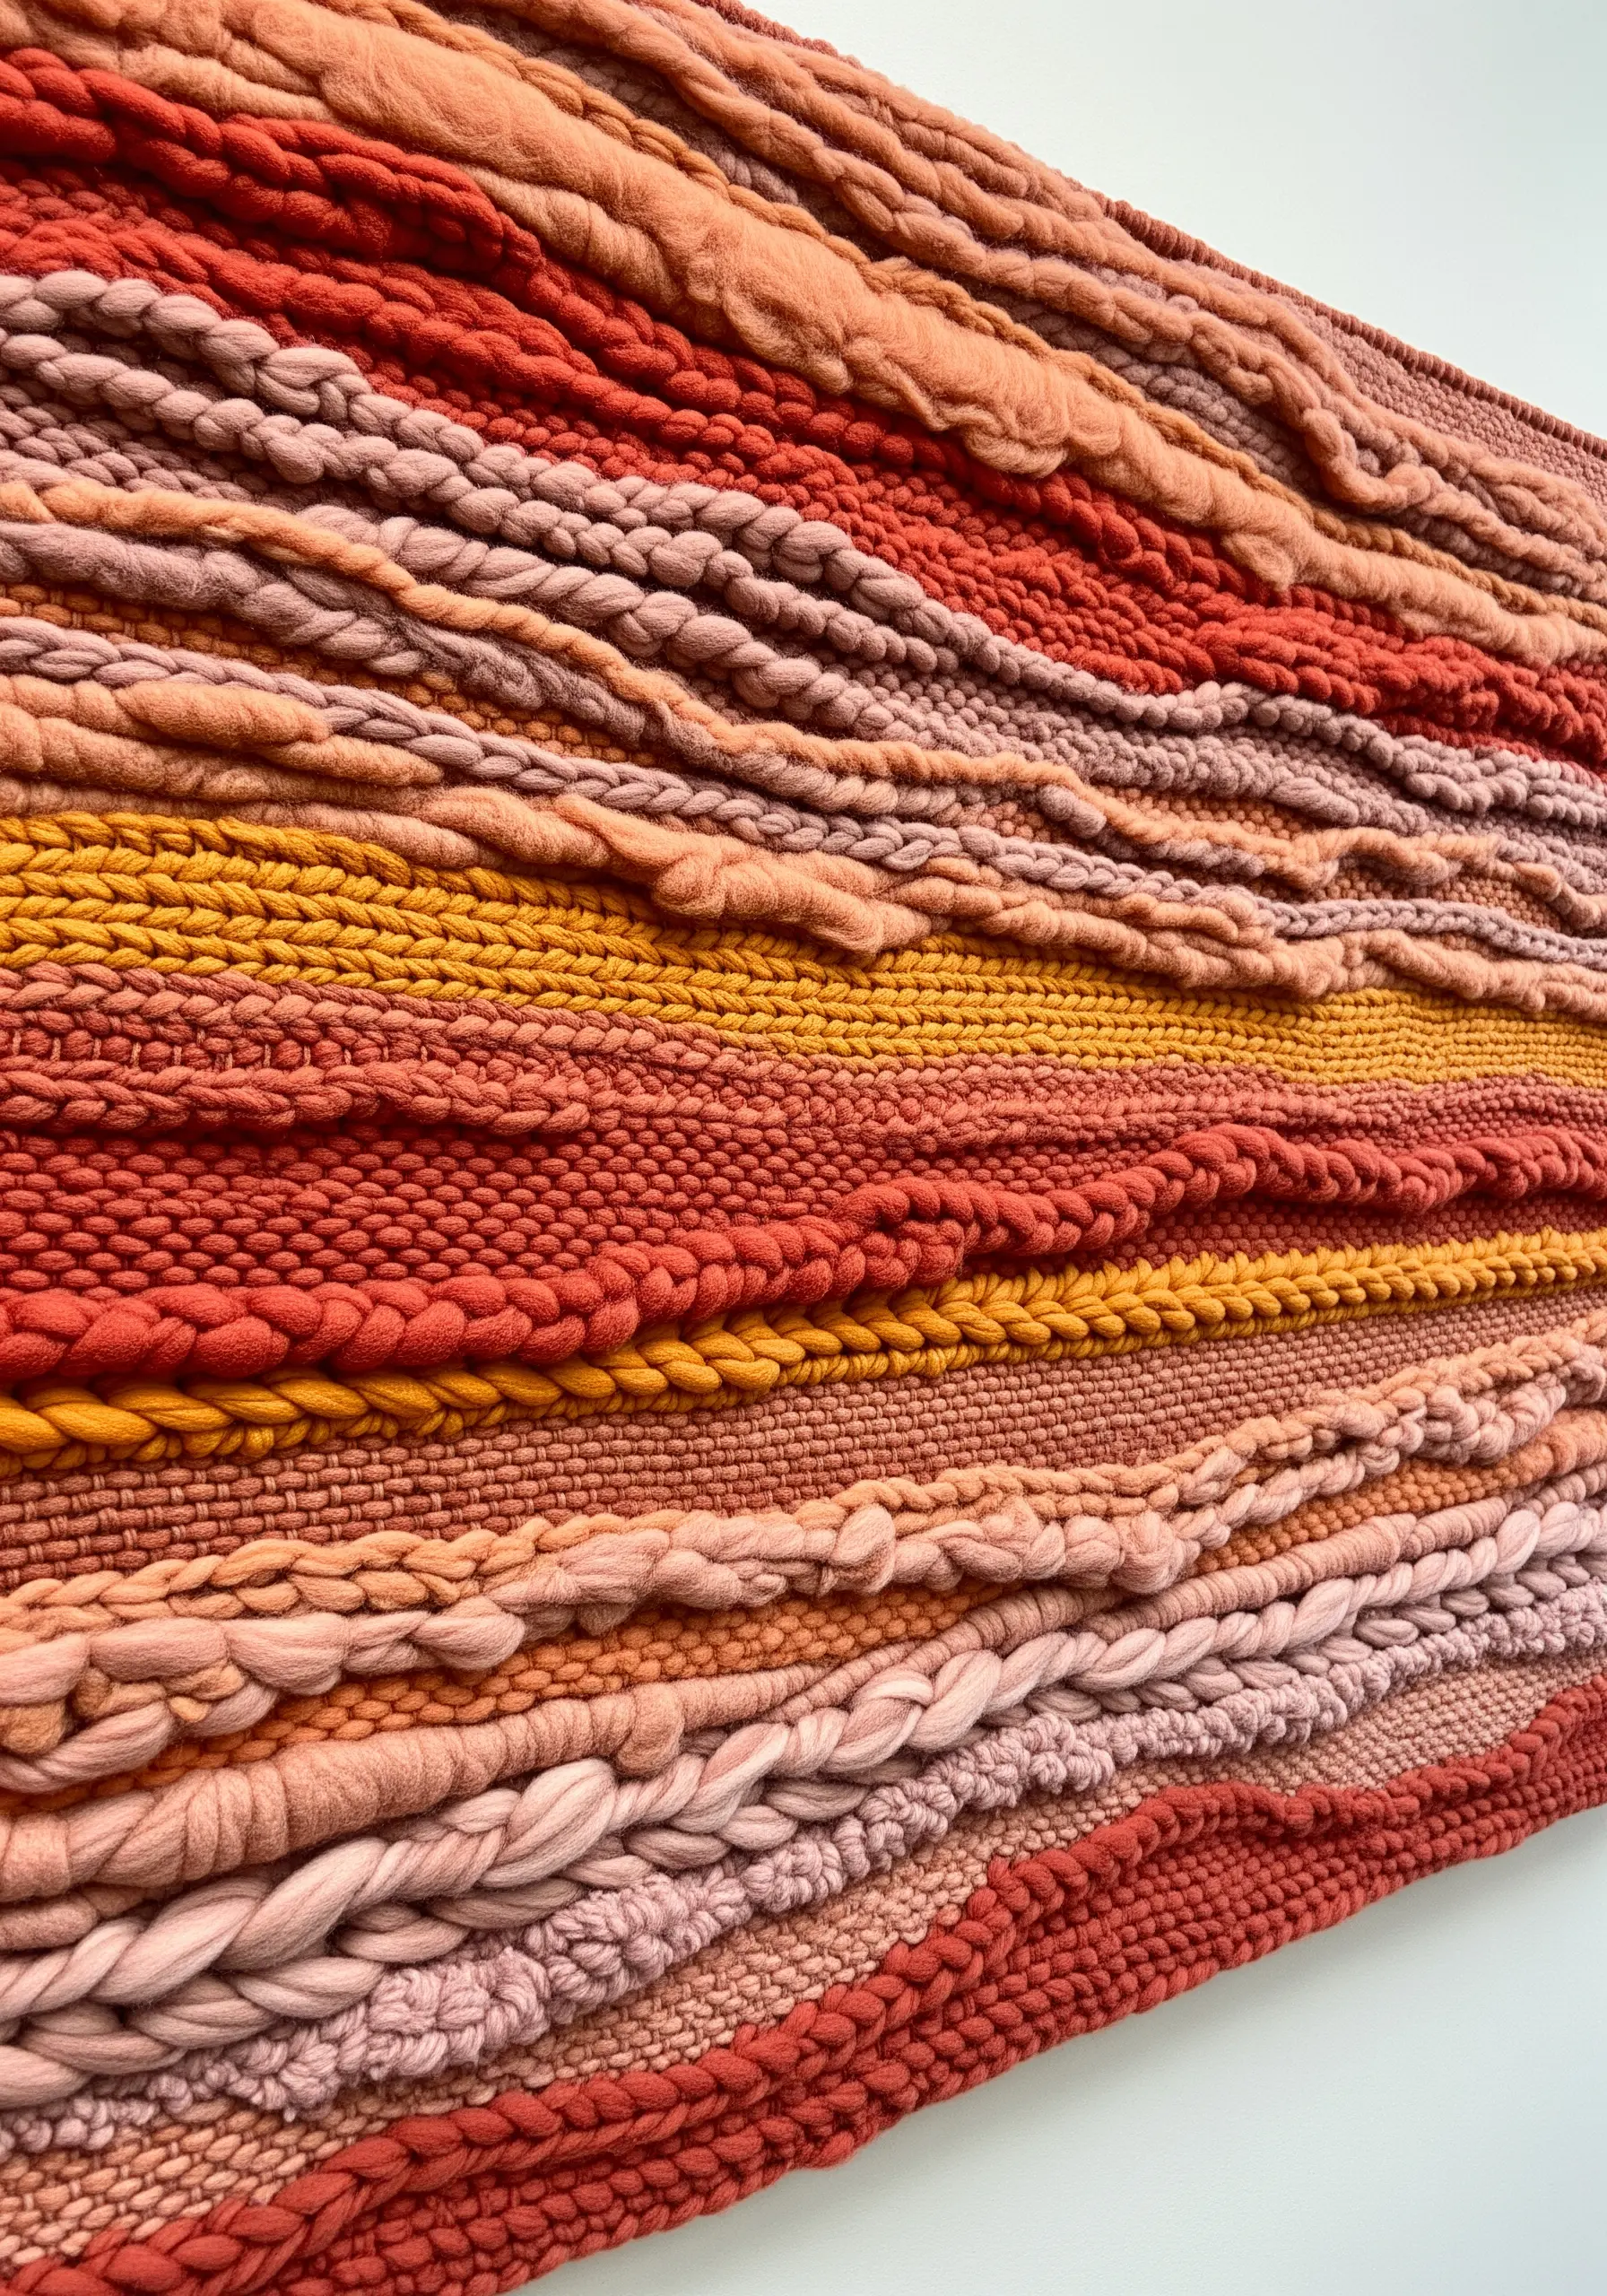
You don’t need a riot of color to create a visually stunning piece. This weaving achieves its impact by focusing entirely on texture within a limited, warm palette.
Create a dynamic rhythm by alternating different stitches and yarn types in each row: plain weave, chunky soumak braids, high-pile loops, and tightly twisted cords.
By varying the thickness, sheen, and structure of the yarn, you build a composition that is incredibly rich and invites the viewer to touch and explore its surface.
20. Dewdrop Illusions with Thread and Beads

The striking realism of this piece comes from a simple but brilliant material choice.
First, stitch the spider web on a dark, plain-weave fabric using a fine, single strand of white or silver metallic thread. A whipped backstitch will give you a smooth, solid line.
For the dewdrops, use clear, teardrop-shaped glass beads. Secure each one with a tiny stitch using a thread that perfectly matches your dark background fabric.
This makes the stitch virtually disappear, creating the magical illusion of water droplets clinging to the web.
21. Botanical Accuracy with Fishbone Stitch
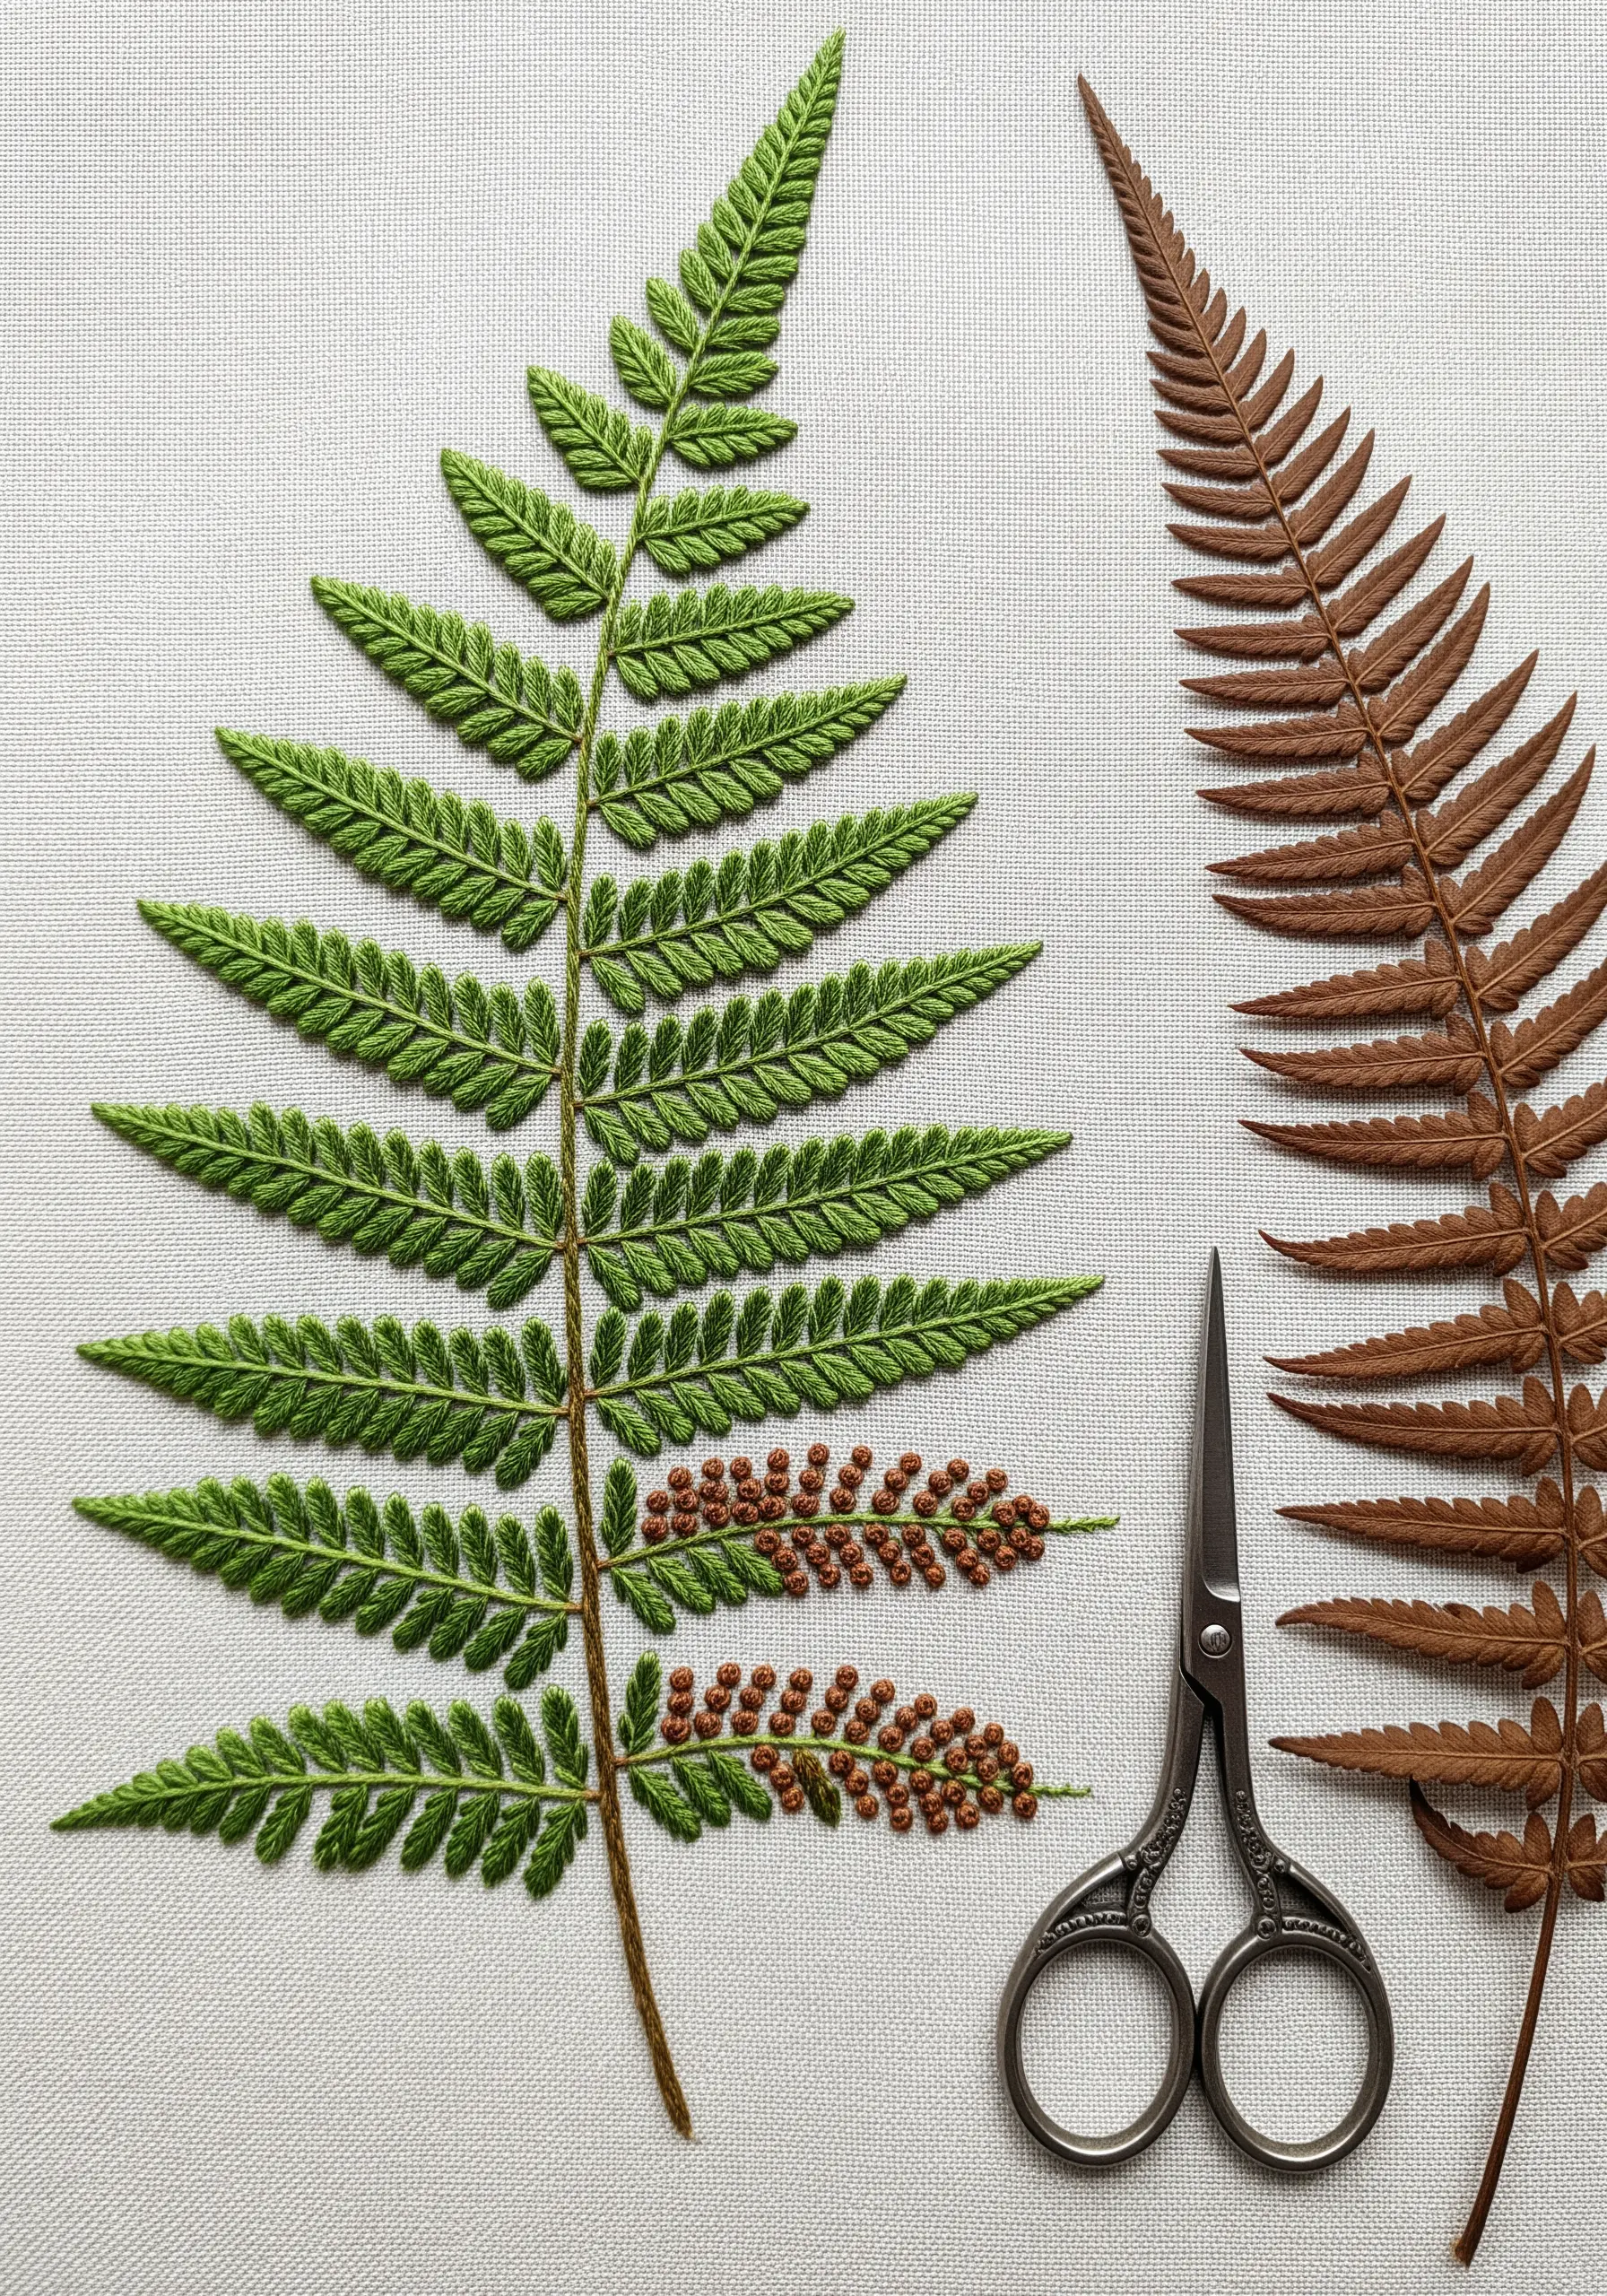
To achieve the hyper-realistic look of a fern frond, the fishbone stitch is your most effective tool.
This single stitch ingeniously creates both the central stem and the angled leaflets in one continuous motion, perfectly replicating the plant’s natural structure.
For the delicate sori (spore clusters), switch to a contrasting matte brown thread and create dense clusters of tiny French knots.
This is a perfect project for your nature-themed embroidery samplers to practice real plant shapes, as it hones your observational skills and stitch control.


