
A simple cushion is one of the most rewarding canvases you can choose. It’s a small world where a few intentional stitches can completely redefine a room’s character, turning a forgotten accessory into a piece of personal art.
But how do you move from simply stitching a pattern to creating something that feels truly designed? The secret isn’t in mastering hundreds of complex stitches. It’s in understanding how to use simple techniques with purpose—choosing the right thread to create texture, the right color placement to guide the eye, and the right composition to feel balanced and complete.
Think of these border ideas not as strict rules, but as starting points for your own creativity. Here, you’ll find ways to play with dimension, texture, and rhythm to transform a plain pillow into a piece that reflects your own unique style. It’s your chance to create decor that doesn’t just fill a space, but enriches it.
1. Frame with Folk Art Florals

Create a bold, graphic border using a repeating folk art motif like this stylized tulip.
Use a thick, matte thread, such as cotton perle #8, to give your stitches a raised, almost illustrative quality that stands out against a plain weave fabric.
Work the flower heads with two opposing detached chain stitches (lazy daisies) and use simple straight stitches for the stems and leaves.
A disciplined two or three-color palette enhances the graphic impact, creating a timeless design that feels both modern and traditional.
2. Embrace Art Deco Glamour with Metallics
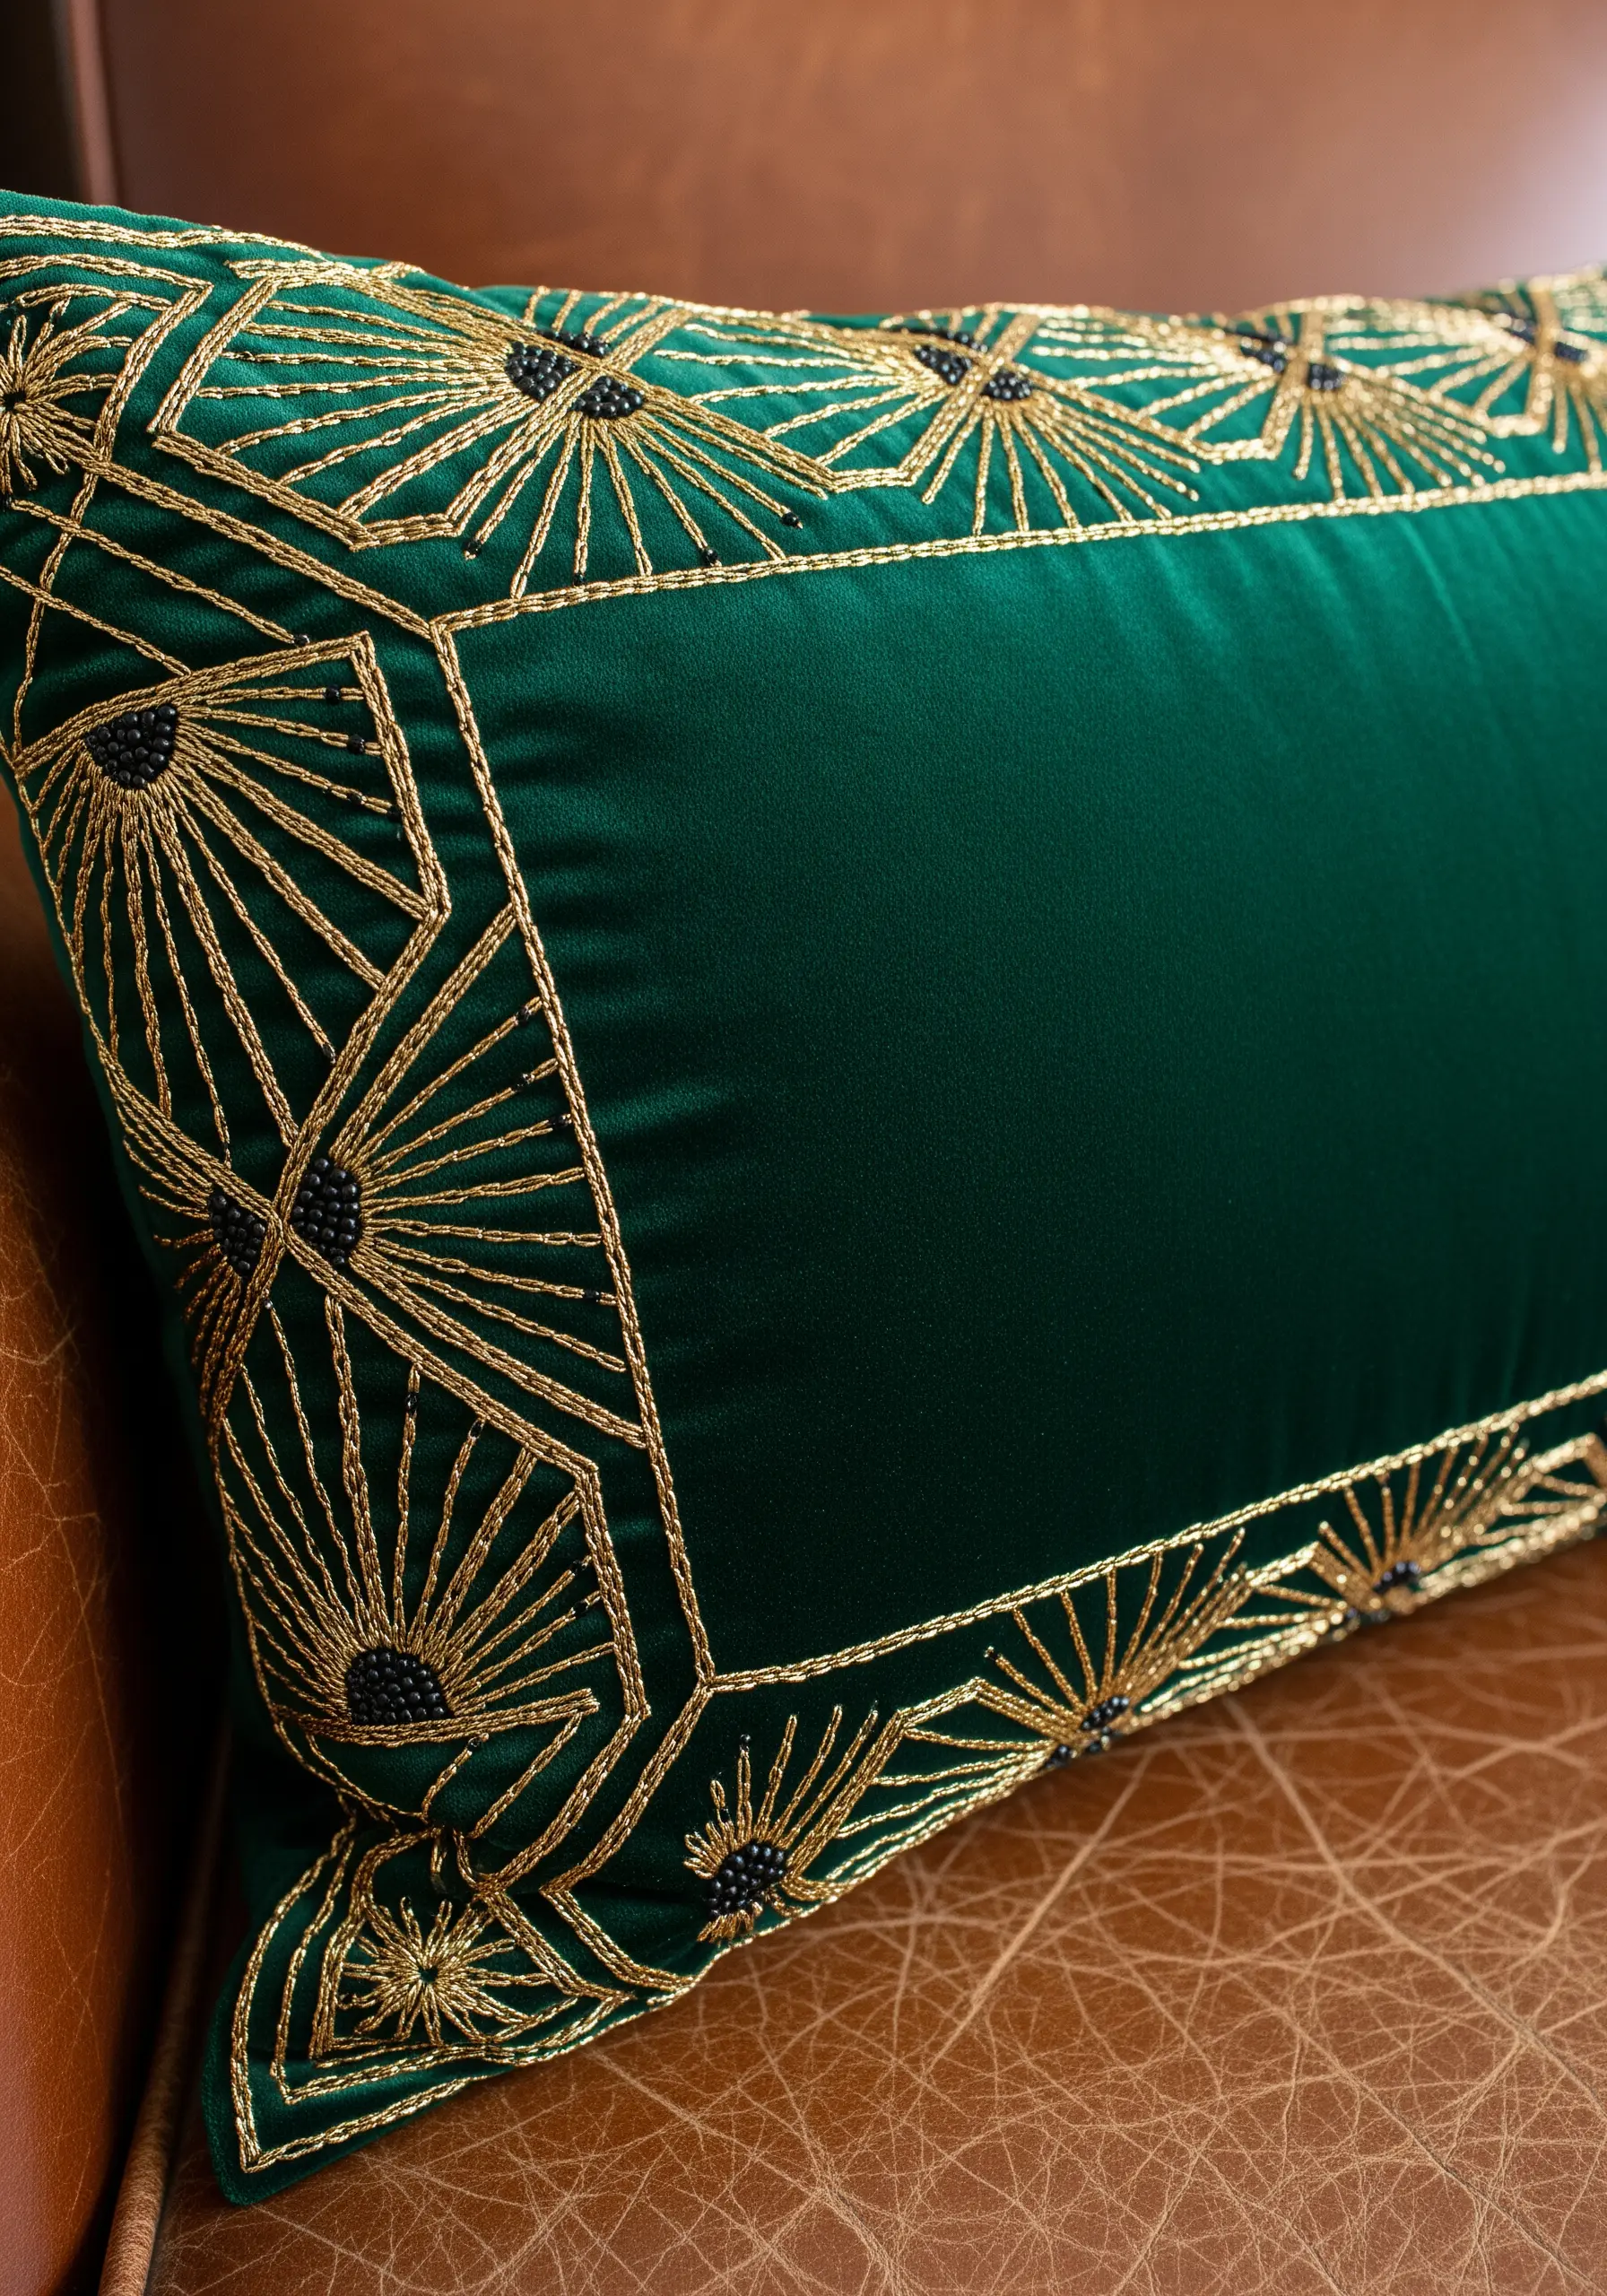
Evoke 1920s elegance by stitching a geometric border with metallic thread on a jewel-toned satin or velvet cushion.
To create the sunburst fans, use clean, precise straight stitches radiating from a central point.
Define the sharp, geometric lines with a couching stitch—laying down a thicker metallic cord and tacking it with a finer, matching thread—to ensure perfectly smooth curves and corners.
Incorporate black seed beads at the intersections to add a touch of texture and anchor the design, preventing the metallic shine from feeling flat.
3. Create a Lush Tropical Frame
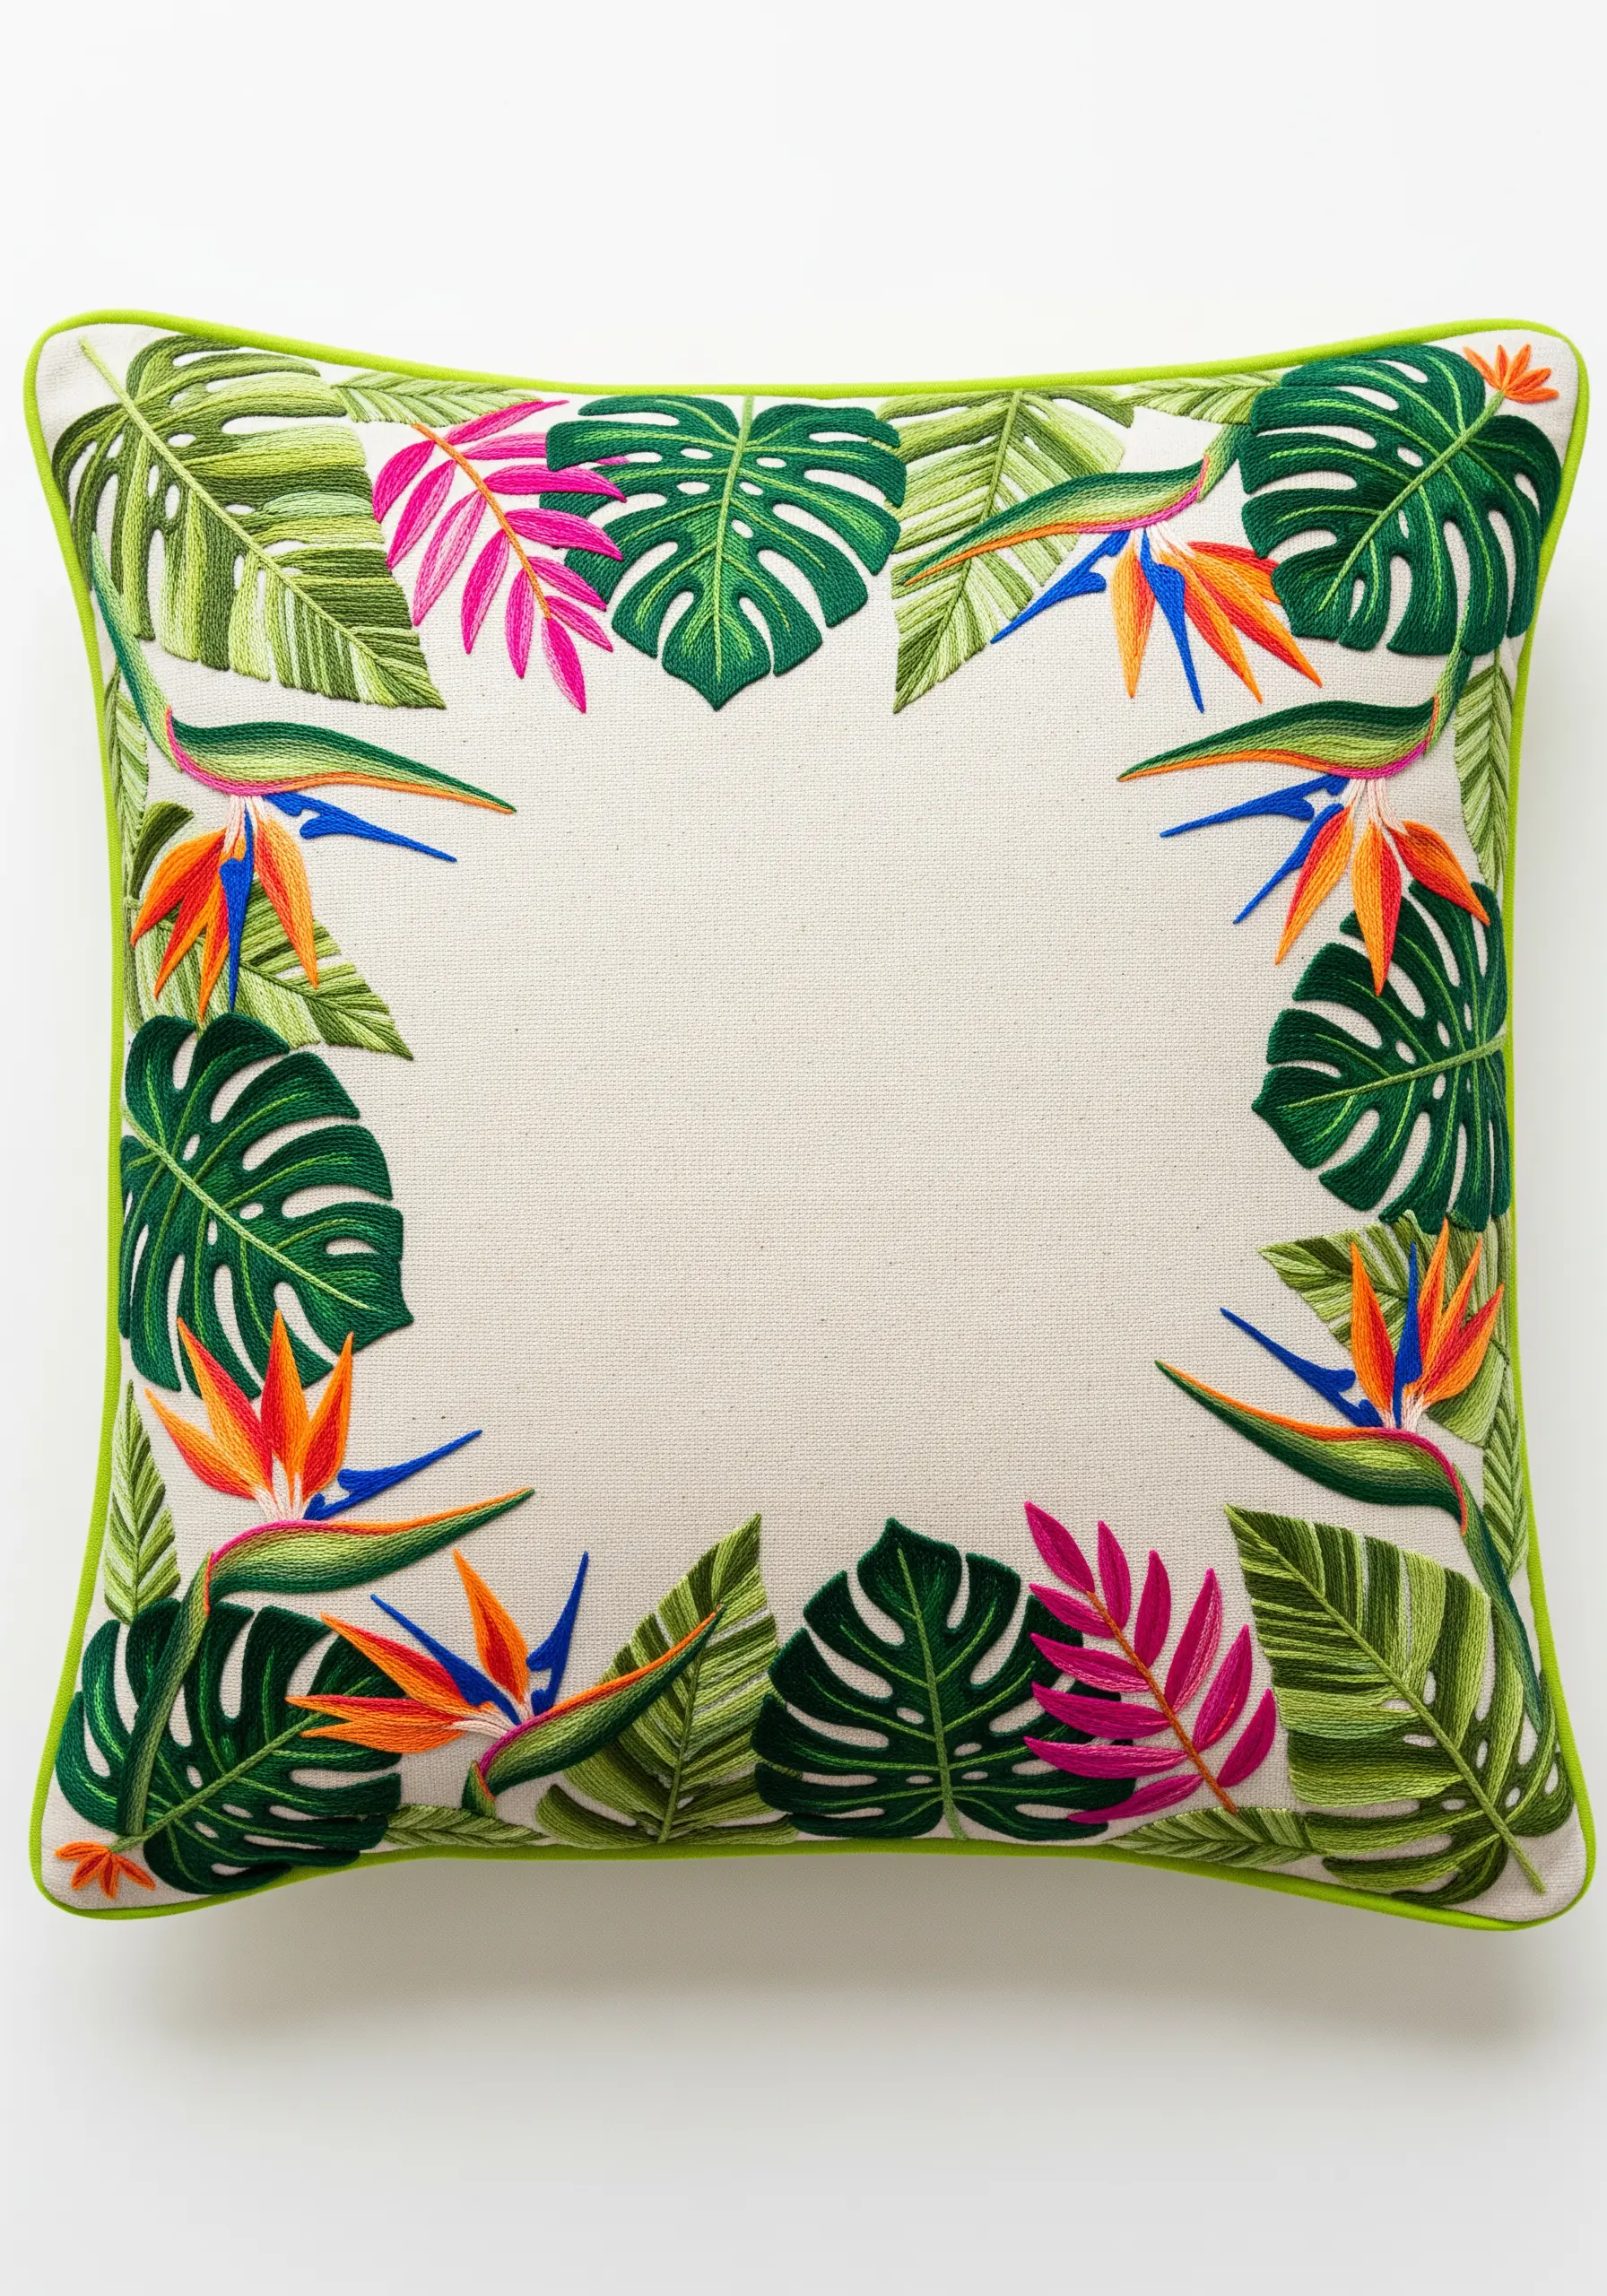
Turn your cushion into a botanical window by framing the center with vibrant, overlapping tropical leaves.
Use long-and-short stitch to blend multiple shades of green within each leaf, giving them realistic dimension and a hand-painted look.
Introduce unexpected pops of hot pink and orange to break up the greenery, creating a dynamic composition that draws the eye.
Finish the cushion with a bright, contrasting piped edge—like the lime green here—to neatly contain the design and make the colors pop even more.
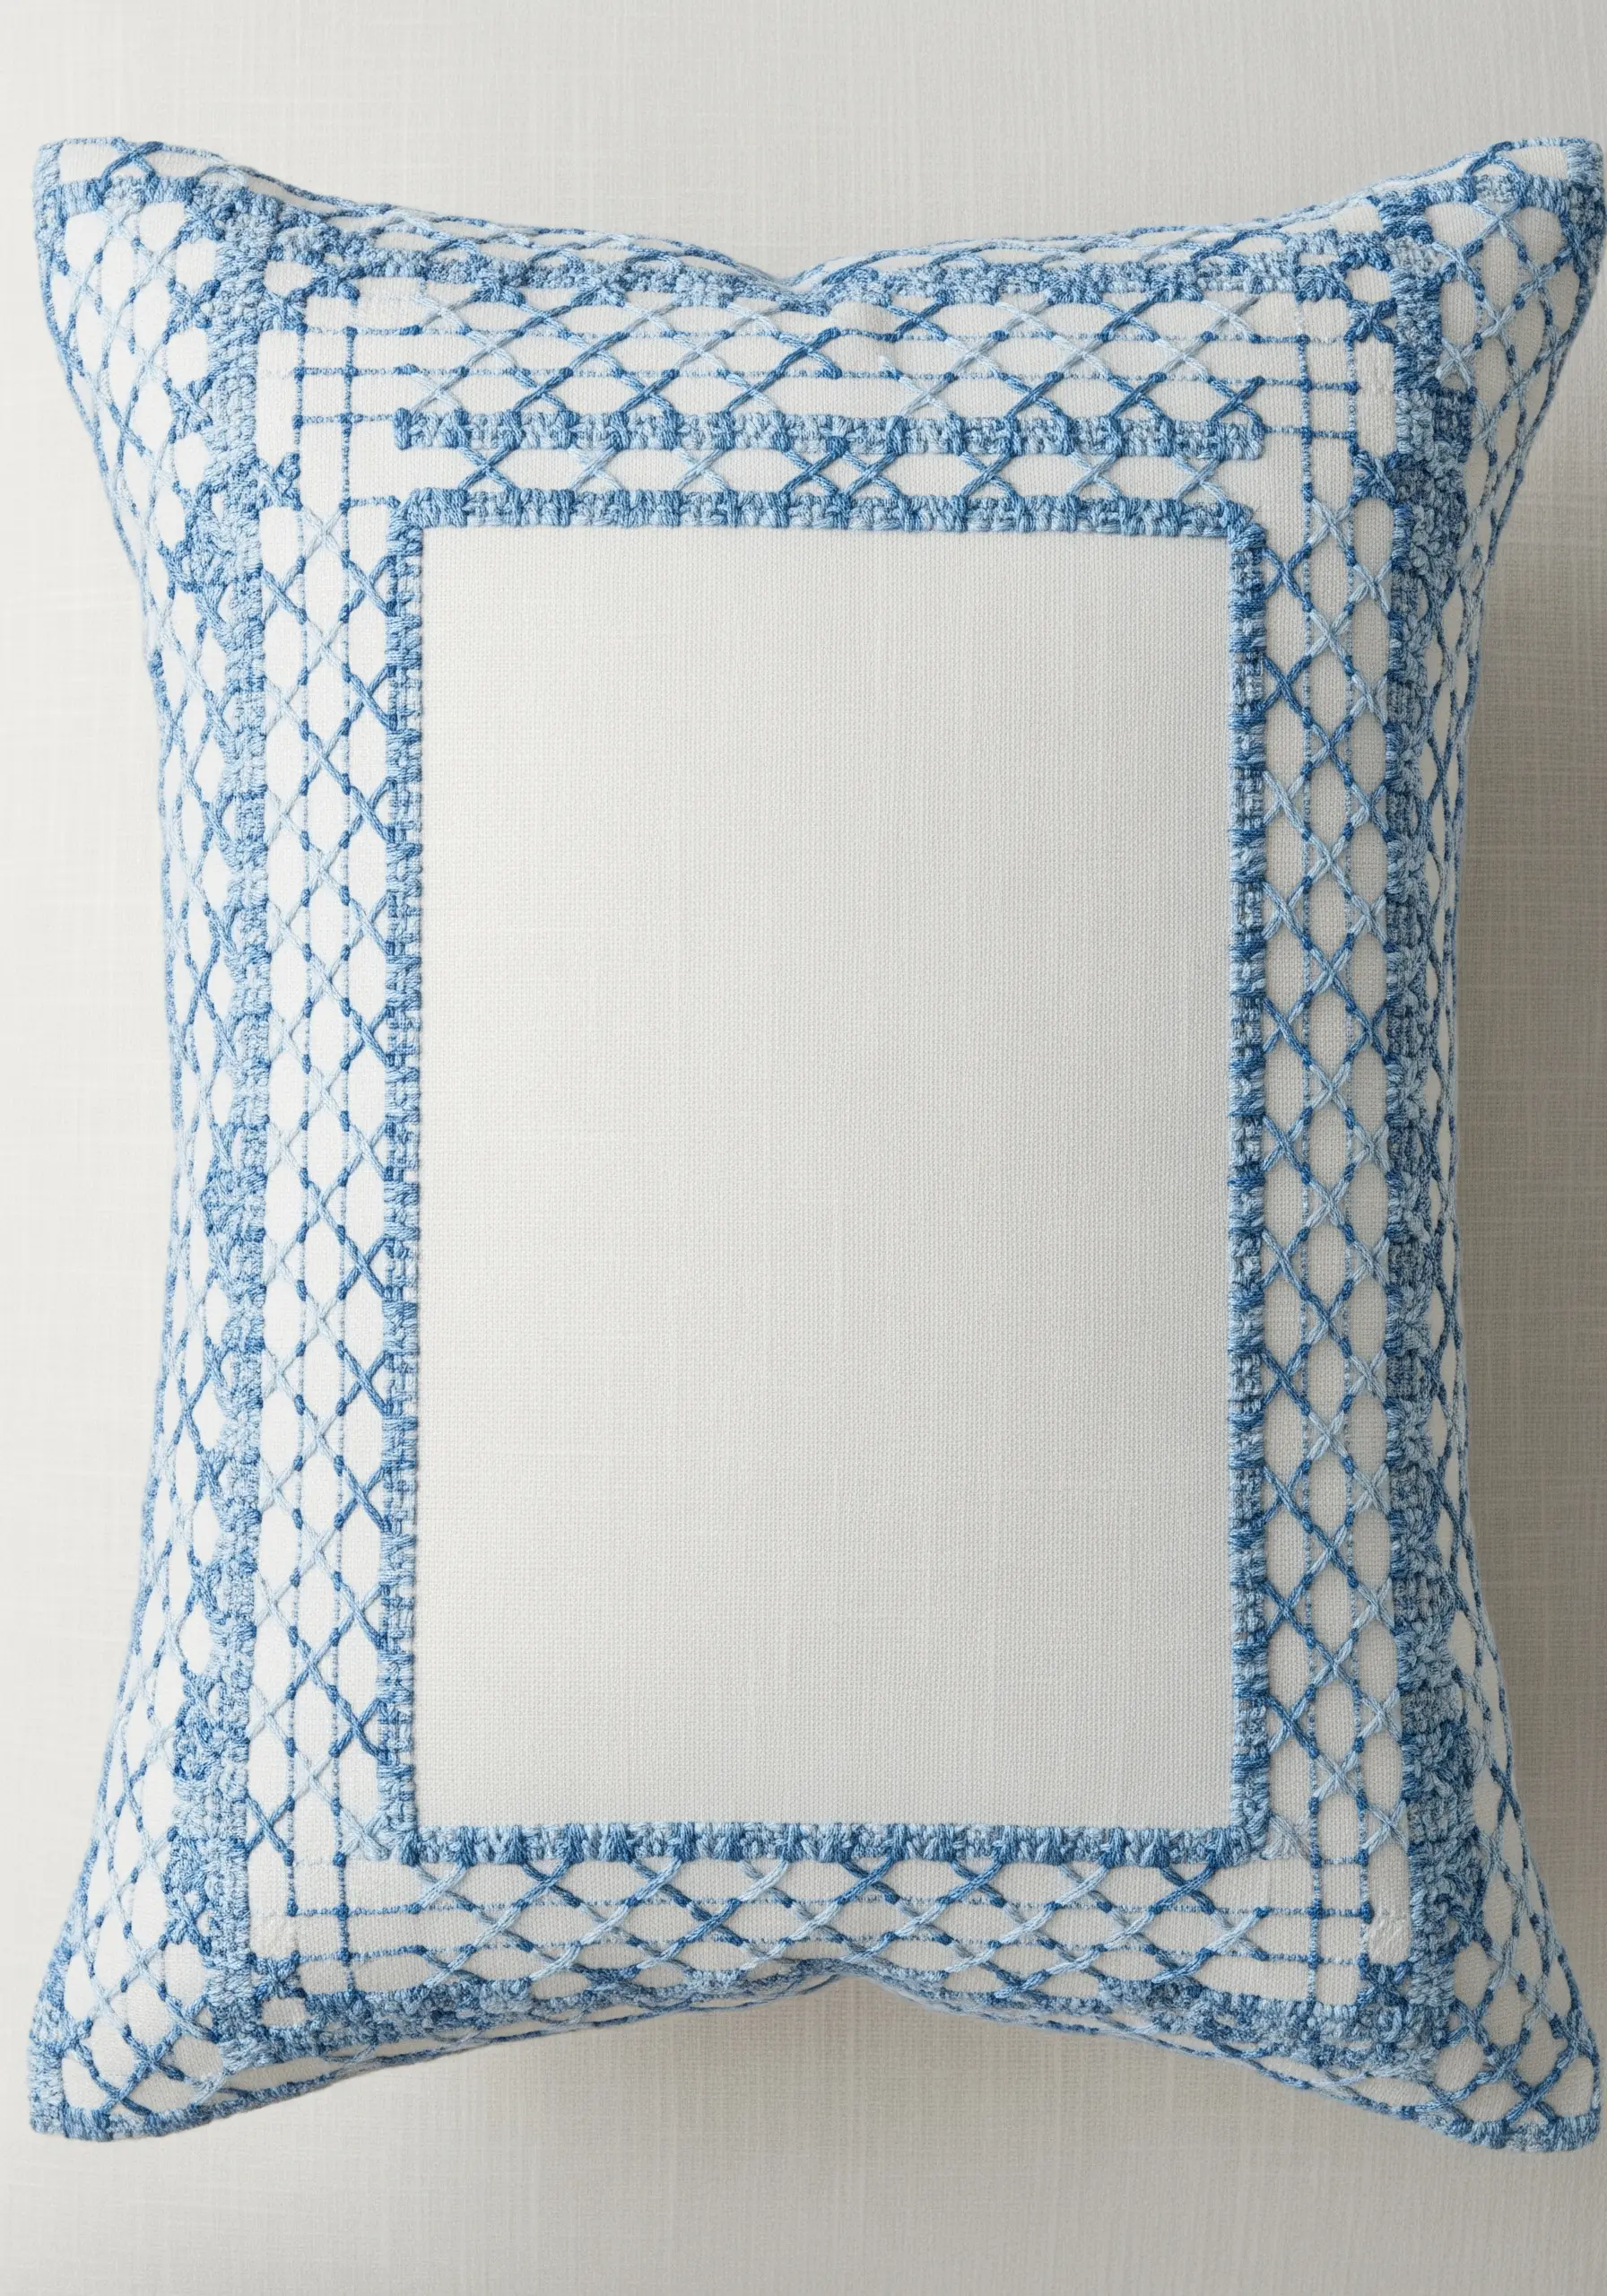
4. Stitch a Rhythmic Sashiko-Inspired Border
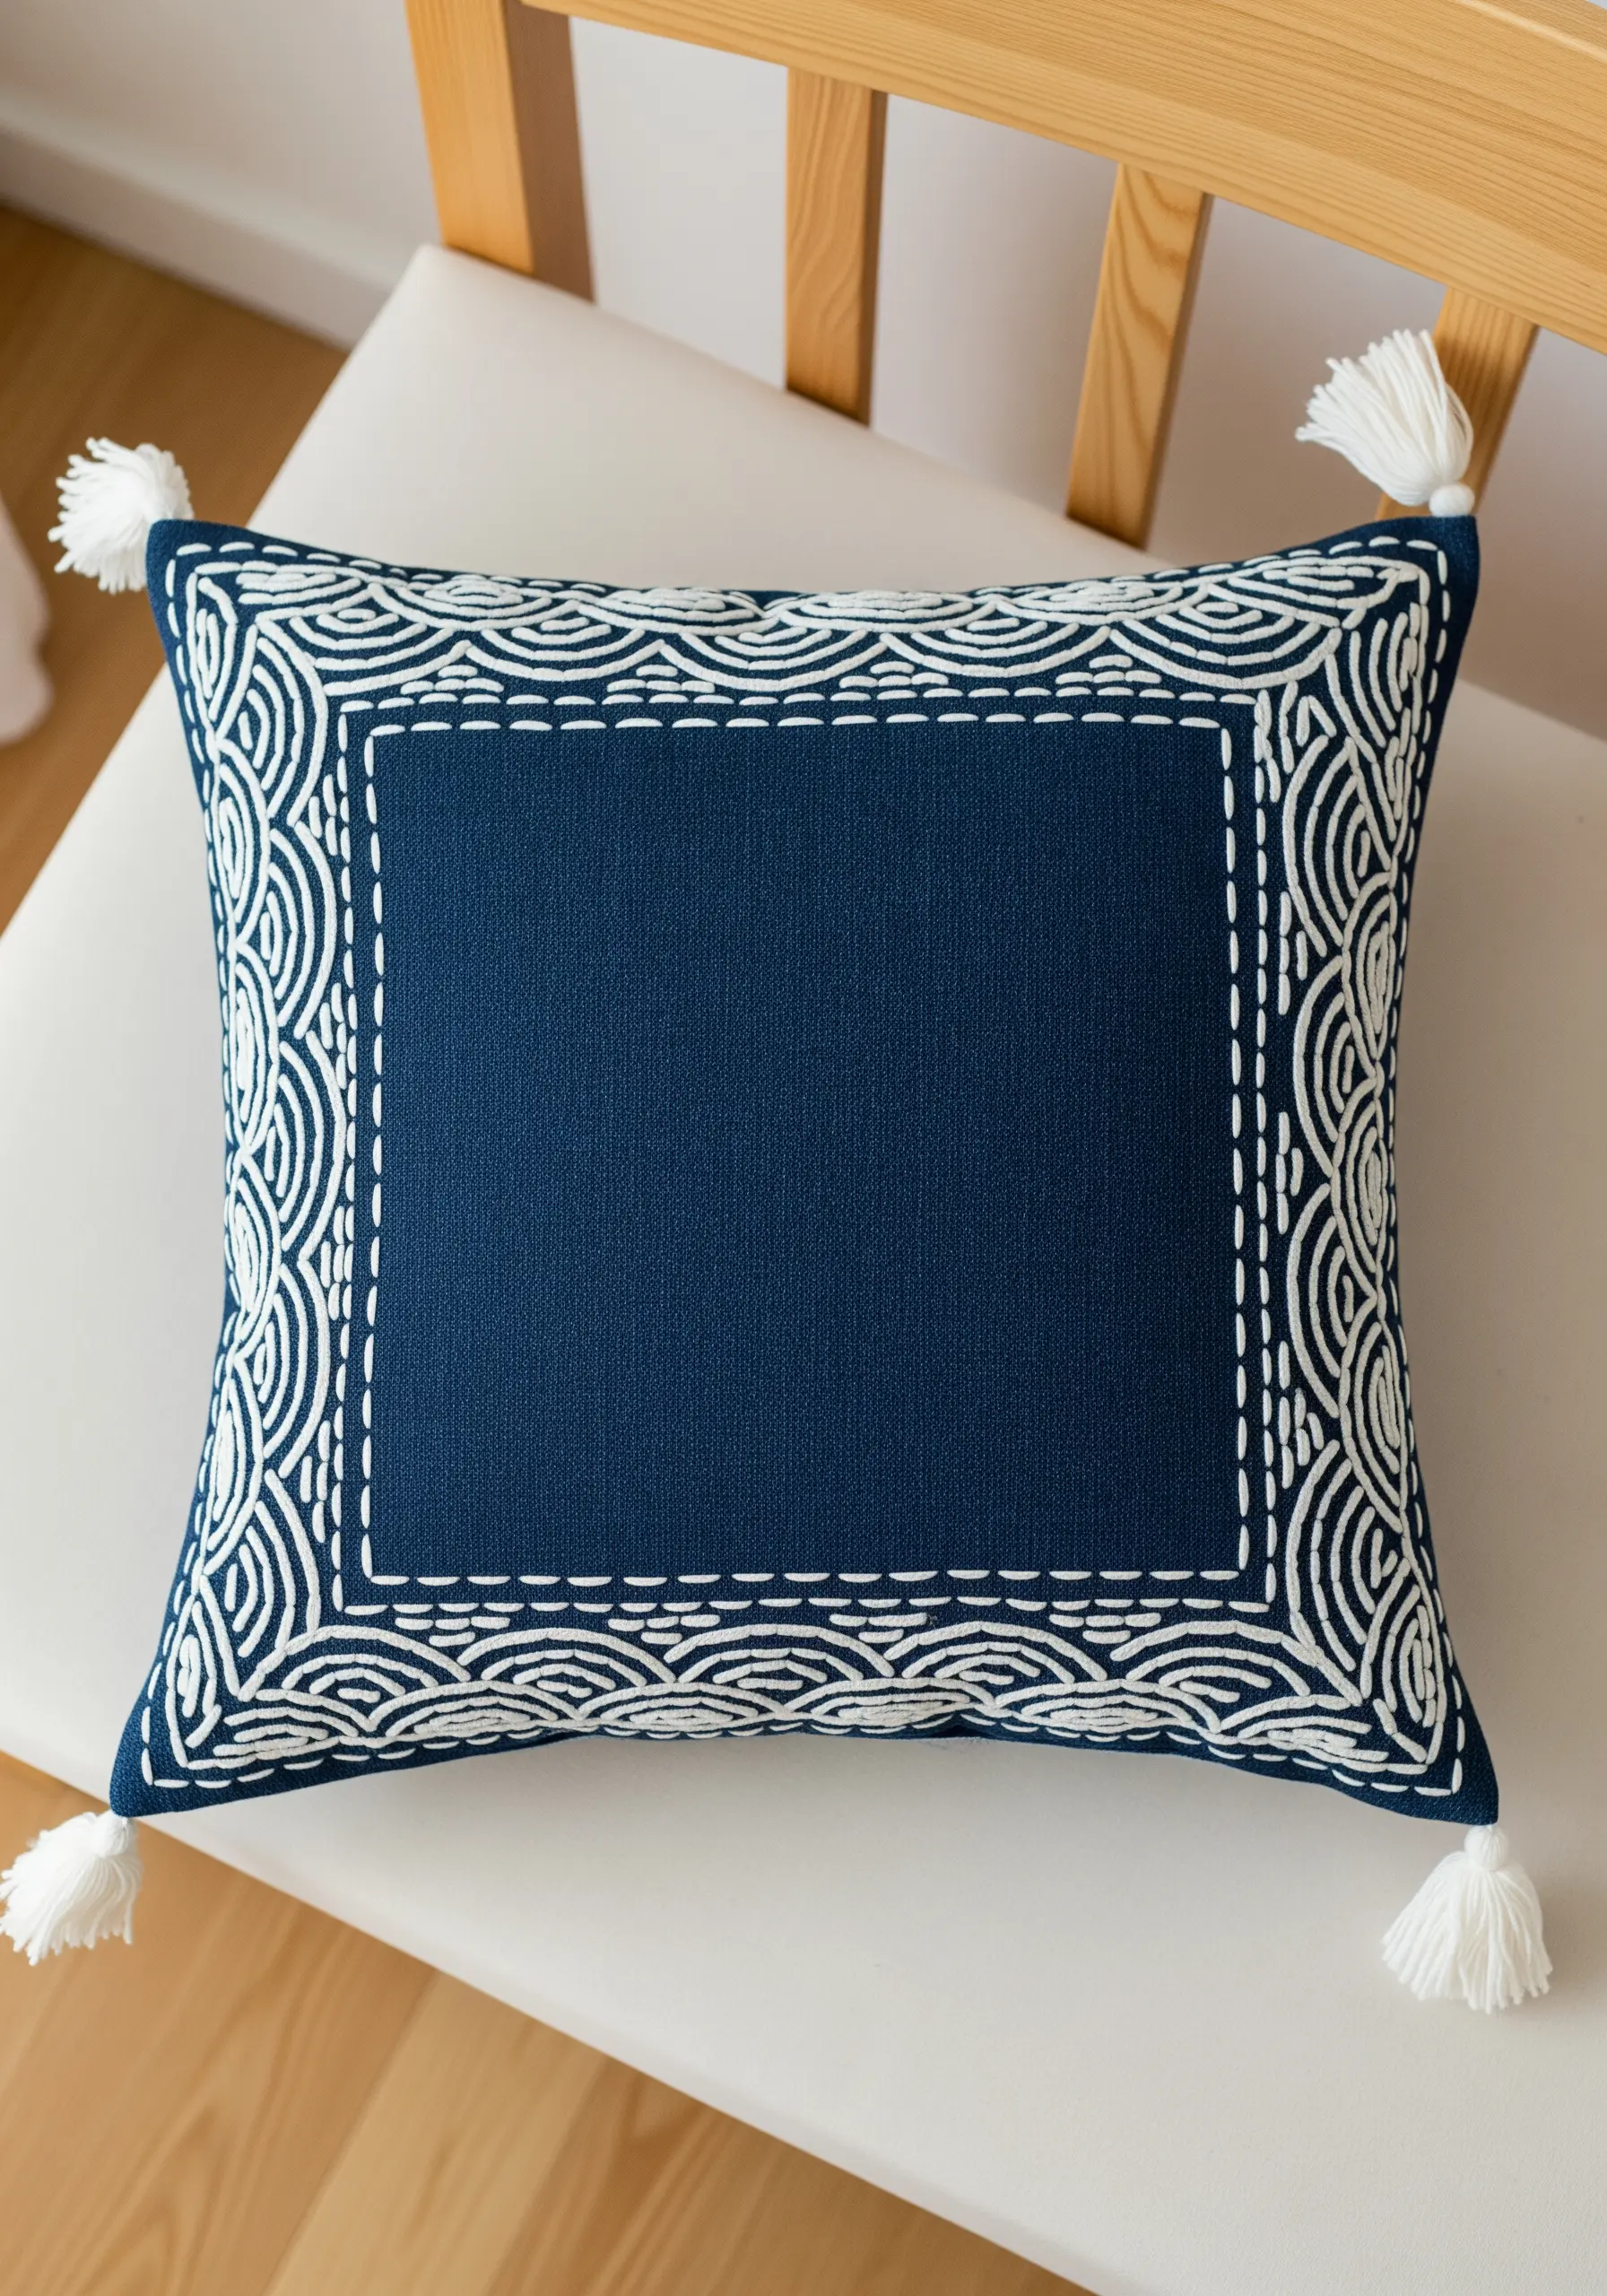
Achieve a clean, meditative look with a Japanese-inspired Sashiko pattern using repeating running stitches.
The key to this technique is consistency in stitch length and spacing, so mark your pattern lightly with a water-soluble pen before you begin.
Use a crisp, high-contrast palette like white on indigo for maximum graphic impact. A thicker thread, like sashiko thread or cotton perle, will give the lines satisfying weight.
Add handmade tassels to the corners using the same thread to create a cohesive, polished finish.
5. Design a Delicate Trailing Vine
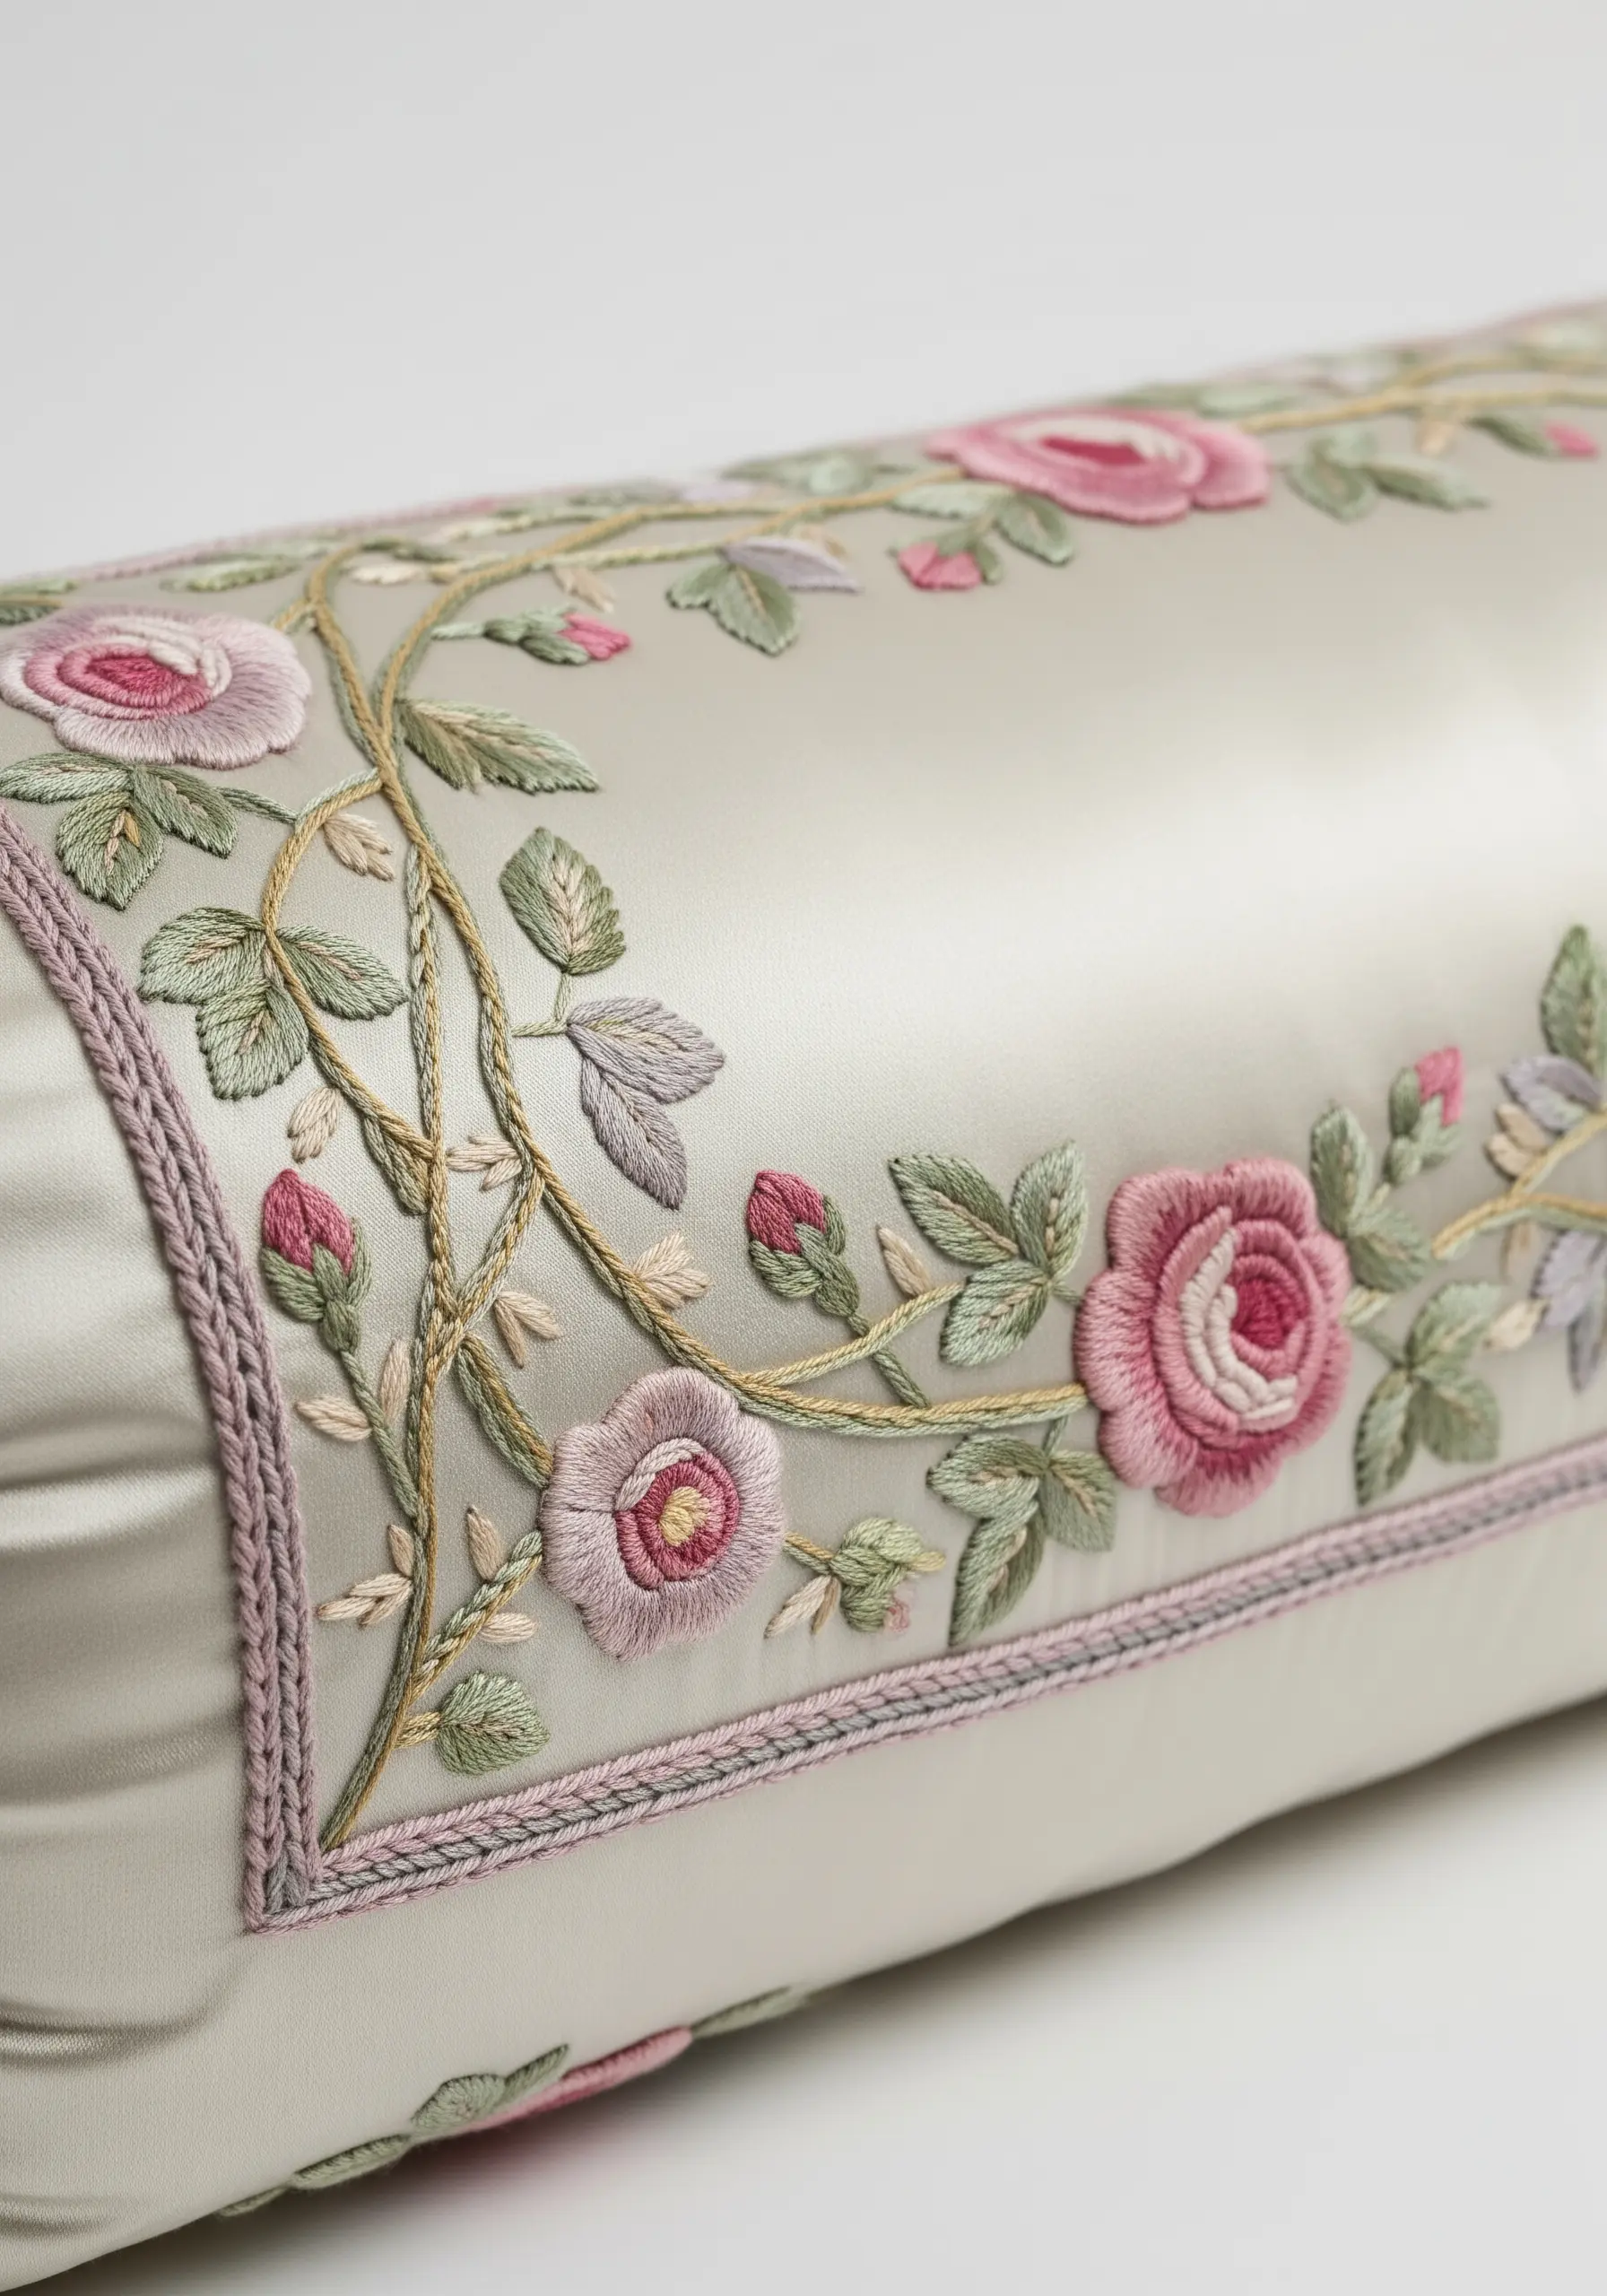
For a soft, romantic effect on a bolster pillow, stitch an asymmetrical vine that meanders naturally across the fabric.
Use a single strand of floss for the flowers and leaves, employing silk shading (long-and-short stitch) to blend soft pinks, mauves, and greens for a painterly feel.
The stem stitch, worked with a slightly darker thread, provides the structure for the vine, guiding the eye along the design.
This technique works best on smooth, lustrous fabrics like silk or sateen, where the delicate stitches can truly shine.
6. Build Texture with Braids and Chains
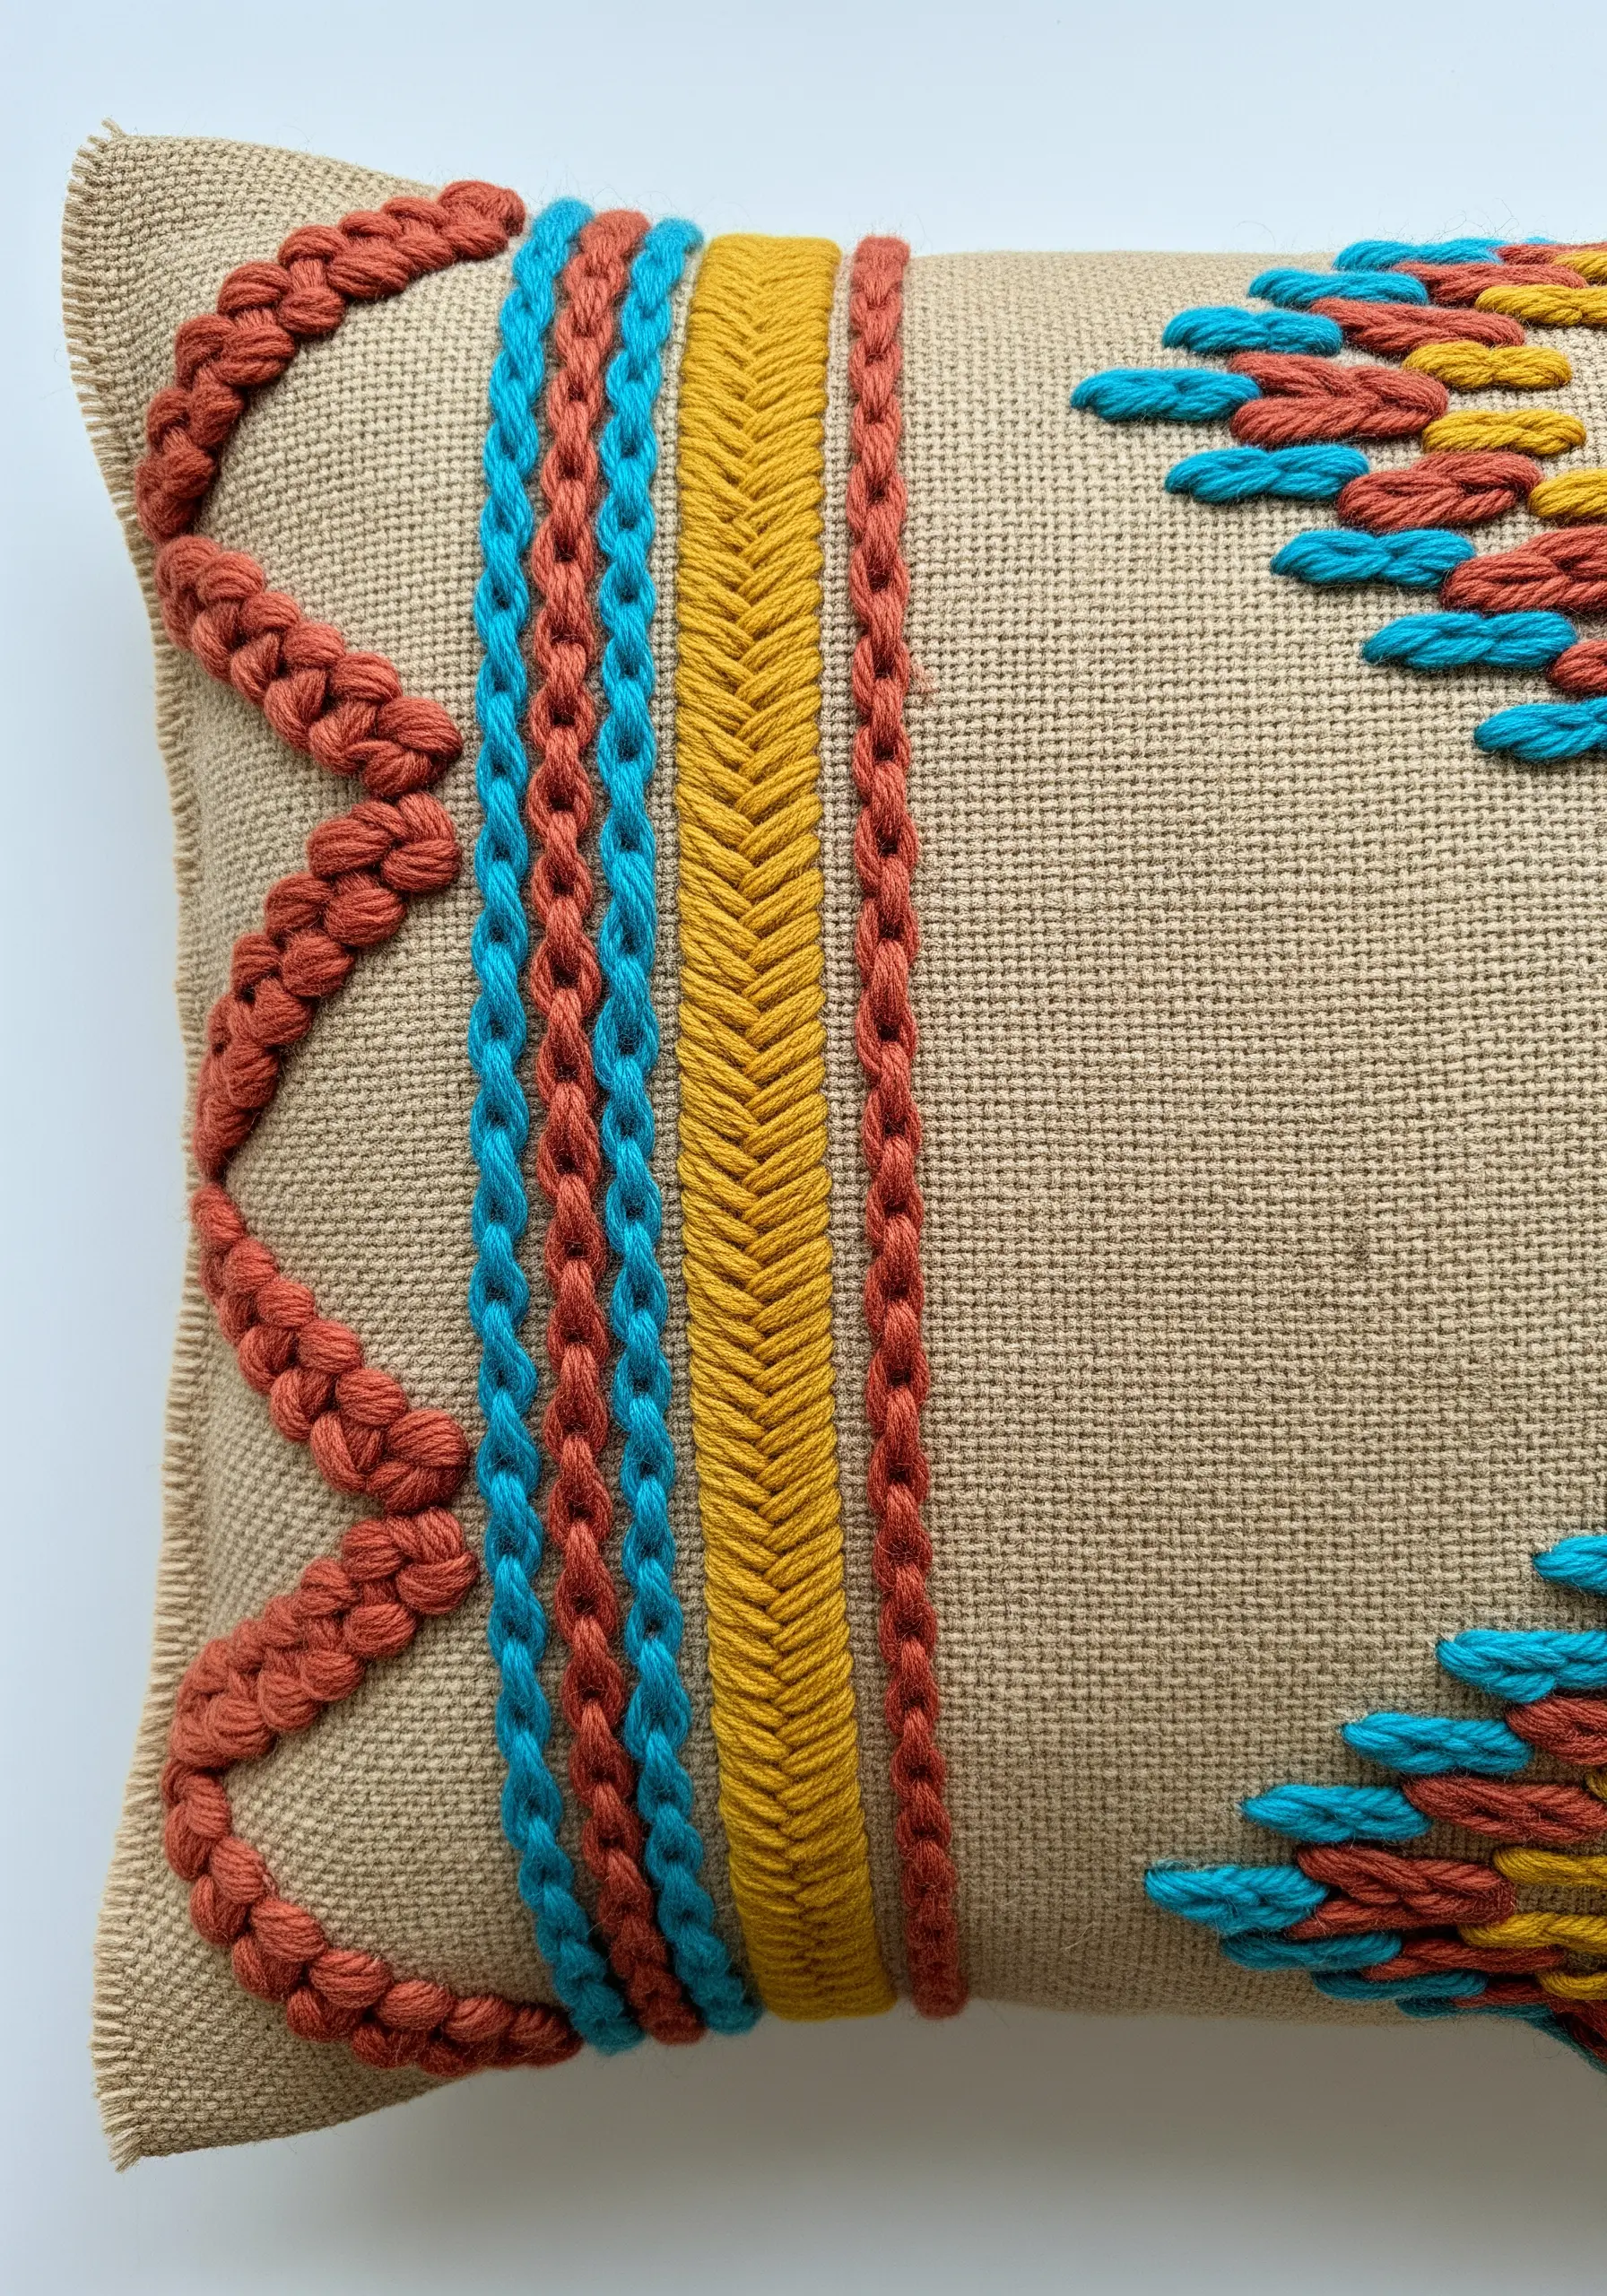
Create a highly tactile border by combining dimensional stitches in contrasting colors and weights.
Use thick yarn or multiple strands of floss to work a heavy chain stitch or a plaited braid stitch for the boldest lines. This gives the design a sculptural, three-dimensional quality.
Juxtapose these thicker stitches with finer, flatter lines like the herringbone stitch to create visual rhythm and depth.
This technique is perfect for rustic, heavily woven fabrics like burlap or coarse linen, as the fabric’s texture complements the chunky stitches.
7. Weave a Celestial Beaded Border
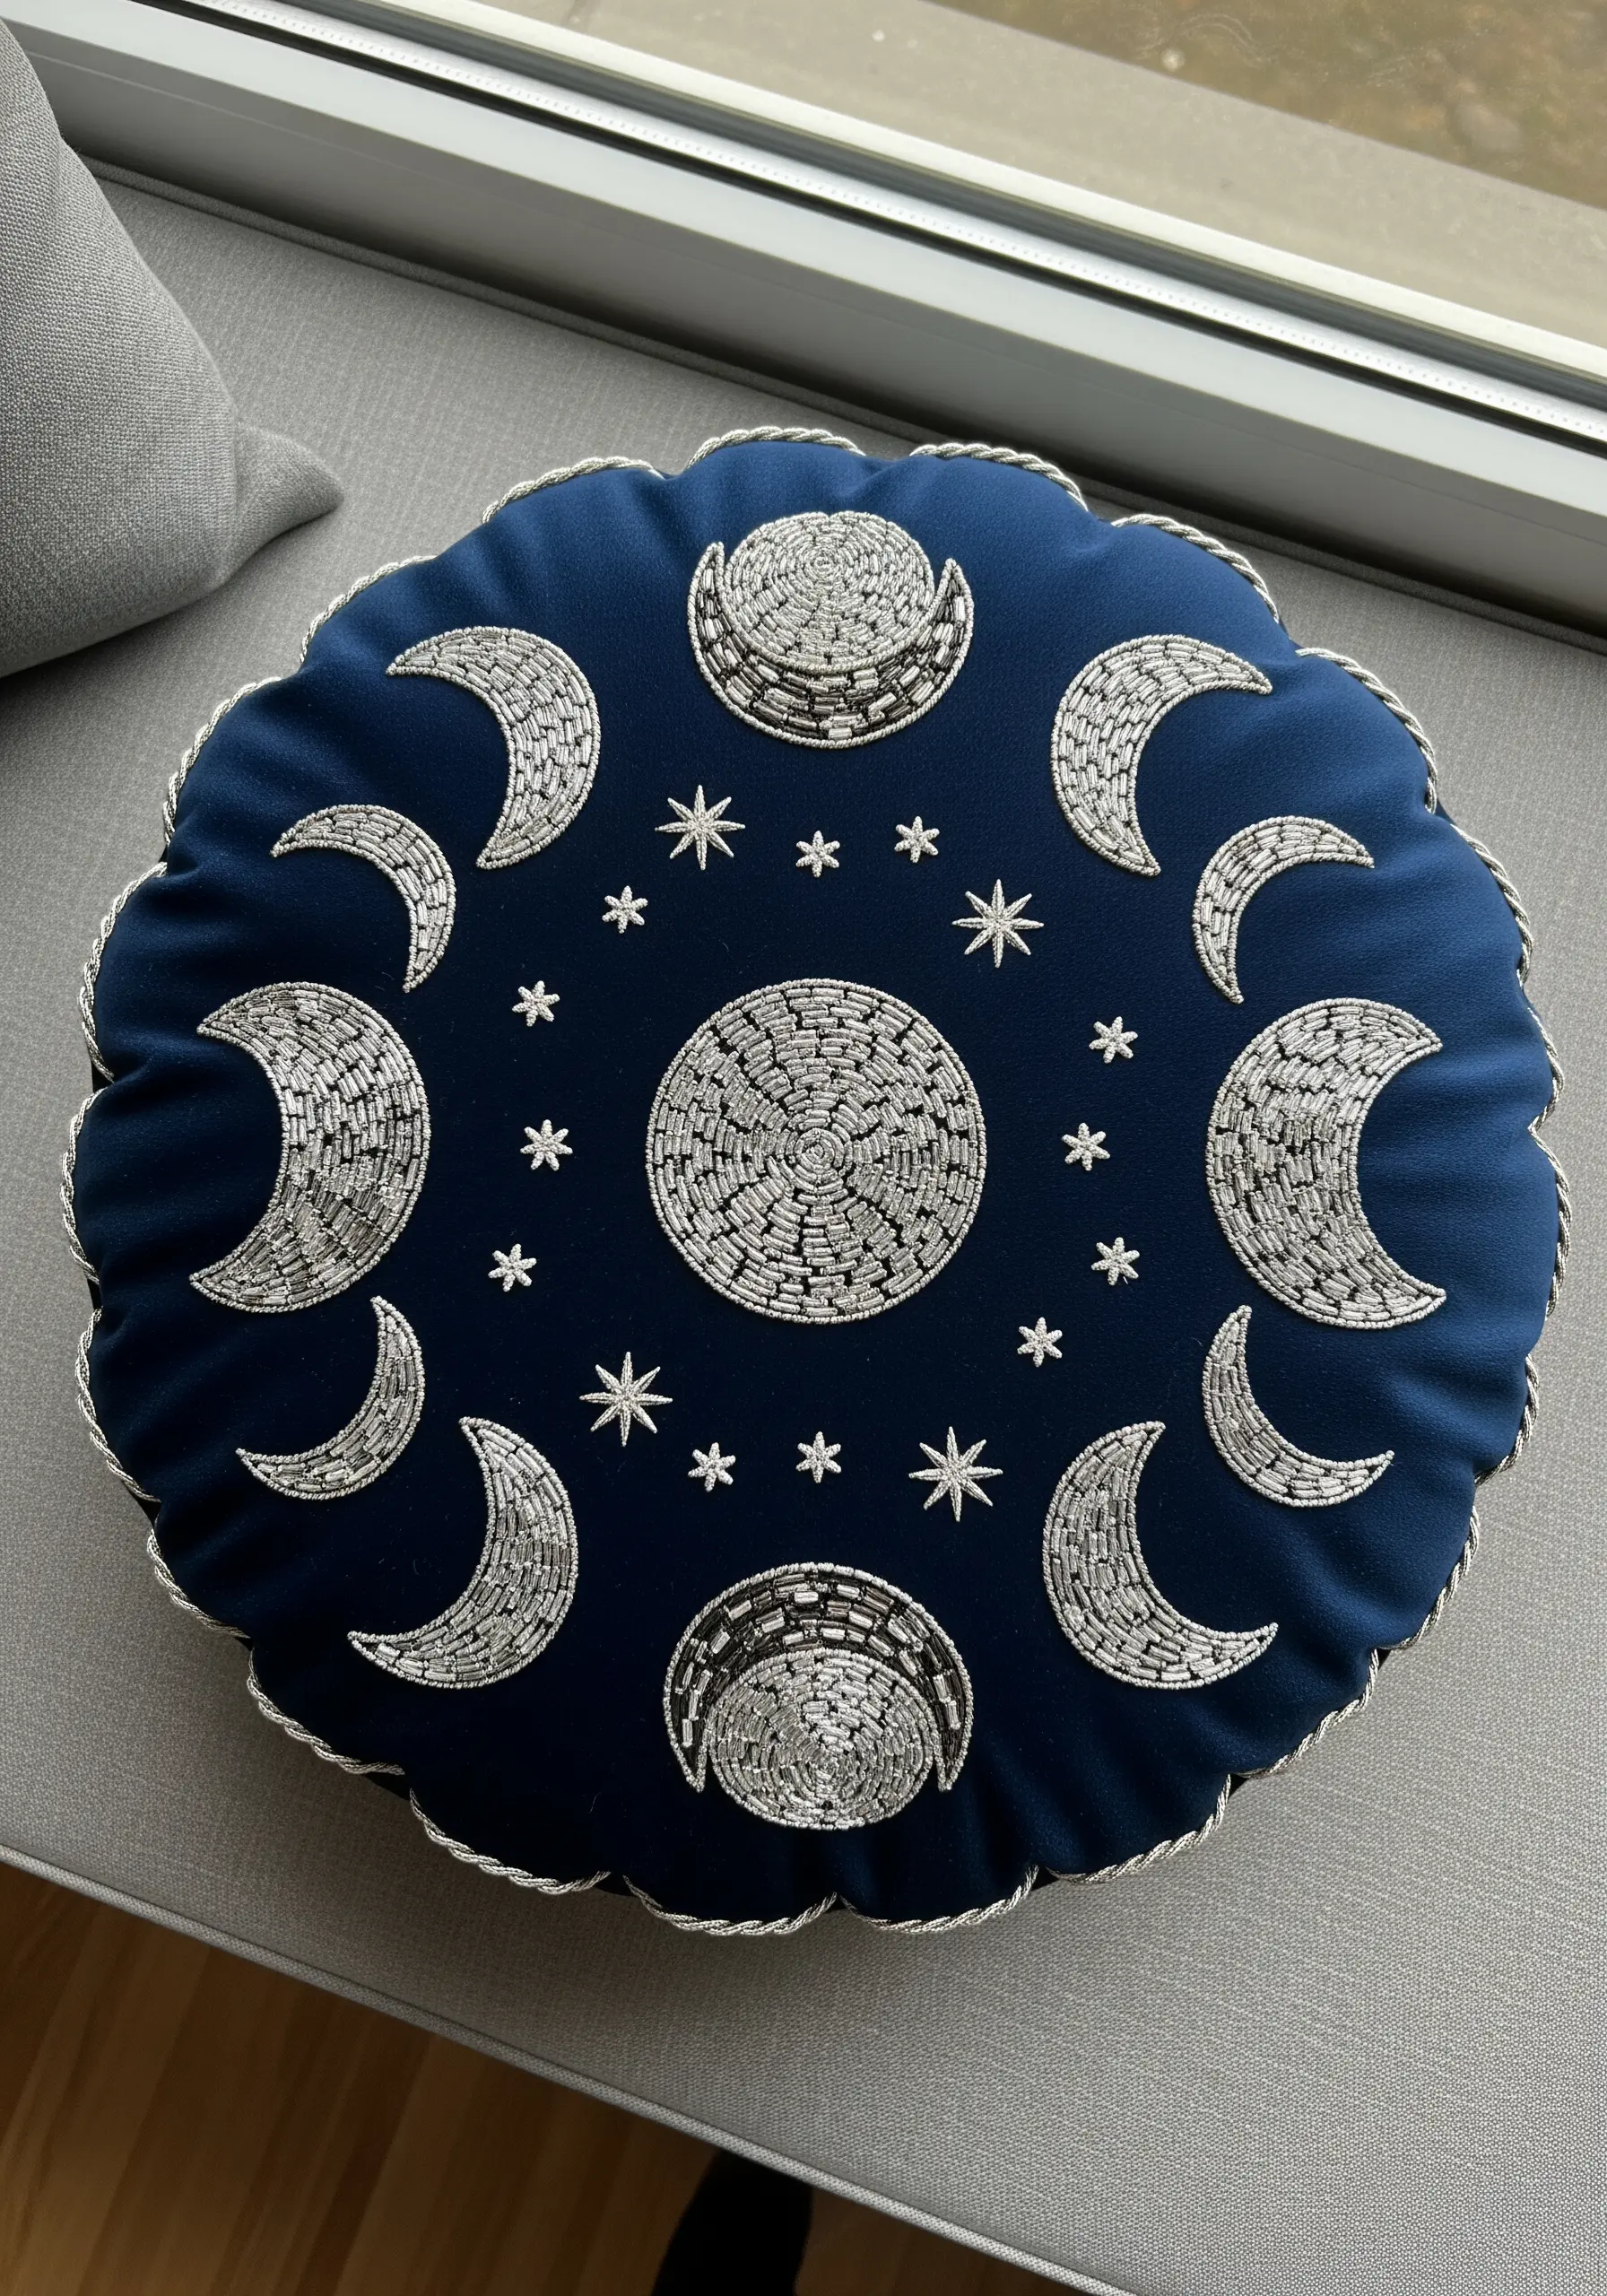
Map out a celestial scene on a dark velvet or satin cushion for a touch of cosmic magic.
Instead of thread, fill in the shapes of the moon and stars with rows of tiny silver seed beads or bugle beads, creating a mosaic-like texture that catches the light.
Outline each celestial body with a fine silver cord, couched down with a matching sewing thread, to give the beaded shapes crisp definition.
Arrange the motifs in a circular pattern to create a natural frame that draws the eye to the center of the cushion.
8. Plant a Wildflower Meadow Corner
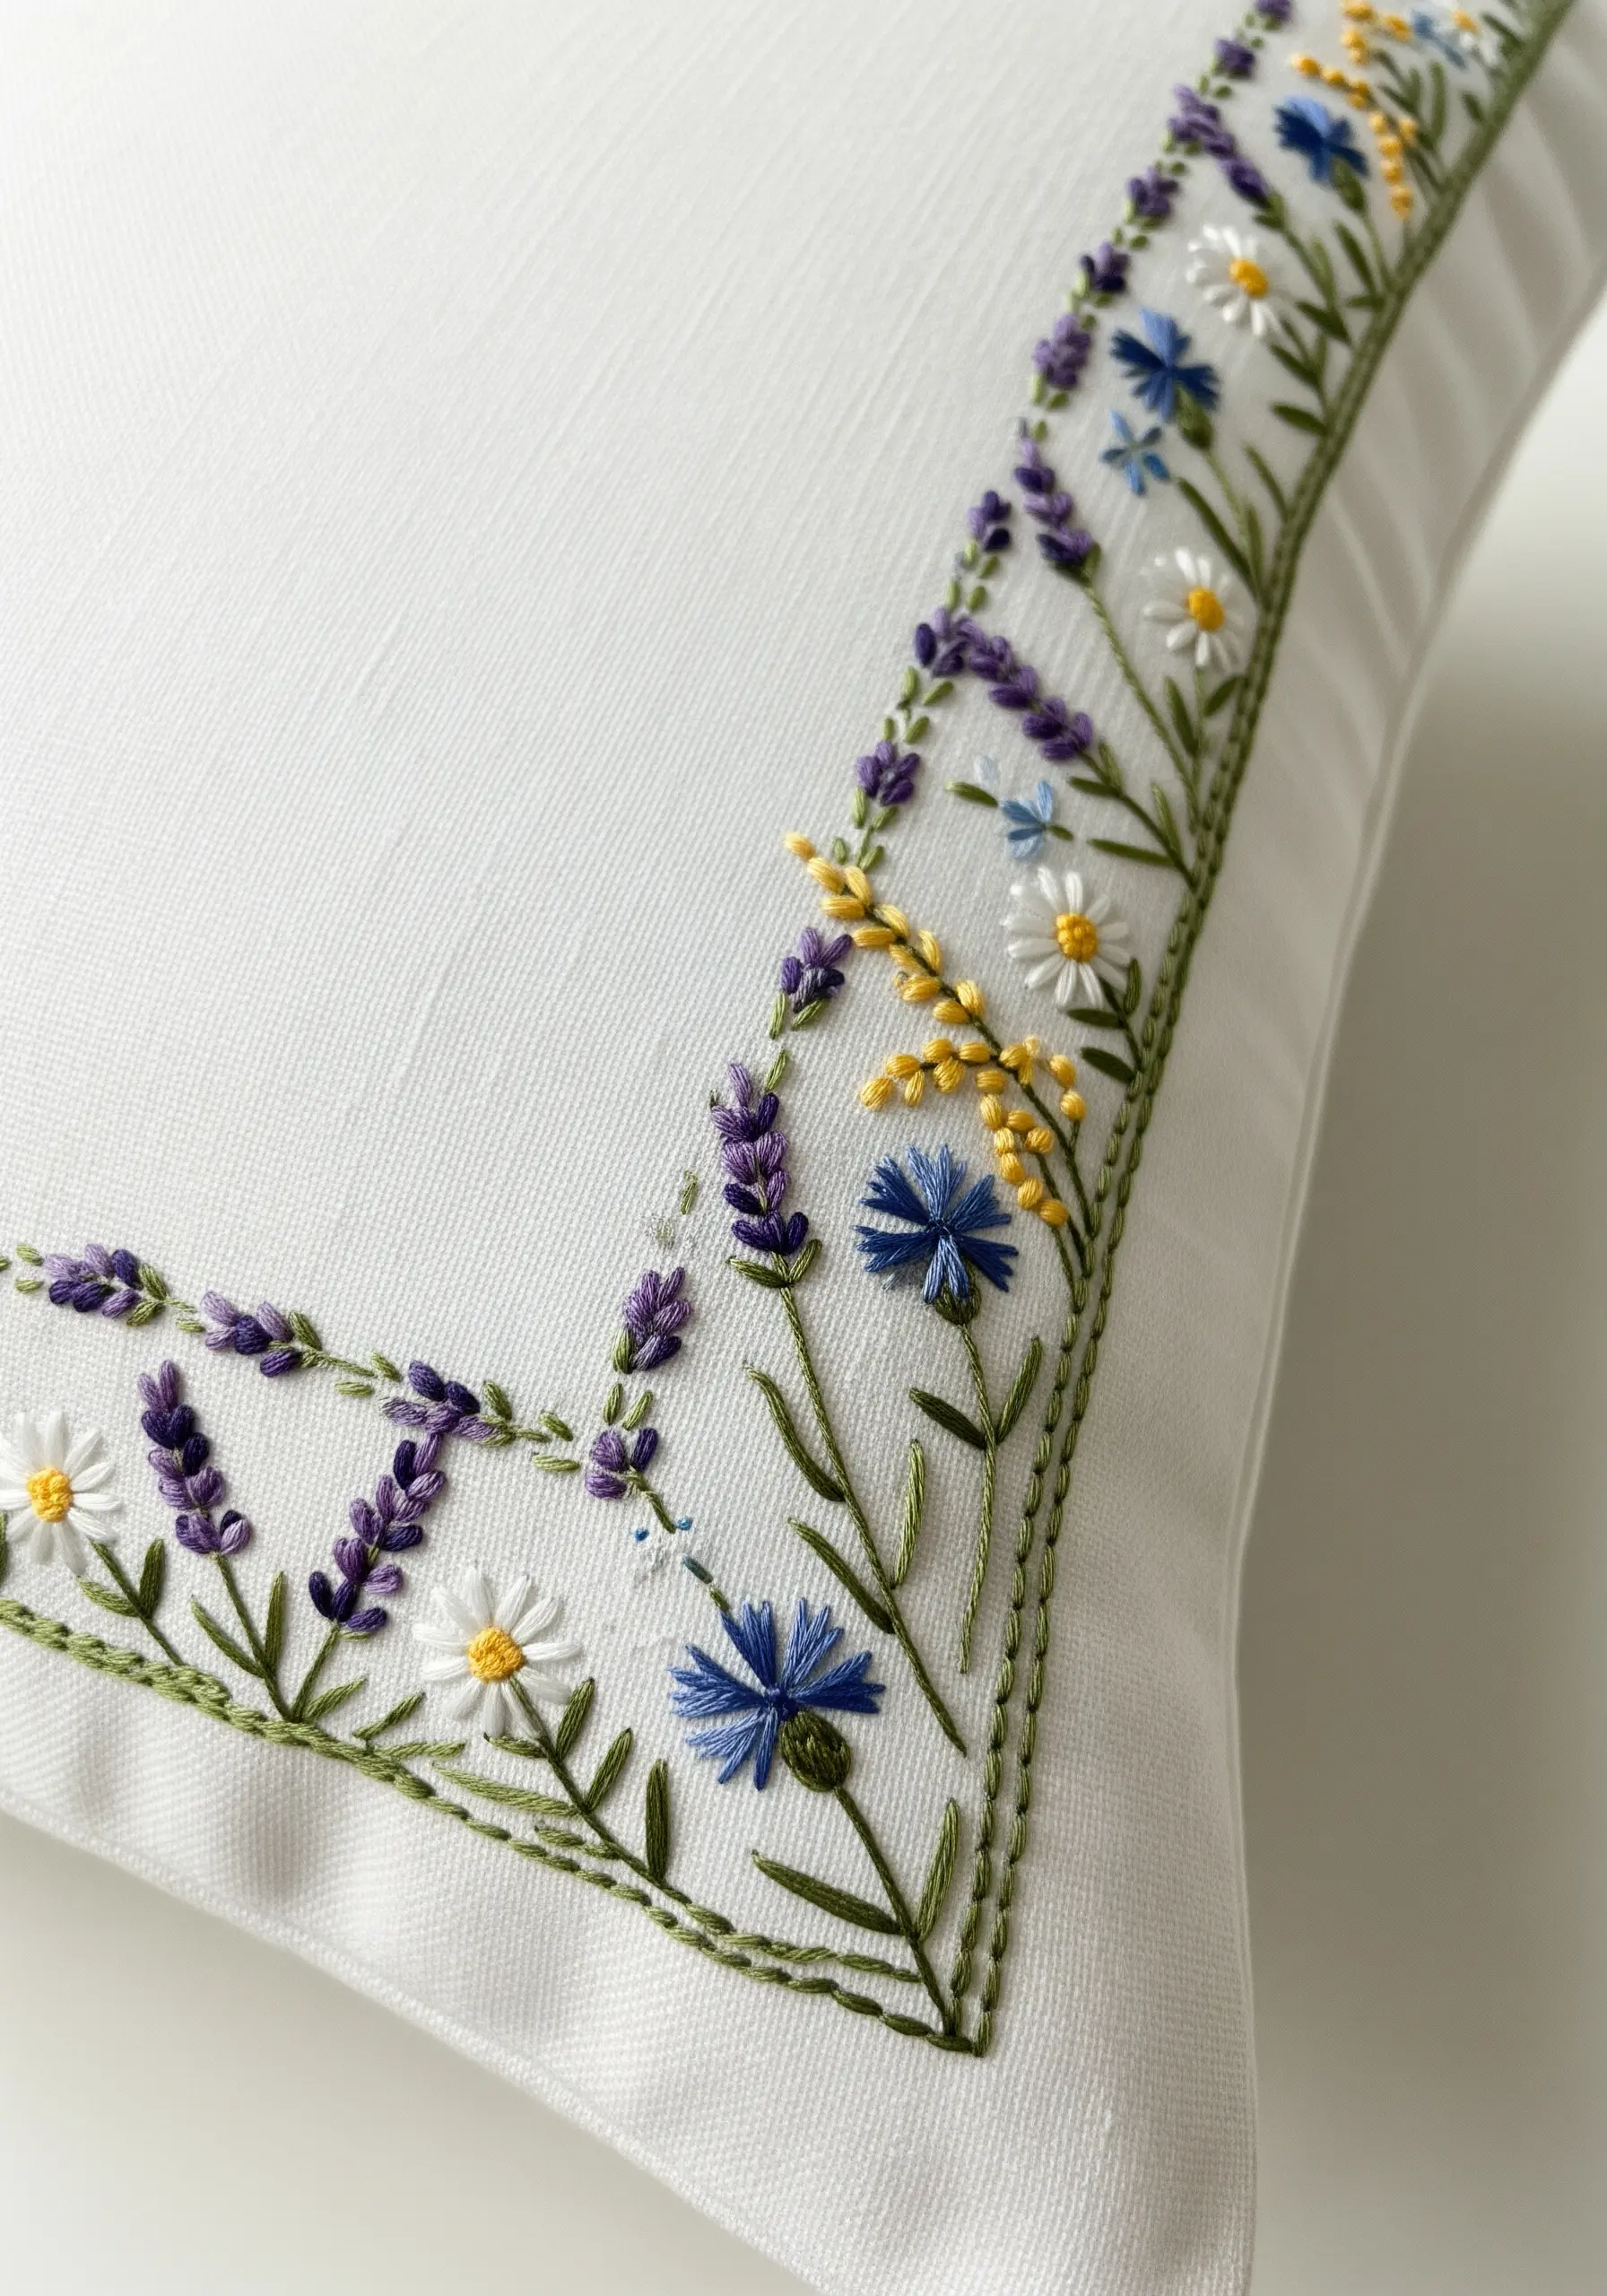
Create the feeling of a full border by concentrating a dense cluster of wildflowers at each corner.
Use a variety of simple stitches to represent different flowers: lazy daisy for daisies, French knots for goldenrods, and straight stitches for lavender.
Vary the height and direction of your stems using a delicate stem stitch to give the arrangement a natural, just-picked-from-the-meadow feel.
A fine chain stitch in a soft green provides a subtle, unifying border that connects the corners without overwhelming the delicate florals.
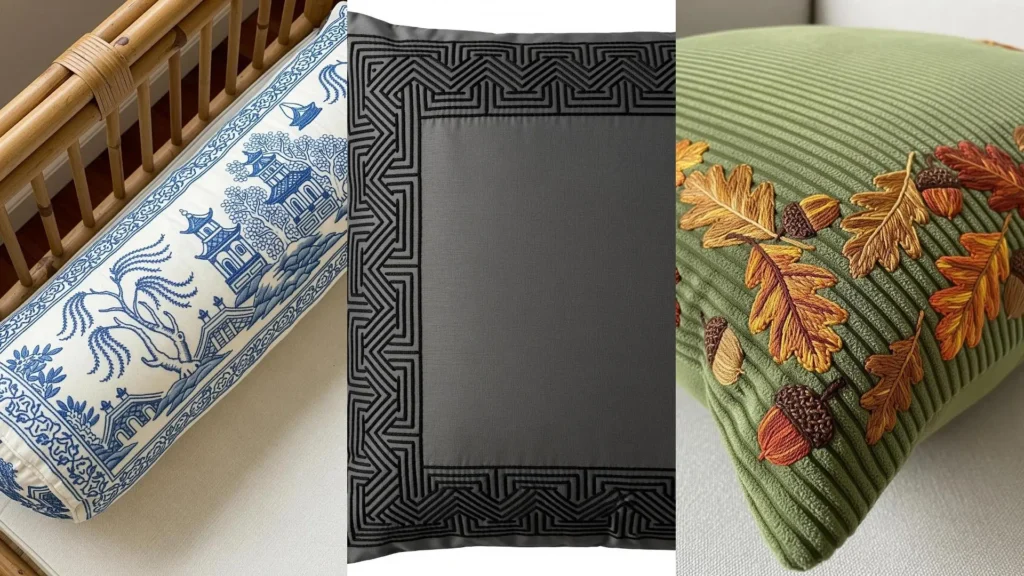
9. Define Edges with a Bold Geometric Maze
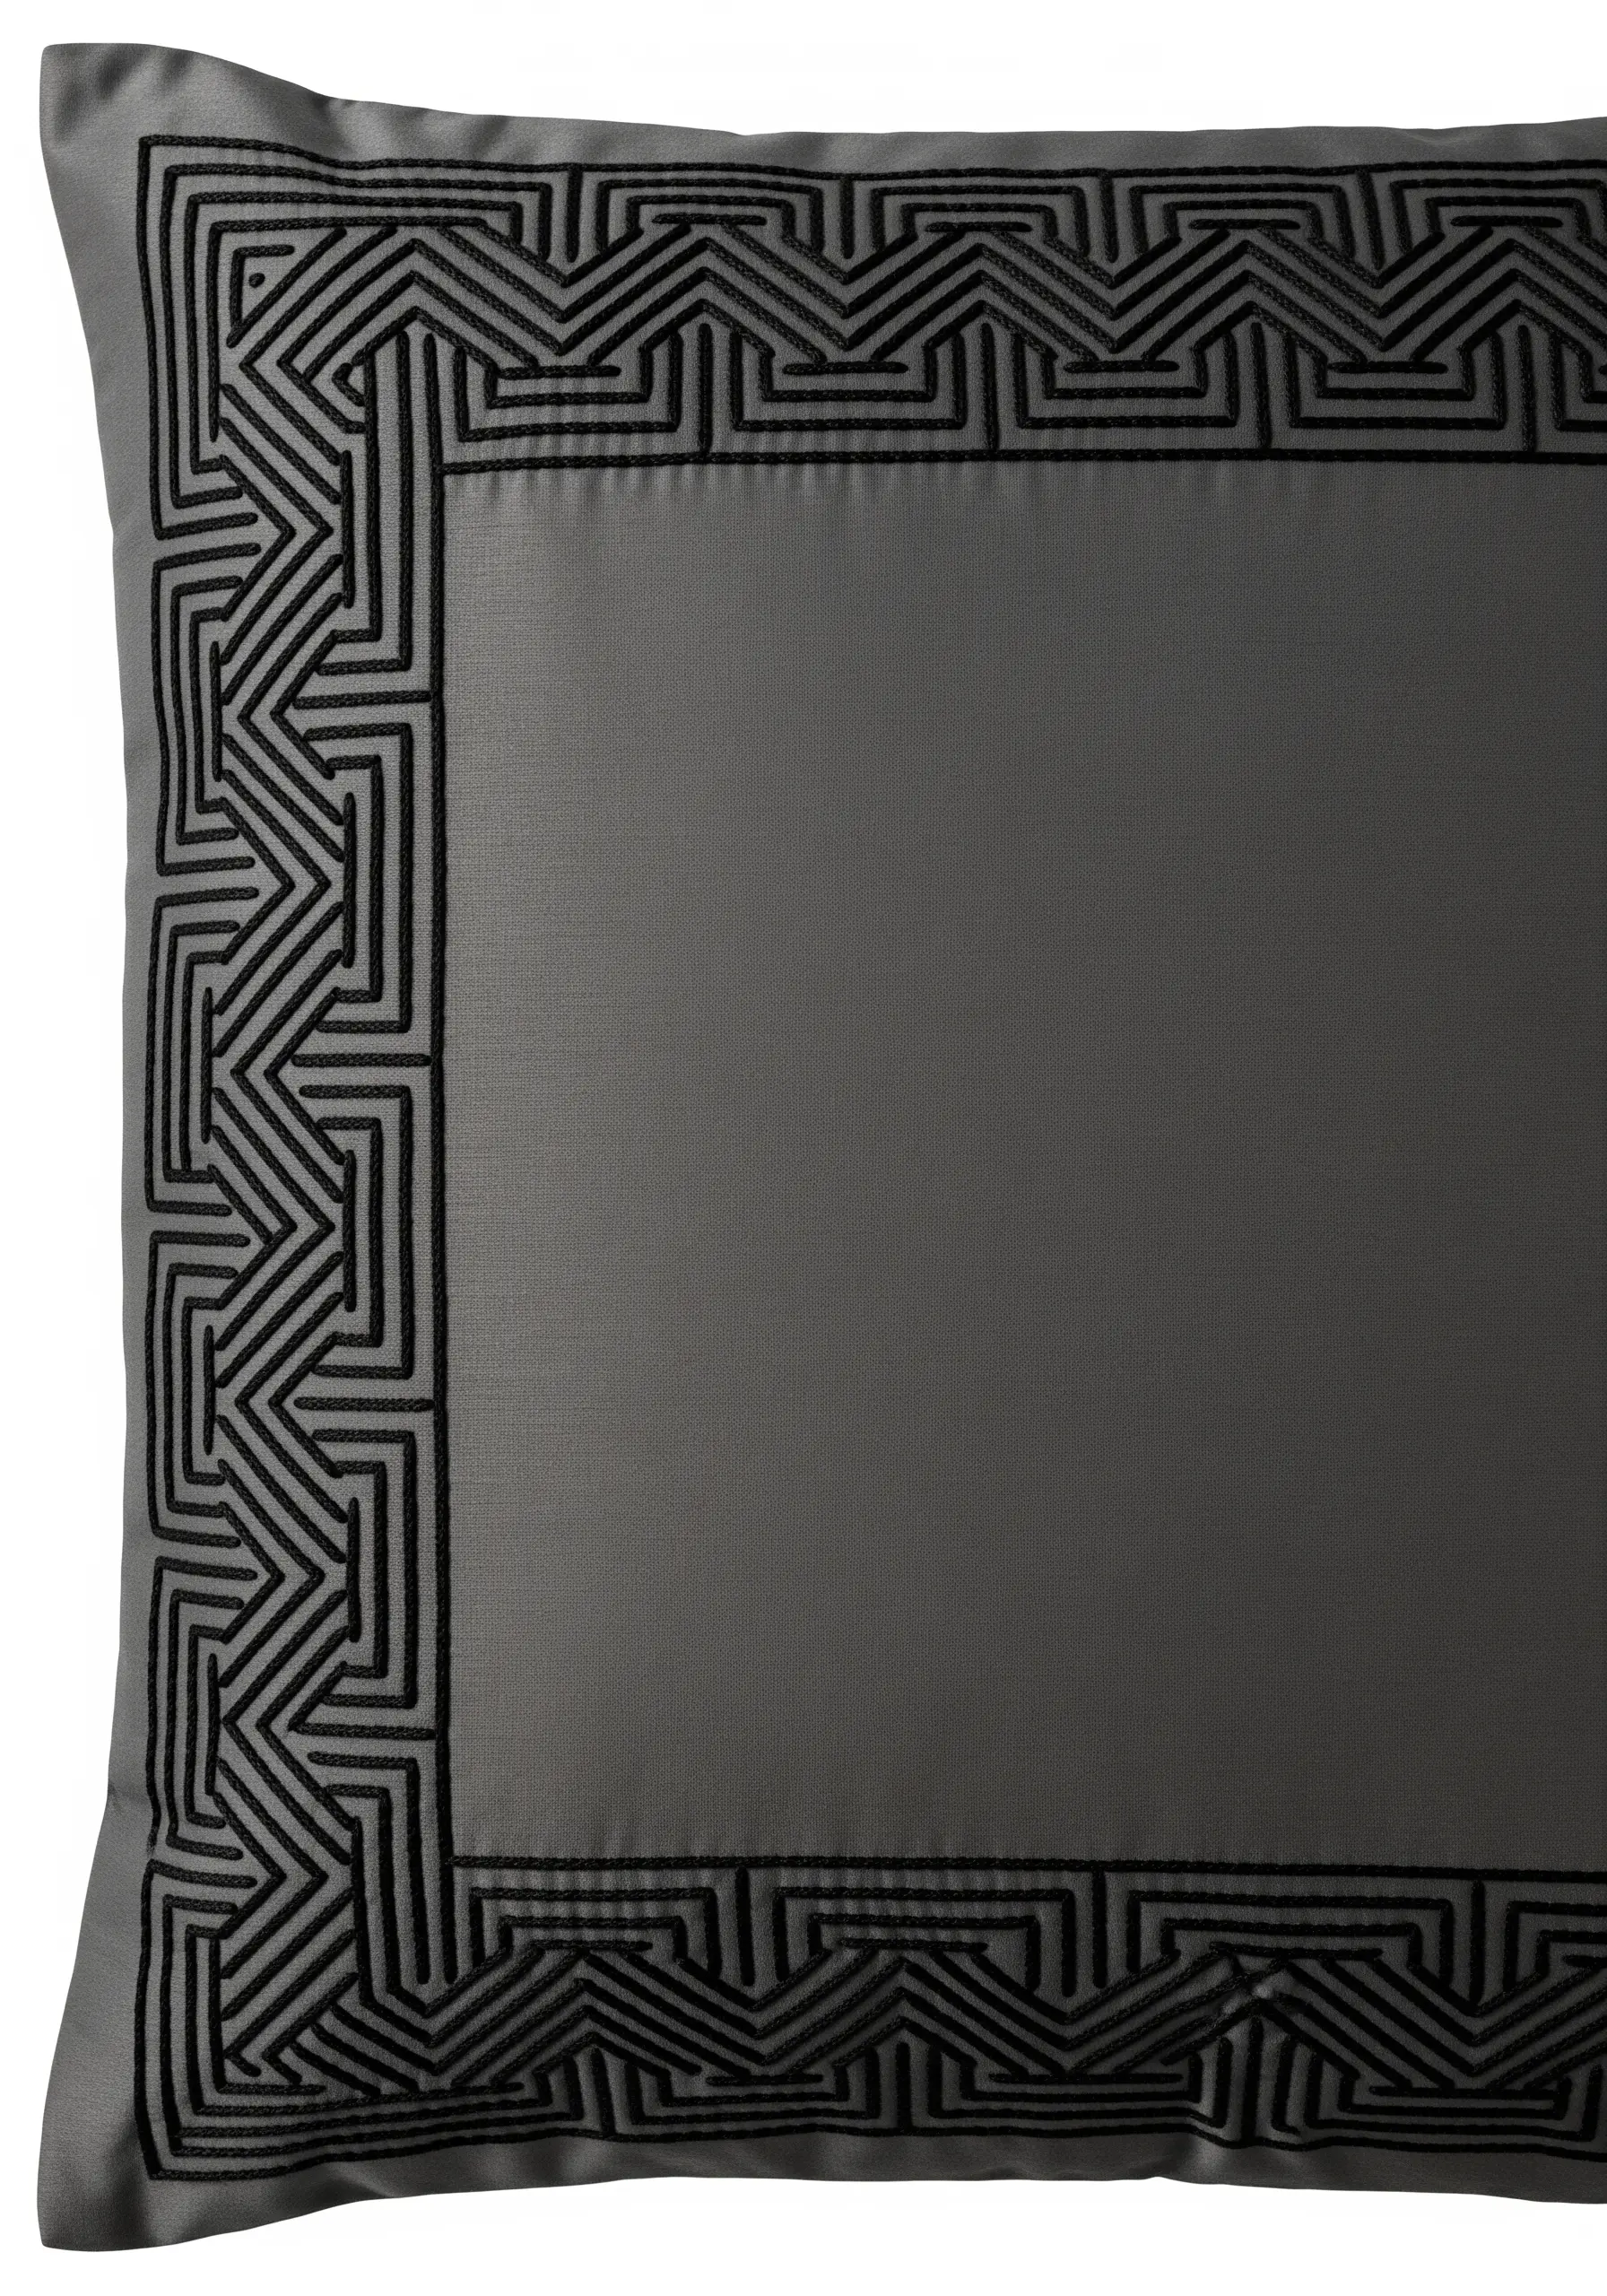
For a modern, architectural statement, stitch a border using a continuous, interlocking geometric pattern.
Use a satin stitch, worked with a high-sheen thread, to fill the lines. This creates a smooth, raised surface that contrasts beautifully with a matte fabric like cotton or linen.
A tone-on-tone color scheme, like black on charcoal grey, feels sophisticated and intentional, emphasizing the pattern’s form and texture over color.
Ensure your stitches are uniform in length and direction to maintain the clean, sharp lines essential for this style.
10. Create a Tiled Effect with Repeating Motifs
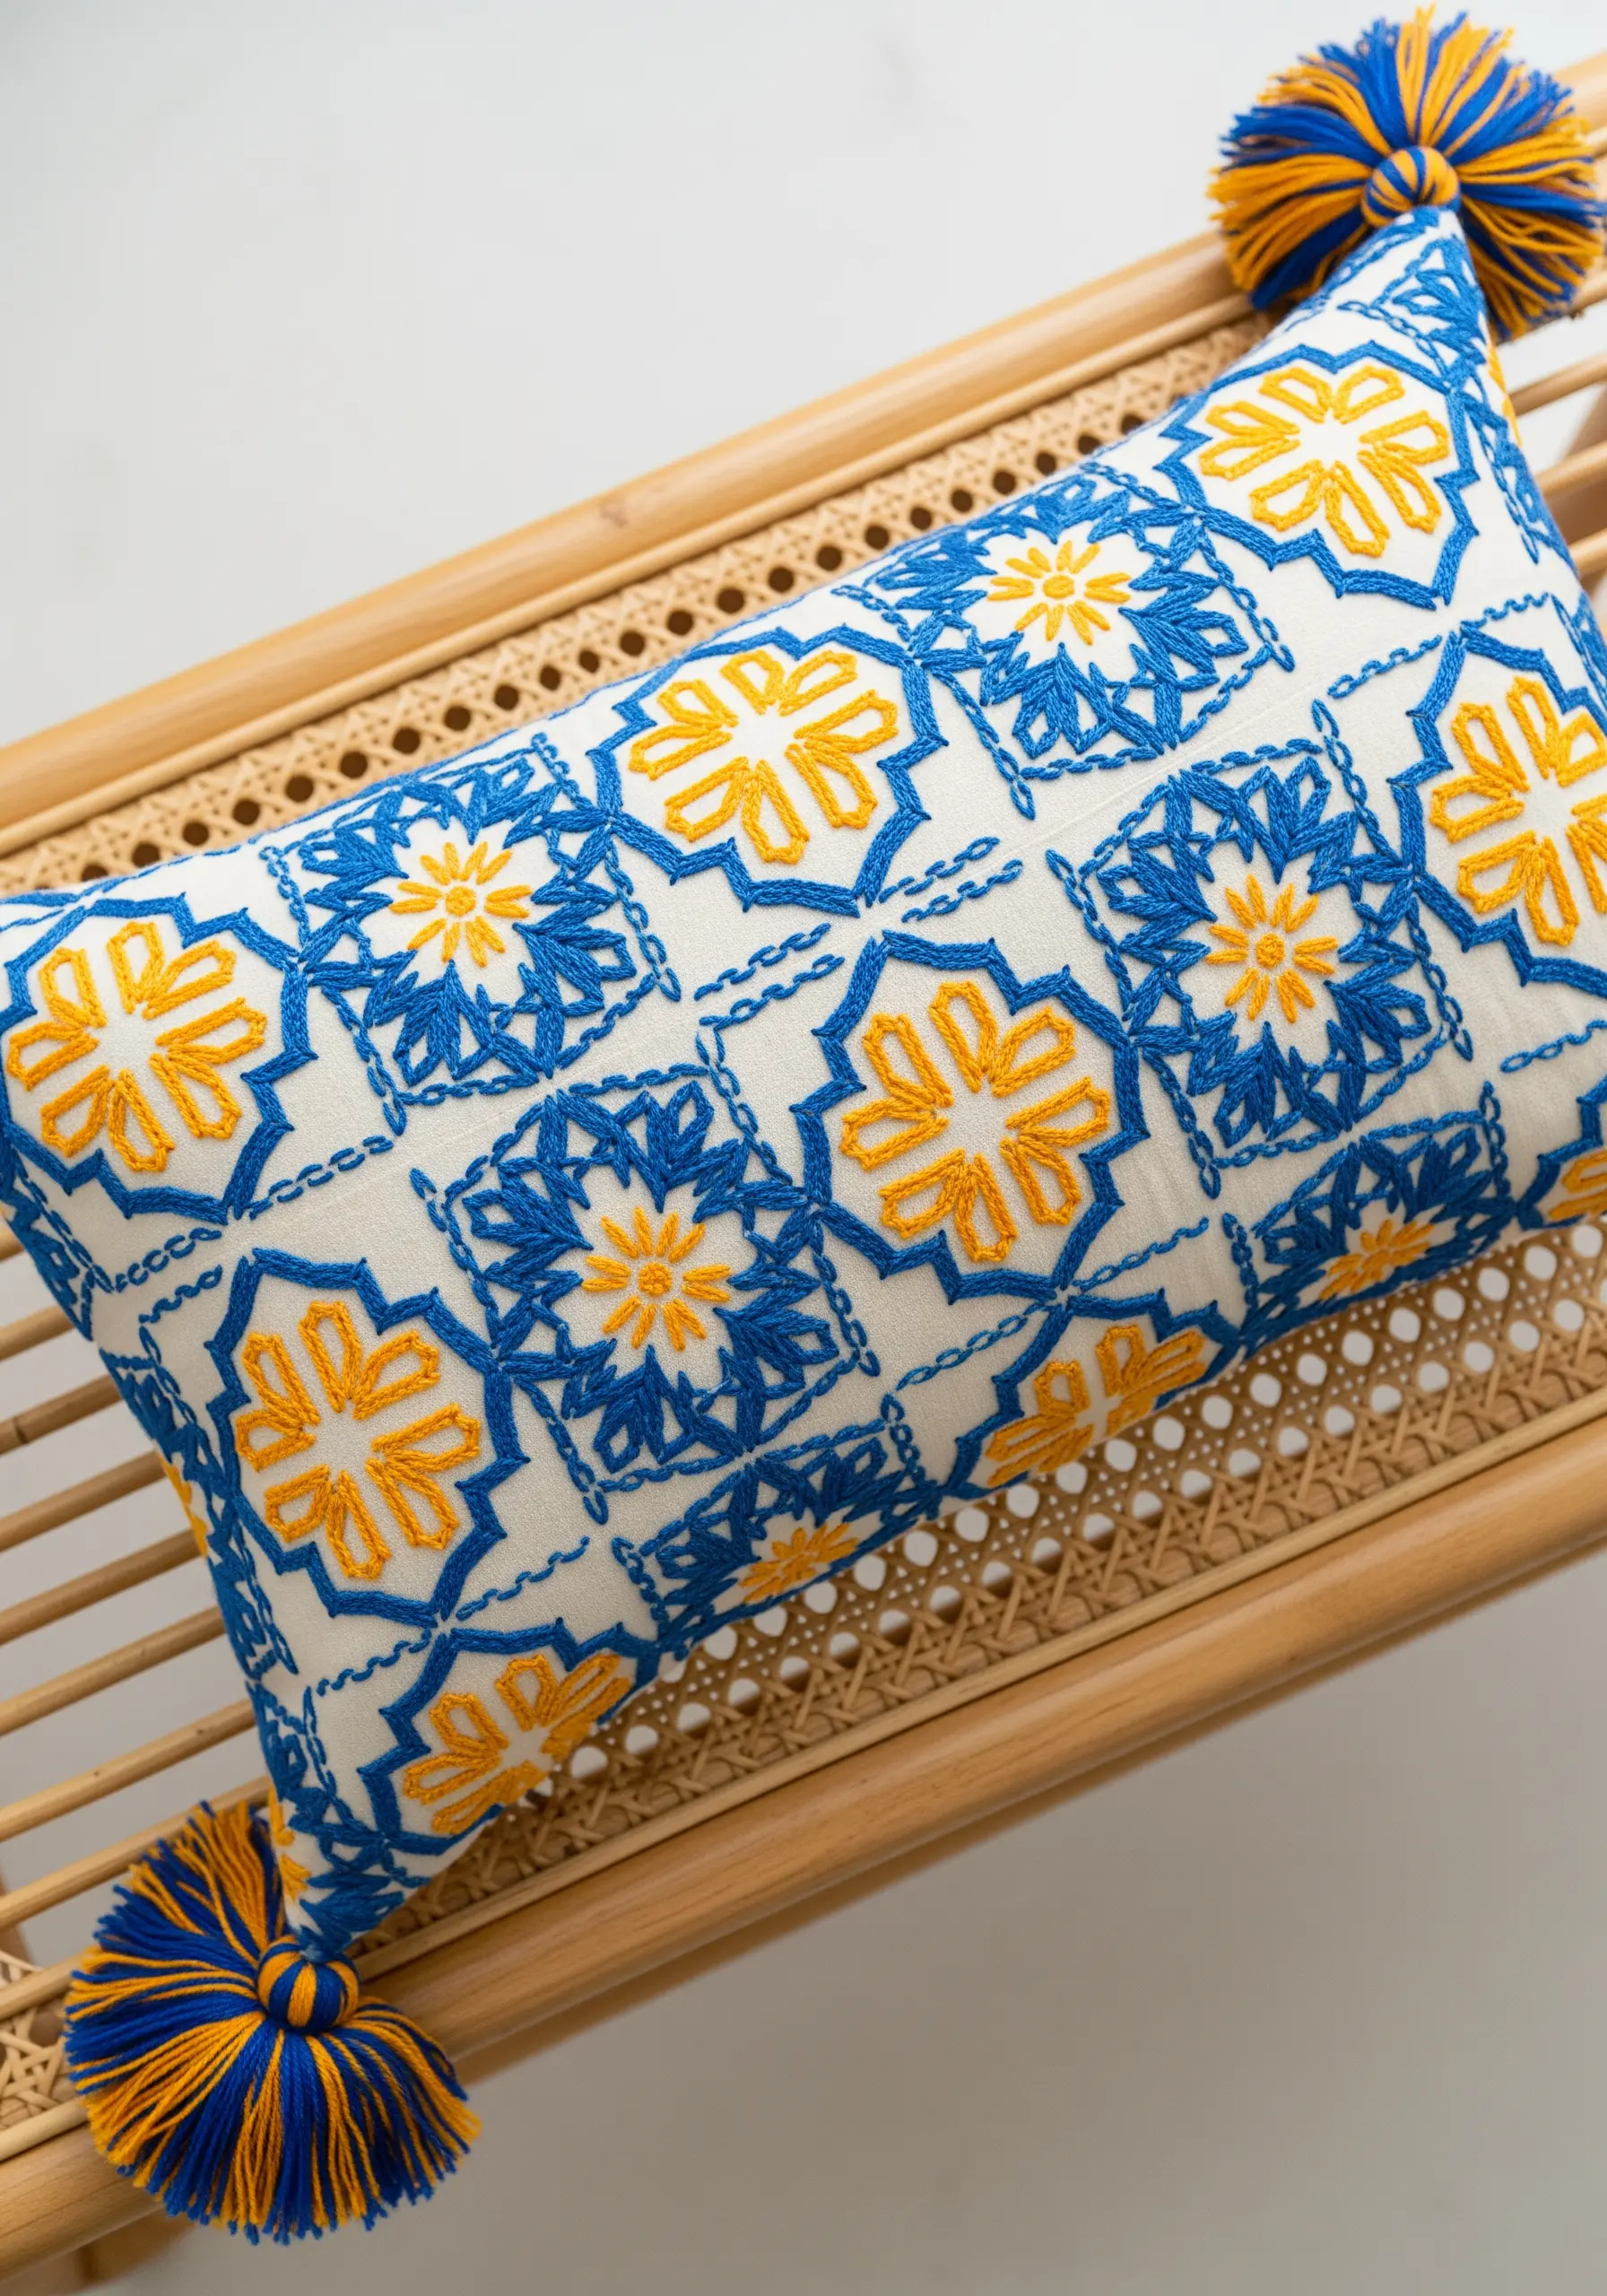
Emulate the look of Mediterranean tiles by filling the entire cushion surface with a repeating geometric floral pattern.
Work the outlines of each ’tile’ and motif with a simple backstitch or stem stitch, then fill the shapes with a uniform satin stitch for a block of solid, vibrant color.
A bright, high-contrast color palette of blue and yellow enhances the cheerful, sun-drenched aesthetic.
Complete the look with chunky, multi-colored tassels on the corners, pulling colors directly from your embroidery floss for perfect coordination.
11. Stitch an Autumnal Leaf Scatter
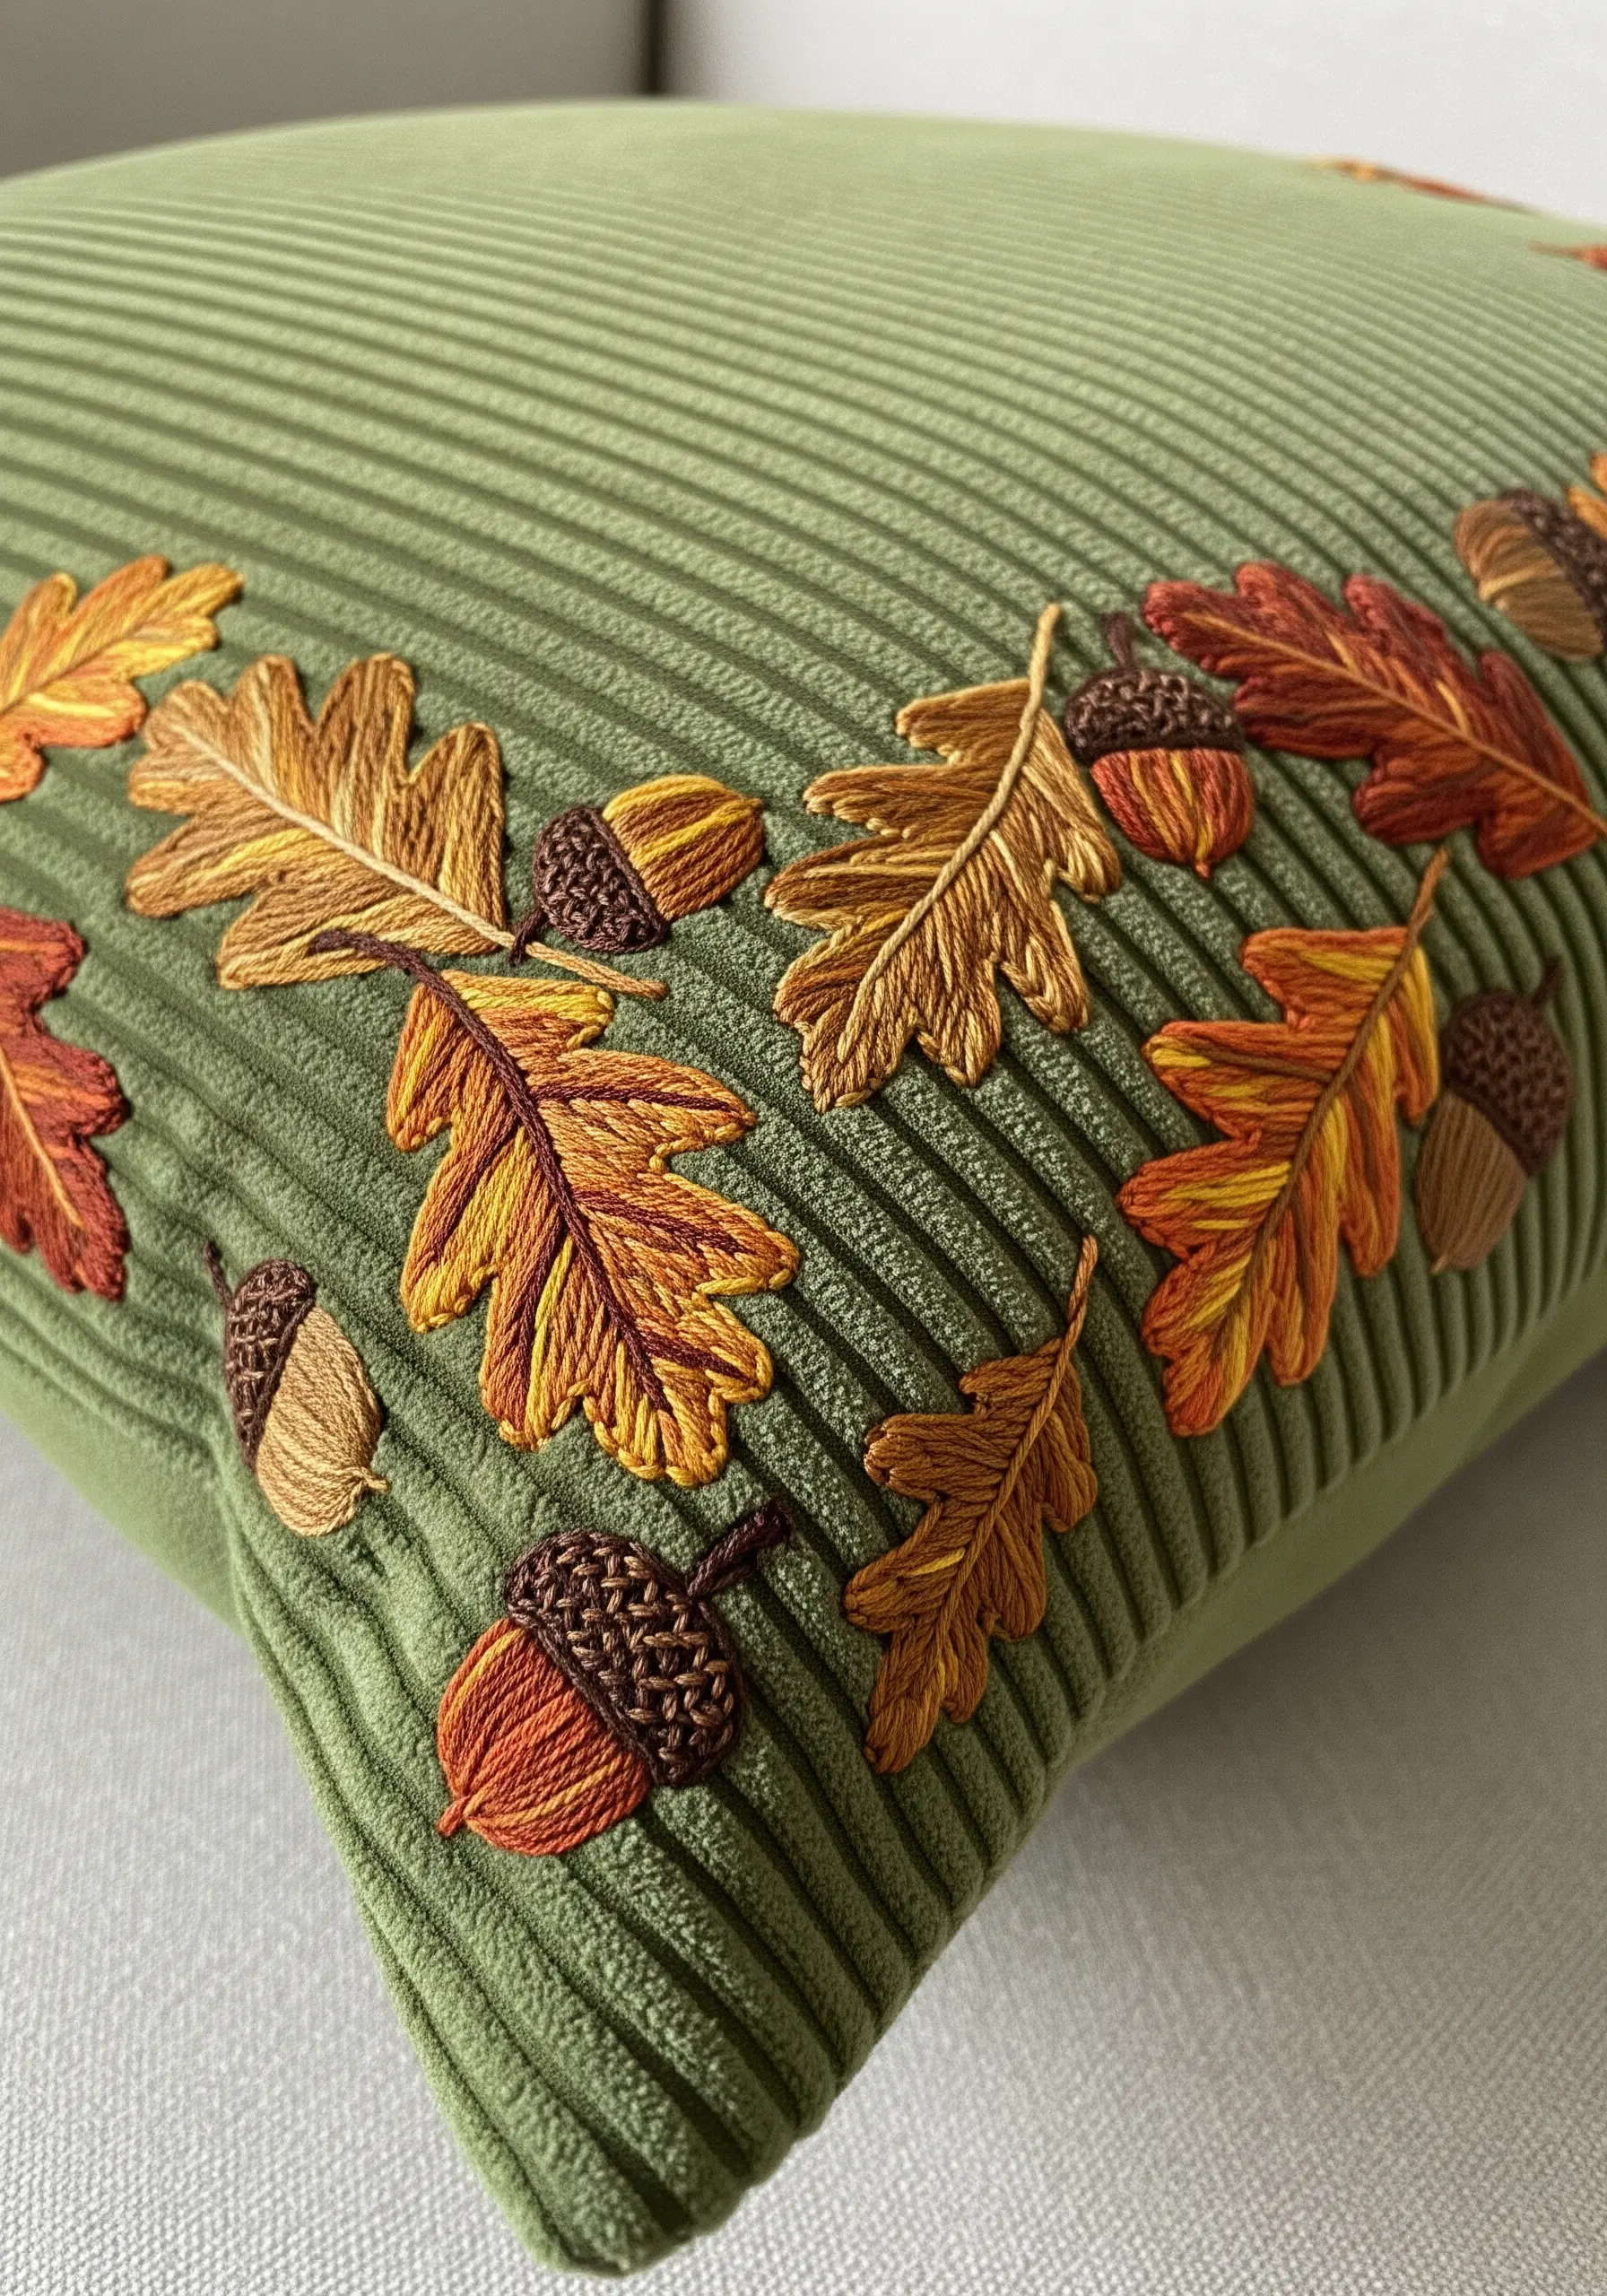
Capture the feeling of fall by embroidering a cascade of oak leaves and acorns along the edge of your cushion.
This design is particularly effective on a textured fabric like corduroy, as the fabric’s ridges interact with the direction of your stitches, adding another layer of depth.
Use long-and-short stitch to blend autumnal shades of gold, rust, and brown within a single leaf, giving them a realistic, variegated appearance.
Fill the acorns with a woven stitch (like a spiderweb wheel) to create a nubby, dimensional texture that contrasts with the smooth leaves.
12. Frame with Art Nouveau Water Lilies
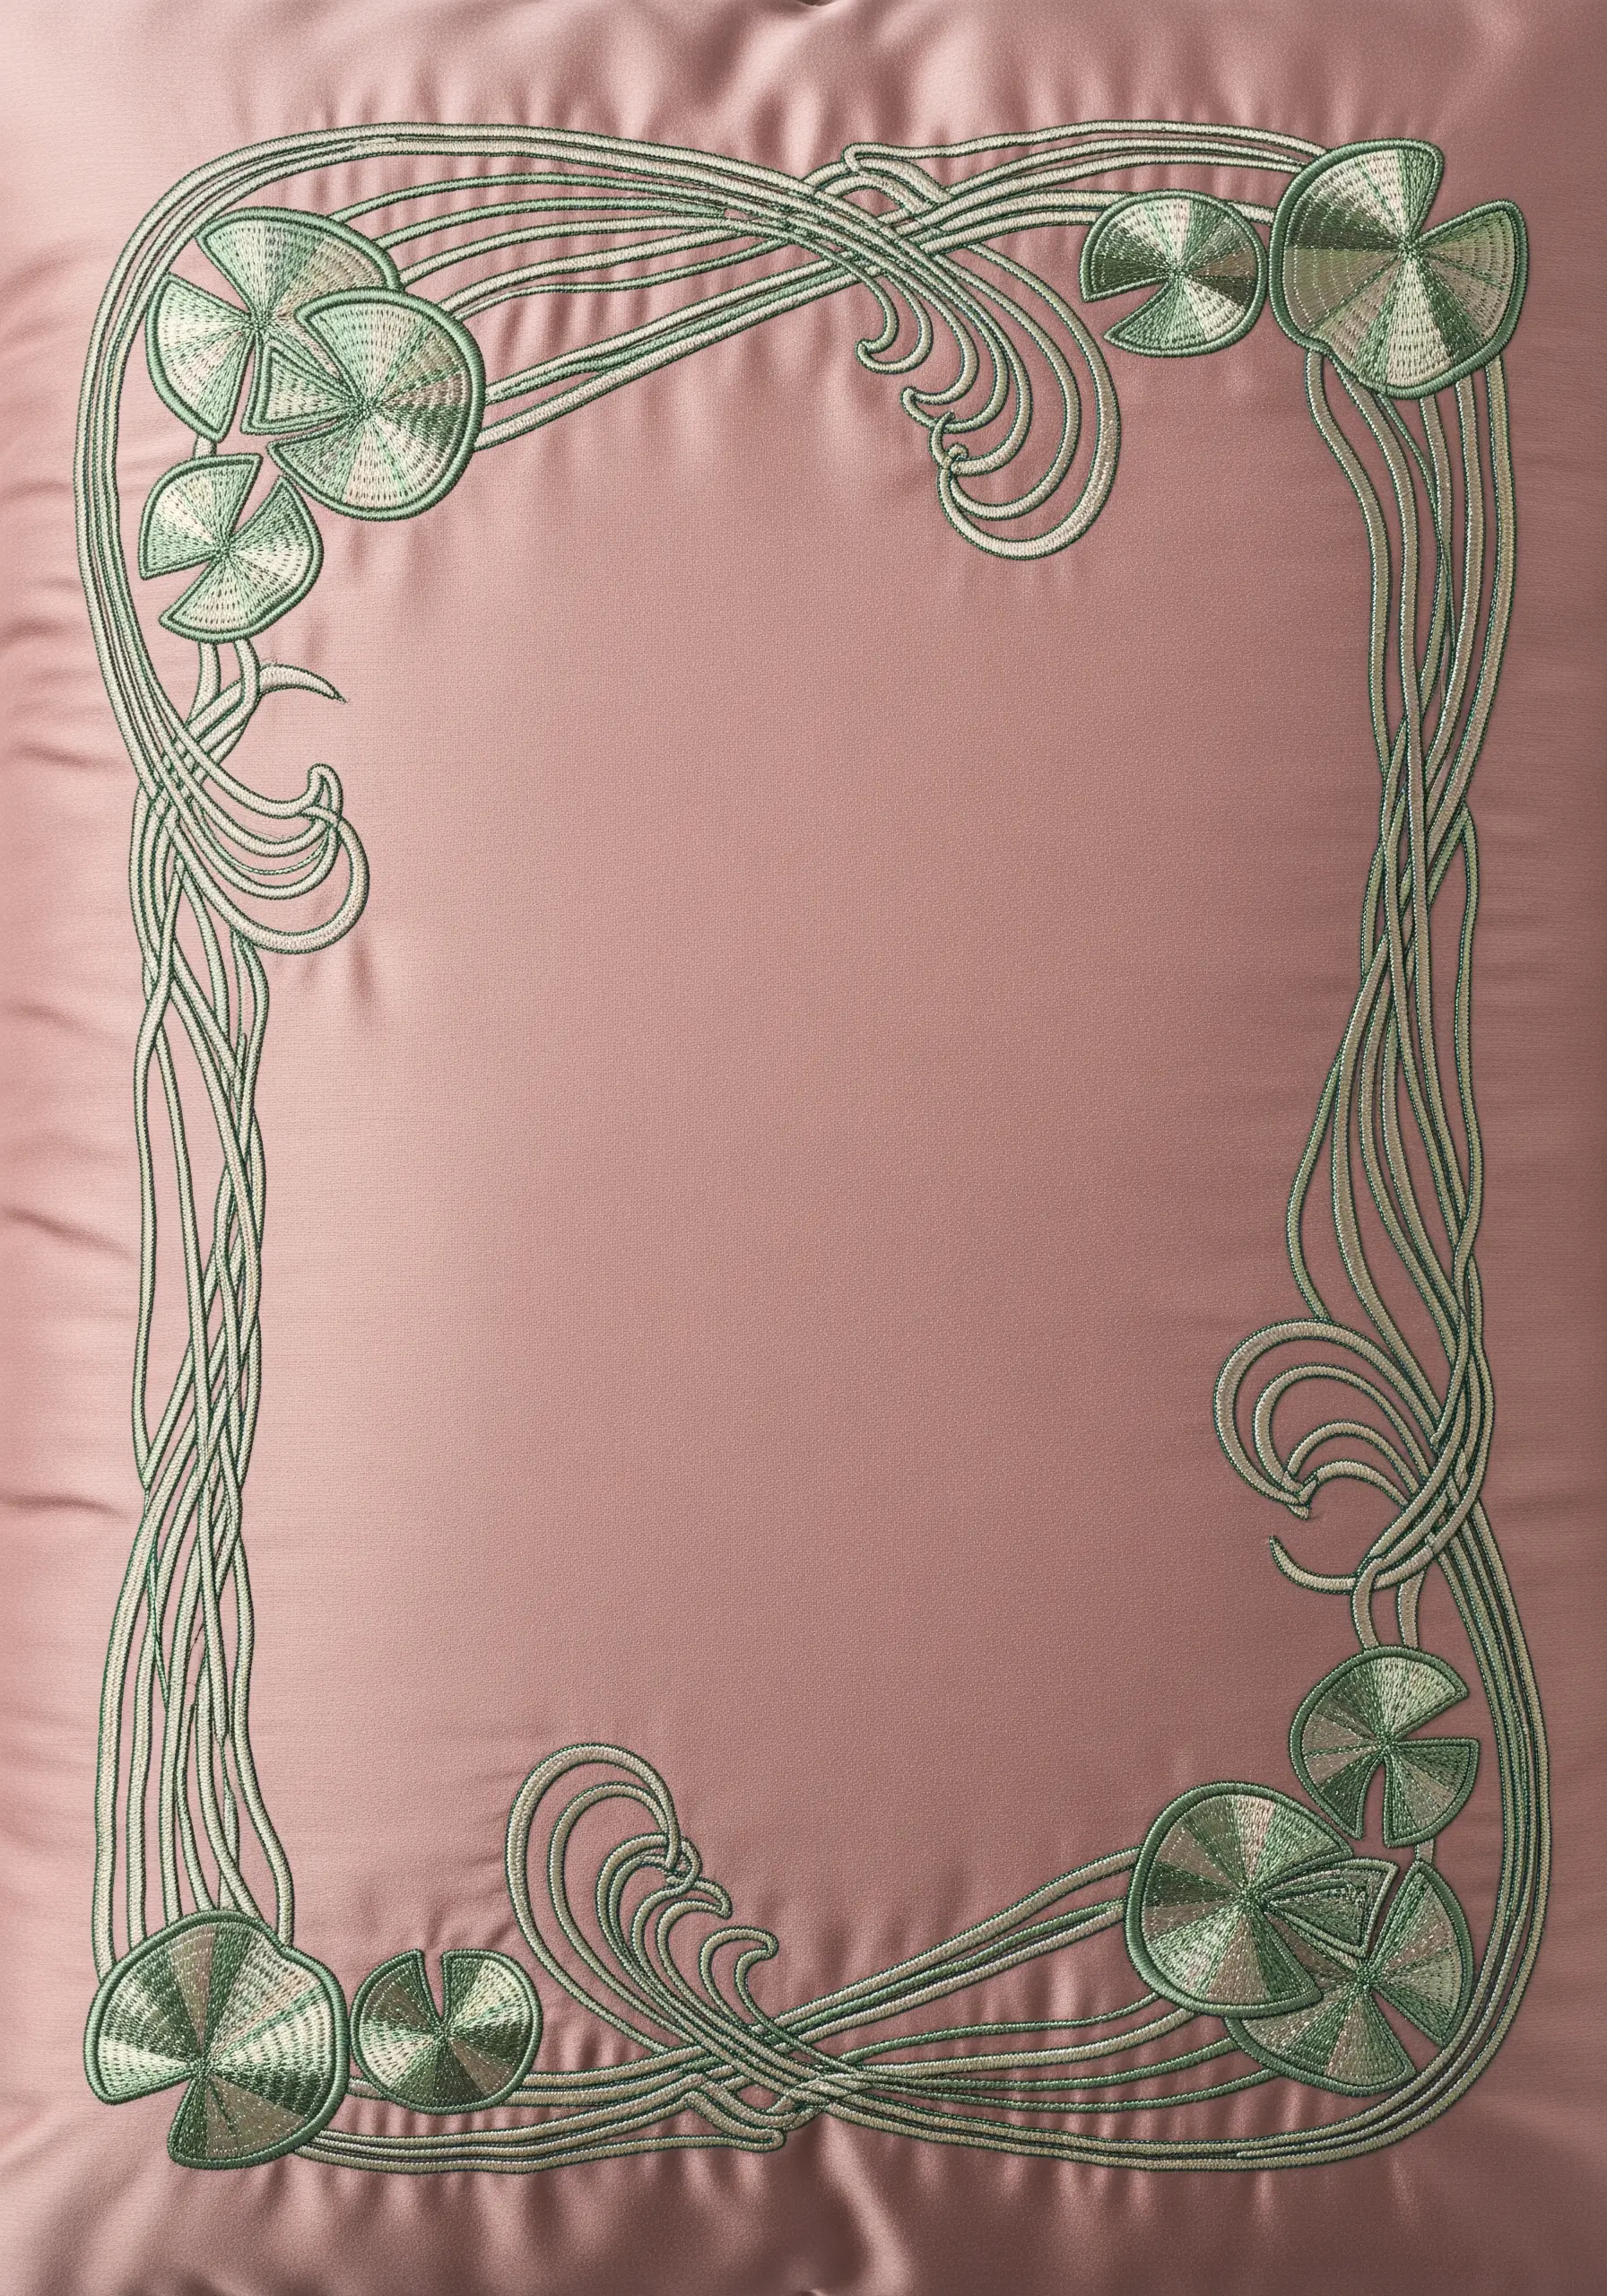
Channel the organic elegance of Art Nouveau with a border of stylized, flowing water lilies and tendrils.
Use a whipped backstitch or a heavy chain stitch for the outlines to create the bold, sinuous lines characteristic of the style.
Fill the lily pads with concentric circles of split stitch in varying shades of green to create a subtle gradient and a sense of depth.
The beauty of this style lies in its asymmetry and movement, so allow the lines to curve and overlap naturally around the cushion’s edge.
13. Weave a Trompe l’Oeil Ribbon Border
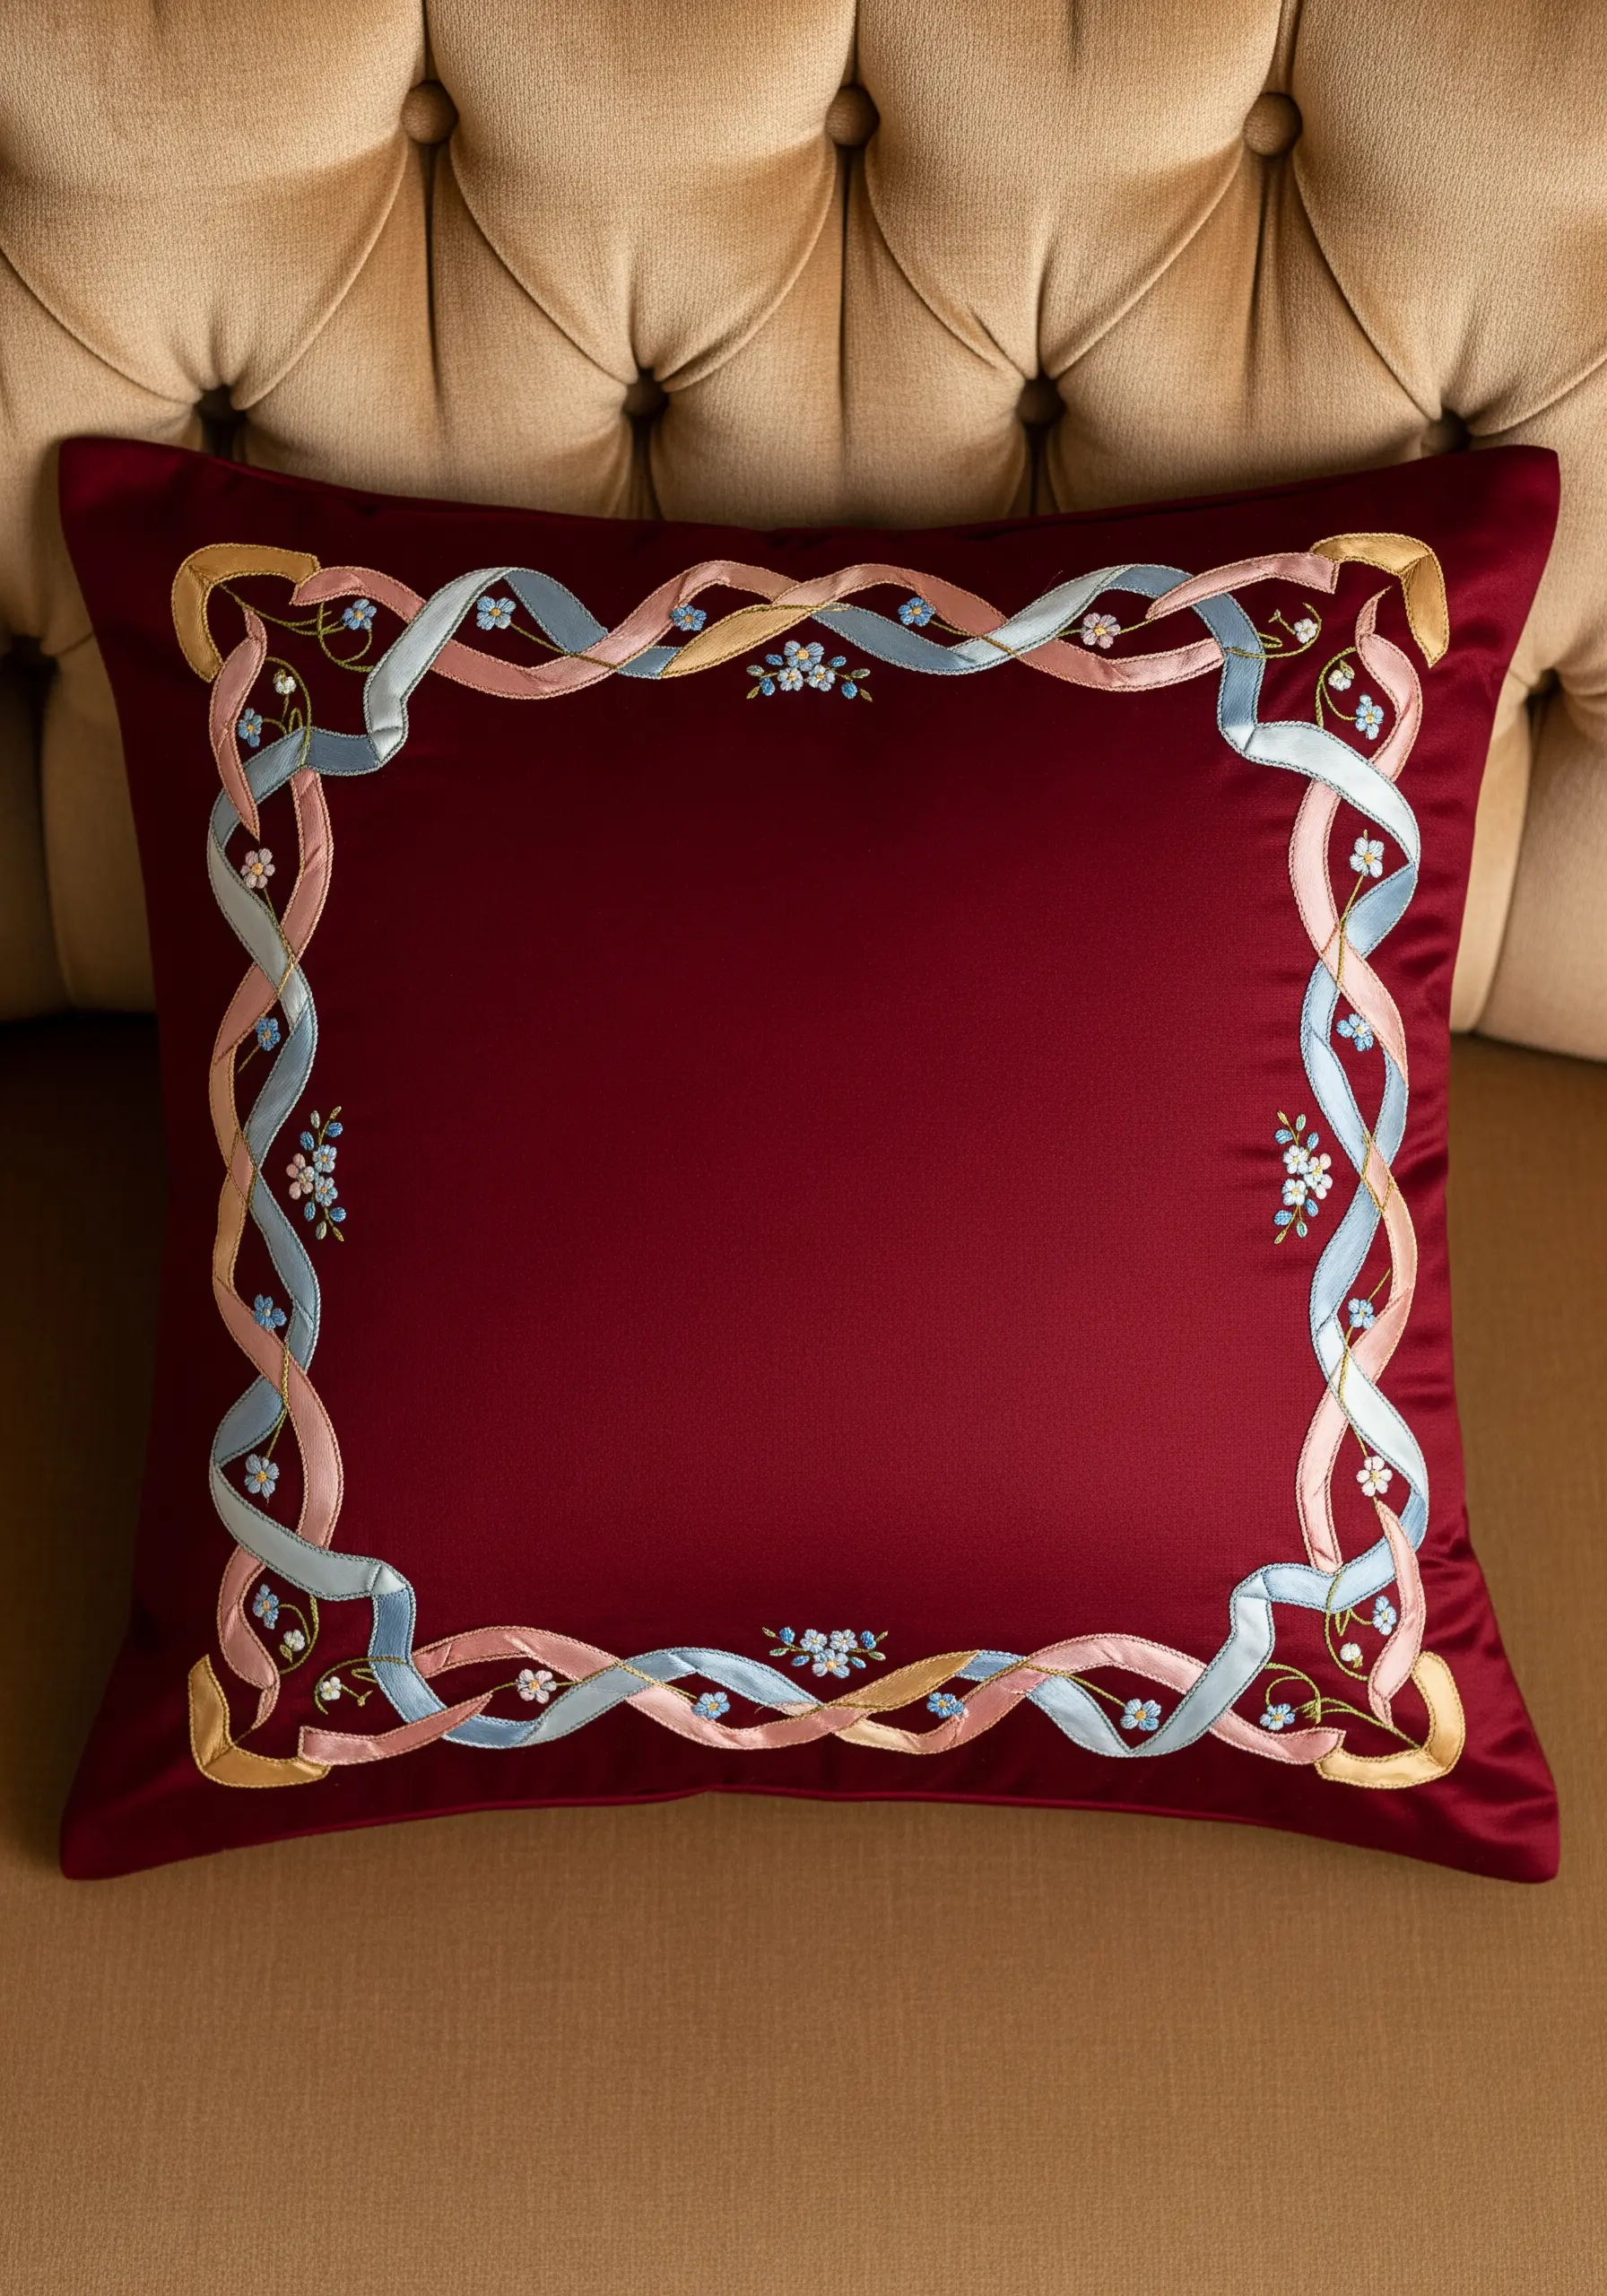
Create the illusion of real, intertwined ribbons using satin stitch and clever color placement.
Work each section of the ribbon in a solid, smooth satin stitch, changing the angle of your stitches slightly where the ribbon would curve to enhance the 3D effect.
Use a darker shade of the main color for the ‘underside’ sections where the ribbon twists, creating a shadow that tricks the eye.
Scatter tiny floral details like forget-me-nots using French knots and detached chain stitches where the ribbons intersect for a delicate, romantic touch.
14. Block Out Color with Geometric Yarn Work
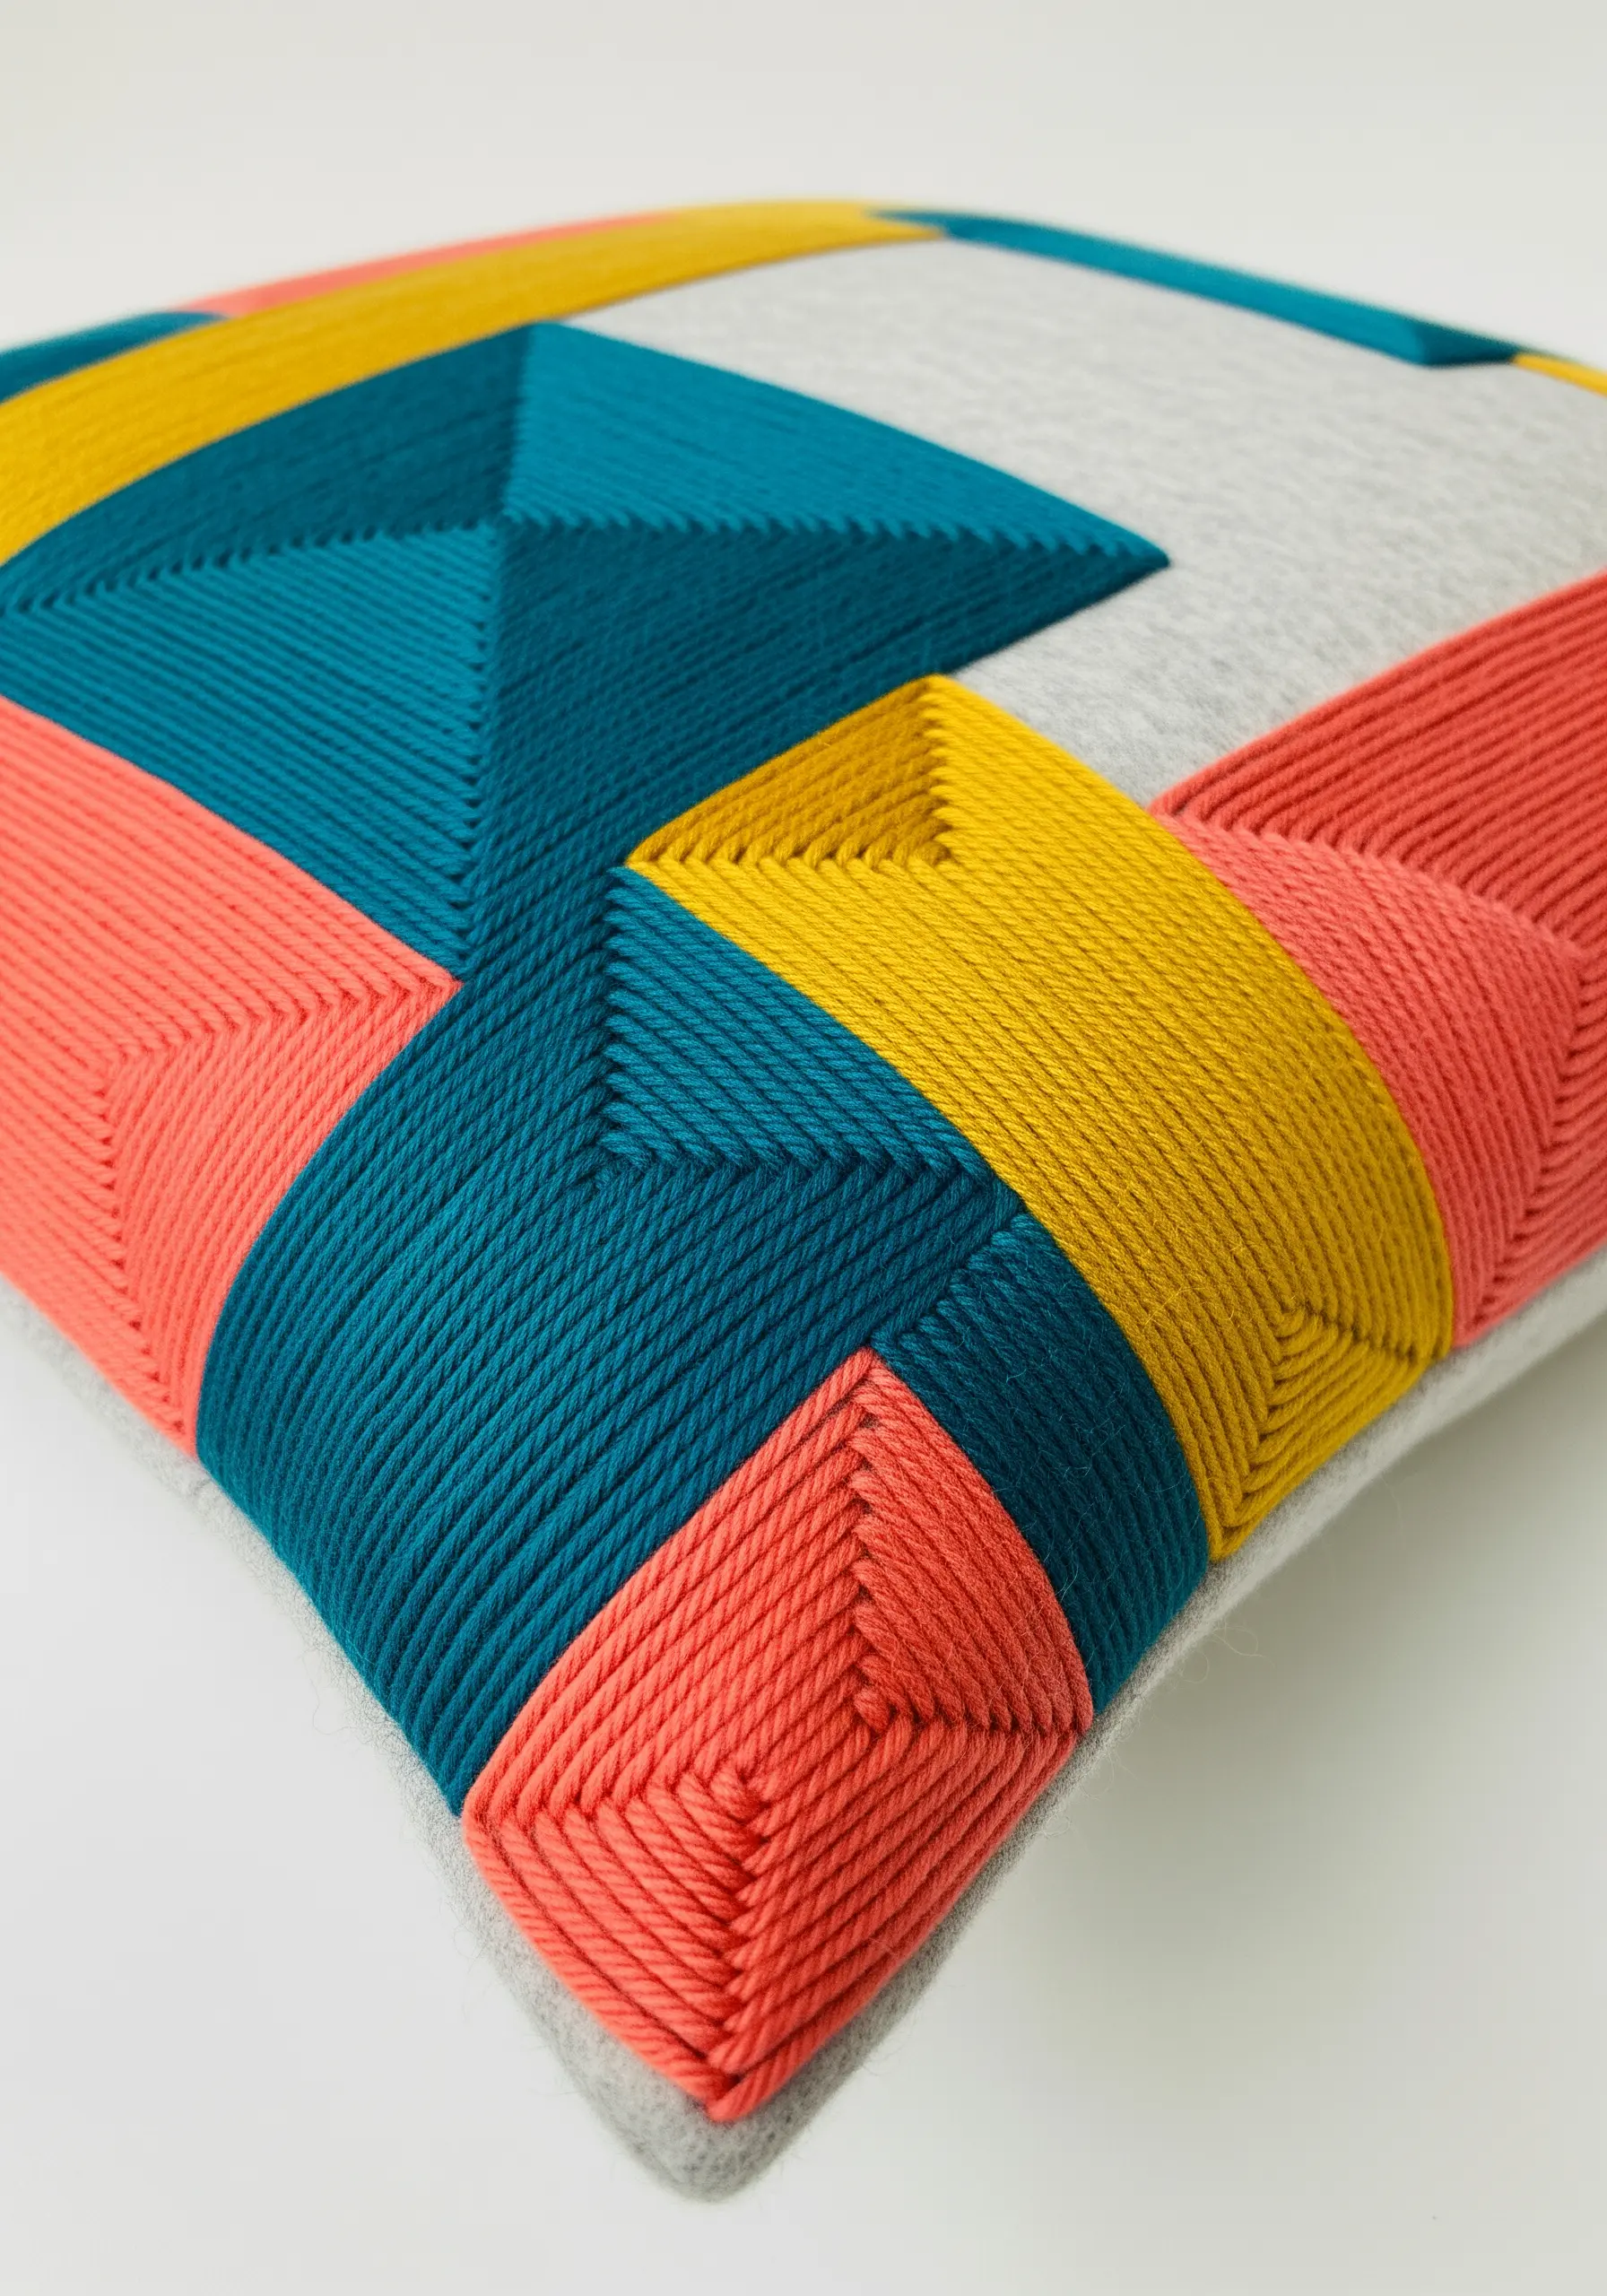
For a bold, graphic effect with maximum texture, try surface darning or yarn couching to create solid blocks of color.
Lay down strands of thick yarn parallel to each other to fill a geometric shape, then use a thinner, matching thread to tack them down at regular intervals.
This method covers large areas quickly and creates a satisfyingly dense, woven texture.
Choose a felted wool or thick jersey fabric for the cushion base; its stable, non-fraying nature provides excellent support for the heavy yarn work.
15. Cultivate a Beaded Coral Garden
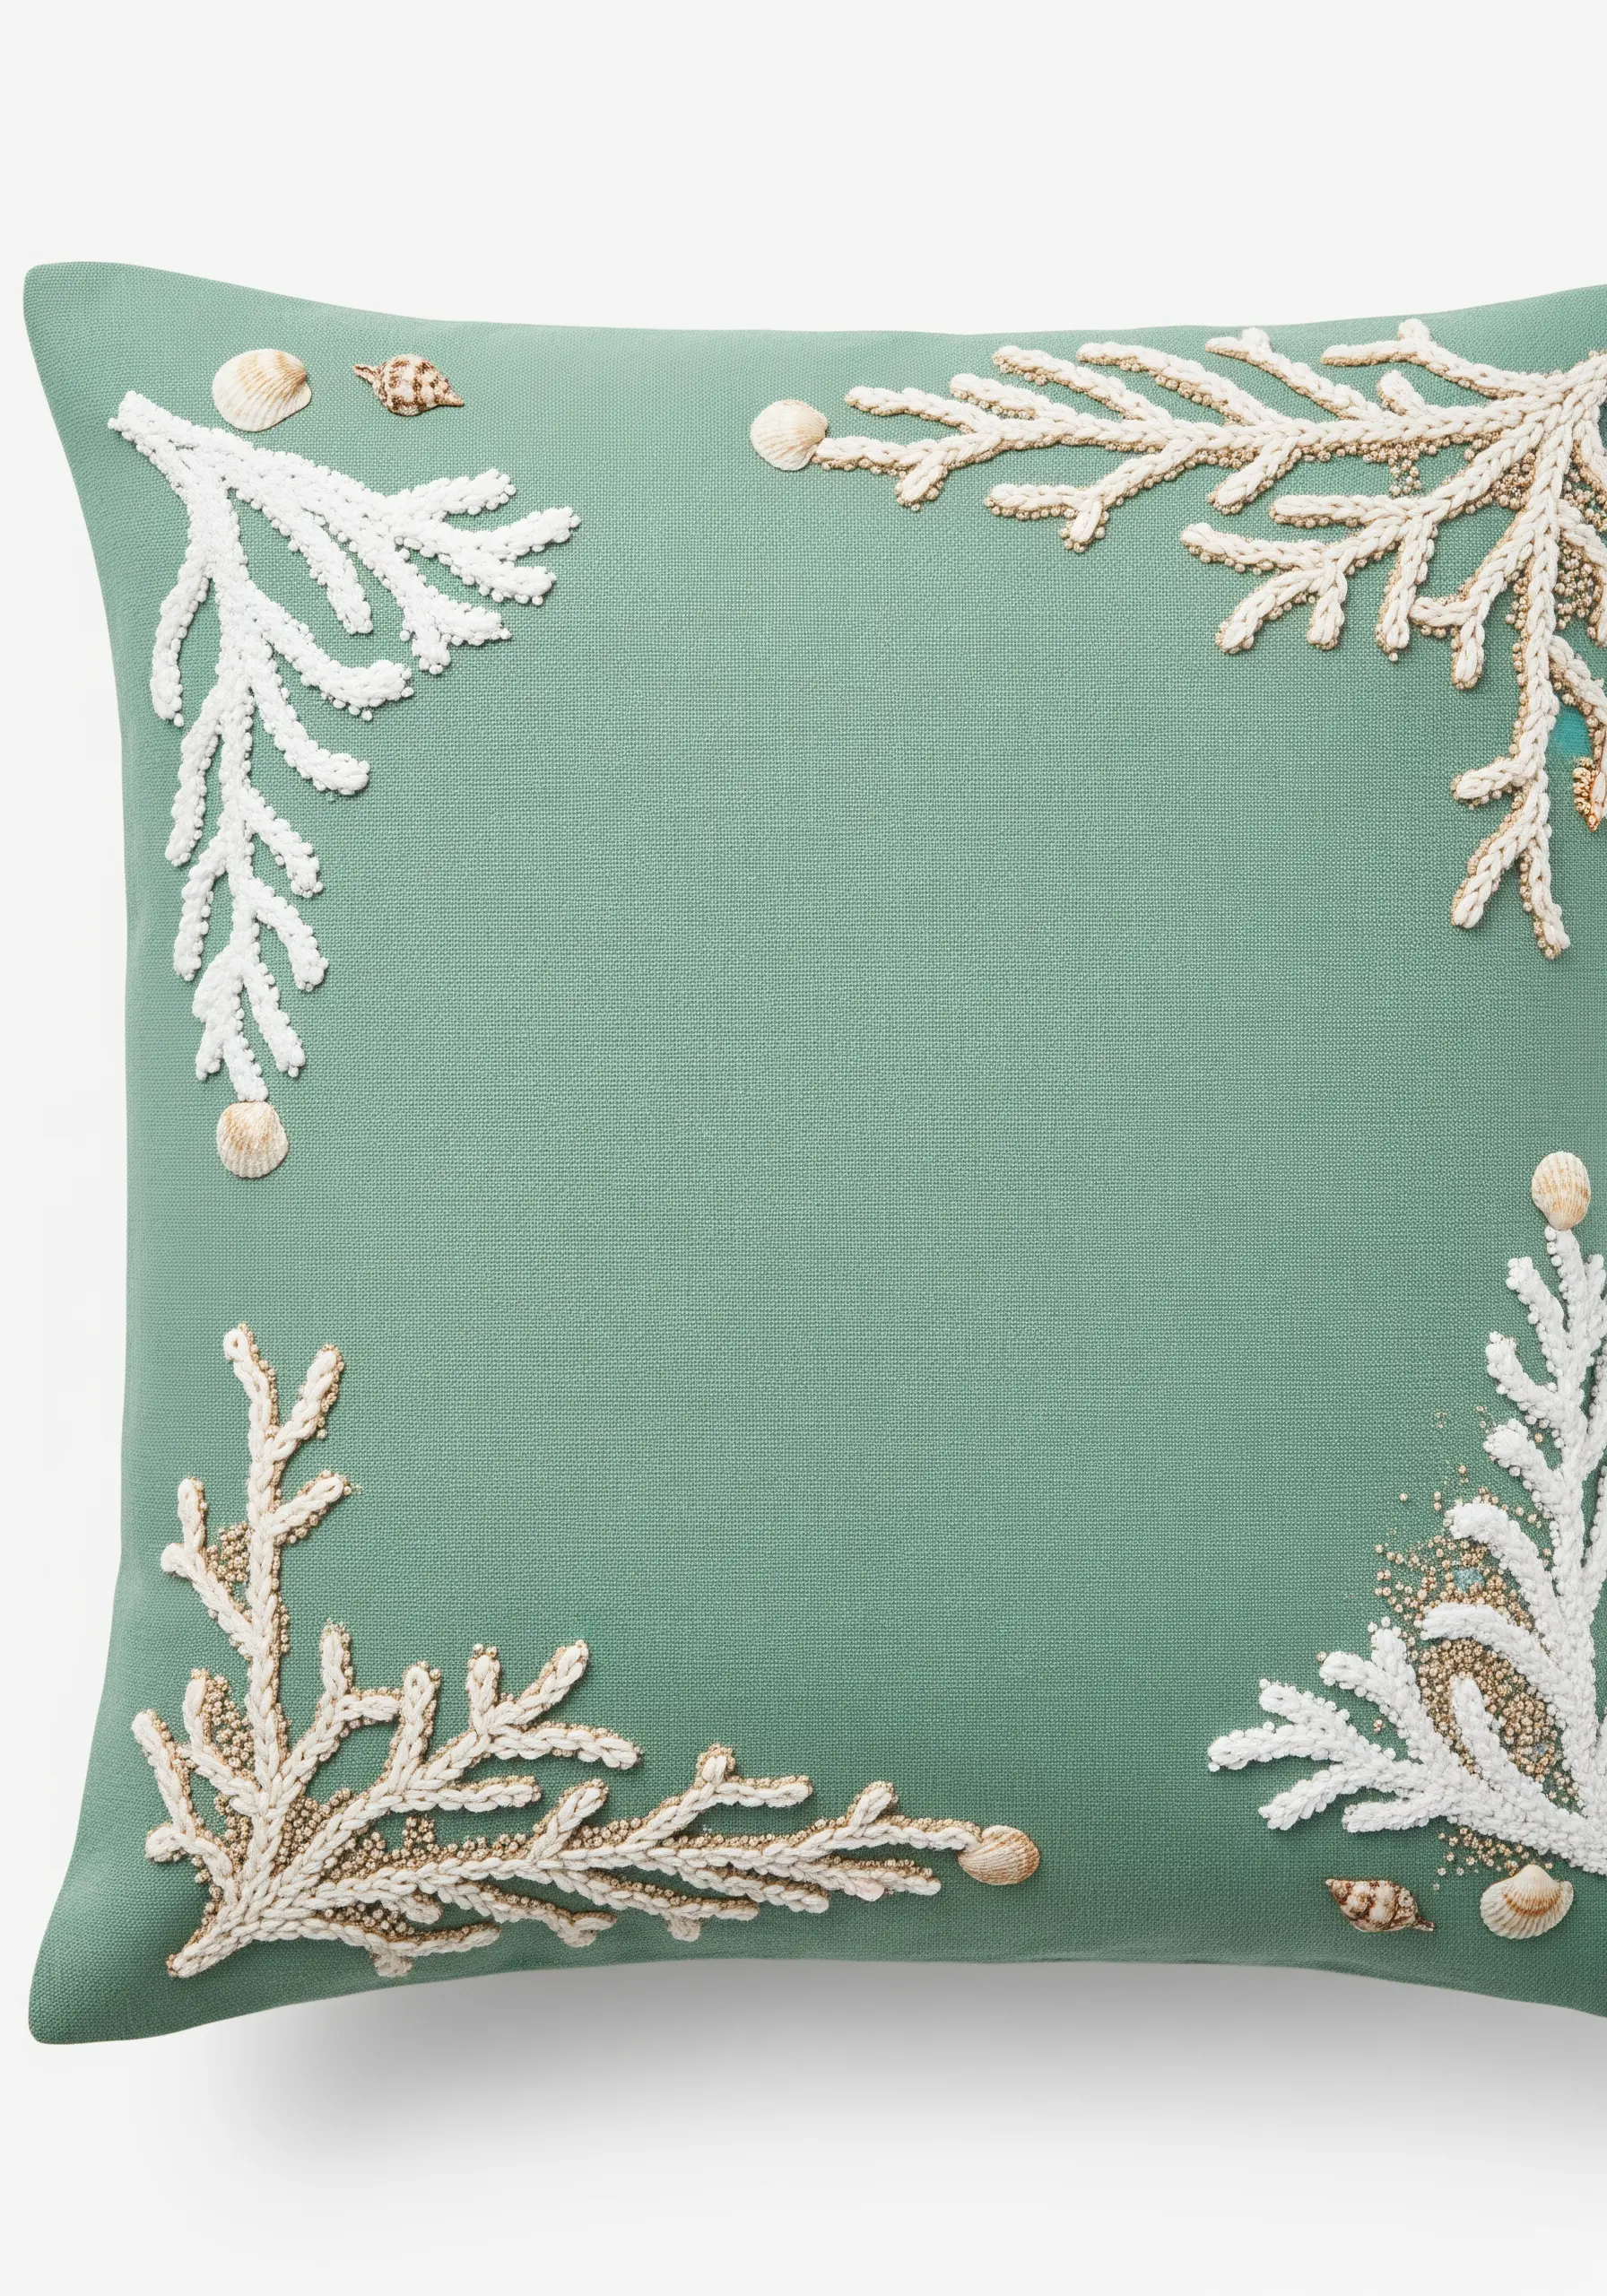
Create an underwater scene by forming coral branches at the corners of your cushion using French knots and seed beads.
Use a matte, off-white cotton floss for the French knots, clustering them tightly to form the main coral structure. This gives a wonderful, nubby texture.
Intersperse the knots with clusters of pearlescent seed beads and tiny gold beads to mimic the varied textures of a reef and add a subtle shimmer.
Adding real, tiny seashells at the tips of the branches grounds the design in natural beauty and provides a delightful, unexpected detail.
16. Outline with a Bold Greek Key
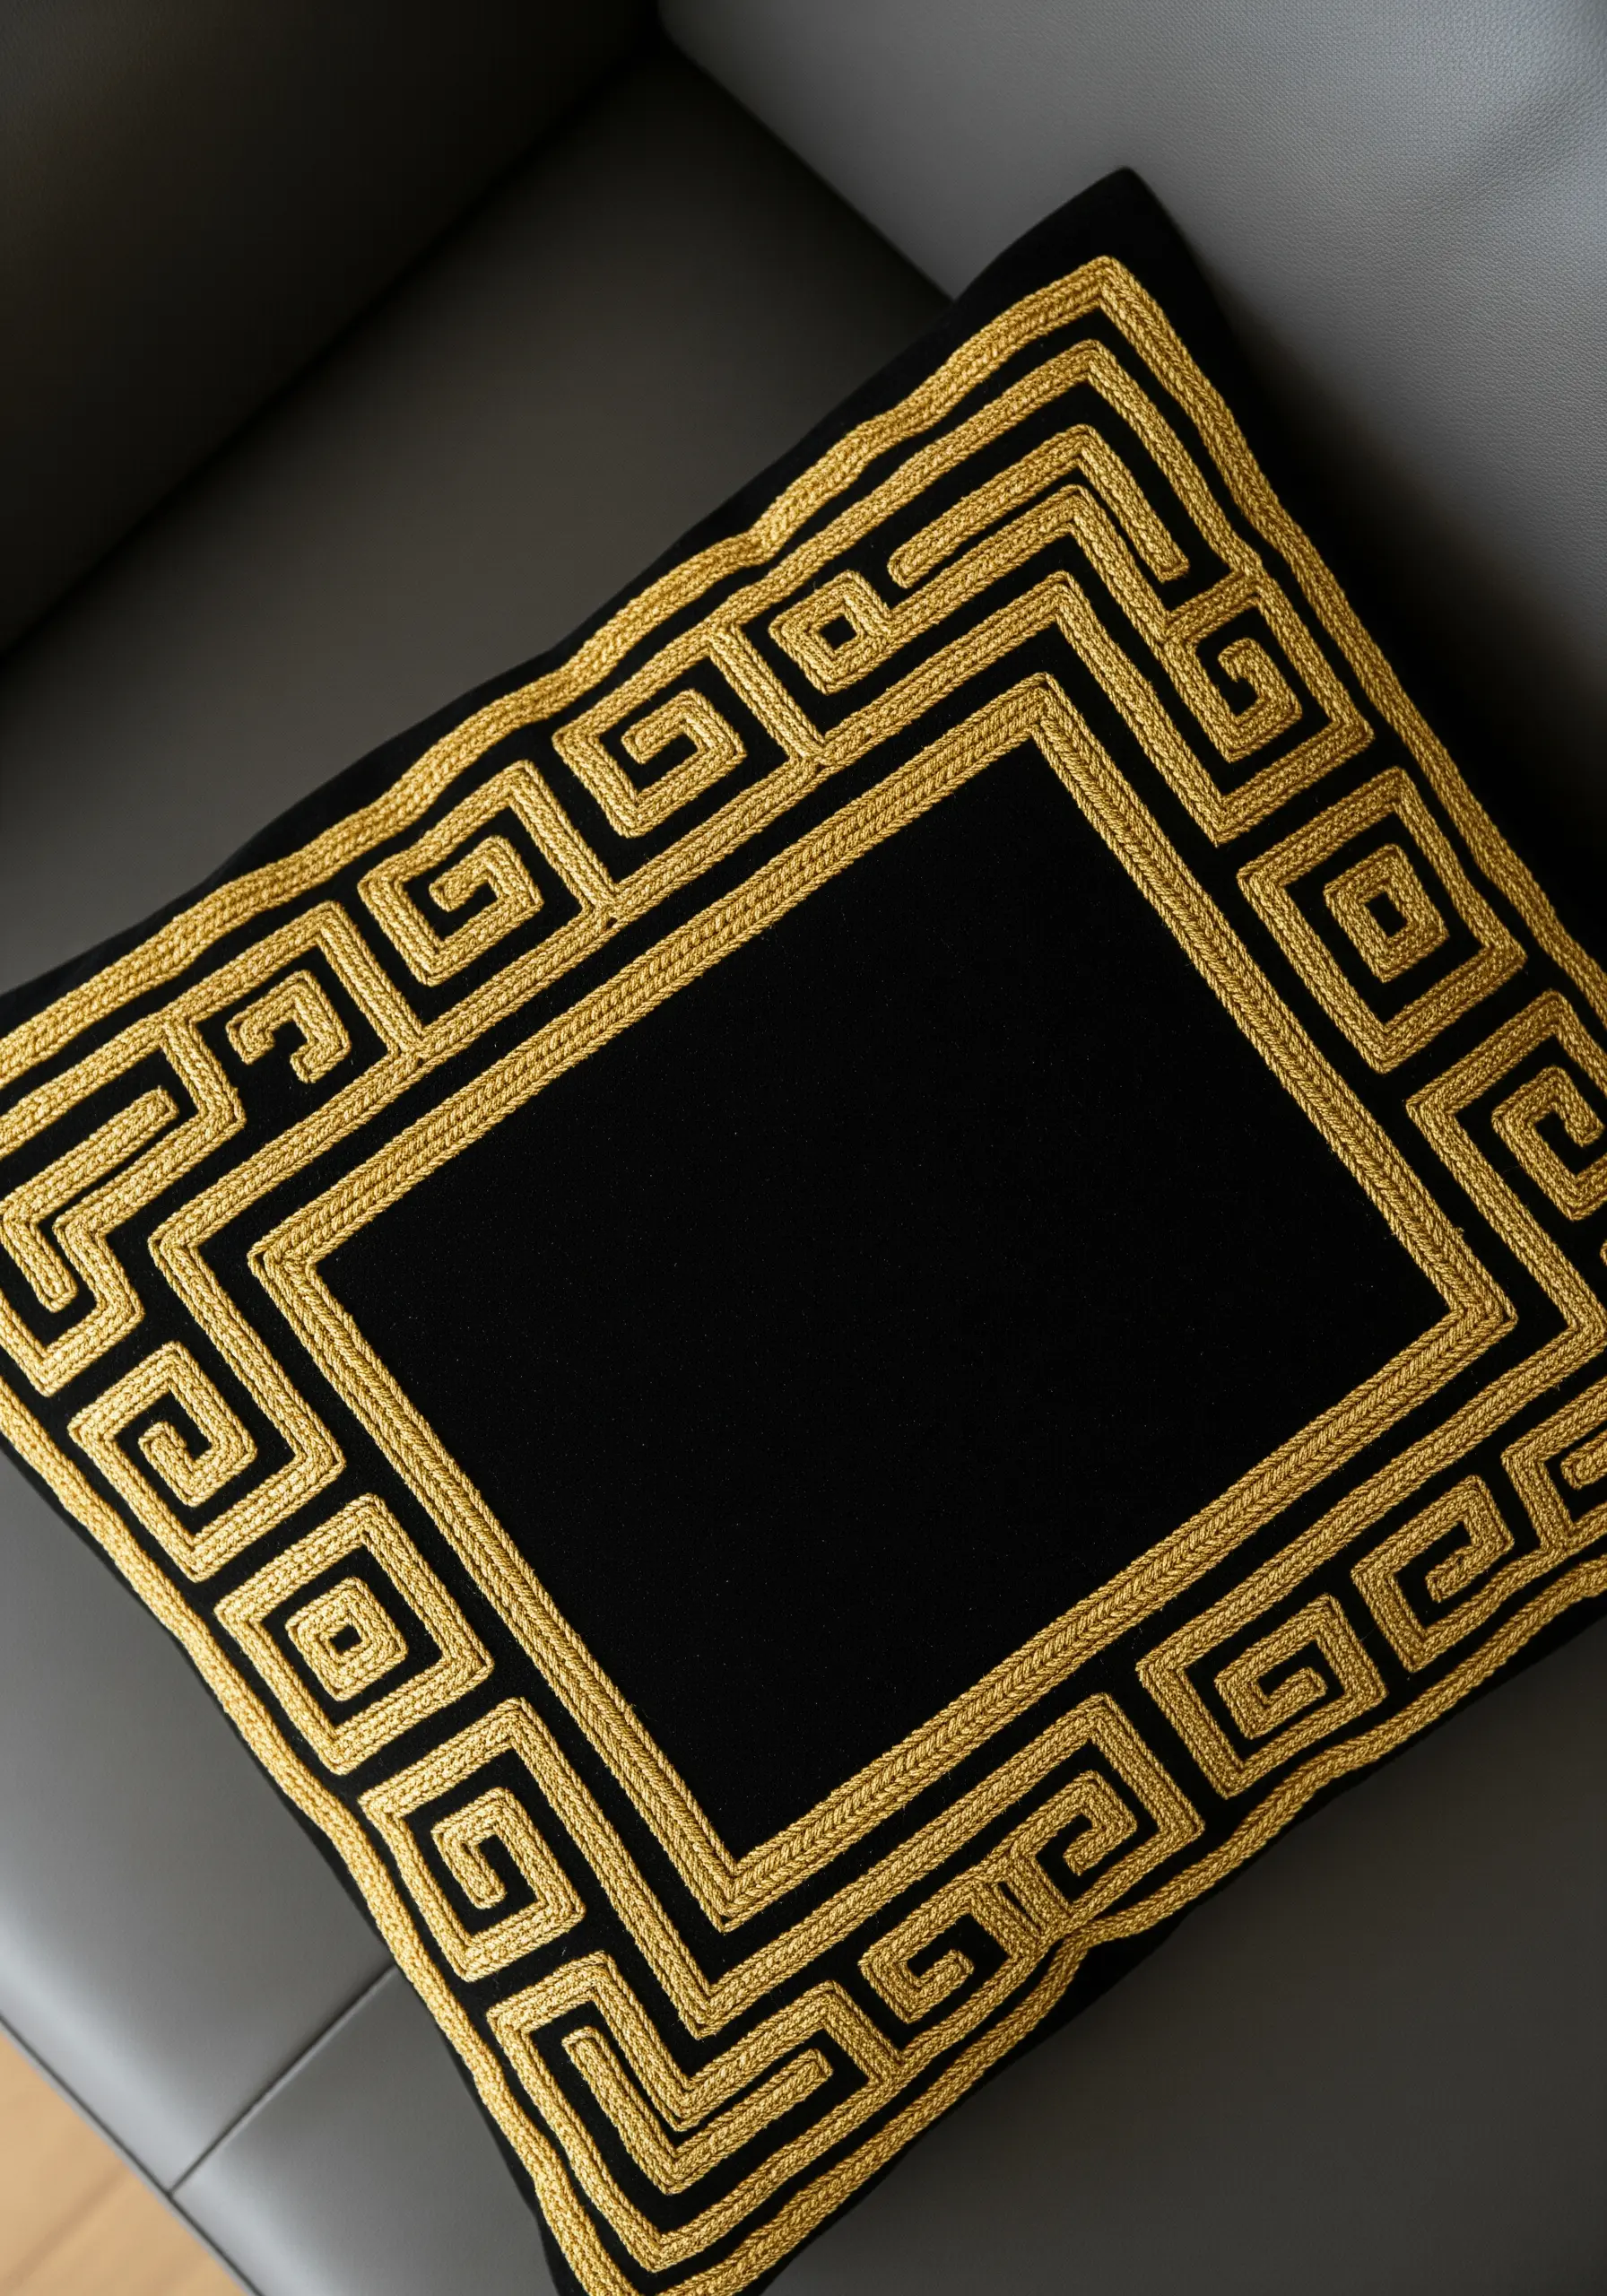
For a timeless and stately border, use a thick, cord-like stitch to create a classic Greek Key motif.
A heavy chain stitch or a raised stem stitch band, worked in a contrasting color, will give the design the necessary weight and definition.
Using a metallic gold thread against a black background elevates the classic pattern into a luxurious statement piece.
To ensure perfect 90-degree angles, mark your pattern precisely and make a single, anchoring stitch at each turning point before continuing along the new direction.
17. Adorn with Dimensional Ribbon Bows
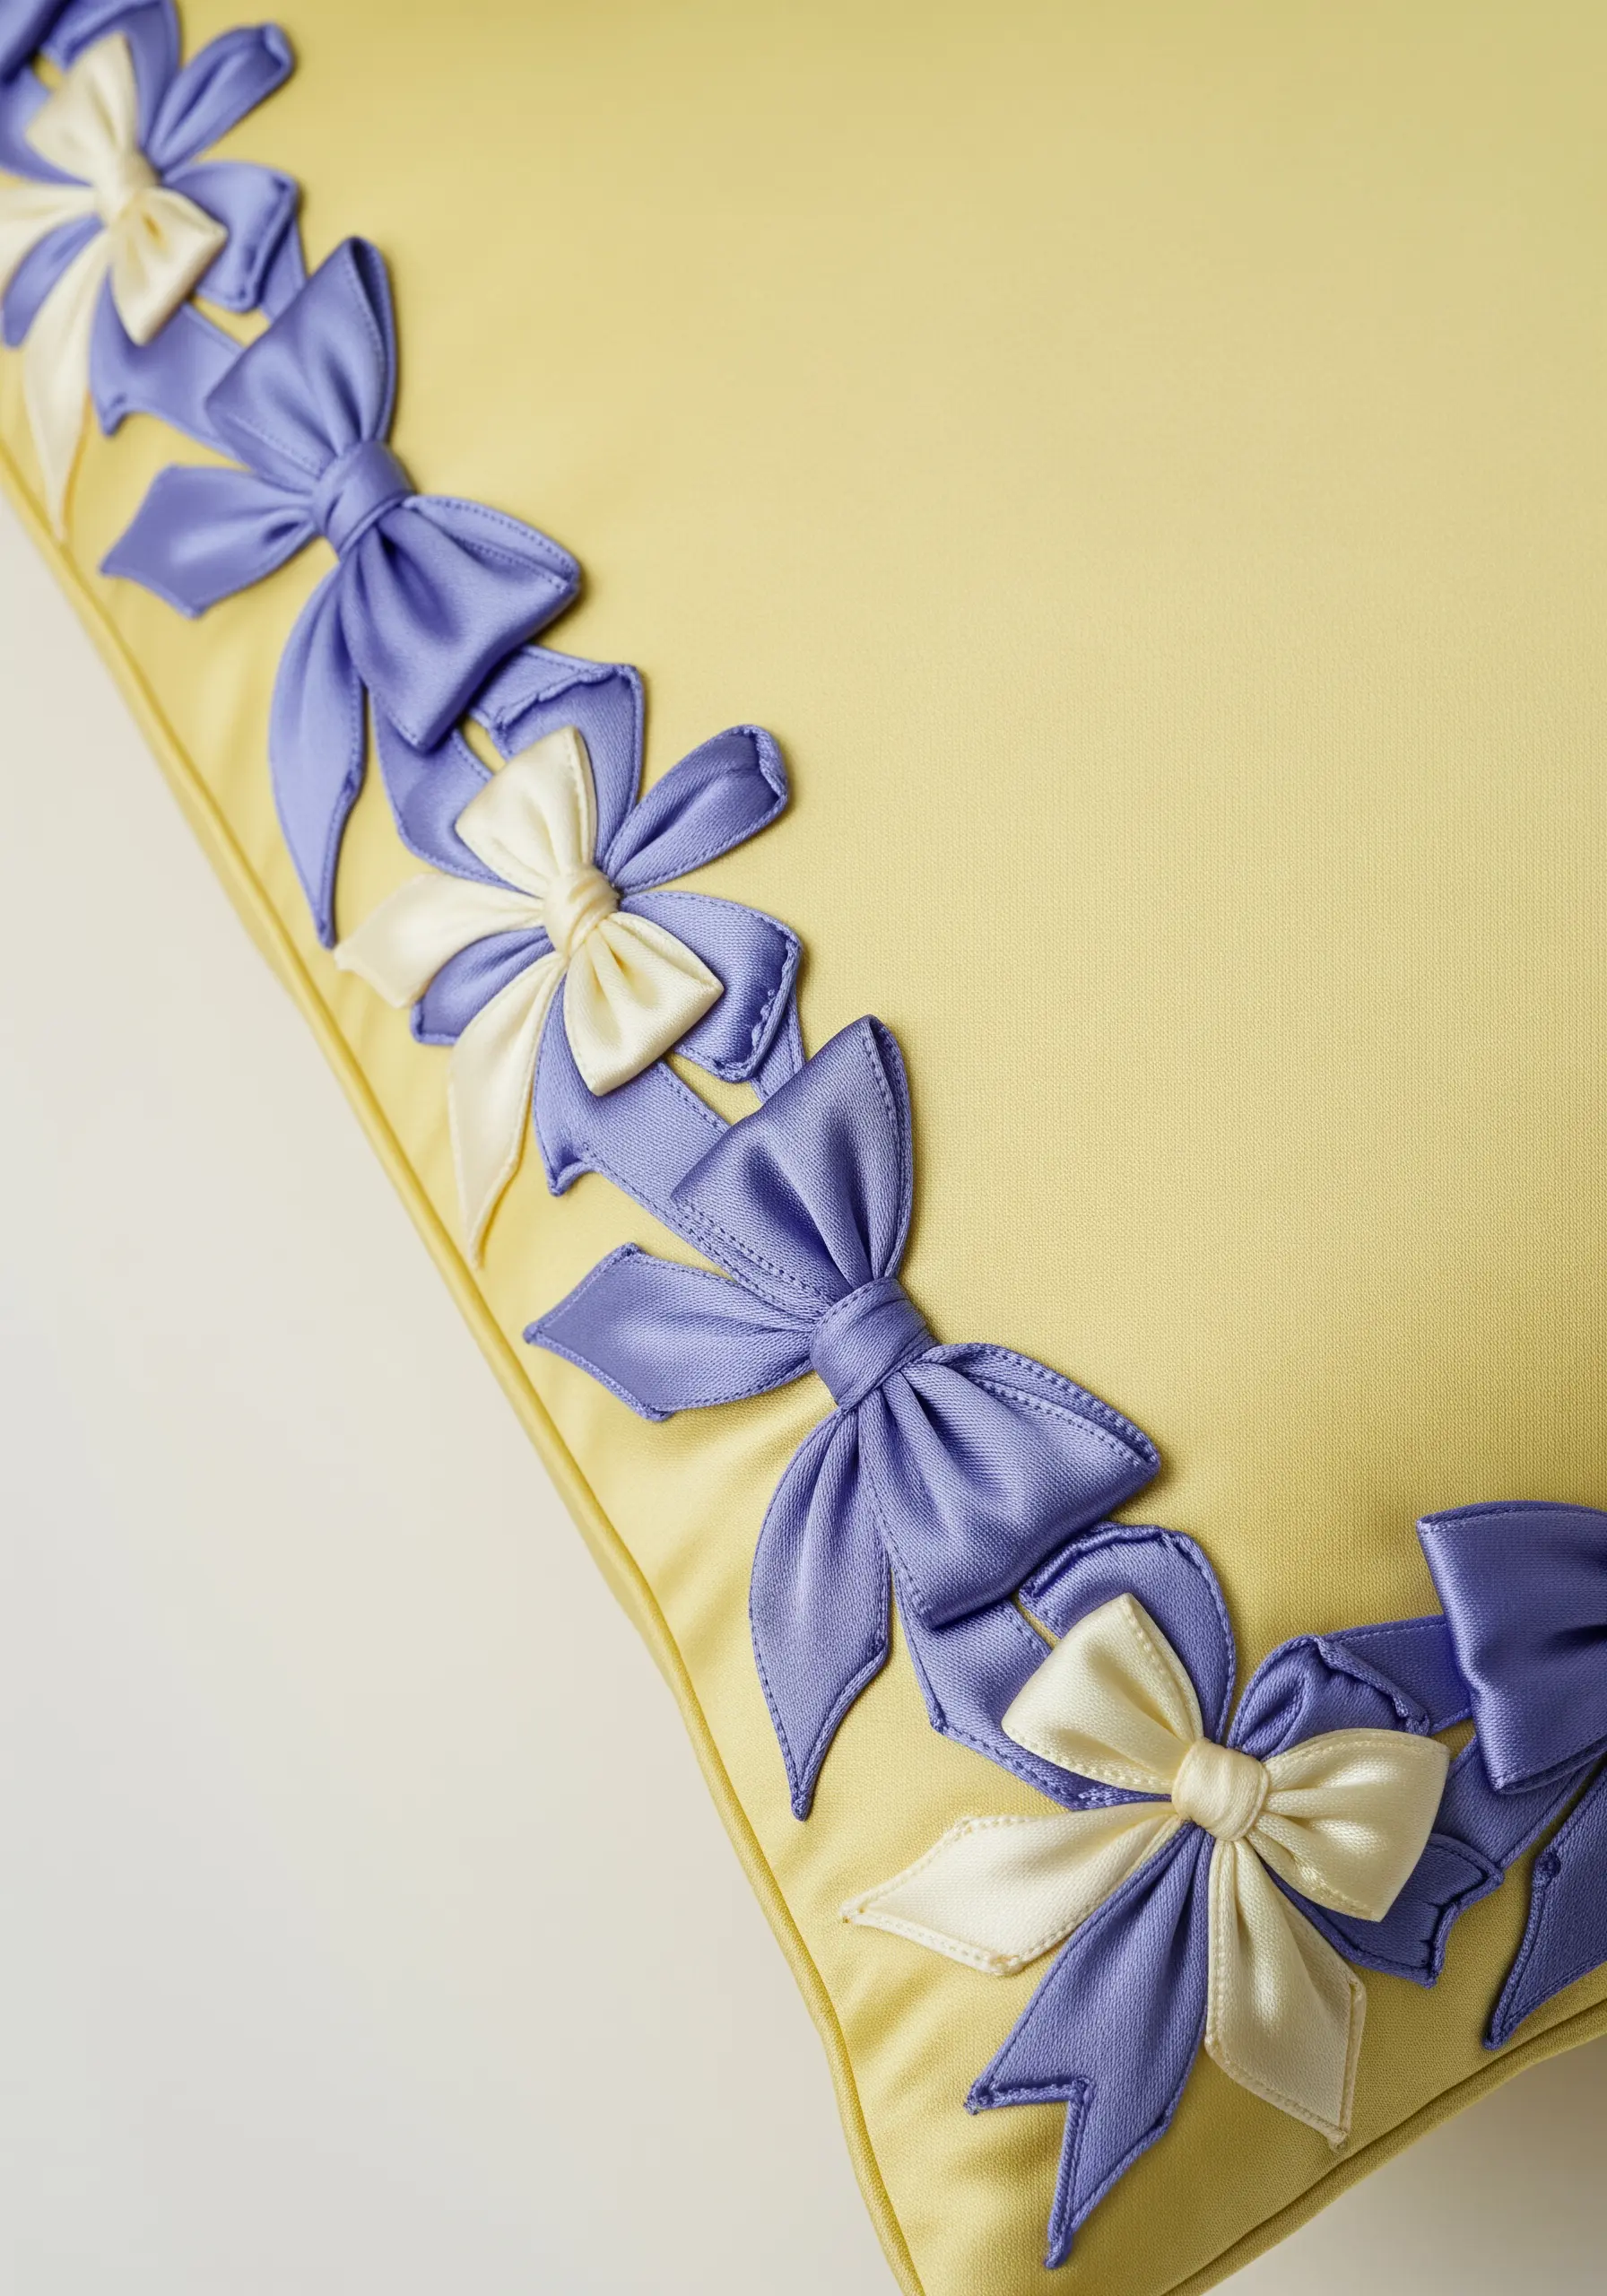
Move beyond thread and incorporate 3D elements by creating a border of delicate ribbon bows.
Use silk ribbon, which has a beautiful drape and a subtle sheen. Form each bow separately and then securely stitch it to the cushion cover through its central knot.
Alternate colors or sizes of bows for a more dynamic and playful rhythm along the border.
This technique is a perfect no-stitch alternative for those who love textile art but prefer not to embroider, adding instant texture and charm.
18. Stitch an Oceanic Wave Crest
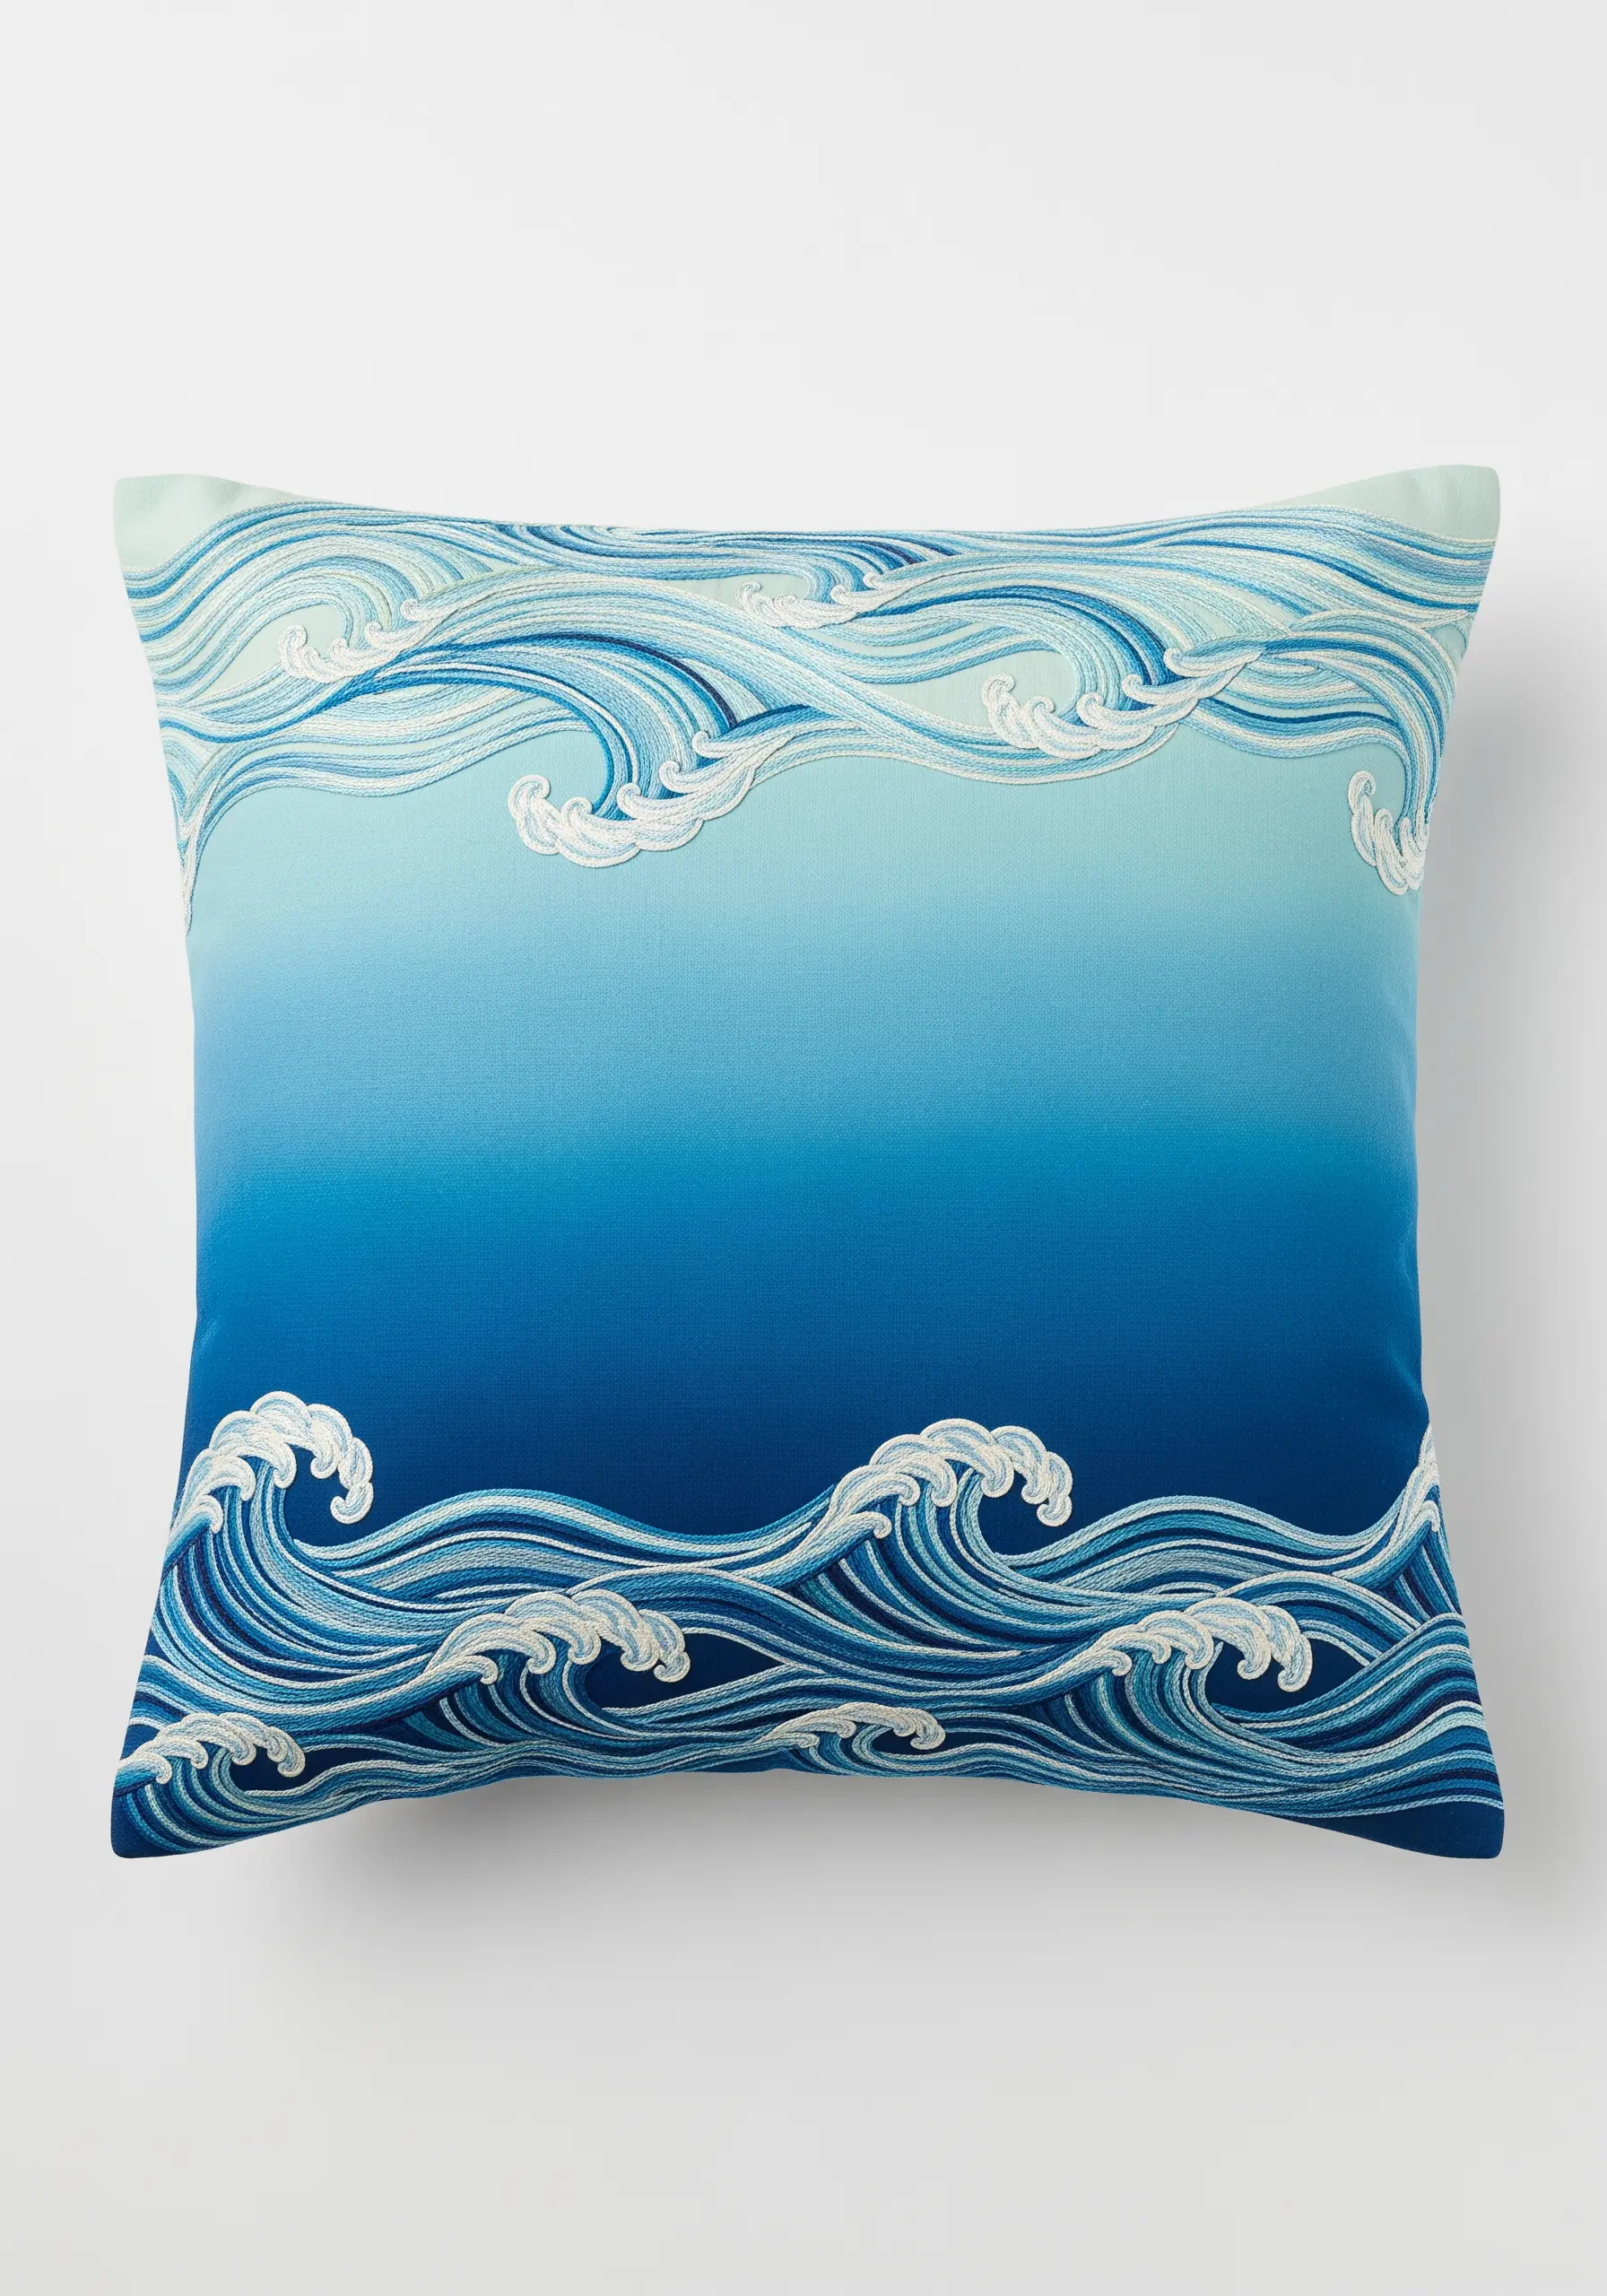
Capture the movement of the sea by embroidering stylized wave crests along the top and bottom borders of your cushion.
This design works beautifully on an ombré fabric that transitions from deep blue to pale sky, enhancing the oceanic theme.
Use a mix of satin stitch and long-and-short stitch in various shades of blue, aqua, and white to create the churning, foamy texture of the waves.
Varying the thickness of your lines by adding or subtracting strands of floss will add to the sense of depth and motion.
19. Recreate a Chinoiserie Landscape
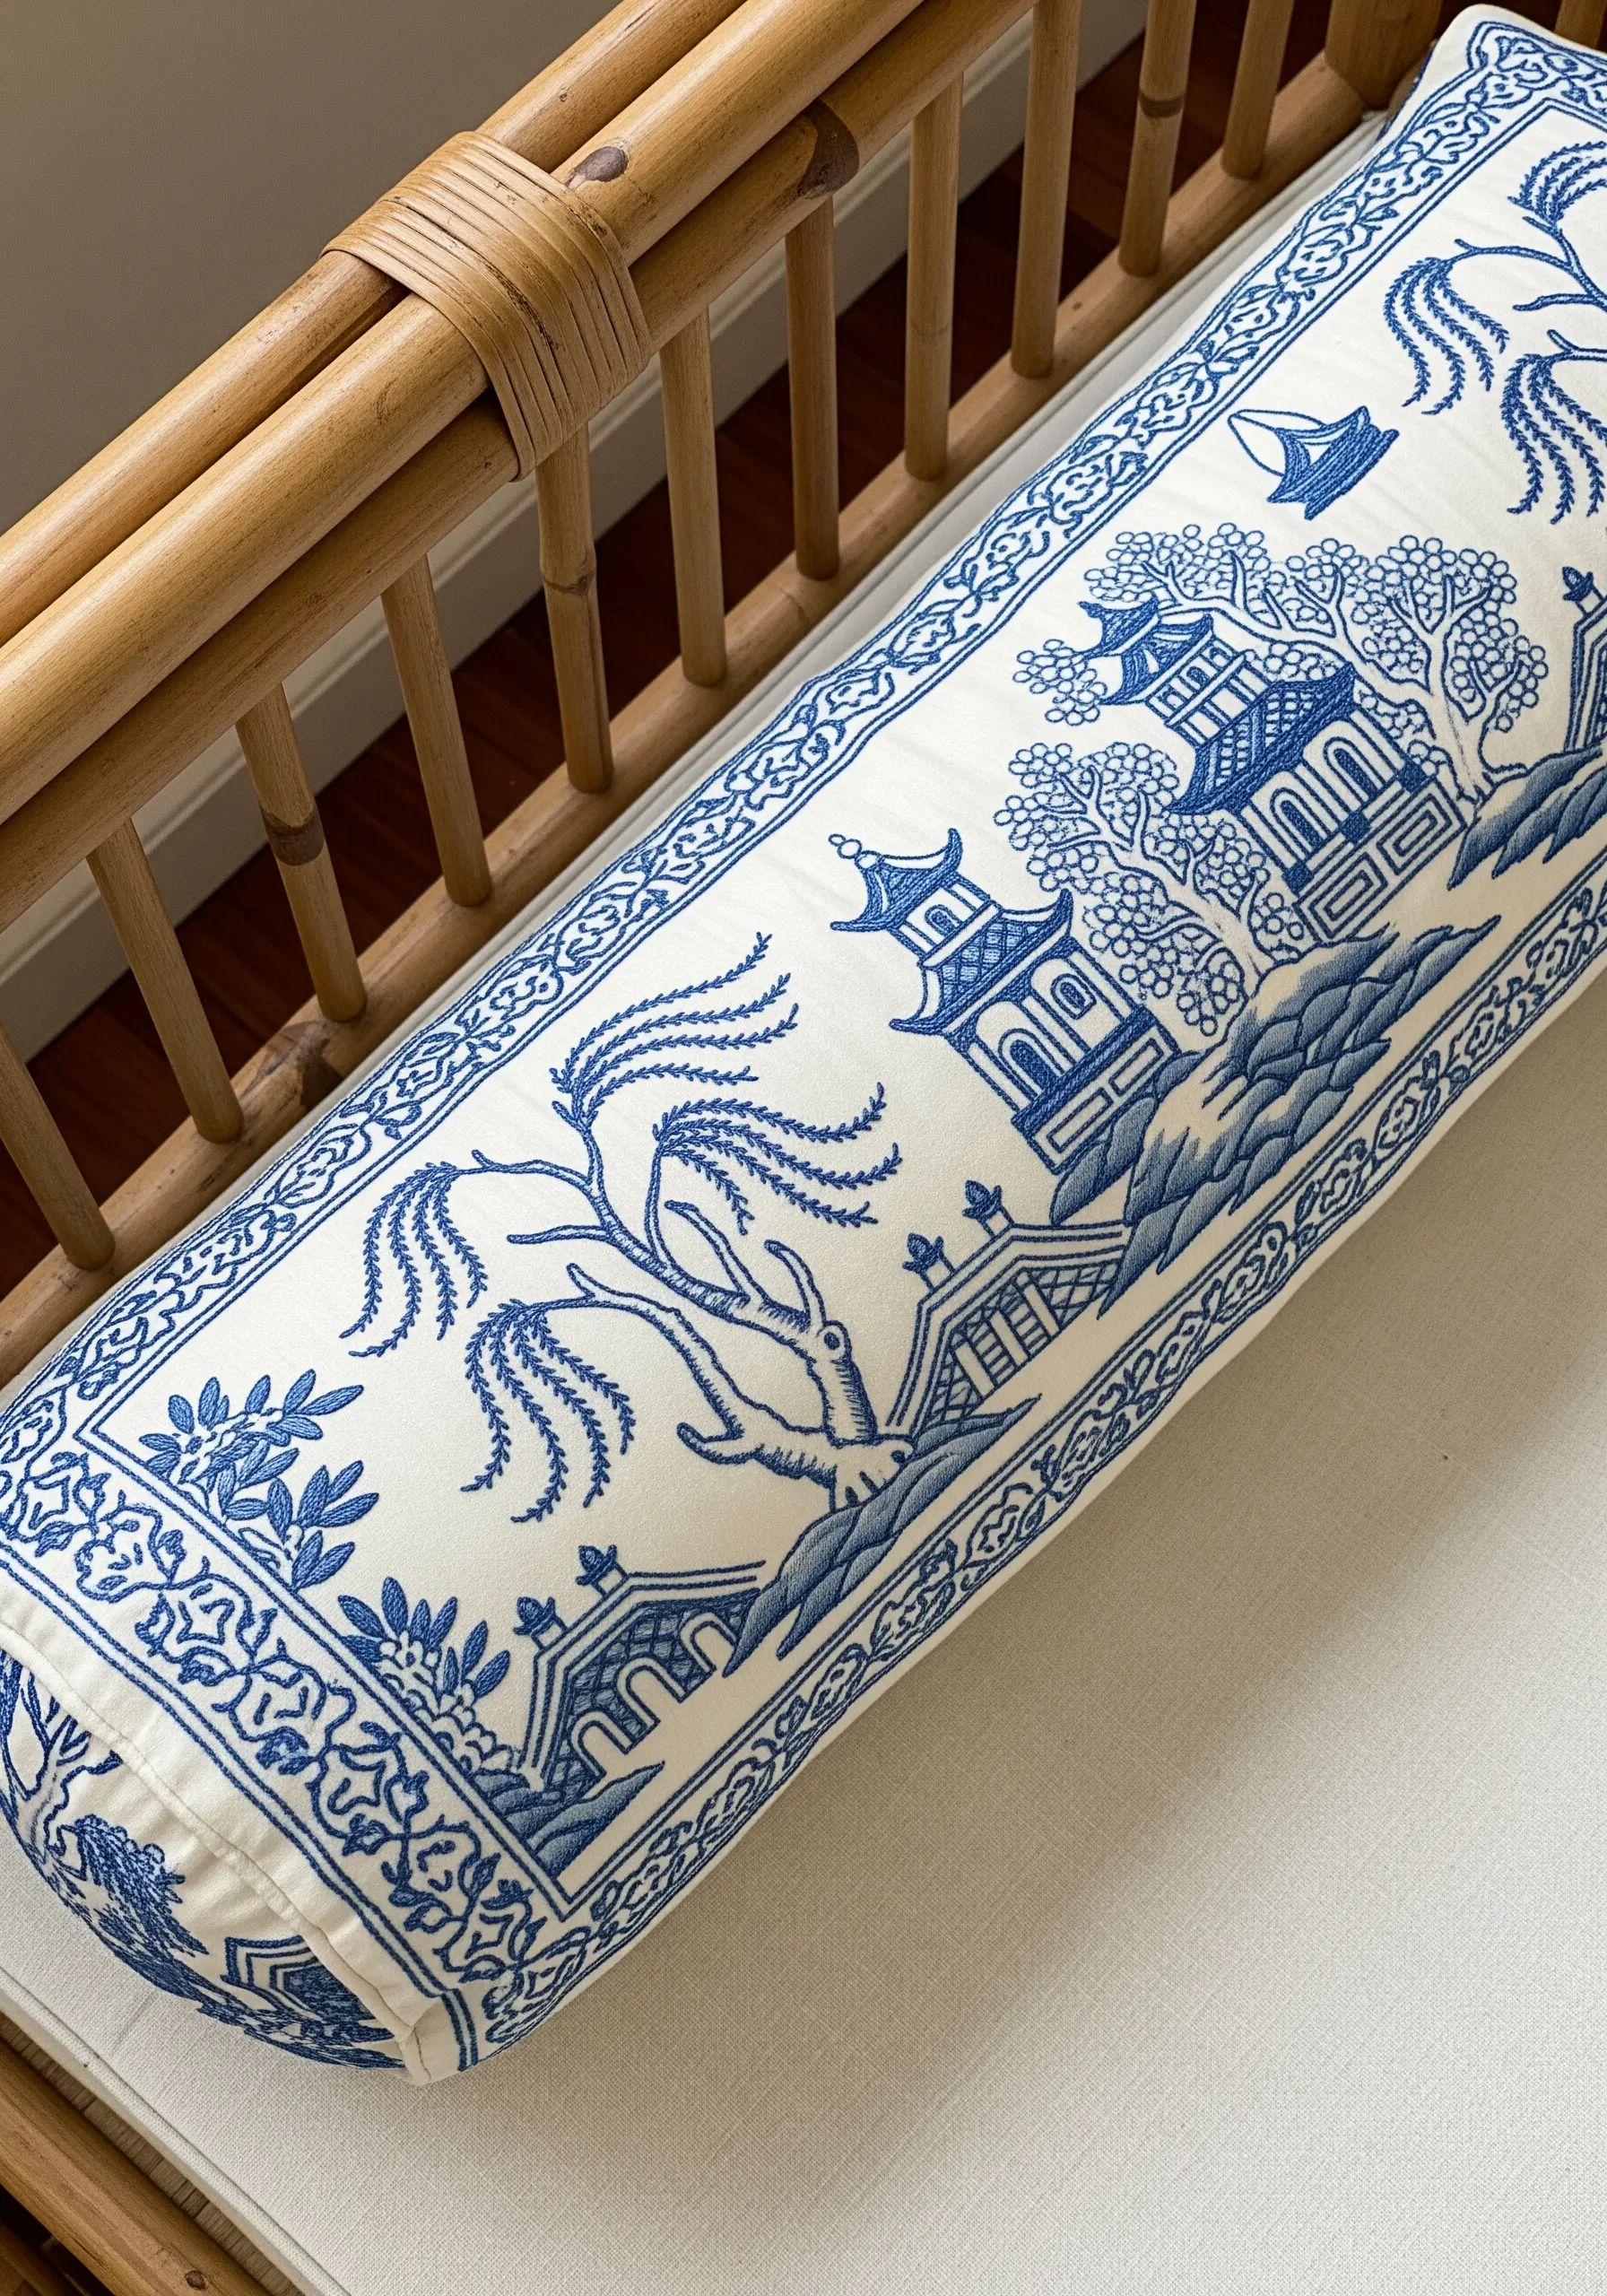
Emulate the style of classic blue-and-white porcelain by stitching a delicate Chinoiserie-inspired landscape border.
Use a single color of thread—a classic delft blue—and rely on different stitches to create texture and detail.
Outline pagodas and bridges with a fine backstitch, fill in foliage with seed stitch or French knots, and use satin stitch for solid areas.
This technique is especially striking on a long bolster or lumbar pillow, allowing the scenic narrative to unfold across the length of the cushion.
20. Weave a Modern Bargello Pattern

Create a vibrant, graphic design using Bargello embroidery, a type of needlepoint that uses upright stitches to form geometric patterns.
Work with a thick tapestry wool or yarn on a canvas-like fabric. The beauty of Bargello is in the rhythm of the repeating stitch patterns and the interplay of color.
Choose a bold, high-contrast color palette to emphasize the sharp, flame-stitch or chevron movements.
Define the edge of the embroidered area with a clean whipped backstitch to give it a crisp, finished look against the base fabric.
21. Cultivate a Dimensional Rose Border

Create a lush, three-dimensional frame of roses using the woven spiderweb wheel stitch.
First, create a foundation of straight stitches like the spokes of a wheel, then weave your thread over and under them in a circular motion until the spokes are completely covered.
Using a variegated thread in shades of pink and red will give each rose instant depth and color variation without needing to change your floss.
Tuck in small, simple leaves between the roses using a detached chain stitch (lazy daisy) to complete the garden effect.
22. Frame with Abstract Line Art Faces
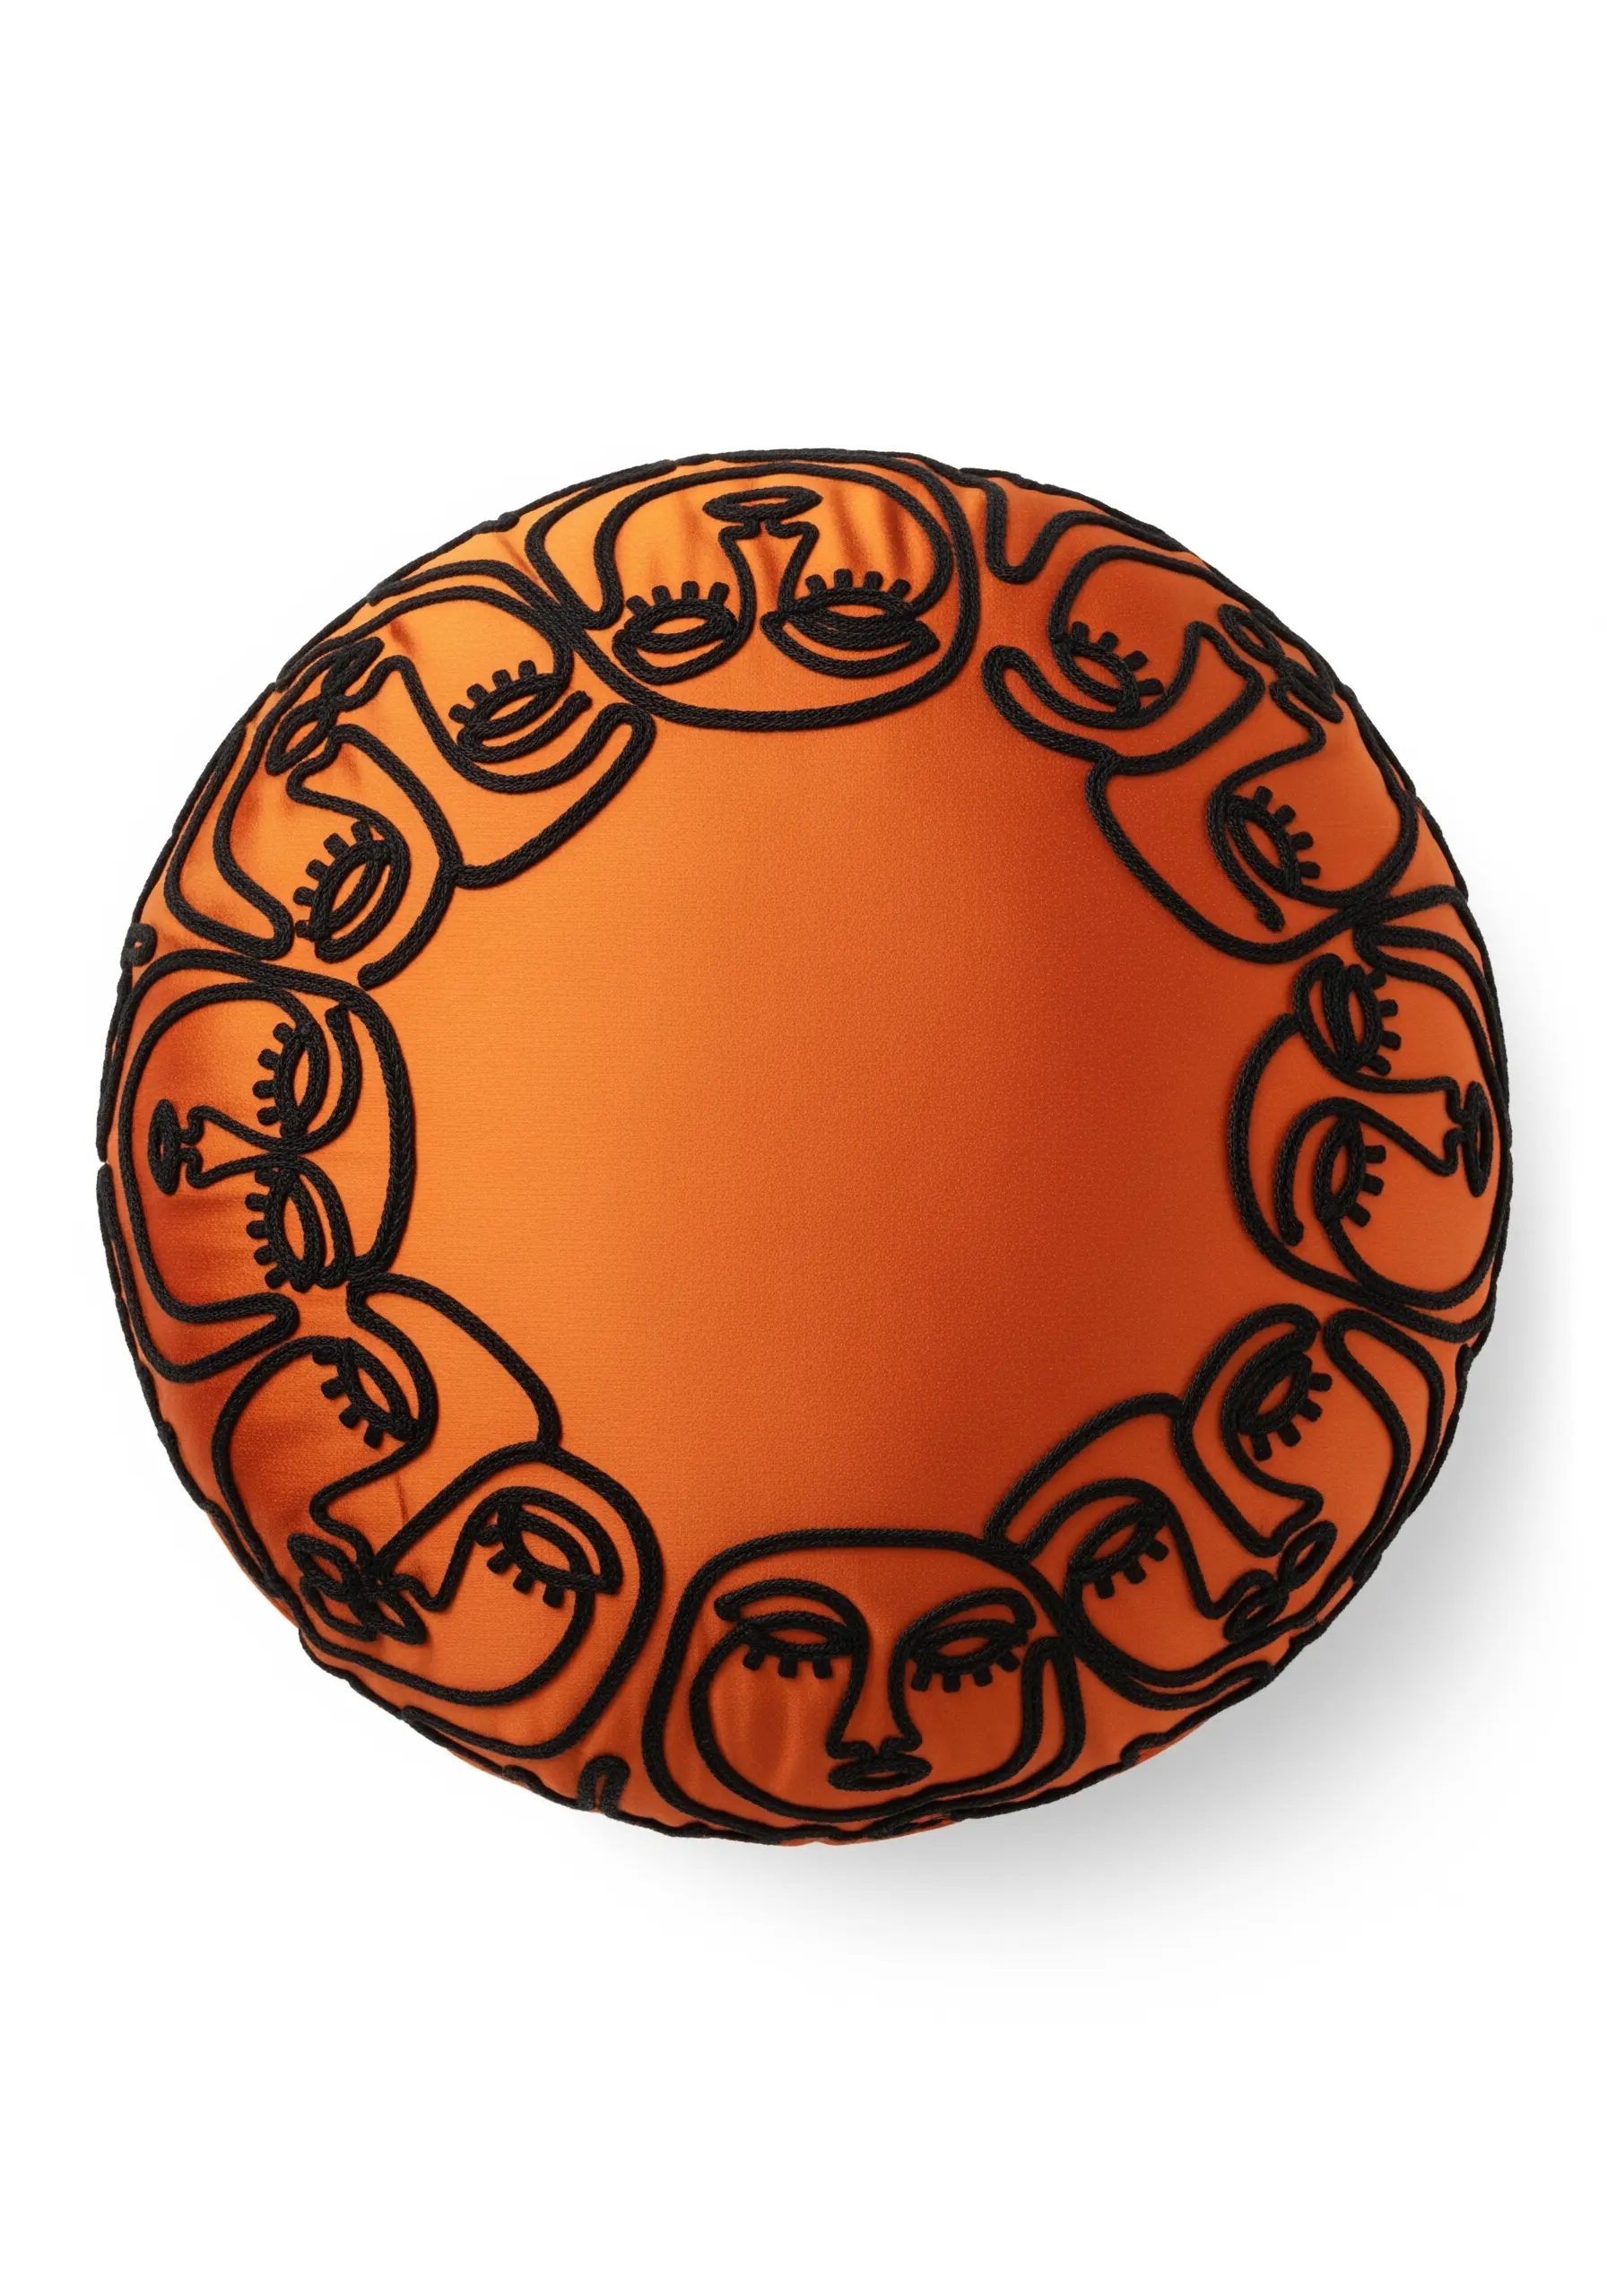
For a modern, artistic touch, create a border using a continuous line drawing of abstract faces.
Use a thick, black cord or yarn and the couching technique—tacking it down with a fine, invisible thread—to perfectly replicate the fluid, unbroken lines of the drawing.
Stitching on a bold, solid-colored satin, like this vibrant orange, makes the black linework pop and feels incredibly contemporary.
This design is perfect for a round cushion, as the circular shape enhances the feeling of a continuous, unending loop.
23. Add Ornate Architectural Corners
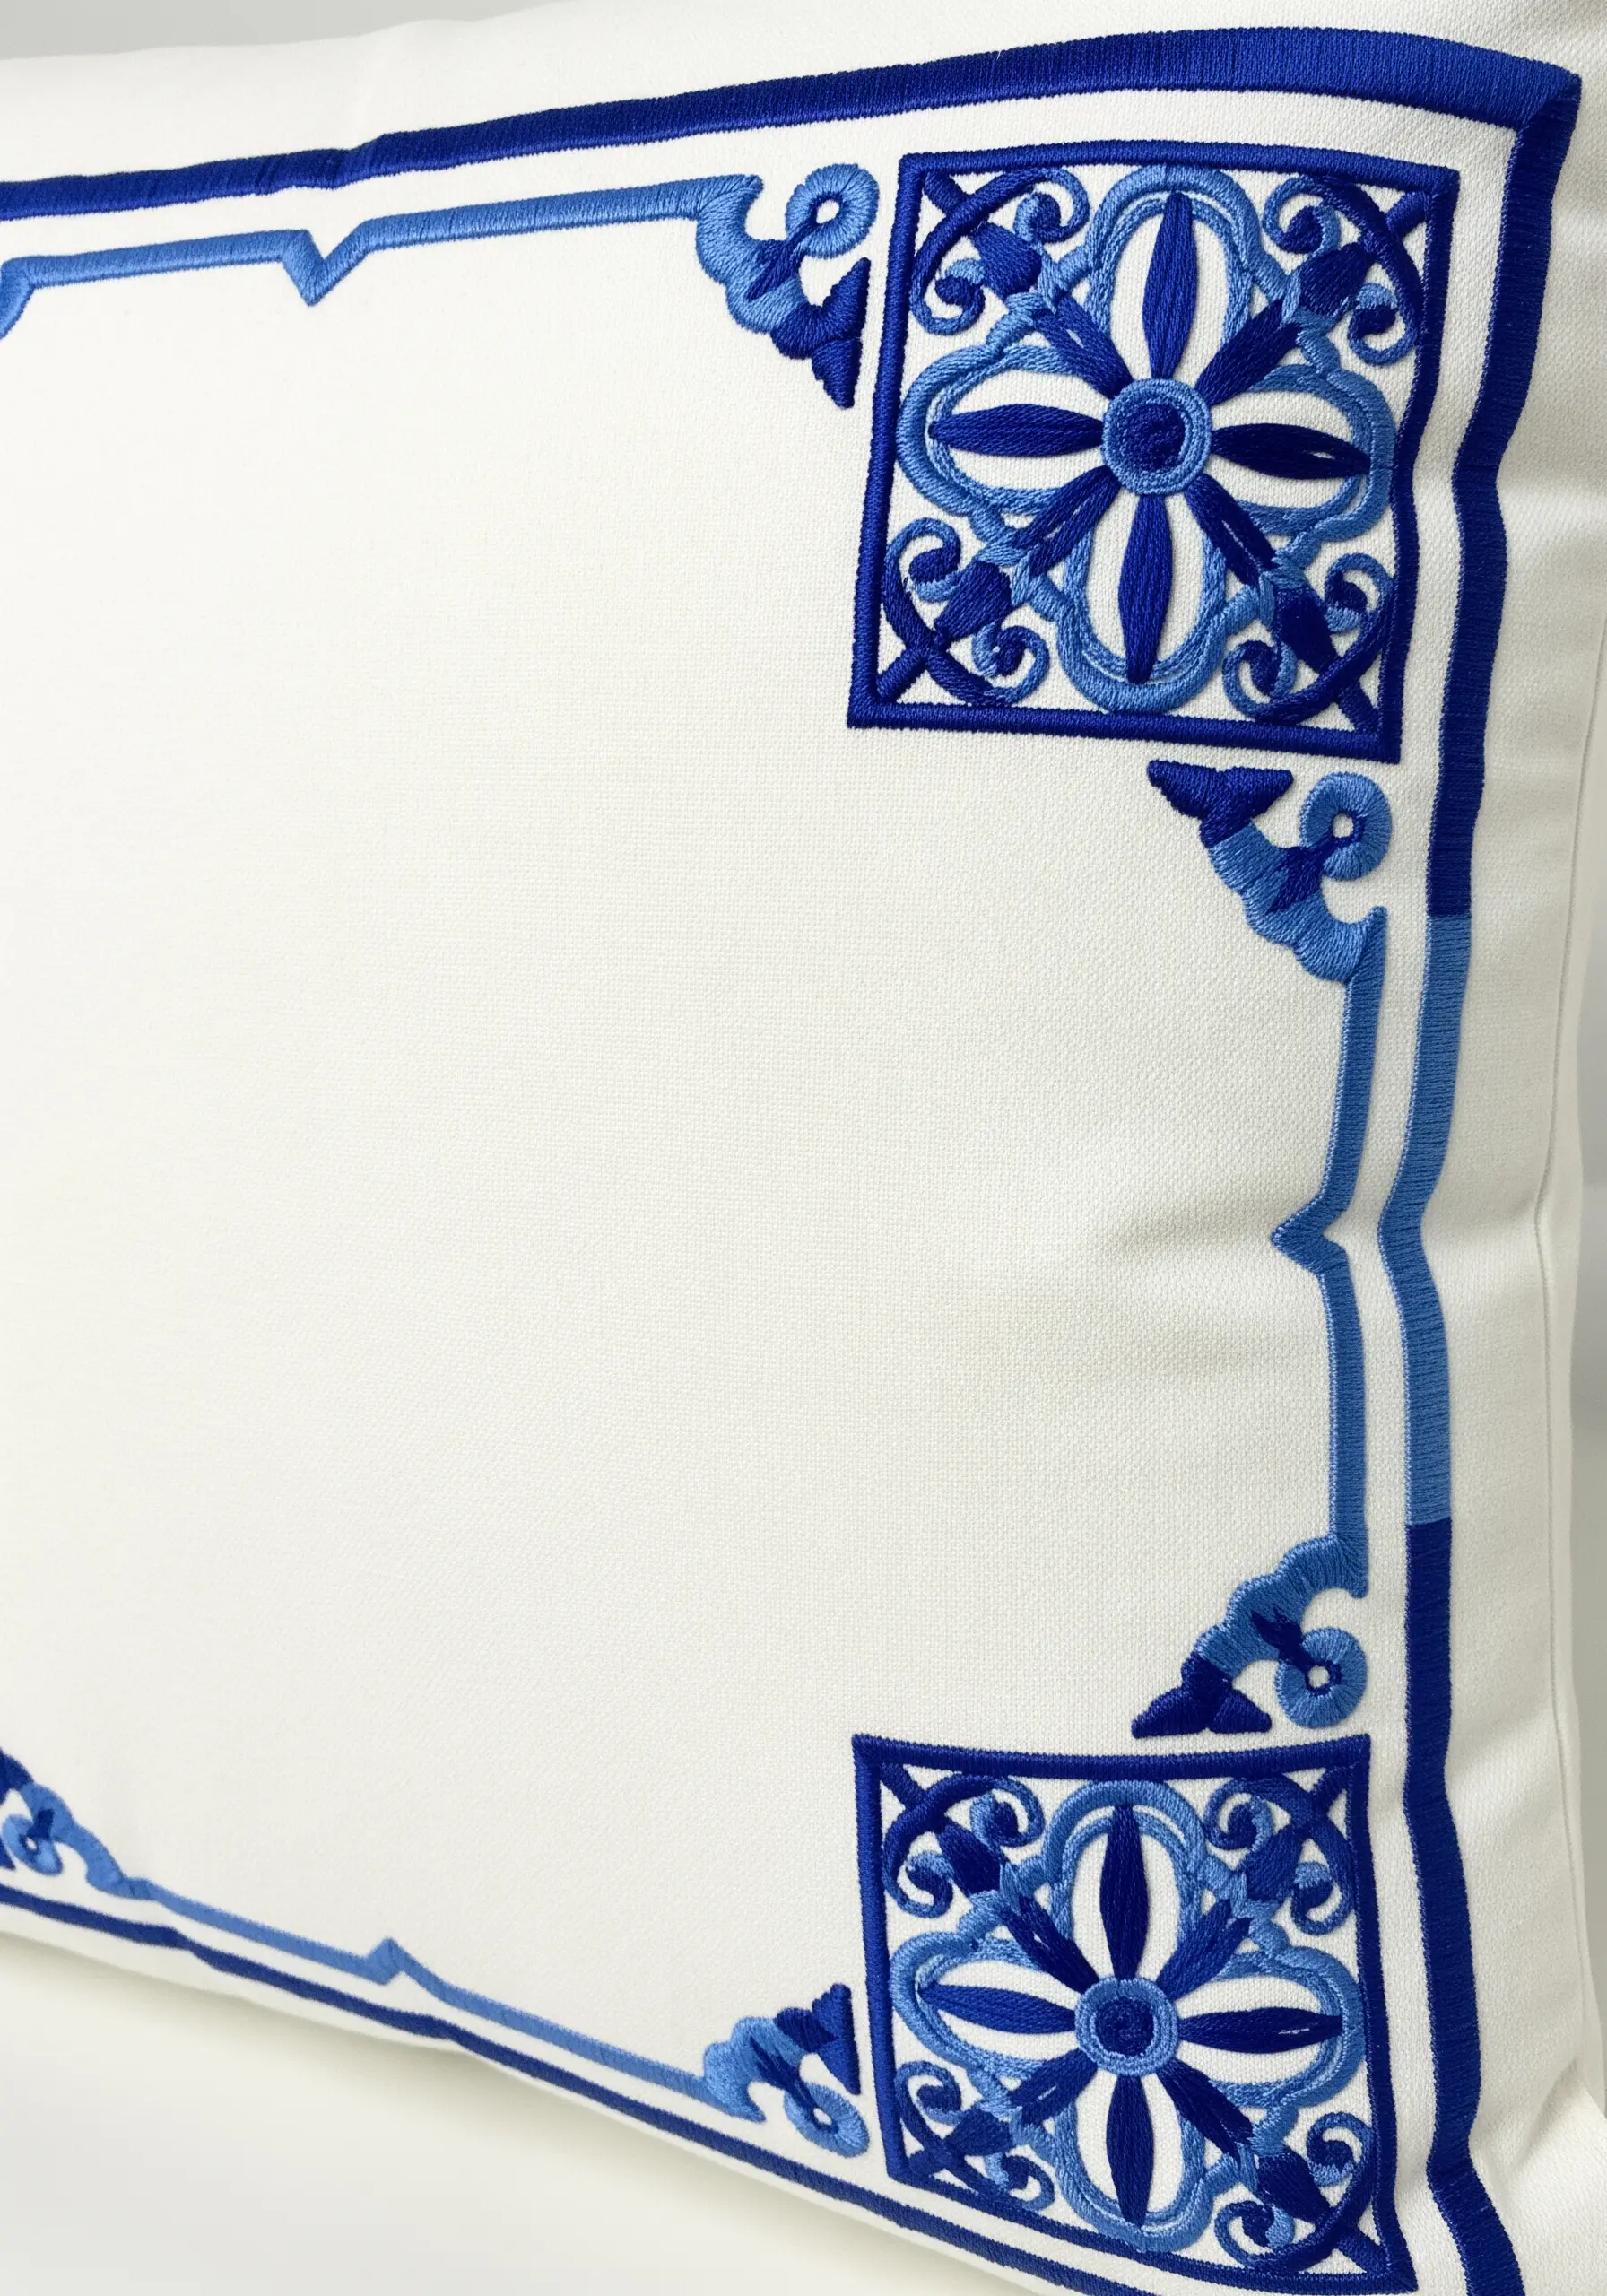
Instead of a continuous border, place highly detailed, ornate motifs at each of the four corners.
This technique draws inspiration from architectural details or illuminated manuscripts, creating a formal and elegant frame.
Use a dense satin stitch with threads in two or three shades of the same color to create depth and a carved, bas-relief effect within the design.
A simple, fine backstitch line connecting the corners provides a delicate structure that contains the design without competing with the intricate corner details.
24. Create a Whimsical Woodland Scene
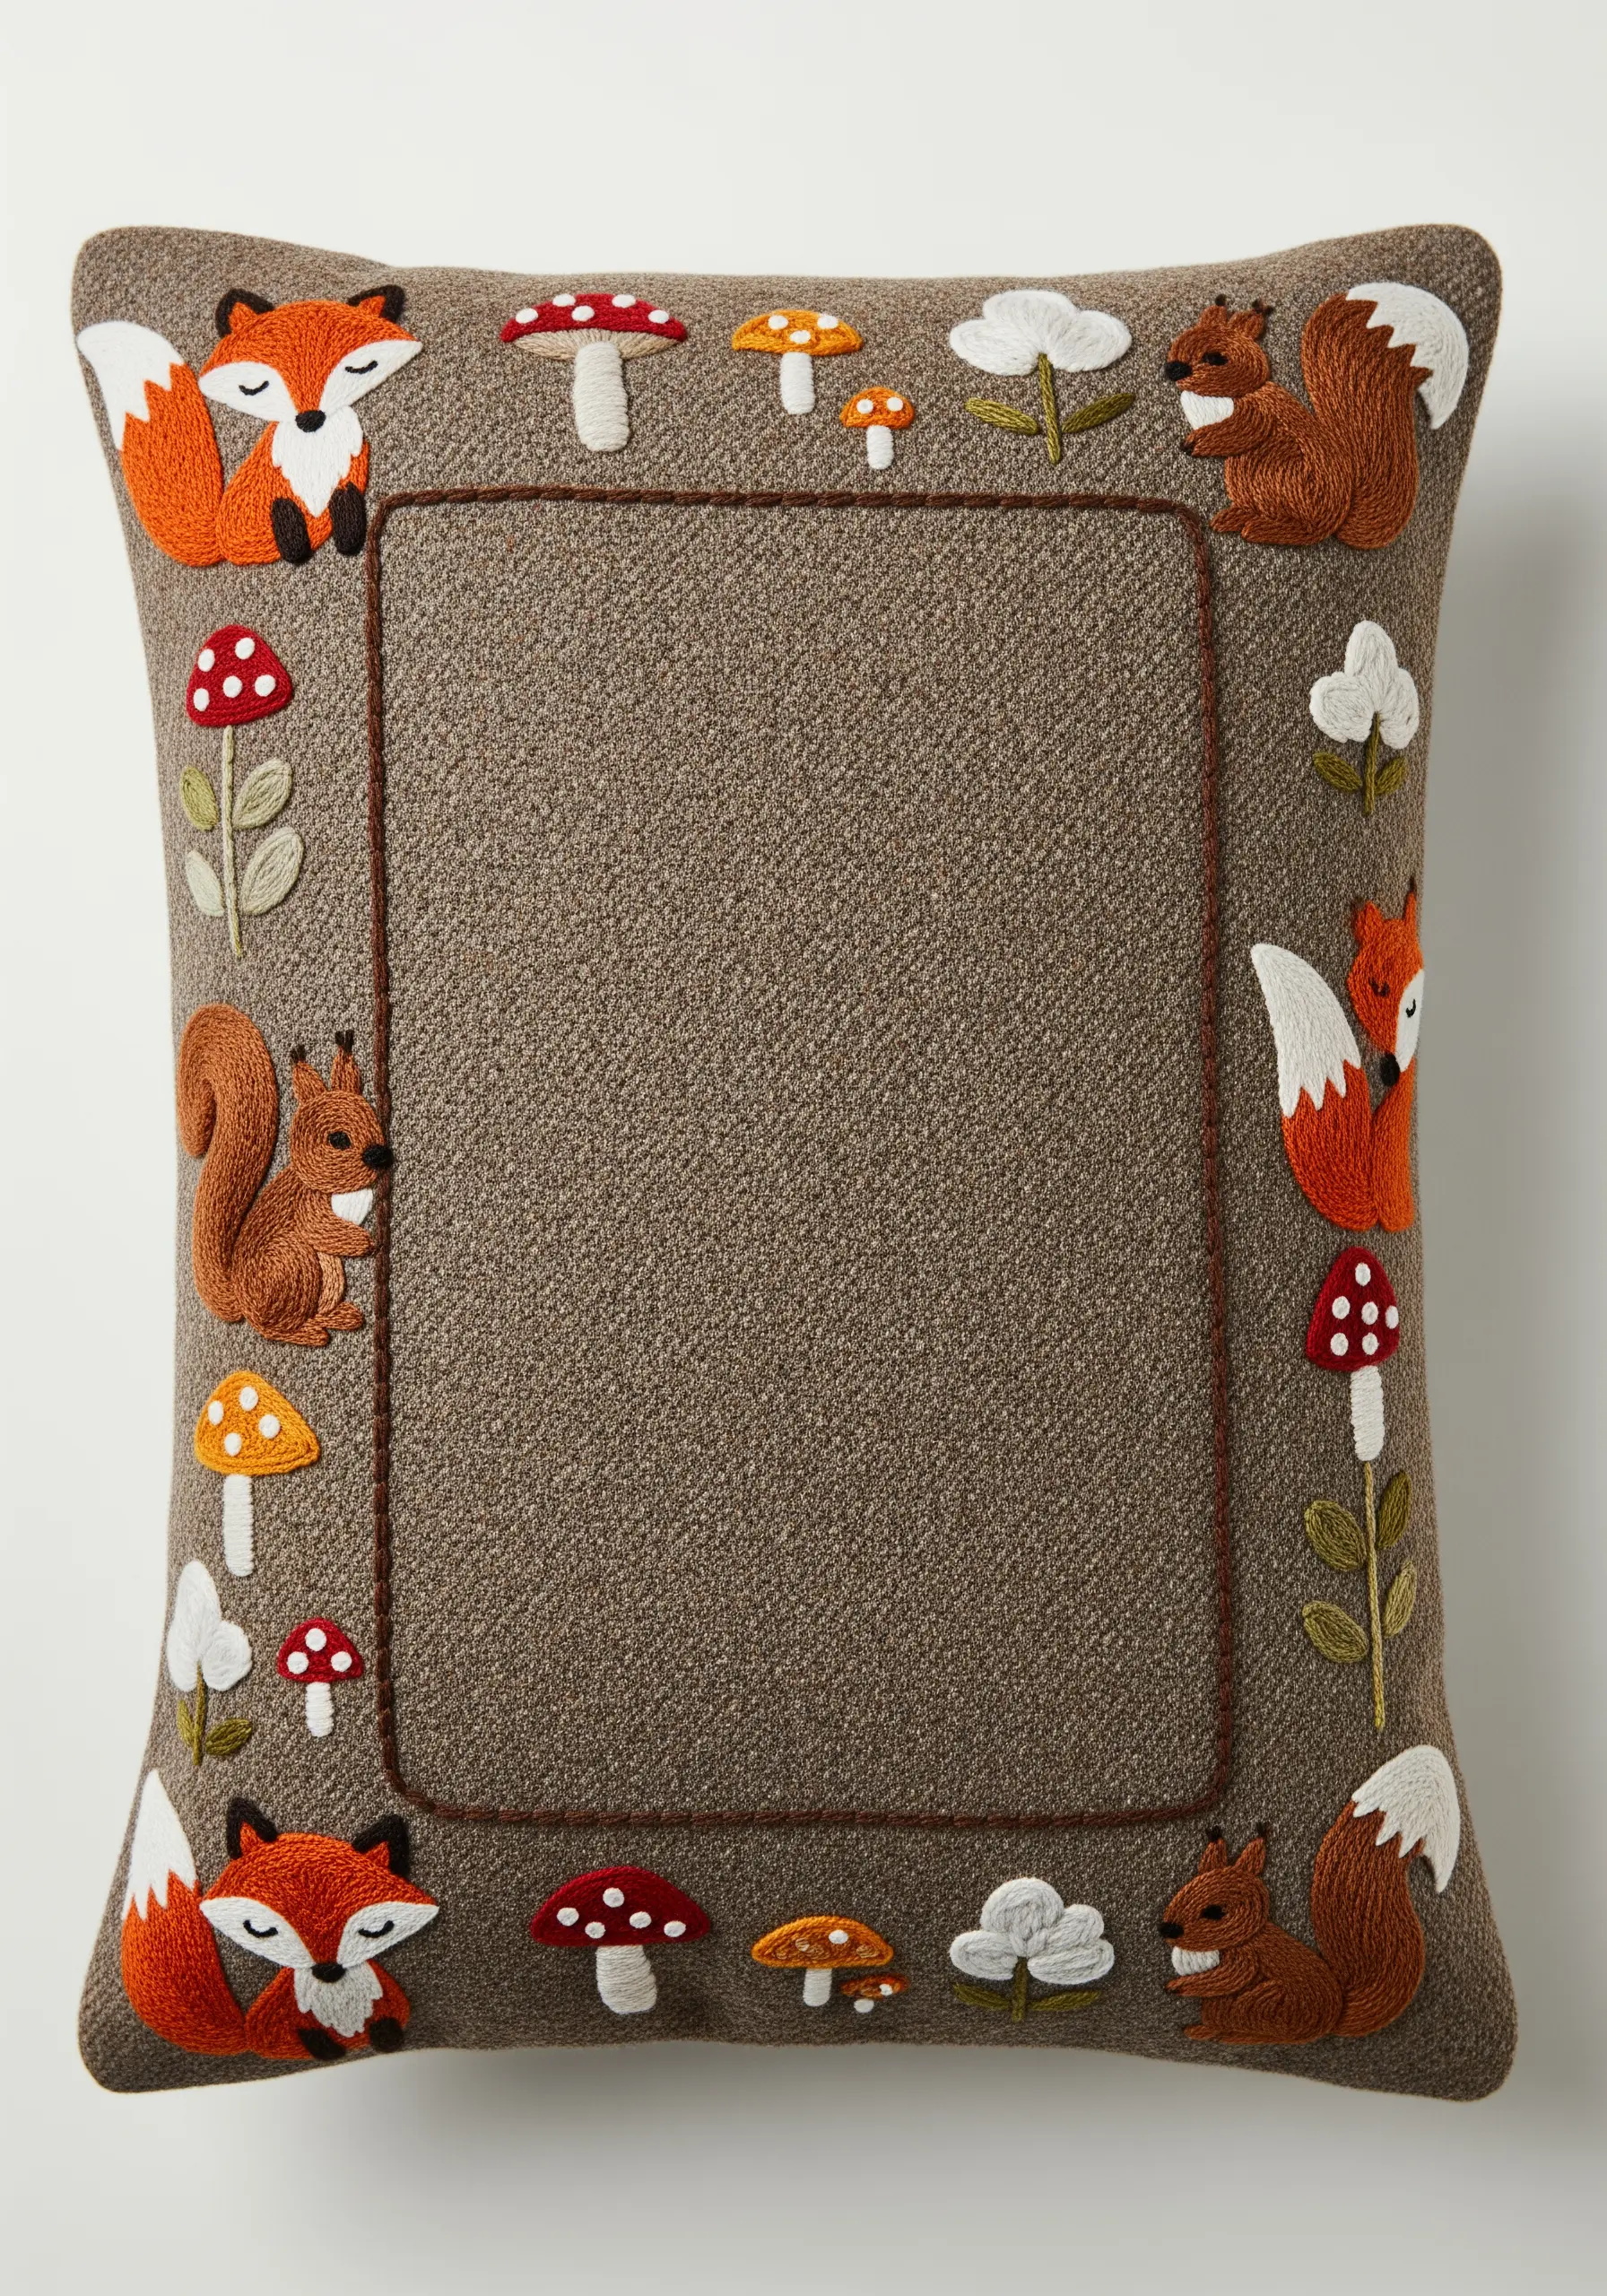
Tell a story with your border by stitching a charming collection of woodland creatures and flora.
Use felt appliqué for the larger shapes, like the fox’s body, and then add embroidered details on top with satin stitch and backstitch. This combination of textures adds dimension and character.
Vary the scale of the motifs—mixing tiny mushrooms with larger animals—to create a dynamic and playful rhythm around the frame.
Choosing a tweedy or woolen fabric for the cushion base enhances the cozy, rustic feel of the woodland theme.
25. Layer Lines of Running Stitch

Build a complex-looking border from the simplest of stitches: the running stitch.
Create depth and rhythm by stitching multiple parallel rows in different colors, varying the stitch length and spacing in each row.
This technique mimics the look of woven textiles and allows for endless color play. It feels both modern and rooted in traditional handwork.
A central band of a contrasting stitch, like the clean backstitch here, provides a focal point and structure to the layered, ‘freehand’ running stitches.
26. Construct an Art Deco Beaded Frame
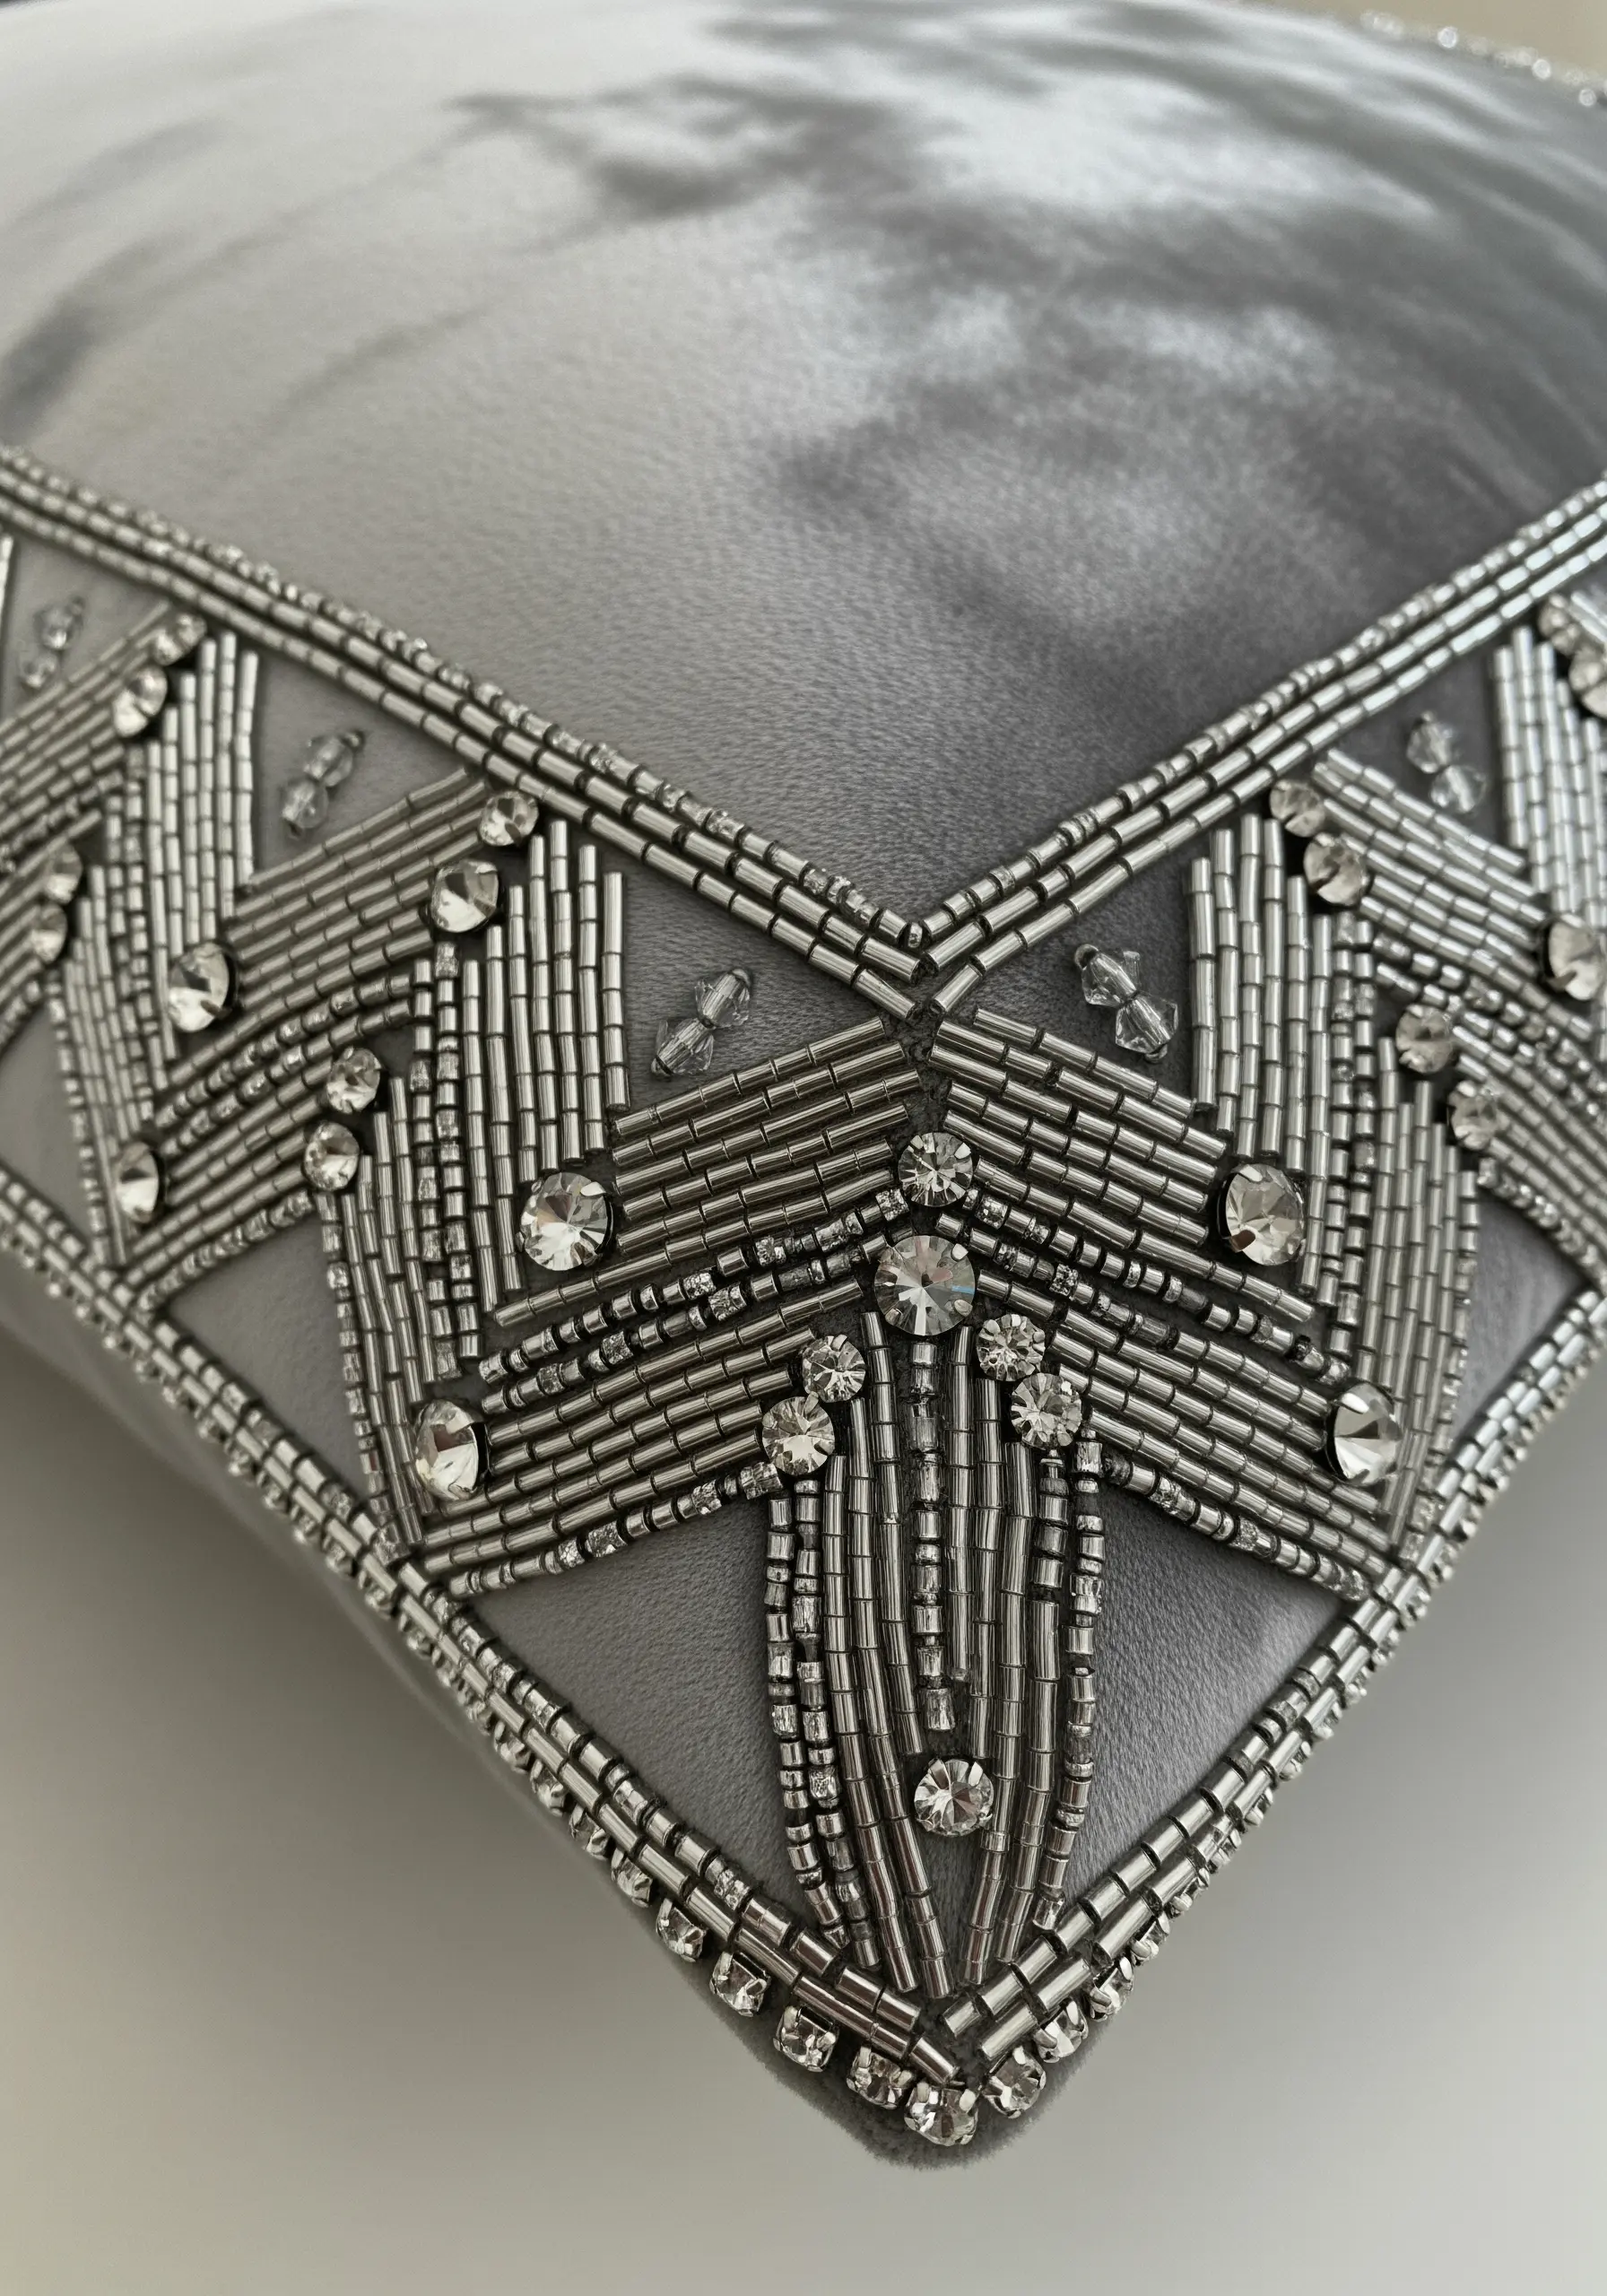
For ultimate glamour, build a geometric border using metallic bugle beads and sparkling crystals.
Stitch down rows of silver bugle beads to create the strong, directional lines characteristic of Art Deco design.
Use multi-faceted crystals or rhinestones at the intersections and key focal points to catch the light and add a luxurious, jewelry-like quality.
This technique works best on a plush fabric like velvet, as the deep pile provides a stable base for the beadwork and its rich texture contrasts beautifully with the sleek, cool beads.
27. Weave an Interlocking Celtic Knot

Create a border with the timeless appeal of a Celtic knot, symbolizing infinity and connection.
To achieve the raised, corded look, use a heavy chain stitch or couch down multiple strands of floss laid together.
The key to a successful Celtic knot is mastering the ‘over-under’ illusion. At each intersection, ensure one cord appears to pass cleanly over the other by carefully planning your stitch path.
Using a high-contrast color like cream on olive green makes the intricate, interwoven pattern clearly visible and impactful.
28. Add a Playful Pom-Pom and Tassel Edge
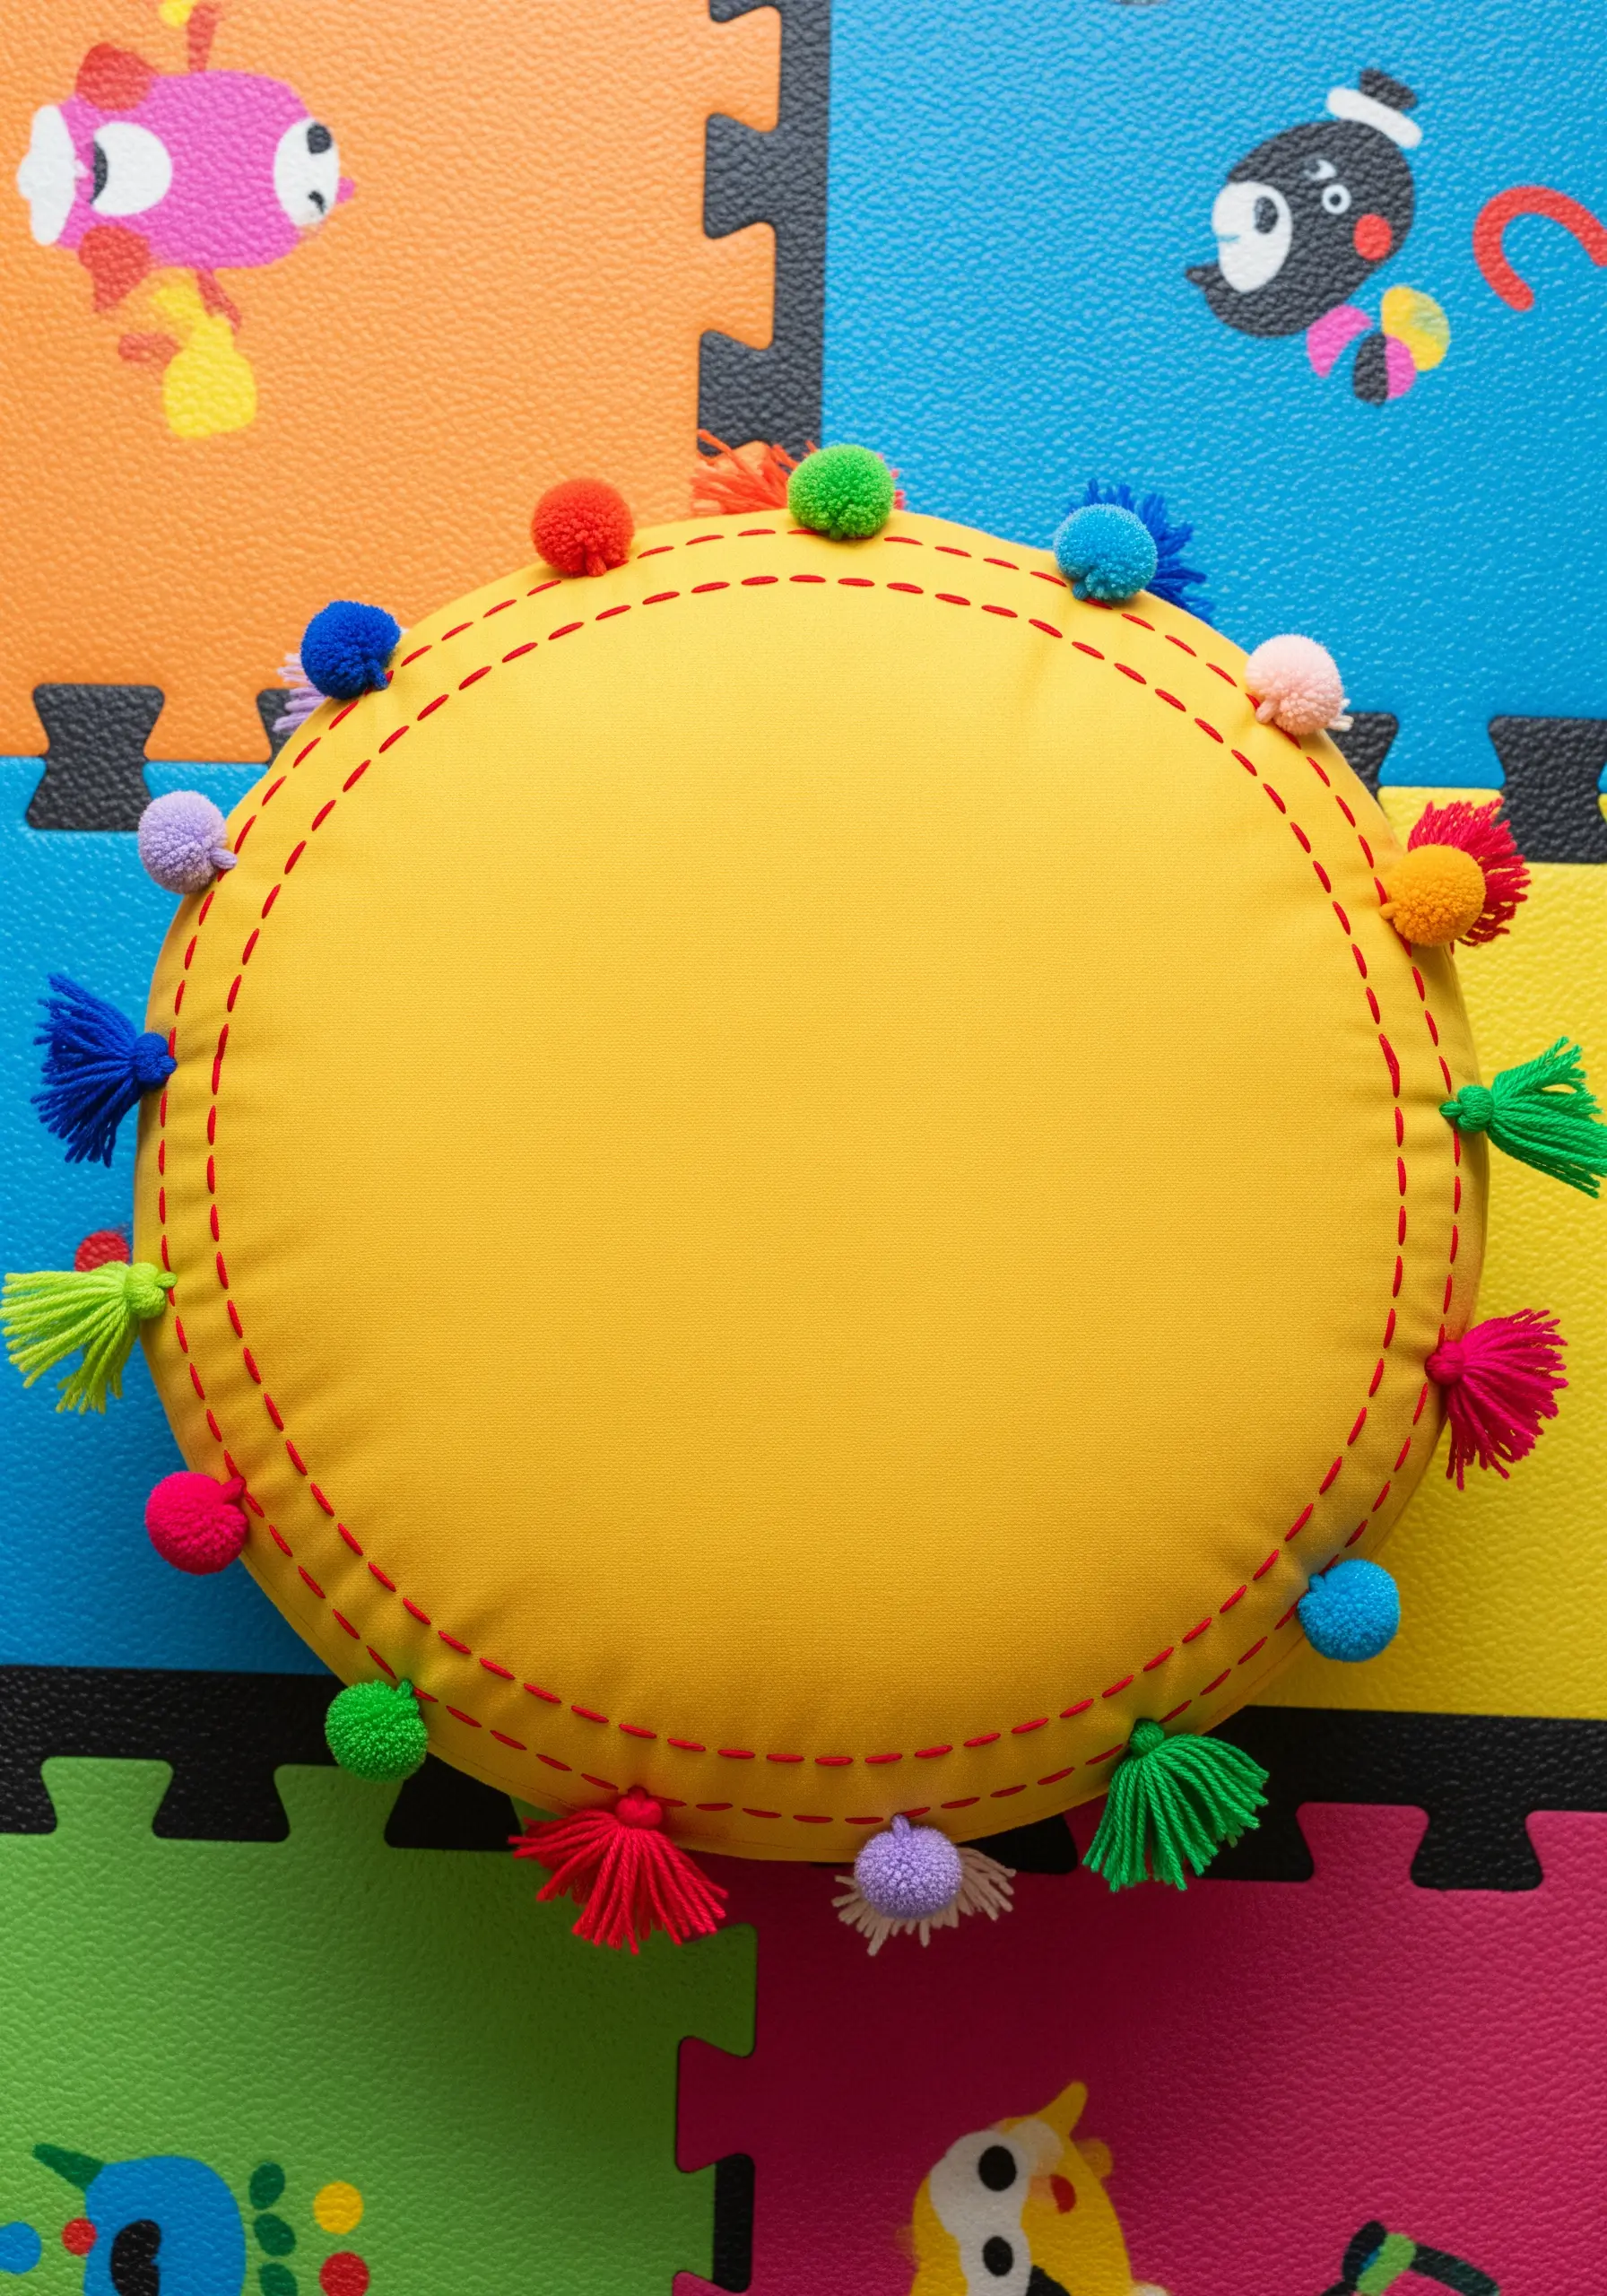
For a fun, textural, and fast finish, embellish the edge of a round cushion with handmade pom-poms and tassels.
Alternate small pom-poms with mini tassels in a riot of bright, cheerful colors for a playful, bohemian vibe.
A simple, visible running stitch in a contrasting color, set just inside the seam, adds a final hand-stitched detail that ties the look together.
This is a perfect project for using up leftover yarn and embroidery floss from your stash.
29. Layer 3D Stumpwork Butterflies and Blooms

Take your floral border to the next level with stumpwork, a technique that creates raised, three-dimensional elements.
Embroider the butterfly wings separately on a piece of fabric with a fine wire stitched into the edge. Then, cut them out and attach only the ‘body’ to the cushion, allowing the wings to lift off the surface.
Combine these 3D elements with flatter, thread-painted pansies to create a dynamic composition with incredible depth and realism.
This advanced technique transforms a simple pillow into a true work of textile art.
30. Design a Mid-Century Modern Motif Scatter

Capture a retro 1950s vibe by scattering atomic-age motifs across a textured background.
Combine different textures for this style: use a dense loop stitch (punch needle) or concentric circles of chain stitch for the solid color ‘pods’, and simple straight stitches for the starburst lines.
The background of French knots provides a uniform, nubby texture that makes the smoother satin-stitched elements pop.
Stick to a classic mid-century palette of turquoise, orange, chartreuse, and black for an authentic vintage feel.
31. Create a Faded Trellis Effect
Achieve the soft, weathered look of a garden trellis by using a variegated or space-dyed thread.
Work a simple cross-hatch pattern using a herringbone or cross stitch. A space-dyed thread, which has multiple colors along its length, will automatically create a subtle, watercolor-like shift in tone as you stitch.
This technique adds immense visual interest and a painterly quality without the complexity of constantly changing threads.
It works best on a neutral, linen-like fabric that allows the delicate color variations to take center stage.
32. Stitch a Regal Goldwork Acanthus Leaf Border
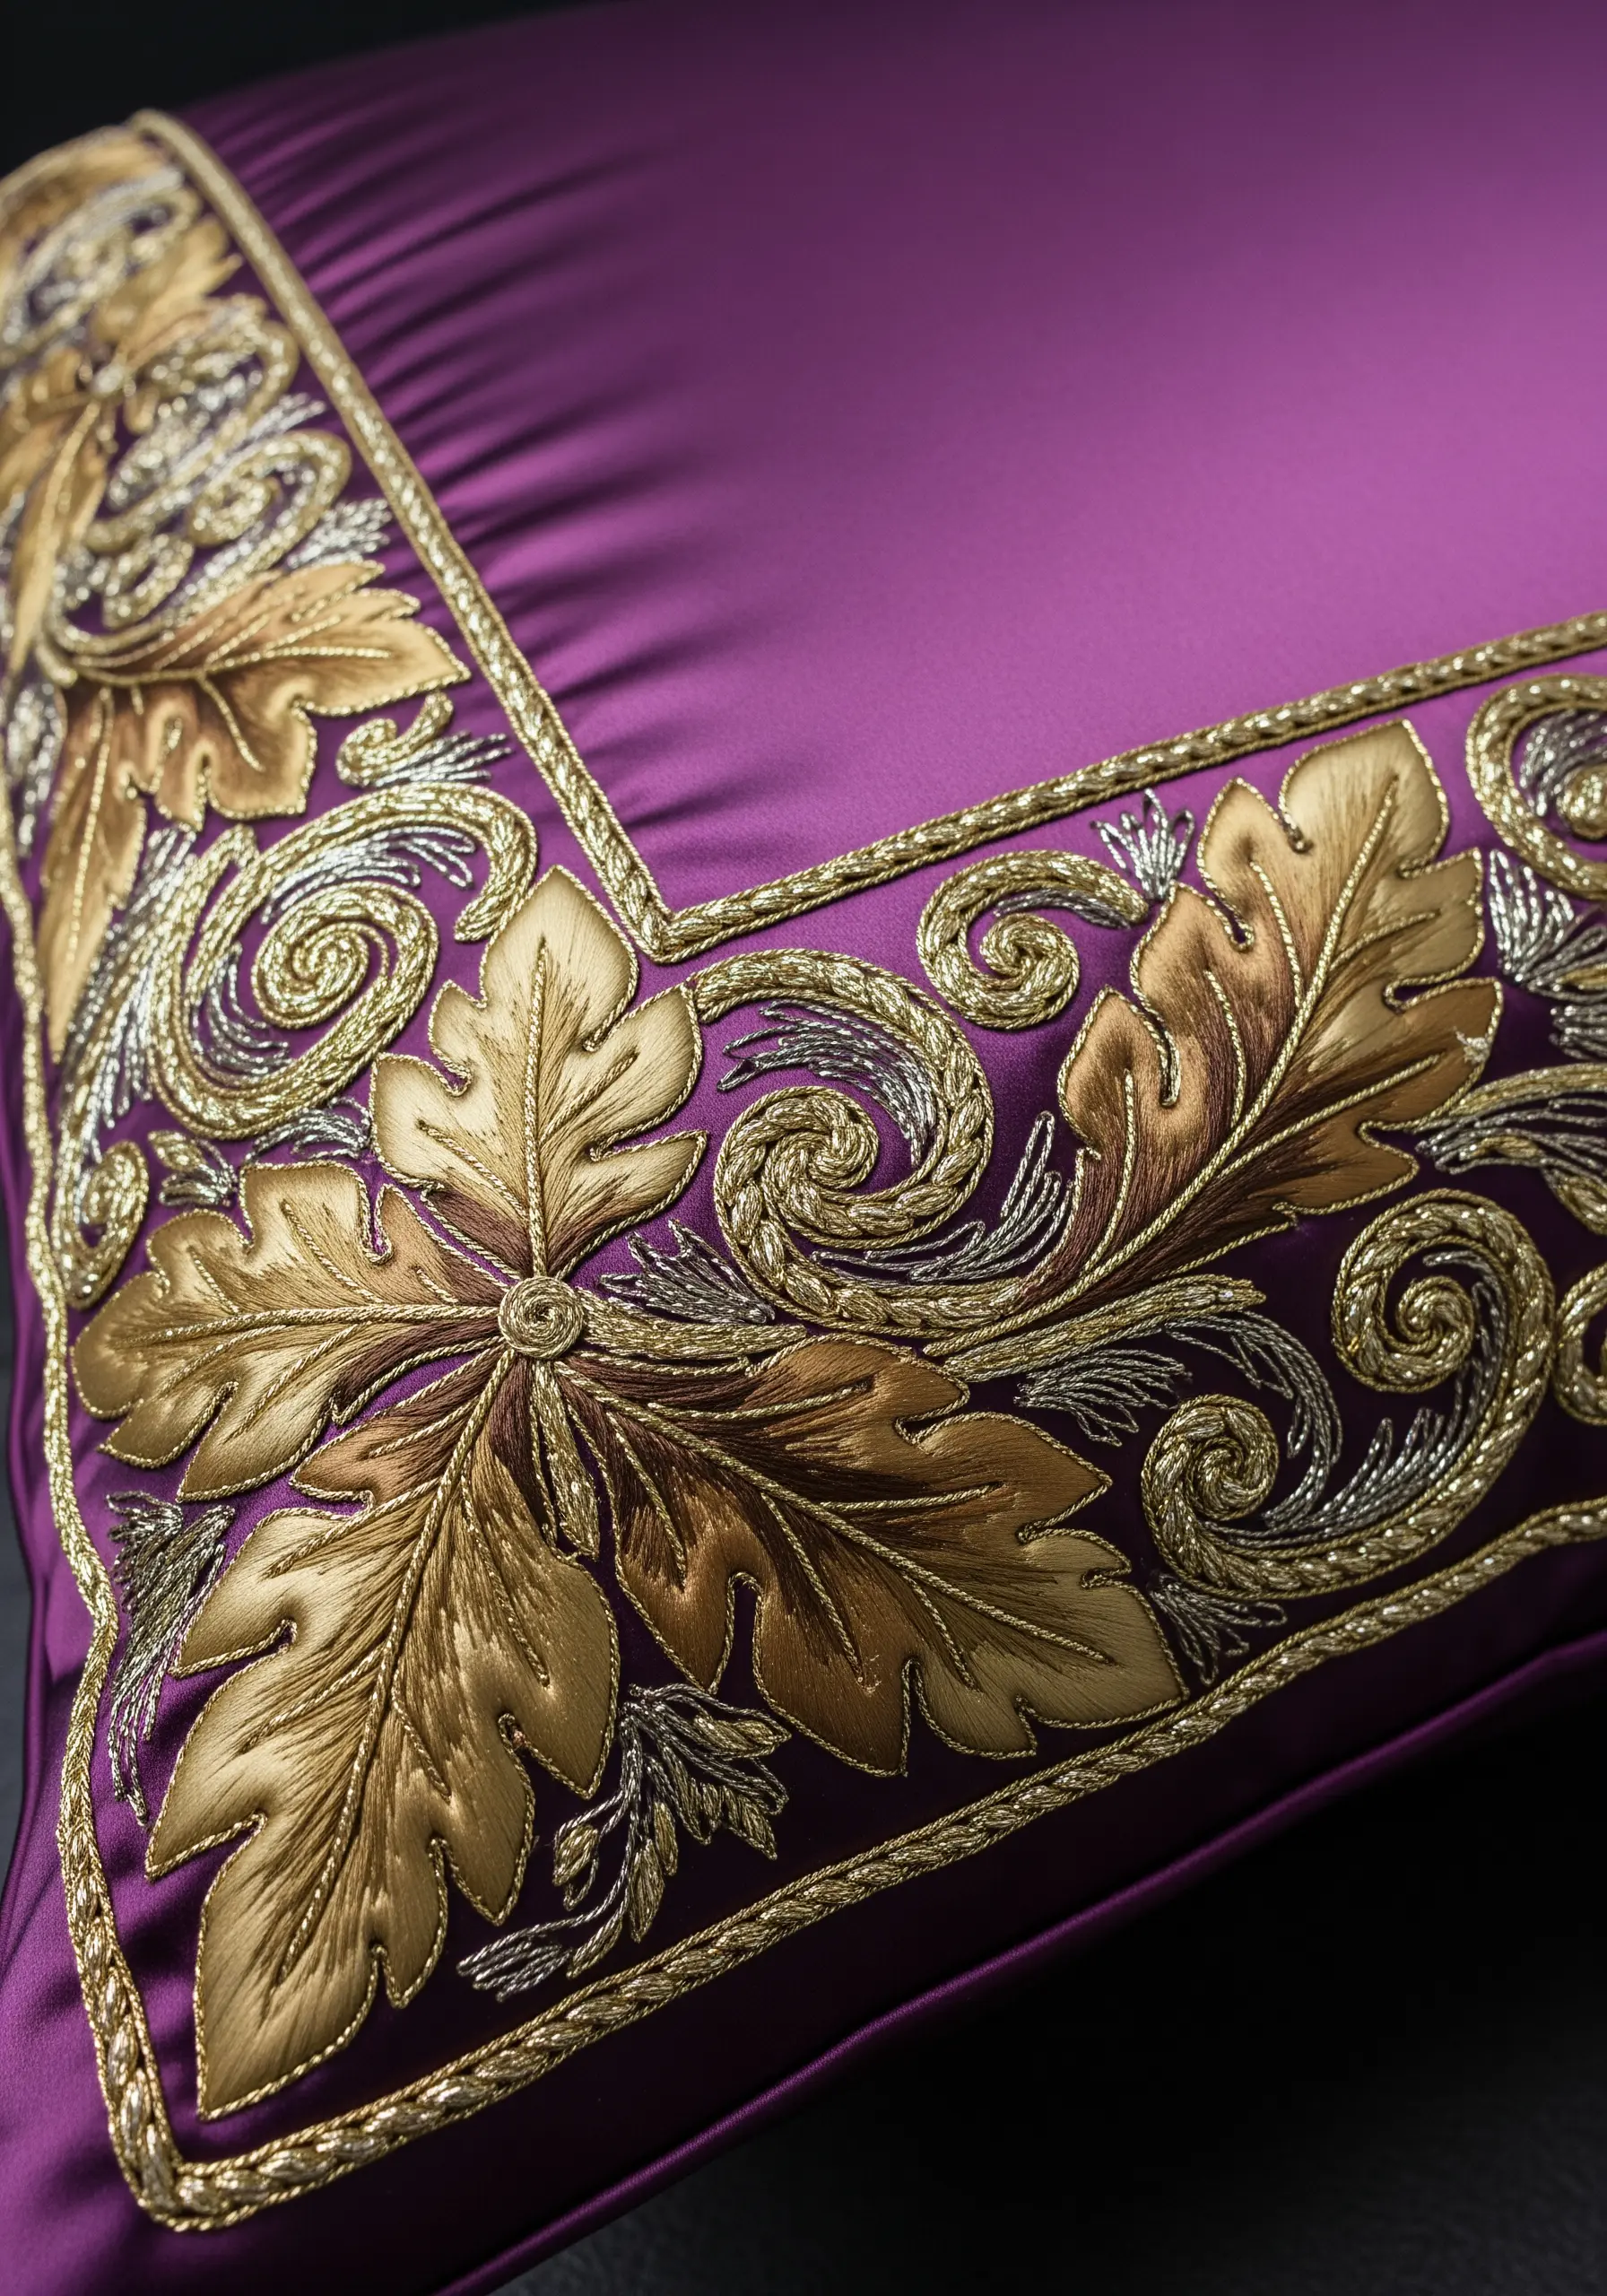
For unparalleled luxury, explore the art of goldwork, using metallic threads and wires to create a raised, sculptural surface.
Outline the acanthus leaves with a fine metallic cord, then fill the sections with long-and-short stitch using shimmering gold and silver threads to create highlights and shadows.
The swirling, organic shapes stitched against a rich, saturated fabric like this purple silk feel opulent and historic.
This is an advanced technique, but you can achieve a similar effect by using high-sheen satin floss in metallic colors for a less complex but still luxurious finish.
33. Grow a Cascading Wildflower Garden

Break free from a traditional border and let a riot of wildflowers spill into the center of the cushion.
Create a dense, meadow-like texture by layering hundreds of French knots in a wide variety of colors. This technique is wonderfully forgiving and incredibly impactful.
Add height and movement with long, delicate straight stitches for stems, allowing them to droop and curve naturally.
By leaving the very center of the cushion empty, you create a beautiful negative space that makes the surrounding floral chaos feel intentional and balanced.
34. Layer Satin-Stitched Scallops
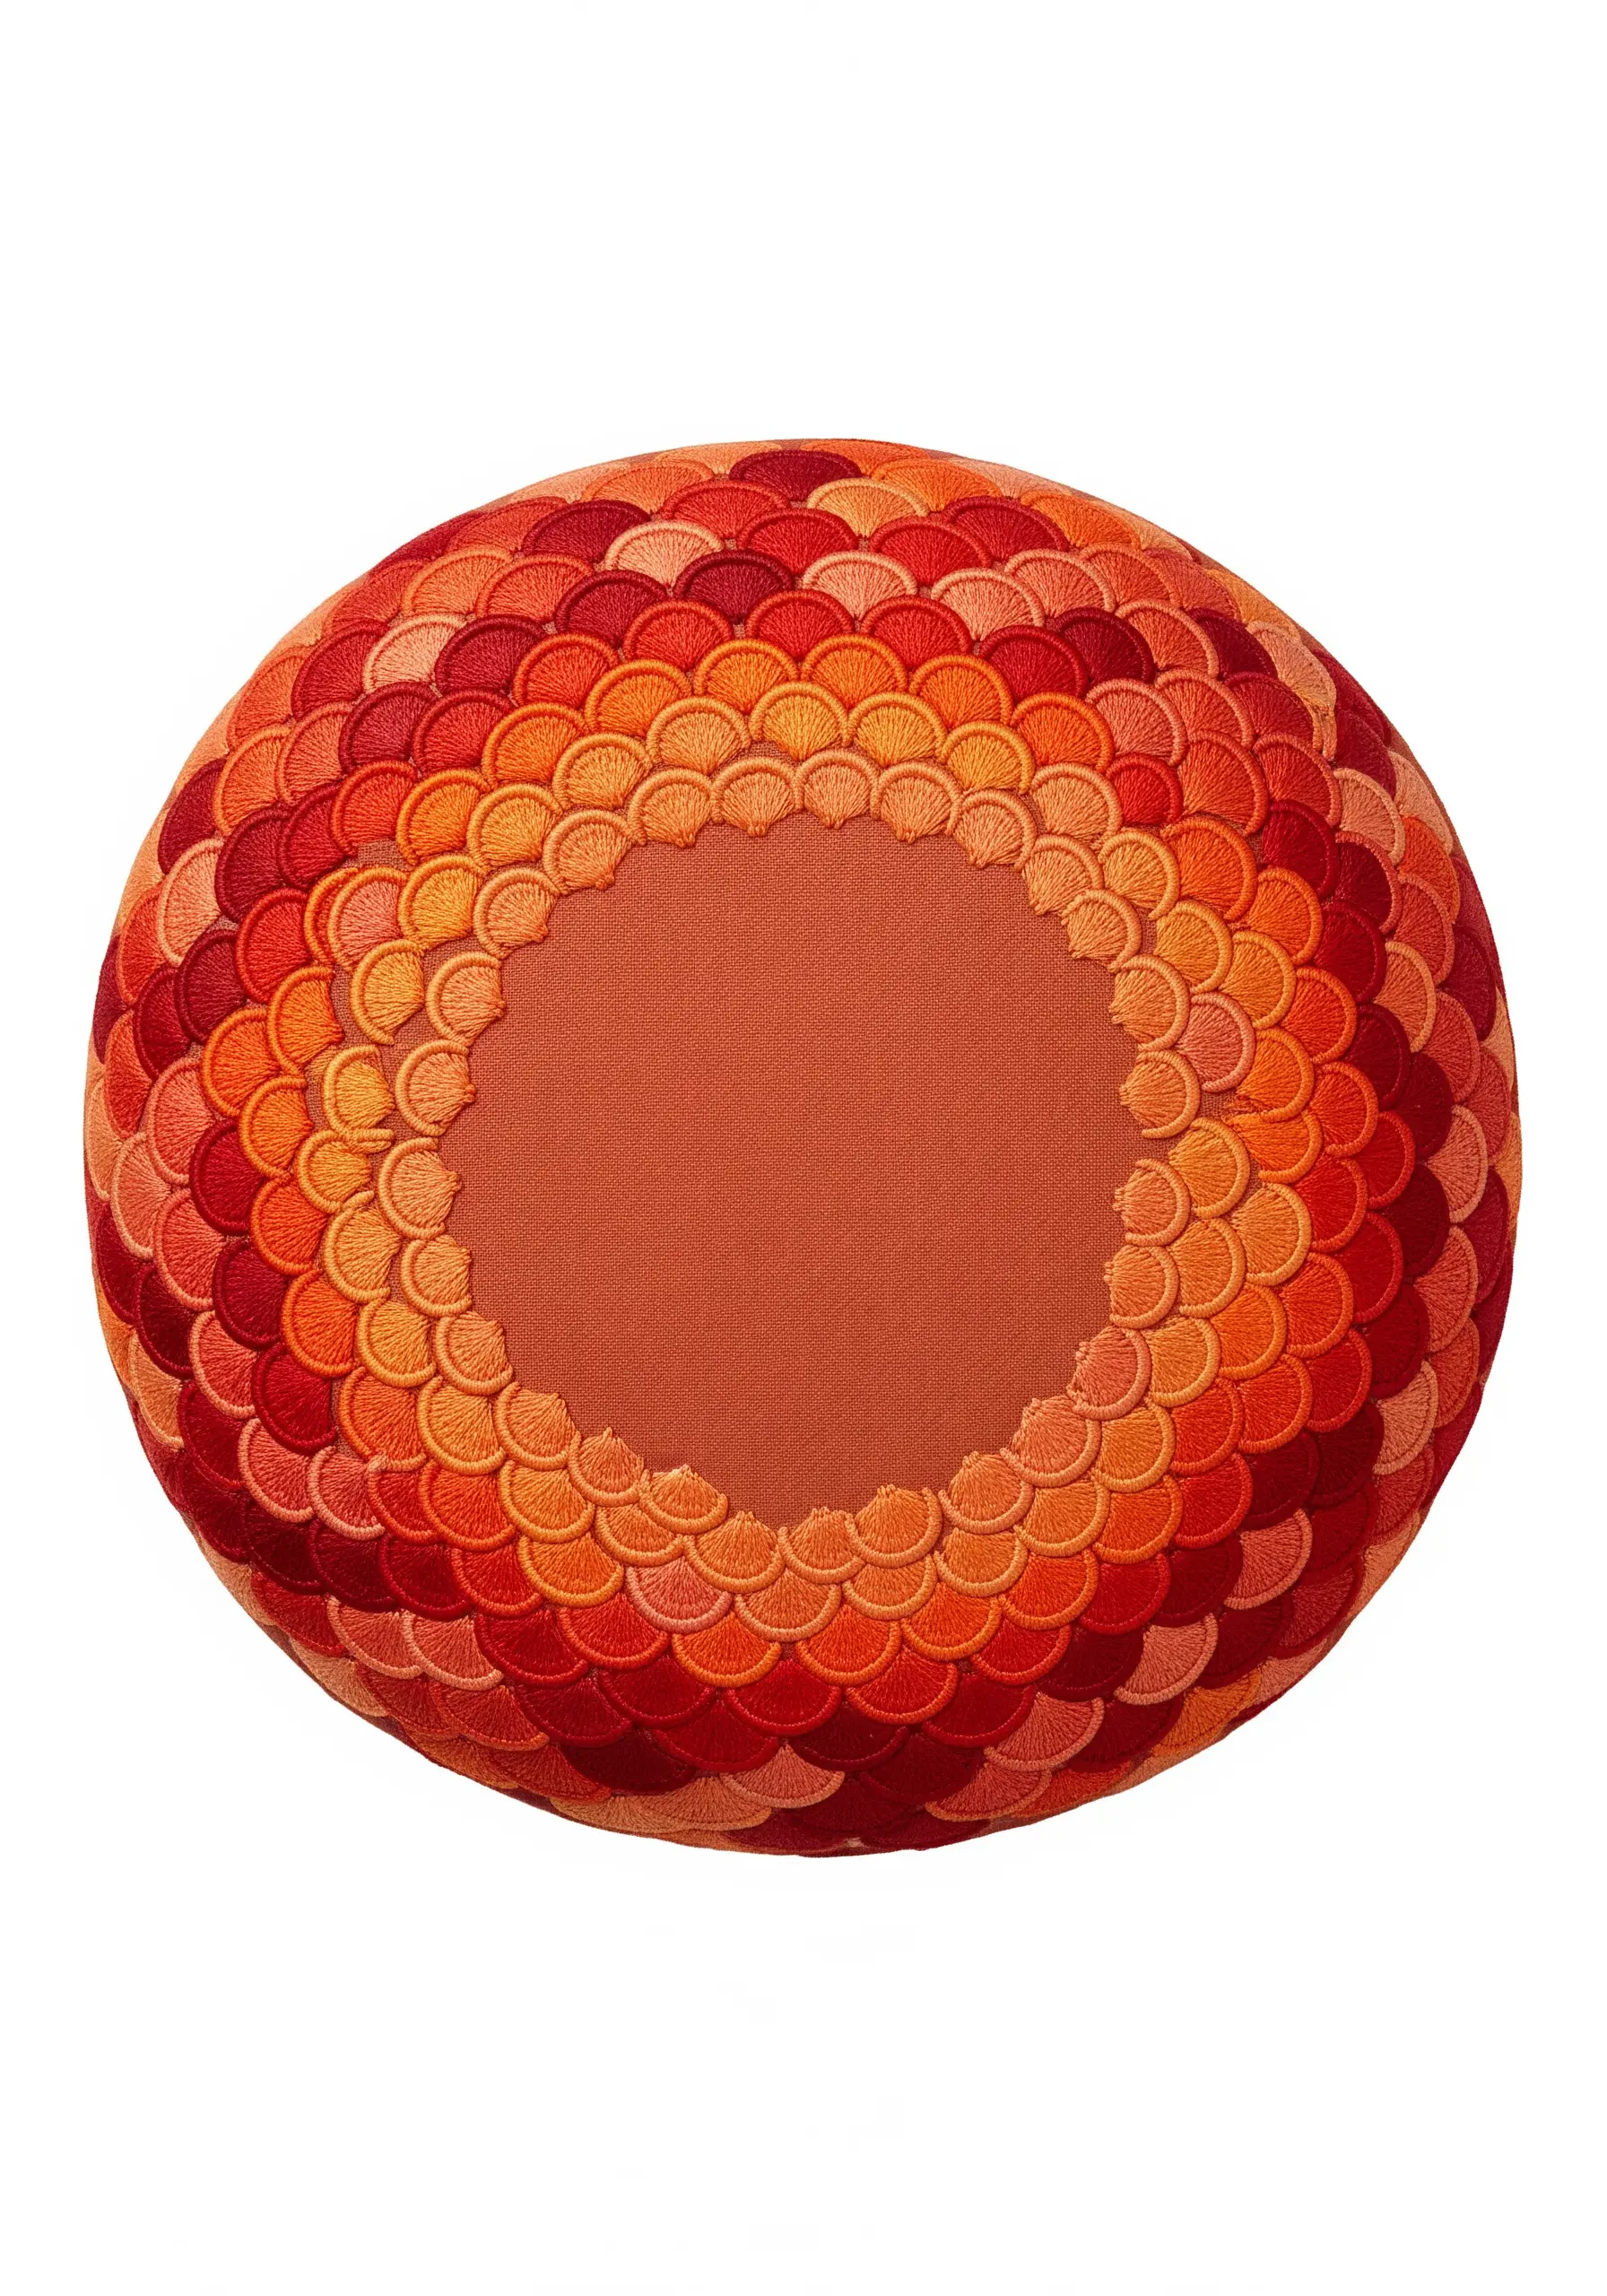
Create a mesmerizing, dimensional pattern by stitching concentric rings of overlapping scallops or scales.
Work each scallop as a small, neat satin stitch arc. By layering the rows and using a gradient of colors from dark to light, you create a stunning ombré effect with a texture that begs to be touched.
To keep the edges of each scallop crisp, outline them first with a tiny split stitch before filling them in with satin stitch.
This design is perfect for a round cushion, where the circular pattern echoes the shape of the pillow itself.
35. Create a Stitch Sampler Patchwork
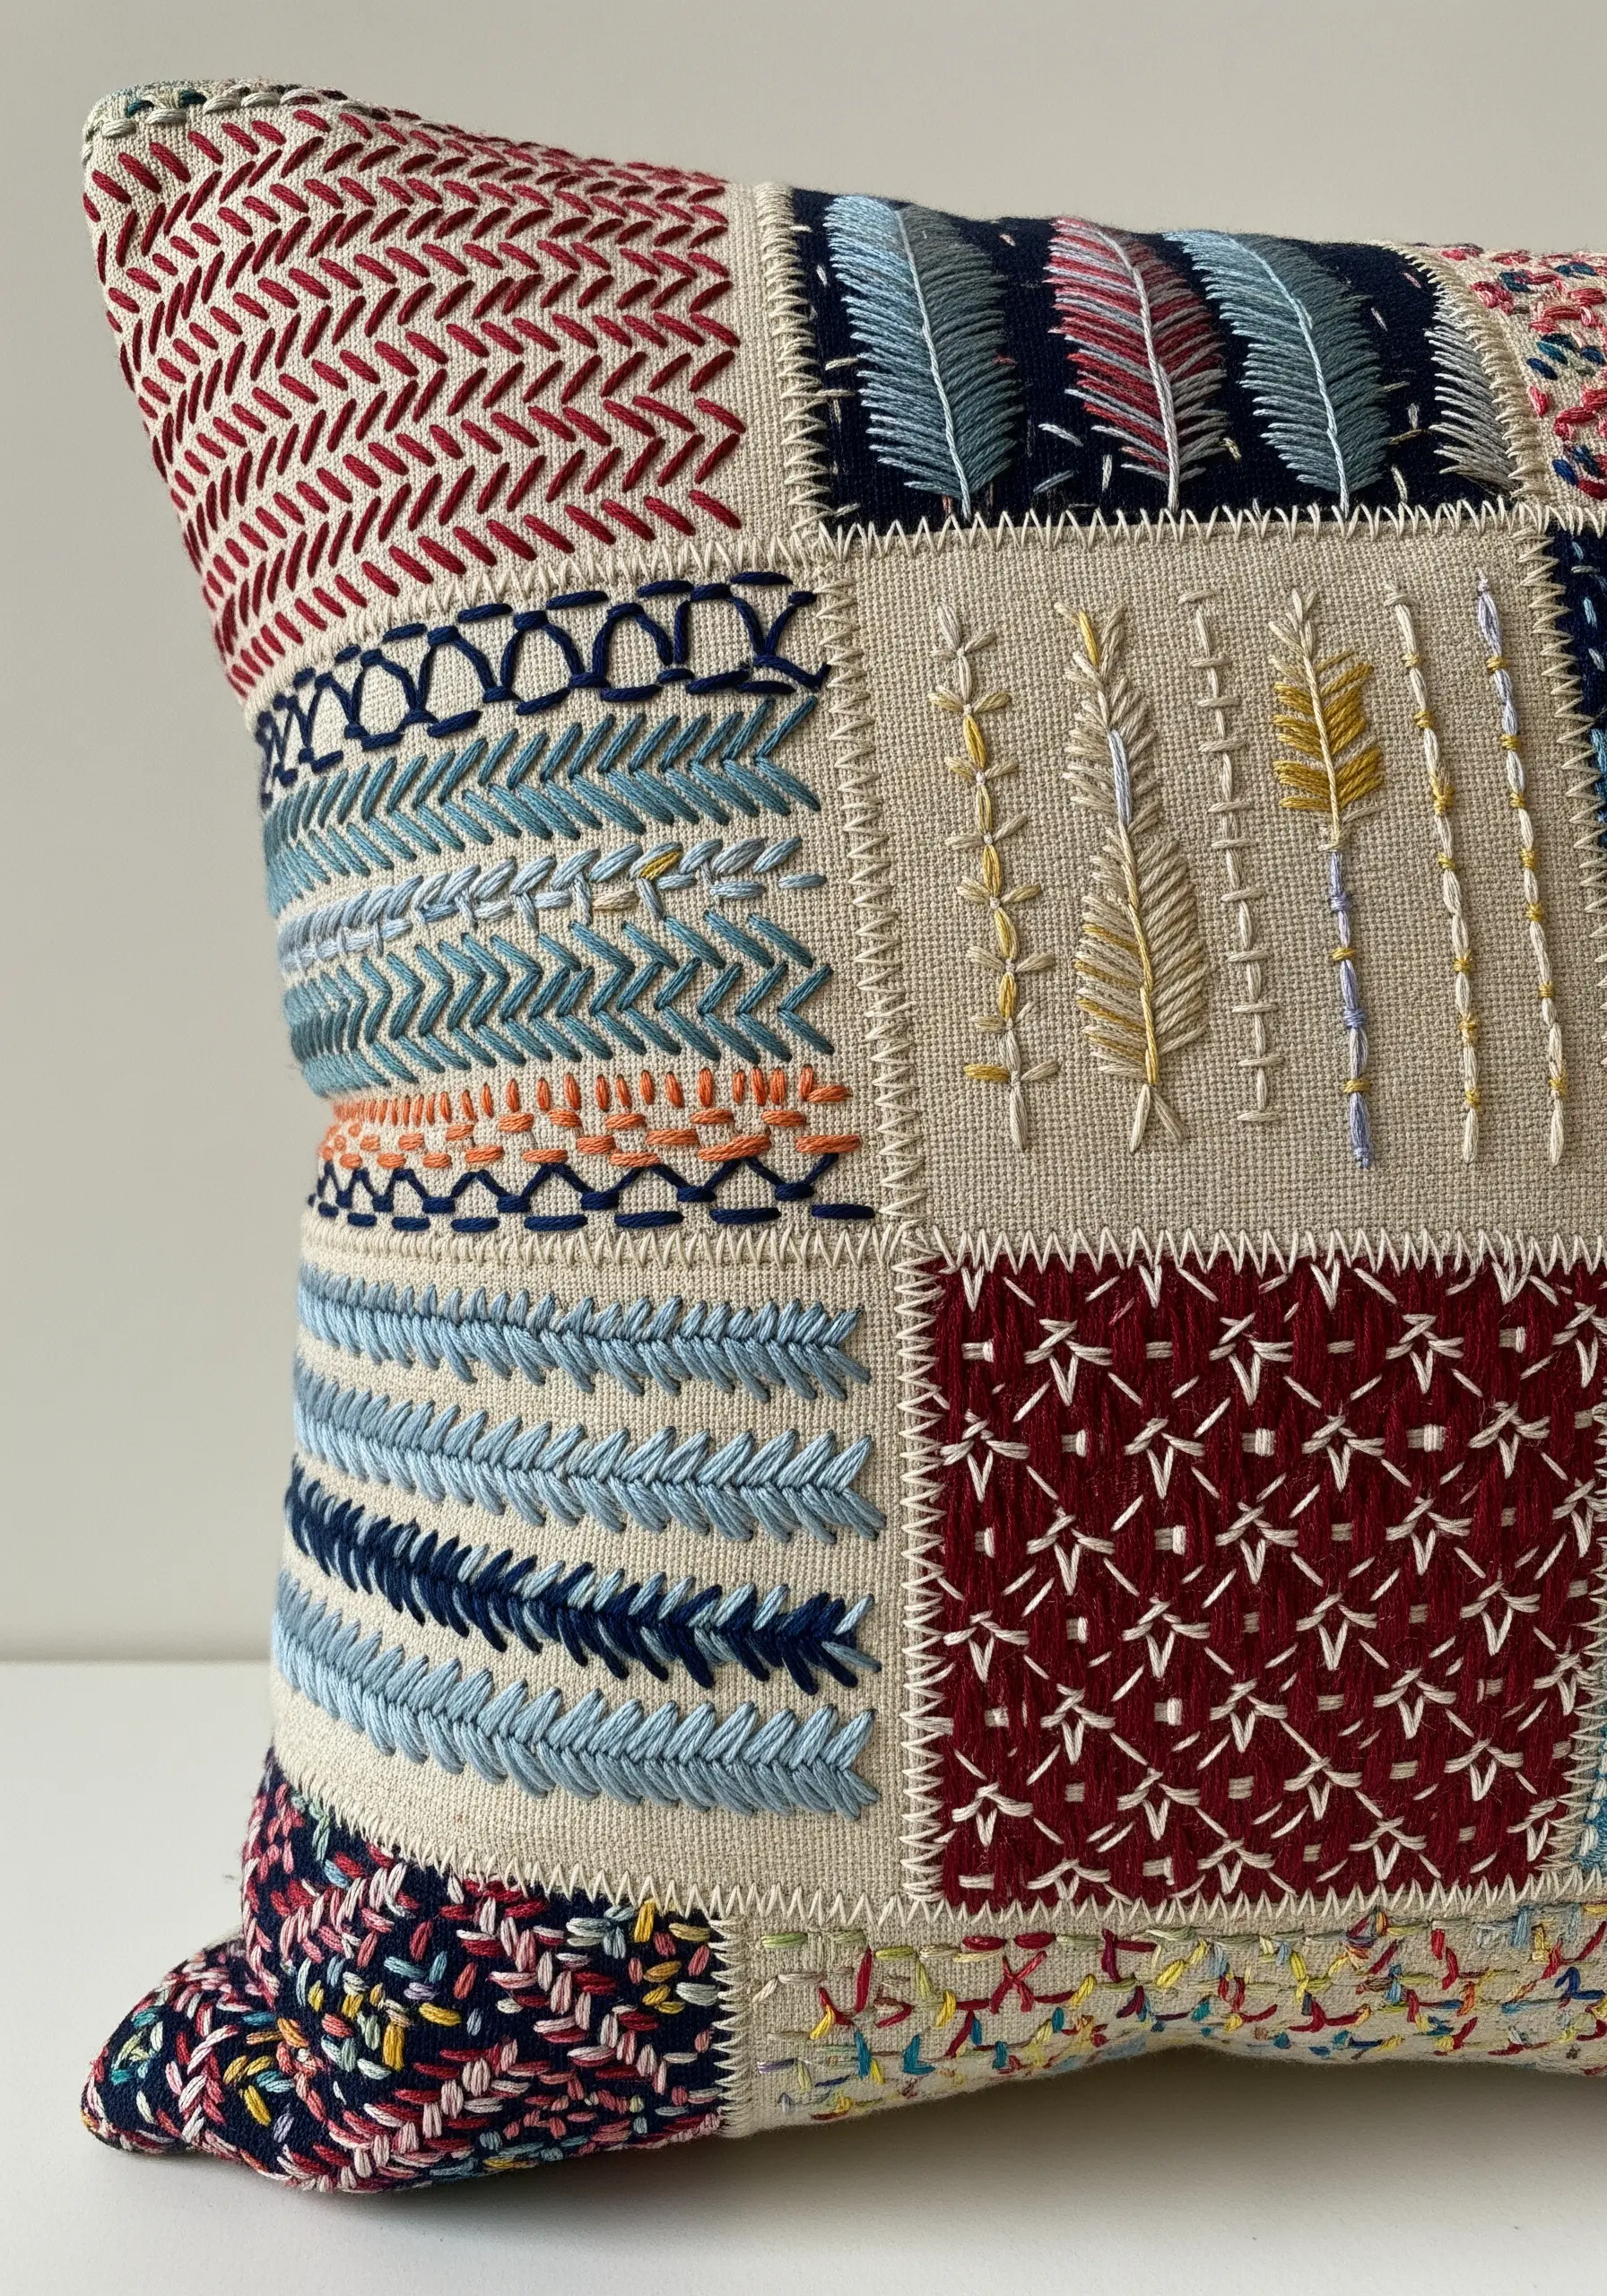
Turn your cushion into a textile diary by creating a patchwork of different stitch samples.
Divide your cushion into a grid and fill each square with a different decorative stitch: herringbone, feather stitch, fly stitch, chain stitch, and more.
Varying the color, thread weight, and stitch density in each patch adds to the rich, eclectic look.
Outline each patch with a simple backstitch in a contrasting color to define the squares and give the finished piece a clean, quilted appearance.
36. Outline a Minimalist Mountain Range
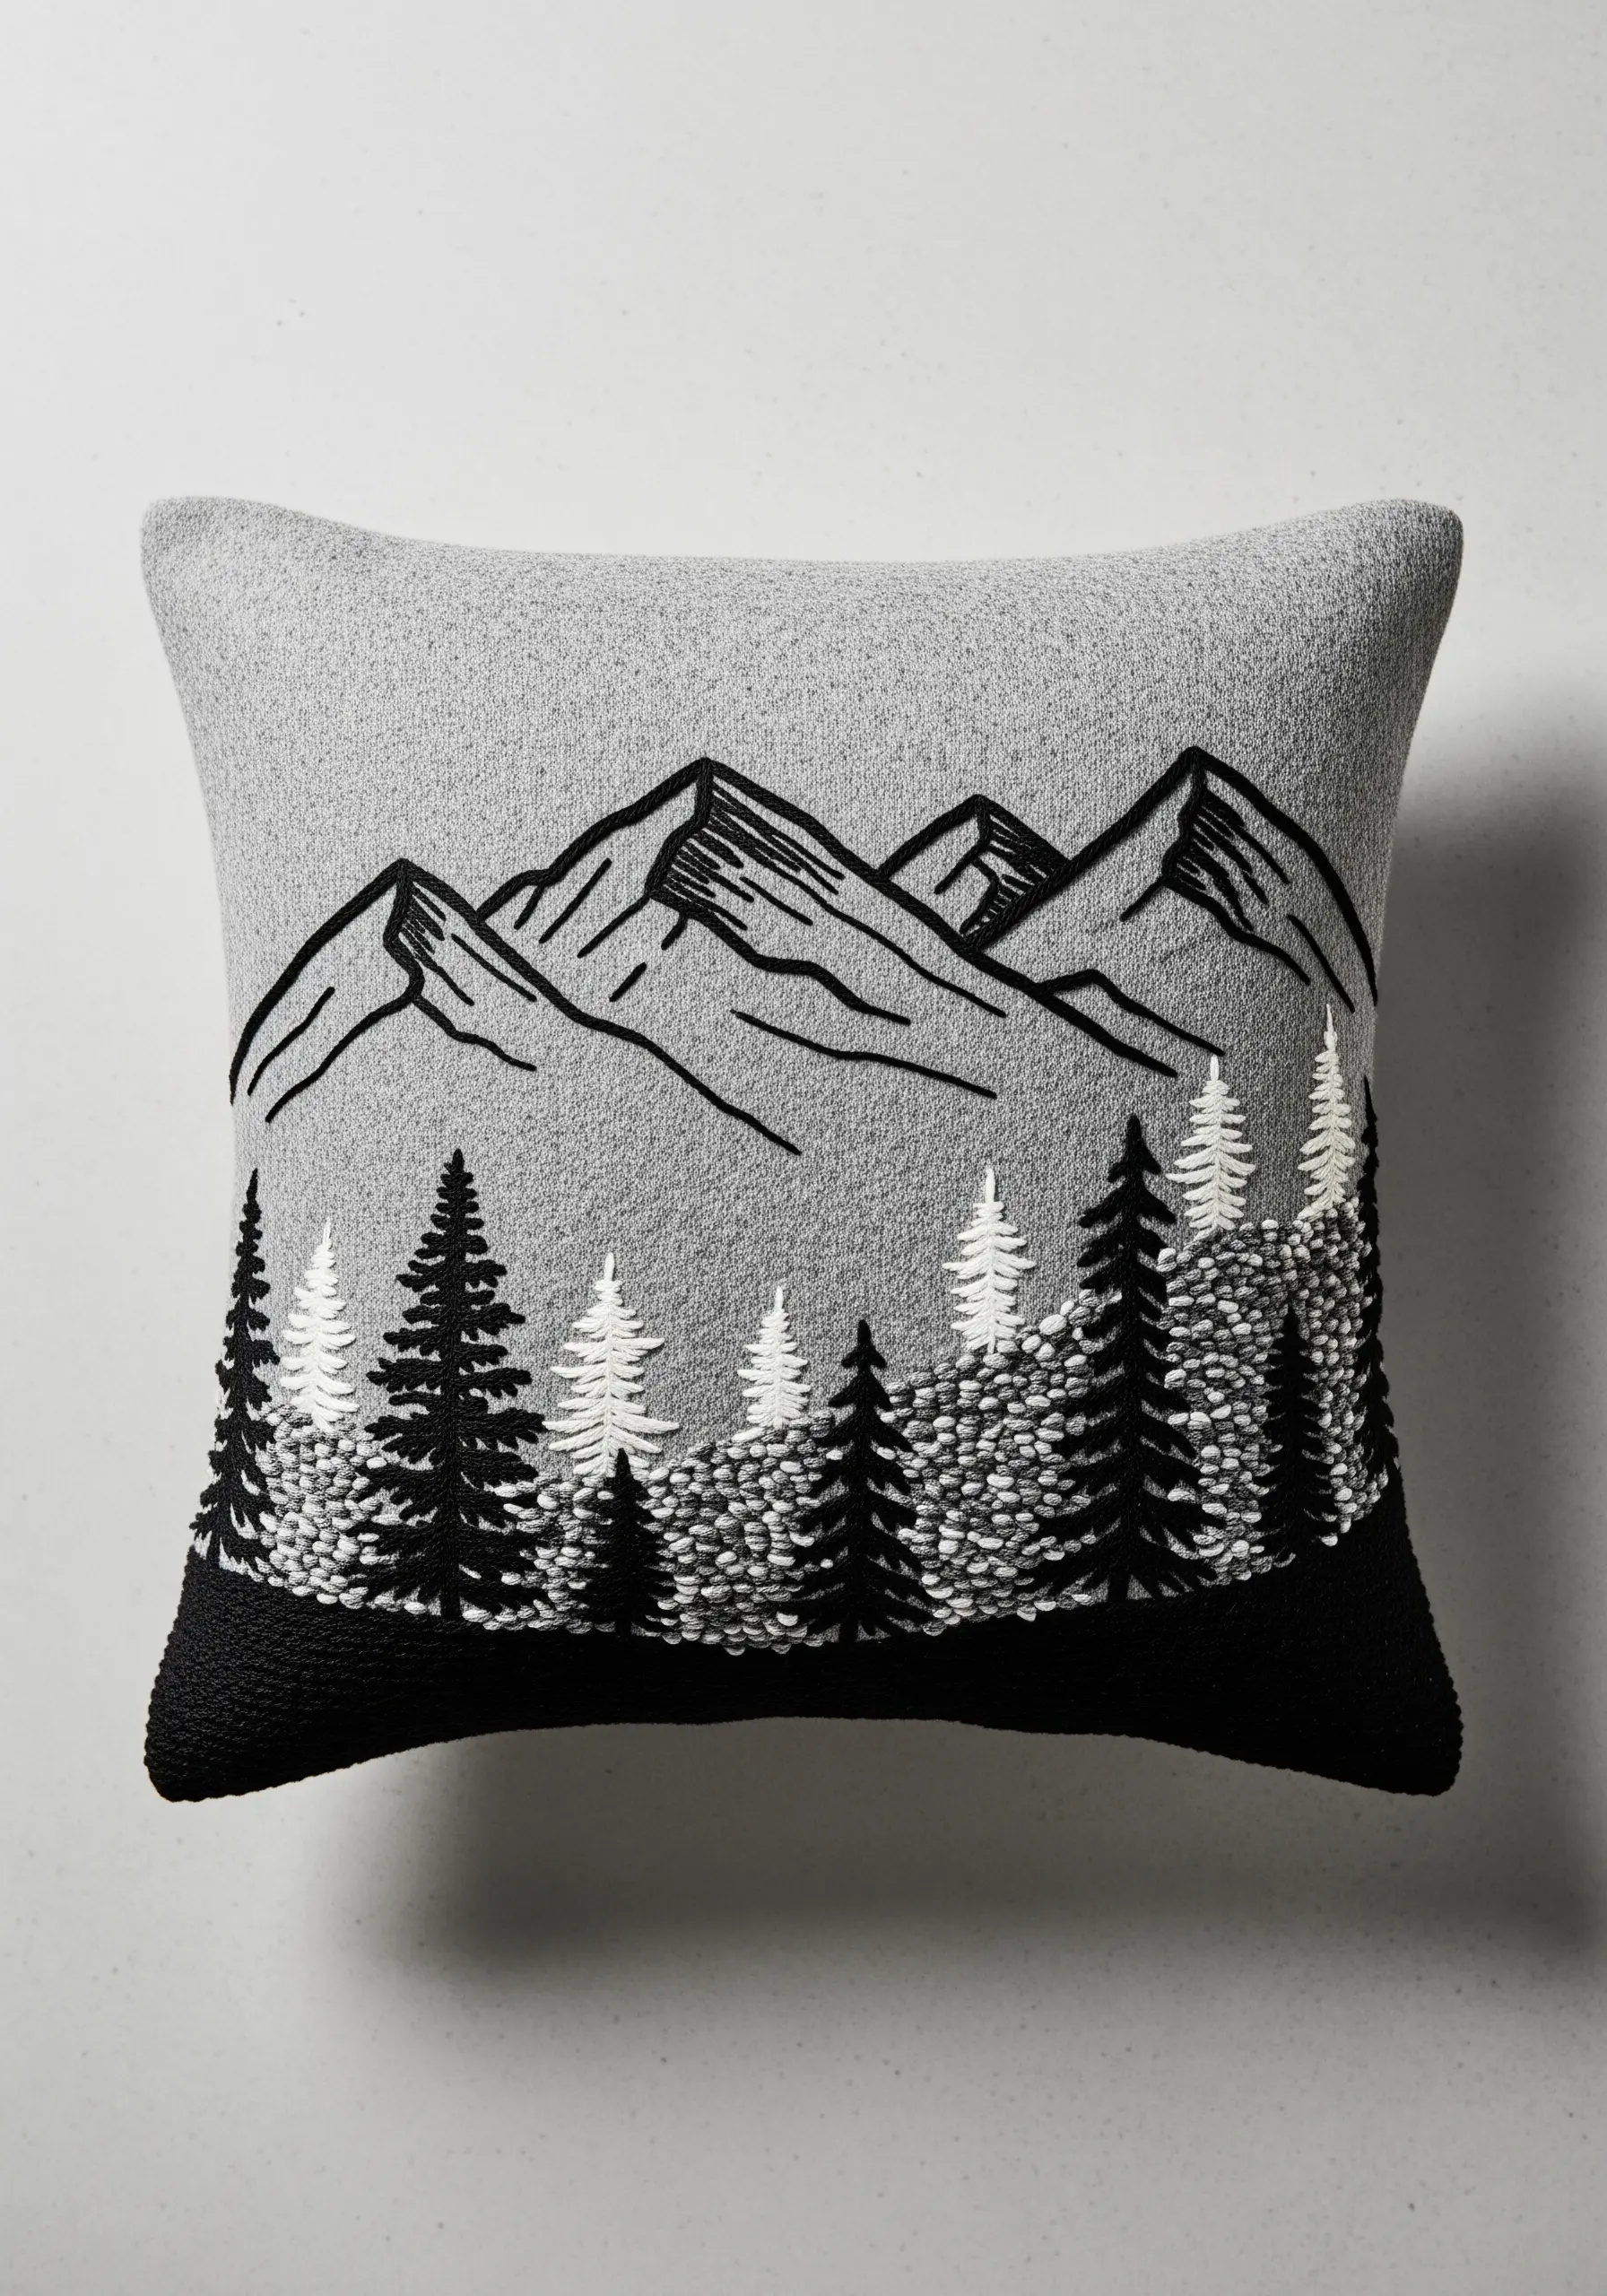
For a modern, graphic landscape, use simple stitches and high-contrast texture to define your border.
Outline the mountain peaks with a bold, clean whipped backstitch or stem stitch in black thread. The power of this design is in its simplicity.
Fill the foreground with a dense forest of French knots, using black, white, and grey to create depth and the illusion of light and shadow.
The unstitched heathered grey fabric of the cushion becomes the sky, making the negative space an integral part of the monochromatic scene.


