

Embroidering for children is a chance to tell a story in thread—to create something that feels not just handmade, but alive with personality and joy.
But turning a simple cartoon into a polished, durable piece of wearable art requires more than just basic stitches. It’s about choosing the right texture for a furry monster, the perfect outline to make a character pop, or a clever placement that sparks a child’s imagination every time they wear it.
Here, you’ll find techniques that add that professional touch. We’ll move beyond the basics to explore how stitch direction, thread choice, and strategic placement can transform a simple garment into a cherished keepsake, ready for every adventure.
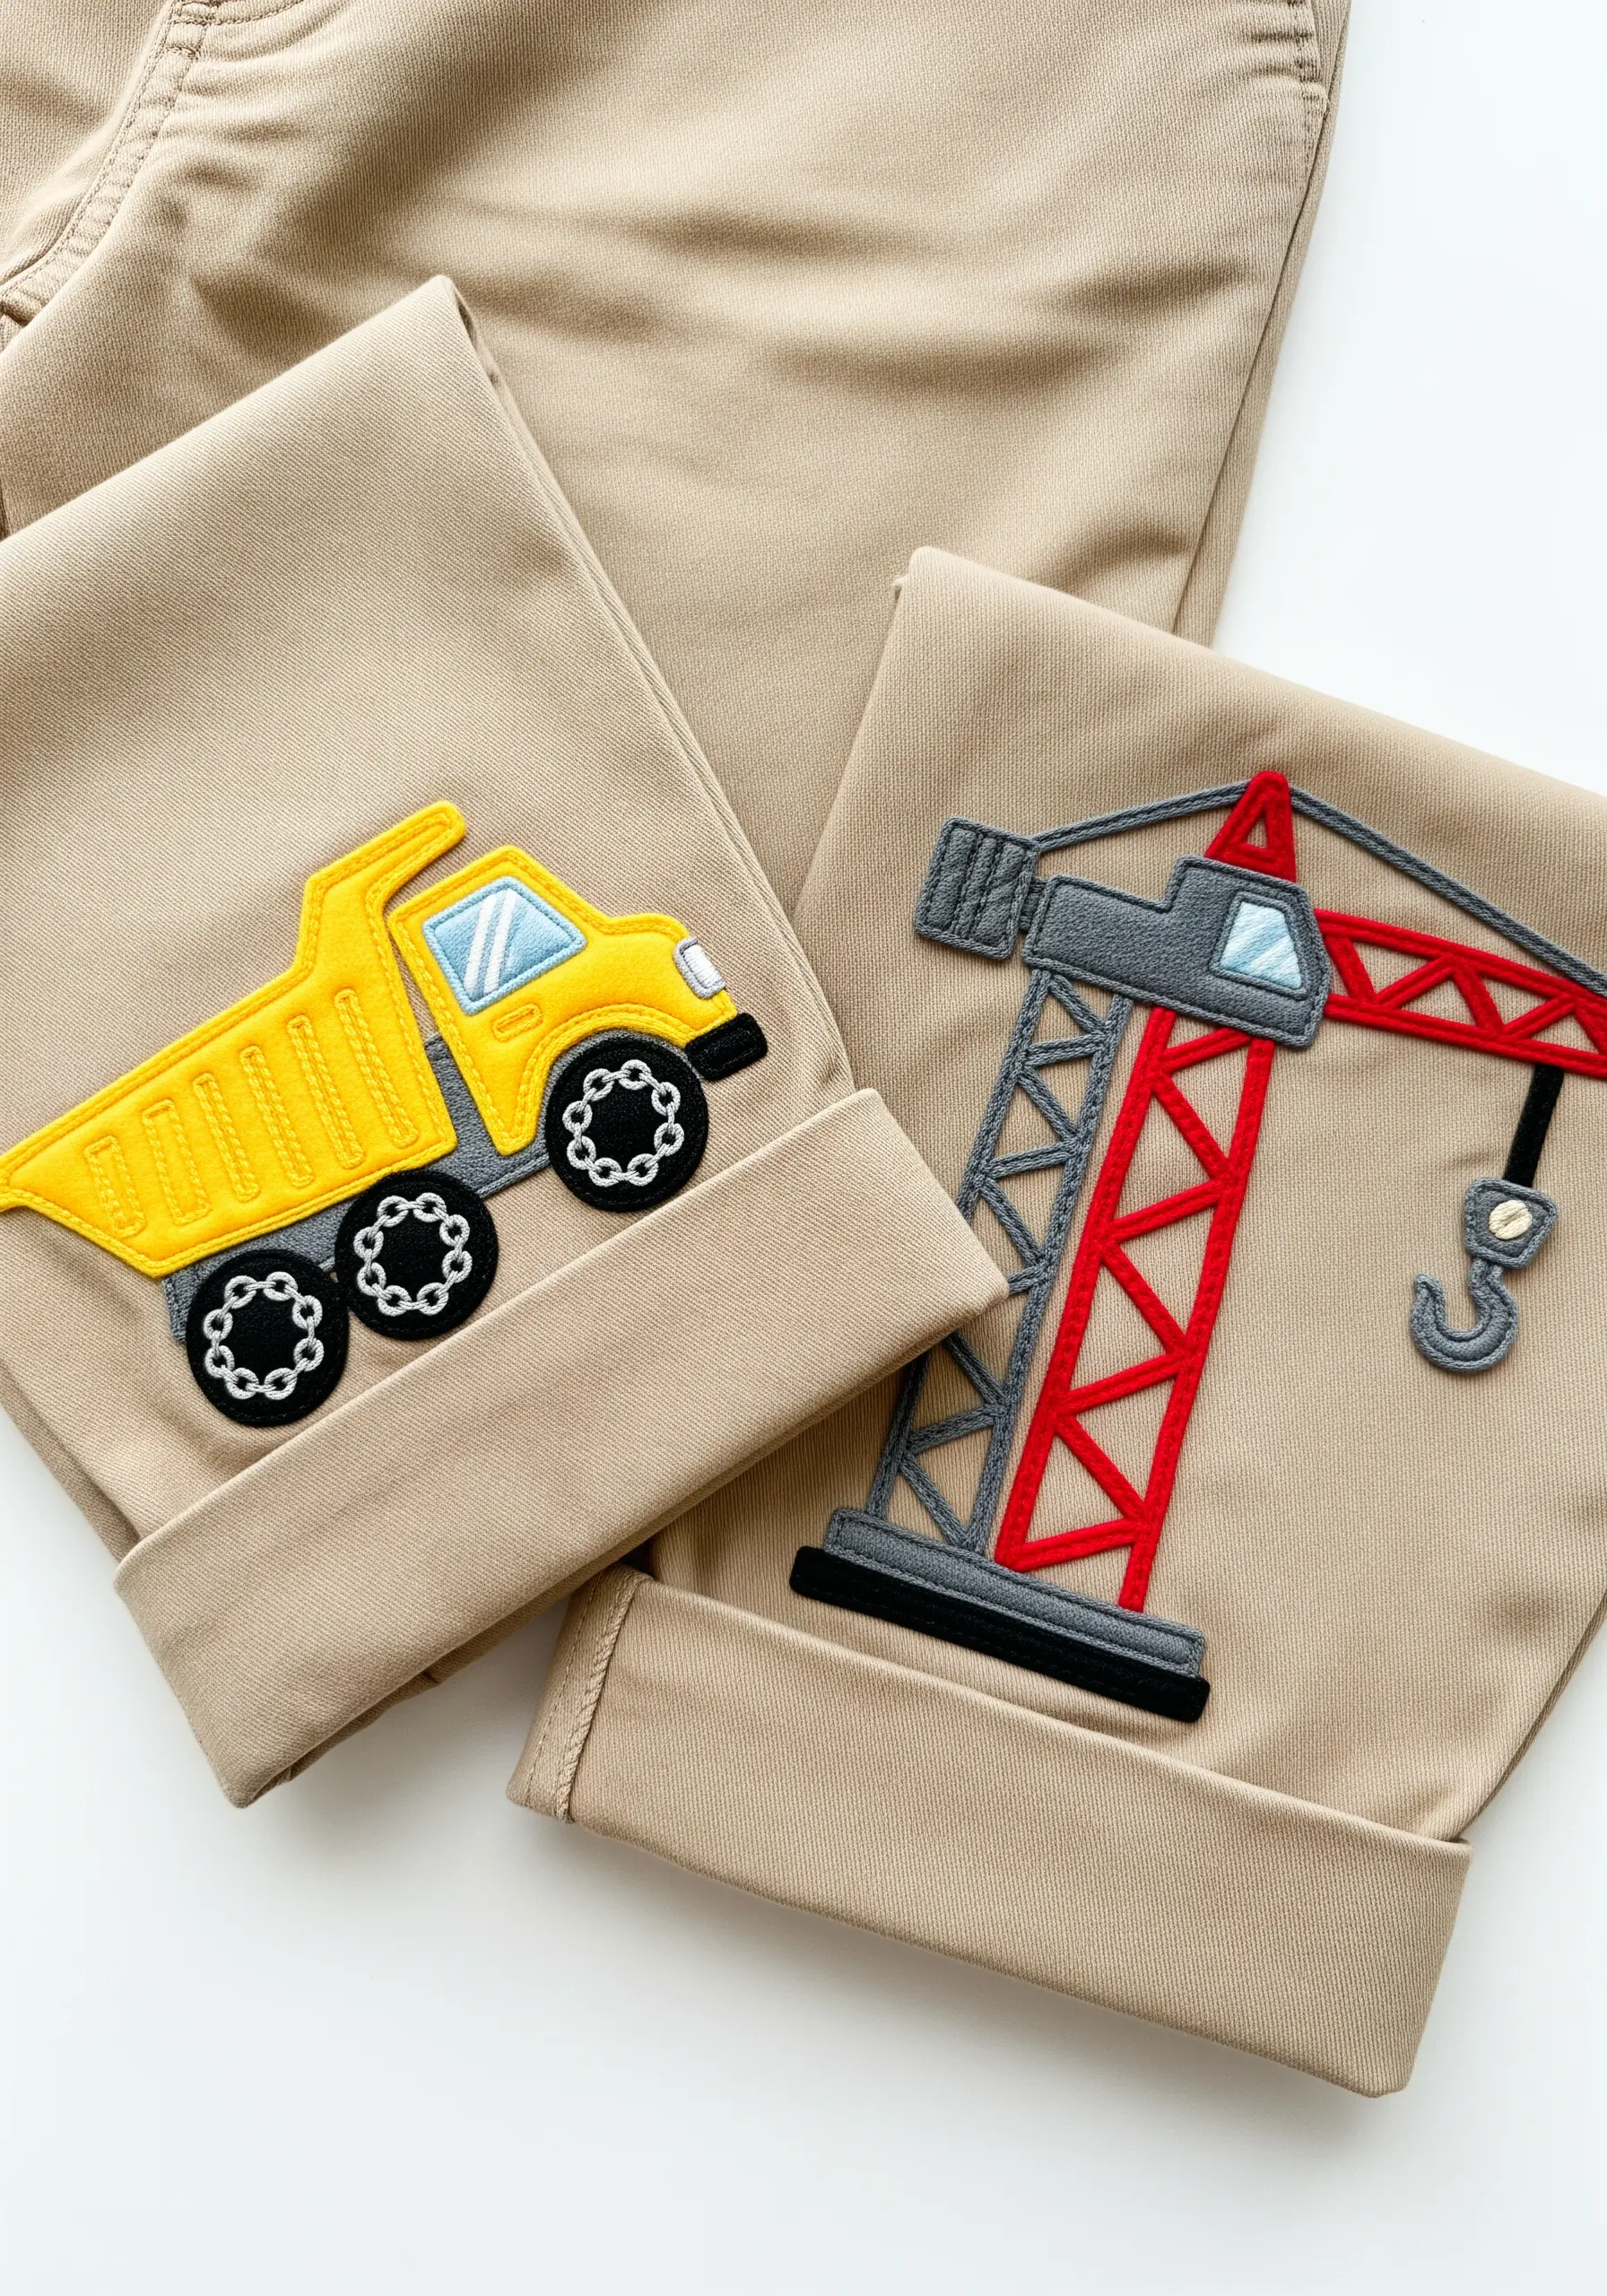
1. Build Dimension with Appliqué and Bold Edges
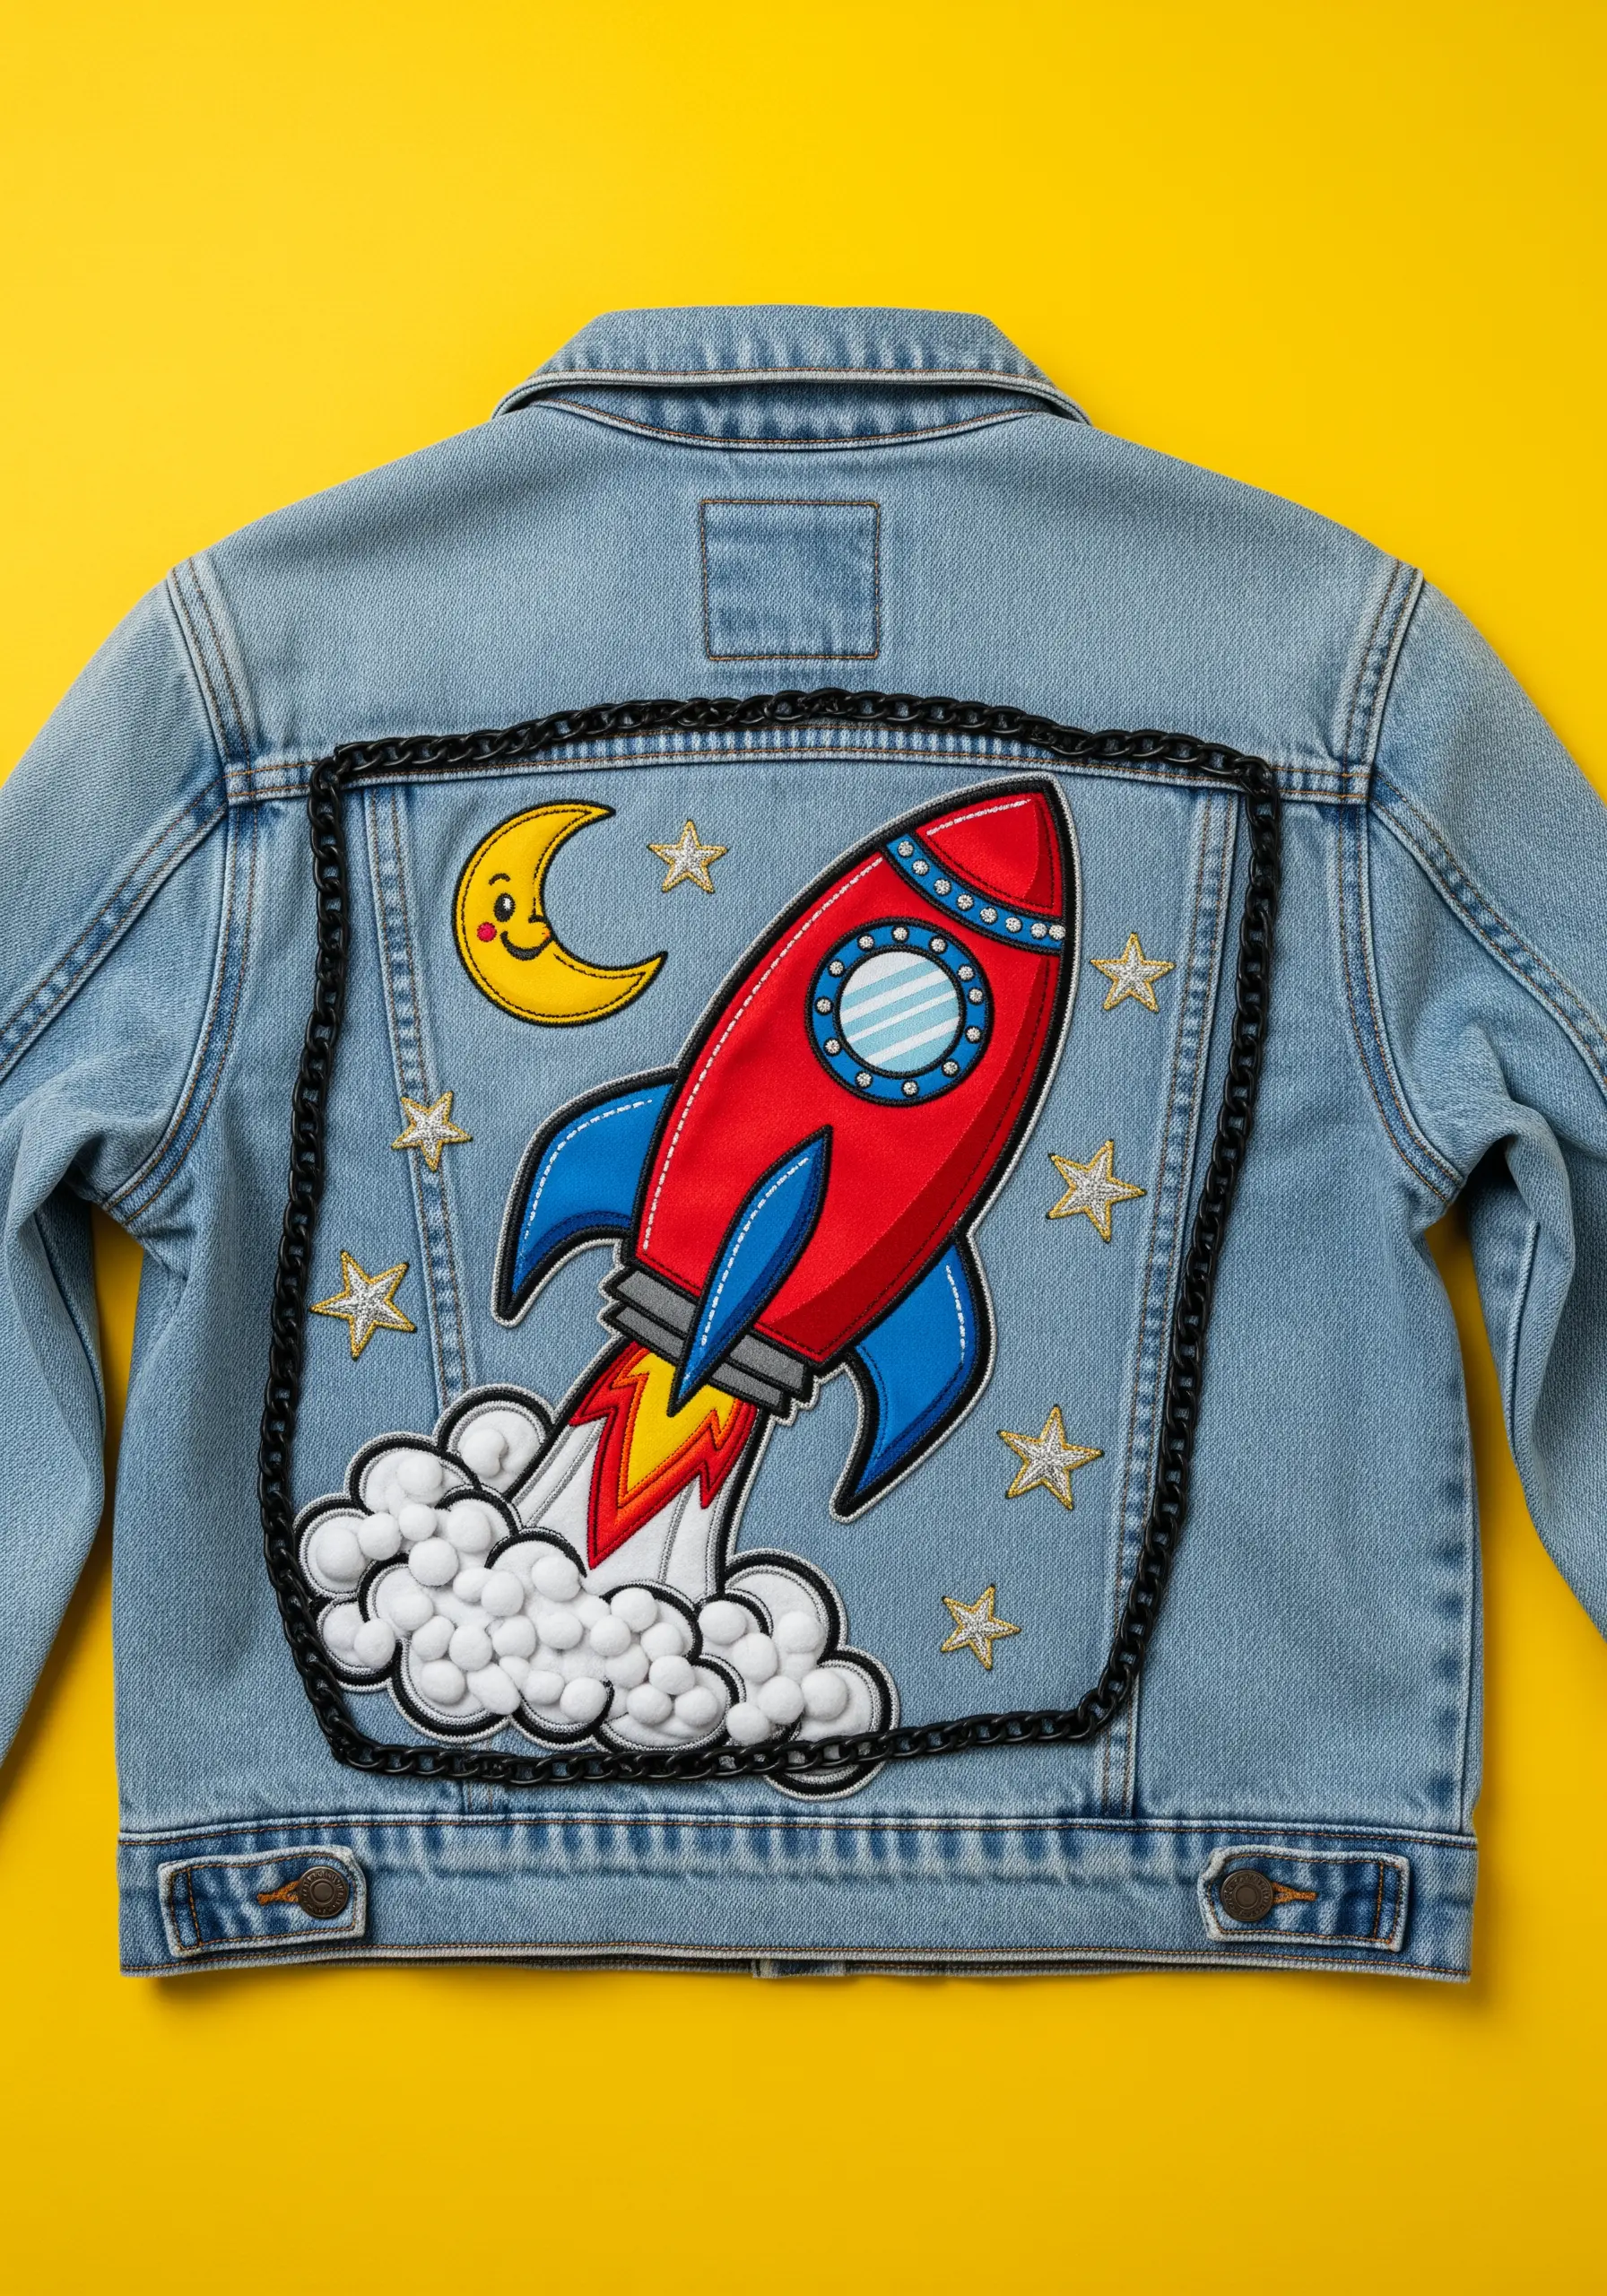
Combine fabric appliqué with embroidery to create large, graphic motifs that pop against durable fabrics like denim.
First, cut your shapes from felt or sturdy cotton and secure them with an iron-on adhesive.
Then, frame each piece with a dense, wide satin stitch border using a high-sheen polyester thread.
This technique not only adds a clean, cartoon-like outline but also permanently secures the appliqué, ensuring it withstands wear and washing.
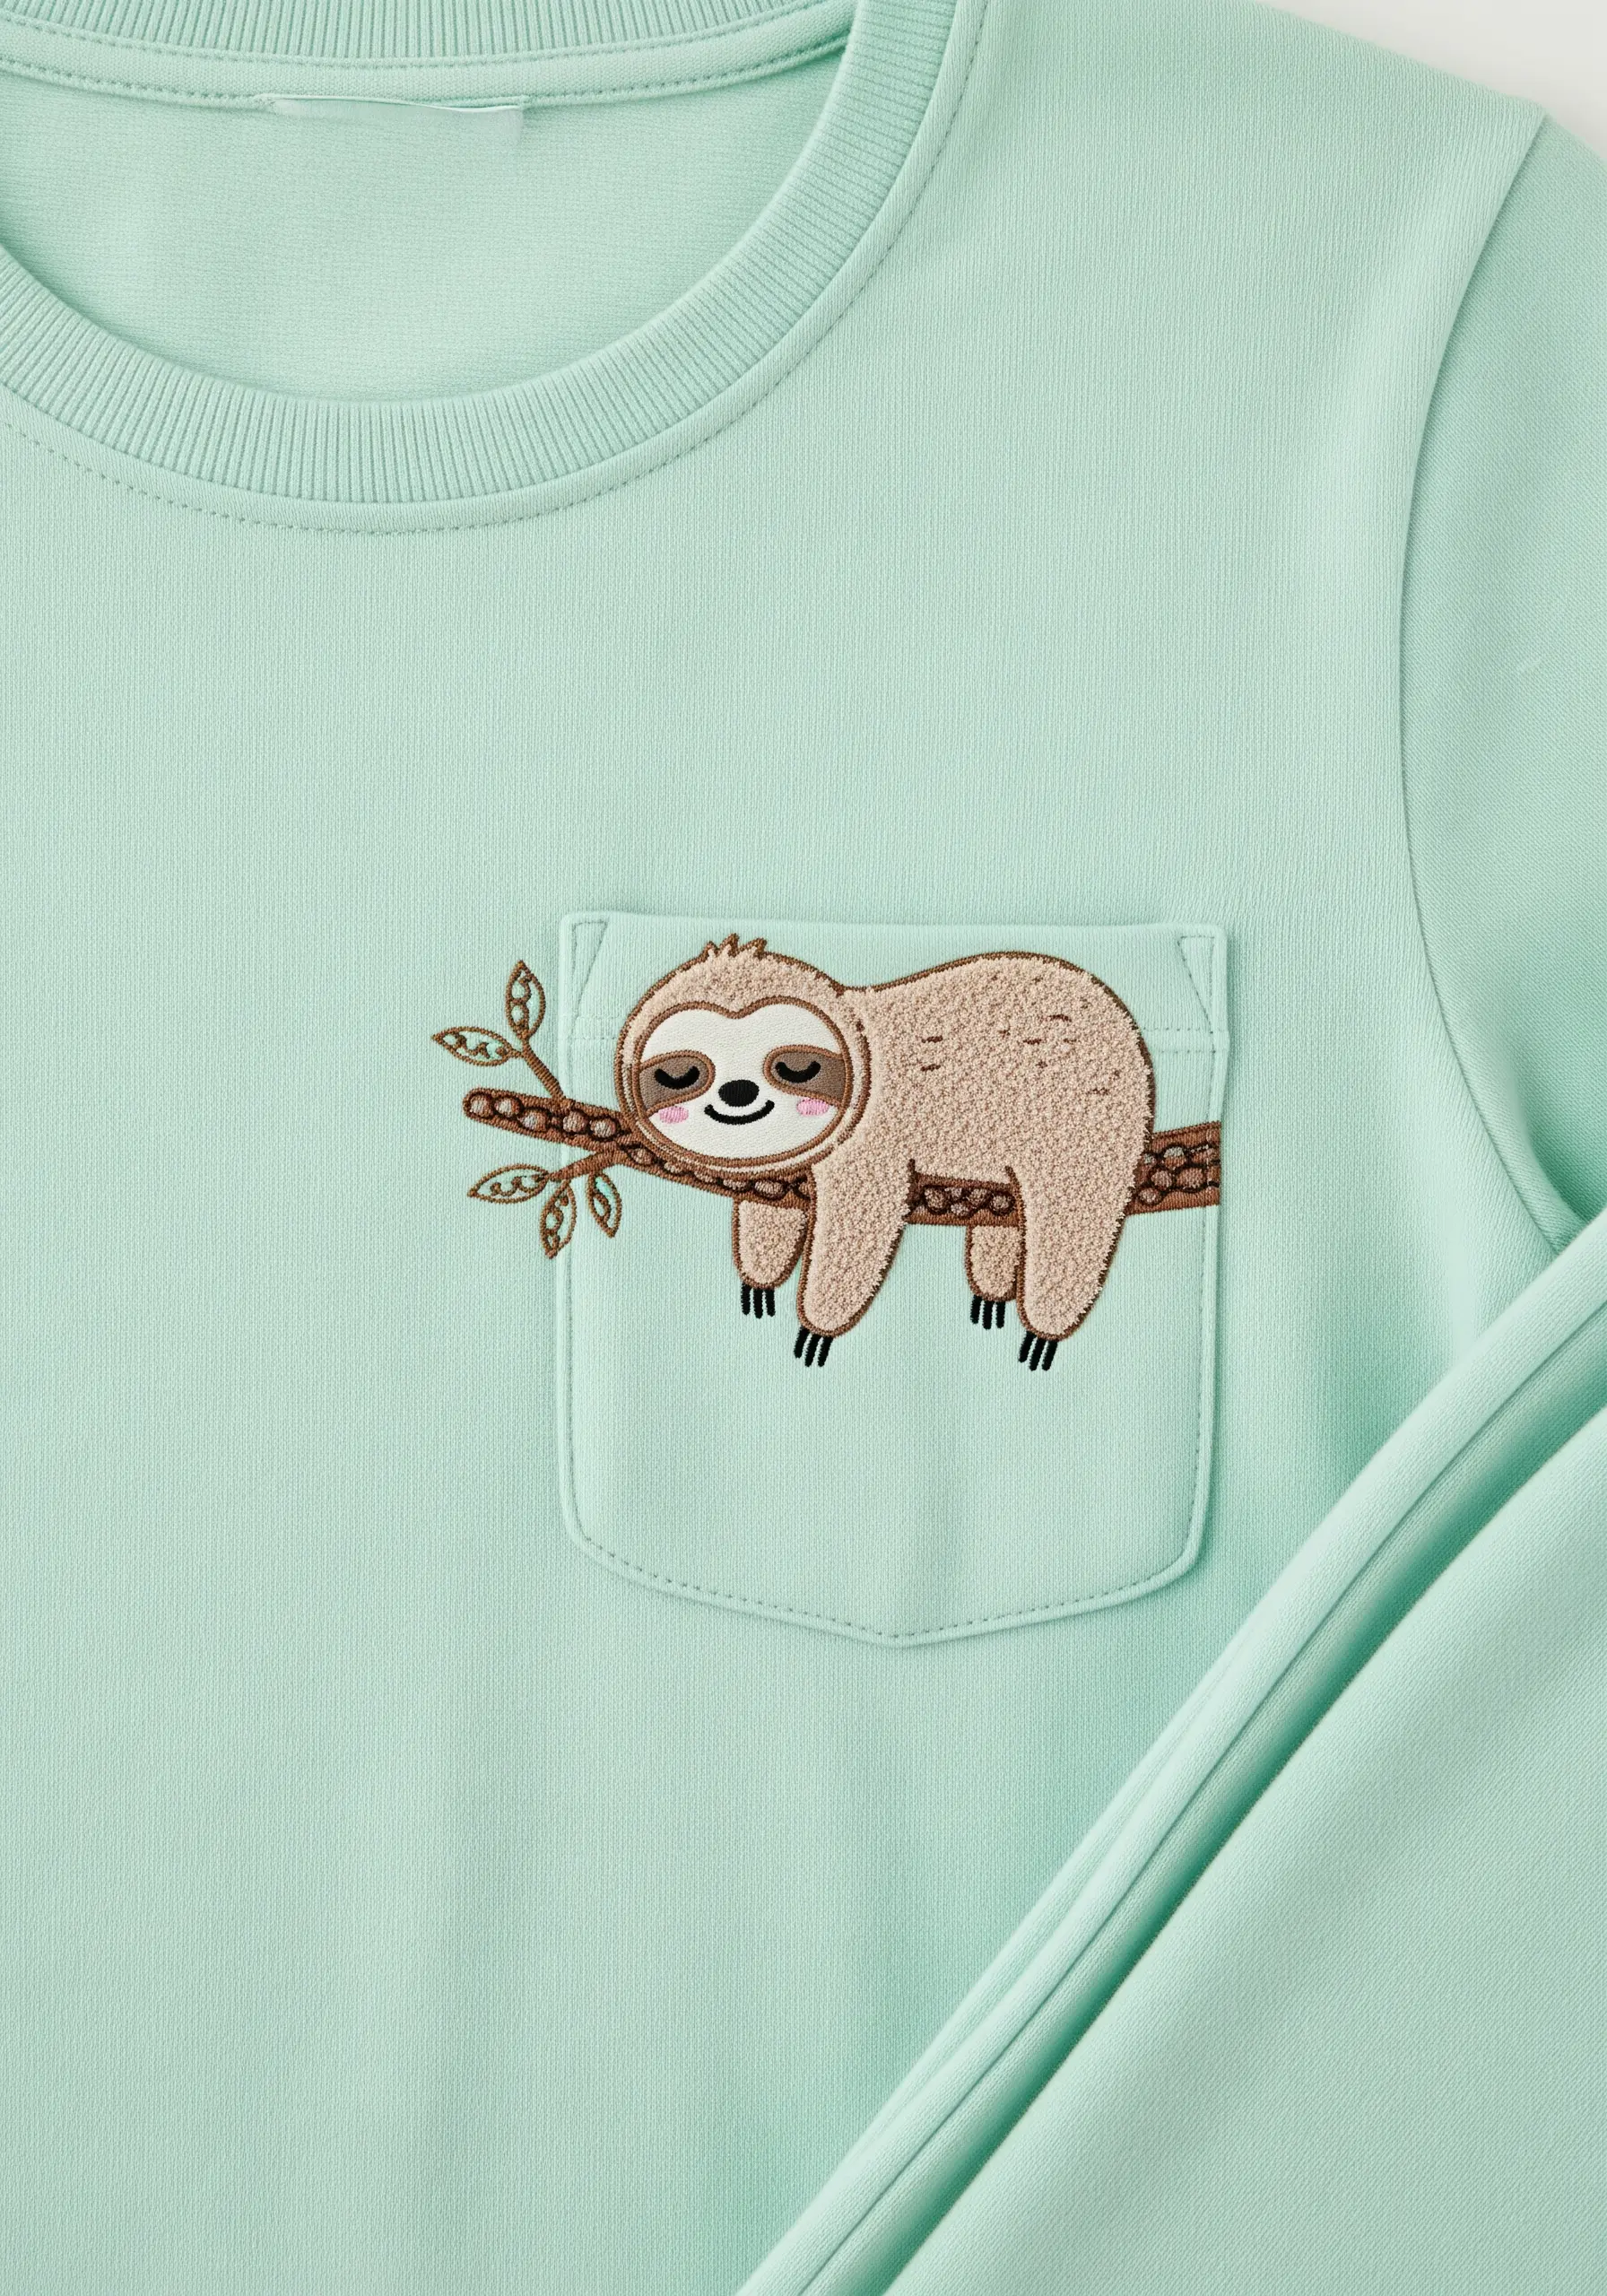
2. Create Playful Interactions with Pocket Motifs

Use a pocket to create a delightful ‘peekaboo’ effect that adds an element of surprise to a simple t-shirt.
Position your motif so it appears to be emerging from the pocket, which instantly gives the character personality.
For a crisp, patch-like finish, fill the design with a dense satin stitch, ensuring your stitches are uniform and lie flat against the fabric.
Use a cut-away stabilizer inside the shirt to support the stitches and prevent the knit fabric from stretching or puckering.
3. Introduce Tactile Texture with Loop Stitches
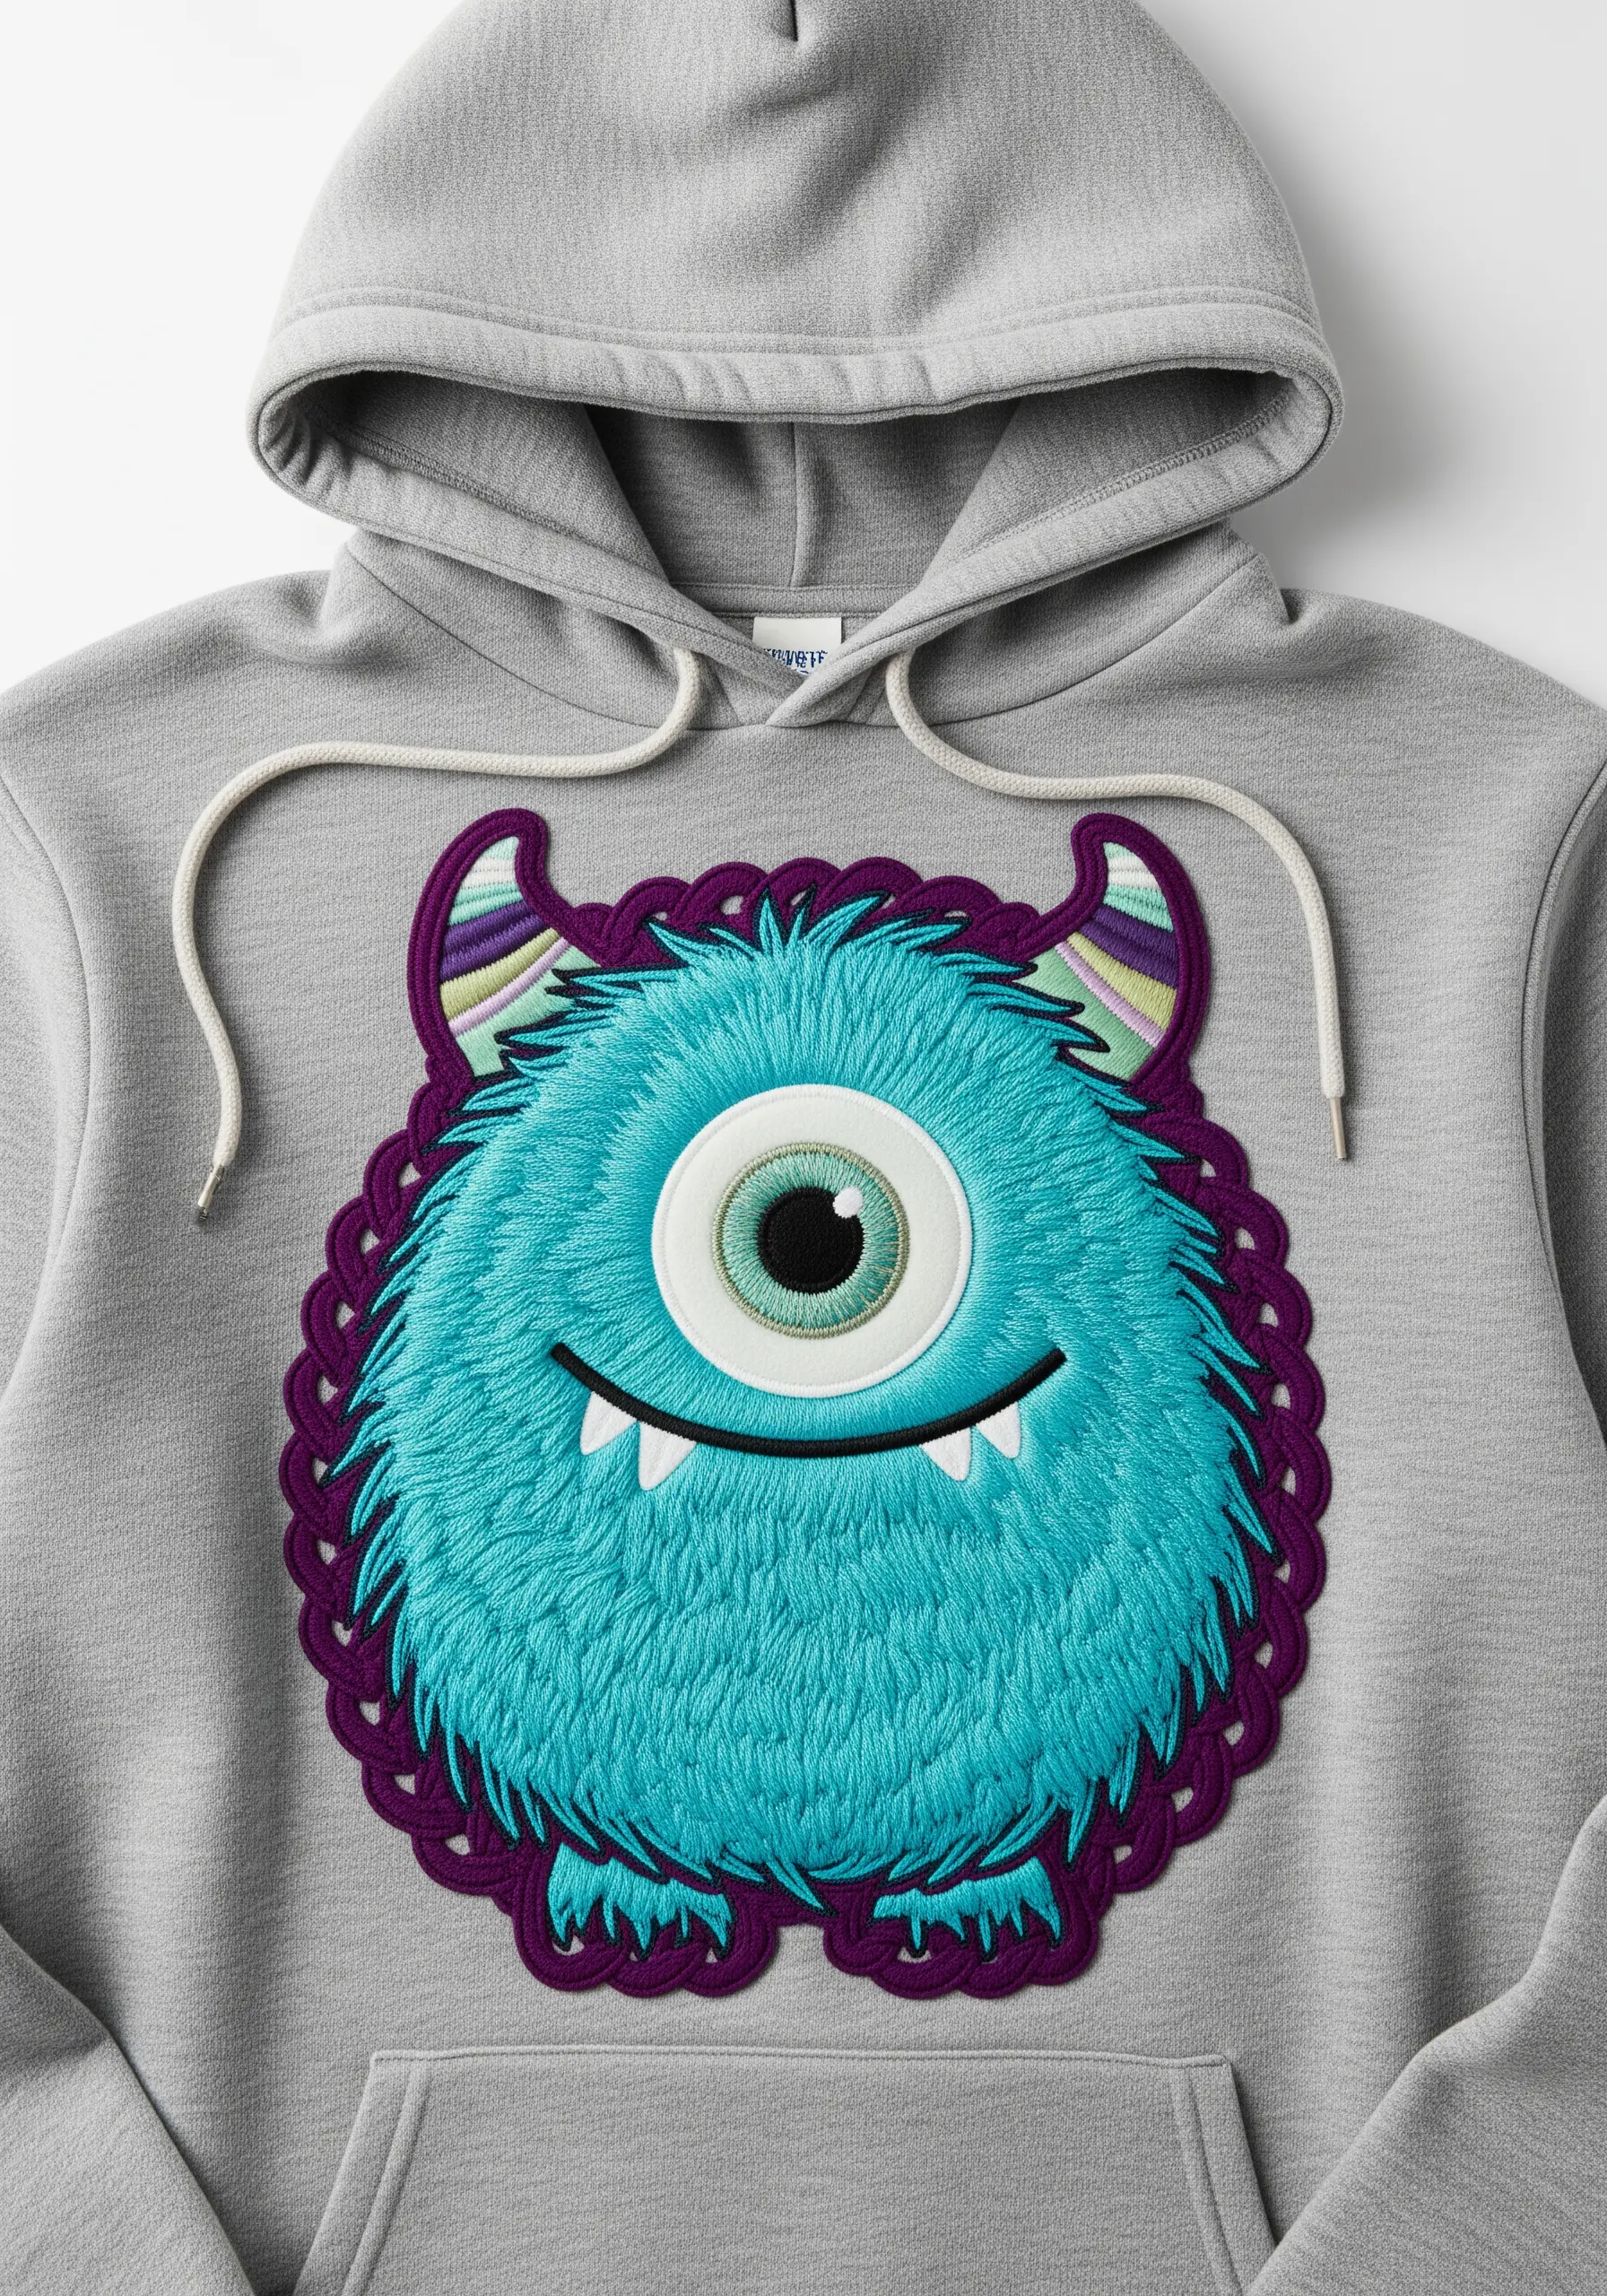
Give a friendly monster a genuinely furry feel by using the turkey stitch (also known as loop stitch) for its body.
Create dense loops across the entire area, then carefully snip them to create a plush, high-pile texture that invites touch.
Contrast this soft texture with flat, smooth satin stitching for the eyes, horns, and border.
This textural contrast makes the furry parts feel even more pronounced and adds significant sensory appeal for a child.
4. Design with Repetition for Rhythmic Patterns

Transform a plain garment by creating a scattered pattern with a few simple, repeating motifs.
To keep the design balanced and not chaotic, use a water-soluble transfer pen and a simple template to mark placement before you begin stitching.
Vary the orientation of the characters slightly to give the pattern a sense of movement and playfulness.
This approach works especially well on smaller garments like overalls, where a large, single design might feel overwhelming.
5. Stabilize Stitches on Stretchy Knits

When embroidering on ribbed knits like beanies, a stabilizer is non-negotiable to prevent your design from distorting.
Place a piece of cut-away stabilizer on the inside of the hat to provide a firm foundation for your stitches.
Loosen your tension slightly to allow the stitches to sit on top of the knit structure rather than sinking in and causing puckering.
Choose a simple fill, like satin stitch, and keep outlines bold to ensure the design remains clear and readable on the textured surface.
6. Master Large-Scale Designs on Heavy Canvas
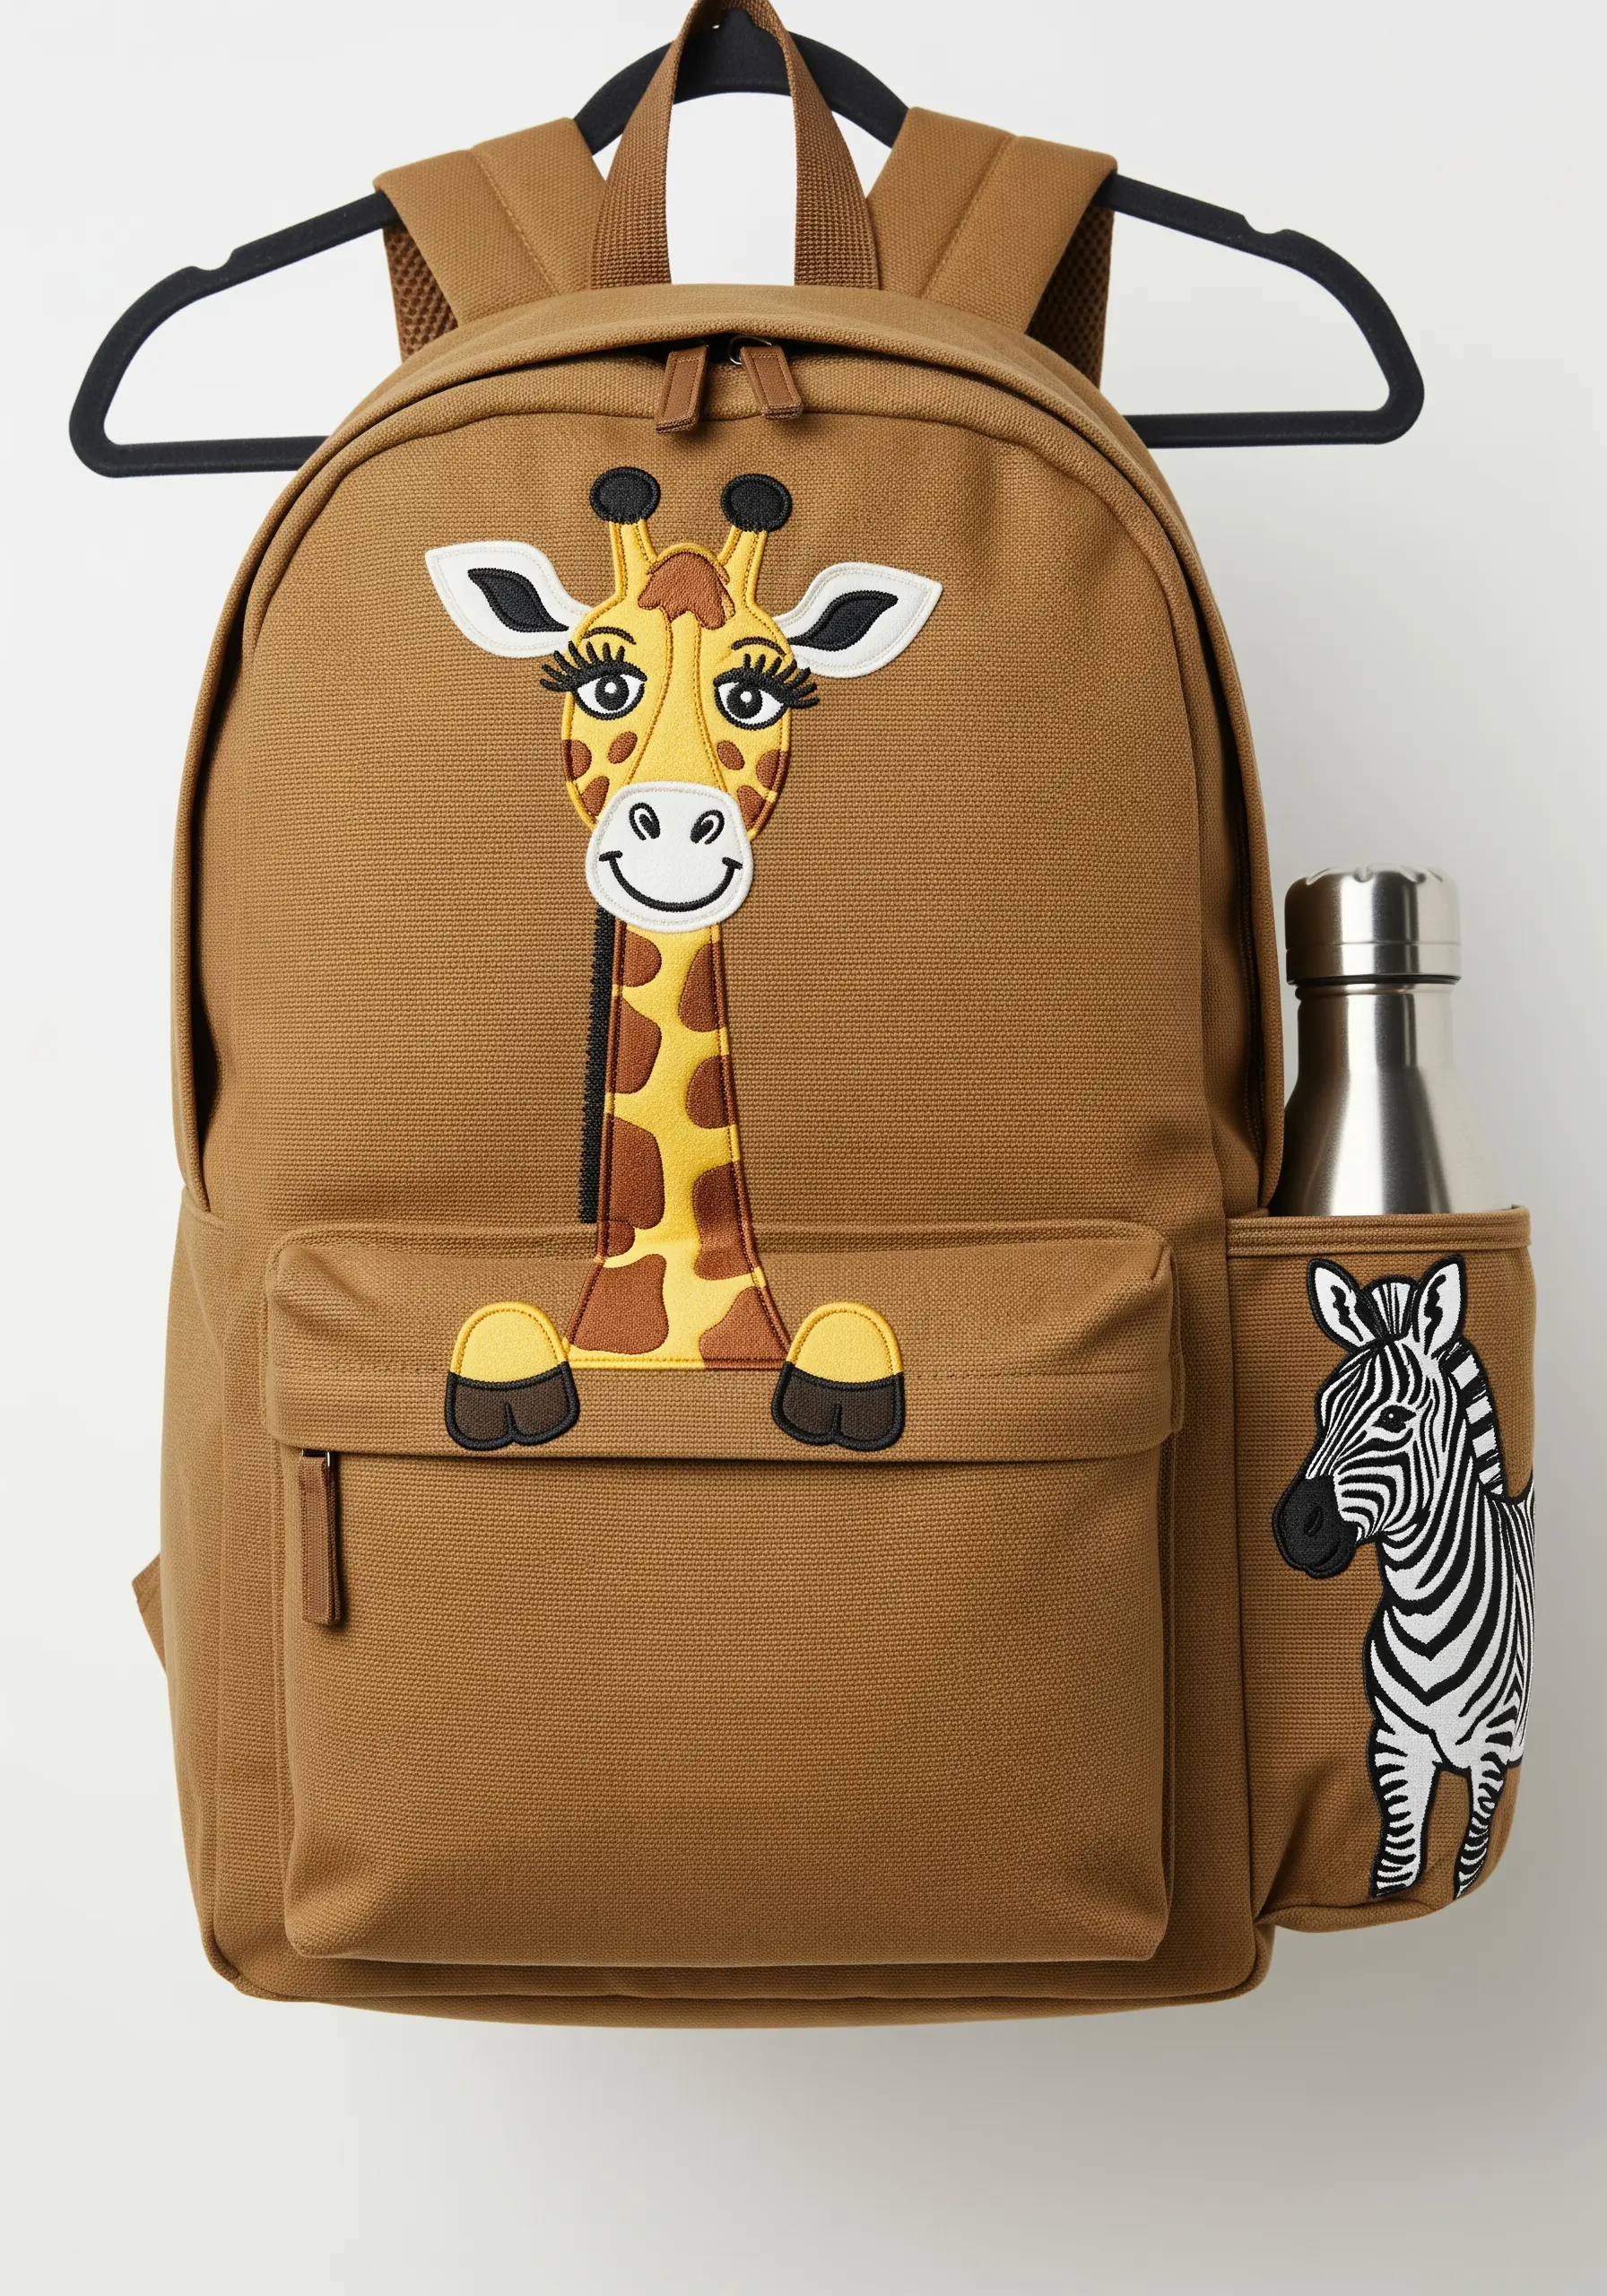
For large motifs on sturdy items like backpacks, use appliqué for the main color blocks to cover ground efficiently and keep the stitch count manageable.
Layer felt pieces for the giraffe’s head and spots, then use a dense satin stitch to define the edges and add details like the muzzle and ears.
This layered approach creates a 3D effect that feels both professional and playful, elevating simple line art travel adventure symbols into a feature piece.
Use a heavy-duty needle (size 90/14) to easily penetrate the thick canvas without skipping stitches.
7. Define Shapes with a Split-Stitch Outline
To achieve those crisp, clean edges essential for cartoon-style characters, always outline your shapes before filling them in.
Use a two-strand split stitch for your outlines; this creates a slightly raised, chain-like line that gives your subsequent fill stitches a perfect edge to tuck into.
When you fill the shape with satin stitch, bring your needle up just inside the outline and down just on the other side of it.
This technique completely covers the outline, leaving you with a perfectly smooth, contained shape and professional-looking color blocking.
8. Add Detail to High-Wear Areas
Placing embroidery on cuffs and hemlines adds a custom touch to a wardrobe staple, but it requires thinking about durability.
Choose robust threads, like polyester, which resist abrasion and color fading better than cotton floss.
Secure the back of your work with an iron-on interfacing, like Sulky Tender Touch, to protect the stitches from friction and prevent them from irritating sensitive skin.
This finishing step ensures your playful design lasts as long as the garment itself.
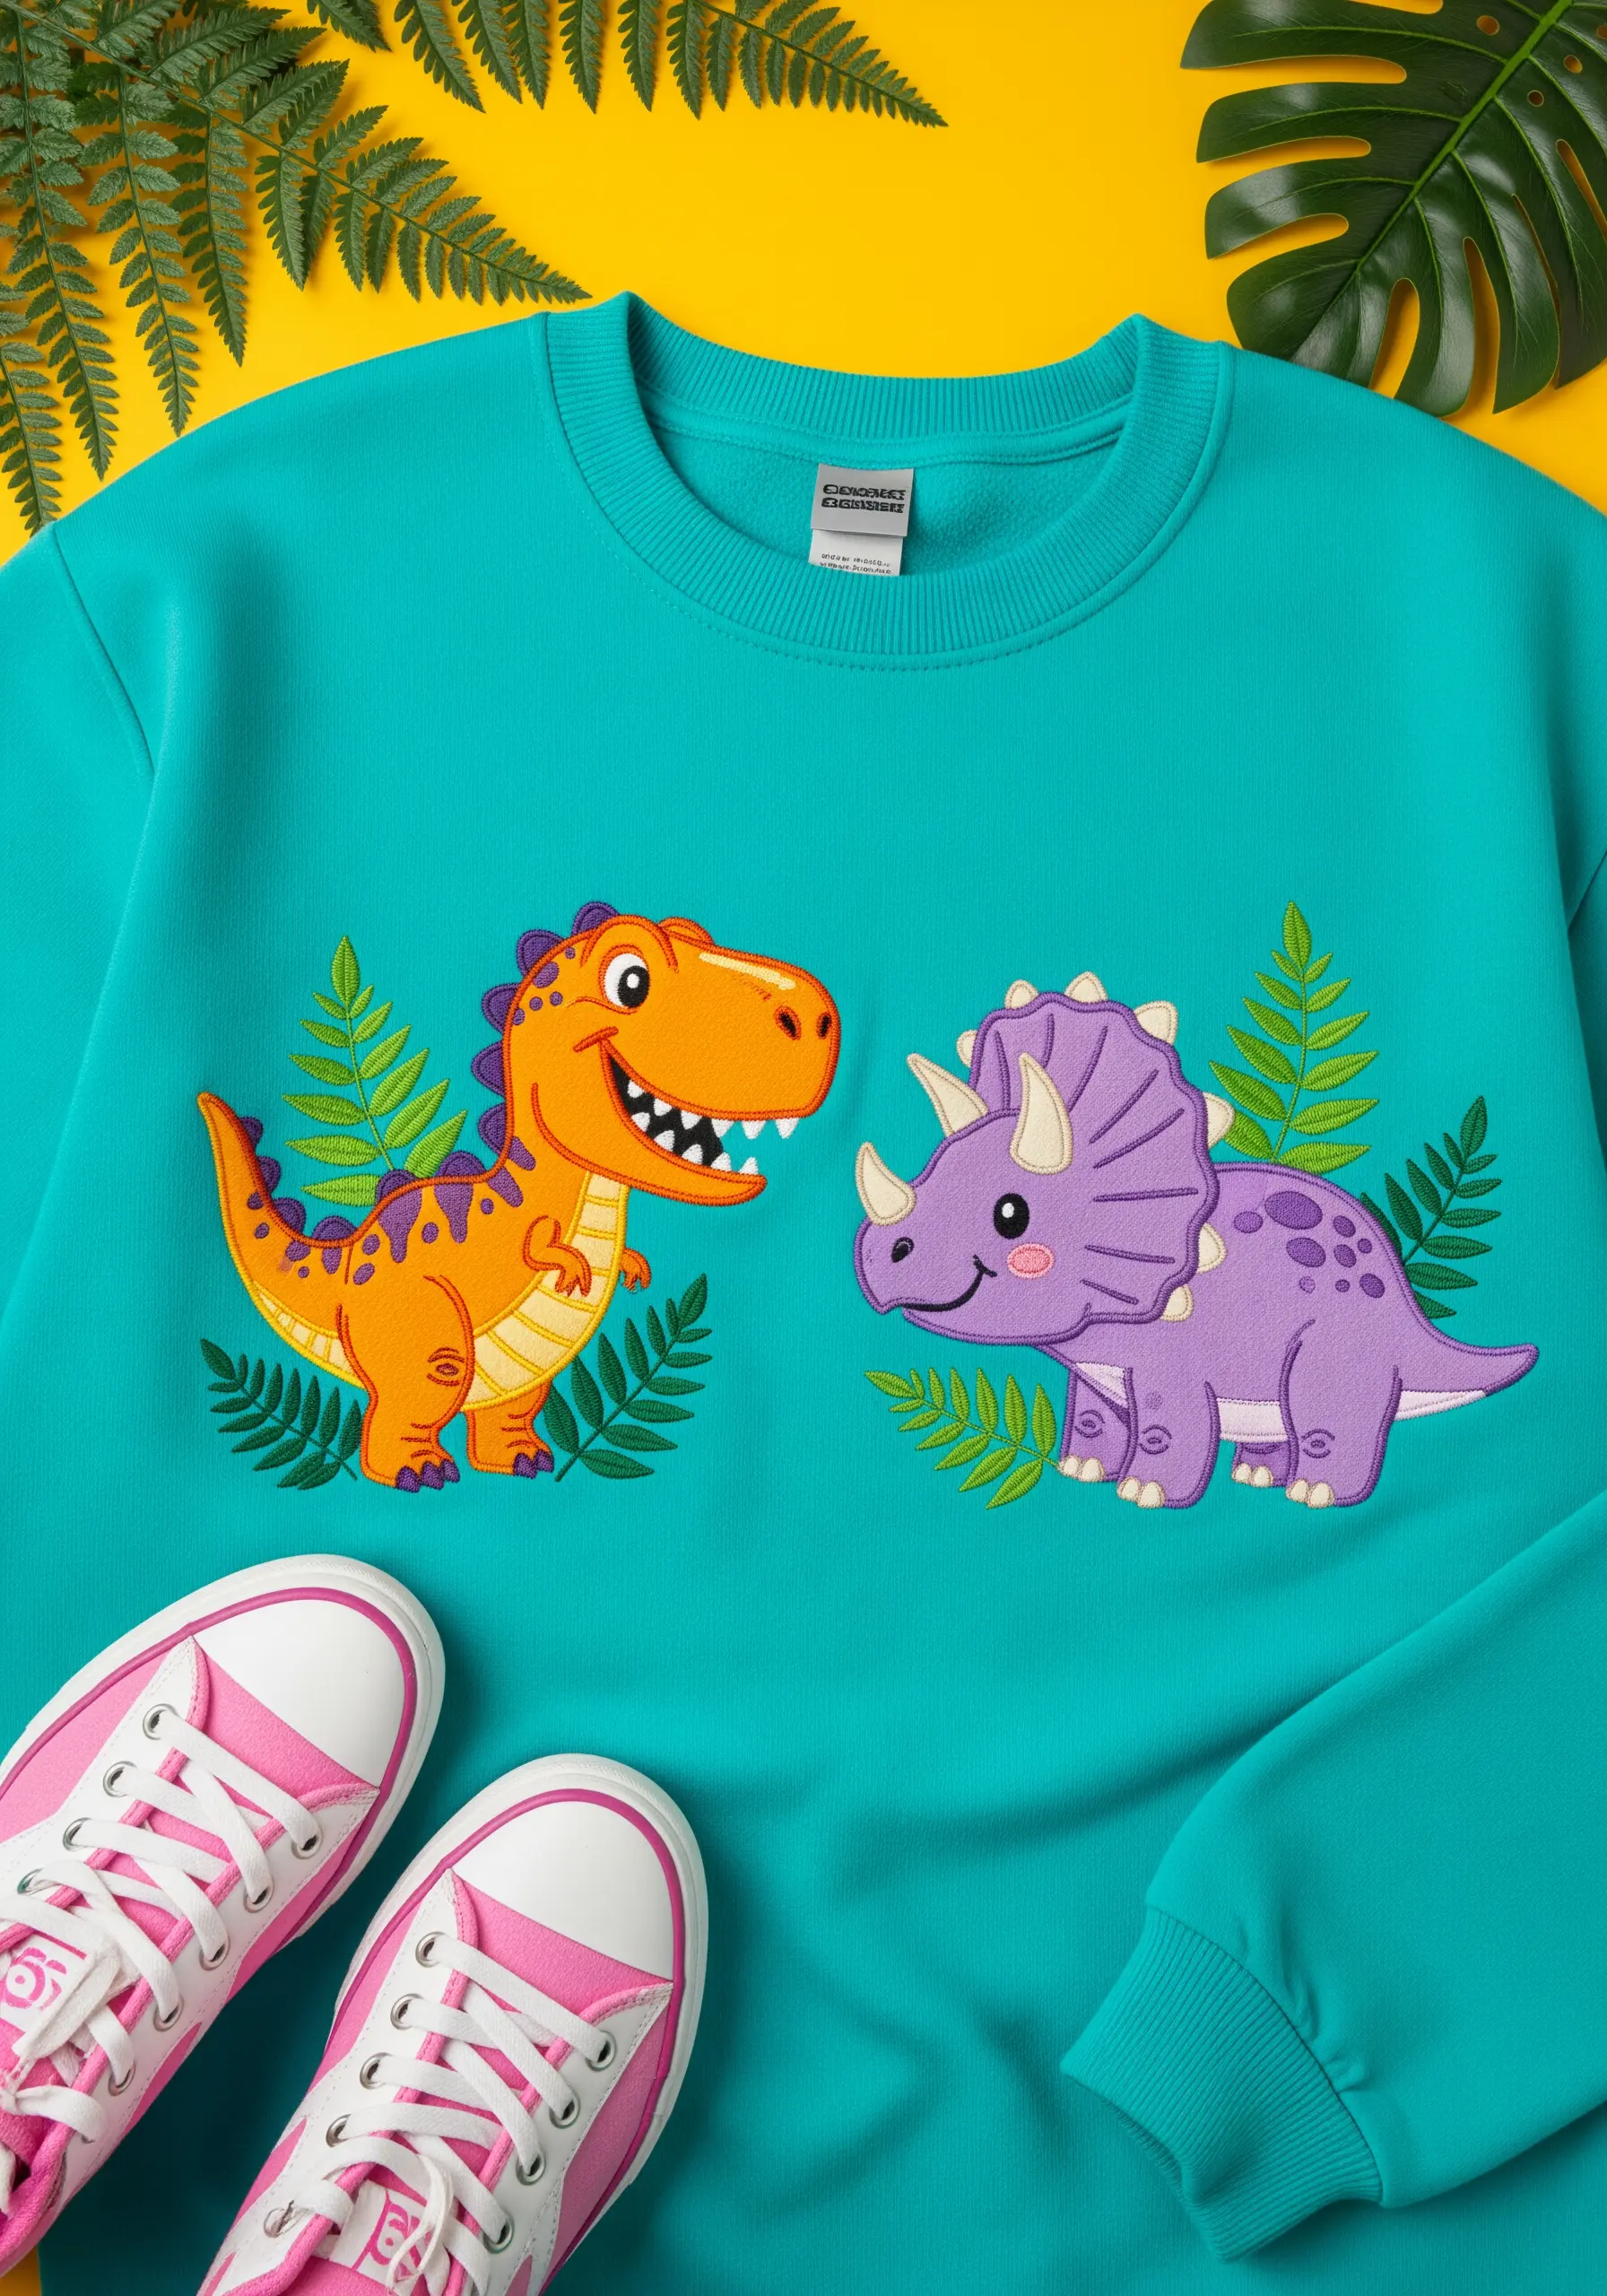
9. Build an Underwater Scene with Varied Stitches

Create a dynamic underwater world by assigning different textures and sheens to each element.
Use a standard satin stitch for the smooth bodies of the octopus and jellyfish, but consider a metallic thread for the bubbles to give them a shimmering, reflective quality.
For the rainbow fish, use thread blending in your needle to try one of these contemporary rainbow blend stitches that create magical ombre effects within each small stripe.
Use French knots for the octopus’s suction cups to add a subtle, bumpy texture that contrasts with the smooth tentacles.
10. Capture Detail with Fewer Strands
When working on small-scale characters, the key to clarity is reducing your thread count.
Switch from the standard six strands of embroidery floss to just one or two for fine details like eyes, whiskers, and stripes.
This allows you to create sharp lines and precise shapes without the bulk that can make tiny embroidery patterns look crowded or messy.
Use a magnifying lamp if needed—it makes a world of difference for intricate work.
11. Create a Cohesive All-Over Pattern
Turn a simple garment into a statement piece with an all-over embroidered pattern.
First, create a grid on your fabric using a water-soluble marker to guide the placement of each motif, ensuring even spacing.
To maintain a cohesive look, use a consistent color palette across all characters and keep their scale uniform.
Work one color at a time across the entire garment—stitching all the egg yolks, then all the toast—to make the process more efficient and meditative.
12. Add a Touch of Magic with Specialty Threads
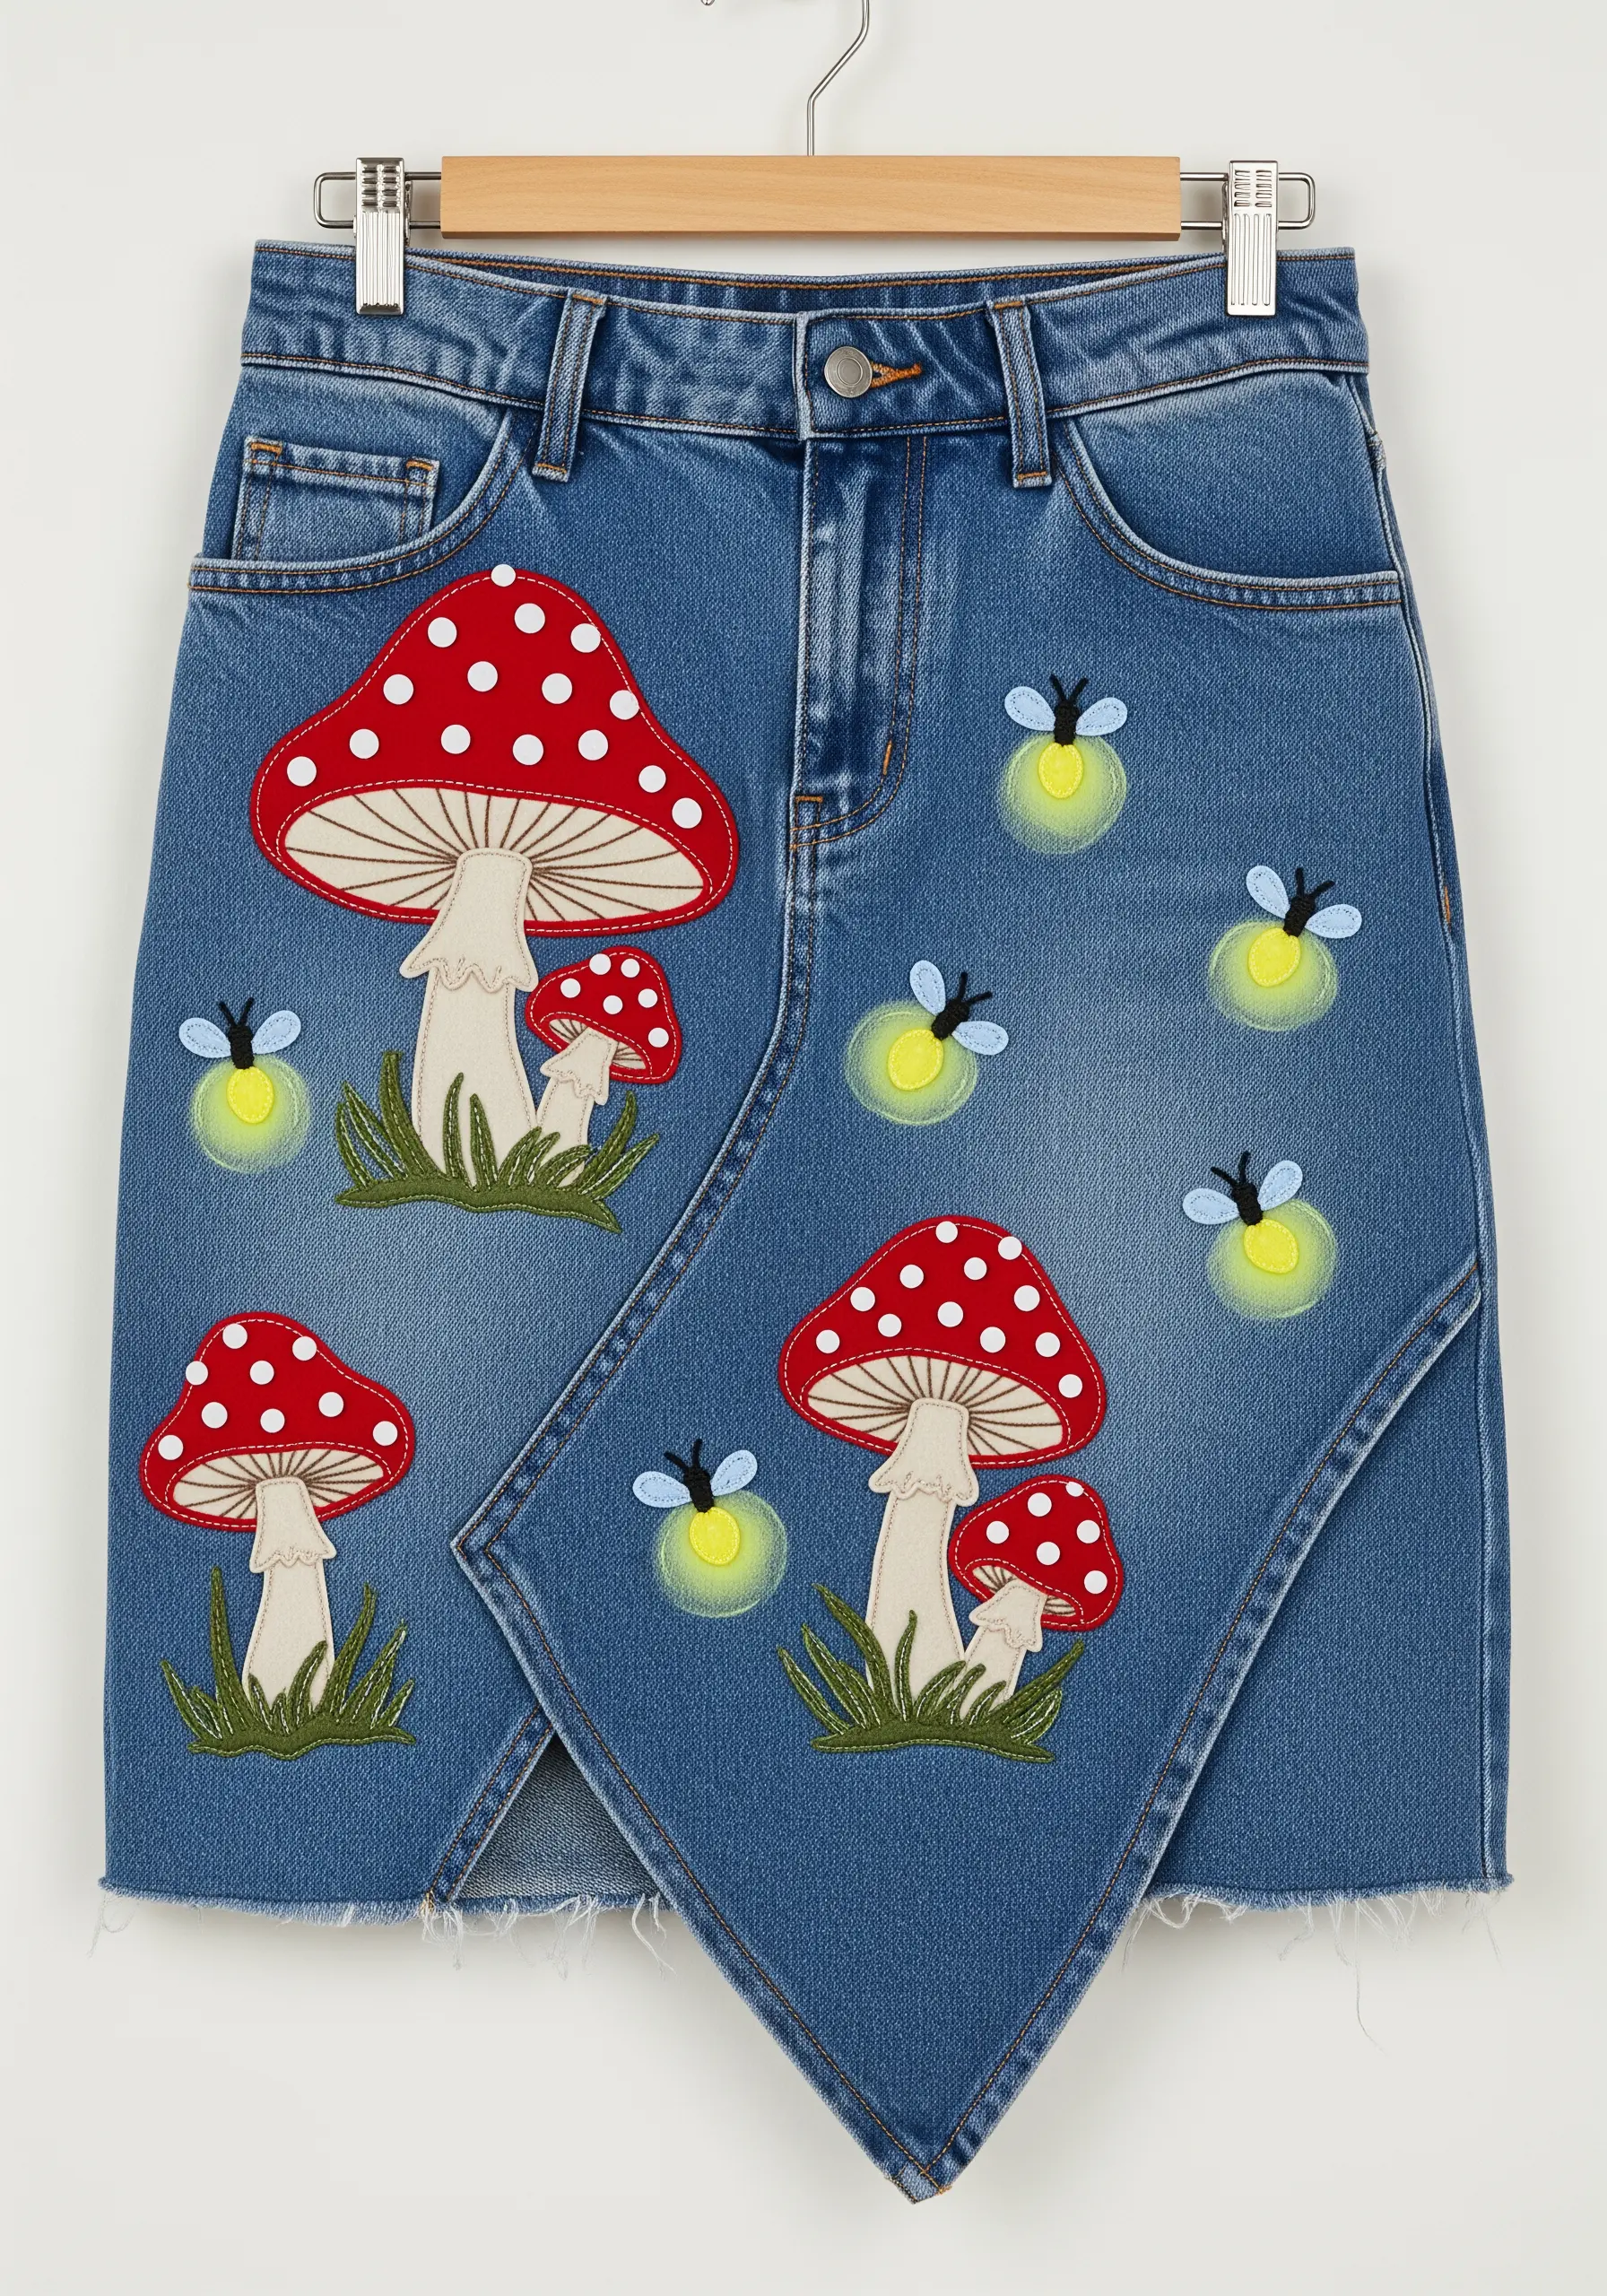
Elevate a simple design by incorporating a thread with special properties, like glow-in-the-dark floss.
Use it for a surprising element, such as the glowing bodies of the fireflies, while stitching the rest of the design in standard cotton or polyester thread.
The contrast between the matte finish of the mushrooms and the unexpected glow creates a magical detail that only reveals itself in the dark.
Charge the thread by holding it under a bright light for a few minutes before turning the lights off.
13. Integrate Your Design with the Garment
Make your embroidery feel truly intentional by designing it to interact with the garment’s existing features, like a pocket.
Instead of just placing the motif on top of the pocket, position it so the character is resting on or hanging from the pocket’s edge.
This small adjustment transforms the pocket from a simple fabric square into a prop within the scene, making the entire piece feel more thoughtful and integrated.
Stitch the branch directly onto the pocket edge to solidify the illusion.
14. Embroider on Waterproof Fabrics with Care

Stitching on vinyl or PVC-coated fabrics like a raincoat requires a different approach because every needle puncture is permanent.
Use a sharp, fresh needle (a microtex needle is ideal) to make clean holes, and plan your stitches carefully to avoid having to unpick them.
Apply a peel-and-stick stabilizer to the back of the fabric instead of hooping it, as a hoop can permanently mark the material.
After stitching, you can seal the back of the embroidery with a waterproof seam sealant to maintain the garment’s integrity.
15. Tackle Canvas Sneakers with Bold Outlines

Embroidering on shoes is a fantastic way to create one-of-a-kind wearable art.
Use a strong, curved upholstery needle and a thimble to help you push through the thick canvas without hurting your fingers.
Opt for bold, graphic designs and use a thick outline stitch, like a chain stitch or a whipped backstitch, to ensure the artwork is visible and impactful.
Use all six strands of floss for maximum coverage and a vibrant, graffiti-like effect.
16. Achieve Clarity on Dark, Shiny Fabrics

When embroidering on slick fabrics like satin or nylon, the main challenge is preventing the stitches from shifting or sinking.
Always use a stabilizer—a cut-away type is best for providing permanent support on a bomber jacket.
Choose high-contrast thread colors to ensure your design stands out against the dark, reflective background.
To create the metallic look of the goggles, alternate stitches of light and dark grey thread in a satin stitch fill; this technique, called thread painting, creates a realistic sheen.
17. Align Motifs for a Playful Button Replacement

Use embroidery to create a vertical narrative or theme along a cardigan’s button placket.
By arranging the motifs in a neat column, you create a visual line that mimics the function of buttons, adding a layer of clever design.
Ensure your satin stitches are all angled in the same direction within each colored section for a smooth, light-reflective finish.
A few well-placed French knots or seed stitches for ‘sprinkles’ add a final touch of texture and detail.
18. Create Flowing Designs on Pant Legs
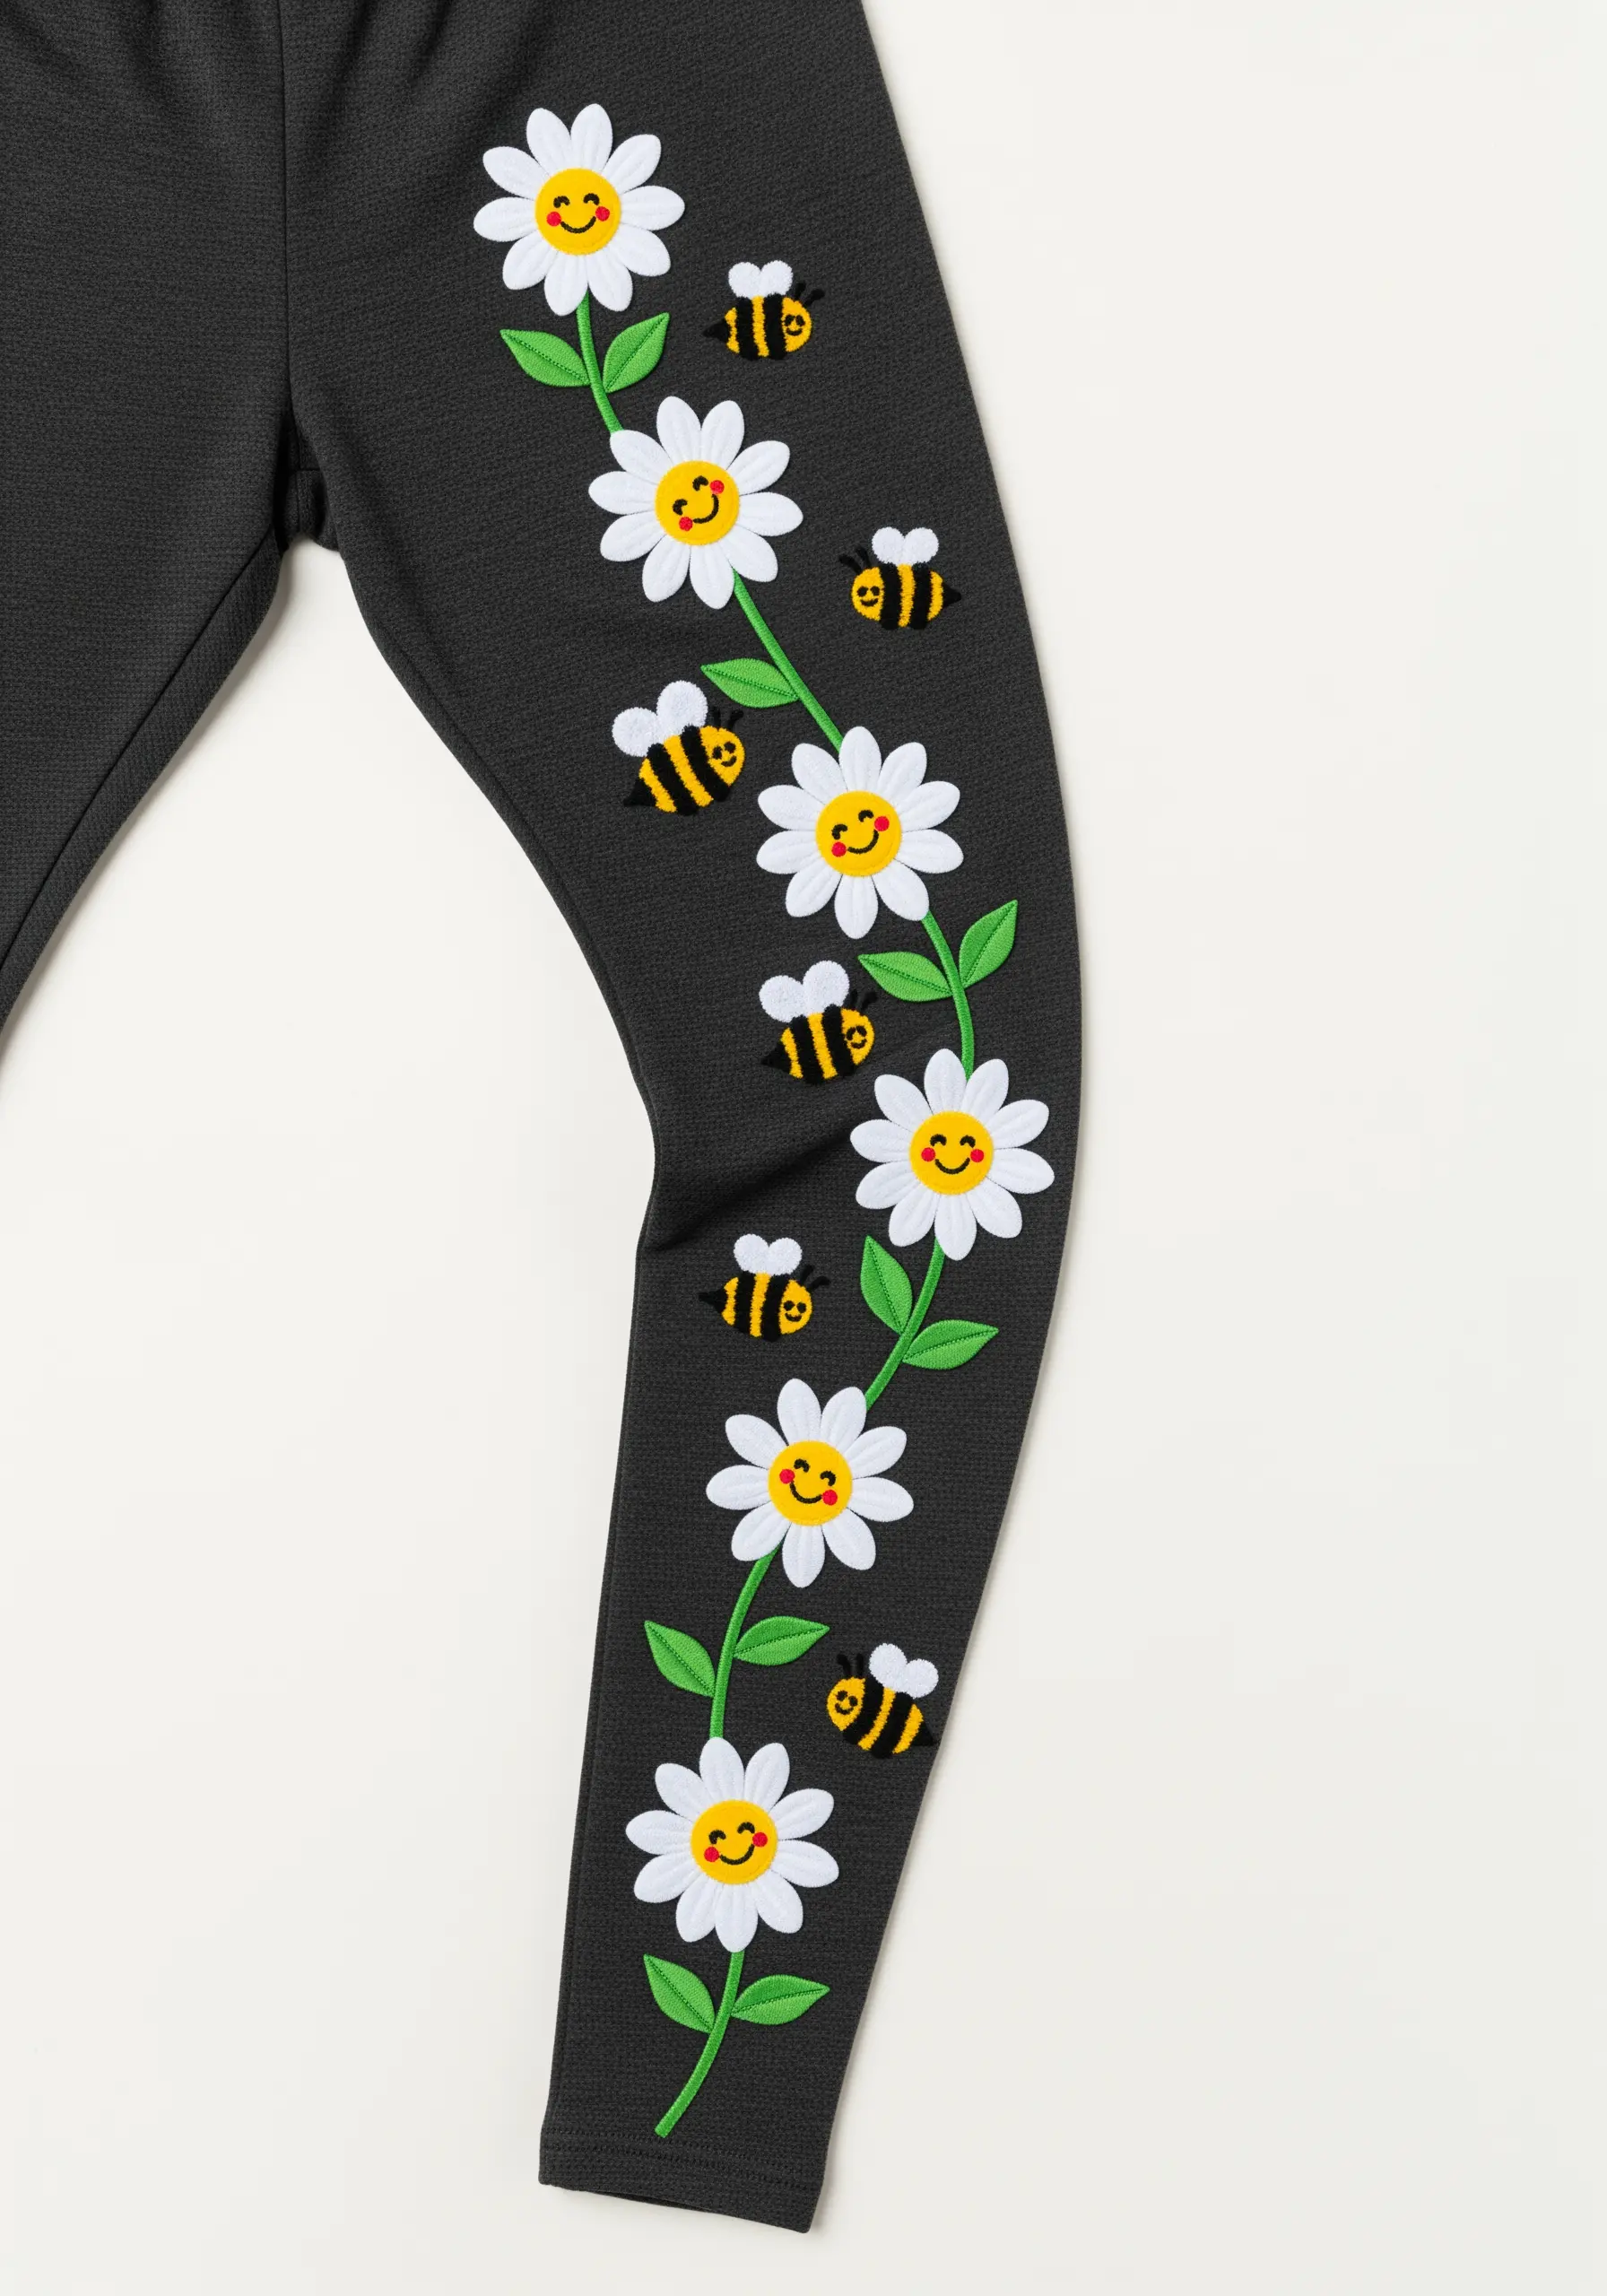
Guide the eye and add a sense of movement by creating a design that winds its way up a pant leg.
Use a smooth, consistent stem stitch for the vine to create elegant curves without any jagged edges.
To make the daisies pop against the dark fabric, stitch the white petals first, then add the yellow centers using French knots.
This order of operations ensures your lighter threads stay clean and bright, making this a fresh take on botanical line art embroidery patterns.
19. Adapt Your Technique for Textured Surfaces
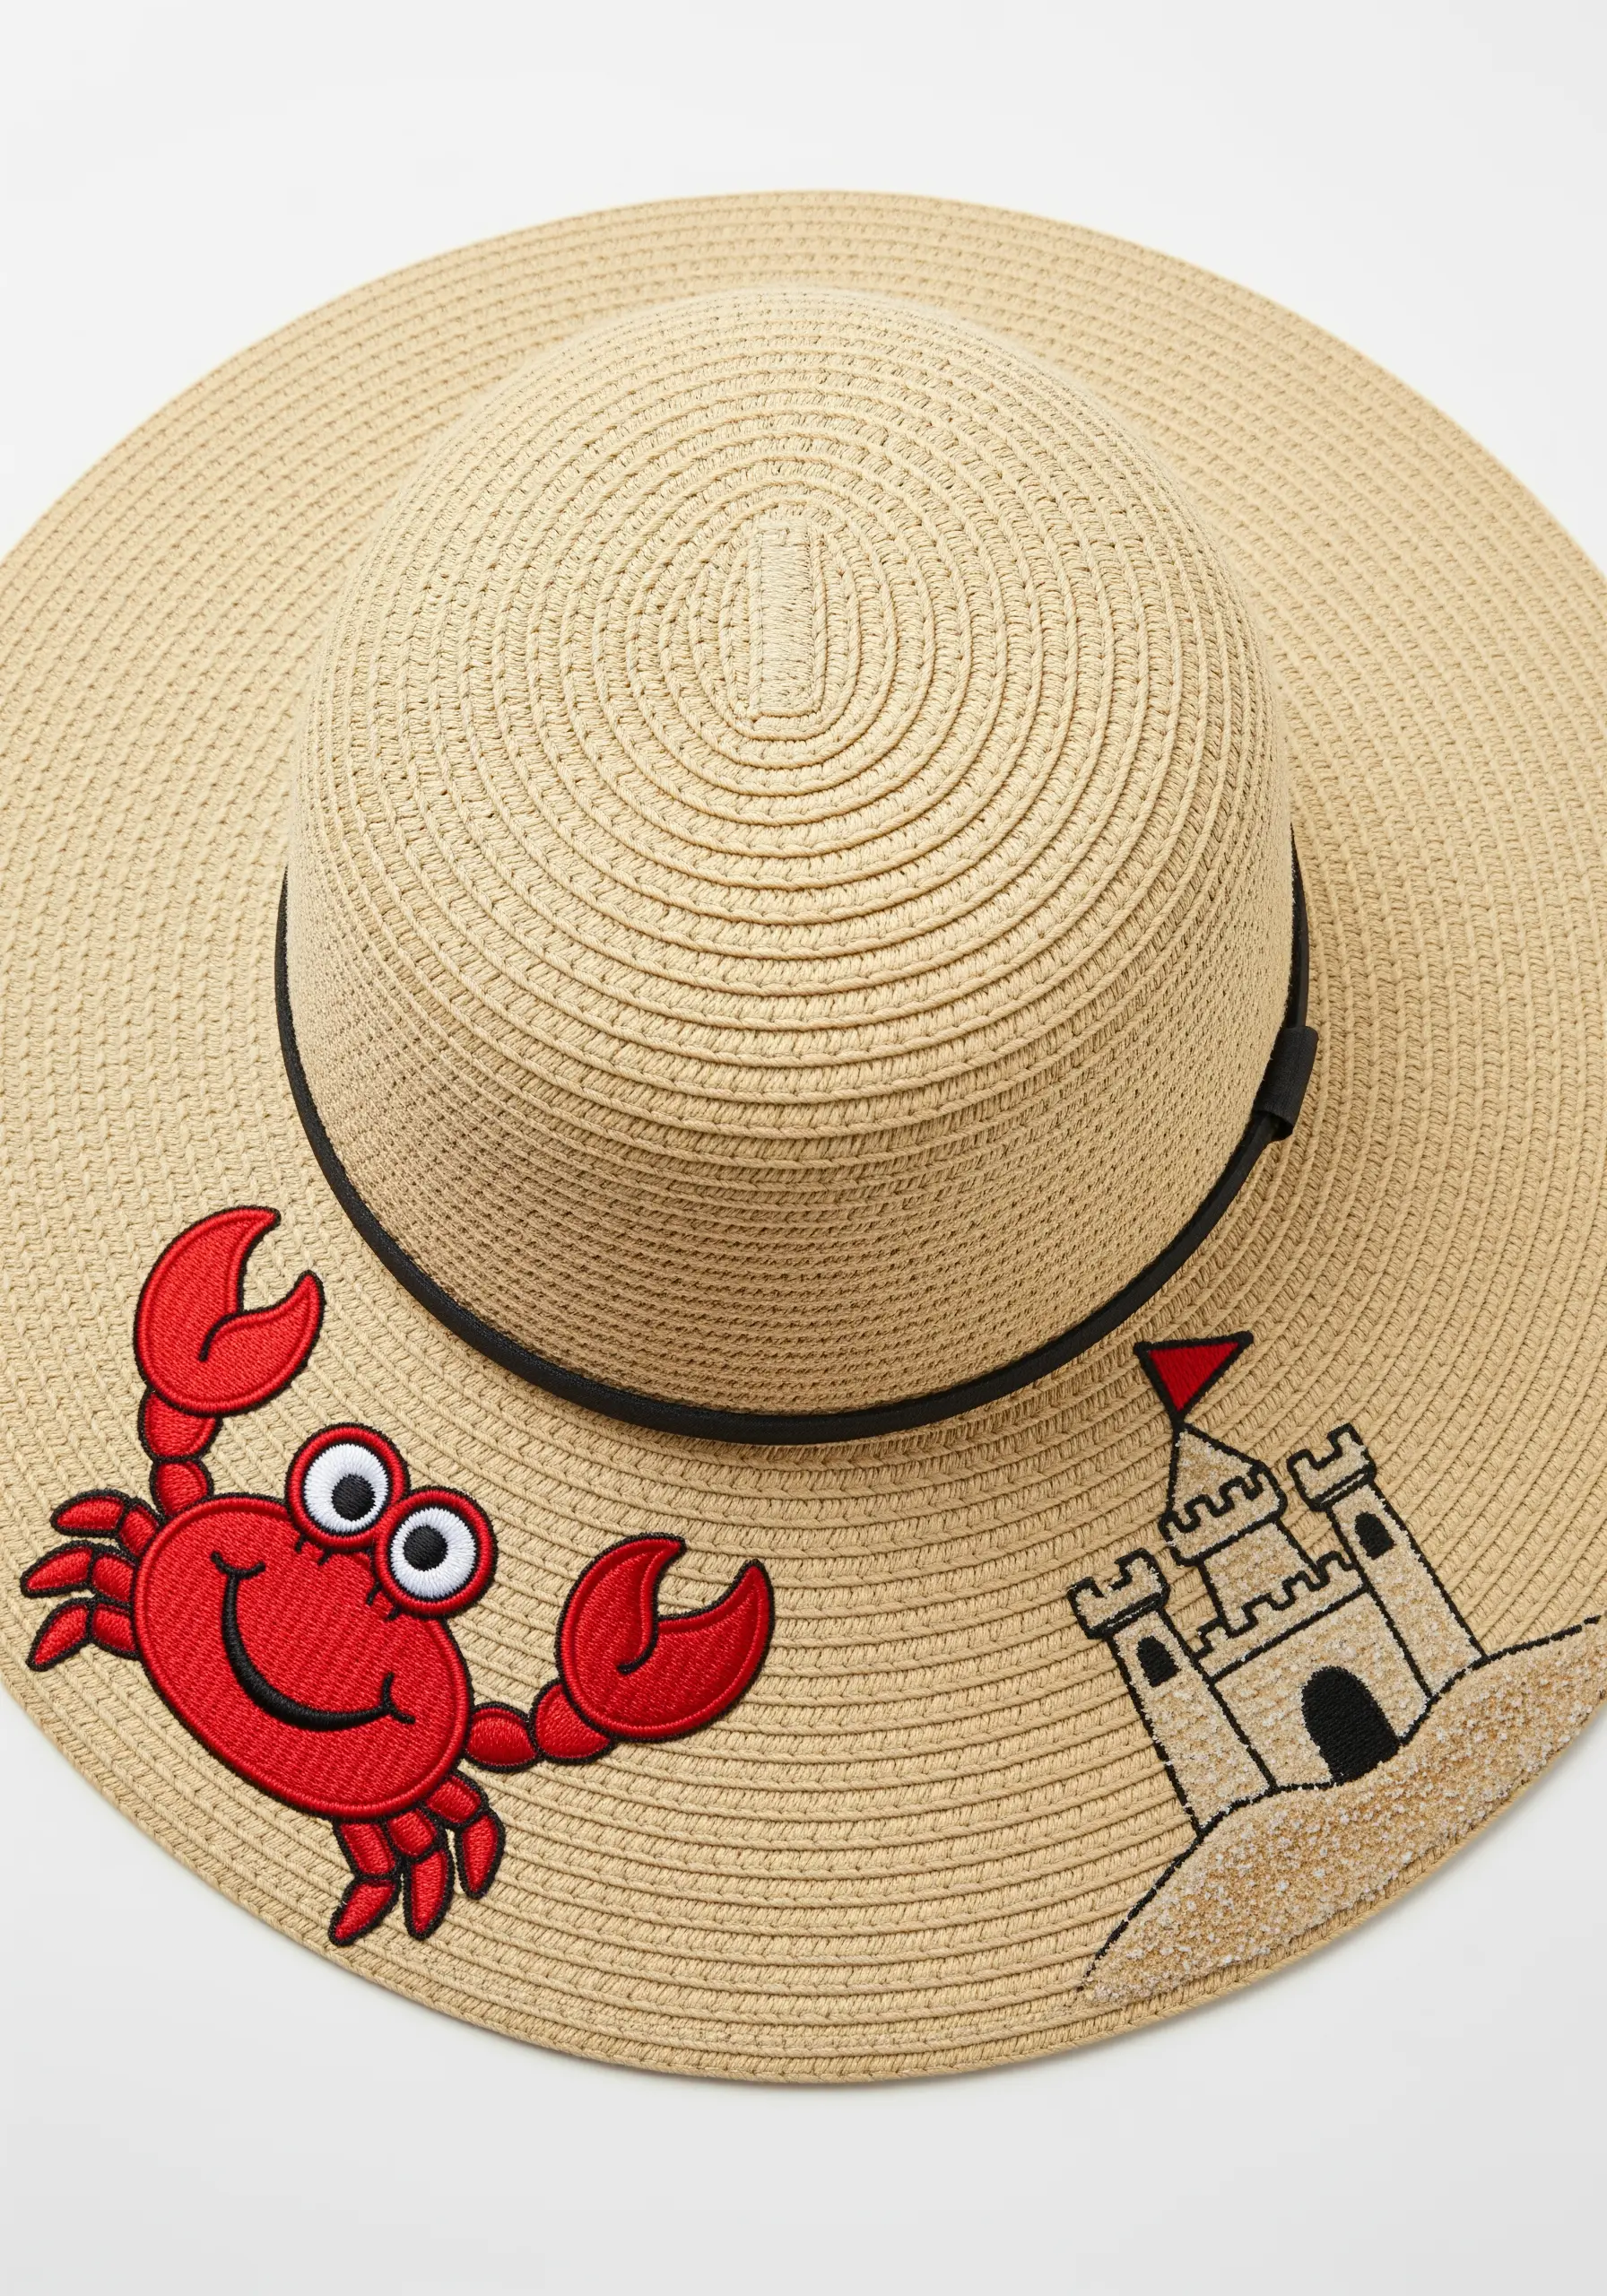
Embroidering on a woven surface like a straw hat requires anchoring your stitches securely.
For the filled crab appliqué, use a sharp needle to pierce the straw and secure the fabric piece with small, tight whip stitches around the edge.
For the line-art sandcastle, use a simple backstitch, making sure each stitch goes over and under the woven straw strands to lock it in place.
Using a combination of appliqué and simple line work is ideal for such an unconventional texture.
20. Personify Objects with Simple, Expressive Faces
Bring everyday objects to life by adding simple, expressive faces. All it takes is a few strategically placed stitches.
Use two small satin stitches or French knots for the eyes and a single curved backstitch for the smile.
To make your characters stand out on canvas, outline them with a whipped backstitch. This stitch covers a standard backstitch with a second thread, creating a raised, cord-like line that is both clean and bold.
21. Keep Stitches Aloft on High-Pile Fabrics

To prevent your embroidery from sinking and disappearing into plush fabrics like terry cloth, you need a topping stabilizer.
Place a layer of water-soluble stabilizer (like Sulky Solvy) over the top of your design area before you start stitching.
This clear film provides a smooth surface that forces your stitches to sit on top of the fabric’s pile.
Once you are finished, any remaining stabilizer can be easily washed away with water, leaving behind a crisp, professional-looking design.
22. Design a Playful Peekaboo Surprise

Create an adorable and interactive detail by designing characters that peek out from behind pocket flaps.
The key is to stitch only the top portion of the character—head, eyes, and paws—directly onto the shirt, positioned just above the pocket line.
This creates the illusion that the rest of the animal is hidden inside, sparking imagination and adding a custom touch that feels both clever and heartwarming.
Use a tear-away stabilizer to avoid adding extra bulk to the shirt front.
23. Combine Text and Graphics for a Comic Book Vibe

Create a bold, graphic-novel effect by pairing a character with punchy text and action words.
For the lettering, use a simple, clean backstitch or a whipped backstitch to ensure every word is perfectly legible.
For the ‘POW!’ graphic, use a high-contrast satin stitch fill with a dark outline to make it explode off the fabric.
This combination of clean typography and vibrant illustration tells a story and gives the garment a fun, dynamic energy.


