

Perhaps you’ve mastered stitching on linen and cotton, but feel a desire for a new kind of canvas. I want you to consider paper—a surface that transforms your needle and thread into something graphic, precise, and wonderfully immediate.
Working on paper isn’t like working on fabric. It doesn’t forgive as easily, but it rewards intention. Every puncture is a deliberate mark, every stitch a clean line. This is an opportunity to explore the interplay between the soft, yielding nature of thread and the crisp, structural quality of paper.
Here, you will find projects that honor this unique partnership. They are designed to be completed in a weekend, offering the satisfaction of a finished piece that is both a delicate illustration and a small, tactile sculpture. Let this be your invitation to stitch with fresh eyes and create something truly beautiful.
1. Botanical Studies on Deckle-Edge Paper
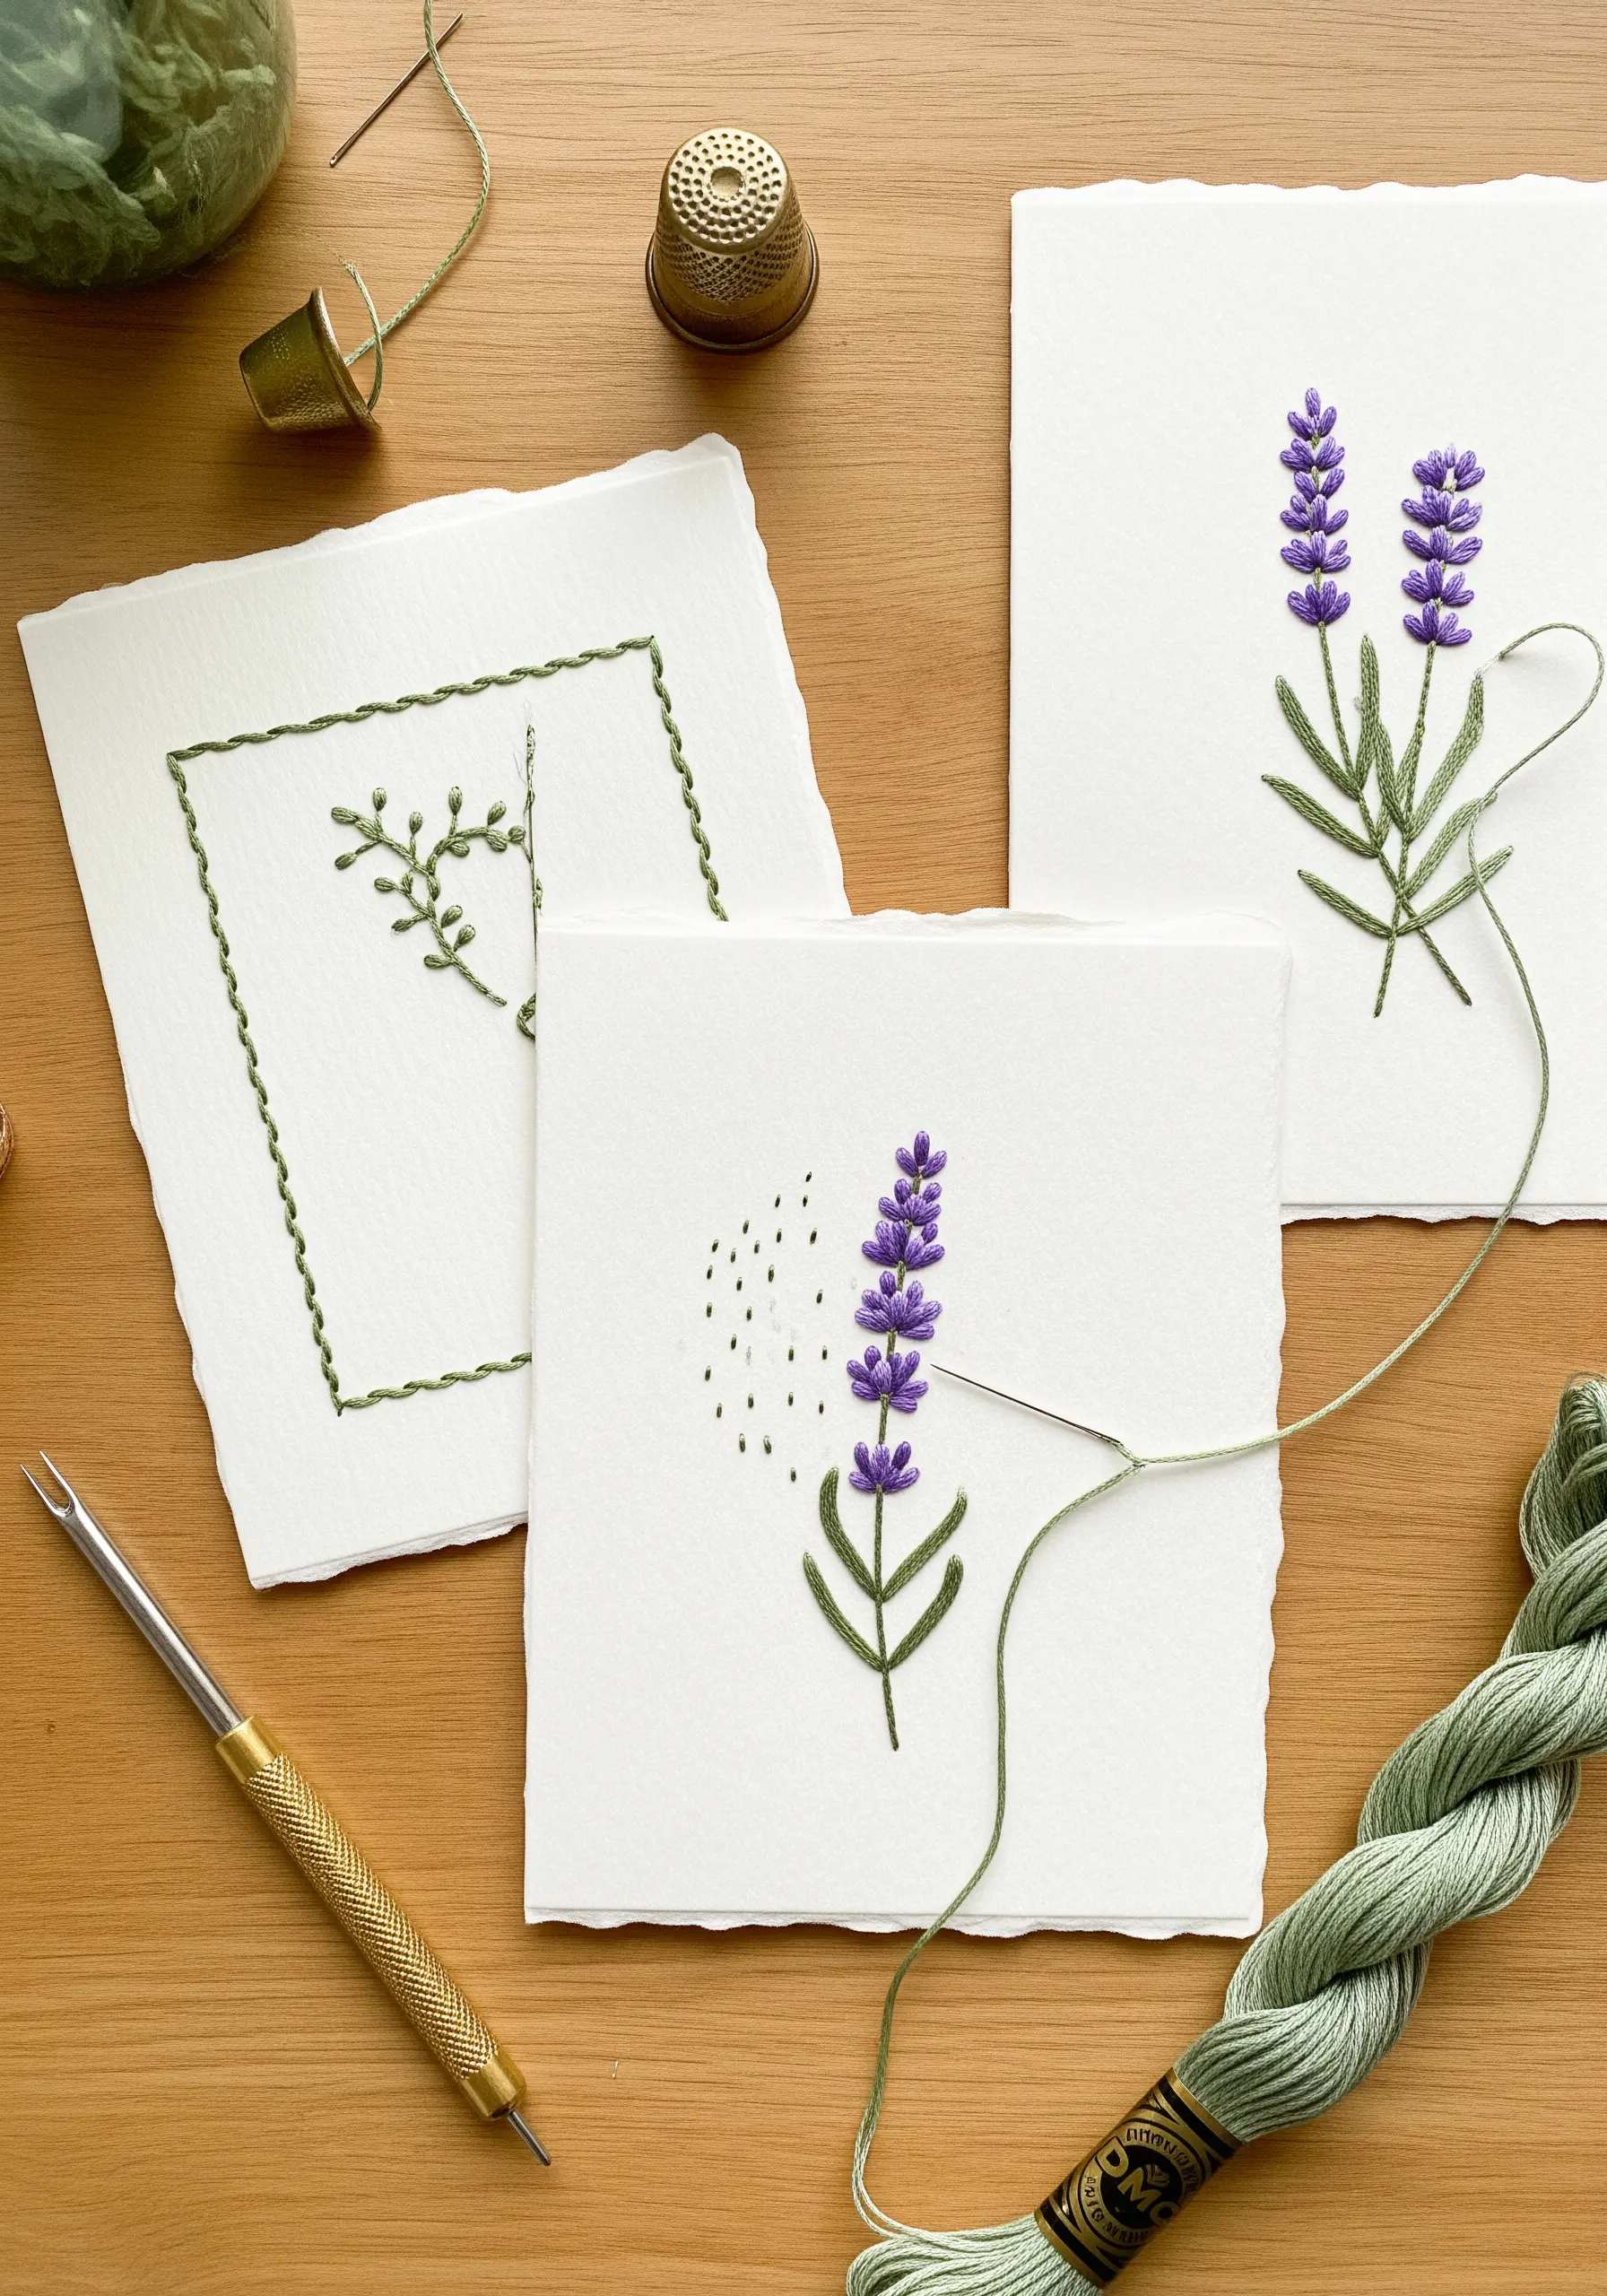
When embroidering on paper, choose a heavyweight, 100% cotton-rag stock to prevent tearing and support your stitches.
Use a very fine, sharp needle (like a milliner’s needle) to create clean piercings that won’t distort the paper’s fibers.
For the lavender florets, use French knots with just two strands of floss, varying their tightness to build realistic texture.
A single-strand stem stitch for the stalks maintains a delicate, illustrative quality, allowing the texture of the deckle-edge paper to complement the organic form.
2. Art Deco Bookmarks with Metallic Thread
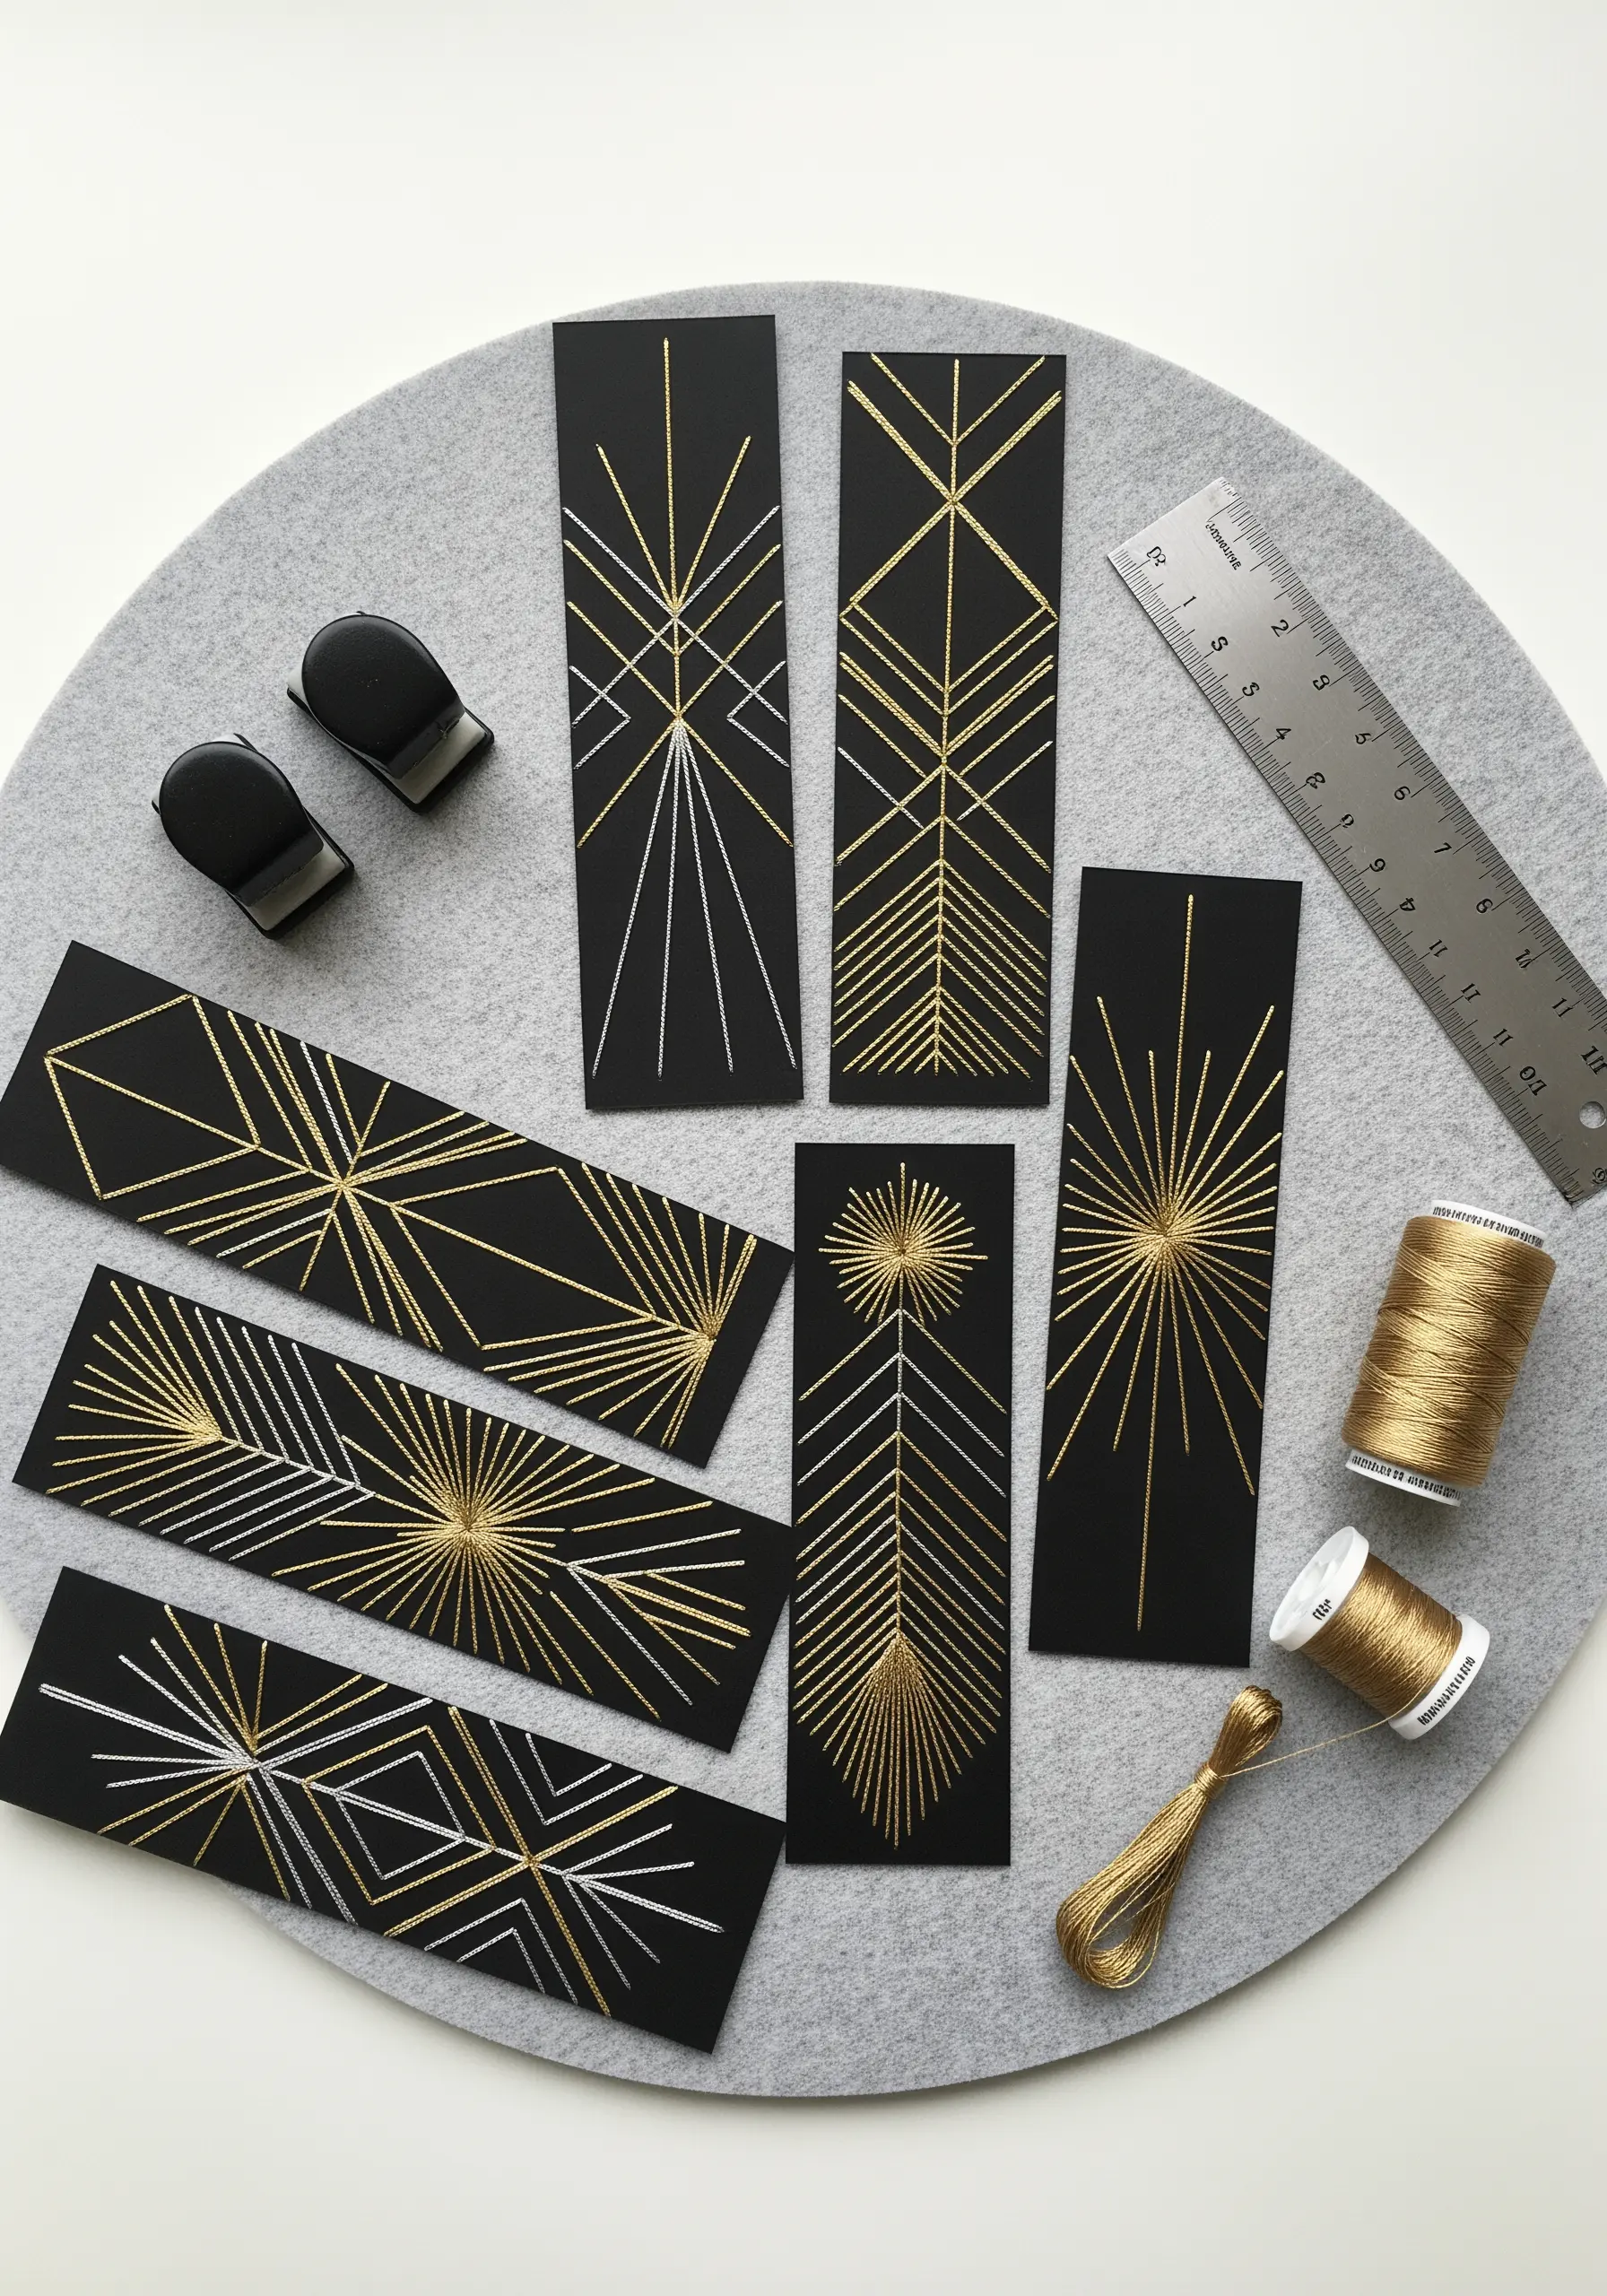
To achieve those clean, graphic lines on cardstock, pre-piercing your holes with a fine awl is non-negotiable.
This step prevents the paper from buckling and ensures every stitch is perfectly placed.
Metallic thread can be prone to fraying, so work with shorter lengths and consider using a thread conditioner to help it glide smoothly.
The key to this design’s success is maintaining taut, consistent tension, which allows the sharp geometric rays to feel precise and intentional against the matte black background.
3. Celestial Cartography with Thread
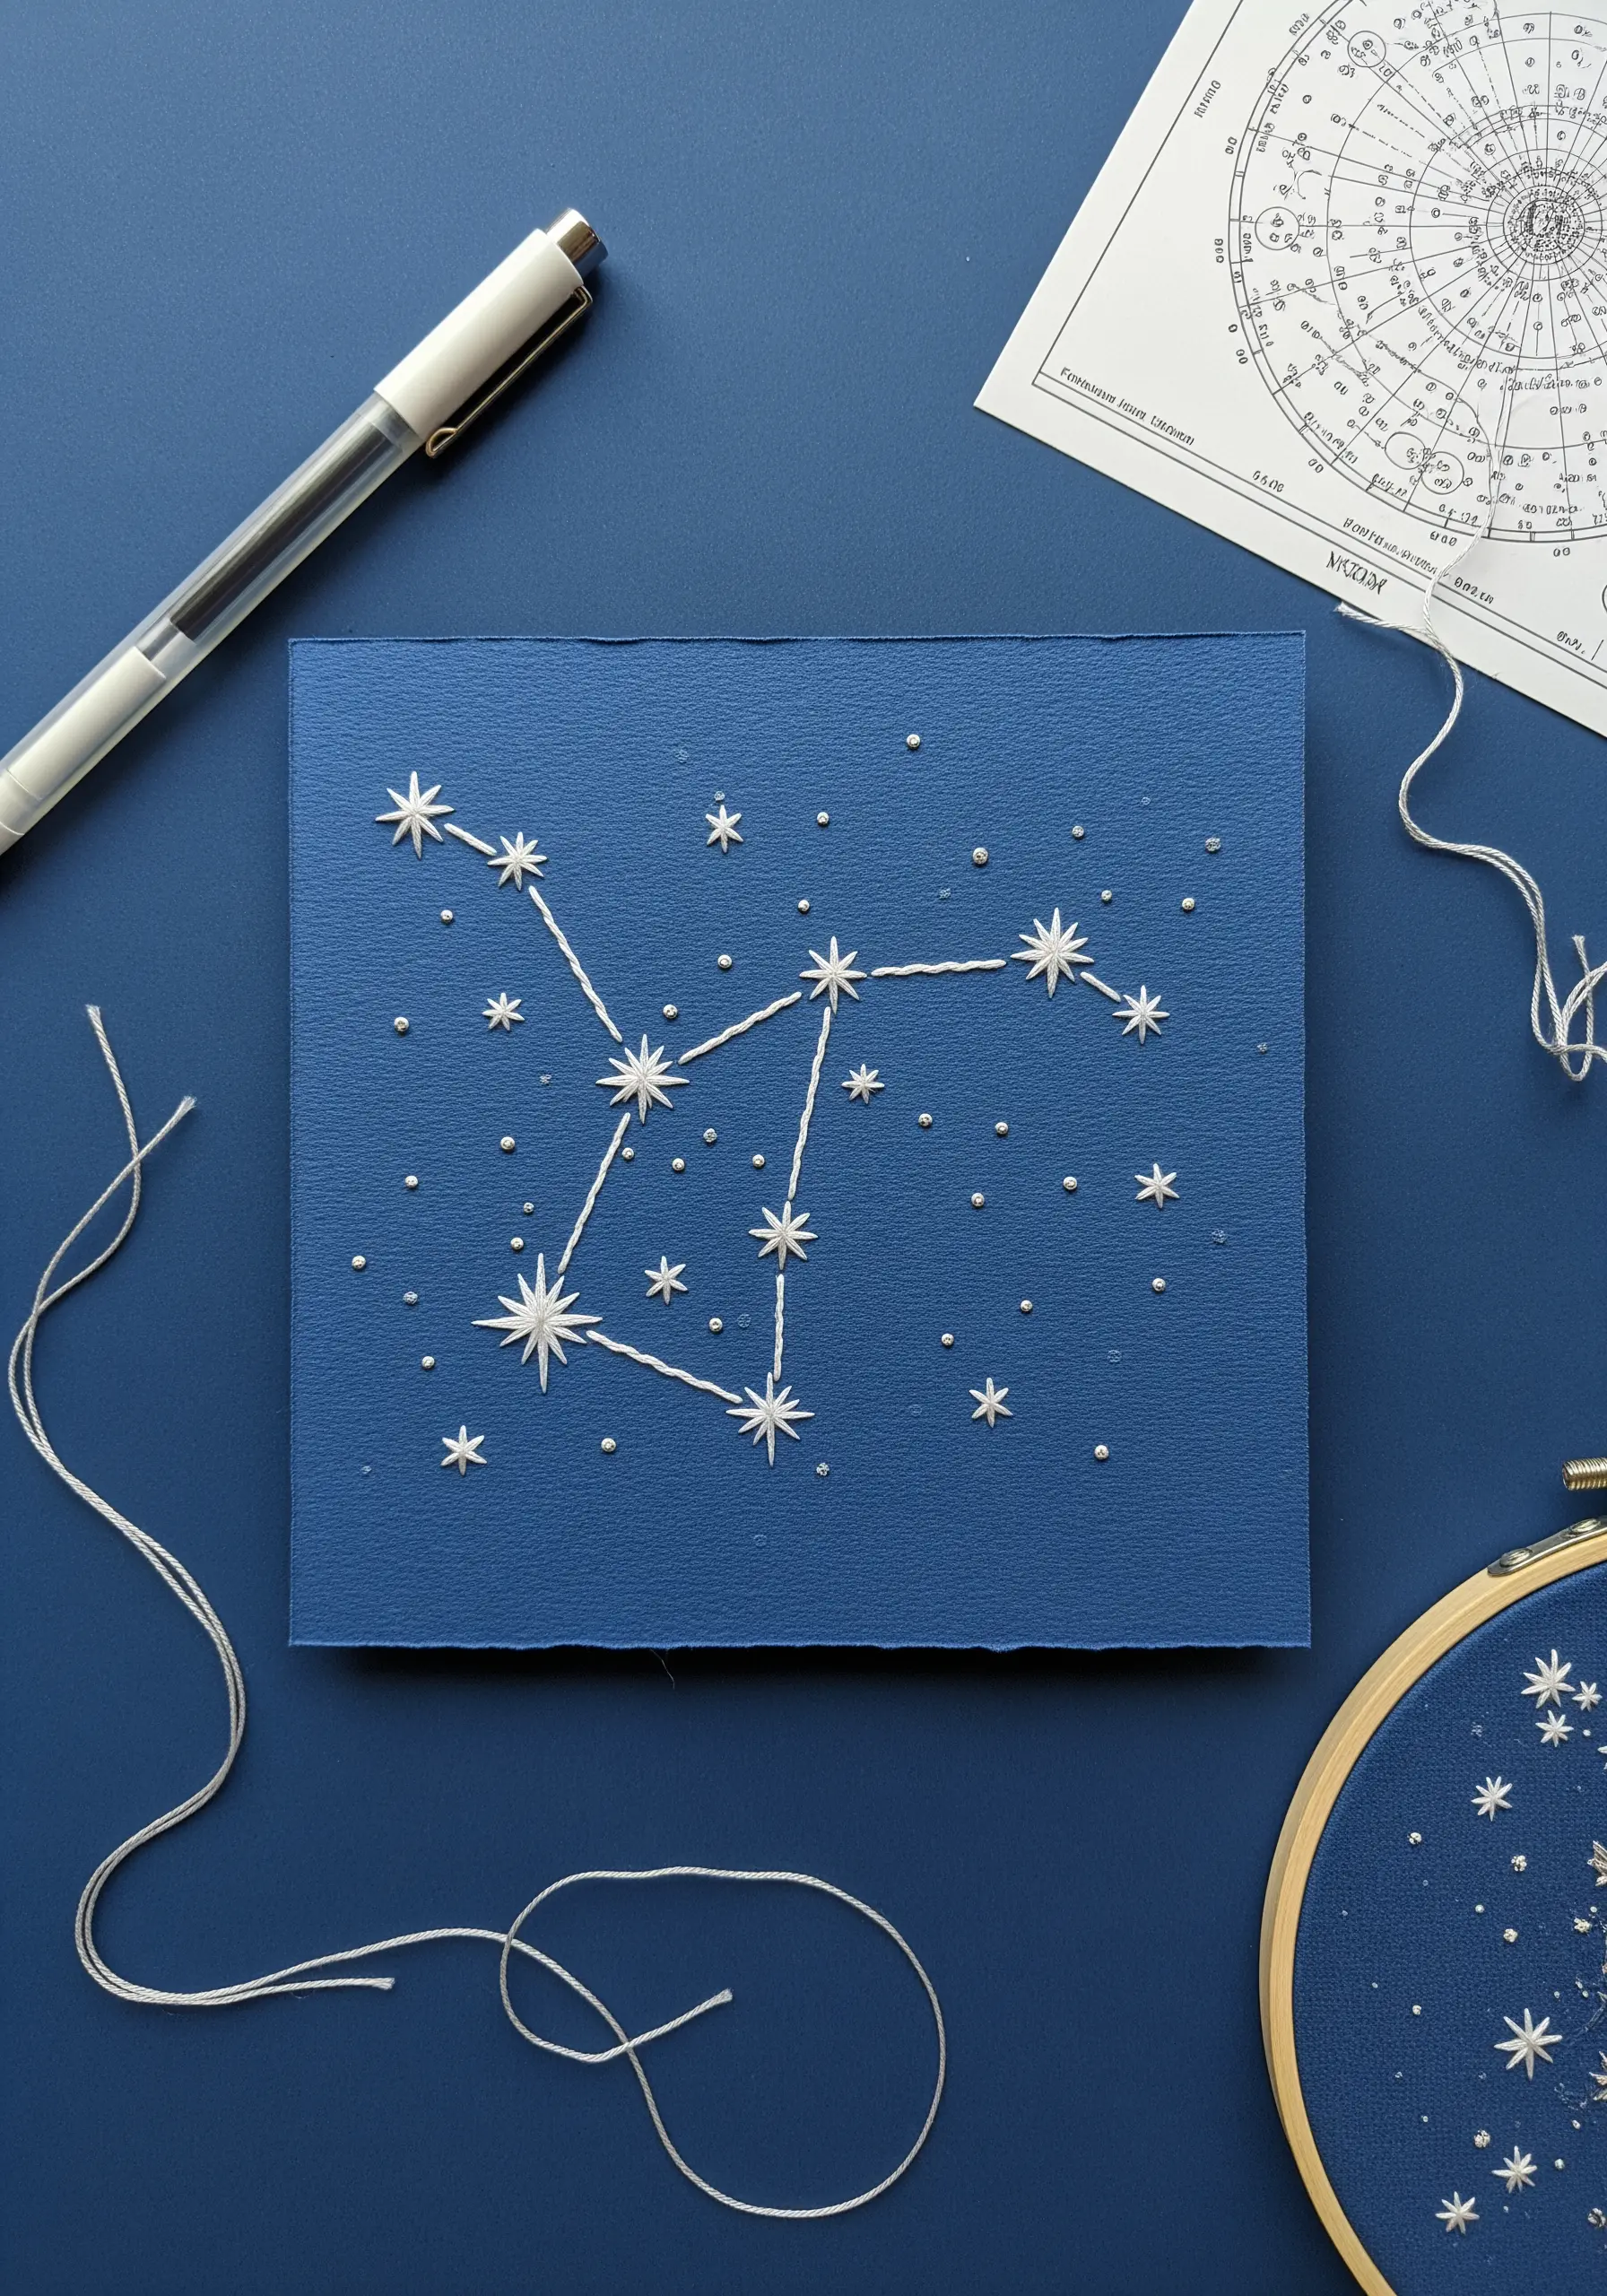
Create a dynamic night sky by varying your stitches to represent different celestial bodies.
Use isolated star stitches for the main points of a constellation, and then scatter tiny, single-wrap French knots around them to suggest a distant starfield.
This simple variation in scale adds immense visual depth.
Stitching with a bright white or silver metallic thread on deep blue cardstock enhances the illusion and helps your design mimic a night sky with beautiful accuracy.
4. Frame Your Memories with a Stitched Mat Border
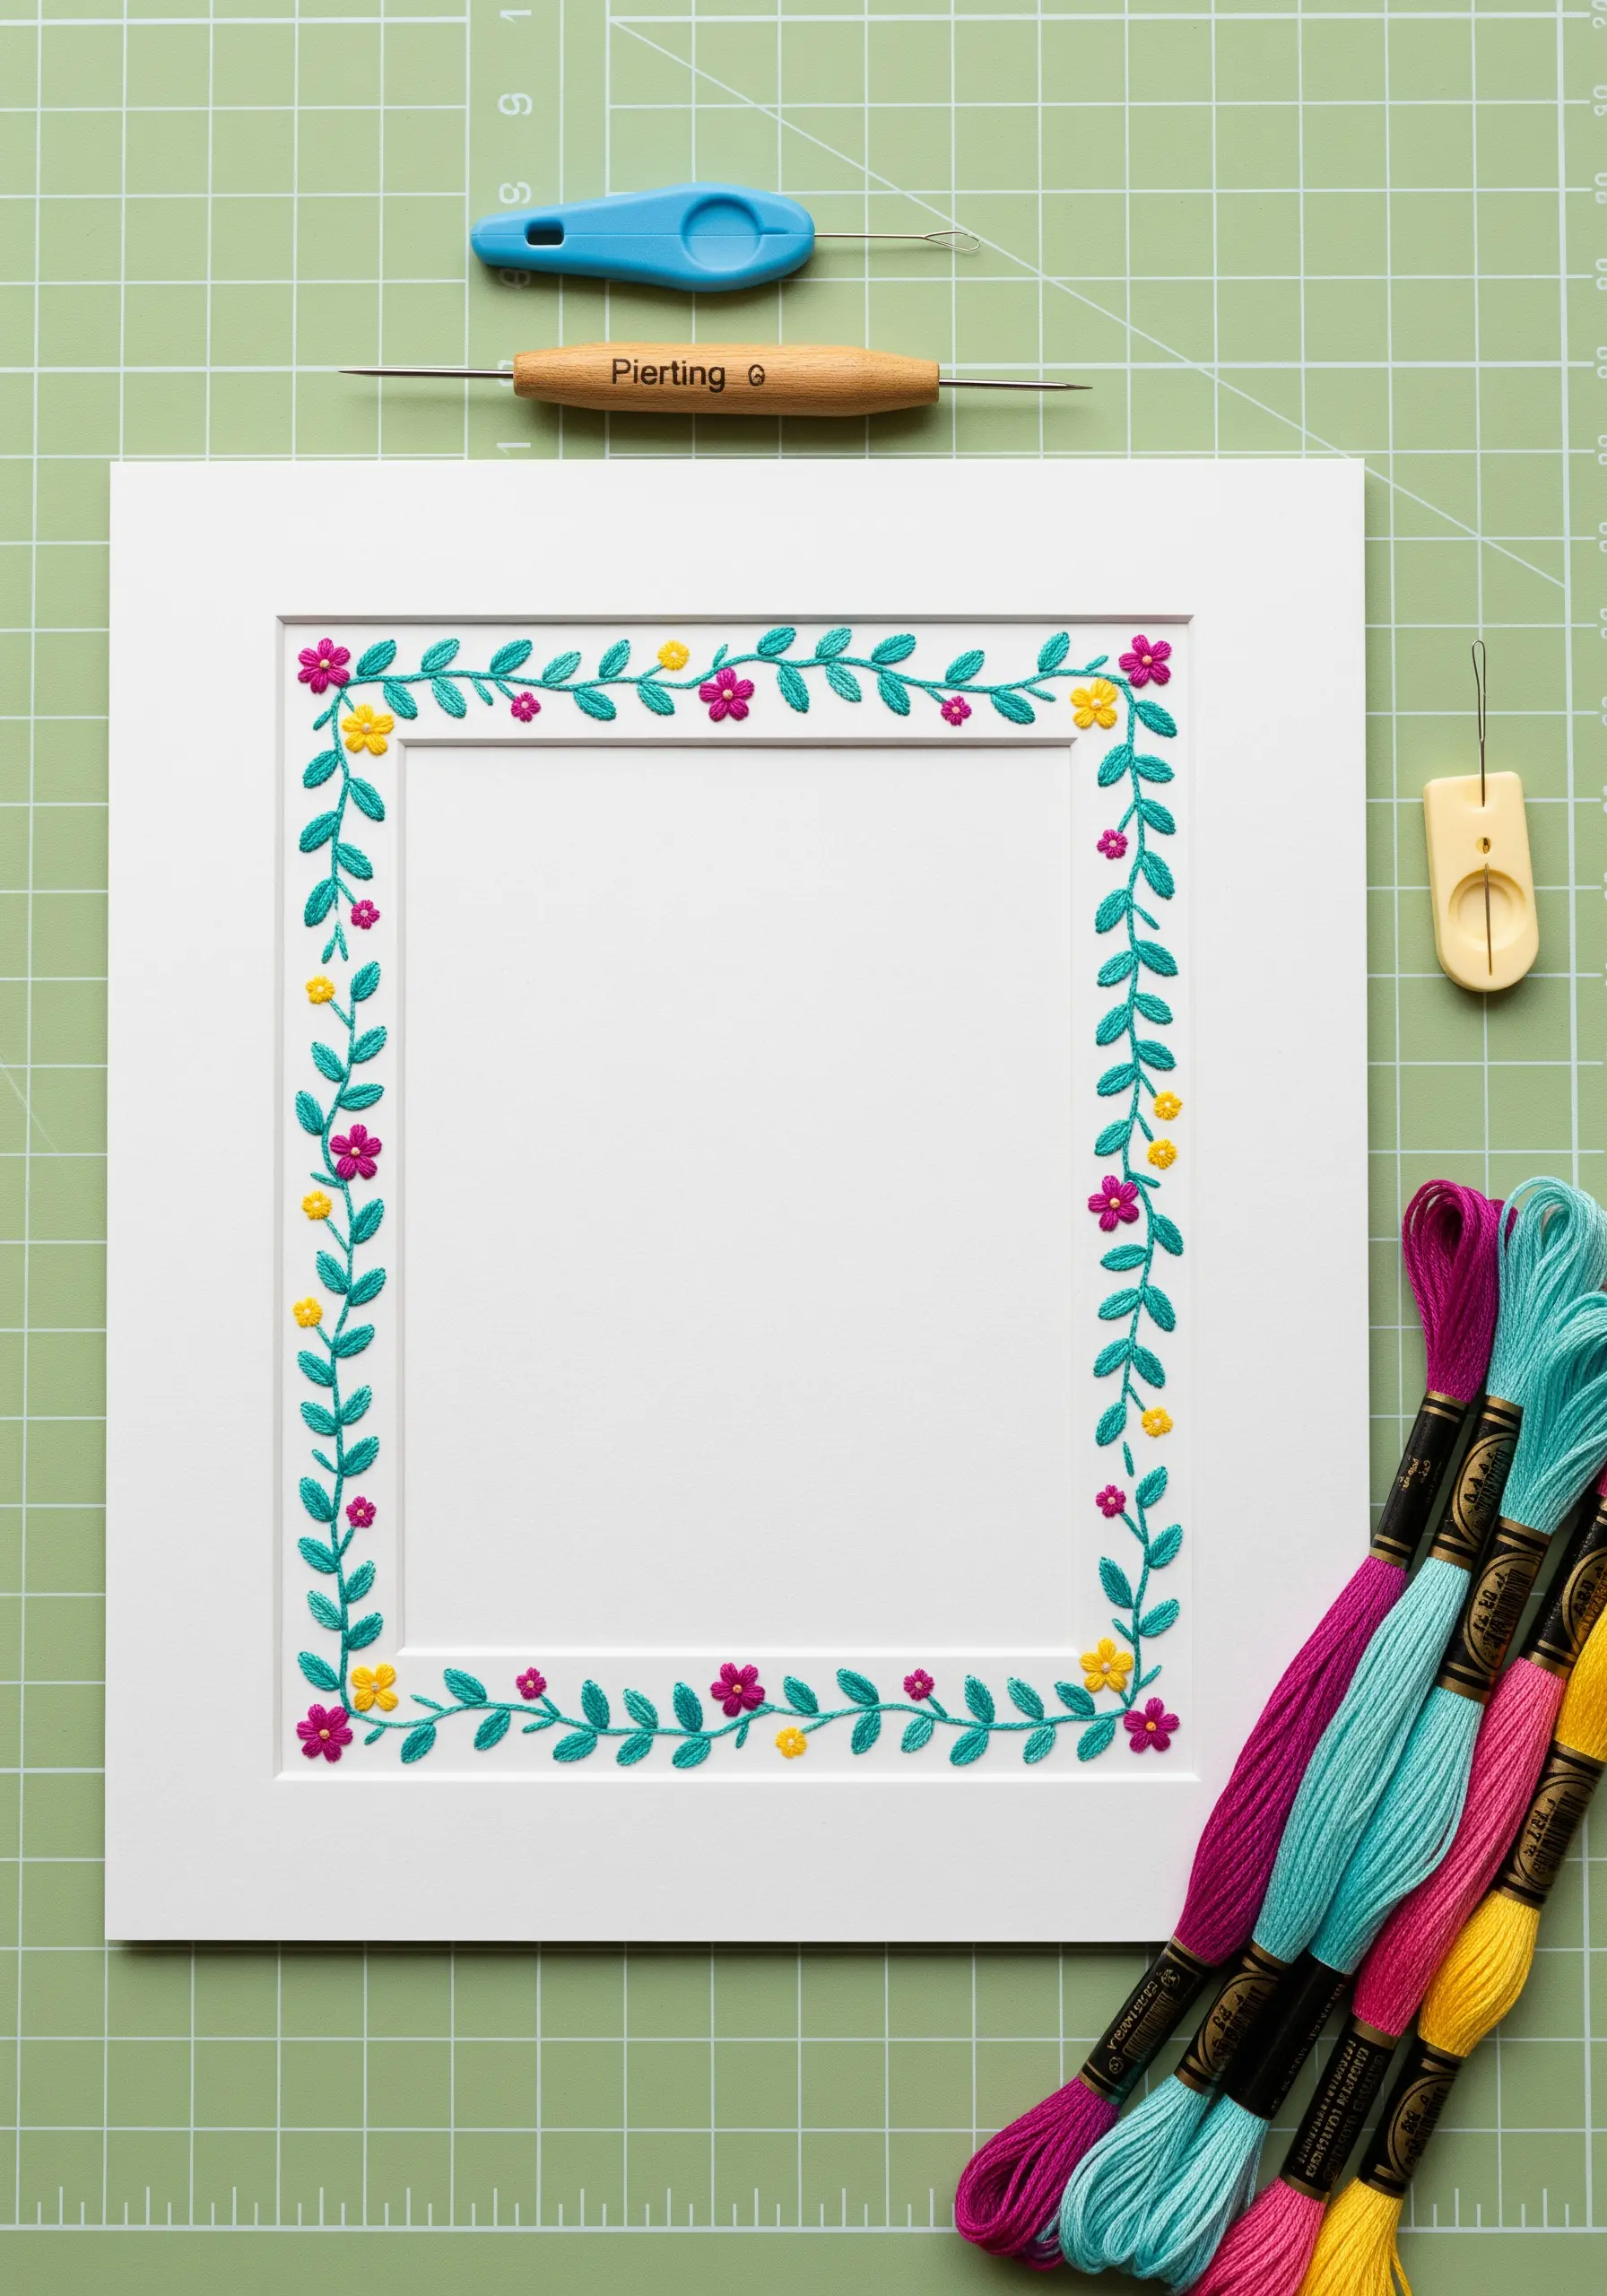
Elevate a standard picture mat by adding a hand-stitched floral border.
Use lazy daisy stitches for petals and French knots for flower centers; these dimensional stitches sit beautifully on the rigid surface of the mat board.
Before you begin, lightly mark your stitch placements with a pencil to ensure the rhythm and spacing of your repeating pattern is perfect.
This precision is what transforms a simple frame into a polished, custom piece.
5. Woven Texture on Kraft Paper Tags
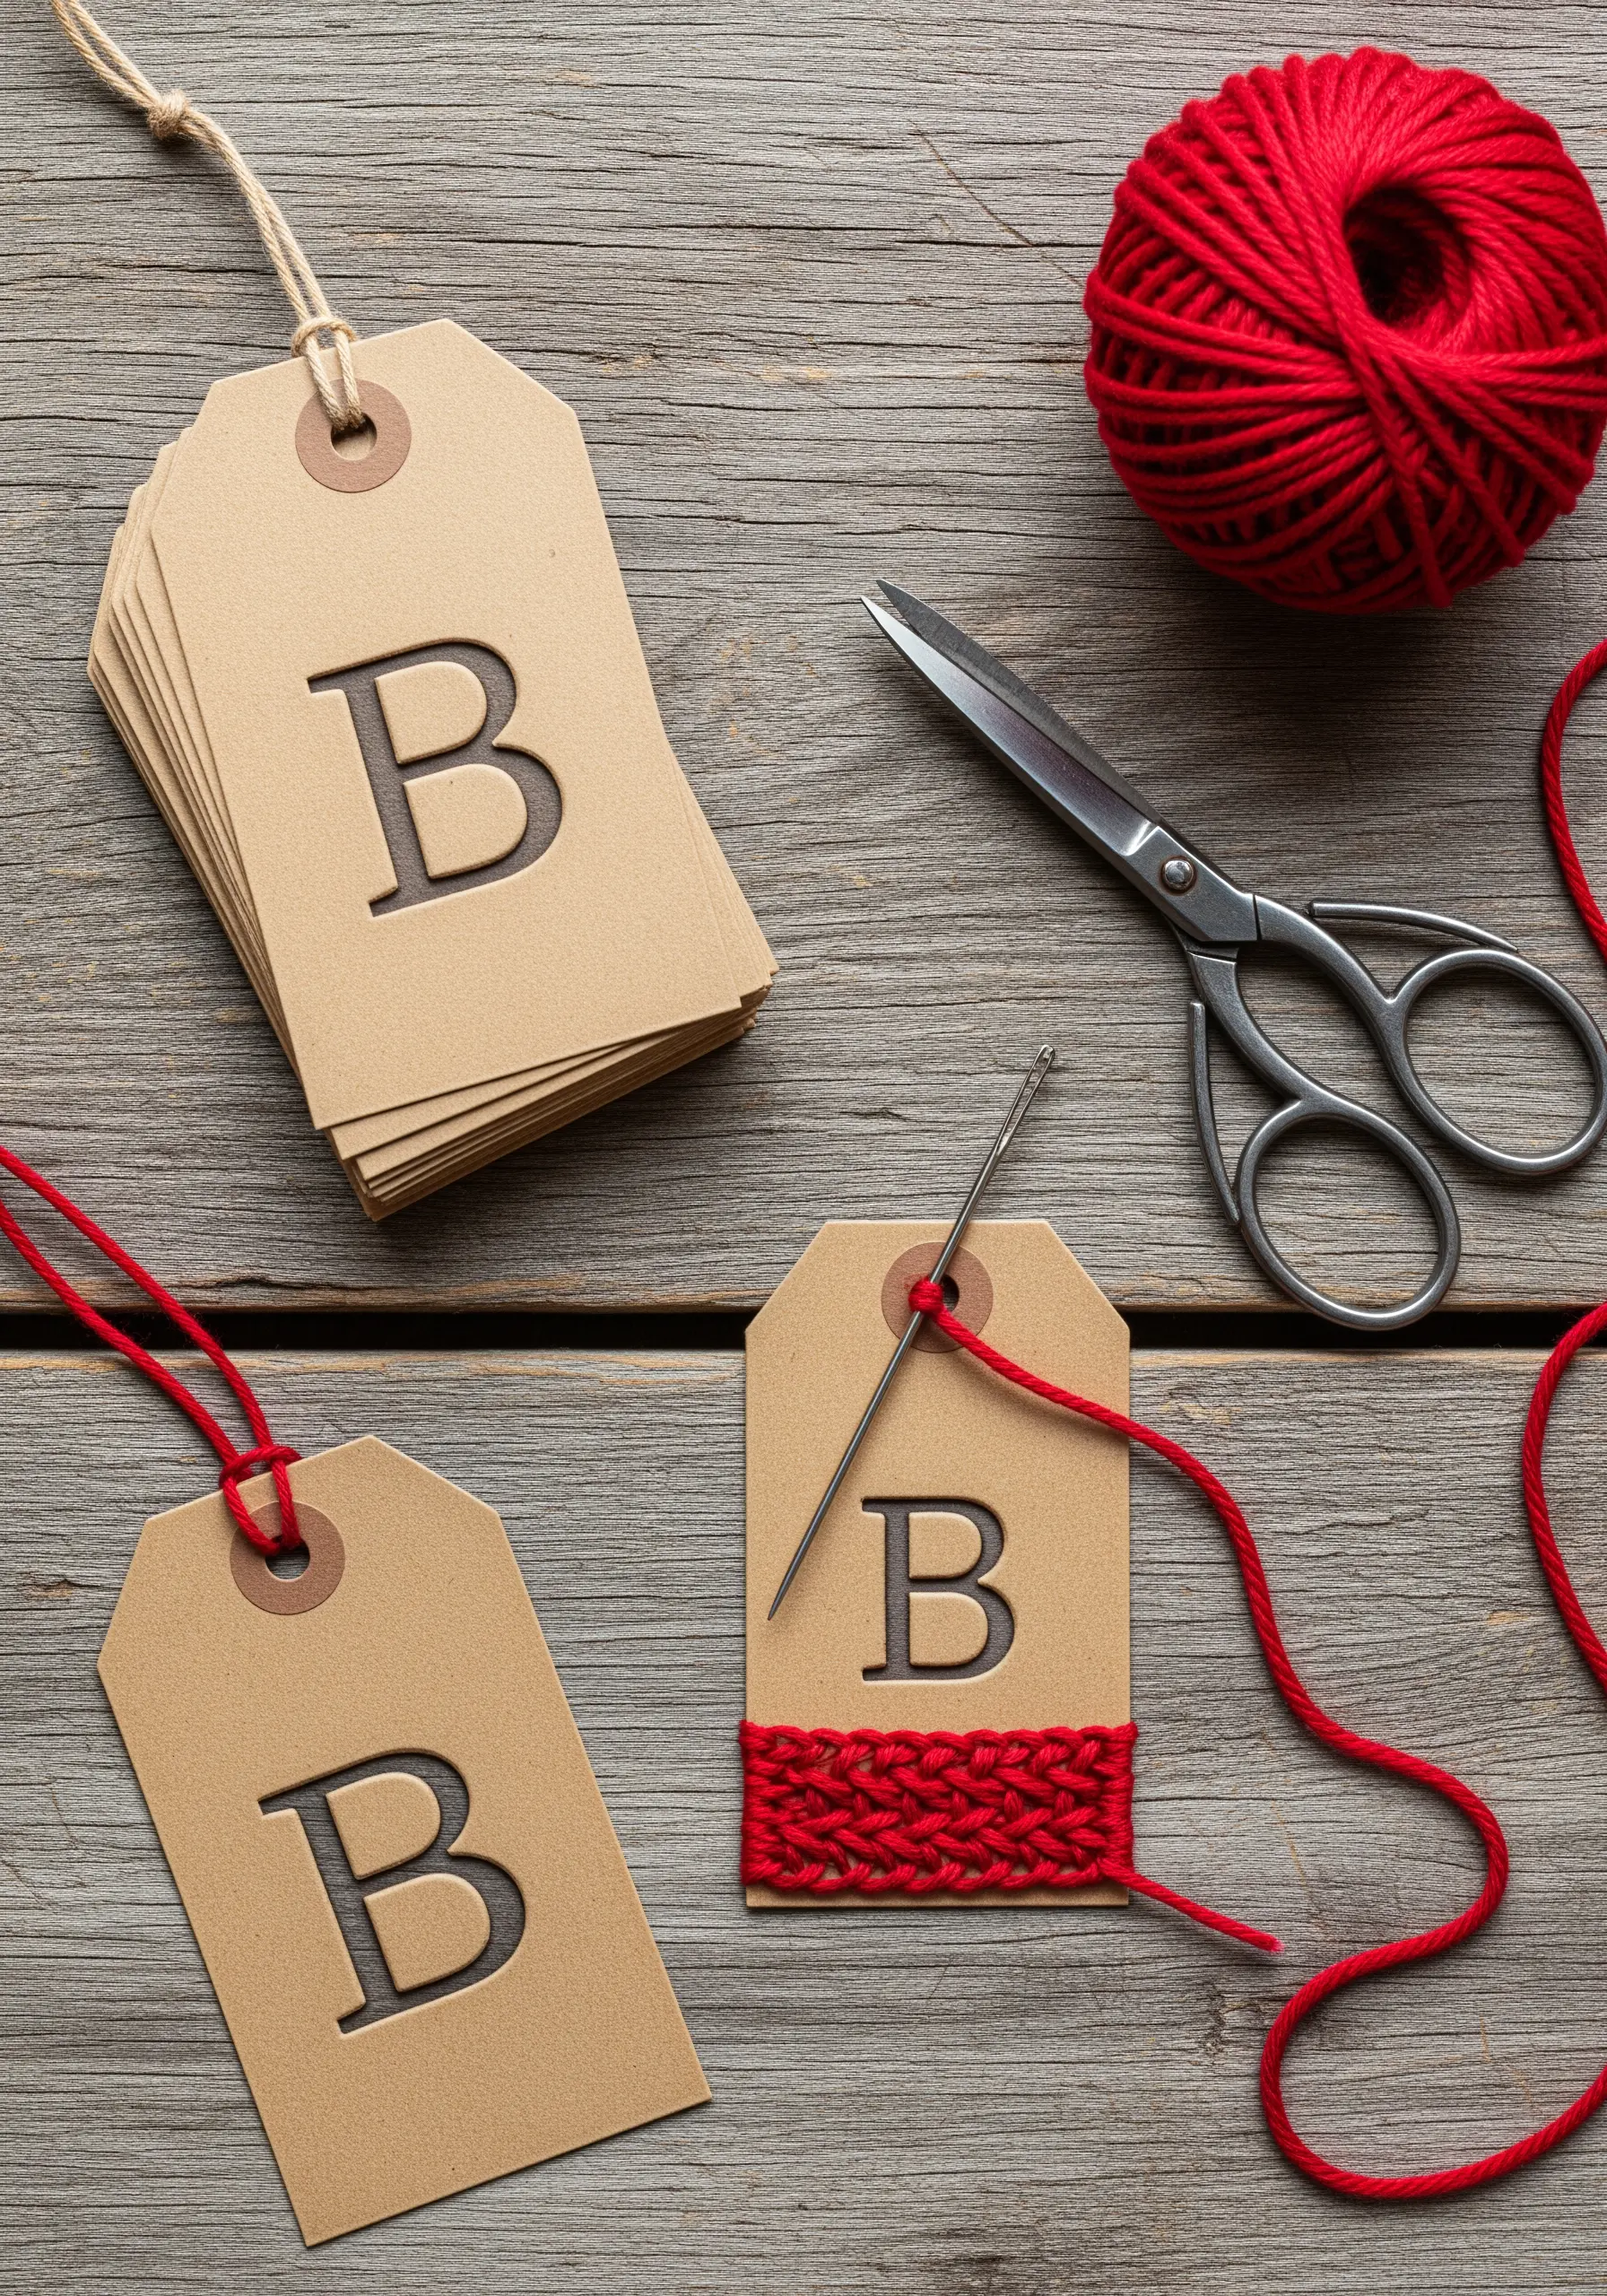
Introduce a cozy, tactile element to simple gift tags by weaving yarn directly onto the paper.
Use a hole punch to create two parallel rows of holes, which will act as your loom.
The density of your weave is controlled by the spacing of these holes—place them closer together for a tight, fabric-like texture.
This technique turns a disposable tag into a memorable part of the gift itself.
6. Stitched Paper Garland for Instant Celebration
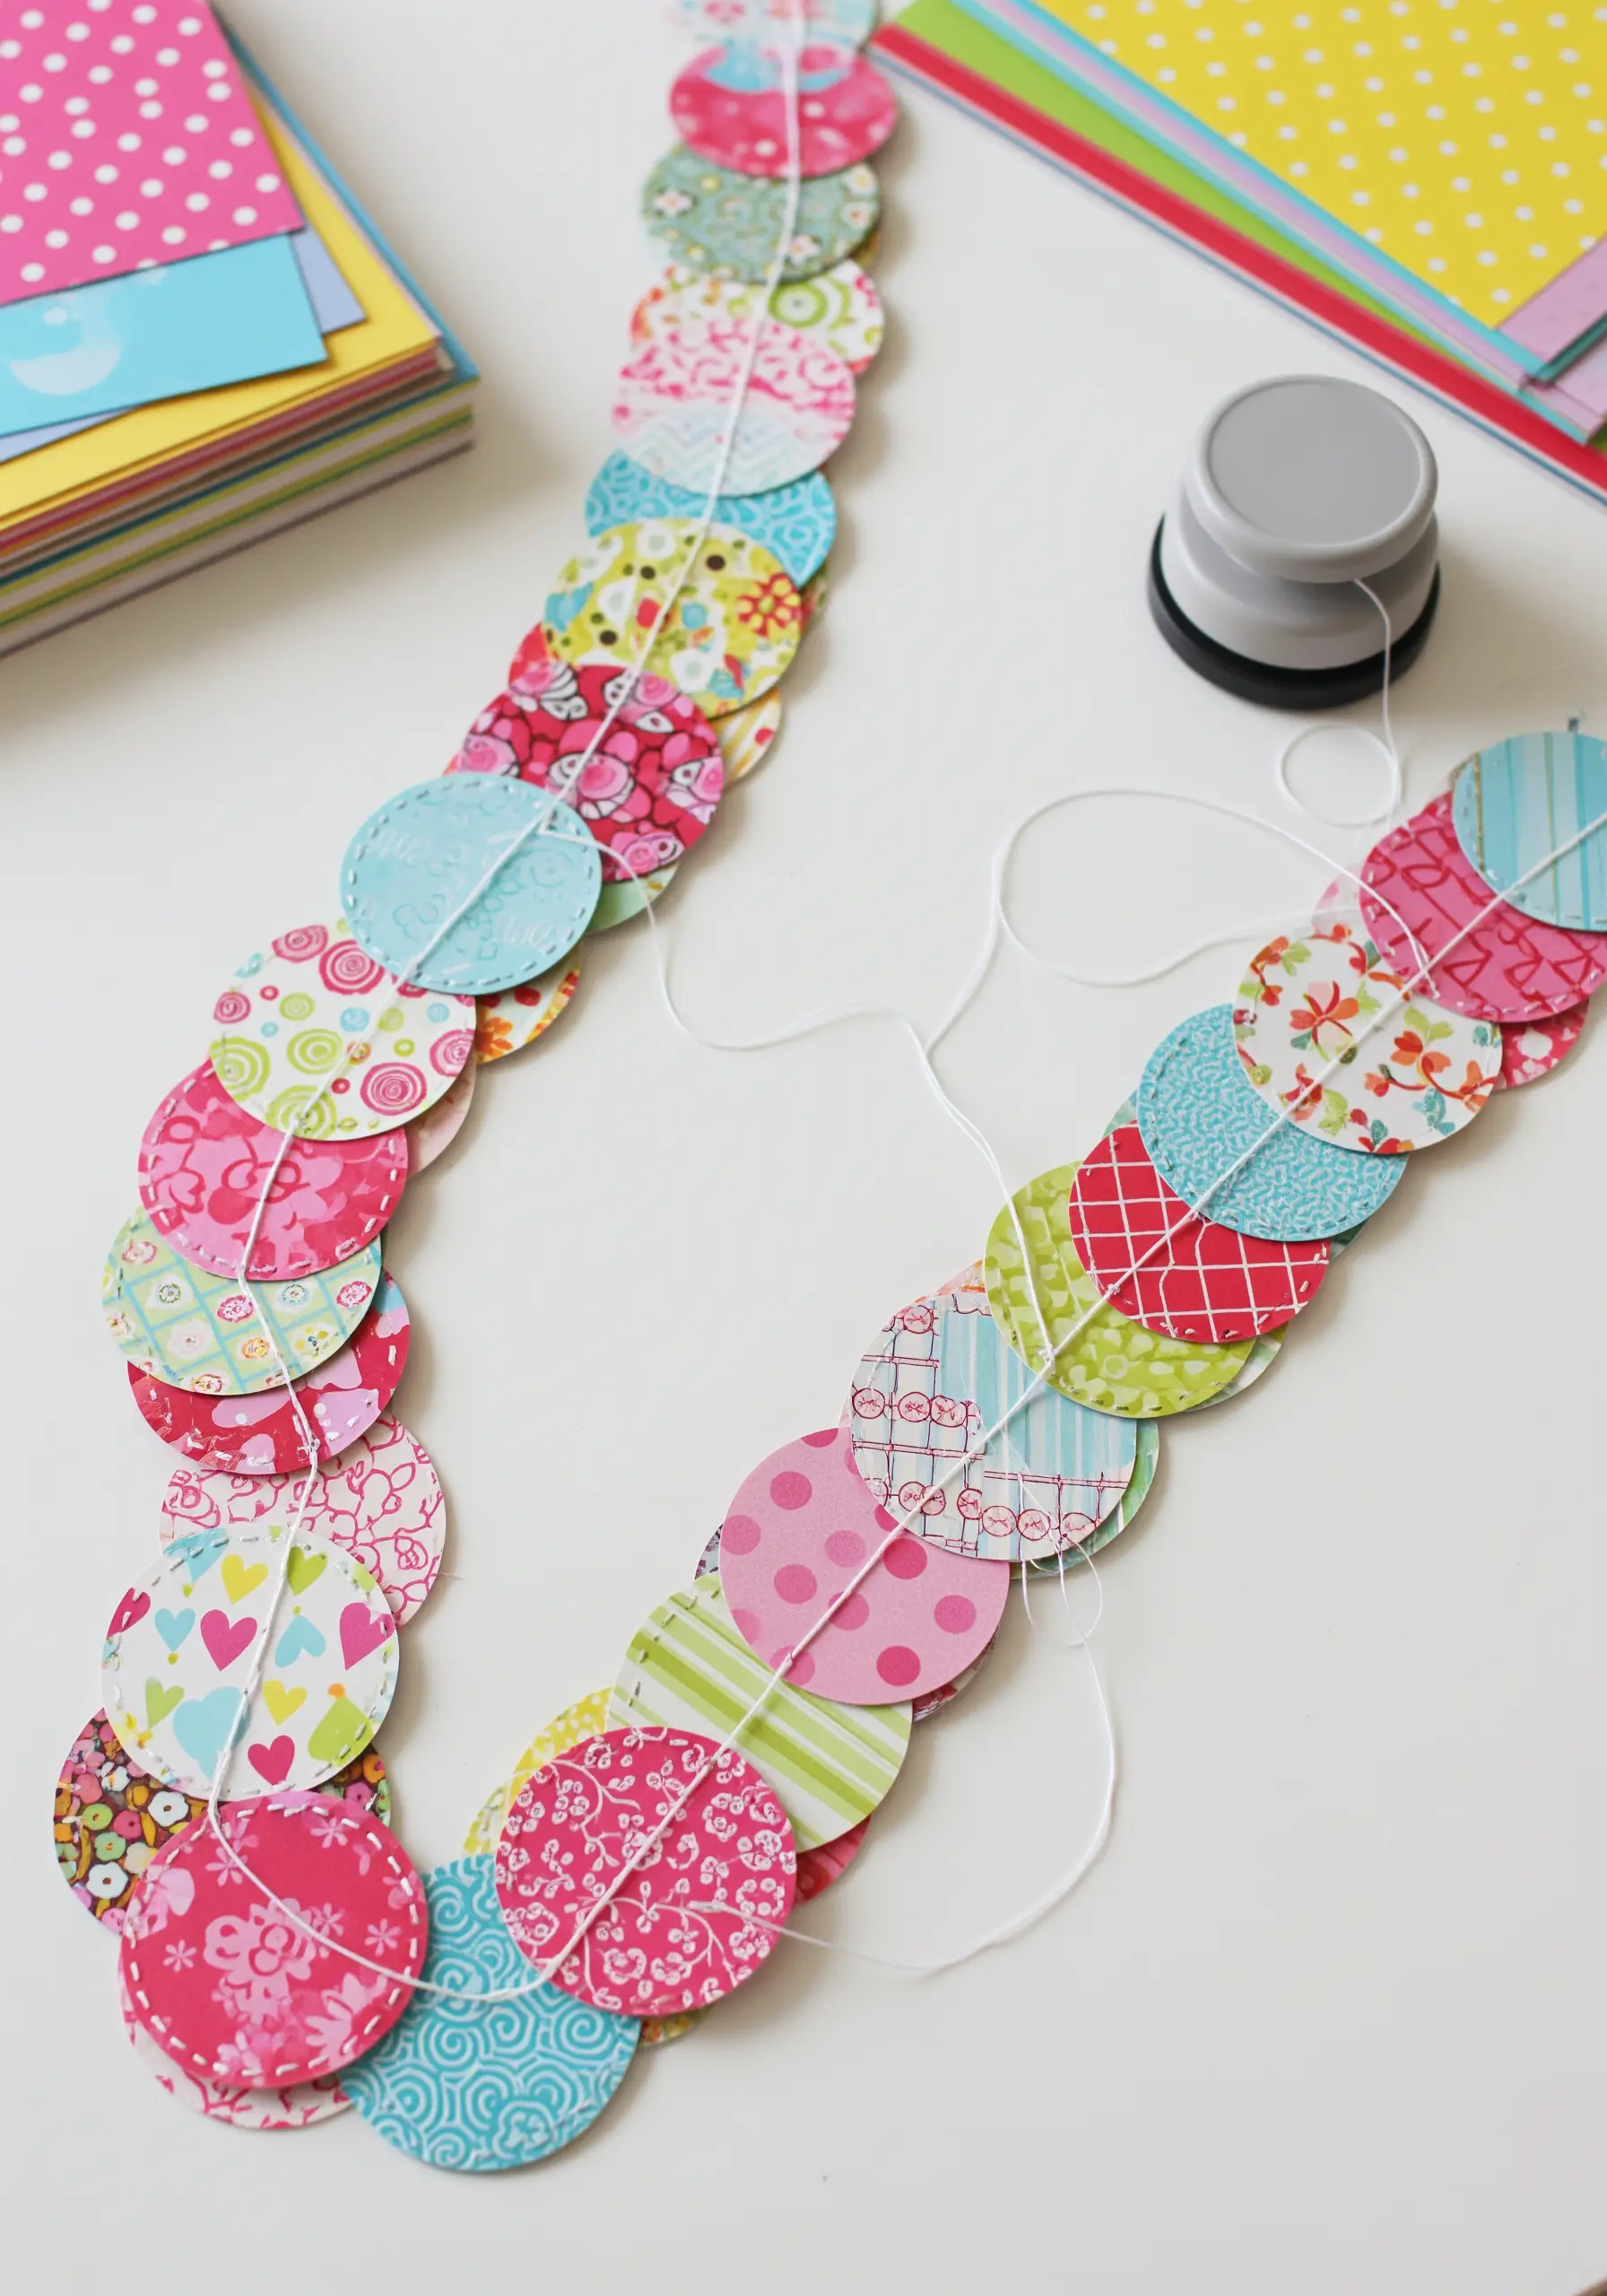
This is a perfect project for your sewing machine, allowing you to create long, festive garlands in minutes.
Use a circle punch for uniform shapes and choose coordinating patterned scrapbook paper.
Set your machine to a long straight stitch and feed the paper circles through one by one, leaving a small gap of stitches between each to form the connecting chain.
For a polished, double-sided finish, simply stitch through two paper circles placed back-to-back.
7. Meditative Mandala on Cardstock
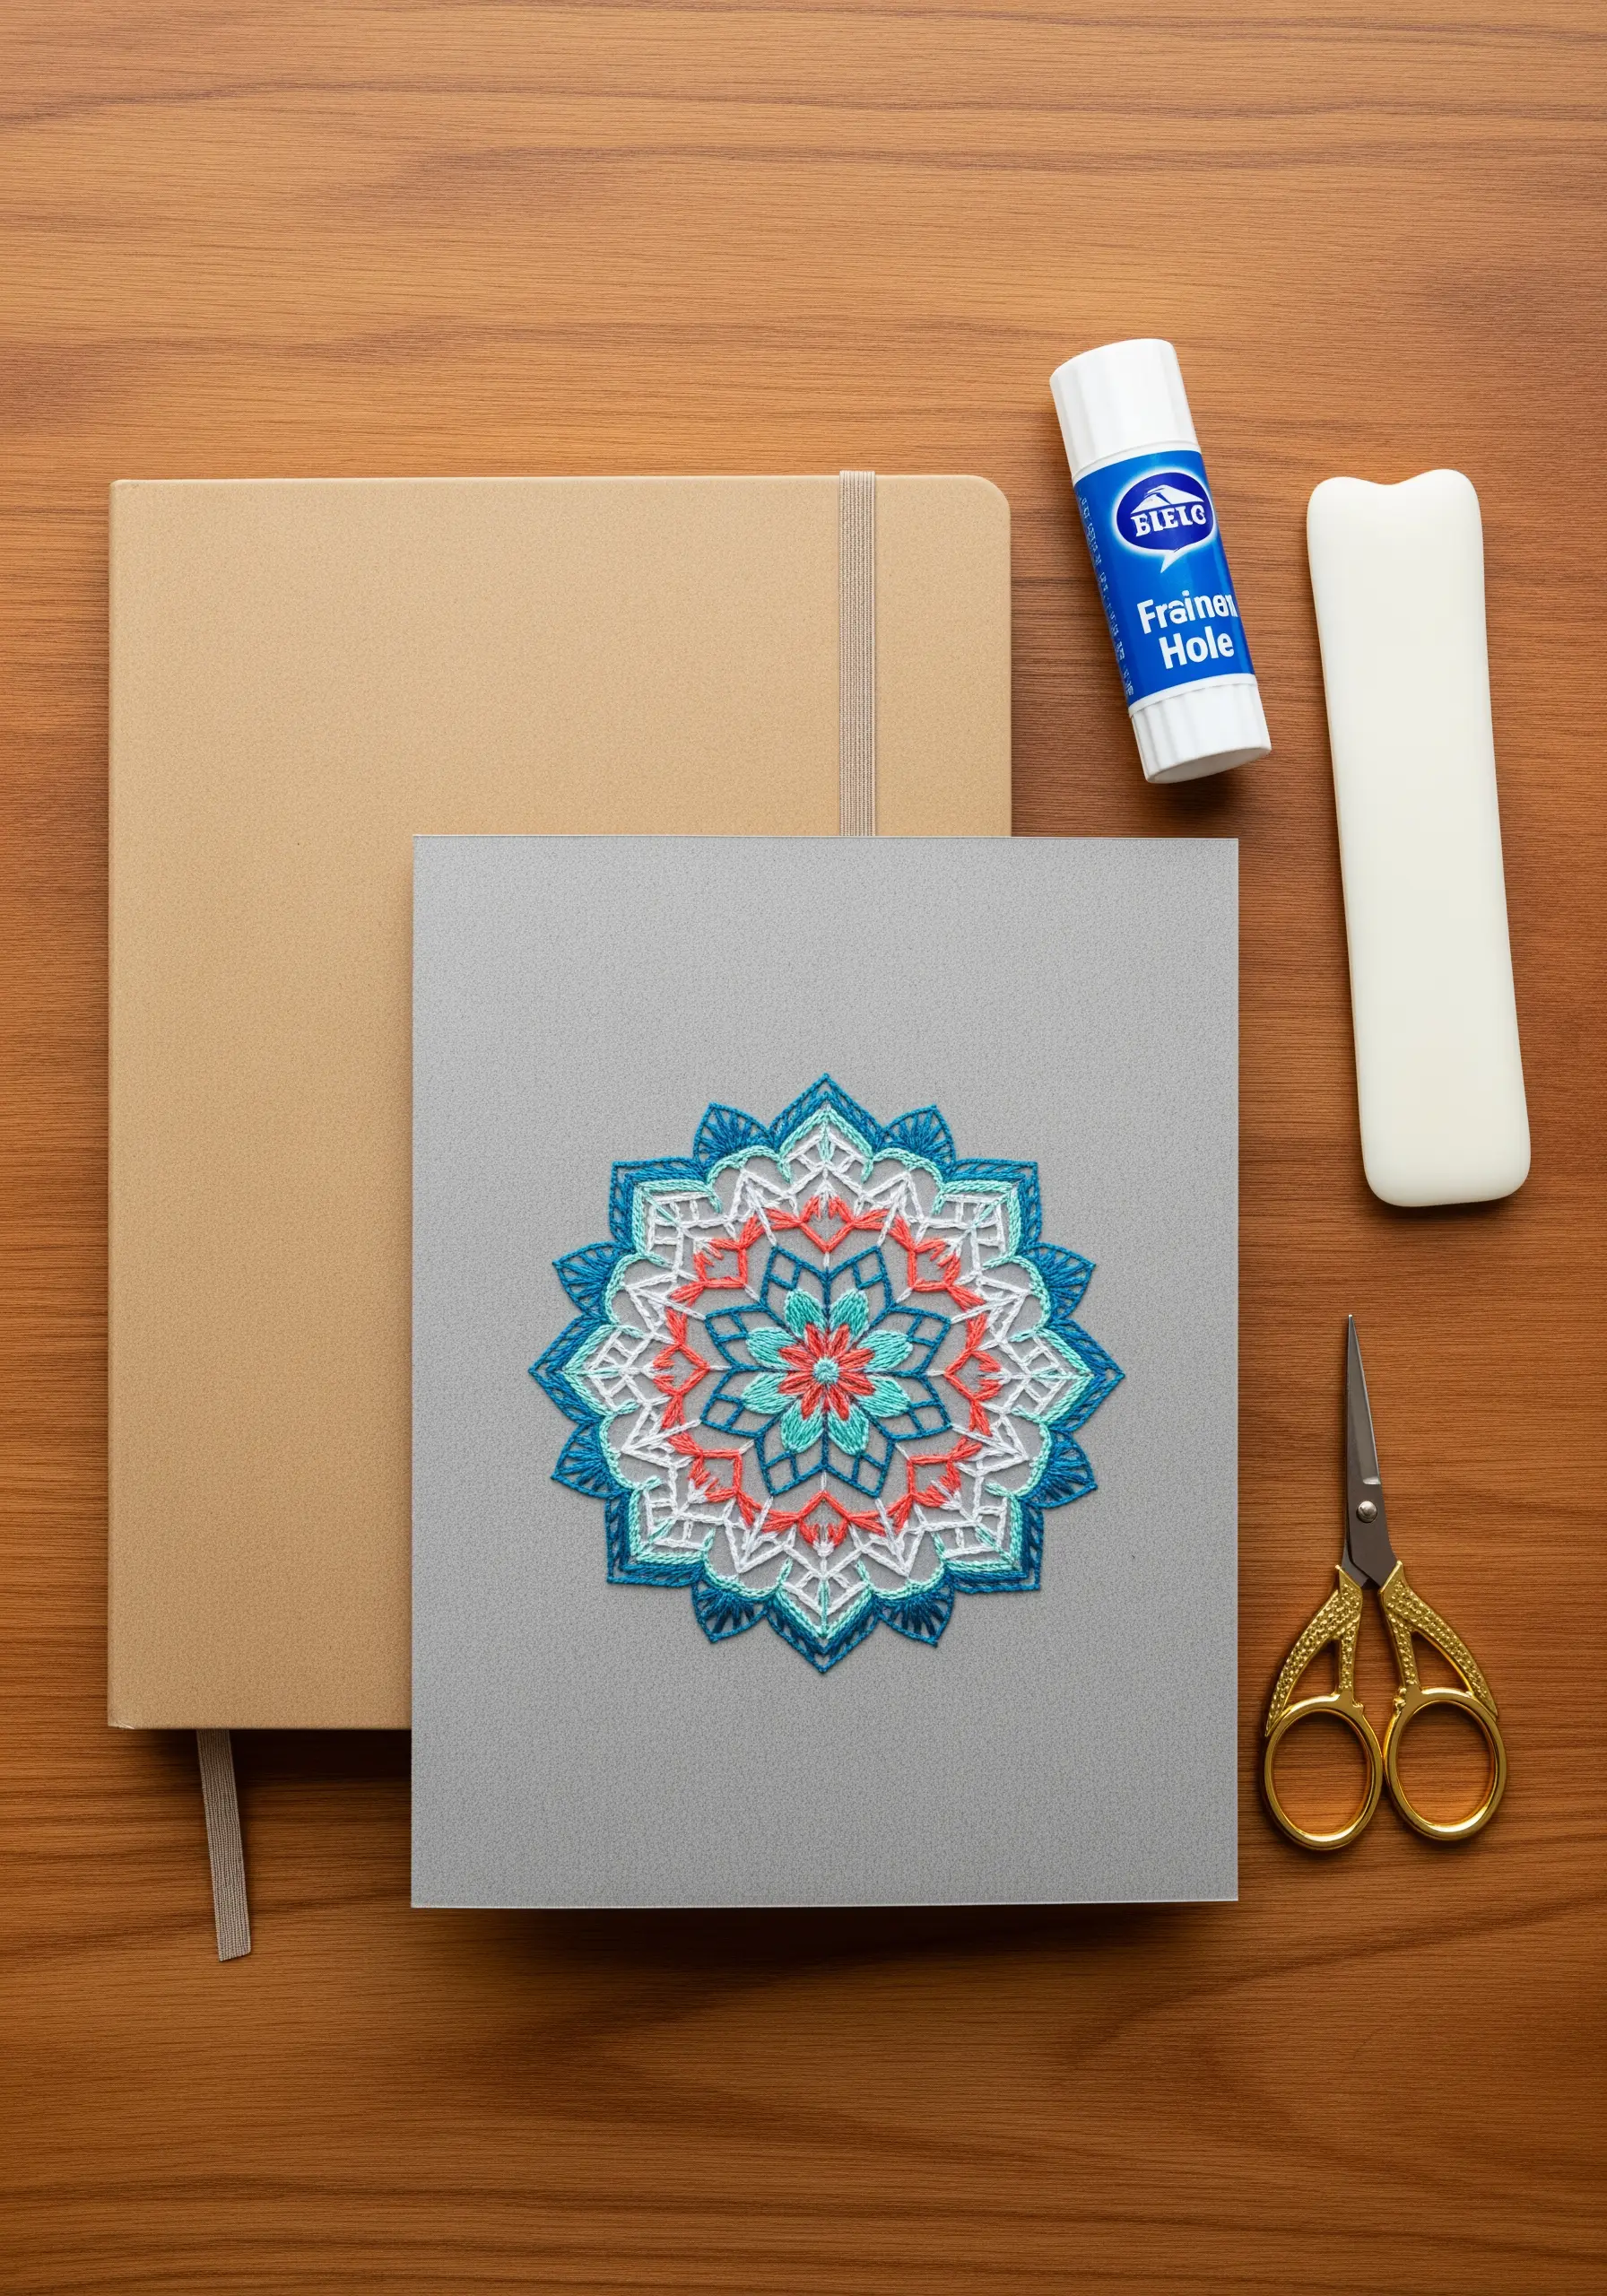
The rigidity of paper is ideal for creating crisp, geometric mandalas where precision is key.
Begin by drawing faint guidelines with a compass and protractor, then pre-pierce all the holes for your stitches.
This preparation guarantees the flawless symmetry essential for a stitched mandala on paper.
Alternate between backstitch for sharp outlines and satin stitch for filled sections to build layers and create a rich, textured design.
8. Abstract Composition on Hooped Paper
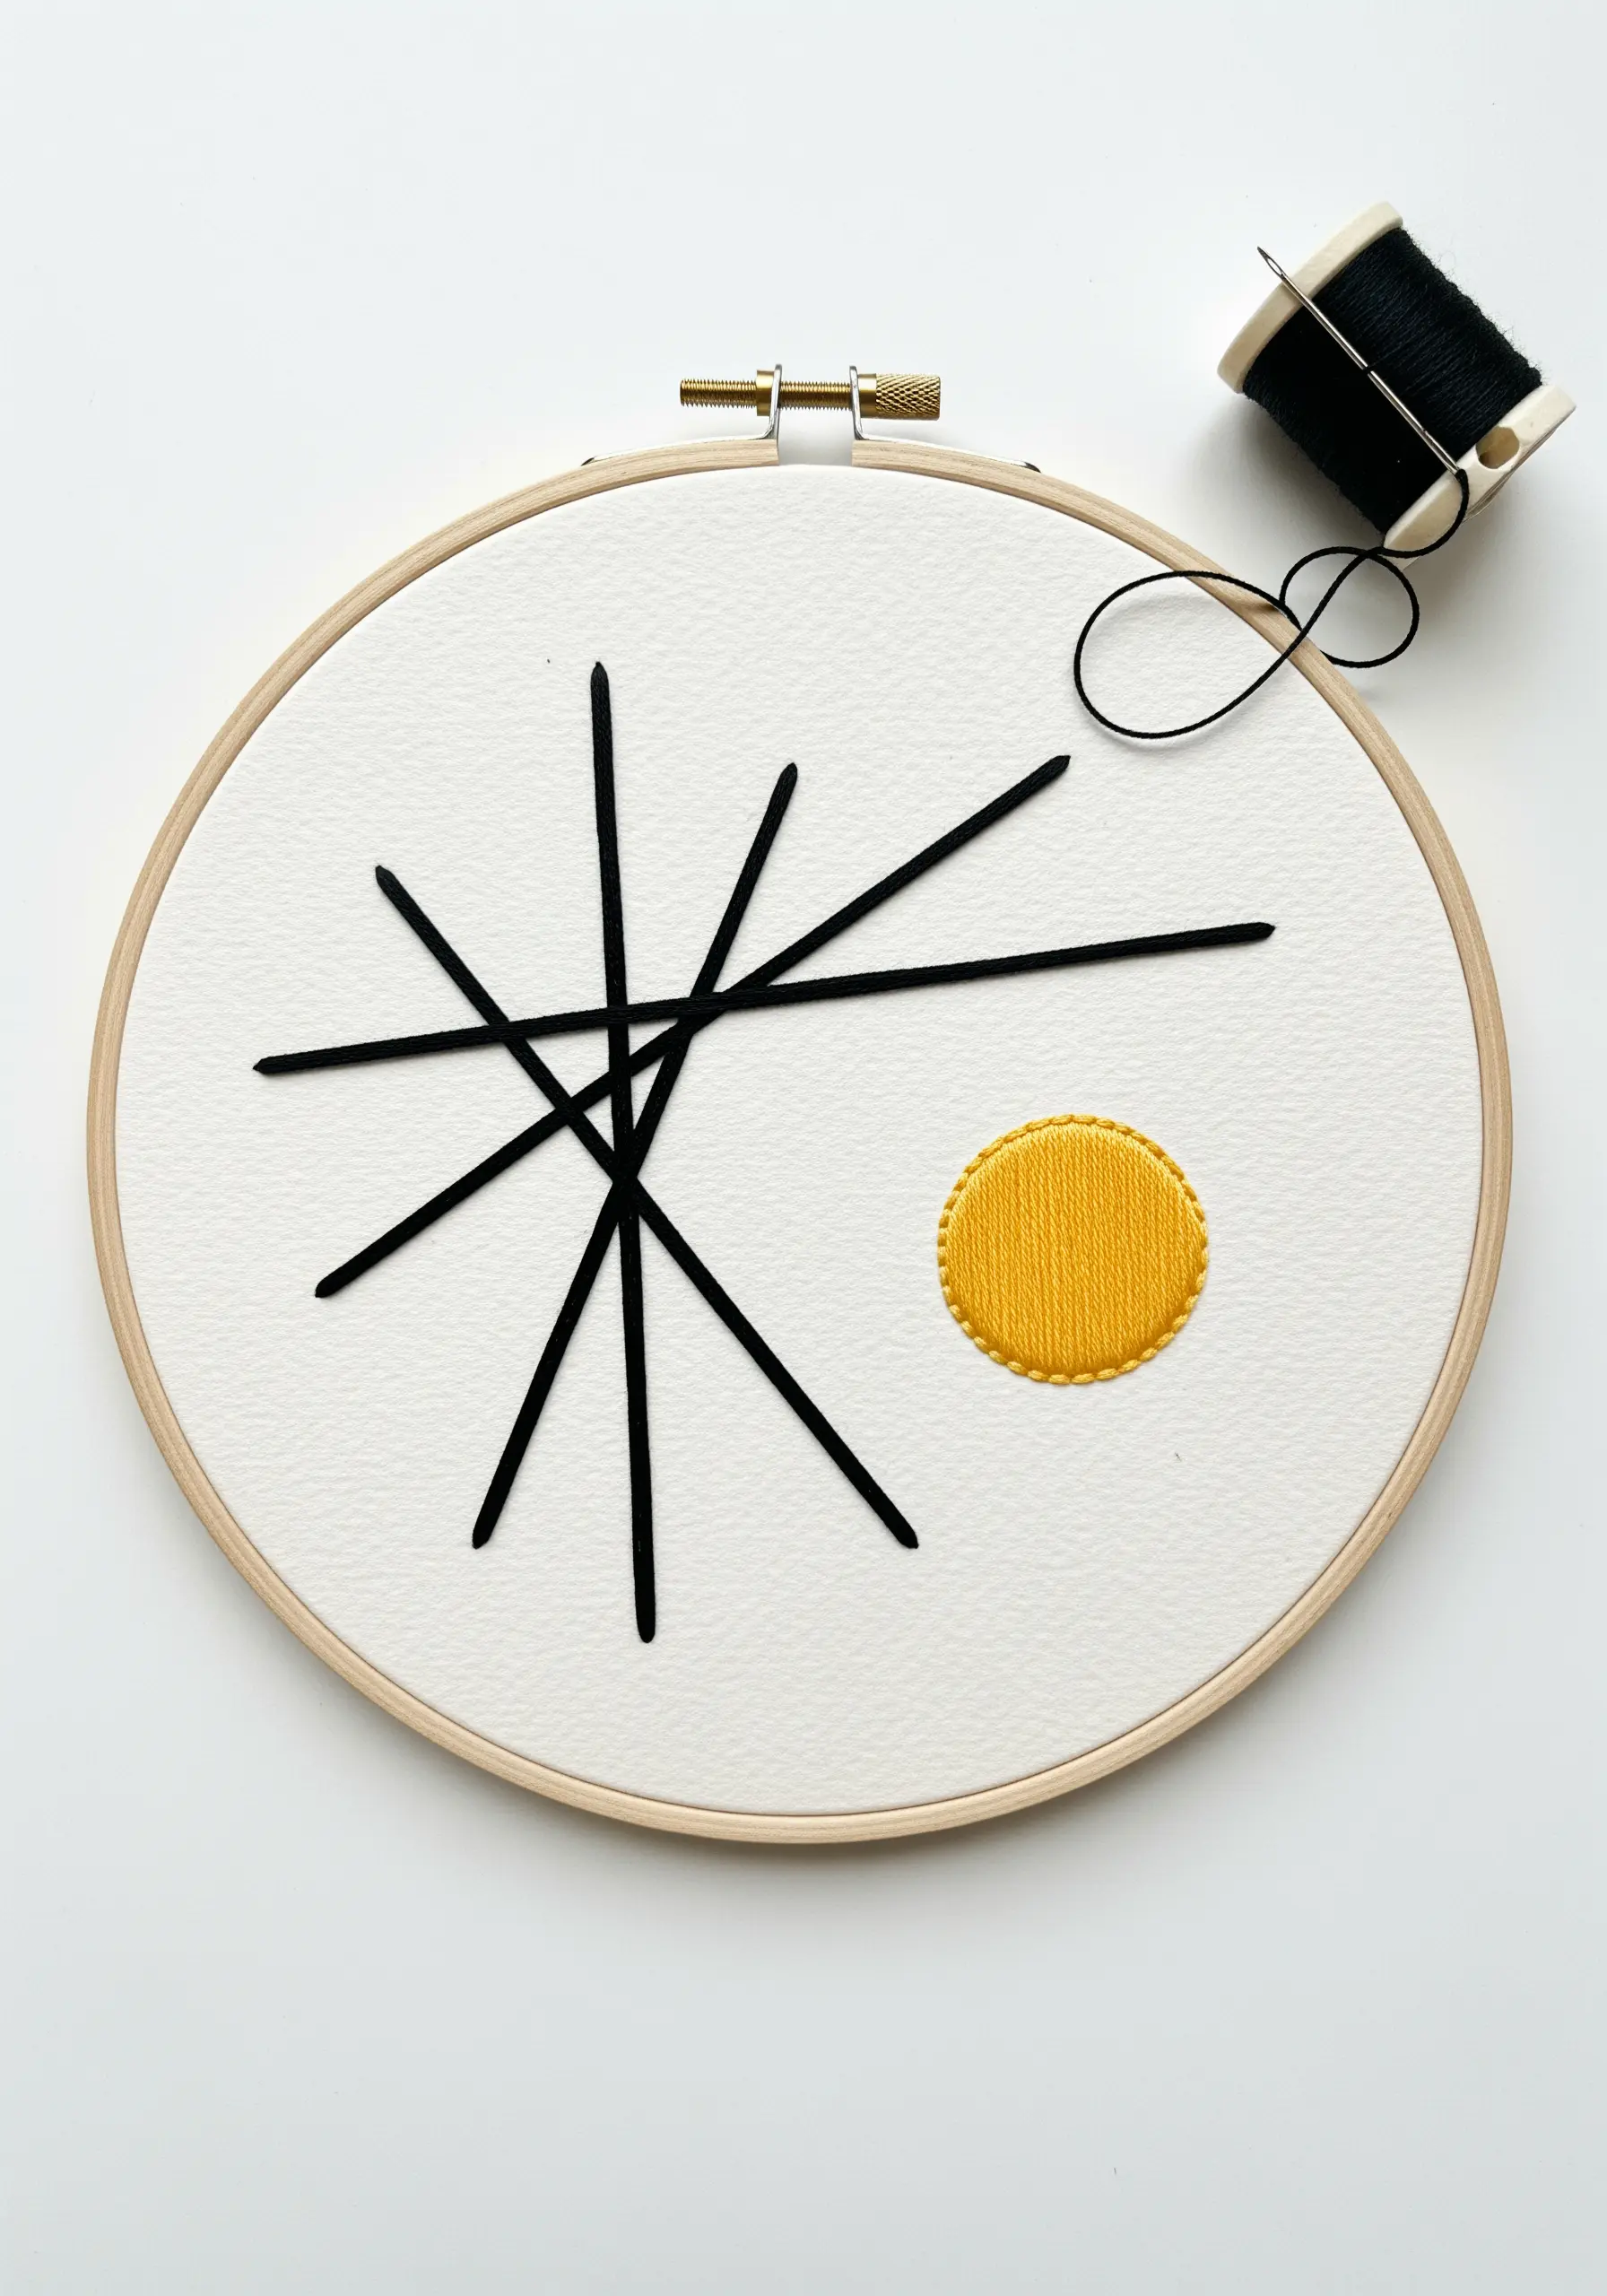
Treat heavyweight watercolor paper just like fabric by securing it in an embroidery hoop for optimal tension.
This allows you to pull your stitches taut for incredibly clean, sharp lines that are difficult to achieve on soft textiles.
Contrast the bold, black line work with a single, satin-stitched shape in a vibrant color.
This pop of soft texture creates a compelling focal point and balances the graphic nature of the abstract design.
9. Delicate Stitched Paper Feathers
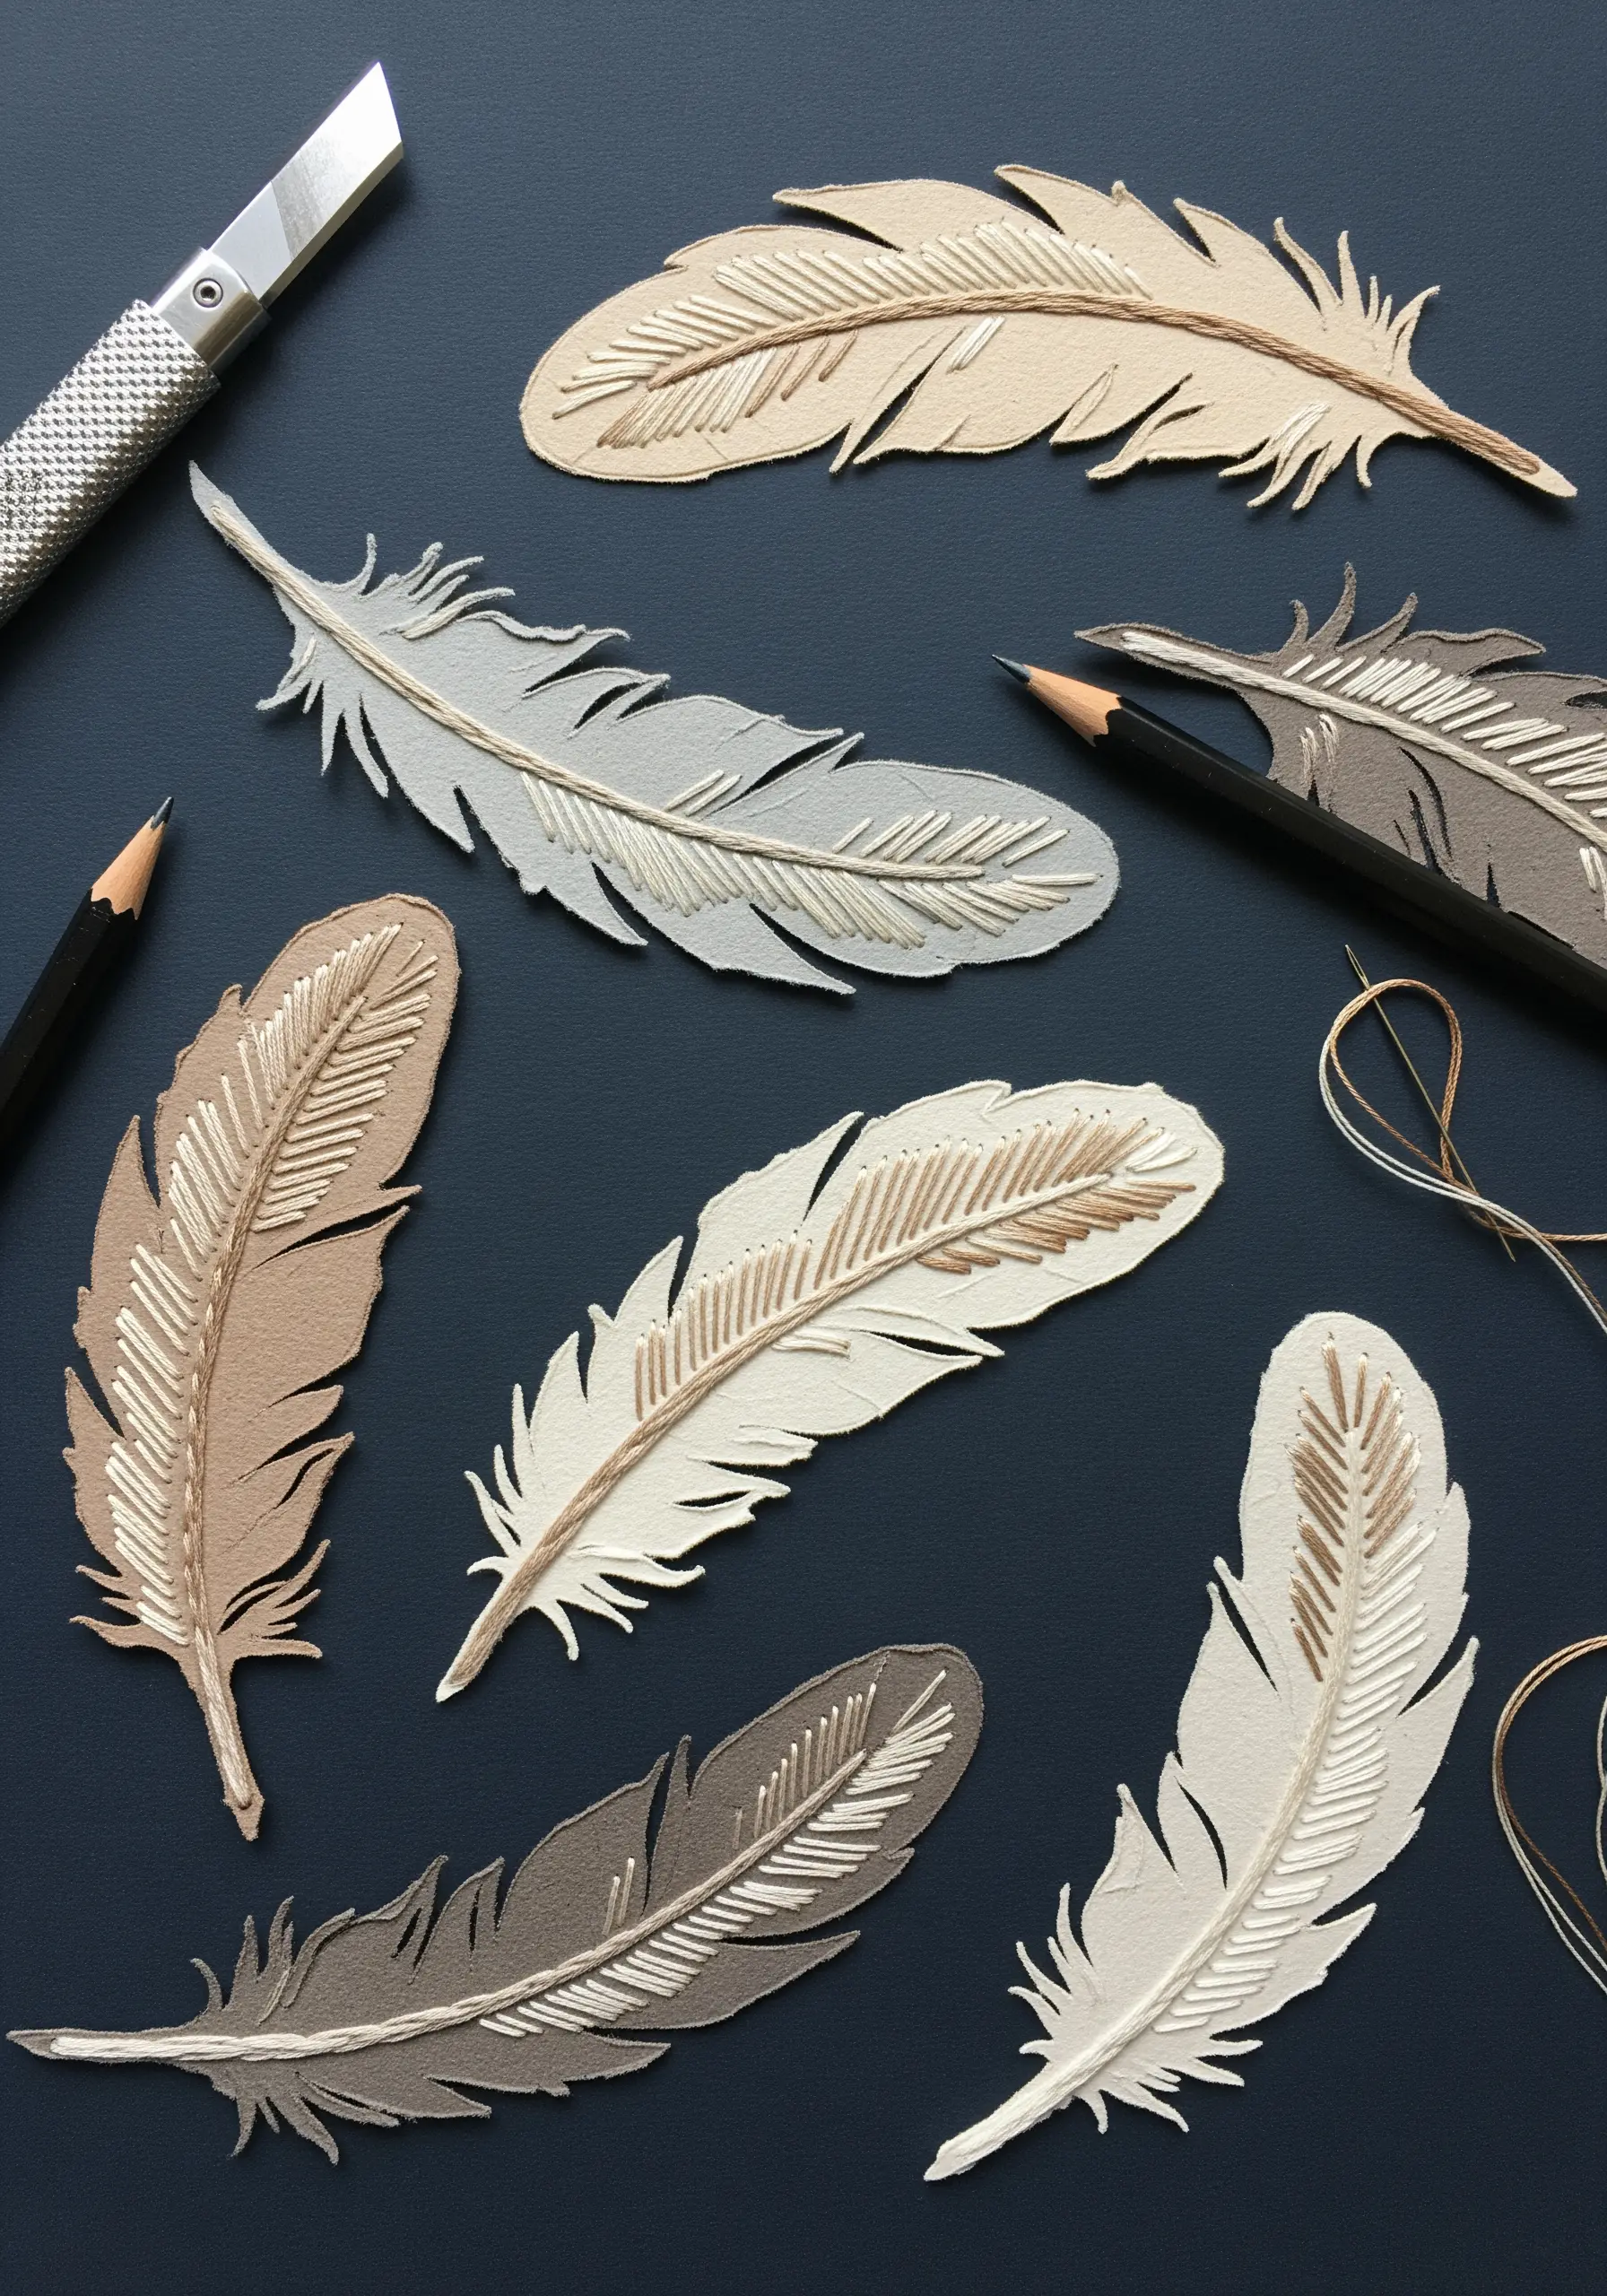
Combine the precision of paper cutting with the subtlety of embroidery to create lifelike, dimensional feathers.
After cutting your feather shape from cardstock, use a single strand of thread to add texture.
A central stem stitch forms the rachis, while angled straight stitches mimic the delicate barbs.
The goal is suggestion, not full coverage; sparse stitching allows the paper form to remain the hero of the piece.
10. Layered Paper-and-Stitch Landscapes
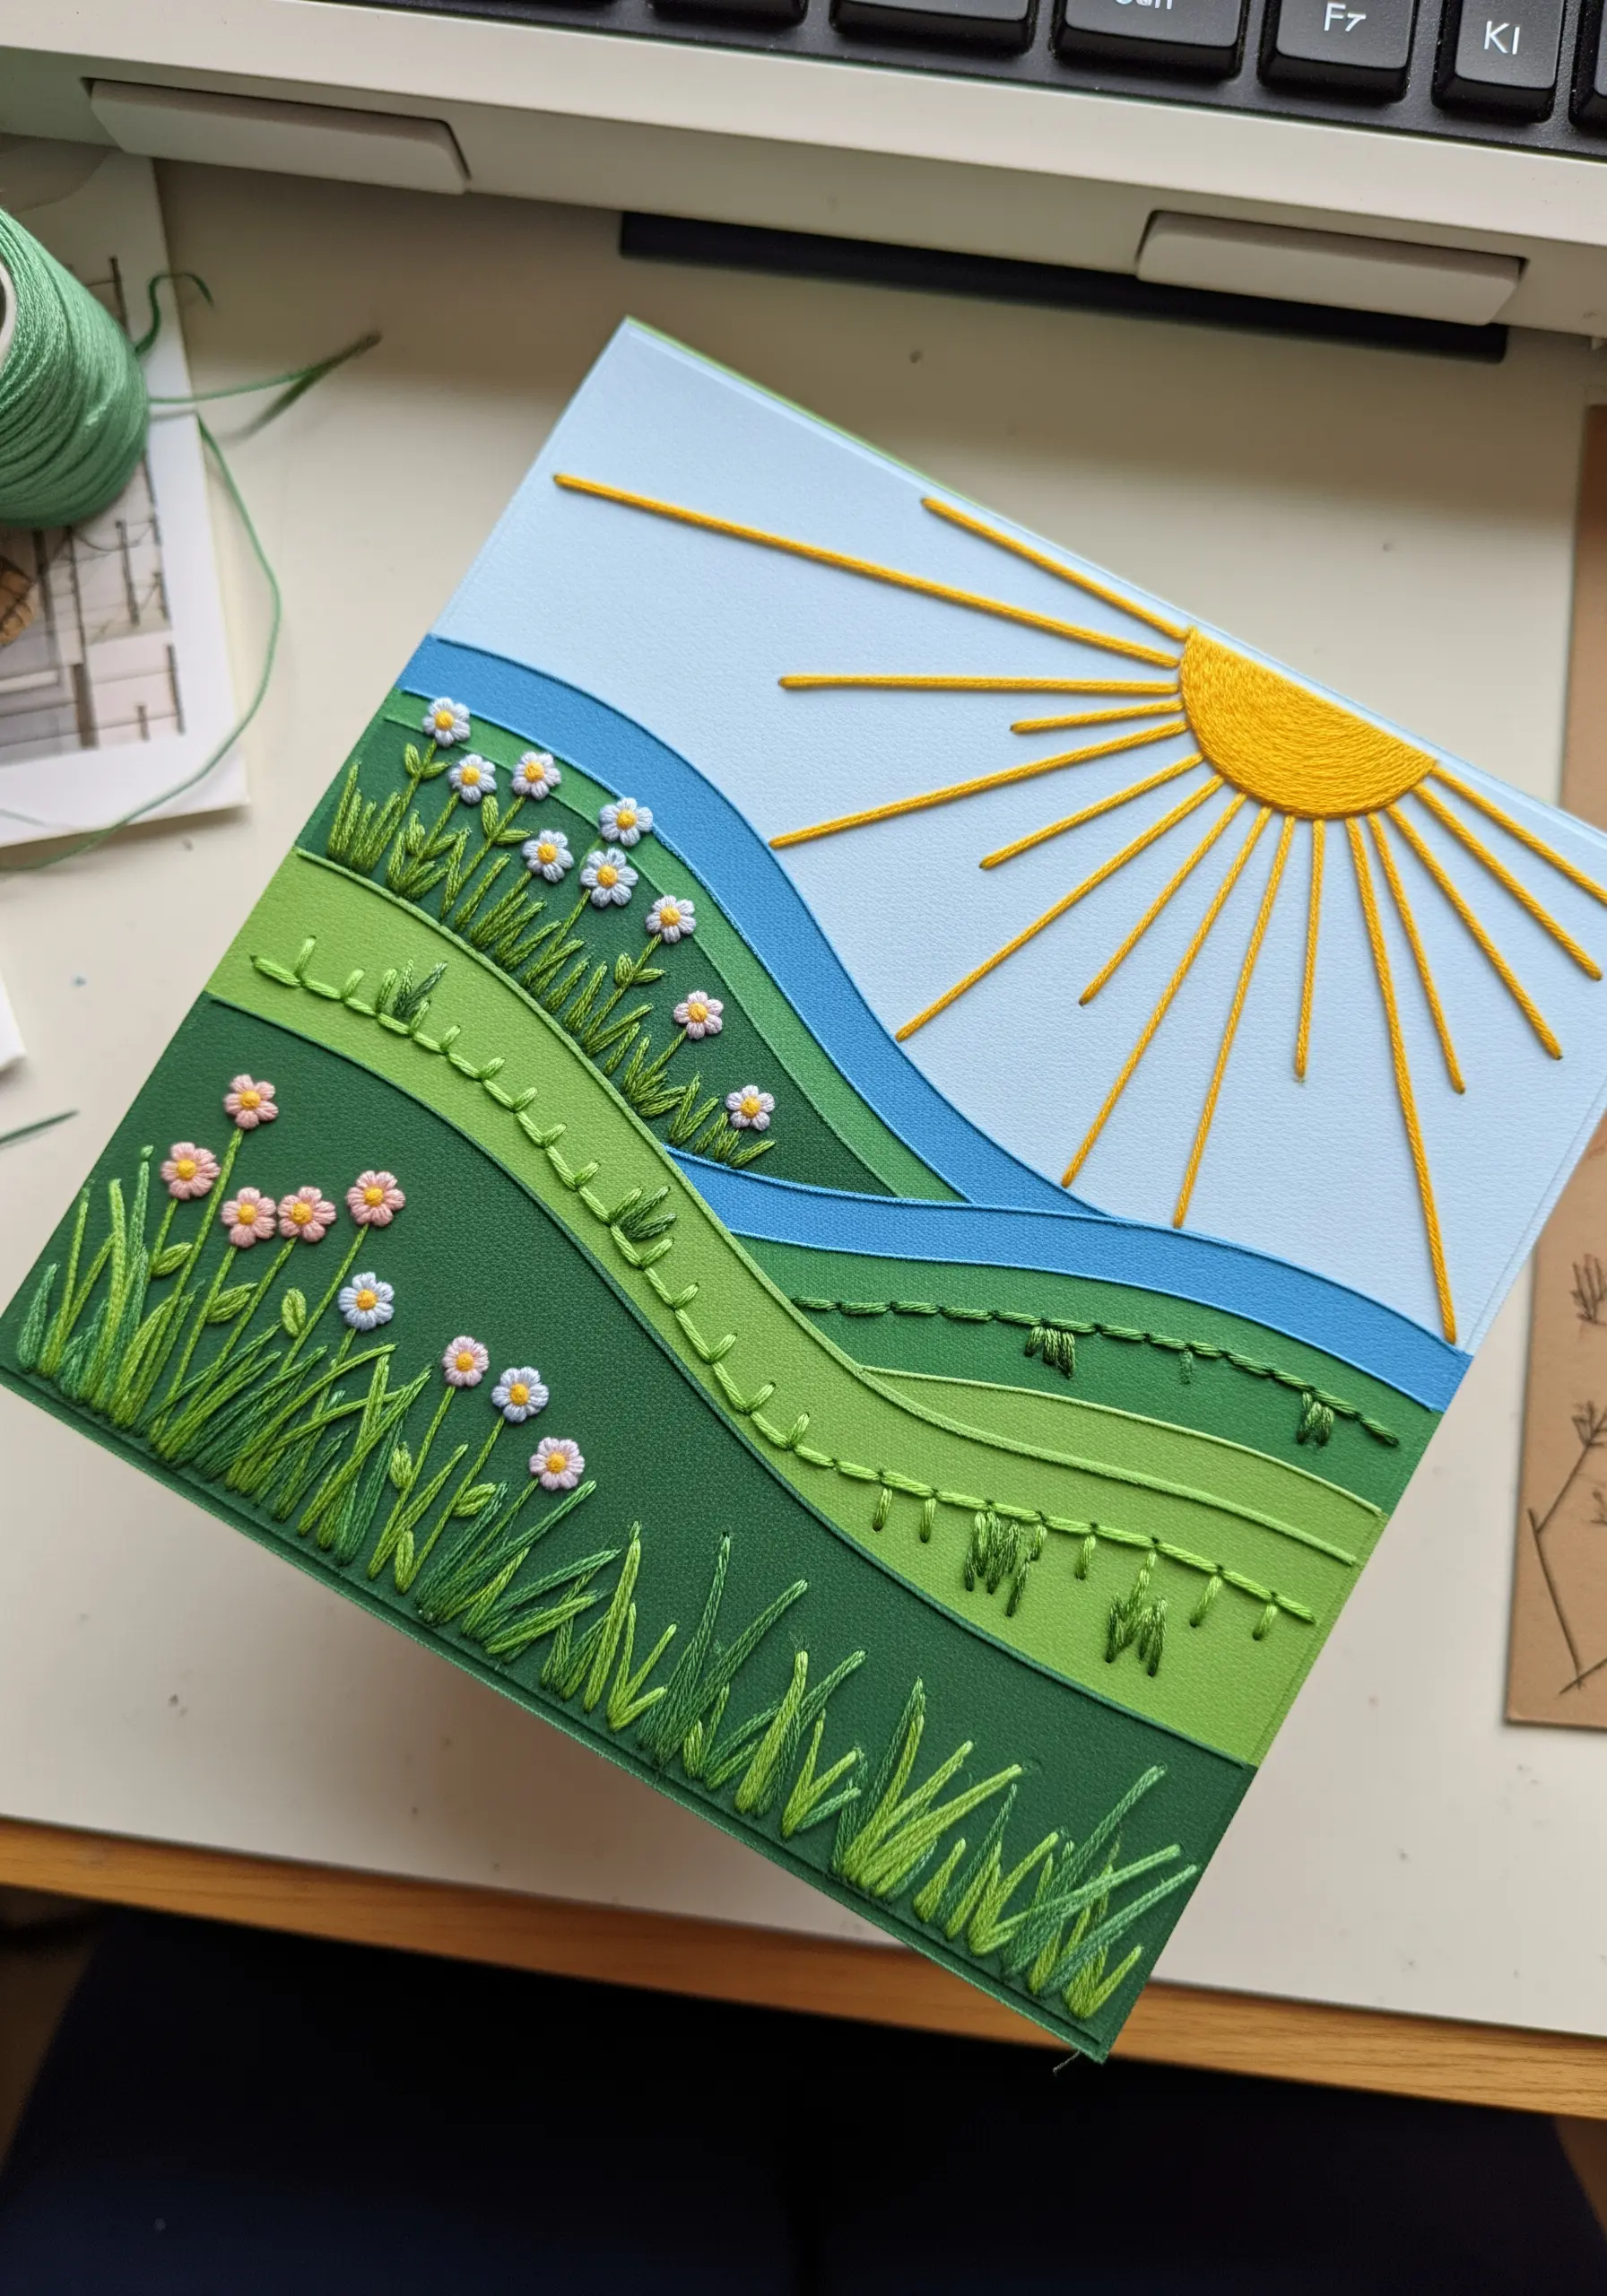
Build a landscape with real depth by layering different shades of colored cardstock.
Use your stitches not just as decoration, but as a way to physically connect the paper layers.
Simple straight stitches can become blades of grass that hold one hill to another, while French knot flowers can anchor a foreground element.
This creates a cohesive and sculptural tactile scene that feels both illustrated and constructed.
11. Geometric String Art on Vellum
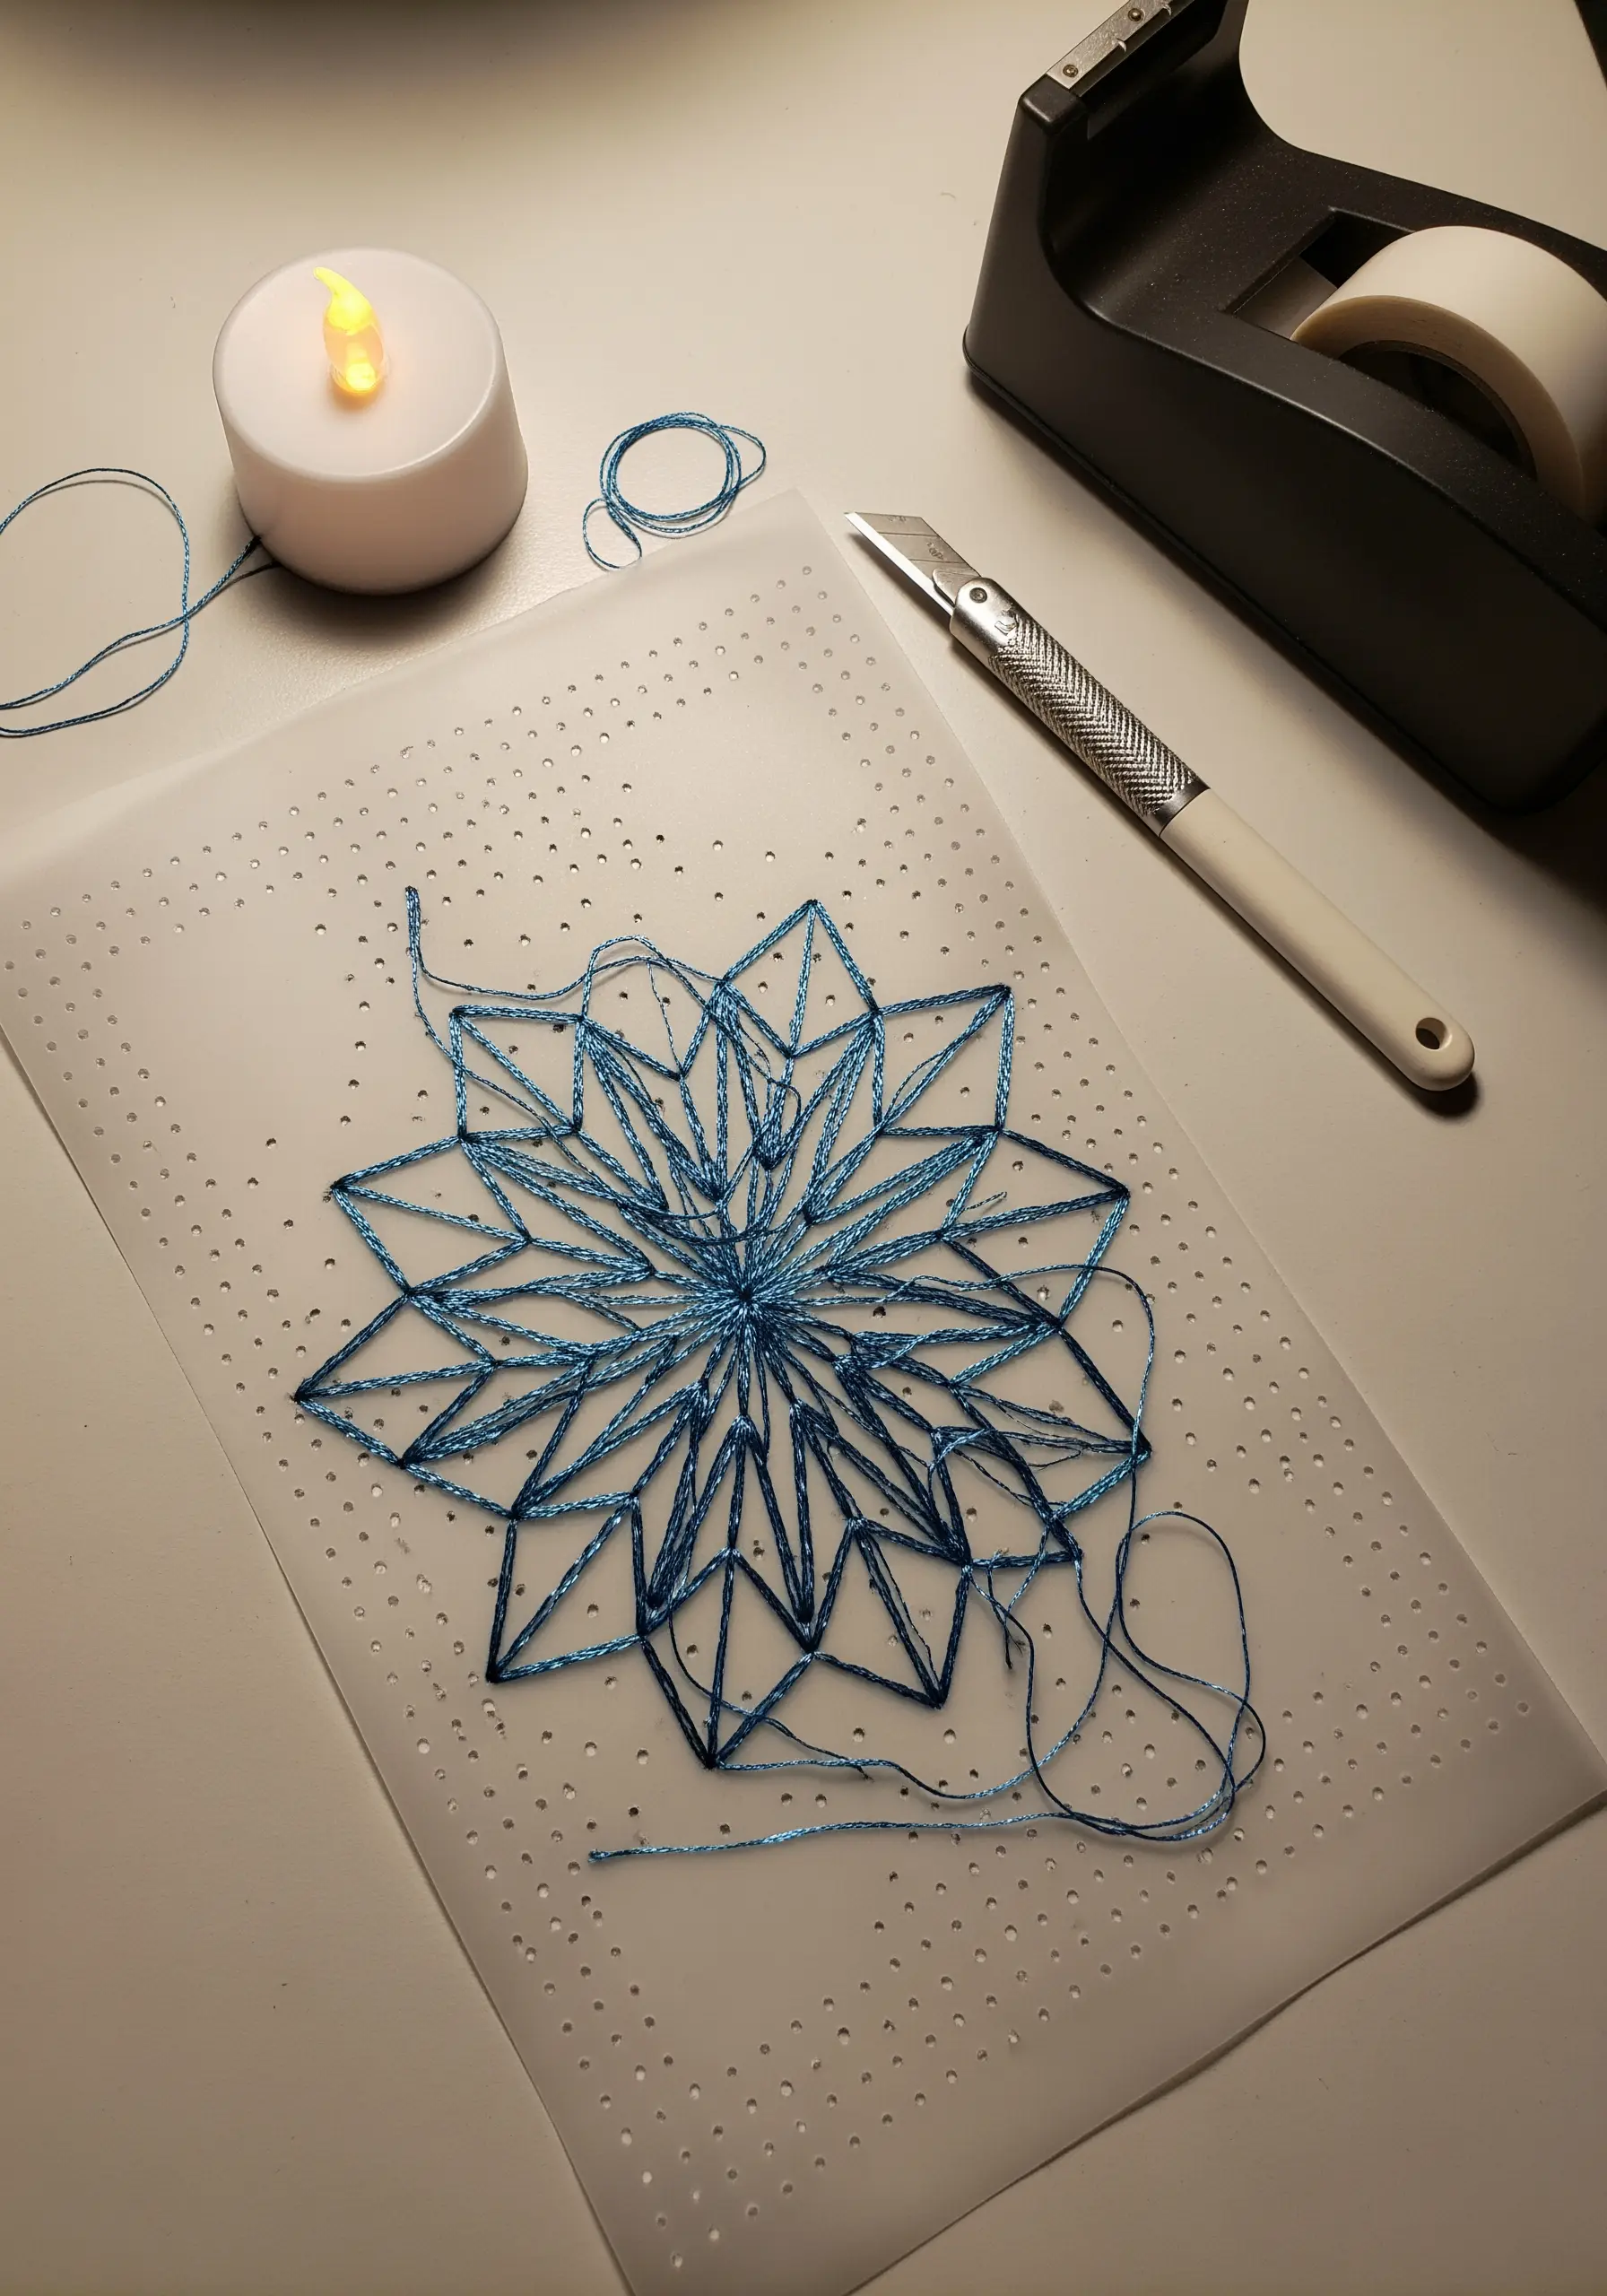
Use perforated paper or vellum to explore string art techniques where the focus is on connecting points rather than forming traditional stitches.
The pre-made grid ensures perfect spacing, freeing you to create intricate geometric patterns by weaving thread from one point to another.
Choose a thread with a slight sheen, like a metallic or silk floss, to catch the light and enhance the design’s luminous, airy quality.
12. Celebratory Cake Card with 3D Stitches
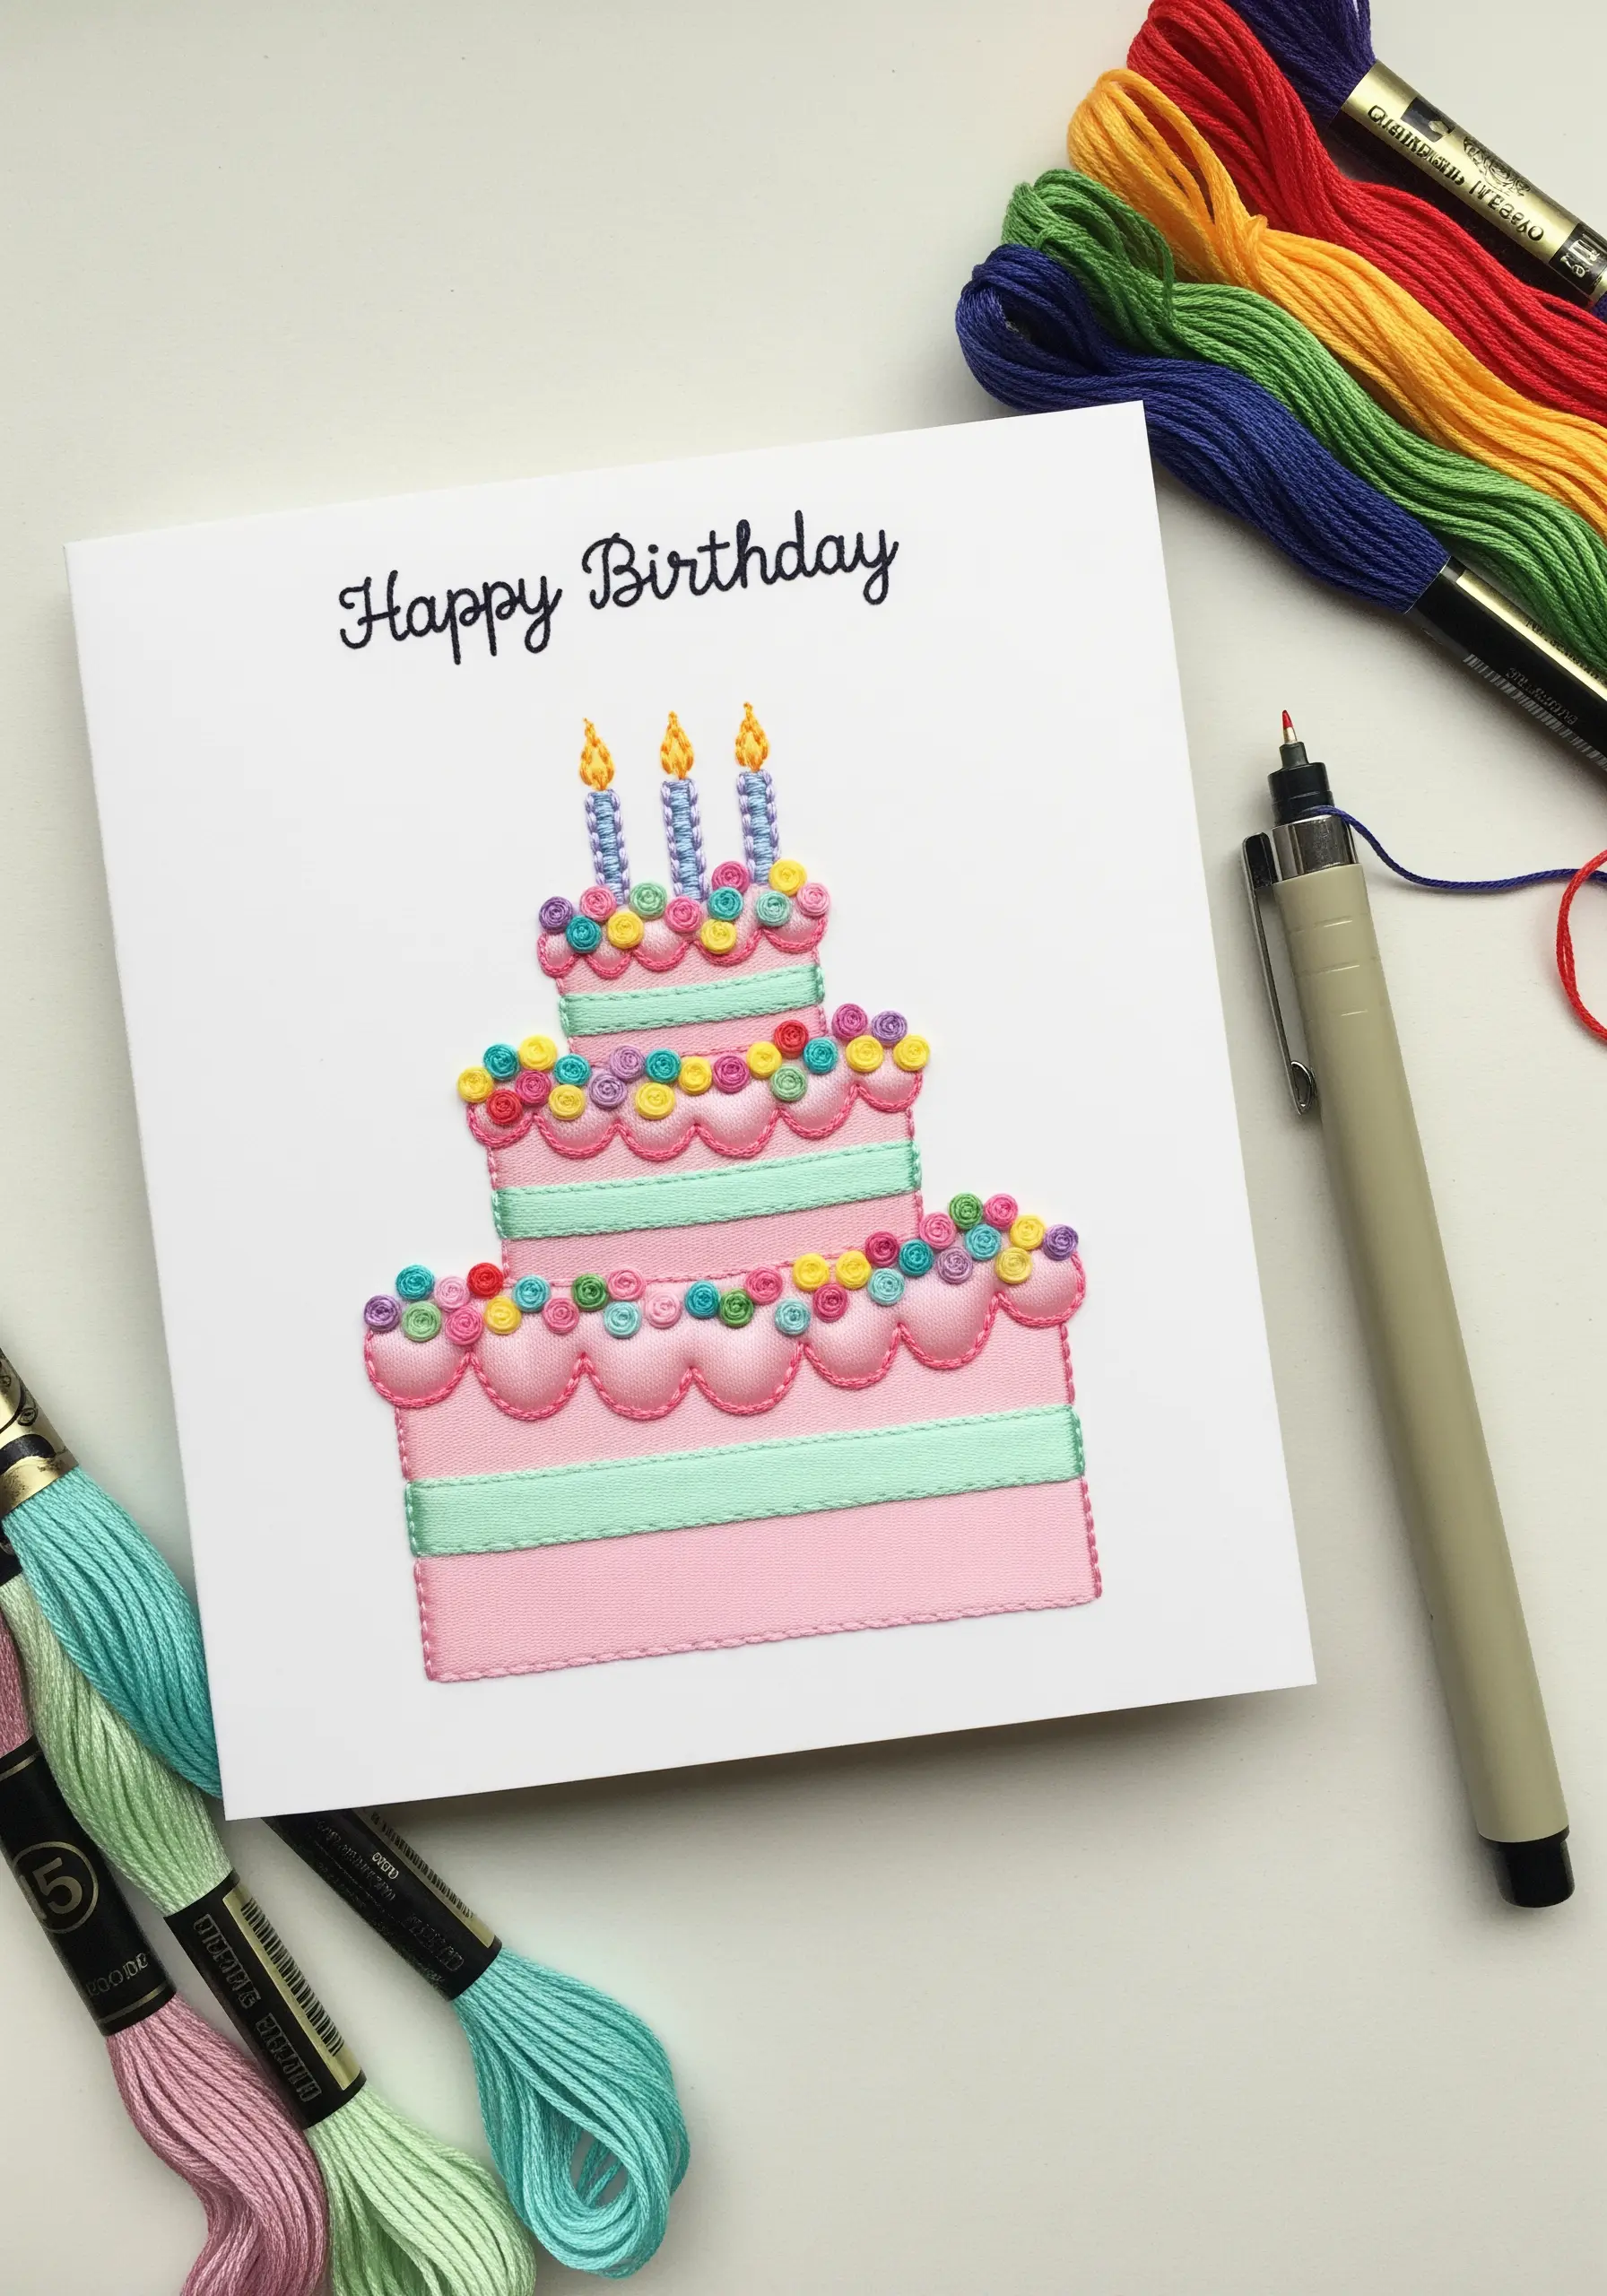
Give a handmade card a delightful, tactile quality by building your design with dimensional stitches.
Use woven wheel stitches to create puffy, round frosting dollops that sit high on the paper’s surface.
For the horizontal layers of icing, place a narrow strip of ribbon on the card and cover it completely with satin stitch.
This adds volume and a smooth, raised texture that makes the design pop.
13. Woven Paper Coasters with a Whipped Stitch Edge
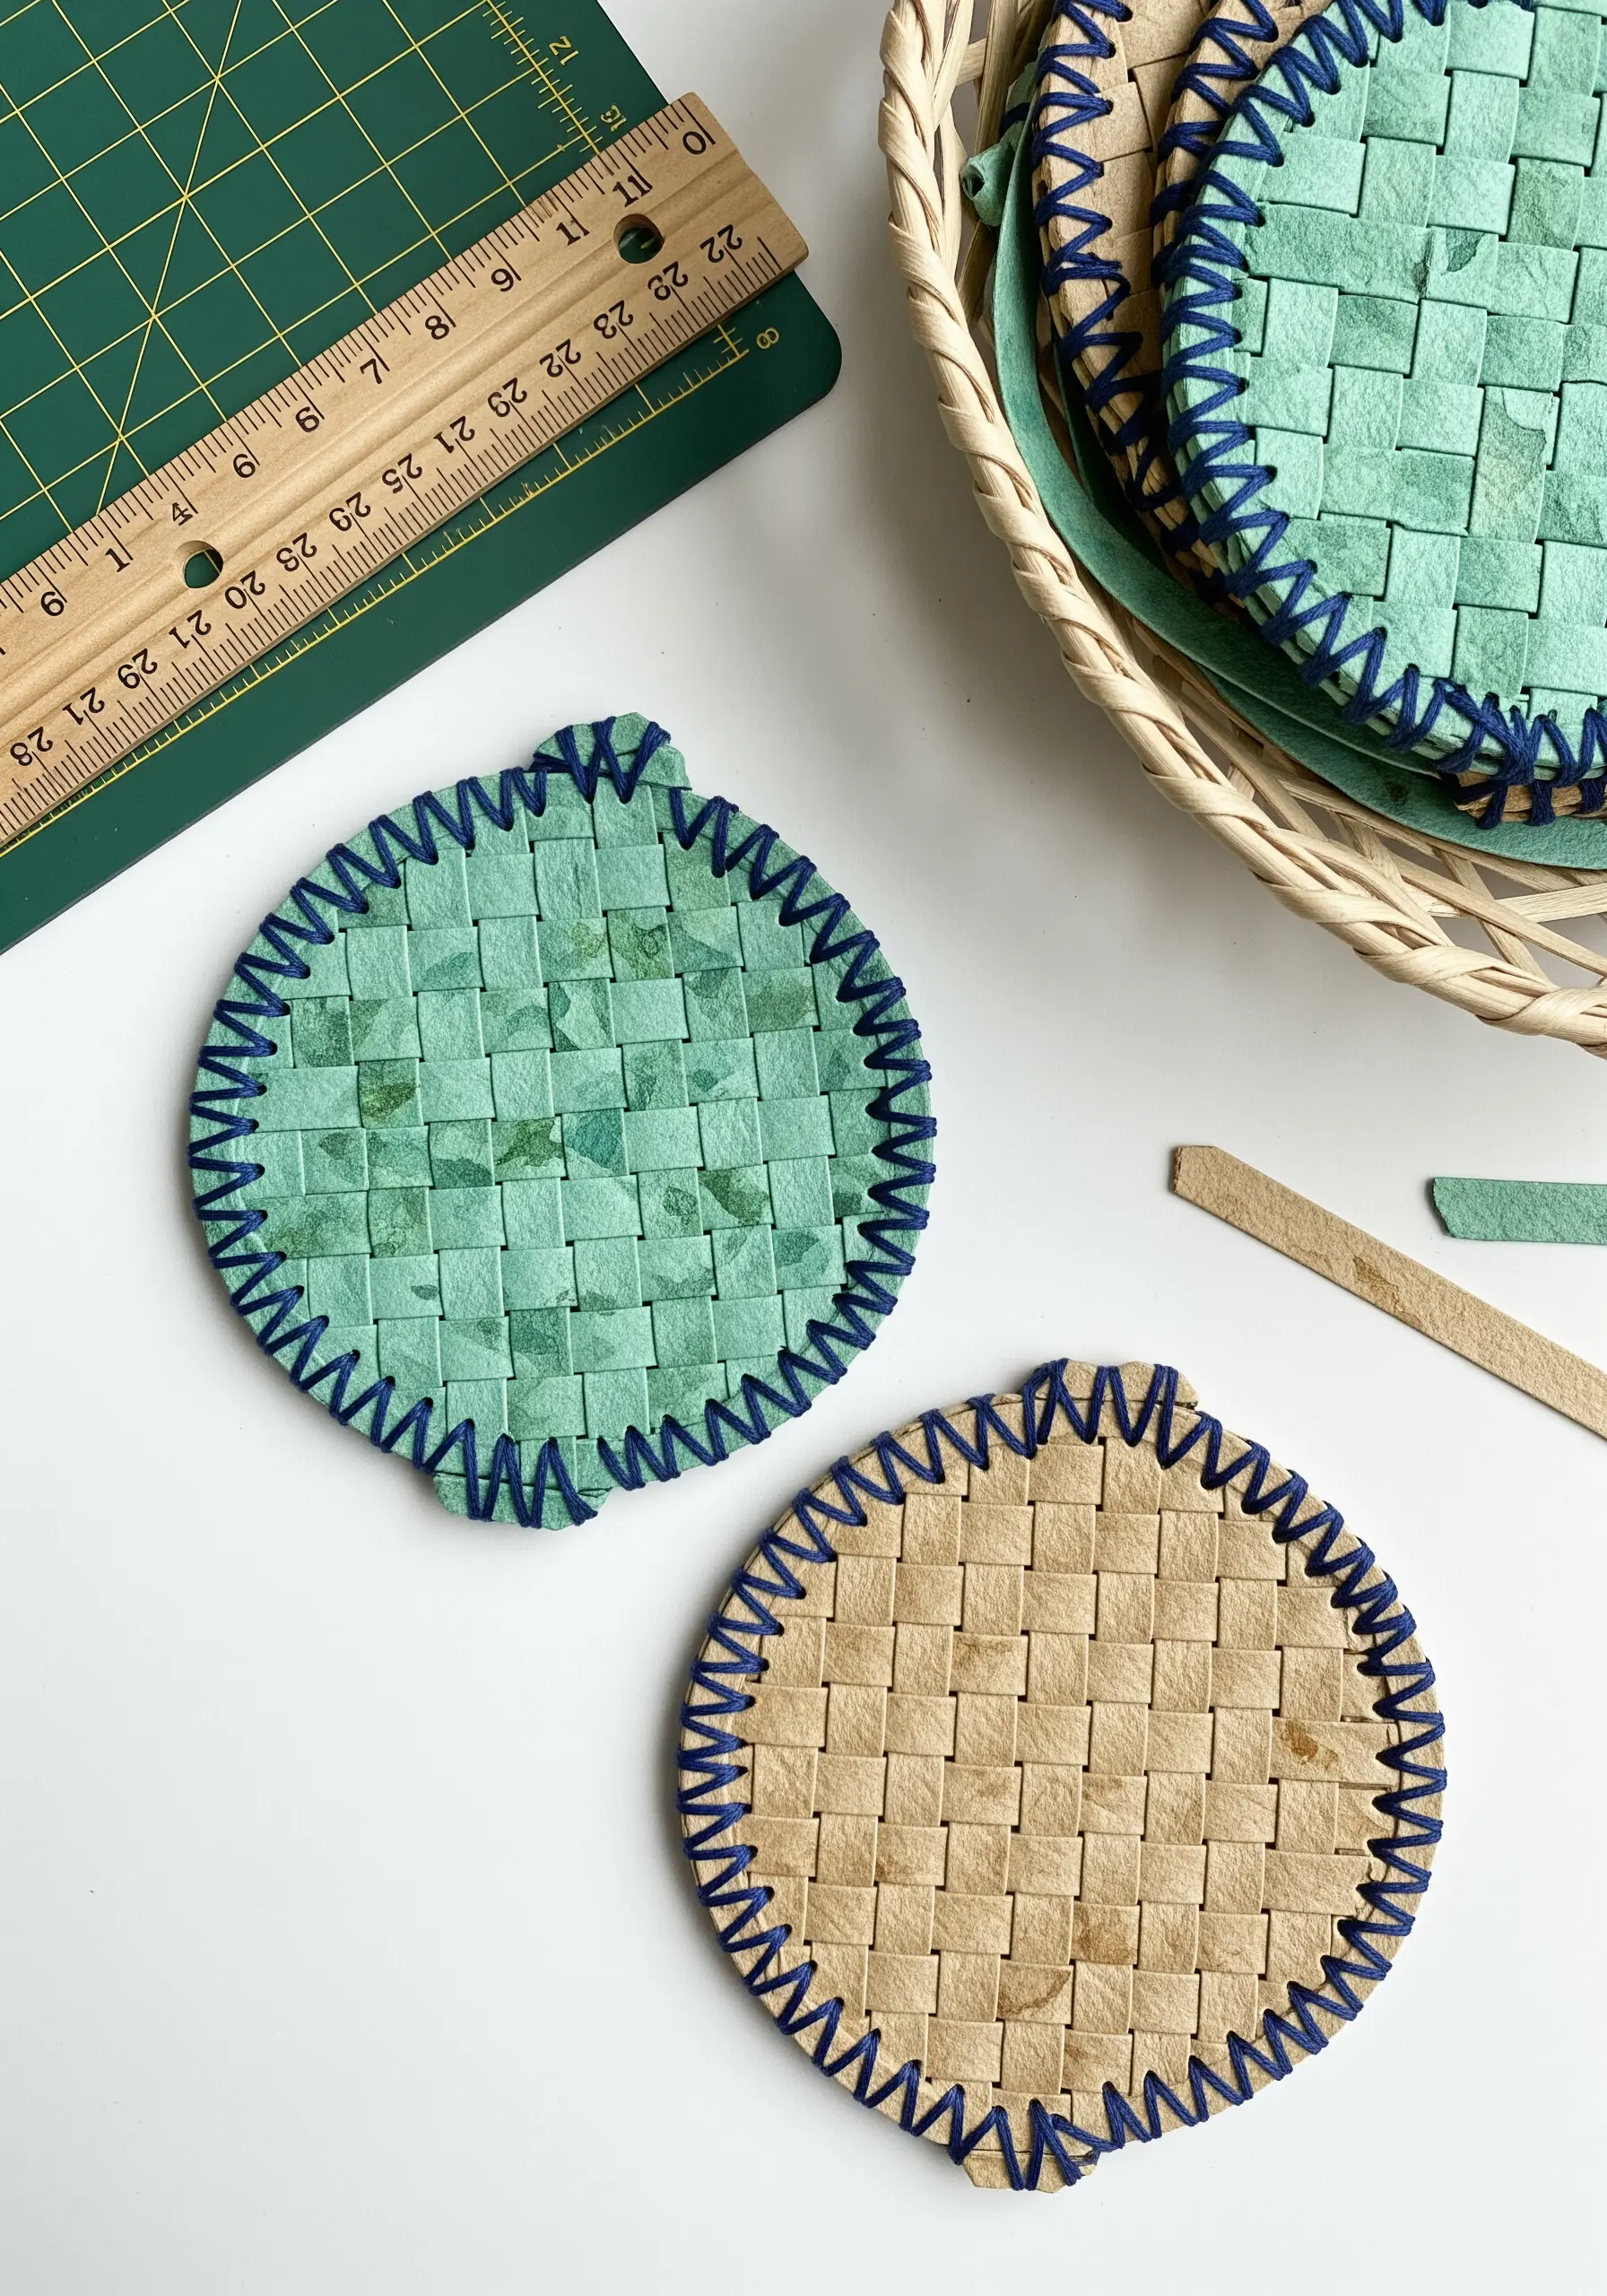
Transform woven paper into a durable, functional piece of art by securing the perimeter with a stitched edge.
After weaving your coaster from sturdy paper strips, punch evenly spaced holes around the border.
Use a blanket stitch or a simple whipped stitch with a contrasting, thick thread.
This final detail not only prevents the woven strips from fraying but also adds a clean, decorative frame to your work.
14. Selective Color Embroidery on Photographs

Breathe new life into a printed photograph by embroidering directly onto it.
Print your image on high-quality matte photo paper, which has a toothy surface that grips the thread nicely.
Choosing a black and white photo allows your colorful stitches to create a dramatic focal point.
This technique creates a powerful dialogue between the flat, mechanical nature of the photograph and the warm, dimensional touch of hand embroidery.
15. Mixed-Media Nursery Mobile
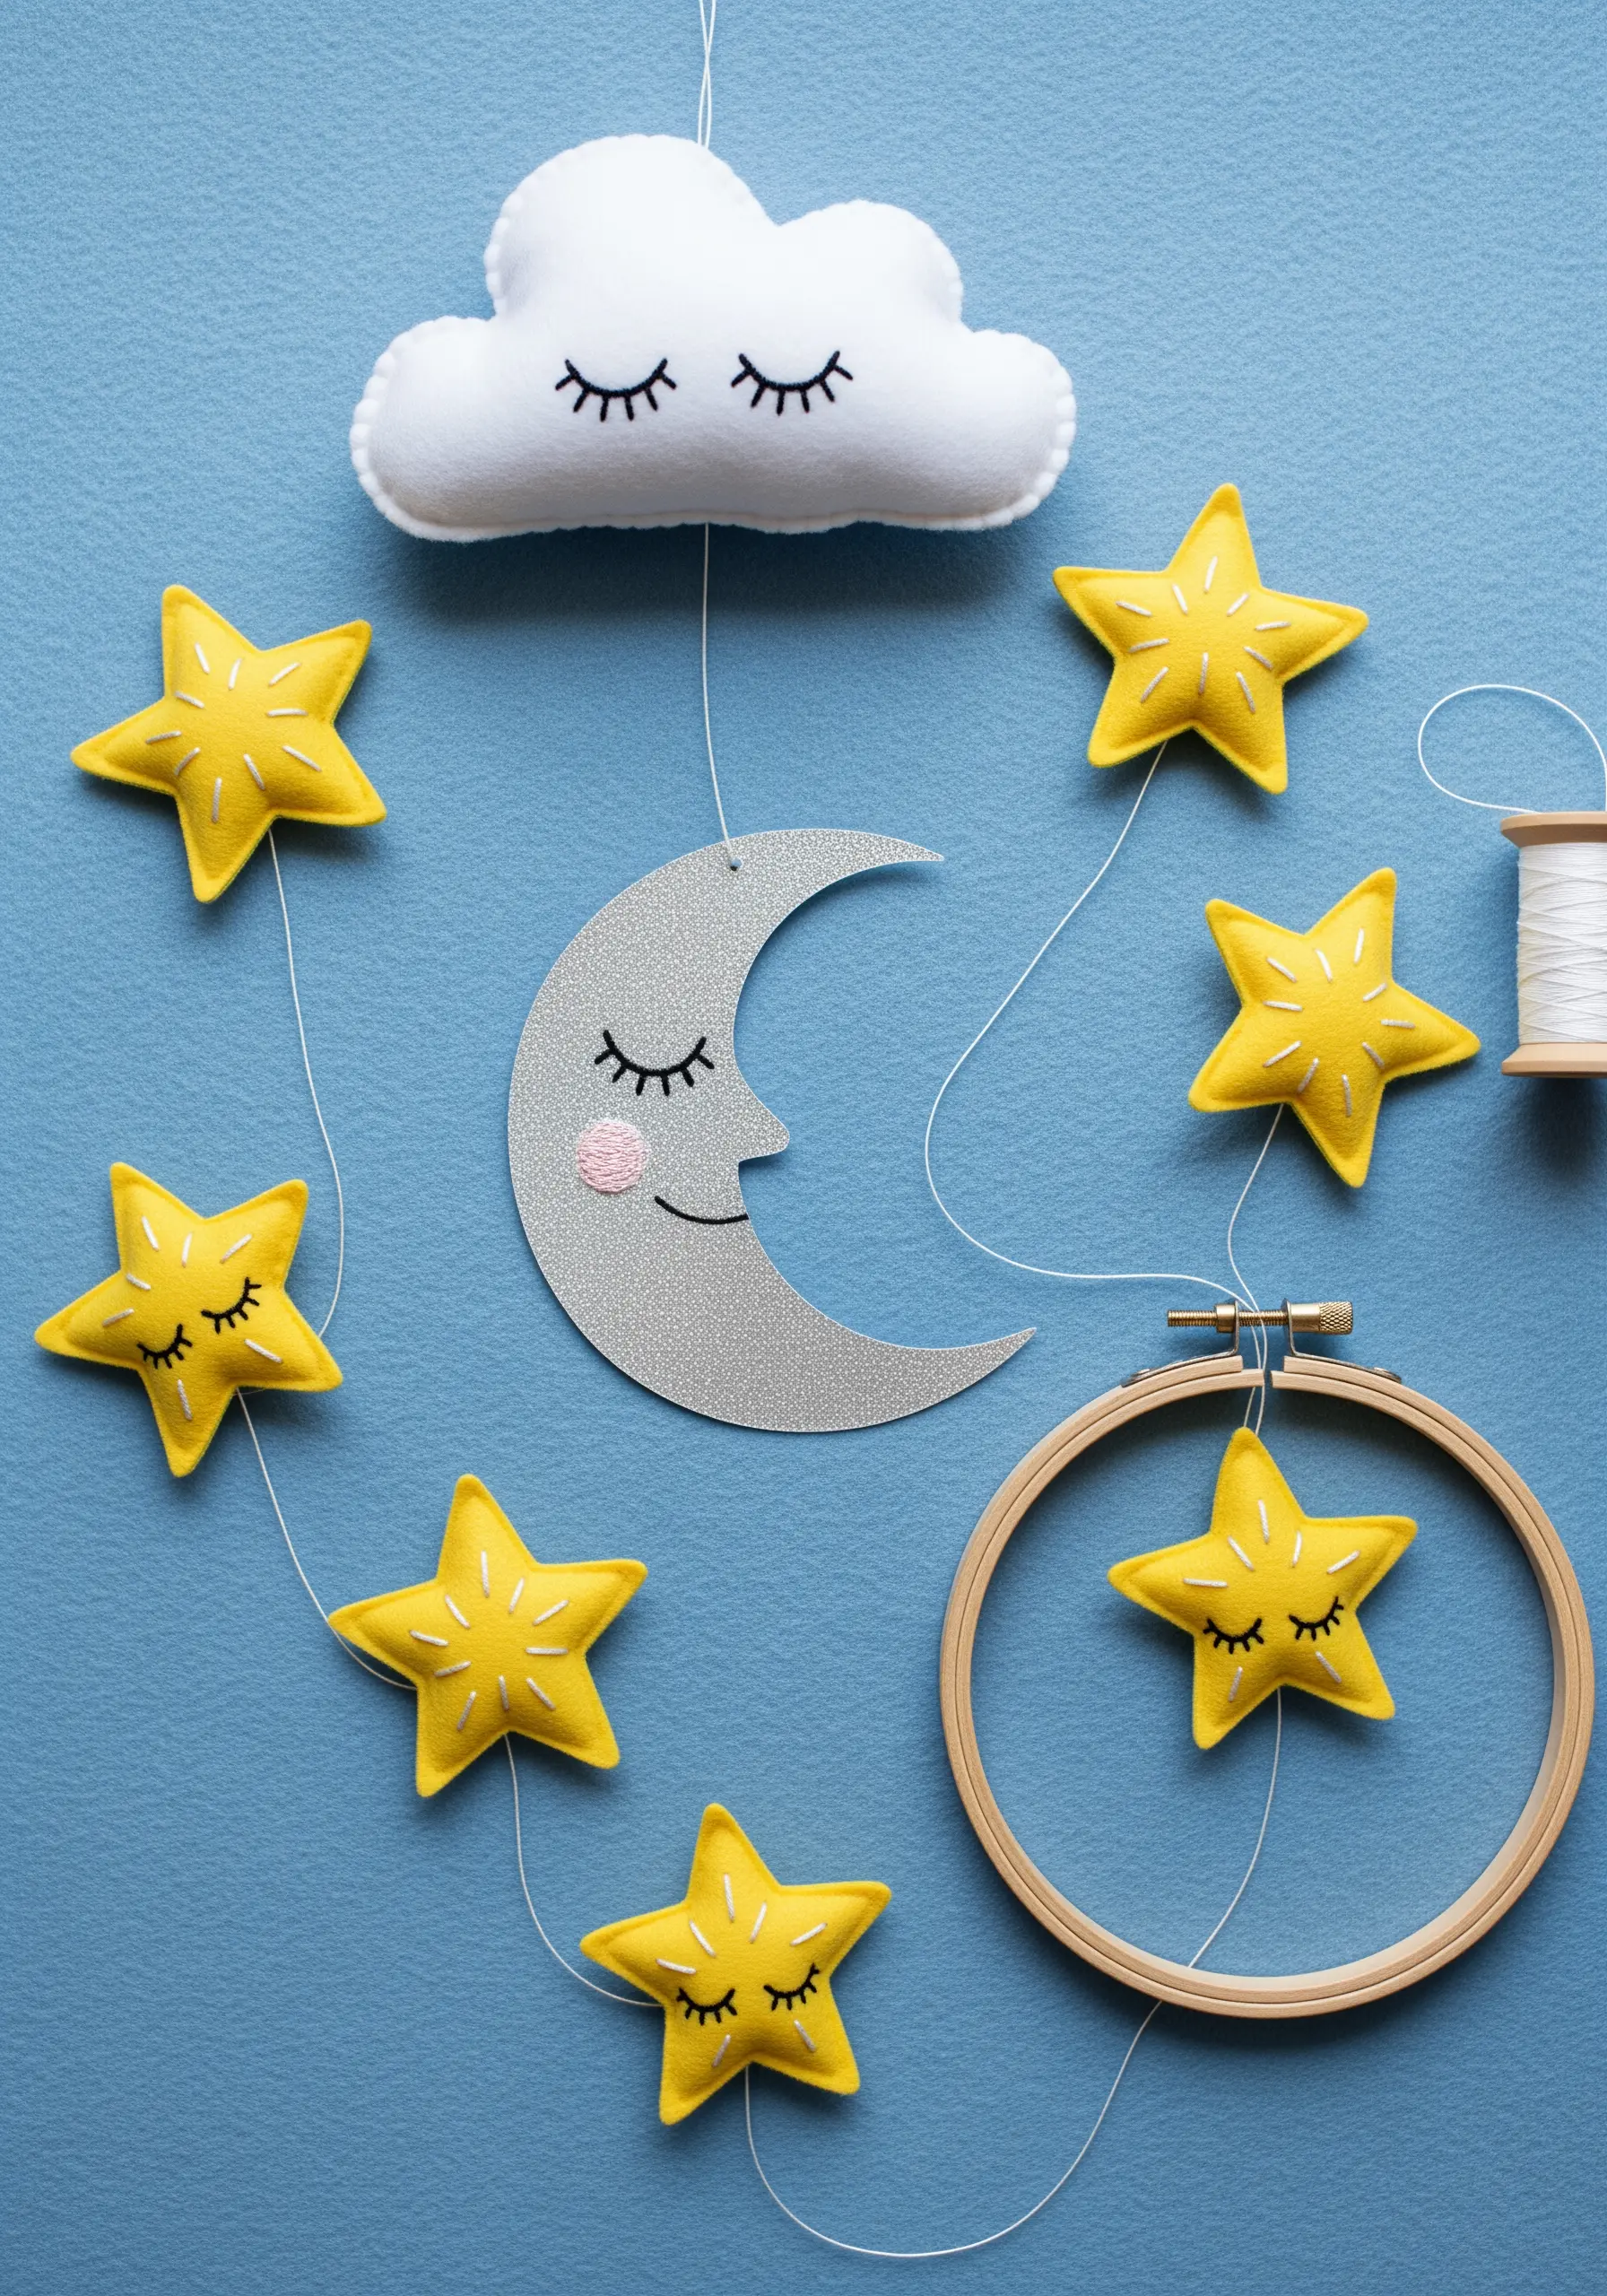
Create a charming Nursery Mobile by mixing the textures of soft felt, sparkling cardstock, and gentle thread.
A few tiny, carefully placed stitches are all you need to give the felt and paper shapes a sleepy, sweet personality.
Use a single strand of black floss for the eyes and a soft pink for the cheeks.
This minimalist approach to embroidery adds character and life without overwhelming the simple, soothing forms of the mobile.
16. Illustrated Recipe Cards with Stitched Motifs
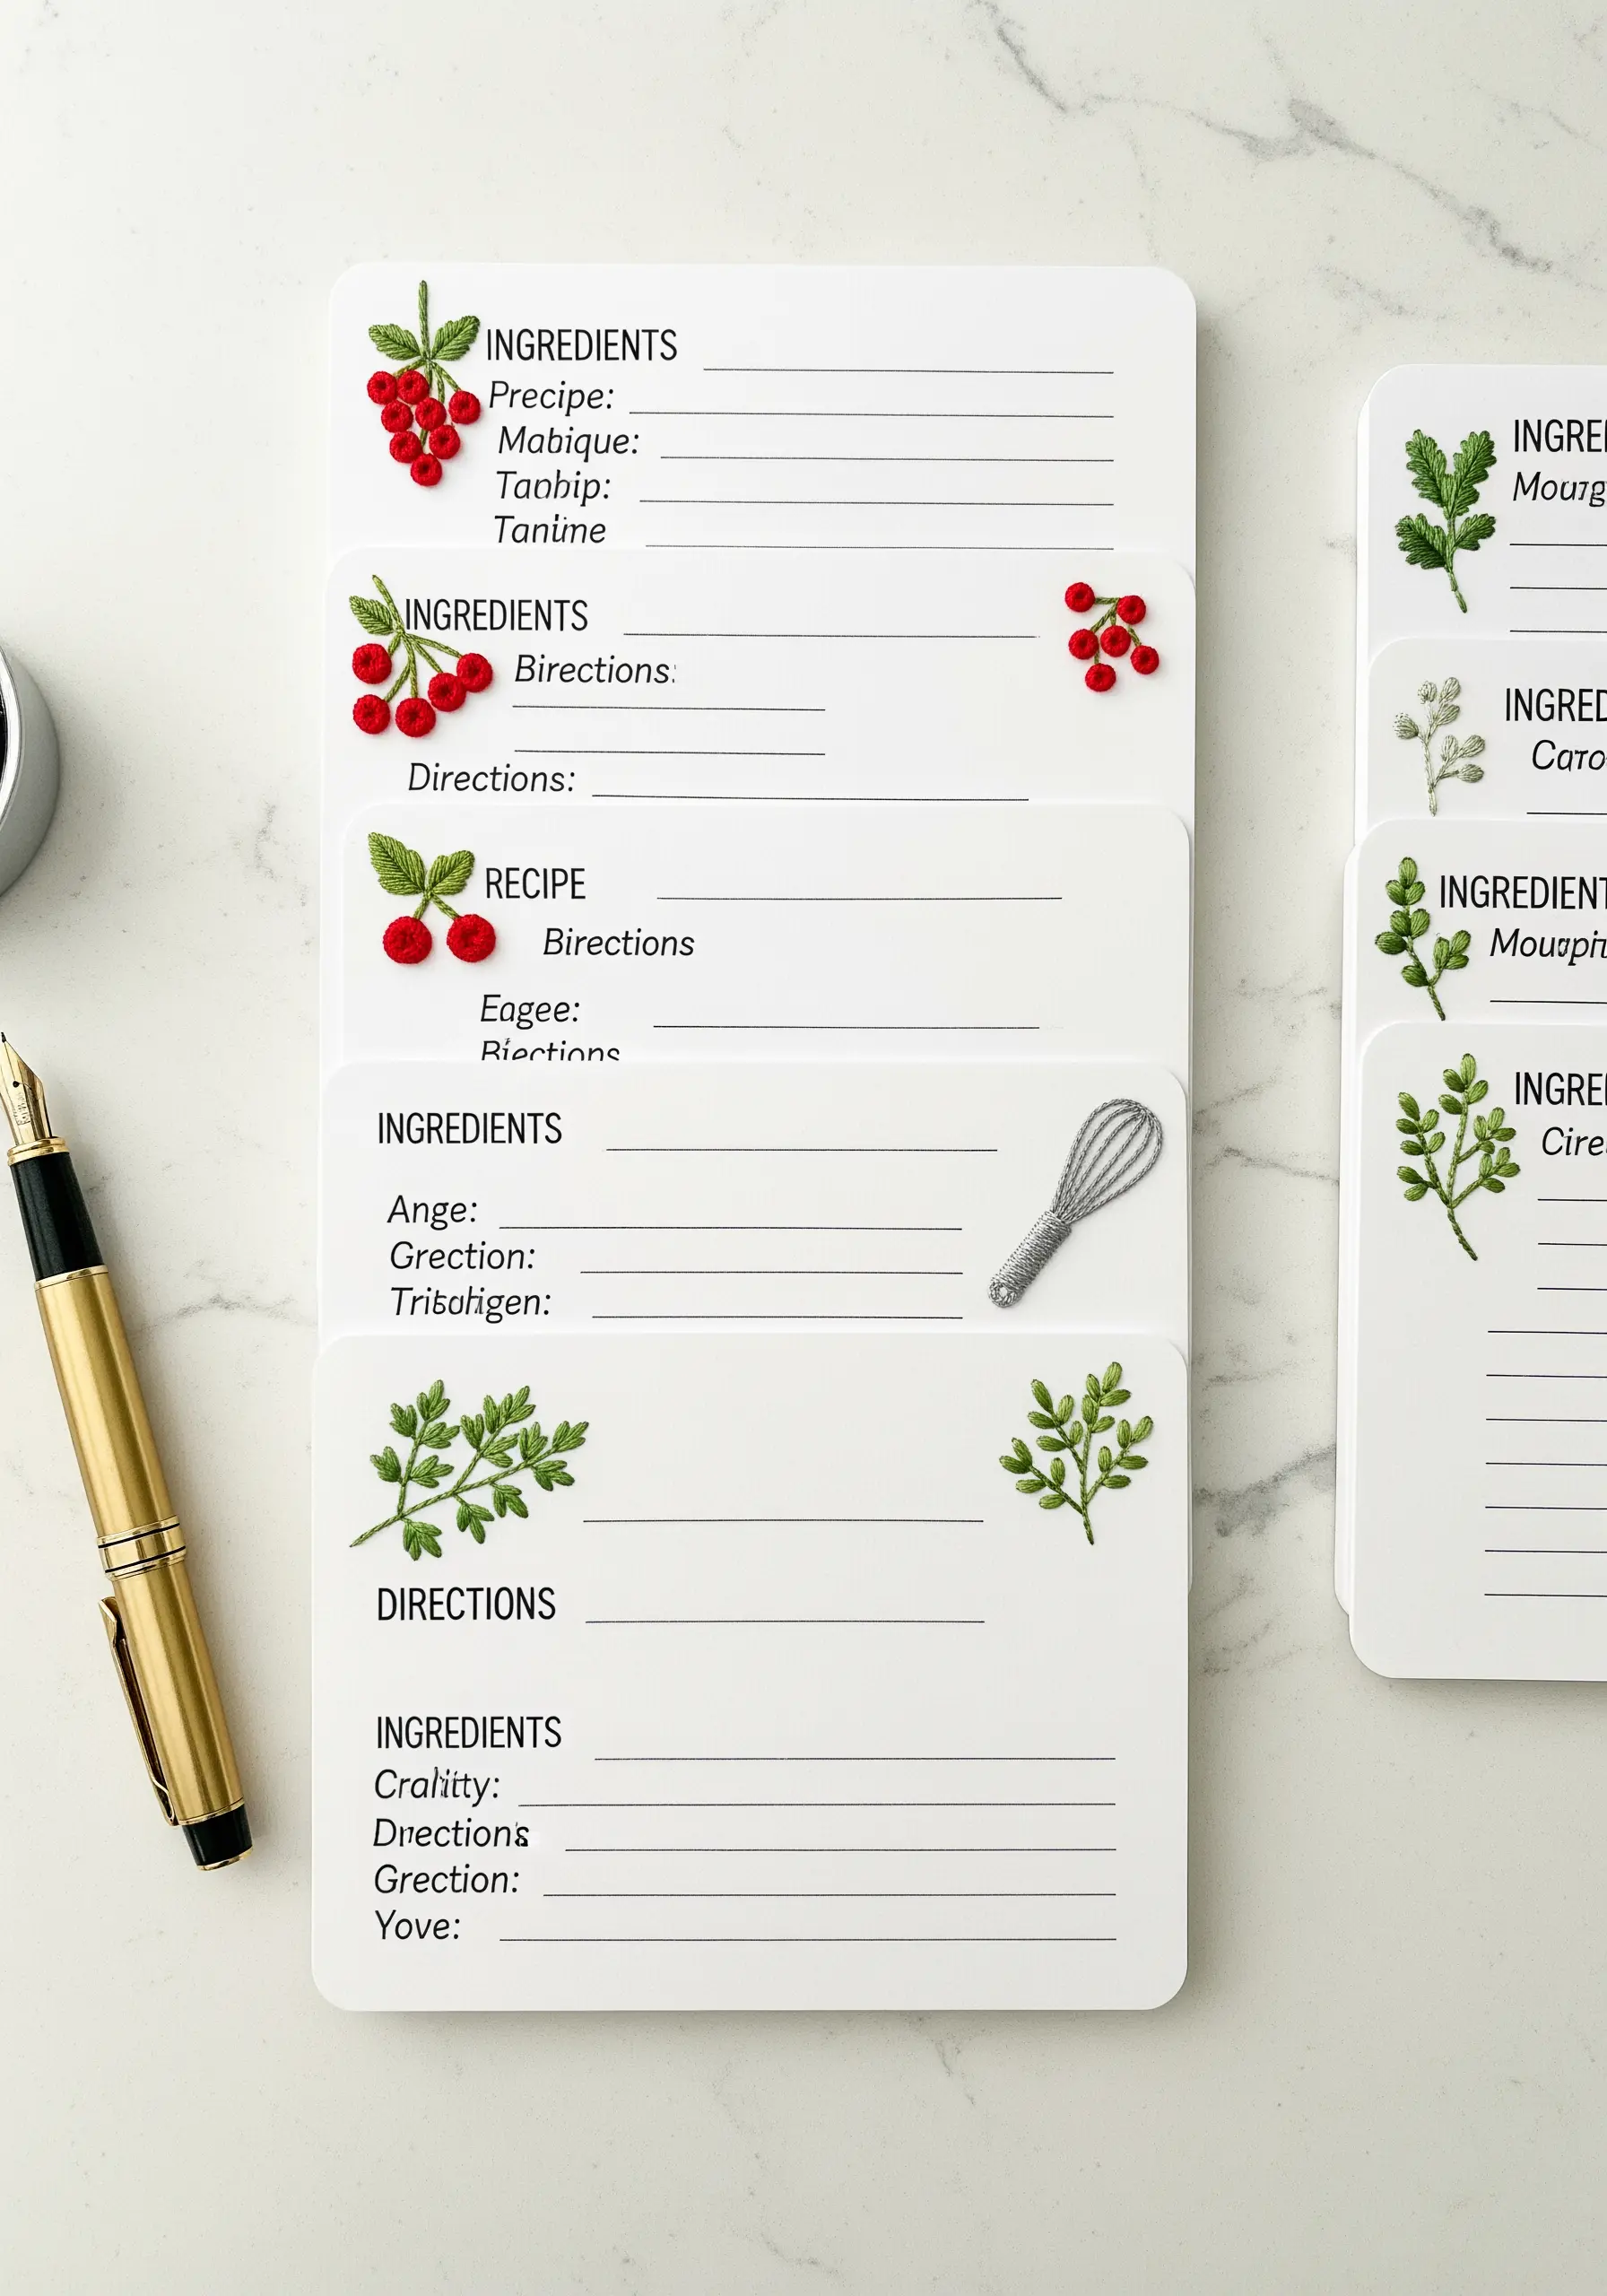
Personalize a set of recipe cards with tiny, illustrative stitches that hint at the contents within.
Work on a heavy cardstock that can handle the needle without bending.
Keep your motifs small and simple—a few satin-stitched berries or a sprig of herbs rendered in stem stitch is all you need.
The elegance comes from the scale; the embroidery is a delicate garnish, not the main course, leaving ample space for the recipe itself.
17. Embroidered Accents on Origami
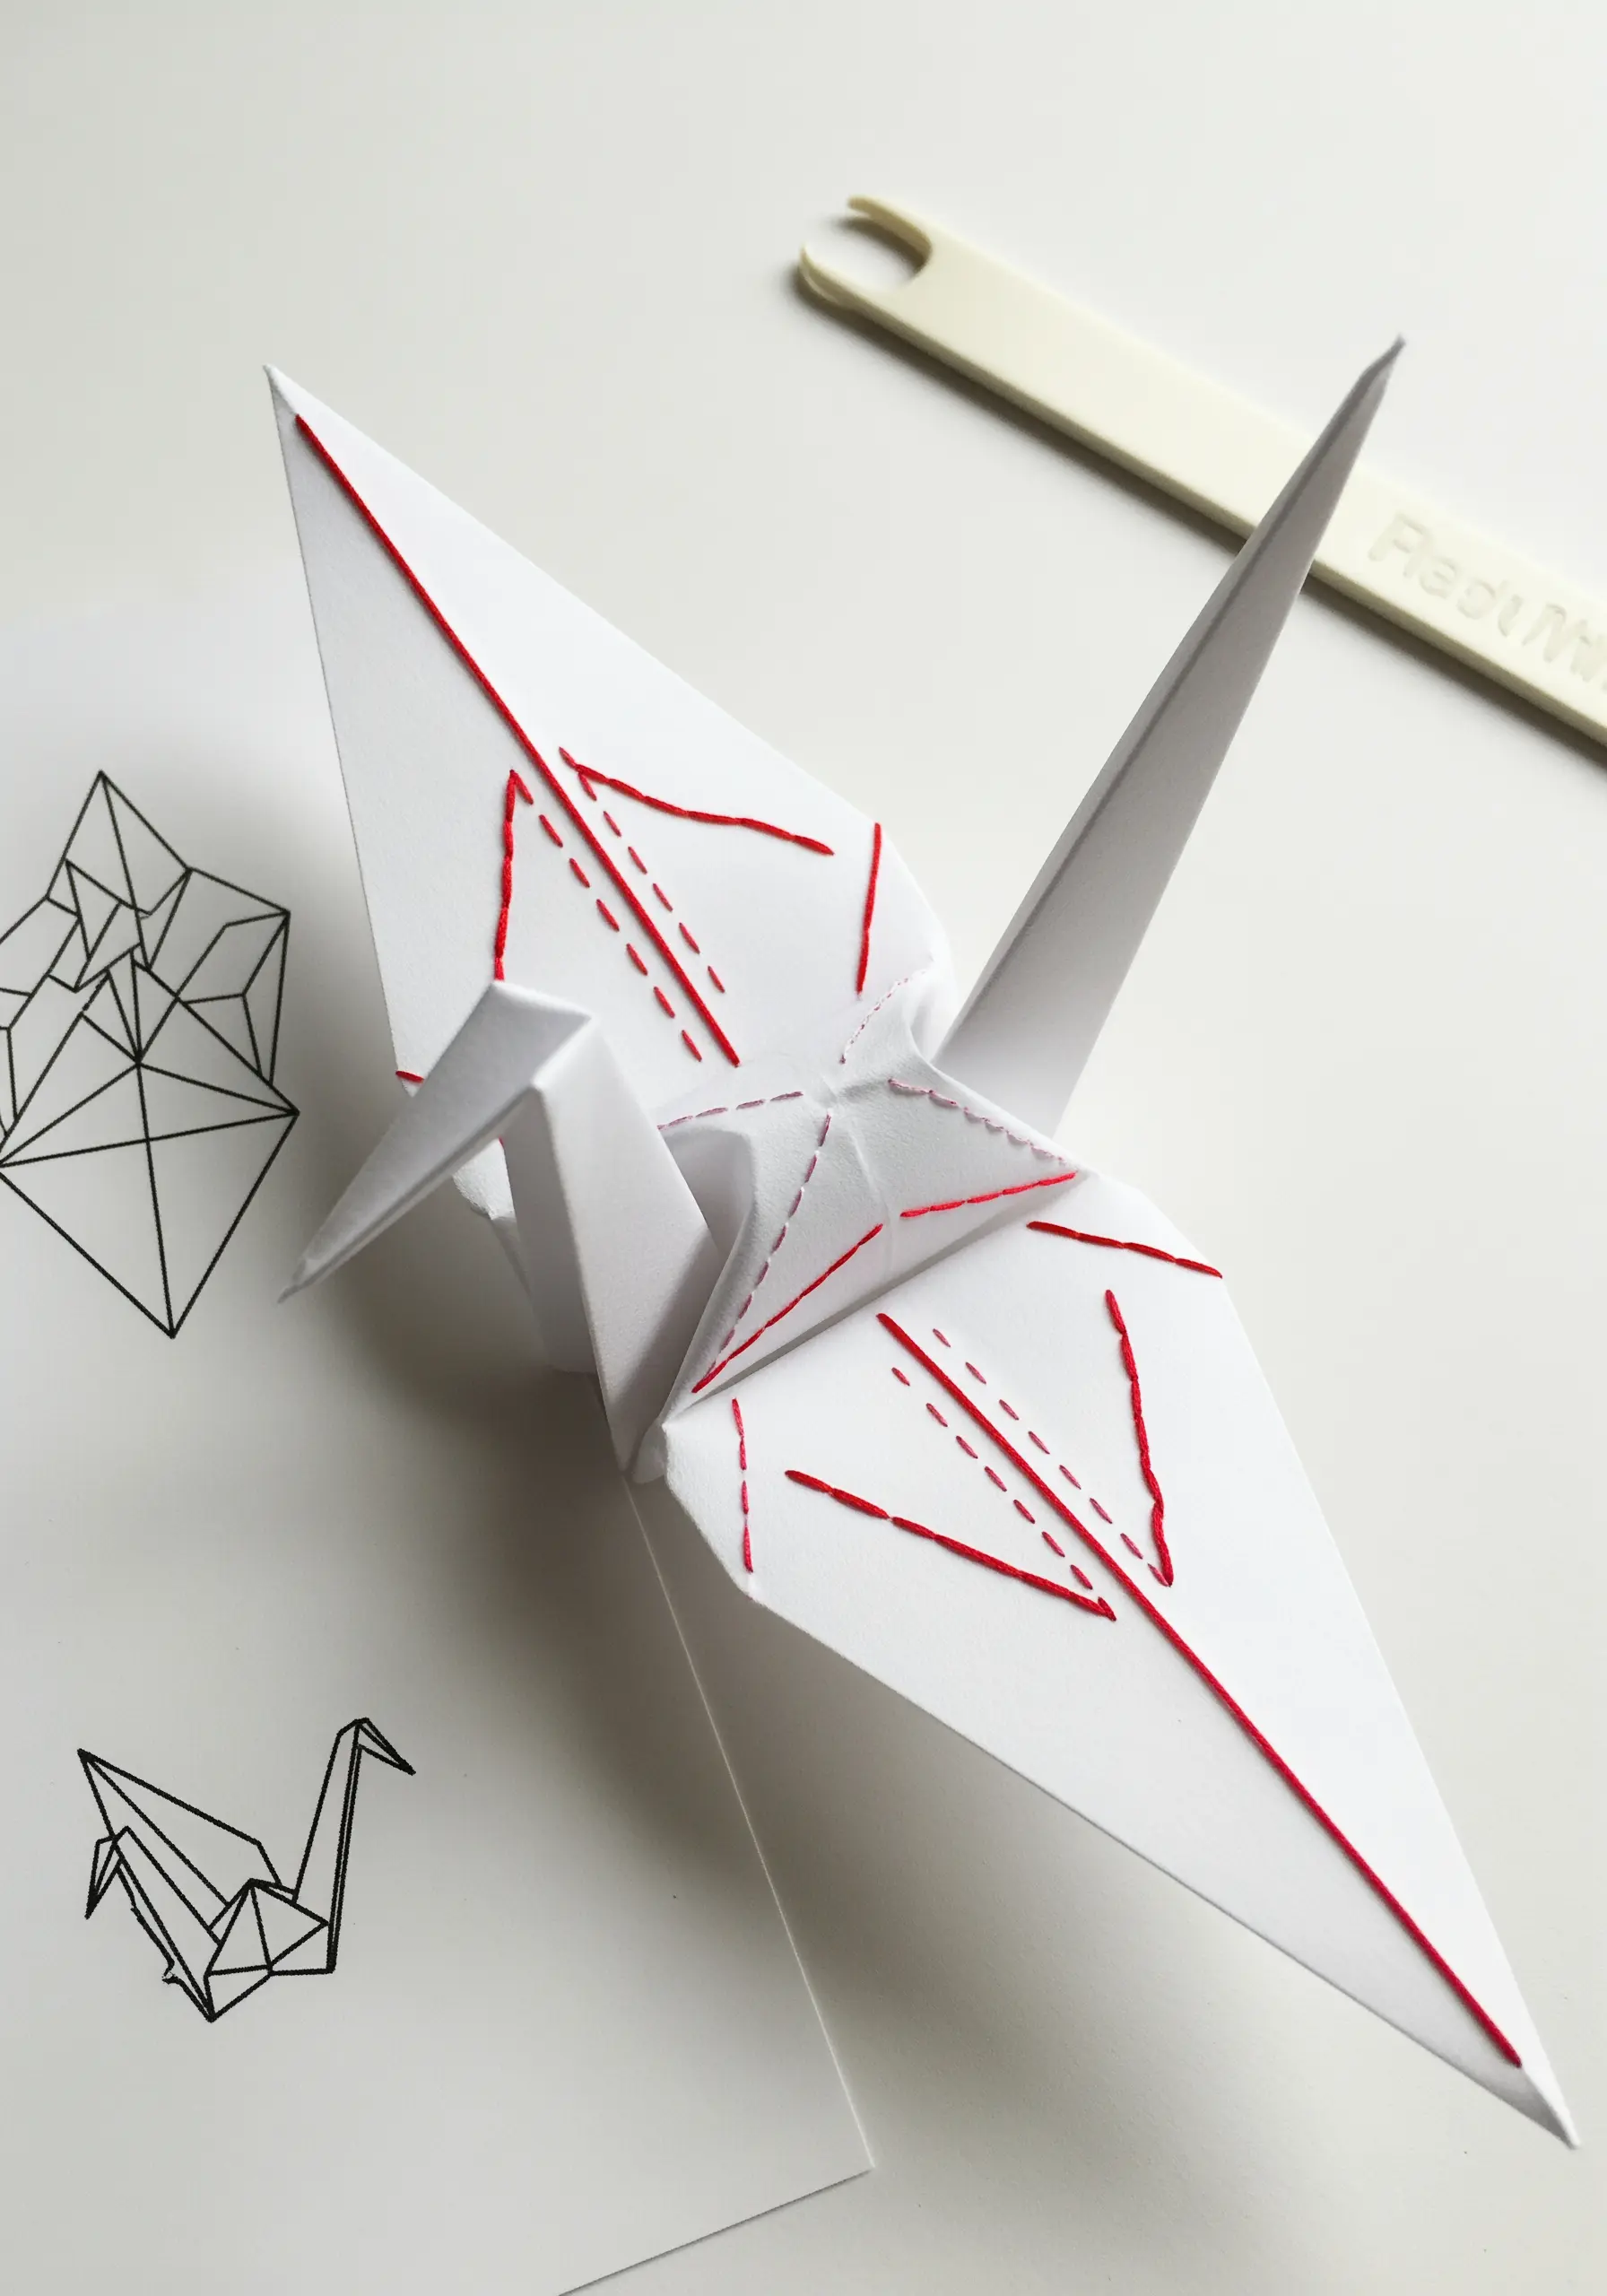
The secret to combining embroidery with origami is to stitch the paper while it’s still flat, before you begin folding.
Map out your origami creases lightly in pencil, then add simple running stitches or backstitch patterns that will accentuate the final form.
This thoughtful placement allows the thread to become an integral part of the design, turning a traditional folded crane into a unique piece of mixed-media art.
18. Paper-Cut Luminary Bags with Stitched Accents
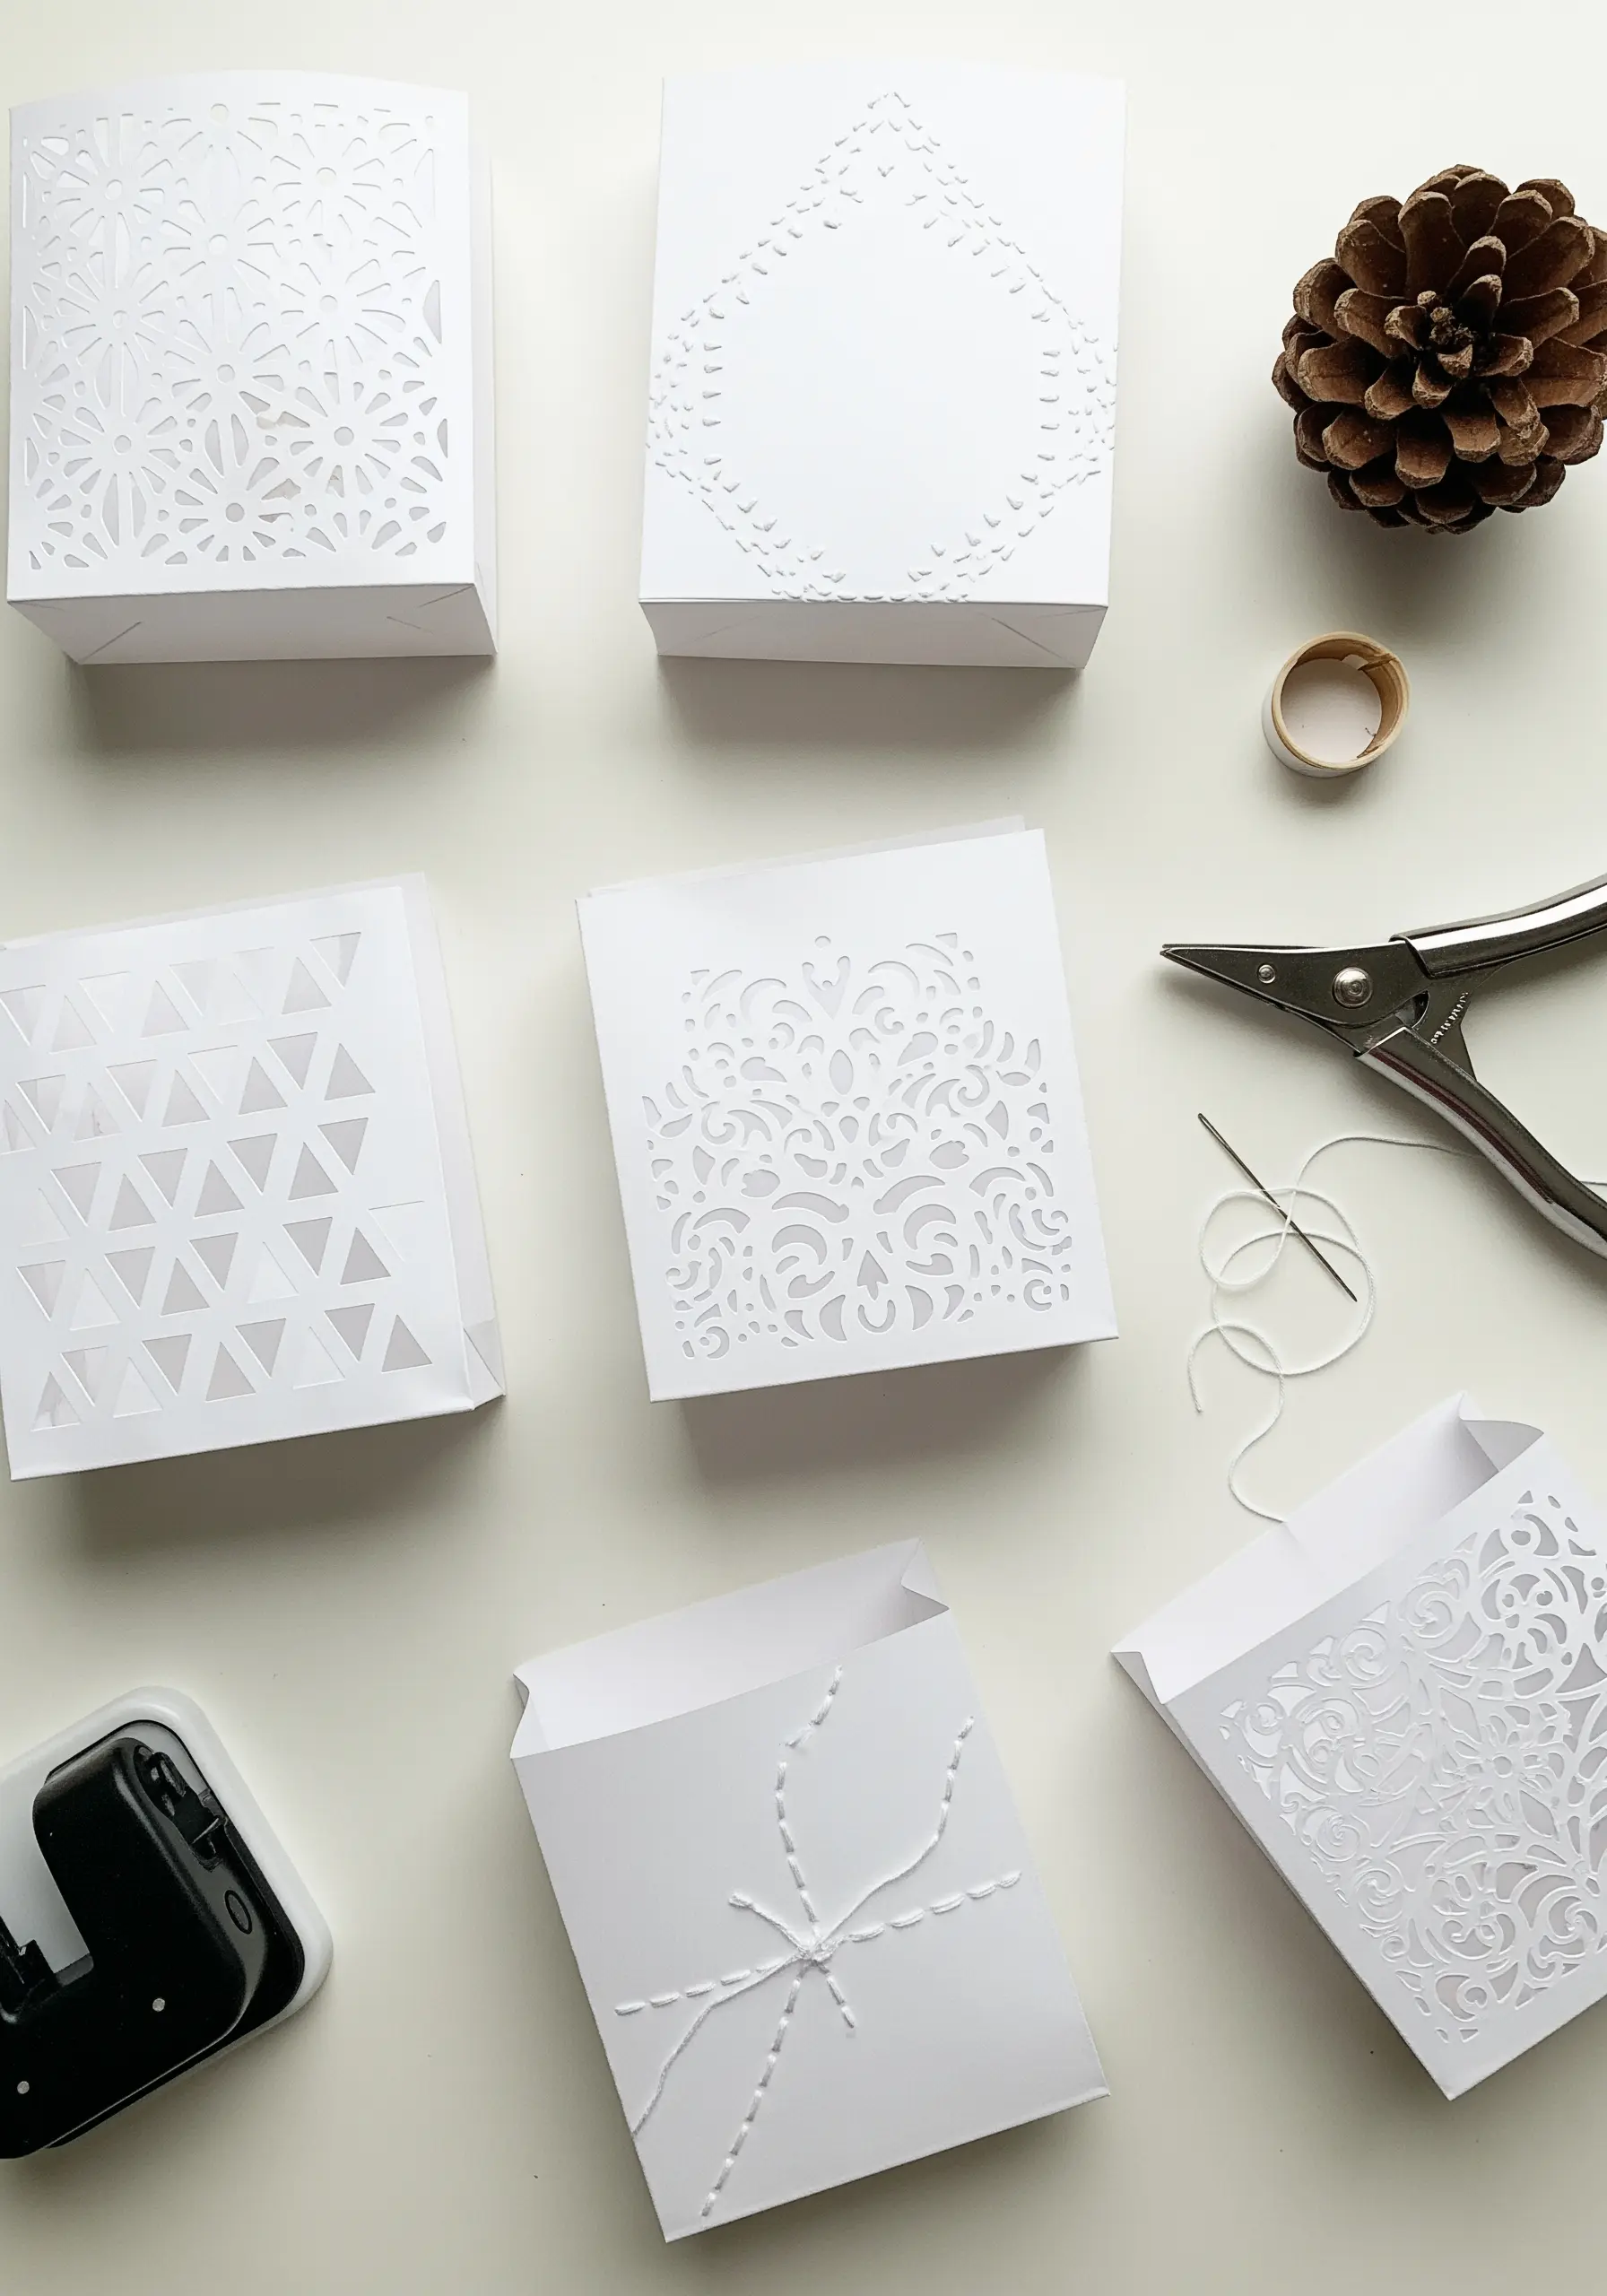
Complement the delicacy of paper-cut designs with the simplest of embroidered details.
Whether you cut the patterns yourself or use pre-made luminary bags, a single line of running stitch along the top edge adds a subtle, handmade finish.
Alternatively, a simple bow tied through two small holes provides a soft touch that harmonizes with the intricate cutwork without competing for attention.
Choose a thread color that matches the paper to maintain a cohesive, elegant look.
19. Freestanding Thread-Painted Leaf
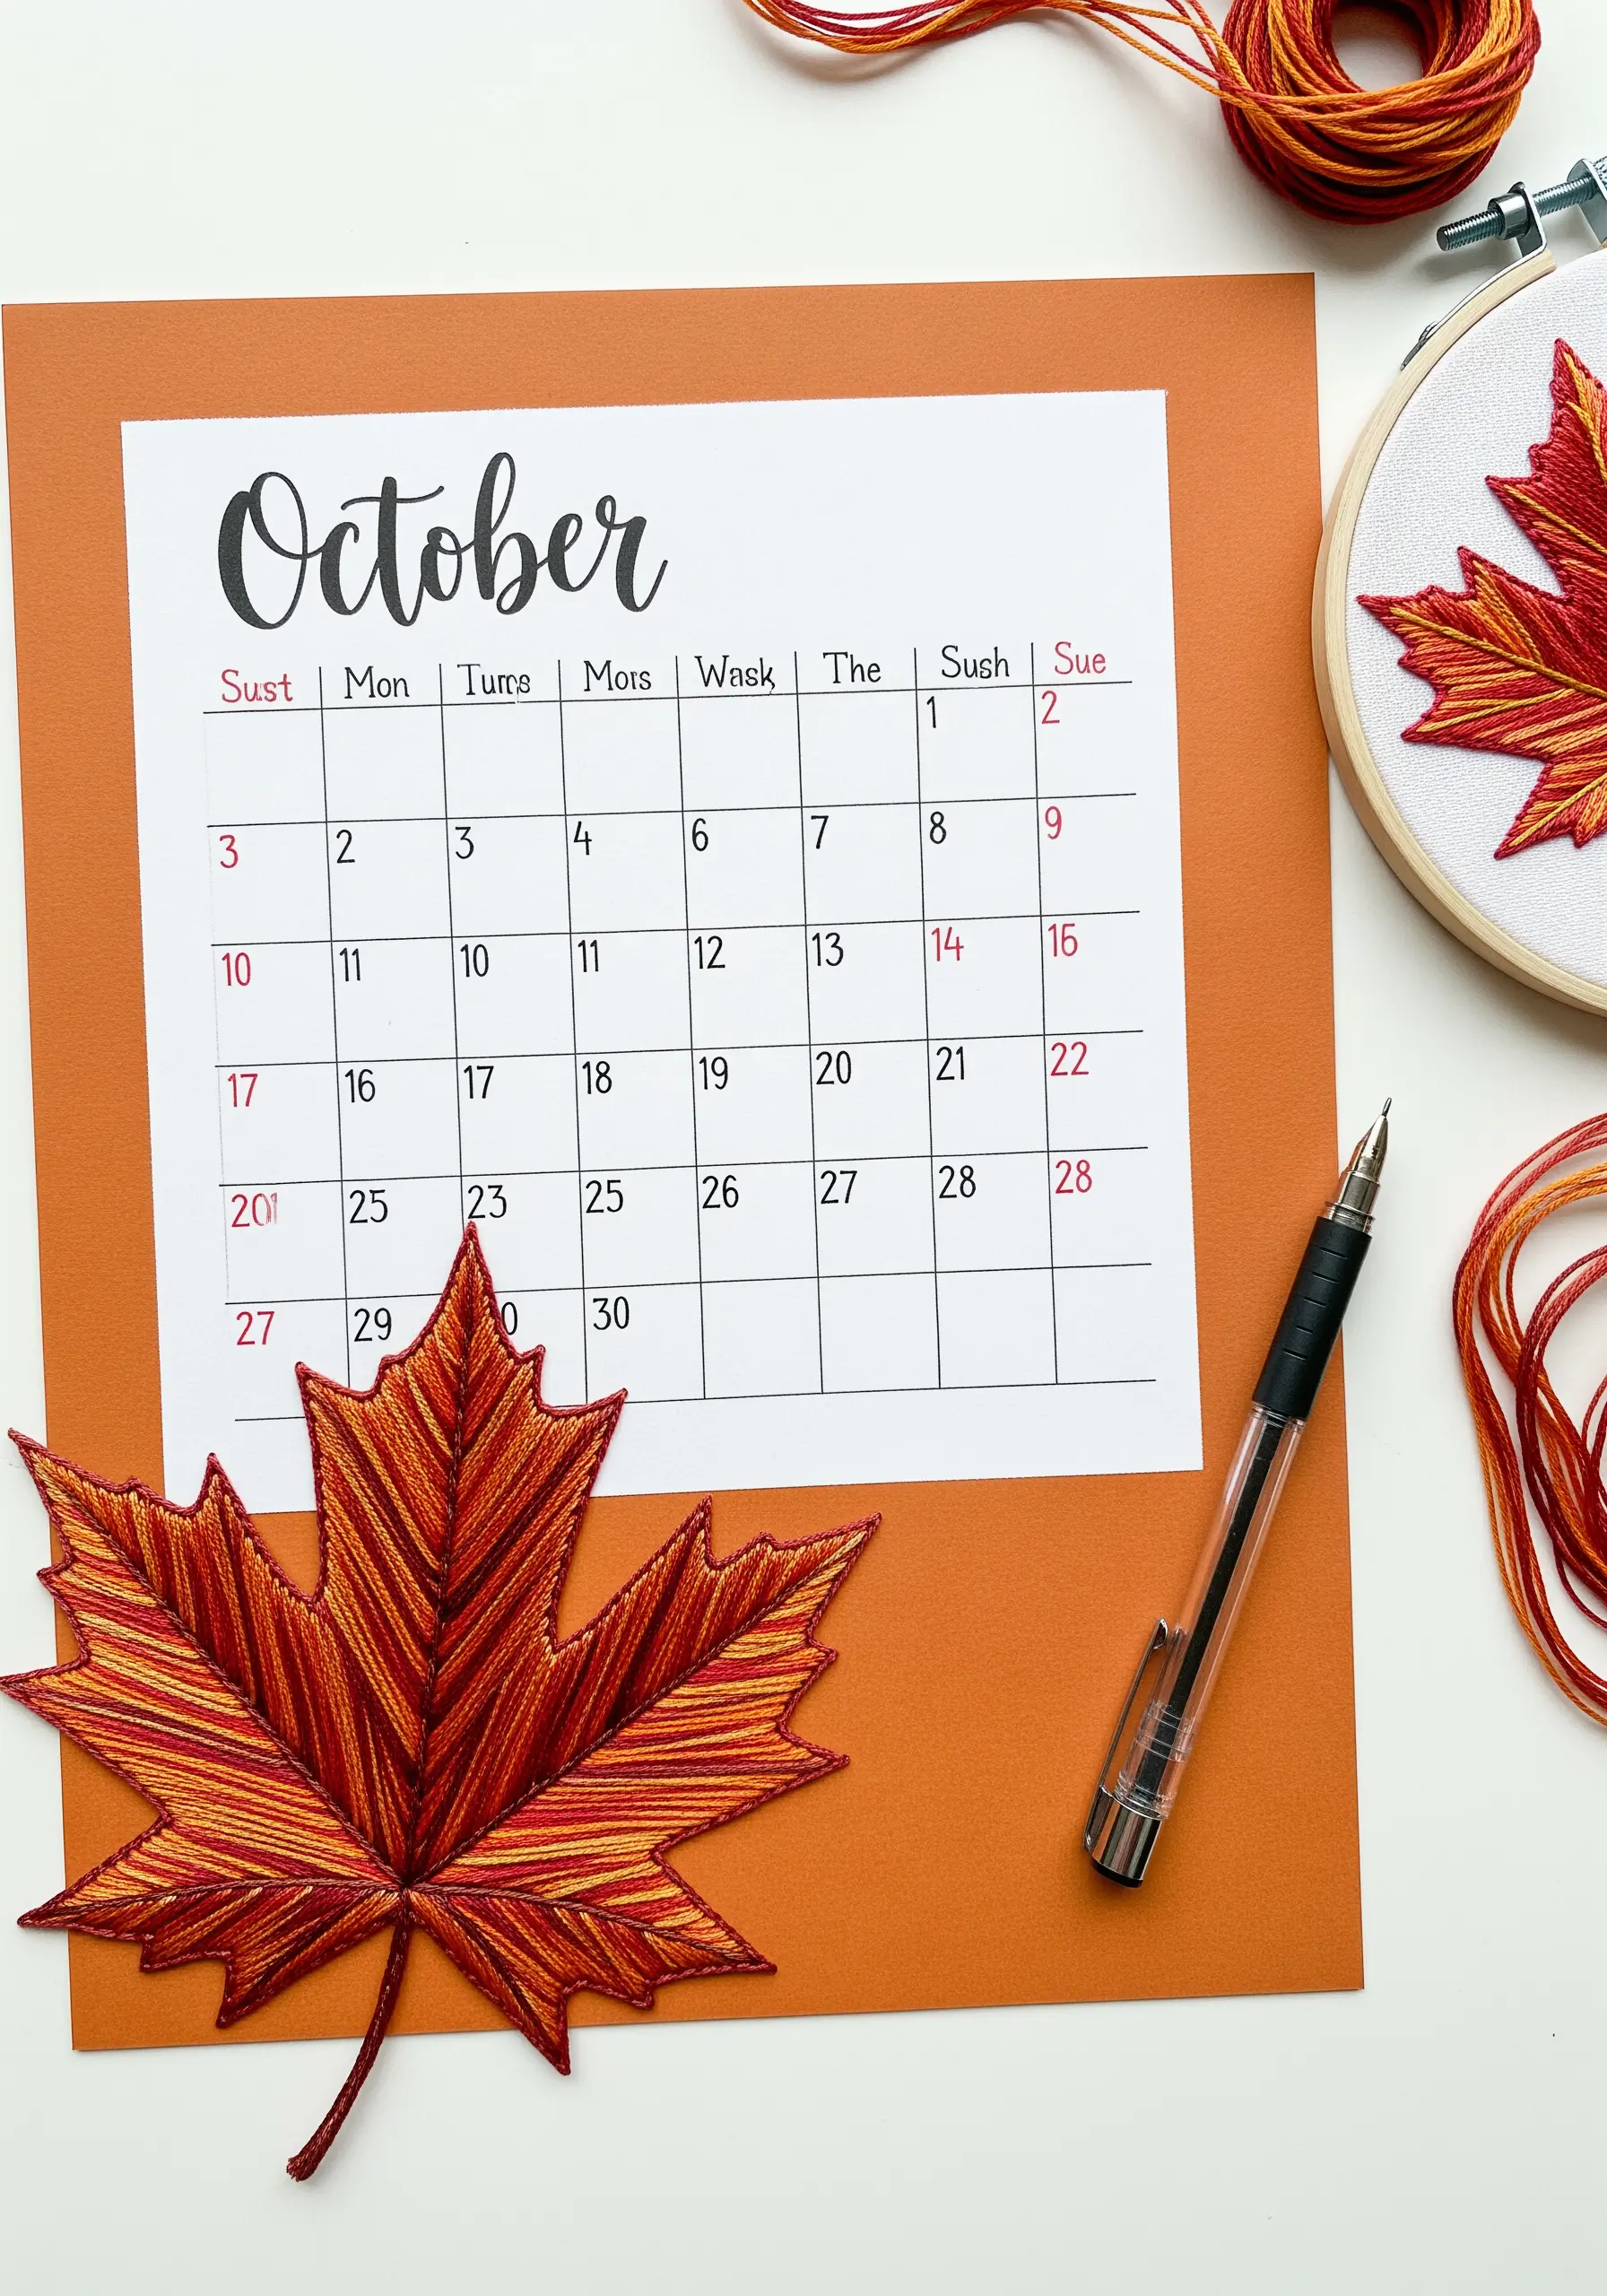
Create a versatile embellishment by stitching a design entirely on water-soluble stabilizer, with no paper or fabric backing.
Use long-and-short stitch to blend colors seamlessly, creating a realistic, thread-painted leaf.
Ensure your stitches are dense and overlapping to create a solid structure.
After rinsing away the stabilizer, you’ll be left with a flexible, fabric-like appliqué made only of thread, ready to be glued onto a calendar, card, or journal.
20. Embellished Seed Packets with Satin Stitch
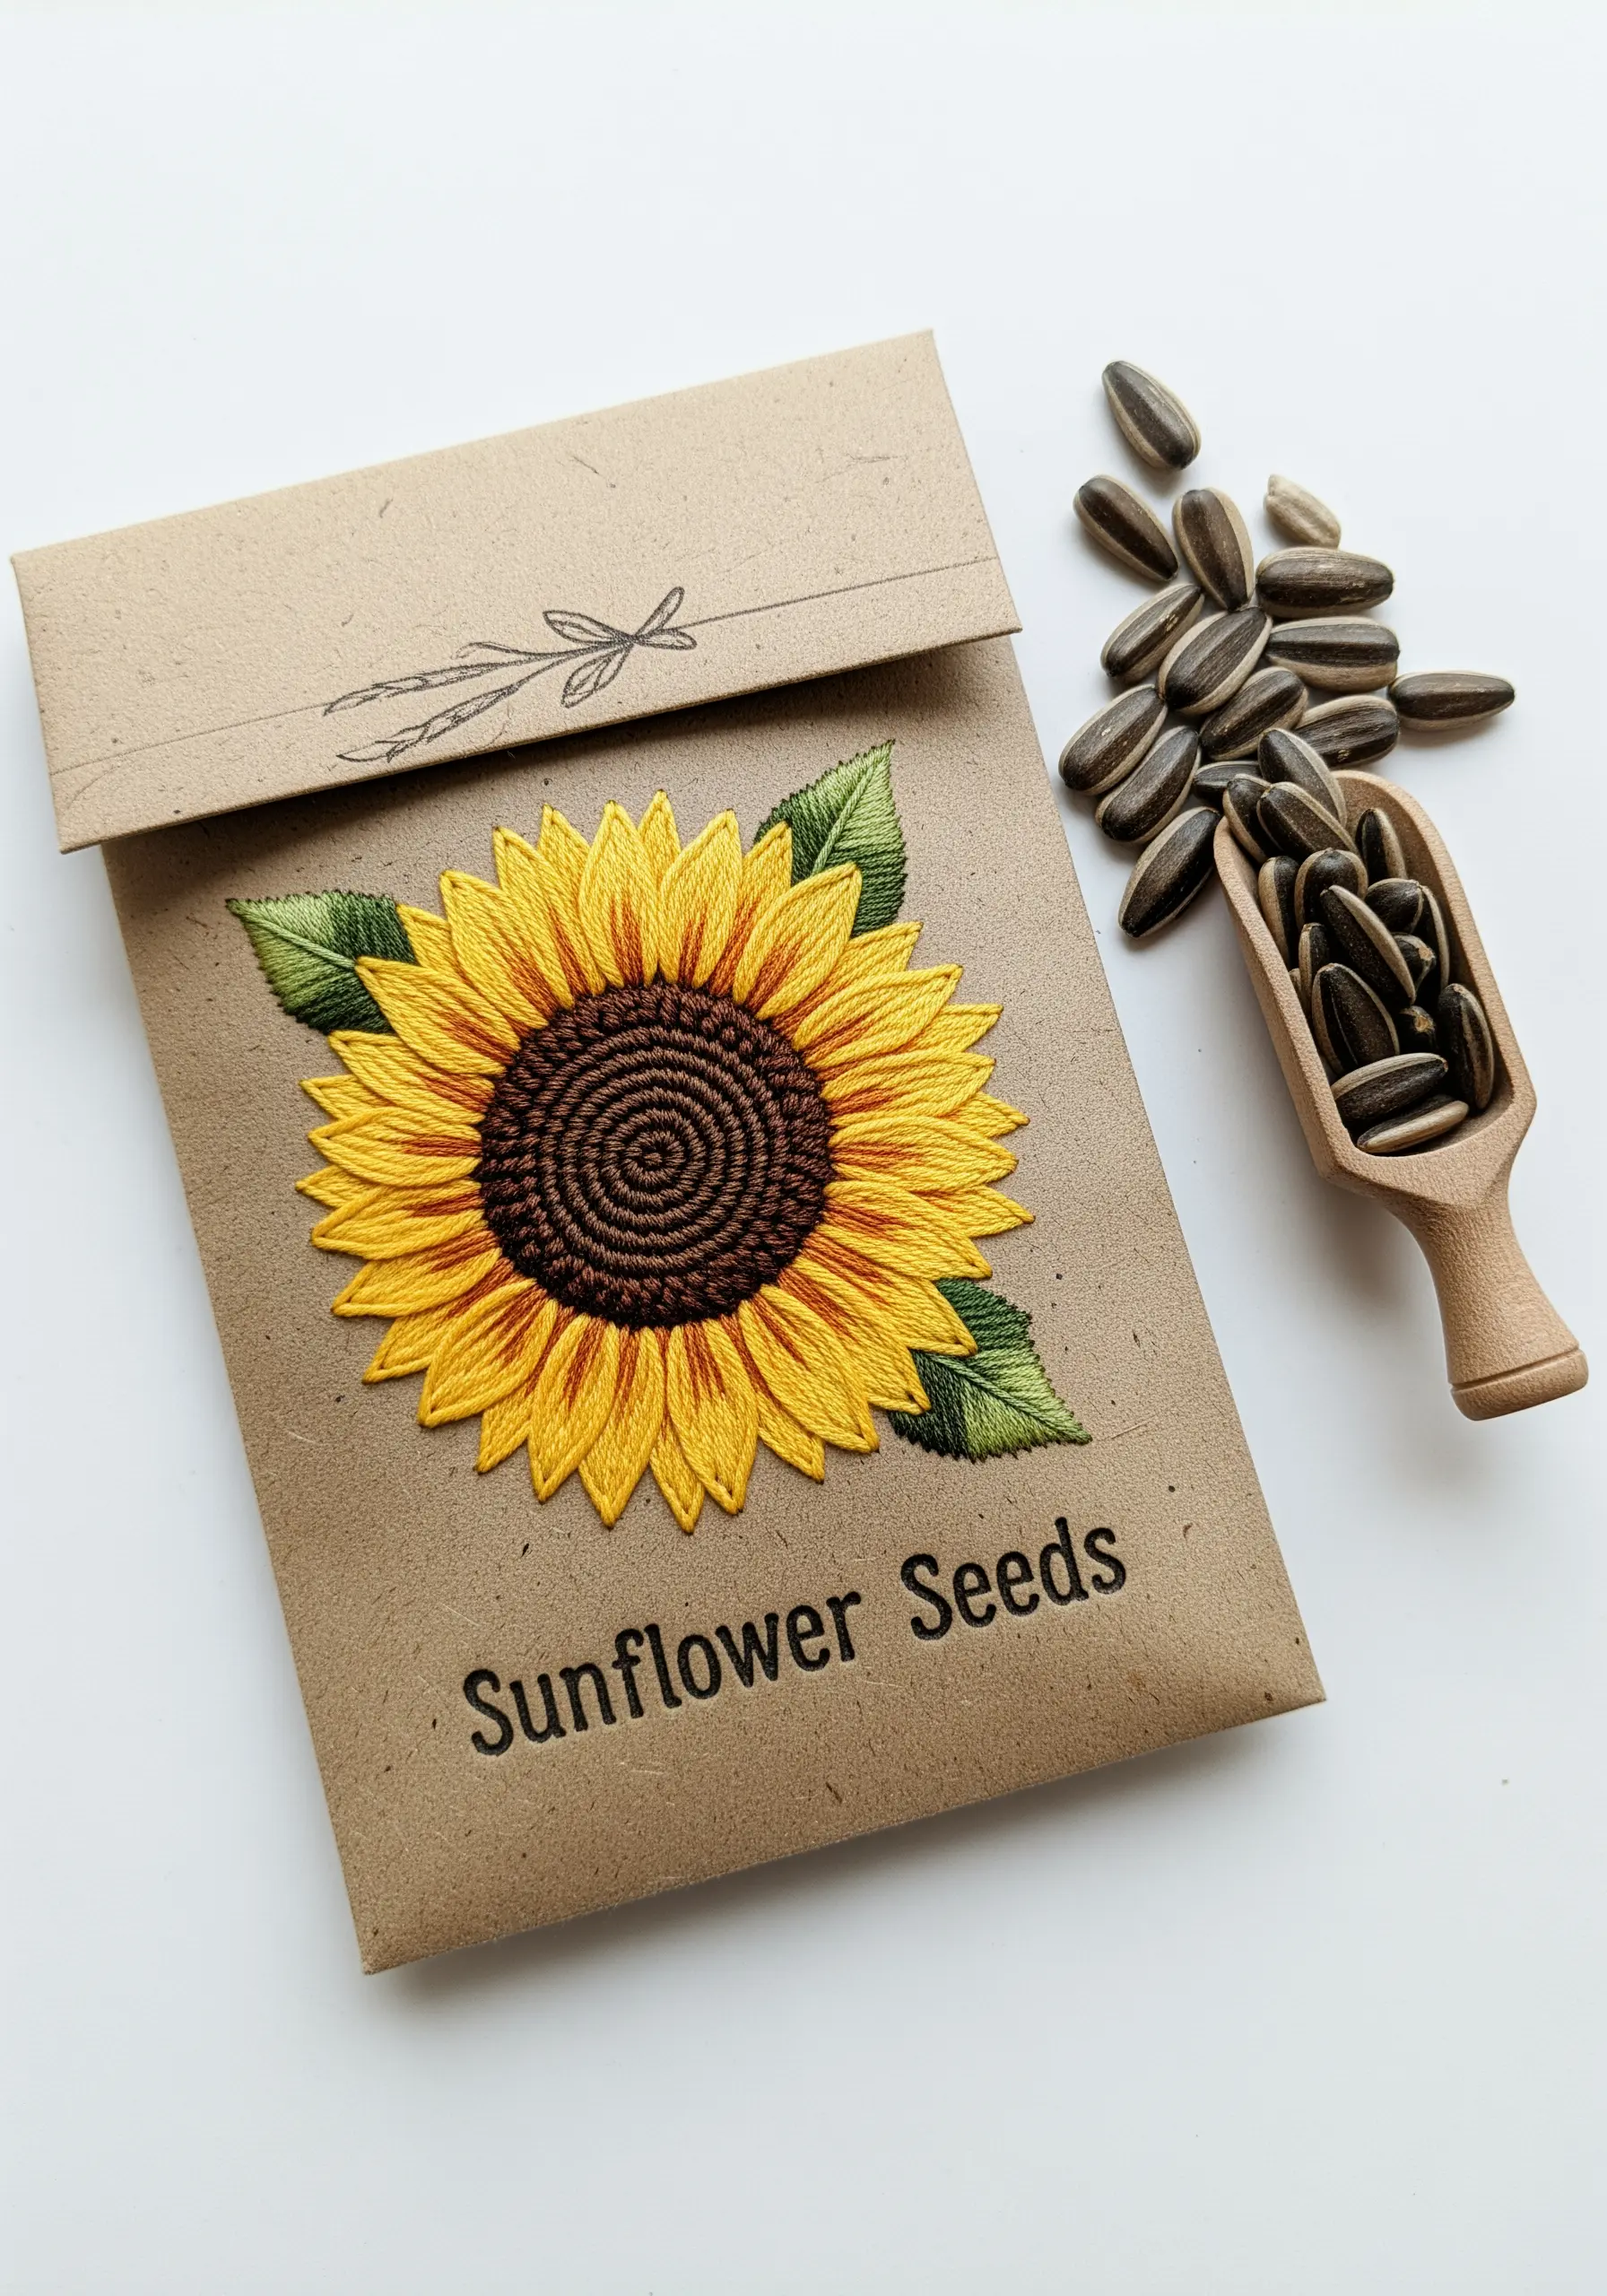
For a project like this, where you want a dense, lush embroidered motif on thin paper, it’s best to stitch the design separately.
Create your embroidered sunflower on a piece of cotton or linen fabric.
Then, carefully trim around the shape, leaving a tiny margin, and affix it to the kraft paper packet with fabric glue.
This method prevents the paper from puckering under the tension of heavy satin stitching and keeps the back of your work neat.
21. Topographical Maps with Stitched Pathways
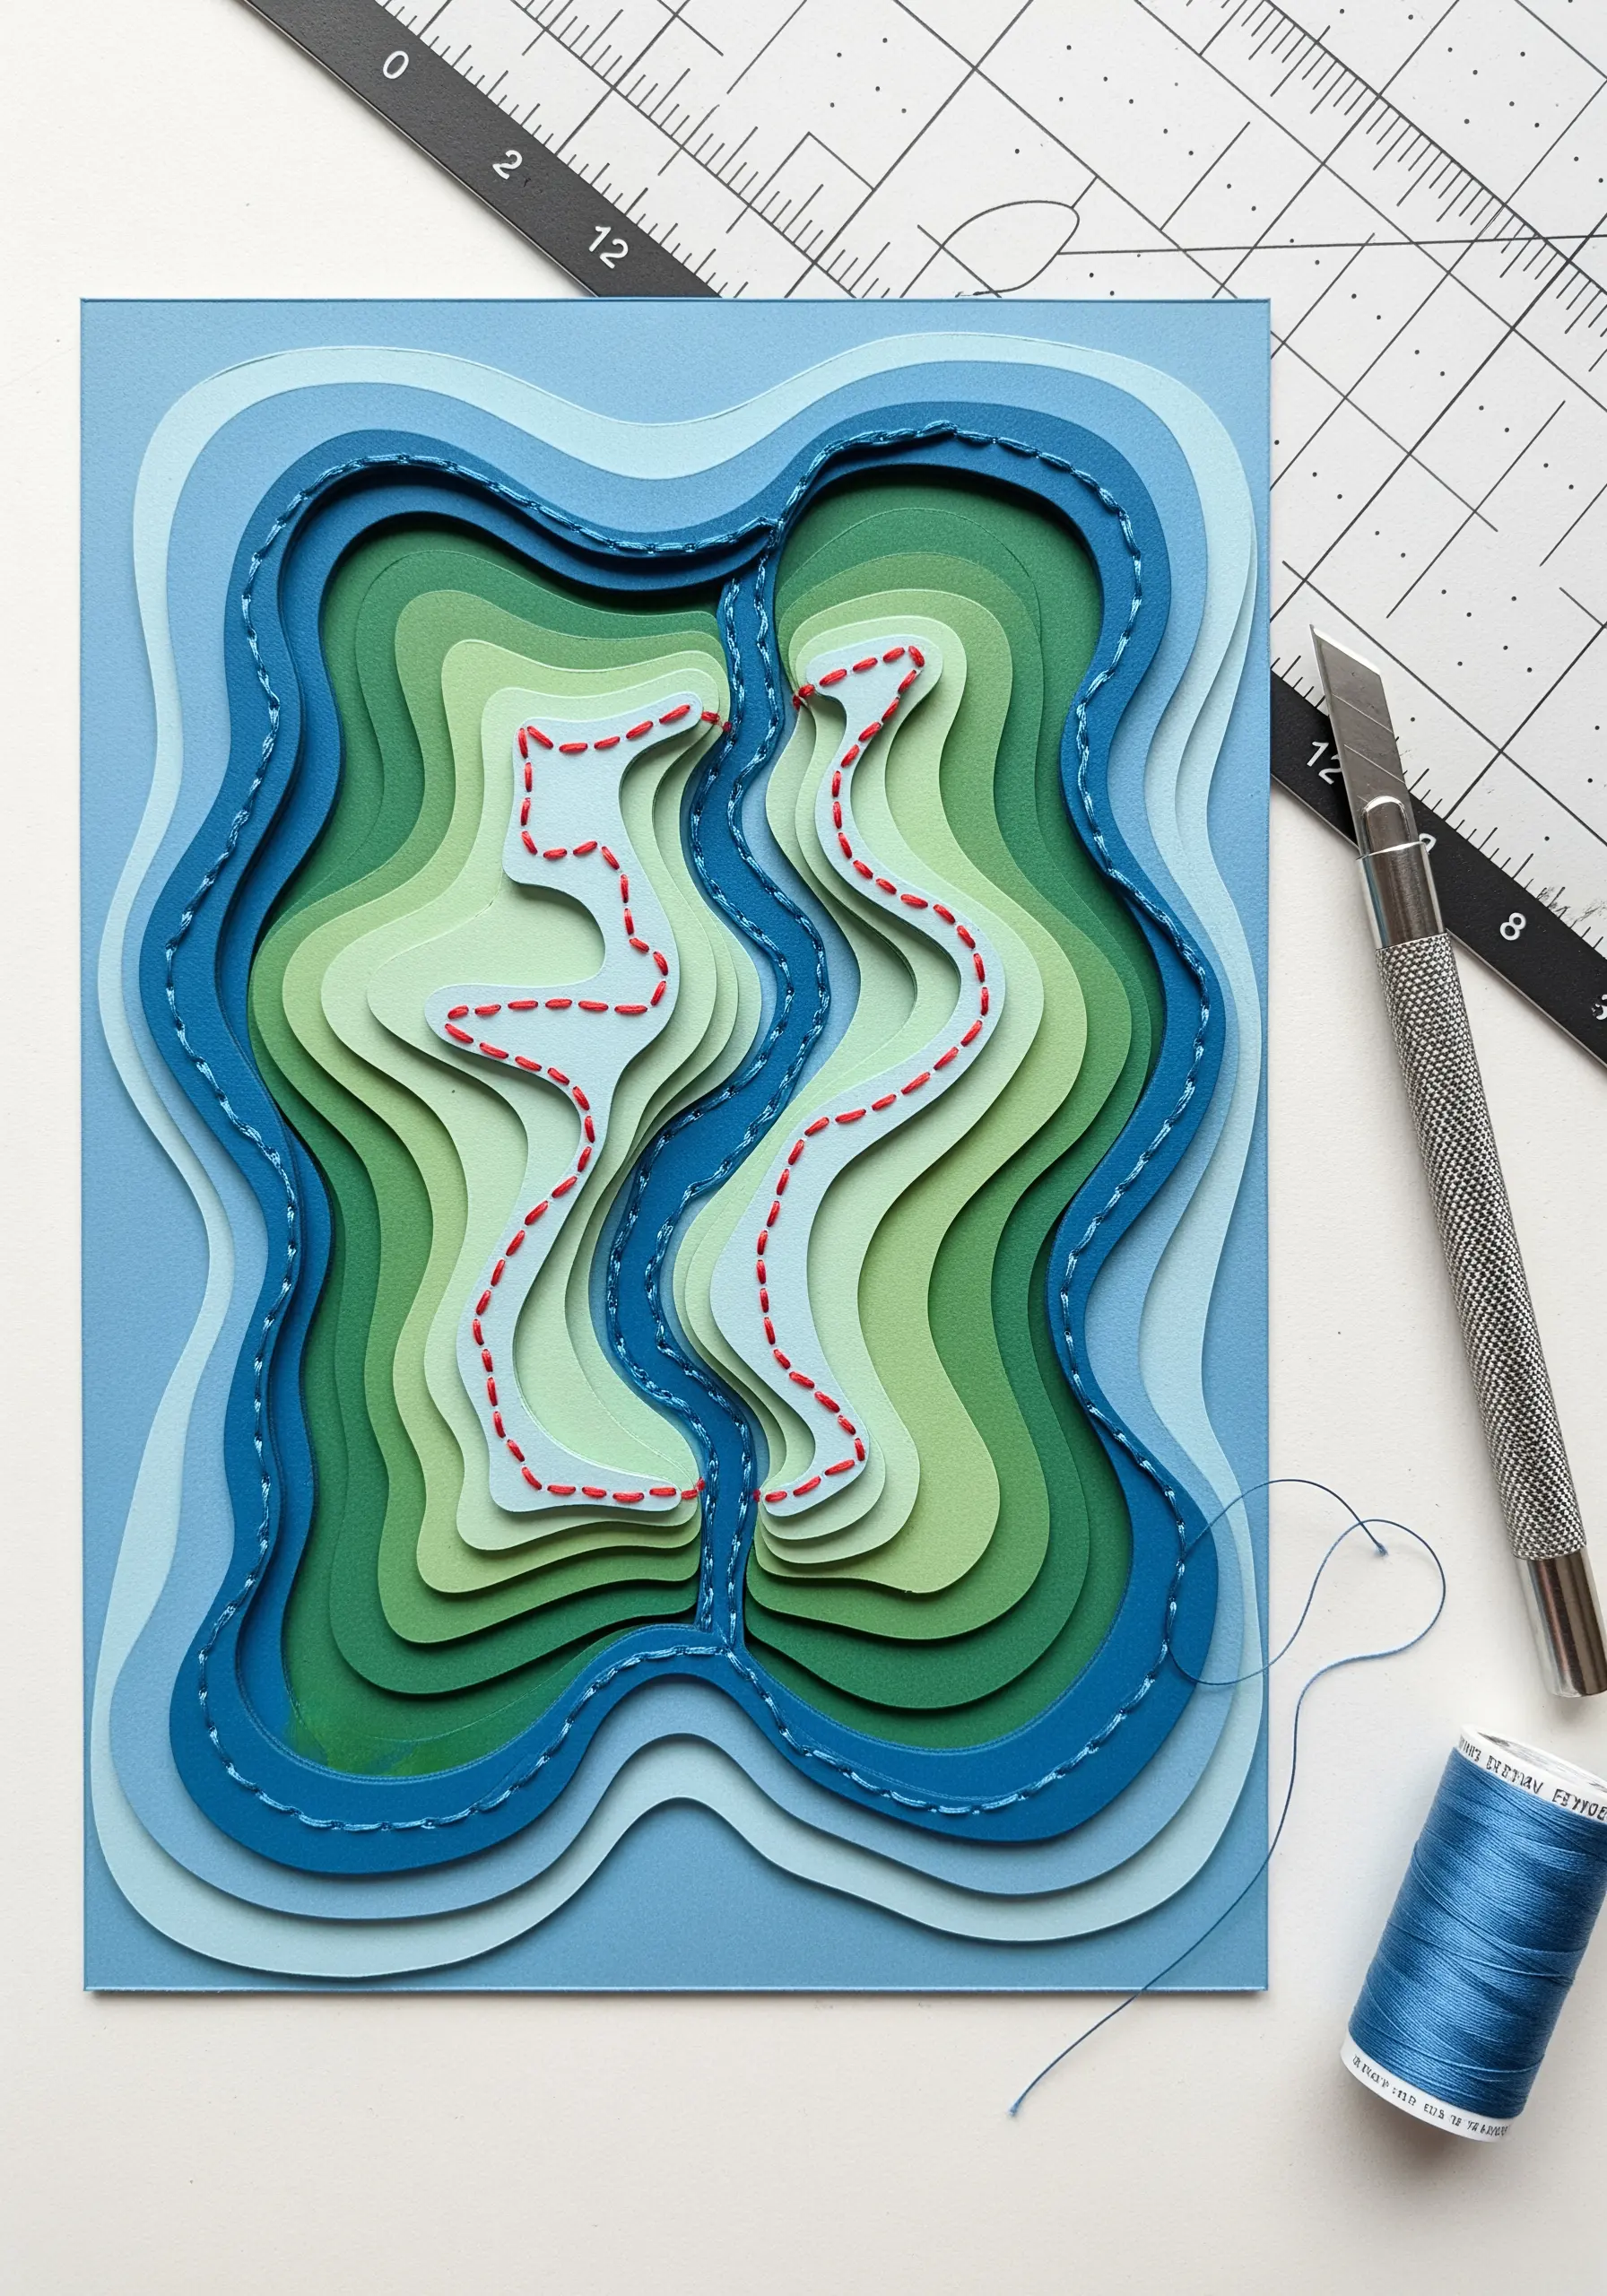
This project uses thread as a powerful narrative tool, telling a story of a journey across a landscape.
After layering cut cardstock to build your 3D topography, use a simple backstitch to trace a route.
A contrasting thread color—like red or blue—makes the path stand out as a deliberate, graphic element.
These stitched pathways guide the viewer’s eye and add a layer of personal meaning to the abstract shapes of the map.


