

You’ve just snipped the final thread on a piece you love. The stitches are perfect, the colors are just right, and you feel that quiet hum of satisfaction. But then comes the question: what now? While a simple hoop has its charm, sometimes your work deserves more—a presentation that feels as intentional and artful as the embroidery itself.
This is where paper becomes your most versatile partner. Think of it not just as a background, but as a structural element, a frame, a stage. Paper offers what fabric cannot: crisp architectural lines, the ability to hold sculptural form, and a unique way of playing with light and shadow. It can transform your soft, textural embroidery into a finished piece of dimensional art.
Here, you won’t find impossibly complex projects. Instead, consider this an invitation to explore. These ideas are about combining the gentle rhythm of stitching with the simple joy of cutting, folding, and layering paper. It’s time to take your beautiful embroidery out of the hoop and give it a home that makes it shine.
1. Botanical Framing for Embroidered Specimens
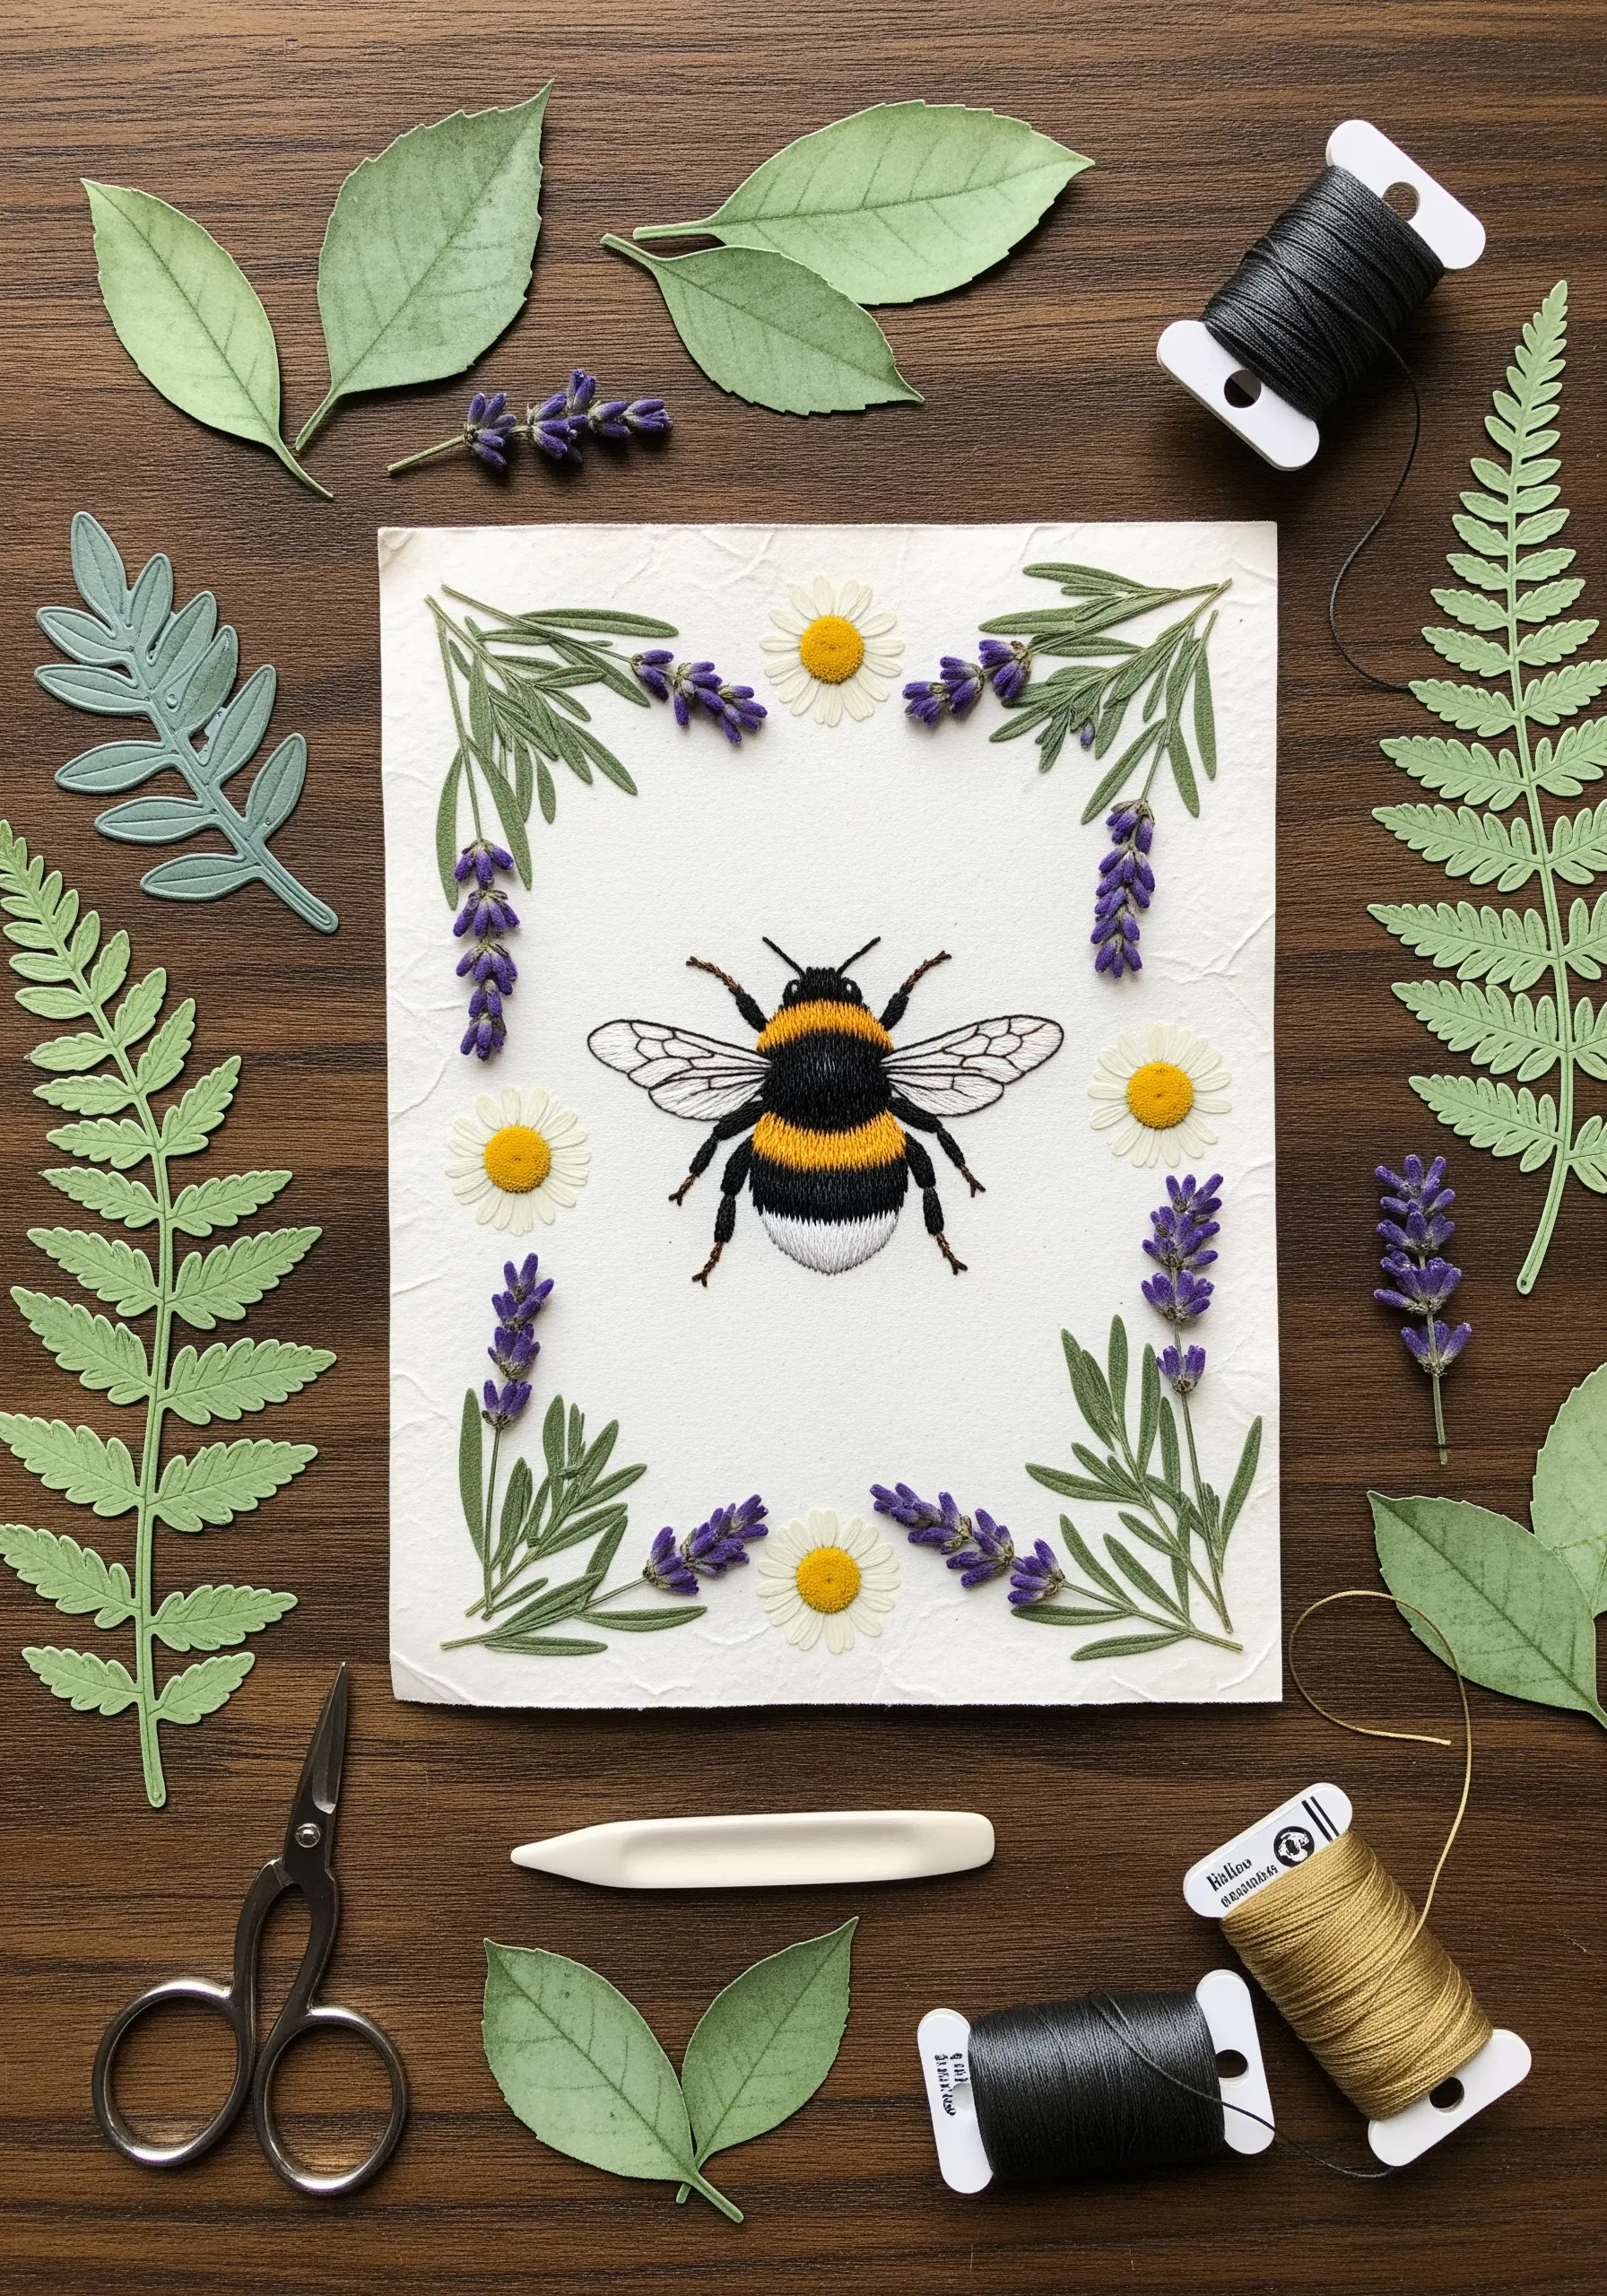
Mount your finished embroidery on heavyweight, textured paper to give it the gravitas of a botanical illustration.
First, stitch your motif—like this thread-painted bee—on a light fabric, leaving ample space around the edges.
Secure the fabric to archival-quality cardstock using a thin, even layer of acid-free glue, pulling it taut to avoid wrinkles.
Frame your stitched ‘specimen’ with pressed flowers and leaves, attaching them with a tiny dot of craft glue to create a delicate, three-dimensional border that tells a story.
This method transforms your stitchwork into a piece of natural history art, blending the texture of thread with the fragility of real botanicals.
2. Integrating Stitches into 3D Paper Forms
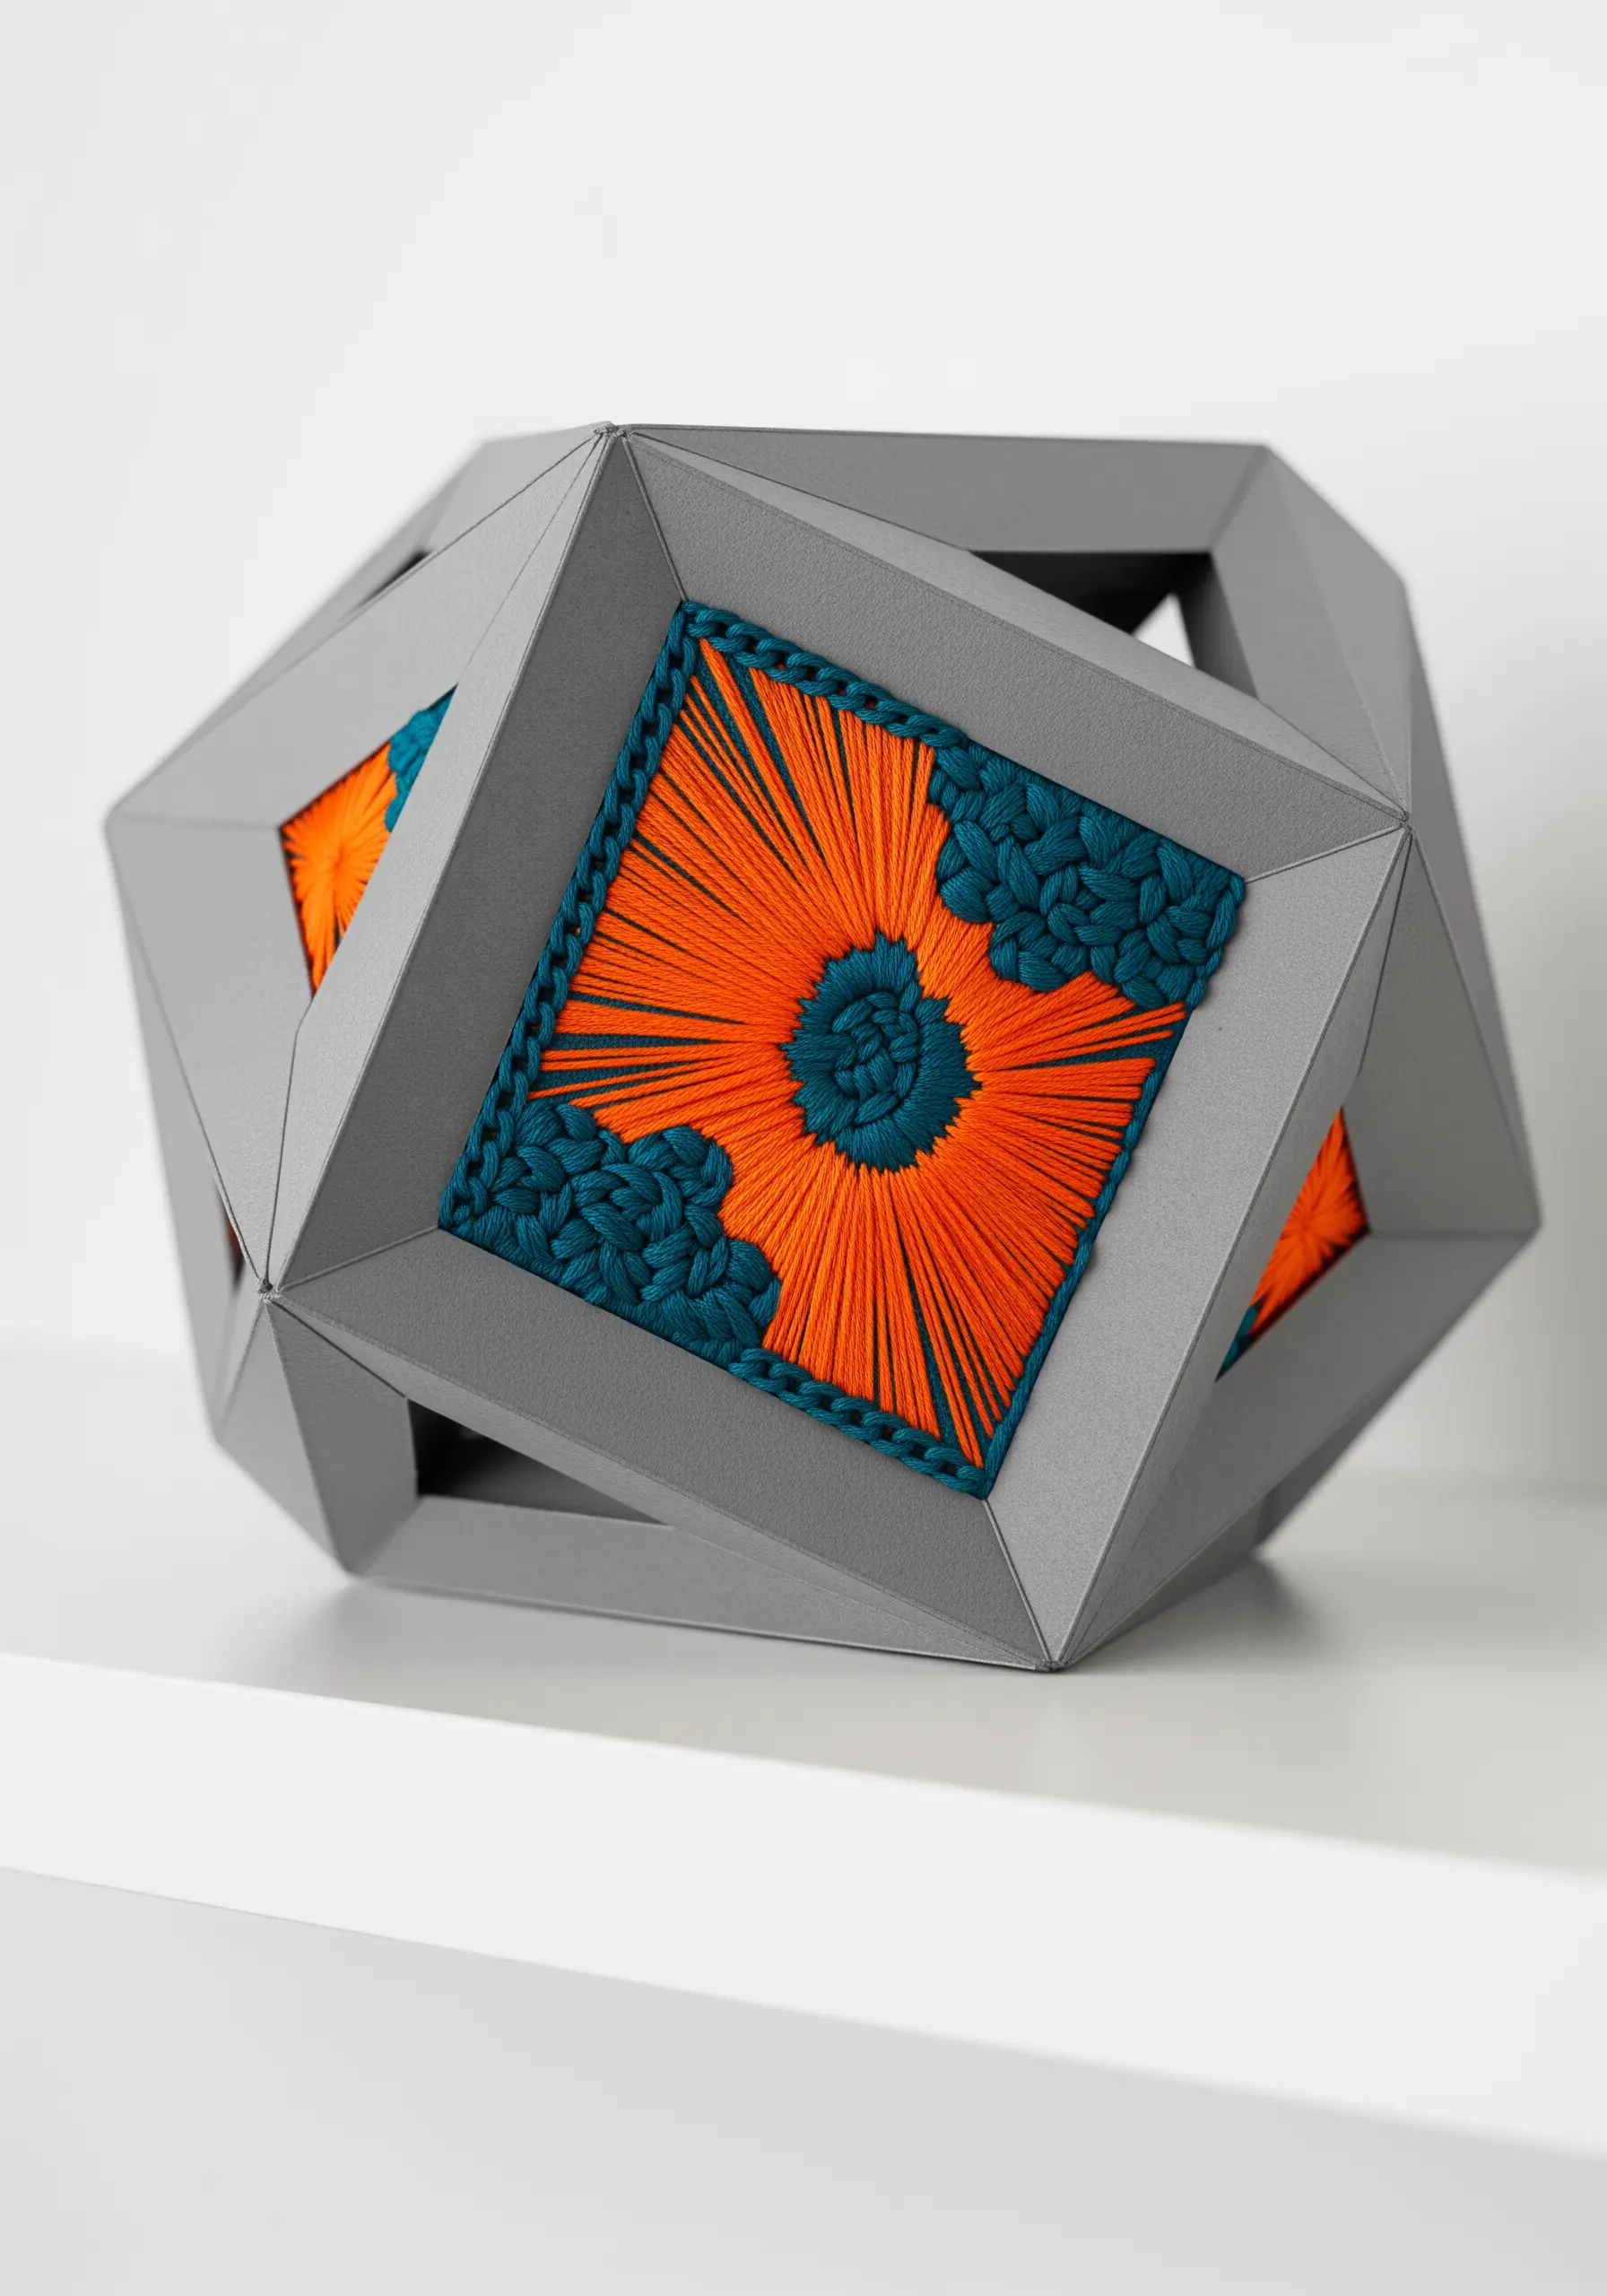
Give your embroidery architectural presence by incorporating it into a geometric paper sculpture.
Before assembling the 3D object, stitch your designs onto fabric panels that precisely match the paper templates.
Mount the embroidered fabric onto the corresponding cardstock pieces using a strong adhesive, ensuring the edges are crisp and clean.
The tension between the soft, vibrant thread and the sharp, mathematical lines of the paper structure creates a striking contemporary art piece.
Choose high-contrast colors like this orange and teal to make the stitched sections the undeniable focal point.
3. Nesting Embroidery in Sculptural Paper Pulp
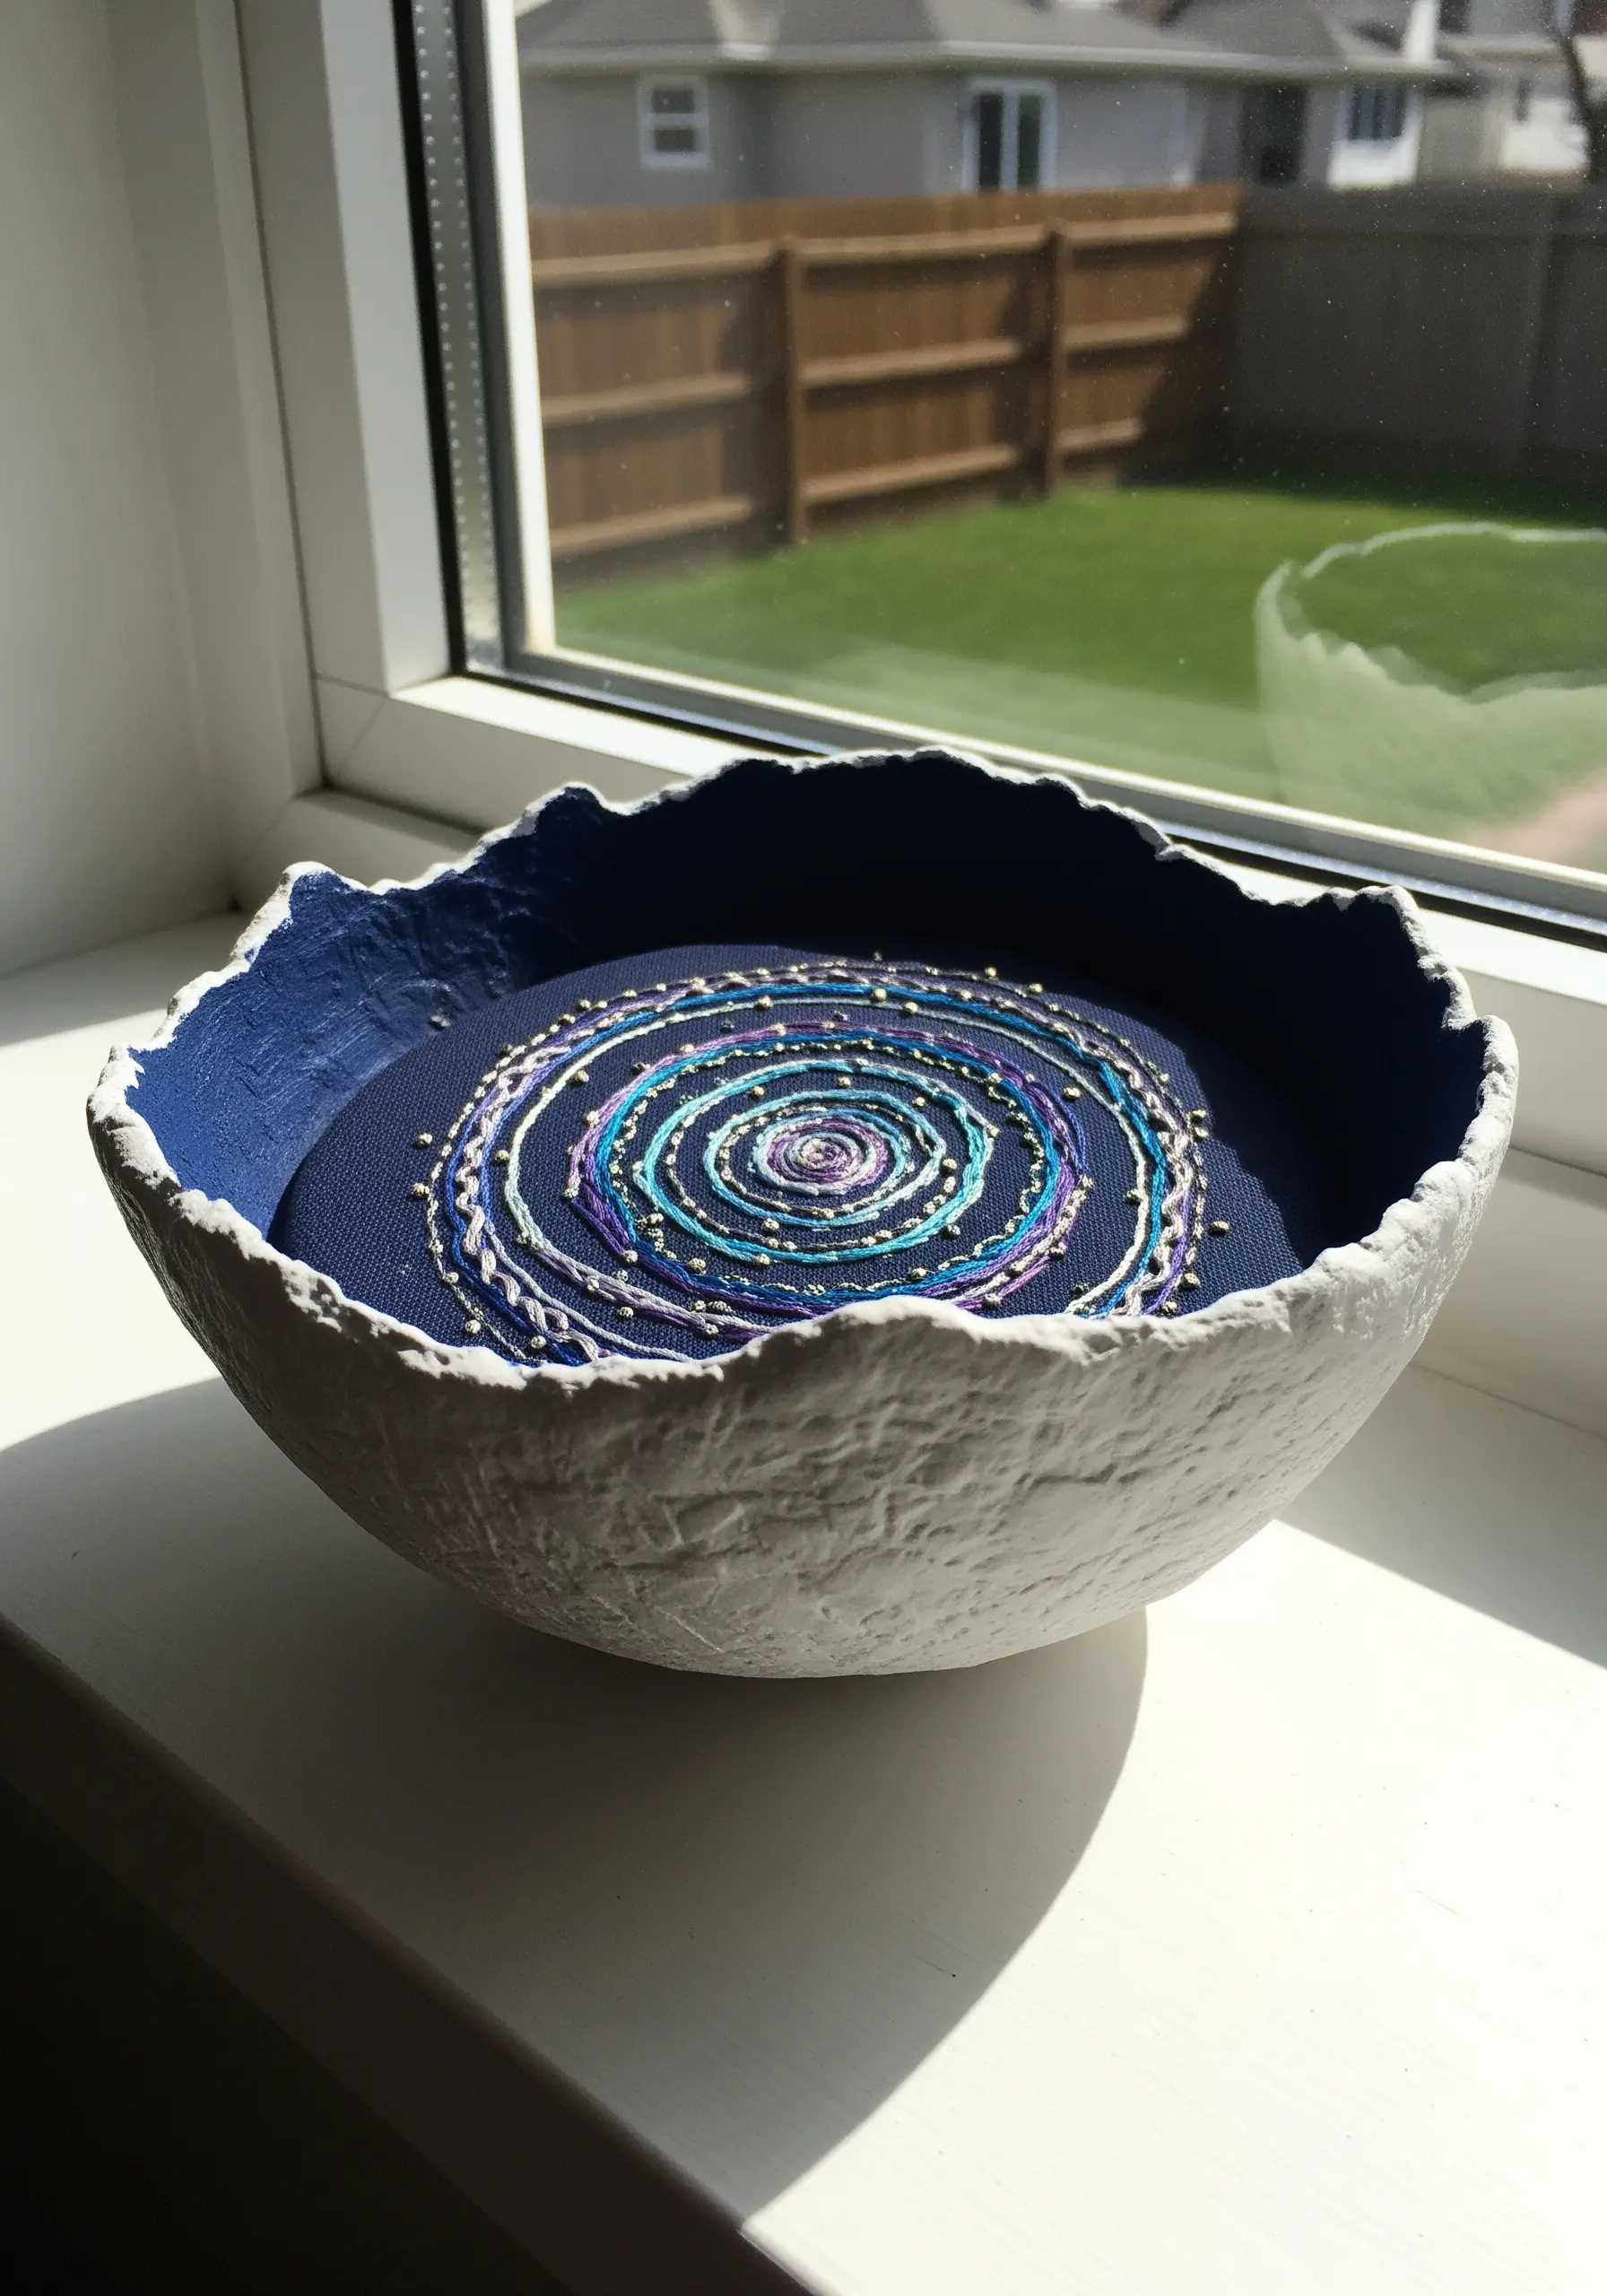
Create a dramatic contrast in textures by setting your detailed embroidery within a rustic paper pulp bowl.
Form a bowl using paper mâché or air-dry paper clay, leaving the edges rough and organic to emphasize its handmade quality.
Once dry, paint the interior a deep, matte color to make your stitchwork pop.
Mount your finished embroidery on a stiff, fabric-covered disc and nestle it inside the bowl.
The raw, earthy texture of the paper vessel makes the precision and sheen of your threadwork appear even more refined and precious.
4. Layered Paper Collage for Celestial Stitching

Build atmospheric depth by integrating your embroidery into a multi-layered paper collage.
Stitch your central motif, like this textured moon, on fabric and carefully cut it out, leaving a minimal border.
Create a backdrop by tearing and layering different shades of high-quality art paper; the torn edges produce a soft, cloud-like effect that frames your work organically.
This technique is perfect for adding narrative and texture to journals and daily planners.
The interplay of smooth stitches, rough paper edges, and subtle color variations transforms a flat piece into a tactile experience.
5. Framing Hoops with Delicate Paper-Cut Latticework
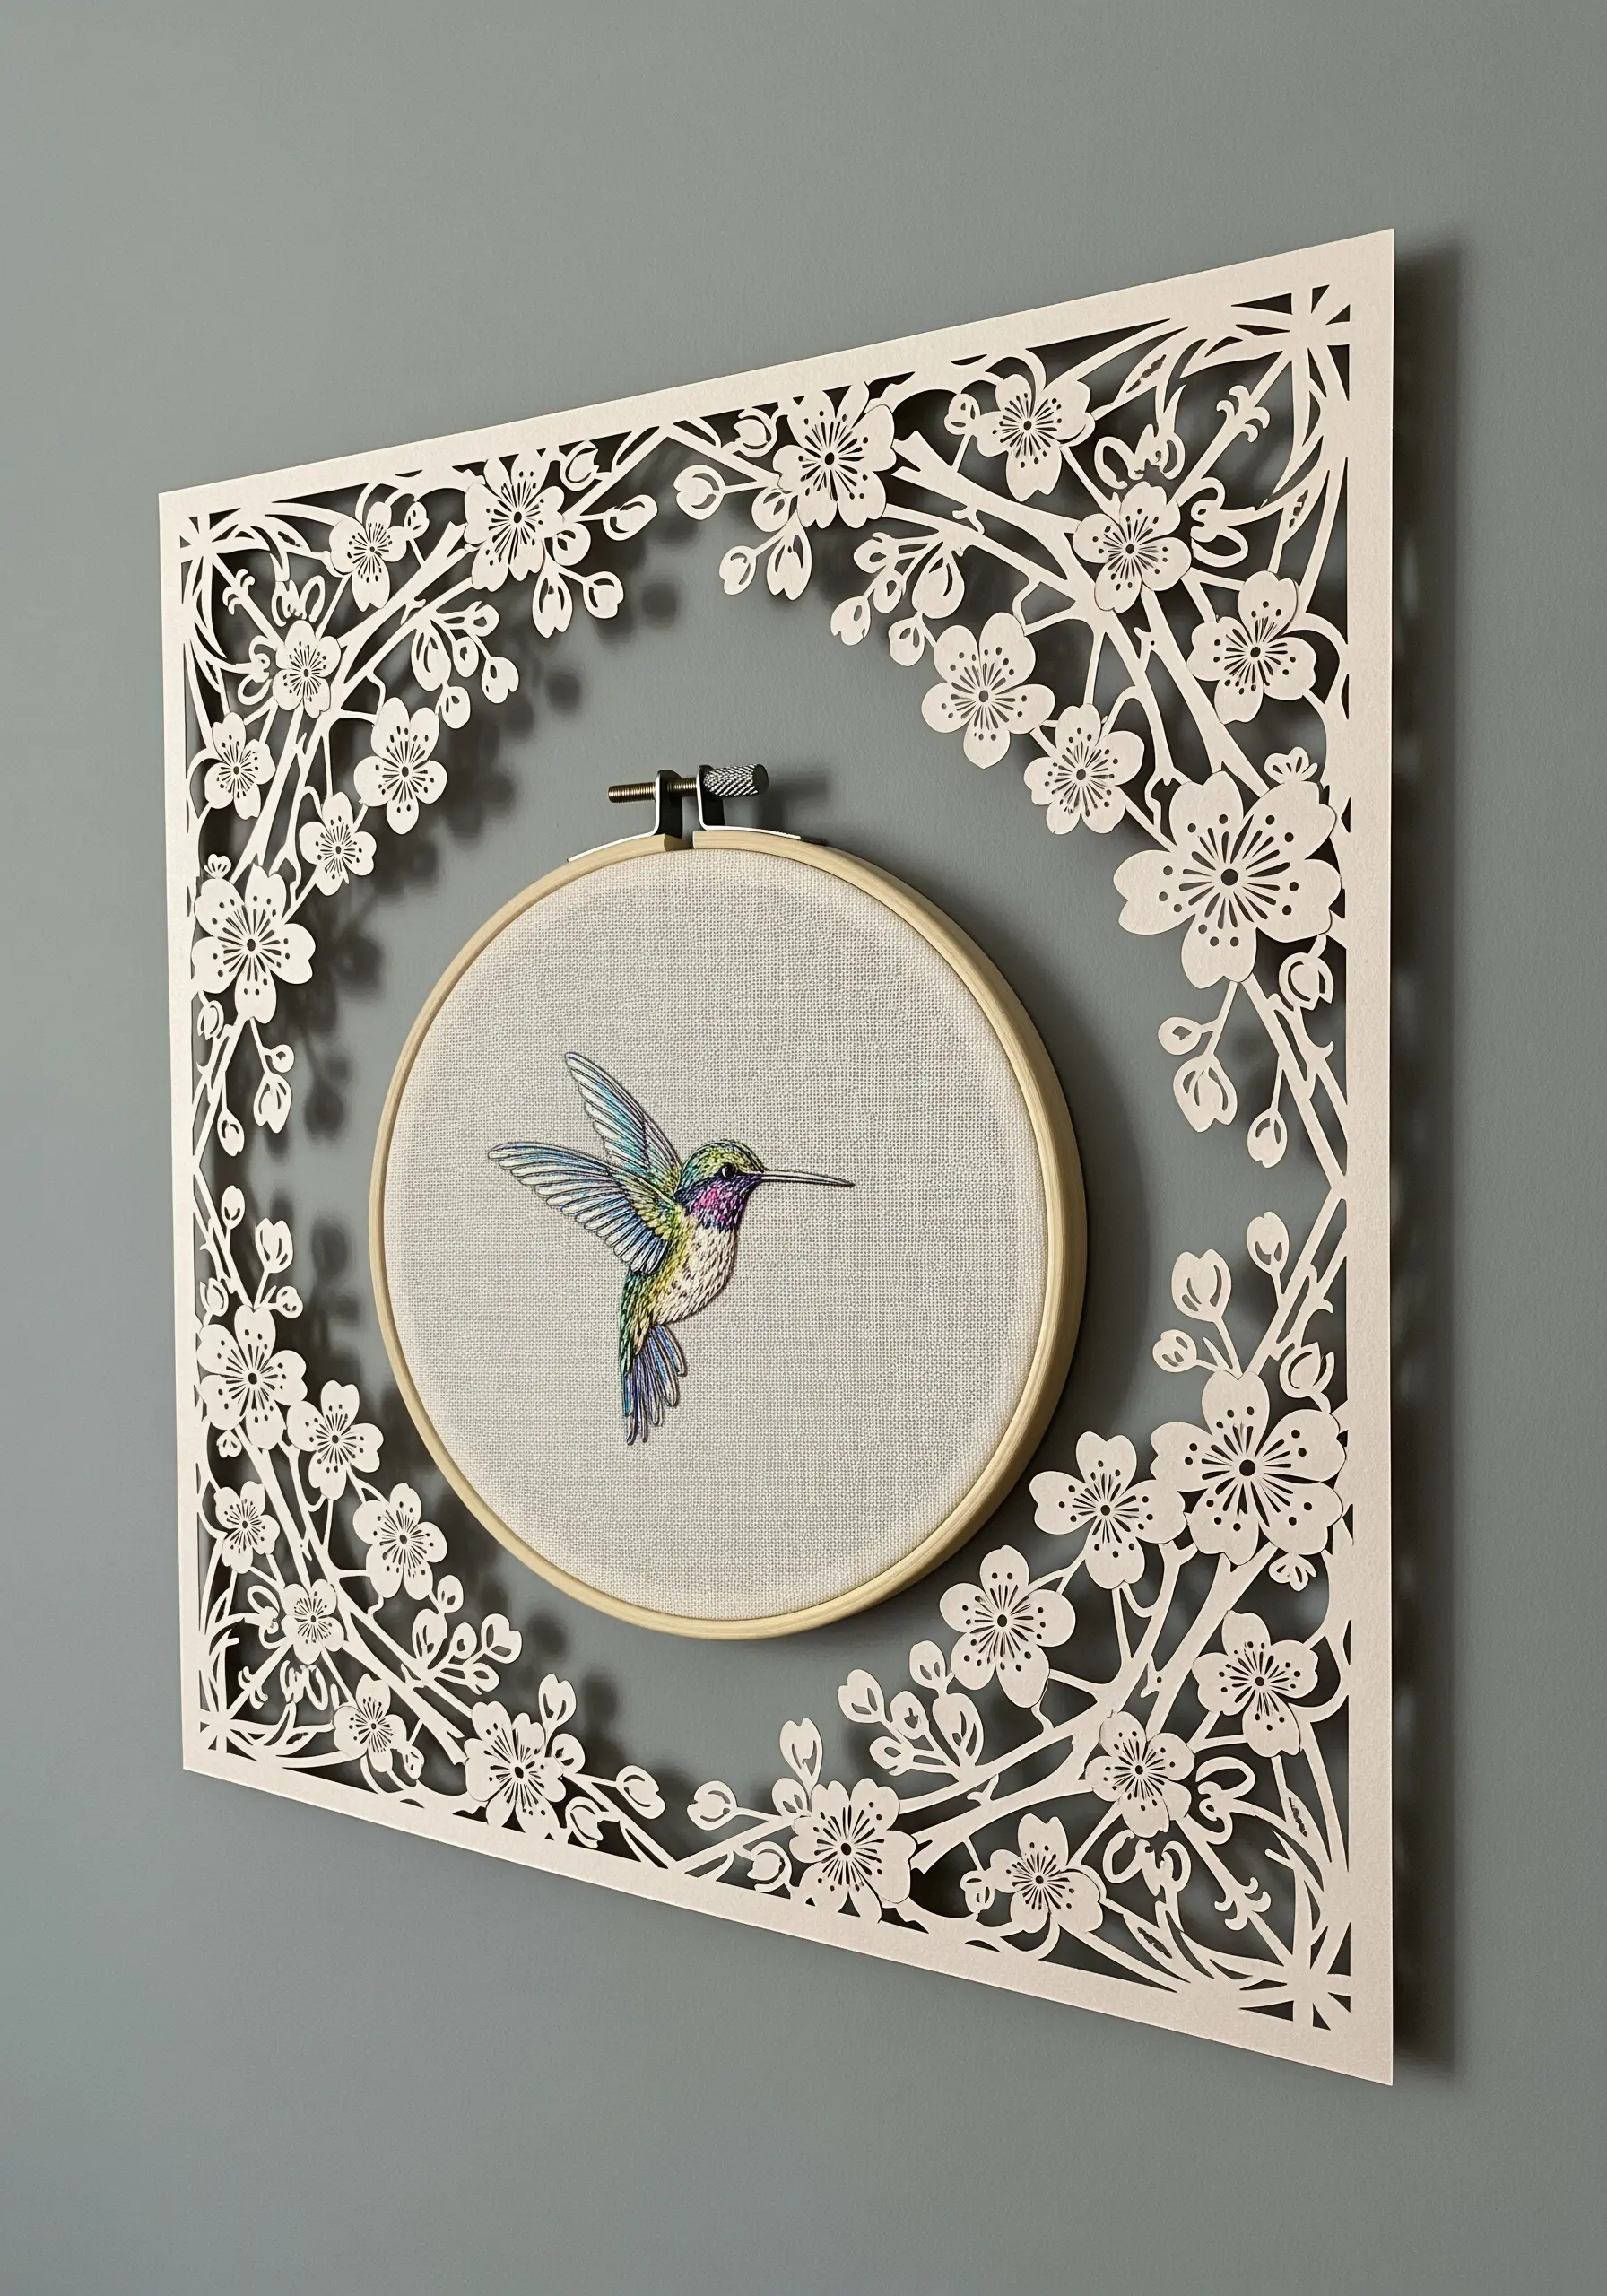
Elevate your standard hoop display by adding an intricate paper-cut overlay.
Instead of stopping at the hoop’s edge, extend the world of your embroidery with a custom-cut paper frame.
Design a pattern that complements your stitched motif—here, cherry blossoms echo the floral feel of the hummingbird.
You can cut the design by hand with a craft knife or use a digital cutting machine for perfect precision.
This method seamlessly merges the two crafts, creating a cohesive and gallery-ready piece that feels intentional and complete.
6. Stitched Characters for Paper Dioramas
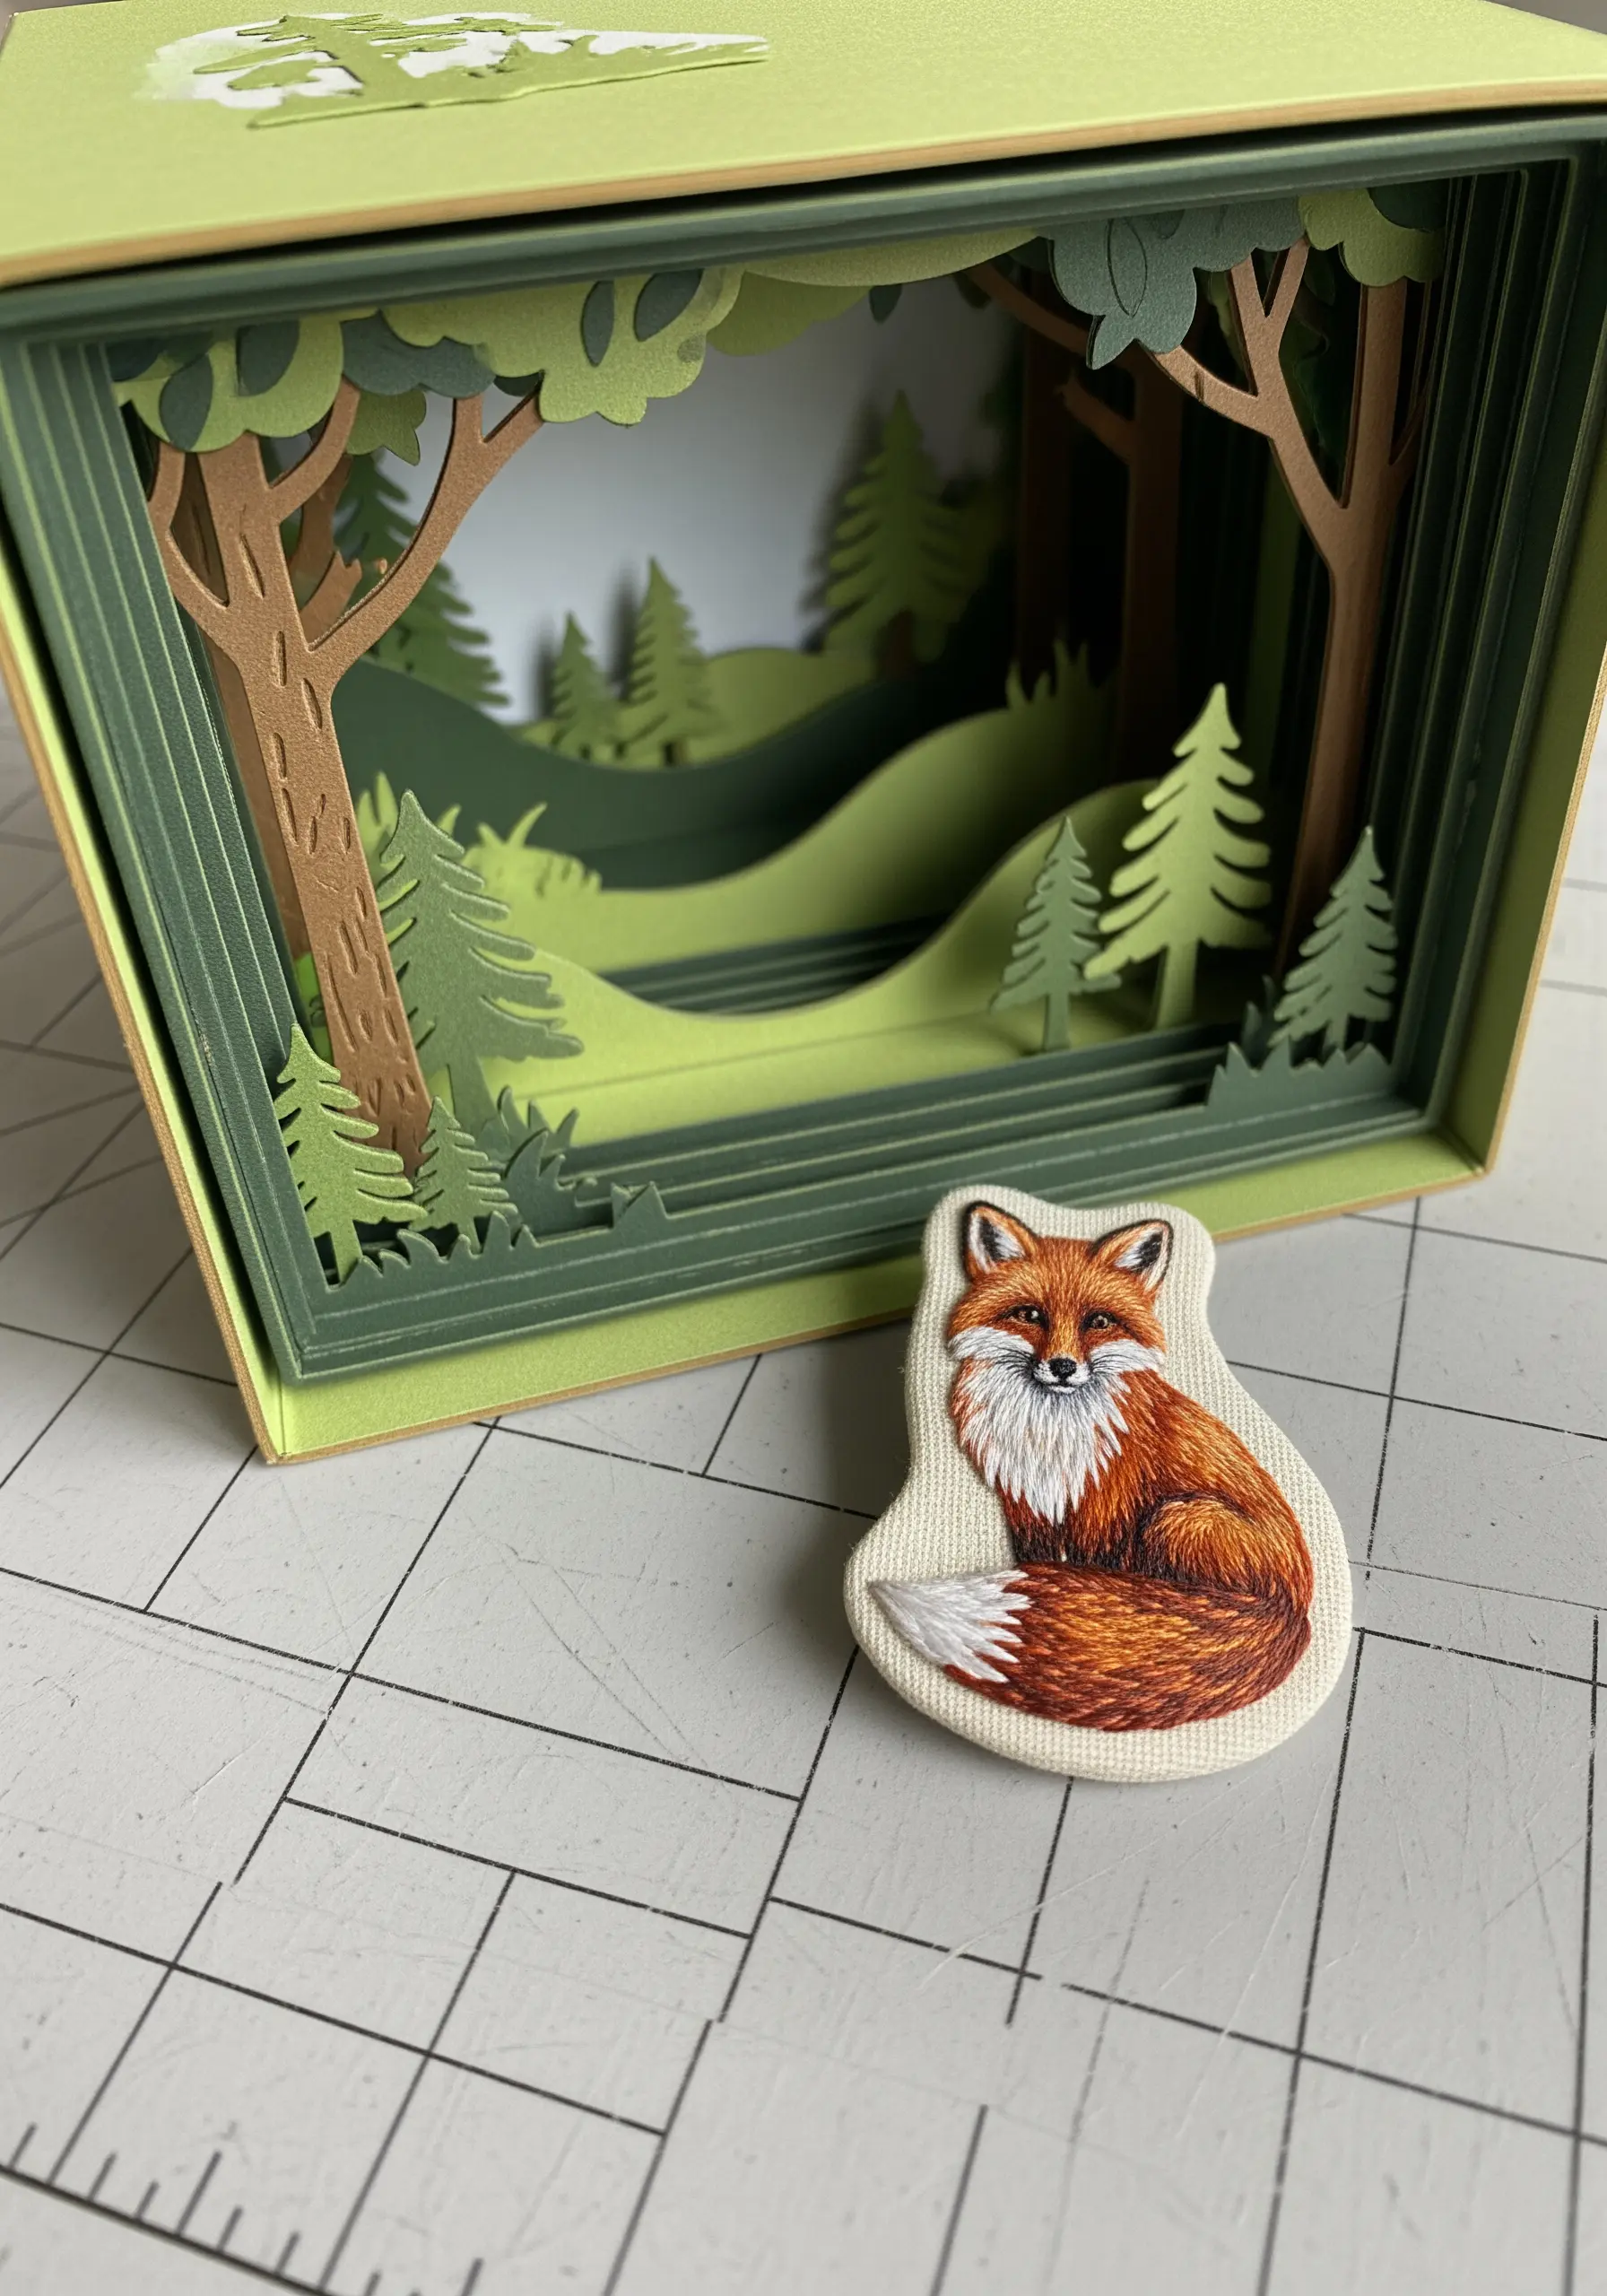
Bring your embroidered creatures to life by placing them in a three-dimensional paper scene.
Stitch your character using thread painting techniques for realism, then apply a stiff iron-on backing before cutting it out to create a sturdy patch.
Construct a shadow box or diorama using layered cardstock to create a sense of depth and perspective.
Position your stitched character within the paper world to tell a miniature story, turning your embroidery from a simple motif into the protagonist of its own scene.
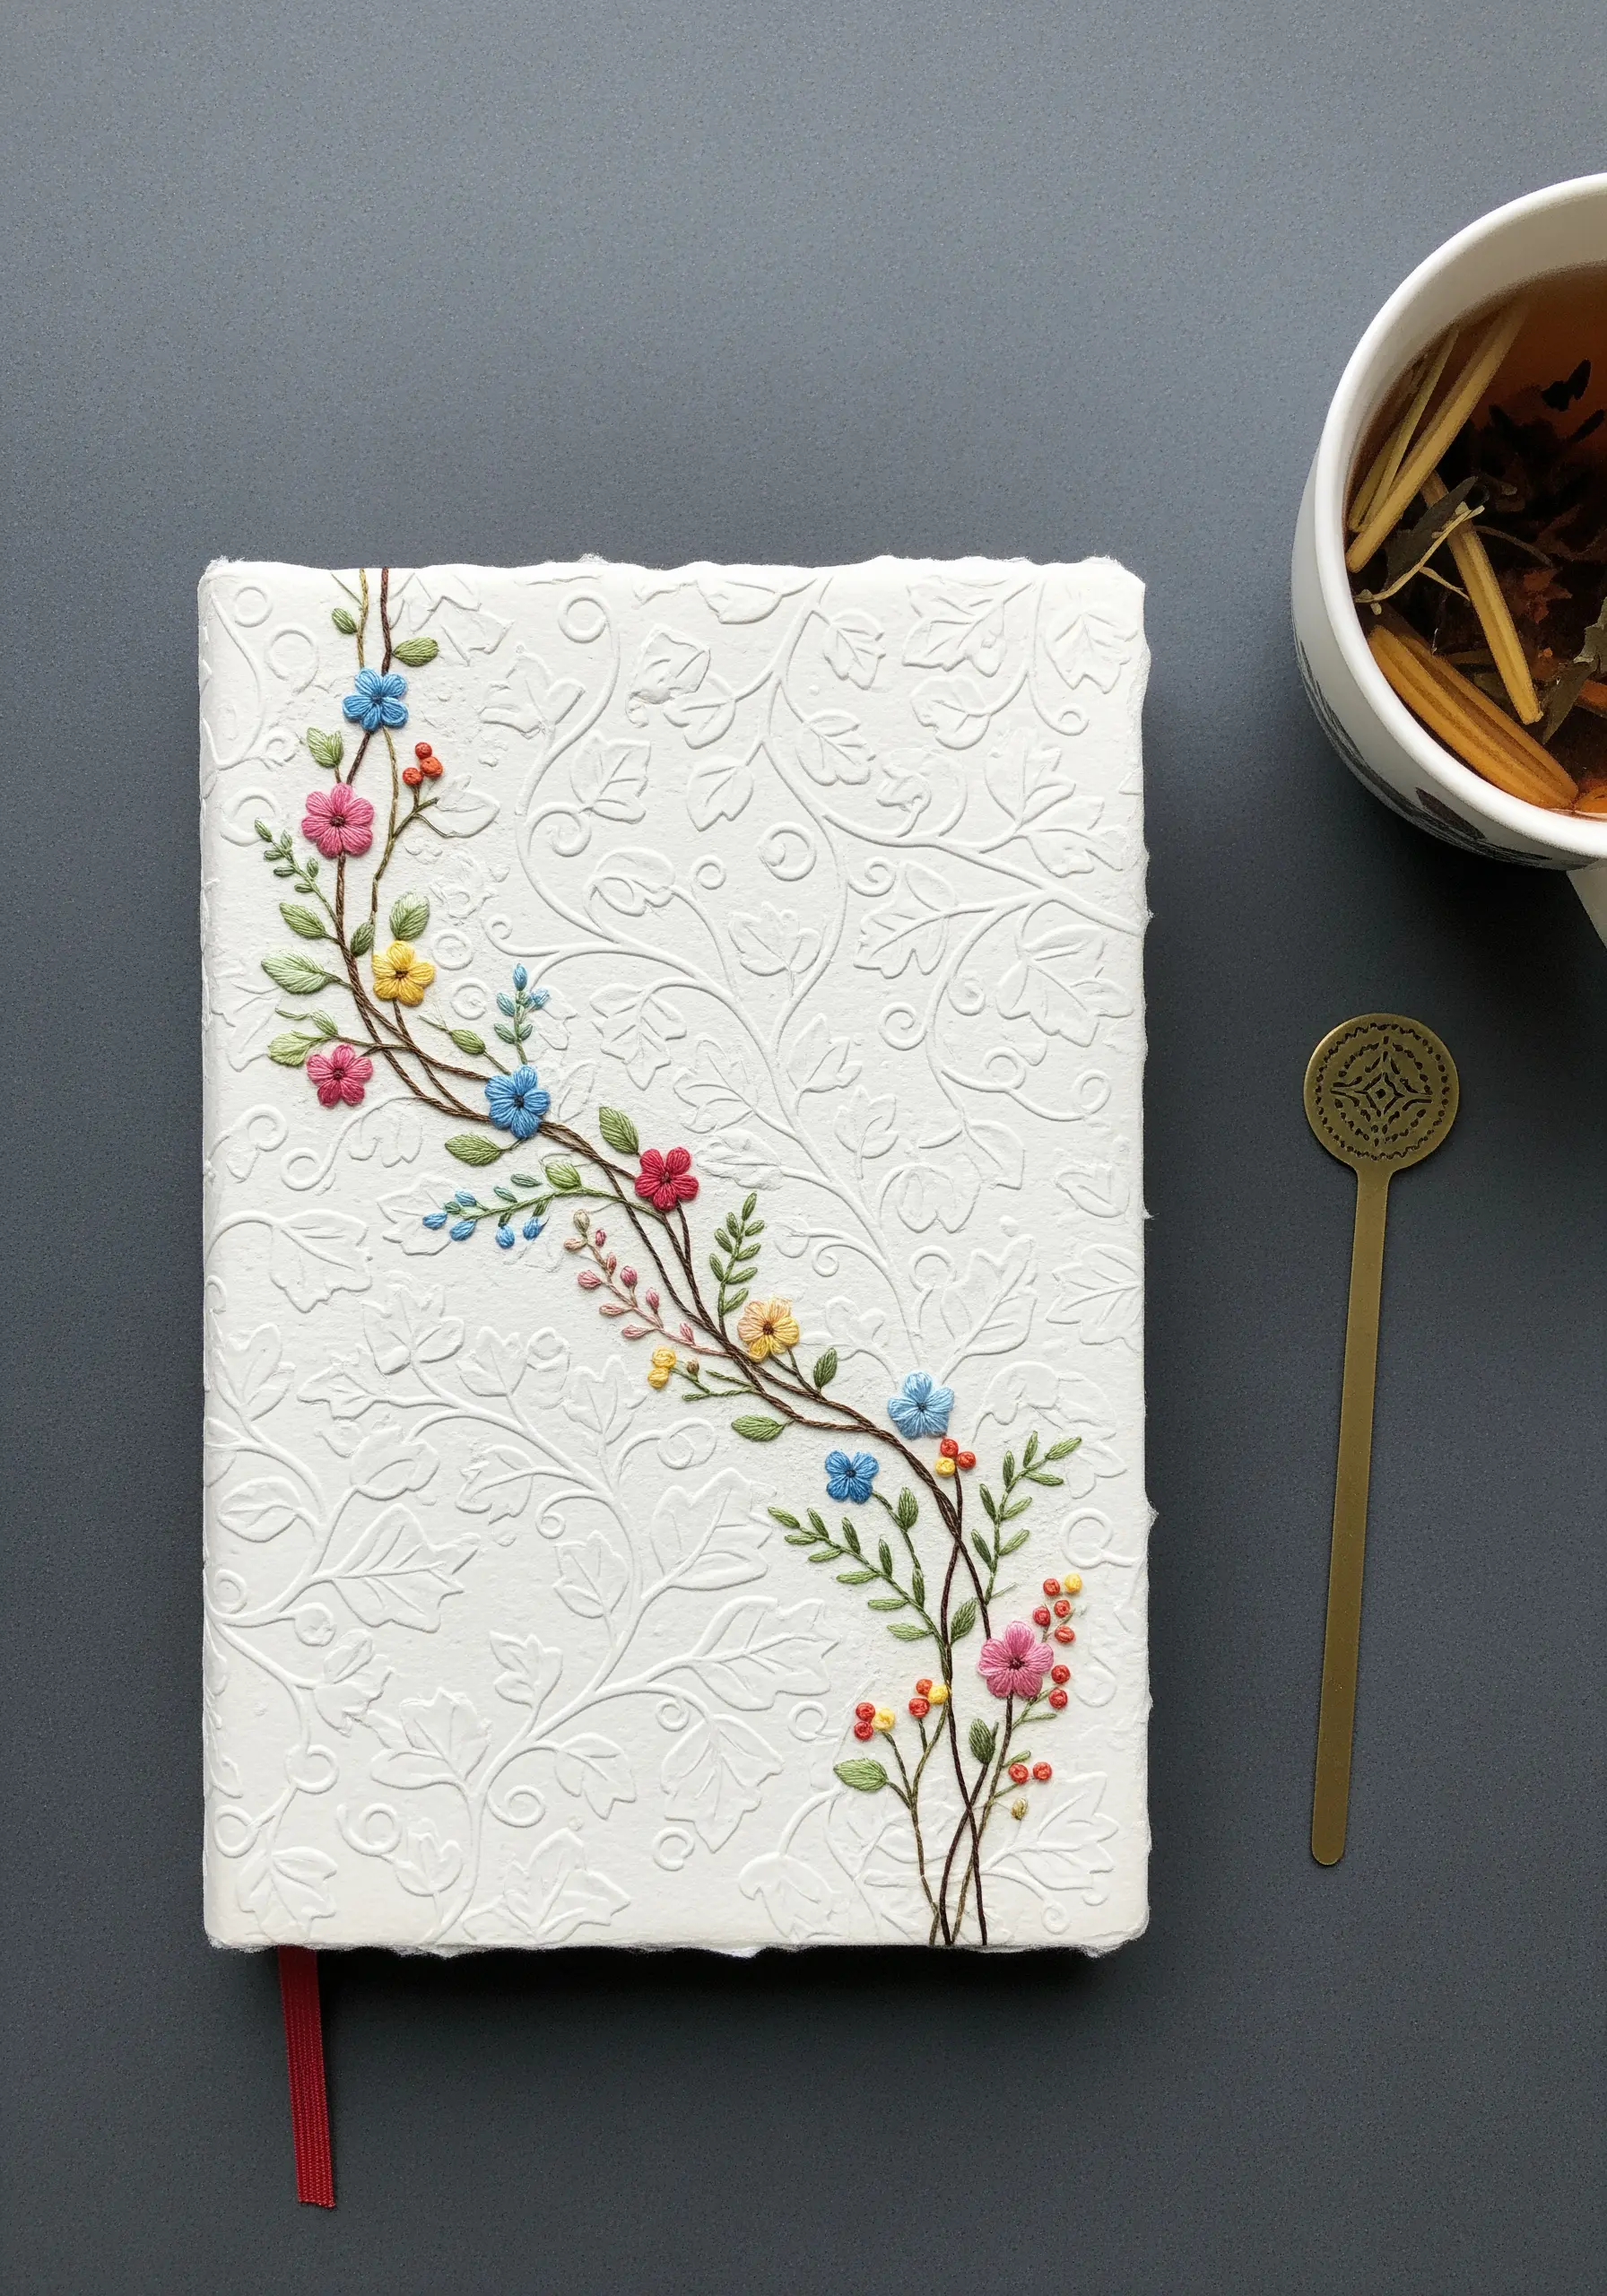
7. Stitching Directly onto Handmade Paper
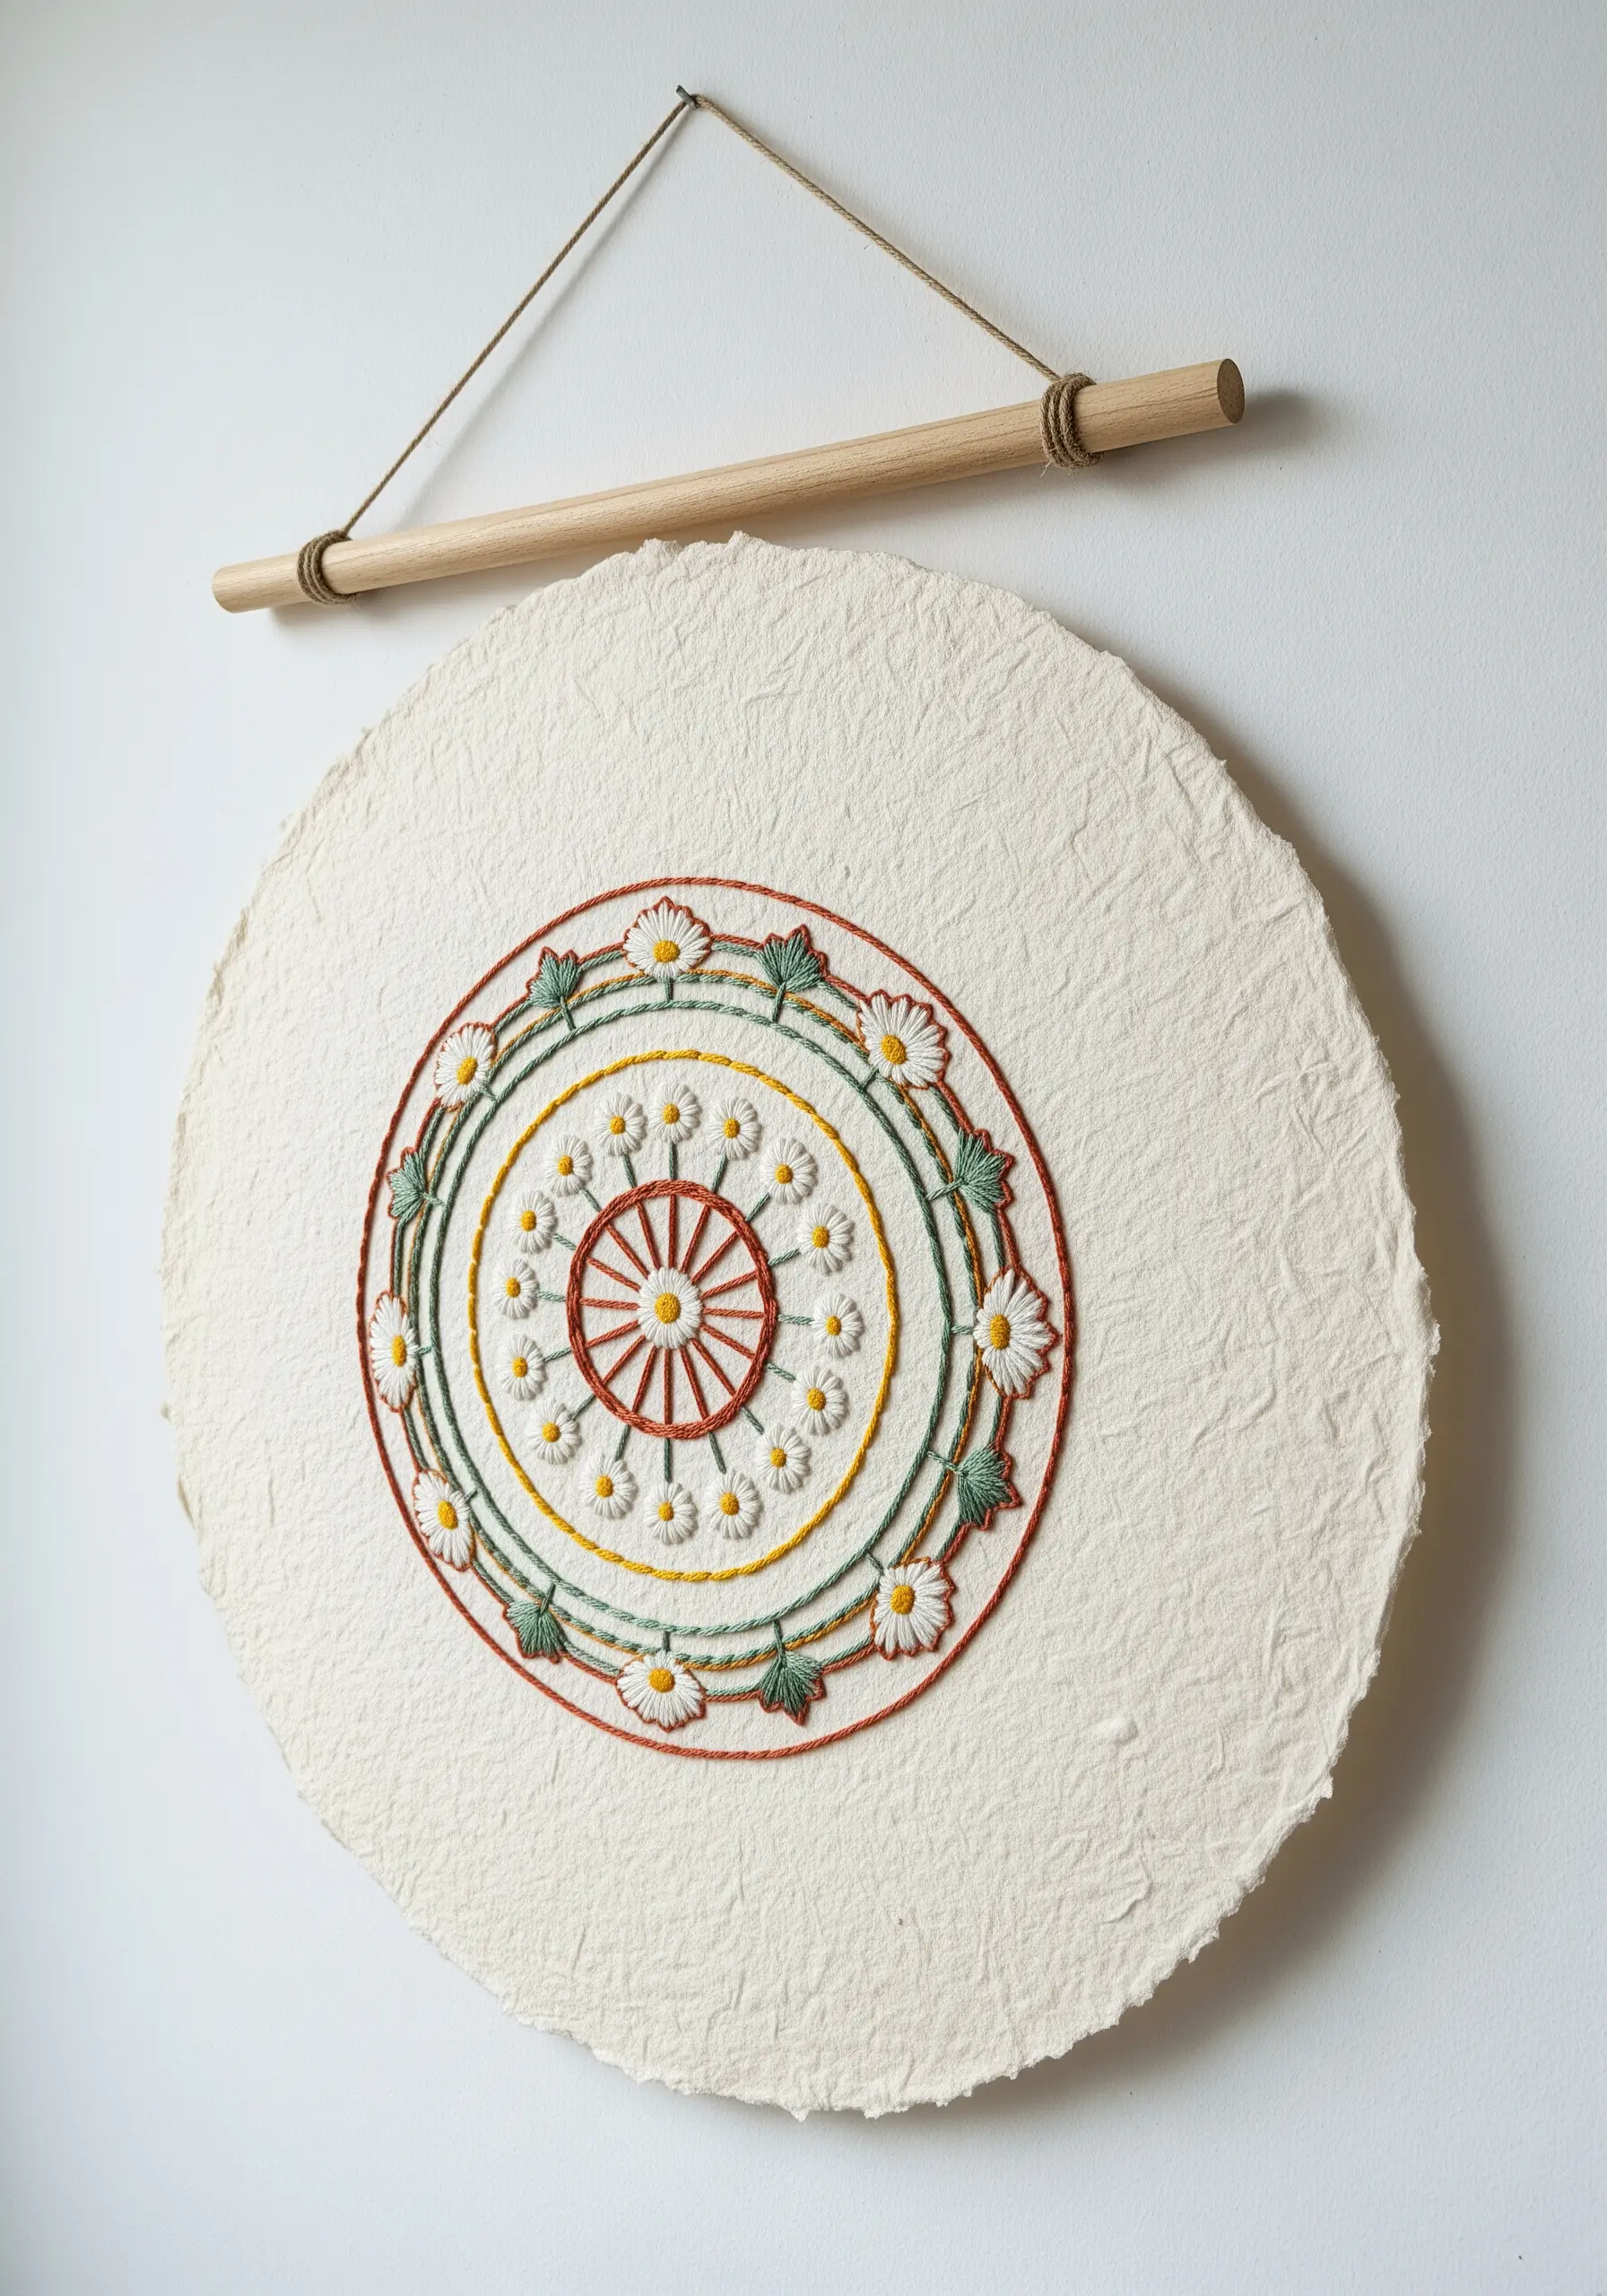
Explore a new surface by embroidering directly onto thick, fibrous handmade paper.
Choose a paper with visible texture and weight to ensure it can support your stitches without tearing.
Use a sharp, fine needle and consider pre-piercing the holes with an awl for thicker threads or complex stitches.
The natural deckle edge and organic texture of the paper become an integral part of the artwork, creating a beautifully rustic and tactile finish perfect for embroidered mandala wall art.
8. Illuminating Stitches with Paper Lanterns
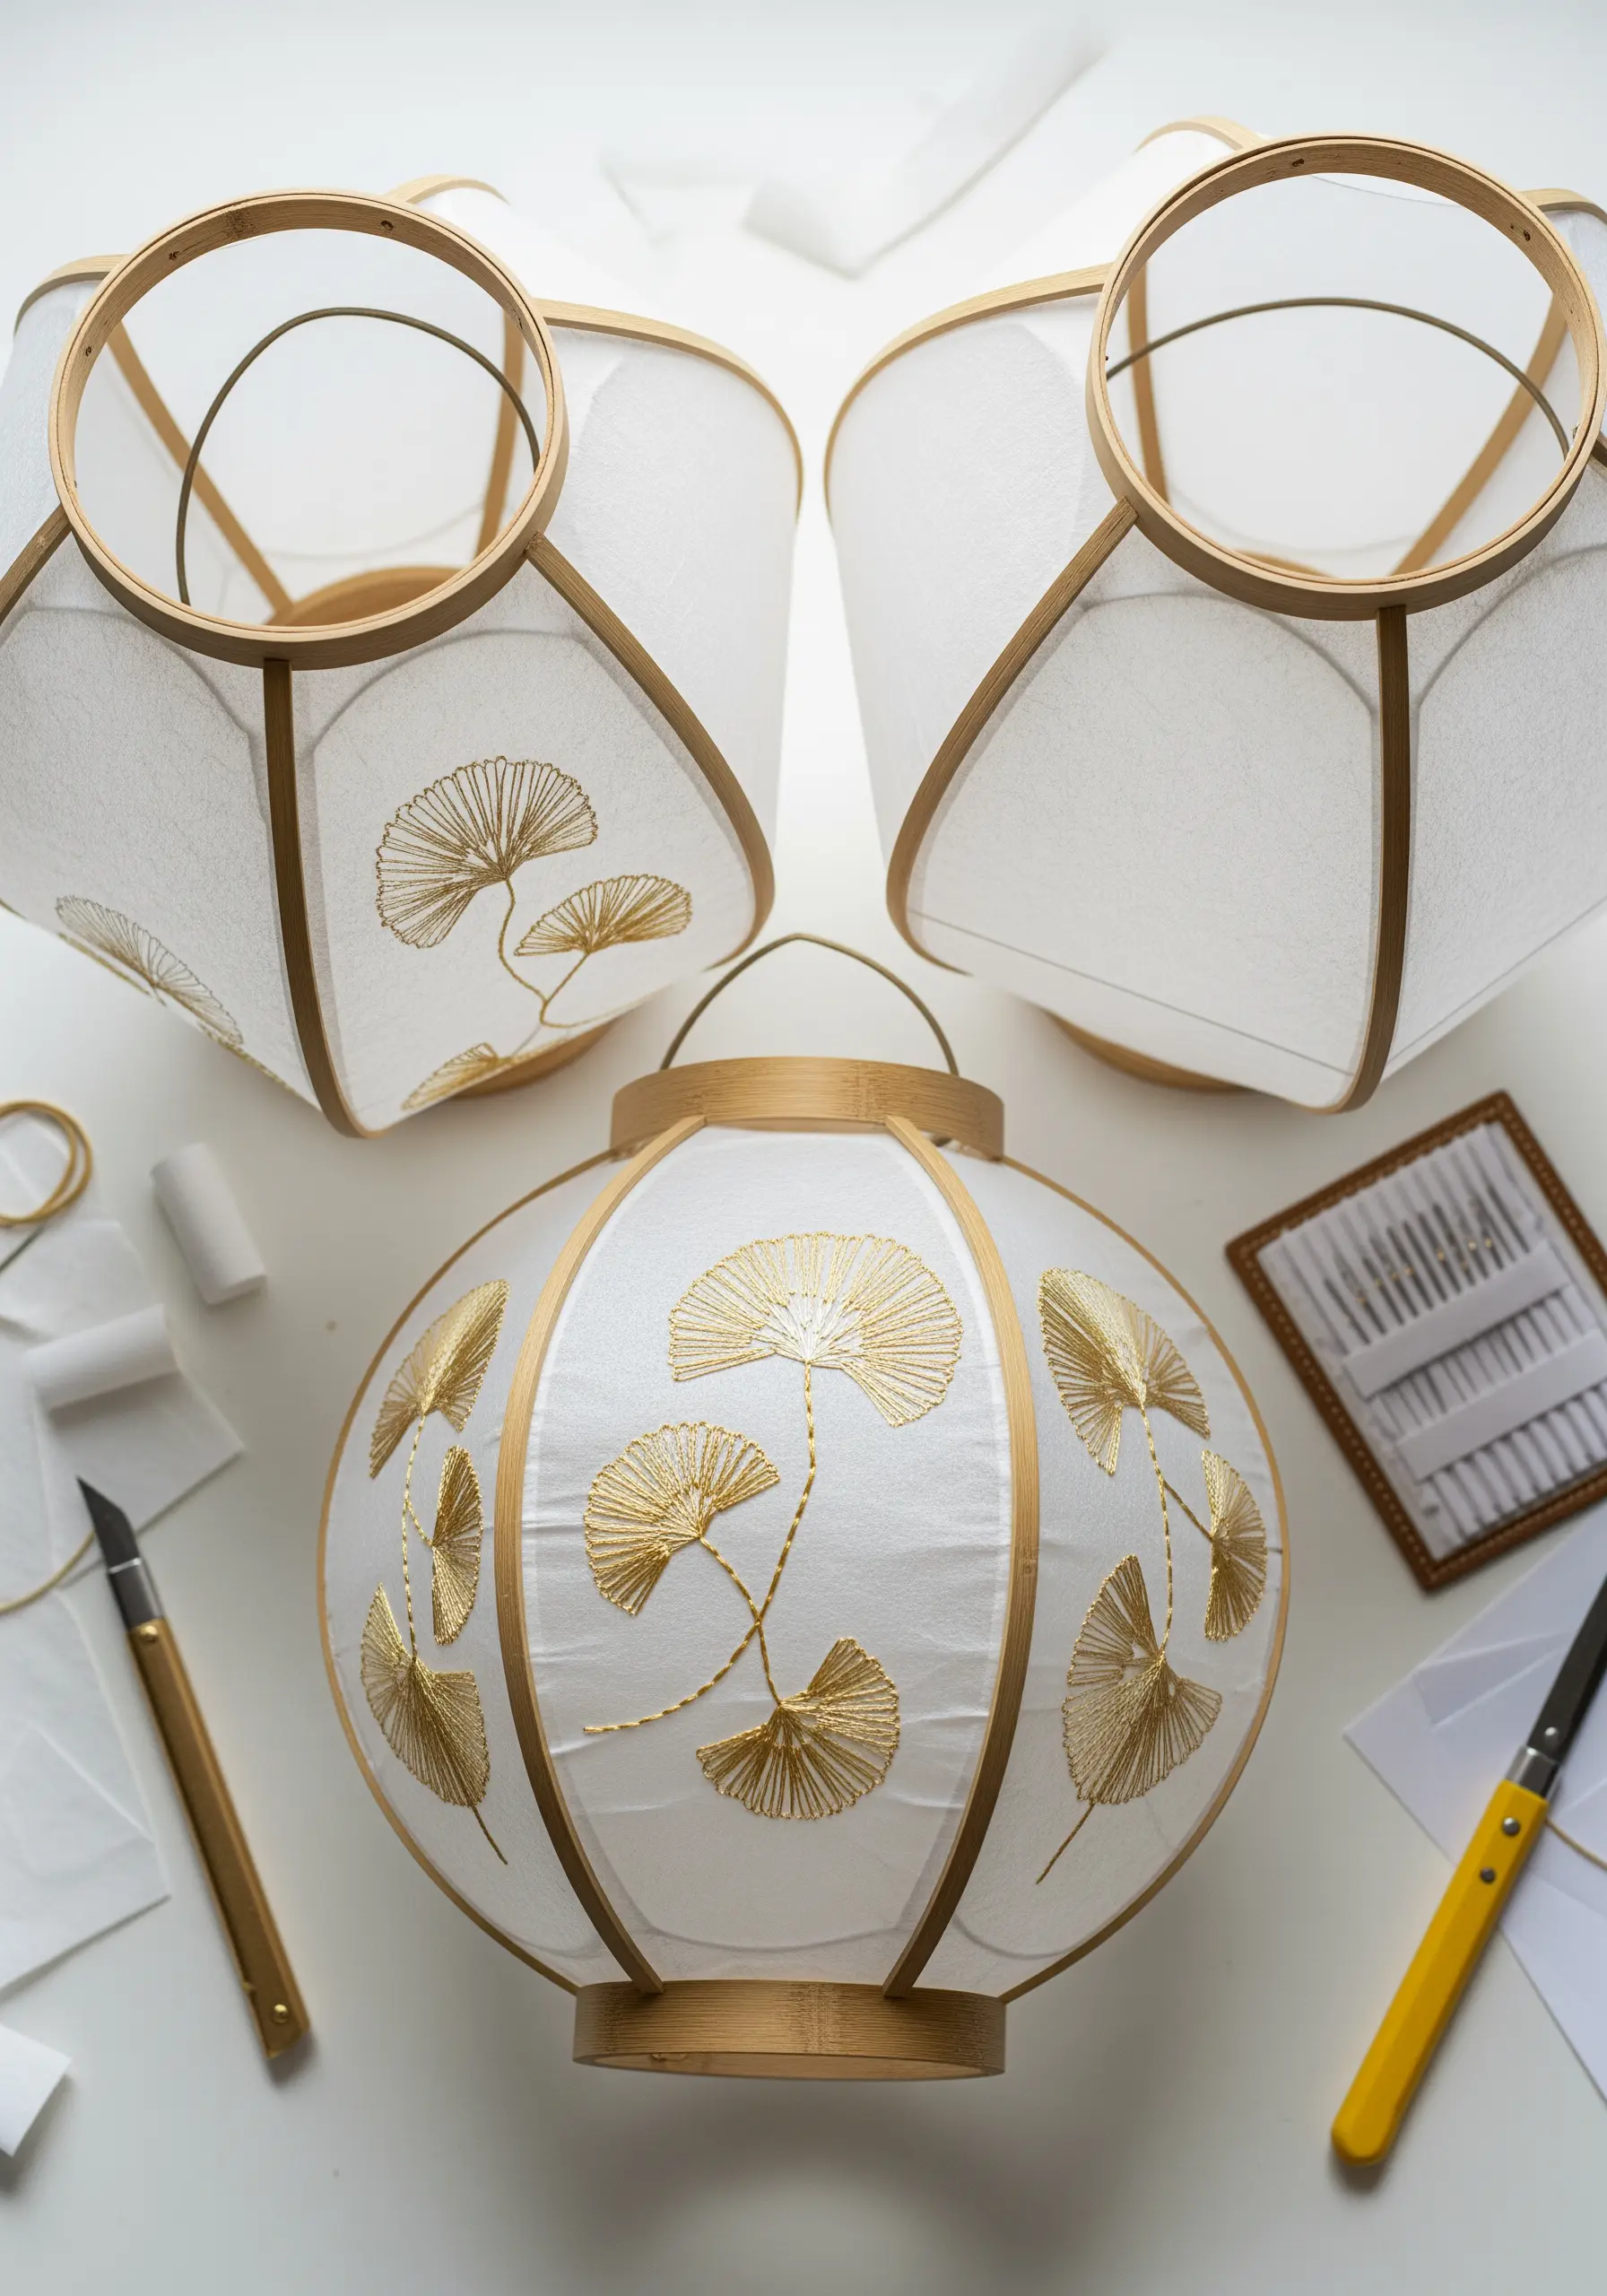
Transform your embroidery into a source of light by incorporating it into a paper lantern.
Stitch your designs onto translucent vellum or a lightweight fabric that you can then affix to the lantern’s frame.
Use metallic or silk threads in a light color; their natural sheen will catch the light beautifully, making your stitches shimmer and glow from within.
This functional art piece combines the delicacy of embroidery with the warm ambiance of soft lighting, creating a truly magical effect.
9. Creating a Specimen Box with Stitched Vellum
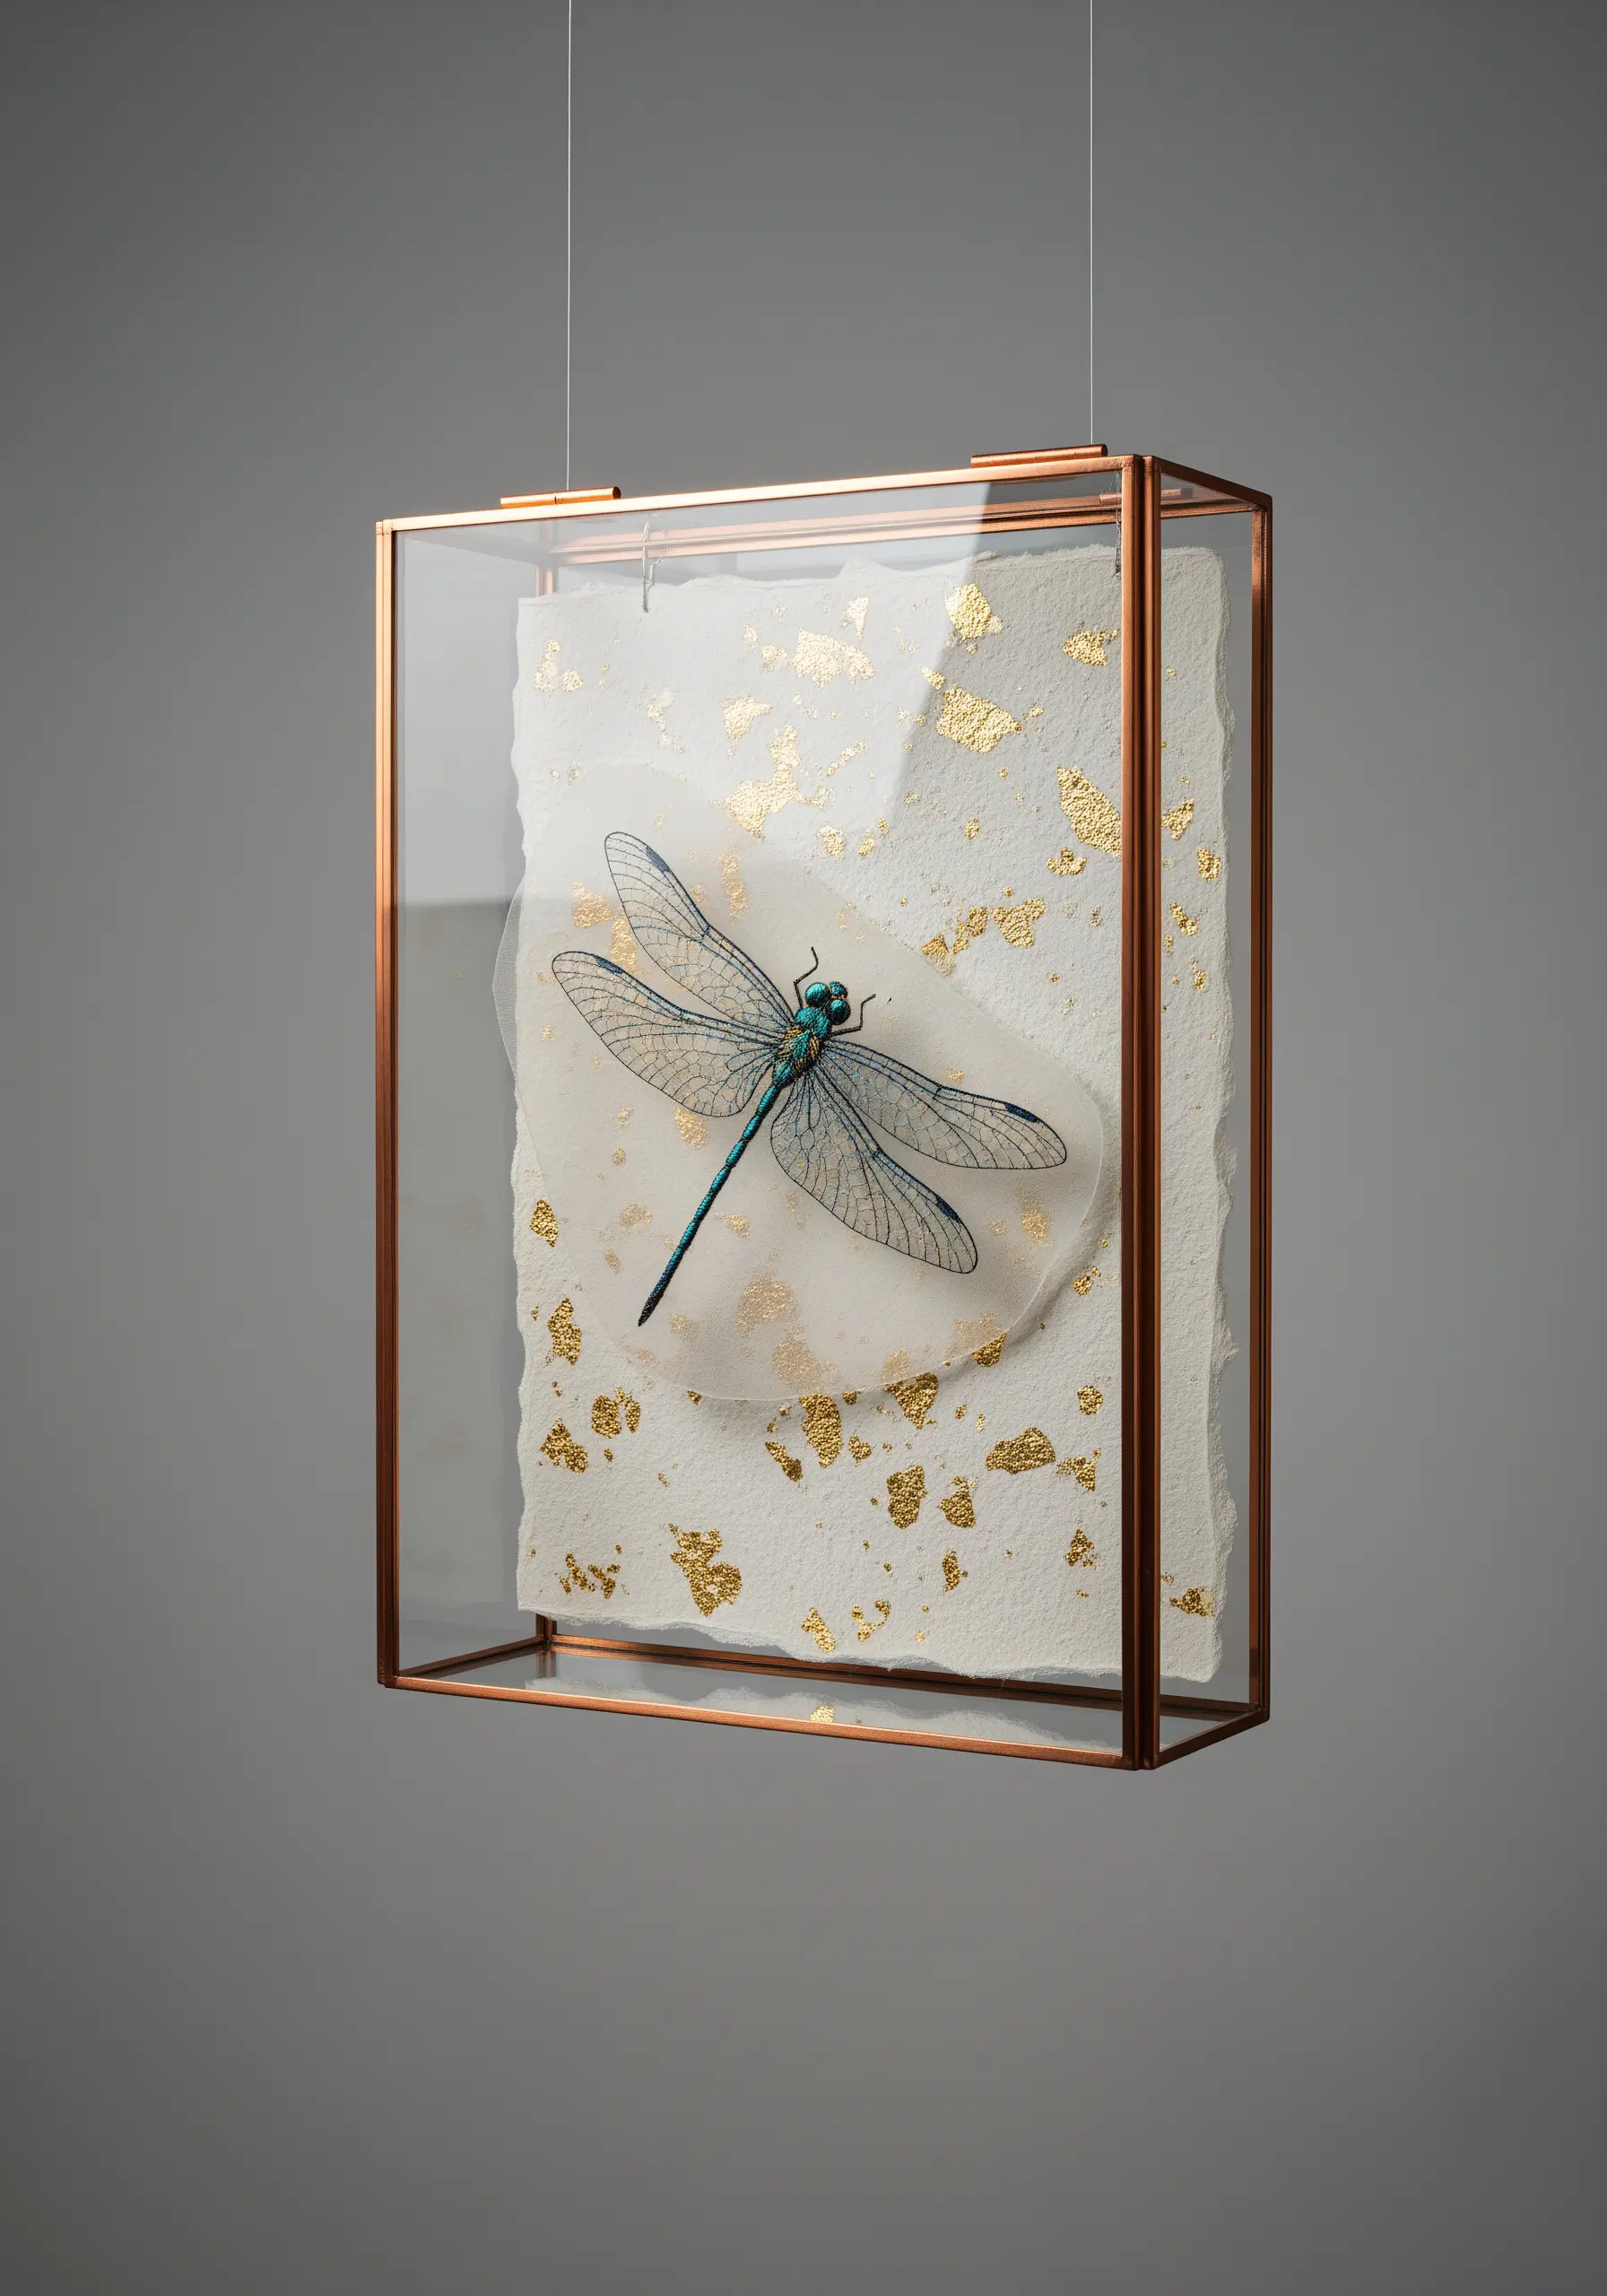
Give your work a precious, museum-quality feel by displaying it in a glass specimen box.
Stitch your motif onto a sheer material like vellum or organza to create a delicate, almost translucent effect.
Mount the stitched vellum inside a copper-and-glass box, positioning it slightly away from a backdrop of textured paper flecked with gold leaf.
This layering creates a floating effect, highlighting every detail of your work and turning it into a cherished object. It’s one of many paper art projects that turn simple stitches into stunning decor.
10. Accenting Paper Cuts with Metallic Thread
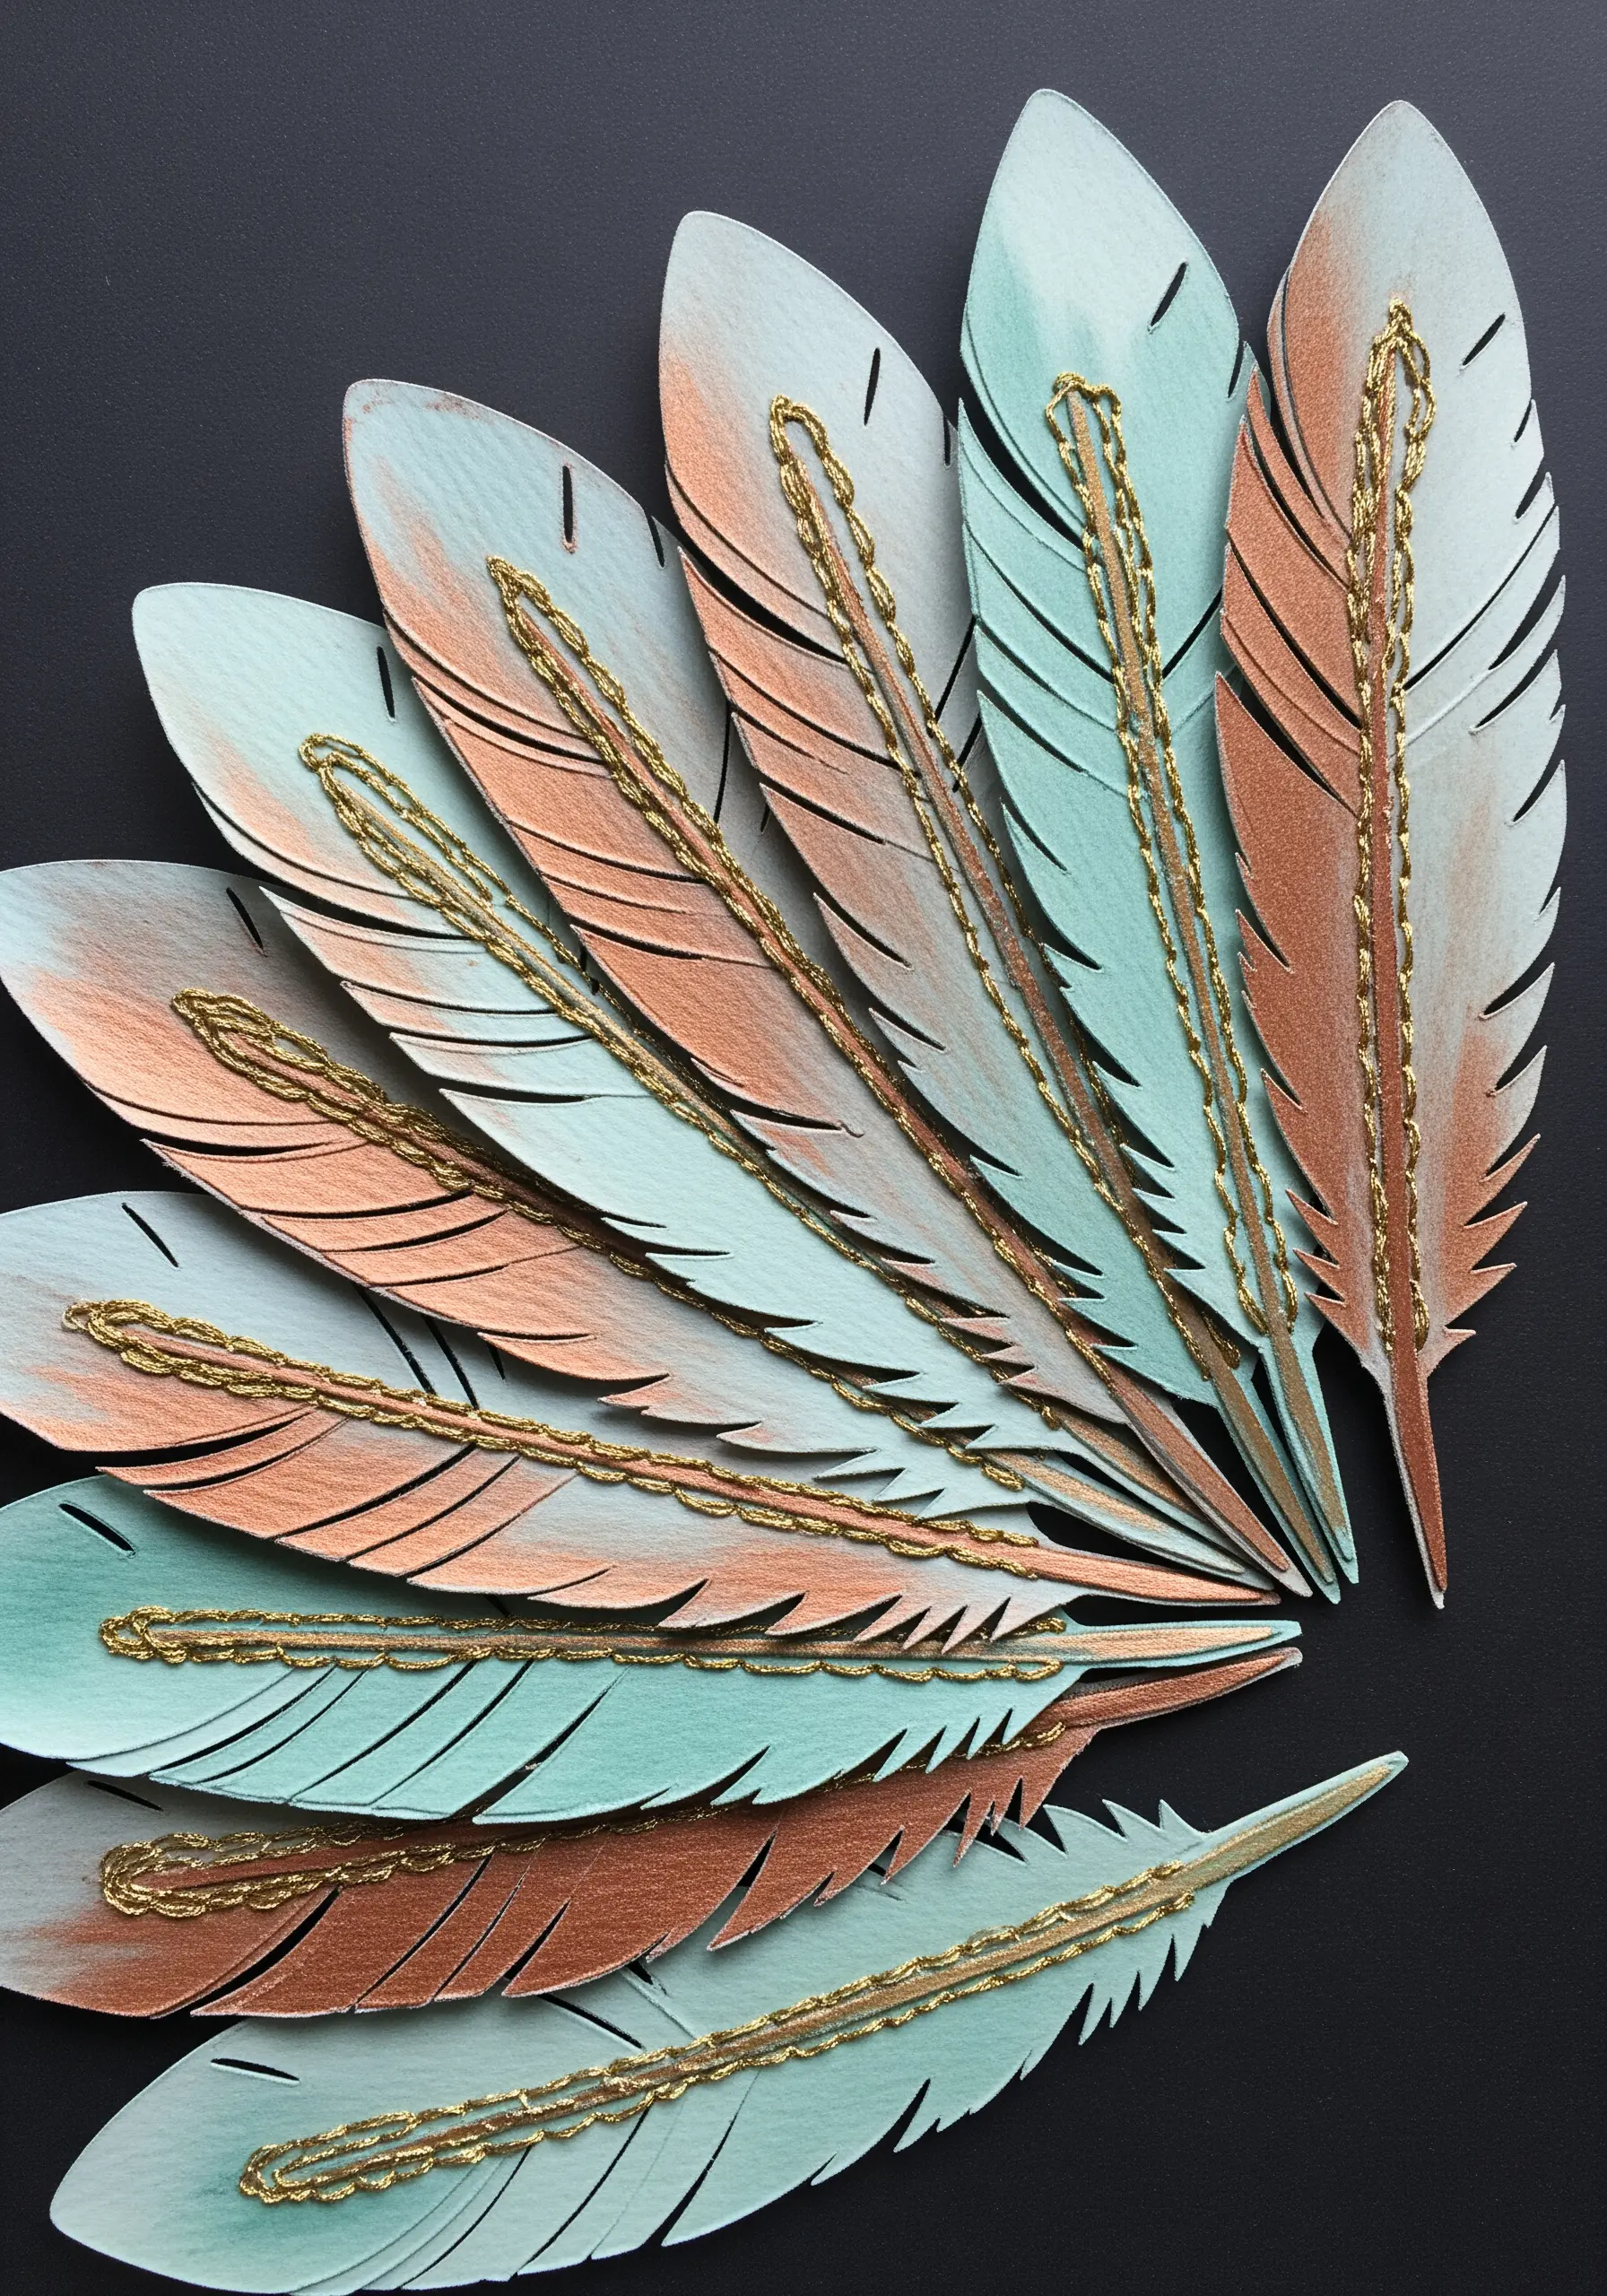
Combine the clean lines of paper cutting with the luxe texture of embroidery for a refined mixed-media piece.
Cut detailed shapes, like these feathers, from high-quality cardstock that you’ve painted or colored.
Then, use a single strand of metallic thread to add a defining line or accent, such as a chain stitch along the quill.
The thread introduces a subtle, raised texture and a flash of light that elevates the flat paper into something far more dynamic and elegant.
11. Mounting Embroidery on Decoupage Blocks
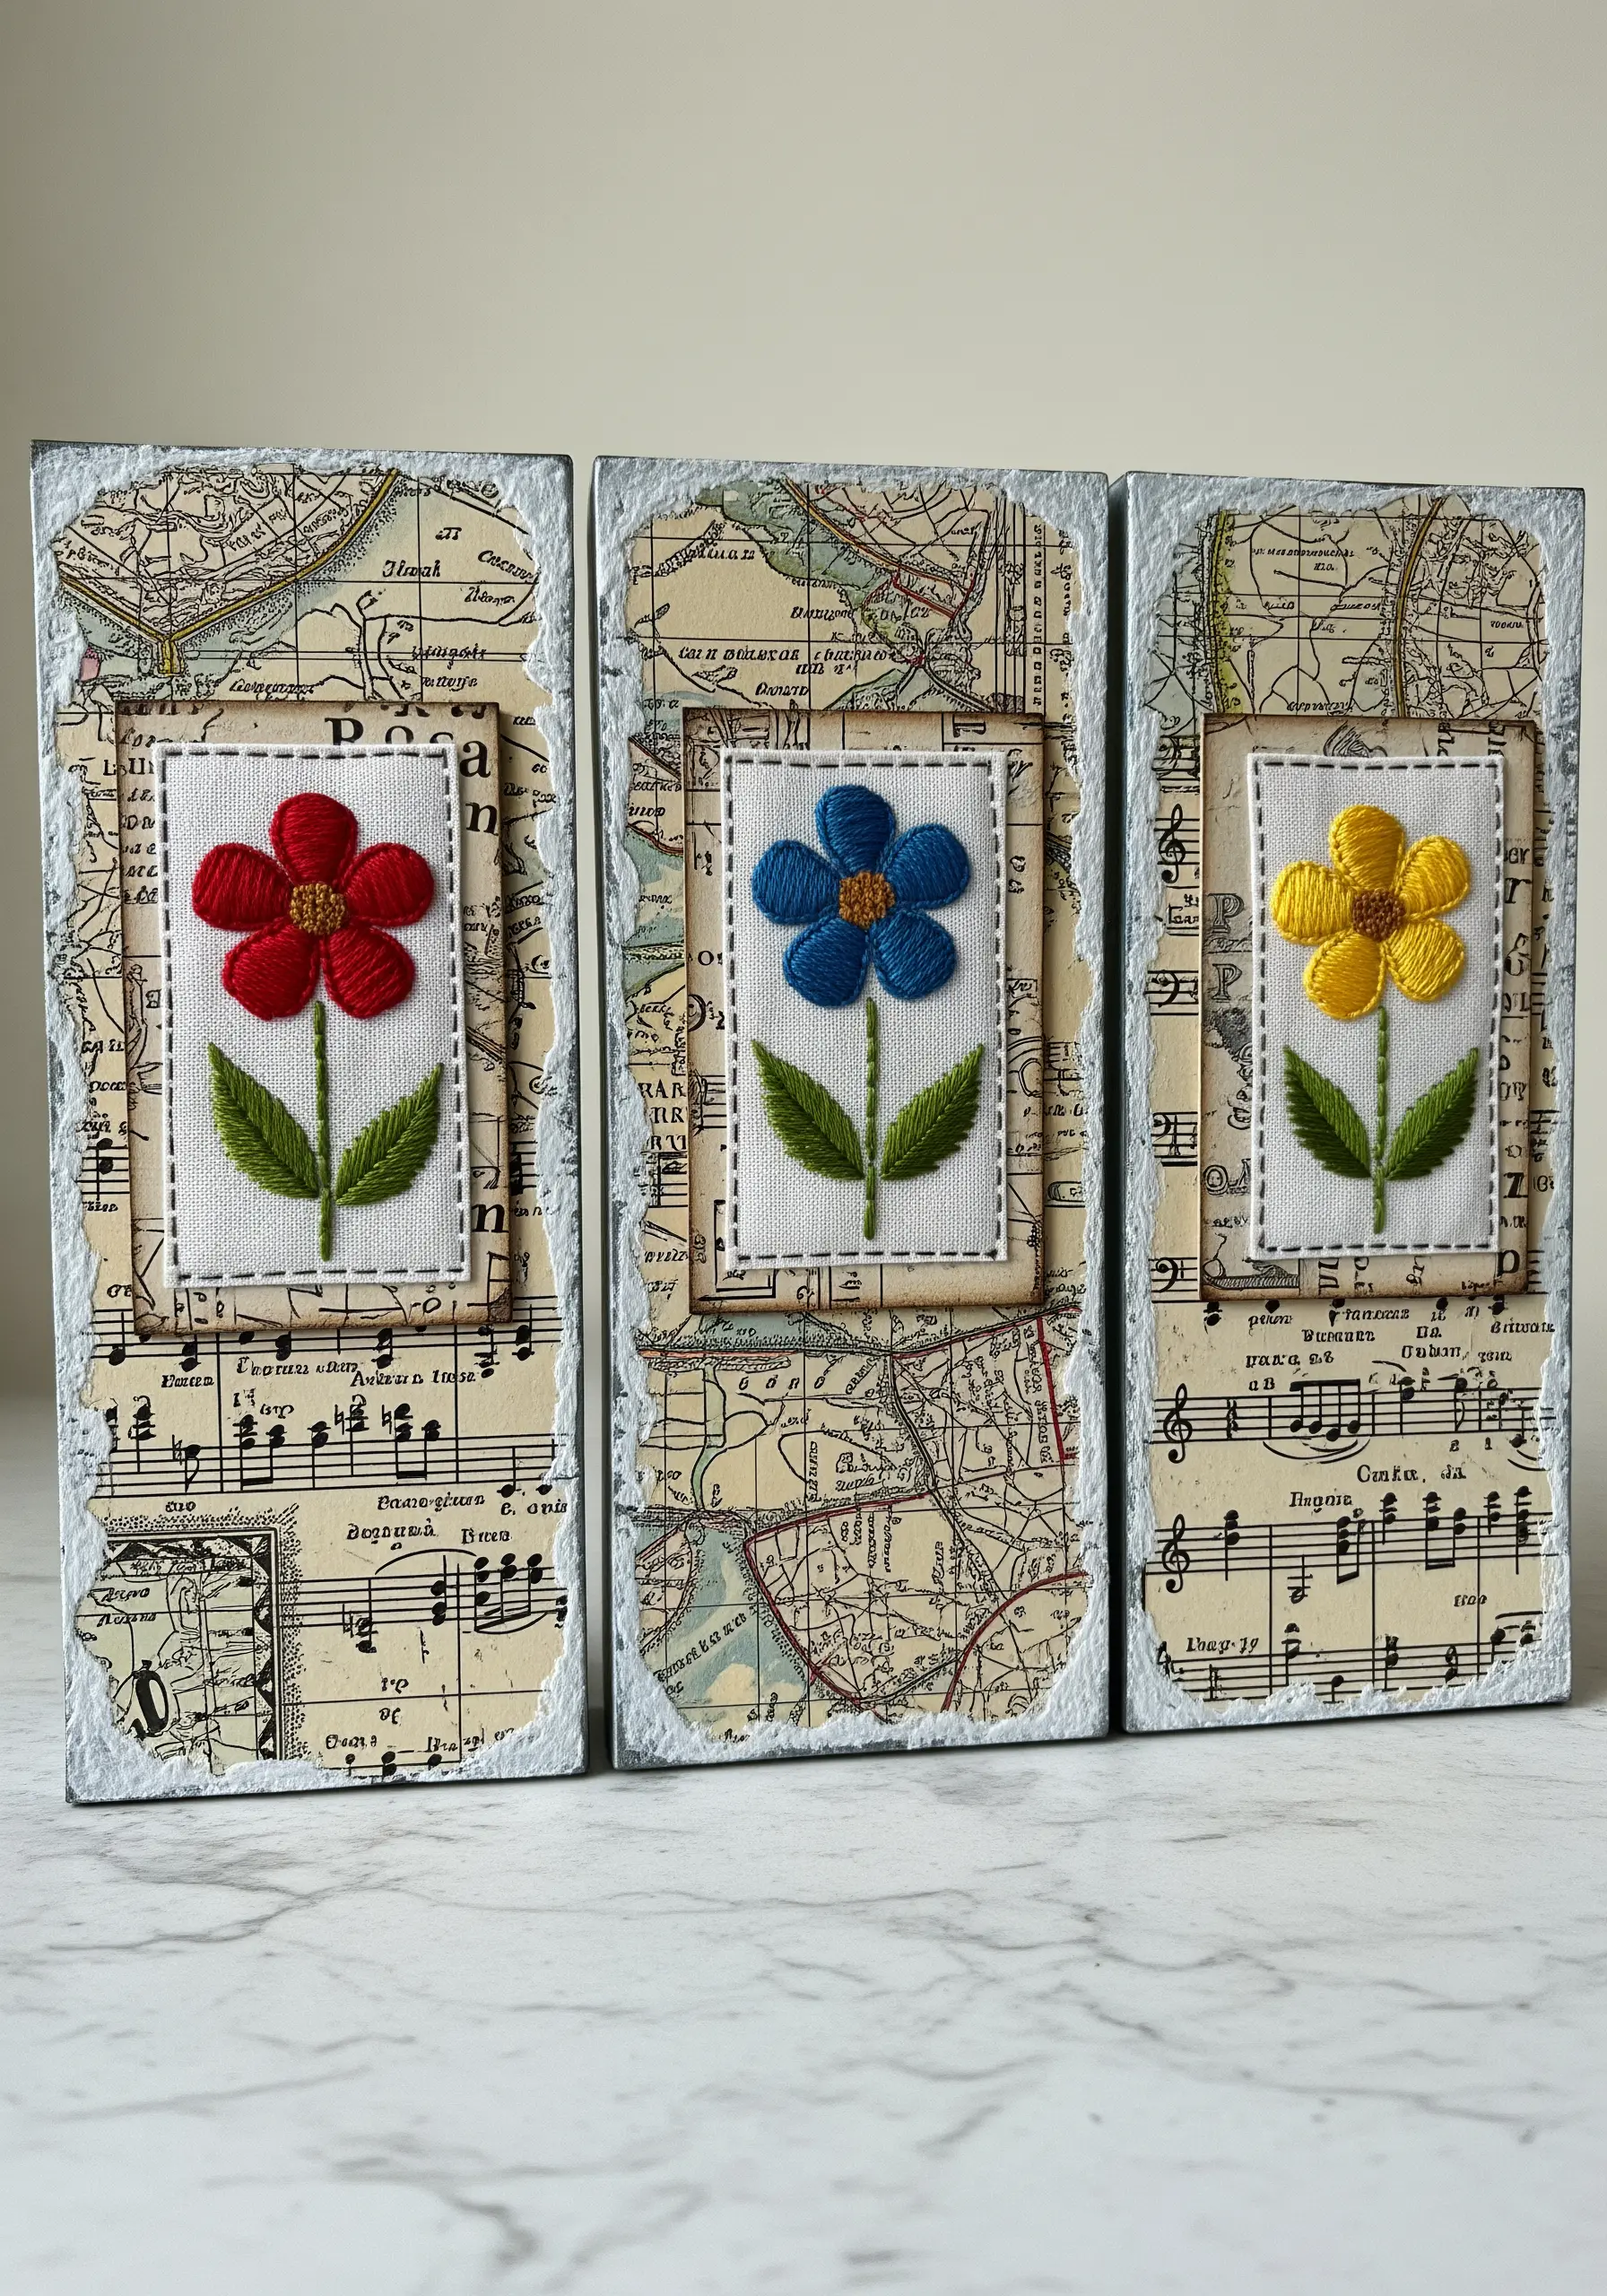
Transform small embroidered motifs into substantial, decorative objects by mounting them on collaged blocks.
Cover small wooden or canvas blocks with layers of vintage paper—sheet music, maps, or old letters work beautifully for this.
Stitch your design on a separate piece of fabric, then center it and glue it firmly onto the decoupaged surface.
This technique layers meaning and texture, allowing the story of the paper to become the backdrop for the story of your stitches. It’s a great example of combining embroidery and mixed-media magic.
12. Combining Paper Quilling with Monogram Stitches
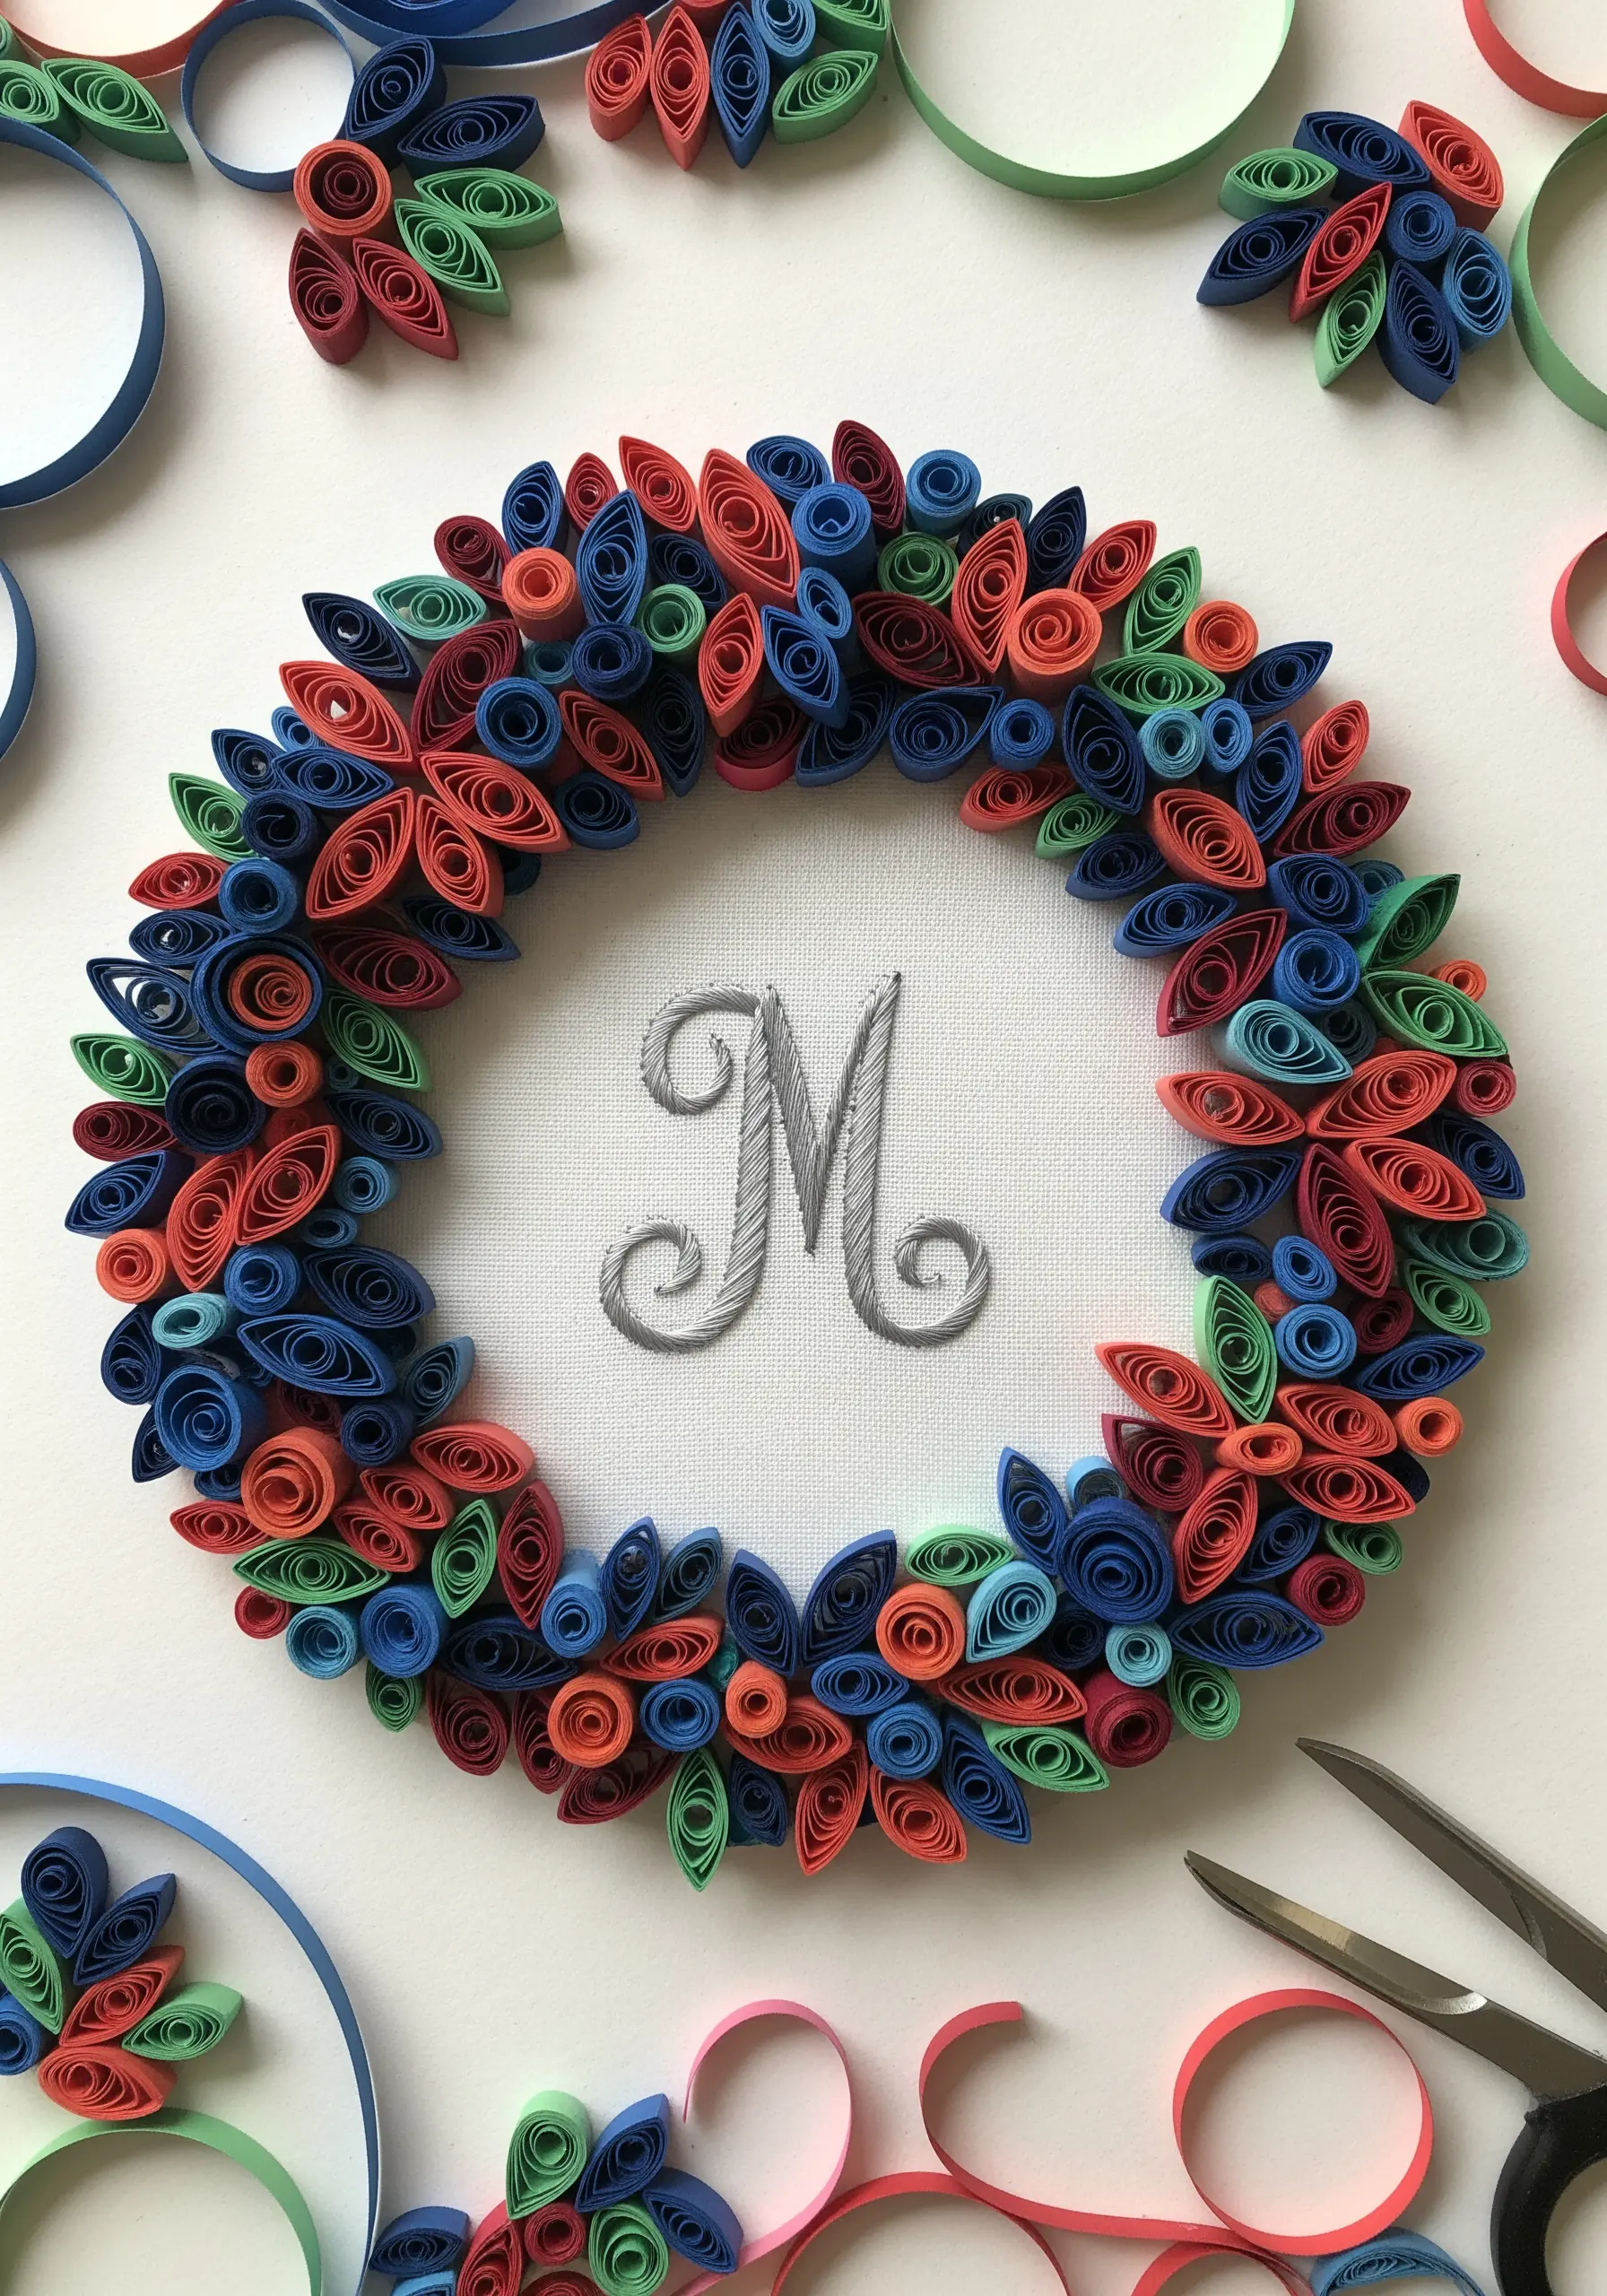
Create a stunning interplay of 2D and 3D textures by framing a stitched monogram with paper quilling.
First, embroider your chosen letter onto a tightly woven fabric, using a stitch like satin or split stitch for a smooth, elegant finish.
Next, use paper quilling strips to build a dimensional wreath around your monogram.
The sculptural, curled paper forms a natural frame that draws the eye inward, making the soft, flat texture of your embroidery the clear centerpiece.
13. Wrapping 3D Paper Vases with Embroidery

Soften the hard edges of a geometric paper sculpture with a panel of delicate botanical embroidery.
Construct a faceted vase or object from heavy cardstock, leaving one panel to be covered.
Stitch your floral design on a piece of neutral-toned linen, ensuring it fits the panel’s dimensions perfectly.
Carefully adhere the embroidered linen to the cardstock panel before the final assembly of the vase.
This juxtaposition of organic, detailed stitchwork and clean, minimalist geometry creates a sophisticated and modern decorative piece.
14. Adding Stitched Details to Origami
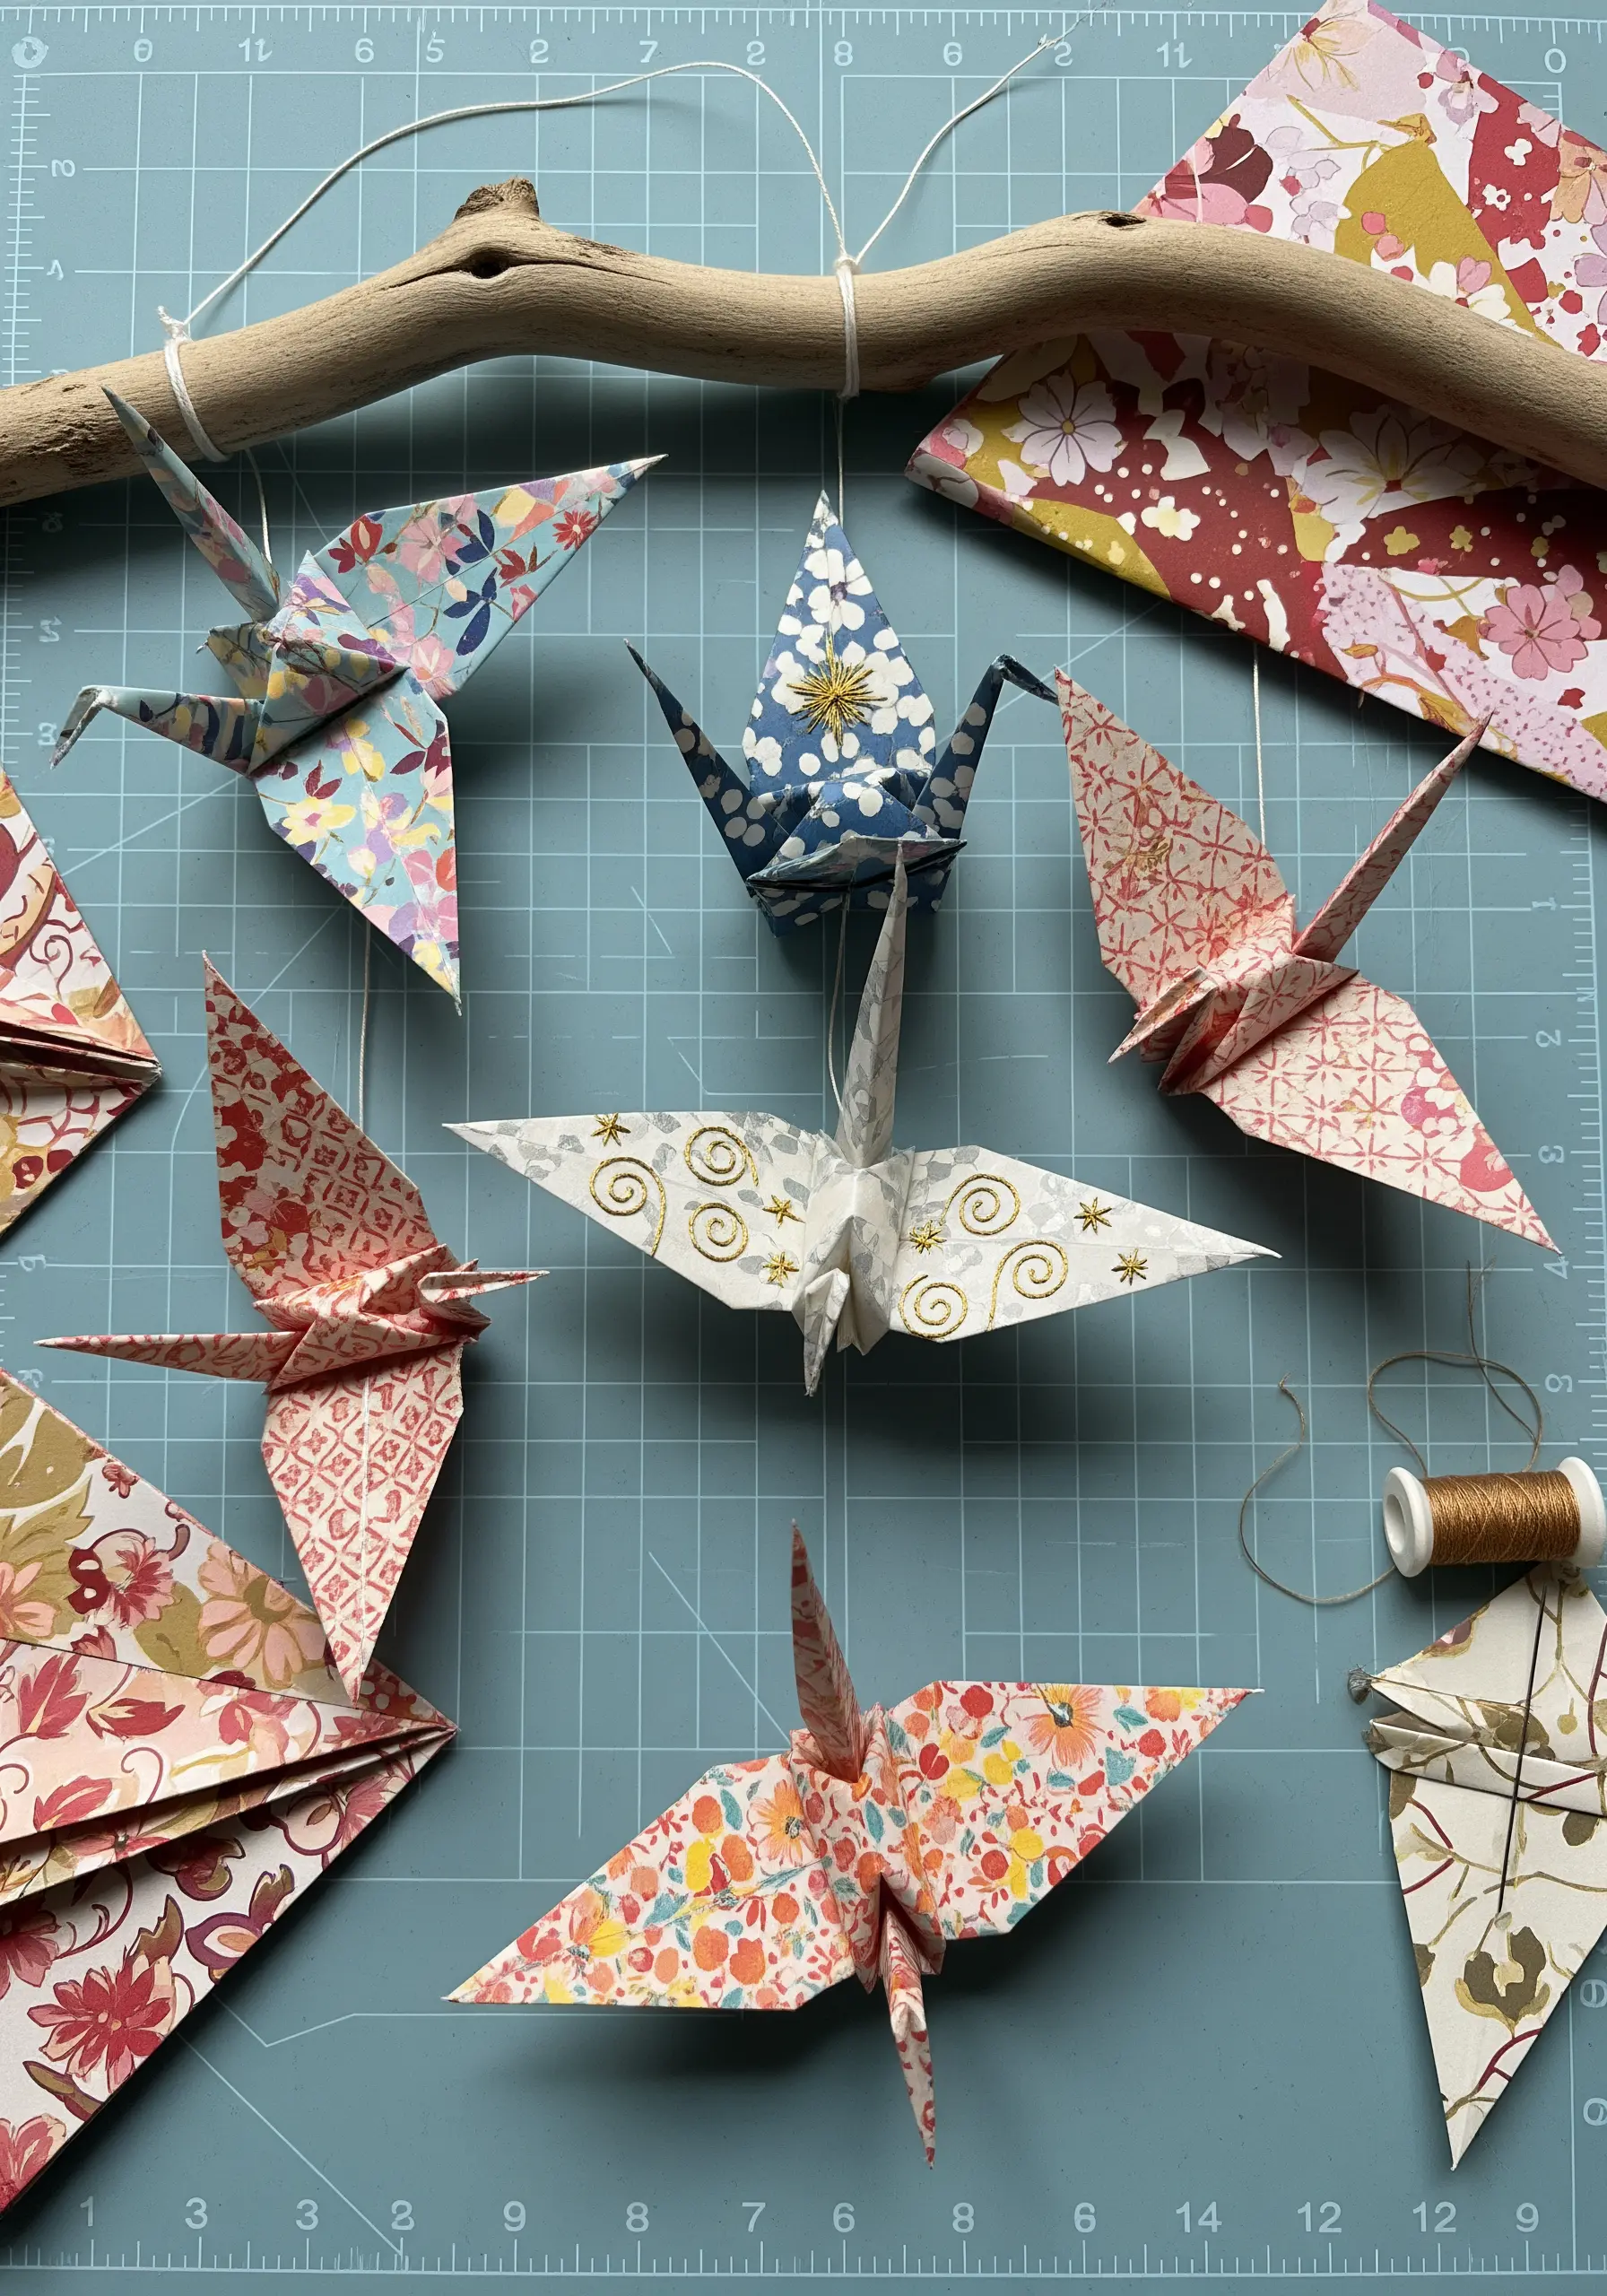
Introduce an unexpected layer of detail to your origami by adding subtle embroidery before you begin folding.
Choose a beautiful, patterned origami paper and use a single strand of contrasting thread to add small accents.
A few tiny seed stitches along a wing, a French knot for an eye, or a simple backstitched line can add a personal, handmade touch.
The stitches become a secret texture, a delightful surprise that merges two meticulous and mindful art forms.
15. Presenting Embroidery as a Traditional Paper Scroll
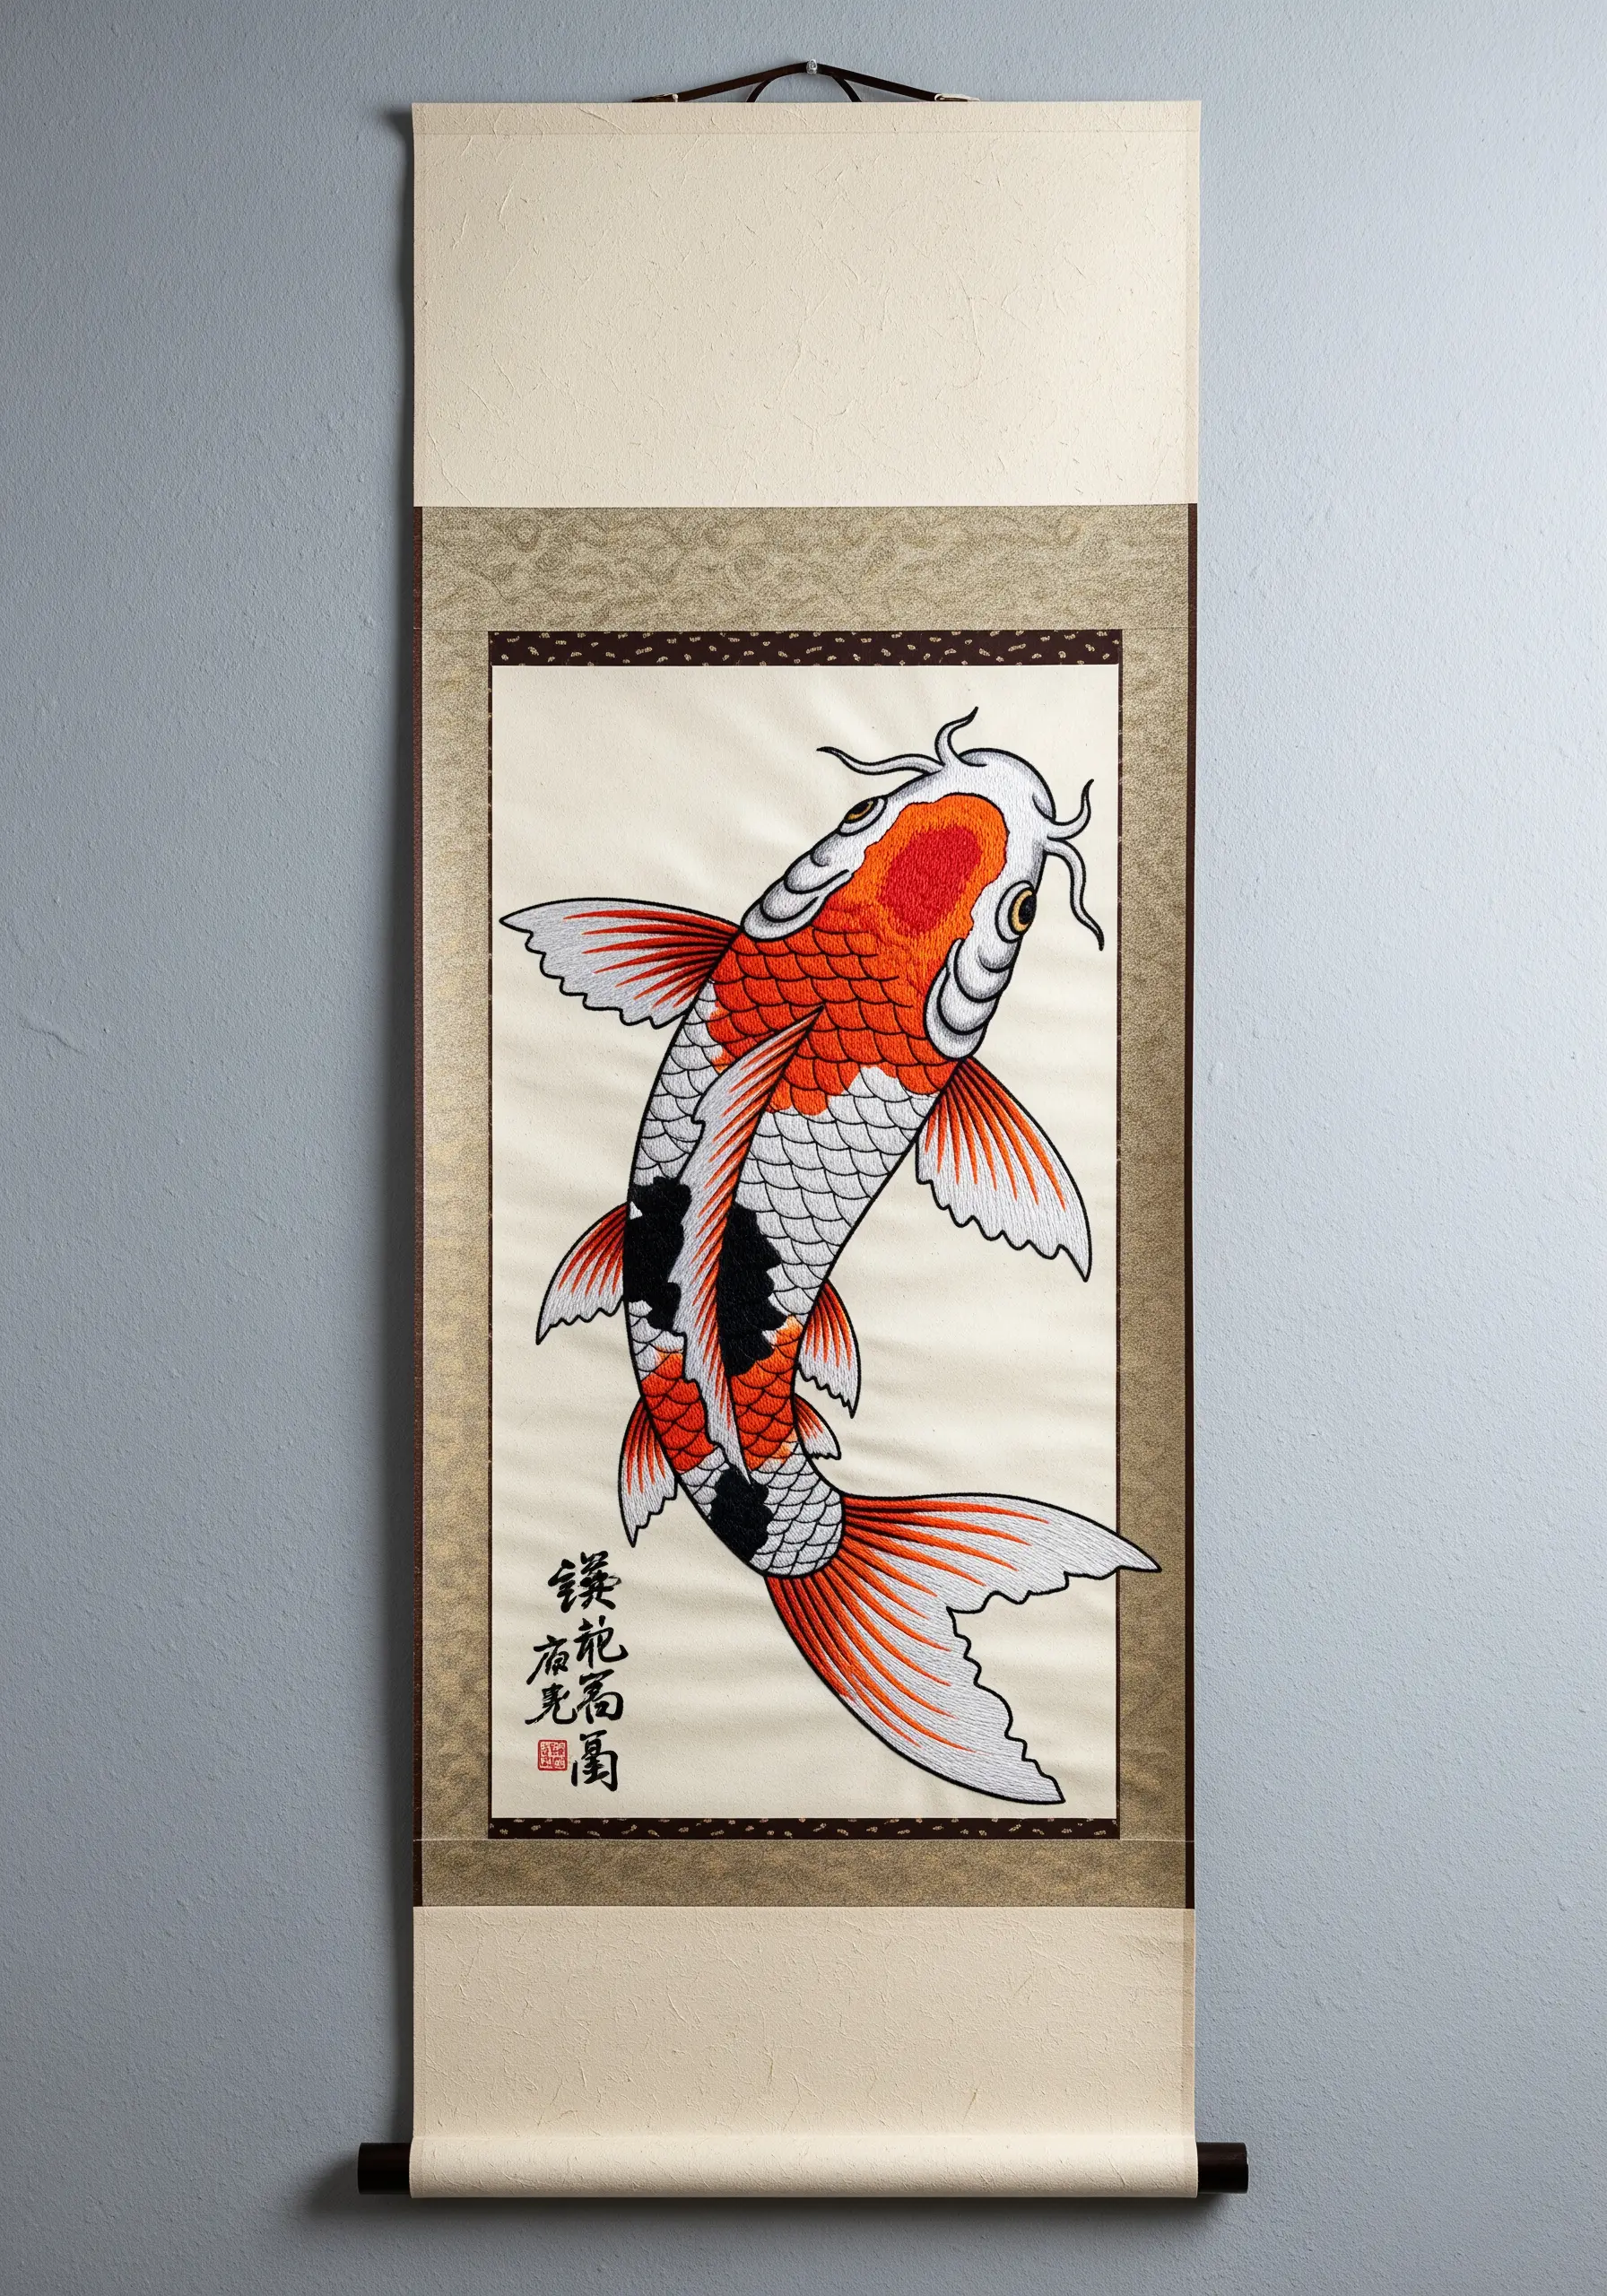
Lend your embroidery a sense of ceremony and importance by presenting it as a classic hanging scroll.
After completing your stitchwork on a fine fabric like silk or linen, have it professionally mounted or carefully mount it yourself onto traditional backing paper.
Attach wooden dowels at the top and bottom to give it the proper weight and form.
This timeless display method removes the work from a casual context and transforms it into a piece of fine art deserving of focused contemplation.
16. Stitching Over Embossed Paper Surfaces
Use the subtle, raised patterns of embossed paper as a textured canvas and creative guide for your embroidery.
The embossed design provides a built-in framework that you can either follow or contrast with your stitches.
Choose a delicate motif, like a winding vine, and allow it to interact with the paper’s texture.
This technique creates a rich, tone-on-tone effect where the soft relief of the paper and the raised relief of the thread work in beautiful harmony. Explore more unexpected embroidery techniques for creative fabric crafts like this.
17. Building Miniature Worlds for Tiny Stitches
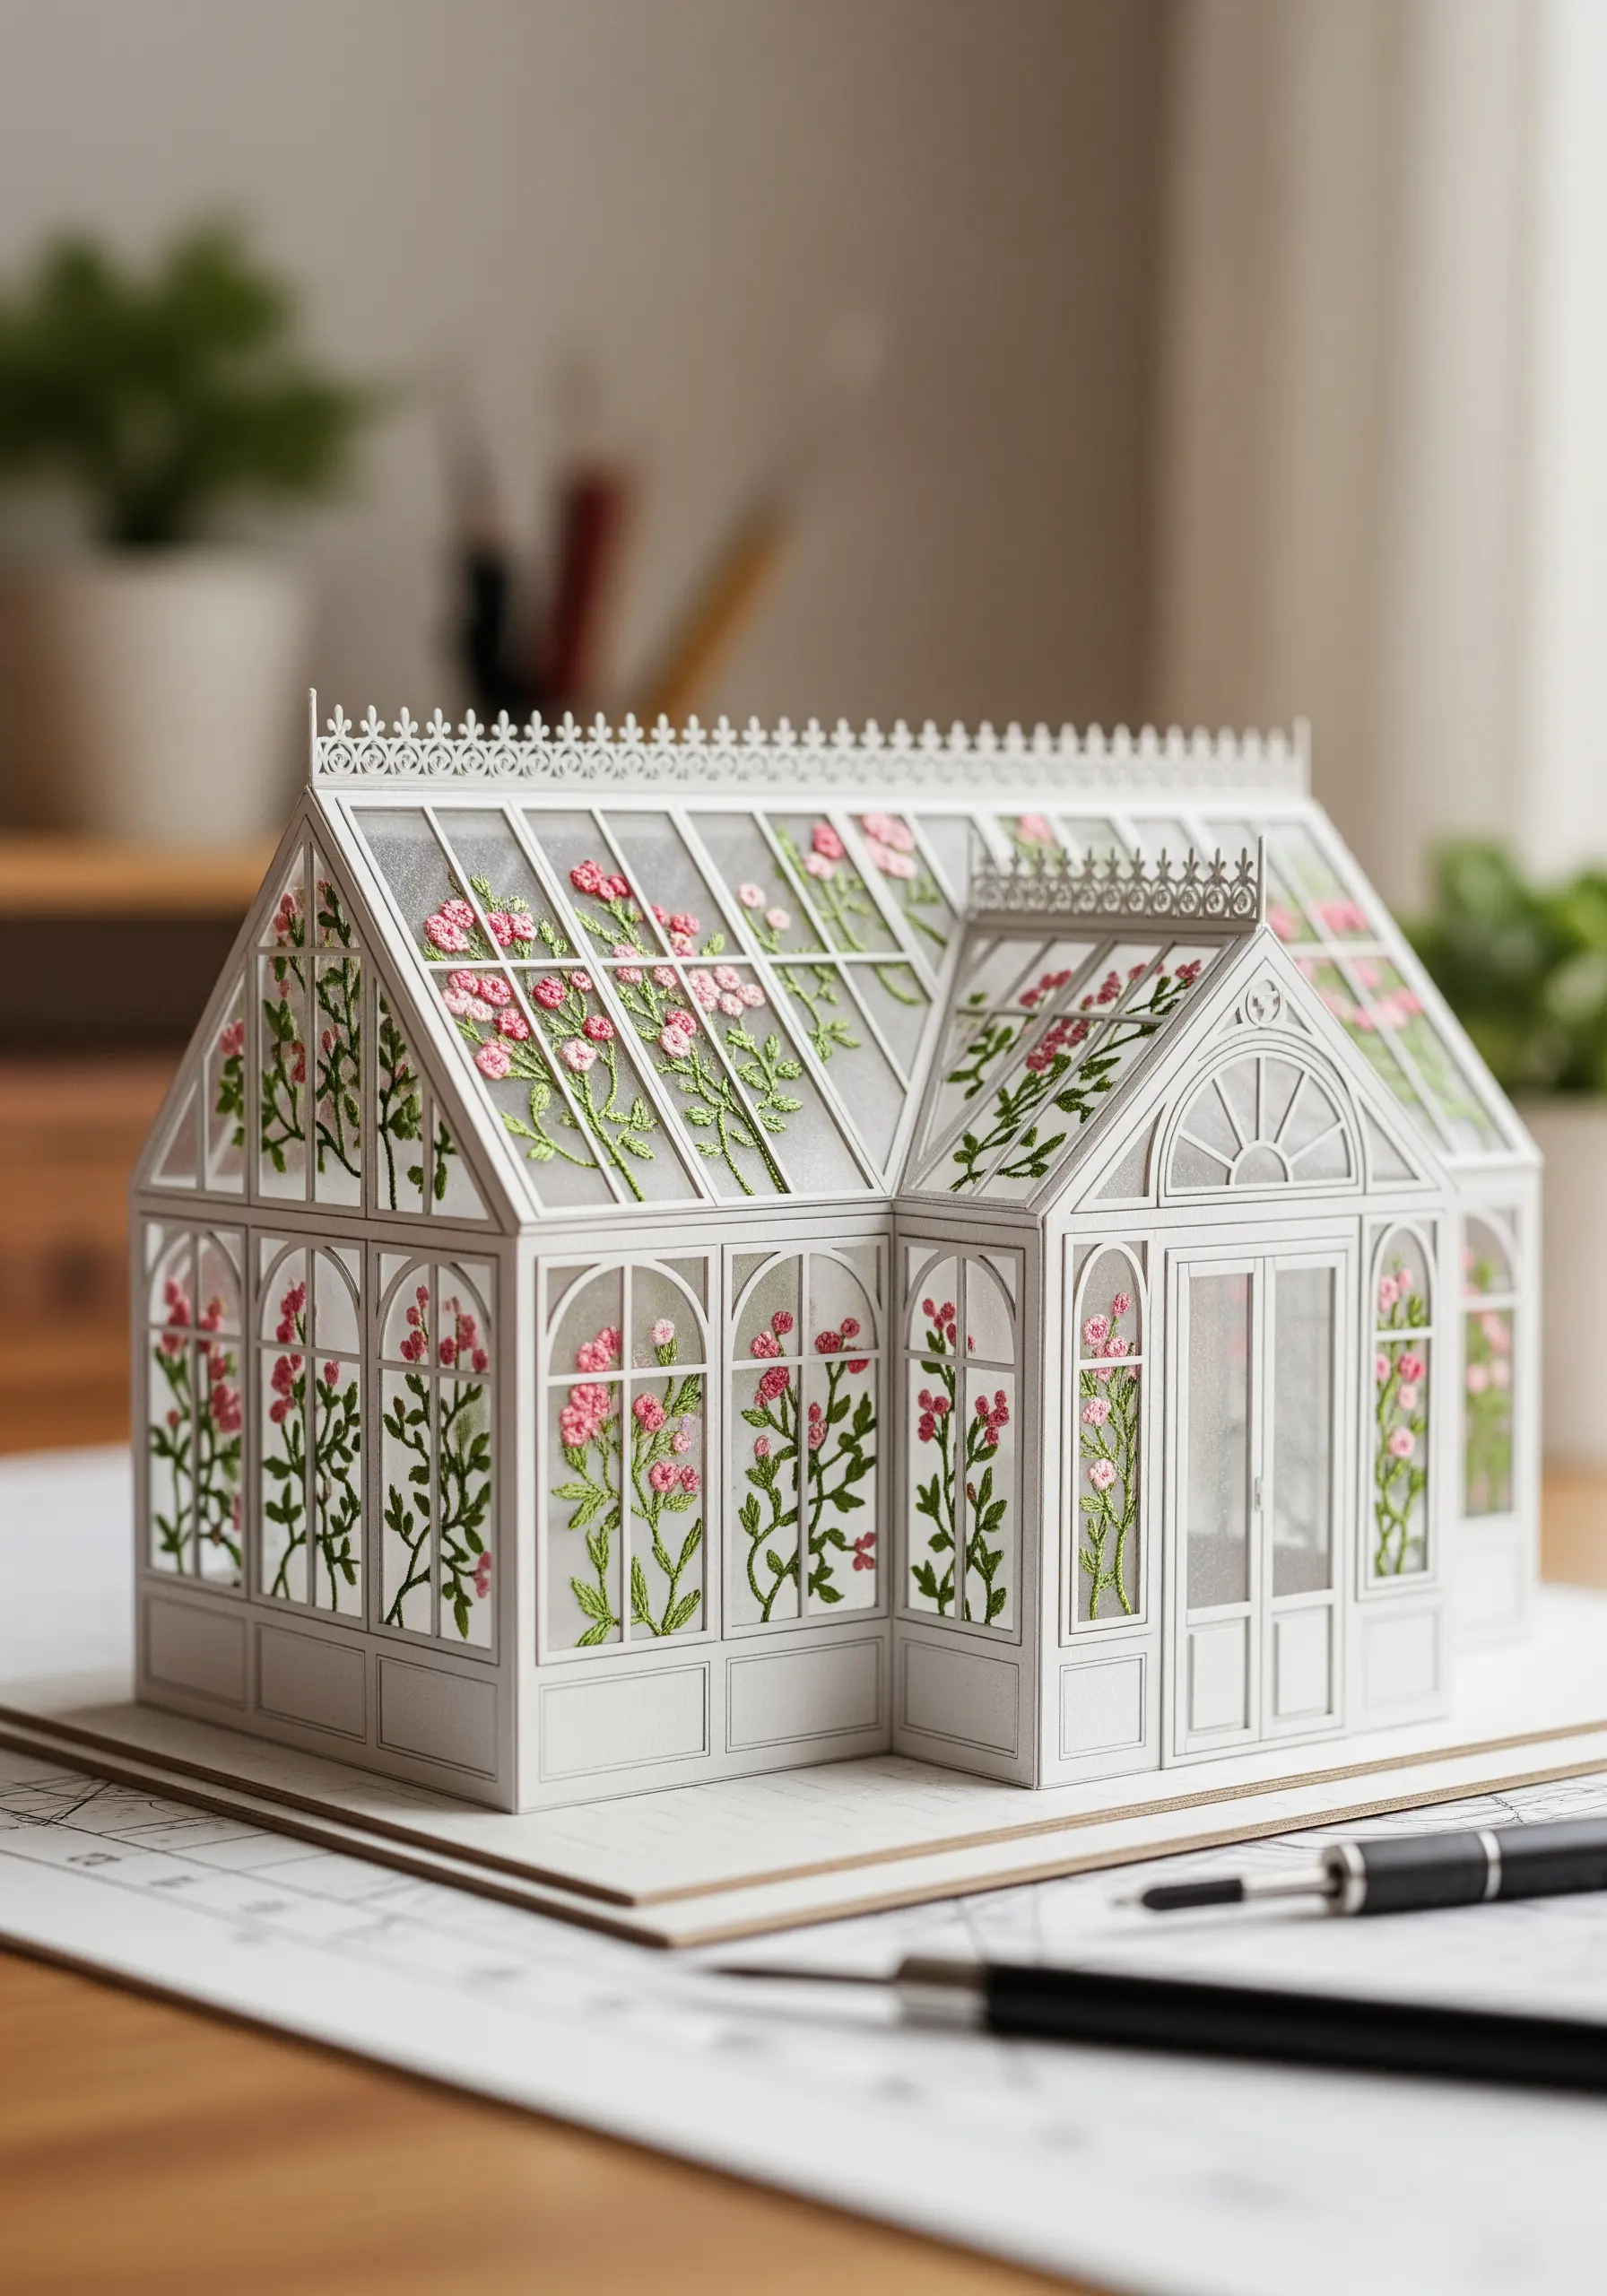
Provide a narrative context for your most detailed work by housing it within a miniature papercraft structure.
Construct a delicate paper model, such as this Victorian greenhouse, using a precision cutting tool.
Create tiny embroidered panels to place inside, like these climbing roses on sheer fabric, which mimic real plants.
The paper architecture gives your tiny stitches a home and a story, transforming them from isolated motifs into key elements of a magical, miniature world.
18. Crafting Miniature Embroidered Landscape Tags
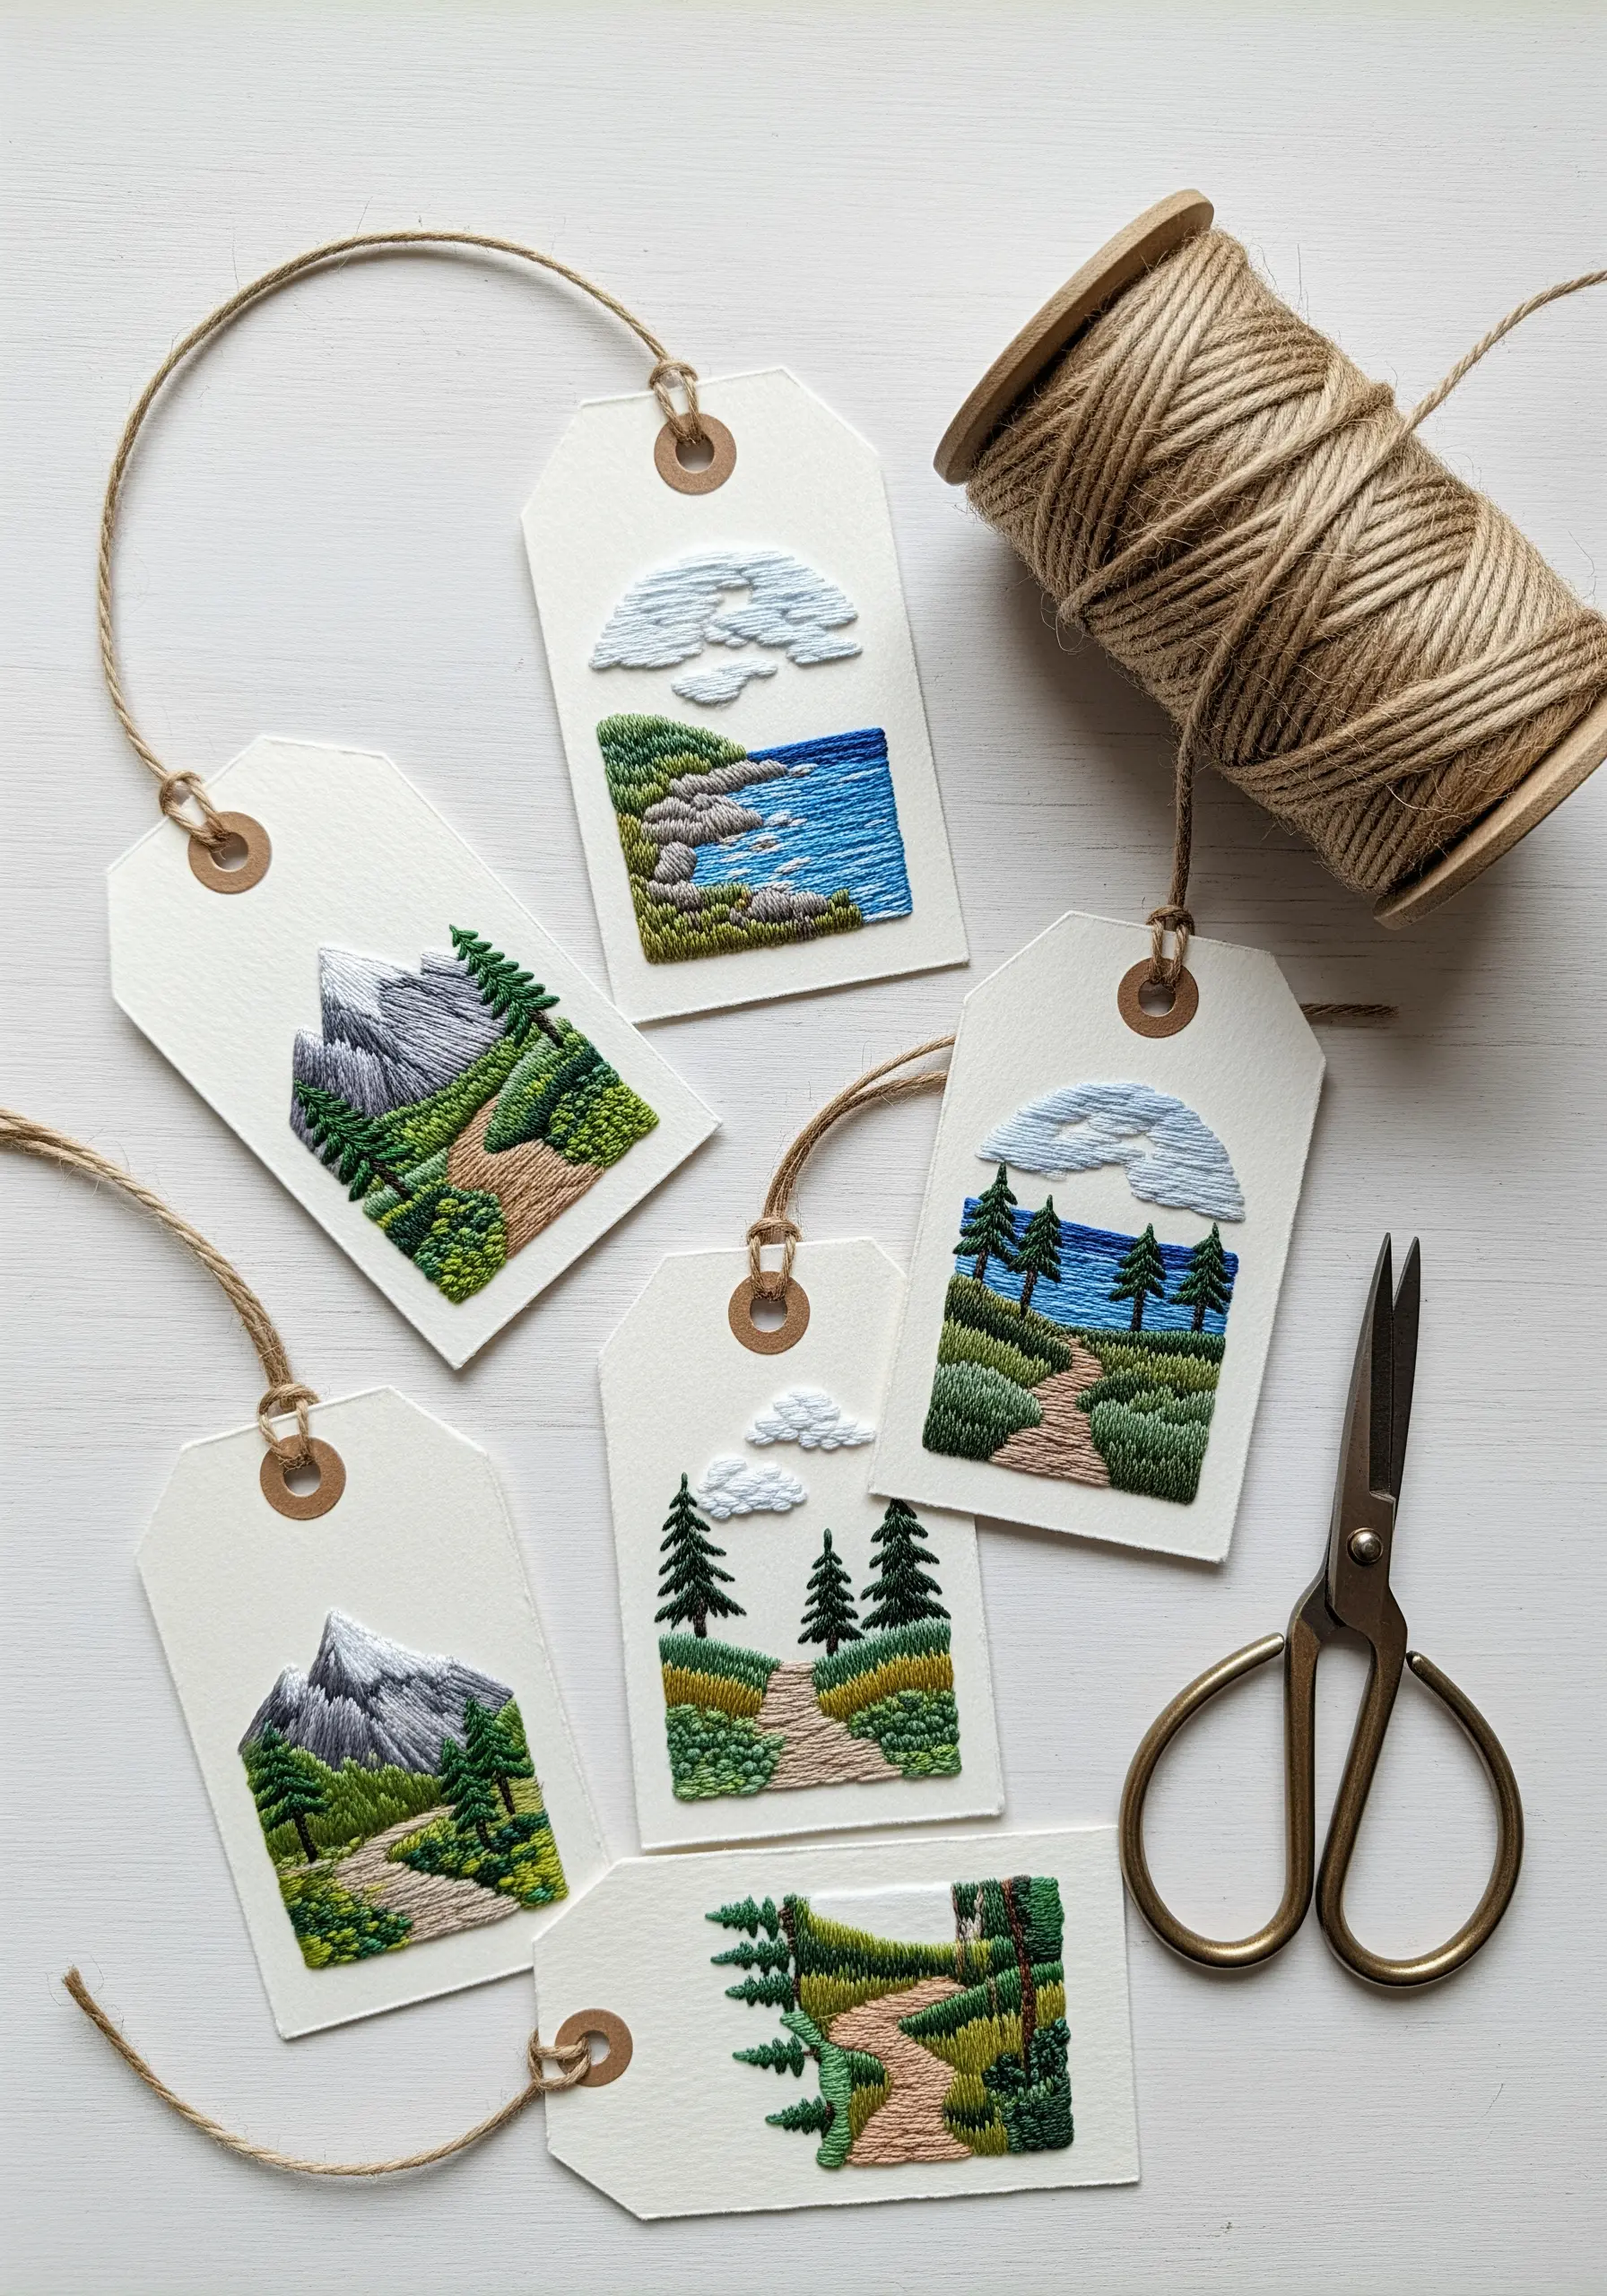
Turn simple cardstock tags into miniature windows onto sweeping landscapes.
Use thick, high-quality paper tags as your canvas, lightly sketching a simple scene first.
Translate the landscape into thread using distinct textures: long and short stitch for grassy hills, satin stitch for water, and French knots for trees or clouds.
The small scale encourages a charming, impressionistic style and makes for exquisite gift toppers or tiny, framable art. It’s a perfect way to create reusable and beautiful eco-gift packaging.
19. Embroidering on Painted Paper Screens
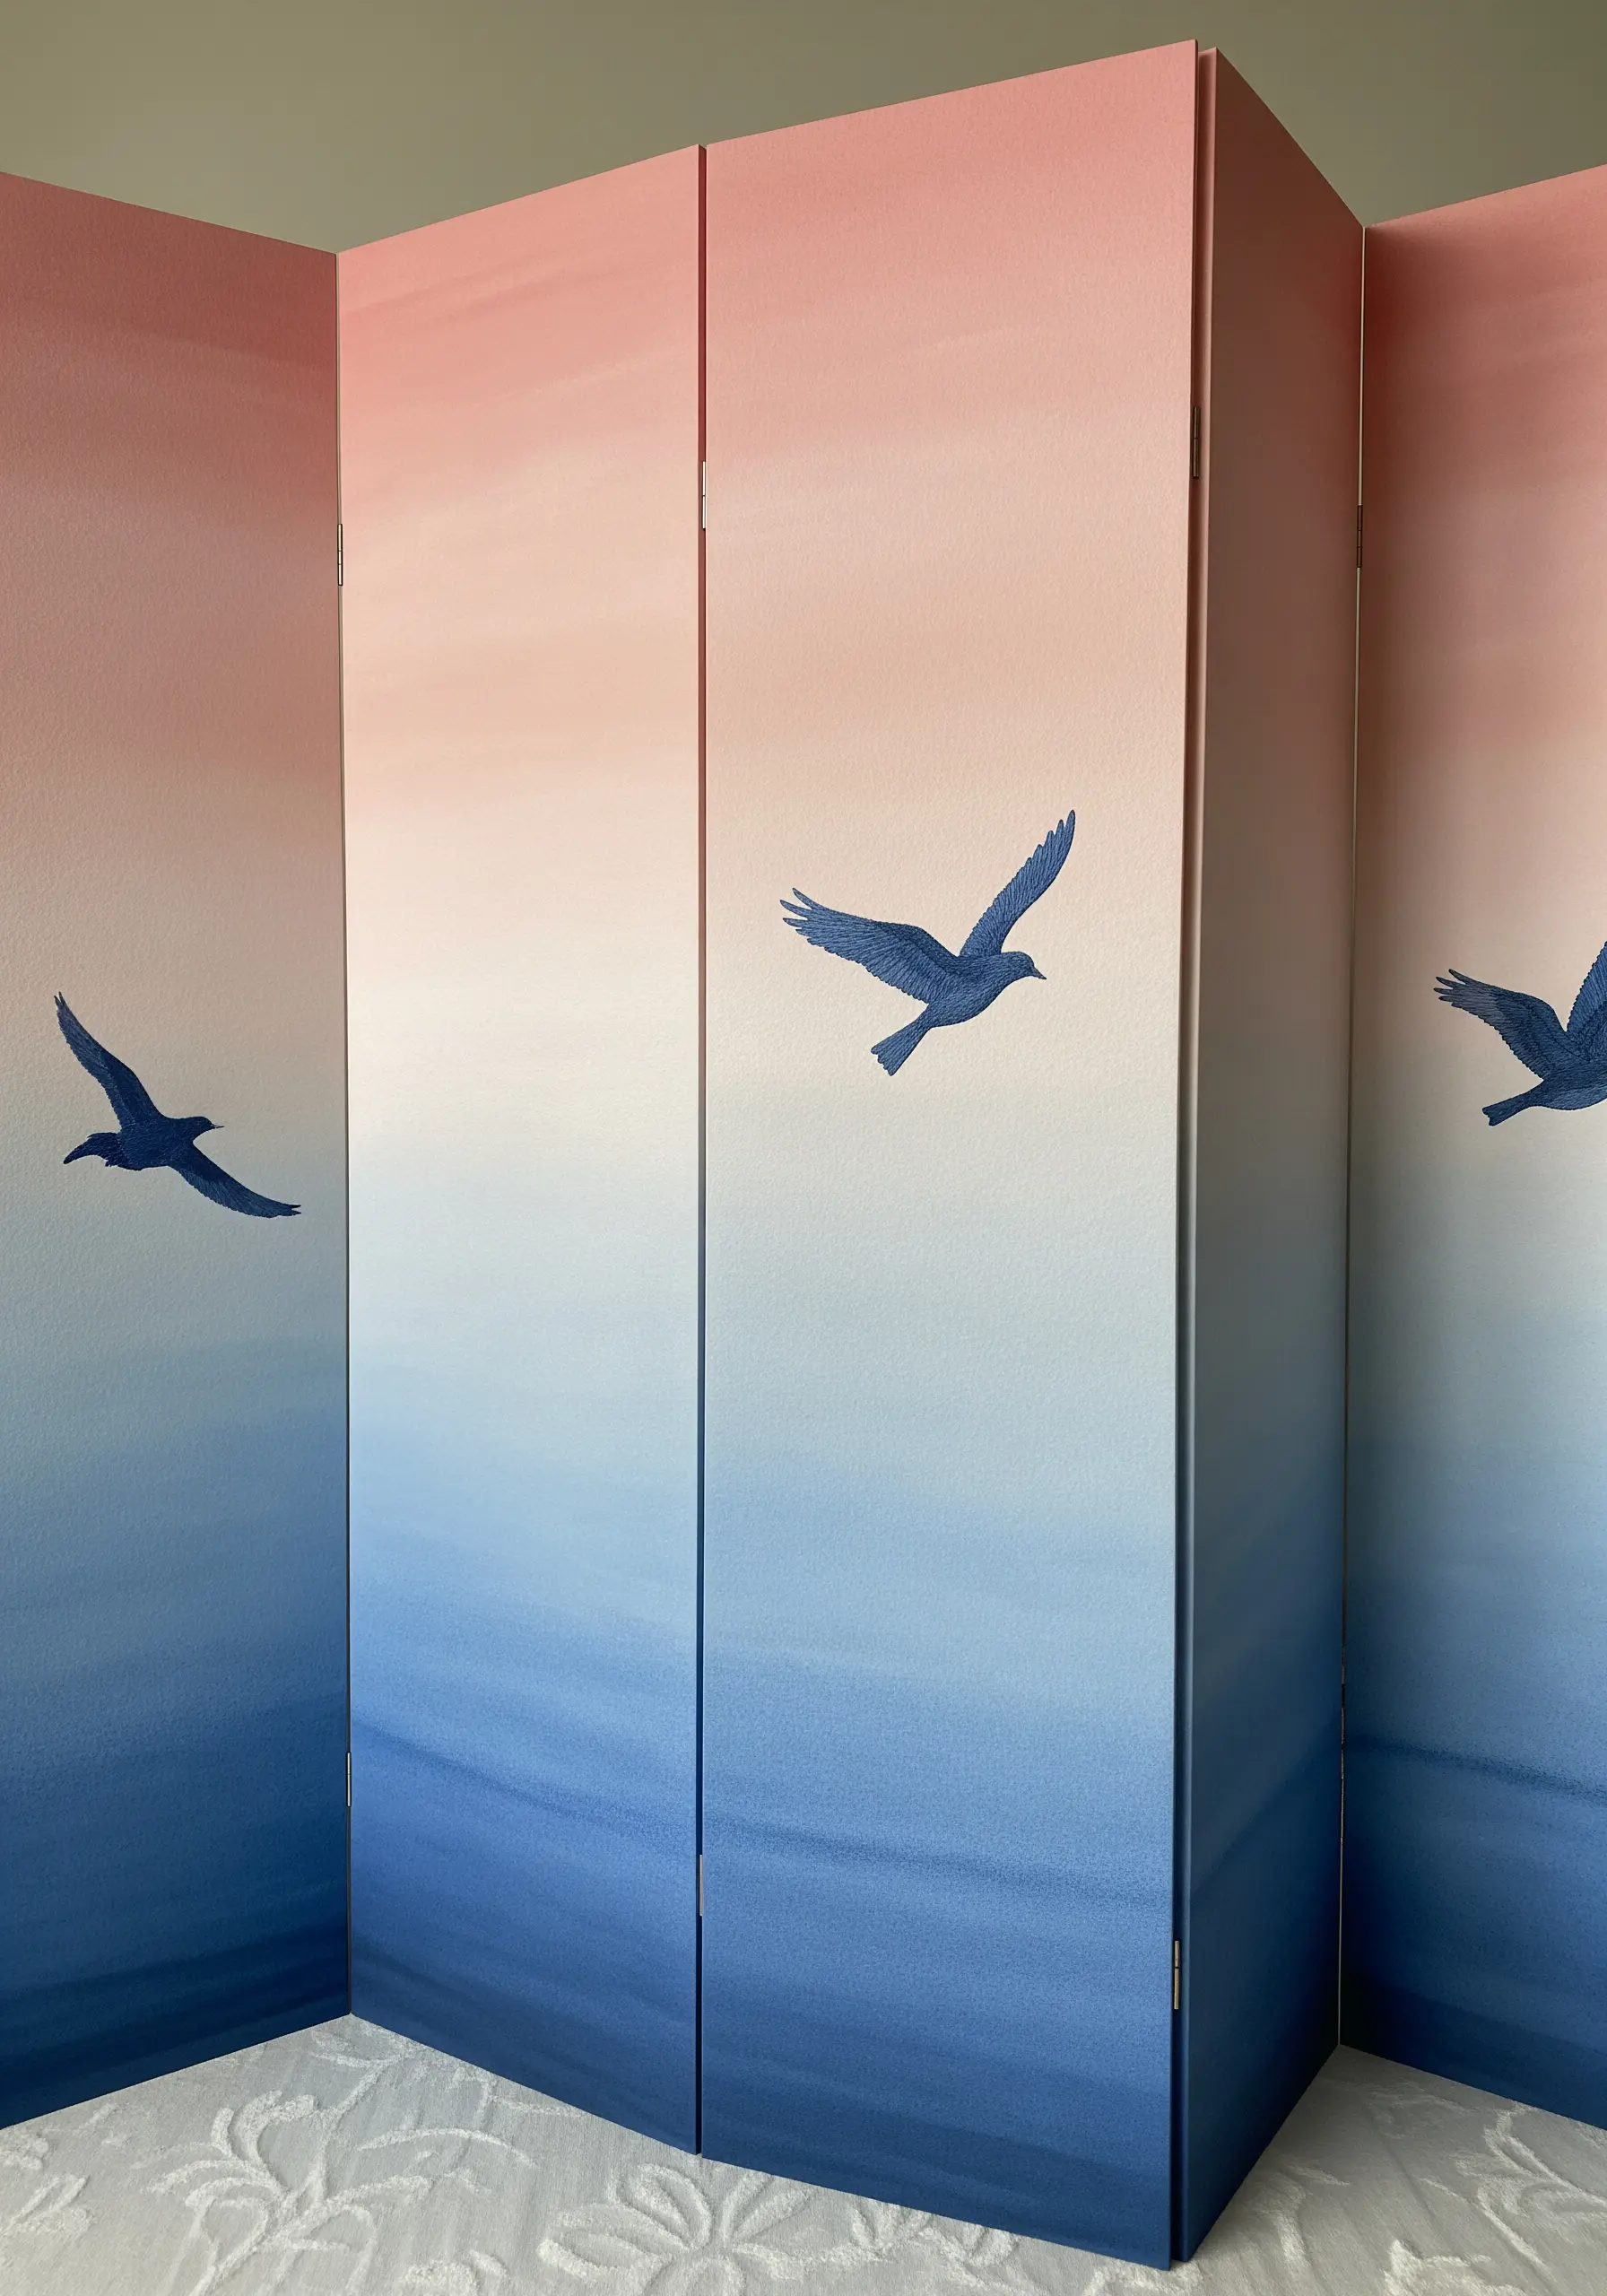
Create a modern, elegant piece of decor by stitching directly onto painted paper panels.
Prepare panels of heavyweight watercolor paper by applying a soft, blended gradient wash with acrylics or watercolors.
Once the paint is completely dry, stitch a simple, graphic motif—like these bird silhouettes—using a dark, contrasting thread.
The combination of the fluid, painterly background and the sharp, precise lines of the embroidery results in a sophisticated piece of art that feels both handmade and highly designed.
20. Weaving Thread Through Paper Structures
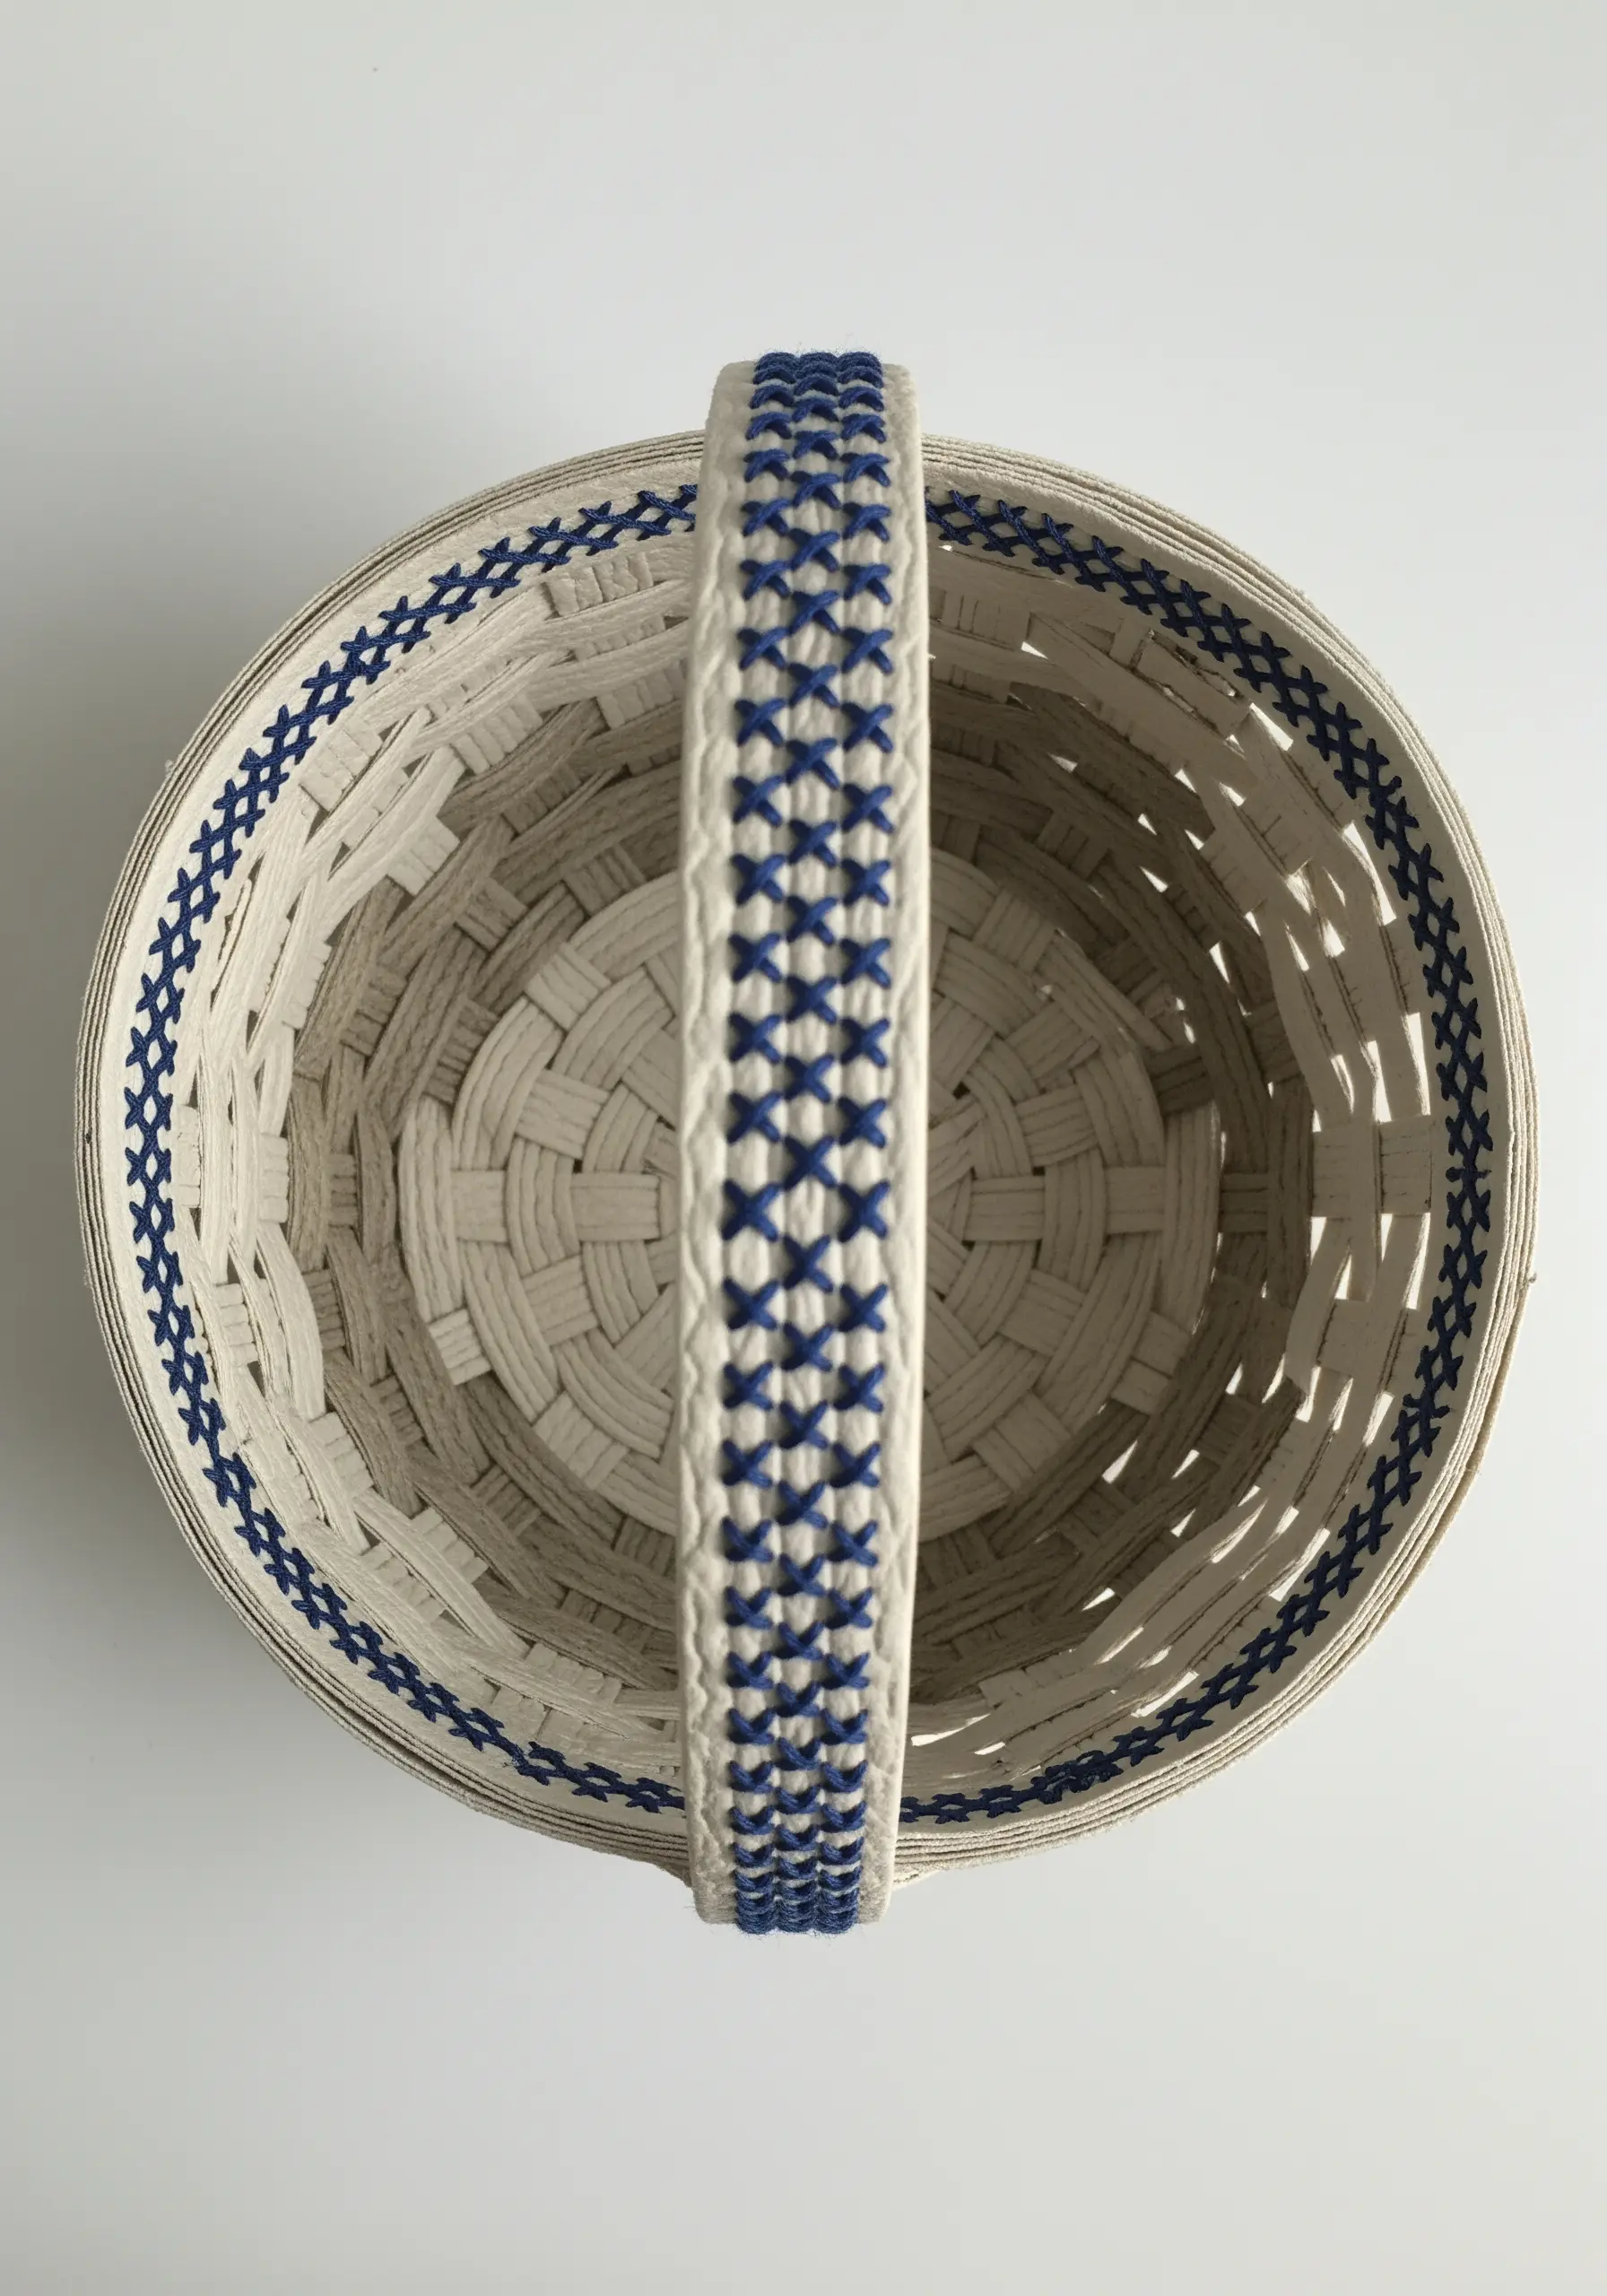
Instead of stitching onto a paper surface, integrate your thread into its very structure.
For a woven paper item like this basket, use the existing grid as a natural guide for decorative stitching.
Employ geometric stitches like cross-stitch or running stitch to add a pattern to the rim and handle.
This technique not only adds a pop of color and handmade detail but also reinforces the paper’s structure, blending decoration and function seamlessly.
21. Defining Paper Sculptures with Contour Stitching
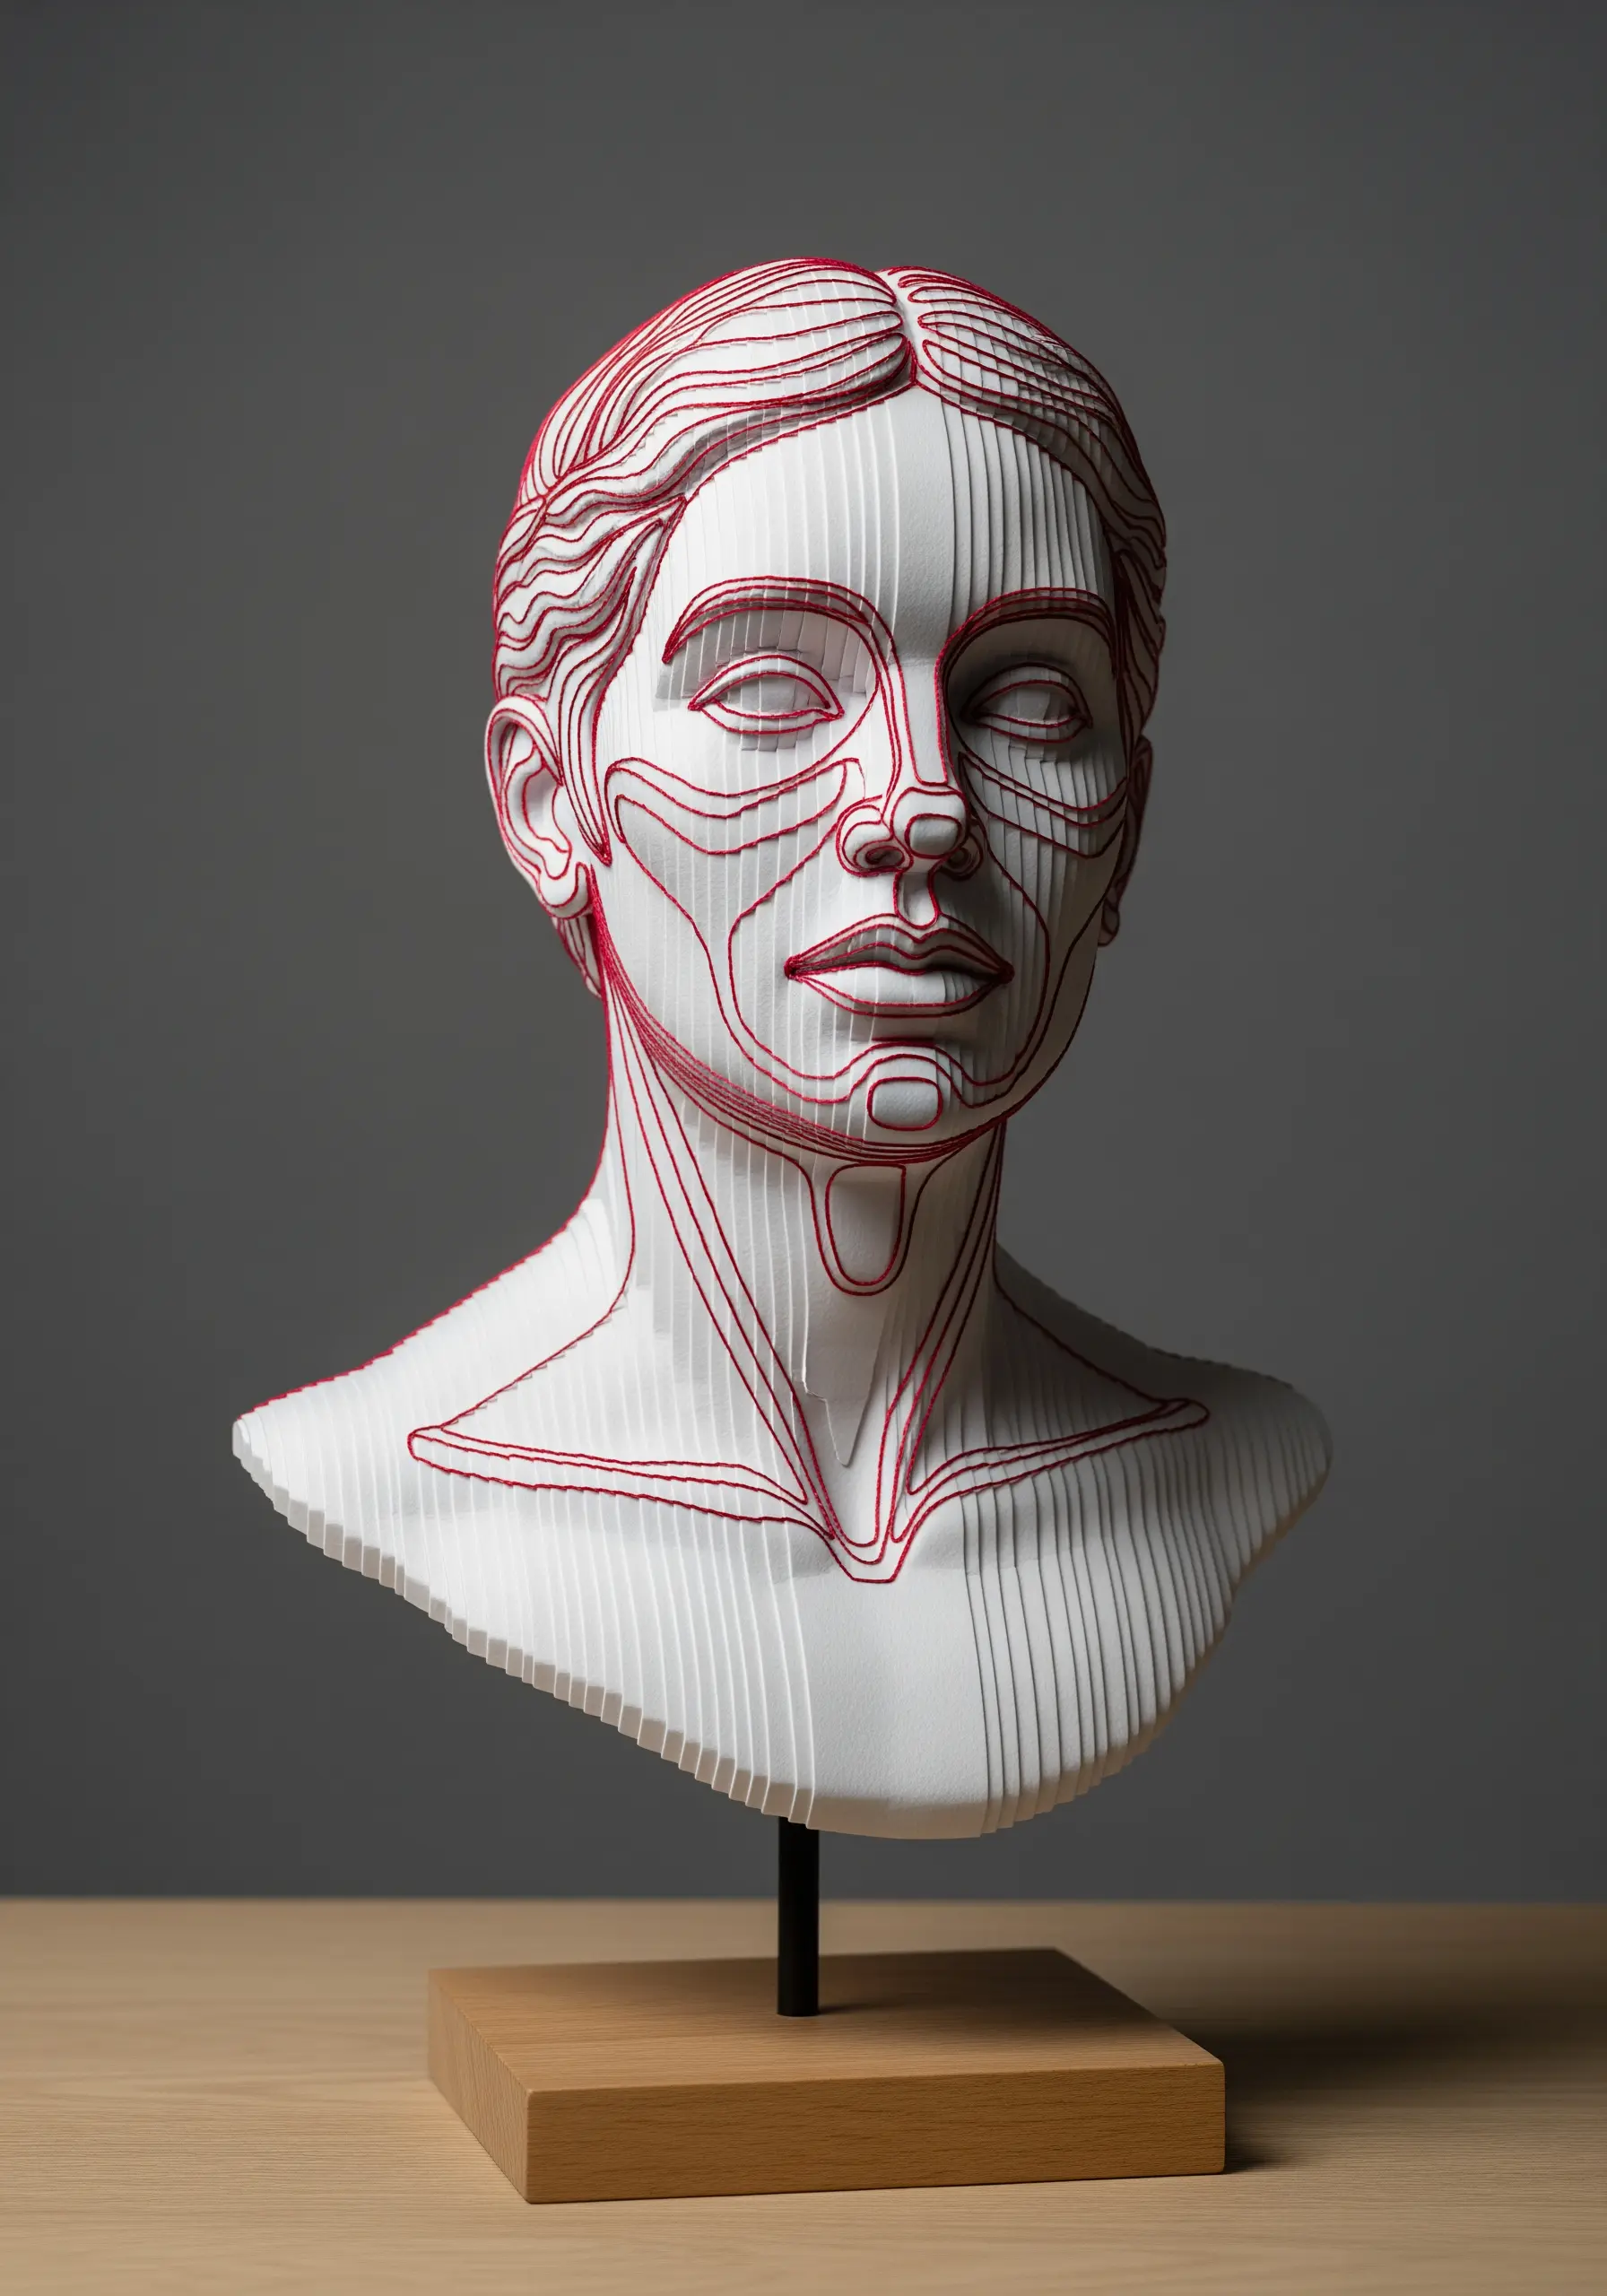
Use thread as a drawing tool to accentuate the form of a three-dimensional paper sculpture.
After constructing a layered paper object, like this portrait bust, use a single, bold thread to trace its essential contours.
Carefully stitch through the paper layers, following the curves of the face and hair to add definition and a graphic, illustrative quality.
This technique merges sculpture and line work, creating a powerful visual dialogue between form and line. It’s an inspiring idea for DIY mixed-media embroidery projects you can finish in an afternoon.
22. Creating Glow-in-the-Dark Constellation Maps
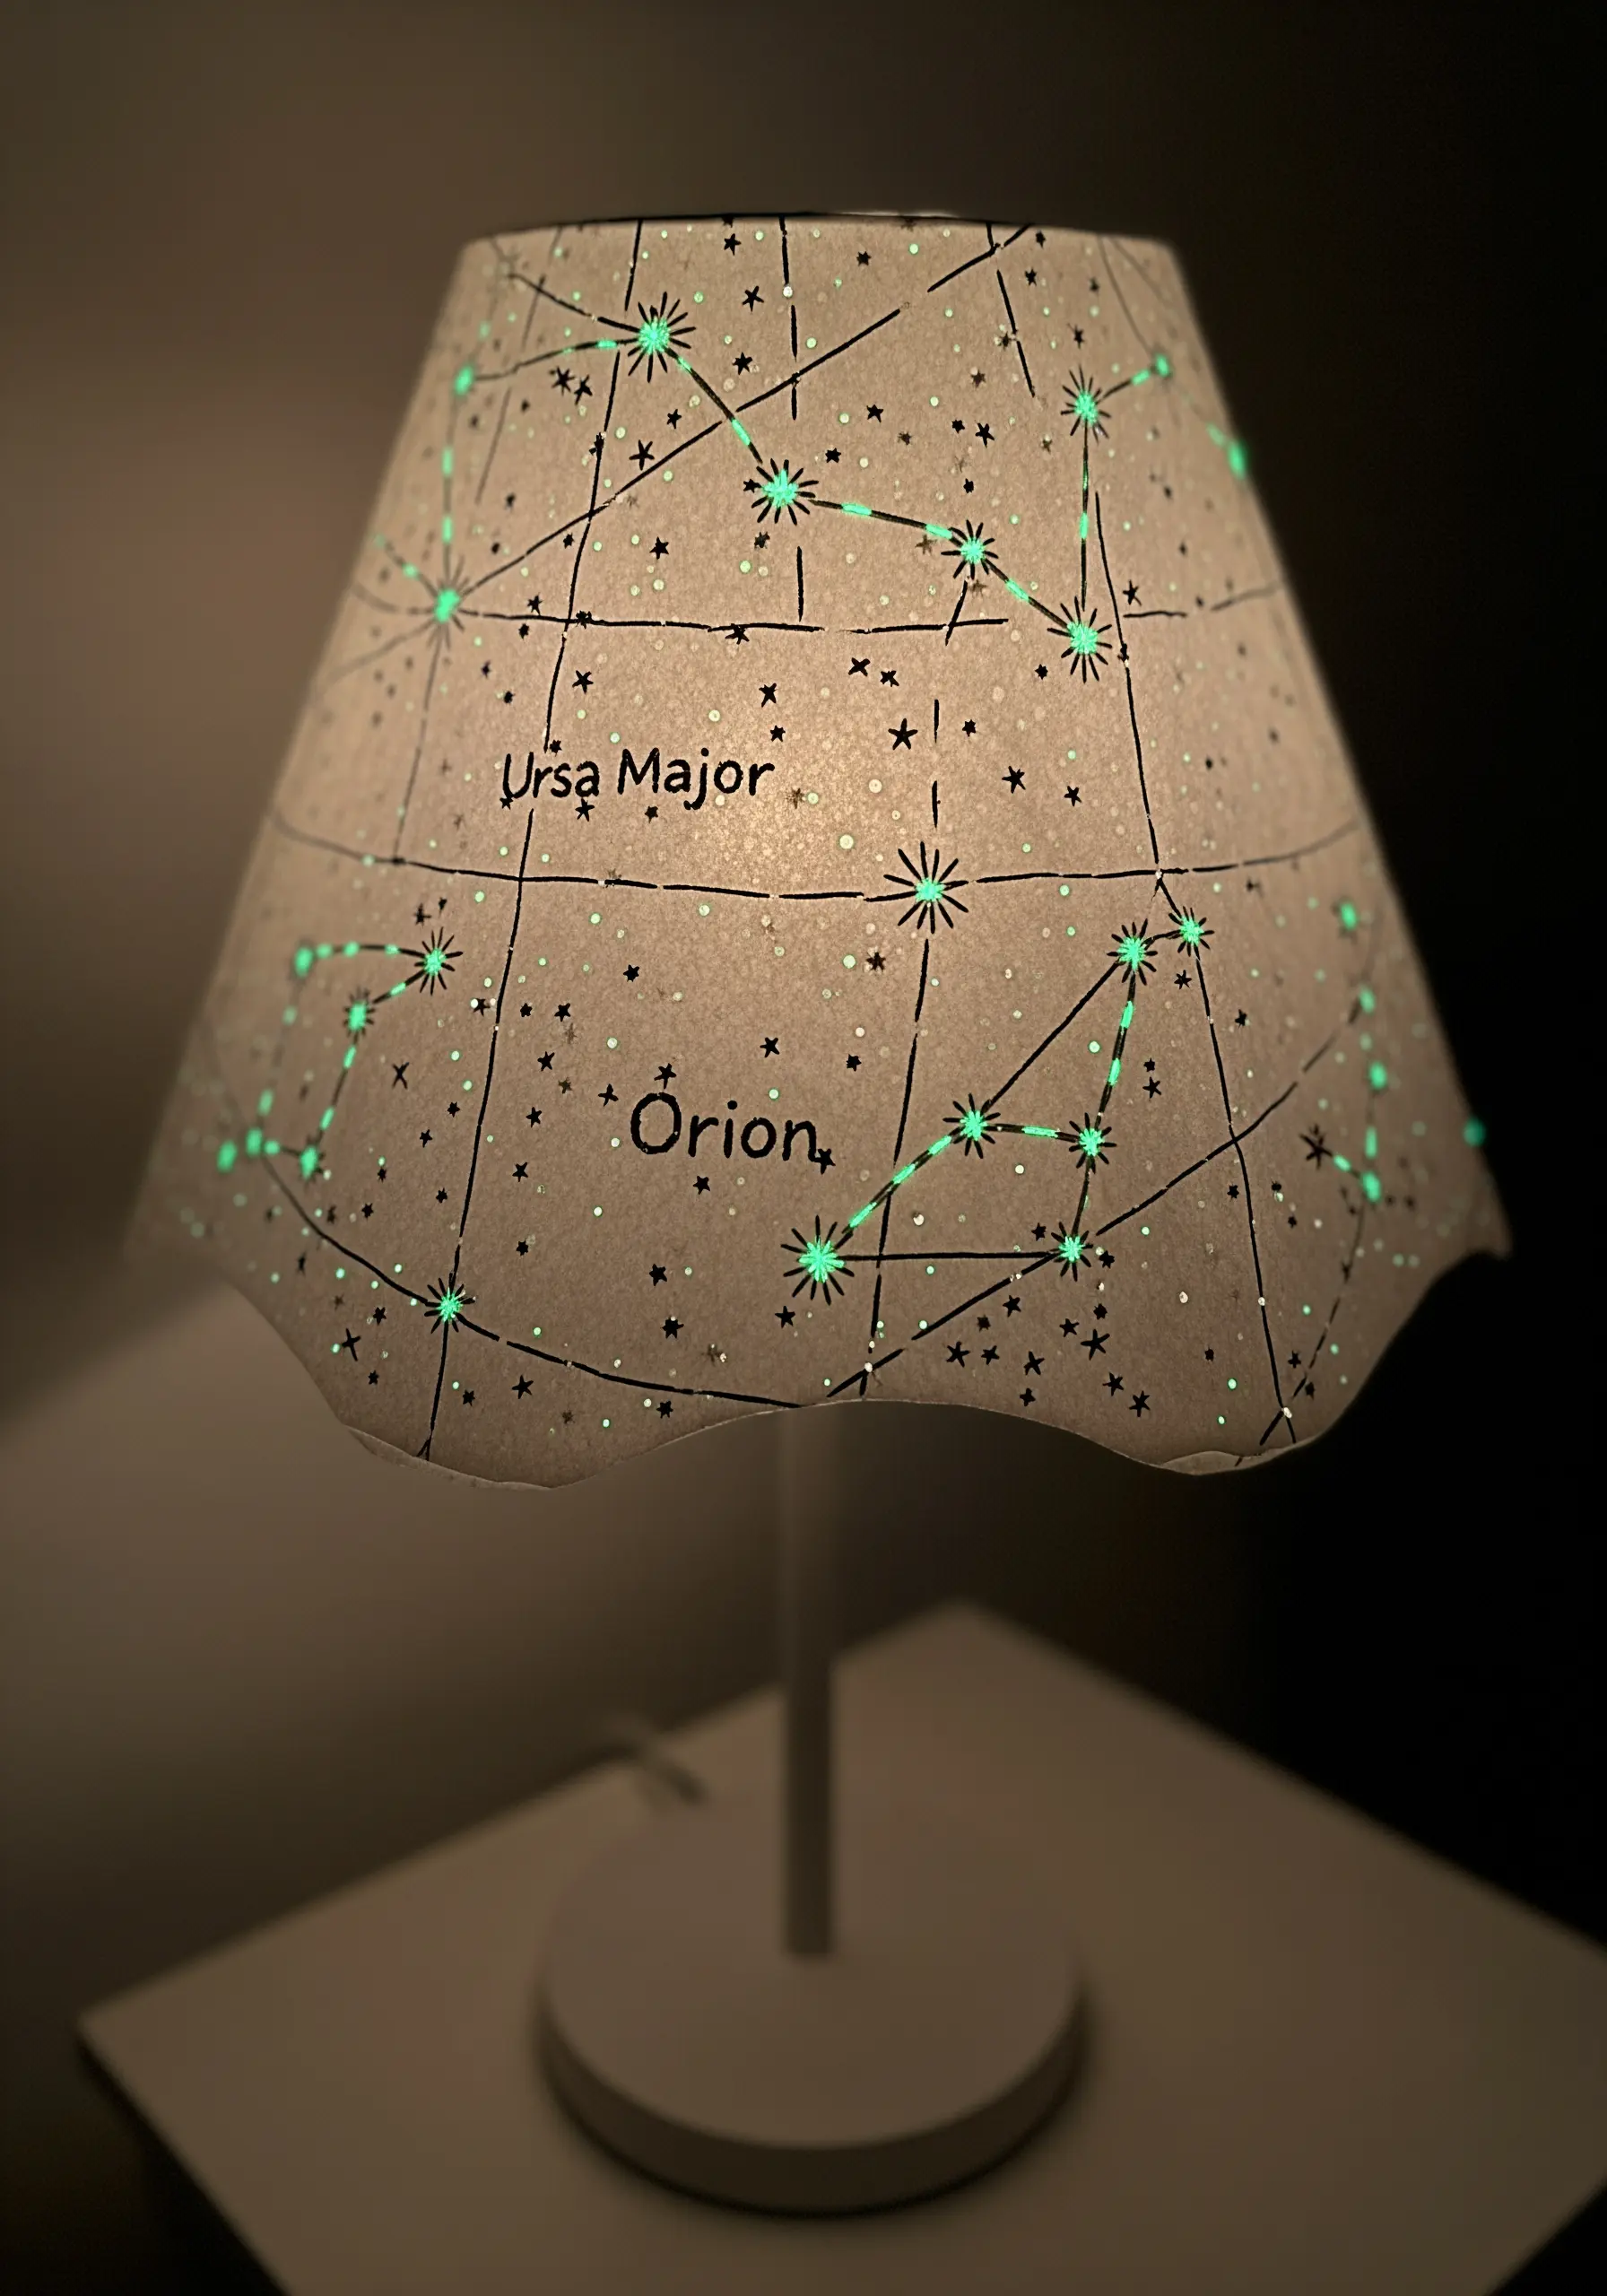
Turn a simple paper lampshade into a celestial map that comes alive in the dark.
Use a needle to carefully pre-punch holes in a parchment paper shade, marking the locations of stars in your favorite constellations.
Then, connect the dots using glow-in-the-dark embroidery floss and a simple backstitch.
By day, the stitching is a subtle, textural detail; by night, with the lights off, your secret star map magically appears.
23. Layering Stitched Portraits in Mixed-Media Collage

Achieve an ethereal, layered effect by incorporating a stitched portrait into a paper collage.
Use a single thread to embroider a line-art portrait onto a sheet of semi-transparent vellum.
Assemble a collage of vintage papers, stamps, and ephemera as your background.
Finally, place the stitched vellum portrait over the top, allowing the colors and textures of the underlying collage to show through, creating depth and a dreamlike quality. This is one of many creative collage inspirations for combining paper layers with subtle embroidery.
24. Designing Textured Lids for Keepsake Boxes
Transform ordinary paper boxes into luxurious, tactile keepsakes by adding embroidered lids.
Choose a geometric pattern that can be repeated, and stitch it onto a piece of fabric using a tonal thread for a subtle, sophisticated look.
Mount the embroidered fabric onto a piece of cardstock cut to the exact size of the box lid.
The raised, textural quality of the stitching provides a delightful contrast to the smooth sides of the box, making it an object you want to touch and hold.
25. Integrating Stitches into Paper-Cut Art
Add a delicate touch of color and texture to intricate paper-cut designs with micro-embroidery.
After you have cut your primary design, such as this tree, from a single sheet of paper, identify areas that could benefit from detail.
Use a single strand of floss and a very fine needle to add tiny accents—like individual seed stitches or French knots—to represent leaves or blossoms.
This subtle addition blends the two art forms, creating a piece with incredible dimension and detail that invites closer inspection.
26. Embellishing Paper Star Lanterns with Stitches
Personalize a simple paper star lantern by adding your own celestial embroidery before assembly.
Unfold the lantern and lay it flat. Use metallic or iridescent threads to stitch small, cosmic motifs onto the points of the star.
Simple starbursts, tiny planets, and crescent moons work beautifully.
Once you reassemble the lantern and light it from within, your stitched details will catch the light and shimmer, creating a unique and magical glow for any room.


