
When you have a large, empty wall, paint feels like the only answer. But what if you could fill that space with the warmth, texture, and personal story that only thread can offer? A statement-size textile hanging transforms a room, adding softness and a focal point that is deeply and uniquely yours.
Don’t be intimidated by the scale. The same skills you use for a small hoop are the foundation for a masterpiece. The key is to shift your thinking from tiny details to bold textures, smart color choices, and techniques that build impact efficiently.
This collection is your guide to thinking bigger. You’ll discover how to translate your love for stitching into large-scale art that is not only achievable but also profoundly beautiful. It’s time to let your embroidery move from the hoop to the wall, creating a home that truly reflects the artist you are.
1. Evoke Rolling Hills with Topographical Texture
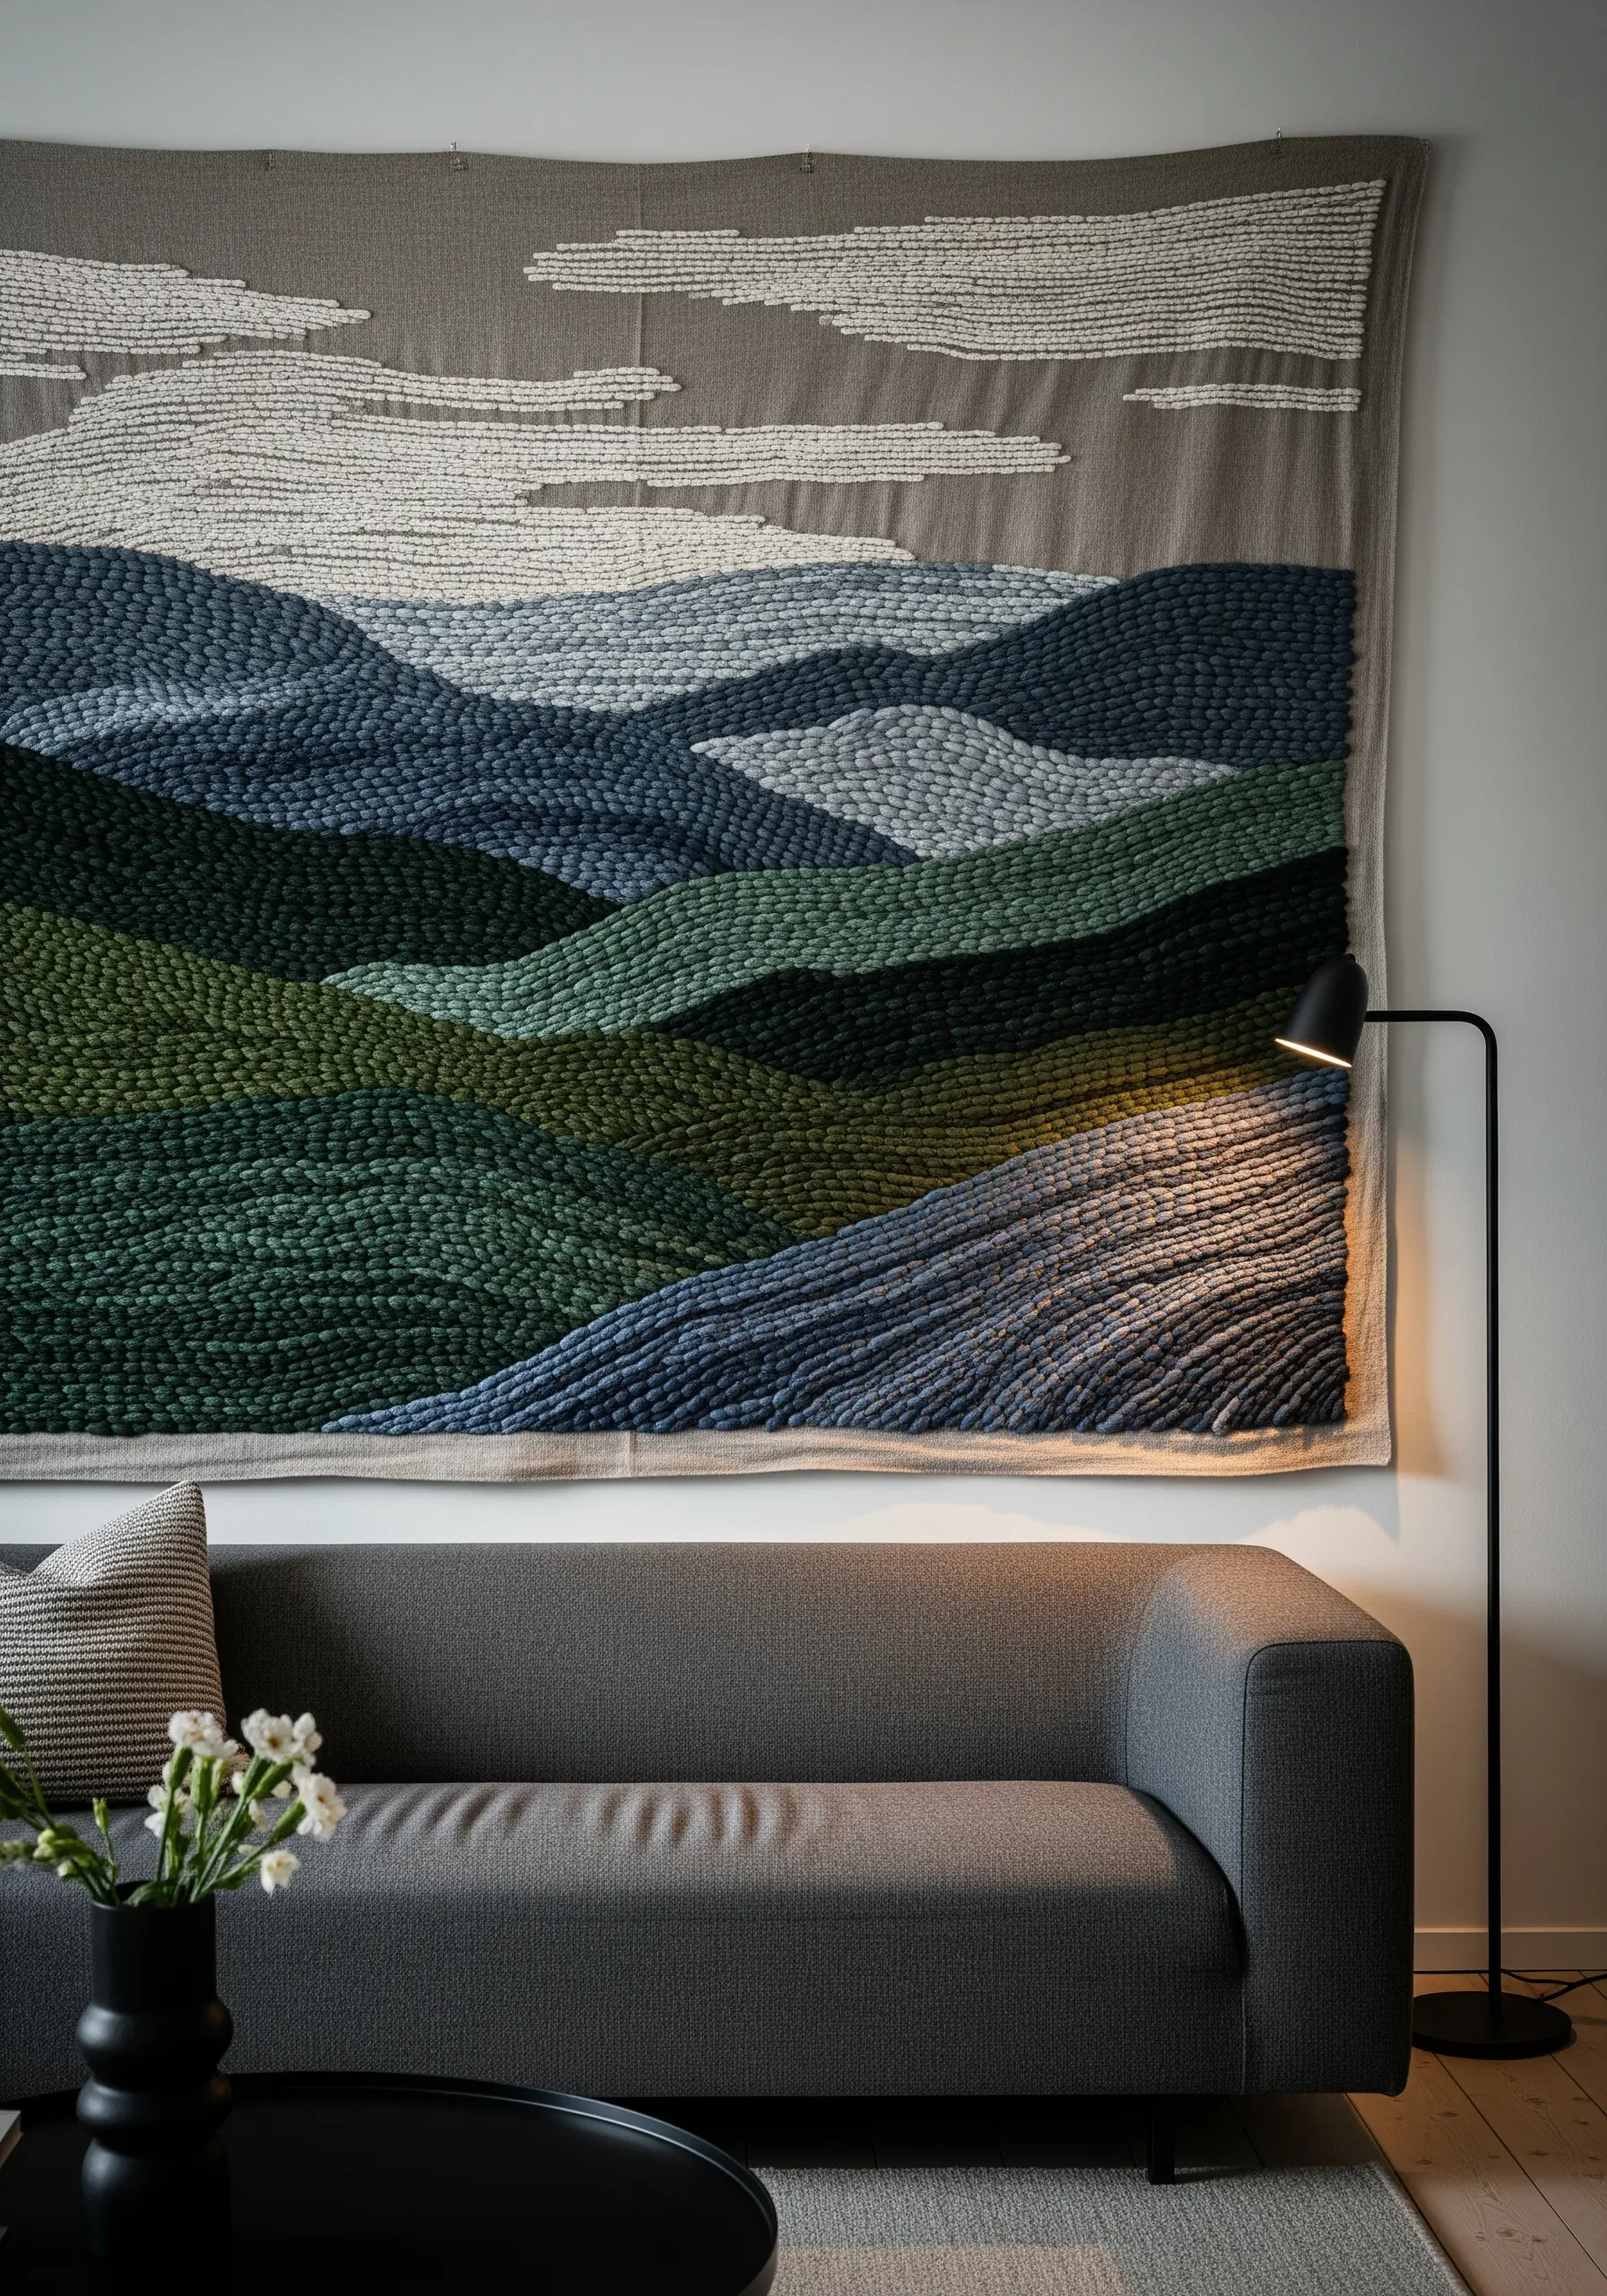
To achieve this deeply textural landscape, use punch needle or a rug-hooking technique with chunky wool yarn on a sturdy monk’s cloth or linen backing.
Create the illusion of depth by varying your loop heights—use shorter, tighter loops for distant hills and gradually increase to longer, plusher loops for the foreground.
Work in organic, curved rows that follow the contours of your design, rather than strict horizontal lines.
This method builds visual weight and texture rapidly, making it perfect for creating nature-inspired embroidery wall decor that fills a large space with warmth.
2. Master Bold Graphics with a Triptych Layout
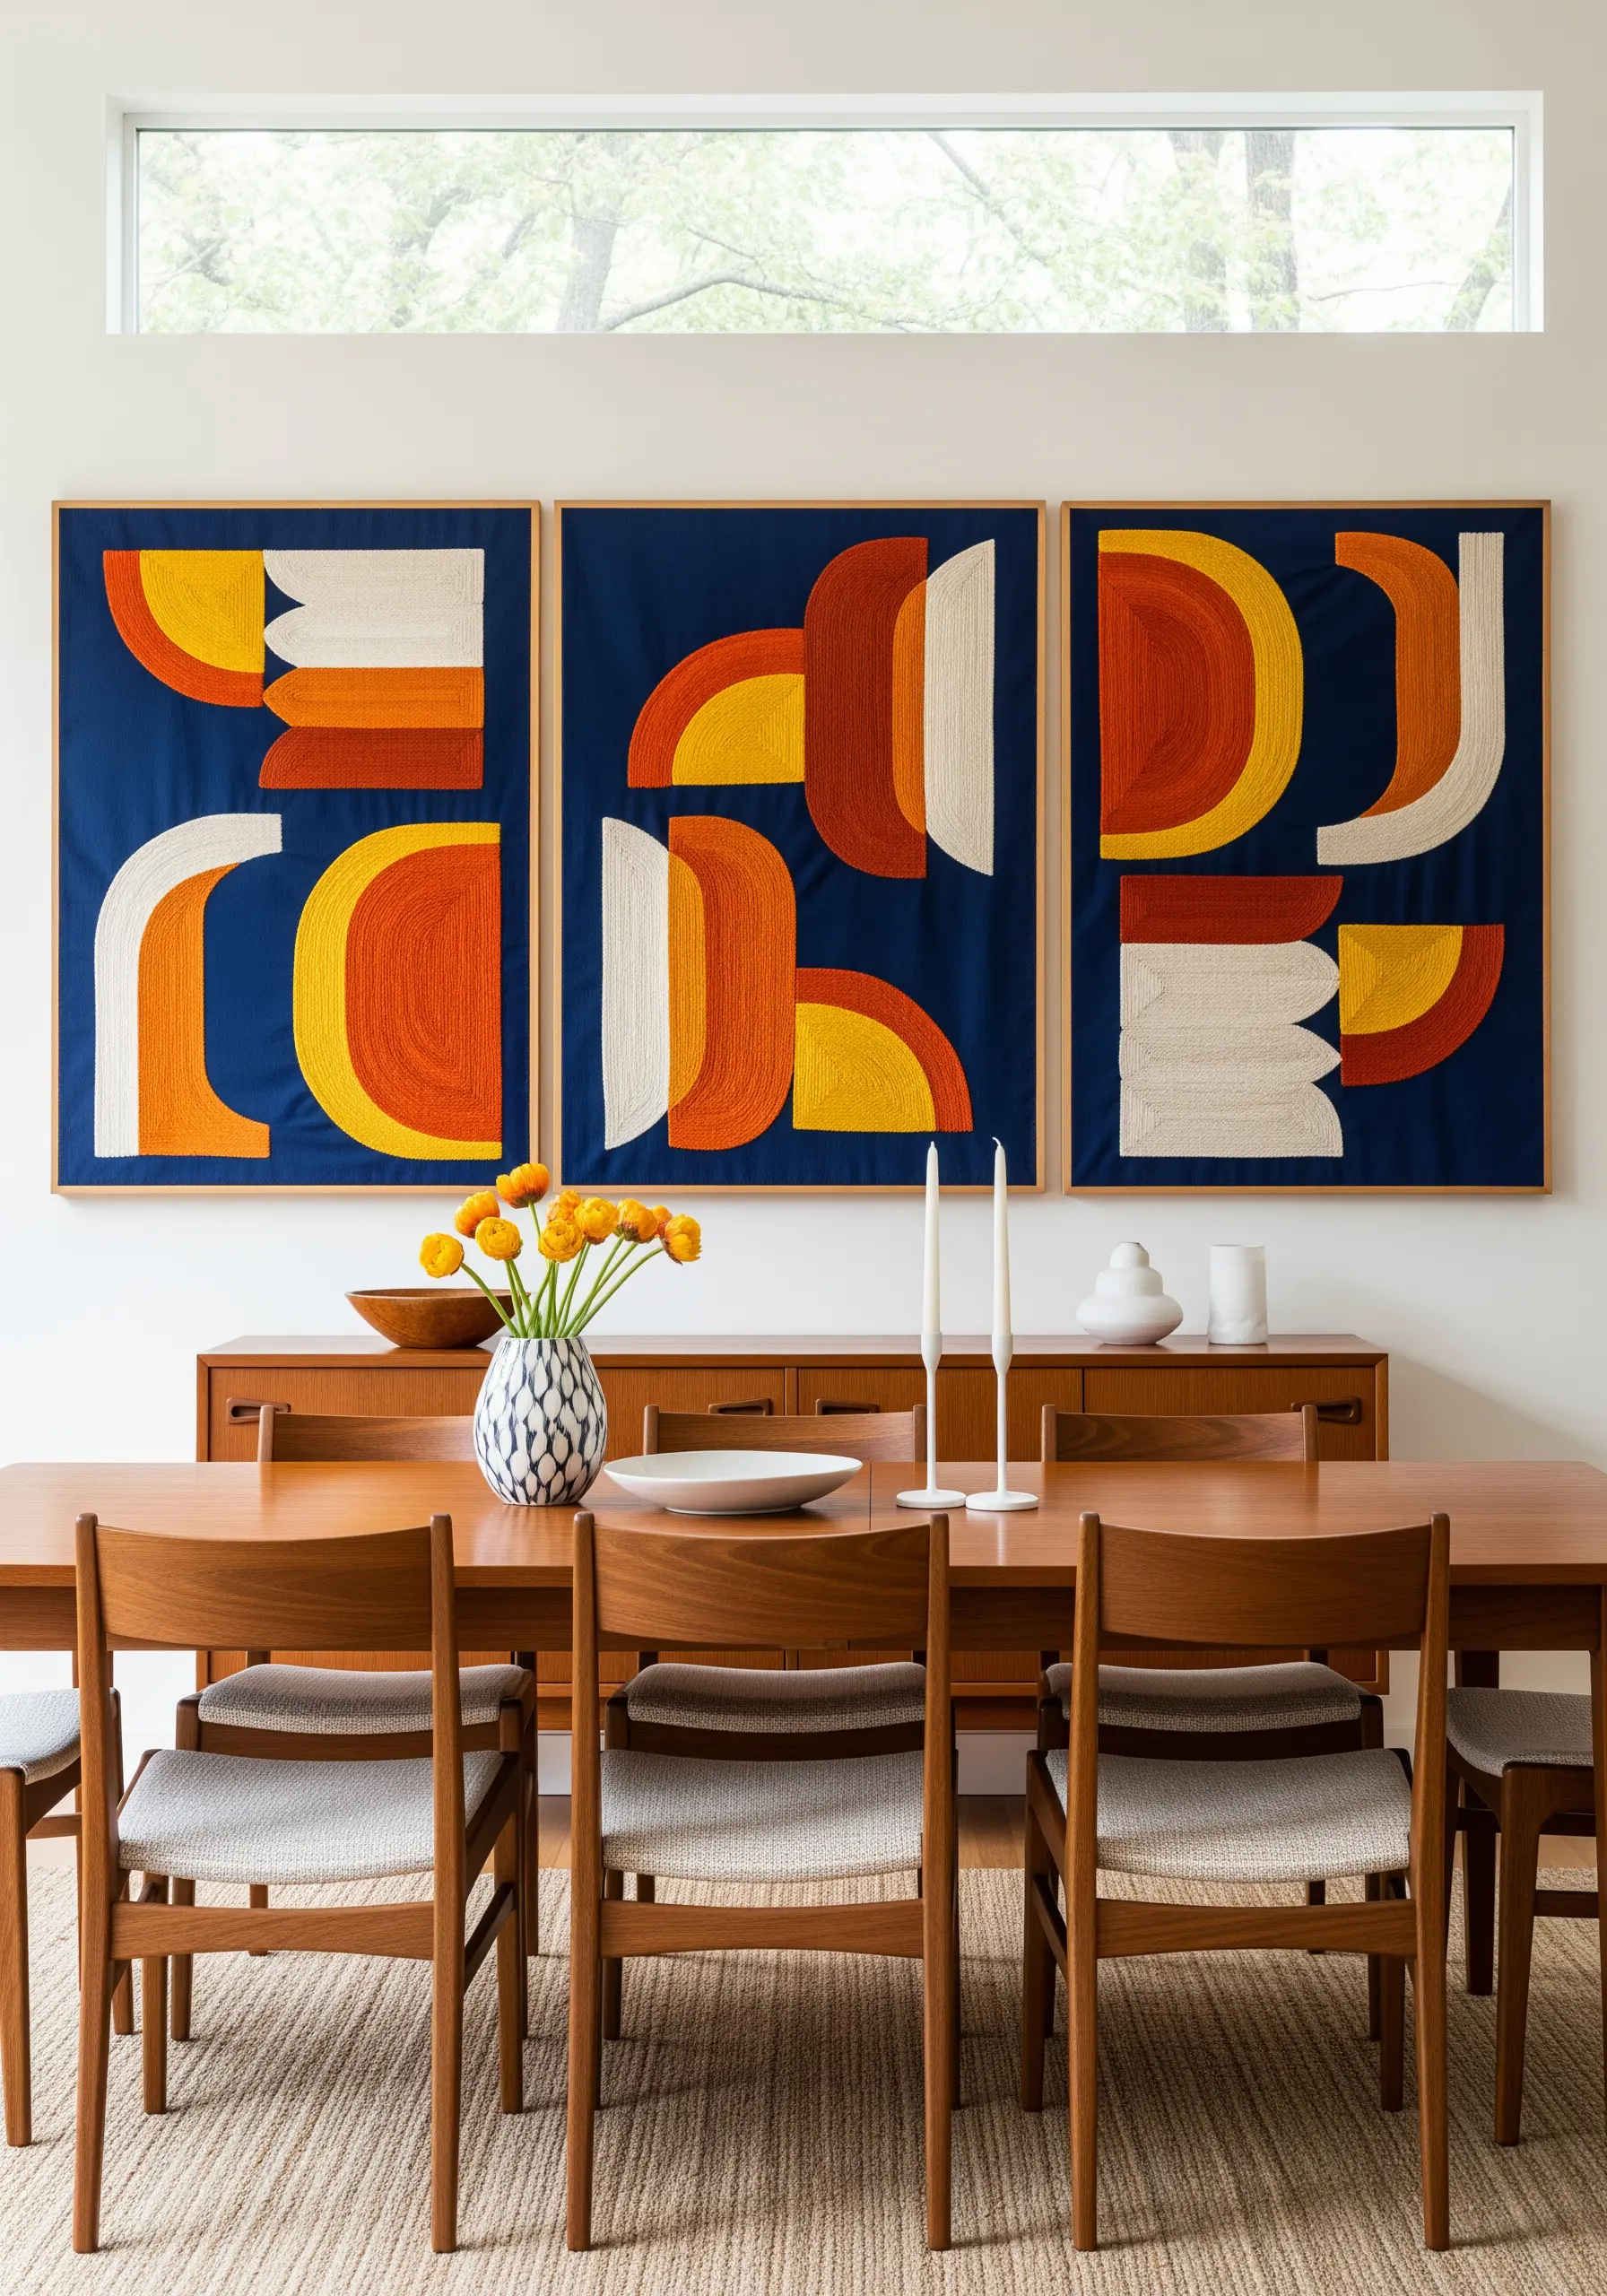
Break a large composition into three separate panels, or a triptych, to make the project more manageable and create a powerful, modern rhythm.
For impeccably clean edges on your color blocks, first outline each shape with a single row of split stitch before filling it with directional satin stitch.
This underpinning prevents the fill stitches from shifting and creates a sharp, defined line that makes the colors pop, especially on a high-contrast fabric like navy linen.
This technique elevates bold, abstract embroidery motifs into gallery-quality art.
3. Scale Up Symmetry with a Statement Mandala
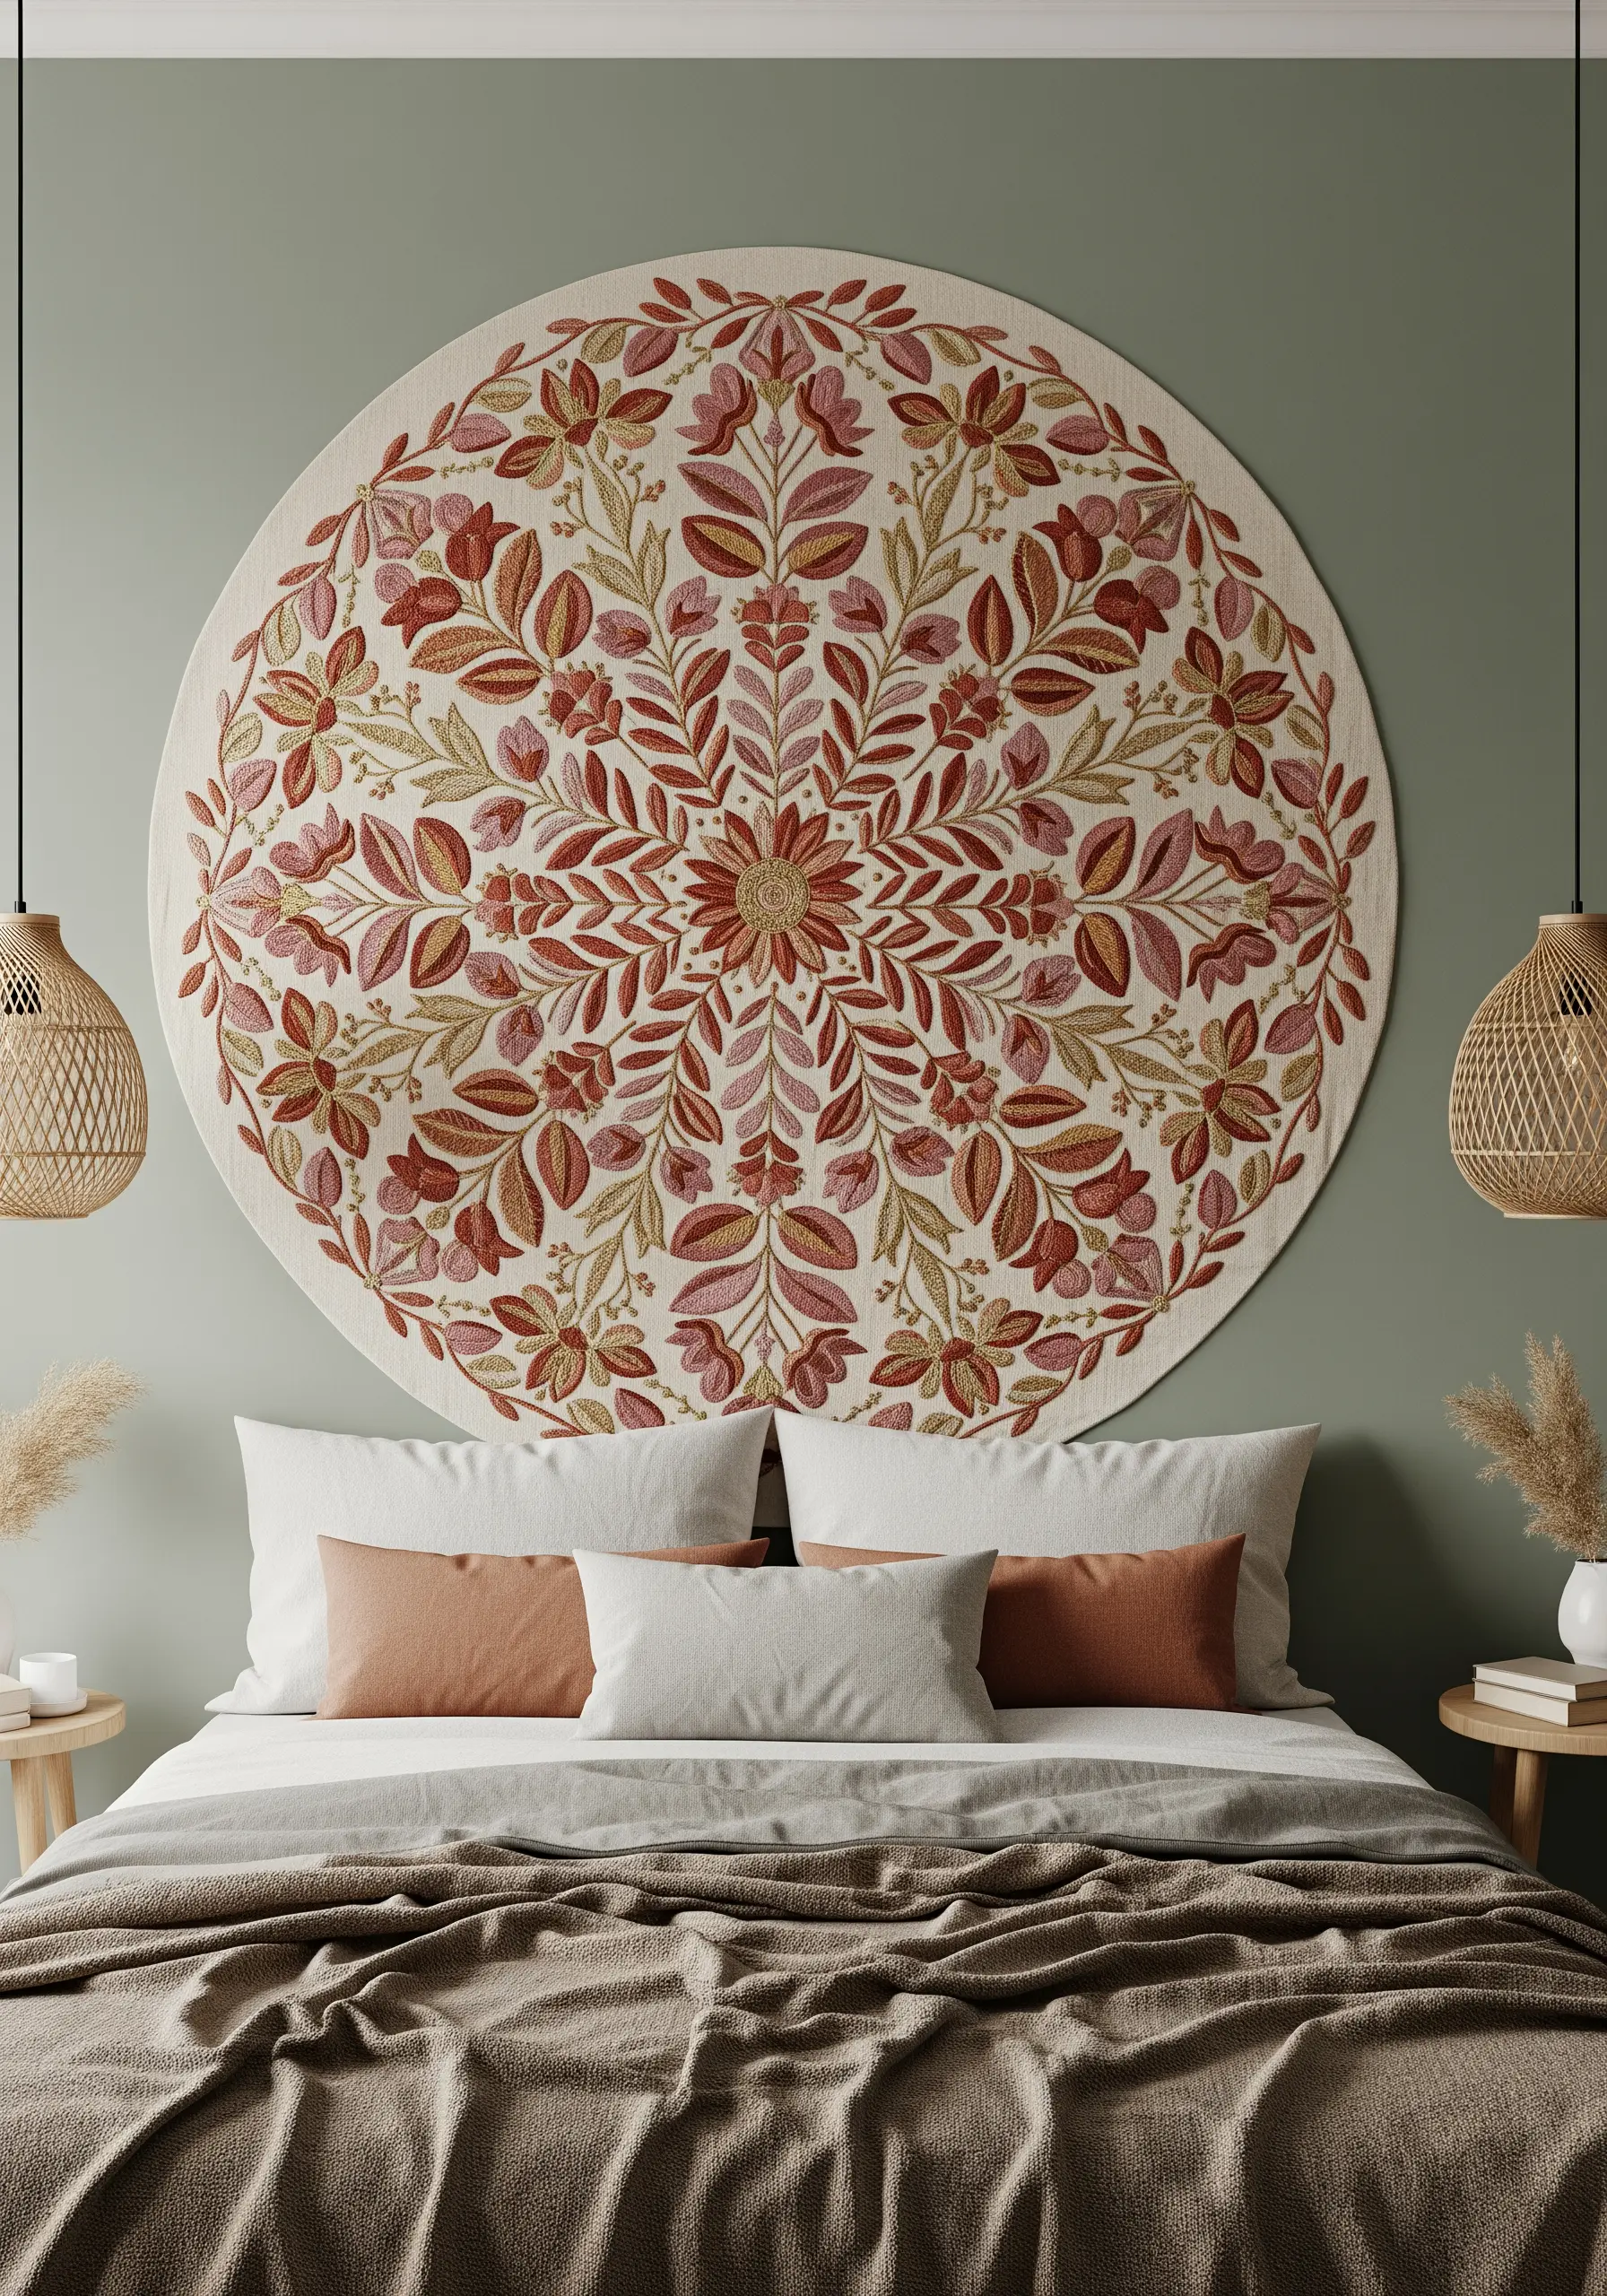
When adapting a small pattern for a large circular surface, focus on stitch variation rather than an overwhelming number of colors.
Choose a refined, harmonious palette of three to five shades to maintain elegance and cohesion.
Create visual interest by alternating between flat stitches (satin stitch), knotted stitches (dense French knots), and linear stitches (stem or chain stitch).
This adds a beautiful rhythm and texture that prevents the design from feeling flat, transforming a simple mandala embroidery into a sophisticated focal point.
4. Embrace Expressive Energy with Mixed-Media Marks
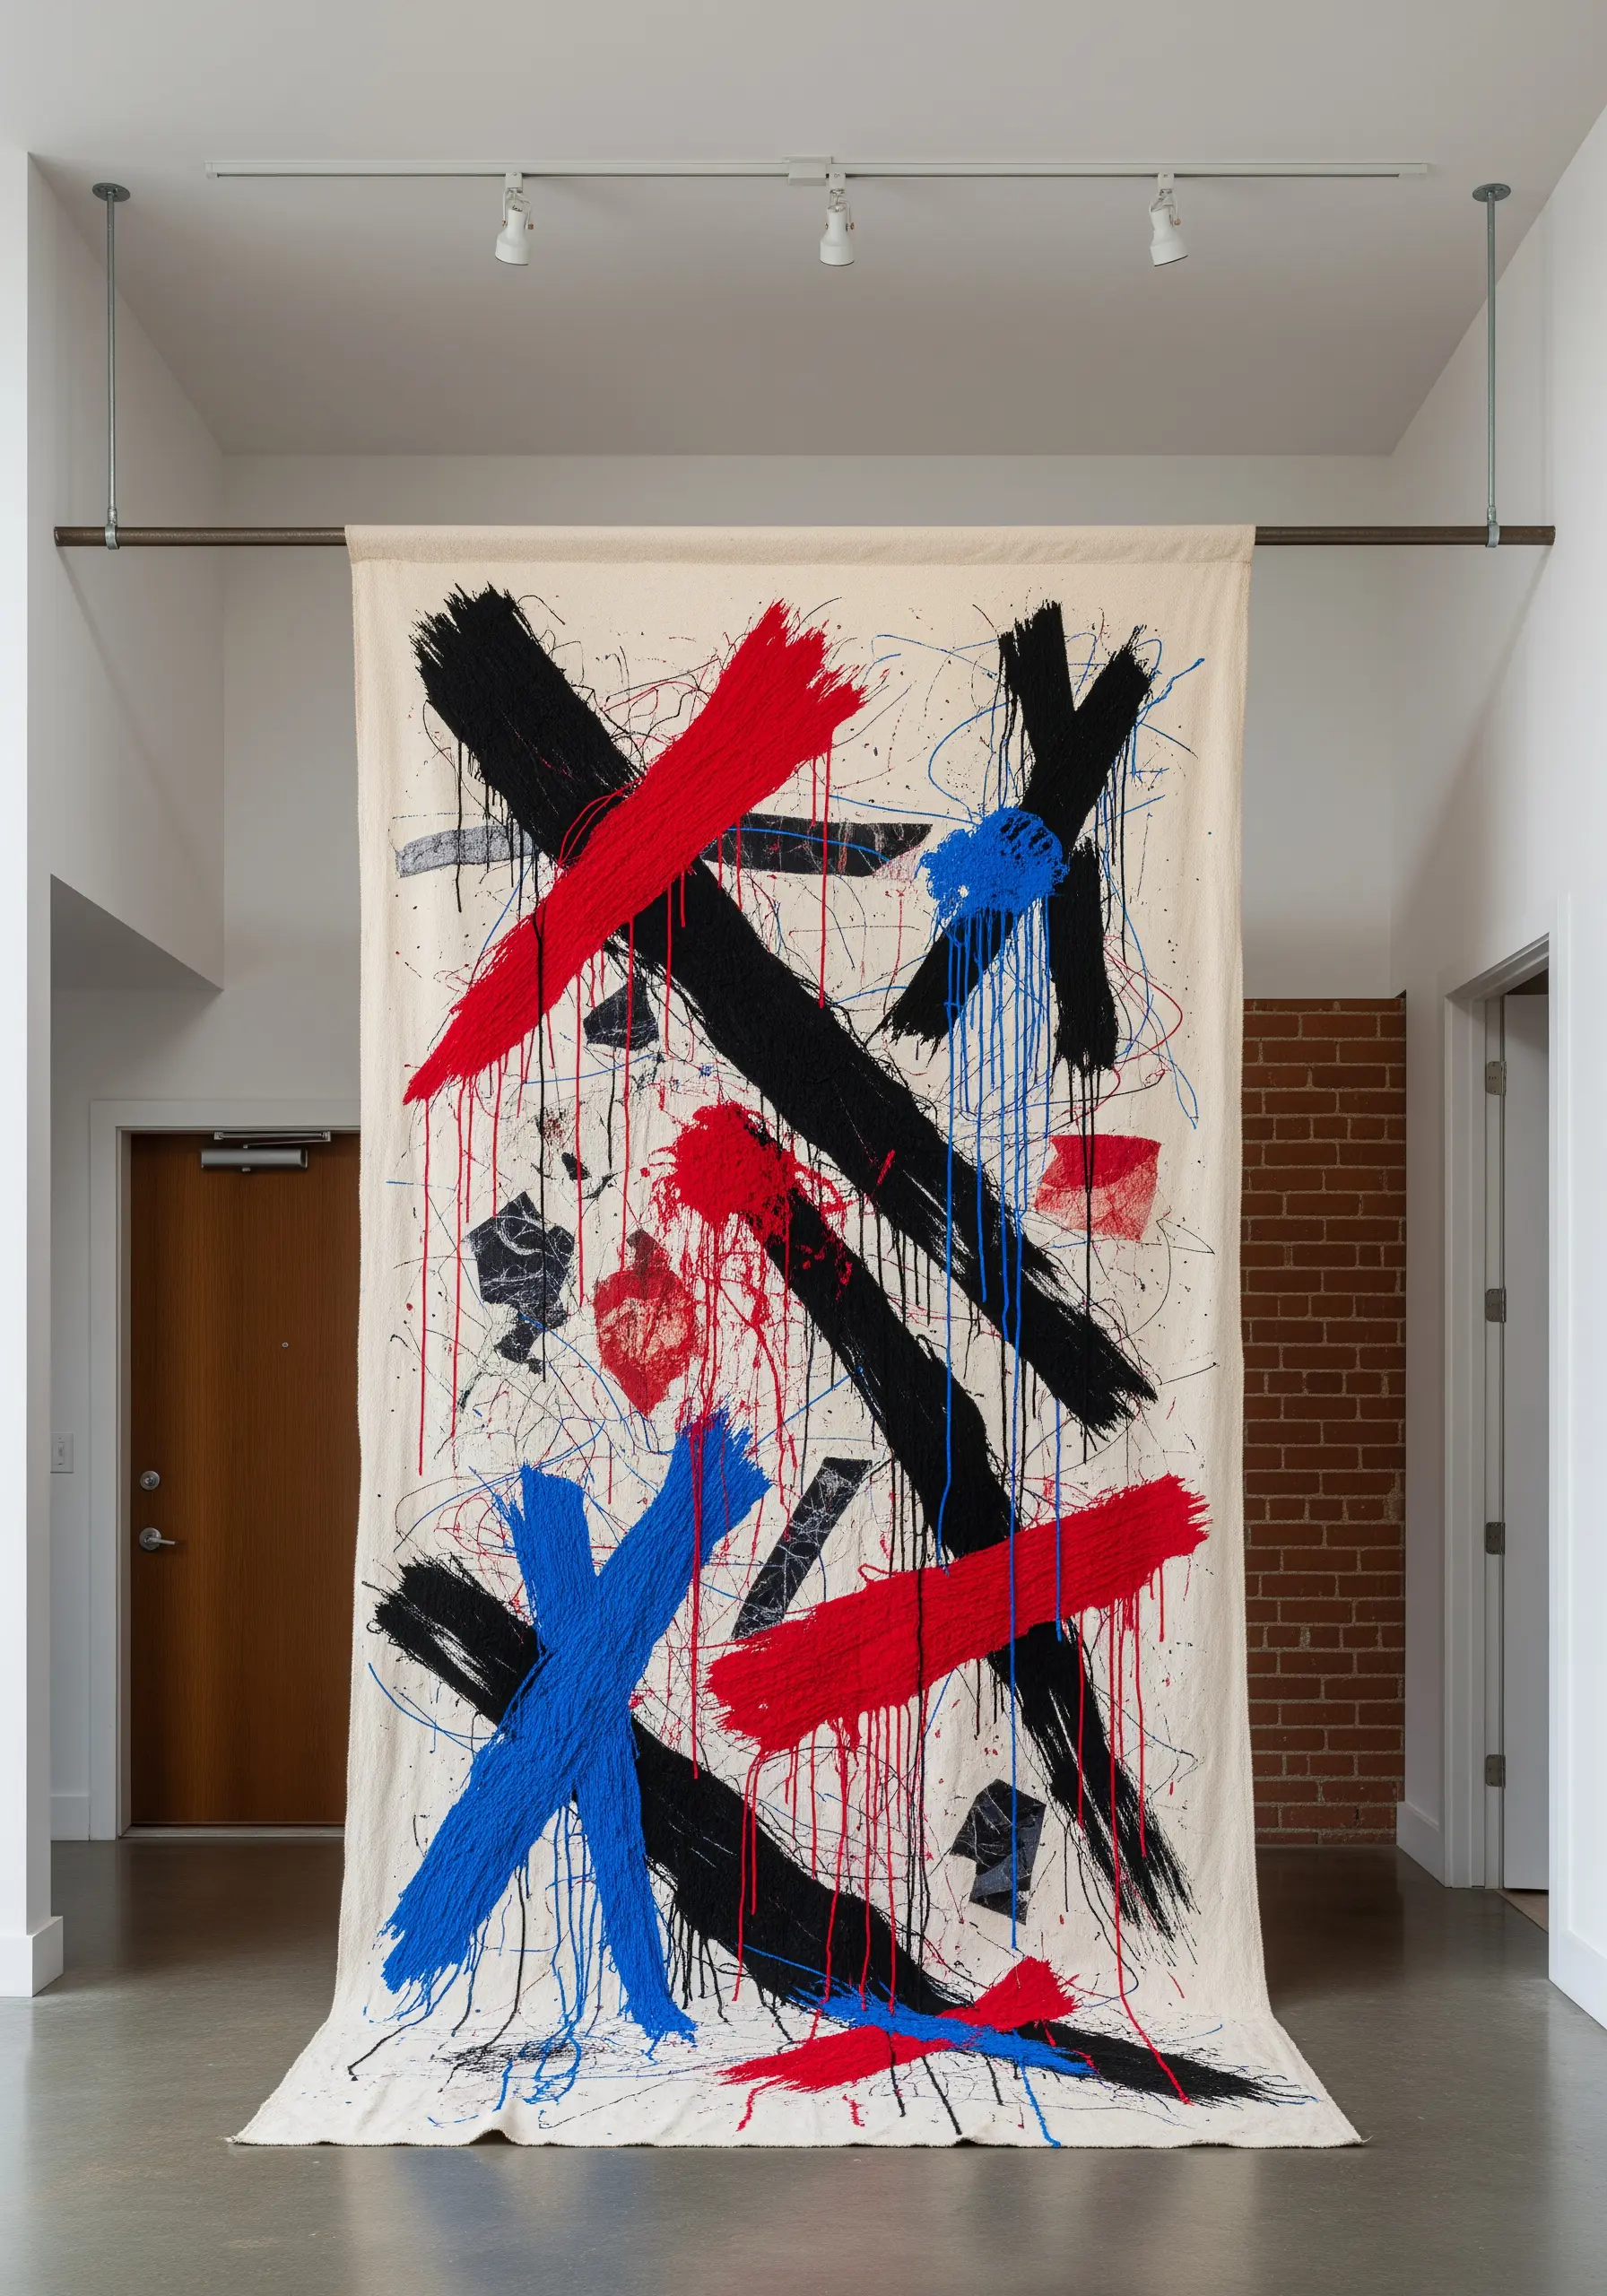
Channel an abstract-expressionist feel by combining bold stitching with intentional paint or dye drips.
Use thick, chunky yarn and couch it onto the canvas with a thinner, matching thread to create the large, gestural ‘brushstrokes’.
After stitching, lay the canvas flat and use watered-down acrylic paint or fabric dye to add drips and splatters, allowing them to interact with the stitched areas.
This fusion of controlled stitching and spontaneous marks creates dynamic, mixed-media contemporary embroidery designs with undeniable energy.
5. Weave Dimension with Braided Cord Couching
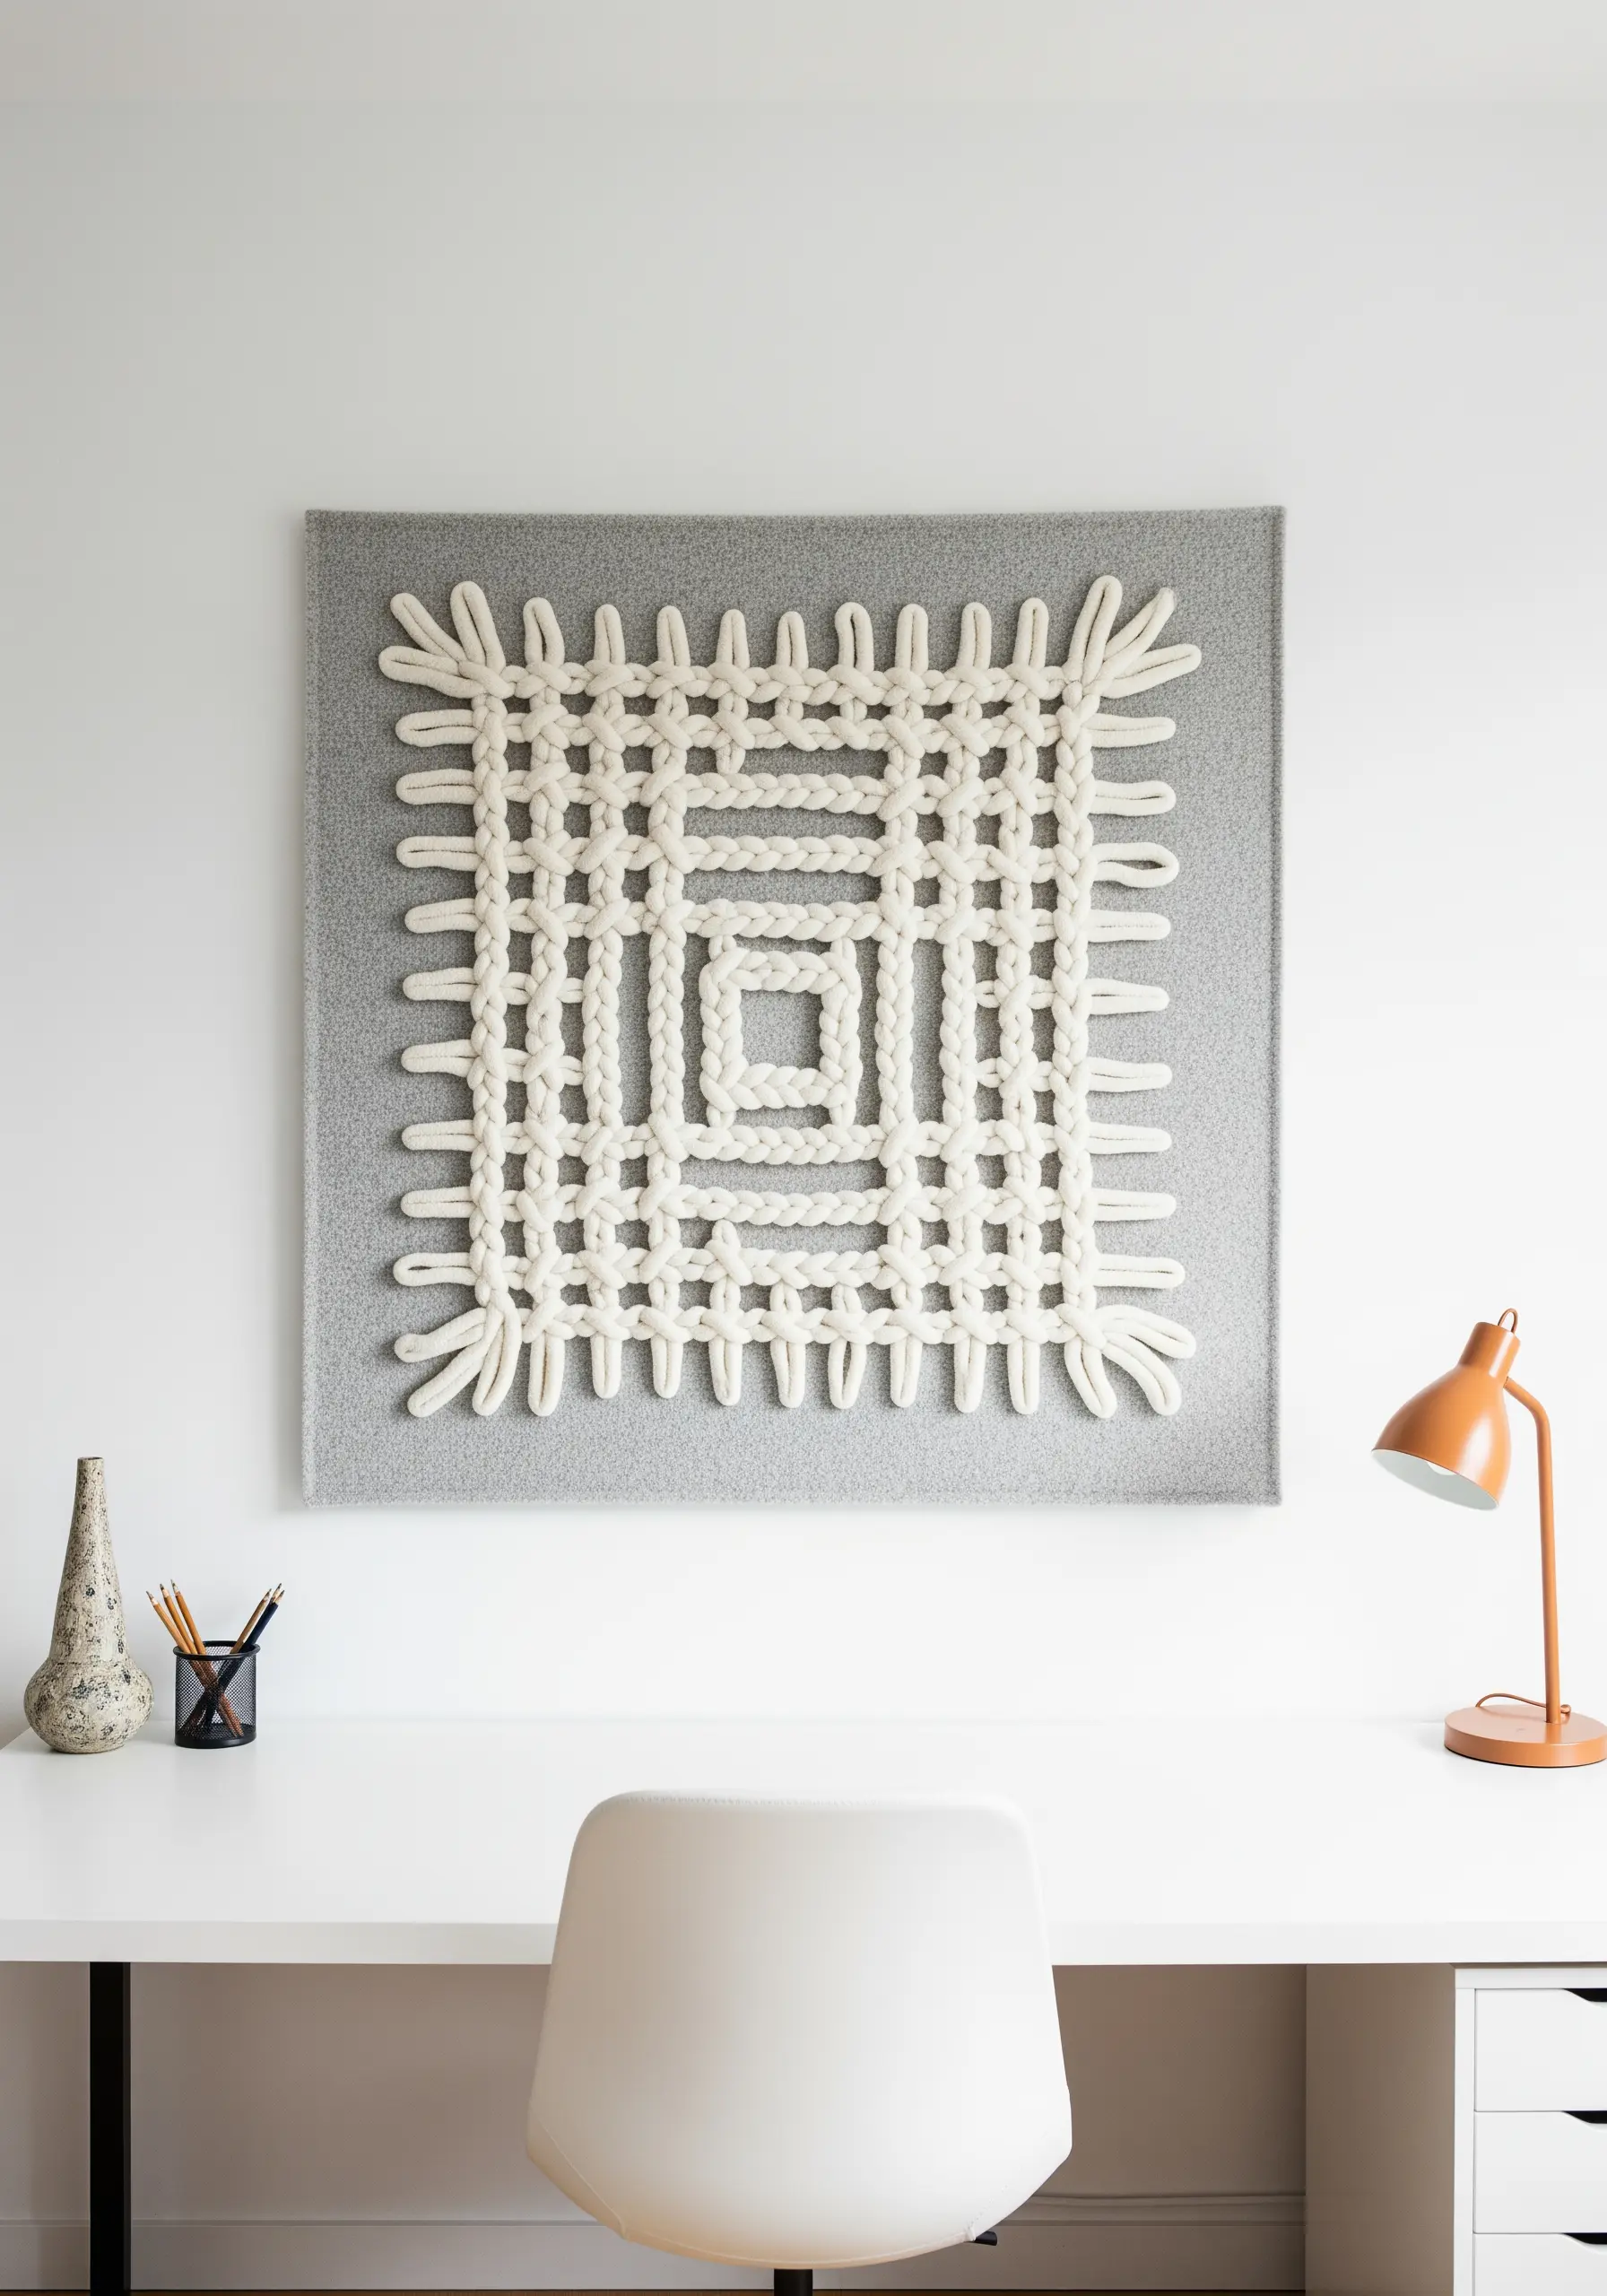
Create a sculptural, woven effect by couching thick, pre-braided cotton or wool cords onto a rigid, felt-covered panel.
Plan your grid-like pattern first, marking it lightly on the felt background.
Instead of trying to stitch through the thick cord, lay it on your marked lines and secure it every inch with a small, strong stitch in a matching color, sinking your needle into the felt base.
This technique gives you the look of complex weaving without a loom, making it ideal for creating unique mixed fiber wall hangings.
6. Capture Fluid Motion on Sheer Fabric
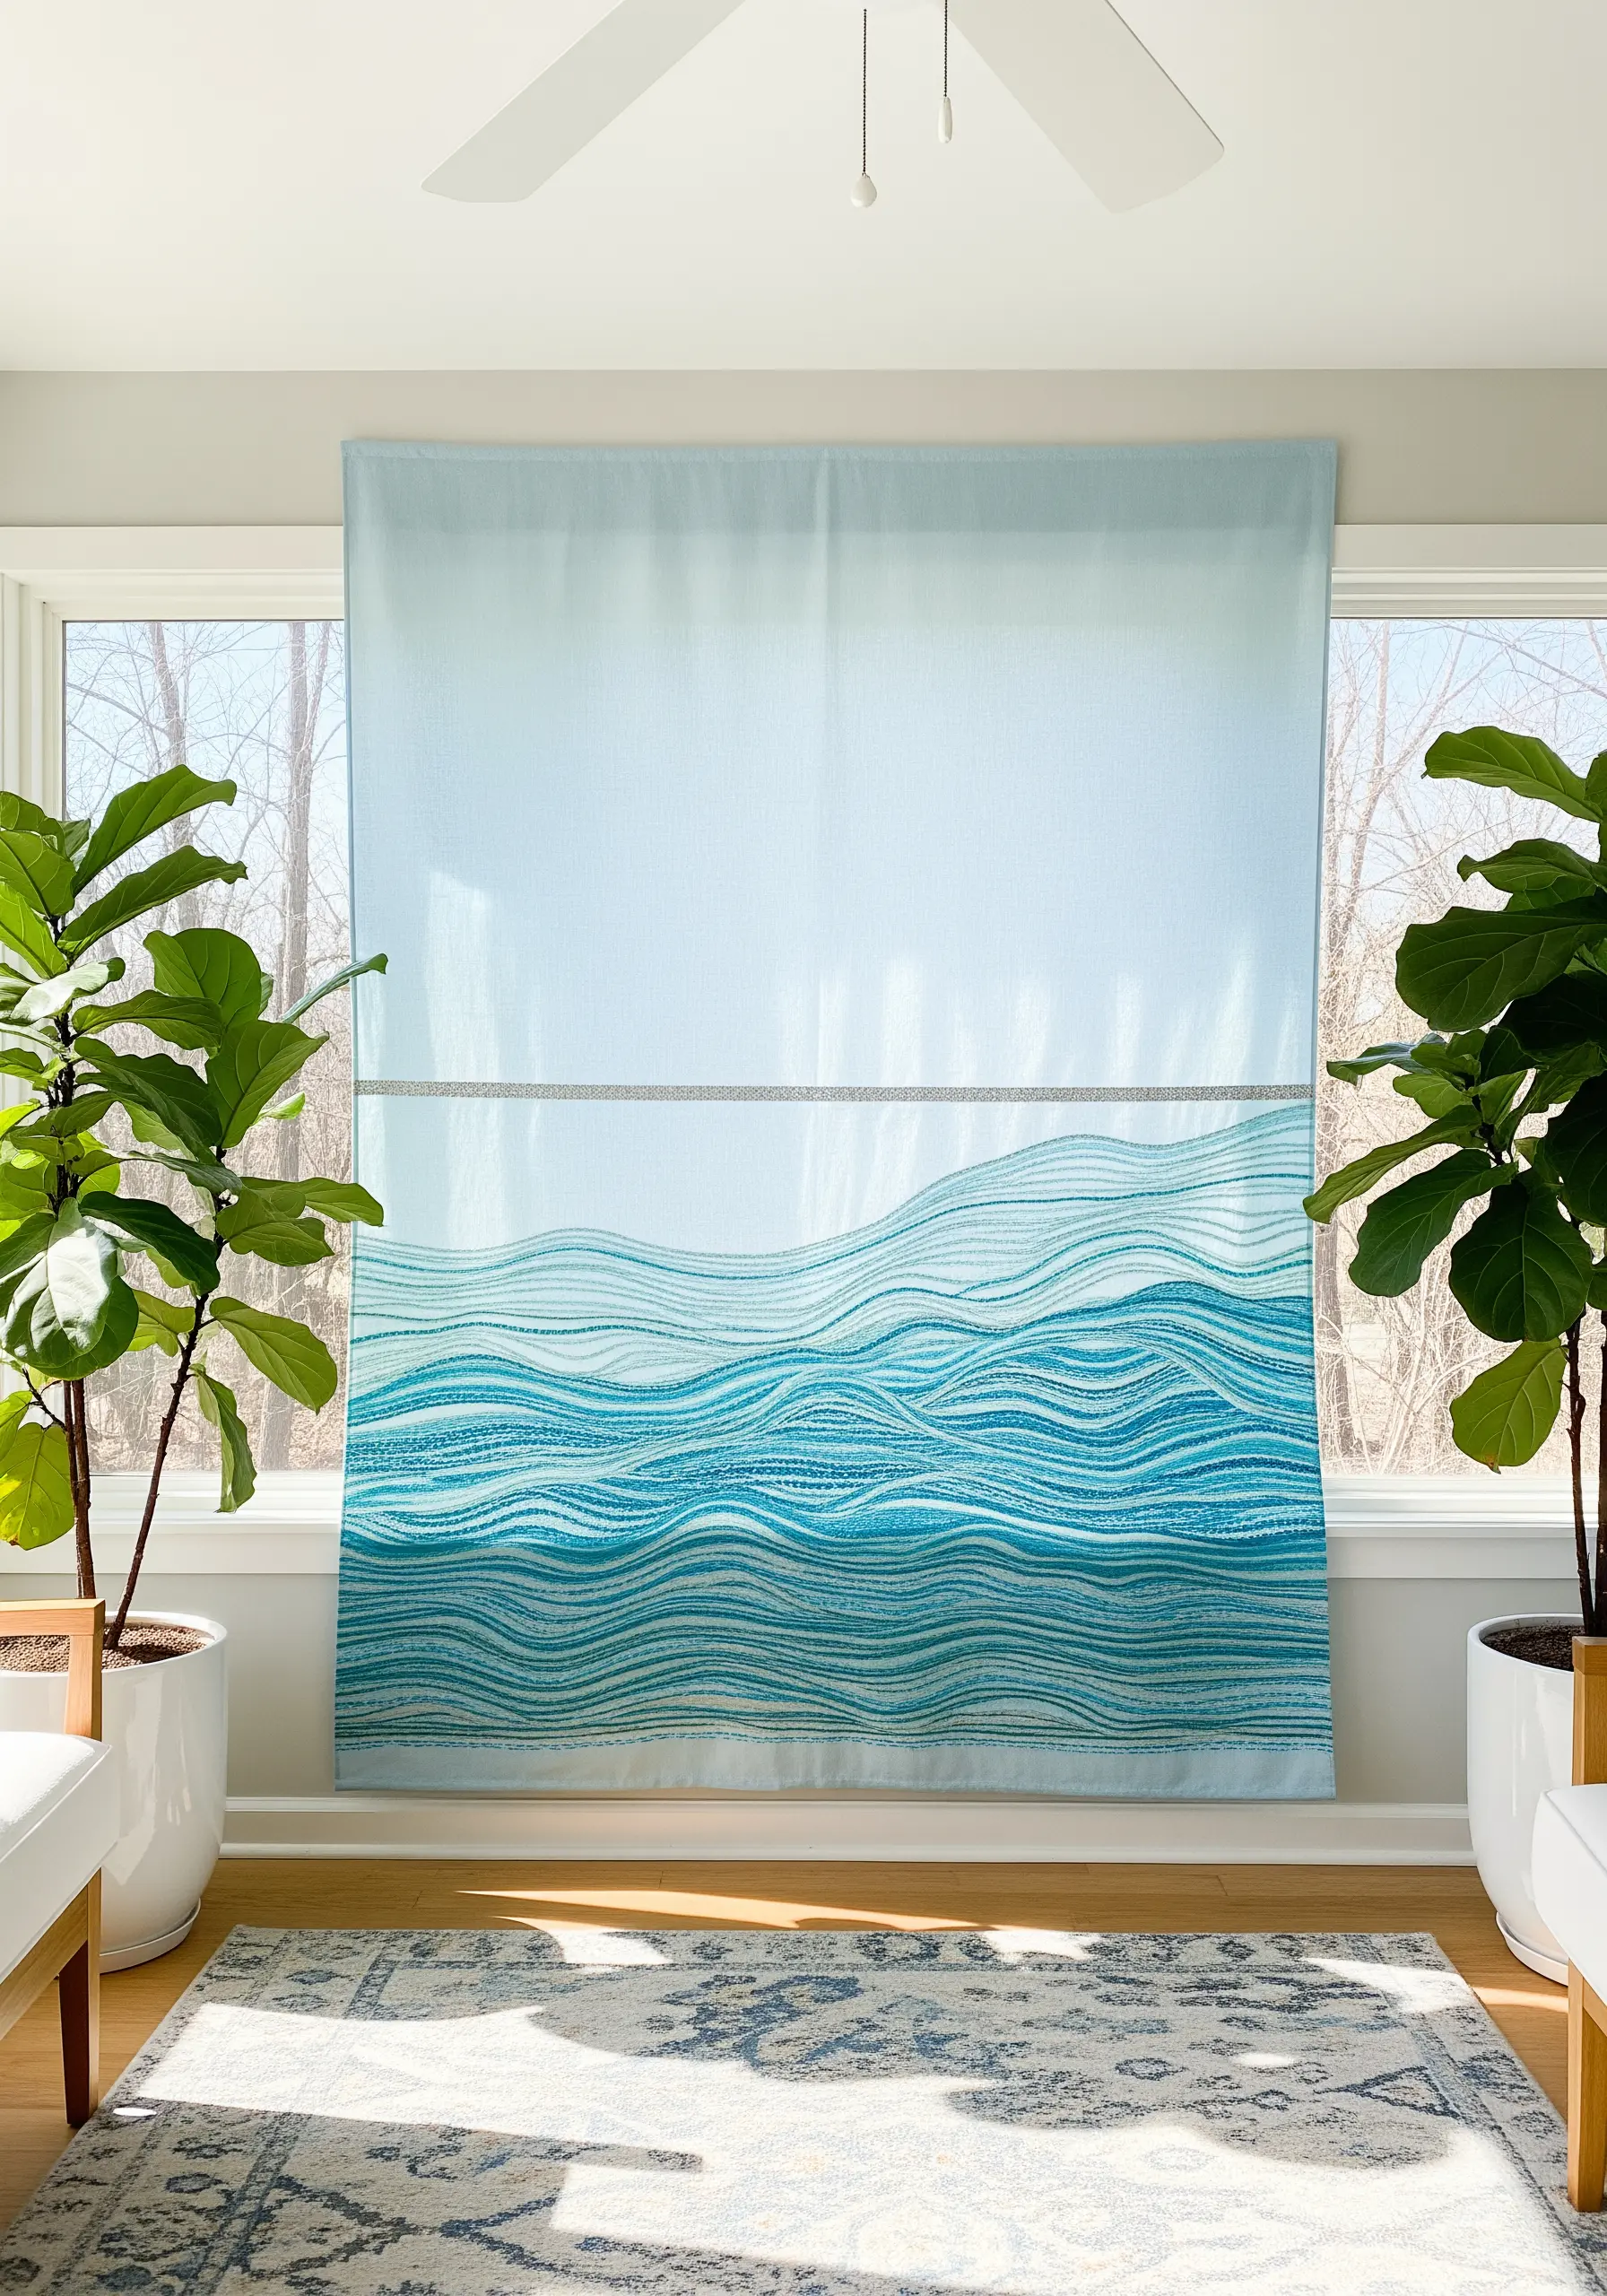
Stitching on lightweight or sheer fabric requires stabilization. Use a stick-on, water-soluble stabilizer on the back to prevent puckering as you work.
To create the sense of moving water, use varying shades of blue and aqua thread, stitching in long, flowing lines that follow the direction of the waves.
Alternate between simple running stitch and backstitch to create subtle variations in texture and line weight.
The transparency of the fabric allows light to pass through, enhancing the airy, fluid feel of the abstract thread waves.
7. Build a Forest Canopy with Knotted Textures
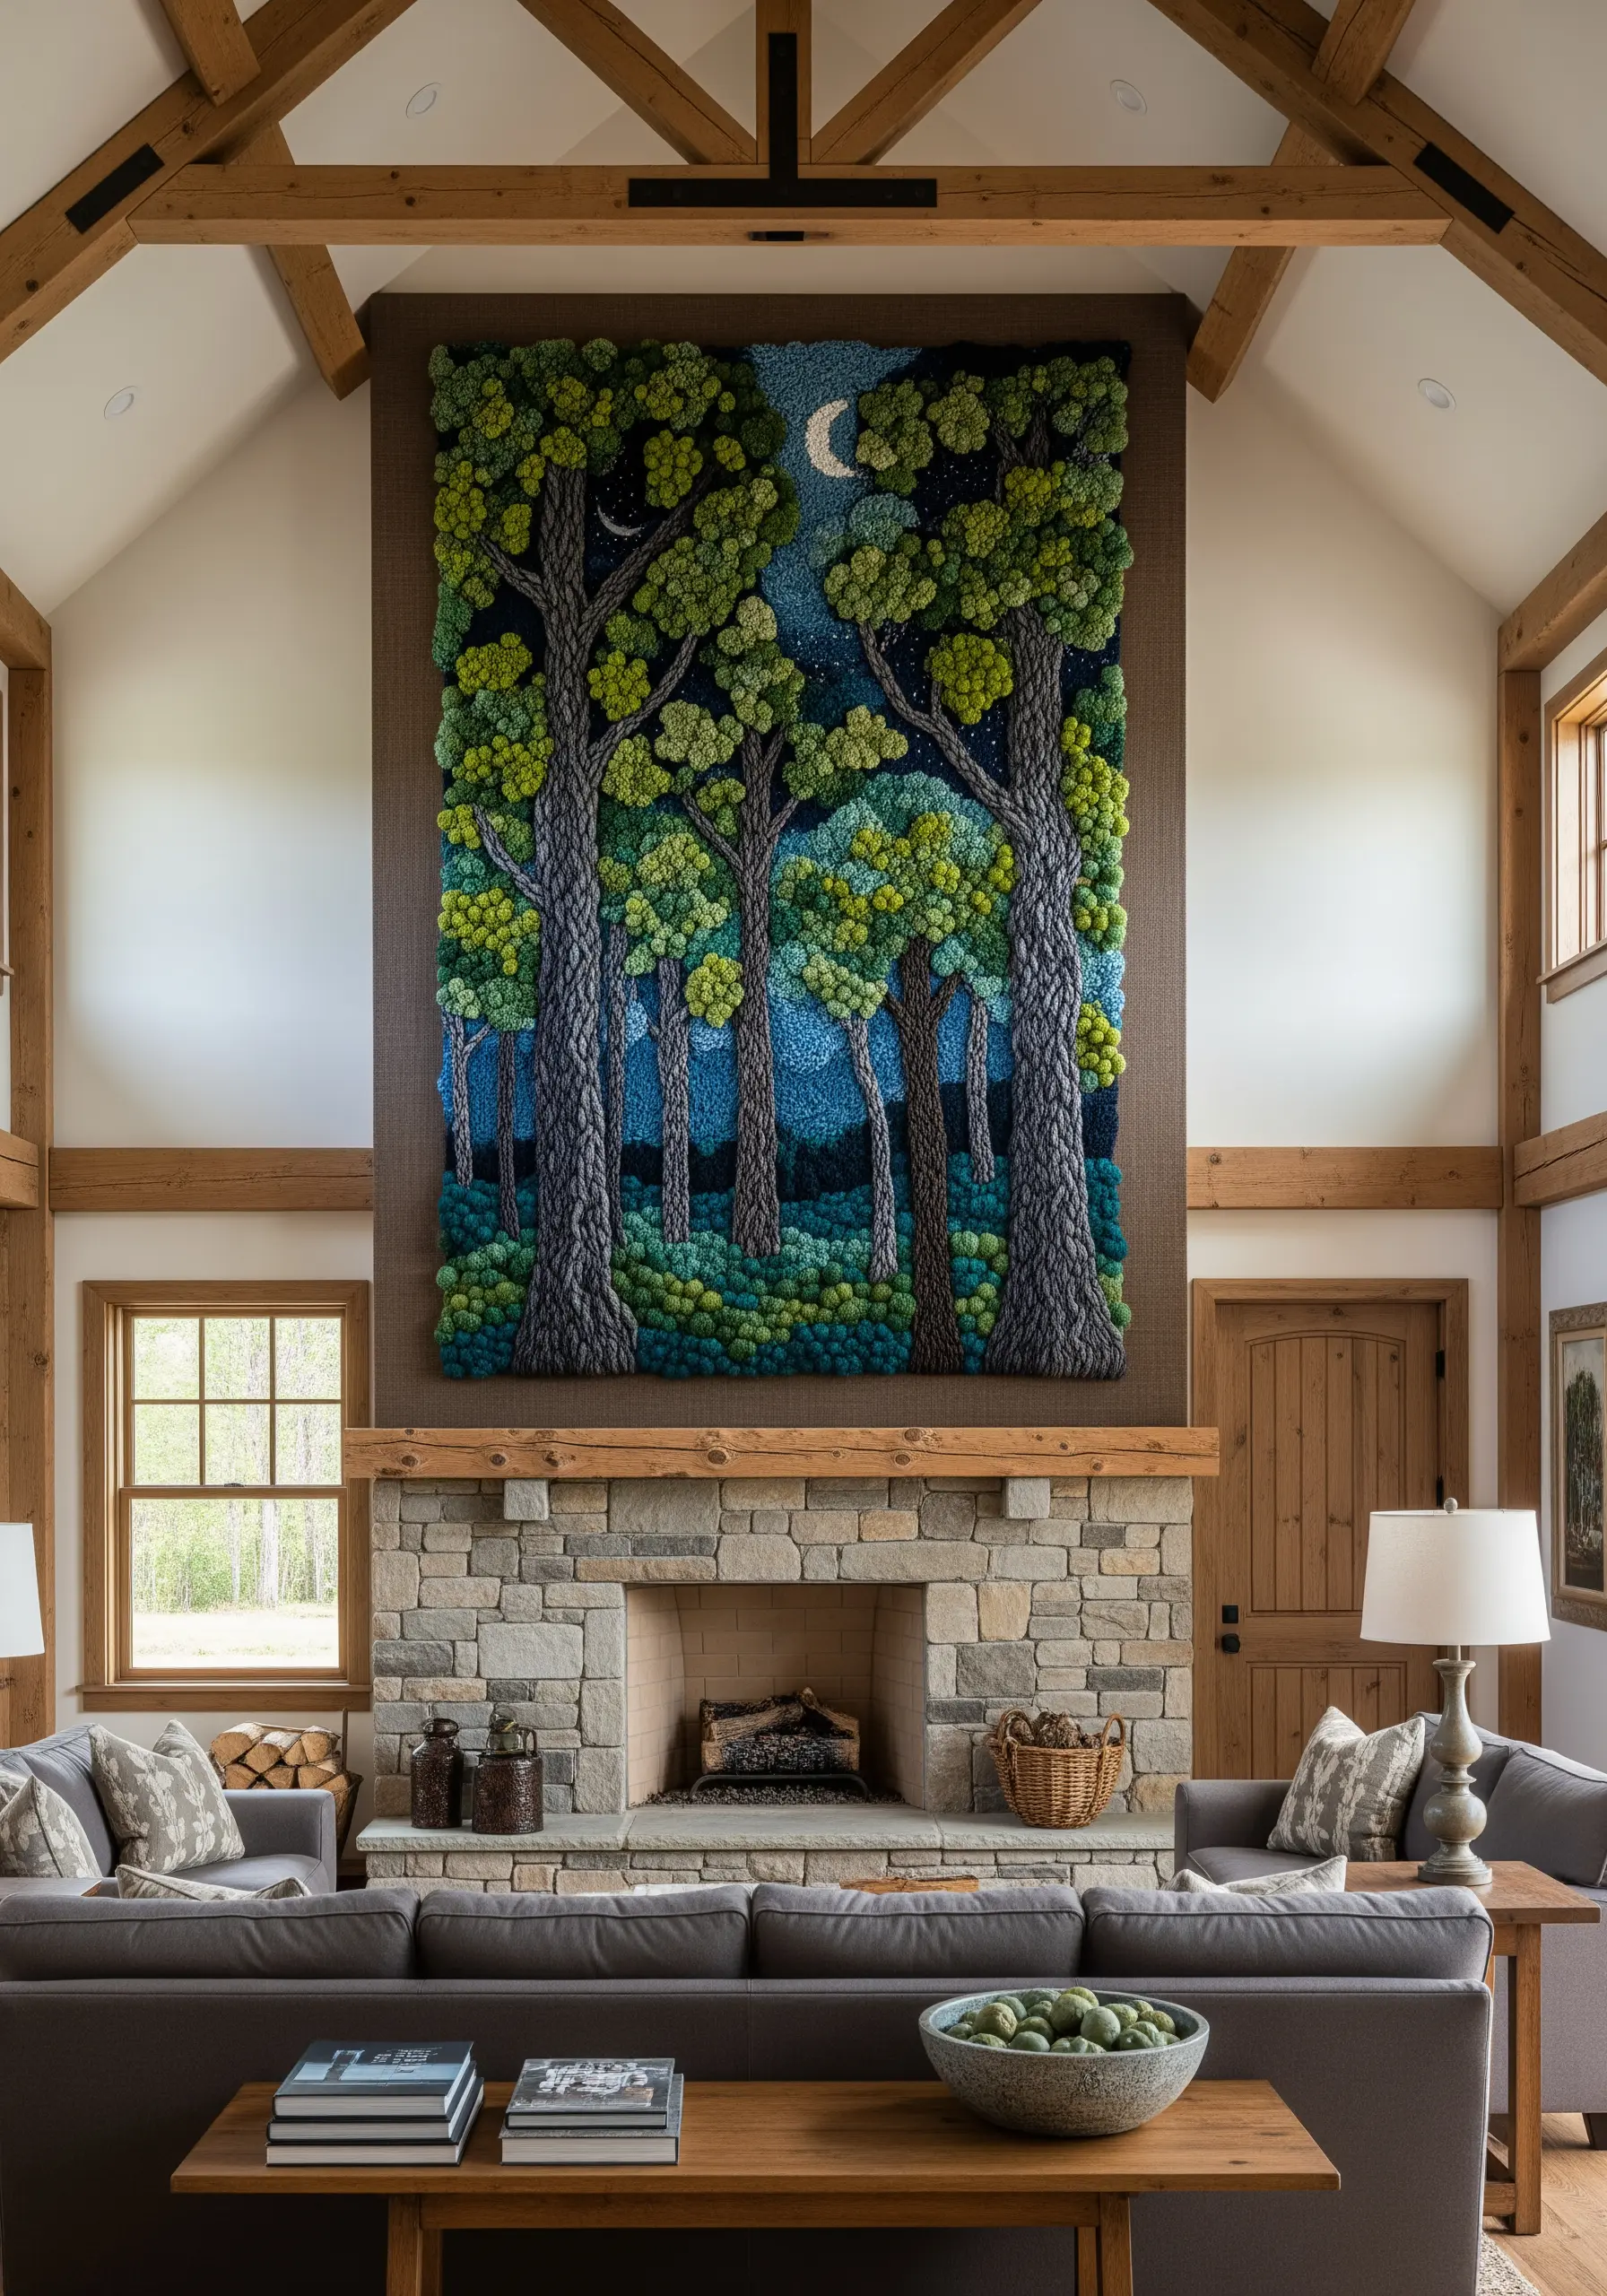
Recreate the dense foliage of a forest canopy using masses of French knots and bullion knots in various greens and charcoals.
Use a thicker wool-blend thread or multiple strands of cotton floss to give your knots volume.
For the tree bark, use long vertical satin stitches or couched threads in grays and browns to mimic texture.
This intensive, layered approach allows you to capture nature’s textures in a way that is both visually and tactilely rich.
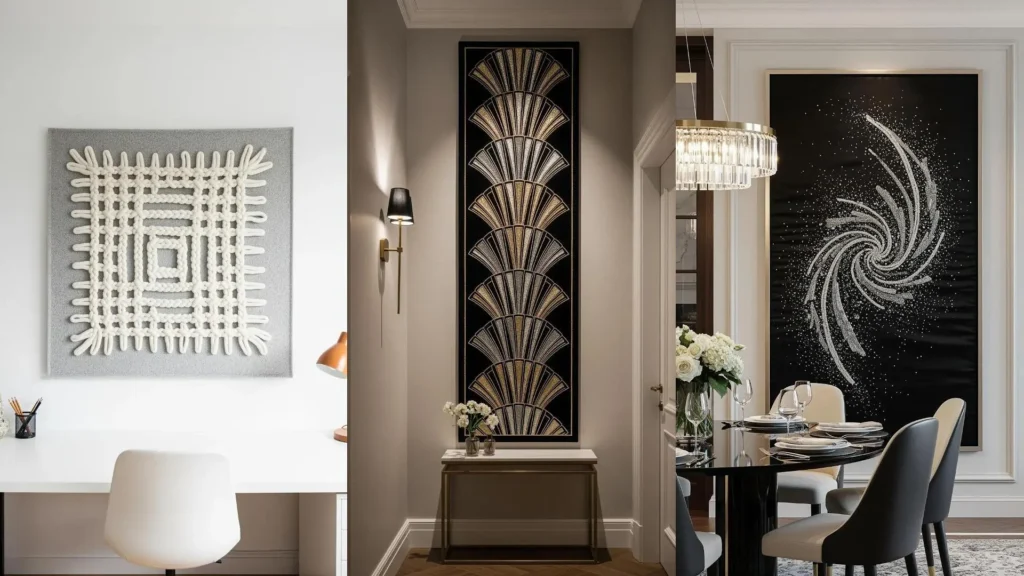
8. Achieve Art Deco Glamour with Metallic Gradients

For a sophisticated Art Deco look, contrast is key. Use a deep black velvet or heavy linen as your base to make metallic threads truly shine.
Fill the fan shapes with a precise long-and-short stitch, blending from silver to gold to create a smooth, reflective gradient.
To keep your metallic thread from snagging, use shorter lengths and a thread conditioner like beeswax.
This meticulous technique results in striking metallic thread wall art that catches the light beautifully.
9. Explore the Power of Minimalist Texture
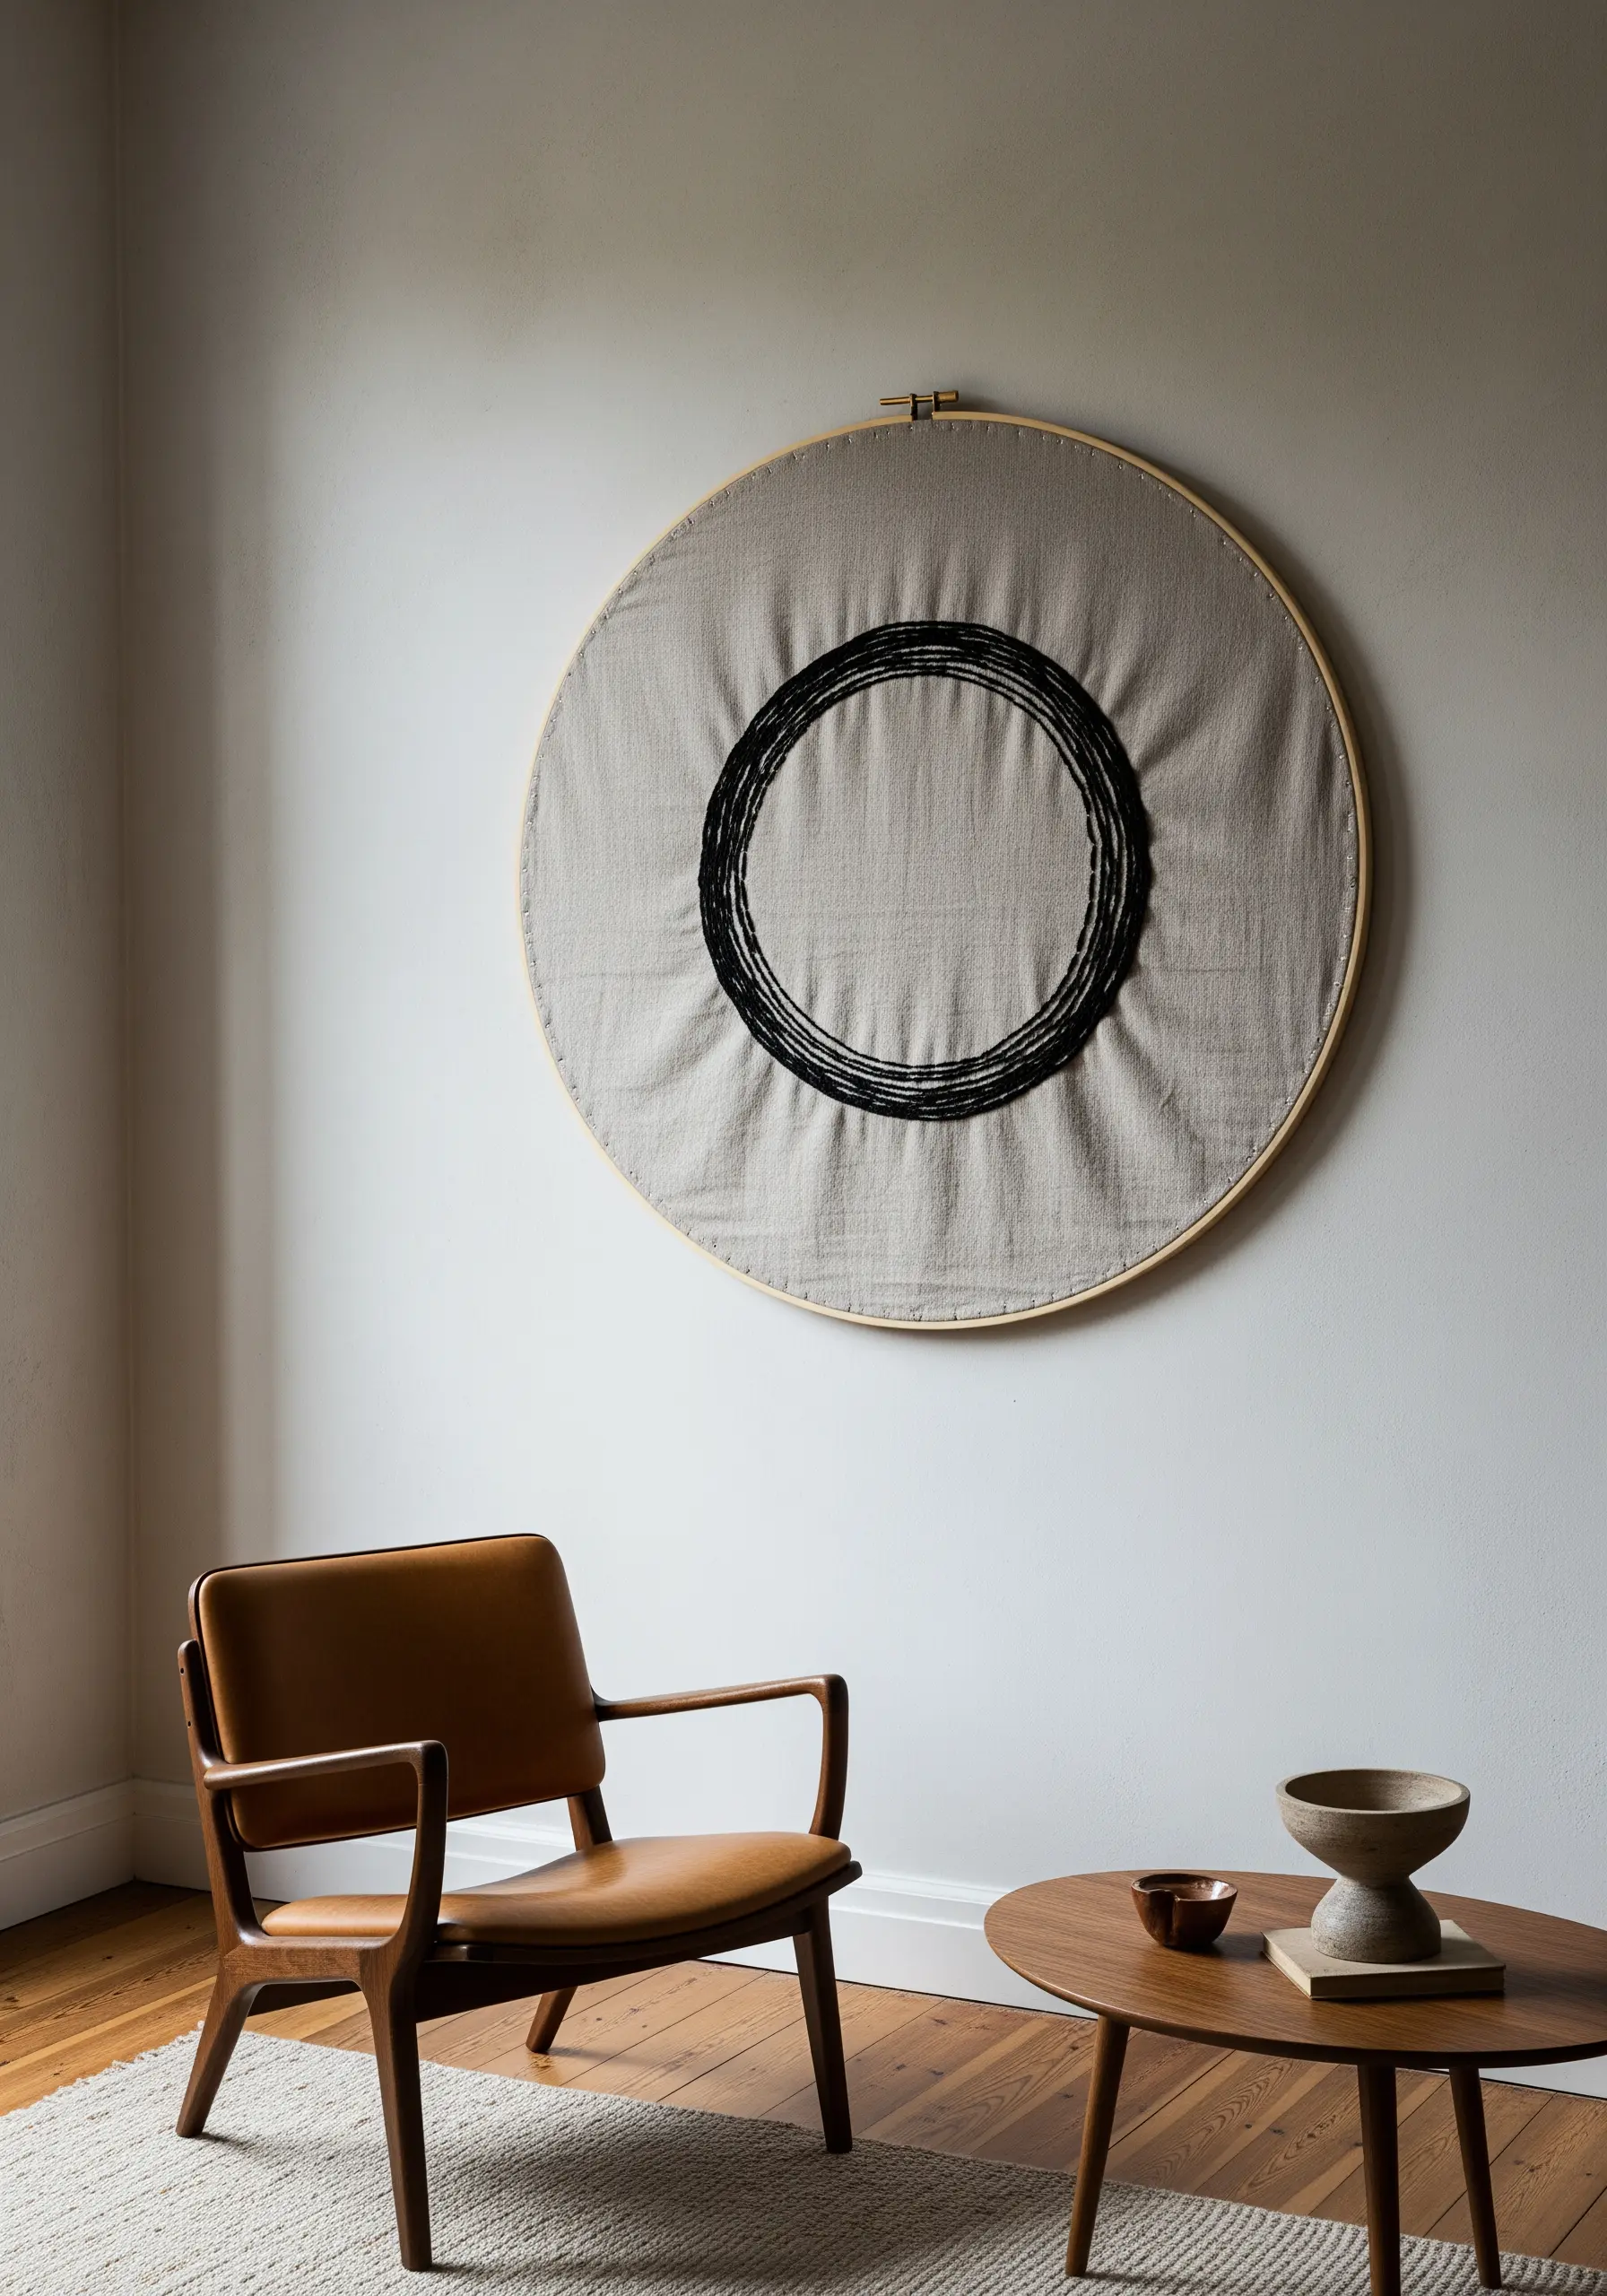
A large-scale minimalist piece draws its power from texture, not complexity.
Create this sculptural circle by densely layering a single stitch—like a backstitch or seed stitch—in concentric rings using a thick, black sashiko or perle cotton thread.
Vary the stitch direction slightly in different sections to create subtle shifts in how the light hits the surface.
This is one of those minimalist embroidery diys that proves simplicity can make the strongest statement.
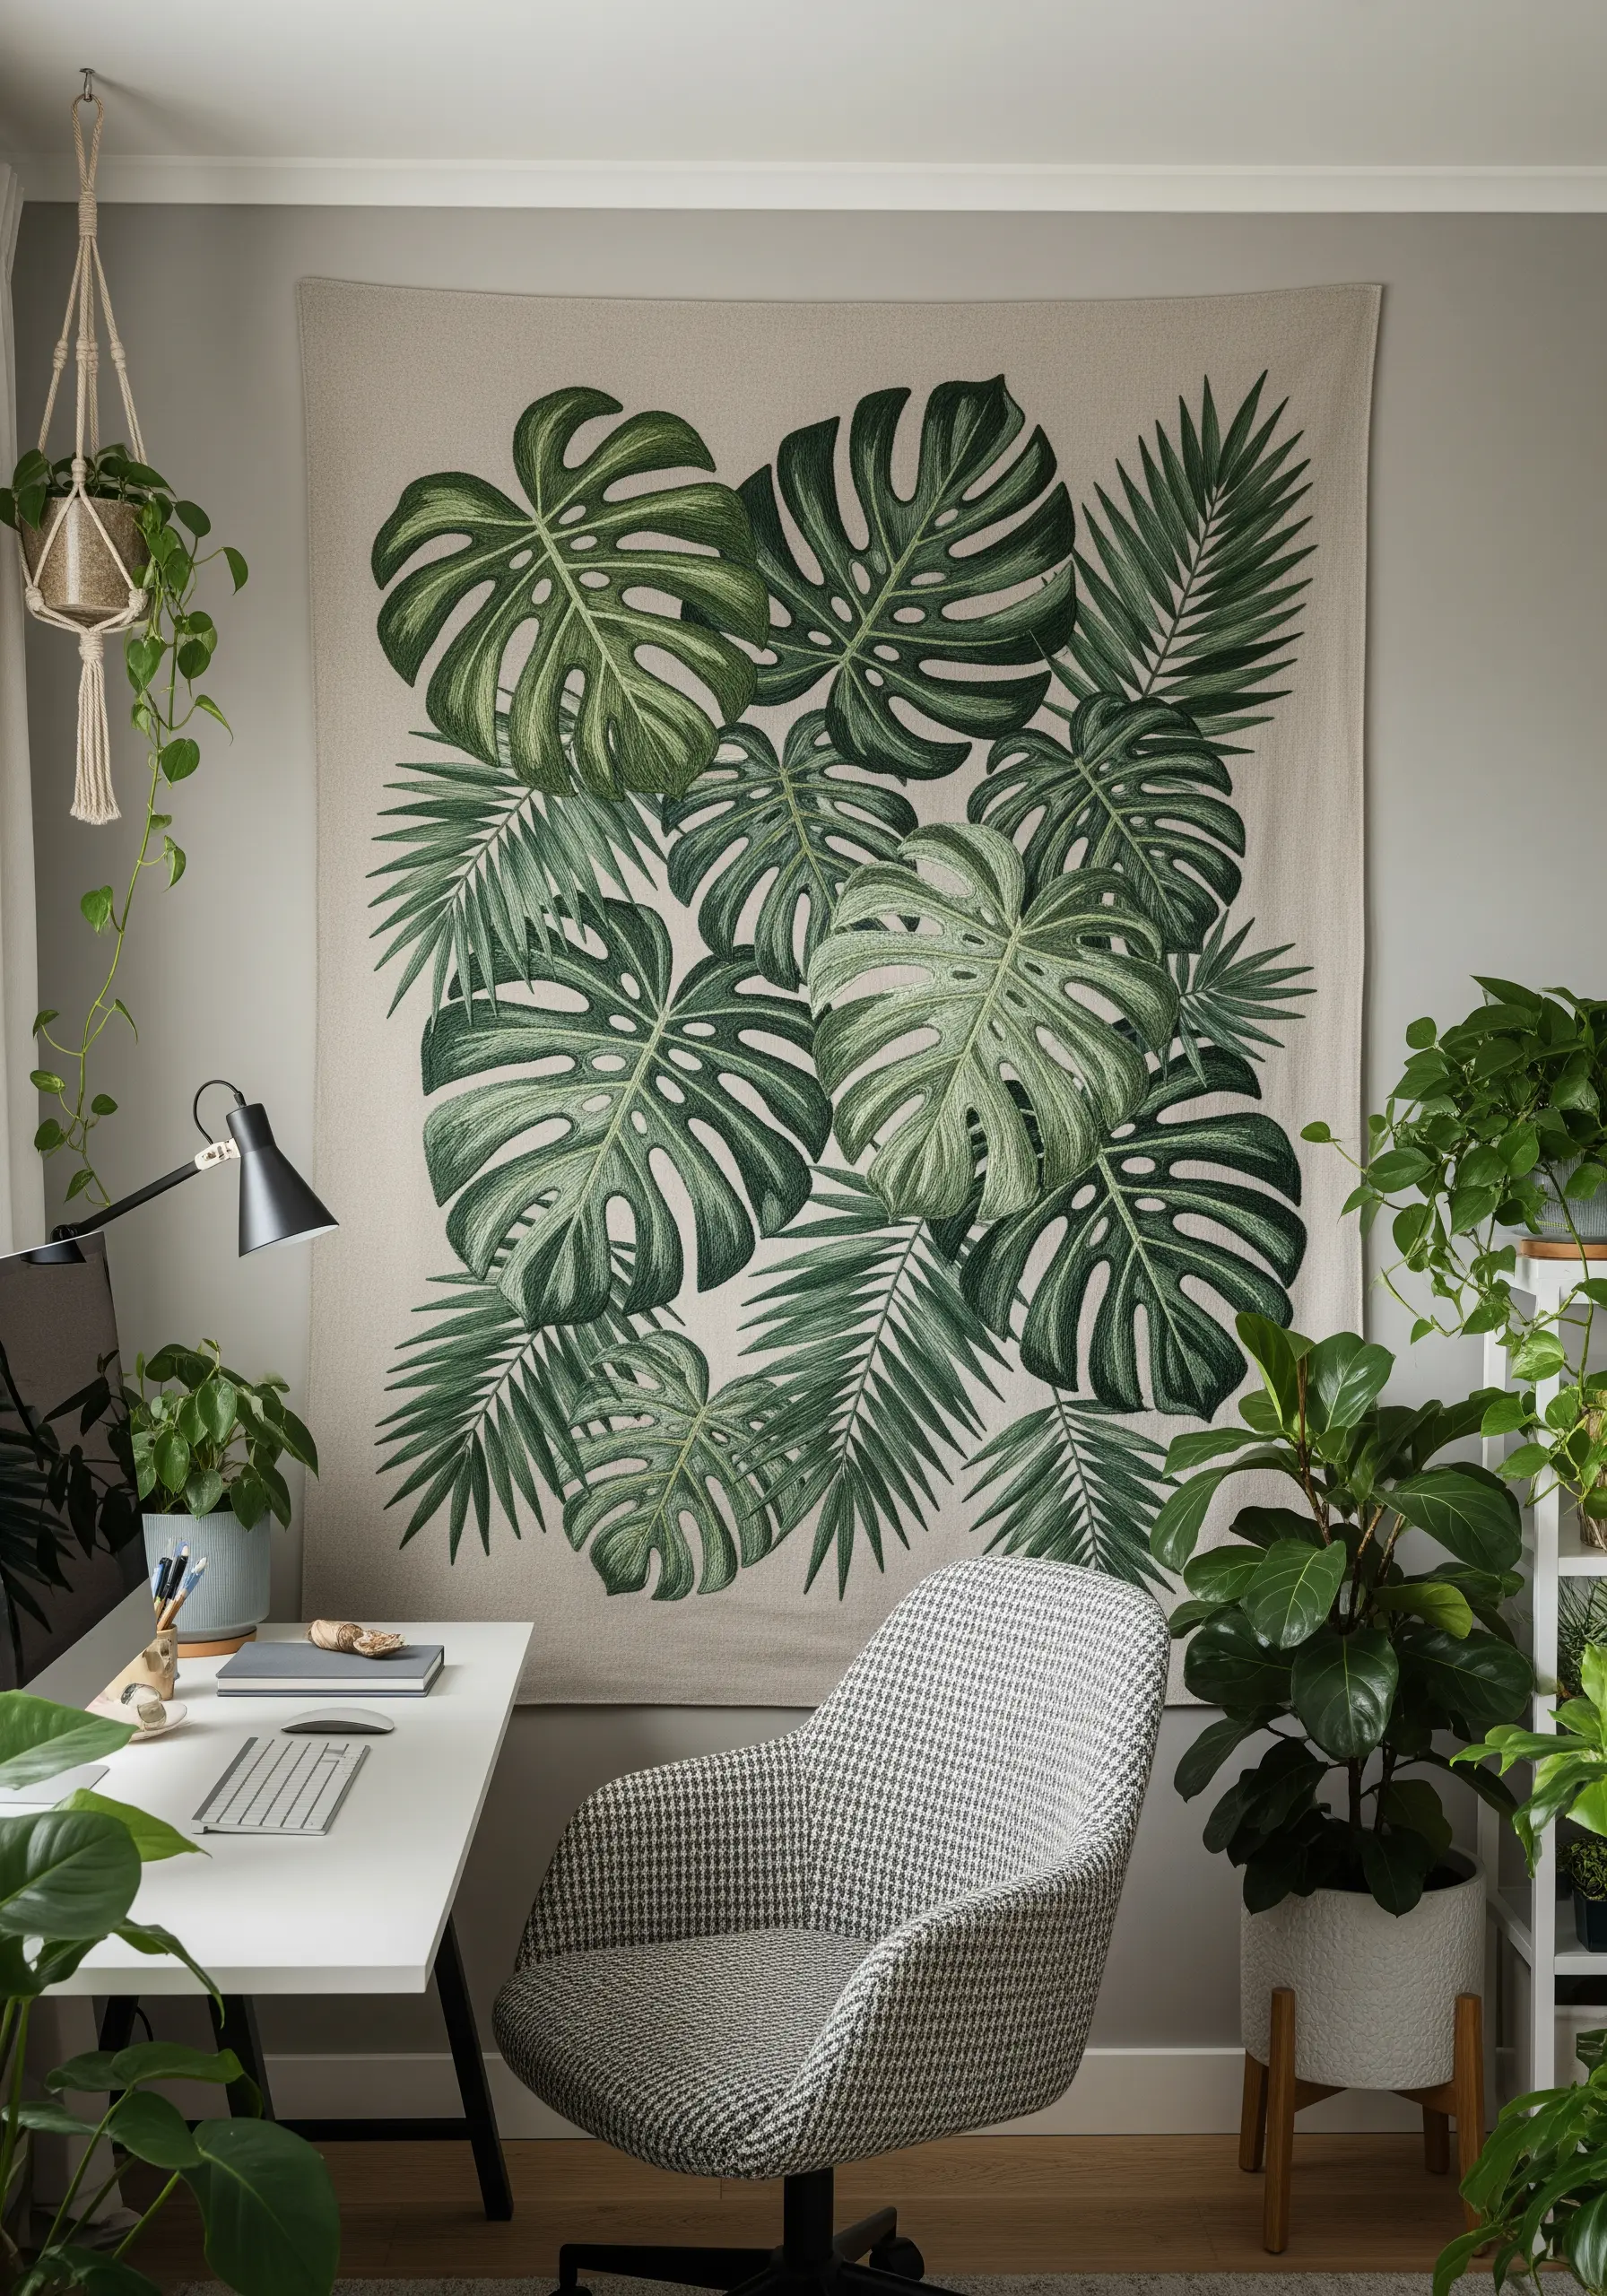
10. Curate a Maximalist Jungle with Layered Stitches
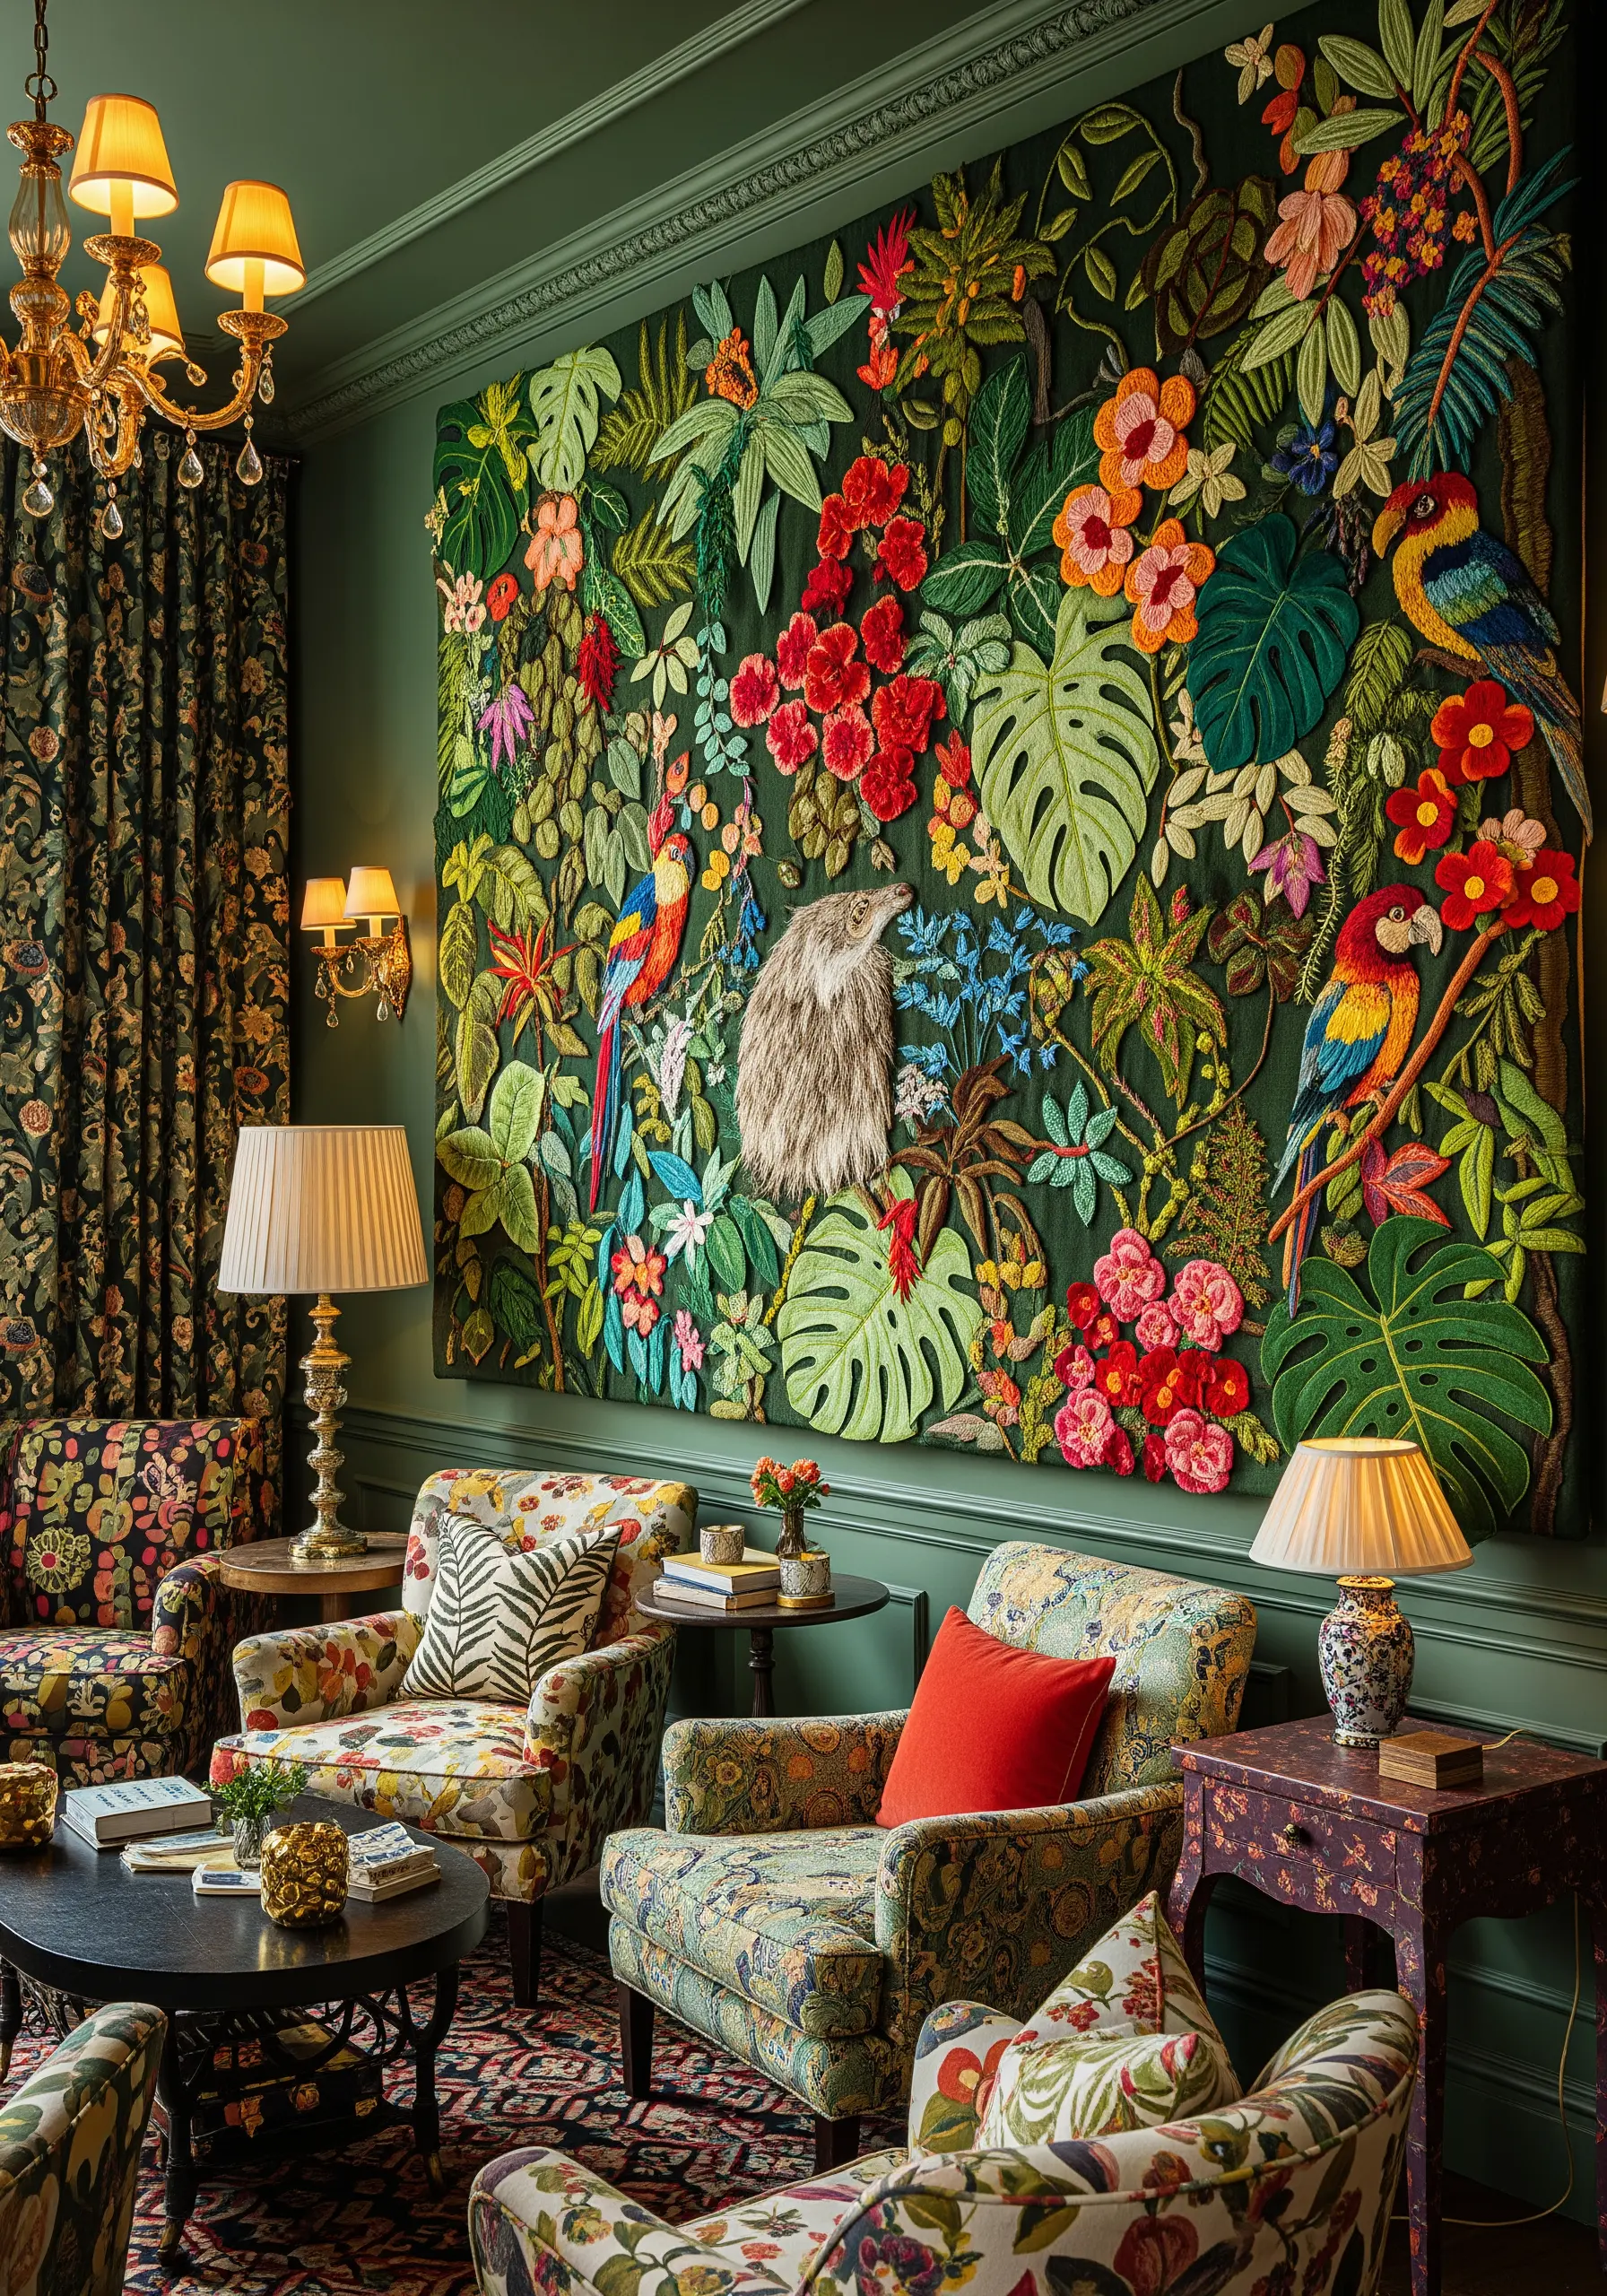
A maximalist design requires a strategic approach to layering to avoid looking chaotic.
Begin by stitching the largest background elements, like the big monstera leaves, using a flat satin or long-and-short stitch.
Work your way forward, adding mid-ground elements, and finally, stitch the most prominent foreground details like parrots and bright flowers.
Use a wide variety of stitches—bullion knots for textured flowers, couching for vines, and single-strand thread painting for fine details—to ensure each element is distinct.
This thoughtful layering of tropical leaf flower combination patterns creates incredible depth.
11. Design a Graphic Cascade with Vertical Lines
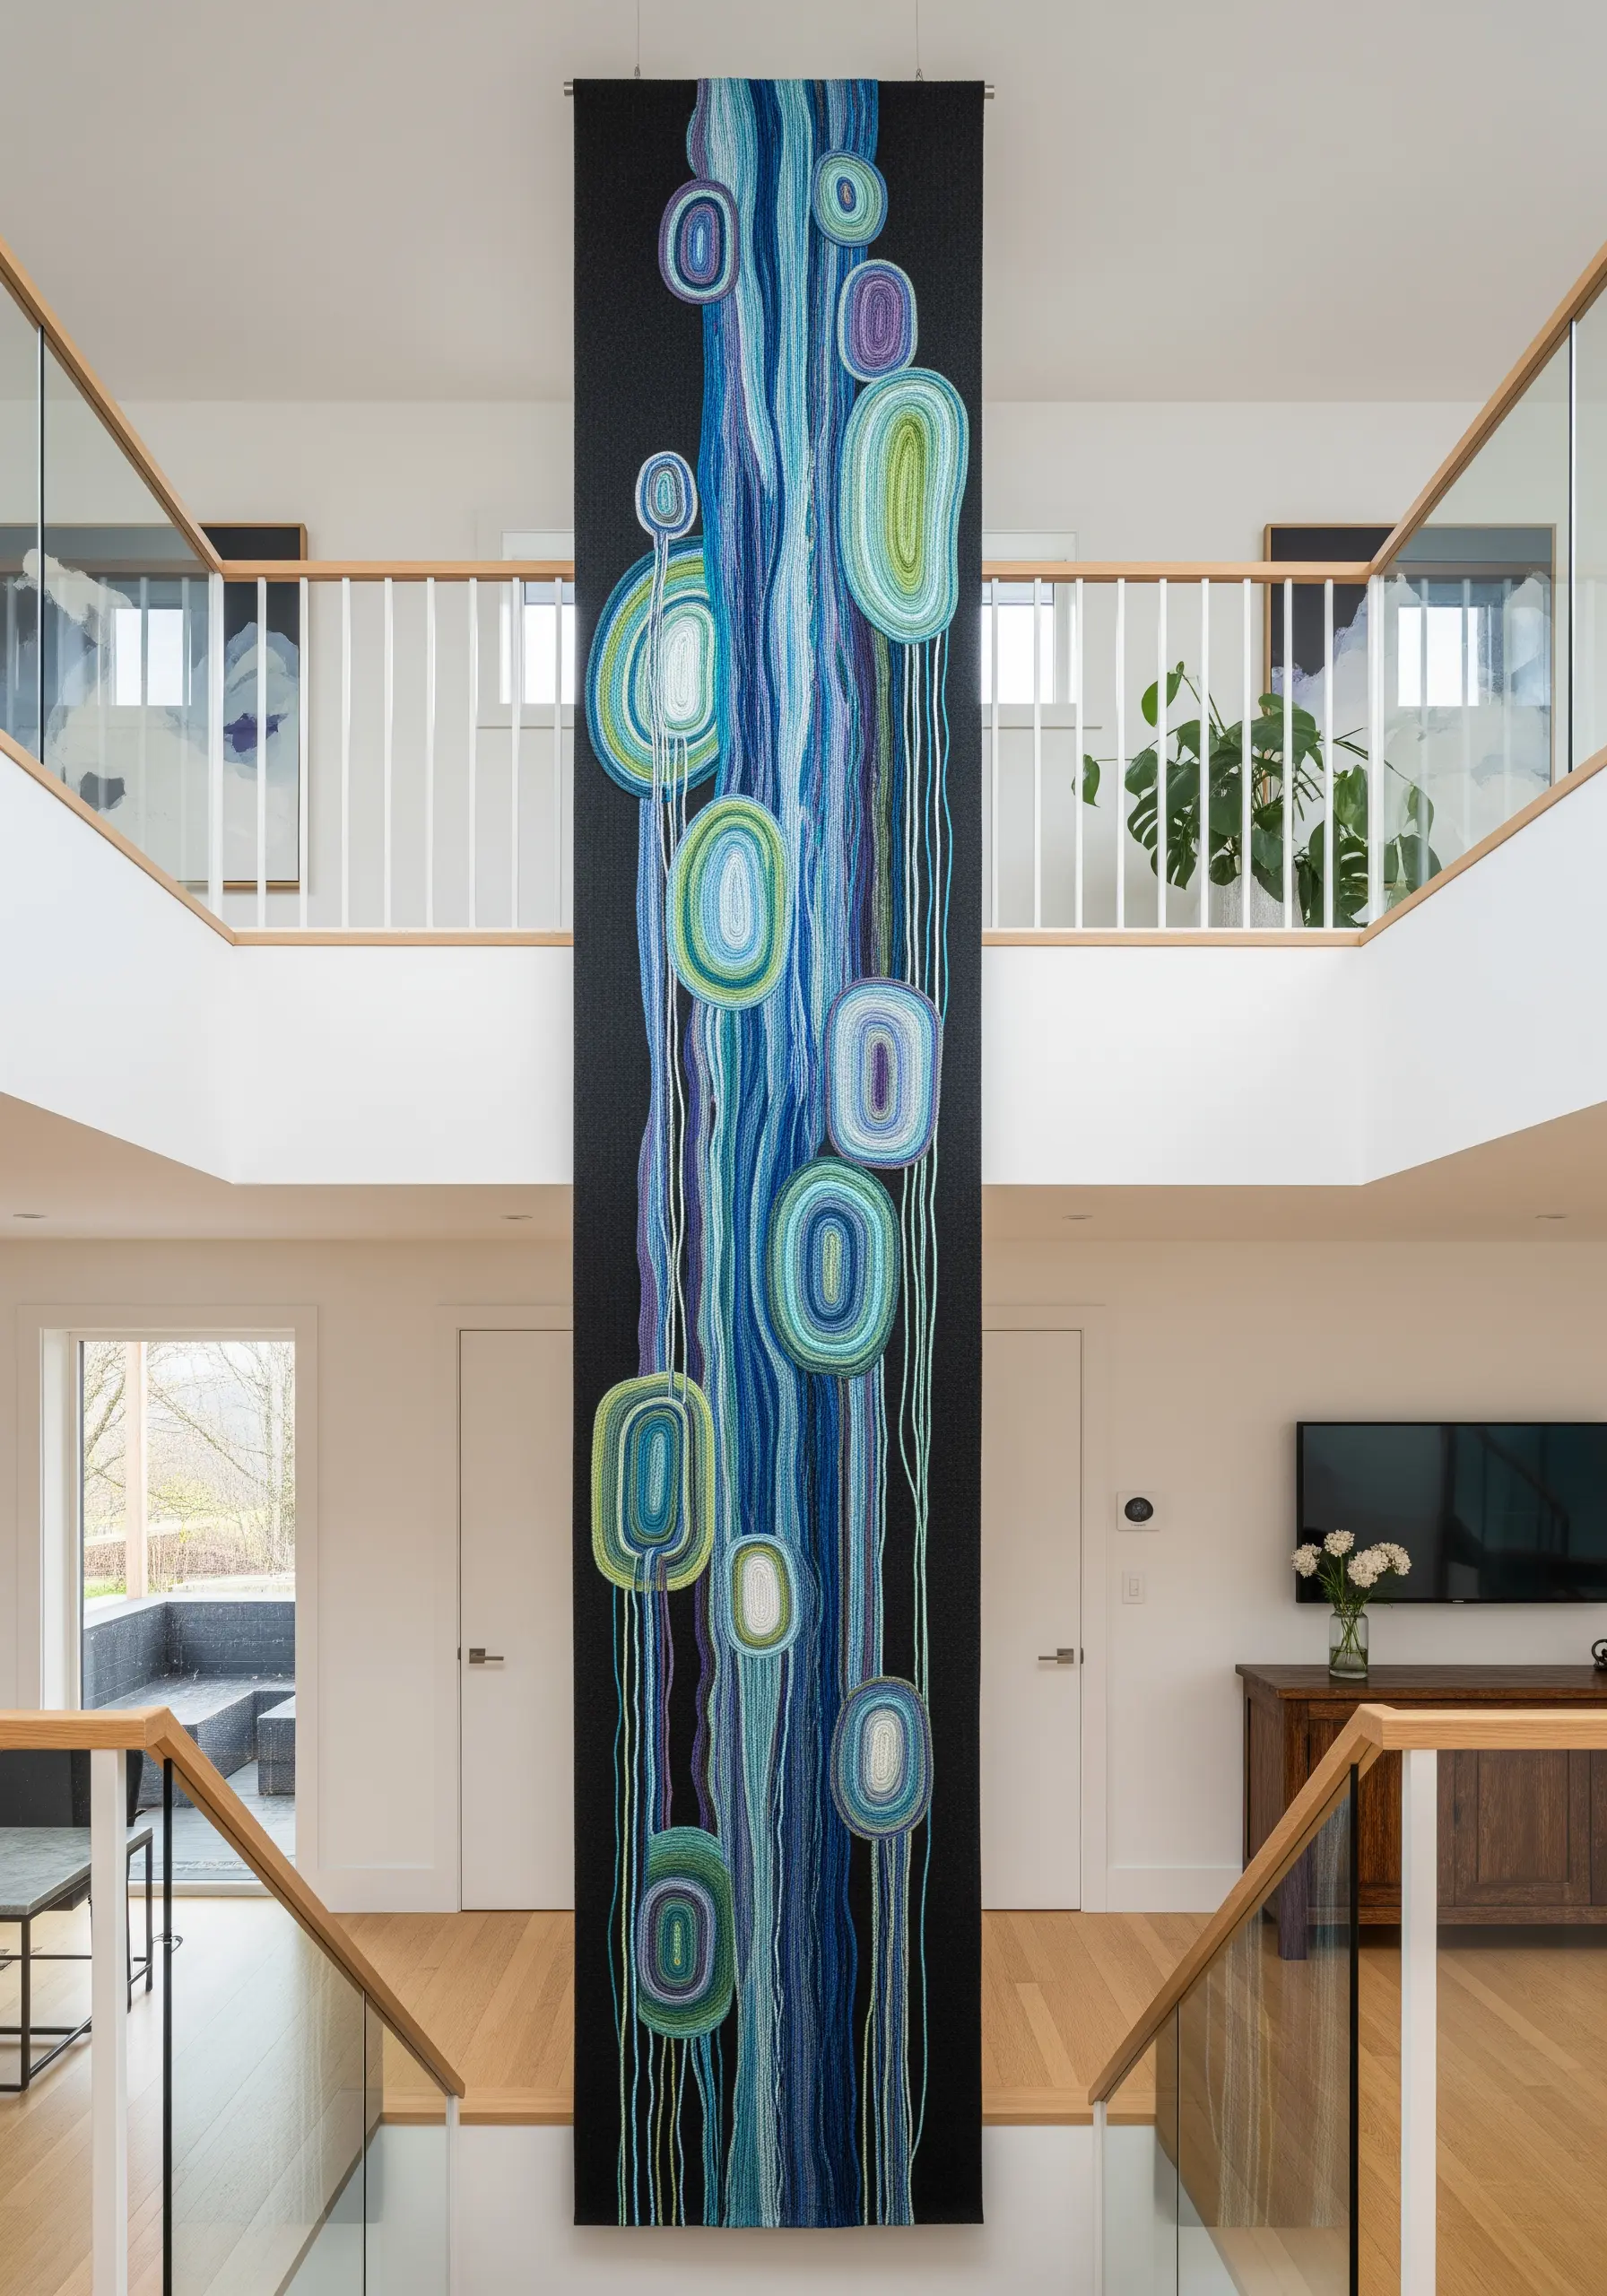
For a tall, narrow space, emphasize verticality in your design. Use couching to achieve perfectly straight, clean vertical lines with heavier yarn or multiple strands of floss.
Outline the rounded, pebble-like shapes with a precise backstitch, then fill them with concentric rows of stem stitch to create a sense of interior movement and contour.
The high contrast between the dark background and the cool blue and green palette enhances the graphic, flowing quality of these abstract thread embroidery ideas.
12. Map the Cosmos with Simple Stitches
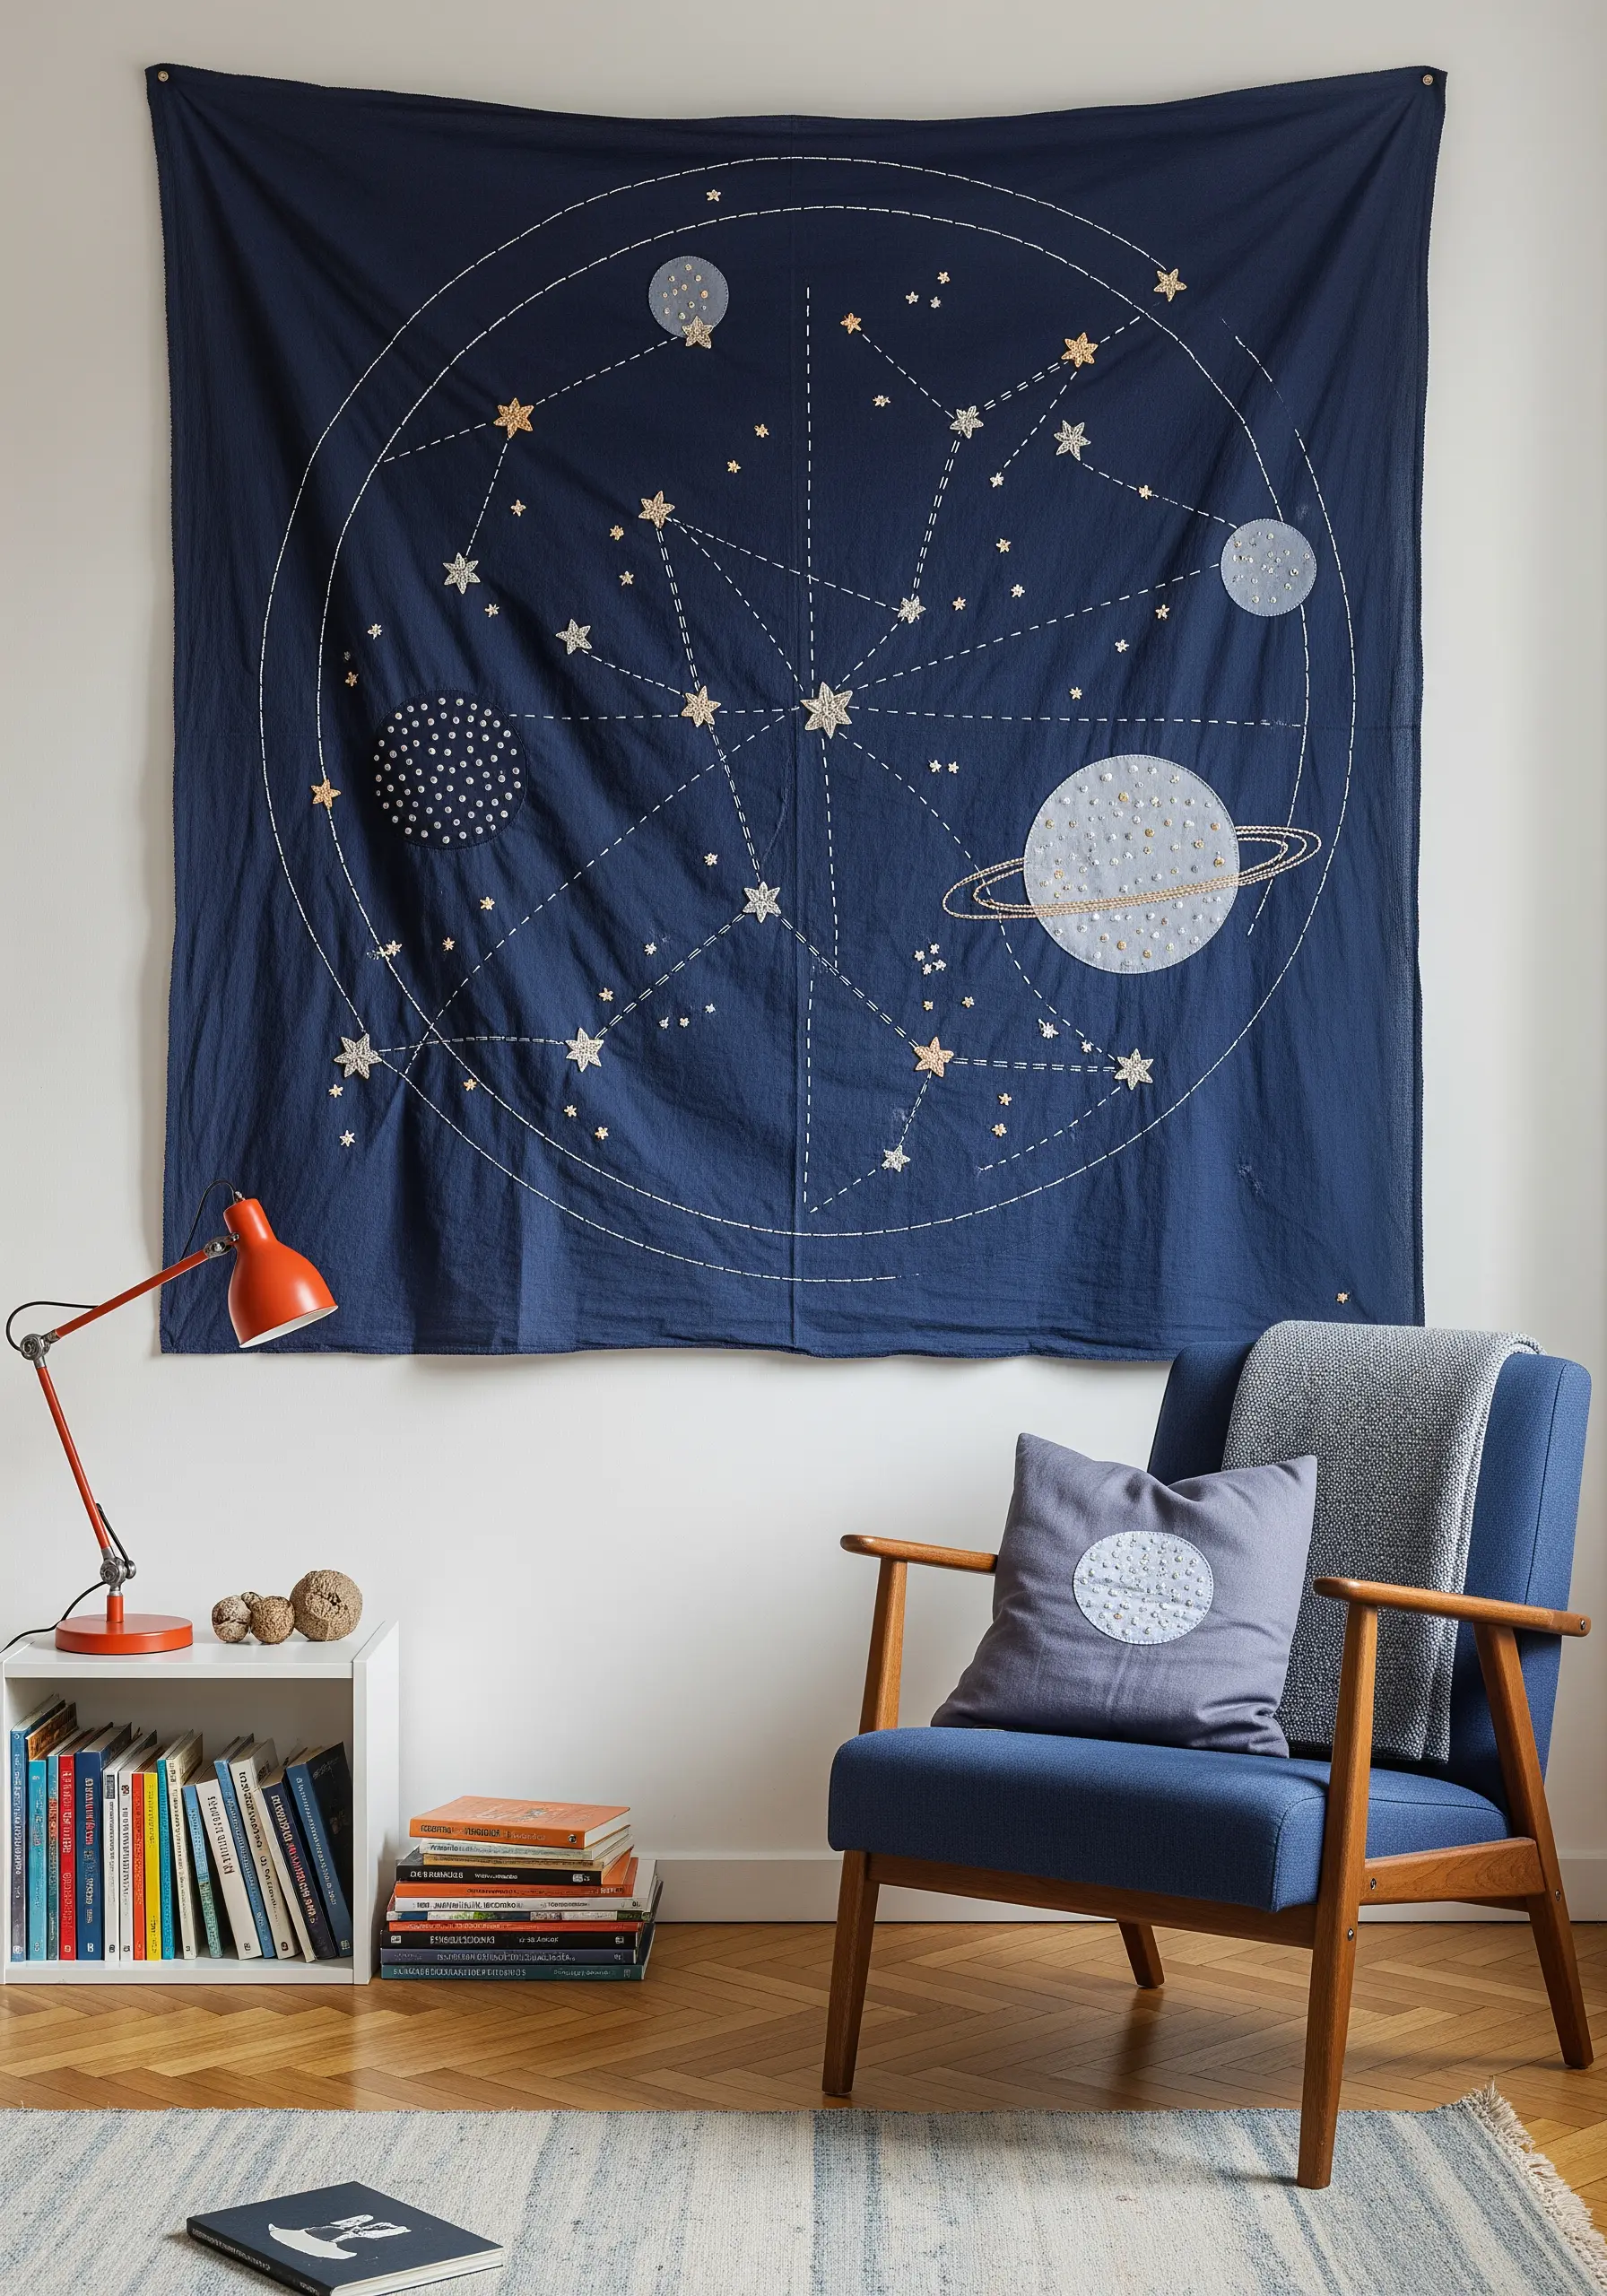
You don’t need complex techniques to create a stunning celestial map. On a dark navy or black cotton fabric, simple stitches in a contrasting thread have immense impact.
Use backstitch for constellation lines, single straight stitches for small stars, and satin stitch or seed stitch to fill the larger planets.
For a perfectly round planet, consider using an appliqué technique with a subtly patterned fabric secured with a tiny blanket stitch around the edge.
These are the kinds of night sky embroidery designs that create a sense of wonder.
13. Paint a Desert Scene with Varied Textures
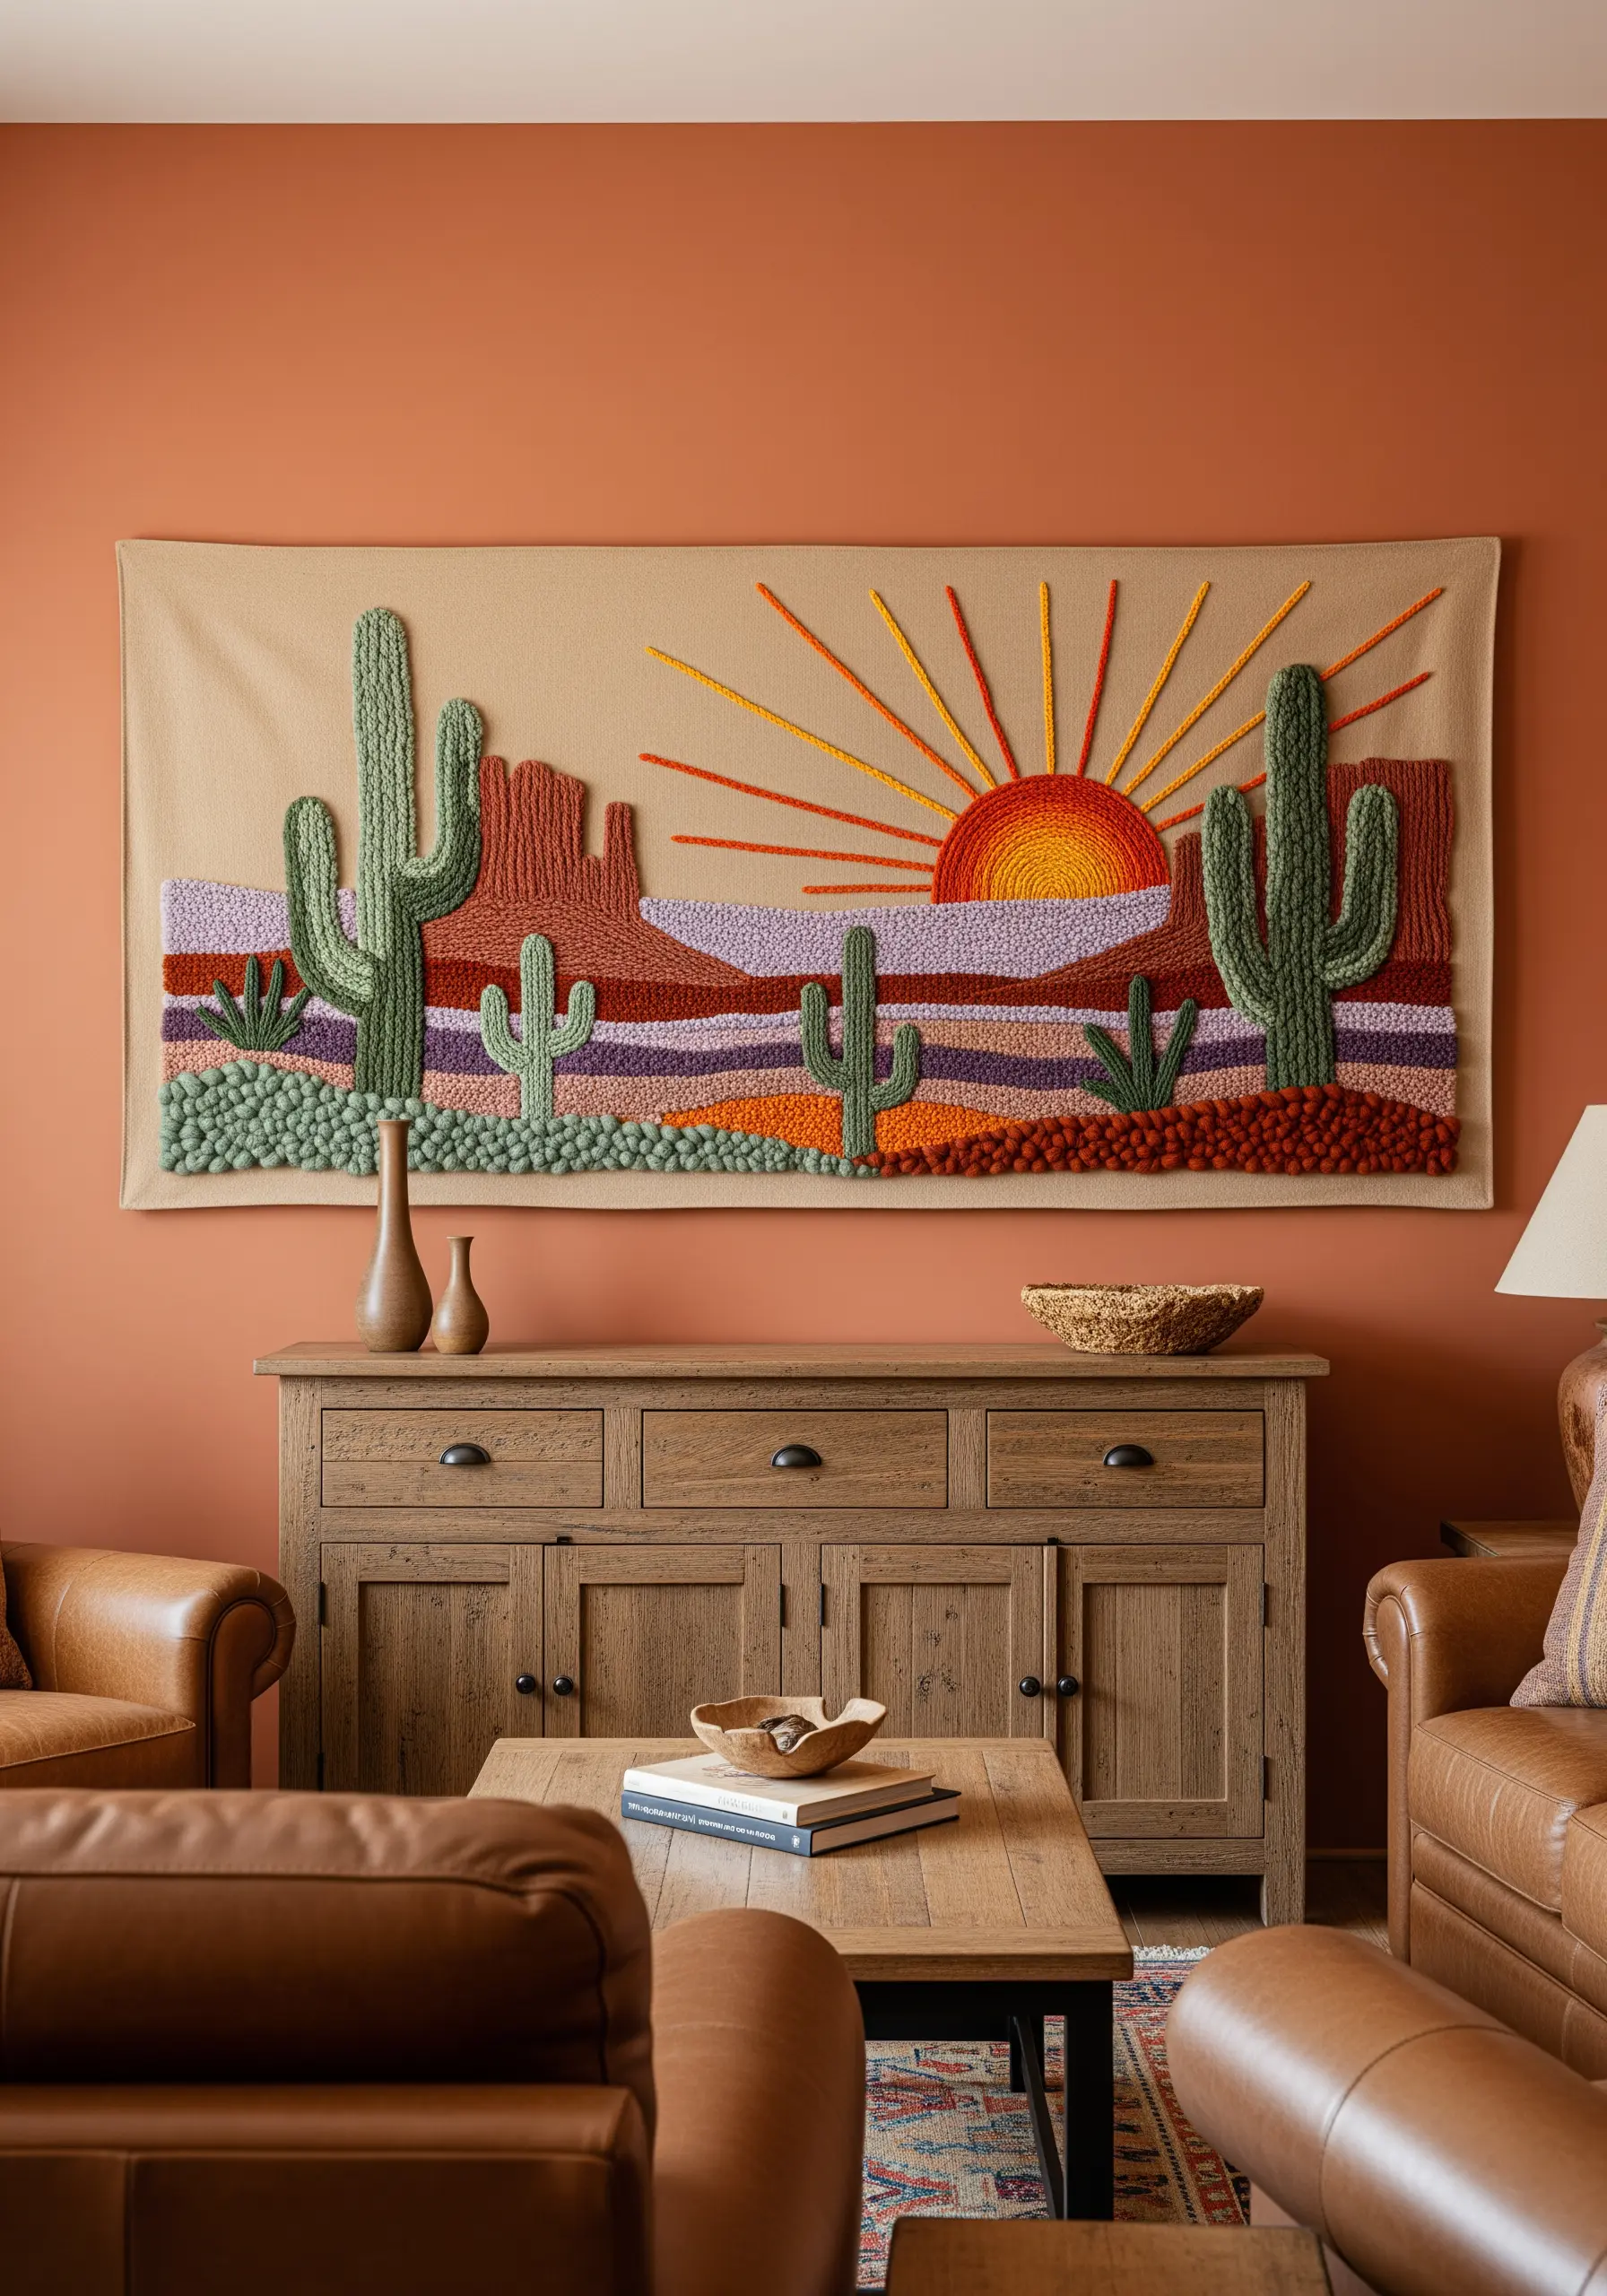
Capture the varied surfaces of a desert landscape by assigning a different stitch to each element.
Use punch needle with earthy tones for the sandy ground and distant mountains to quickly fill large areas with a satisfying texture.
Stitch the cacti with vertical satin stitches to mimic their ribbed form, and use dense French knots or Turkey work for smaller, scrubby plants.
For the sun, long, radiating straight stitches in a gradient of warm colors create a perfect focal point in these warm, earthy embroidery ideas.
14. Emulate Watercolors with Thread Painting
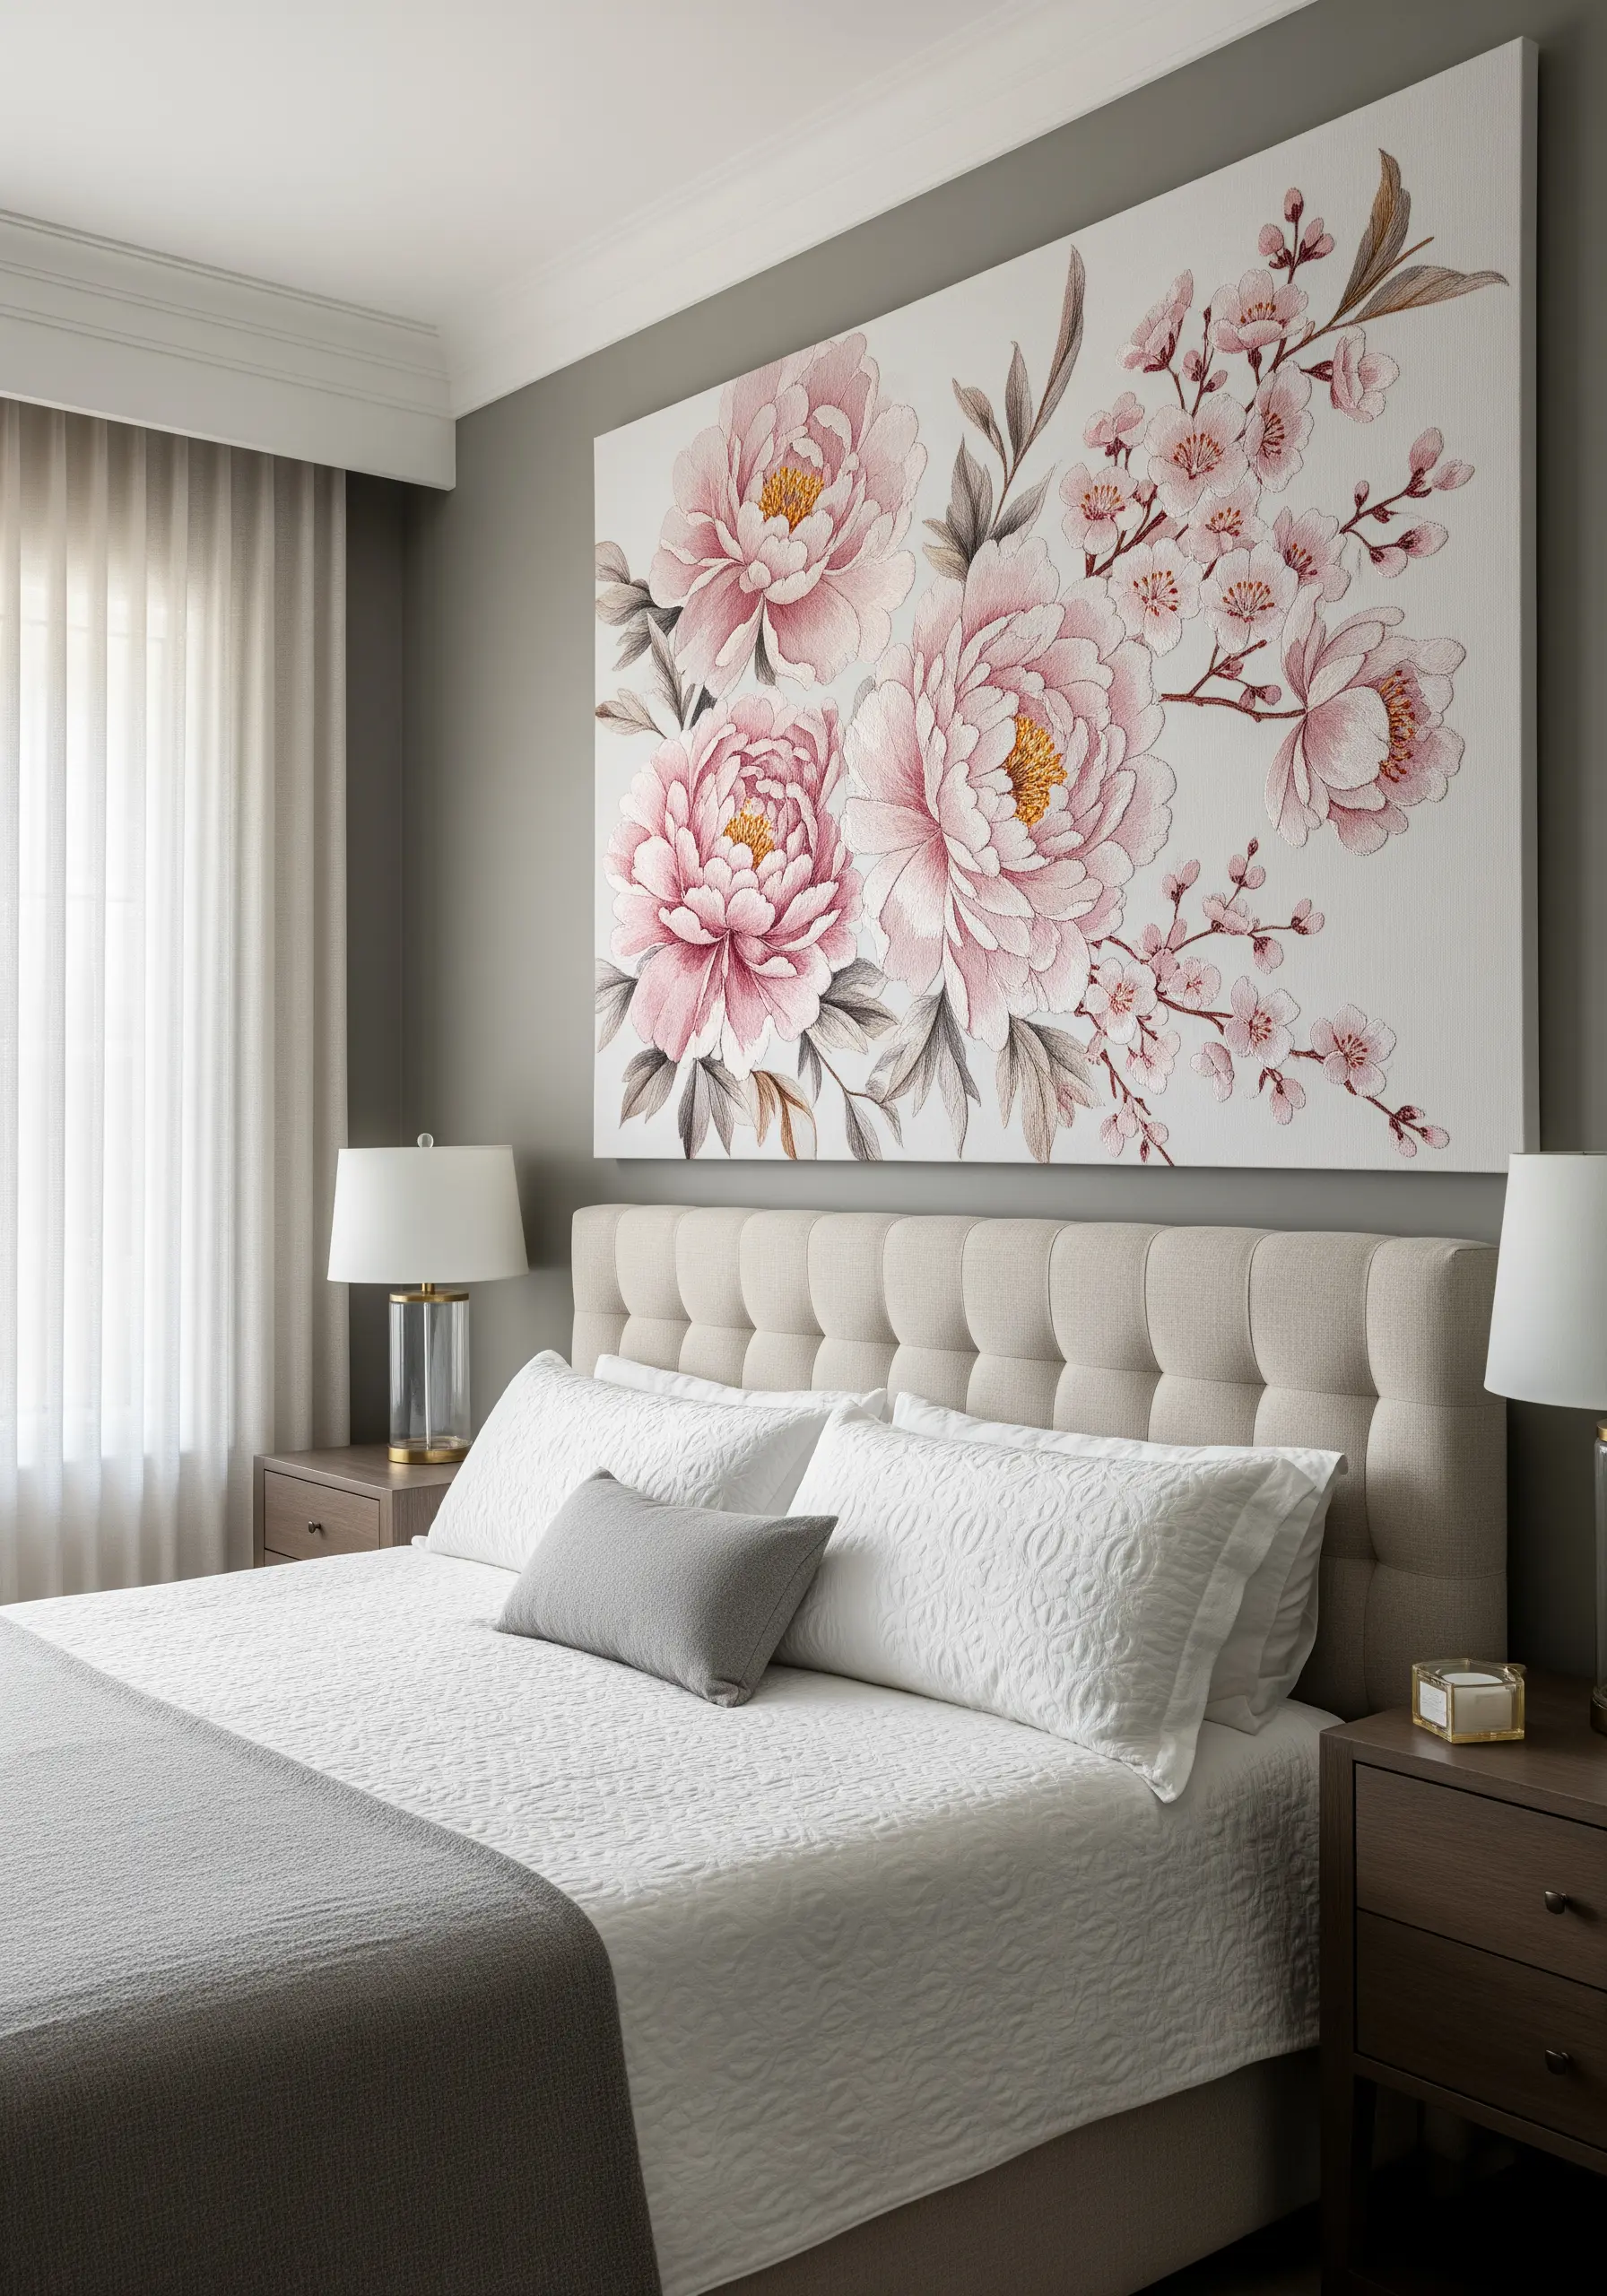
To achieve a soft, painterly effect on a large canvas, you need to master the art of blending.
Use only a single strand of embroidery floss at a time and work with a long-and-short stitch, allowing your stitches to overlap and interlock like brushstrokes.
Work with several shades of a color simultaneously, using multiple threaded needles to seamlessly blend light, mid, and dark tones within a single petal.
This technique turns thread into paint, perfect for delicate, watercolor-style embroidery patterns.
15. Sculpt a Galaxy with Thread and Beads
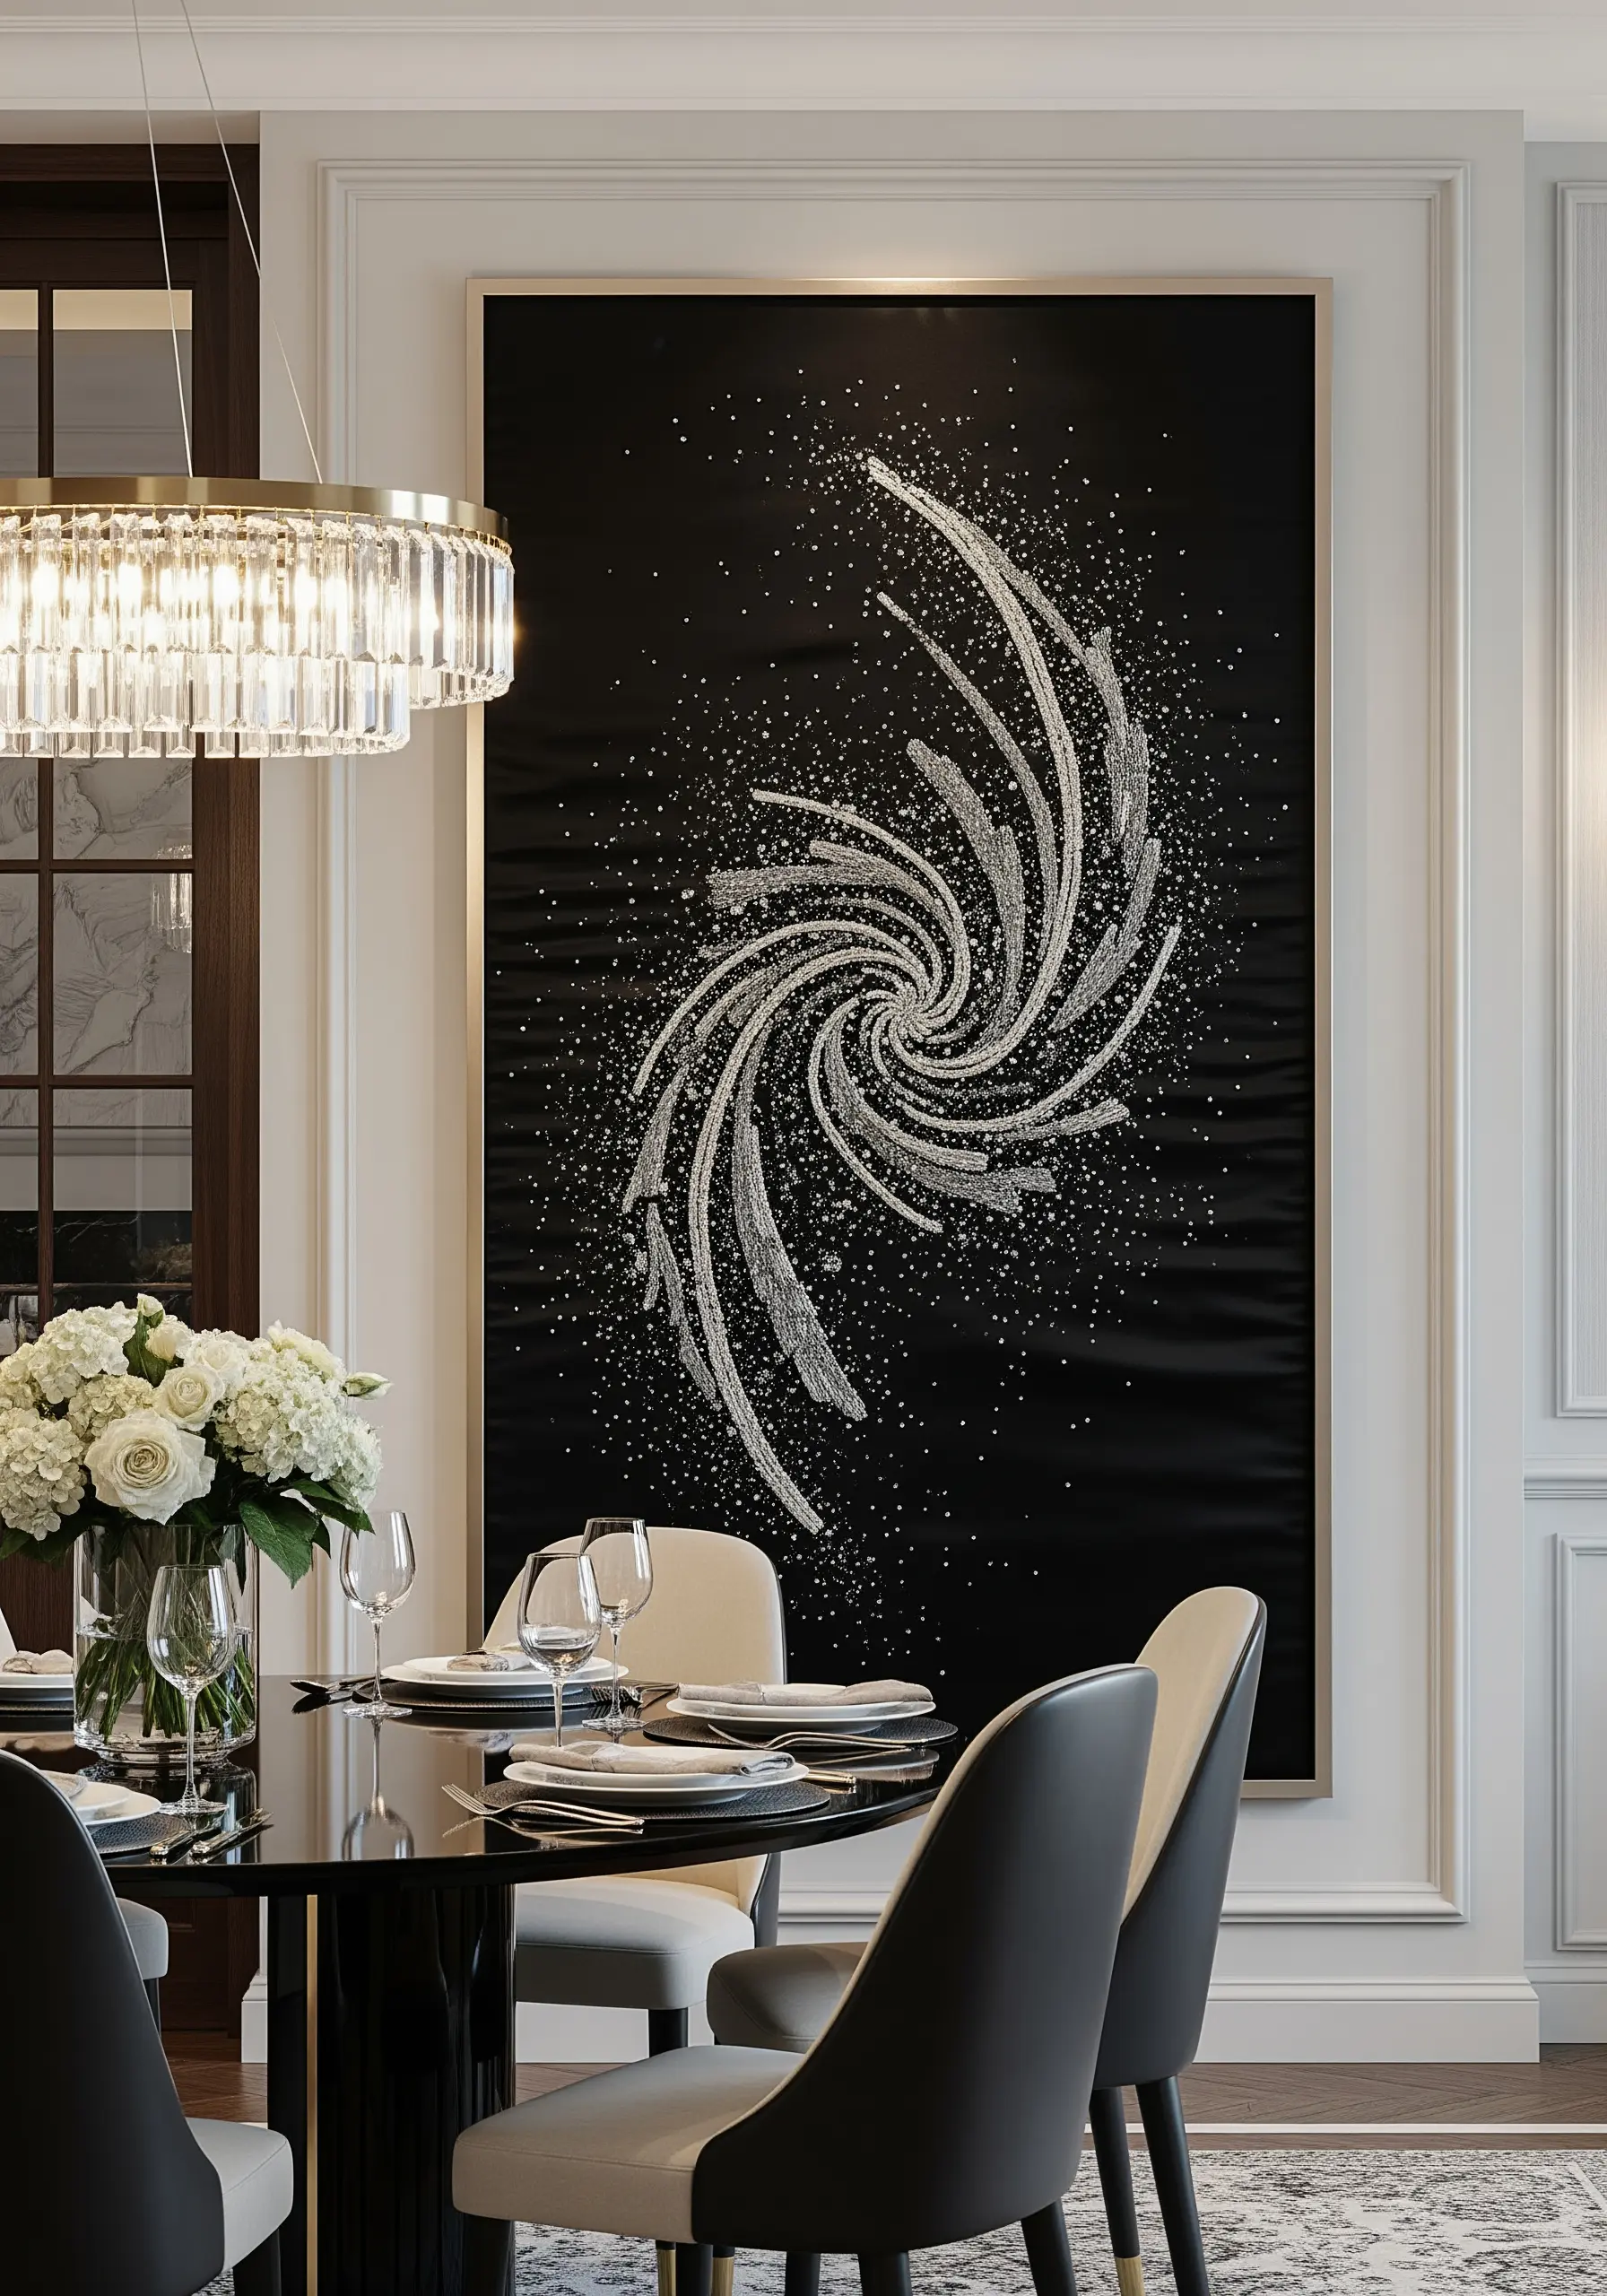
Create a dynamic, swirling galaxy by combining directional stitching with light-catching embellishments.
Lay down the foundational spiral arms using a whipped backstitch or stem stitch with a metallic silver thread to create smooth, raised lines.
Then, fill the spaces between the arms with a scattering of tiny seed stitches and strategically placed silver seed beads or crystals.
The beads add a layer of sparkle that mimics distant stars, transforming simple lines into dramatic, abstract thread burst techniques.
16. Define a Skyline with a Single Continuous Line
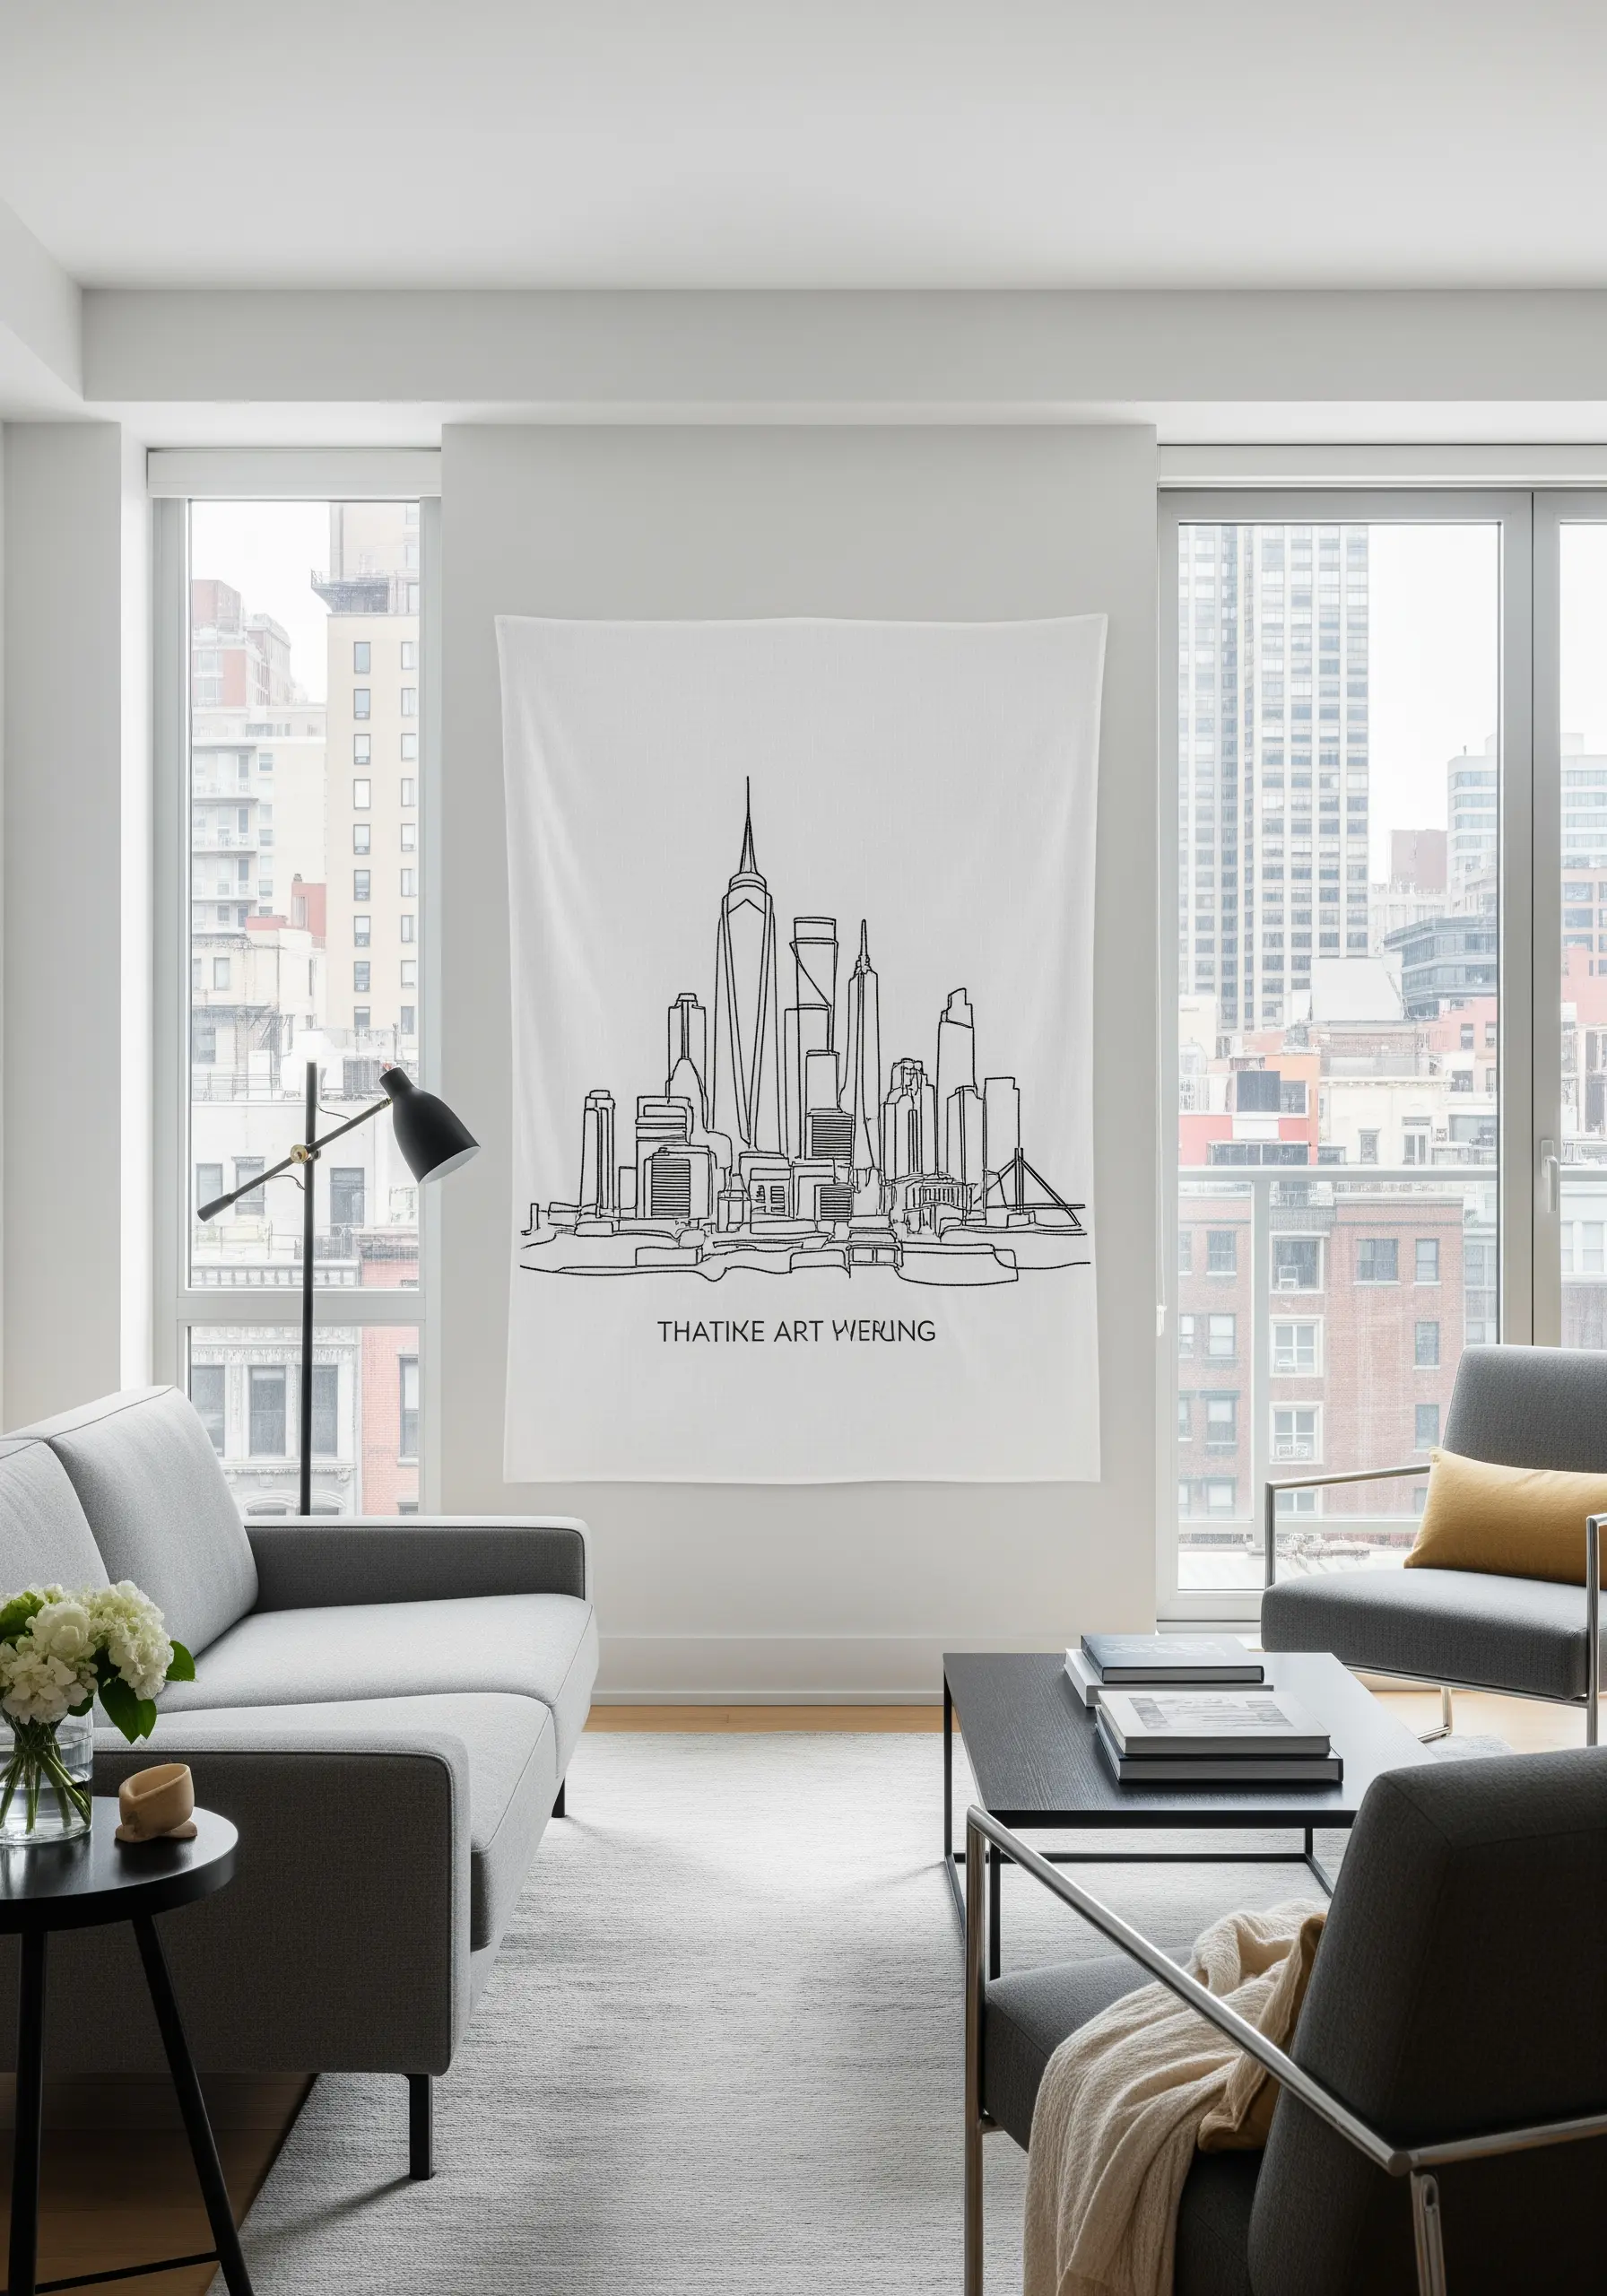
The success of a single-line design at a large scale depends on the consistency and weight of your line.
Choose a heavier-weight thread, like a perle cotton No. 5 or No. 8, to ensure the line is substantial enough to be seen from a distance.
Use a meticulous stem stitch or whipped backstitch, focusing on maintaining even stitch length and smooth curves.
This technique brings a clean, architectural feel to abstract face line embroidery designs and cityscapes alike.
17. Render Realistic Foliage with Directional Stitching
To make leaves look realistic, your stitches must follow the natural direction of their veins.
Before you begin, lightly draw the central vein and the smaller veins branching outward on your fabric.
Use these lines as your guide, filling each section with long-and-short stitch that flows from the center outwards.
Blend several shades of green within each leaf to create highlights and shadows, adding a level of realism to your botanical embroidery wall pieces.
18. Elevate Line Art with a Refined Outline
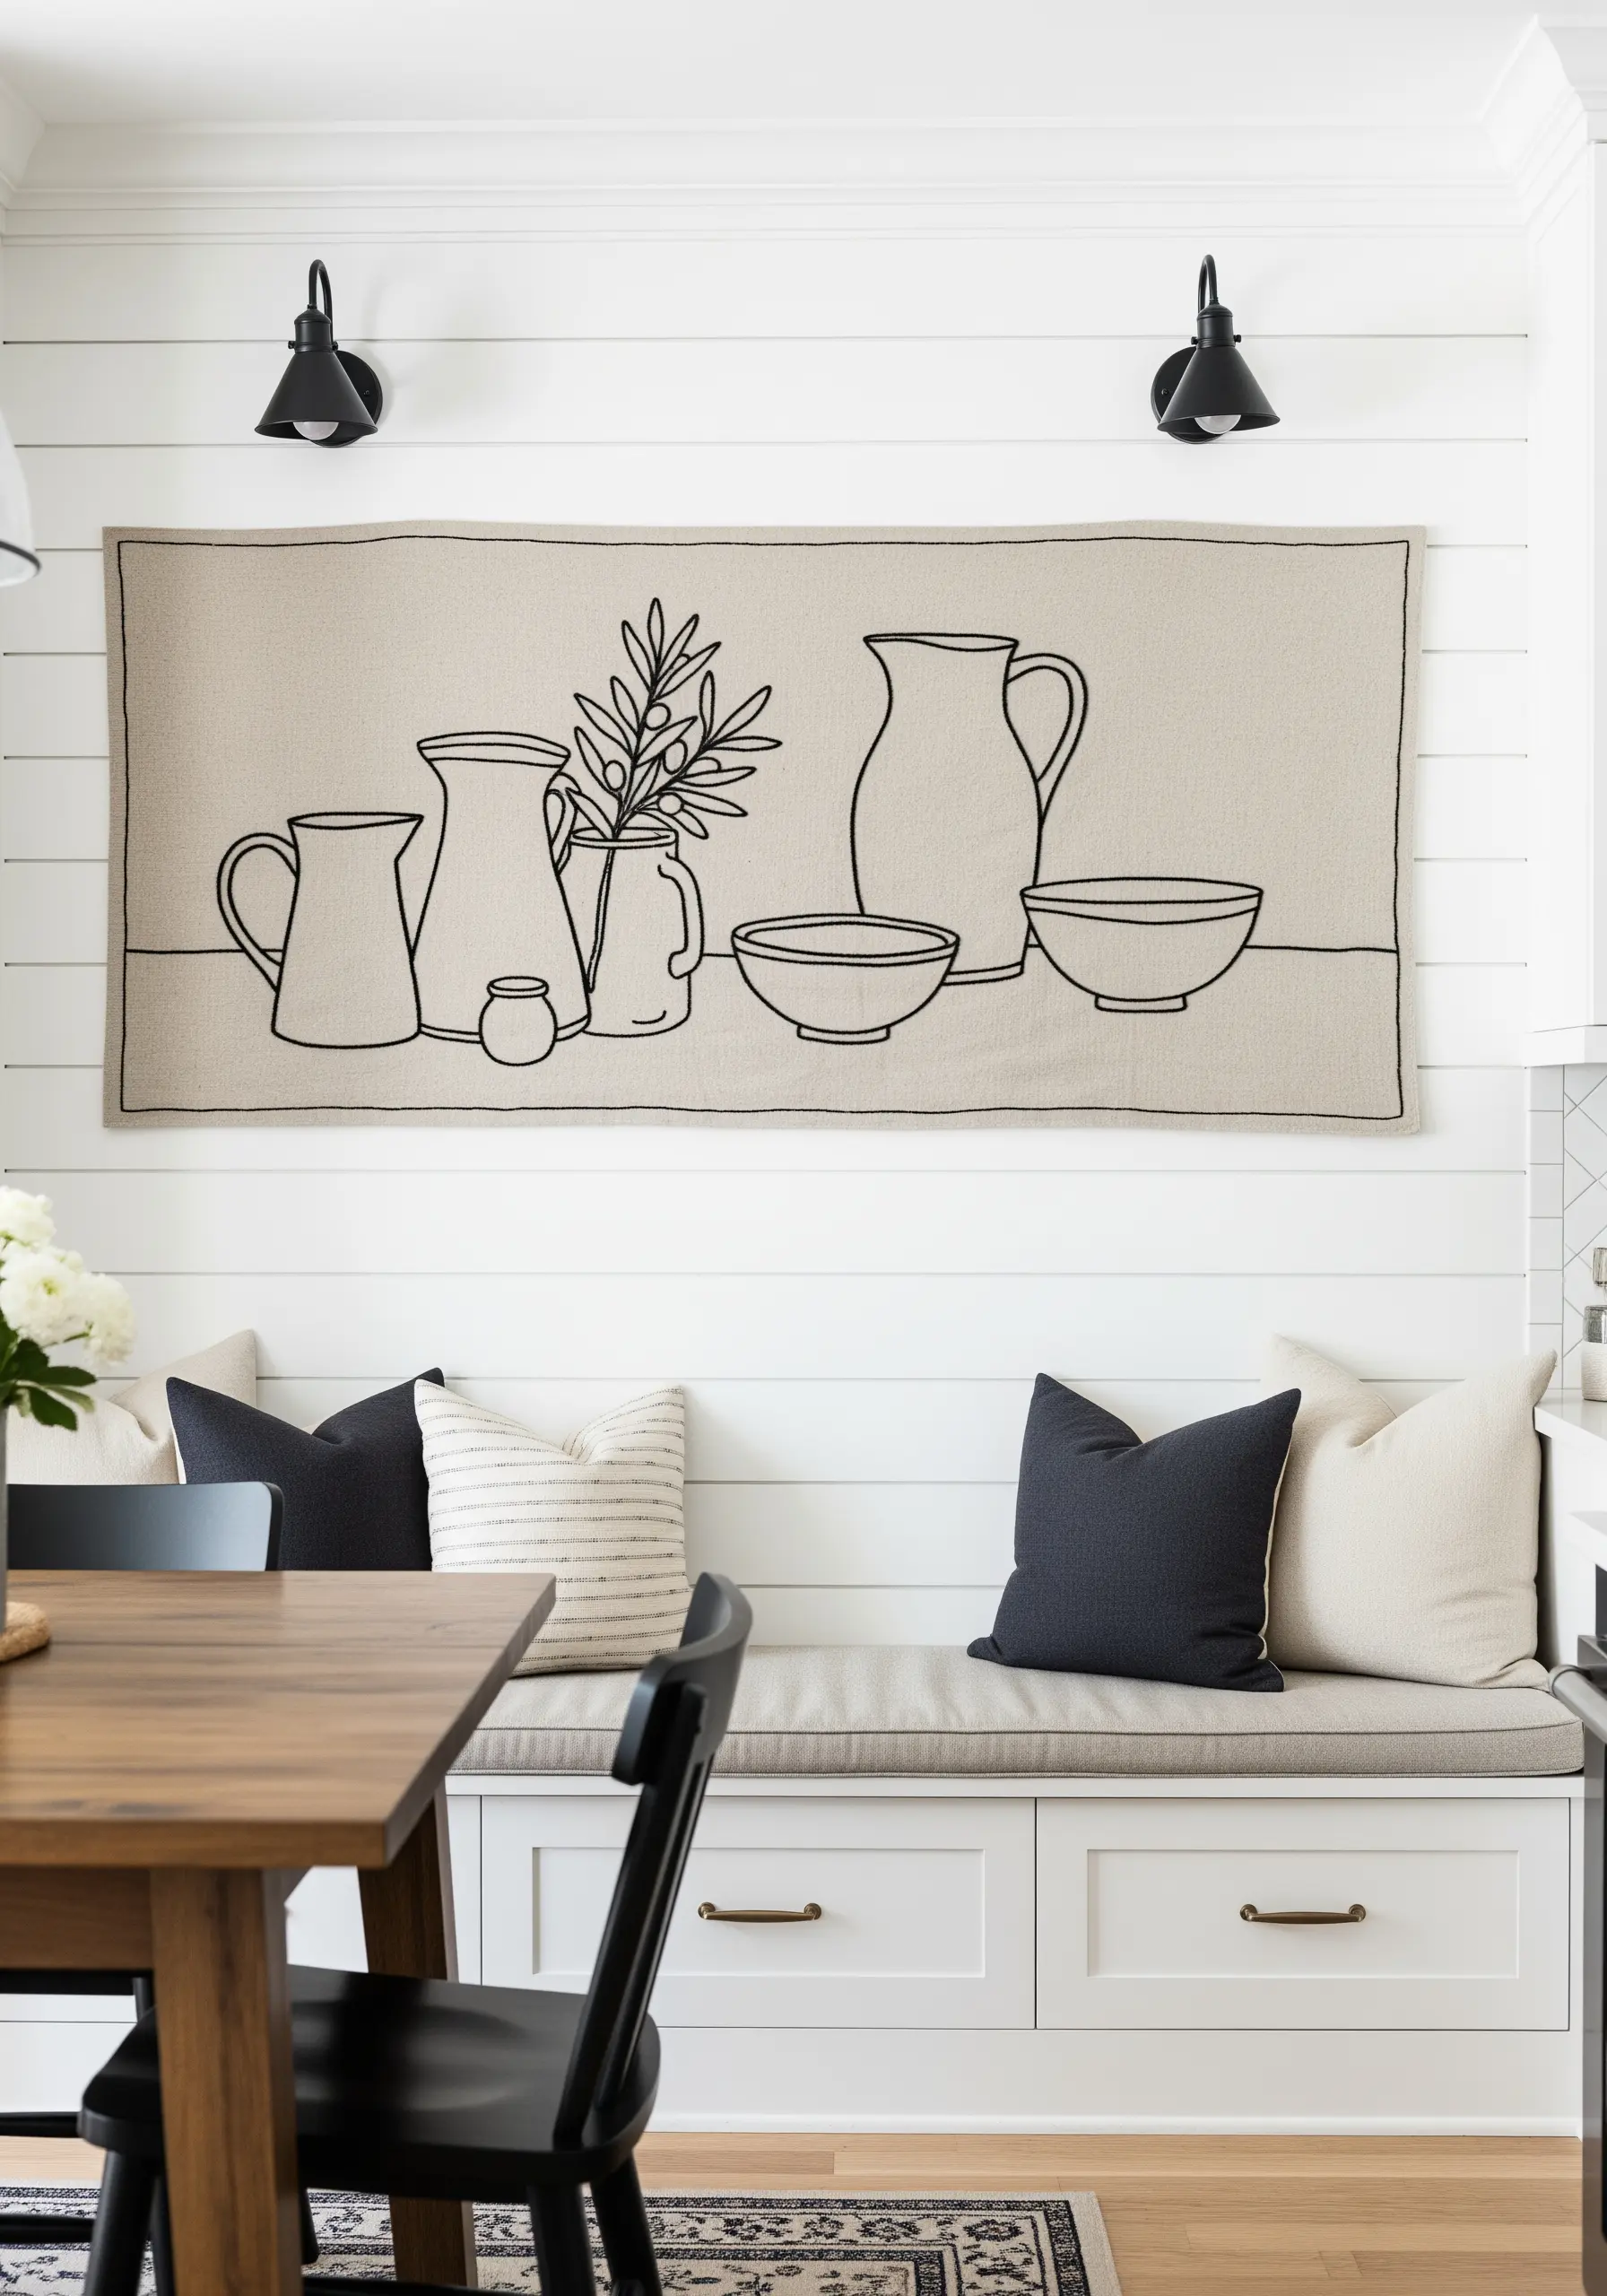
For clean, illustrative line art that feels polished, a simple backstitch can sometimes look disjointed up close.
Instead, use a whipped backstitch. First, complete your design in a standard backstitch, then weave a second thread through the stitches on the surface without piercing the fabric.
This wrapping motion smooths the line, creating a solid, rope-like effect that gives your work a clean, graphic quality perfect for simple line art fruit food motifs.
19. Sculpt Crashing Waves with 3D Stitches
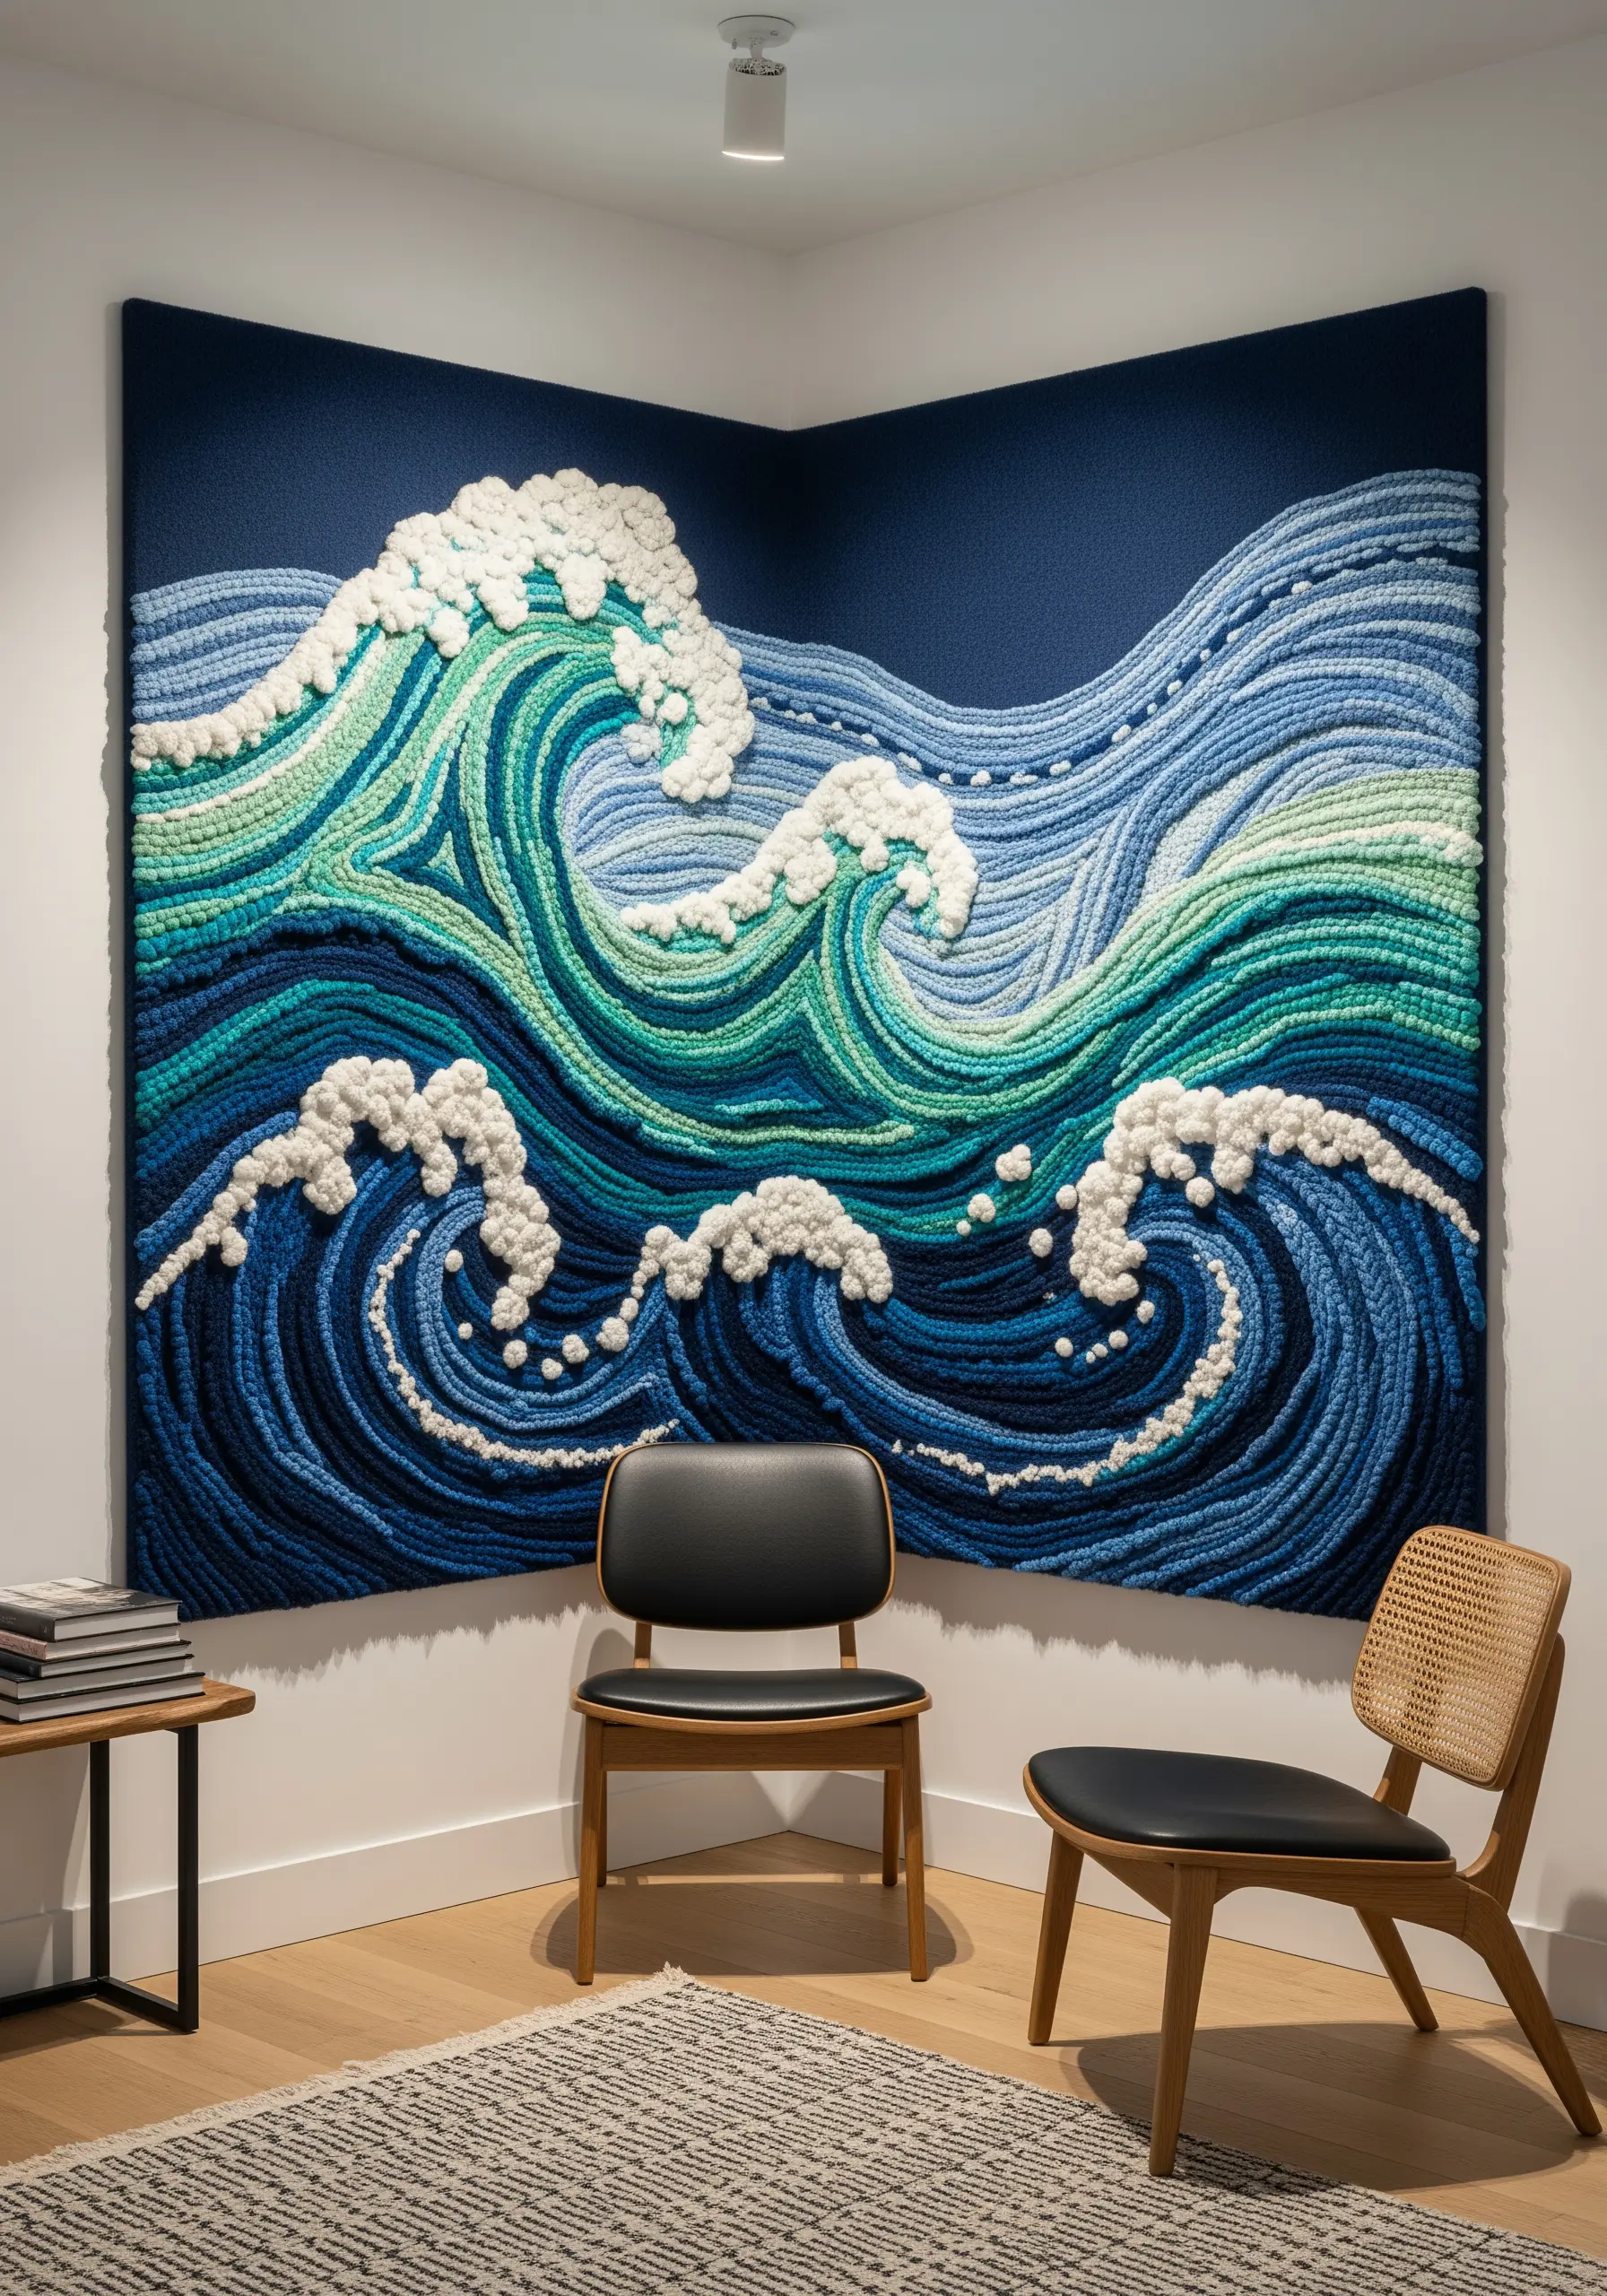
To create the powerful dimension of ocean waves, you need to build texture vertically off the fabric.
Use high-pile techniques like Turkey work or punch needle with varying loop heights. Create the highest, most dense loops with white or off-white yarn for the sea foam.
For the body of the waves, use shorter loops and directional satin stitch in shades of blue and green to create the sense of swirling water beneath the surface.
This is how you turn classic ocean-inspired hoop embroidery ideas into immersive installations.
20. Tell a Story with Patchwork and Sashiko
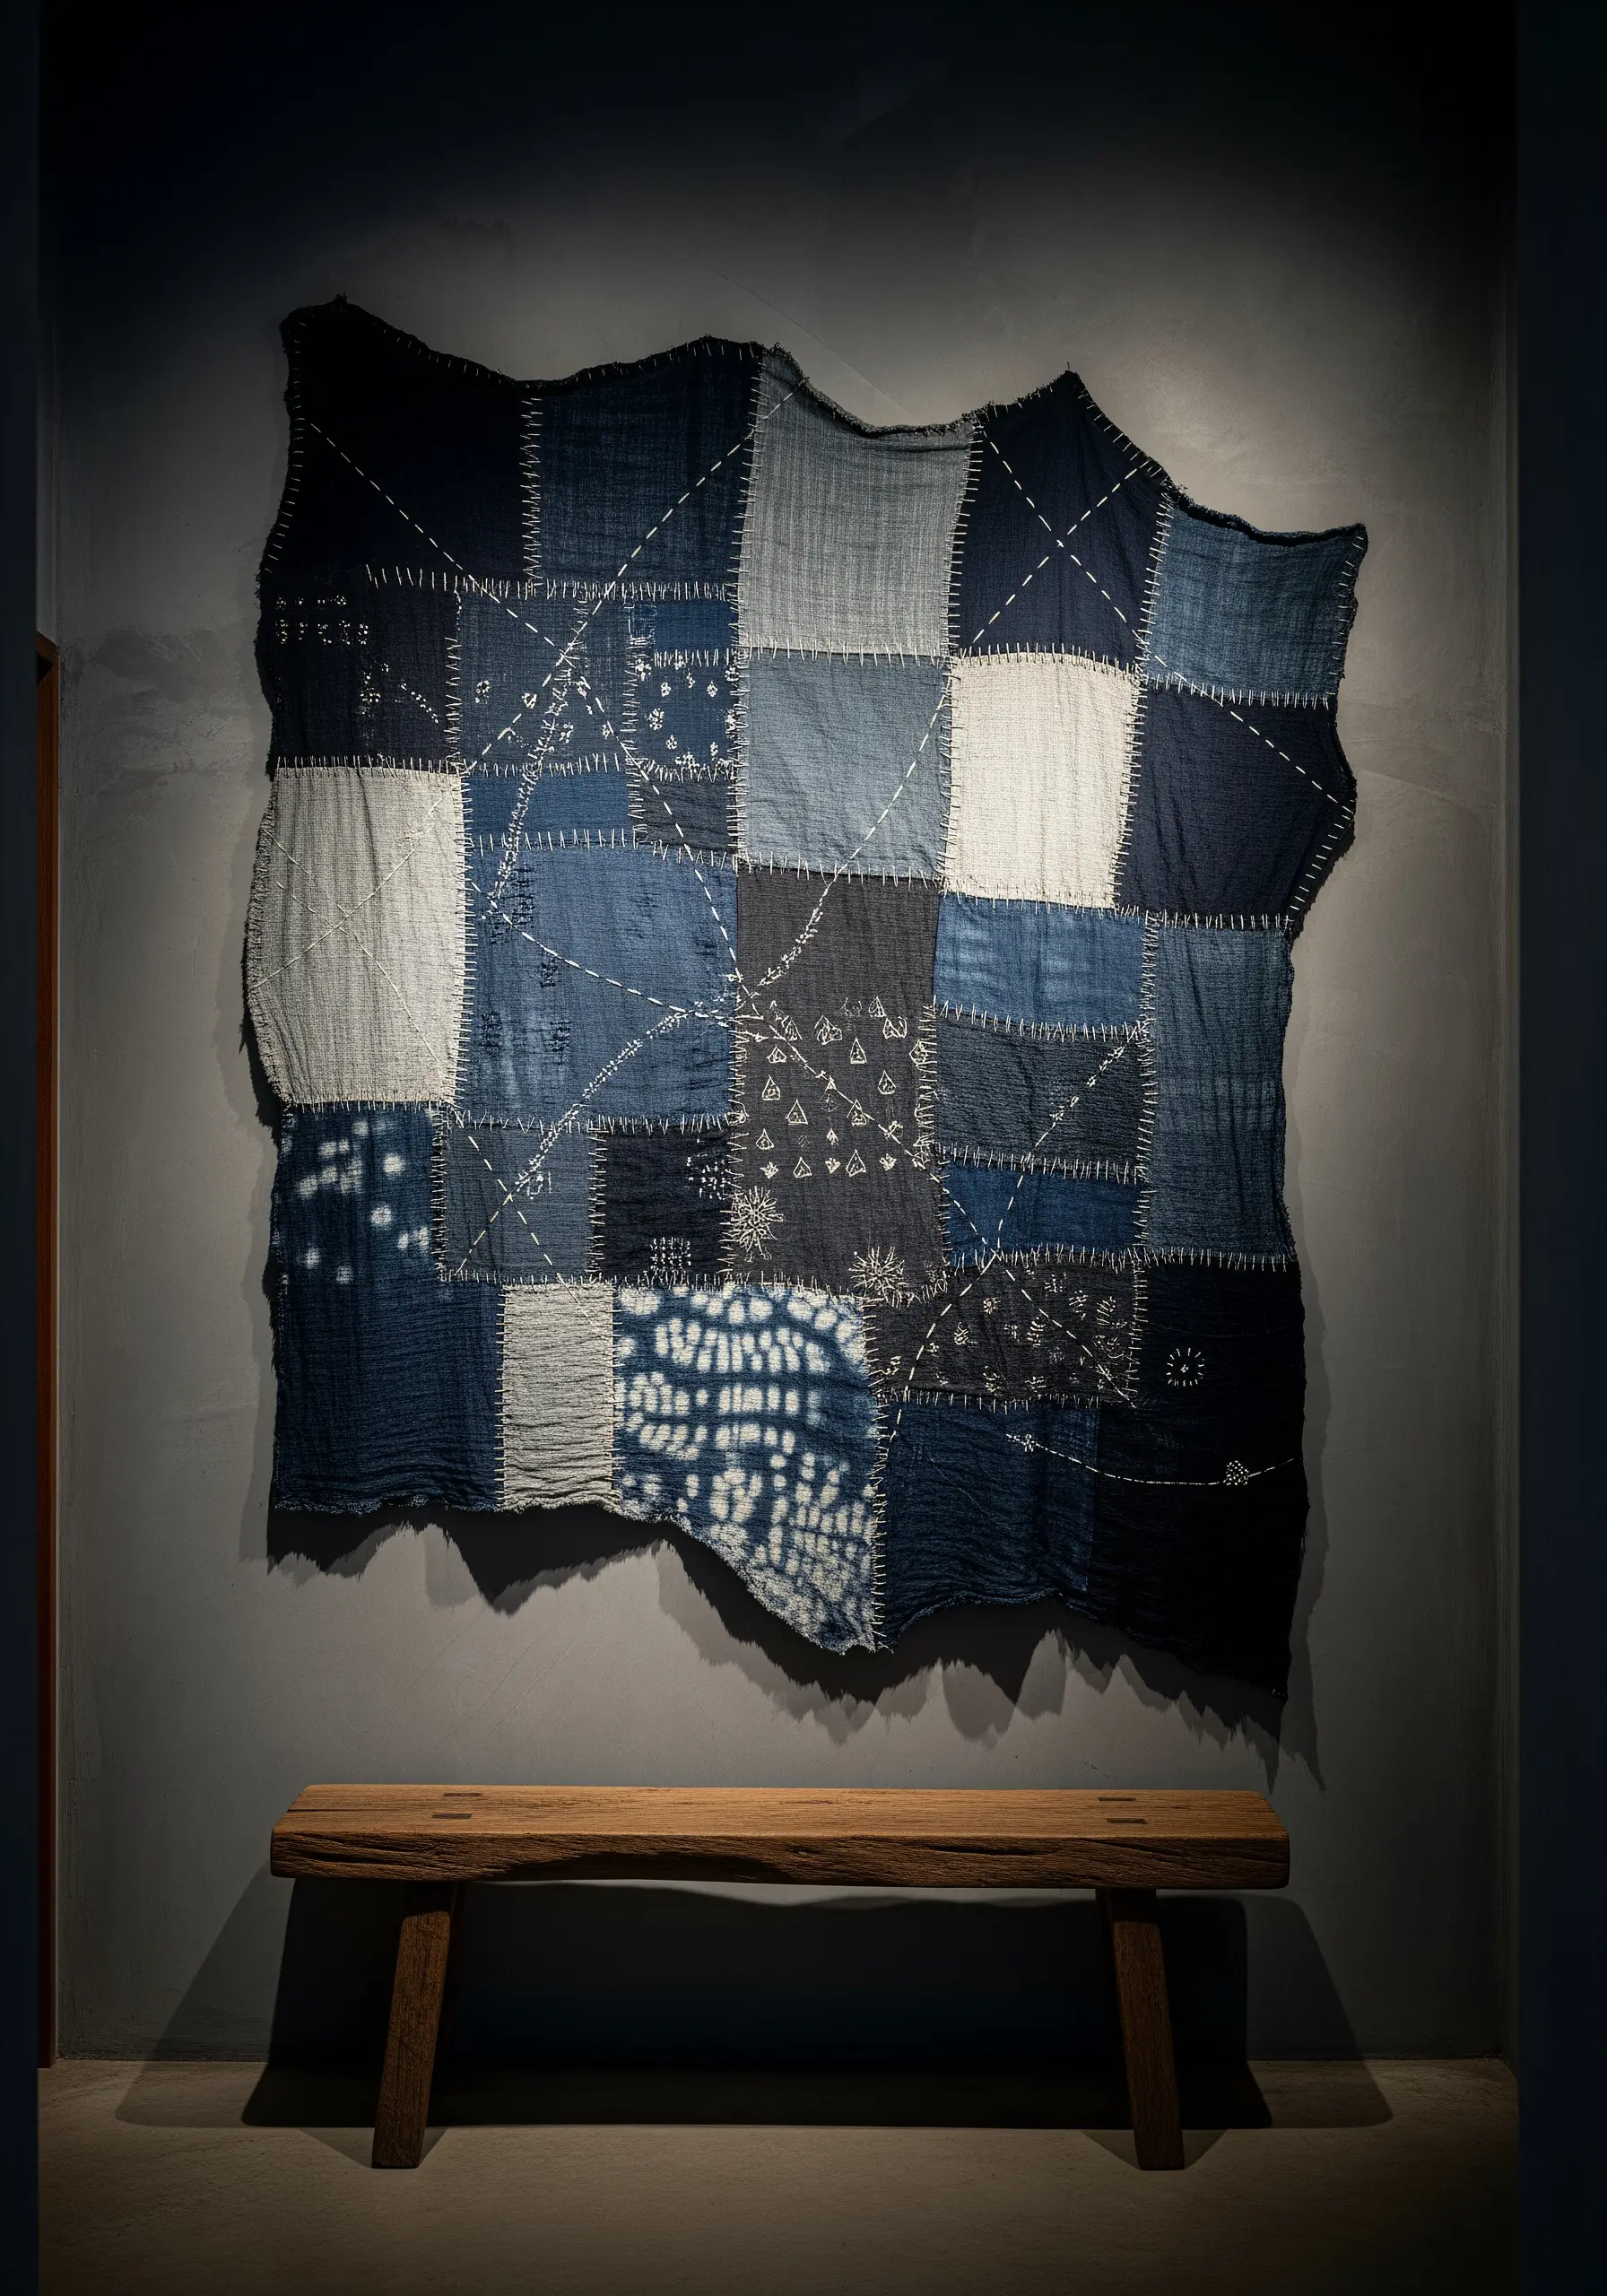
Embrace the philosophy of Japanese Boro by creating a large textile from patched-together pieces of fabric, like denim, linen, and cotton scraps.
Join the pieces and add decorative reinforcement using Sashiko stitching—a simple running stitch worked in geometric patterns with a thick, contrasting thread (typically white or ivory).
The visible mending and decorative patterns celebrate texture, history, and imperfection, making for beautiful upcycled fabric wall art projects.


