
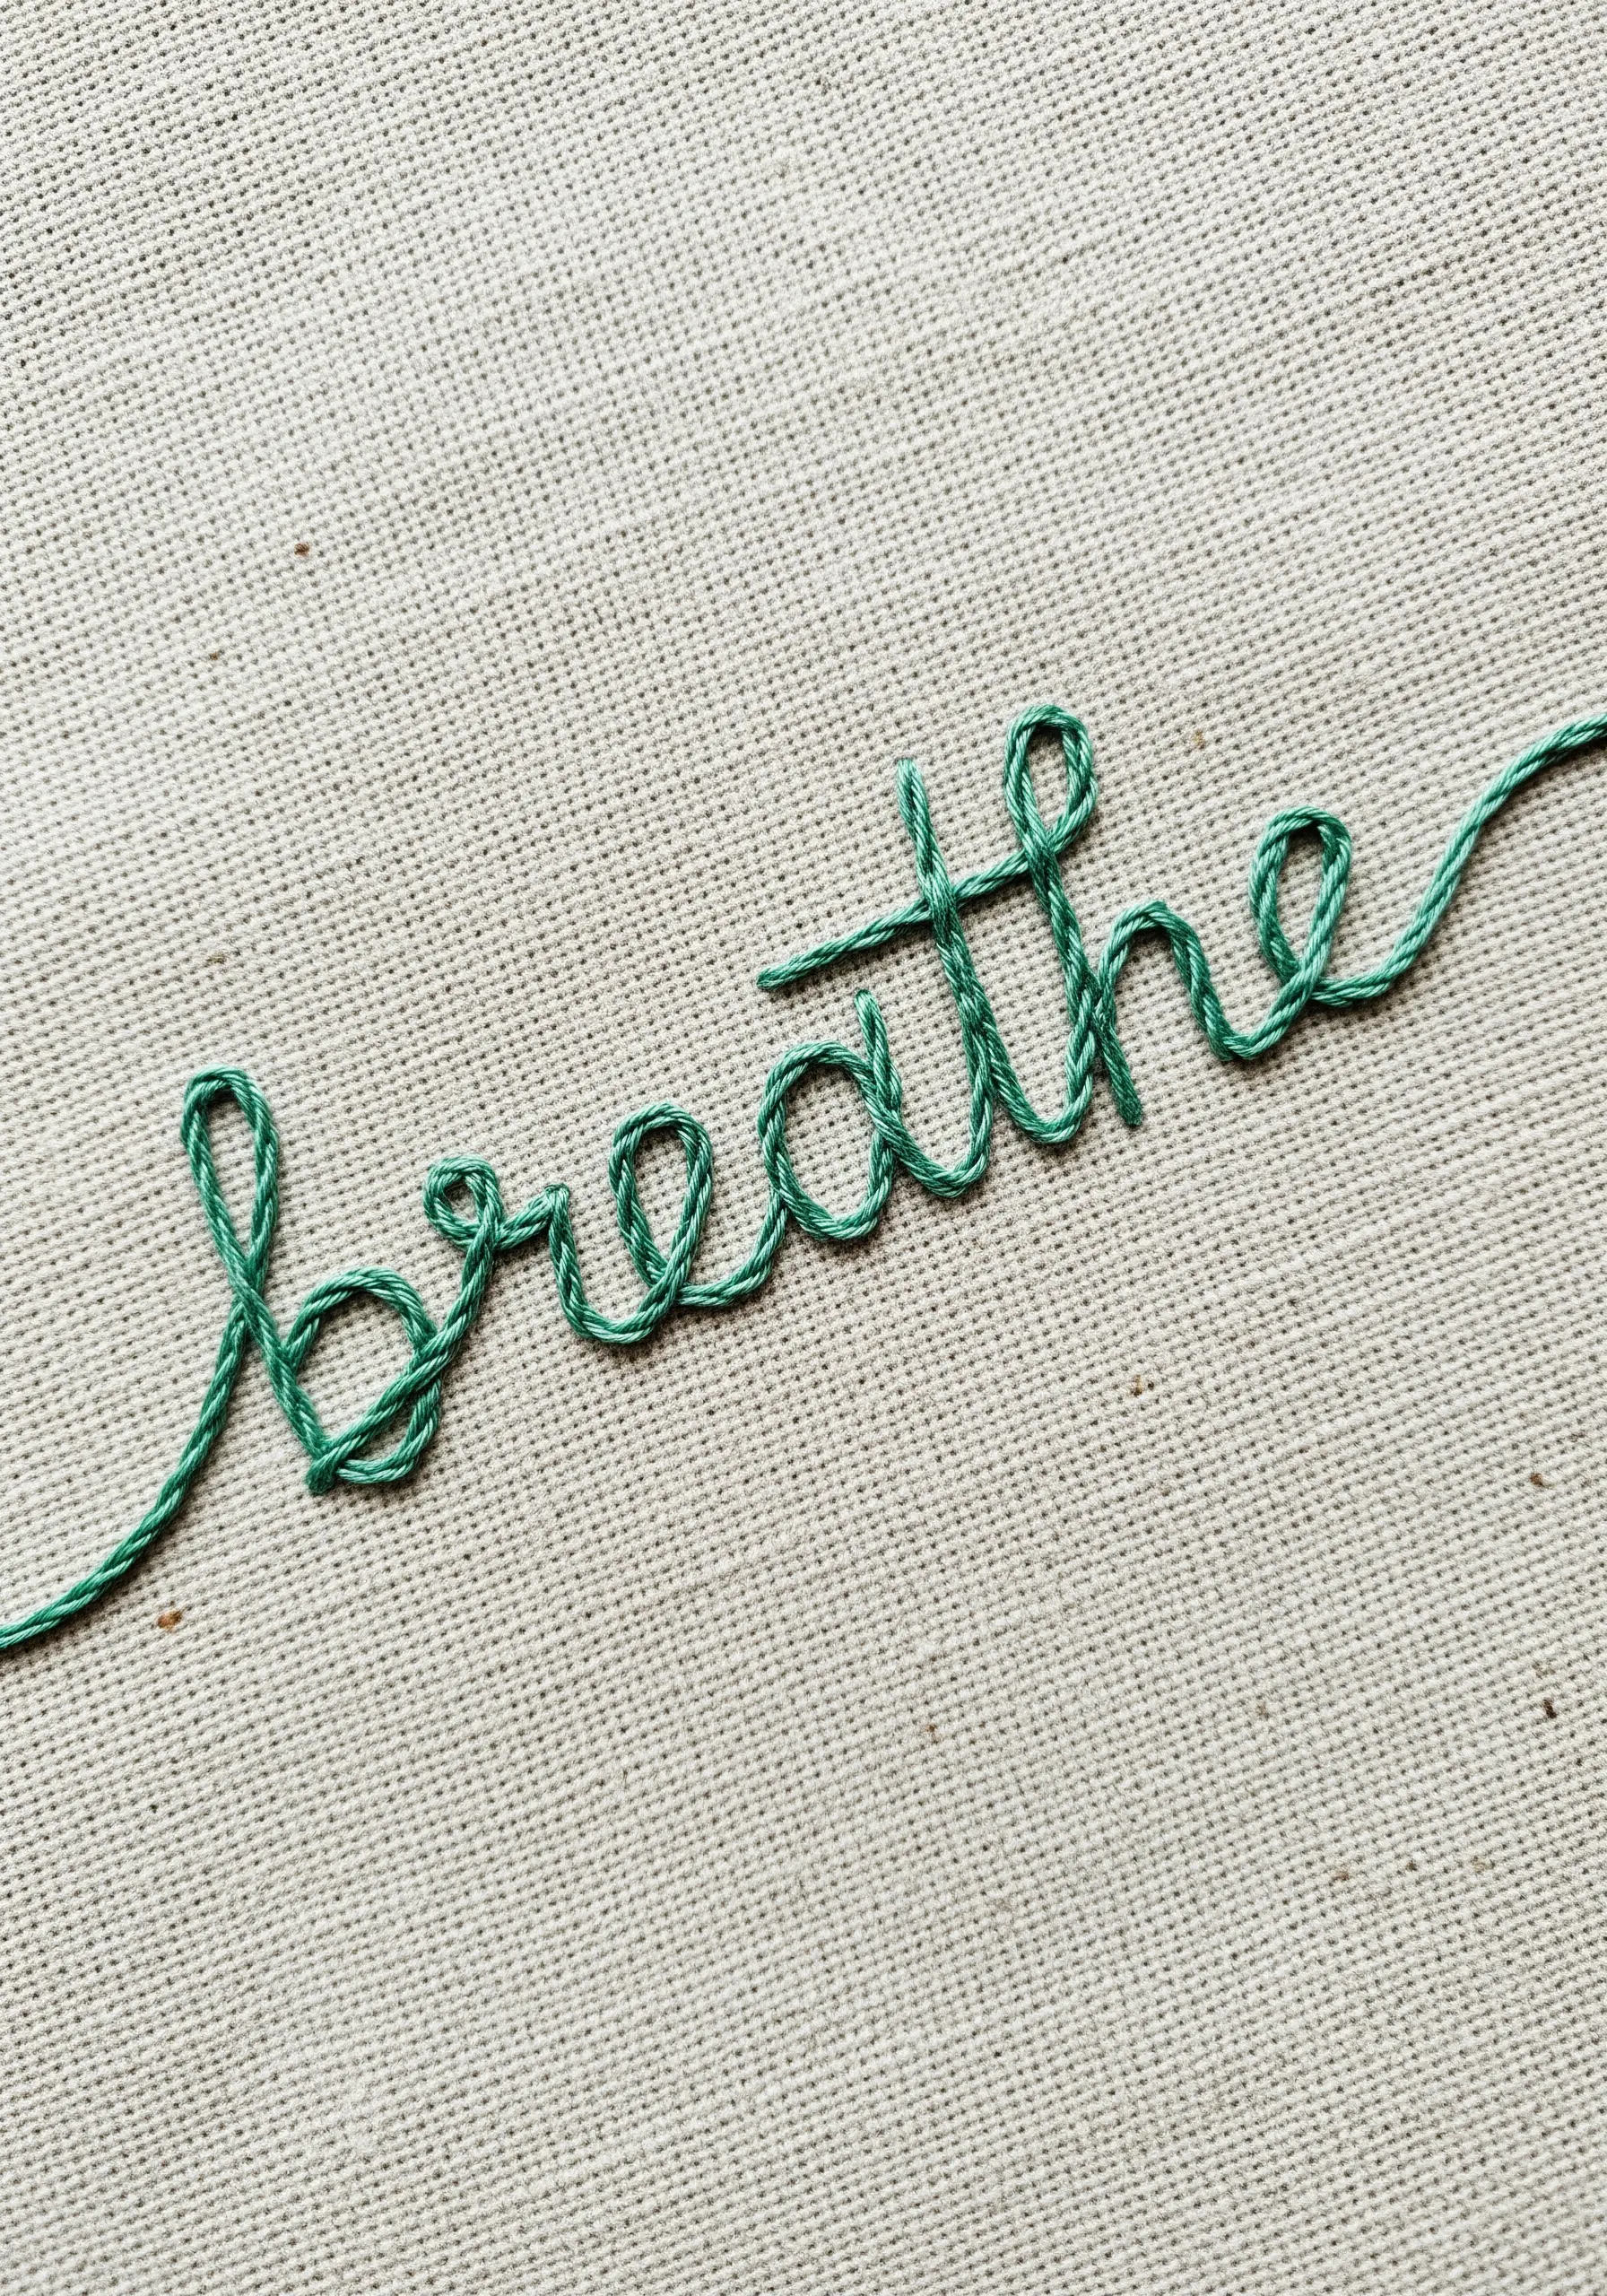
You have the thread, the fabric, and the desire to create a gift that feels truly personal. But often, the leap from a simple stitch to a finished piece that looks polished and intentional can feel vast. Small embroidery doesn’t have to mean insignificant—it’s an opportunity for precision and quiet beauty.
Think of each tiny design not as a shortcut, but as a study in technique. A single, perfectly executed French knot has more impact than a dozen uneven ones. The curve of a stem stitch can convey movement, and the direction of a satin stitch can create light and shadow. These details are what transform a simple object into a cherished keepsake.
Use these ideas as a starting point to build your own visual language. Master a few key stitches, understand how thread weight changes a design, and see how a limited color palette can create harmony. Soon, you’ll be adding your own personal touch to every gift, not because you followed a pattern, but because you know exactly how to make the thread speak for you.
1. Lavender with Dimensional Texture
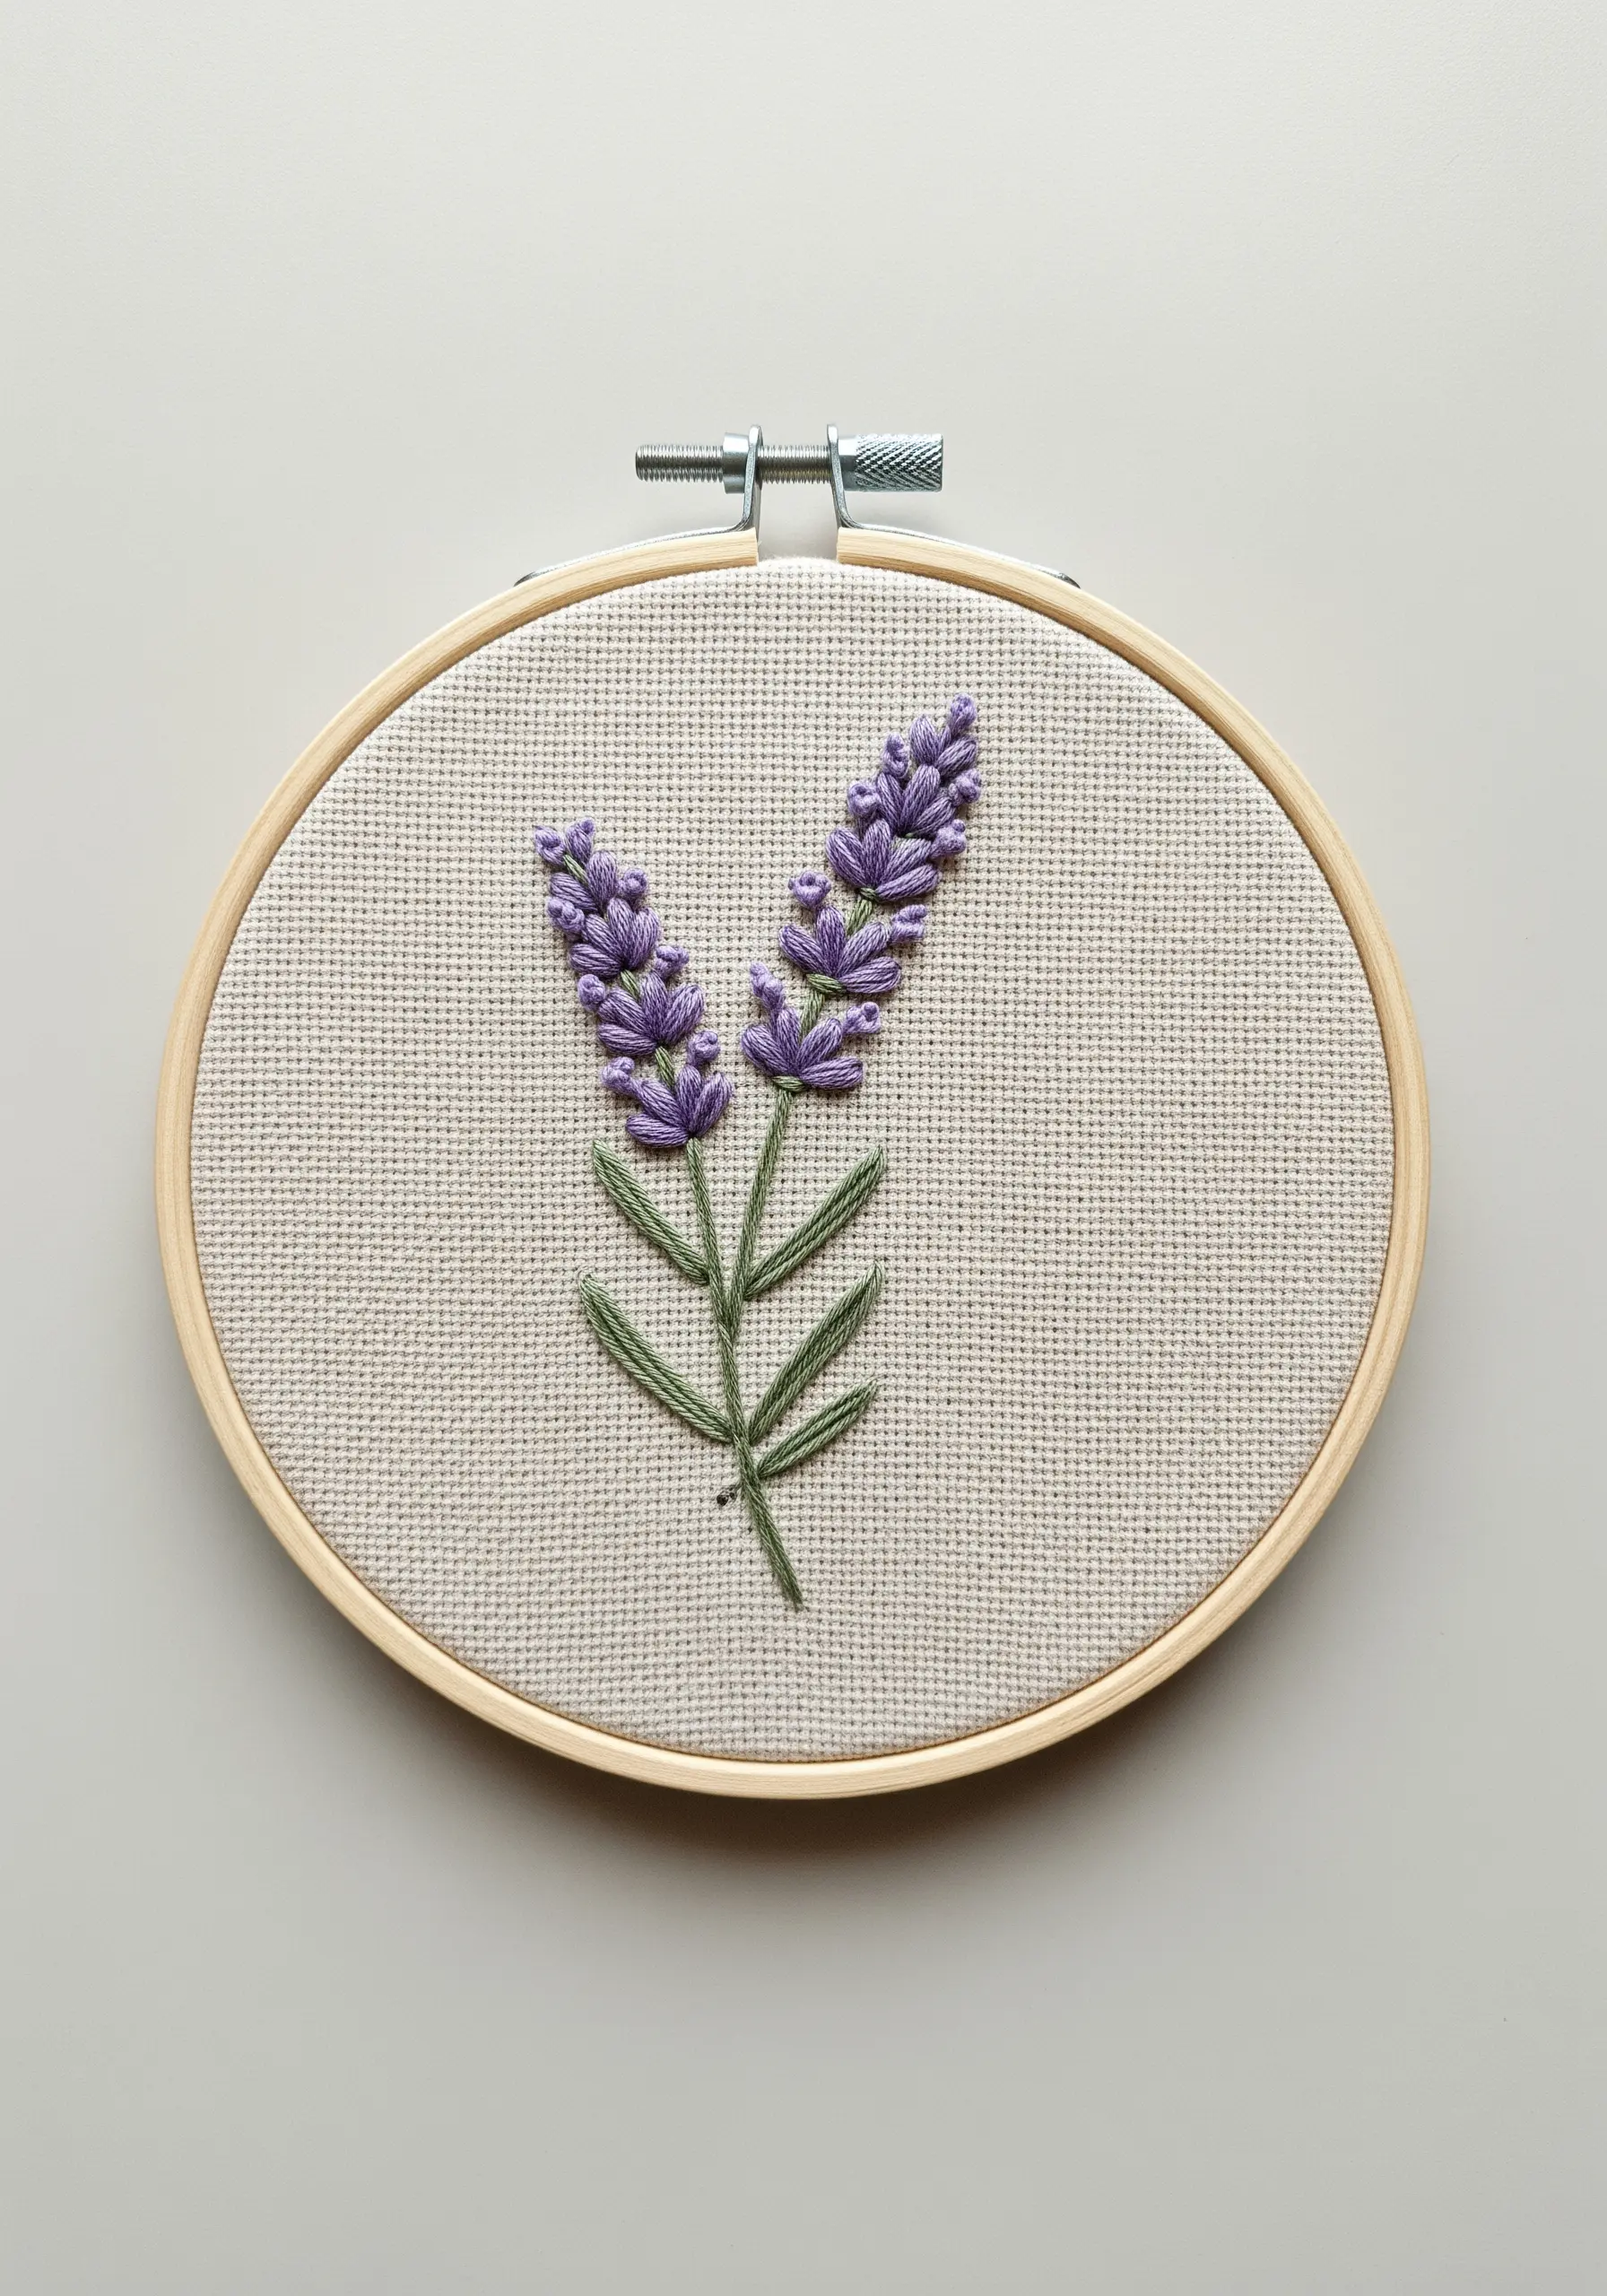
Create a more realistic lavender sprig by focusing on texture.
Use French knots for the buds, but vary the number of times you wrap the thread (once or twice) to create subtle differences in size, mimicking a natural cluster.
For the stems, a whipped backstitch provides a smooth, rounded finish that stands out against the fabric, giving the plant a more substantial presence.
This technique is perfect for creating calming bedroom art or adding a delicate touch to linen gifts.
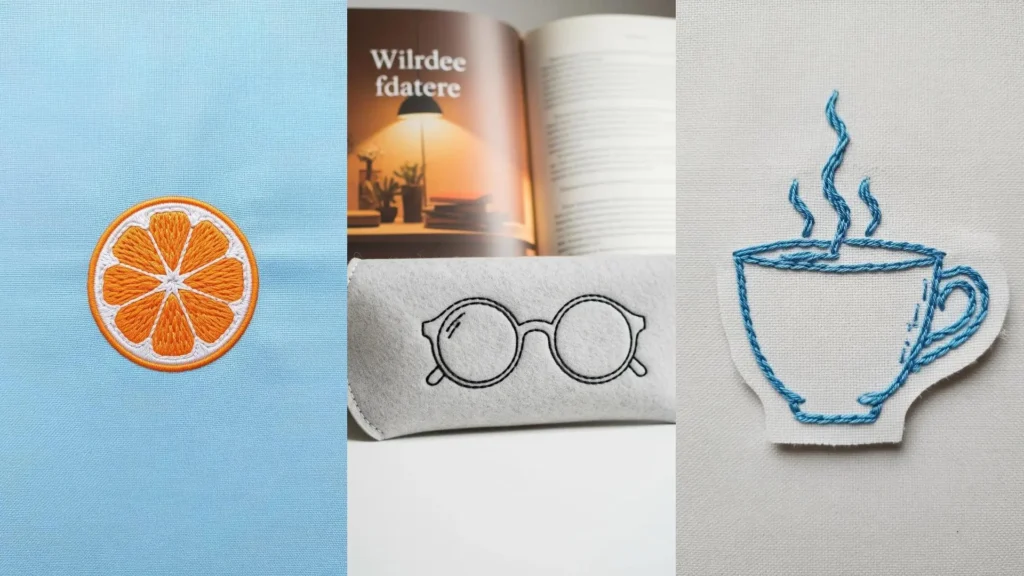
2. A Delicate Bee with Single-Strand Details
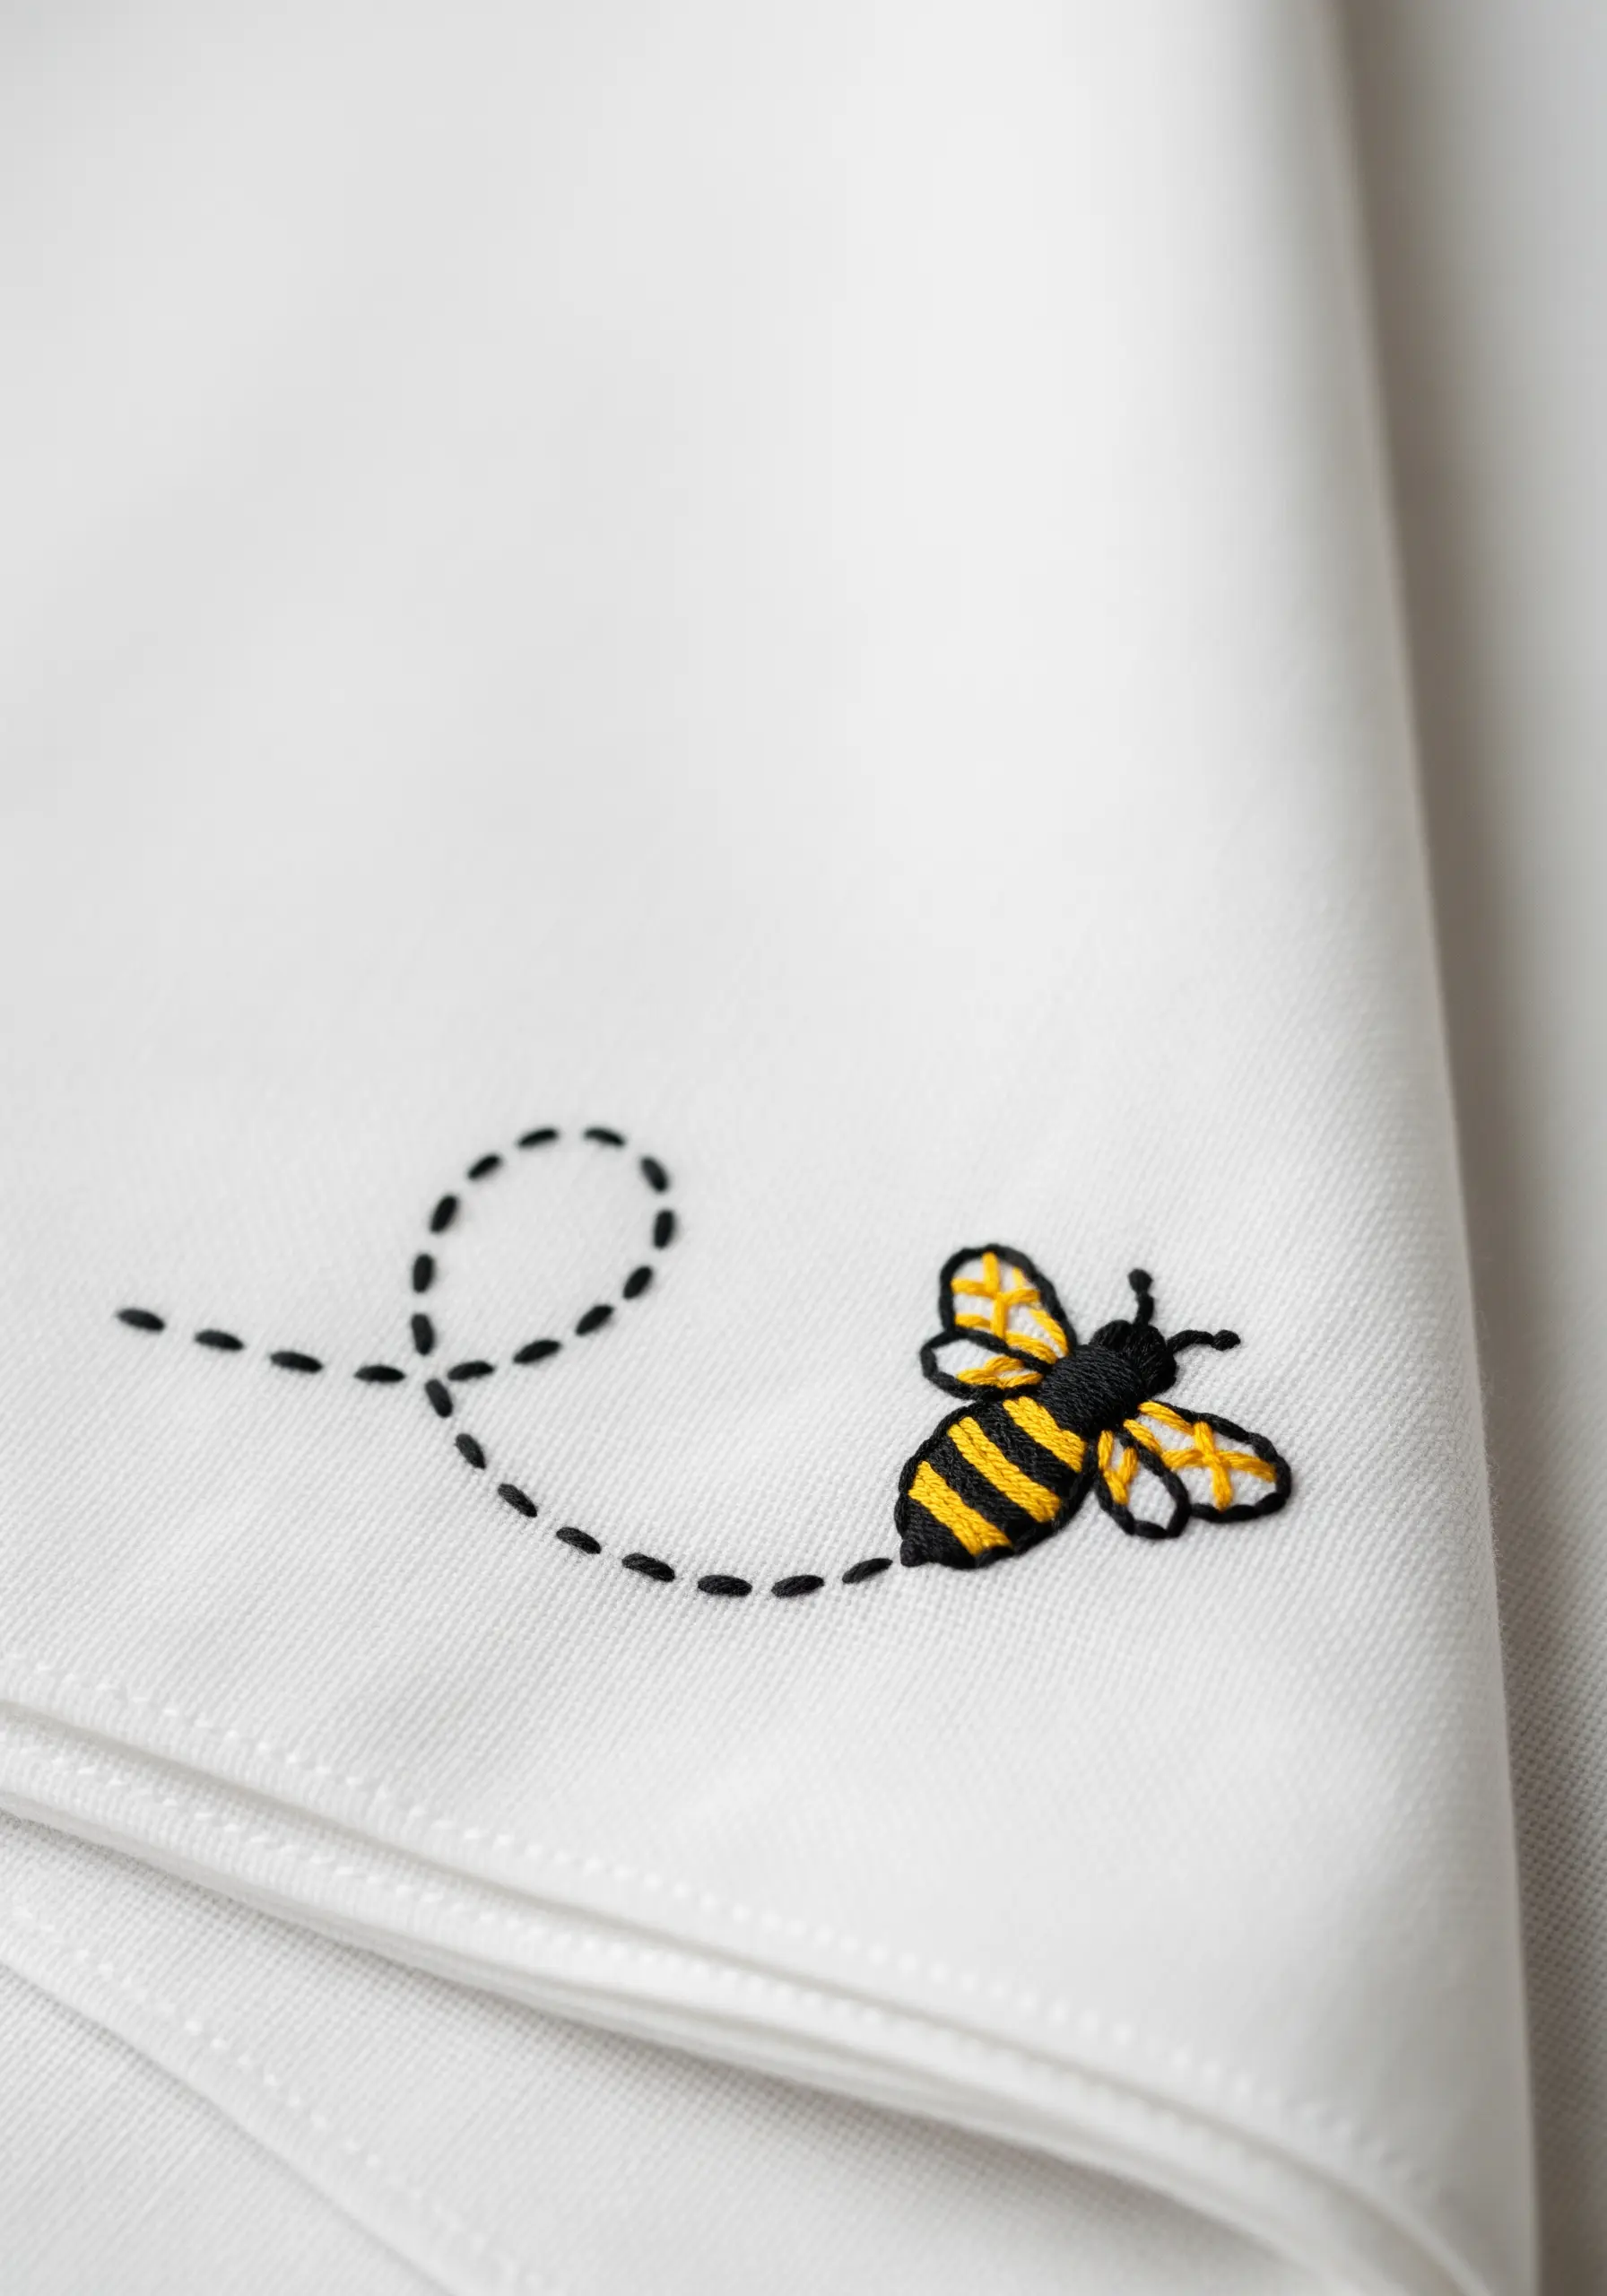
To achieve the fine, almost transparent look of a bee’s wings, switch to a single strand of black or grey thread for the outlines.
Fill the body with a classic satin stitch, angling your stitches slightly inward to create the illusion of a curved, plump shape.
This contrast between the delicate wings and the solid body is what gives tiny motifs like this a professional, detailed finish.
3. Clean Line Art on Paper
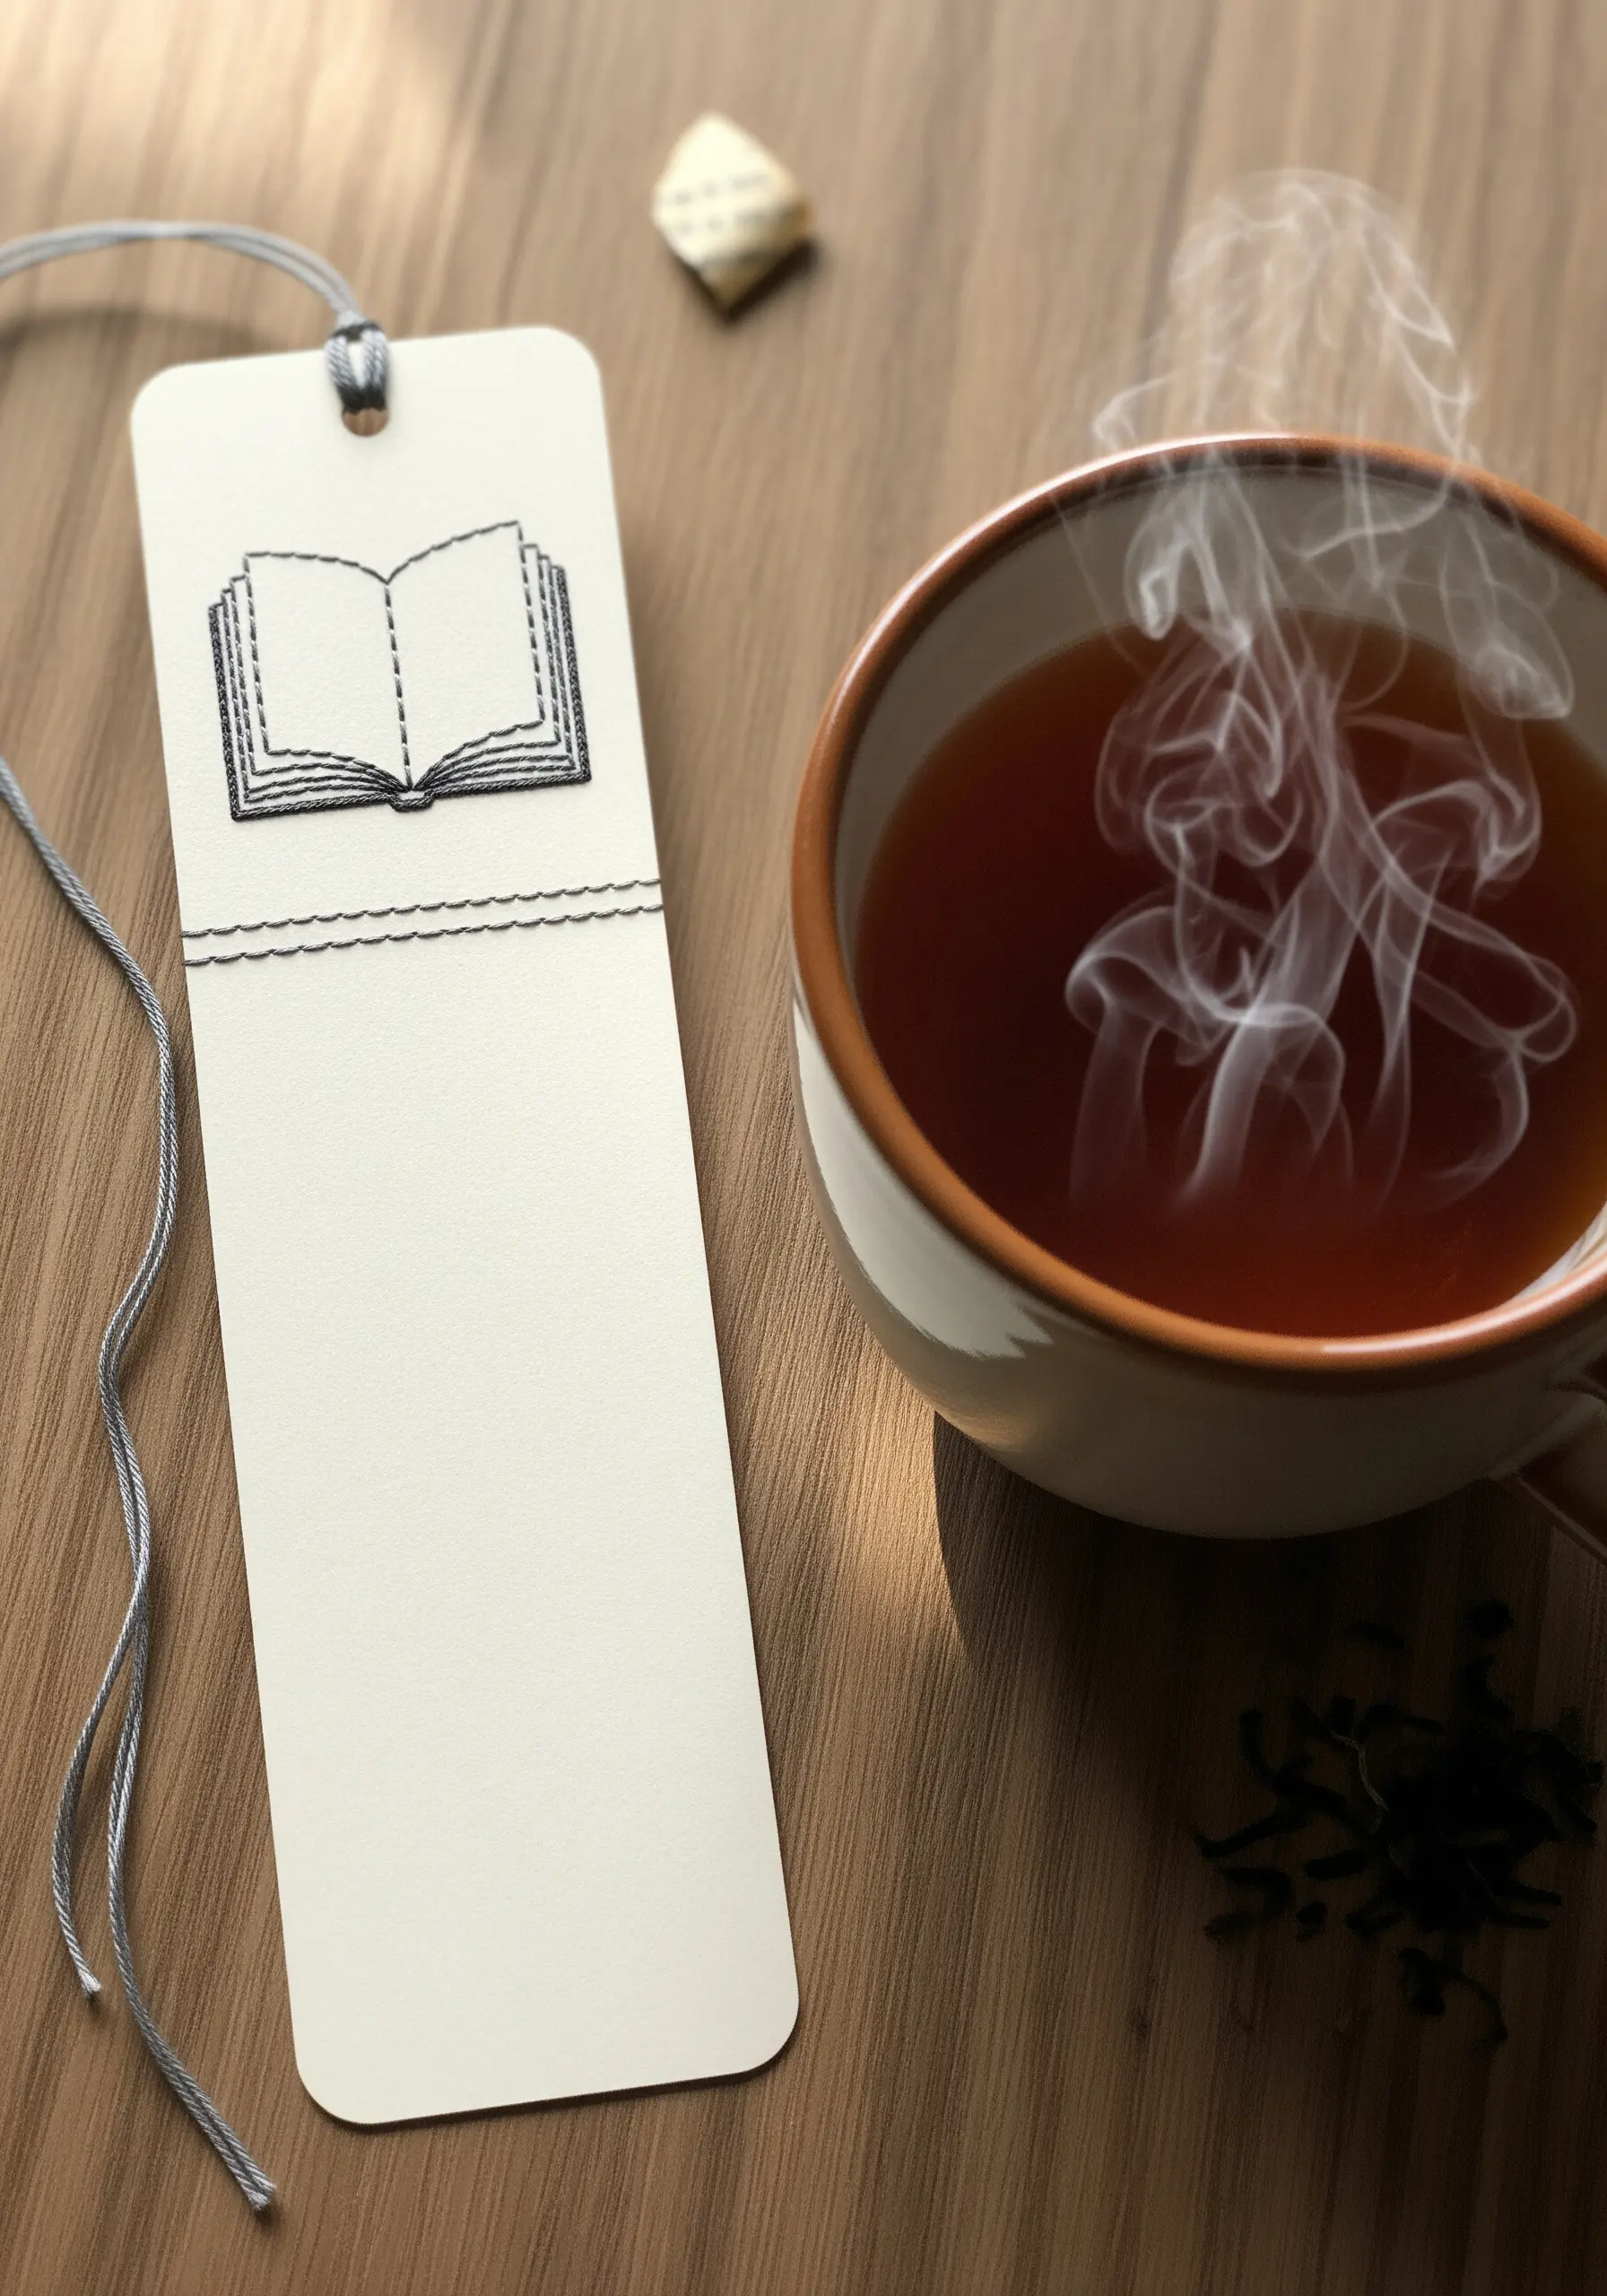
Embroidering on cardstock creates a uniquely tactile gift for book lovers.
First, gently pre-punch your holes along the design lines with a pin or awl to prevent tearing the paper.
Use a simple backstitch with three strands of floss for a bold, clean line that won’t overwhelm the paper.
This method turns a simple bookmark into a thoughtful, handmade keepsake and is a great way to explore paper art techniques.
4. A High-Contrast Textured Moon
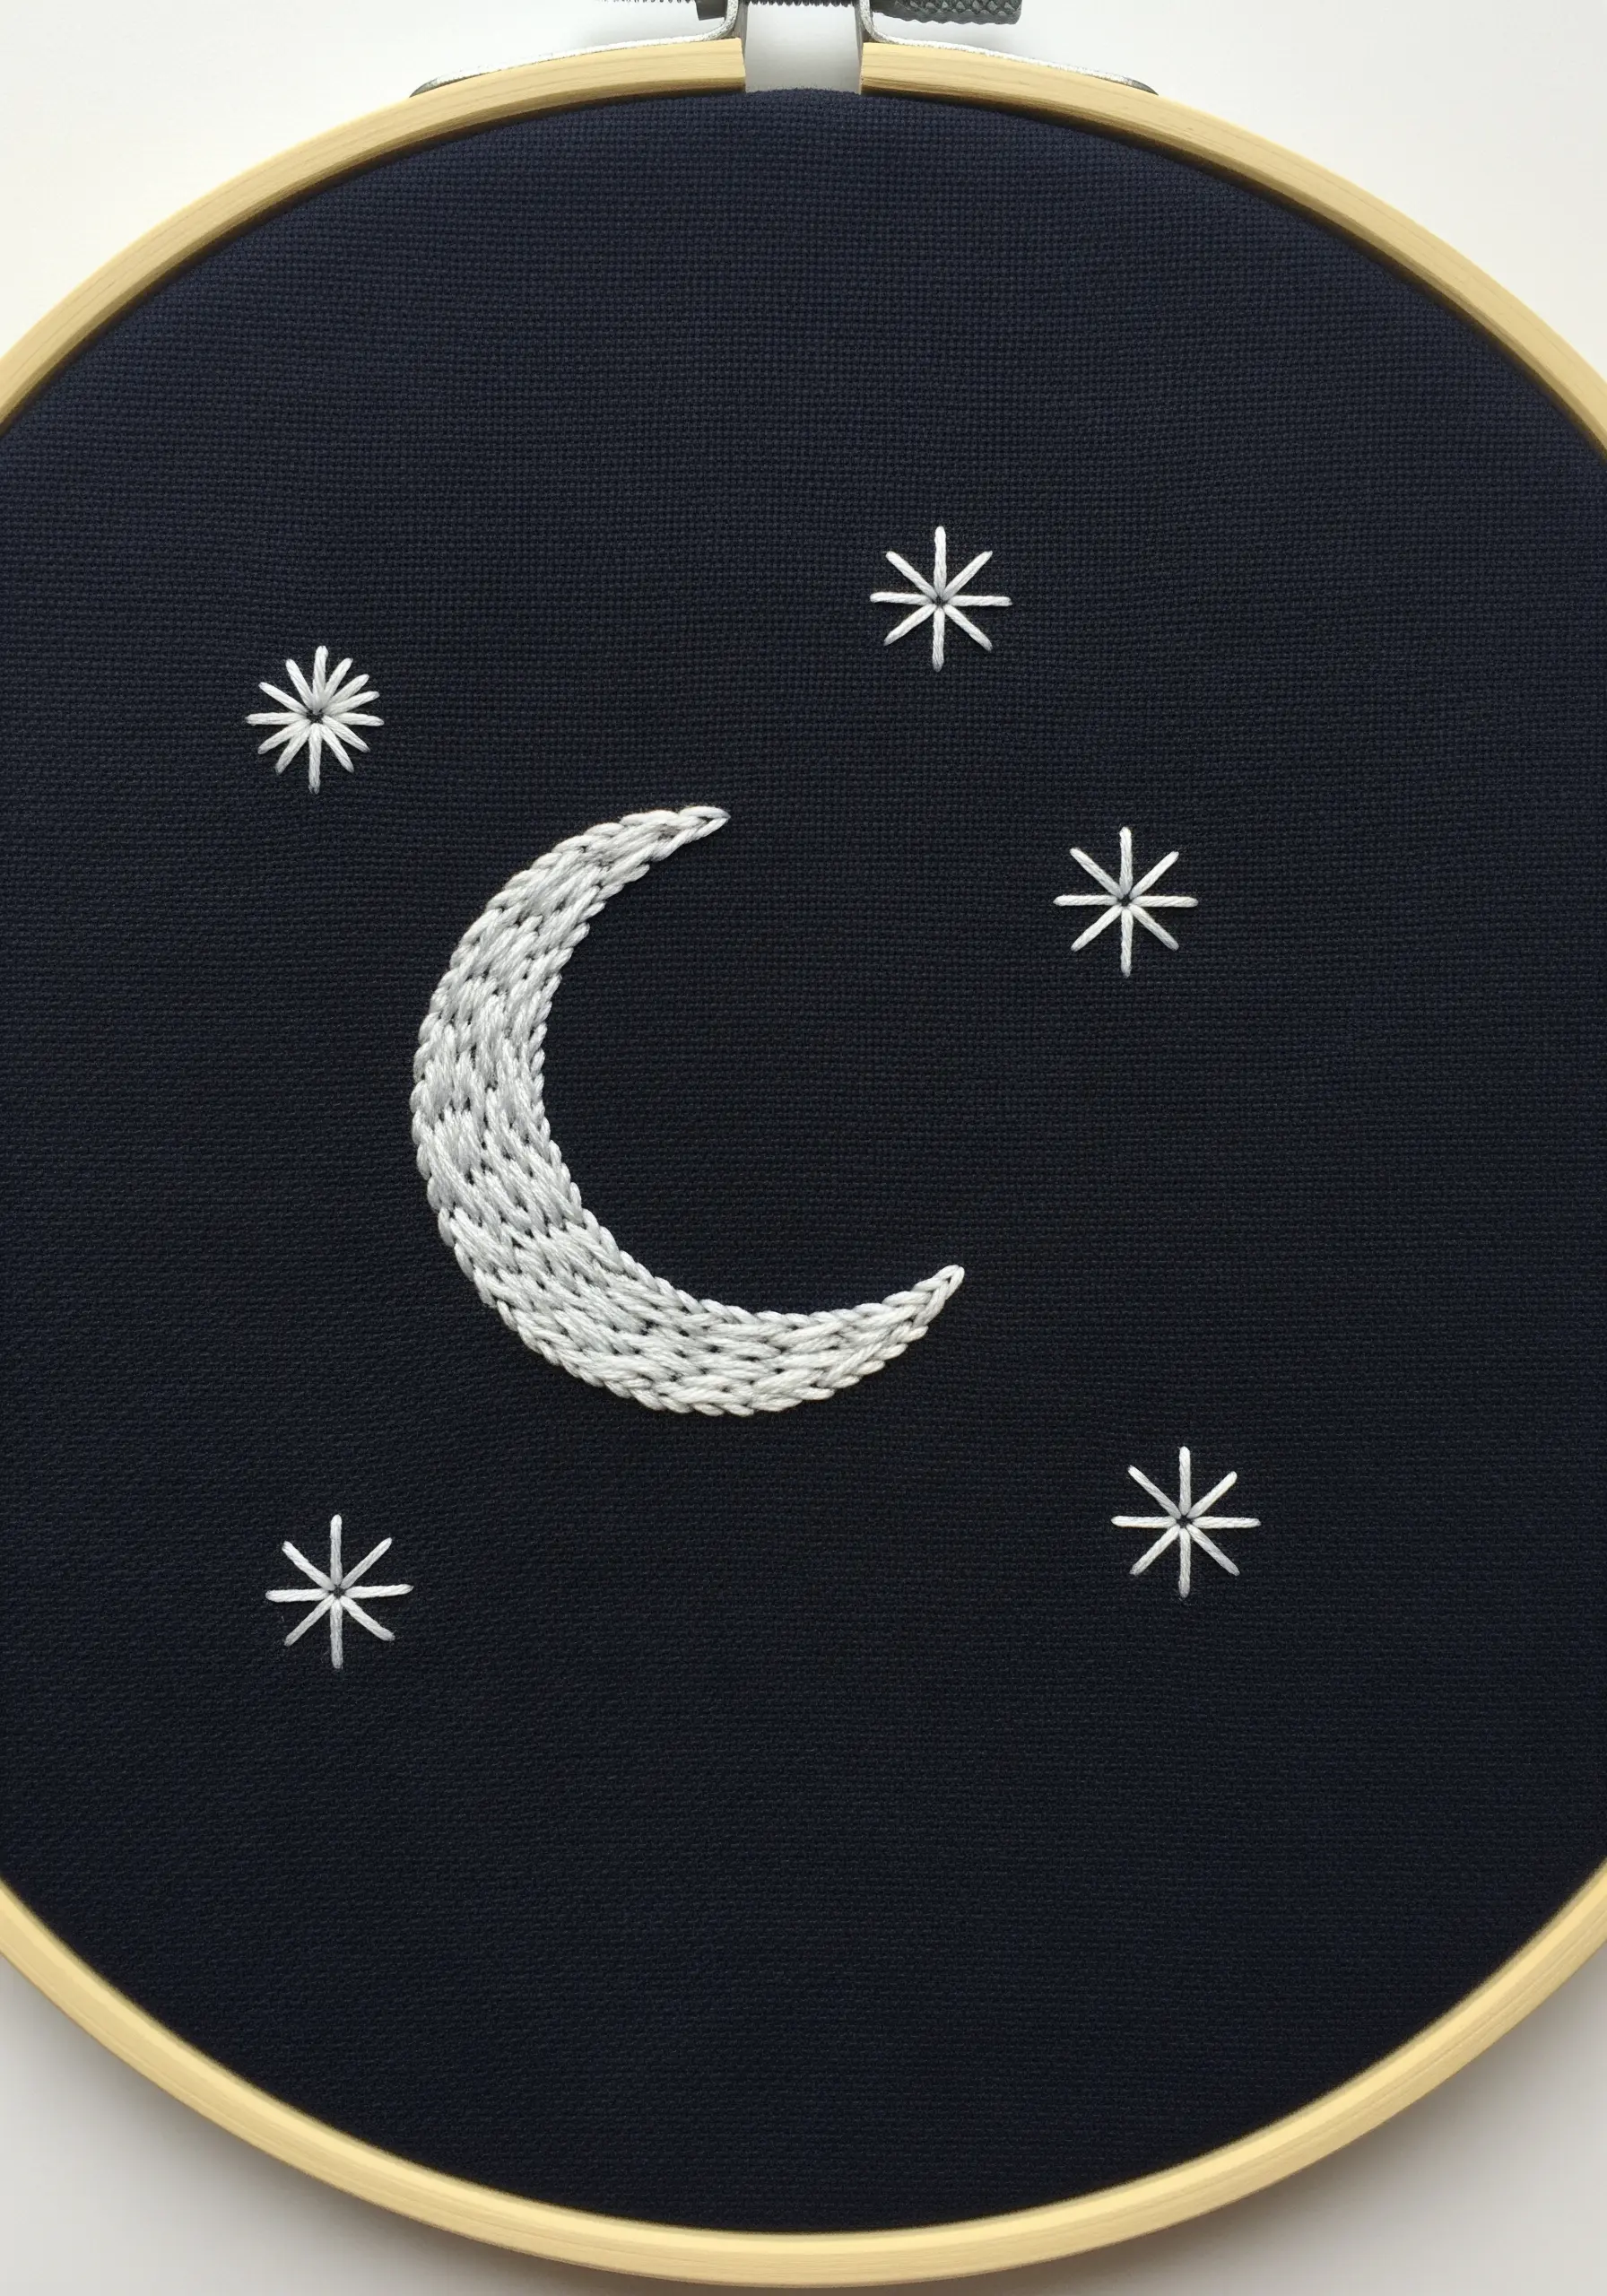
Create striking visual texture by filling the crescent moon with layered straight stitches instead of a flat satin stitch.
Lay your stitches in slightly different directions, overlapping them to build a woven, almost painterly effect that catches the light.
For the stars, a simple star stitch using fewer strands keeps the focus on the moon’s texture, making it a perfect element for tiny night sky embroidery designs.
5. Mountain Patch with Directional Fill
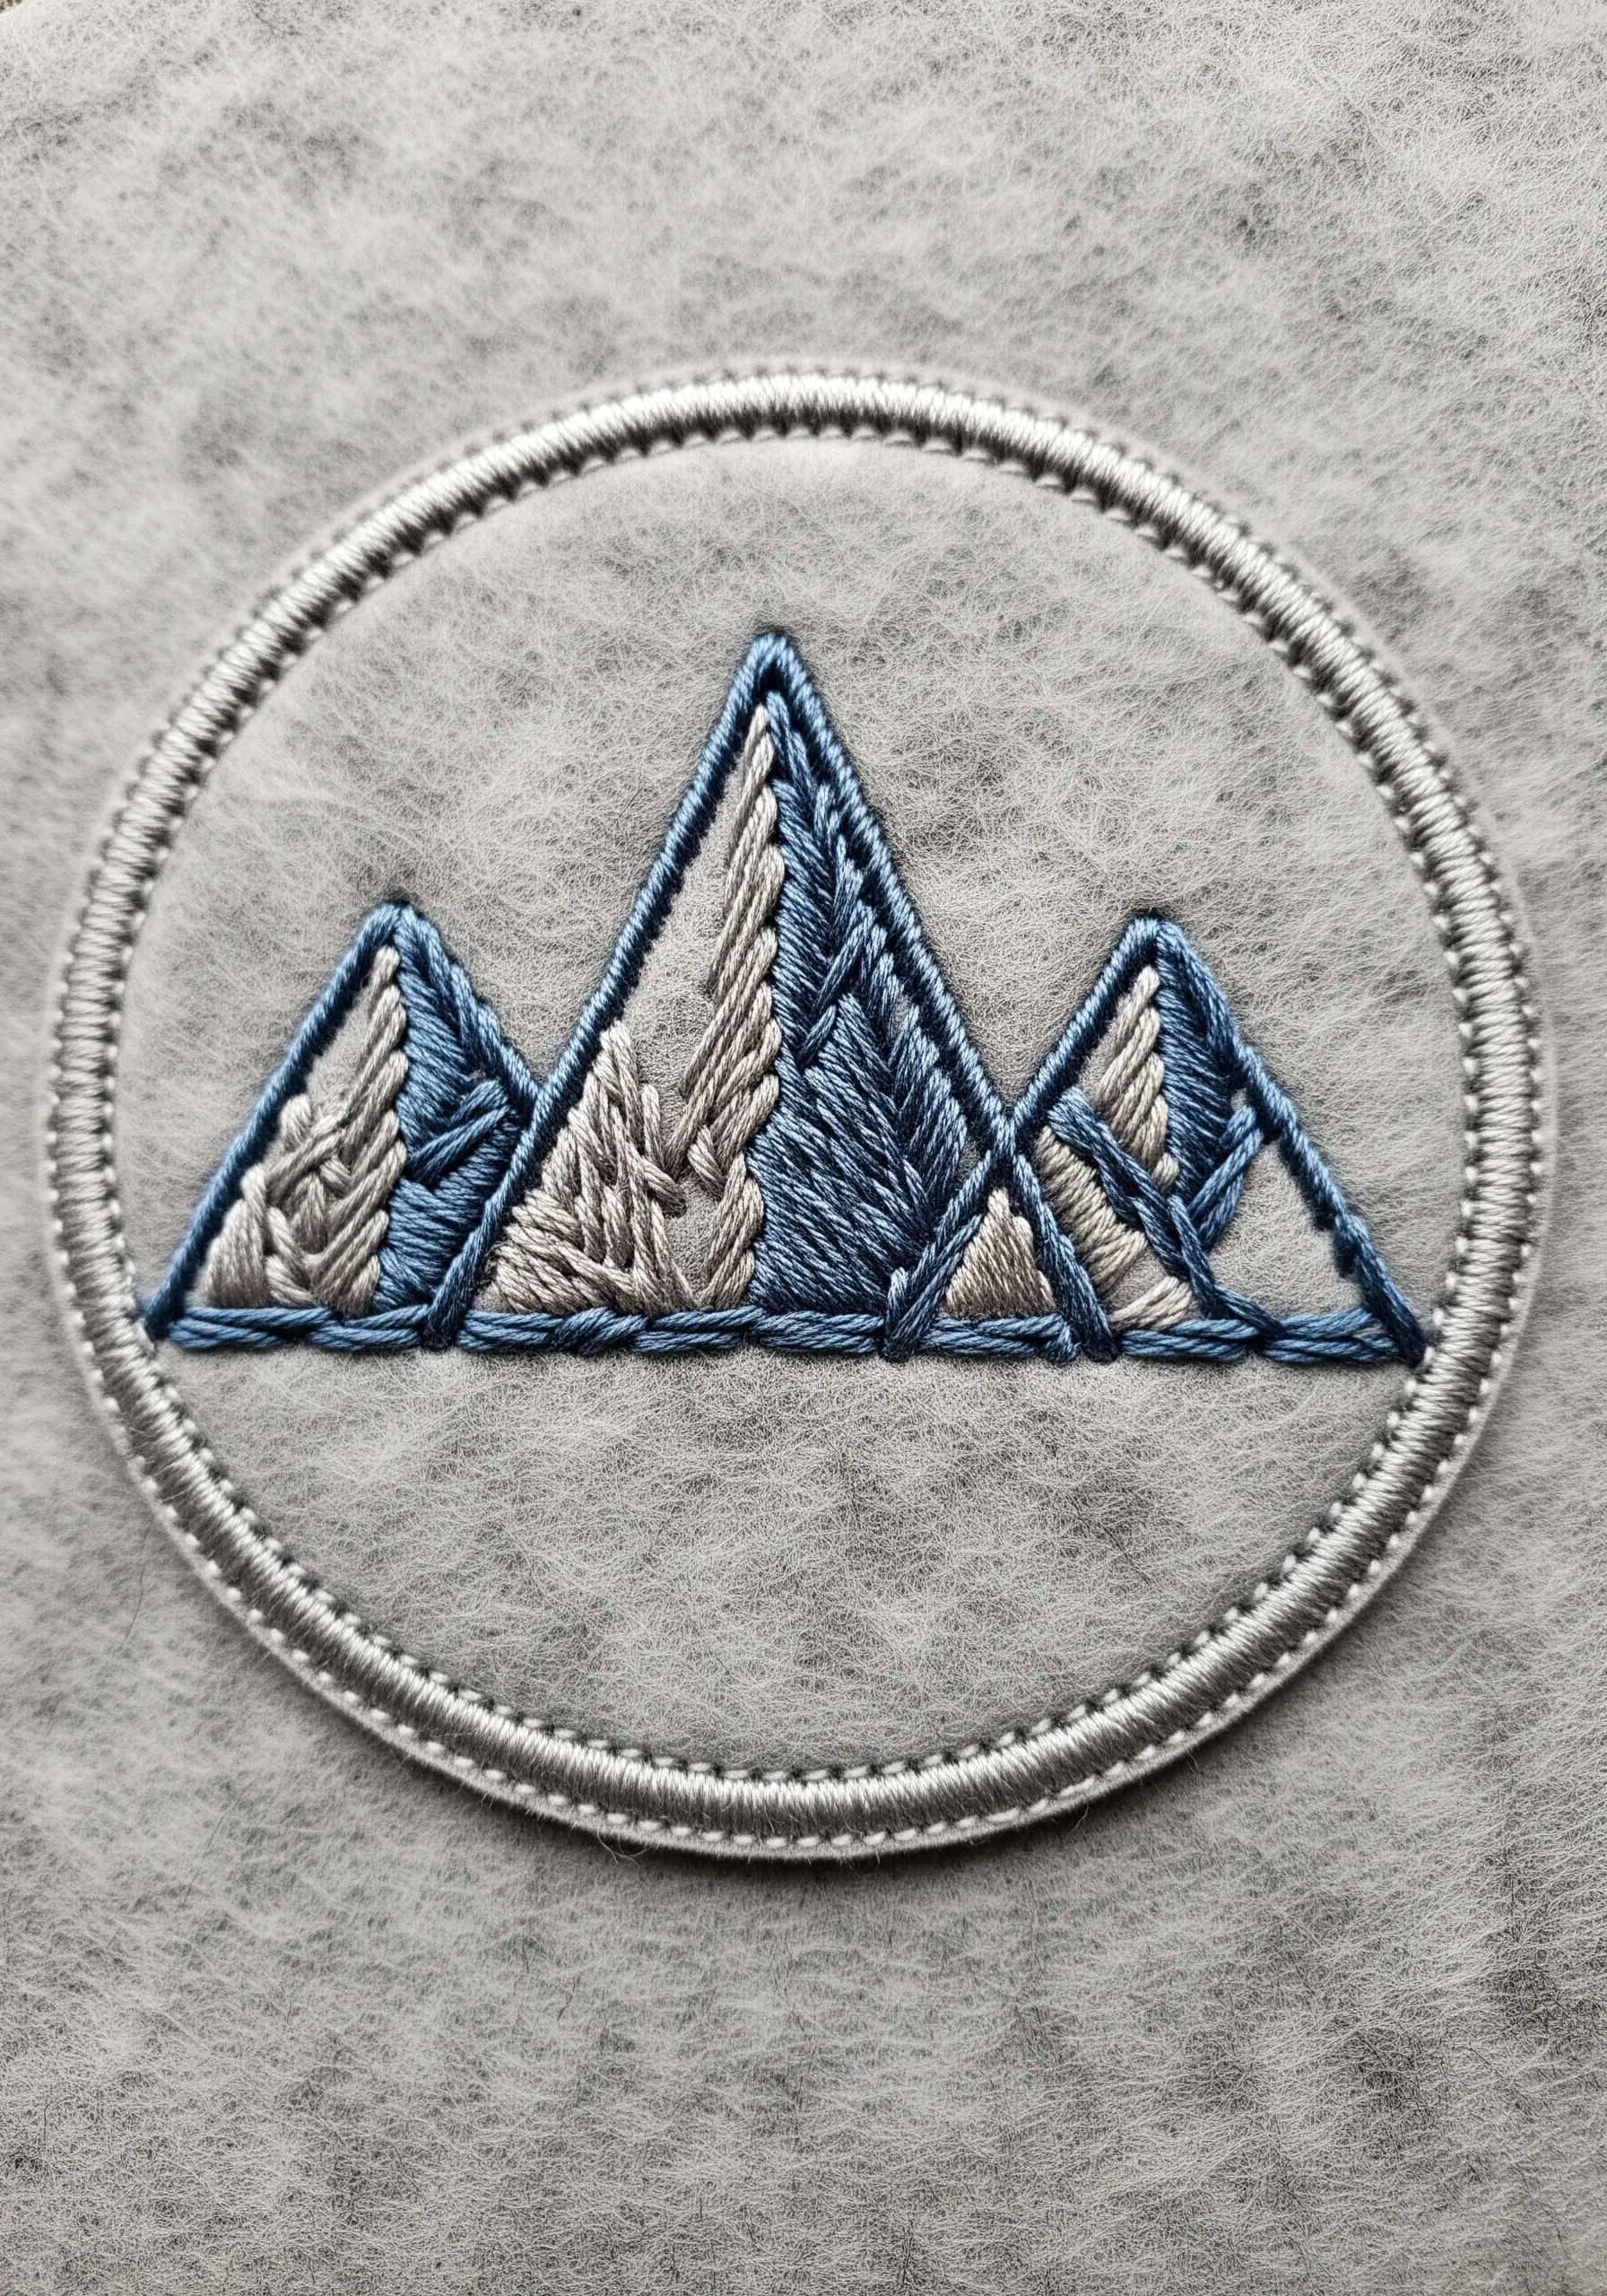
To give your mountain range depth, fill each distinct plane with a long and short stitch, but change the angle of the stitches for each section.
This technique mimics the way light and shadow fall on different faces of a mountain, creating dimension without needing many colors.
A tight, clean border made with a satin stitch transforms the design into a polished, wearable patch.
6. An Elegant Monogram on a Gift Tag
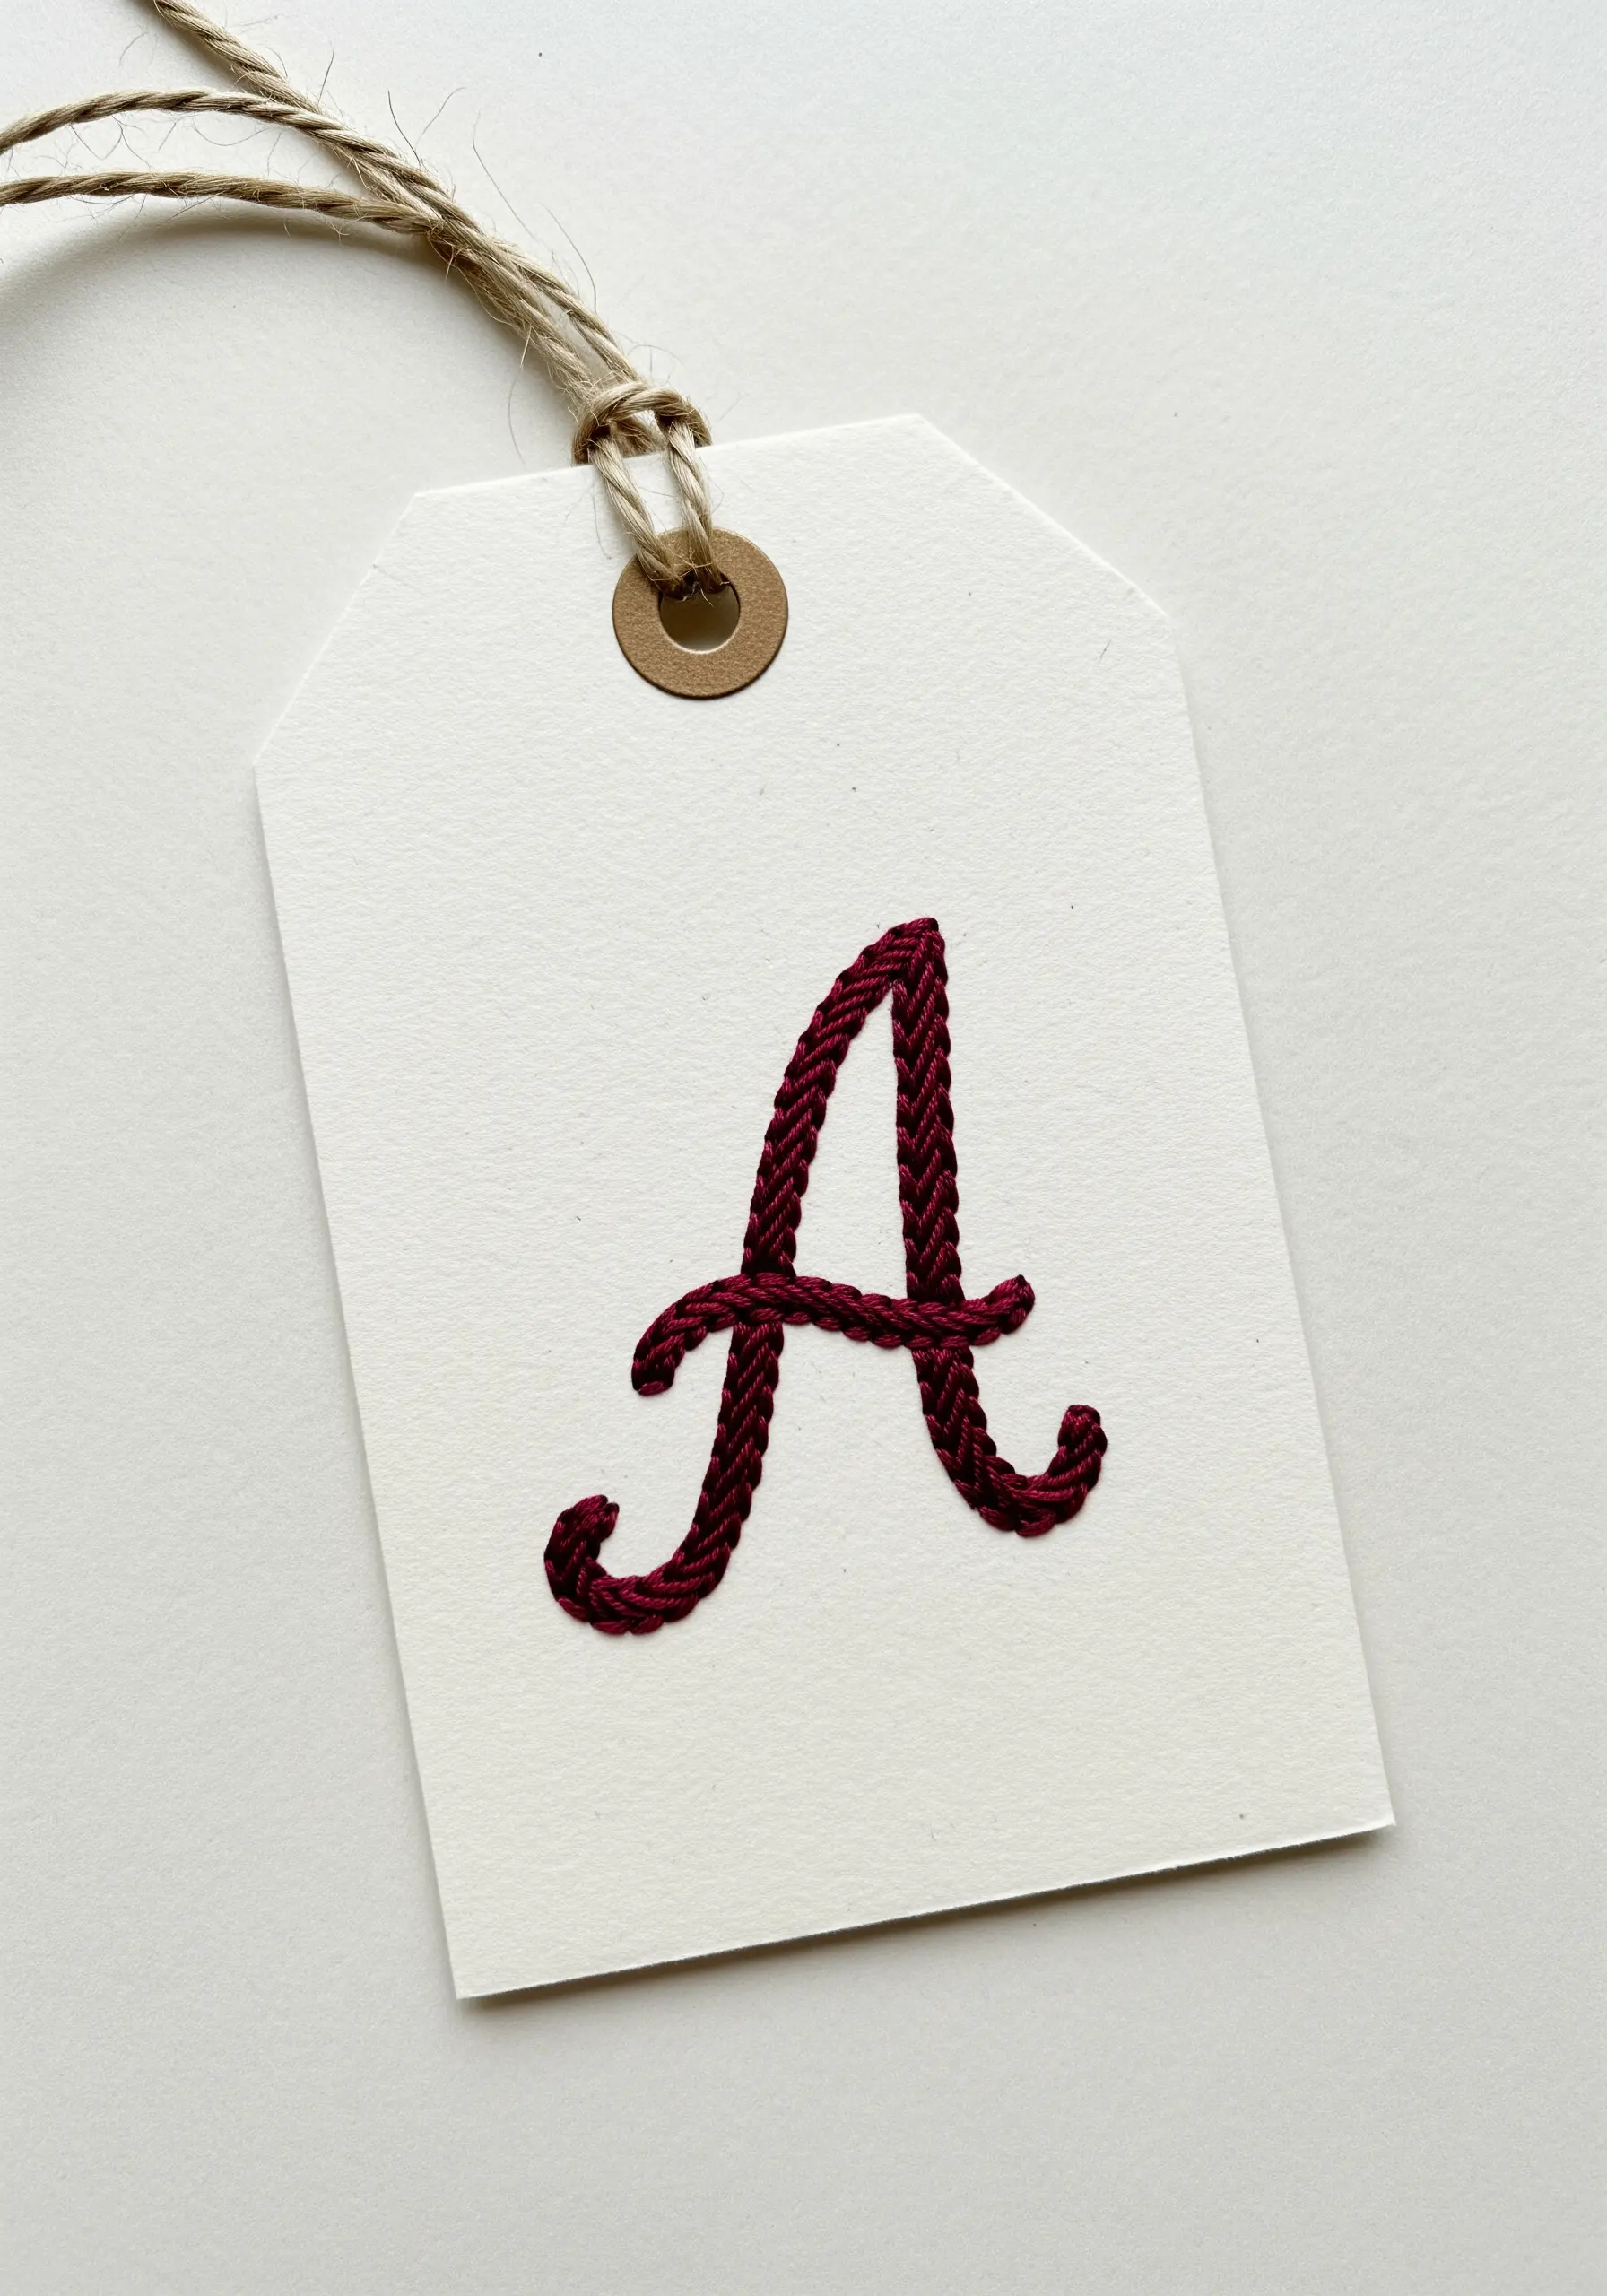
Elevate a simple initial by using a whipped backstitch.
First, create the letter shape with a standard backstitch.
Then, take a second thread (either matching or contrasting) and wrap it around each stitch without piercing the paper or fabric.
This technique smooths out the curves and creates a raised, cord-like effect that makes minimal monogram styles look incredibly sophisticated.
7. A Modern Monstera with a Bold Outline
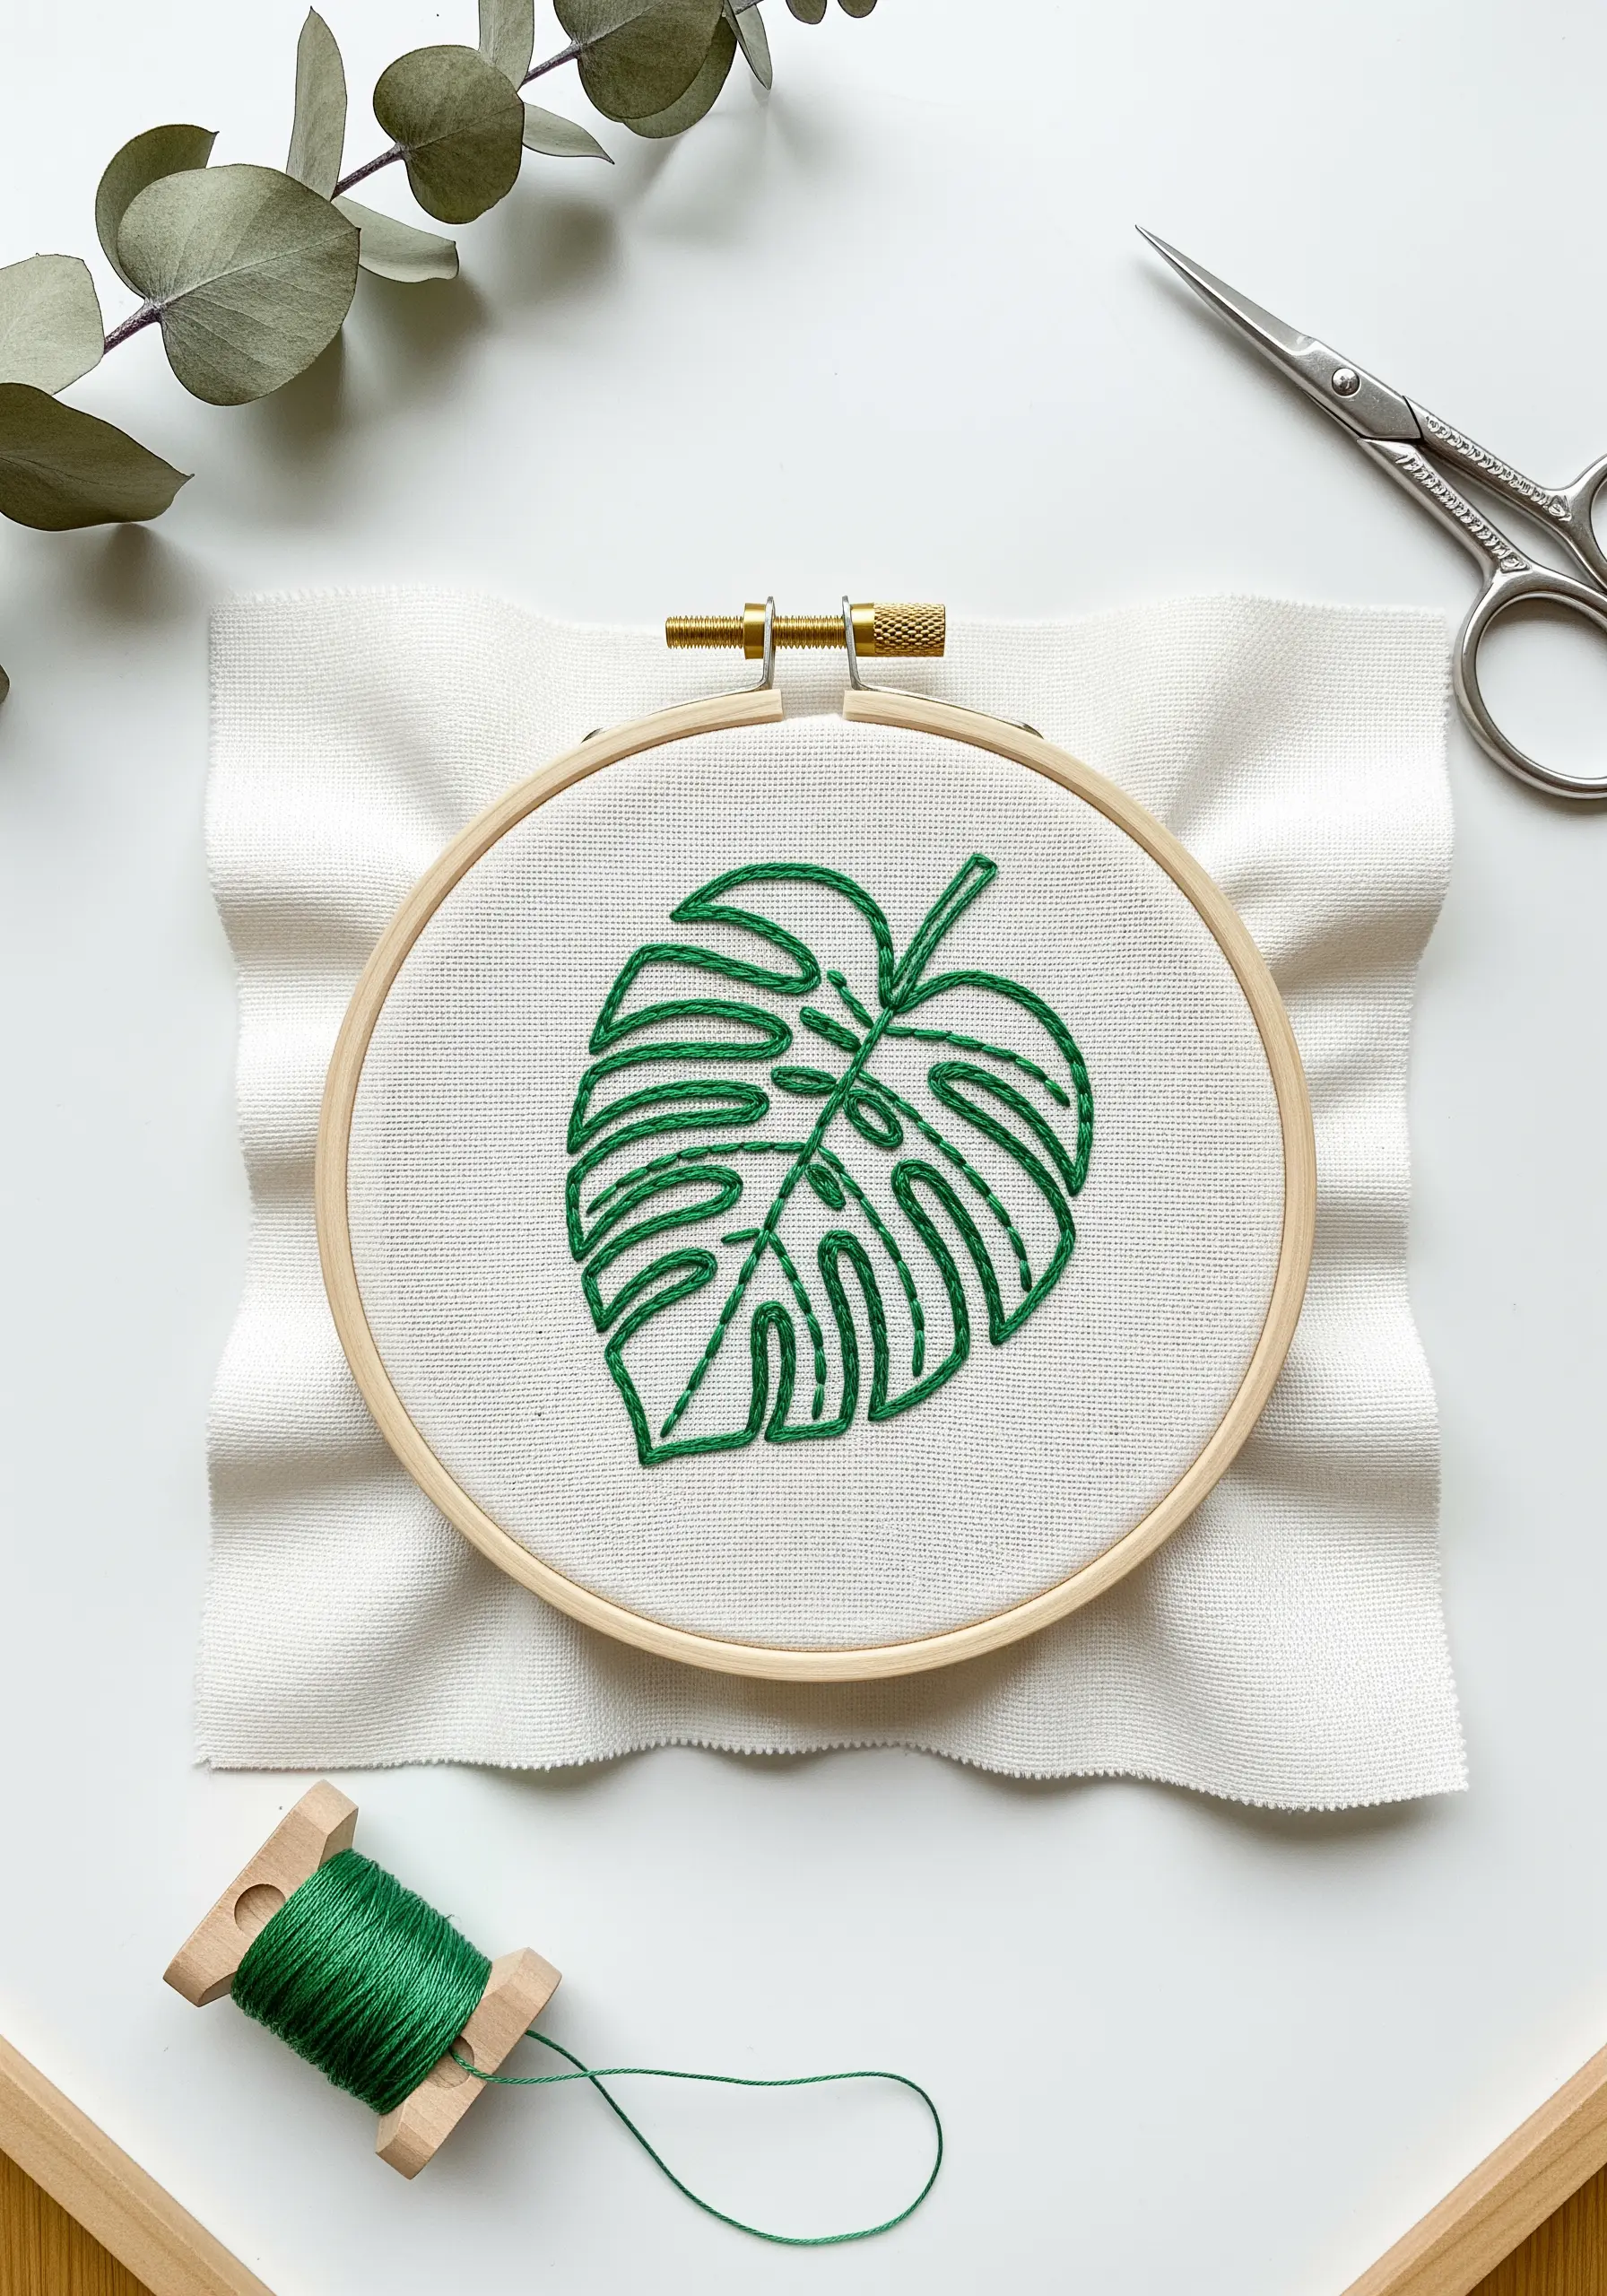
For a clean, graphic botanical, use a chain stitch for the entire outline.
This stitch creates a thicker, more defined line than a backstitch, which is perfect for minimalist designs where the line itself is the main feature.
Using a consistent stitch length around the curves is key to achieving a smooth, modern look, especially for popular tropical leaf embroidery designs.
8. A Steaming Cup with Purposeful Stitches
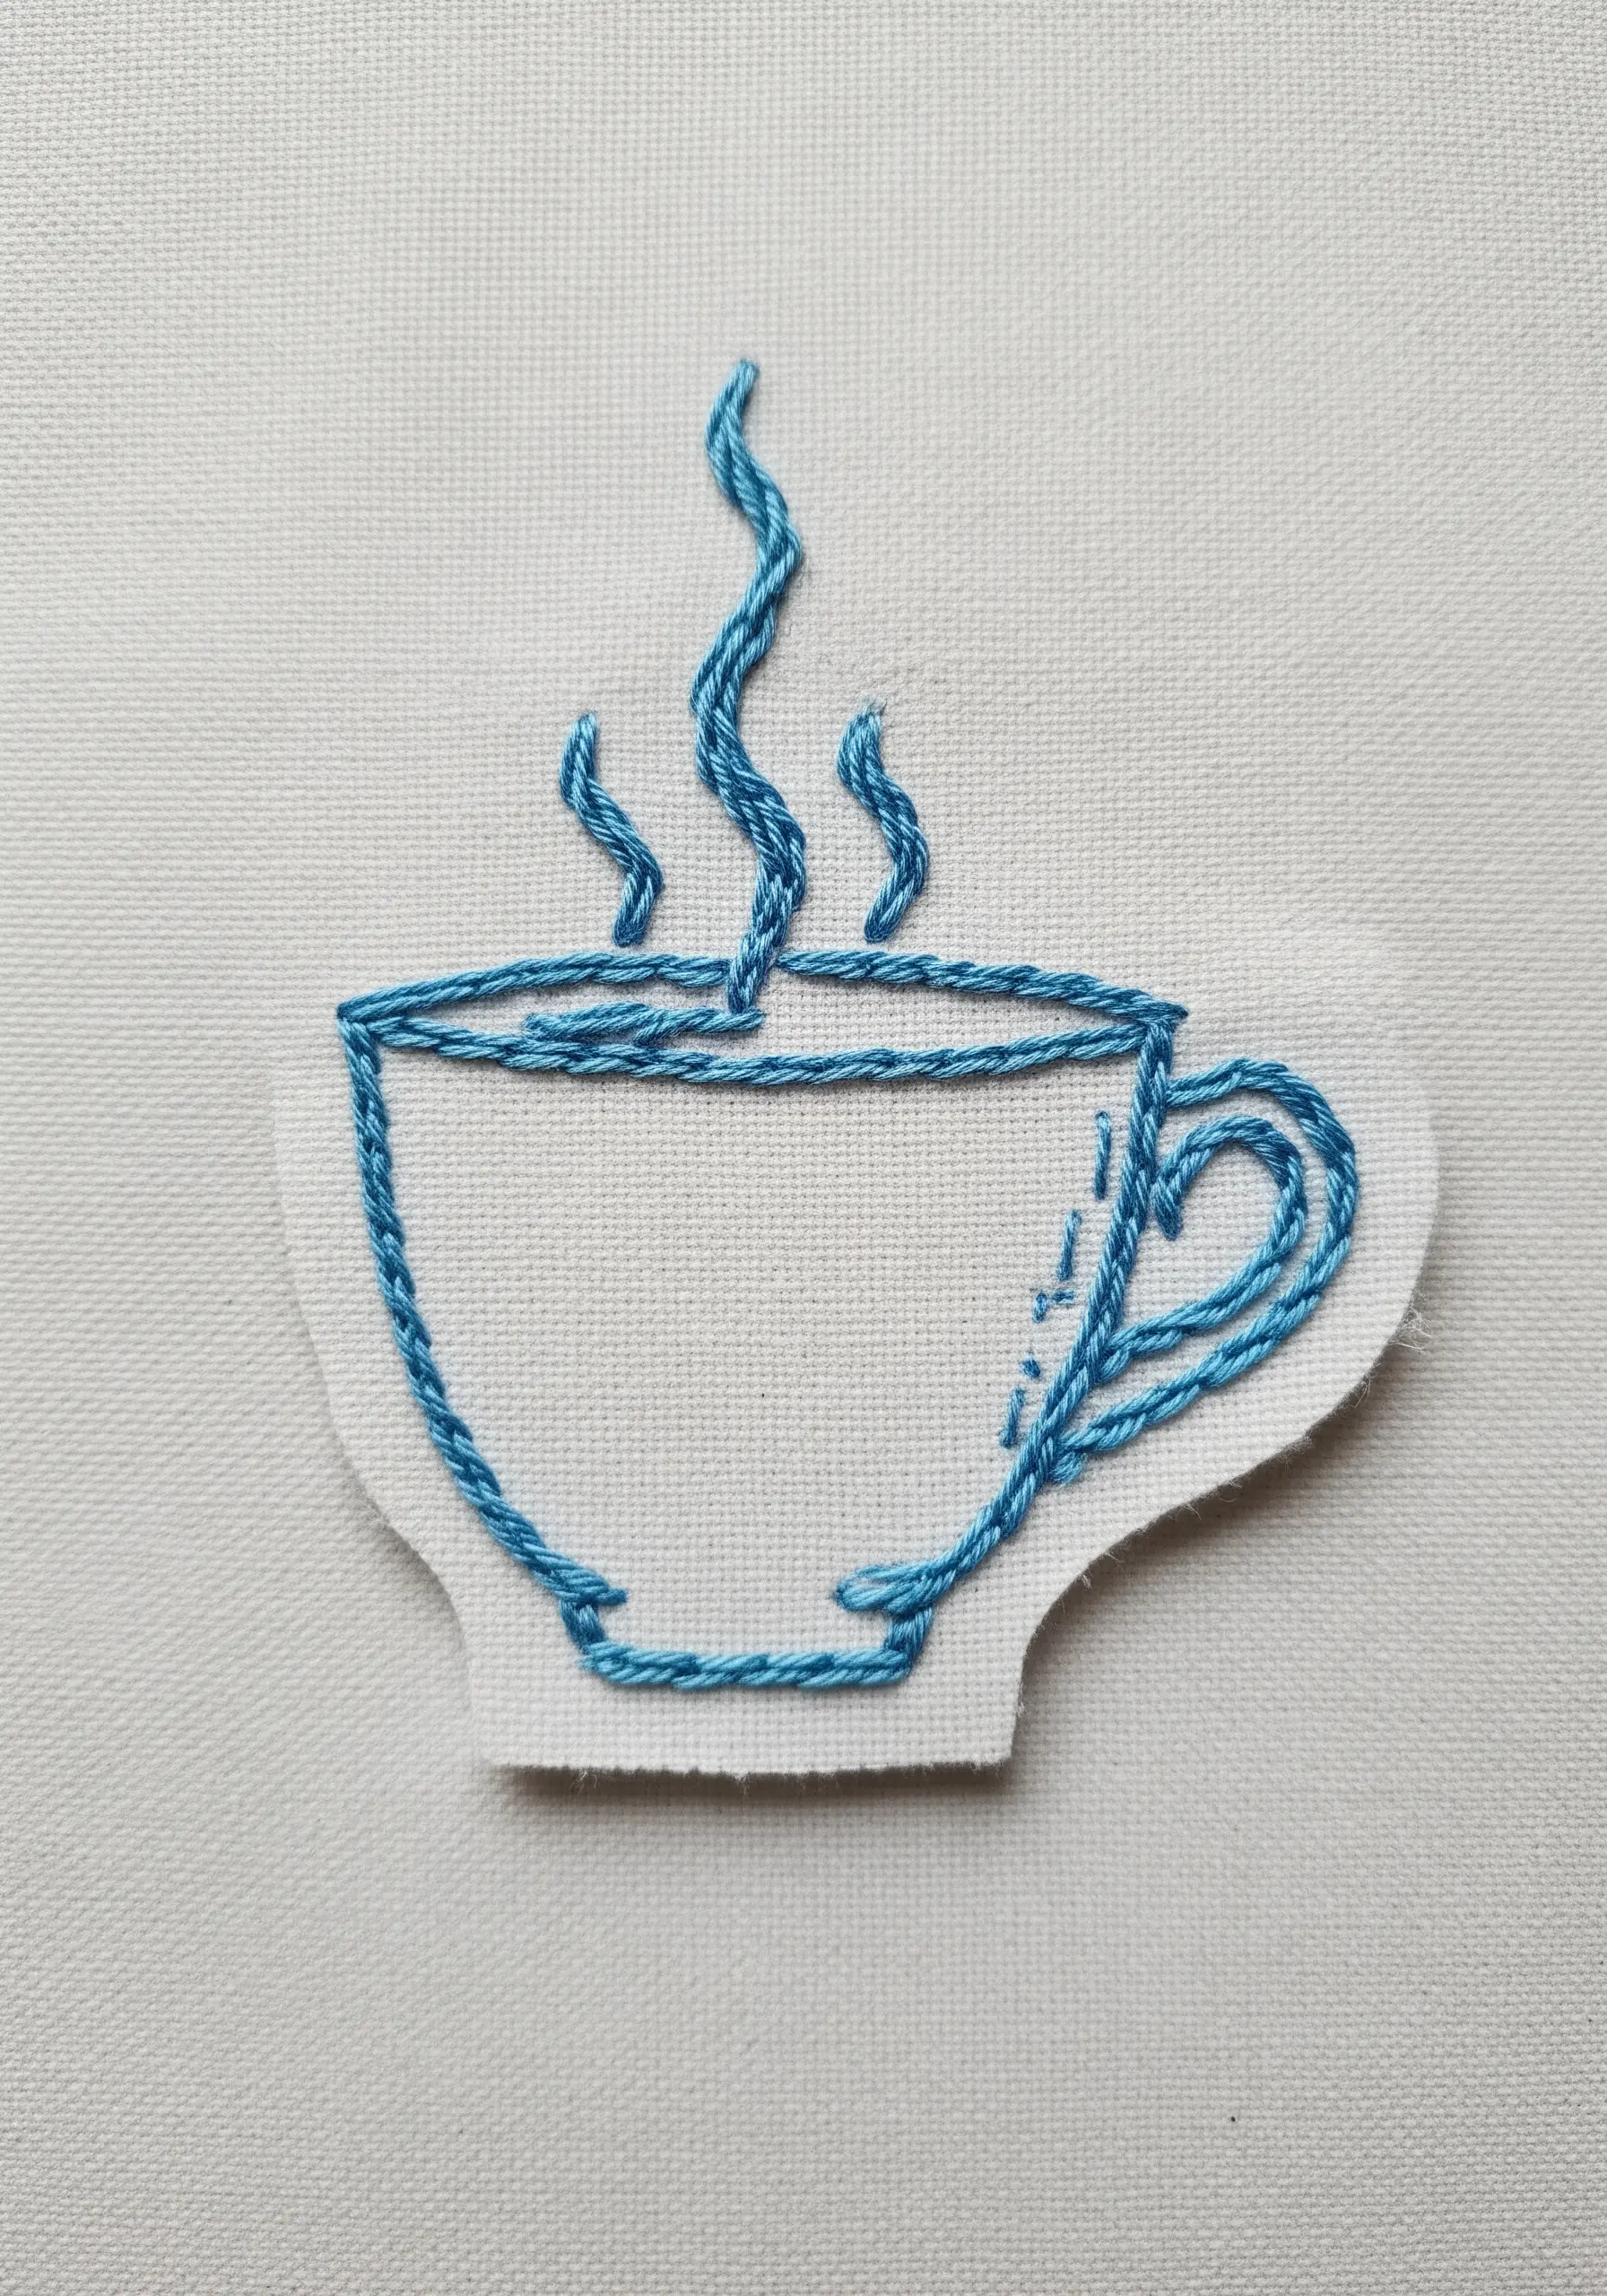
Combine different line stitches to add character to a simple outline.
Use a whipped backstitch for the cup and handle to create a solid, stable shape.
For the steam, switch to a stem stitch—its naturally twisting, rope-like appearance gives a sense of gentle, flowing movement that a simple backstitch wouldn’t capture.
9. Abstract Waves on a Pouch
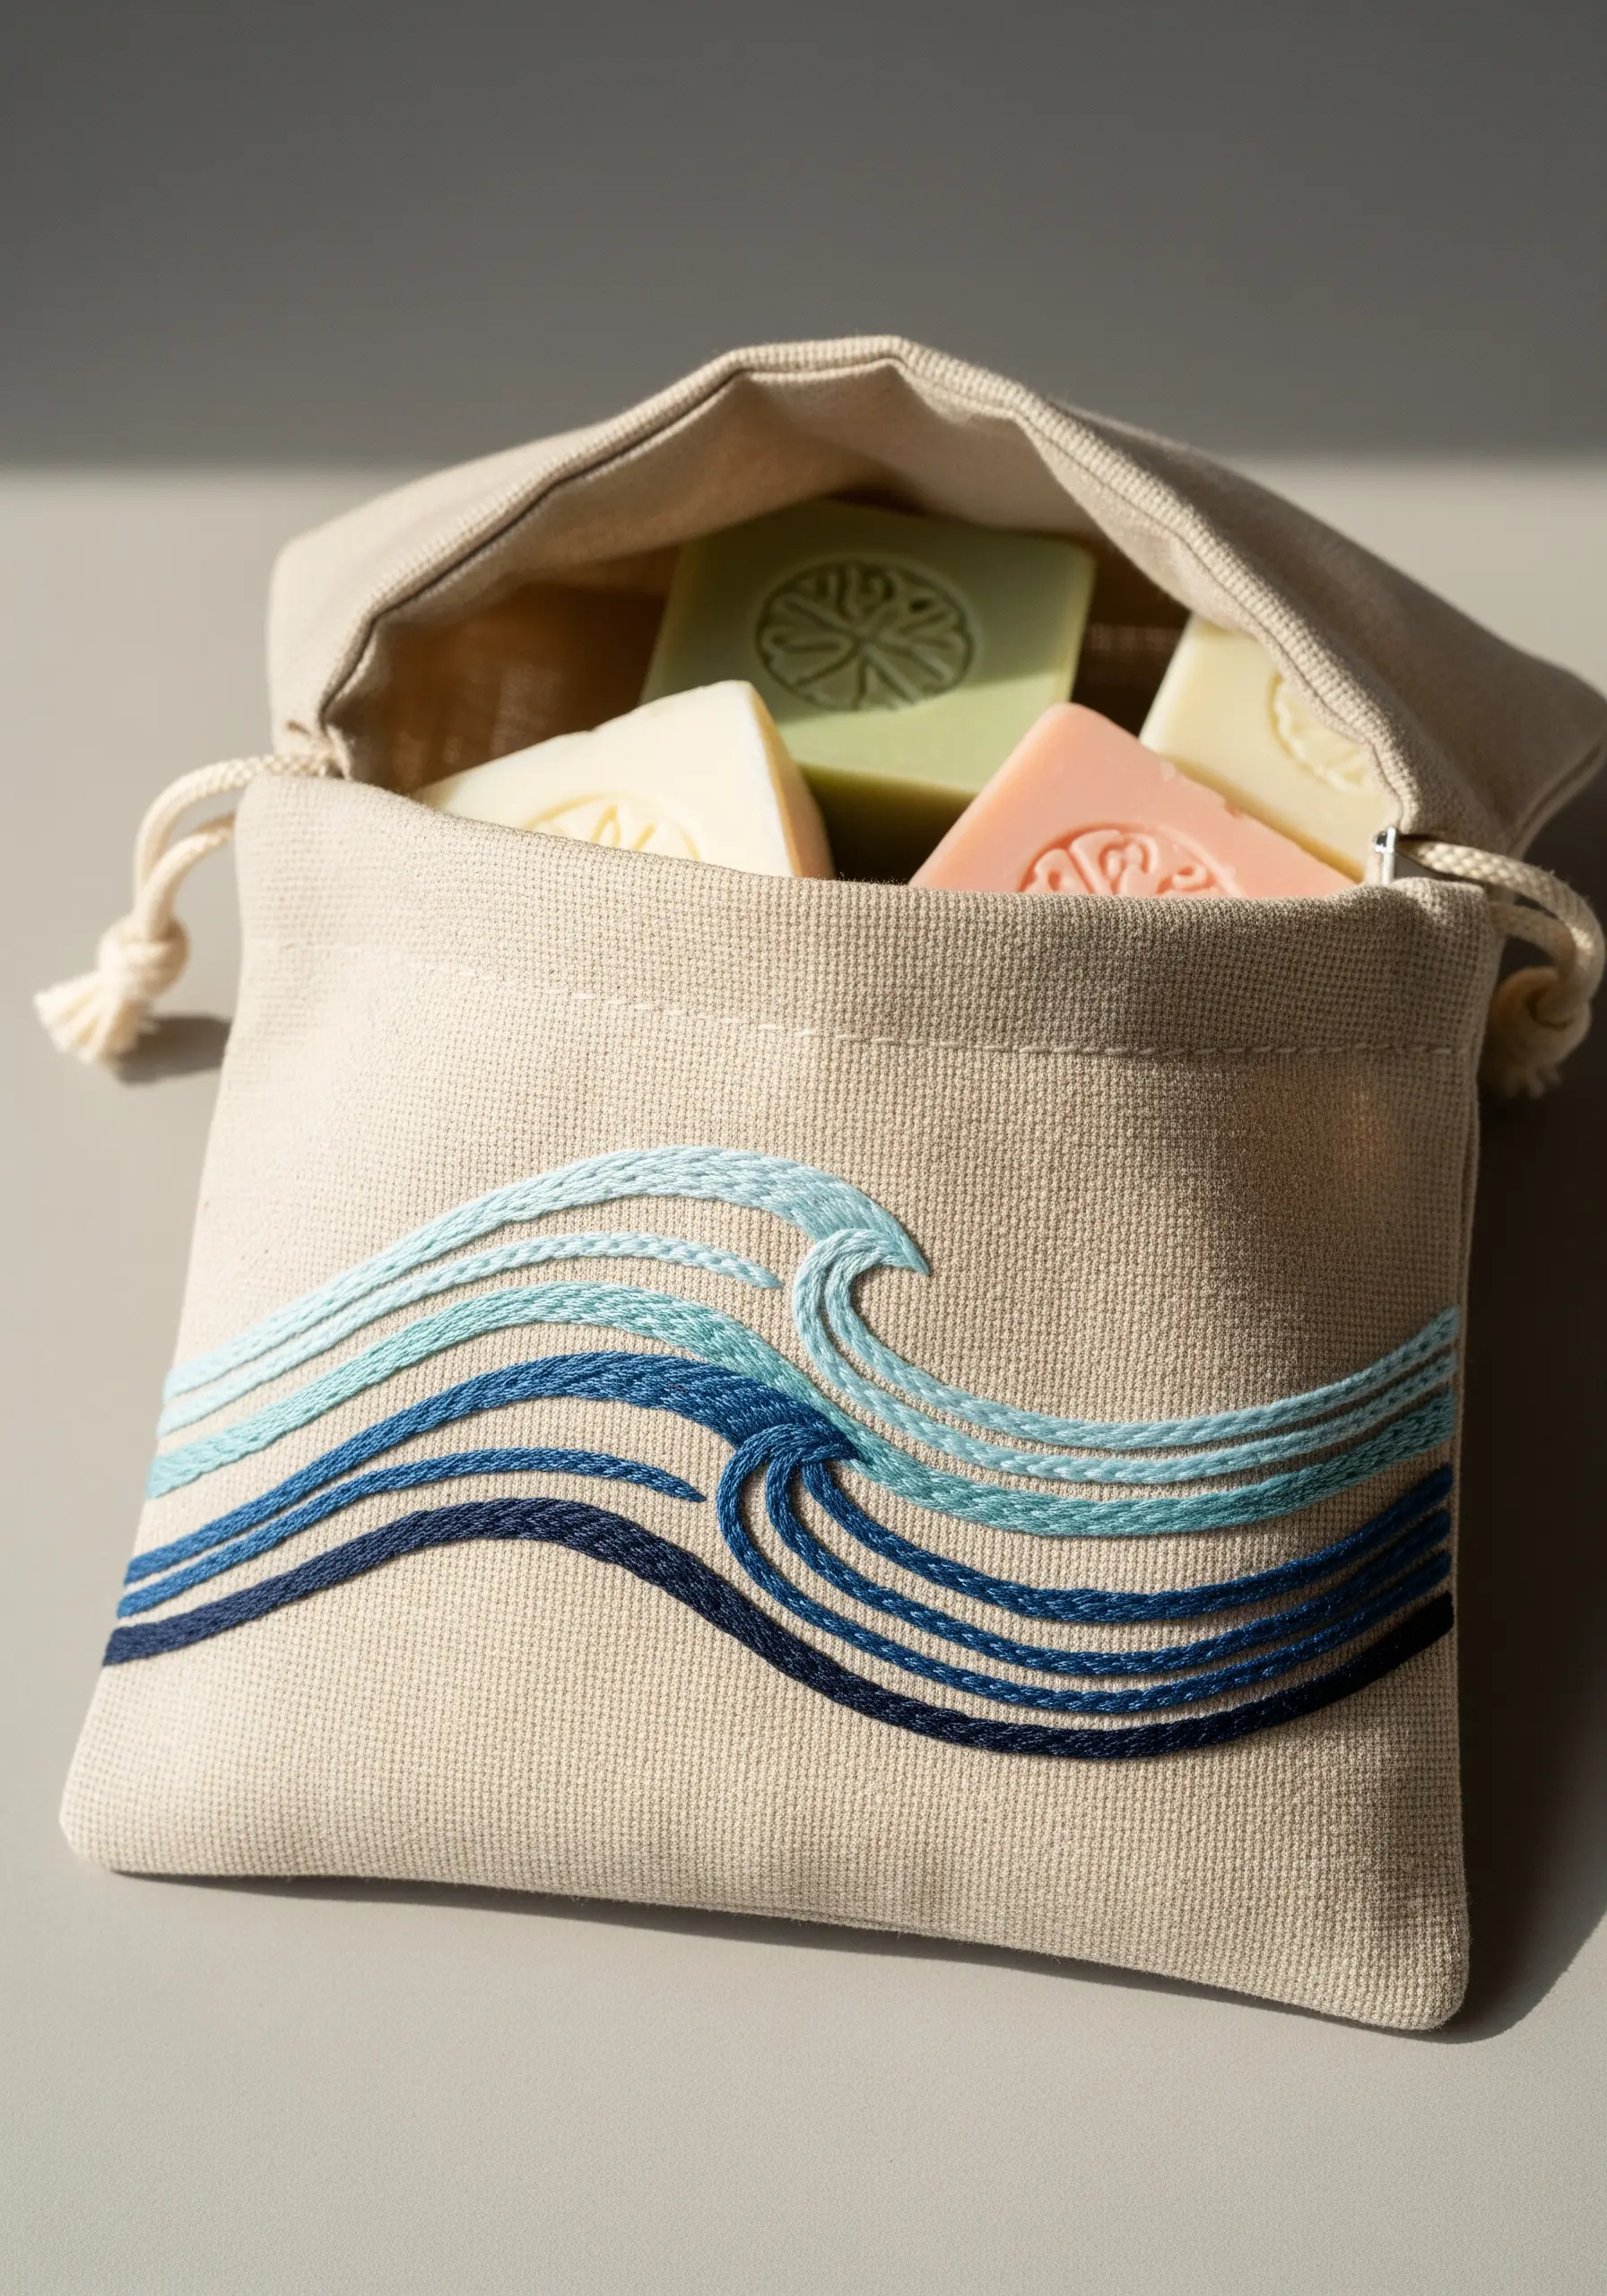
Create a sense of motion and depth by stitching layered waves in an analogous color scheme (colors next to each other on the color wheel).
Use a split stitch for a textured, seamless fill that flows easily along curves.
Vary the number of thread strands—using three or four for the darker, foreground waves and just two for the lighter ones—to create a beautiful fading effect, perfect for ocean-inspired hoop embroidery ideas.
10. Three-Dimensional Strawberries
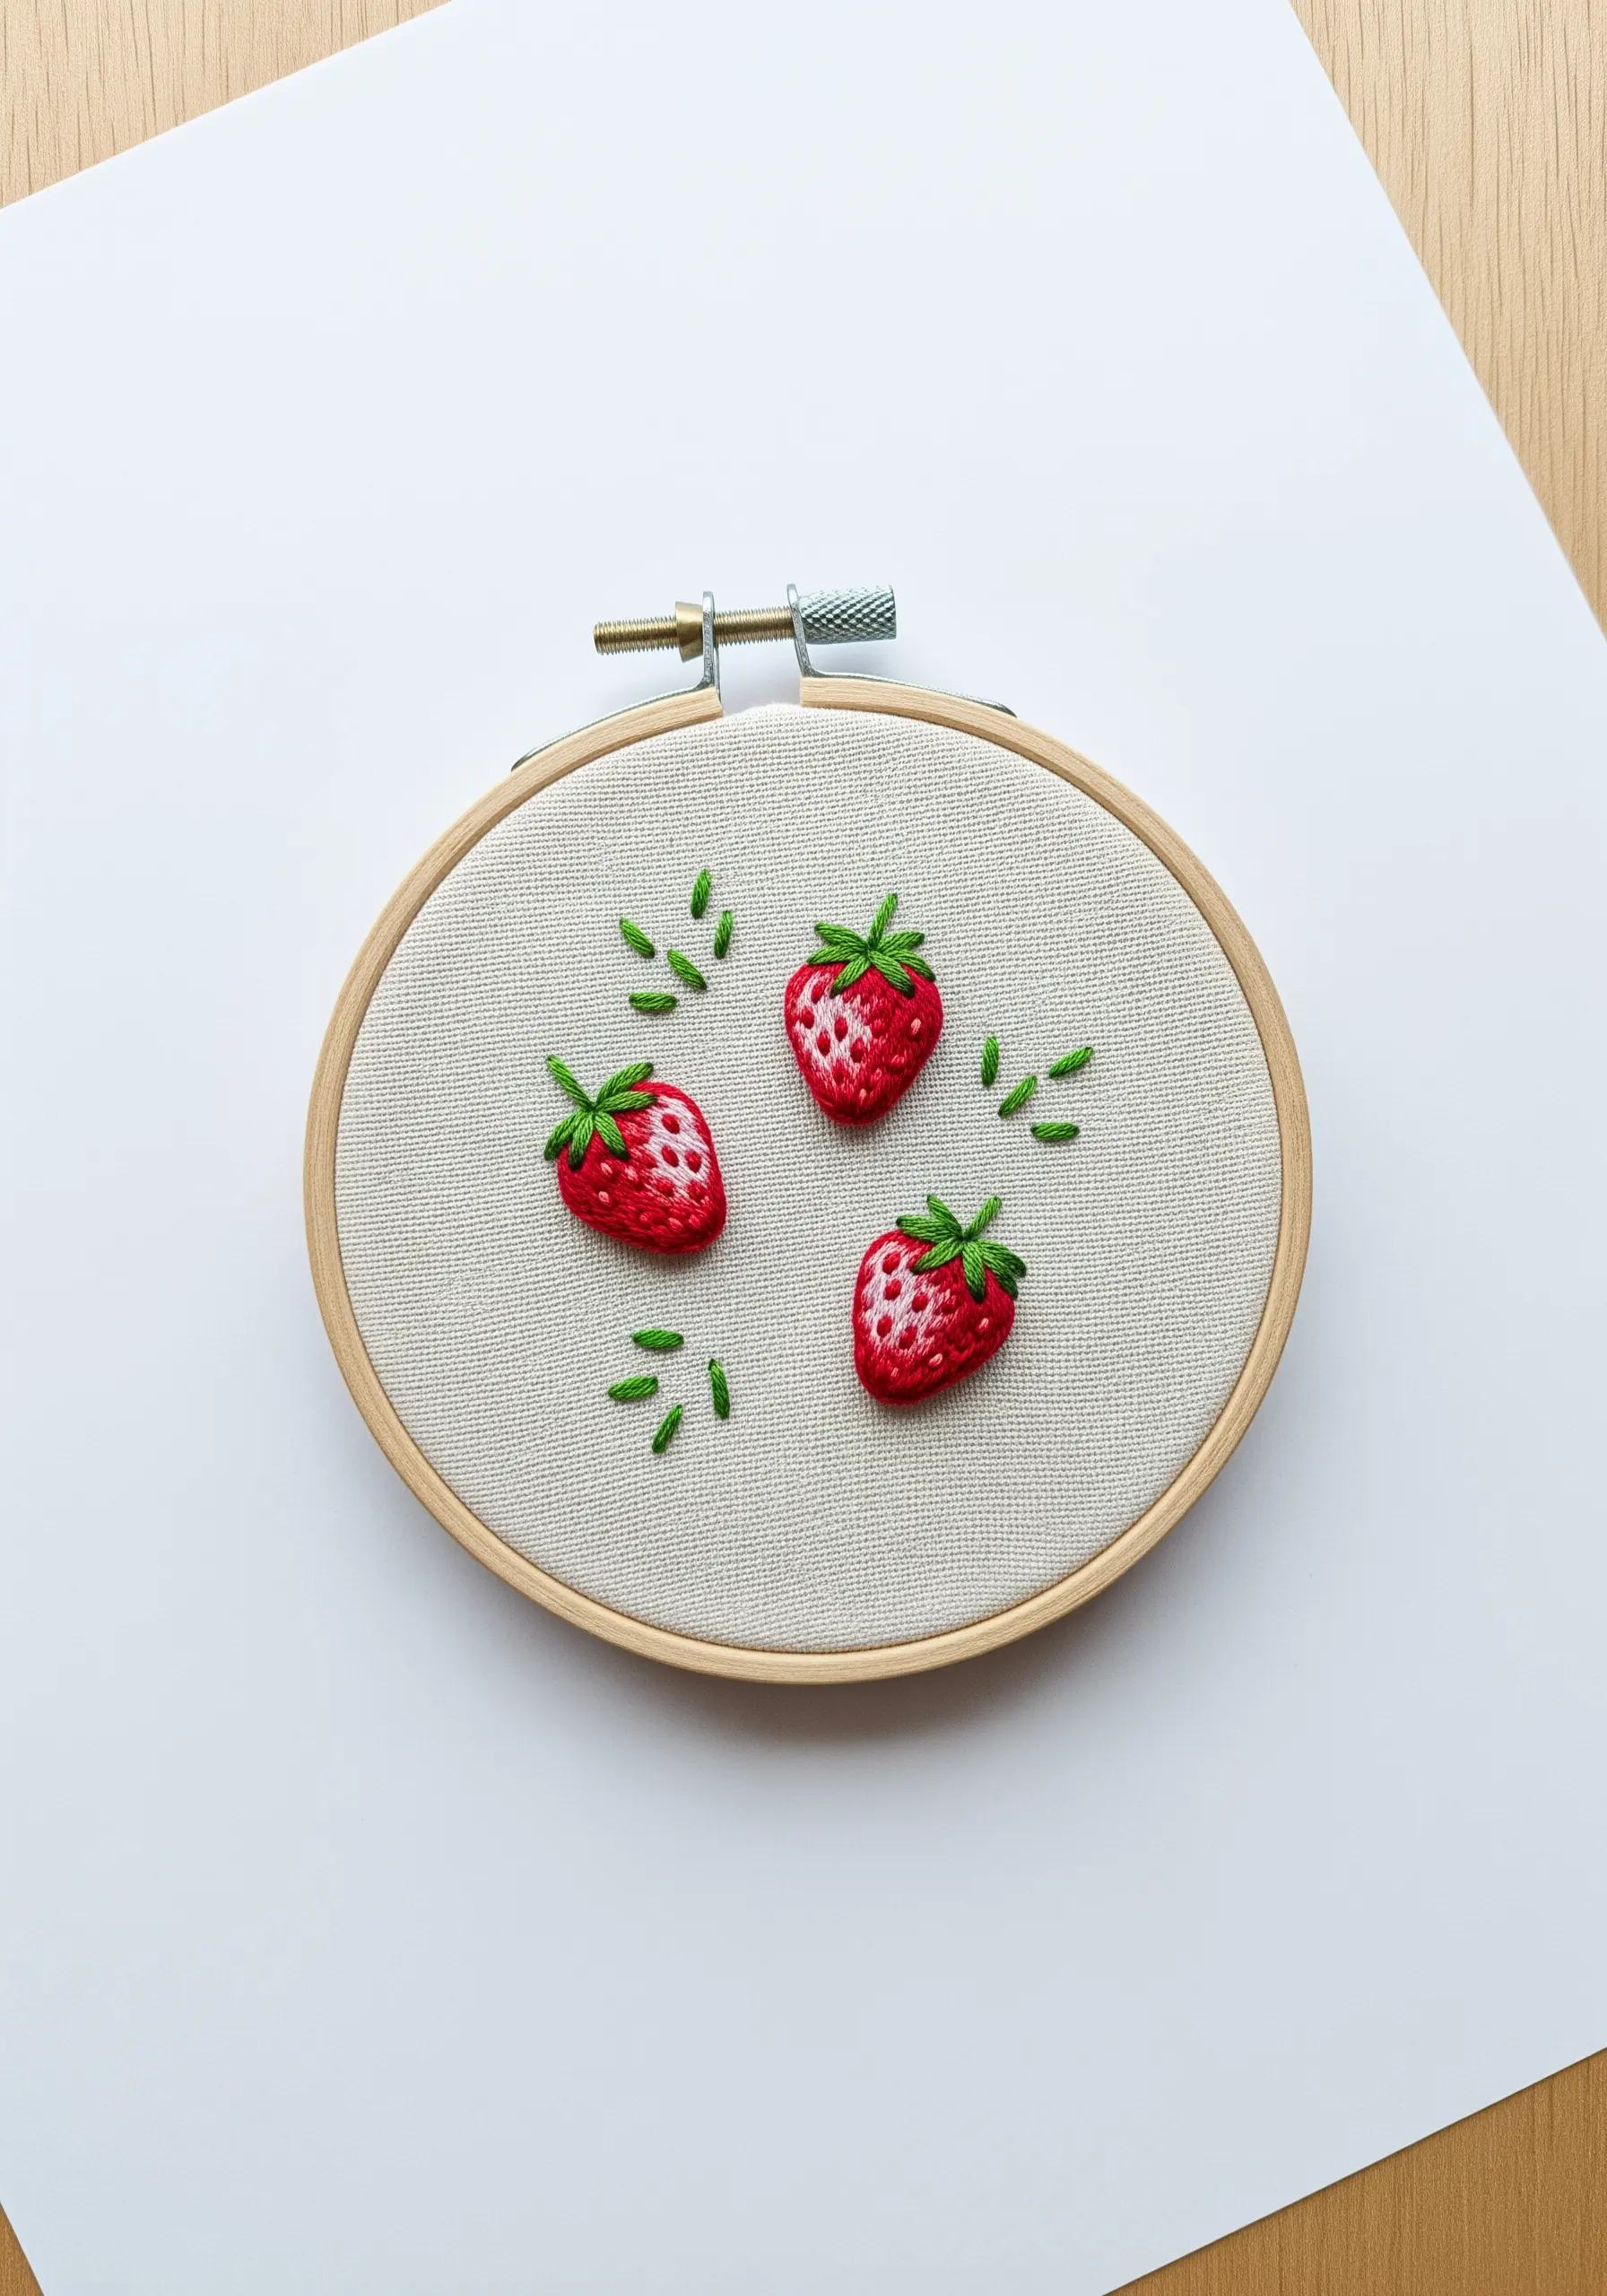
To give your strawberries a realistic texture, use scattered seed stitches over a base of light red satin stitch.
This two-layer technique provides both color coverage and the bumpy texture of the fruit’s surface.
Finish with tiny white or pale yellow French knots for the seeds to add that final touch of realism.
11. An Airy Dandelion Head
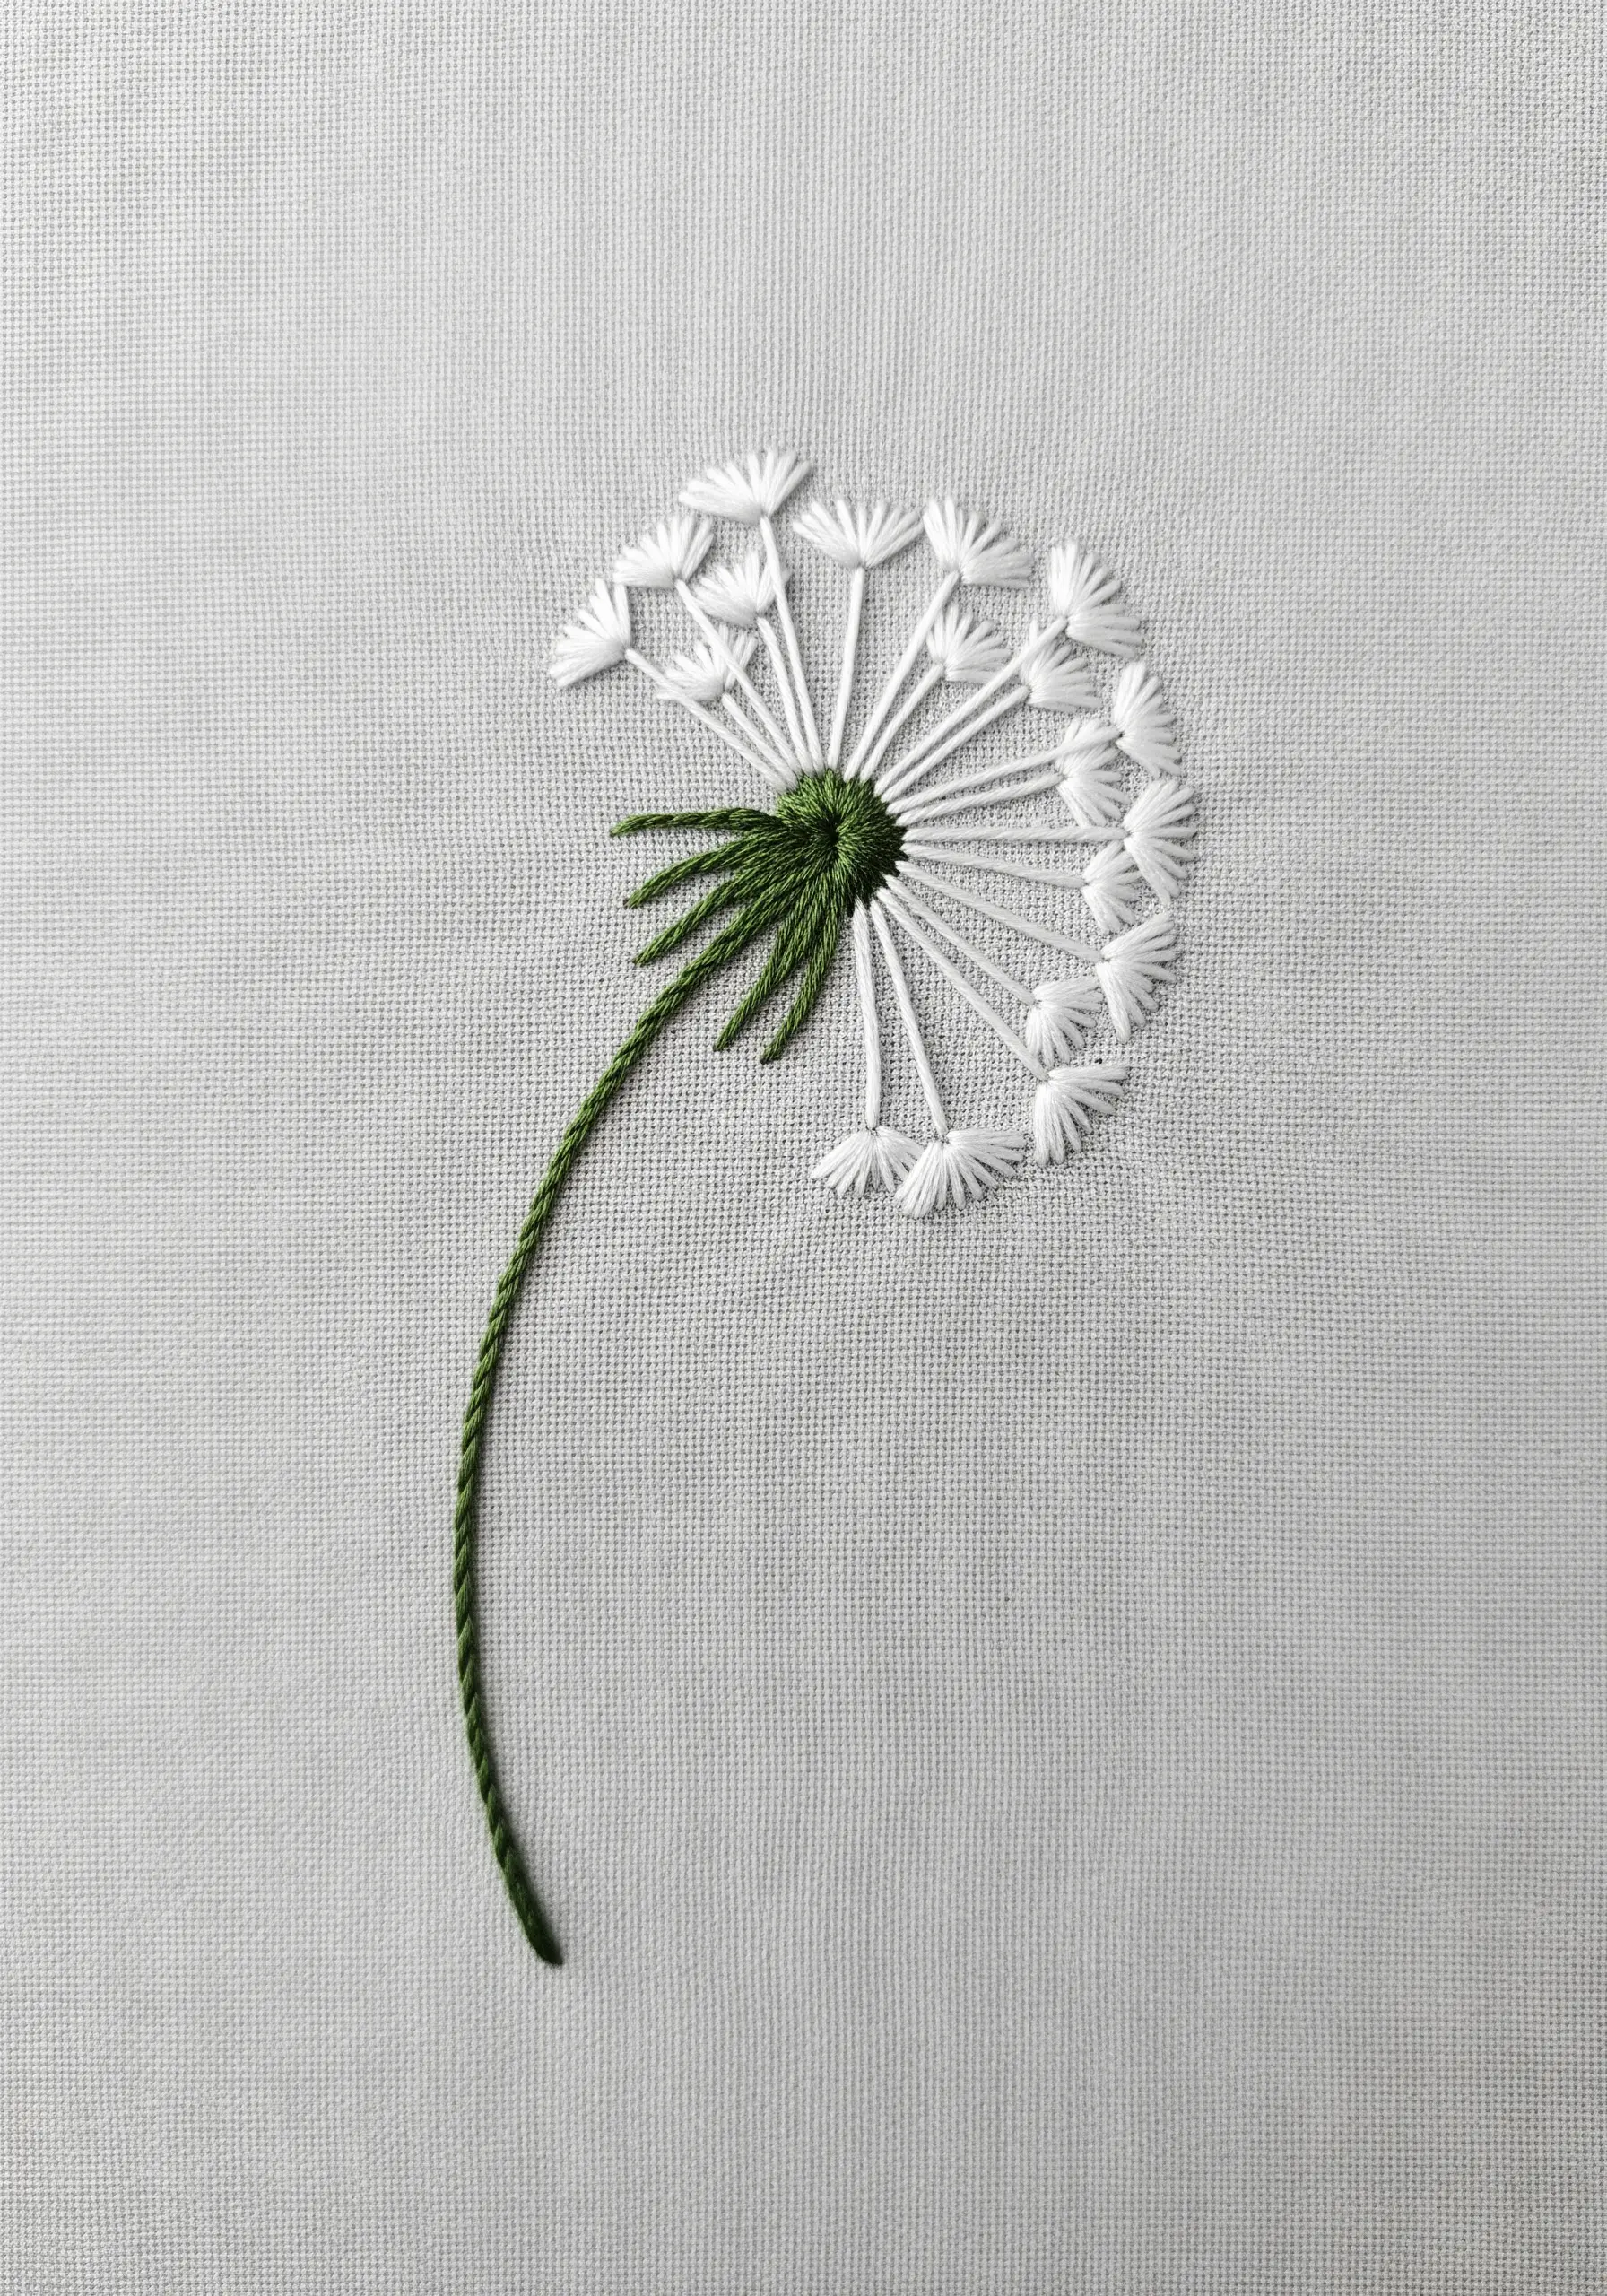
The key to a delicate dandelion is using detached chain stitches (lazy daisies) for the individual seed heads.
Arrange them in a radial pattern, pointing outward from the center.
For the fluffy parachutes, add a few tiny straight stitches fanning out from the tip of each lazy daisy.
A tightly twisted stem stitch provides a strong visual anchor for the airy, light top.
12. A Radiant Sun Motif
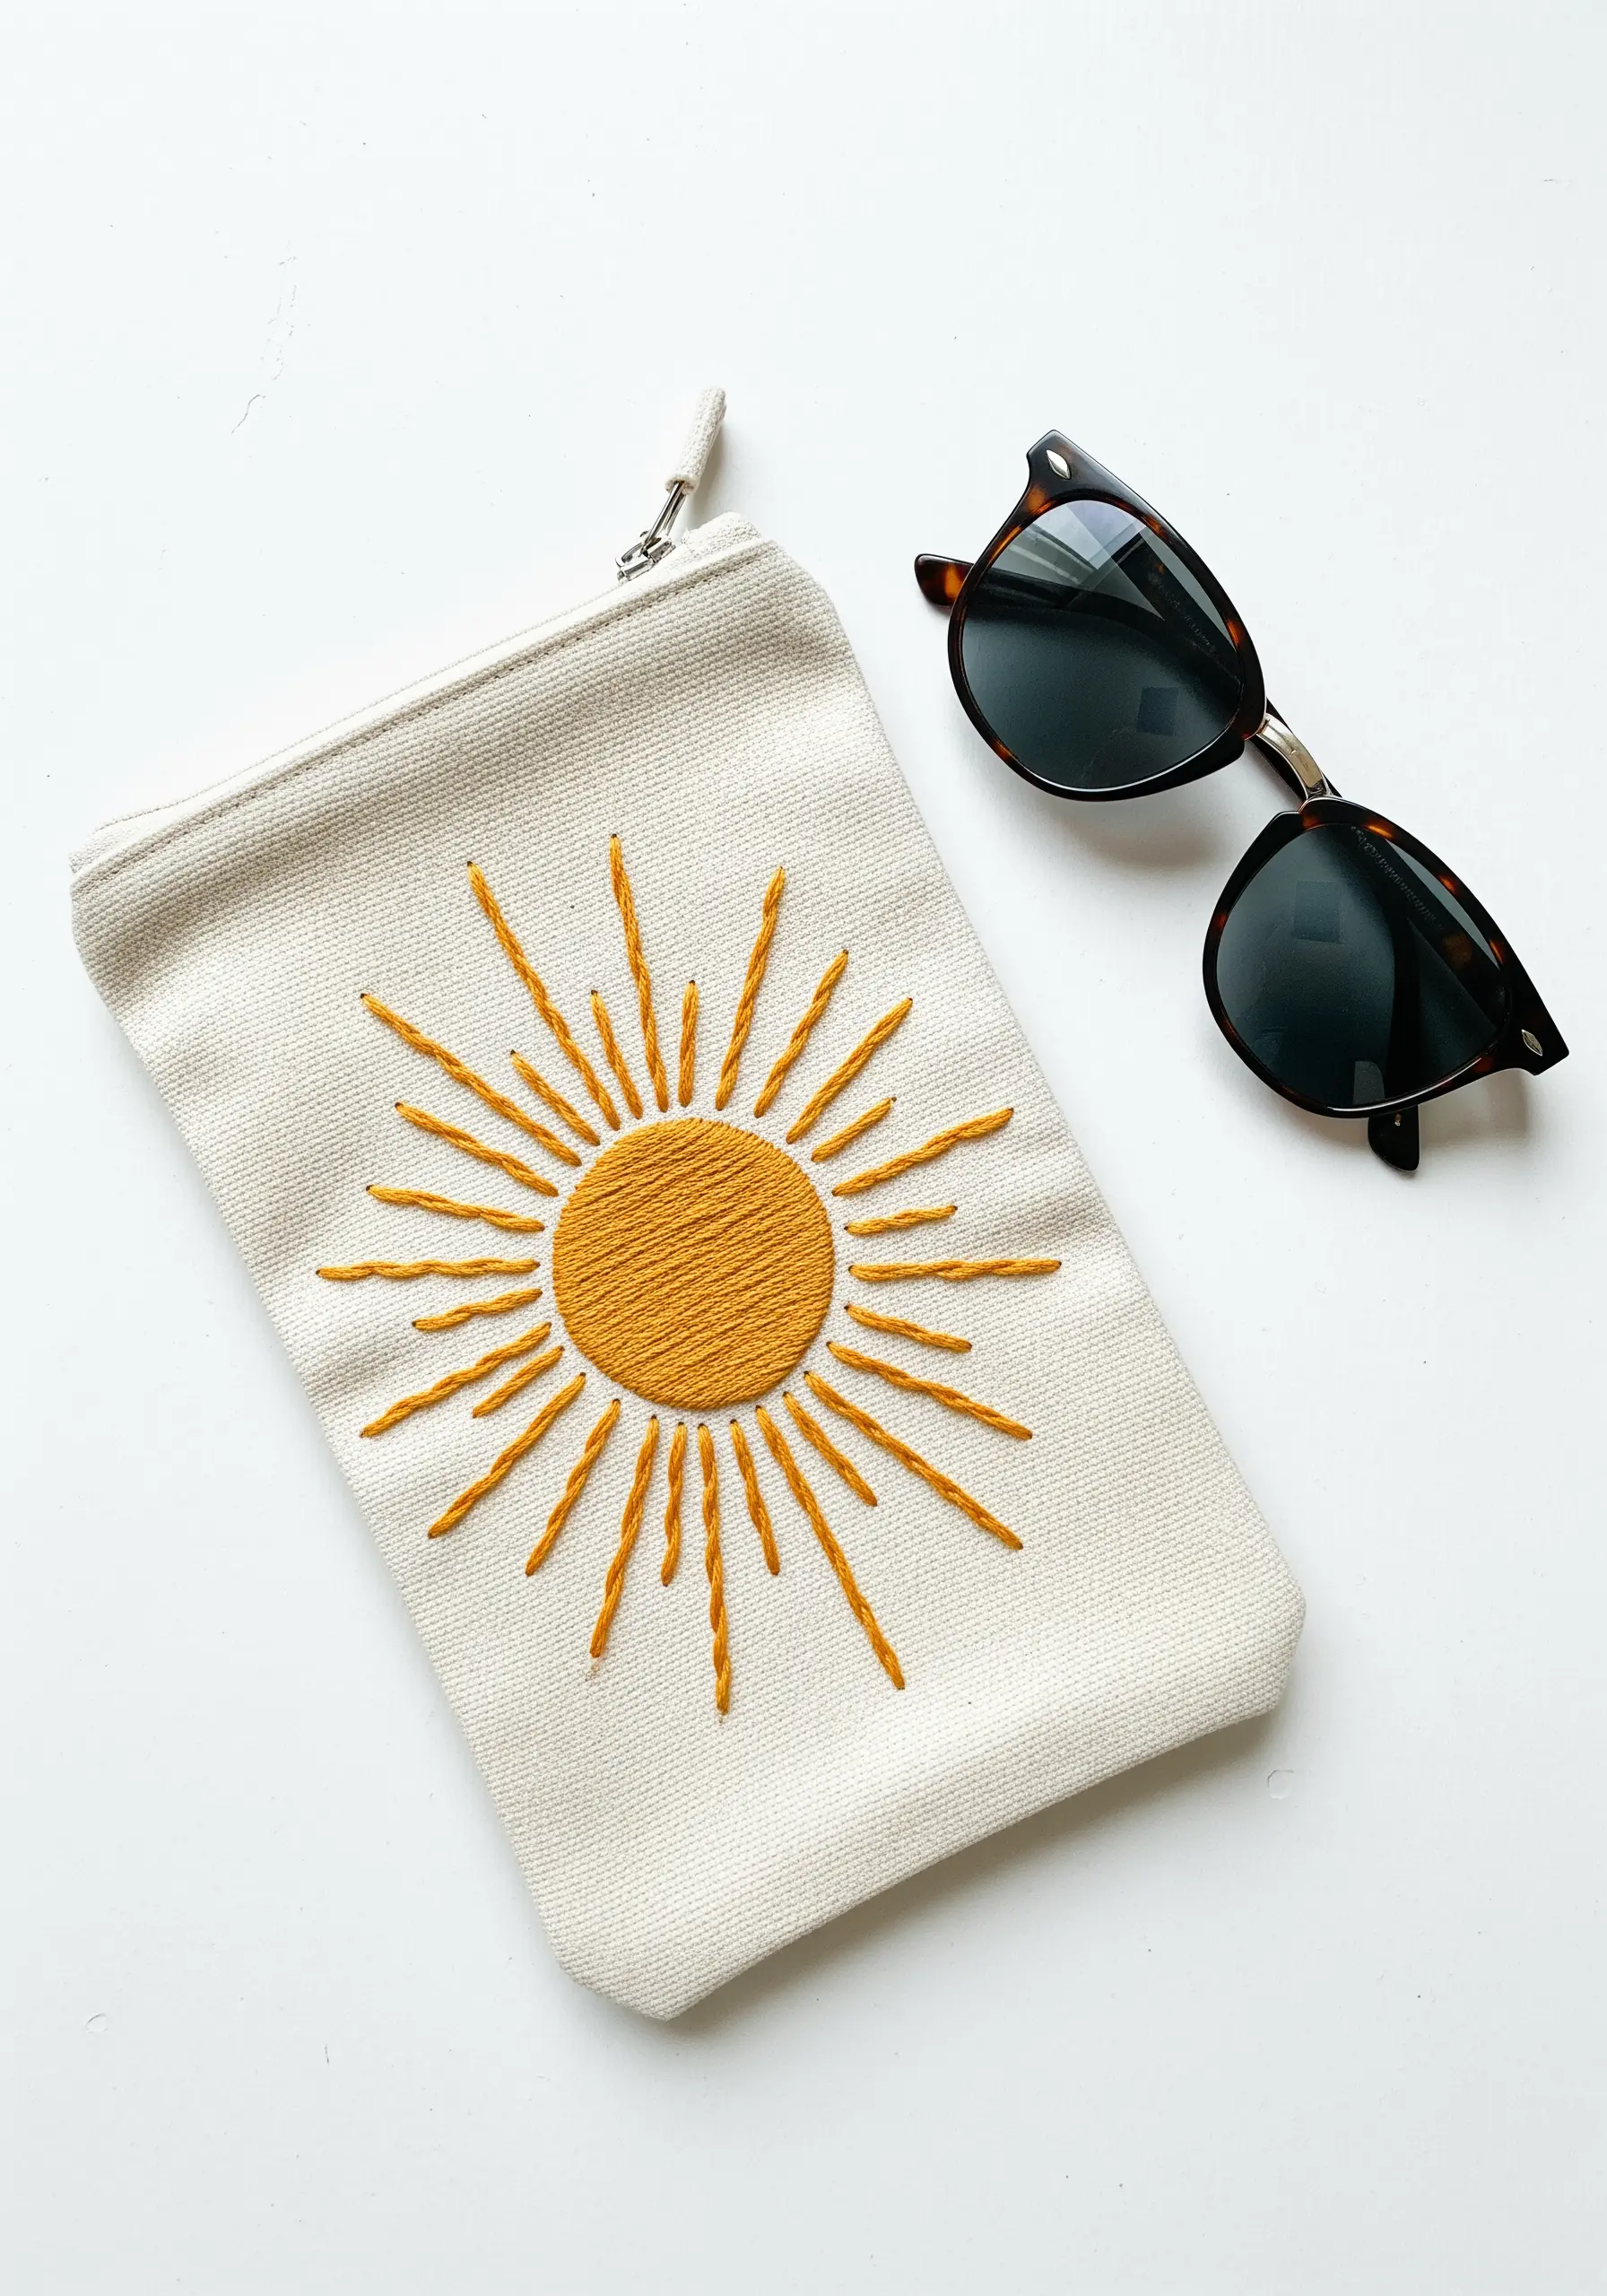
To make a simple sunburst design more dynamic, vary the length of the straight stitches used for the rays.
Alternate between long and short stitches as you work your way around the central circle.
This subtle variation creates a feeling of shimmering energy and is more visually interesting than rays of a uniform length. It’s one of those small stitches that add instant charm.
13. A Geometric Color Block Design
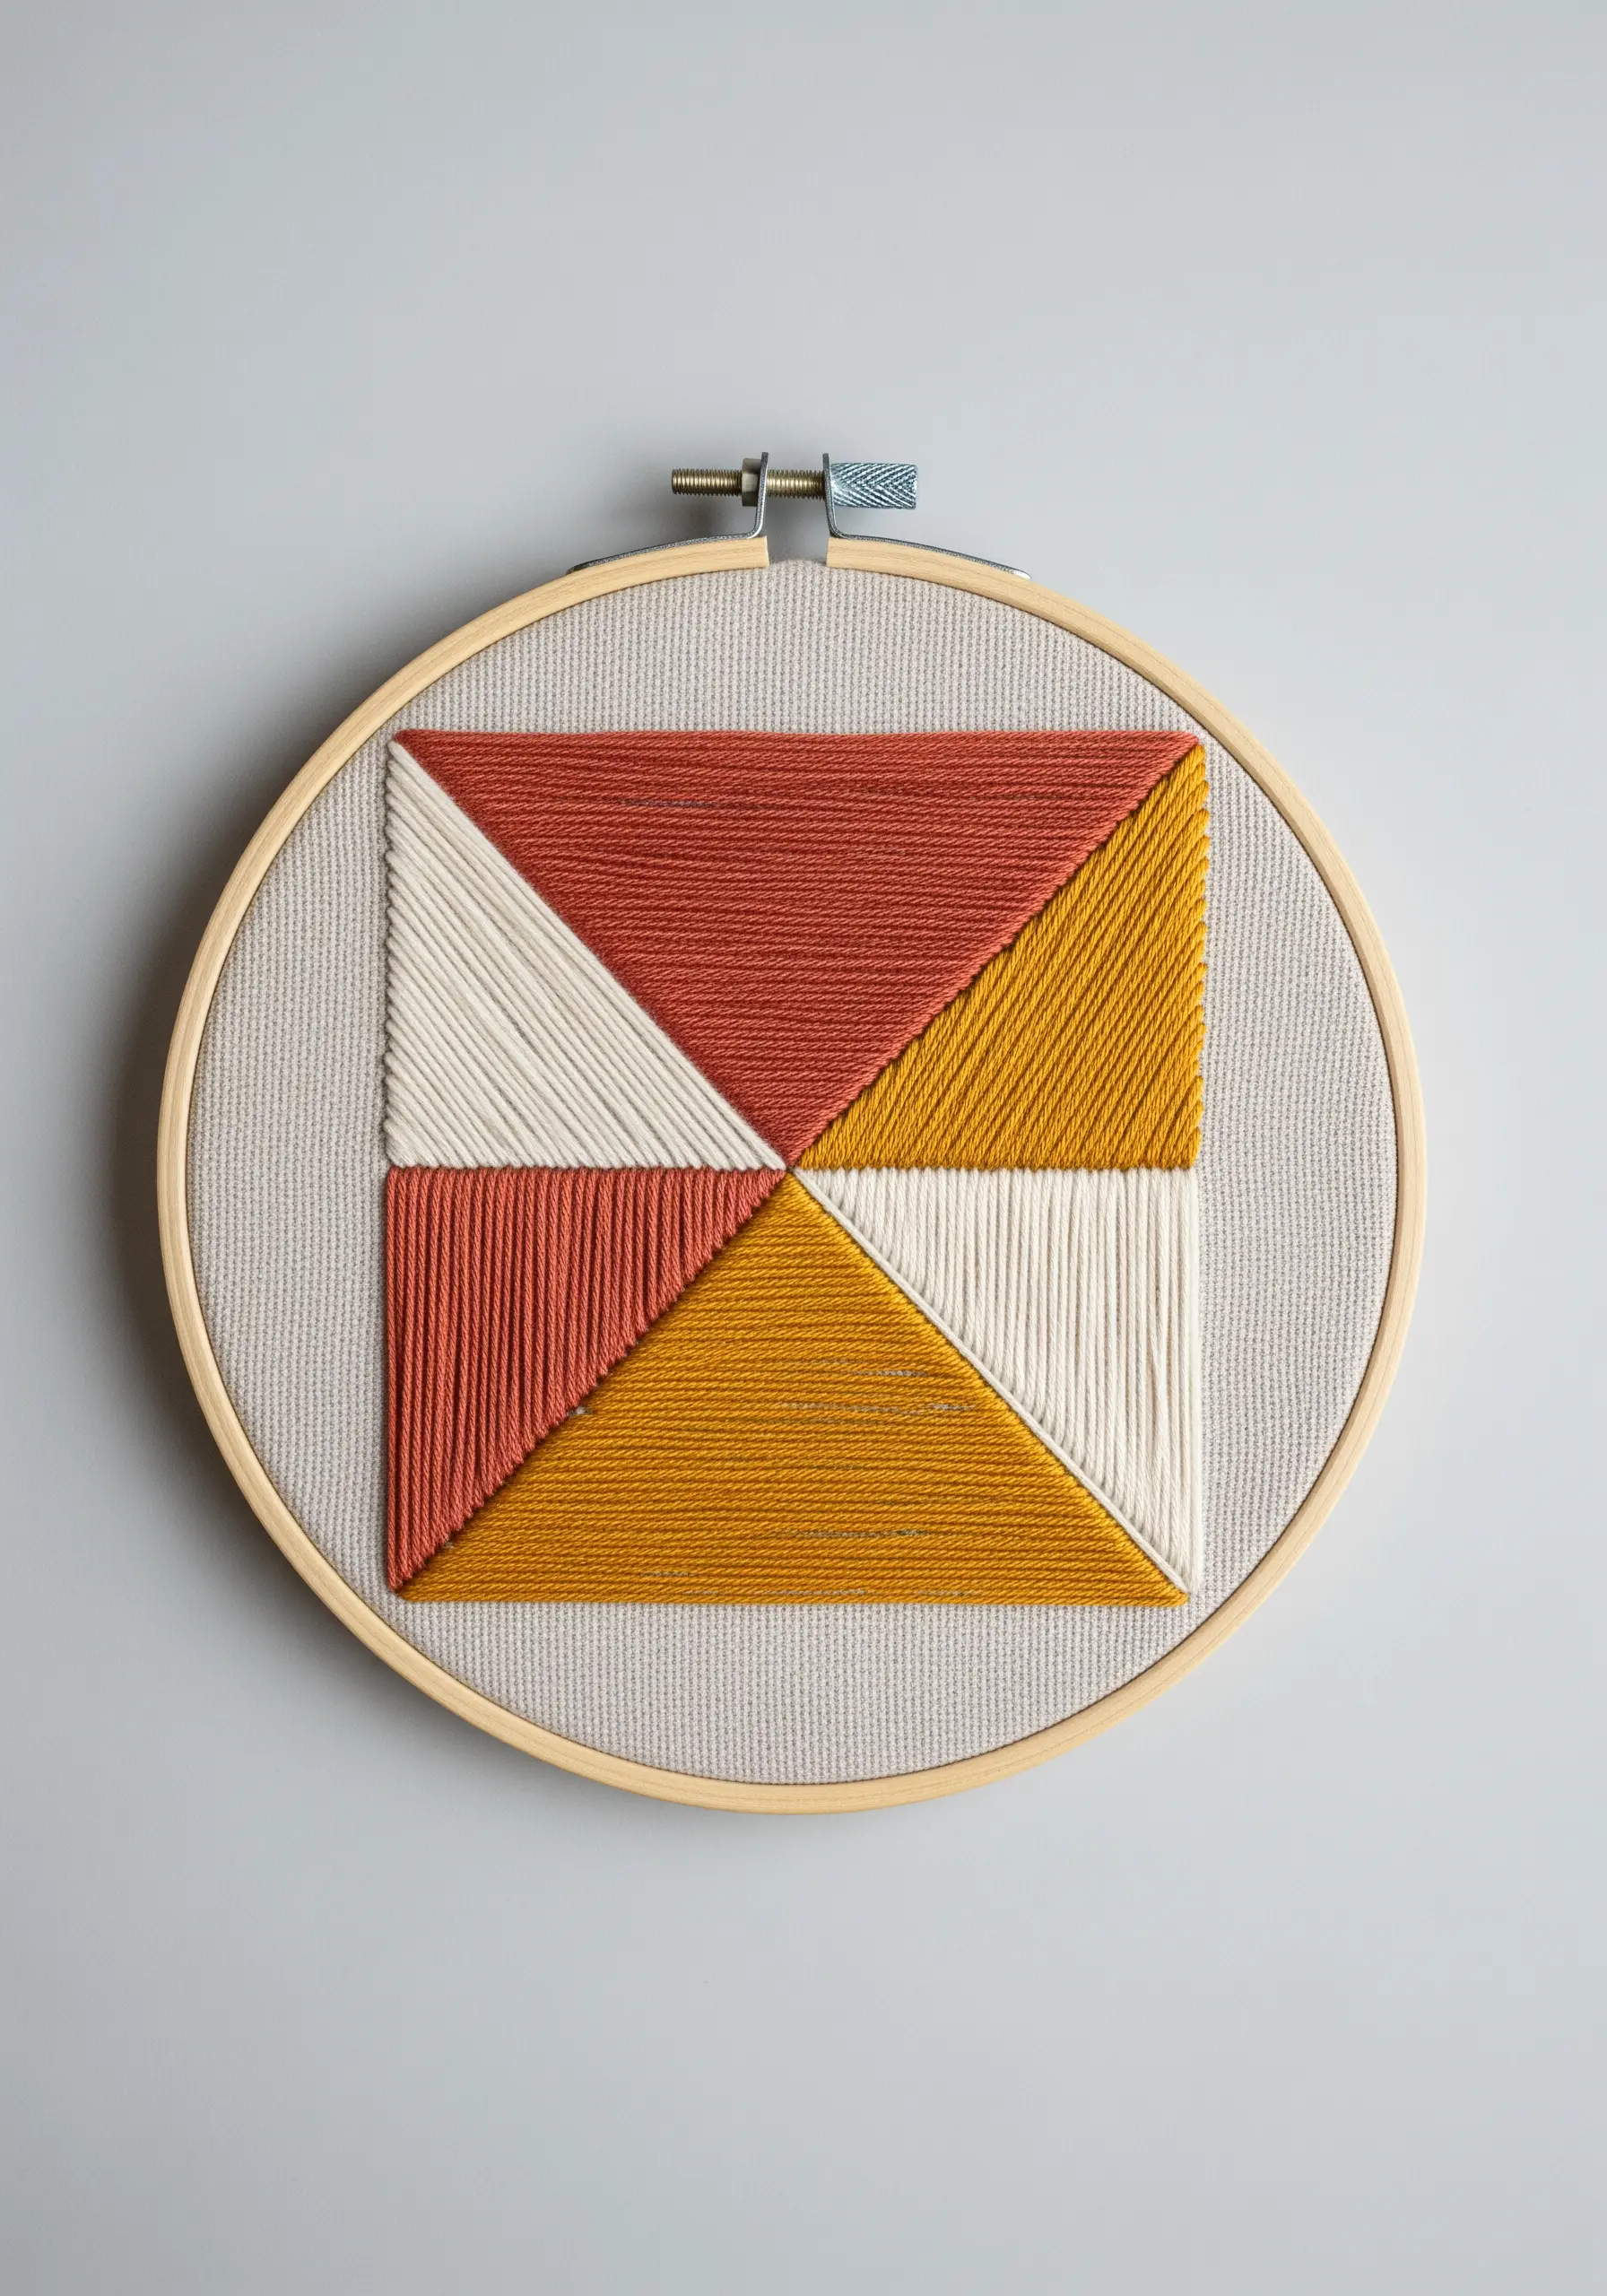
The secret to perfectly smooth, dense blocks of satin stitch is preparation.
Before filling any shape, outline it with a split stitch using the same color thread.
This creates a slightly raised edge that acts as a boundary, preventing your satin stitches from slipping and ensuring crisp, clean lines where the colors meet.
14. A Stylized Eucalyptus Branch
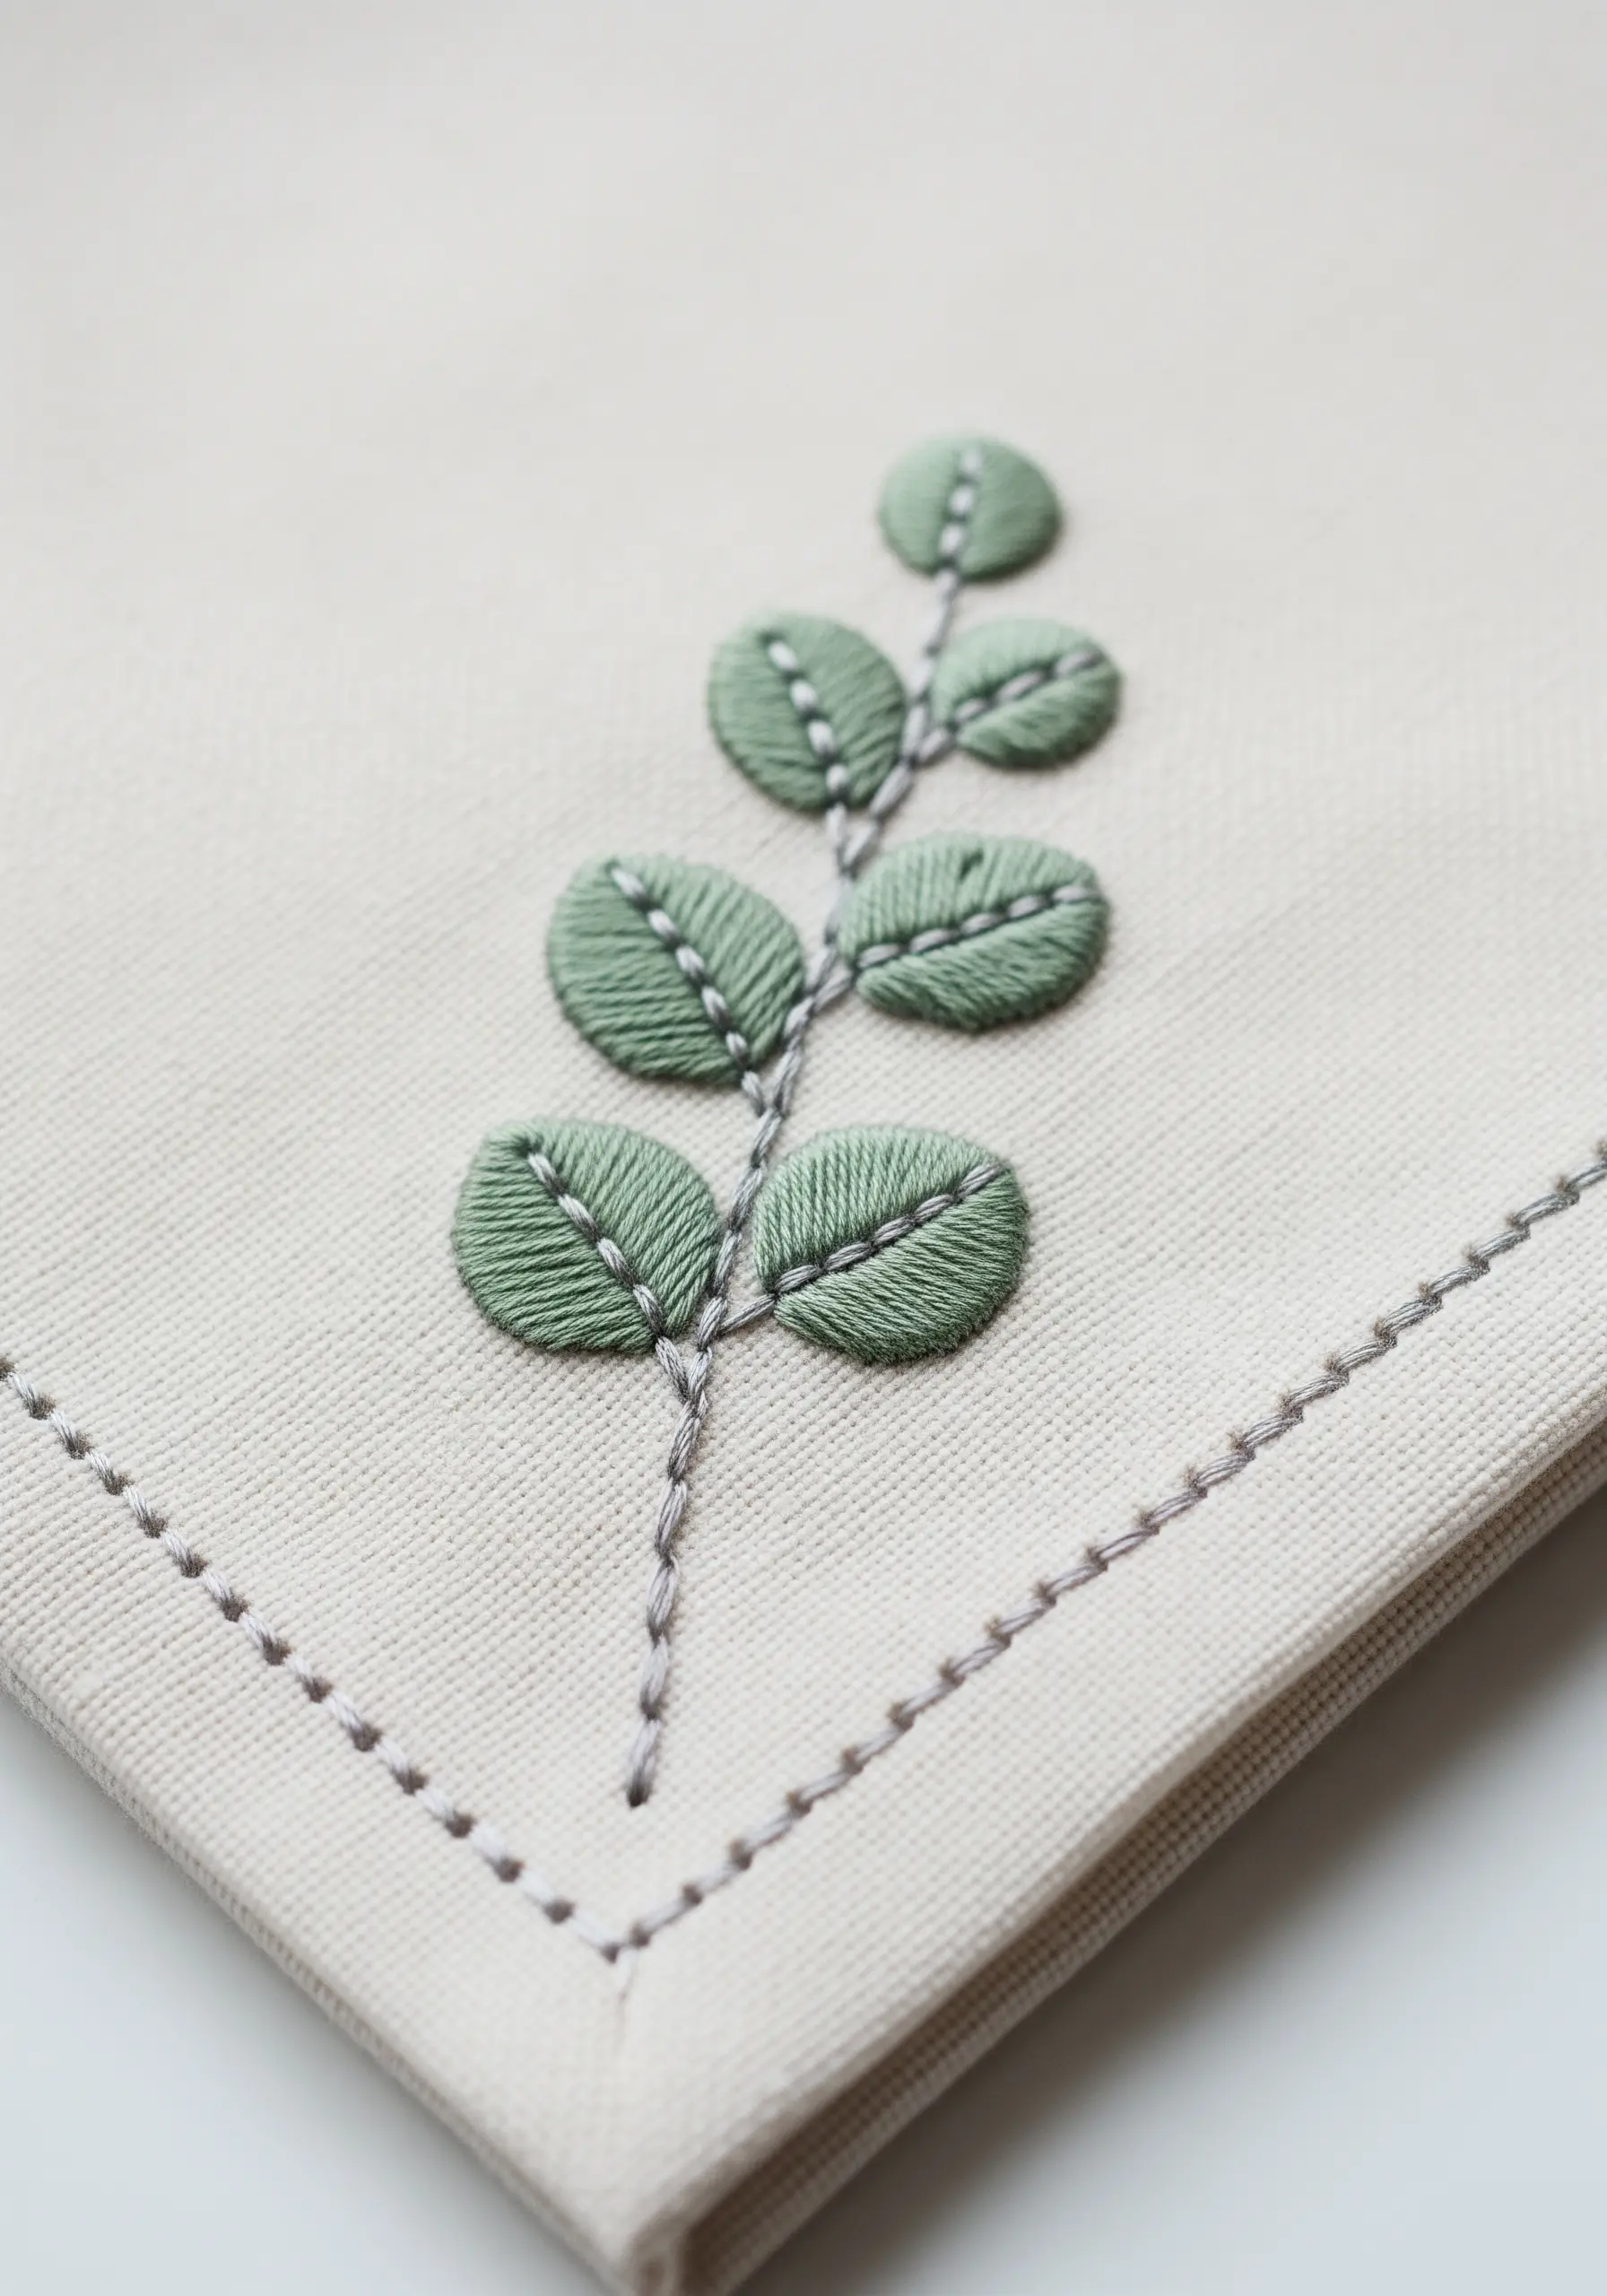
Combine fill and outline stitches for a sophisticated, modern botanical.
Fill each leaf with a vertical satin stitch.
Then, add the central vein and stem detail afterward, stitching directly over the satin stitch with a contrasting backstitch.
This layered approach adds a clean, graphic element and makes the simple shapes feel more detailed and intentional.
15. A Minimalist Constellation

For an understated and elegant design on dark fabric, use just a single strand of white or metallic thread.
Use tiny star stitches or French knots for the stars, and connect them with a delicate running stitch.
The beauty of this design lies in its simplicity and precision, proving that even the most minimalist embroidery ideas can have a powerful impact.
16. A Whimsical Paper Airplane
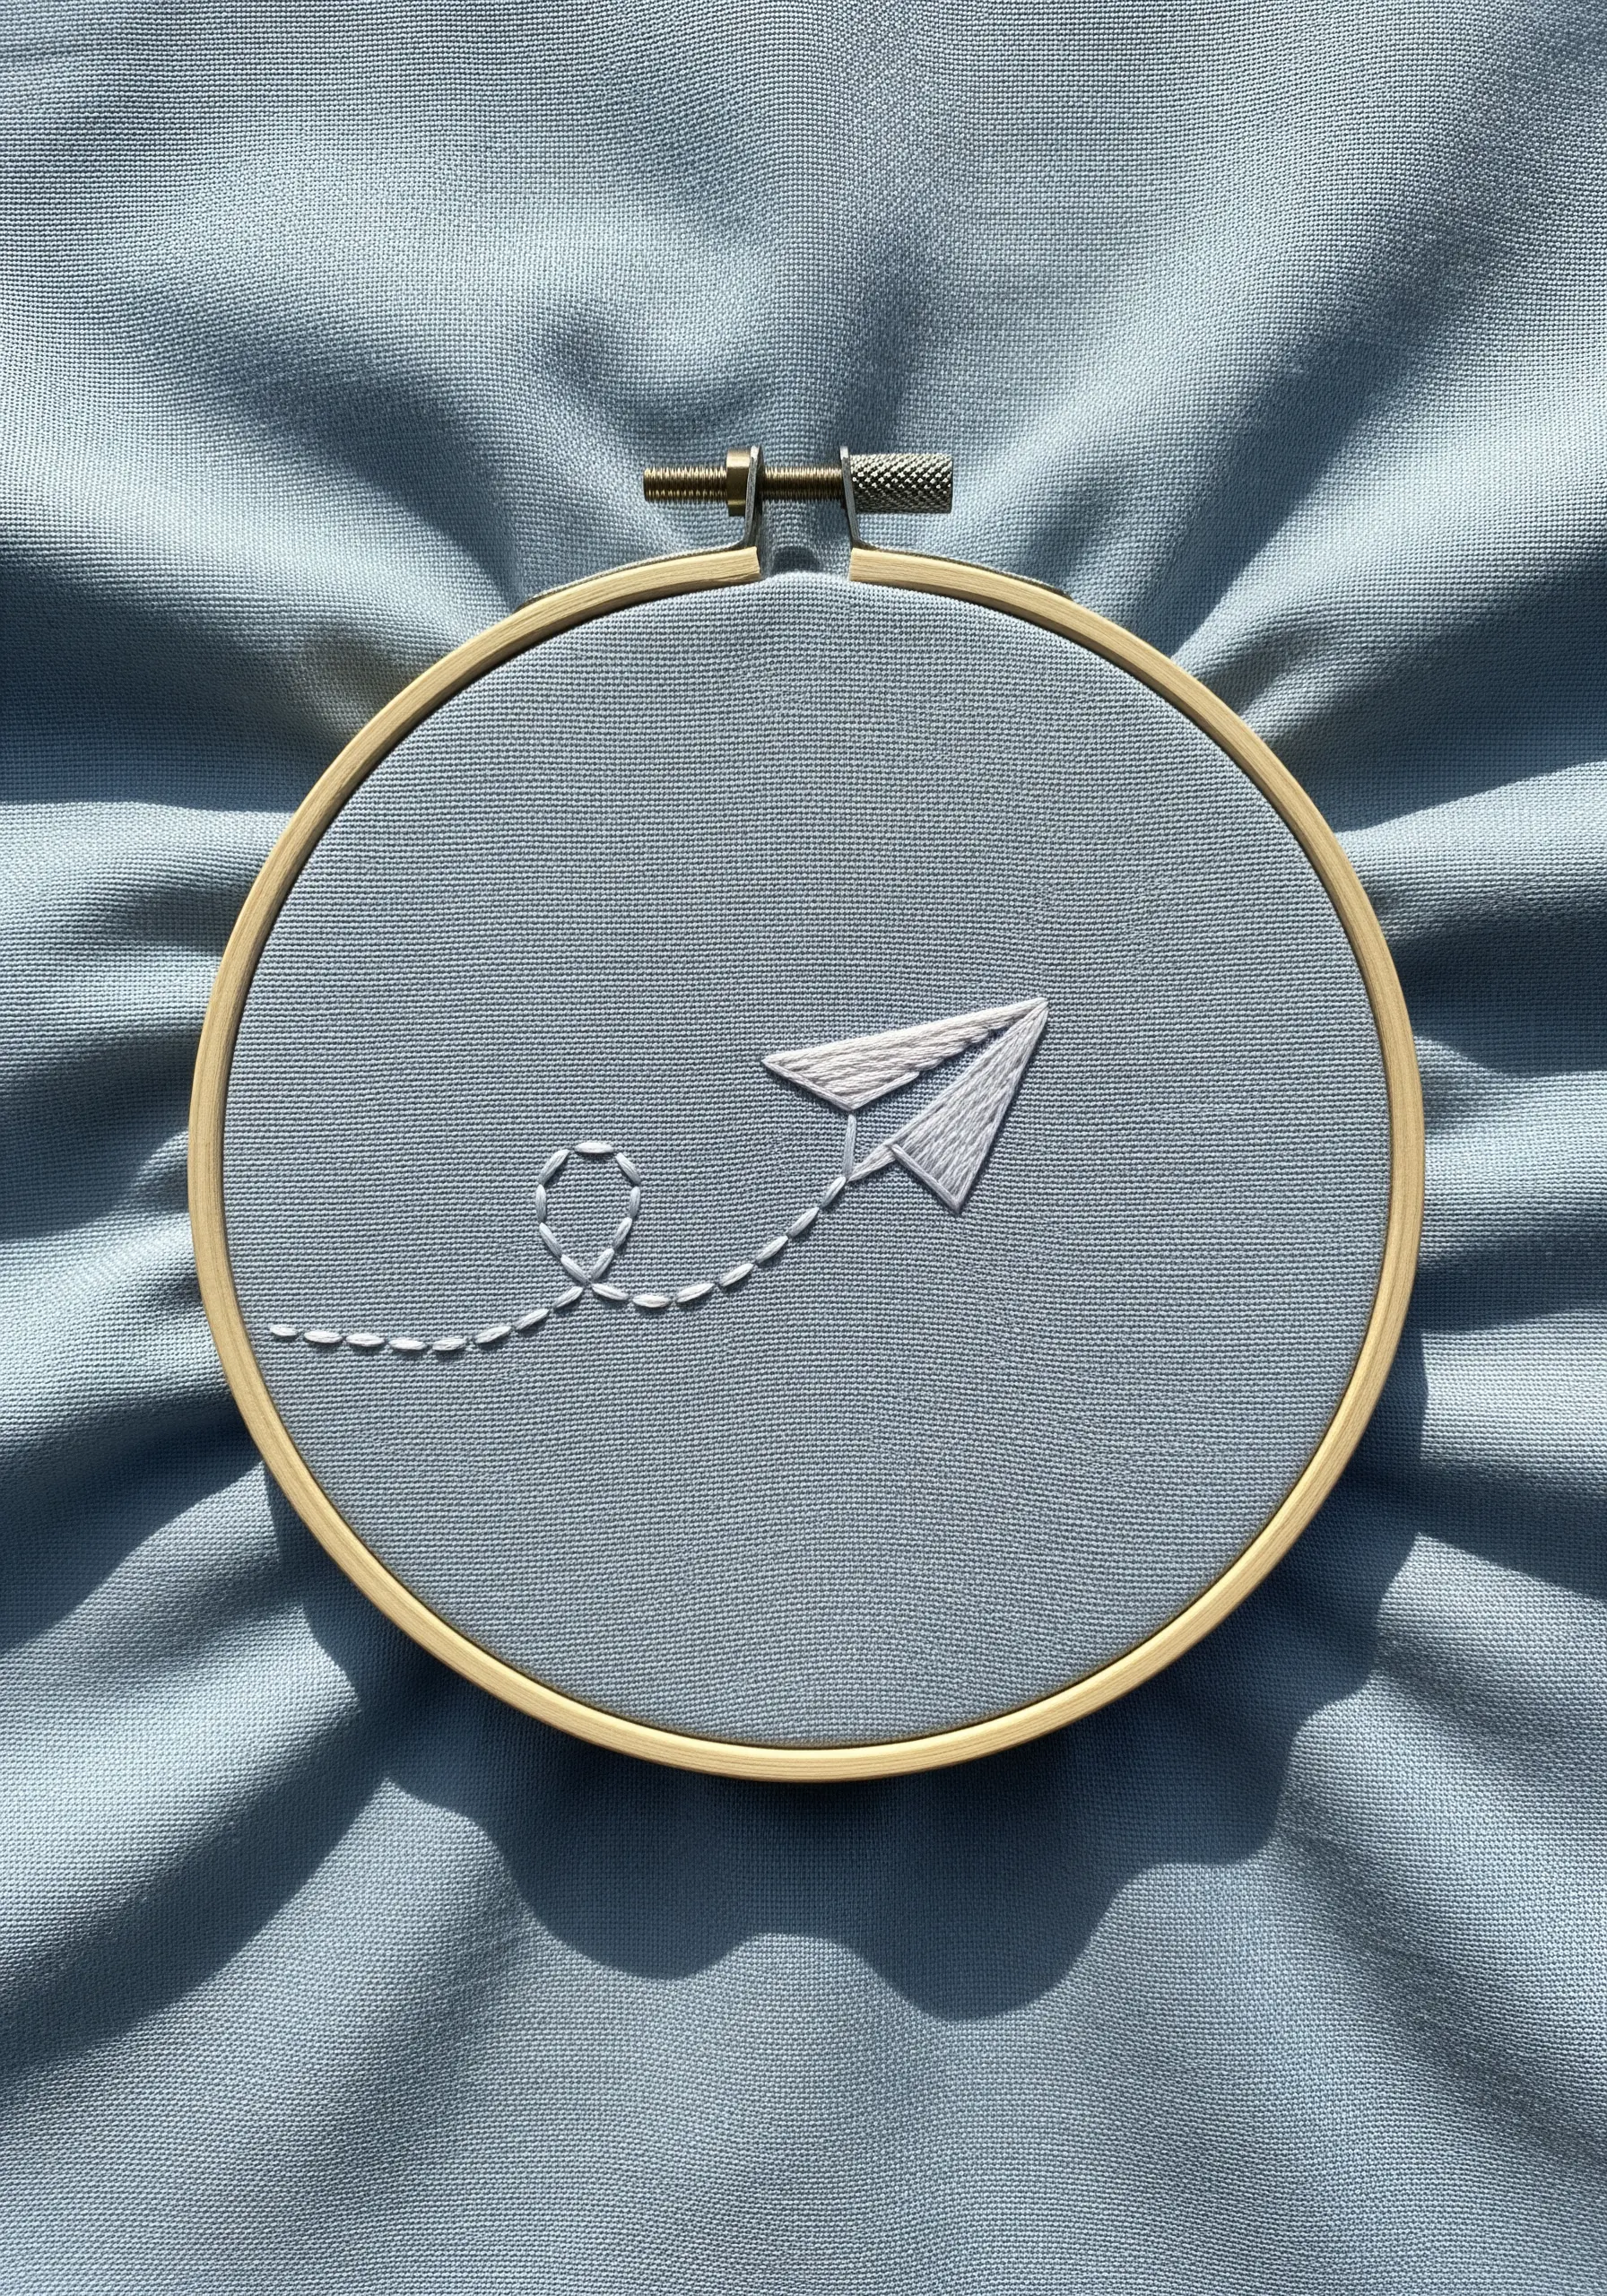
You can create a sense of movement with just a few well-placed stitches.
Fill the airplane with a simple satin stitch, angling the stitches to define the paper folds and create dimension.
For the flight path, use a dashed running stitch—its broken line creates a light, whimsical feeling of motion that a solid line wouldn’t achieve. This is a perfect idea for travel-inspired embroidery hoops.
17. A Two-Tone Ginkgo Leaf
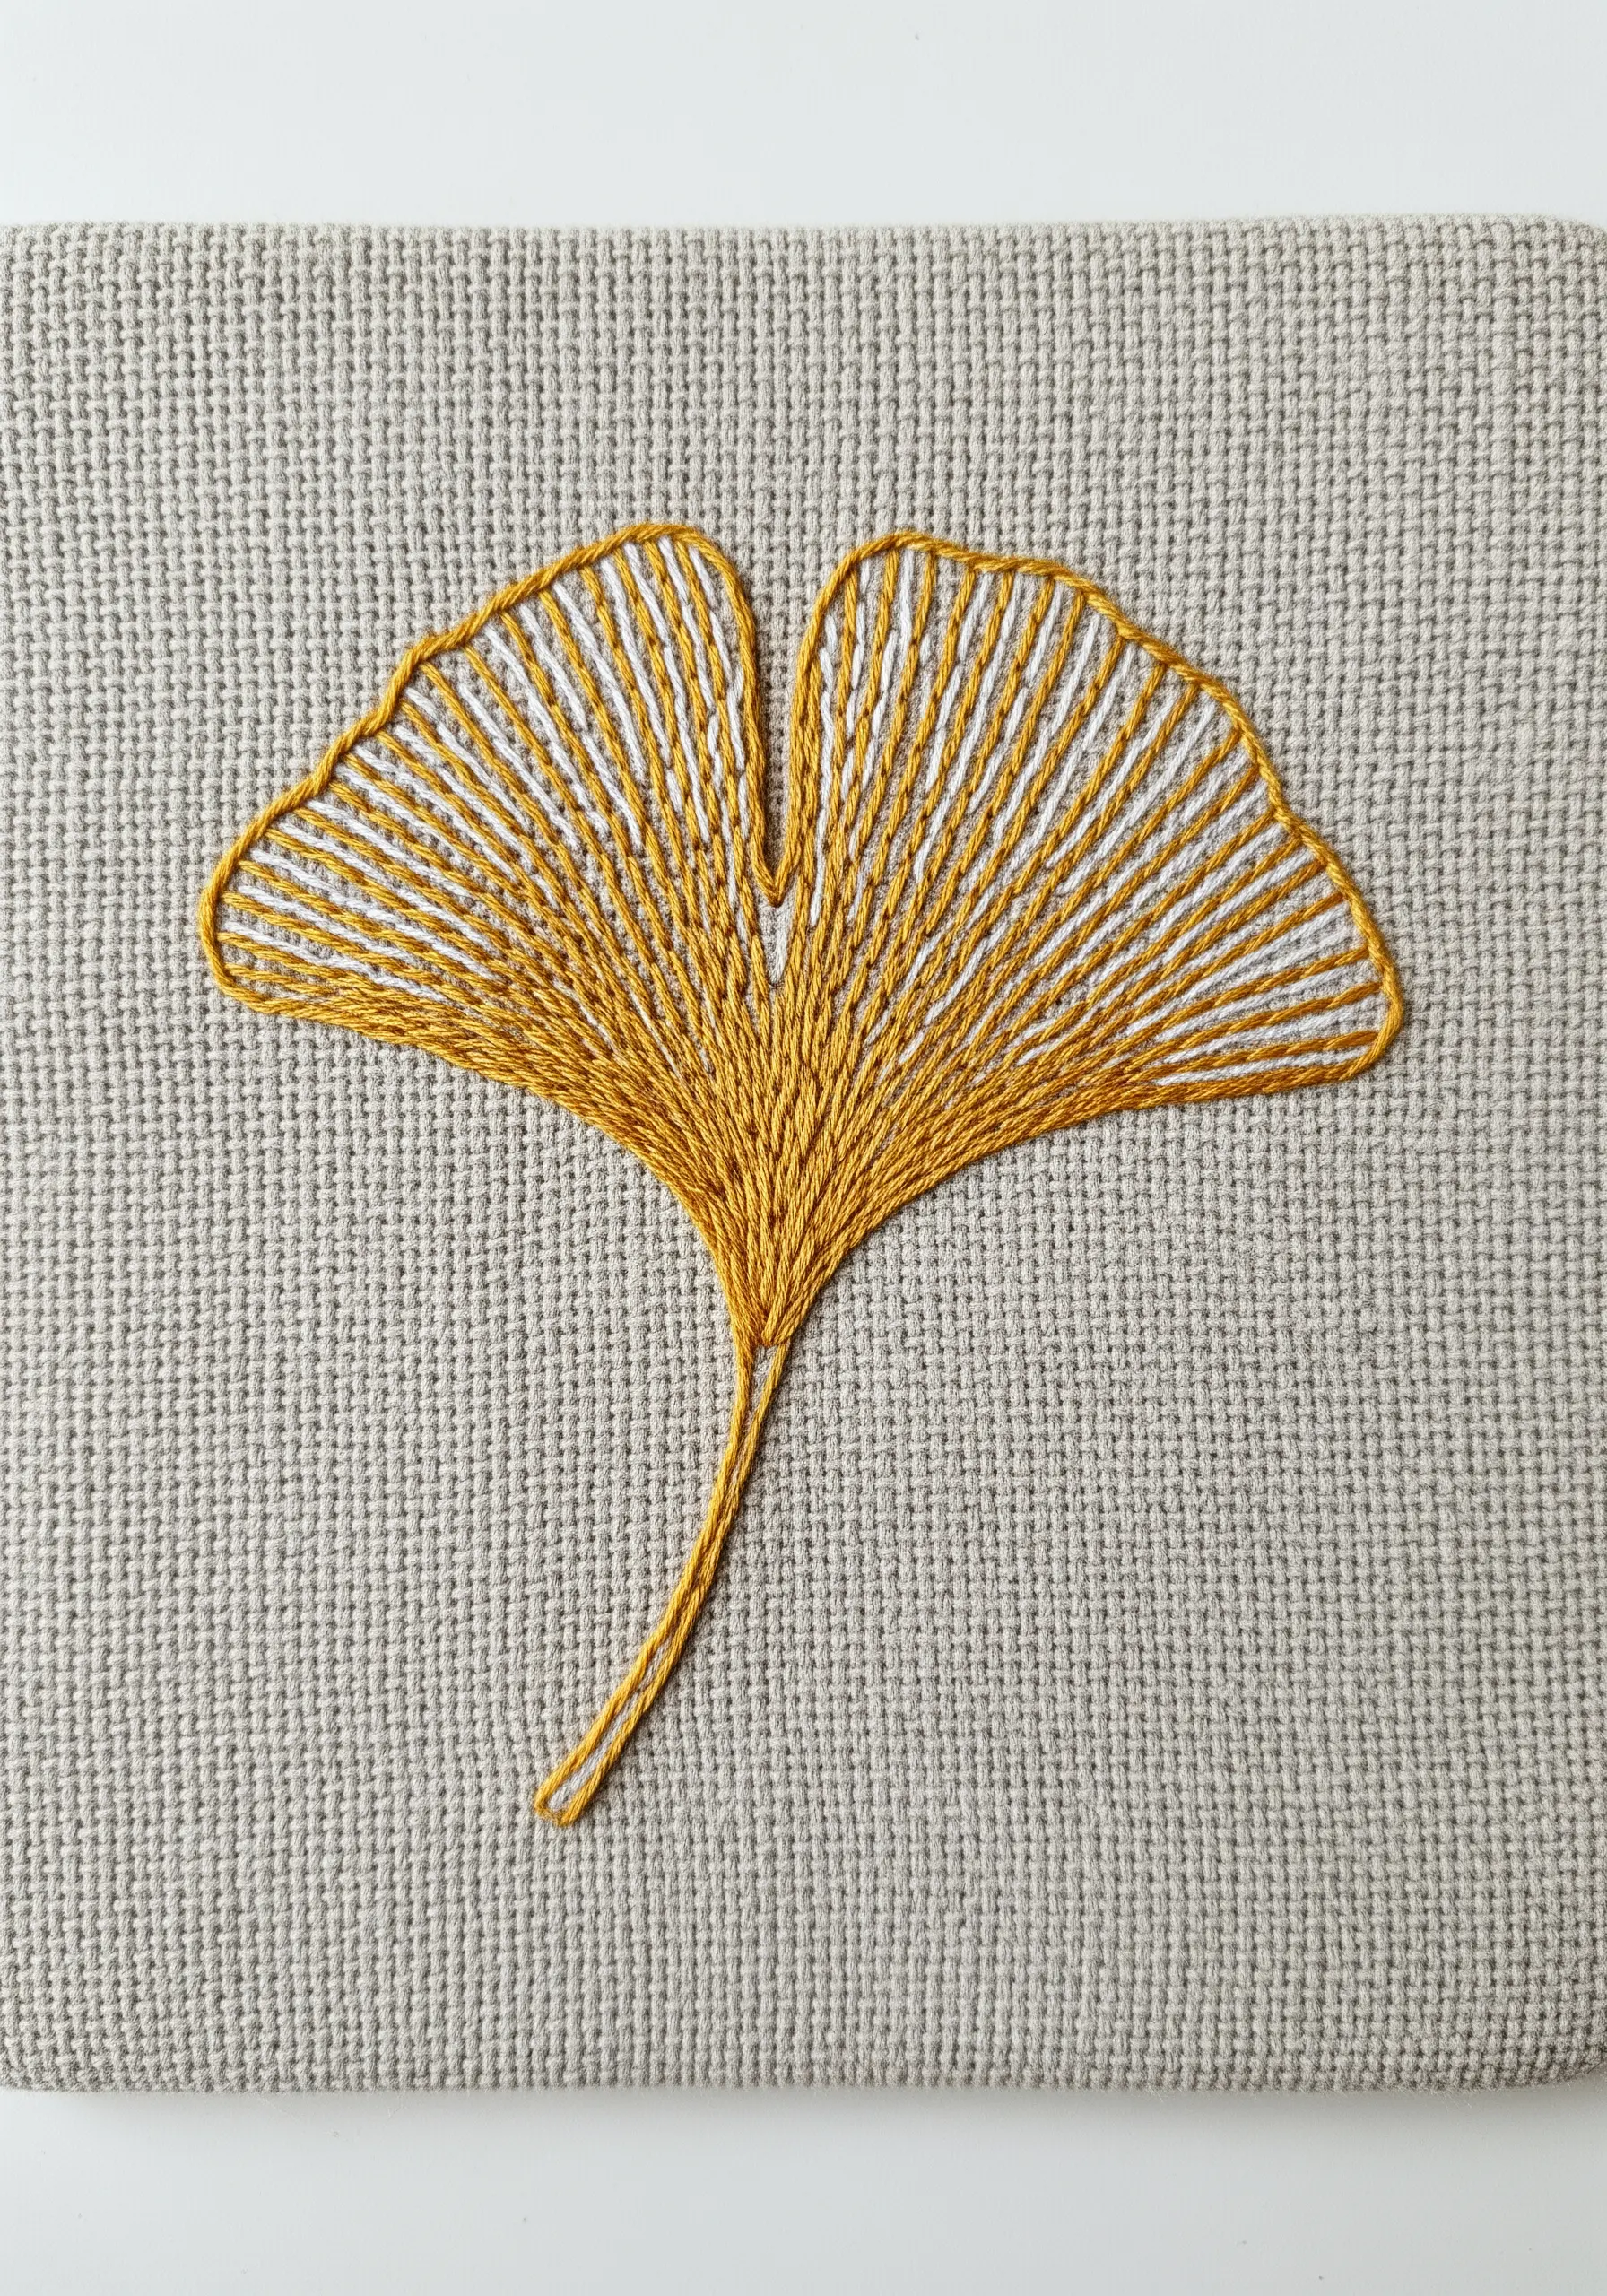
Add visual interest to a simple shape by using a two-tone fill.
Embroider the leaf’s veins with long straight stitches, alternating between two complementary colors like mustard and white.
This technique highlights the unique structure of the ginkgo leaf and creates a subtle, textured pattern that is more engaging than a solid color fill. Define the final shape with a stem stitch outline.
18. A Monogrammed Scented Pillow
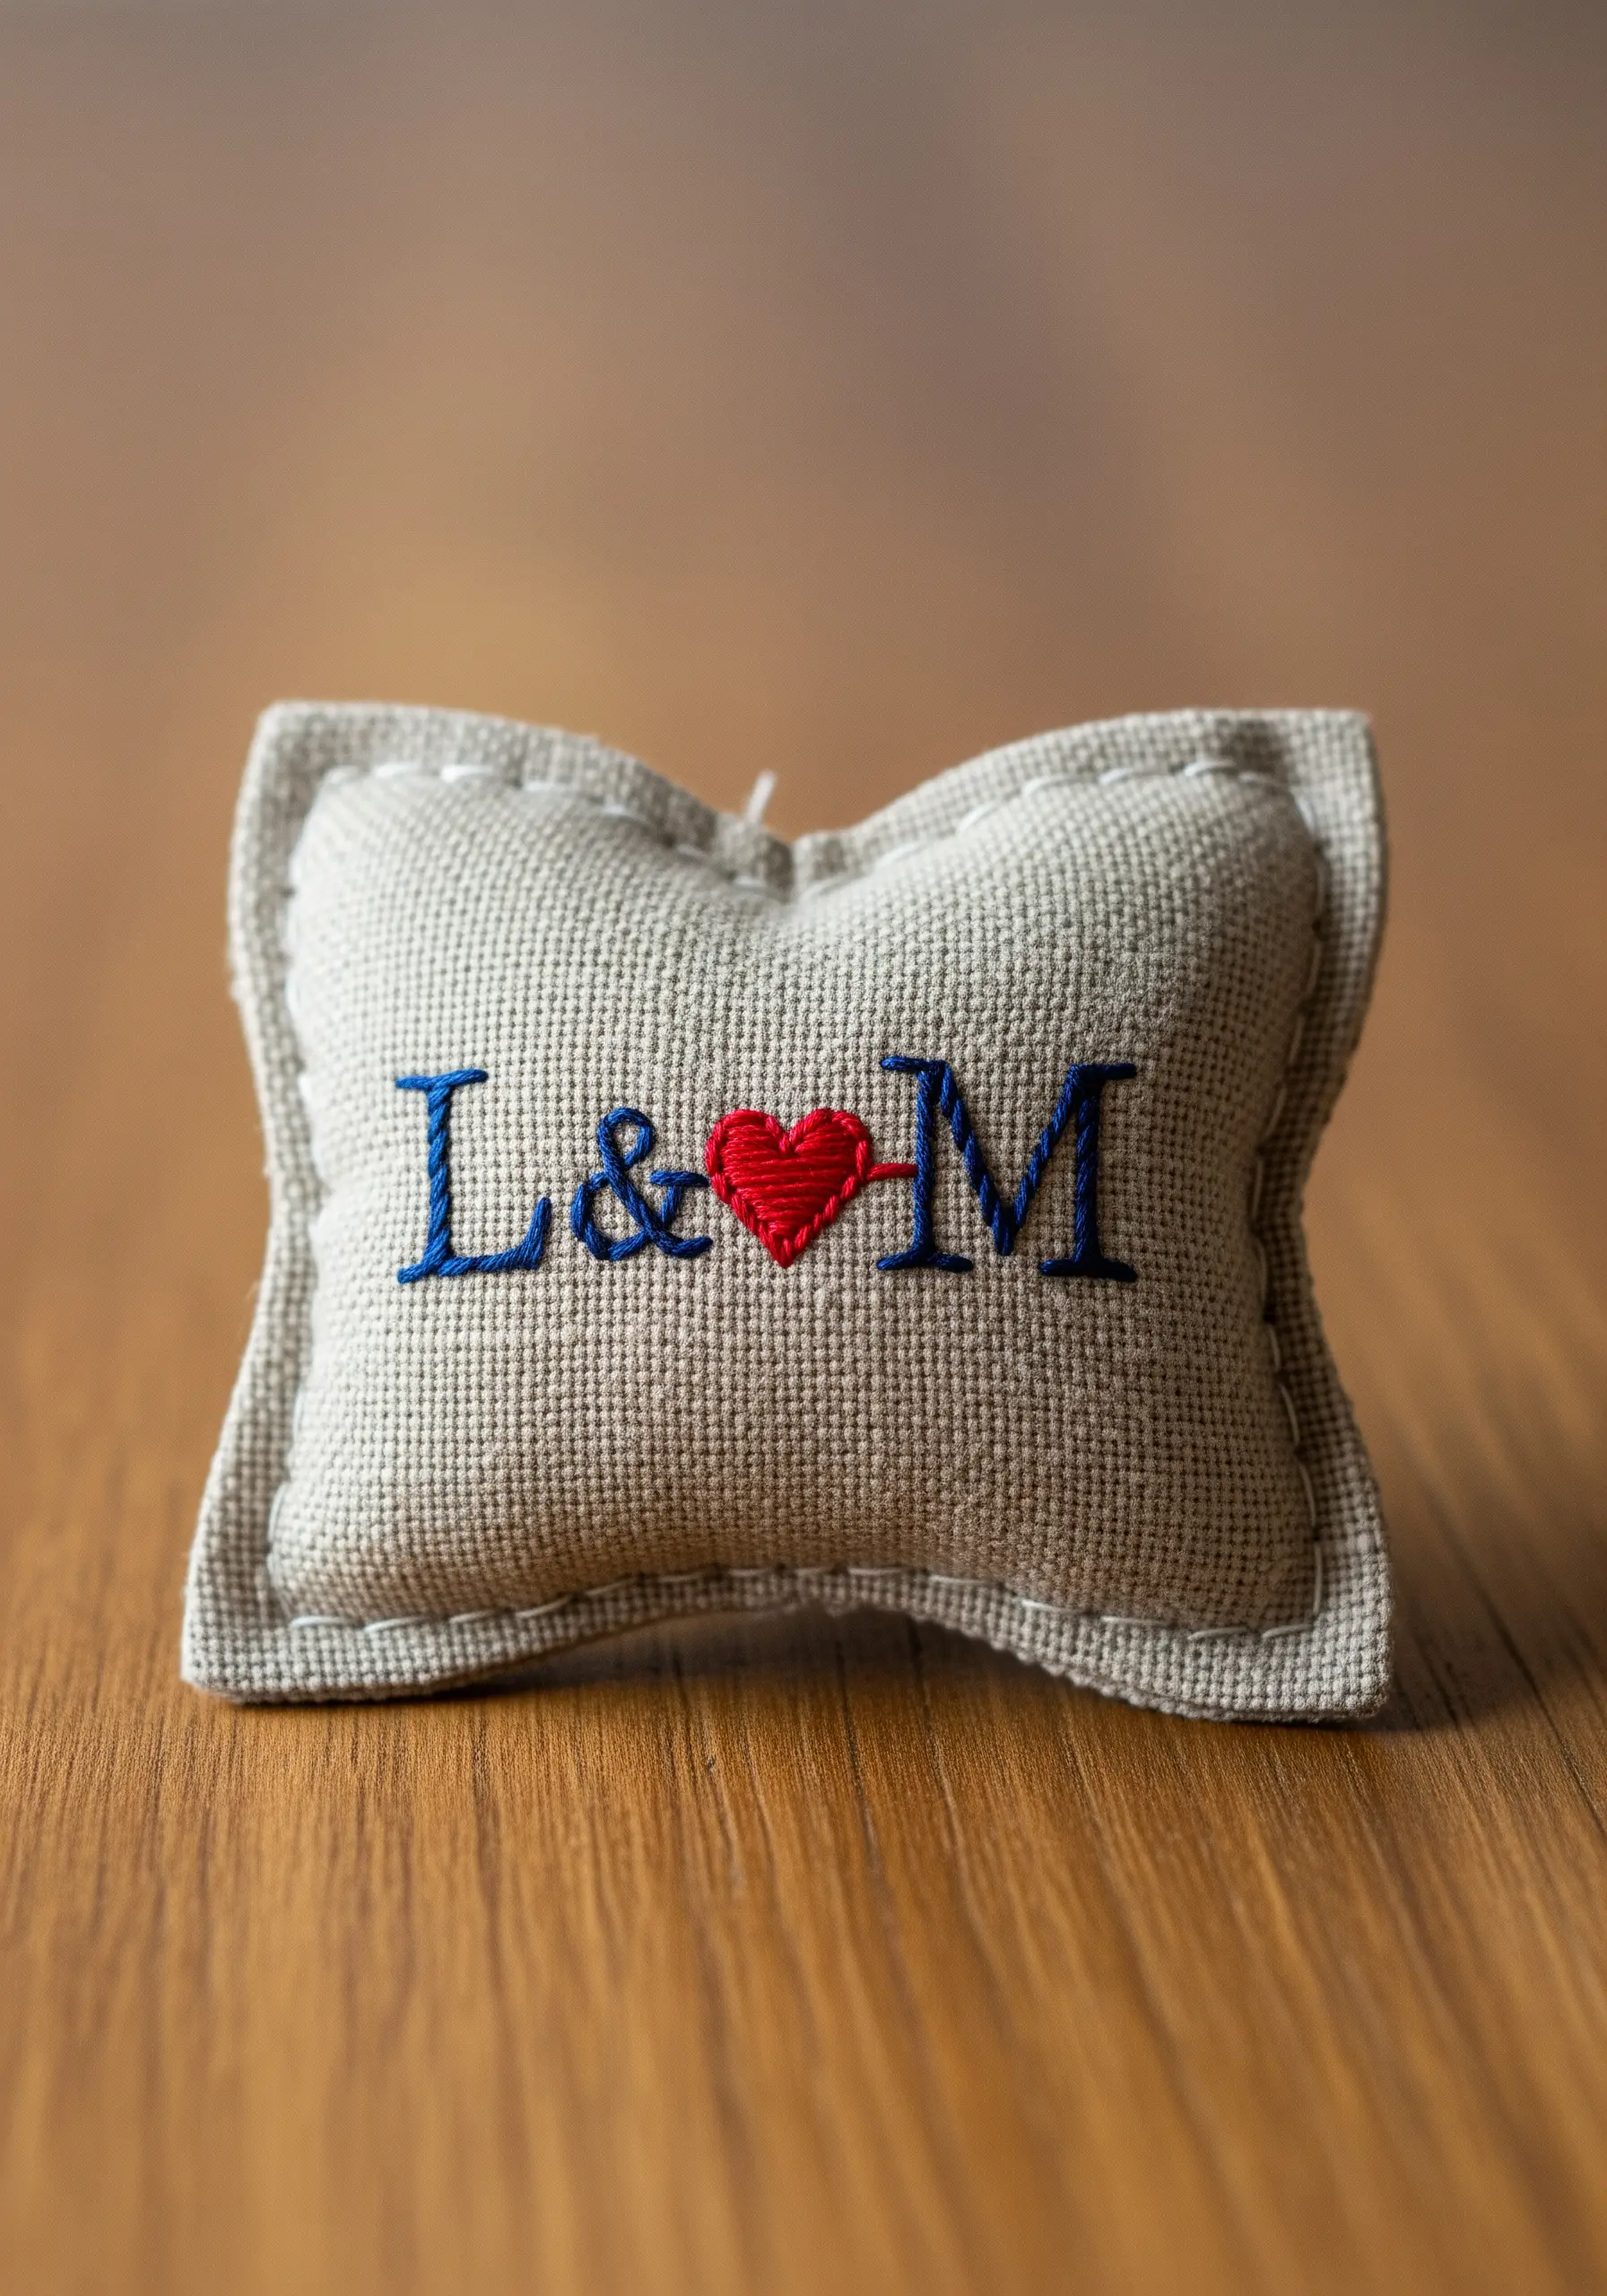
To achieve clean, readable serif letters, always outline the shape with a split stitch first.
This preparatory step creates a raised edge that guides your satin stitch fill, ensuring sharp corners and smooth curves.
For the ampersand, a contrasting color or a different stitch, like a simple backstitch, can add a playful, modern touch to a classic monogram.
19. A Textured Rainbow with Chain Stitch
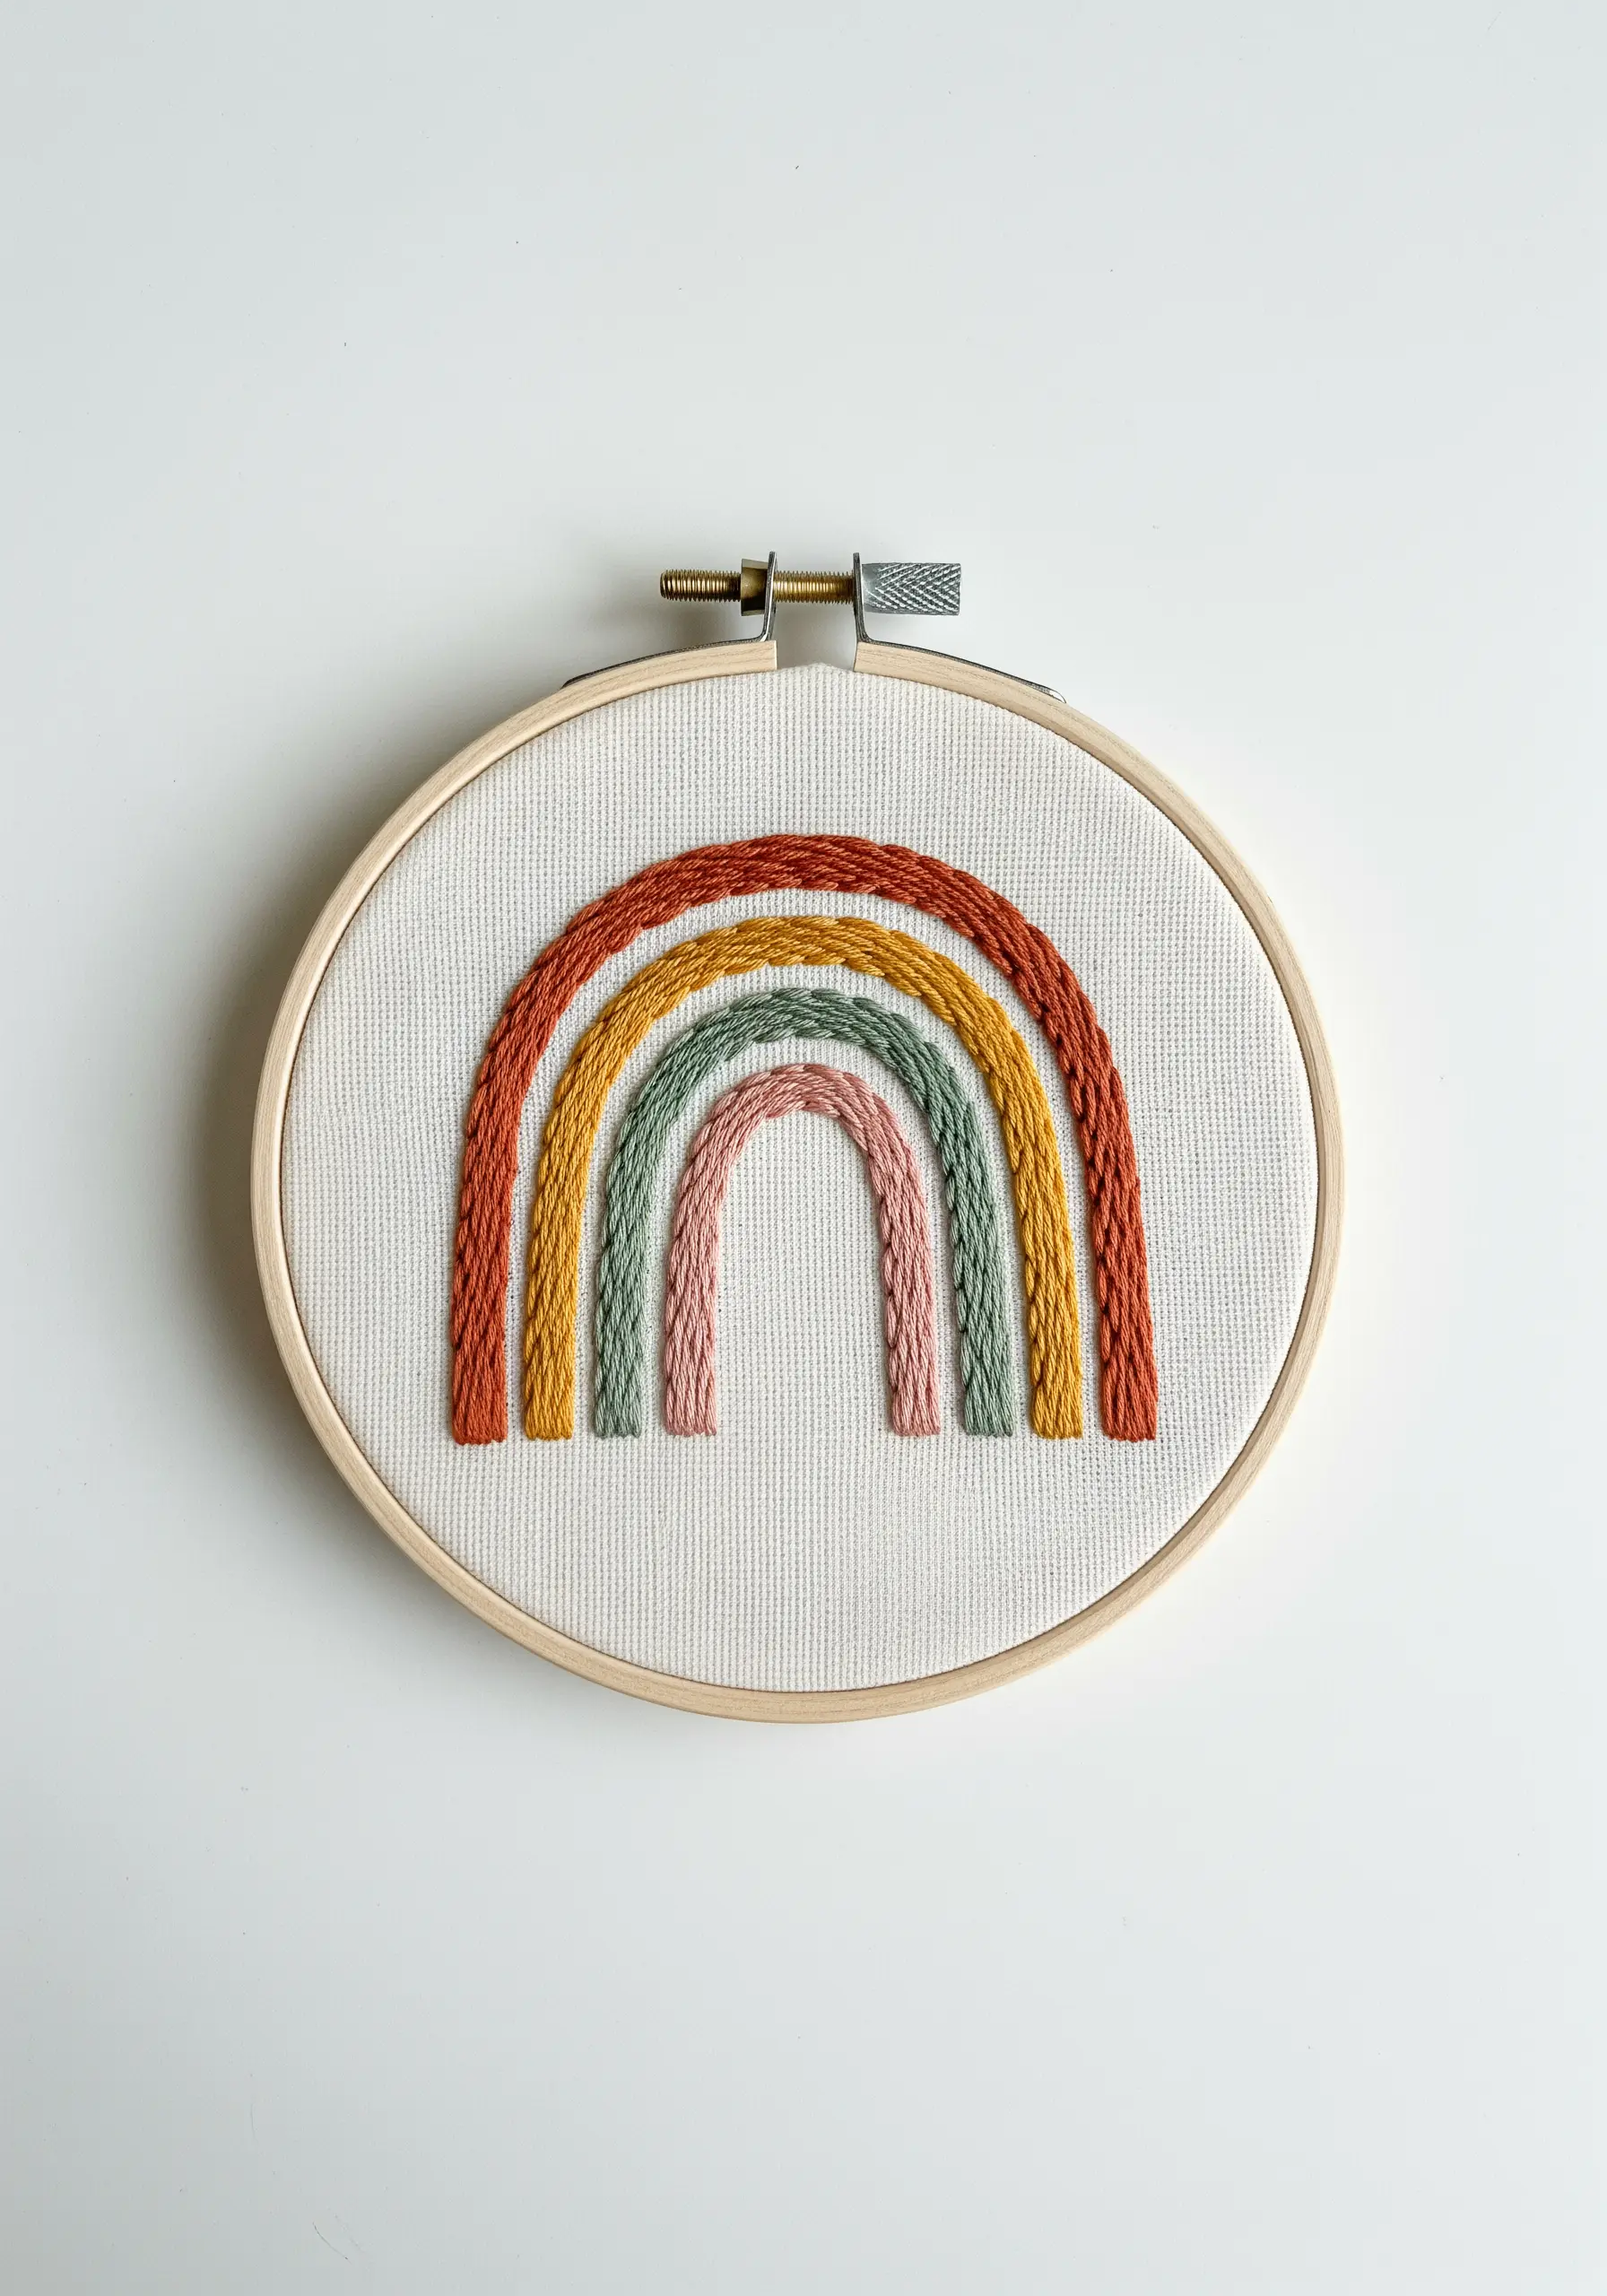
Instead of a flat satin stitch, give your rainbow a cozy, tactile quality by filling each arc with a thick chain stitch.
This stitch creates a beautiful, braided texture that adds warmth and dimension to the design.
For an even chunkier look, use all six strands of embroidery floss or switch to a thicker thread like DMC Perle Cotton.
20. A Realistic Coffee Bean
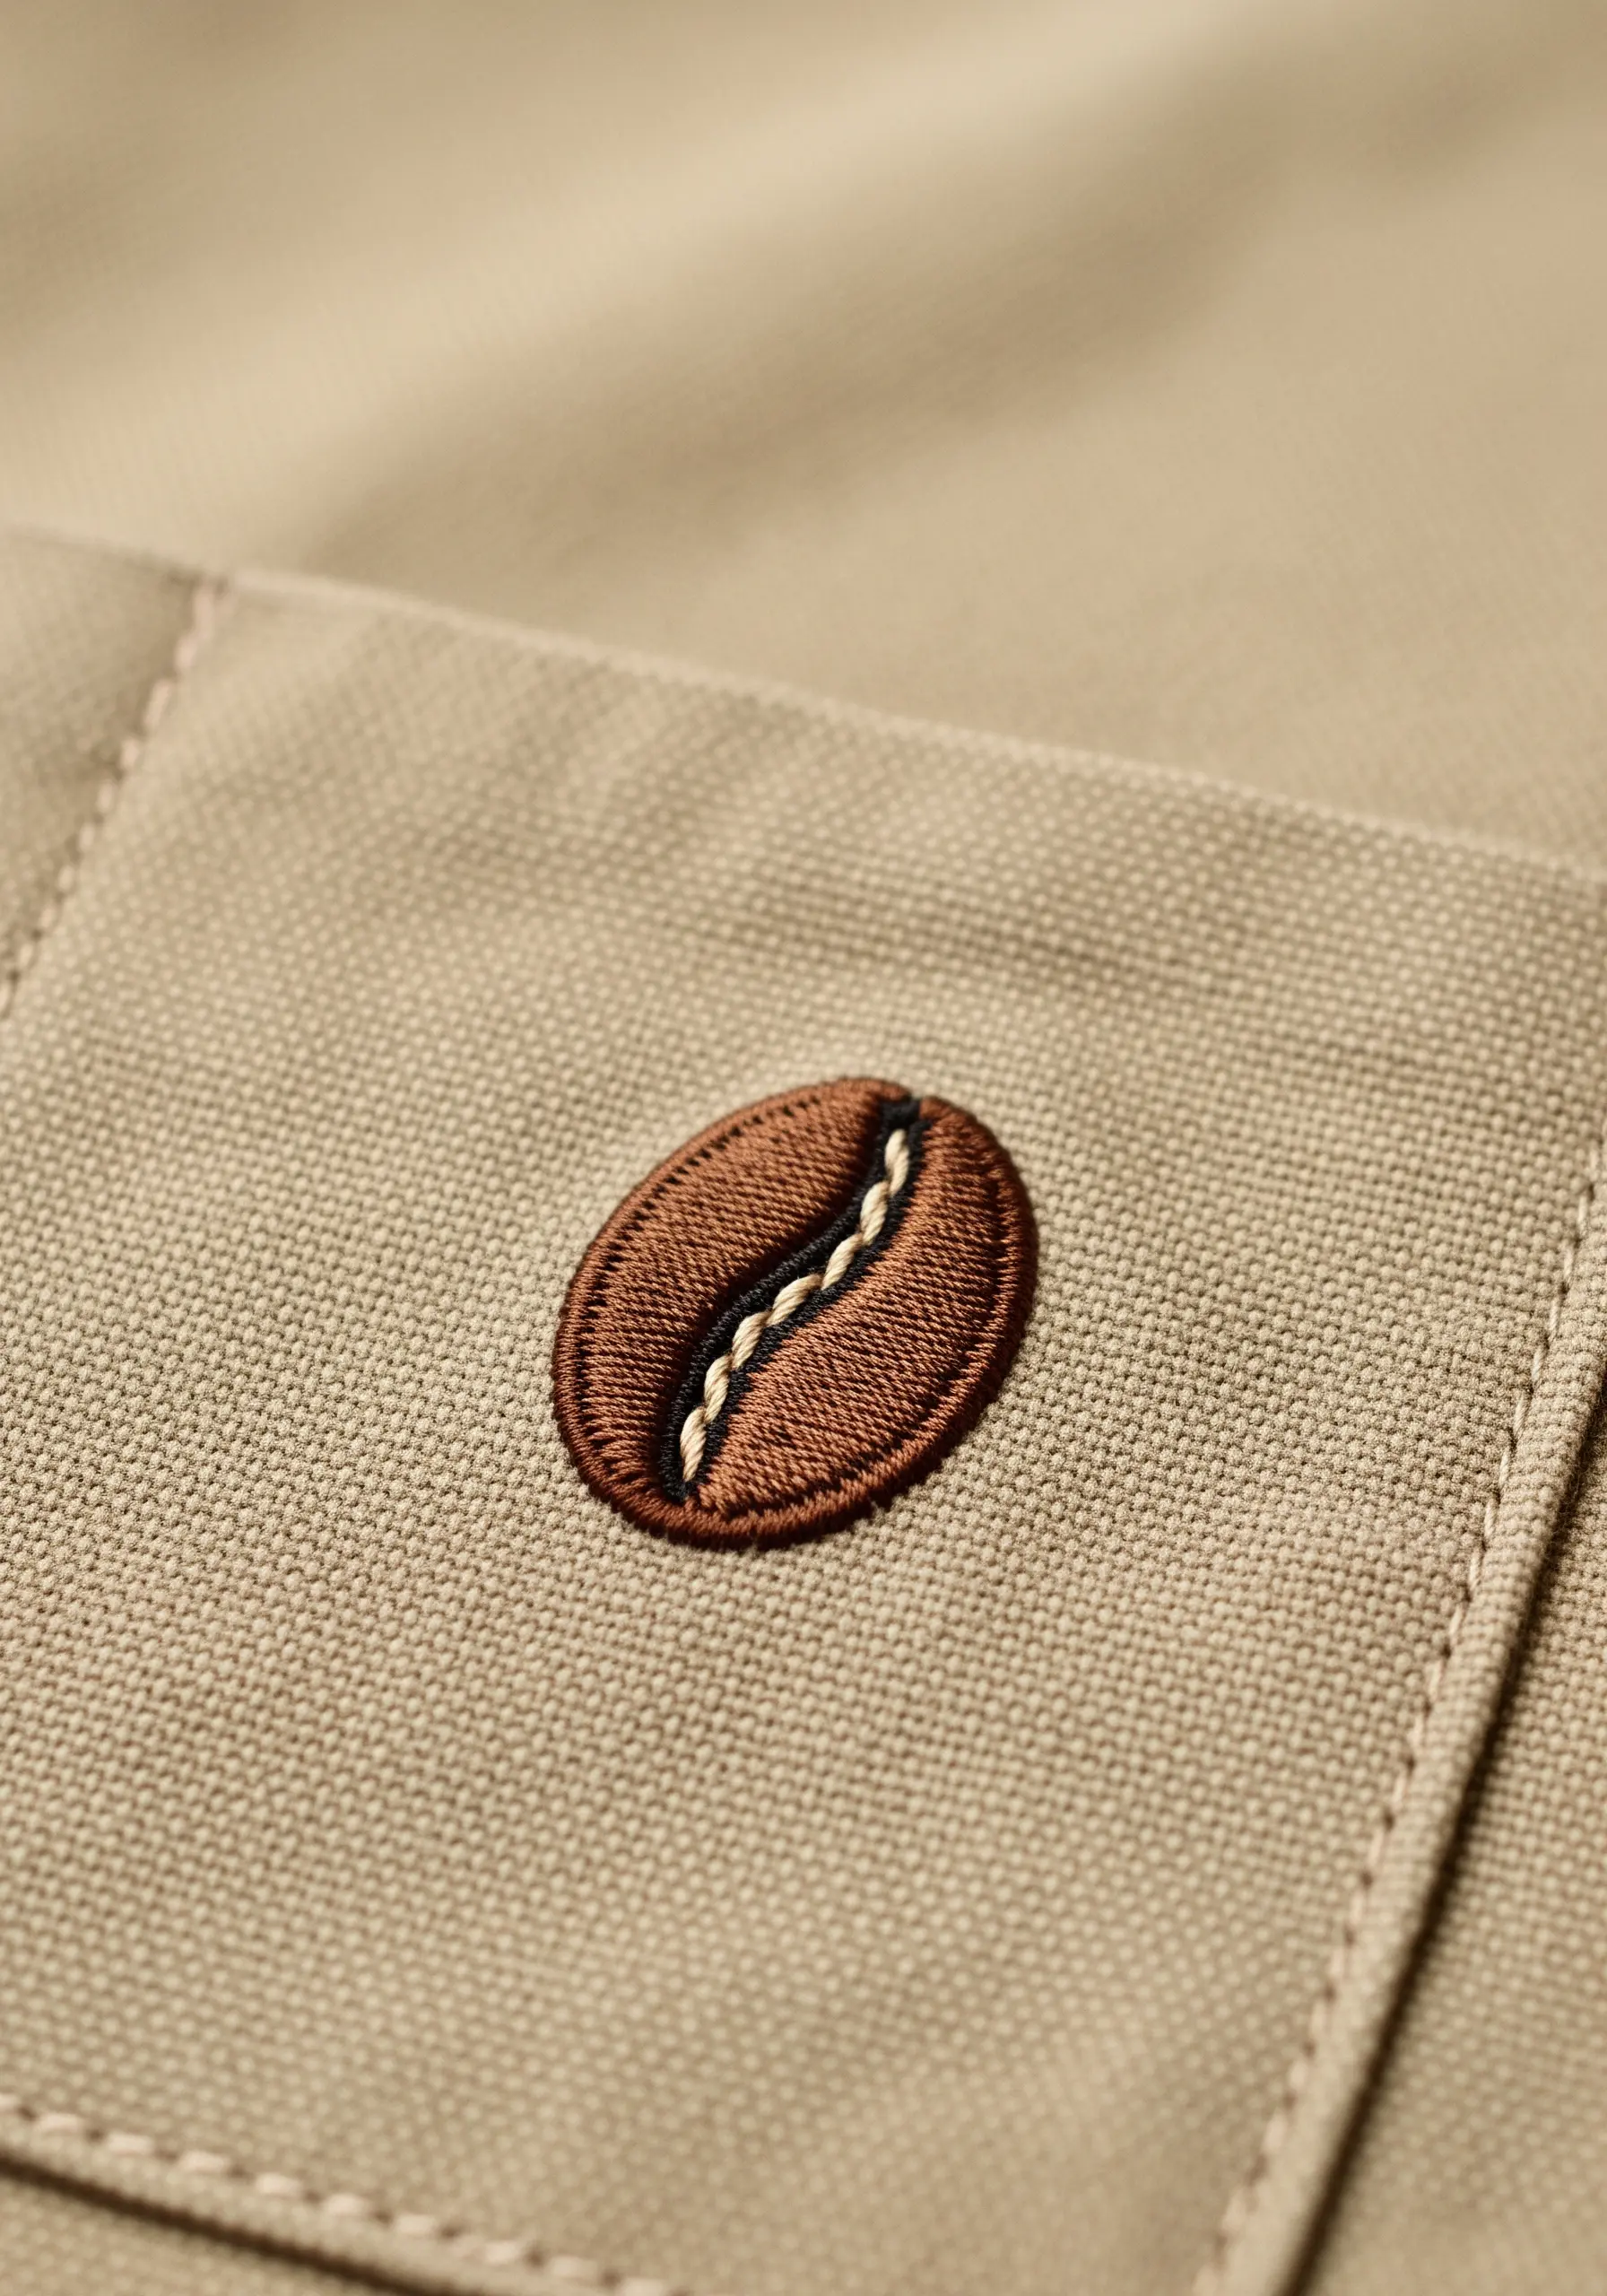
Achieve a smooth, glossy look with miniature thread painting.
Use a long-and-short stitch with three shades of brown: dark for the outer edge, a medium tone for the main body, and a light shade for the highlight.
This careful blending creates the illusion of a rounded, three-dimensional object. A single stitch in a contrasting light color forms the bean’s central crack.
21. A Grape Cluster Gift Tag
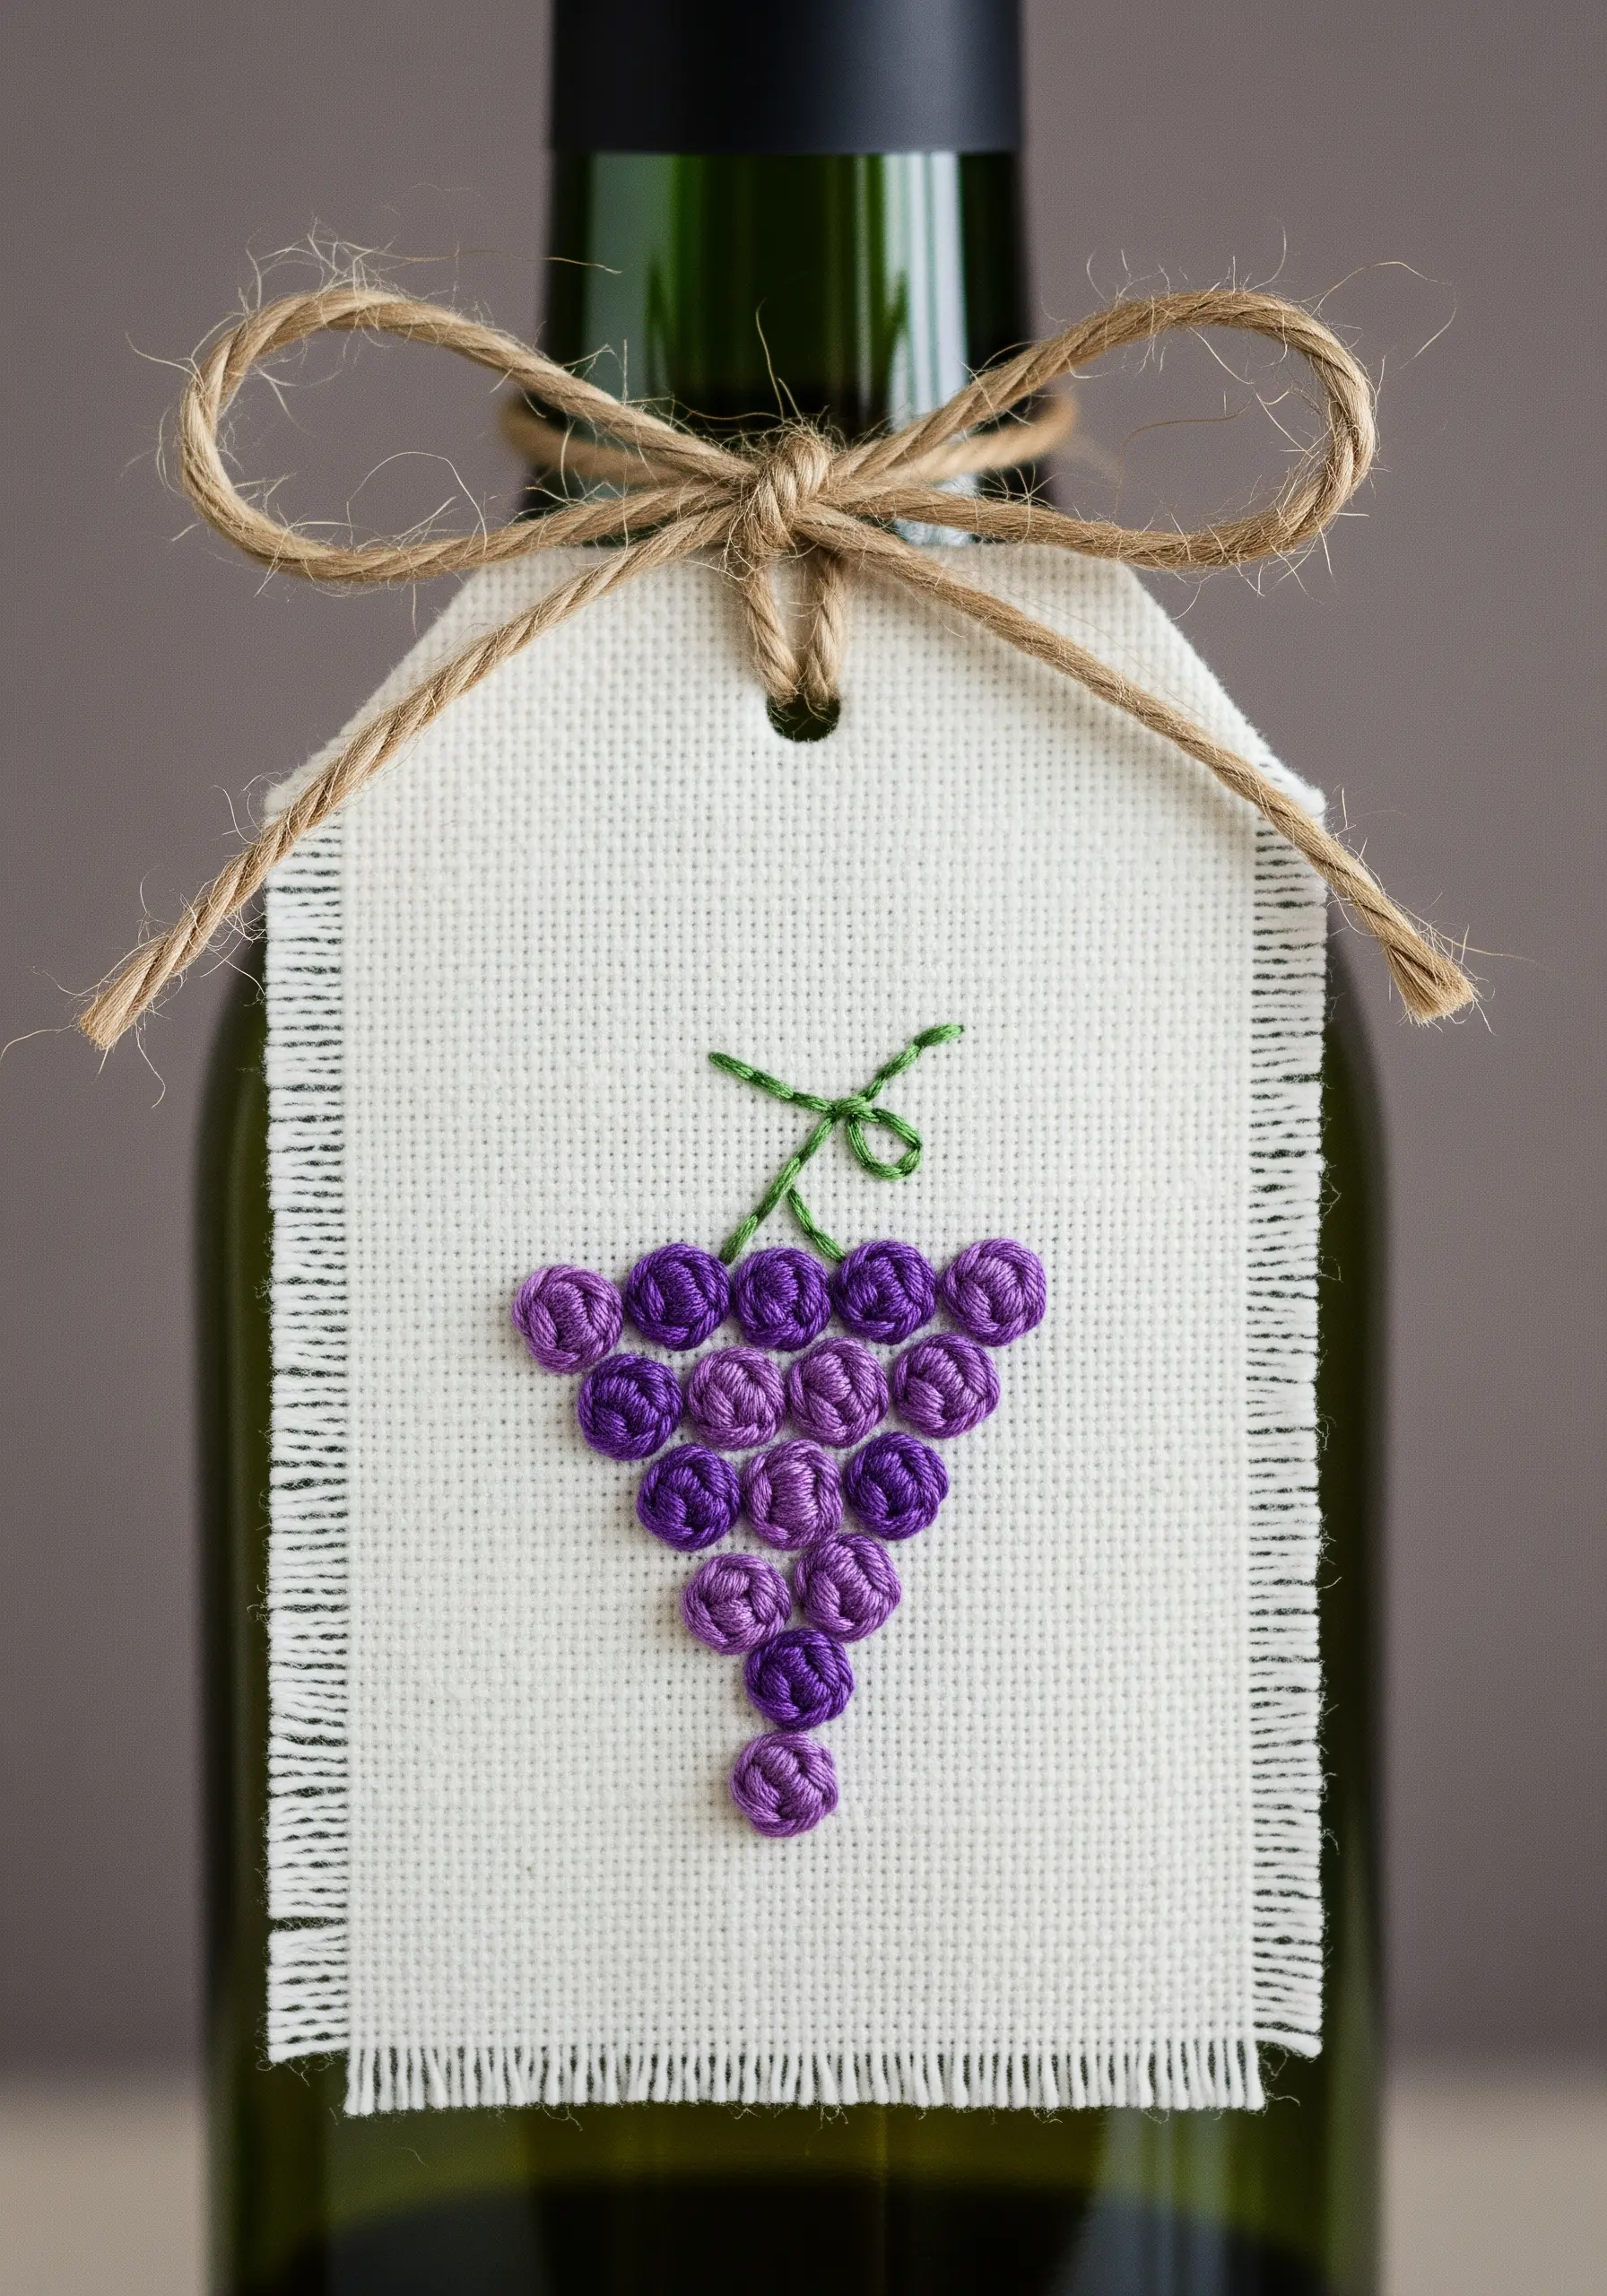
For a beautifully raised, three-dimensional effect, form a cluster of grapes using French knots.
Use two or three analogous shades of purple and vary your thread wraps (one, two, or three times) to create knots of slightly different sizes.
This variation makes the bunch look more organic and realistic. A few simple straight stitches are all you need for the vine and leaf.
22. A Striking Blackbird Silhouette
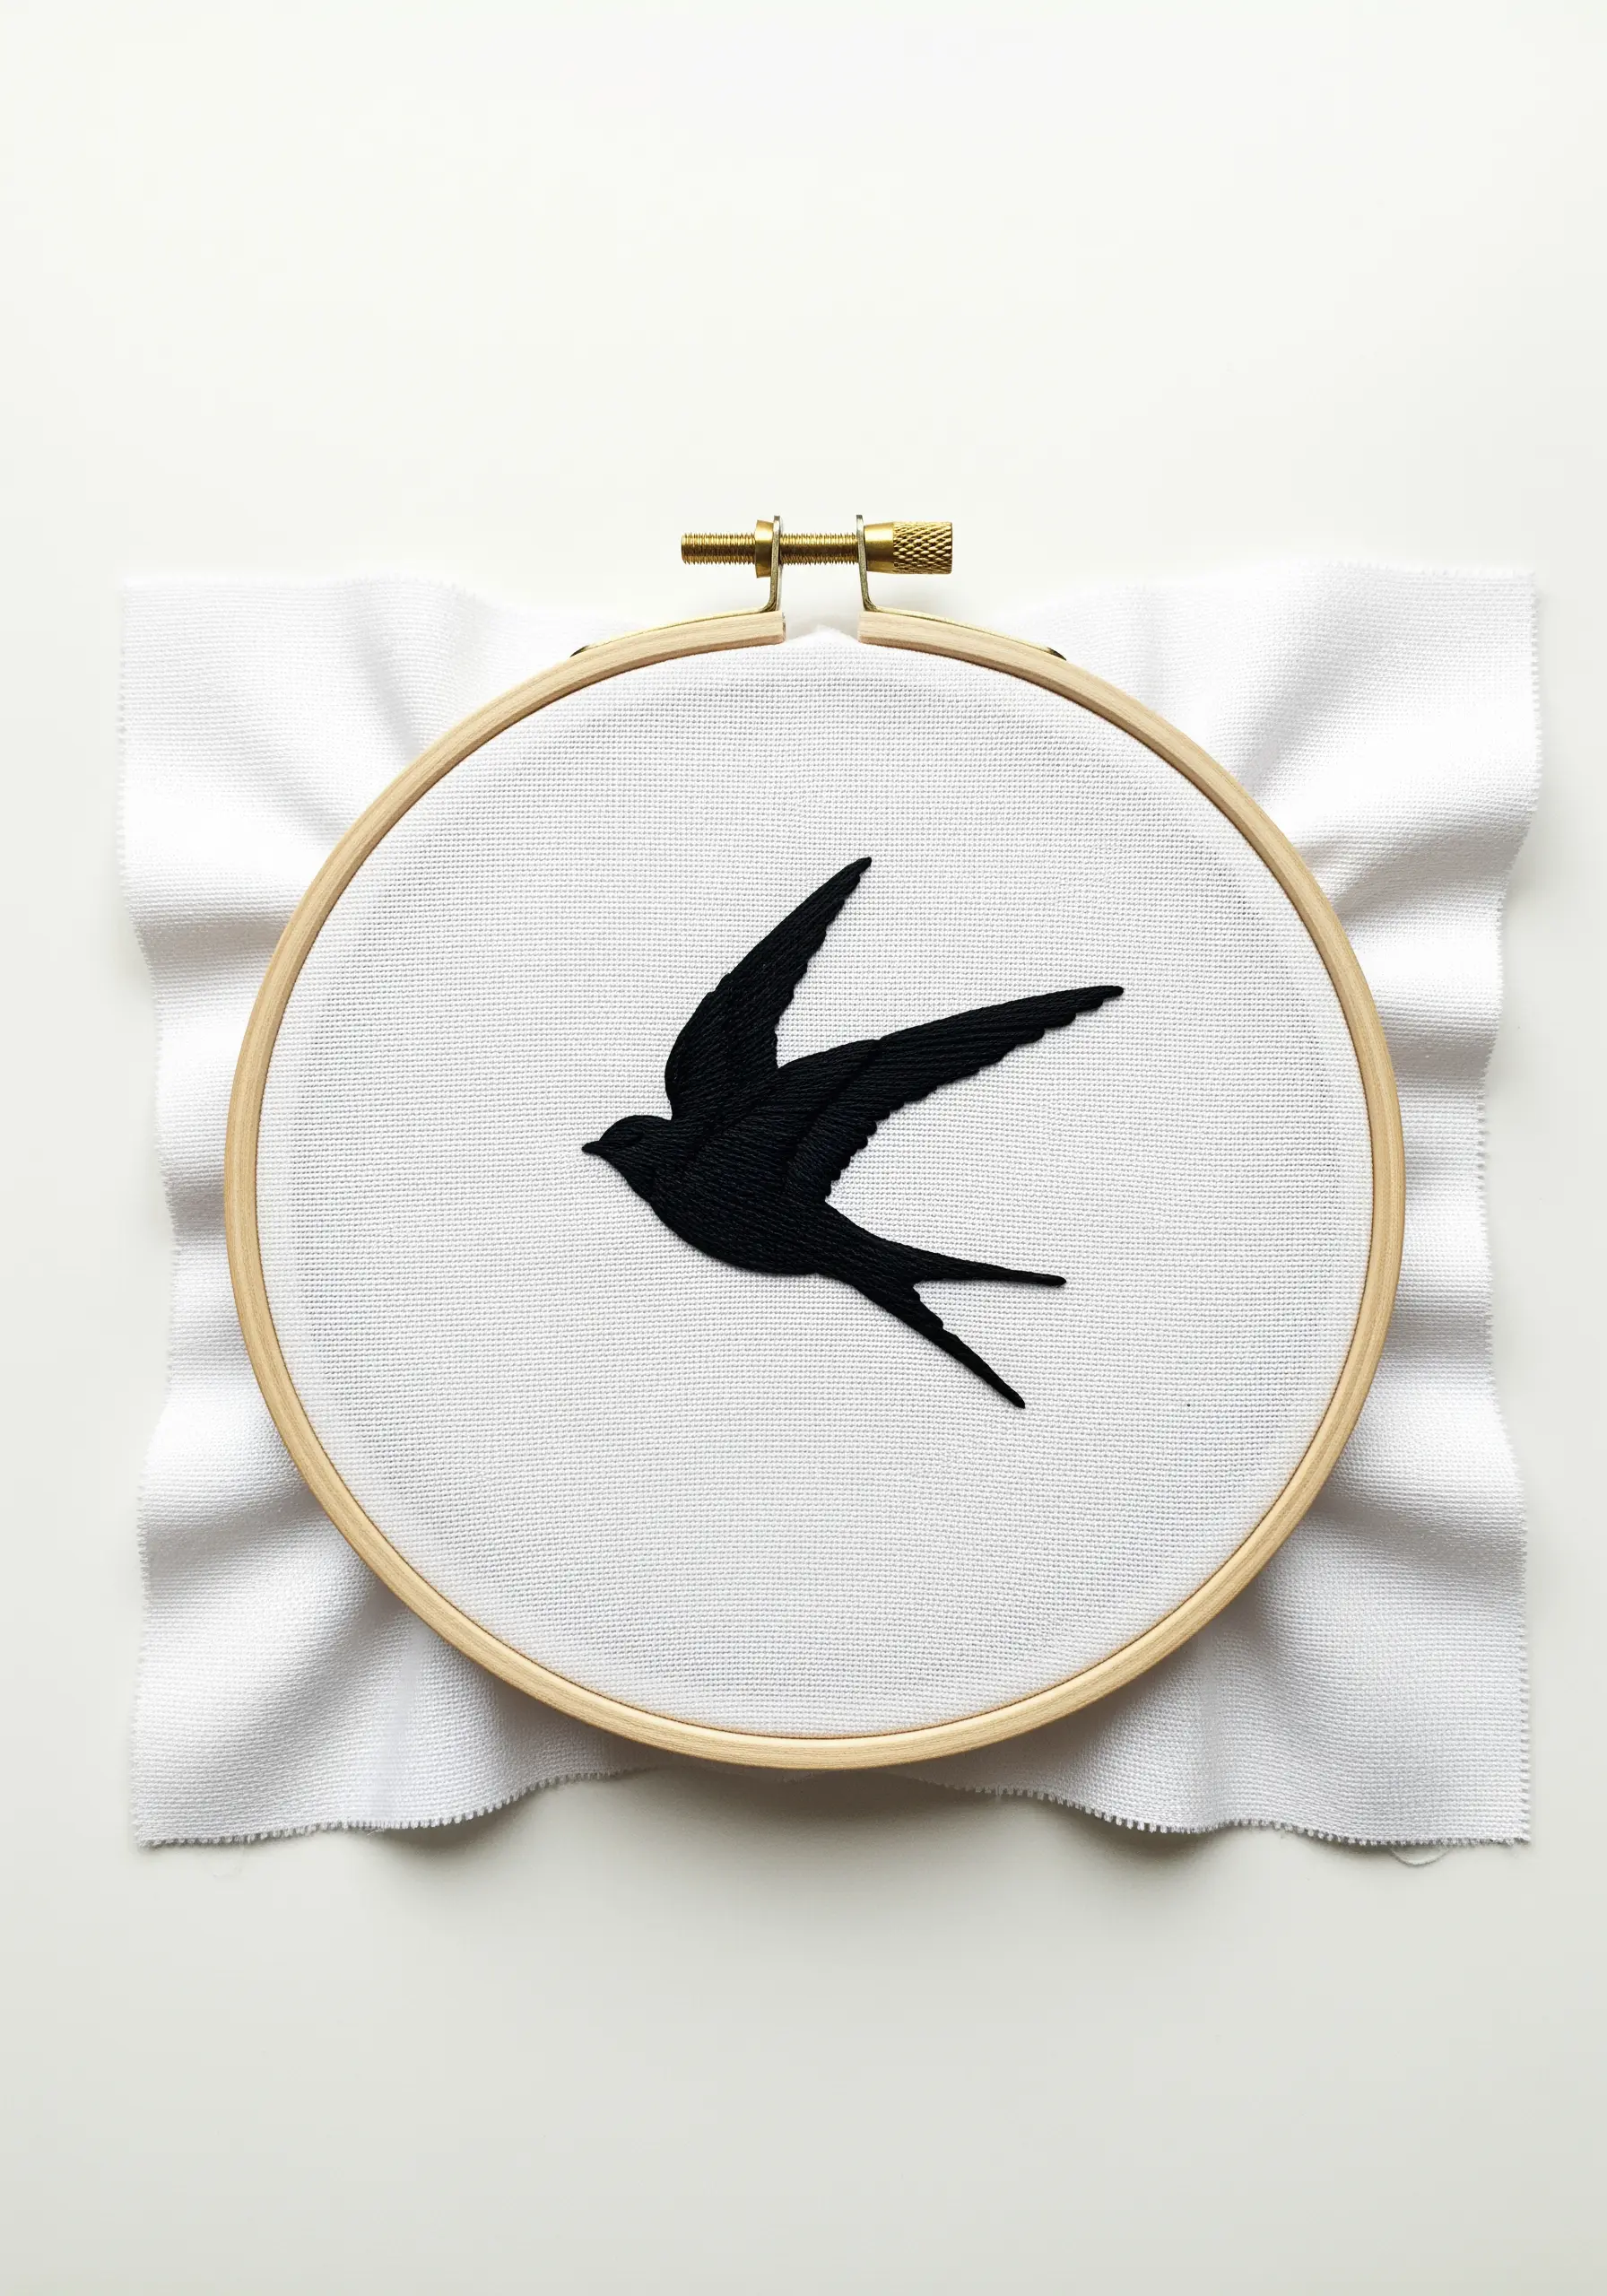
For a flawless solid fill on a large silhouette, the key is tension and preparation.
Always use a non-fusible stabilizer behind your fabric to prevent puckering, especially with dense stitching.
Outline the entire shape with a split stitch first to create a clean edge, then fill with a smooth satin stitch, keeping your stitches perfectly parallel.
23. An Abstract ‘Confetti’ Burst
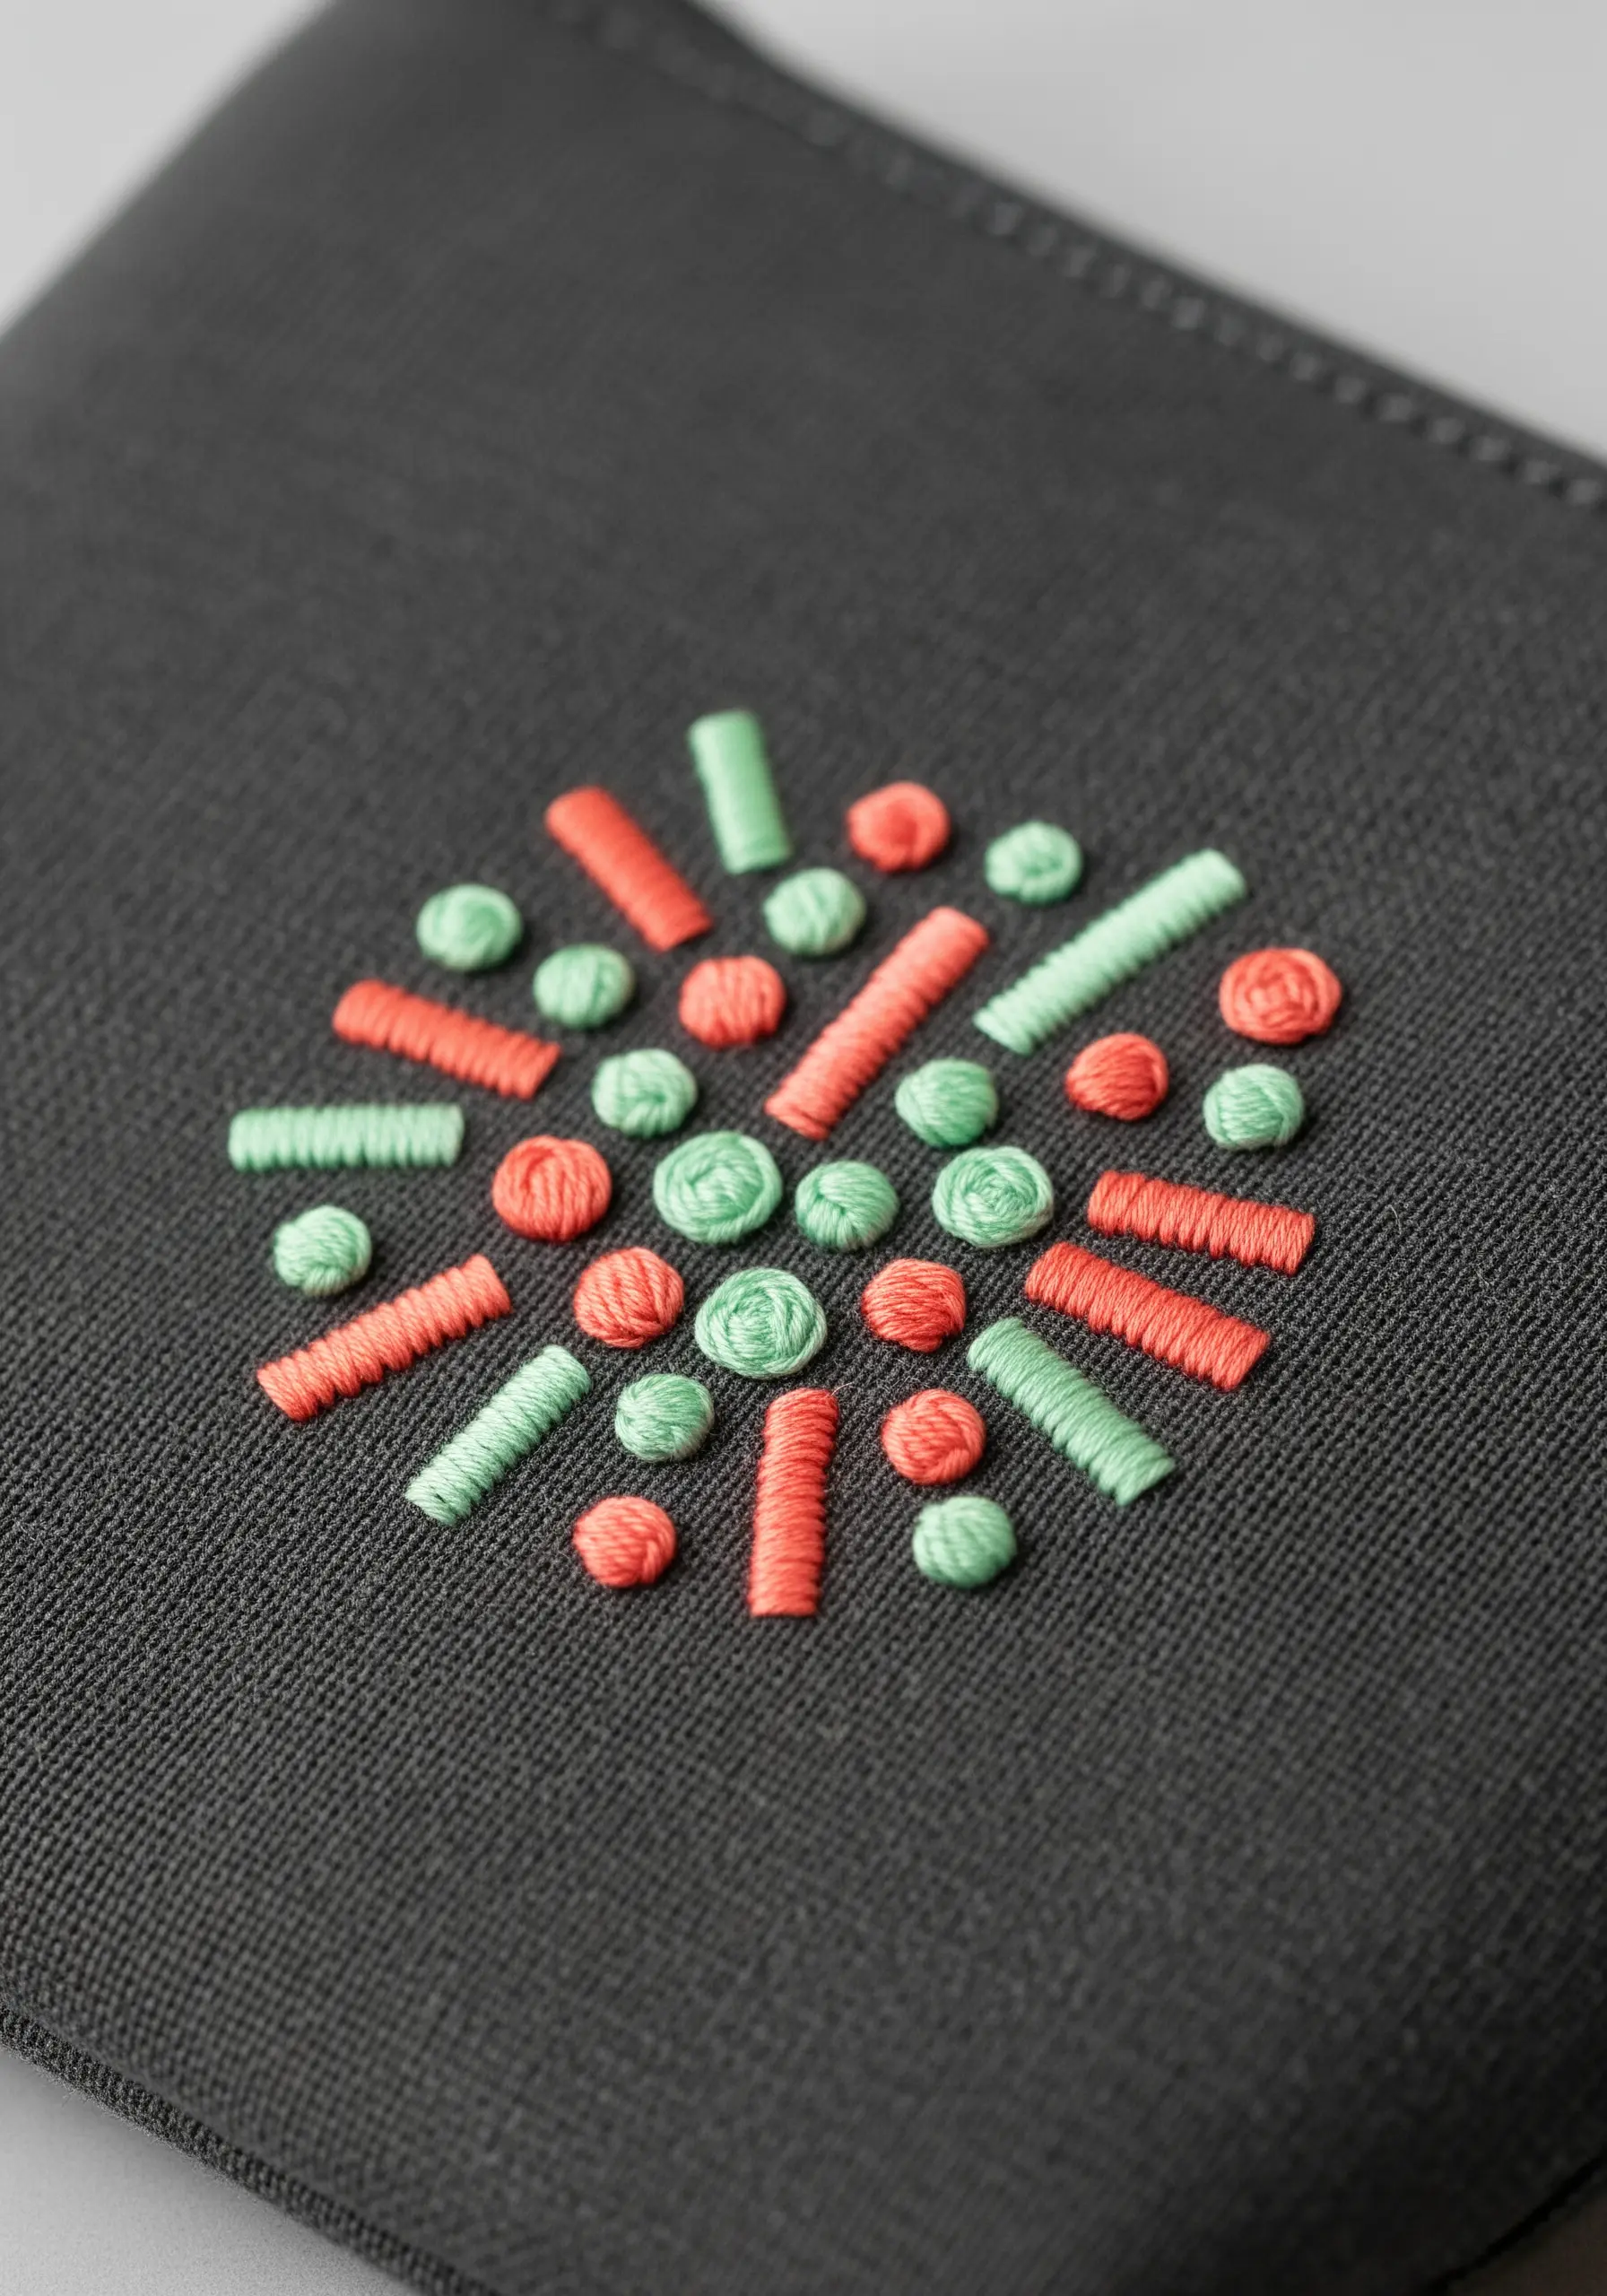
This design is a perfect exercise in texture and composition, and a great way to use up thread scraps.
Combine a variety of simple stitches—French knots, straight stitches, and bullion knots or lazy daisies—in a scattered circular pattern.
To keep the design feeling modern and cohesive rather than chaotic, stick to a limited, high-contrast color palette of two or three colors.
24. An Elegant Feline Outline
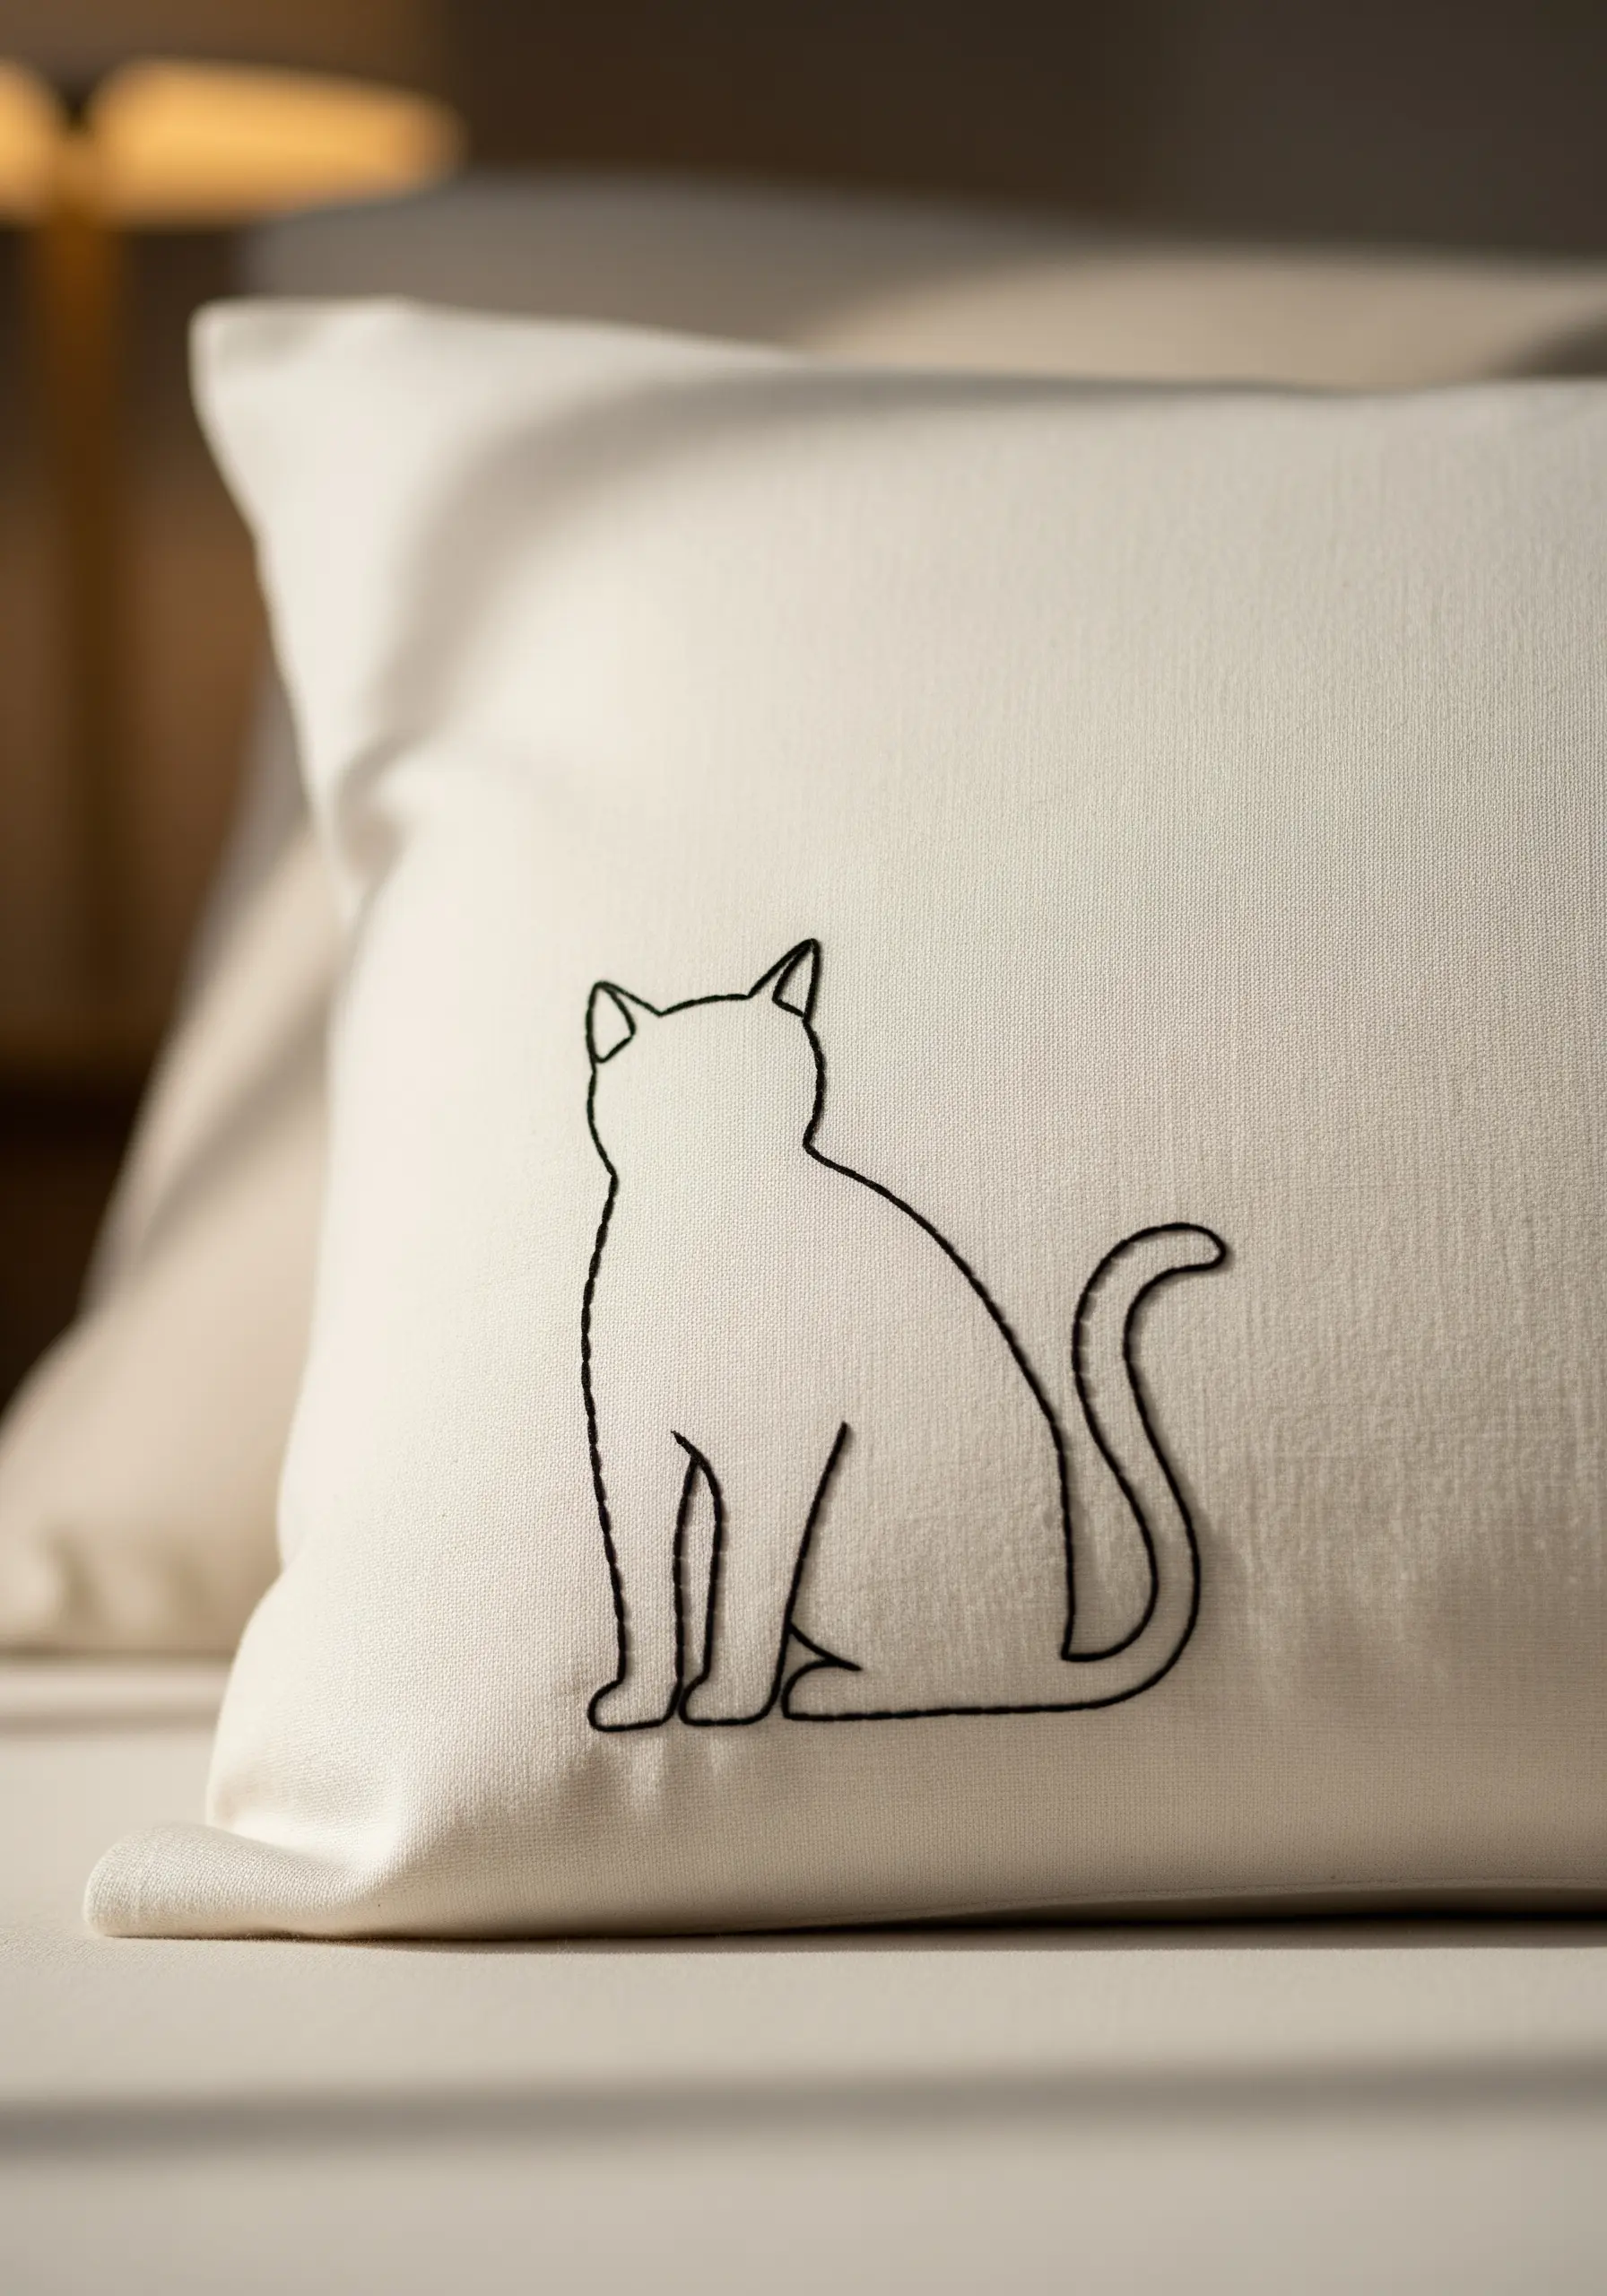
To create a perfectly smooth, continuous line that flows around curves, use a whipped backstitch.
First, stitch the entire outline with a standard backstitch.
Then, using the same thread, weave or ‘whip’ it around each stitch on the surface without going back through the fabric.
This technique elevates simple delicate pet line art embroidery by creating a raised, cord-like line.
25. A Classic Holiday Wreath
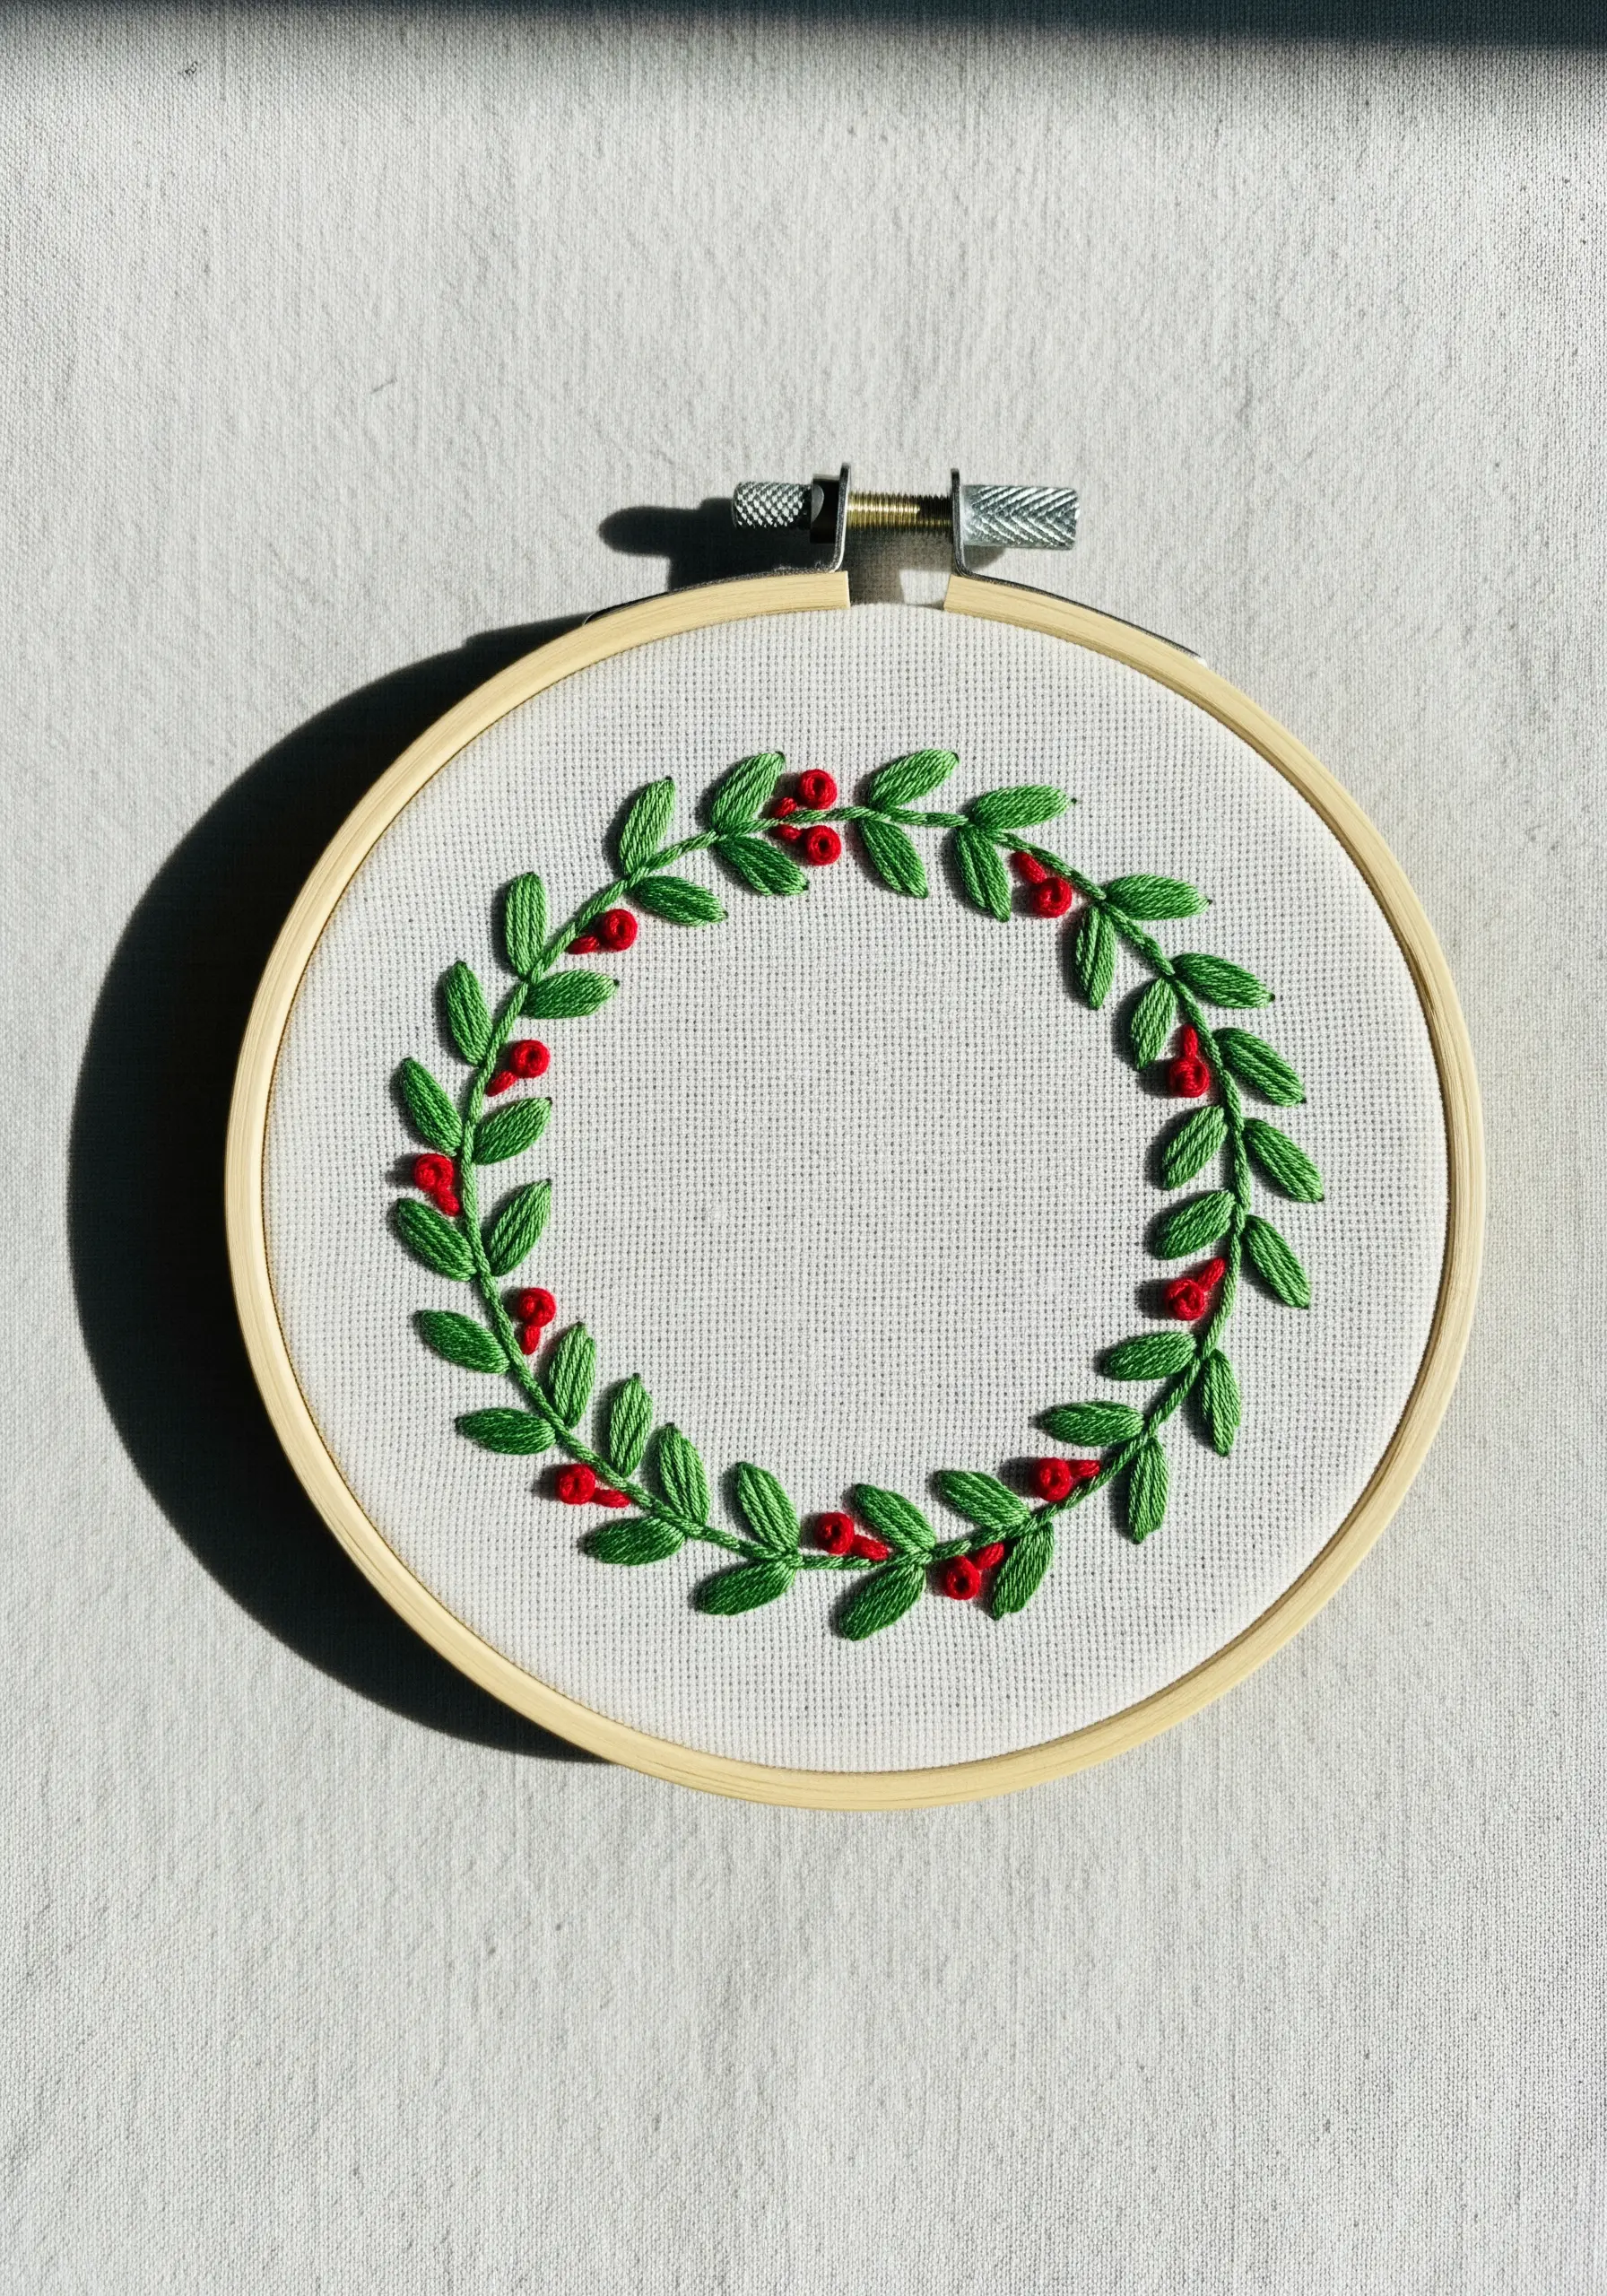
Build a wreath with dimension by layering your stitches.
Use the fishbone stitch for the leaves, as it creates a beautiful, built-in central vein and a natural shape.
Slightly overlap the leaves as you work your way around the circle to create a sense of fullness.
Add the berries last, using small, bright red French knots stitched directly on top of the leaves for a final pop of color.
26. A Realistic Feather with Blended Threads
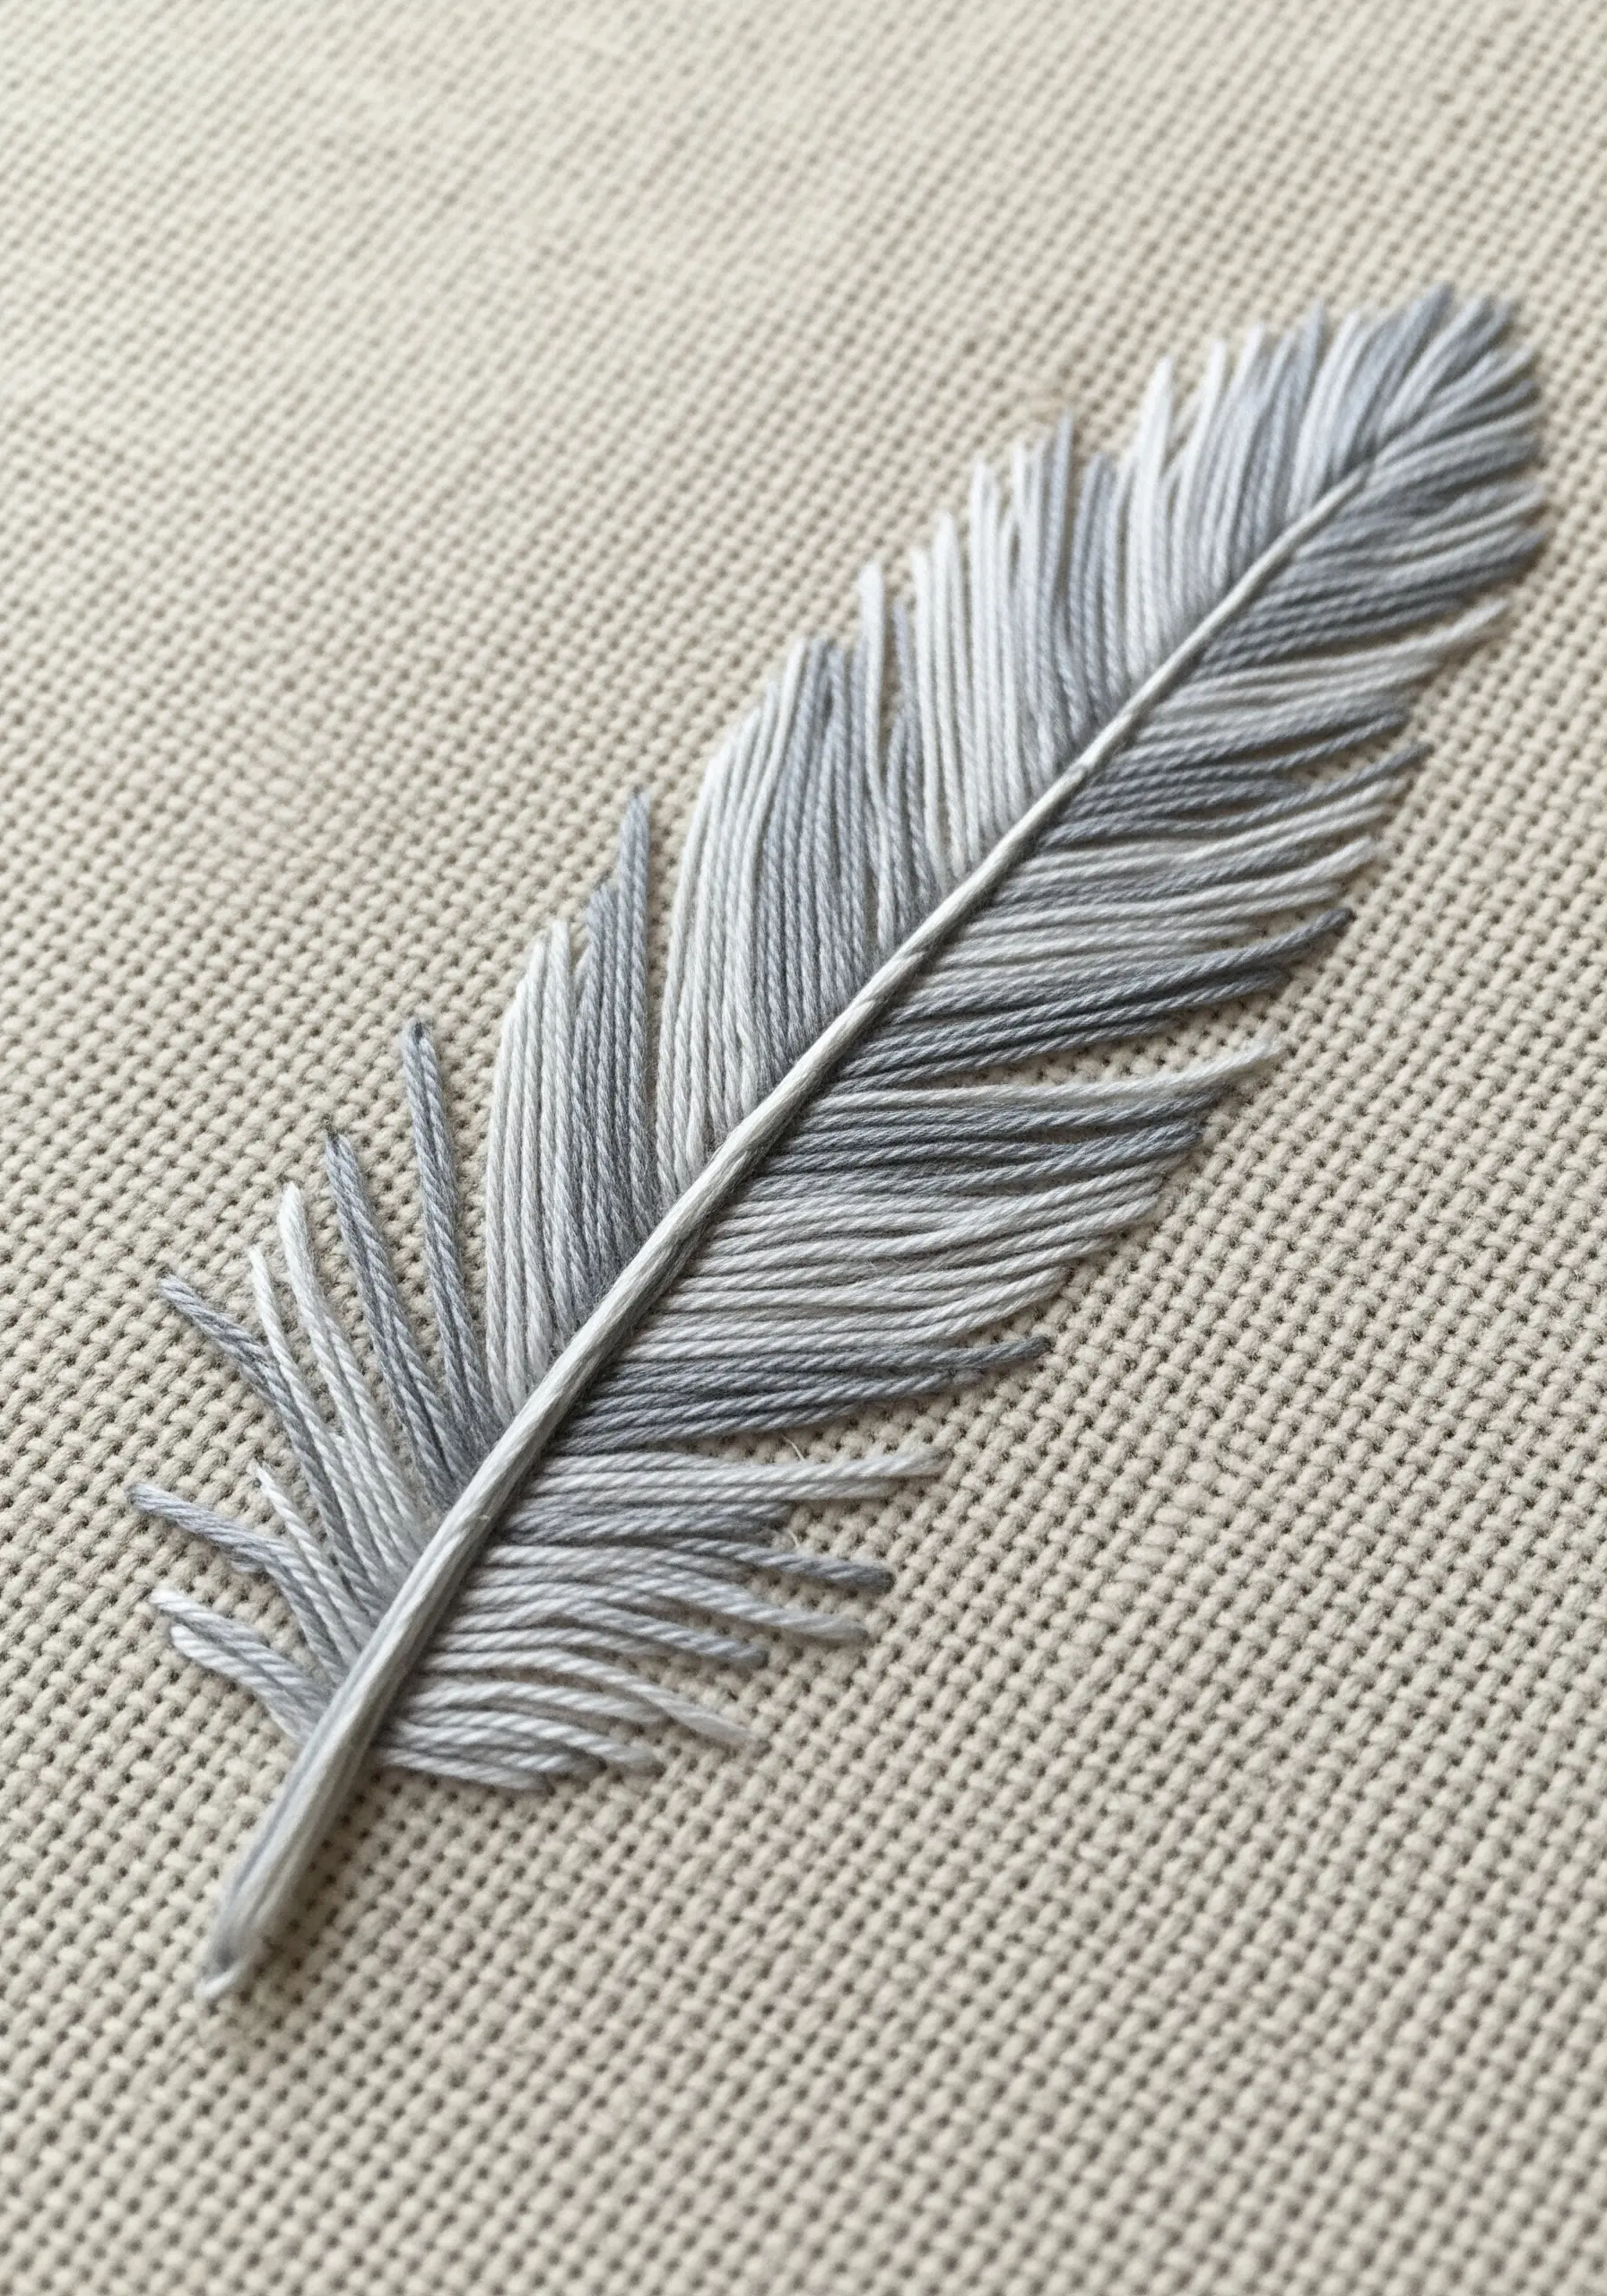
To capture the soft, delicate texture of a feather, the magic is in the stitch direction and color blending.
Use a single line of stem stitch for the central quill.
For the barbs, use angled straight stitches of varying lengths, layering them slightly.
To achieve the color gradient, thread your needle with one strand each of two or three different shades of grey and stitch with them together. This is a simple way to capture nature’s textures.
27. Minimalist Glasses on a Felt Case
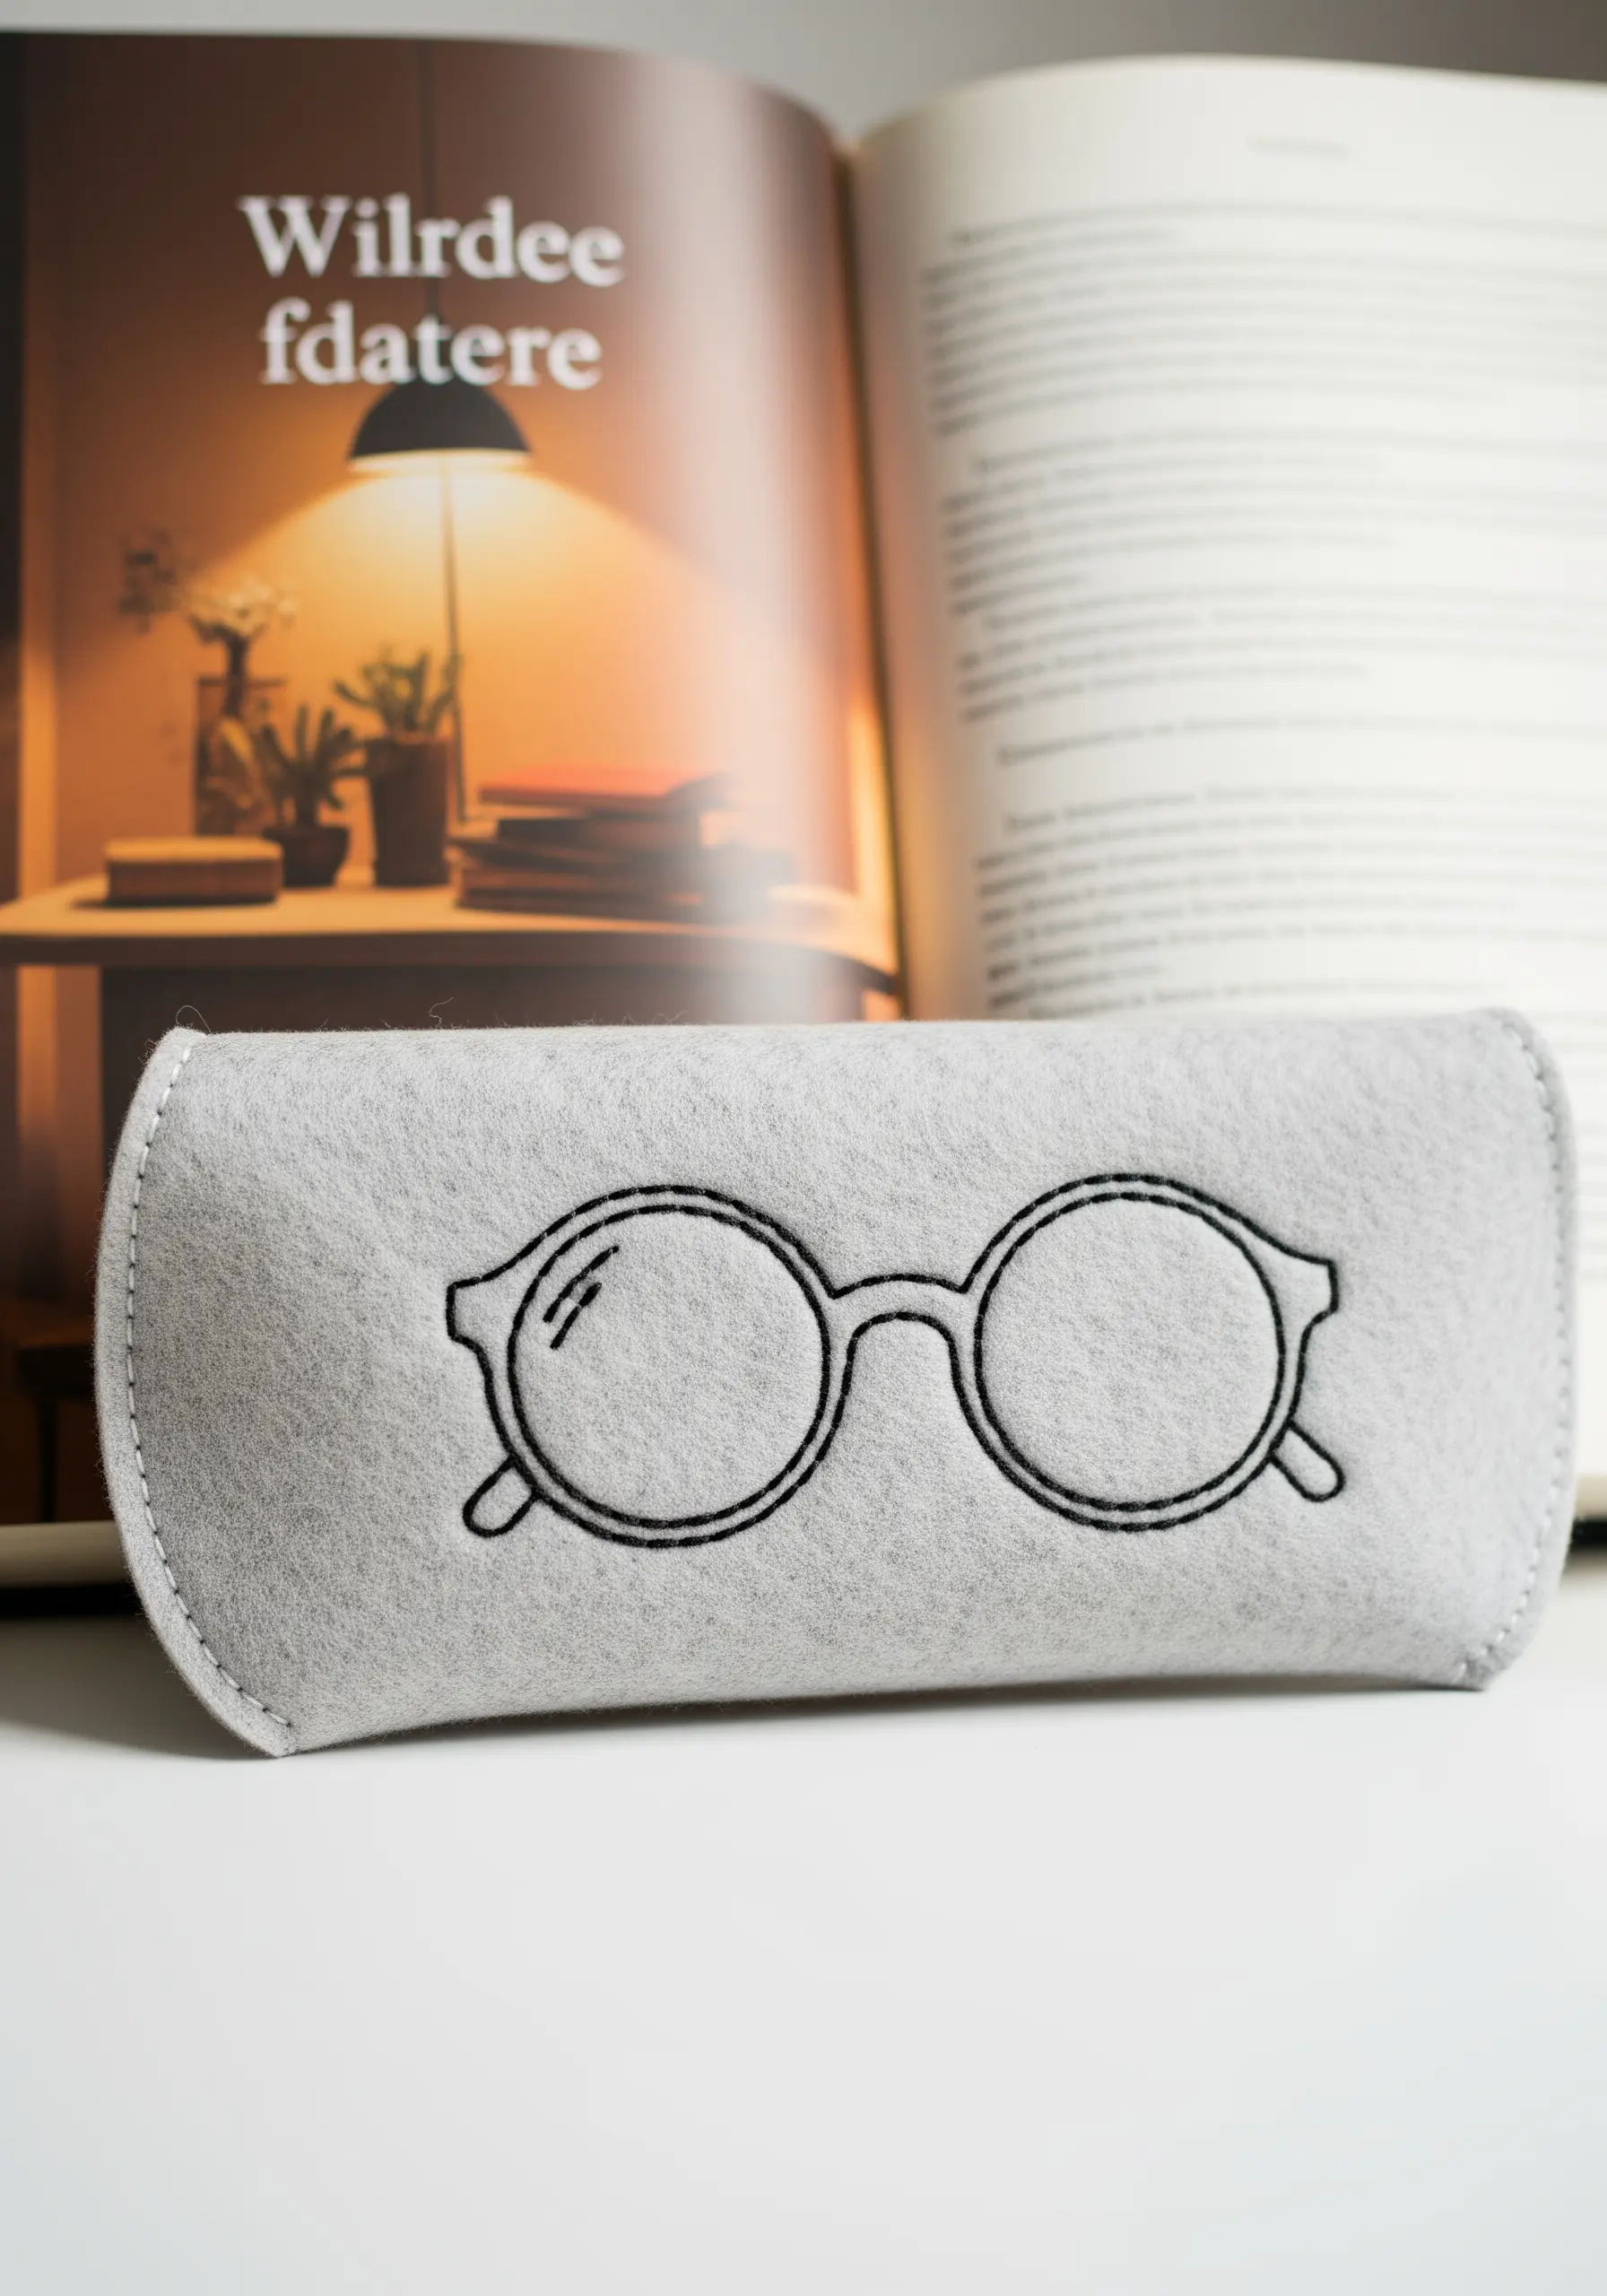
When embroidering on a thick fabric like felt, simplicity is key.
A clean backstitch using two or three strands of floss provides a line that is bold enough to be seen against the felt’s texture but still looks refined.
The most important part of this technique is maintaining a perfectly consistent stitch length, especially around the curves of the frames.
28. A Juicy Orange Slice Patch
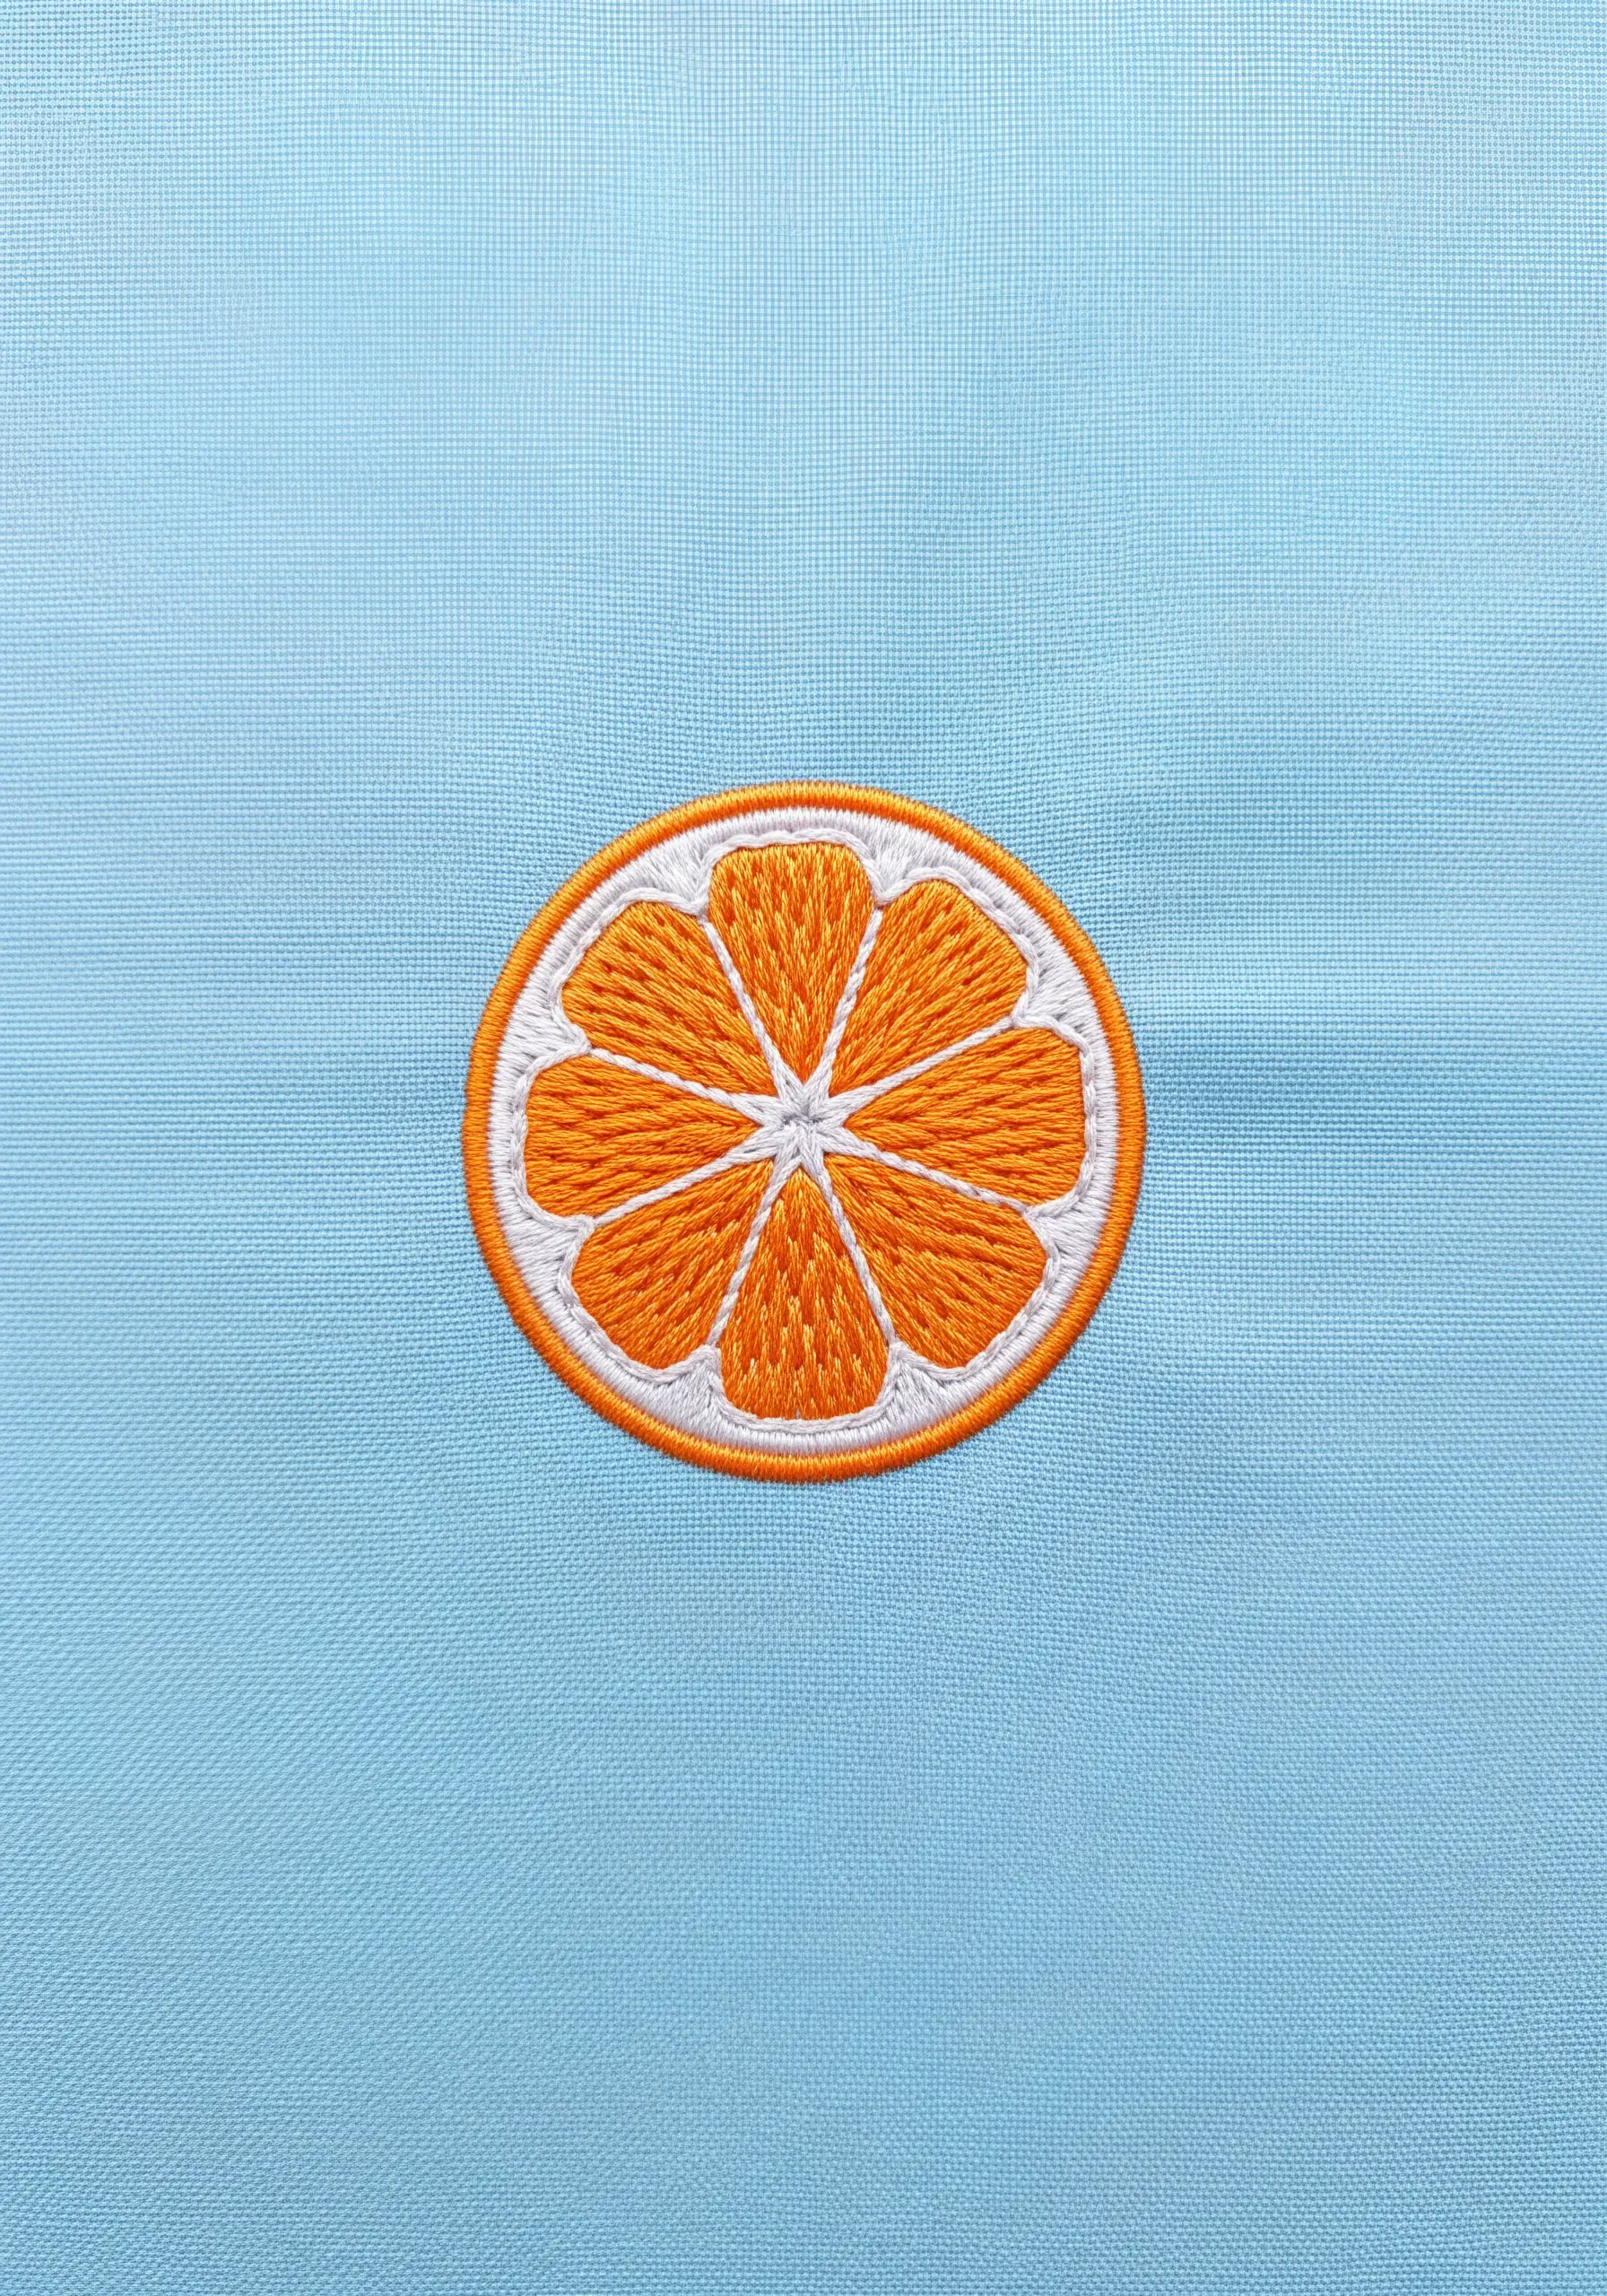
Achieving those sharp, pointed segments in a citrus slice requires precision.
As you fill each segment with satin stitch, make sure every stitch goes down into the exact same central point.
Before you fill the outer rind, create the white pith by outlining the entire circle with a thick split stitch or chain stitch. This provides a clean, raised border to stitch against.
29. Cursive Lettering with Chain Stitch
Stitching smooth cursive script can be challenging, but the chain stitch makes it effortless.
Its structure naturally forms beautiful, even curves and creates a uniform, rope-like line that looks like elegant ink penmanship.
This stitch is far more forgiving than a backstitch or stem stitch for intricate lettering, making it one of the most useful tiny lettering embroidery ideas.
30. A Vintage Key Bookmark
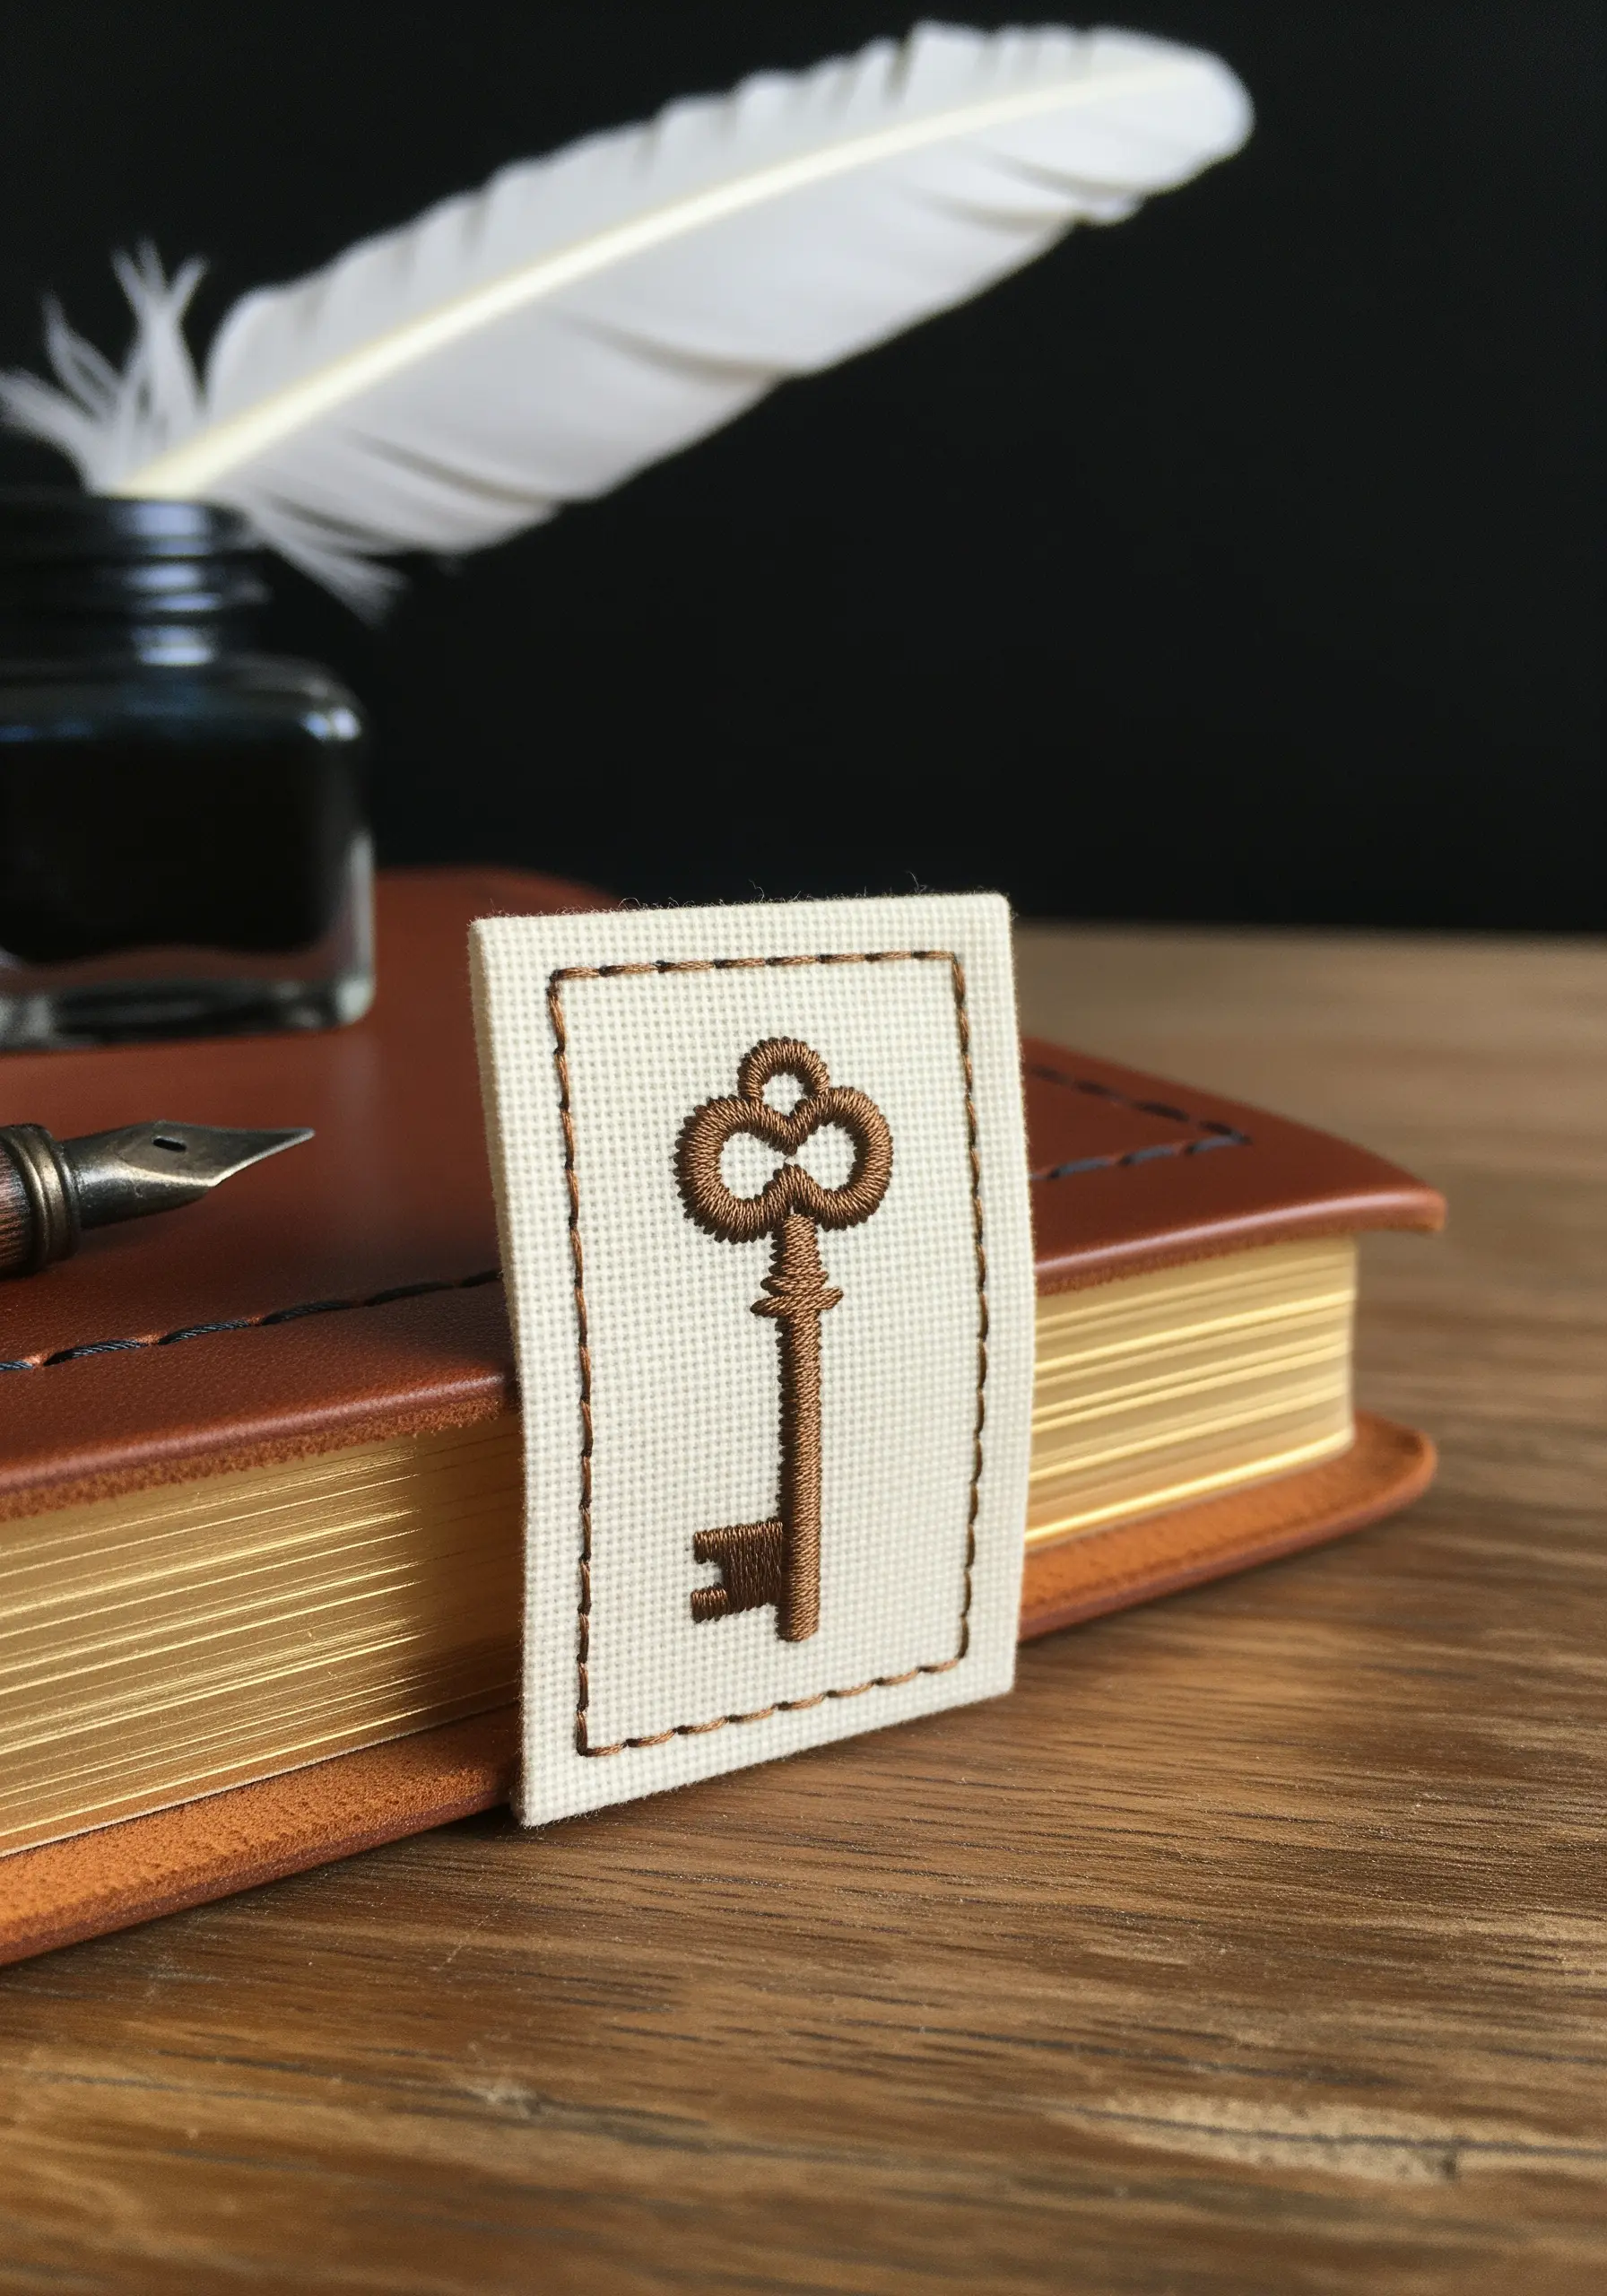
Cross-stitch on even-weave fabric like Aida cloth is perfect for creating small, detailed motifs with a classic, slightly pixelated charm.
Use a darker thread to outline the key’s shape first, which defines its silhouette and makes it stand out.
Then, fill the interior with a lighter, complementary color. This technique ensures a crisp and easy-to-read design.
31. A Cluster of Forget-Me-Nots
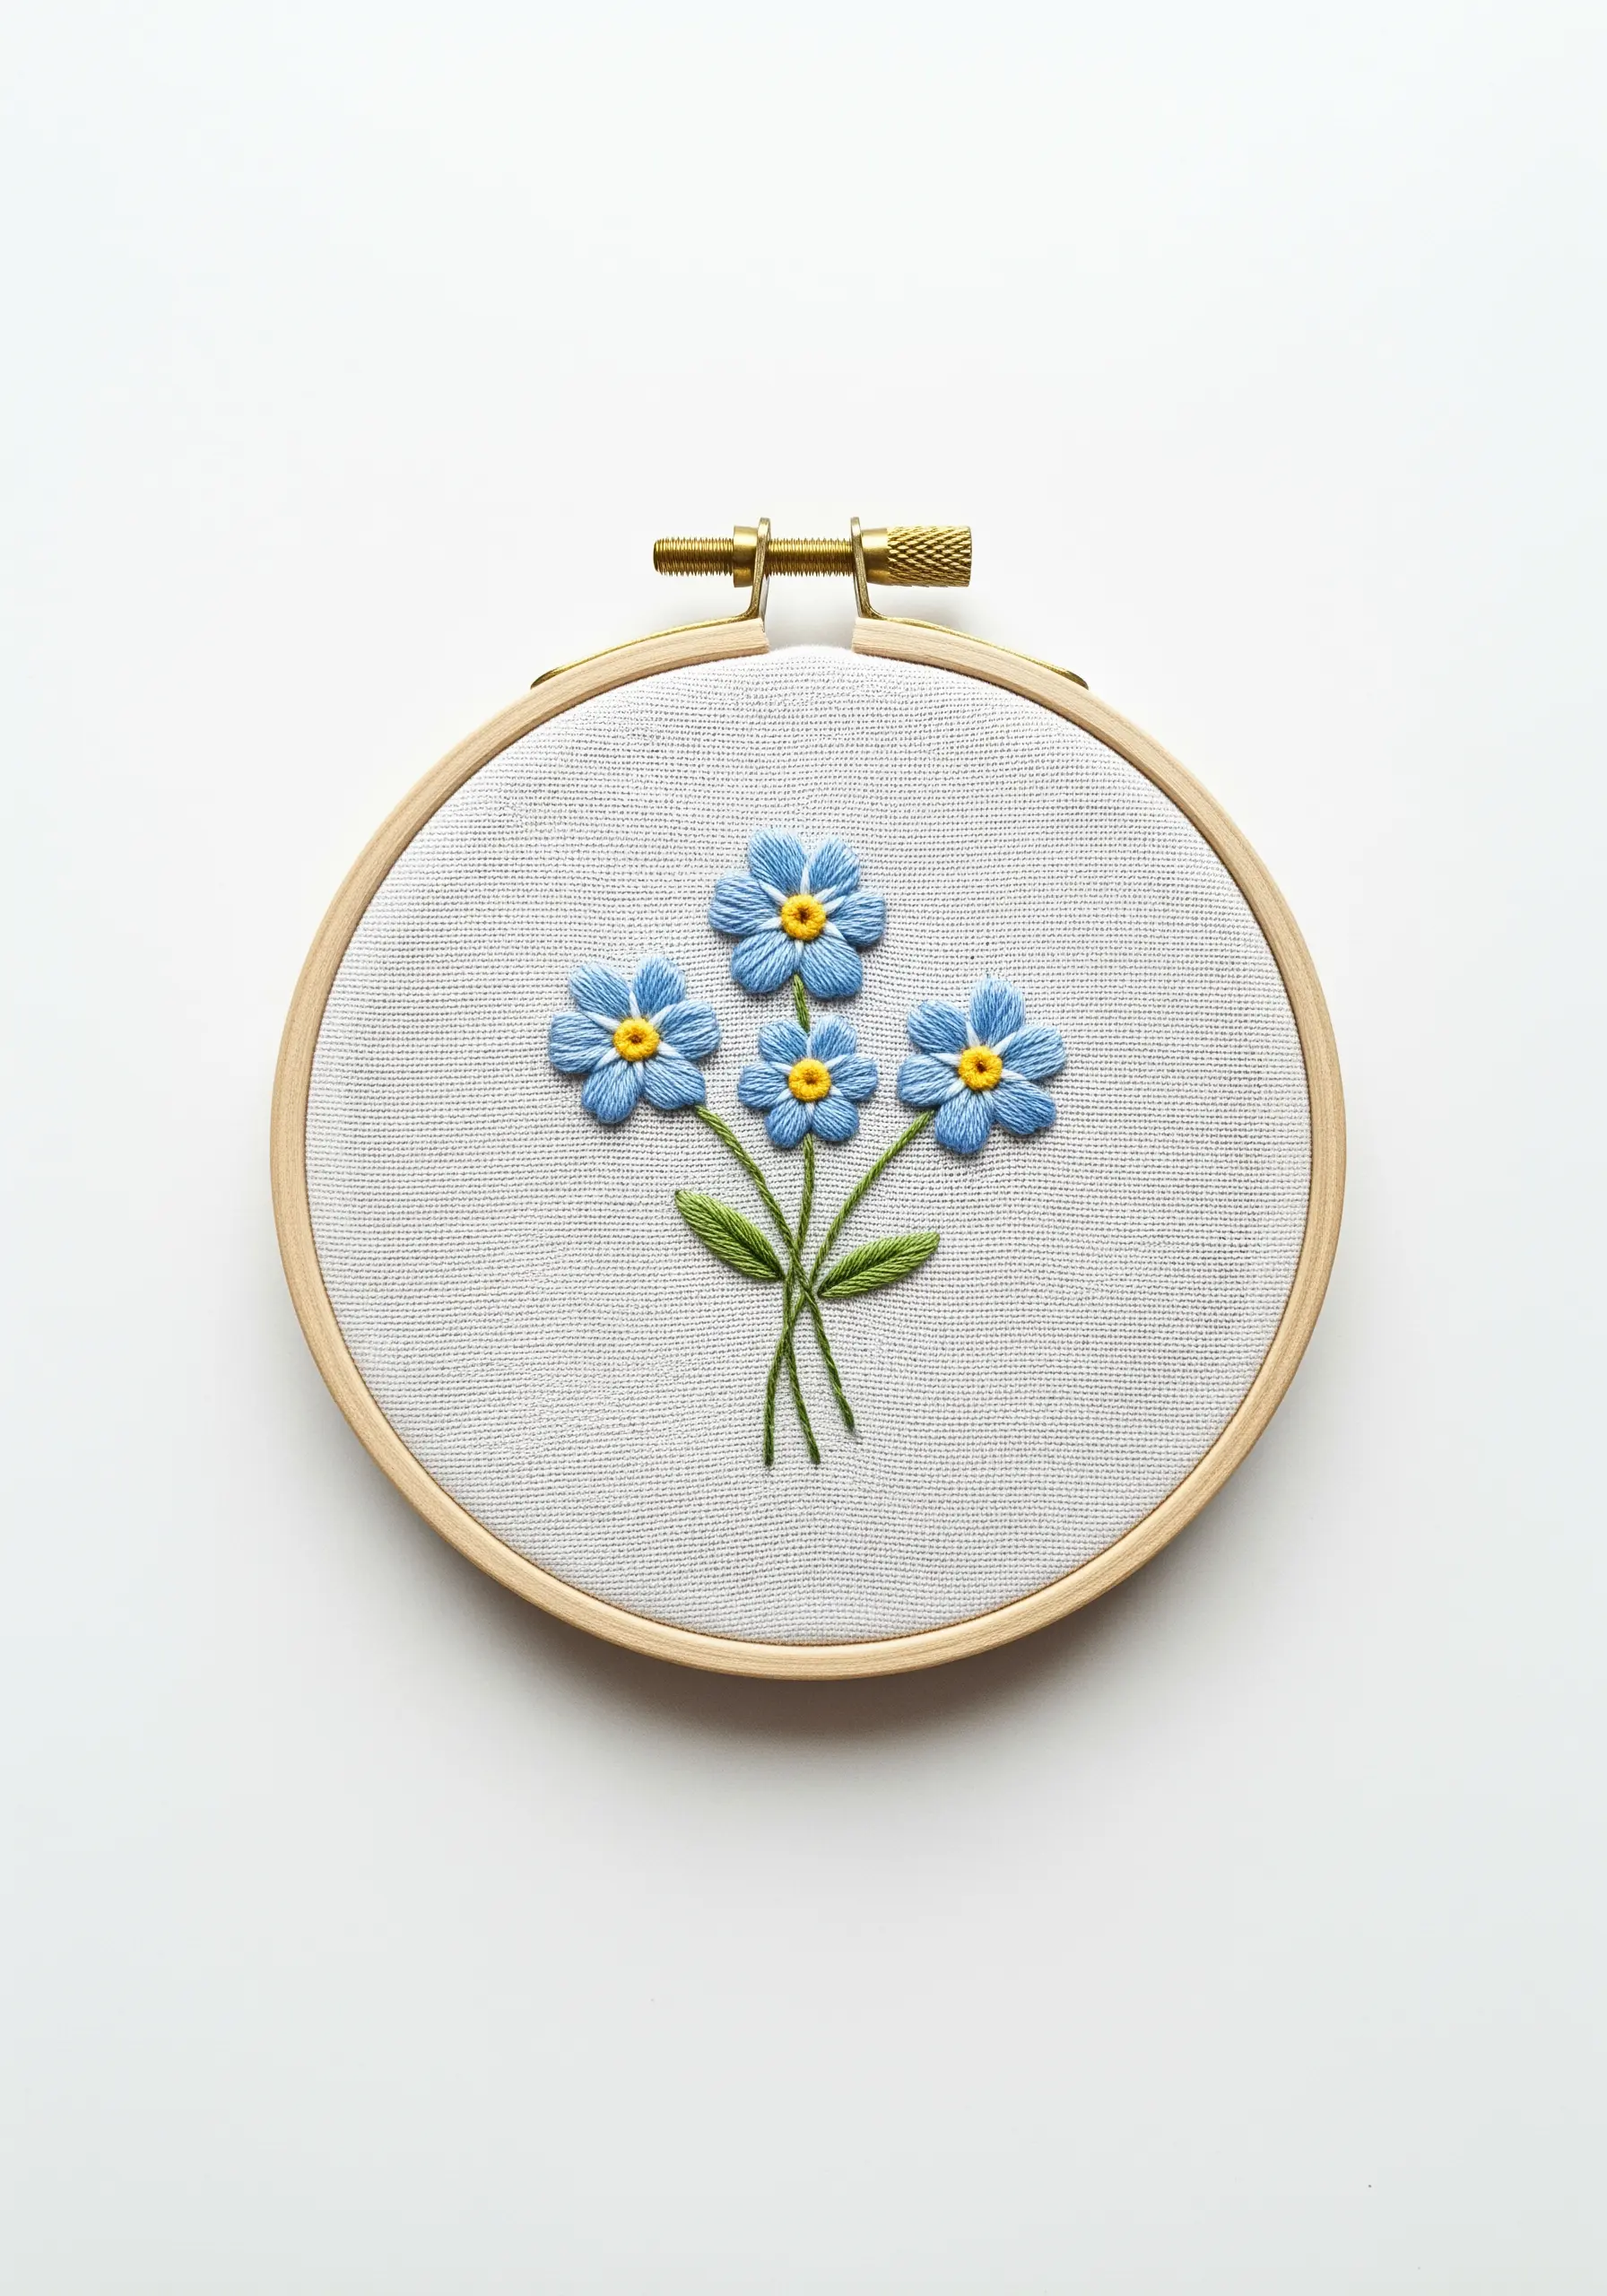
The detached chain stitch, also known as the lazy daisy, is perfect for creating the five delicate petals of these simple flowers.
Arrange five stitches in a circle, and place a single French knot in a contrasting color (like bright yellow) at the center to complete each bloom.
Grouping several flowers together on thin stem-stitch stems creates a lovely, natural-looking bouquet.
32. A Fluffy French Knot Cloud
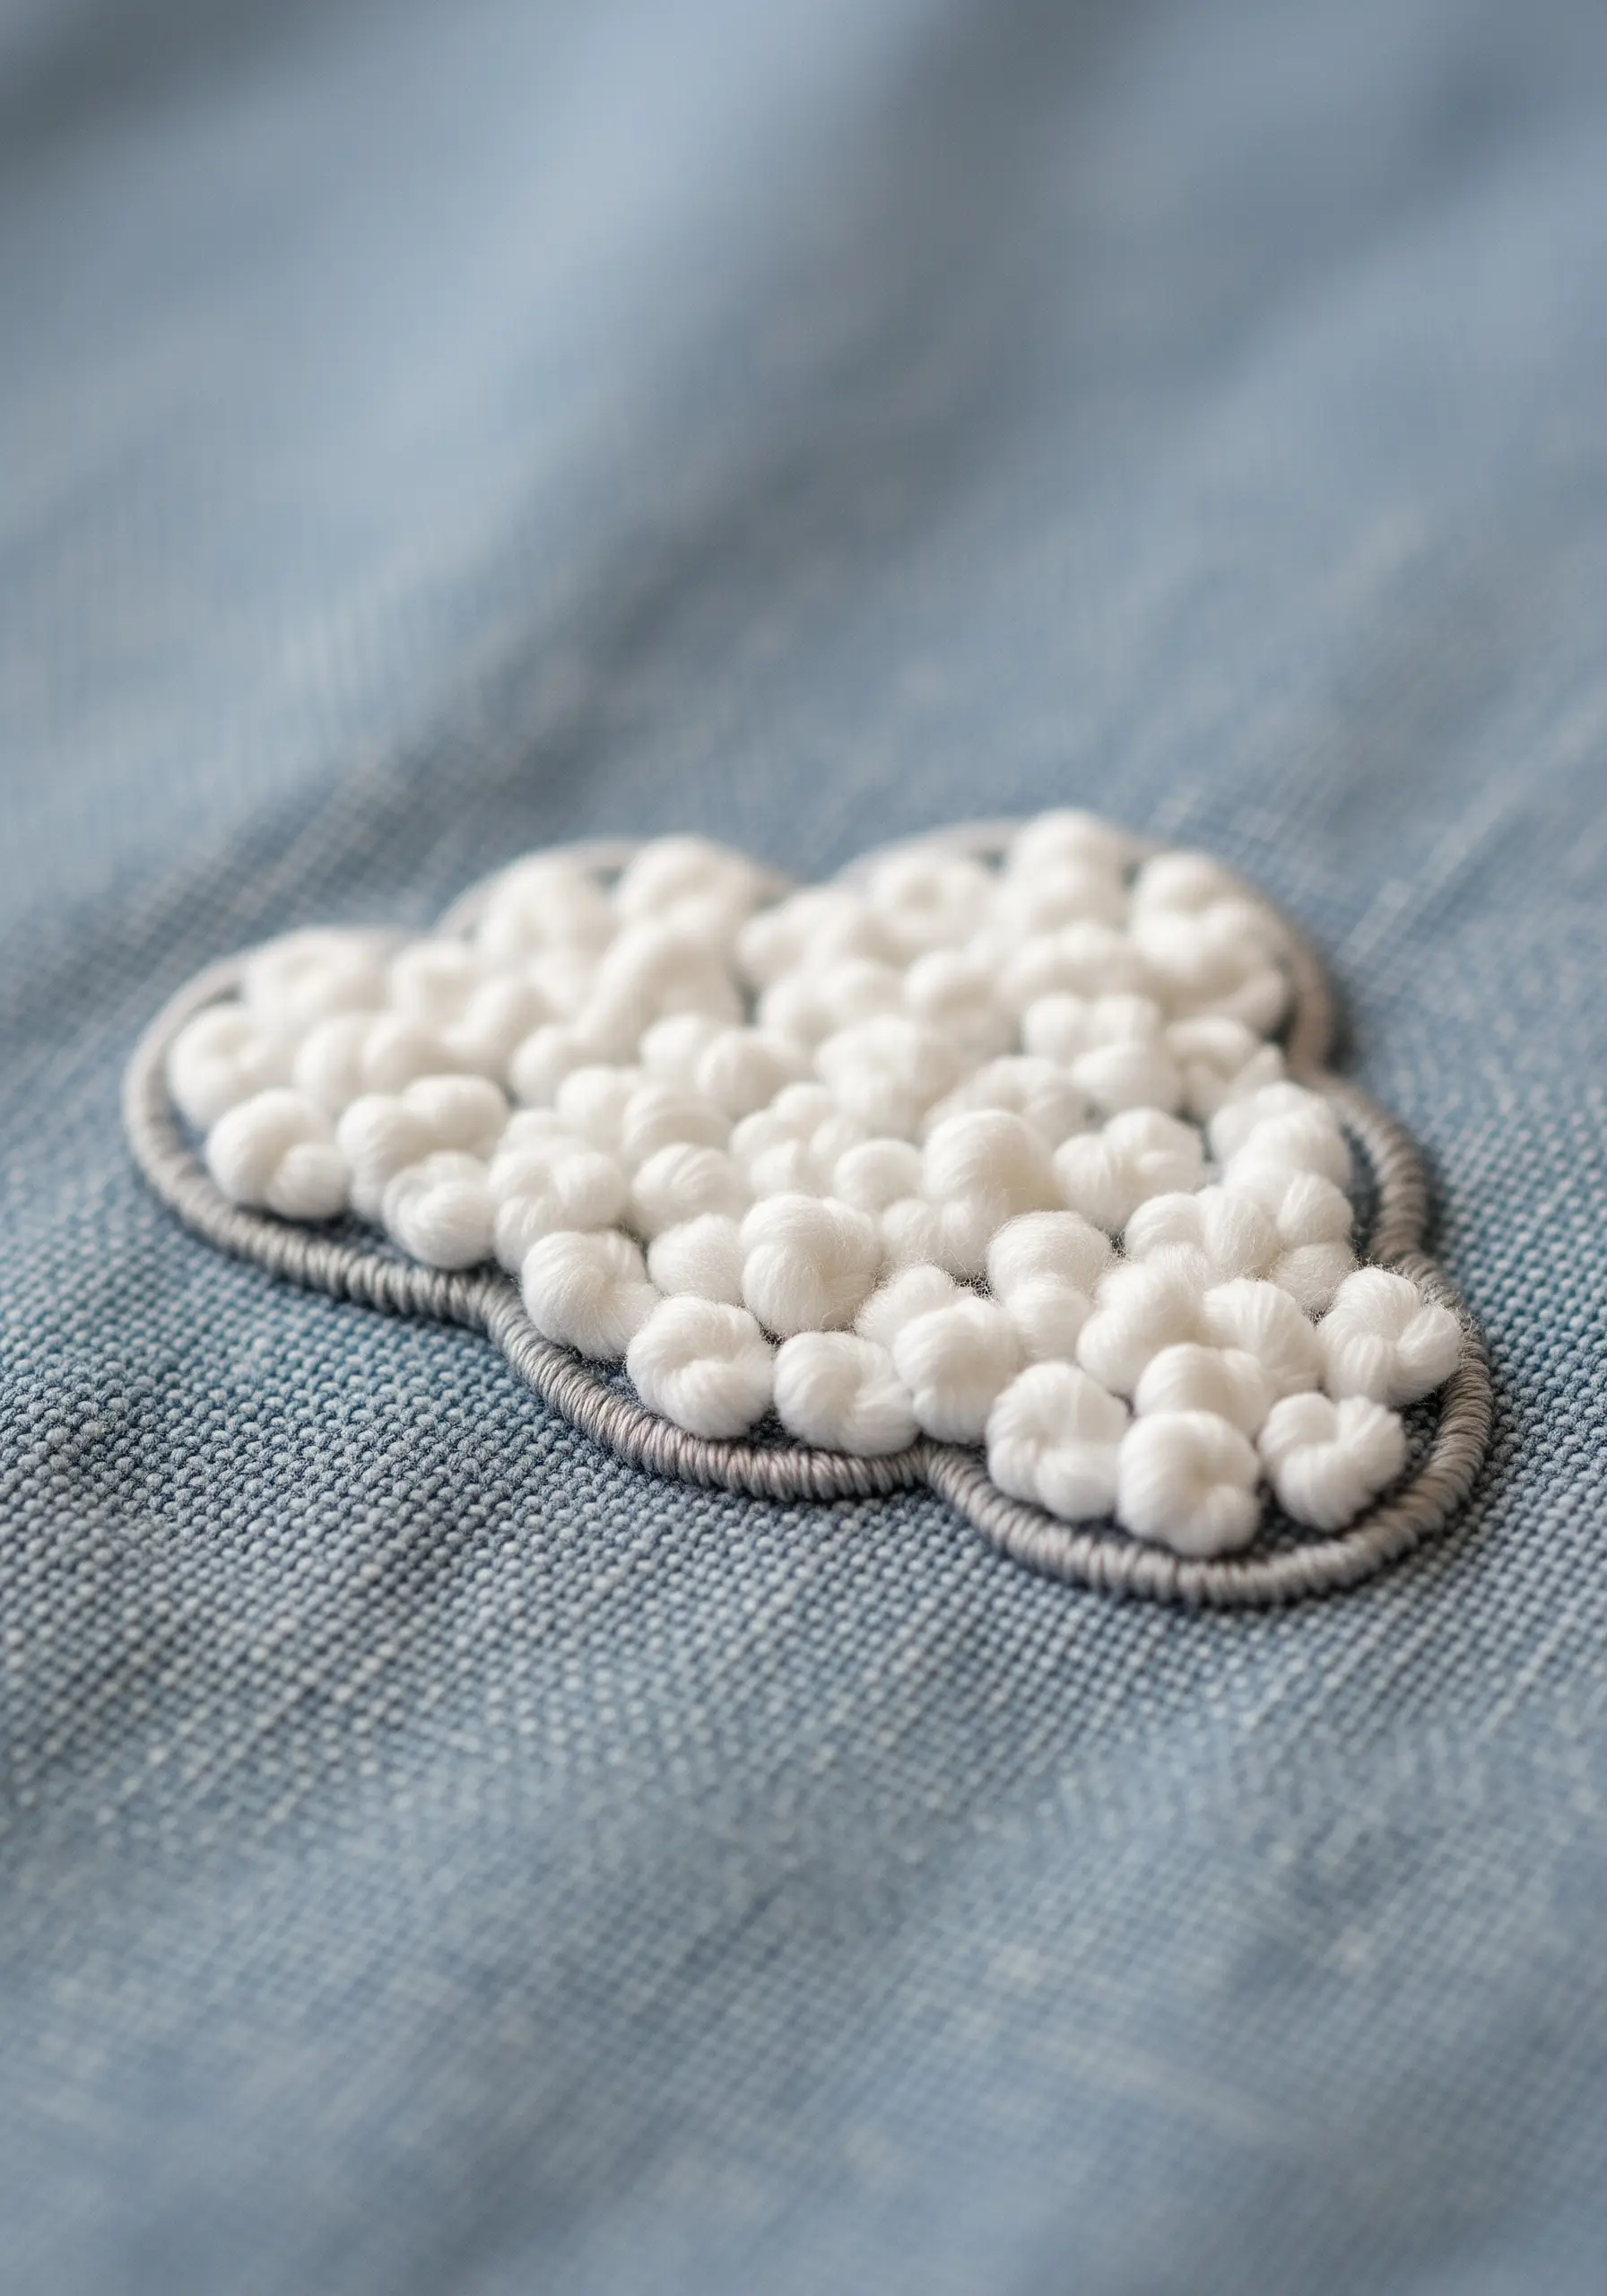
To create a wonderfully puffy, three-dimensional cloud, fill the entire shape with tightly packed French knots.
For maximum fluffiness, use all six strands of your embroidery floss or opt for a thicker thread like Perle Cotton.
A thin outline in a slightly darker color, like grey, helps contain the shape and gives it a clean, finished edge against the fabric.
33. A Graphic Sailboat Motif
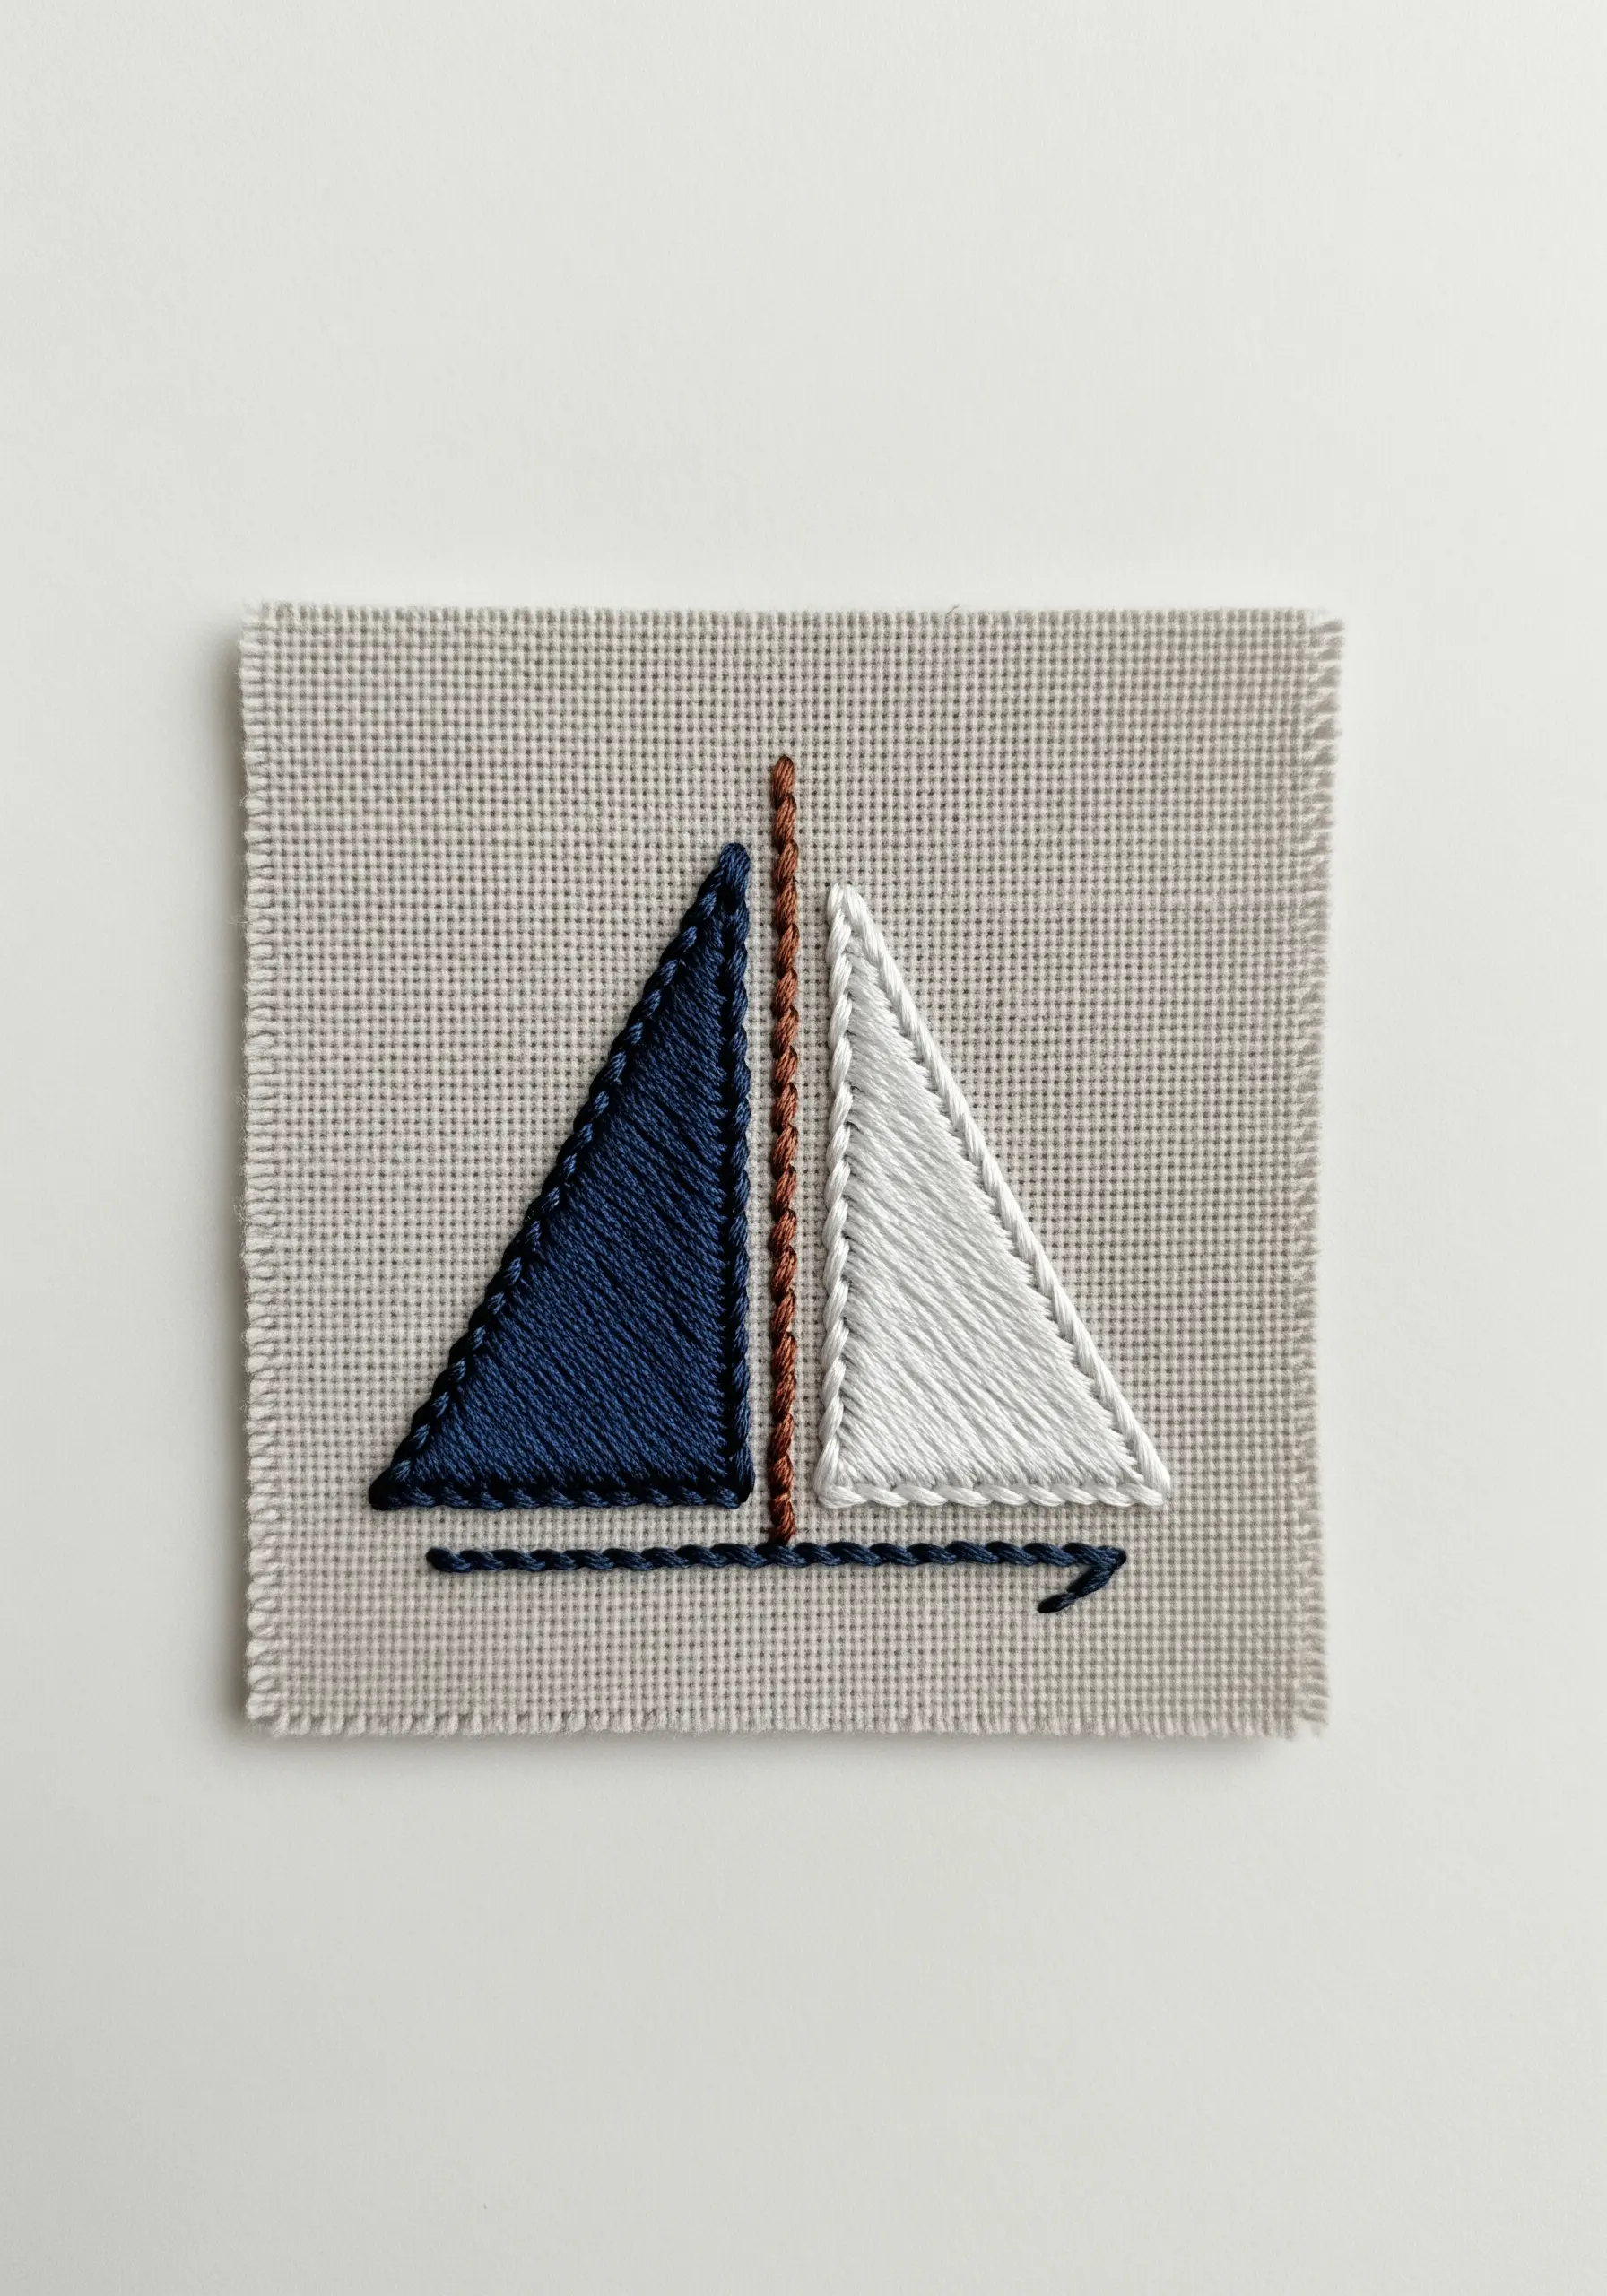
For a bold, almost block-printed look, use a split stitch to both outline and fill your shapes.
This stitch creates a textured, braid-like surface that is more forgiving than a satin stitch, especially for beginners.
It adds a charming, hand-drawn quality to the design, making it perfect for small, graphic patches or embellishments.
34. A Pattern-Filled Heart
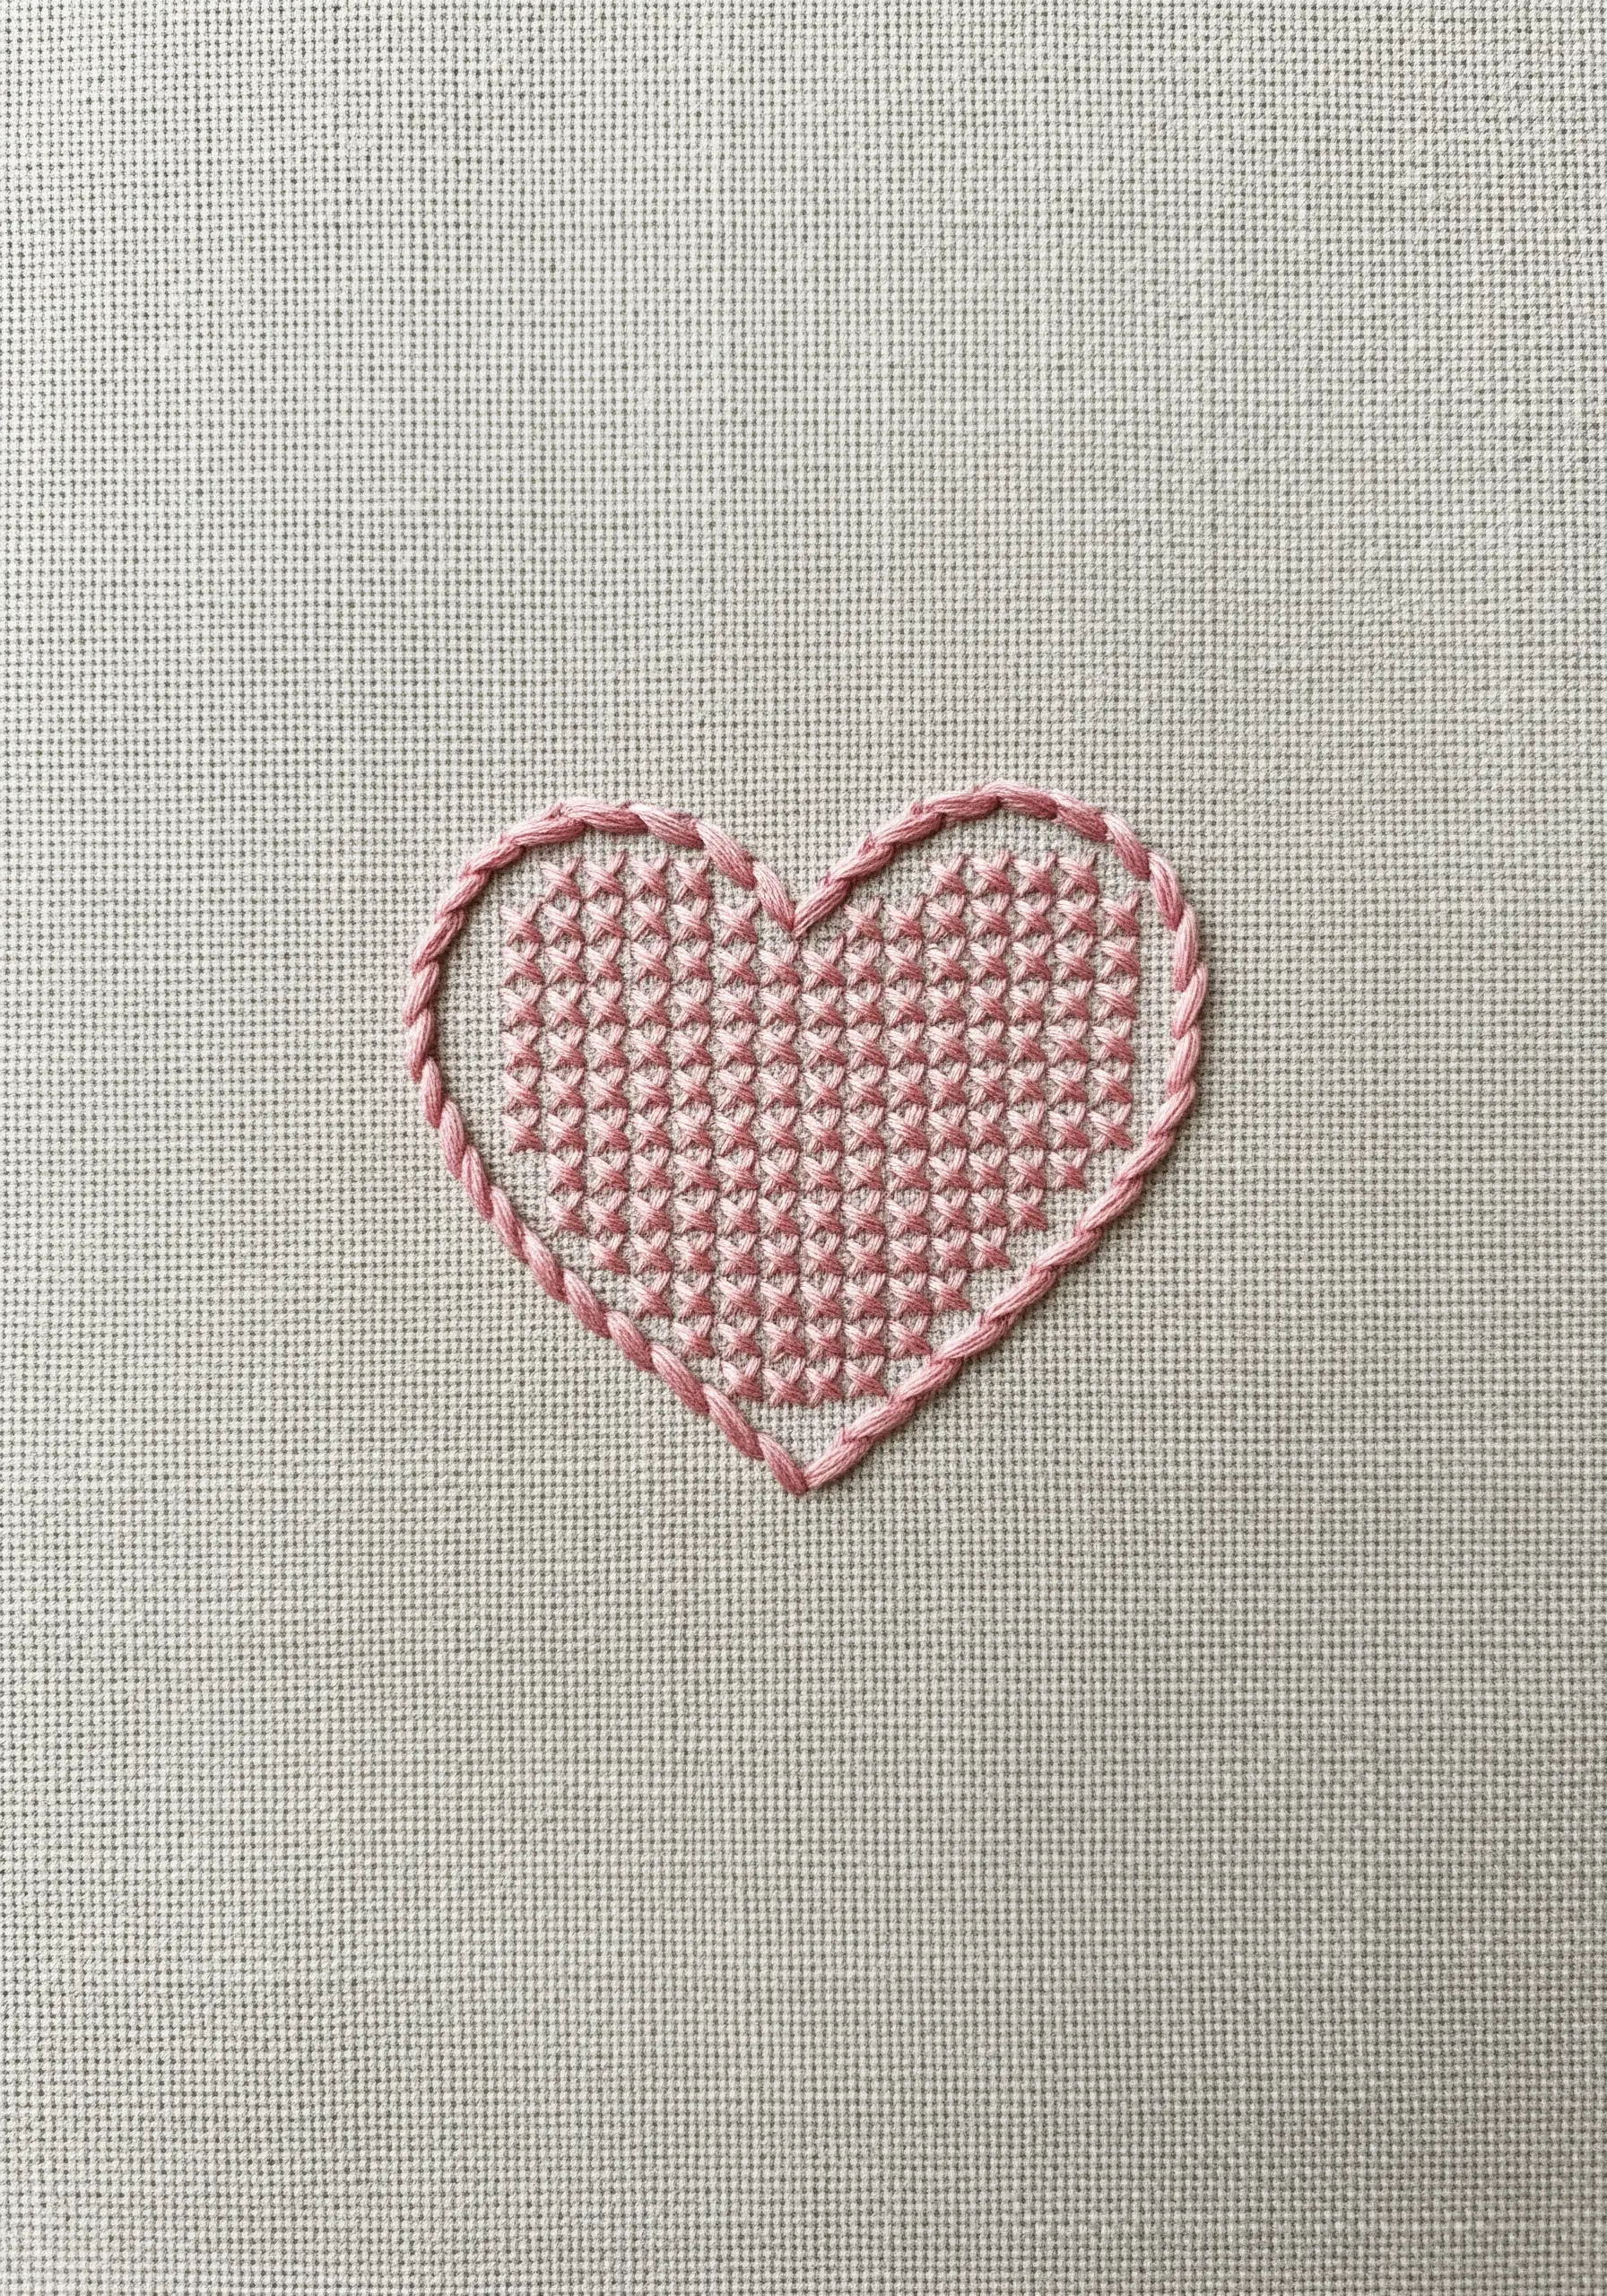
Instead of filling a shape with a solid color, create visual interest with a patterned fill.
A simple grid of cross-stitches or even small straight stitches arranged in a pattern adds texture and a traditional, sampler-inspired feel.
Contain the design with a clean whipped backstitch outline to give the heart a smooth, defined edge.
35. A Tulip Outline on Knit Fabric

When embroidering on stretchy fabrics like sweatshirts or t-shirts, always use a stabilizer on the back to prevent the design from puckering or warping.
A stem stitch is the ideal choice for outlines on knits, as it has a natural flexibility that allows it to move with the fabric without distorting the design.
It creates a lovely, rope-like texture that sits beautifully on the surface of the knit.
36. A Plump Carrot on a Produce Bag
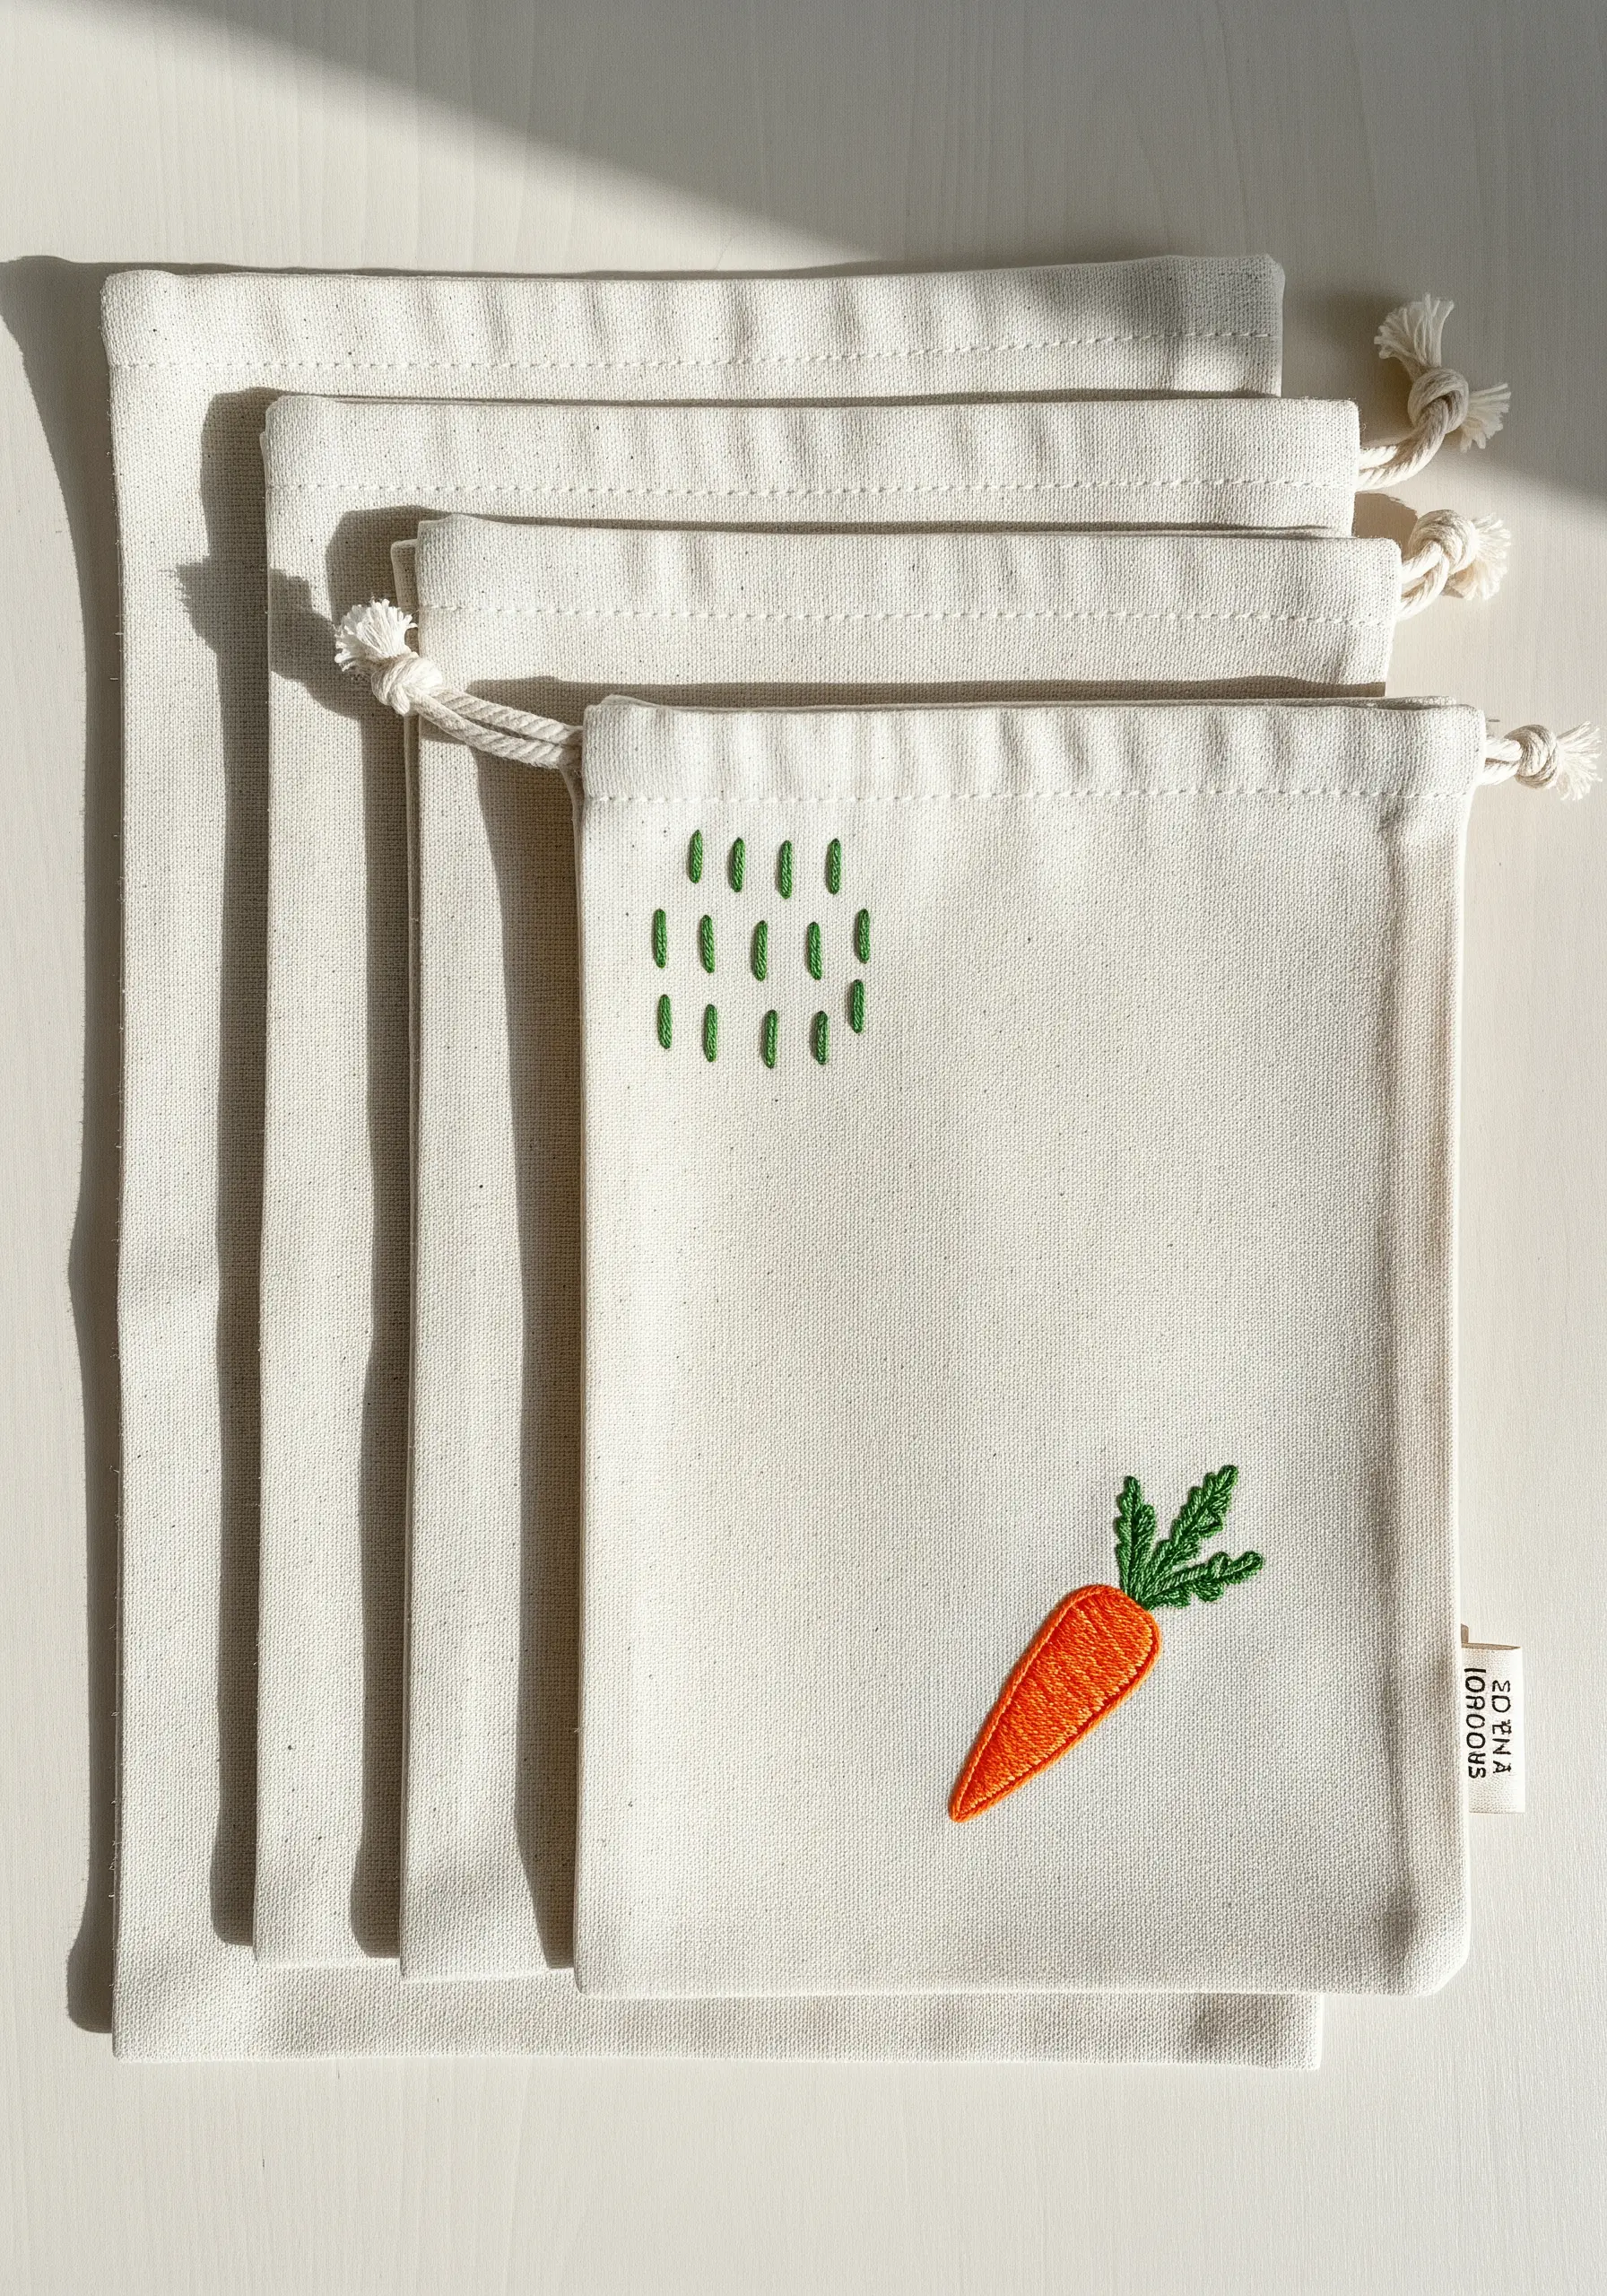
You can suggest dimension and roundness with a simple trick: angle your satin stitches.
Instead of filling the carrot with perfectly horizontal or vertical stitches, angle them slightly diagonally.
This subtle shift tricks the eye into seeing a curved surface, making the carrot look fuller and less flat.
For the leafy greens, use a fishbone stitch to create texture and a natural, feathery look.


