

Let’s move beyond just following patterns and start thinking about how each stitch, thread, and fabric choice can shape the feeling of your work. The difference between good embroidery and truly captivating embroidery often lies in the subtle, intentional details.
In these designs, you’ll discover how to use texture to evoke a feeling, how a simple shift in thread weight can create depth, and how a restrained color palette can amplify the impact of your stitching. It’s about making choices that are not just decorative, but deliberate.
This isn’t about mastering dozens of complex stitches. It’s about using a few simple techniques with precision and purpose. You have the ability to create pieces that feel calm, sophisticated, and deeply personal—artwork that brings a quiet, organic beauty into your home.
1. Render Botanical Realism with Directional Stitching
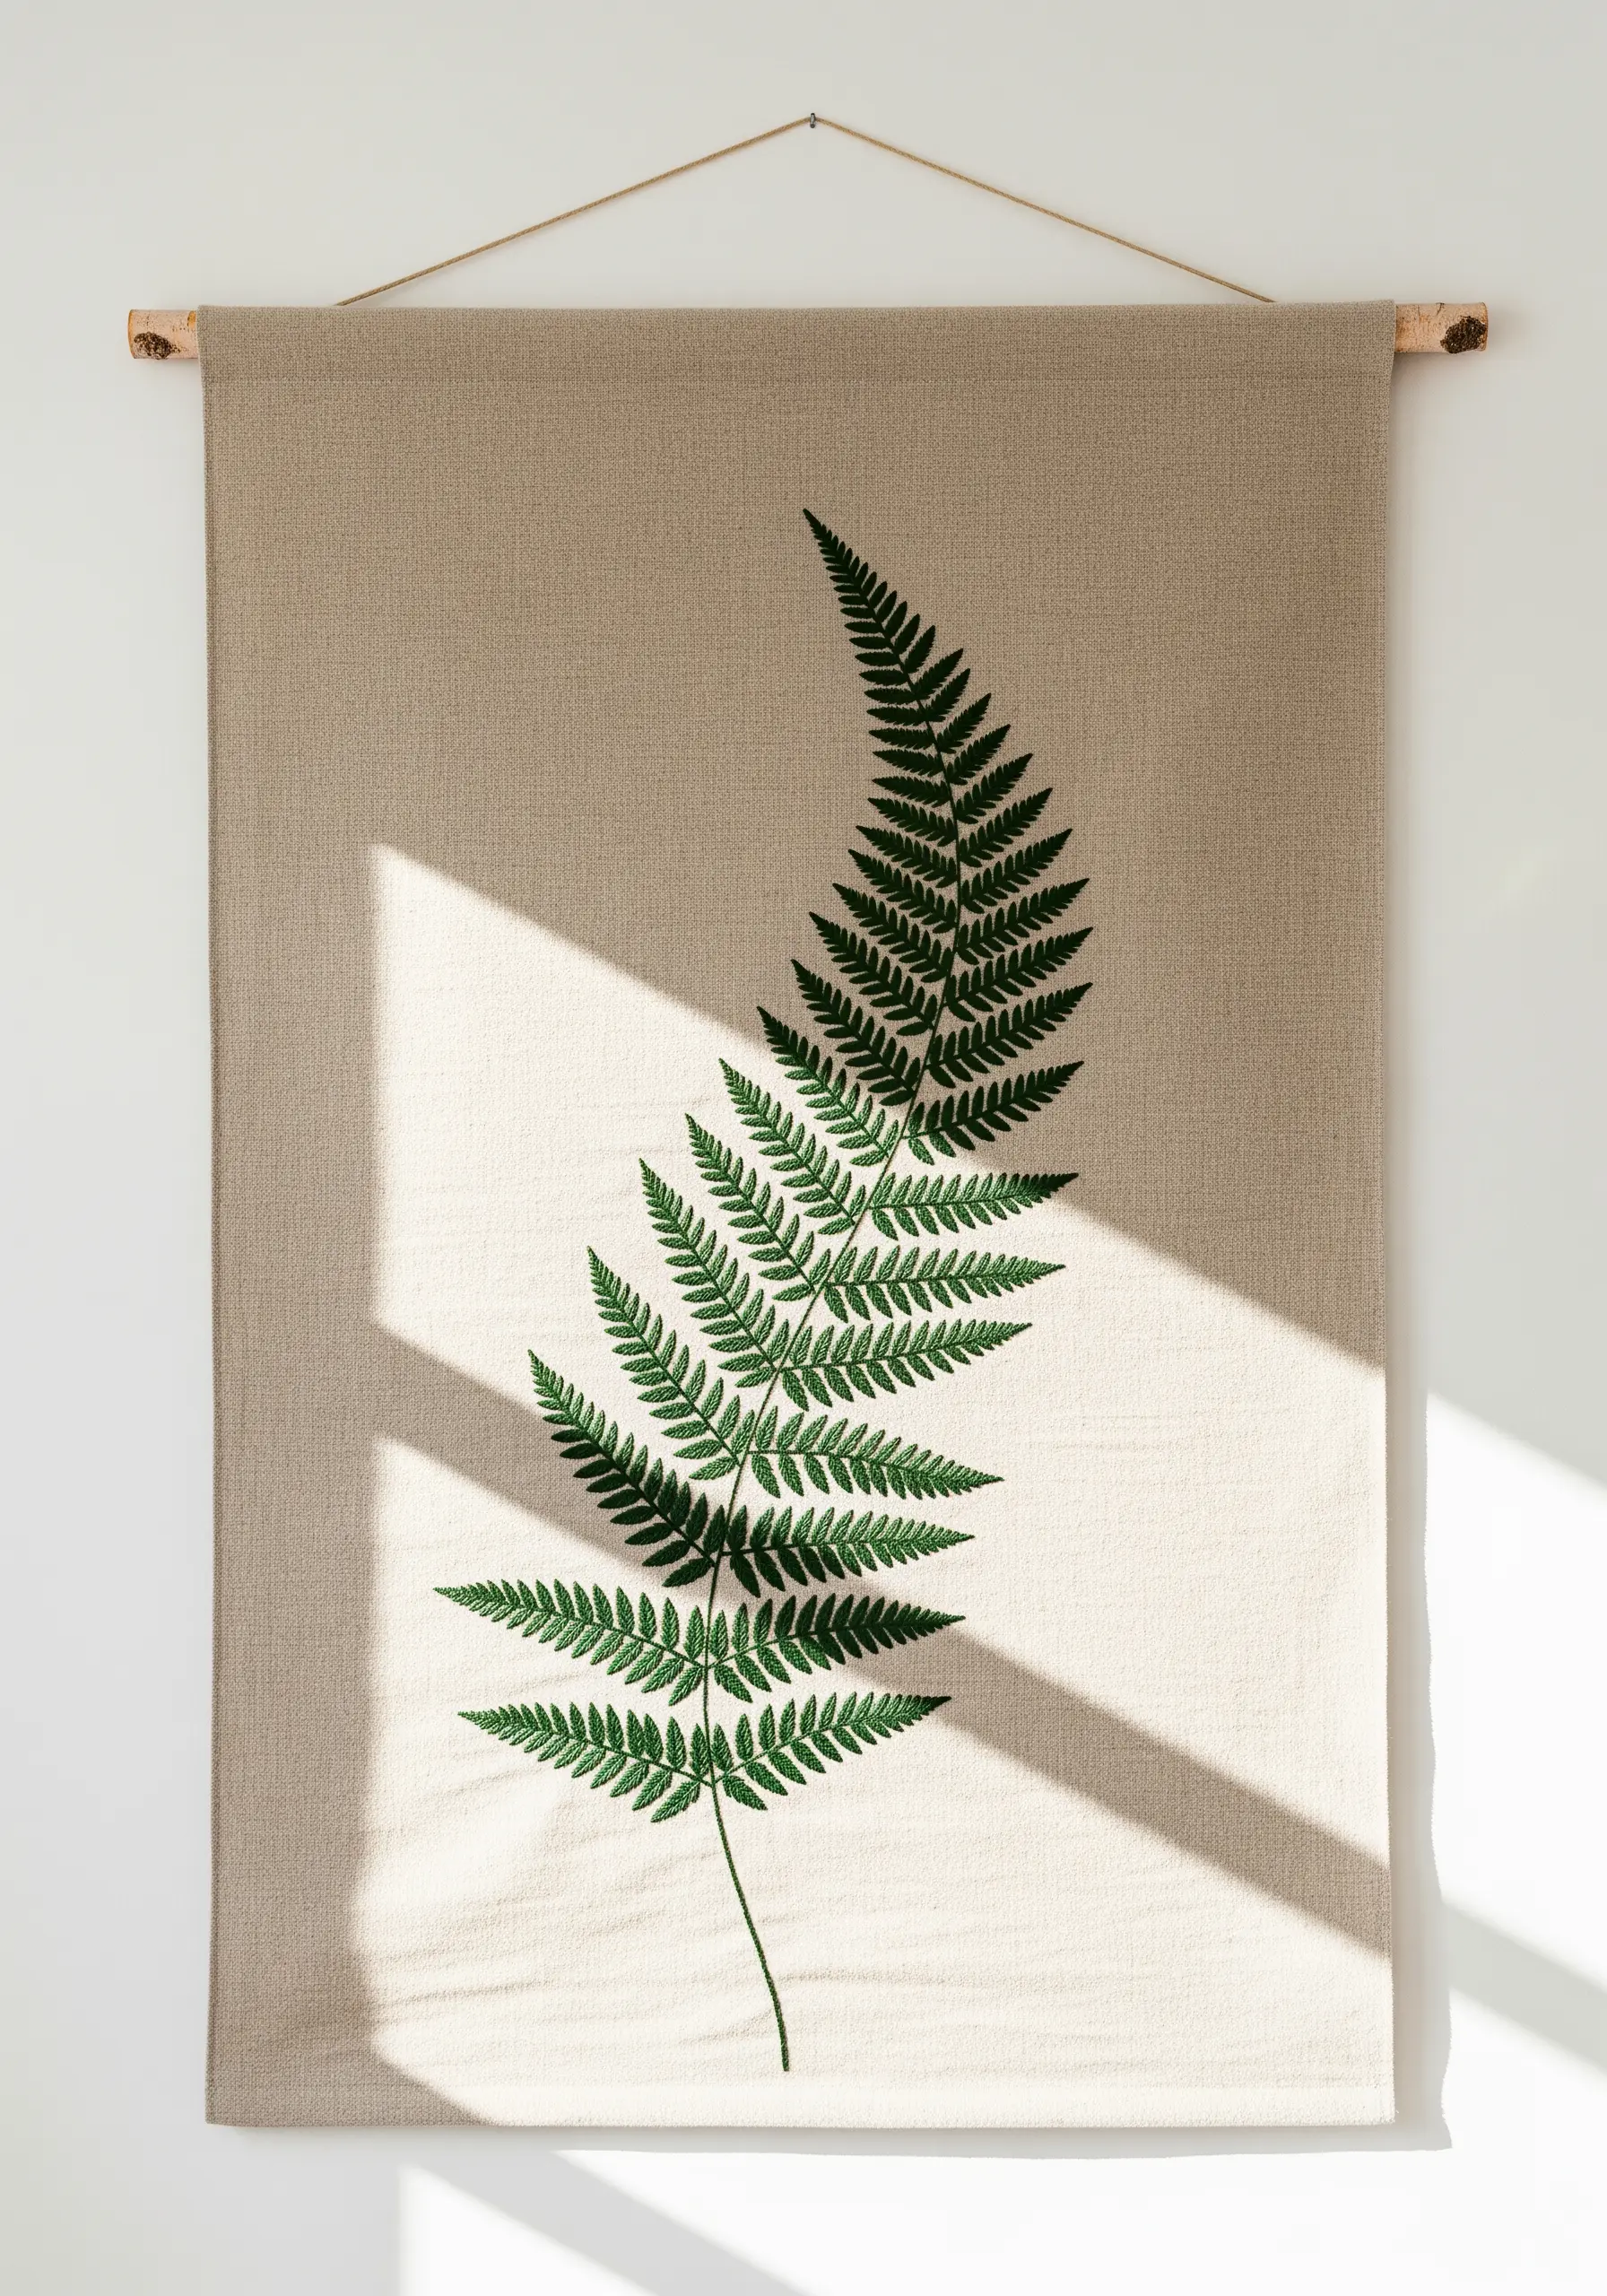
To capture the life-like grace of a fern, focus entirely on stitch direction.
Instead of filling each leaflet with a uniform satin stitch, angle your stitches to follow the plant’s natural upward and outward growth pattern.
Use a single strand of thread for the most delicate parts of the fronds to achieve a fine, almost-drawn quality.
For the central stem, use a split stitch to create a solid, slightly raised line that provides structure and anchors the entire composition.
This approach transforms a simple botanical into one of the most elegant handmade embroidery touches that make every room feel natural and intentional.
2. Create Abstract Flow with Yarn Couching
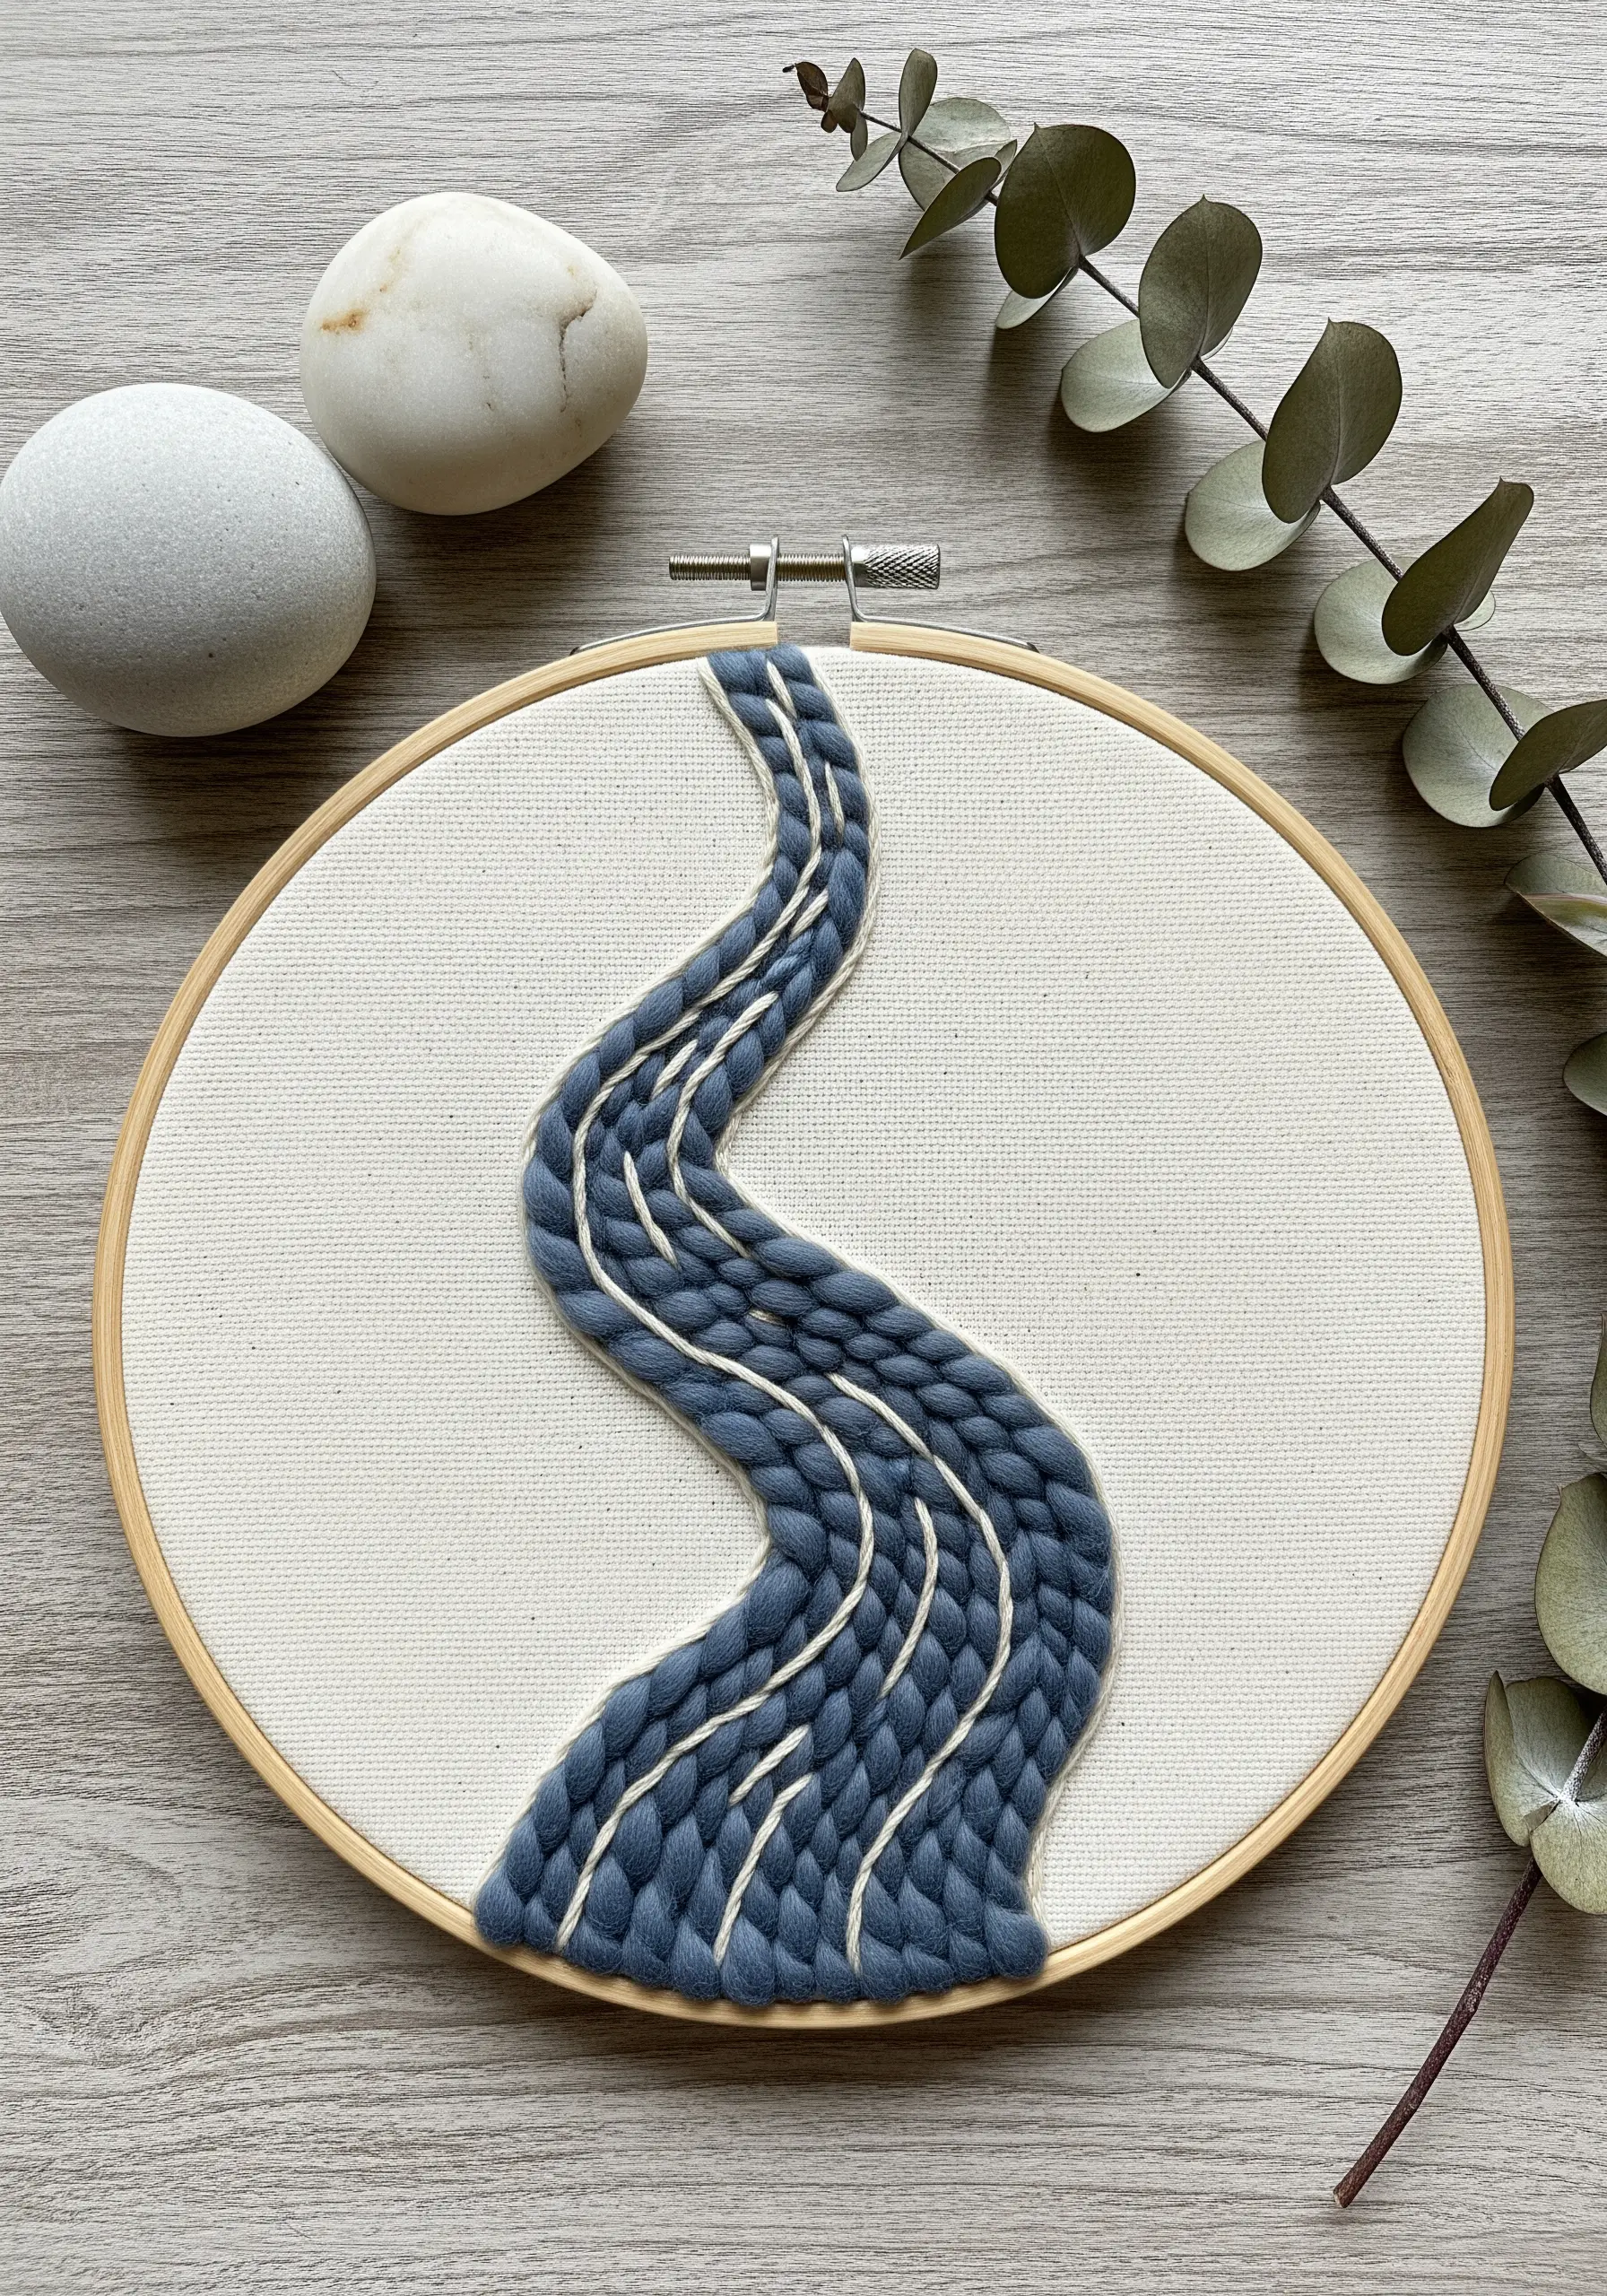
Introduce dramatic texture by combining thick yarn with fine embroidery floss.
Lay down a thick, soft yarn in a meandering river-like shape, pinning it temporarily to hold the curves.
Then, use a single strand of contrasting floss to tack the yarn down with small, evenly spaced straight stitches—a technique called couching.
The thin, bright stitches act as delicate accents against the plush yarn, creating a powerful visual rhythm and depth that elevates simple shapes into tactile art.
This is a perfect entry into abstract mixed media embroidery ideas, turning your hoop into a canvas for texture.
3. Sculpt Graphic Mountains with Strategic Line Work
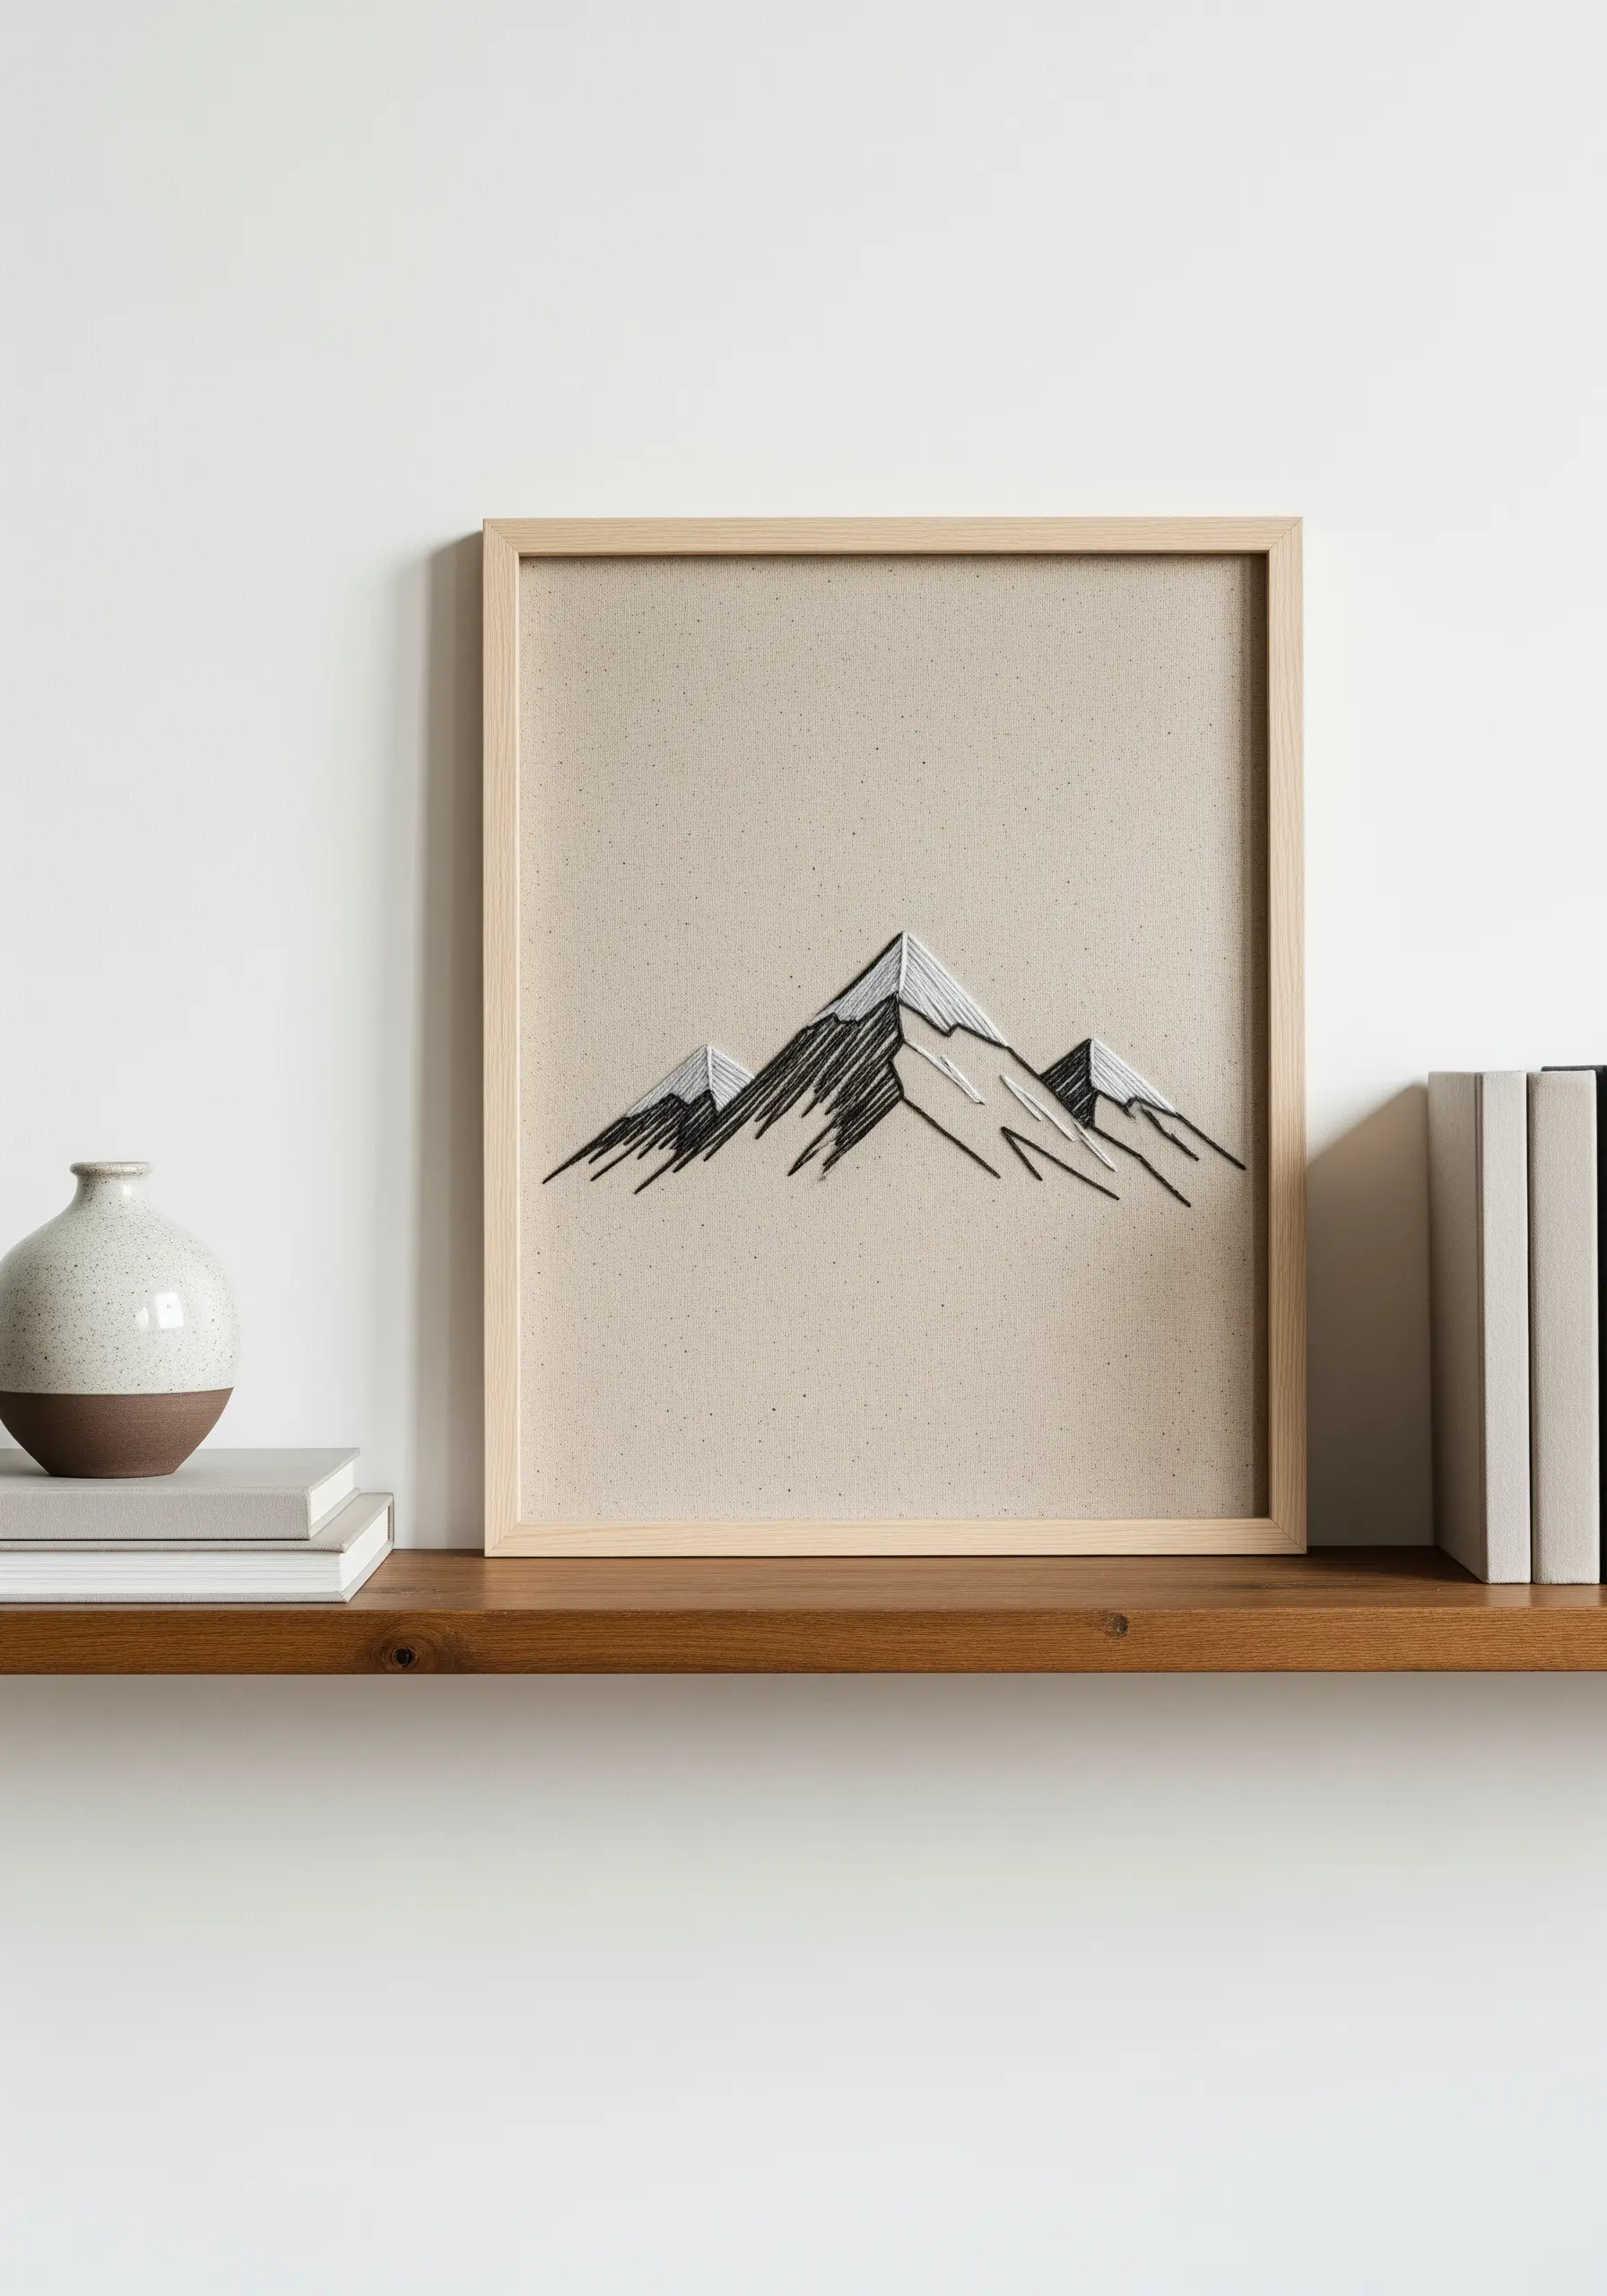
Build dramatic, graphic landscapes using nothing more than straight stitches.
Map out the main angular planes of the mountains first, then fill them with long, dense stitches that follow the slope of each peak.
Create shadows and highlights not by changing stitch type, but by altering thread color and density—pack black threads tightly for deep shadows and use sparse white stitches for sunlit edges.
This technique gives the finished piece a sharp, architectural quality, turning thread into a powerful tool for graphic illustration.
4. Curate a Cohesive Gallery Wall with Thematic Hoops
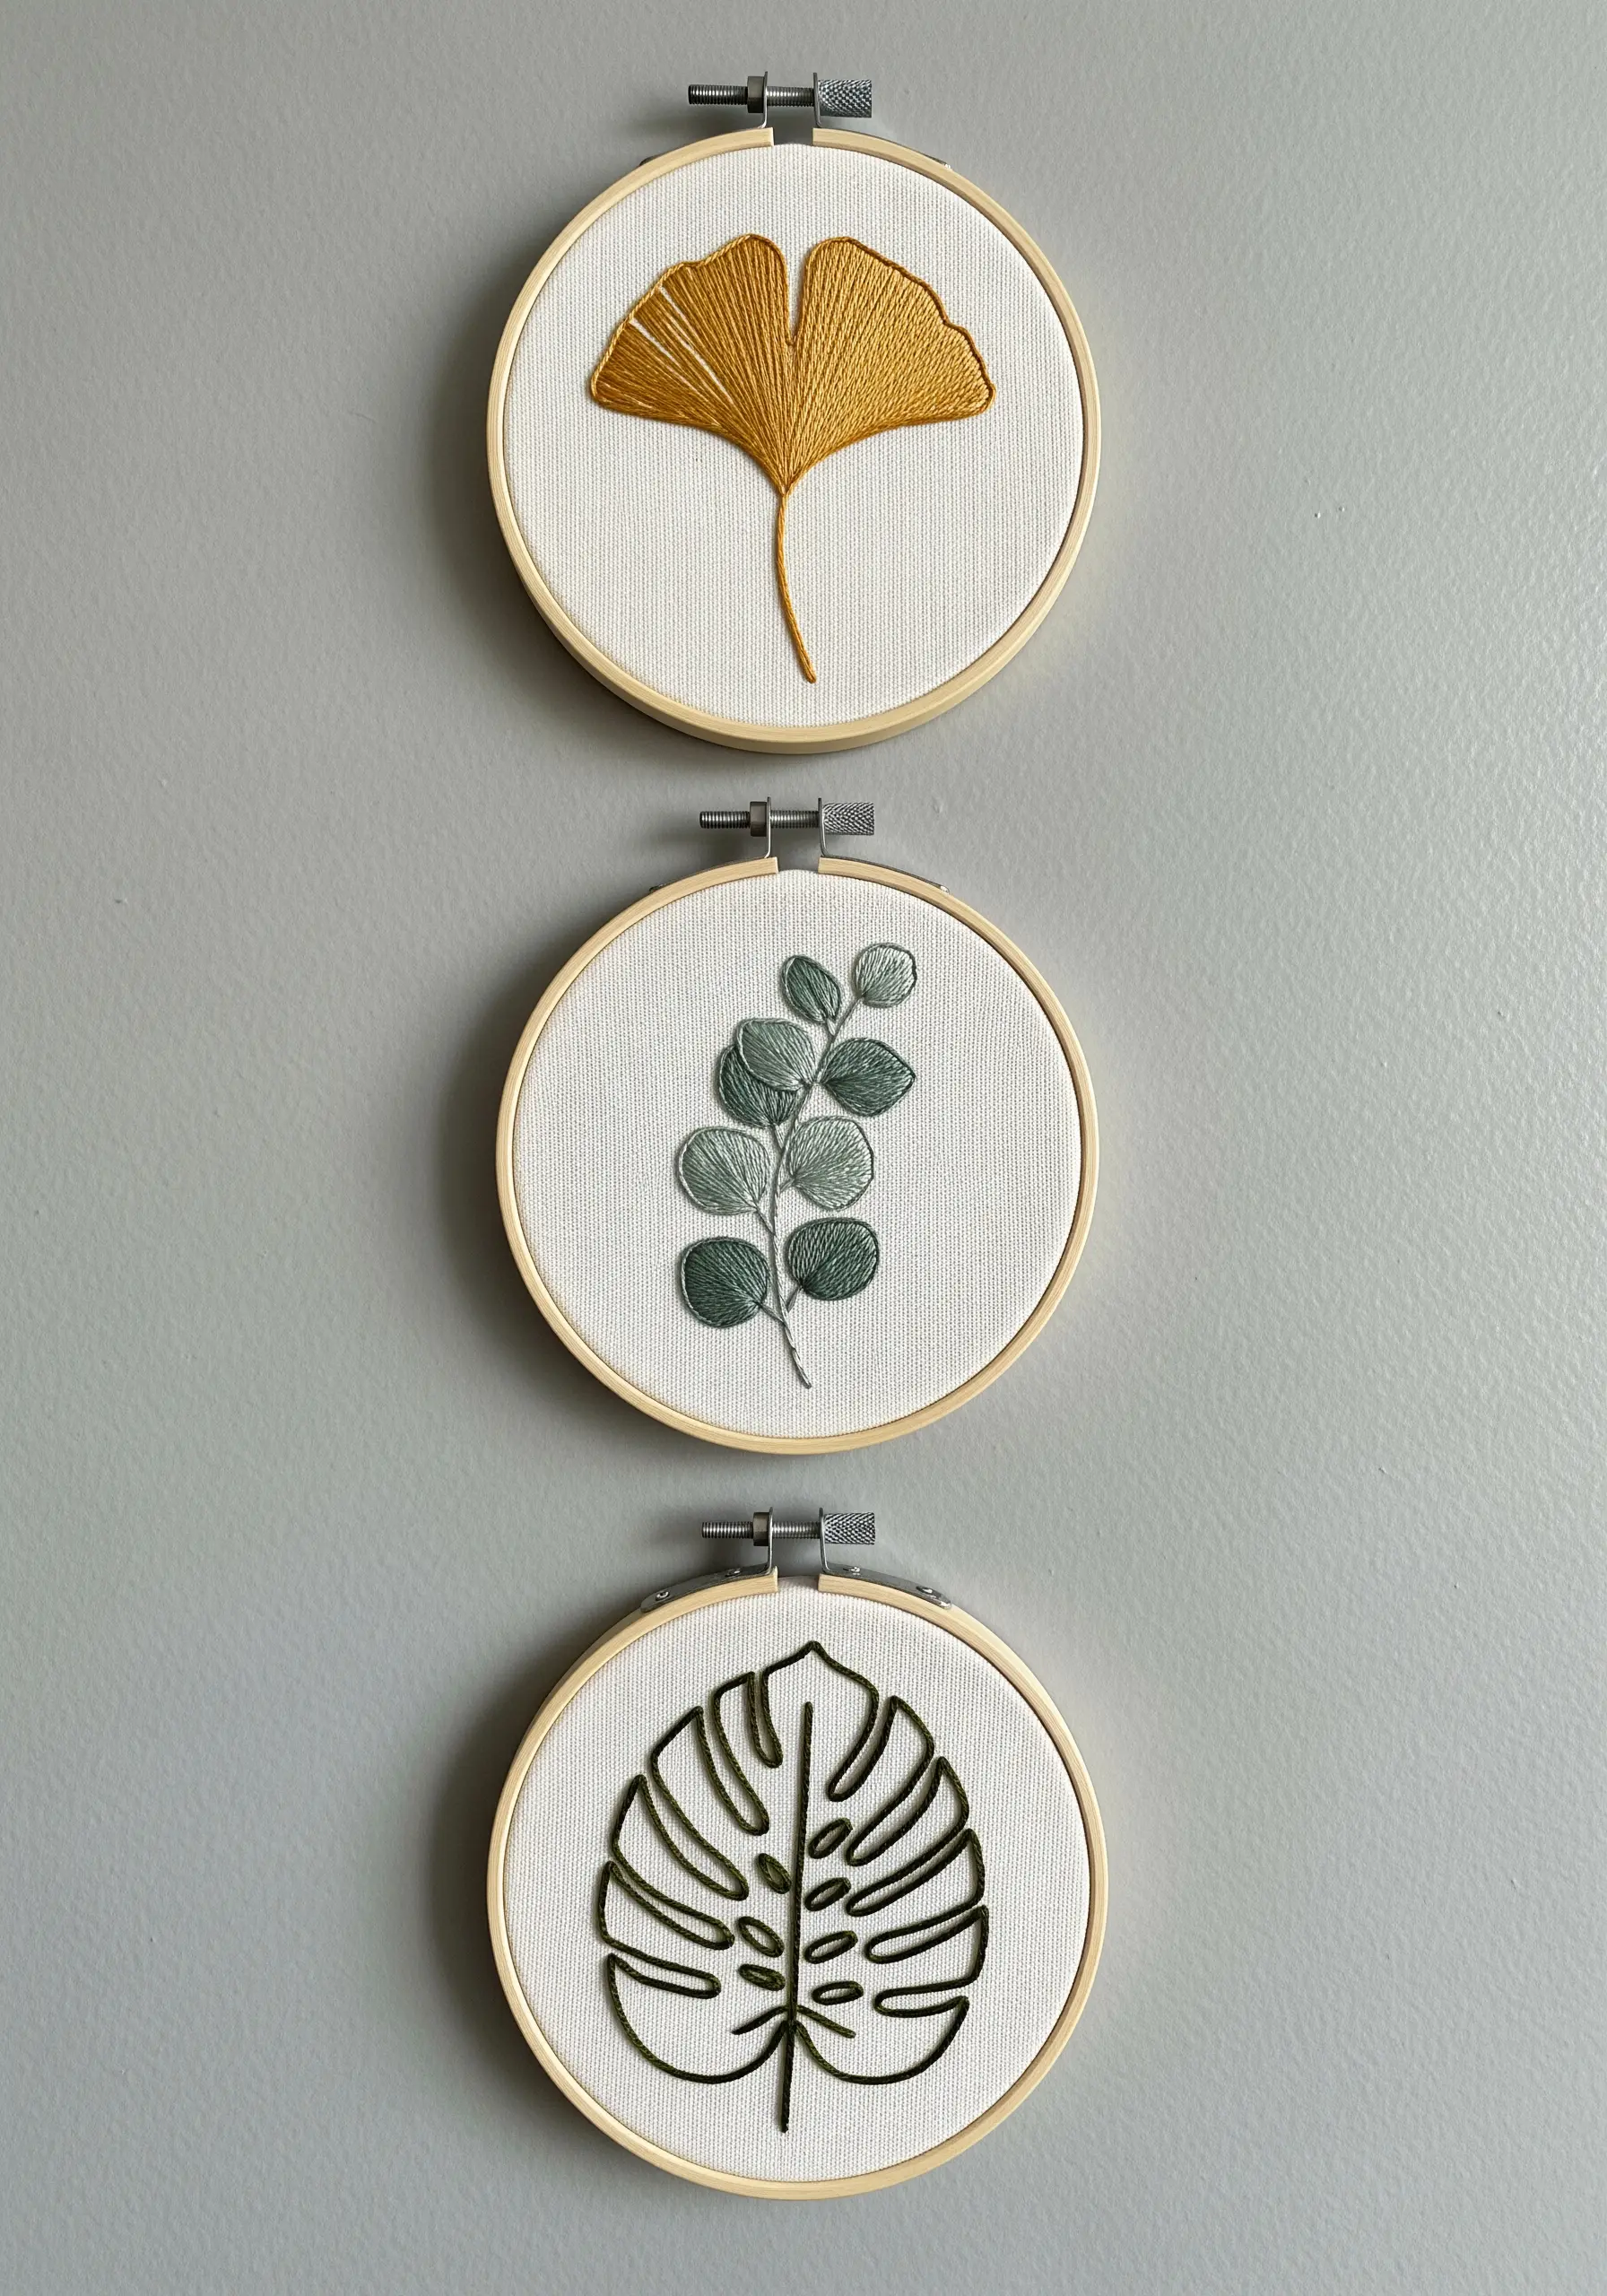
To design a sophisticated trio of hoops, establish unity through constraints.
Choose a single theme, like botanicals, and a restrained color palette that links all three pieces.
Maintain consistency by using the same fabric and hoop size, creating a predictable canvas for your work.
Then, introduce subtle variety by changing the stitch technique for each plant—a smooth satin stitch for one, a clean outline for another, and a textured long-and-short stitch for the third.
This balance of consistency and variety makes your collection feel curated and intentional, perfect for modern decor.
5. Capture Ephemeral Movement in a Dandelion
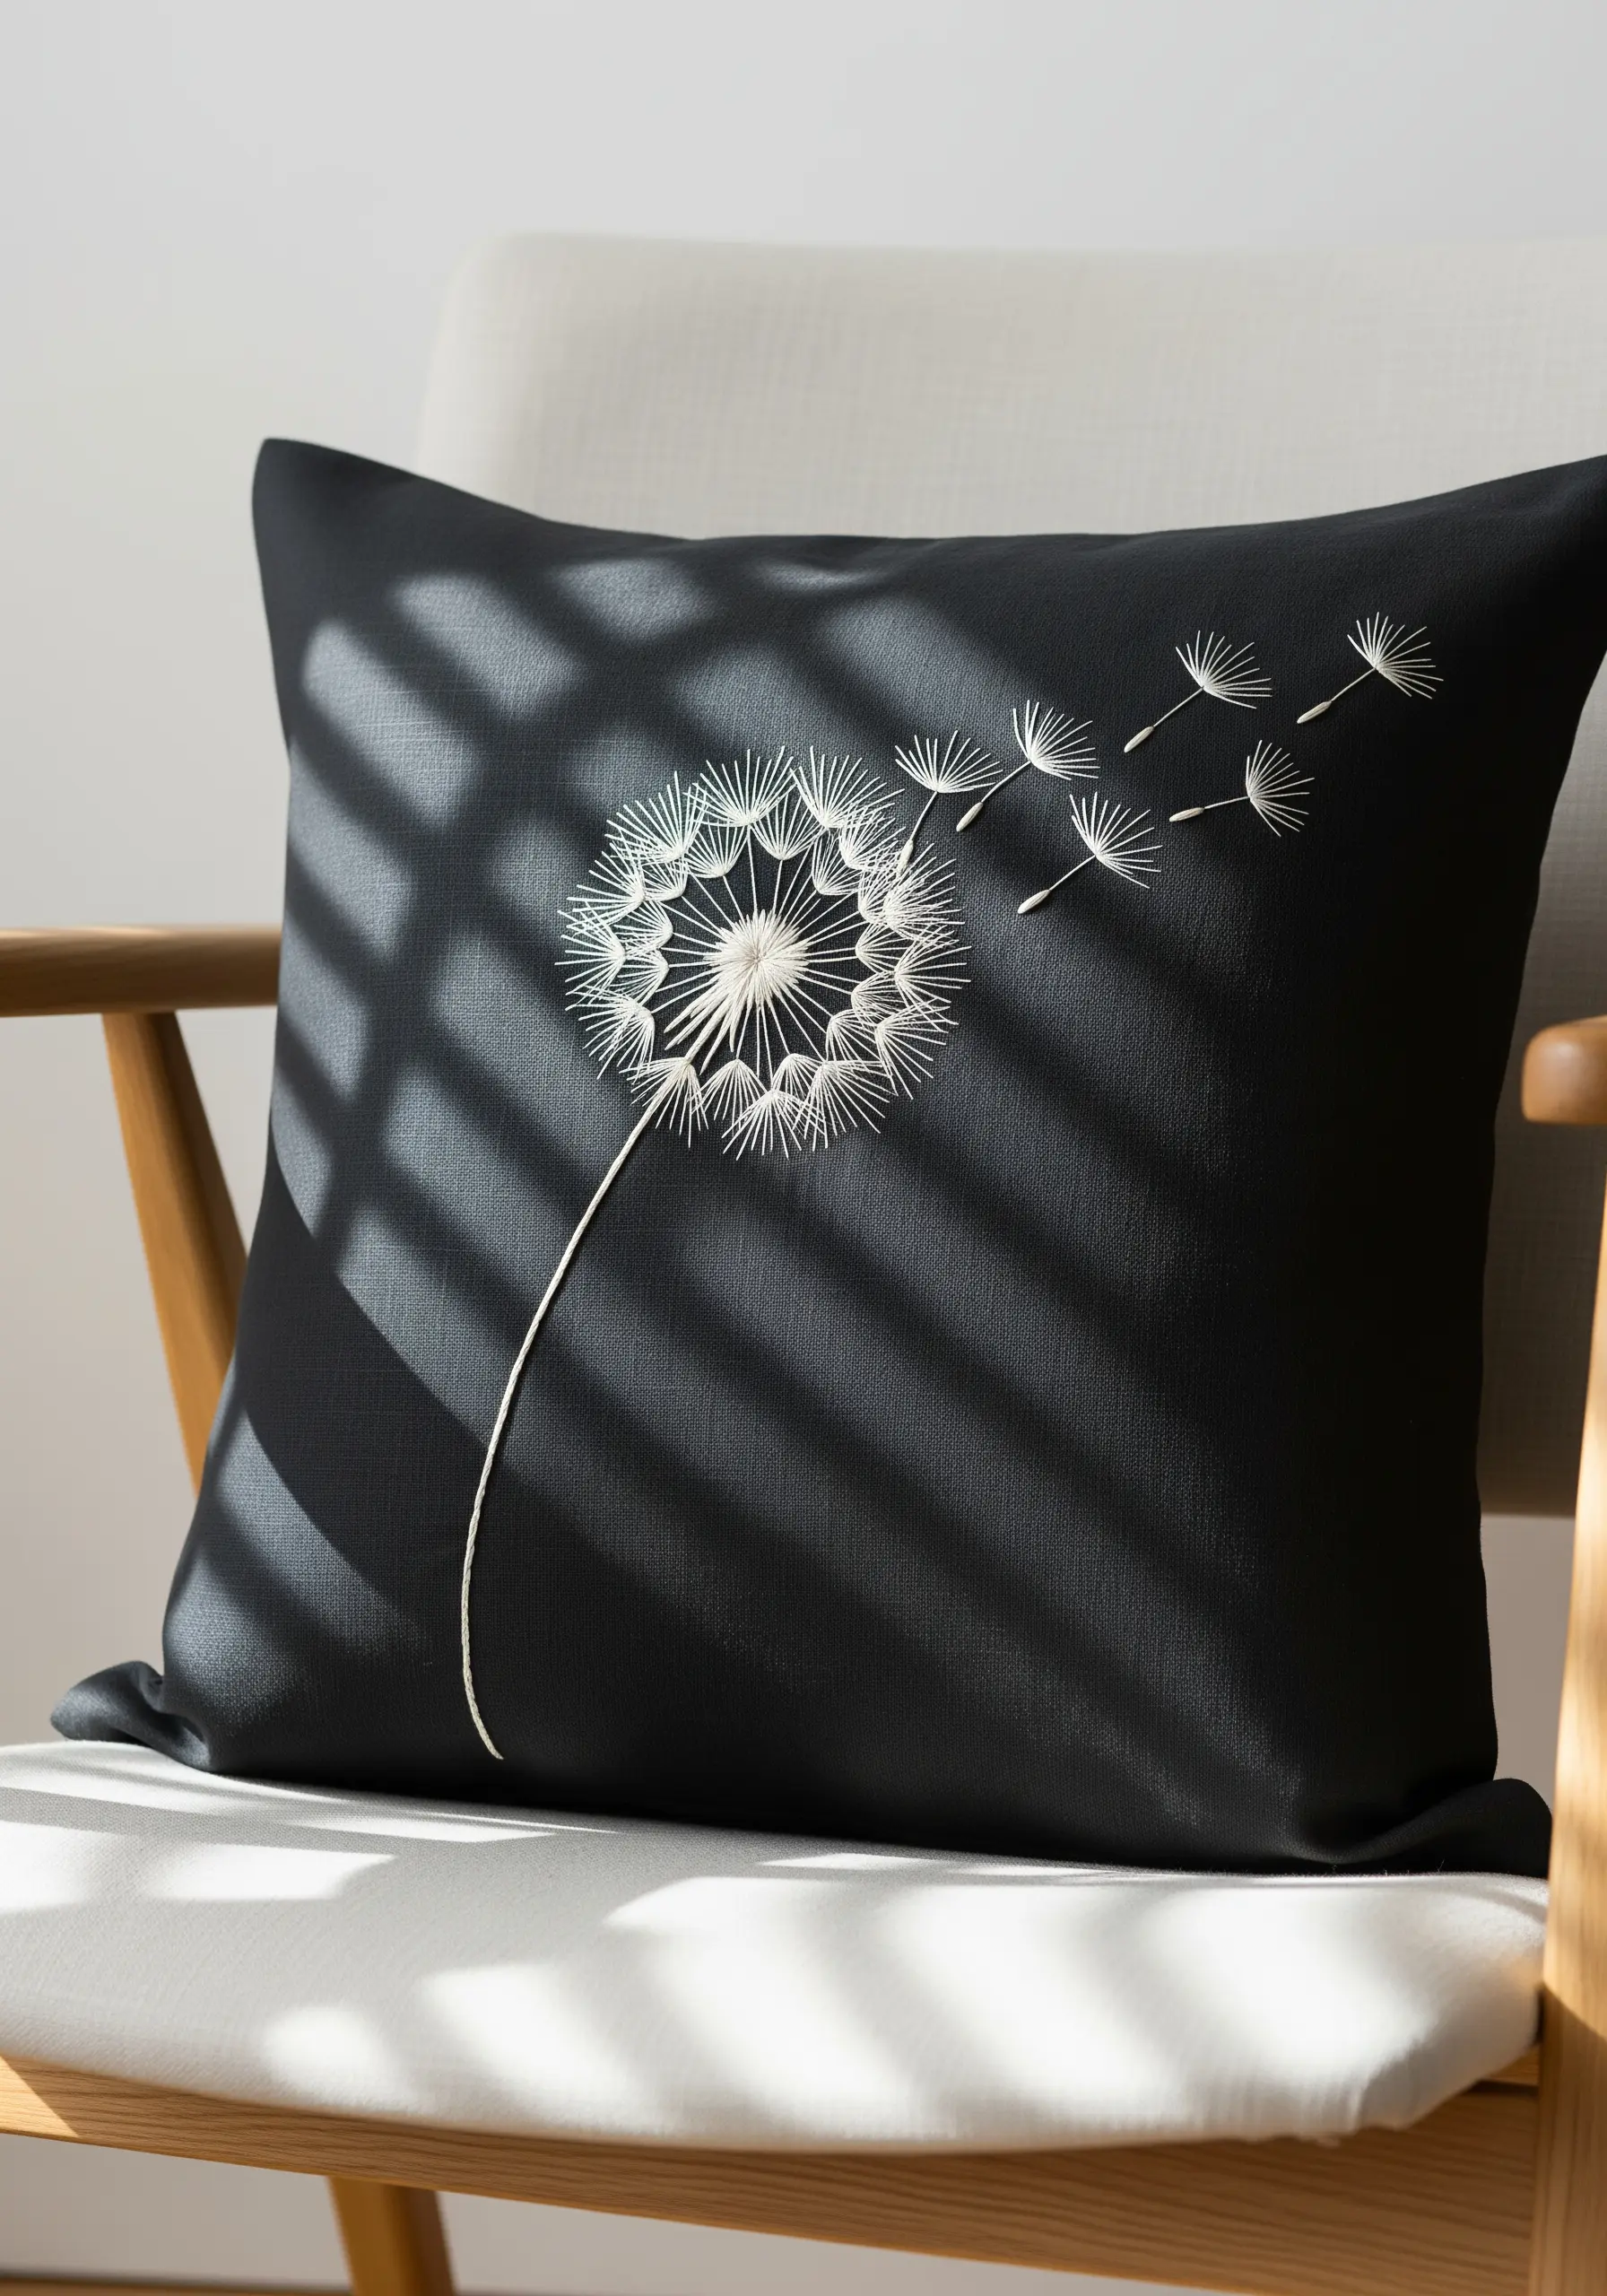
The key to embroidering a dandelion isn’t just the shape, but the feeling of lightness and motion.
Use radiating straight stitches for the central puff, anchored with a few French knots at the very center for texture.
For the seeds floating away, use a combination of single detached chain stitches for the parachute and a long straight stitch for the stem.
Stitching with a fine, single-strand white thread on a dark, matte fabric like black linen creates stark contrast, making the delicate design appear to float.
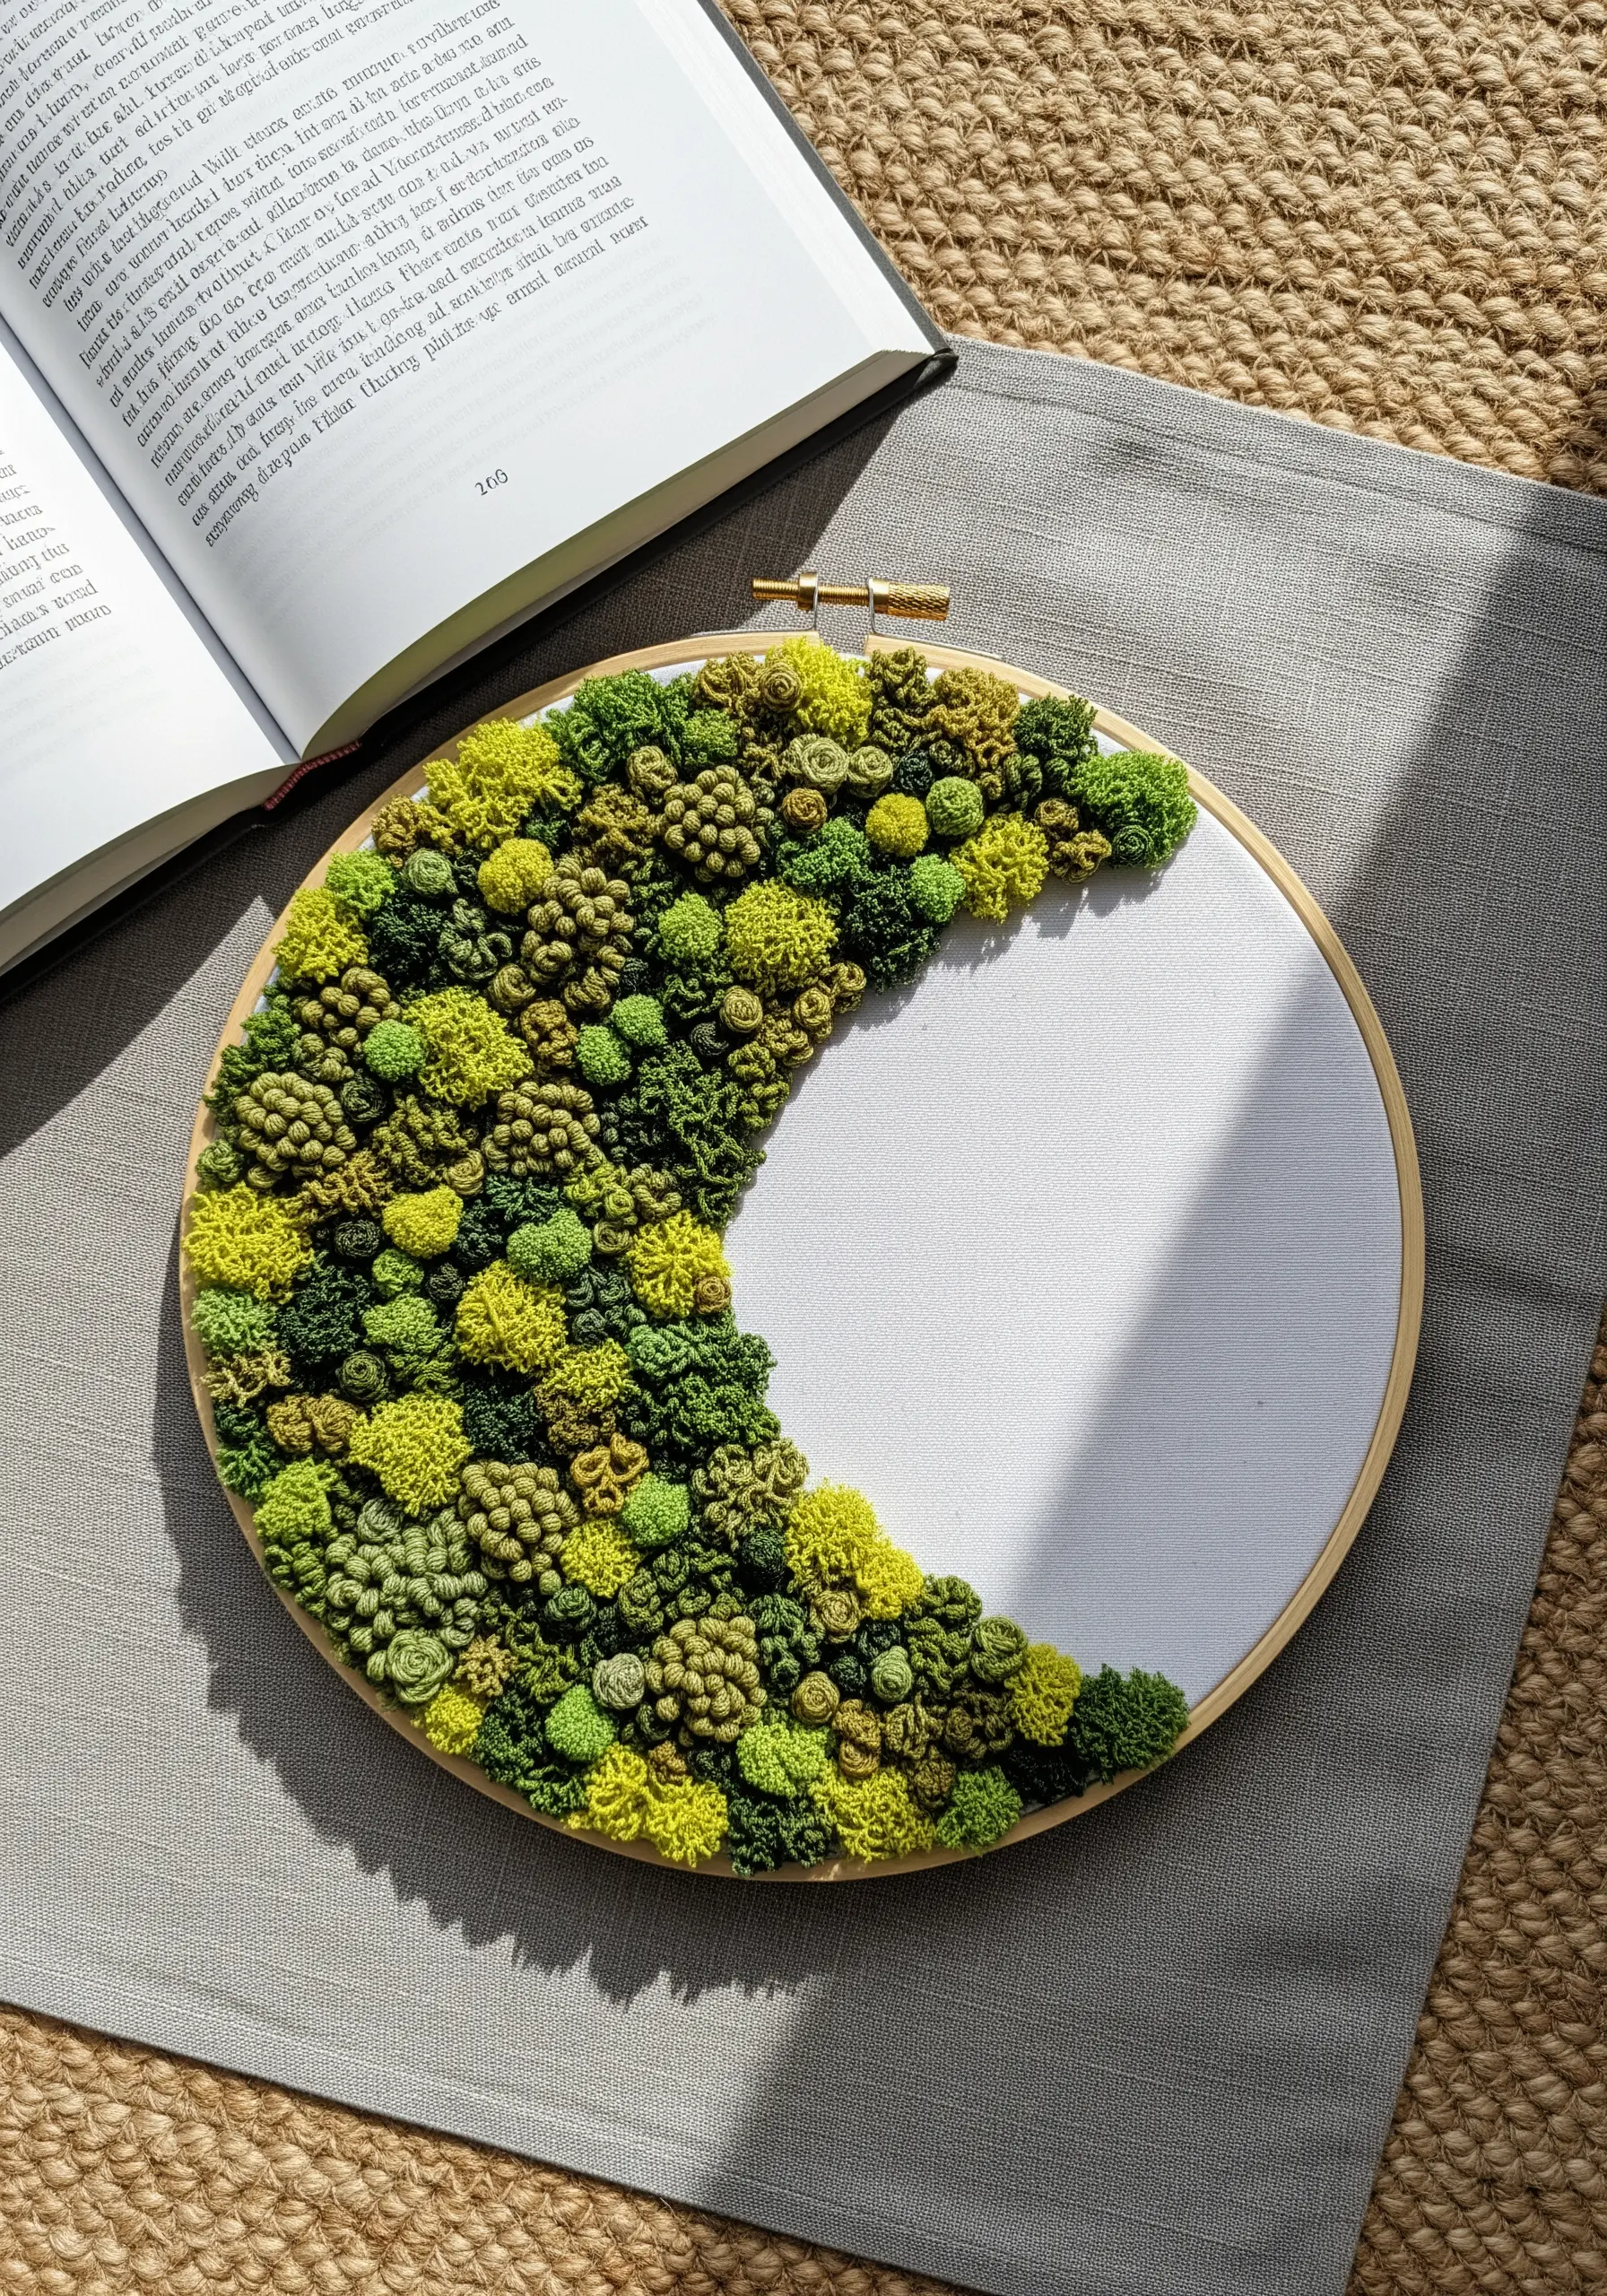
6. Weave a Meditative Mandala with Textured Stitches
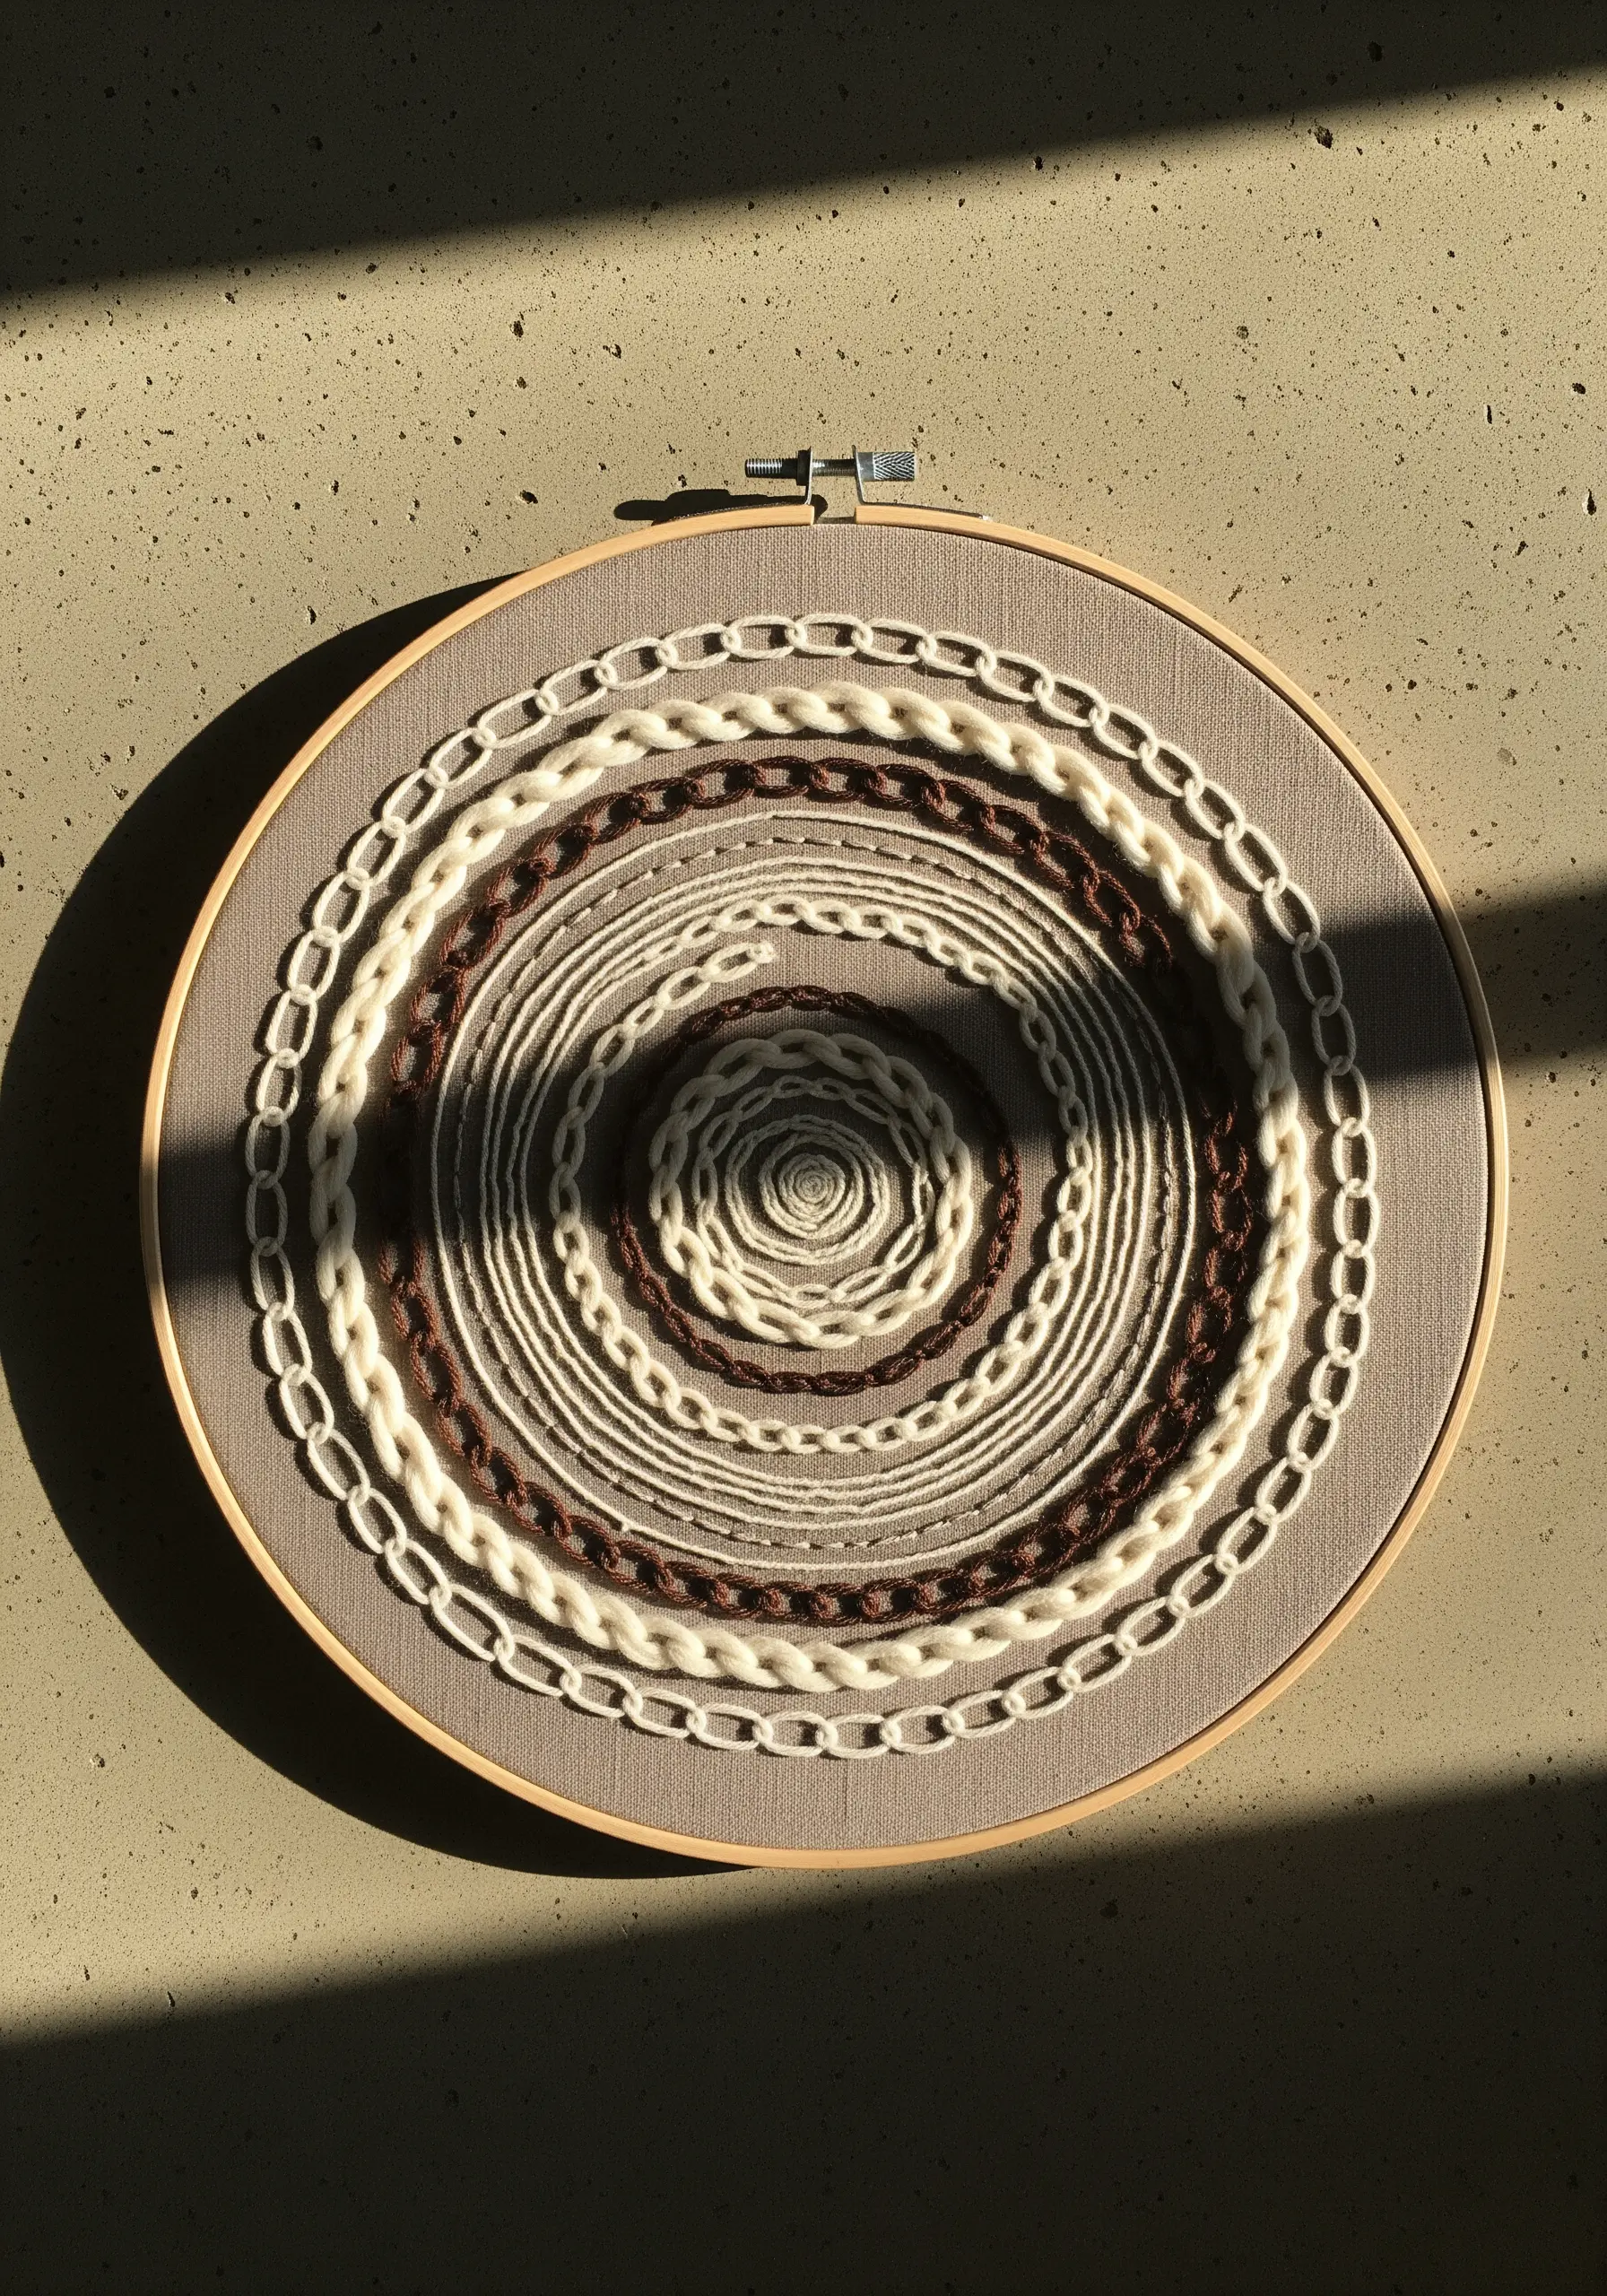
Transform a simple circle into a tactile masterpiece by focusing on texture over color.
Use a neutral, earthy palette and build concentric rings with highly textural stitches and fibers.
Alternate between thick yarn couching, plush chain stitch loops, and tightly wound rope stitches to create distinct bands of texture.
The repetition of the circular form combined with the varied surfaces invites touch and creates a calming, meditative effect, making it a perfect example of embroidered mandala wall art designs for mindful stitching.
7. Refine Apparel Embellishment with Clean Outlines
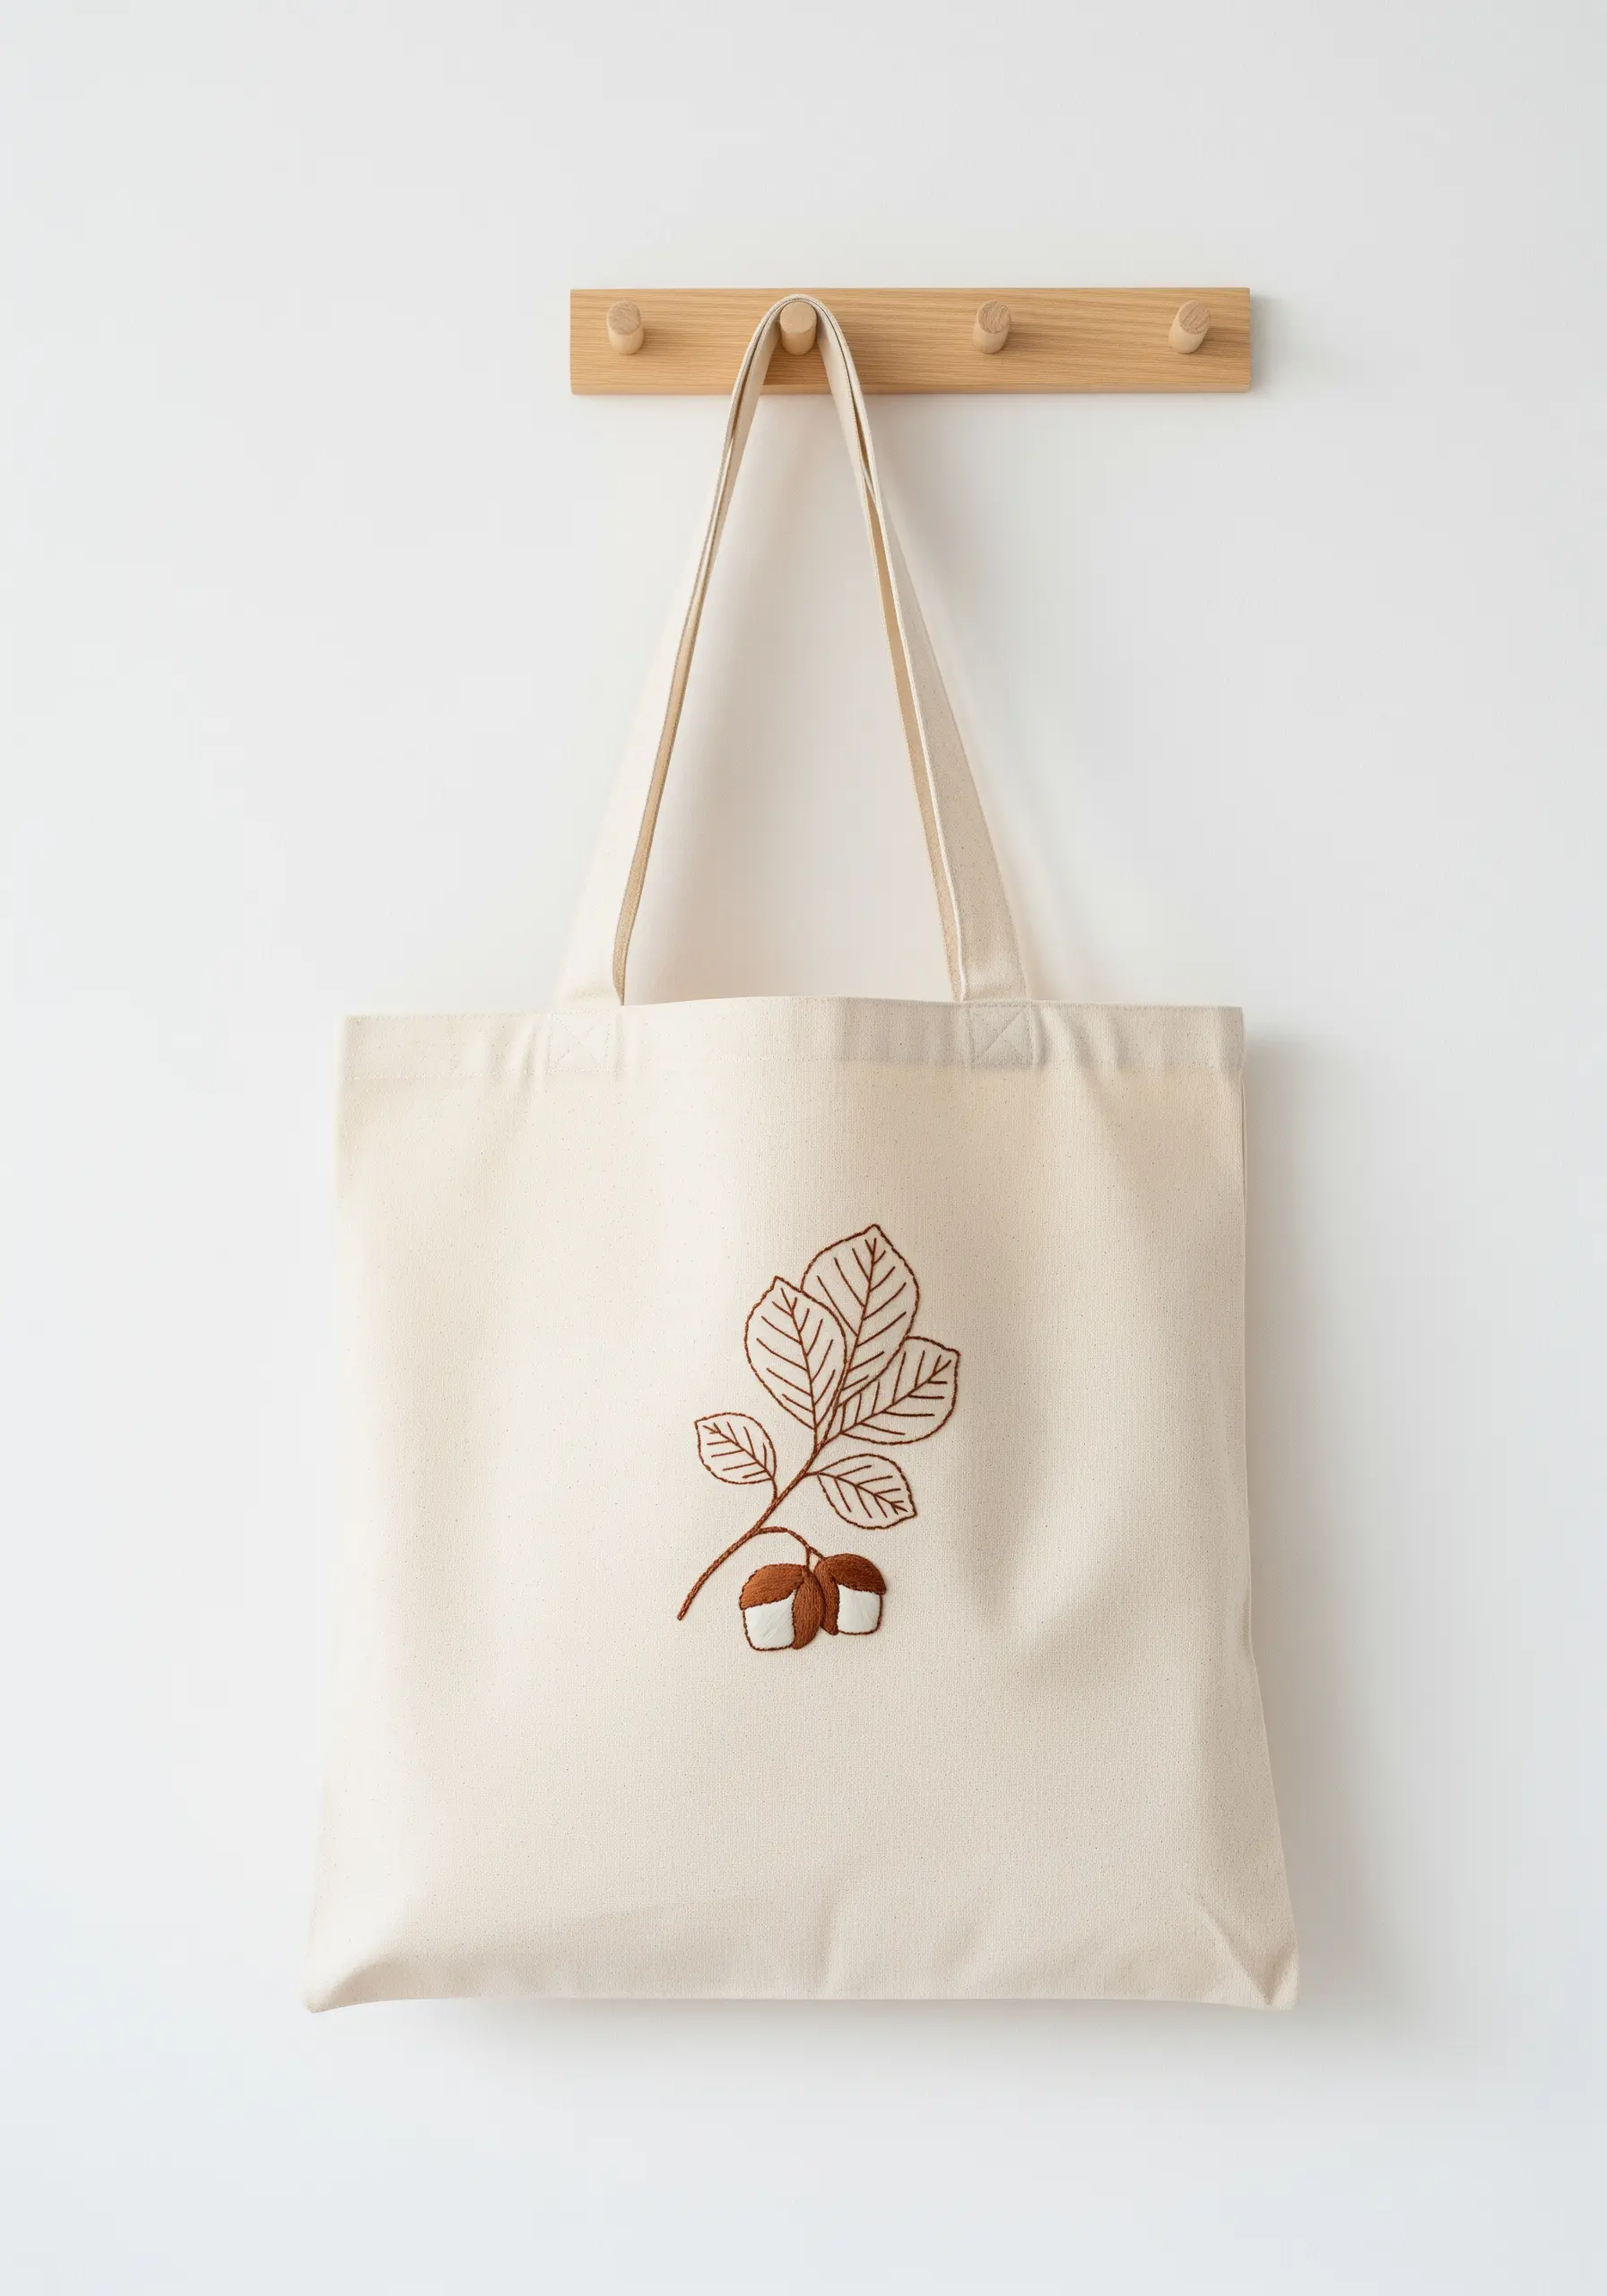
To ensure your embroidery on functional items like tote bags looks sharp and professional, prioritize clean linework.
Always use a stabilizer on the back of the fabric to prevent puckering and distortion while you stitch.
Choose a precise outline stitch, like a backstitch or stem stitch, and focus on maintaining consistent stitch length and tension for a smooth, unwavering line.
For fine details like leaf veins, switch to a single strand of floss to create delicate marks that add detail without overwhelming the primary outlines.
These are the kinds of aesthetic embroidery ideas to turn your old clothes into art with professional polish.
8. Build Organic Forms with Raised Stitches and Sequins
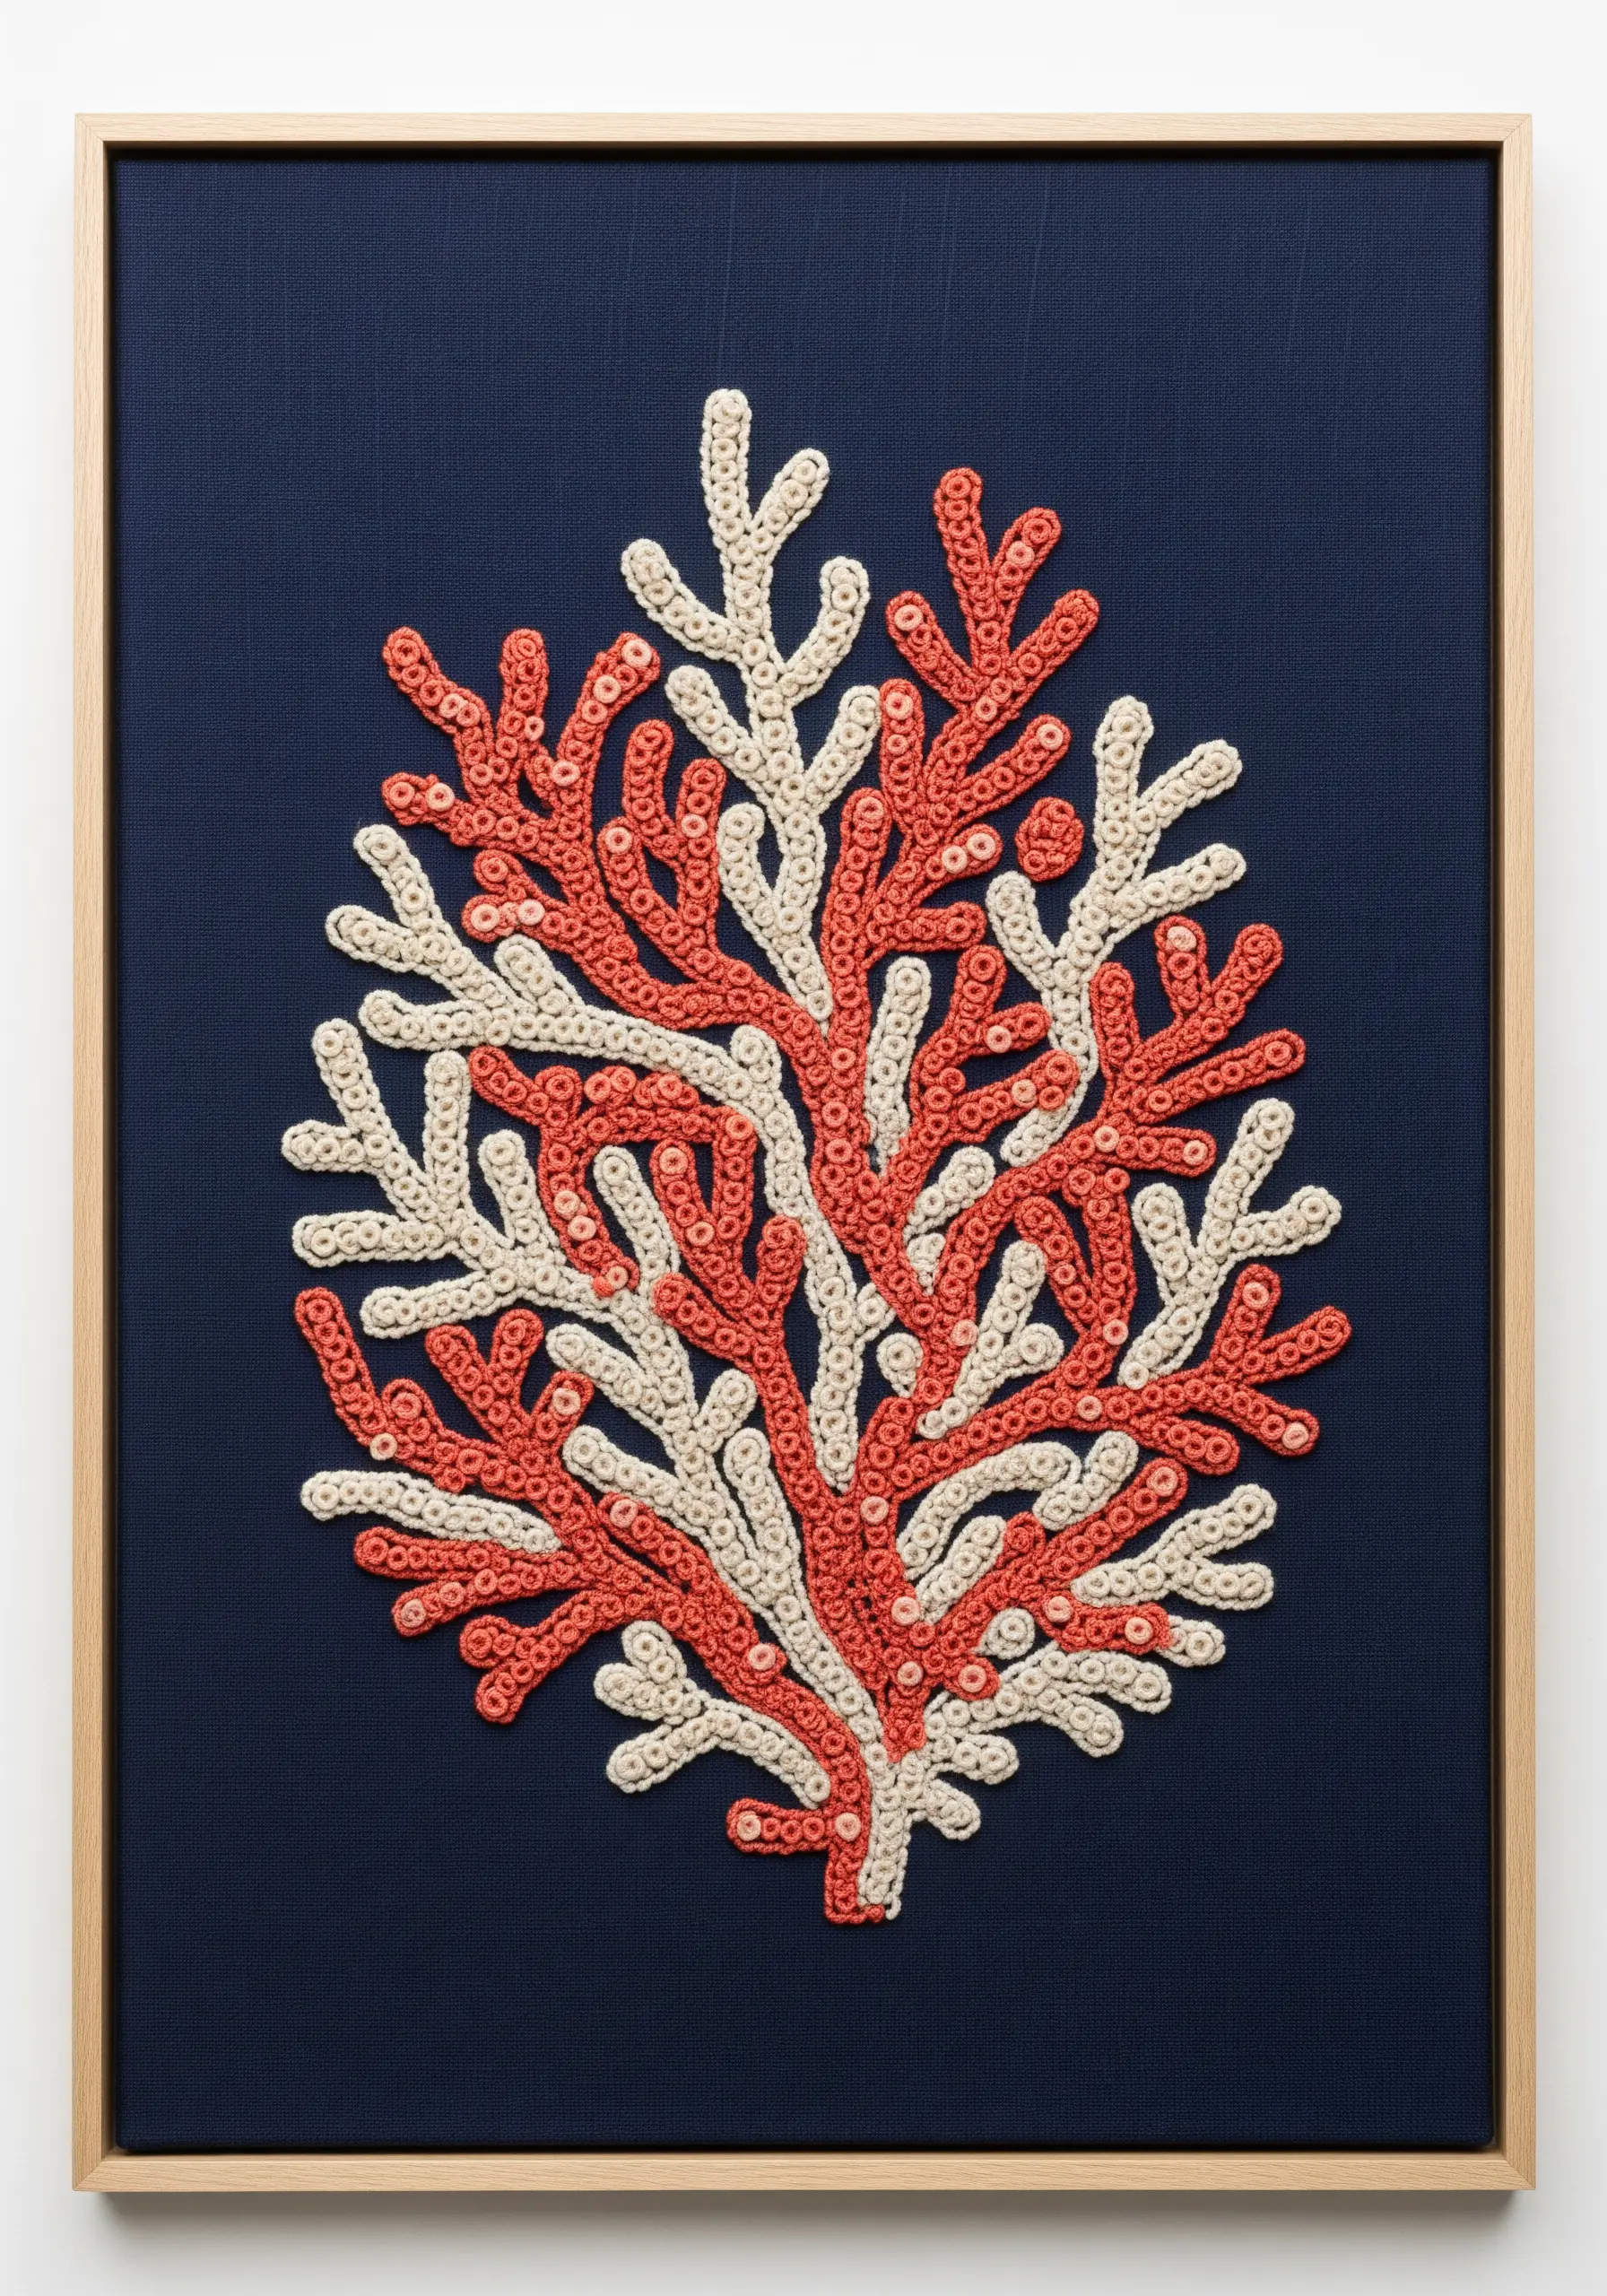
To create the dense, branching structure of coral, use a stitch that builds dimension.
A raised stem stitch band or densely packed French knots will create a rounded, three-dimensional effect that lifts the design off the fabric.
For a touch of underwater magic, discreetly scatter a few tiny, iridescent sequins within the stitches, securing them with a single seed stitch.
This subtle sparkle will catch the light and mimic the natural glimmer of marine life, adding a layer of sophisticated detail to your textile art.
9. Command Space with Large-Scale Celestial Motifs
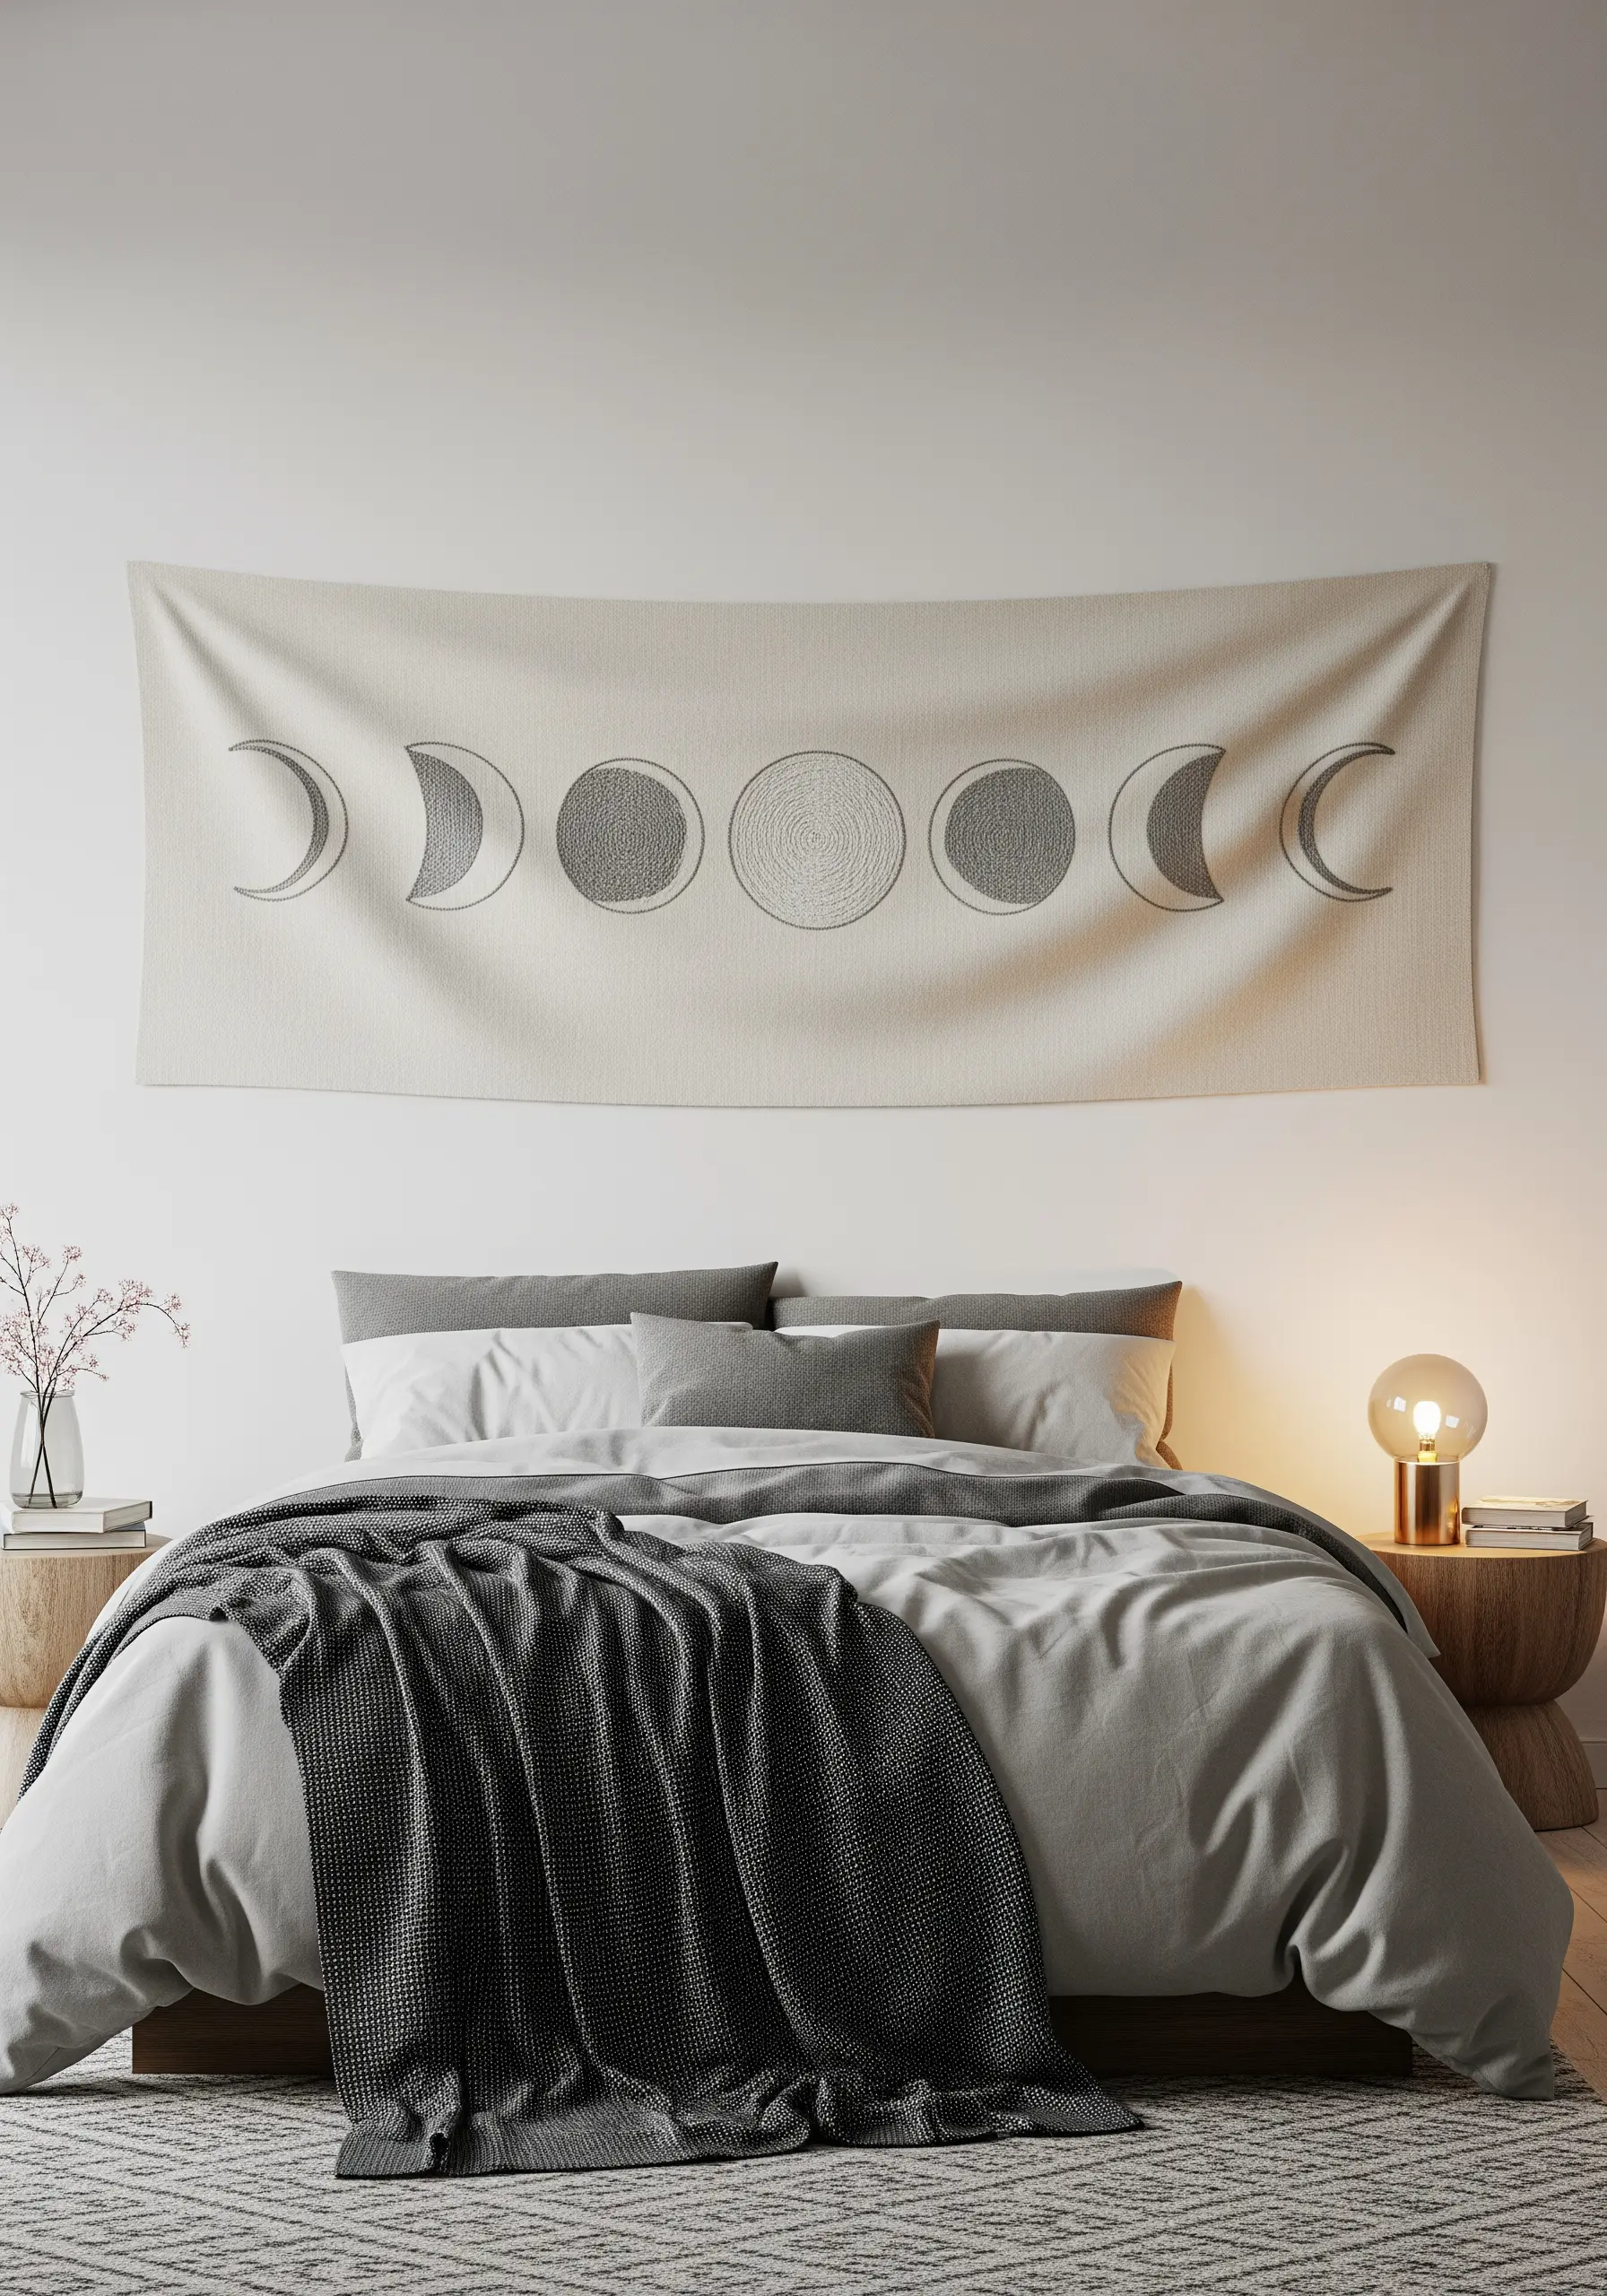
For a statement wall hanging, simplify your technique to amplify the design’s impact.
Fill each phase of the moon with a spiral chain stitch or backstitch, working from the outside in.
This method is faster than satin stitch for large areas and creates a subtle, concentric texture that adds depth and visual interest.
The key to a serene and balanced final piece is precise spacing—ensure the distance between each celestial body is perfectly uniform to create a calming, rhythmic pattern.
This is a wonderful nature-calm stitching project to transform a bedroom wall.
10. Illustrate Depth and Motion with Thread Weight
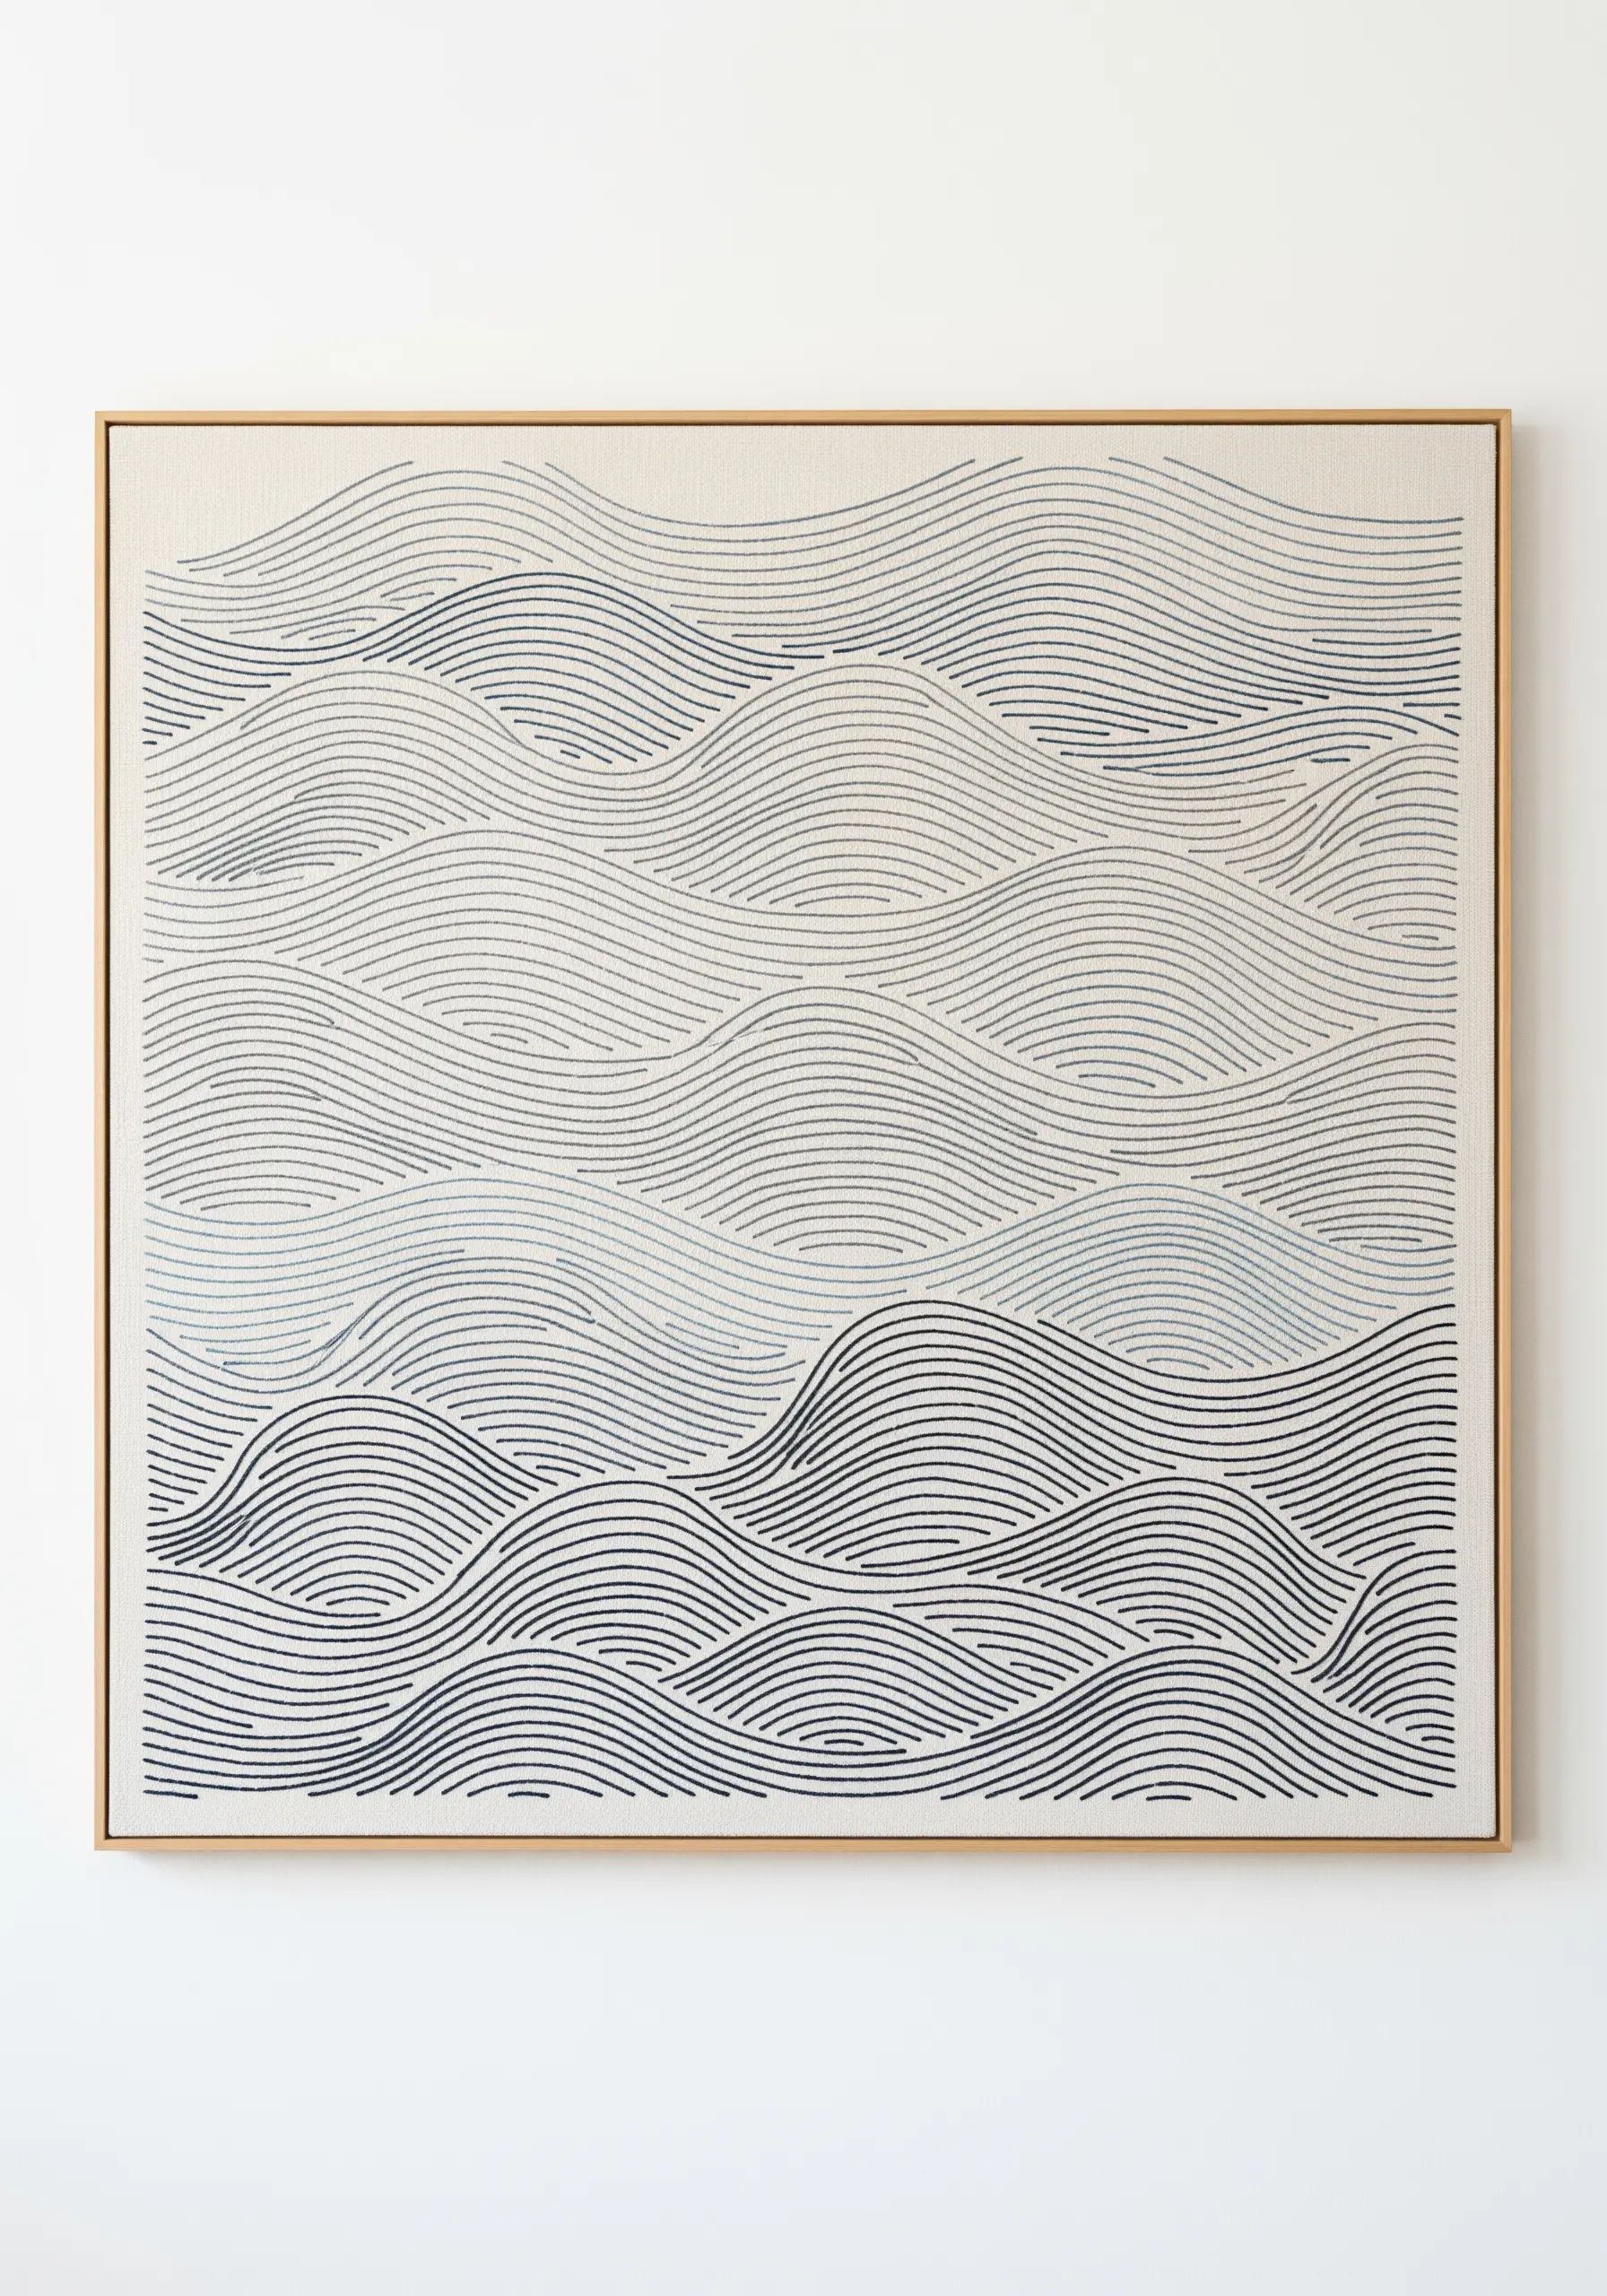
Create the illusion of rolling waves and atmospheric depth by varying the weight of your thread.
For the waves in the foreground, use three or four strands of floss in a darker shade to give them presence and weight.
As you move toward the horizon, reduce your thread to two strands, then a single strand in a lighter color for the distant waves.
This simple adjustment in thread thickness is a powerful tool that tricks the eye, creating a sophisticated sense of perspective in a minimal, line-based design. These are the stitched details that make plain walls pop elegantly.
11. Marry Soft and Sleek Fibers for Tactile Contrast
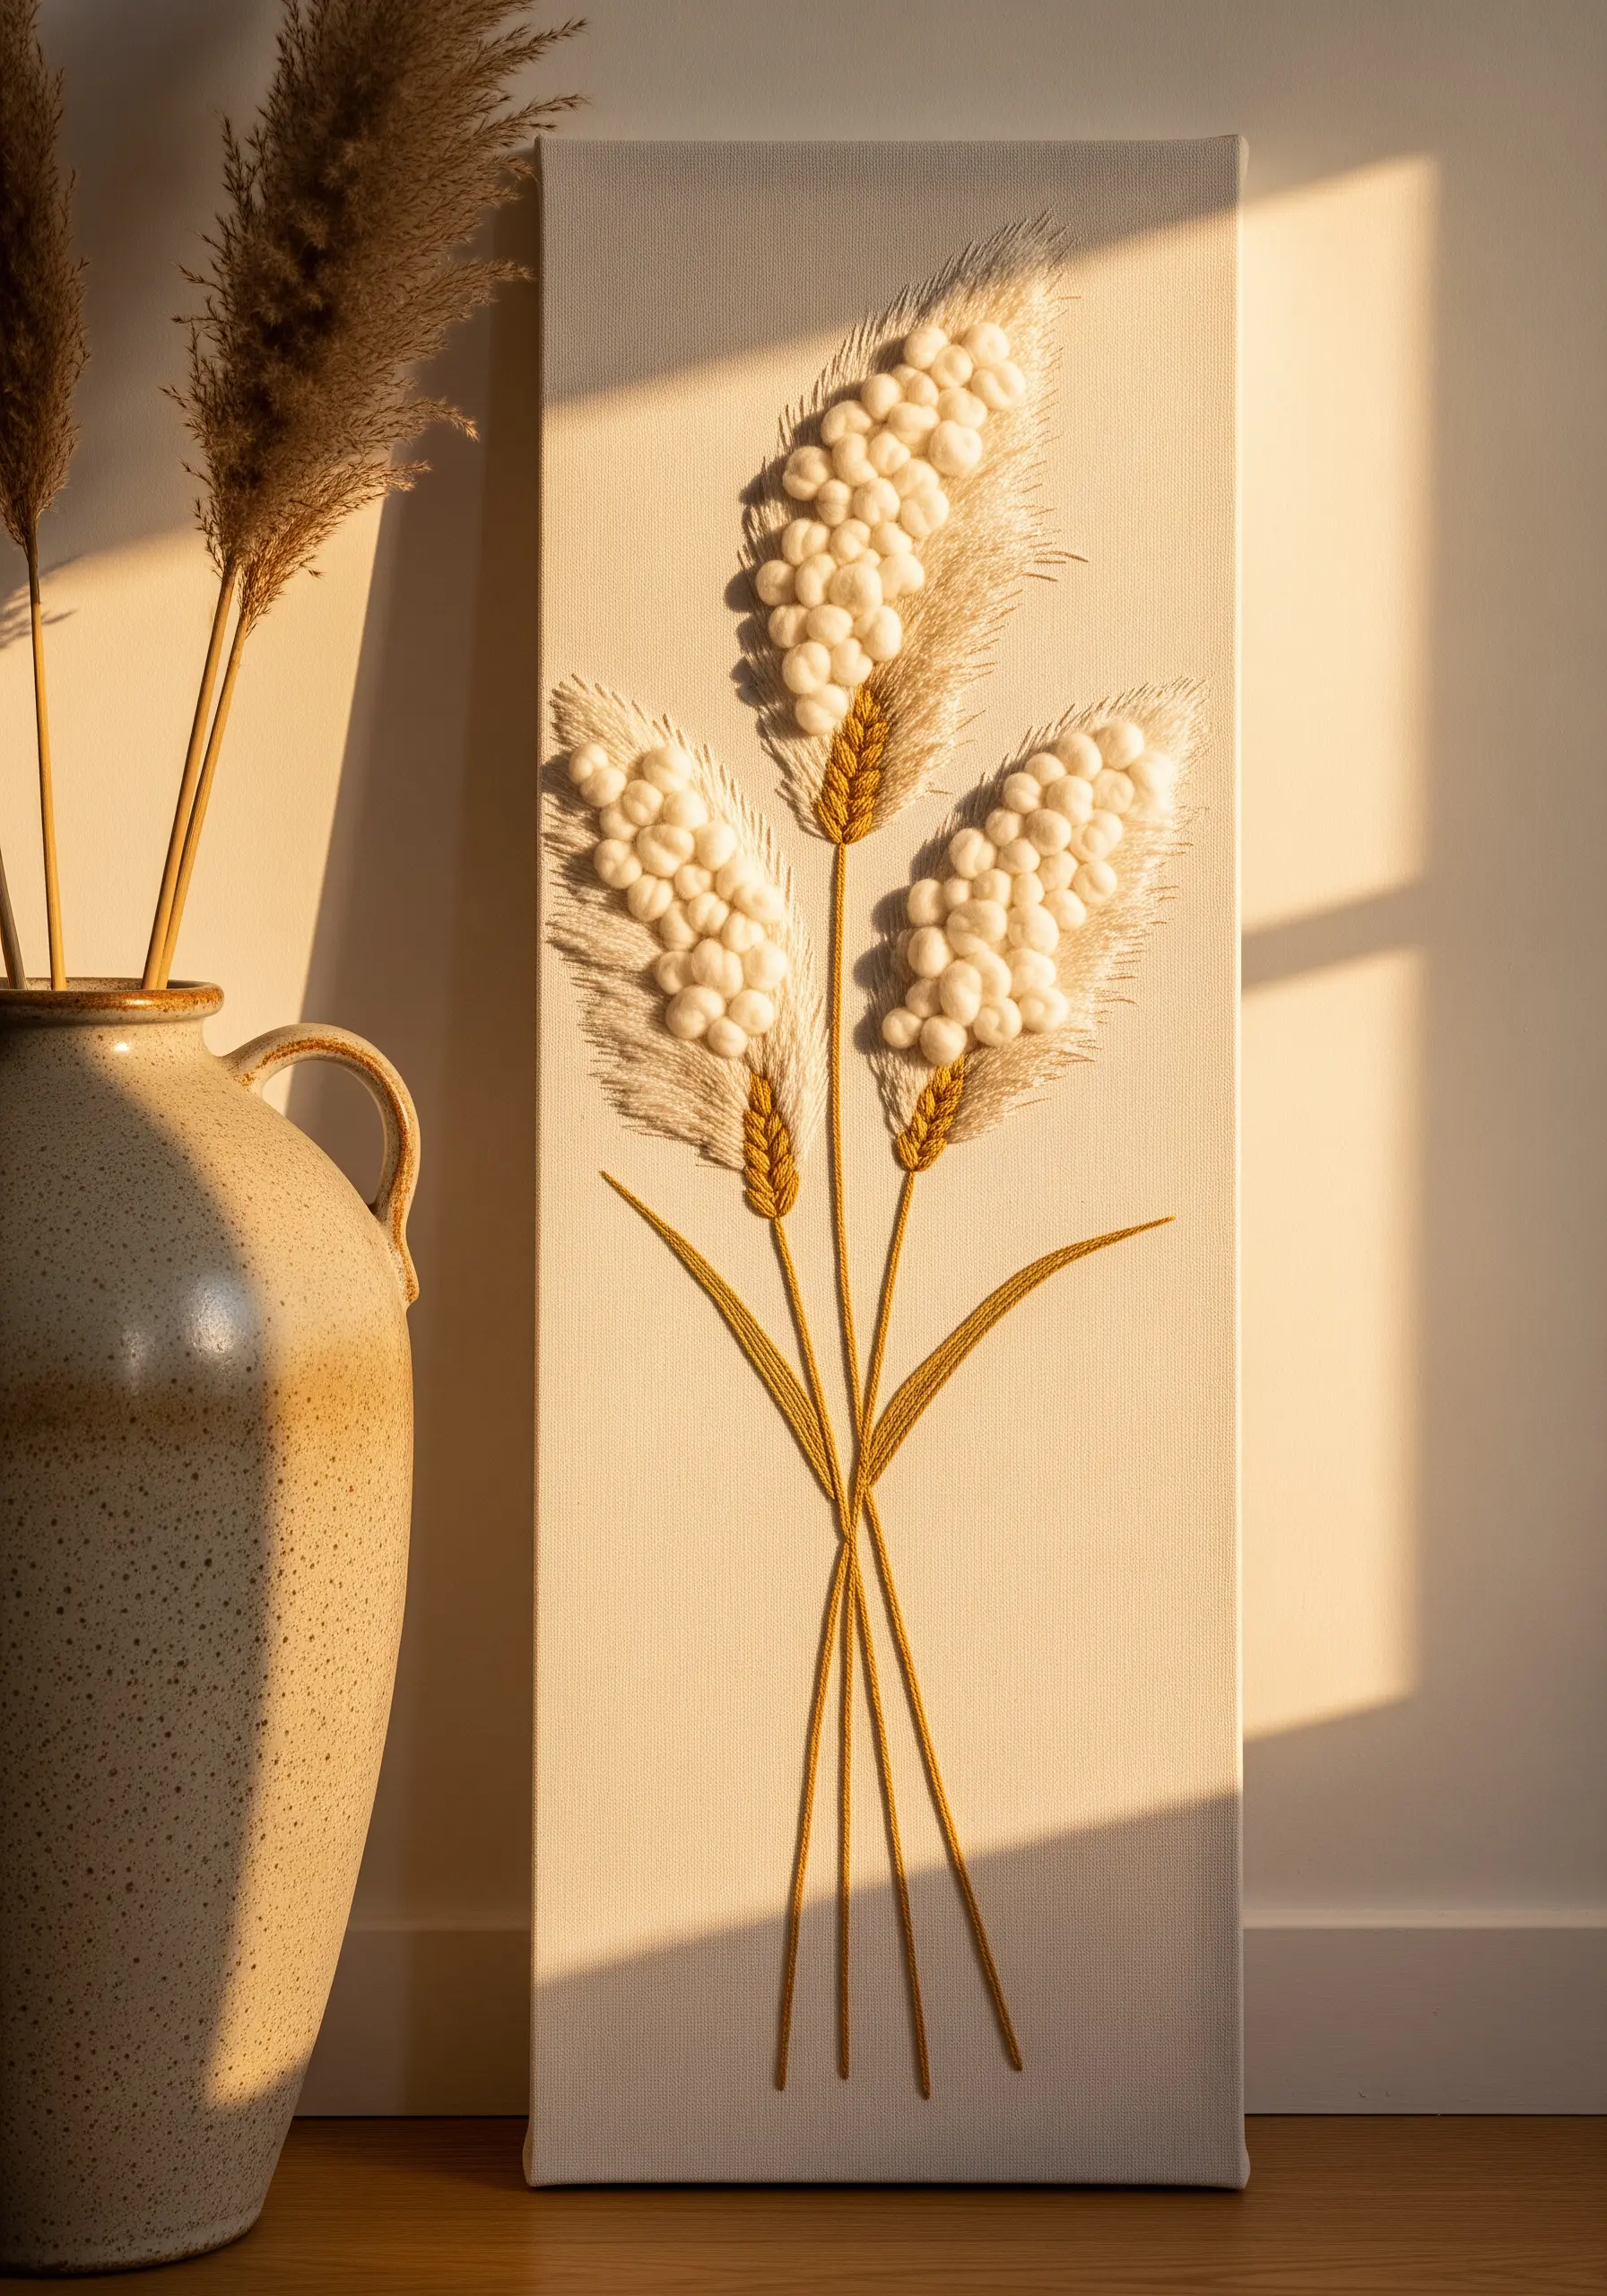
Evoke the texture of pampas grass by combining different types of fiber in one piece.
Create the fluffy plumes using chunky, unplied wool yarn, stitched in dense loops that you can trim and fluff up for maximum softness.
For the slender stems and sharp leaves, switch to a smooth, standard embroidery floss and use a disciplined satin stitch or wrapped backstitch.
This intentional contrast between the soft, diffused texture of the wool and the crisp, defined lines of the floss makes the piece visually and tactilely dynamic.
12. Add Sophistication with Subtle Shifts in Line Weight
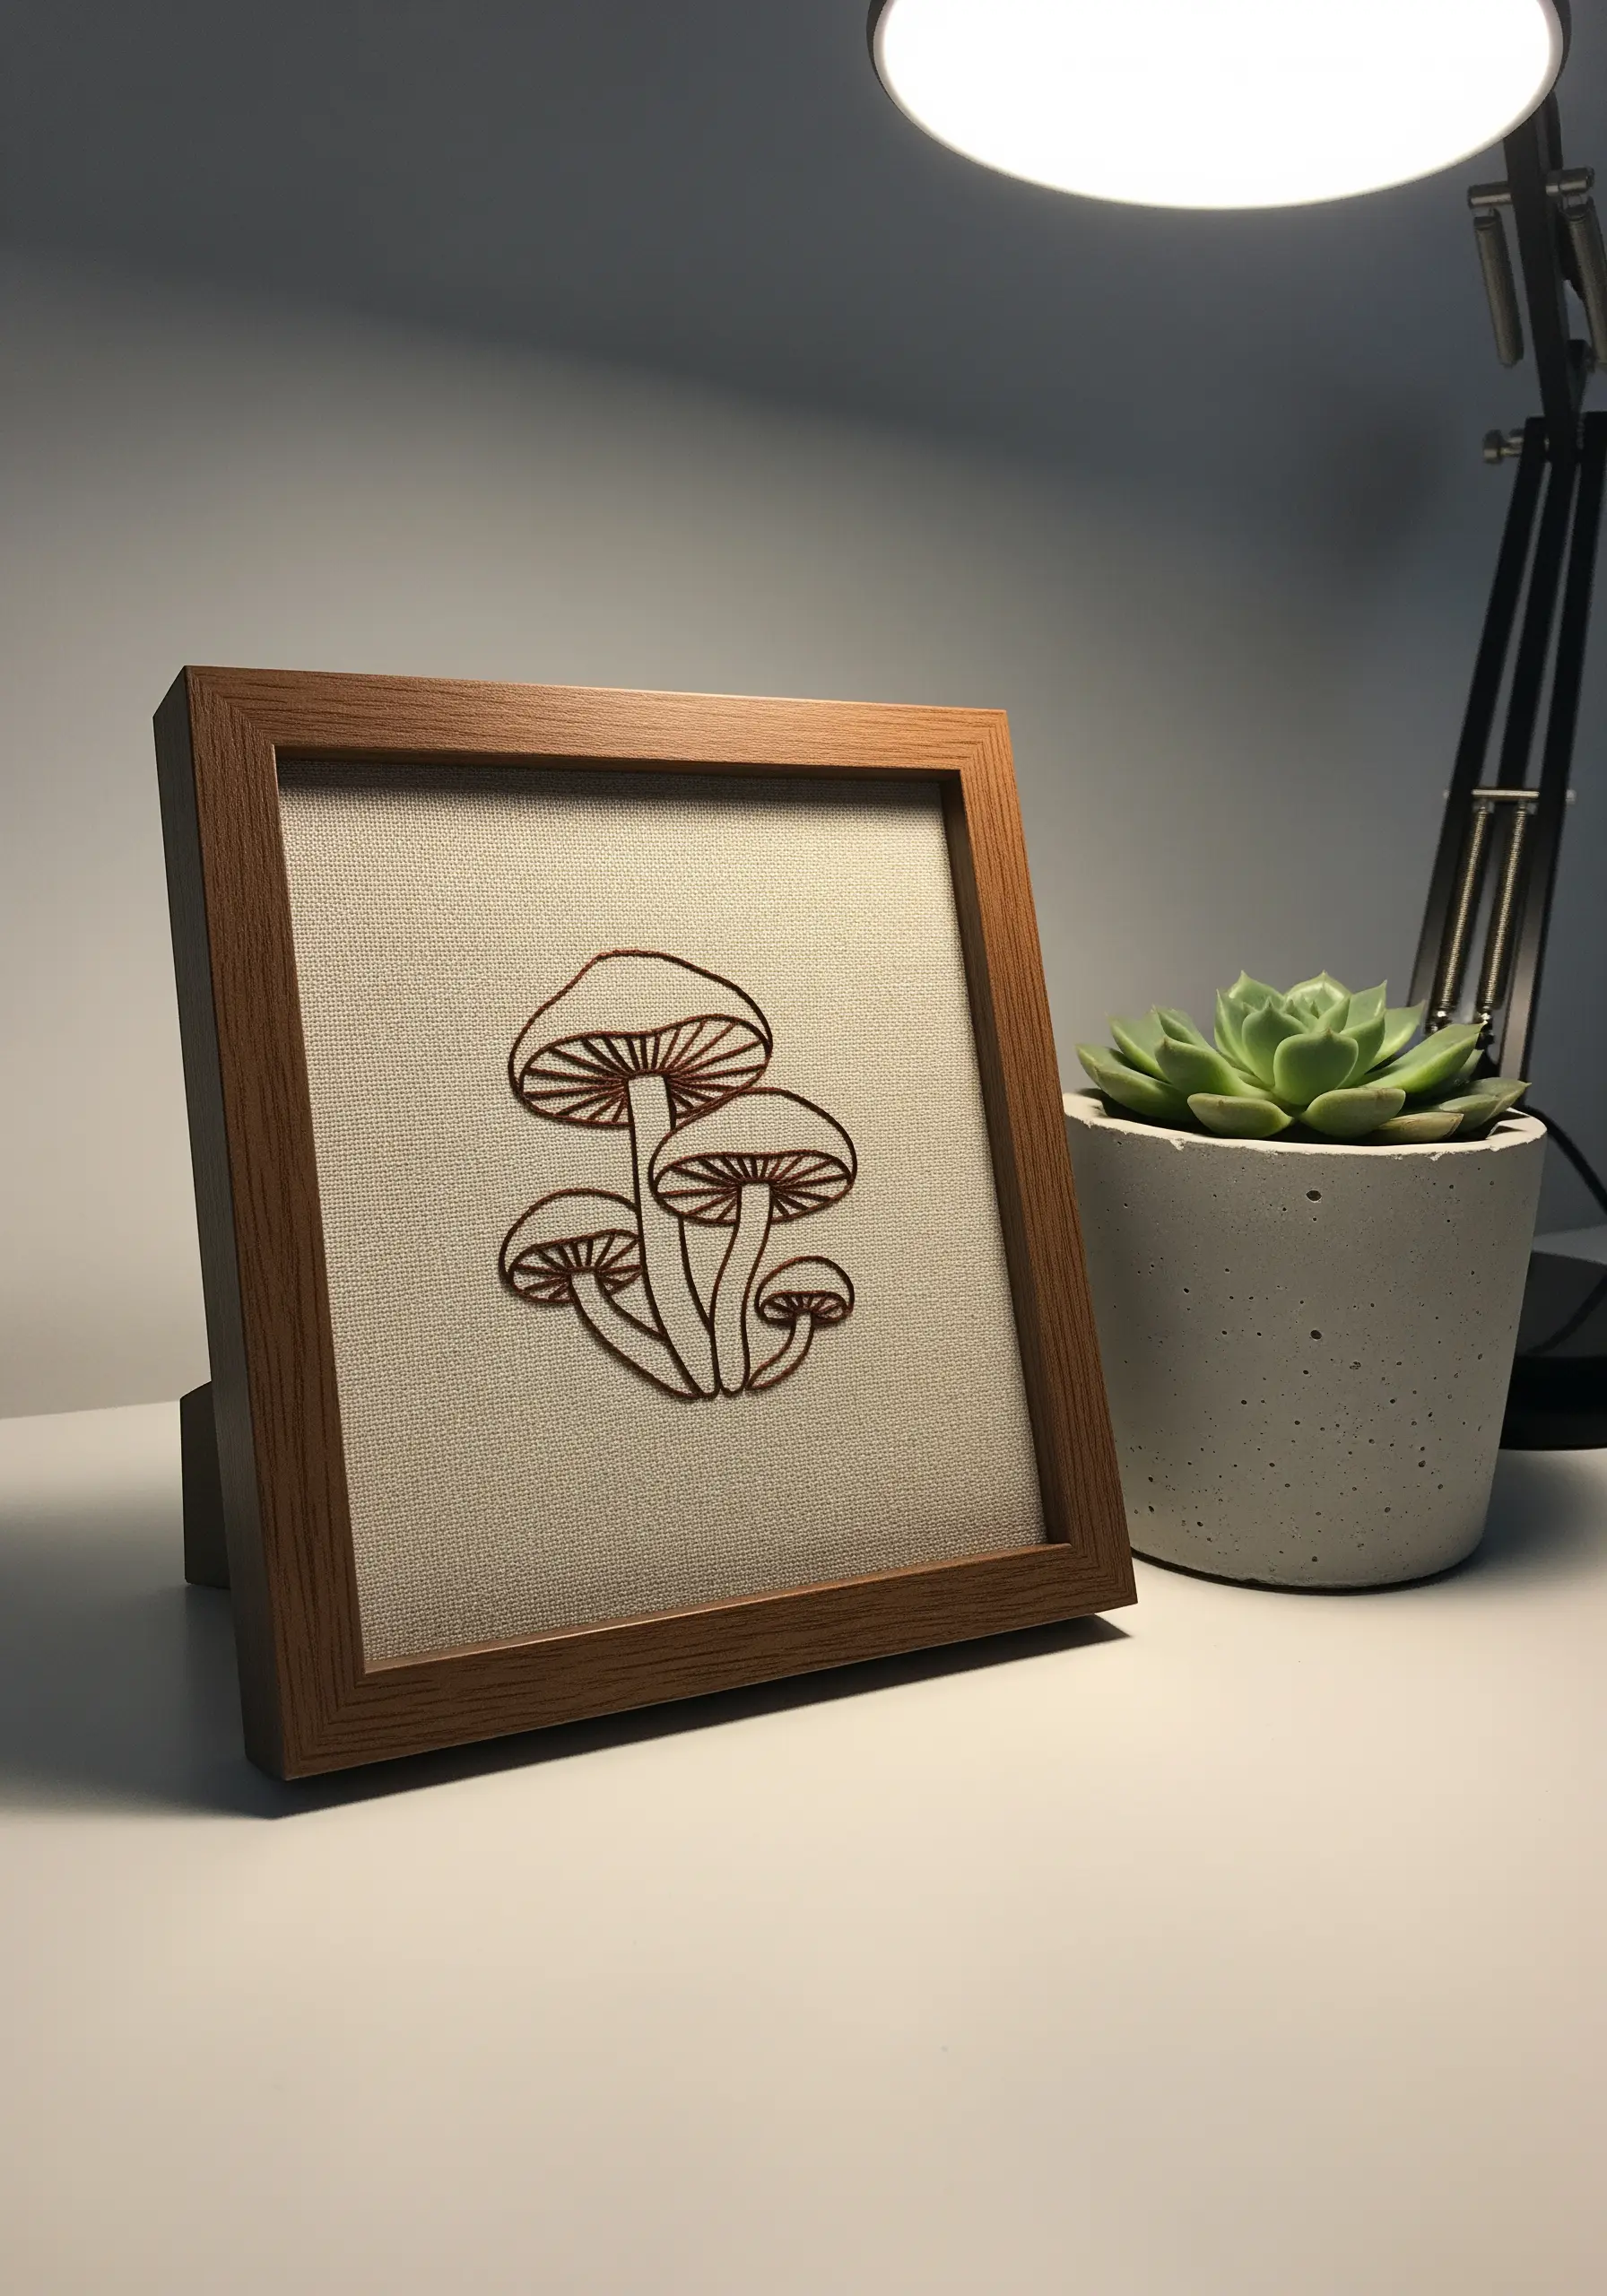
Elevate a simple line-art design by thinking like an illustrator and varying your line weight.
For the main outlines of the mushroom caps and stems, use two strands of floss to create a bold, confident line.
Then, for the delicate, secondary details like the gills underneath, switch to a single strand of the same color.
This subtle shift creates an immediate sense of depth and refinement, giving the flat design a sophisticated visual hierarchy without adding complexity or new colors.
13. Cultivate a Mossy Texture with French Knots
To replicate the dense, varied texture of moss, rely on the humble French knot.
The secret to a natural, organic look is variation: use multiple shades of green and chartreuse thread, and constantly alter the number of strands (from two to four) and the number of times you wrap the thread around the needle.
Cluster the knots tightly, allowing them to push against each other and overlap. This controlled chaos is what gives the final piece its realistic, lush, and deeply tactile quality.
14. Achieve Flawless Curves with Couching
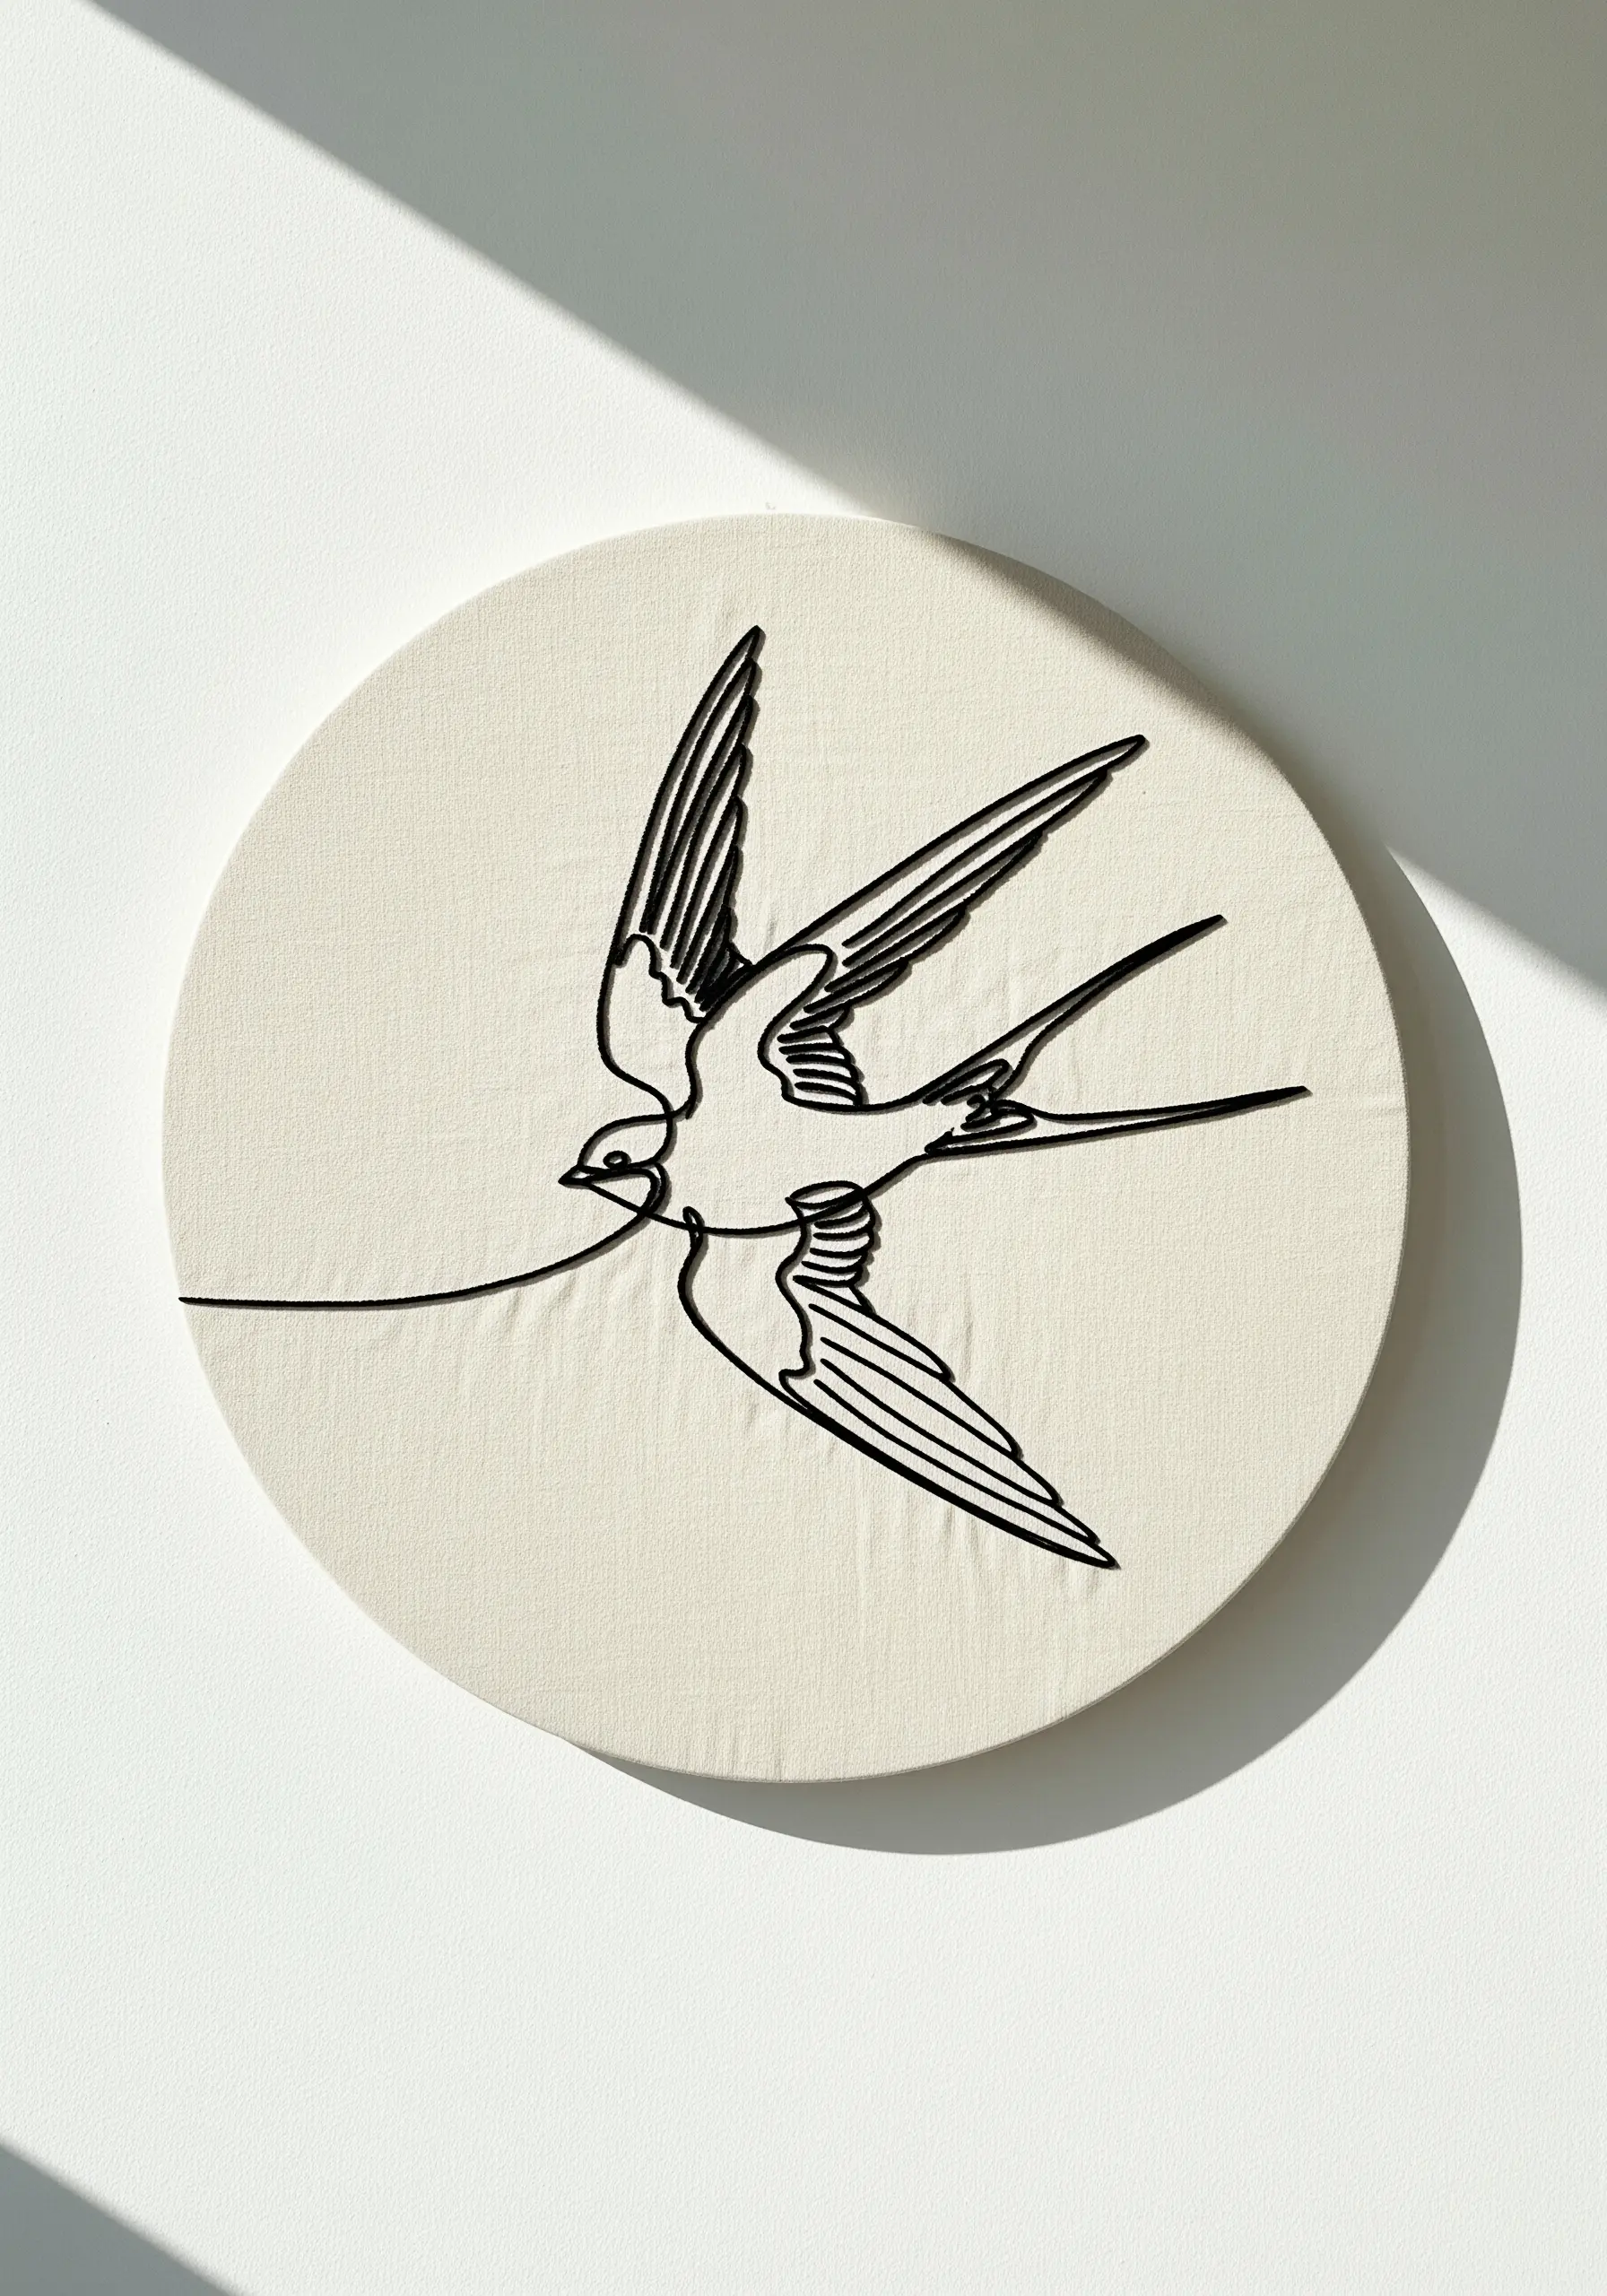
For a single-line design with bold, continuous curves, traditional outline stitches can sometimes appear jagged.
Instead, lay down a thicker cord or multiple strands of embroidery floss along your design line.
Then, use a single, matching strand of floss to tack the cord down with tiny, nearly invisible stitches.
This couching technique gives you complete control over the line’s shape, ensuring every curve is perfectly smooth and fluid, resulting in a clean, graphic, and elevated finish.
15. Play with Dimension Using Padded Outlines
Create abstract designs with a subtle 3D effect by padding your stitches.
Before stitching your main outlines, lay down a foundation of straight stitches within the shape.
Then, work your final outline stitch—like a satin or whipped backstitch—over this padded base. The outline will be instantly raised from the fabric surface.
Contrast this dimensional outline with a flat, delicate fill, like scattered seed stitches, to emphasize the difference in height and texture.
16. Give Graphic Shapes Presence with Raised Satin Stitch
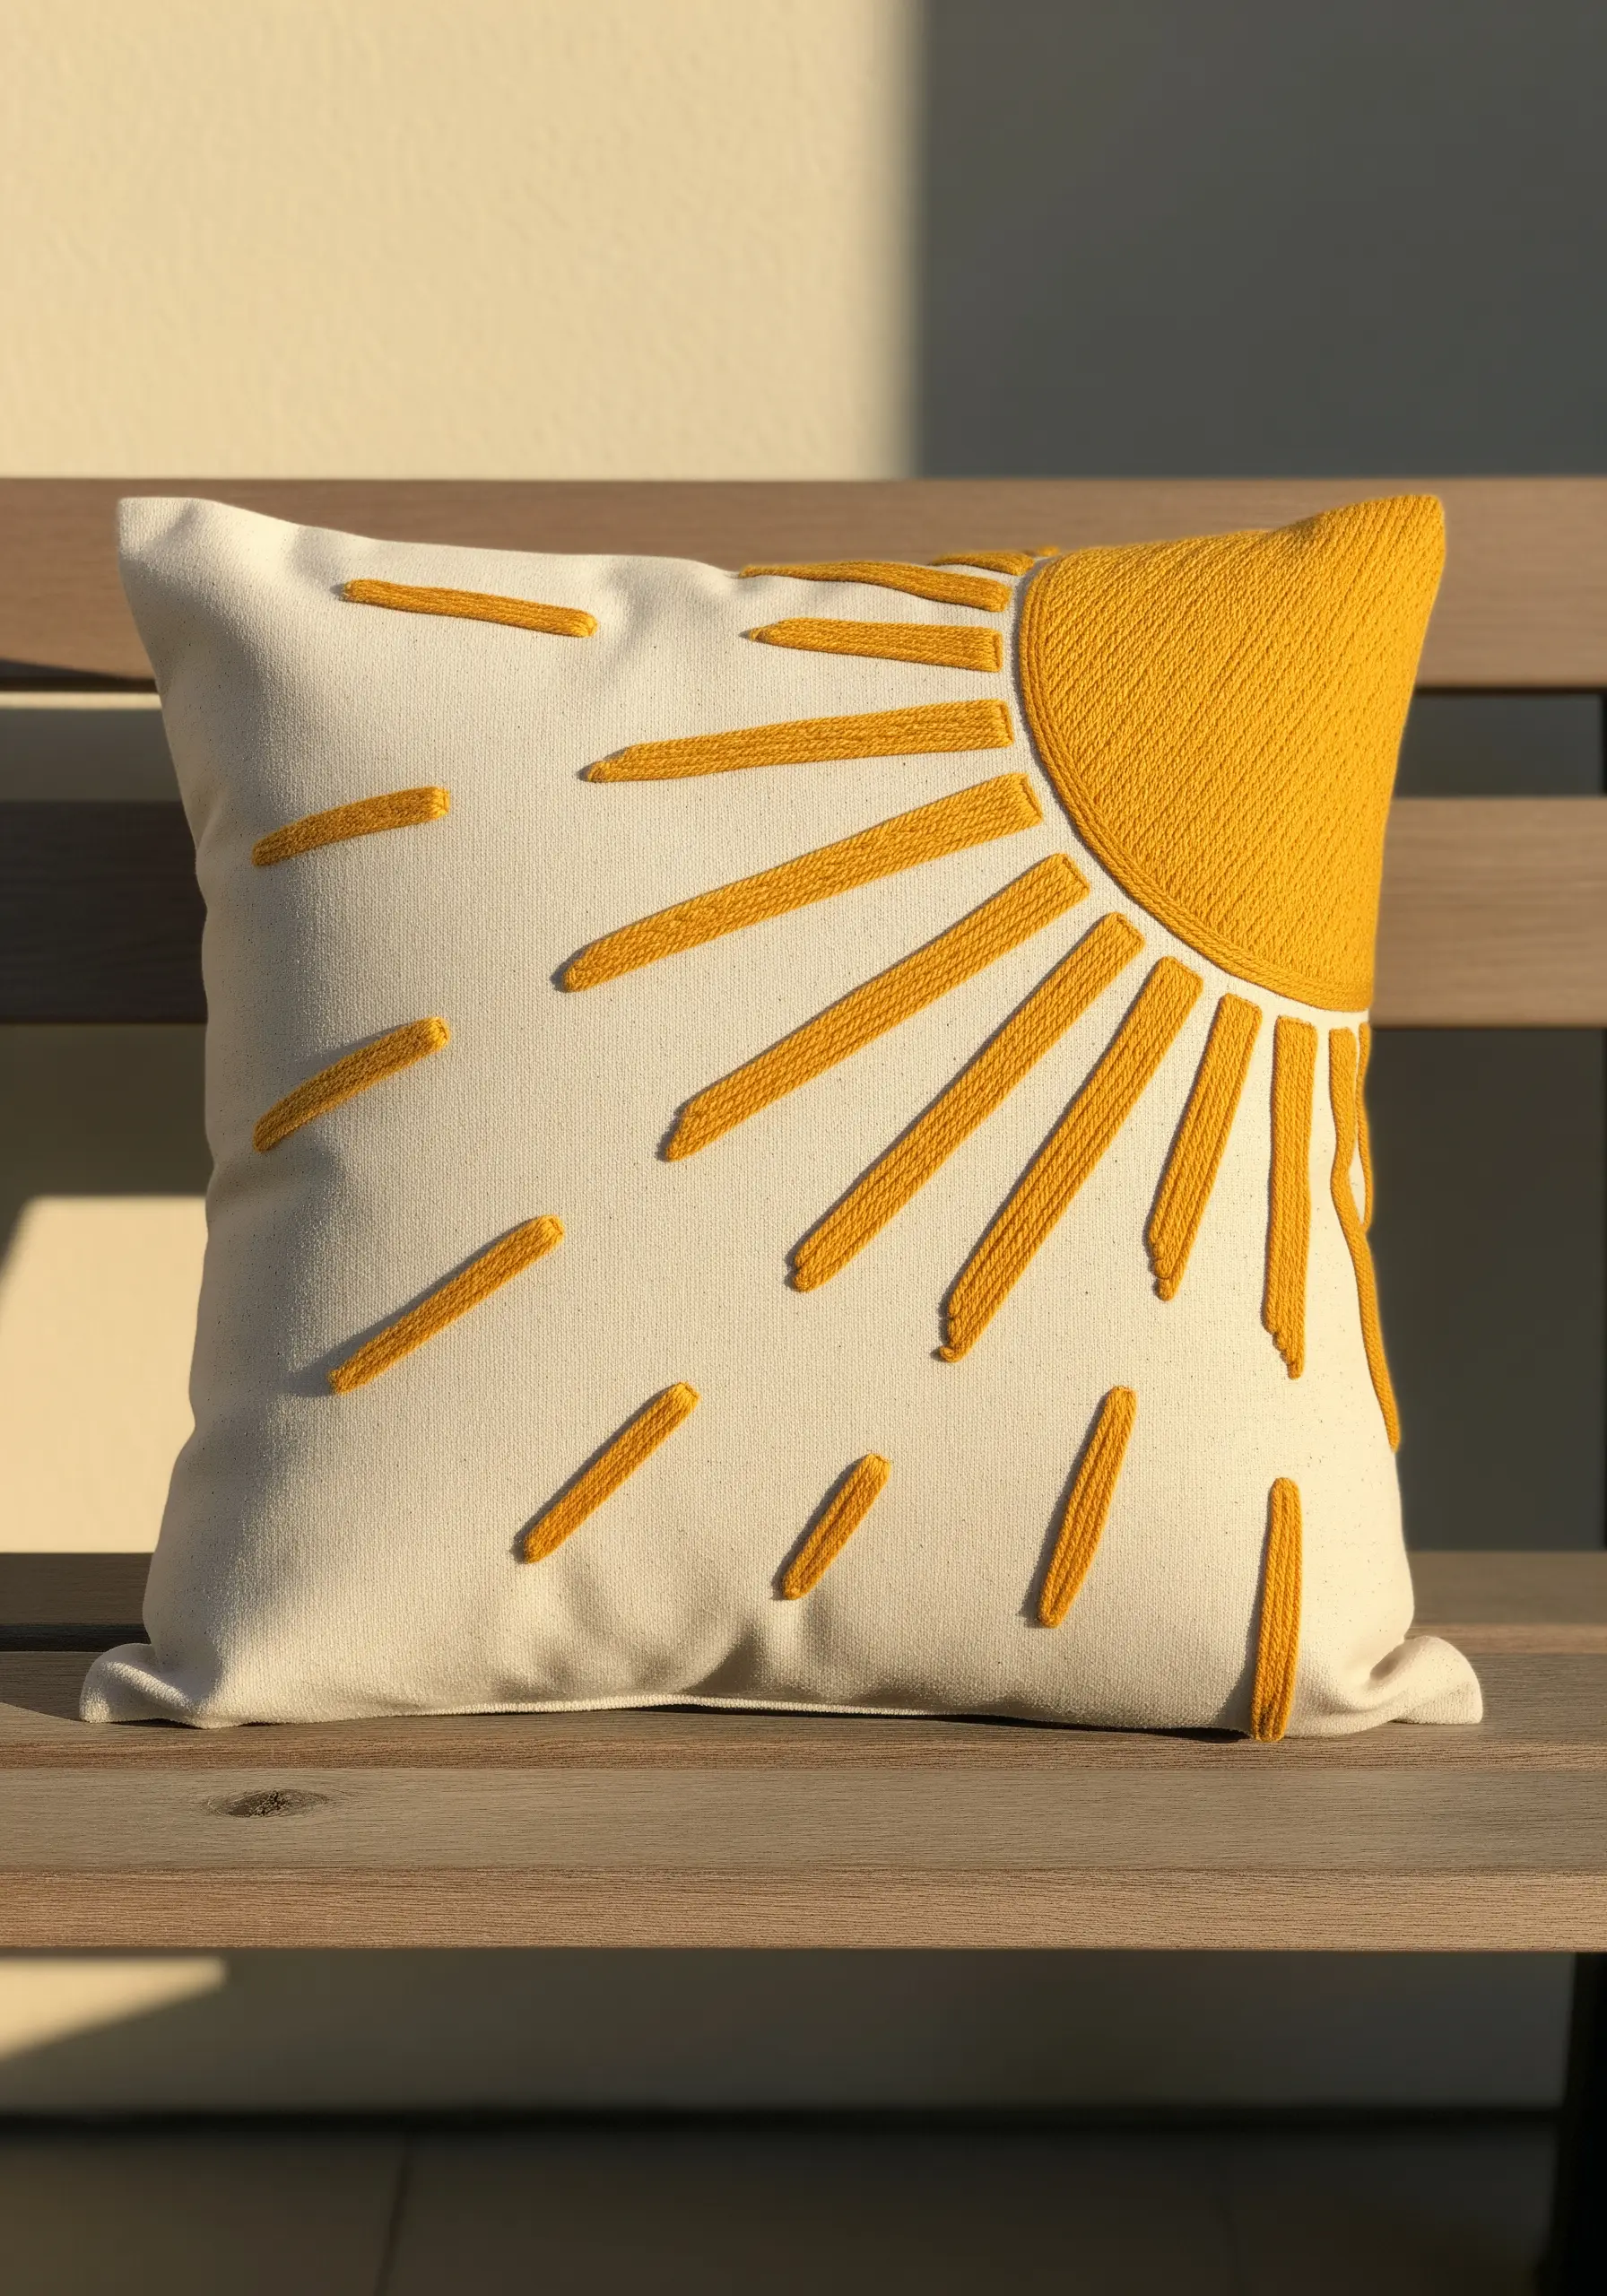
Make simple, bold shapes pop by using a padded satin stitch for a raised, dimensional finish.
For the sun’s rays, first lay down a few straight stitches along the length of each ray to create a foundation.
Then, cover this padding with satin stitches worked in the opposite direction. The extra volume underneath will make the rays lift off the cushion’s surface.
This technique turns a flat graphic into a tactile object, giving it more presence and a high-quality feel.
17. Spin a Delicate Web with High-Sheen Thread
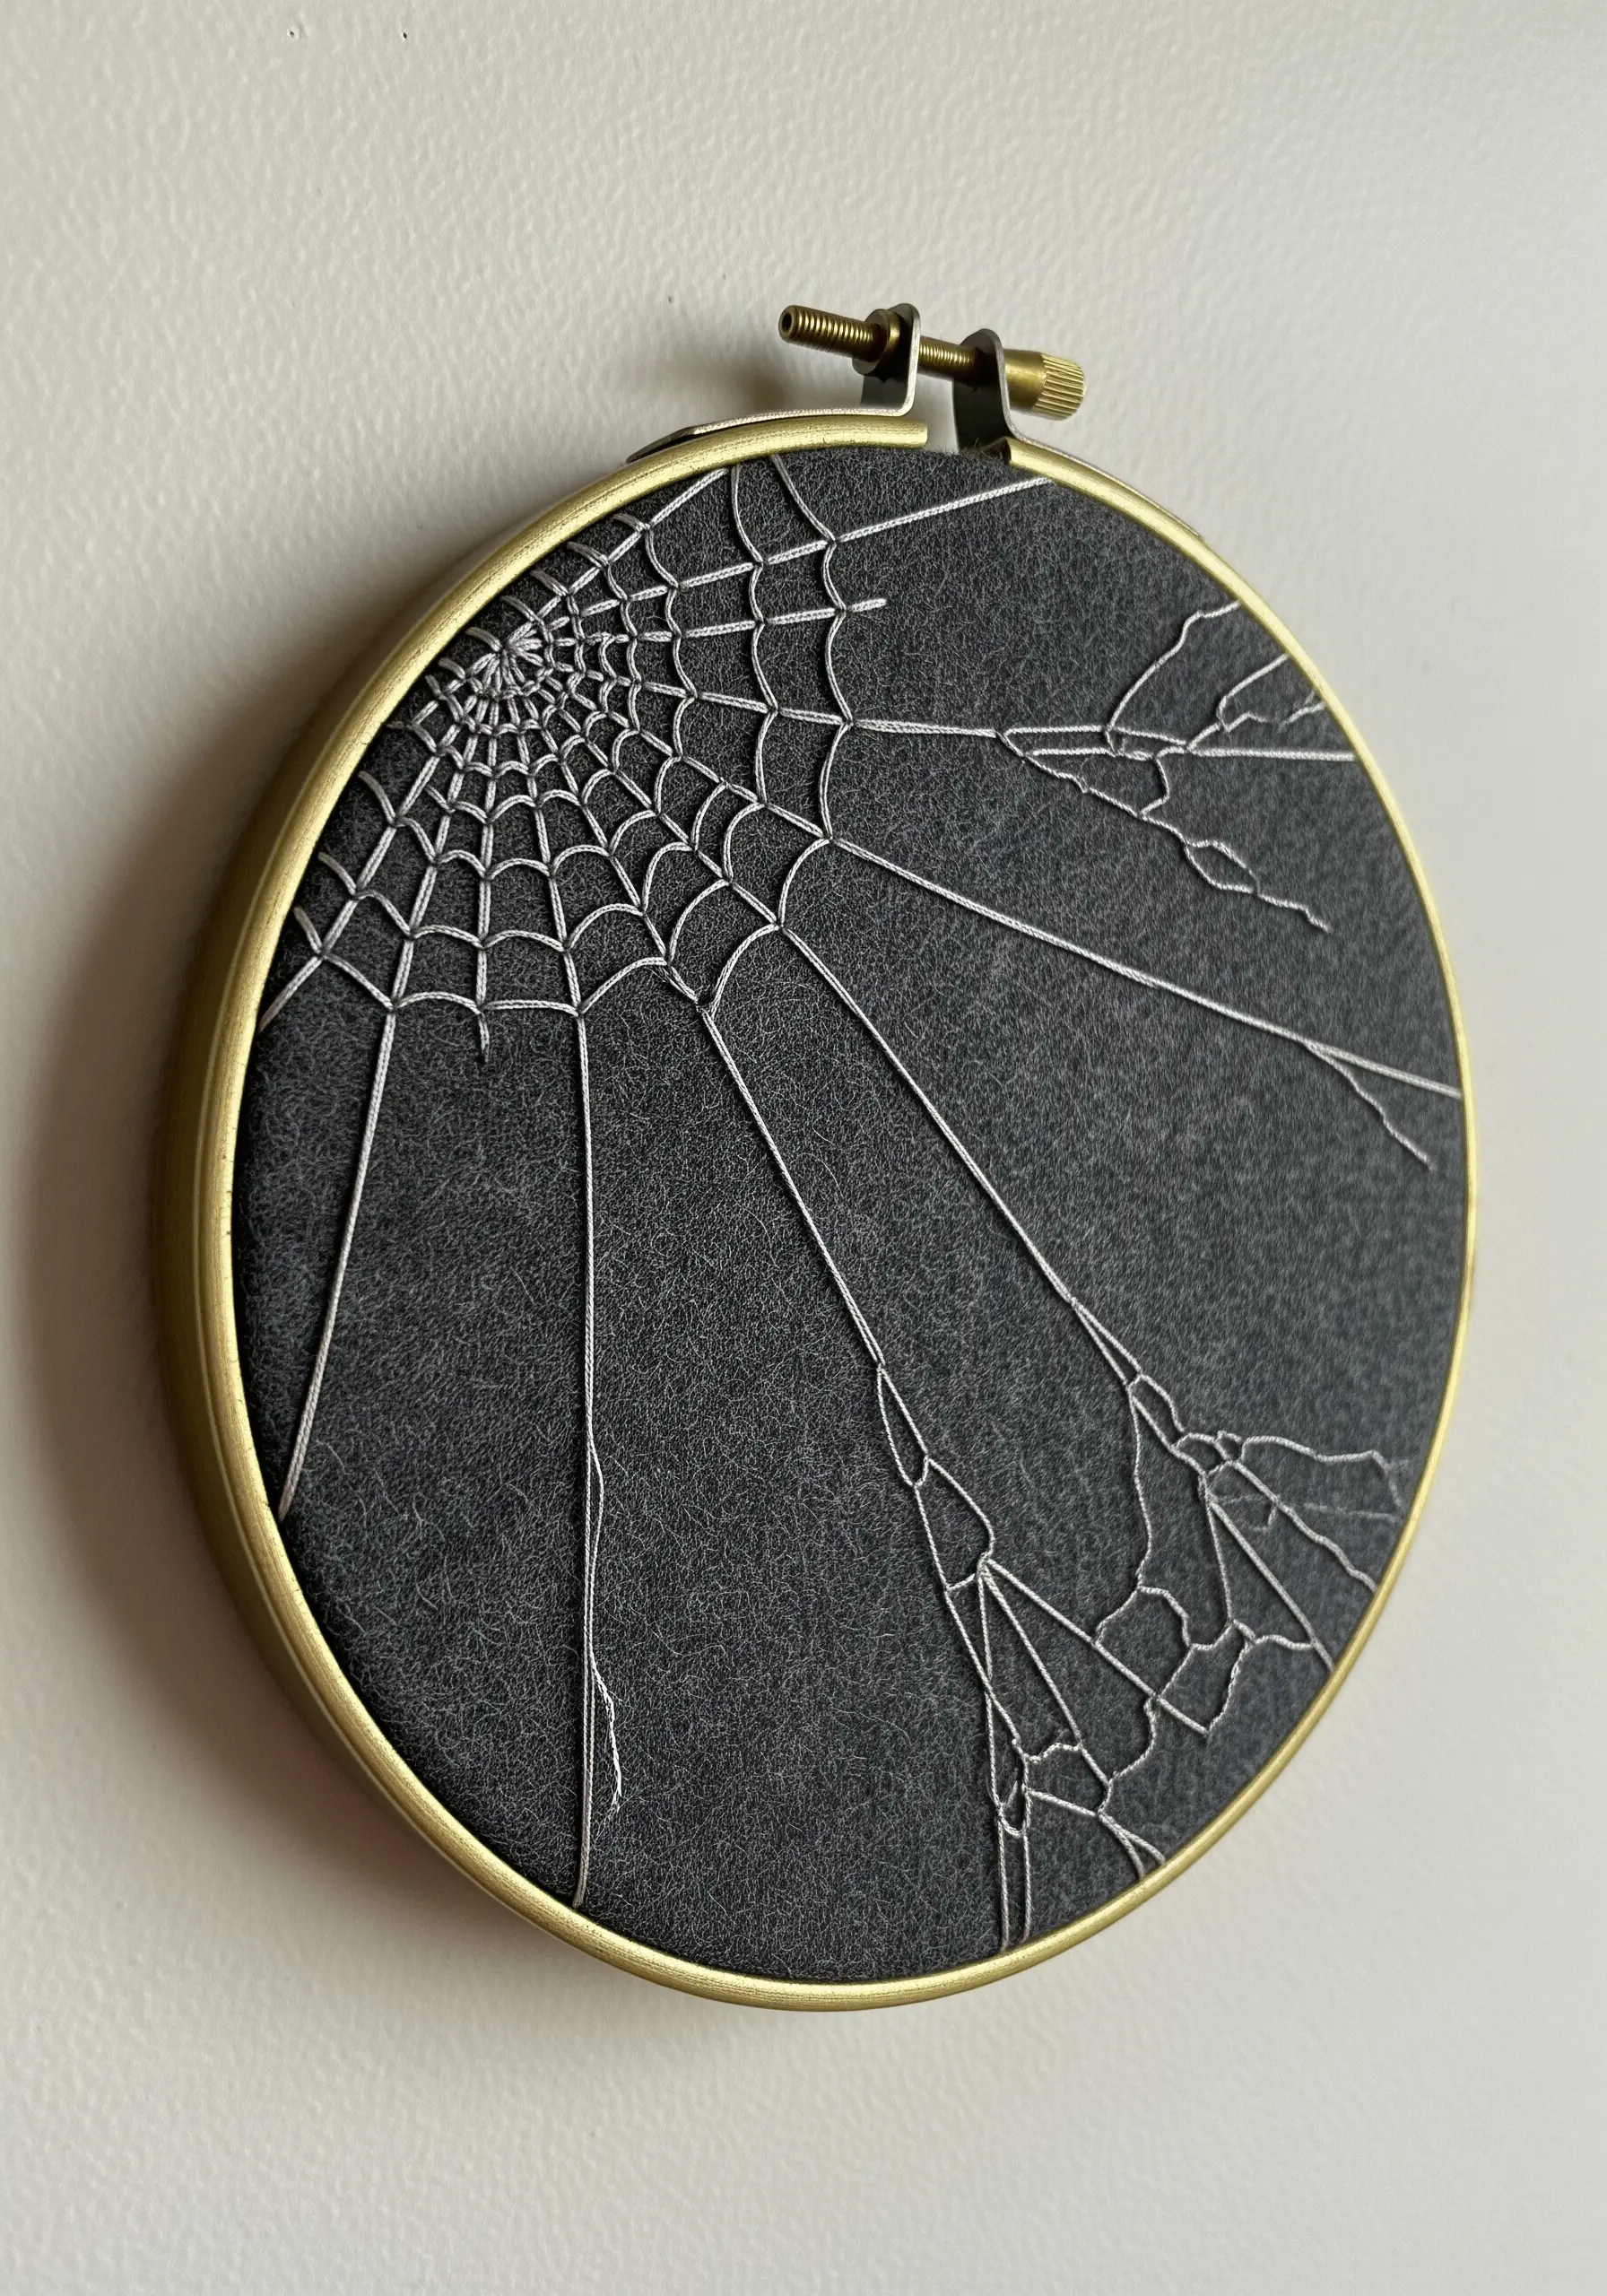
The success of an embroidered spiderweb lies in the choice of thread and the order of operations.
Select a single strand of a high-sheen metallic or silk thread to capture the delicate, light-reflecting quality of real silk.
First, create the radial ‘spoke’ lines of the web, ensuring they are taut. Then, stitch the spiral from the outside in, wrapping it around each spoke or securing it with a tiny, invisible couching stitch to maintain the web’s structure and tension.
18. Trace Topographic Forms with Color Gradients
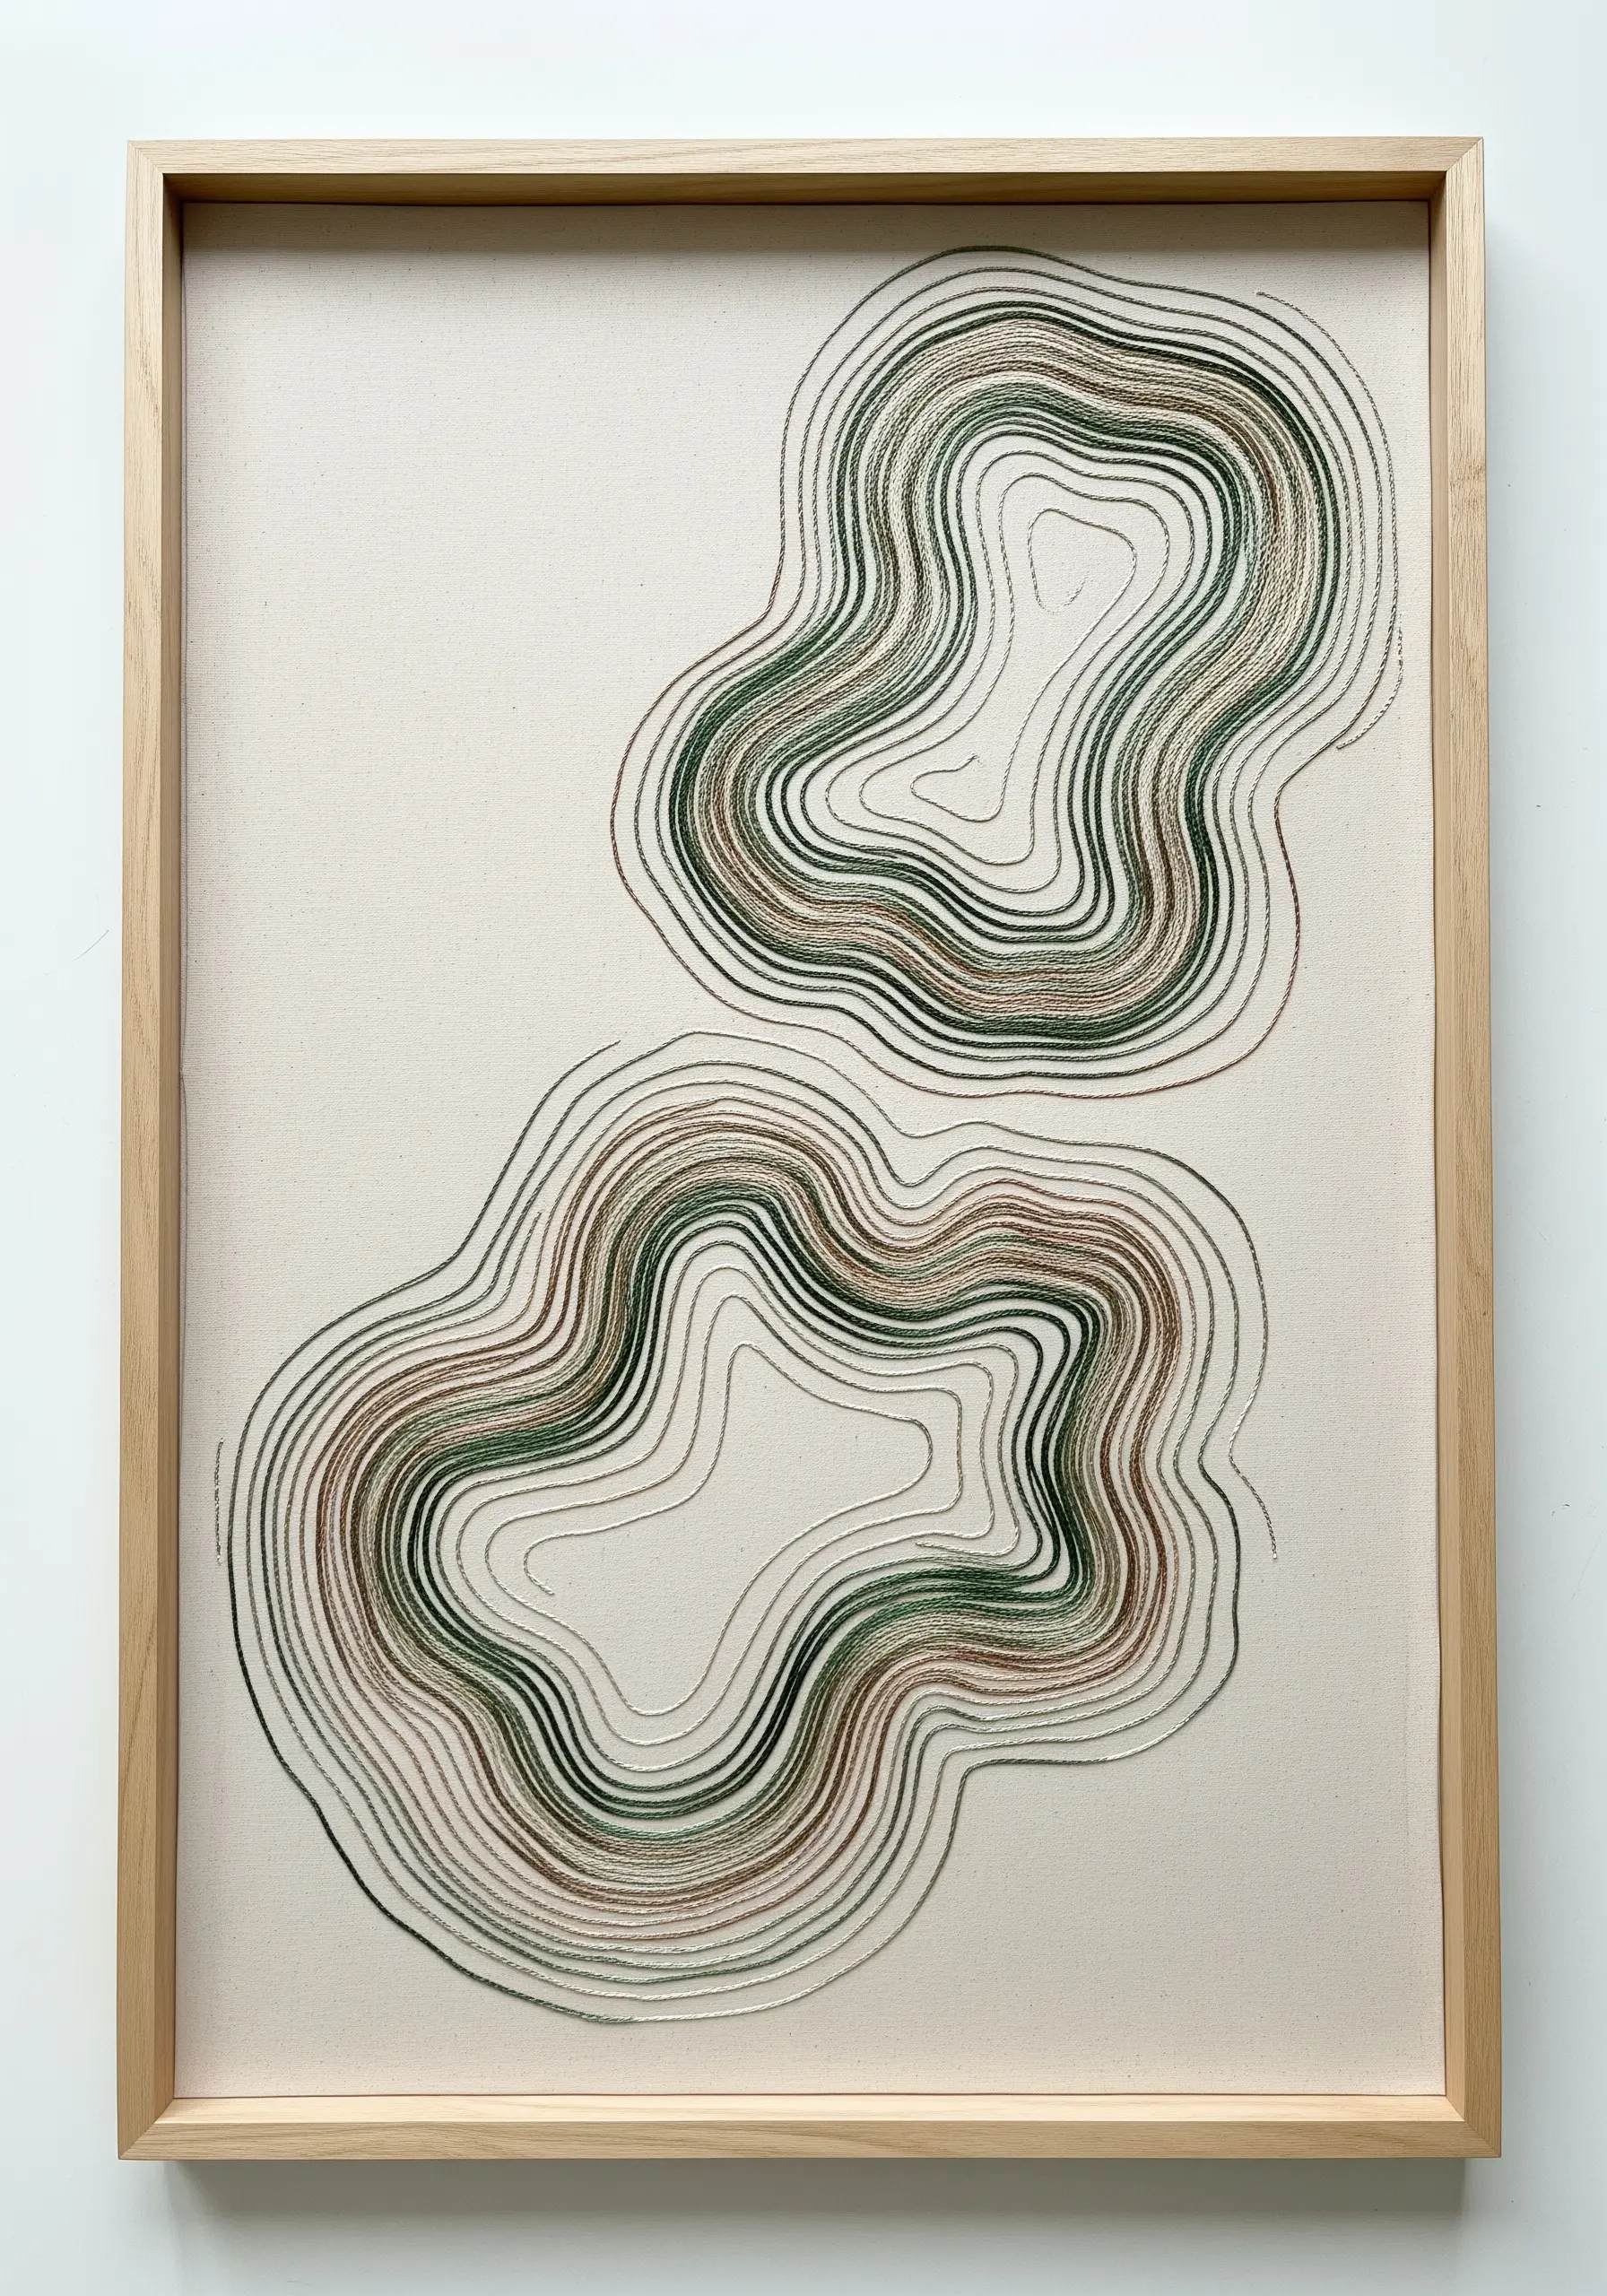
Create abstract, map-like patterns that suggest three-dimensional form through careful color planning.
Select a family of analogous colors—like earthy greens, browns, and grays—and assign them to different layers of your contour lines.
Use a simple backstitch for every line, focusing on maintaining even spacing and smooth curves.
The magic is in the color transitions; as the shades flow into one another, they create a visual gradient that gives the flat artwork a mesmerizing sense of depth. It’s an ideal choice for framed embroidery ideas.
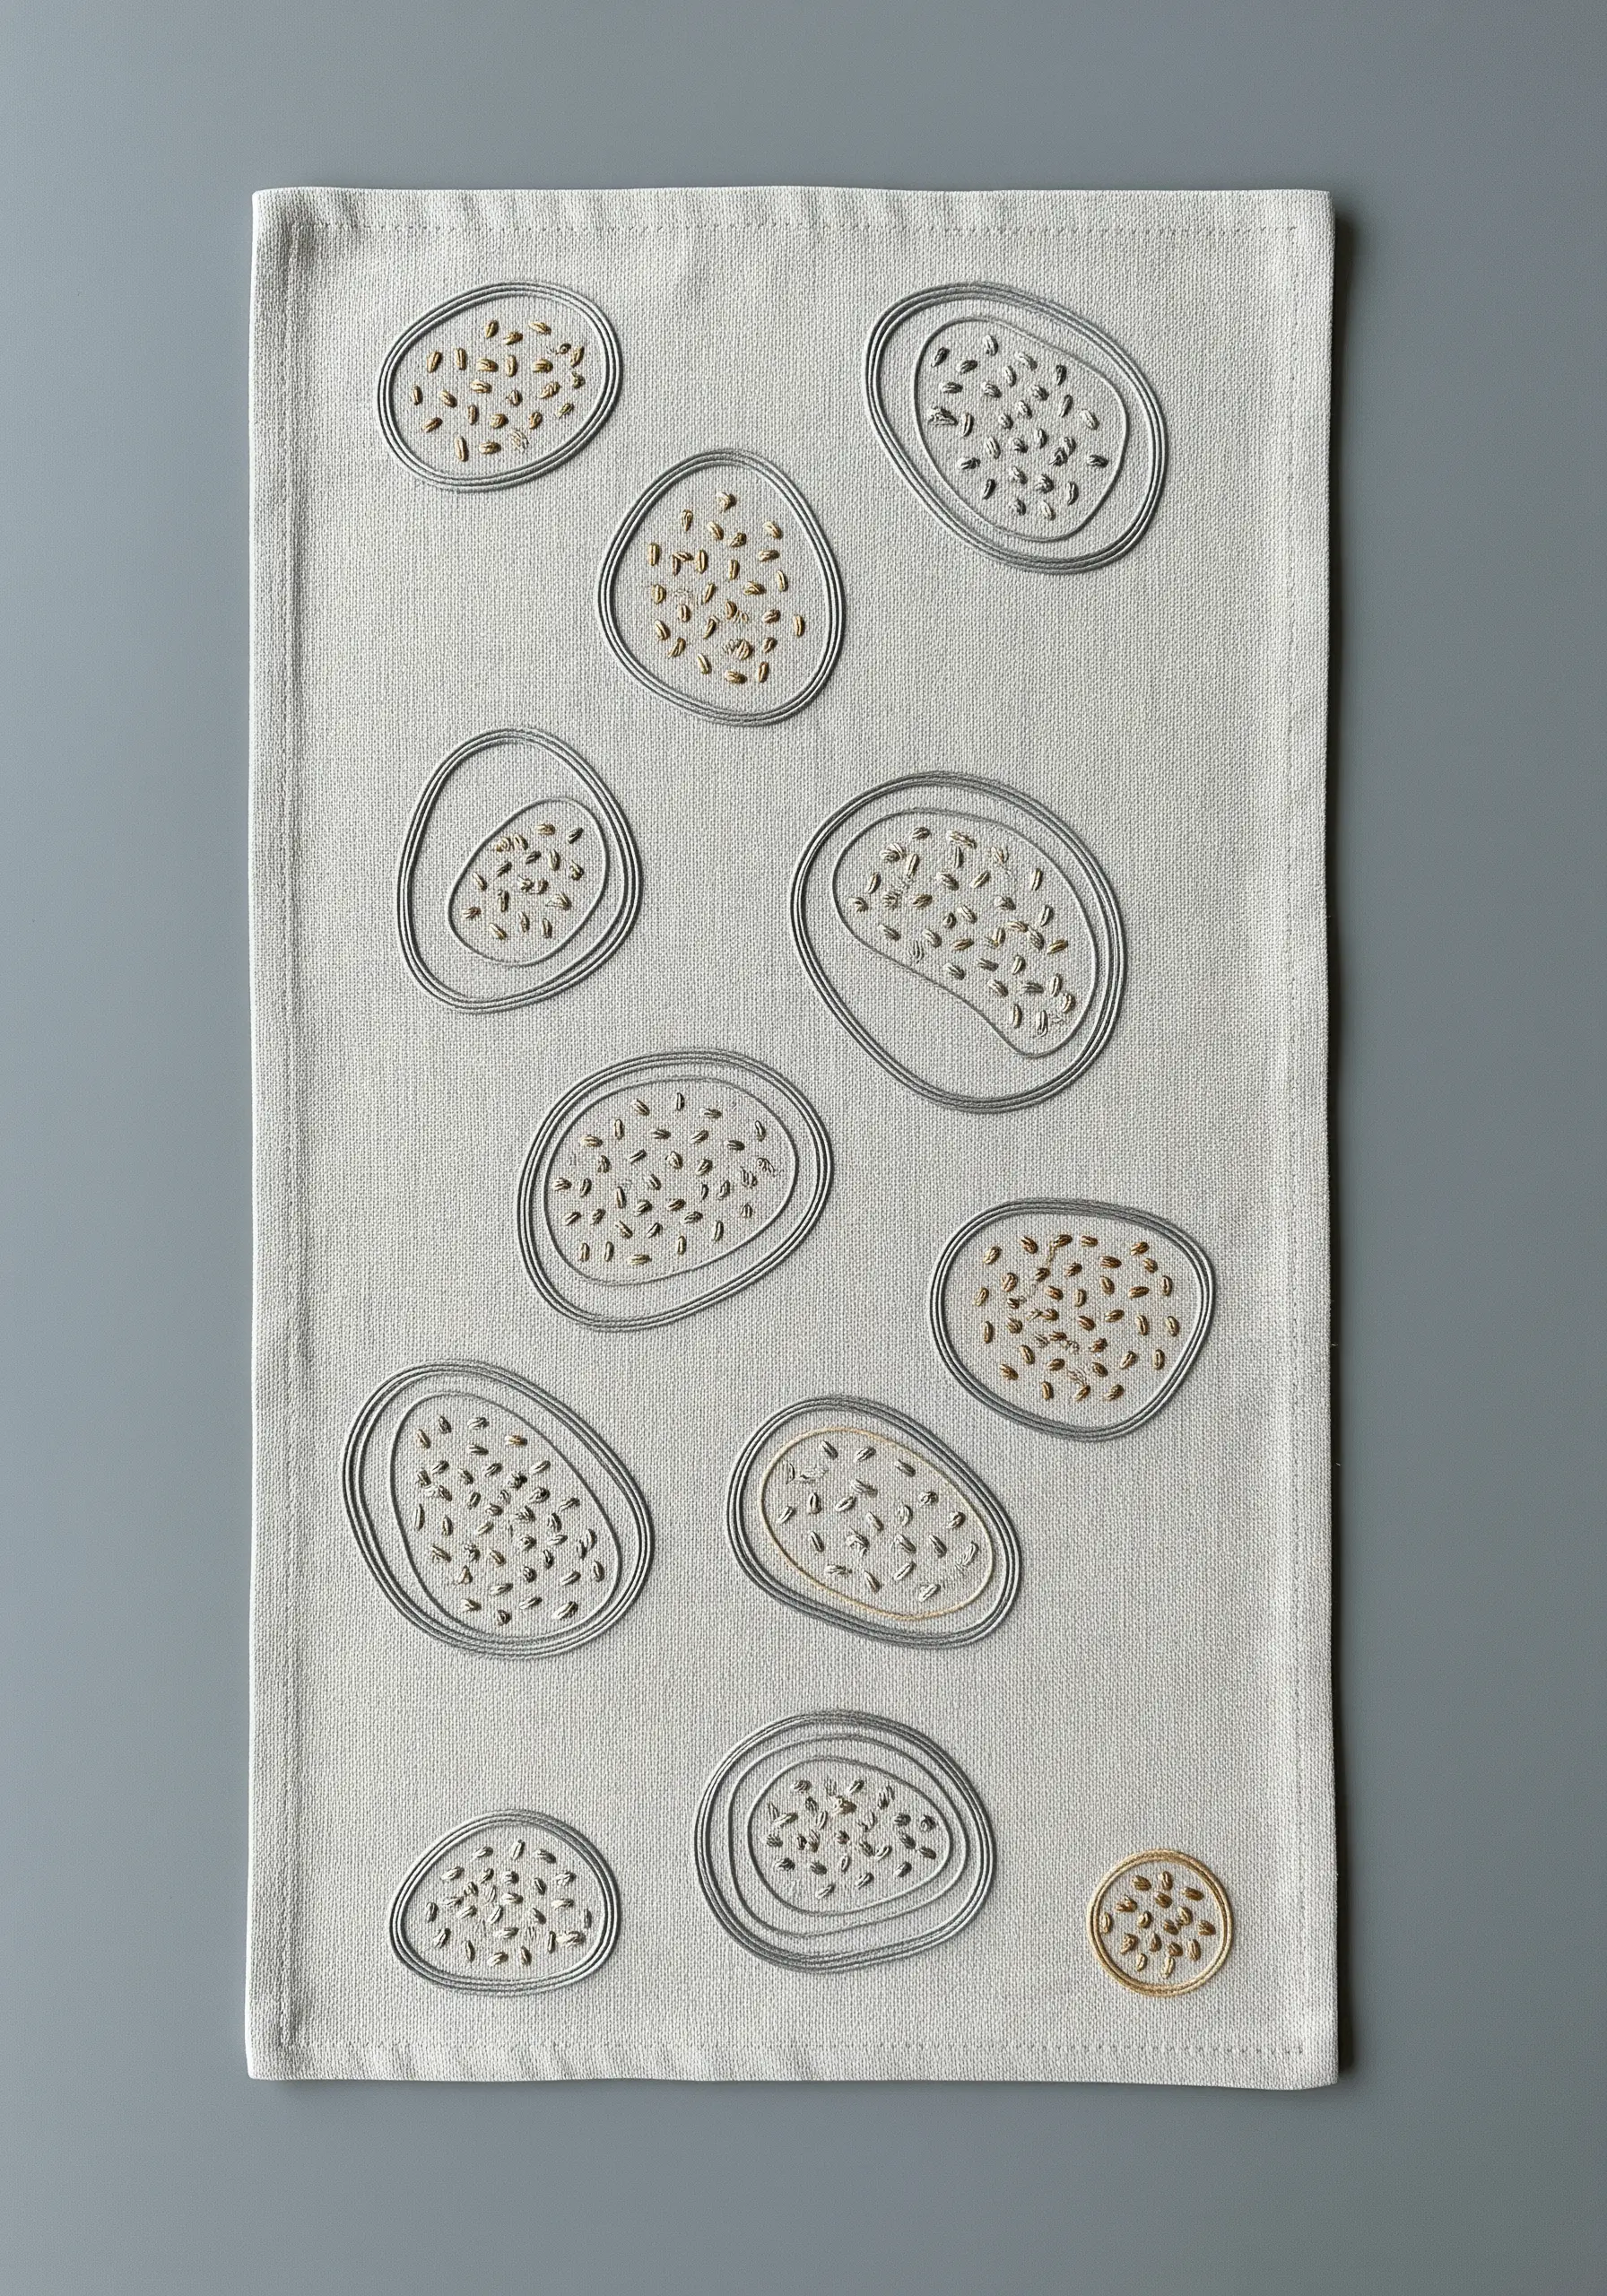
19. Add Nuance to Small Florals with Variegated Thread

For small, detailed projects like a lavender sachet, variegated thread is your secret weapon for creating complexity with ease.
Use a variegated purple floss to stitch the flower buds with French knots. Each knot will have a slightly different hue, perfectly mimicking the natural color variations in a real lavender sprig.
This simple choice eliminates the need to constantly switch between different shades of purple, giving you a rich, nuanced result with minimal effort.
It’s a perfect technique for handmade embroidery projects to give as thoughtful birthday gifts.


