
You’ve just placed the final stitch. The hours of focus, the careful selection of threads, the quiet joy of watching a design come to life—it’s all there in your hands. But how do you present it in a way that honors the artistry you poured into it?
Think of paper not as a separate craft, but as the perfect partner for your embroidery. Paper can provide the frame, the context, and the texture that allows your thread work to truly shine. It’s the final layer of thoughtfulness that transforms a beautiful handmade item into an unforgettable gift.
These ideas are not about starting over with a new, complex skill. Instead, they are simple, elegant ways to build a world around your stitching. They are about creating a cohesive story, where the wrapping, the card, or the companion object all speak the same visual language as your embroidery, making the entire experience feel complete and intentional.
1. Layer Stitched Paper Feathers
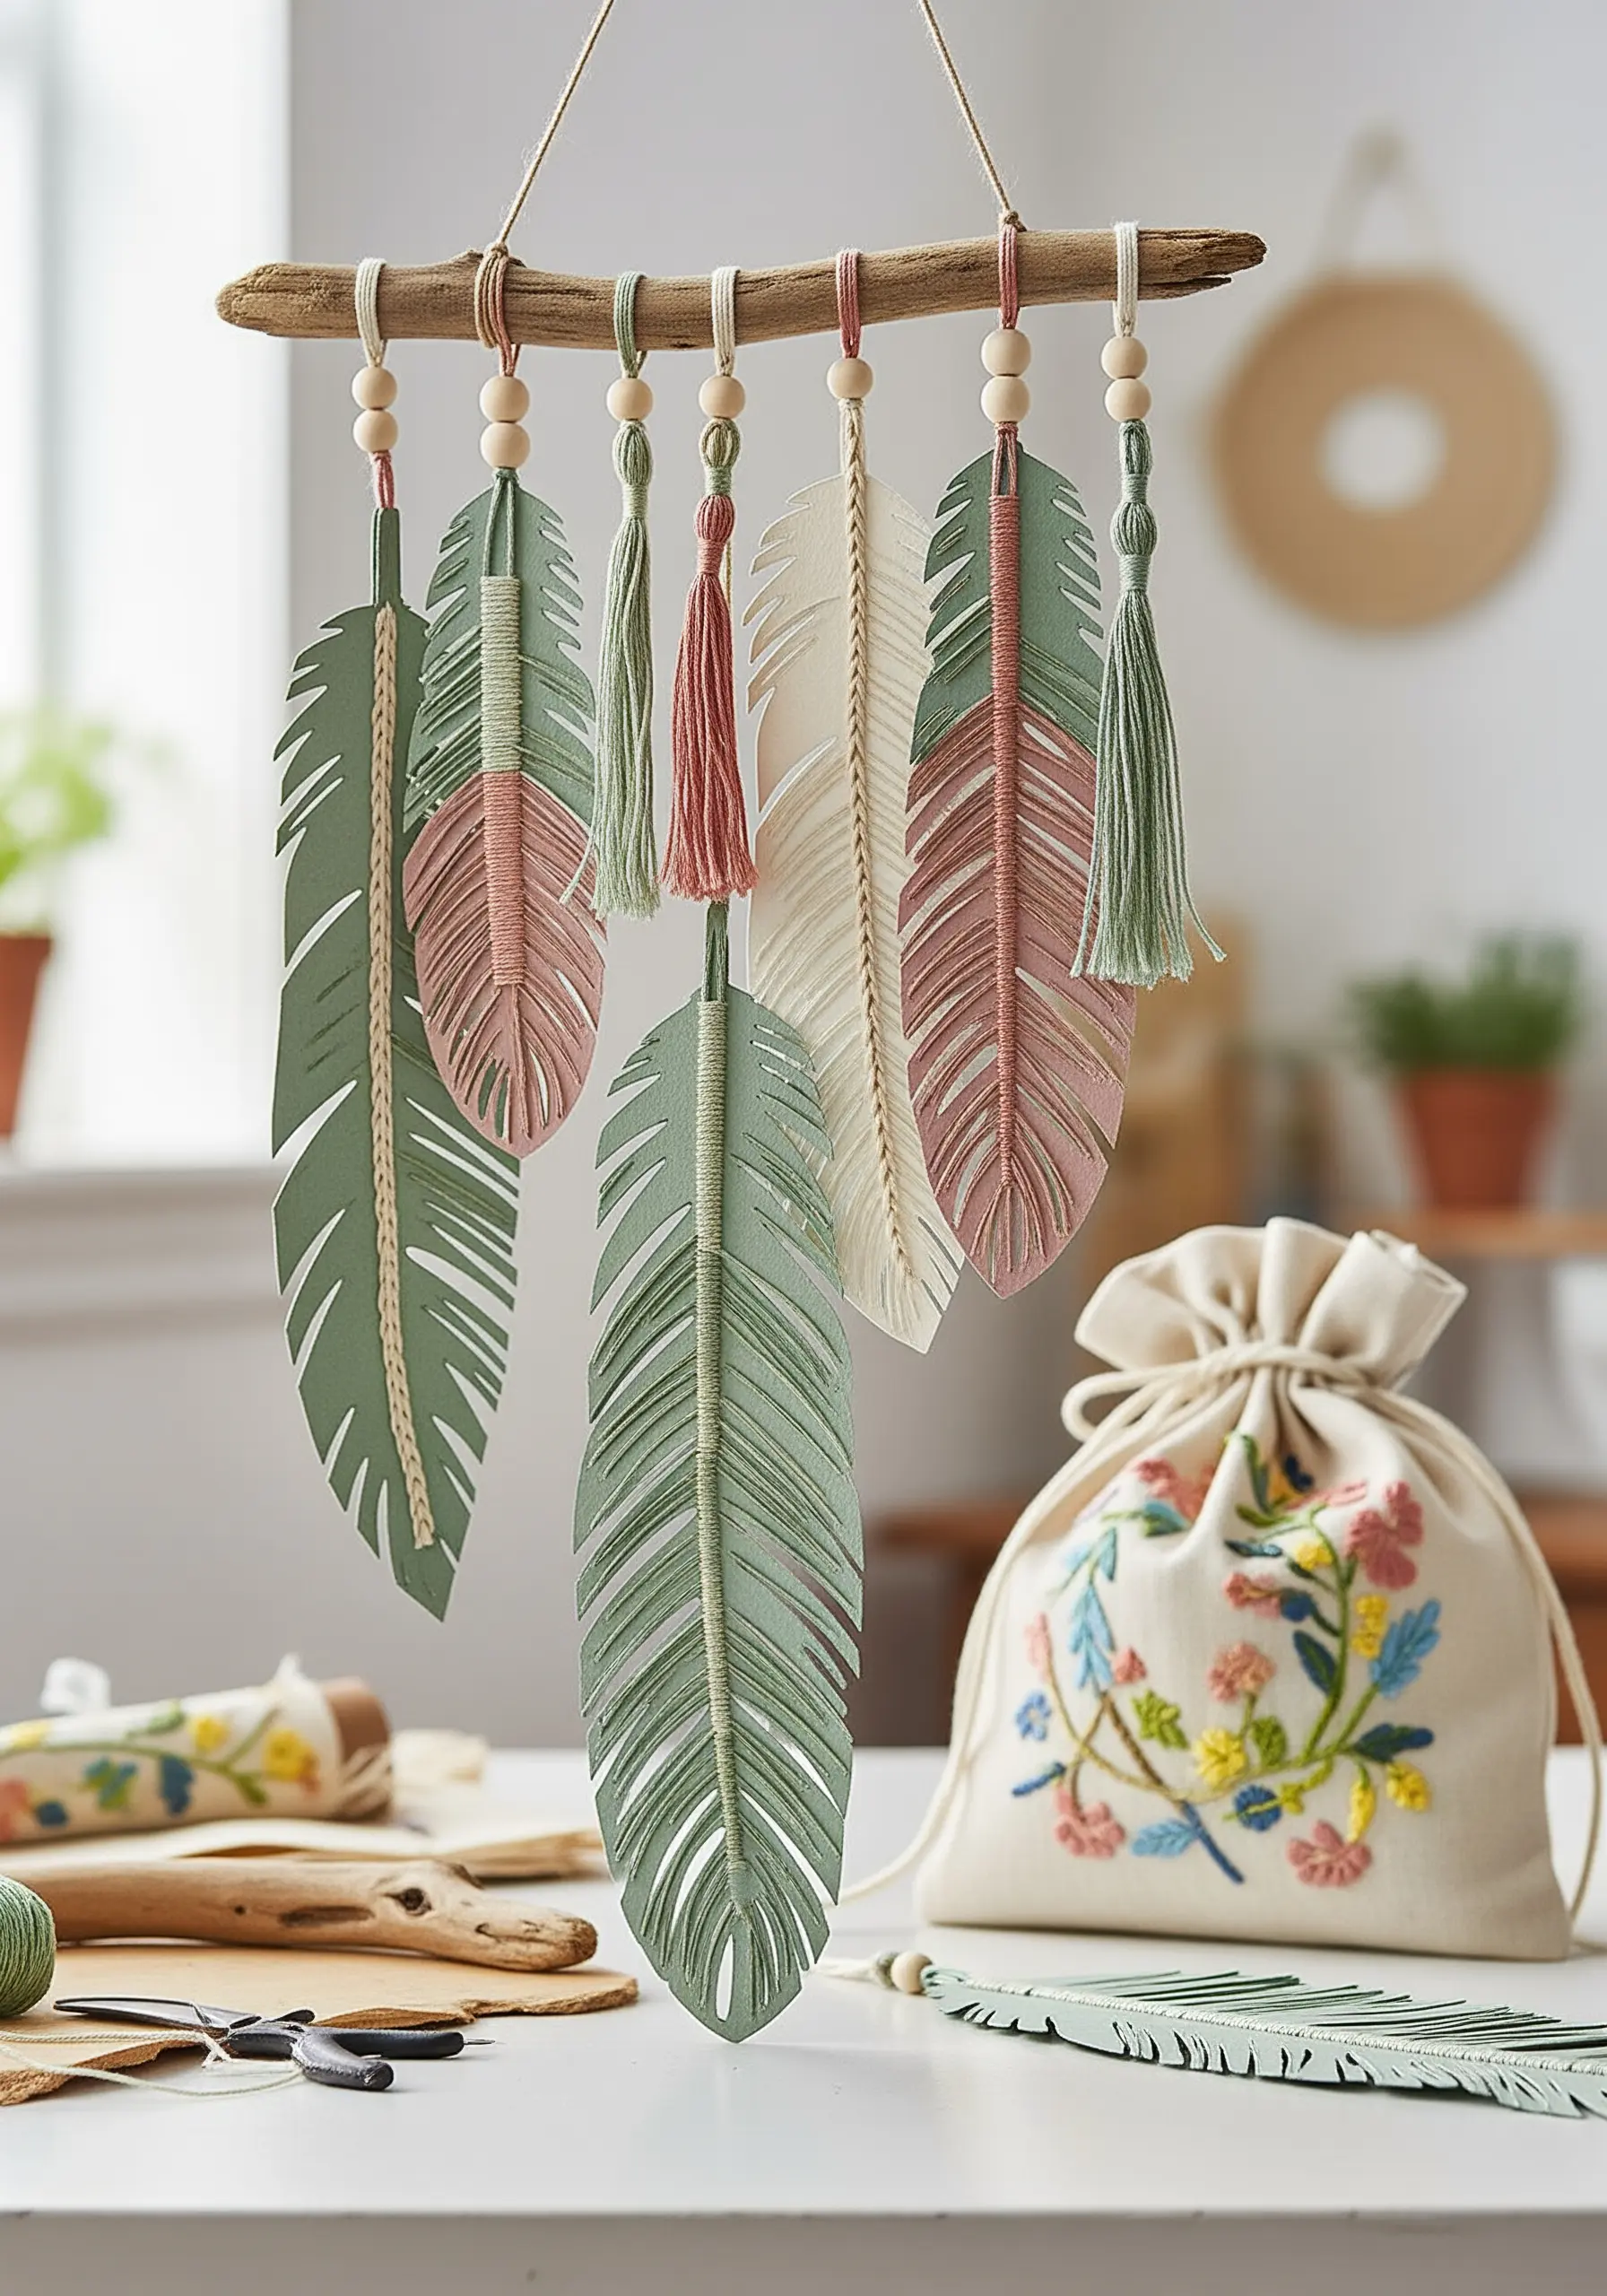
Create a stunning wall hanging that directly complements your embroidered gift by pairing paper and thread.
Use a heavyweight cardstock (at least 65 lb/176 gsm) to prevent tearing when you stitch.
With a single strand of embroidery floss, use a simple running stitch along the center to create the feather’s spine—this adds a subtle, tactile detail that bridges the gap between the two crafts.
Match the thread and paper colors to the palette of your embroidered piece for a beautifully cohesive gift set.
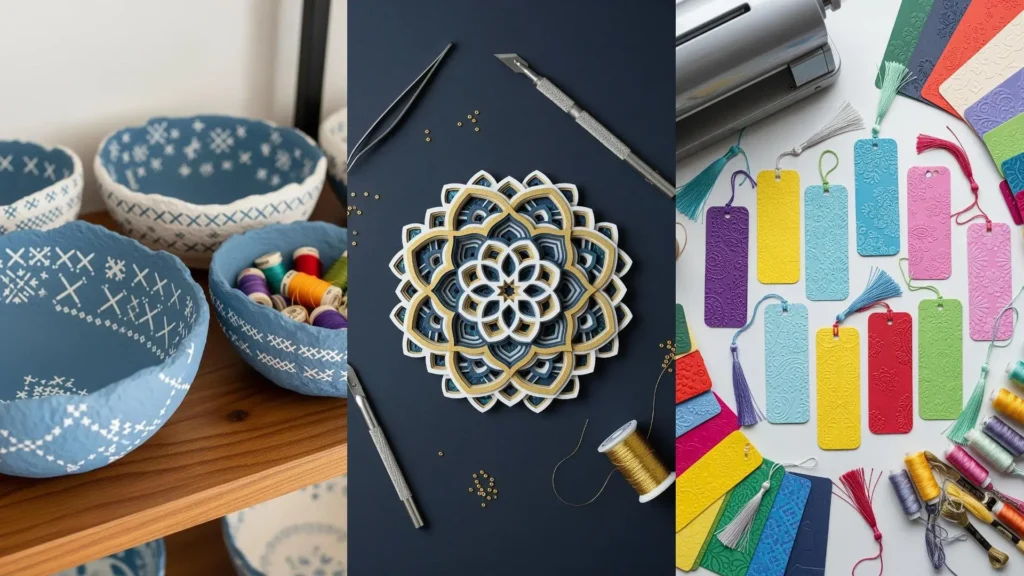
2. Frame Embroidery with a 3D Paper Mandala
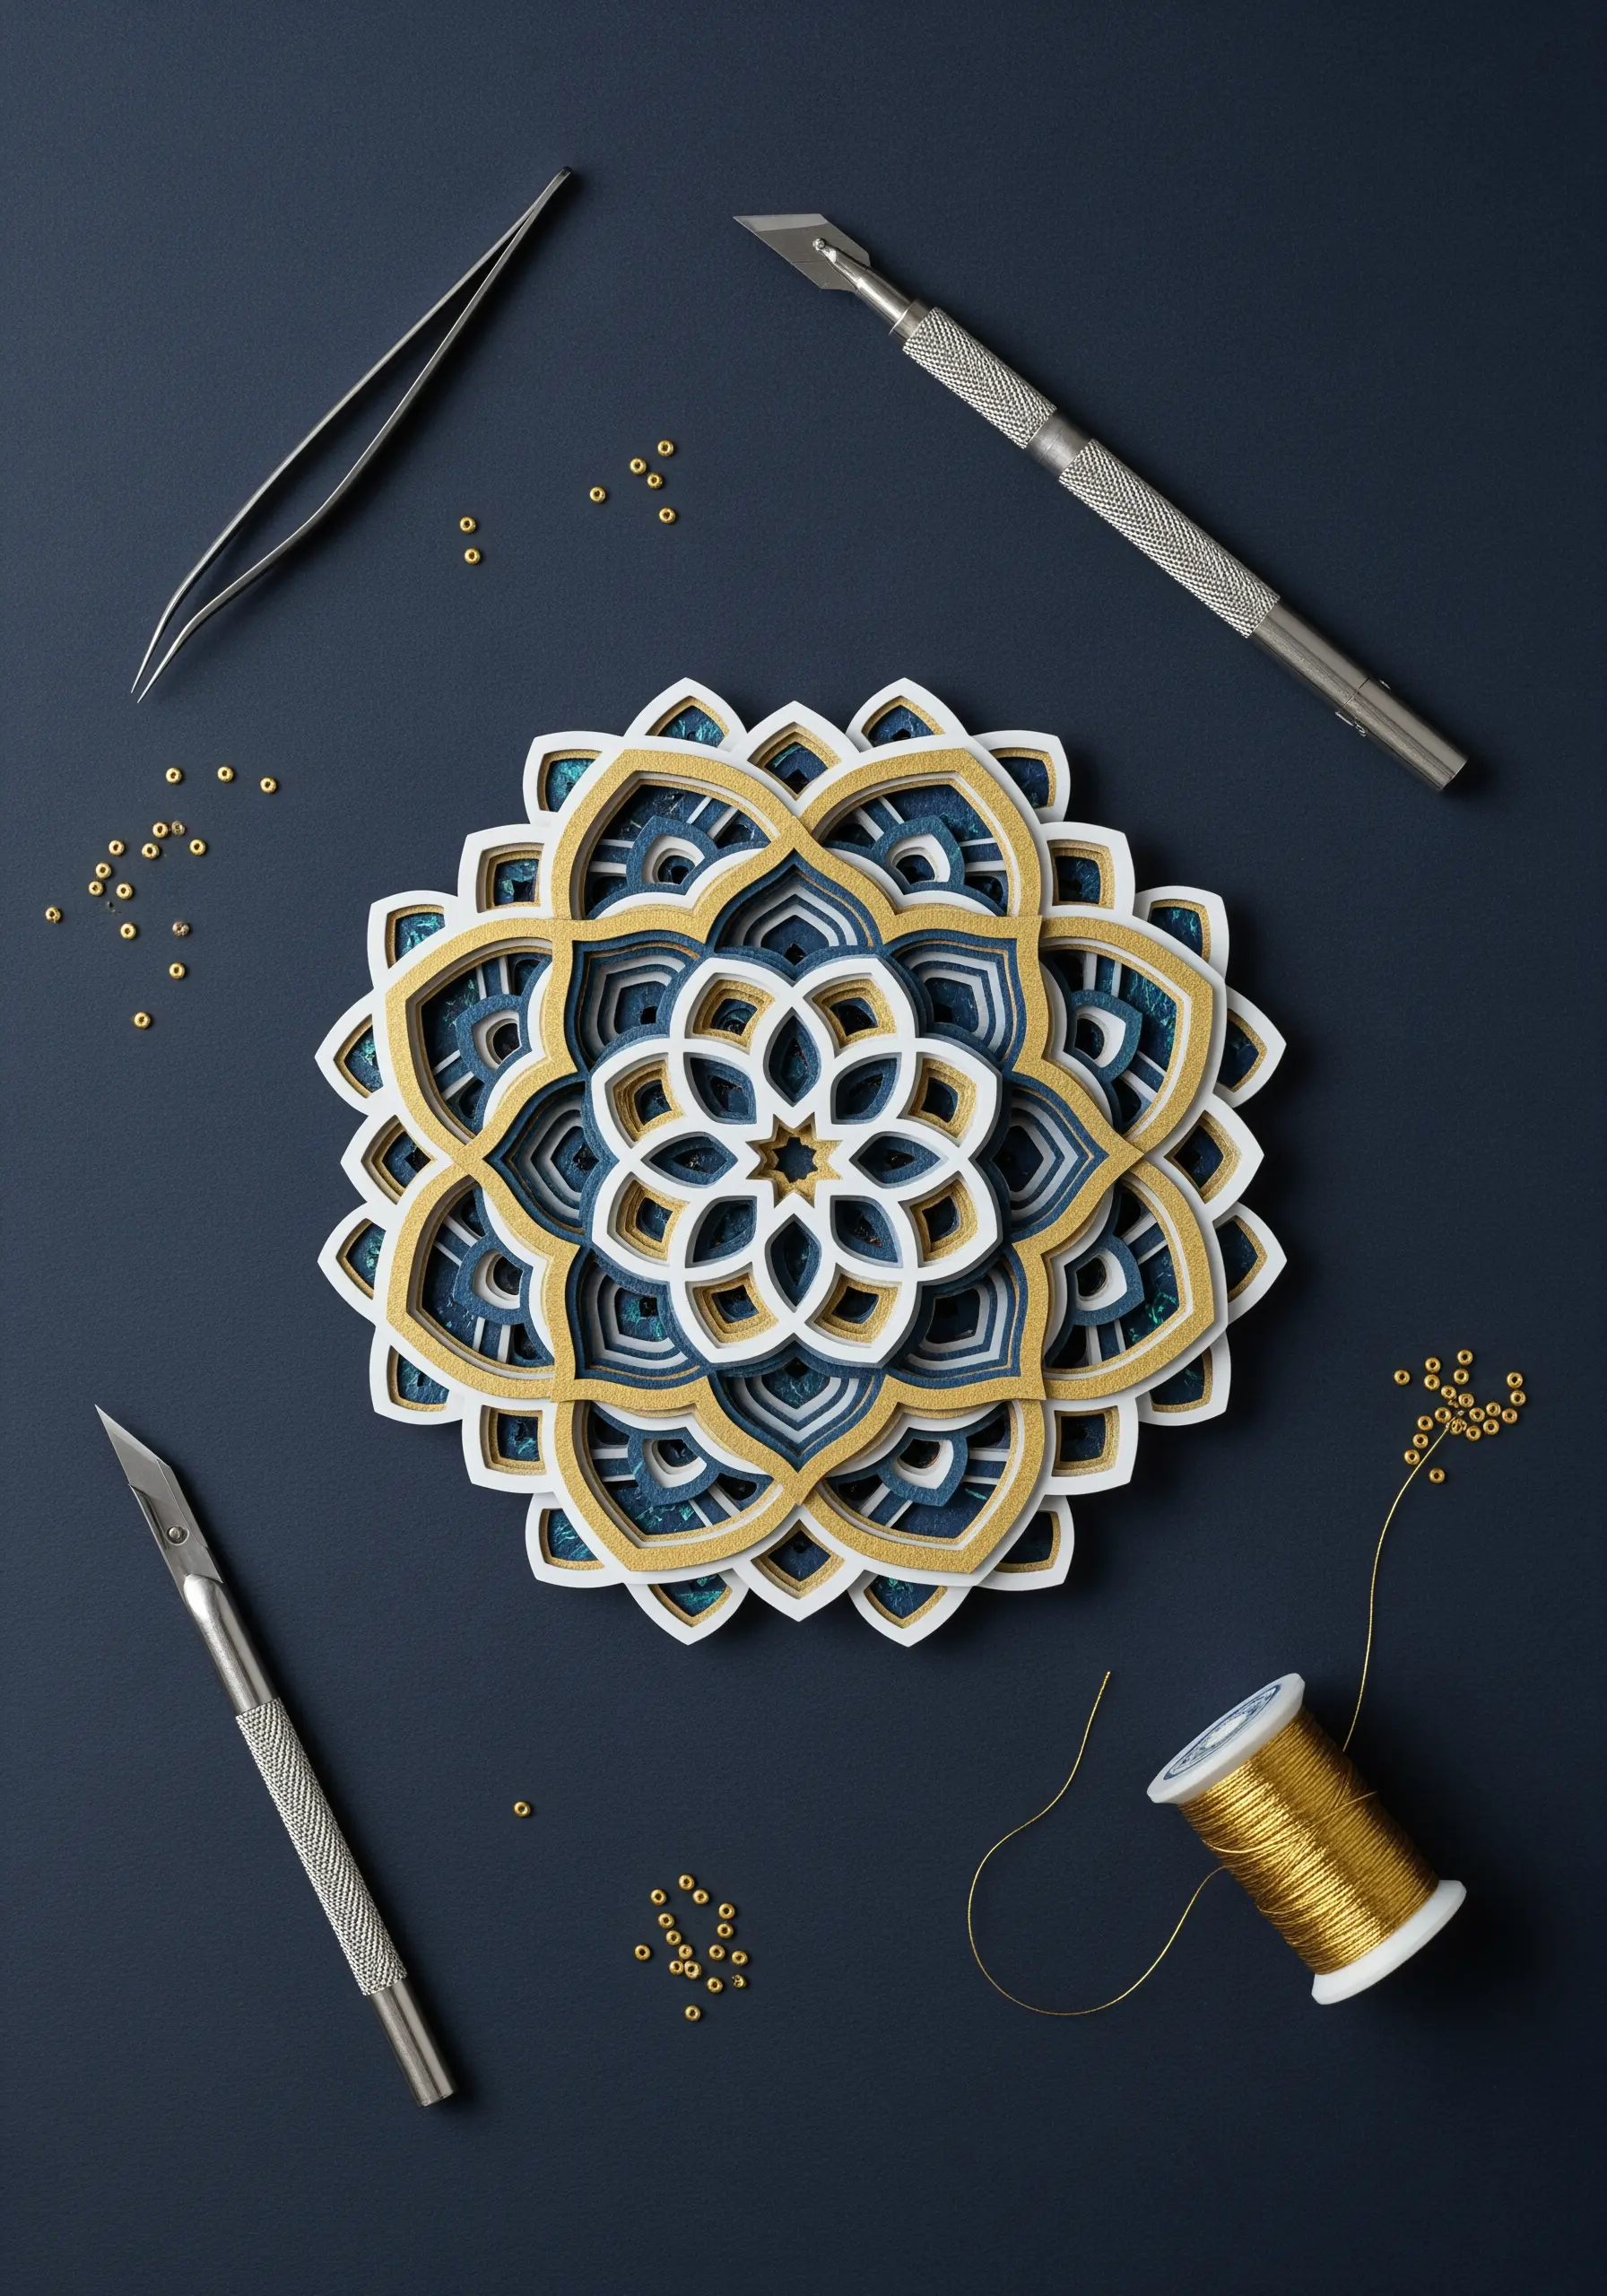
Give your stitching a sense of depth and occasion by presenting it alongside a layered paper mandala.
The intricate cuts and shadows of the paper create a dramatic frame that makes even simple embroidery feel more significant.
If you add thread to the paper itself, use a fine metallic filament and pre-pierce the holes with a pin to ensure clean stitches that don’t damage the delicate paper.
This technique works especially well for mandala embroidery, creating a harmonious pairing of pattern and texture.
3. Craft Hand-Stitched Gift Tags
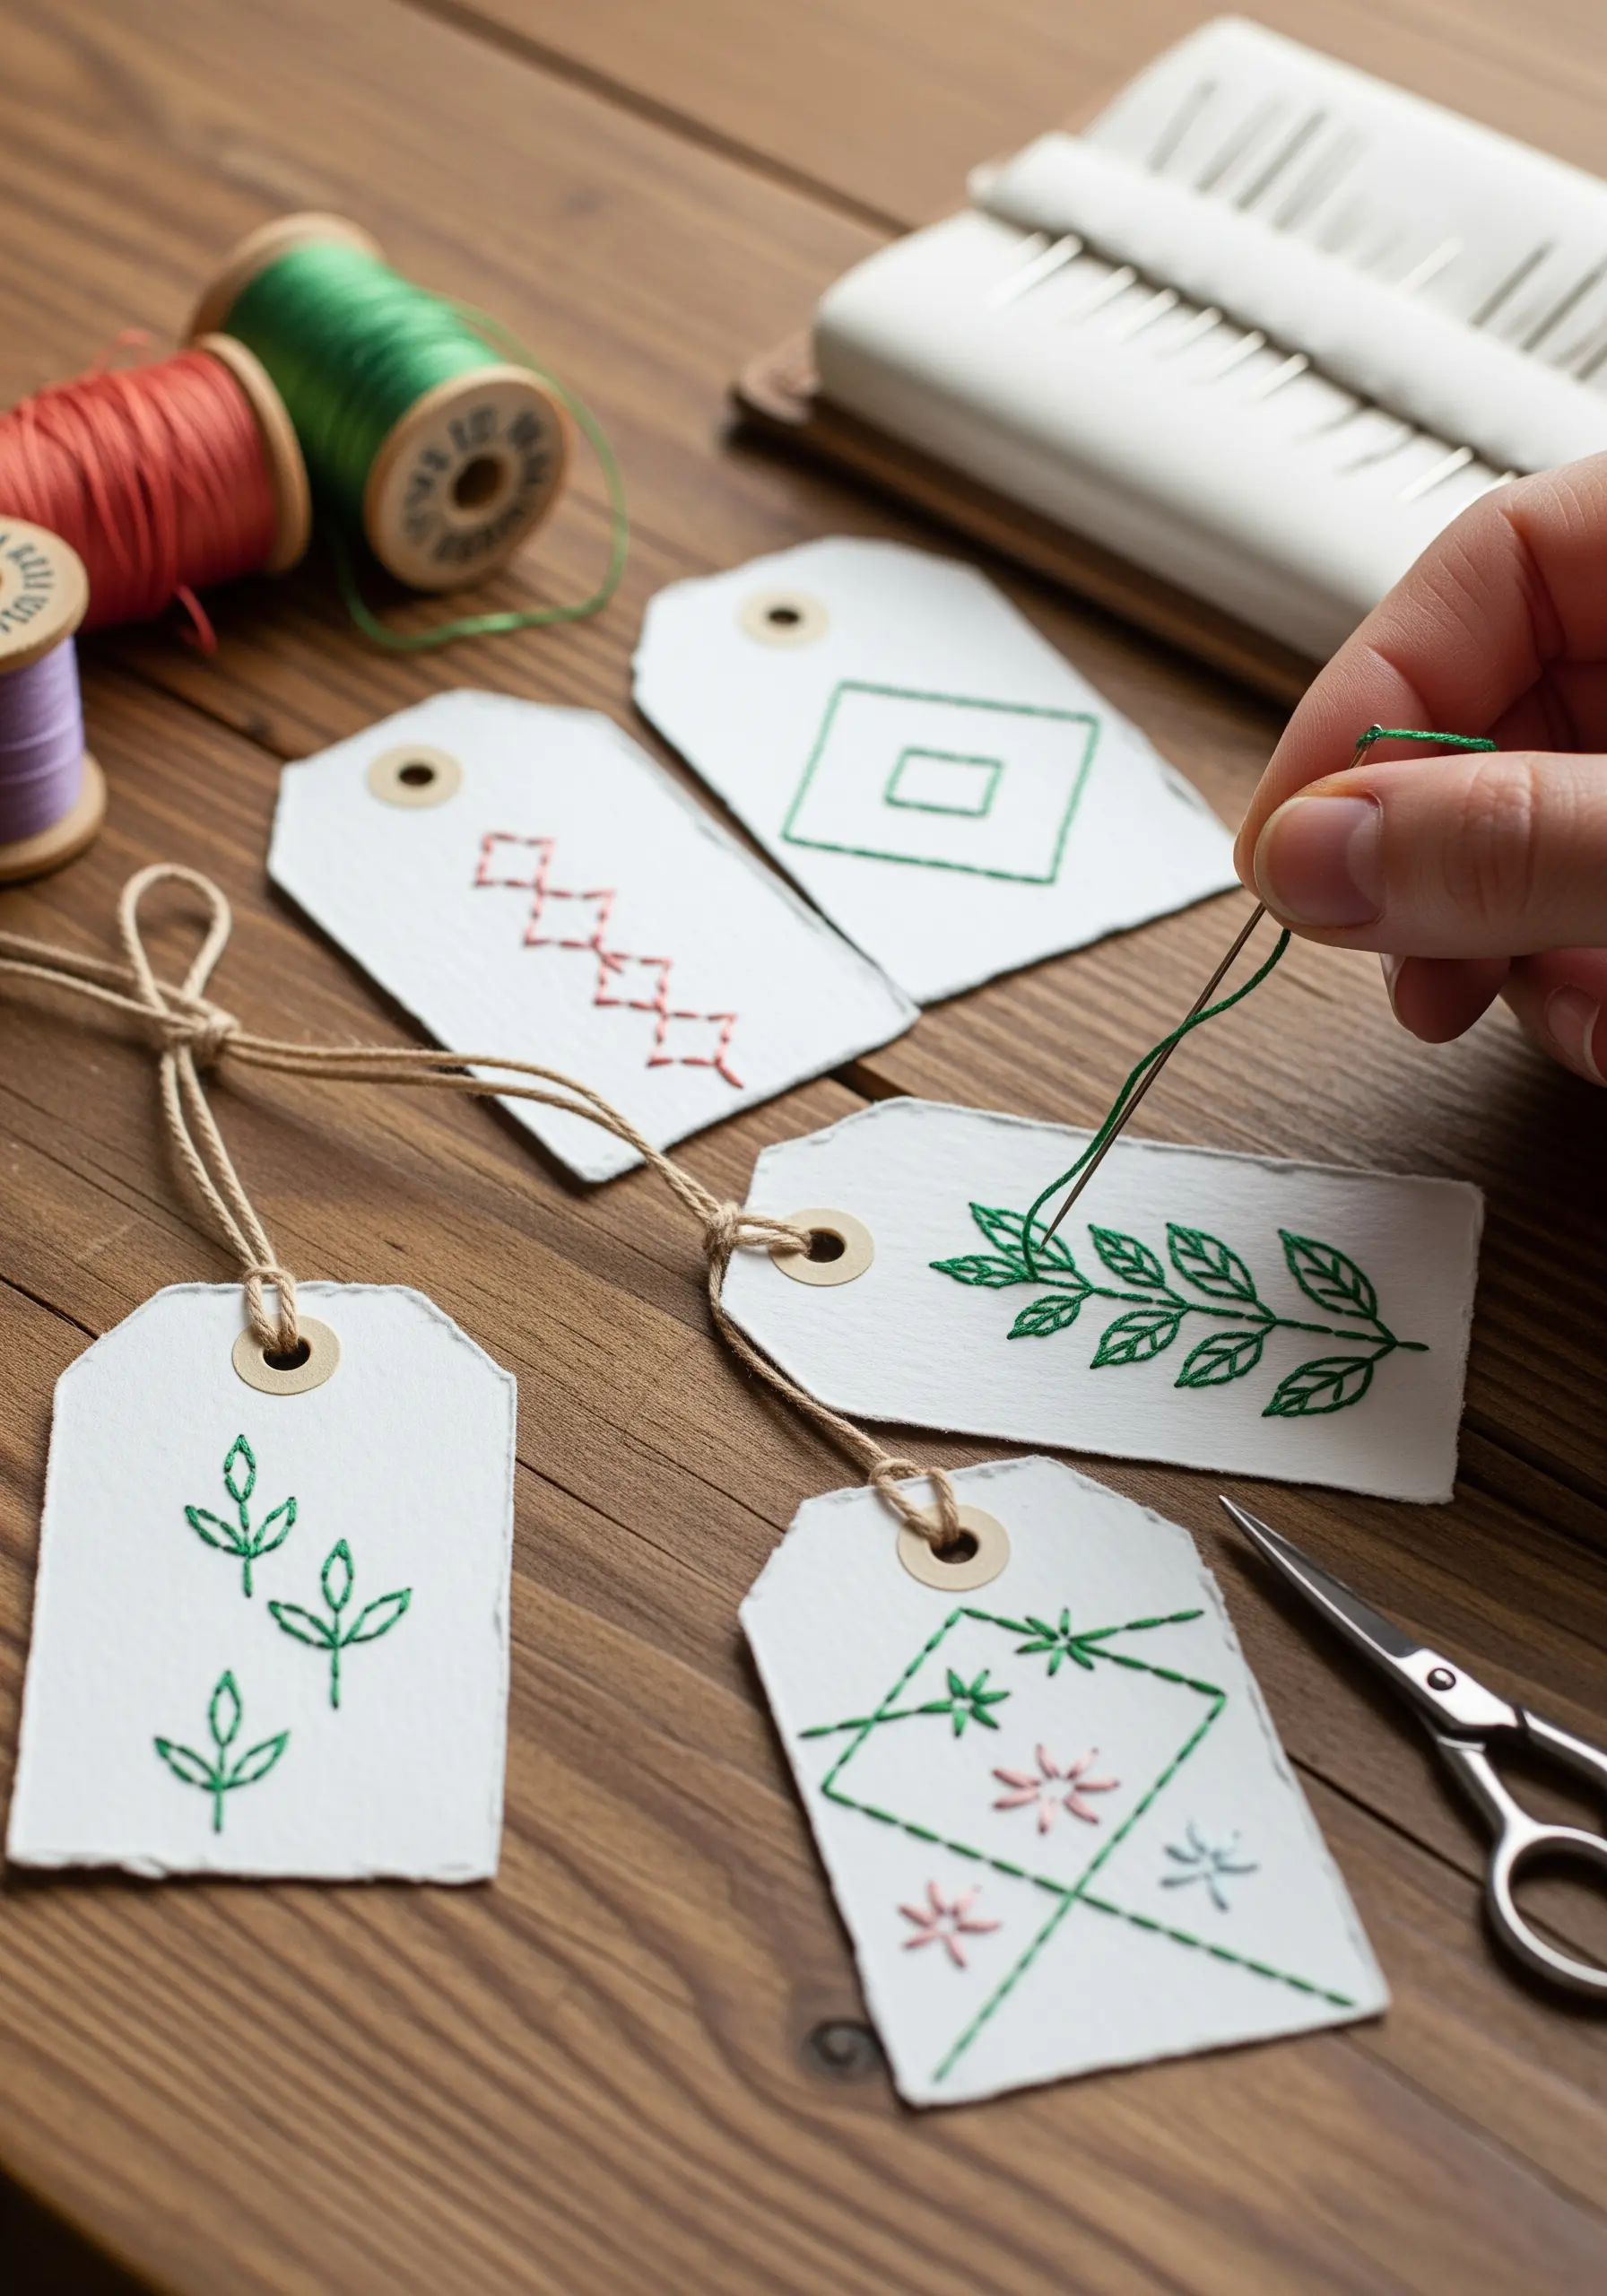
Elevate your gift wrapping by creating custom embroidered tags on thick, textured watercolor paper.
Use a sharp, size 24 tapestry needle and limit your floss to two strands; this prevents the paper from buckling and keeps the stitches looking delicate and clean.
Simple motifs like tiny sprigs, geometric shapes, or single initials are most effective.
A backstitch for outlines and detached chain stitches for leaves offer precision without overwhelming the small surface.
These tags are the perfect finishing touch for presents featuring your small embroidery ideas.
4. Echo Thread Textures with Paper Quilling
Translate the dimensional quality of your embroidery into a complementary paper art piece.
Paper quilling, the art of rolling and shaping paper strips, creates coiled textures that beautifully mimic French knots, woven wheel stitches, and raised satin stitch.
Create a small, quilled landscape and frame it in a shadow box to display next to your embroidered art.
This pairing creates a dialogue between the two pieces, highlighting their shared textural language and transforming them into a curated set.
5. Mimic Paper Folds with Stitched Bands

Use the structured, accordion-like form of this paper vase as inspiration for creating unique textile embellishments.
To replicate the woven band, embroider a dense pattern of herringbone stitch or lay down parallel rows of couched thick yarn on a strip of fabric.
You can then use this embroidered band to trim a pillow, a tote bag, or the hem of a garment.
This approach translates a 3D paper structure into a sophisticated, two-dimensional stitched texture.
6. Frame Florals with Woven Paper
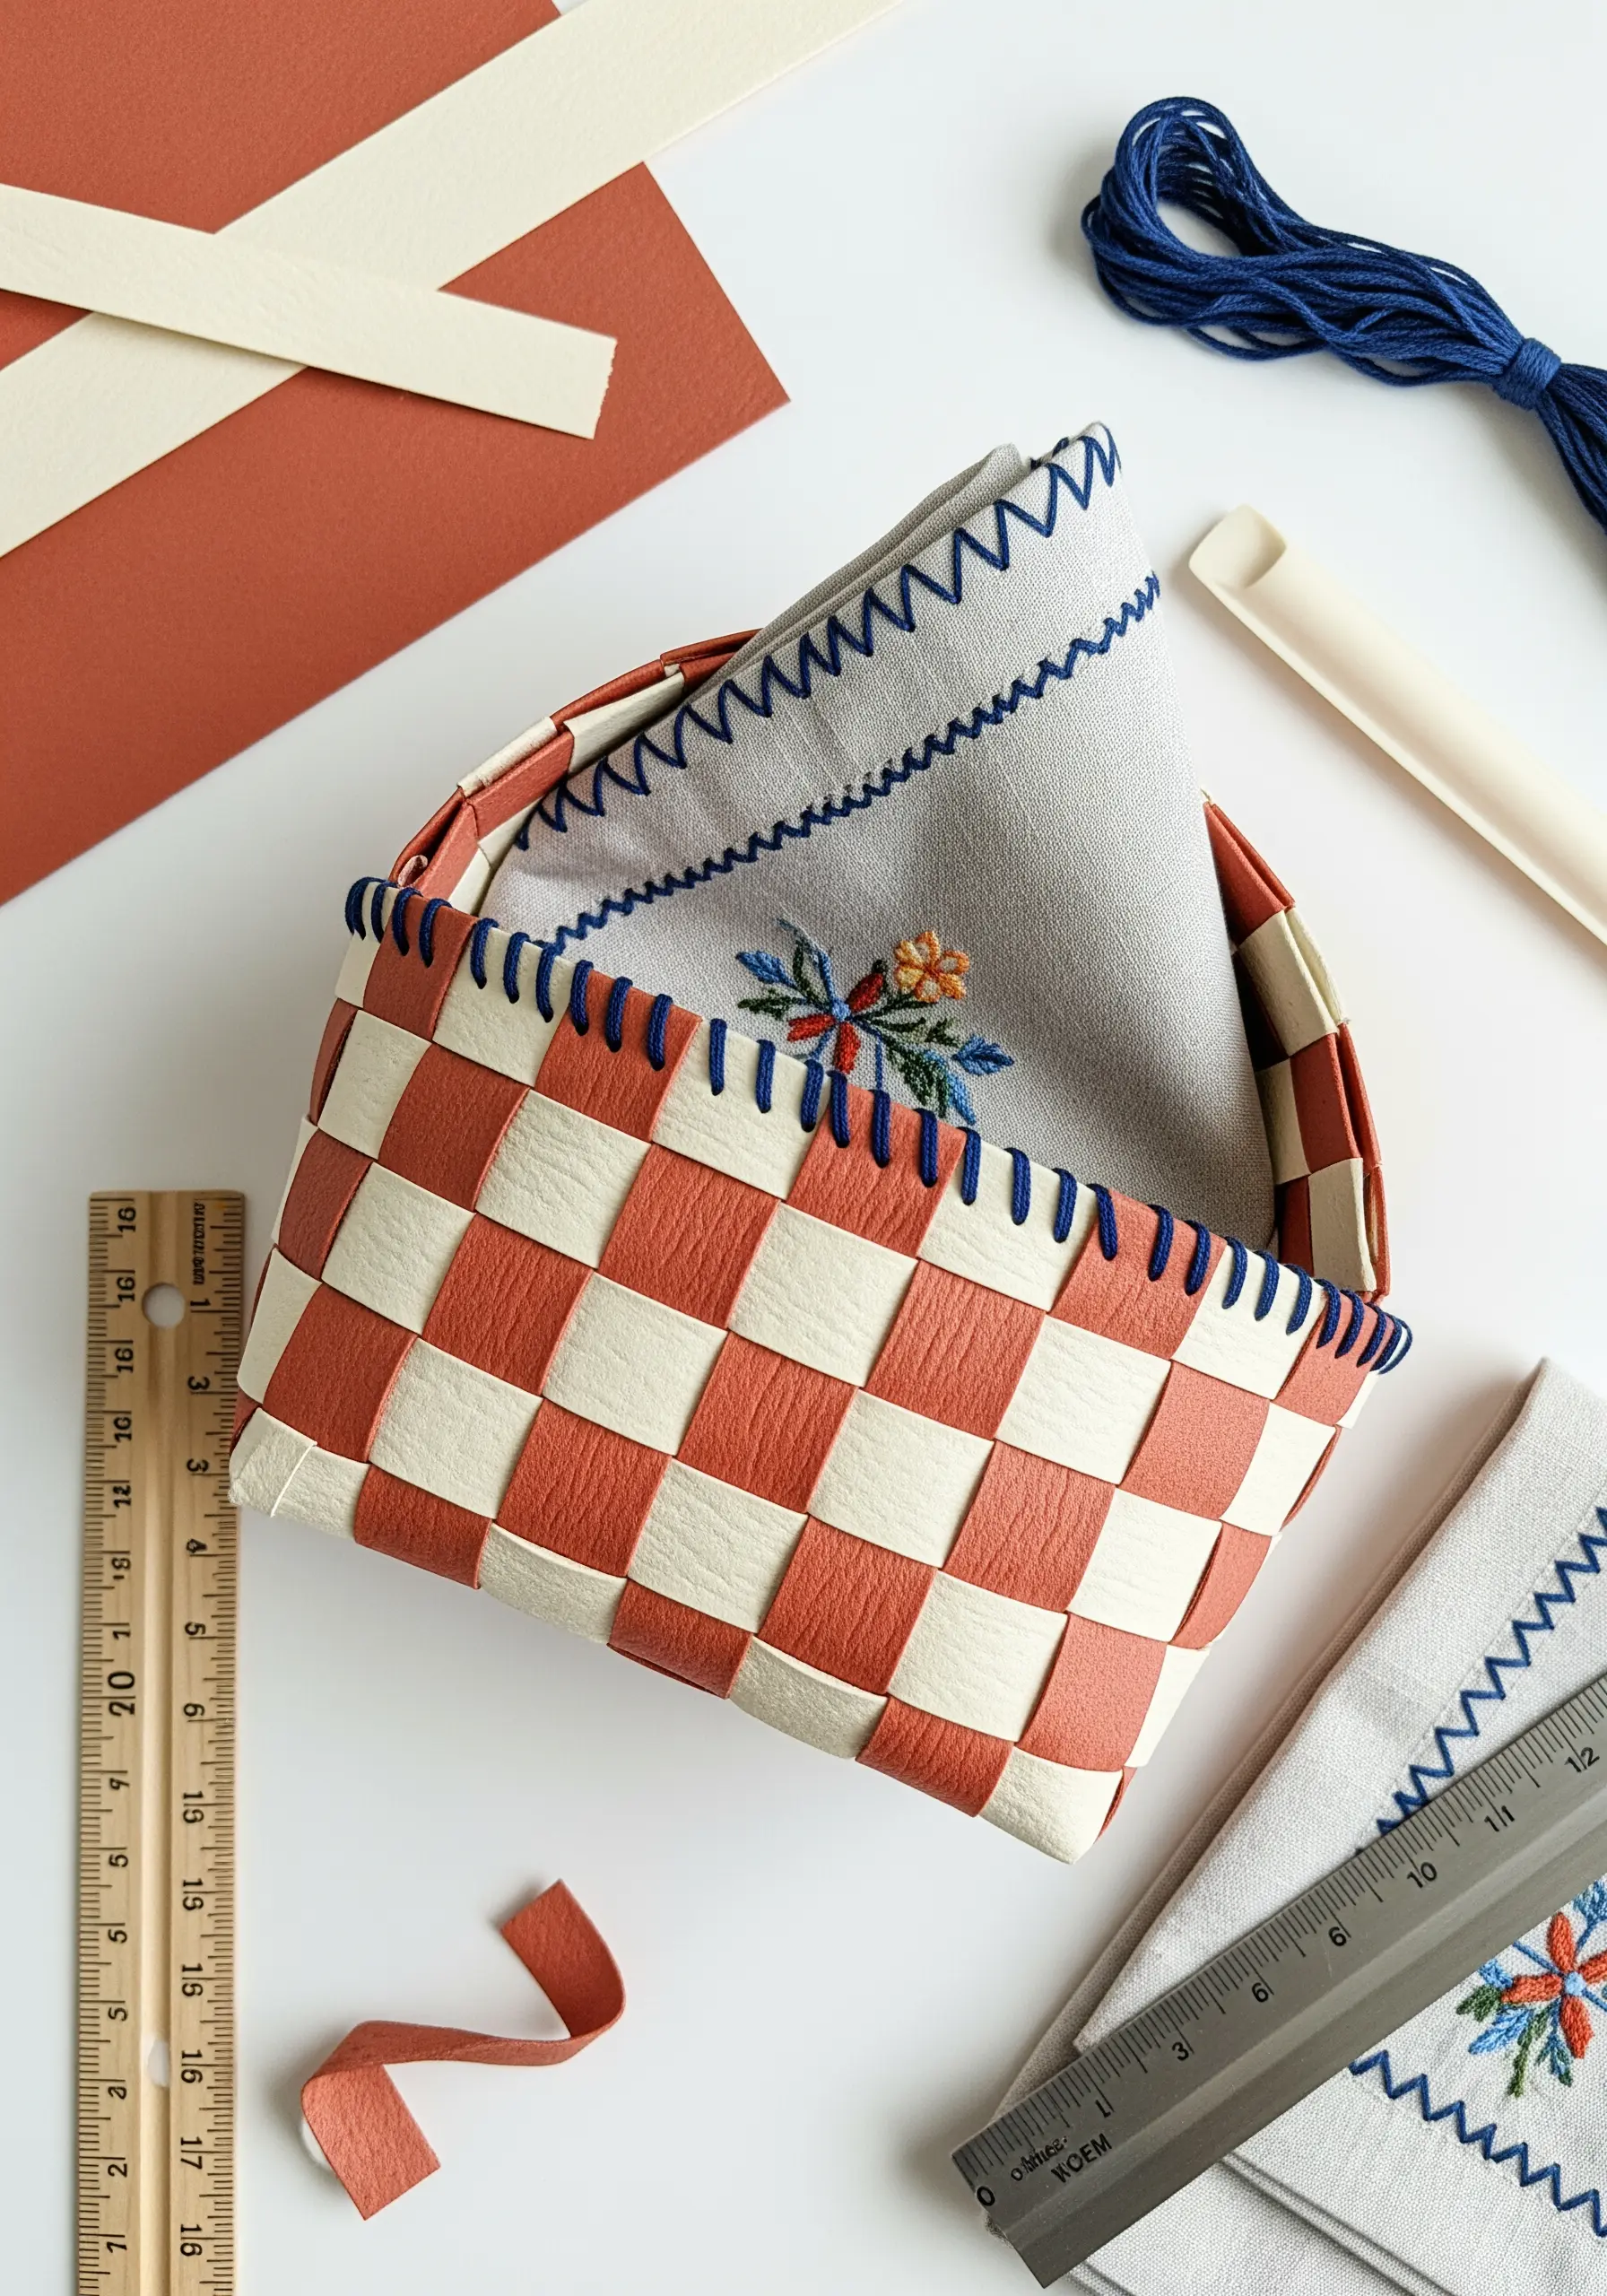
Use a strong, graphic paper structure to accentuate the softness of your floral embroidery.
Weave strips of sturdy paper or faux leather to create a small basket or box, perfect for holding an embroidered linen or sachet.
The clean, geometric checkerboard pattern provides a visual anchor, making the organic curves and delicate colors of your stitching the clear focal point.
This contrast between rigid structure and soft textile creates a balanced and professional presentation.
7. Assemble a Color-Matched Paper Bouquet
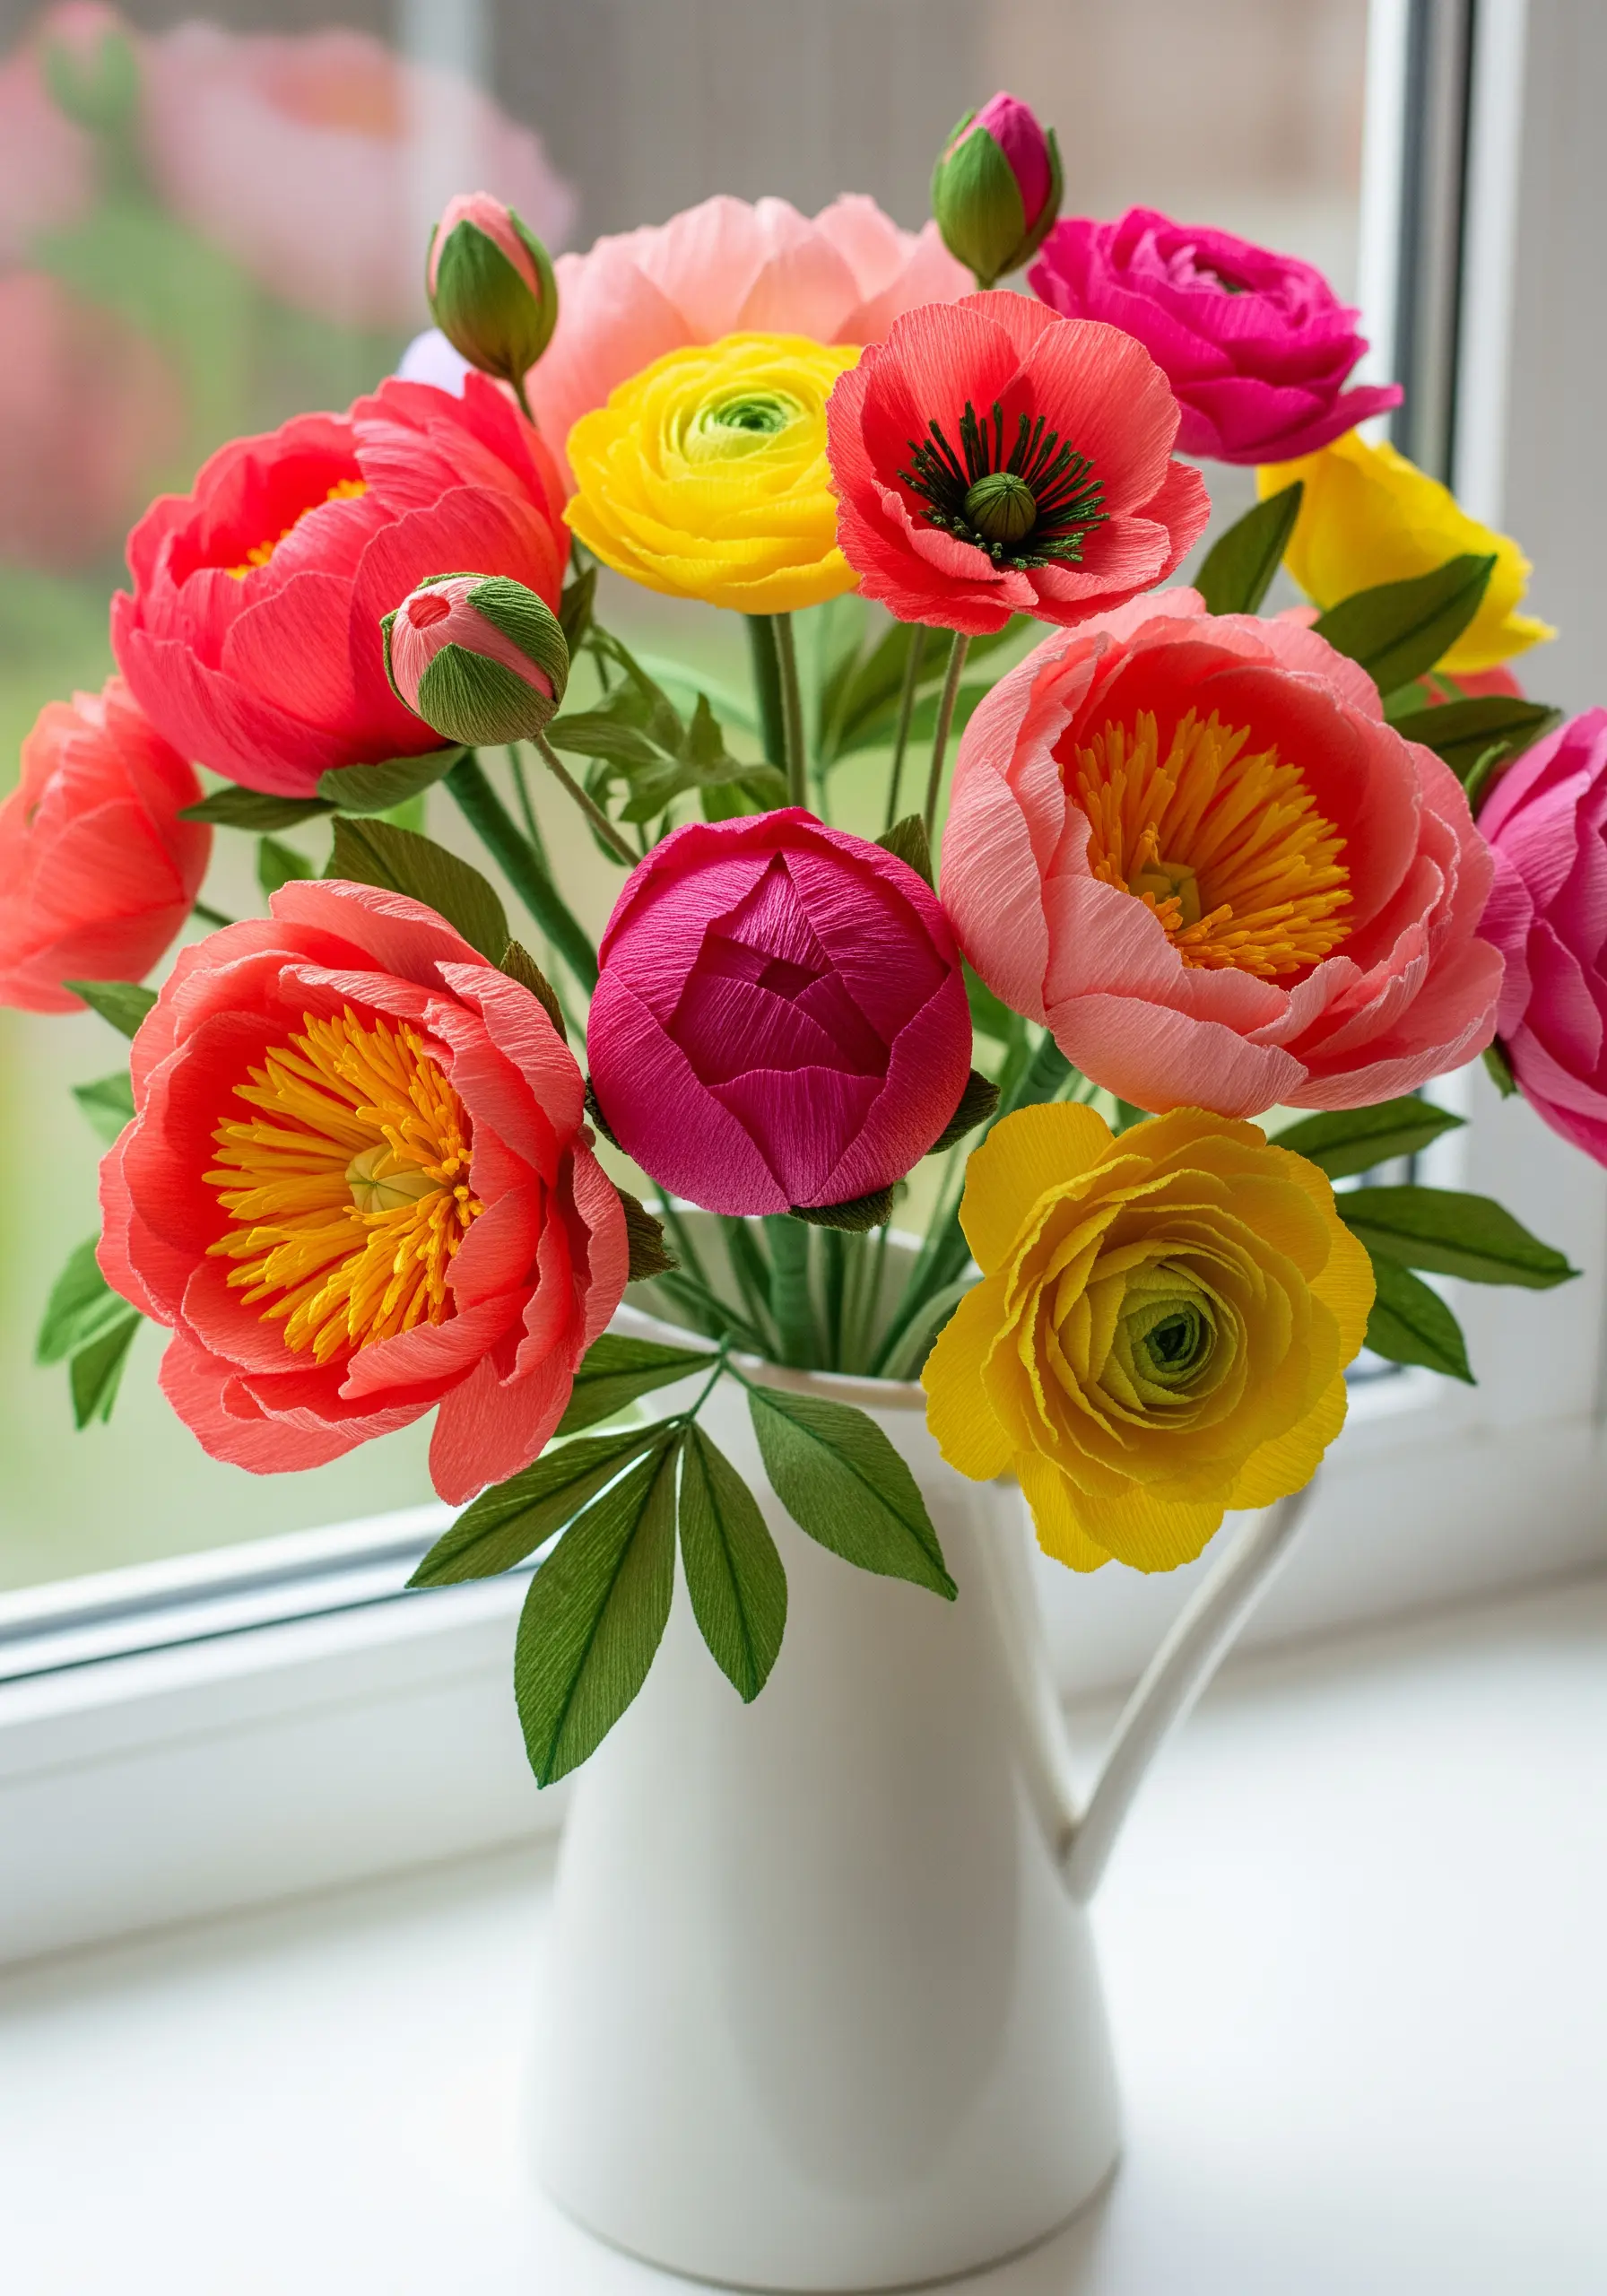
Create a truly immersive gift by pairing your embroidery with a bouquet of paper flowers that shares its exact color story.
Before you begin your floral embroidery, select your thread palette. Then, source crepe paper in those specific shades of pink, yellow, and coral.
When you present the finished embroidered piece alongside the matching paper bouquet, the coordinated colors create a powerful, intentional, and deeply thoughtful statement.
This transforms a simple gift into a curated experience.
8. Illuminate Designs with Paper-Cut Lanterns
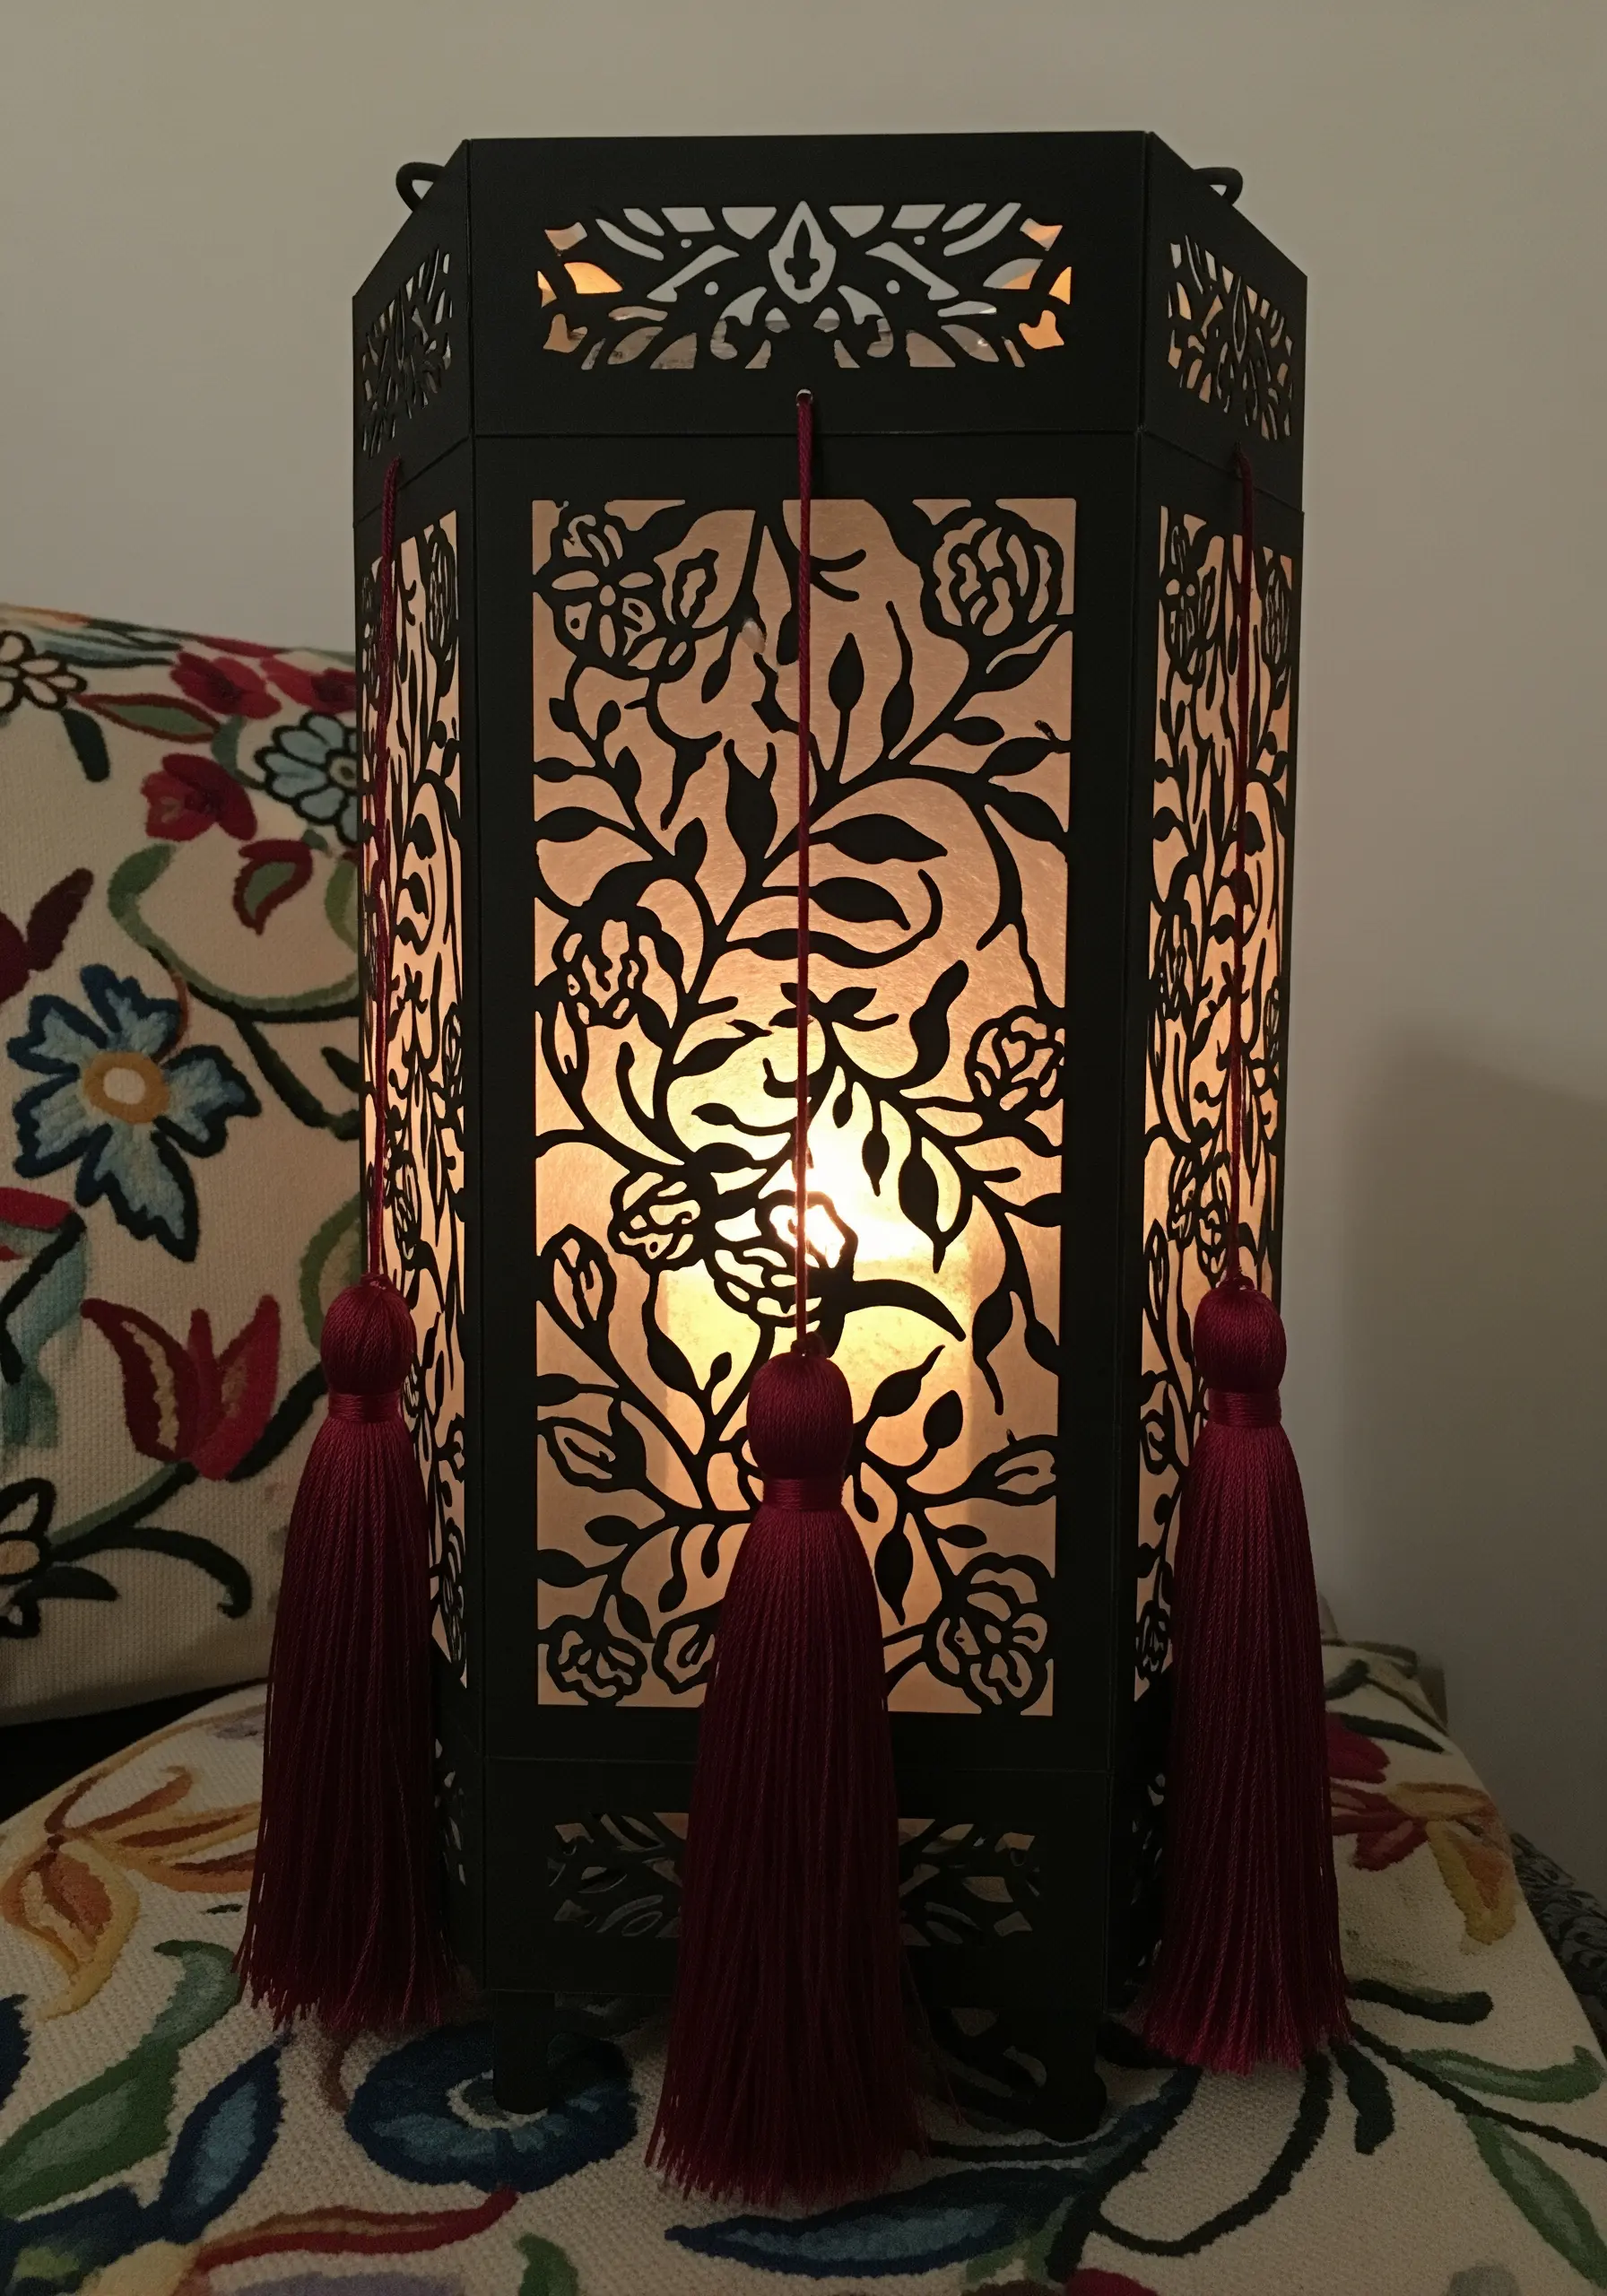
Draw inspiration from the elegant silhouettes of paper-cut art to inform your embroidery designs.
Create a companion piece using negative space and simple outlines, such as a blackwork pattern or a single-color floral motif stitched on sheer organza.
When displayed near a lantern, the light will shine through the fabric, mimicking the cut-paper effect.
Finish your gift with tassels made from the same floss for a direct, tangible connection between the two objects.
9. Create a Mixed-Media Embroidery Collage

Mount your finished embroidery on heavy watercolor paper to transform it into a piece of fine art.
After stitching, press your fabric and trim it, leaving a small border. Lightly fray the edges before securing it to the paper with archival fabric glue.
Surround your stitched piece with layers of vintage book pages, handmade paper, and pressed flowers to build a rich, narrative world around your embroidery.
This technique gives your thread work a permanent and compelling home.
10. Coordinate Origami Paper with Nursery Embroidery
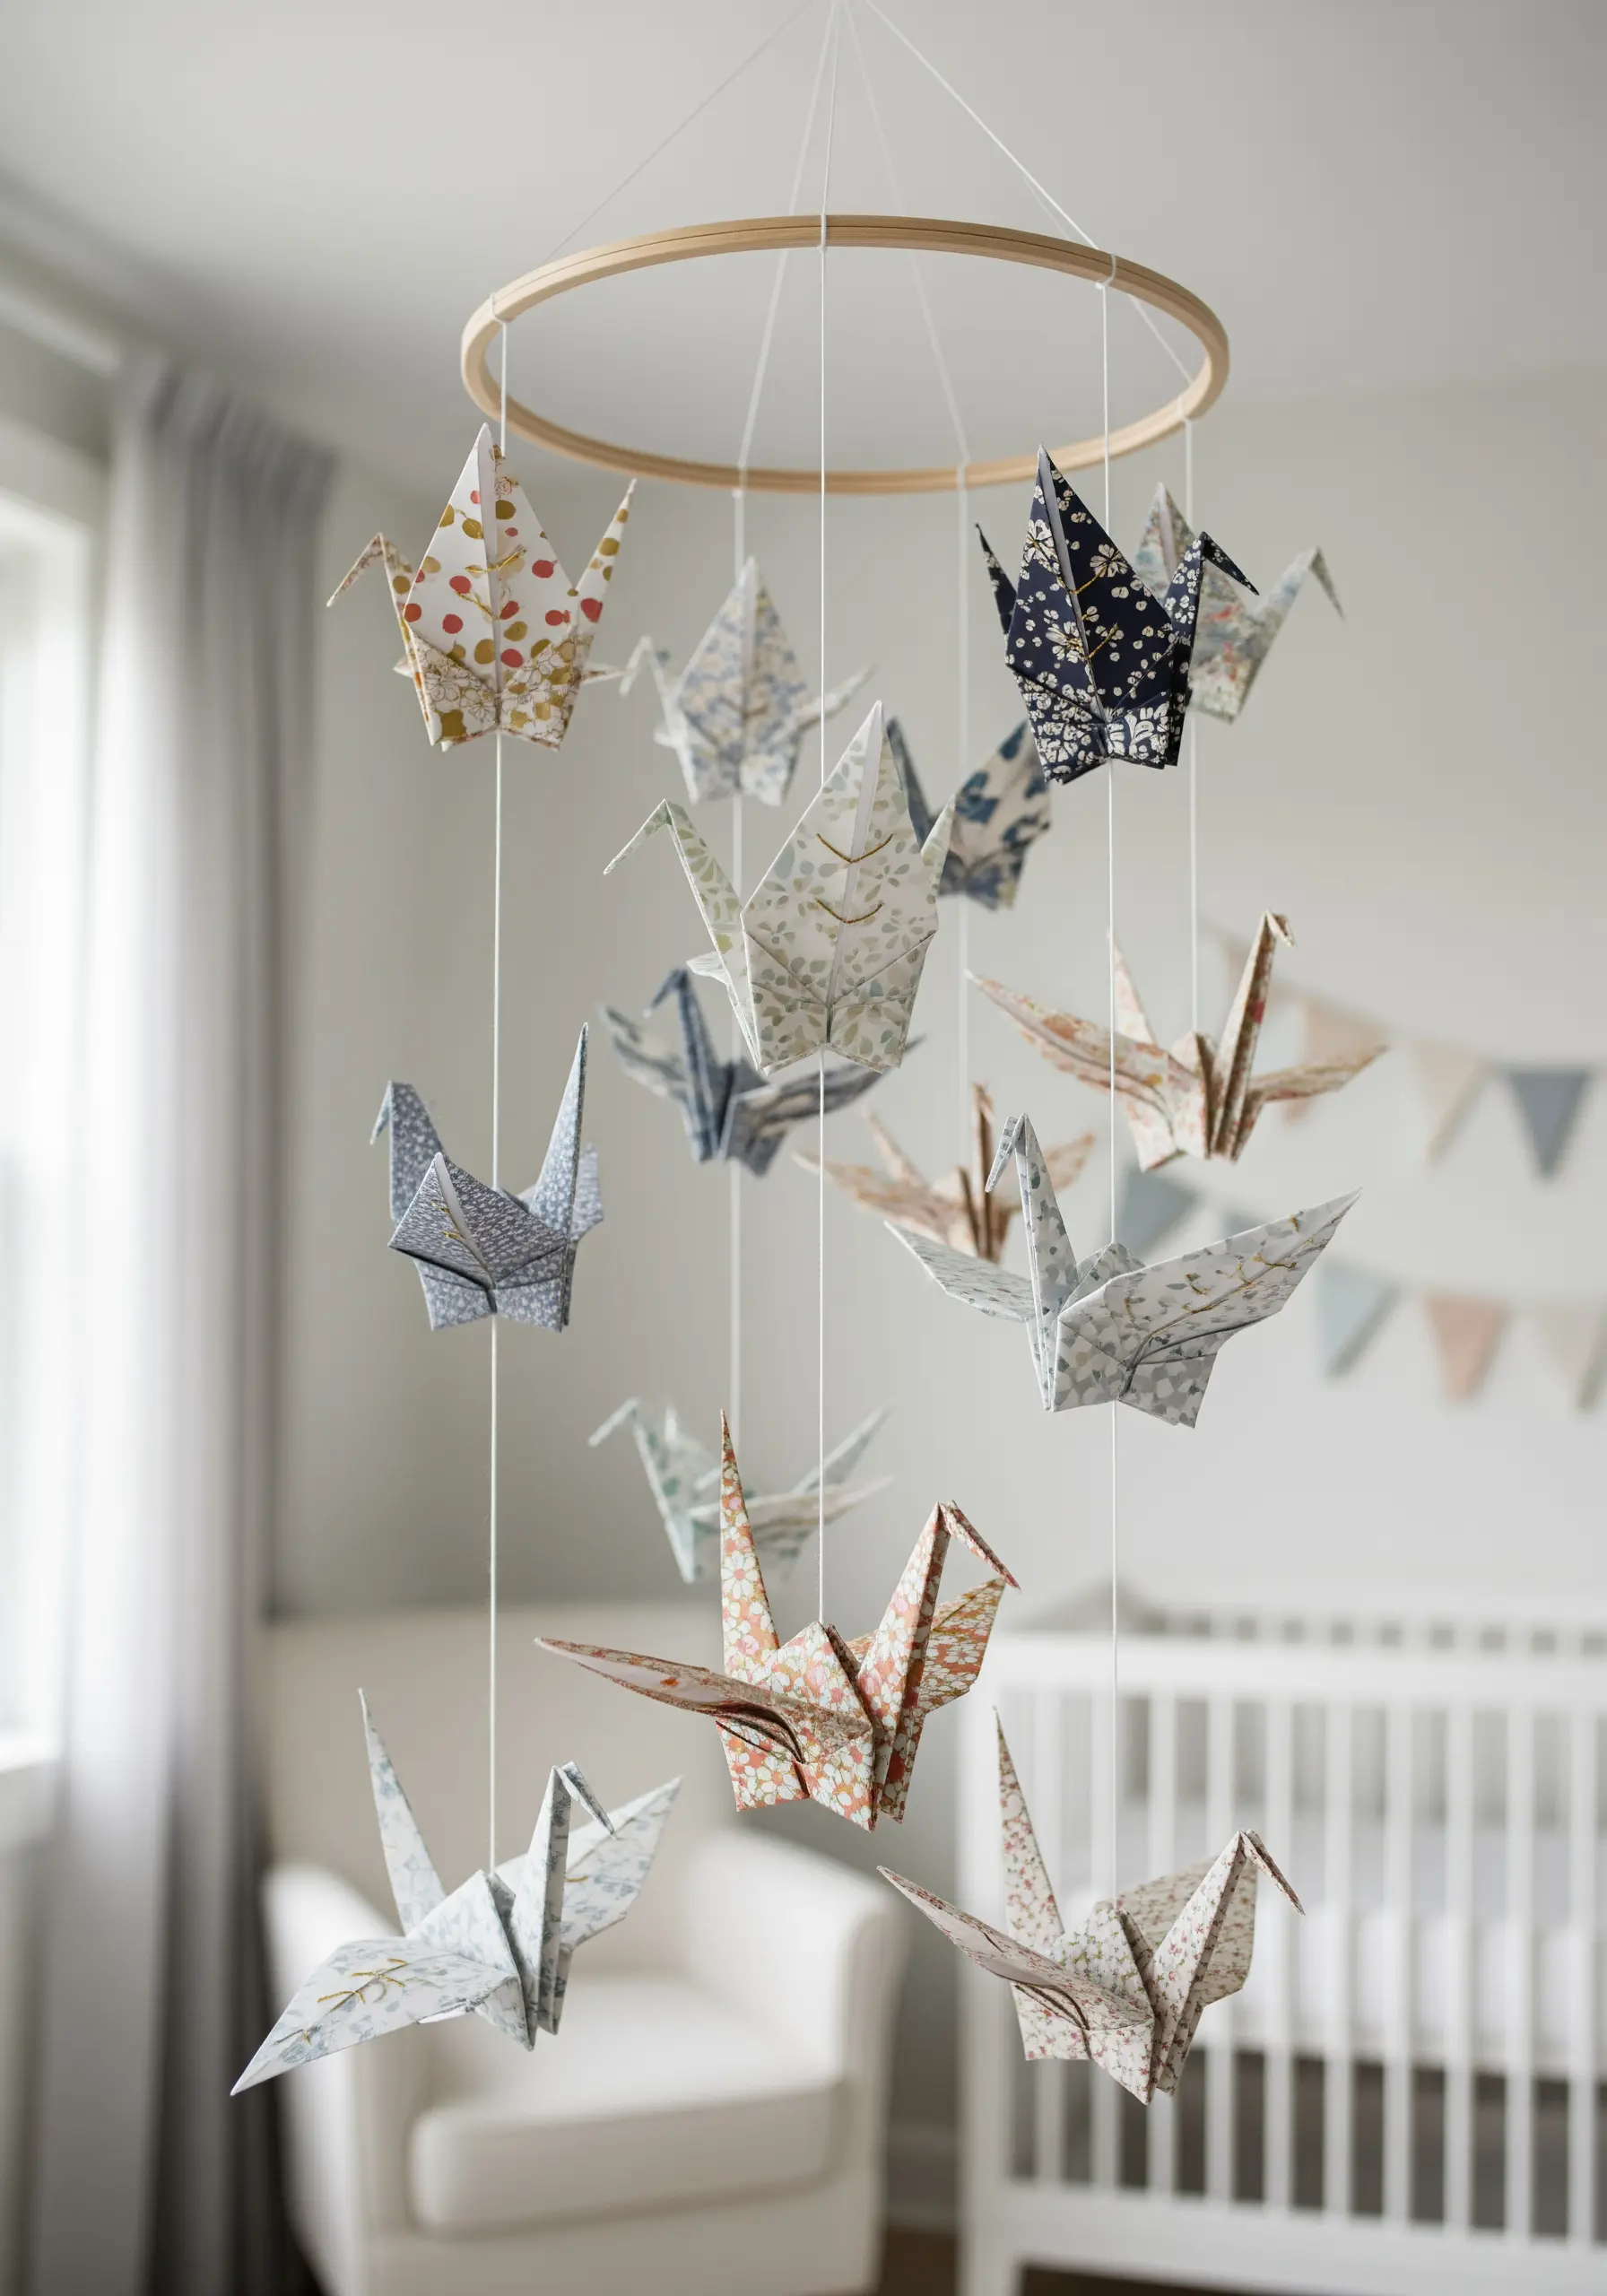
When gifting an embroidered baby blanket or wall hanging, create a companion piece that extends the theme into the room.
A delicate mobile made from origami cranes is a timeless and elegant addition to any nursery.
The key to a sophisticated look is to select origami papers that feature the same colors or motifs as your embroidery—tiny florals, subtle geometrics, or soft pastels.
This simple step creates a cohesive and lovingly curated environment.
11. Paint Stitched Patterns on Papier-Mâché
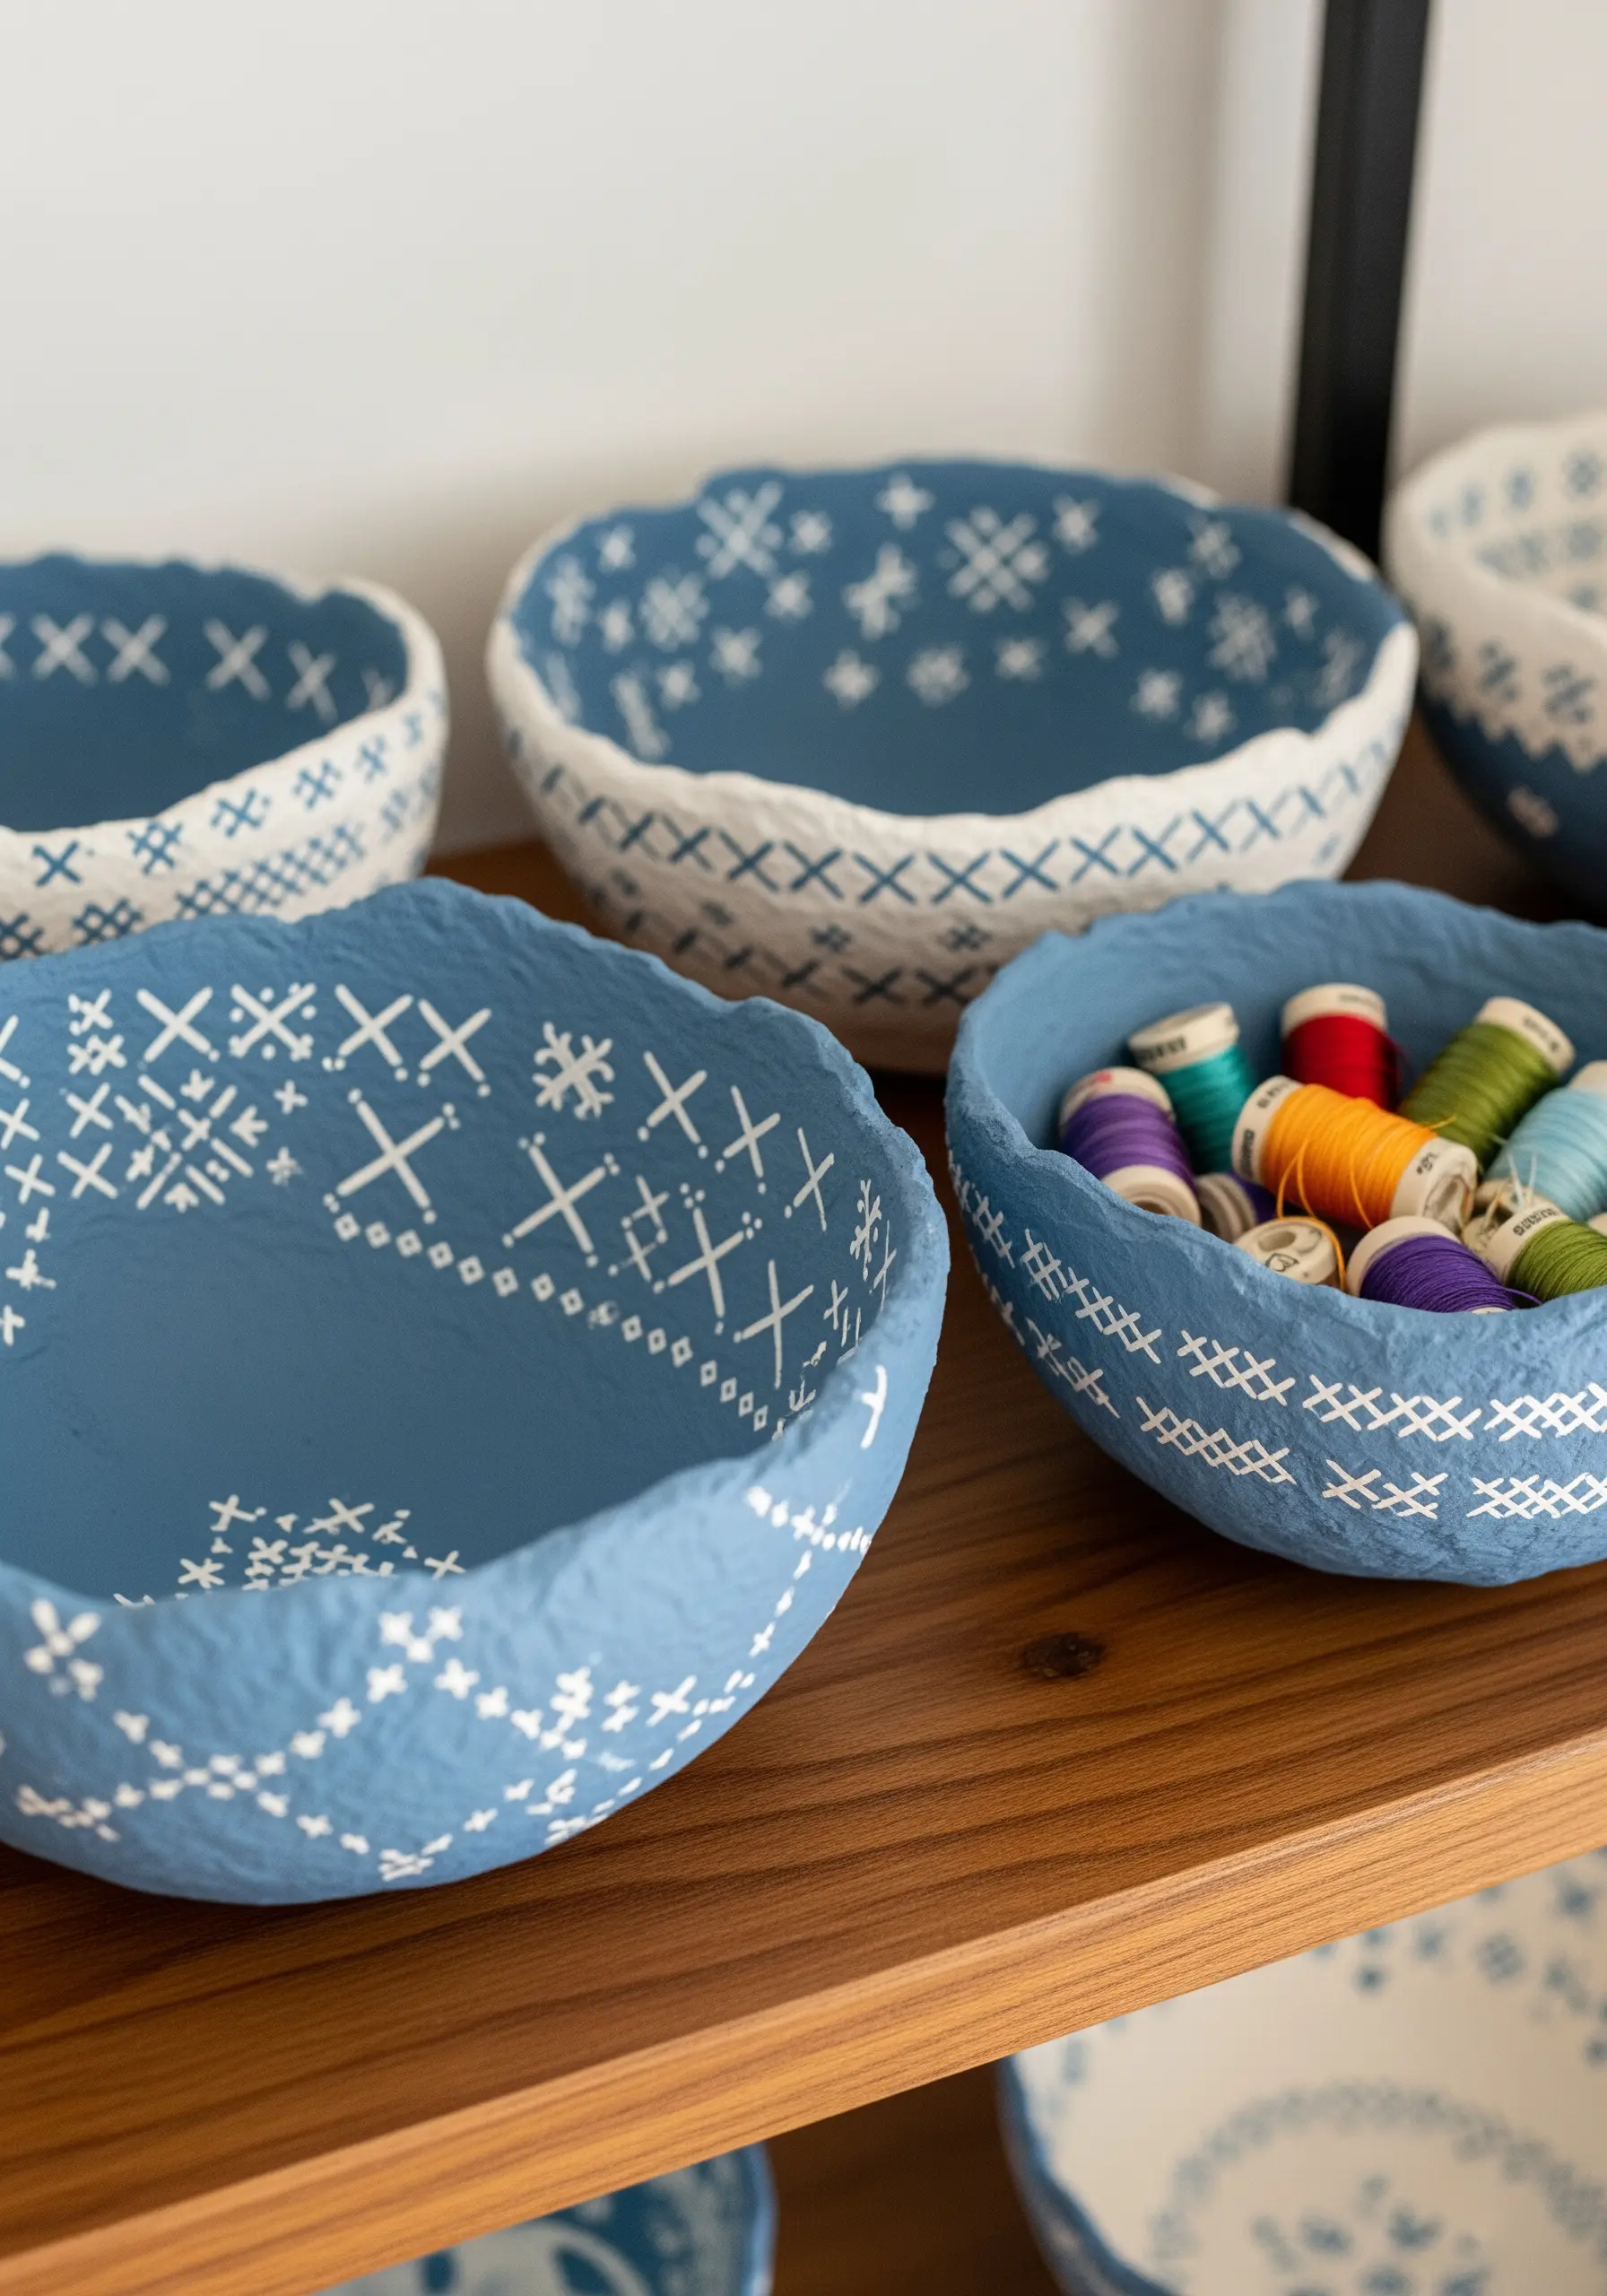
Translate the pixelated charm of cross-stitch onto a three-dimensional object.
Form simple, organic bowls using papier-mâché and allow them to dry completely.
Paint the bowls with a matte acrylic base, then use a fine-tipped paint pen to draw cross-stitch or blackwork patterns along the rim or interior.
These bowls become the perfect vessel for gifting embroidery notions, threads, or a small, folded embroidered piece, connecting the two crafts through a shared pattern language.
12. Add Dimension with Layered Paper Botanicals
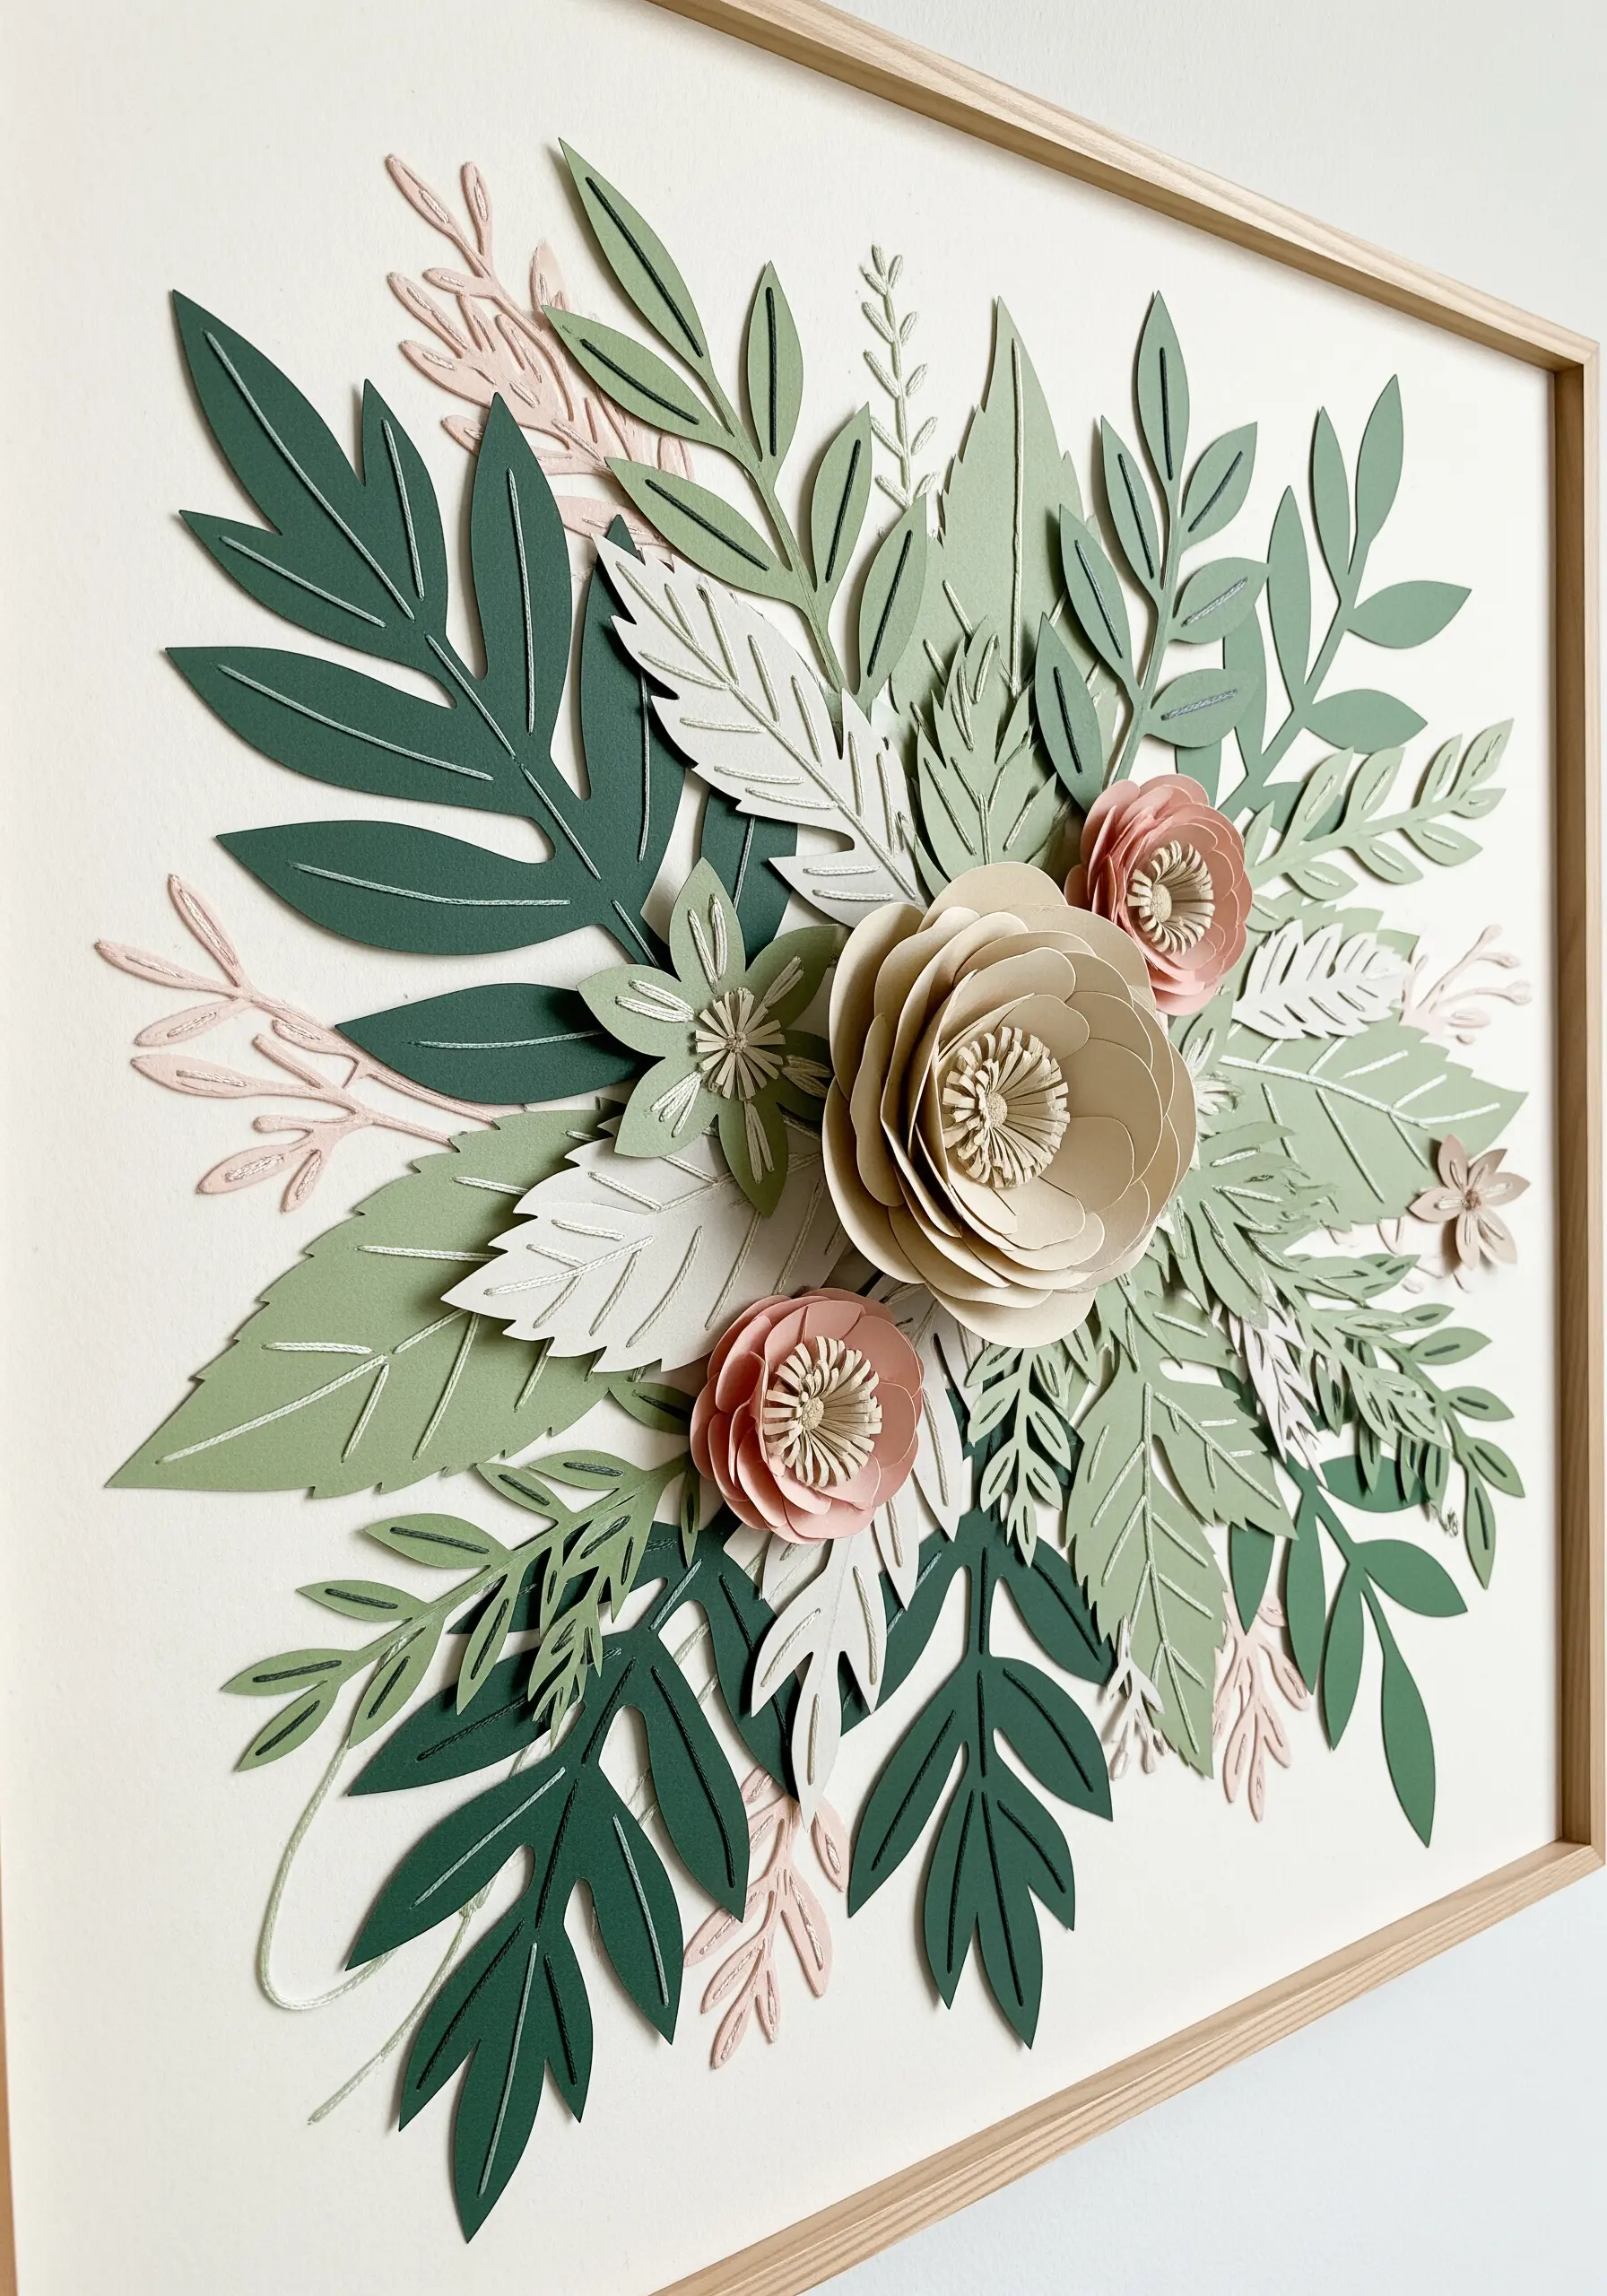
Frame your botanical embroidery with a burst of three-dimensional paper foliage to create stunning depth.
The clean, crisp edges and gentle shadows of the cut-paper leaves provide a beautiful contrast to the soft texture of your thread work.
This method is a fantastic alternative to a traditional hoop, turning your embroidery into a focal point within a larger, textural artwork.
It celebrates the art of layering leaf stitching by echoing its dimension in a different medium.
13. Pair Embossed Paper with Thread Tassels
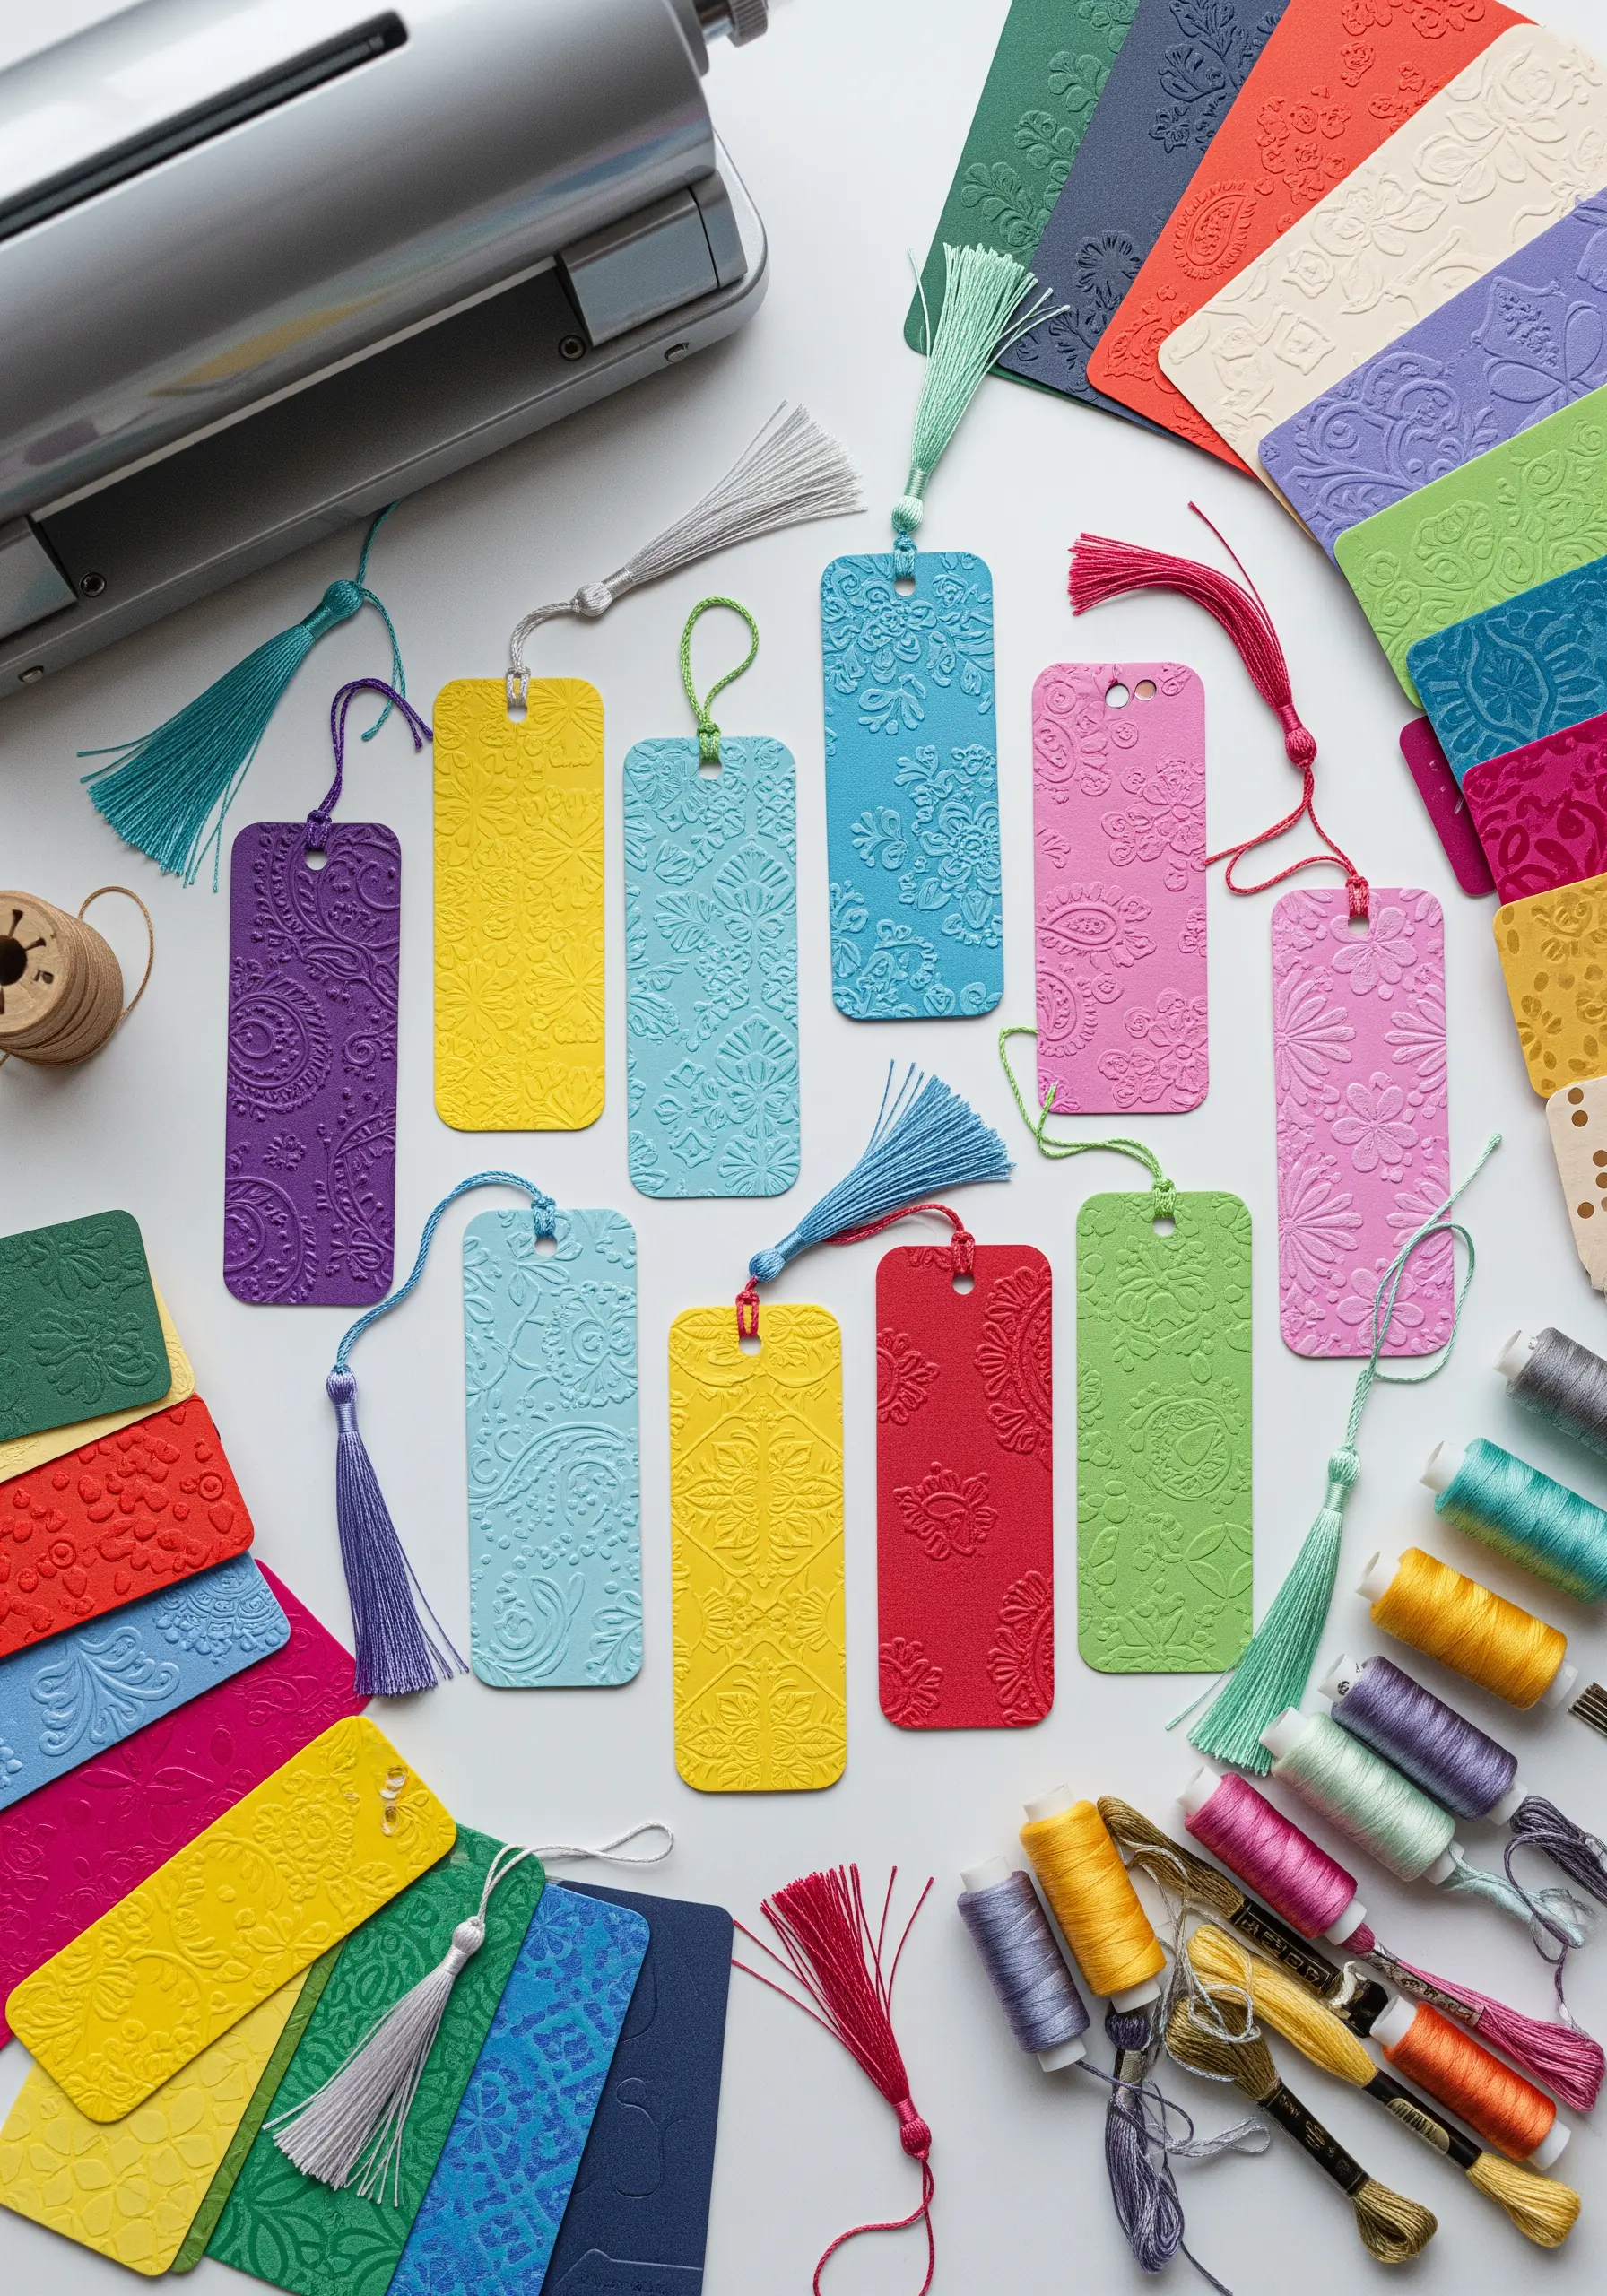
Combine subtle paper texture with the smooth finish of embroidery floss for an elegant gift pairing.
Create bookmarks from embossed cardstock, which offers a tactile pattern that feels luxurious and refined.
Make a silky tassel using the exact same threads you used in an embroidered gift, like a journal cover or glasses case.
This creates a direct link between the two items, making them feel like a perfectly matched set.
14. Unify Your Palette with a Paper Garland
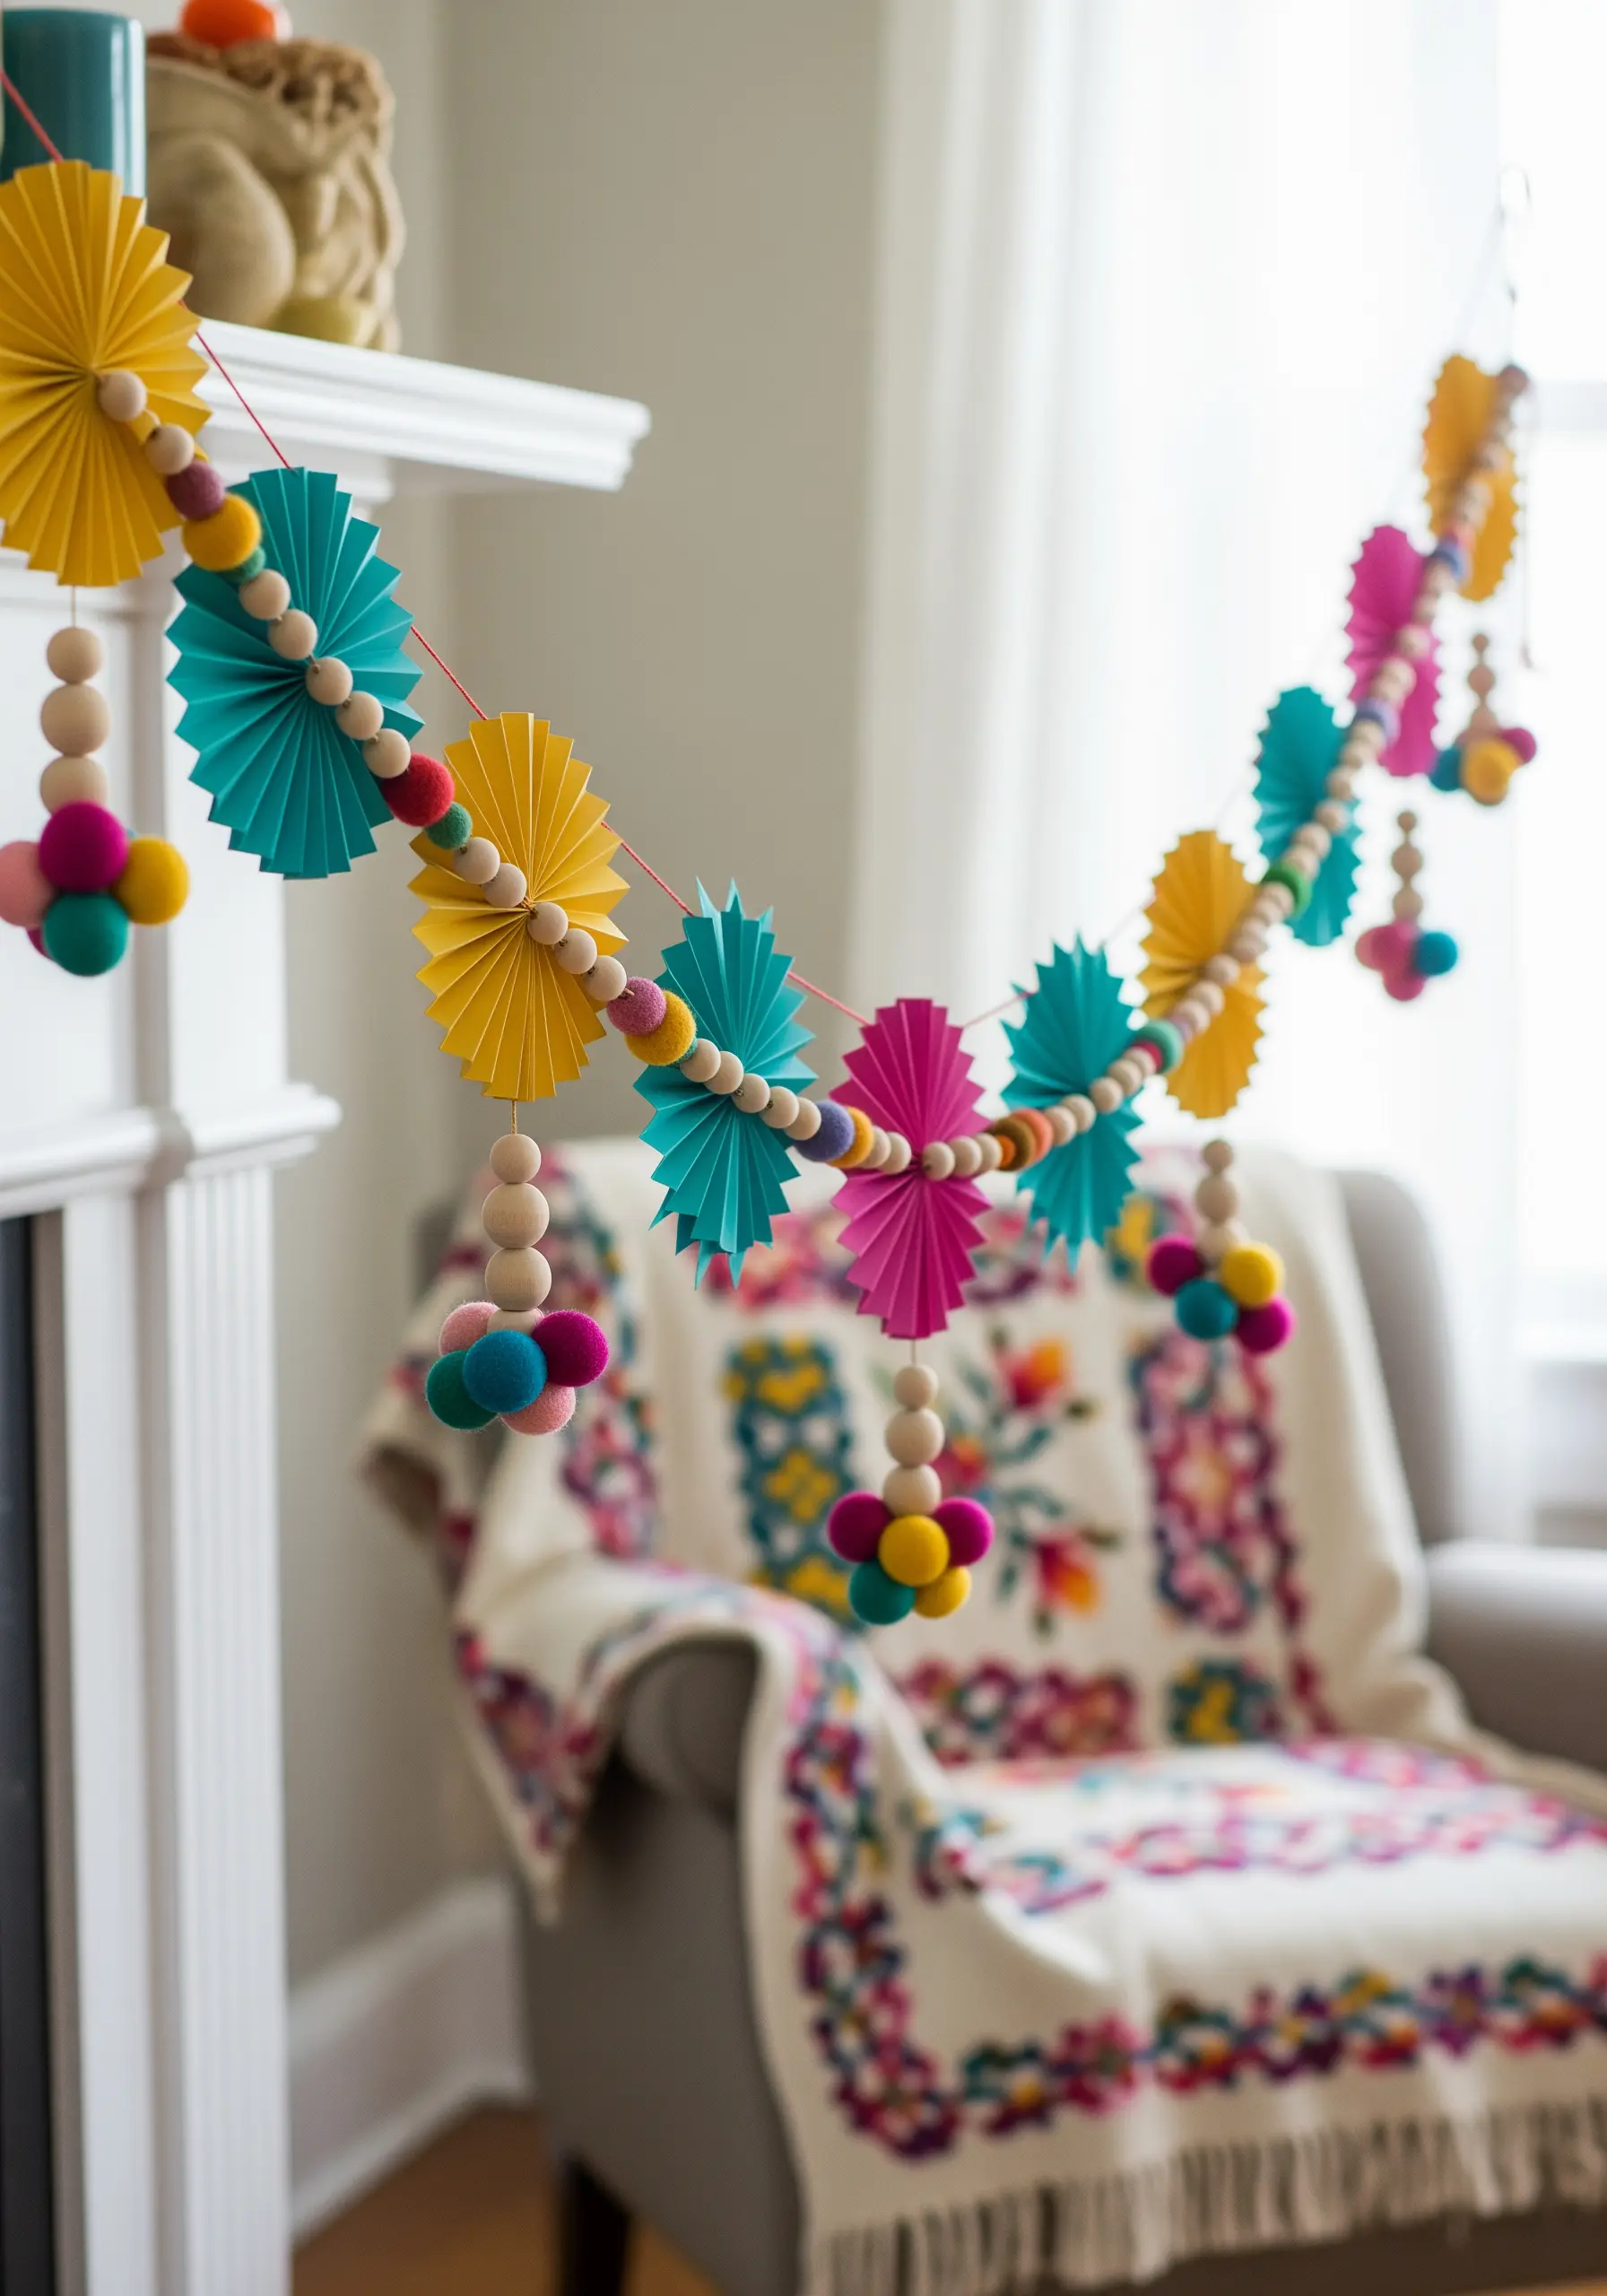
When presenting a large embroidered gift, like a blanket or cushion, use paper decorations to create a festive and cohesive backdrop.
Craft a simple paper fan garland, but be intentional with your color choice.
Pull two or three of the most prominent colors from your embroidery and use those for the paper fans.
This simple act of color coordination ties the entire scene together, making the moment of gift-giving feel curated and special.
15. Stitch Constellations onto Paper Gift Bags

Transform simple paper packaging into a work of art with direct paper embroidery.
Lightly sketch a constellation or celestial motif onto a plain paper bag.
Use an awl or a thick needle to carefully pre-punch holes along the lines of your design, spaced about 1/8 inch apart.
Then, using a metallic or white thread, connect the holes with a simple backstitch to reveal the pattern. This is a perfect way to wrap gifts that feature your own tiny night sky embroidery designs.
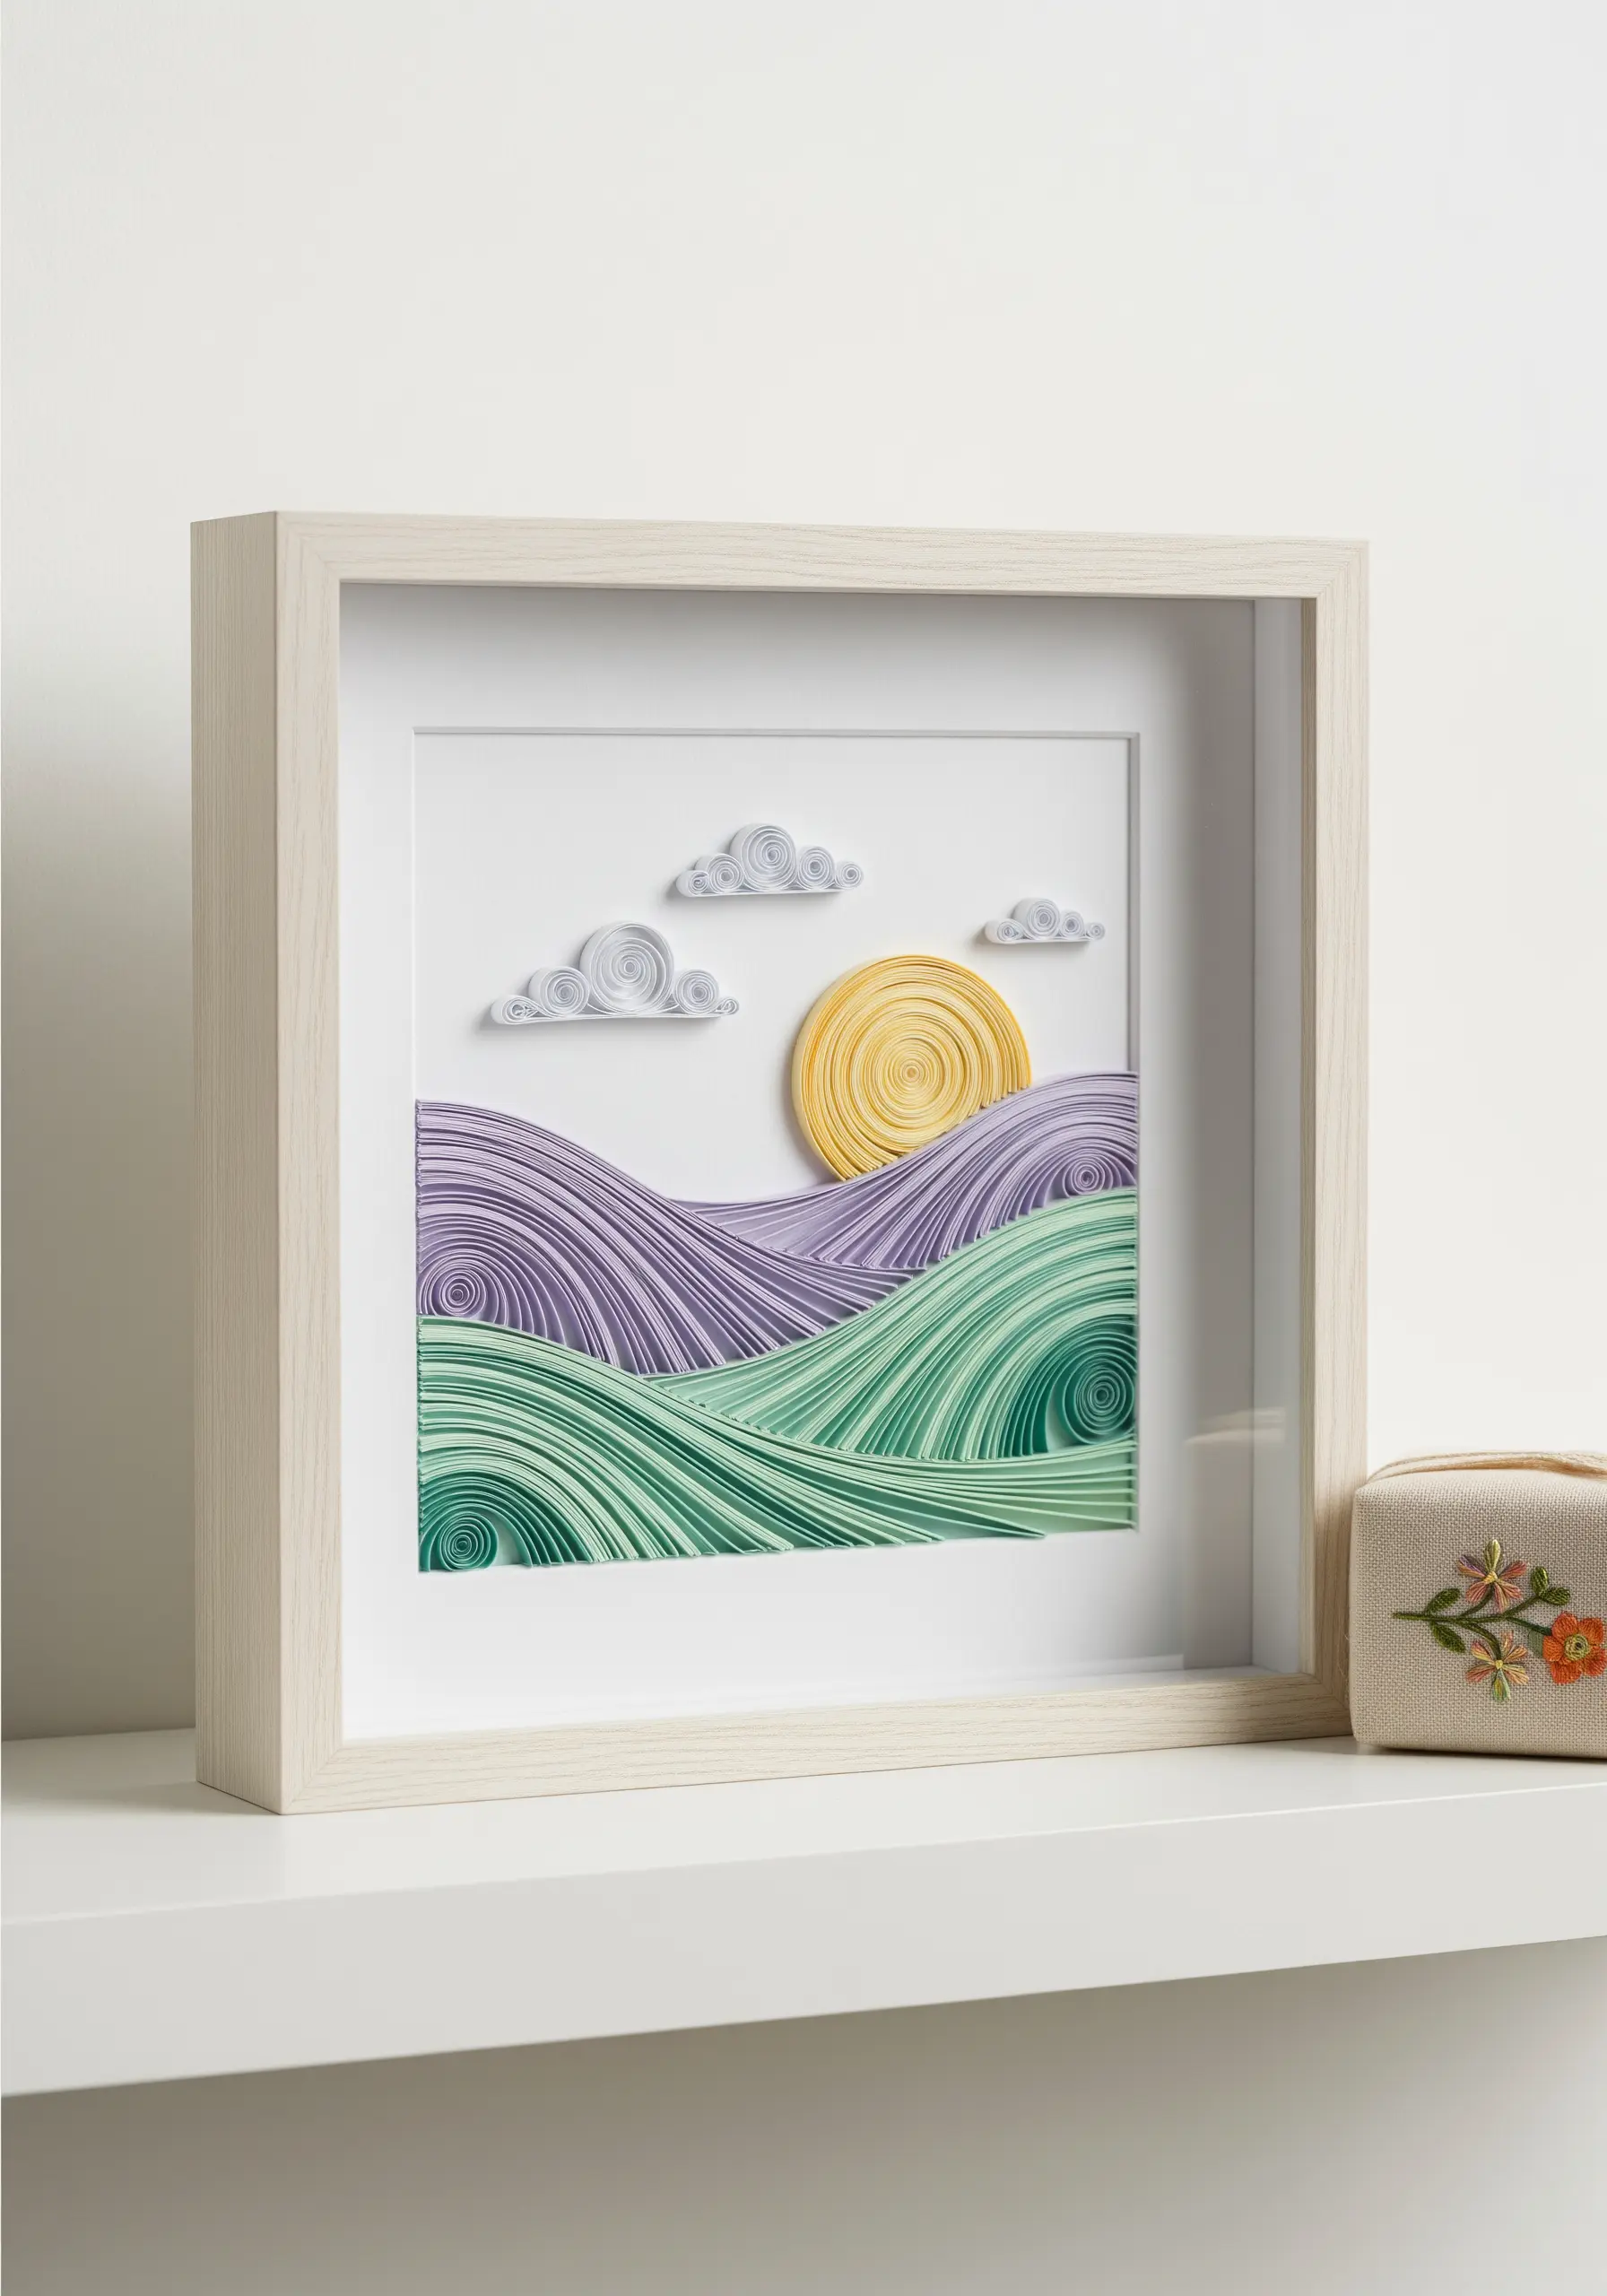
16. Inspire Stitches with Topographic Paper Art
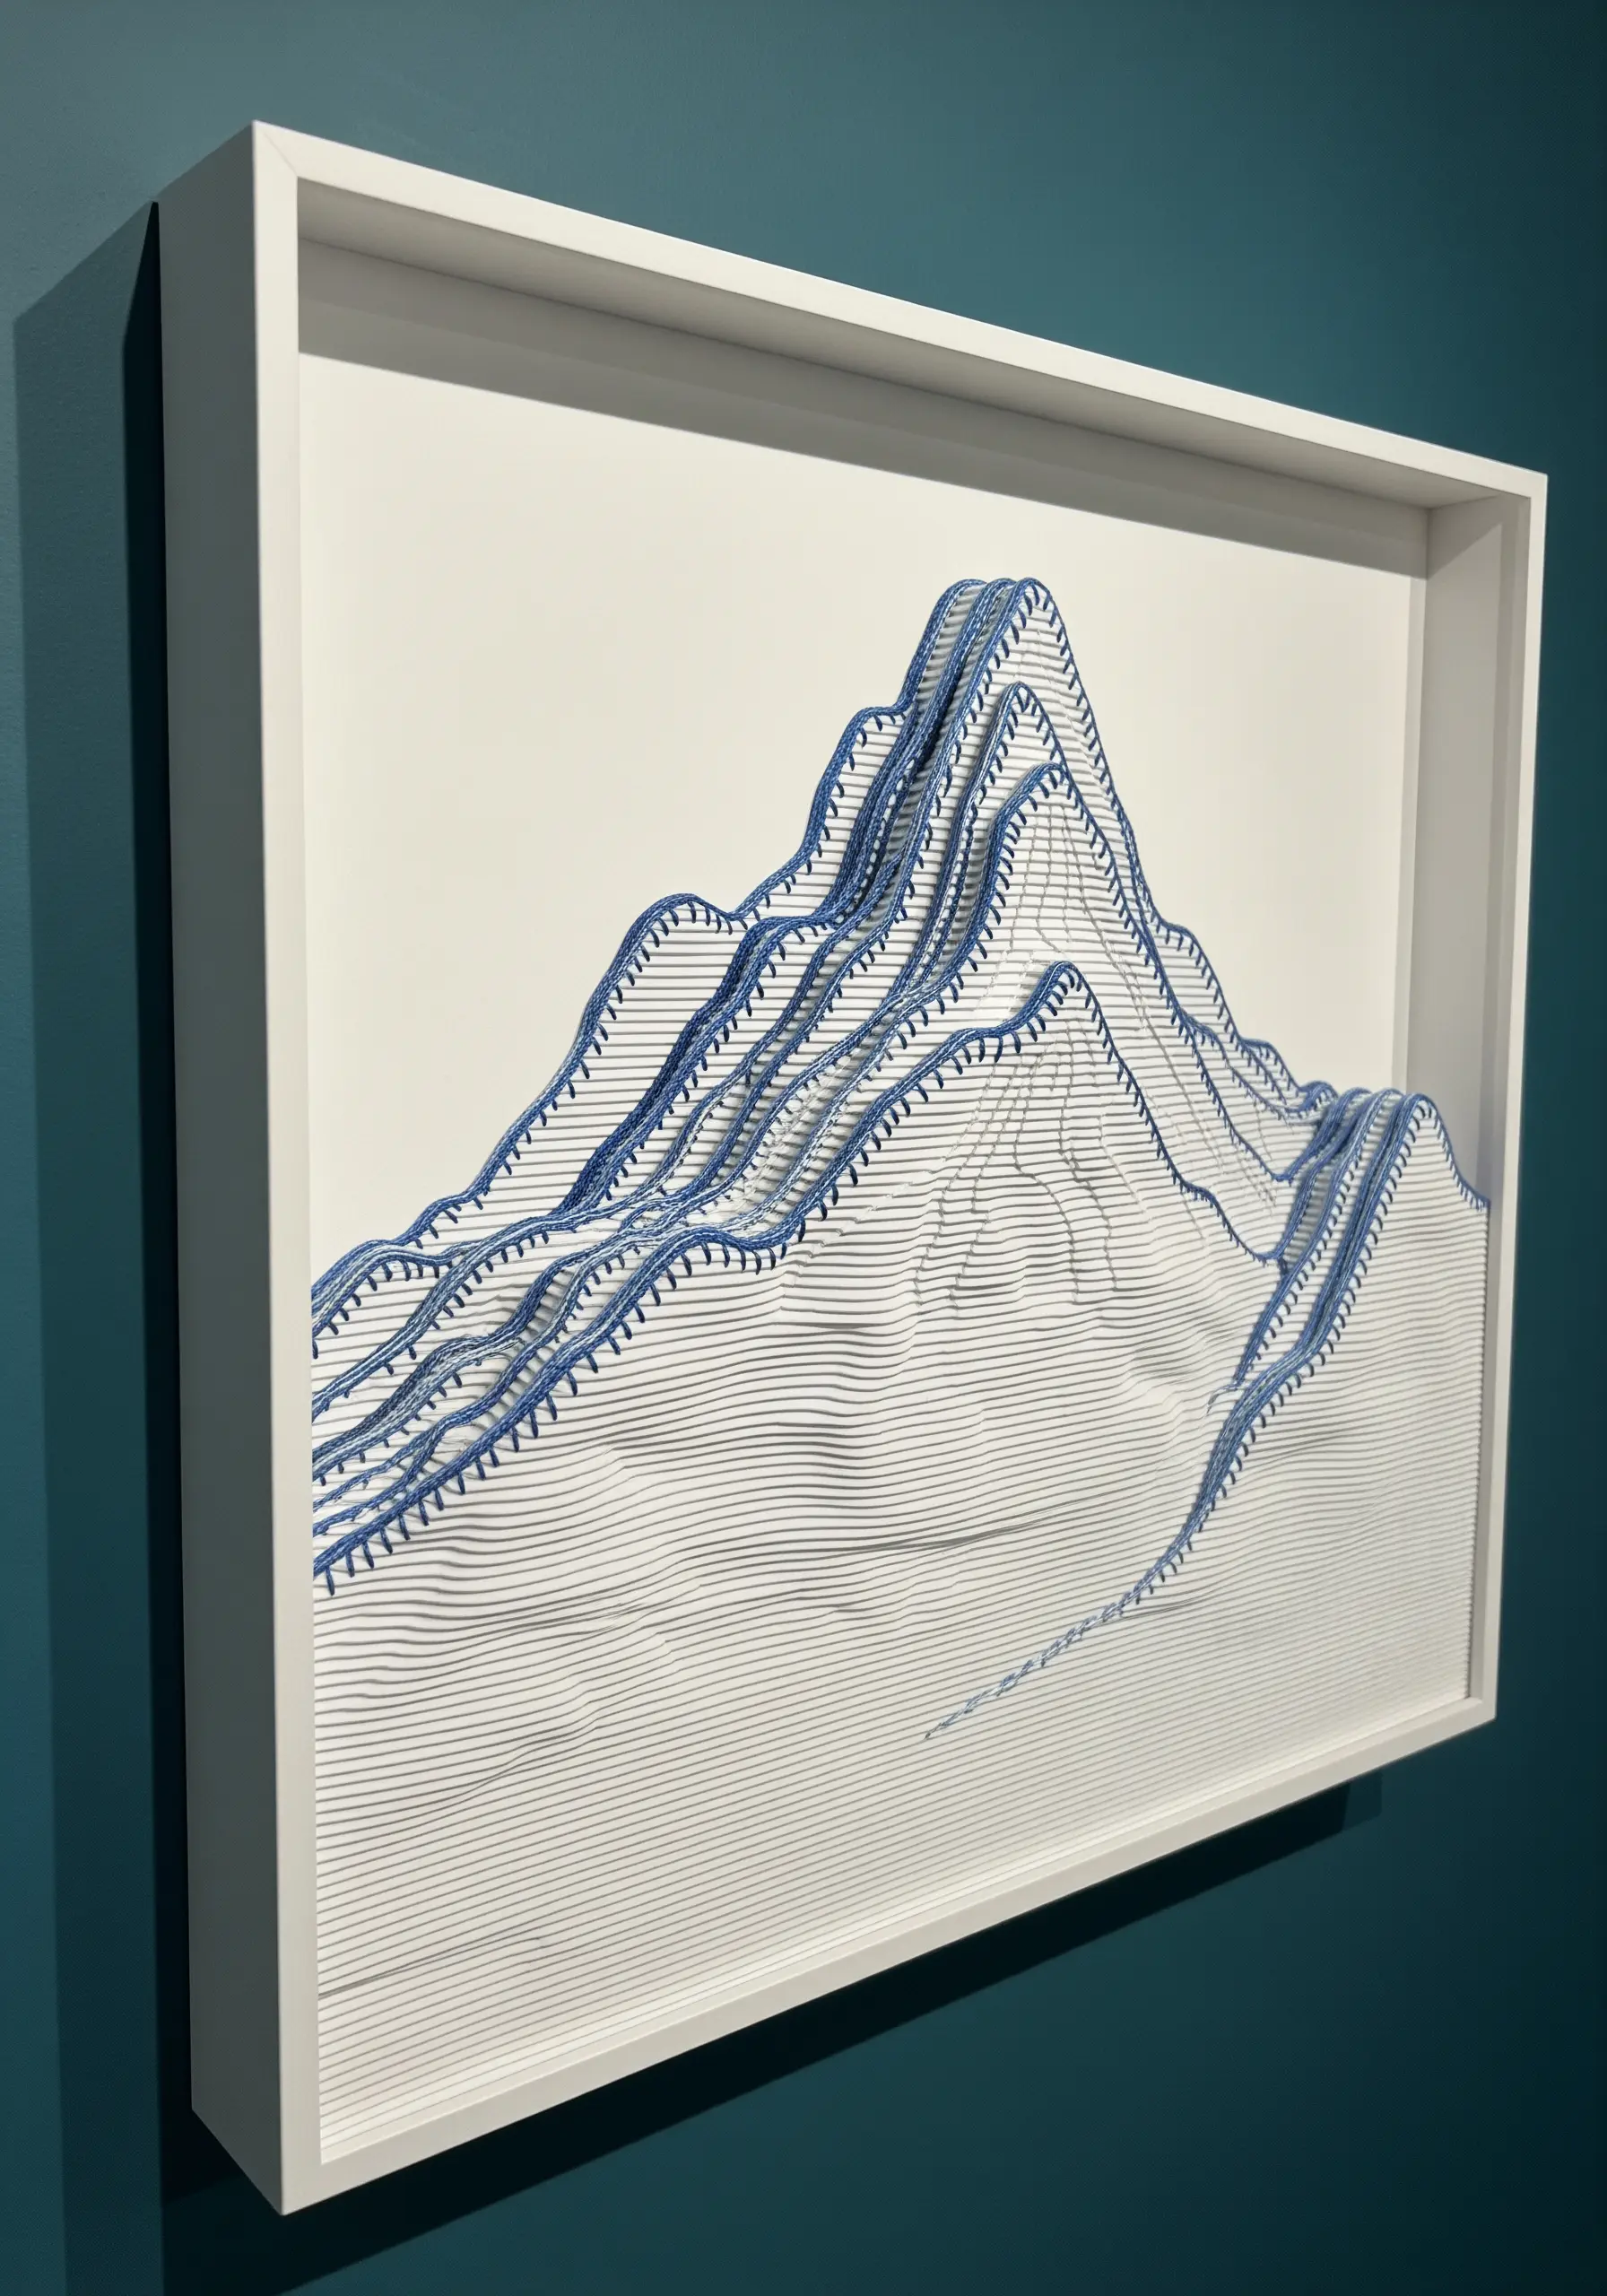
Use the visual language of layered paper art to inspire your approach to thread painting.
The distinct paper layers in this topographic sculpture are analogous to the blocks of color you create with long-and-short stitch.
Study how the lines create form and shadow, then apply that understanding to your next stitched landscape.
Give this paper art as a companion to your own mountain landscape thread painting for a gift that speaks to process and artistry.
17. Feature Embroidery on a Decoupage Box
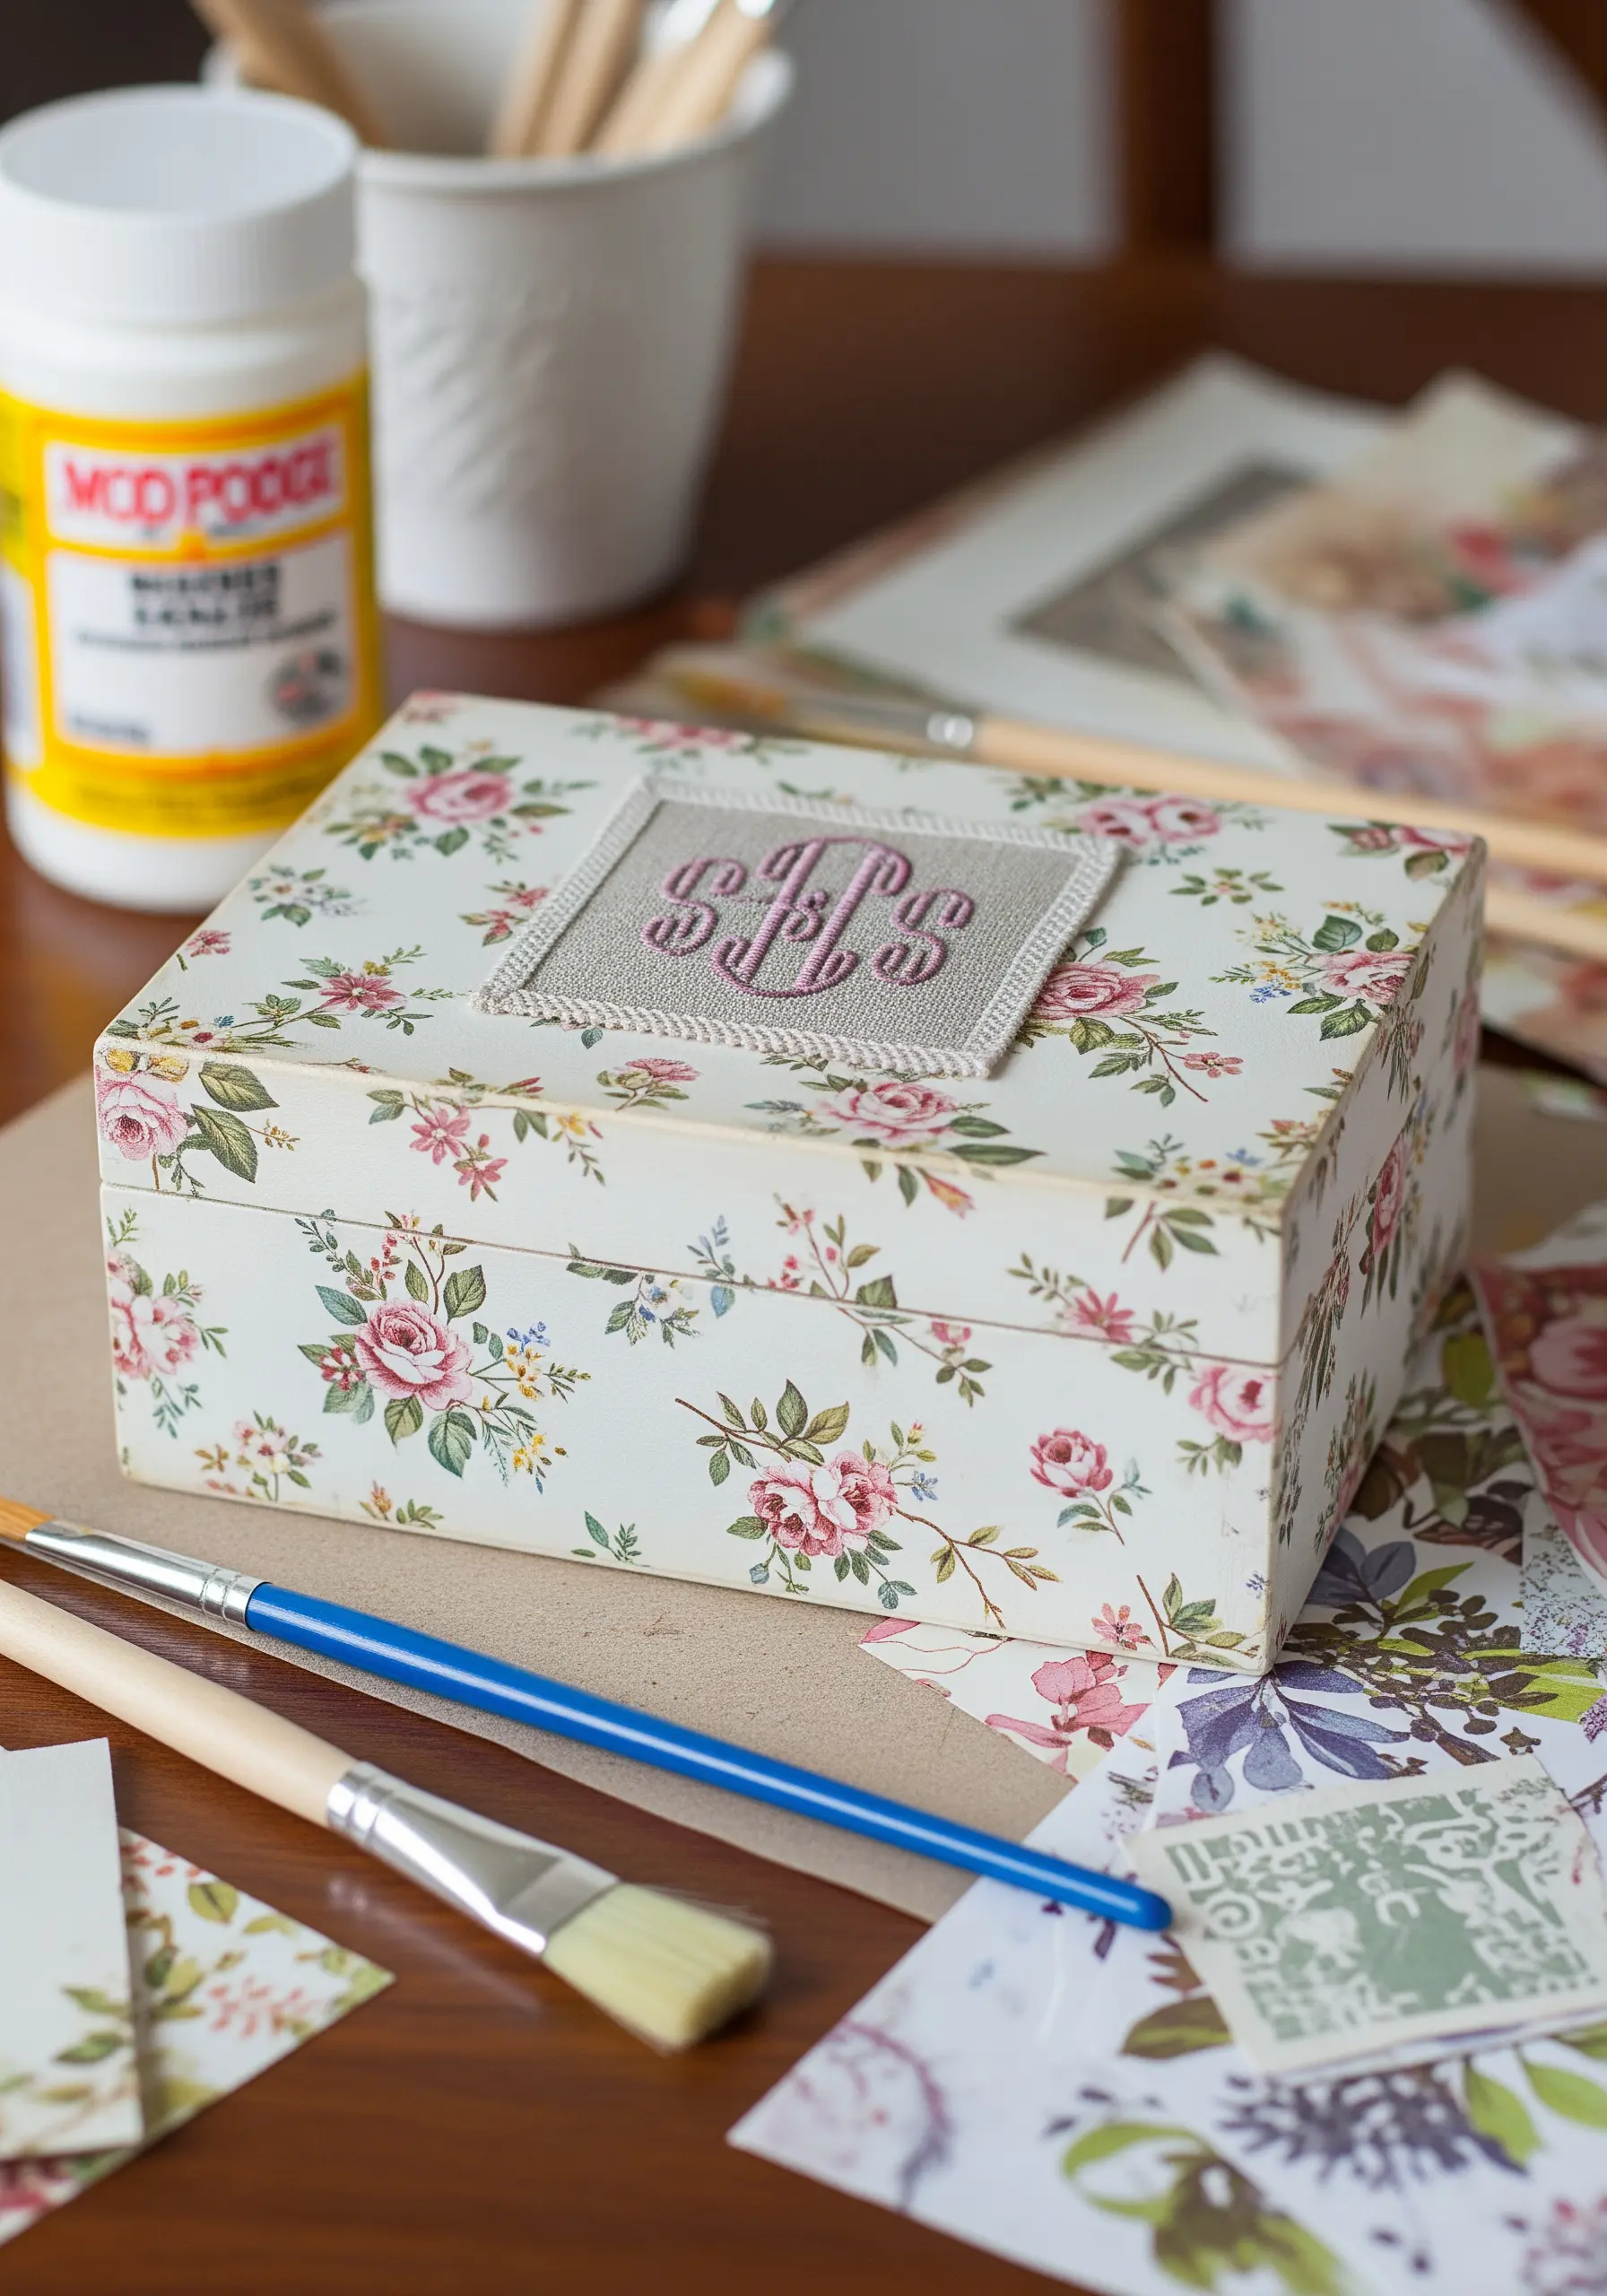
Give your embroidery a functional purpose by making it the centerpiece of a decorative box.
First, cover a plain wooden box with floral paper using decoupage glue.
Stitch your monogram or motif on a piece of evenweave fabric, leaving at least an inch of margin on all sides.
Secure the stitched piece to the lid with fabric adhesive, ensuring it sits flat and centered. The paper provides a beautiful, patterned frame for your handiwork.
18. Complement Upcycled Paper Beads with Thread
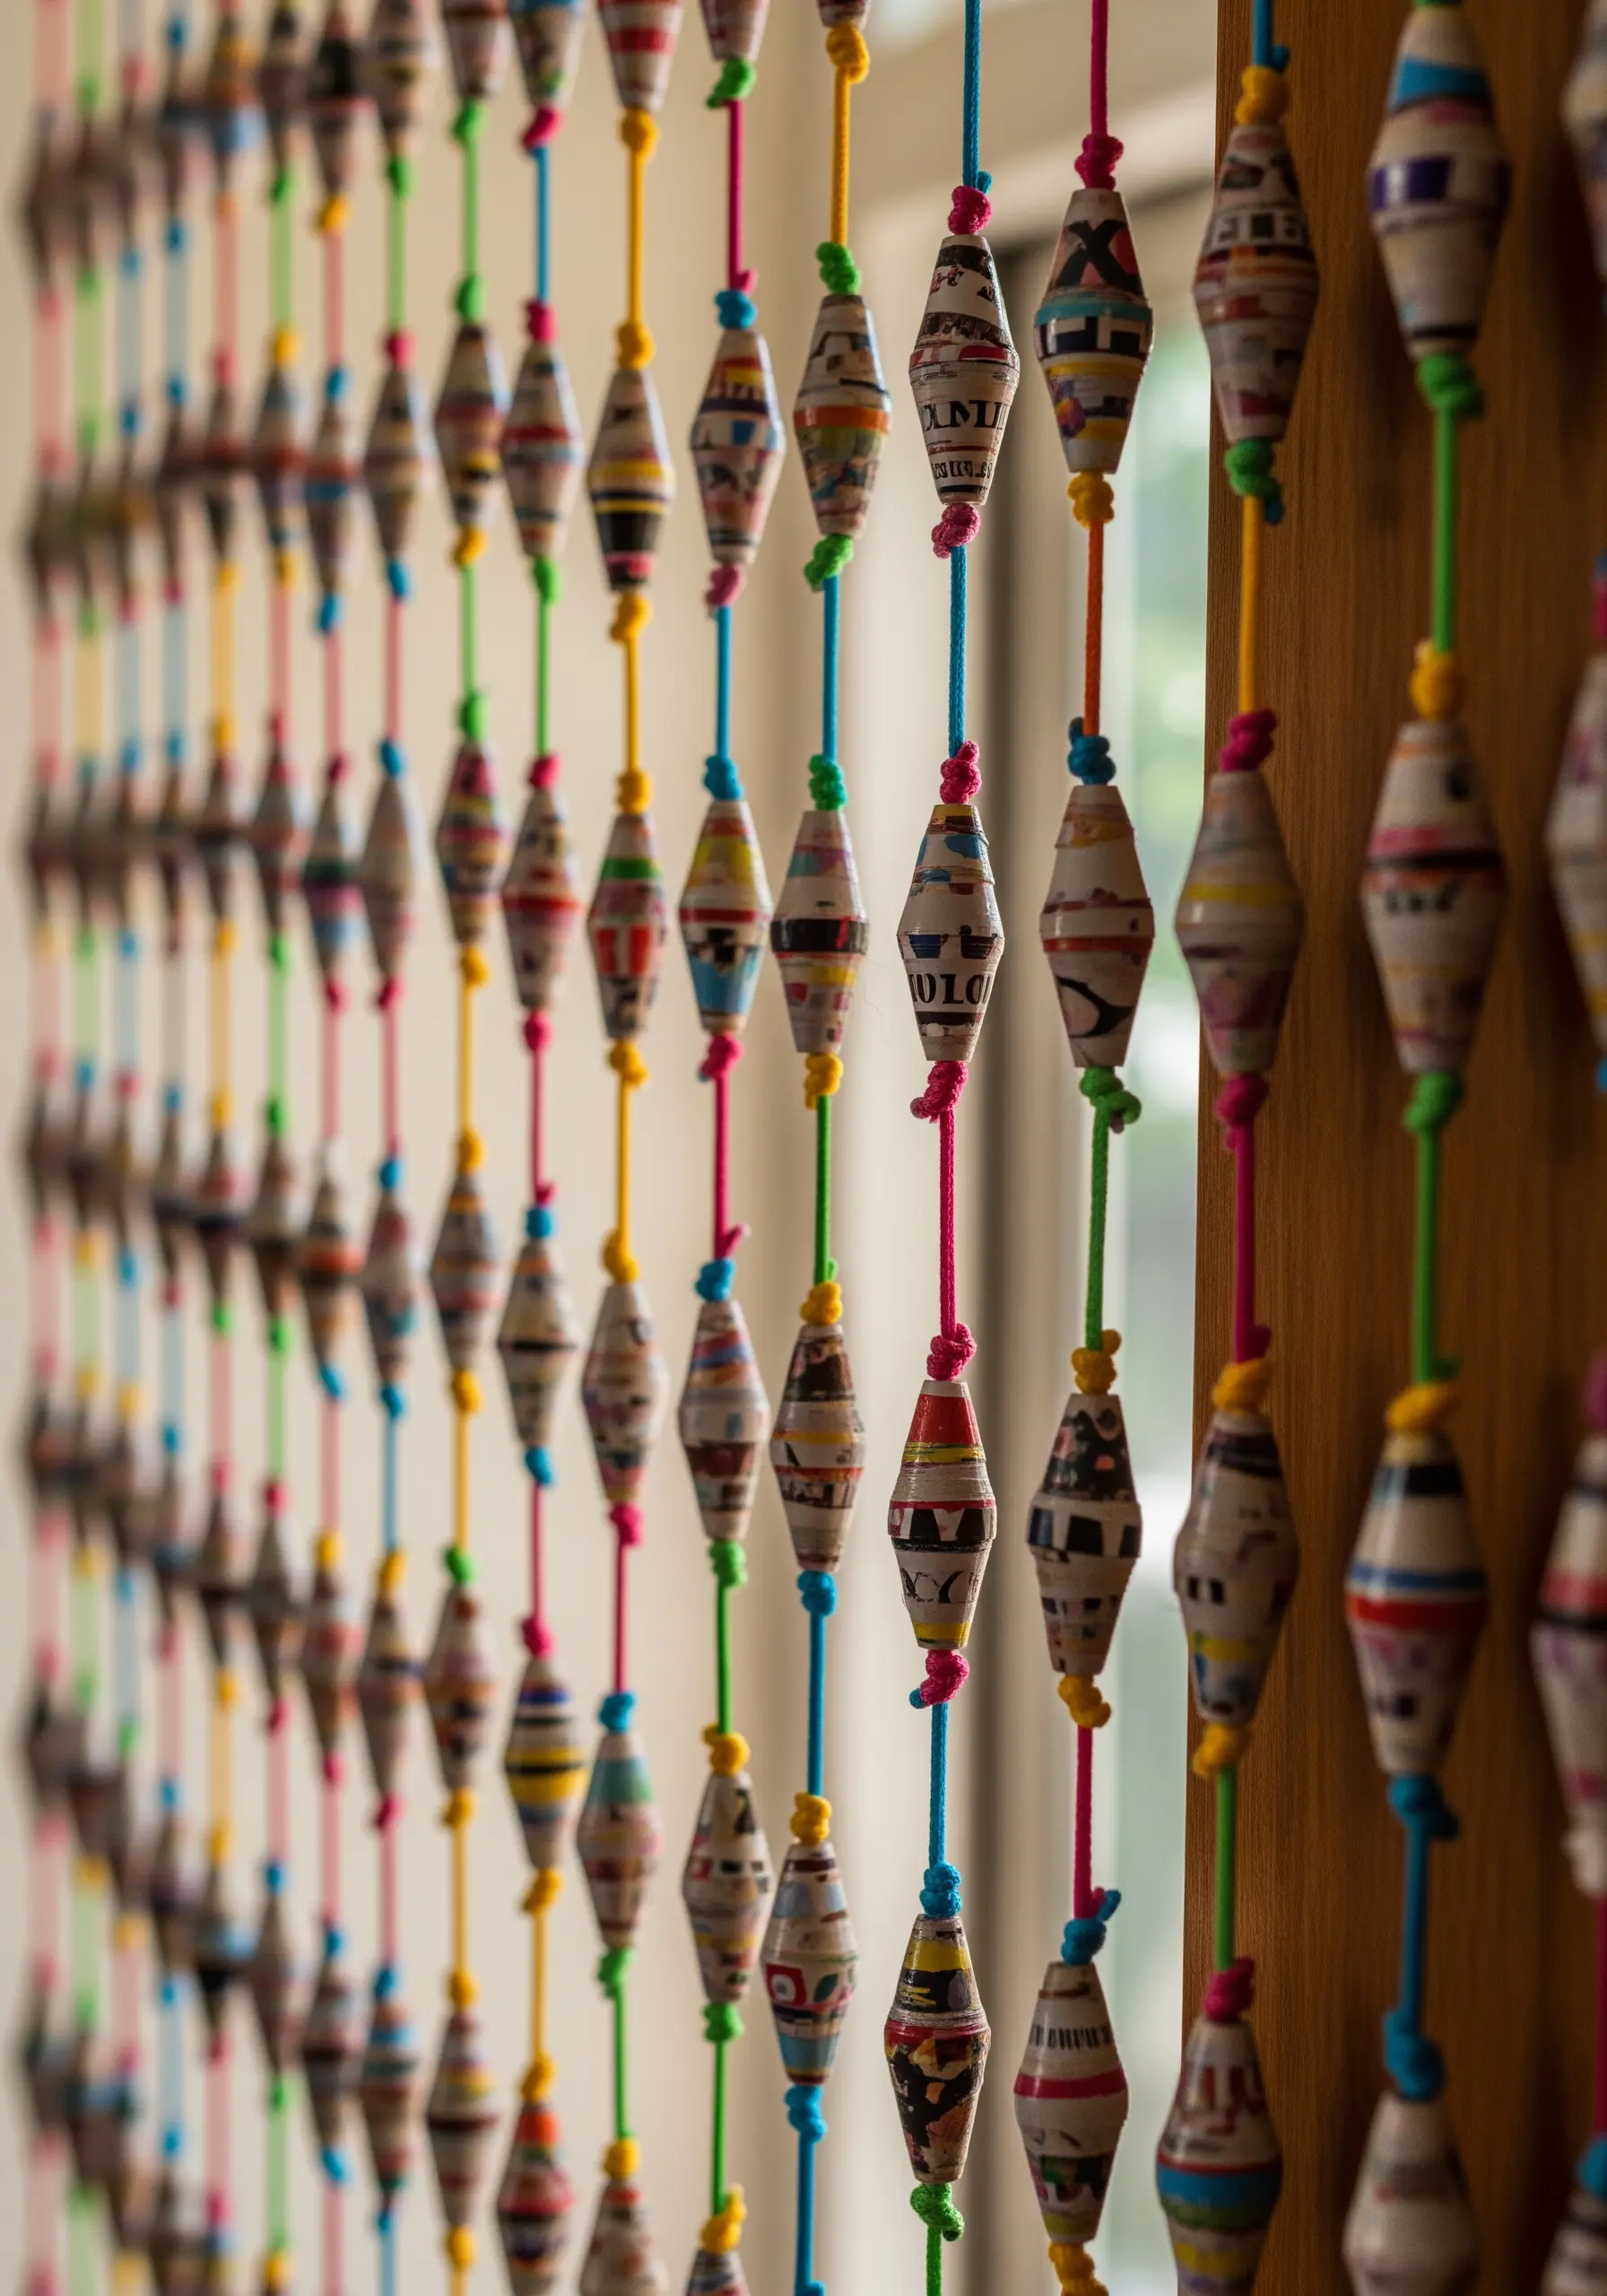
Create harmony between recycled paper art and your embroidery by focusing on color and rhythm.
A curtain made of rolled paper beads has a wonderful, repetitive pattern and a unique color palette derived from the original magazine or newspaper pages.
Craft matching tassels or an embroidered curtain tie-back using threads that pull out the brightest colors from the beads.
This small touch connects the two pieces, echoing the spirit of upcycled fabric wall art and thoughtful craftsmanship.


