
Sometimes the desire to create something beautiful feels at odds with the time we actually have. You see a finished piece and imagine hours of intricate work, but I want you to see it differently—as a series of small, intentional choices that lead to a meaningful result.
A personalized gift doesn’t need to be overwhelmingly complex to be deeply felt. In fact, the most elegant solutions often come from mastering a simple technique and applying it with thought and care.
In the space of a single afternoon, you can create something polished, personal, and complete. Let these ideas guide you not just in what to stitch, but in *how* to see the potential in a single stitch, a thoughtful color choice, or a perfectly placed line. Your hands already know what to do; let’s give them a place to begin.
1. Master the Classic Satin Stitch Monogram
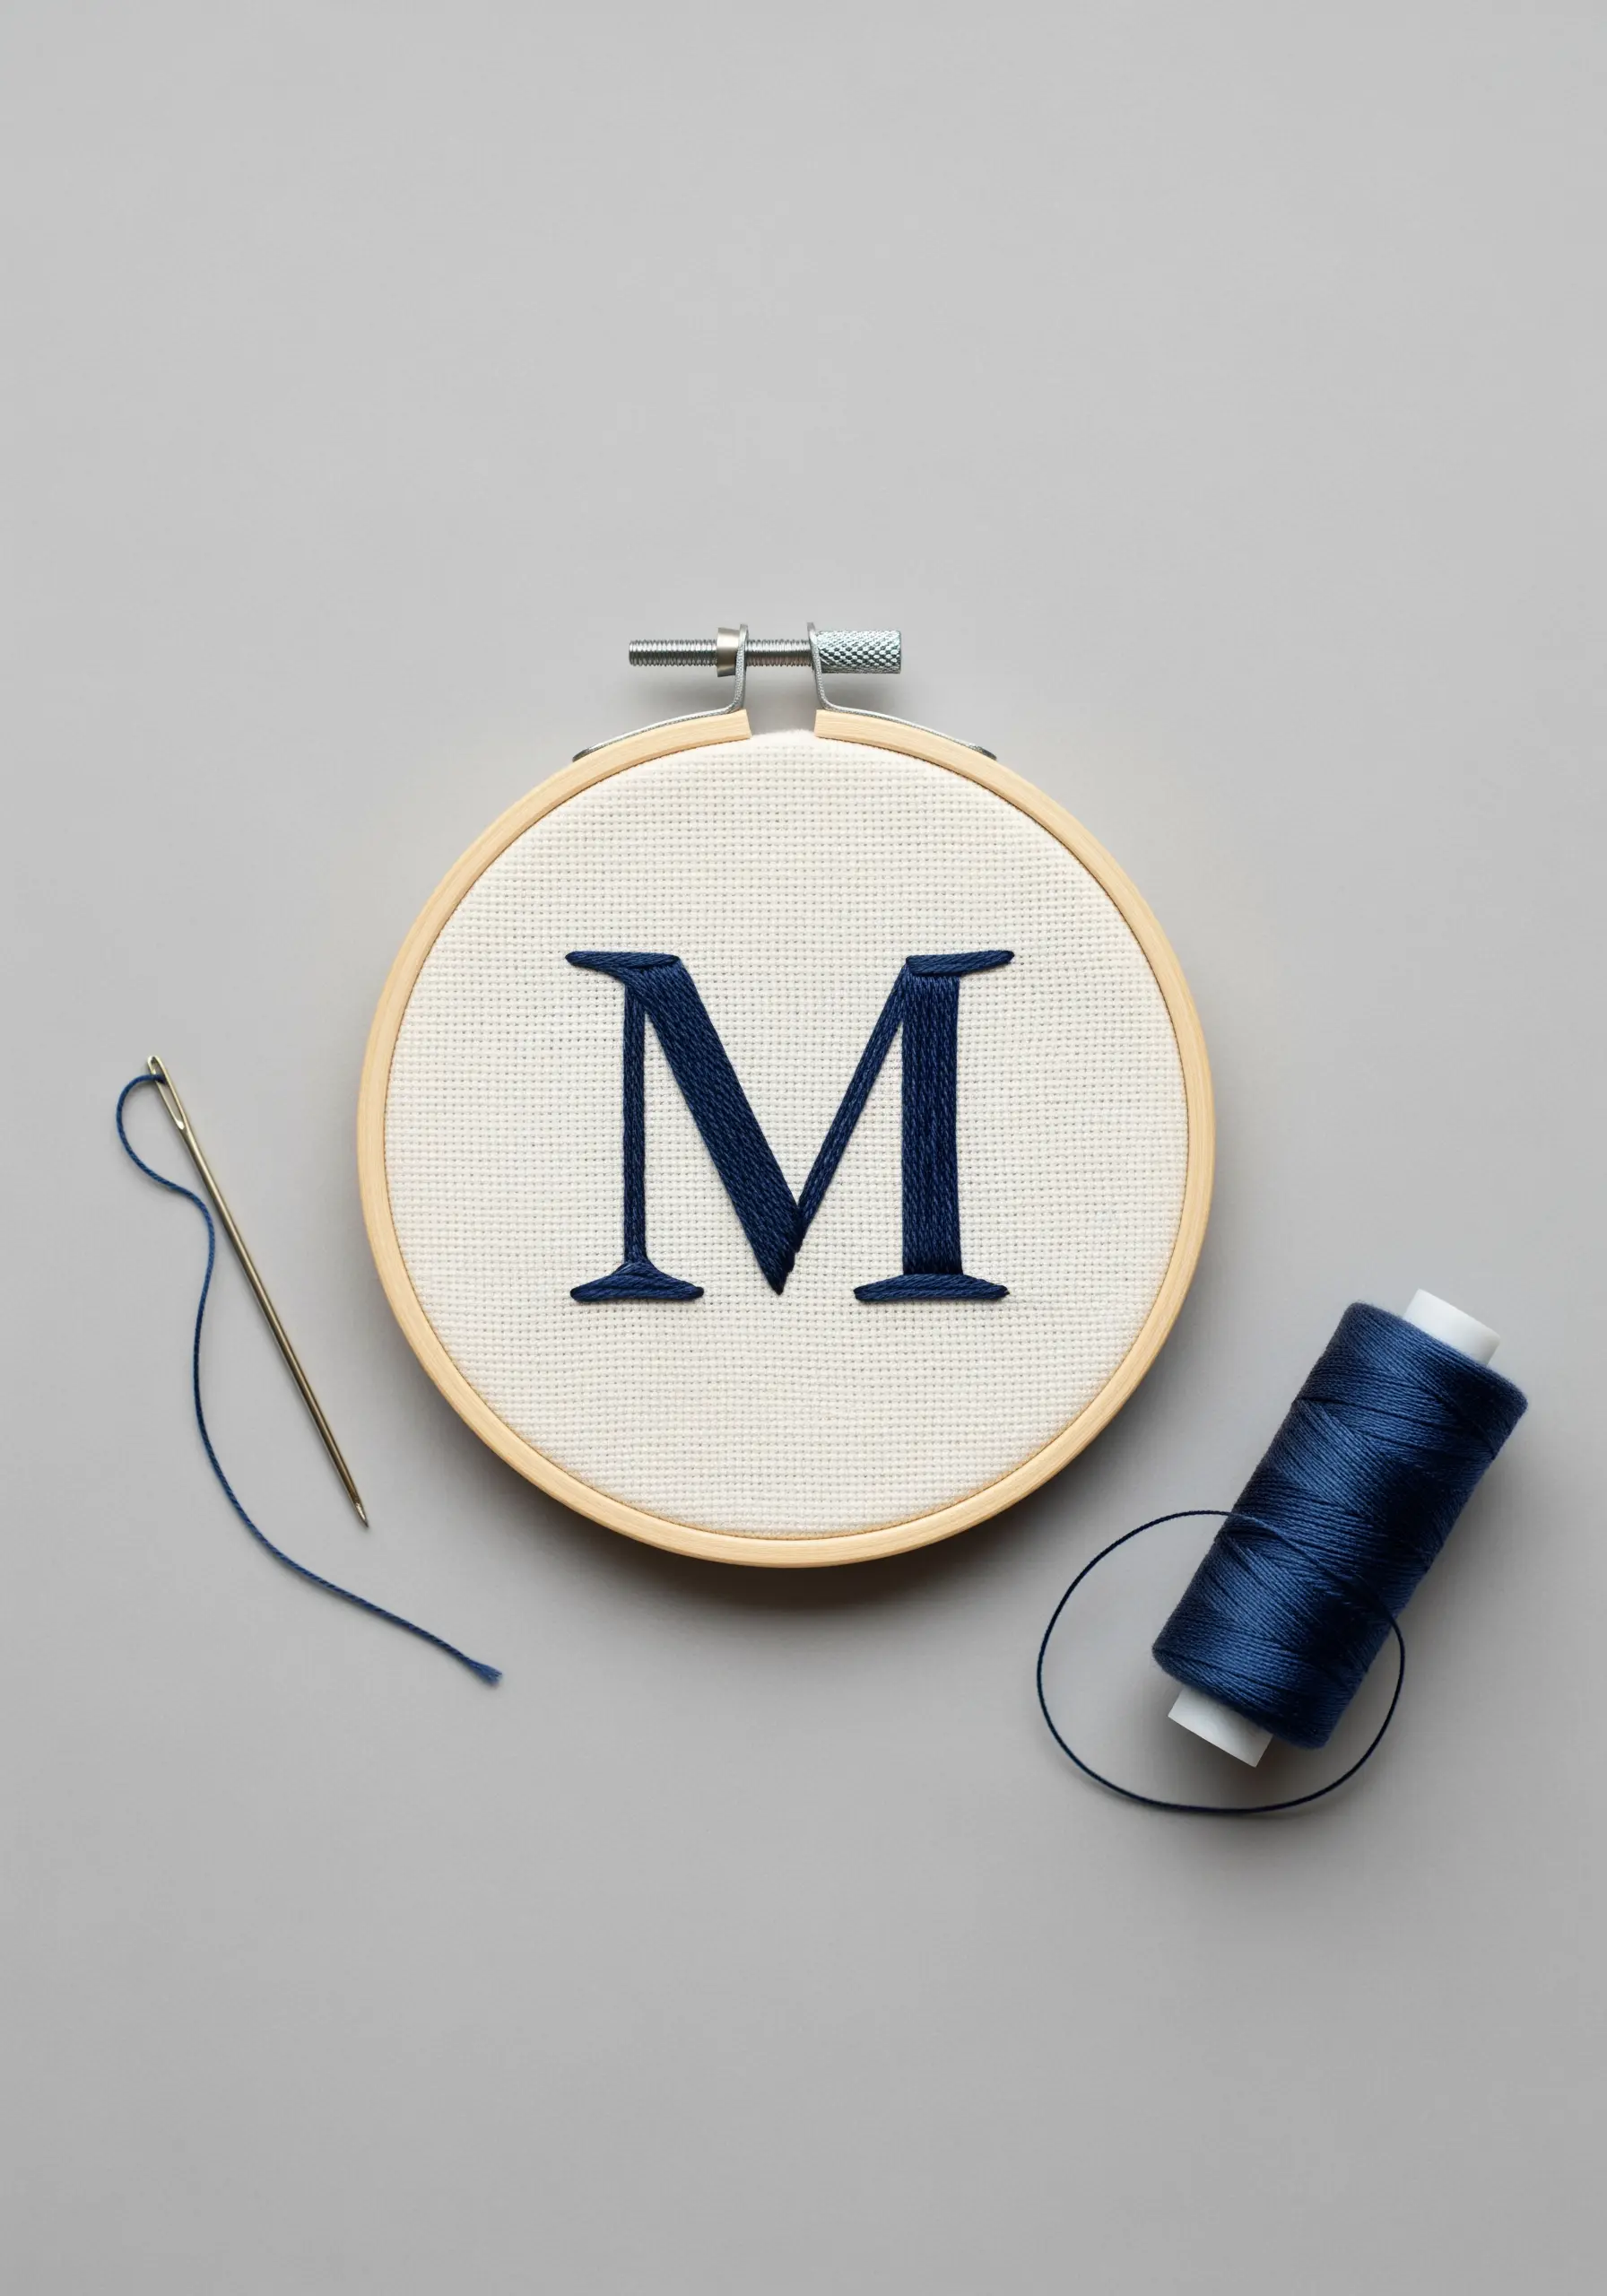
For a truly polished monogram, the secret lies in perfectly aligned satin stitches.
Use aida cloth or a fabric with a visible weave to guide your needle, ensuring each stitch enters and exits precisely on the same horizontal line.
To achieve those crisp, satisfying edges, outline the letter with a split stitch first.
This simple preparation acts as a raised barrier, giving your satin stitches a sharp boundary to fill against, resulting in a professional, block-like finish.
Consider using all six strands of floss for a bold, substantial feel that makes the initial stand out with authority.
2. Add Dimension to Botanicals with Directional Fill
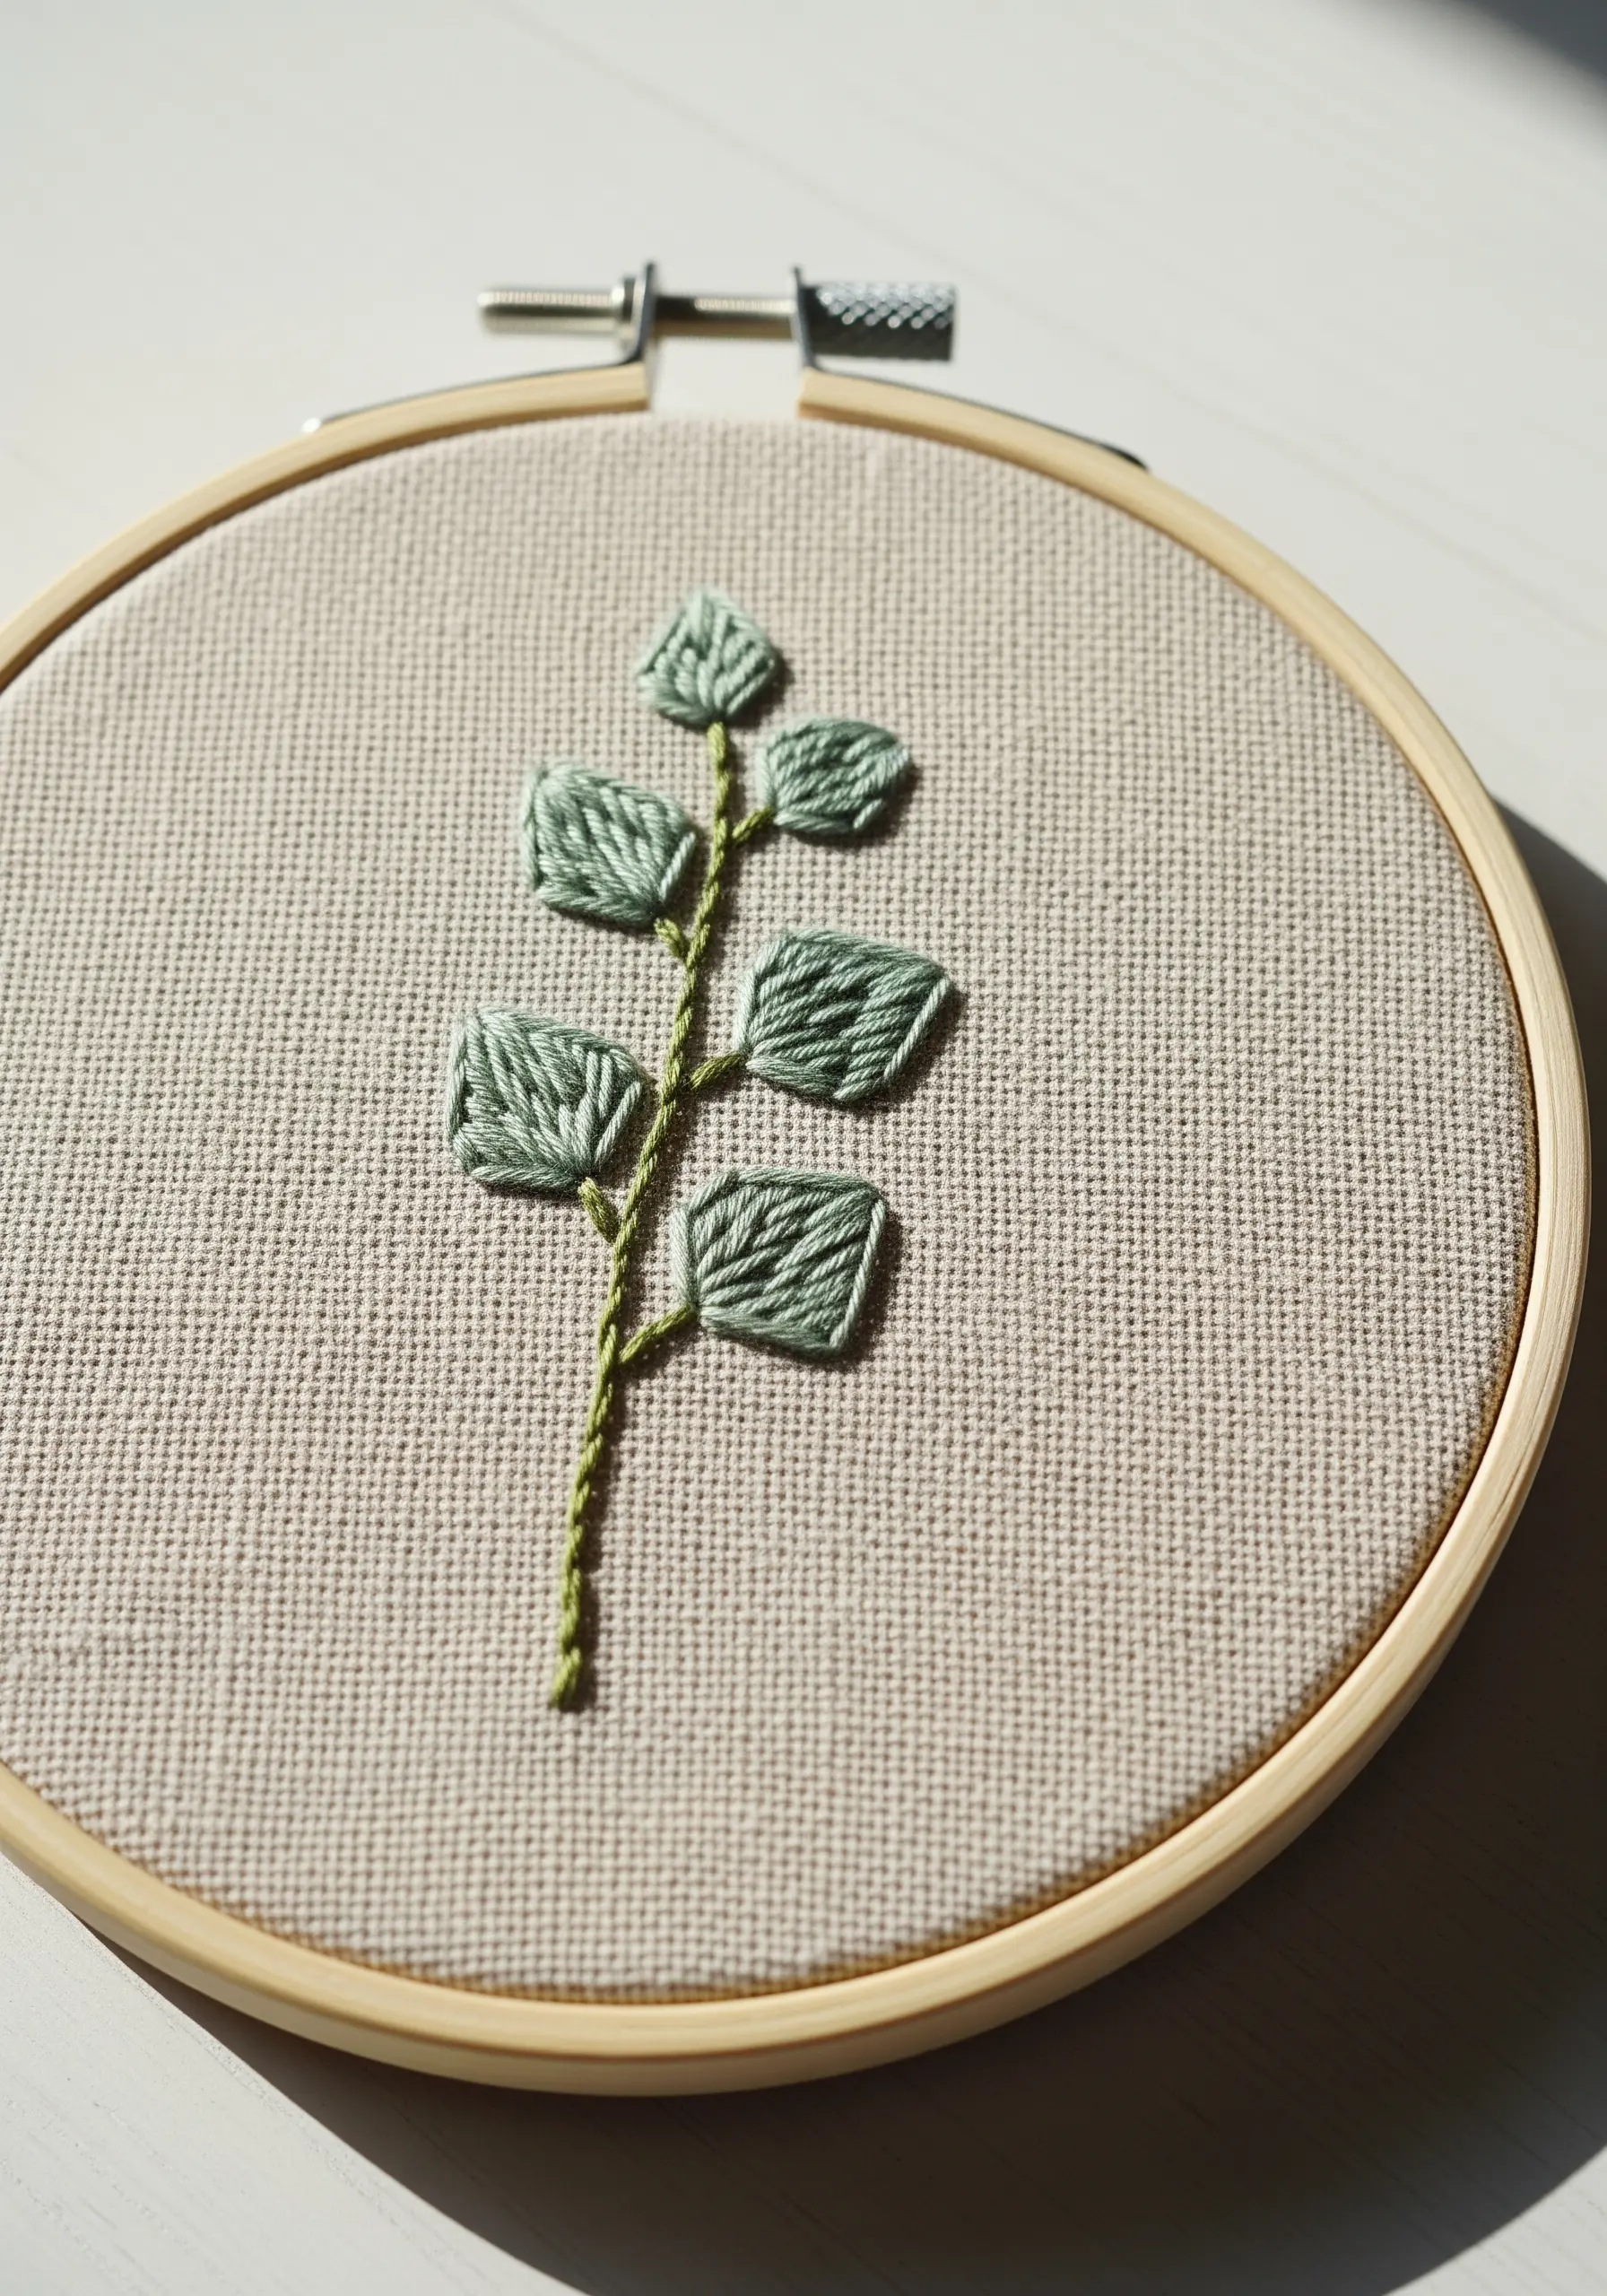
Bring simple leaf shapes to life by varying the direction of your satin stitches.
Instead of filling each leaf with uniform vertical or horizontal stitches, angle them to mimic the natural veins and curves of real foliage.
For the stem, use a twisted chain stitch or a simple stem stitch to create a raised, cord-like texture that contrasts beautifully with the smooth leaves.
This technique elevates a basic botanical motif, giving it a subtle, realistic sense of movement and depth without adding complexity.
Use a matte cotton thread on a natural linen or cotton canvas to enhance the organic feel.
3. Combine Crisp Outlines with Bold Color Fill
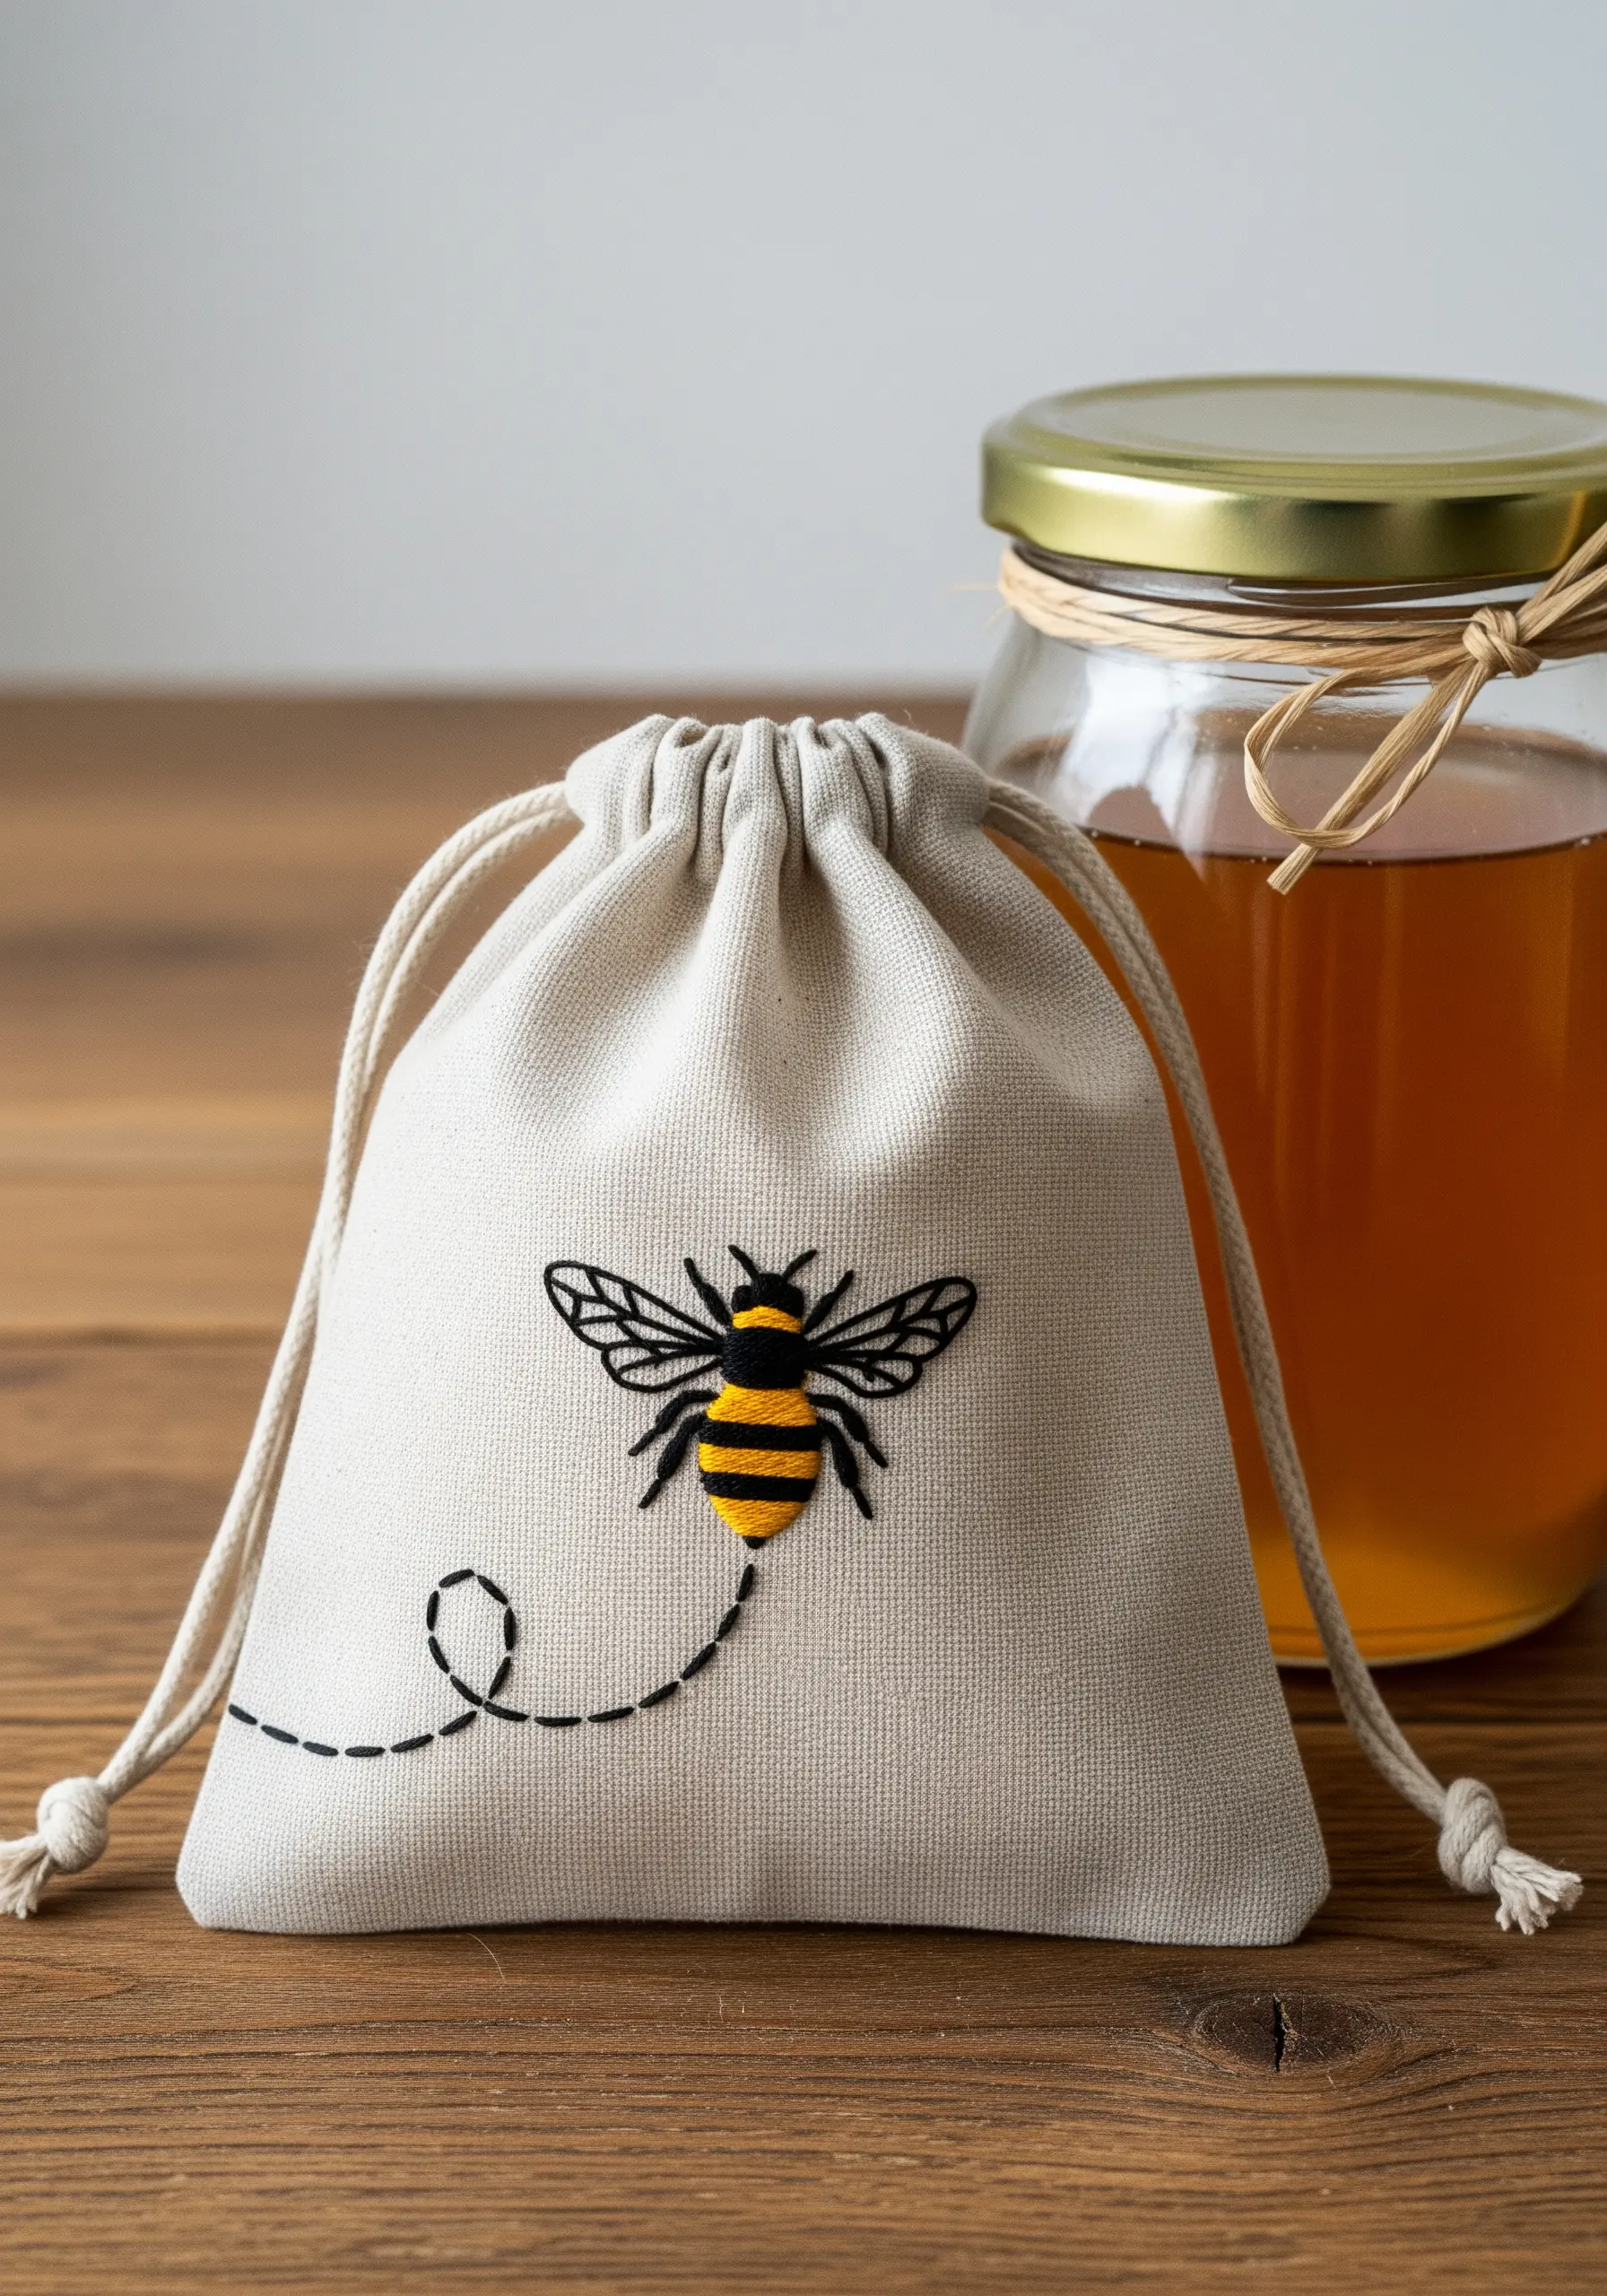
Create a striking, graphic effect by pairing a sharp backstitch outline with a dense satin stitch fill.
Use a single strand of black thread for the delicate wing details and outlines to keep them crisp and clear.
Then, switch to three or four strands of colored floss for the body, laying your satin stitches close together for opaque, vibrant coverage.
This contrast in thread weight and stitch style makes the design pop, turning a simple drawstring bag into a statement piece.
The dashed line adds a touch of playful movement, a perfect finishing detail for a gift.
4. Elevate Linens with Subtle, Tone-on-Tone Detail
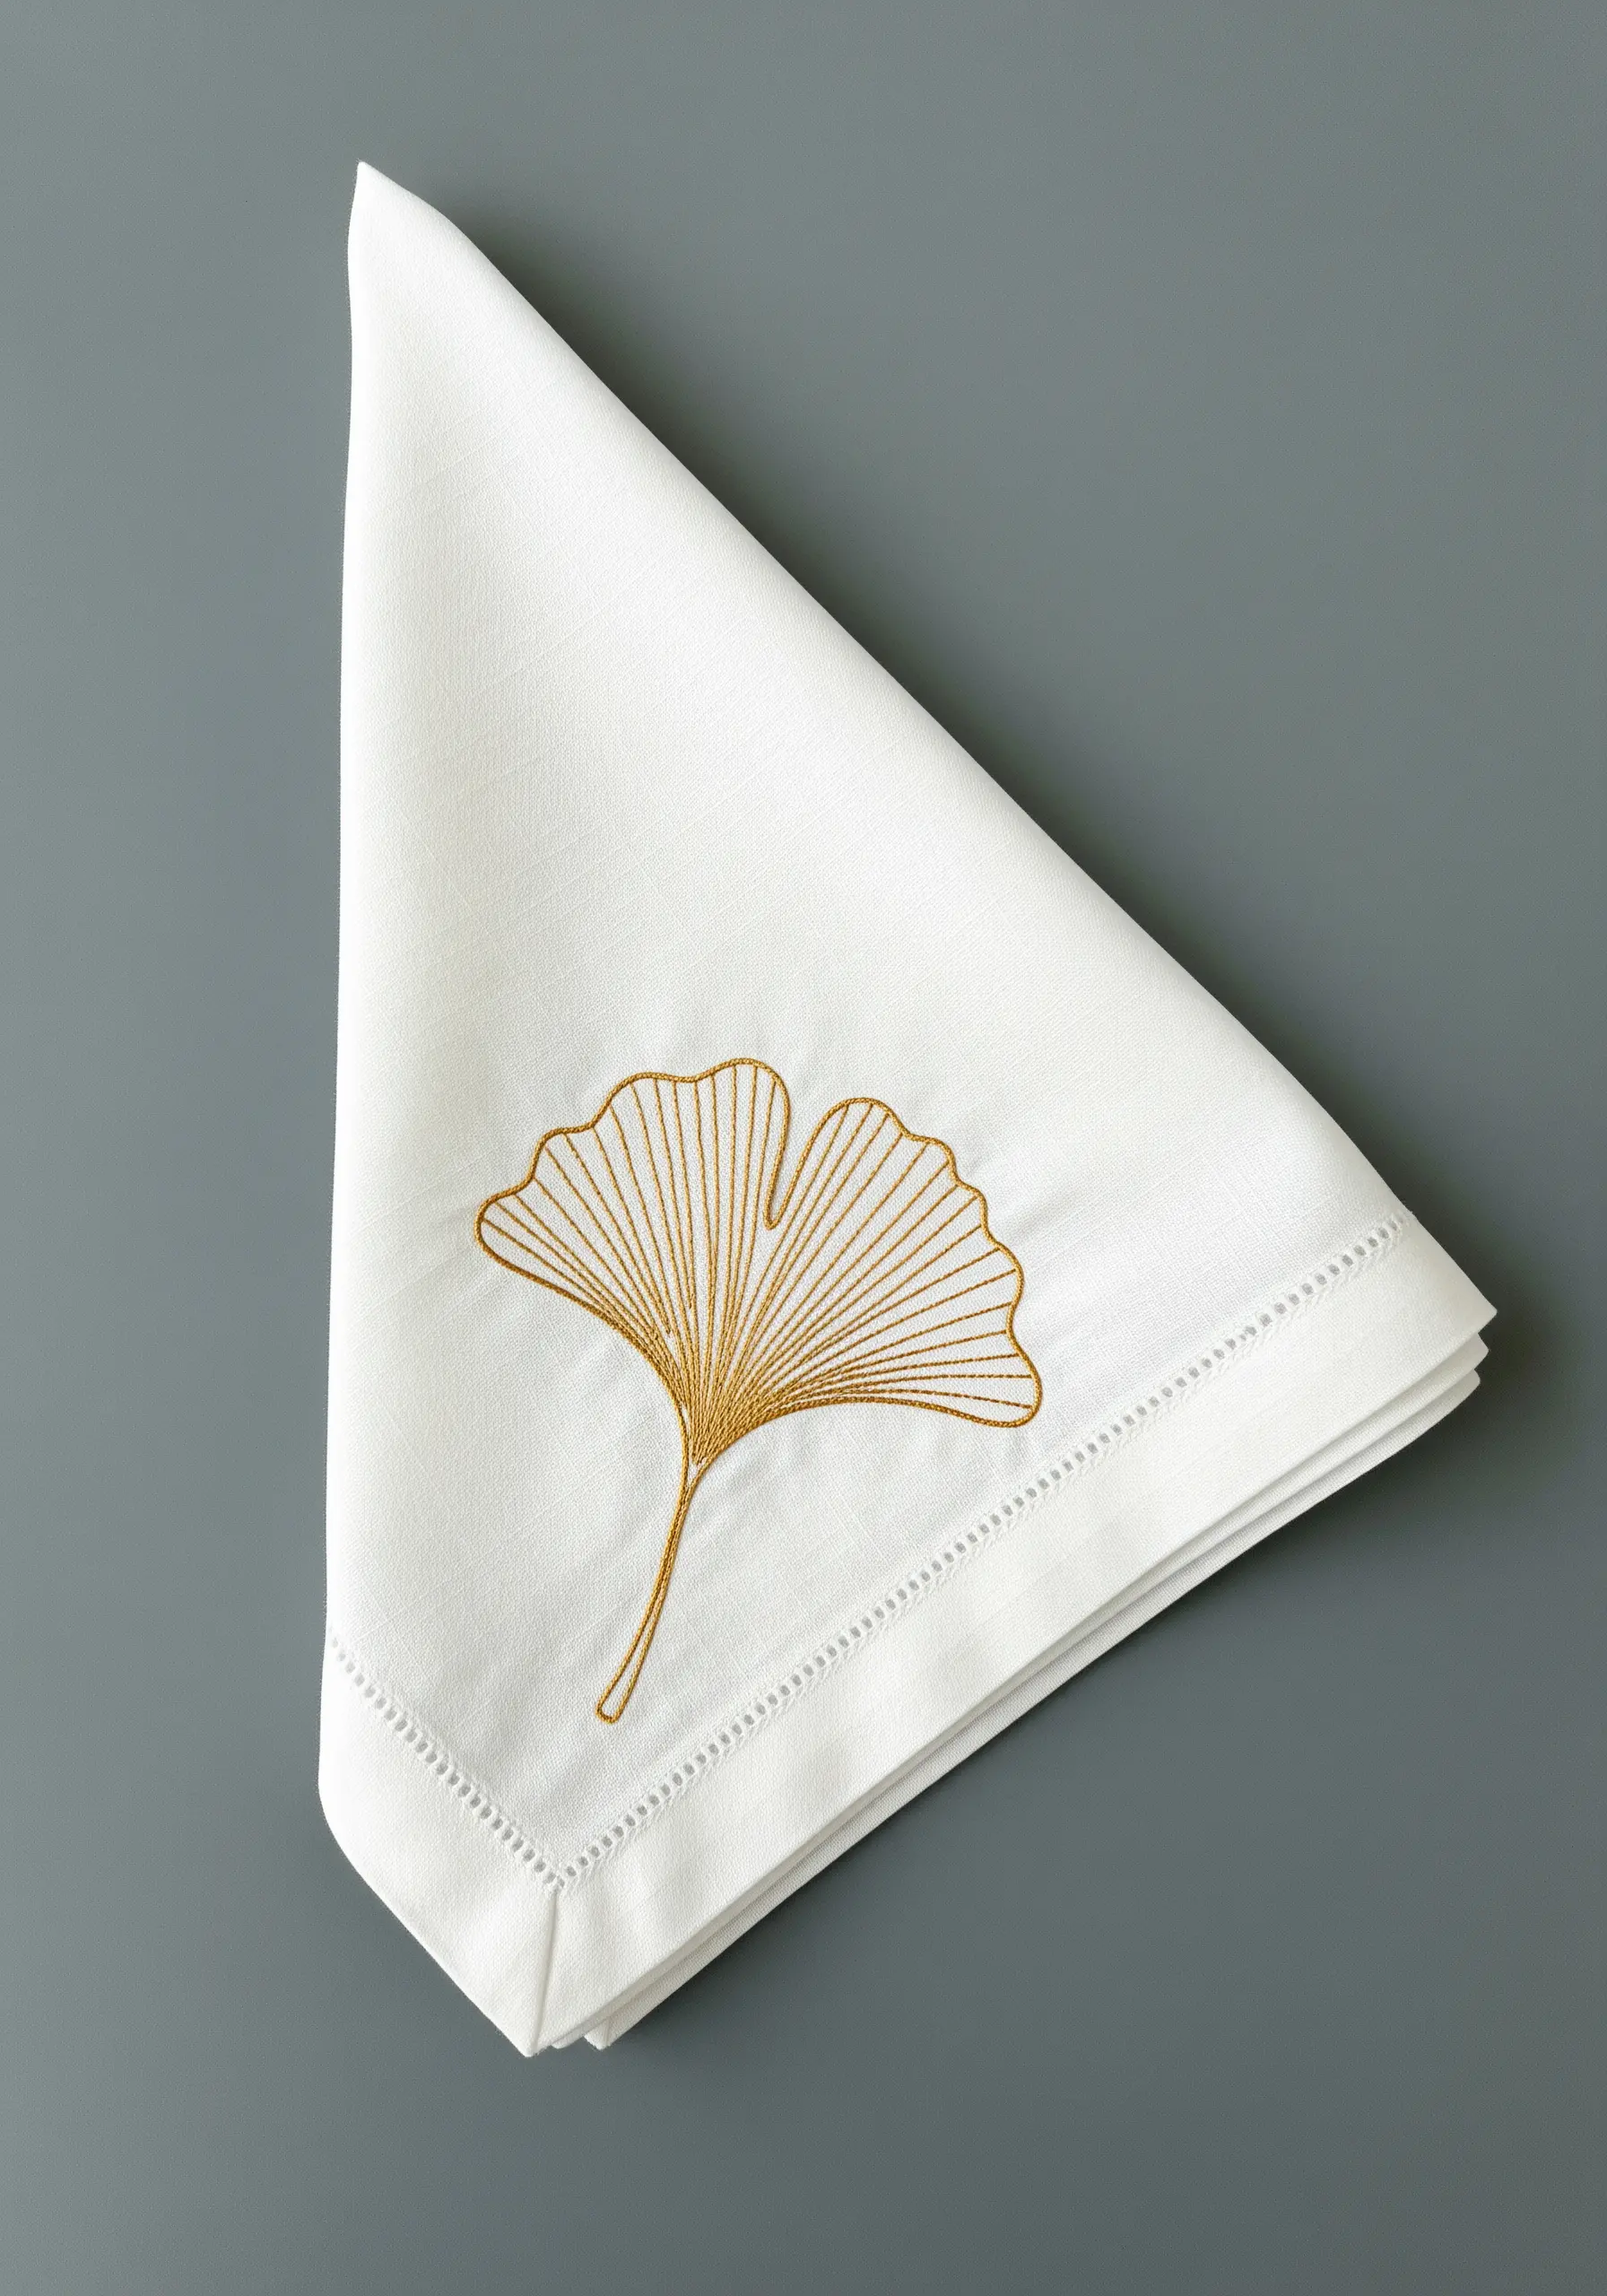
For an understated yet luxurious gift, explore tone-on-tone embroidery techniques.
Stitching a design in a color that is only a few shades lighter or darker than the base fabric creates an elegant, textural effect that feels both modern and timeless.
On a crisp white napkin, a soft gold or silver-grey thread offers a hint of warmth and sophistication without overwhelming the piece.
Use a fine backstitch for the delicate veins of the ginkgo leaf, ensuring your stitch length is consistent for a smooth, unbroken line.
This technique is perfect for personalizing table linens, towels, or pillowcases with a touch of bespoke grace.
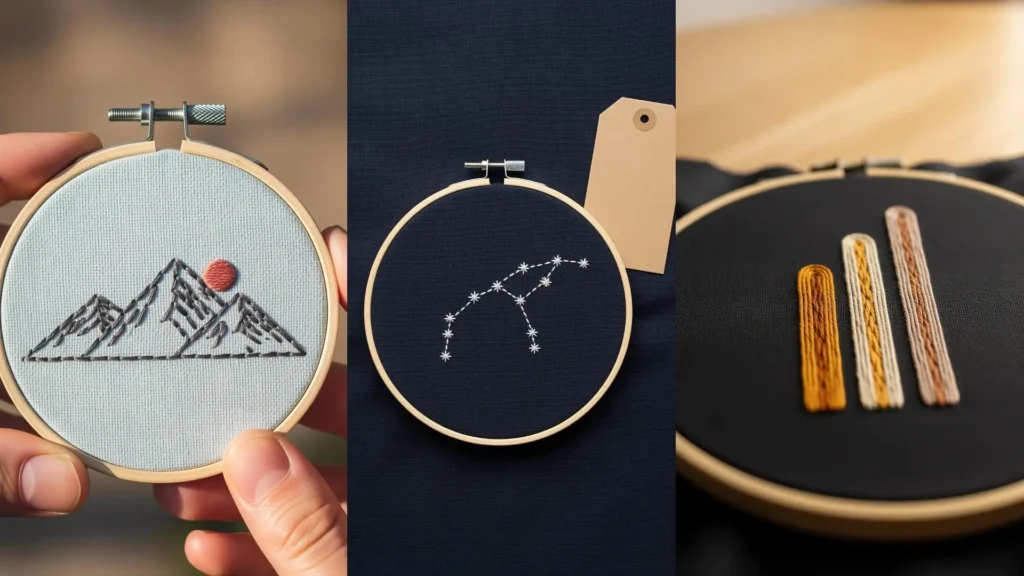
5. Sketch a Landscape with Simple Line Work
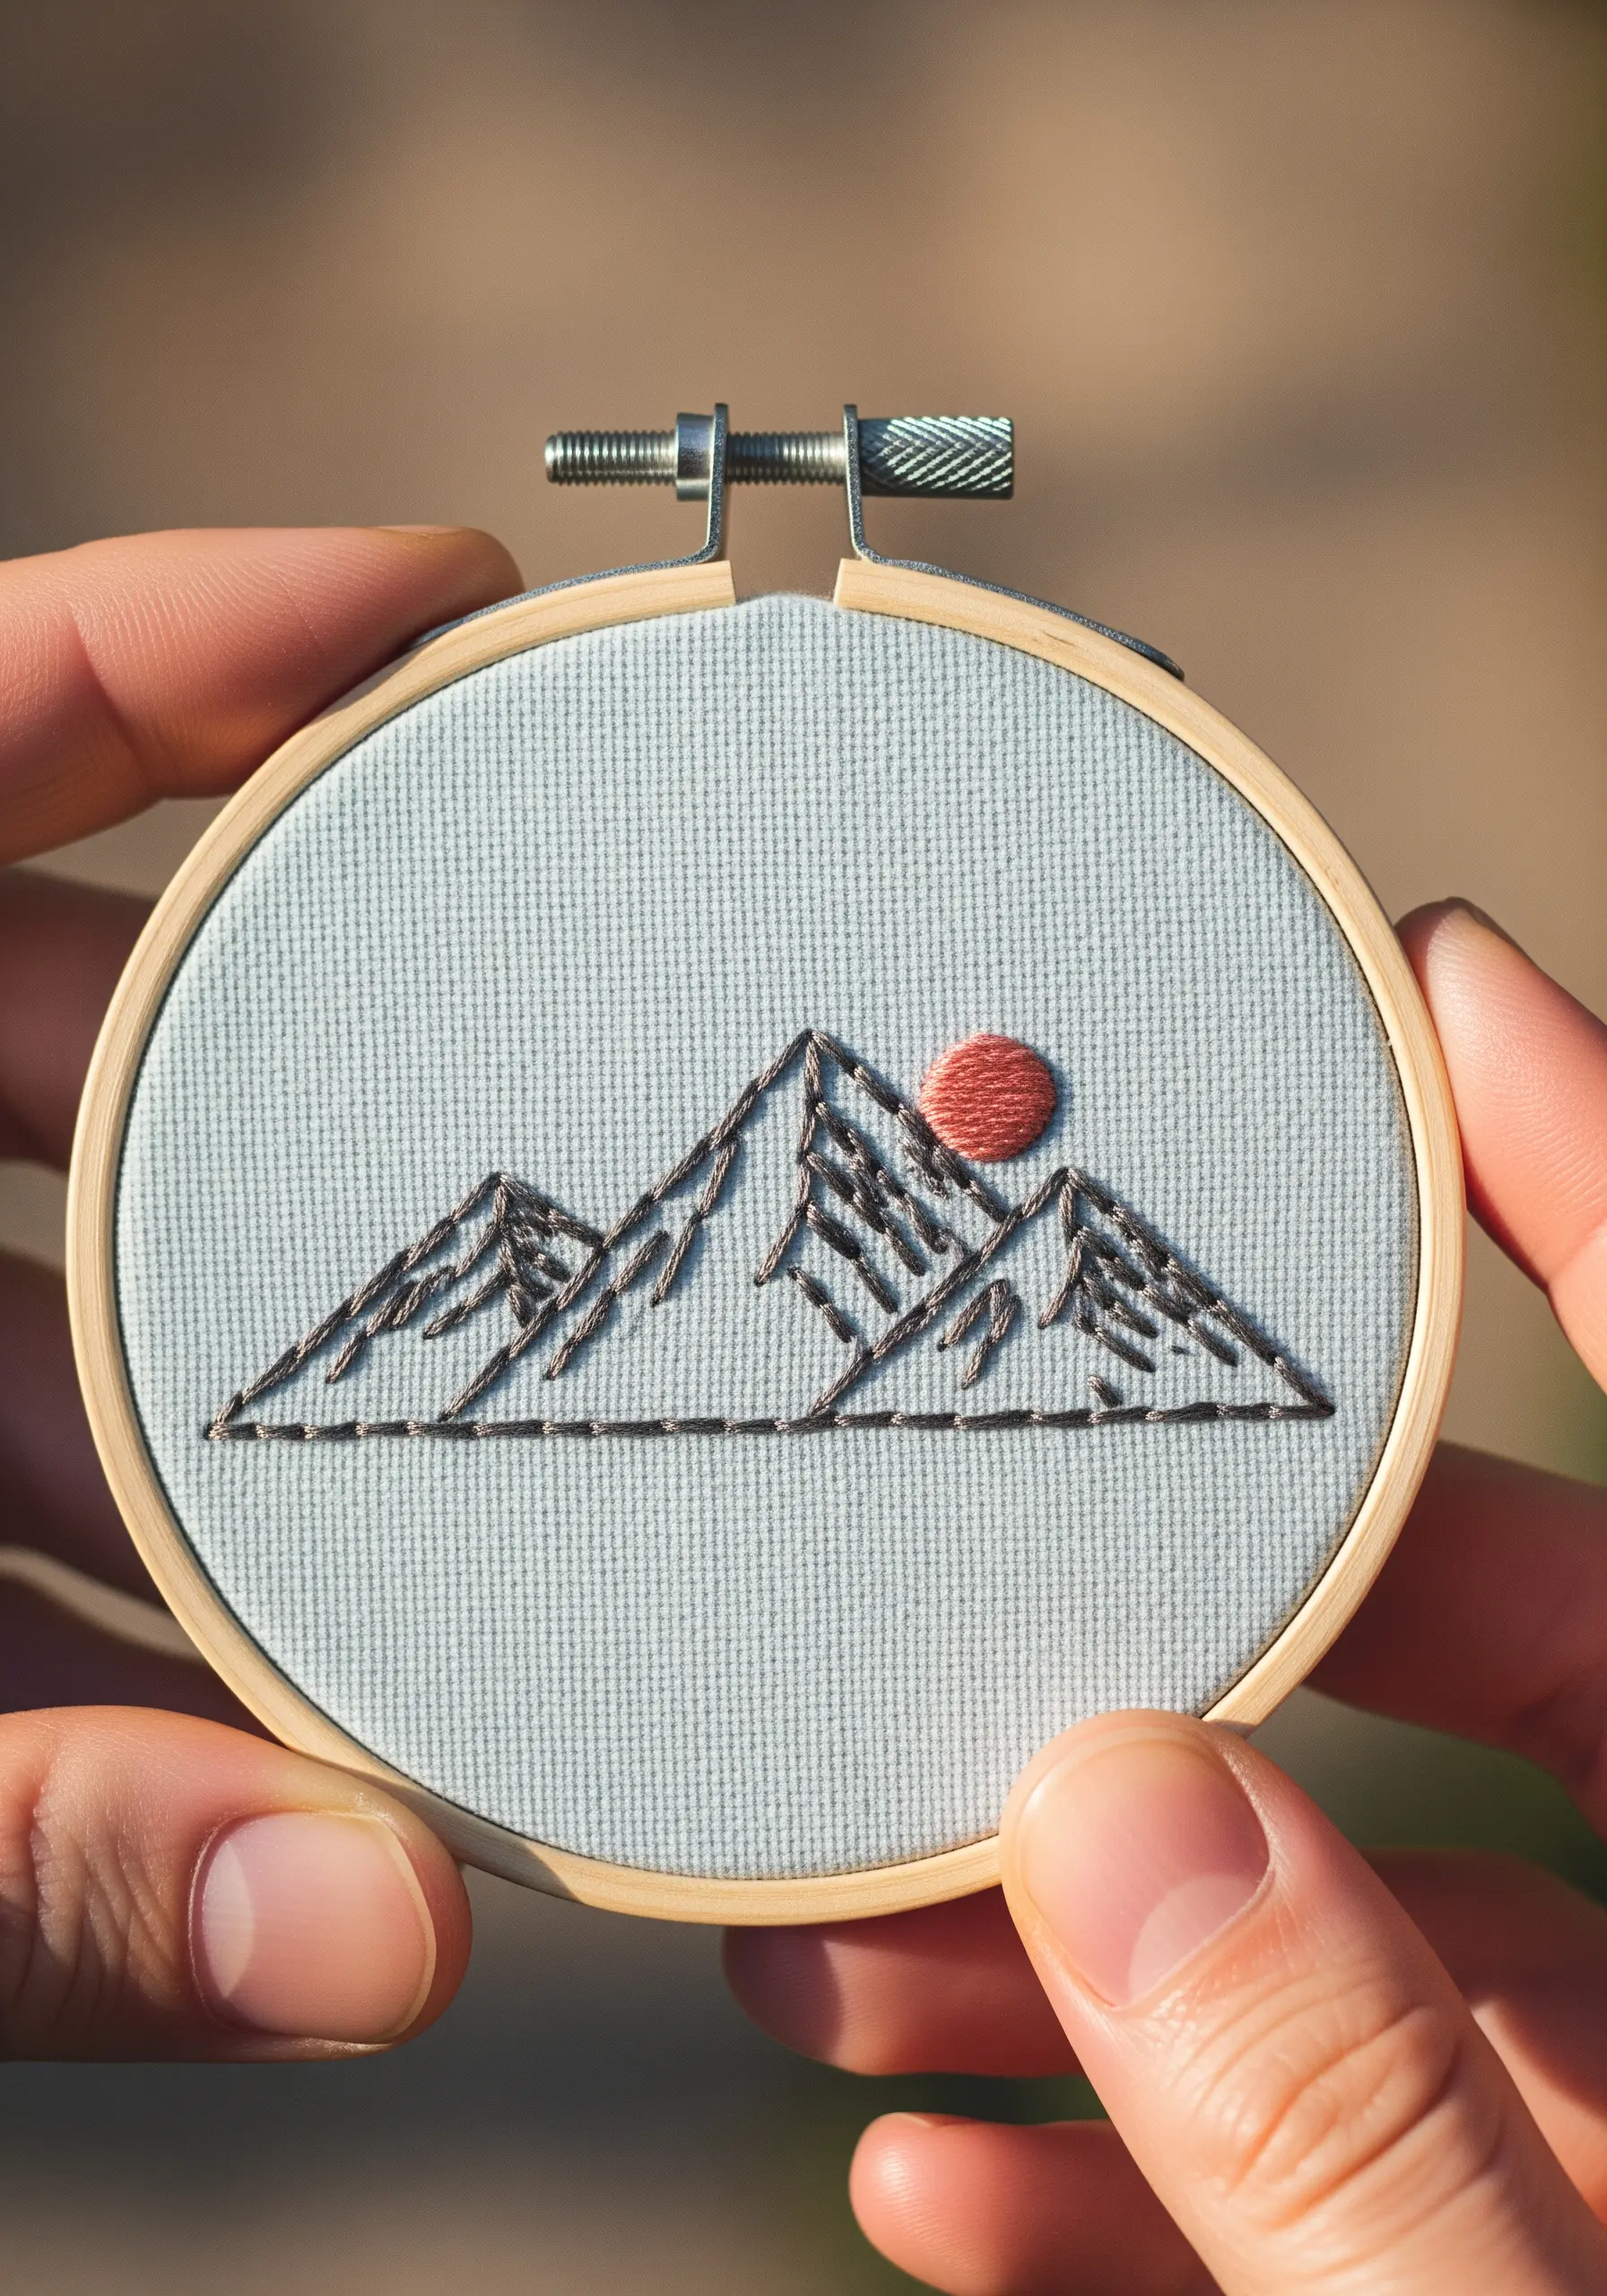
You don’t need complex stitches to capture the essence of a place.
Use a simple backstitch in a dark, contrasting thread to outline the peaks of a mountain range, letting the negative space define the scene.
Add texture and shadow by filling in small sections with straight stitches angled in different directions, suggesting rocky faces and crevices.
A small, satin-stitched sun adds a single pop of color, creating a focal point and balancing the composition.
This minimalist approach turns a small hoop into a thoughtful memento of a favorite view or journey, making it one of the most powerful mountain landscape thread painting techniques.
6. Craft a Delicate Bookmark with a Single Motif
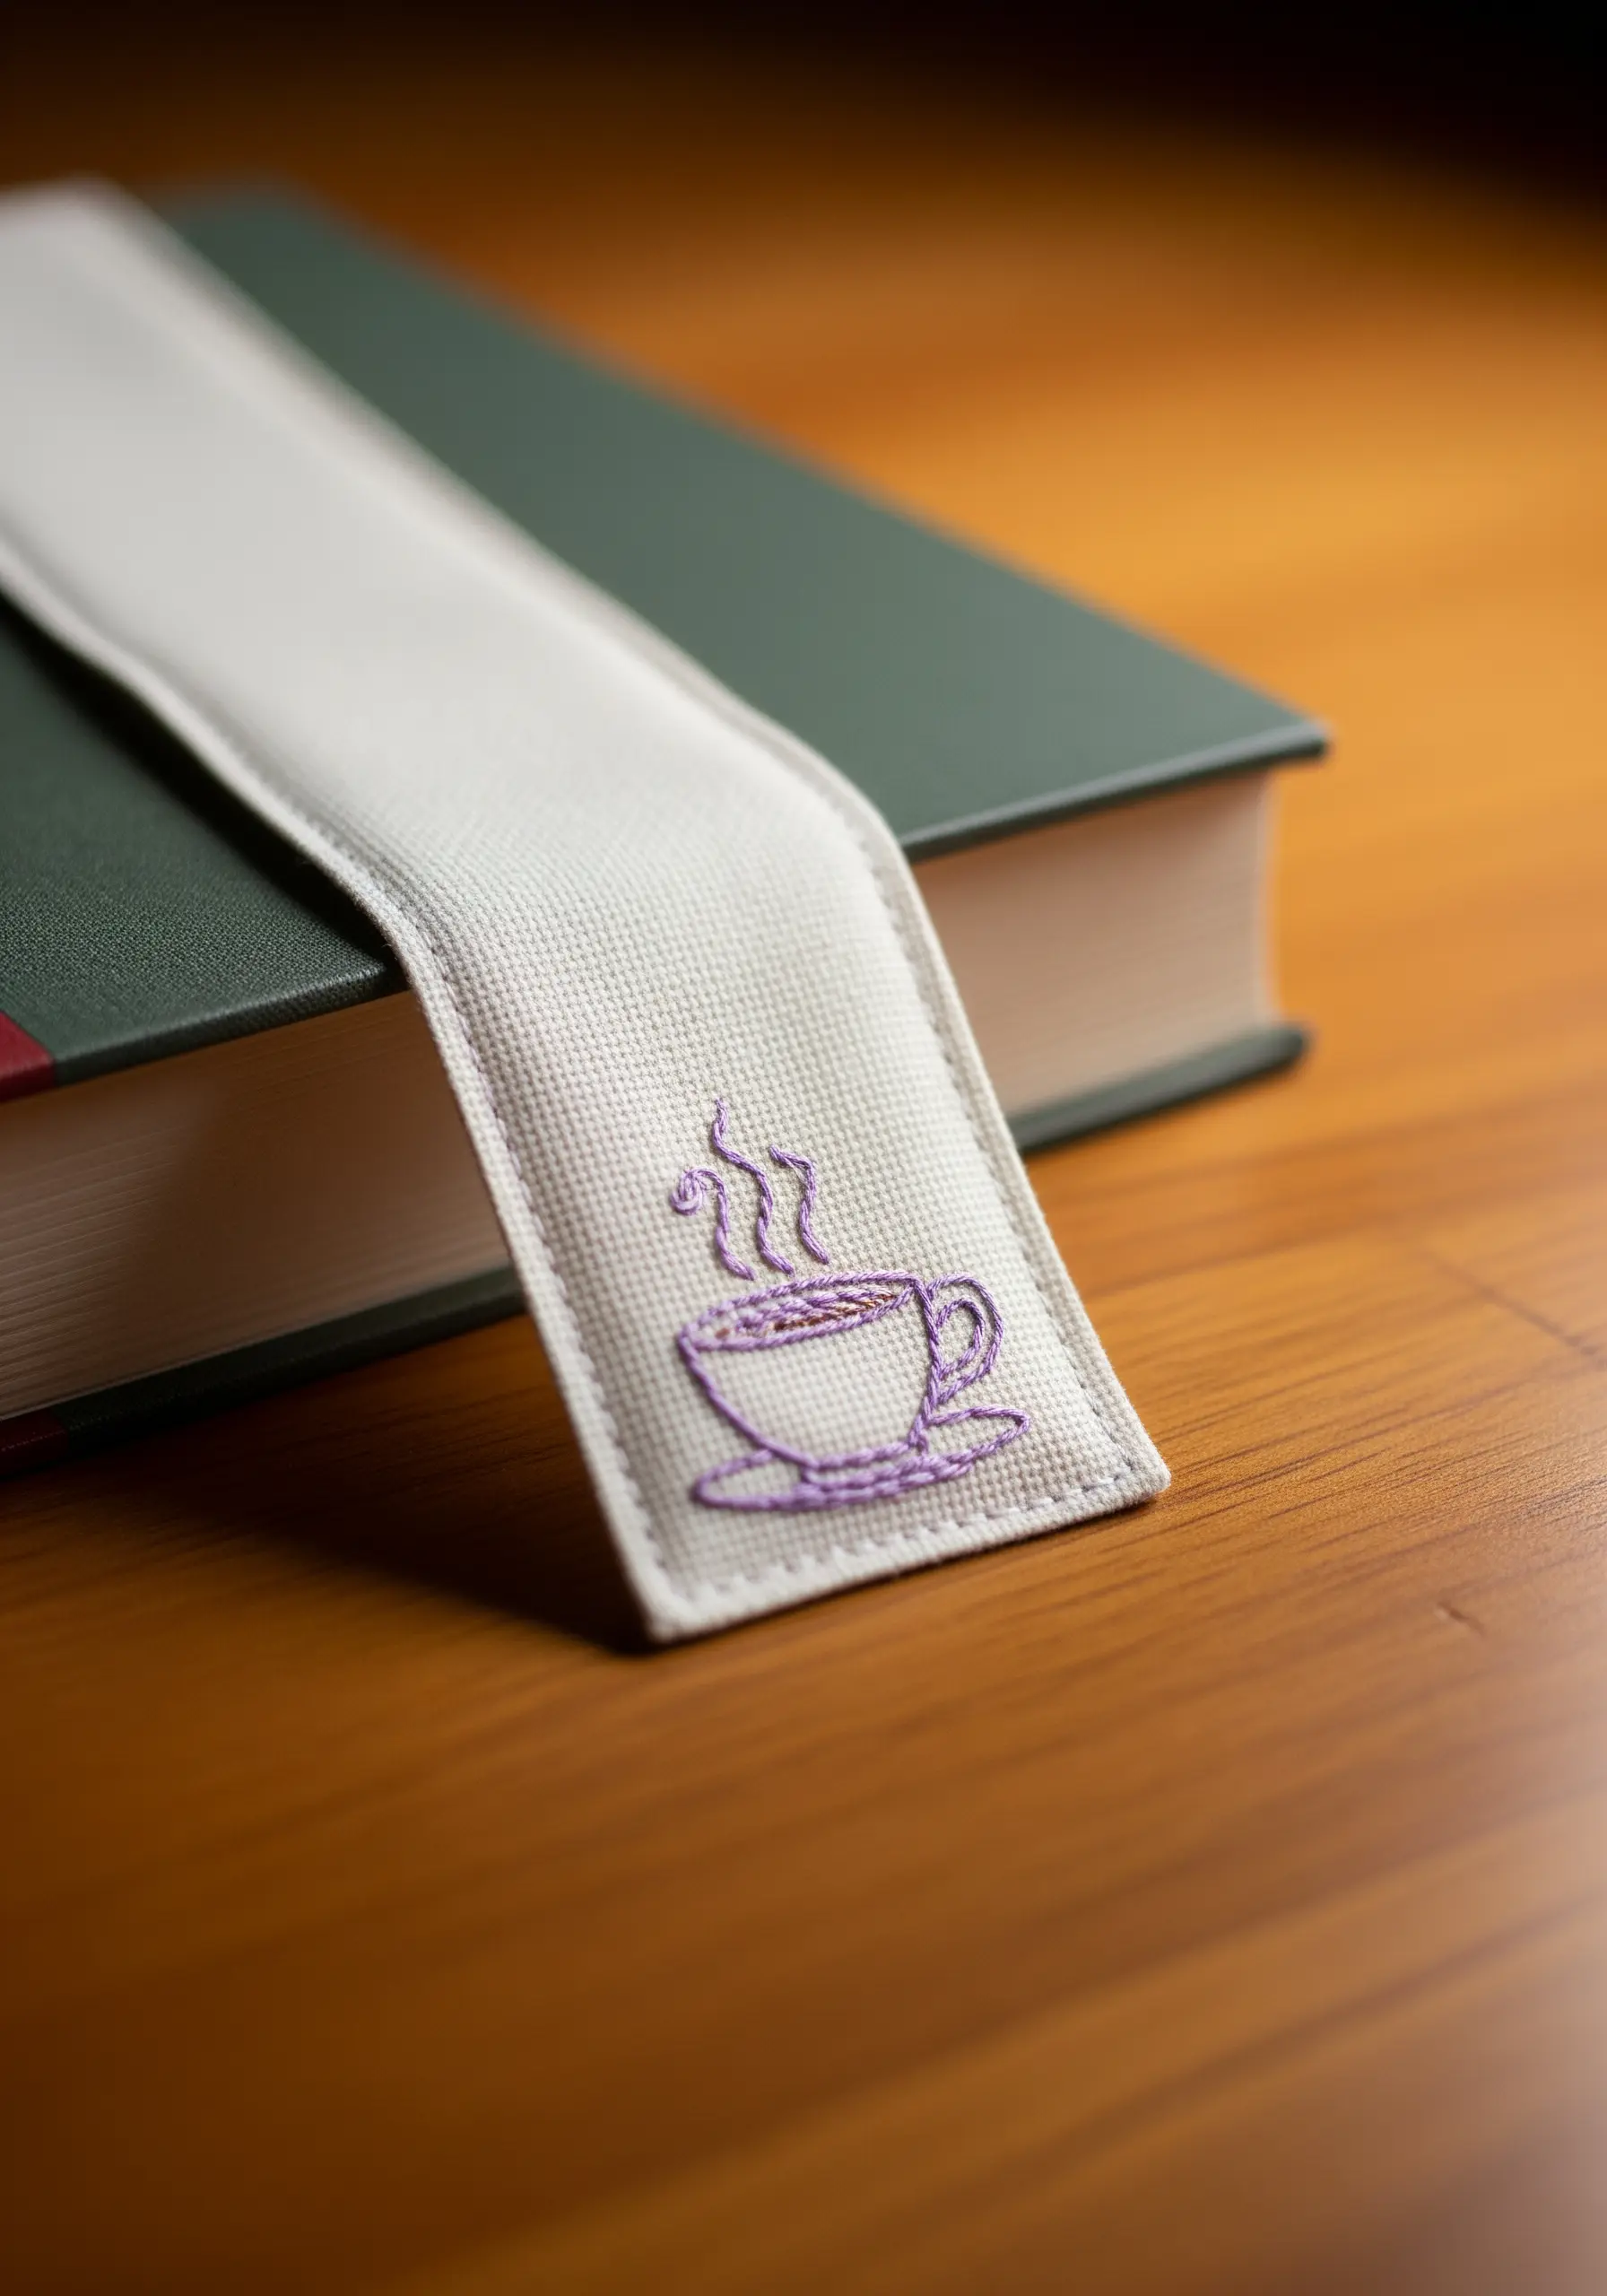
A handmade bookmark is a wonderfully personal gift for any reader, and a single, well-placed motif is all you need.
Choose a simple line-art design, like a steaming cup, and stitch it using just two or three strands of floss for a delicate feel.
A backstitch or stem stitch works perfectly here, providing a clean and continuous line.
When working on a narrow object like a bookmark, ensure your fabric is taut in a hoop while stitching, even if you have to move the hoop along the length of the piece.
This prevents puckering and keeps your tiny design crisp and legible.
7. Stitch the Stars on a Deep Night Sky
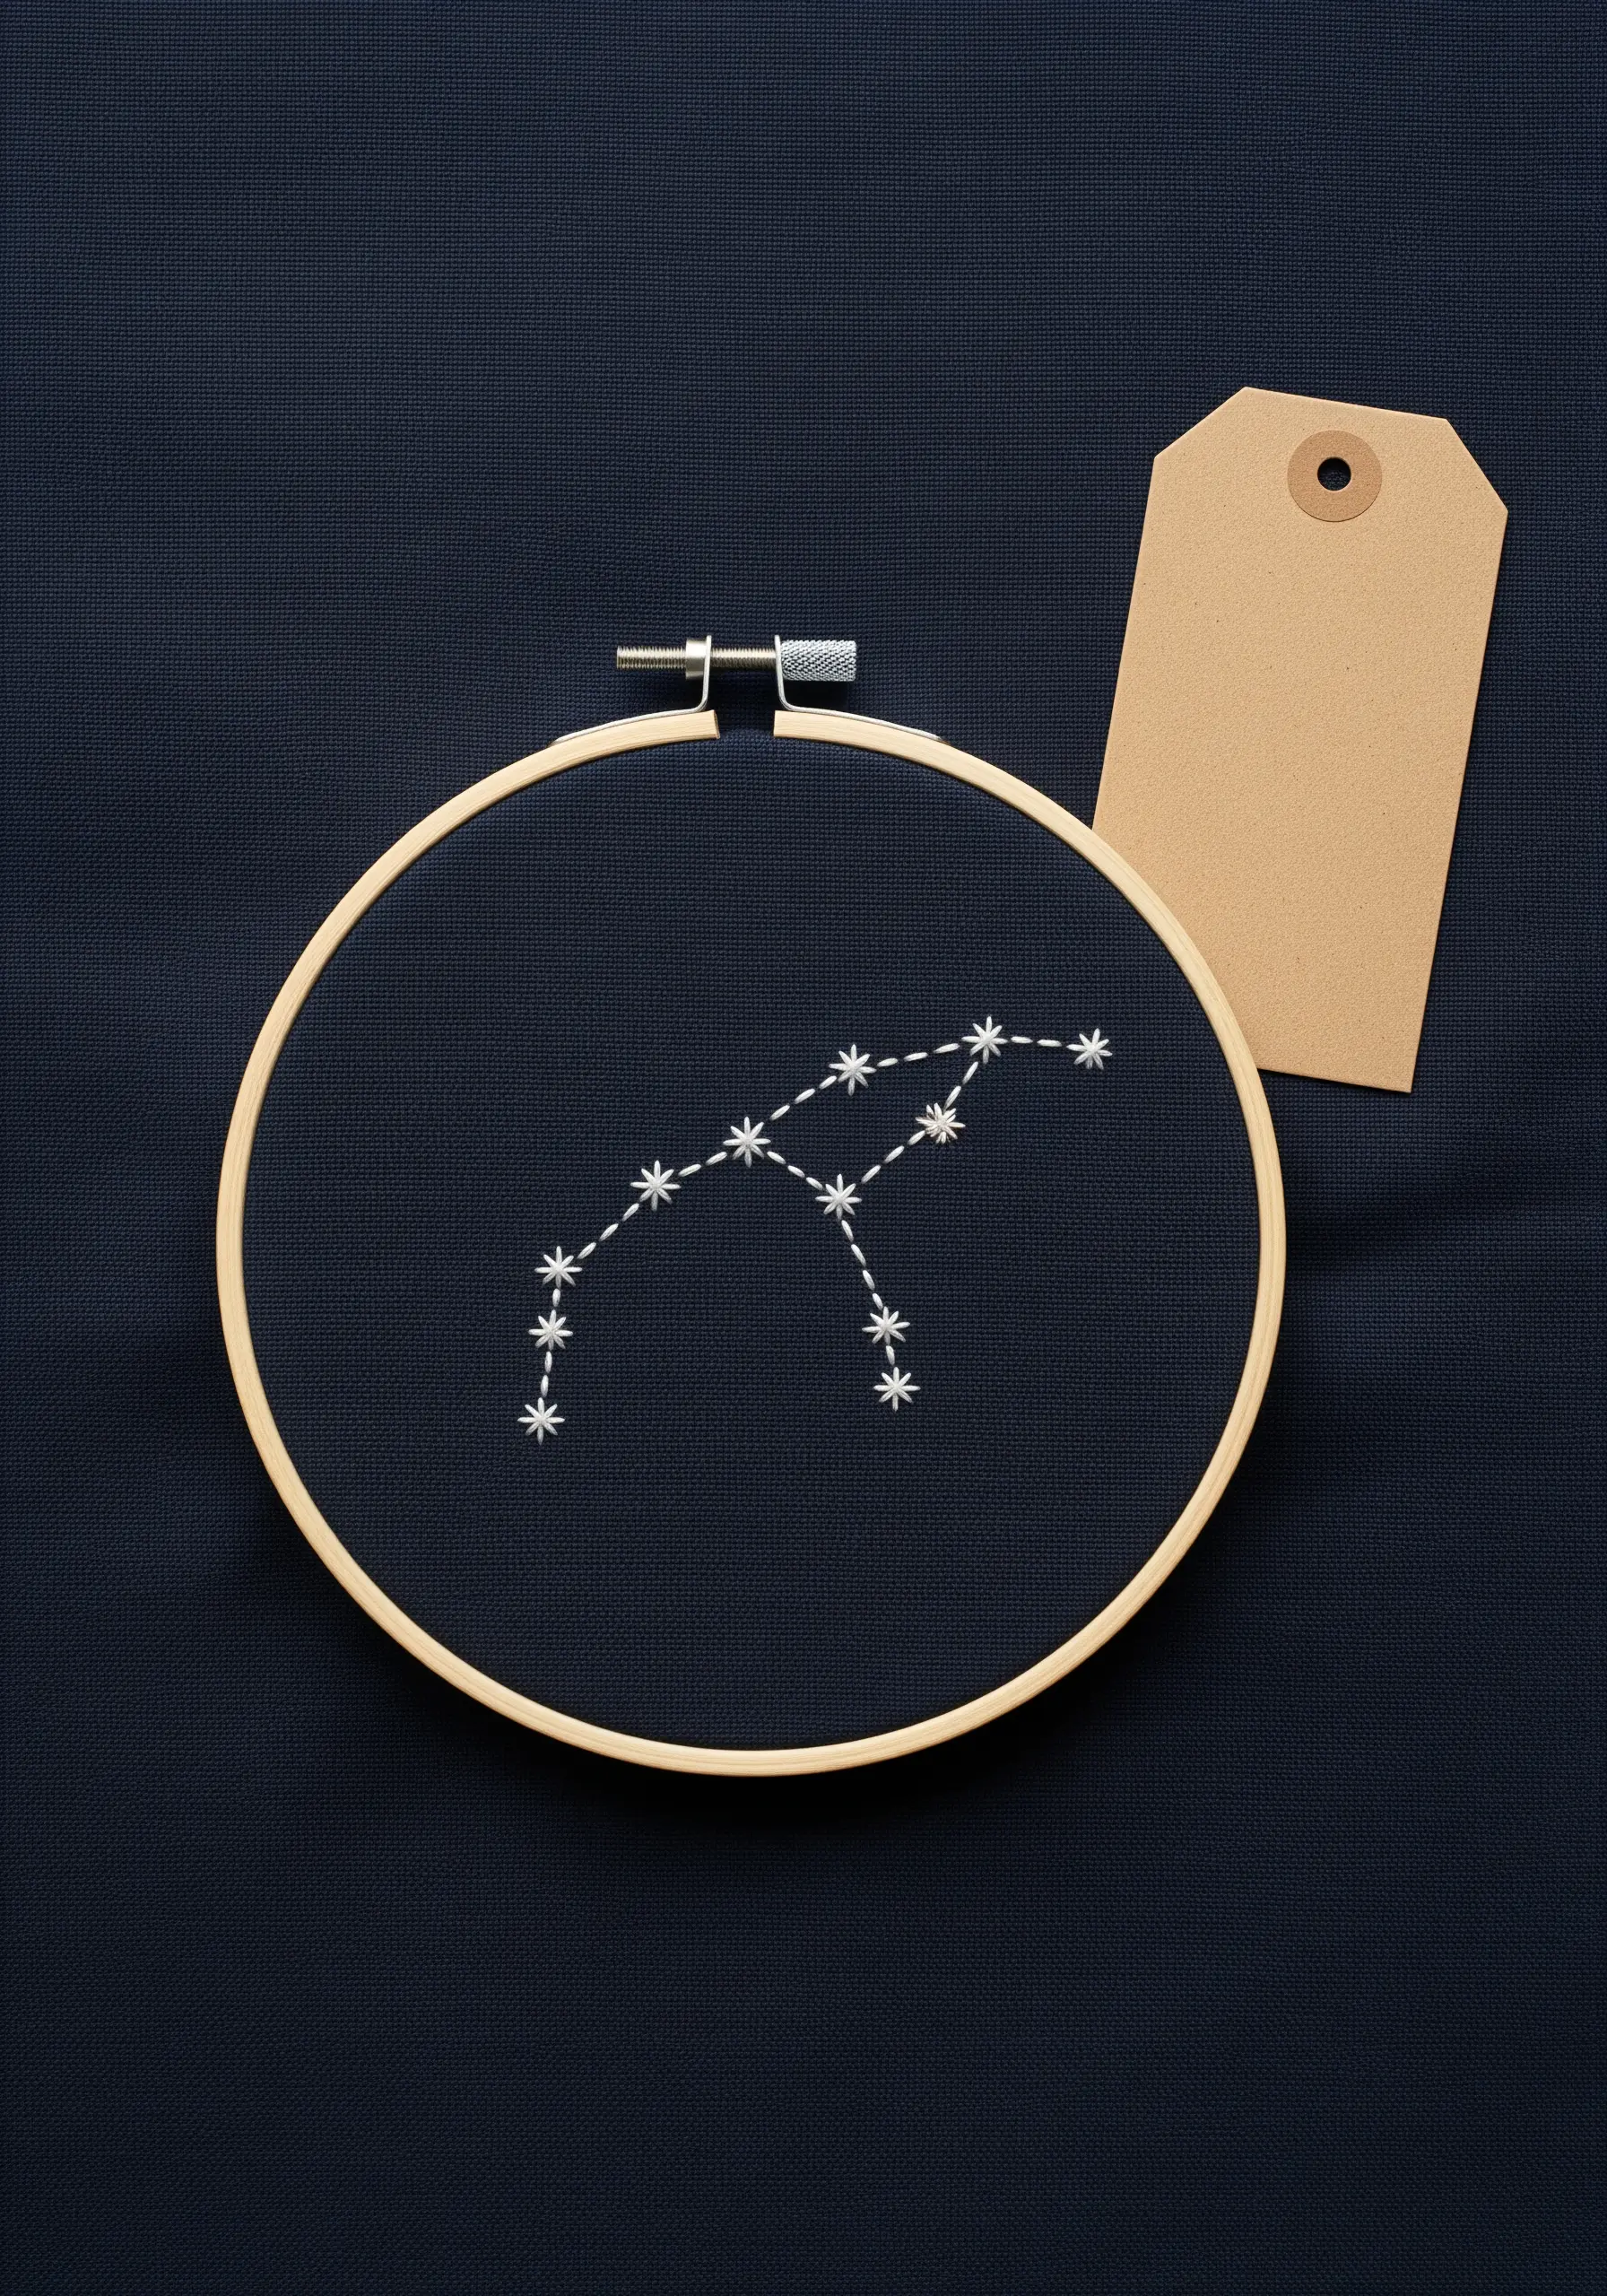
Create a gift that feels cosmic and personal by stitching a favorite constellation on dark navy or black fabric.
Use a bright white or metallic silver thread to ensure the stars stand out dramatically against the deep background.
For the stars themselves, use a simple star stitch or a tiny cluster of French knots to give them texture and dimension.
Connect them with a delicate backstitch or a single straight stitch to map out the constellation’s shape.
This is one of the most effective tiny night sky embroidery designs for a quick, meaningful project.
8. Build Intricate Patterns with a Simple Grid
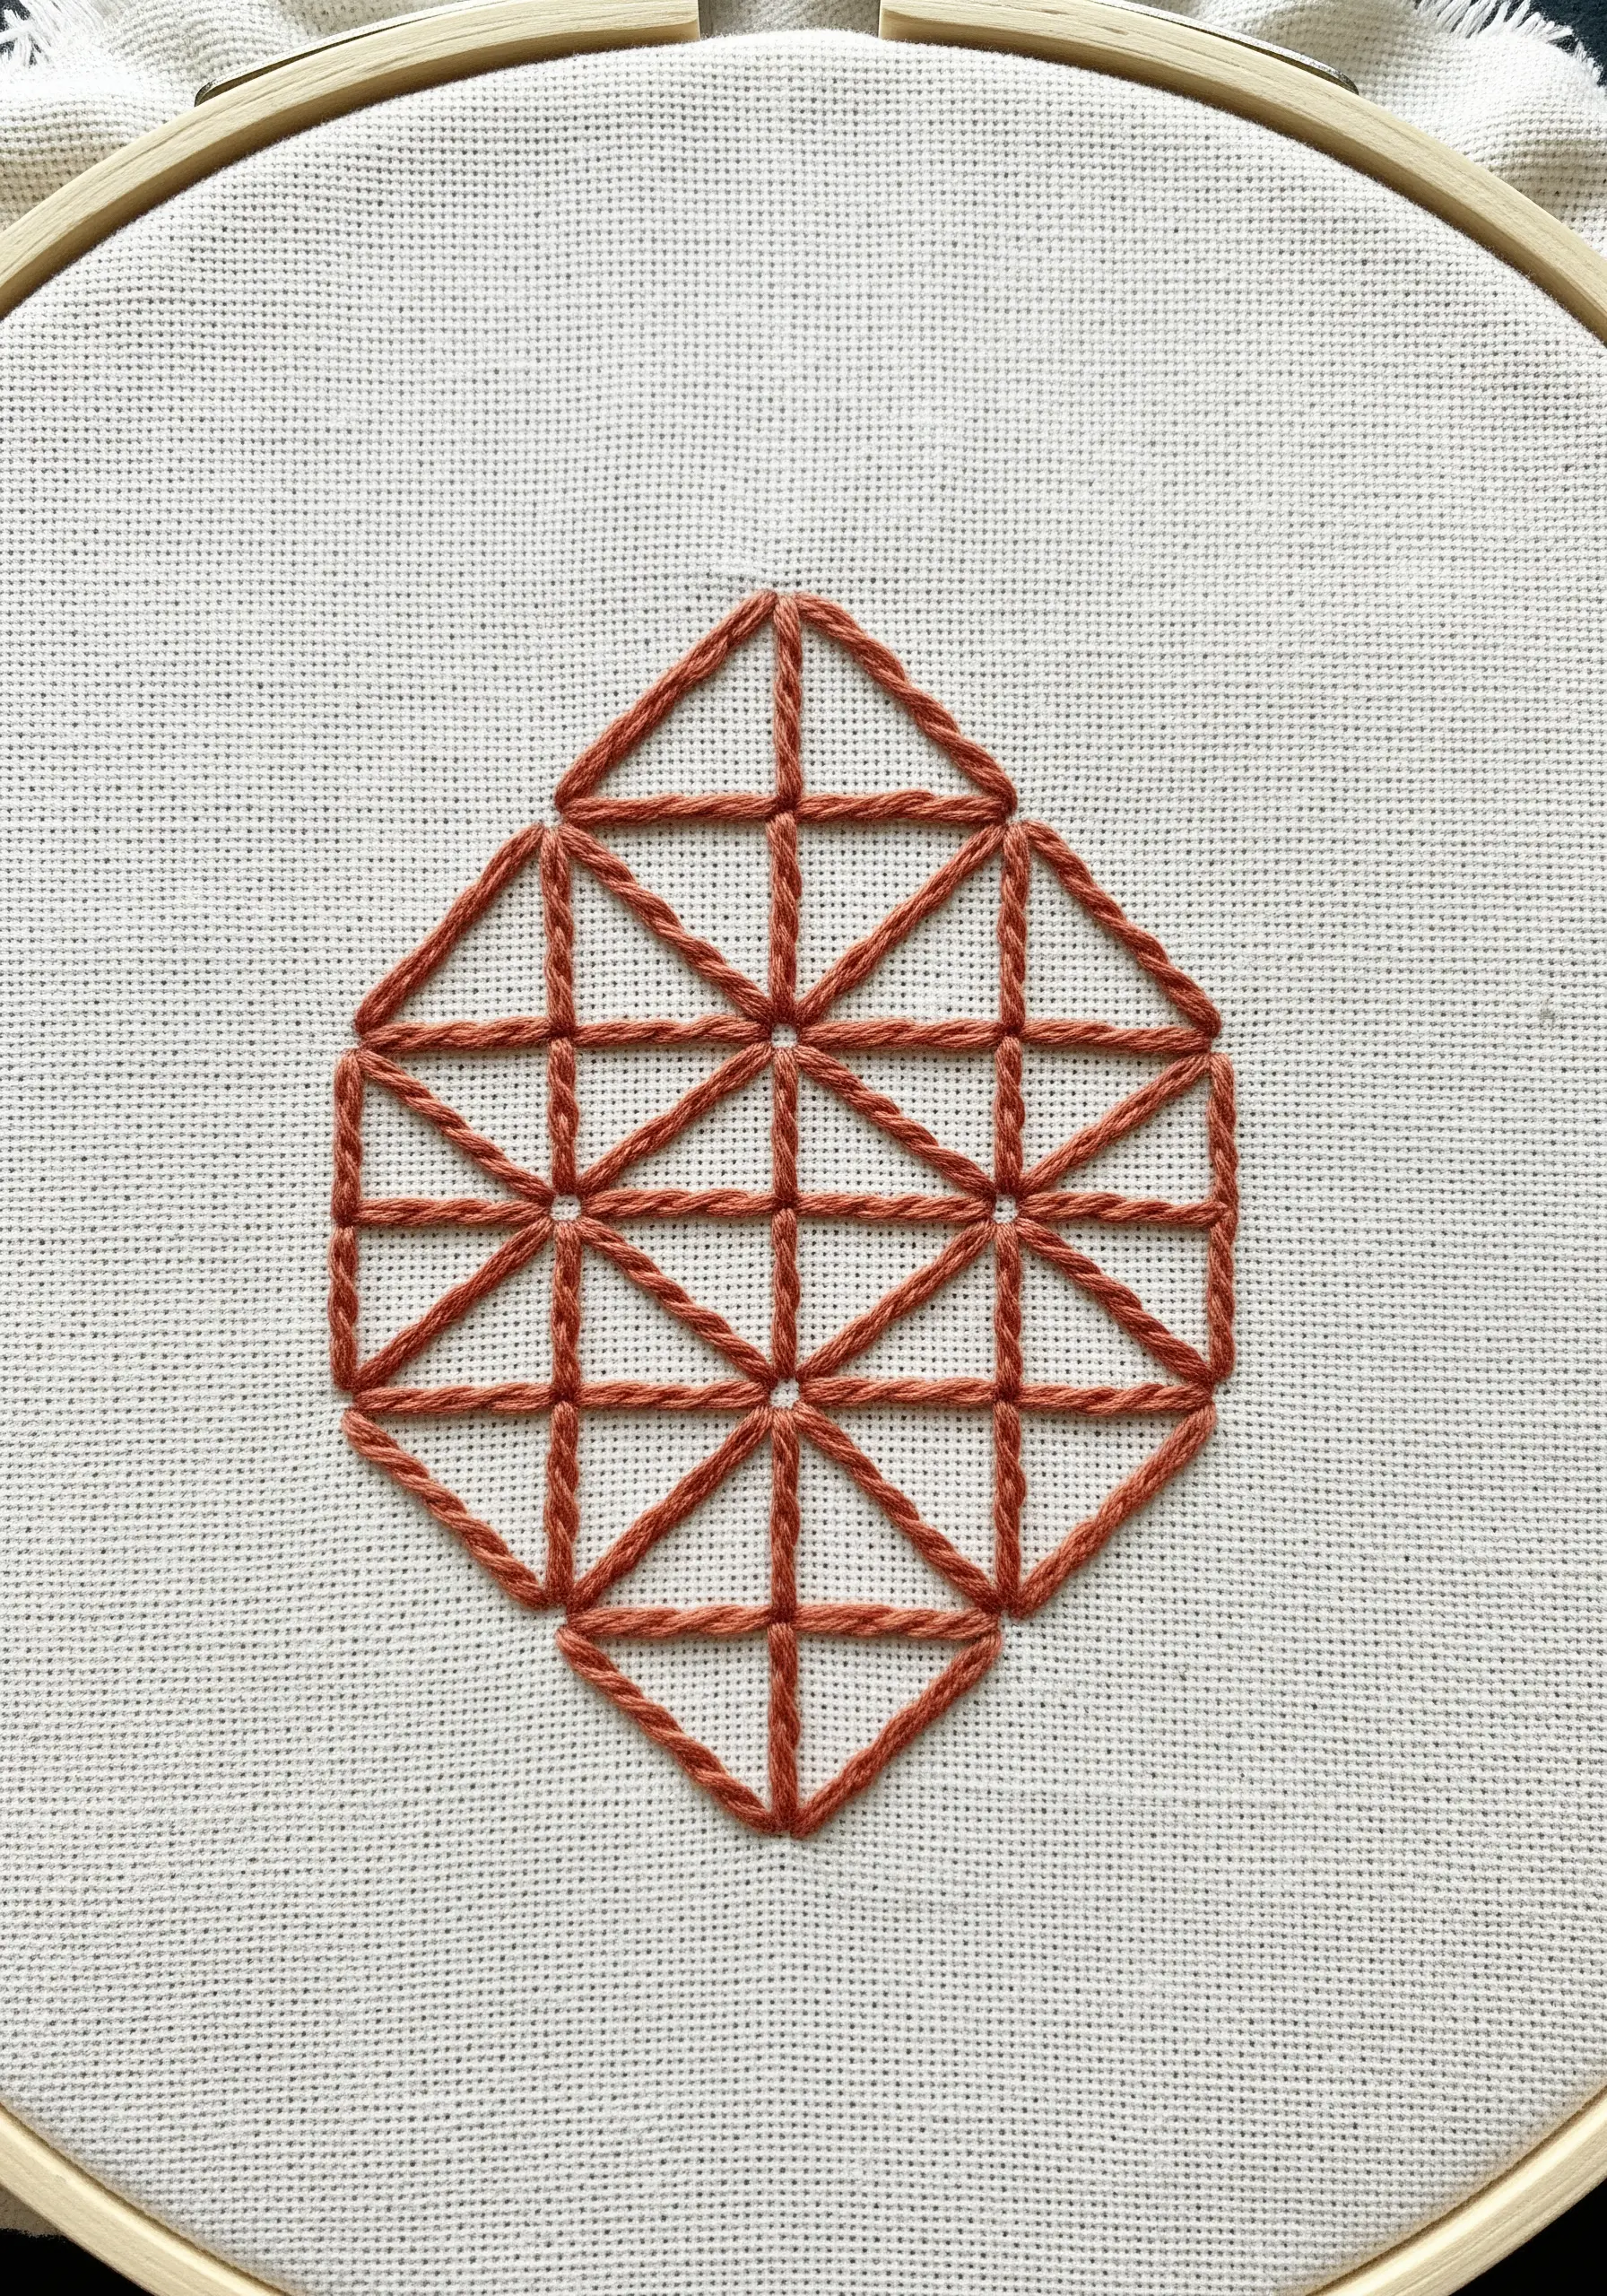
Geometric patterns look complex, but they are often built from simple, repeating lines.
Lightly draw a grid with a water-soluble pen to serve as your guide for perfectly spaced stitches.
Use a whipped backstitch to create the raised, cord-like lines that give this design its texture and definition.
First, lay down a foundation of simple backstitches along your grid lines, then whip over them with a second pass of thread without piercing the fabric.
This technique ensures your lines are smooth, uniform, and visually striking, transforming a basic grid into a piece of intricate art.
9. Stitch a Cheerful Motif in Under an Hour
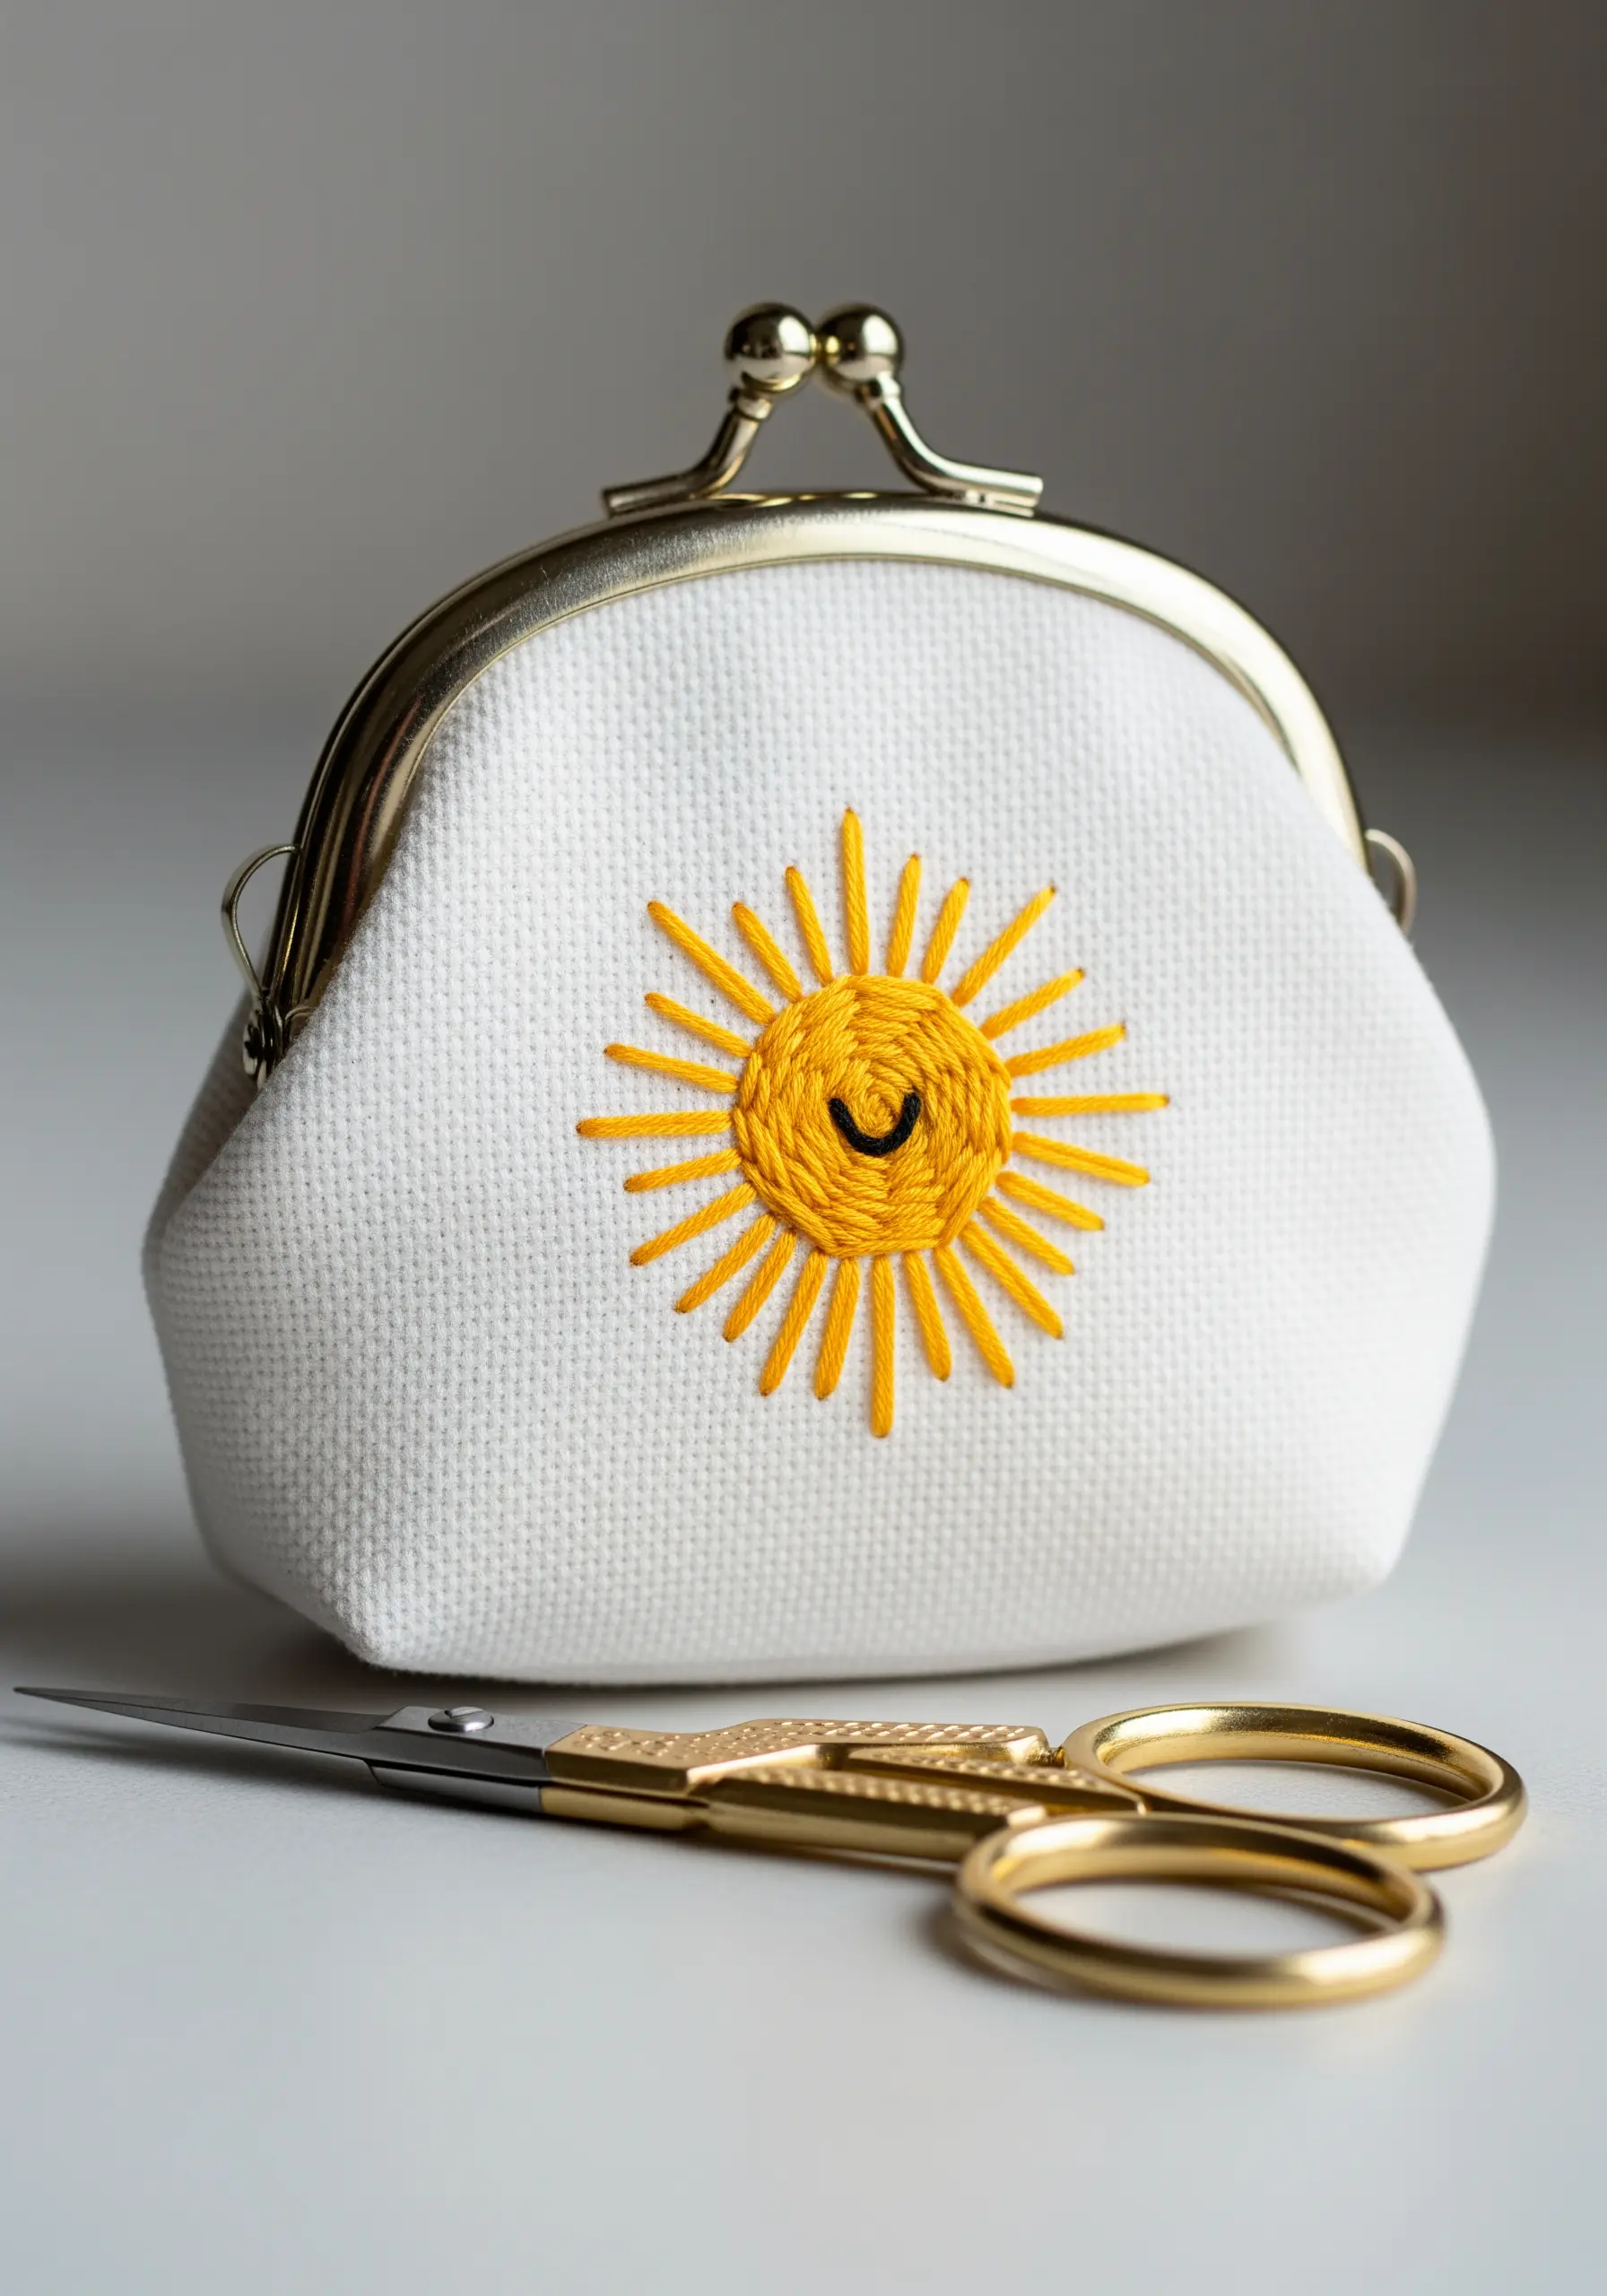
Sometimes, the simplest designs have the most impact.
For a quick and joyful gift, stitch a small, happy sun on a coin purse or pouch.
Use radiating straight stitches for the sun’s rays, keeping them varied in length for a more dynamic, hand-drawn look.
Fill the center with a spiral of backstitch or a small satin stitch circle.
Choosing a bright, warm yellow thread on a neutral fabric background makes the color feel even more vibrant and optimistic, proving how small embroidery ideas can pack a big punch.
10. Capture Fluidity with a Single, Continuous Line
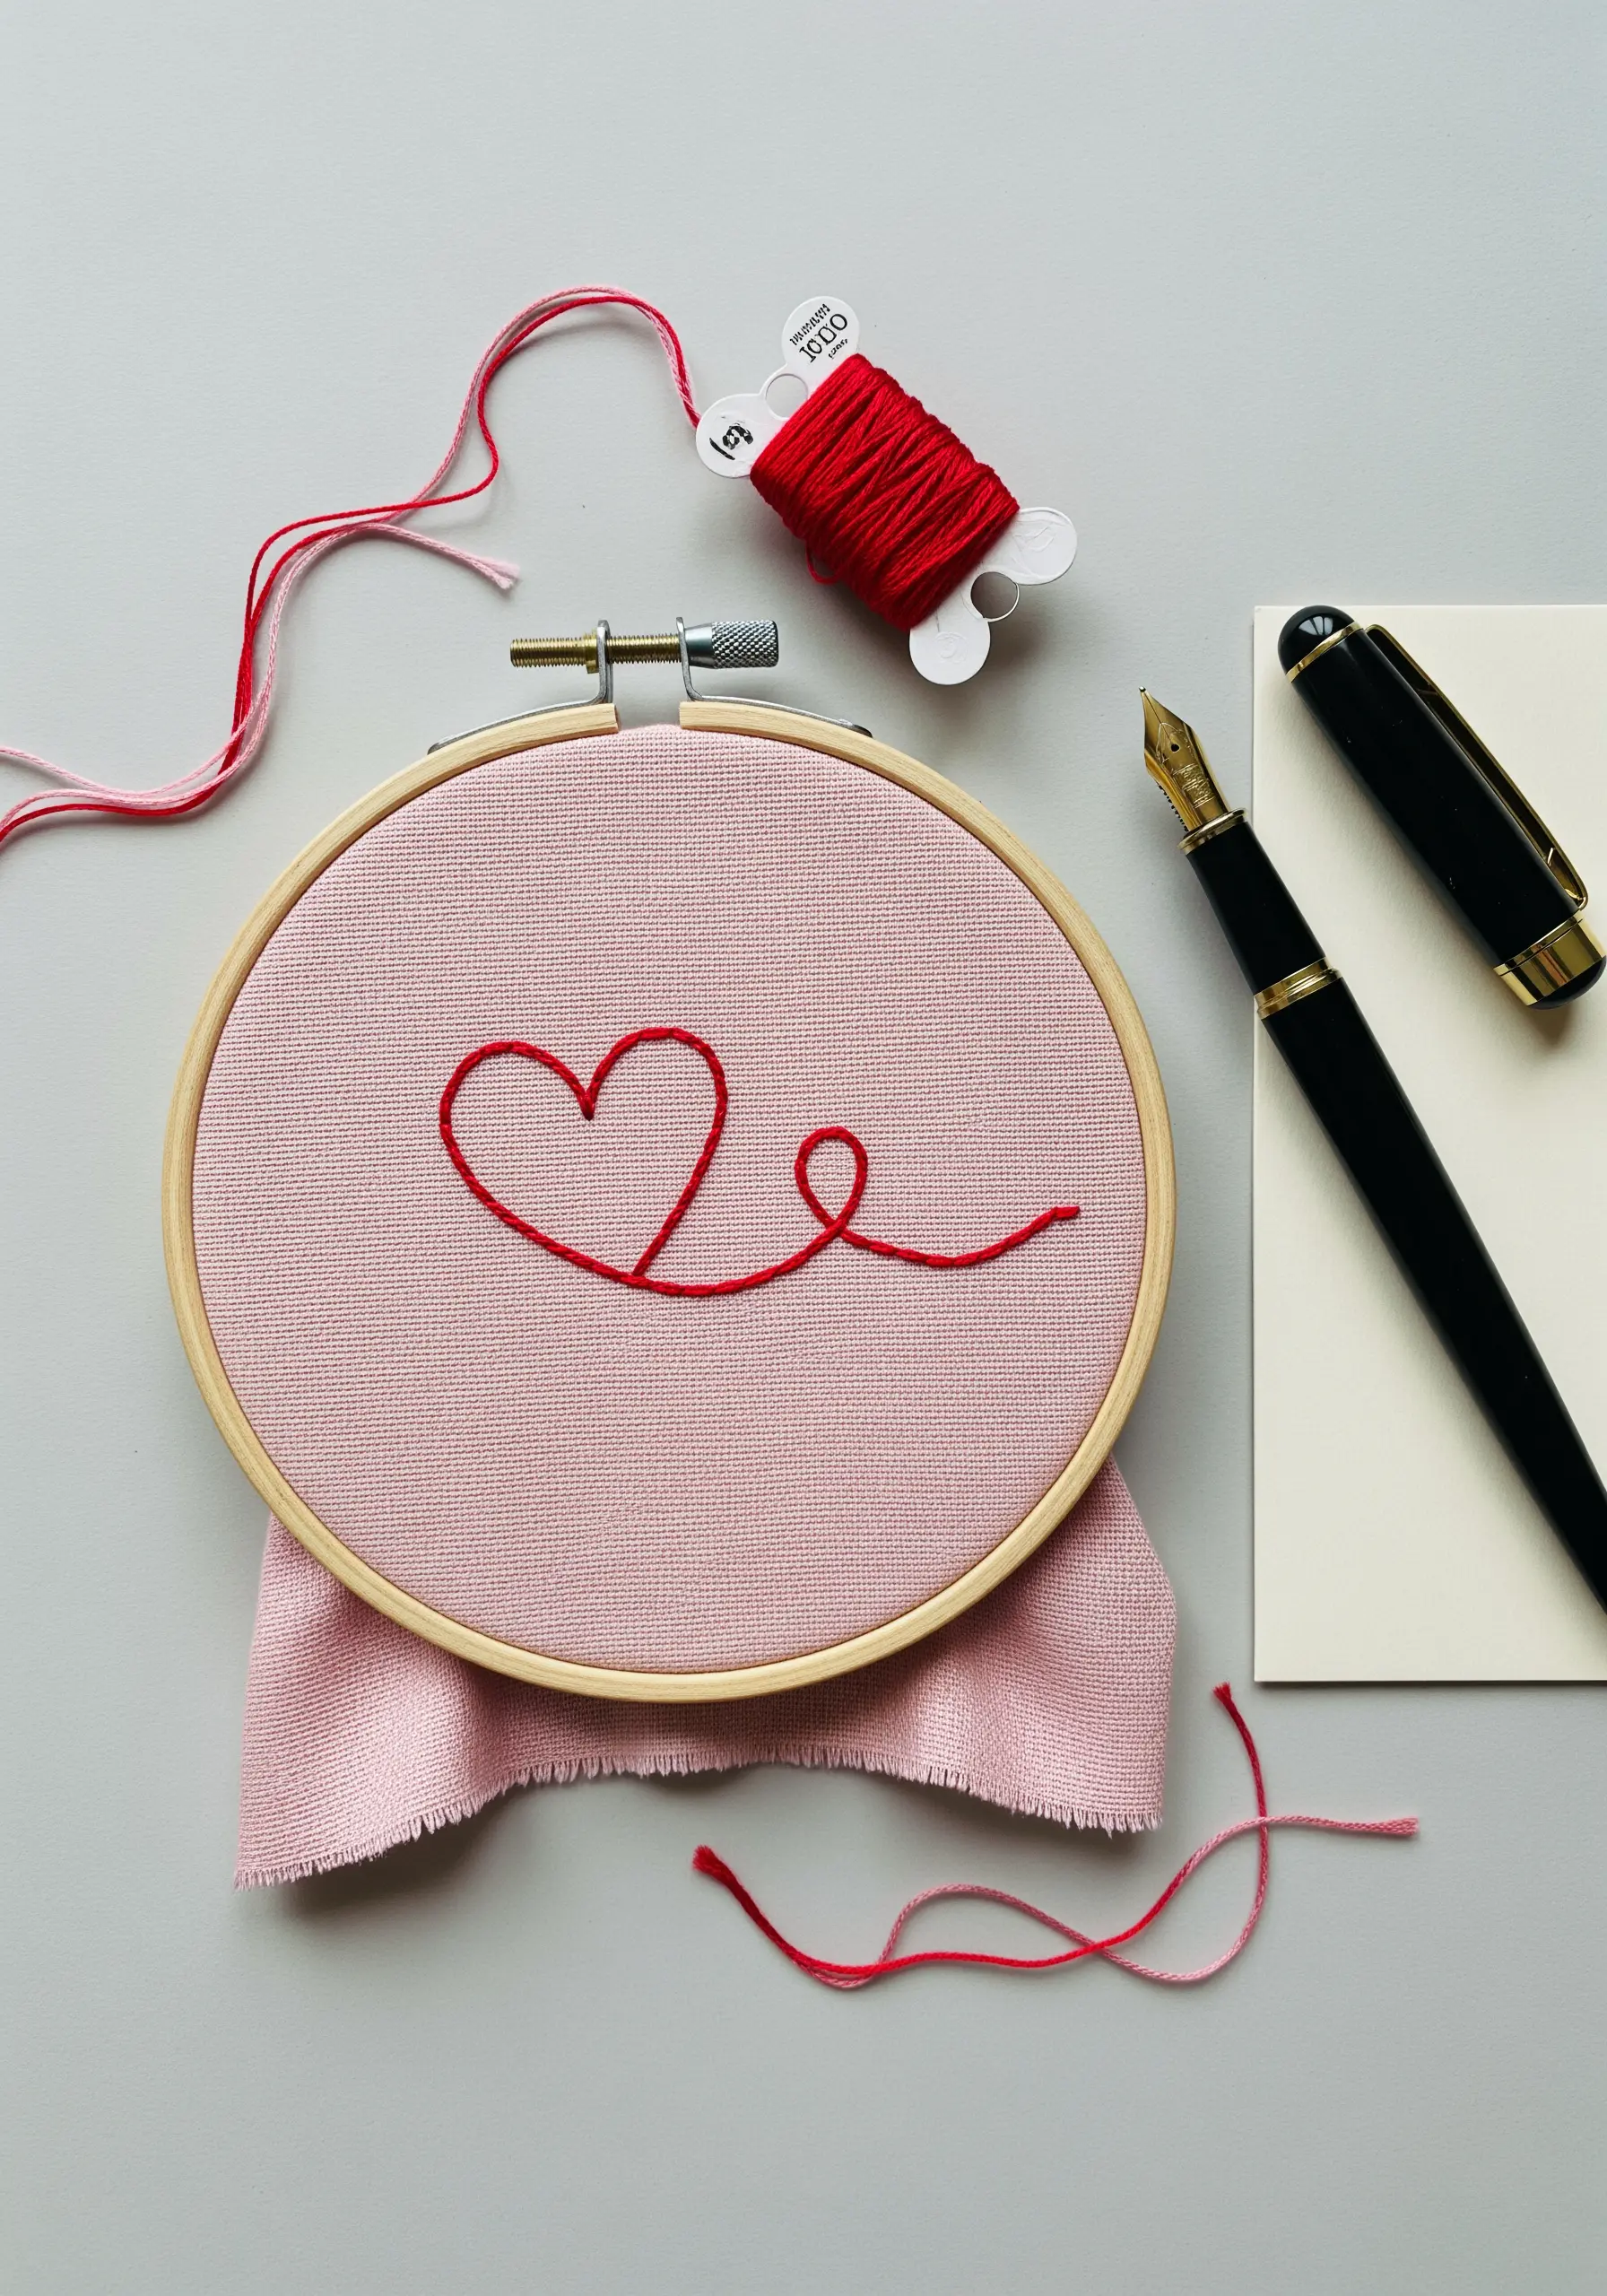
Embrace the elegance of minimalism by creating a design with a single, unbroken line.
This technique mimics the feel of a quick ink drawing, making the result feel fluid and effortless.
Use a stem stitch or a whipped backstitch to ensure your line has a smooth, consistent curve without any jagged edges.
Choose a bold, high-contrast color like red on soft pink to make the simple form stand out.
This approach works beautifully for abstract shapes, simple silhouettes, or initials, turning a single thread into a statement of modern style.
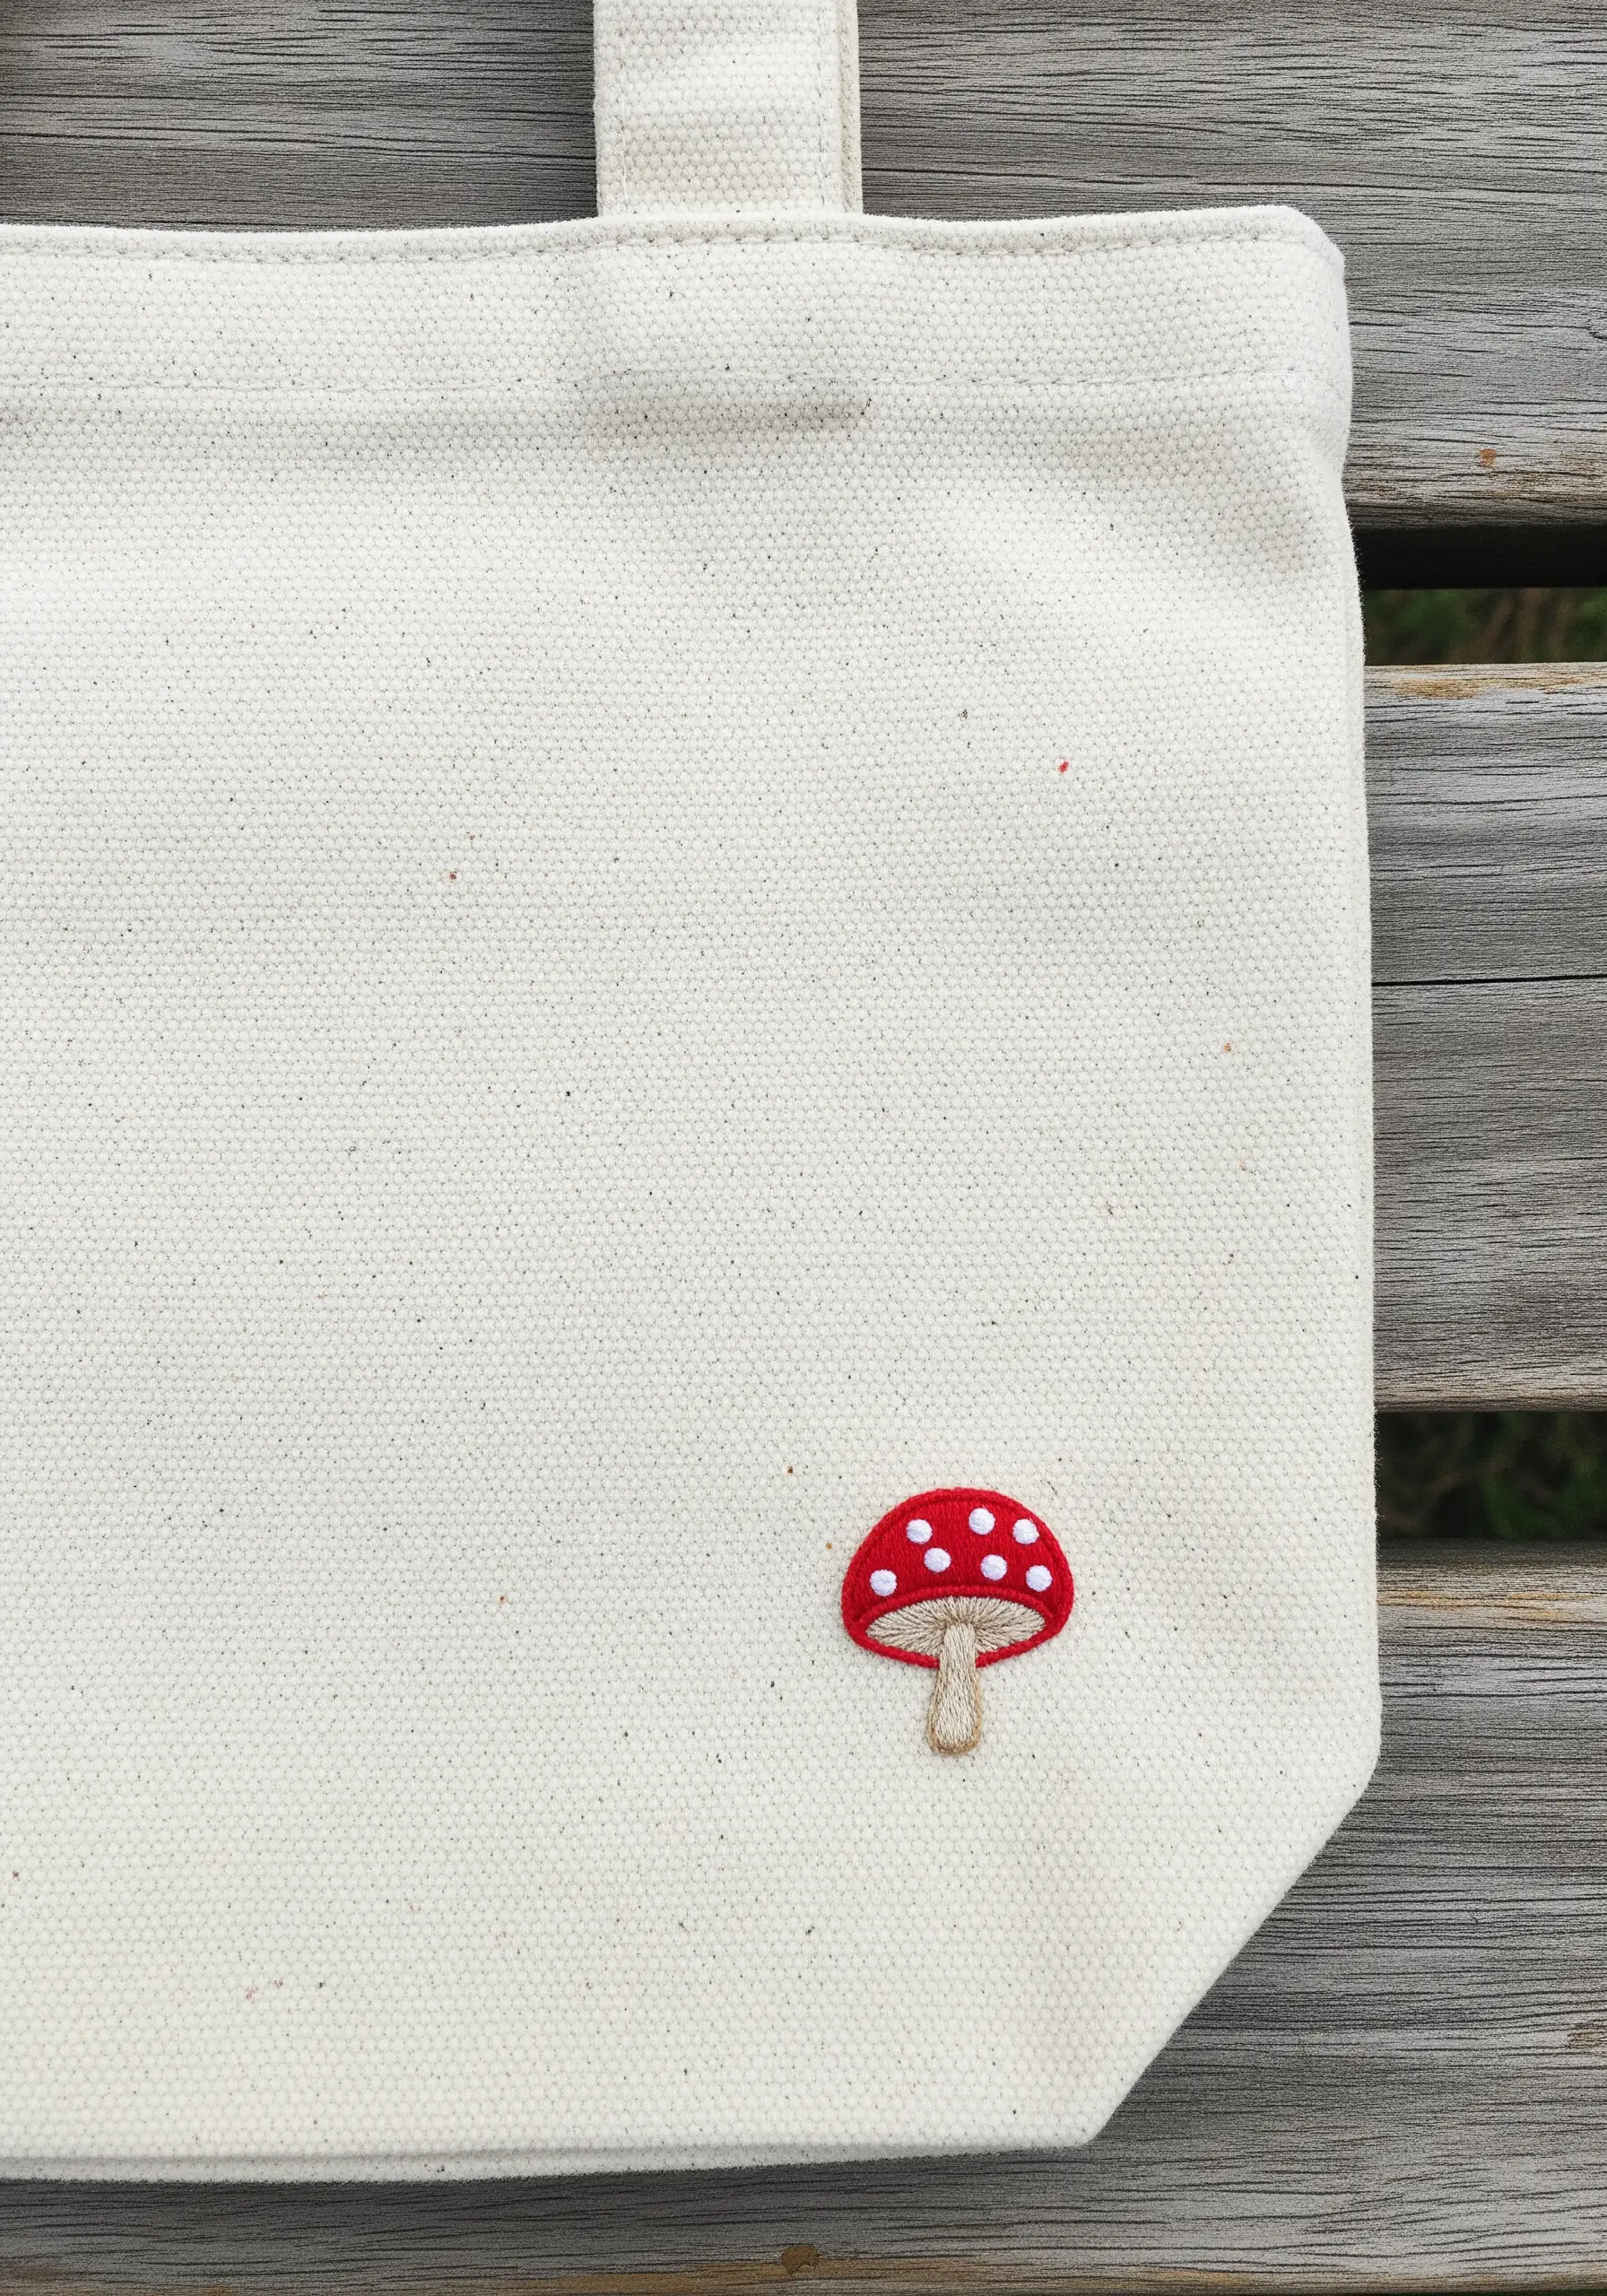
11. Create a Wearable Gift with a Felt Patch
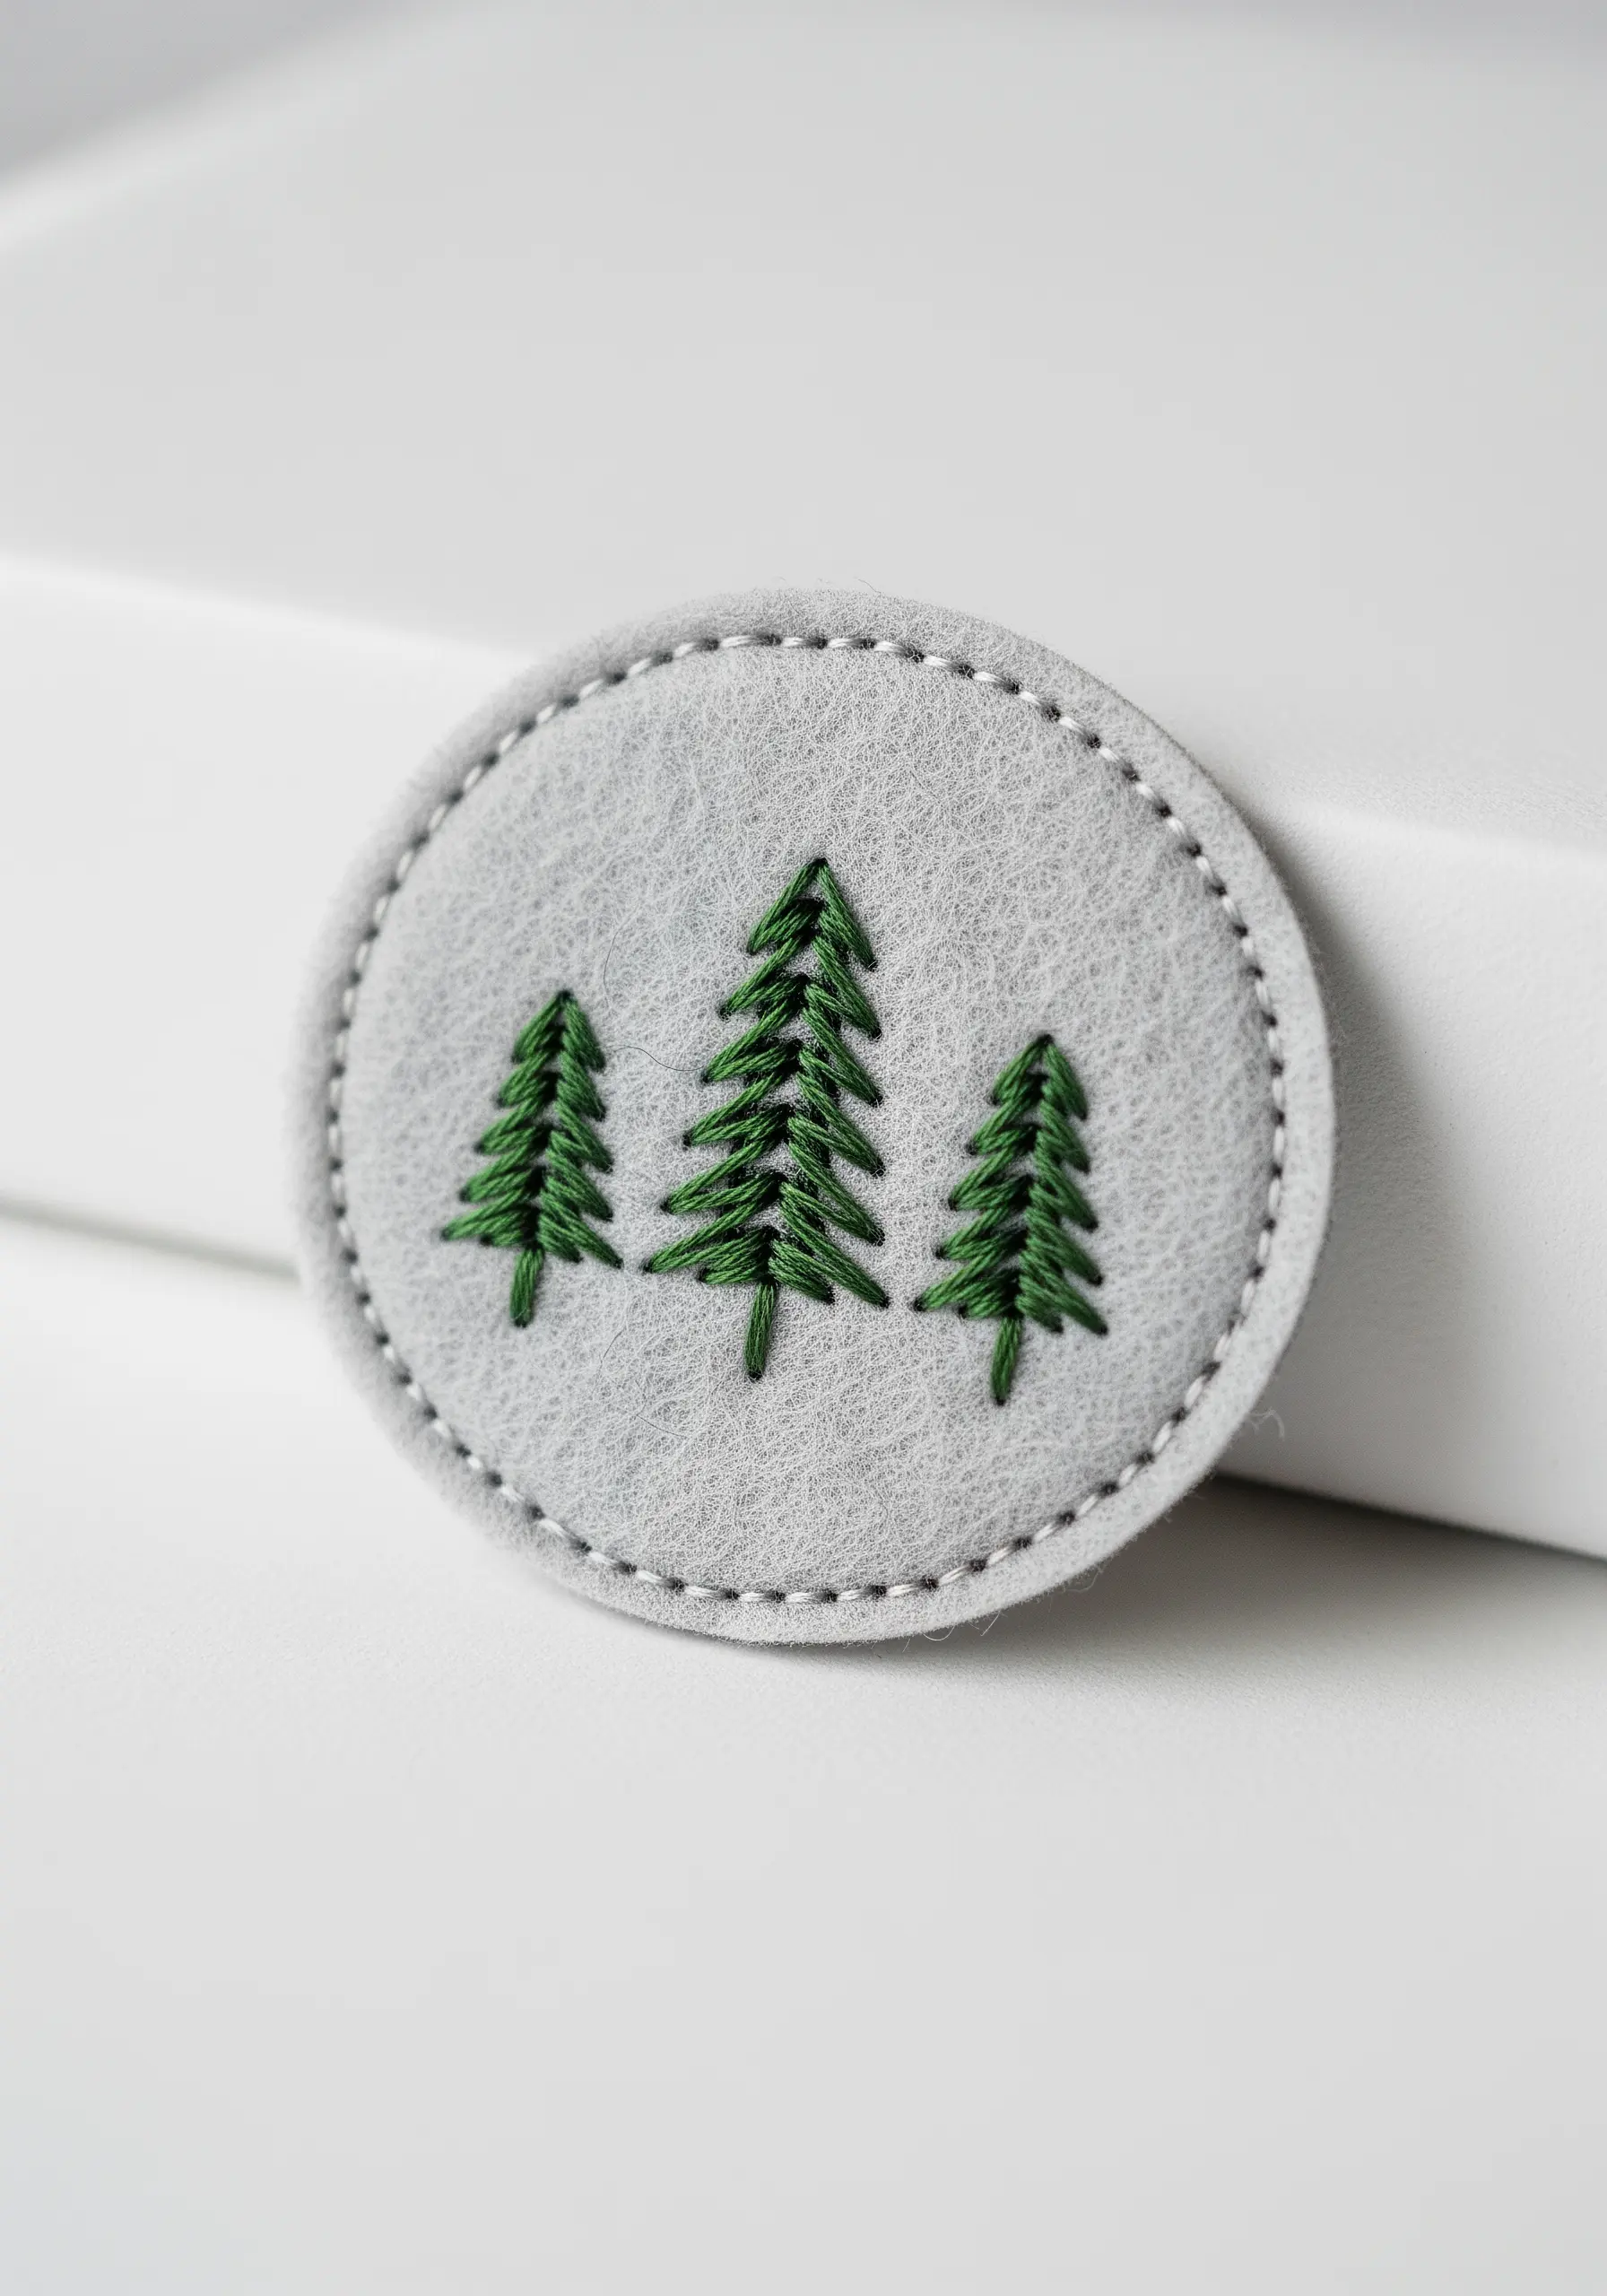
Turn a small embroidery into a versatile gift by creating a wearable patch.
Felt is the ideal base material because its edges won’t fray, making it easy to cut out after you’ve finished stitching.
Use simple straight stitches of varying lengths and angles to form the pine trees, layering shades of green to add depth.
Once your design is complete, add a neat running stitch around the border for a clean finish.
This is a wonderful way to use botanical patch ideas to personalize a jacket, backpack, or hat.
12. Use a Border to Define Your Shapes

When filling a shape with satin stitch, especially on dark fabric, adding a contrasting border makes the form significantly sharper.
First, fill the body of the moon with a light grey or white satin stitch, keeping your stitches parallel and close together for a smooth surface.
Then, outline the entire shape with a single-strand backstitch using a slightly darker grey or even a silver metallic thread.
This technique acts like a frame, containing the satin stitches and giving the crescent a crisp, defined silhouette that pops against the background.
13. Build Floral Texture with French Knots
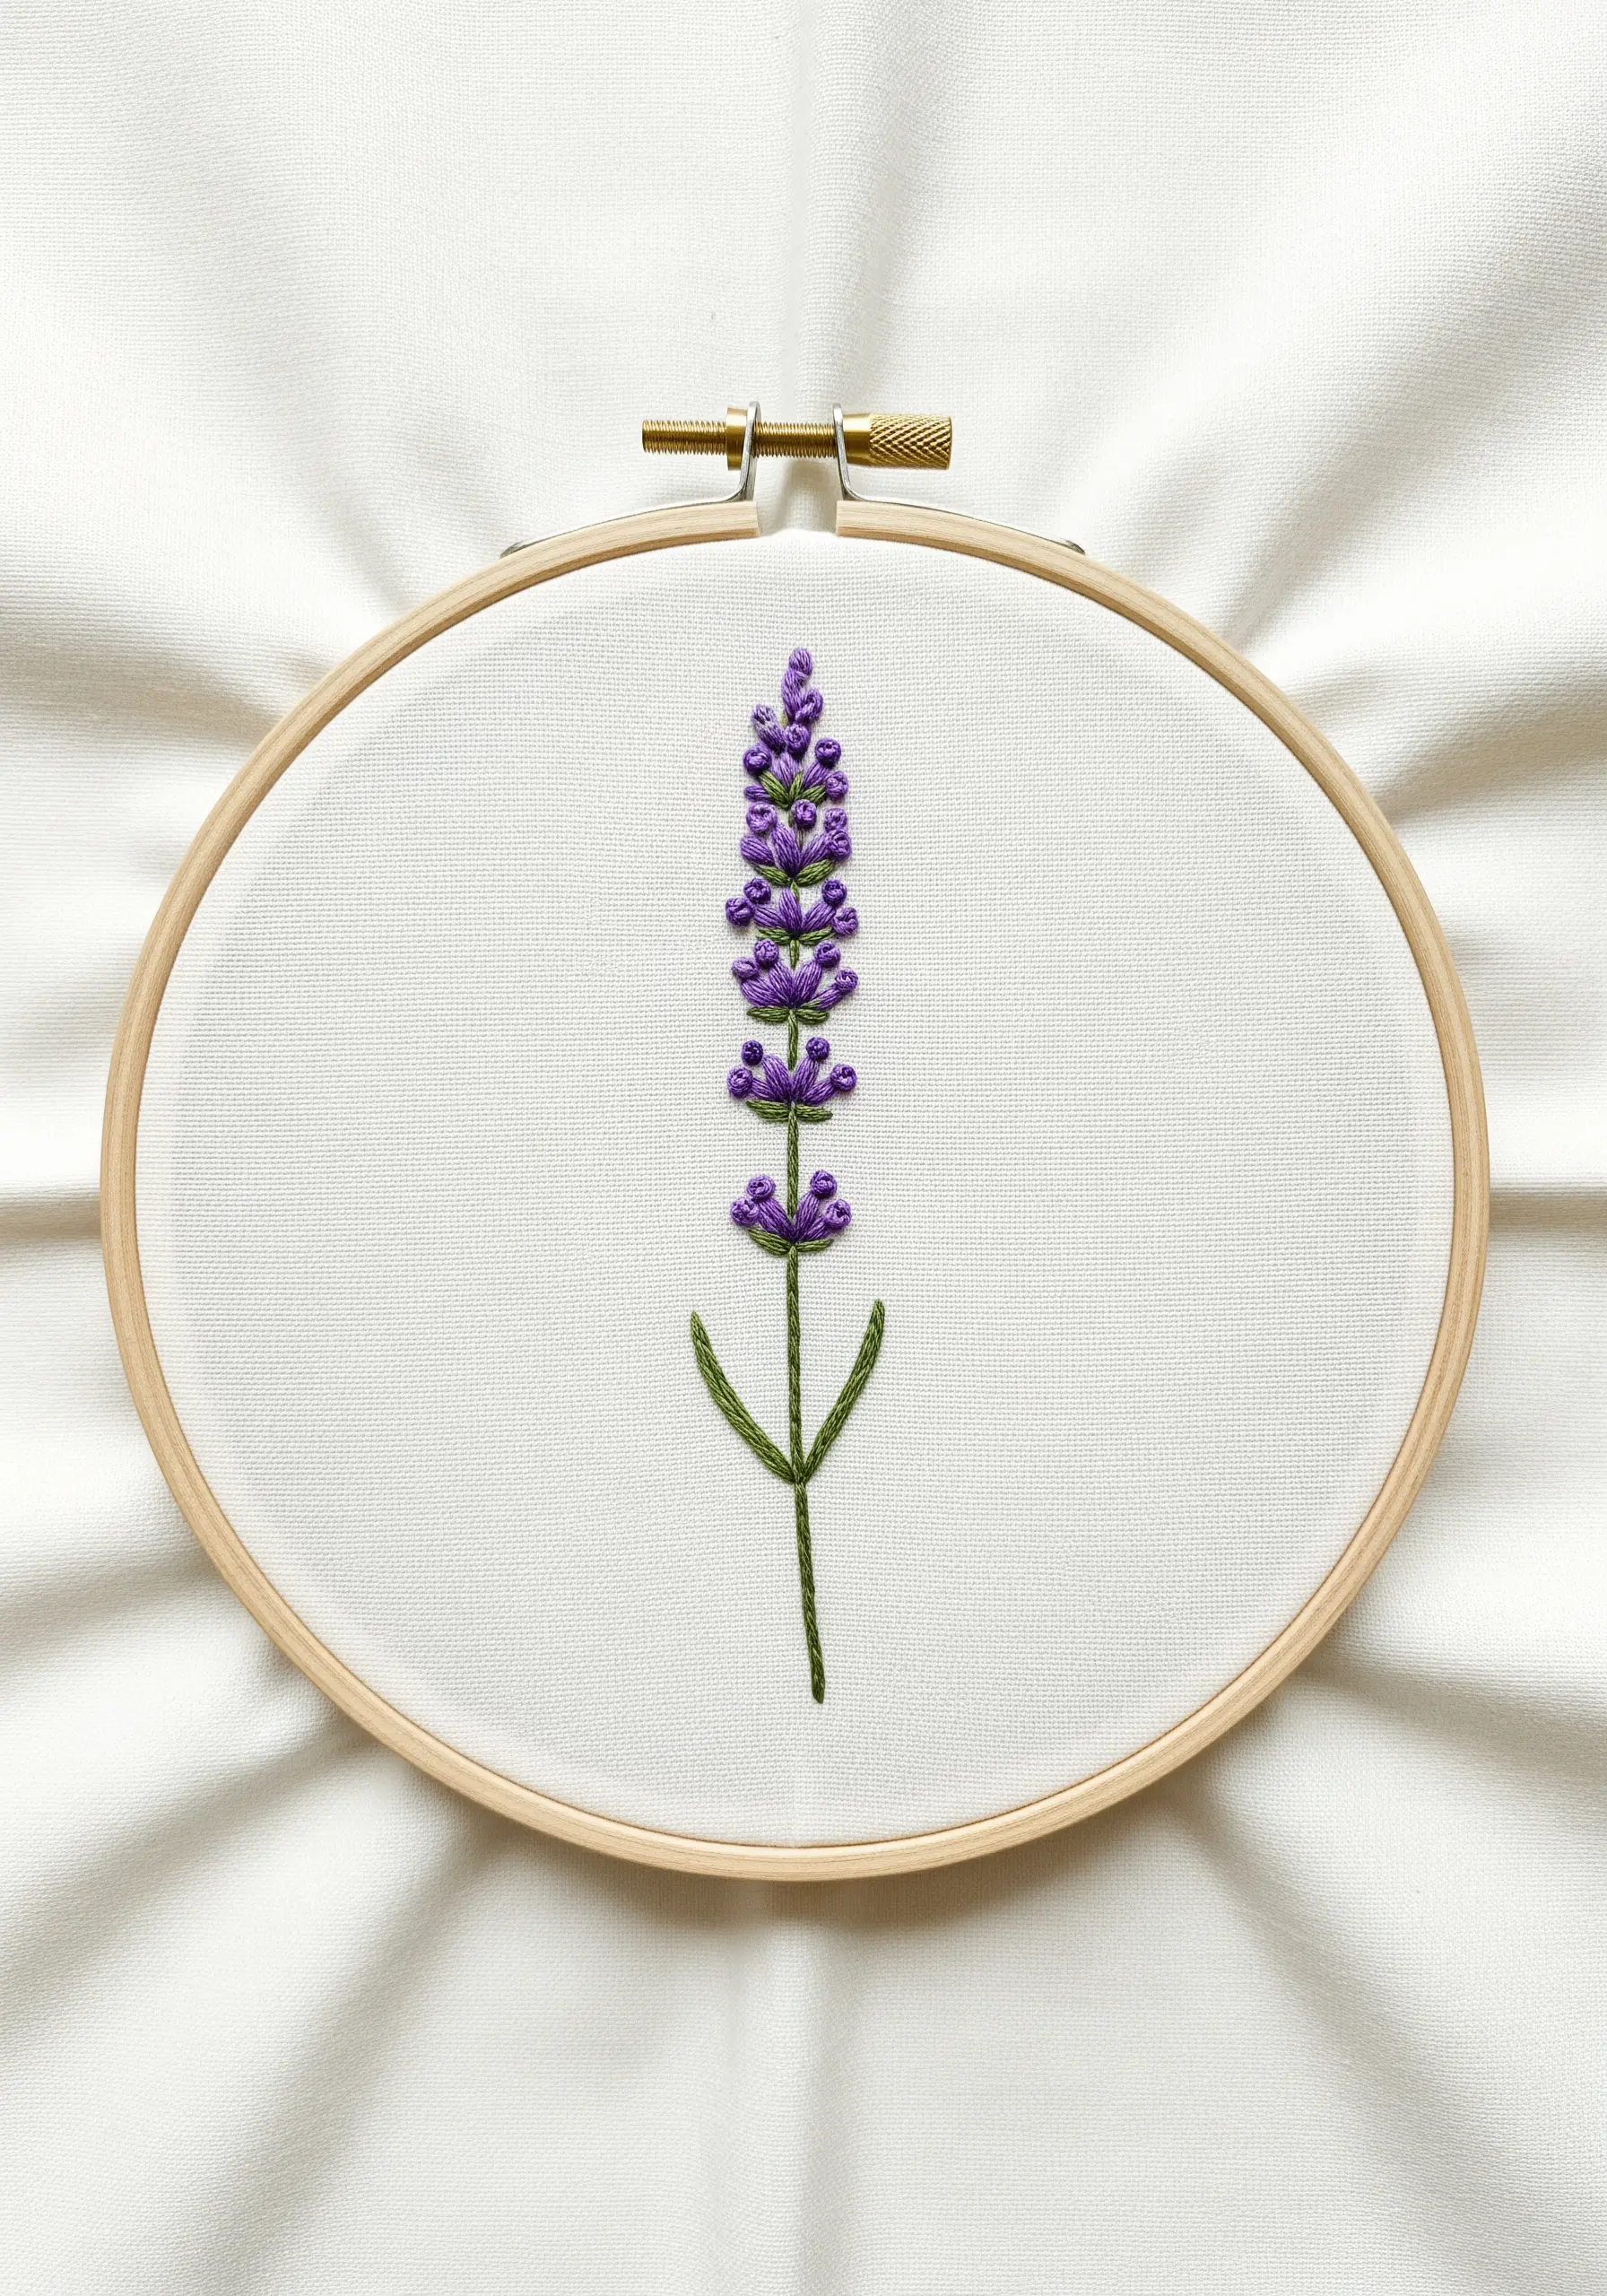
Recreate the delicate texture of a lavender sprig by using a combination of simple, effective stitches.
Use French knots for the tiny purple blossoms, clustering them together along the top of the stem.
Vary the number of times you wrap the thread around the needle (once or twice) to create subtle differences in the size of the knots, mimicking a natural bloom.
A simple stem stitch in green provides the perfect structure for the stalk.
This is one of the quickest delicate lavender stitch ideas to create a piece that feels both tactile and visually beautiful.
14. Convey Motion with Textured Stitches
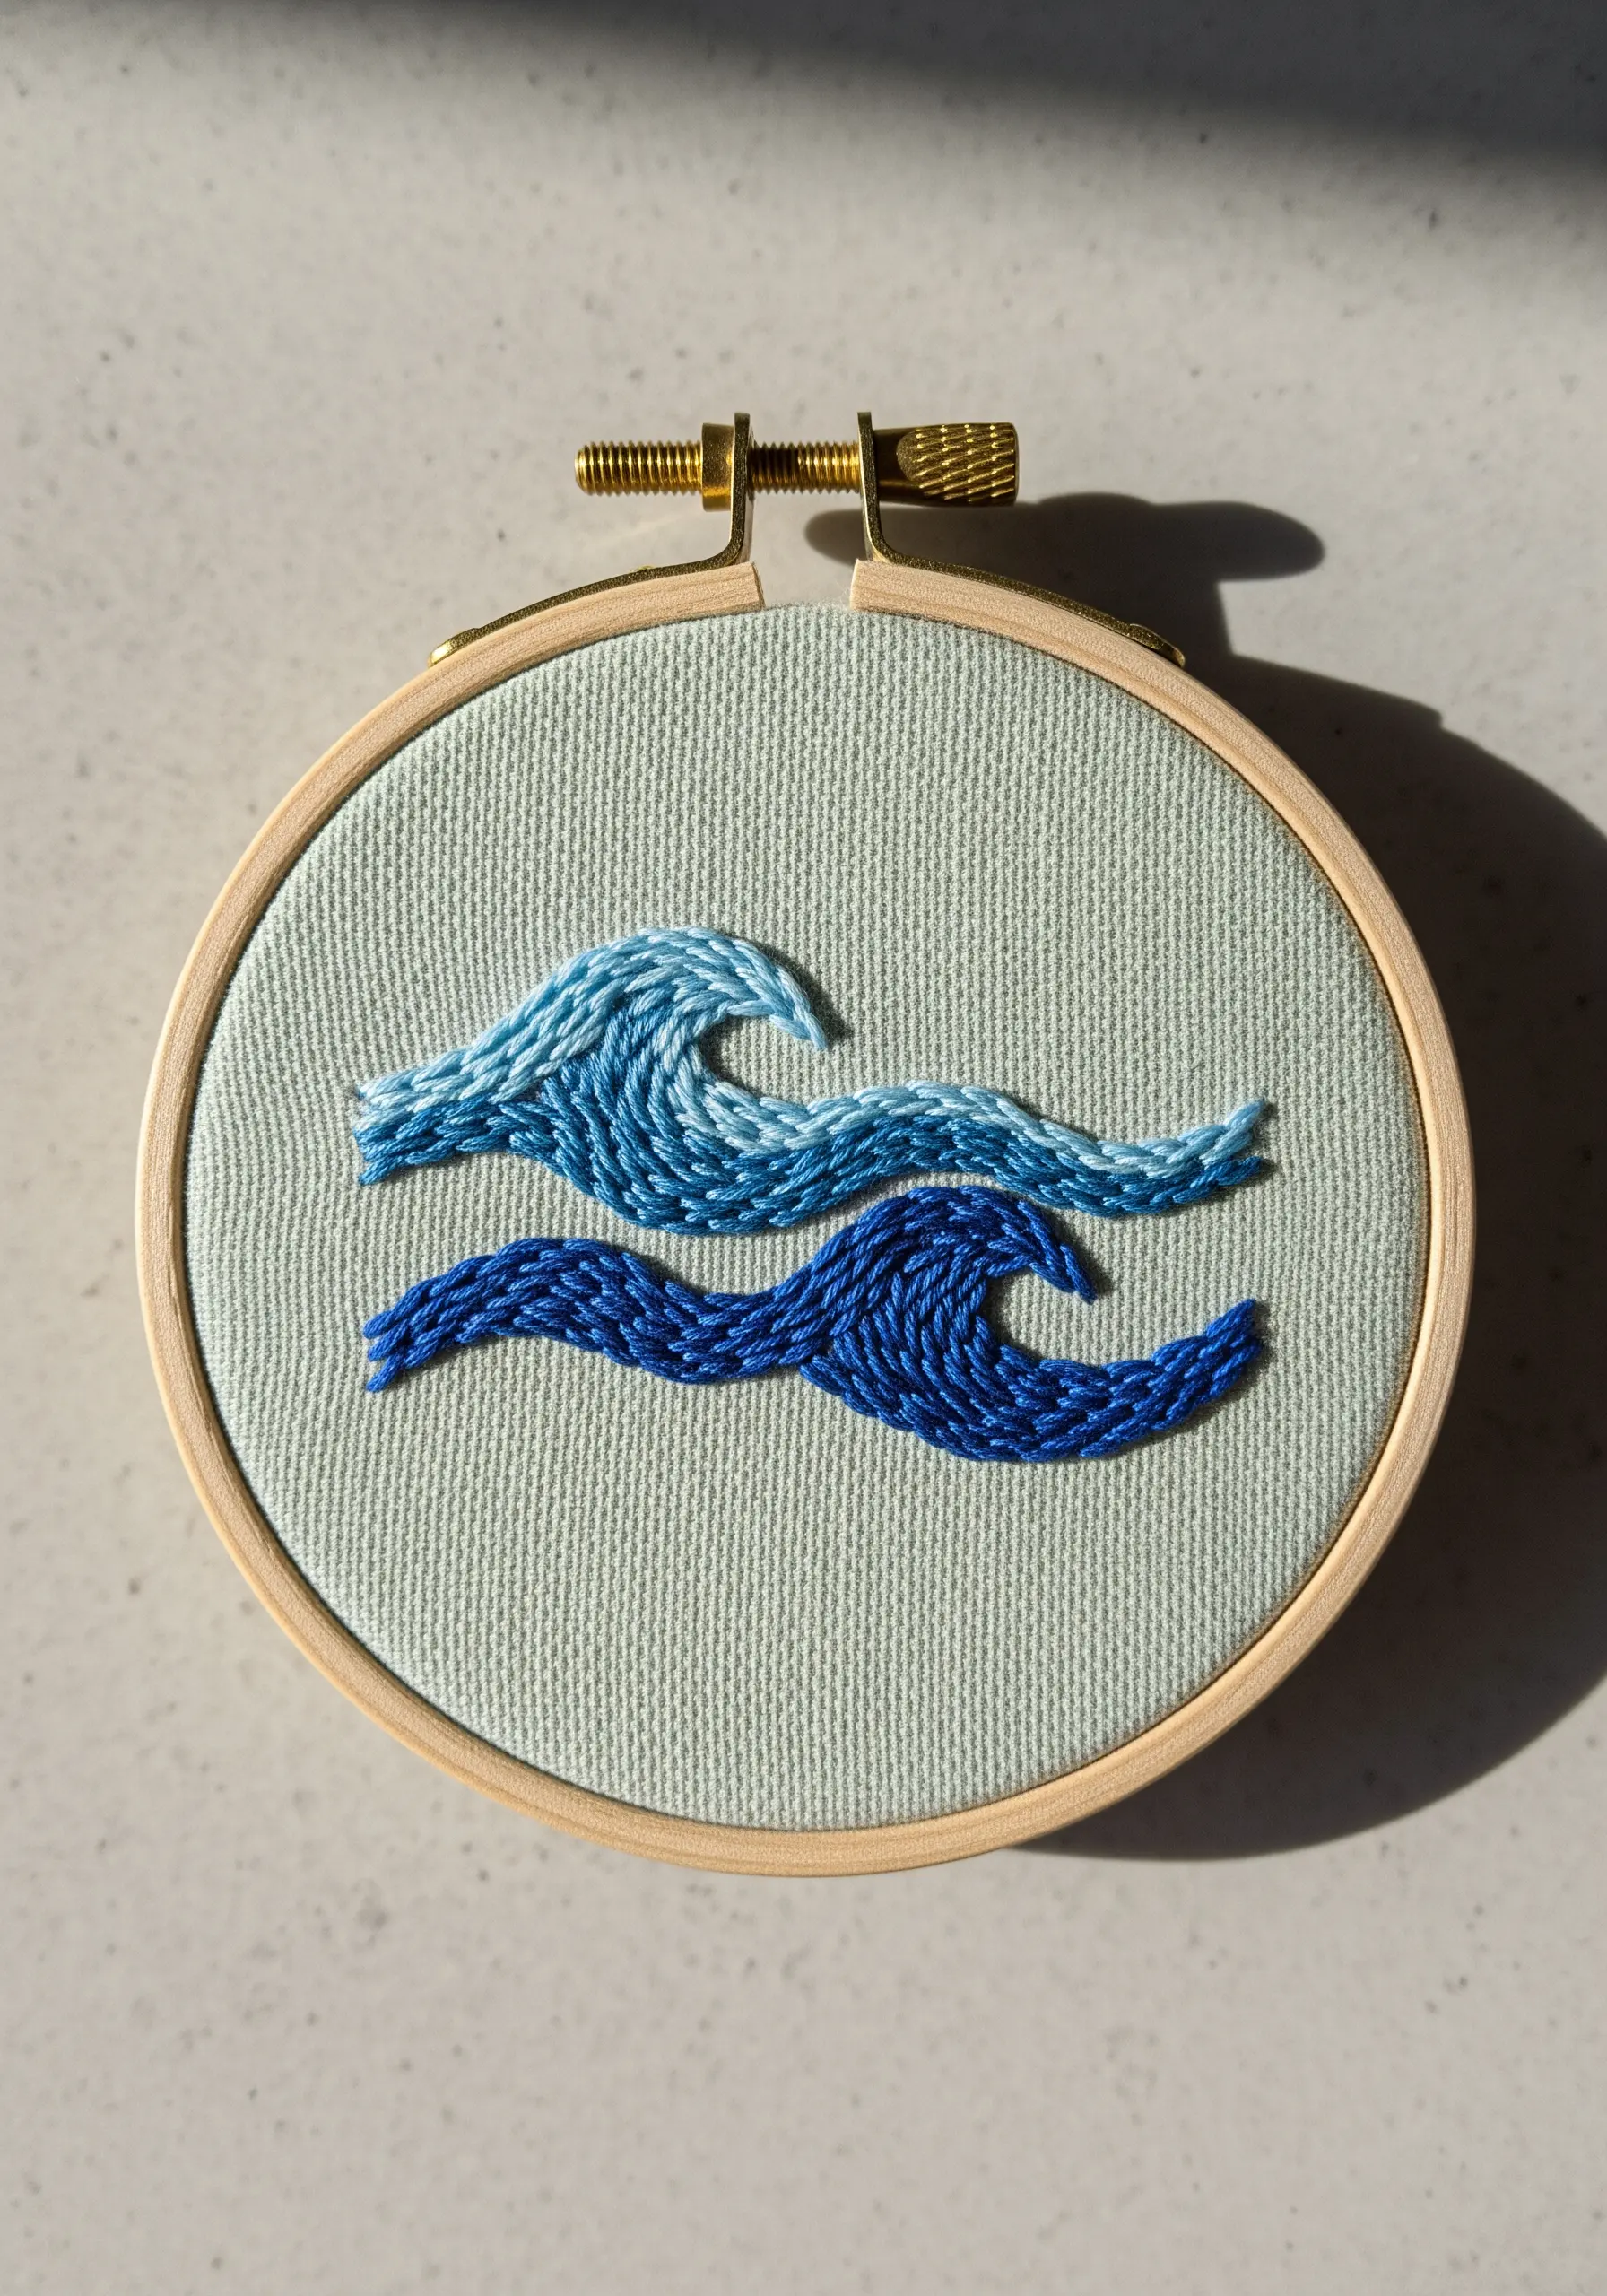
Capture the energy of ocean waves by using a stitch that creates inherent texture and movement.
The chain stitch is perfect for this, as each interlocking loop builds upon the last, creating a braided effect that mimics flowing water.
Stitch two wave forms, one in a lighter and one in a darker blue, to create a sense of depth and shadow.
By arranging the stitches to follow the curve of the wave, you enhance the feeling of motion, turning a static image into a dynamic one.
It’s a beautiful way to explore ocean-inspired hoop embroidery ideas in an afternoon.
15. Personalize a Gift with Cursive Lettering
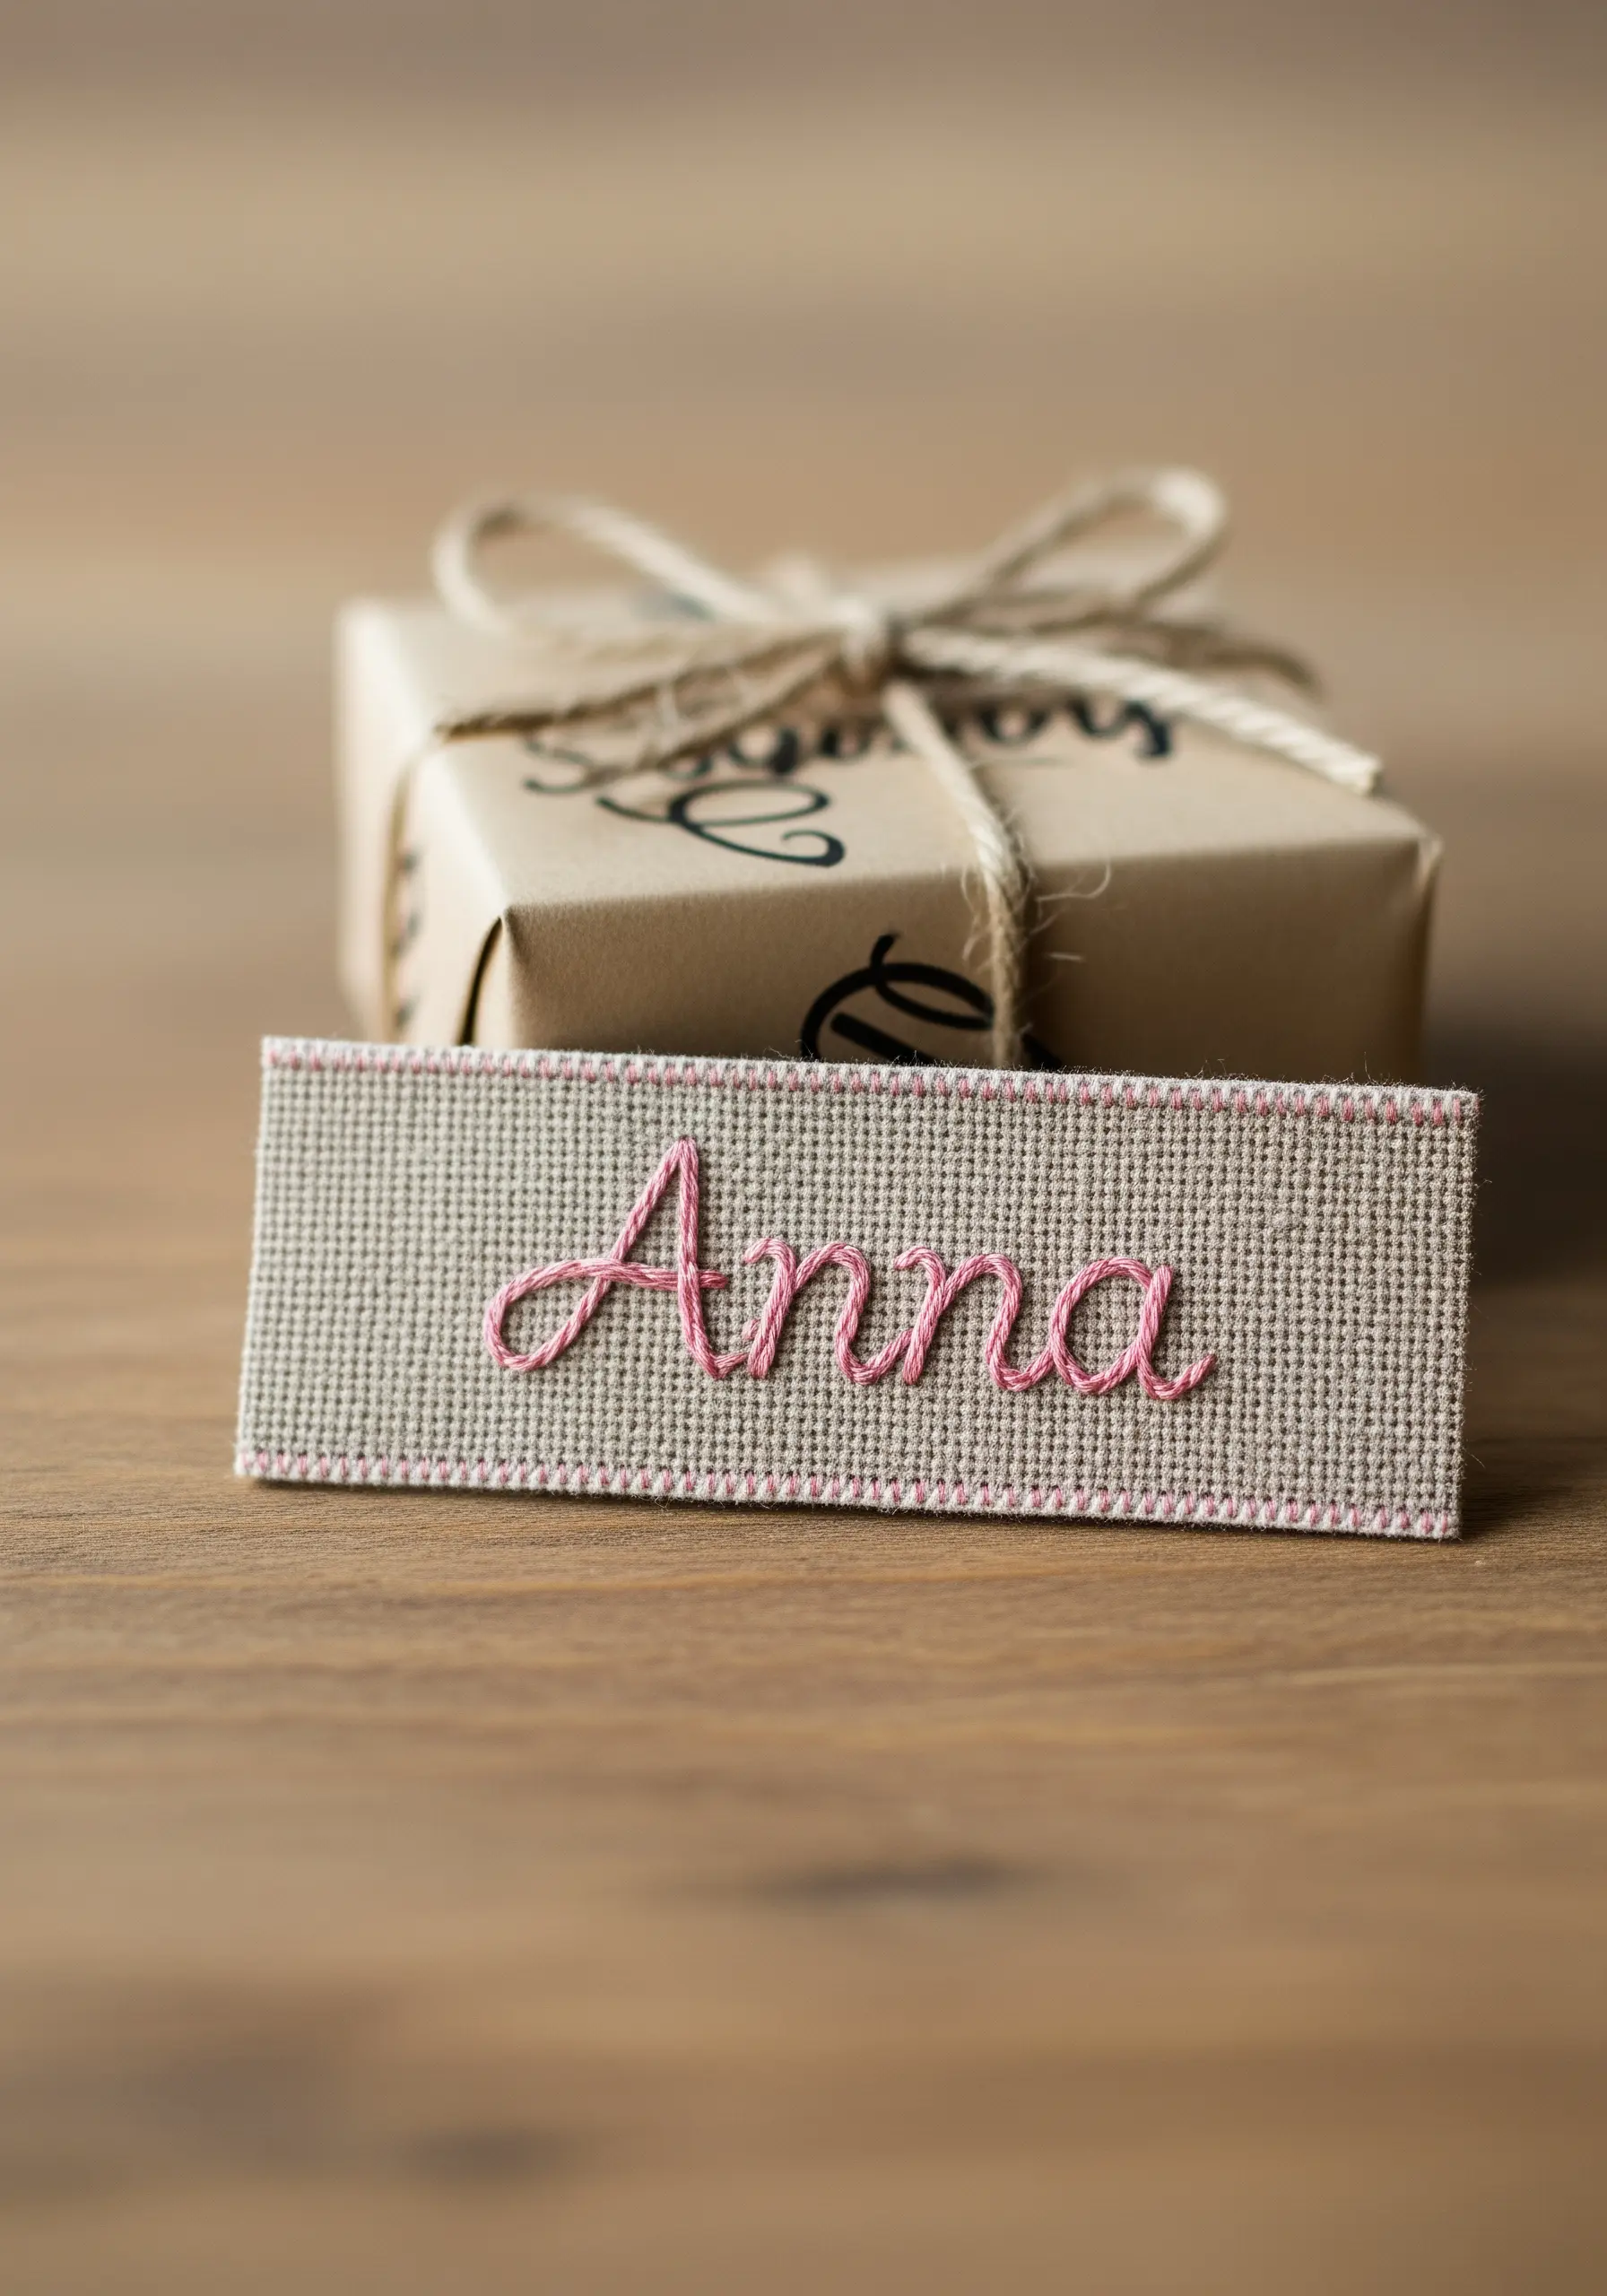
Hand-stitched lettering adds a deeply personal touch to any gift, from a simple tag to a linen napkin.
To achieve a smooth, flowing script, use a stem stitch or a split stitch, which are ideal for navigating curves.
The key to elegant lettering is consistency in your stitch length and angle.
Lightly trace the name onto the fabric with a pencil or a water-soluble marker to use as a guide, ensuring your stitches follow the lines precisely.
This method transforms a simple name into a beautiful, handcrafted keepsake.
16. Create Delicate Forms with Radiating Lines
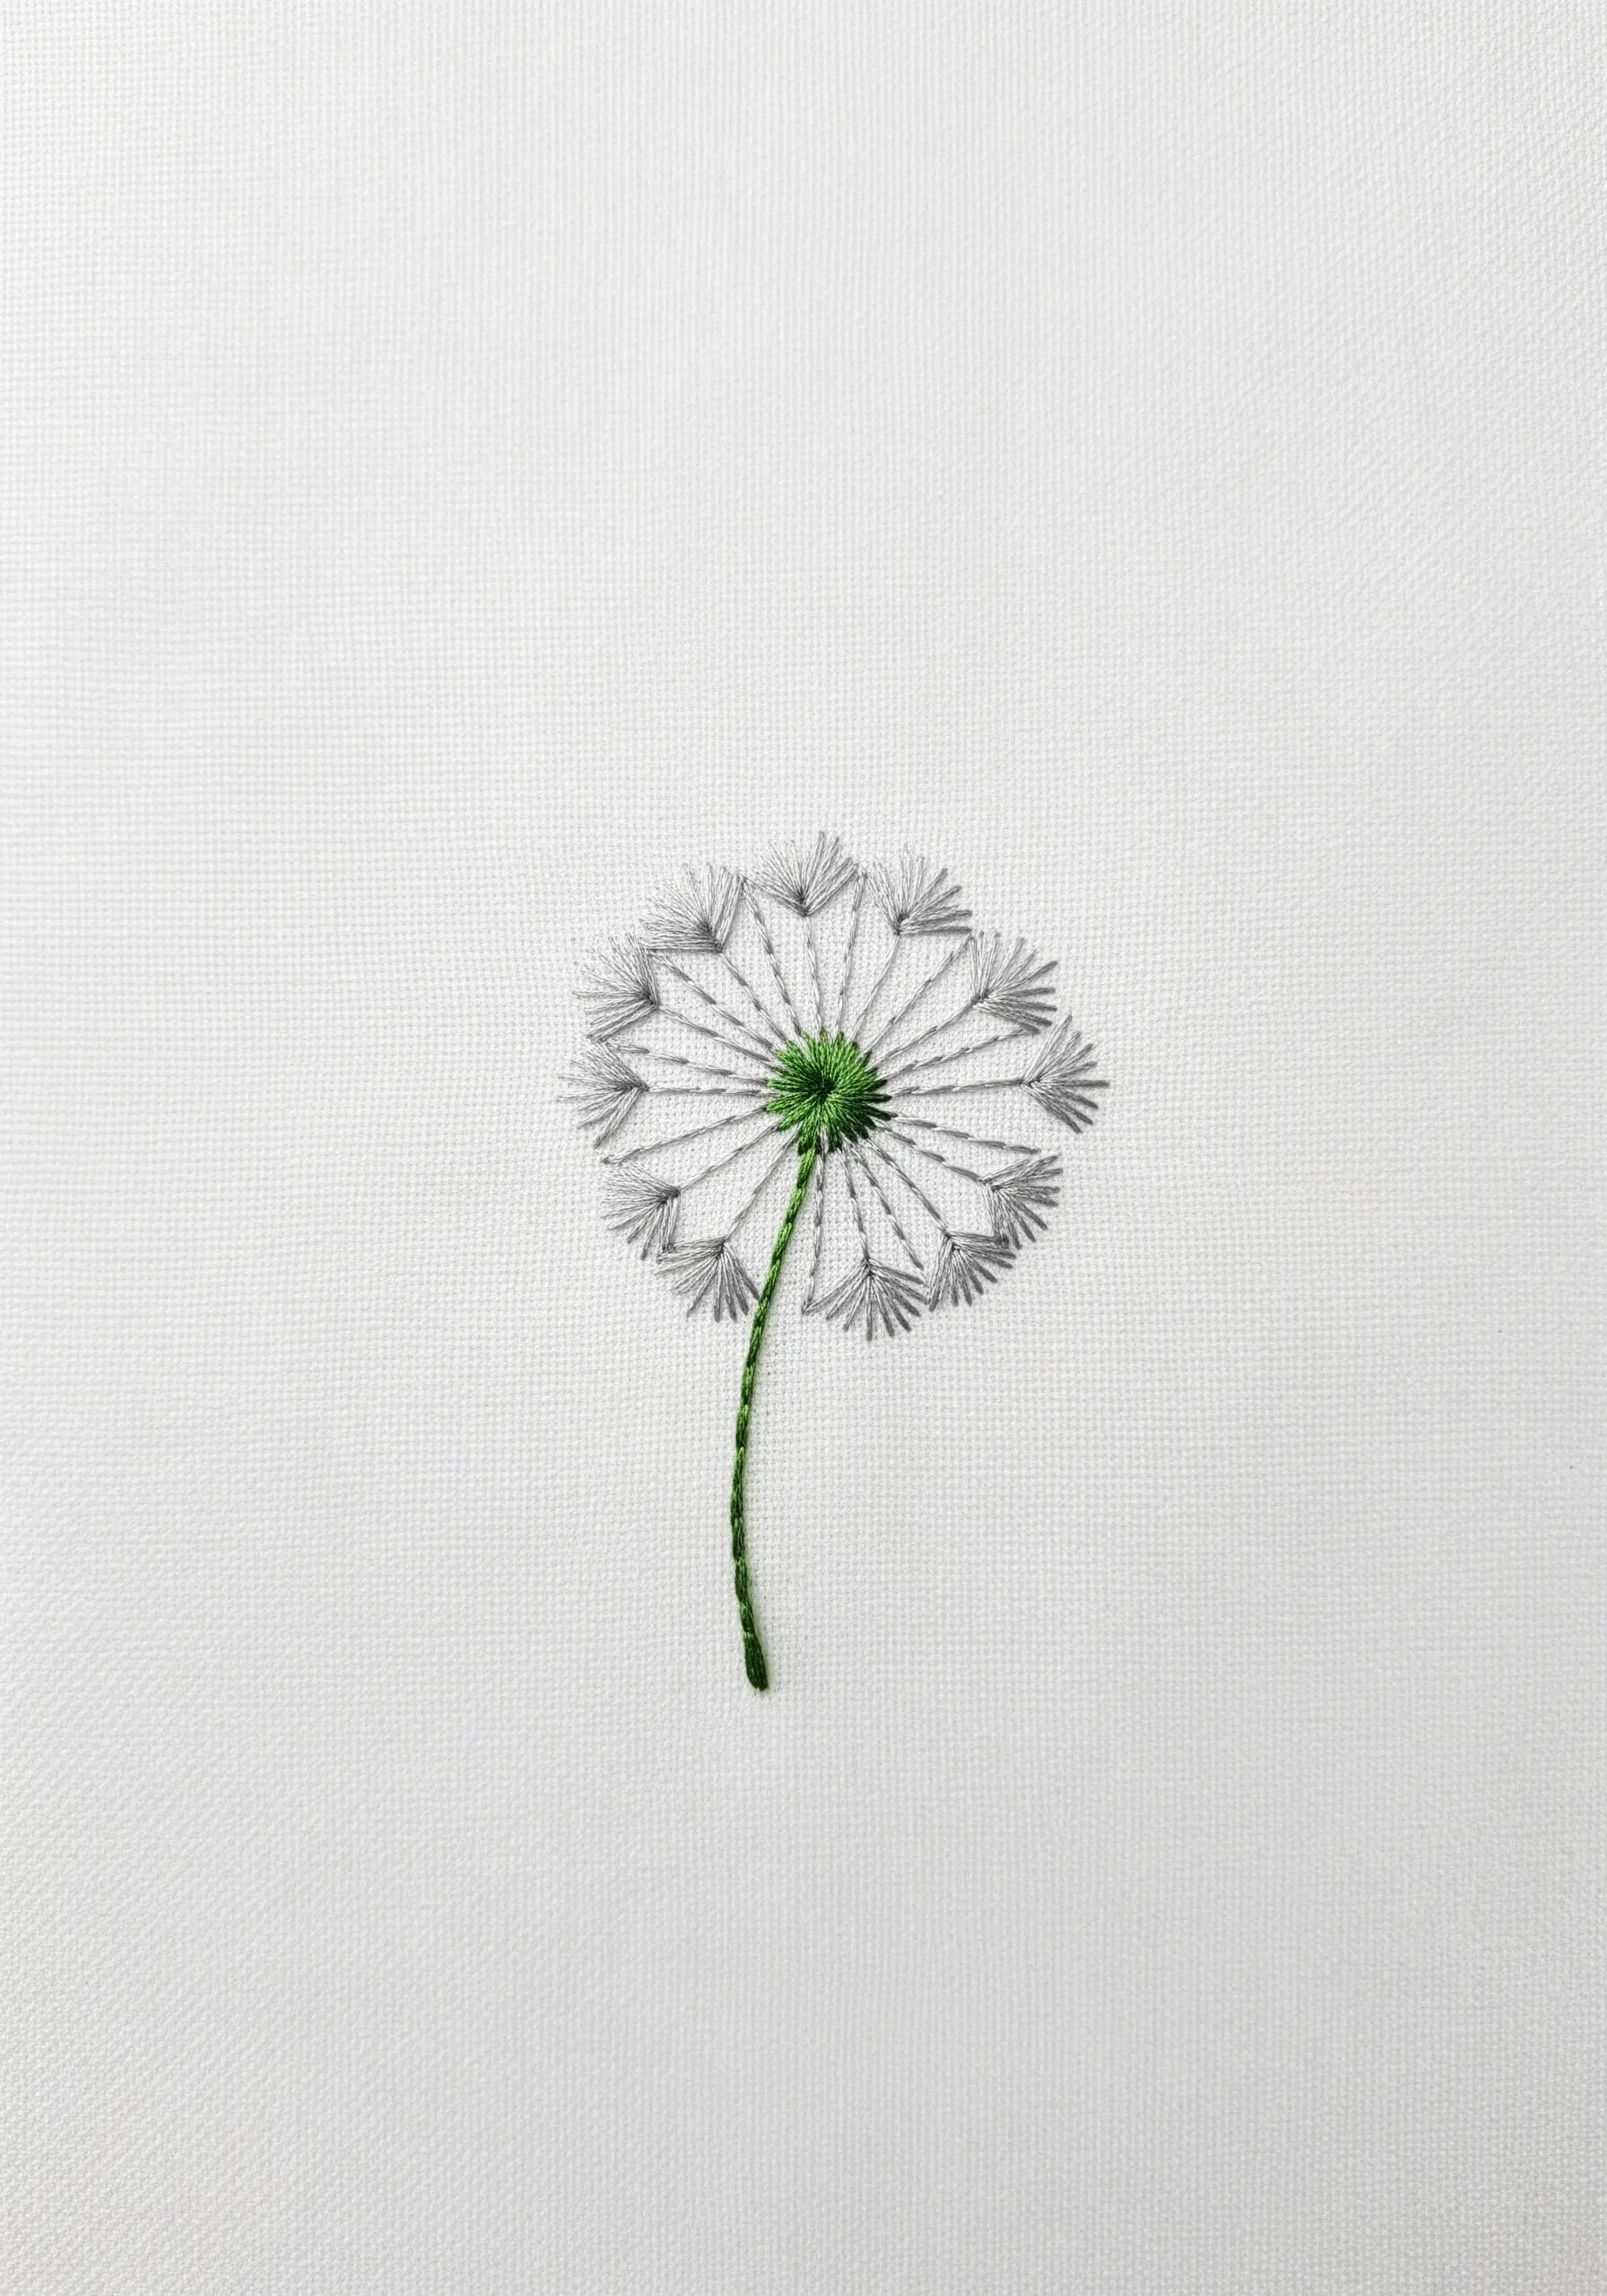
Capture the airy, delicate structure of a dandelion seed head using only straight stitches.
Start by creating the center with a few small green satin stitches or a tight cluster of French knots.
Then, work your way around, stitching long, straight lines that radiate out from the center.
Use a light grey or off-white thread to give it a soft, ethereal quality.
Finish by adding tiny ‘V’ shapes at the end of each line to represent the seeds.
This technique is a beautiful example of how simple embroidery patterns can create surprisingly detailed and graceful results.
17. Experiment with Abstract Color Blocking
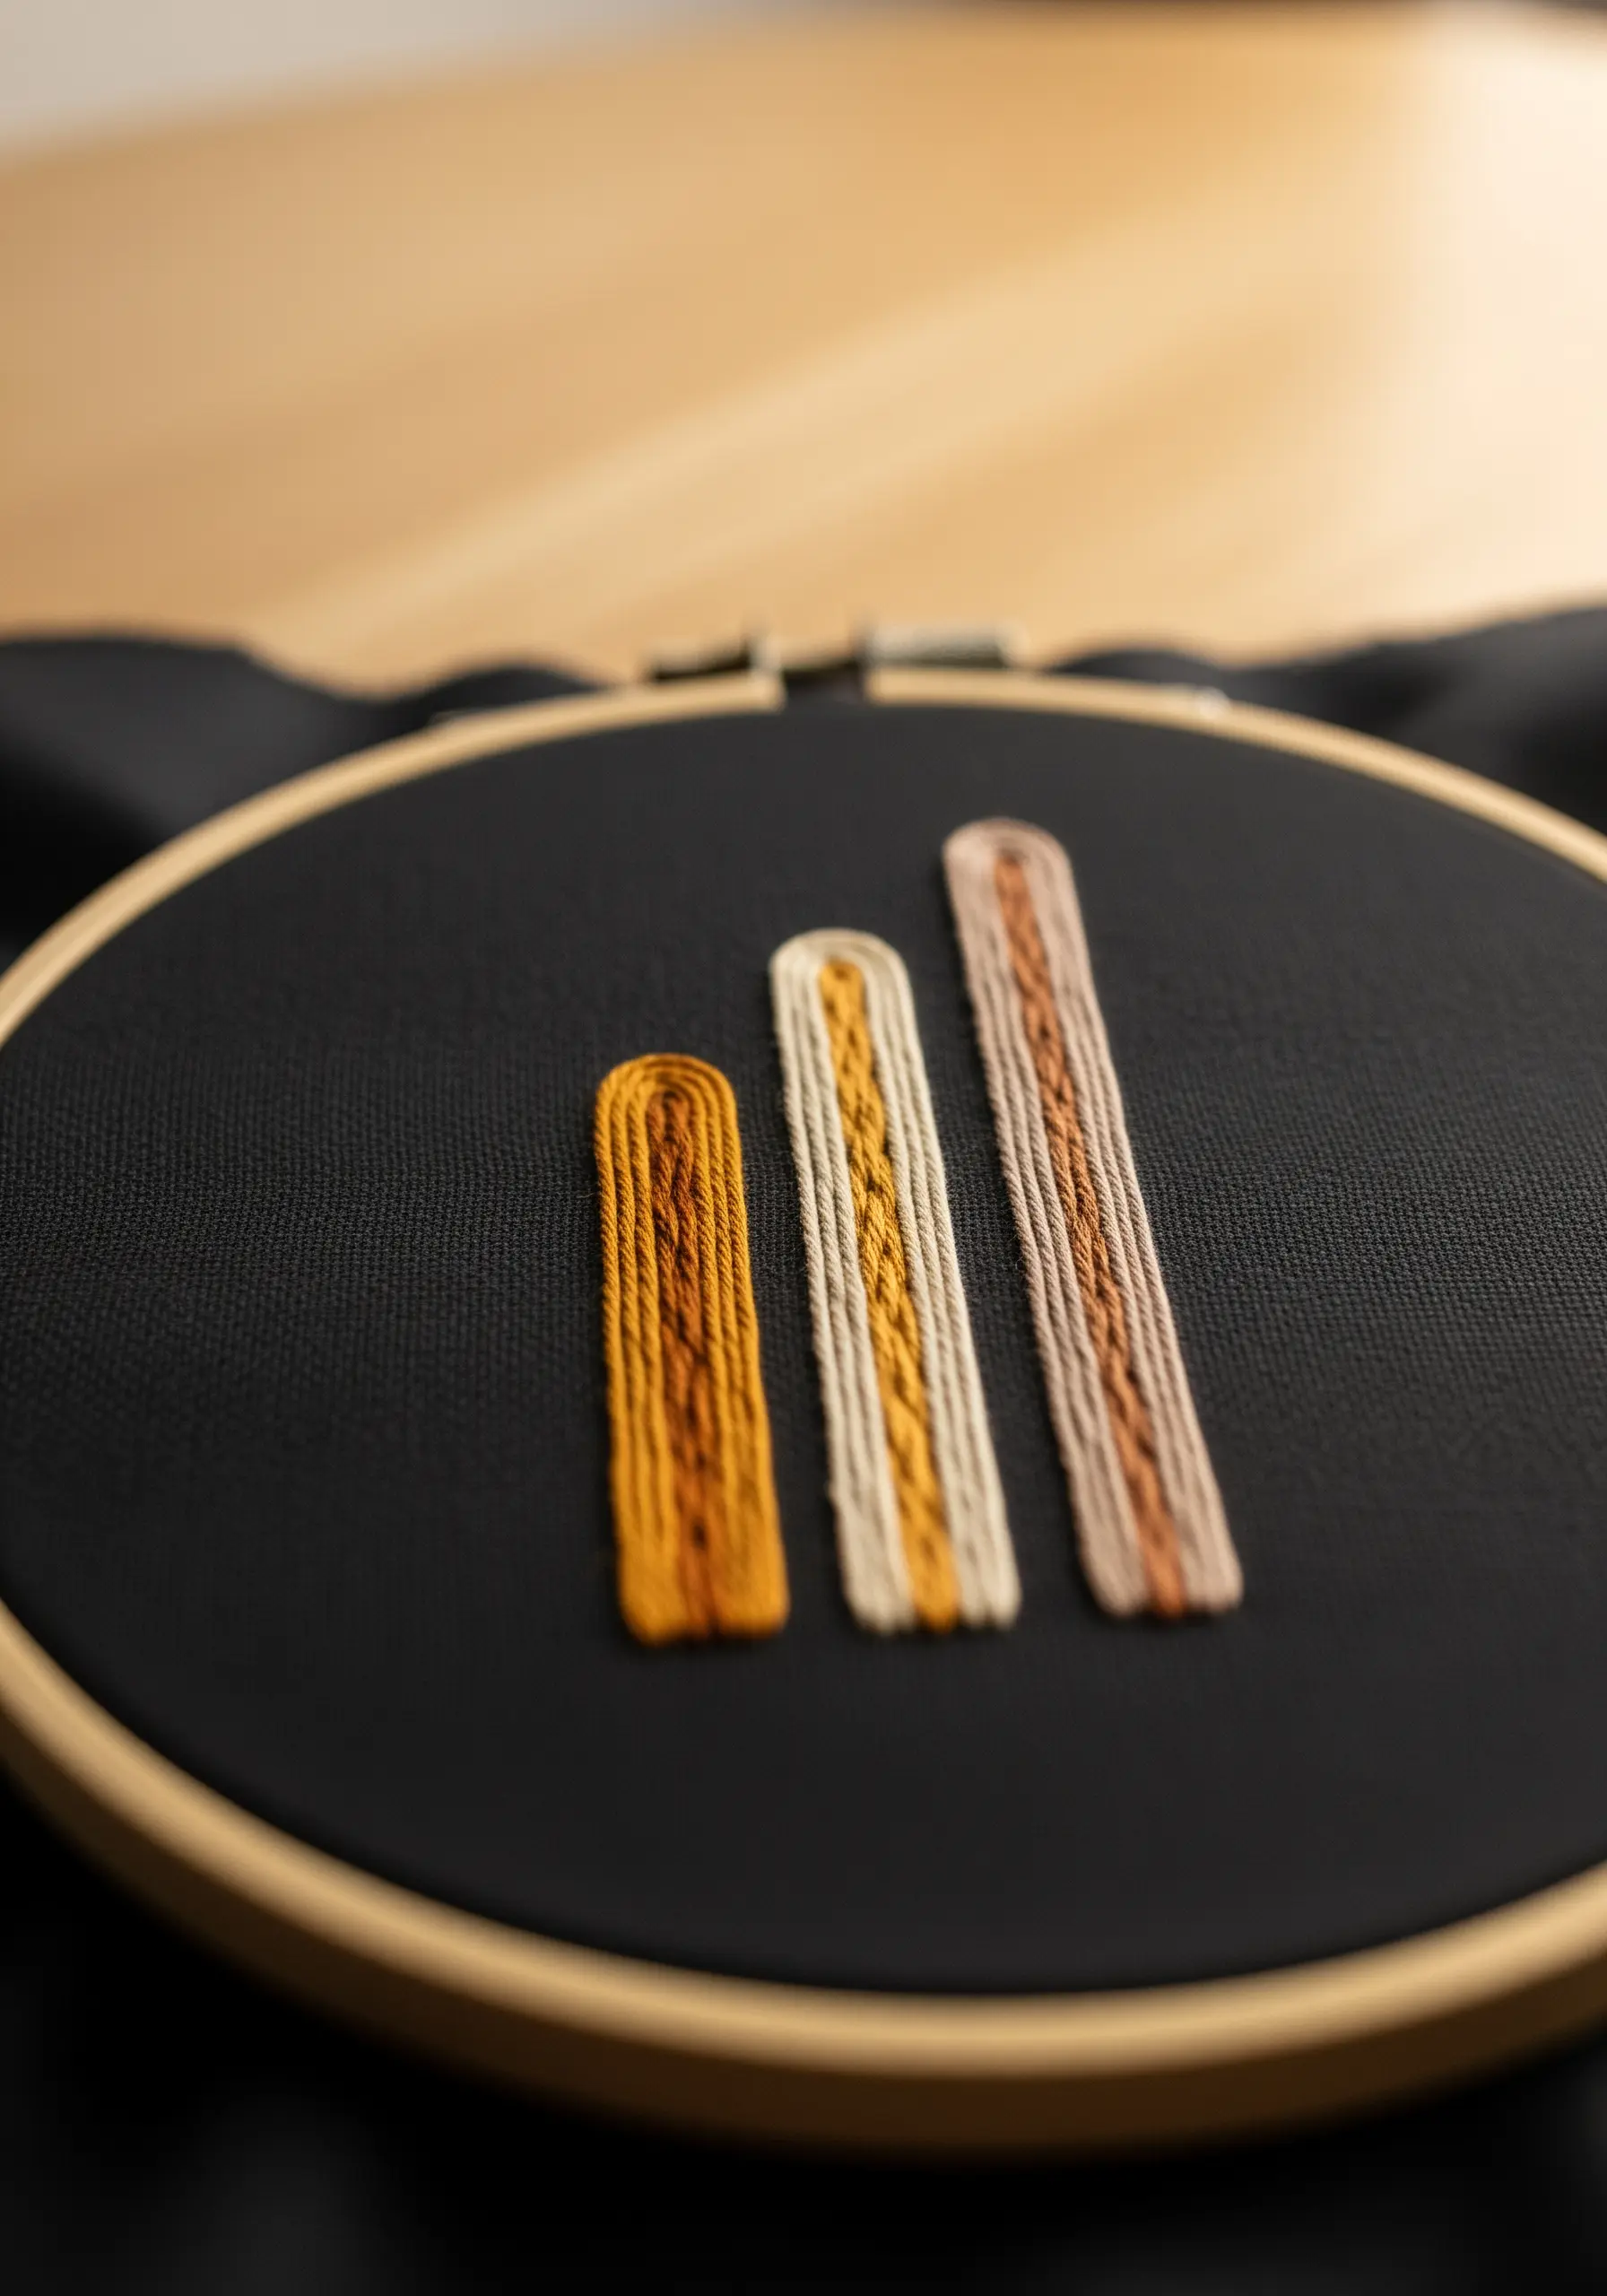
Move beyond pictorial designs and play with color and texture in an abstract composition.
Create simple shapes, like these vertical bars, and fill them with different stitch techniques or color combinations.
One bar can be solid satin stitch, another can be a blend of two colors using a long-and-short stitch, and a third can be wrapped with a contrasting thread (a technique called couching).
Arranging these textural bars on a dark, solid background allows the colors and stitches to become the focus, resulting in a modern piece of fiber art.
18. Achieve Smooth Gradients with Long-and-Short Stitch
Give your motifs a realistic, shaded look by using the long-and-short stitch.
This technique, often called ‘thread painting,’ is perfect for blending colors smoothly, as seen on this mushroom cap.
Start by filling the edge of the shape with a row of alternating long and short stitches.
Then, fill in the subsequent rows by bringing your needle up through the stitches of the previous row, staggering the entry points to seamlessly blend the colors.
This is one of the most transformative floral embroidery ideas that you can apply to any natural motif.
19. Capture Fine Detail with Angled Straight Stitches
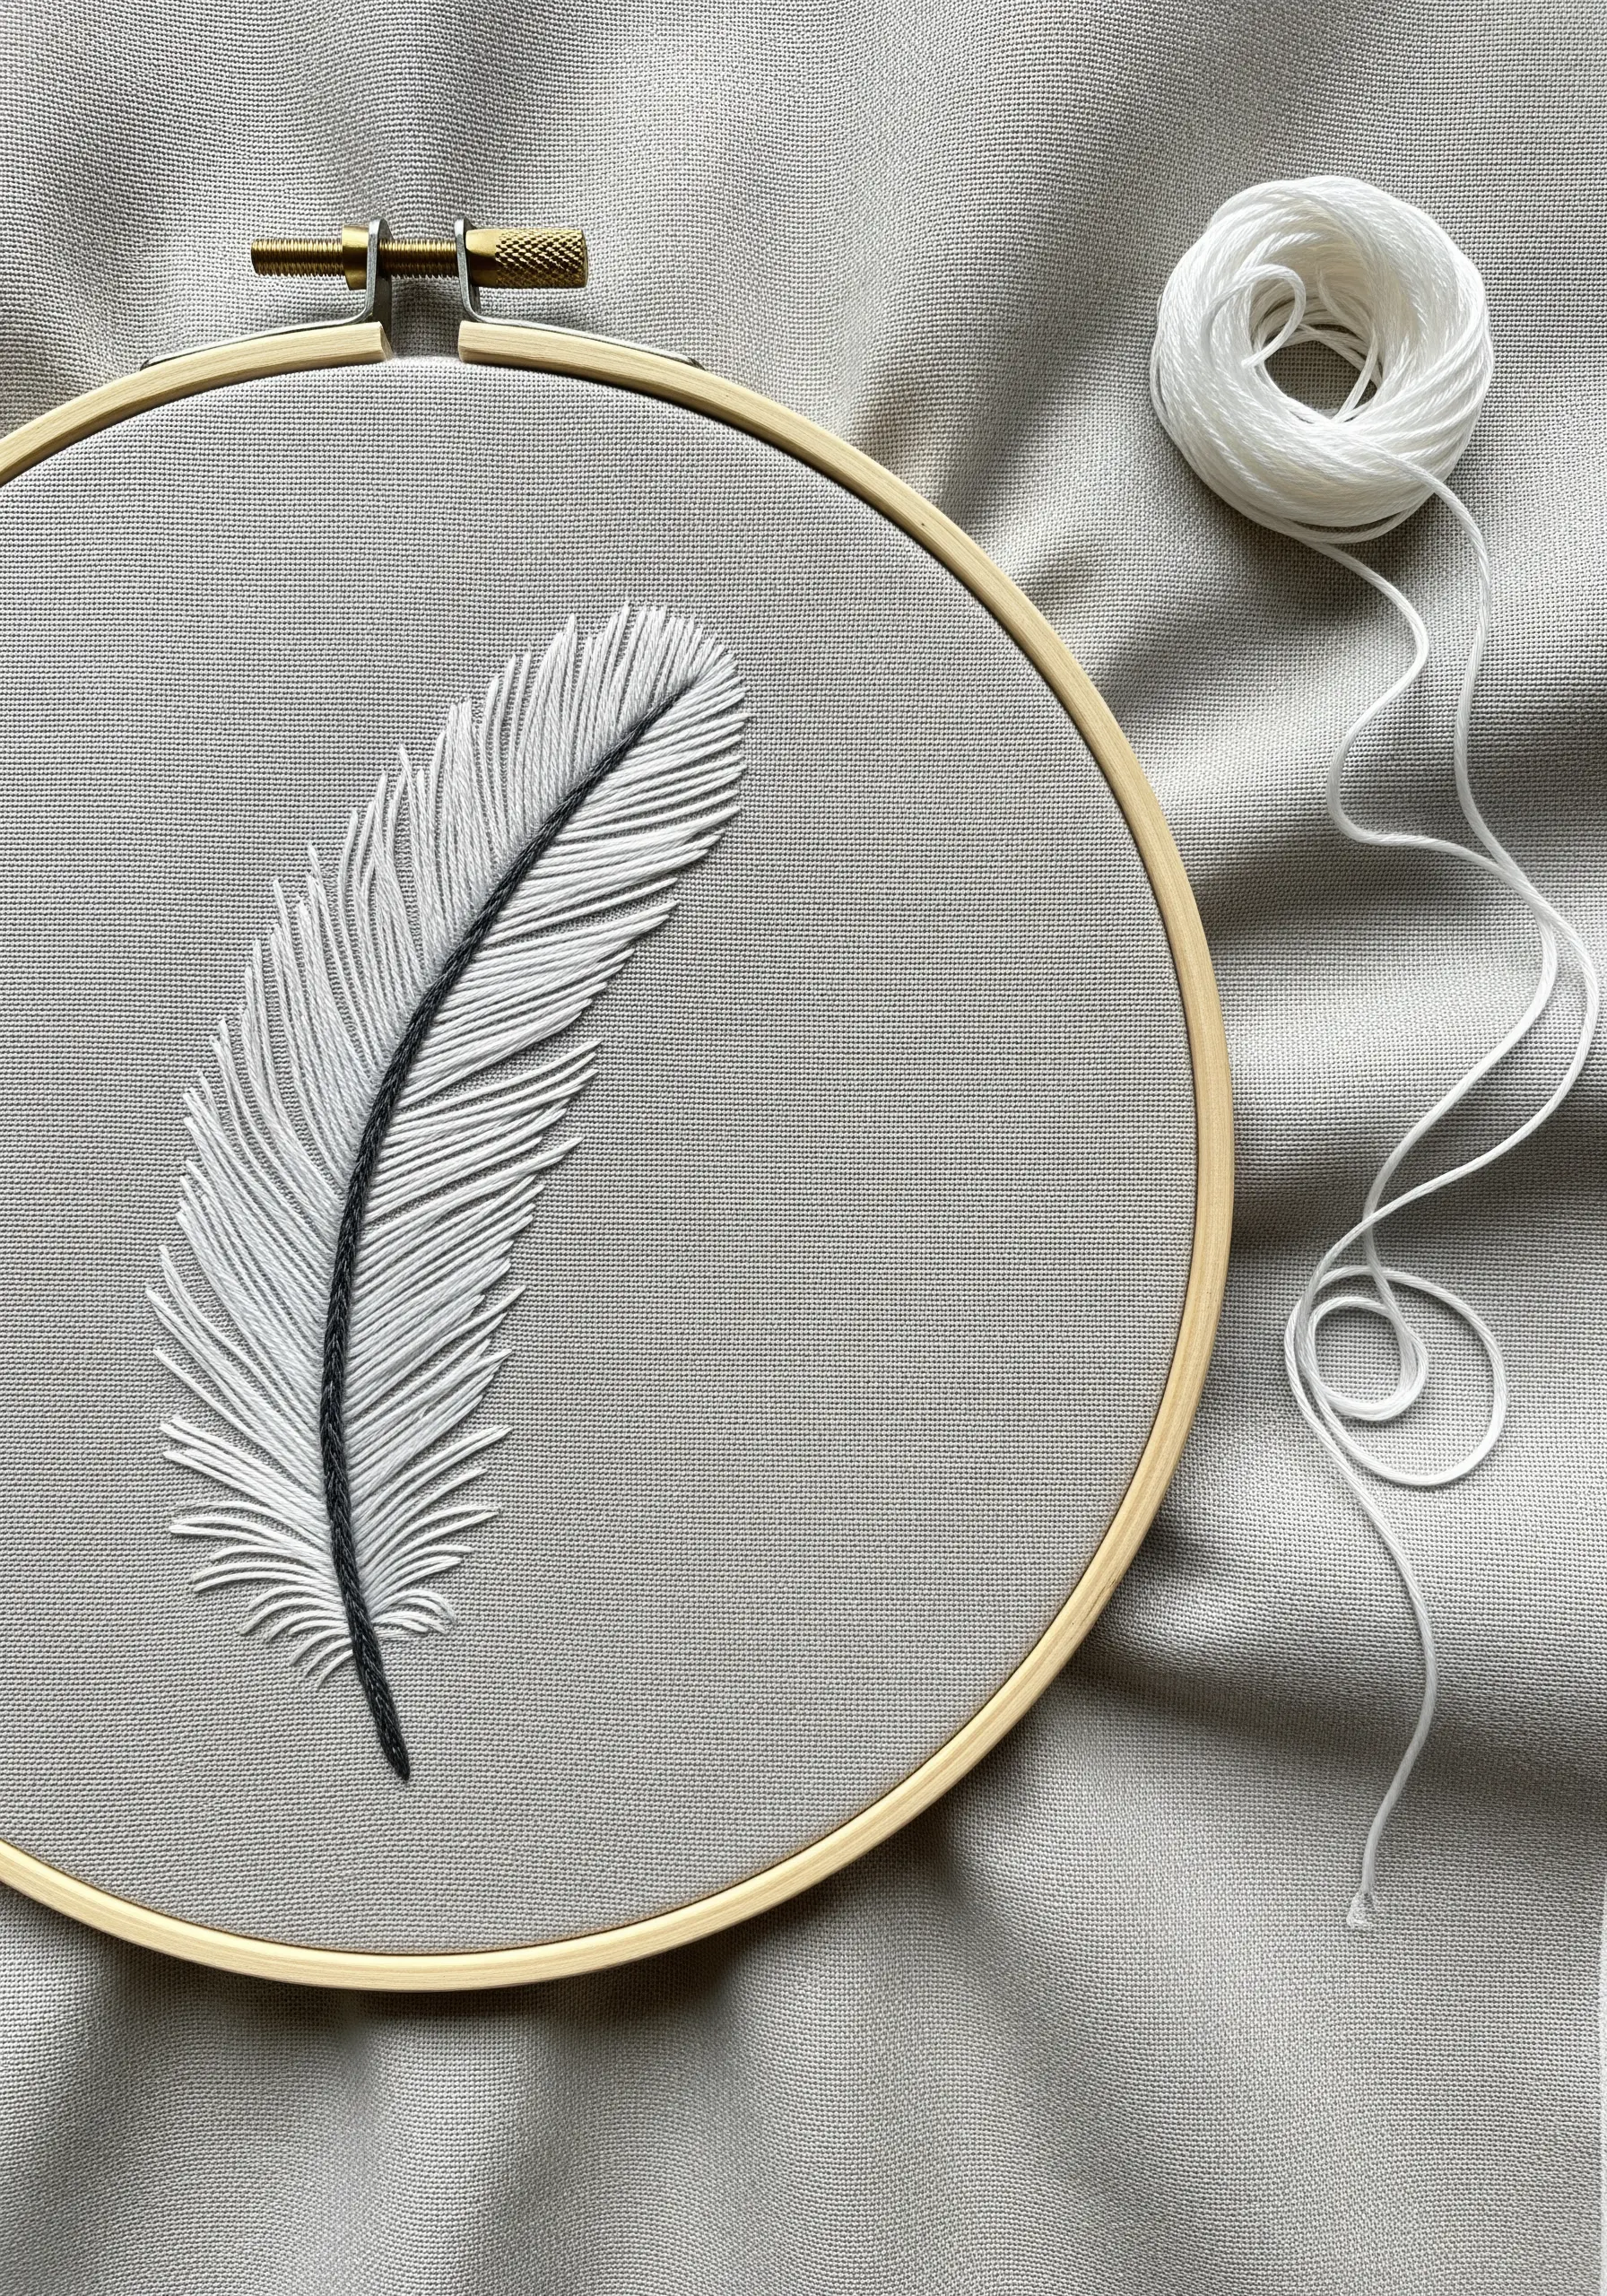
Mimic the delicate texture of a feather by strategically placing angled straight stitches.
First, create the central shaft (the rachis) using a thin line of backstitch or stem stitch in a dark, contrasting color.
Then, fill in the barbs on either side with dense, fine straight stitches in a lighter color, like white or grey.
Angle your stitches slightly downward and away from the shaft, just as they would appear on a real feather.
Varying the length and density of the stitches will give the form a soft, natural, and remarkably realistic appearance.
20. Use Directional Satin Stitch for a 3D Effect
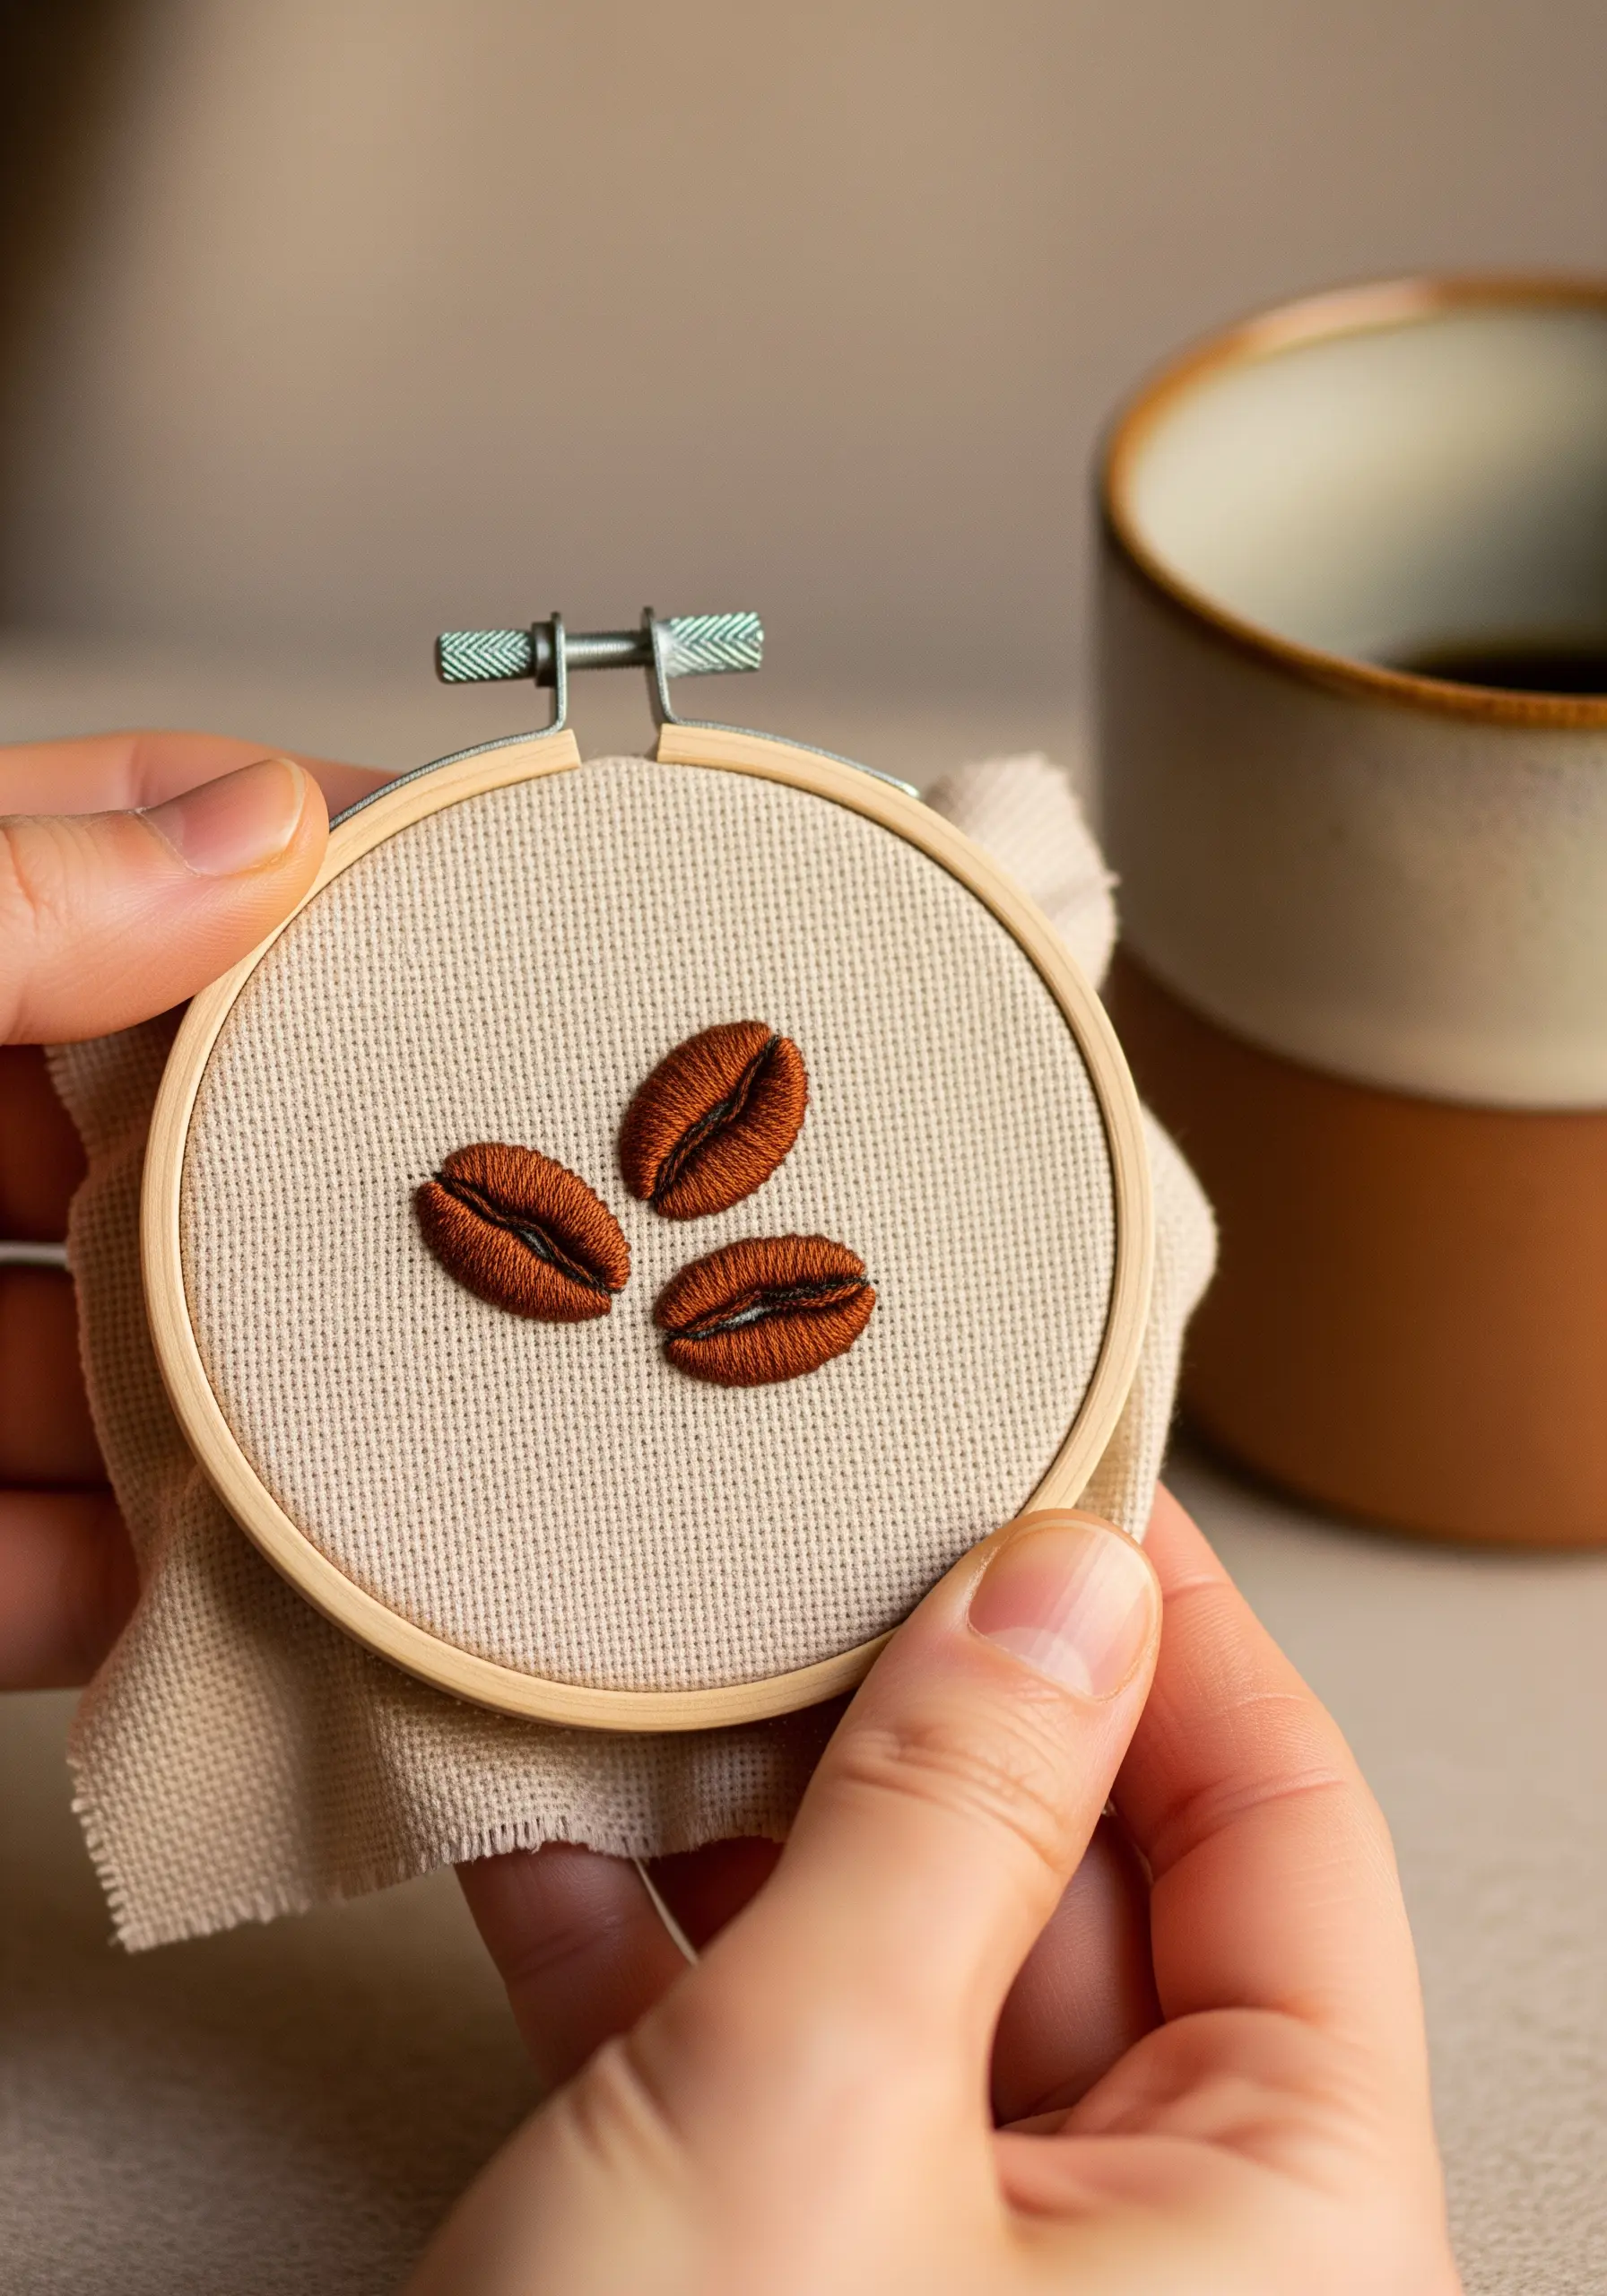
Transform a flat shape into a rounded, three-dimensional object by controlling the direction of your satin stitch.
For these coffee beans, instead of stitching straight across, curve your satin stitches to follow the natural contour of the bean.
Imagine the stitches wrapping around the form.
Use a slightly darker thread for a few stitches along the outer edge to create a subtle shadow, enhancing the illusion of roundness.
This is one of the best small hoop embroidery tricks to make your work look instantly more realistic and dynamic.


