
Think of your embroidery hoop not just as a frame, but as a canvas for modern art. Geometric and abstract designs free you from the rules of realism and invite you to play with the fundamental elements of art: line, shape, color, and texture.
Here, thread is not just for filling in cartoons; it is the medium itself. You will learn to use stitches to create optical illusions, build sculptural forms, and compose with the quiet confidence of a minimalist painter.
Forget perfection. Instead, focus on intention. Each of these ideas is a starting point for developing your own visual language. Whether you create a single, powerful statement piece or a multi-hoop installation, you’re not just stitching—you’re designing a piece of your home’s story.
1. Master Sculptural Yarn Couching
Create bold, graphic shapes by couching thick yarn onto a neutral canvas background.
Instead of traditional embroidery floss, use a smooth, tightly spun yarn and lay it down in concentric spirals or rows, securing it with small, invisible stitches in a matching floss color.
This technique turns simple geometric forms into raised, tactile blocks of color, emphasizing shape and texture over intricate stitching.
The key is maintaining even tension in both the yarn and the securing stitches to prevent the fabric from puckering.
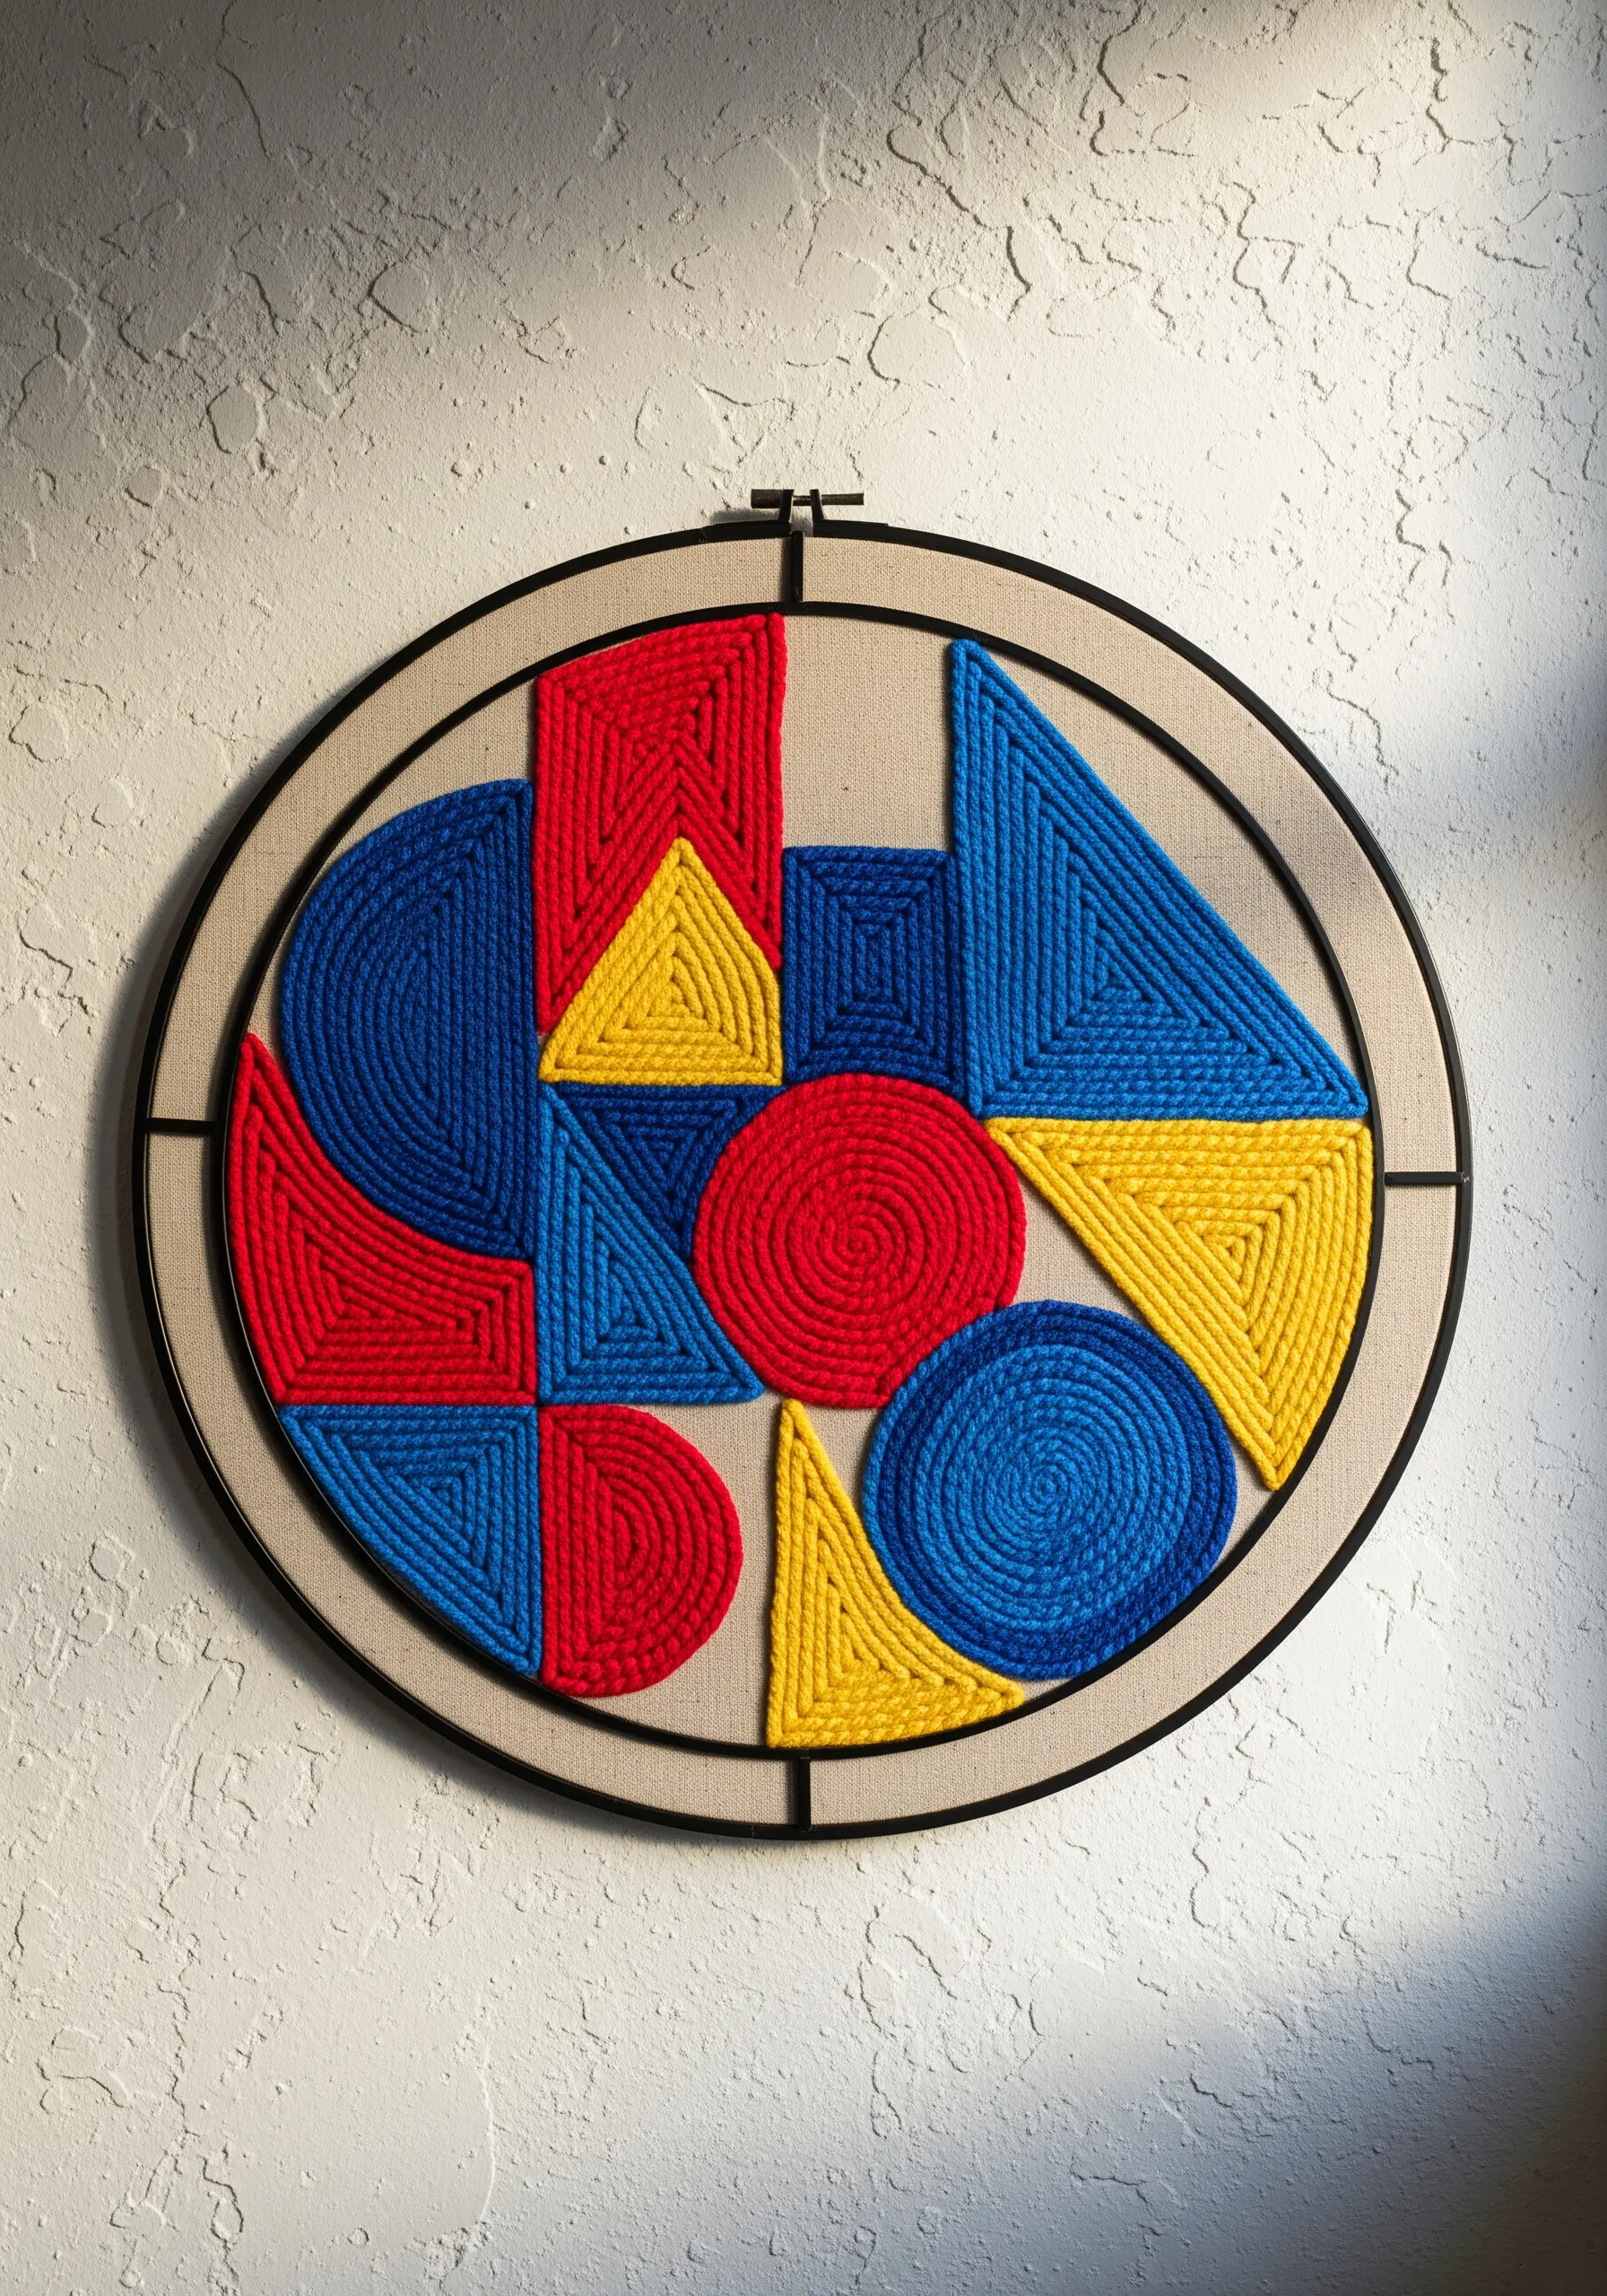
2. Arrange a Luminous Triptych with Metallic Thread
Elevate simple straight stitches into a sophisticated installation by creating a triptych—three hoops displayed together as a single piece of art.
Use a dark, non-reflective fabric like black cotton or linen to make metallic and satin threads appear to glow.
Map out your anchor points evenly around the hoop’s circumference and pull each stitch taut to create sharp, clean lines.
Grouping the hoops vertically creates a powerful focal point, drawing the eye upward and transforming a simple pattern into one of the most compelling fiber art installations.
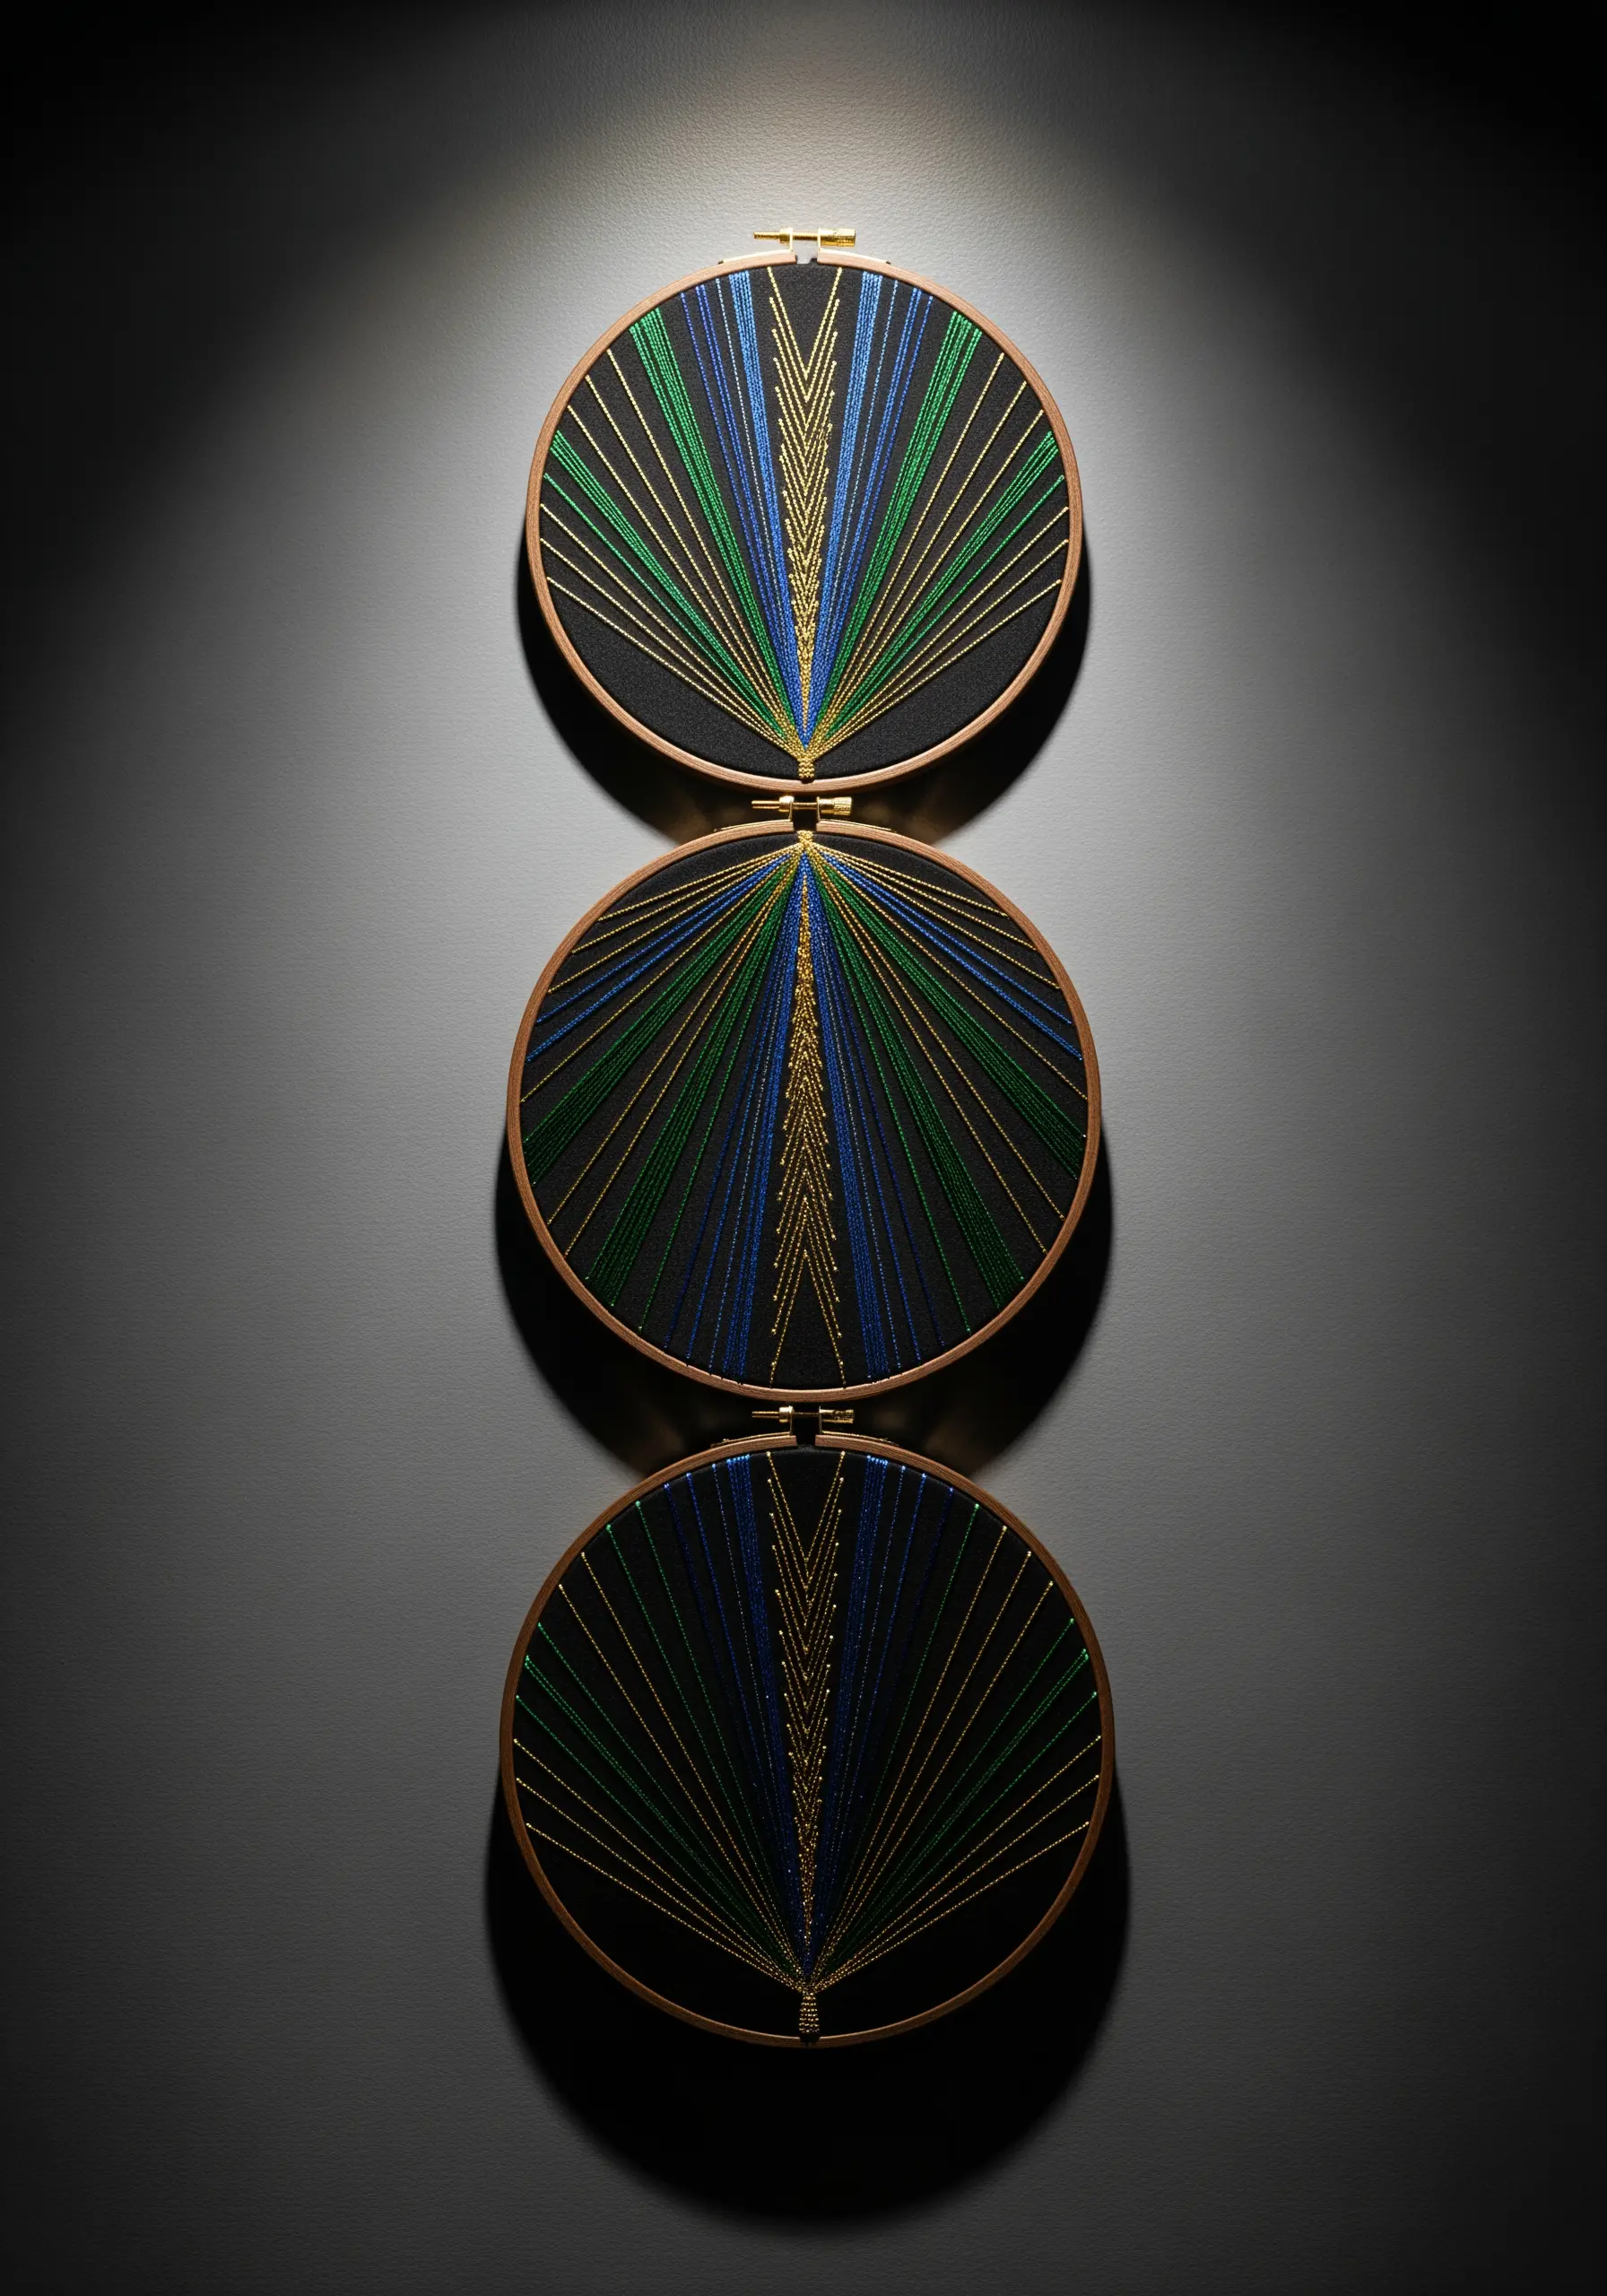
3. Embrace the Power of Negative Space
Create visual tension and elegance by focusing on composition rather than complex stitches.
Use a single strand of black floss and a precise backstitch to render ultra-fine lines, treating your thread like pen and ink.
Introduce a single, small burst of color with a perfectly executed satin stitch circle—this acts as a focal point, anchoring the entire design.
The beauty of this approach lies in the balance between the stitched elements and the empty fabric, proving that thoughtful placement is a technique in itself.
Consider these ways to combine thread and negative space to achieve a refined, gallery-worthy finish.
4. Curate a Monochrome Texture Compendium
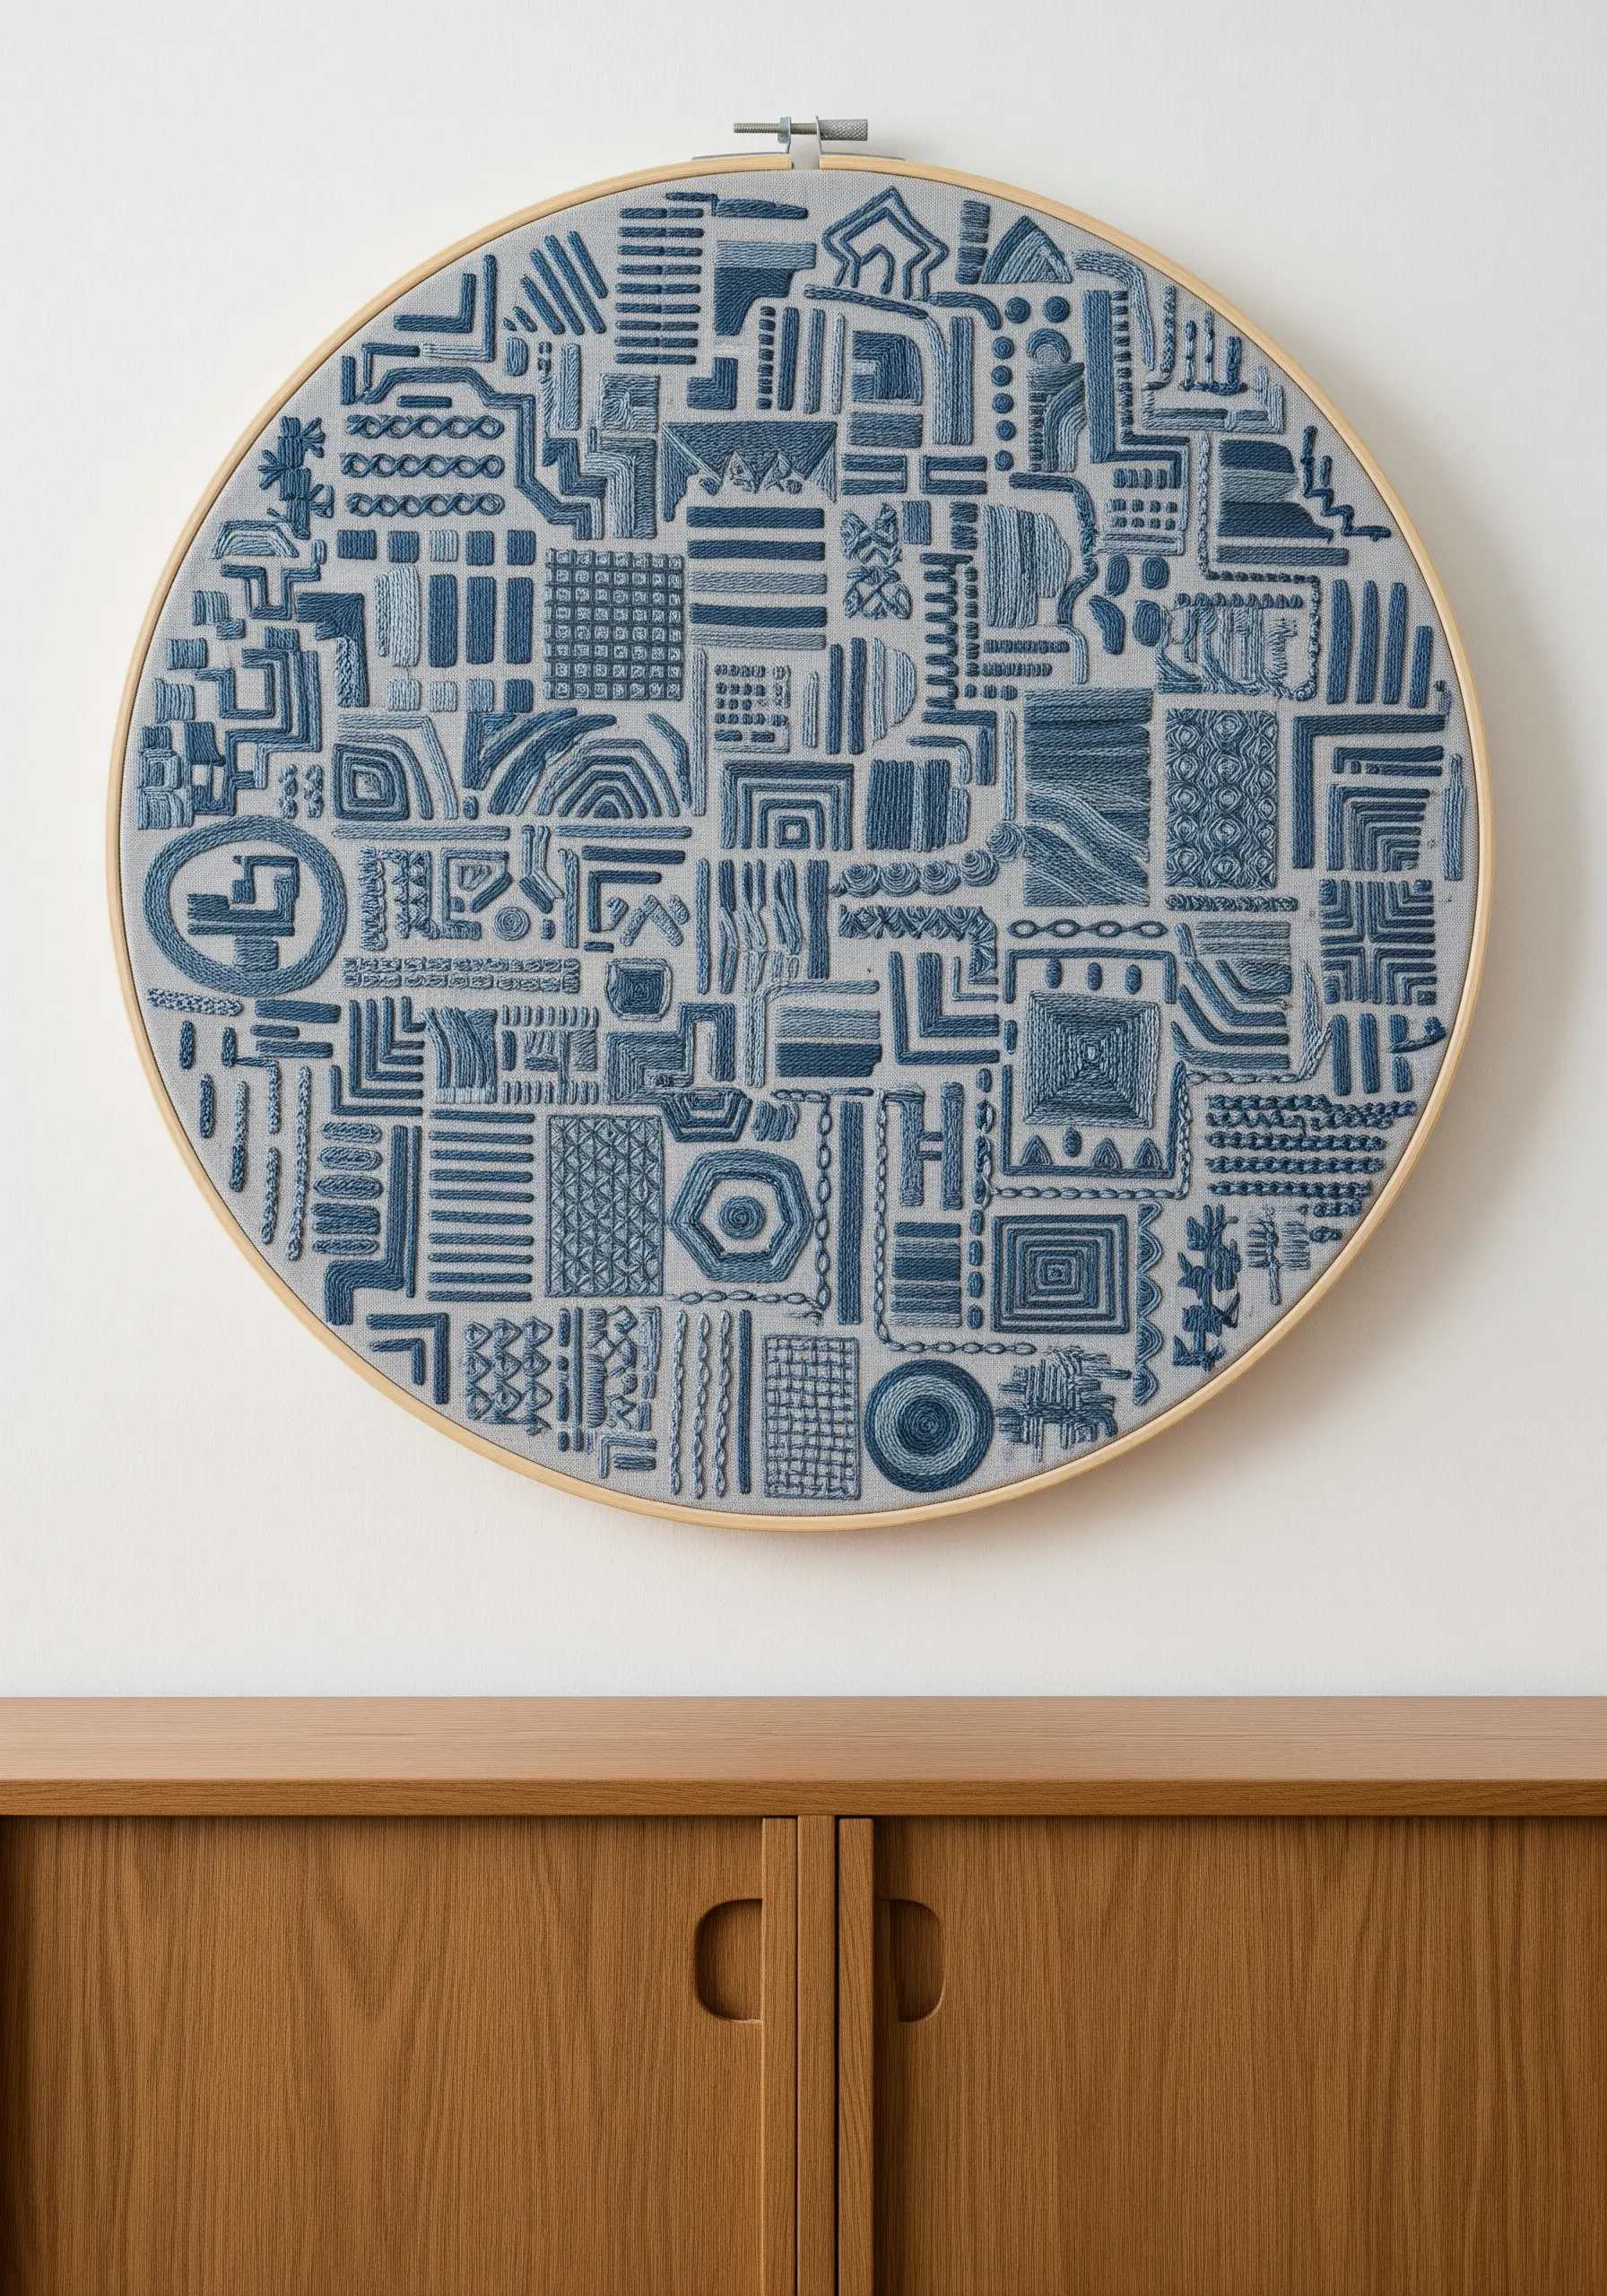
Dedicate a single large hoop to exploring a universe of texture, all within one color family.
Divide your canvas into a dense grid of abstract shapes, then assign a different fill stitch to each—satin stitch, French knots, chain stitch, seed stitch, and woven stitches.
By removing color variation, you force the viewer to appreciate the subtle interplay of light and shadow across different thread patterns.
This technique turns a simple hoop into one of your most intricate embroidery on canvas wall pieces, showcasing your skill and patience.
5. Design a Cohesive Multi-Hoop Gallery Wall
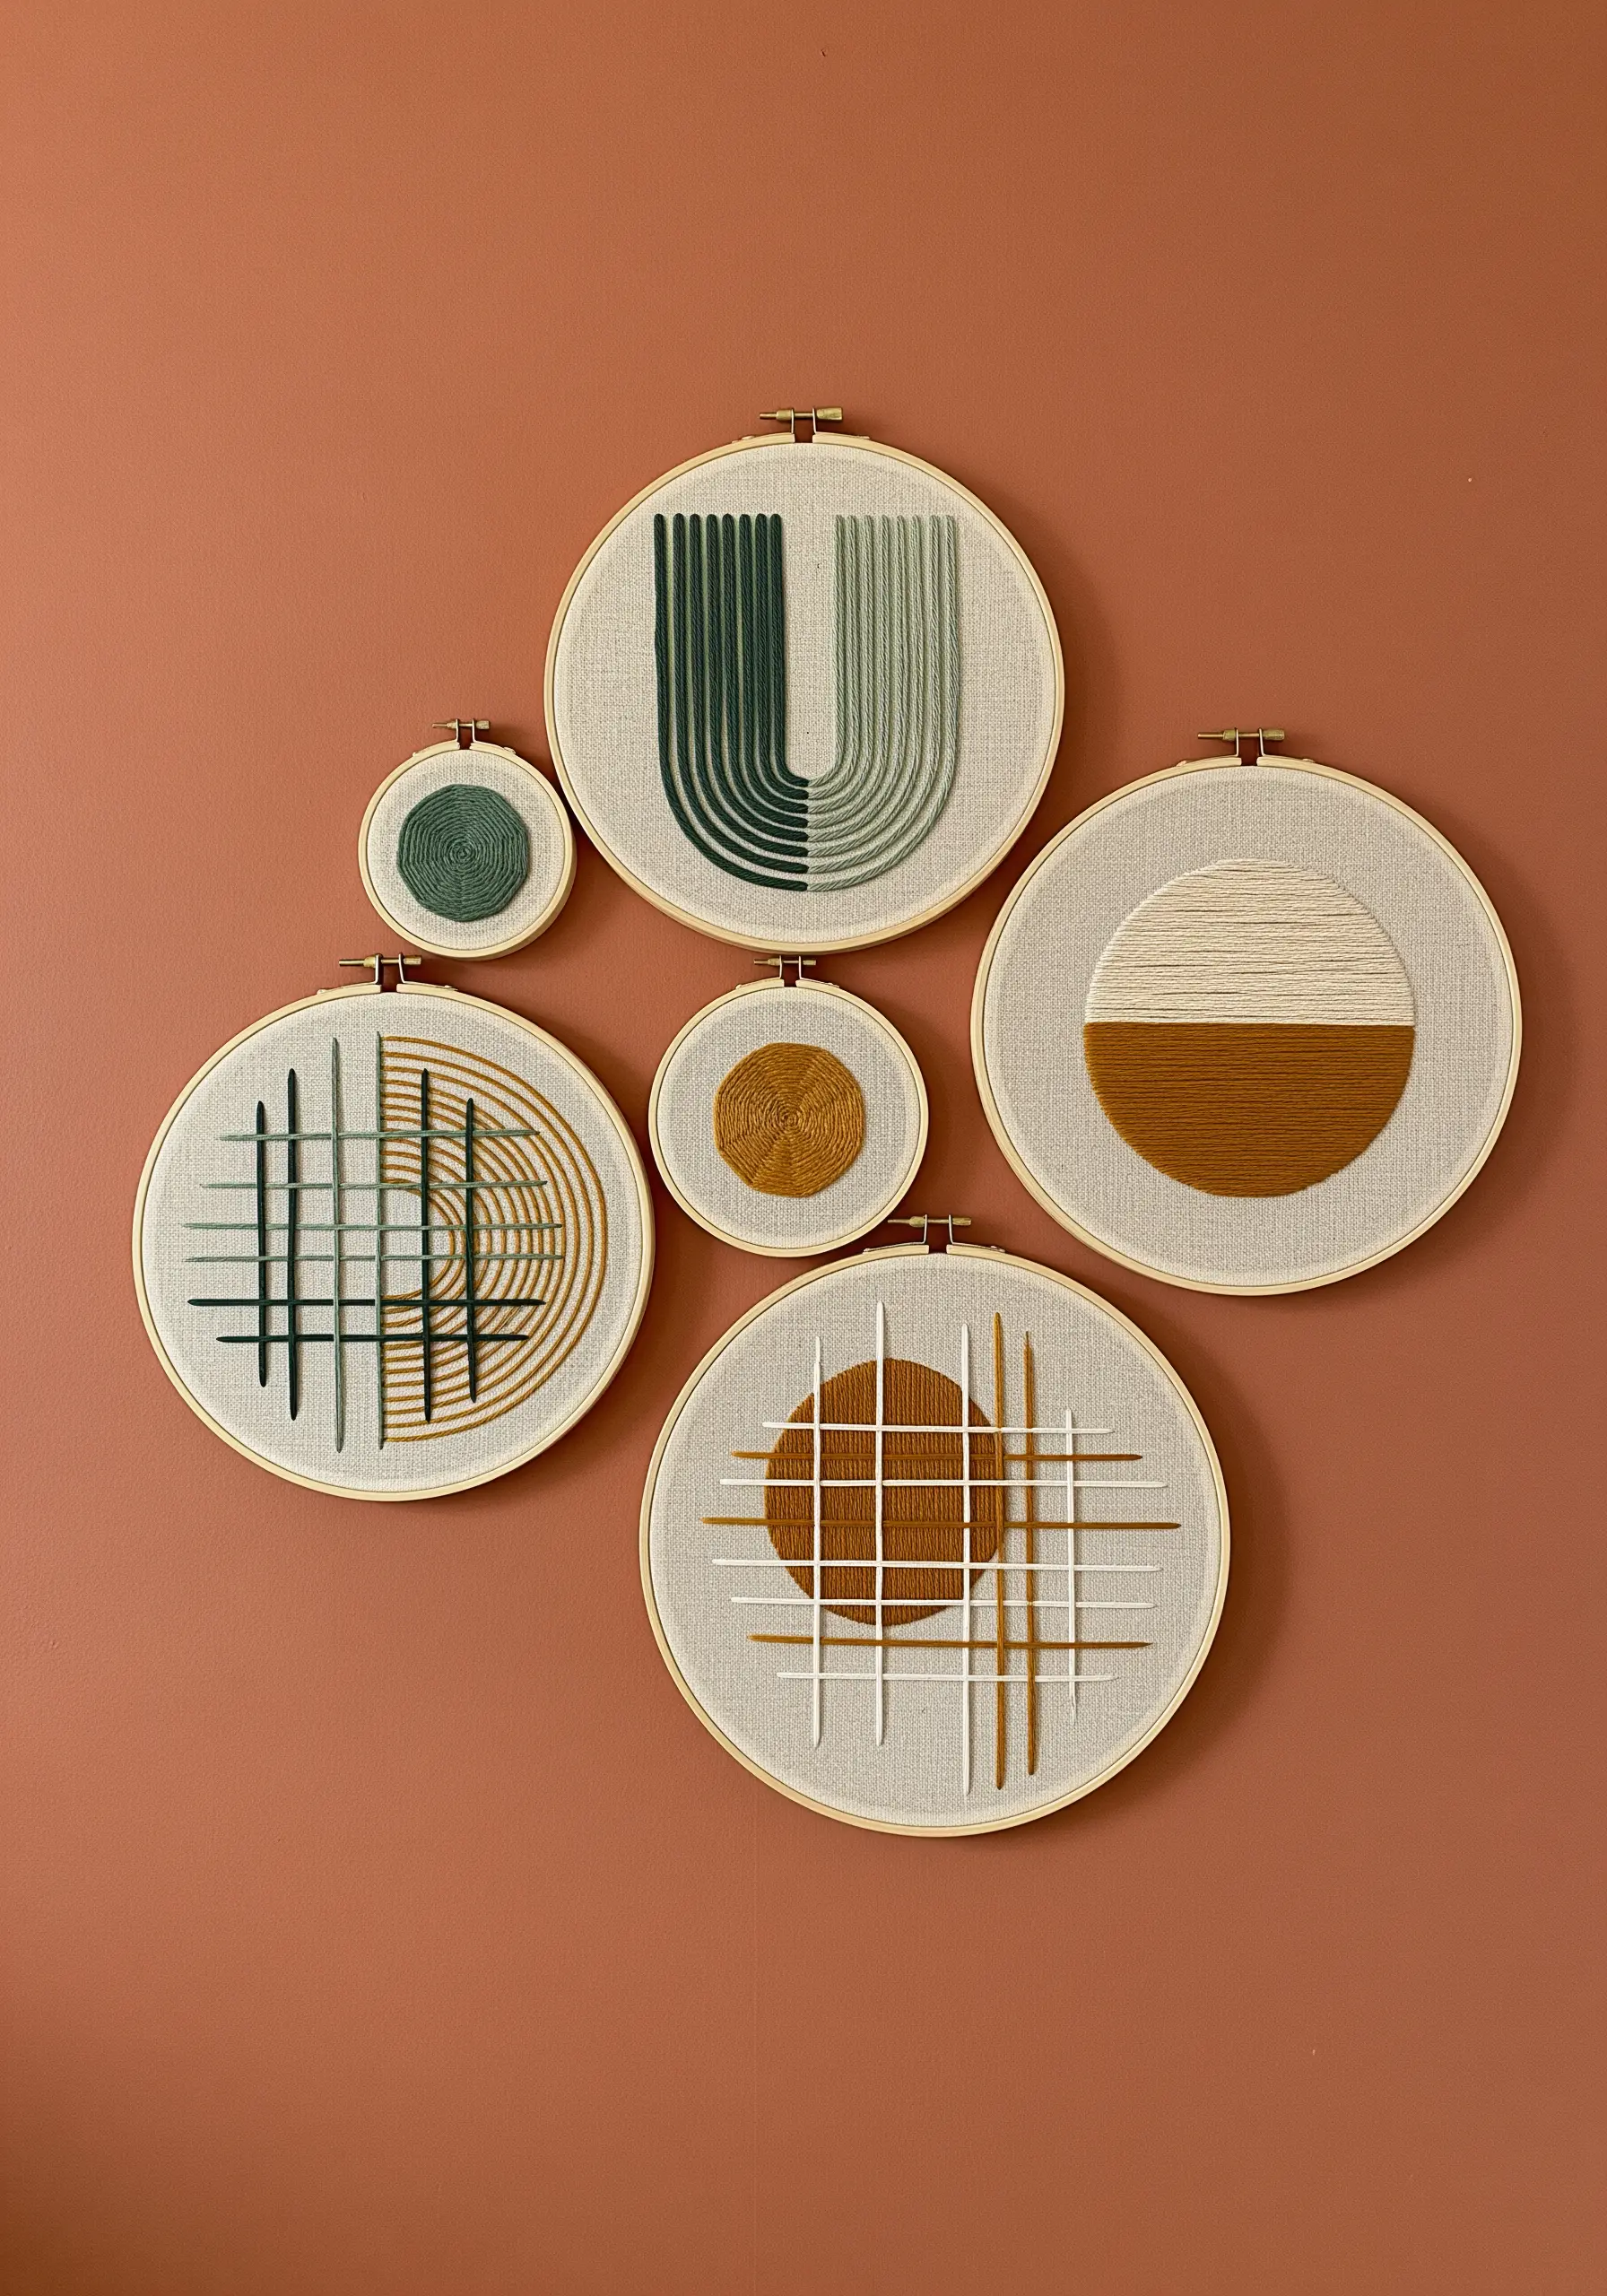
Tell a larger visual story by designing a collection of hoops that work together as one installation.
Choose a unified color palette—like these warm, earthy tones—and distribute it across hoops of various sizes.
Vary the complexity of each piece; some can be simple color blocks, while others feature intricate line work or woven textures.
This method allows you to fill a larger wall space with impact, turning individual projects into a dynamic, intentional art collection that feels curated and complete.
6. Stitch an Optical Illusion with Radiating Lines
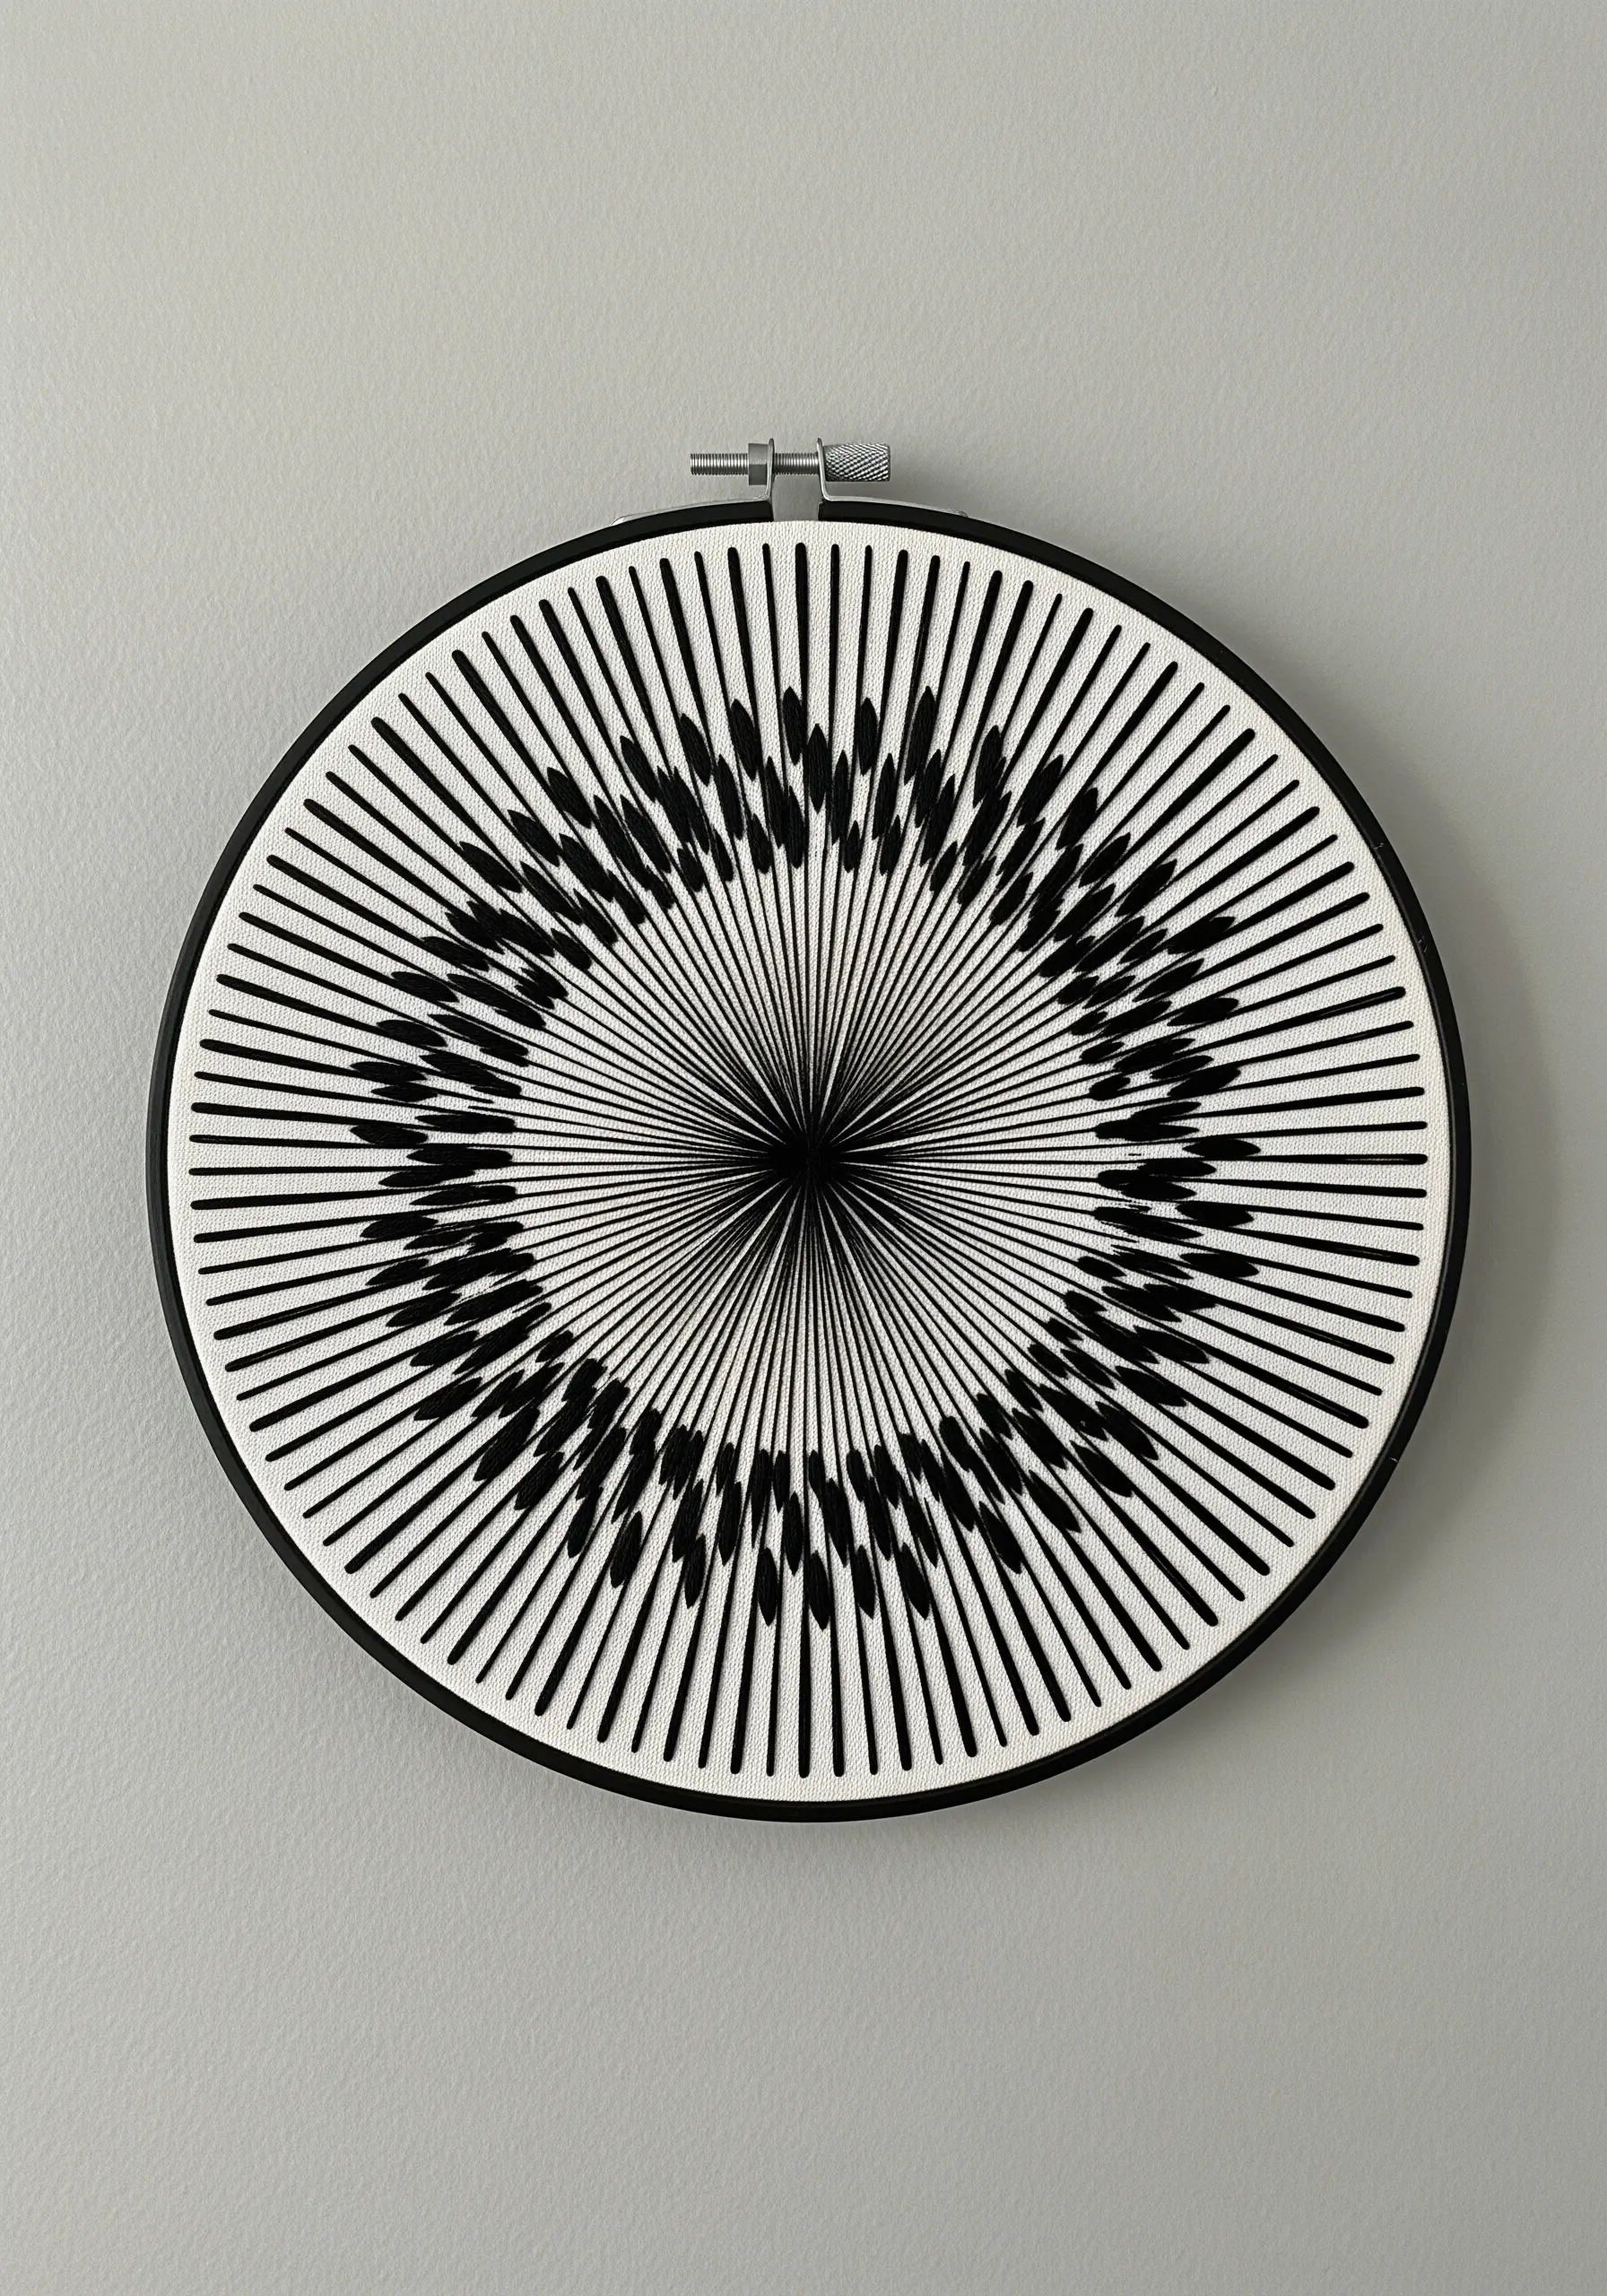
Create mesmerizing depth and movement using only black and white straight stitches.
The trick to these abstract optical illusion stitches is precision; mark your anchor points meticulously around the hoop’s edge and a central circle.
Alternate black and white thread as you stitch from the outer to the inner ring, ensuring every single thread is pulled tight with uniform tension.
The resulting pattern tricks the eye into seeing vibration and dimension where there is only flat thread, creating a truly dynamic piece.
7. Trace Sacred Geometry with Iridescent Thread

Give ancient patterns a modern update by stitching them with thread that shifts in the light.
For a design like the Flower of Life, use a variegated or pearlescent thread against a dark, solid background like navy blue or black cotton.
A whipped backstitch will create perfectly smooth, raised lines that define the intersecting circles with clarity.
The subtle color shifts in the thread add a layer of complexity and magic to the precise geometric form, making the pattern feel alive.
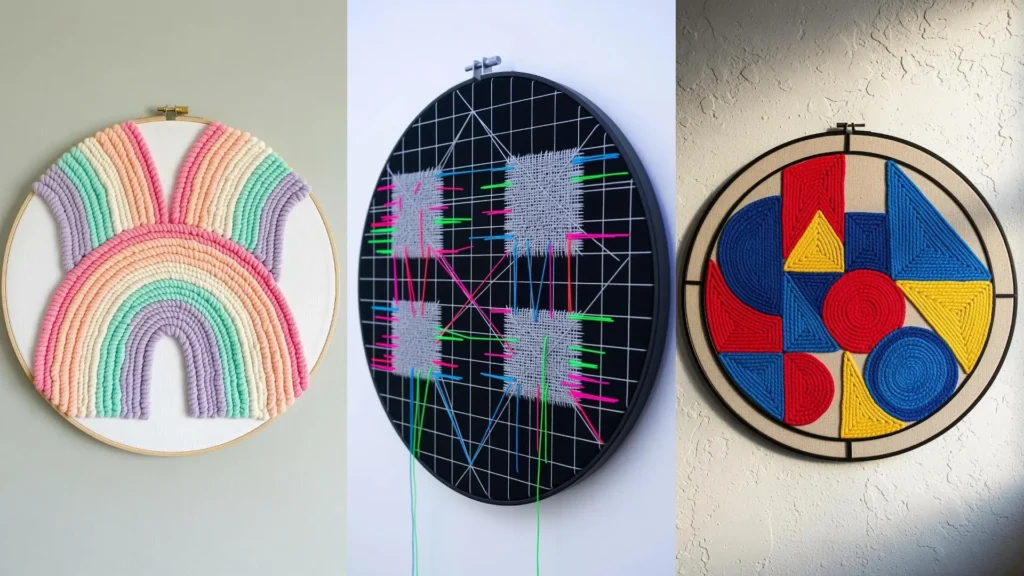
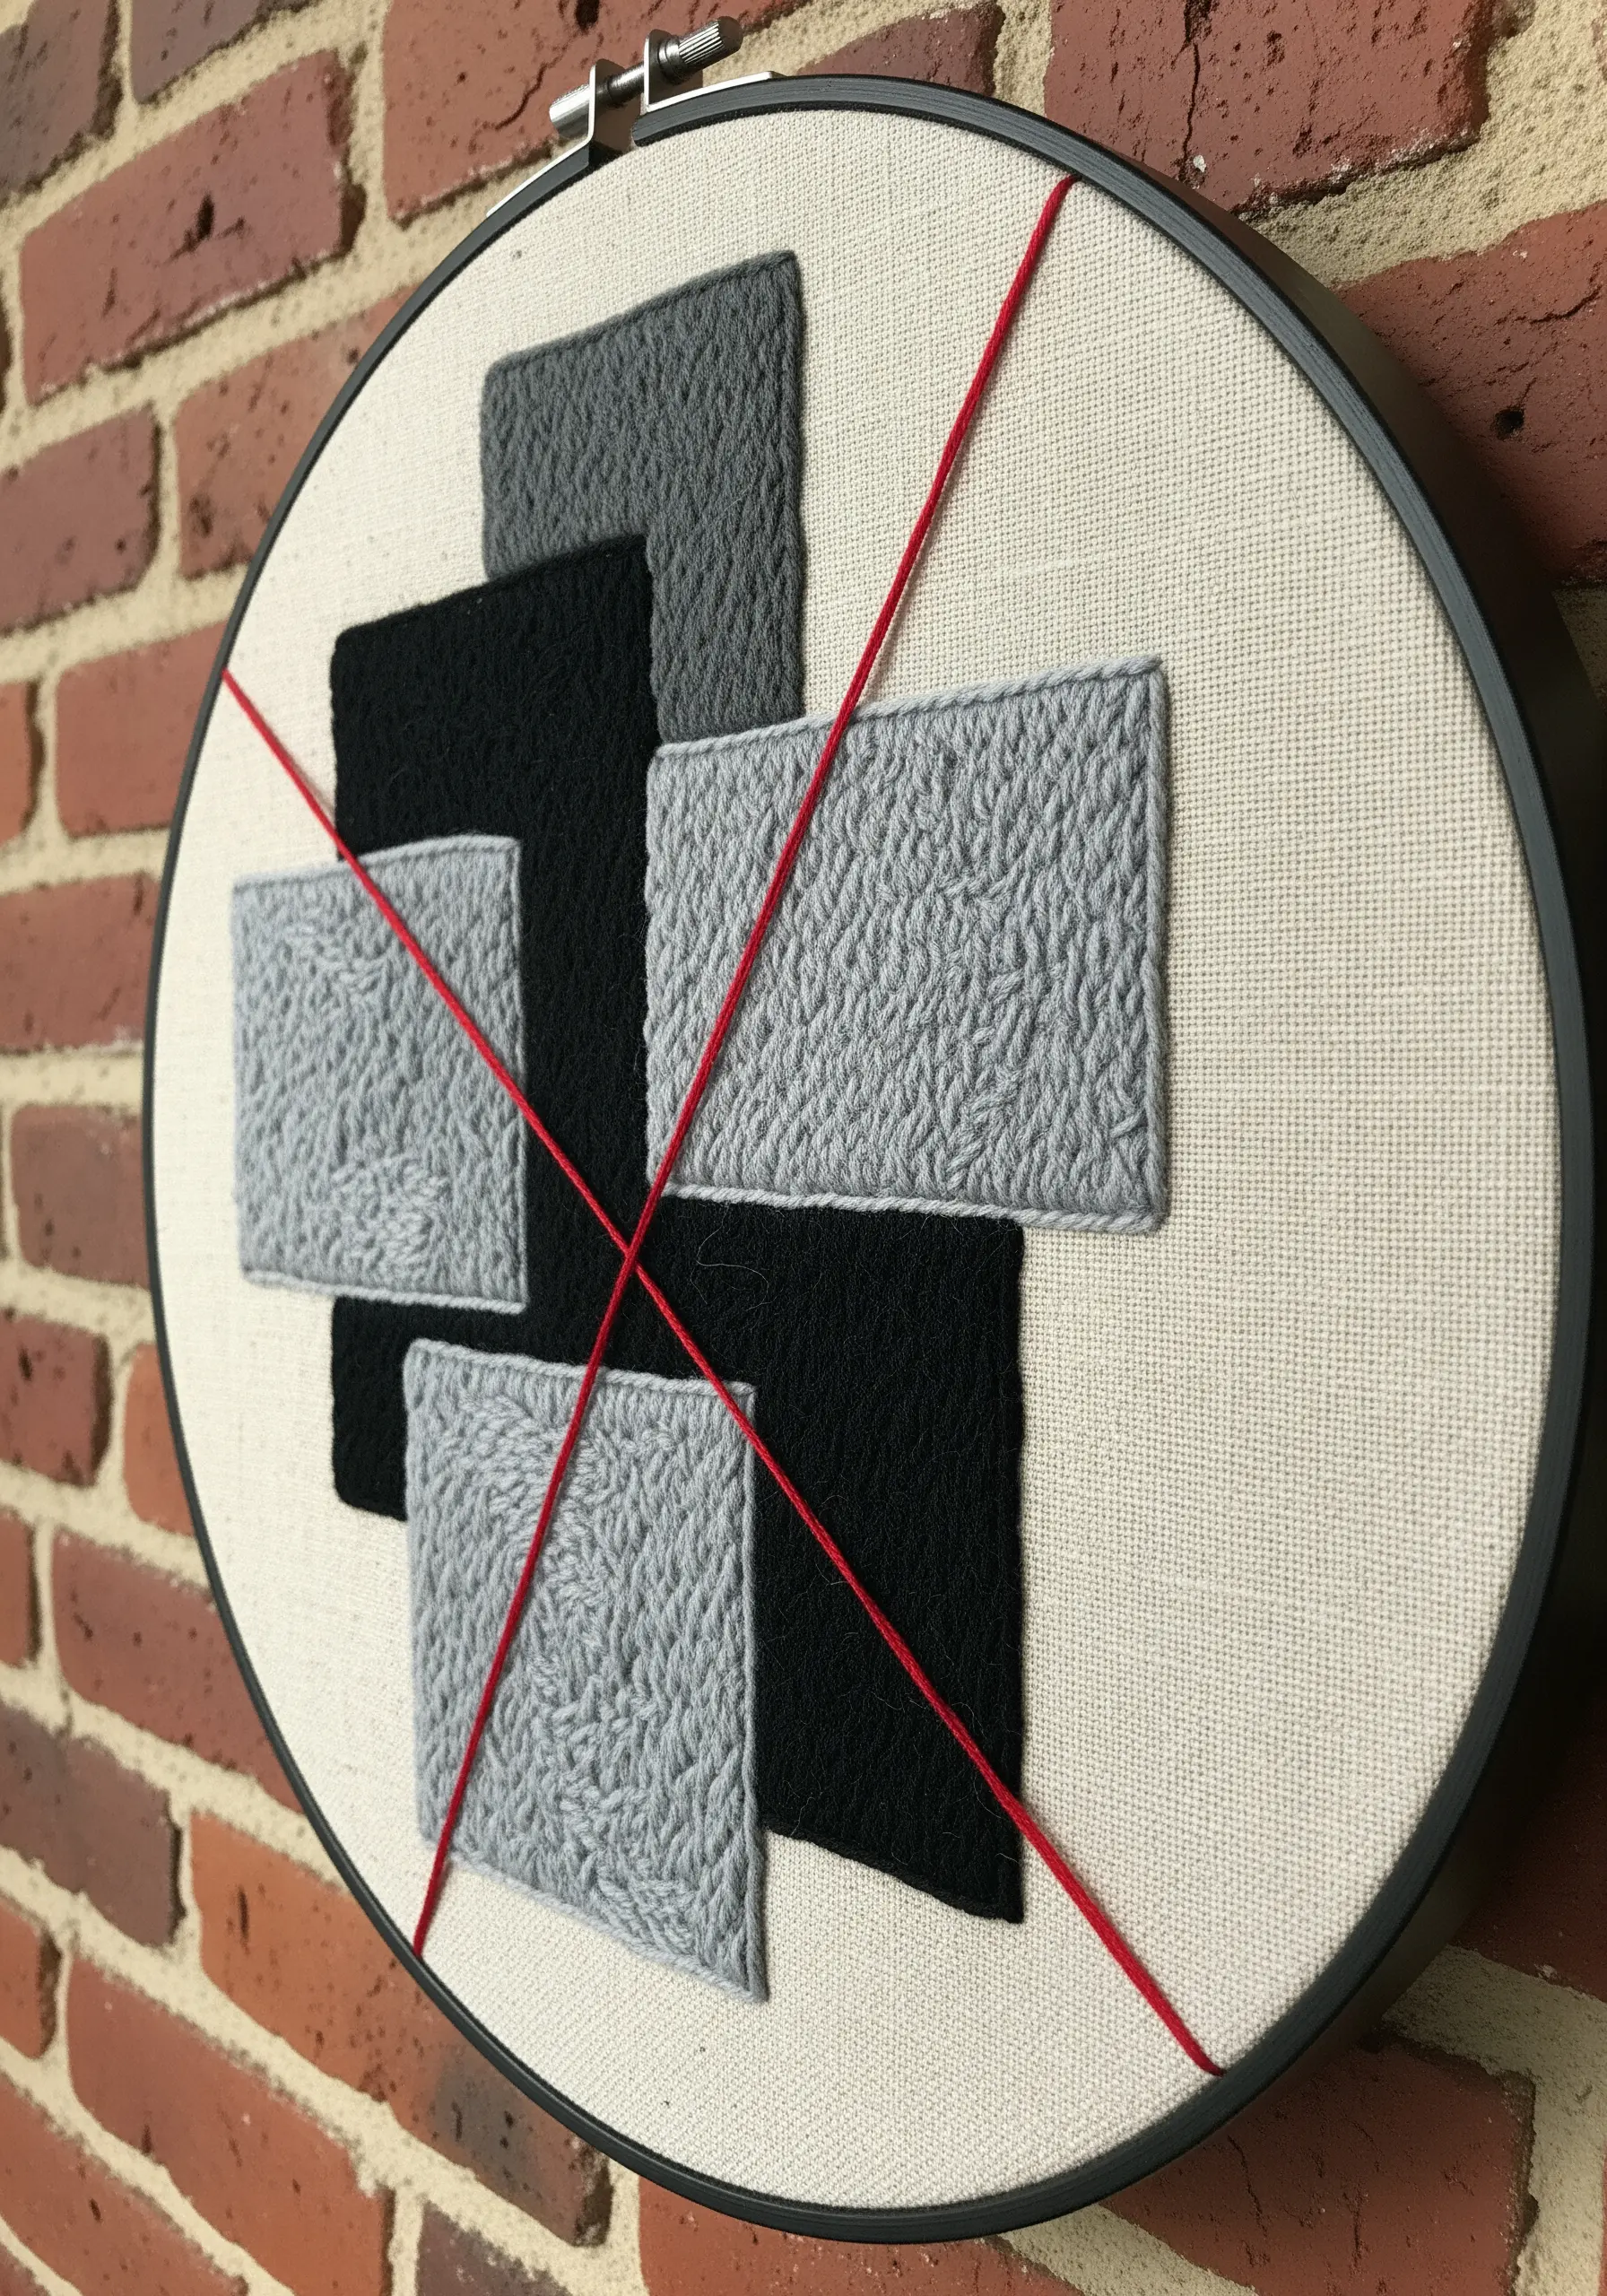
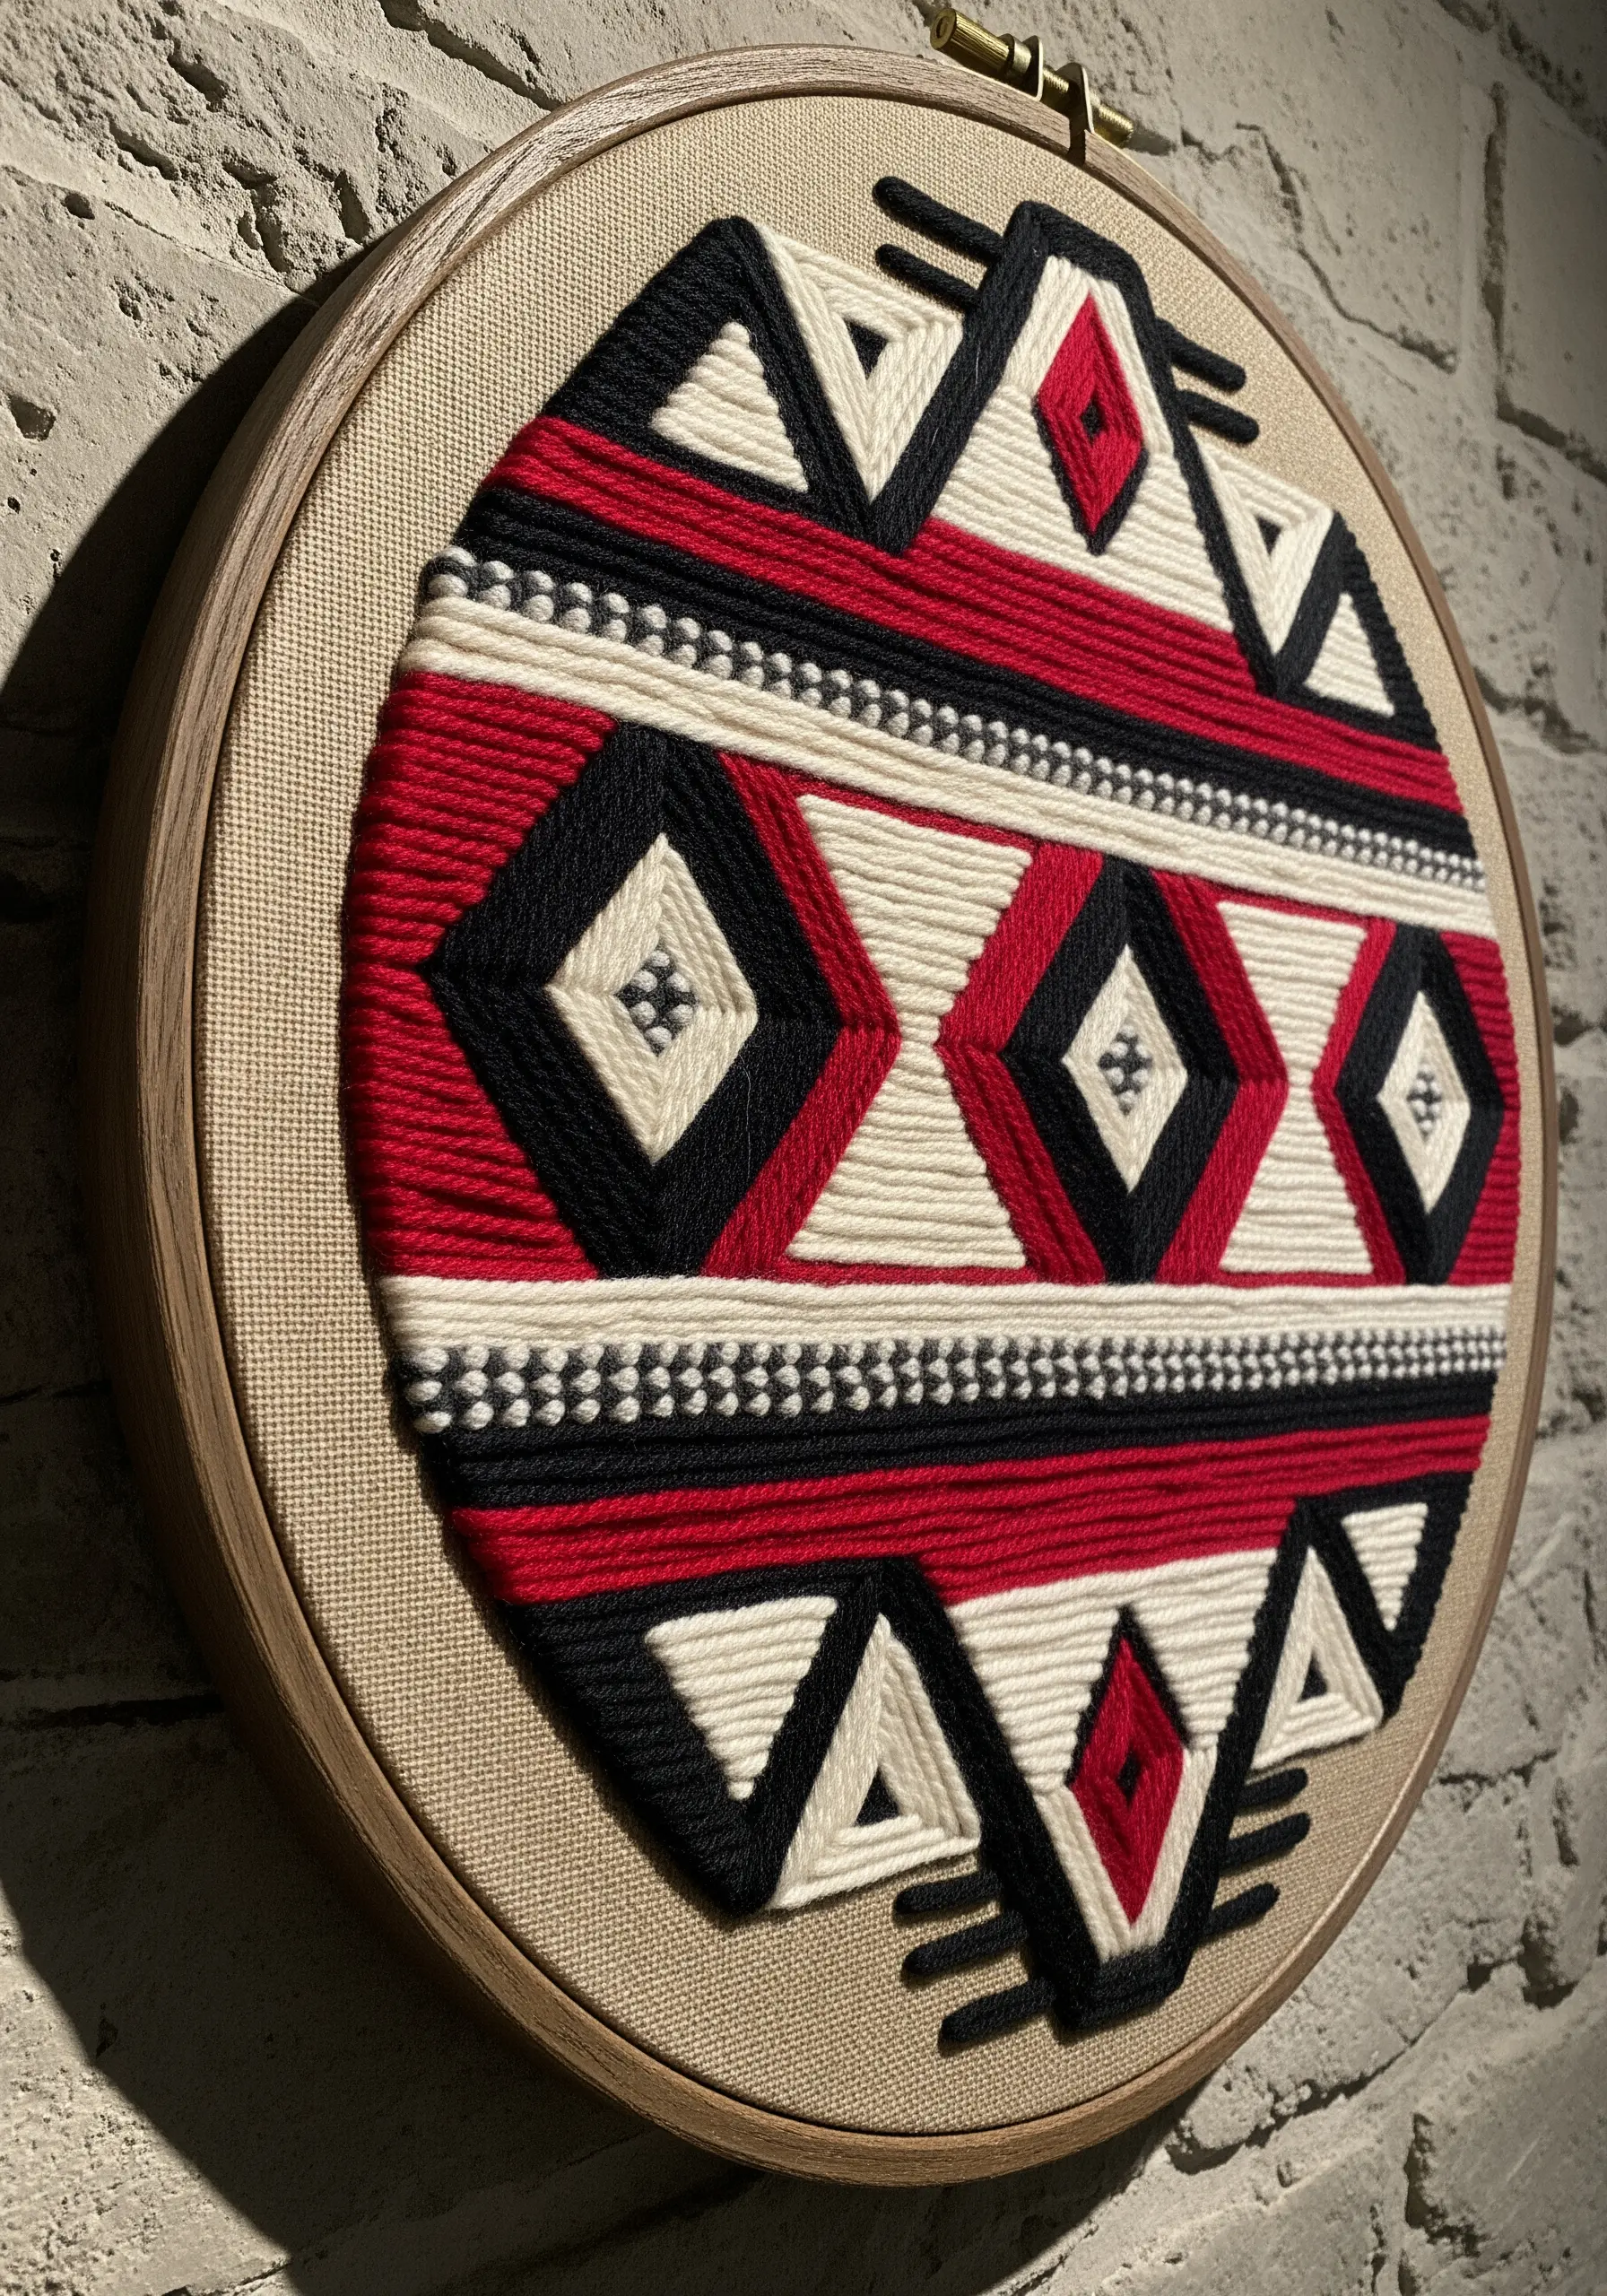
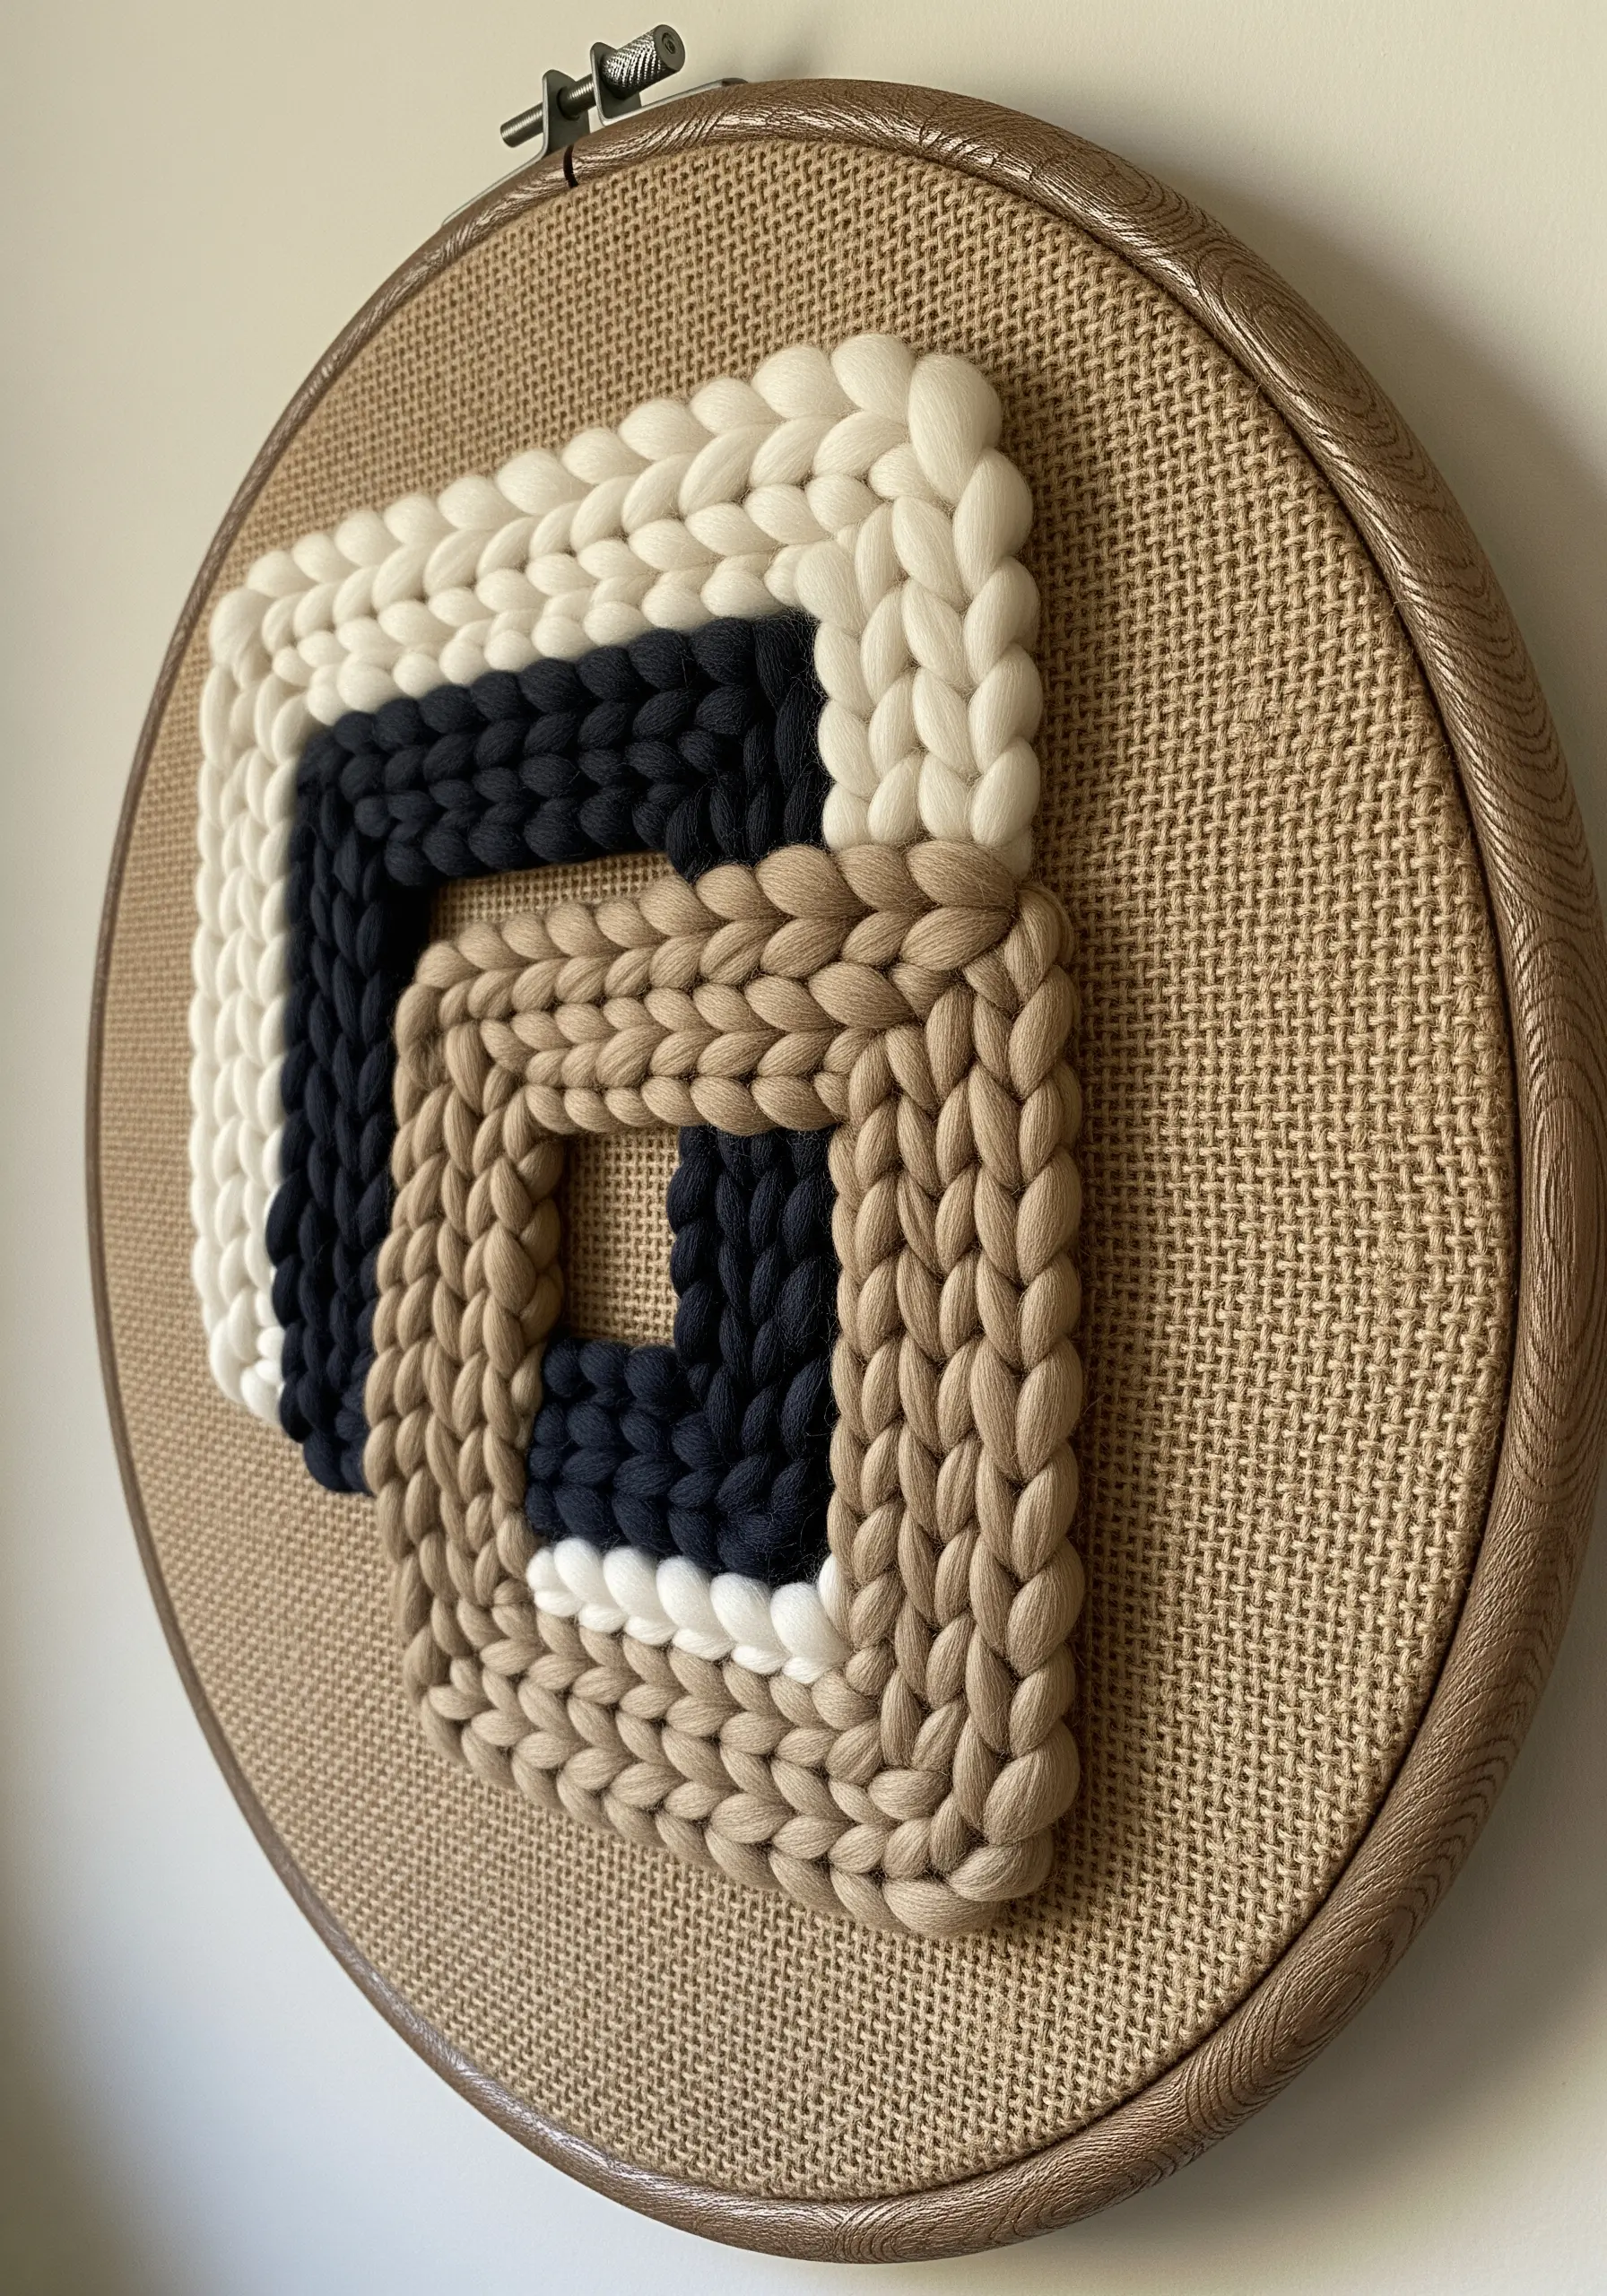
8. Define Shapes with Sculptural Braided Borders
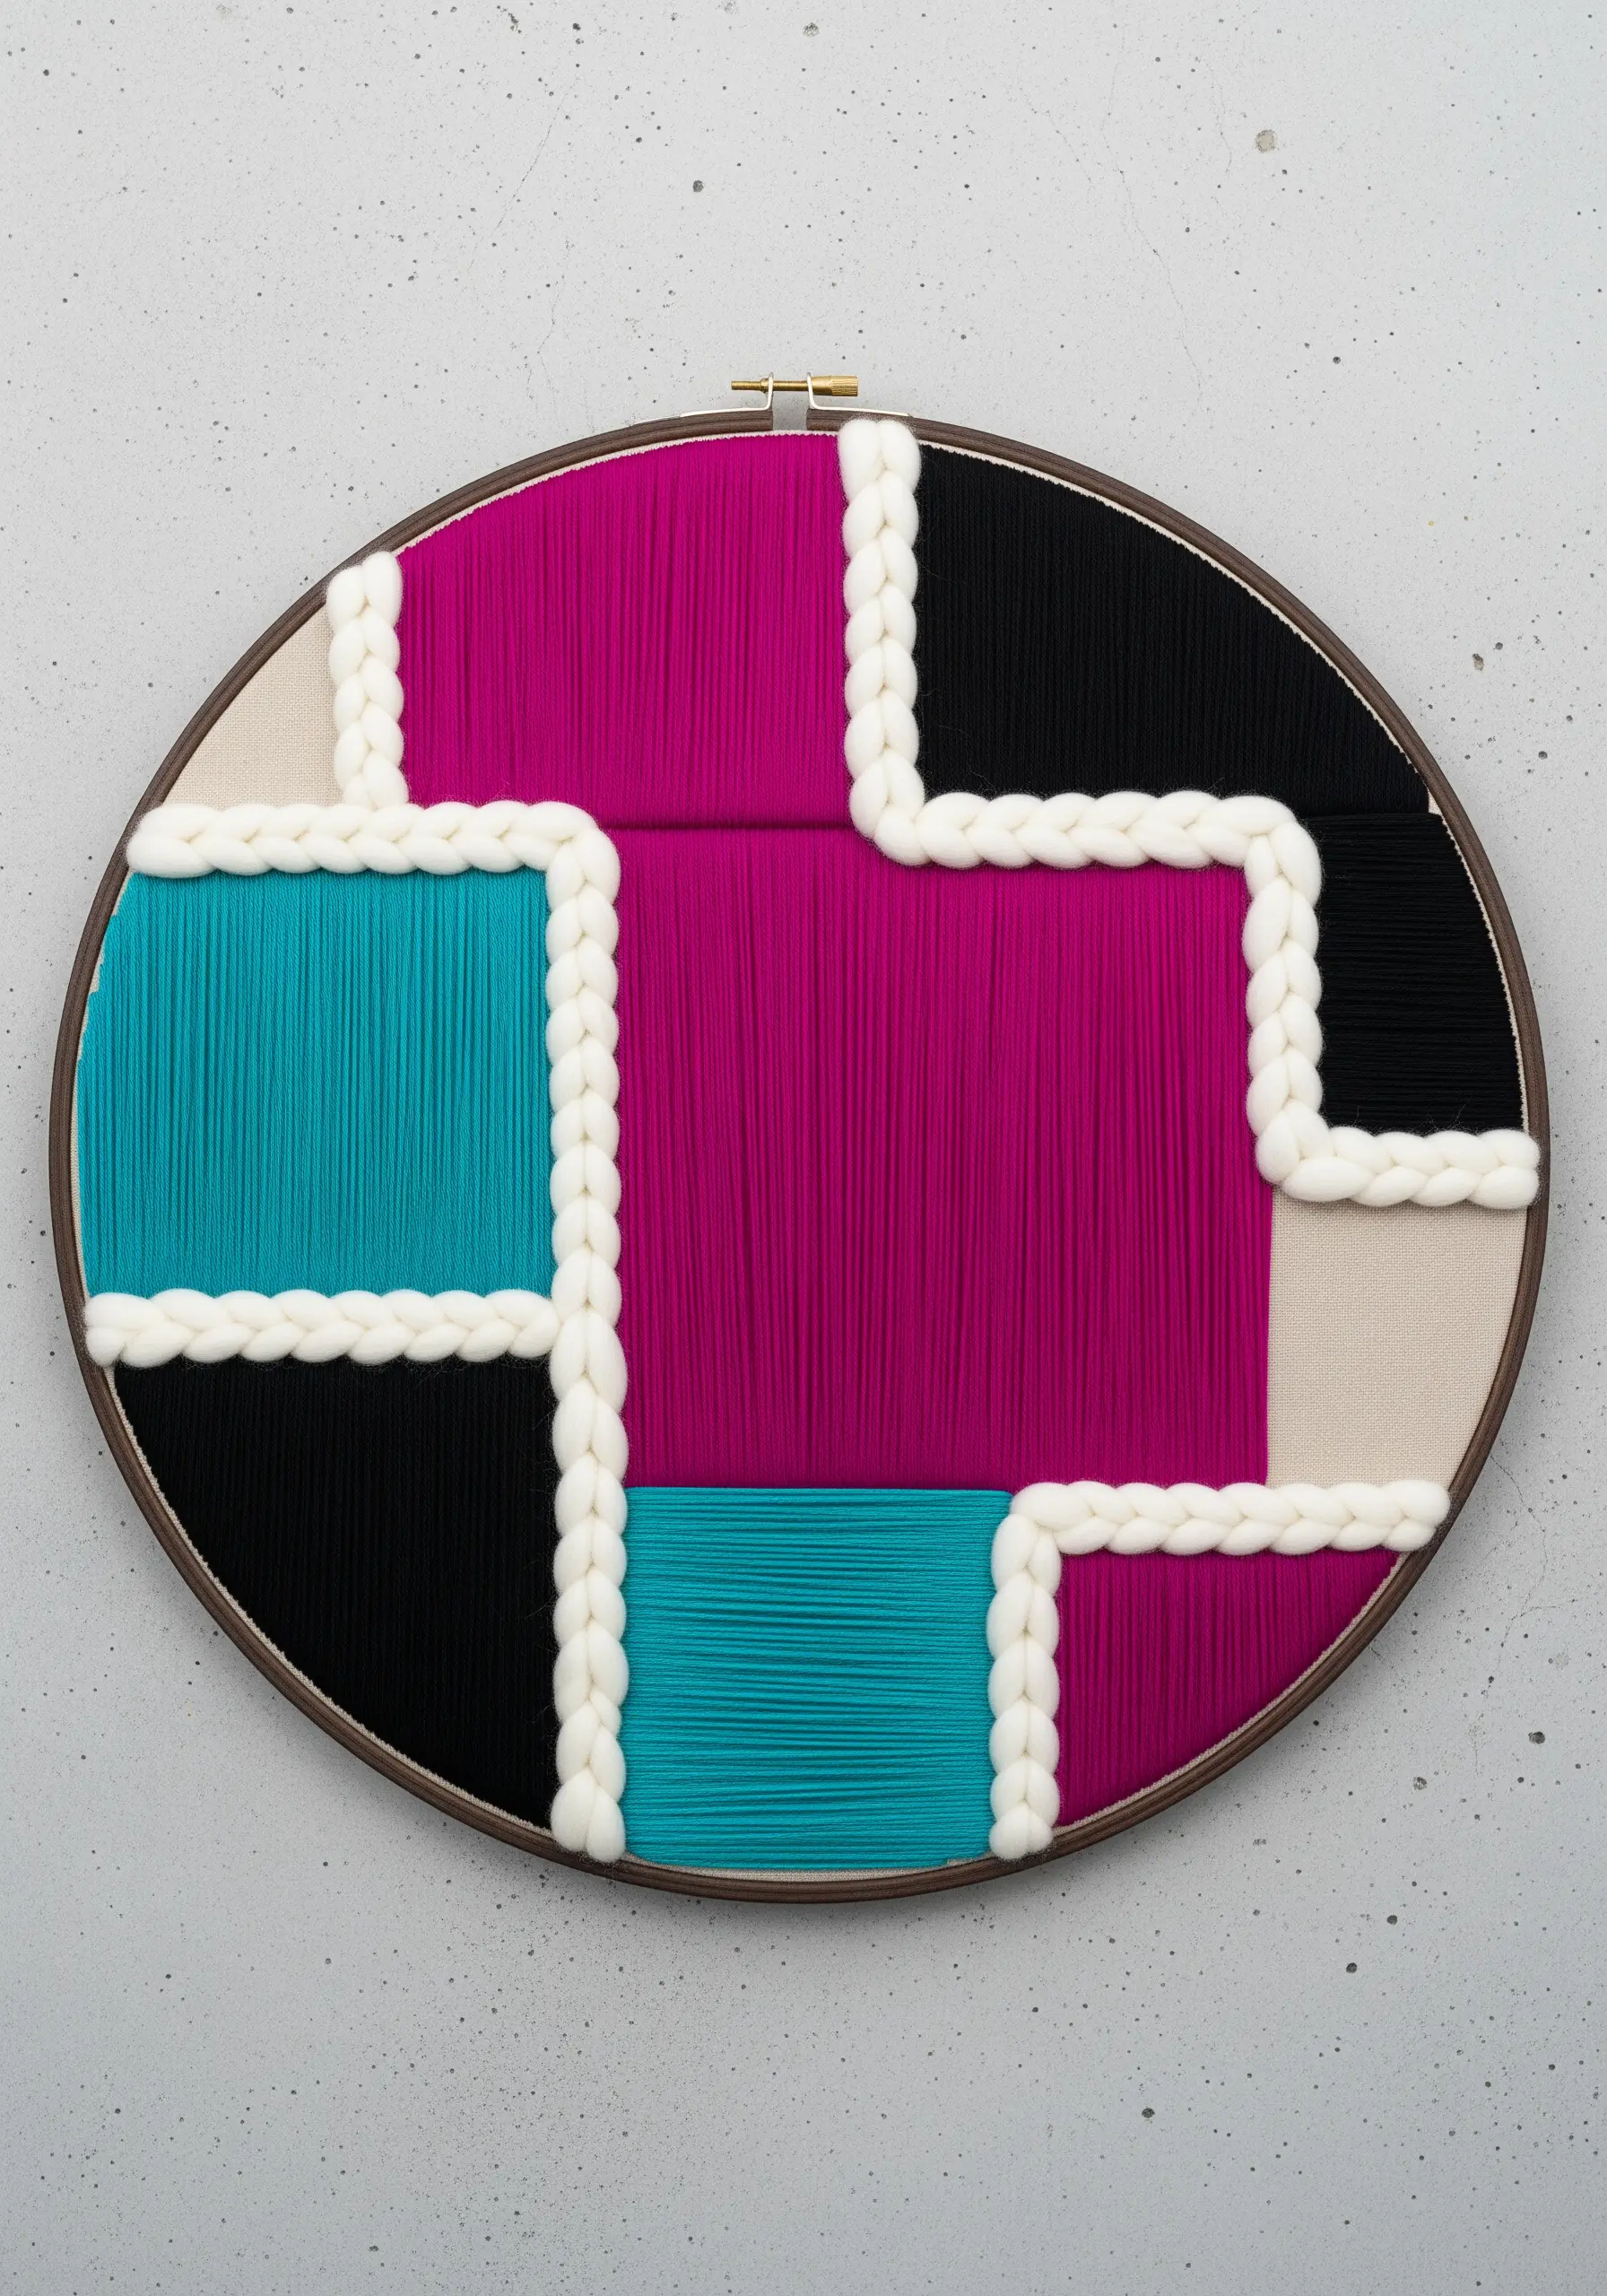
Add a powerful, three-dimensional element to your color-blocked designs with thick, braided outlines.
First, fill your geometric shapes with dense, vertical satin stitches for a smooth, flat surface.
Then, couch a thick, chunky braid of yarn along the borders of each color block. This technique creates a clean, graphic separation between the colors while adding significant depth and texture.
It’s one of the best contemporary texture techniques for turning a flat design into a touchable, sculptural object.
9. Paint a Gradient with Vertical Stitches
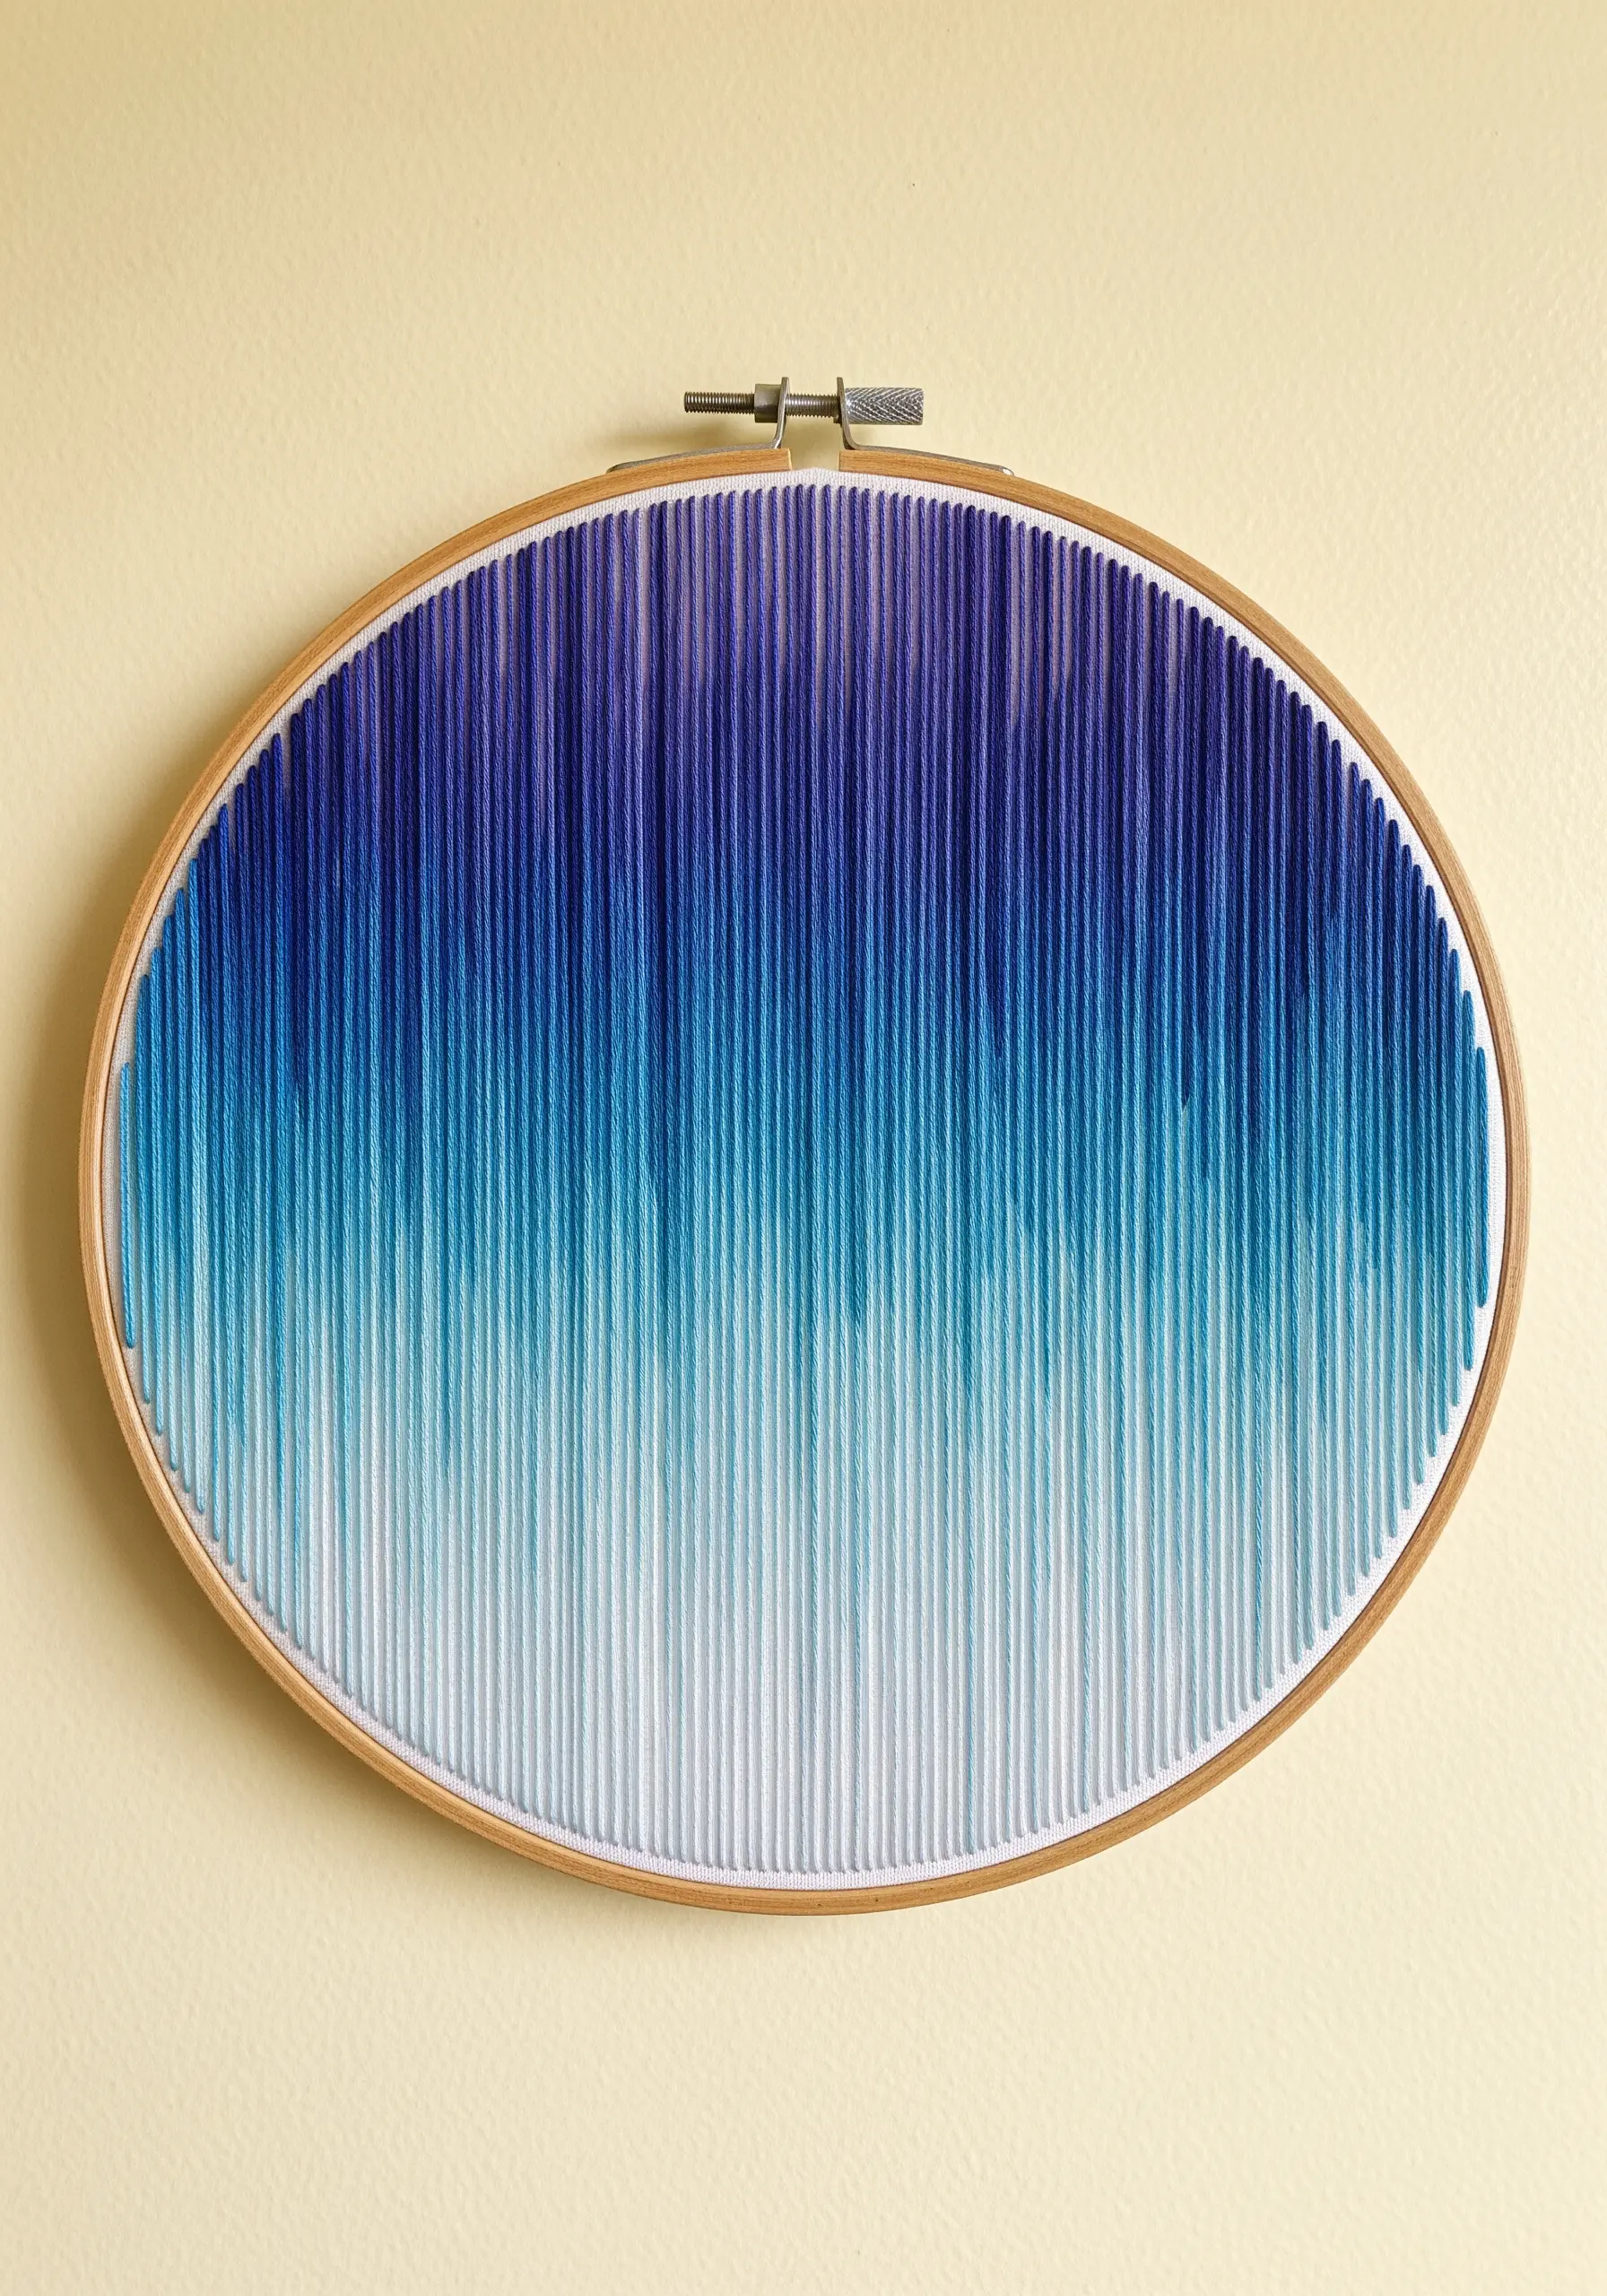
Use thread to mimic the soft transition of a watercolor wash or a digital gradient.
Working in an oval hoop, fill the entire surface with long, vertical satin stitches.
Start with your darkest color at the top, stitching a few rows, then introduce the next shade down, blending them slightly by alternating stitches for a row or two.
Continue this process until you reach your lightest shade. This method creates a beautifully smooth color transition that feels both modern and serene.
10. Build a Faceted Hexagonal Gradient
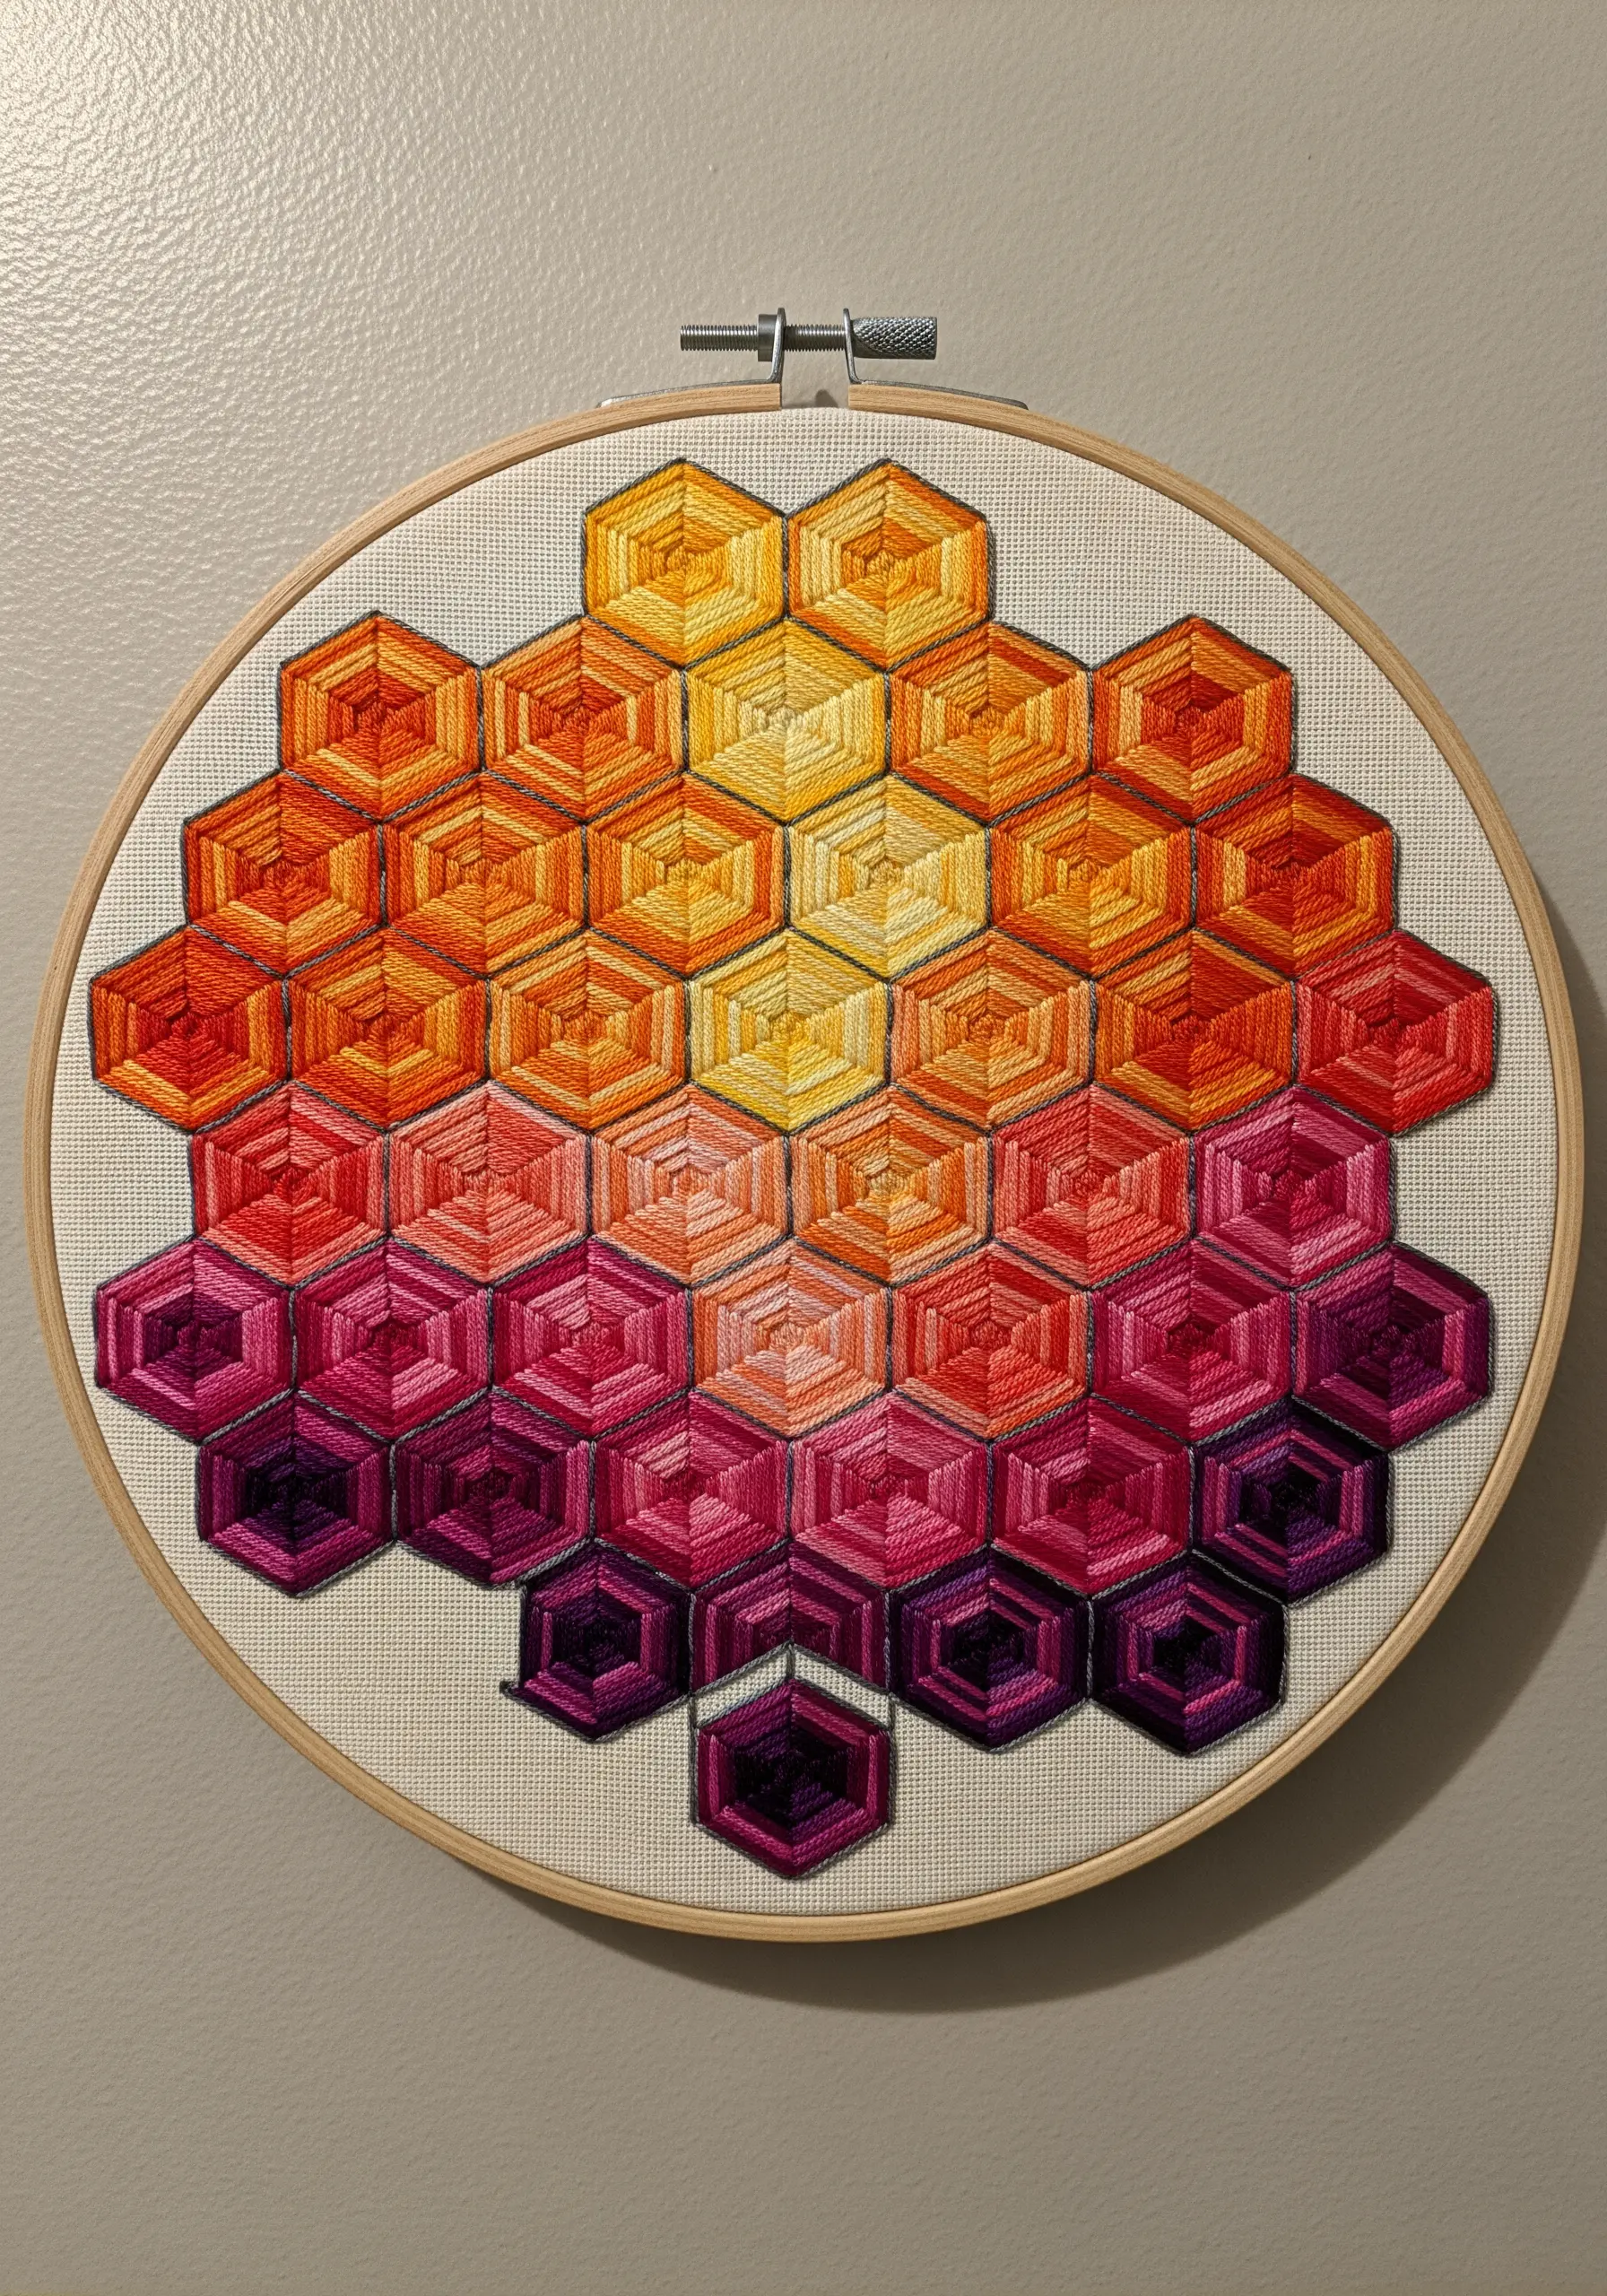
Create the illusion of three-dimensional cubes by carefully planning your color and stitch direction.
Fill each hexagon with satin stitches, changing the angle of your stitches for each of the three visible ‘faces’ of the imagined cube.
Arrange your colors in a gradient, from a light, bright center to deeper, richer tones on the edges.
This meticulous approach transforms simple hexagons into a complex, shimmering mosaic that plays with light and perspective.
11. Layer Textures for an Abstract Collage
Combine different fill stitches to build a composition with rich tactile variation.
Assign a unique texture to each geometric block: use a flat satin stitch for one, a nubby seed stitch for another, and a directional darning stitch for a third.
Sticking to a limited palette of black and greys allows the textures to become the main focus.
For a final disruptive element, stretch a contrasting thread across the finished piece—this breaks the plane and adds a layer of conceptual depth, turning it into one of your favorite abstract framed embroidery patterns.
12. Electrify Your Lines with Neon Chevrons
Make your geometric patterns vibrate with energy by using fluorescent threads on a stark black background.
Don’t just fill your chevron shapes; give each band its own personality by using different stitches—a smooth satin stitch, a braided chain stitch, or a sharp zigzag stitch.
This variety adds a layer of texture that enhances the visual buzz of the neon colors.
The high contrast is key; the black fabric acts as a void, making the bright colors feel like they’re lit from within.
13. Explore Minimalist Metallurgy

Achieve a look of modern luxury with the simple combination of metallic thread and neutral fabric.
Use a single ply of metallic floss and a sharp needle to avoid shredding. Outline each nested triangle with a simple backstitch or split stitch.
The beauty of this design is in its restraint. Alternating between silver and copper or gold adds warmth and dimension without overwhelming the composition.
These metallic thread wall art designs catch the light beautifully, adding a subtle, elegant shimmer to your walls.
14. Simplify Landscapes into Color Fields

Translate the essence of a landscape into clean, graphic shapes filled with perfect satin stitches.
Divide your scene—like these hills and a sun—into distinct color blocks. Fill each section completely, ensuring your stitches are parallel and flat.
To create a subtle distinction between adjacent shapes of the same color, simply change the angle of your stitches.
This technique transforms organic scenery into serene, string art landscape scenes with a modern, minimalist aesthetic.
15. Capture Motion with Abstract Shards
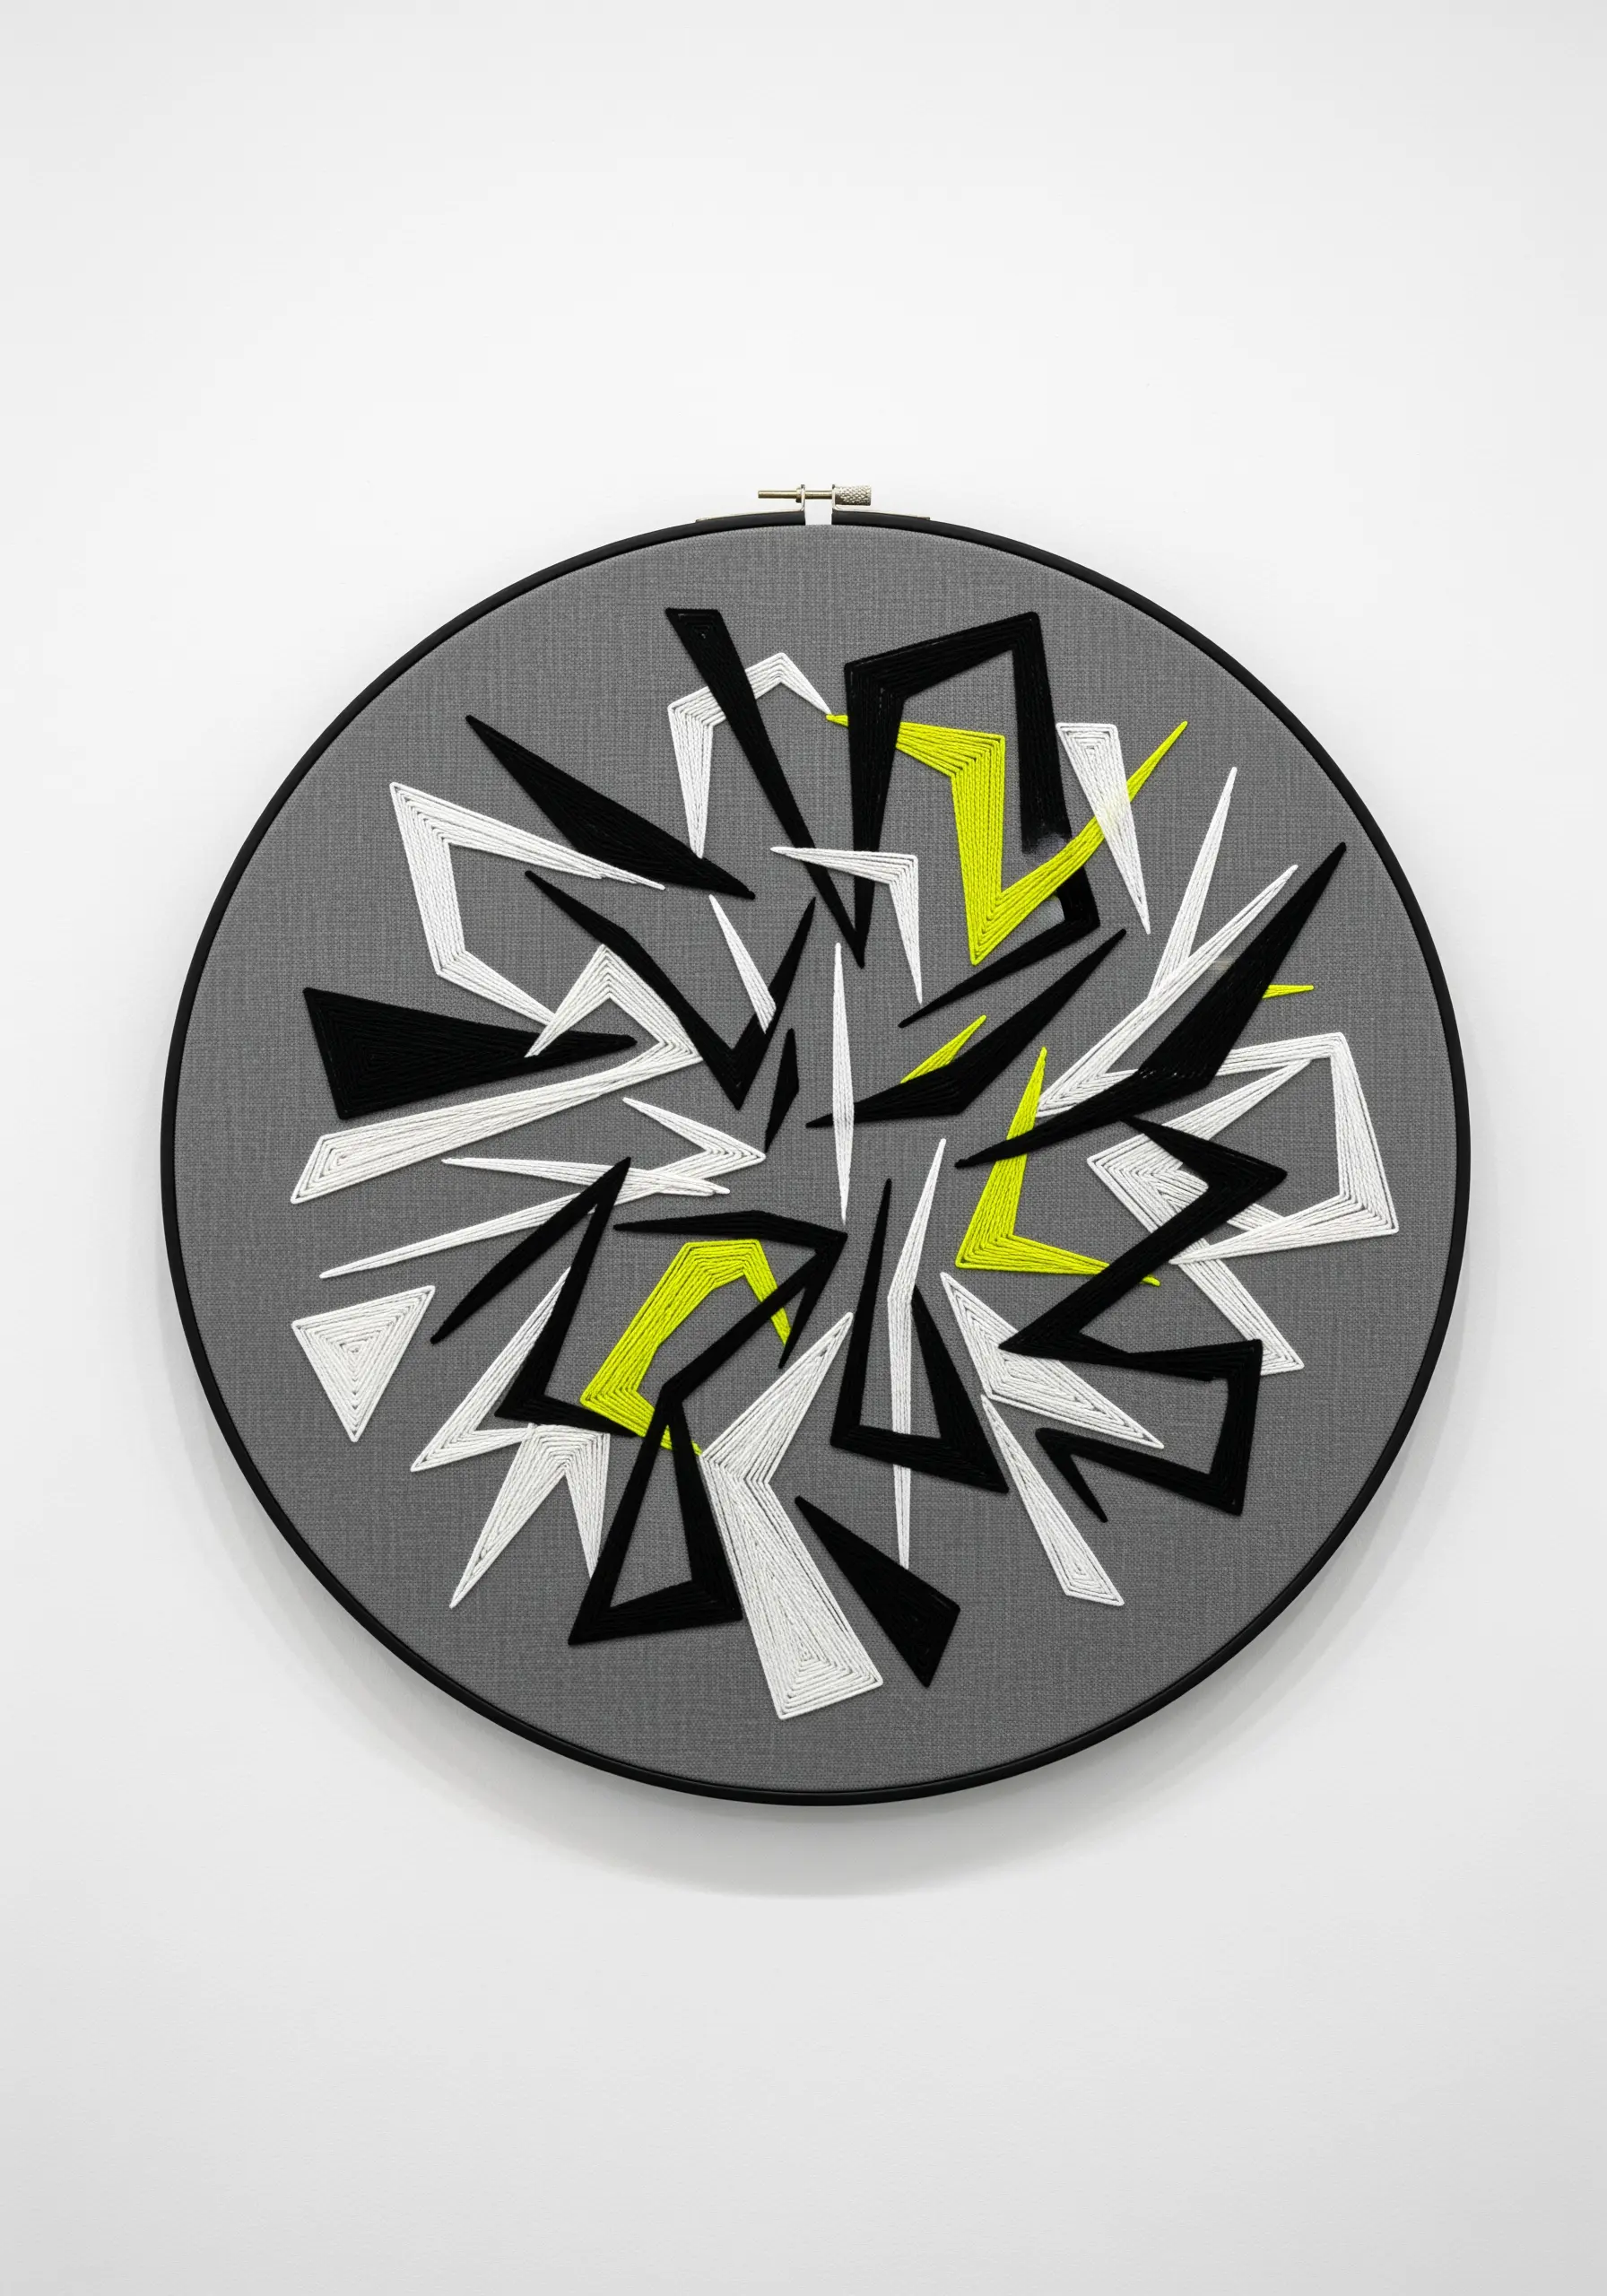
Create a sense of explosive energy by stitching sharp, angular shapes that appear to fly out from the center.
Use a combination of satin stitch fills and bold backstitch outlines to define each ‘shard’ of color.
A neutral palette of black, white, and grey provides the structure, while a single, high-impact accent color—like this electric lime—adds a jolt of visual excitement.
The key is to vary the size and orientation of the shapes to create a dynamic, chaotic, yet balanced composition.
16. Construct a 3D Tumbling Blocks Pattern
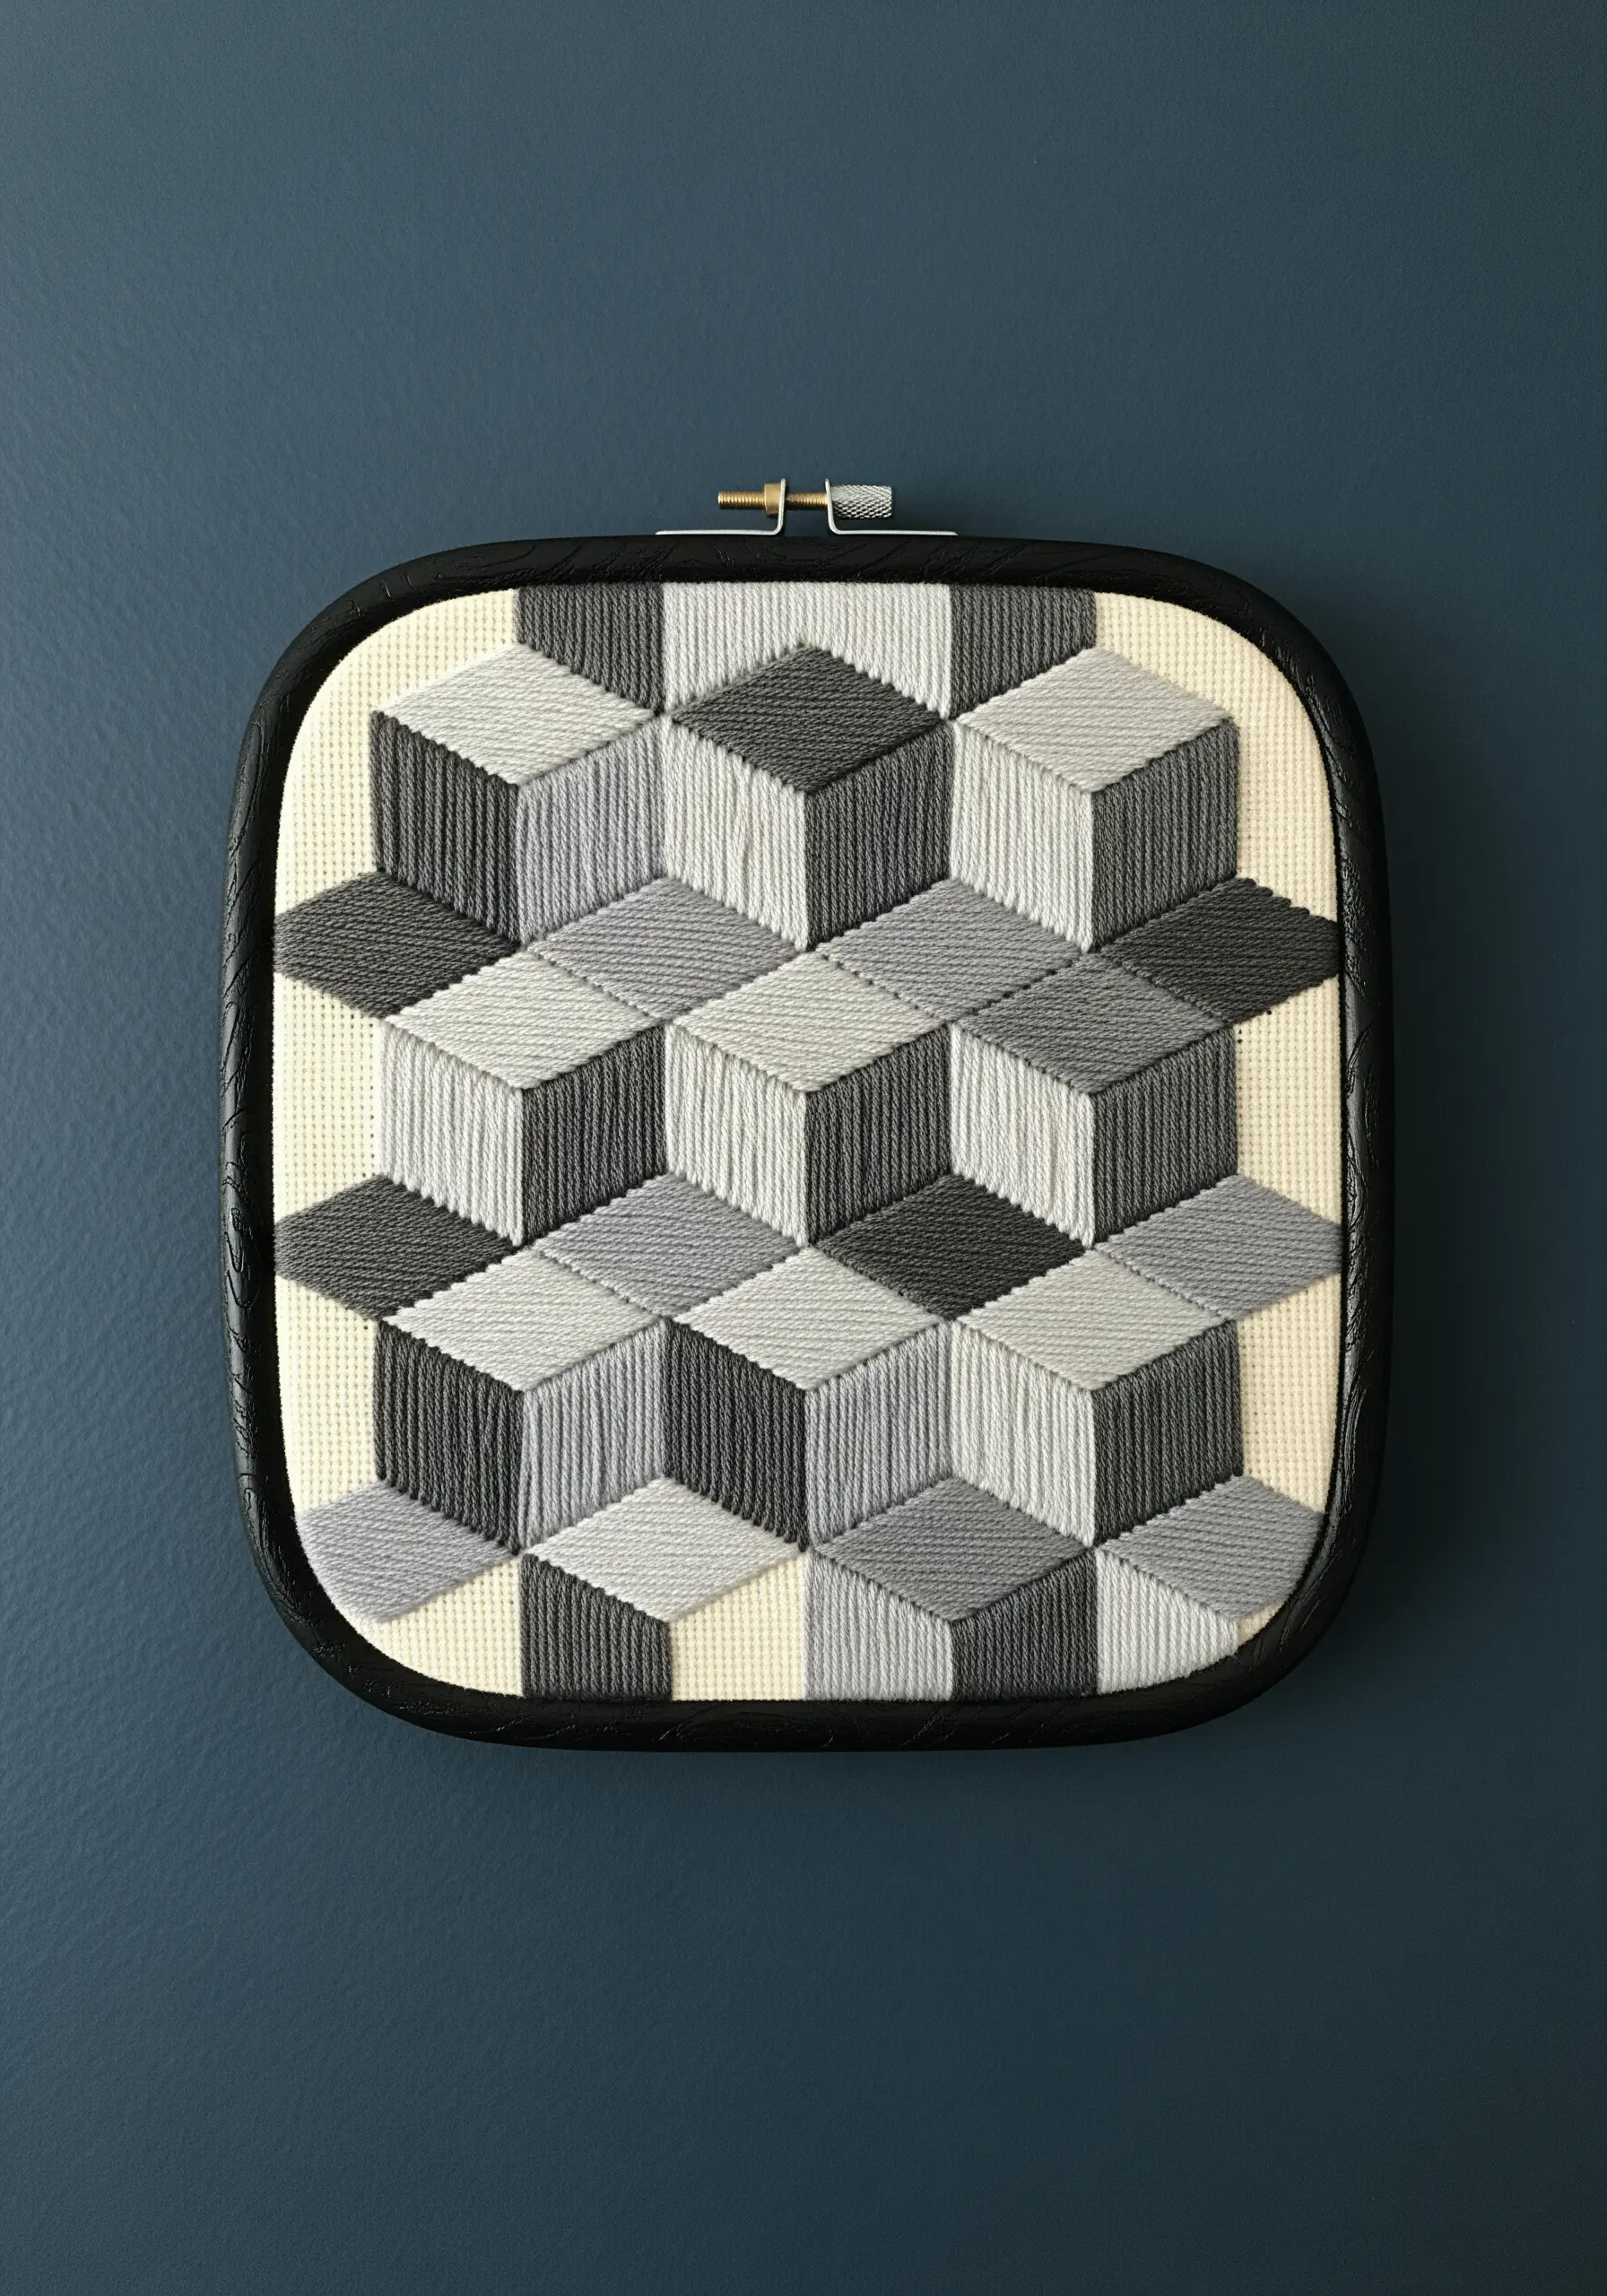
Master the illusion of depth with the classic tumbling blocks pattern, a favorite in quilting and textile art.
The entire effect relies on three distinct tones: a light, a medium, and a dark. Assign one tone to each of the three diamond shapes that form a single cube.
Fill each diamond with satin stitch, keeping your stitches angled in the same direction for each corresponding ‘face’ of the cubes.
This is one of the most satisfying modern geometric thread art ideas, turning a flat surface into a mind-bending, three-dimensional structure.
17. Weave a Rainbow Within the Hoop
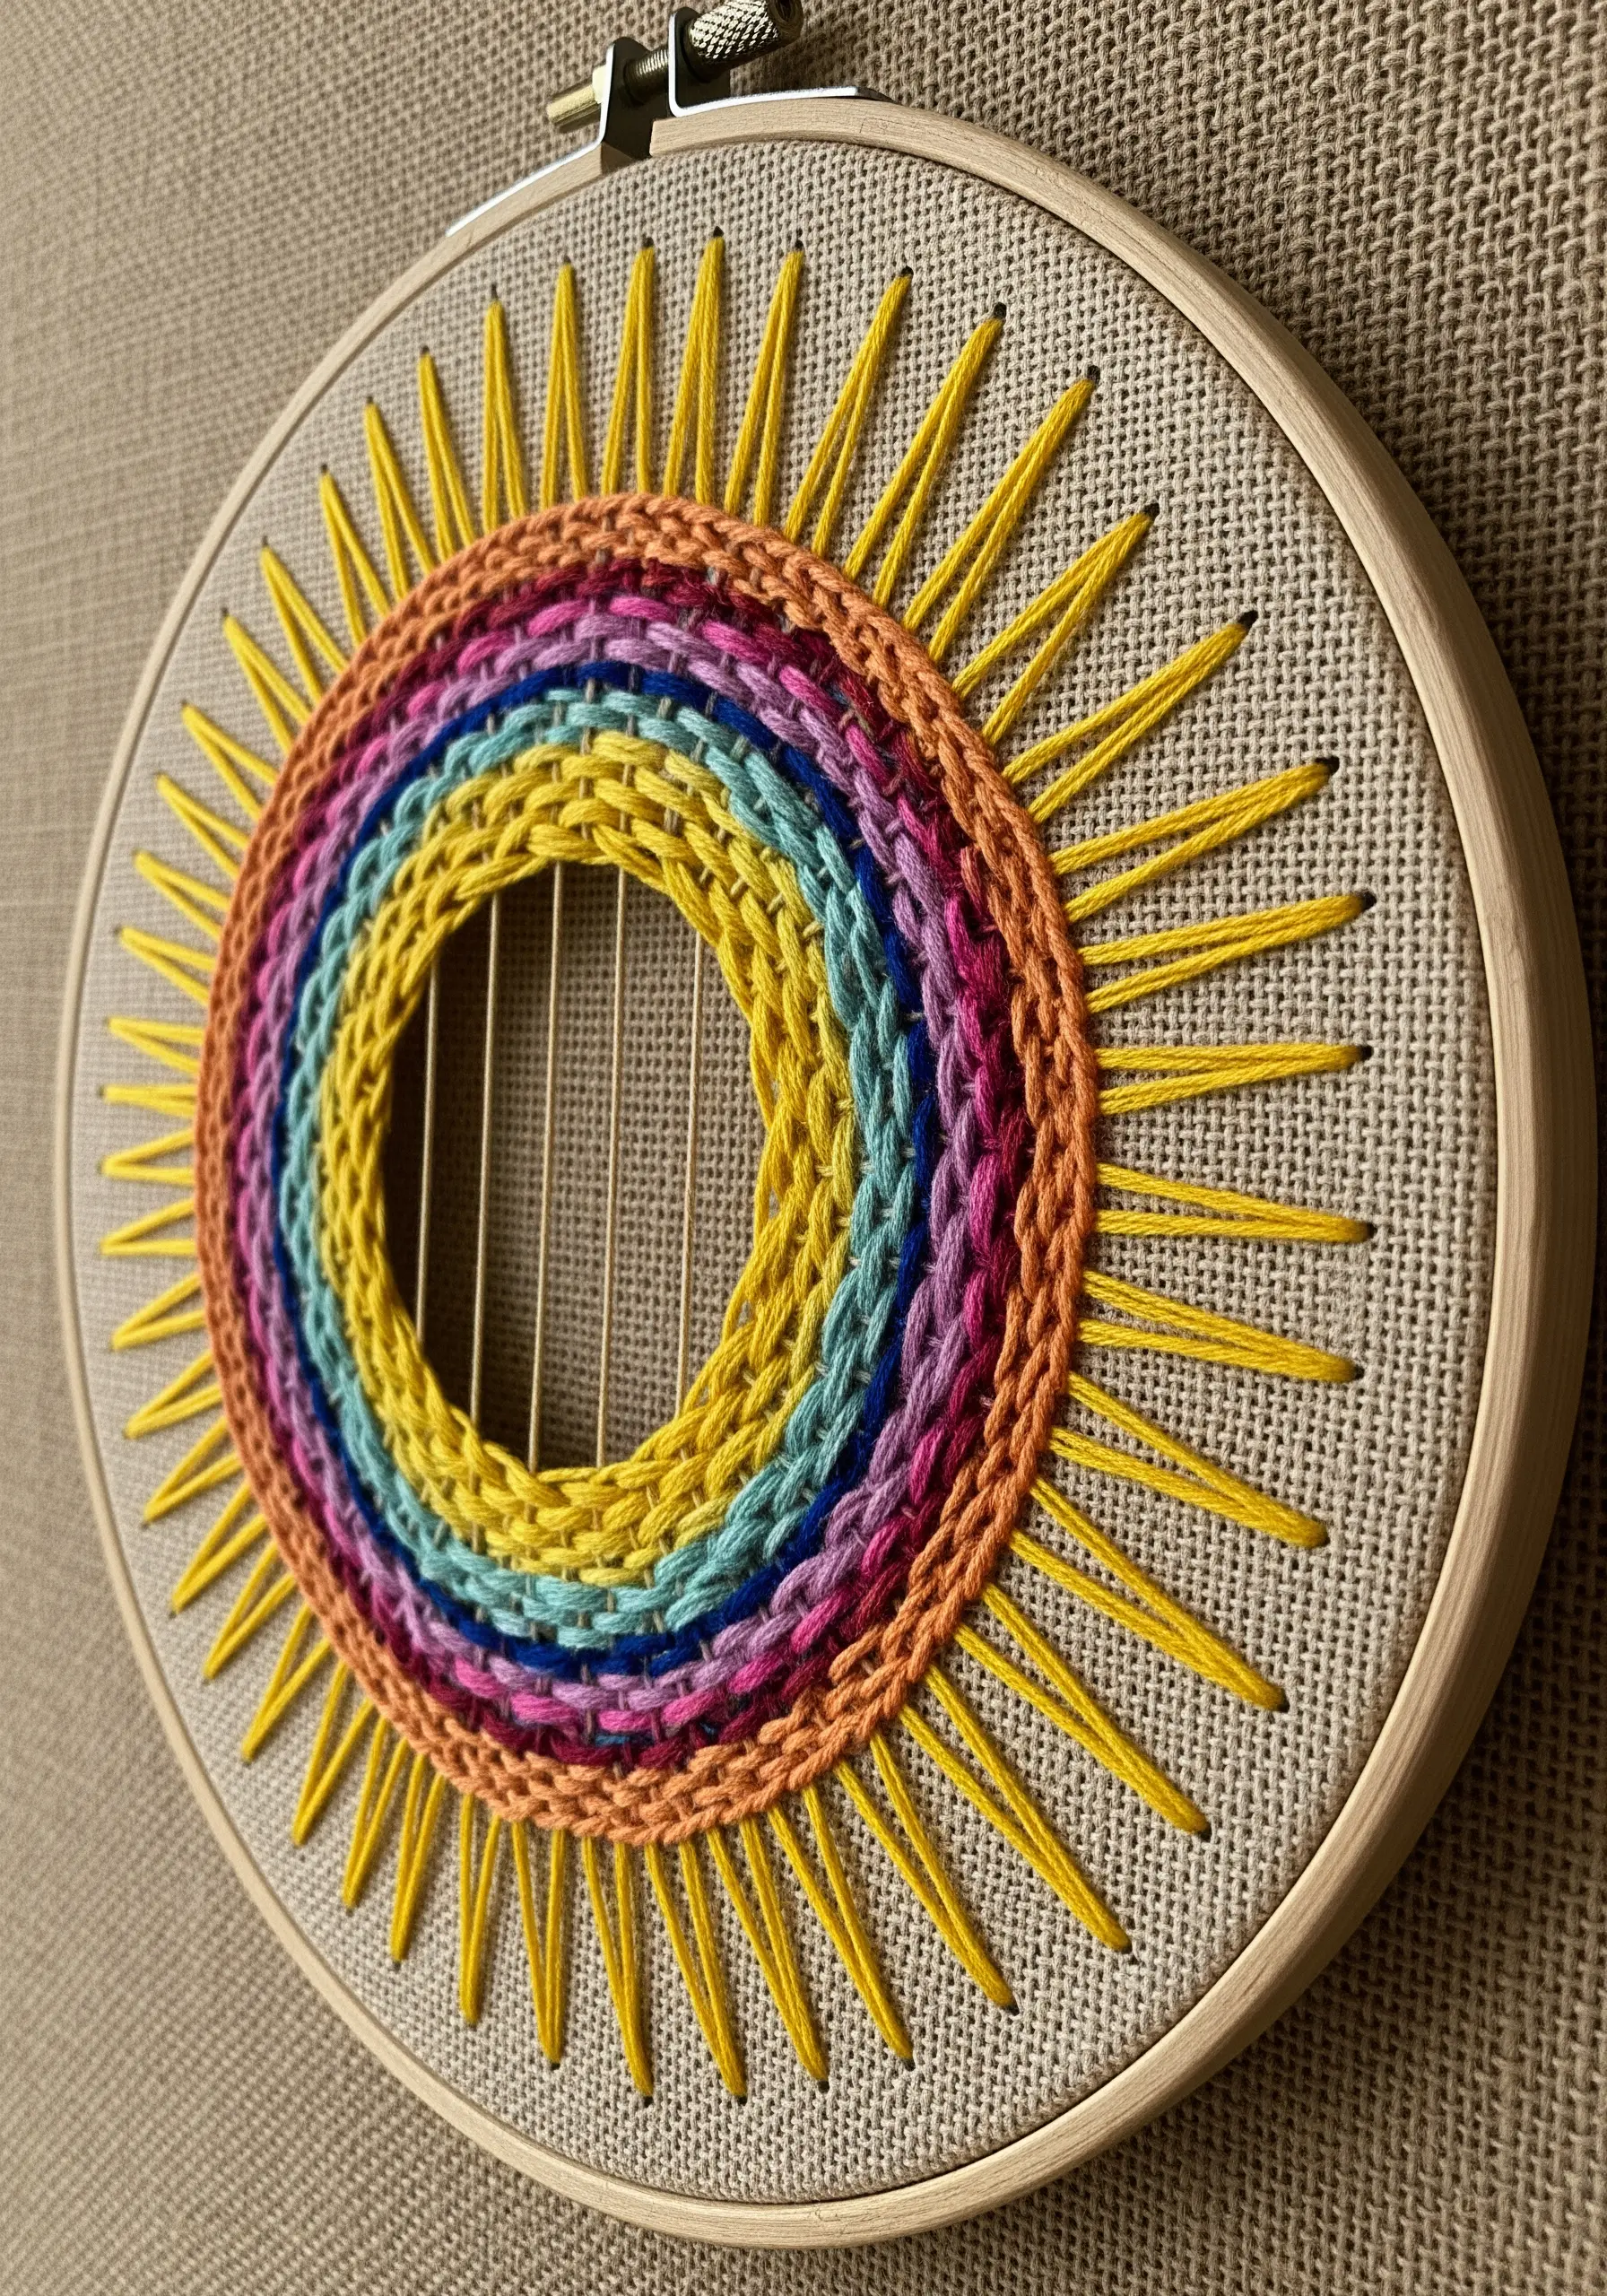
Combine embroidery and weaving for a piece that is rich in both color and texture.
Start by creating a ‘warp’ by stretching several vertical anchor threads across the open center of your hoop.
Then, use a tapestry needle to weave different colors of floss or yarn through these threads. Surround your woven section with complementary embroidery stitches, like the braided chain stitch and radiating straight stitches shown here.
This mixed-media approach adds unexpected dimension and turns your hoop into a miniature loom.
18. Engineer a Padded Solar System
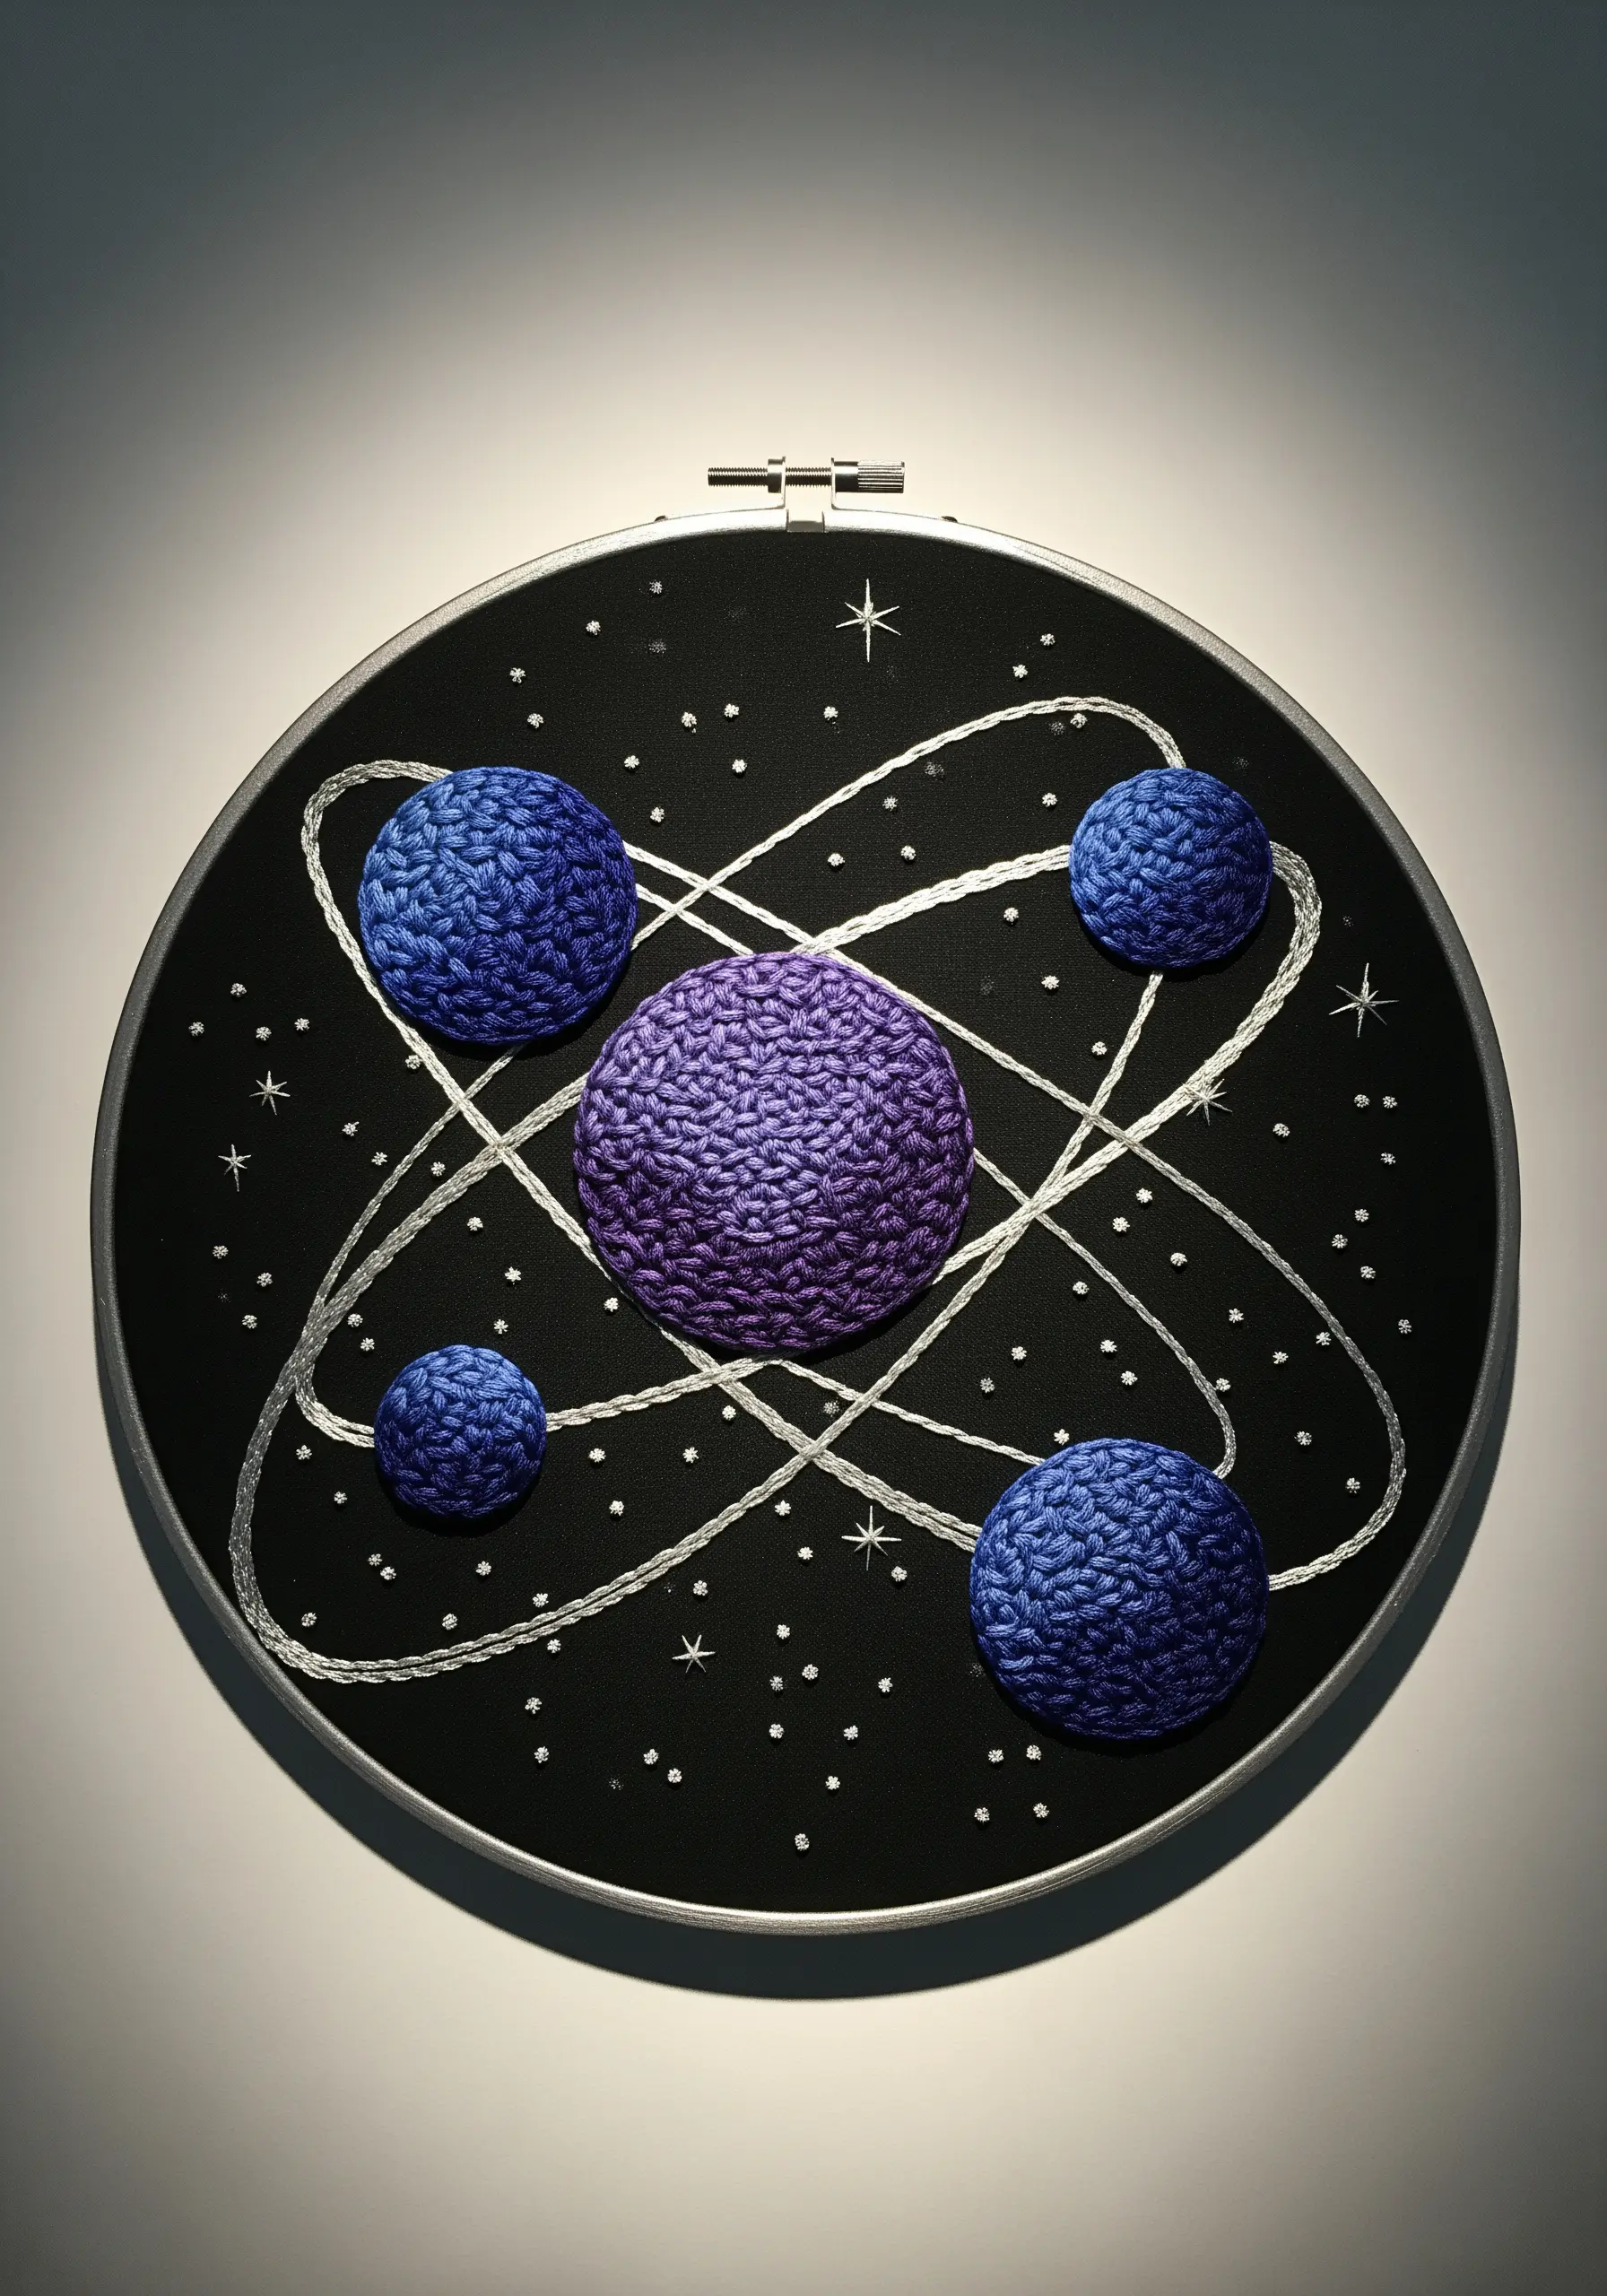
Give your geometric shapes a sculptural, 3D lift by stitching them over a padded base.
To create the planets, first stitch a layer of felt cut to shape onto your fabric, or build up a dense base with seed stitches.
Then, cover this padding with a final layer of tightly packed French knots or satin stitches. This raises the surface, creating dramatic shadows and a touchable quality.
Tiny straight stitches or French knots can serve as distant stars, completing your cosmic scene.
19. Design an Art Deco Triptych
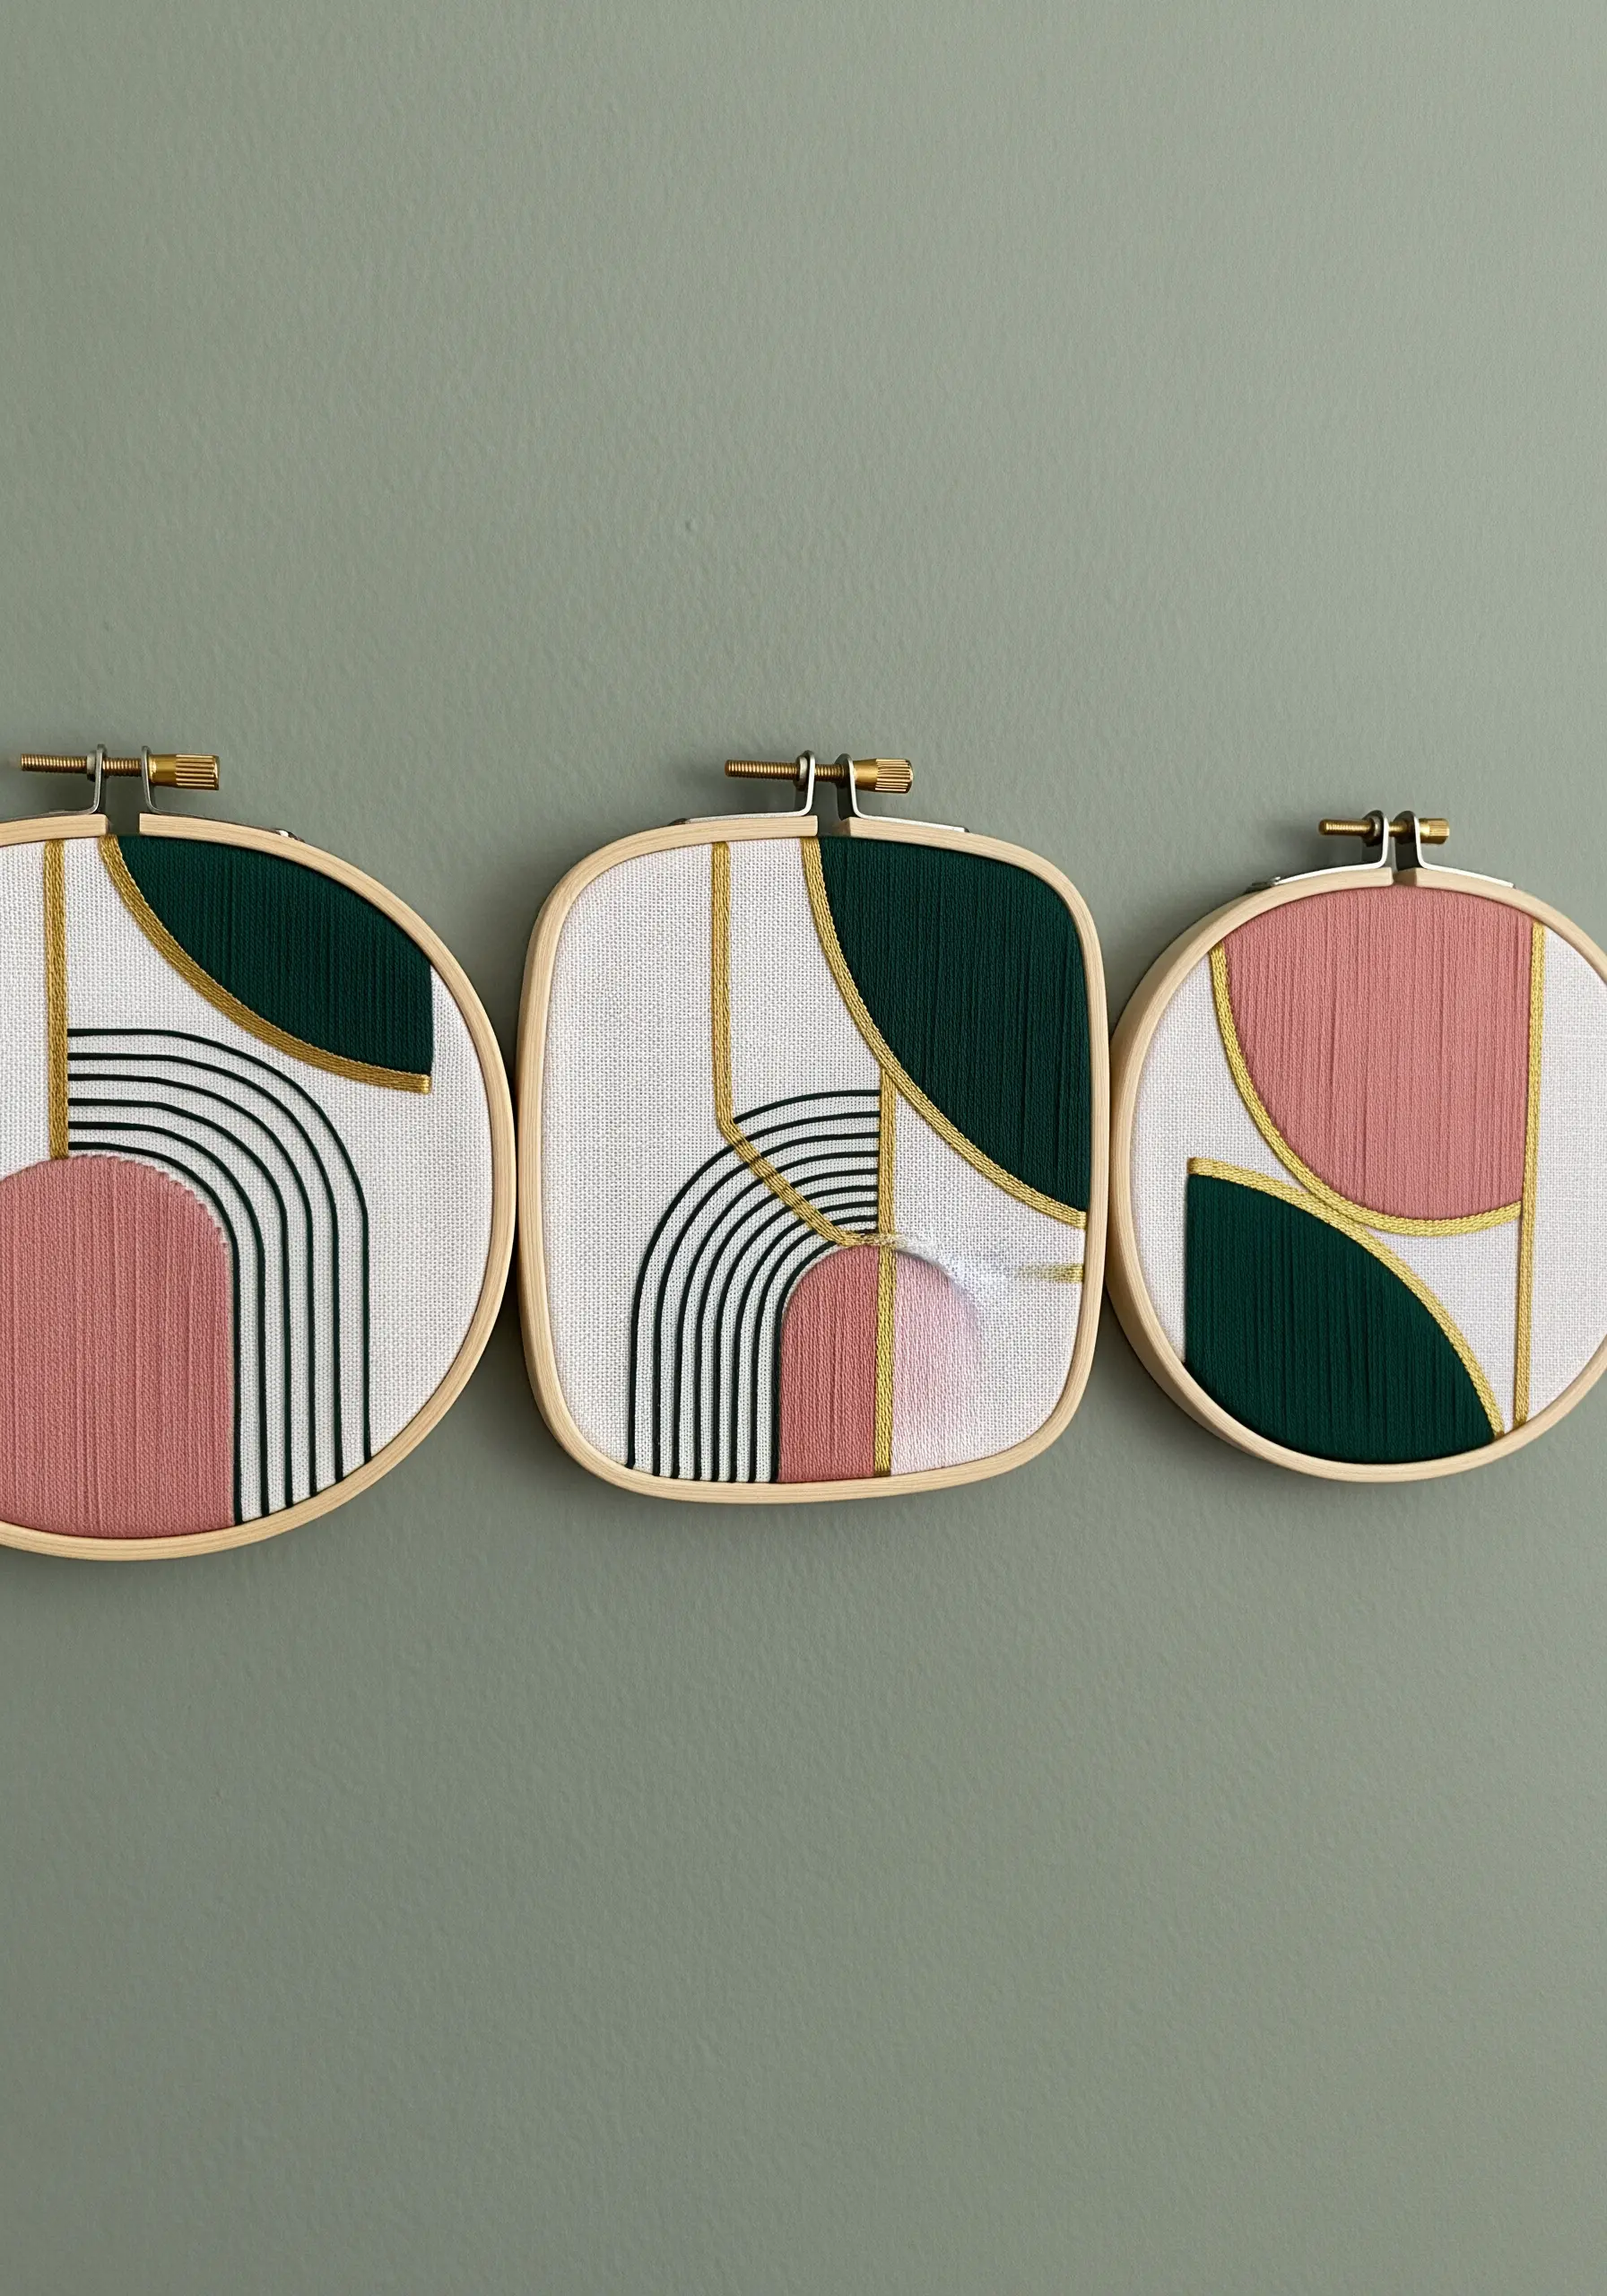
Capture the glamour and geometry of the Art Deco era by creating a multi-hoop display with cohesive design elements.
Combine bold satin stitch color-blocking with fine, precise lines in black or metallic gold thread. The interplay between sweeping curves and sharp, radiating lines is a hallmark of the style.
Using unconventional hoop shapes, like squares or ovals, alongside traditional circles enhances the geometric interest and makes the final installation even more dynamic.
20. Mimic Stained Glass on Sheer Fabric
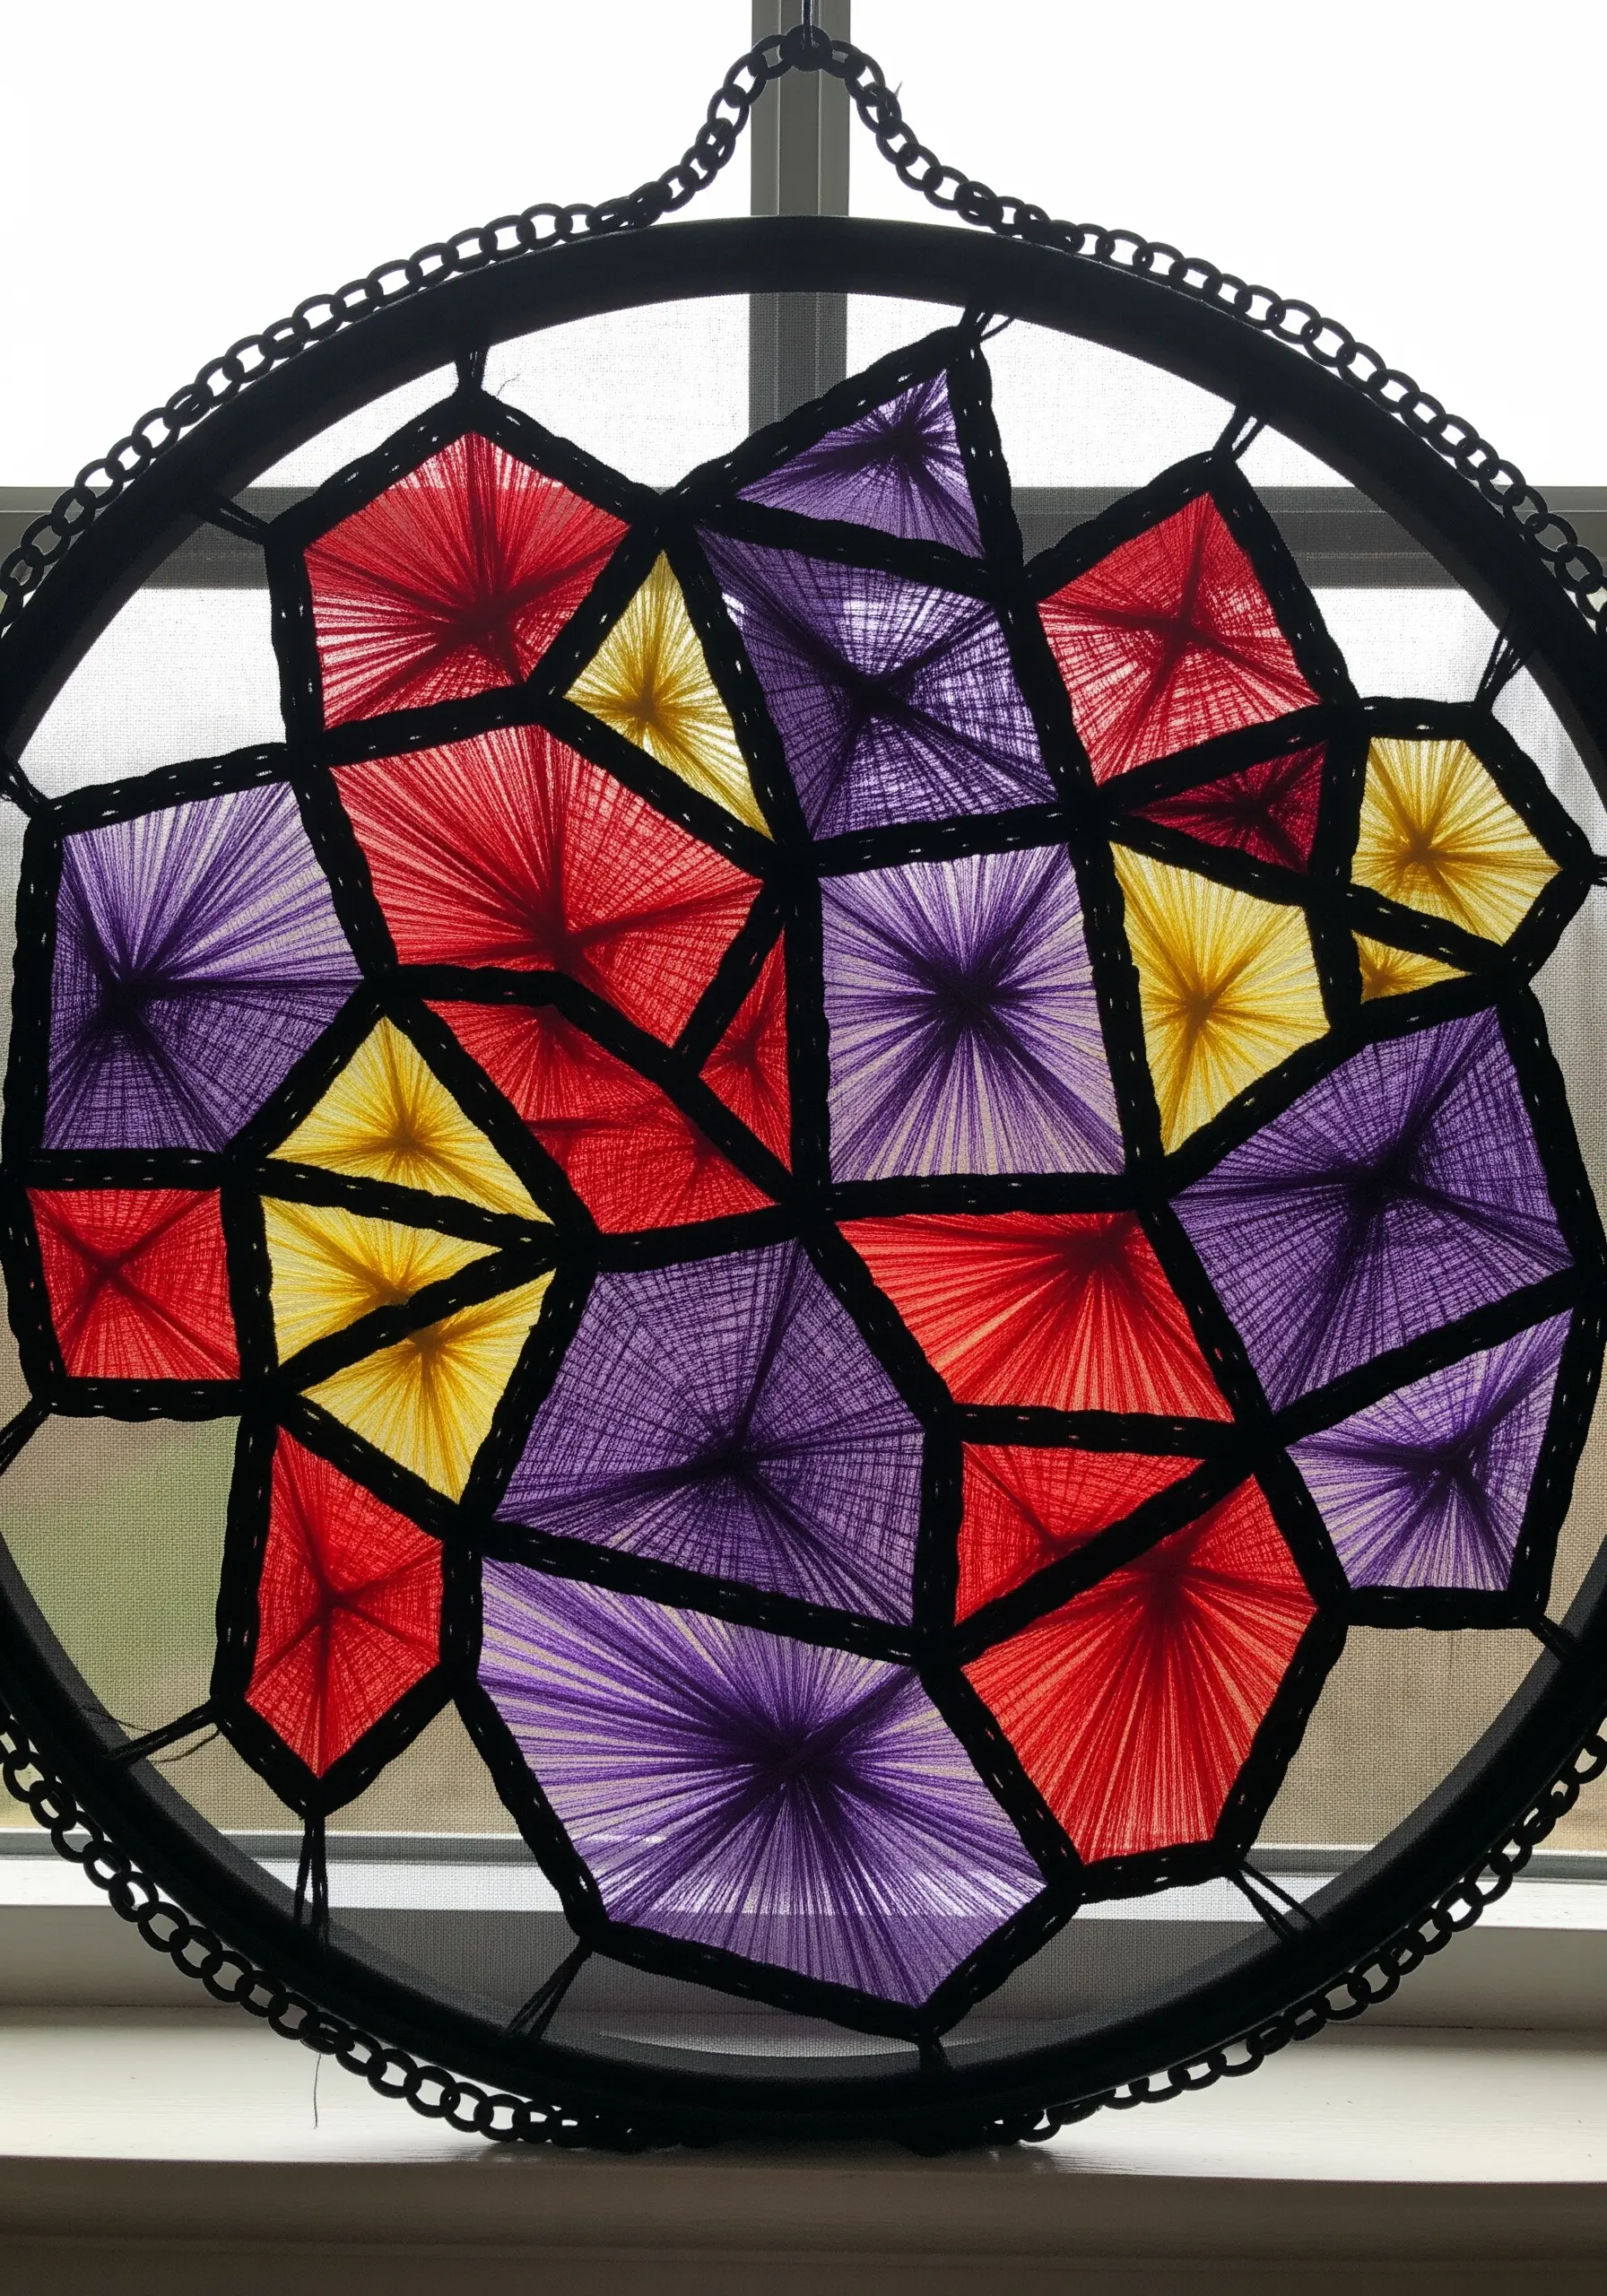
Create a luminous, light-catching piece by using string art techniques on a sheer or semi-sheer fabric.
First, create the ‘leading’ by outlining your geometric shapes with a thick, dark thread like a couched black yarn.
Then, fill each section by stretching colored floss in long, straight stitches from one side of the shape to the other. When hung in a window, light will pass through the fabric and illuminate the threads, creating a stunning stained-glass effect.
21. Weave a Geometric Tapestry in a Hoop
Go beyond surface stitching and use your embroidery hoop as a frame for a miniature woven tapestry.
Secure vertical warp threads directly to the hoop, then use various thicknesses of yarn and a tapestry needle to weave your design.
This technique allows you to play with chunky textures and bold color-blocking in a way that traditional embroidery can’t. It’s a perfect entry point into weaving for embroiderers, creating impressive statement-size wall art ideas.
22. Create Hypnotic Texture with Bullion Knots
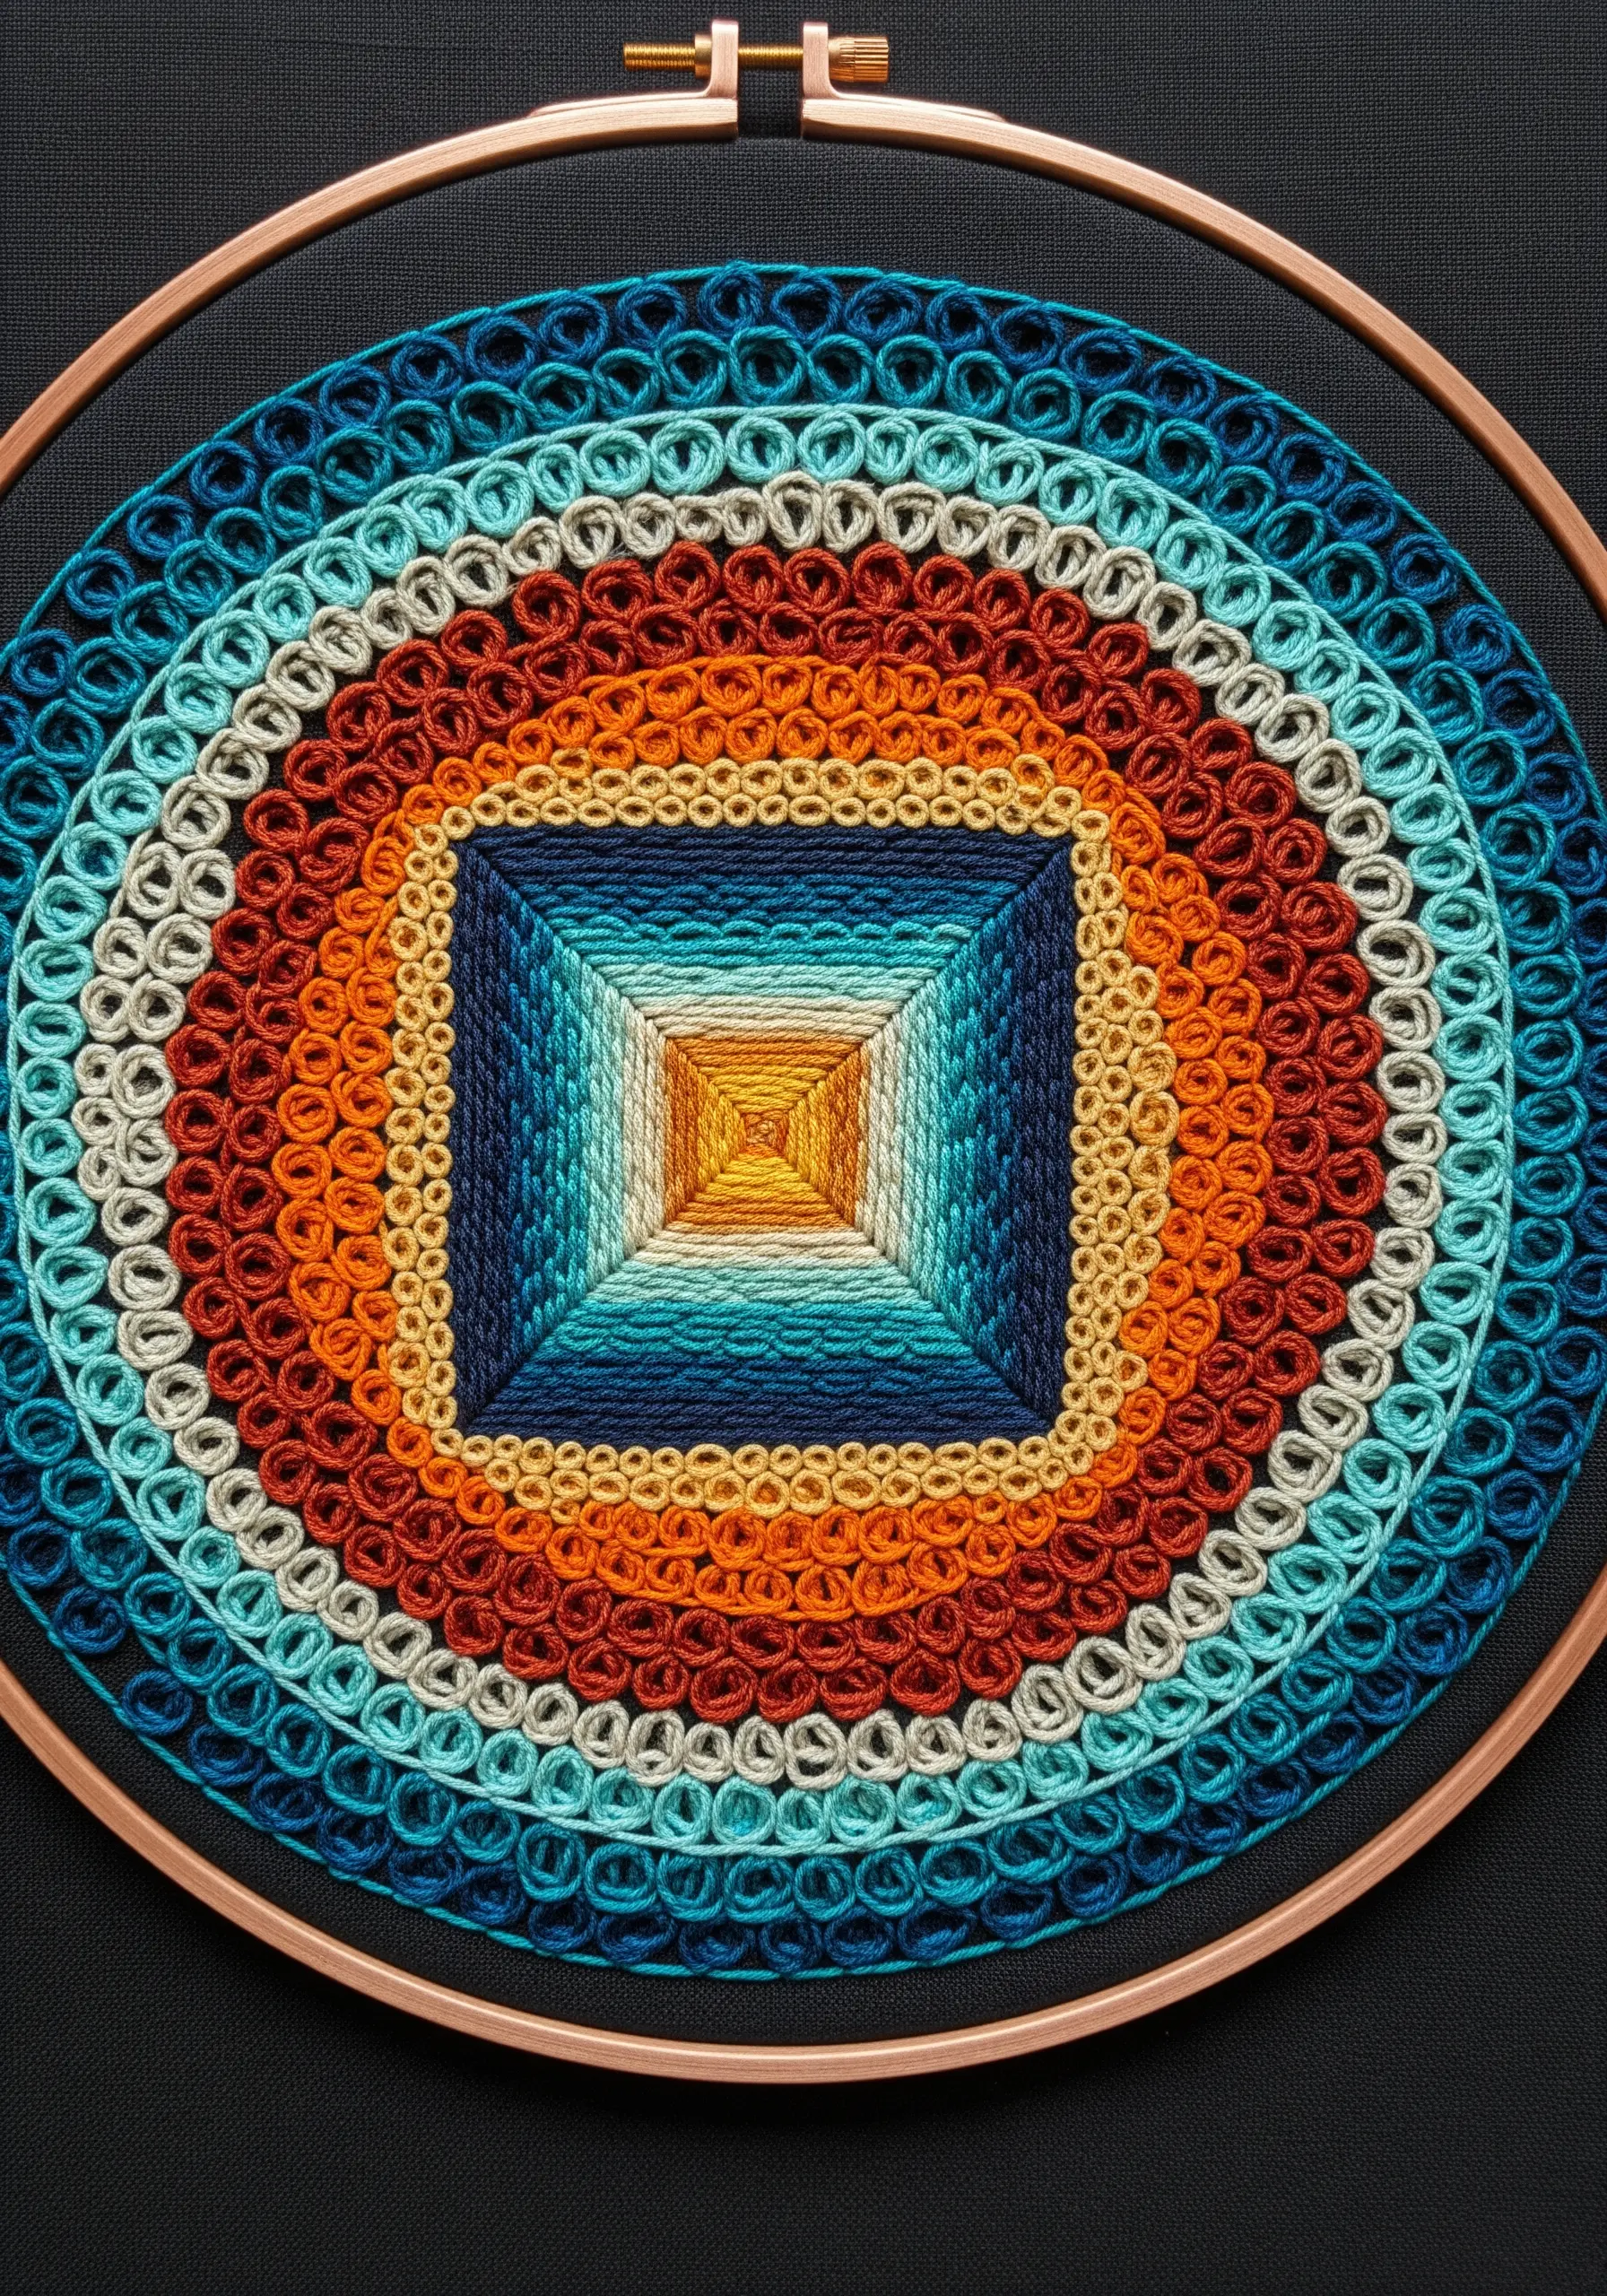
Build a mesmerizing, tactile surface using concentric rows of bullion knots or French knots.
Start from the center and work your way out, tightly packing the knots together. A bullion knot will create a more coiled, worm-like texture, while a French knot gives a dotted, nubby feel.
By arranging your thread colors in a gradient, you can create the illusion of a glowing, recessed center. The result is an intensely textured piece that invites the viewer to look closer.
23. Compose with Scandinavian Simplicity
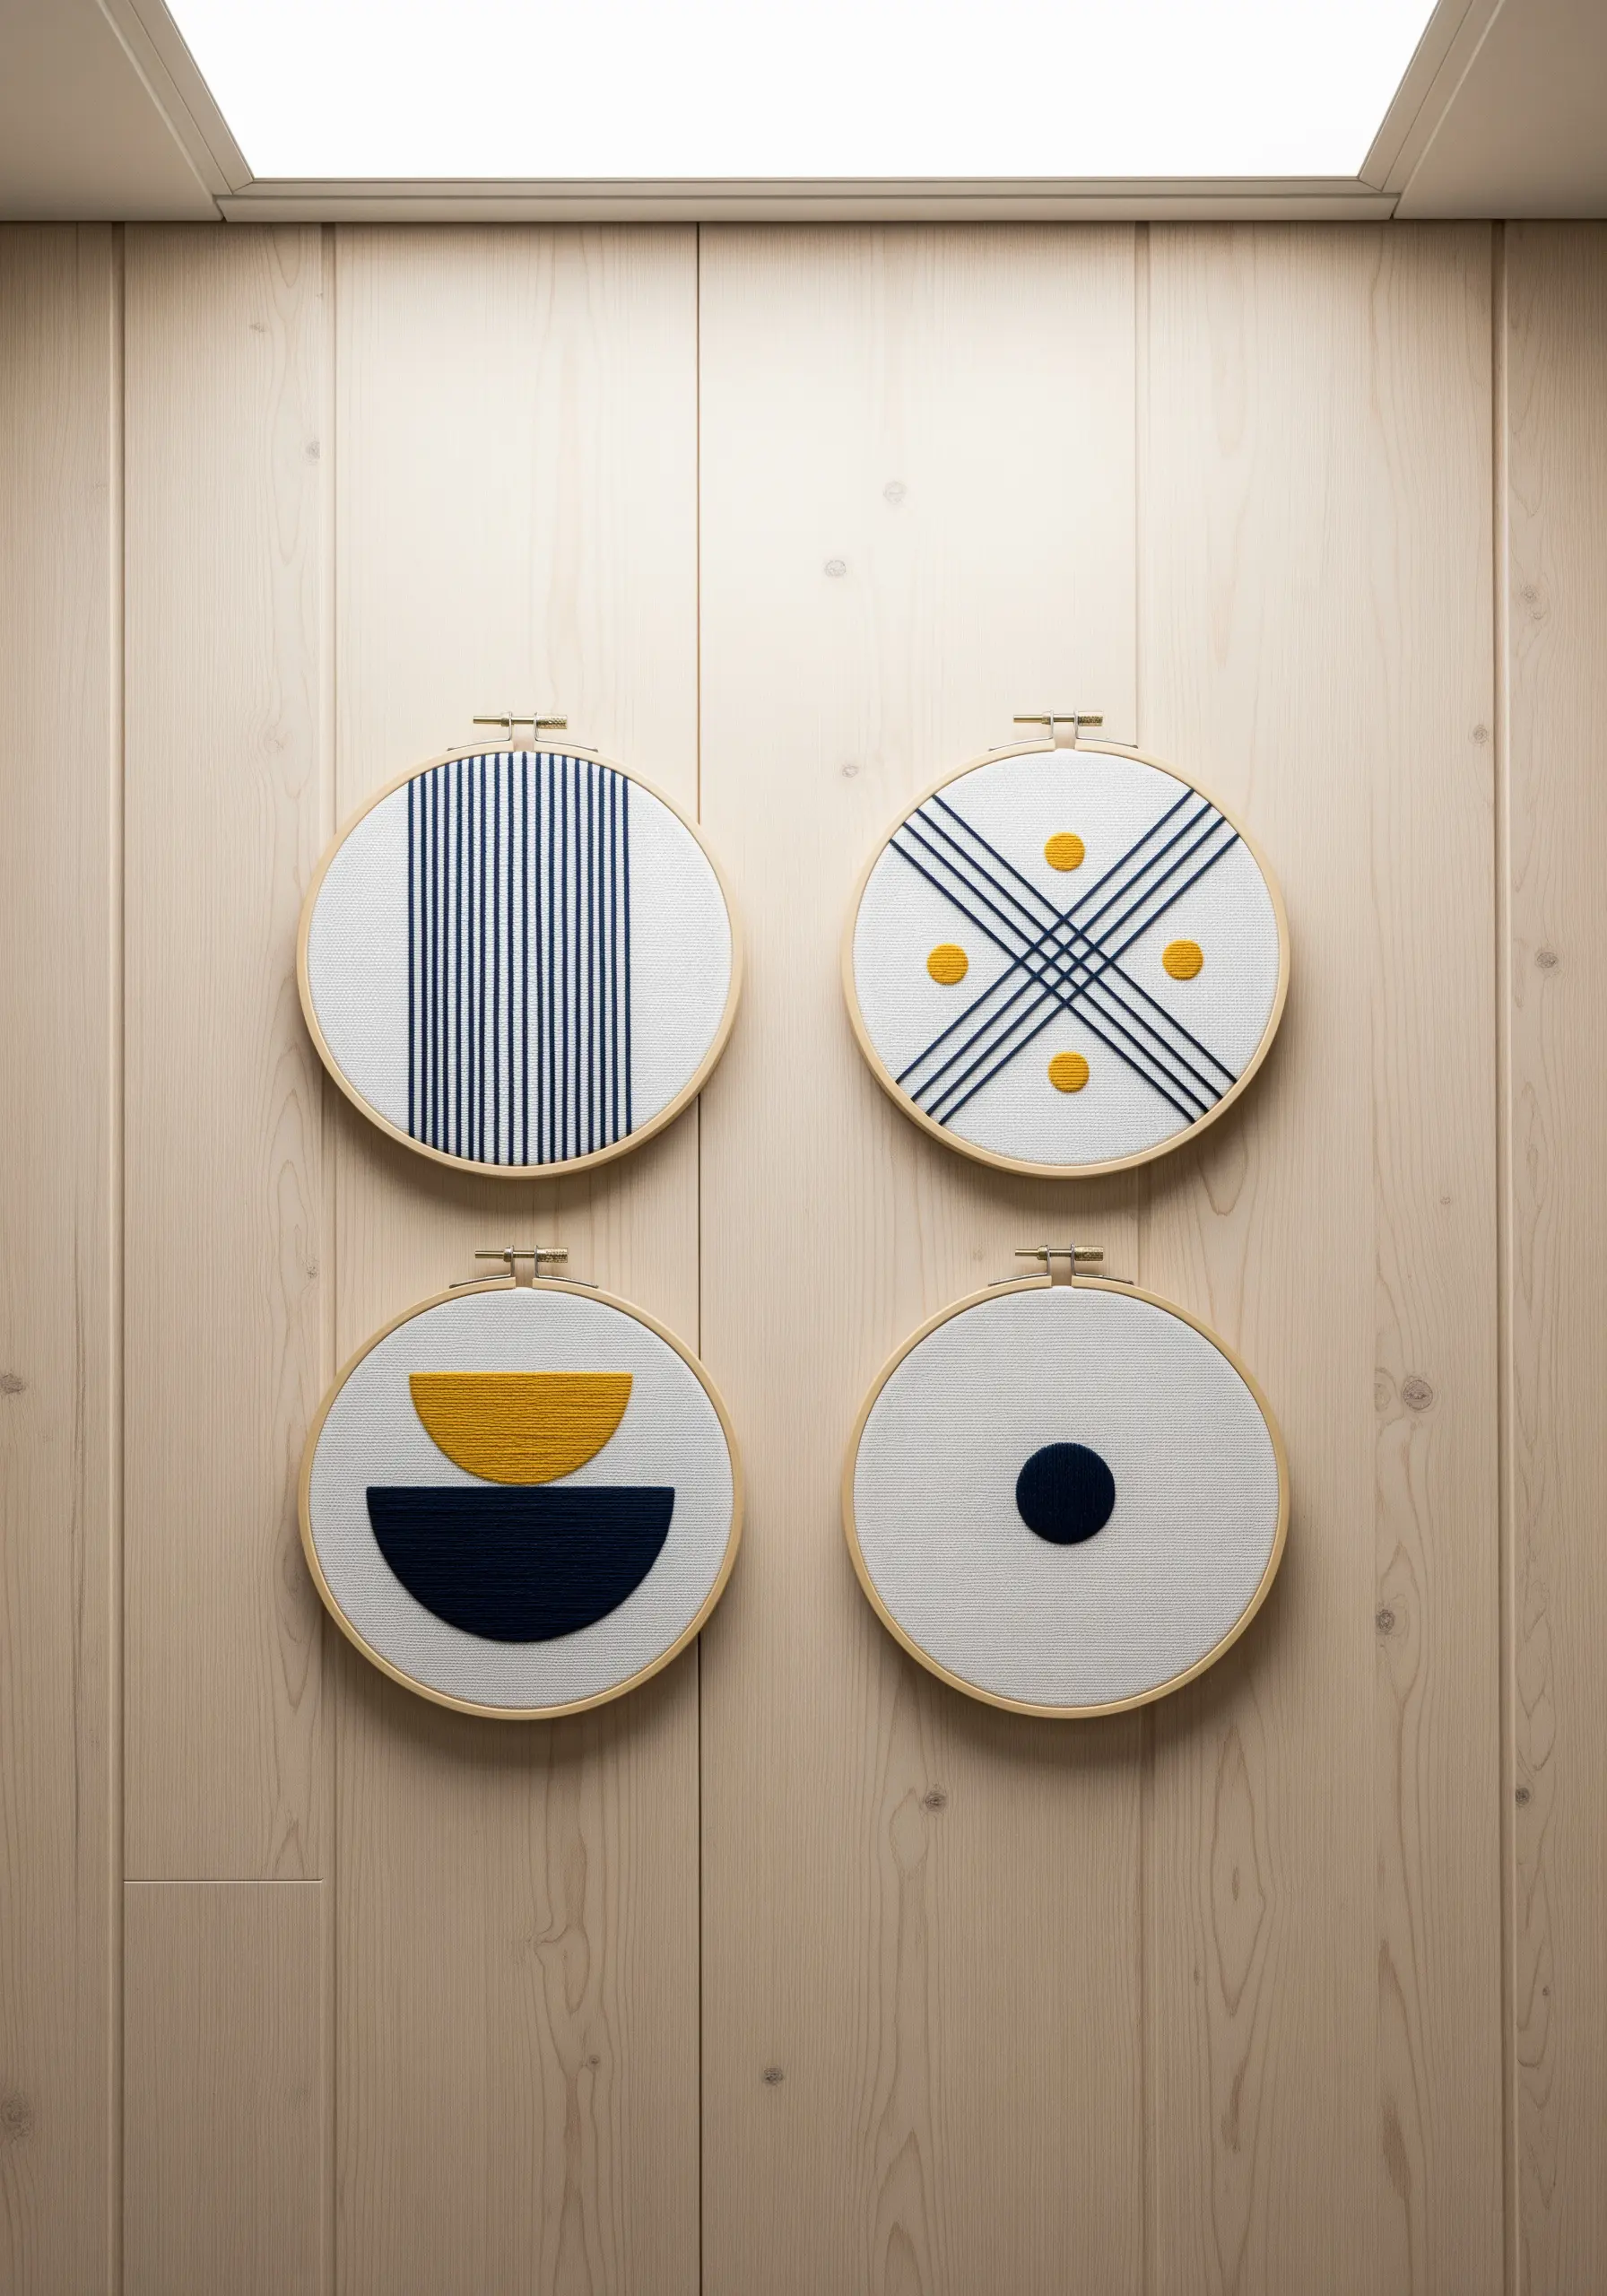
Achieve a clean, modern aesthetic by treating your embroidery like a minimalist graphic design.
Use a limited color palette—like navy, ochre, and the white of the fabric—and focus on simple, pure geometric forms.
Combine techniques like flat satin stitch for solid shapes, straight stitches for intersecting lines, and French knots for accent points.
Arranging four distinct but related designs in a simple grid creates a balanced and serene gallery wall that embodies Scandinavian design principles.
24. Build a Collage of Satin-Stitched Leaves
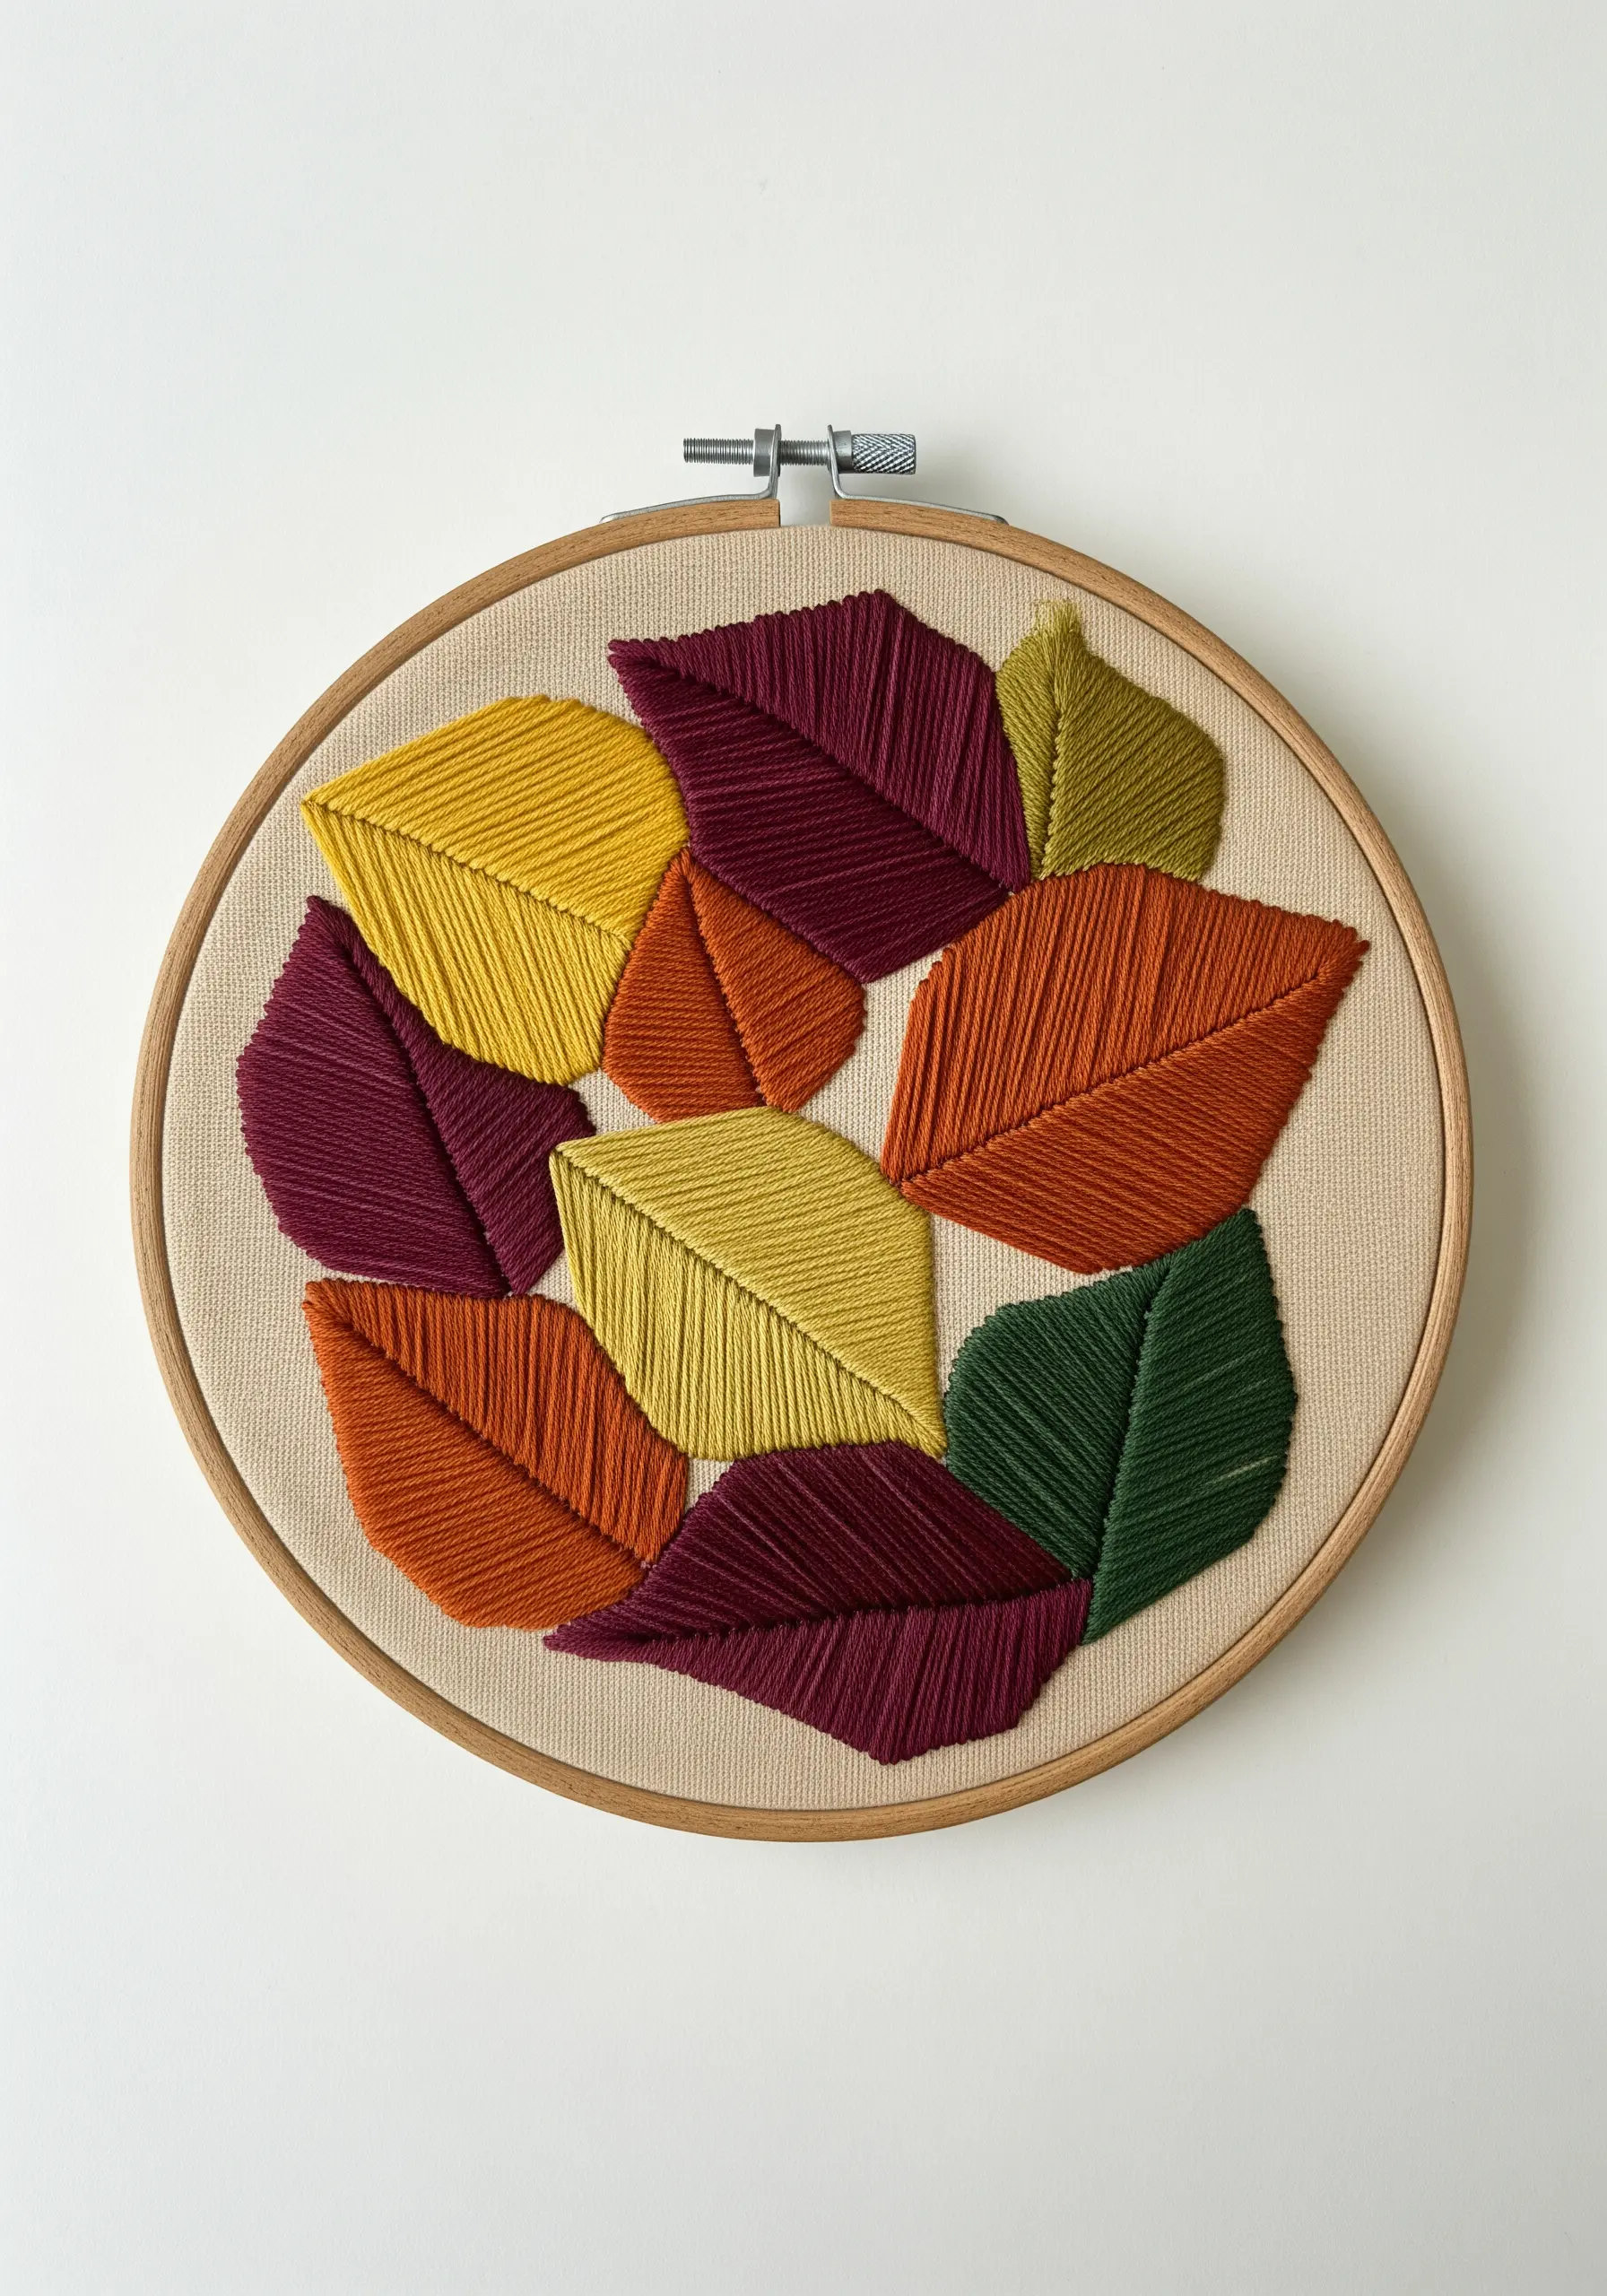
Create a sense of depth and movement by layering simple leaf shapes in a rich, autumnal palette.
Fill each leaf with a dense satin stitch or long-and-short stitch. The key to making them look distinct is to vary the angle of your stitches for each leaf.
This simple shift in direction will catch the light differently, creating subtle definition and the illusion of overlapping forms.
Don’t be afraid to stitch one leaf directly over the edge of another; this enhances the collage effect and makes the composition feel more organic.
25. Deconstruct the Grid with Neon Lines
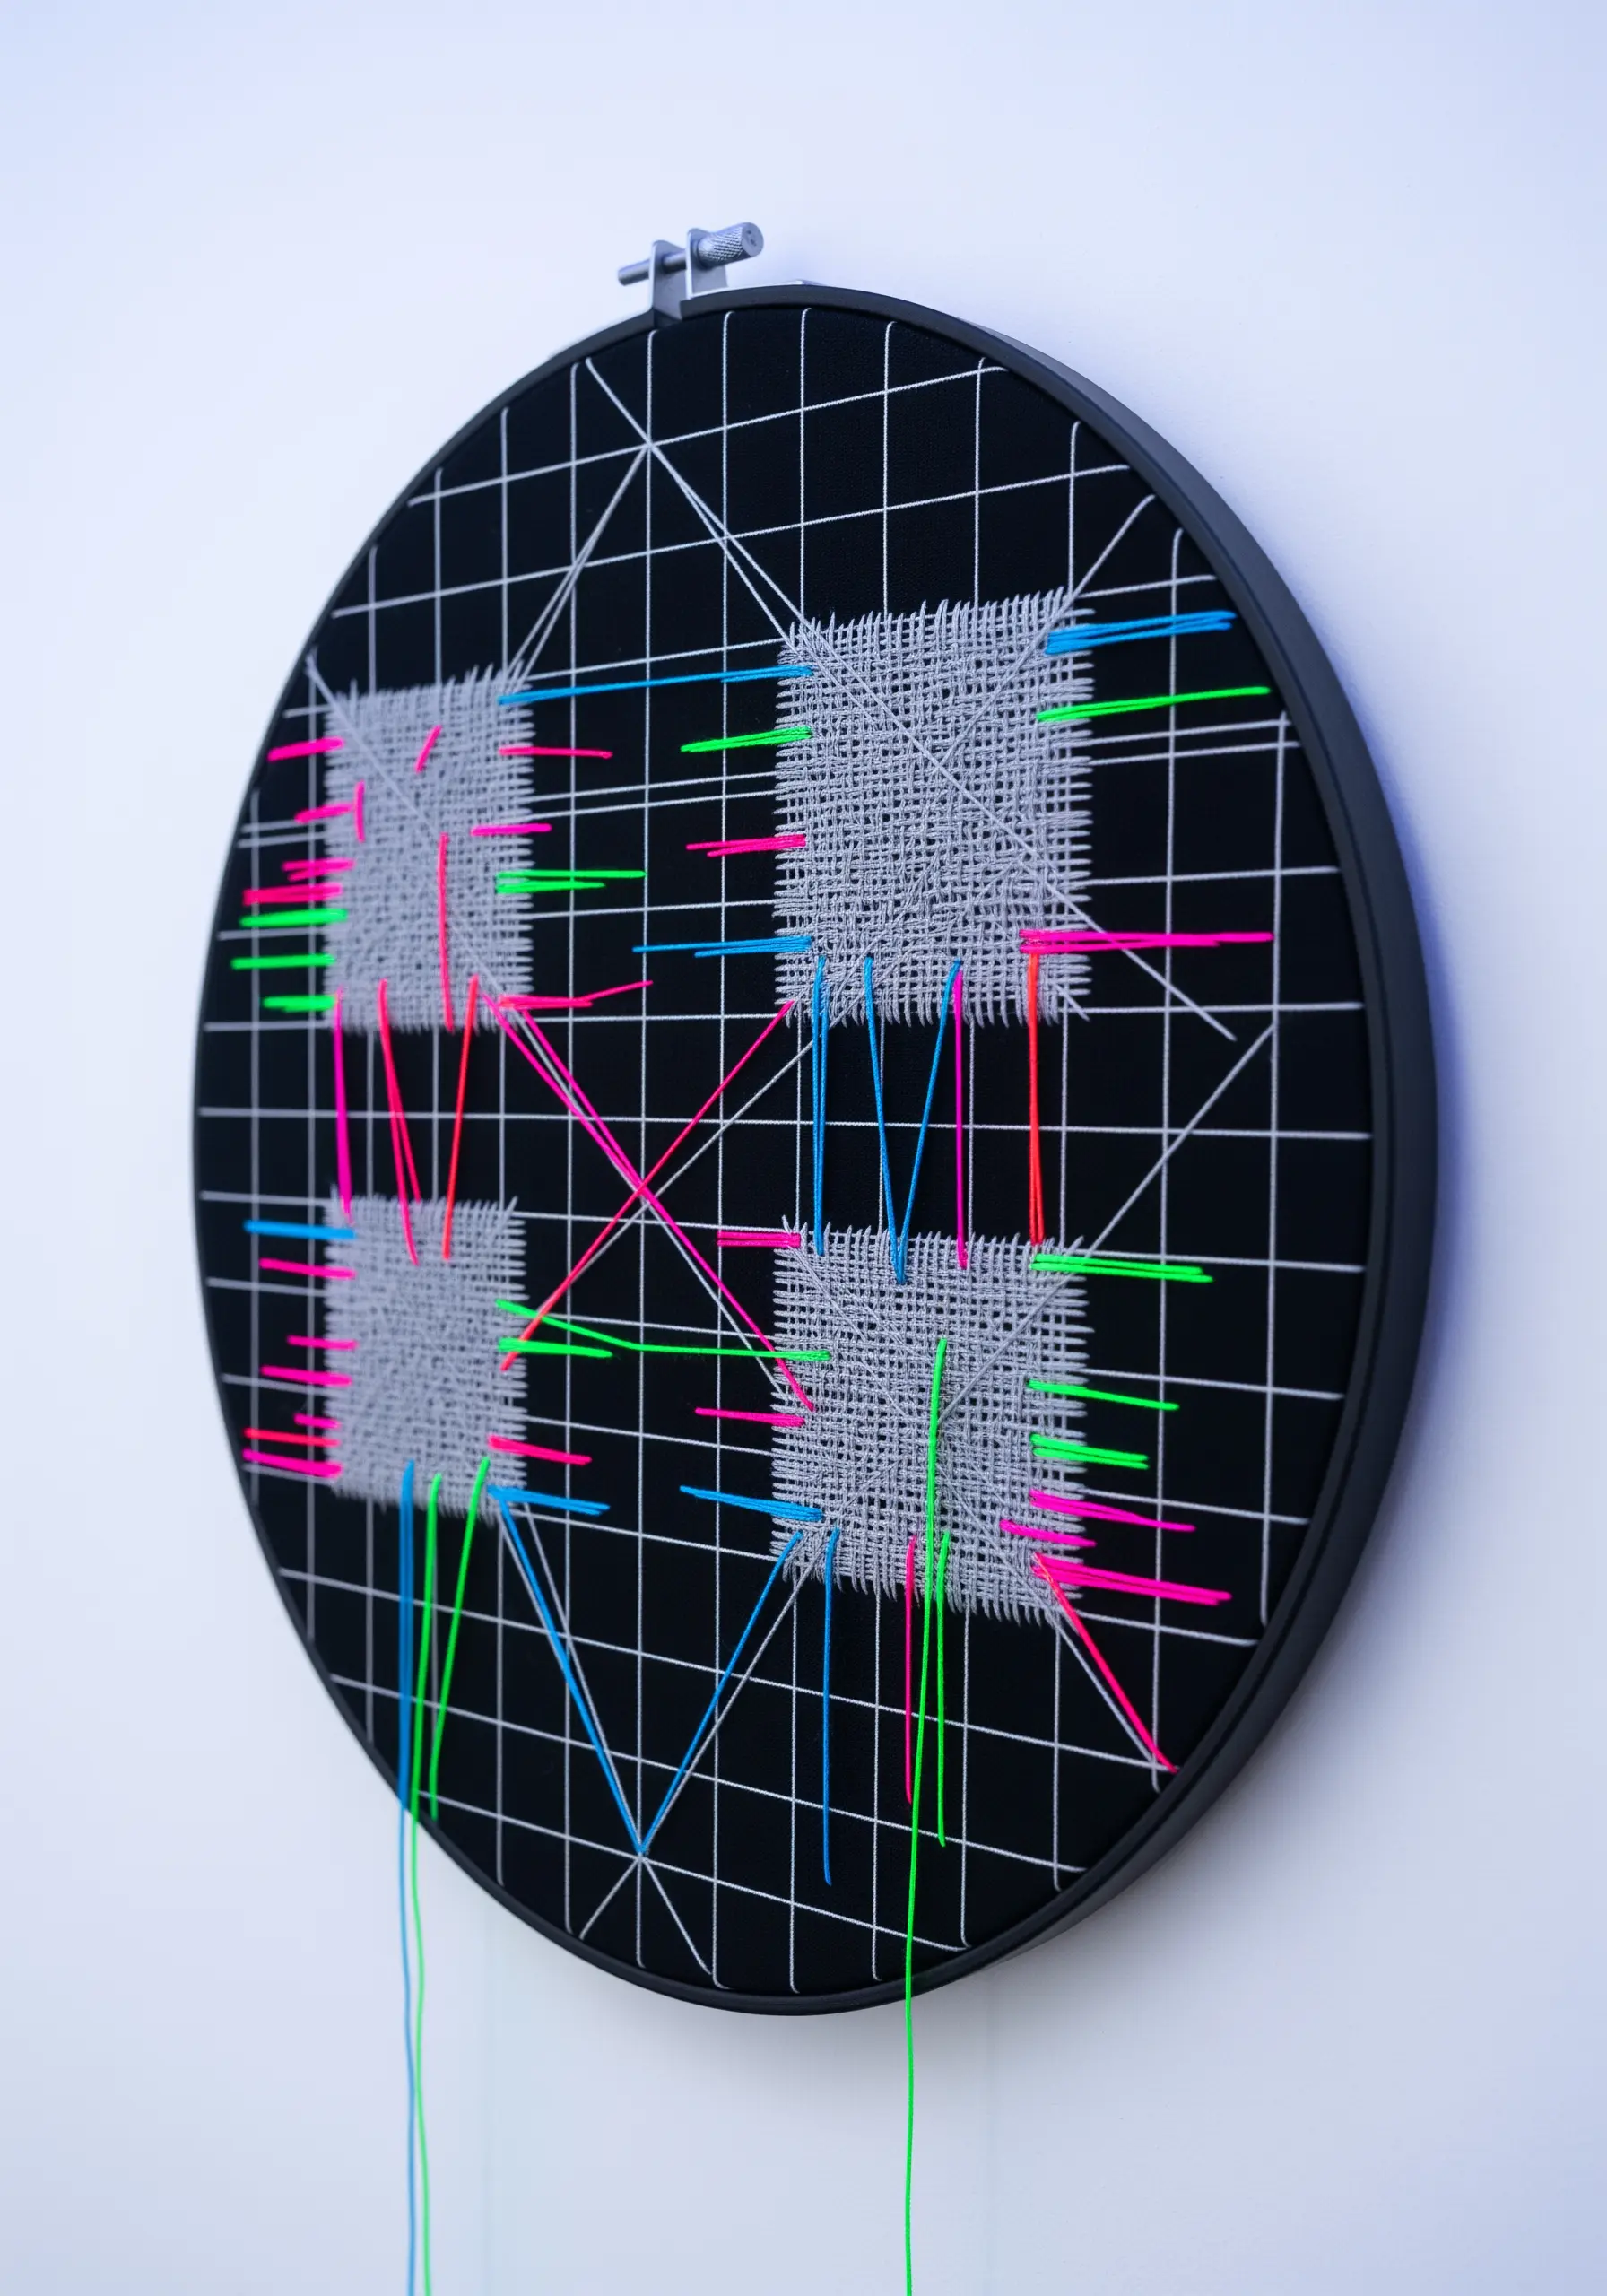
Combine order and chaos for a design that feels both structured and spontaneous.
Start by stitching a precise, orderly grid onto a dark fabric background. Then, fill in sections with woven stitches, creating textured blocks within the grid.
The final layer is one of disruption: add intersecting, long stitches in vibrant neon colors, and even let some threads hang loose.
This contrast between the rigid grid and the free-form neon lines creates a dynamic visual tension that is thoroughly modern.
26. Map Topography with Variegated Thread

Capture the organic, flowing lines of a topographical map or wood grain using a simple stitch and smart thread choice.
Use a variegated thread in earthy tones and a smooth outline stitch, like a whipped backstitch or stem stitch, to create meandering, concentric shapes.
The thread does the color work for you, creating subtle shifts in tone that mimic natural contours and gradients.
This is one of the most effective abstract thread embroidery ideas that turn simple lines into mesmerizing wall art with minimal effort.
27. Sculpt 3D Arcs with Wrapped Cording

Take your embroidery off the surface of the fabric by creating bold, sculptural forms.
Shape thick cotton cording or rope into arcs and couch them onto the canvas, leaving them raised and dimensional.
Then, use a blunt needle to tightly wrap the cords with different colors of embroidery floss or fine yarn. This technique transforms simple lines into chunky, rainbow-colored shapes with a delightful softness and presence.
28. Balance Composition with Asymmetric Tension
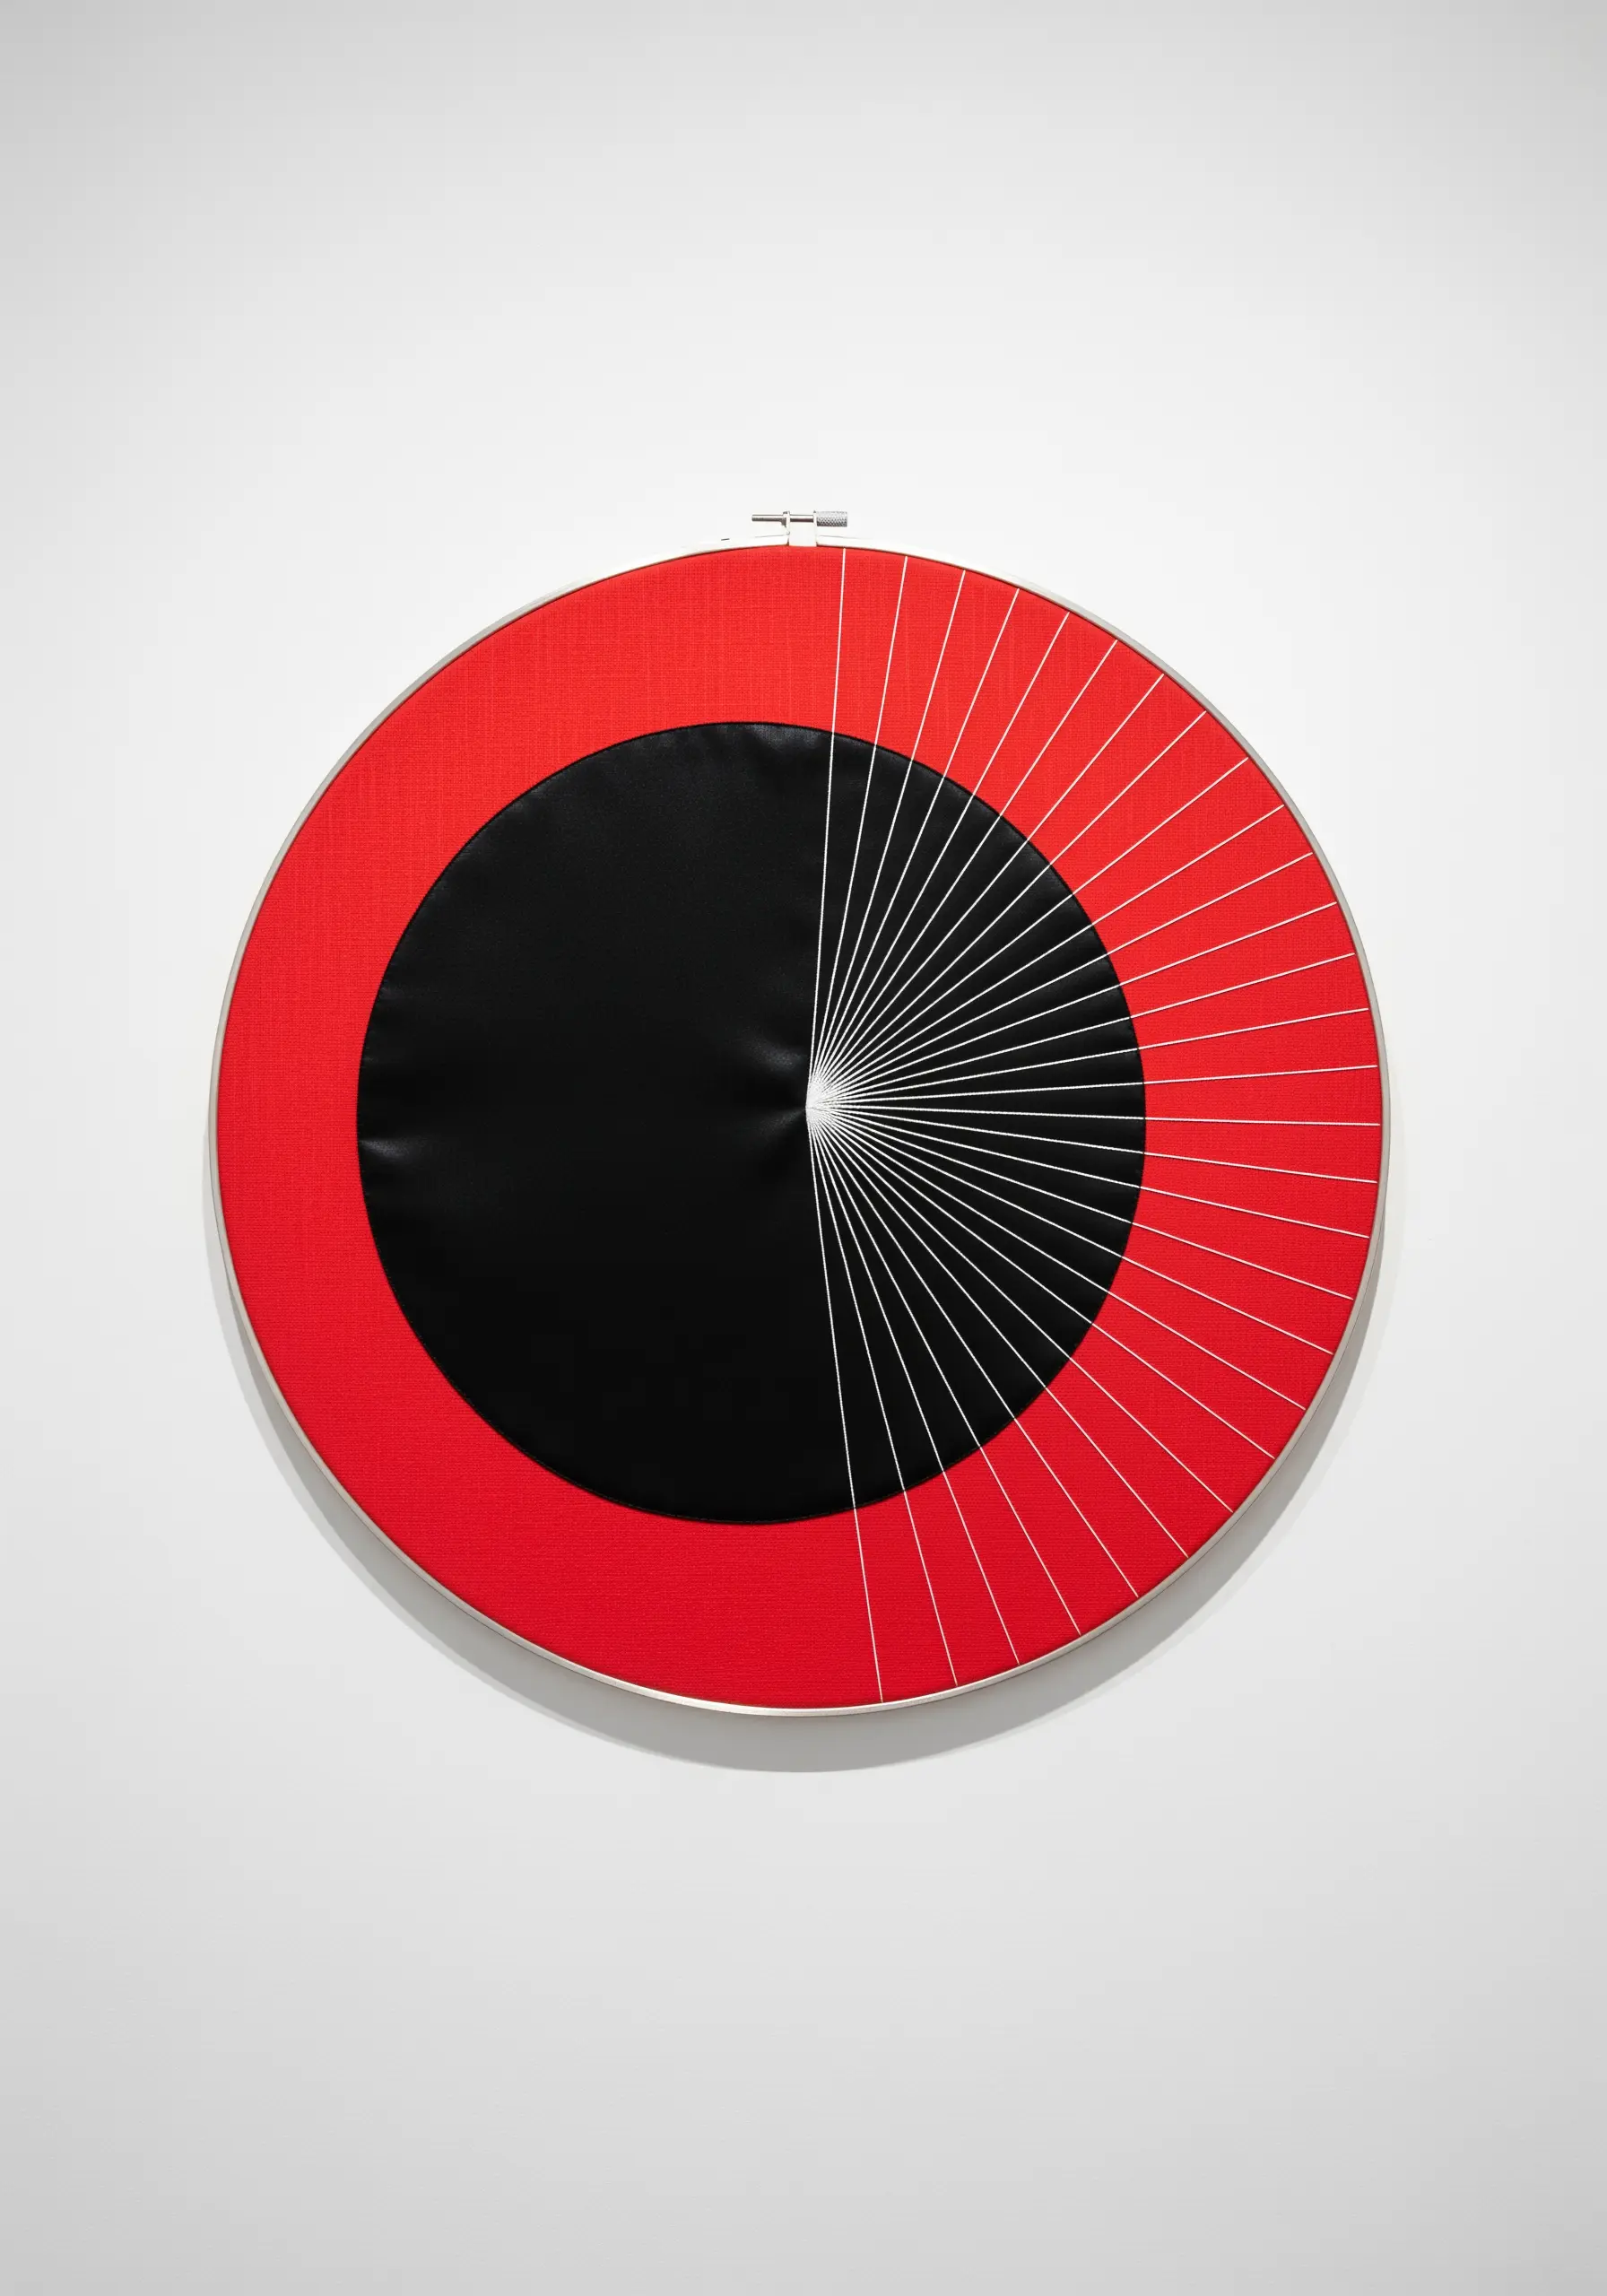
Create a powerful graphic statement by playing with asymmetry and high-contrast elements.
Use a bold color like red to fill a large portion of the hoop with fabric appliqué or dense satin stitch. Juxtapose this with a starkly different element, like the black circle and radiating white lines.
The radiating stitches create a sense of tension and focus, drawing the eye to a single point. This design is a masterclass in balance, proving that a composition doesn’t need to be symmetrical to feel harmonious.
29. Create Labyrinths with Chunky Braided Wool
Prioritize texture above all else by using ultra-chunky, braided yarn to create your design.
Plan a simple, continuous geometric path, like a spiral or labyrinth. Lay the chunky, pre-braided yarn along your design line and use a strong, matching thread to couch it securely to a rustic fabric like burlap.
The result is less about delicate stitching and more about creating a bold, sculptural fiber art piece. It’s a quick way to make a big impact, focusing on the material itself.


