
You’ve mastered the gentle give of linen and the familiar tension of a hoop. But what happens when you swap your fabric for paper? It’s a surface that doesn’t forgive, that holds a crisp edge, and that can be folded, torn, and layered into sculptural forms your fabric never could.
Working with paper isn’t about replacing your love for textile art; it’s about expanding your creative language. It invites you to think like a sculptor, a painter, and a stitcher all at once. The techniques you already know—the simple running stitch, the bold satin stitch, the elegant couching—take on new life, creating graphic lines, dimensional textures, and unexpected juxtapositions.
Here, you’ll find inspirations that push beyond the hoop. Consider these ideas not as strict instructions, but as permissions to experiment. Let the structure of paper challenge you, and discover how its unique character can bring a bold, modern, and entirely new dimension to your threadwork.
1. Sculptural Cord Wrapping with Beaded Inlays
Move beyond the flat surface by creating three-dimensional forms to couch onto paper.
First, wrap a thick cord, like cotton piping, with a bold-colored yarn or floss.
Shape this cord into organic, interlocking loops and secure it to heavy watercolor paper using small, discreet tacking stitches.
Fill the negative spaces within your loops with densely packed seed beads; this creates a stunning textural contrast between the soft yarn and the hard, reflective beads.
This method turns your embroidery into a piece of low-relief sculpture, where the paper acts as a painted canvas rather than a stitched-through ground.
2. Layered Paper Topography with Geometric Stitching
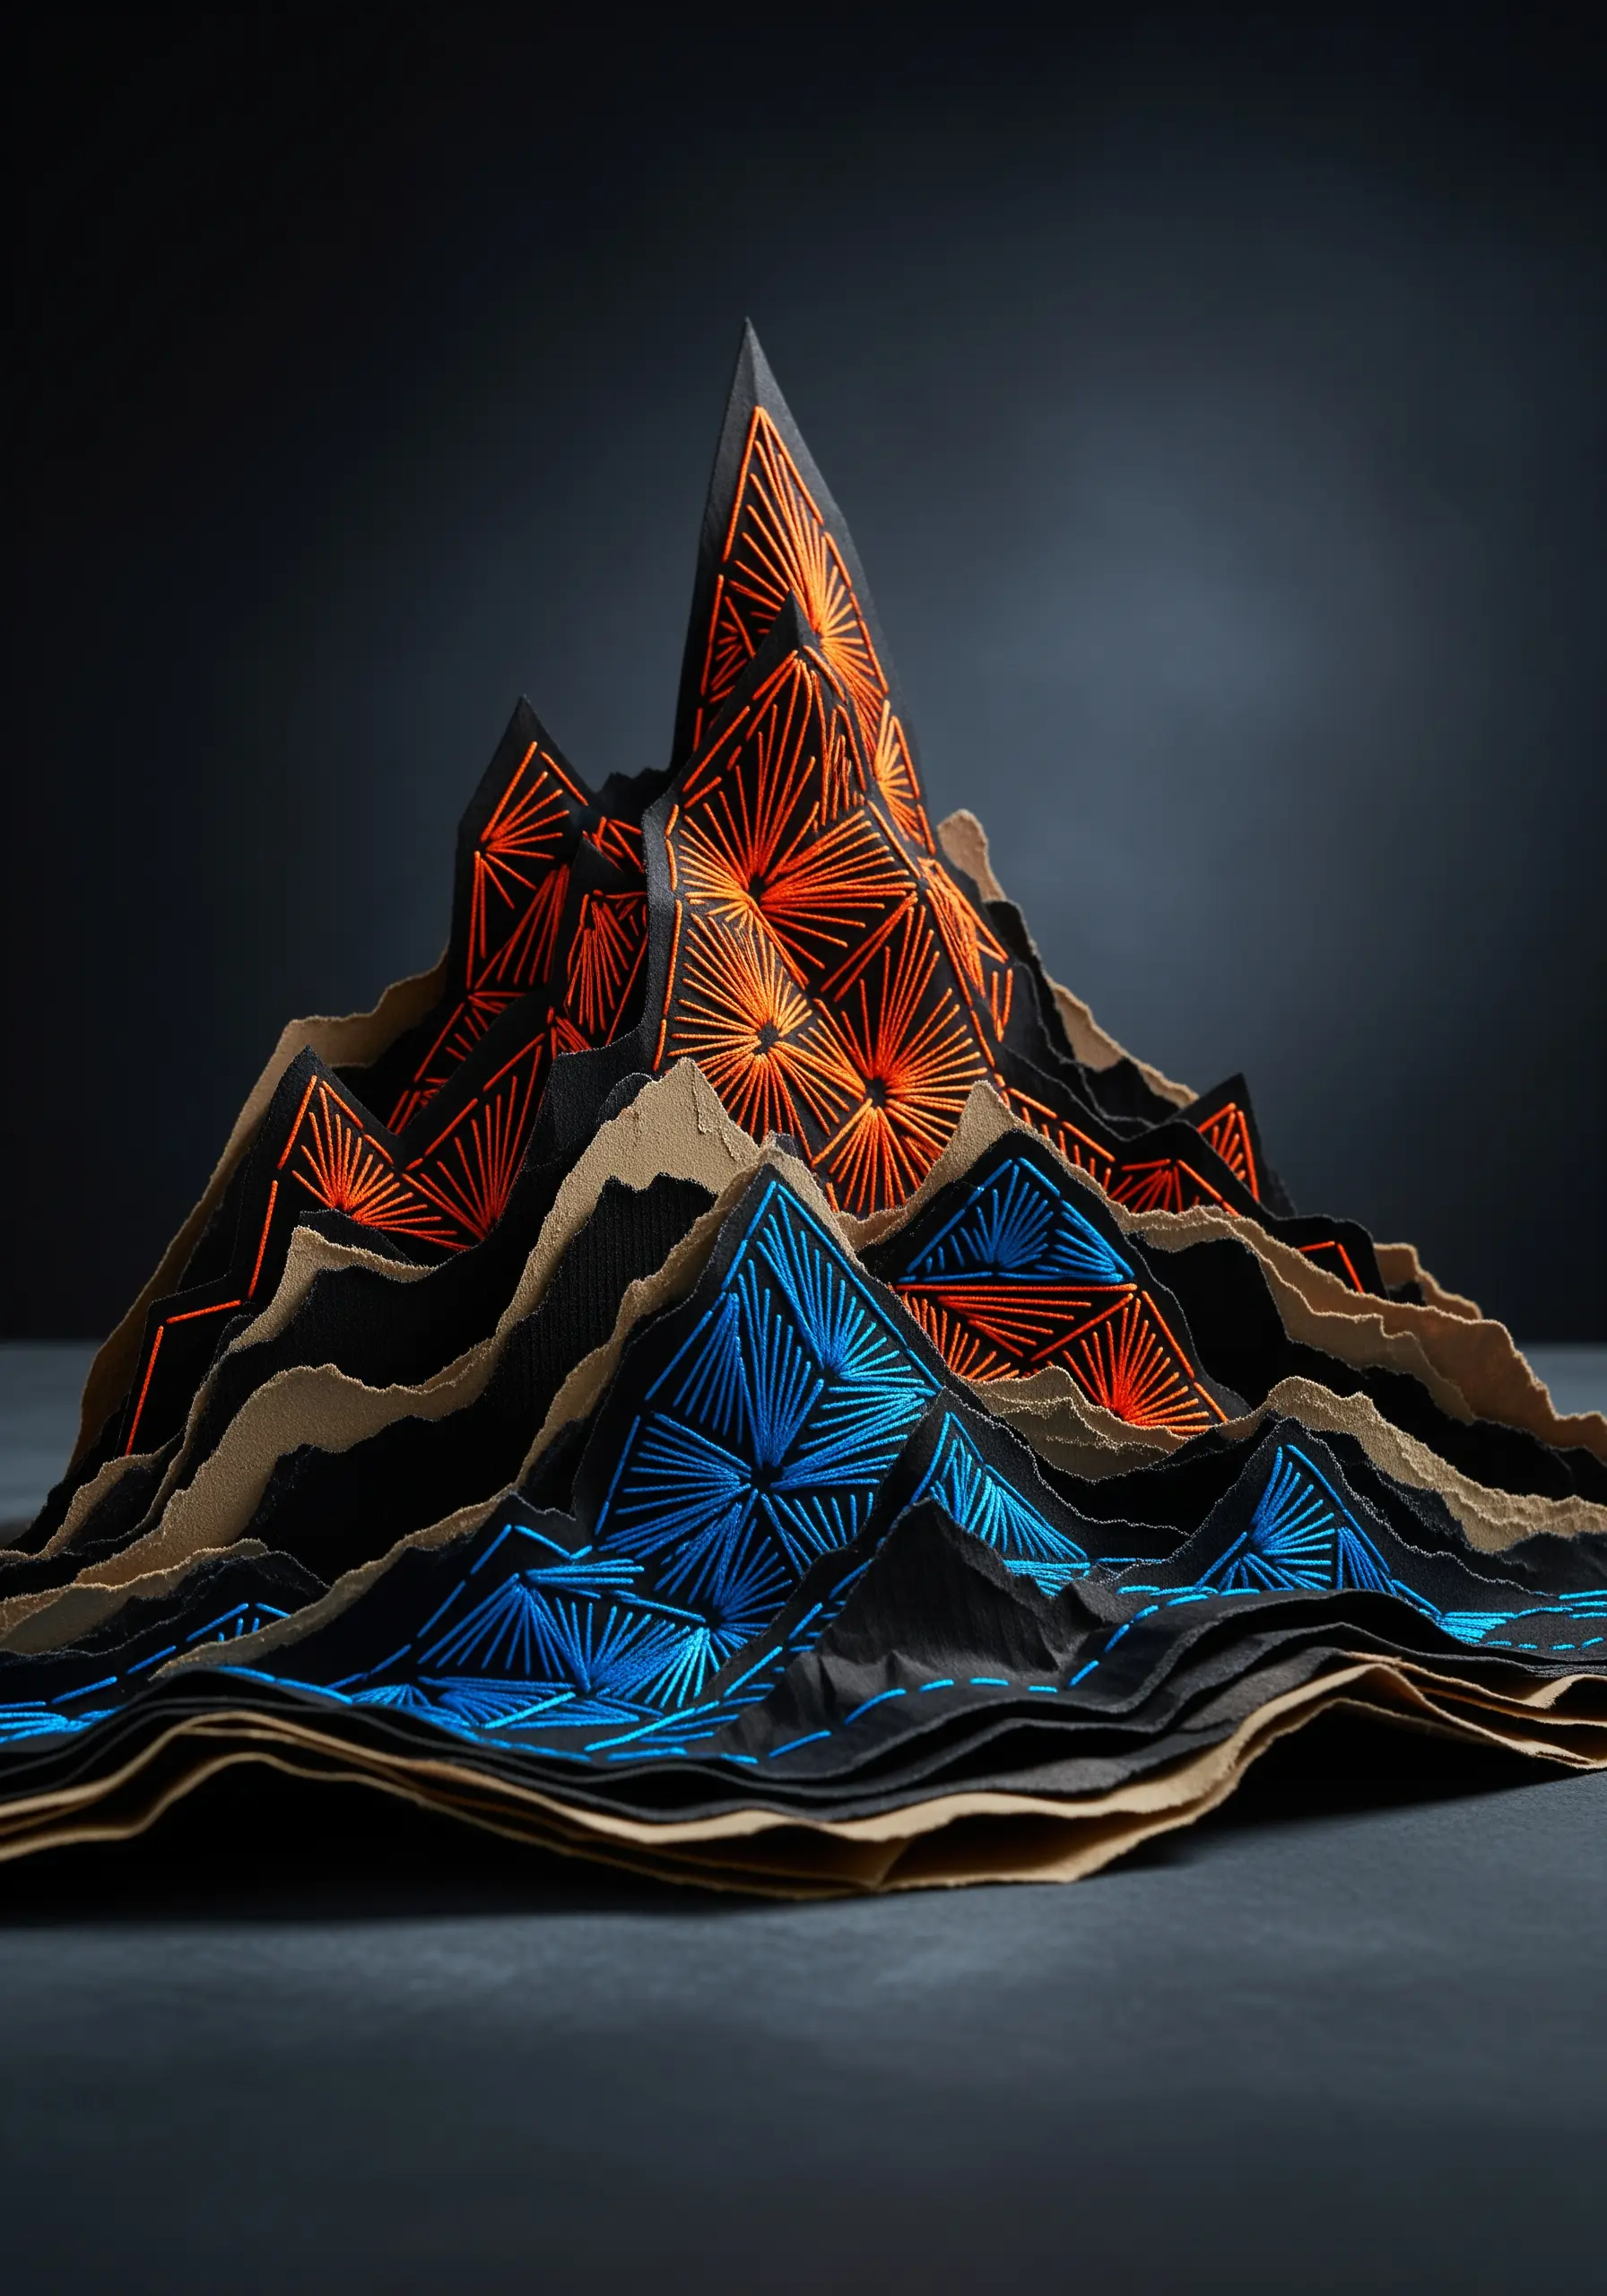
Build depth and dimension by treating paper as a sculptural medium.
Tear heavy cardstock into layered shapes to simulate a mountain range, allowing the rough, torn edges to become a key design element.
Instead of stitching through multiple layers, pre-pierce holes to create geometric patterns on individual sections.
Weave a high-contrast thread through these holes, transforming the surface into a canvas for string art.
This technique creates a powerful dialogue between the organic chaos of the torn paper and the rigid, mathematical precision of the threadwork, resulting in dynamic string art nature trails.
3. Illustrative Embroidery on Vintage Ephemera
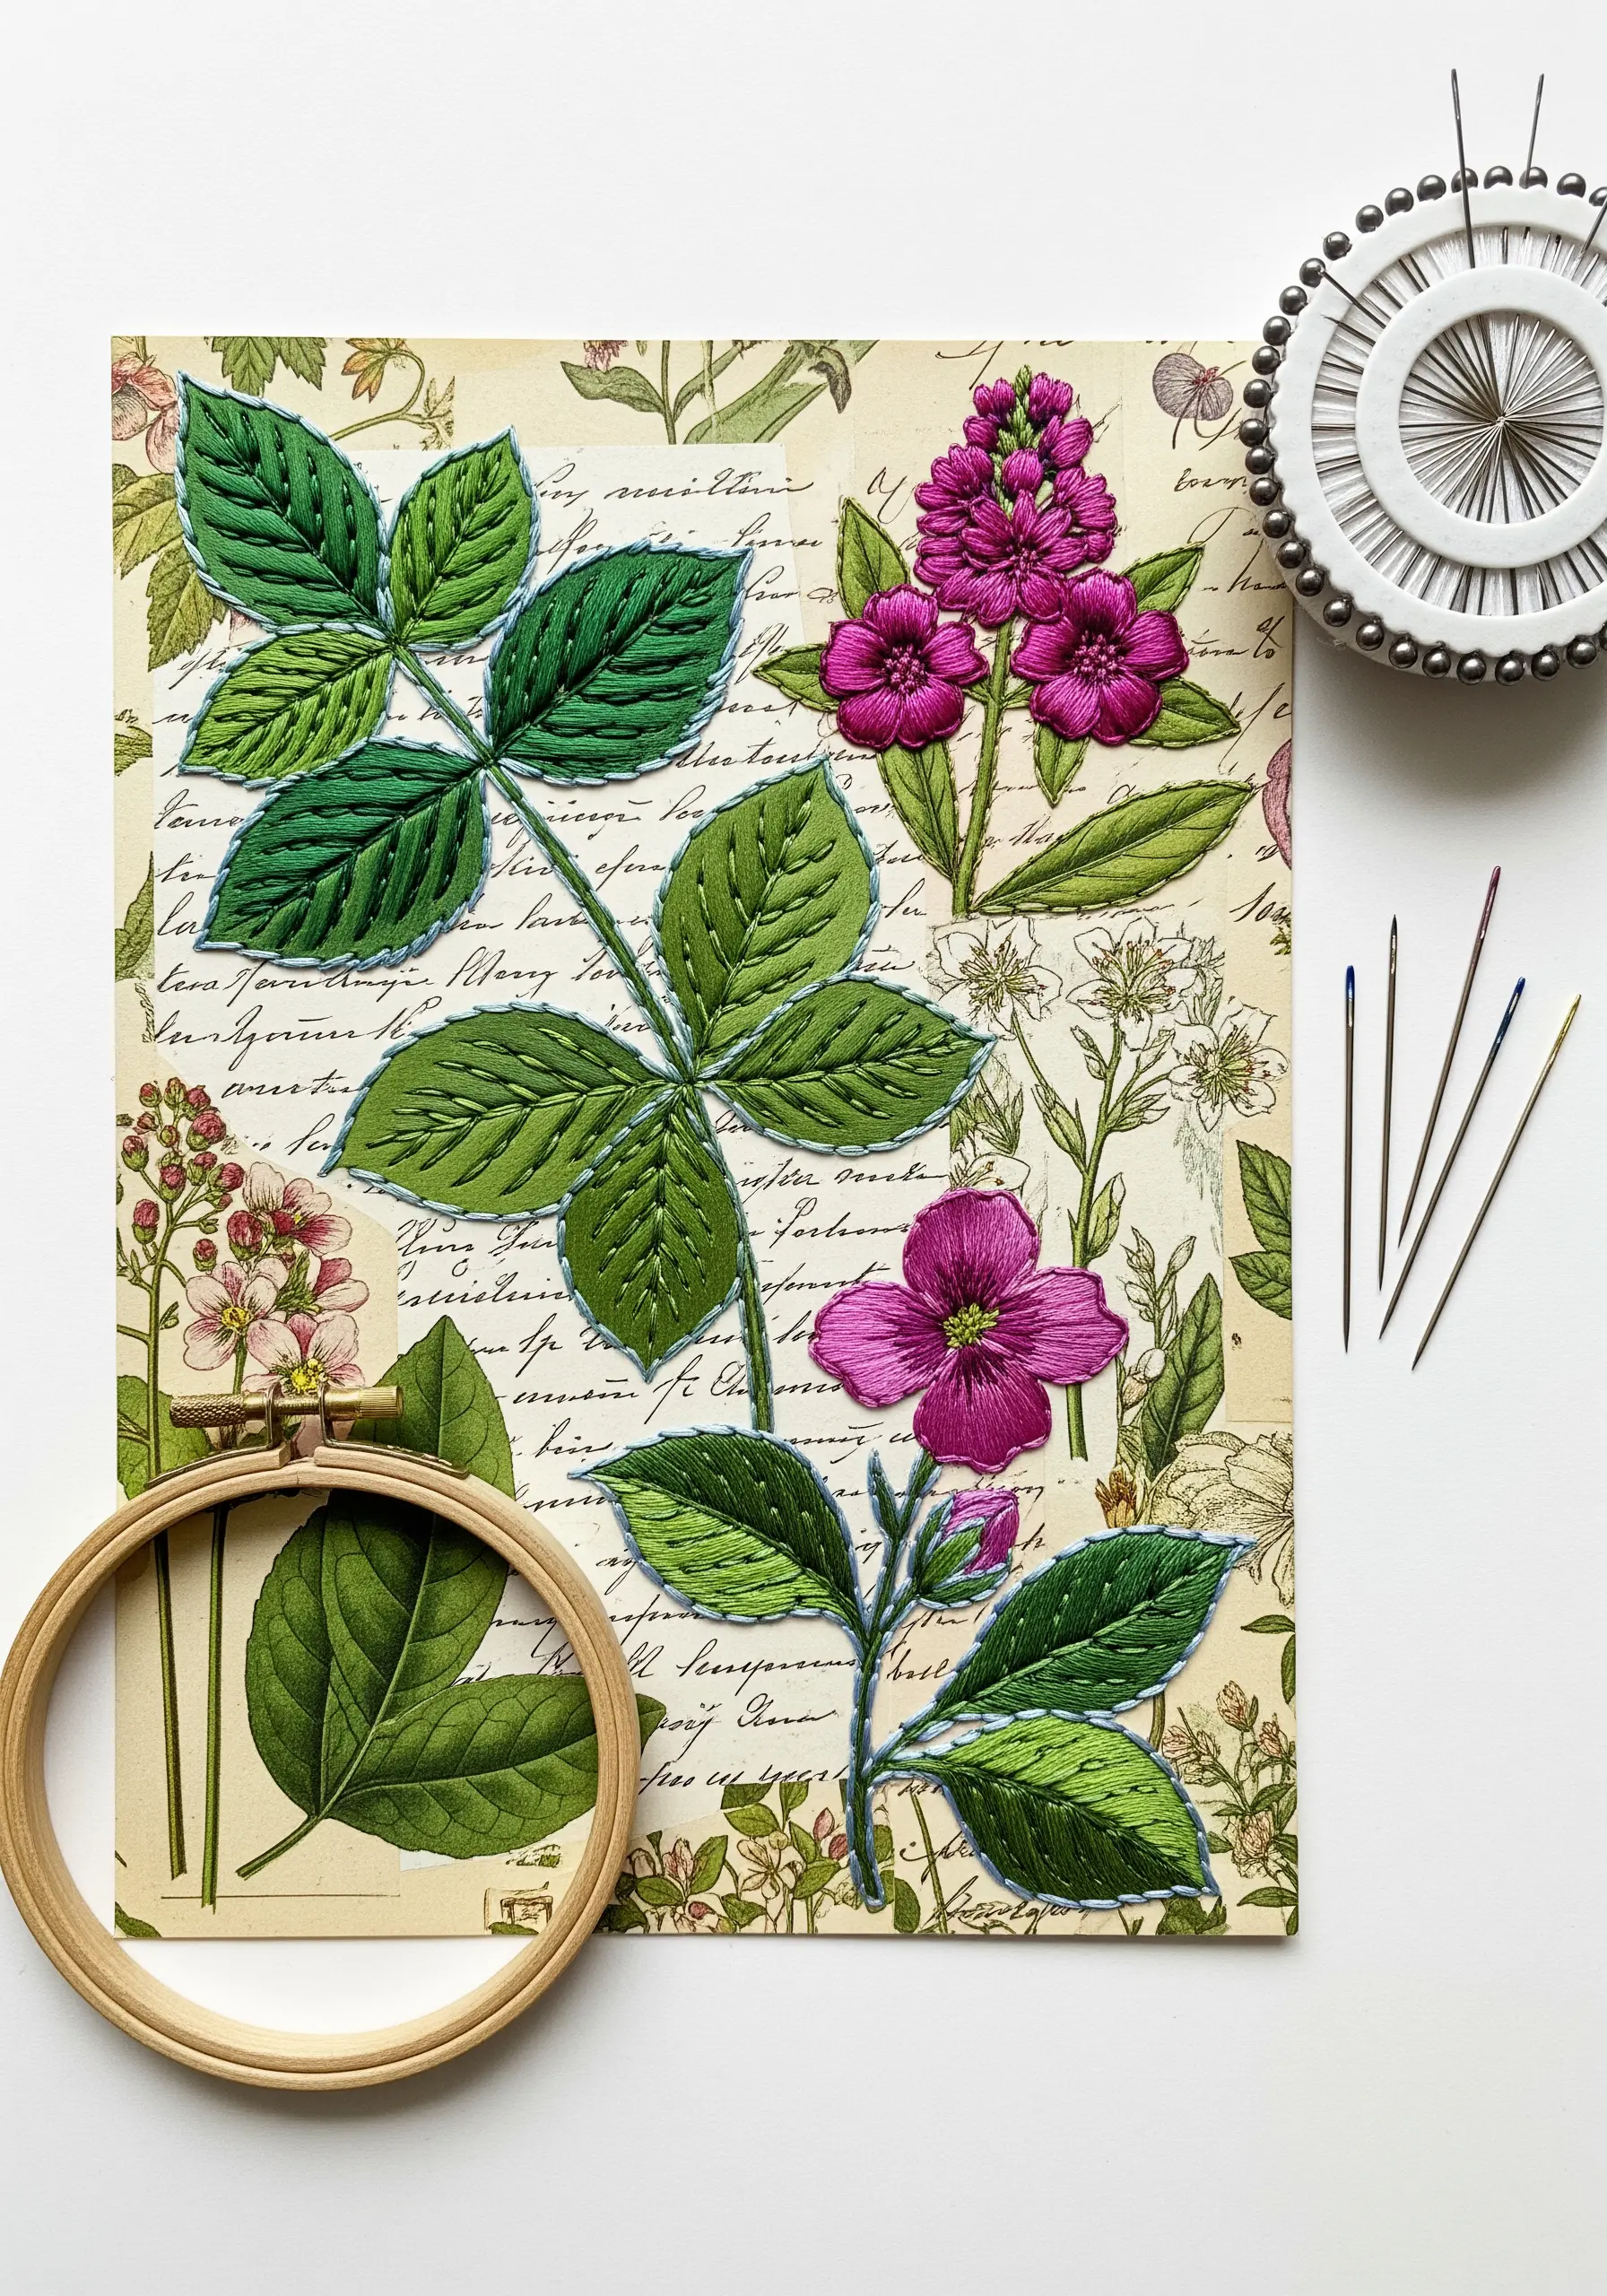
Use found paper with existing illustrations, like old botanical prints or book pages, as your canvas.
Rather than stitching the entire design, selectively apply thread to highlight, color, or outline specific elements.
Use a single strand of floss and a simple backstitch to trace veins on a leaf or define the edge of a petal.
A sparse satin stitch can add a block of color that complements the original ink drawing without overpowering it.
This thoughtful approach transforms a piece of history into a unique mixed-media artwork, blending the printed line with the stitched one.
4. Suspended Mandala Meditations on Paper Discs

Transform your embroidery from a static wall piece into a kinetic sculpture.
Cut circles from heavy cardstock or thin wood veneer and carefully pierce mandala patterns into them with an awl before you begin stitching.
Use a simple backstitch or running stitch with a neutral or metallic thread to trace the geometric designs.
The pierced holes and negative space are as crucial as the thread itself, creating patterns of light and shadow.
Suspend these finished discs from a piece of driftwood to create a mobile that gently moves, turning your stitching into an interactive modern thread mandala.
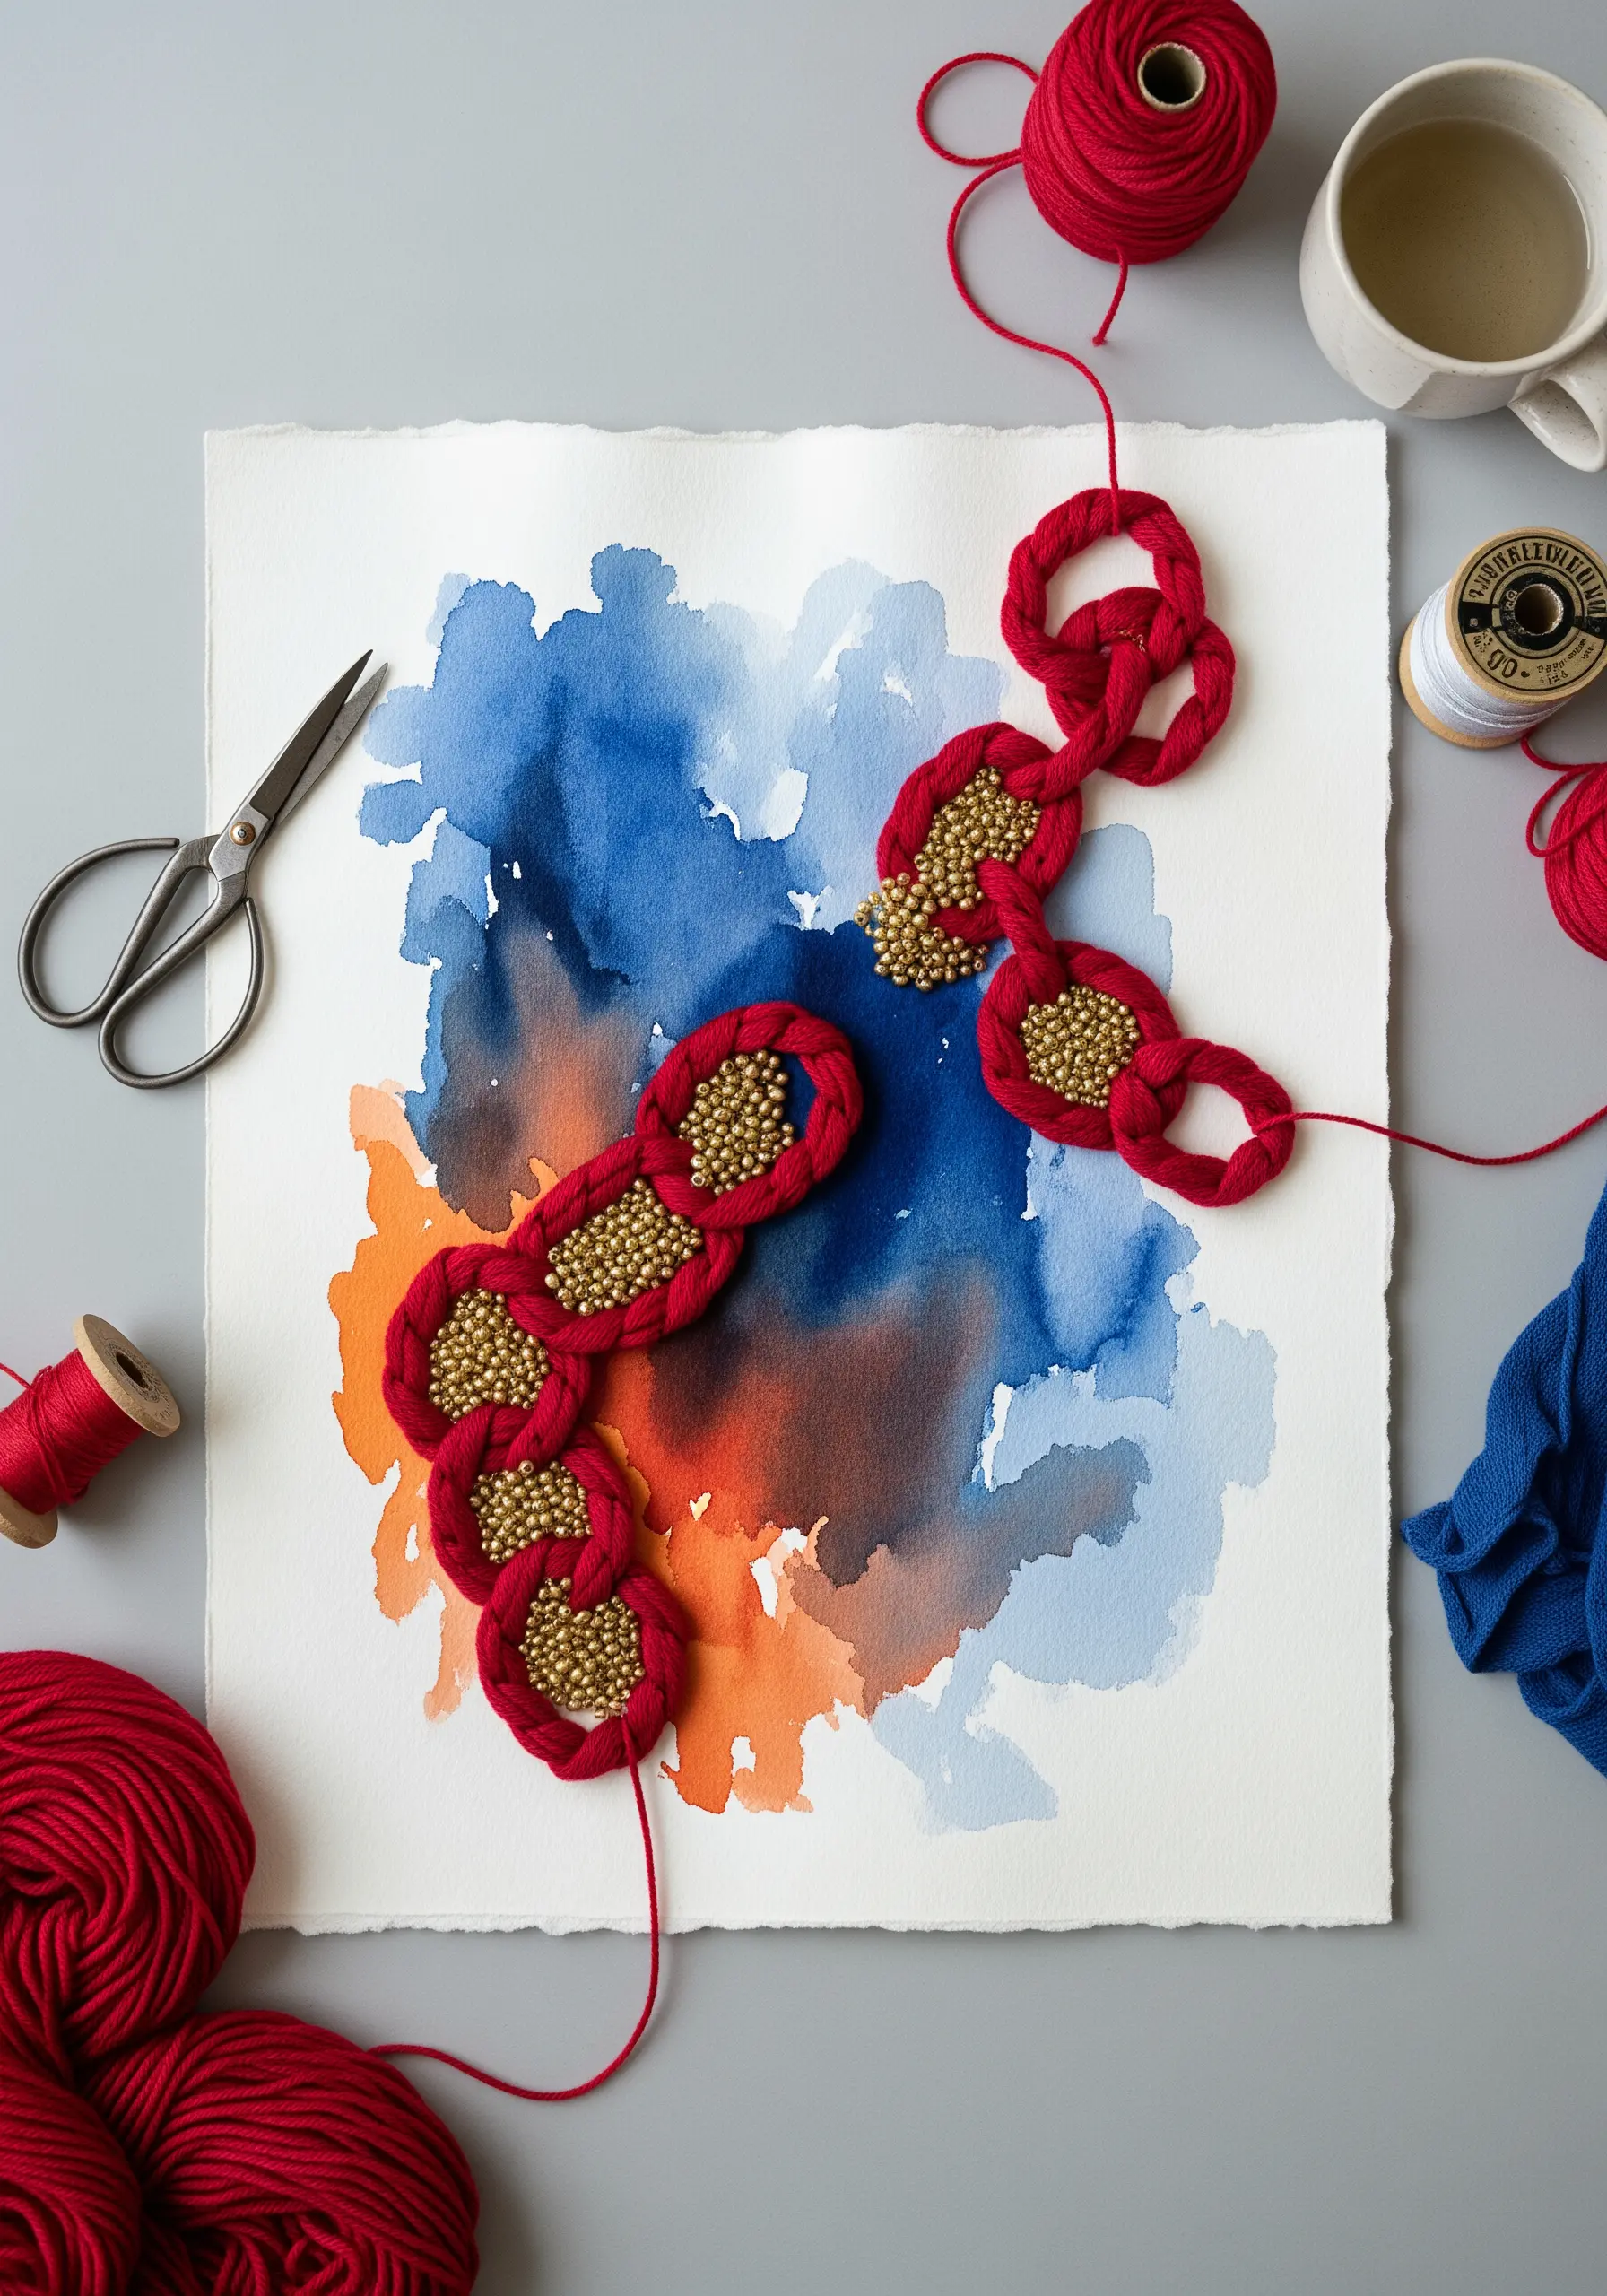
5. Dimensional Knots as Miniature Textile Swatches
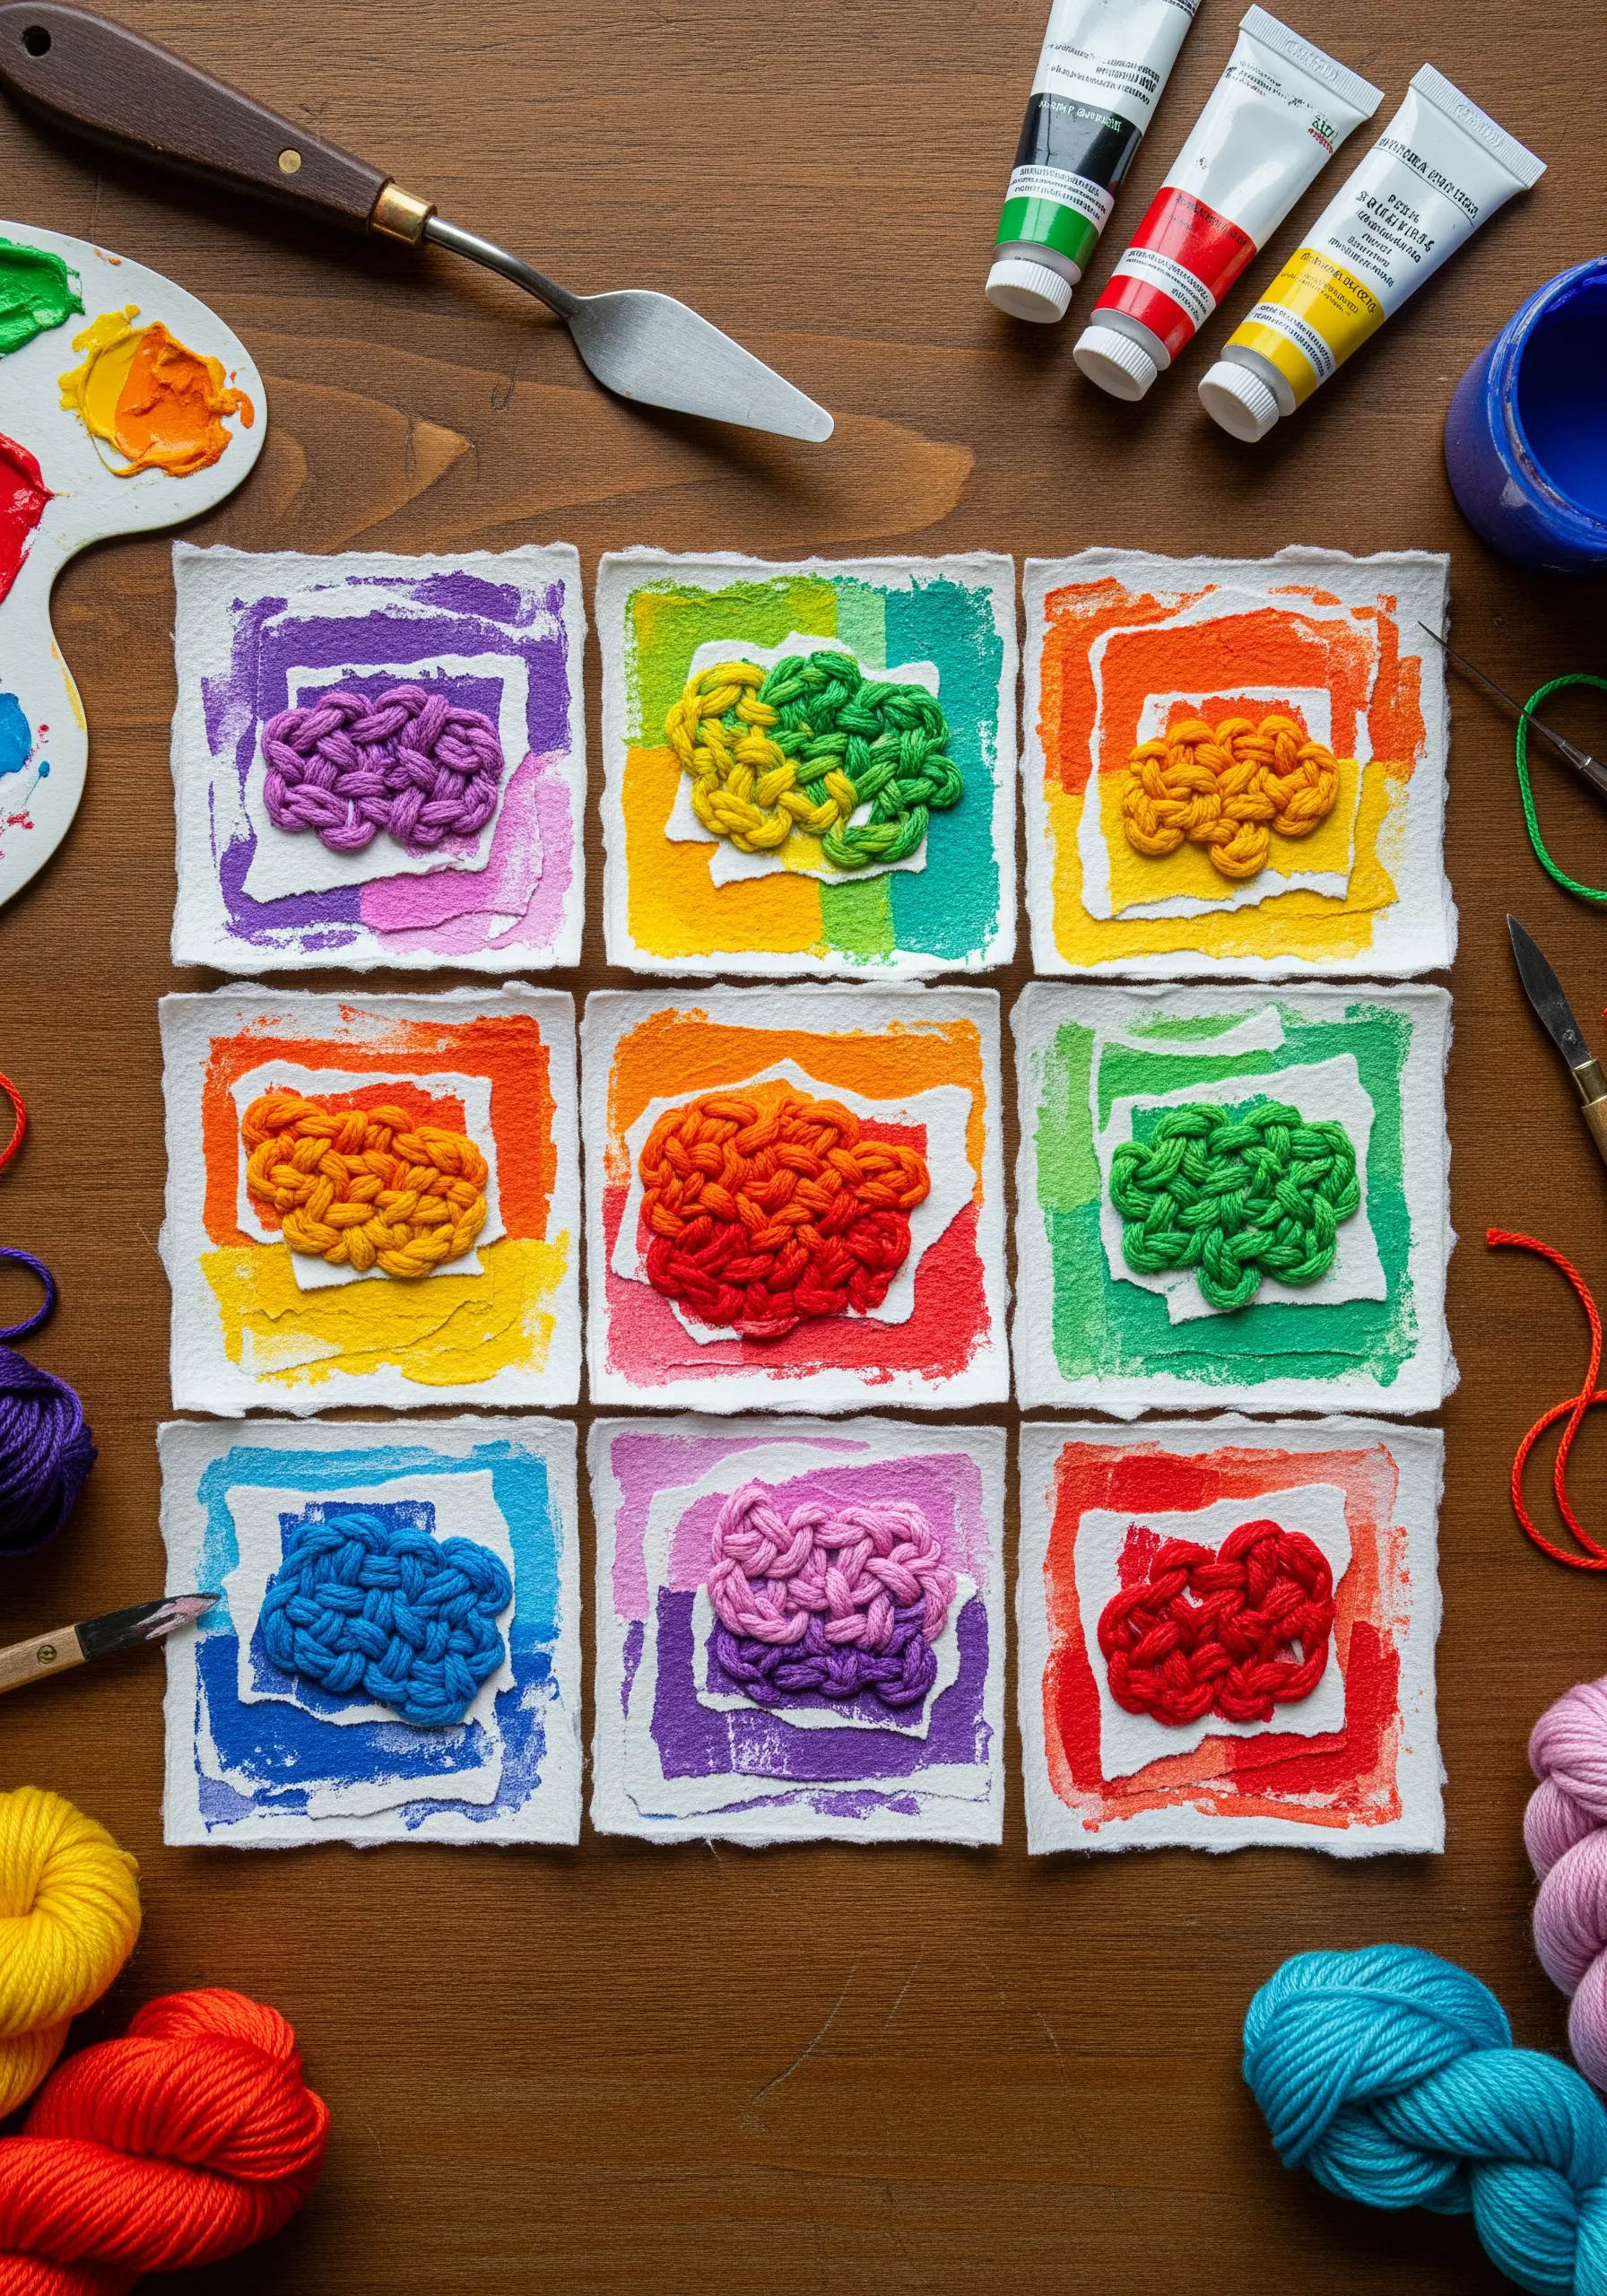
Isolate a single textural stitch and present it as a work of art in itself.
Use thick, plush yarn or perle cotton to create a dense cluster of French knots or woven picot stitches on a small piece of scrap fabric.
Mount this textured swatch onto a piece of heavy, deckle-edge paper that you’ve painted with a complementary color frame.
Arranging these in a grid format turns simple stitch practice into a sophisticated study of color and texture.
This technique elevates the knot from a mere detail to the central subject, inviting viewers to appreciate its sculptural form.
6. Appliqué Stitching on Woven Paper Surfaces
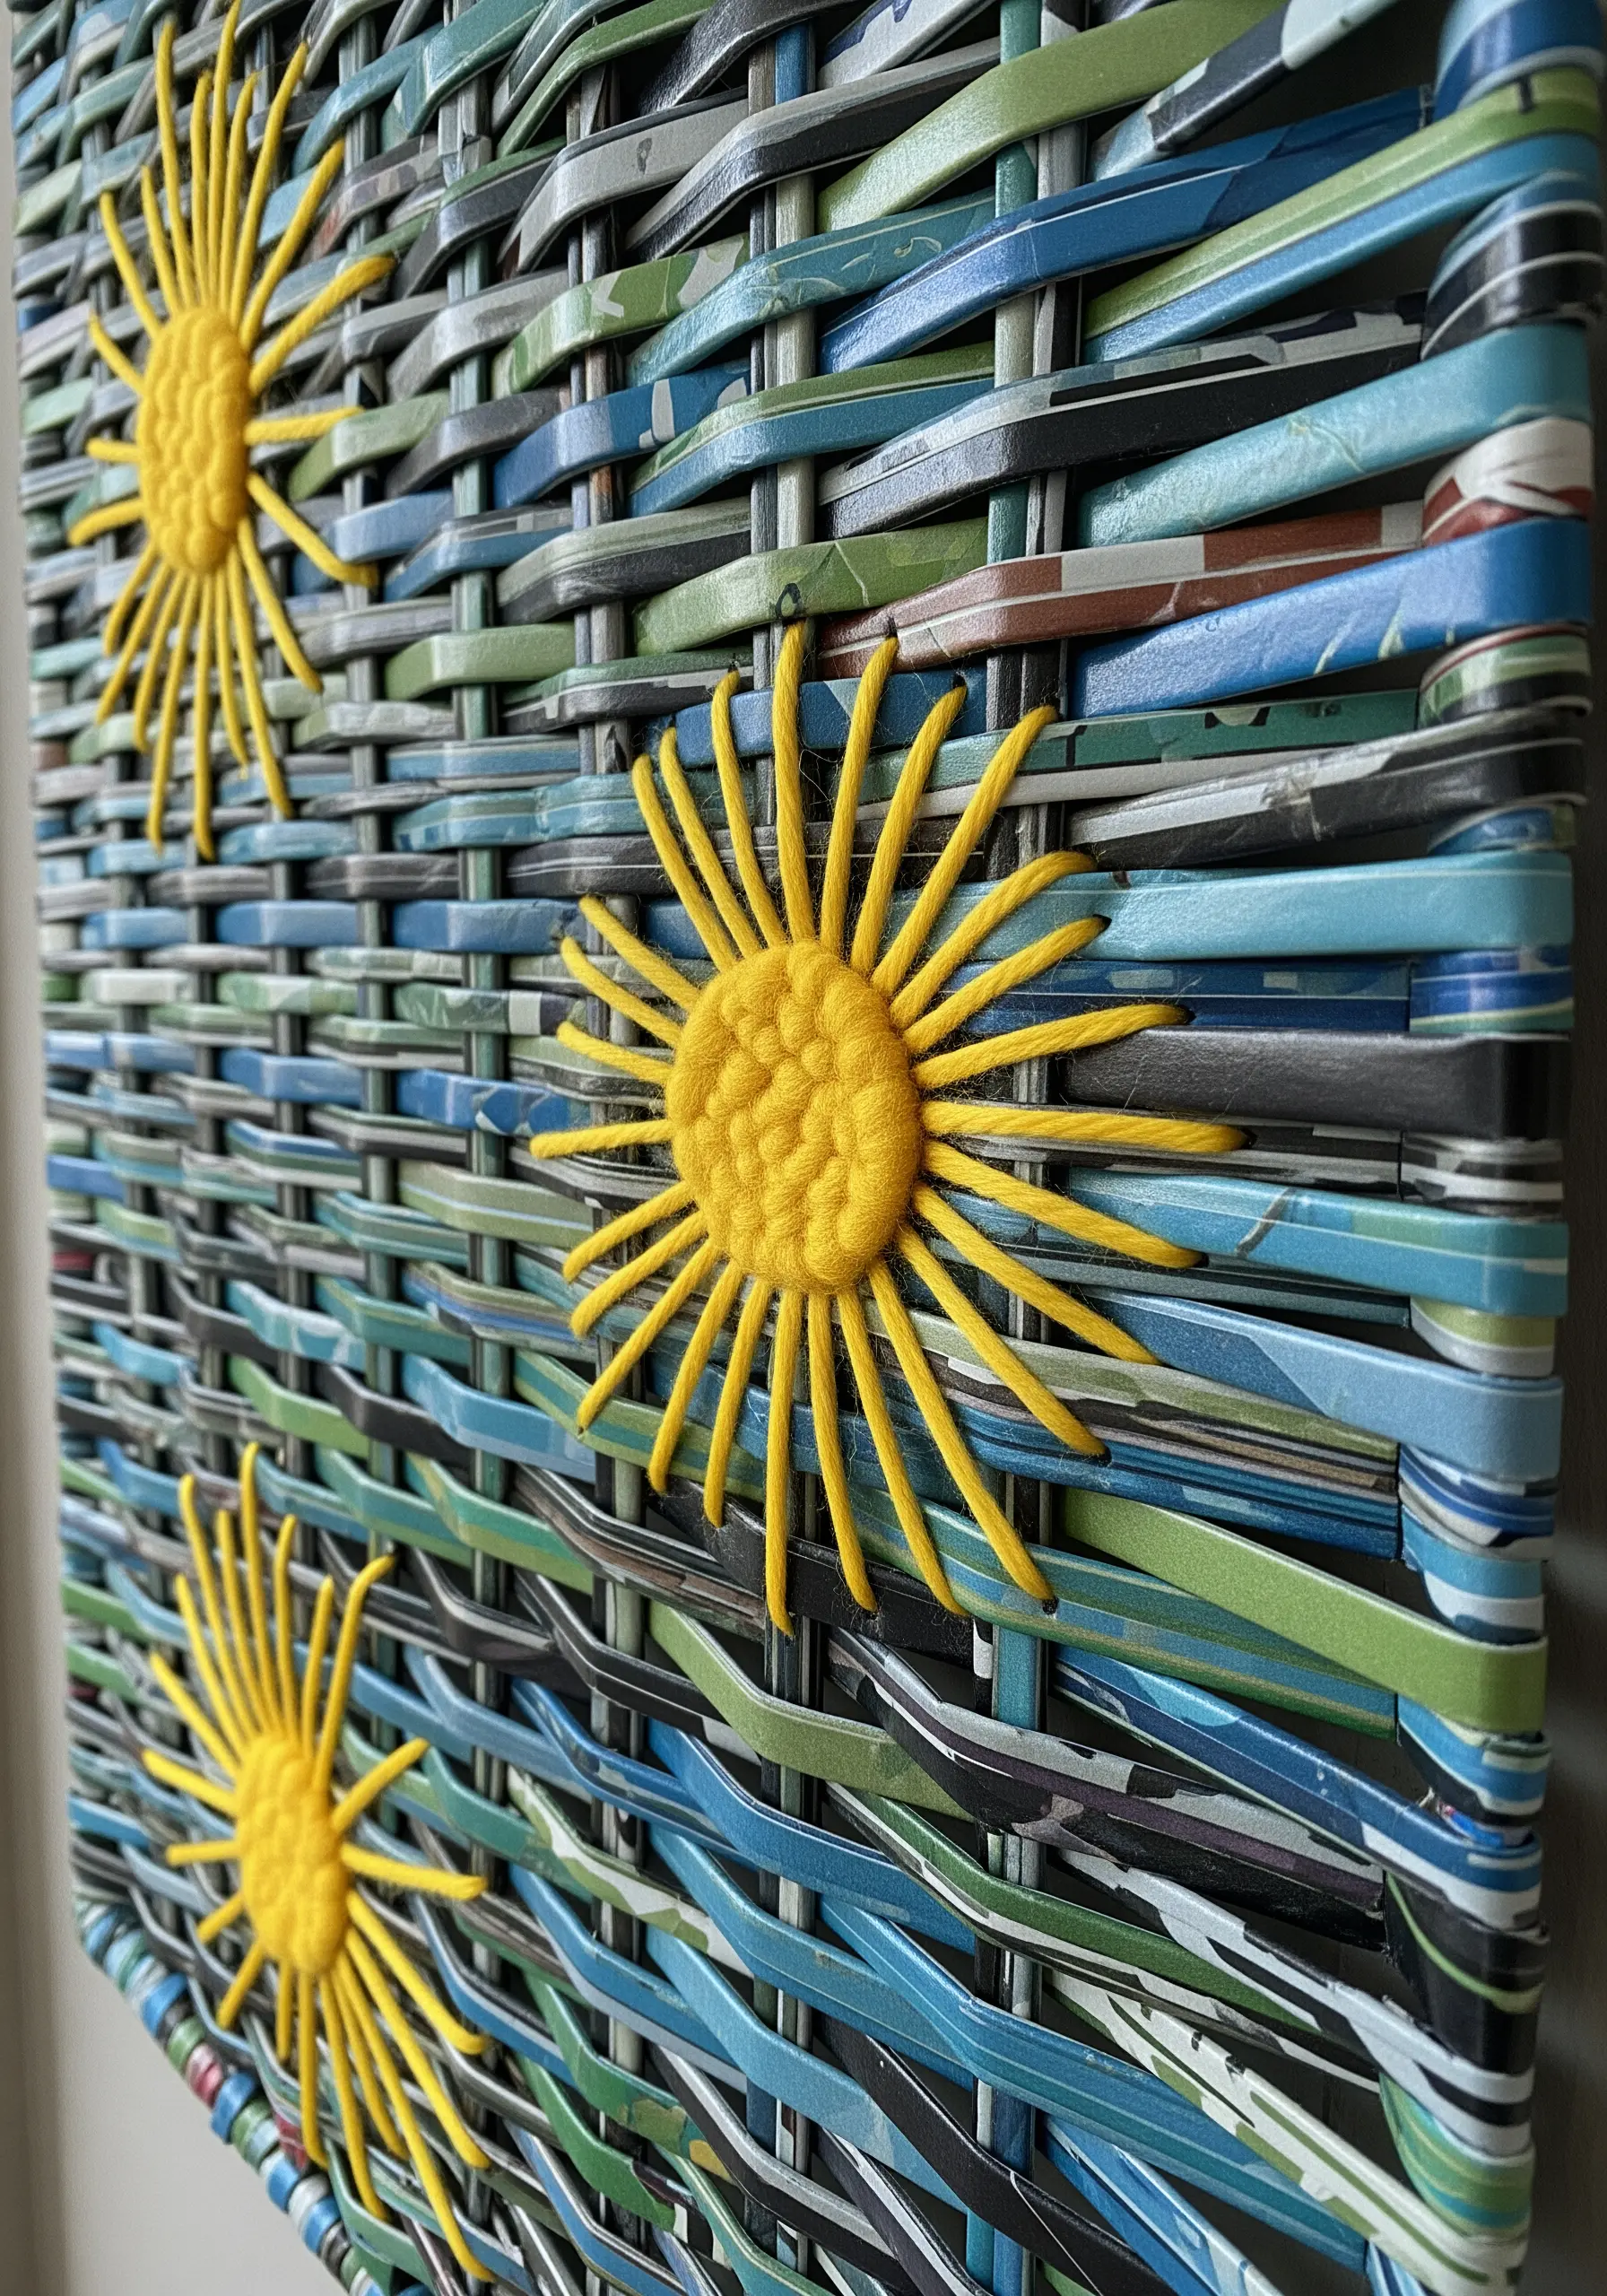
Introduce embroidery to an unconventional base by working on a woven paper structure.
Weave strips of colored or painted paper to create a textured, grid-like canvas.
Instead of trying to stitch through this complex surface, create embroidered appliqué patches on felt or stabilizer.
Stitch your motifs, like these vibrant suns, onto the patch material, cut them out, and then carefully secure them to the woven paper with a few hidden stitches or a strong fabric glue.
This layering method preserves the integrity of the woven base while adding a soft, dimensional element.
7. Single-Line Thread Portraits on Cardstock
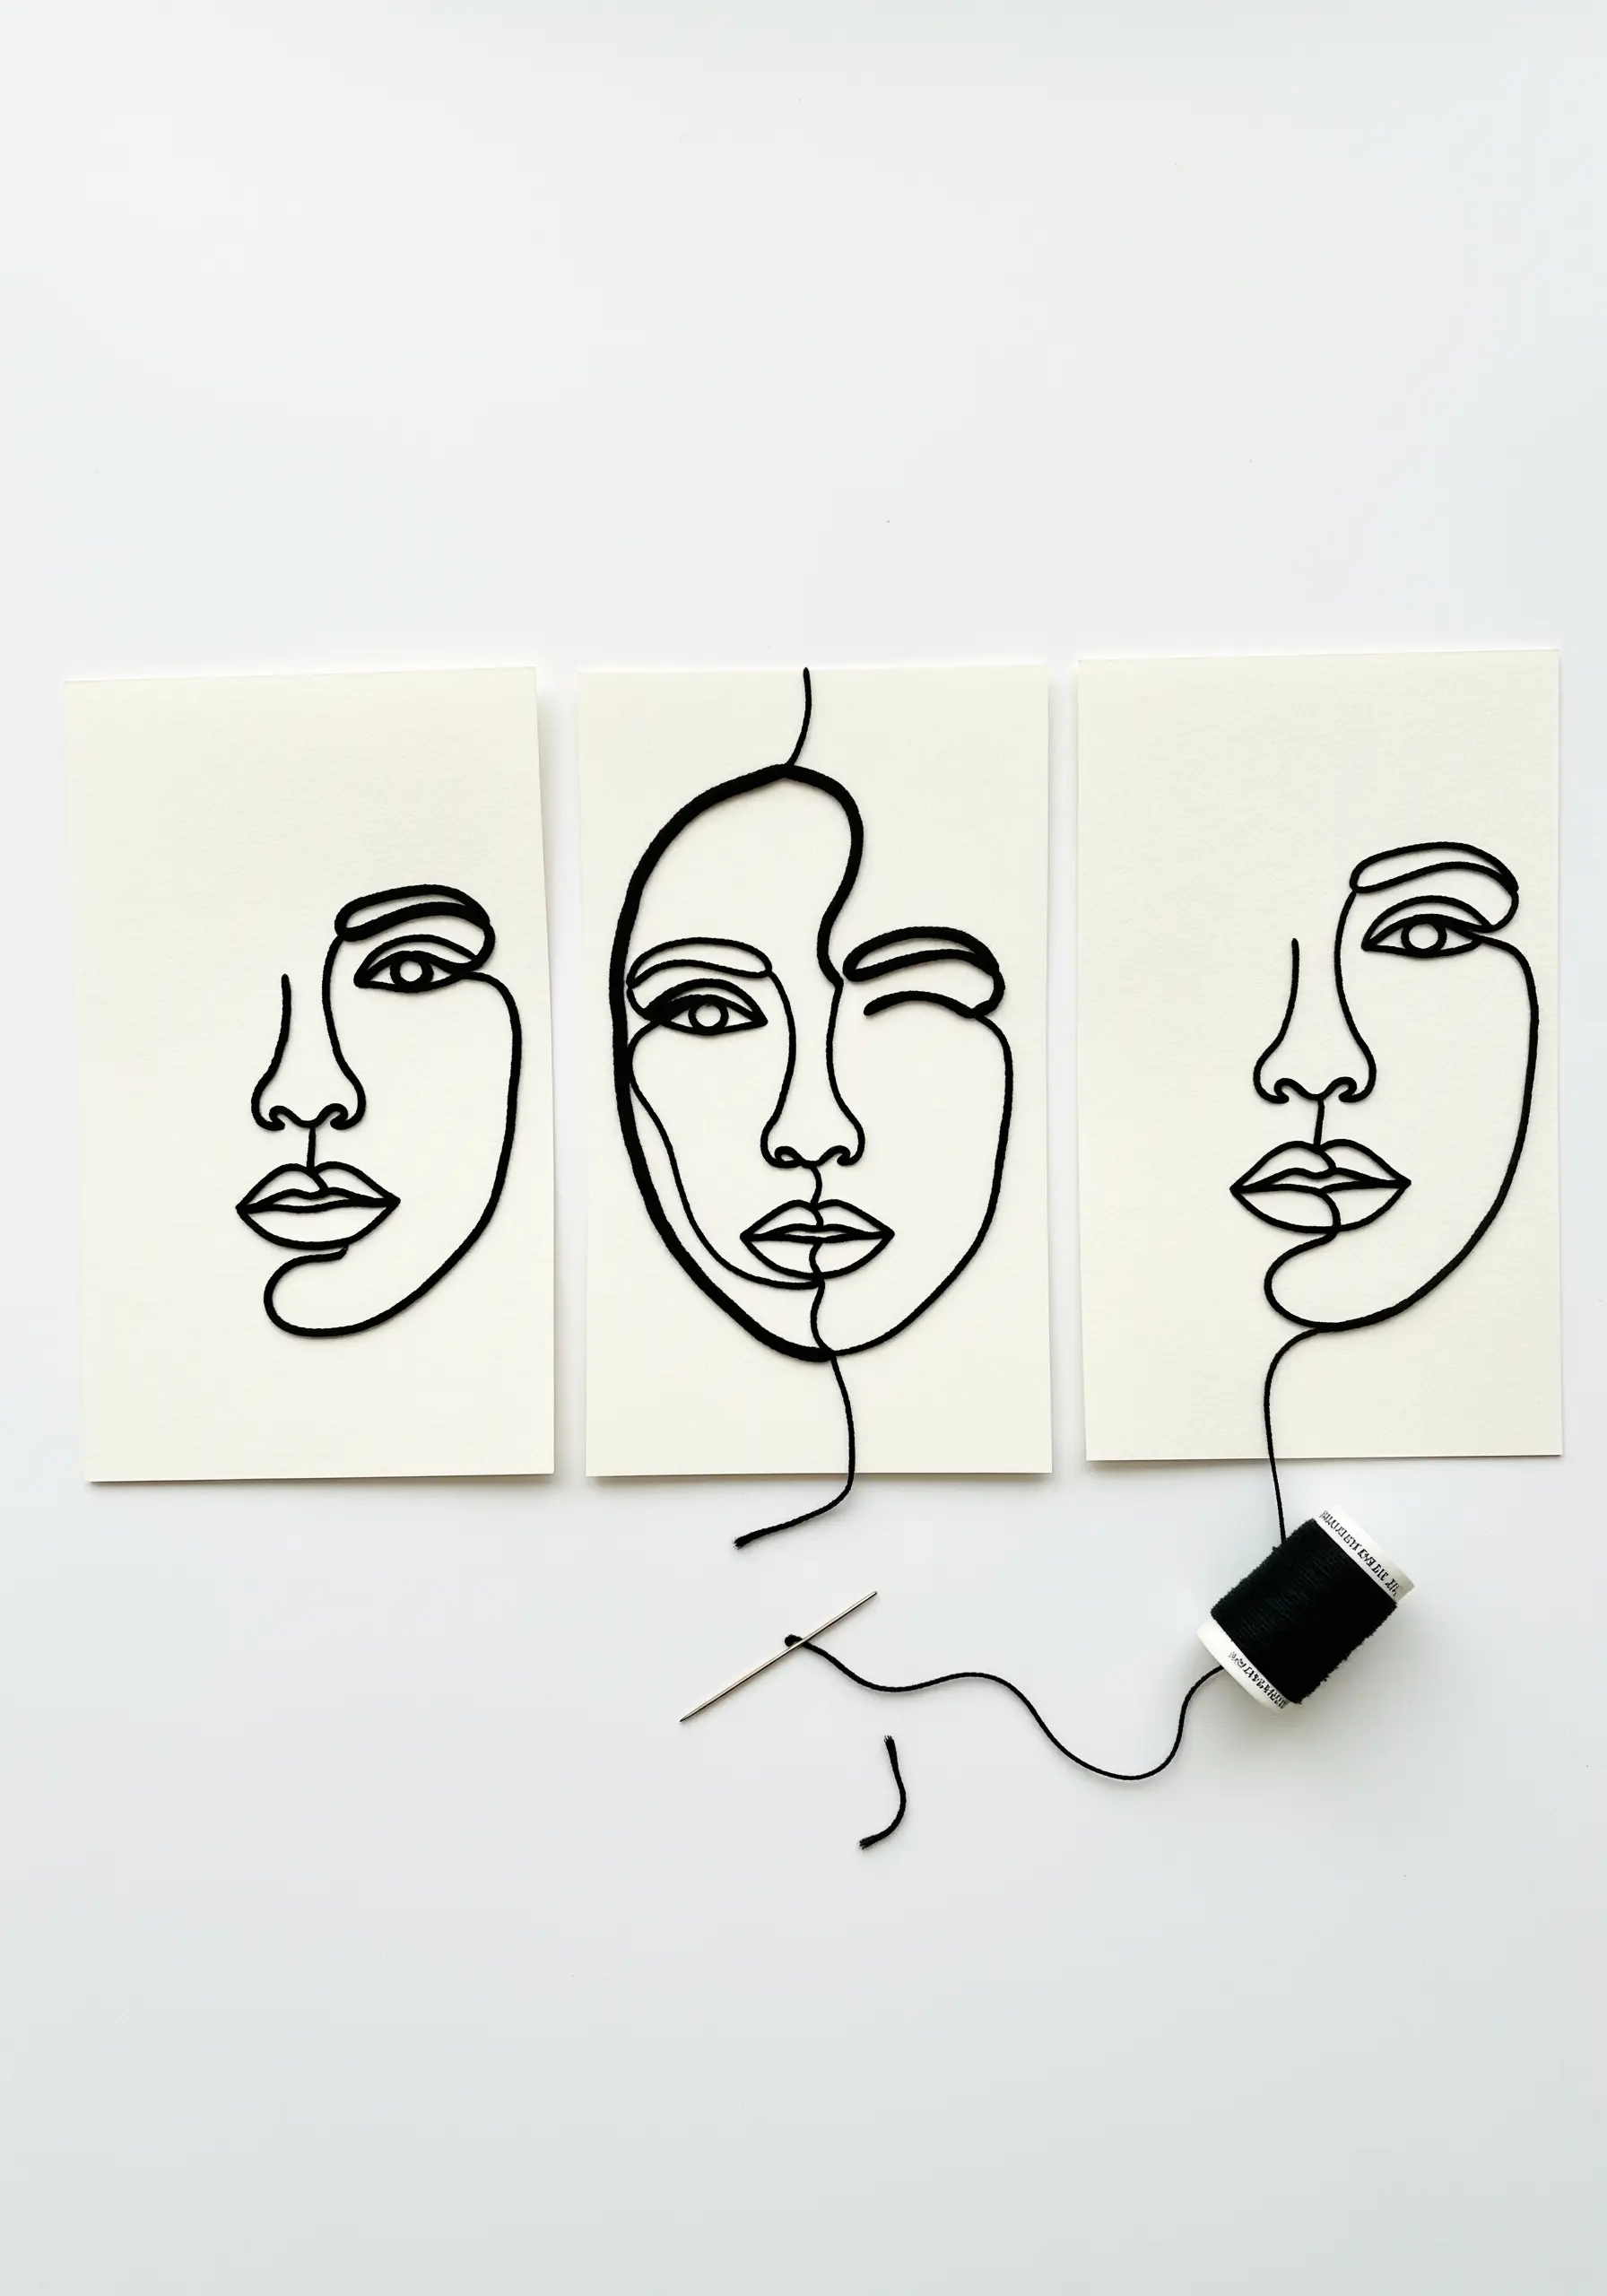
Translate the elegance of minimalist line art into a tactile, threaded form.
Sketch a continuous-line portrait onto sturdy cardstock, then use a fine needle to pre-pierce holes along the drawing.
Use a single, dark thread and a couching technique—laying the thread along the line and tacking it down with tiny, near-invisible stitches from behind.
This method creates a perfectly smooth, uninterrupted line on the surface that mimics ink but offers the subtle dimension of thread.
The result is a sophisticated piece that celebrates the purity of abstract line art silhouettes.
8. Constellation Stitching on Paper Lanterns
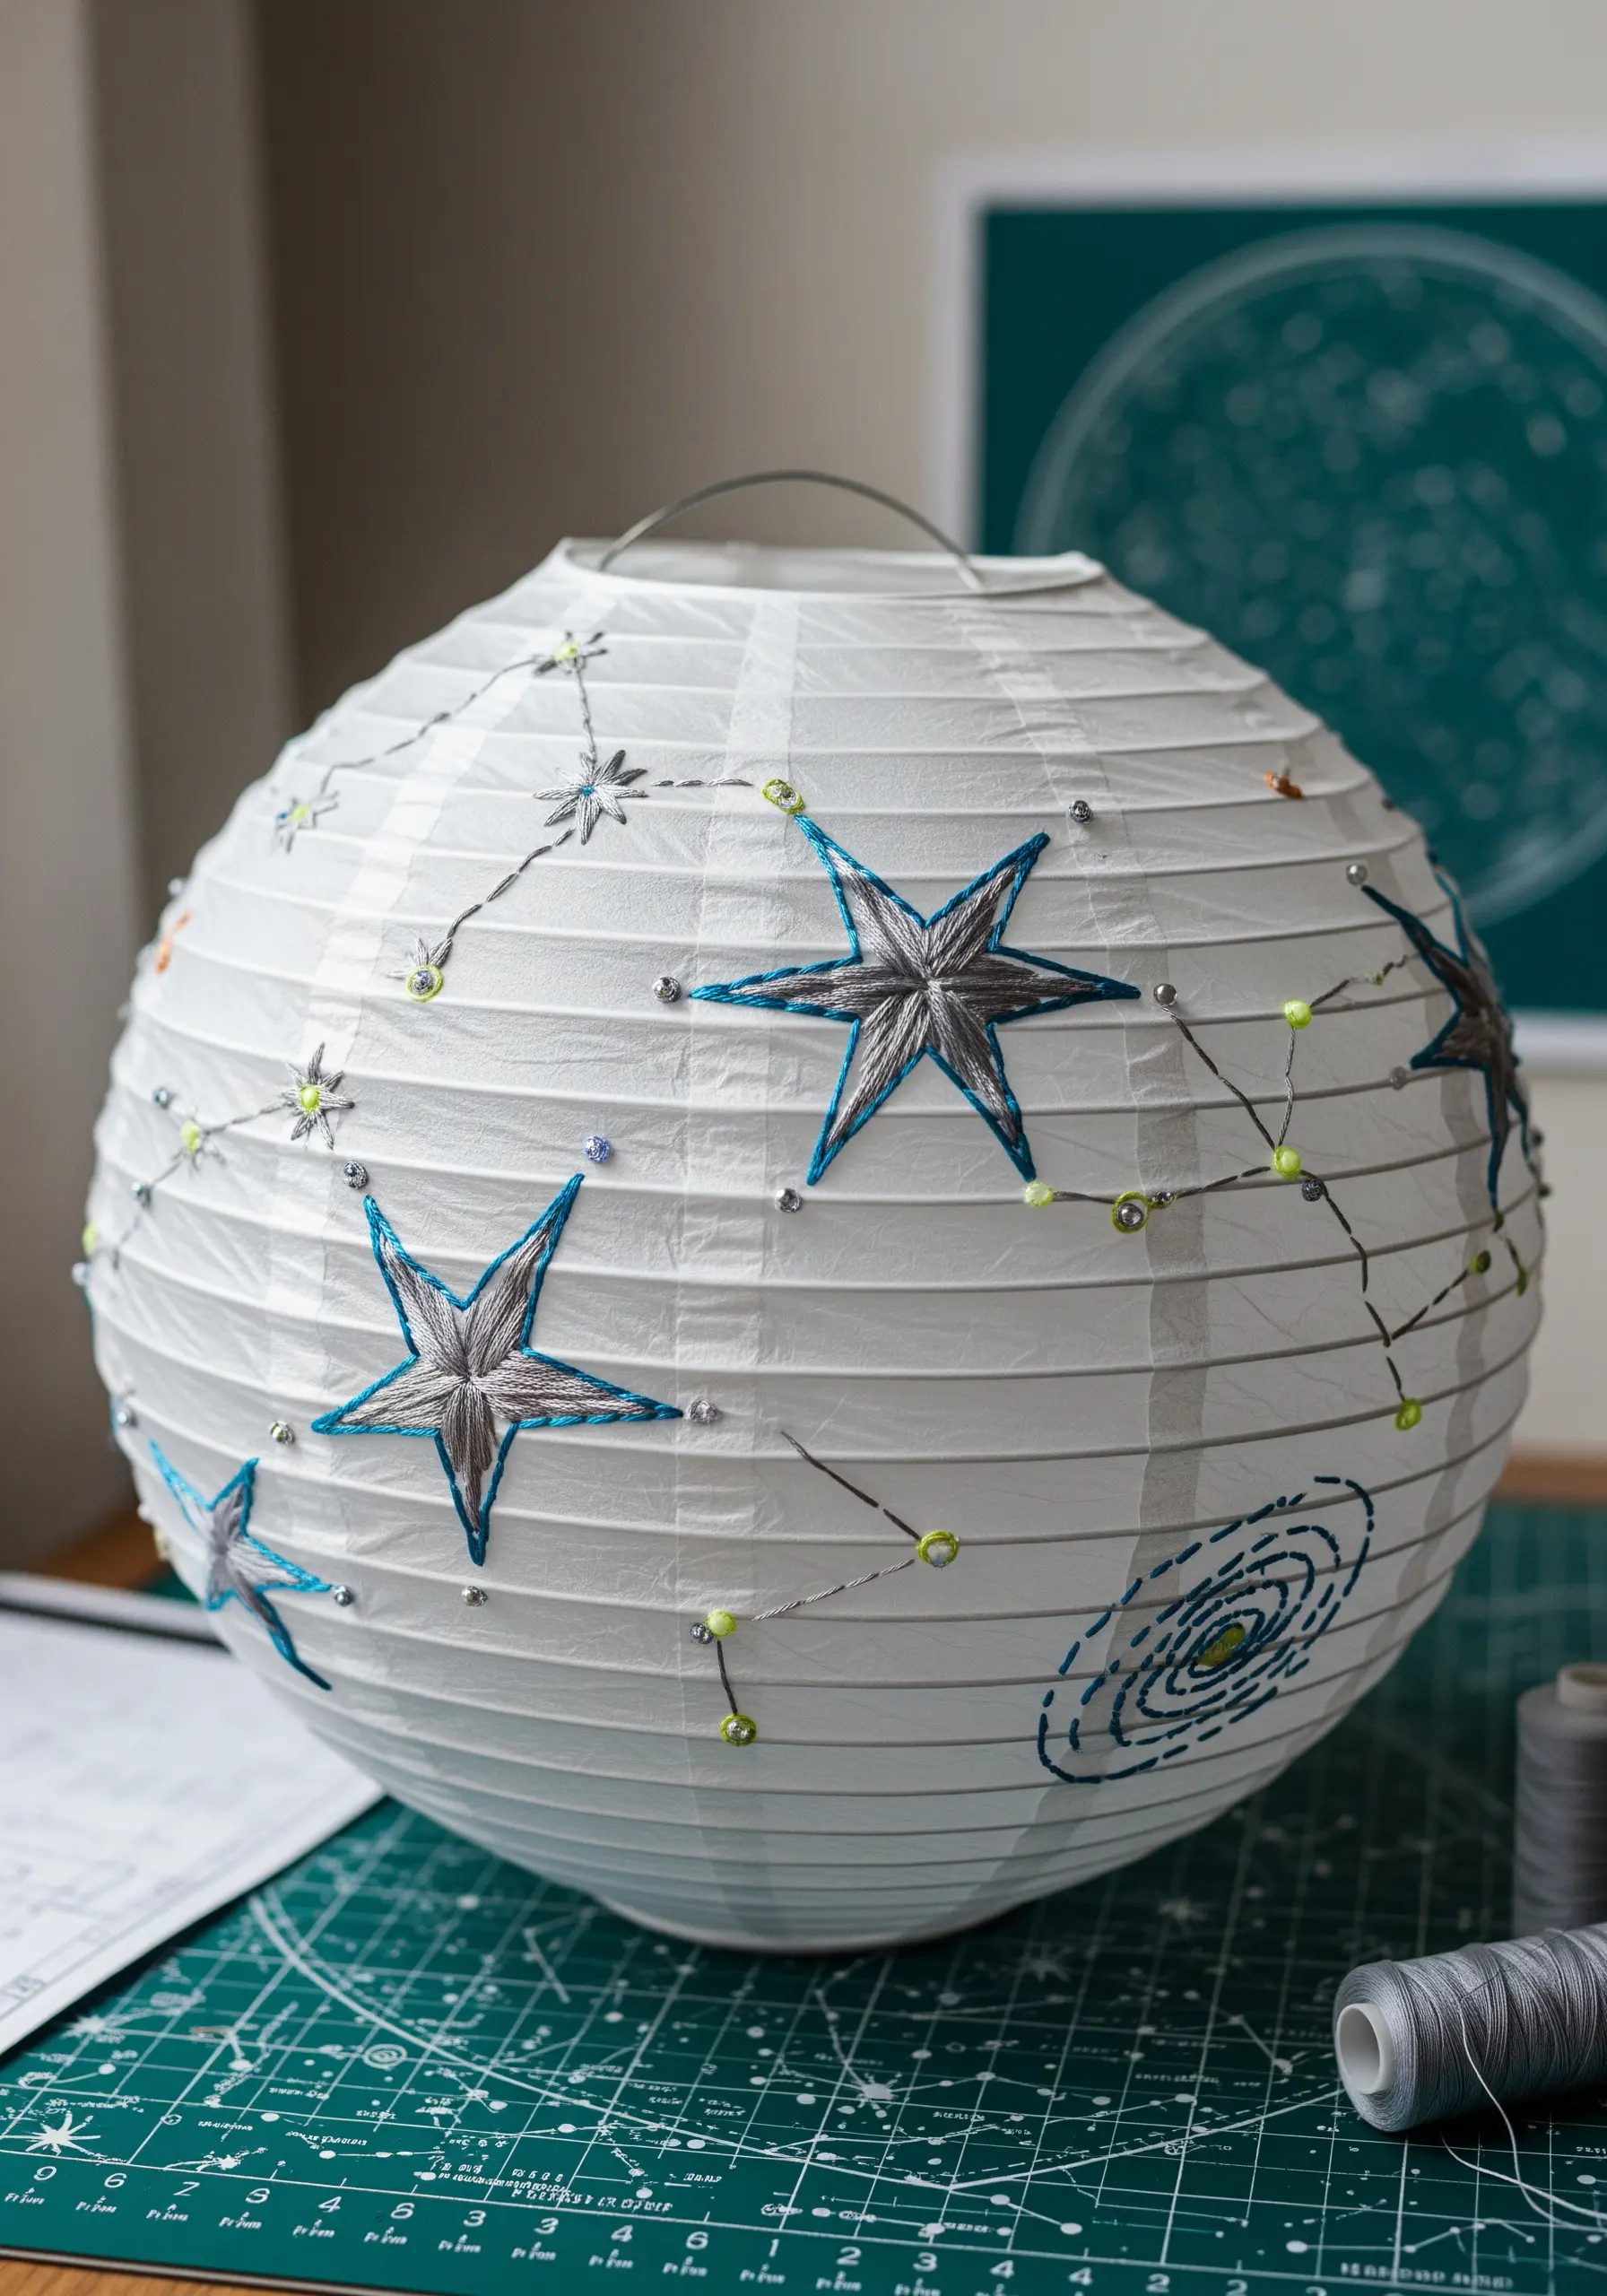
Turn an ordinary paper lantern into a celestial masterpiece.
Lightly draw your constellation patterns onto the delicate paper surface.
Use a very fine needle and a single strand of metallic or glow-in-the-dark thread to carefully stitch the star patterns, connecting them with simple running stitches.
To avoid tearing the paper, work slowly and keep your thread tension loose and even.
Embellish with tiny beads or sequins to represent brighter stars. When lit from within, your stitched constellations will come alive.
9. Textural Couching on Woven Paper
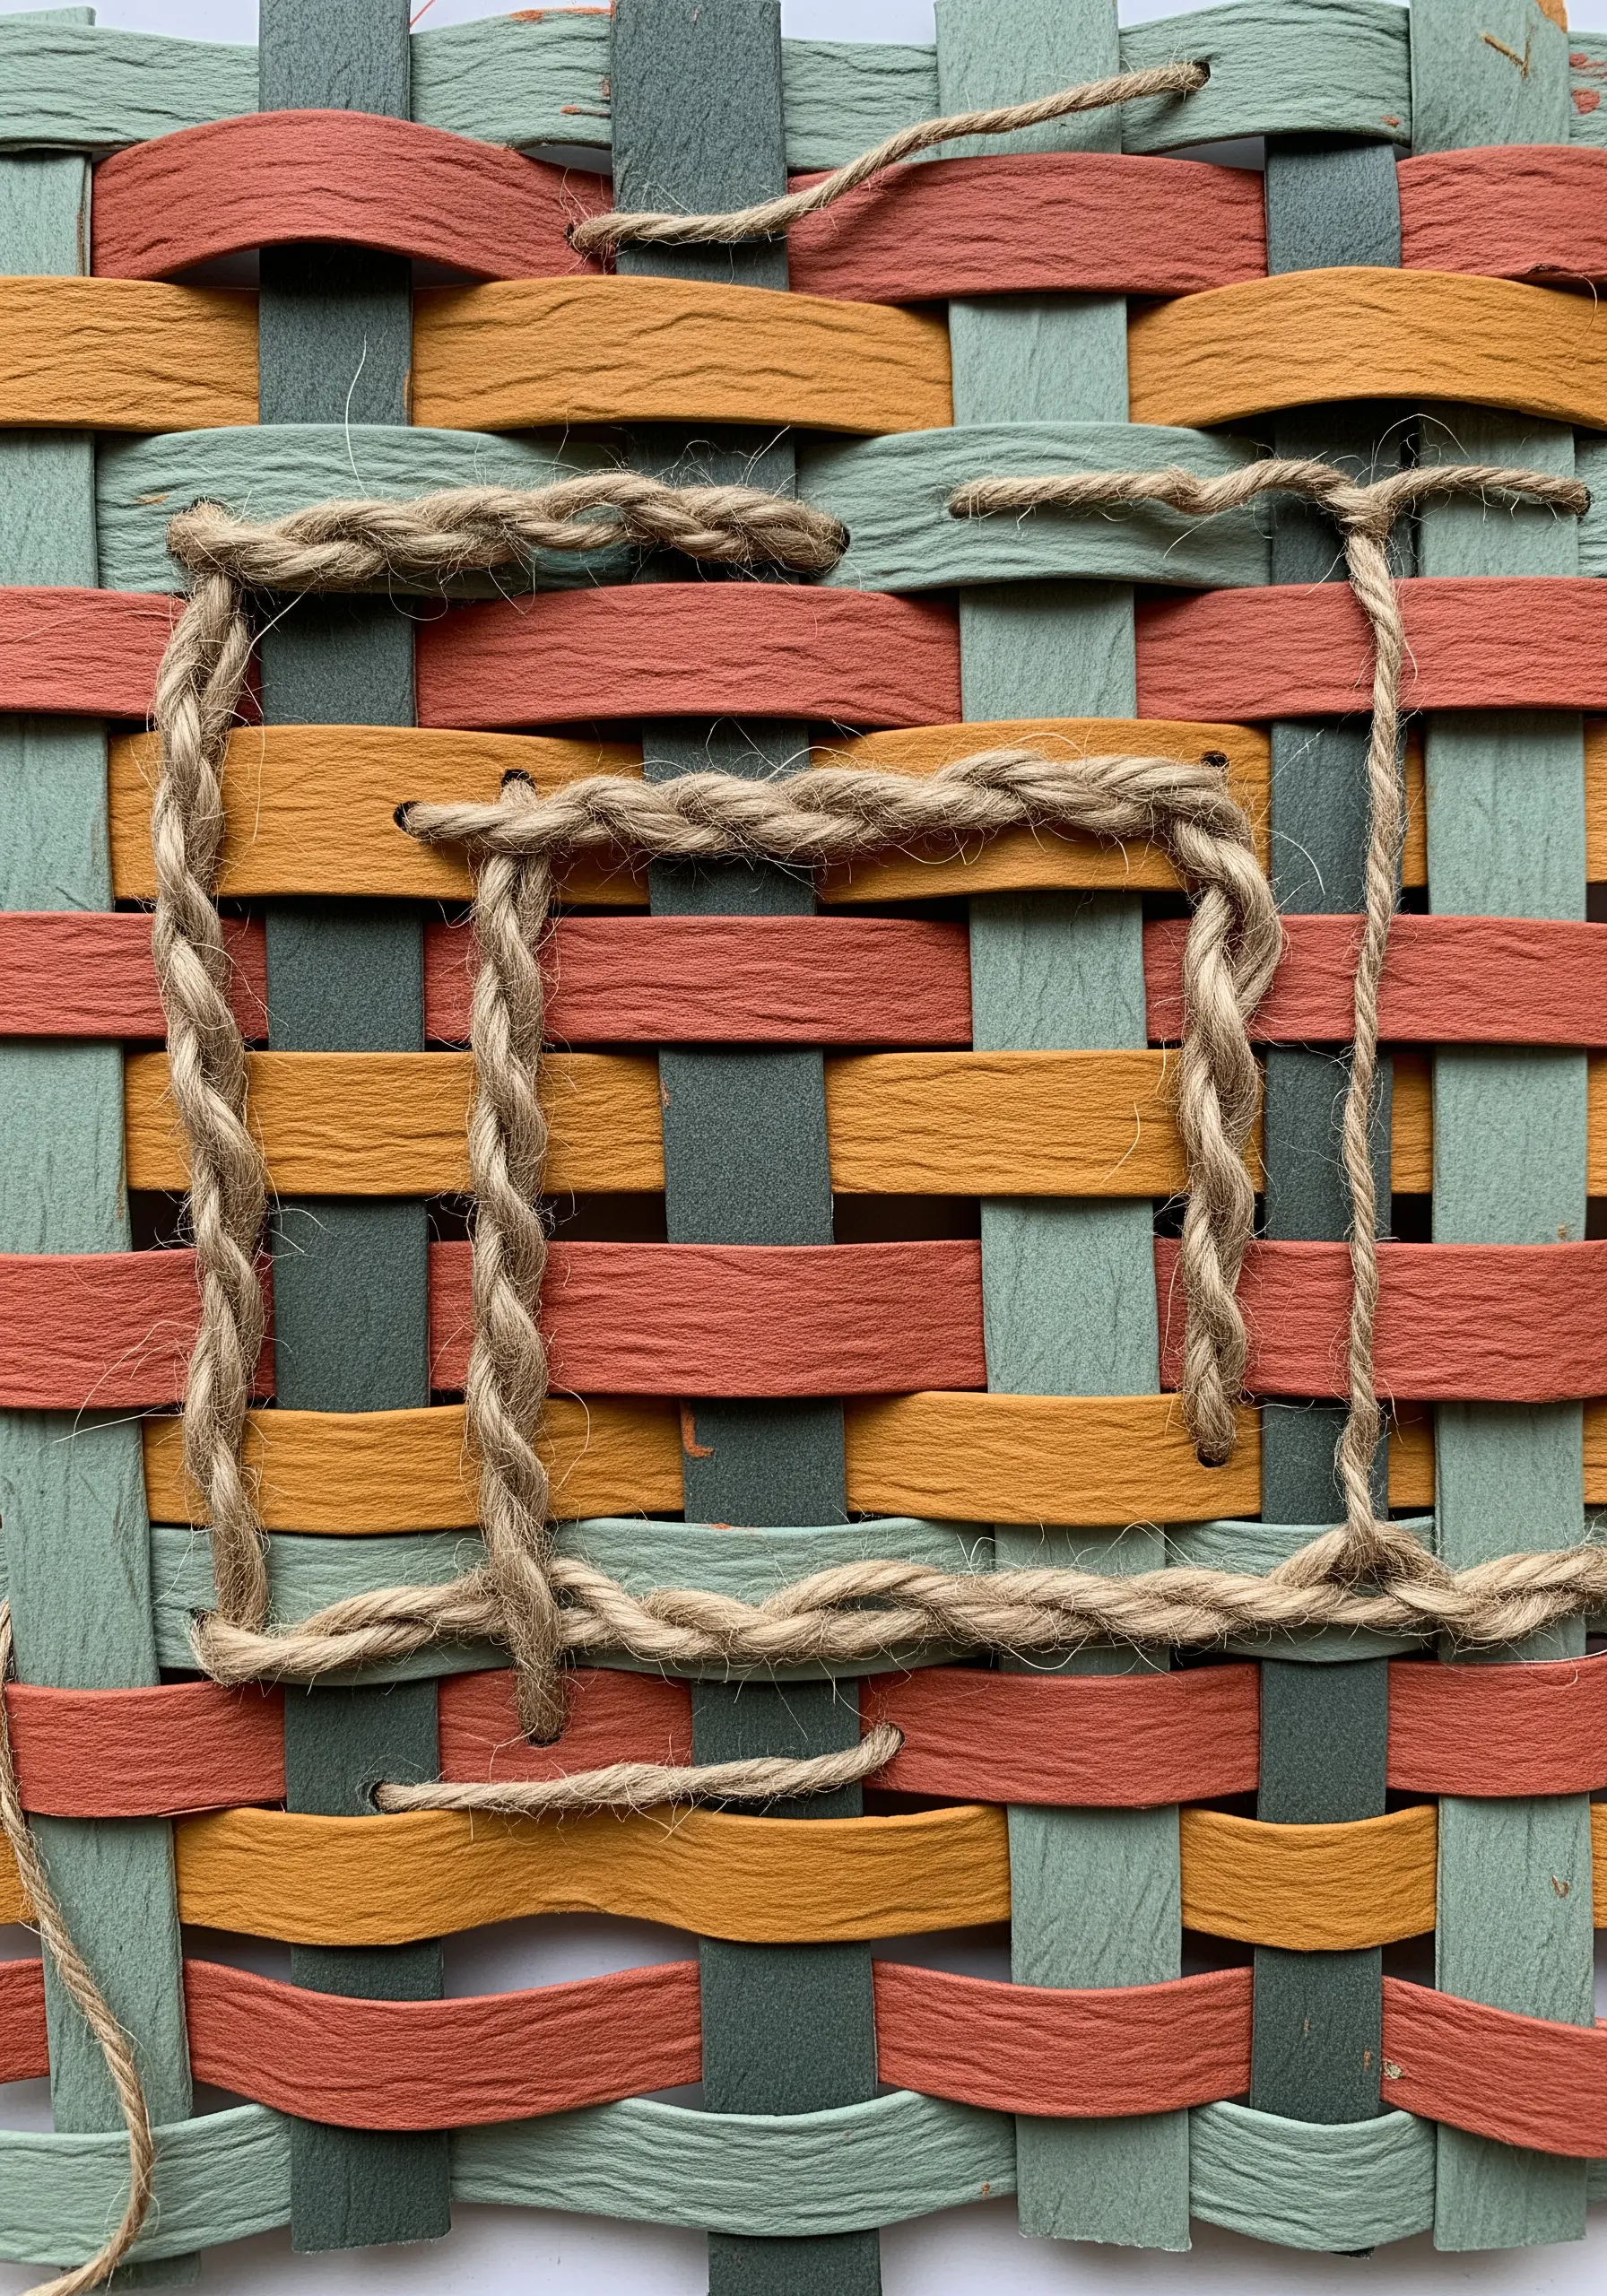
Explore raw, natural textures by combining woven paper with rustic twine.
Create your base by weaving strips of thick, matte-finish paper in an earth-toned palette.
Instead of a fine embroidery floss, use a chunky, braided jute or twine.
Lay the twine on the surface in a geometric pattern and couch it down by stitching over it with a thinner, matching thread that sinks into the paper weave.
This technique highlights the rugged texture of the twine against the smooth paper, creating earthy texture embroidery patterns with a strong graphic presence.
10. Large-Scale Yarn Painting on Kraft Paper
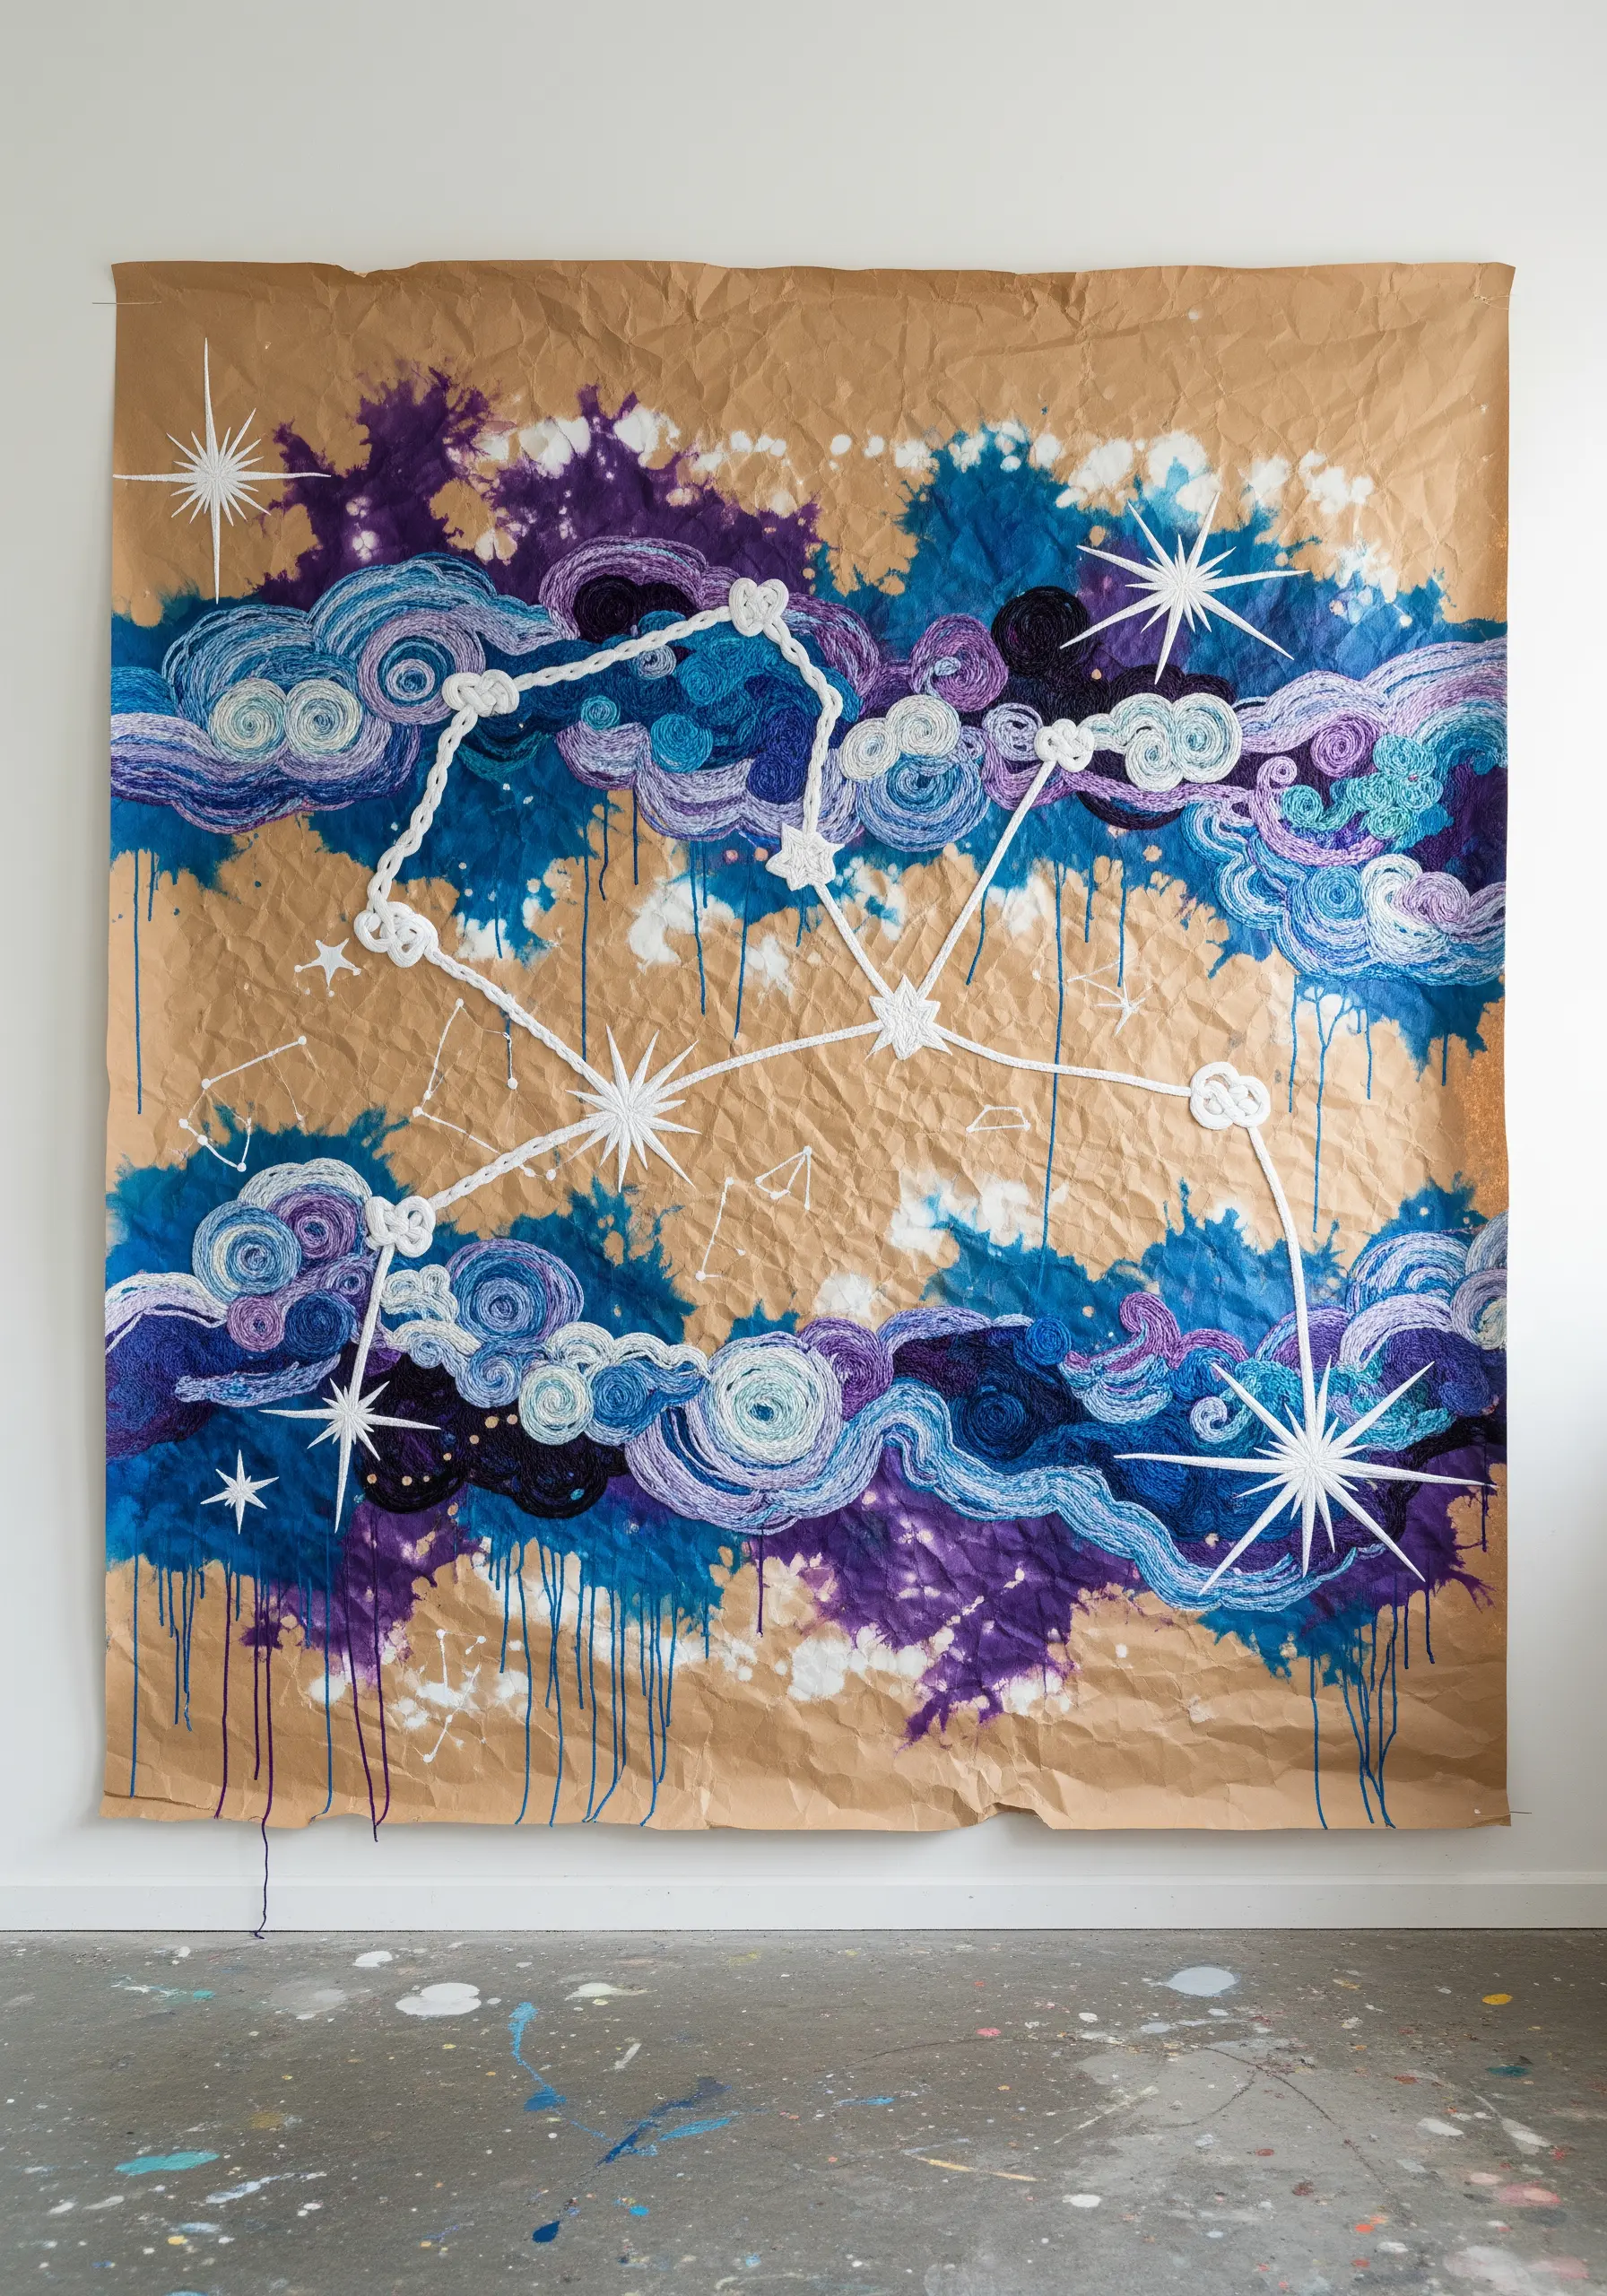
Take your stitching off the hoop and onto a large-scale paper canvas.
Use a roll of kraft paper as your base, creating a painterly background with ink or watercolor washes.
Instead of floss, work with chunky yarn in various textures and colors.
Use a large needle to couch down swirls of yarn, creating dense, cloud-like textures, or use straight stitches for starbursts.
This method allows you to work quickly and expressively, blending the techniques of painting and fiber art to create immersive, statement-size embroidered textile hangings.
11. Embroidered Appliqué Patches for Paper Crafts
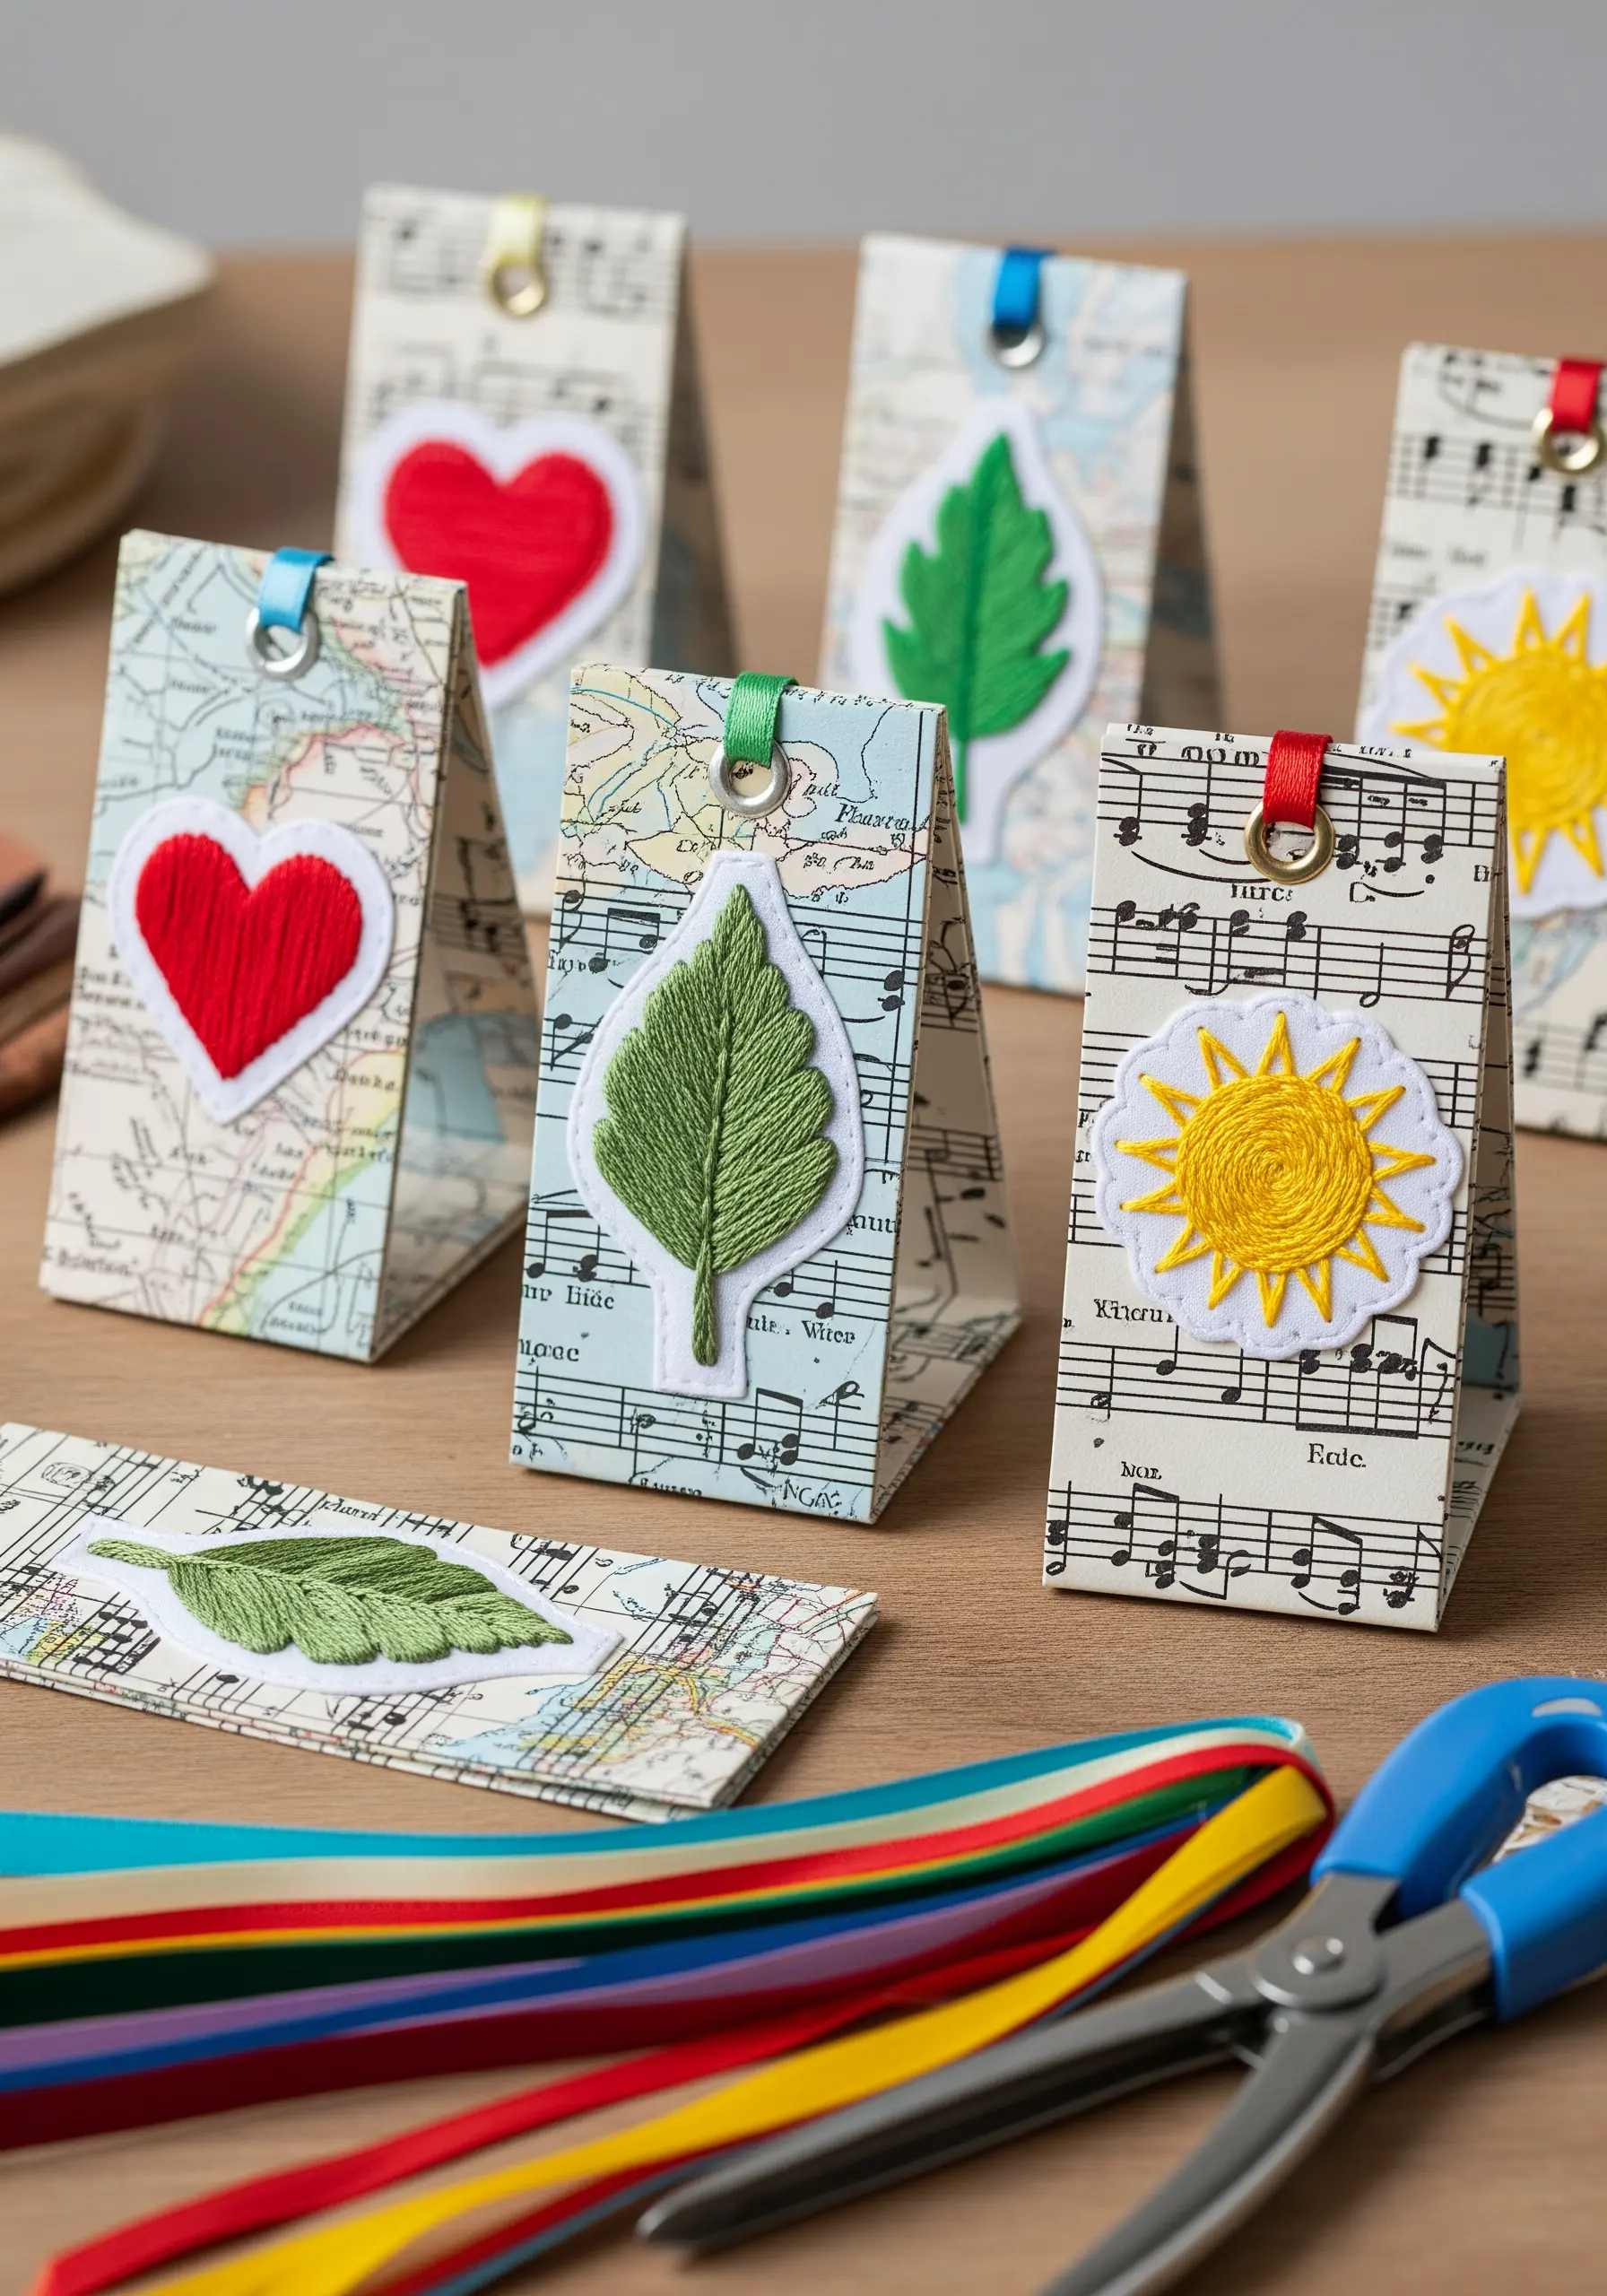
Create versatile, reusable stitched elements to adorn any paper project.
Embroider your motifs—leaves, hearts, or suns—onto a sturdy, non-fraying fabric like felt or a double layer of stabilizer.
Use a dense satin stitch for a clean, solid fill and outline with a contrasting backstitch for definition.
Once finished, carefully cut out the shape, leaving a narrow border.
These patches can then be glued or stitched onto gift tags, bookmarks, or cards, allowing you to add the beauty of embroidery to paper goods without piercing the final product.
12. Stitched Accents on Paper Quilt Blocks
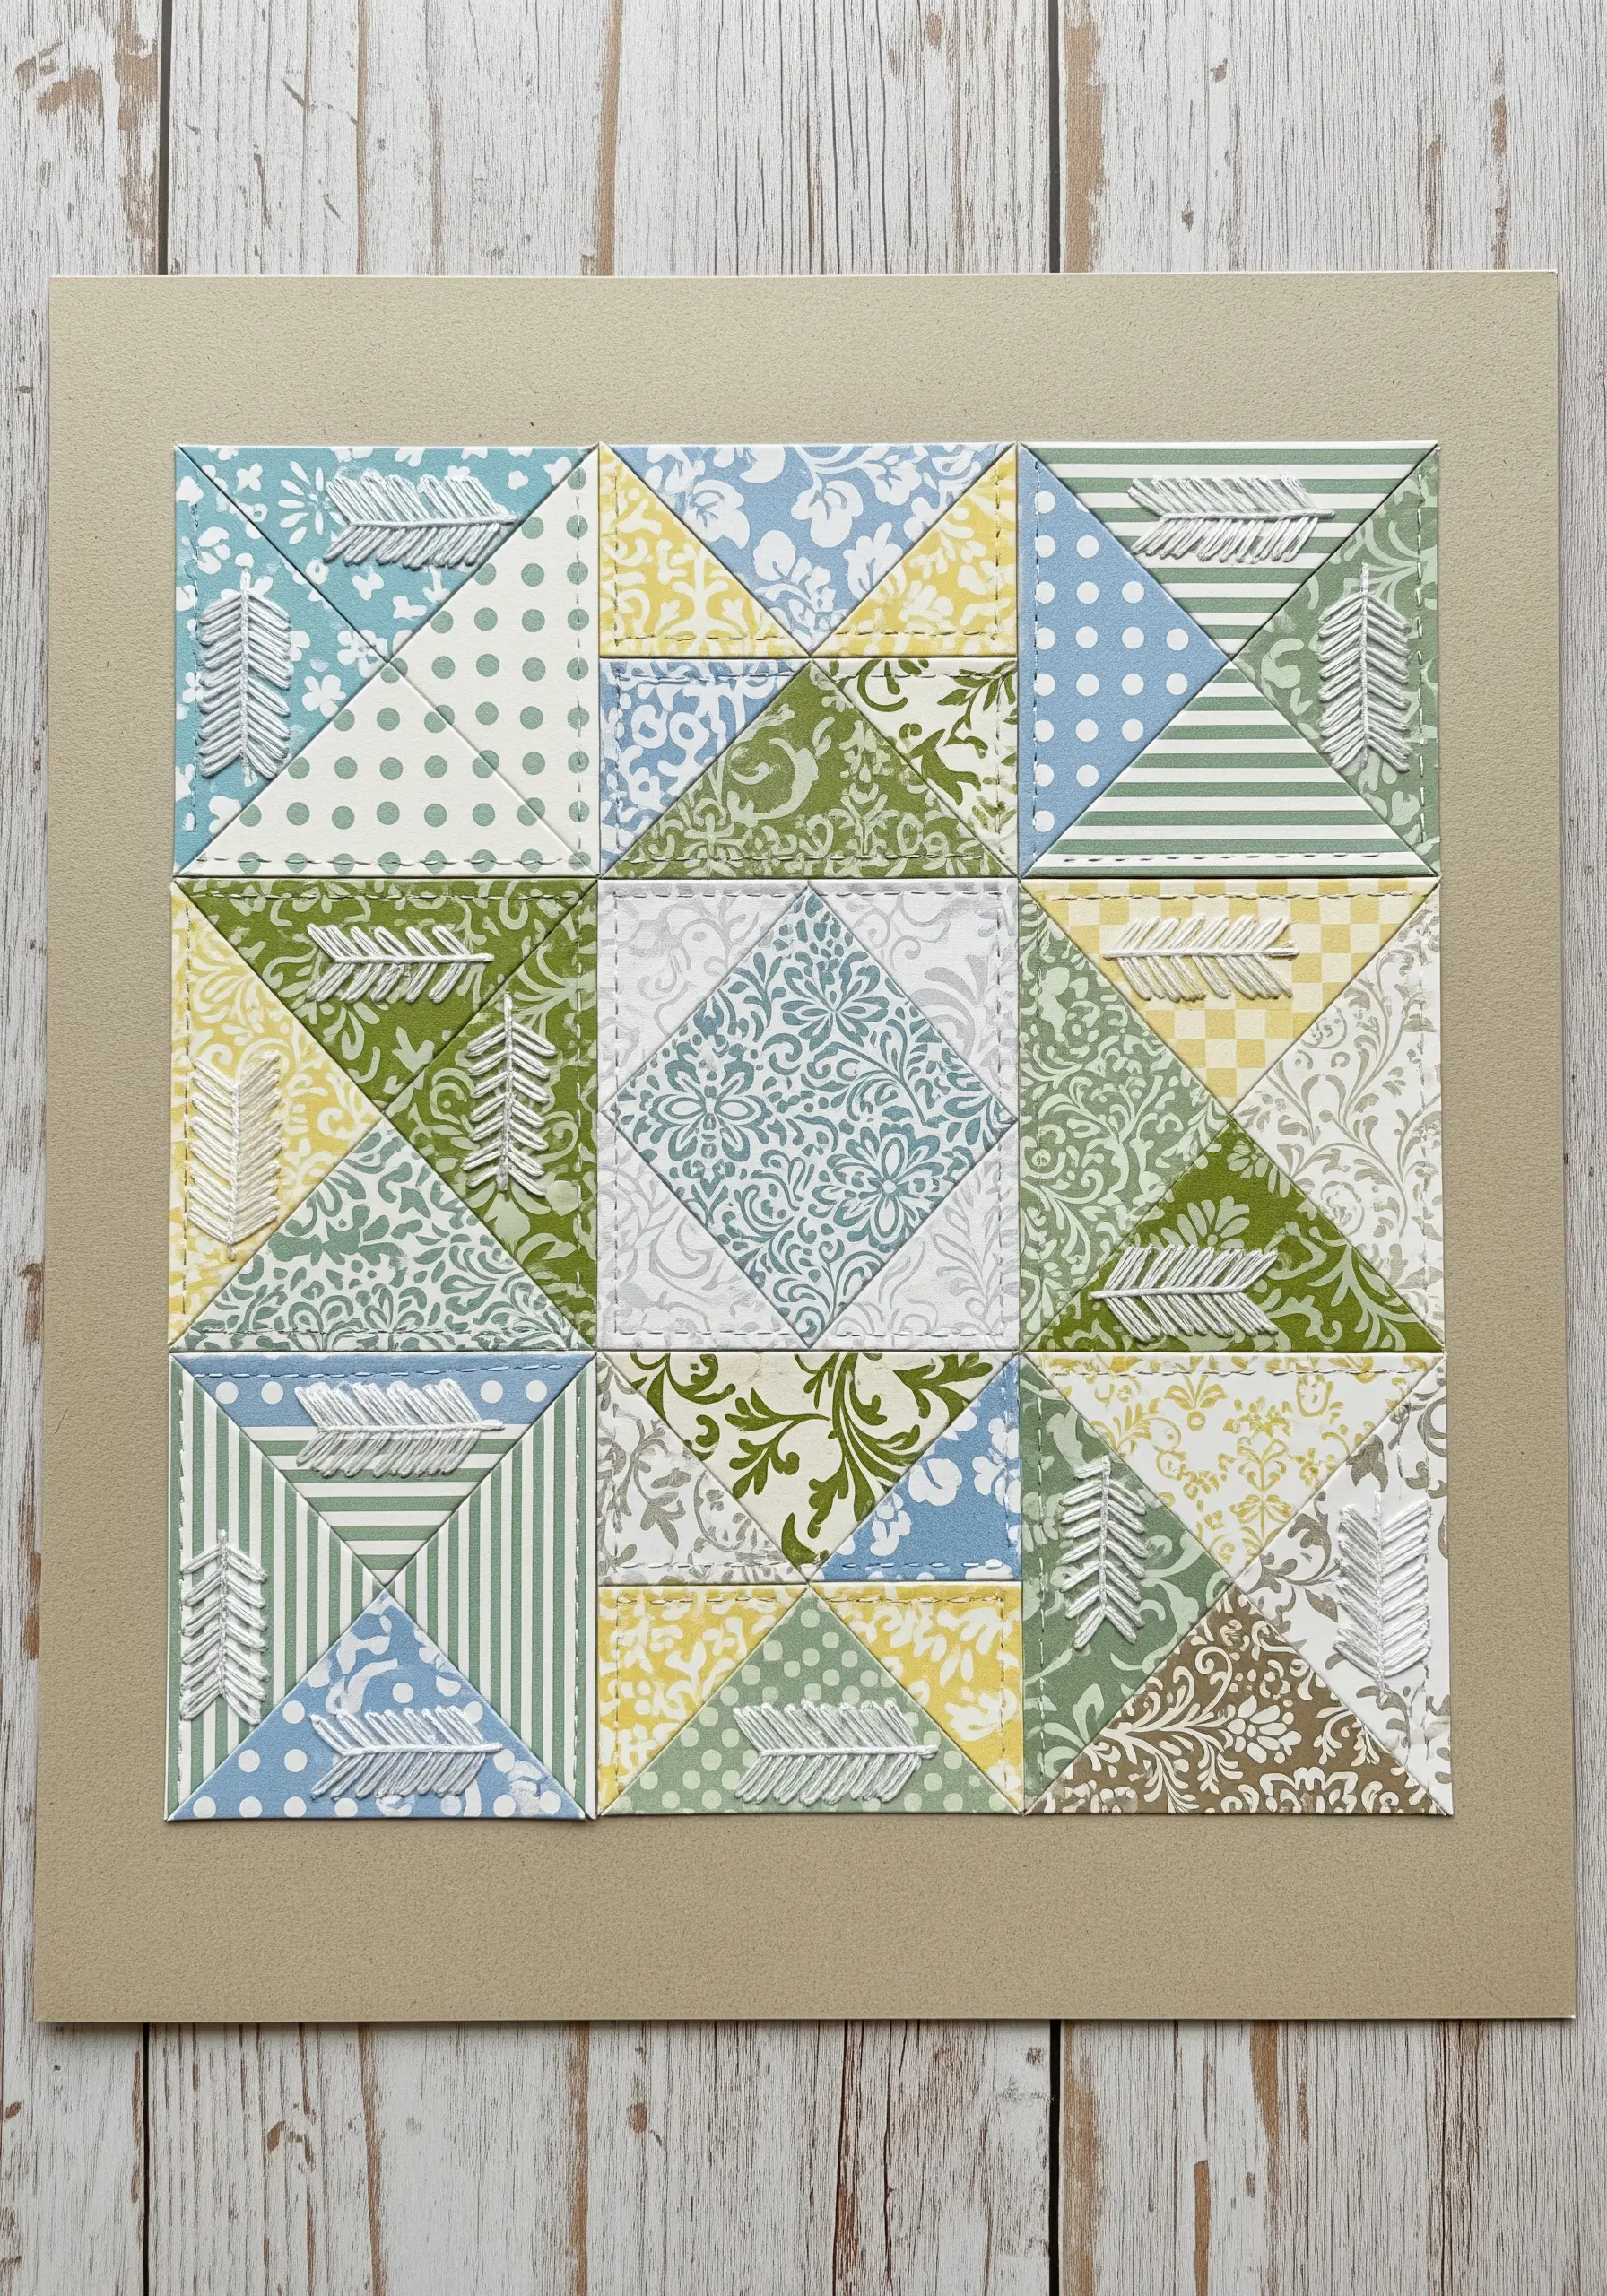
Merge the worlds of paper crafting and embroidery with this paper quilting technique.
Assemble a quilt-block pattern using various scrapbook papers, then add subtle stitched details to enhance the design.
Use a simple running stitch or backstitch to outline shapes or add textural lines within the paper pieces.
Pre-piercing the holes with a needle tool ensures your stitches are straight and the paper doesn’t tear.
This method adds a delicate, handmade touch that unites the different patterns and elevates the papercraft into a sophisticated piece of mixed-media collage.
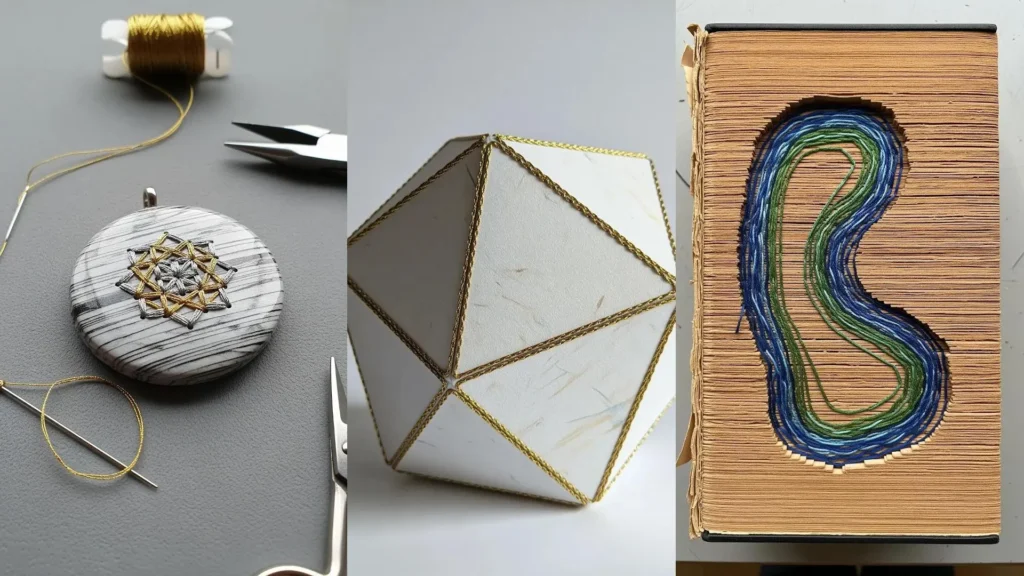
13. Edging 3D Paper Forms with Braided Thread
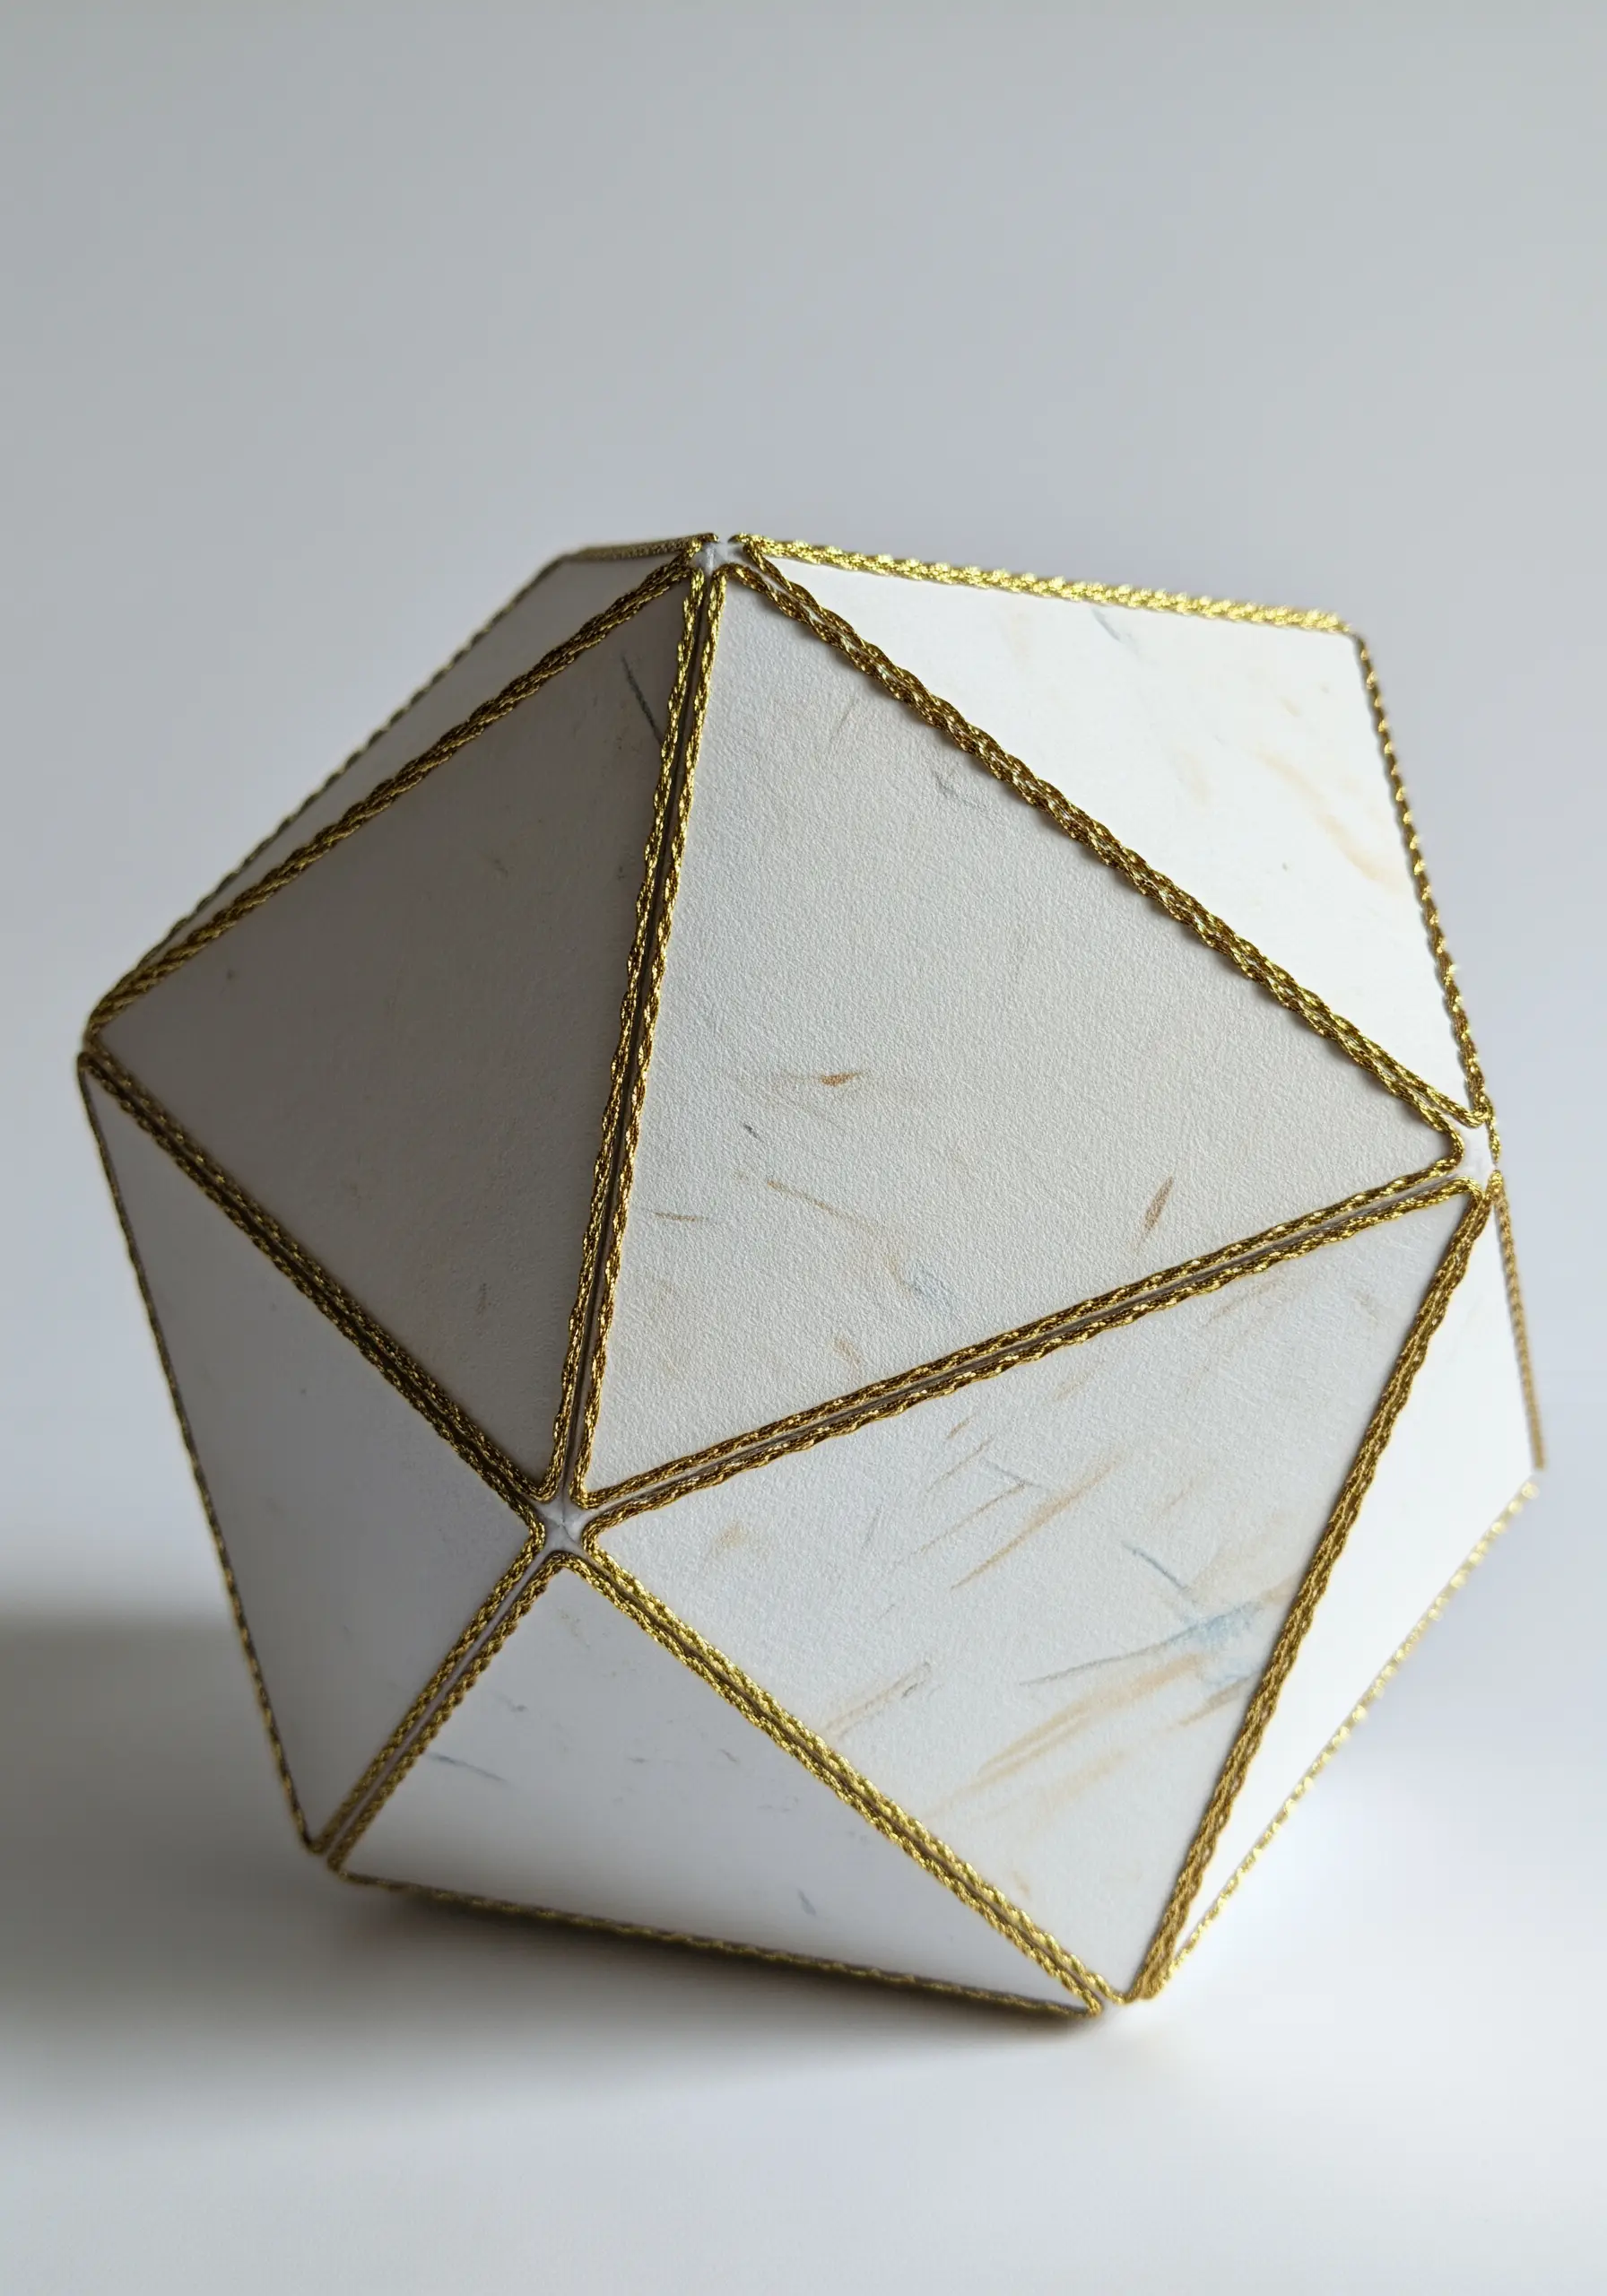
Use thread to define and embellish the structure of three-dimensional paper sculptures.
Construct a geometric shape, like this icosahedron, from heavy cardstock.
Instead of stitching through the paper, use a braided metallic cord or a thick, twisted floss to trace the edges.
Secure the cord with a strong craft glue applied carefully along the seams.
This technique turns the thread into a structural and decorative element, outlining the form and adding a touch of elegance without compromising the paper’s integrity.
14. Pierced Paper Constellations with Metallic Thread
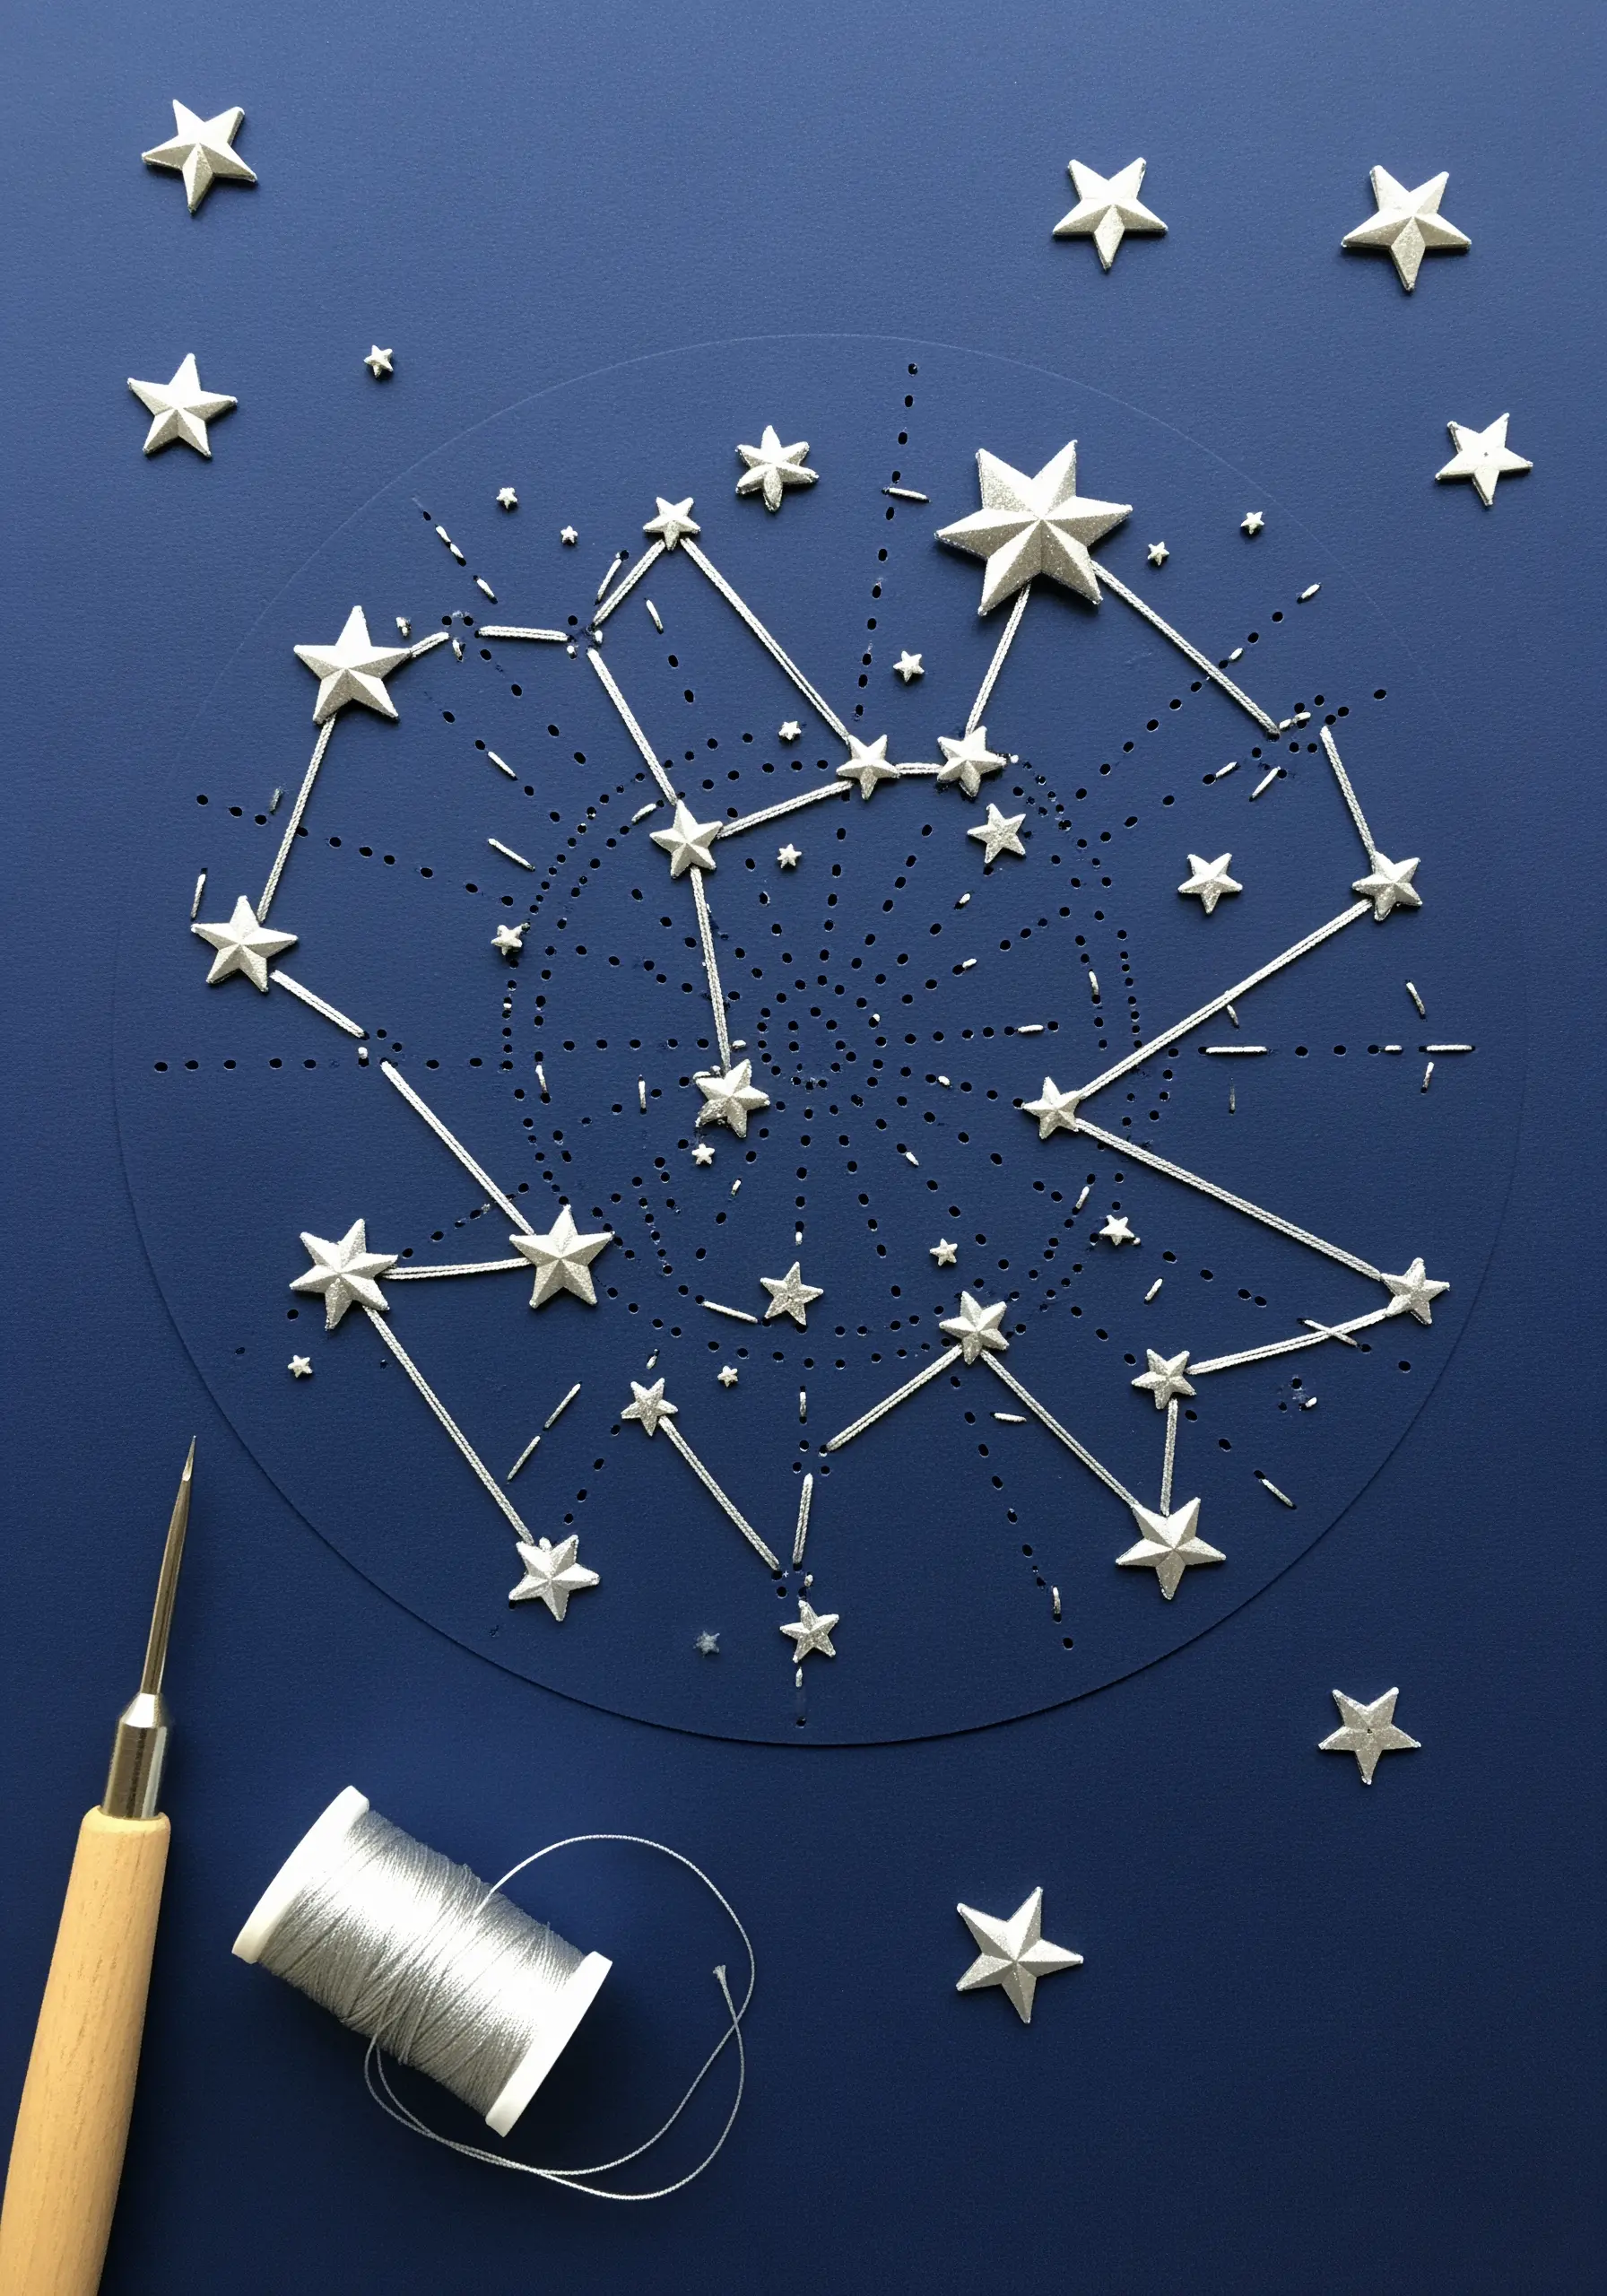
Create celestial art where the holes are as important as the stitches.
On a piece of dark, heavy cardstock, use an awl or piercing tool to create a pattern of holes that map out a constellation.
Vary the size of the holes to represent stars of different magnitudes.
Then, use a fine metallic thread to connect the holes with straight stitches, forming the constellation’s shape.
The final piece plays with light, with the pierced holes and shimmering thread creating a luminous effect against the dark background. It’s a perfect example of abstract metallic thread projects.
15. Layered Paper-Cut Leaves with Stitched Veins
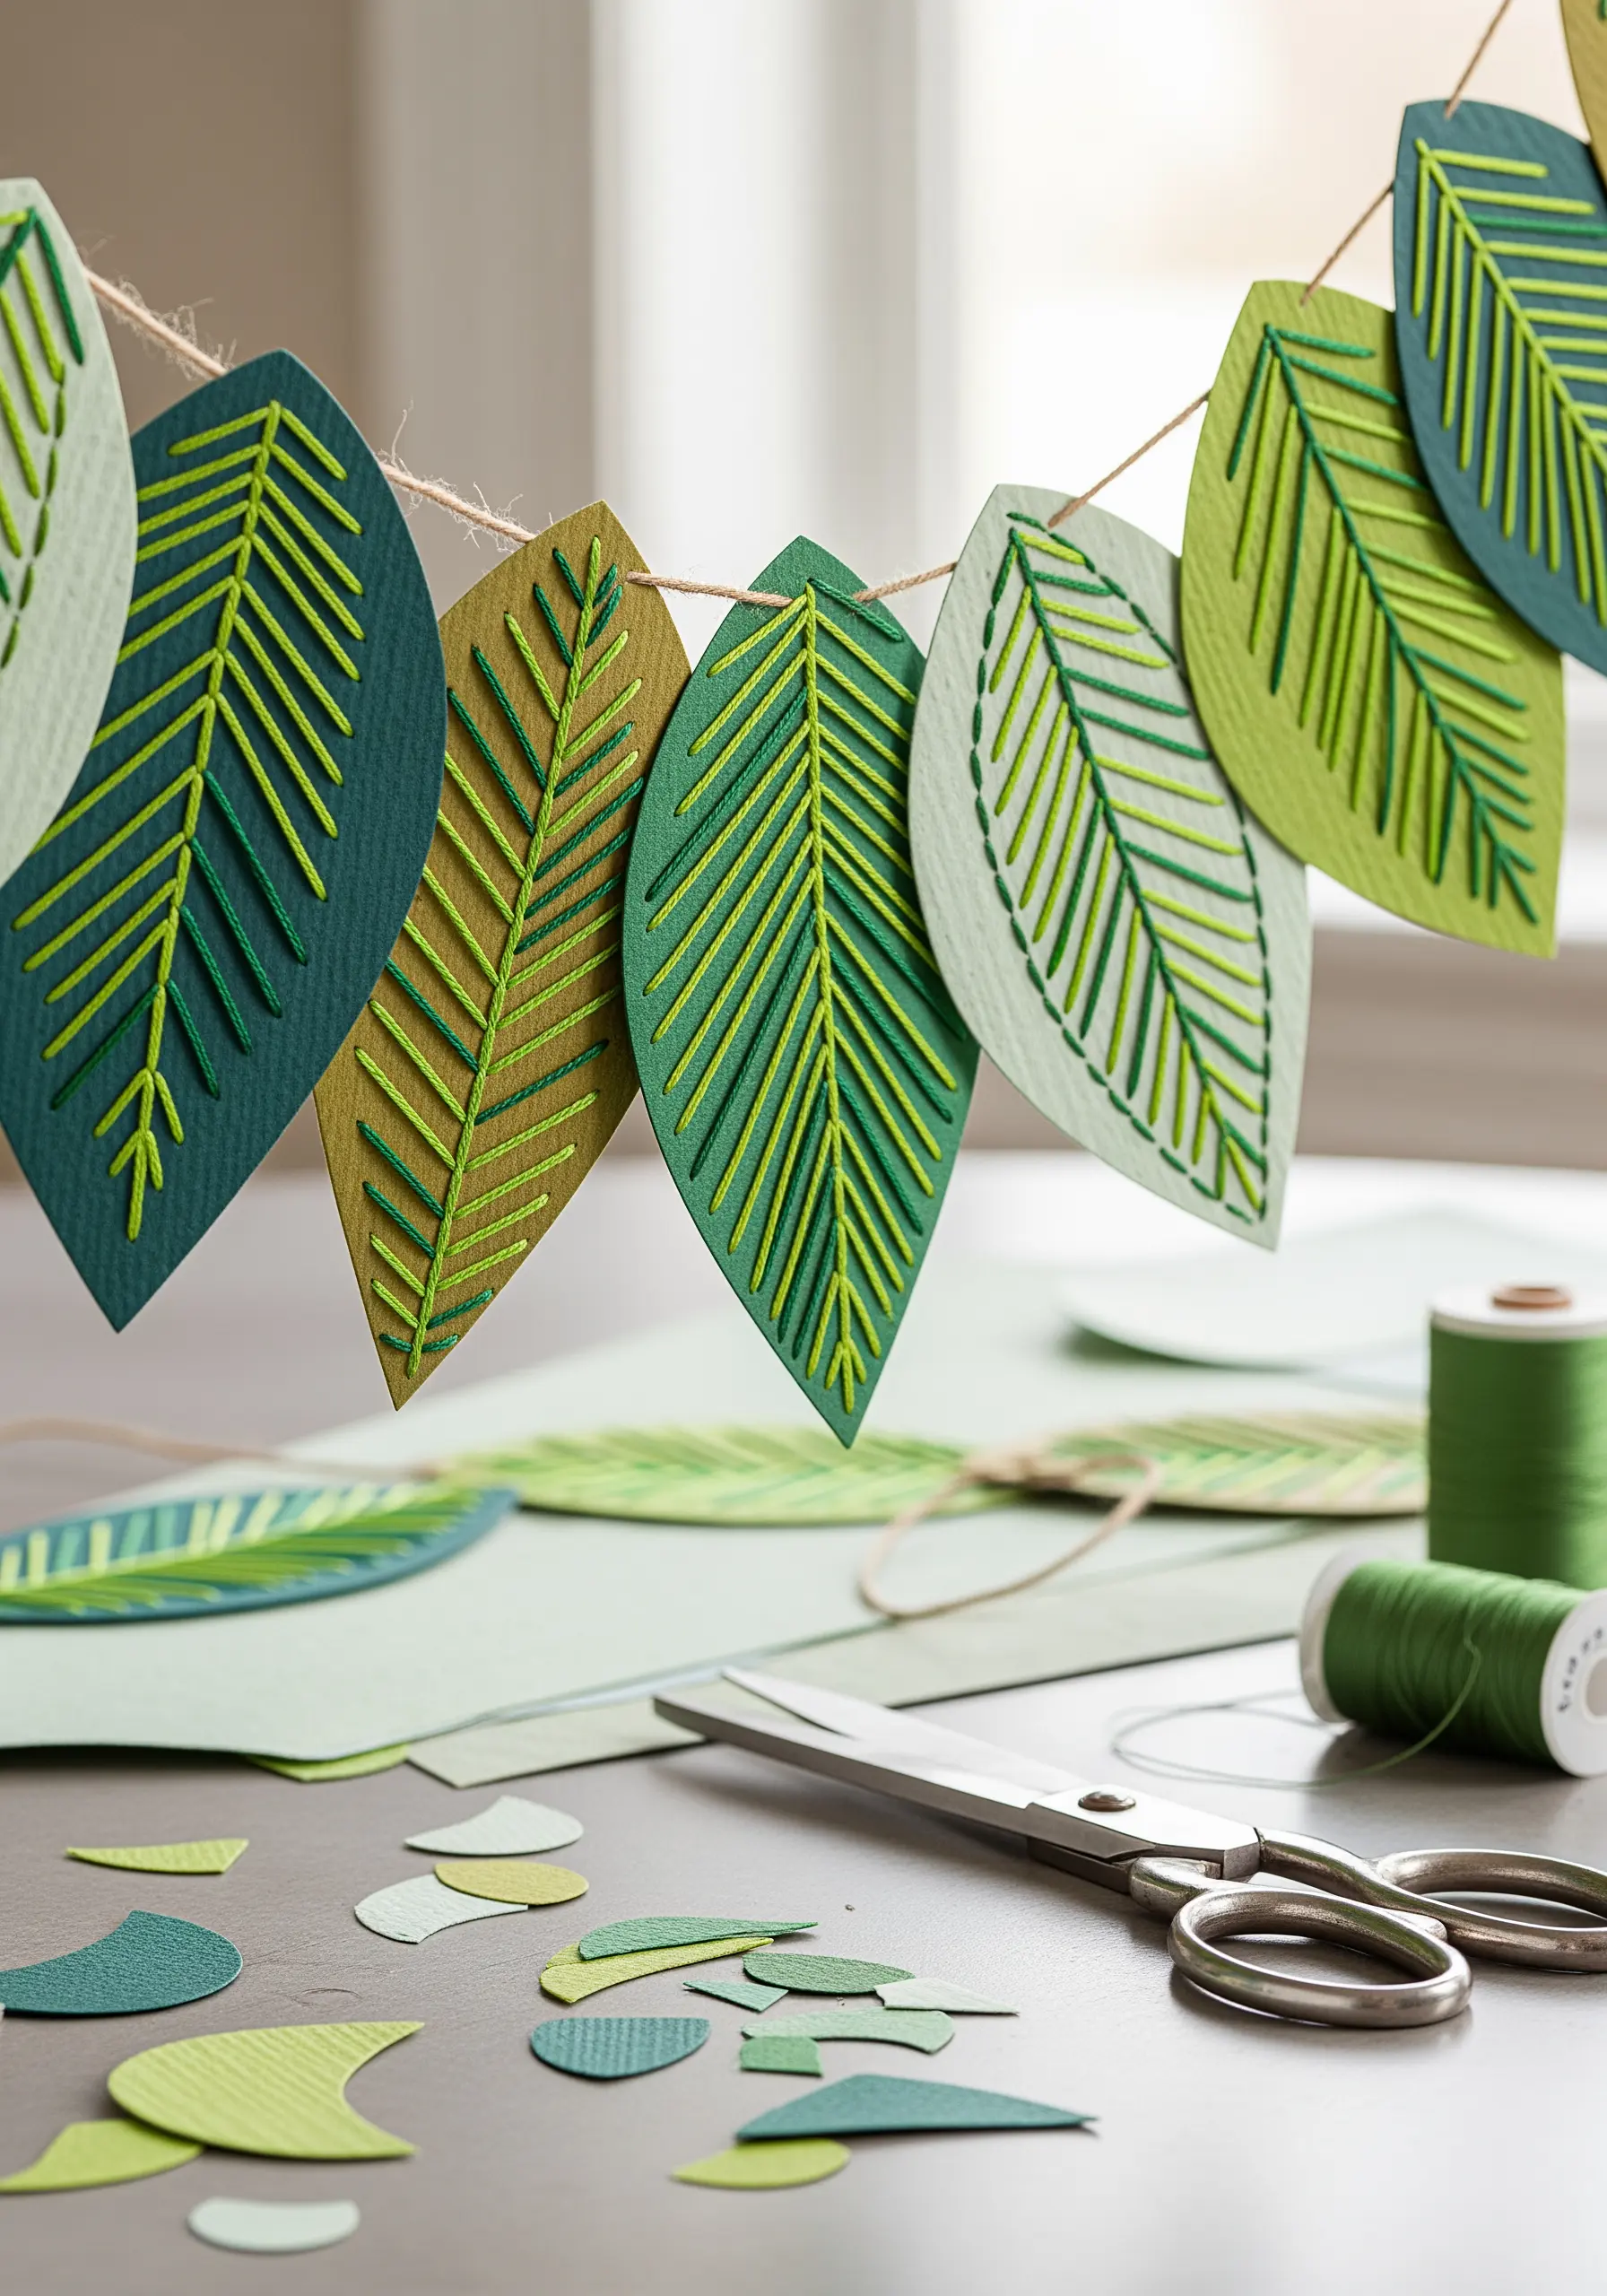
Combine paper cutting and simple embroidery to create a botanical garland with beautiful depth.
Cut leaf shapes from various shades of green cardstock. For some leaves, cut out the veins to create a stencil-like effect.
On solid leaves, stitch the central veins using a simple backstitch or stem stitch in a contrasting green thread.
Layer the solid and cut-out leaves to create visual interest and dimension.
This mix of positive and negative space, along with the texture of the thread, results in a dynamic and modern take on botanical textile art.
16. Anatomical Embroidery on Transferred Illustrations
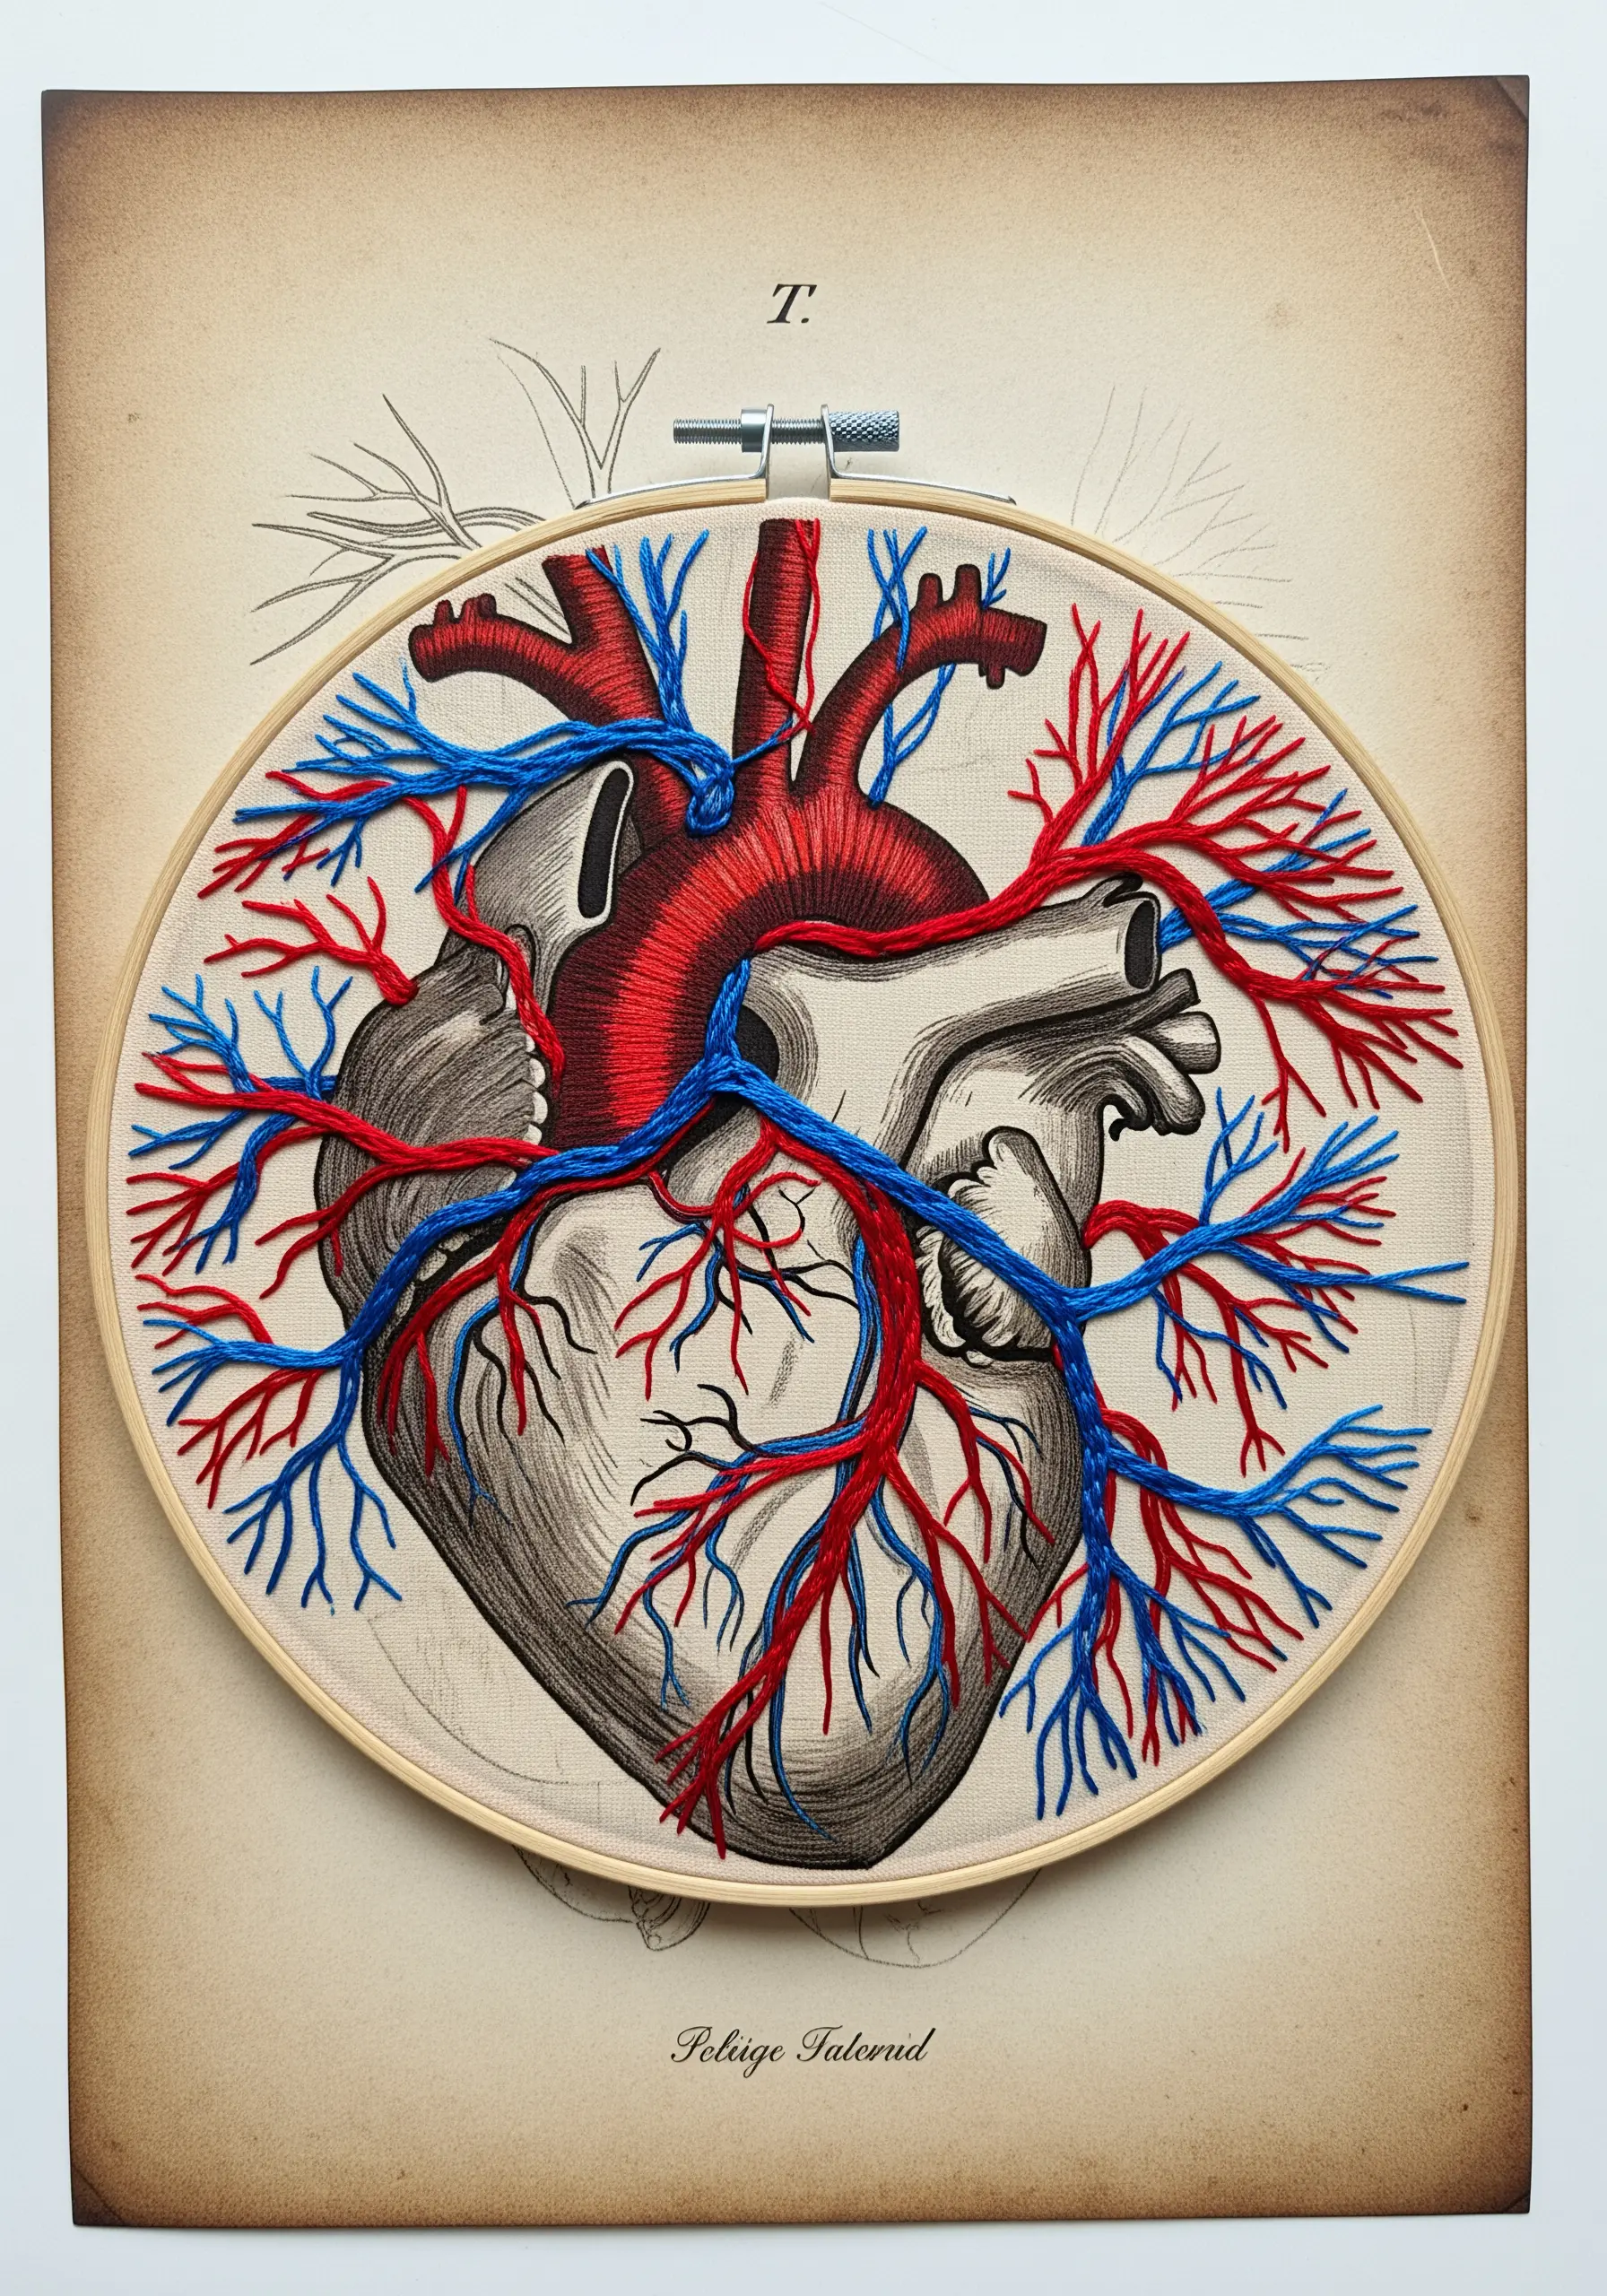
Merge scientific illustration with fiber art for a striking, conceptual piece.
Transfer an anatomical drawing onto a piece of neutral-toned fabric using a light box or iron-on transfer pen.
Instead of coloring the entire illustration, use bold threads to selectively highlight specific systems, like the vibrant red and blue of arteries and veins.
Use a whipped backstitch or stem stitch to create smooth, raised lines that stand out against the flat drawing.
This technique creates a powerful visual metaphor, bringing life and texture to a clinical image.
17. Monogram Stitching on Handmade Petal Paper
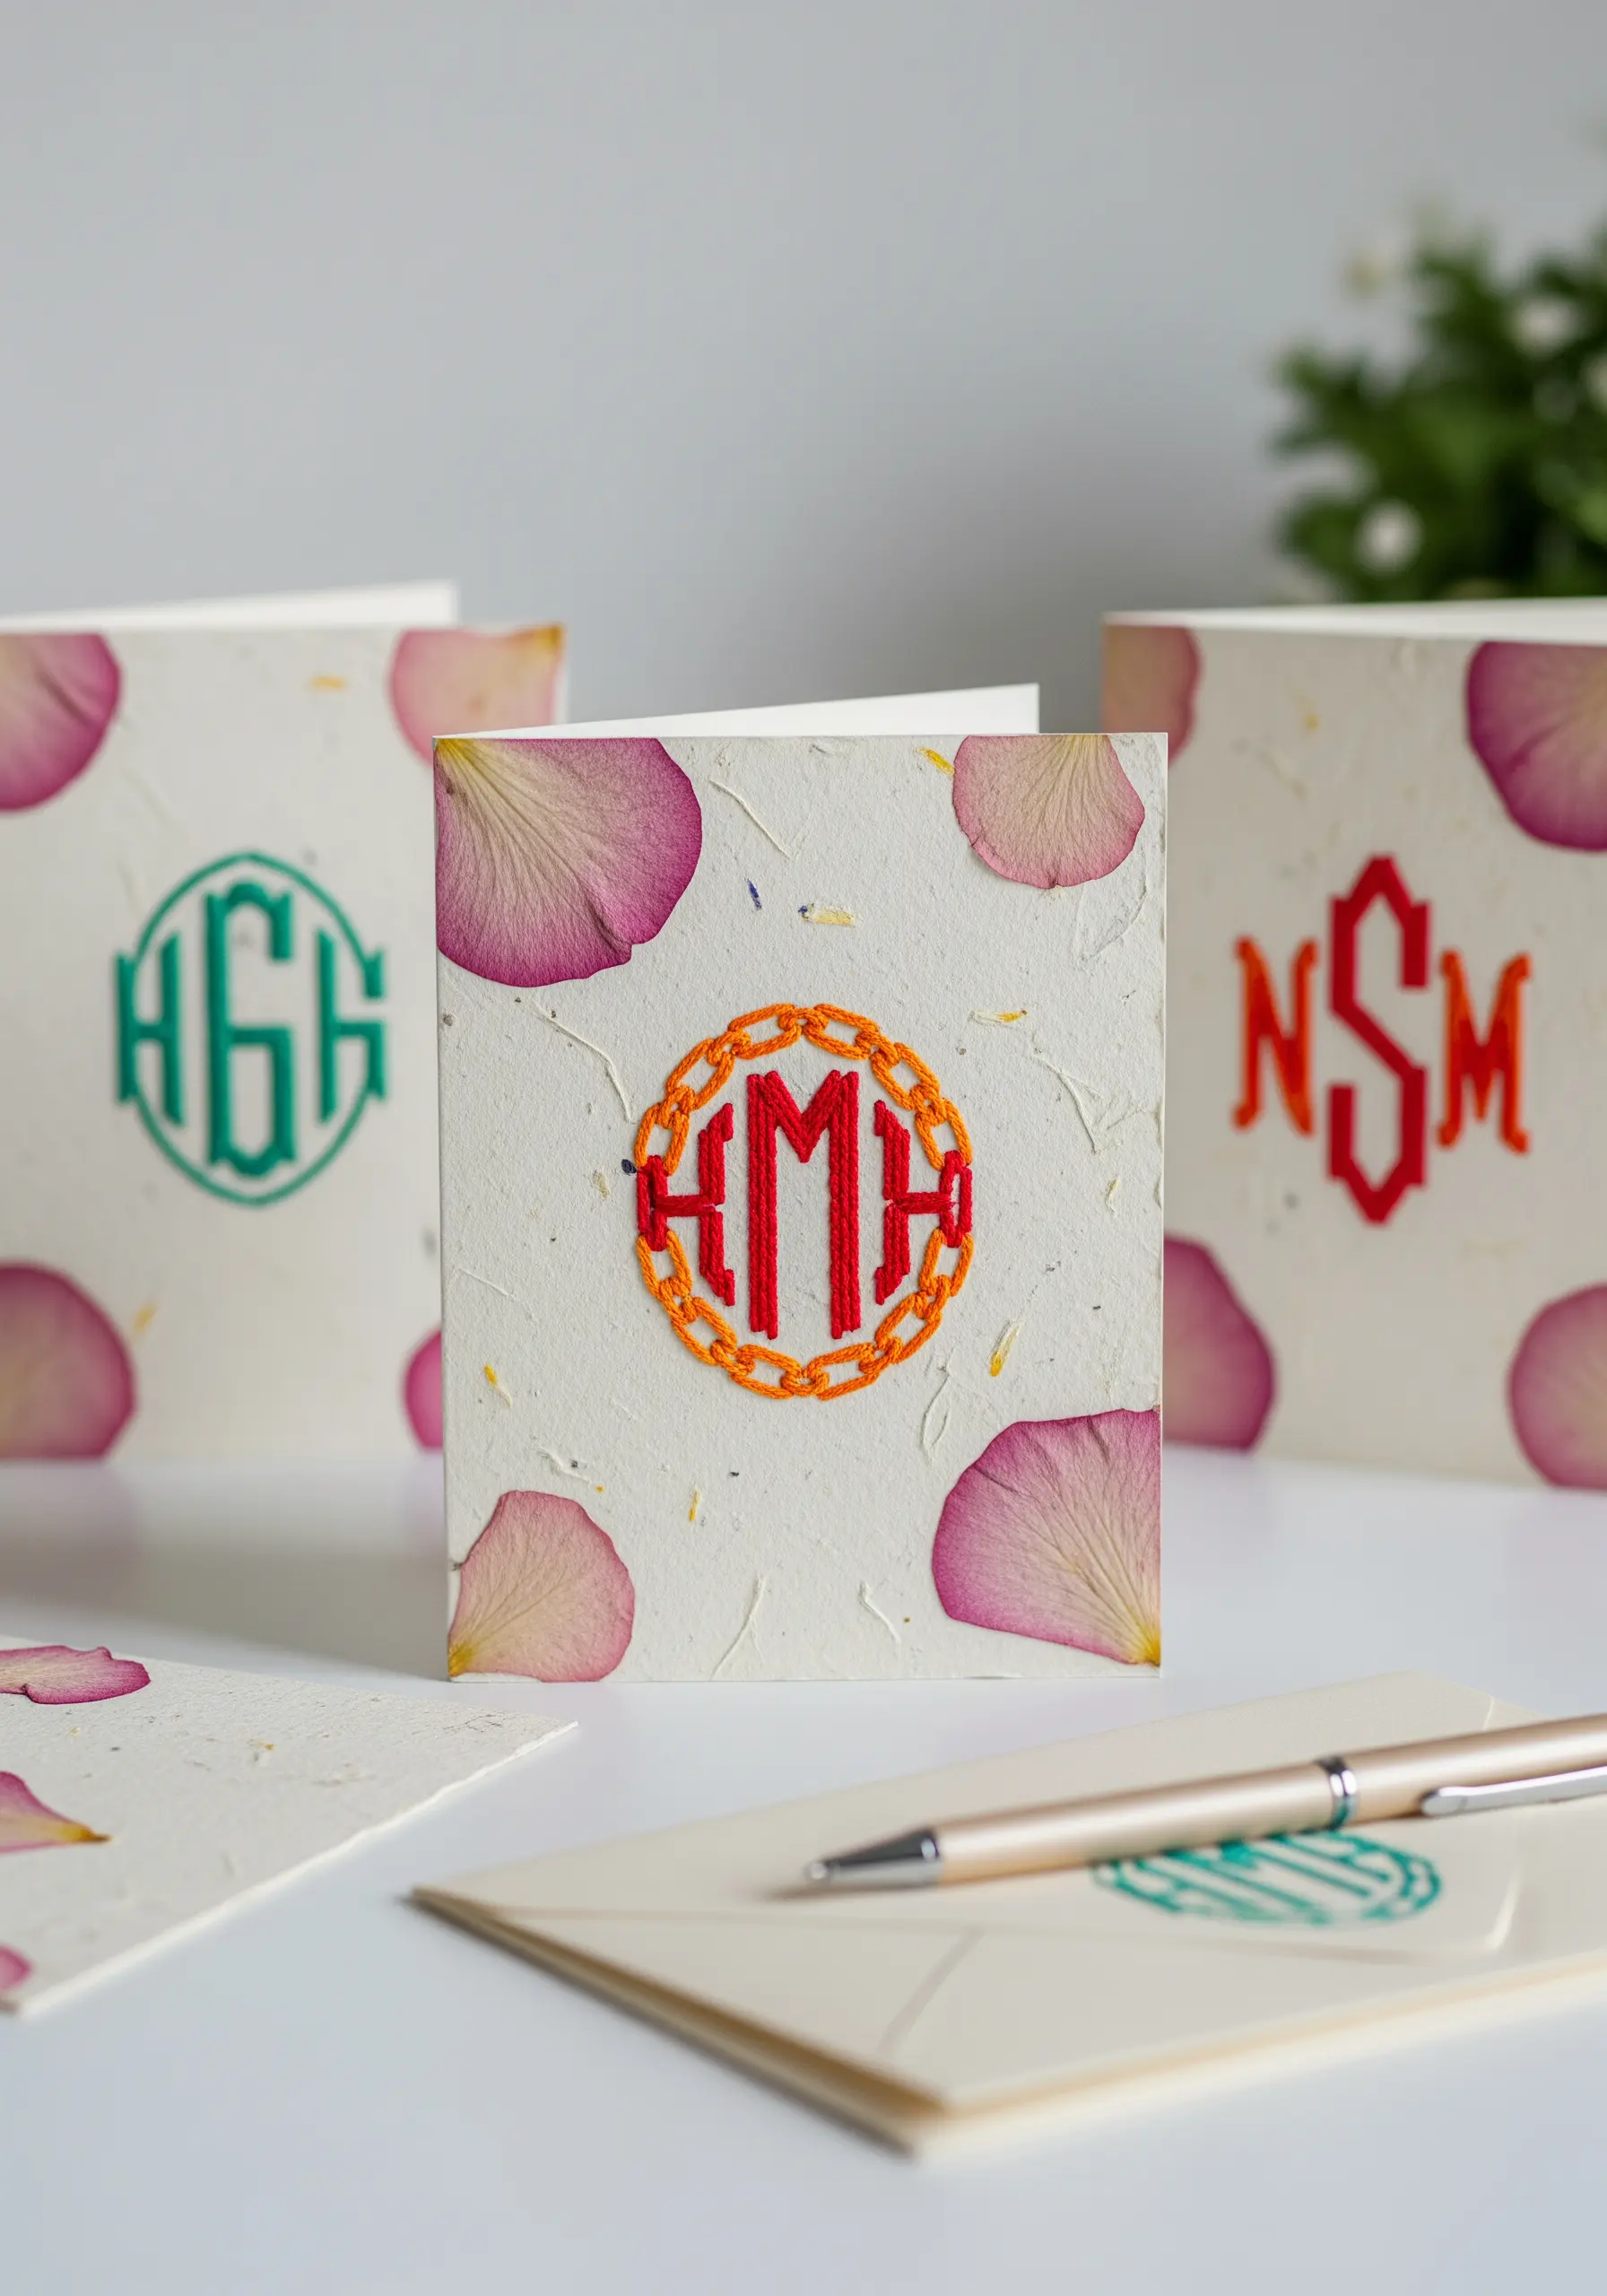
Elevate personalized stationery by embroidering directly onto handmade paper.
Choose a paper with textural inclusions, like flower petals, to add an extra layer of organic beauty.
To avoid tearing, use a sharp, fine needle (like a size 10) and pre-pierce your monogram design if the paper is particularly delicate.
Use a simple satin stitch or chain stitch with bright, contrasting floss to make the letters pop.
This combination of textures—the smooth thread, the fibrous paper, and the delicate petals—creates a truly luxurious and personal correspondence card. It’s one of the most minimal monogram styles that make personalized gifts look high-end.
18. Sculptural Foam Beads for Oceanic Texture
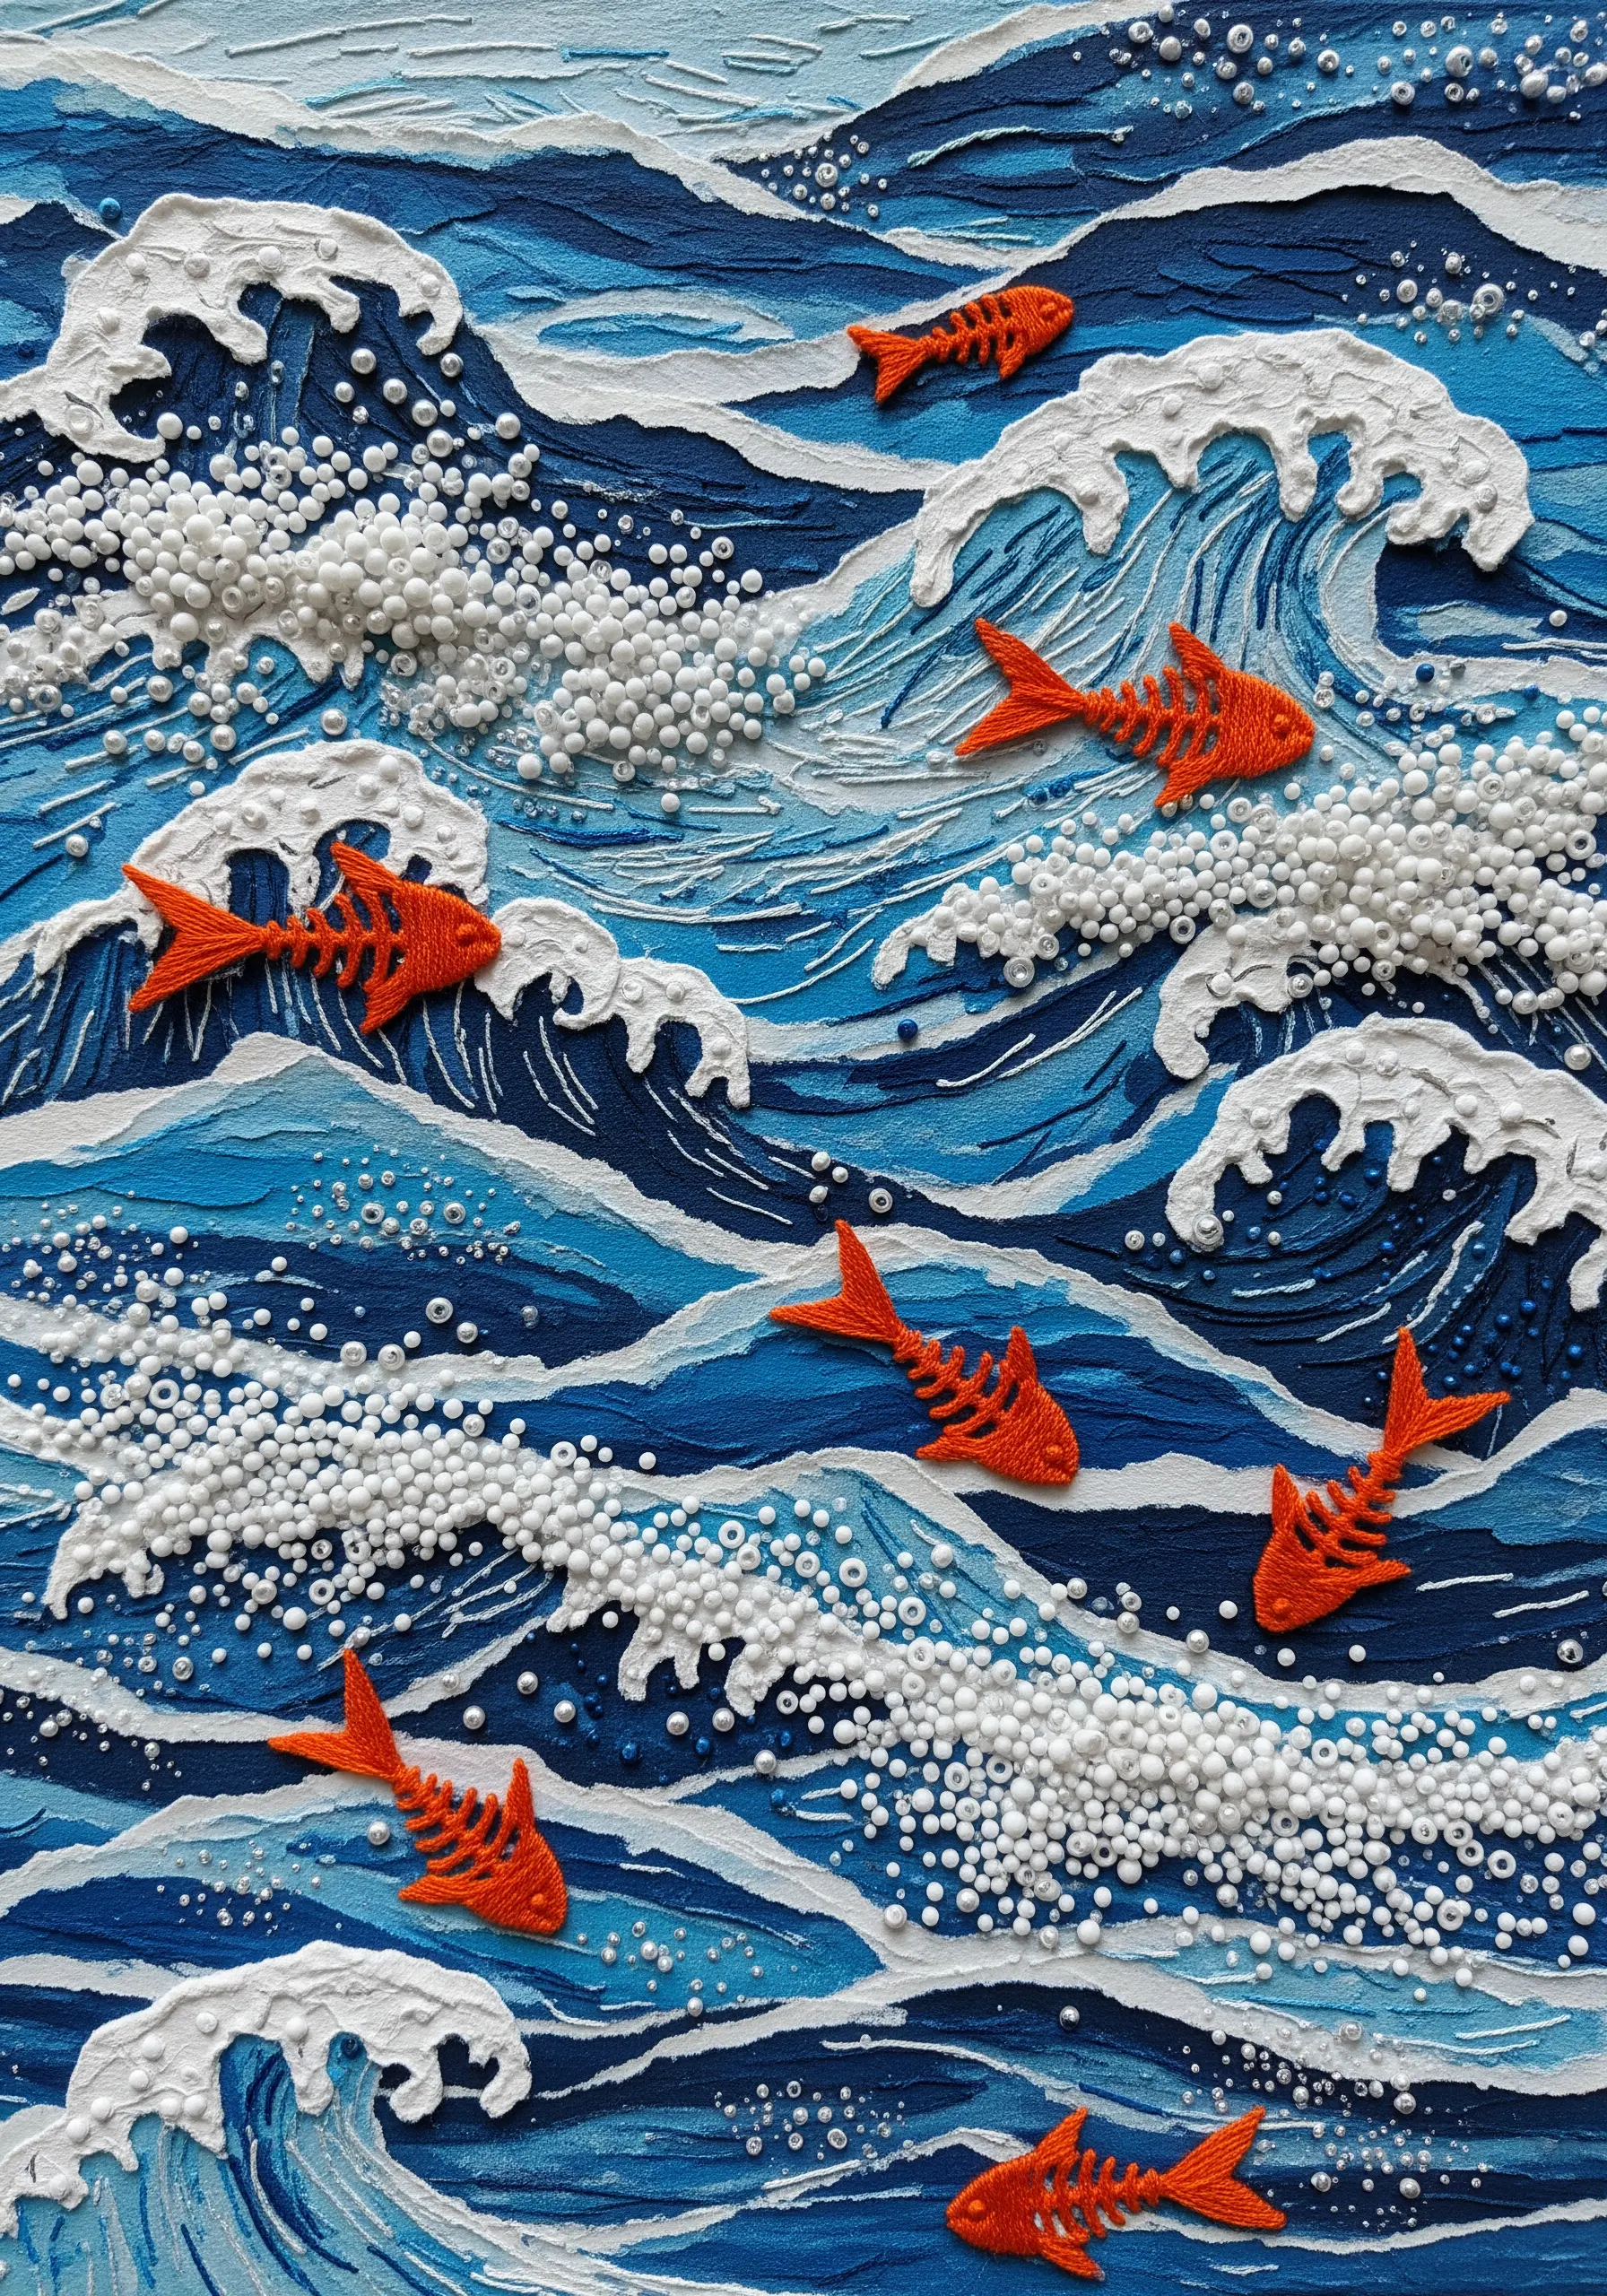
Create realistic, frothy sea foam by incorporating unconventional materials into your embroidery.
After stitching your waves and marine life, use a strong, clear-drying glue to apply tiny polystyrene or foam beads along the crests of the waves.
Apply them densely in some areas and sparsely in others to mimic the natural variation of sea spray.
This mixed-media approach adds a fantastic three-dimensional quality that thread alone cannot achieve, making the texture both visual and tactile.
It’s a bold way to combine embroidery and mixed media for home décor masterpieces.
19. Paper-Cut Labyrinth with Thread Tracing
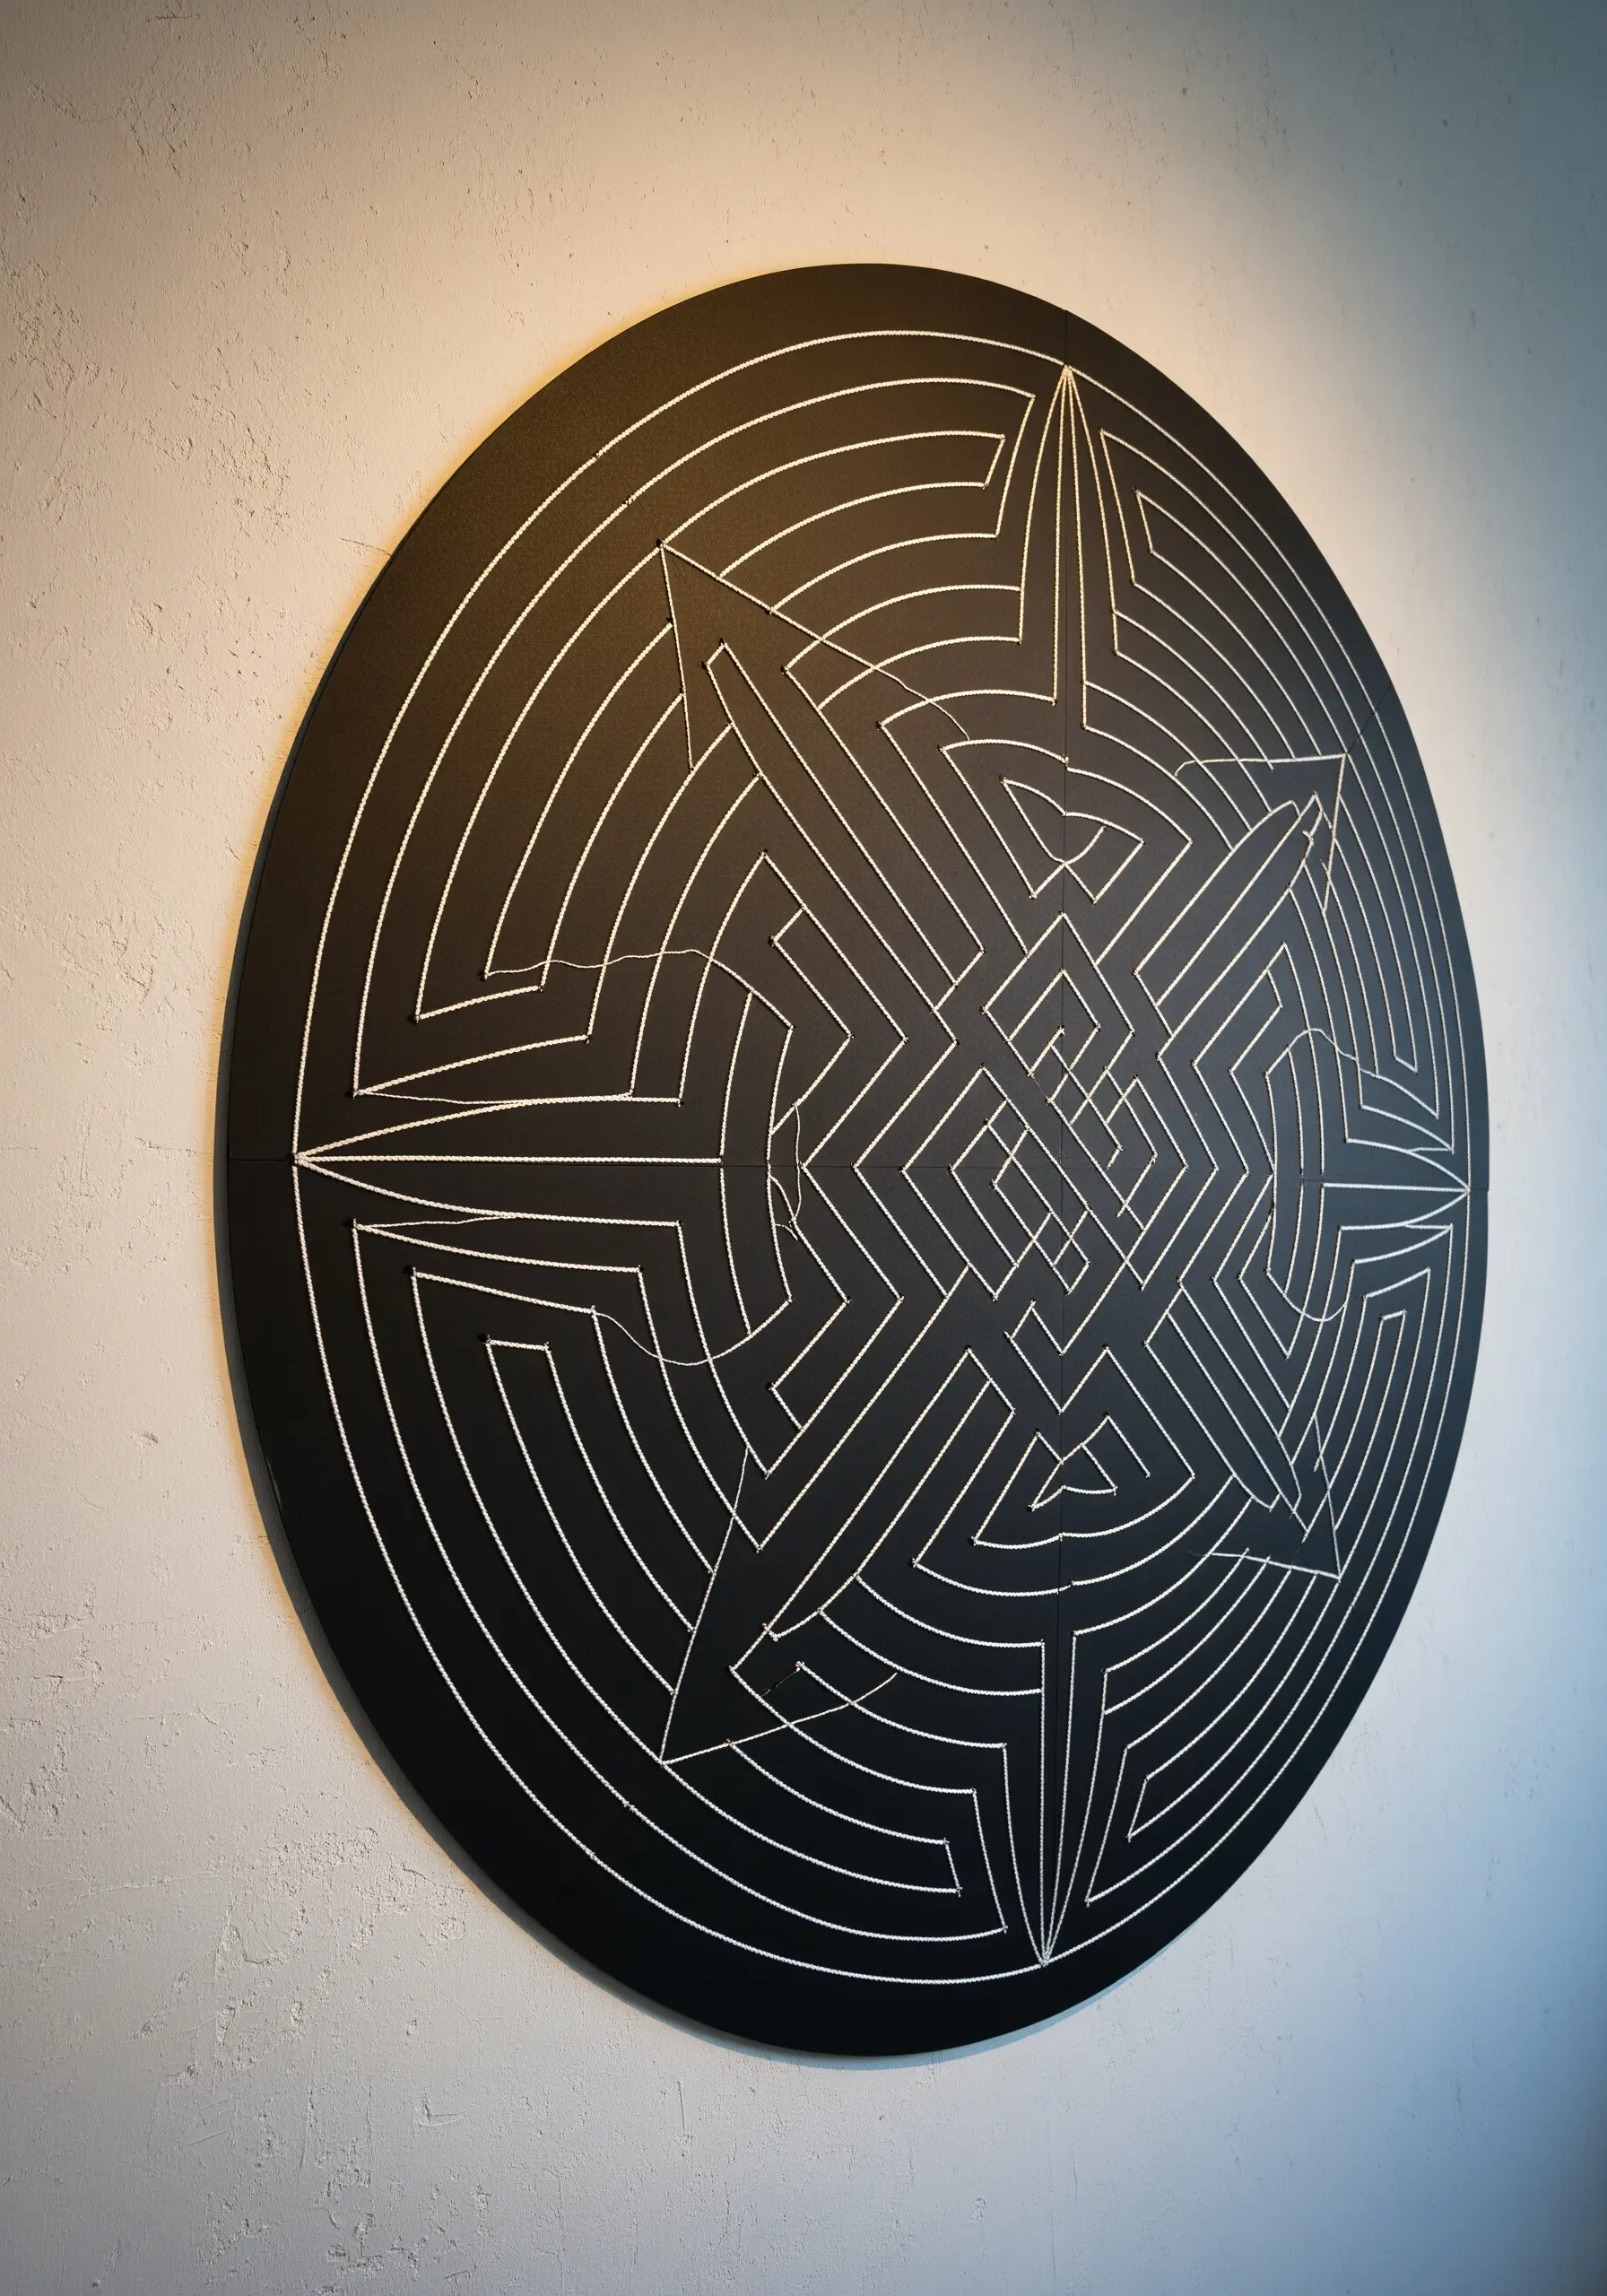
Explore the interplay of light, shadow, and line with this precise paper-cutting technique.
Design a complex geometric maze or labyrinth and have it professionally laser-cut from thick, black mat board for perfectly clean edges.
Alternatively, you can patiently cut it by hand with a craft knife.
Then, carefully wrap or trace a single, continuous white thread along certain pathways of the design, securing it at the start and end points on the back.
The thread doesn’t pierce the paper but rests on top, creating a subtle, secondary layer of texture and guiding the eye through the intricate design.
20. Dimensional Thread Wrapping on Terracotta
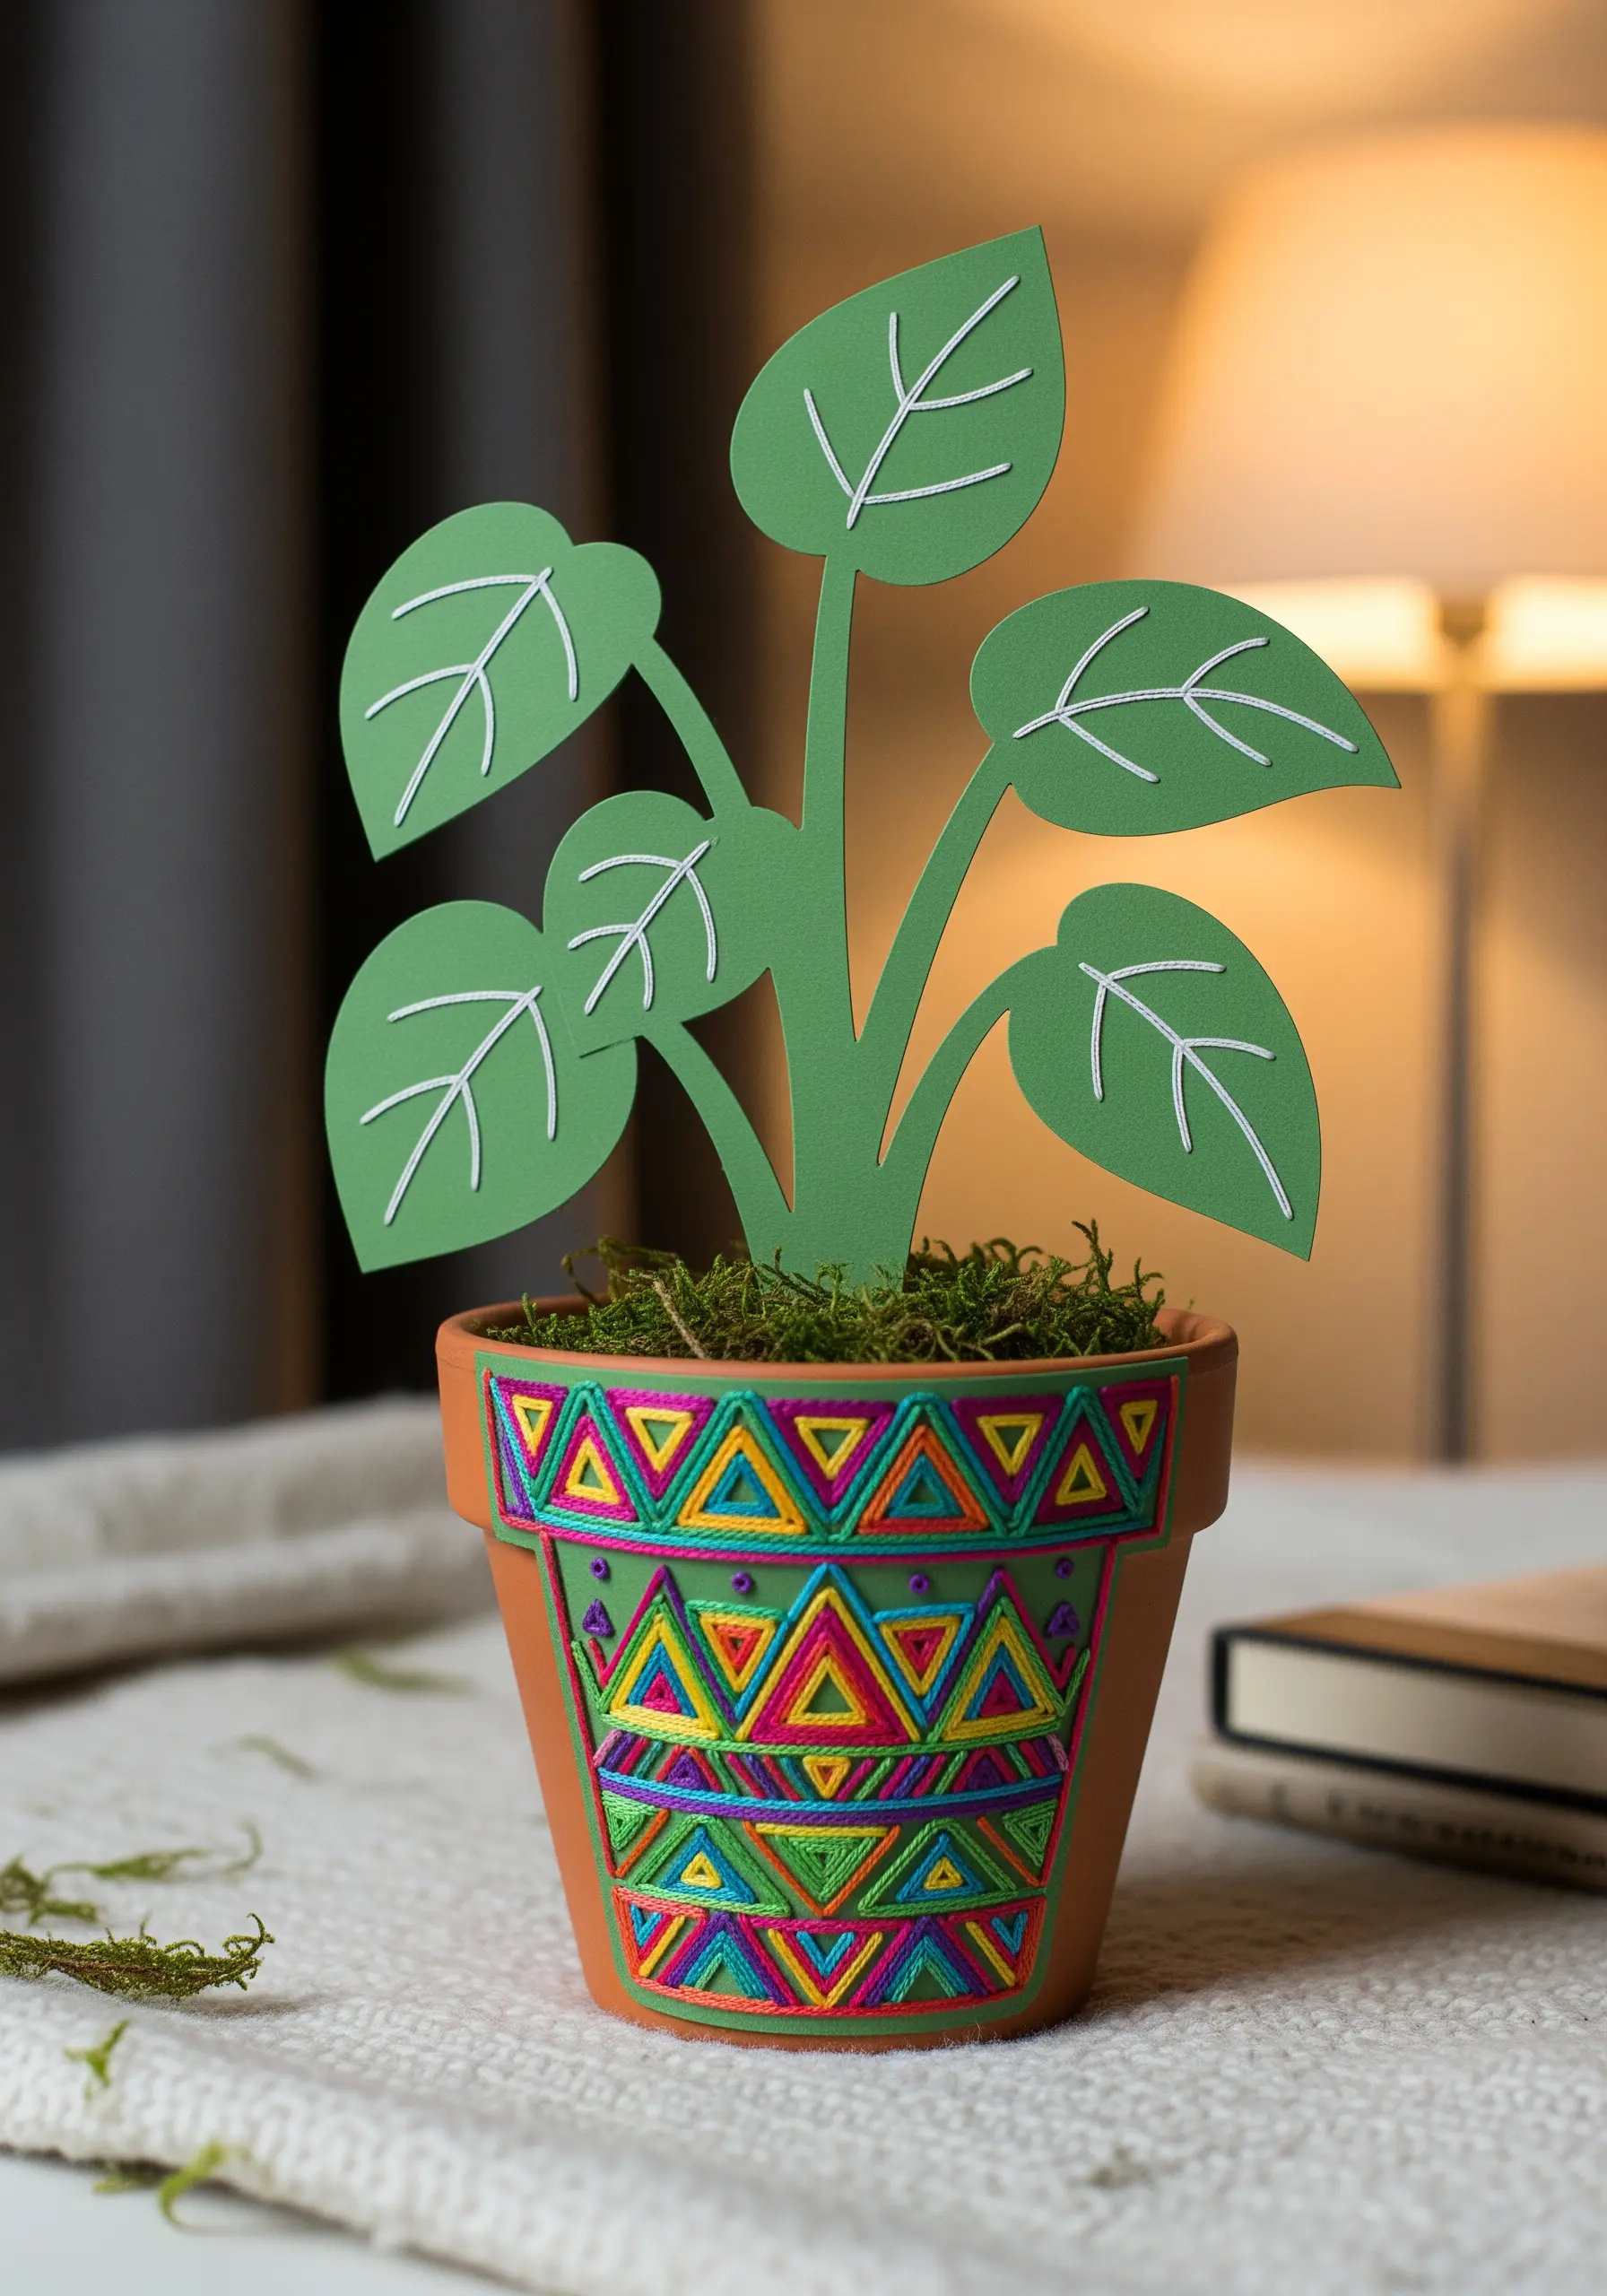
Extend your embroidery skills beyond paper and fabric by embellishing hard surfaces like terracotta.
Lightly sketch a geometric pattern onto a planter pot. Drill tiny, evenly spaced holes along the lines of your design using a fine-bit Dremel or micro drill.
Weave colorful embroidery floss or thin yarn through the holes to create vibrant, textured patterns.
This method transforms a simple object into a unique piece of functional art, combining the earthy texture of terracotta with the soft, vibrant quality of thread.
21. Visualizing Soundwaves with Layered Paper
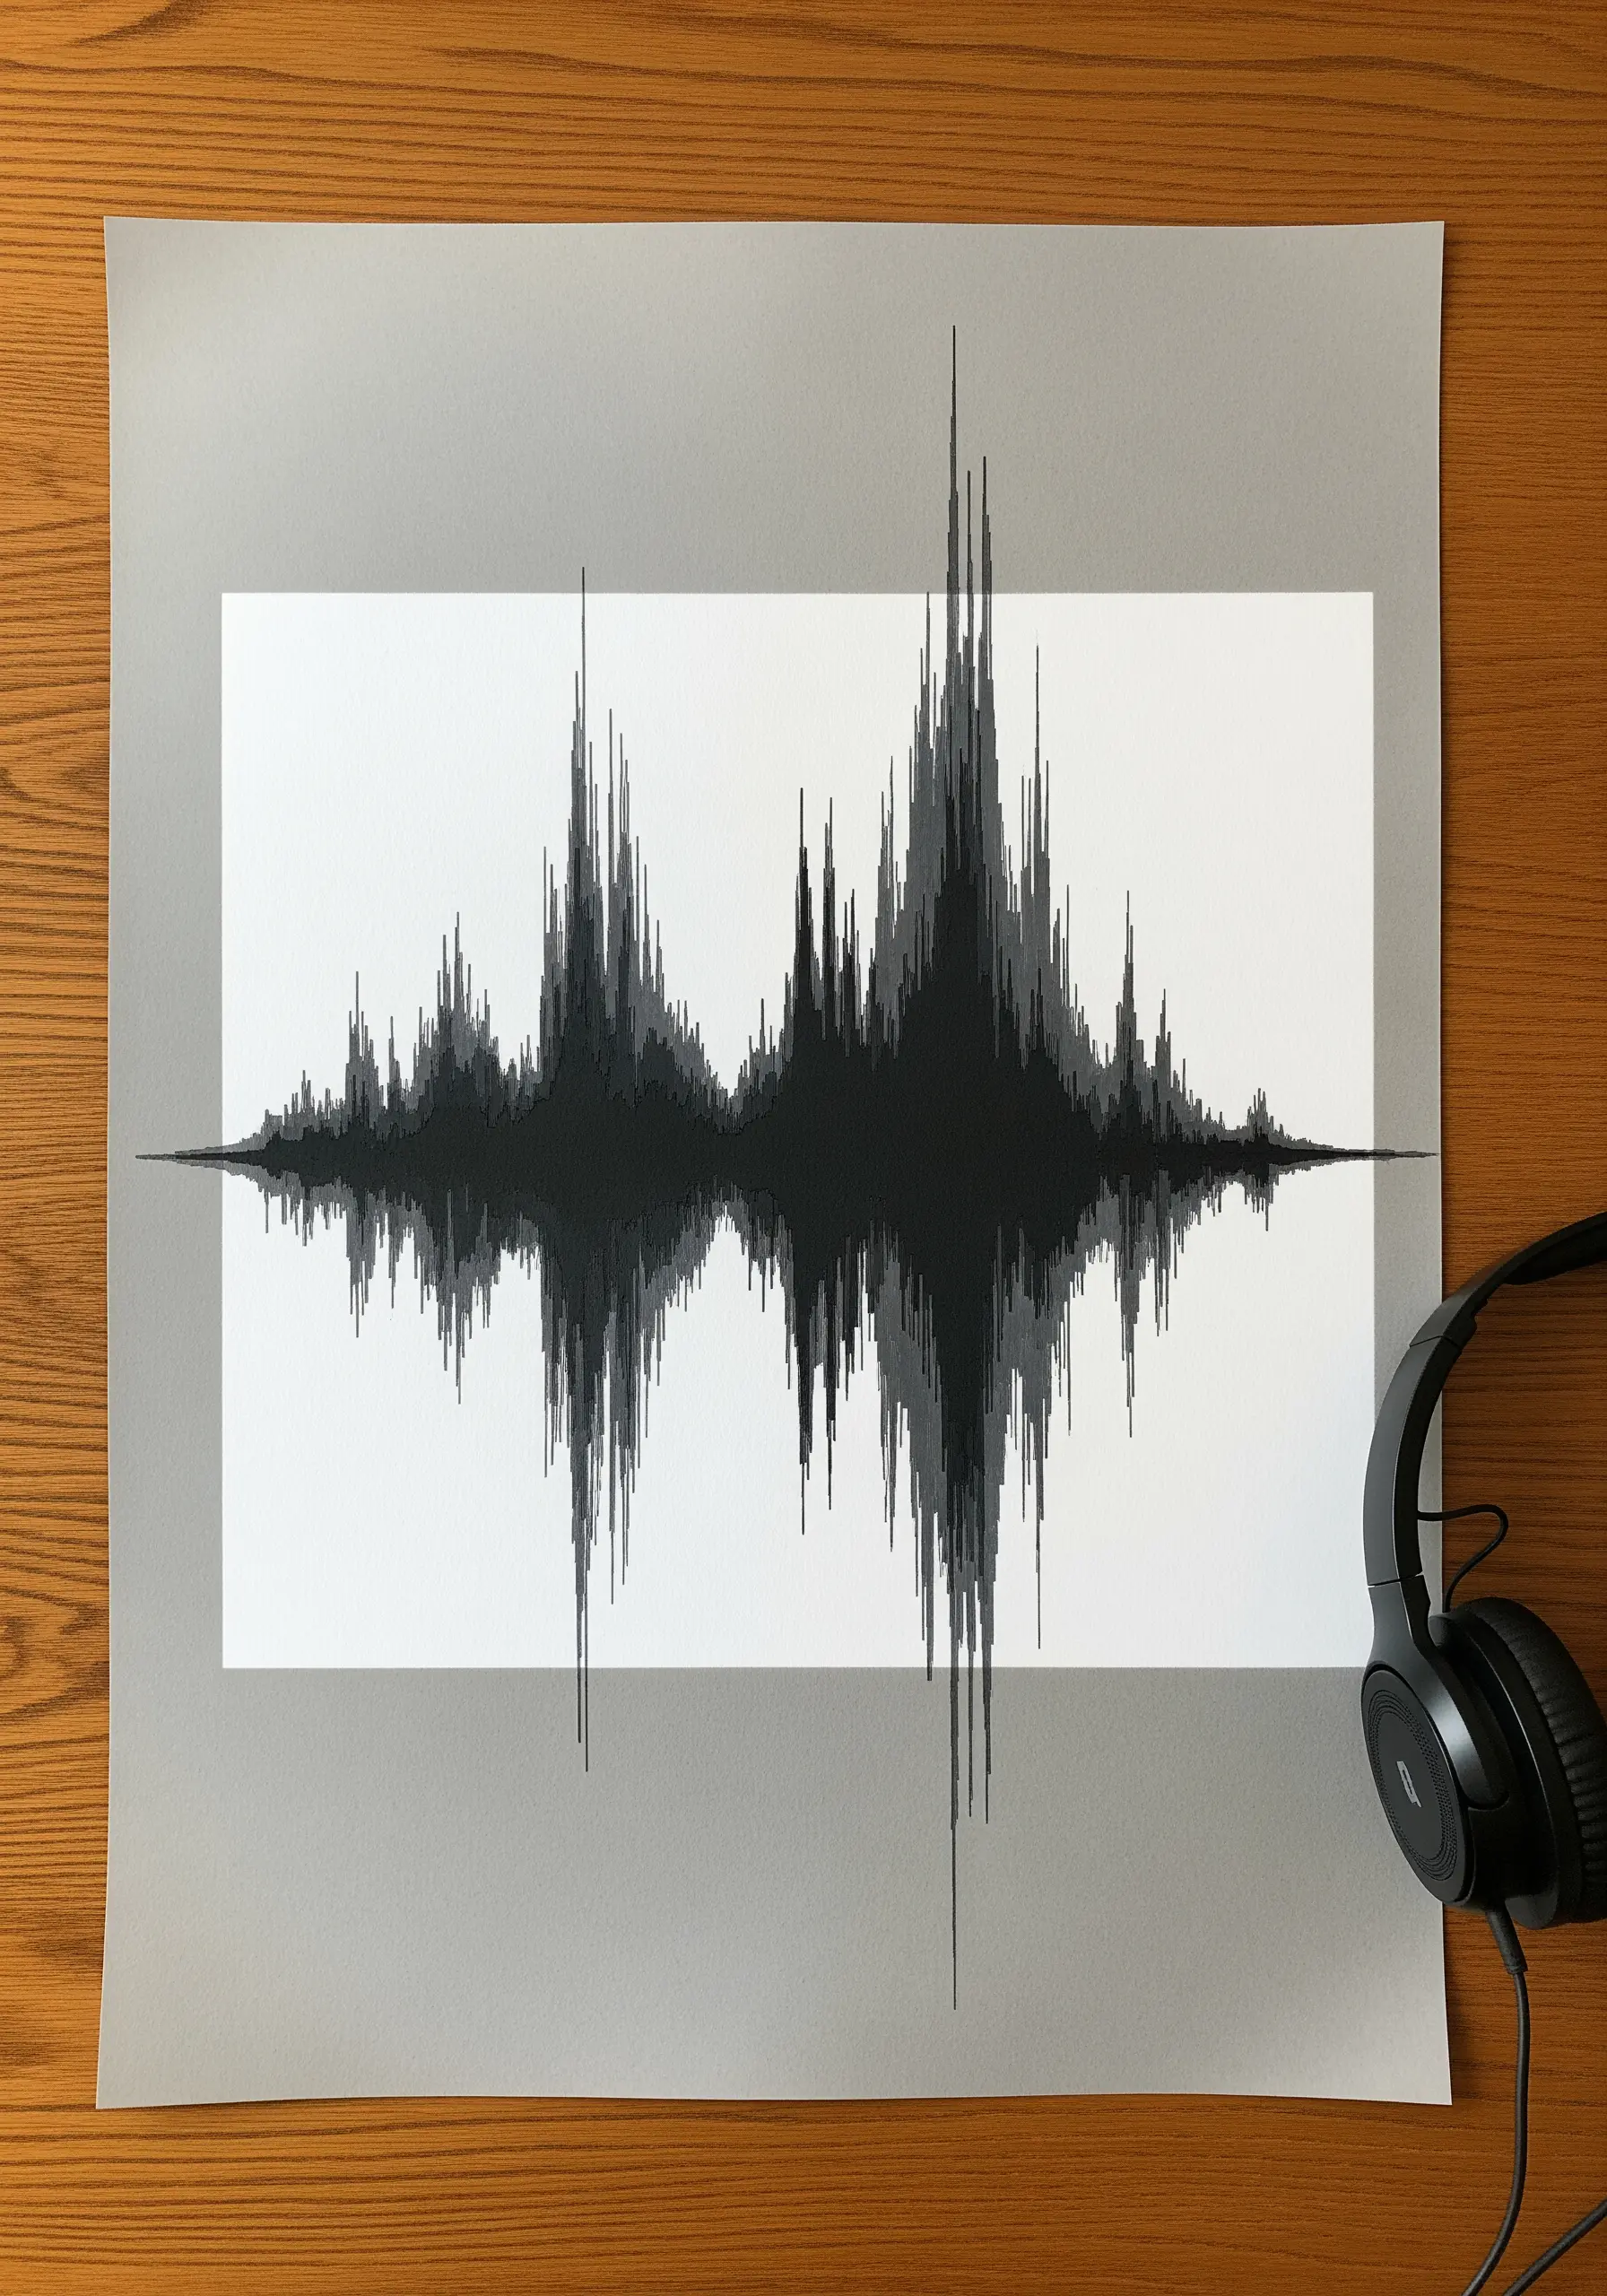
Translate an intangible concept like sound into a physical, textured art piece.
Print a visual of a soundwave and use it as a template to hand-cut layers of black and grey cardstock.
Stack and glue the layers precisely, creating a topographic, three-dimensional representation of the sound.
While this piece doesn’t use thread, it’s a powerful inspiration for how embroidery could be used to add another layer of texture—imagine stitching key frequencies with metallic thread or couching a soft yarn along the peaks.
This is a fantastic starting point for abstract concept art embroidery ideas.
22. Layered Geometric Shapes with Running Stitch Borders
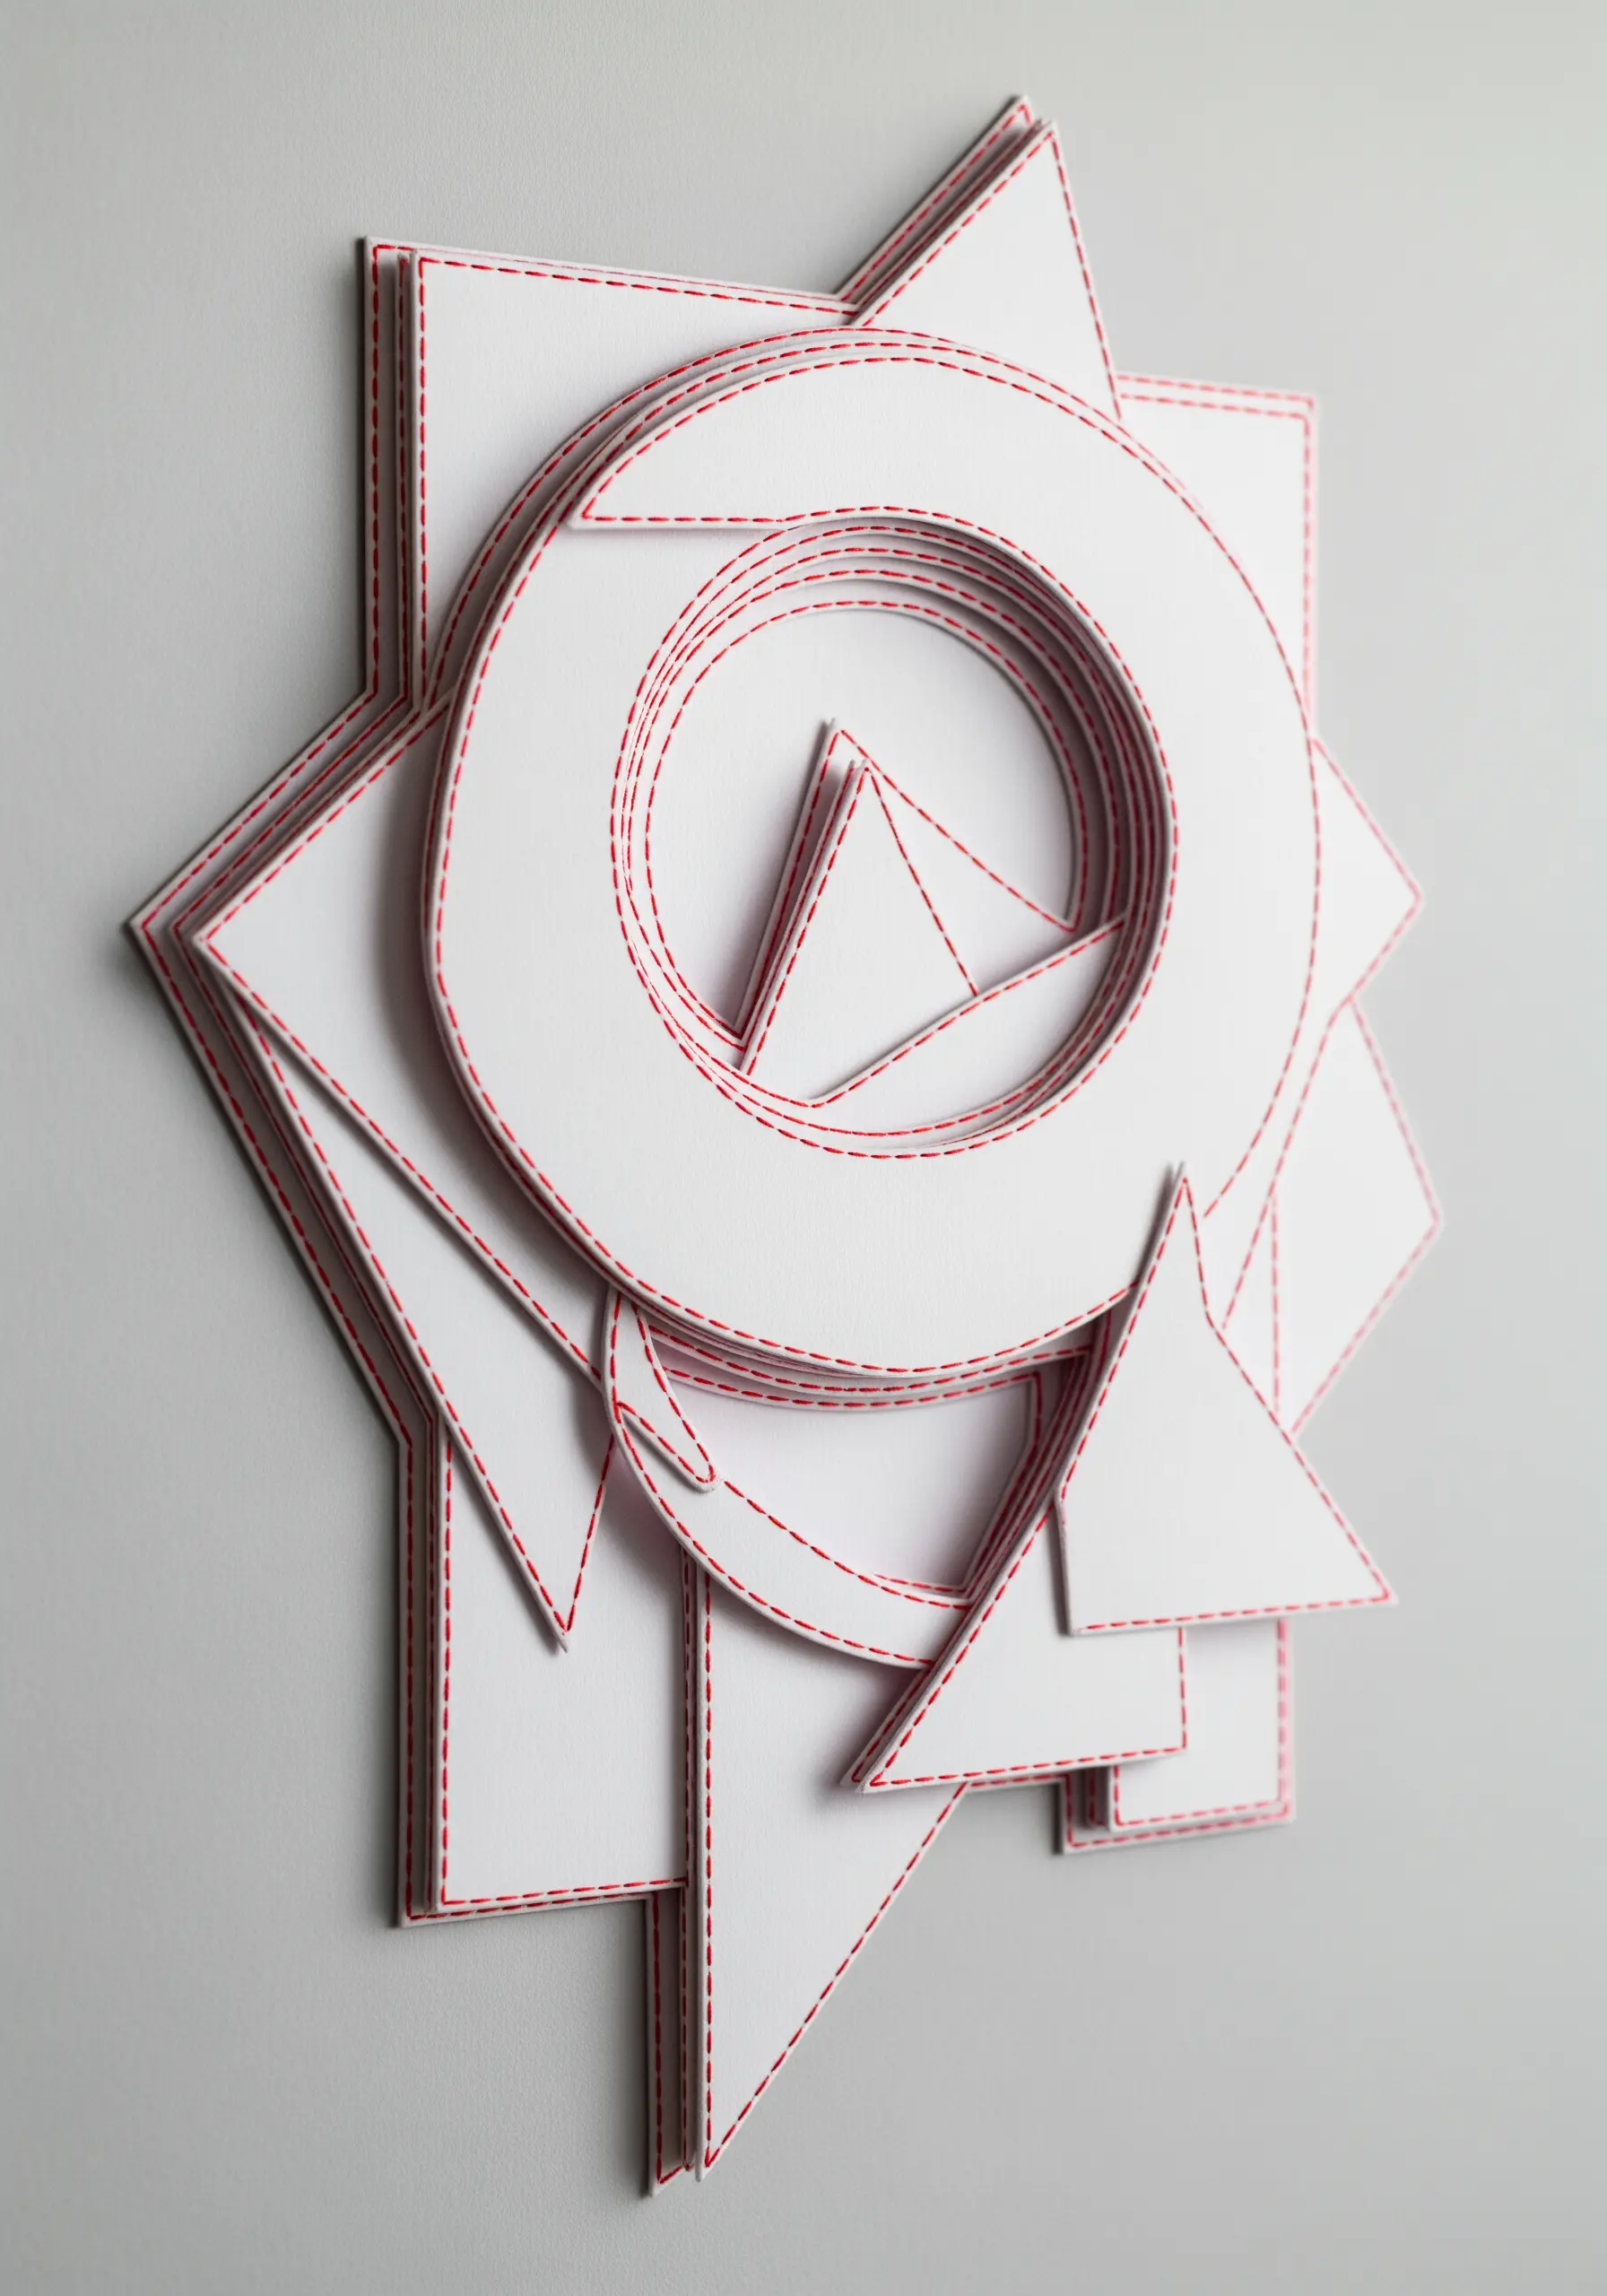
Create a sculptural, architectural piece by layering paper and unifying it with a simple stitch.
Cut geometric shapes from heavy, white cardstock and arrange them in an overlapping, abstract composition.
Before assembling, use a bright red thread to add a simple running stitch just inside the edge of each piece.
This stitched line adds a pop of color, a handmade texture, and a unifying element that ties all the separate components together.
The final assembly has depth and dimension, where the thread acts as both decoration and a subtle structural accent.
23. Fashion Illustration with Paper Collage and Stitched Details
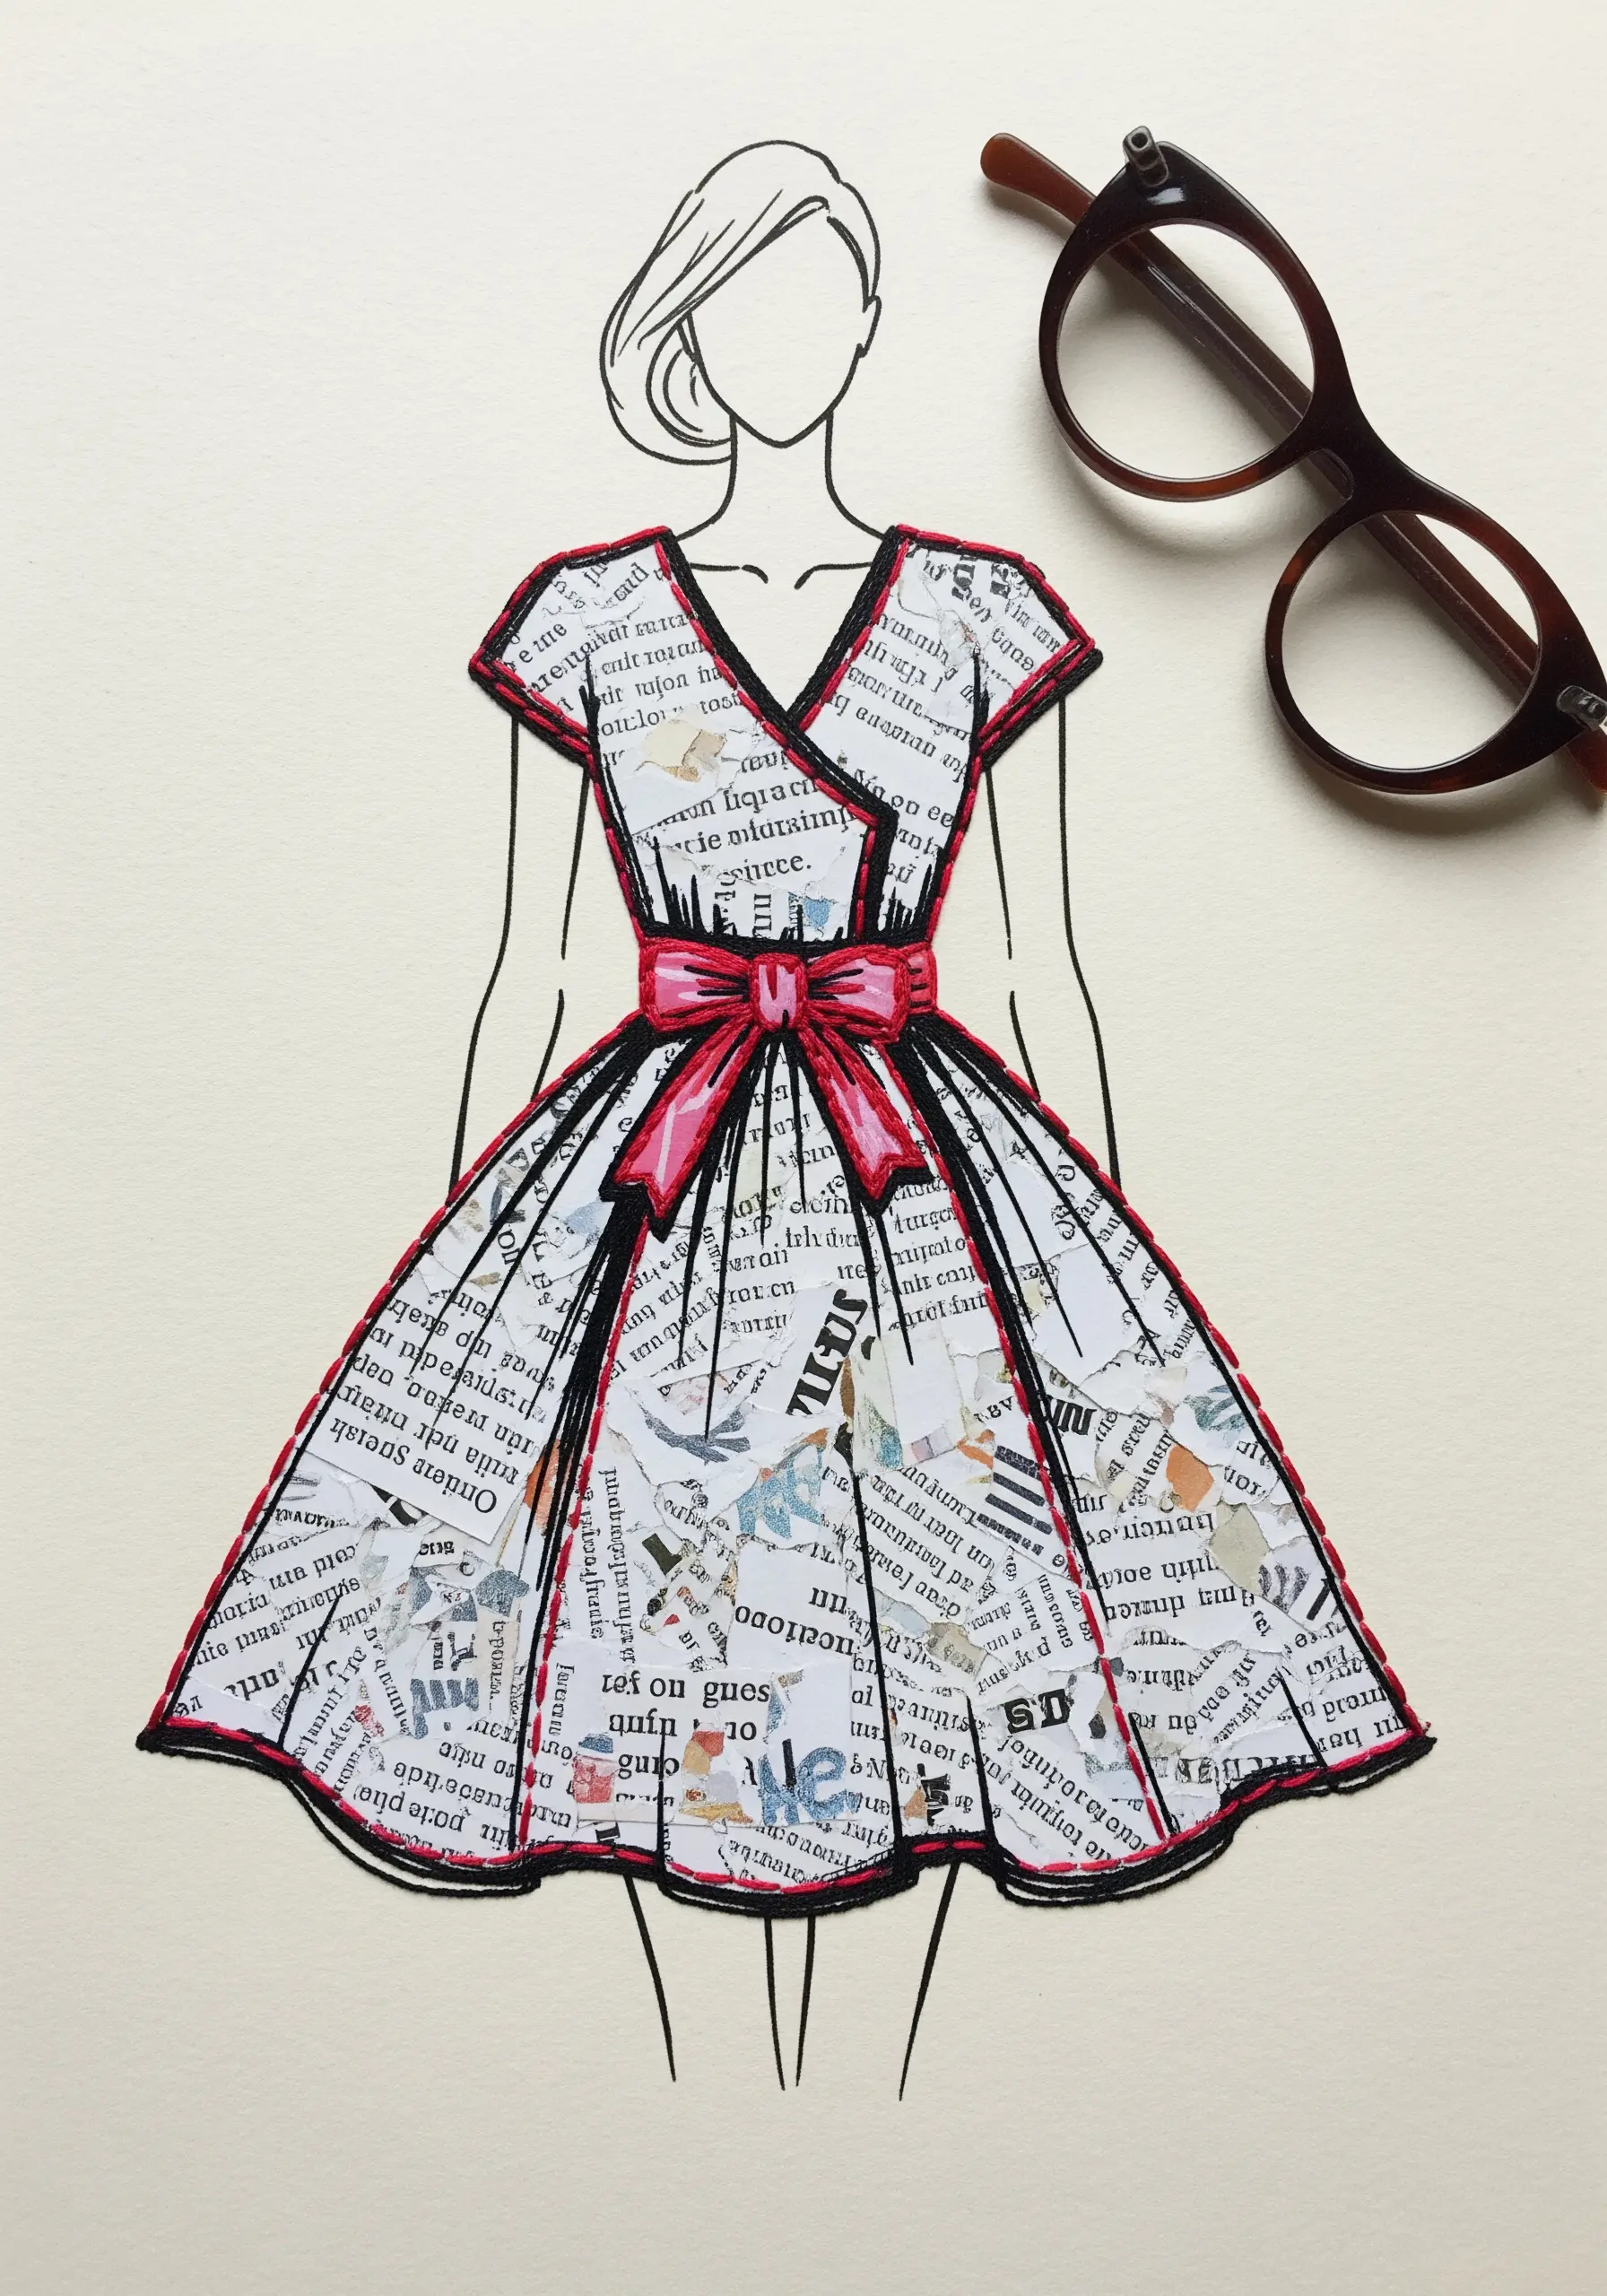
Bring a fashion sketch to life by using collage and embroidery to create the garment.
Draw your figure, then create the dress using collaged pieces of newspaper or patterned paper.
Once the collage is dry, use a bold, contrasting thread to add embroidered details. A backstitch can define the seams and hemlines, while a satin stitch can create a vibrant belt or bow.
This mixed-media technique adds texture and dimension, making the illustration pop off the page.
24. Suspended Thread Puppetry for Backlit Silhouettes
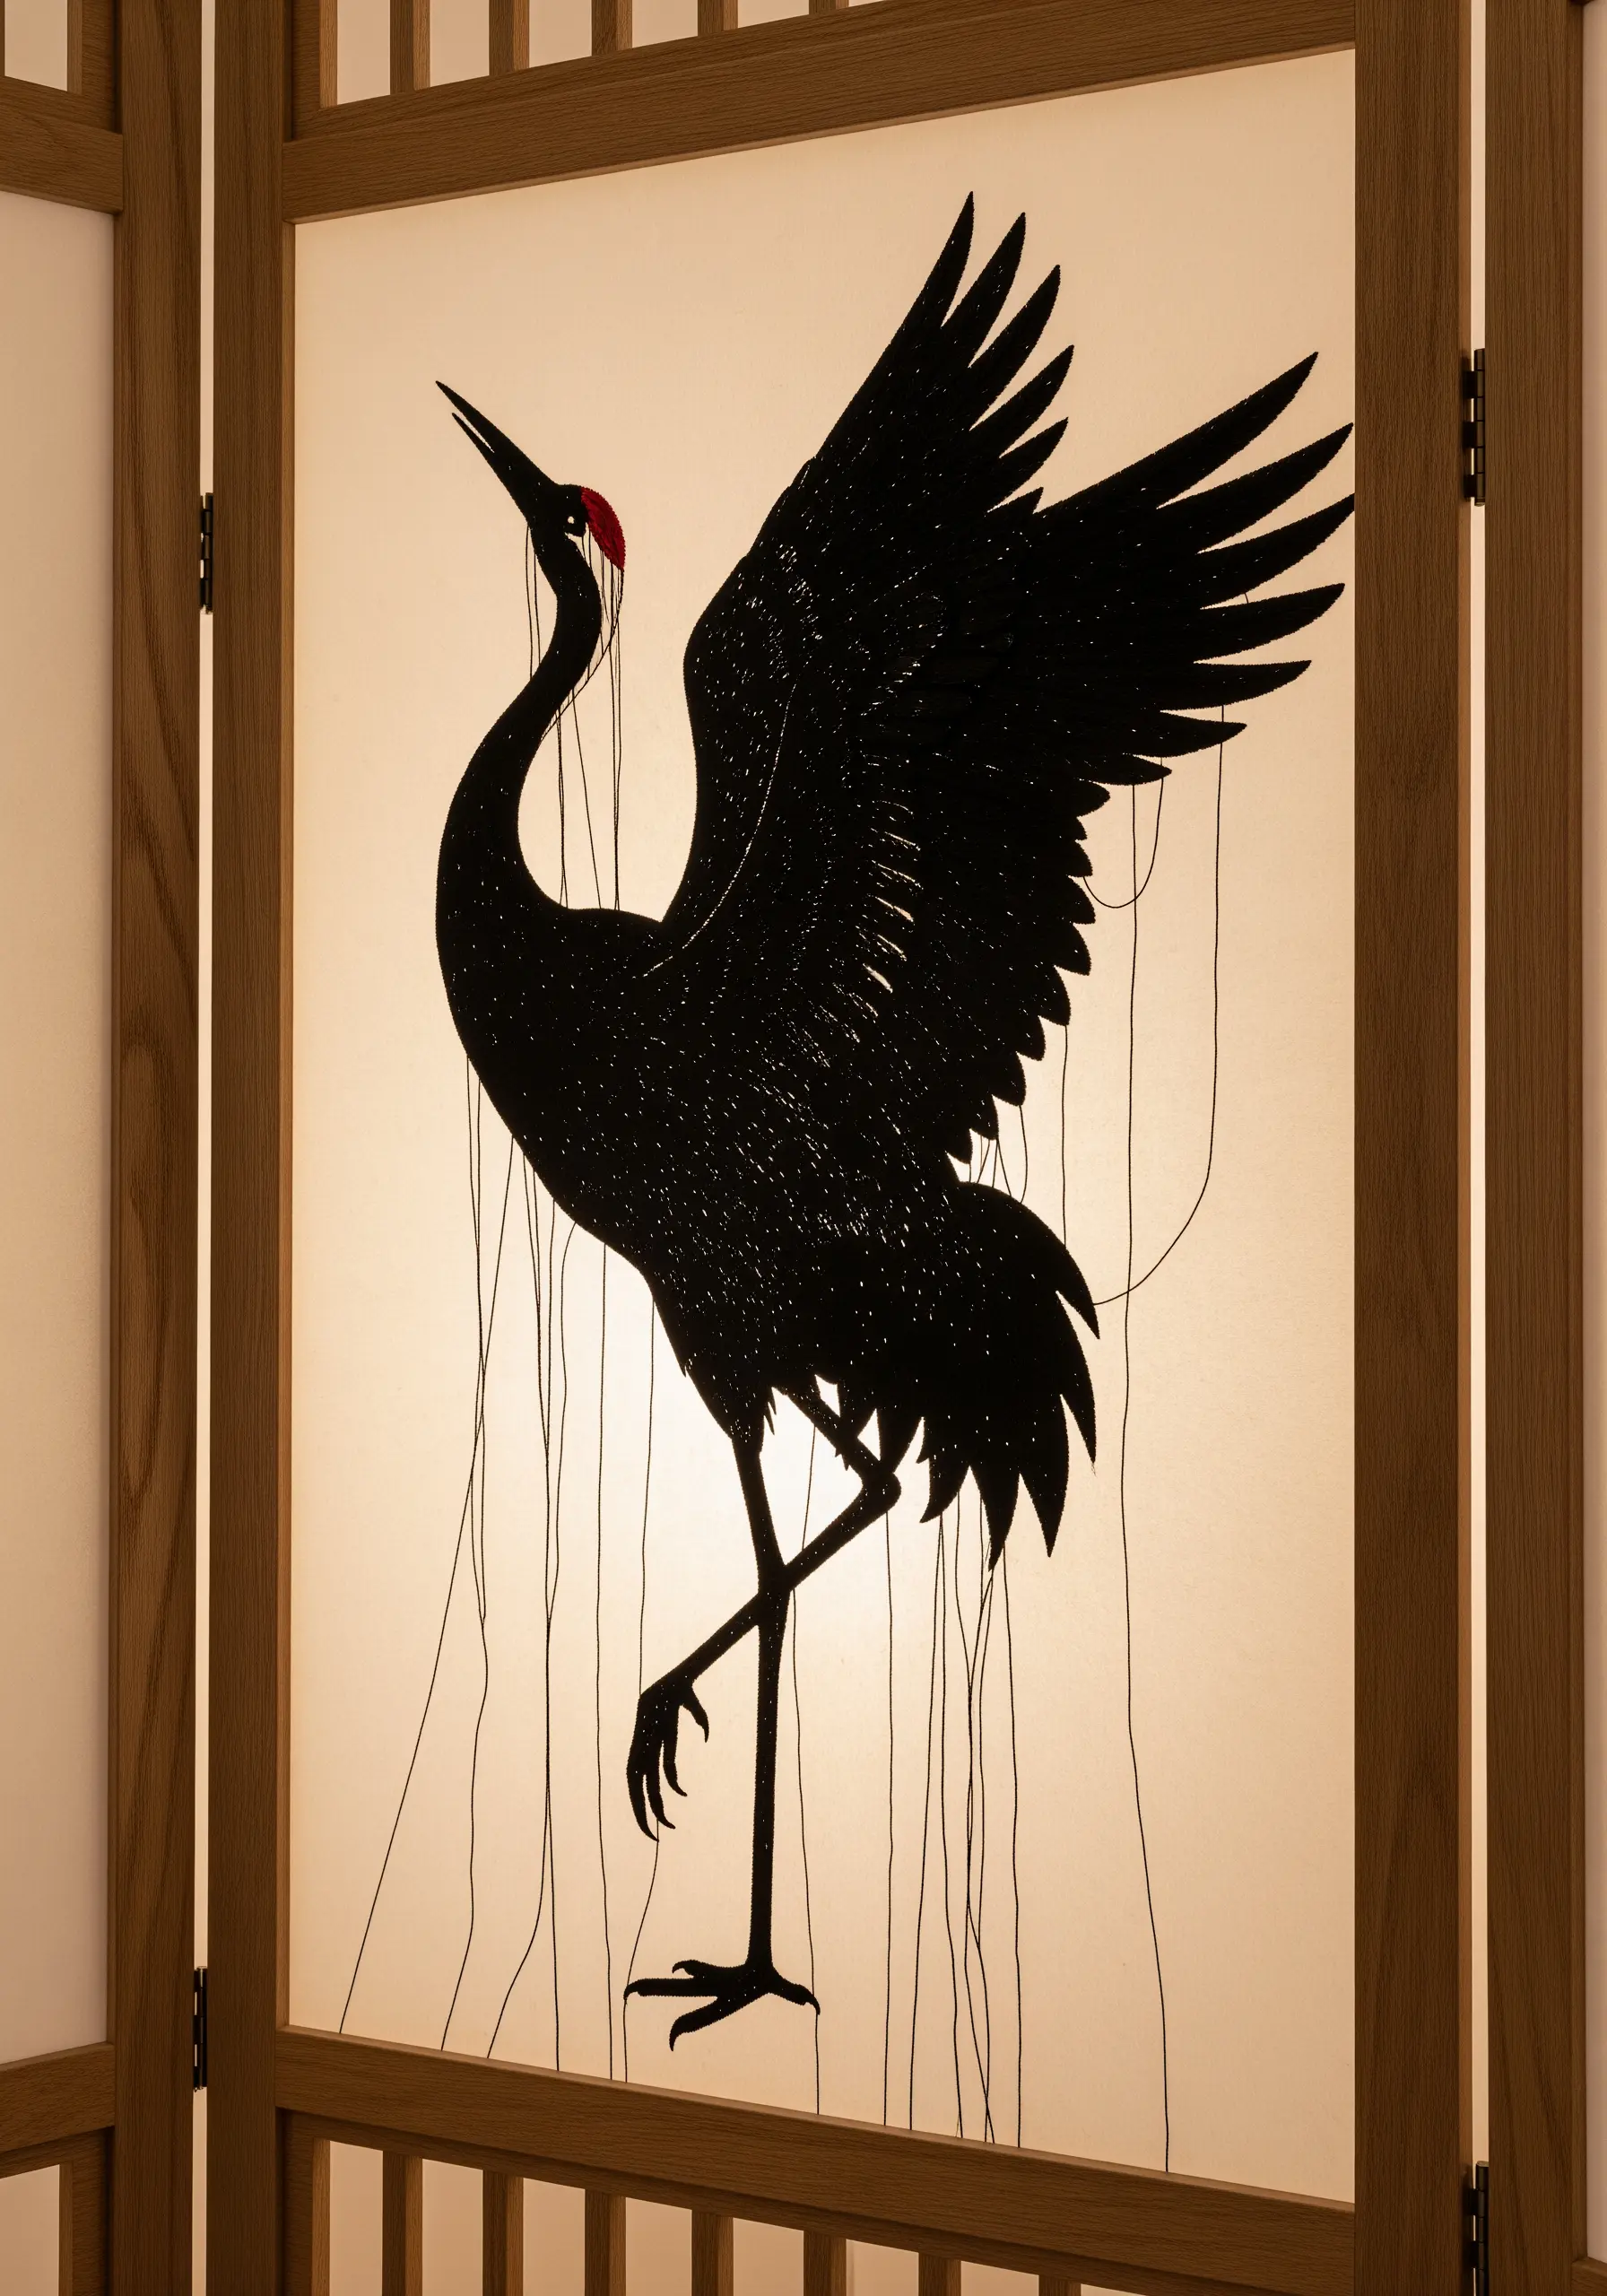
Create a dramatic art piece by combining a bold paper-cut silhouette with the tension of suspended threads.
Place a large paper-cut figure, like this crane, against a backlit panel or shoji screen.
Instead of stitching onto the paper, attach threads to various points on the silhouette and anchor them to the surrounding frame.
This puppetry-like technique adds a layer of dynamic tension and suggests movement. The fine threads catch the light, creating a delicate, web-like structure that contrasts with the solid black form.
25. Abstract Yarn Couching on a Painted Canvas
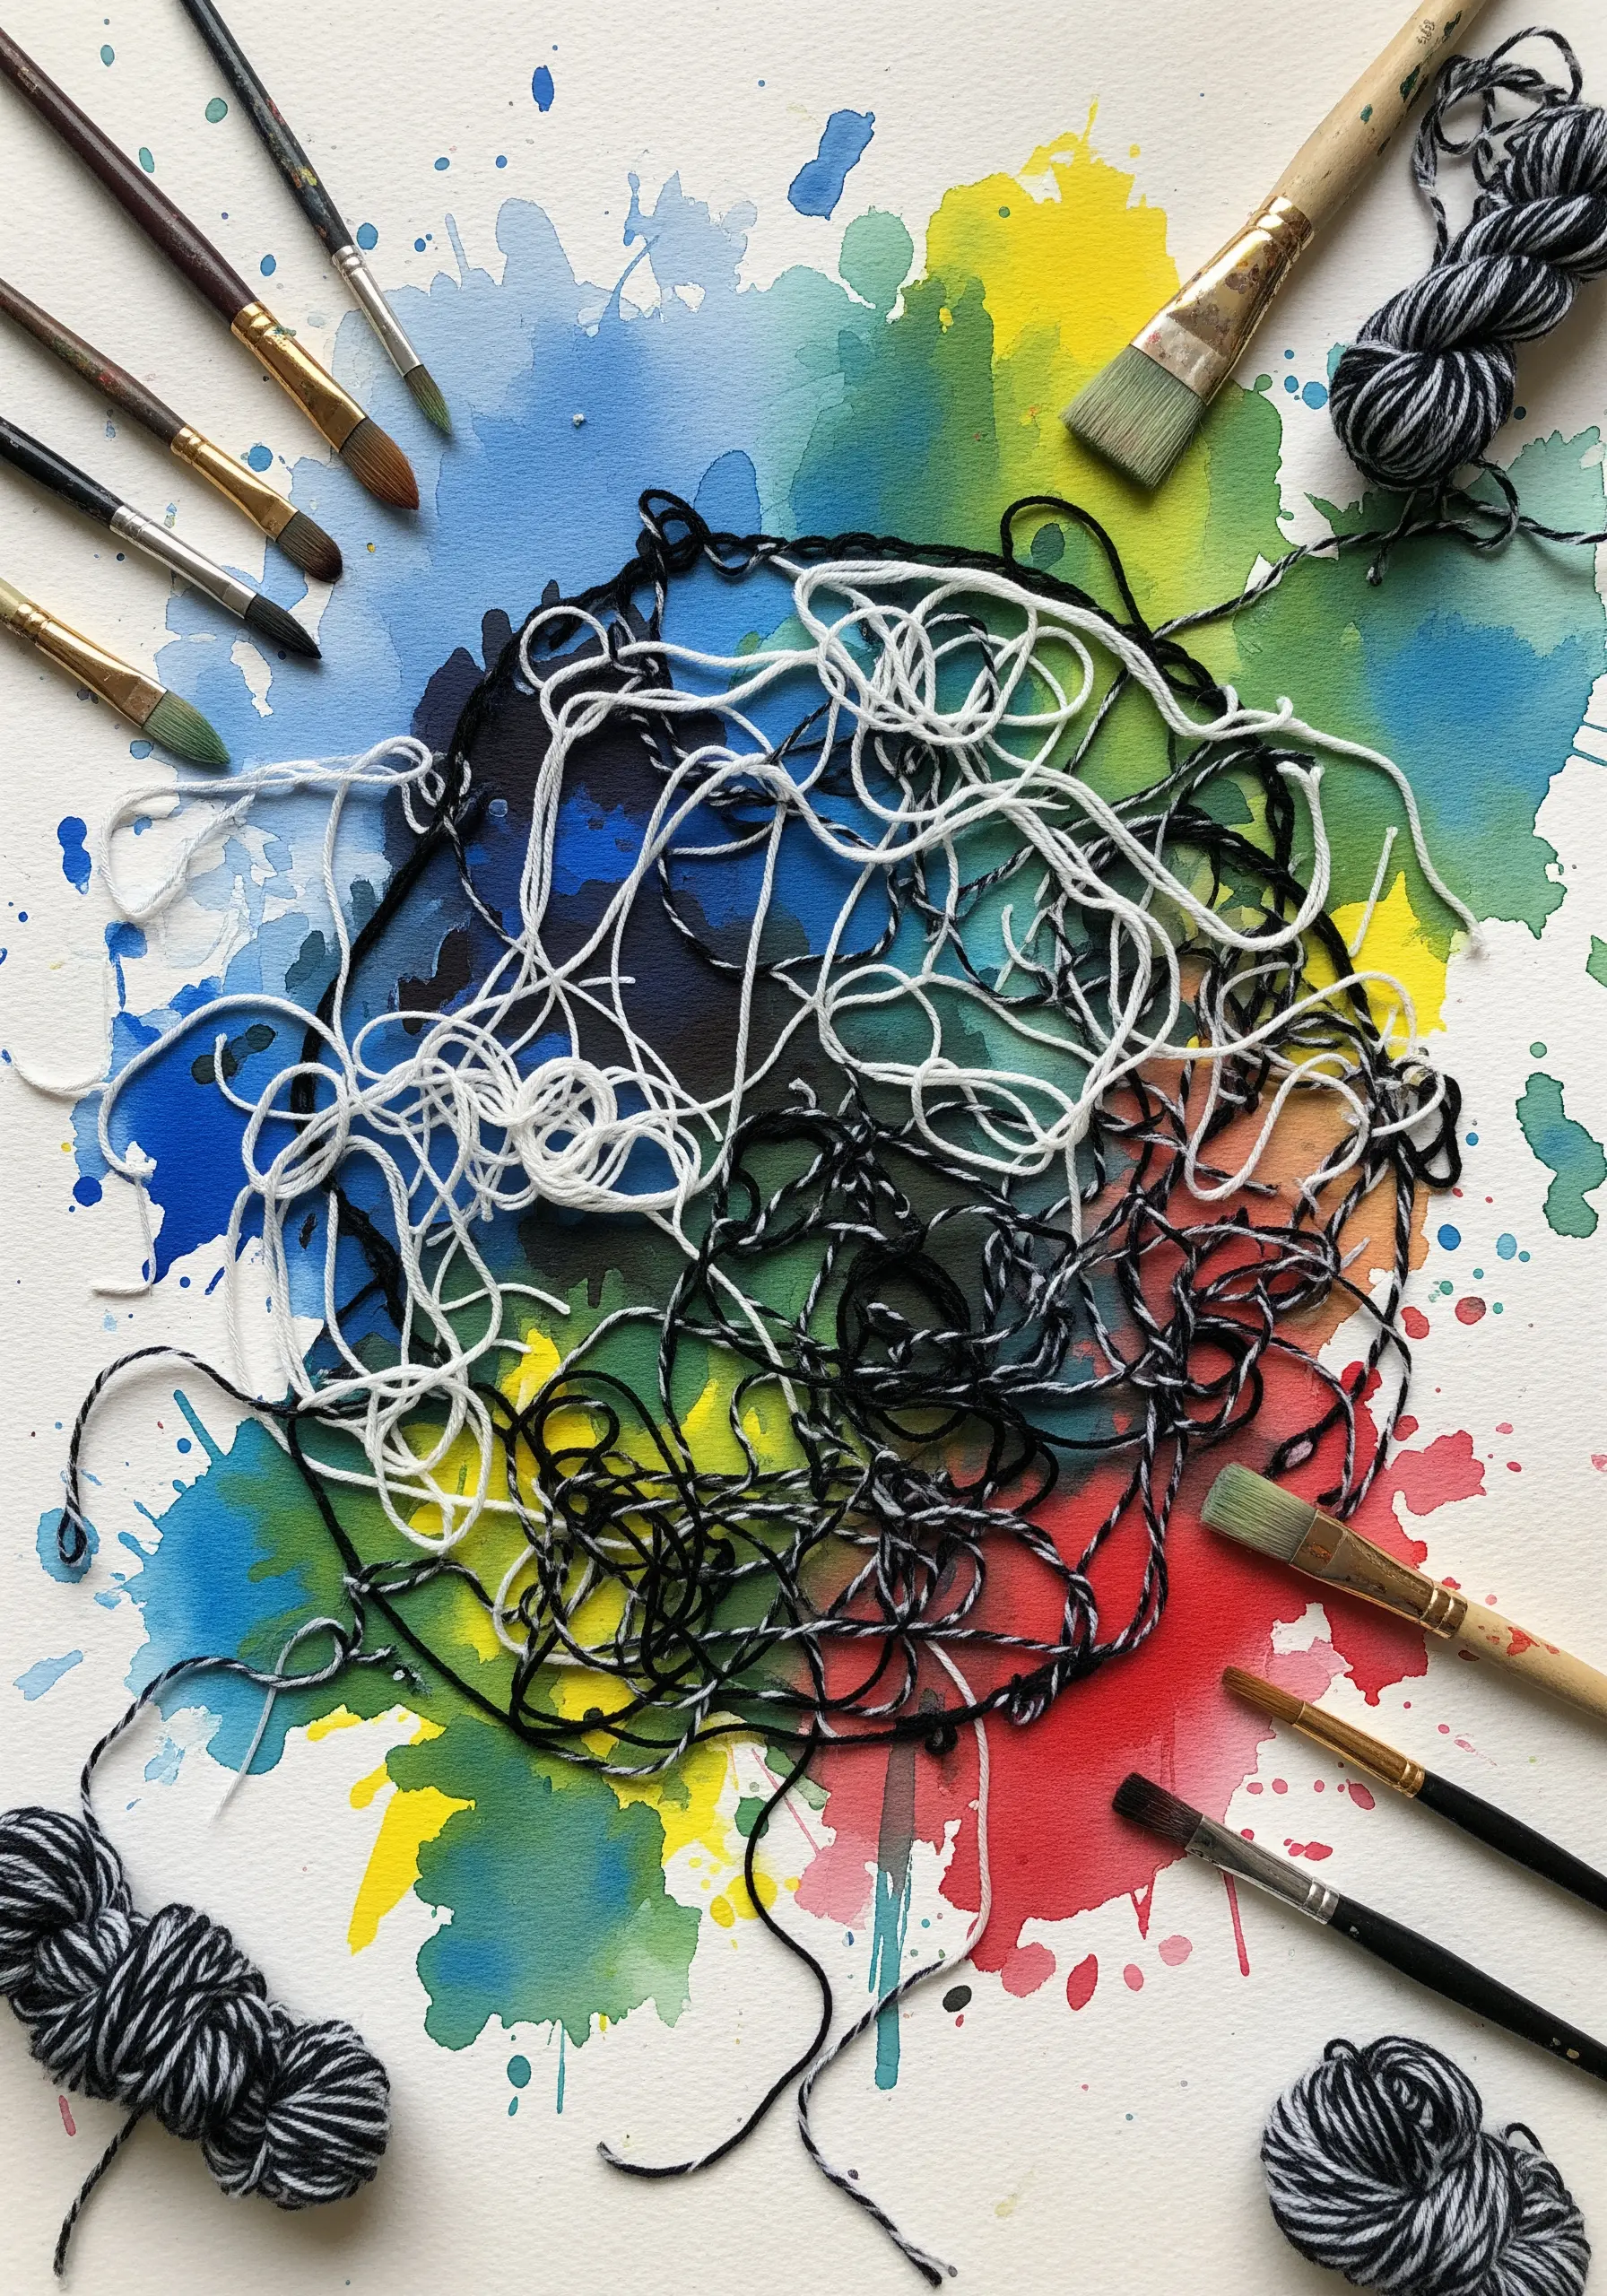
Embrace chaos and texture by using yarn as an expressive drawing tool.
Start with a vibrant, abstract watercolor background on heavy paper or canvas.
Instead of a planned design, lay down variegated or multi-toned yarn in organic, tangled loops across the surface.
Secure the yarn with a few hidden couching stitches, allowing it to retain its wild, energetic form.
This method is a freeing exercise in abstraction, where the thread’s path is intuitive rather than precise, creating an artwork full of movement and raw energy.
26. Micro-Embroidery on Polished Stone or Resin
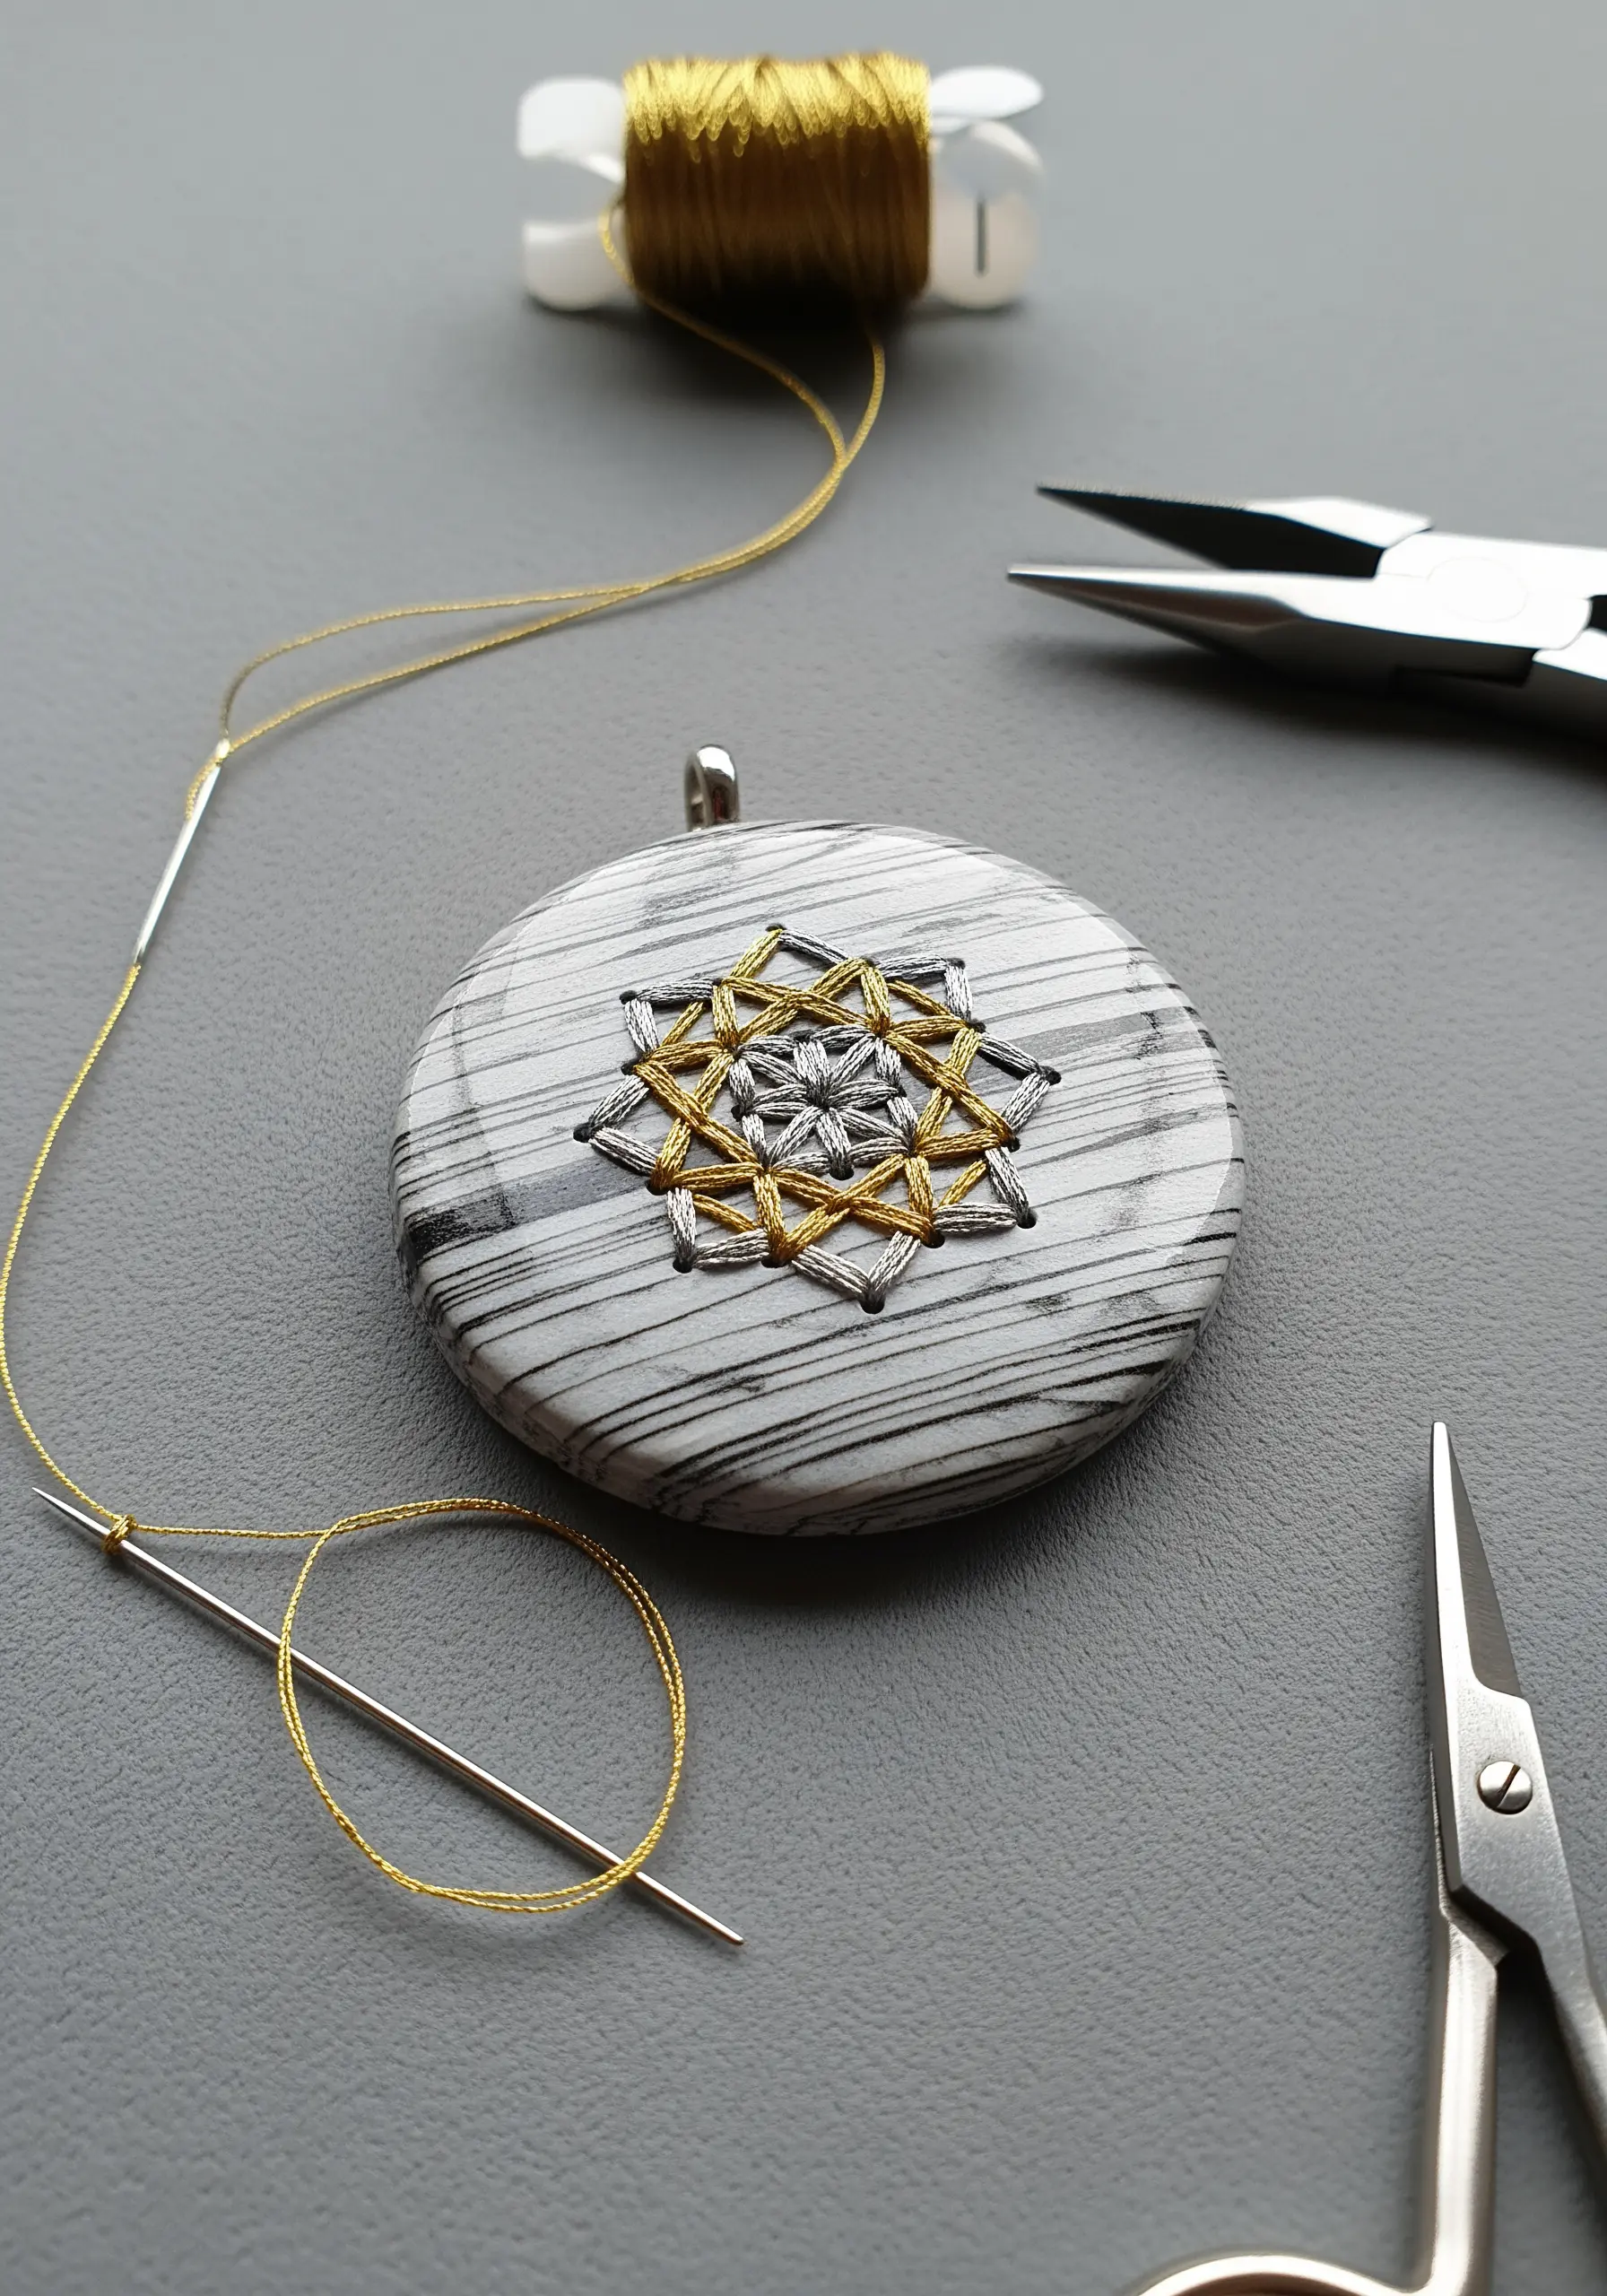
Challenge your precision by stitching on a hard, non-traditional surface to create unique jewelry or art objects.
Use a micro-drill with a very fine bit to carefully drill a pattern of holes into a resin cabochon, a flat polished stone, or a piece of ceramic.
With a fine needle and metallic thread, create intricate geometric or mandala patterns by weaving the thread through the pre-drilled holes.
The contrast between the shimmering, delicate thread and the cool, solid base creates a stunning, high-end look perfect for handmade embroidered jewelry and accessories.
27. Layered Thread Art within a Carved Book
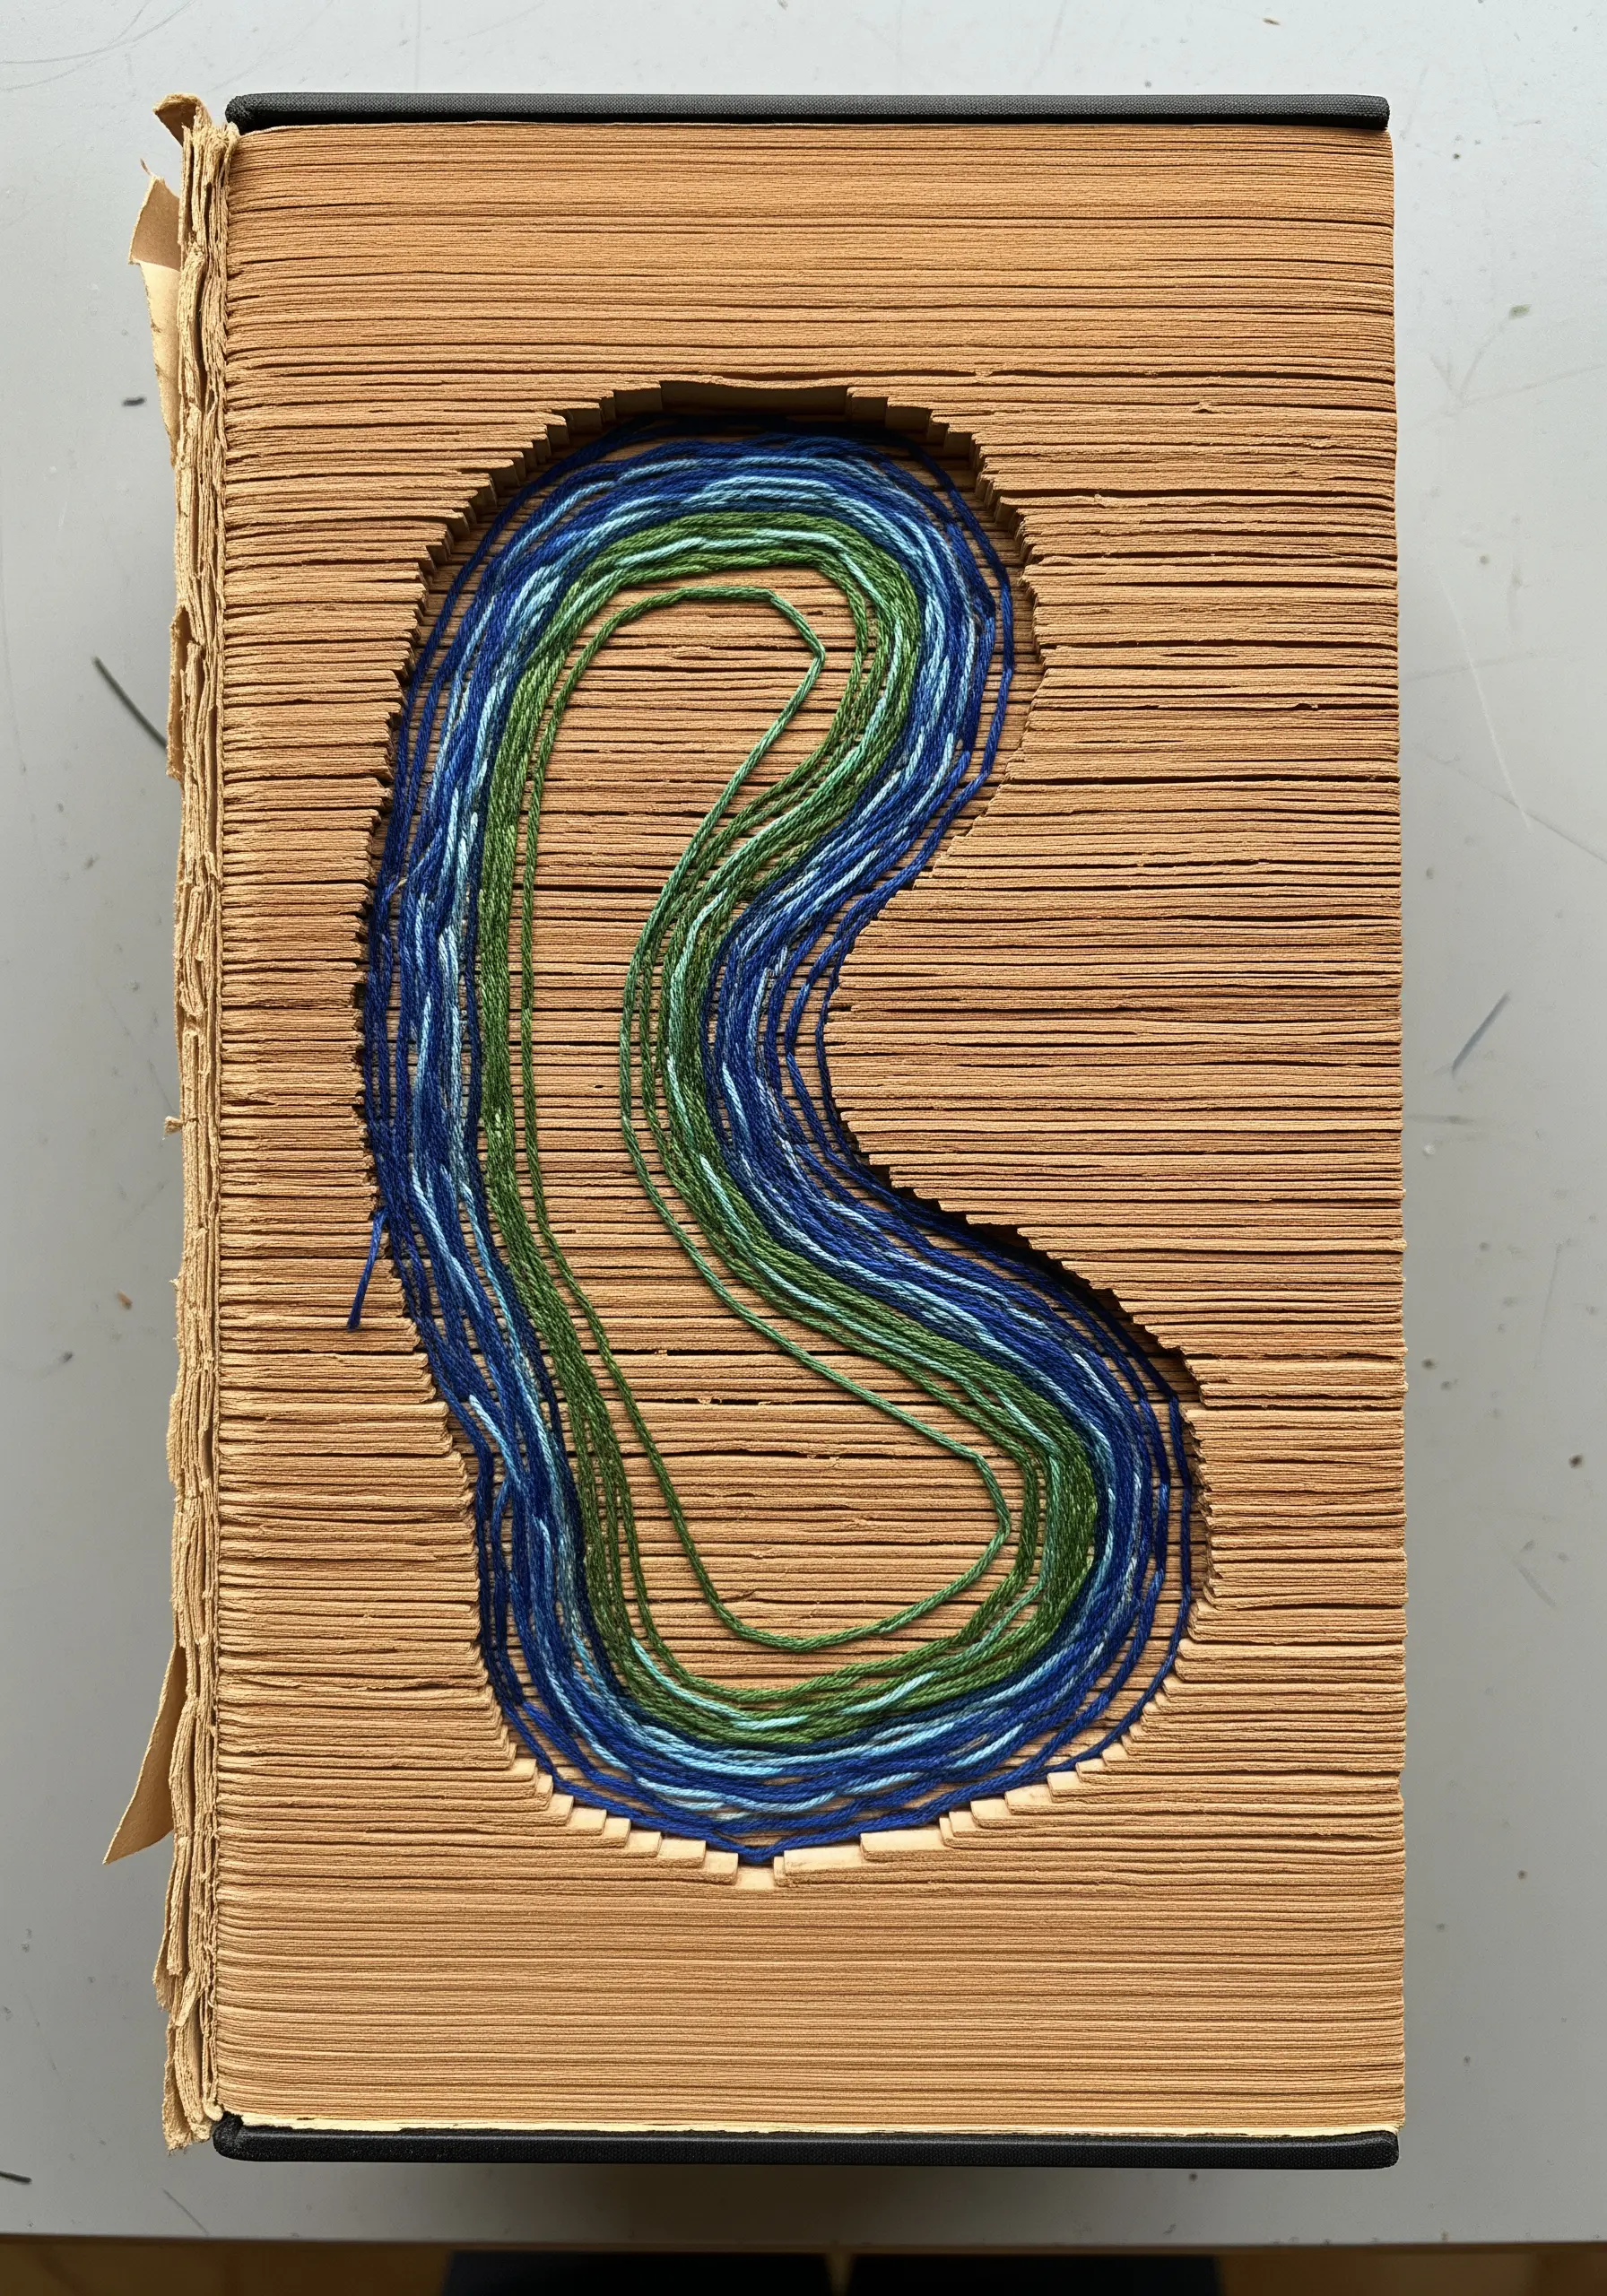
Transform a discarded book into a sculptural vessel for thread art.
Carefully glue the pages of an old hardcover book together, then use a craft knife to carve out a central, organic shape.
Use the inner edges of this carved space as an anchor point, wrapping different colored threads back and forth to create a layered, topographic effect.
The density and color of the threads build a new narrative within the old one, creating a powerful piece of conceptual art that speaks to layers of meaning.
28. Curating a Gallery Wall of Stitched Paper Art
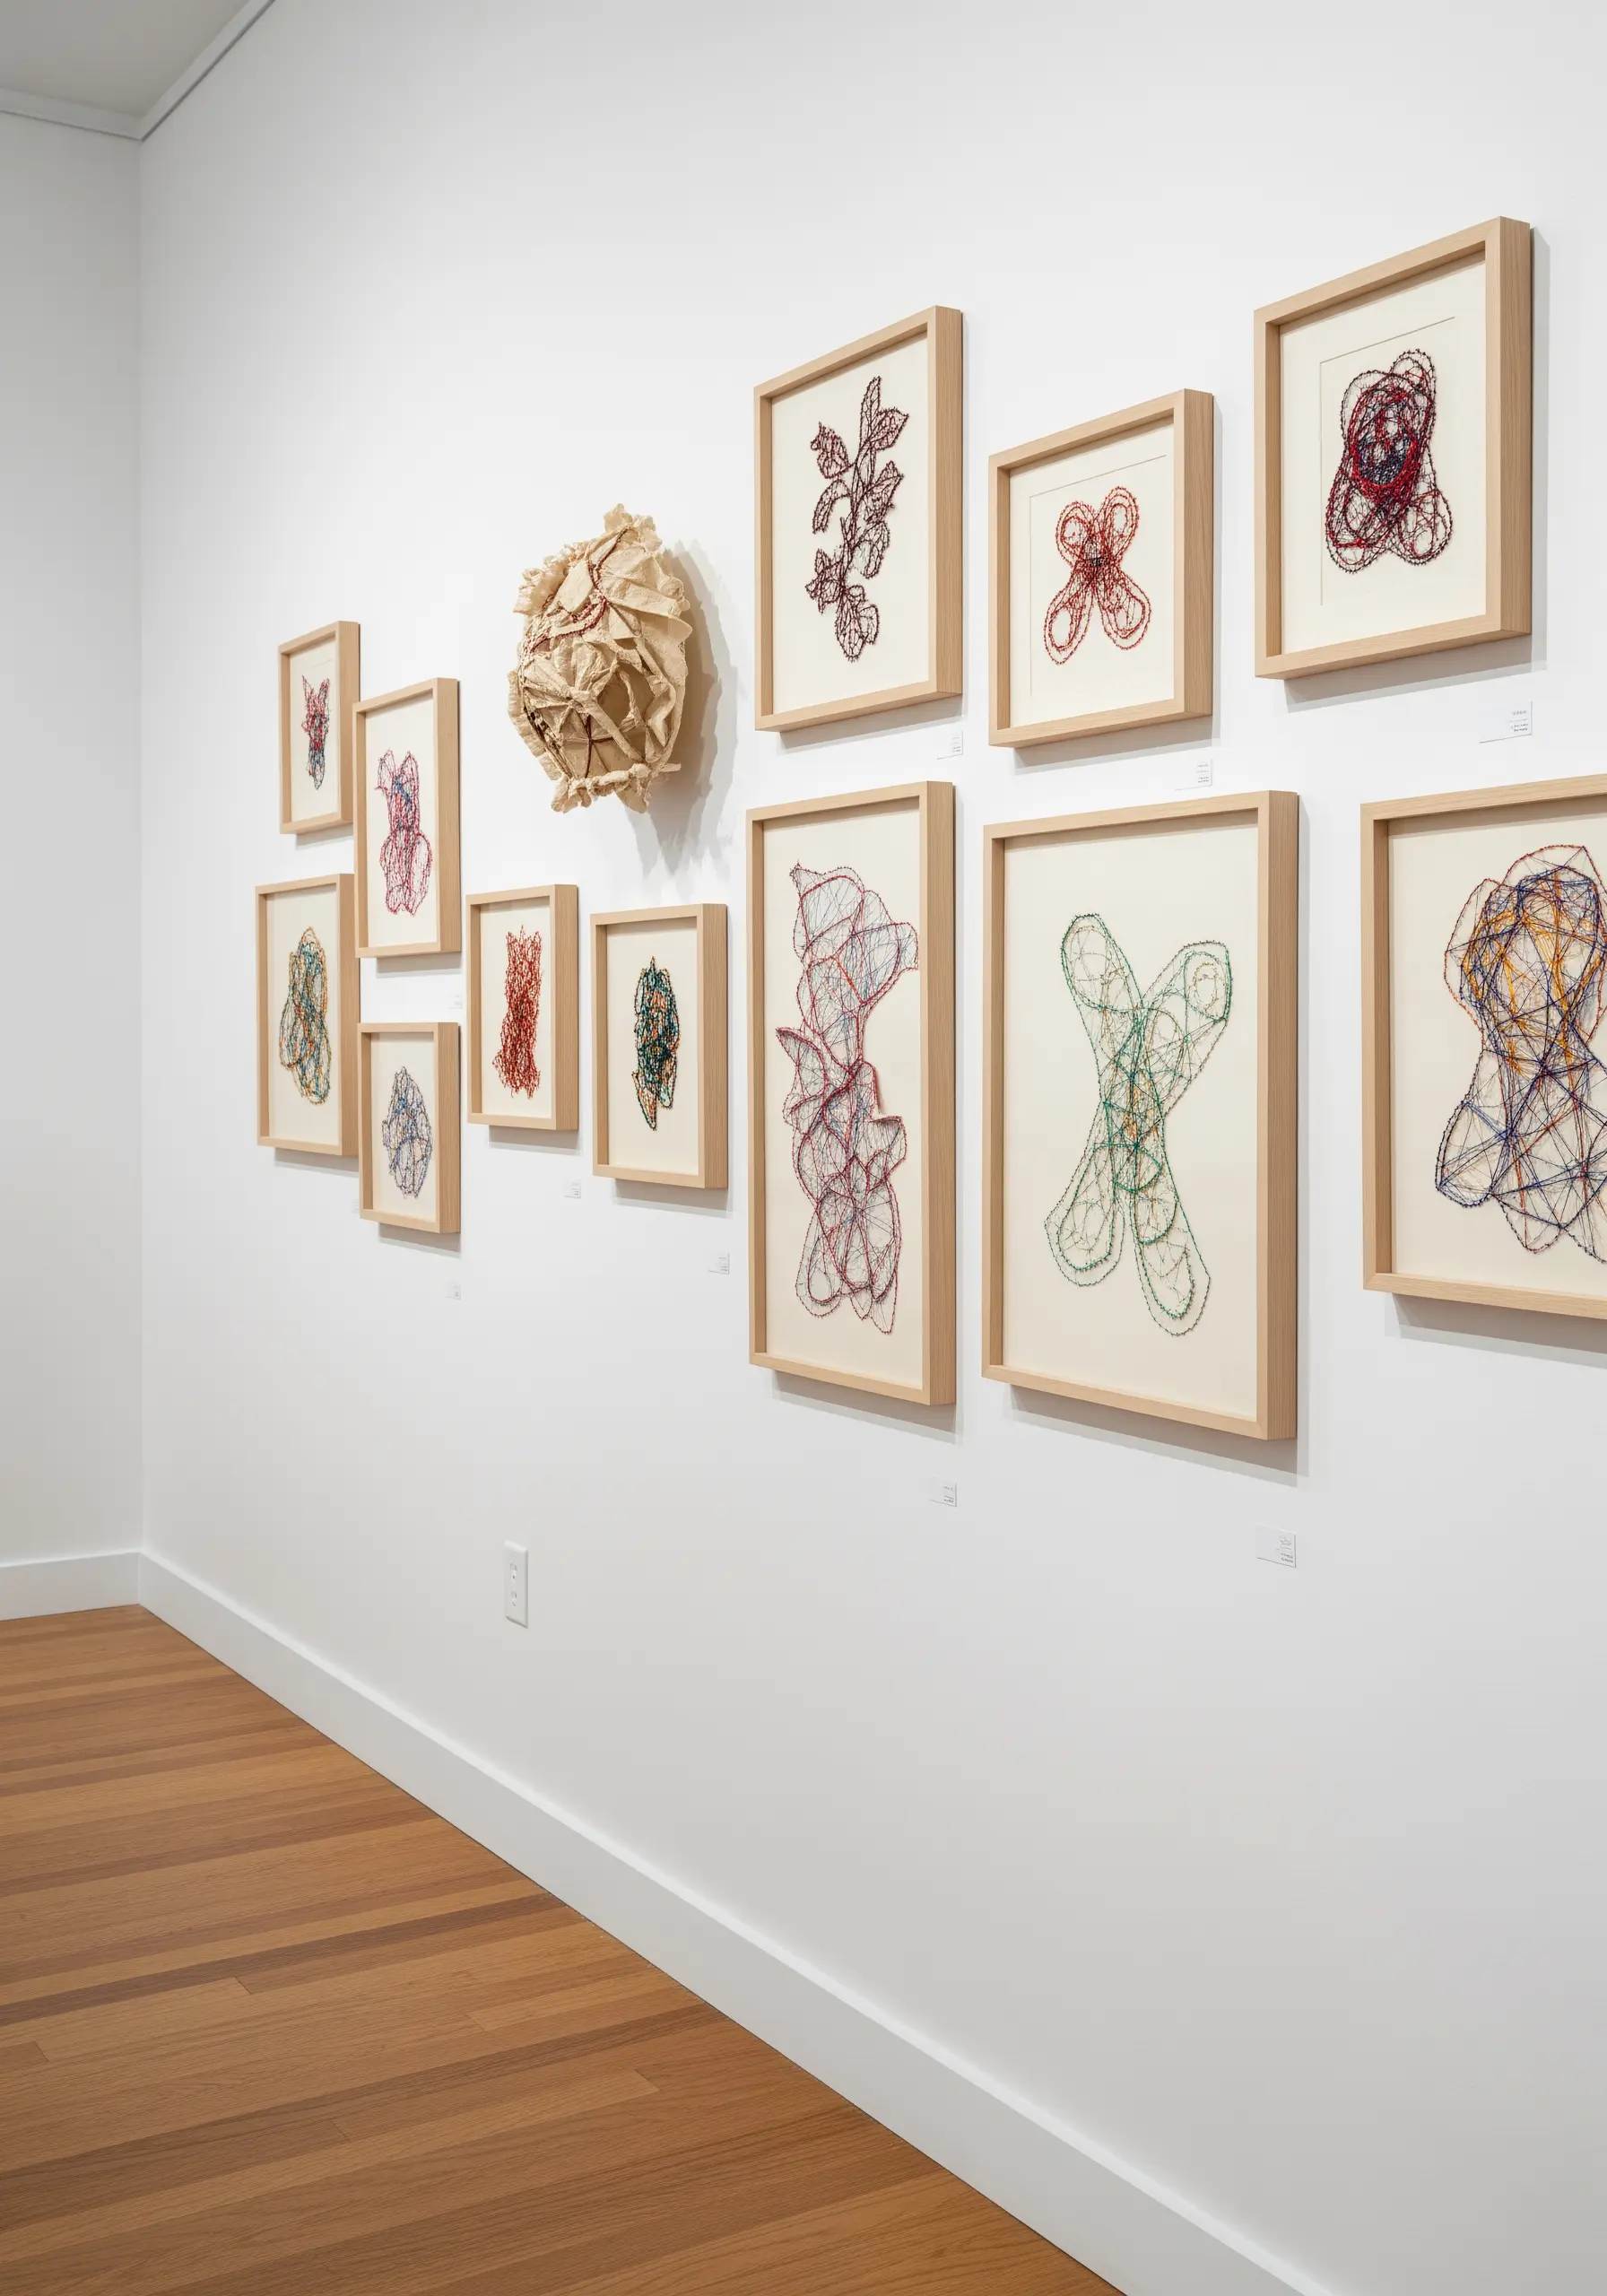
Elevate your paper embroidery by presenting it as a cohesive, curated collection.
Work on a series of pieces using a consistent paper type and a limited color palette to ensure they relate to one another.
Experiment with different abstract forms and thread densities across the series.
Frame each piece identically in simple, natural wood frames to create a unified, professional look.
Displaying them together as a gallery wall amplifies their impact, turning individual experiments into a sophisticated artistic statement and creating framed embroidery patterns that look like they belong in a gallery.


