

Have you ever looked at a simple, everyday object and felt a quiet story unfolding? A worn-out sneaker, a favorite coffee mug, the way light hits a pair of glasses—these are more than just items; they are keepers of our daily rituals, full of texture, form, and personal meaning.
This is where your embroidery can transcend craft and become art. Instead of searching for complex patterns, I invite you to look at the world immediately around you. The goal isn’t just to replicate an object, but to translate its essence—its shine, its softness, its character—into thread.
Here, we will explore how to see with an artist’s eye and stitch with intention. You will learn not just new techniques, but a new way of observing. Together, we’ll turn the familiar into something extraordinary, one thoughtful stitch at a time.
1. Render Digital Icons with Appliqué and Thread
Create a sharp, modern look by combining fabric appliqué with minimal embroidery.
First, cut a piece of black fabric for the phone screen and secure it with an iron-on adhesive before stitching the edges for a clean finish.
Use a couched metallic or silky gray thread for the phone’s outline to give it a sleek, manufactured feel.
For the tiny notification badge, use padded satin stitch: lay a few small straight stitches as a base, then cover them with red satin stitch to make the icon pop with subtle dimension.
2. Stitch Optical Illusions with Concentric Spirals
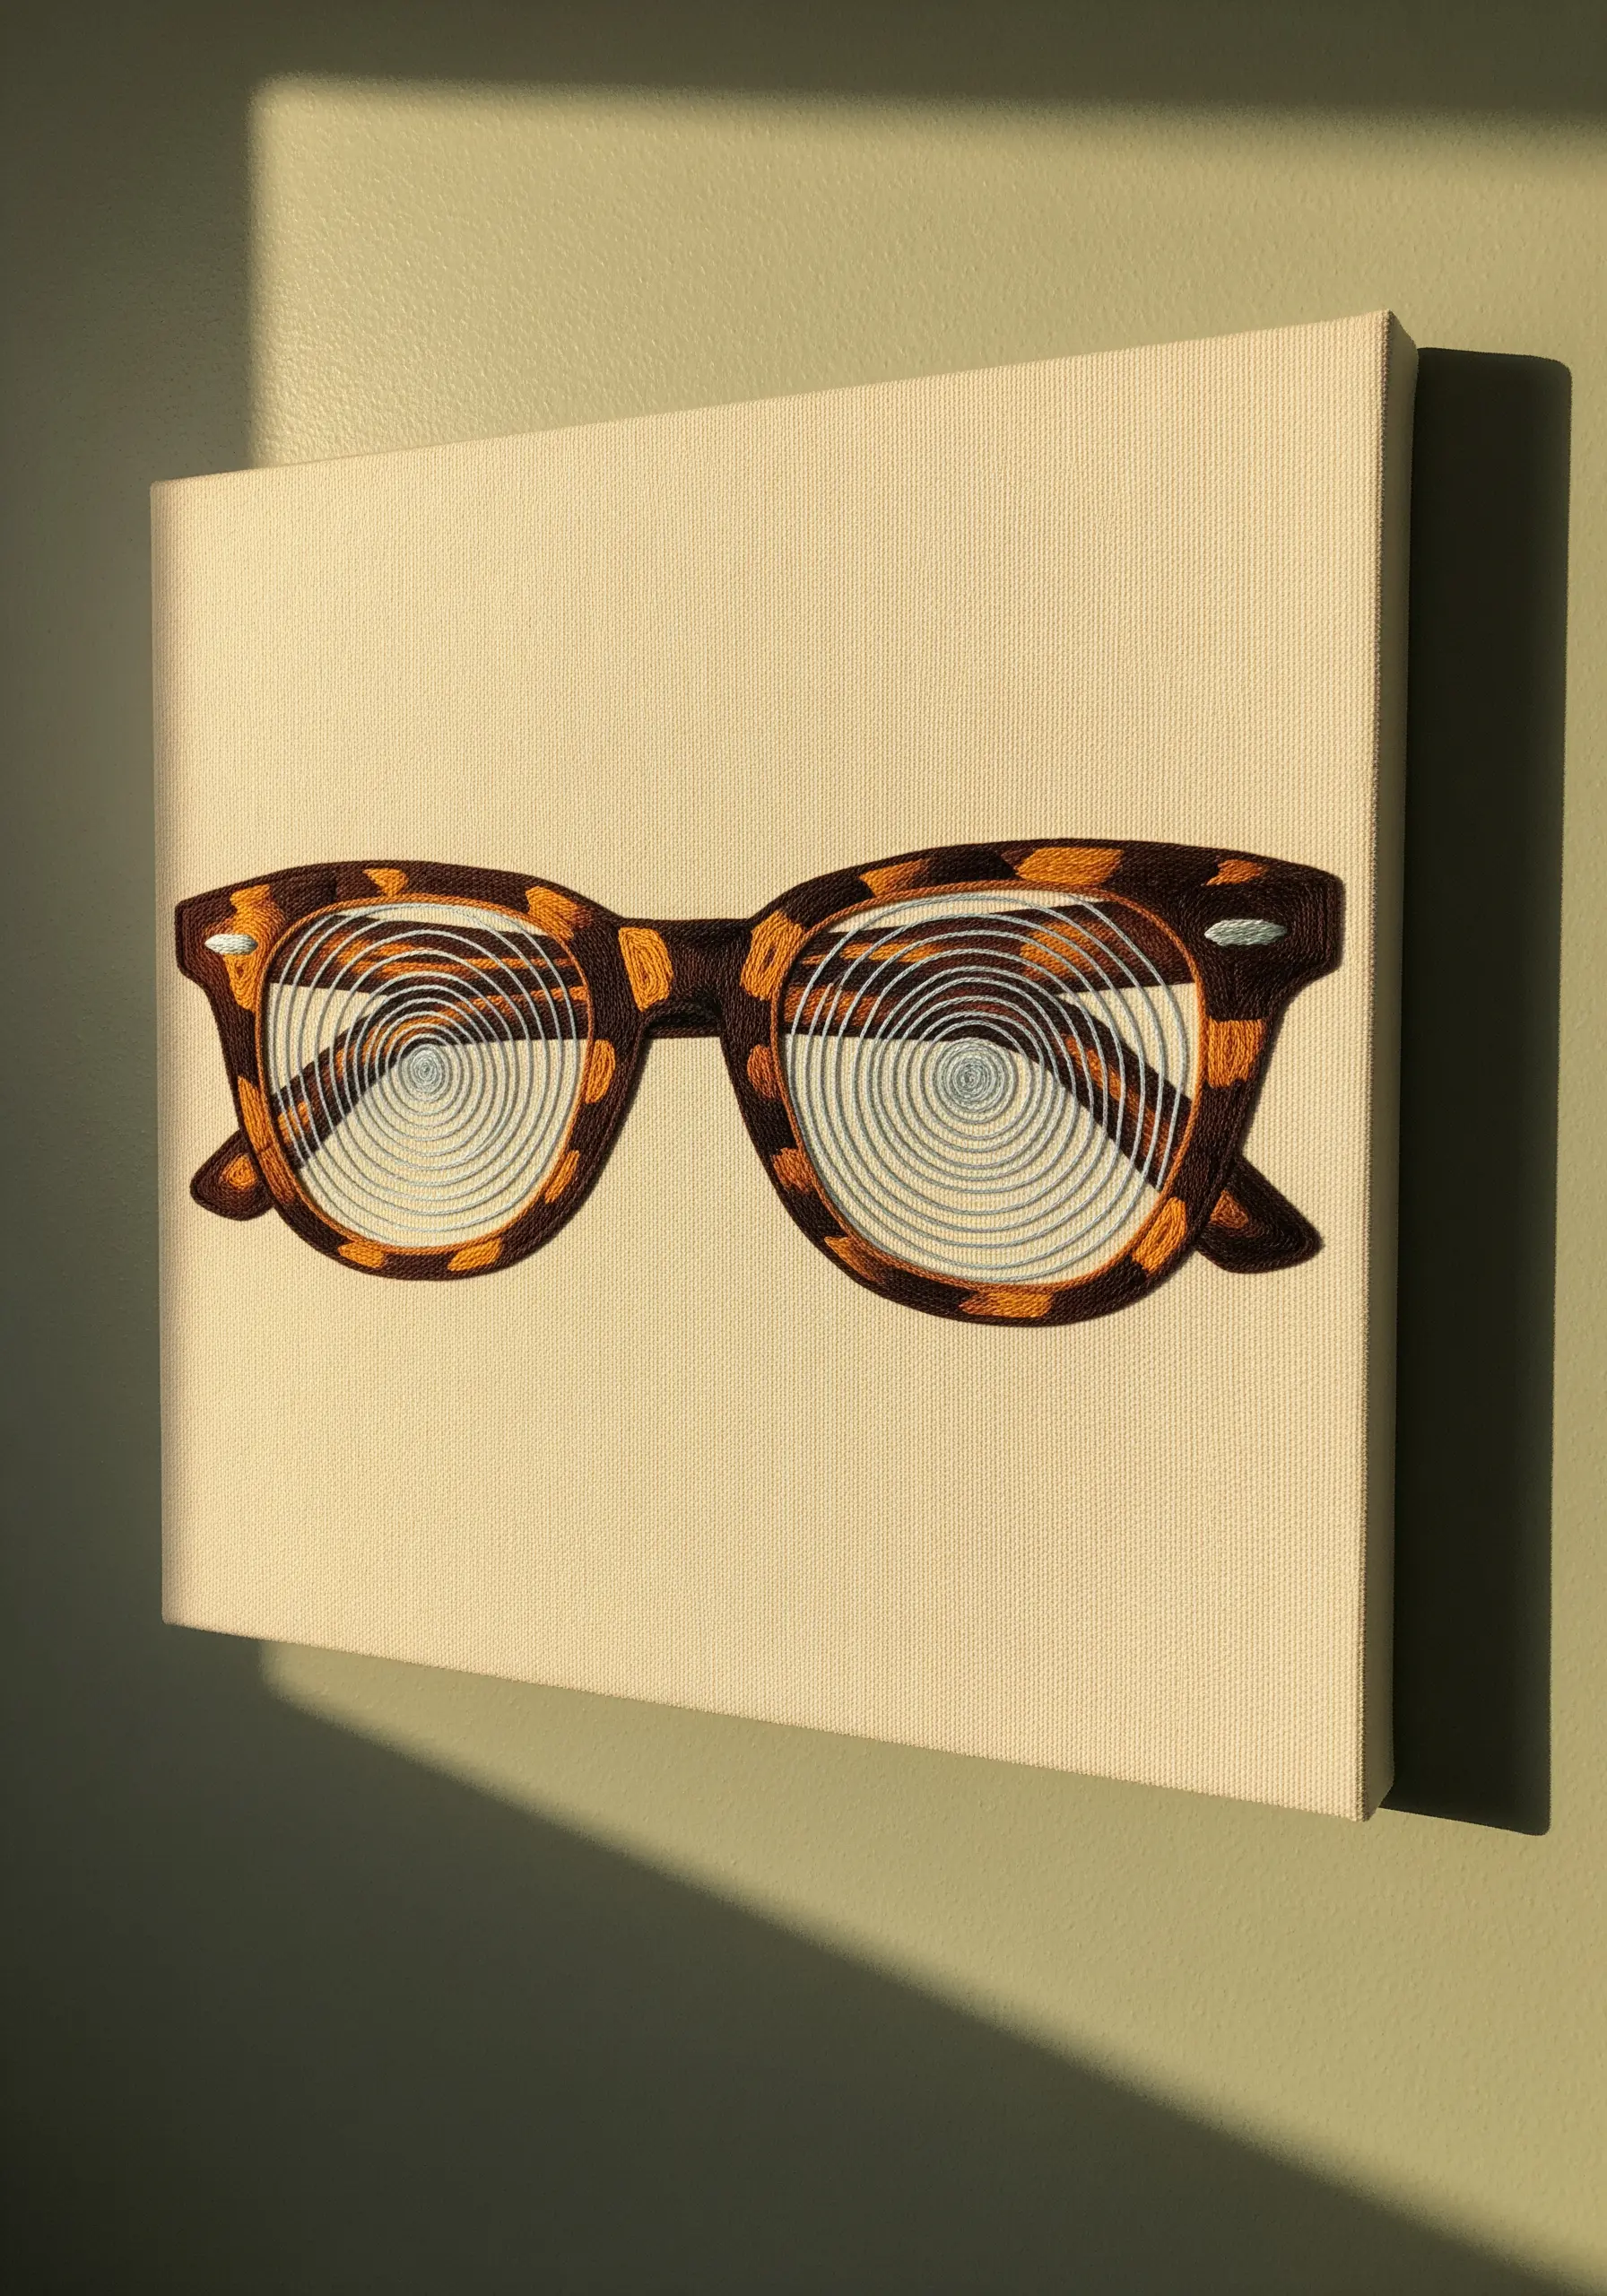
Capture the hypnotic effect of reflections or patterns by using continuous, spiraling lines.
Trace a perfect spiral and use a stem stitch or whipped backstitch with a single strand of thread to create a smooth, unbroken line that draws the eye inward.
For the tortoiseshell frame, blend two or three shades of brown and amber floss in your needle at once.
Use short, scattered satin stitches to replicate the organic, mottled pattern, allowing the colors to mix randomly for a natural effect.
3. Create Cozy Textures with Chunky Yarn

To give your coffee mug a tactile, knitted feel, switch from standard floss to a thicker yarn or multiple strands of embroidery thread.
Use a heavy chain stitch or overlapping bullion knots laid in rows to mimic the look of bulky knitwear.
This high-relief technique creates shadows and depth, making the object feel warm and three-dimensional.
Contrast this heavy texture with delicate, wispy steam, stitched using just one or two strands of white thread in a flowing stem stitch.
4. Achieve a Polished Metallic Sheen on Dark Fabric
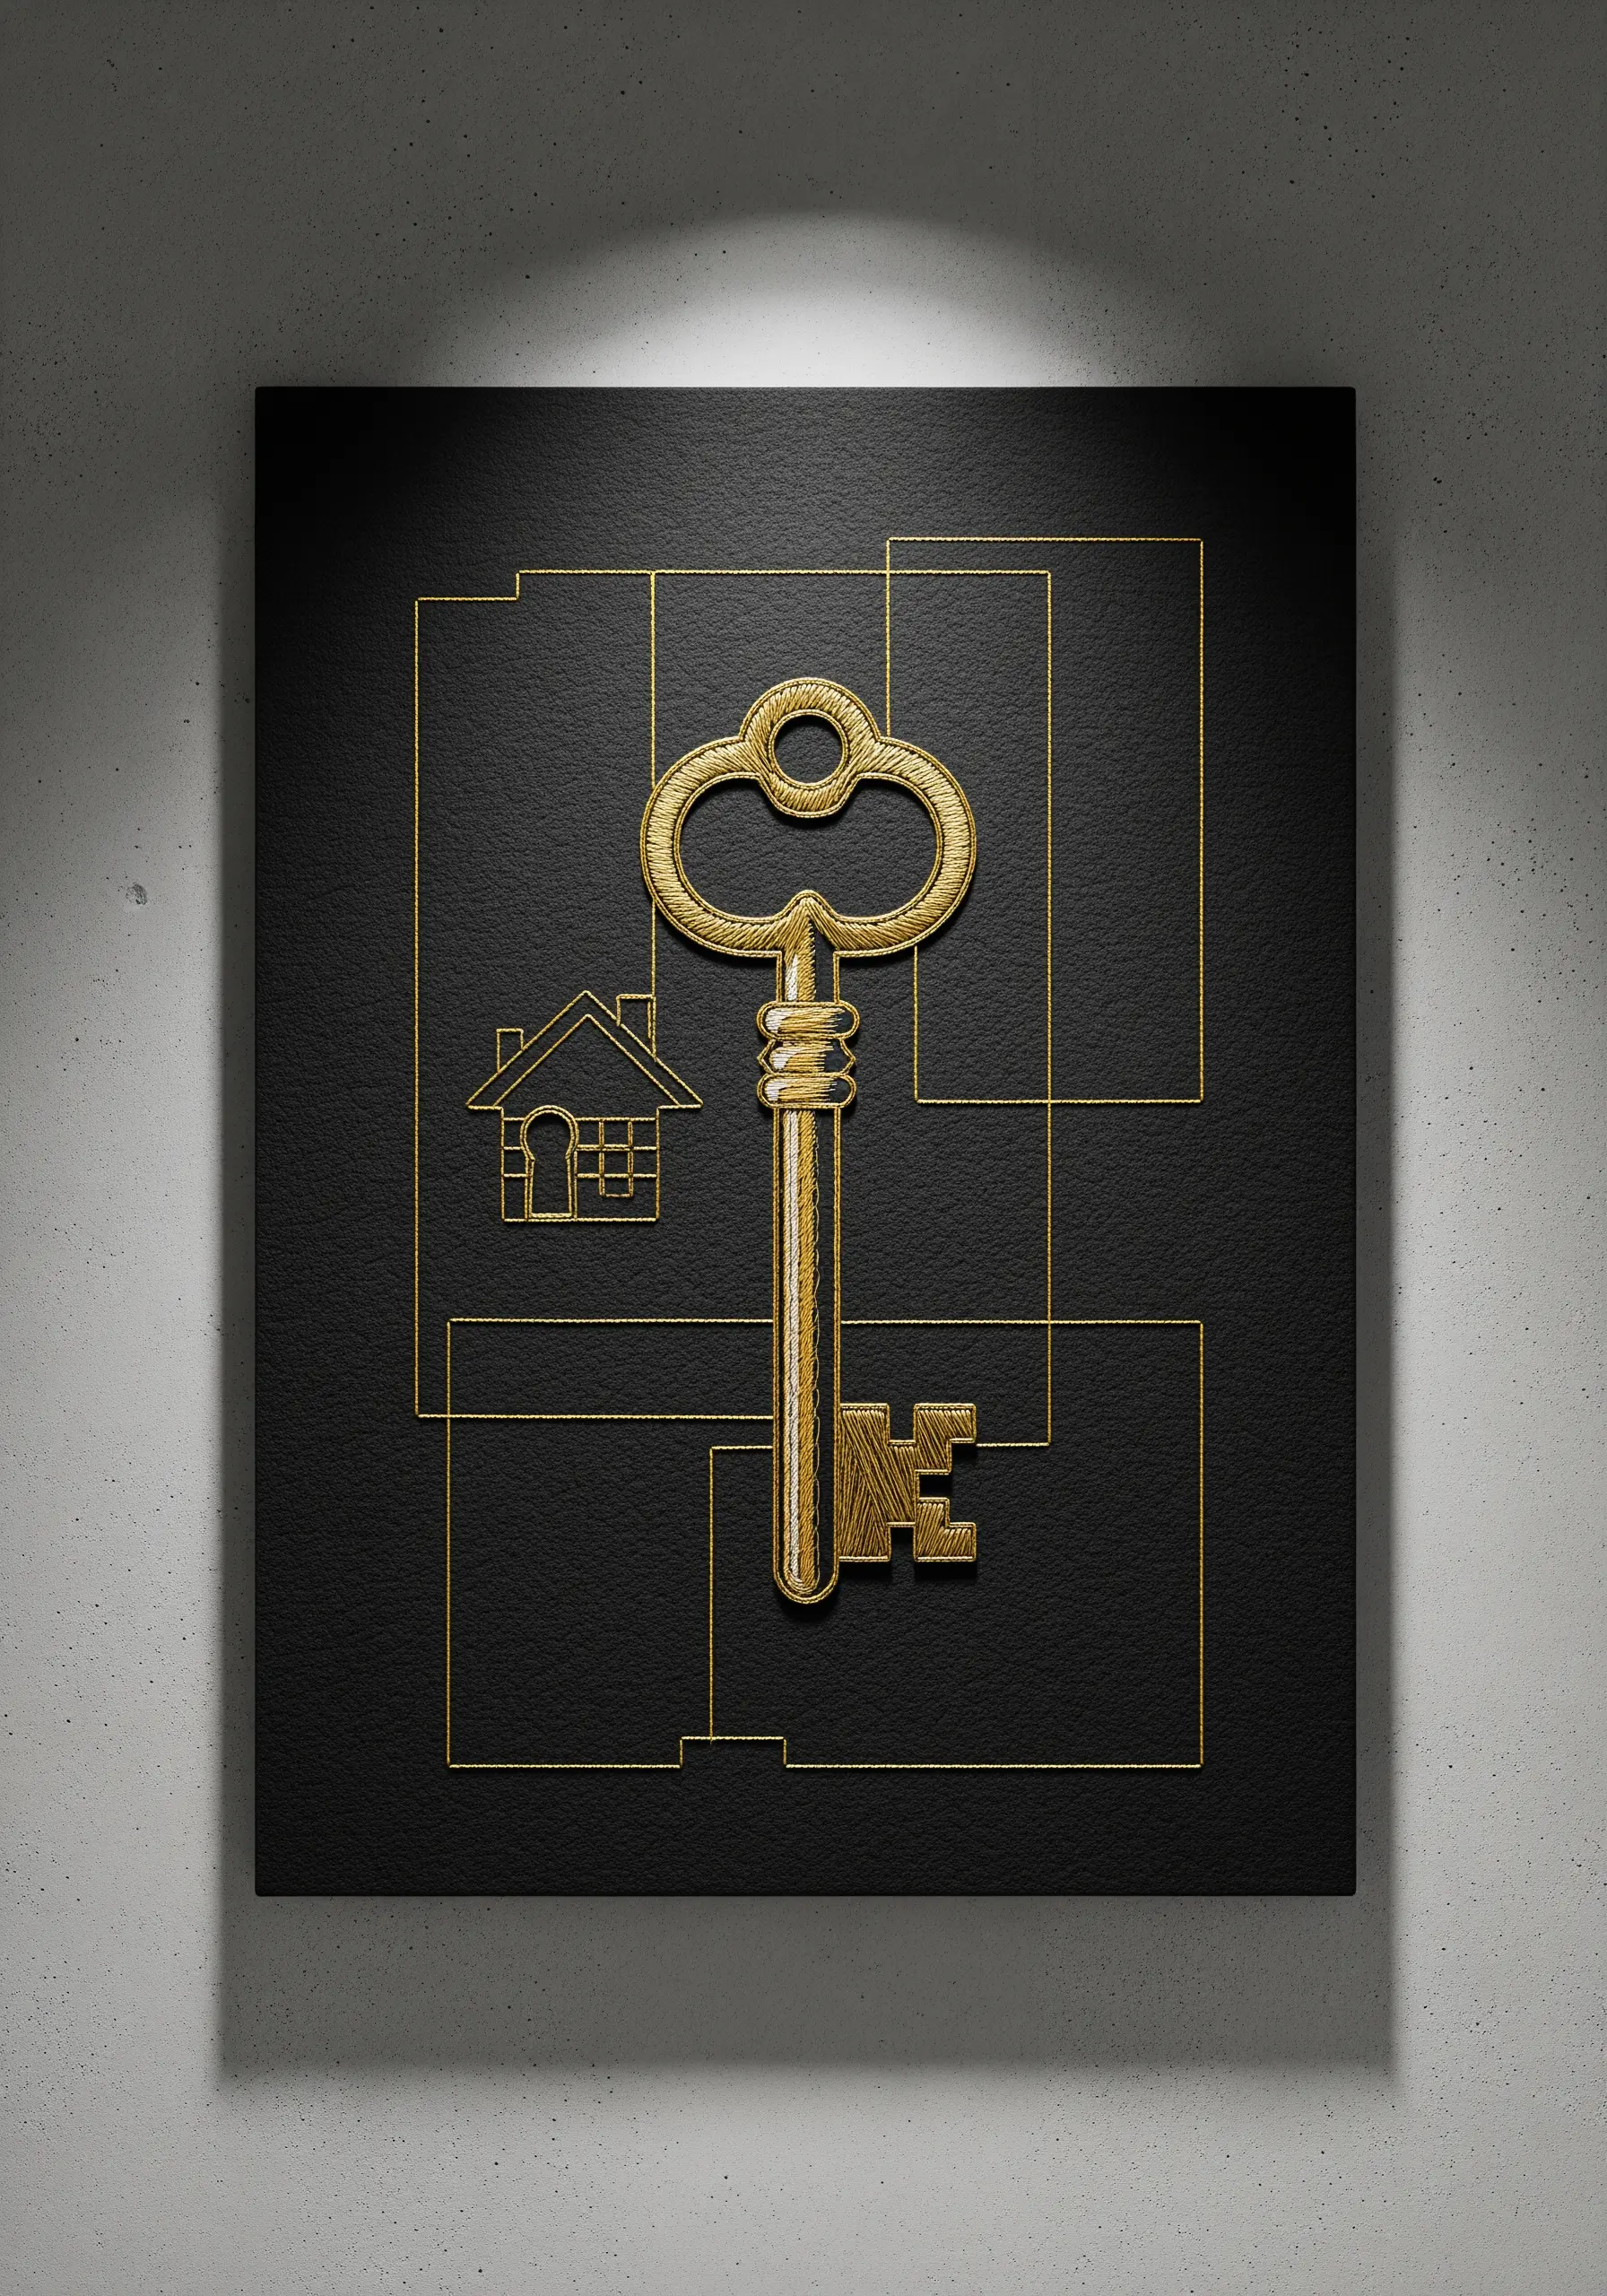
Stitching with metallic thread on a dark background creates a striking contrast that feels luxurious and modern.
To create the key’s metallic surface, use a smooth satin stitch, ensuring your stitches lie flat and parallel.
Work with shorter lengths of metallic floss (no more than 12 inches) and a thread conditioner to prevent tangling and fraying.
For the delicate geometric lines, a single strand of the same metallic thread in a simple backstitch provides a clean, graphic counterpoint to the solid key.
5. Embroider a Radiant Glow with Knots and Bursts
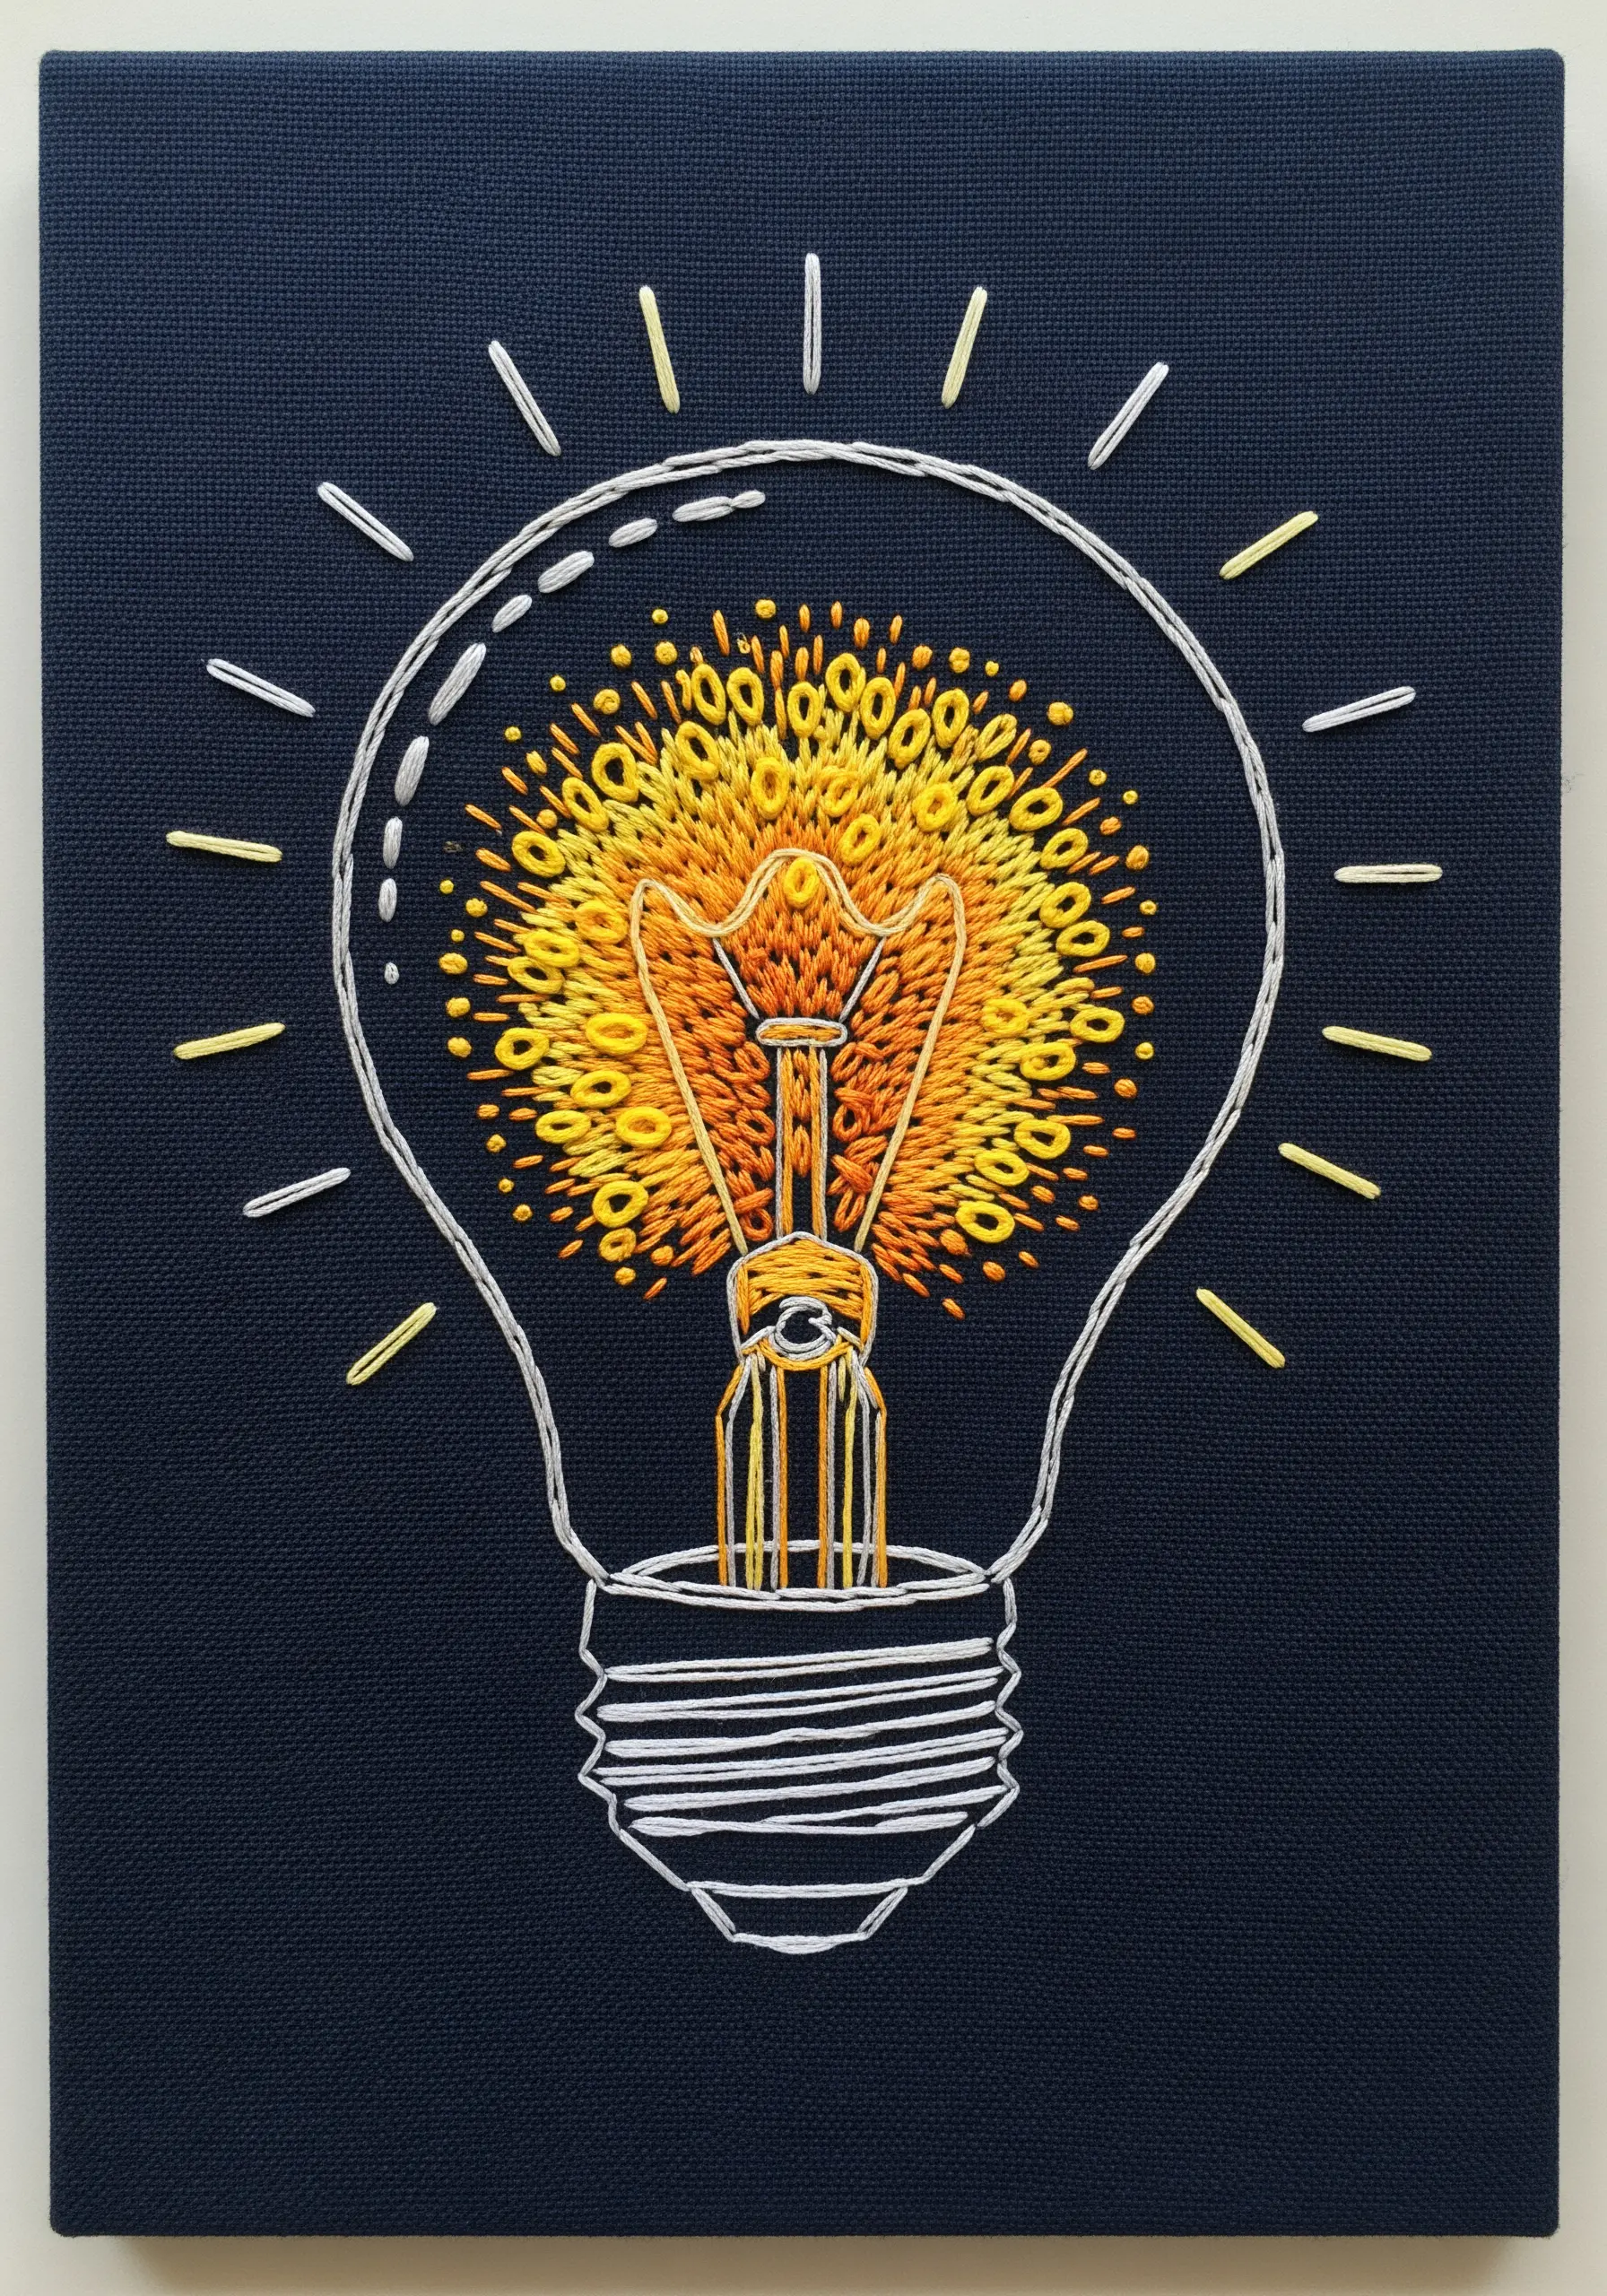
To simulate the brilliant glow of a lightbulb filament, use a combination of French knots and radiating straight stitches.
Cluster yellow and orange French knots of varying sizes at the center to build a dense, energetic core.
From this core, stitch straight stitches outward in a sunburst pattern, using lighter yellows and whites as you move away from the center.
This gradient in color and density creates a powerful illusion of light that seems to emanate from the fabric.
6. Define Graphic Shapes with Couched Cord
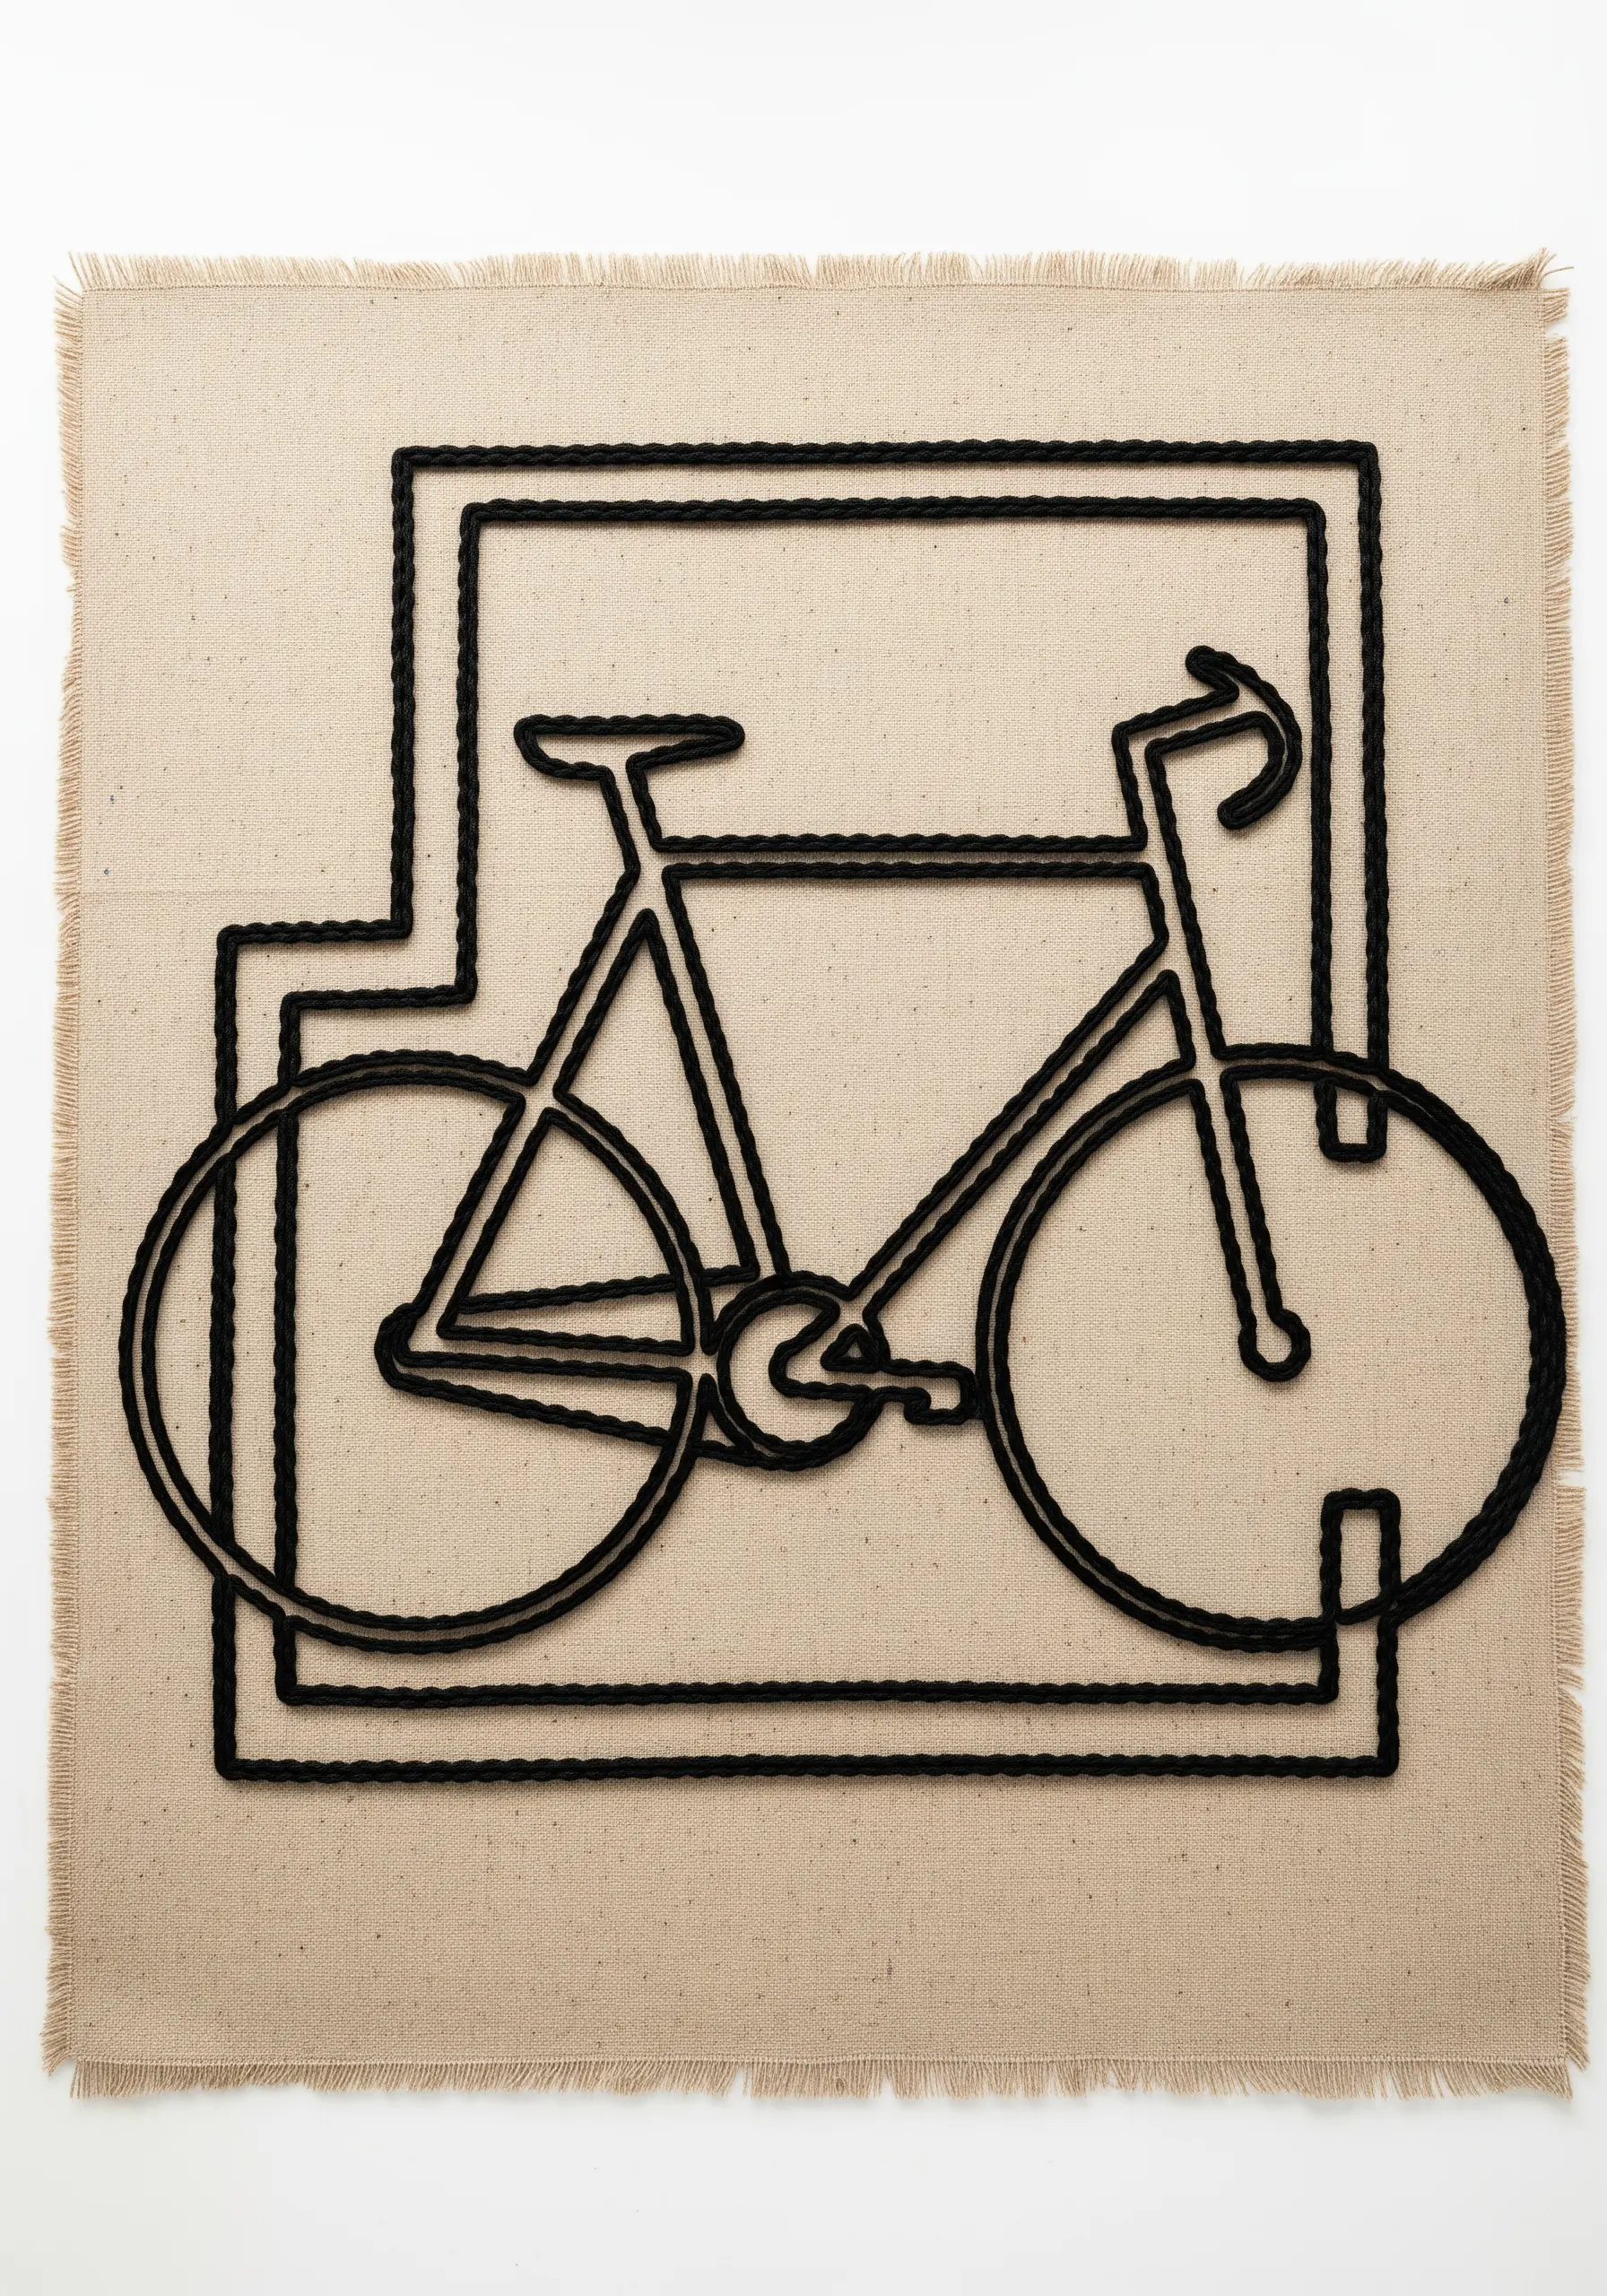
For a bold, minimalist outline, lay down a thick cord or yarn and secure it with a couching stitch.
This technique is faster than traditional outlining stitches and produces a clean, raised line with significant texture.
Choose a rustic fabric like linen or burlap to complement the tactile quality of the cord.
The contrast between the thick, smooth cord and the woven fabric creates a piece of yarn wall art projects that is both graphic and organic.
7. Replicate Materials with Directional Satin Stitch
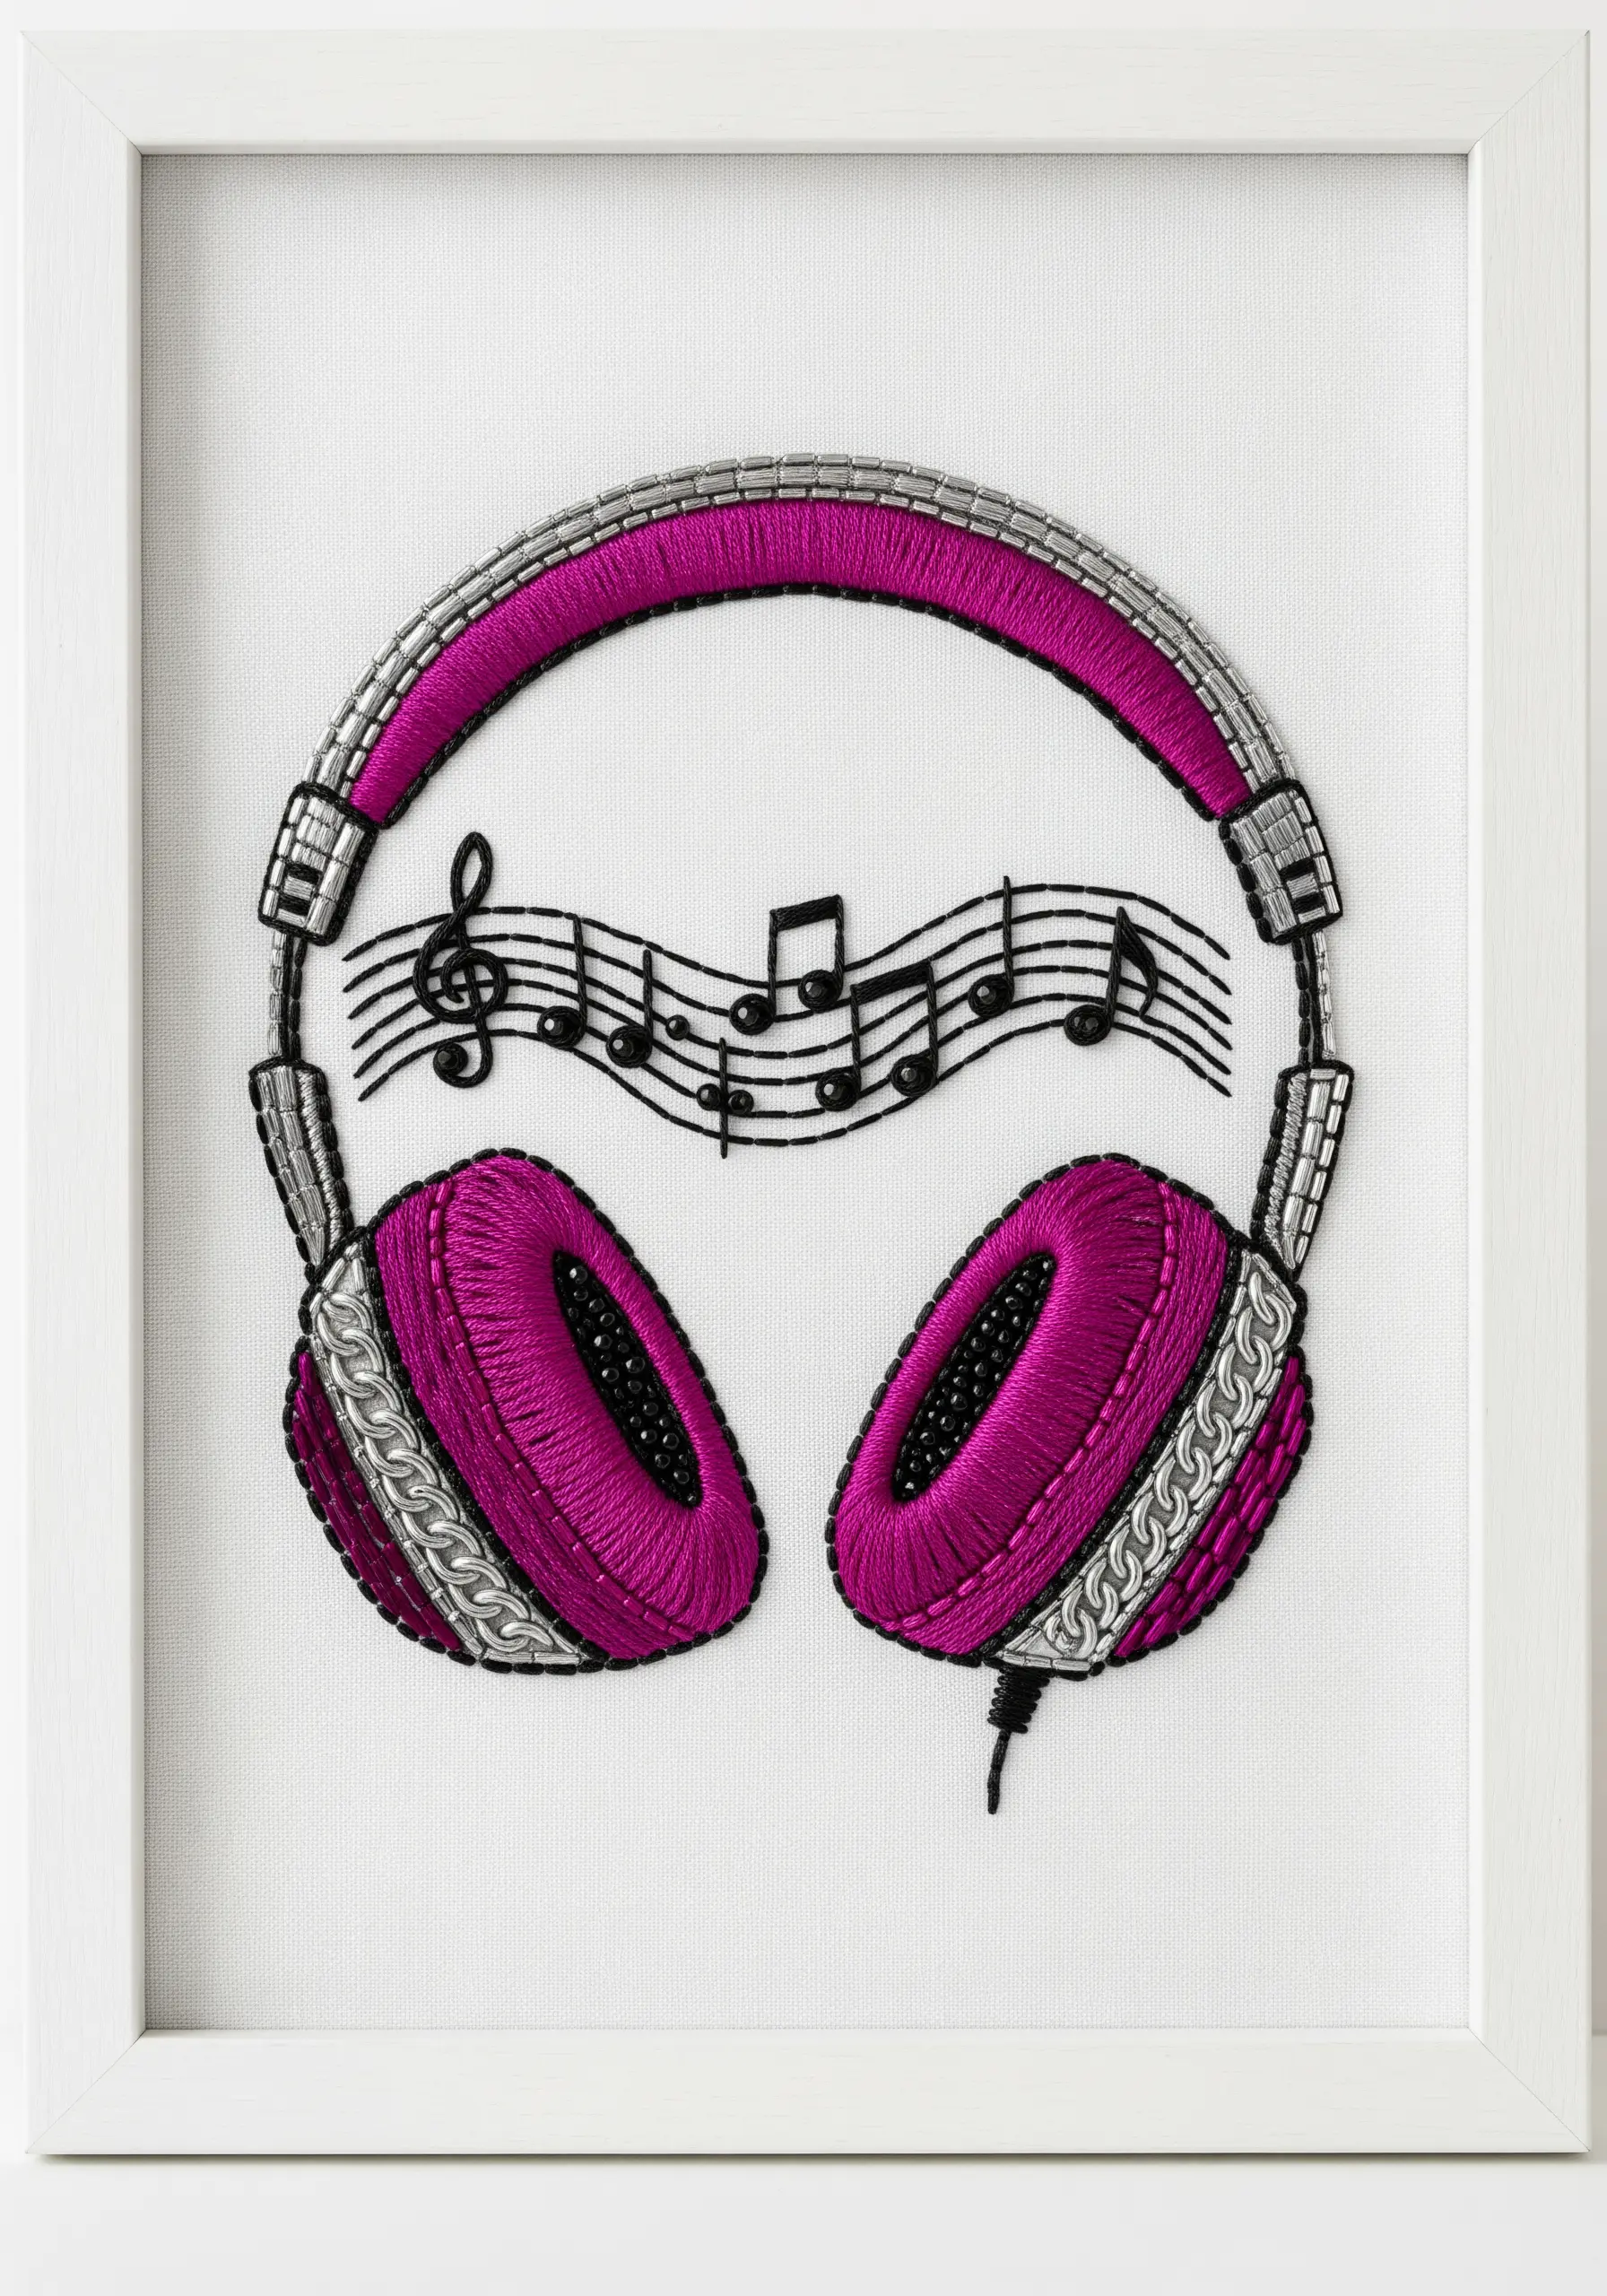
Use the direction of your satin stitches to mimic the form and texture of different materials.
For the headphone band, keep your stitches perfectly aligned to create a smooth, plastic-like sheen.
On the cushioned earpieces, slightly curve your stitches to follow the rounded shape, giving them a softer, more voluminous appearance.
Incorporate a single strand of metallic silver thread alongside your gray floss for subtle, realistic highlights on the hardware.
8. Simplify Complex Objects with Felt Appliqué
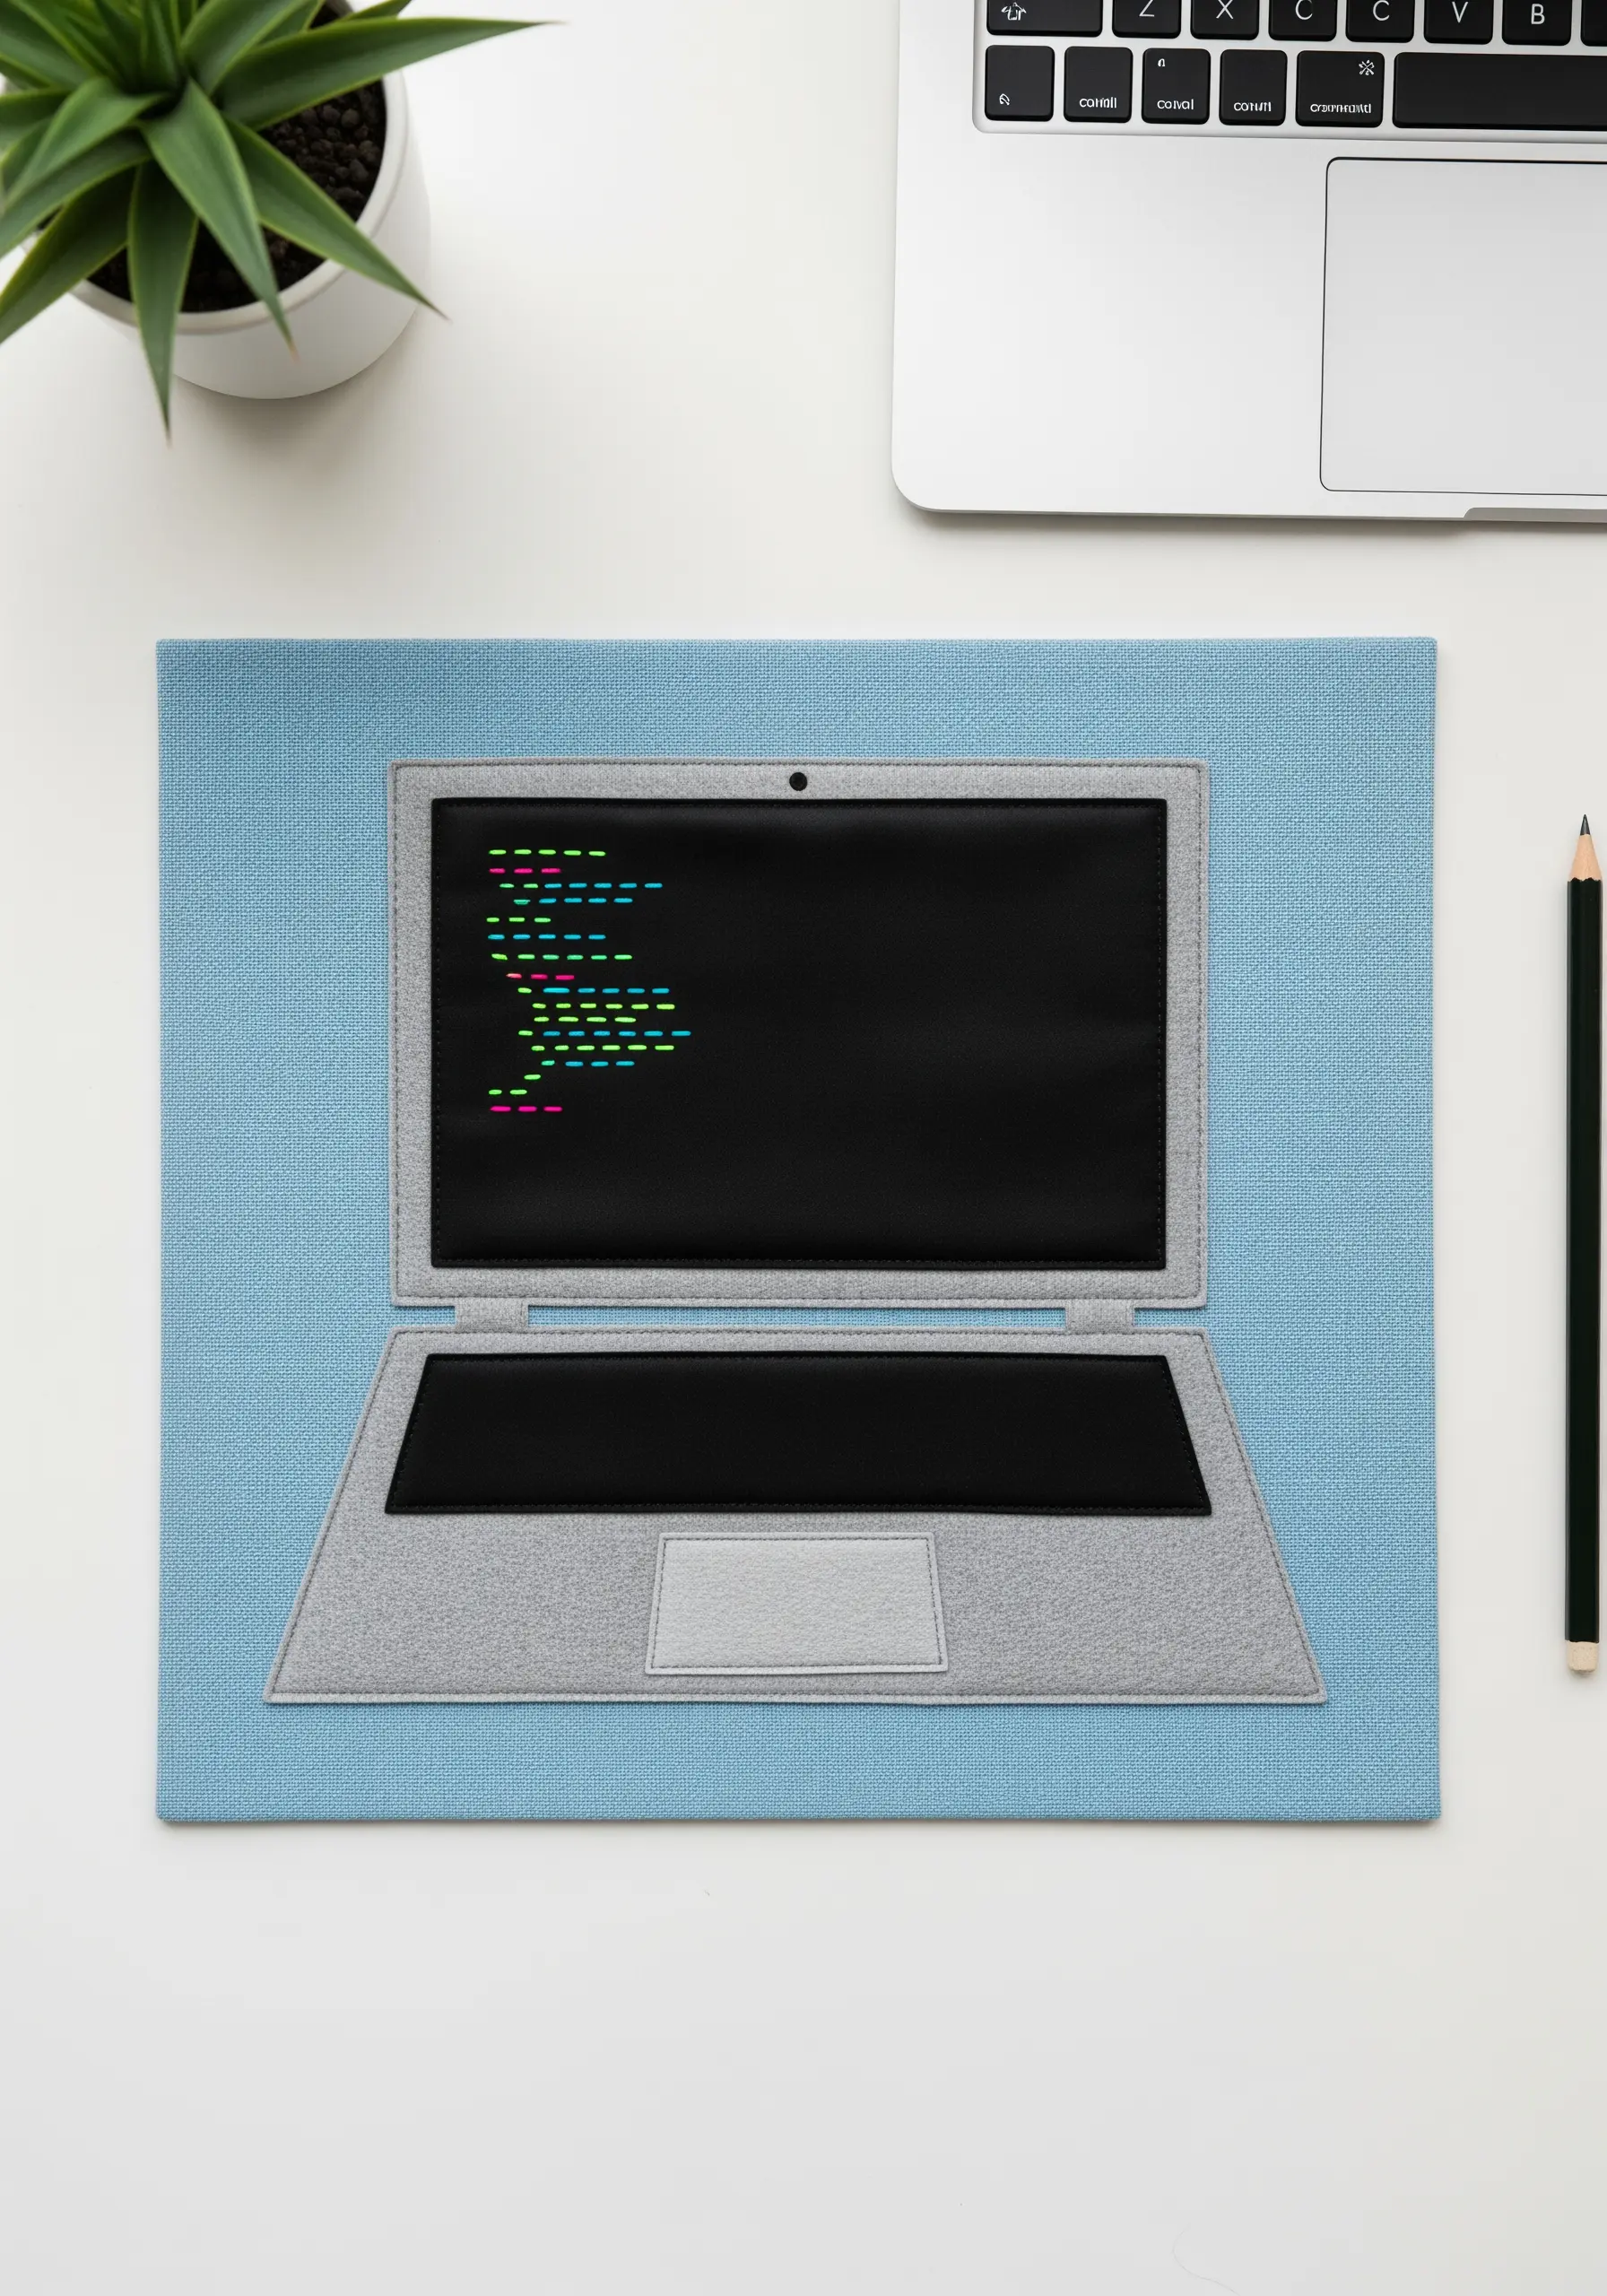
Instead of stitching large blocks of color, use felt appliqué for a clean and efficient alternative.
Cut precise shapes for the laptop body, screen, and trackpad from different shades of felt and secure them to your base fabric.
This mixed-media approach guarantees crisp edges and a uniform, matte finish that’s difficult to achieve with satin stitch alone.
Add tiny embroidered details, like the lines of code, on top of the felt to bring your abstract mixed-media embroidery ideas to life.
9. Capture Worn-In Textures with Subtle Stitching

To give fabric surfaces like canvas shoes a realistic, slightly worn texture, use a directional long-and-short stitch.
Vary the length and angle of your stitches slightly, using an off-white or light gray thread to mimic the weave of the fabric.
For the rubber toe cap, use tiny, tightly packed seed stitches to create a stippled texture that contrasts with the smoother canvas.
A precise backstitch in black and red defines the details and holds the entire composition together.
10. Master Photorealism with Monochromatic Thread Painting
Create stunningly realistic portraits of objects using only shades of black, white, and gray.
The key is to use single-strand floss and the long-and-short stitch to blend shades seamlessly, creating smooth gradients for shadows and highlights.
Pay close attention to the direction of your stitches; they should follow the contours of the object to build form and dimension.
This technique transforms a simple object into a piece of fine art by focusing purely on light, shadow, and texture.
11. Ground Your Composition with Embroidered Shadows
Add instant depth and realism to your work by stitching a shadow beneath your subject.
Select a thread color that is a few shades darker than your background fabric—a dark gray on a light gray canvas, for example.
Fill the shadow shape with a simple satin stitch or long-and-short stitch, keeping the edges soft to create a natural, diffused look.
Learning the ways to embroider realistic shadows makes your objects feel present and anchored within the frame.
12. Build Sculptural Foliage with Woven Picot Stitch
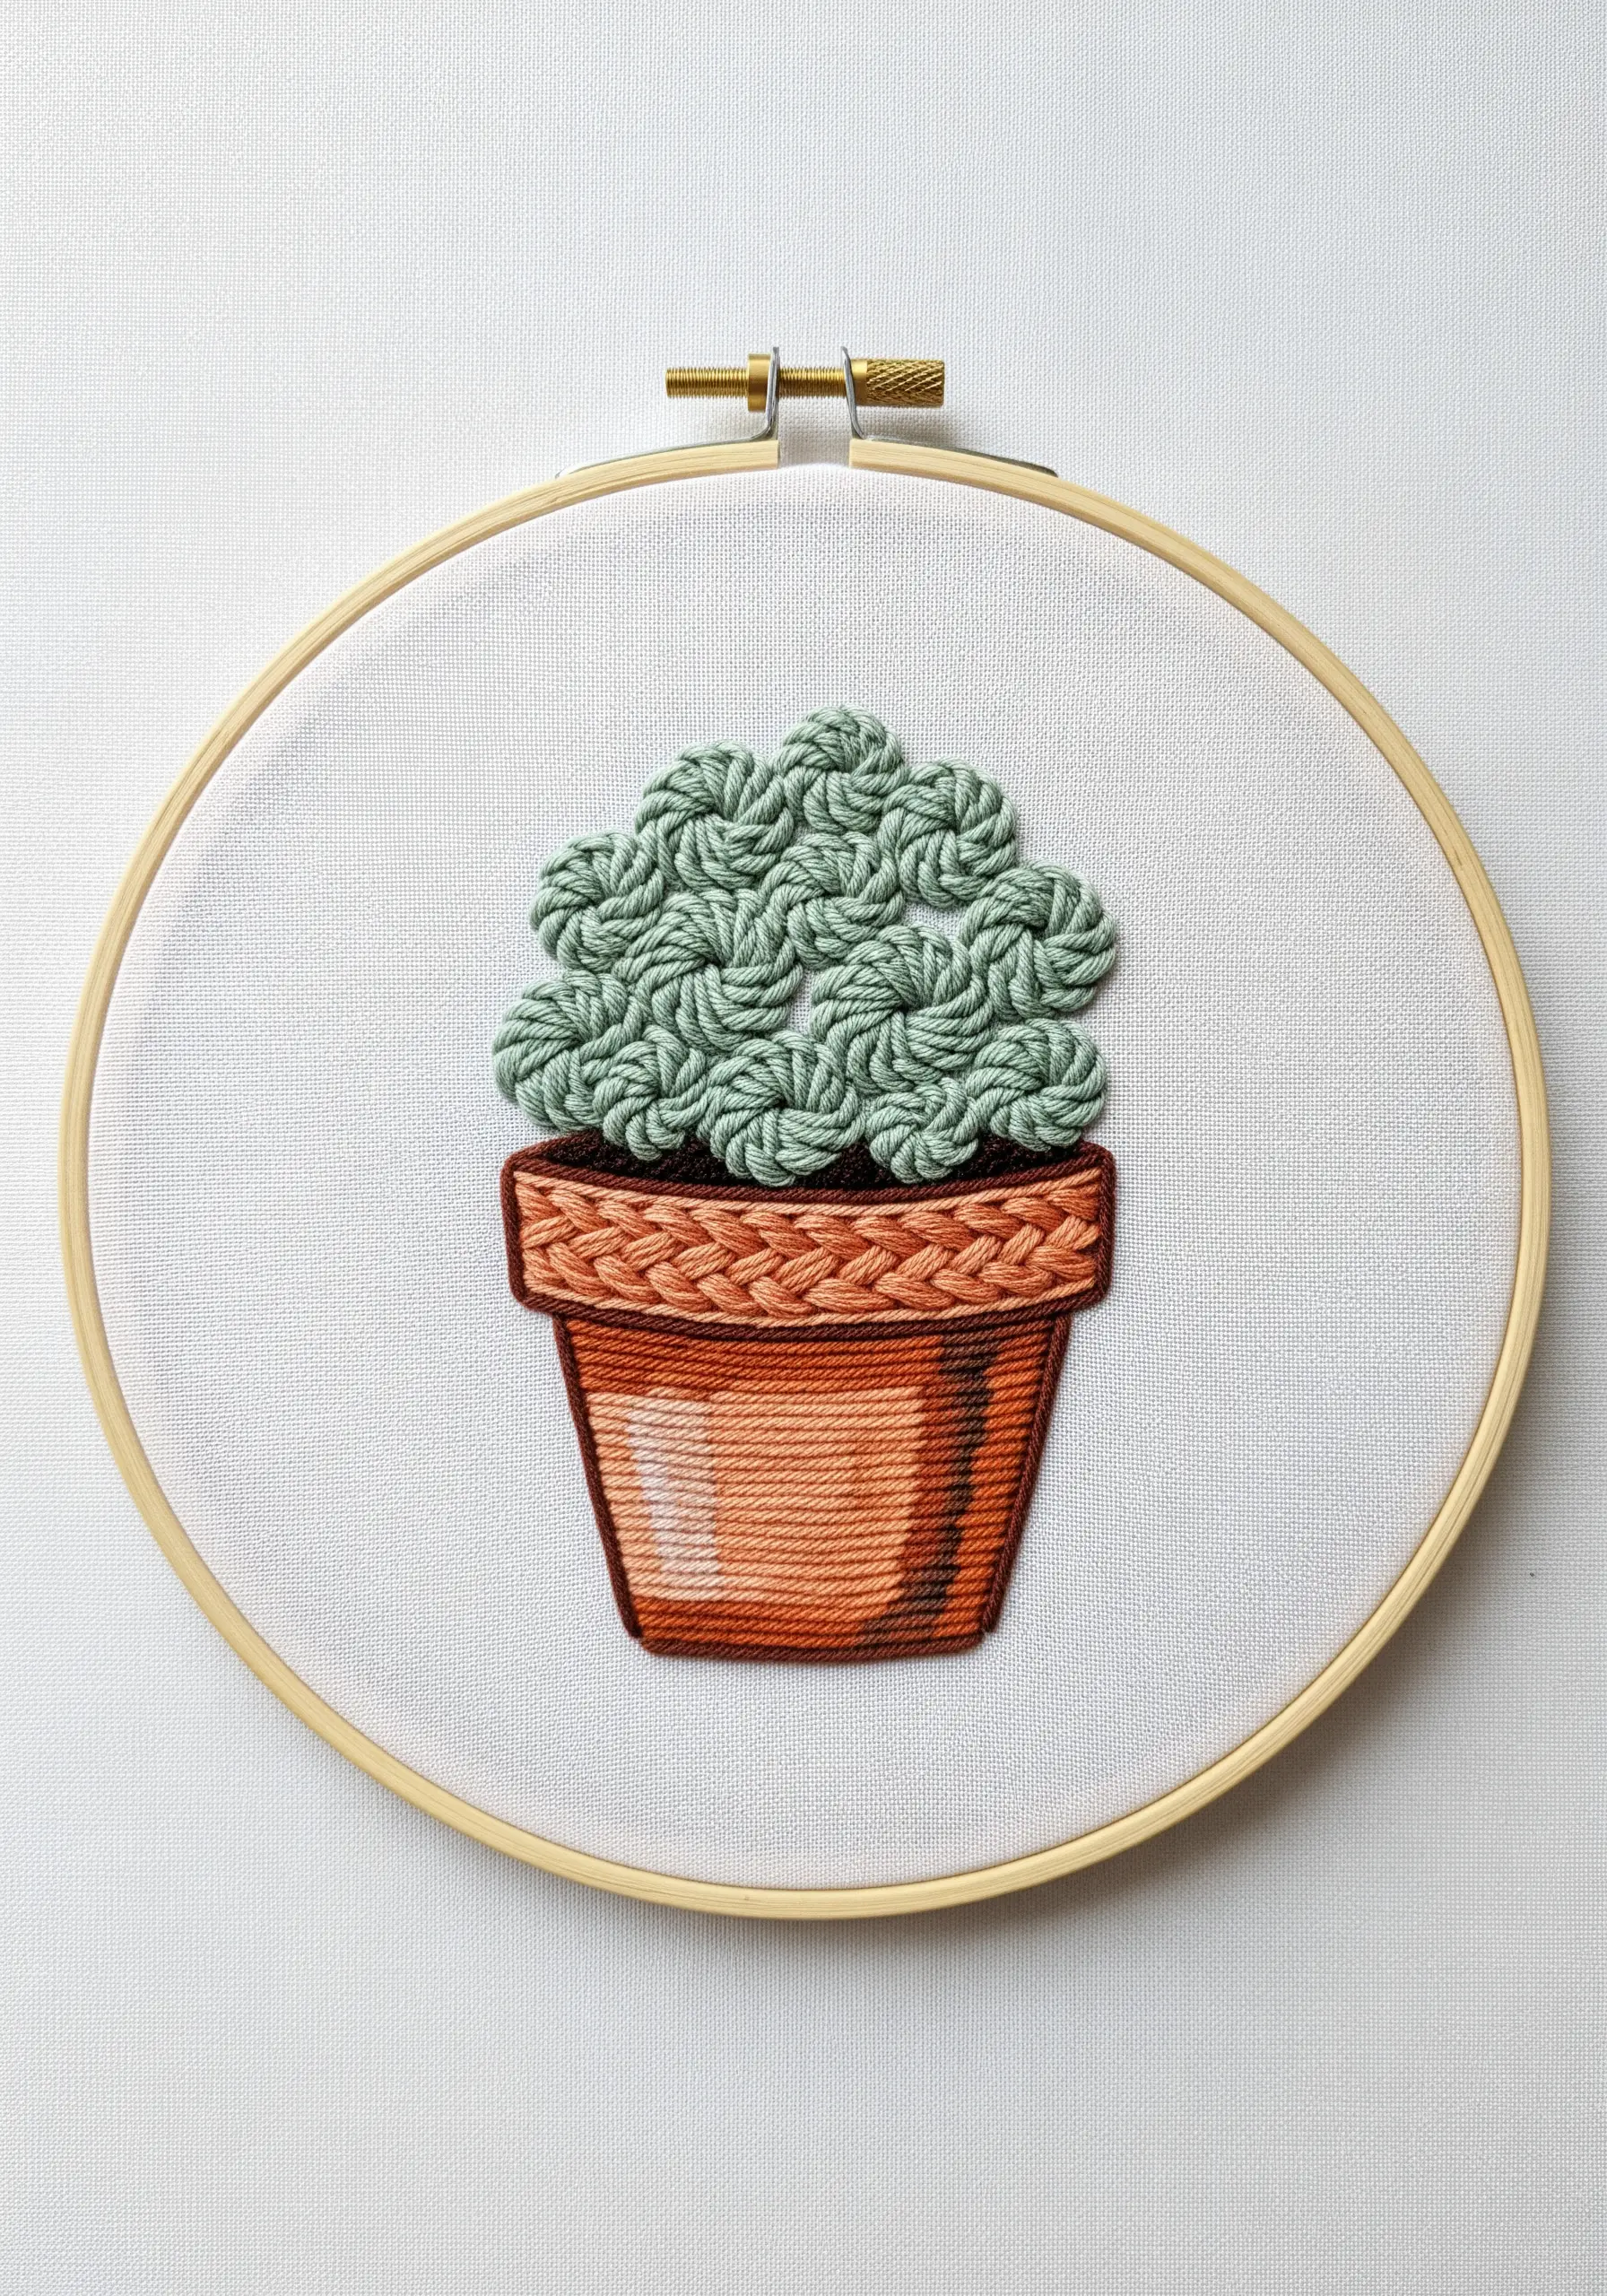
For highly dimensional, tactile leaves or petals, the woven picot stitch is an excellent choice.
Create a foundation of three straight stitches forming a narrow triangle, then weave your thread over and under these anchor points without piercing the fabric.
By packing the woven rows tightly, you create a dense, raised element that lifts off the surface.
This stitch is perfect for succulents and other plants where texture is more important than fine detail, and it works beautifully in high-texture fabric collage embroidery projects.
13. Achieve Razor-Sharp Edges with a Split Stitch Outline
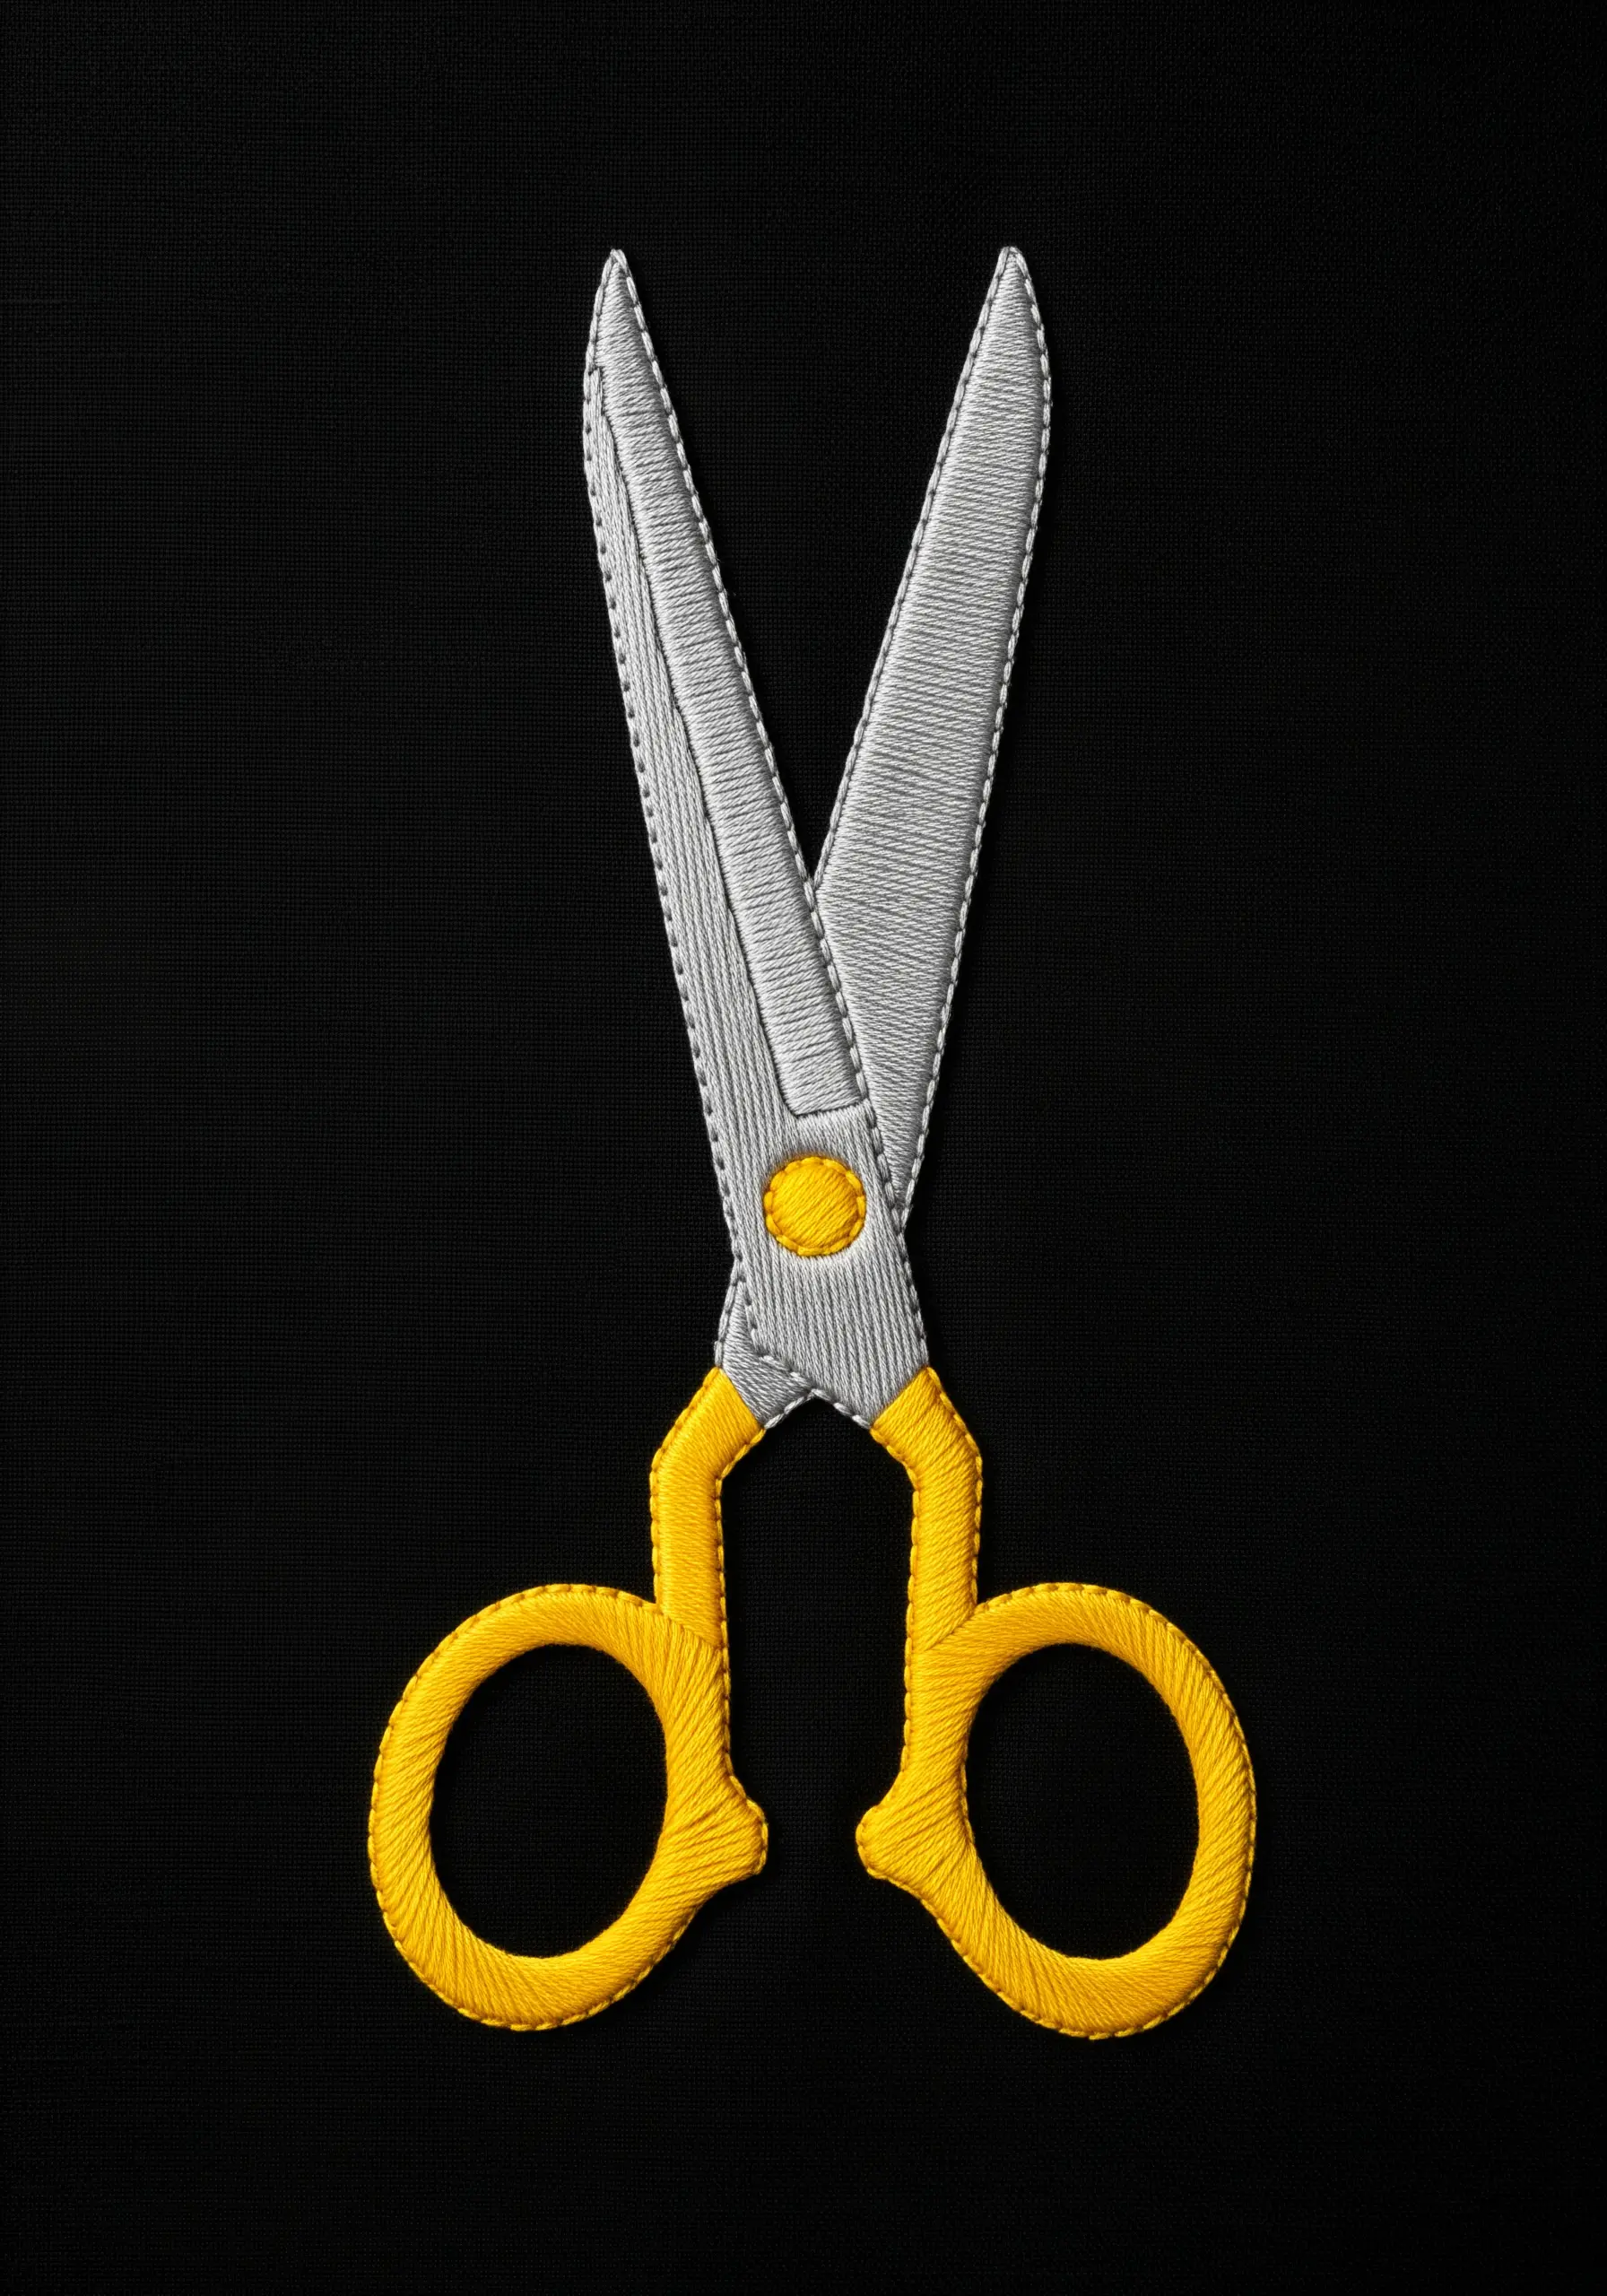
For objects that require clean, precise edges, always begin by outlining the shape with a split stitch.
This creates a slightly raised, stable border that acts as a guide for your fill stitches.
When you fill the shape with satin stitch, bring your needle up just inside the outline and down just outside it.
This technique encases the split stitch border, resulting in a perfectly crisp, defined edge that gives your work a professional finish.
14. Illuminate a Scene with Radiating Straight Stitches
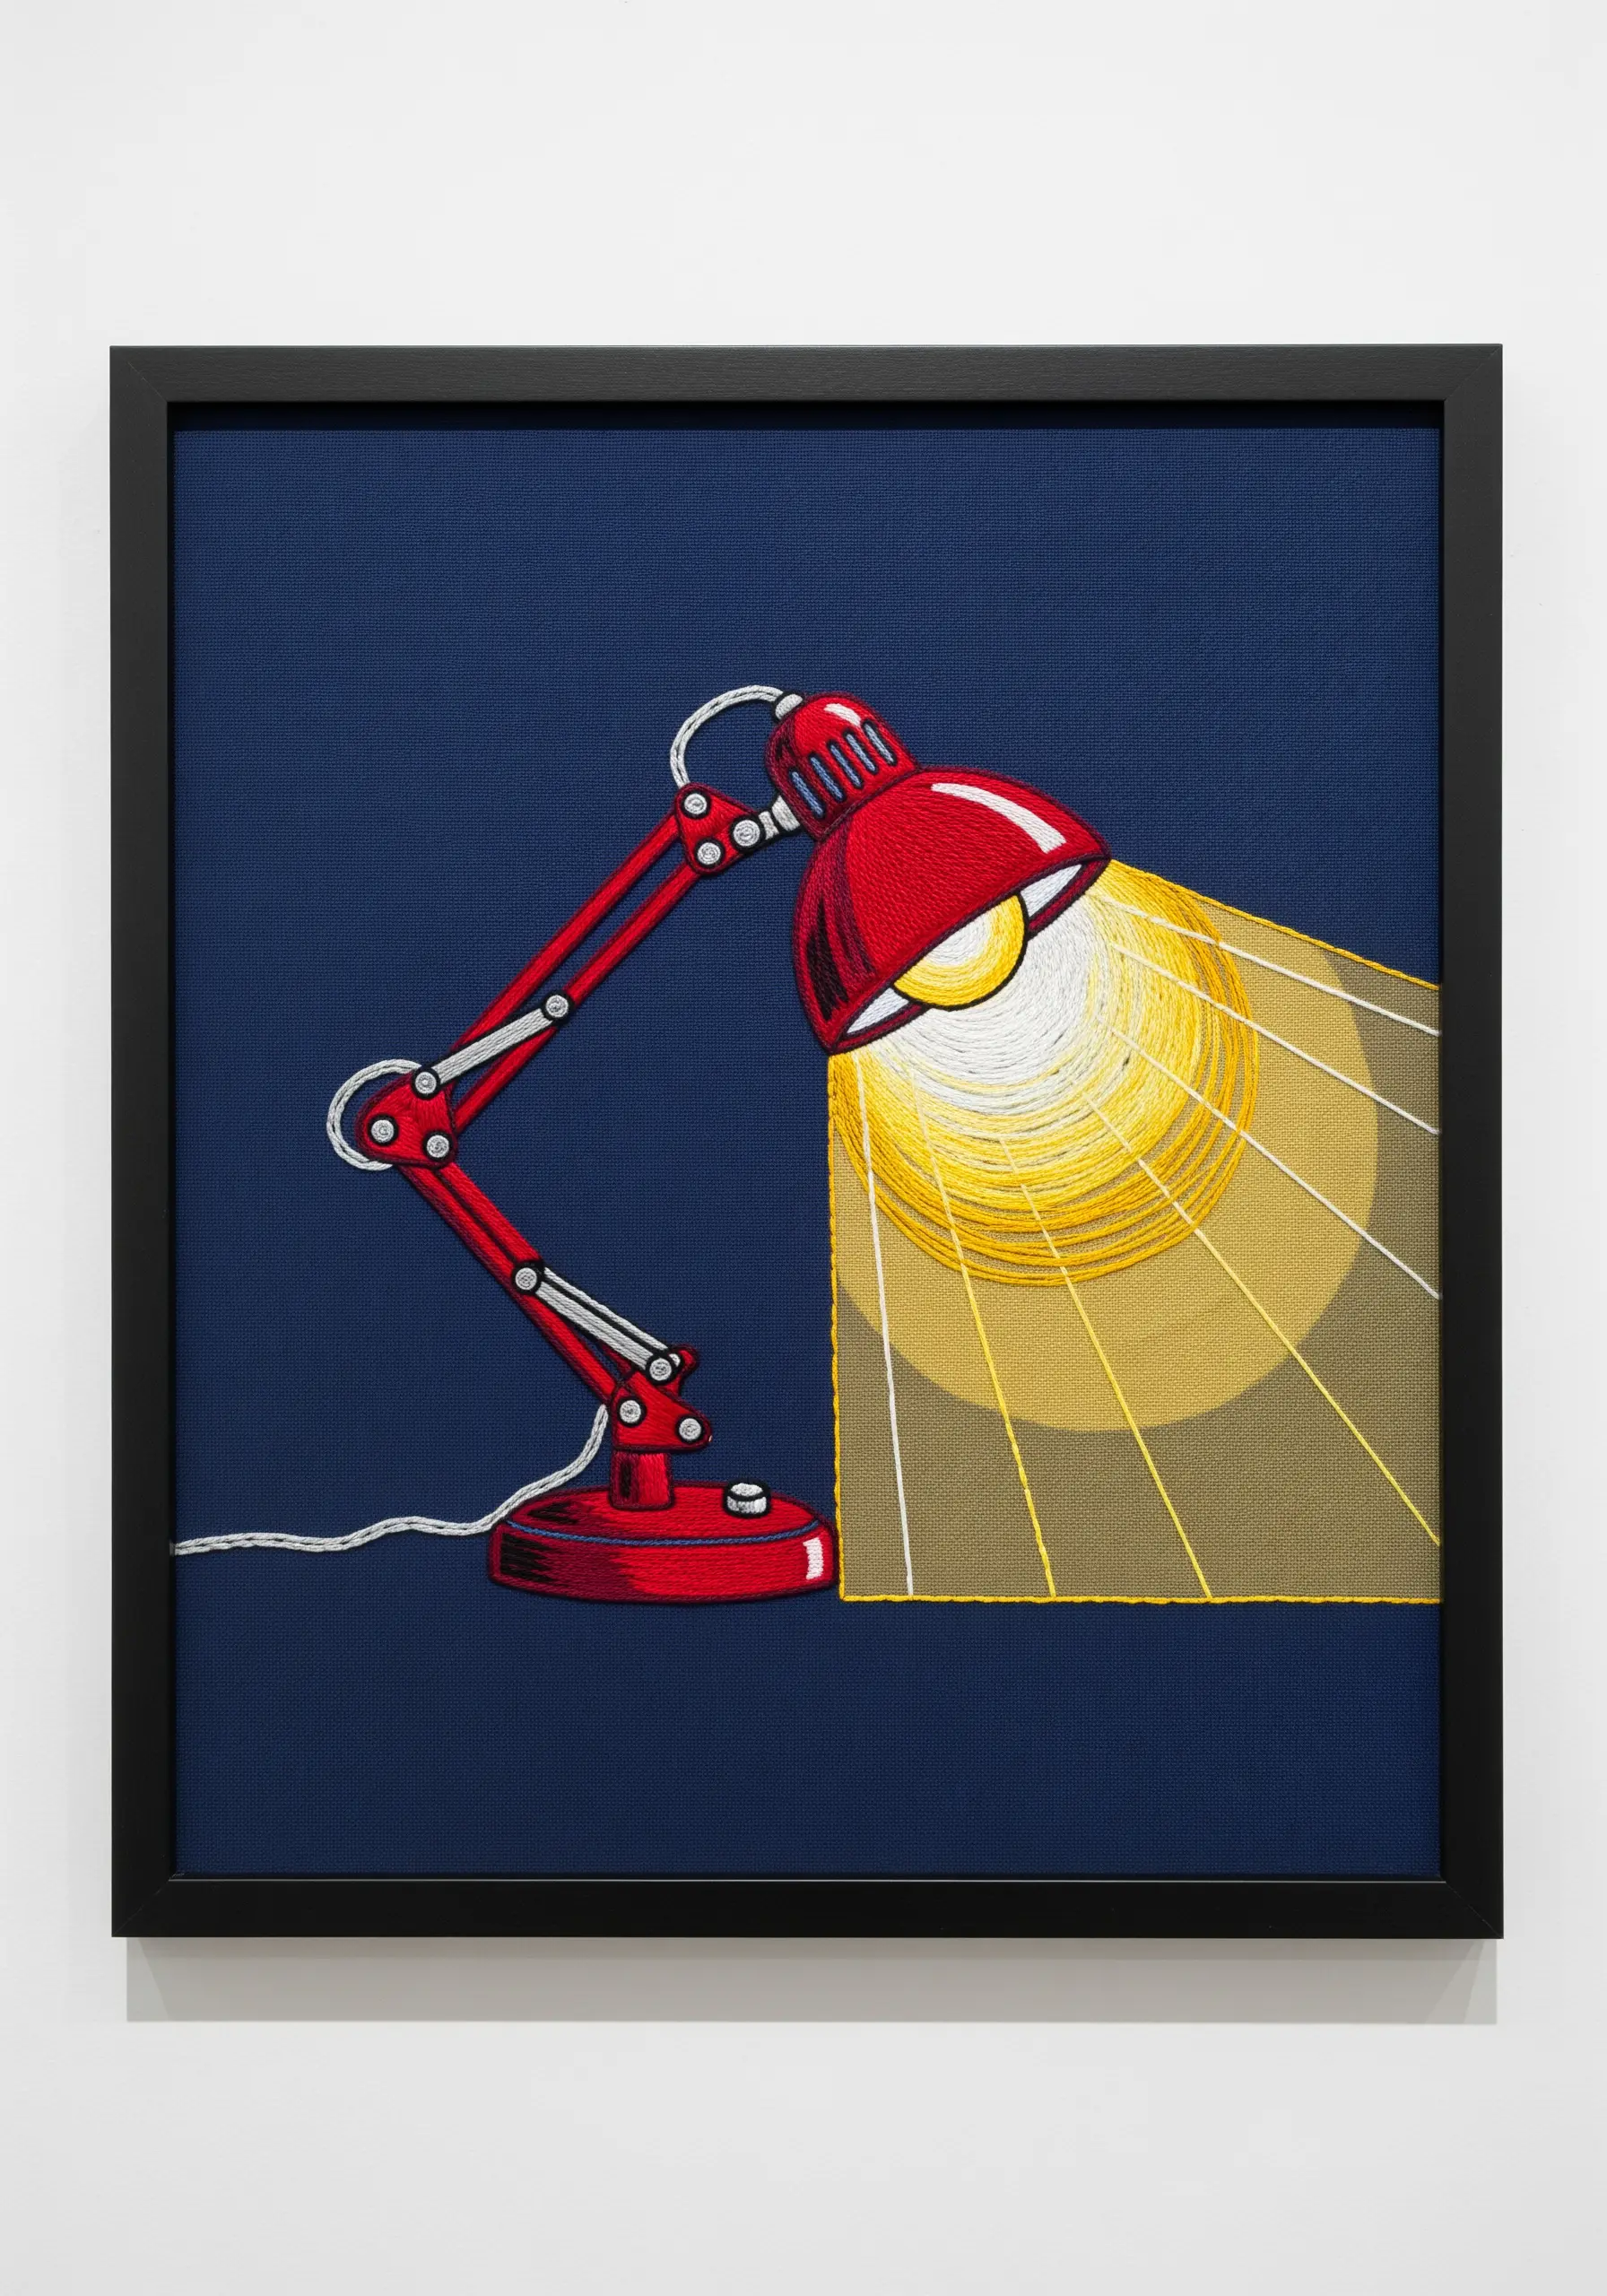
To embroider a beam of light, use long straight stitches that radiate from the light source.
Begin with the lightest color (white or pale yellow) at the center and layer darker shades of yellow and gold as you move outward.
Keep the stitches sparse and overlapping to create a translucent, ethereal effect, as if light is passing through the air.
This simple technique effectively captures the quality of light without needing complex blending.
15. Add Elegance with Delicate Metallic Couching
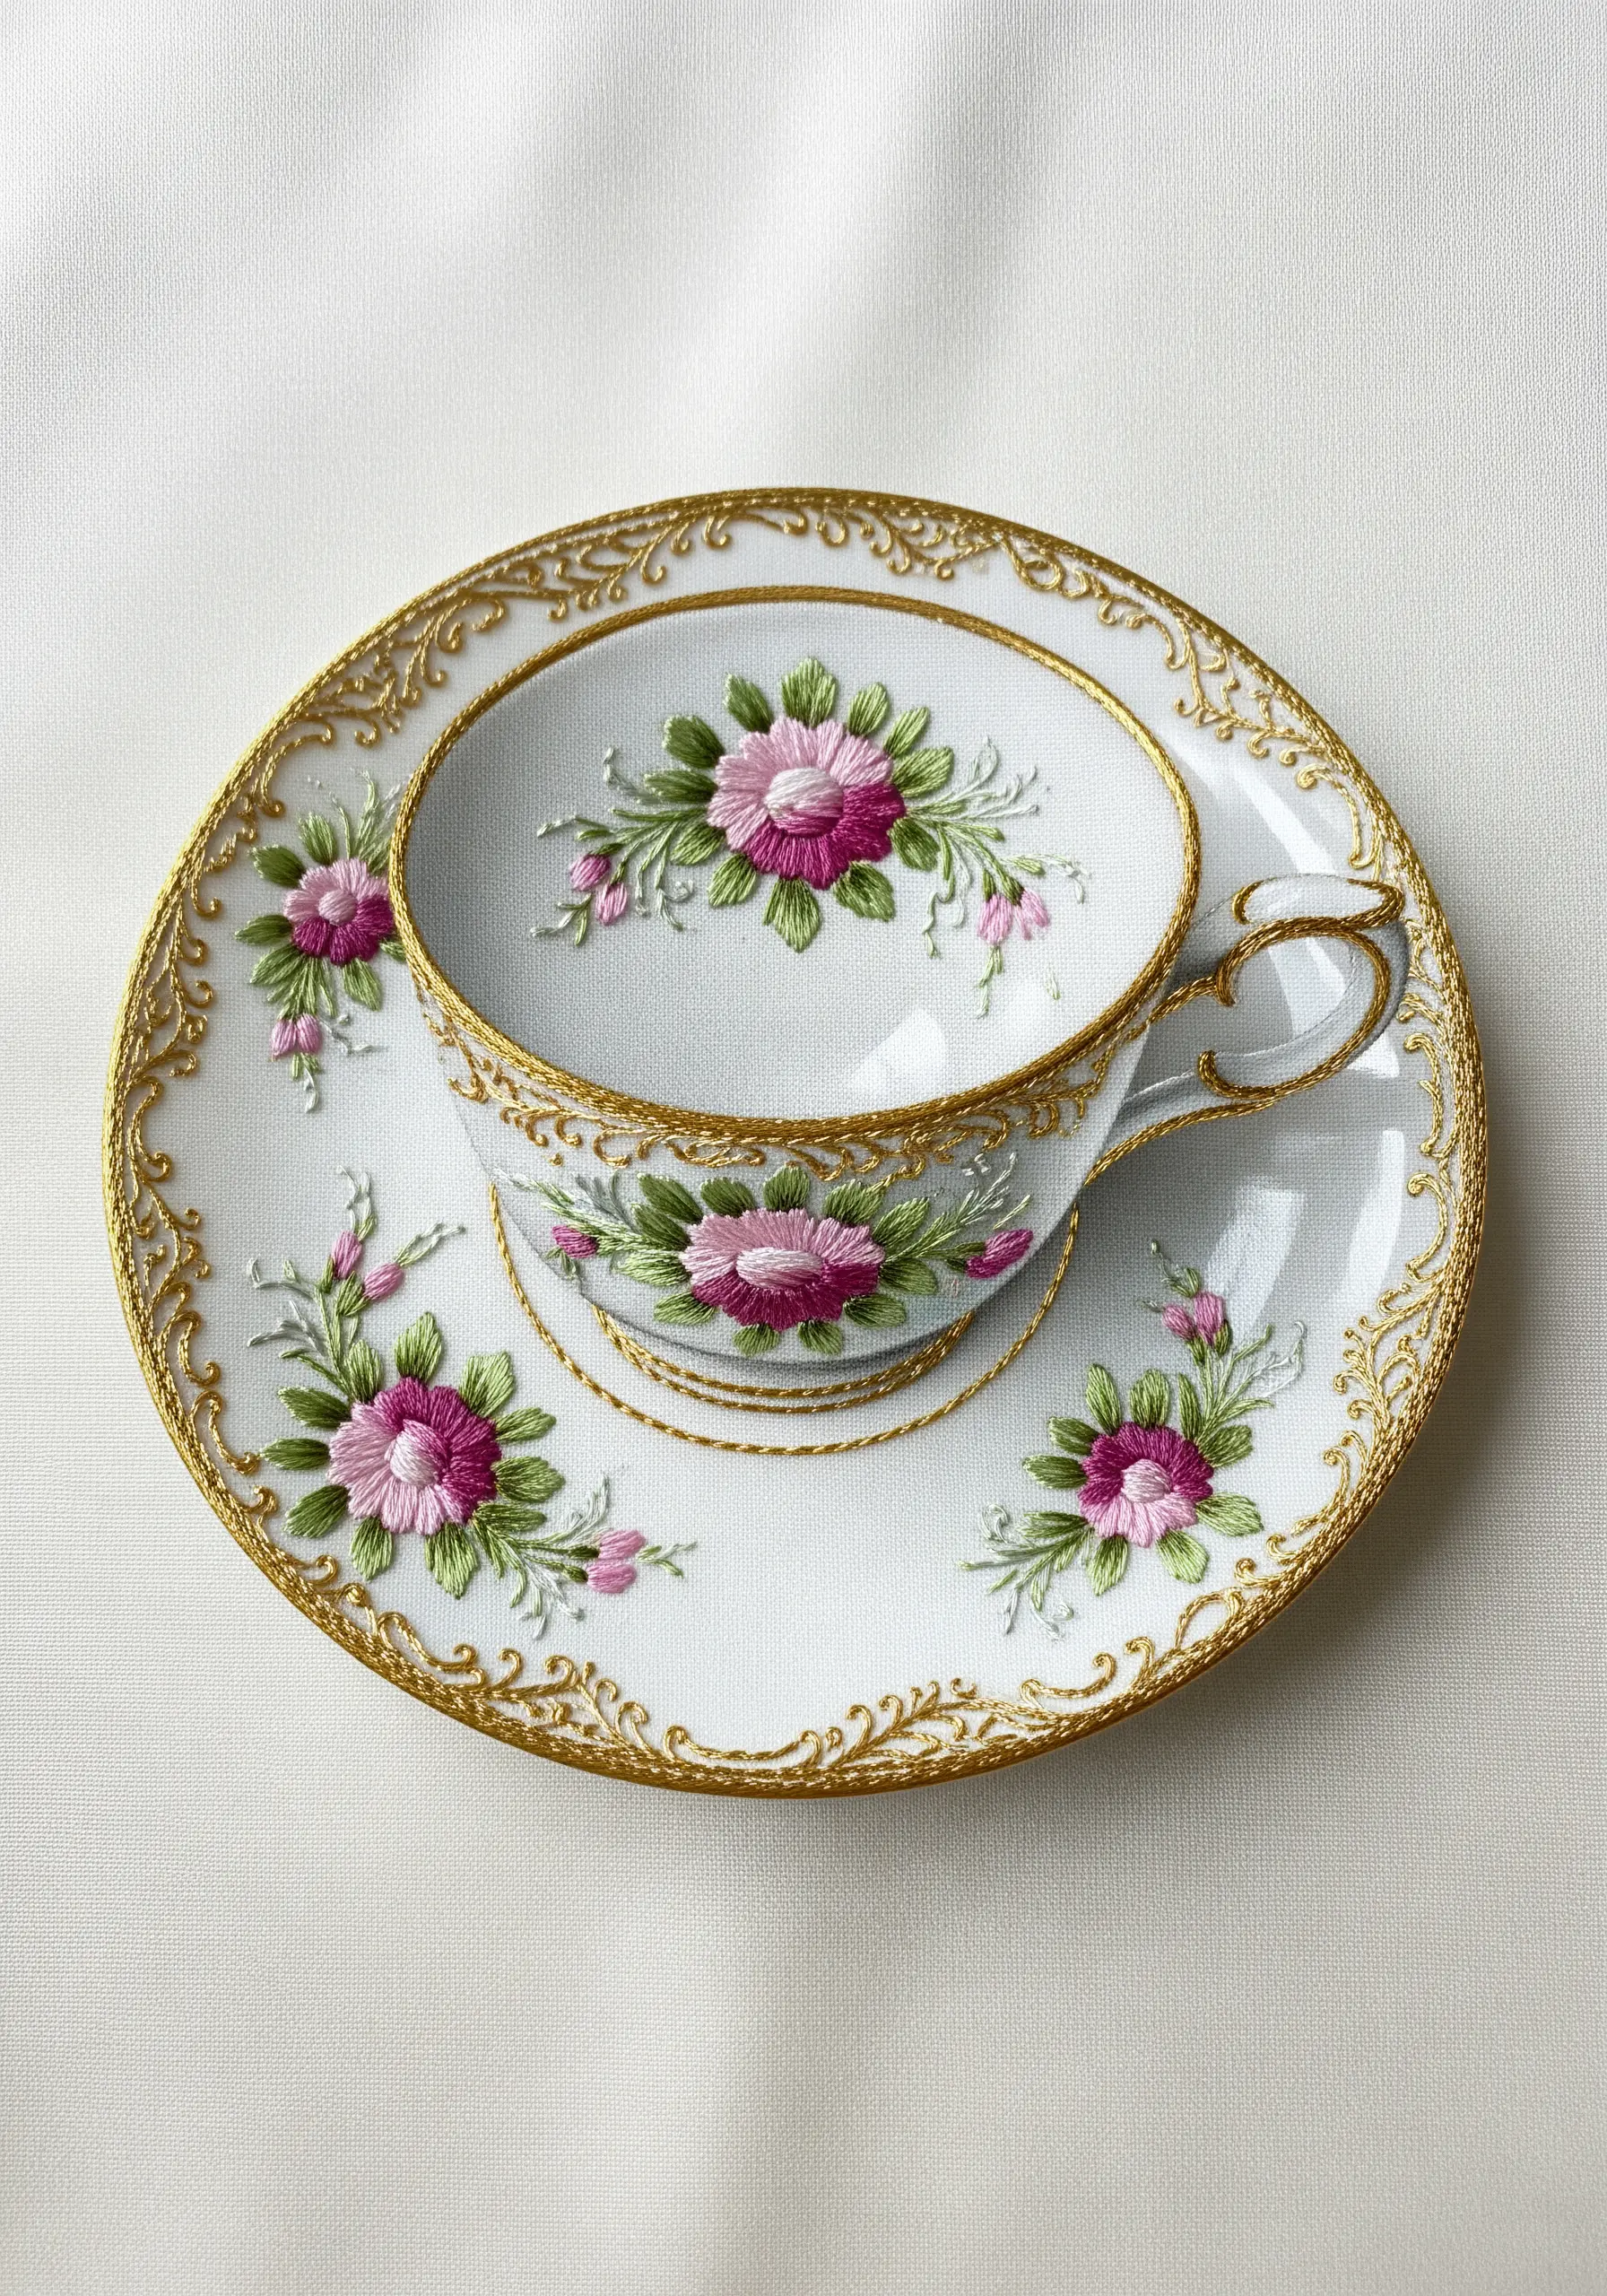
For ornate details like gold trim on porcelain, use the couching technique for perfect control over metallic threads.
Lay down your metallic thread along the design line, then use a second, finer thread (in a matching color) to tack it down with tiny, evenly spaced stitches.
This method prevents the stiff metallic thread from shifting and allows you to create fluid, intricate curves that would be impossible with traditional stitches.
It’s one of the most effective simple embroidery designs that make your old linen look brand new and luxurious.
16. Replicate Woodgrain with Variegated Thread
To create a realistic wood texture quickly, use a single variegated brown thread with the long-and-short stitch.
The natural color variations in the thread will automatically create the highlights and lowlights of a woodgrain pattern as you stitch.
Keep your stitches flowing in one direction to mimic the grain of the wood.
This simple choice of material does most of the complex color work for you, resulting in a rich, organic texture with minimal effort.
17. Create Glossy Surfaces with Blended Highlights
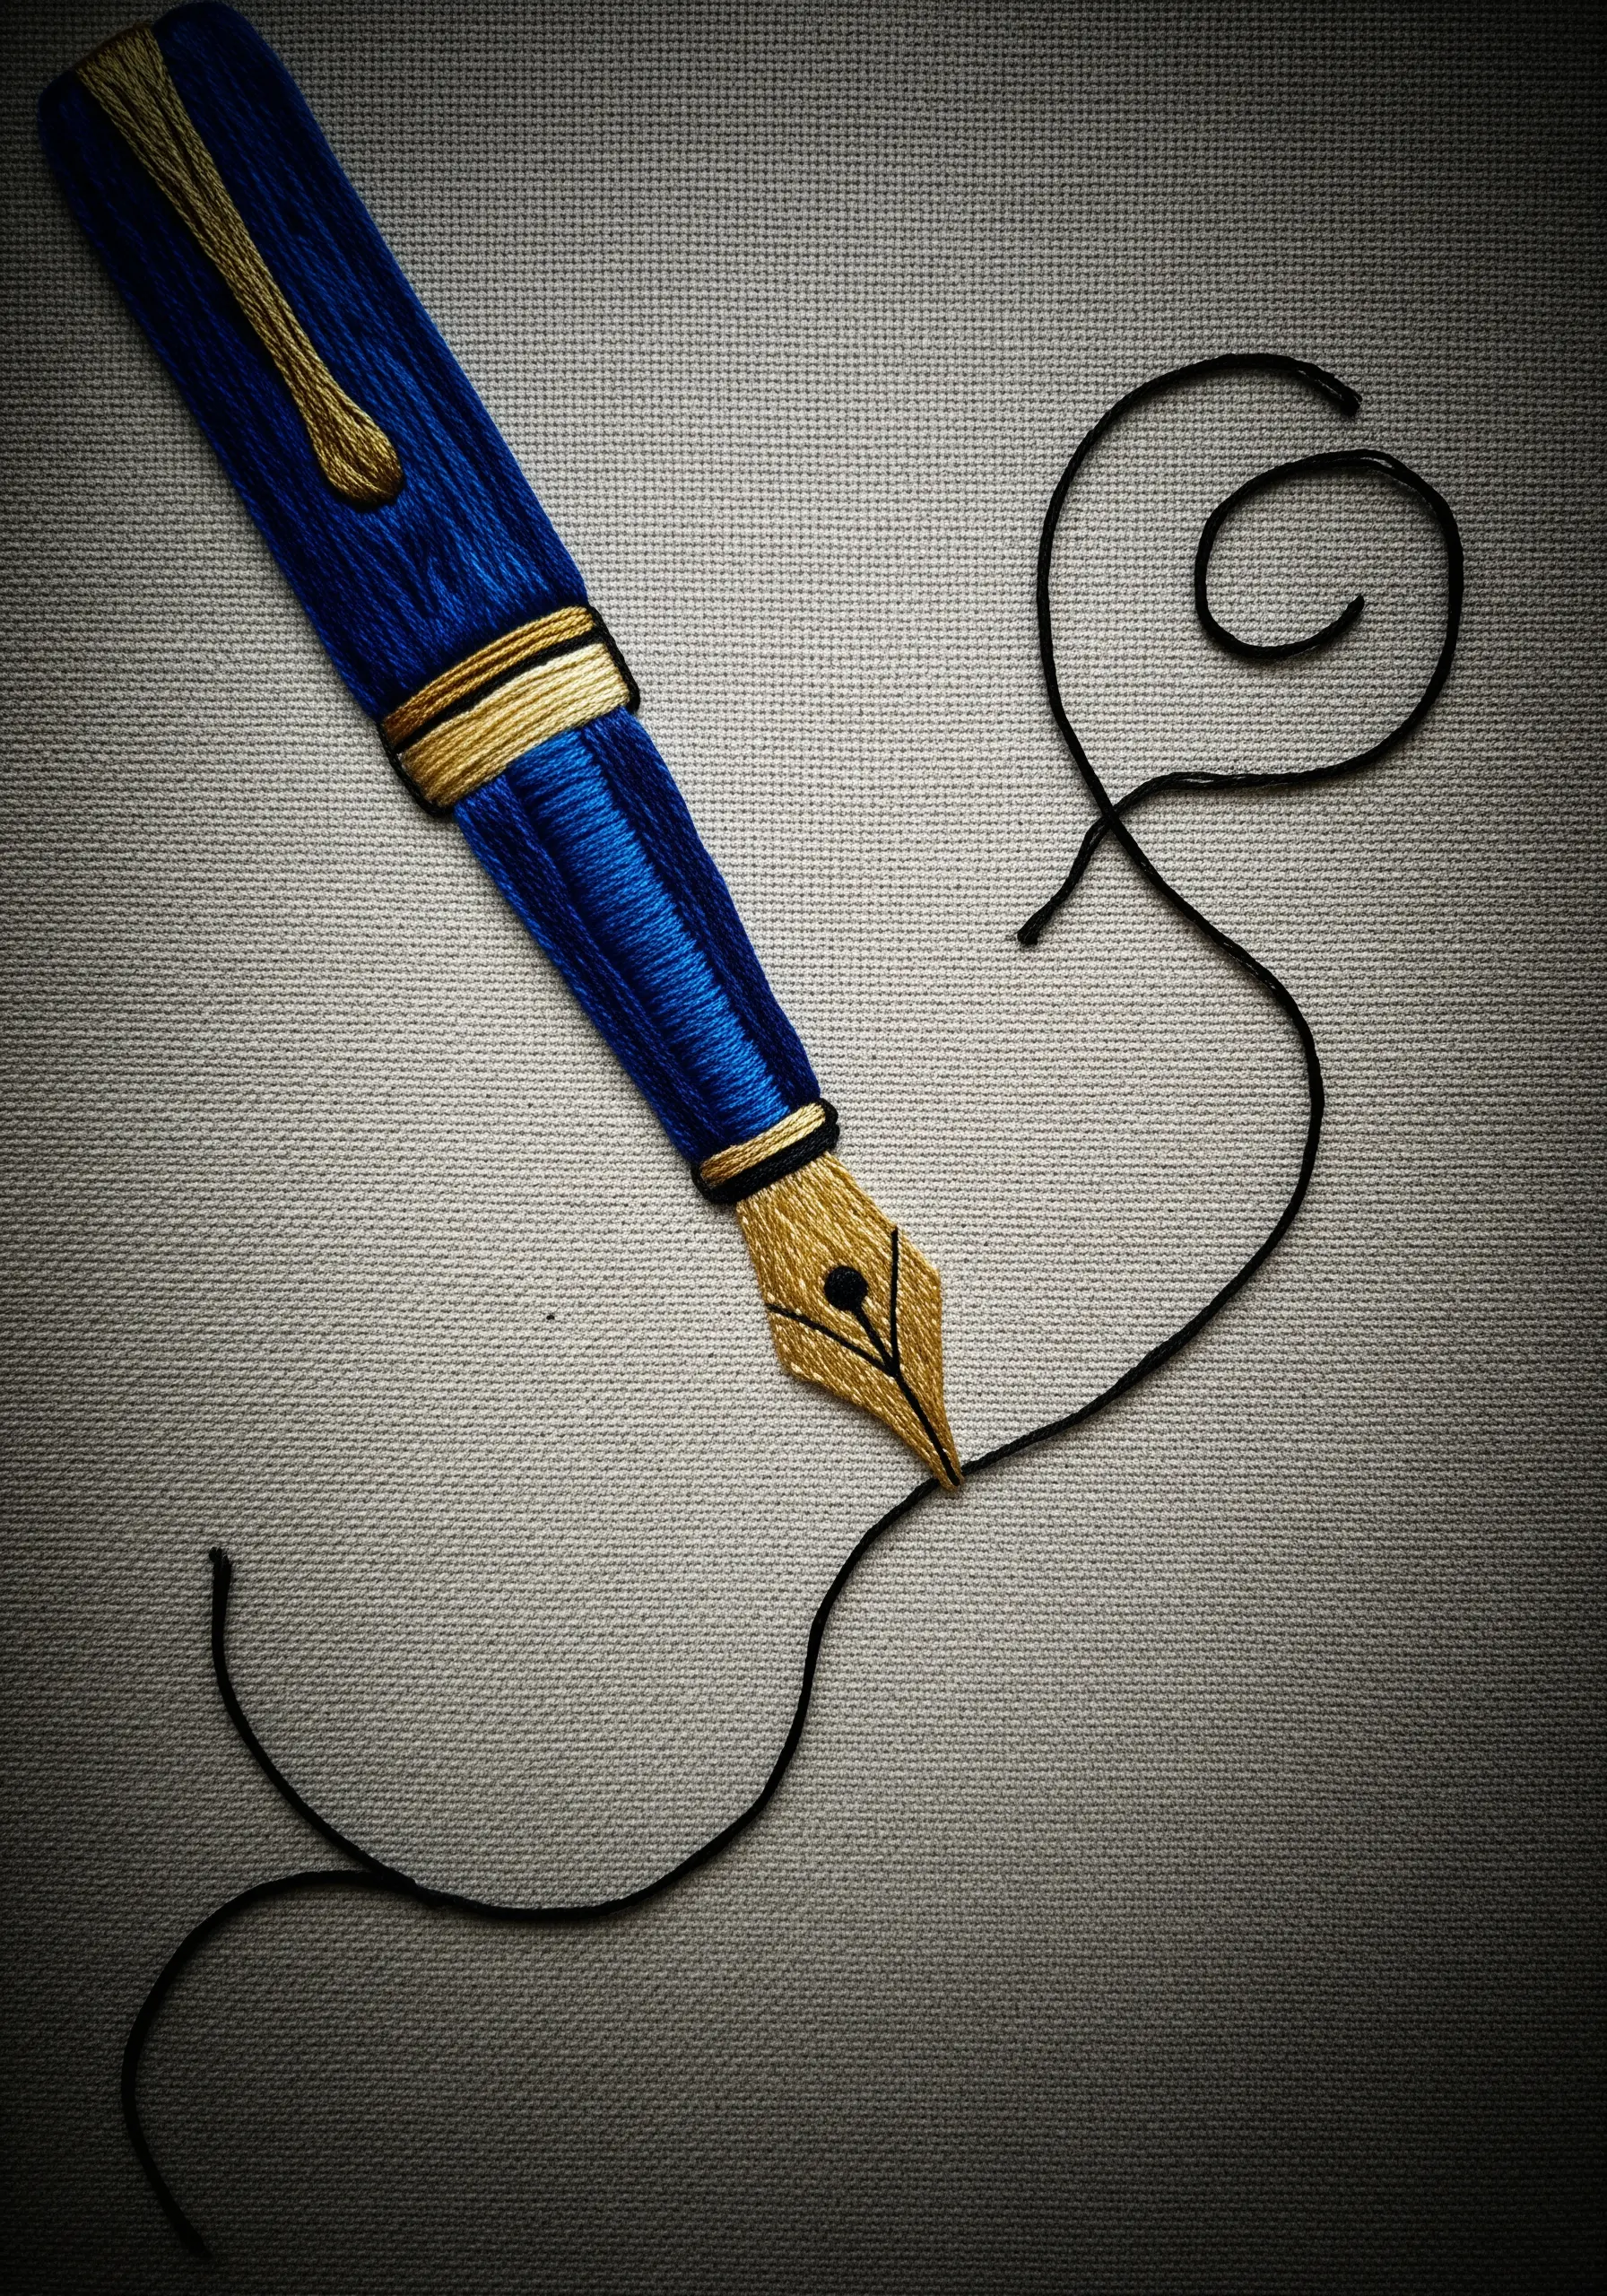
To make an object look rounded and glossy, incorporate a subtle highlight using just one or two strands of a lighter thread.
Fill the main body of the pen with a dark blue satin stitch.
Then, using a slightly lighter blue or even an off-white, add a few long stitches down the center where the light would hit.
Gently blend the edges of this highlight into the main color with a few final stitches to create a smooth, reflective sheen.
18. Mimic Surface Grooves with Circular Stitches
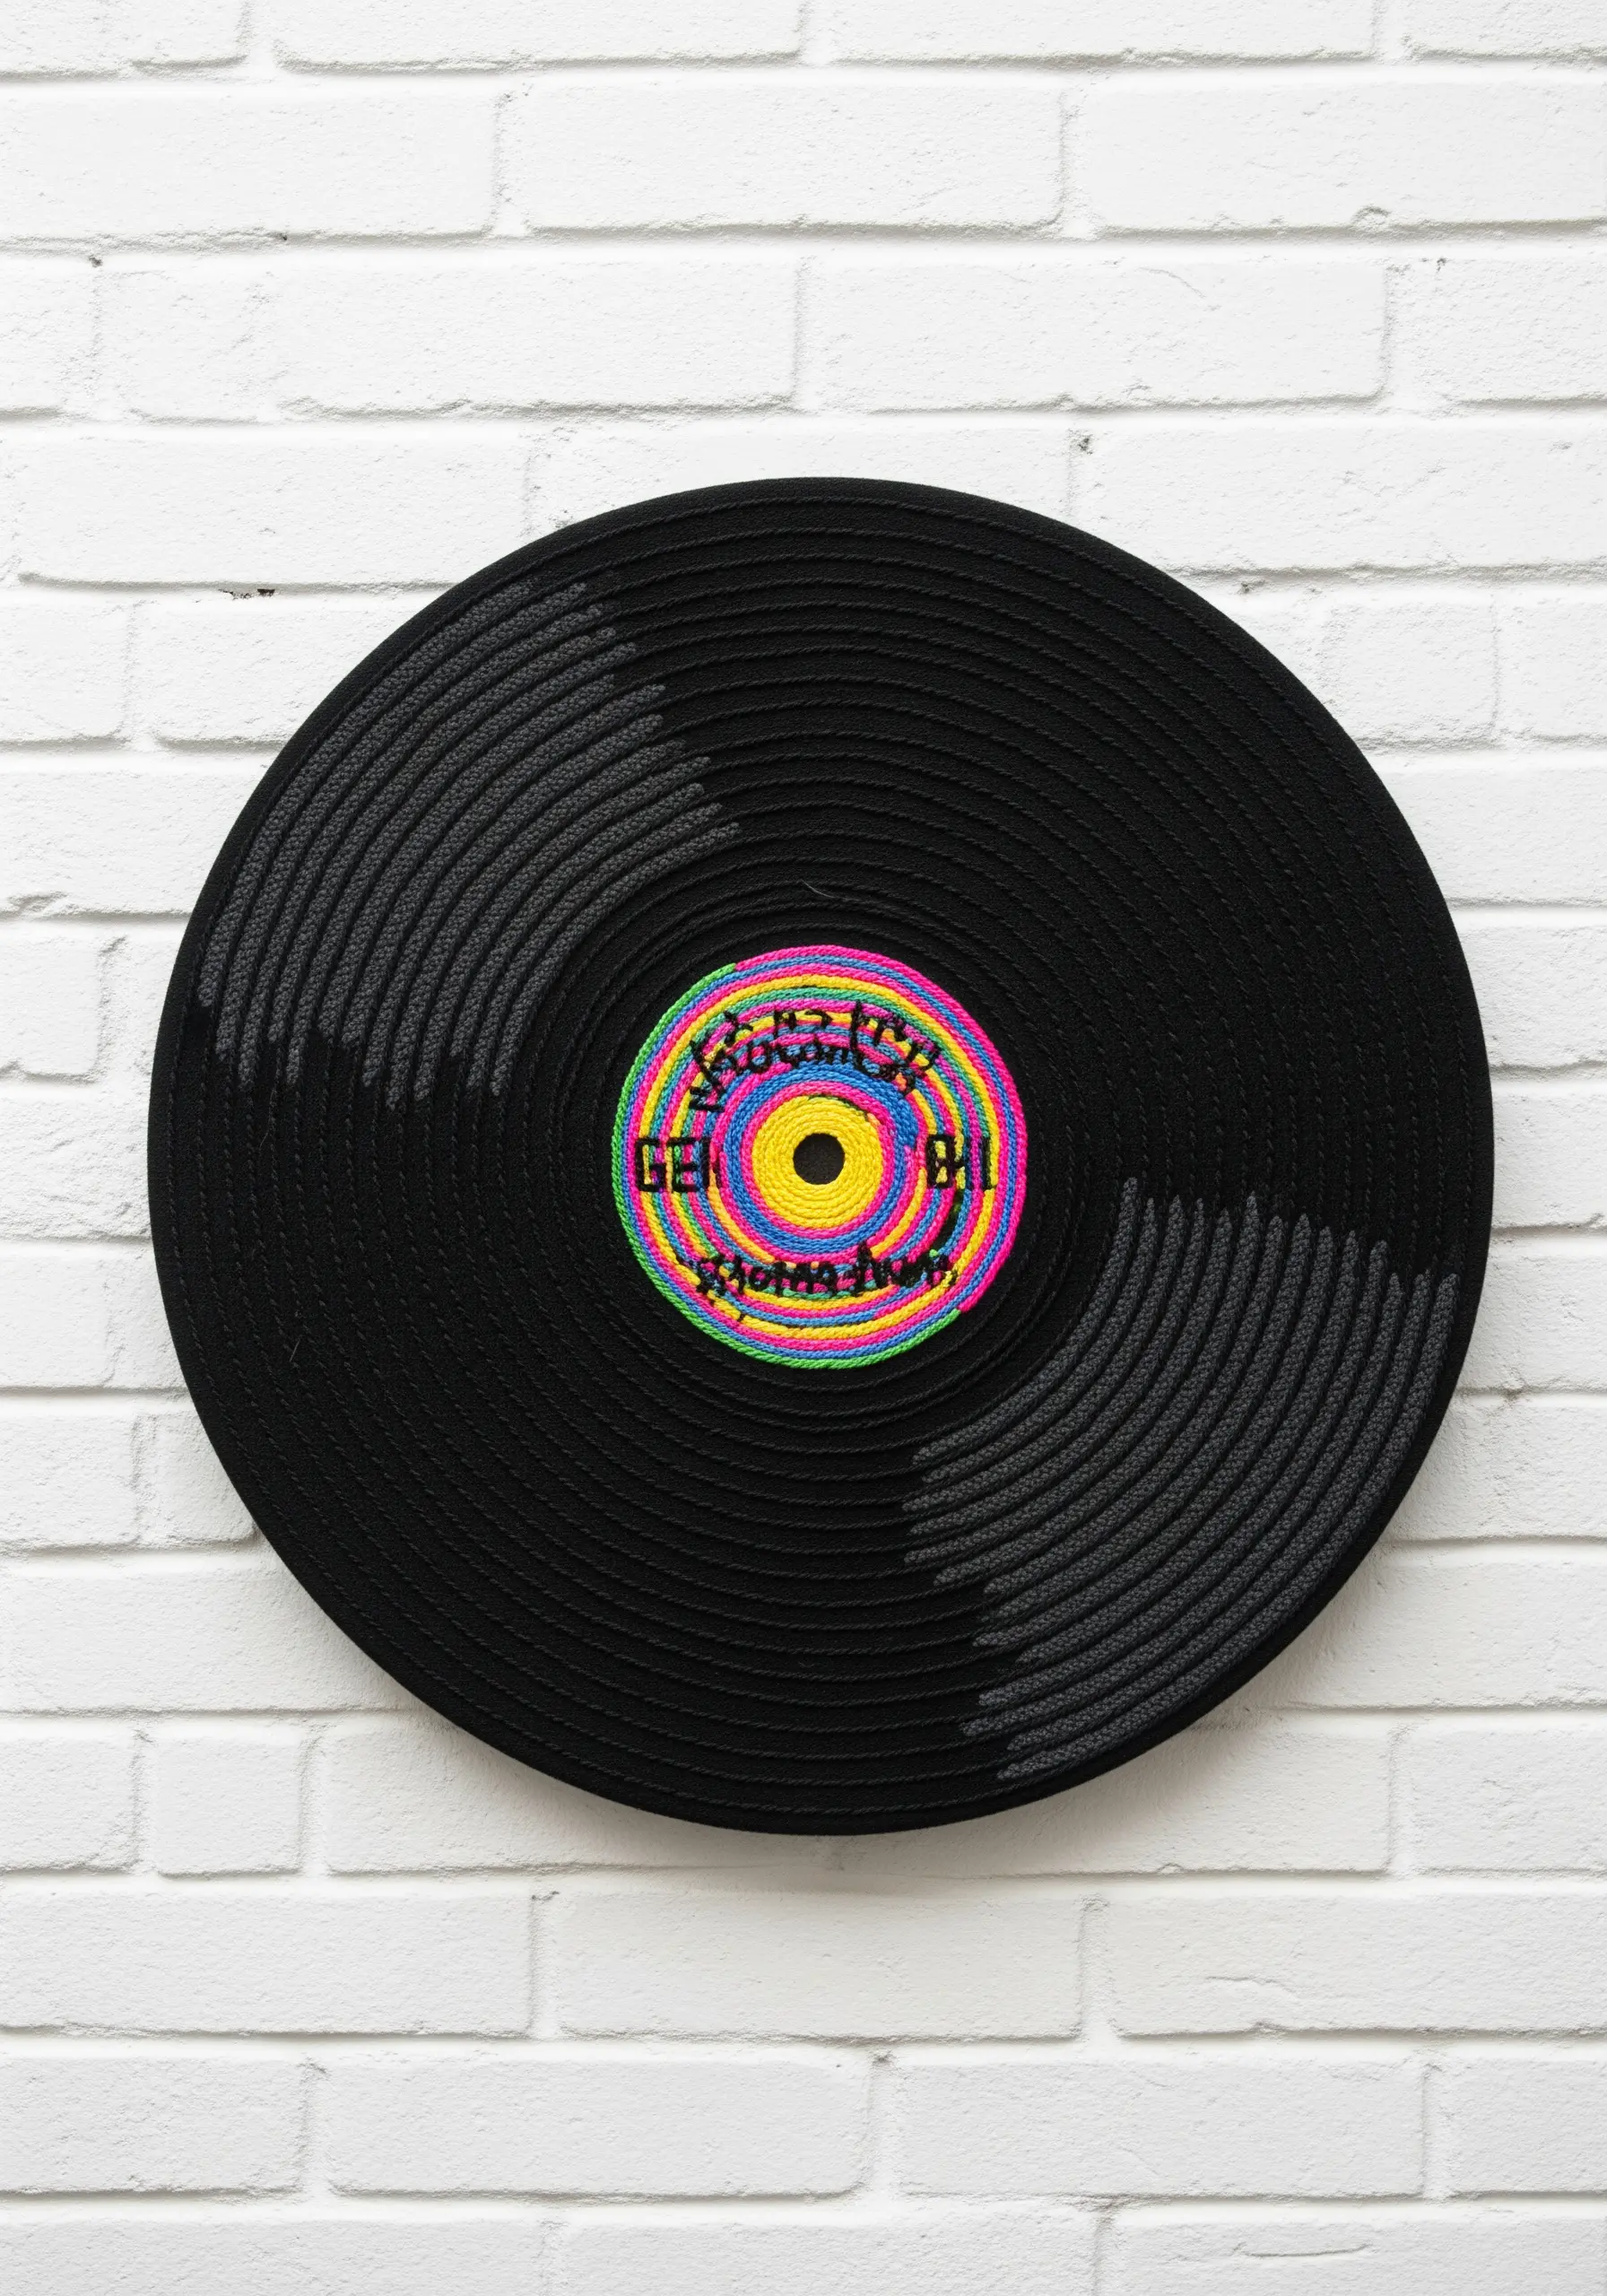
To recreate the texture of a vinyl record, use dense, concentric circles of split stitch or backstitch.
Using a glossy black thread will enhance the effect, catching the light just like real vinyl grooves.
Start from the outside and work your way in, keeping the rows of stitching tight against each other for a solid, textured appearance.
The vibrant, multi-colored label in the center provides a fantastic focal point against the monochromatic black.
19. Use Padded Satin Stitch for 3D Volume
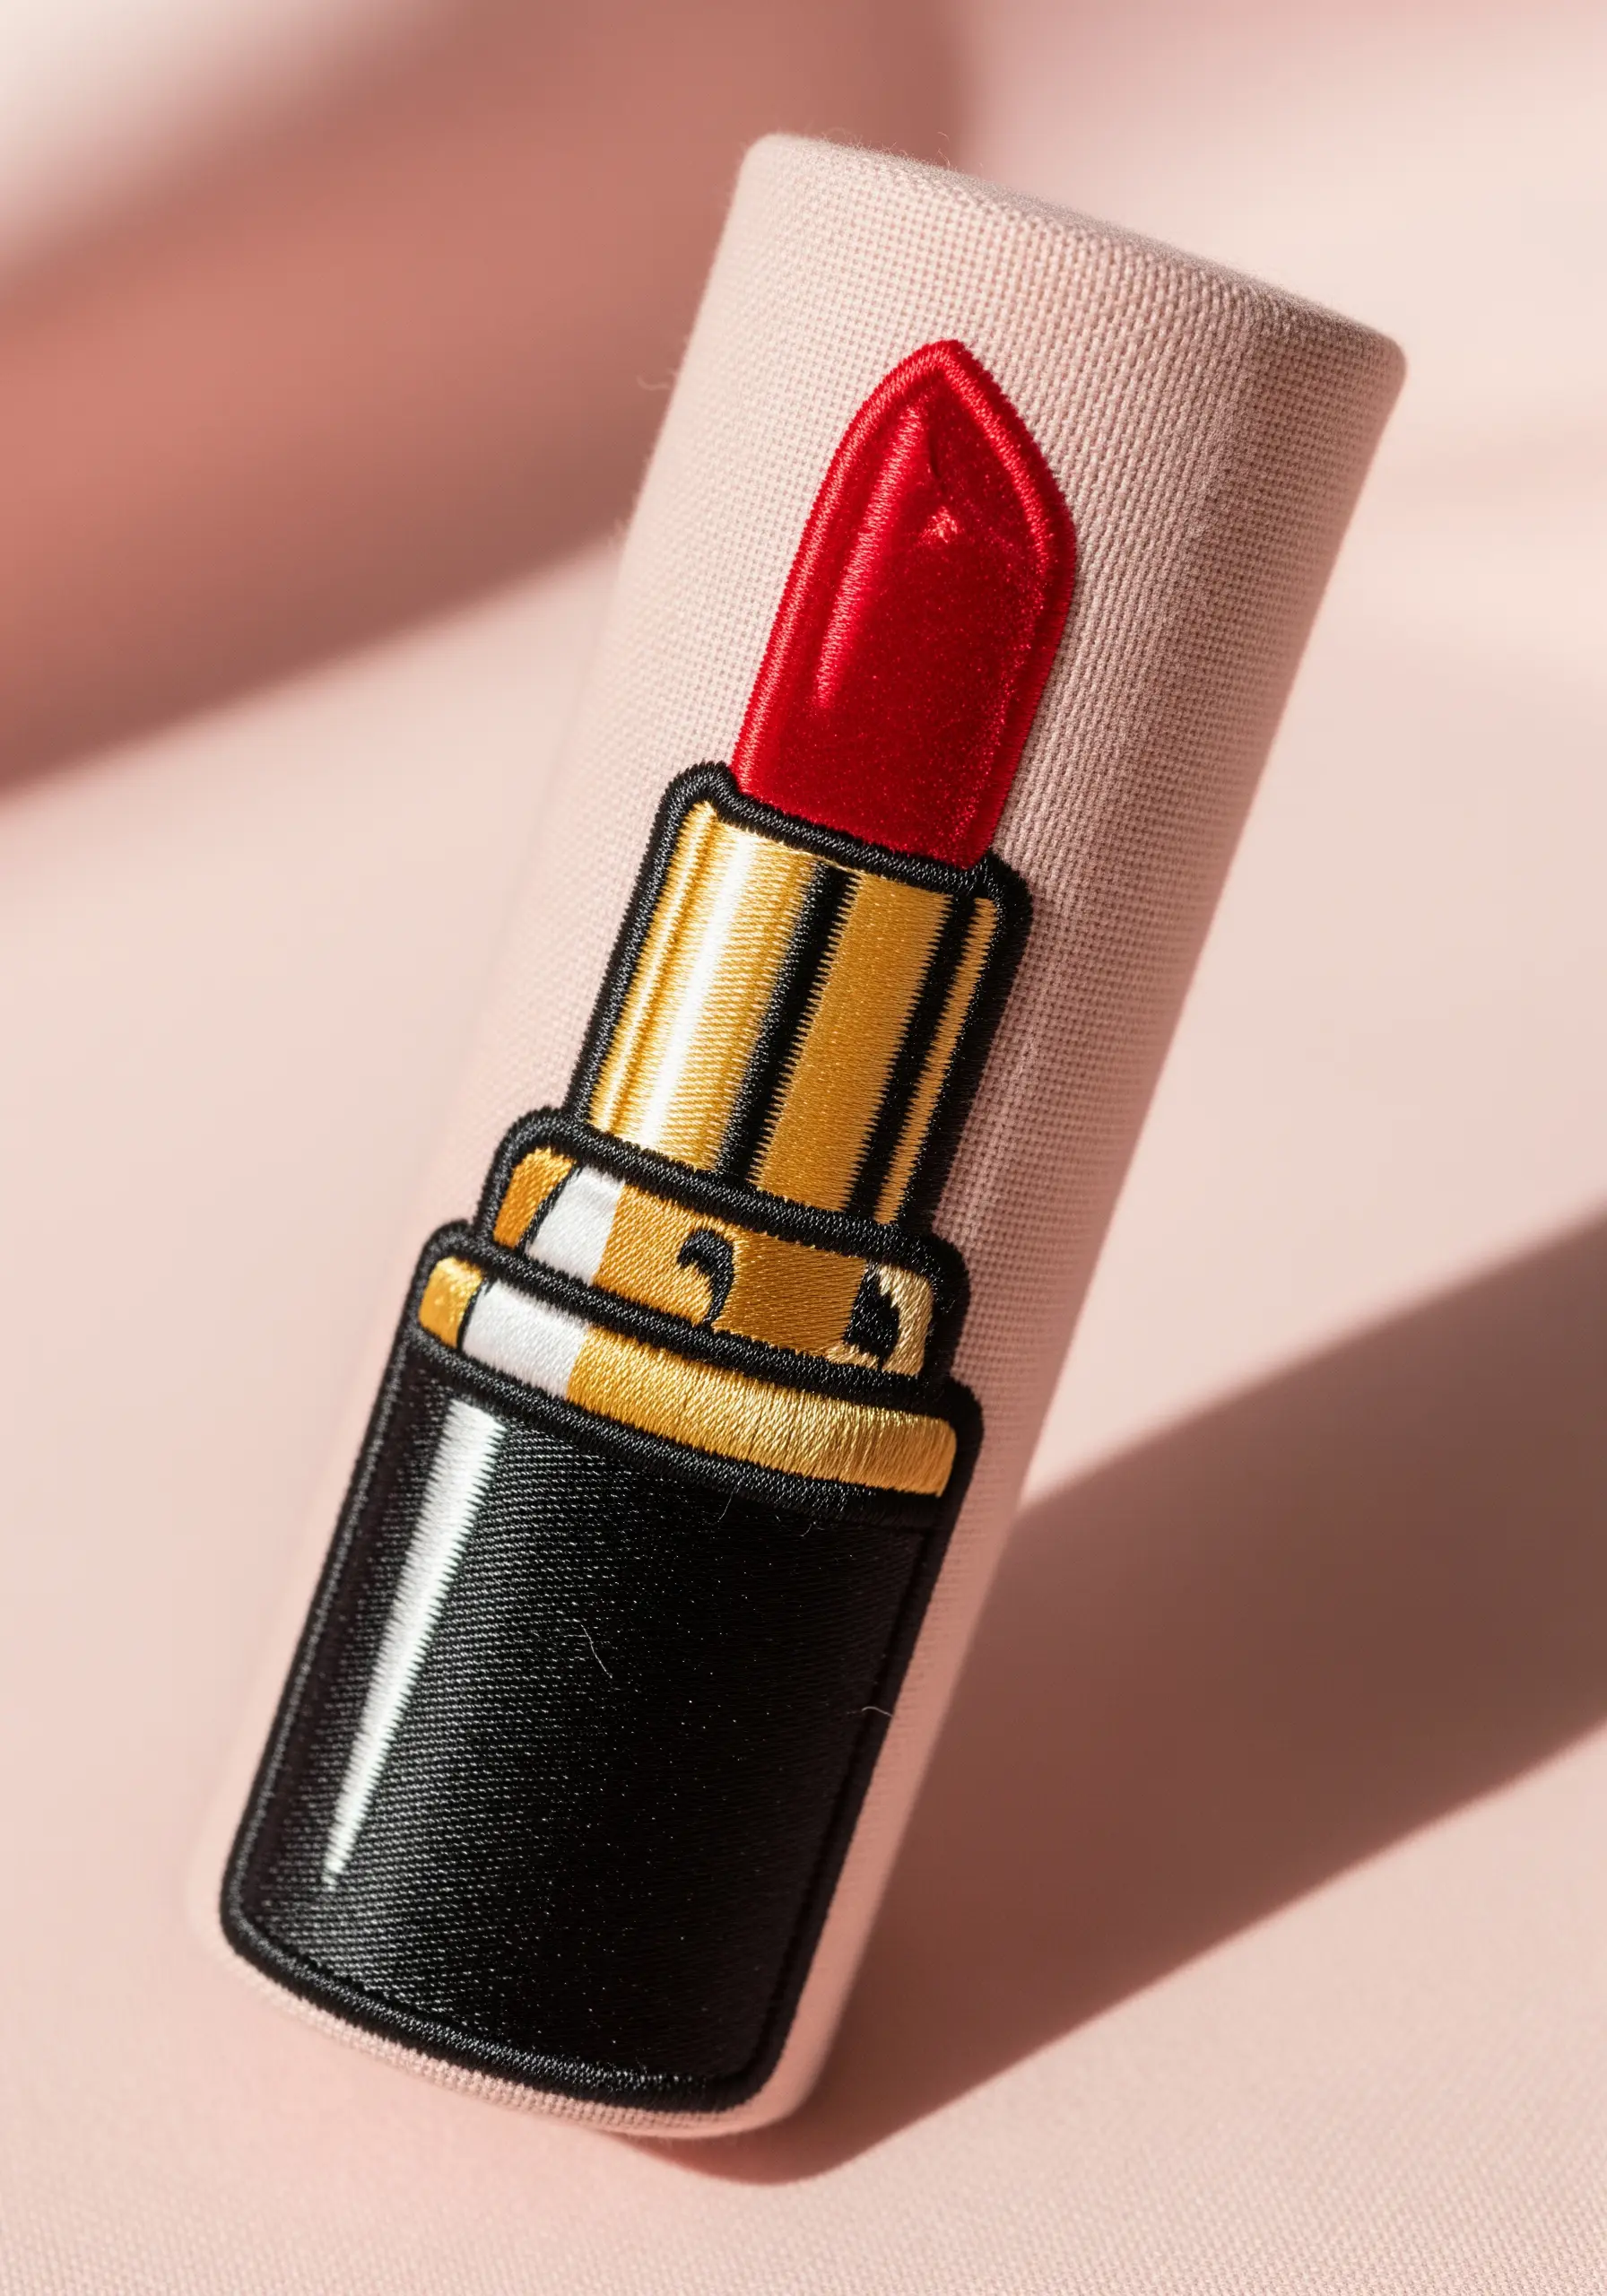
To make small objects like lipstick appear three-dimensional, use padded satin stitch to lift them from the fabric.
First, fill the area you want to raise with a foundation of small, horizontal straight stitches or seed stitches.
Then, cover this padding with your final satin stitch, working in the opposite direction (vertically).
This underlying layer of thread adds volume and creates smooth, rounded surfaces with beautiful highlights.
20. Emulate Woven Upholstery with Patterned Stitches
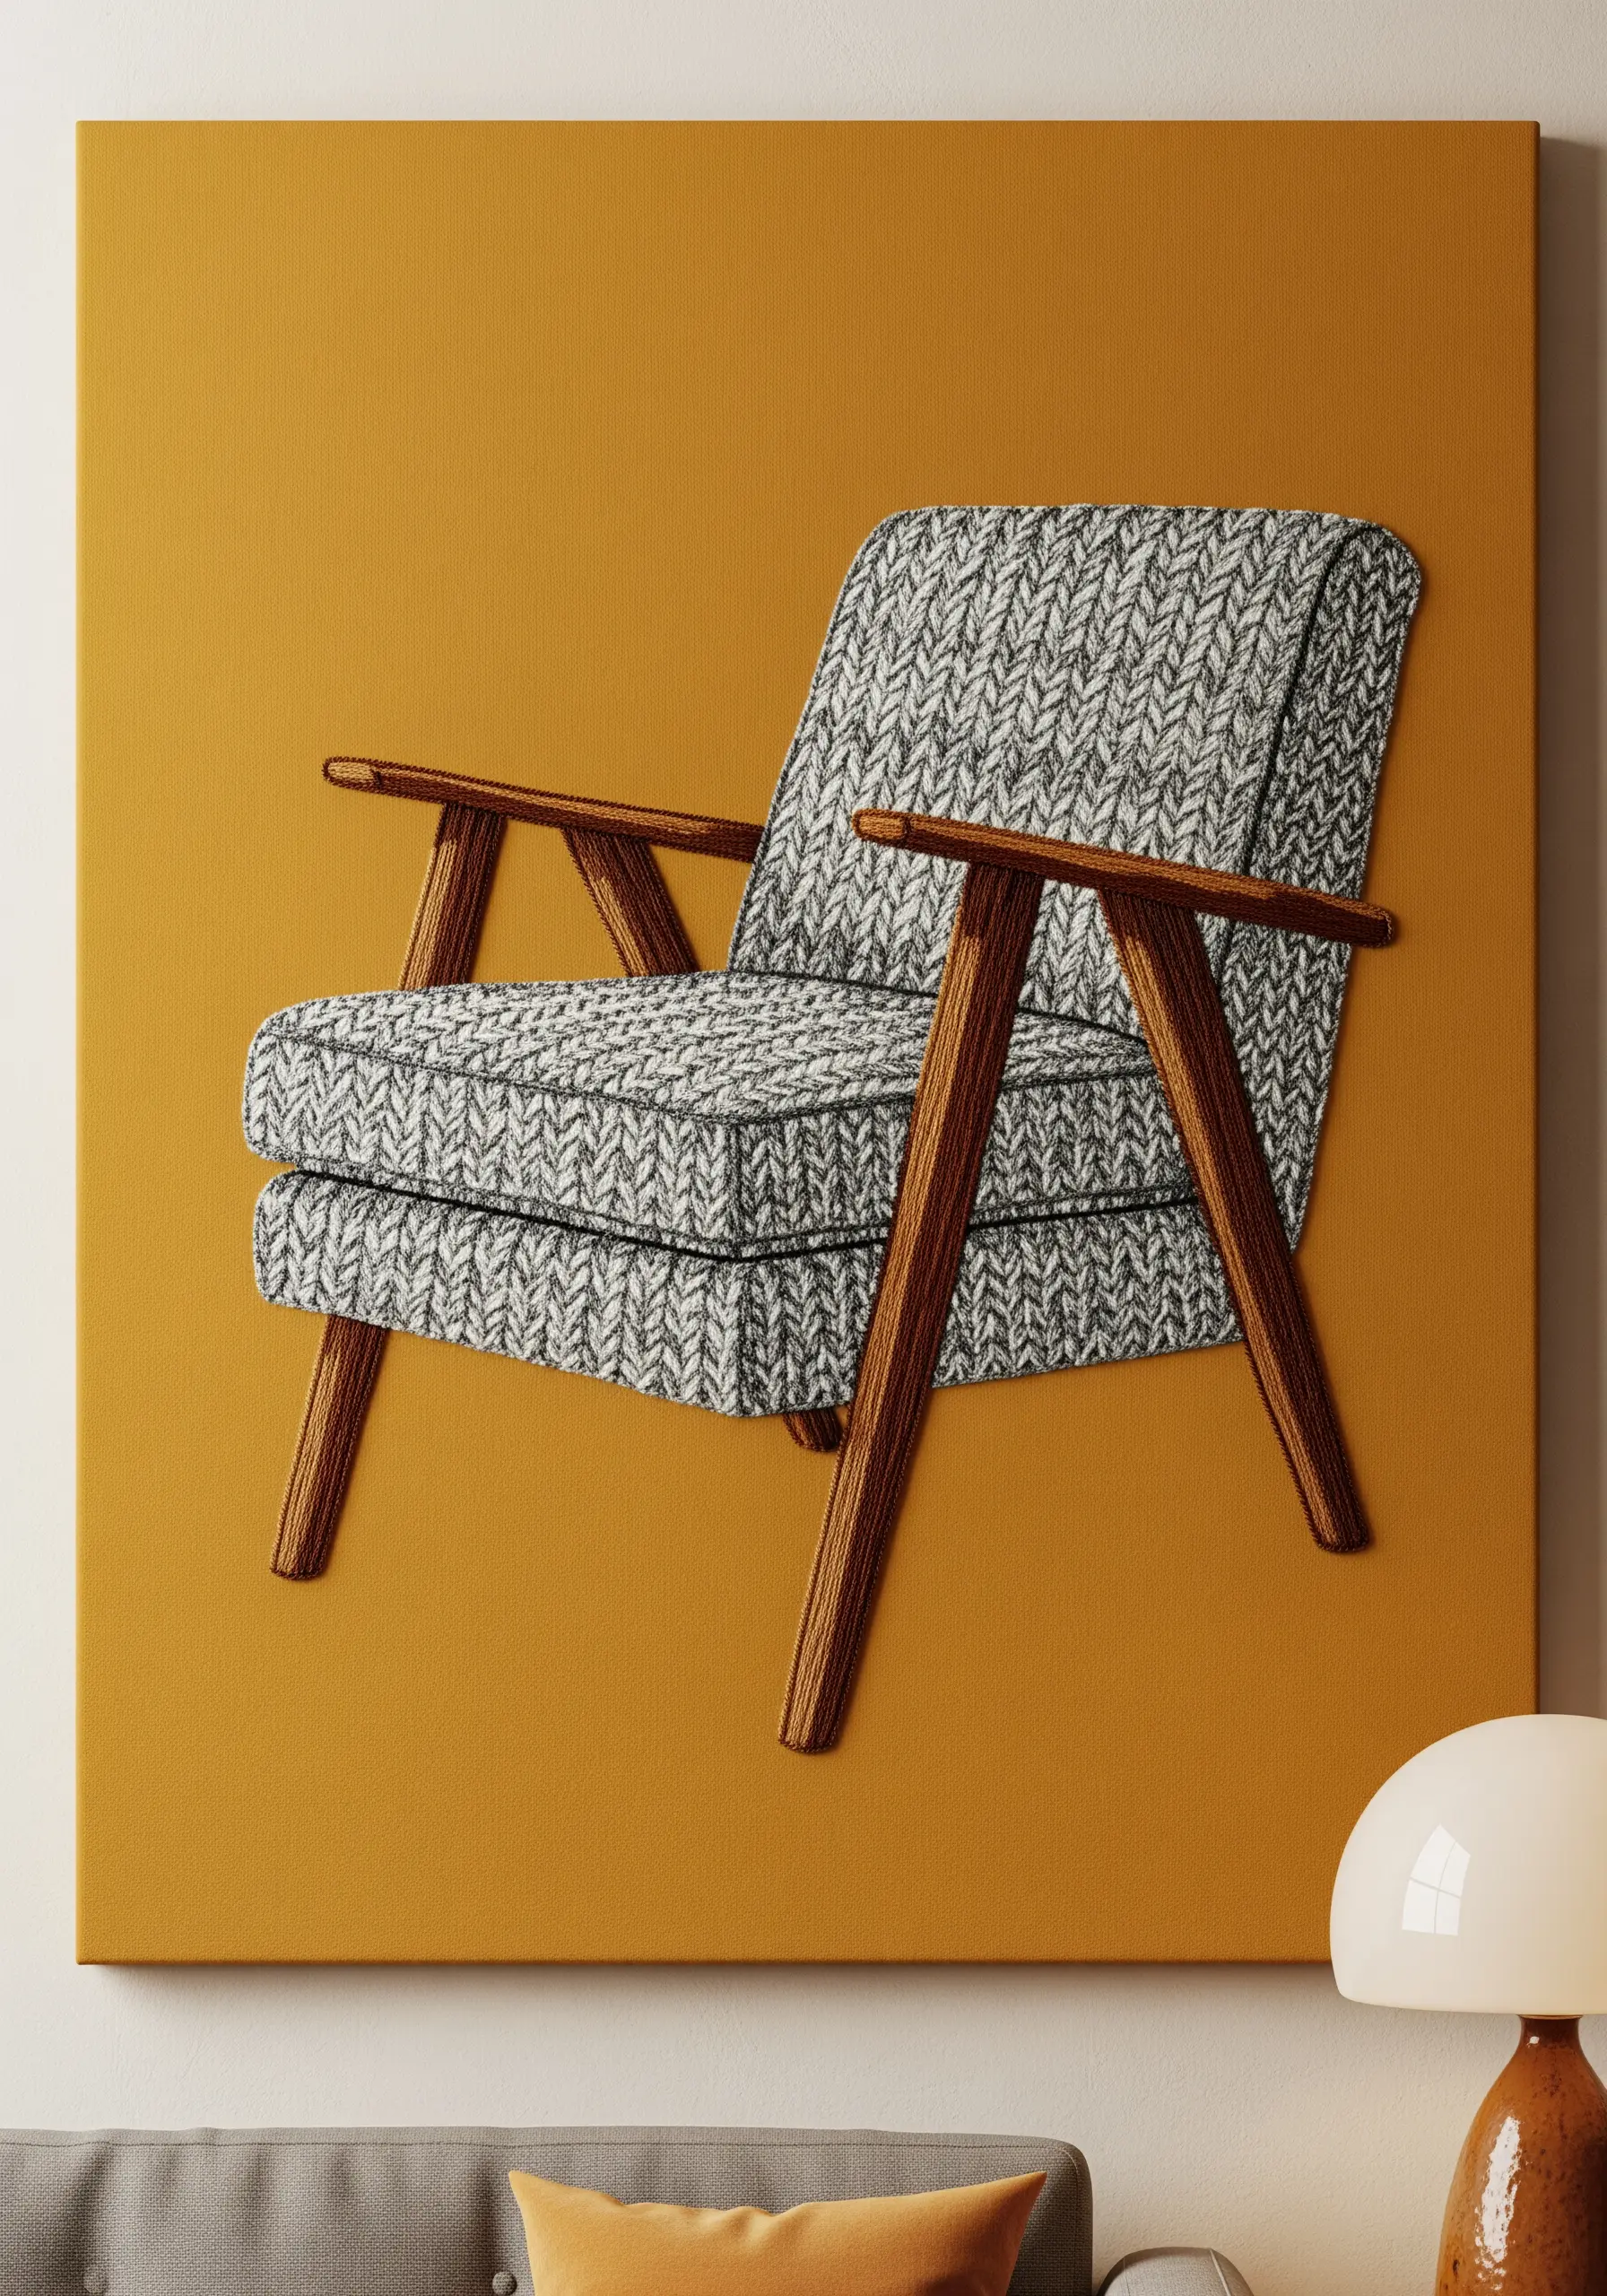
Instead of a flat fill, choose a stitch that mimics the texture of the object’s real-life material.
To capture the look of a woven, tweedy fabric on an armchair, use the basketweave stitch or alternating blocks of vertical and horizontal satin stitches.
This creates a subtle, grid-like pattern that suggests texture and adds a layer of realism.
Contrast this with a smooth, directional long-and-short stitch for the wooden arms to highlight the different materials.
21. Create Dynamic Splatters with Knots and Seed Stitches
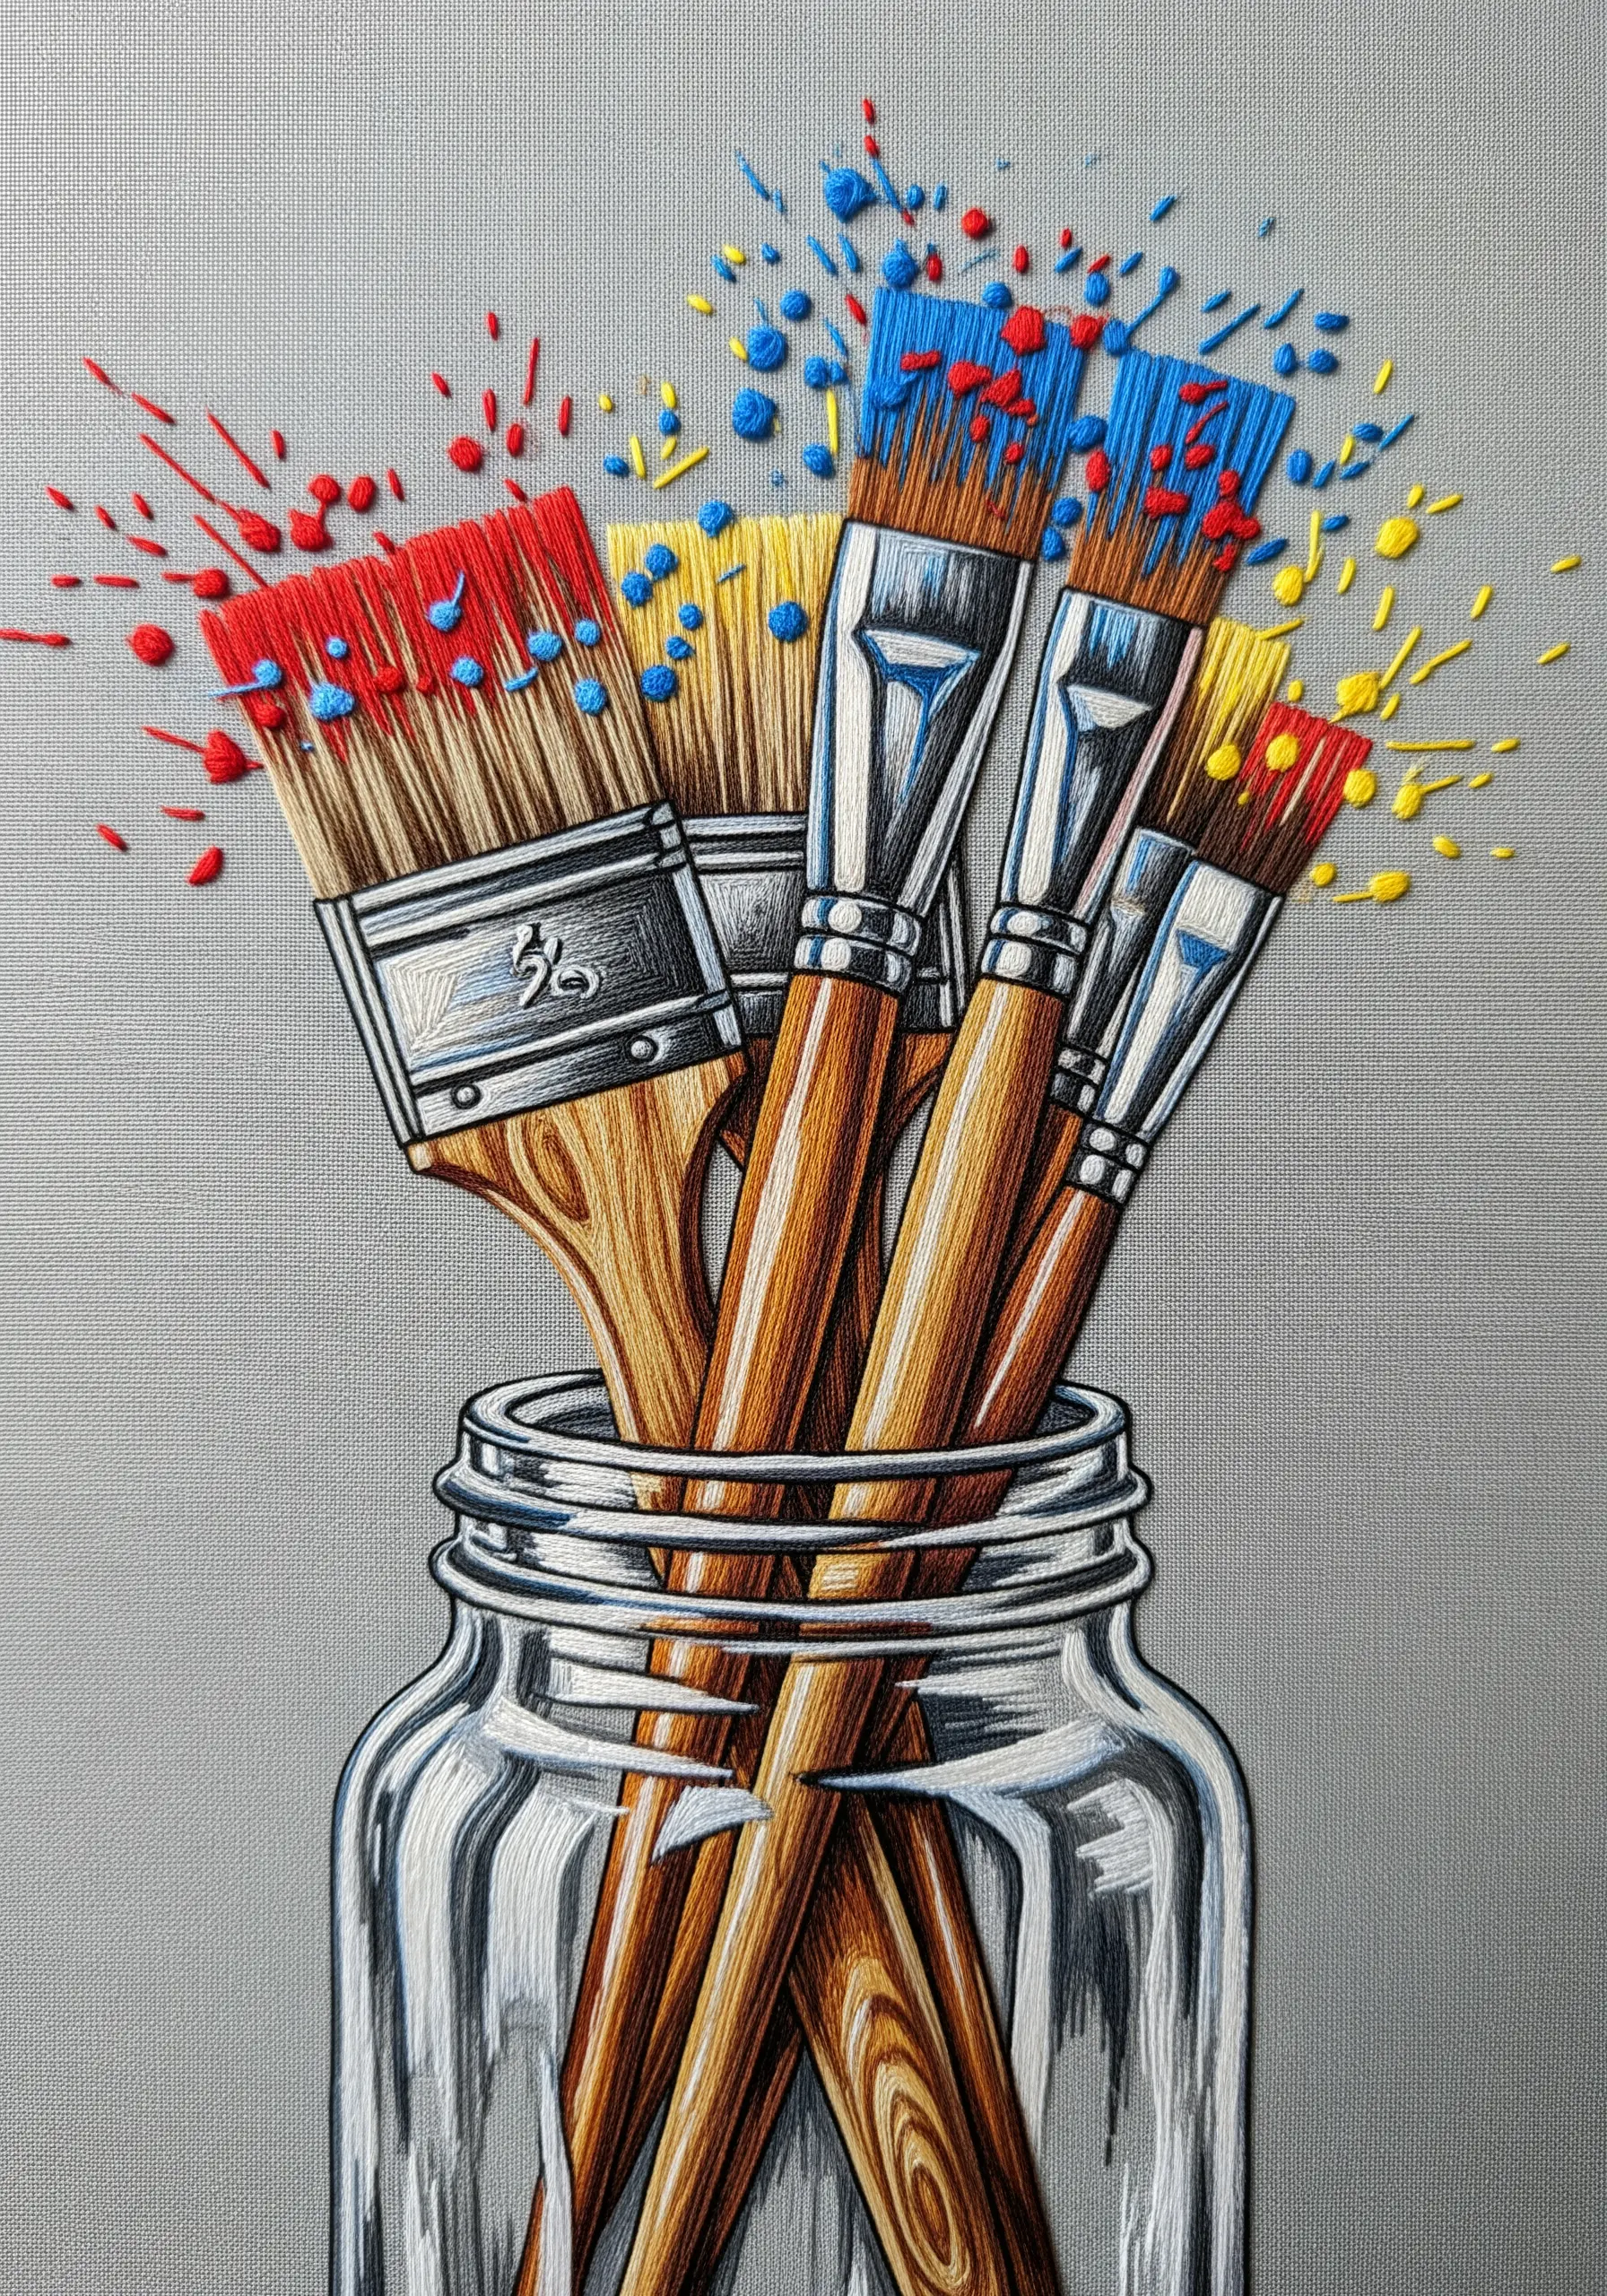
Capture the chaotic energy of paint splatters with a freeform mix of stitches.
Use French knots for larger droplets of paint and tiny, scattered seed stitches or single straight stitches for the smaller flecks.
Vary the stitch direction and color placement randomly to create a natural, spontaneous look.
This technique adds a sense of action and movement to an otherwise static composition, making the scene feel alive.
22. Elevate Outlines with a Plaited Braid Stitch
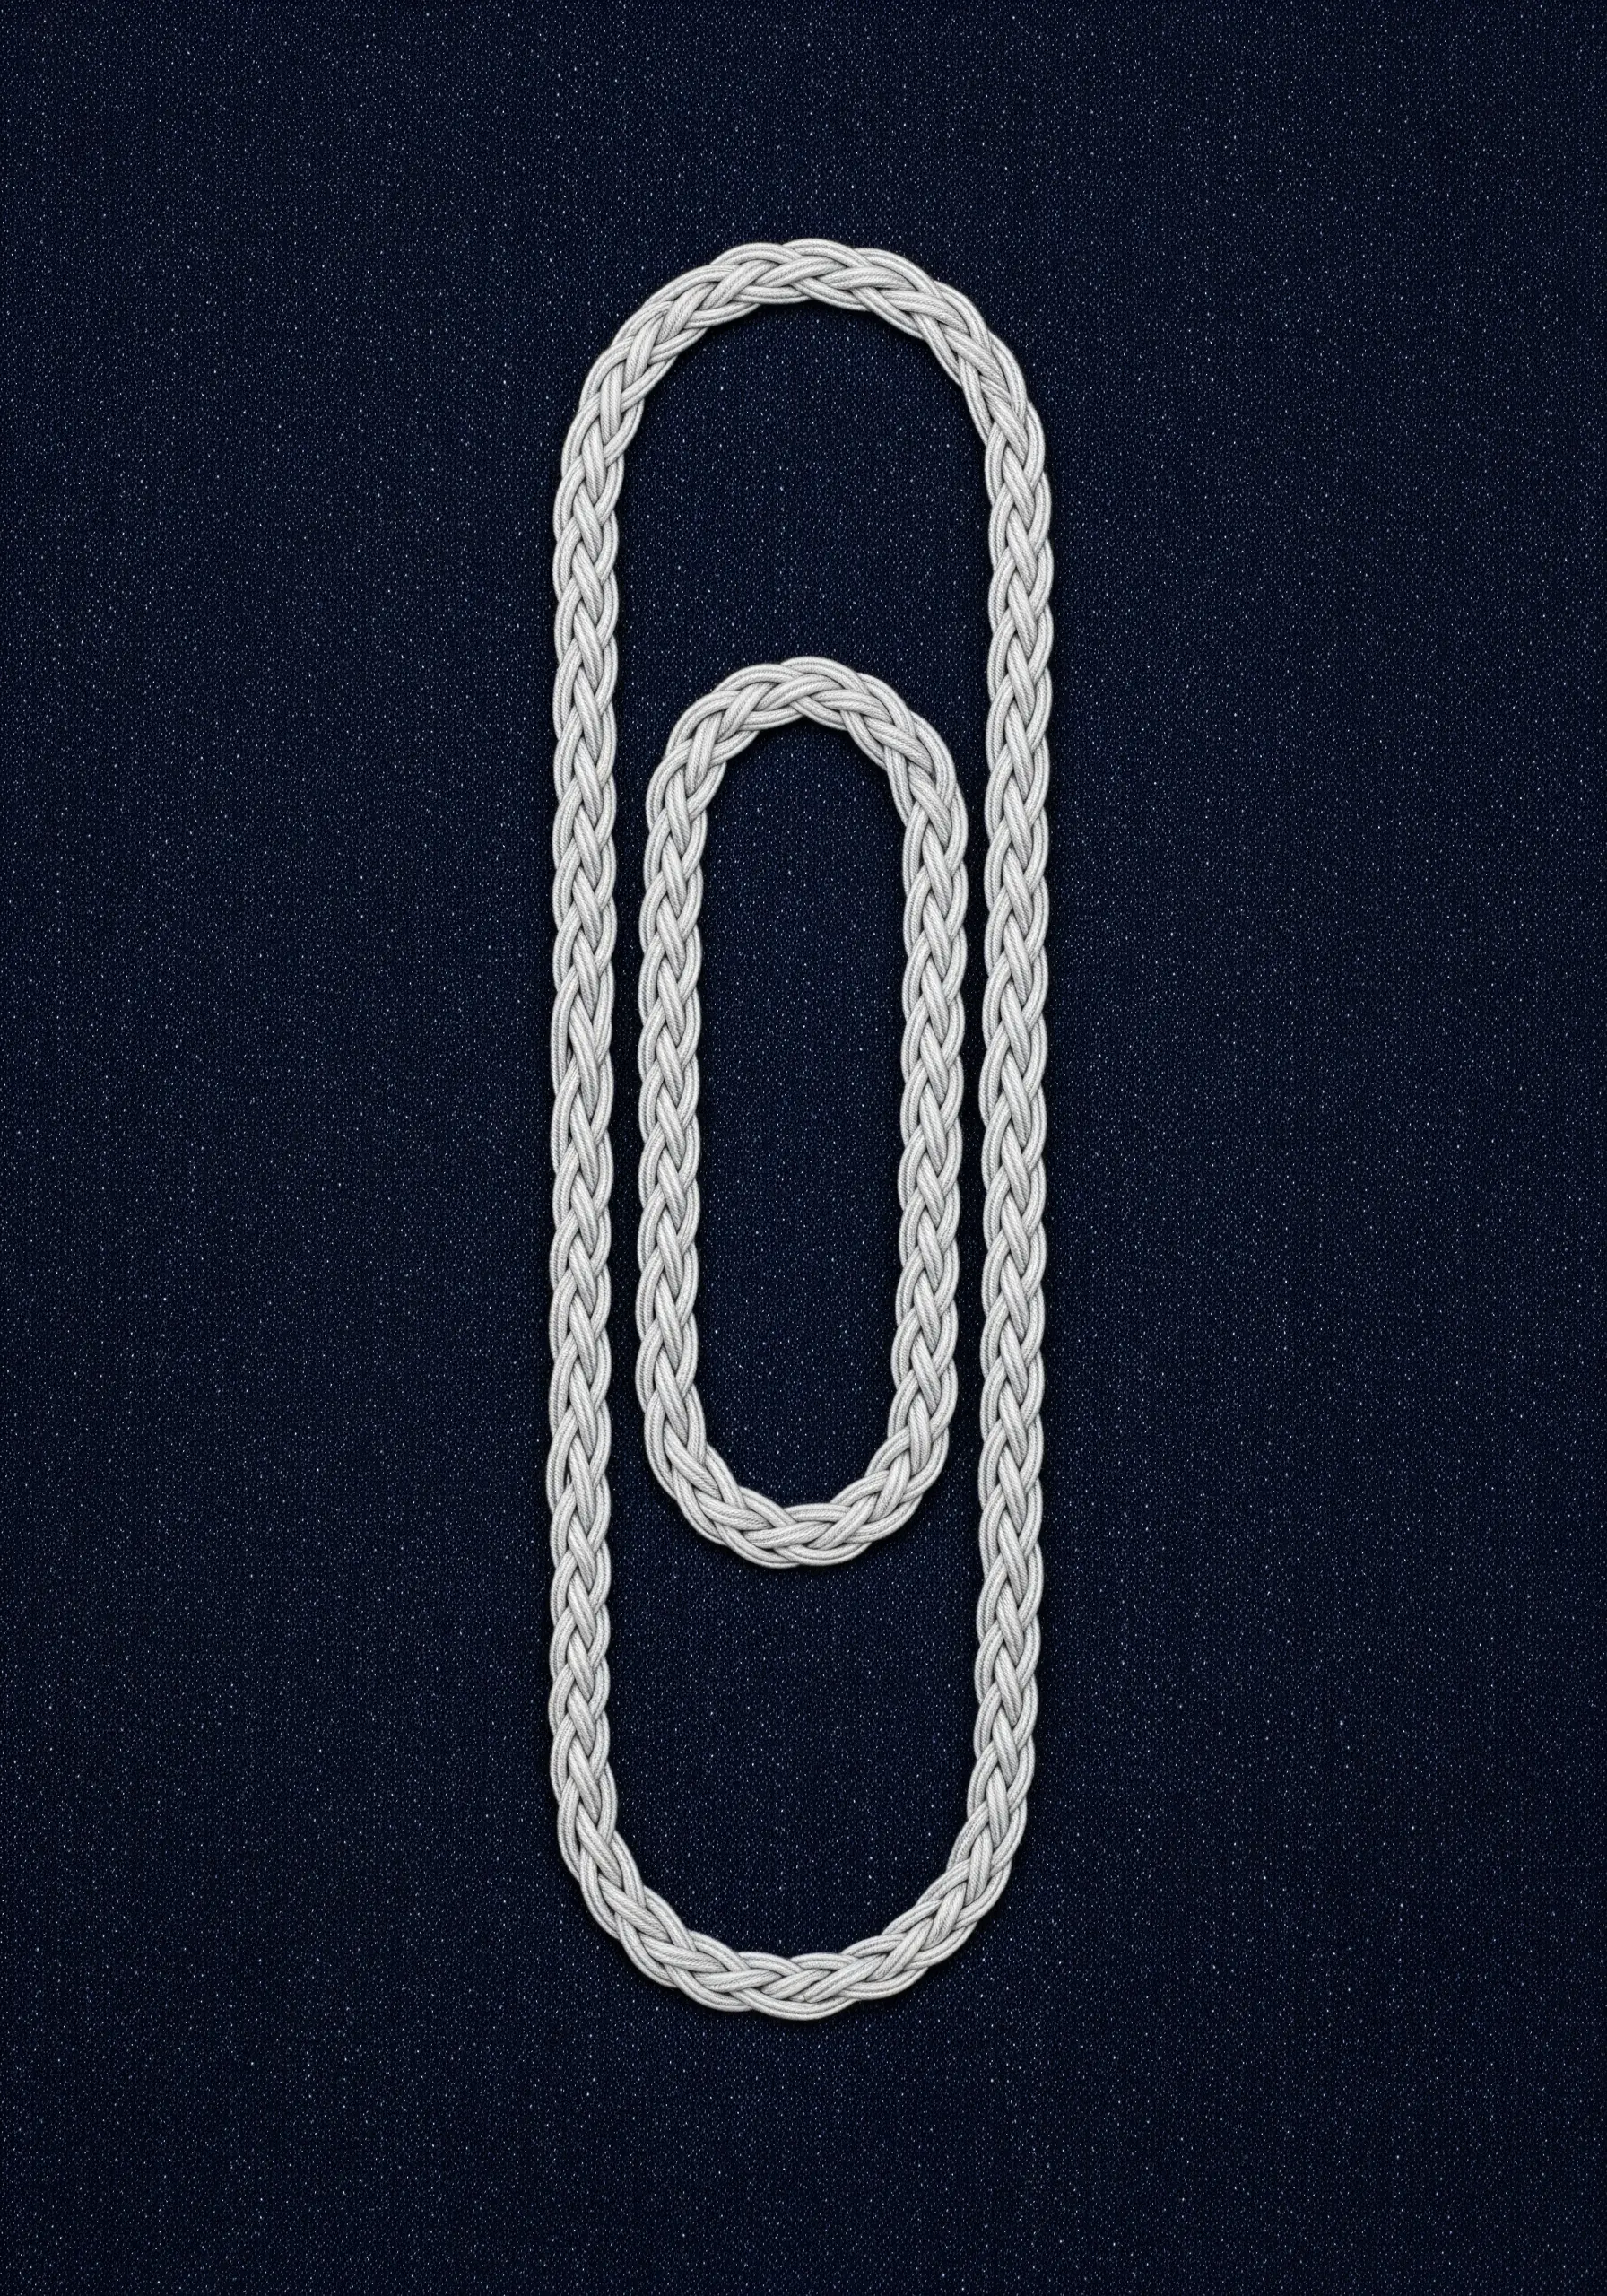
For a simple outline that feels substantial and decorative, use the plaited braid stitch.
This stitch creates a thick, textured line that resembles a real braid, adding a sculptural quality to minimalist designs.
It’s an excellent choice for turning a common object like a paperclip into a statement piece.
Using a metallic or silk thread will further enhance its refined, rope-like appearance, making it a perfect minimal embroidery designs that use only three colors for striking yet soft wall decor element.
23. Create Graphic Dimension with Color Blocking
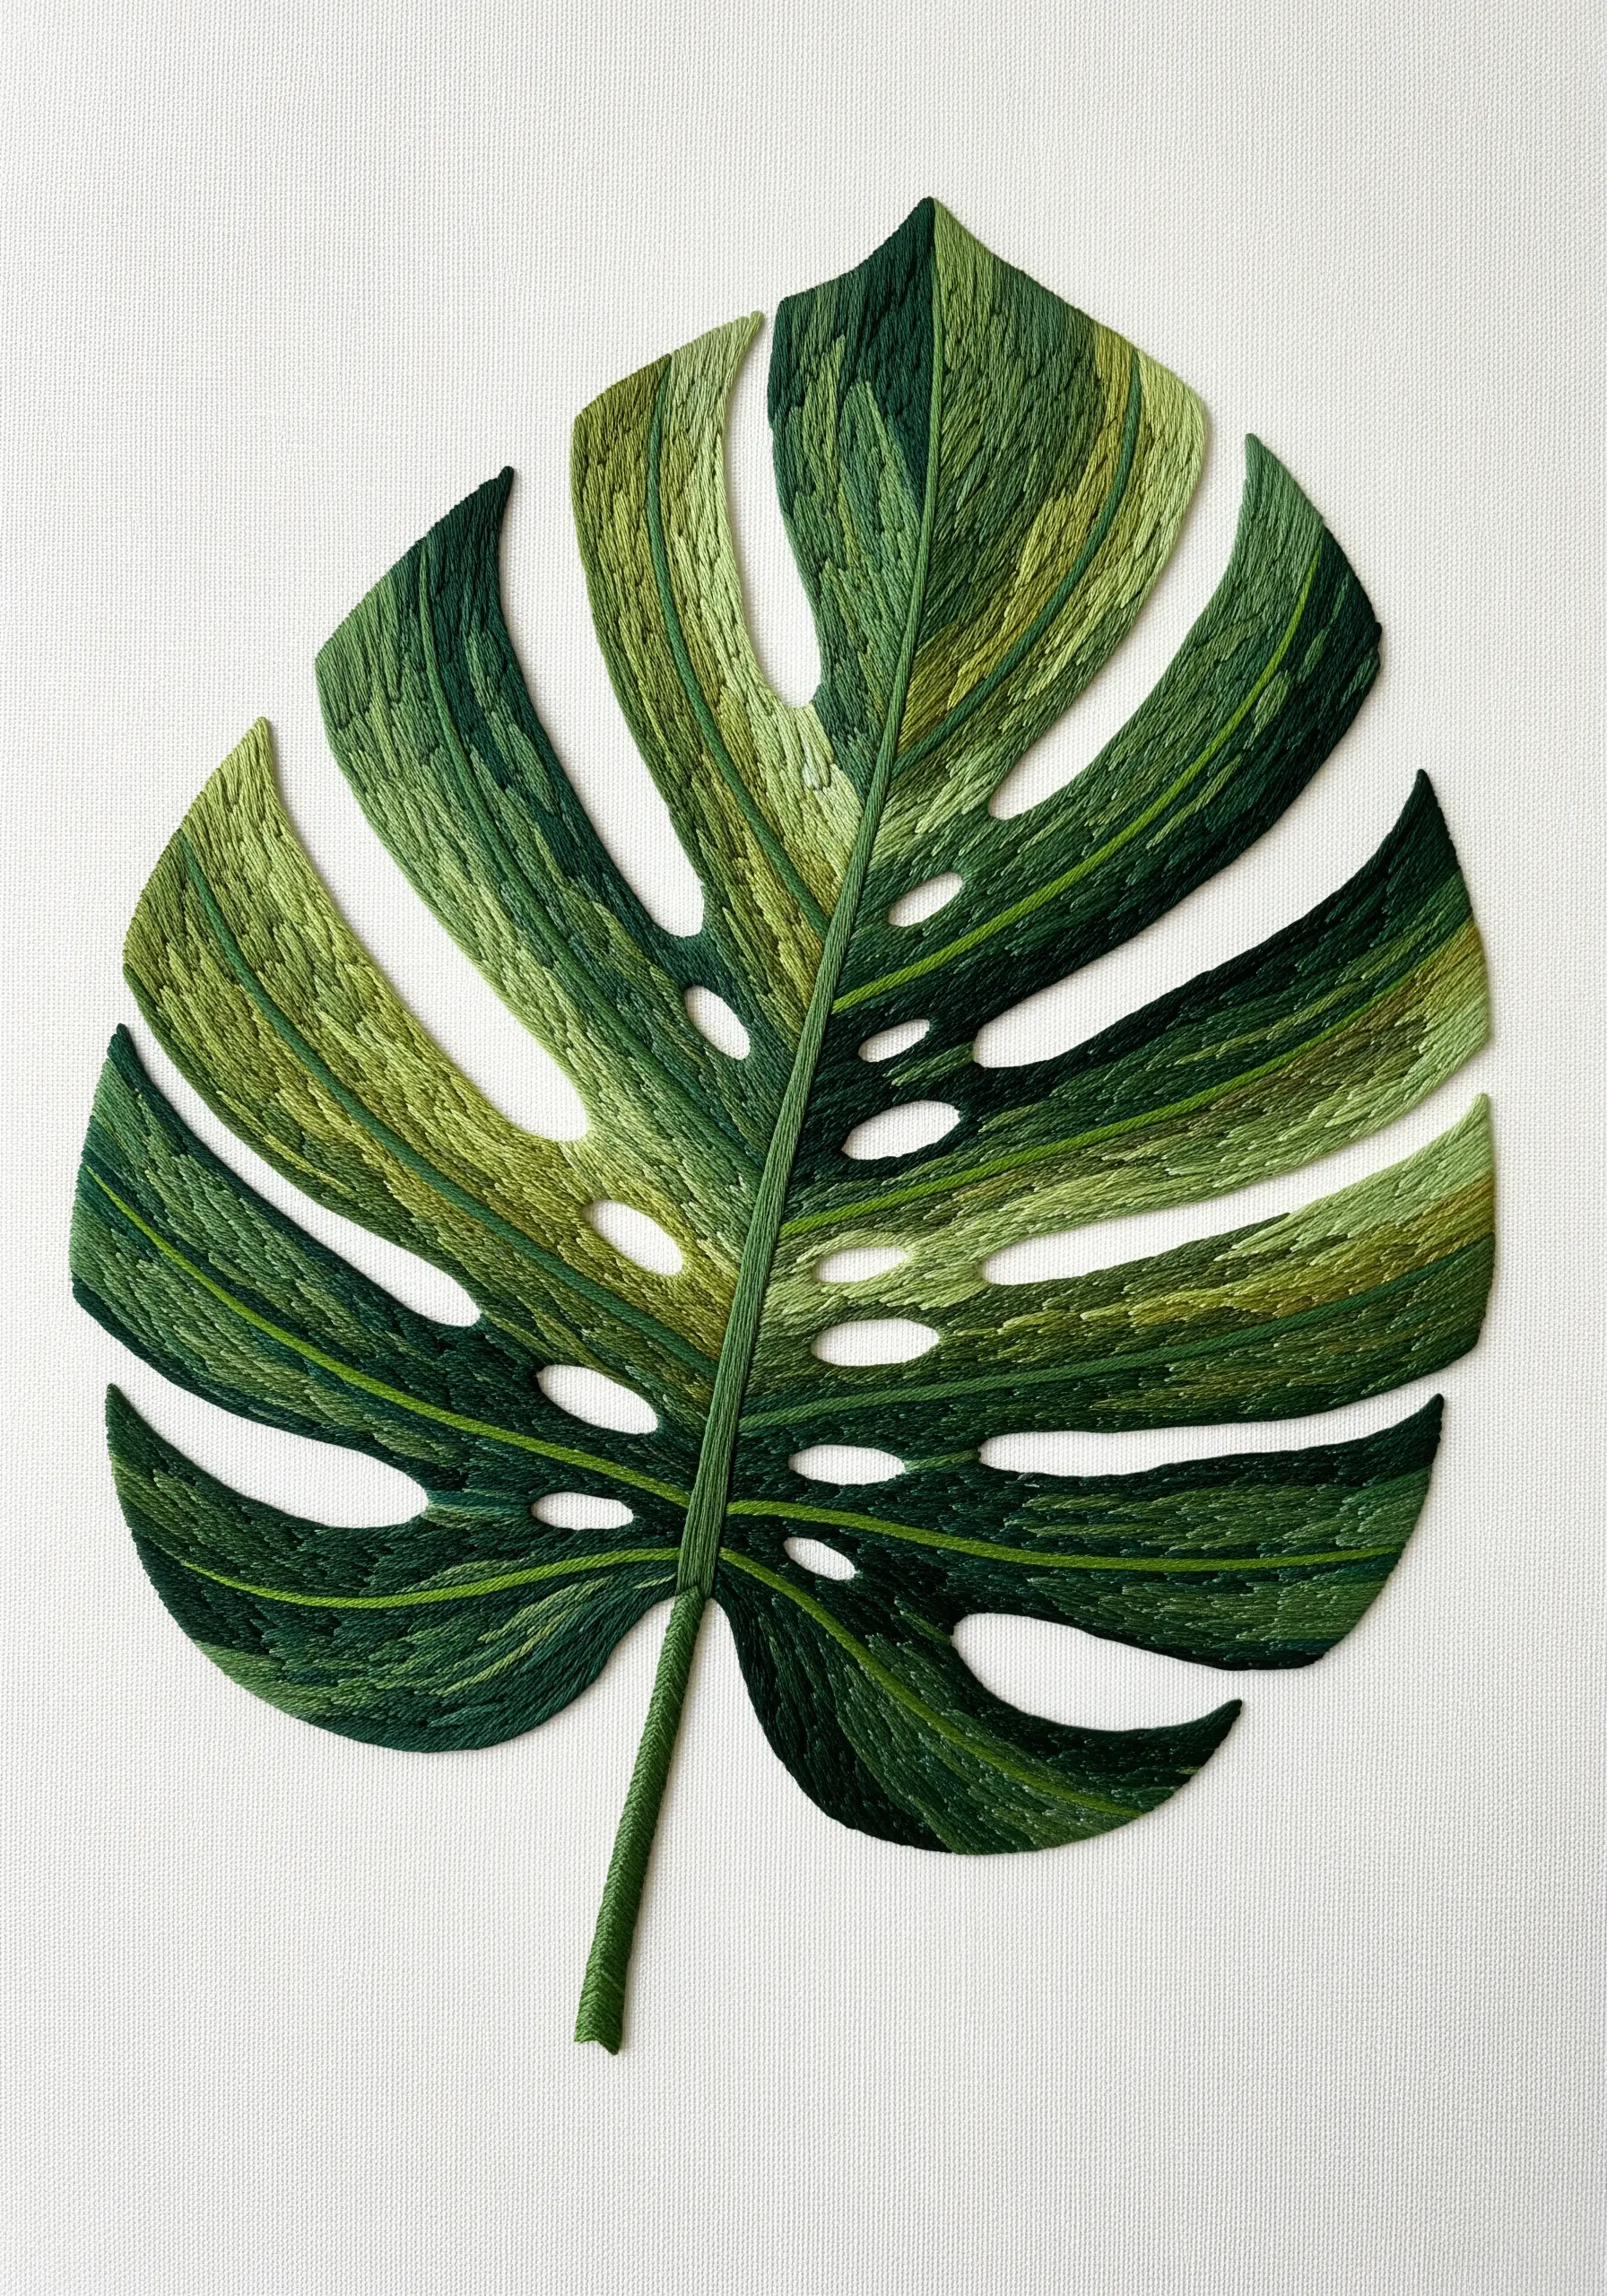
Instead of seamlessly blending colors for a photorealistic look, try color blocking for a modern, graphic effect.
Divide the leaf into distinct sections and fill each one with a different shade of green using a directional satin stitch.
Keep the edges between the color blocks clean and sharp.
This technique emphasizes form and pattern over realism, turning your botanical subject into a bold piece of textile art, perfect for exploring hand embroidery leaf patterns.
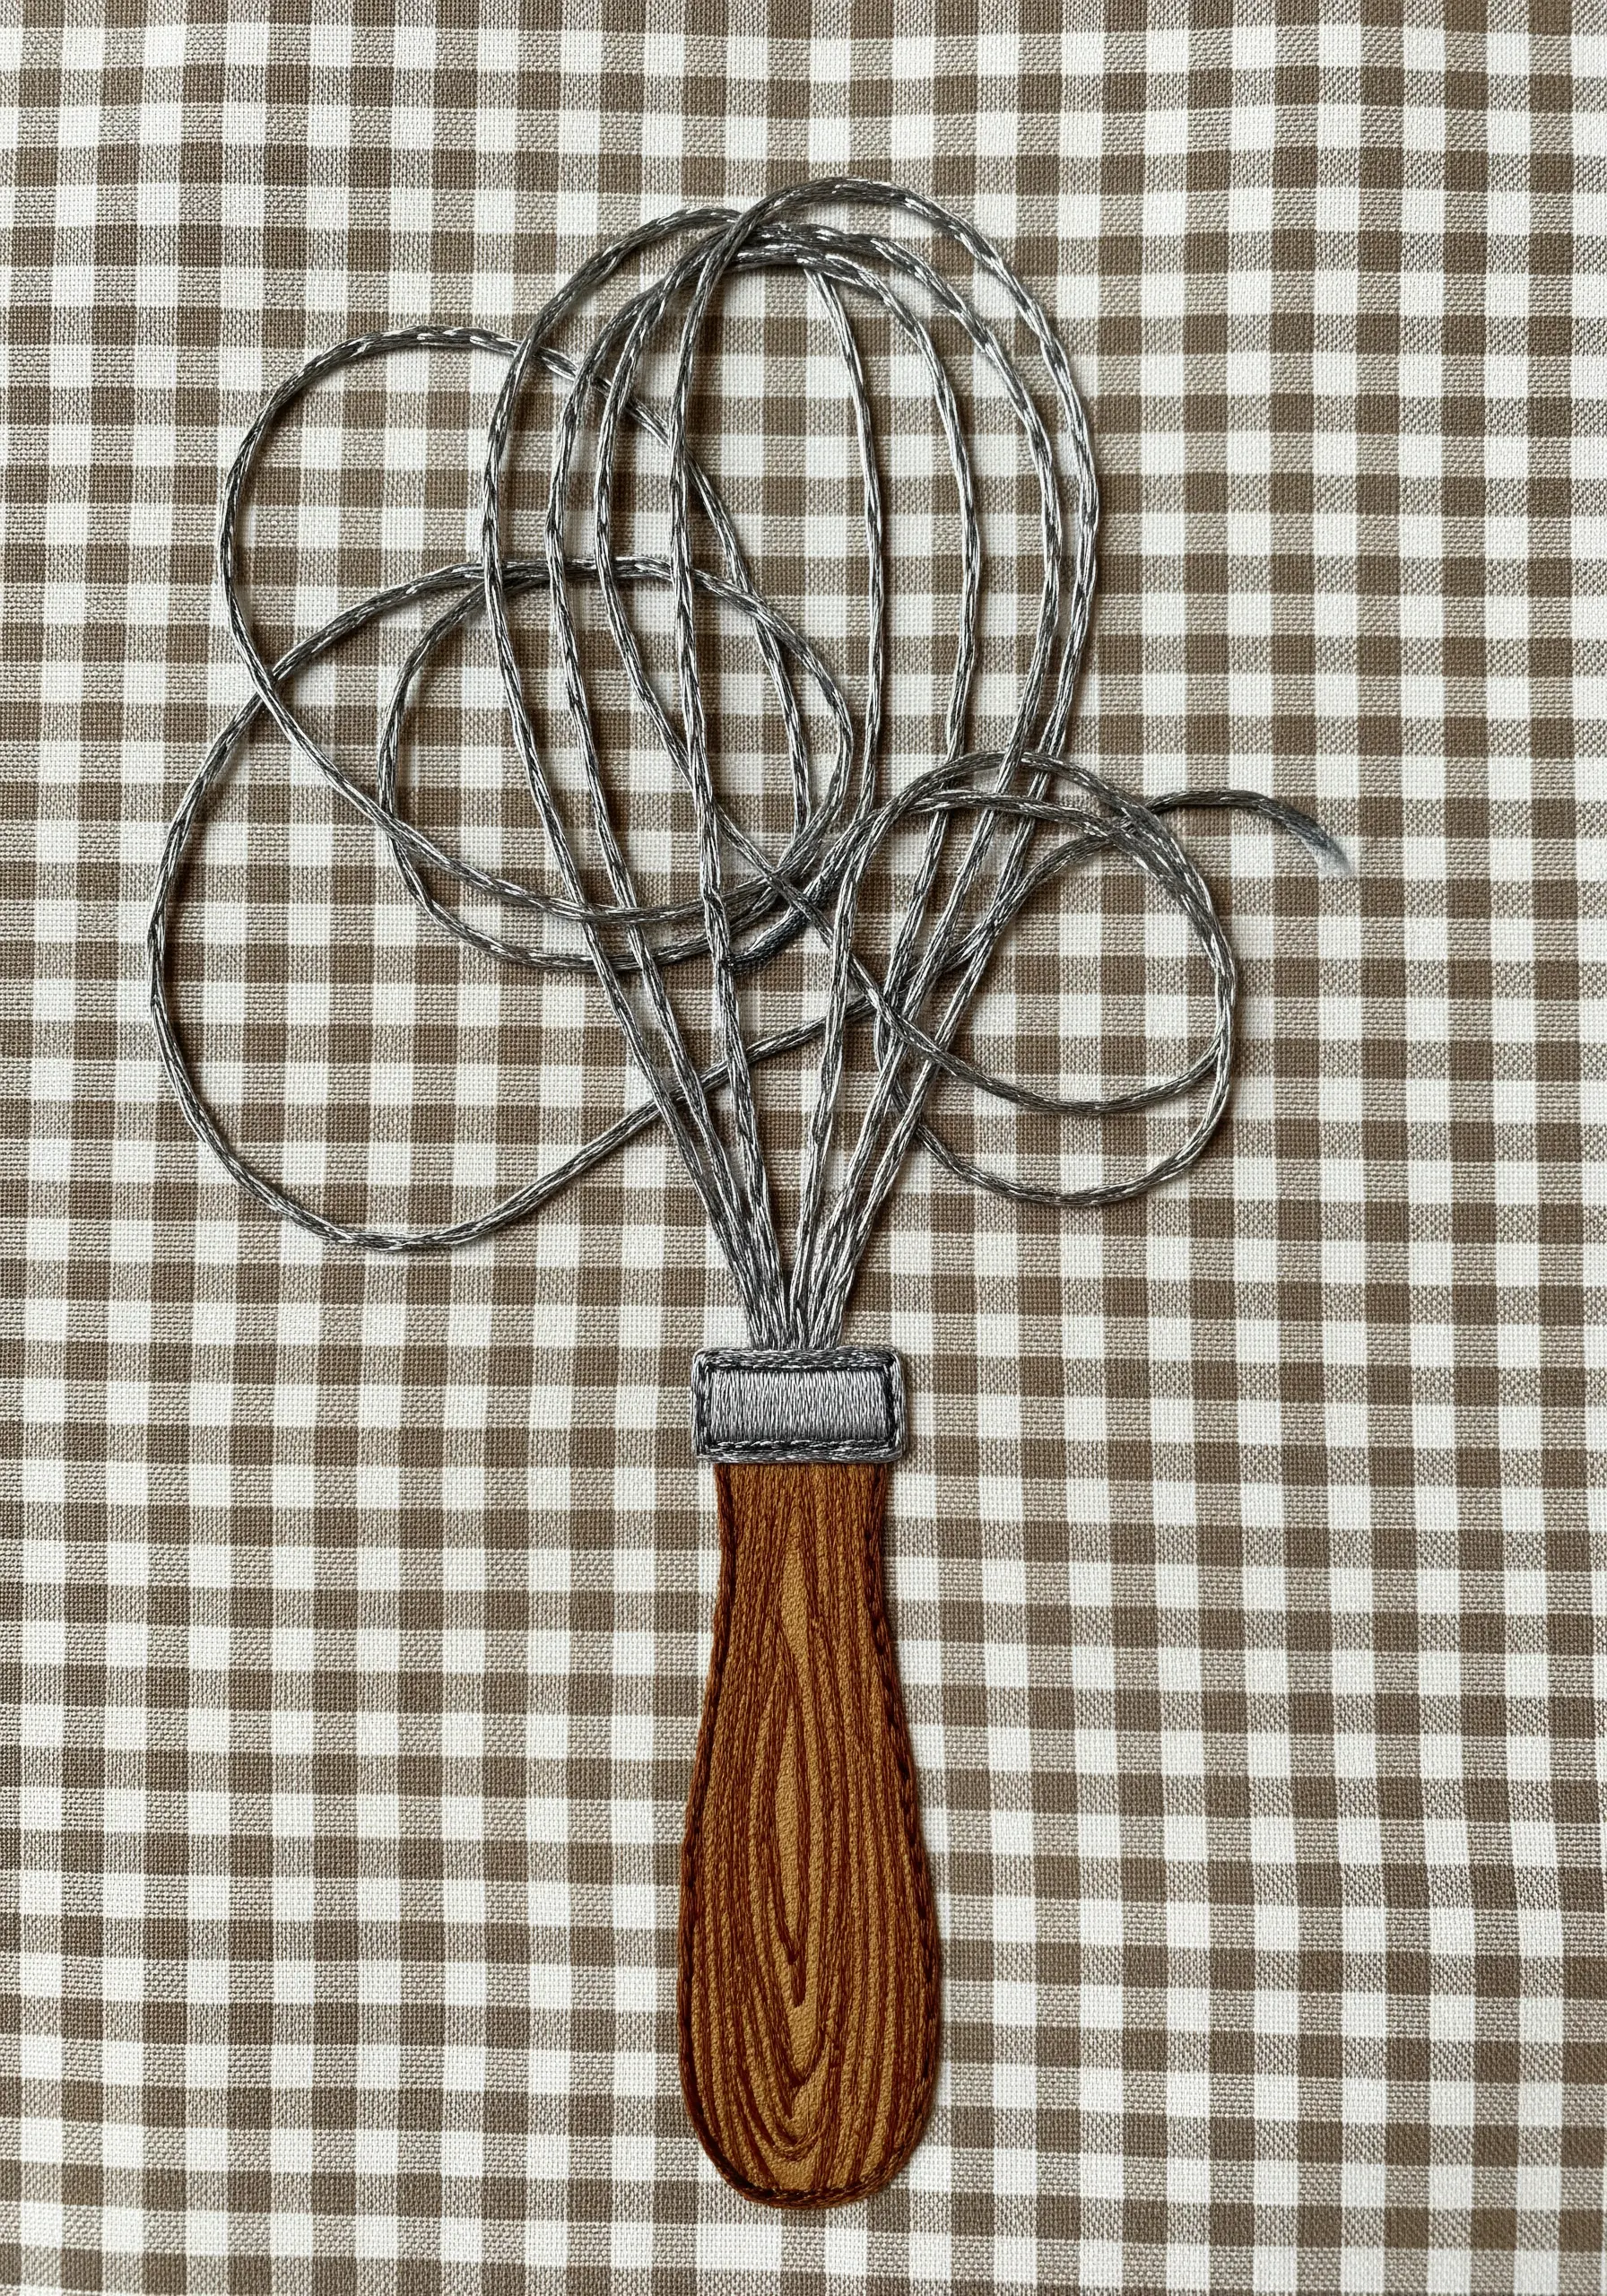
24. Refine Kitchen Art with Clean Line Work
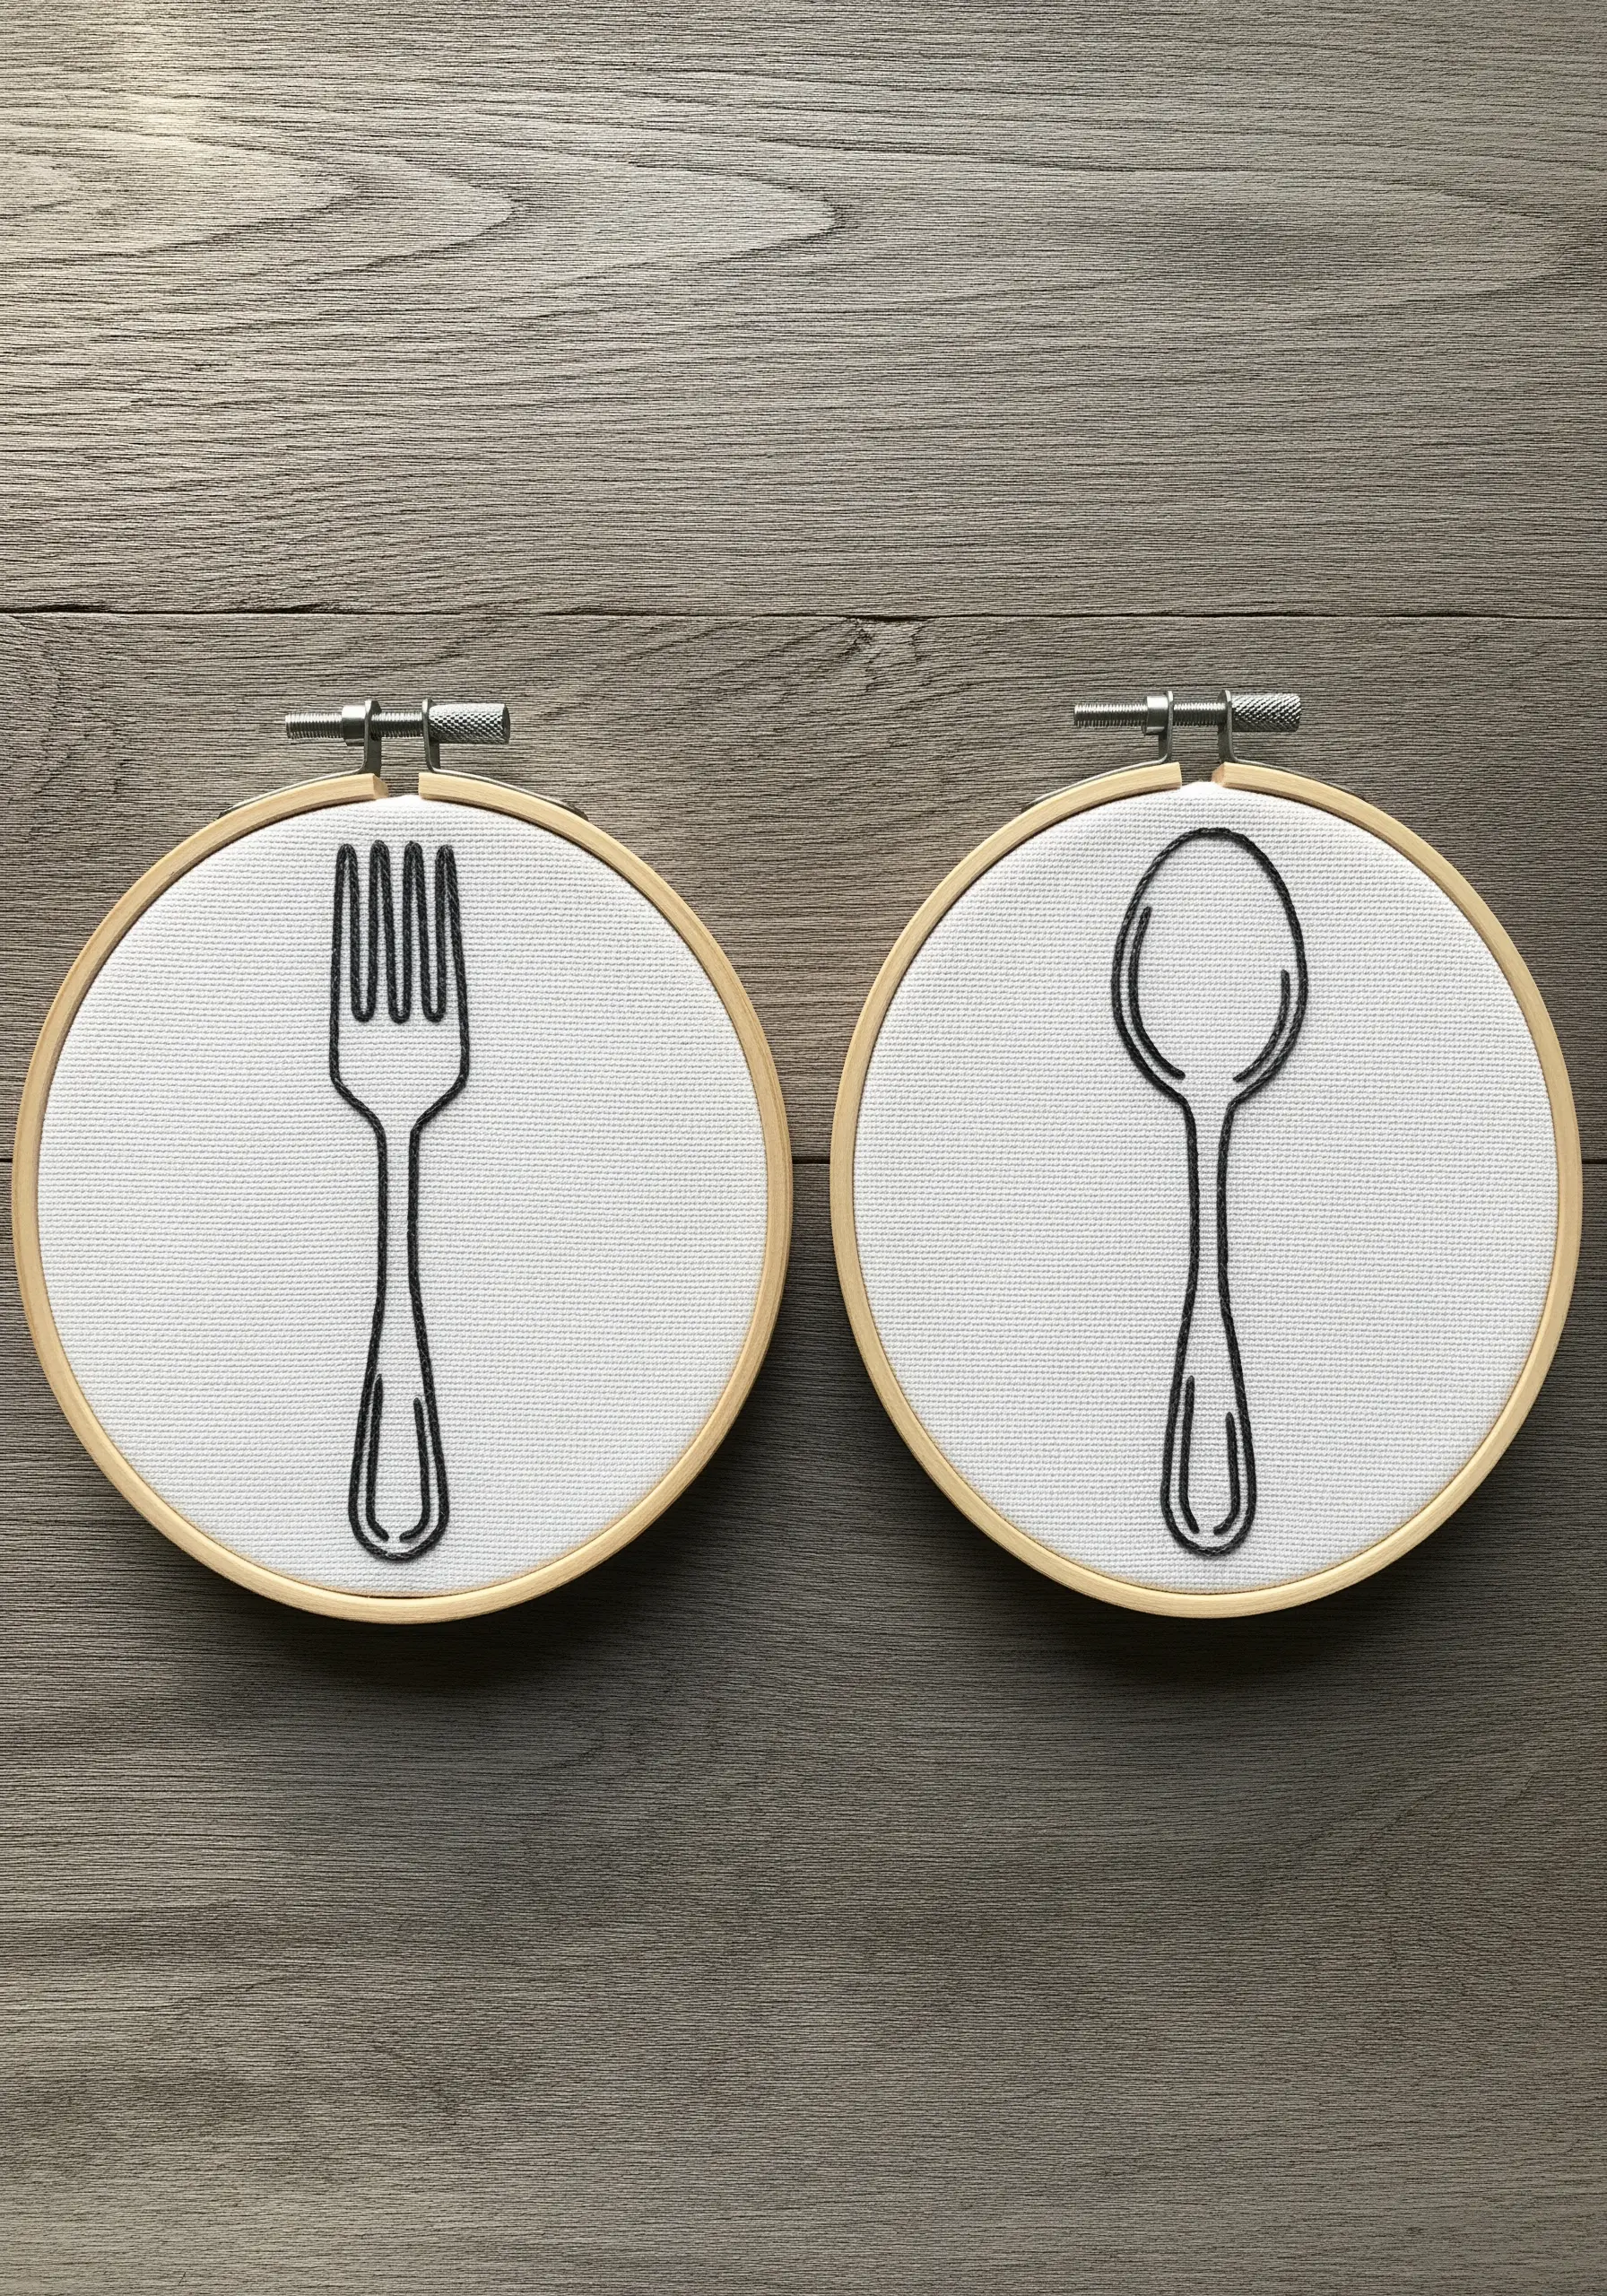
Embrace minimalism by reducing everyday objects to their essential outlines.
Use three or four strands of black floss and a clean, consistent backstitch or stem stitch to create smooth, unbroken lines.
The key to this style is precision—ensure your stitch length is uniform and your curves are fluid.
This approach turns simple utensils into elegant graphic art, proving that thoughtful small embroidery patterns to customize your home decor can have a big impact.
25. Sculpt a Coiled Cord with Bullion Knots
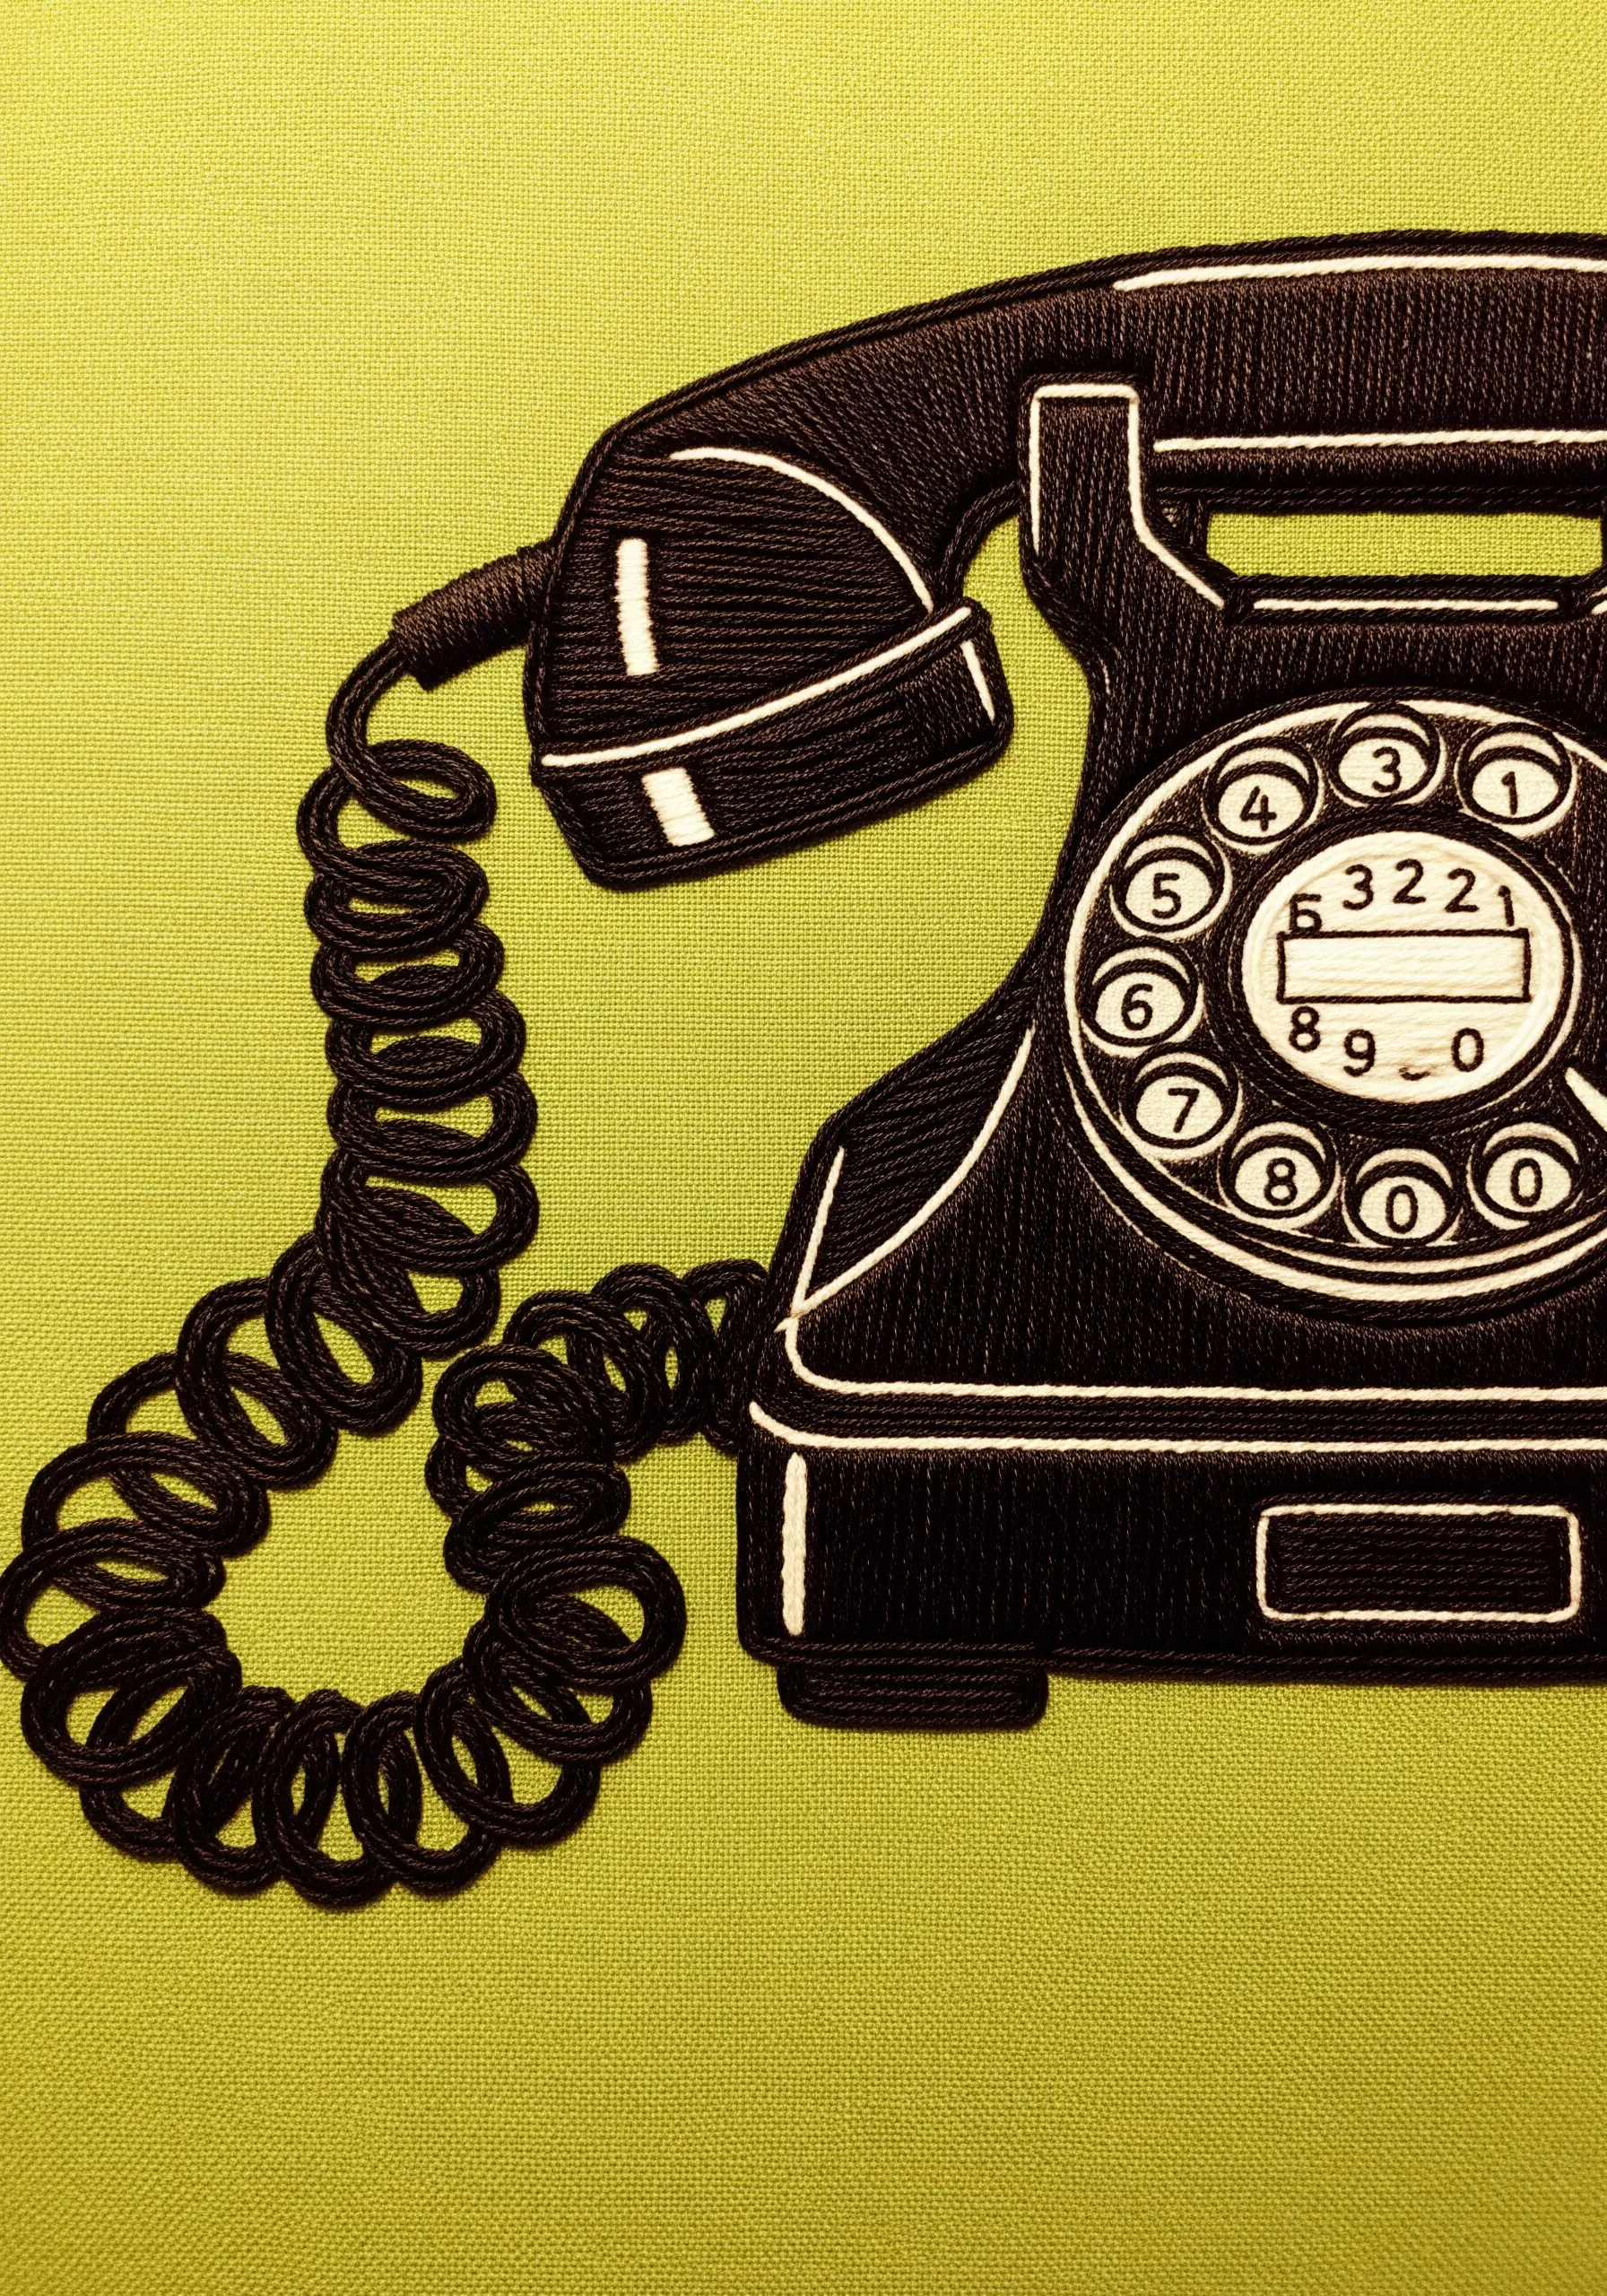
The coiled cord of a vintage telephone is the perfect opportunity to use the bullion knot.
By wrapping the thread around your needle multiple times before pulling it through, you create a dimensional, worm-like stitch.
Place these knots end-to-end in a curved line to build a realistic, springy cord that has both texture and volume.
This single, specialized stitch can elevate a flat design, adding a playful and technically impressive detail.


