
Have you ever finished a small hoop and wished you could scale that feeling of handmade beauty to fill an entire wall? You can. It’s time to rethink your fabric as a canvas and your needle as a paintbrush, creating embroidered panels that transform a room with the texture and soul that wallpaper can only imitate.
Large-scale embroidery isn’t about more complexity; it’s about more impact. It’s a chance to play with bolder textures like chunky yarn, to explore the meditative rhythm of filling a large shape with a single stitch, or to design a multi-panel story that unfolds across your living room.
Here, you won’t just find inspiration. You’ll find the specific techniques—from minimalist line work to dense, sculptural stitching—that turn ambitious ideas into stunning, achievable art. Let’s begin.
1. Weave a Serene Landscape with Directional Stitching
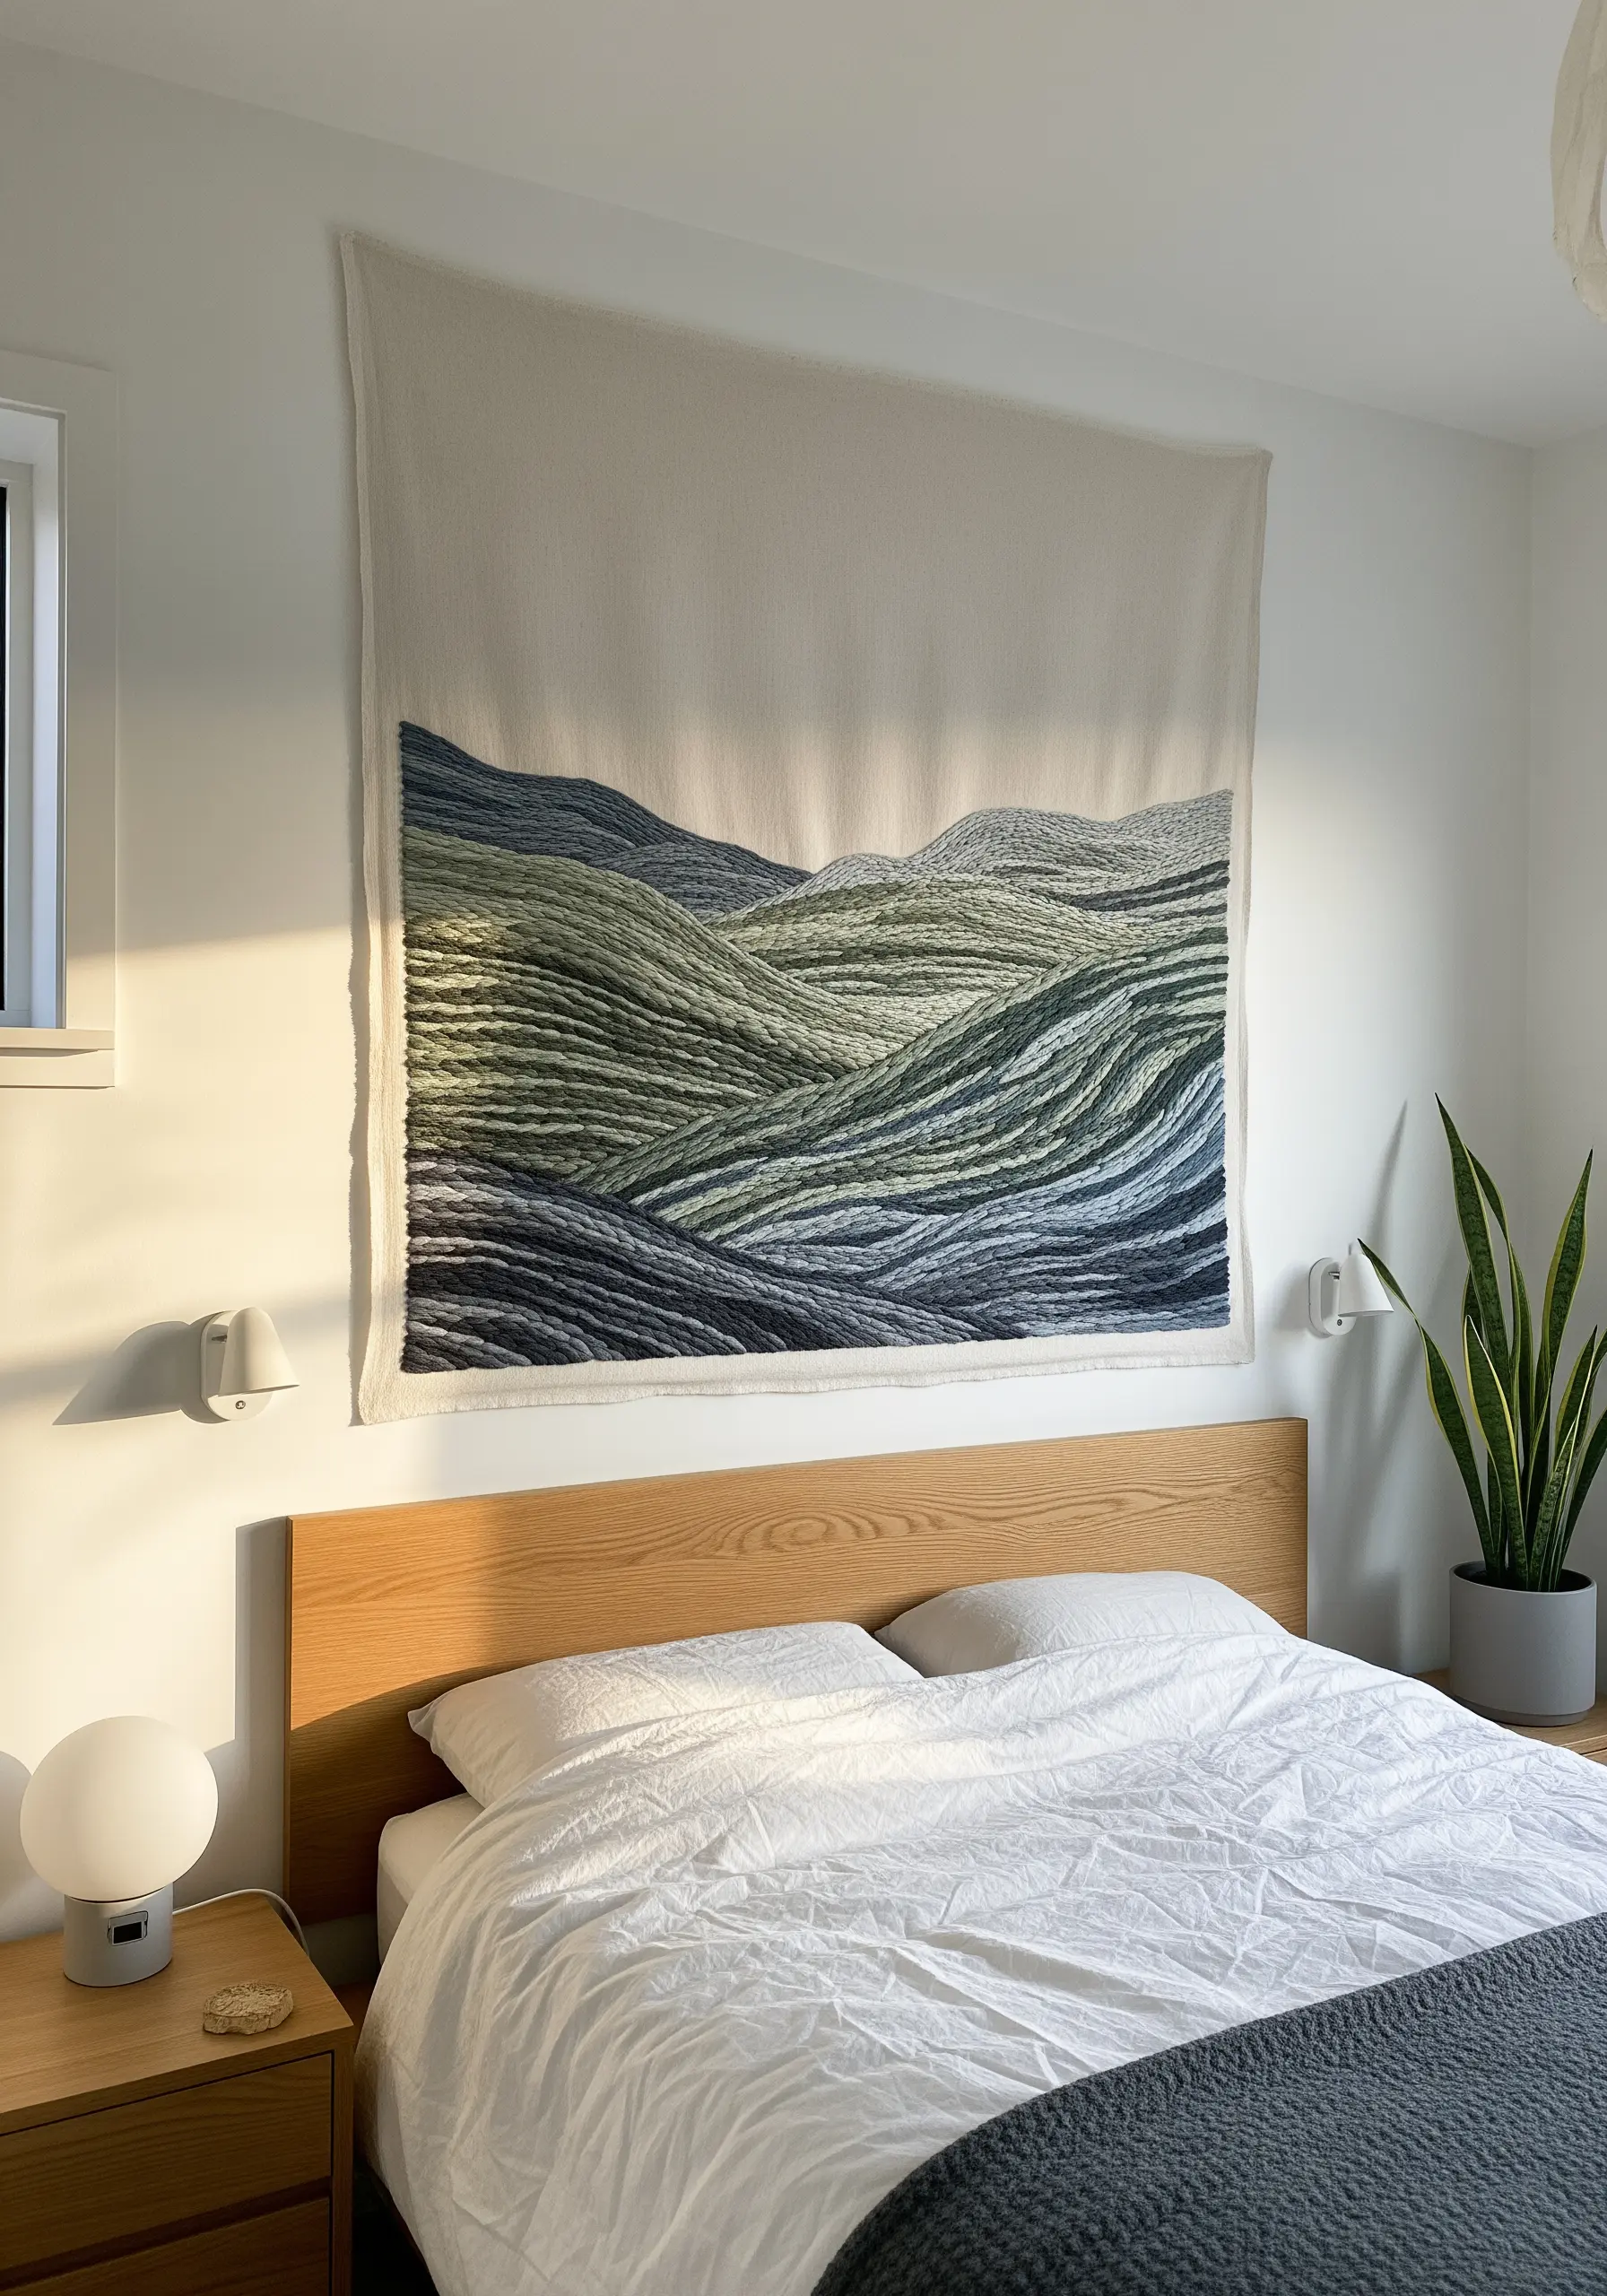
To create the illusion of a woven tapestry, use long, dense horizontal stitches that follow the contours of your landscape design.
Instead of standard six-strand floss, work with fine wool or chunky cotton yarn to build texture and cover large areas more quickly.
Vary the stitch direction slightly in each colored section to mimic the natural, undulating lines of rolling hills.
For a clean finish on a large panel, serge the raw edges or fold them into a neat hem before hanging it from a simple wooden dowel.
2. Create a Lush Botanical Triptych with Varied Outlines
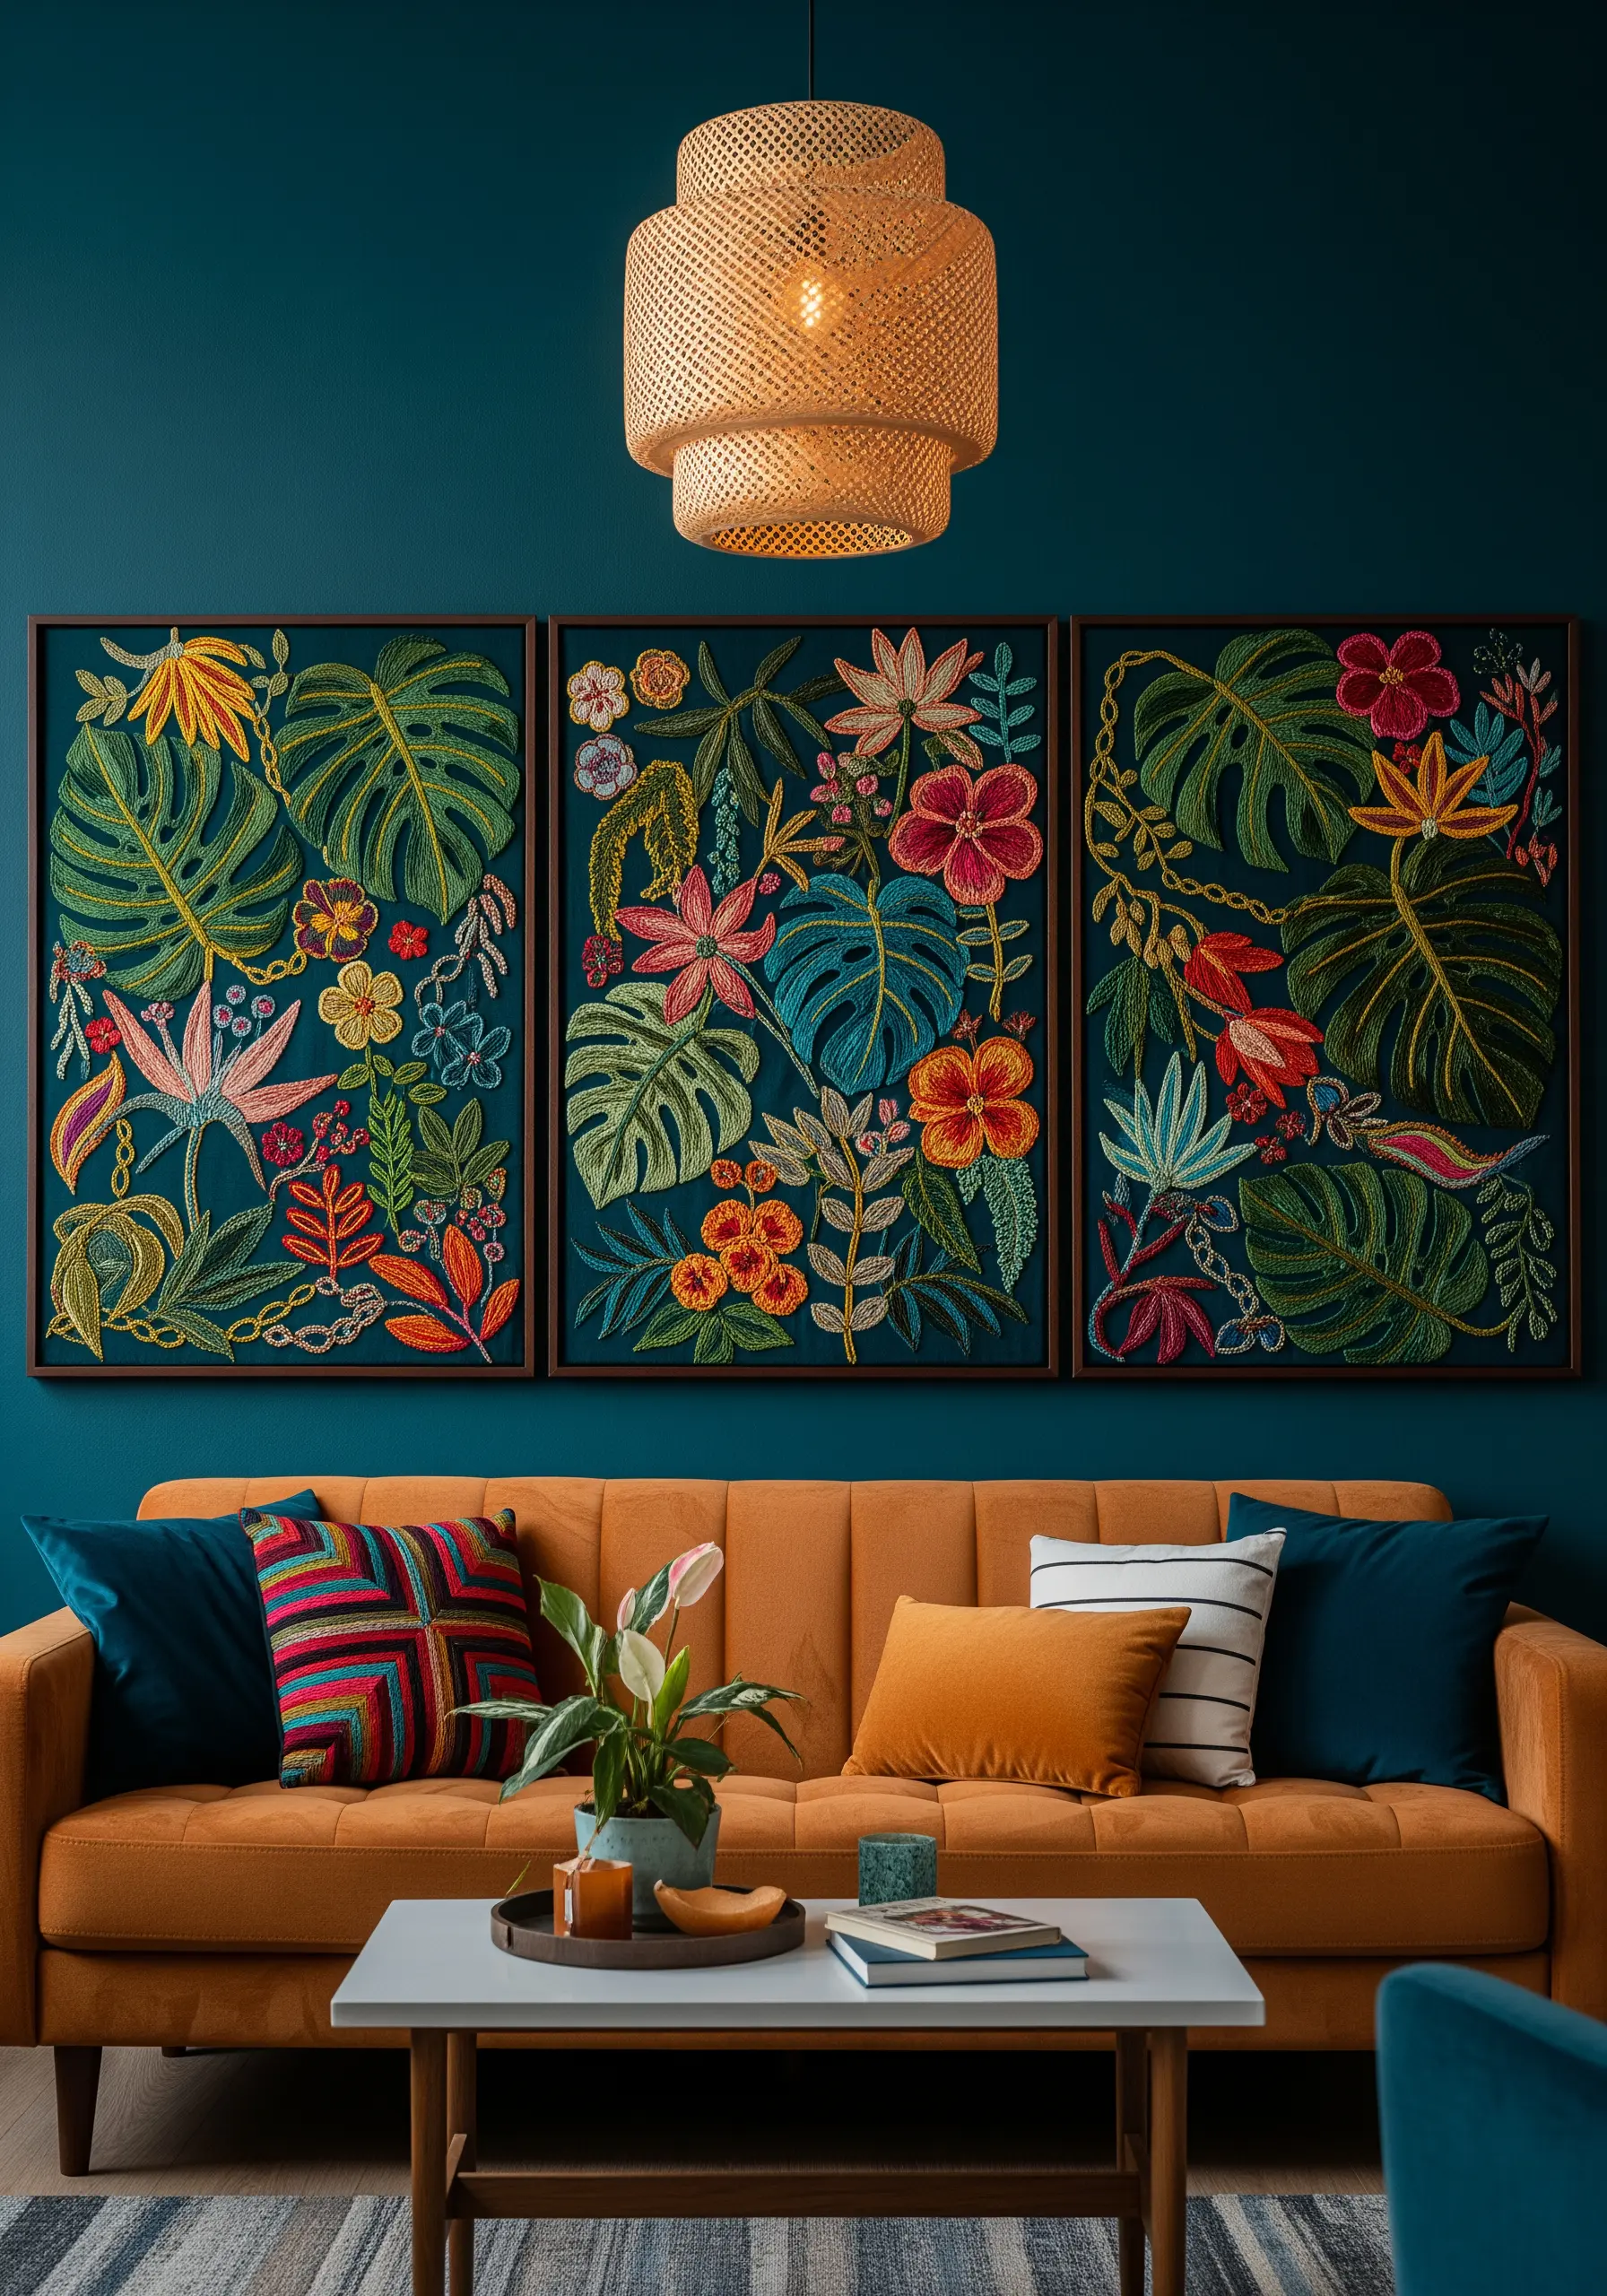
When designing a multi-panel piece, ensure your botanical motifs flow seamlessly from one frame to the next by lightly sketching the full composition first.
Use a variety of outline stitches—chain stitch for bold stems, split stitch for delicate veins, and stem stitch for curving edges—to give each plant a distinct personality.
Fill larger leaves with long and short stitch for a smooth, painted effect, but leave some elements as simple outlines to prevent the overall design from feeling too heavy.
This contrast between filled and open shapes creates visual rhythm and allows the deep background color to become an integral part of the artwork.
3. Master Art Deco Glamour with Metallic and Matte Threads
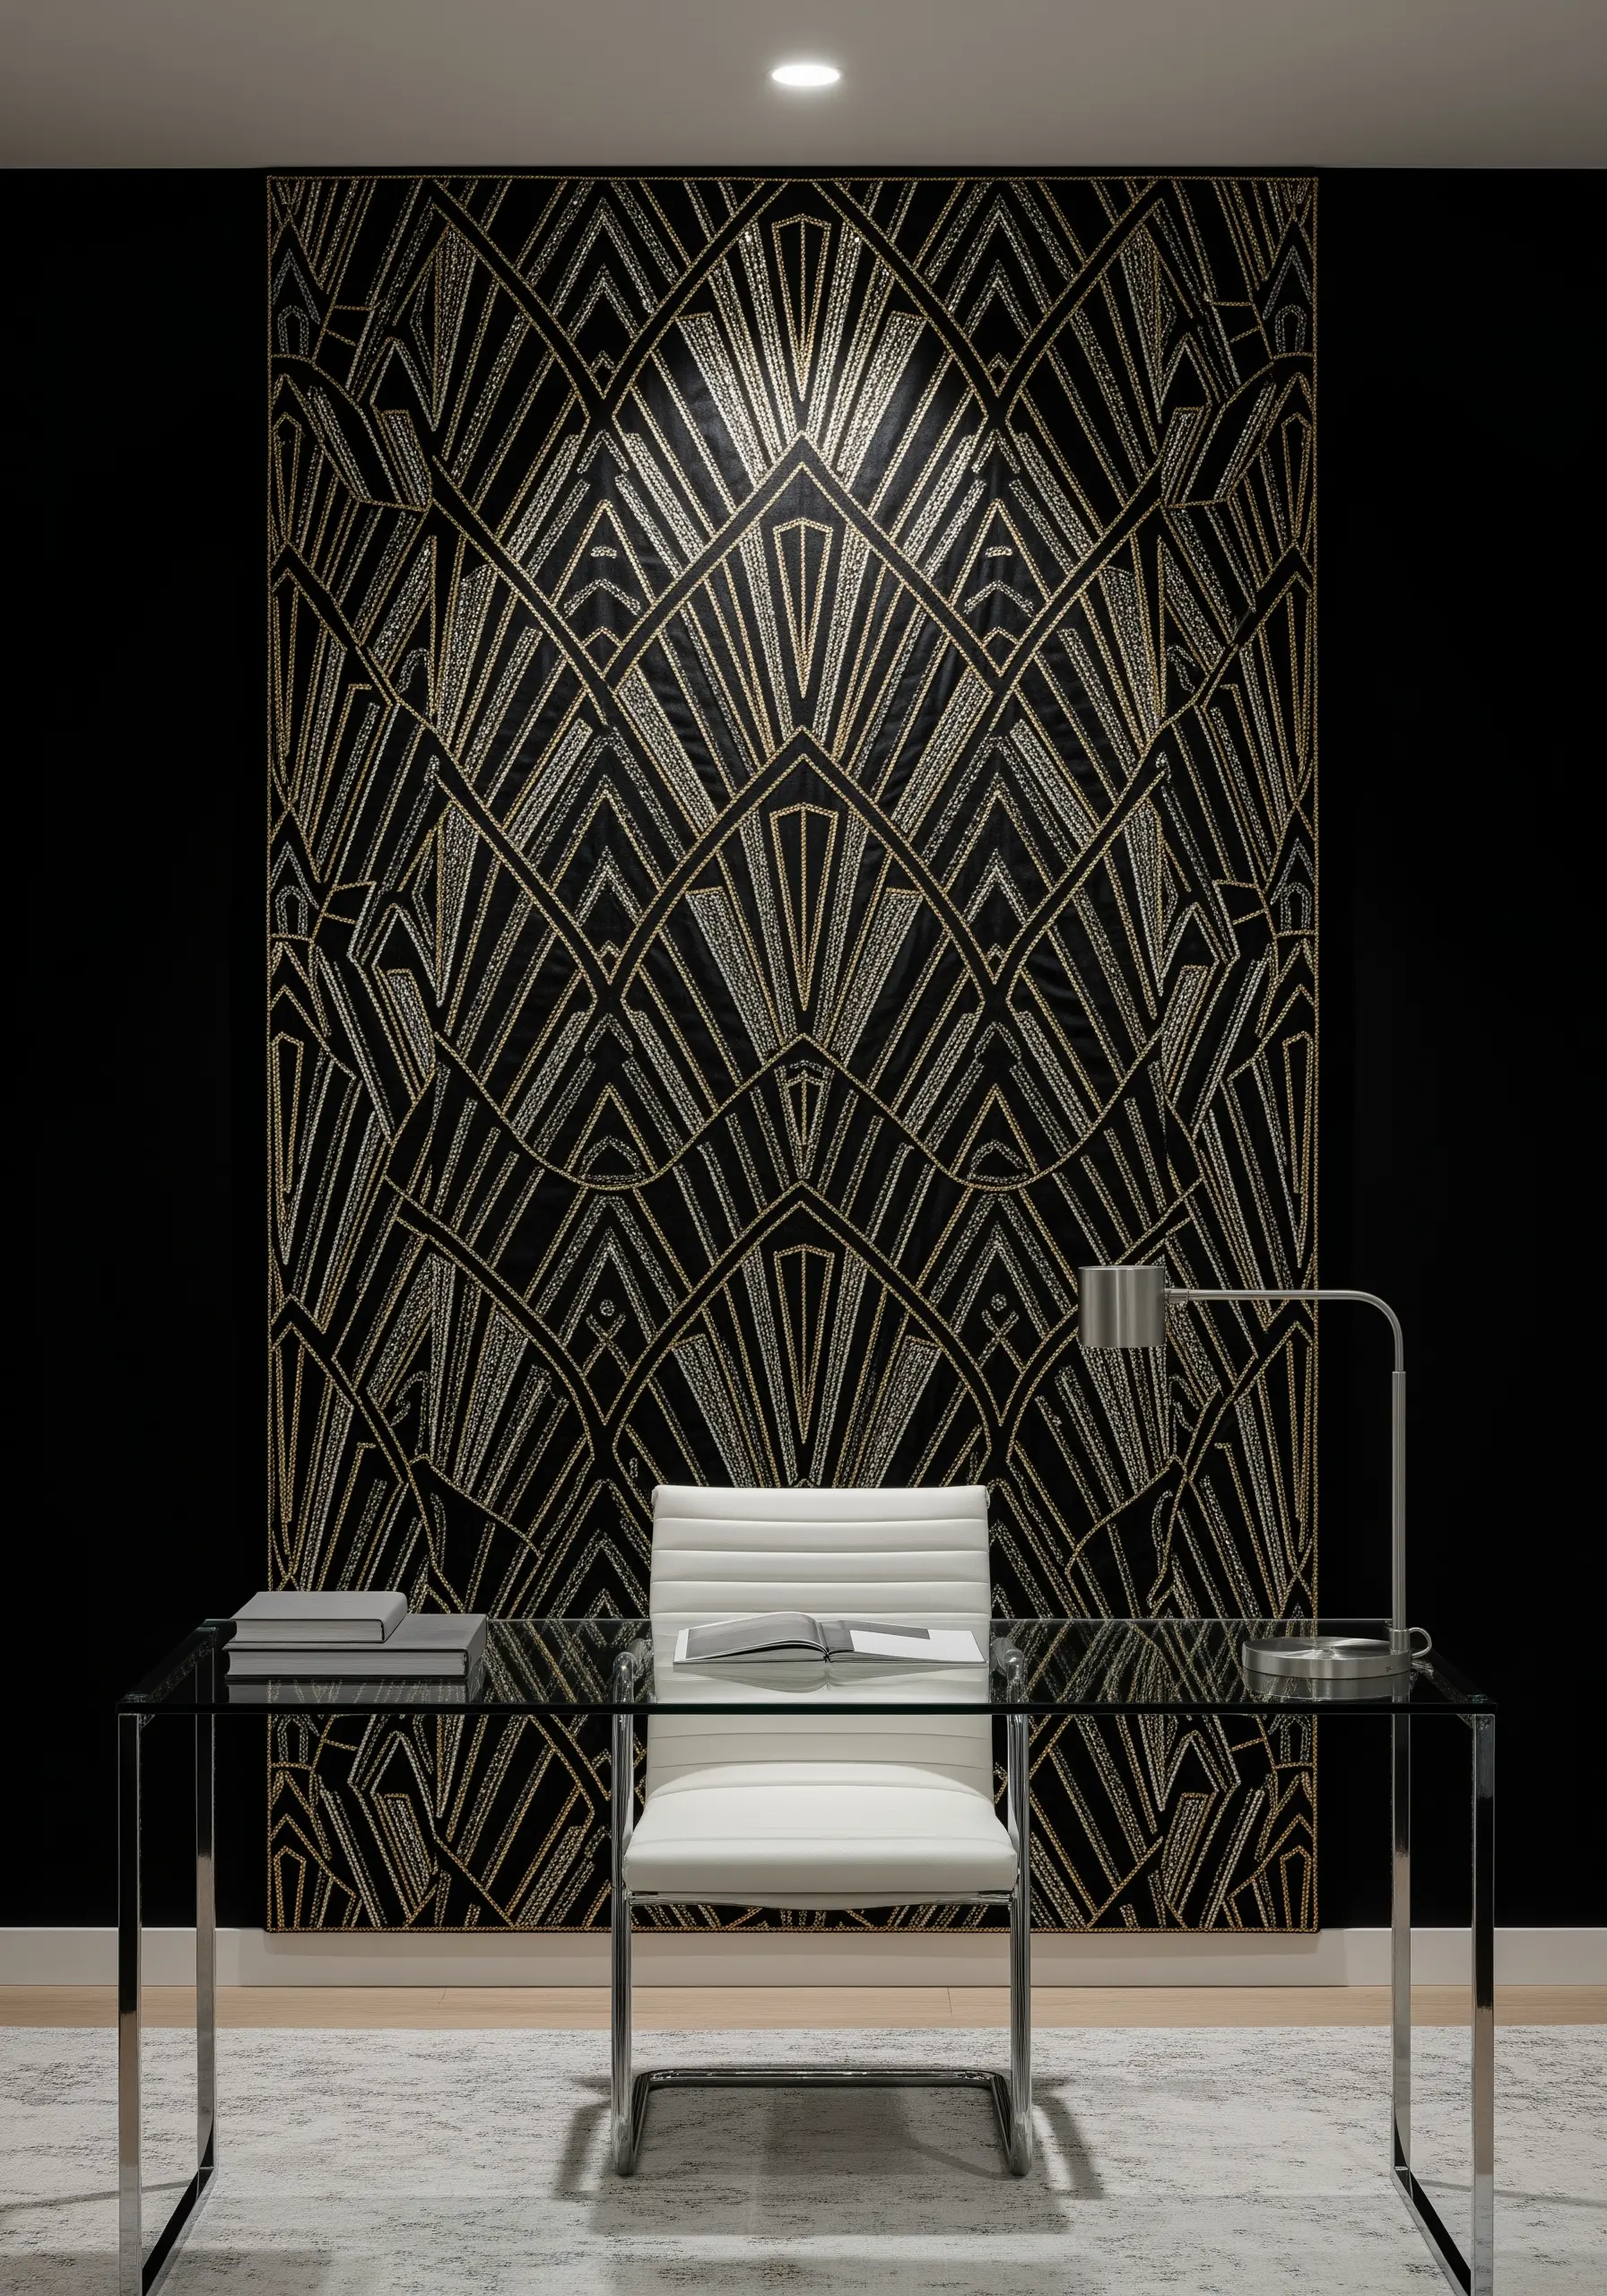
Achieve the sharp, radiating lines of Art Deco design by using a single, precise backstitch or split stitch.
The key to this dramatic look is the high contrast between a shimmering metallic thread and a deep, matte background fabric like black velvet or heavy linen.
To create the textured, glitter-like fill, use a dense scattering of French knots or seed stitches with the same metallic thread, which catches the light from different angles.
Work with a thread conditioner when using metallics to reduce friction and prevent fraying, ensuring your stitches remain smooth and luminous.
4. Curate a Botanical Gallery with Minimalist Stitching
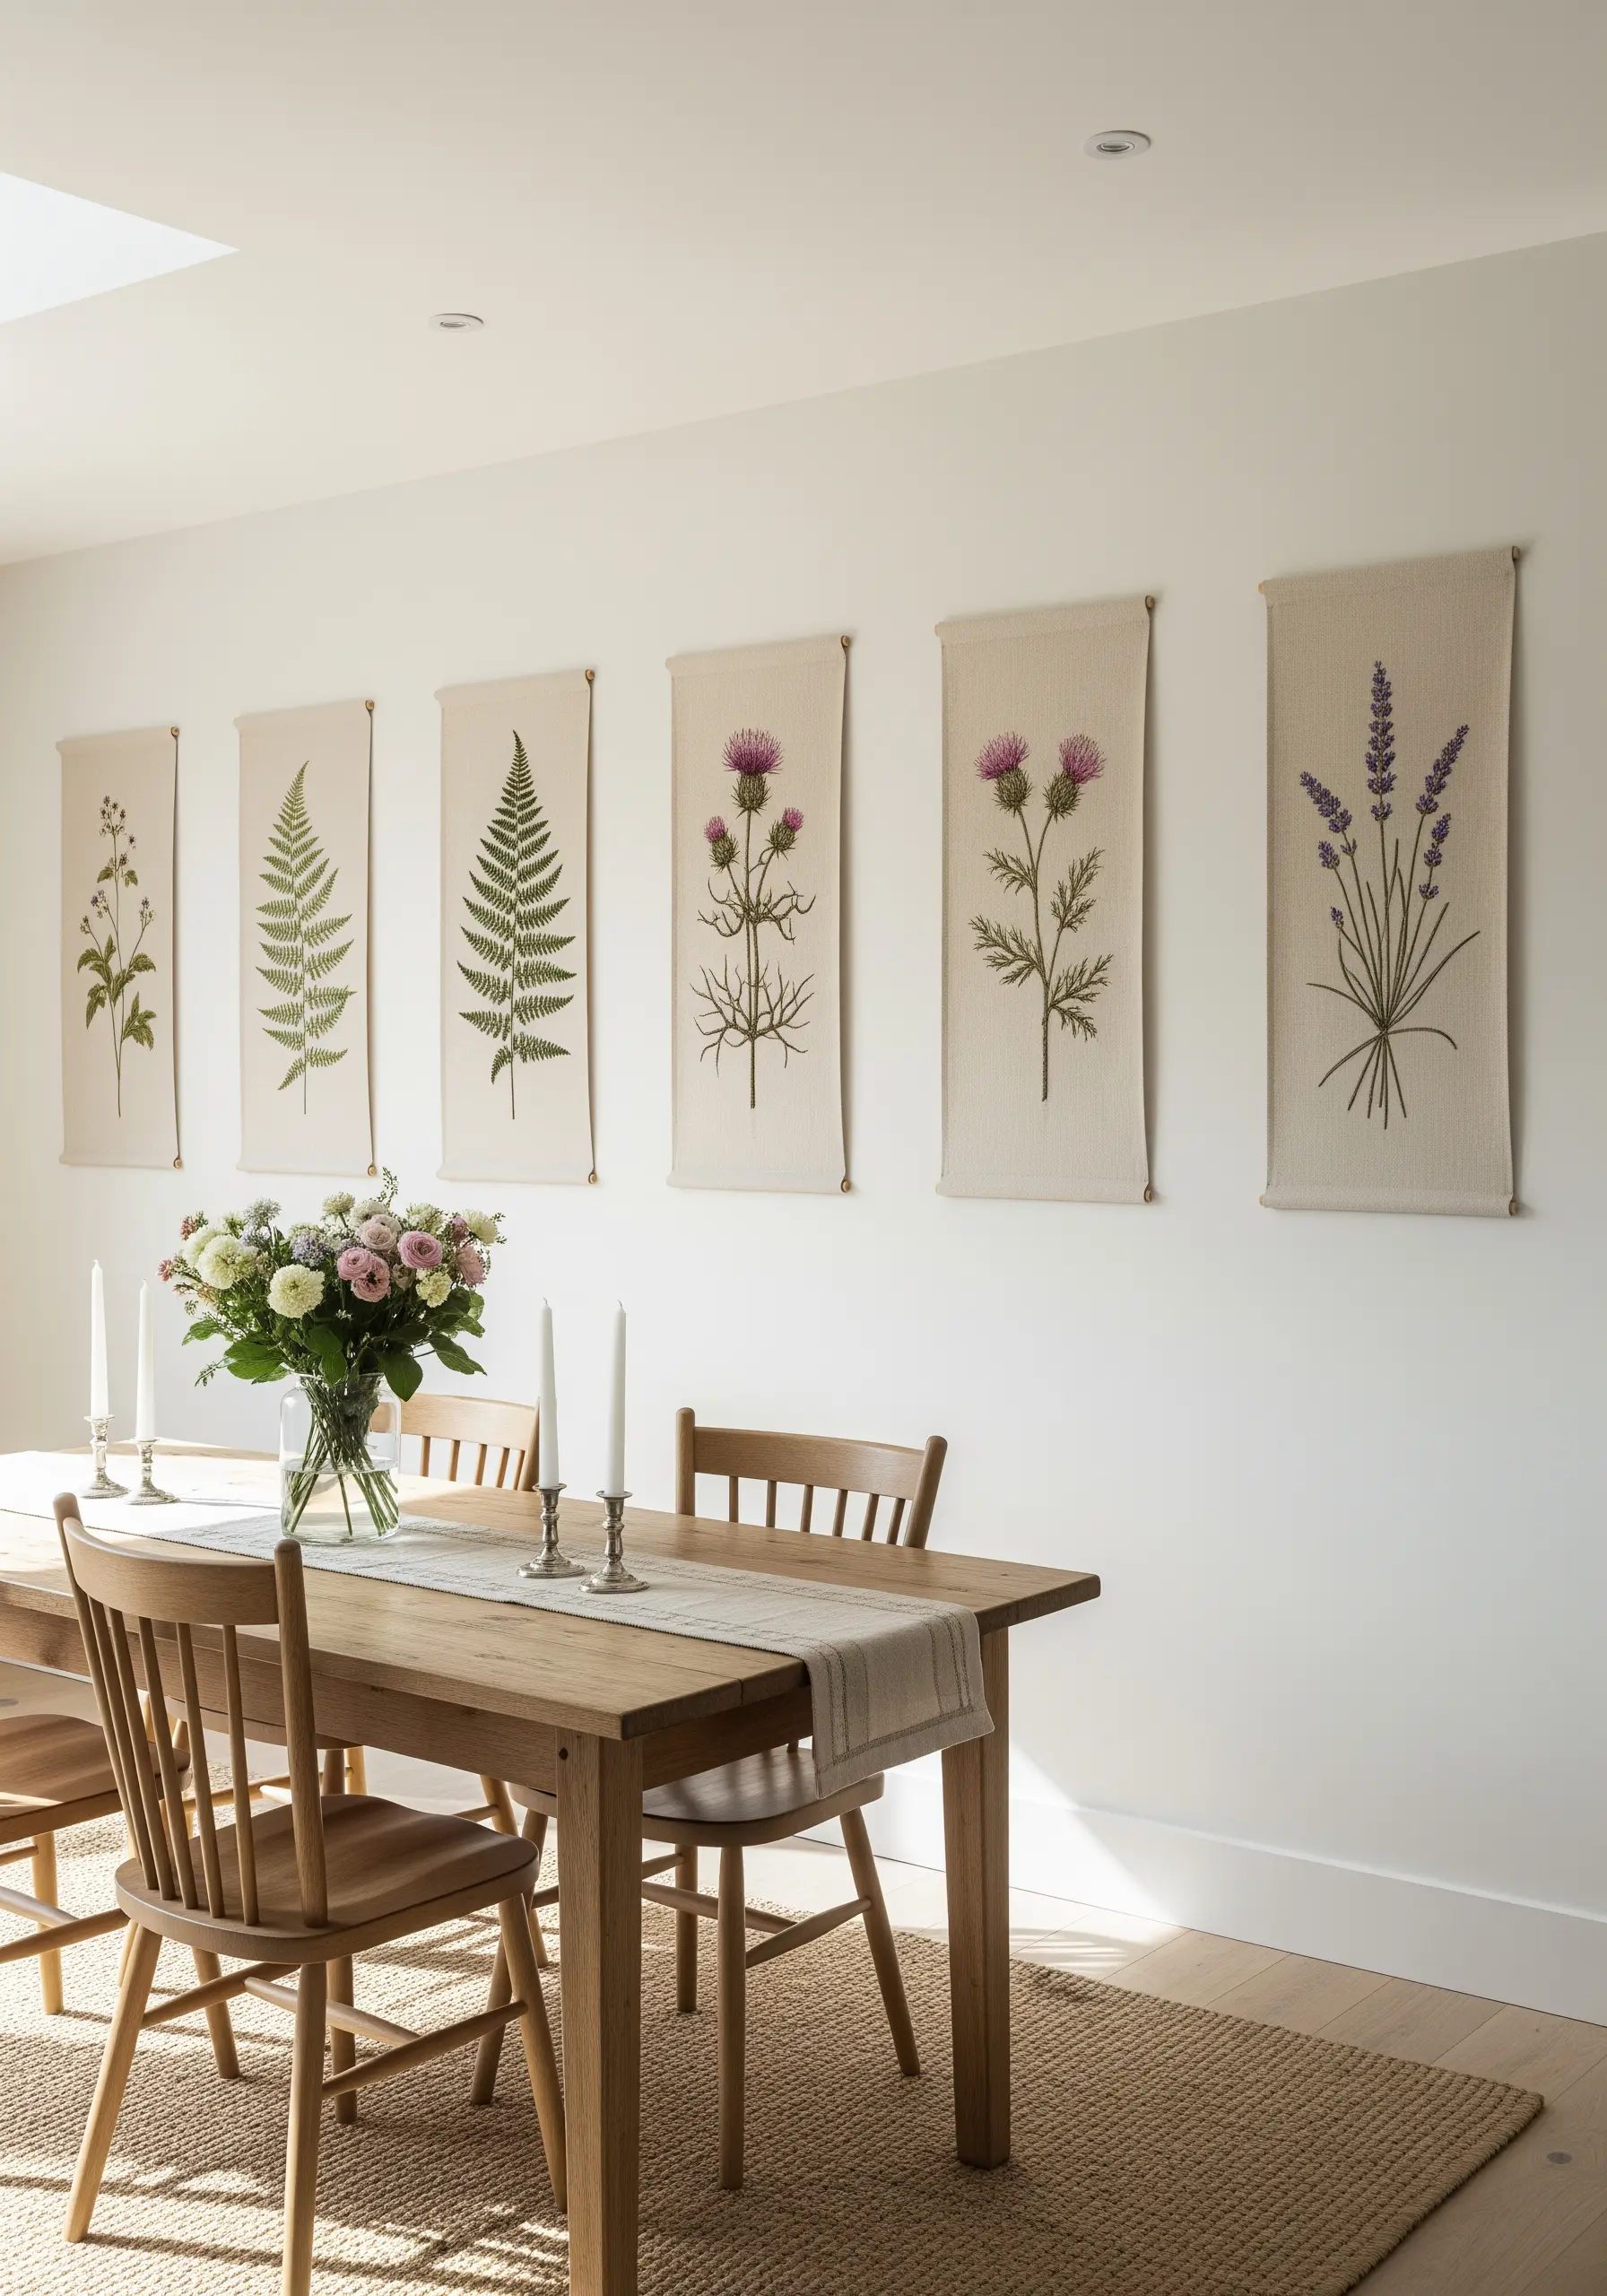
Transform simple botanical illustrations into an elegant gallery wall by focusing on precision and negative space.
Use a fine, single strand of thread and a delicate split stitch or stem stitch to capture the intricate details of leaves and roots without overwhelming the design.
Choose a neutral, unbleached linen or cotton canvas as your base; its natural texture adds warmth and prevents the minimalist style from feeling stark.
Mount each panel on a thin wooden dowel at the top and bottom for a clean, scroll-like presentation that hangs perfectly flat.
5. Craft a Soft, Sculptural Nursery Mural with Padded Appliqué
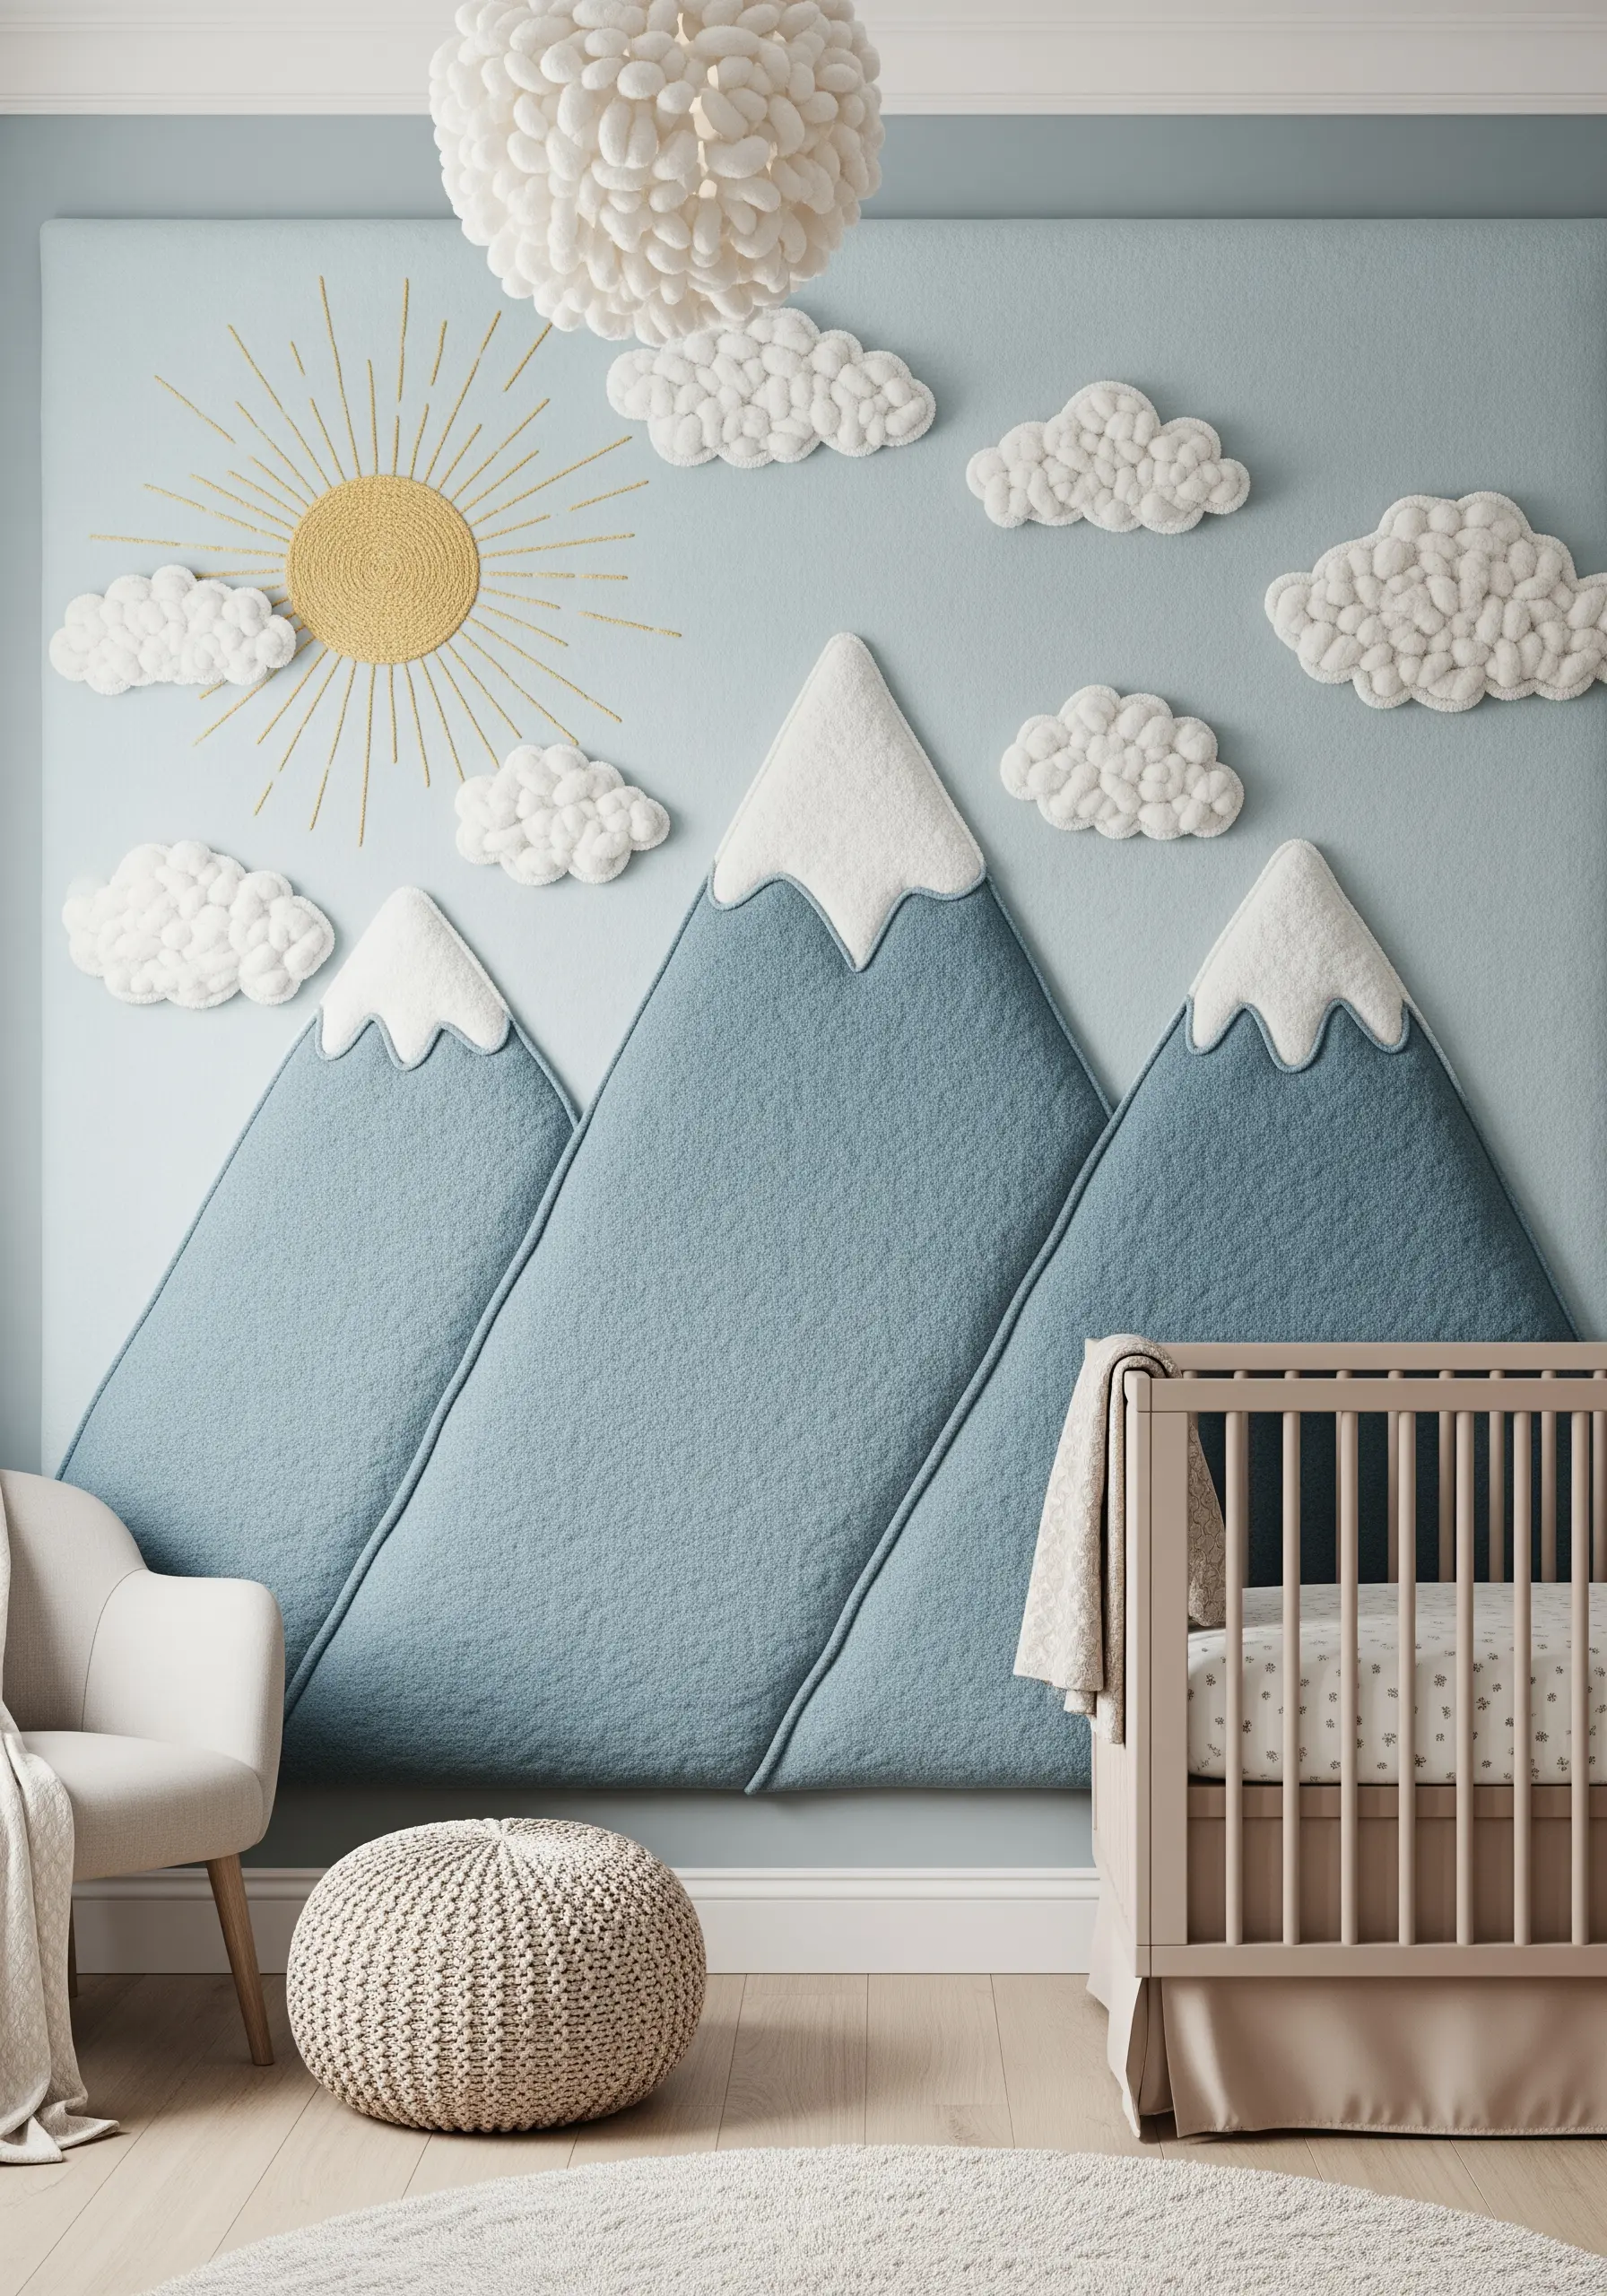
Build a touchably soft wall mural by combining padded appliqué with textural yarn stitching.
Cut your mountain shapes from felt, place a thin layer of batting behind them, and stitch them onto the background fabric for a gentle, three-dimensional effect.
For the fluffy clouds, use a punch needle with soft white yarn or fill the shapes with hundreds of closely packed French knots.
This technique creates a sensory art piece that’s visually calming and adds a layer of sound-dampening softness to the room.
6. Design a Modular Abstract Composition with Couching
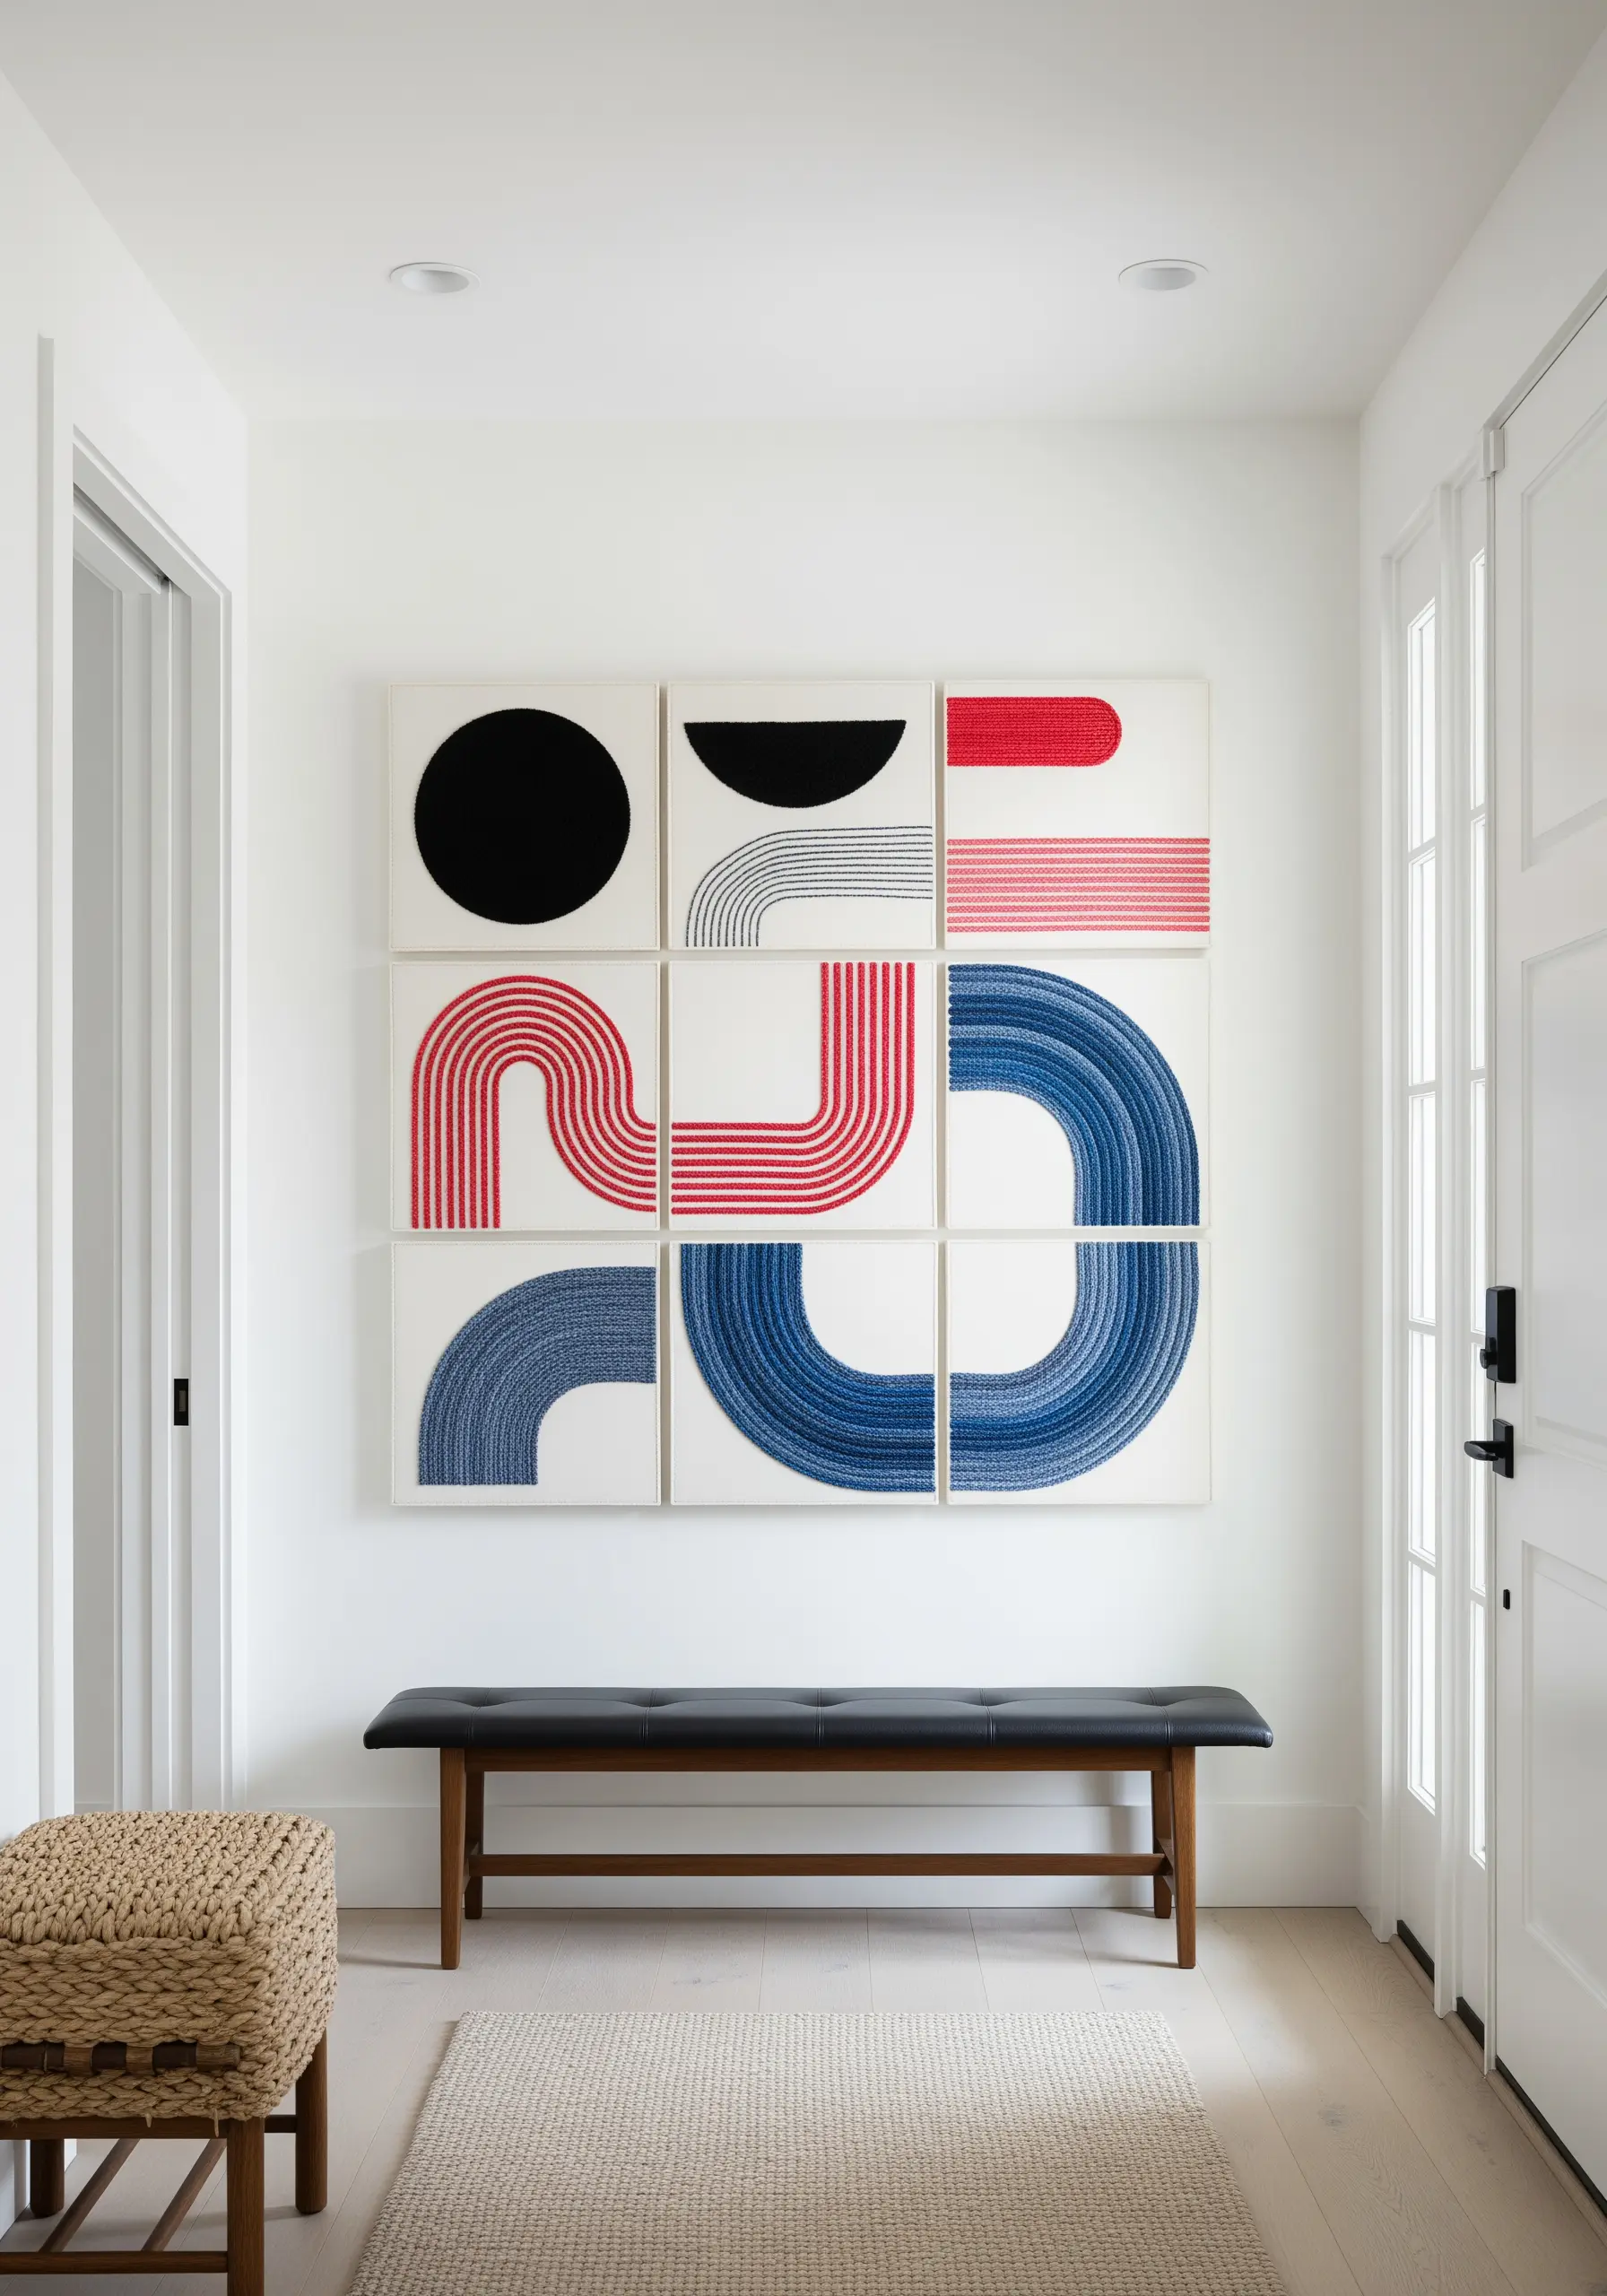
Create a large, impactful abstract piece by breaking it down into smaller, manageable square panels.
Use couching—laying down thick yarn or cord and tacking it in place with a thinner thread—to achieve the clean, curved lines.
This technique allows you to create bold shapes and textures without the density of satin stitch, and it works beautifully for color blocking.
Arrange the finished panels in a grid to form a cohesive, gallery-style installation that feels both modern and handmade.
7. Stitch a Celestial Map with Simple Stitches and Beads
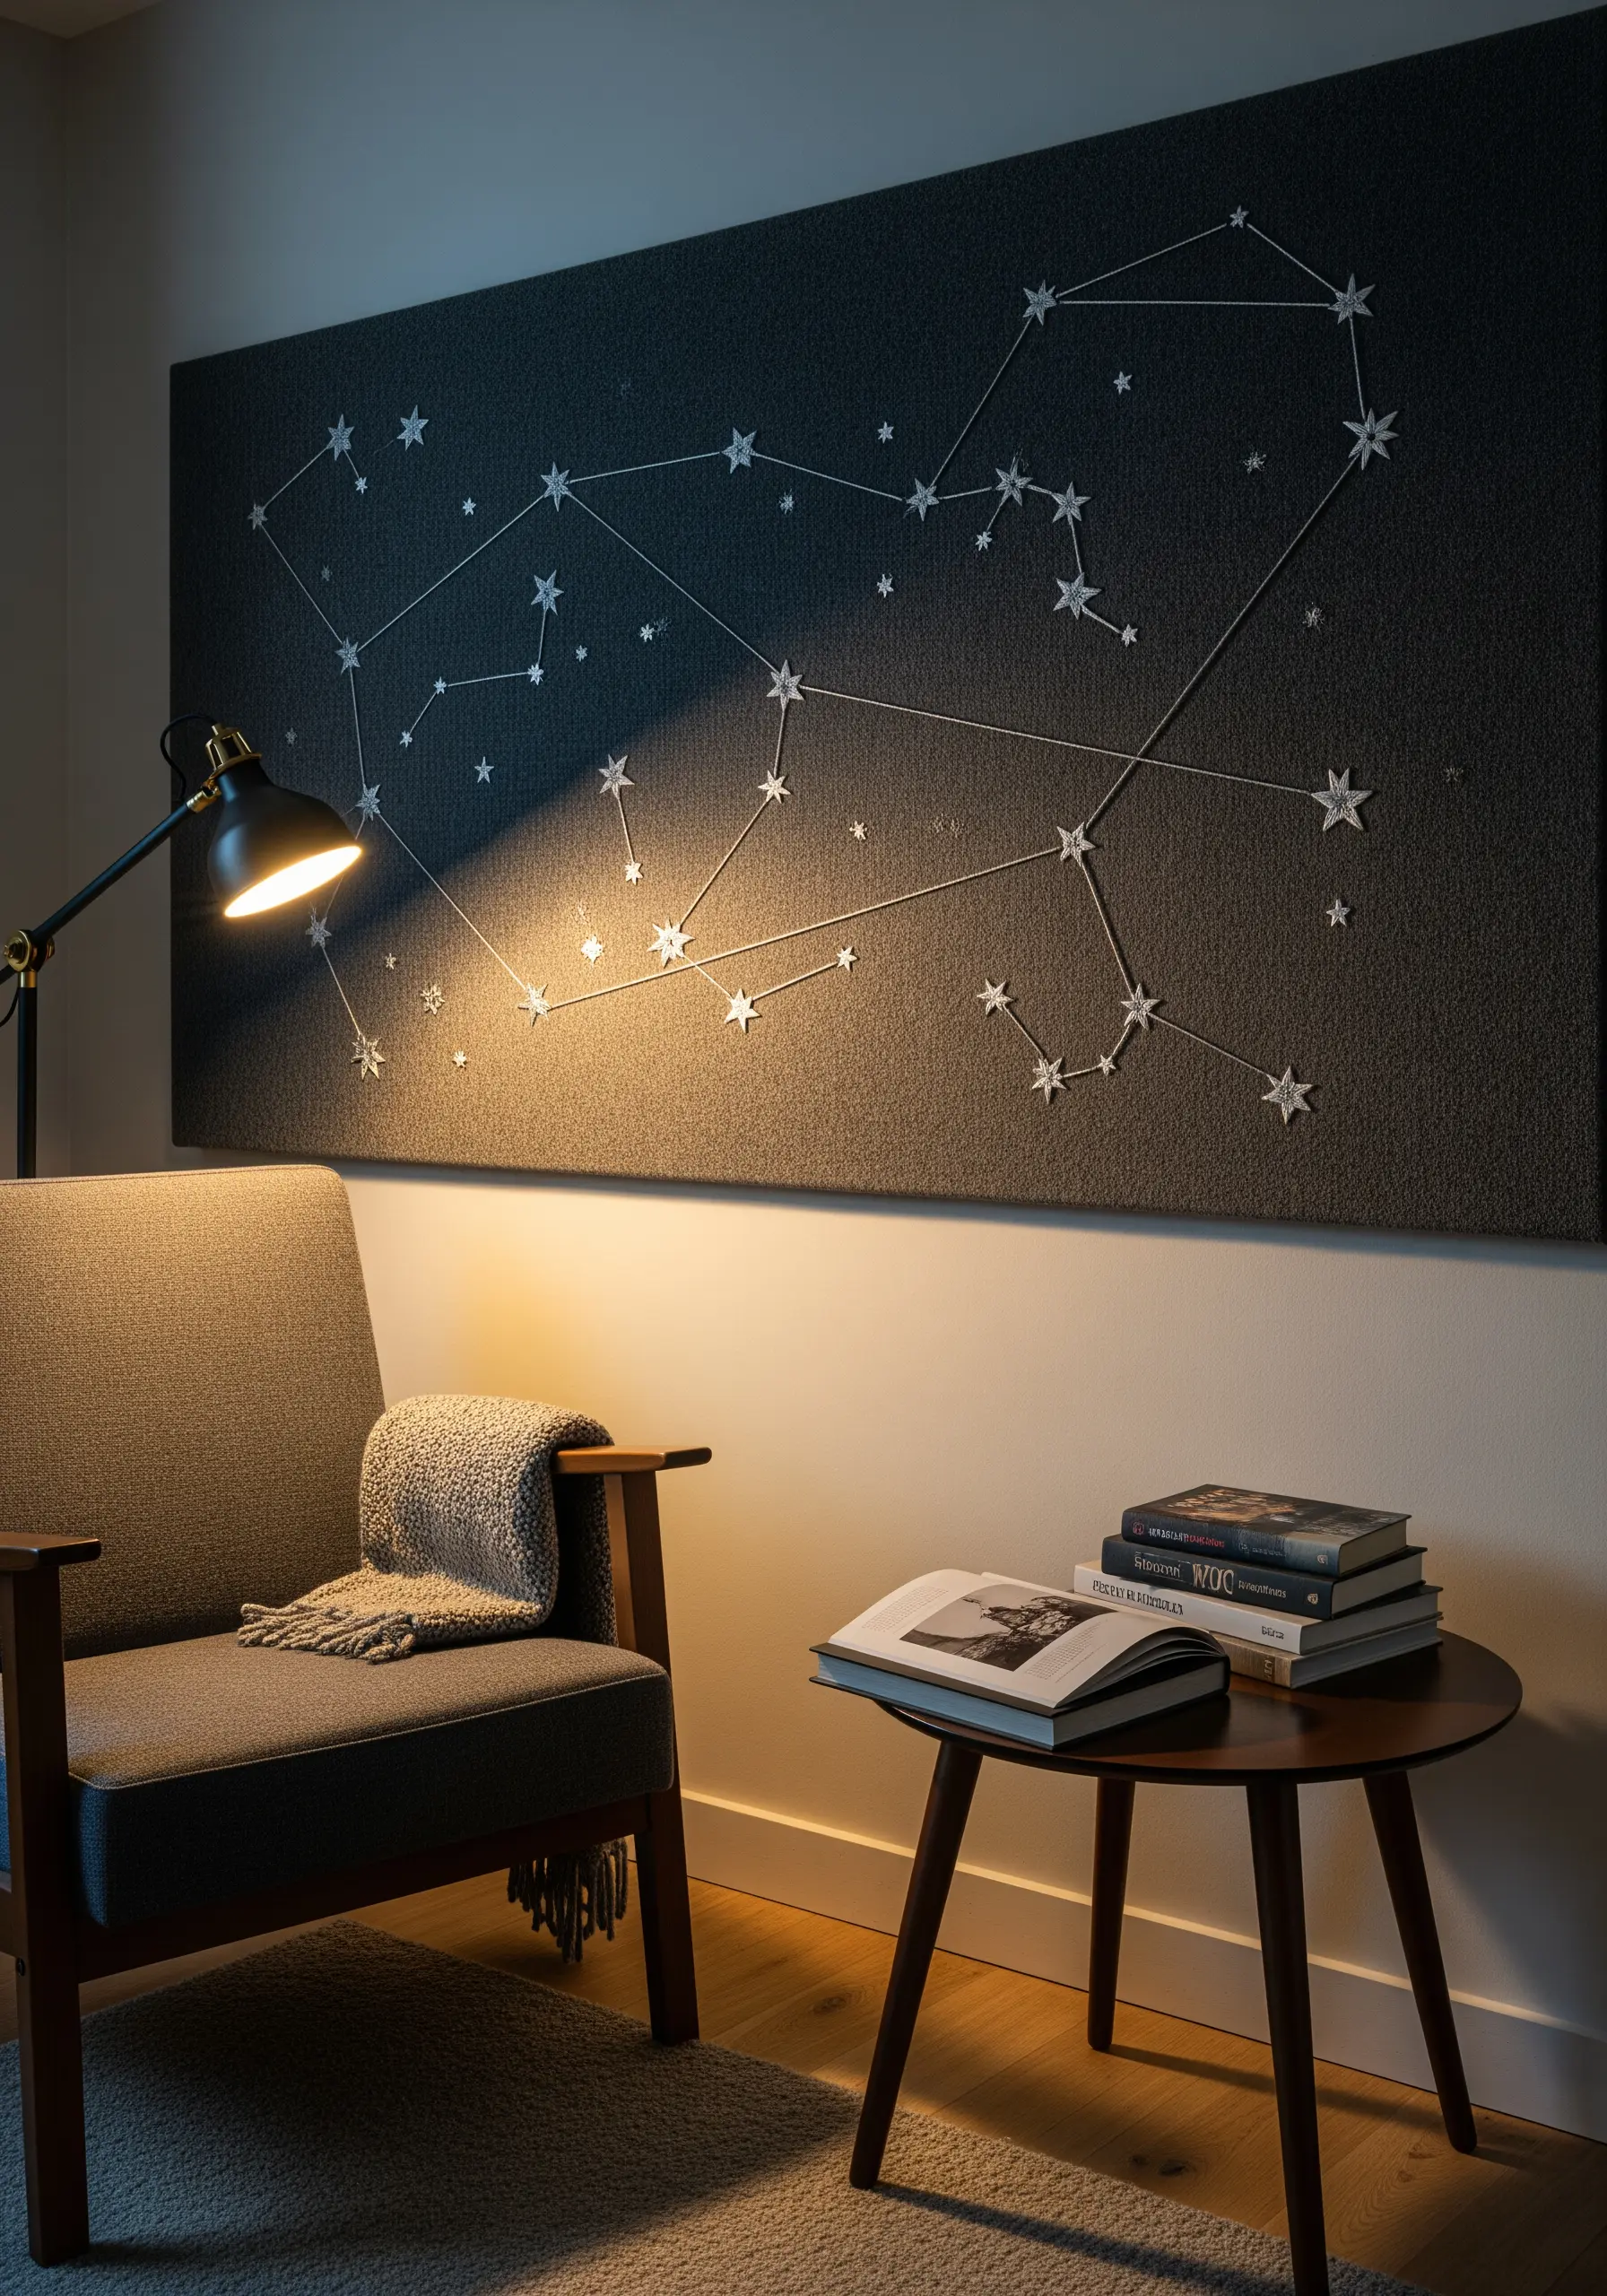
Map out your favorite constellation on dark fabric using a simple backstitch or running stitch with a bright white or silver metallic thread.
To make the stars pop, use a single French knot for smaller stars and stitch tiny silver or iridescent seed beads for the larger, more prominent ones.
Stretch the finished fabric over a cork board or acoustic panel; this not only provides a sturdy base but also helps absorb sound, making it perfect for a quiet reading nook.
This project transforms simple stitches into a sophisticated piece of astronomical art.
8. Sculpt Ocean Waves with High-Pile Yarn Techniques
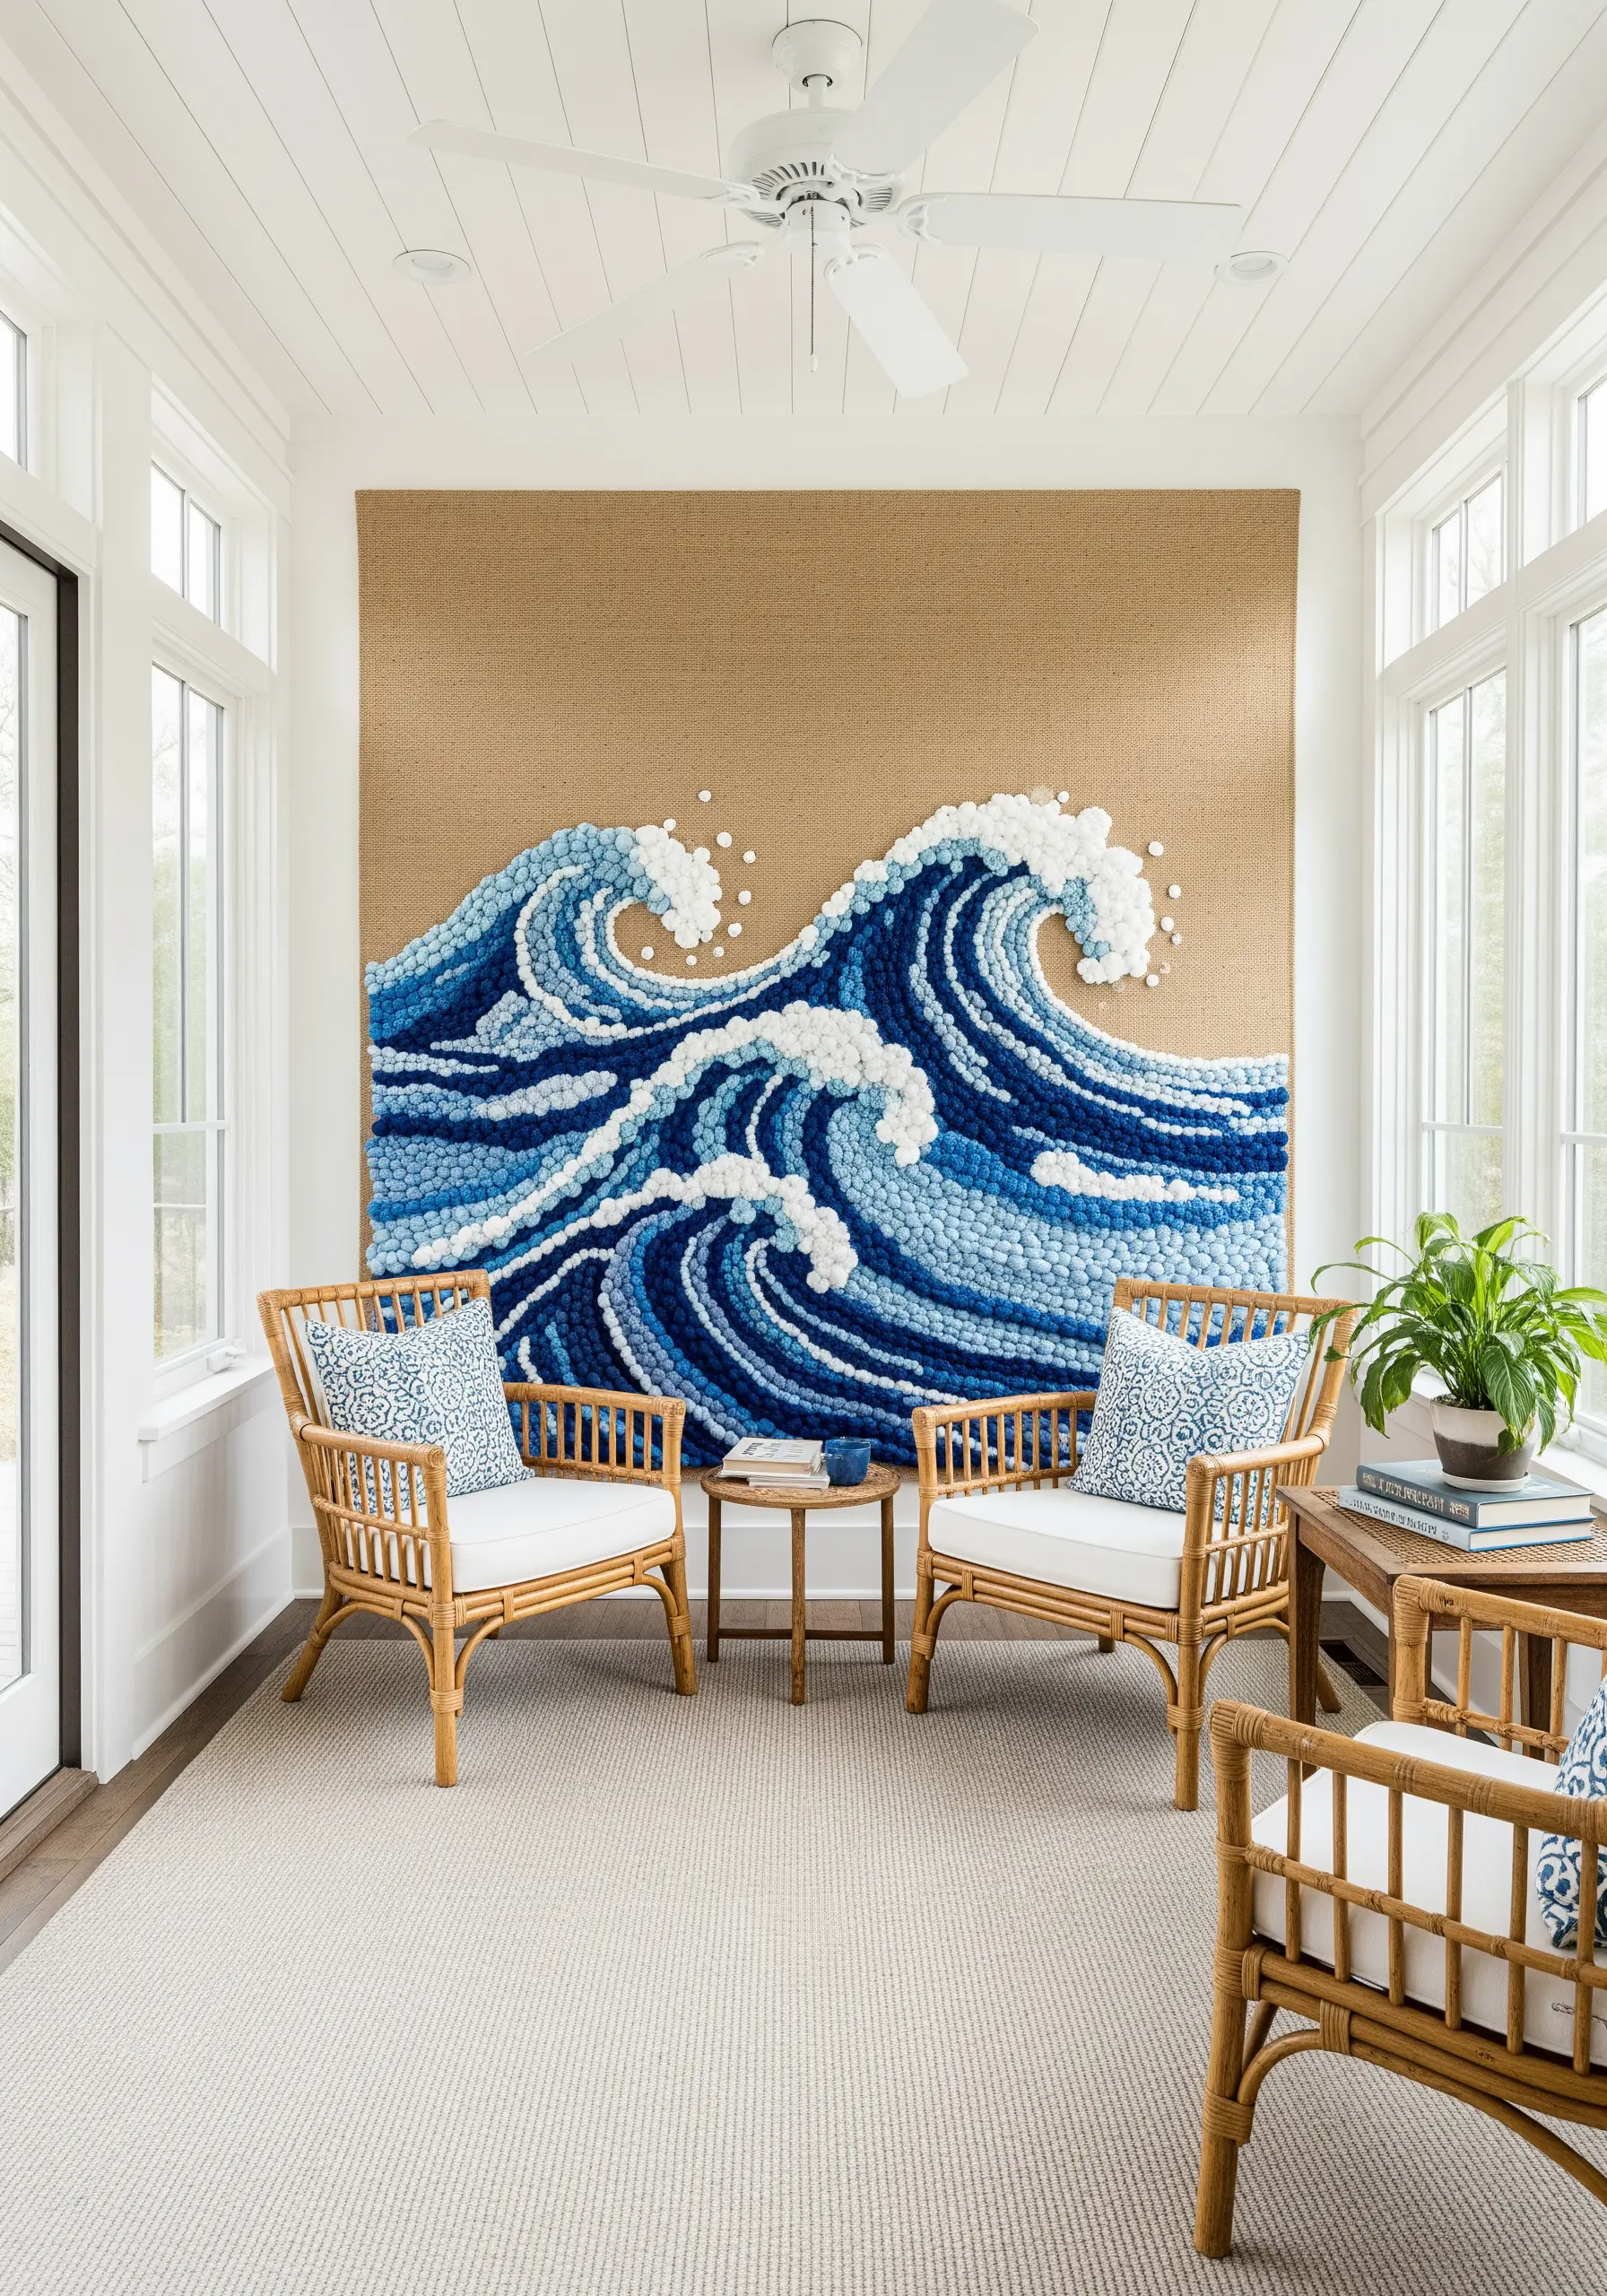
To capture the powerful motion of ocean waves, use techniques that create high-relief texture, such as punch needle or rug hooking.
Work with chunky wool yarn in various shades of blue, white, and seafoam green to build up distinct color-blocked areas.
Vary the loop height in your punch needle work—shorter loops for the base of the wave and longer loops for the frothy crest—to enhance the three-dimensional effect.
Adding scattered French knots in white yarn mimics sea spray and adds a final layer of dynamic detail to your coastal-inspired textile wall art.
9. Emulate Chinoiserie Silk Painting with Thread
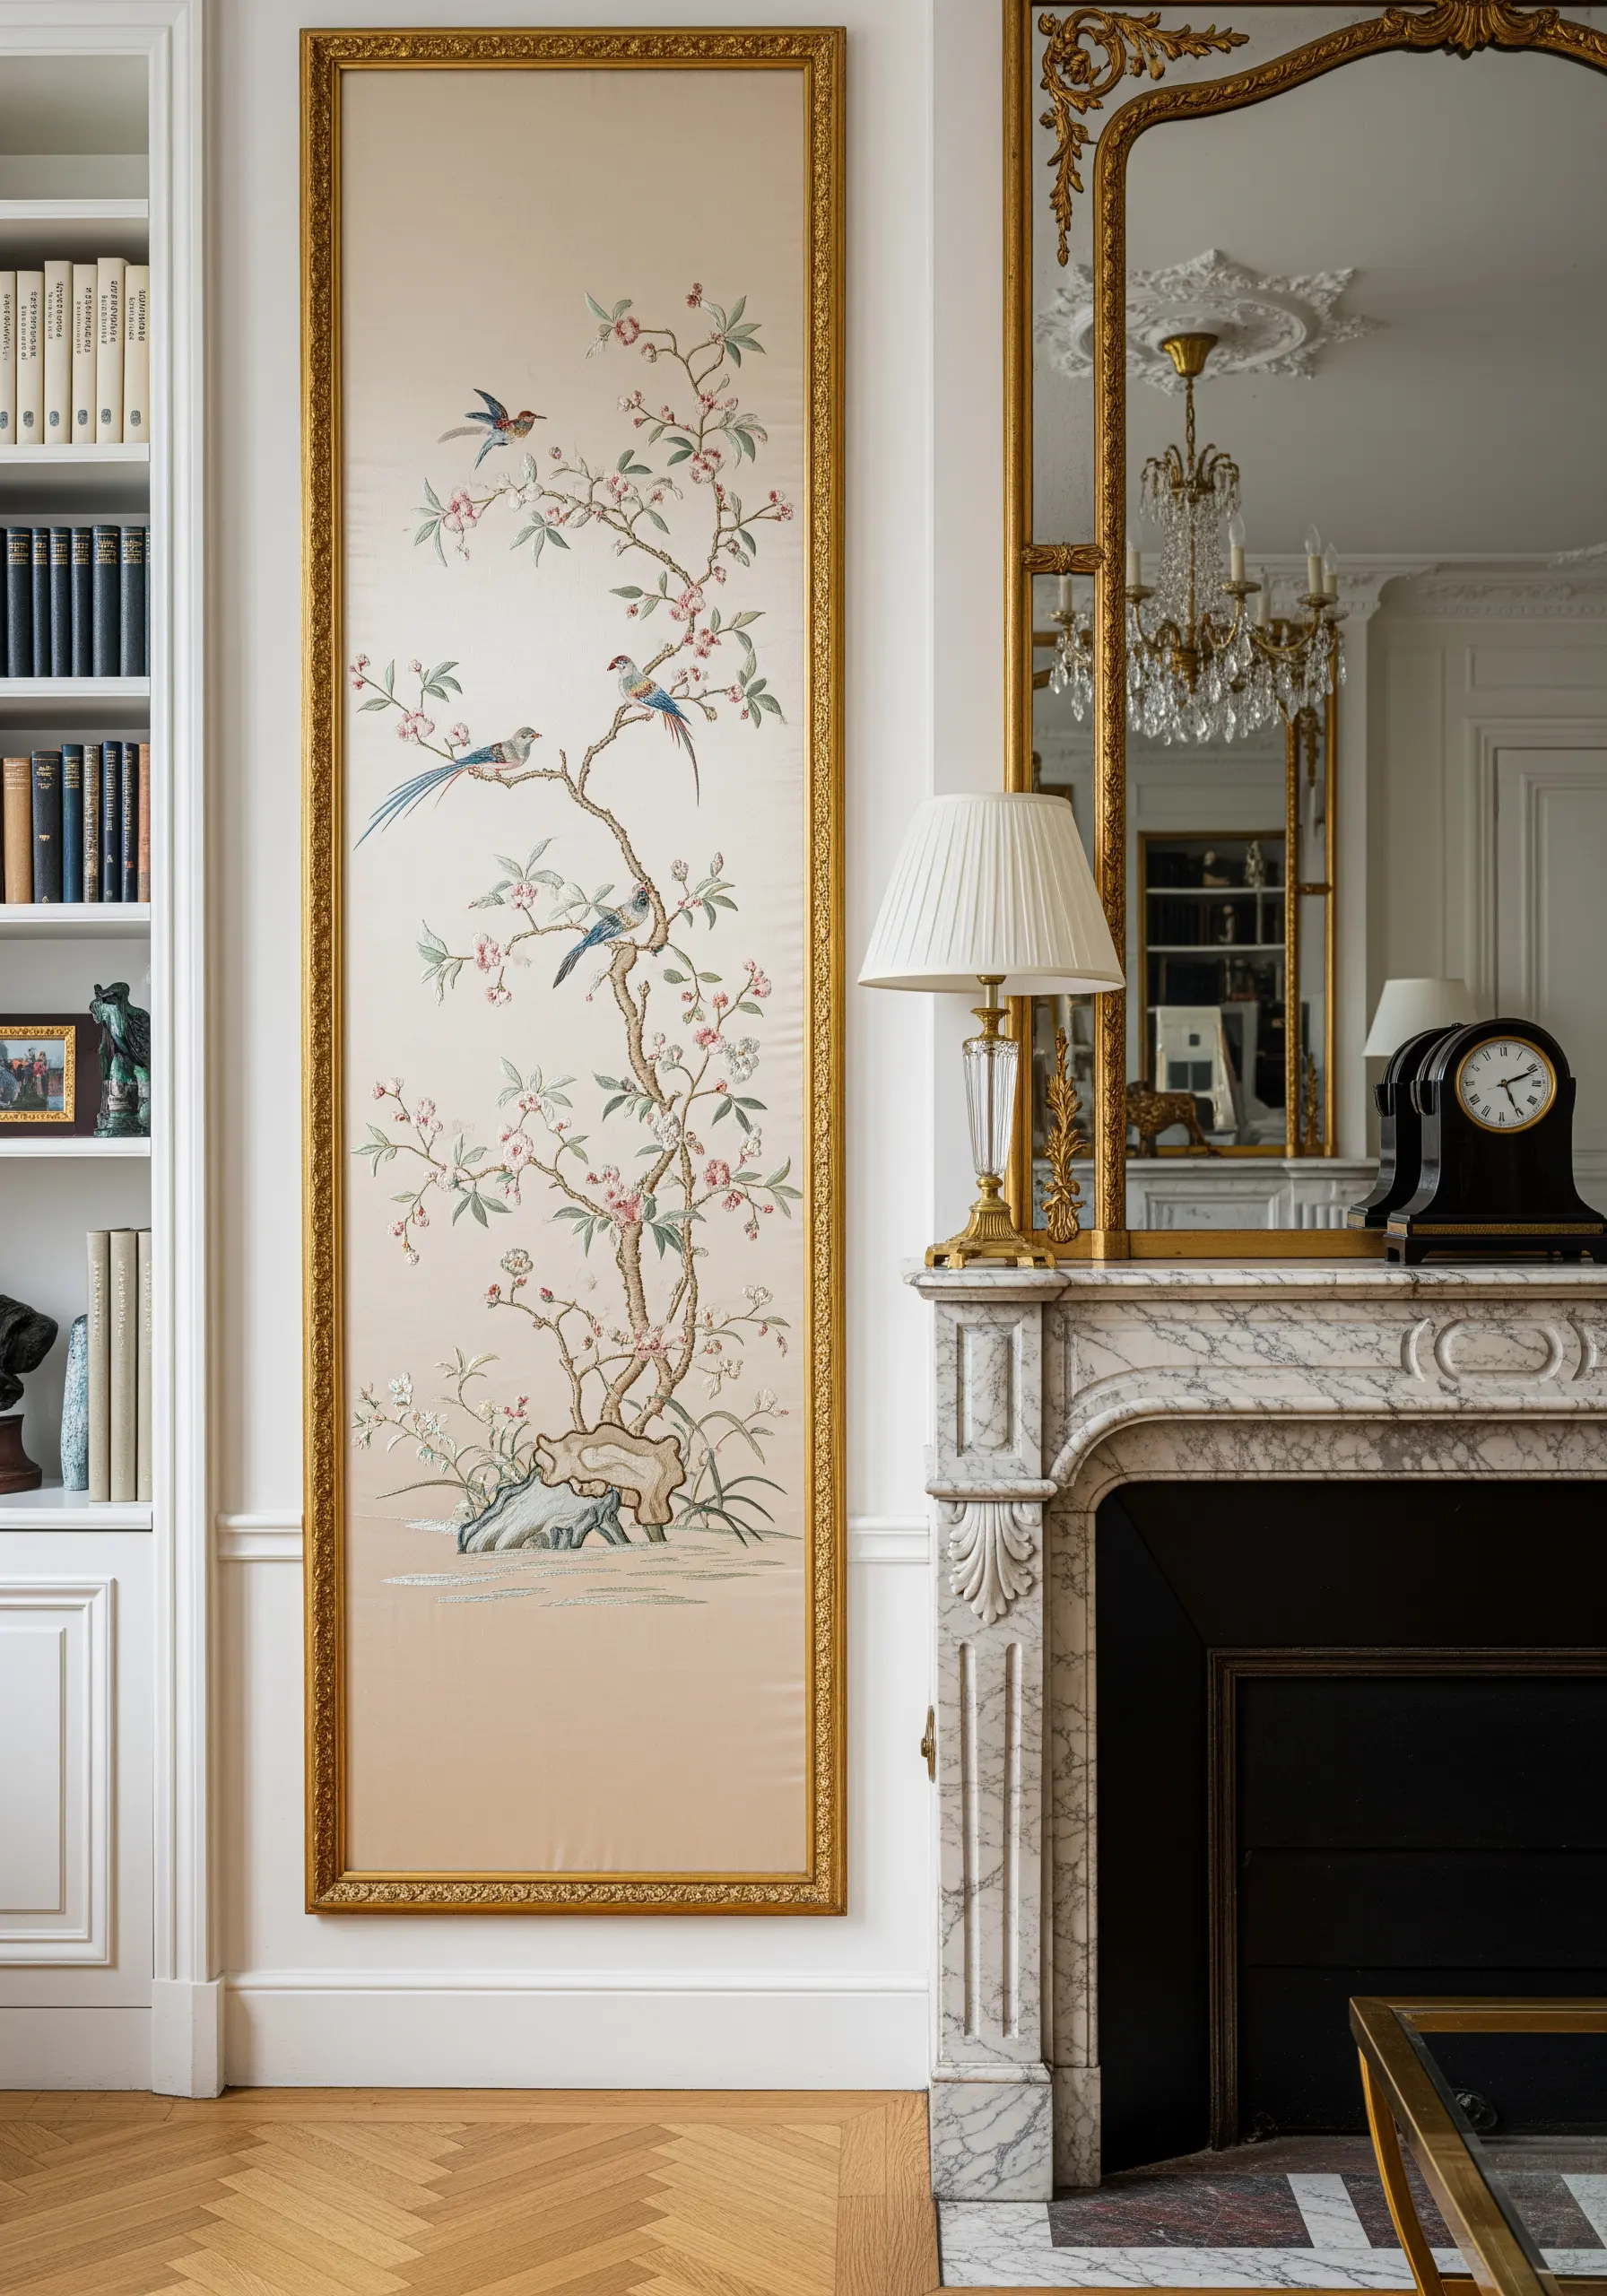
Recreate the elegance of traditional Chinoiserie panels by working on a silk or satin-blend fabric that has a subtle sheen.
Use the long and short stitch to fill in the birds and flowers, blending shades of a single color to create soft, realistic gradients that mimic brushstrokes.
For the delicate branches and stems, a fine, single-strand stem stitch provides the perfect organic, flowing line.
Choosing a muted, sophisticated color palette is essential for achieving this timeless, painterly style.
10. Capture a Retro Vibe with Raised Satin Stitch Arcs
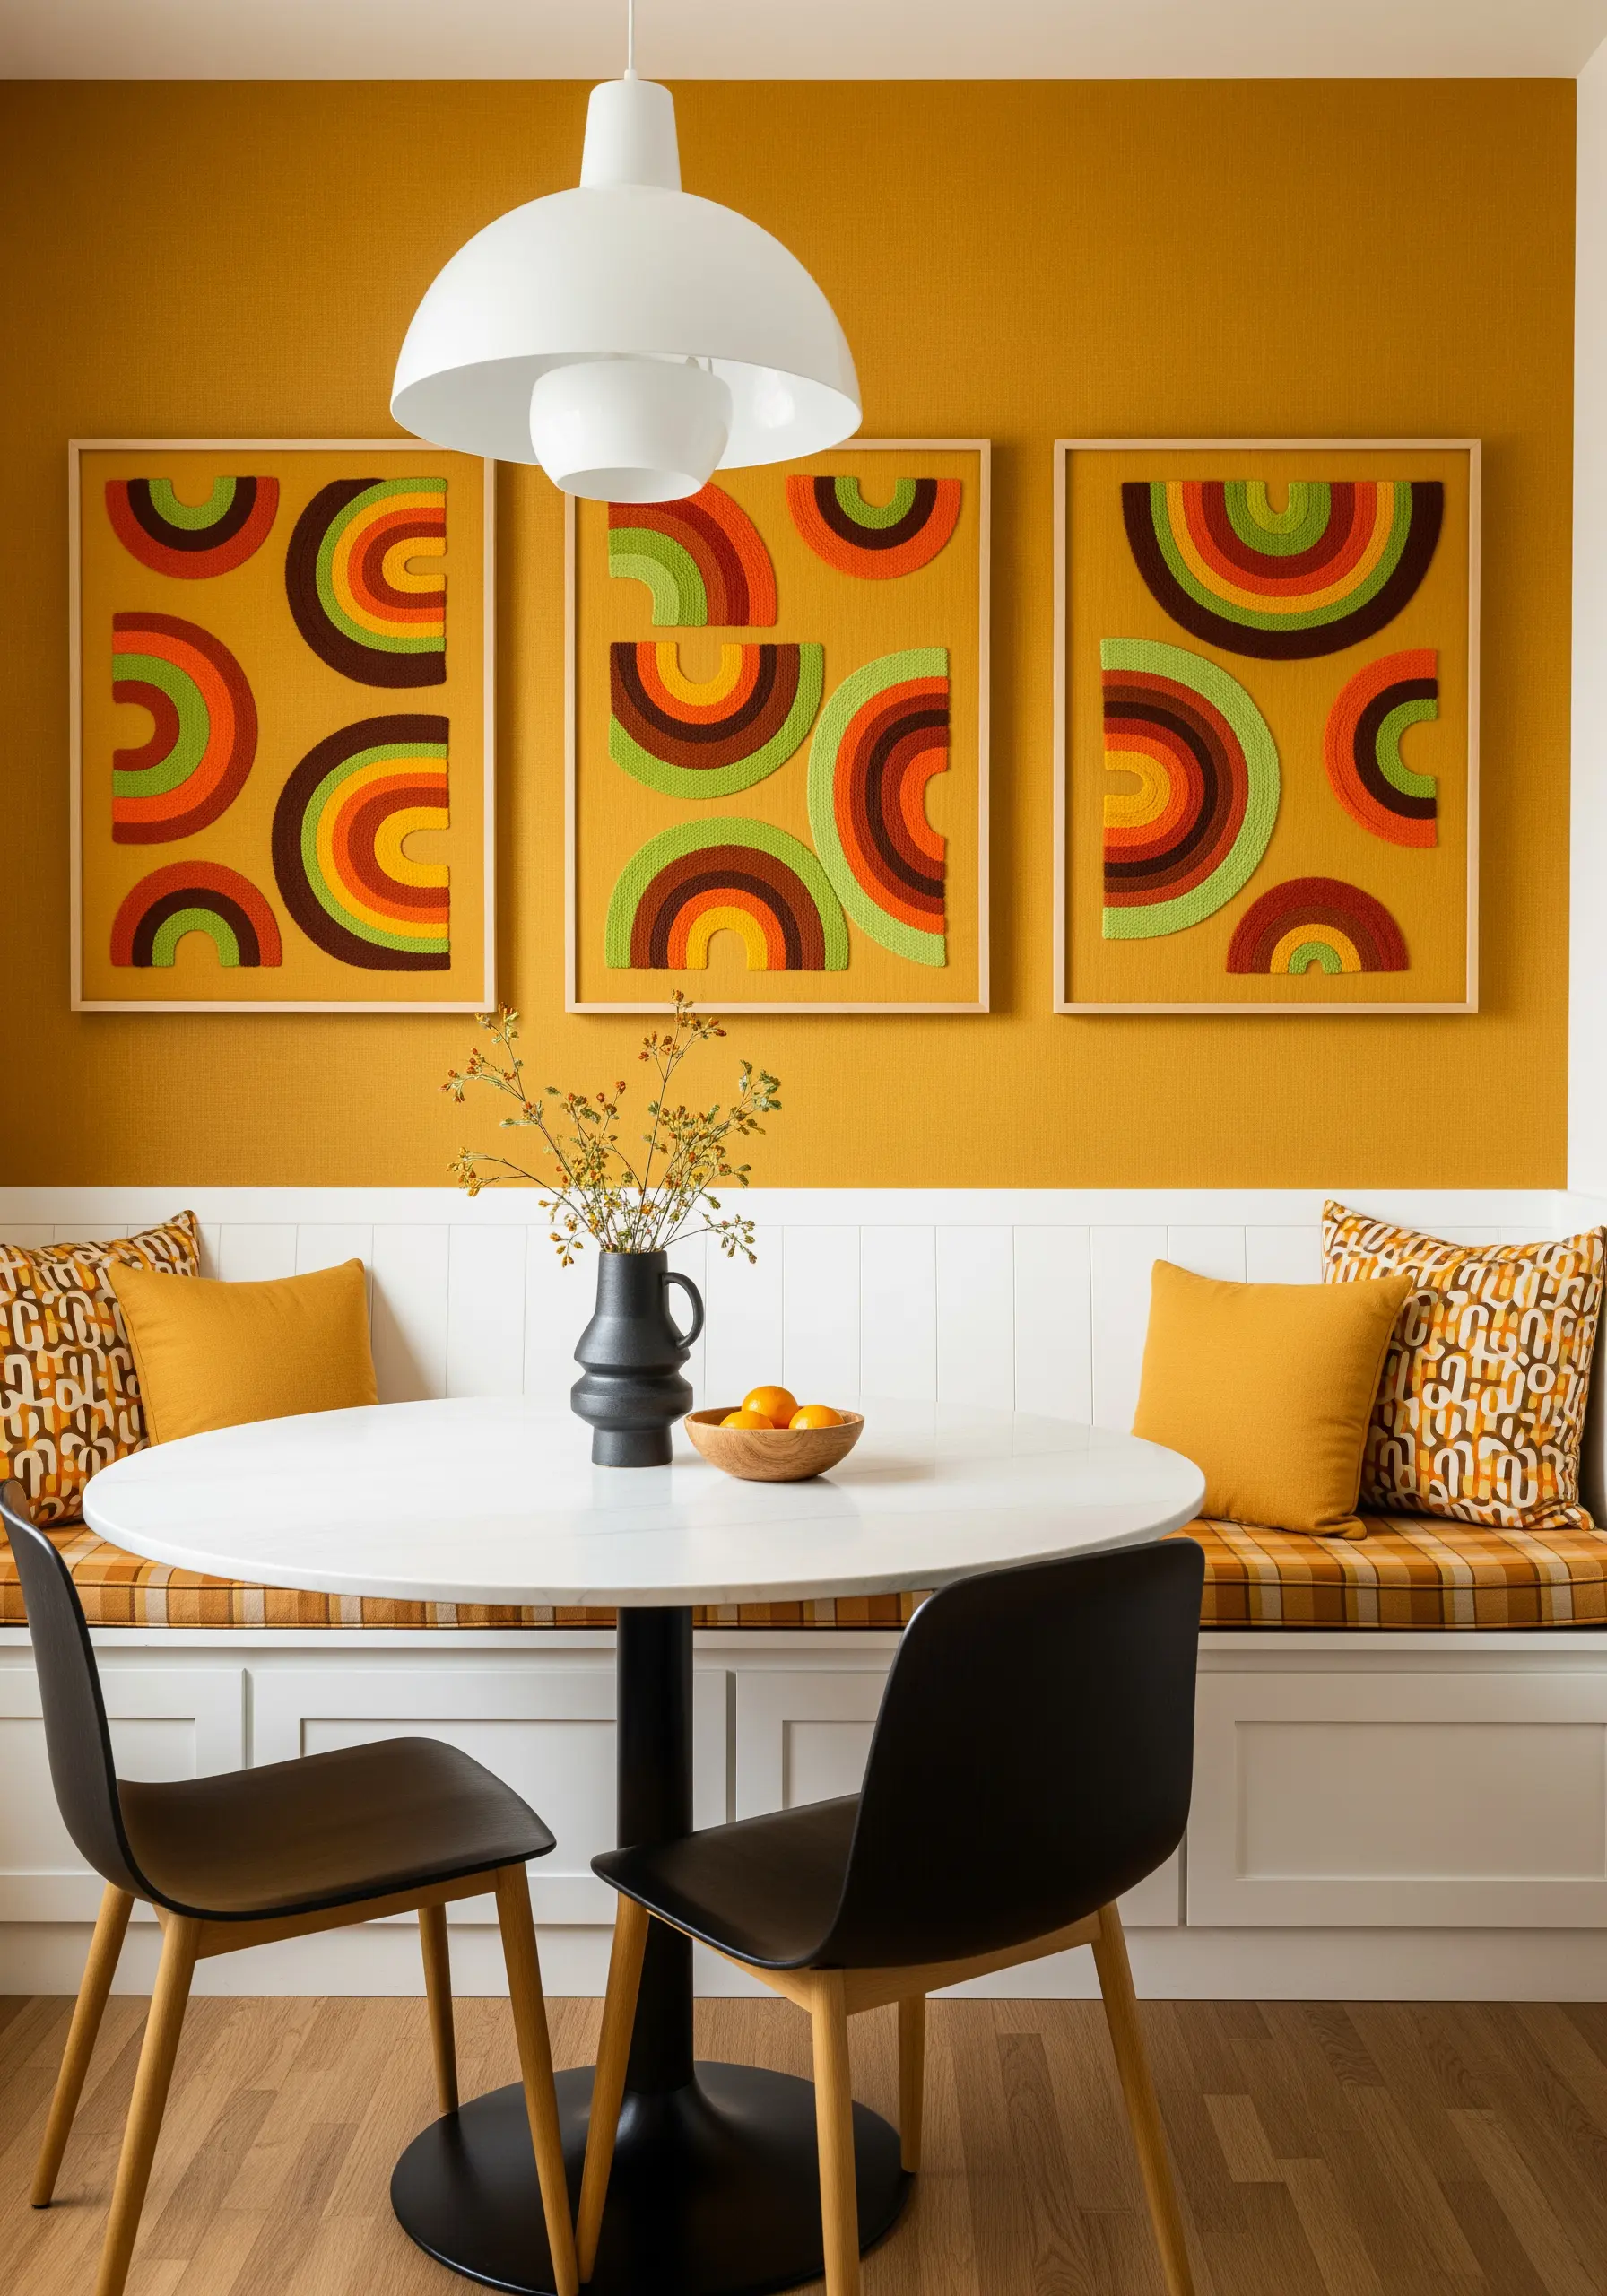
Give your geometric designs a 70s-inspired, three-dimensional feel by using a padded satin stitch.
Before you stitch your satin stitch arcs, lay down a foundation of straight stitches within the shape. This padding raises the final layer, making the colors pop and creating soft shadows.
Work your satin stitches over the padding, keeping them uniform and tight for a smooth, raised finish.
This technique works especially well on a fabric with a visible weave, like the mustard-colored linen shown here, as it enhances the retro, textural feel.
11. Create a Pointillist Gradient with French Knots
For a stunning, large-scale gradient effect, fill your entire canvas with thousands of French knots.
Divide your design into sections and assign a specific thread color to each, planning the transition from dark to light carefully.
To create a smooth blend, create a transitional zone between two colors where you randomly mix French knots of both shades.
This highly textural, pointillist approach transforms simple stitches into a mesmerizing piece of abstract thread painting that changes with the light.
12. Map the Cosmos with Raised Metallic Cording
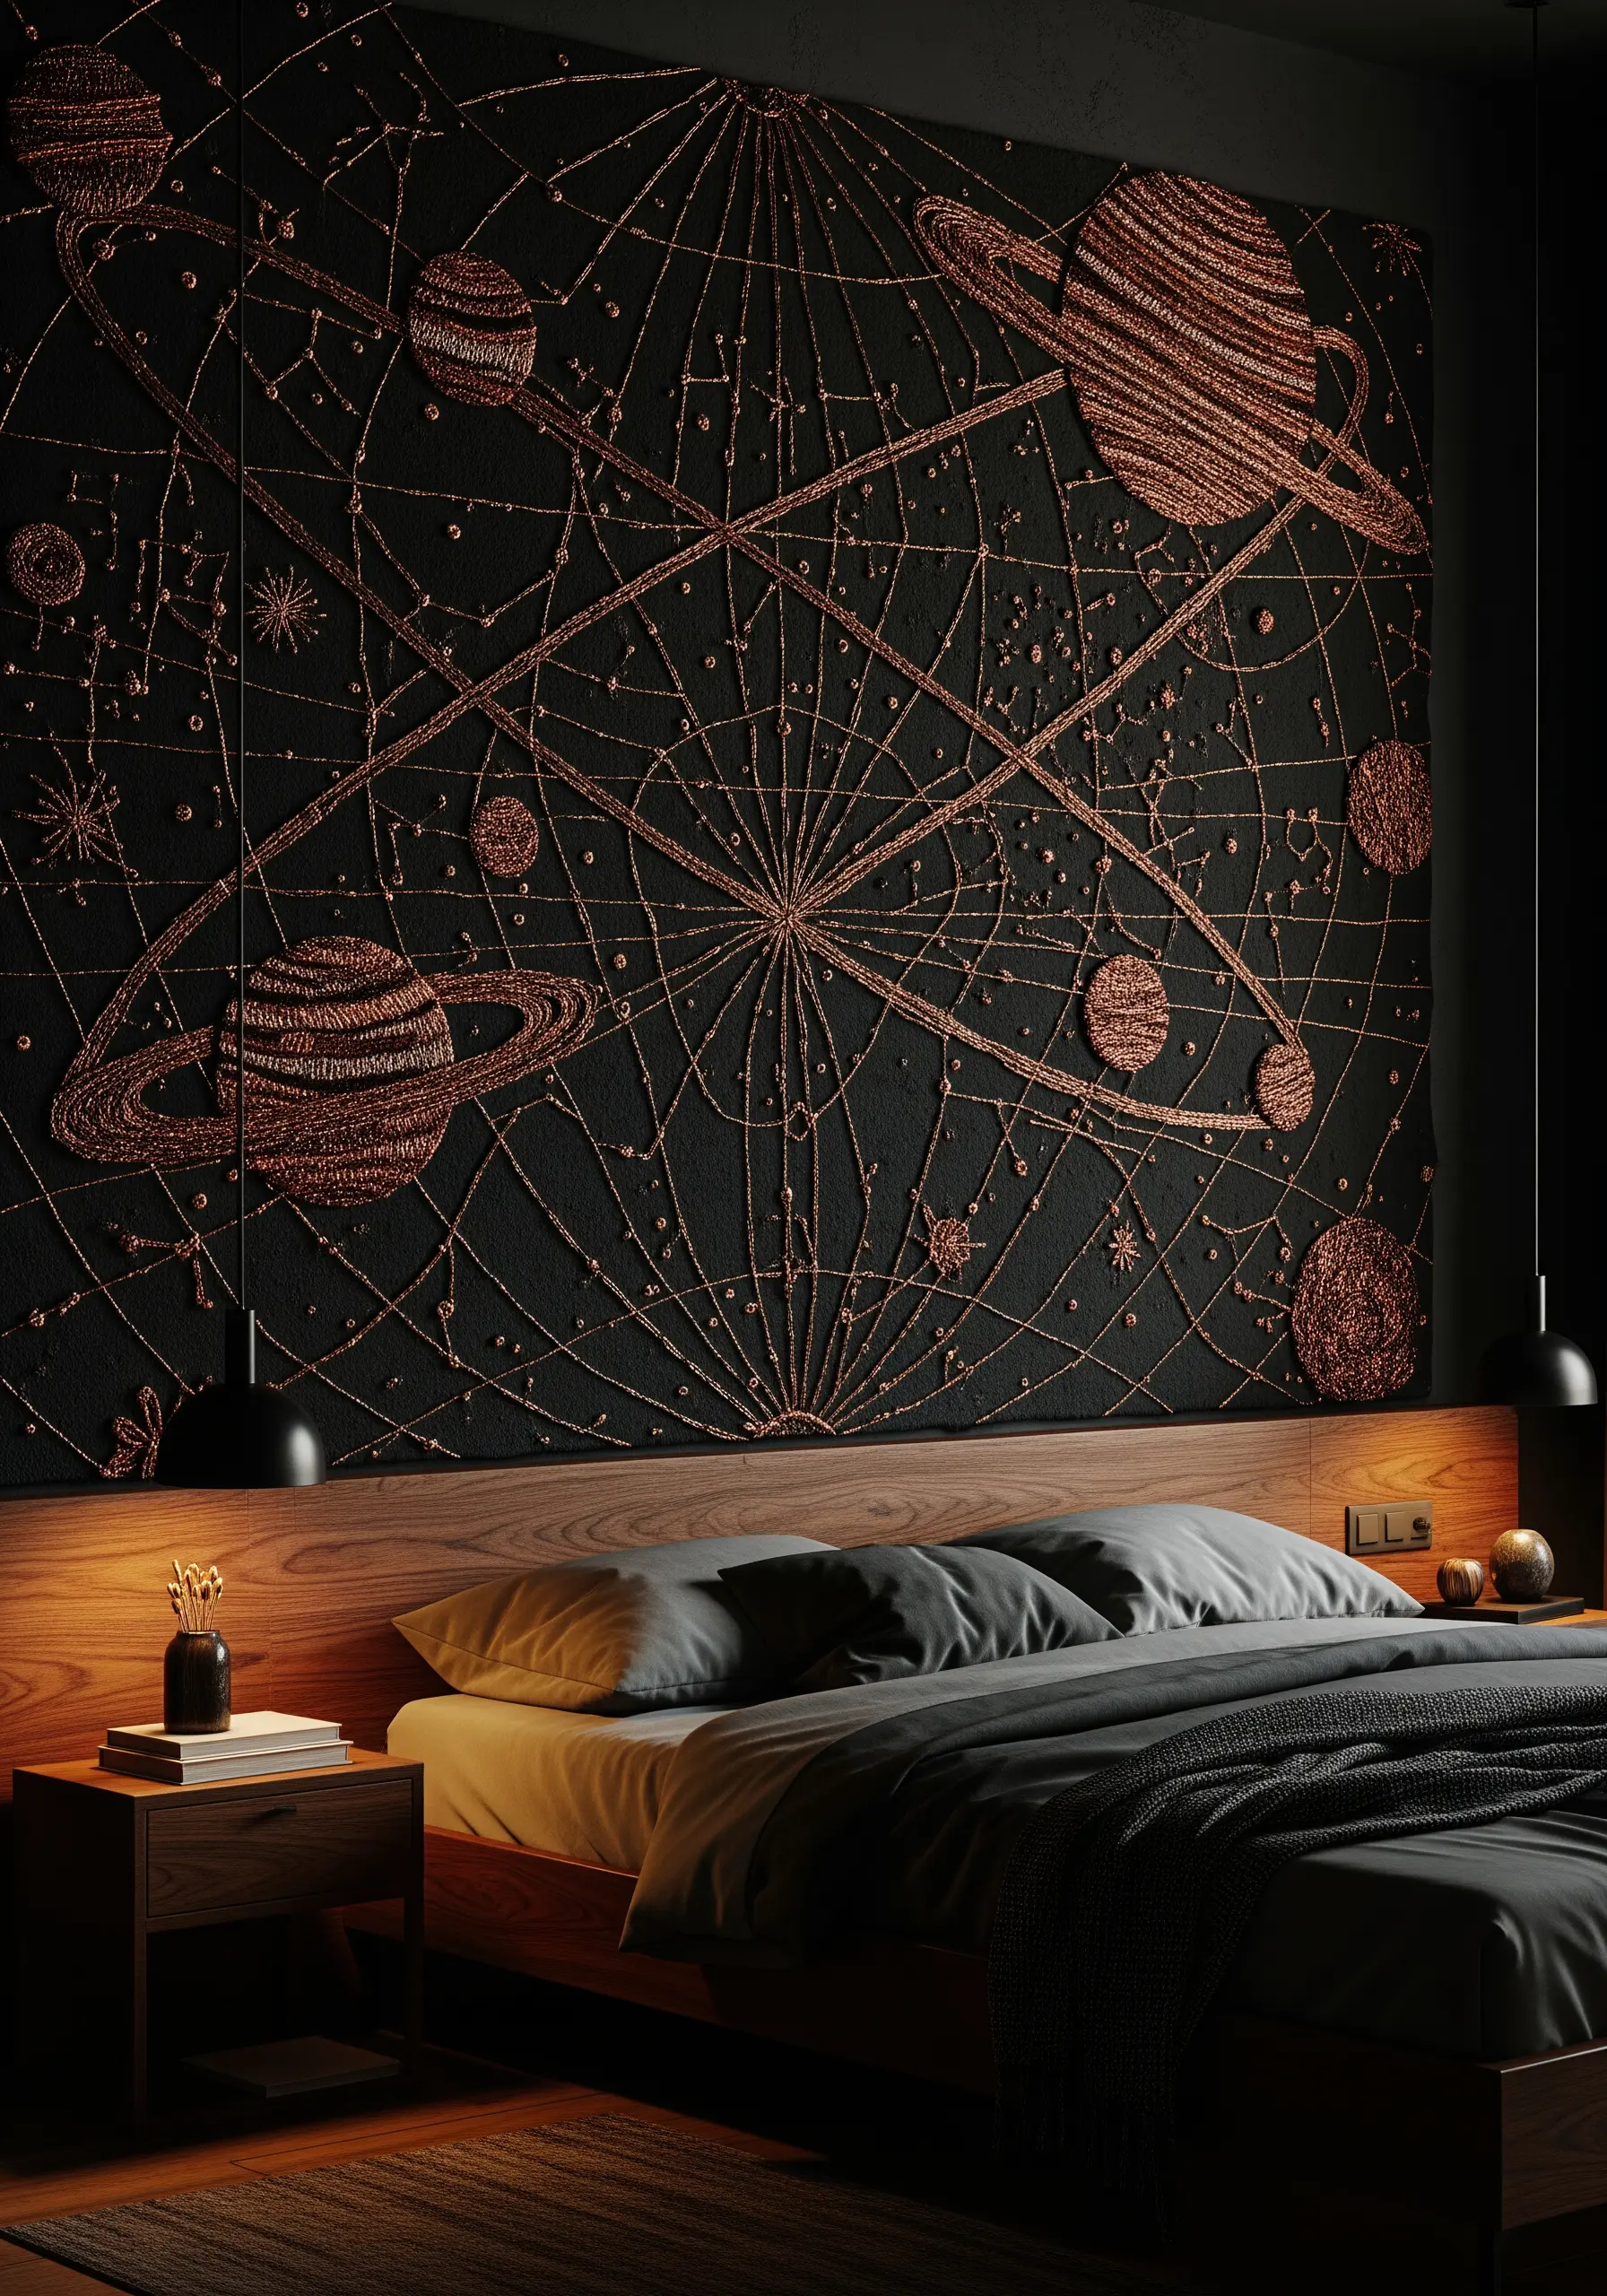
Design a dramatic celestial map using a couching technique with thick, metallic copper cord on a black canvas background.
Instead of stitching through the cord, lay it on the surface of the fabric and use a matching, thinner metallic thread to tack it down with small, evenly spaced stitches.
For the planets and stars, use dense satin stitch or a tight spiral of chain stitch to create raised, textured spheres that contrast with the smooth lines of the orbits.
This combination of high-shine cording and textural stitching creates a sophisticated, architectural piece perfect for a modern bedroom.
13. Stitch a Modern Farmhouse Quilt with Redwork
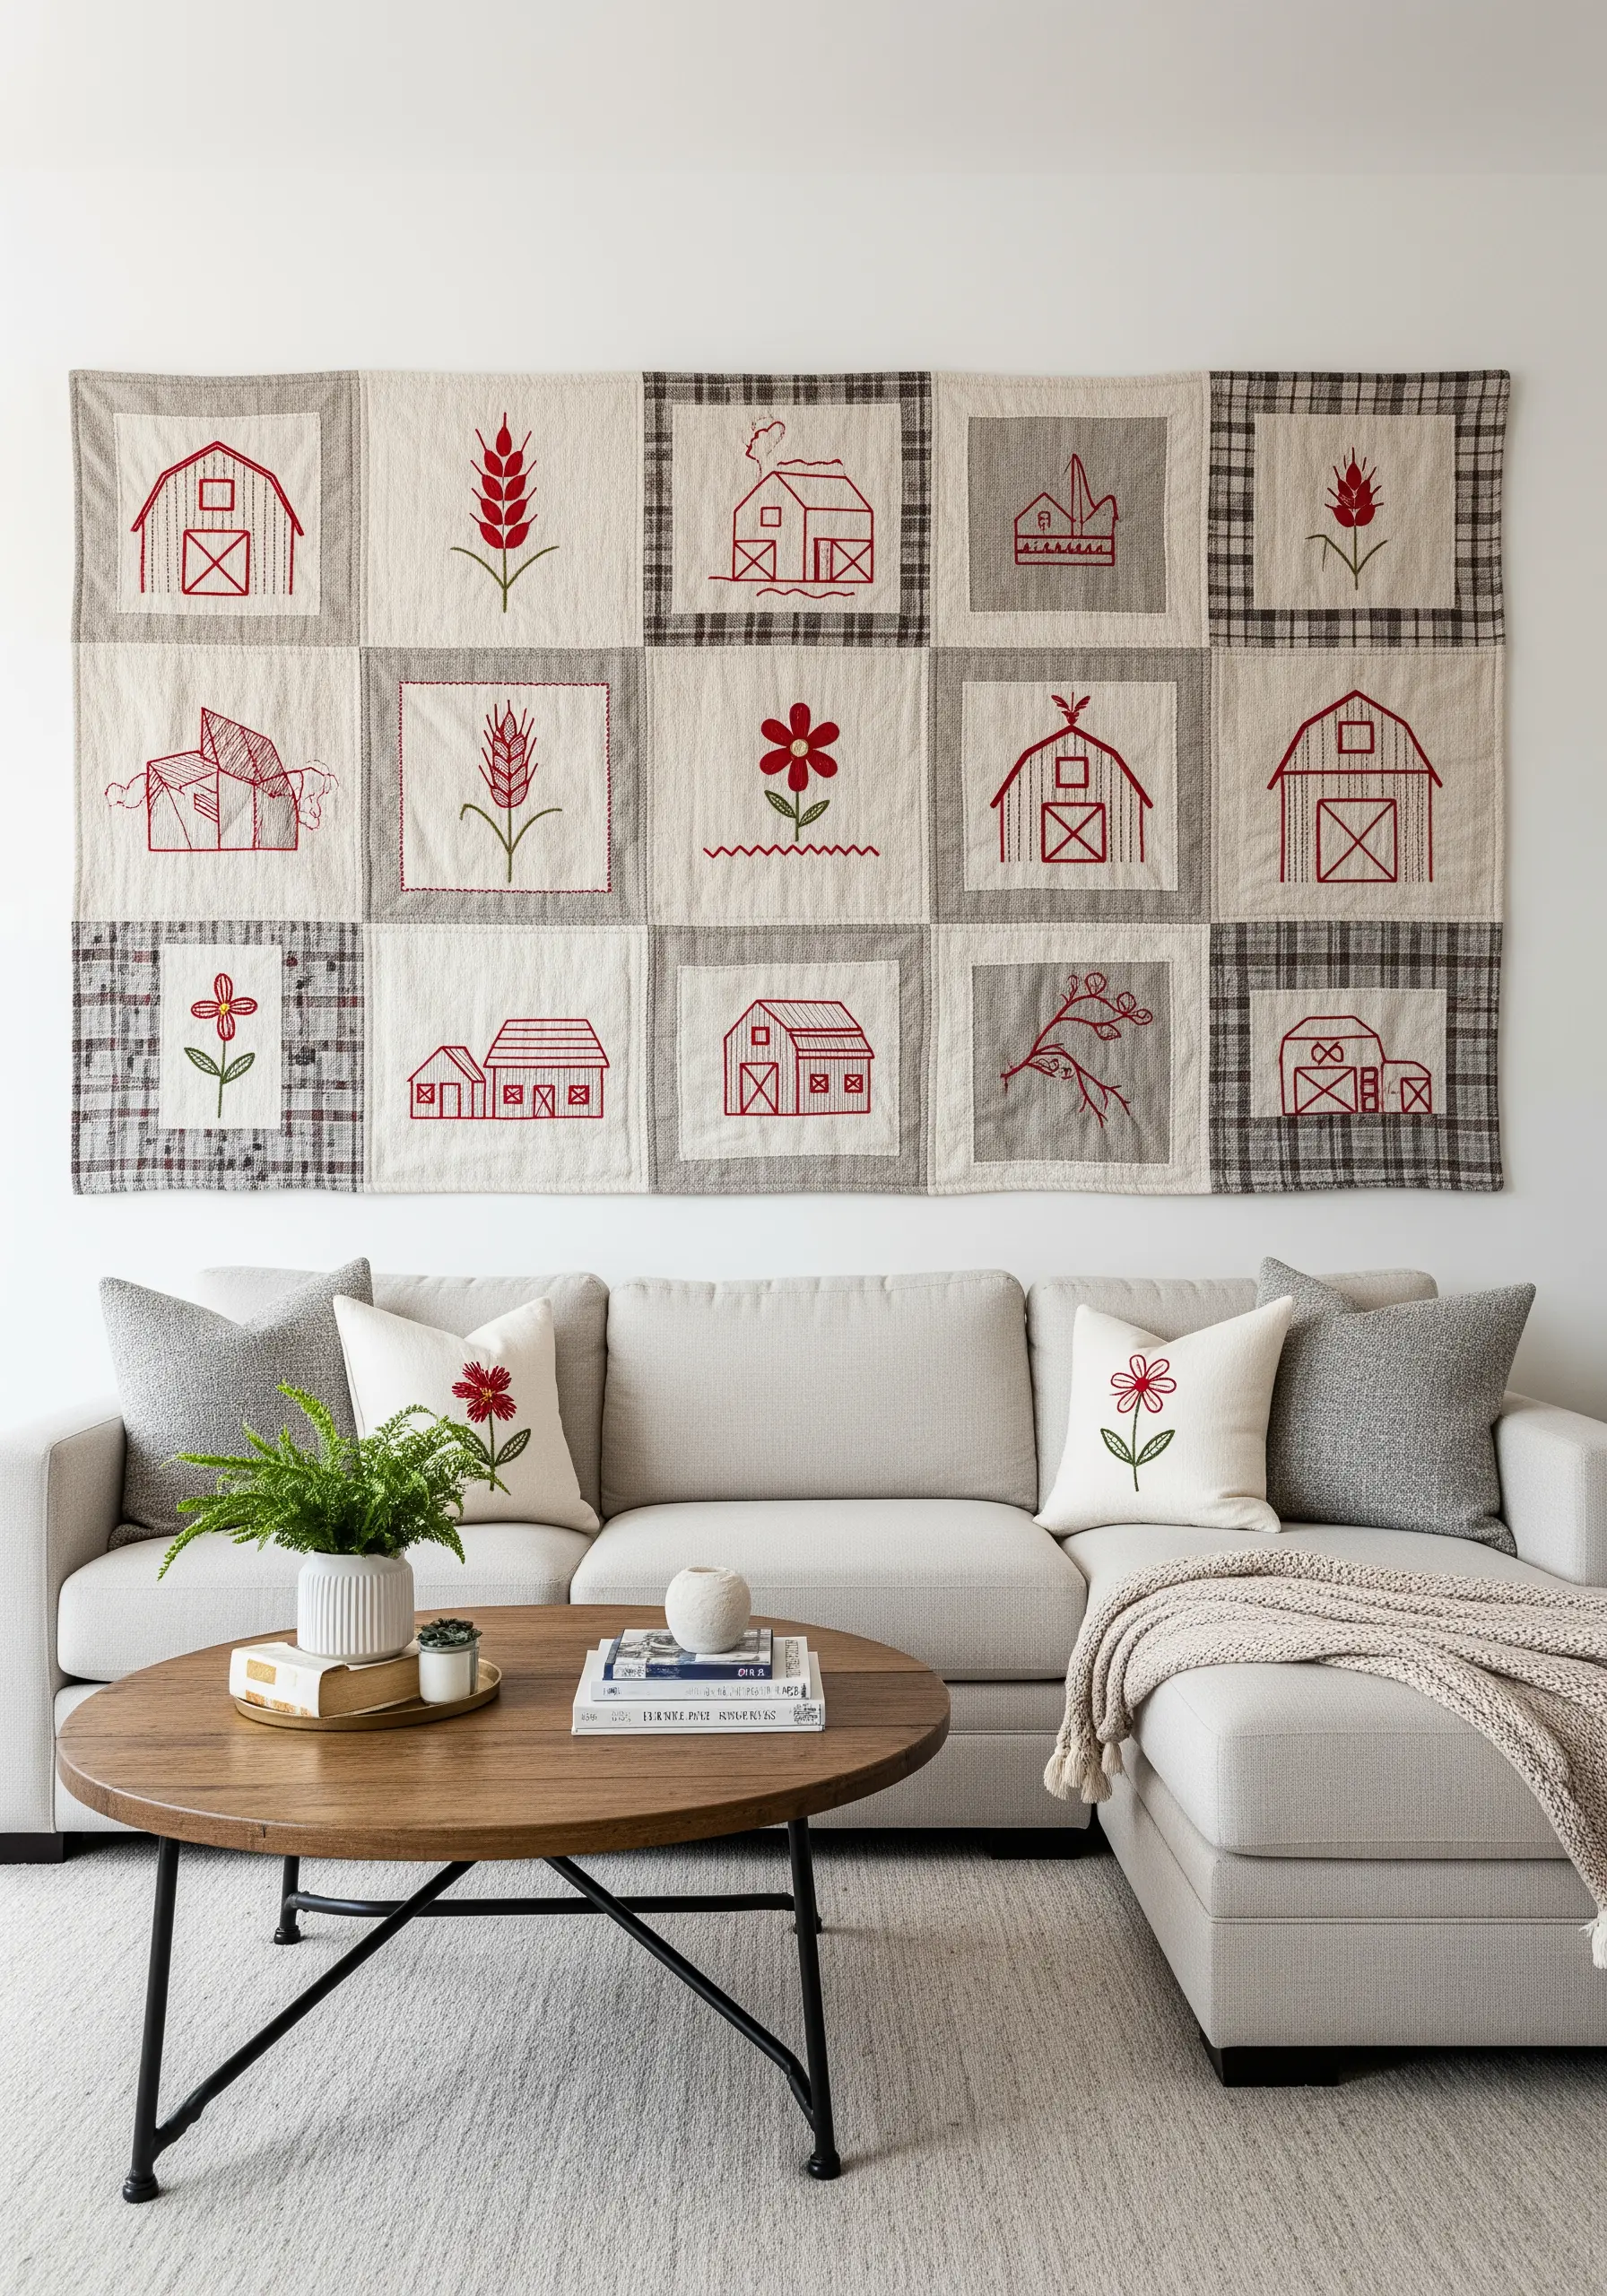
Create the look of a heritage quilt with a modern twist by combining simple redwork embroidery with contemporary plaid and linen fabrics.
Redwork traditionally uses a basic backstitch or stem stitch in red thread to create simple, charming line-art illustrations.
Choose a few repeating motifs, like barns and wheat stalks, and stitch them onto neutral linen squares. Then, assemble your embroidered blocks with coordinating fabric squares to form a quilt-like wall hanging.
This project celebrates the simplicity of line art while adding warmth and handmade charm to your space.
14. Depict Serene Water Scenes with Directional Satin Stitch
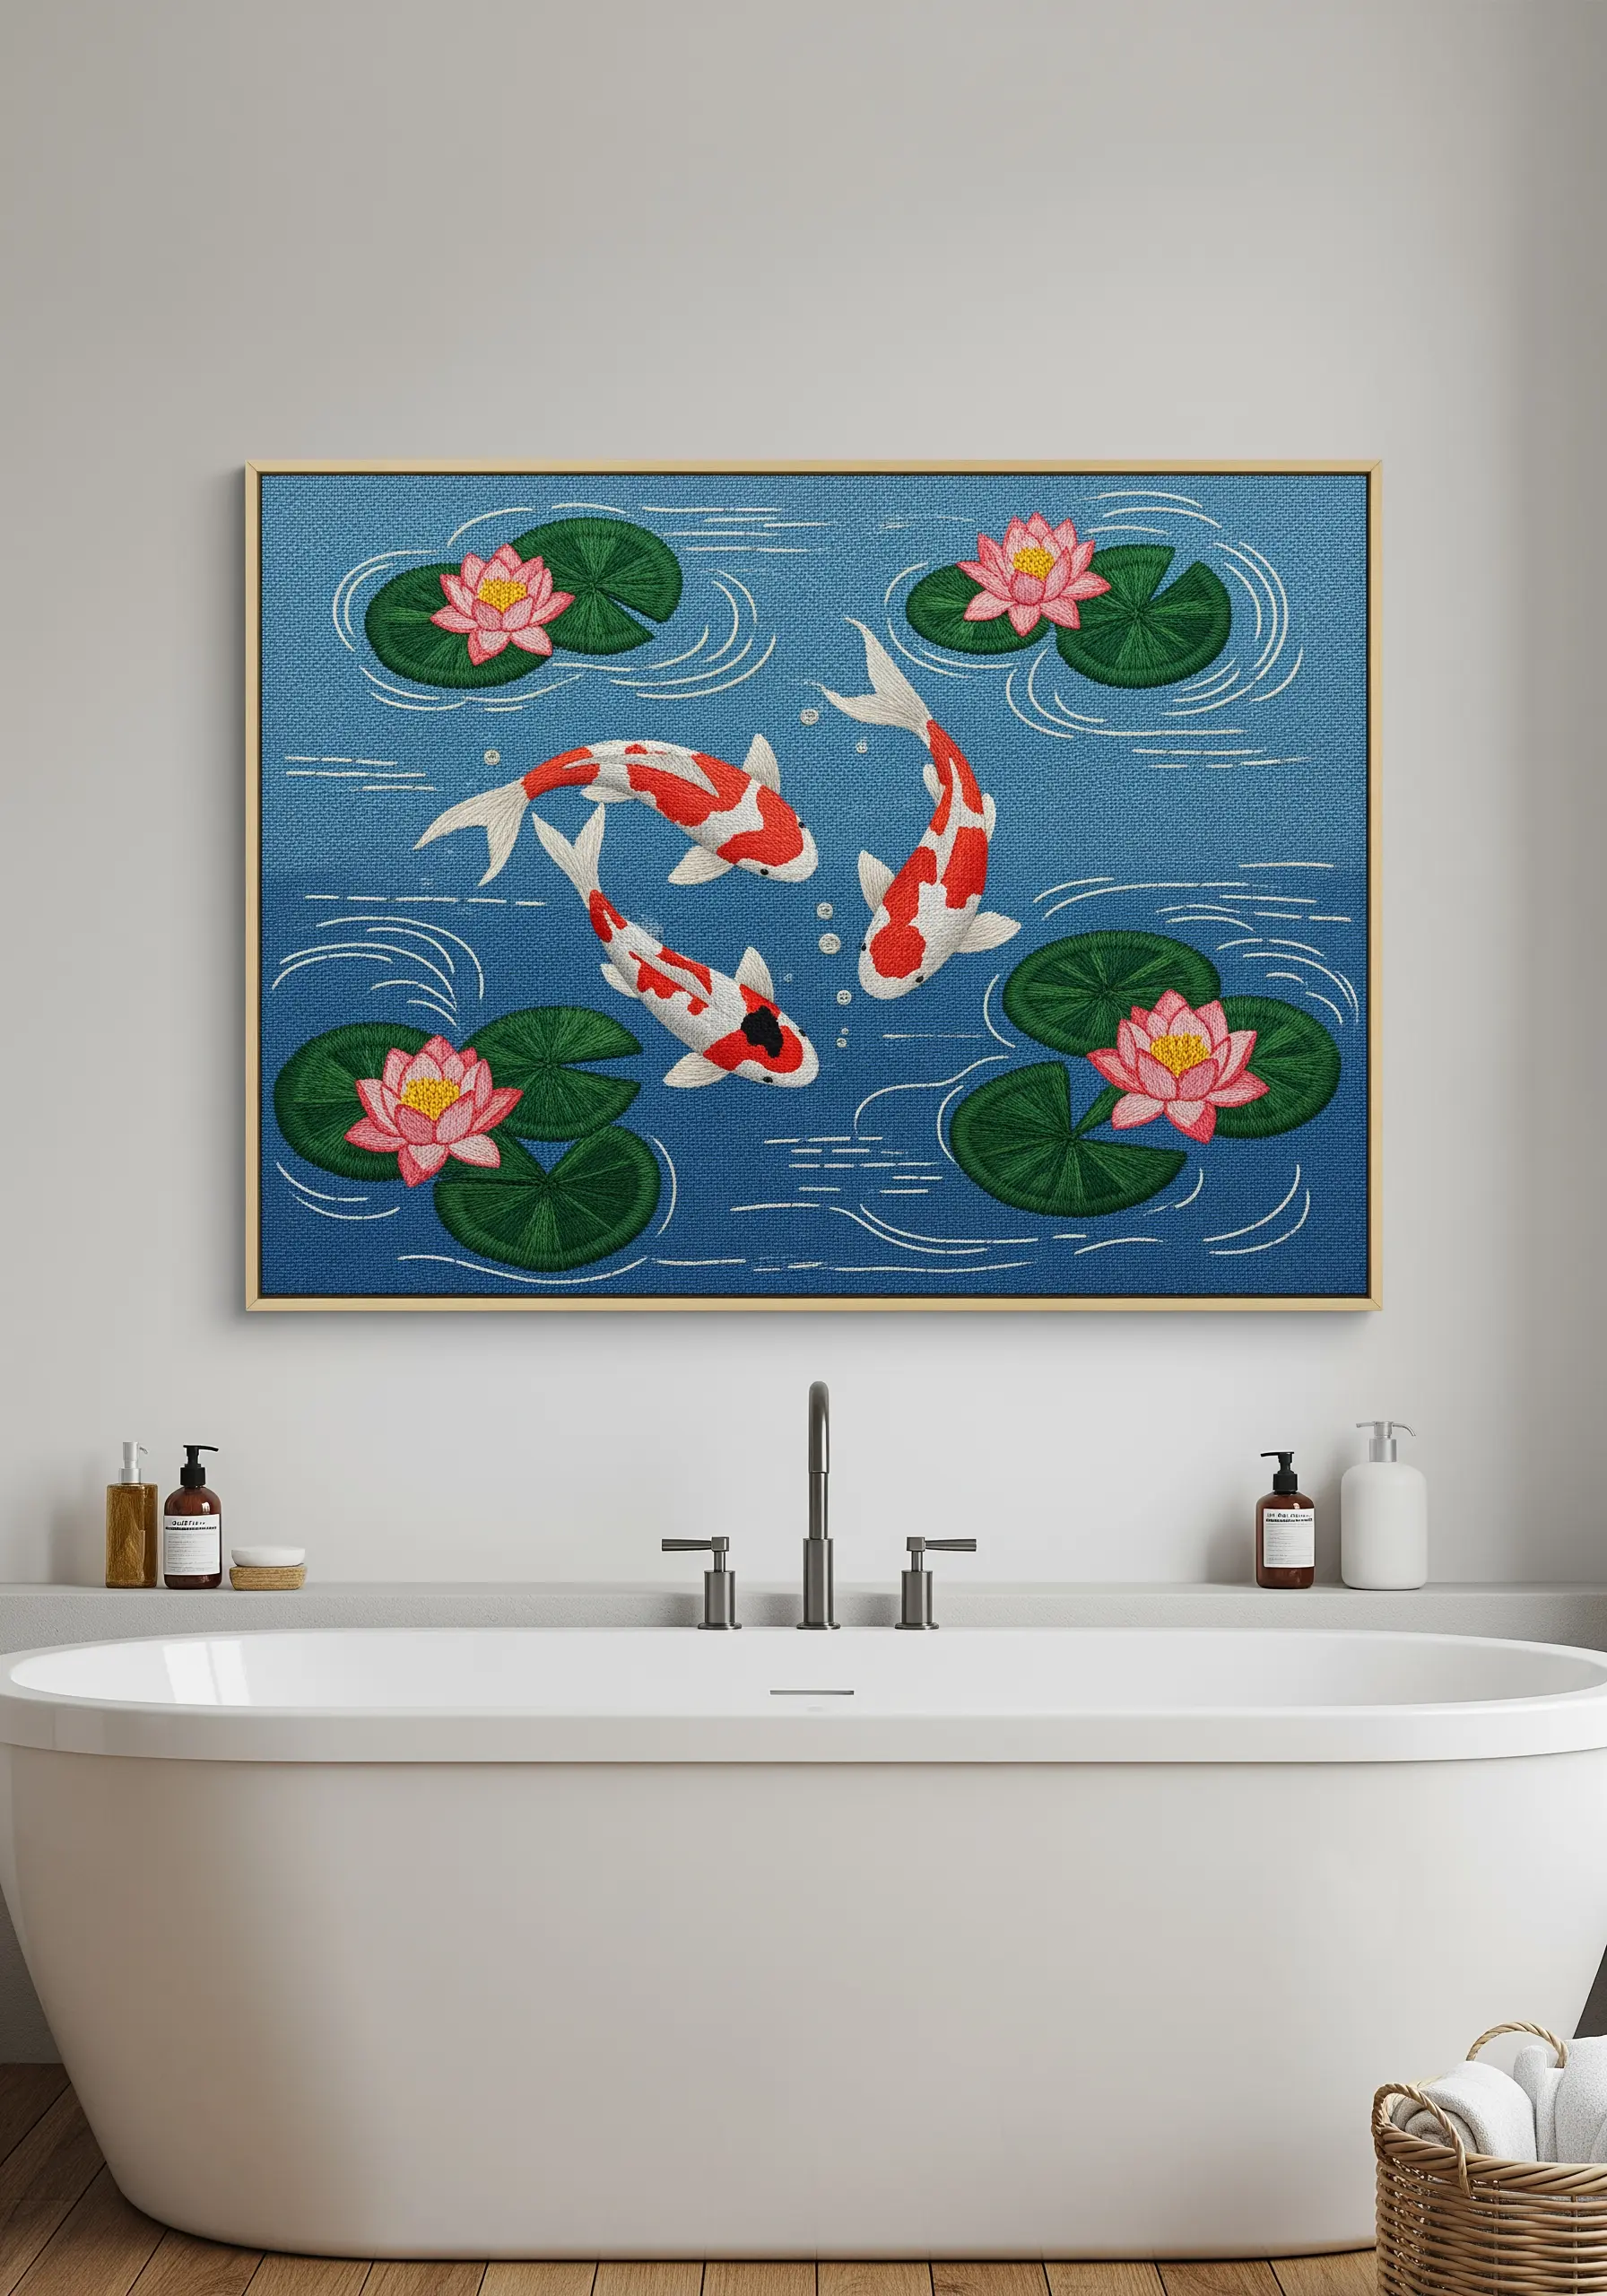
To create the illusion of calm water, use a horizontal satin stitch for the pond’s surface, keeping your stitches long and smooth.
For the ripples, switch to a contrasting white or light blue thread and use a simple backstitch in concentric circles radiating from the fish.
The key to making the koi fish and lily pads appear to float is the dense, raised quality of the satin stitch, which lifts them visually from the flat water background.
This contrast in stitch direction and texture is what brings the tranquil scene to life.
15. Build an Interactive World Map with Felt Appliqué
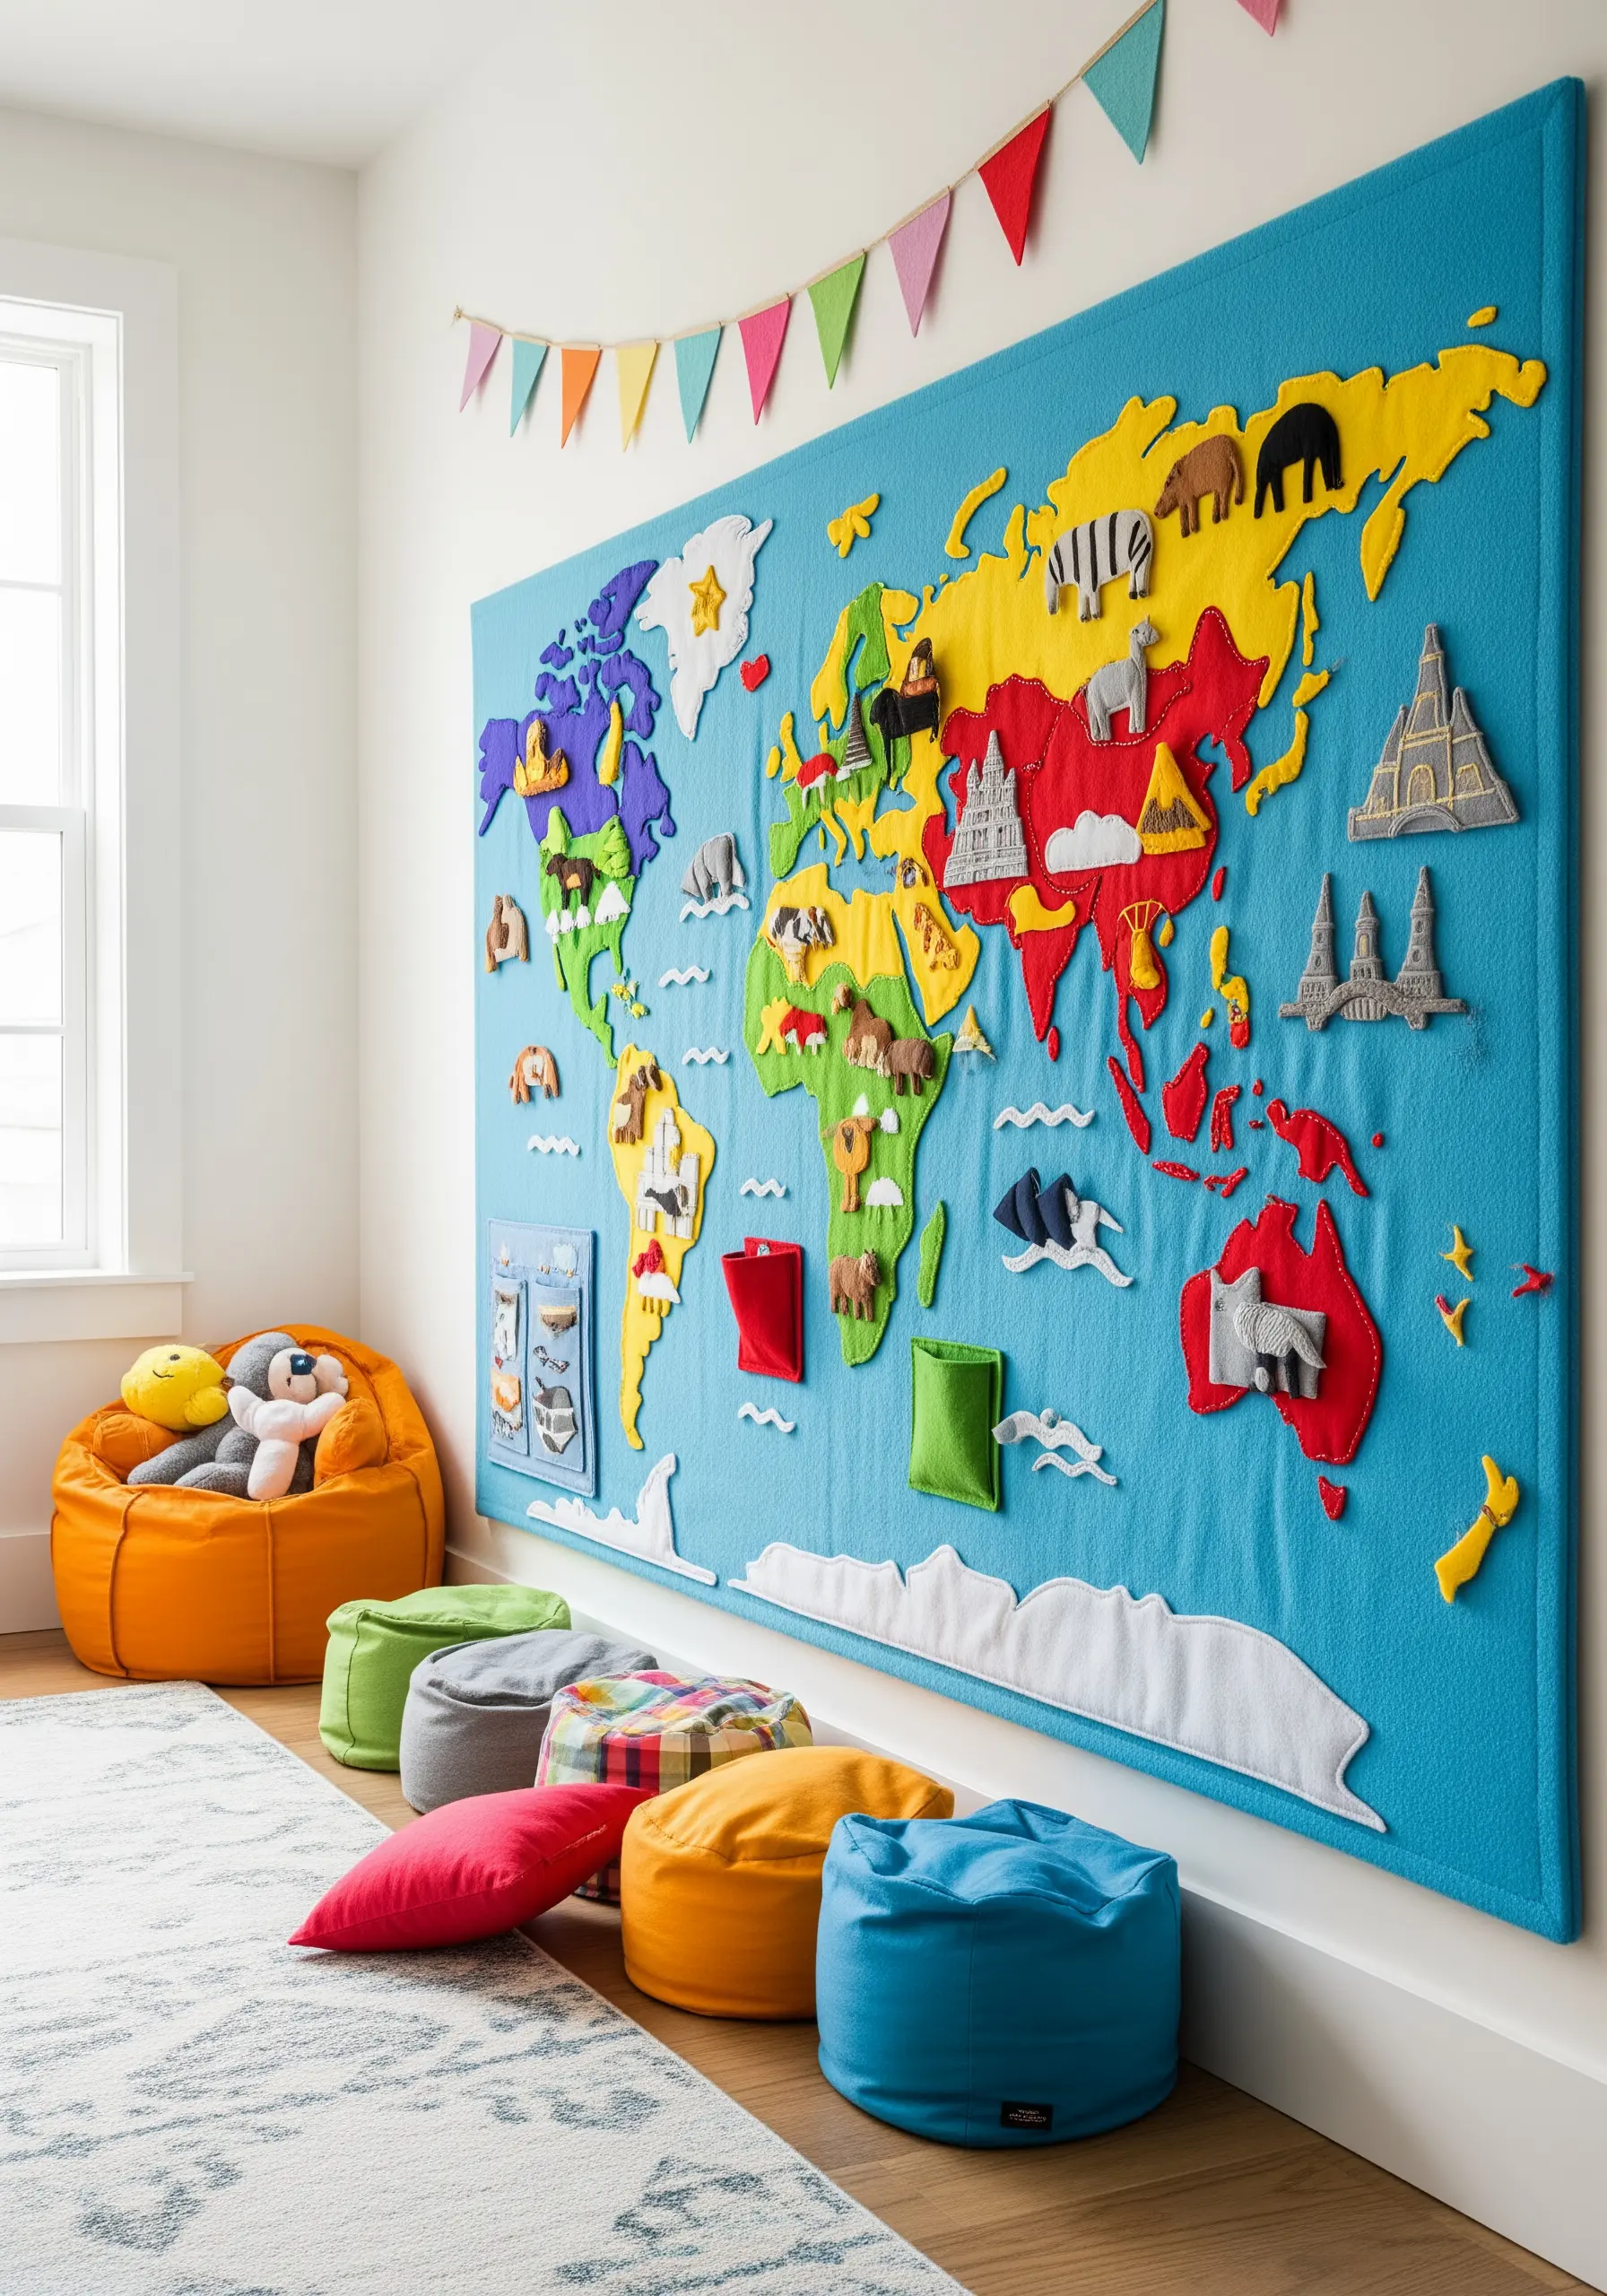
Create a playful and educational wall panel by using felt appliqué for a large-scale world map.
Cut the continents from brightly colored felt and attach them to a blue fabric background with a simple running stitch or whip stitch around the edges.
Make small, stuffed felt animals and landmarks that can be attached with Velcro or small snaps, turning the map into an interactive learning tool.
This tactile project is perfect for a child’s room, adding a huge dose of color and fun while being completely soft and safe.
16. Achieve a Subtle Damask Effect with Tone-on-Tone Stitching
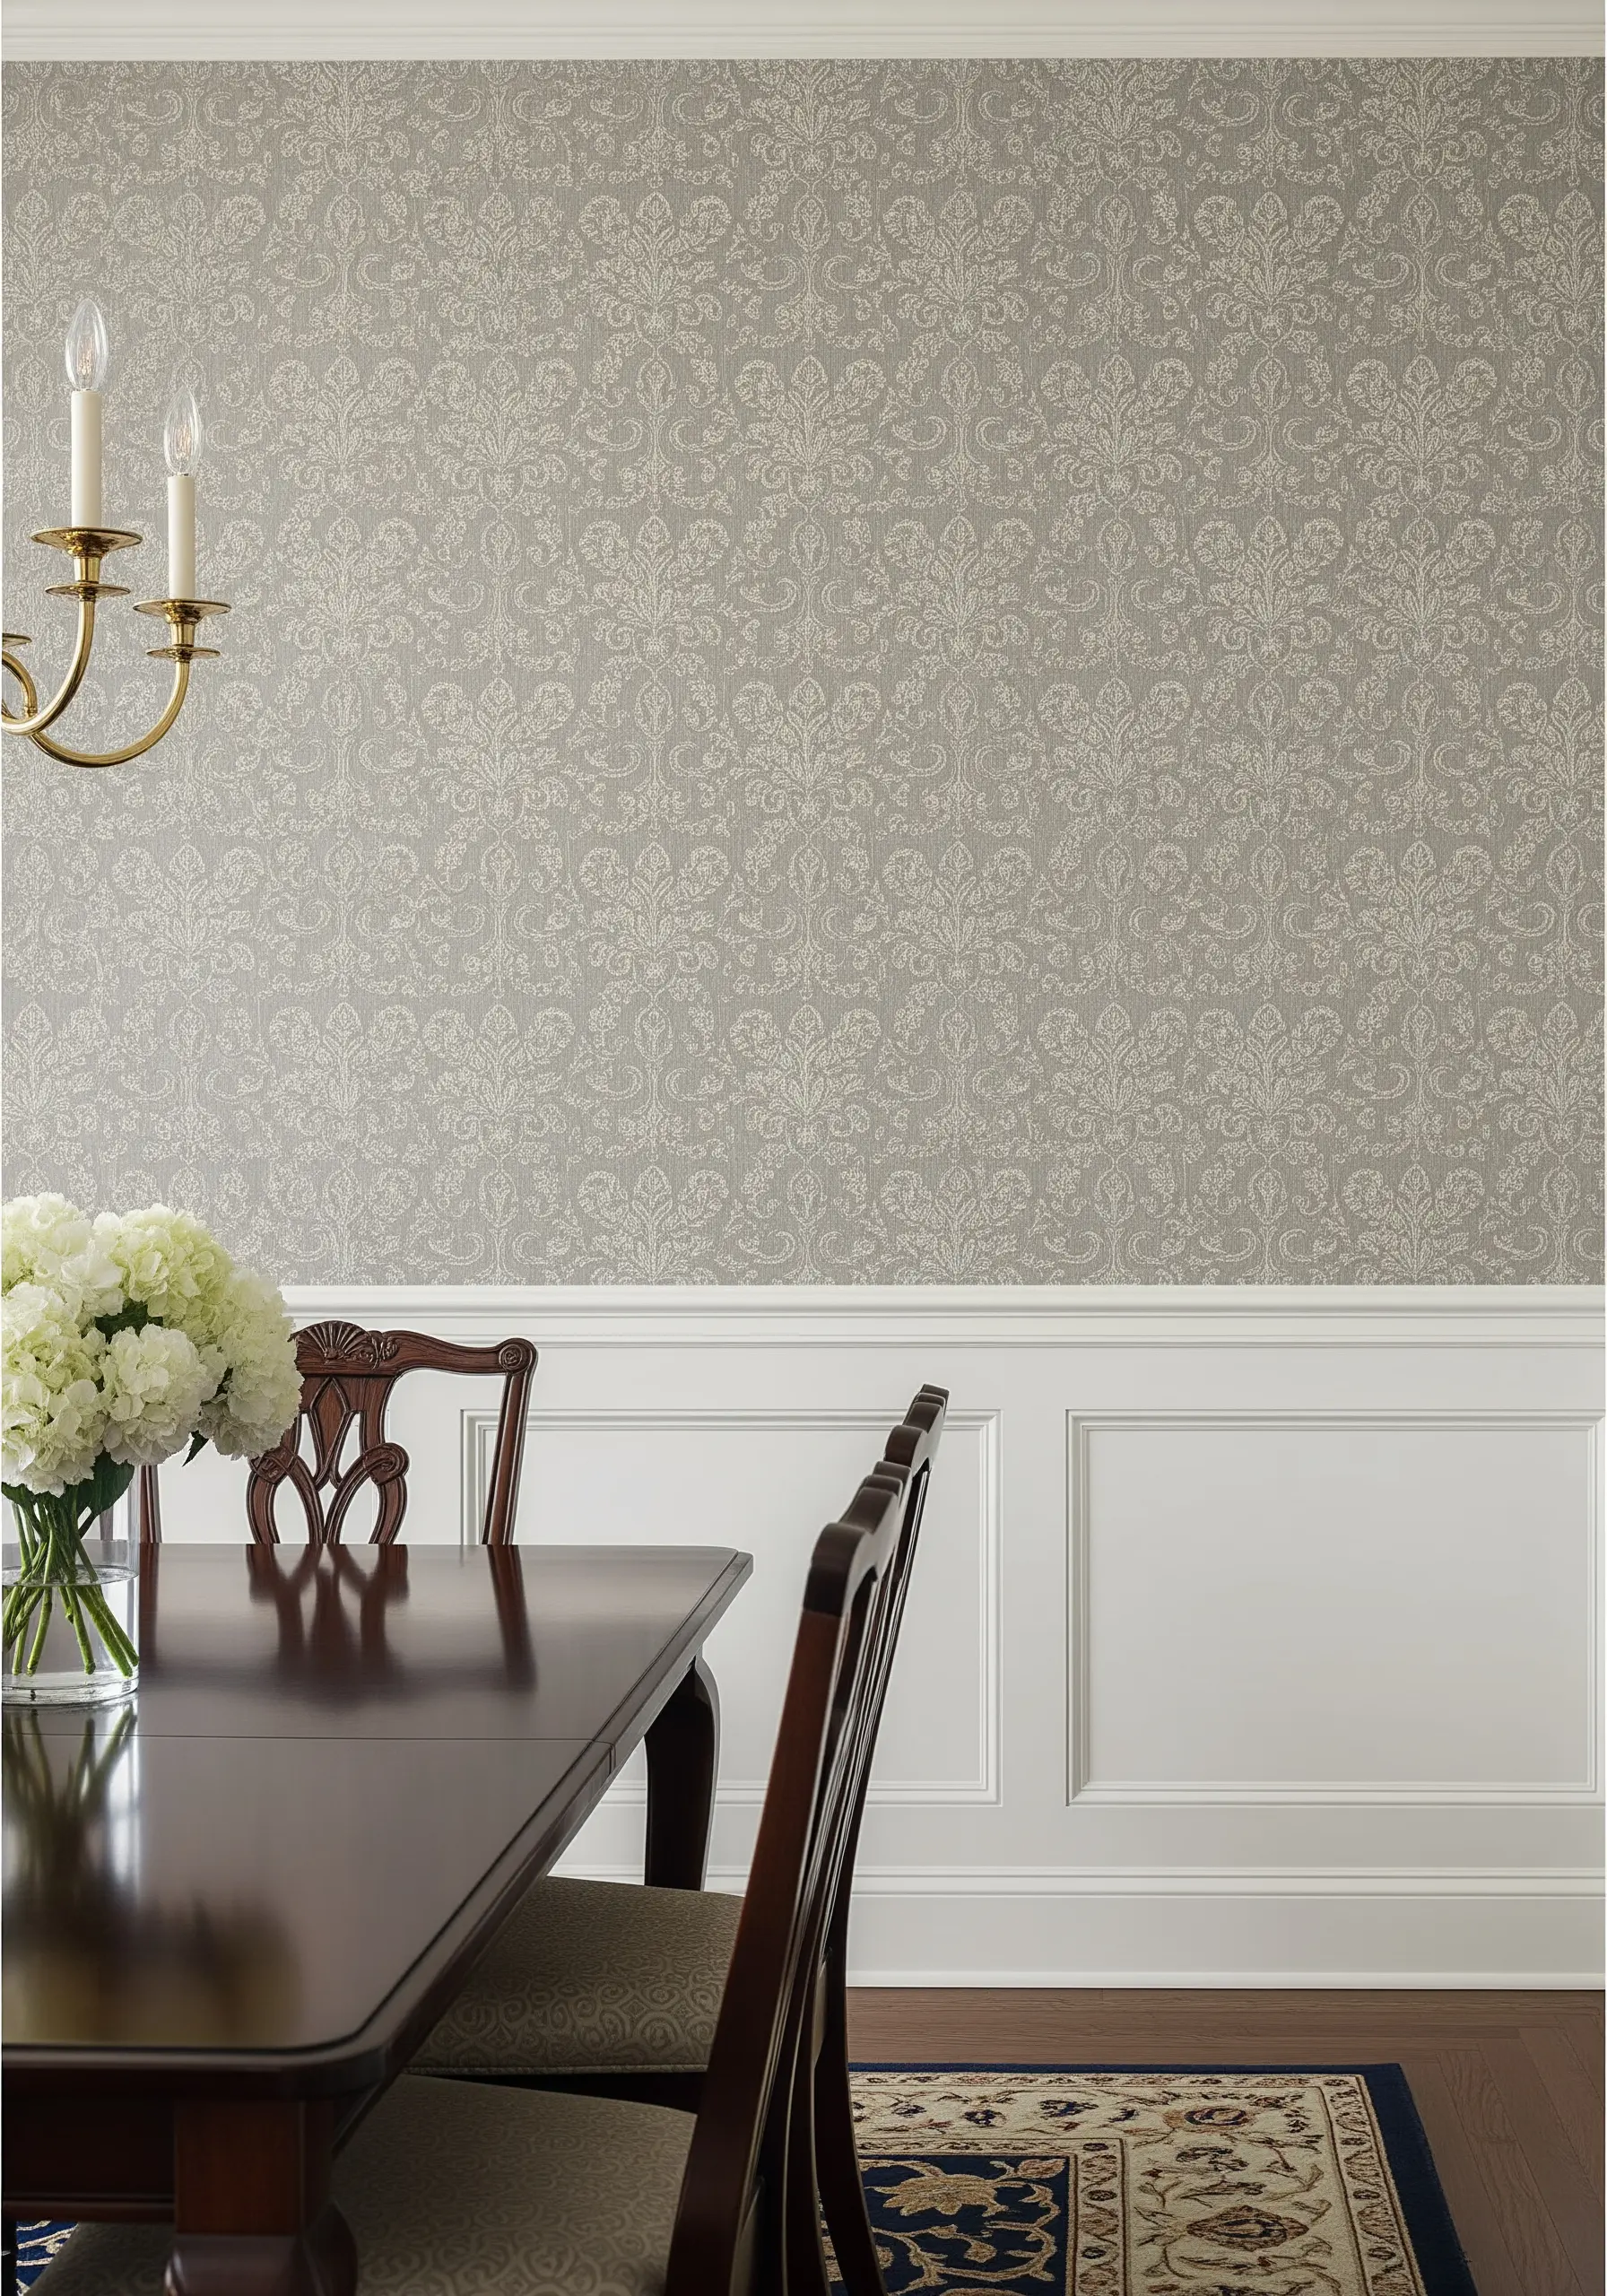
For an incredibly elegant and understated wall covering, embroider a classic damask pattern using thread that is only one or two shades lighter than your fabric.
This tone-on-tone technique creates a beautiful, textural effect where the pattern emerges and recedes depending on how the light hits it.
Use a simple satin stitch or even a machine embroidery design for consistency across a large area.
The result is a wall with the luxurious depth of traditional wallpaper but with the unparalleled softness and subtlety of thread.
17. Make a Statement with Abstract Deconstructed Stitching
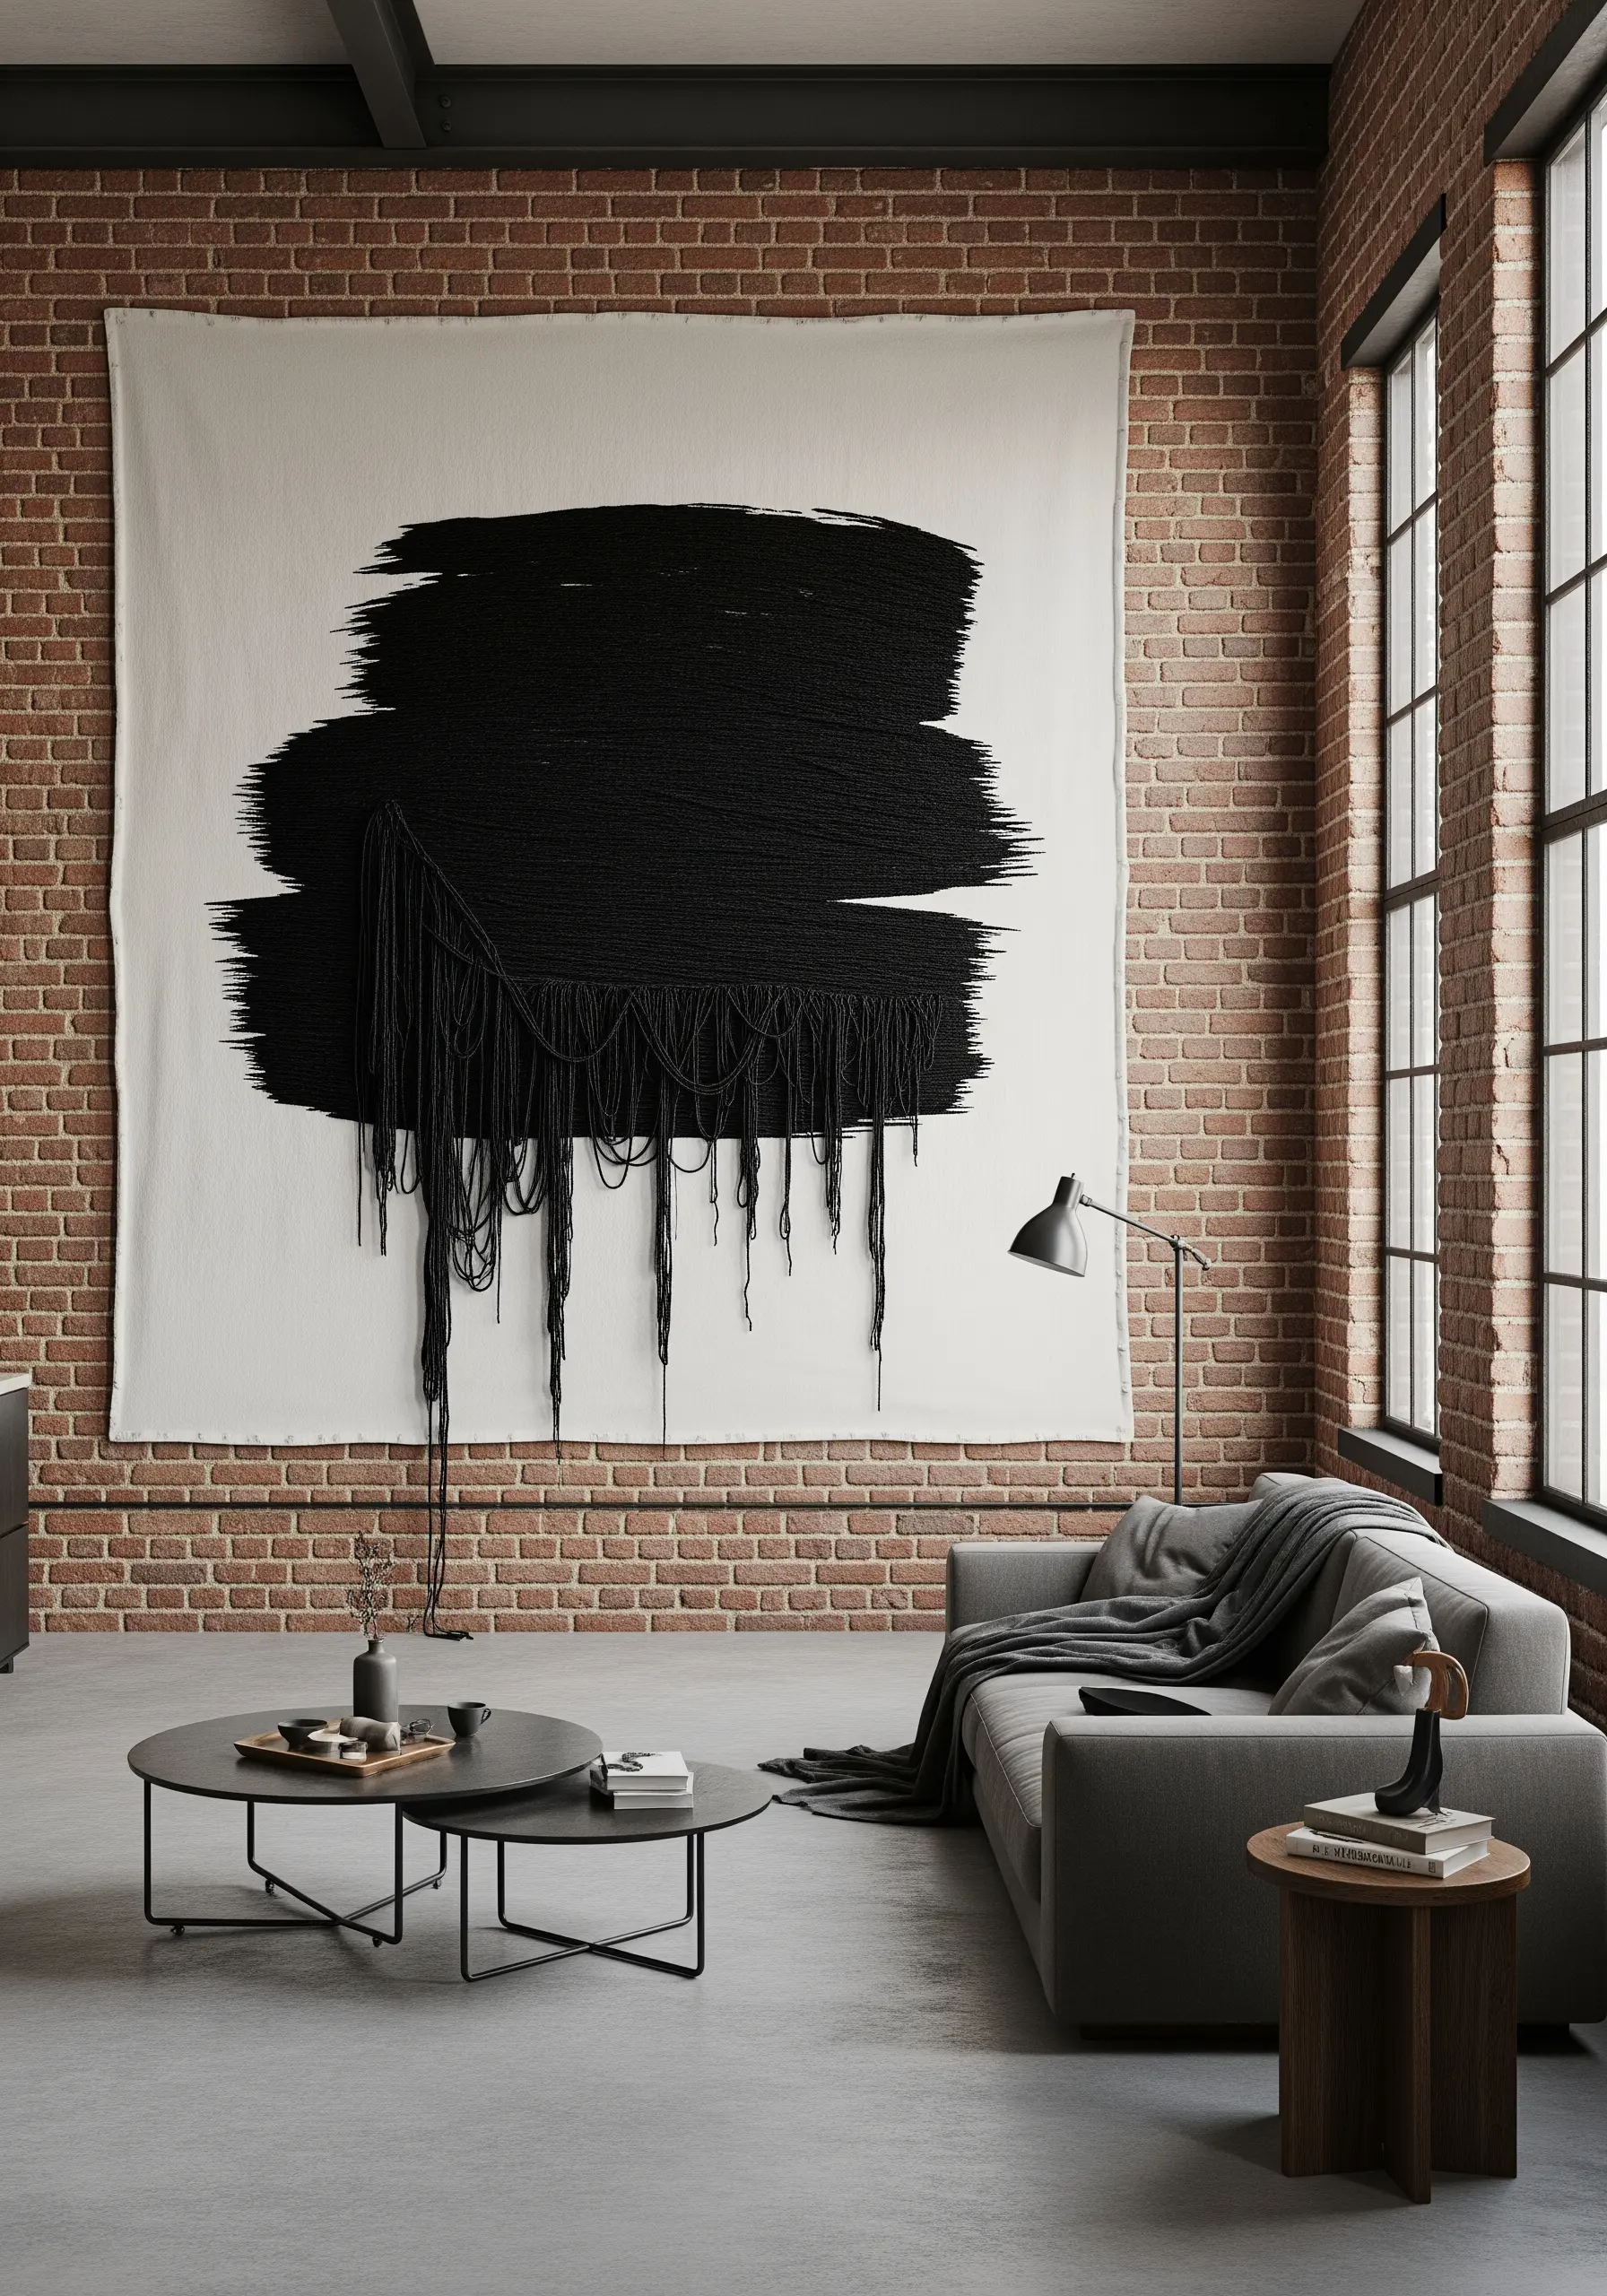
Challenge traditional embroidery by embracing deconstruction and raw texture for a powerful abstract piece.
Create a dense block of black stitching using thick yarn and long, chaotic straight stitches, allowing them to overlap and build up layers.
Then, intentionally let long strands of yarn hang loose, dripping down from the main shape. This adds a sculptural, dynamic element to the work.
This expressive approach works best on a large scale, where the contrast between the controlled shape and the untamed threads can make a bold statement.
18. Stitch a Vibrant Desert Sunset with Color Blocking
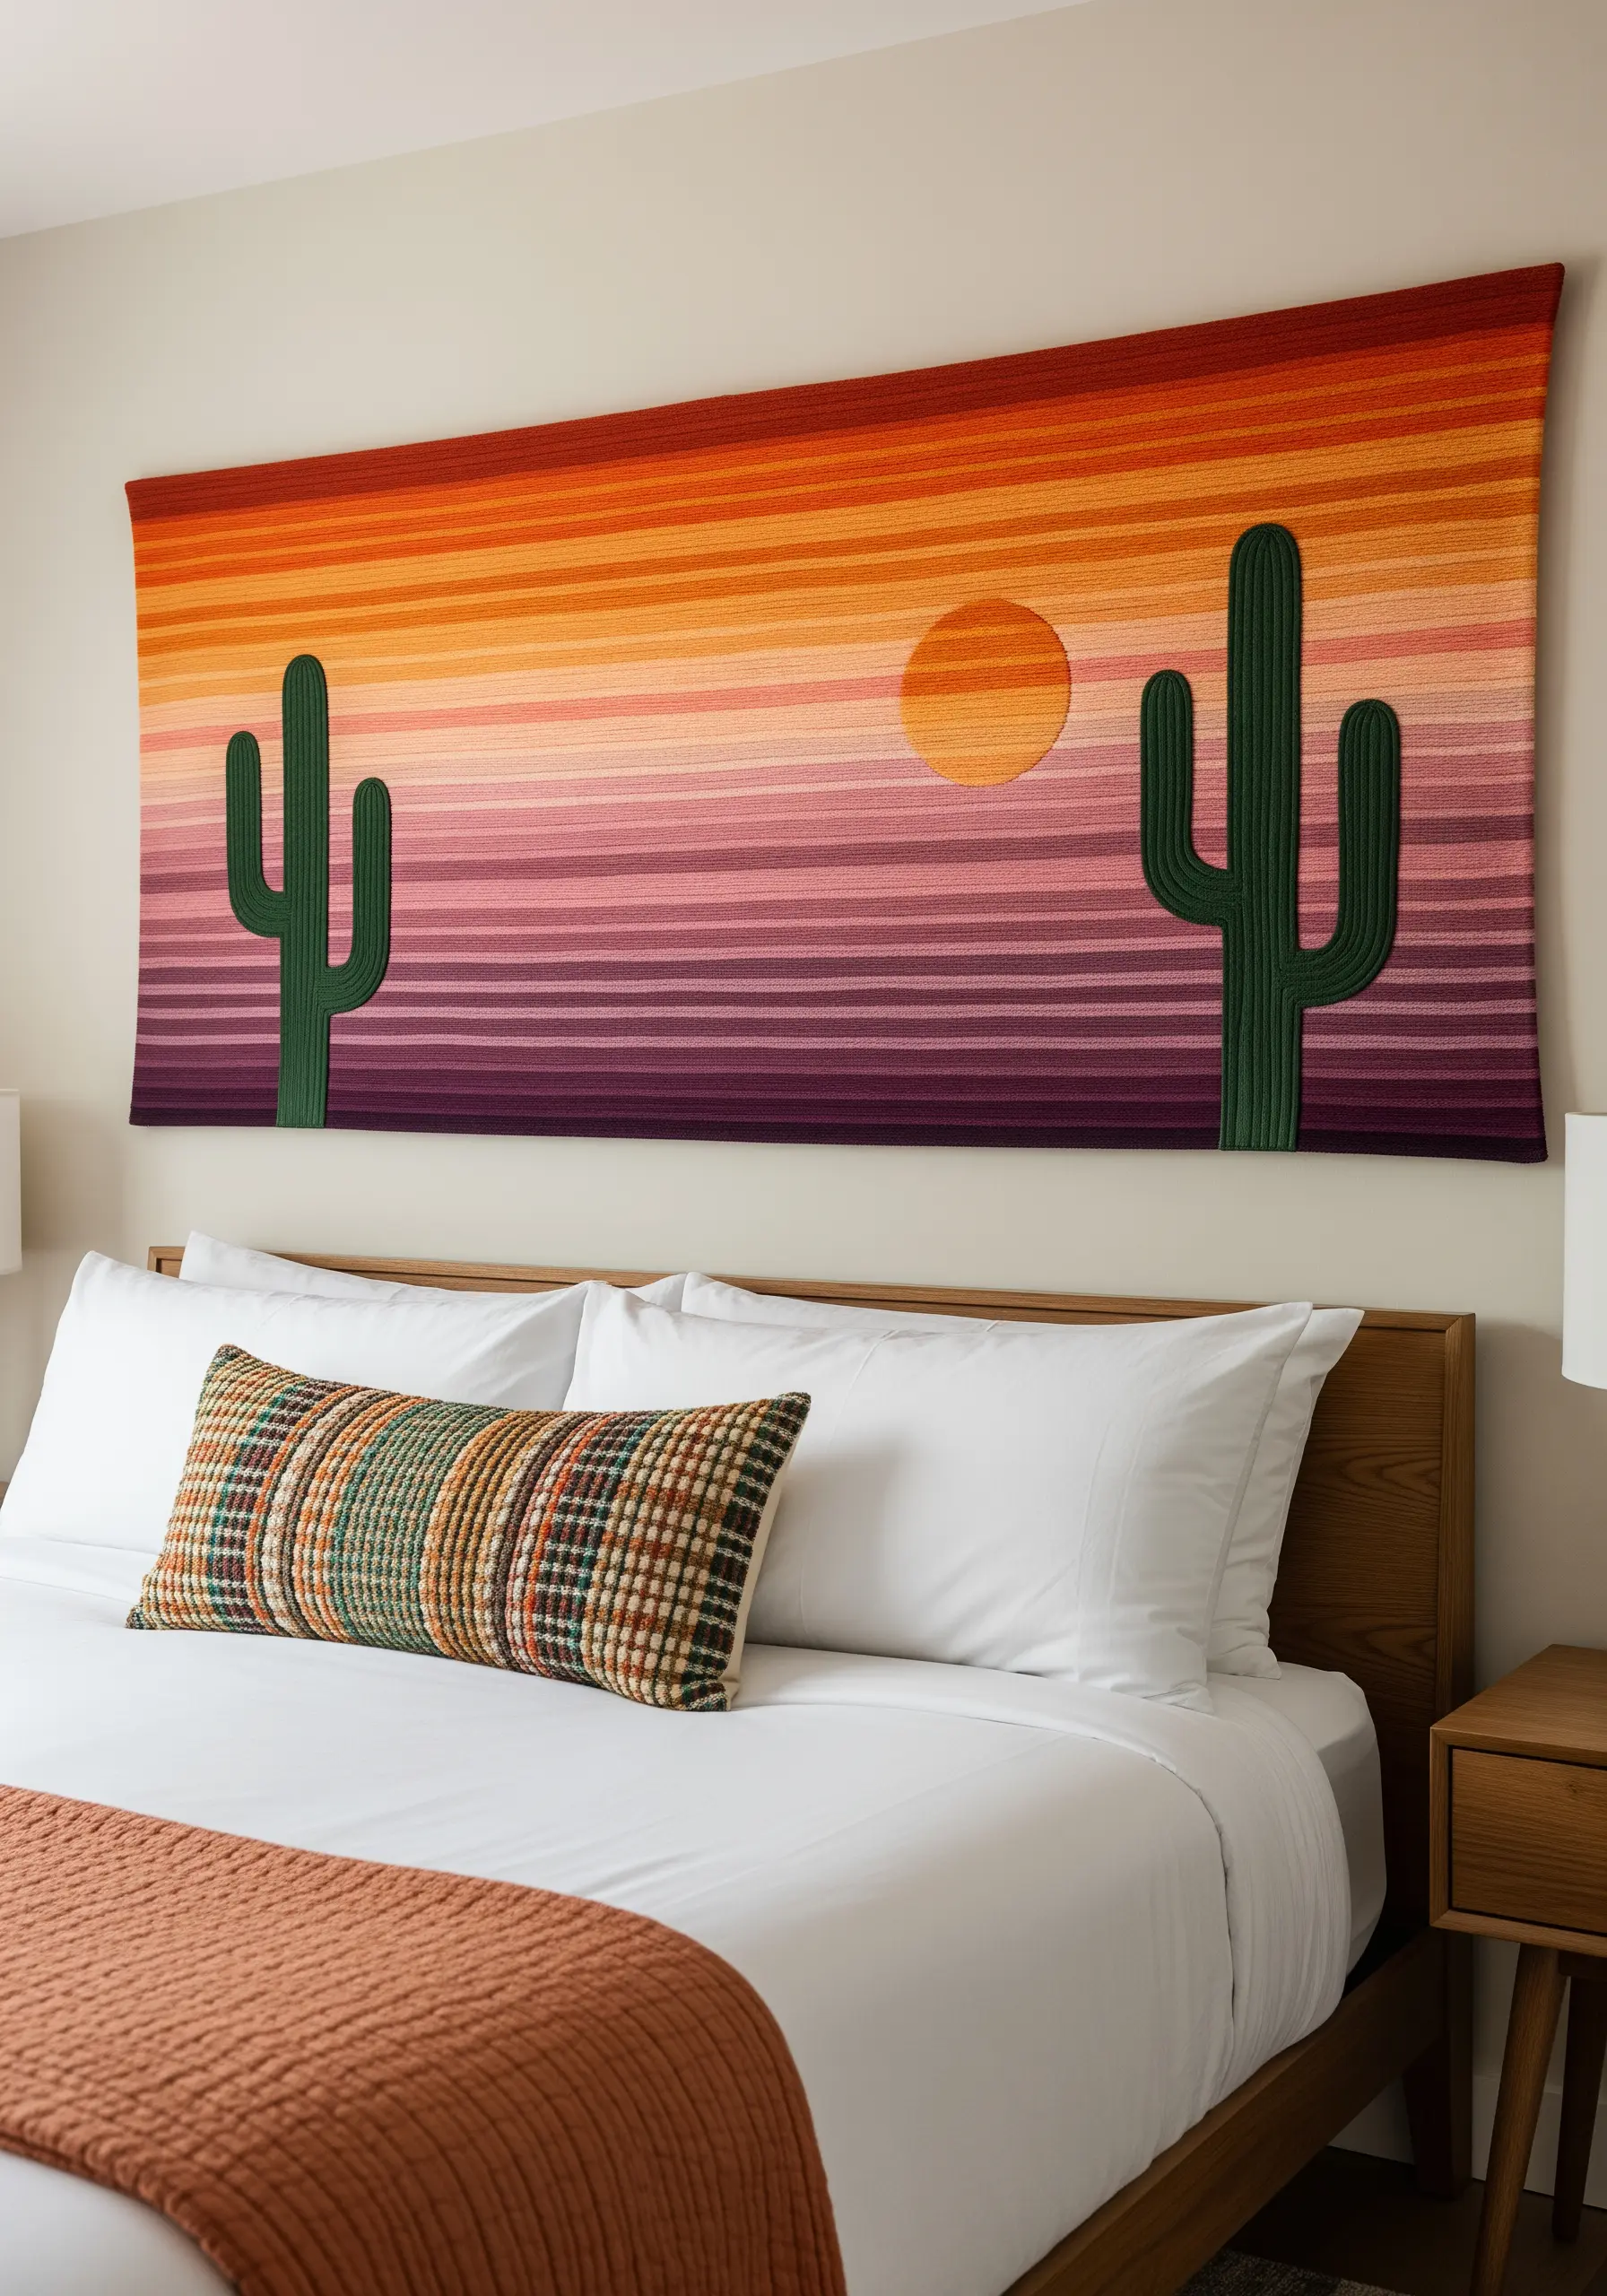
Create a stunning sunset gradient by dividing your fabric into horizontal color-blocked stripes.
Fill each stripe with dense, long straight stitches using a single color of yarn or multiple strands of floss. Ensure all your stitches run in the same direction for a clean, unified look.
The cacti silhouettes are then stitched on top using a vertical satin stitch, creating a subtle contrast in texture and direction that makes them stand out against the background.
This method simplifies a complex gradient into manageable, impactful blocks of color.
19. Craft an Elegant Vine with Raised Knotted Stitches
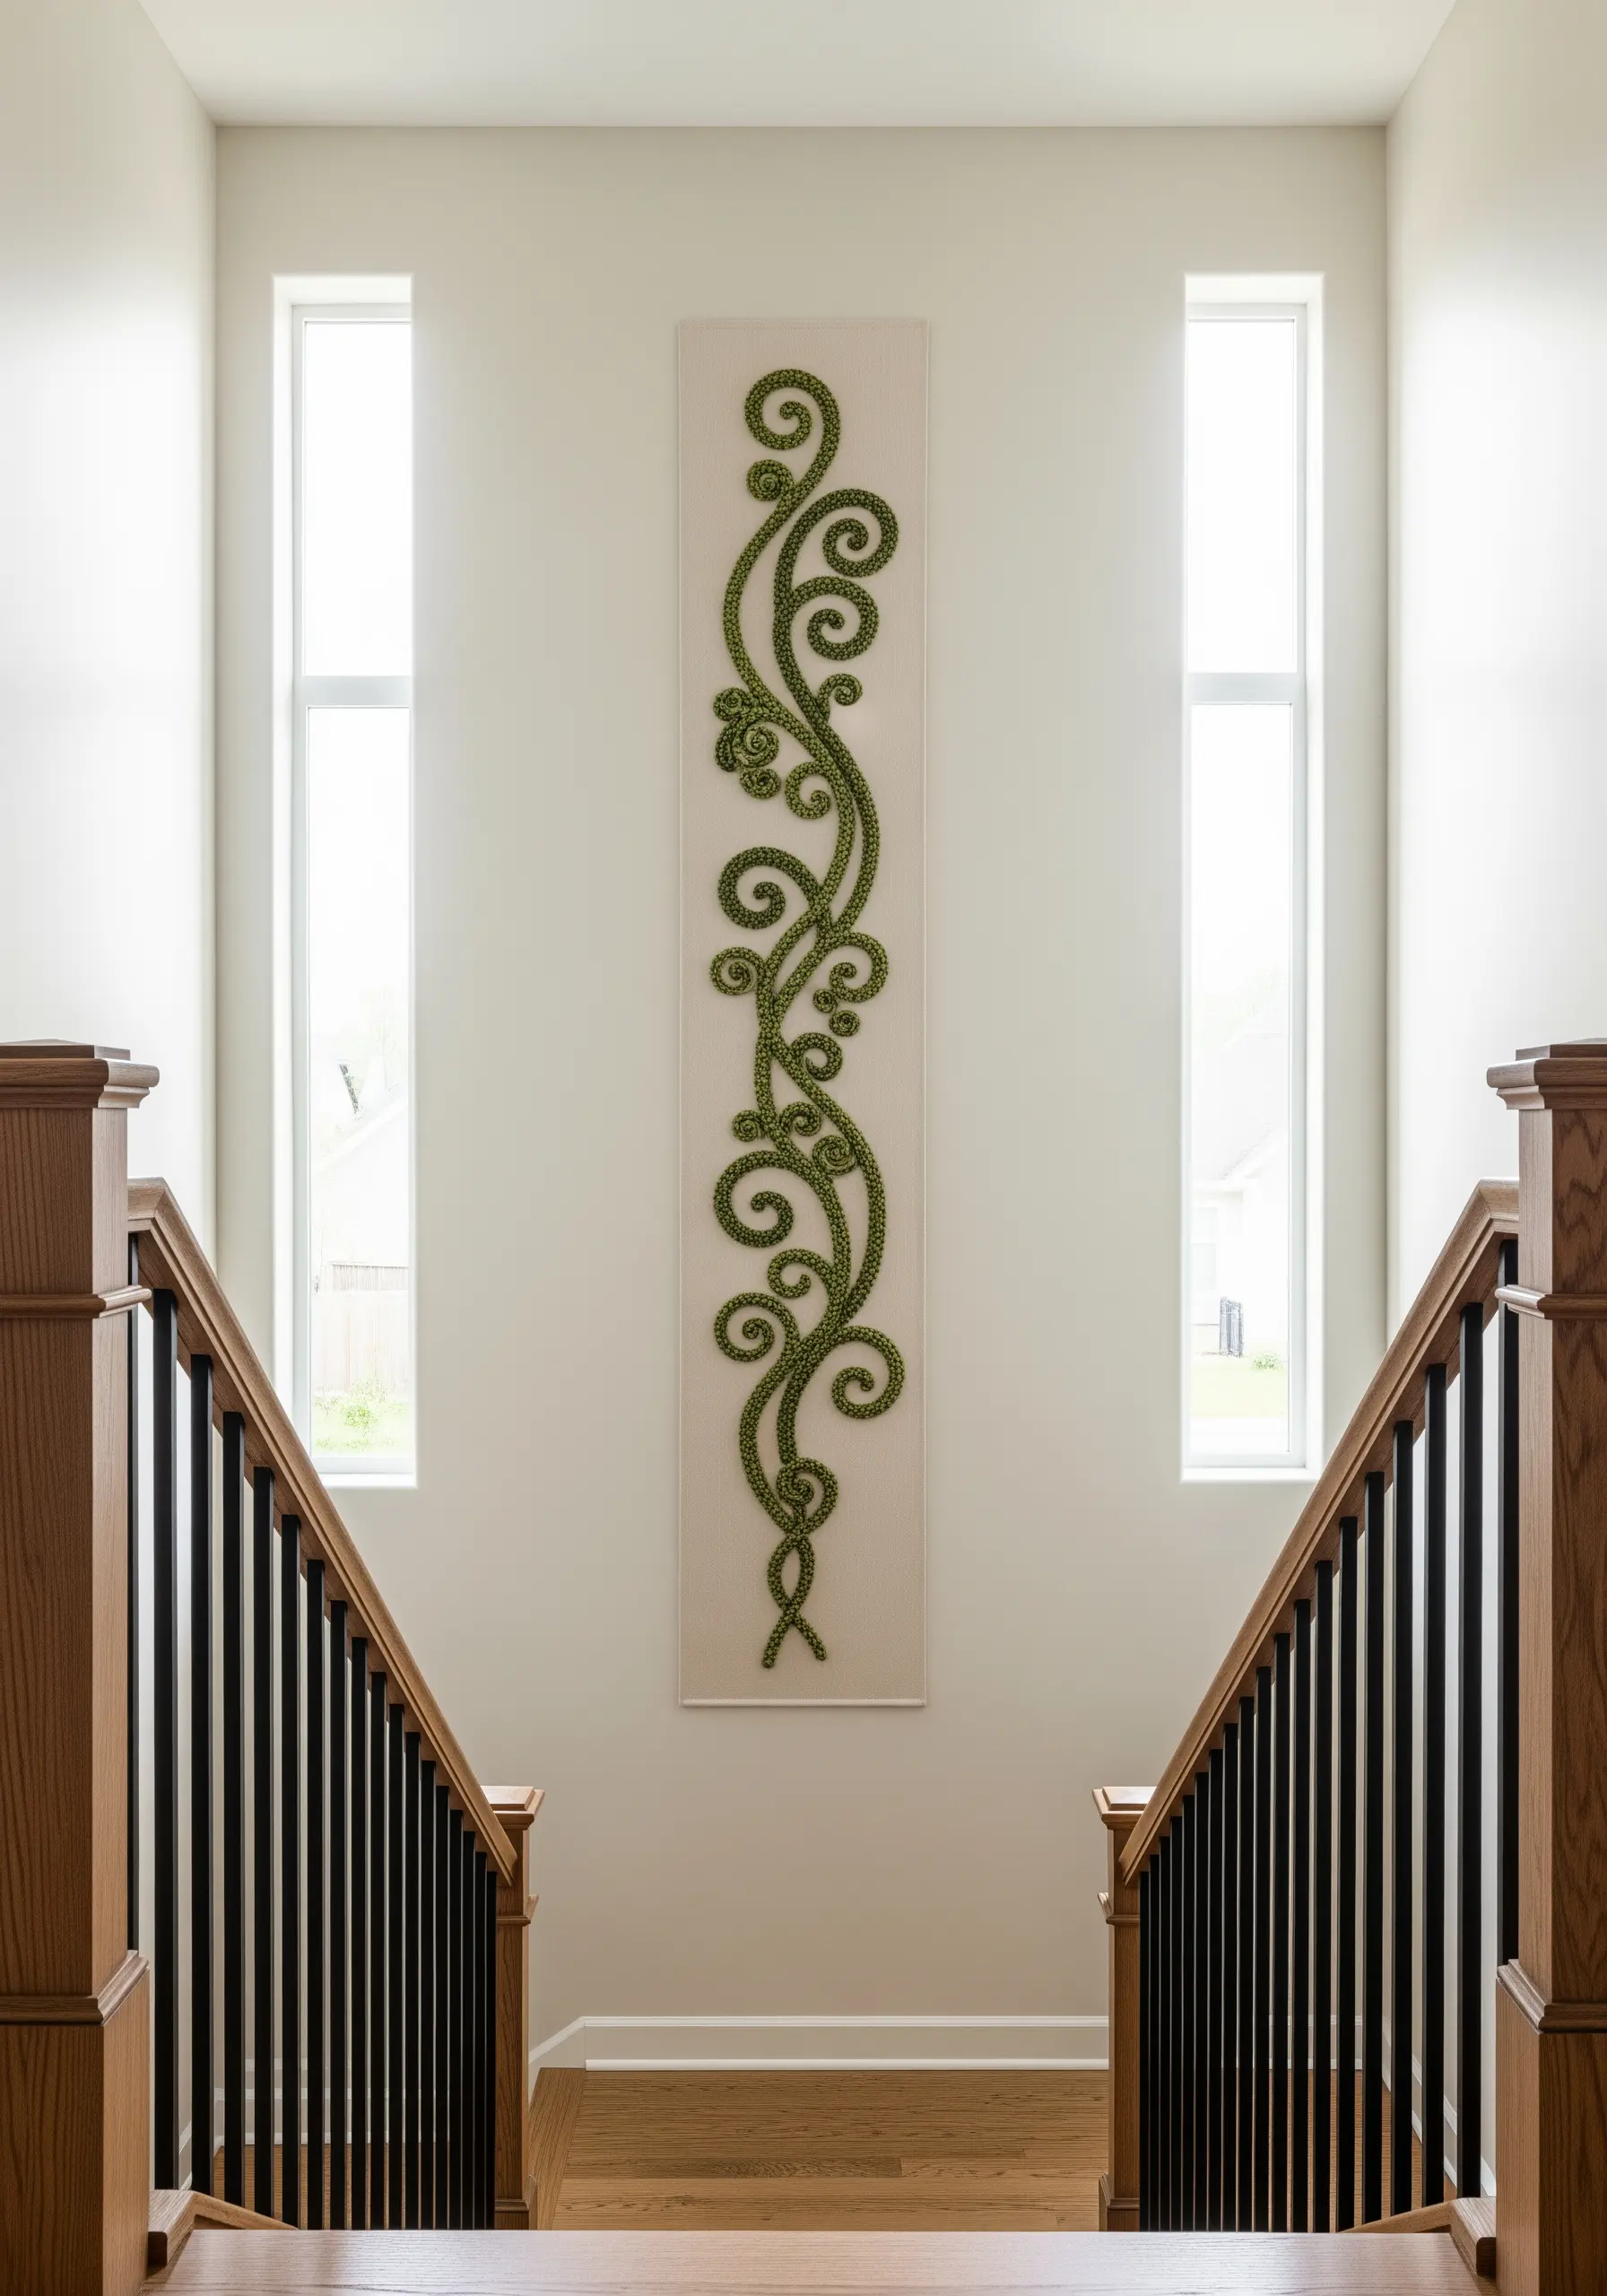
For a highly textural, three-dimensional vine, use a combination of knotted stitches like the Palestrina knot or a knotted chain stitch.
These stitches create a raised, rope-like line that is far more sculptural than a simple stem stitch.
Work with a thicker thread, like pearl cotton or fine yarn, to emphasize the knotted texture and create a piece with significant visual weight.
Placing a single, elegant motif in the center of a long, narrow panel draws the eye upward, making it a perfect solution for tall, empty wall spaces like a stairwell.
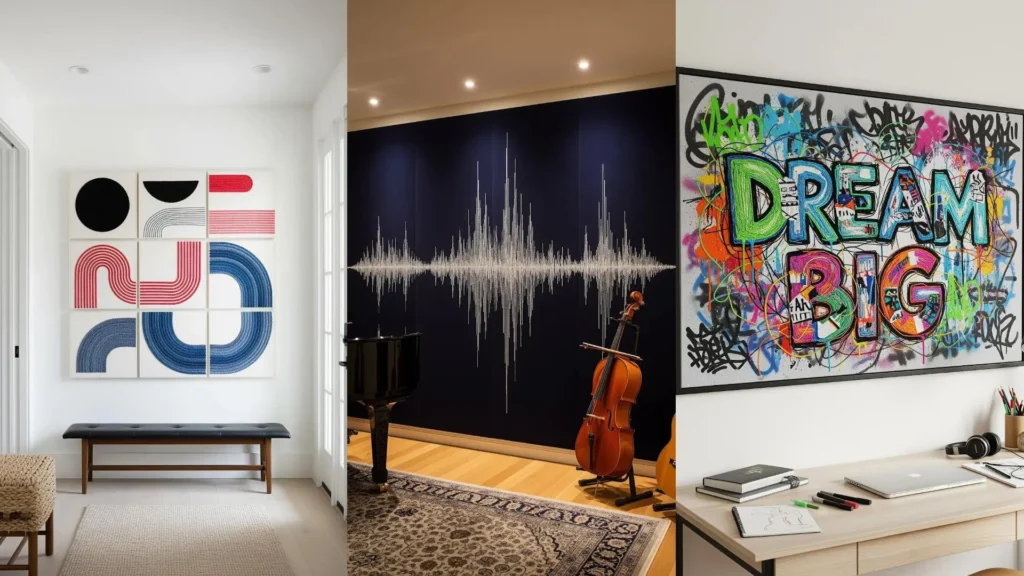
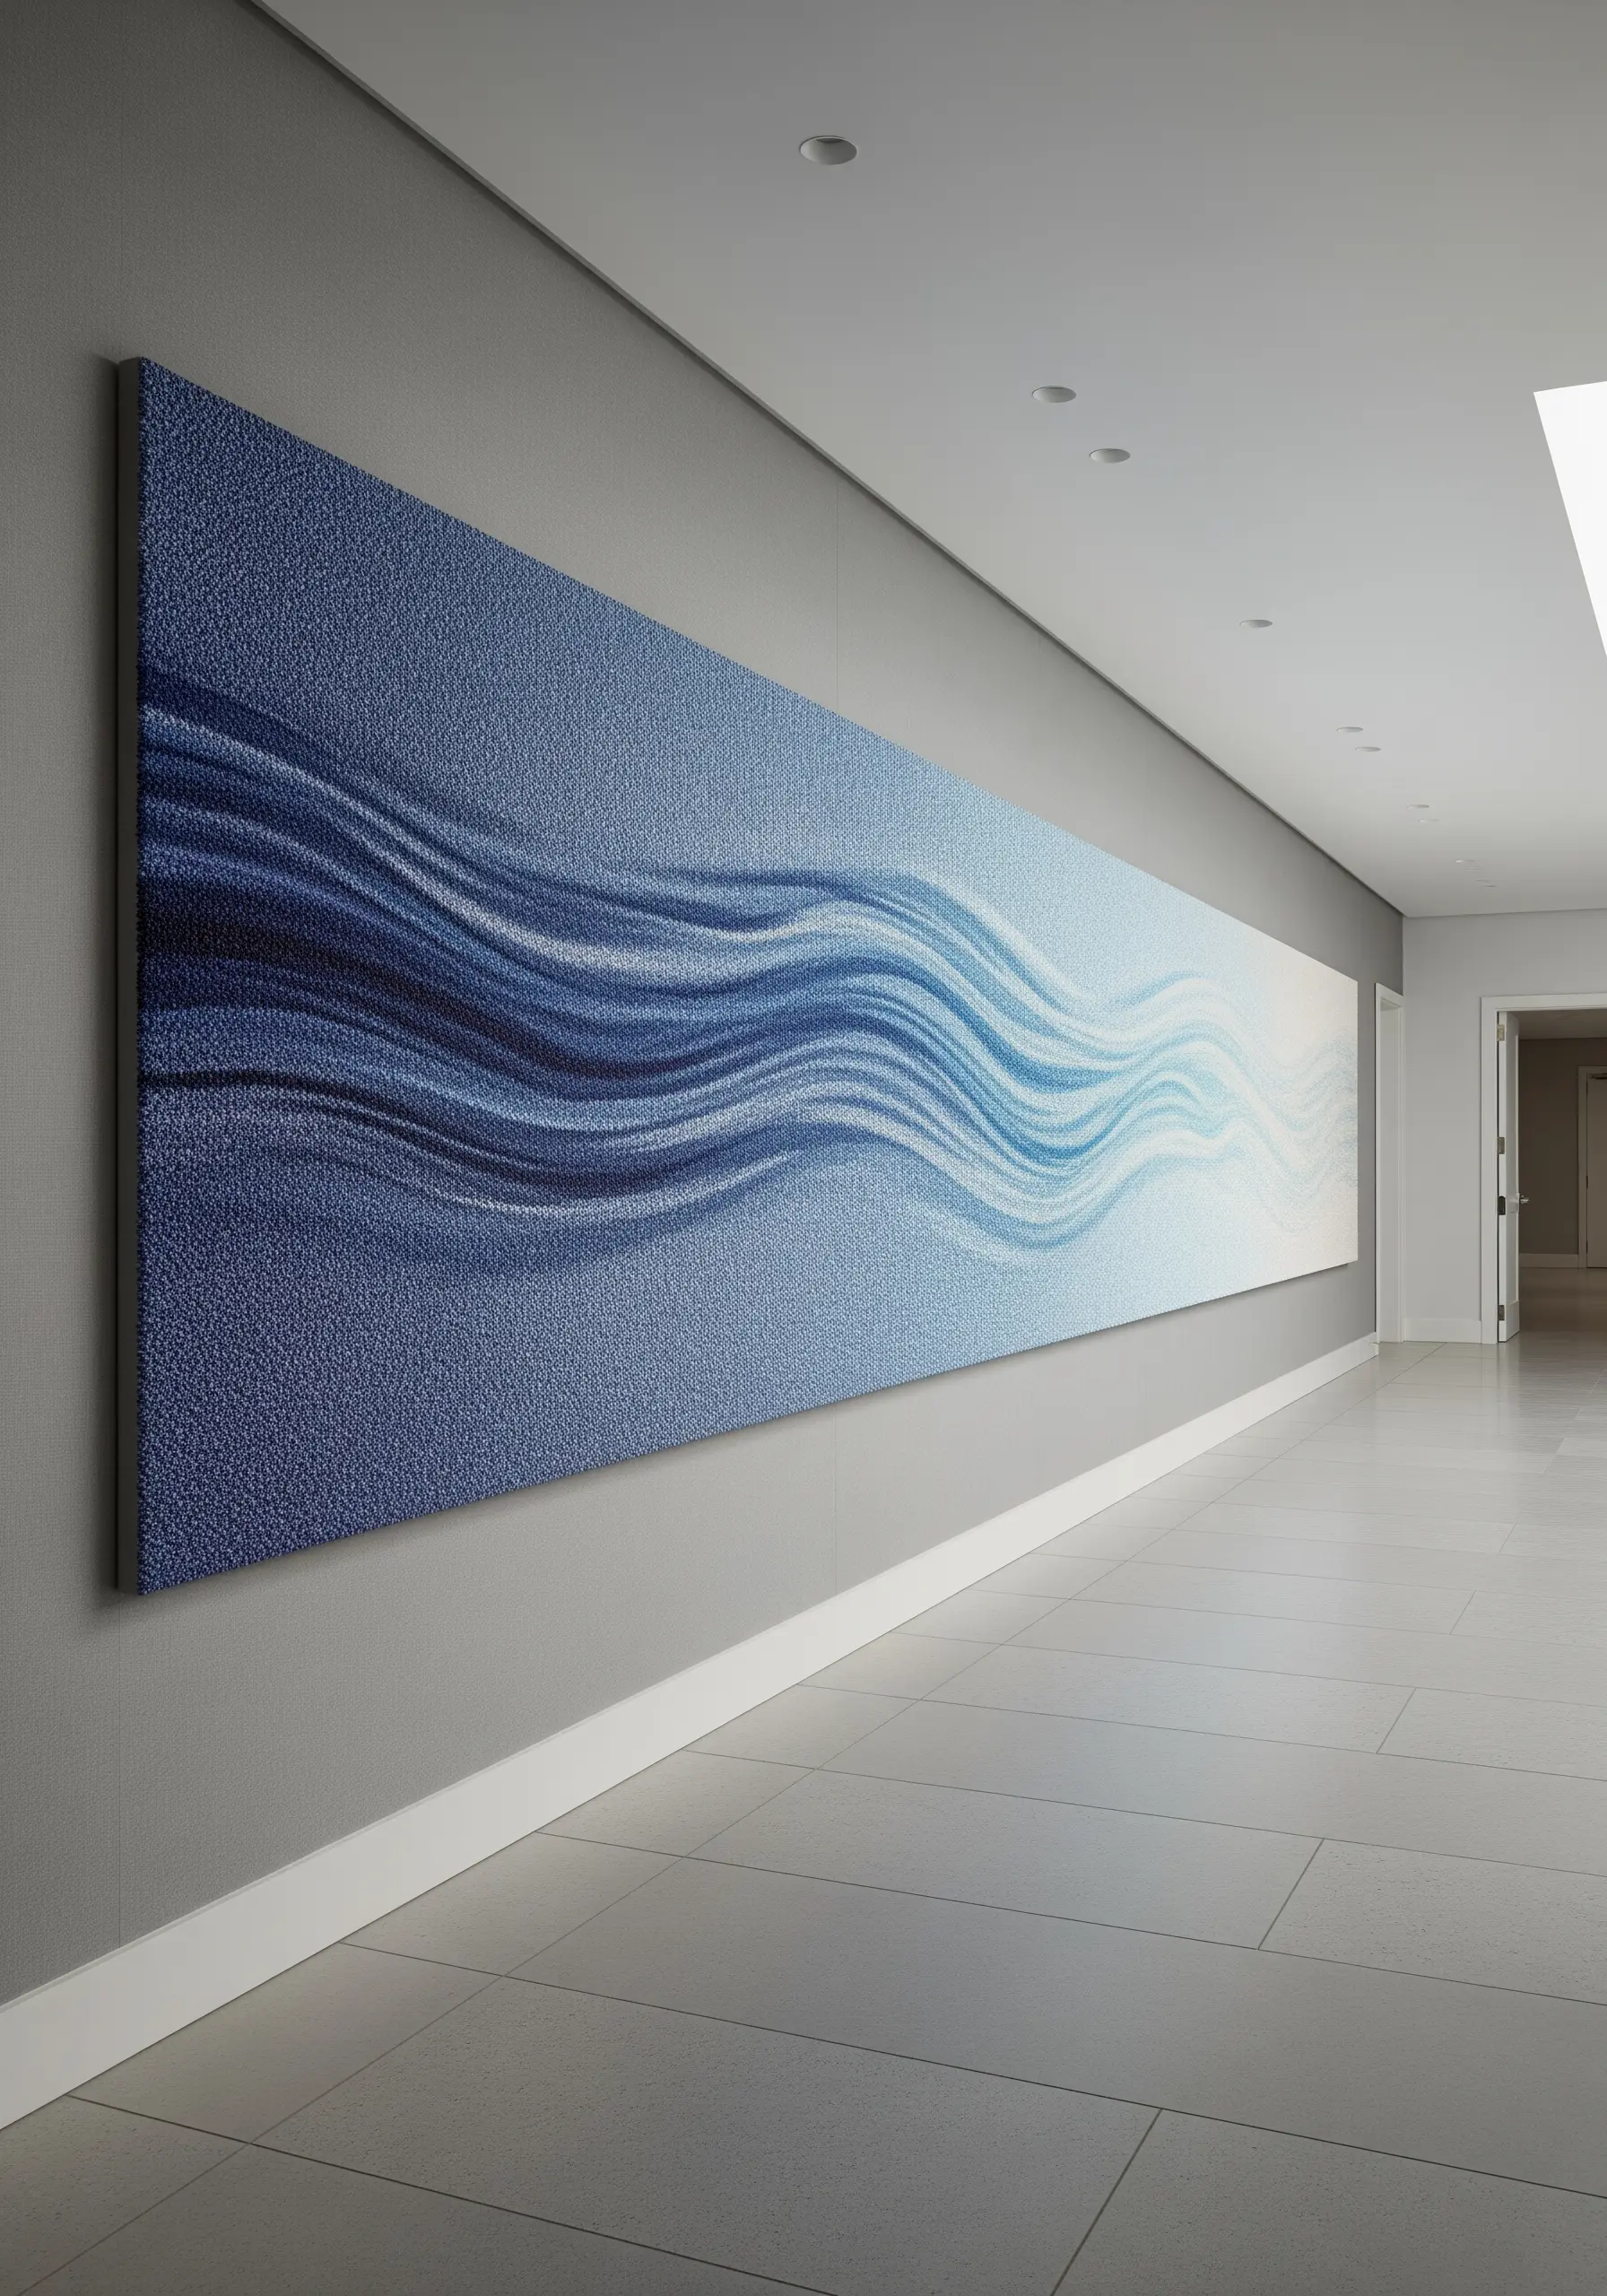
20. Visualize Sound with Precision Line Stitching

Translate a soundwave into a powerful piece of visual art by using a single, precise stitch.
Use a bright white or silver thread on a dark navy or black background for maximum contrast and impact.
A simple backstitch is perfect for this, as it creates a clean, unbroken line that can accurately capture the sharp peaks and valleys of the soundwave.
For a truly personal piece, use an app to visualize a recording of a meaningful phrase or song, and then stitch that specific pattern.
21. Create a Fantasy Map with Aged Fabric and Simple Outlines
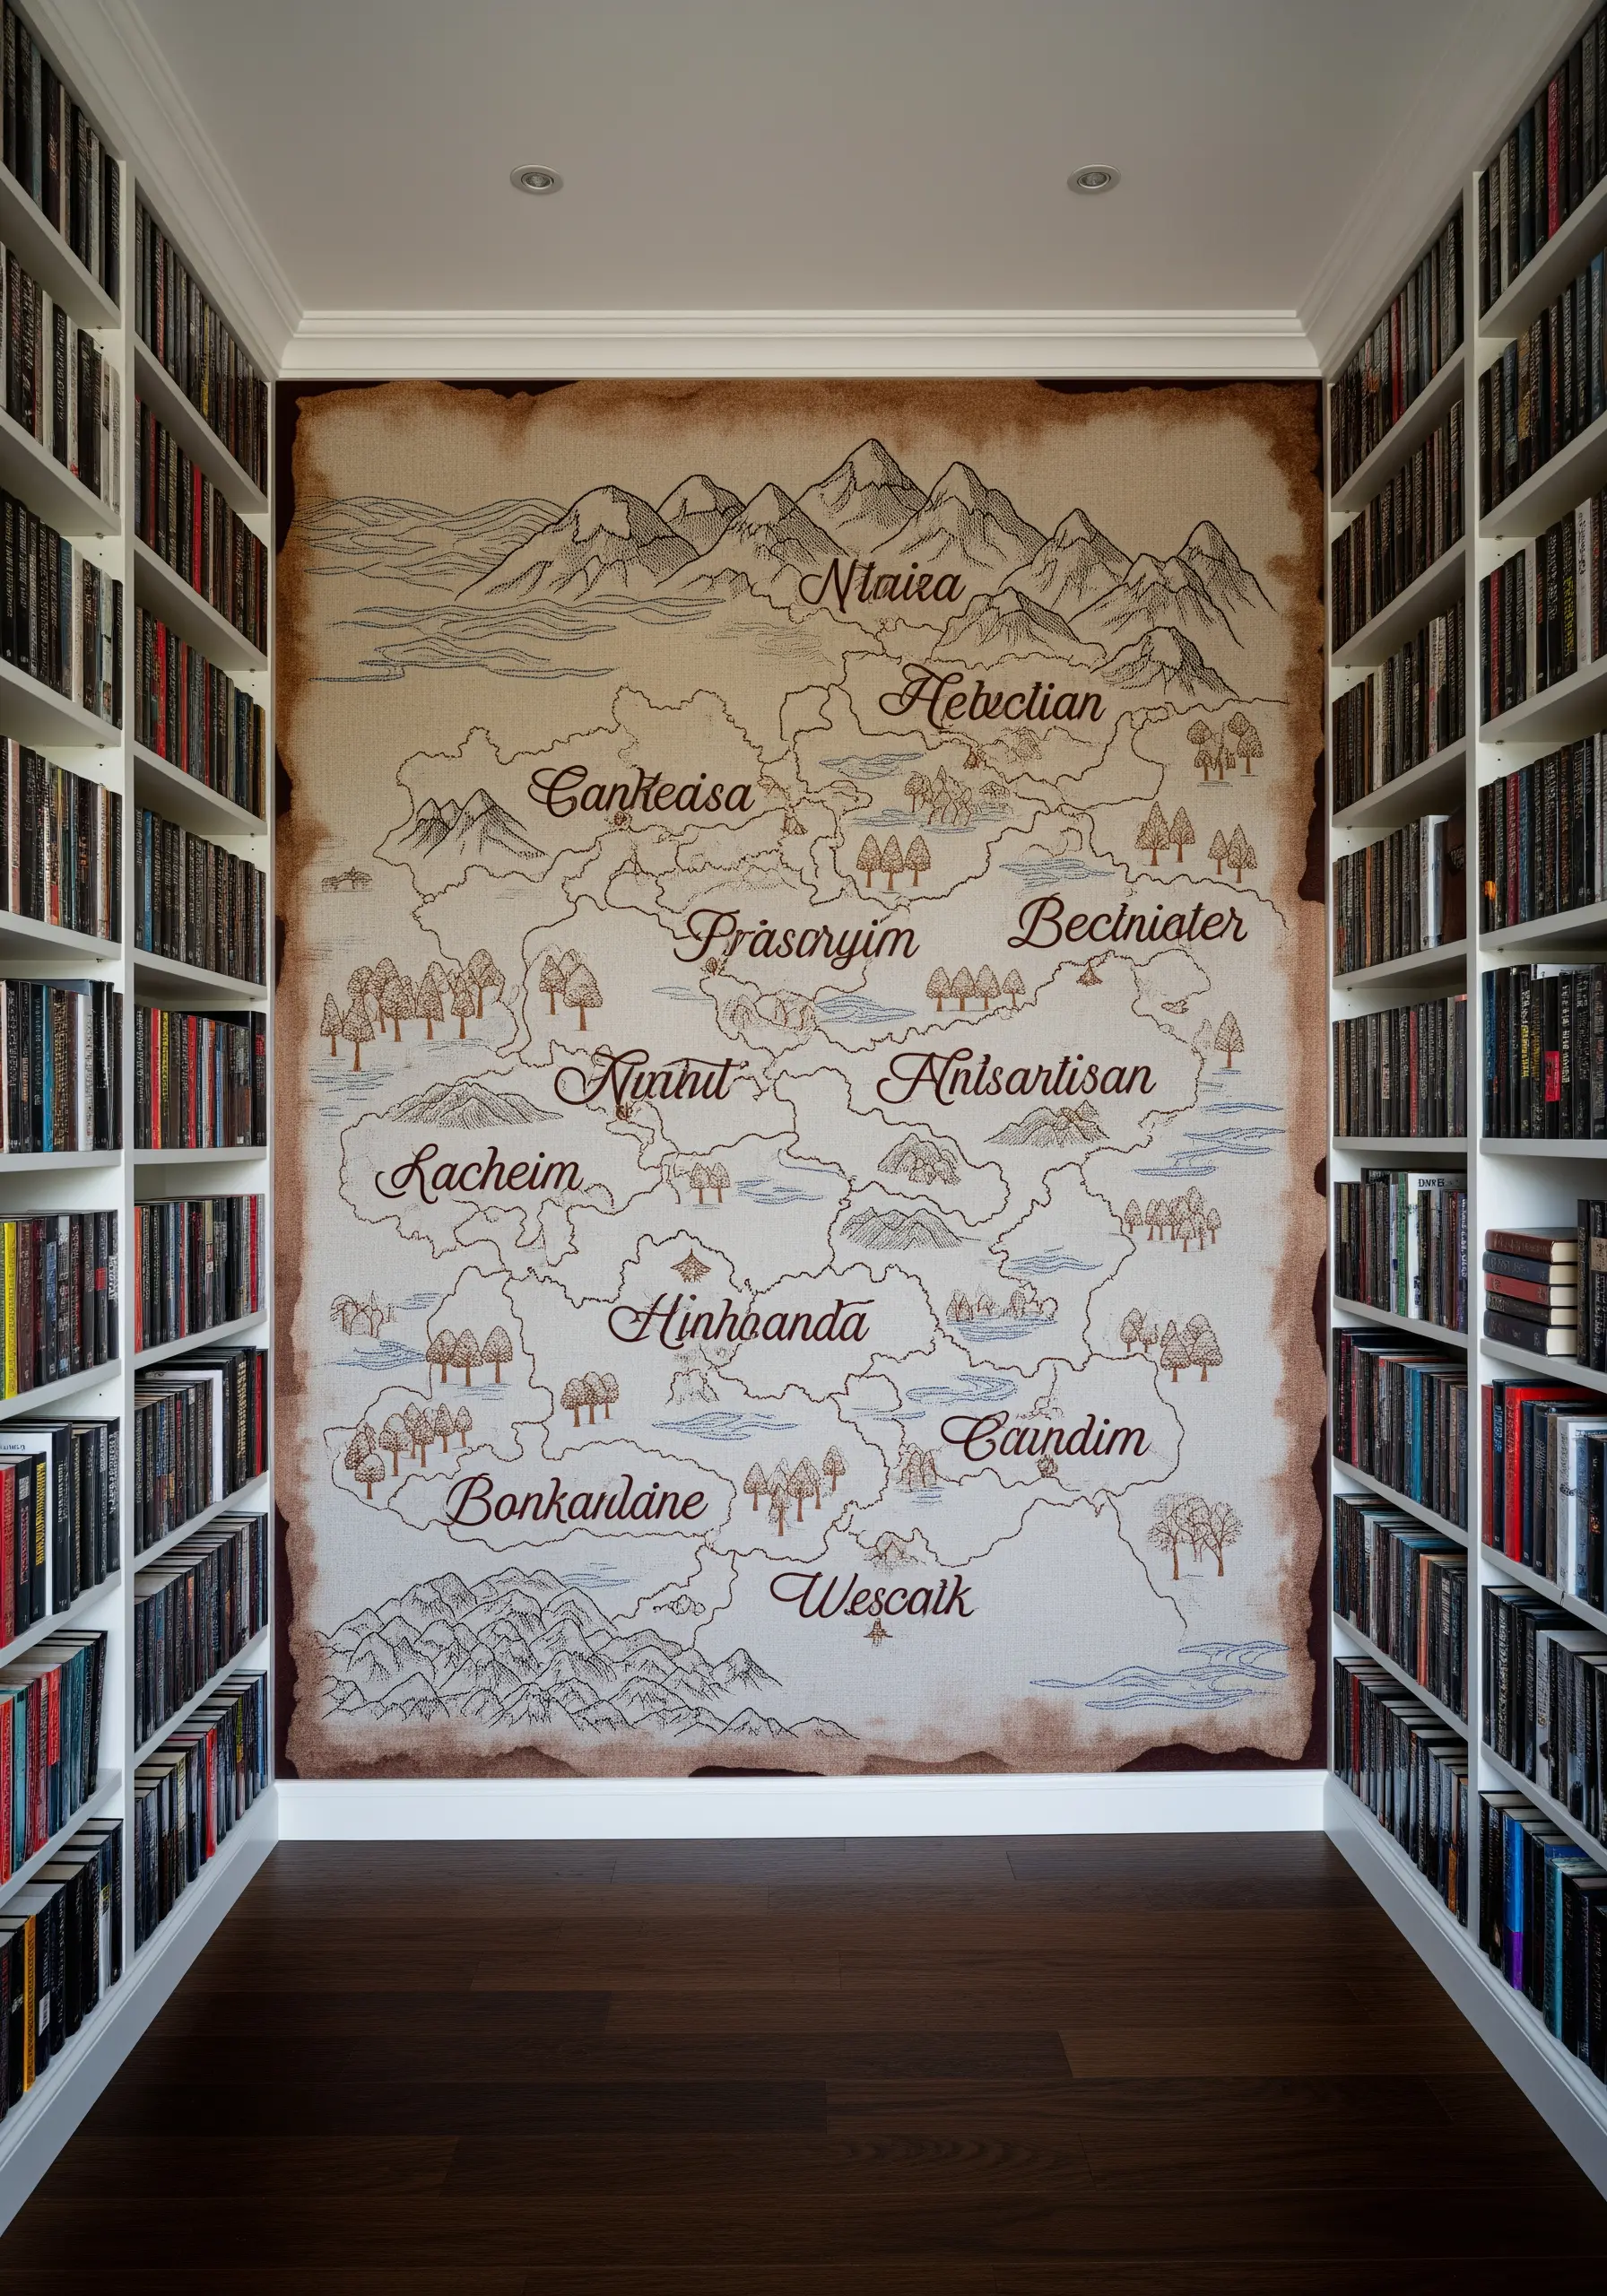
Give your embroidered map an authentic, aged look by tea-staining your linen or cotton fabric before you begin stitching.
Use a basic backstitch for the coastlines and borders, and simple seed stitches or tiny straight stitches for the forests to create subtle texture.
For the lettering, a whipped backstitch will give you a slightly raised, more legible line that mimics the look of ink on parchment.
This project is perfect for bringing a piece of your favorite fictional world into your home library or study.
22. Design a Protective and Stylish Kitchen Backsplash
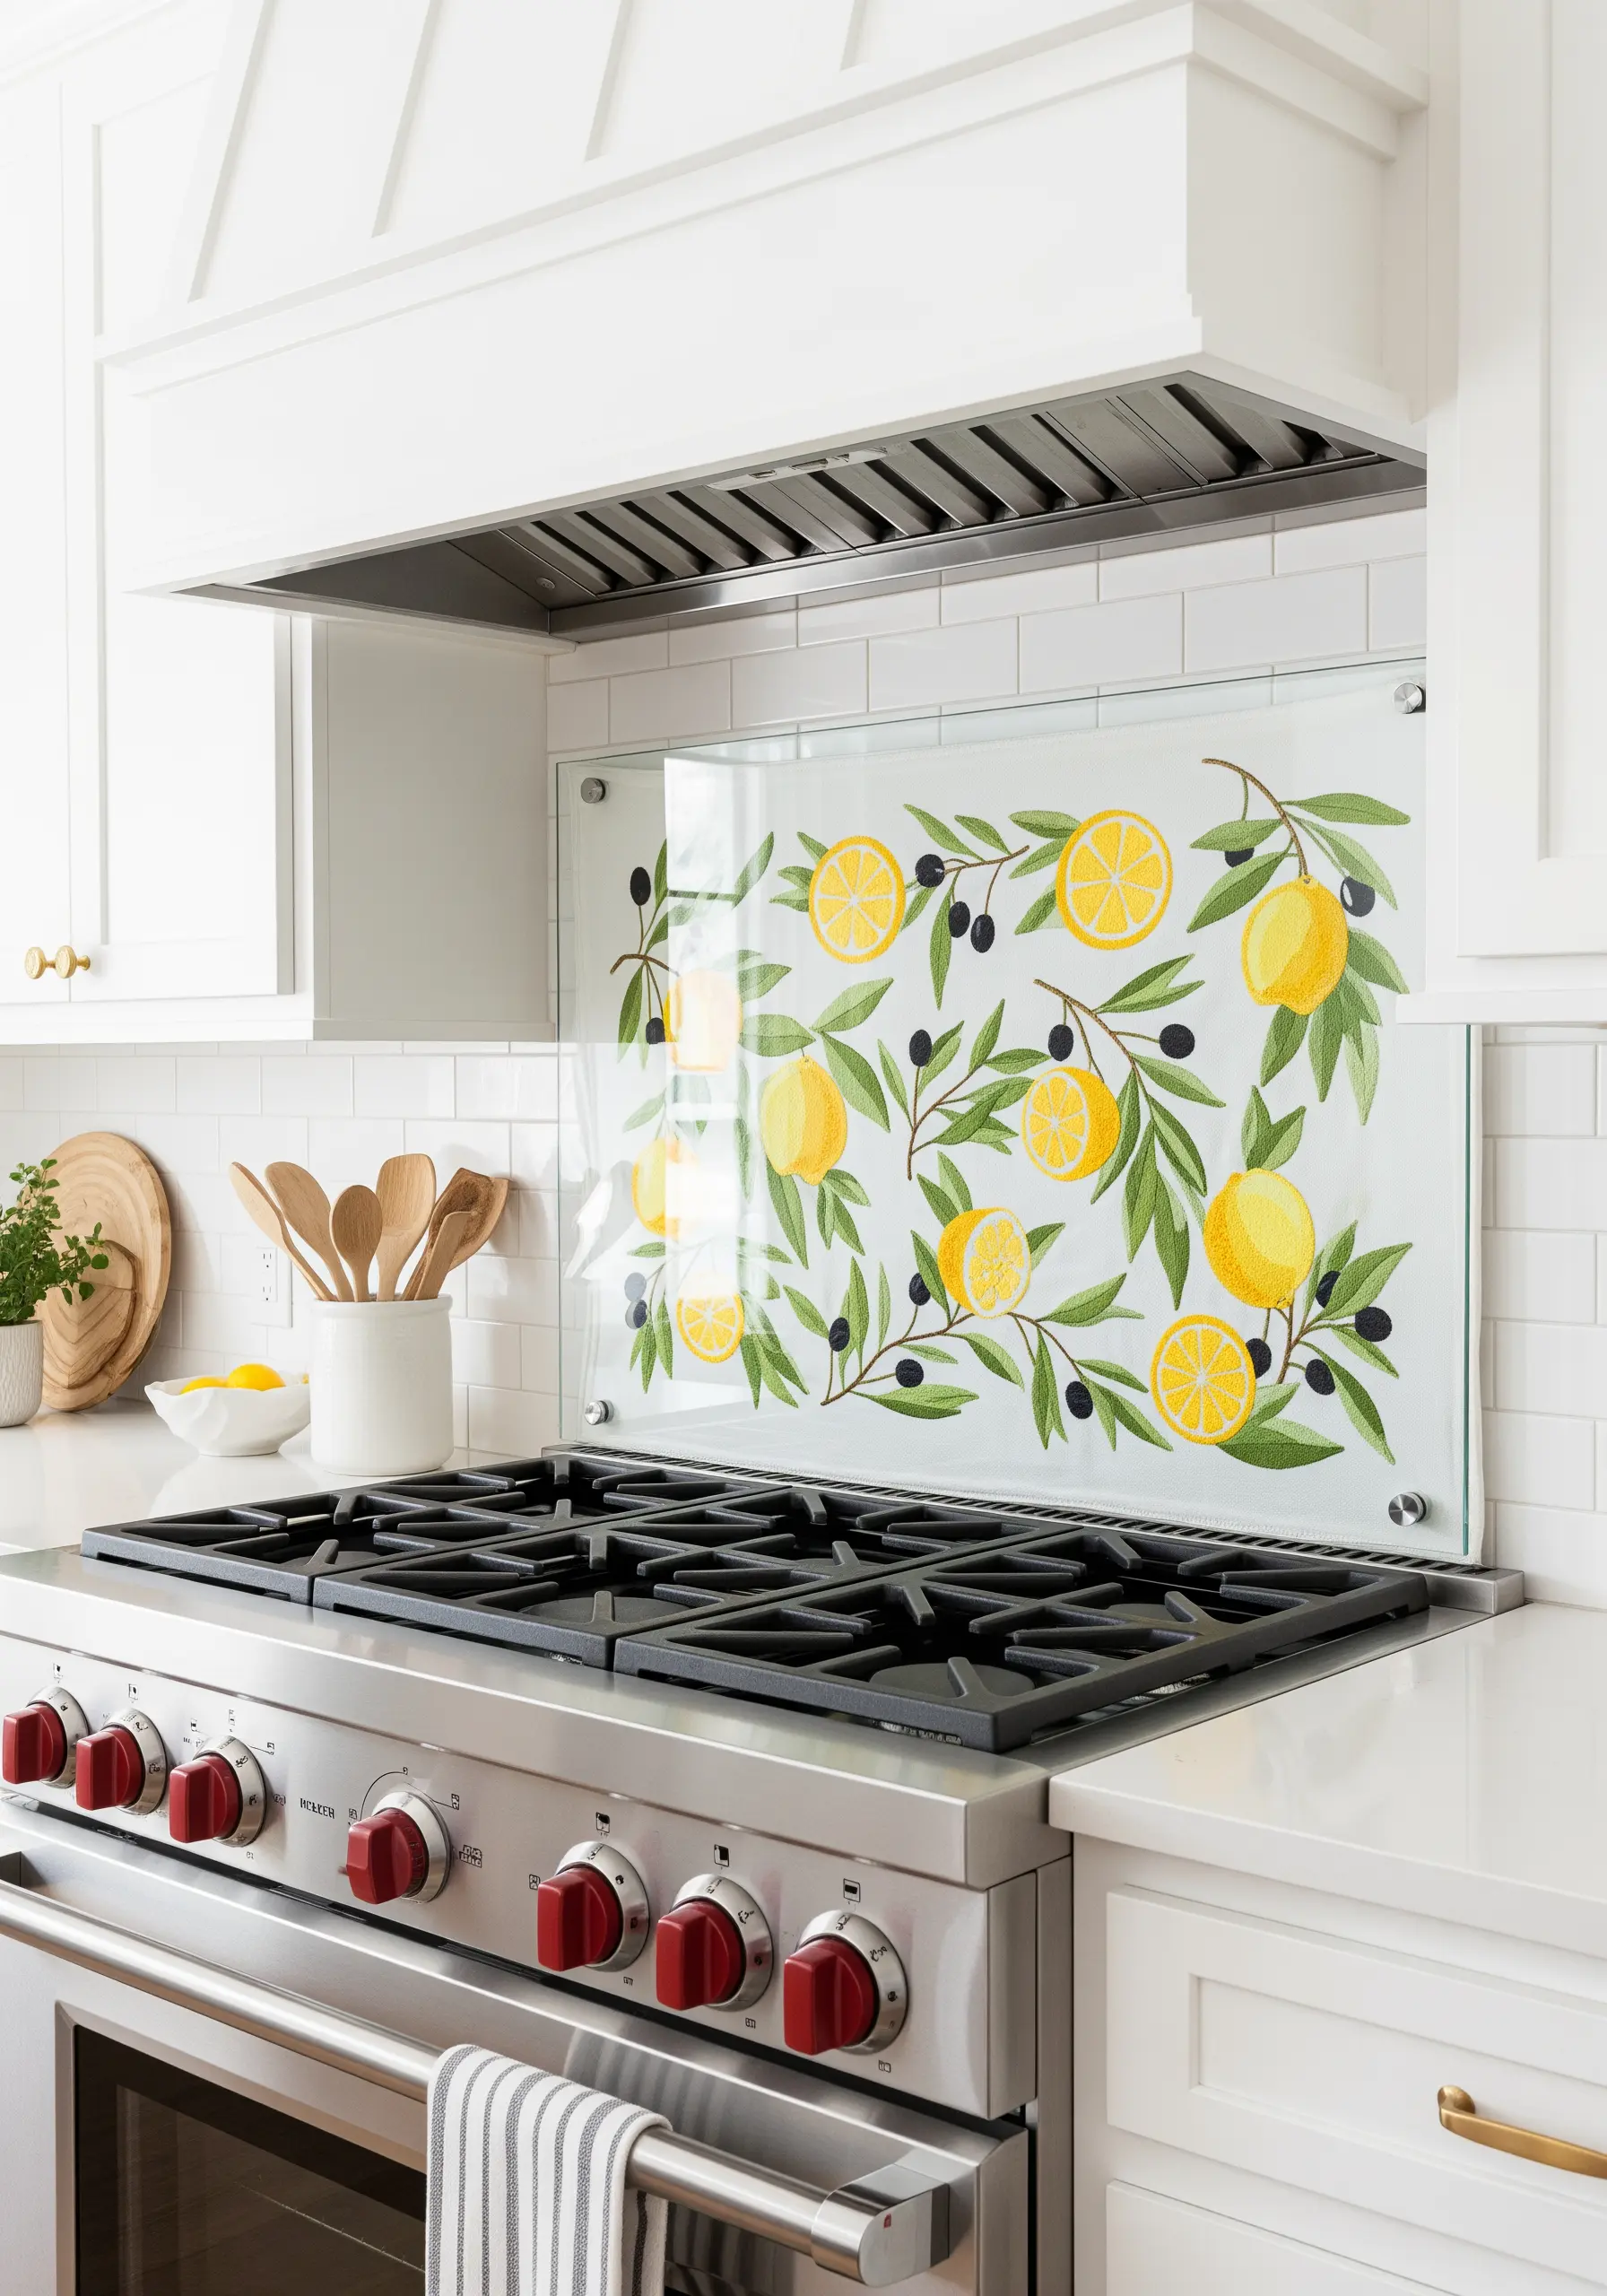
Protect your kitchen wall in style by mounting your finished embroidery behind a sheet of tempered glass or plexiglass.
Choose a vibrant, cheerful design like these lemons and olives to bring life to a neutral kitchen.
Use a smooth, dense satin stitch for the fruit and a delicate stem stitch for the branches to create a clean, illustrative look.
The glass not only keeps your stitching safe from splatters but also adds a glossy, modern finish that elevates the handmade art.
23. Stitch a Meditative Mandala in a Large Hoop
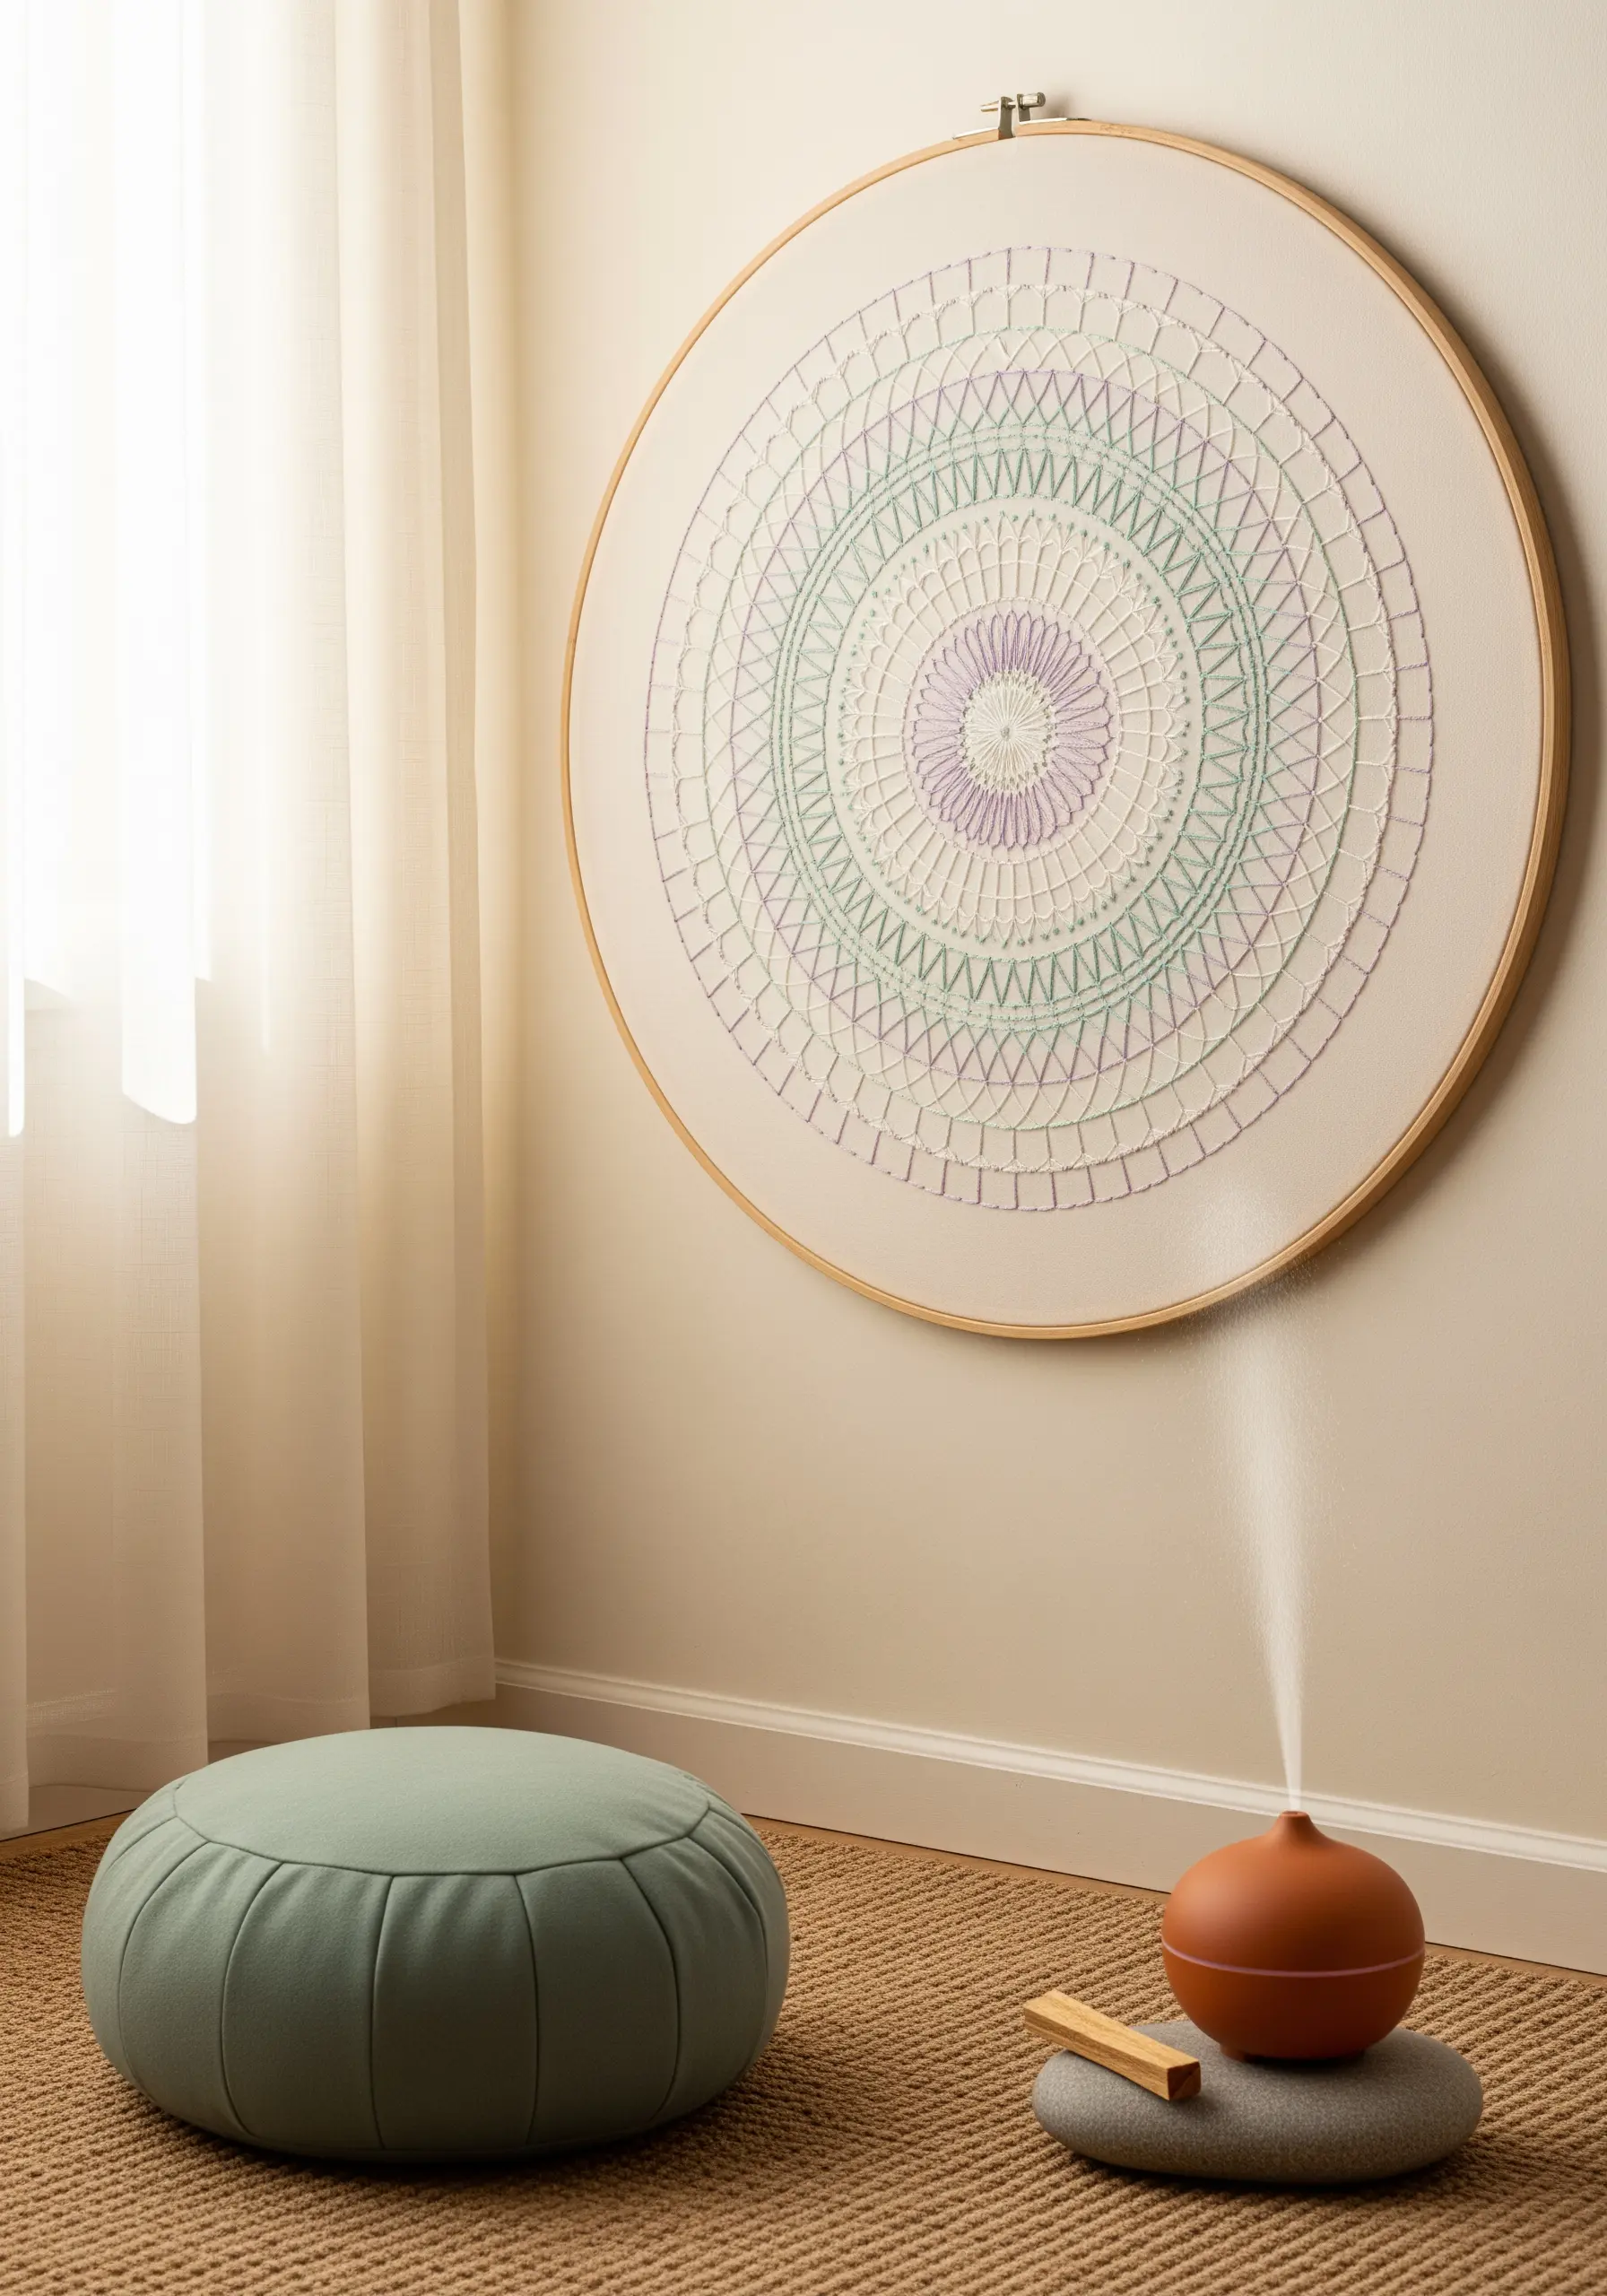
Use a large quilting hoop as a permanent frame for a modern, geometric mandala.
Create intricate patterns by repeating simple stitches like the backstitch, chain stitch, or running stitch in concentric circles.
Choose a soft, calming color palette and let the repetition of the stitches become a meditative process.
The beauty of a stitched mandala lies in its precision and symmetry, turning simple geometry into a serene focal point for a quiet space.
24. Go Bold with a Full-Wall Embroidered Mural
For the ultimate statement, create an embroidered panel that covers an entire wall, mimicking the effect of luxury wallpaper.
This requires a large-scale design, which can be achieved by projecting your pattern onto fabric mounted on the wall or by using a long-arm embroidery machine.
Focus on bold, graphic shapes and a vibrant color palette to make the most of the large canvas.
While a project of this scale is a significant undertaking, it creates a completely unique, immersive environment with unparalleled texture and depth.
25. Capture Graffiti Art with Energetic Thread Painting
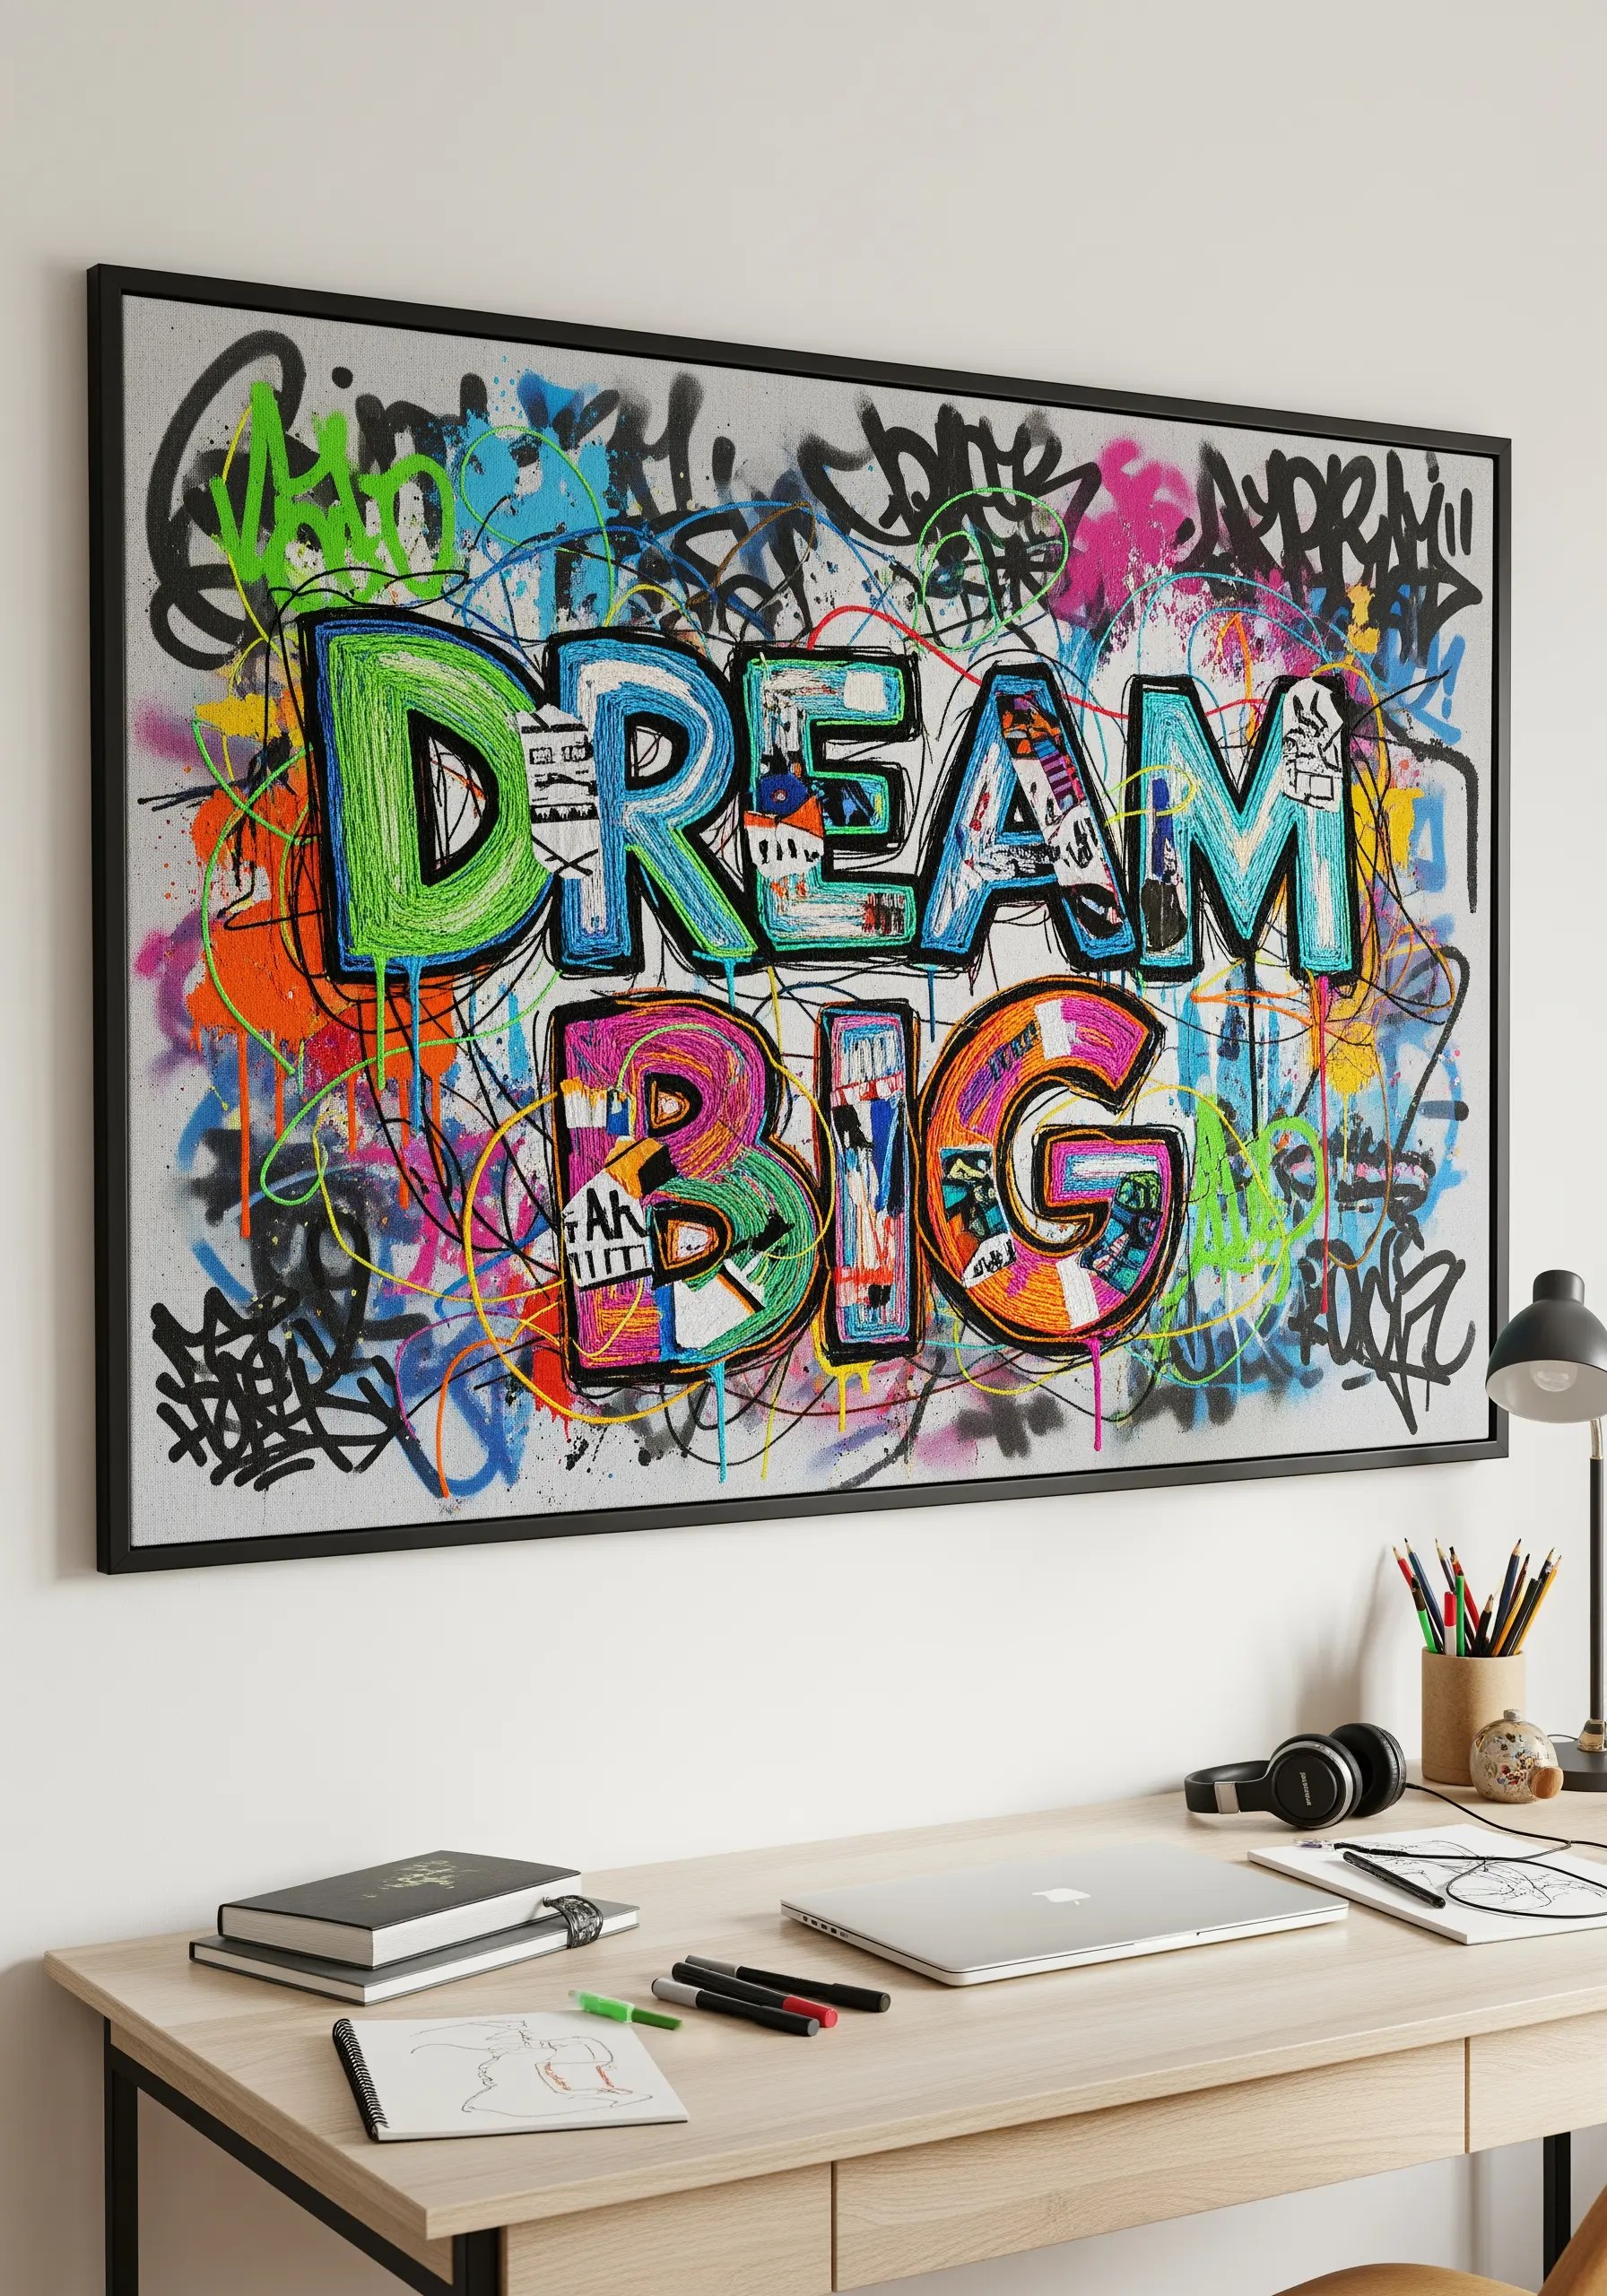
Translate the raw energy of graffiti into thread by embracing controlled chaos in your stitching.
Use a long and short stitch to fill the letters, but allow your stitch direction to be free and expressive rather than perfectly uniform. This mimics the spray of a paint can.
Layer different colors and stitches—like random straight stitches and French knots—to replicate the drips, splatters, and overlapping tags of street art.
This mixed-media approach captures the dynamic, layered spirit of the source material.
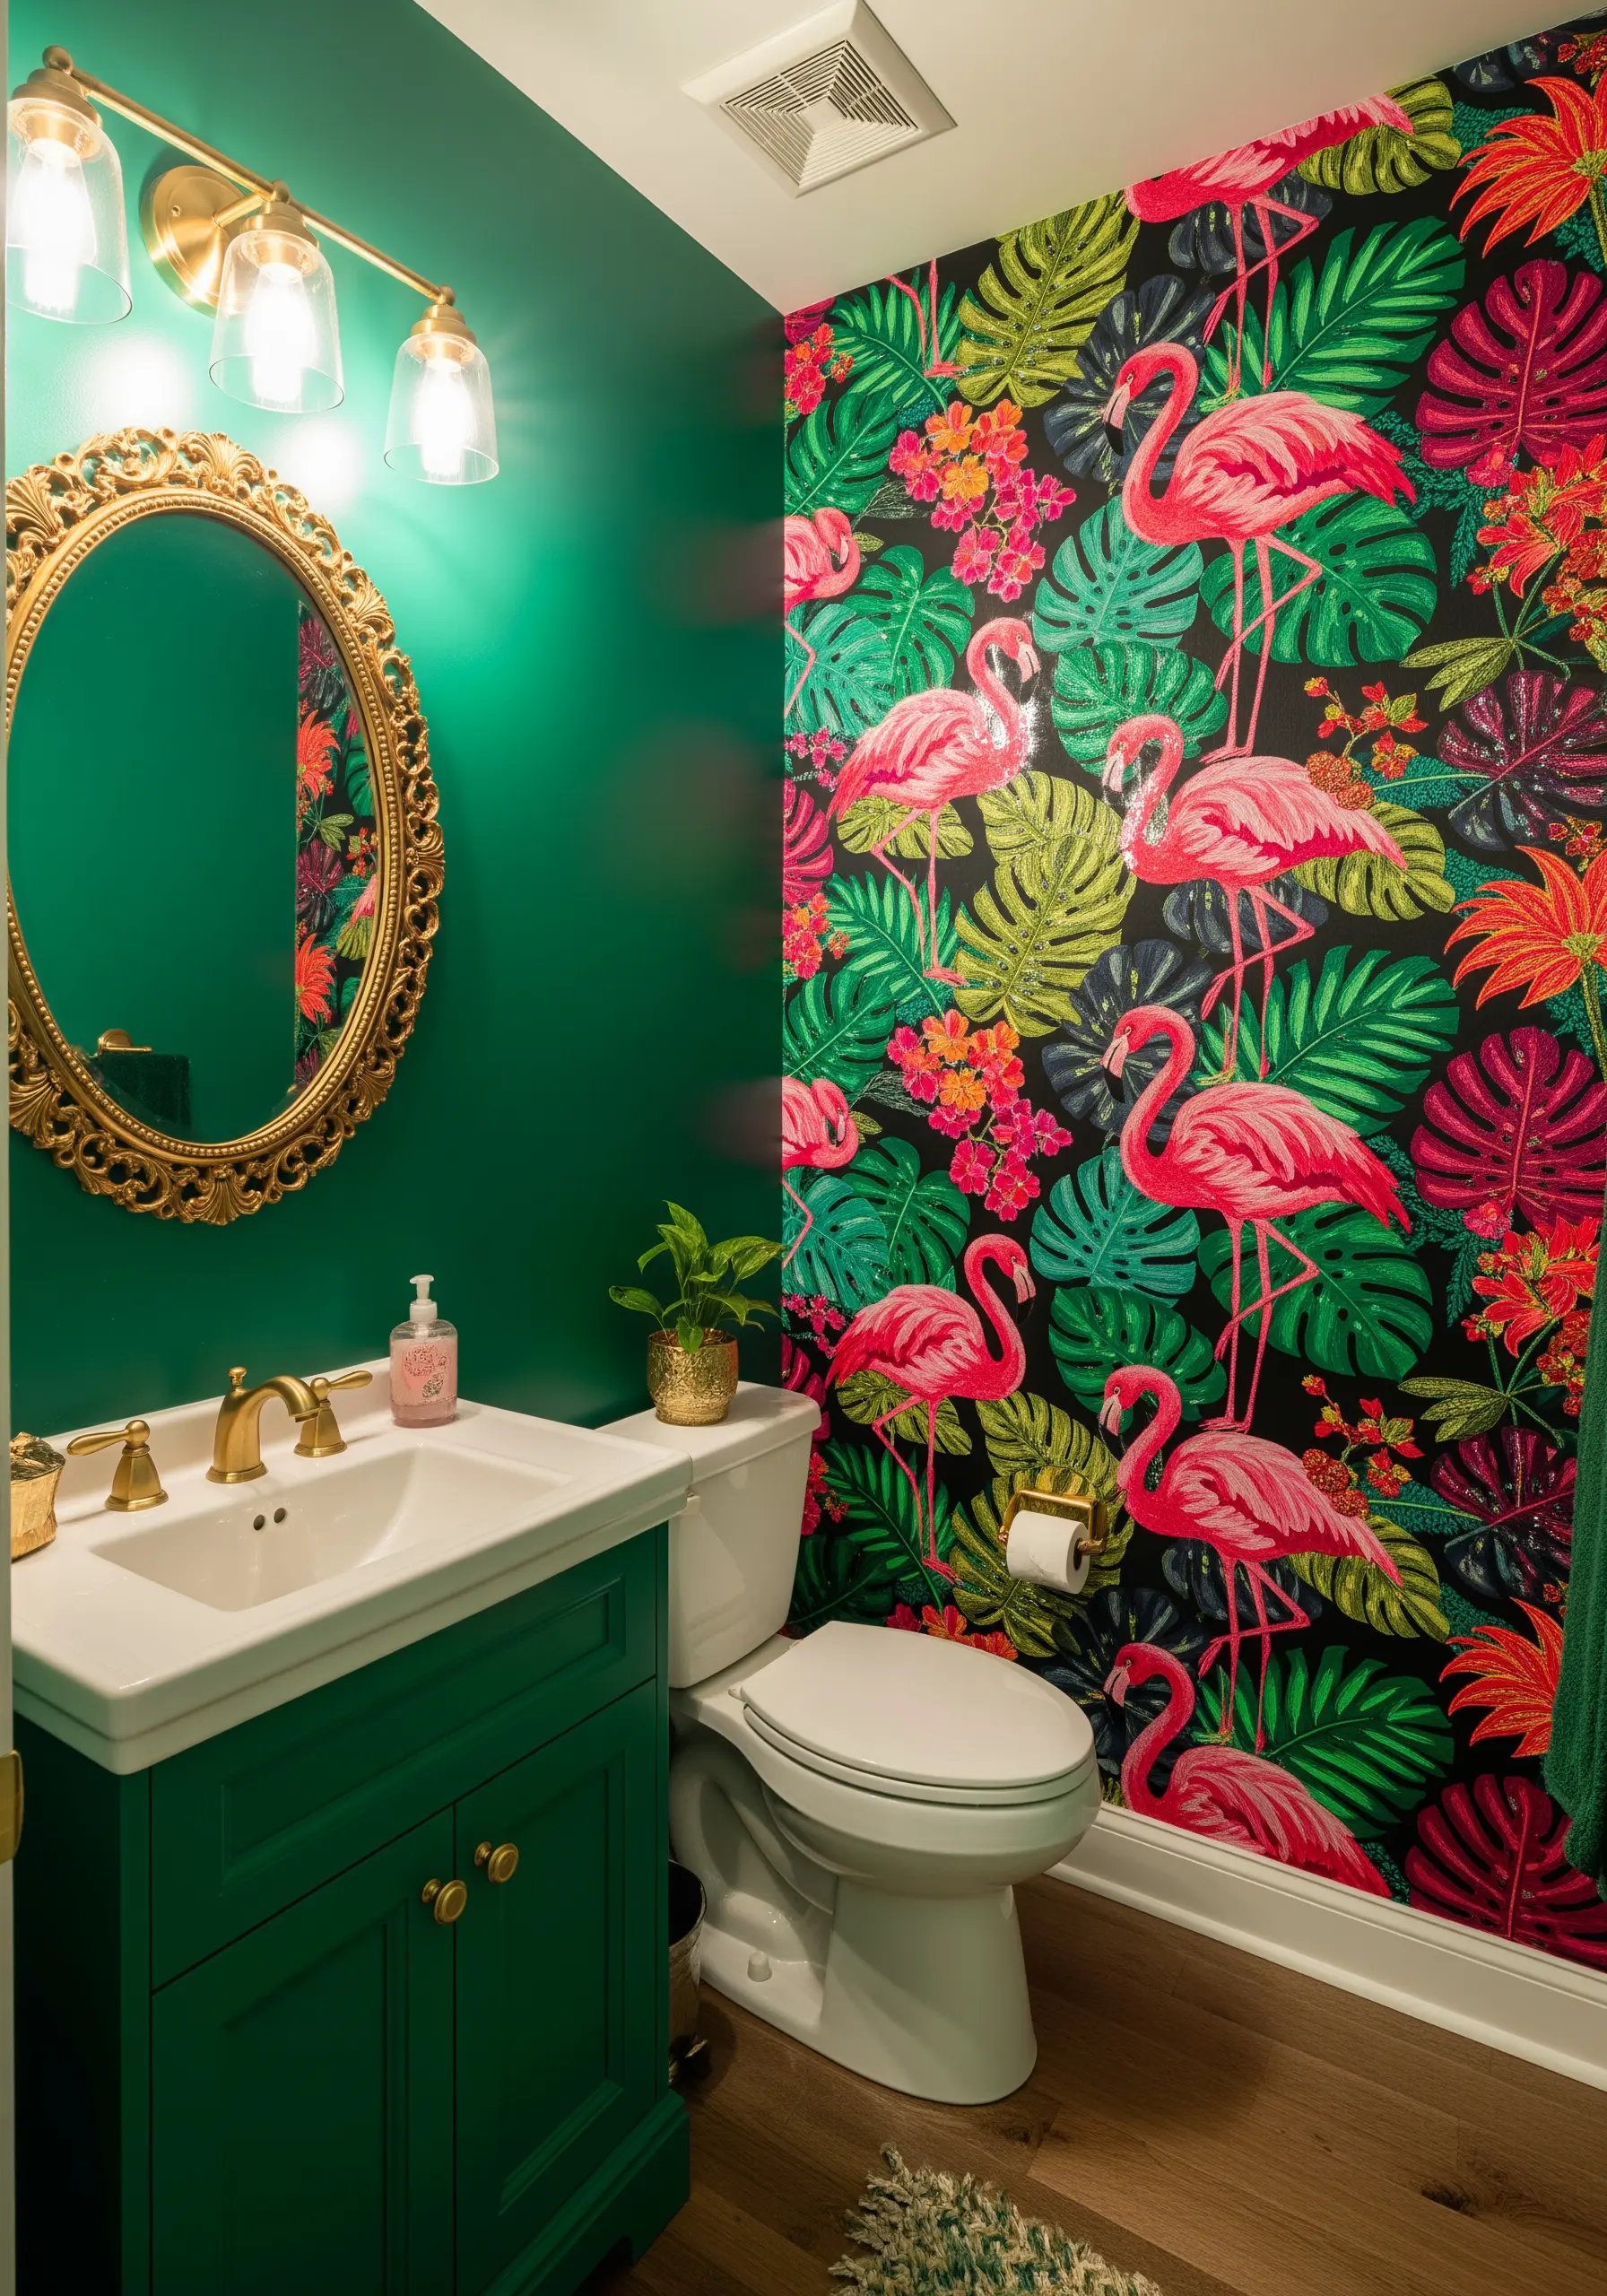
26. Frame a View with Cheerful Garden Panels
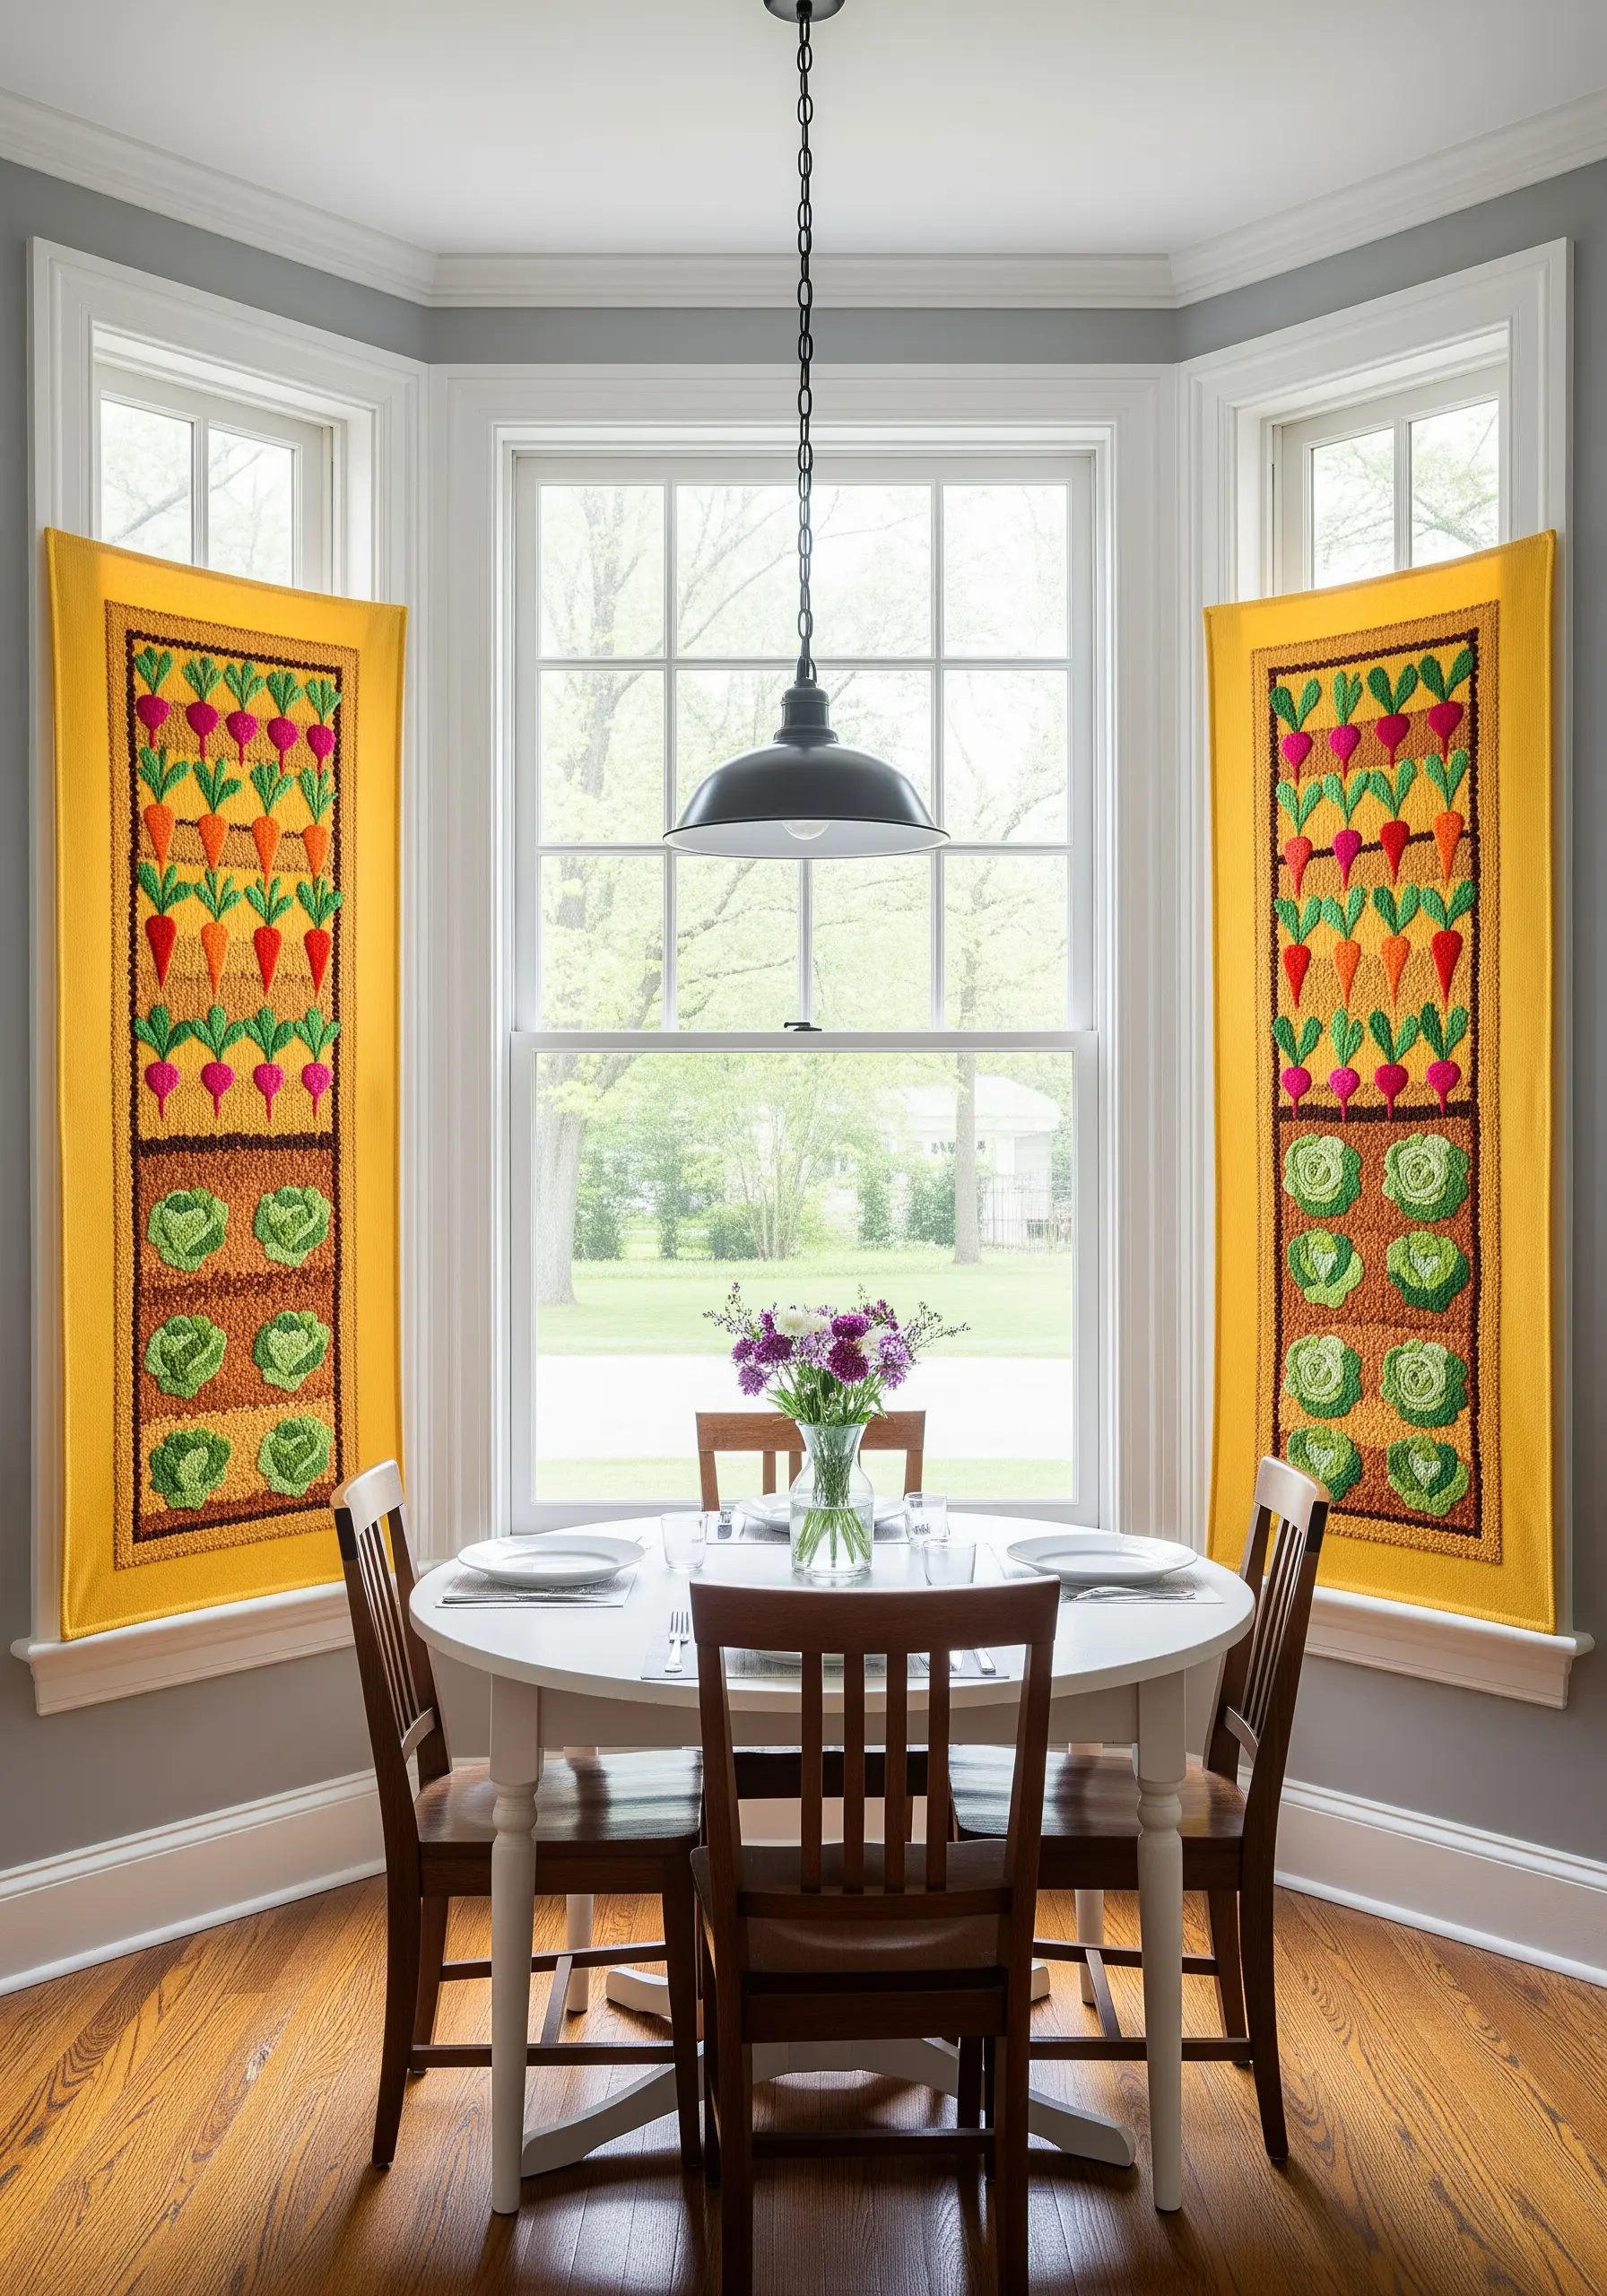
Use embroidered panels as an alternative to traditional curtains or valances, framing a window without blocking the light.
A simple design with repeating rows of vegetables or flowers is perfect for a dining nook or kitchen.
Use textural stitches like French knots for the carrots and radishes, and a bullion knot or woven wheel stitch for the heads of cabbage to create a fun, 3D effect.
A bright background color, like this cheerful yellow, ensures the panels bring warmth and light into the room even on a cloudy day.
27. Create a Sophisticated Cityscape with Minimalist Line Art
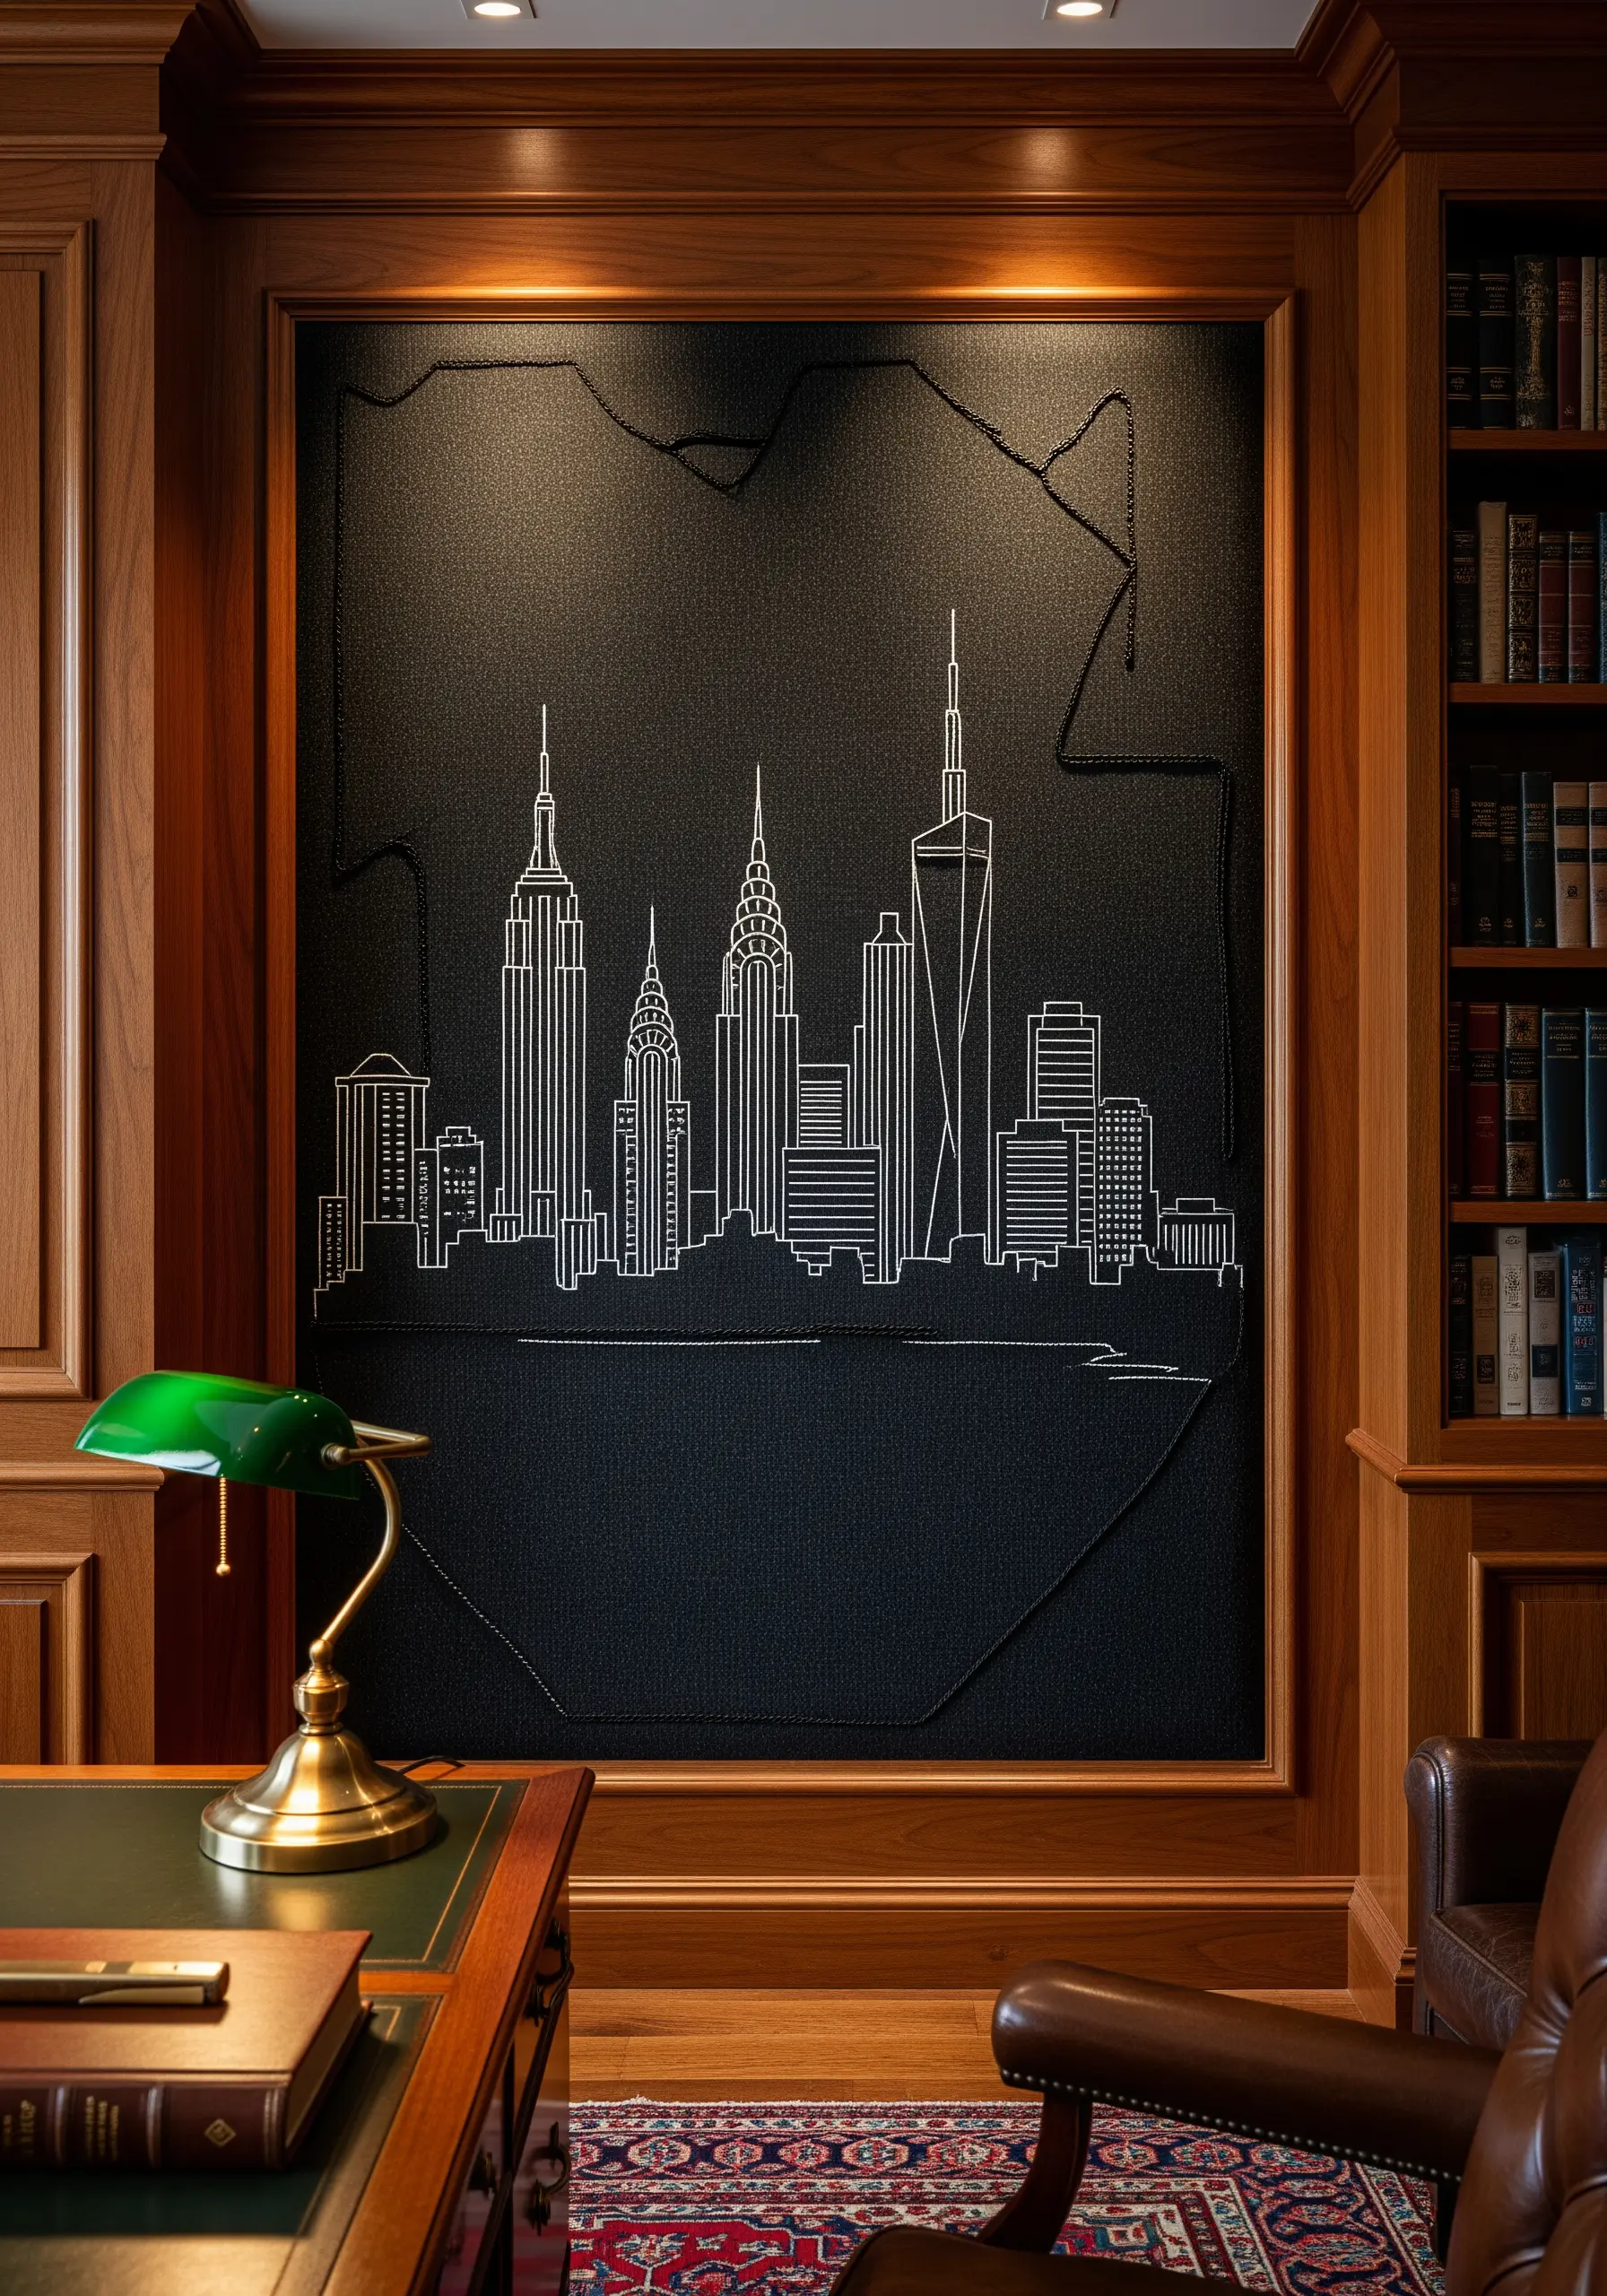
Render a complex city skyline with elegant simplicity by using a single, continuous line for the outline.
A simple backstitch or stem stitch in a high-contrast color—like white on black—is all you need to create a striking architectural silhouette.
This minimalist approach focuses on form and negative space, resulting in a piece that feels modern, sophisticated, and uncluttered.
Mount the finished piece on a stretched canvas or within a recessed wood panel for a polished, gallery-worthy presentation.
28. Stitch a Meaningful Family Tree Keepsake
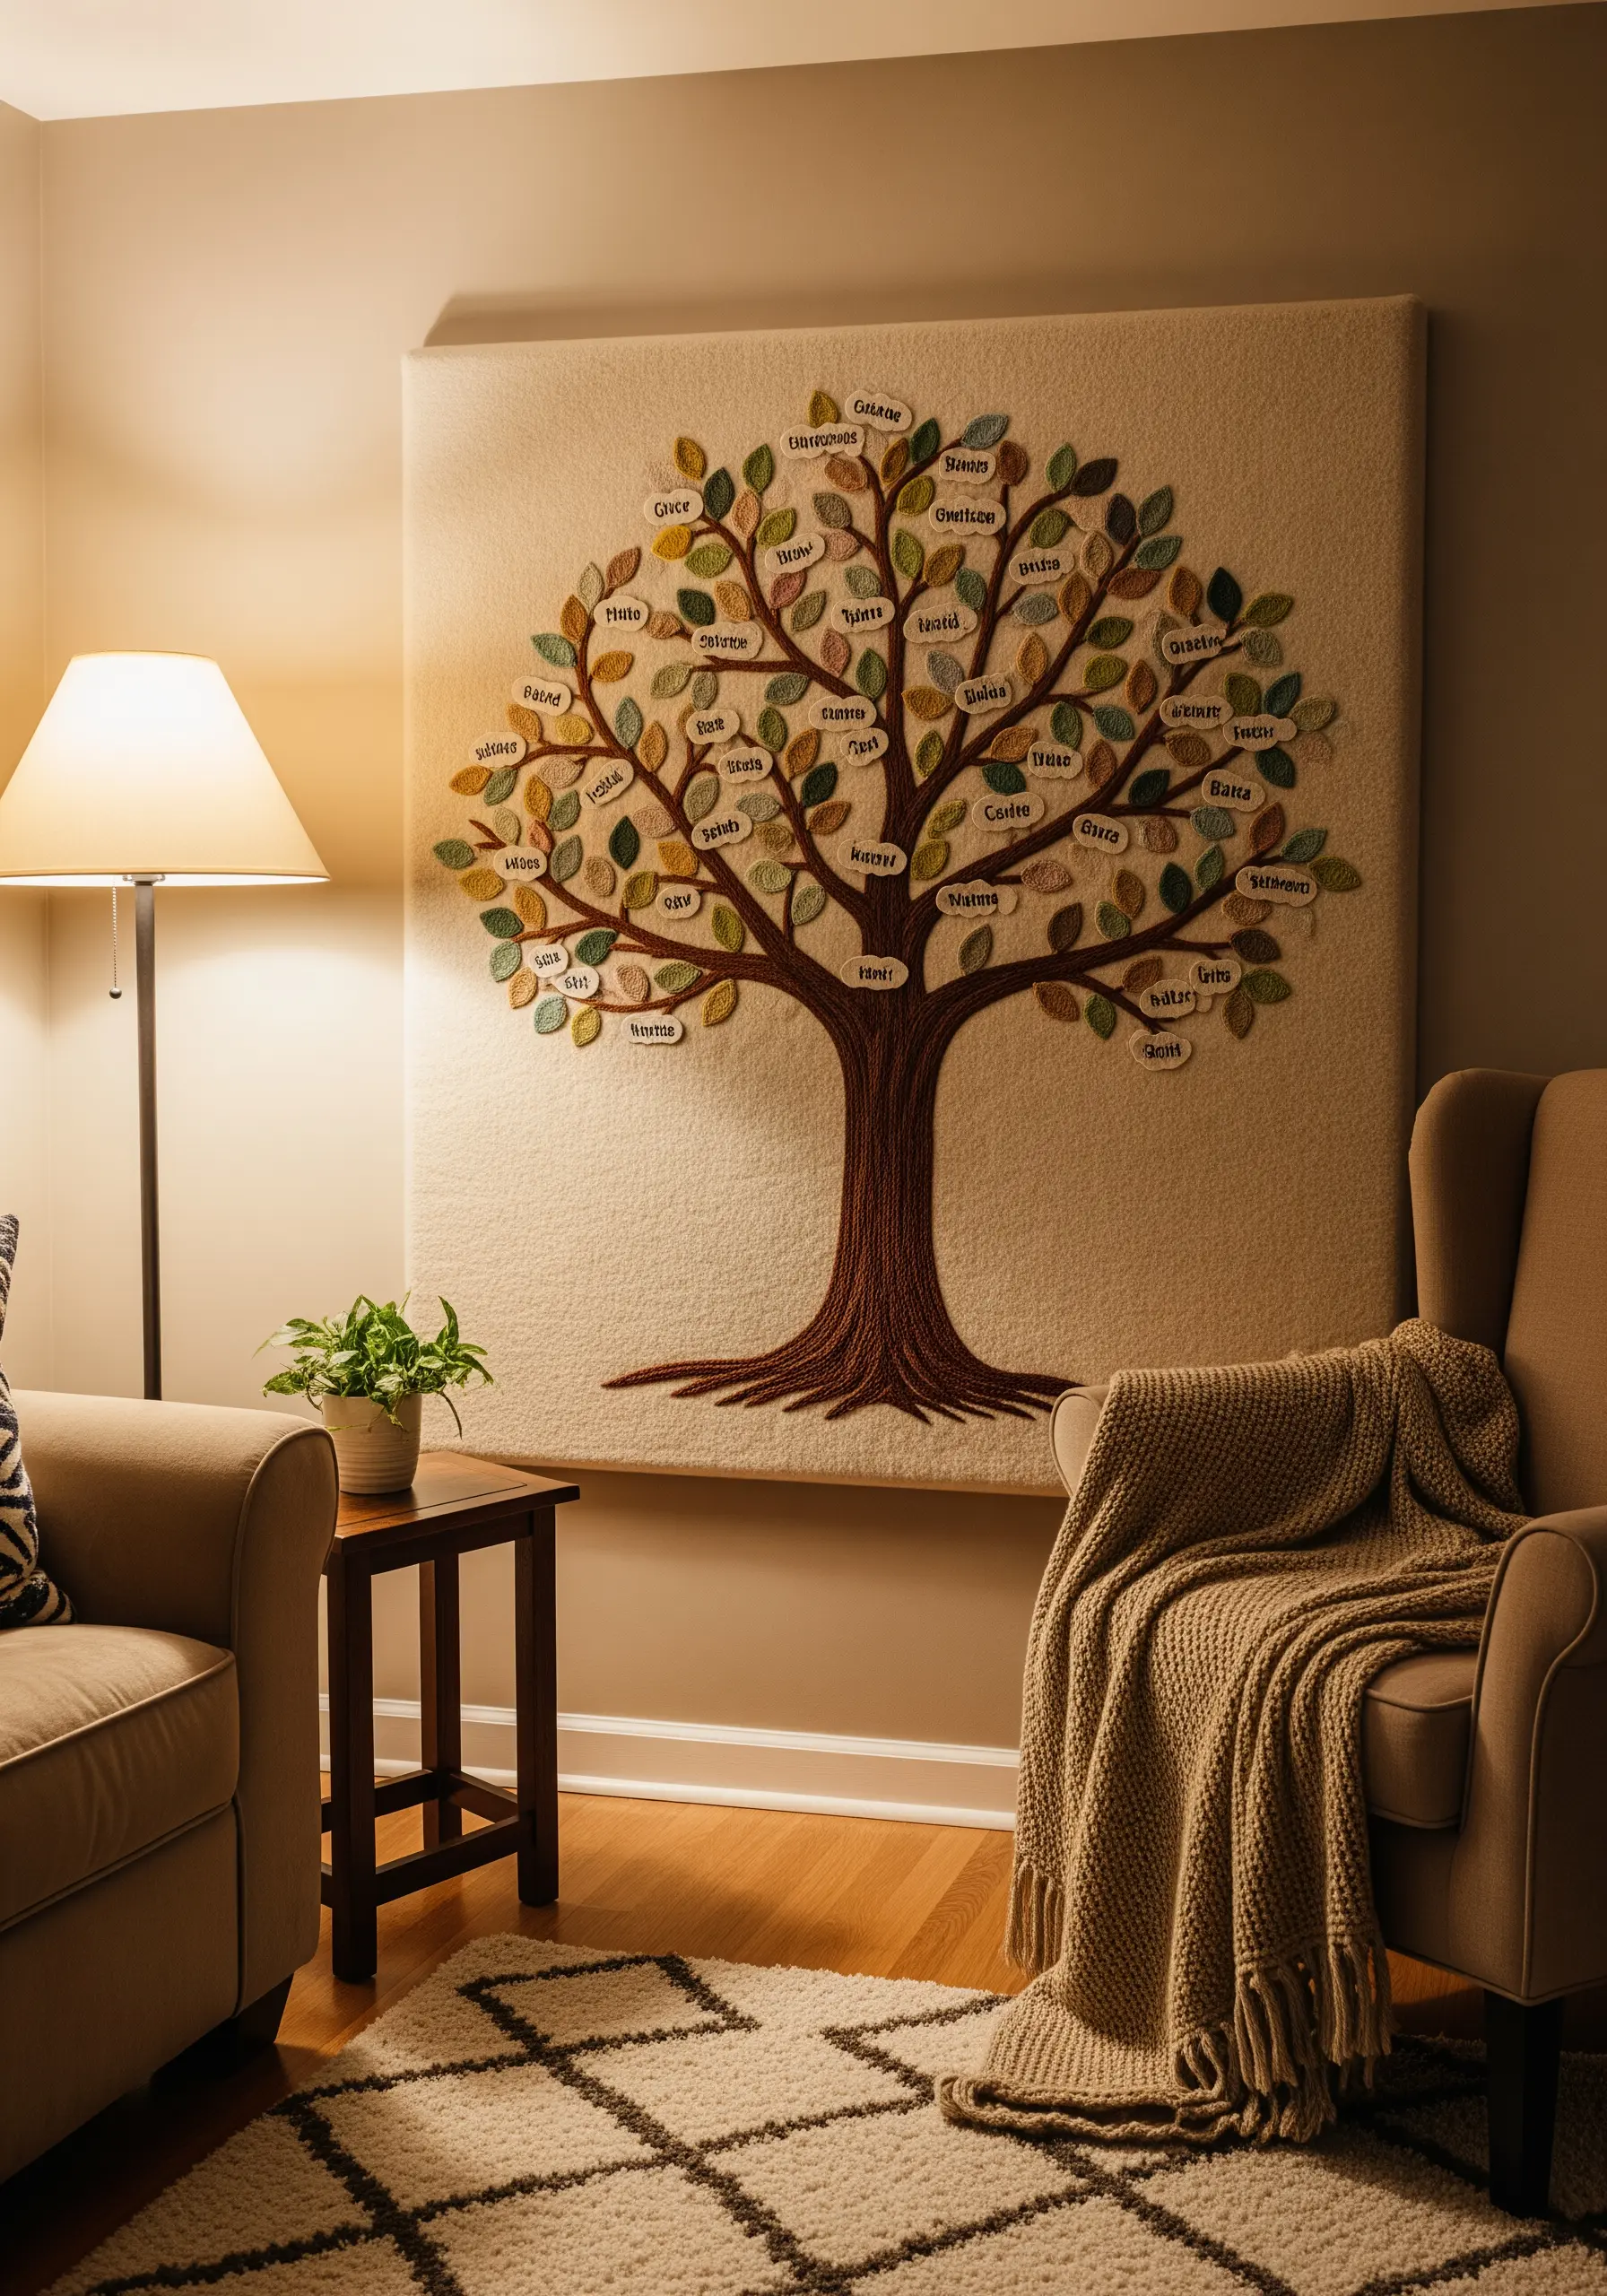
Create a beautiful and personal piece of family history by stitching a family tree.
Use a textured stitch like a chain stitch or couched yarn for the trunk and branches to give them a sturdy, organic feel.
For the leaves, stitch individual ovals onto a separate piece of fabric, write the names with a permanent fabric pen, cut them out, and then appliqué them onto the tree.
This method allows you to easily add new leaves as your family grows, turning your art into a living document.
29. Recreate Intricate Tilework with Geometric Stitches
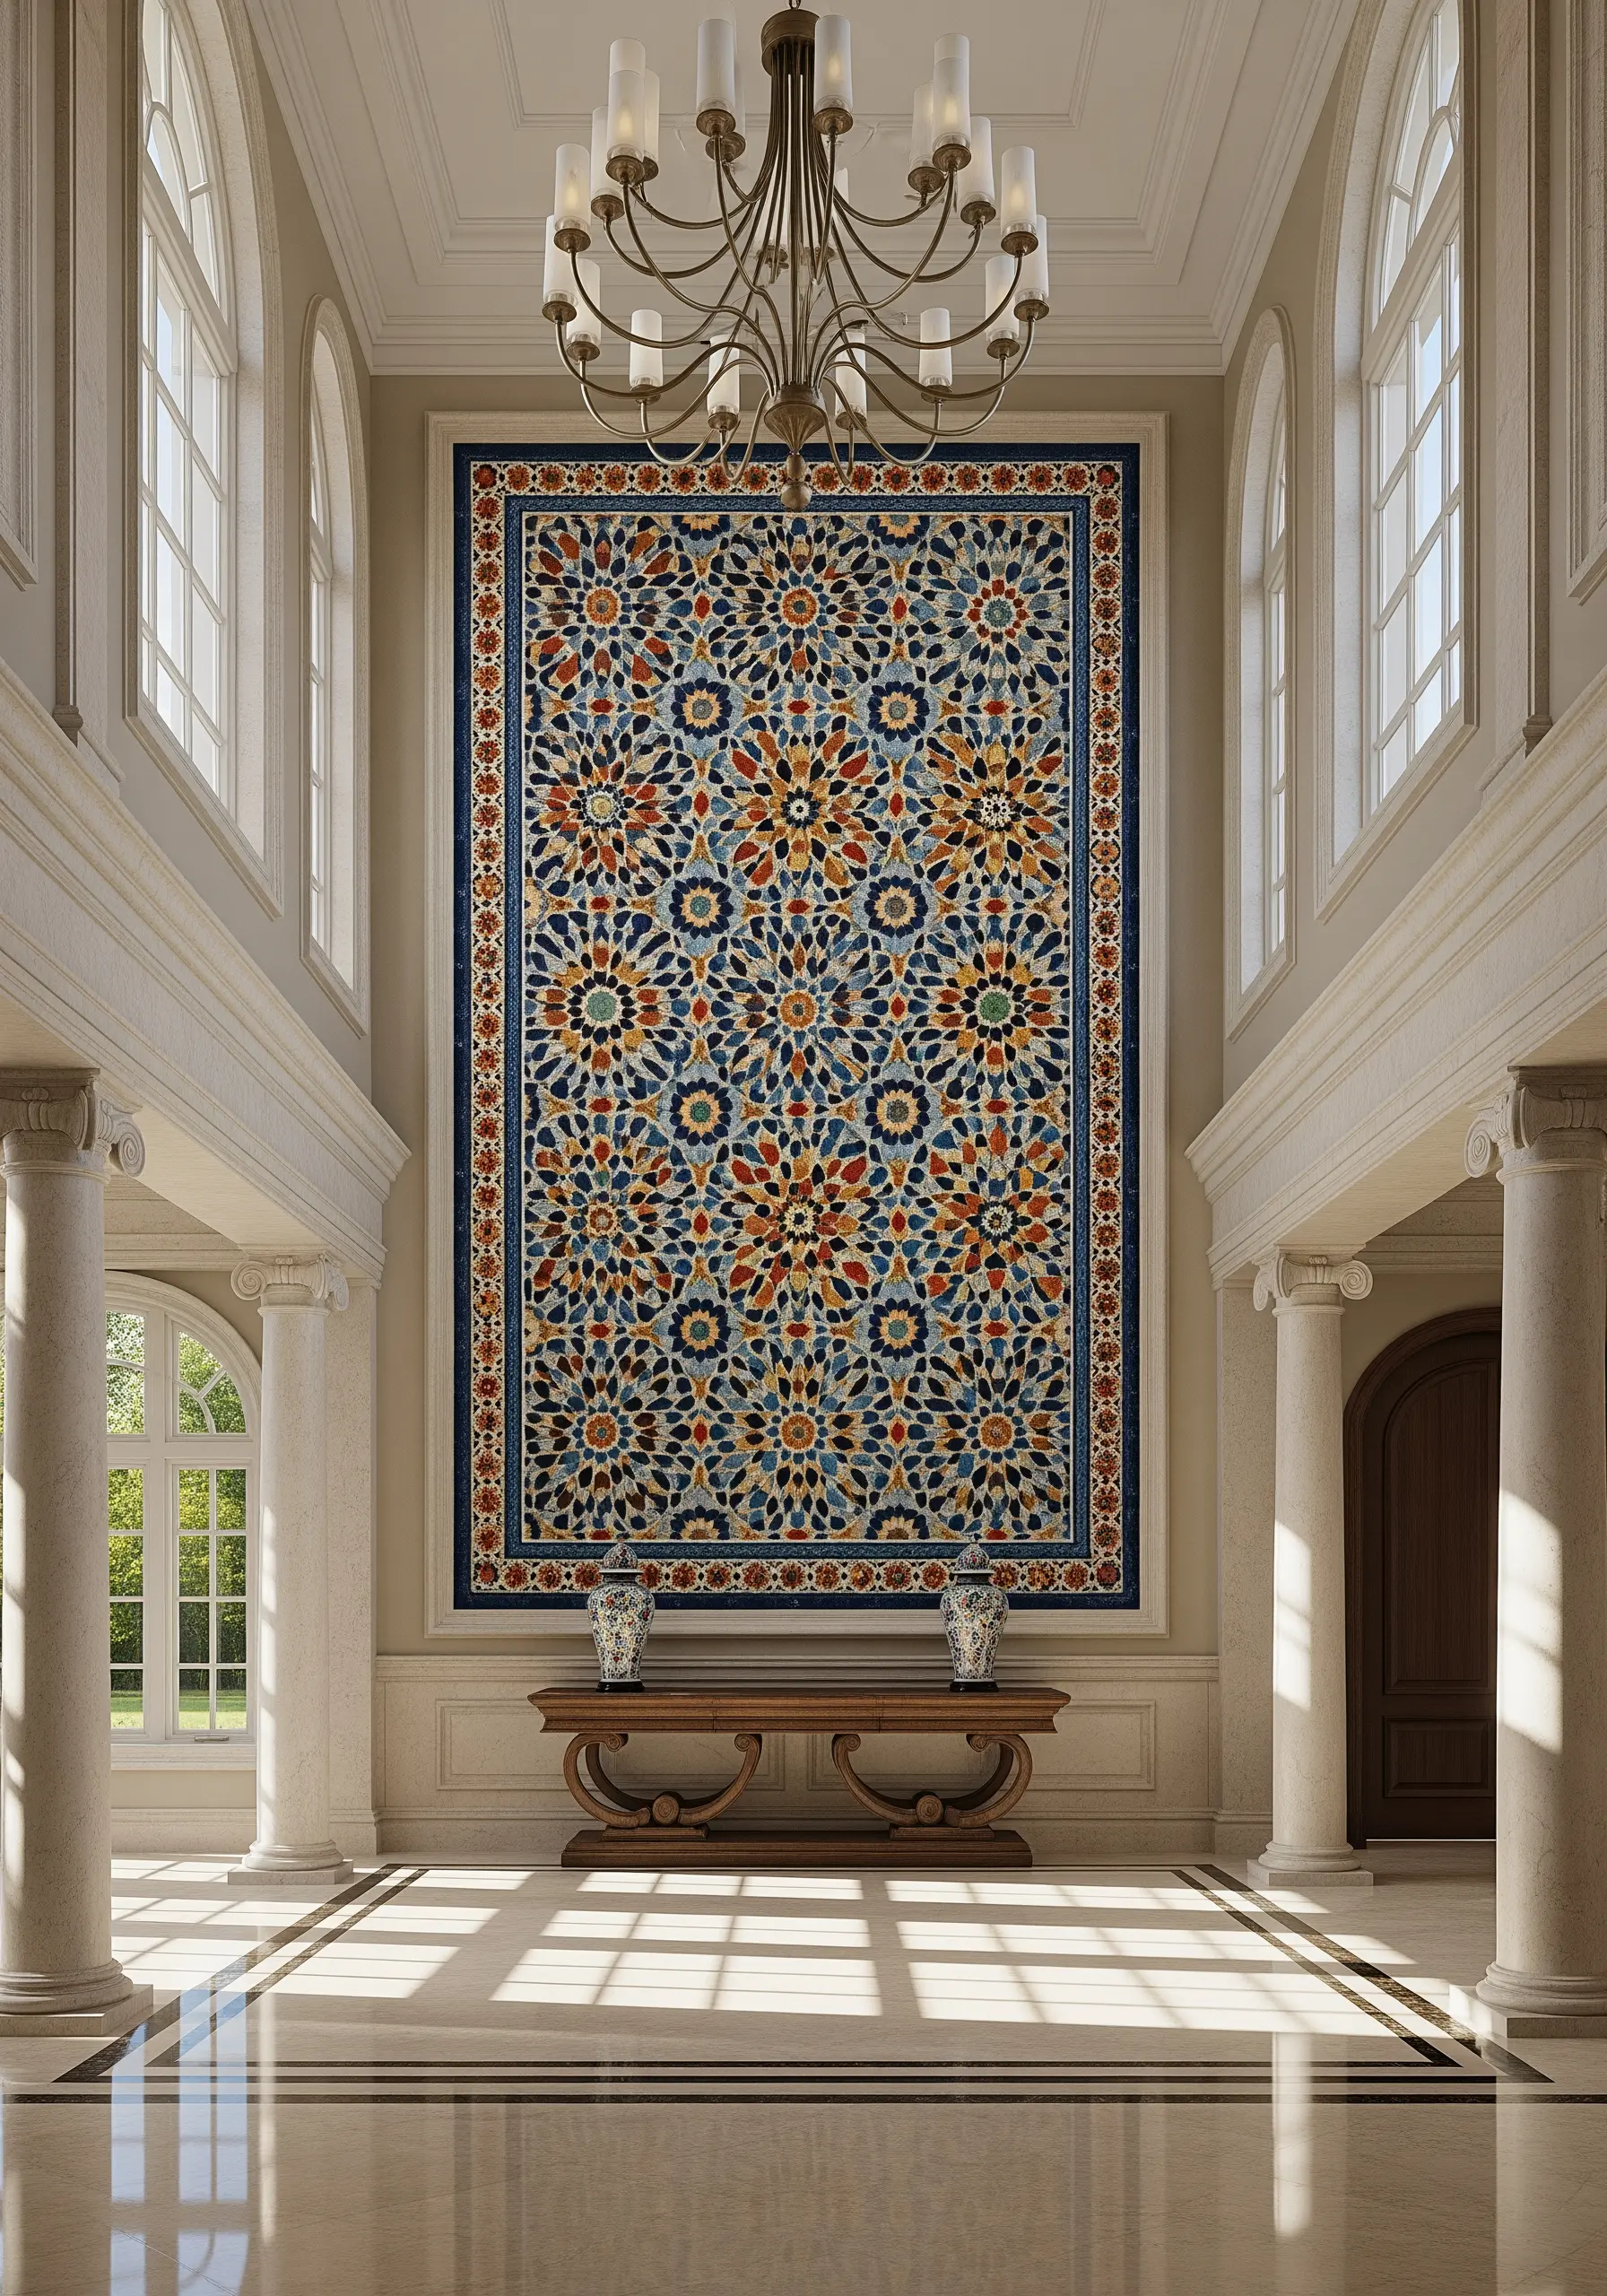
Emulate the stunning complexity of Moroccan zellij or Portuguese azulejo tilework through meticulous geometric embroidery.
Break the pattern down into its repeating shapes—stars, polygons, and petals—and fill each one with a perfectly smooth satin stitch.
Careful planning and a precise pattern transfer are essential for achieving the flawless symmetry that makes these designs so mesmerizing.
This large-scale project transforms your wall into a breathtaking mosaic of thread, offering the visual impact of tile with the softness of textile.
30. Layer Shapes and Lines for a Mid-Century Modern Look
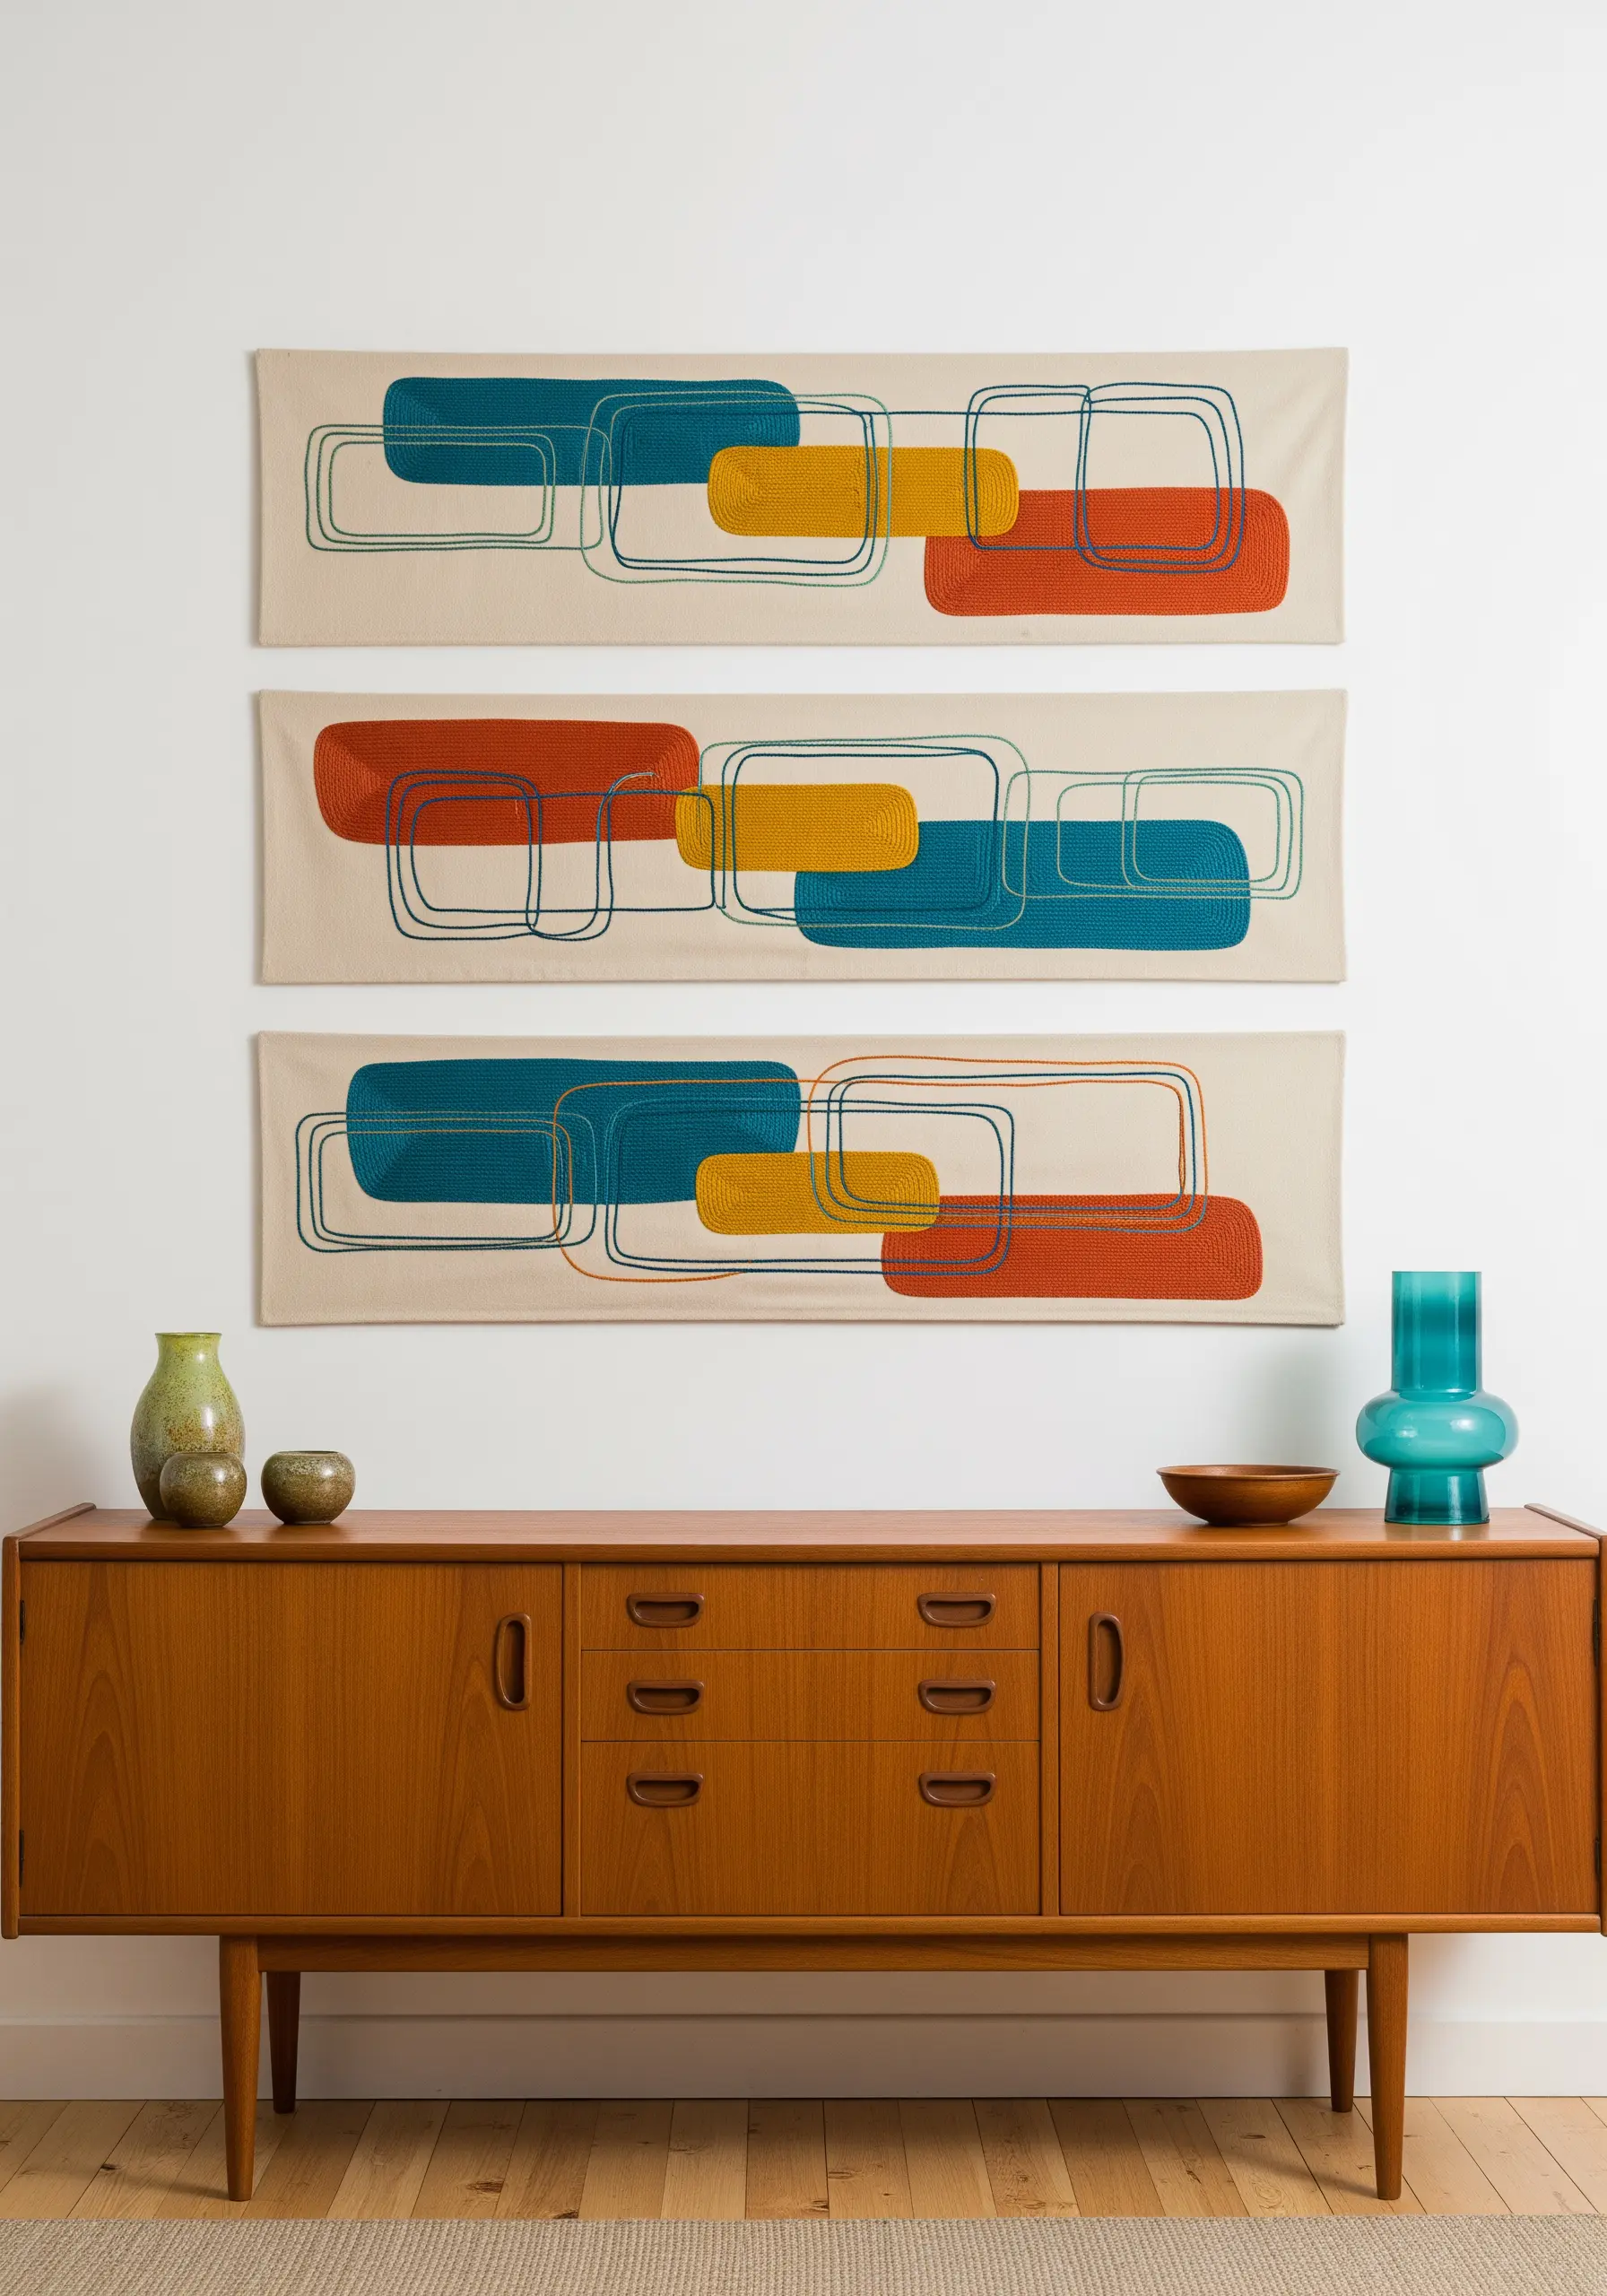
Capture the spirit of mid-century modern design by layering simple filled shapes with clean, free-flowing outlines.
First, create your color-blocked rectangles using a darning stitch or satin stitch. Then, stitch the overlapping black outlines on top using a simple backstitch.
The key to this style is the illusion of transparency where the outlines cross over the colored shapes, combined with a limited, retro color palette.
Displaying the panels horizontally above a long, low piece of furniture reinforces the clean lines and aesthetic of the era.
31. Paint a Misty Forest with Thread and Negative Space
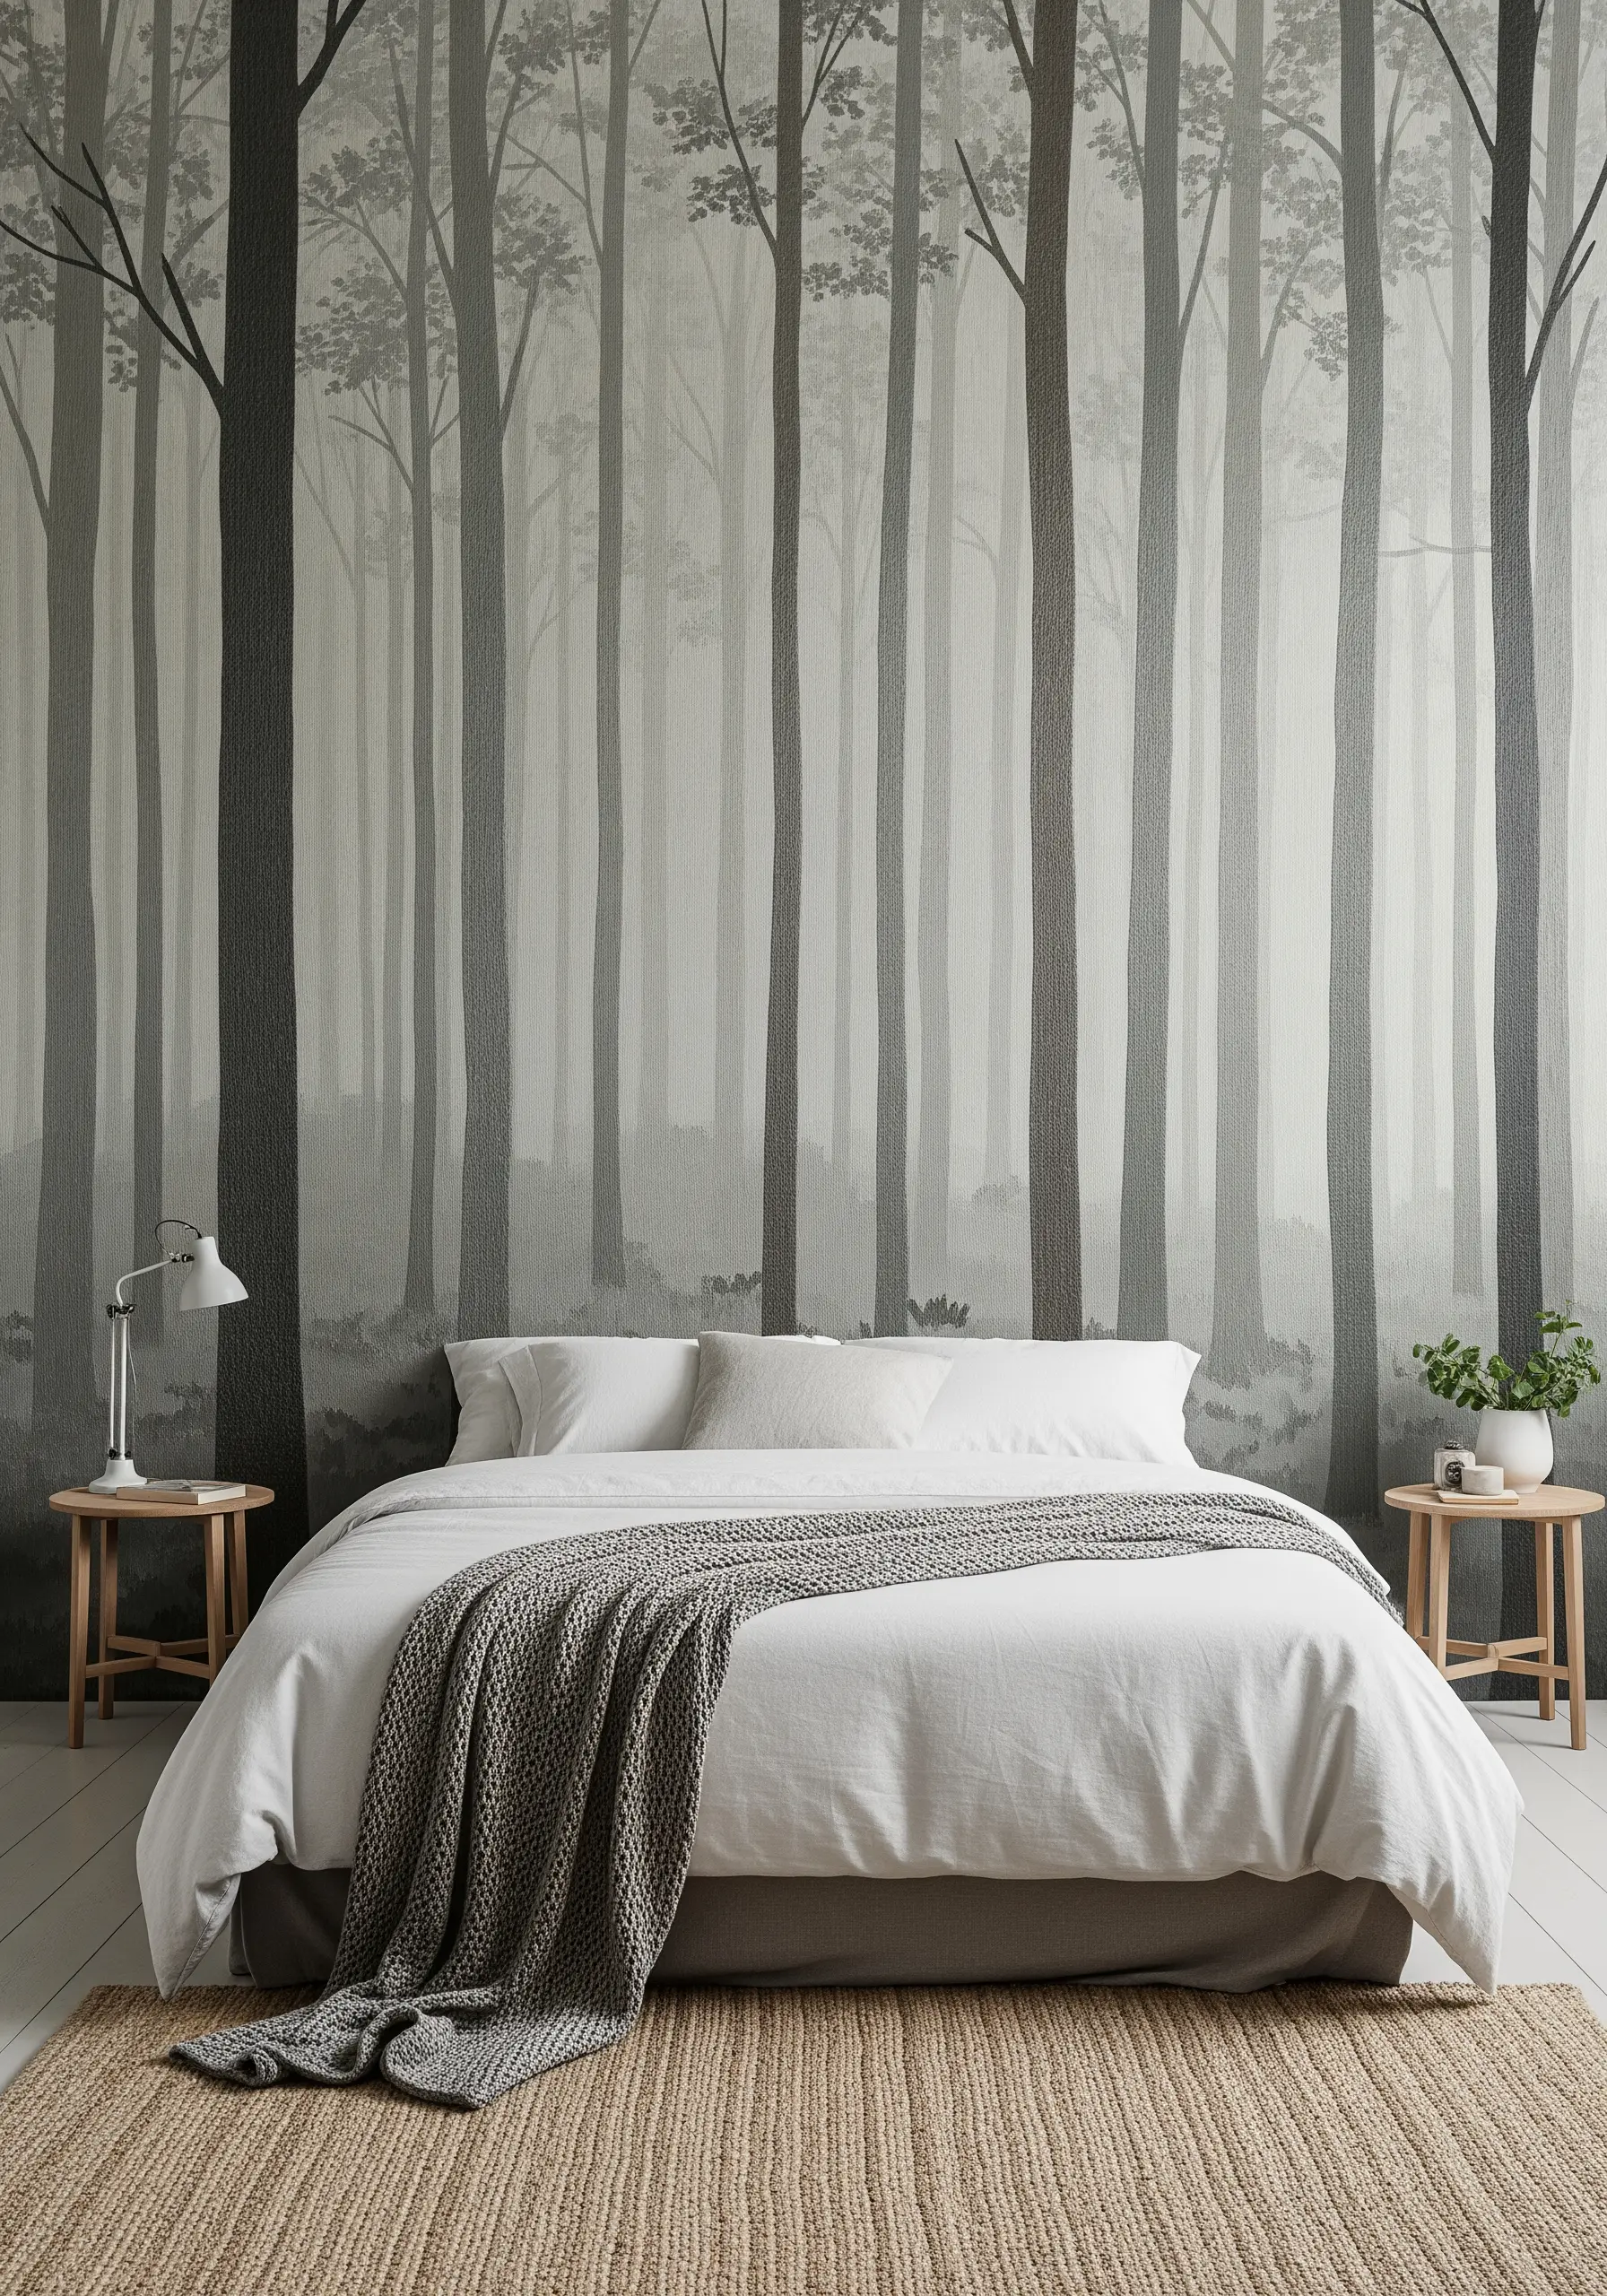
Create a sense of atmospheric depth by using the background fabric as a key element of your design.
Stitch the trees in the foreground with dark, solid satin stitch, and use progressively lighter shades for the trees further back.
For the most distant trees, simply use a light gray outline stitch, allowing the fabric color to represent the mist-filled air between them.
This clever use of negative space and tonal shading turns a simple landscape into an immersive, atmospheric scene.


