

This weekend, I want you to put down the pattern for a moment and simply notice the world around you. Look at the texture of moss on a stone, the lines in a piece of wood, or the way foam gathers on the shore. These are the details that hold the real magic, the textures that can transform your embroidery from a flat image into a living, breathing piece of art.
You don’t need a dozen complex stitches to capture this essence. Often, it’s about how you use the simplest stitches—varying their size, direction, and density. It’s about choosing a thread not just for its color, but for its sheen, its thickness, and the way it feels in your hand.
Here, you’ll find textures inspired by the earth, each one a small invitation to experiment. Think of this not as a list of rules, but as a conversation between your needle, your thread, and the quiet beauty of the natural world. Let’s begin.
1. Cultivate a Mossy Carpet with Varied Knots
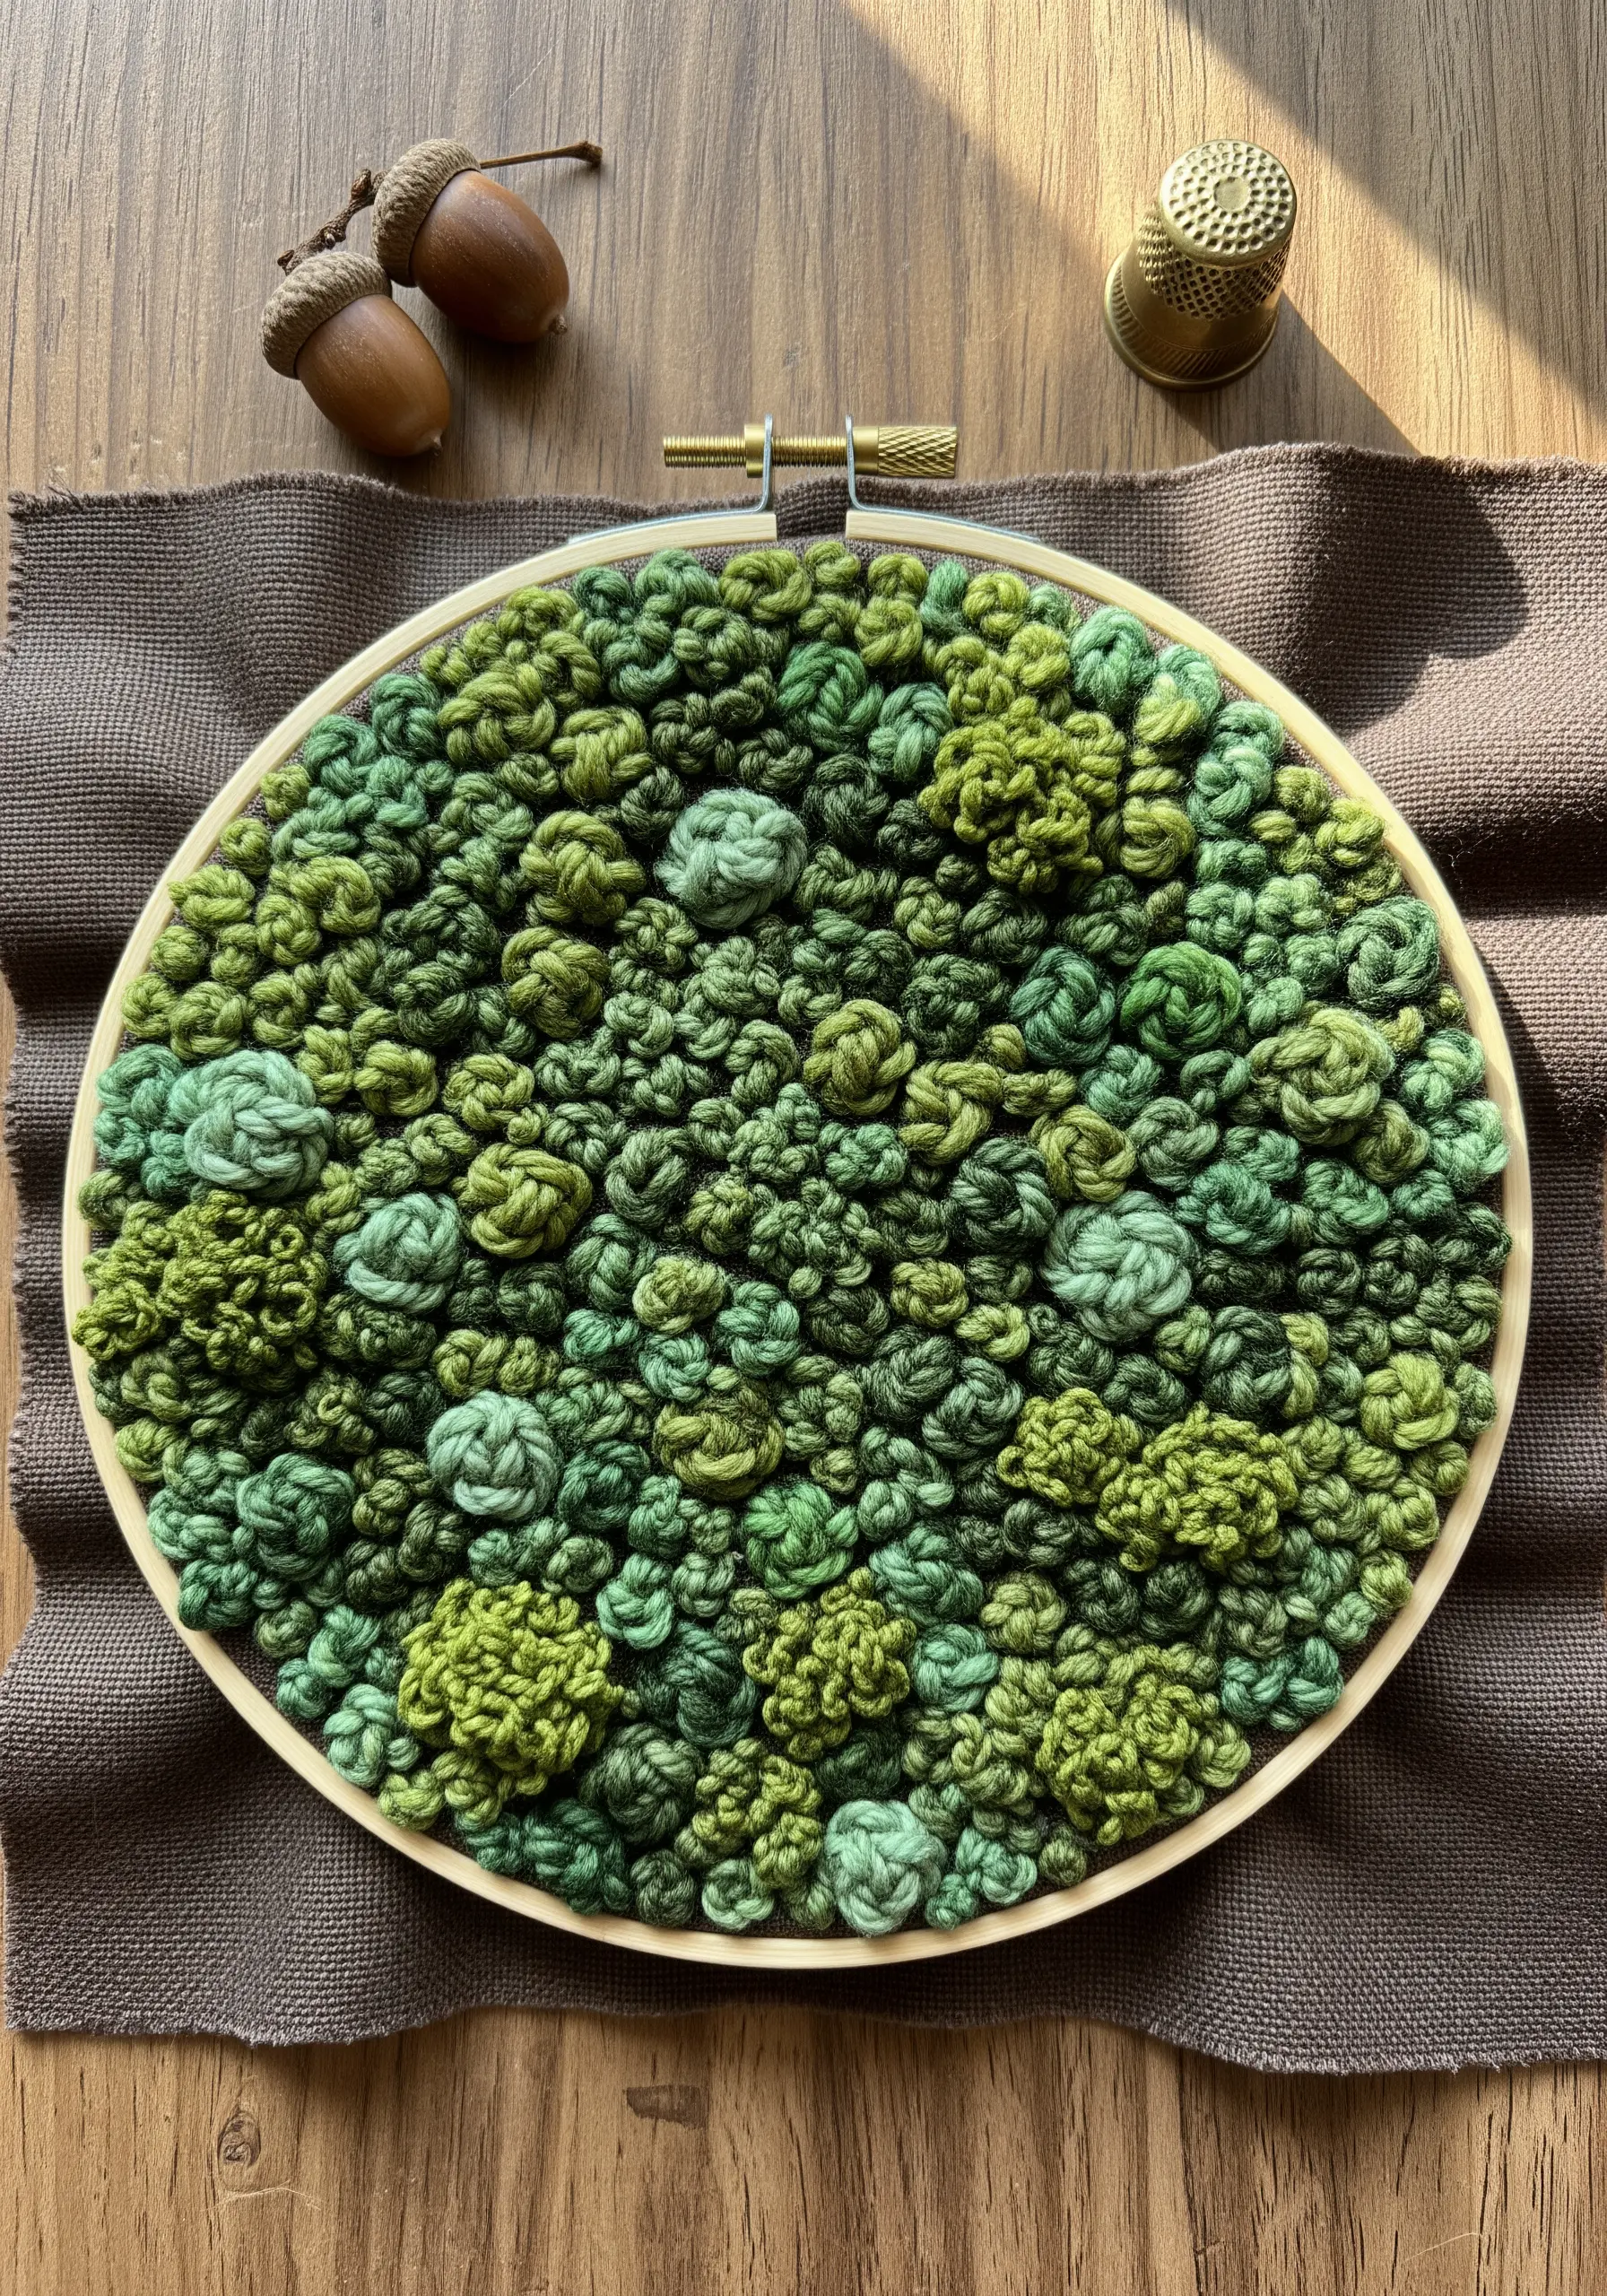
Create a lush, three-dimensional moss texture by densely packing French knots and bullion knots together.
Use a mix of thread types, like matte cotton, wool, and pearl cotton, in at least four or five shades of green to achieve a natural, undulating surface.
The key to realism is variation: make some knots tight with few wraps and others looser with more wraps to mimic the clustered growth of real moss.
This technique is perfect for filling large areas in nature-texture embroidery projects and adds a wonderfully tactile quality to your hoop art.
2. Carve Geological Strata with Directional Stitches
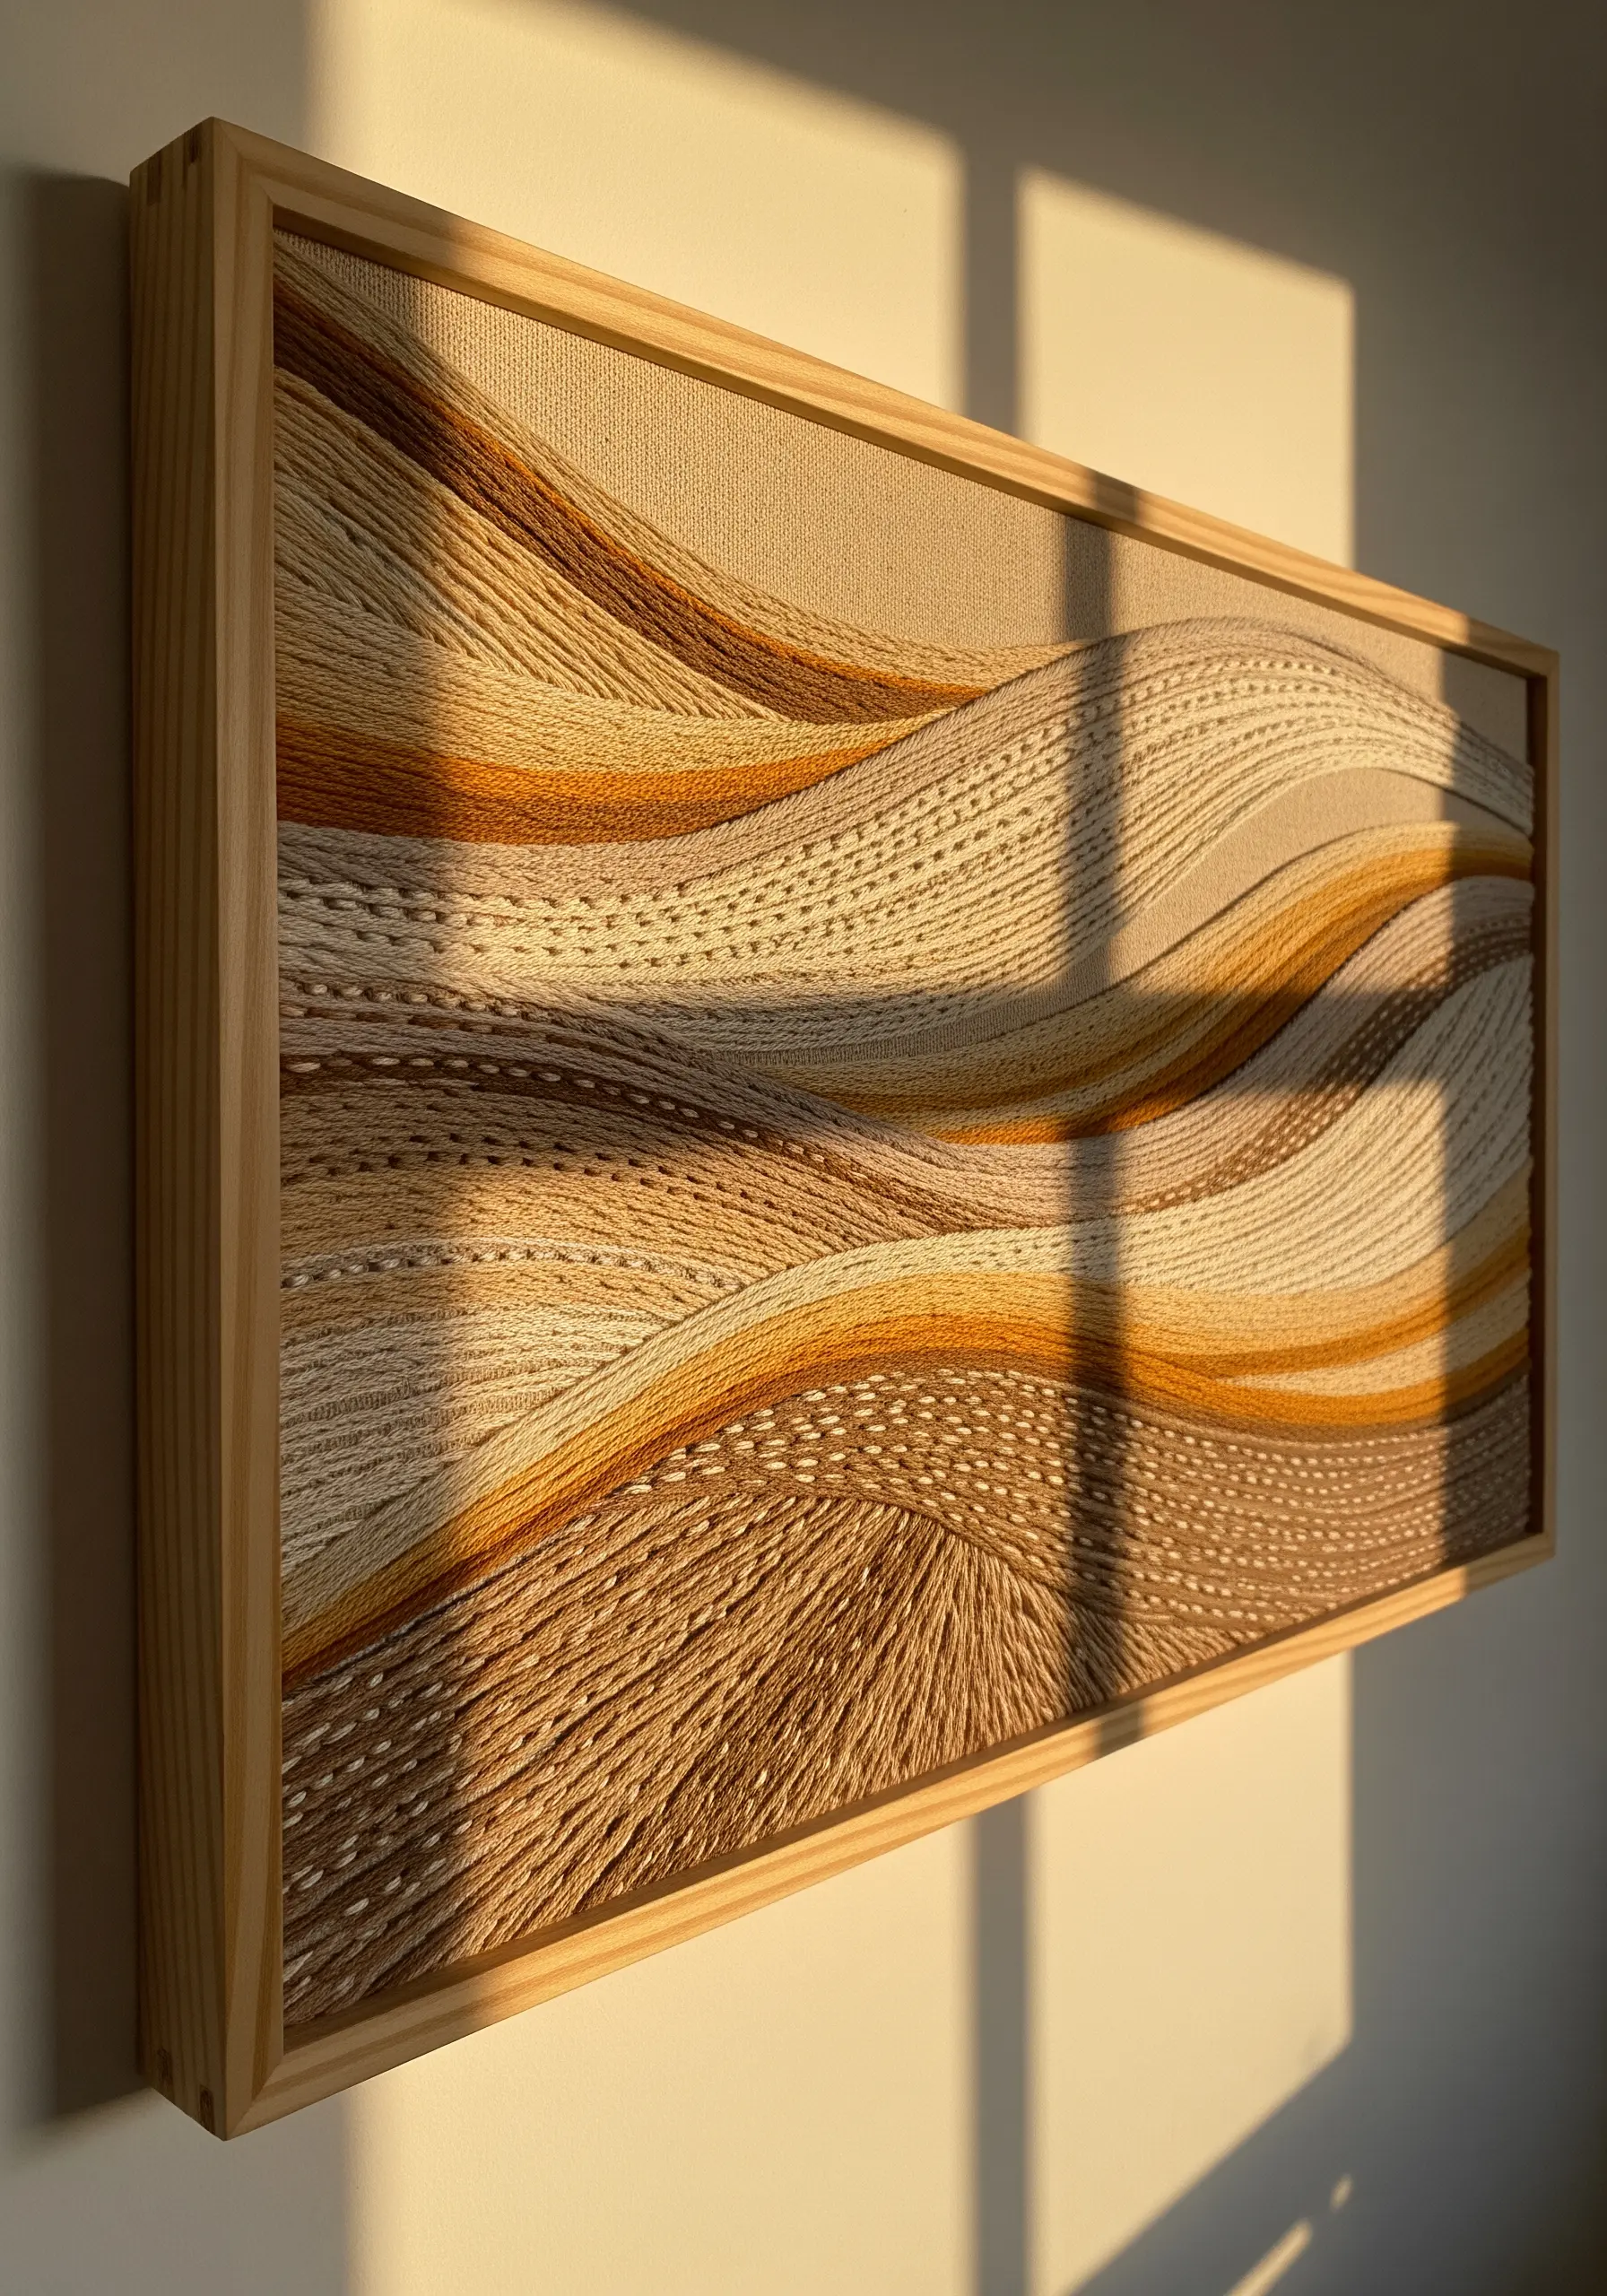
Mimic the appearance of sand dunes or sedimentary rock by combining long satin stitches with textured seed stitches.
Work in flowing, horizontal bands, allowing the direction of your stitches to define the contours of the landscape.
To create depth, use a gradient of earth tones, blending them subtly where one band meets another.
The contrast between the smooth satin stitch areas and the granular seed stitch sections creates a dynamic visual rhythm that guides the eye across the piece.
This approach elevates simple stitches into sophisticated abstract yarn wall art.
3. Replicate Cracked Earth with Dense French Knots
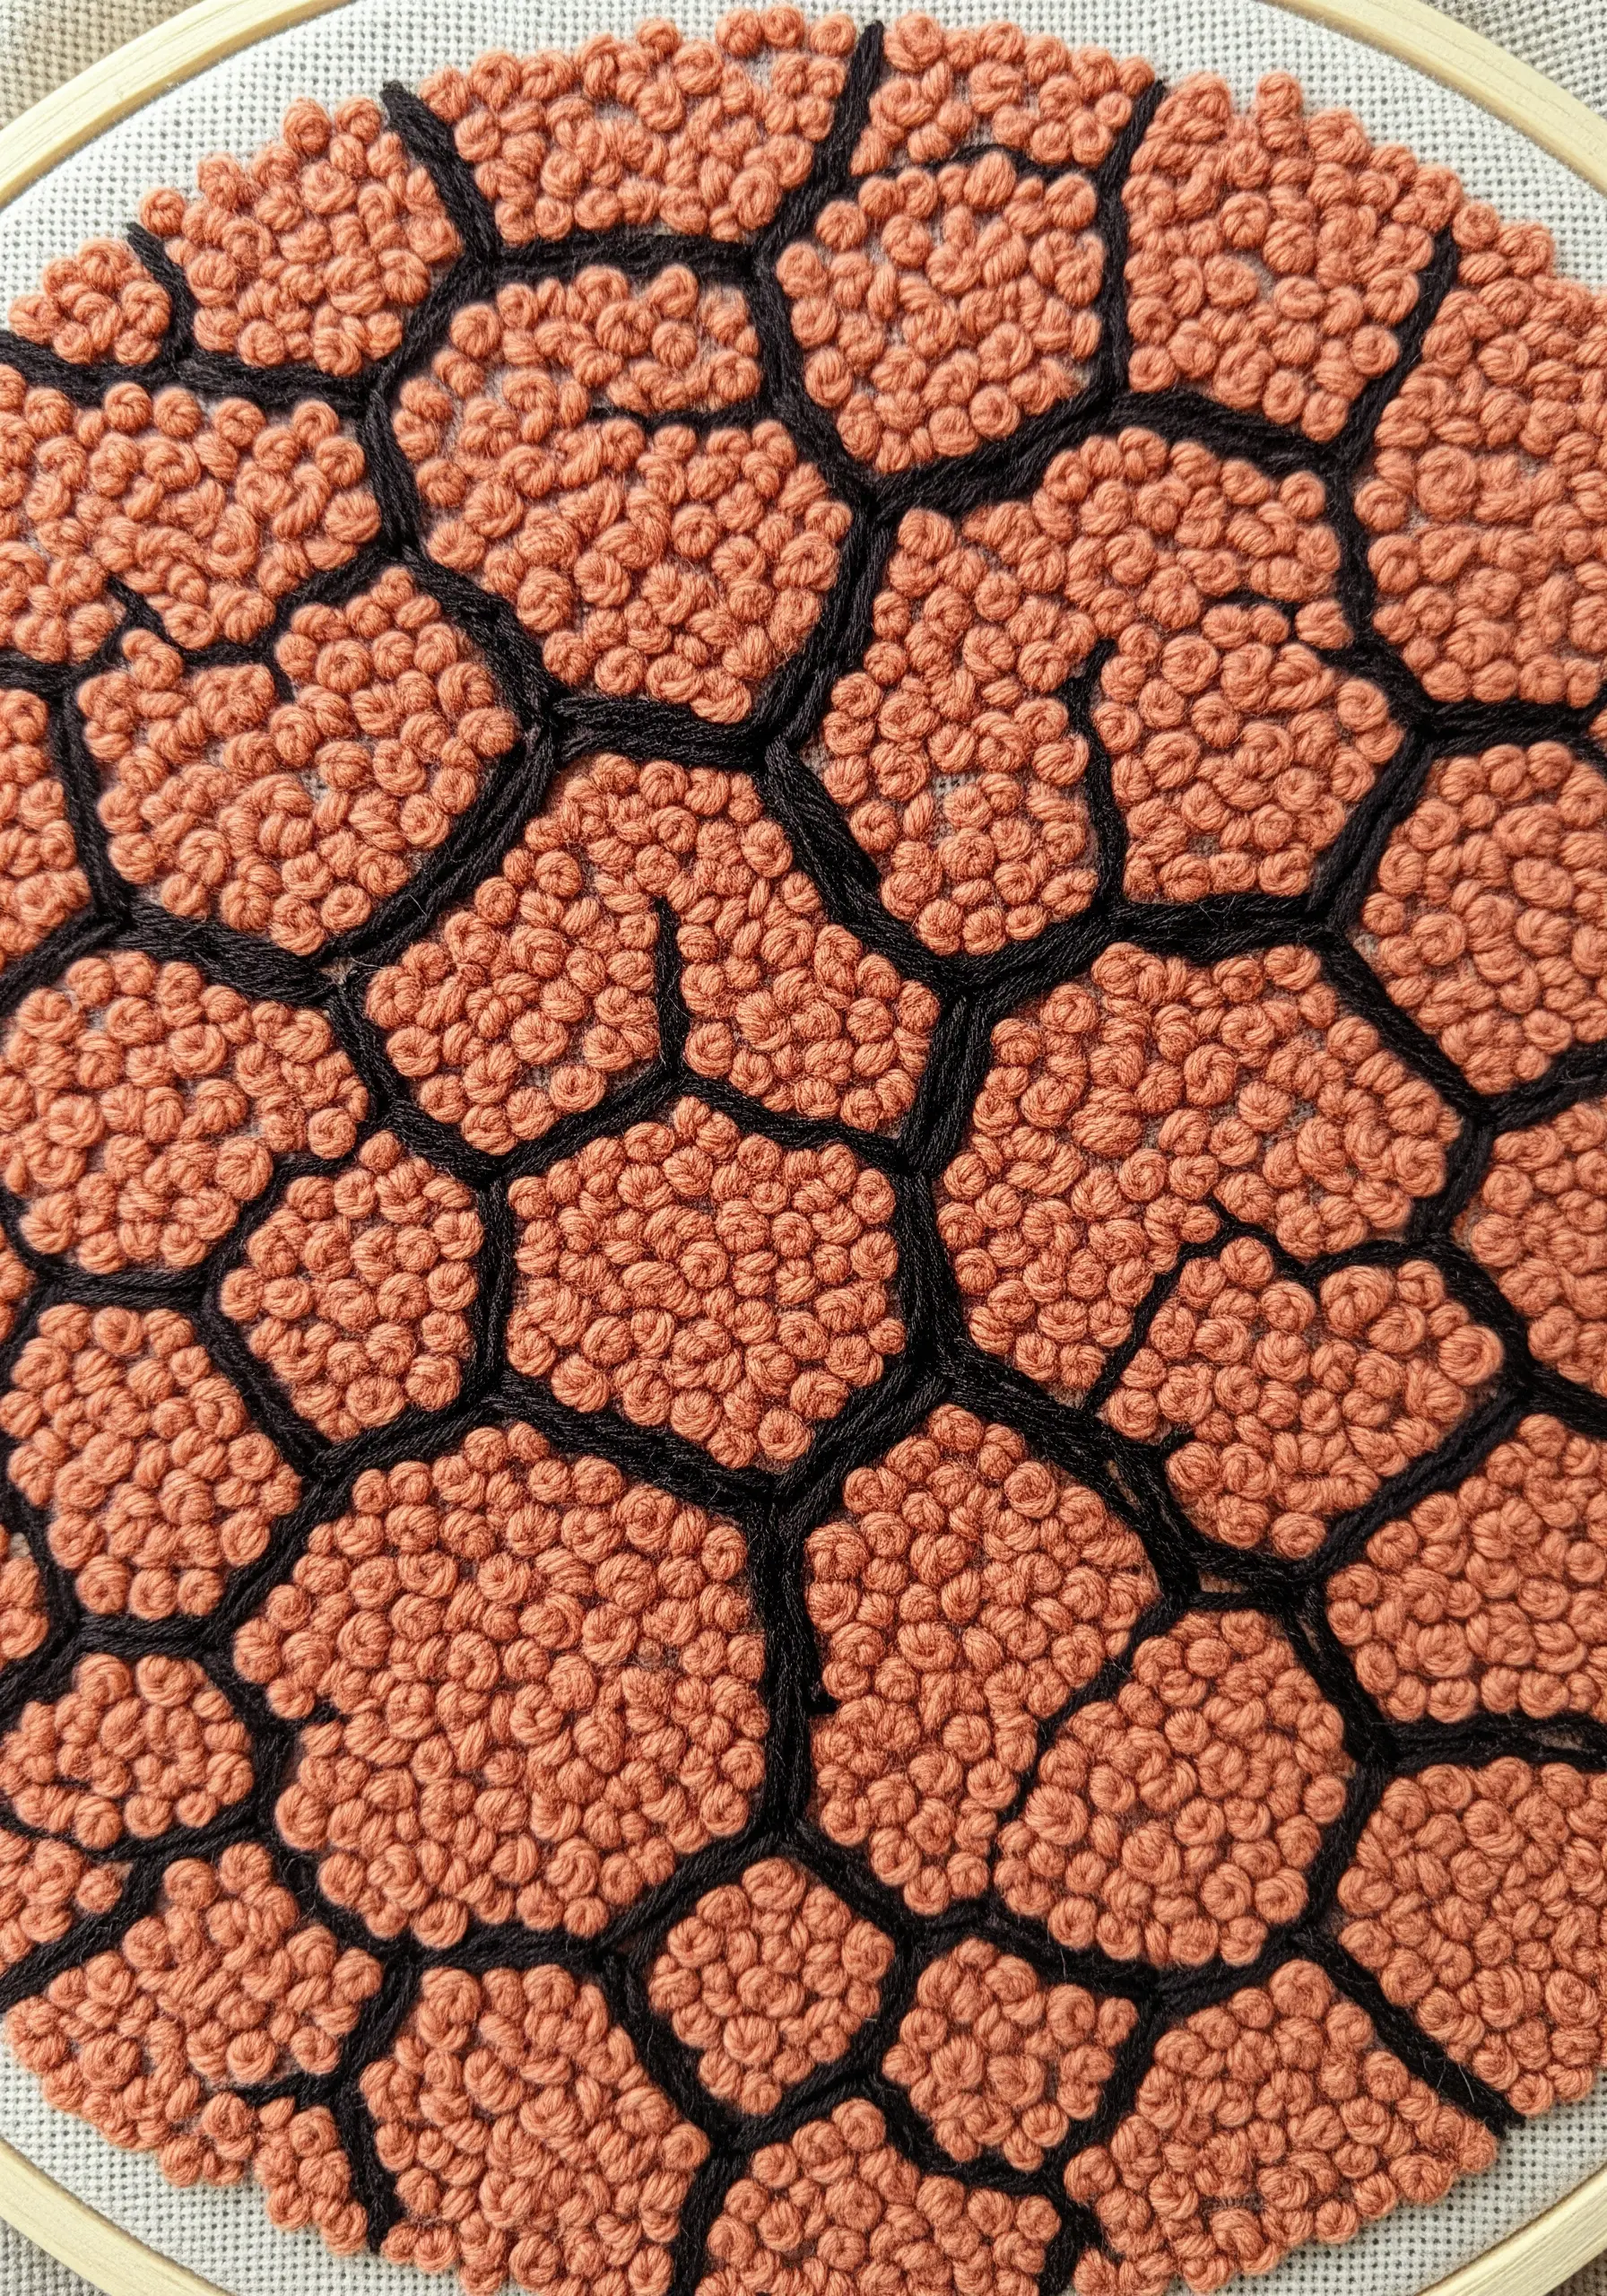
Achieve the texture of parched, cracked earth by filling organically shaped cells with tightly packed French knots.
First, create your pattern by stitching a strong, dark outline using a whipped backstitch or chain stitch—this provides a crisp boundary.
Then, fill each section completely with knots in a single, earthy color like terracotta or ochre.
The density of the knots creates a raised, pebbled surface, while the dark outlines provide the visual contrast needed to simulate deep fissures in the ground.
4. Sculpt River Stones with Padded Satin Stitch
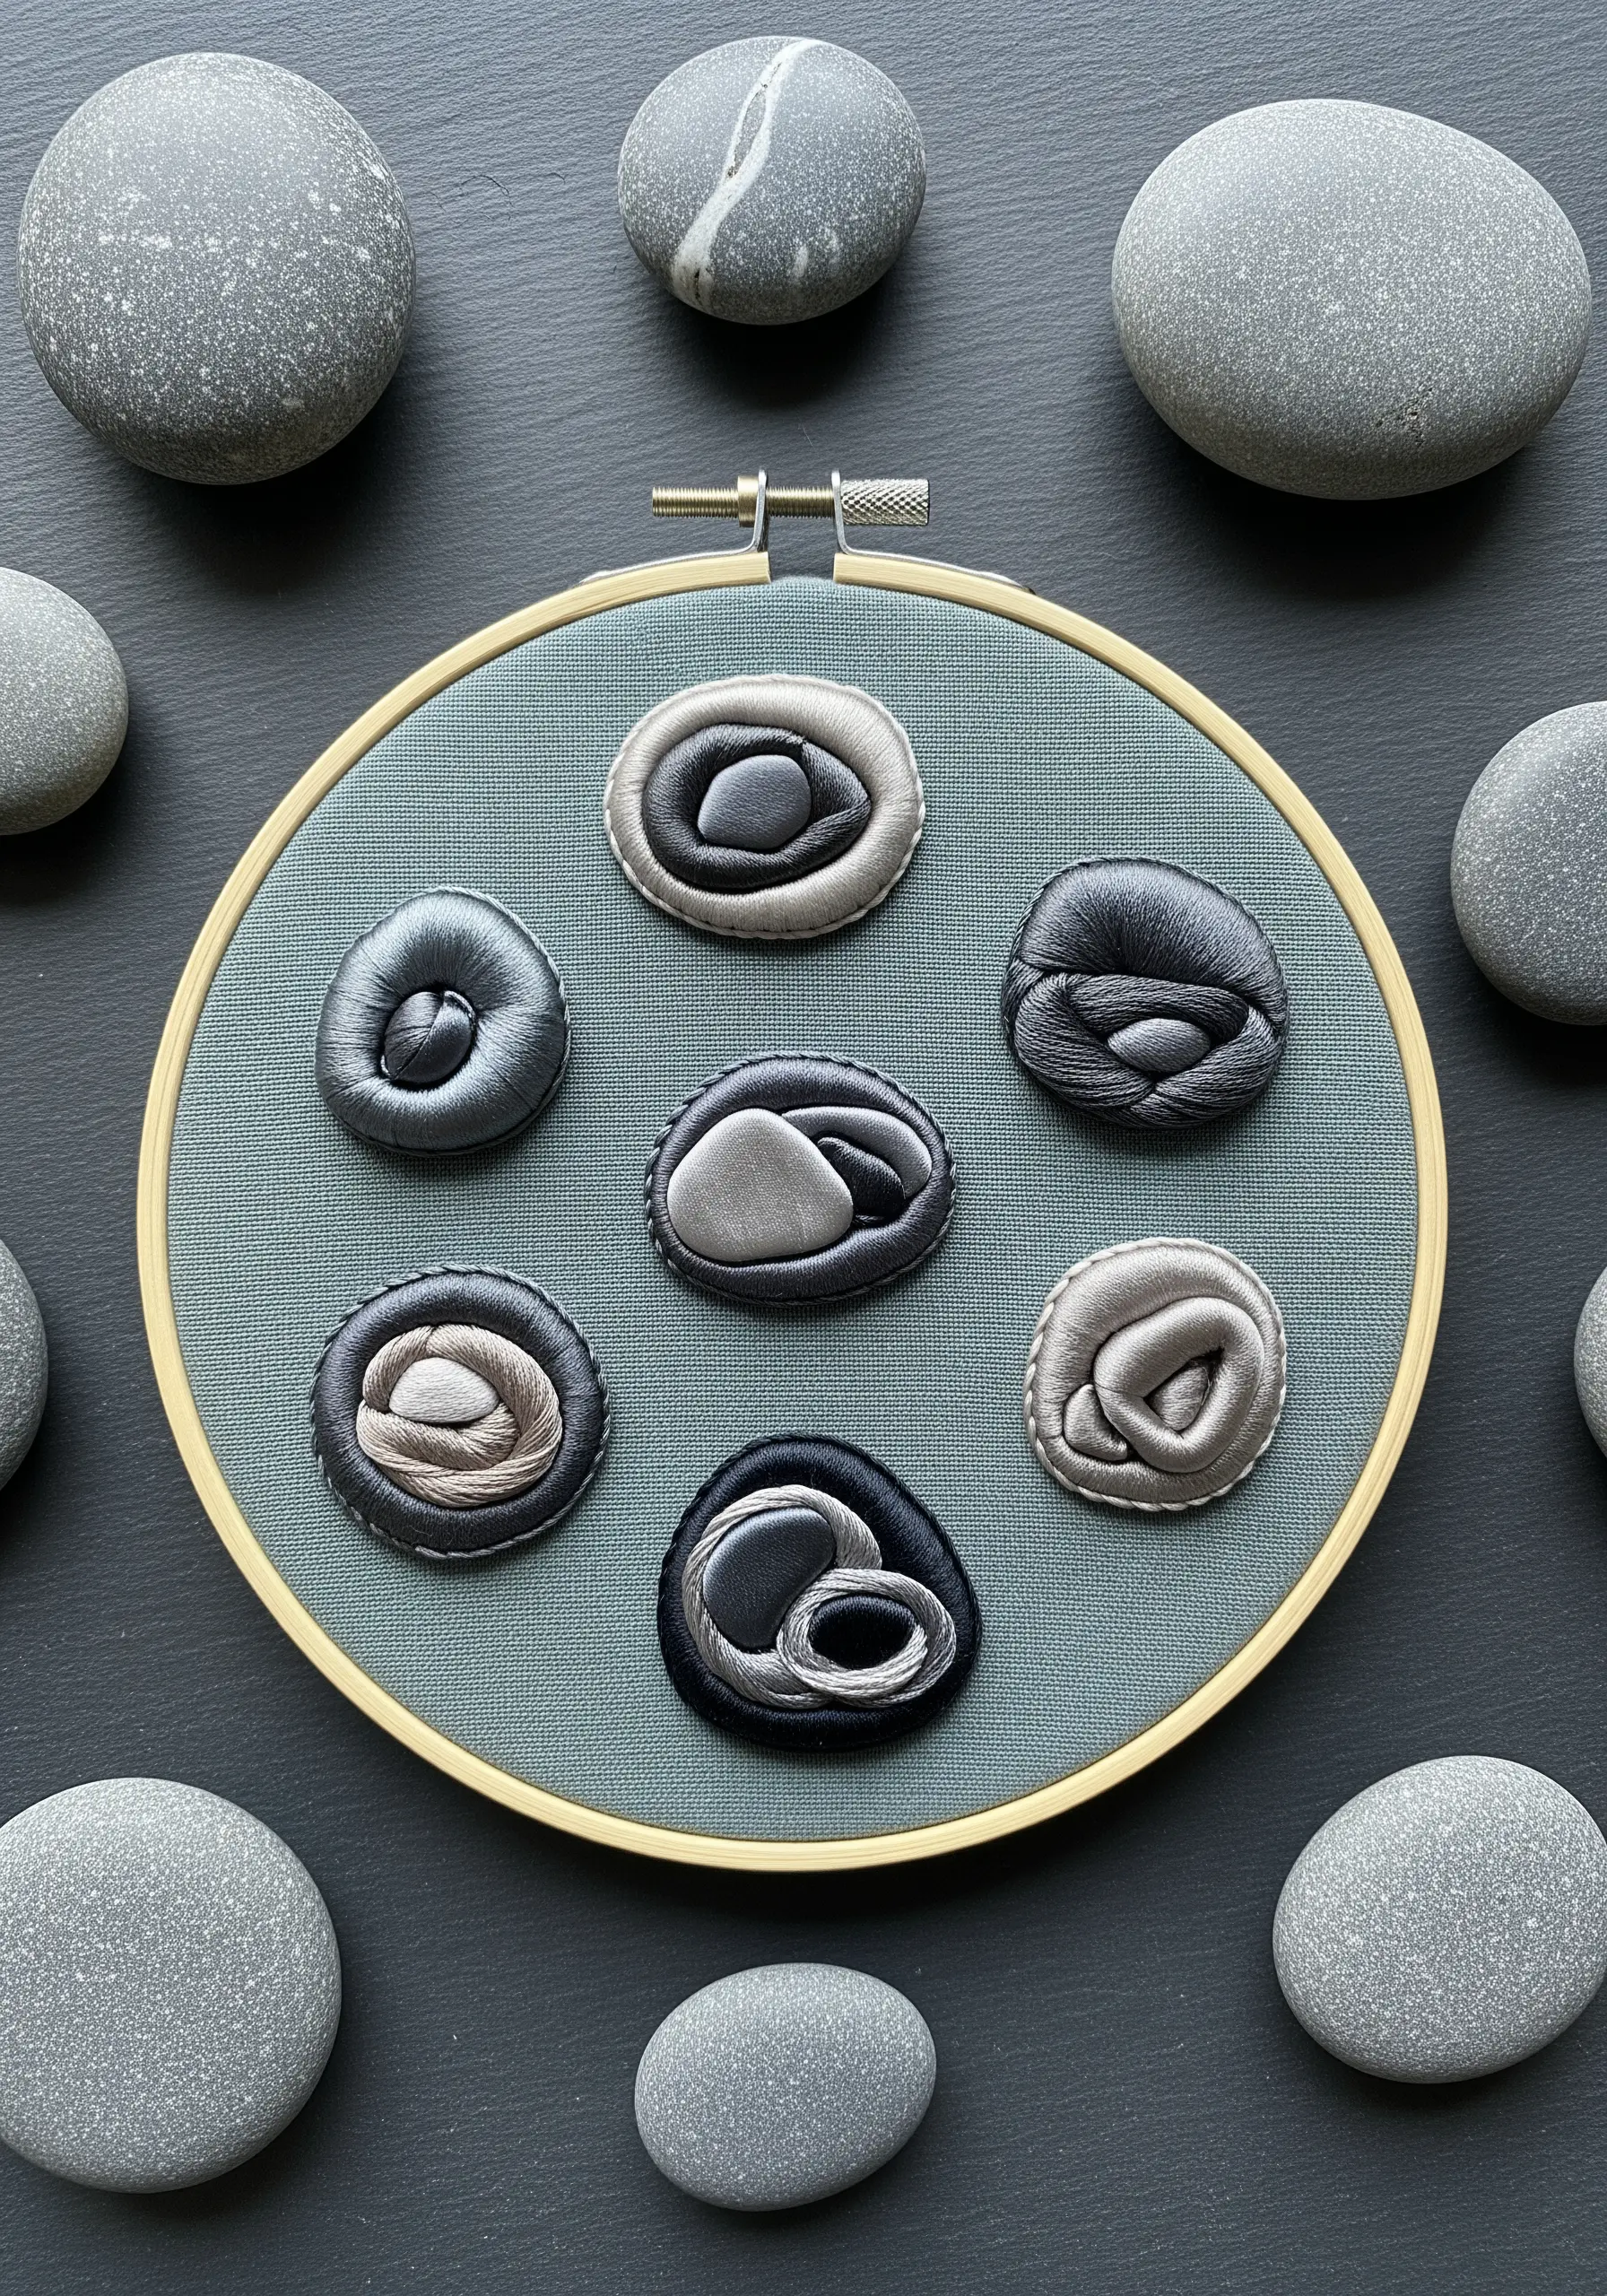
Give your embroidered stones a smooth, rounded, three-dimensional form using the padded satin stitch technique.
Start by creating a base for each stone—either with small, cut-out felt shapes or by building up layers of foundation stitches like seed stitch.
Cover this padding with smooth, even satin stitches, using shades of grey, black, and silver to mimic the light and shadow on a real stone.
The underlying padding lifts the satin stitch from the fabric surface, creating a tangible sense of volume and weight.
This is one of the best embroidery ideas inspired by stones, sand, and soil for adding realism.
5. Mimic Tree Bark with Layered Couching
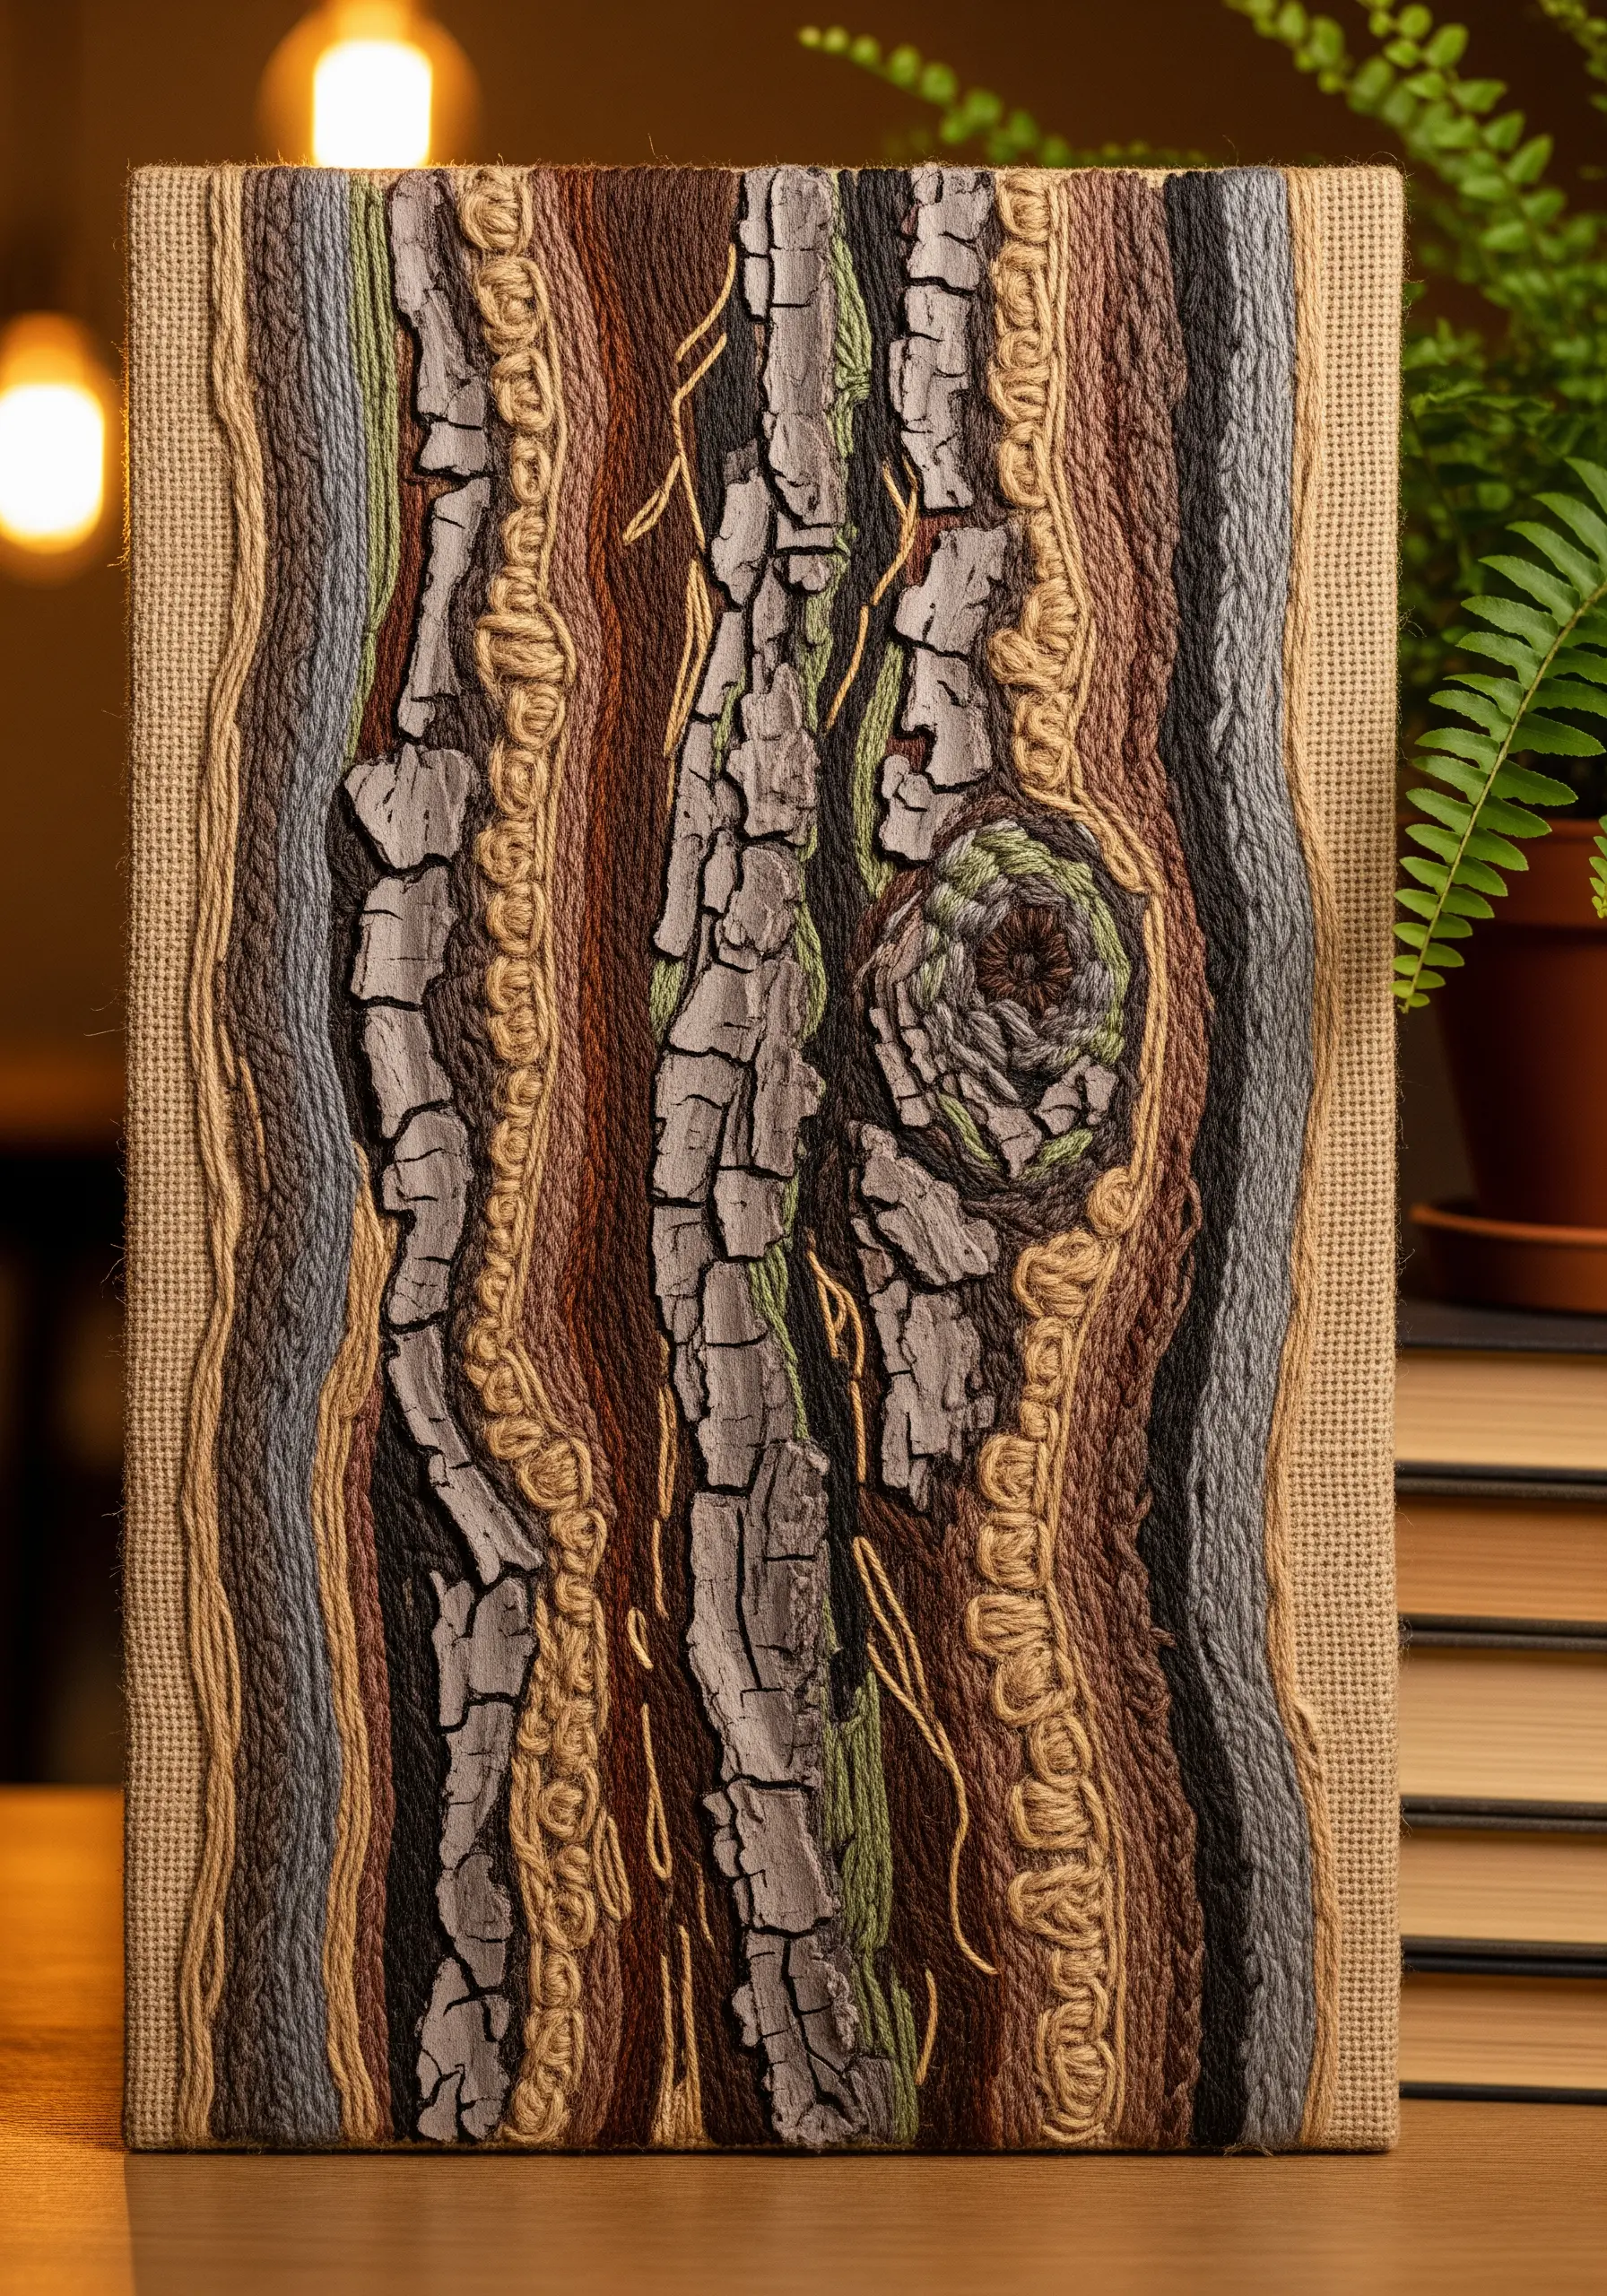
Build an incredibly realistic tree bark texture by layering different threads and stitches.
Use thick, chunky yarn or multiple strands of embroidery floss and couch it onto your fabric to form the main ridges of the bark.
Fill the areas between the couched lines with directional straight stitches or satin stitches in variegated brown and grey threads to simulate the wood grain.
For the final touch, add small, tangled knots or appliqué tiny pieces of frayed fabric to replicate the gnarled, weathered details of a tree trunk.
6. Add Dimension to Botanicals with a Mix of Stitches

Bring a woodland scene to life by assigning a different stitch to each element for maximum textural contrast.
Use a smooth satin stitch for the mushroom caps, allowing the direction of the stitches to follow their curved shape.
Create a spongy, mossy base with a dense layer of French knots, and use a rougher, more uneven split stitch for the decaying log.
This technique ensures each part of your composition has its own distinct character, making the entire piece more engaging and lifelike.
Explore more ideas with these forest floor botanical stitch ideas.
7. Capture Sea Foam with Unraveling Knots
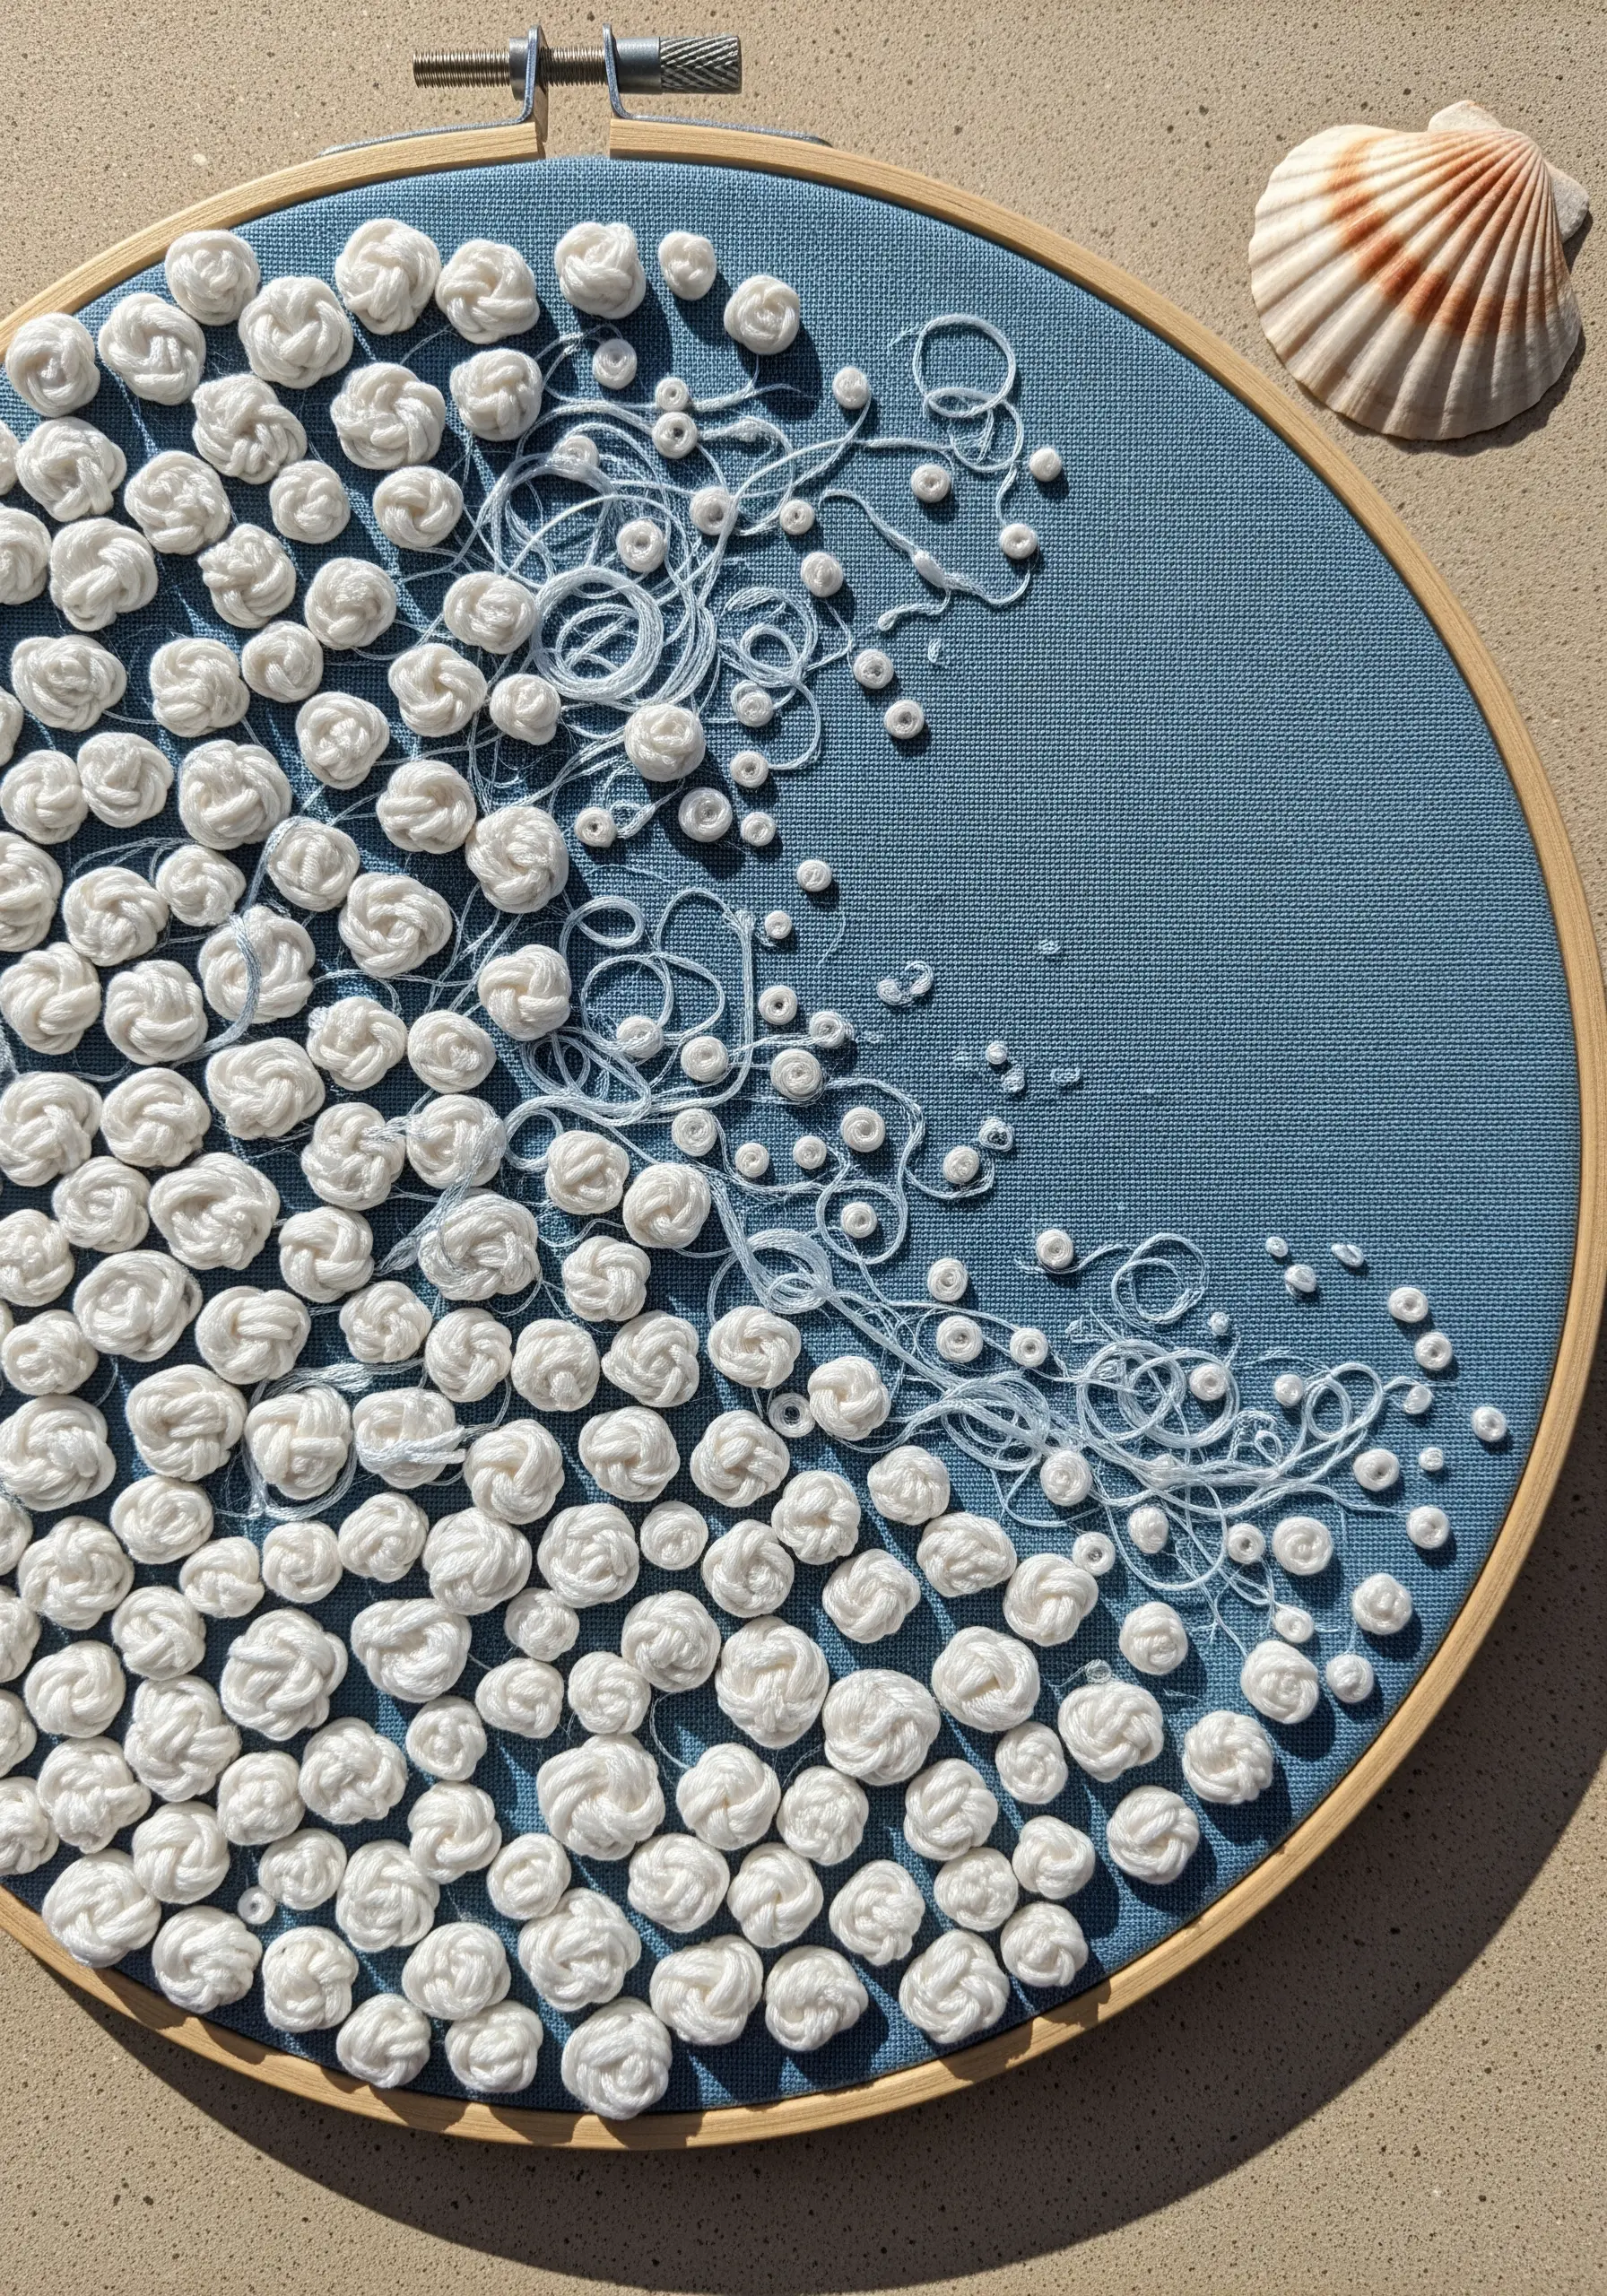
Create the delicate, frothy texture of sea foam by combining structured knots with loose, untamed threads.
Fill the main body of the wave with uniform woven wheel stitches or bullion knots to represent the dense foam.
As you move toward the edge of the foam, transition to smaller French knots, and then let your stitches dissolve into loose, trailing threads.
To do this, simply pull only one end of your thread through the fabric, leaving the other to trail freely on the surface. This contrast between order and chaos perfectly captures the movement of water.
8. Embellish Geodes with Beads and Metallics
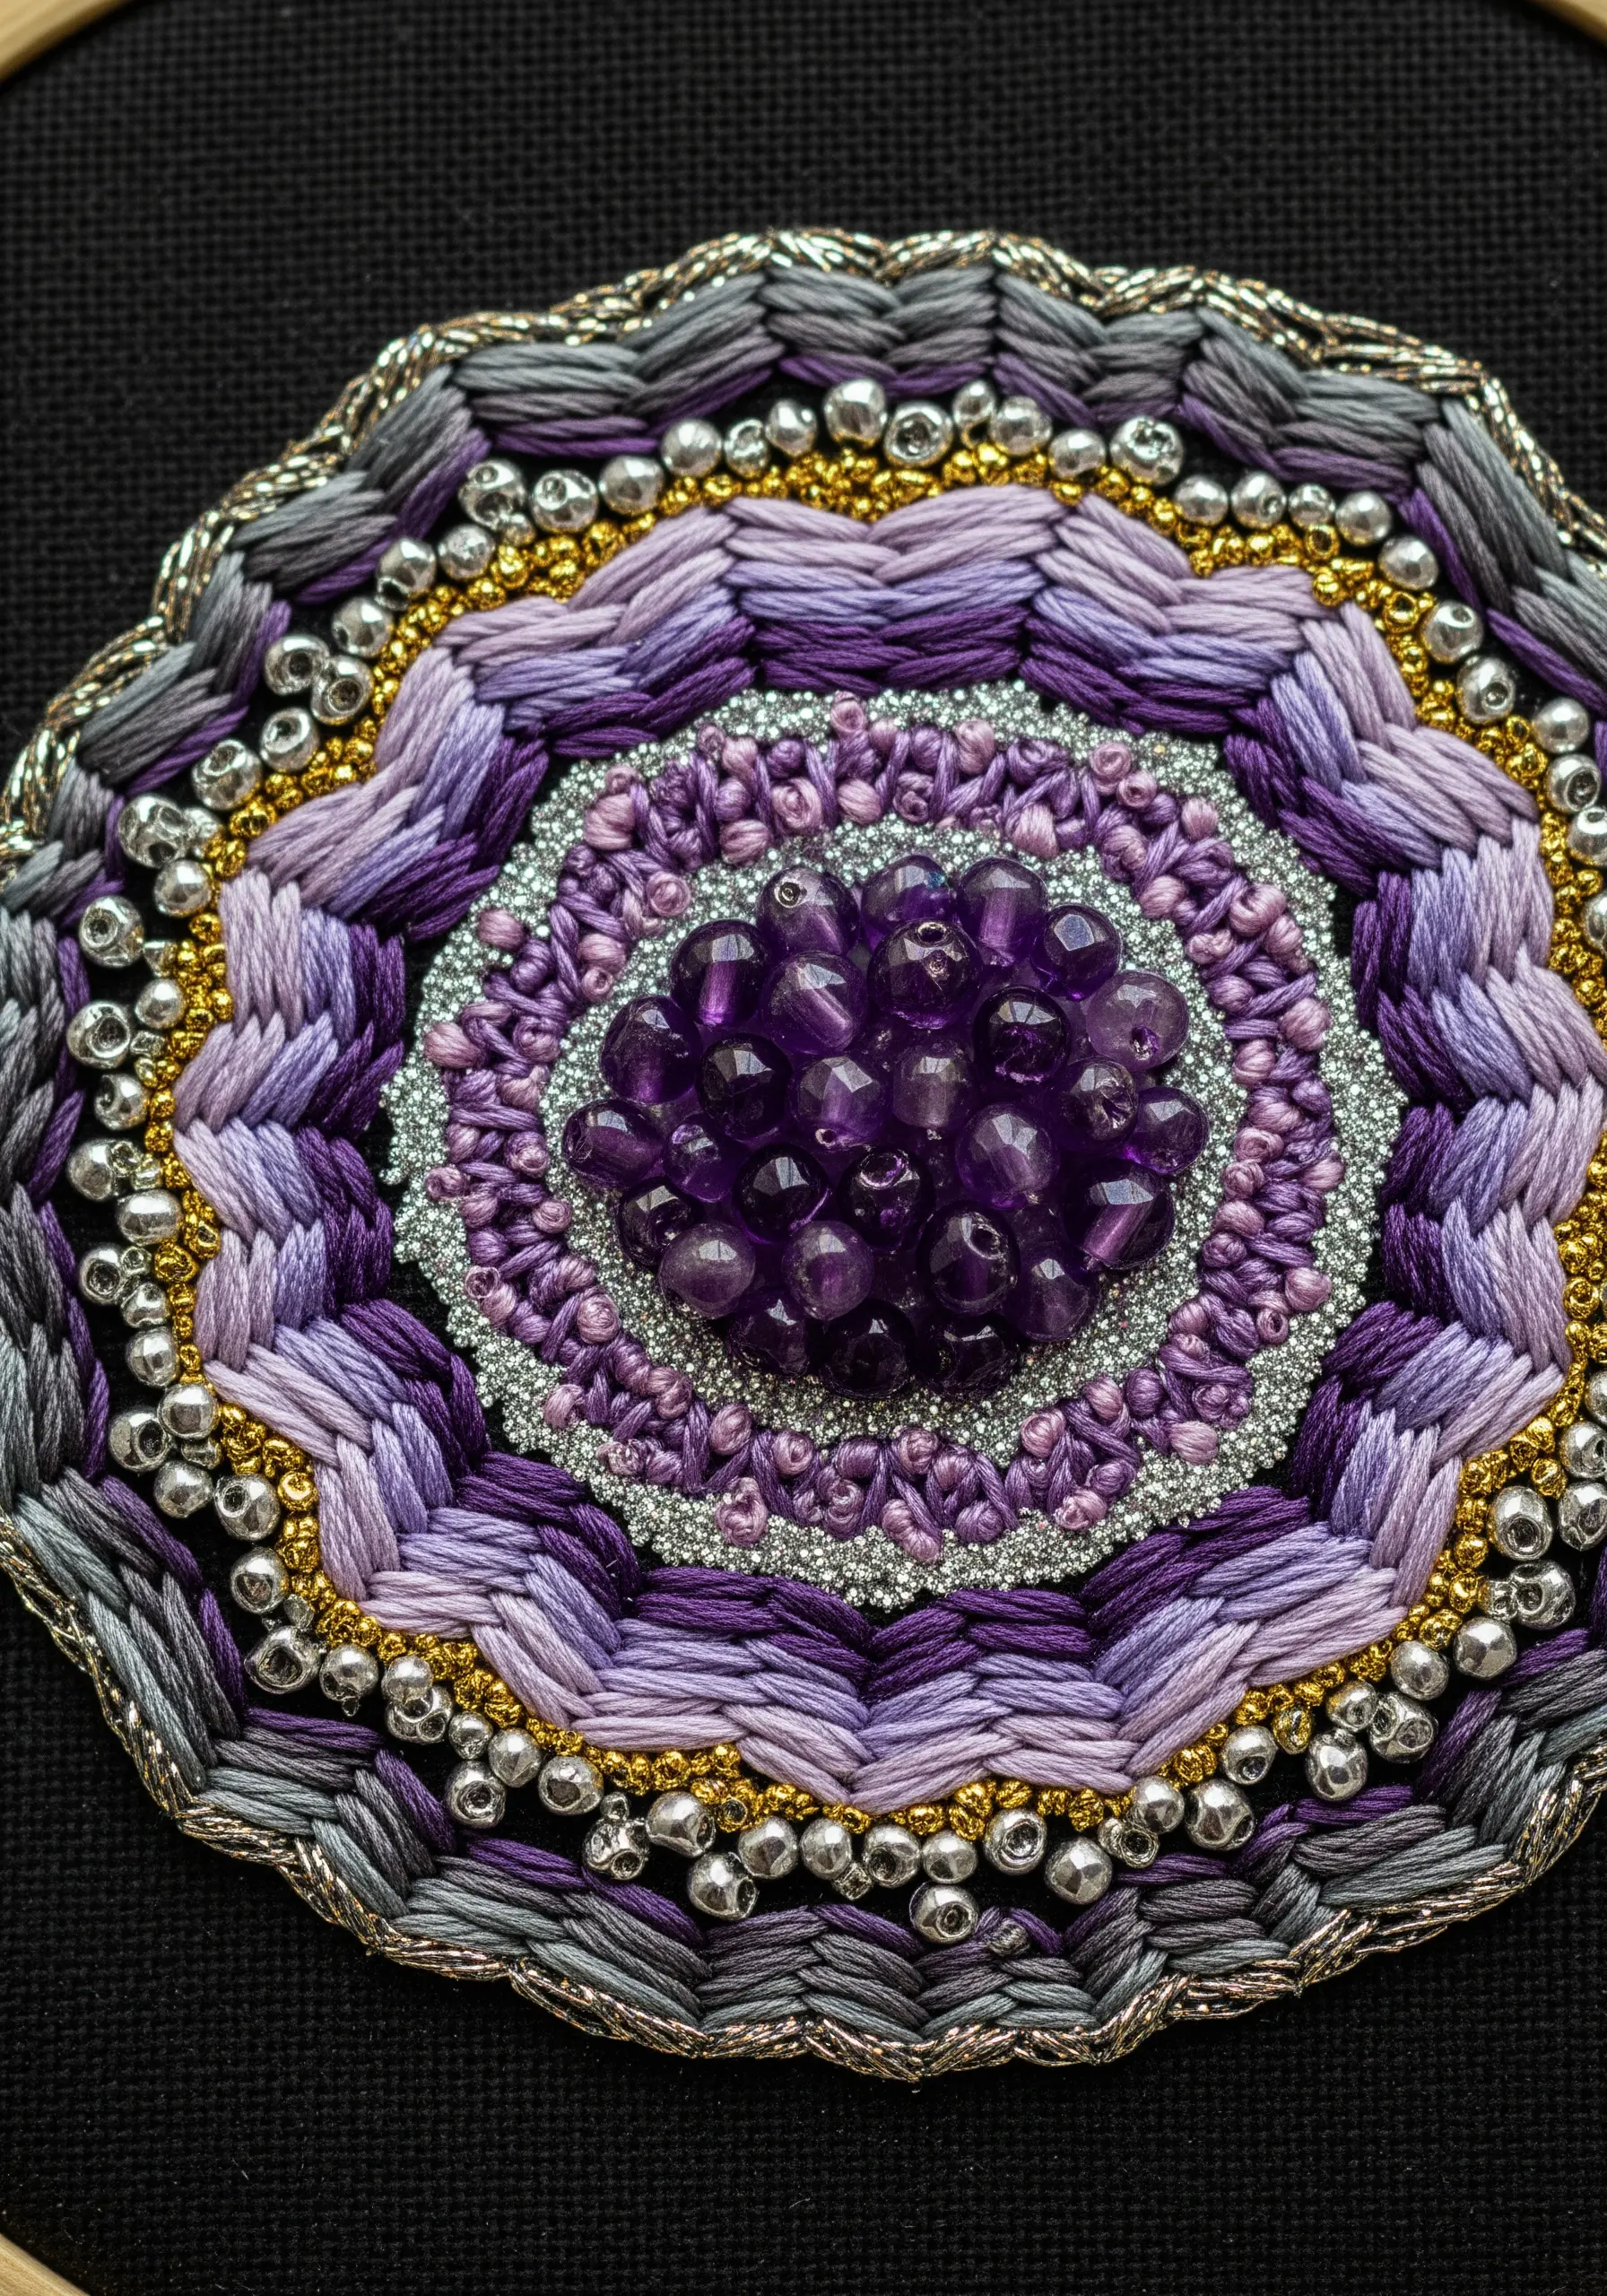
Replicate the crystalline structure of a geode by combining traditional stitches with beadwork and metallic threads.
Use long-and-short stitch in a gradient of purples and greys to form the outer layers of the stone.
For the sparkling center, stitch a dense cluster of real amethyst beads or faceted glass beads.
Separate your color bands with lines of silver metallic thread or tiny seed beads to mimic the crystalline veins, adding a touch of light and luxury to the design.
9. Achieve Rhythmic Texture with Parallel Couching
Create a bold, minimalist texture by couching long, parallel strands of thick thread or yarn onto your fabric.
Draw your central shape, then lay down your main threads, ensuring they are perfectly straight and evenly spaced.
Using a second, finer thread, stitch over the main threads at regular intervals to secure them in place. This creates a clean, ribbed effect.
This technique works beautifully for simple abstract designs and highlights the pure texture and color of your chosen fiber.
10. Weave a Meadow with Interspersed Chain Stitches
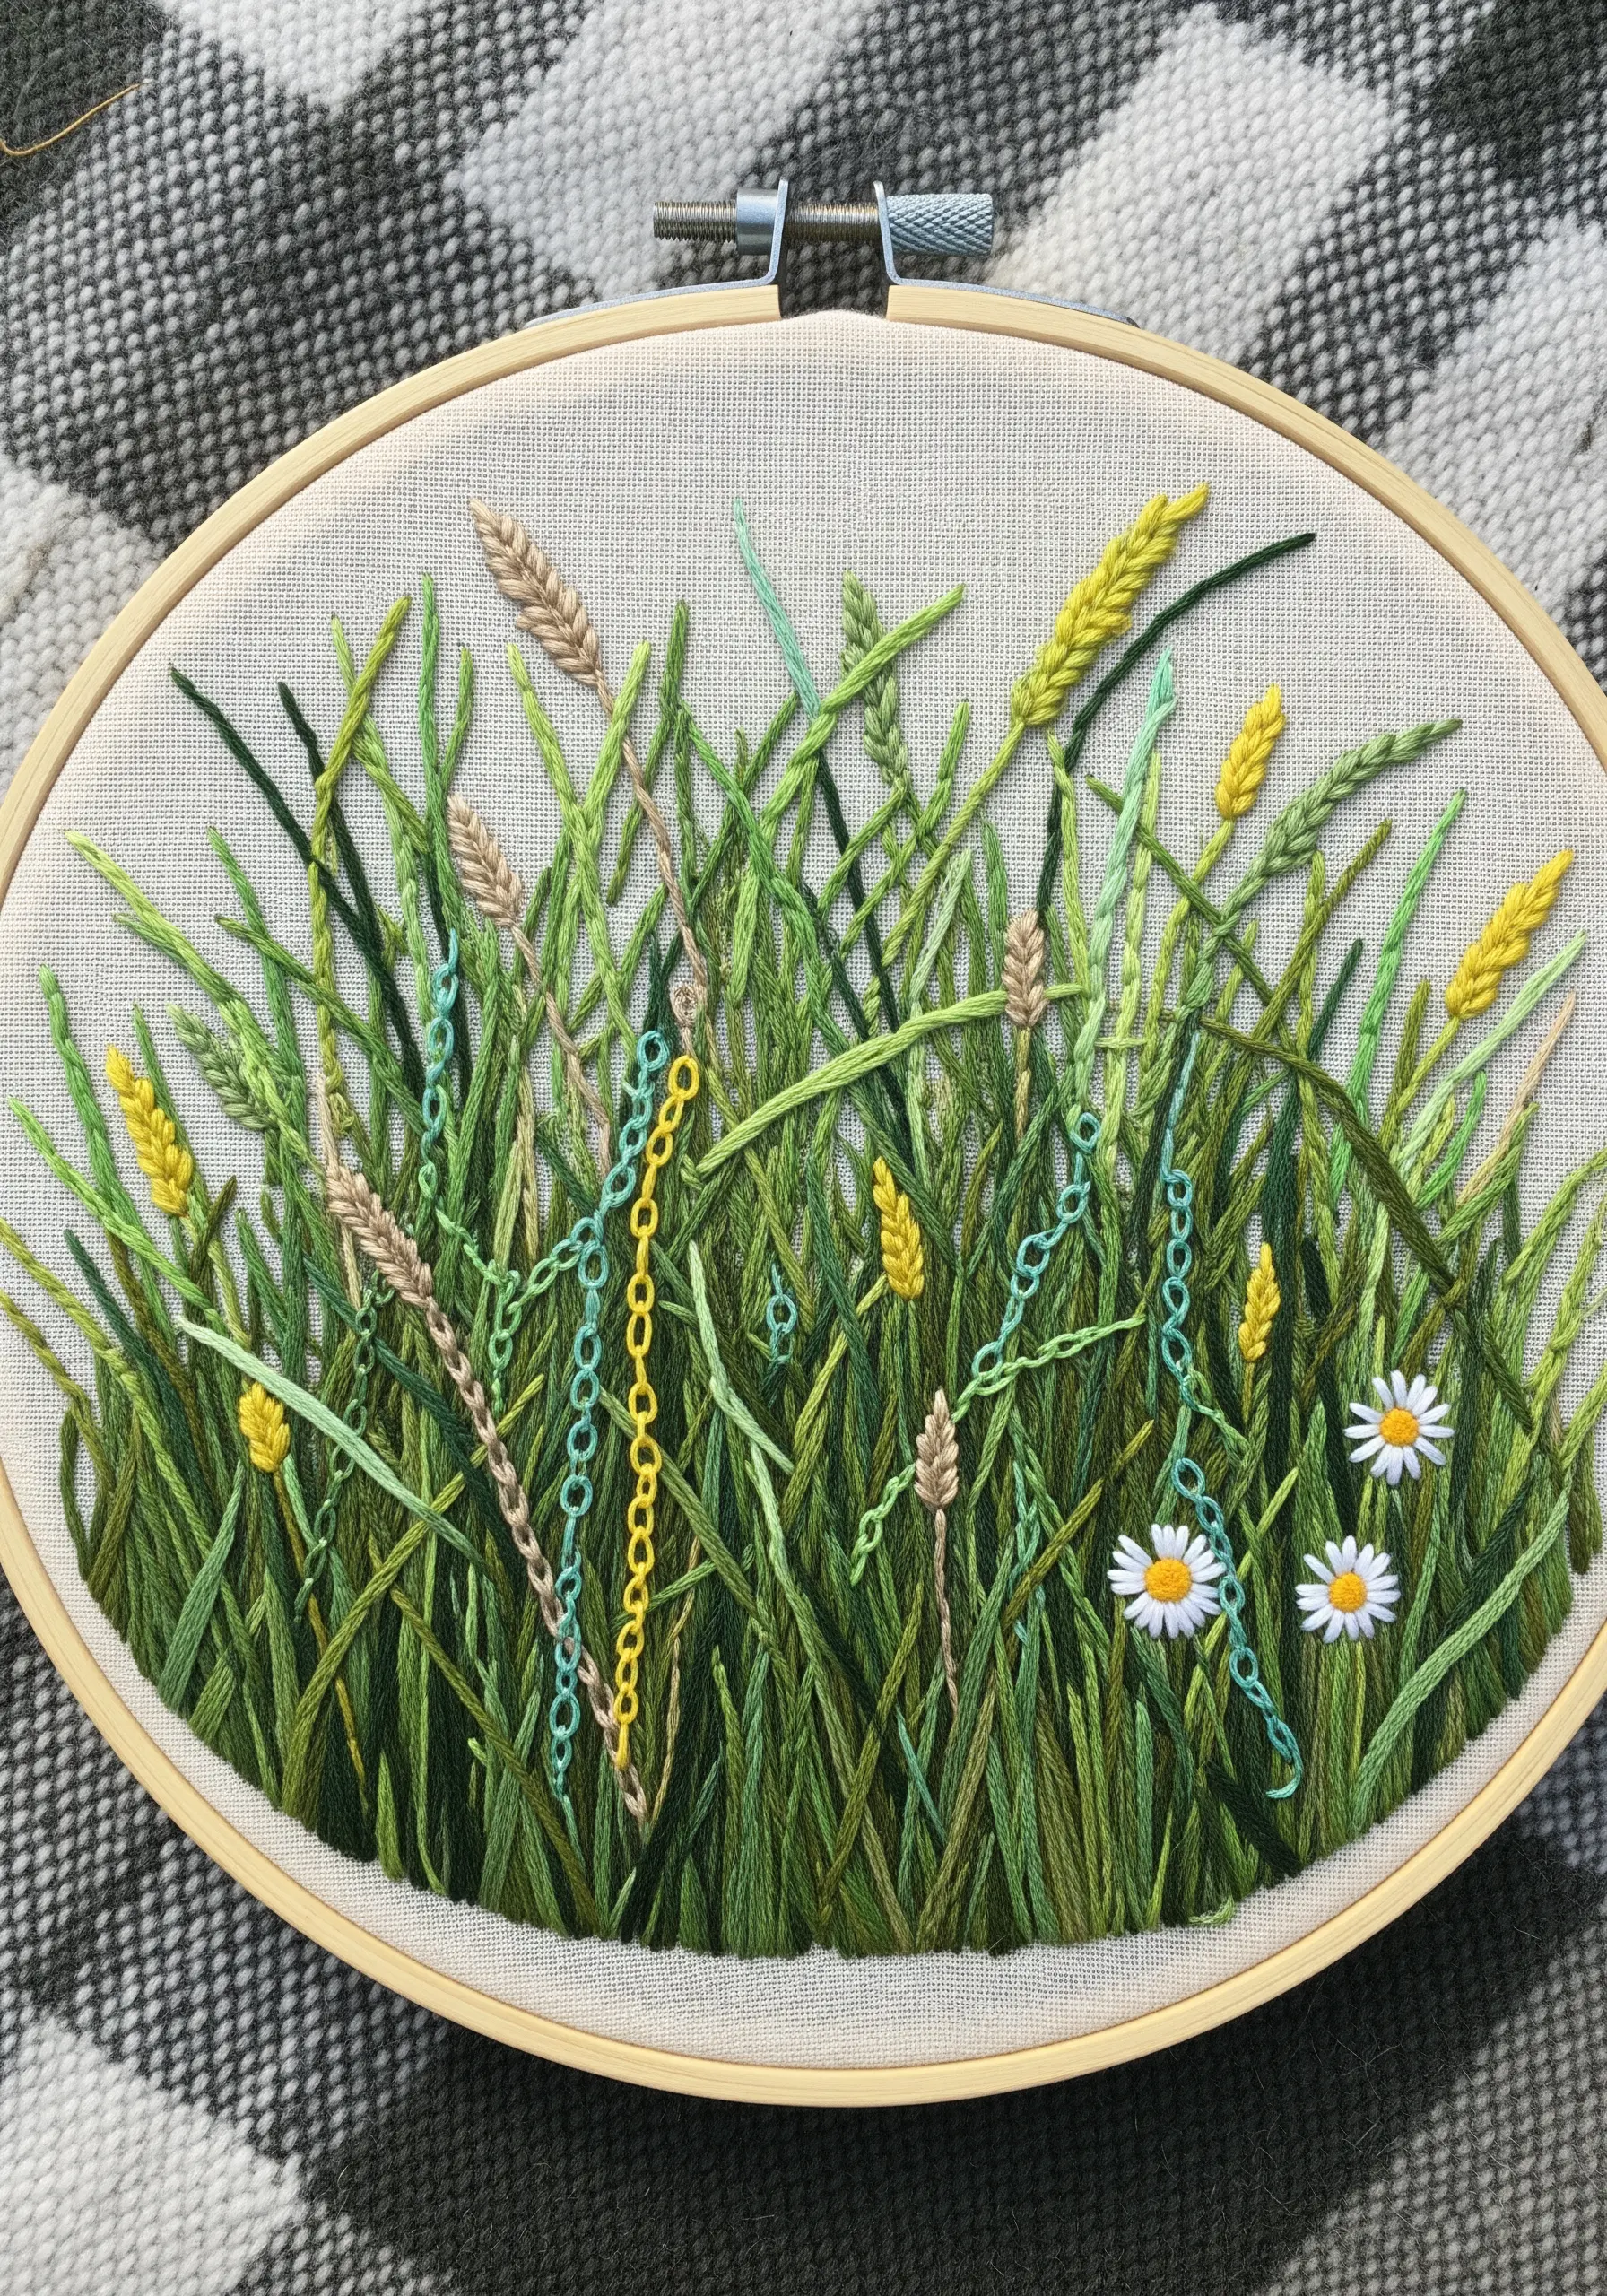
Give your embroidered meadows a sense of depth and wildness by mixing simple straight stitches with delicate chain stitches.
Use single strands of green floss to create blades of grass with straight stitches, varying their length and angle.
Then, weave in single, detached chain stitches in contrasting colors like yellow or blue to suggest tiny, half-hidden wildflowers or leaves.
This subtle addition breaks up the uniformity of the grass and creates a more layered, natural-looking field.
11. Sculpt Volcanic Rock with Dimensional Stitches
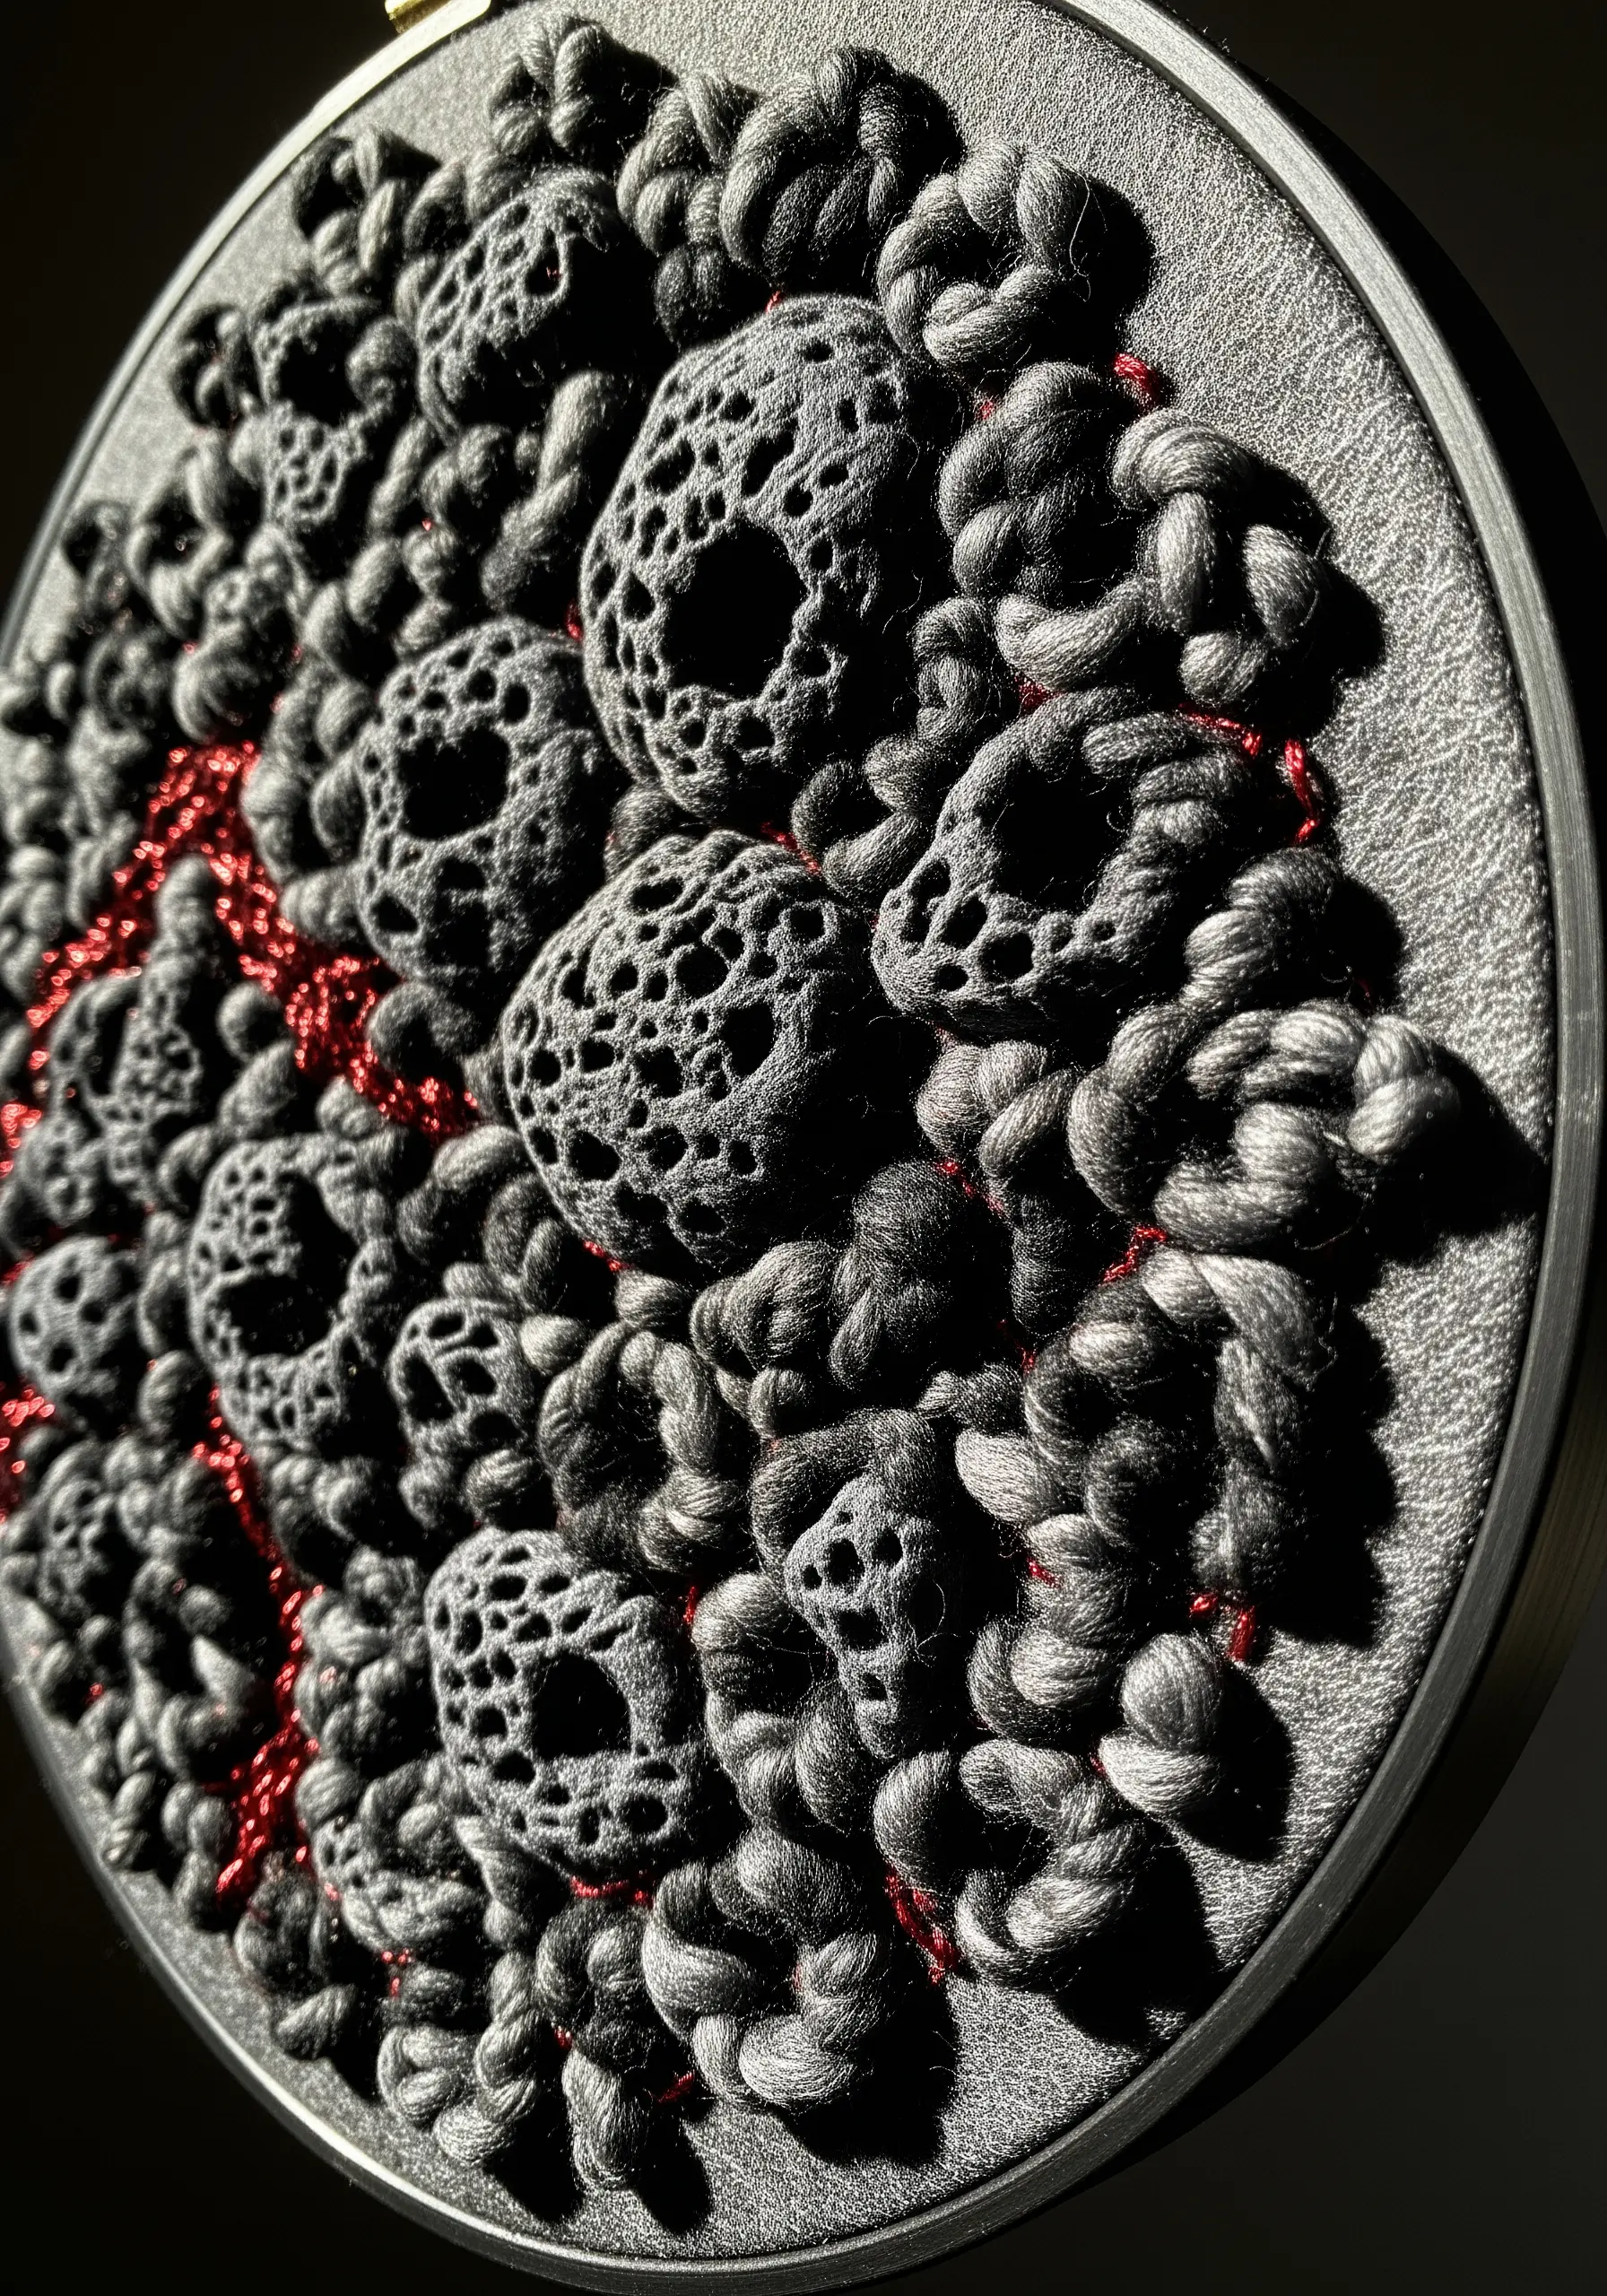
Capture the porous, complex texture of volcanic rock by combining raised stitches with open, lace-like elements.
Use chunky bullion knots and woven picot stitches to build up the main, solid forms of the rock.
For the hollow, pitted areas, create motifs using detached buttonhole stitch, leaving open spaces in the center to suggest pores.
This high-contrast combination of solid and void creates a dramatic, sculptural piece that is visually and texturally compelling.
12. Layer Felt Appliqué for a Clean, Graphic Look
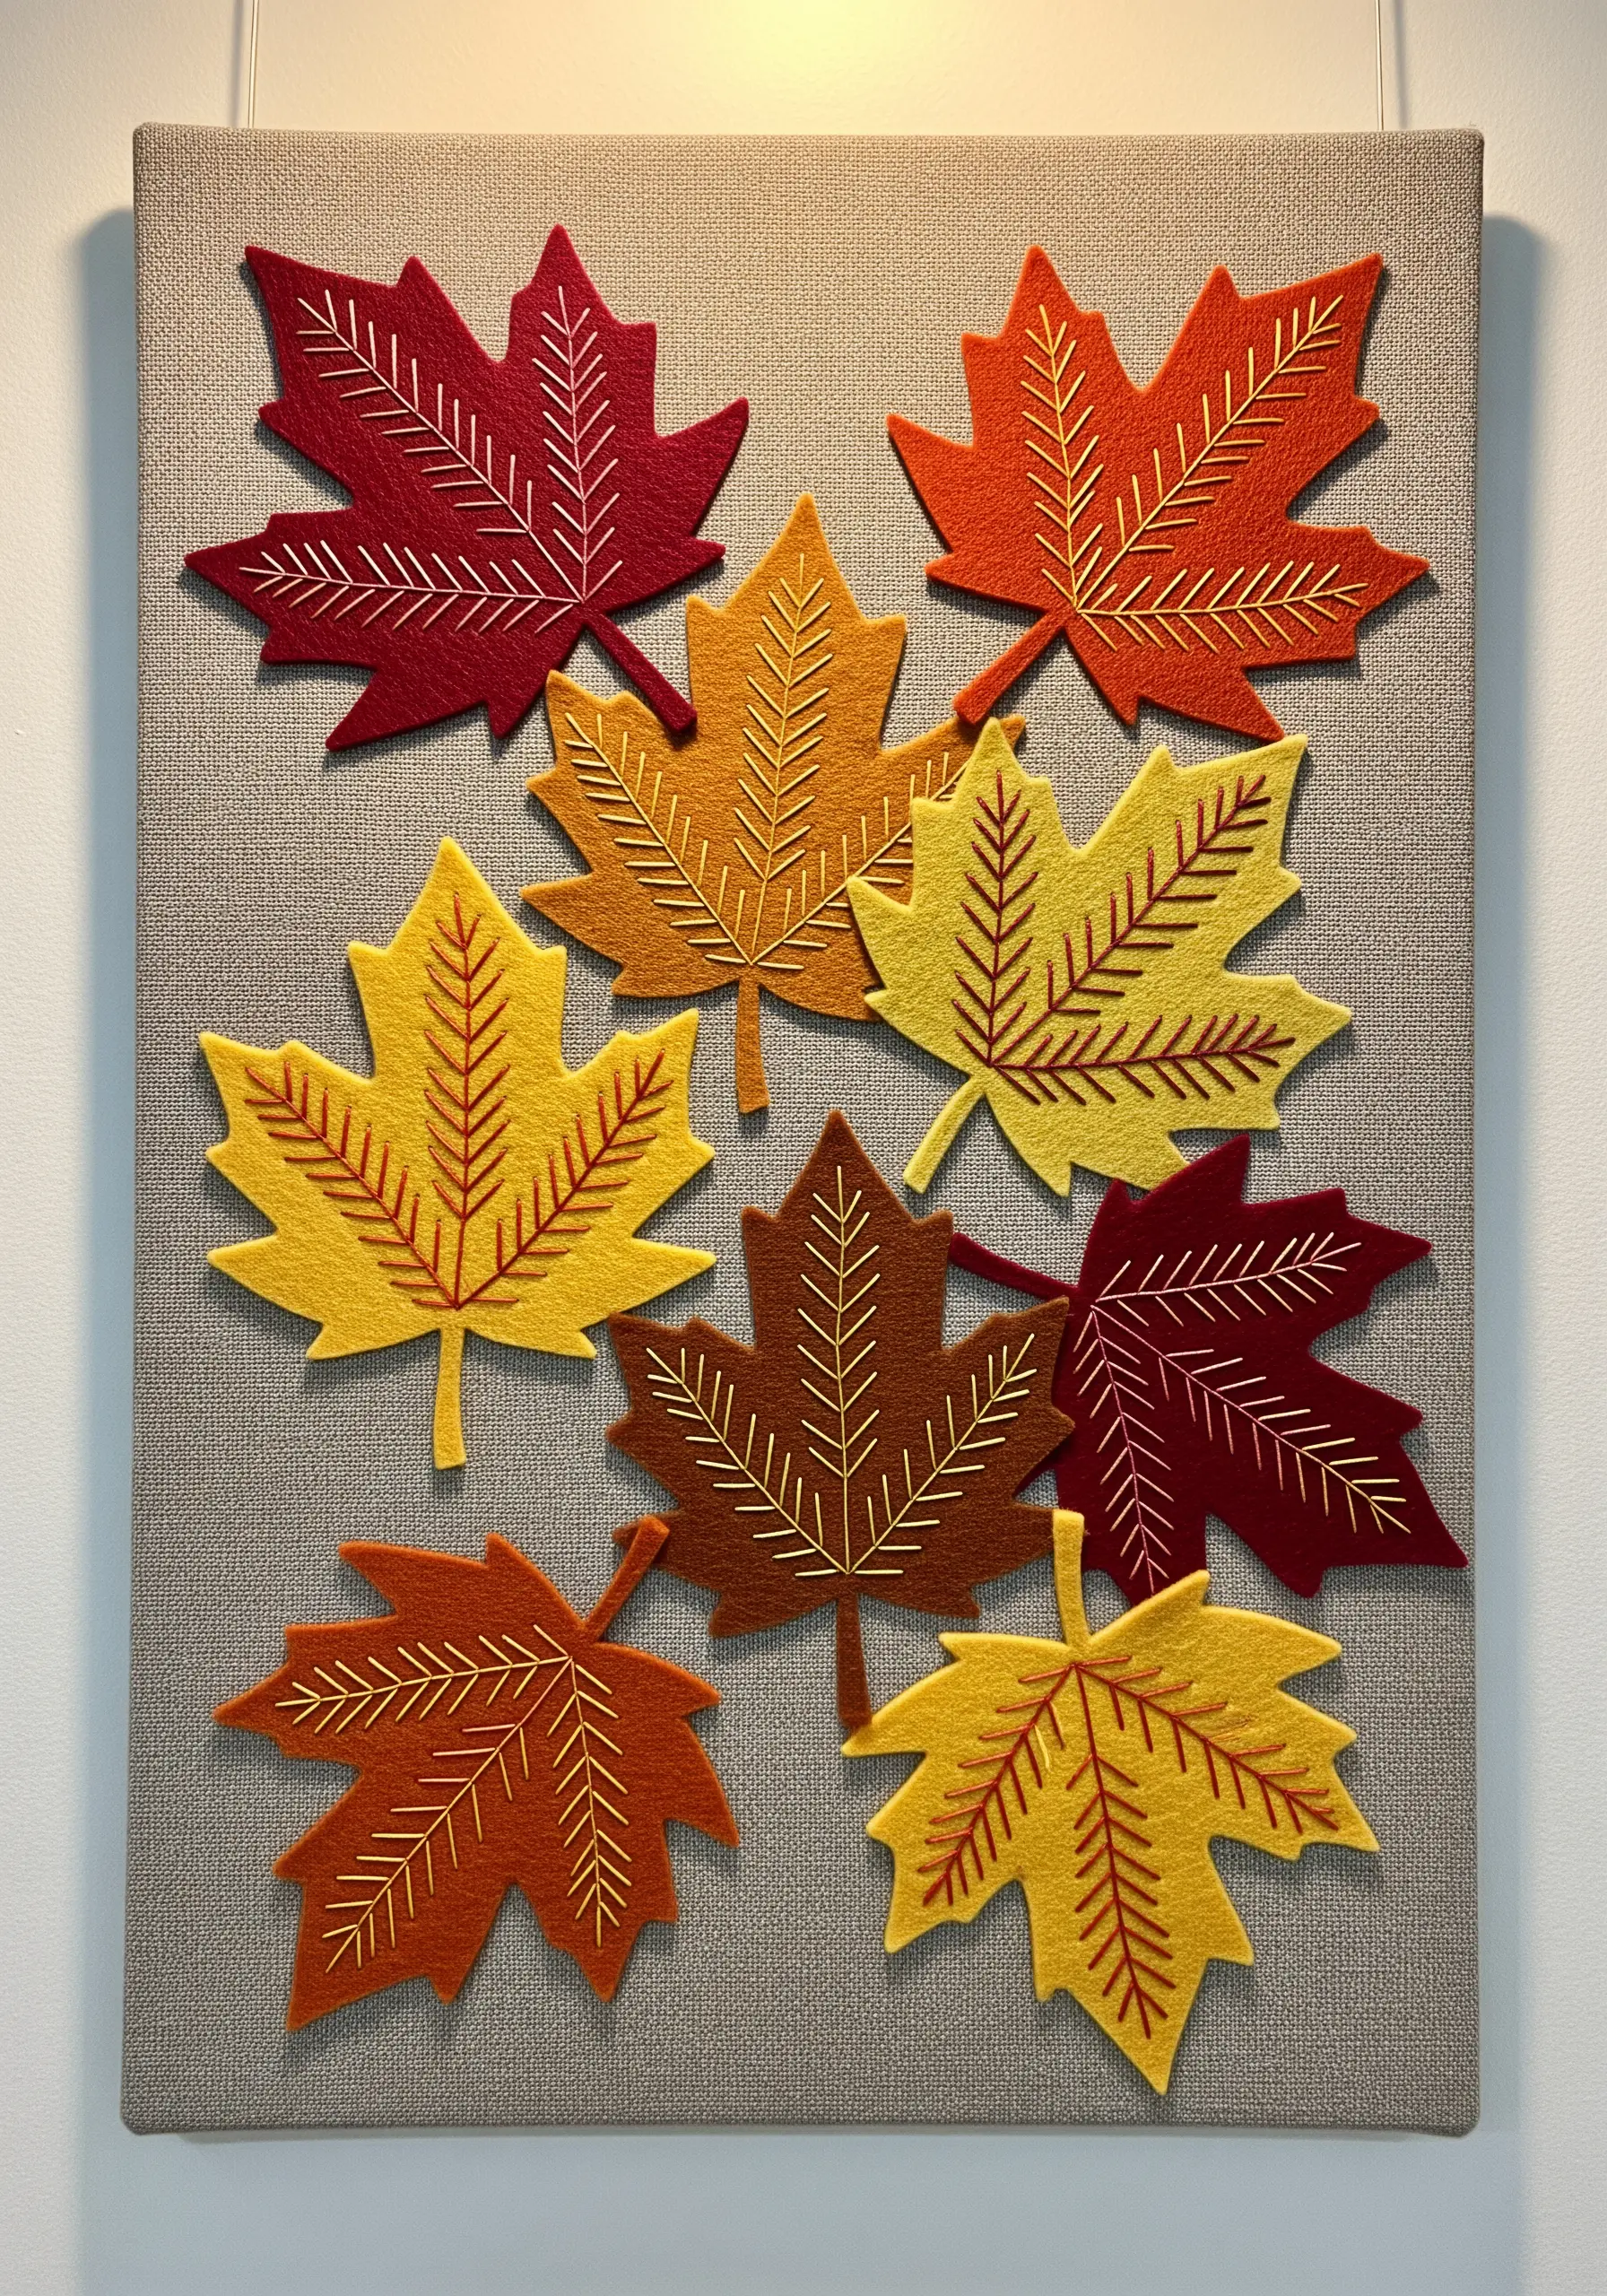
Create a sharp, modern interpretation of natural forms by using felt appliqué as your base.
Cut your leaf shapes from different colors of felt and arrange them on your background fabric, securing them with a fabric-safe adhesive or a few hidden stitches.
Then, add fine details like veins using a simple backstitch or running stitch in a contrasting thread color.
This mixed-media approach is fast, impactful, and allows you to achieve clean edges and bold color blocking that would be difficult with thread alone.
13. Depict Glacial Ice with Woven Ribbon

Capture the sharp, crystalline structure of icebergs by incorporating silk ribbon into your embroidery.
Use wide, flat silk ribbon to create bold, angular shapes with long straight stitches, allowing the ribbon to twist slightly to catch the light.
Combine this with traditional six-strand floss to create finer, shaded details within the ice.
The sheen of the ribbon mimics the reflective quality of ice, while tiny seed beads can be added to suggest drops of melting water for a final touch of realism.
14. Weave a Desert Landscape with Mixed Fibers
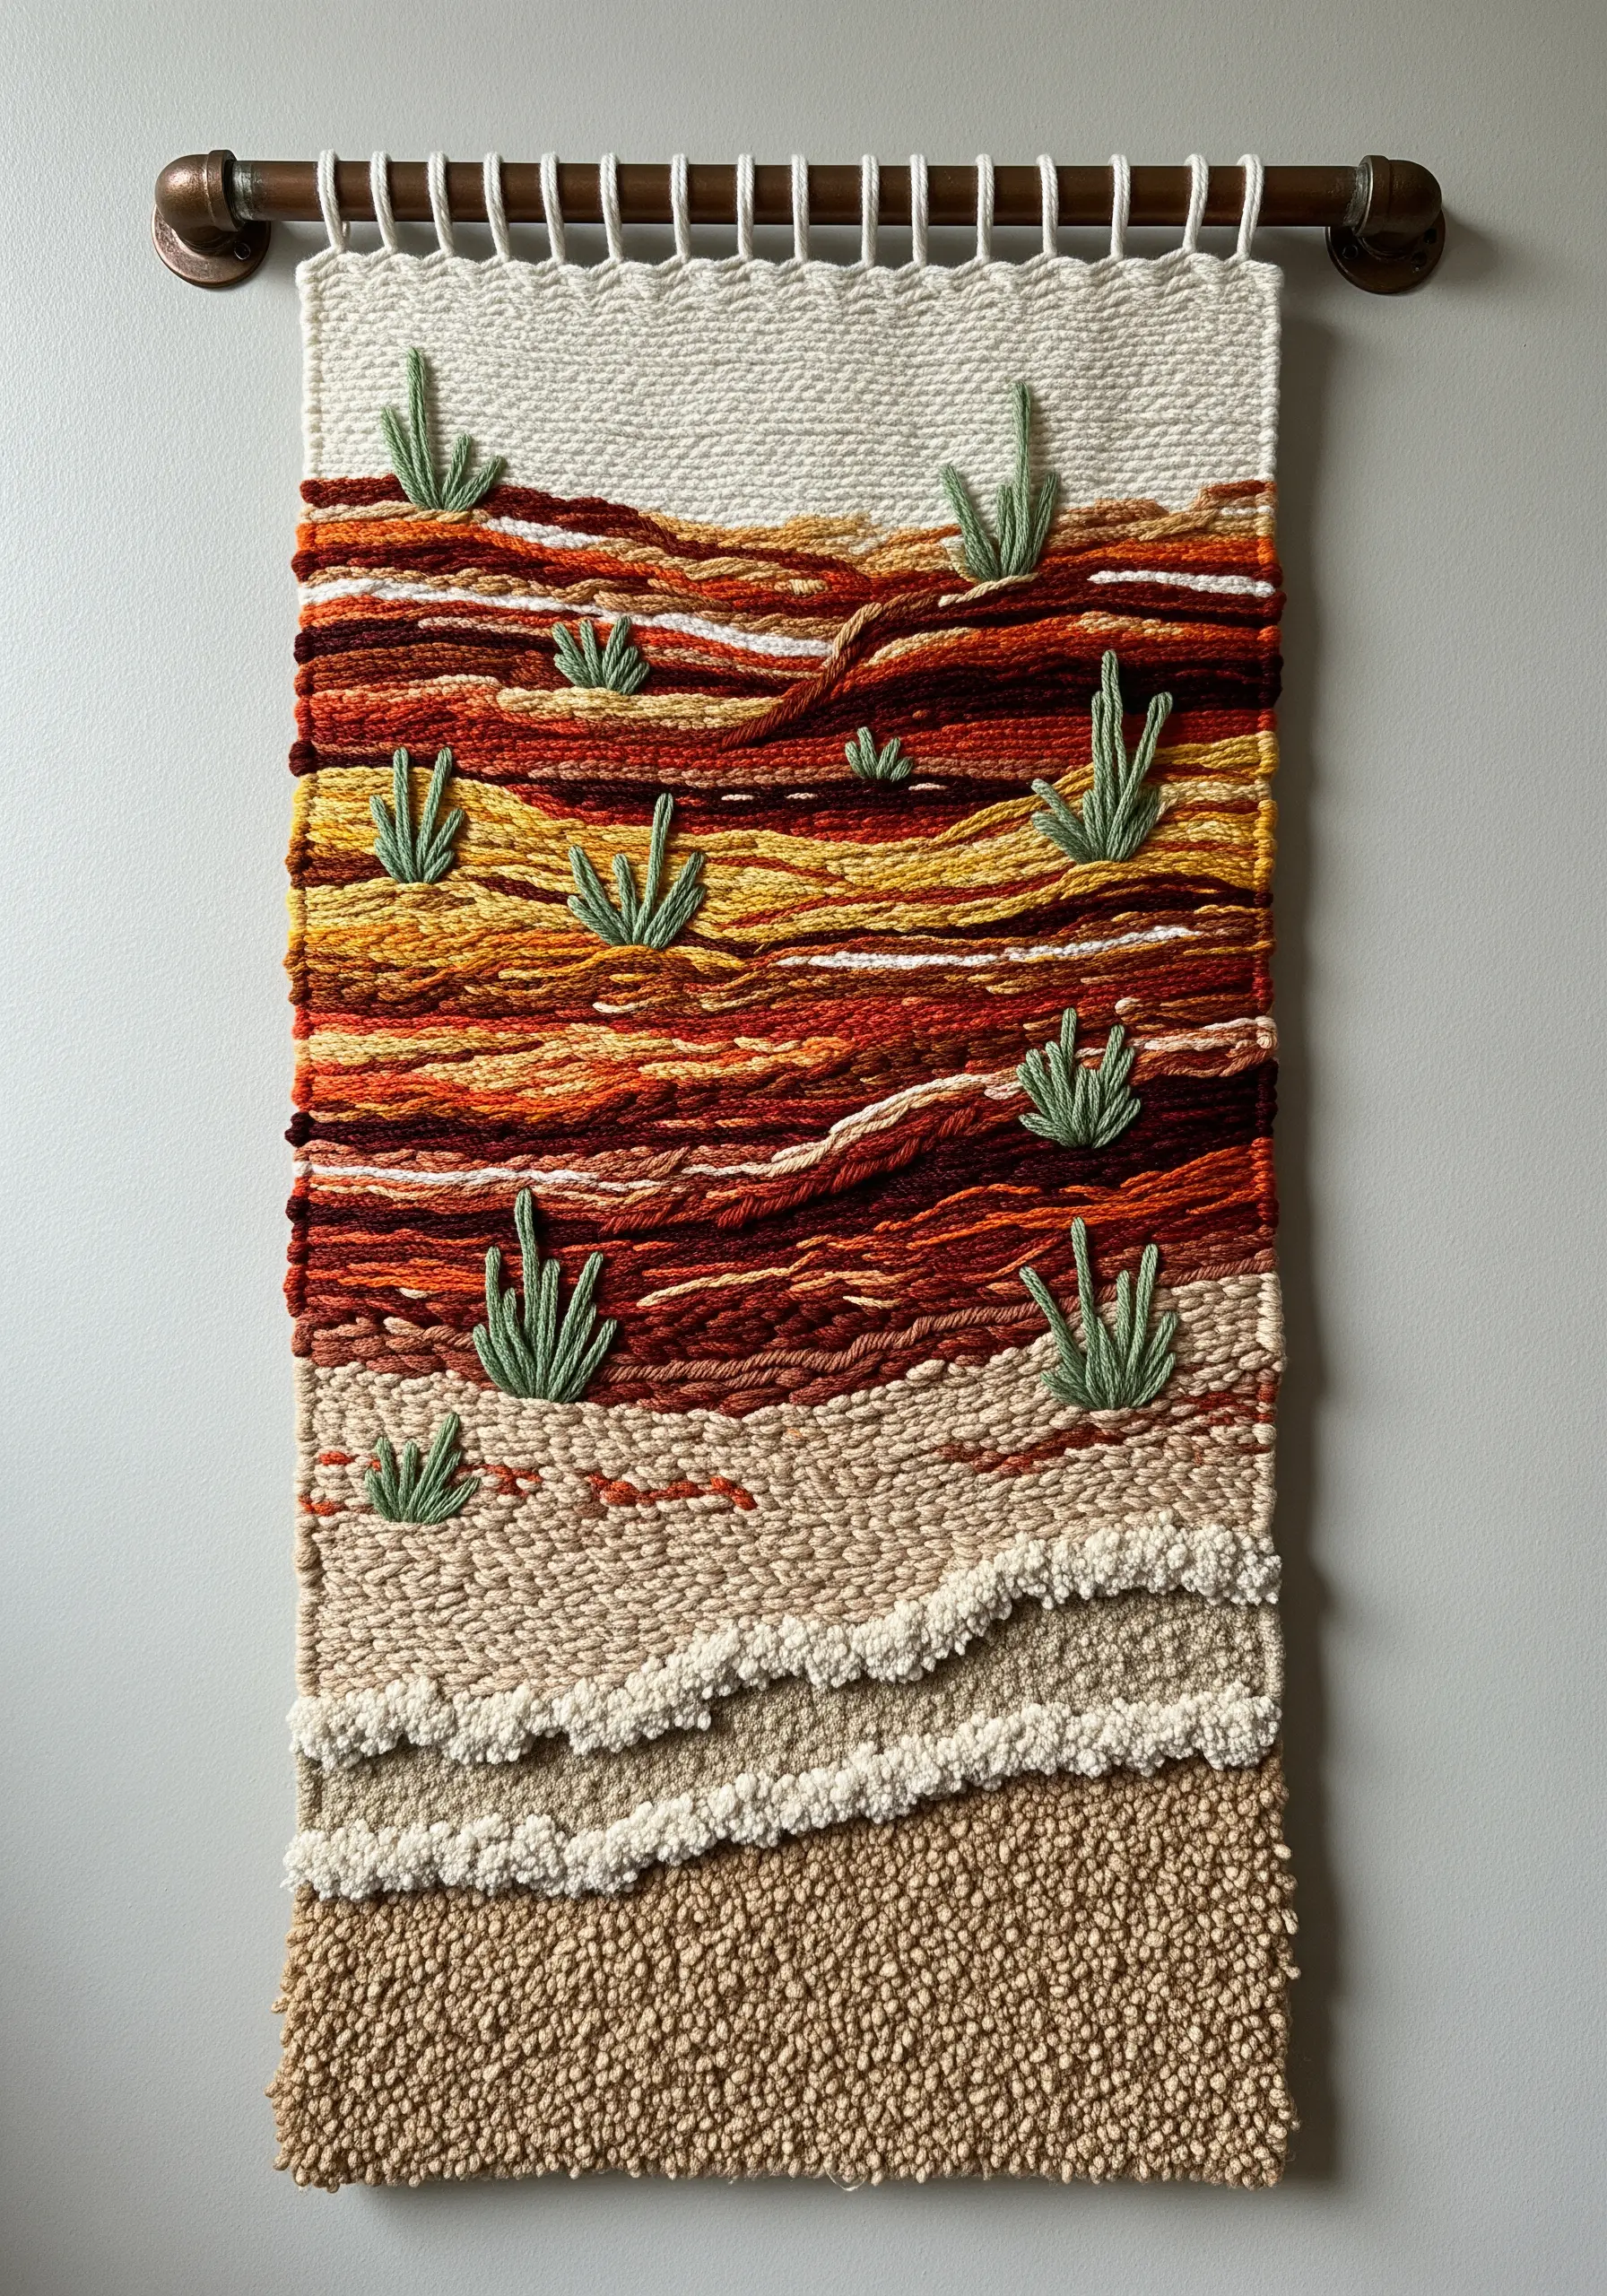
Go beyond the hoop and create a woven wall hanging that captures the textures of the desert.
Use a simple frame loom to weave with a variety of fibers: chunky wool roving for soft, sandy dunes, and smooth cotton yarn for layered rock formations.
Once your woven base is complete, add embroidered details directly onto the weaving.
Use a simple detached chain stitch or lazy daisy stitch with green yarn to represent resilient desert cacti, adding a pop of life to the arid landscape.
15. Render Wood Grain with Variegated Thread
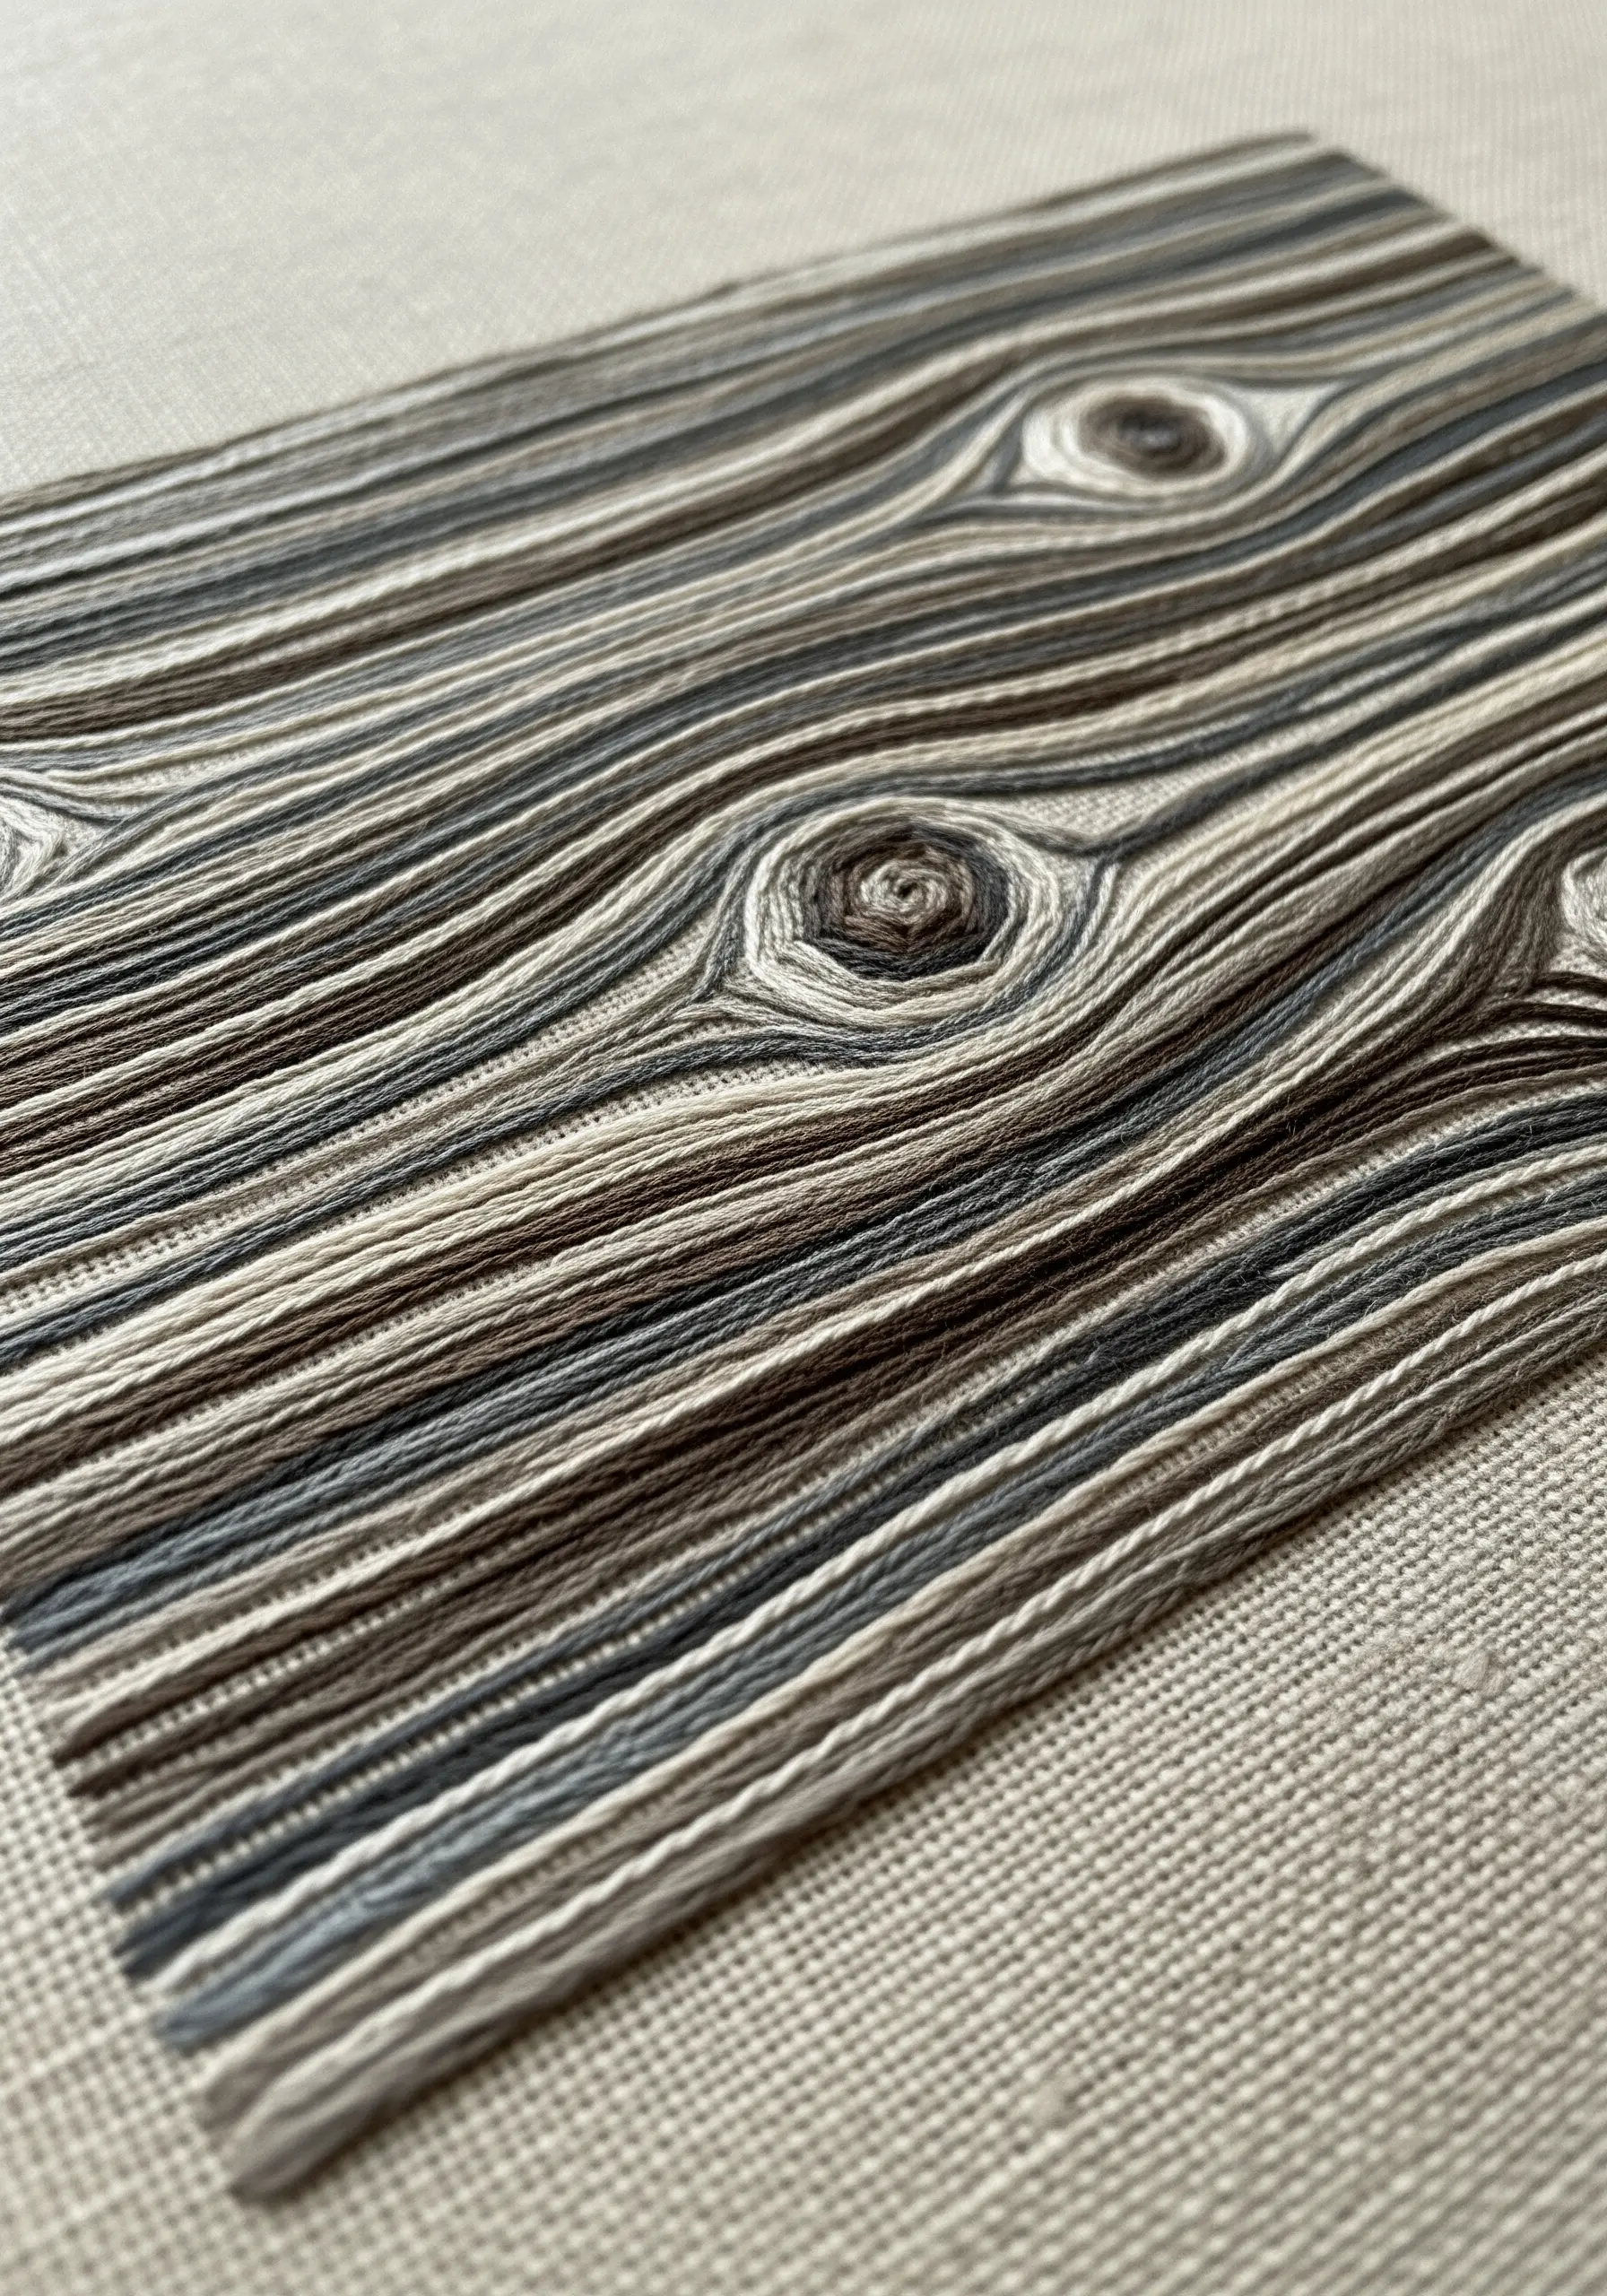
Create a convincing wood grain effect using nothing more than straight stitches and a smart choice of thread.
Select a variegated thread that includes several shades of brown, grey, or beige in a single strand.
Stitch long, flowing lines of straight stitch or backstitch, allowing the natural color changes in the thread to create the grain pattern for you.
Cluster your stitches into swirling knots and gentle waves to mimic the organic patterns found in a cut piece of wood. It’s a simple technique with a remarkably sophisticated result.
16. Create a Coral Reef with Clustered Knots
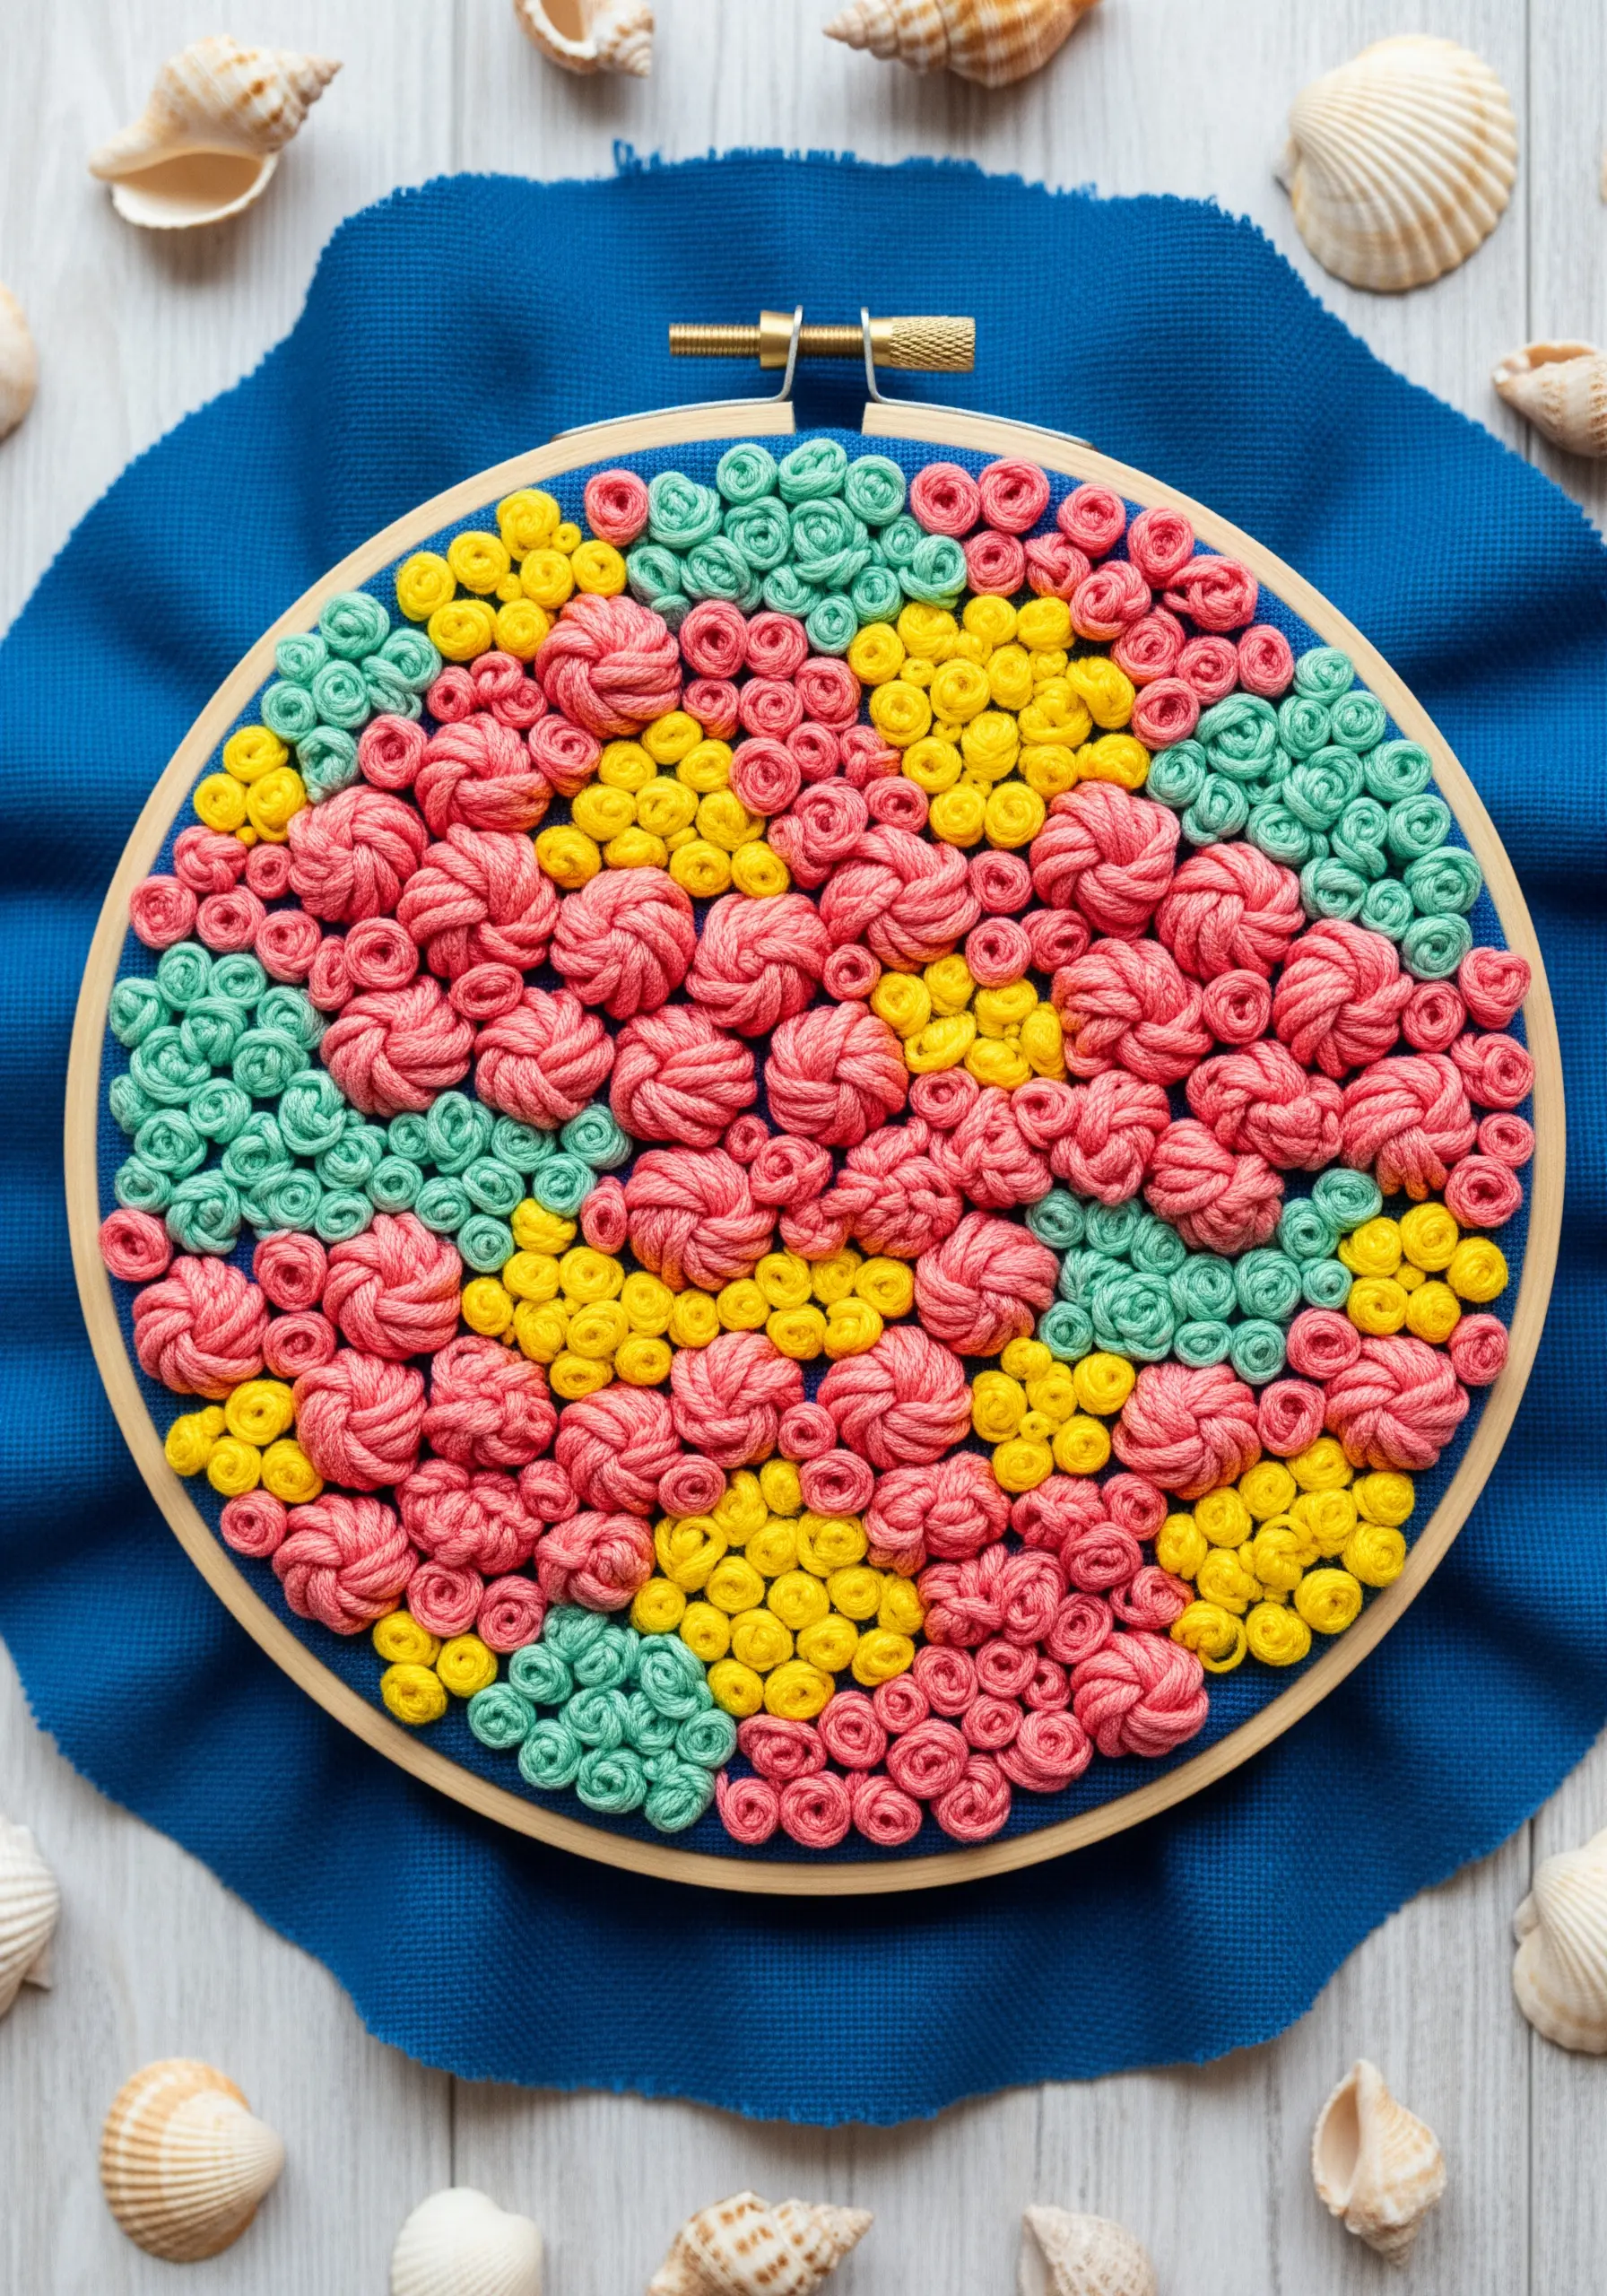
Evoke the vibrant, crowded texture of a coral reef by clustering different types of knots in bold, bright colors.
Use woven wheel stitches (or rose stitches) for larger, flower-like coral forms.
Fill the spaces between them with smaller, tighter French knots and bullion knots to suggest different species of coral polyps.
The key is to pack the stitches very tightly together, allowing them to push against each other to create a single, unified textural mass.
17. Illustrate a Waterfall with Loose Threads
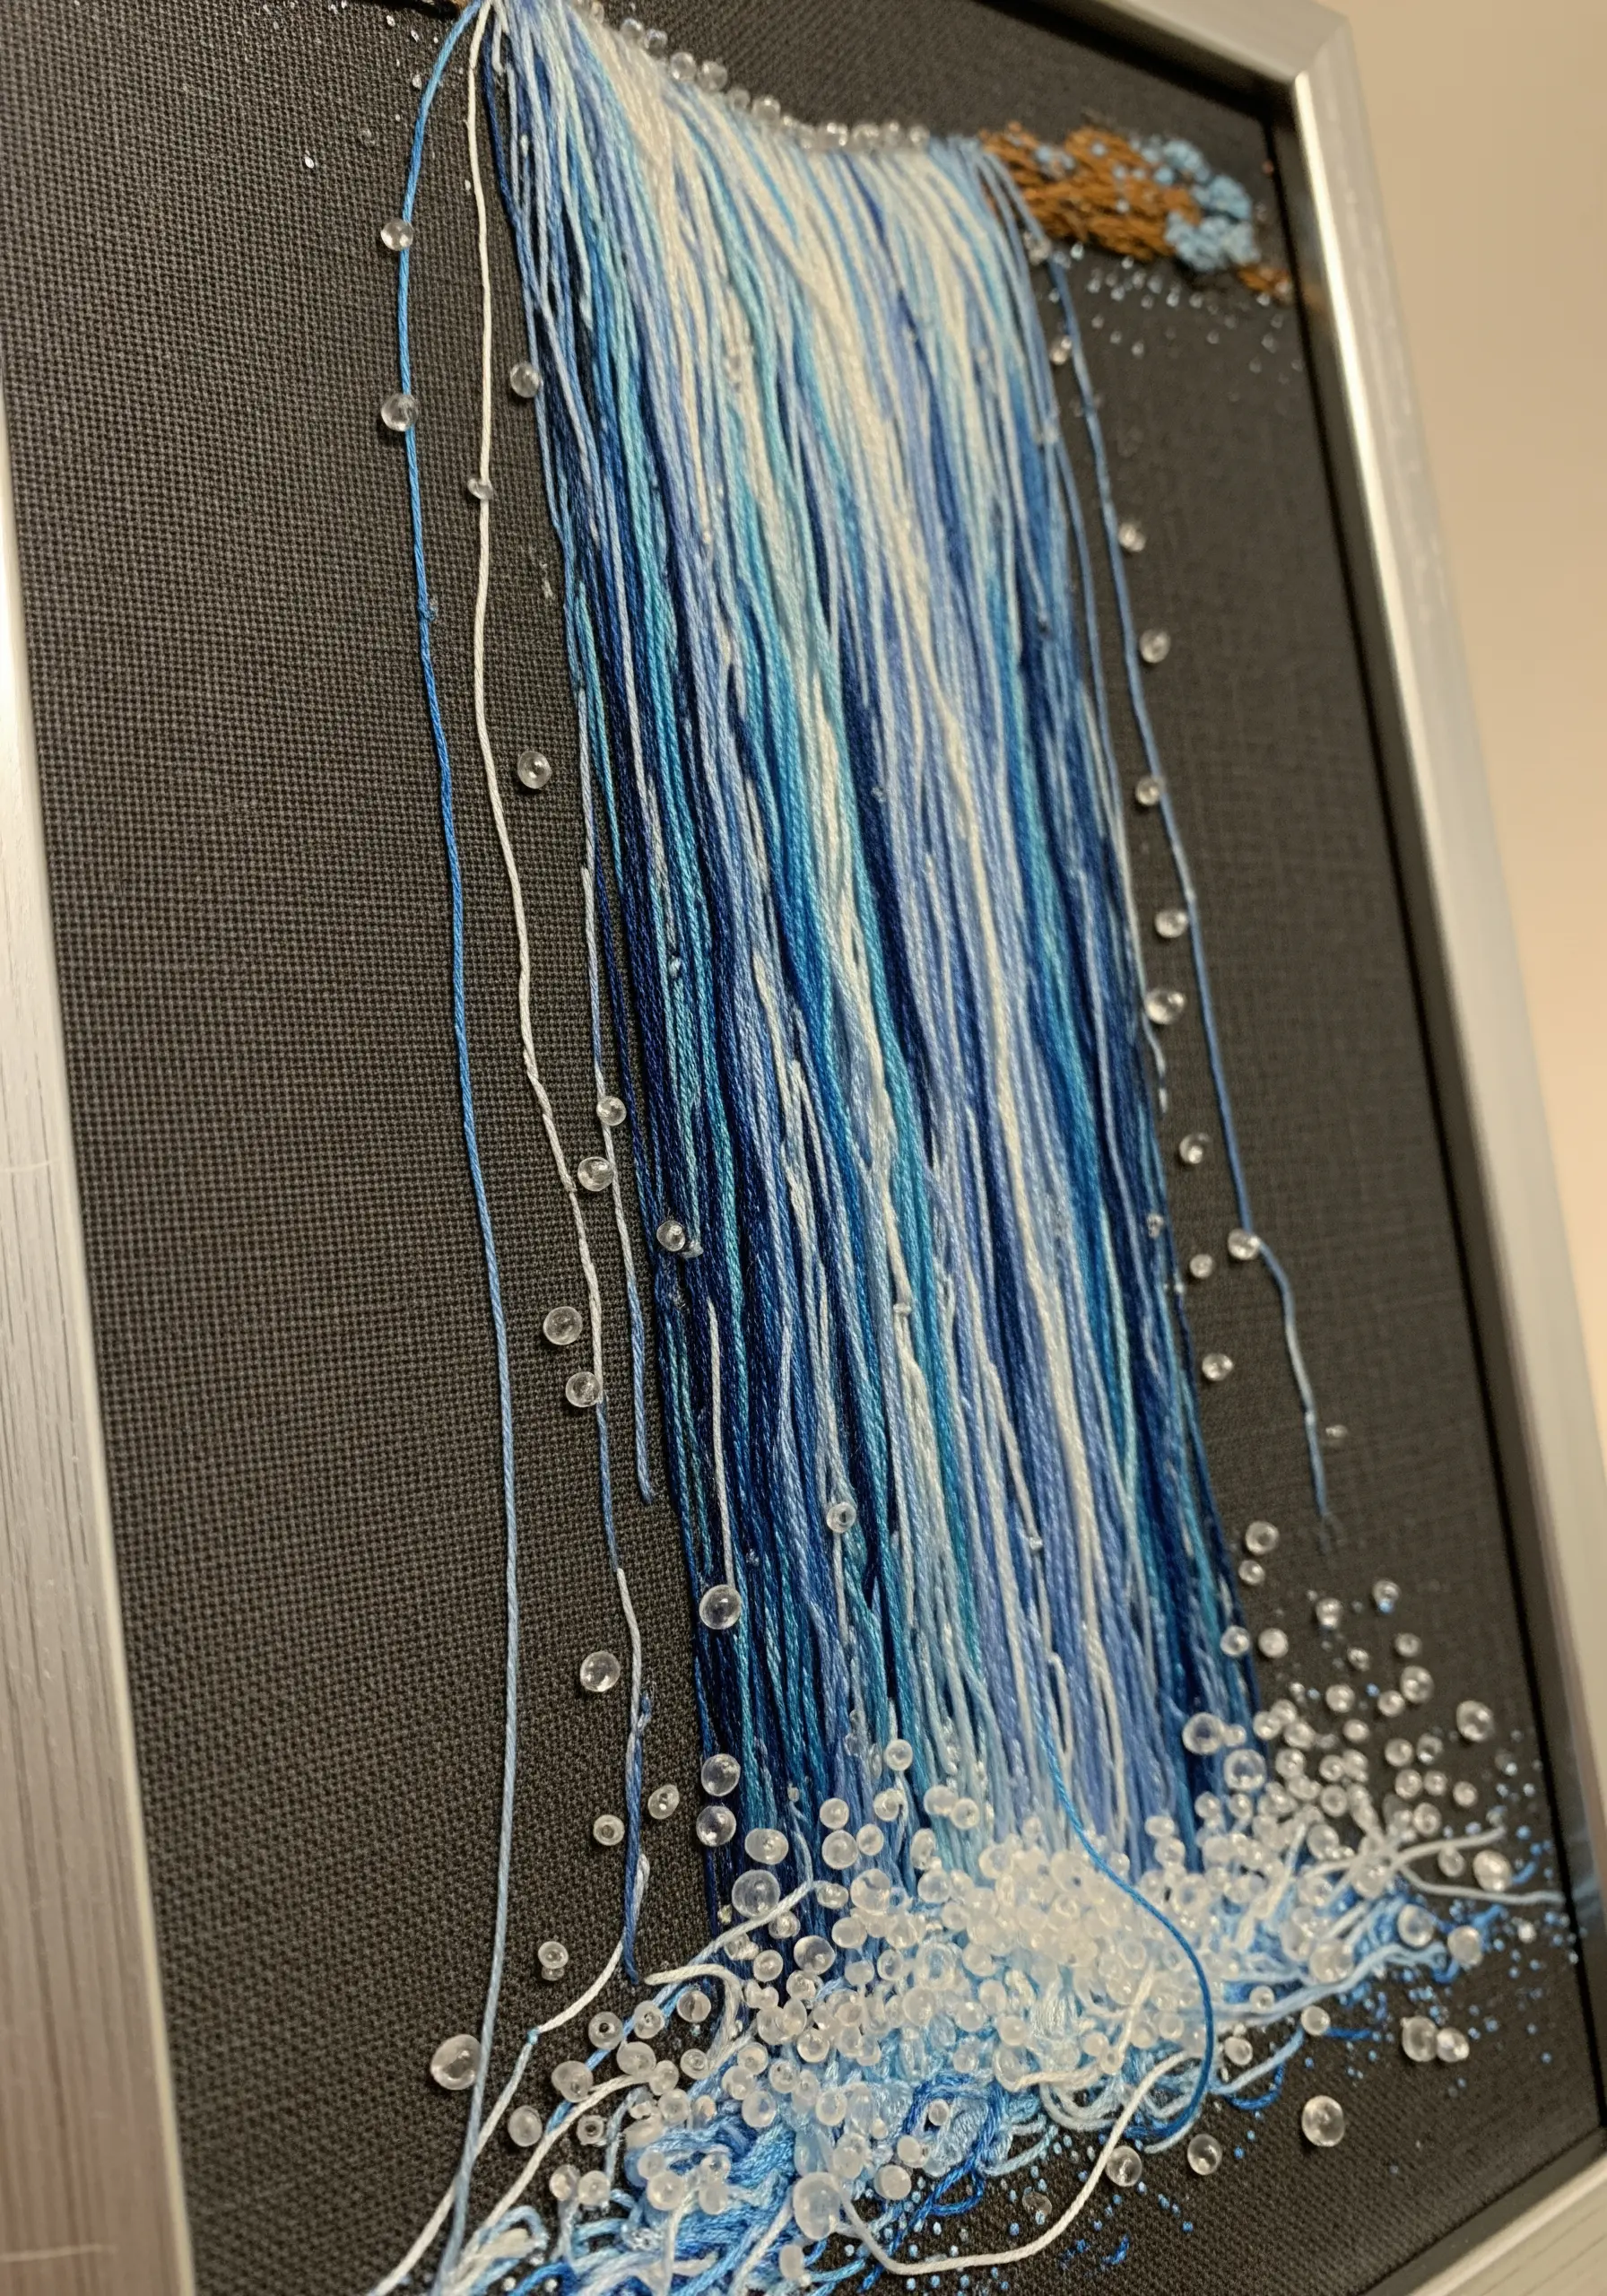
Capture the dynamic movement of a waterfall by letting your threads hang loose and free.
Secure your threads only at the top of the waterfall, using a couched branch or a dense line of satin stitch.
Allow the strands of blue, white, and silver thread to cascade down your fabric without being stitched down.
At the bottom, add a chaotic splash of French knots and clear seed beads to represent the churning water and spray. This technique creates a piece with real movement and energy.
18. Stitch a Starry Night with Metallics and Knots

Recreate a clear night sky using a simple but effective combination of stitches on dark fabric.
Use a silver or white metallic thread to stitch starbursts with straight stitches of varying lengths radiating from a central point.
Scatter tiny French knots made with a single strand of white or silver floss between the larger stars to represent the distant Milky Way.
The contrast between the sharp, bright starbursts and the delicate pinpricks of the knots creates a wonderful sense of cosmic depth.
19. Plant a Wildflower Garden with Layered Stitches

Build a dense, vibrant meadow by layering different floral stitches to create a sense of foreground and background.
Begin with the elements in the back—tall stems and leaves made with straight stitches or stem stitches.
Then, work your way forward, adding lazy daisy stitches, woven wheels, and French knots for the flower heads.
Allow your forward-most flowers to slightly overlap the stems behind them. This simple layering trick is the key to transforming a flat pattern into a lush, three-dimensional garden.
Try these hand-embroidered flower stitches to get started.
20. Weave a Mandala with Contrasting Threads
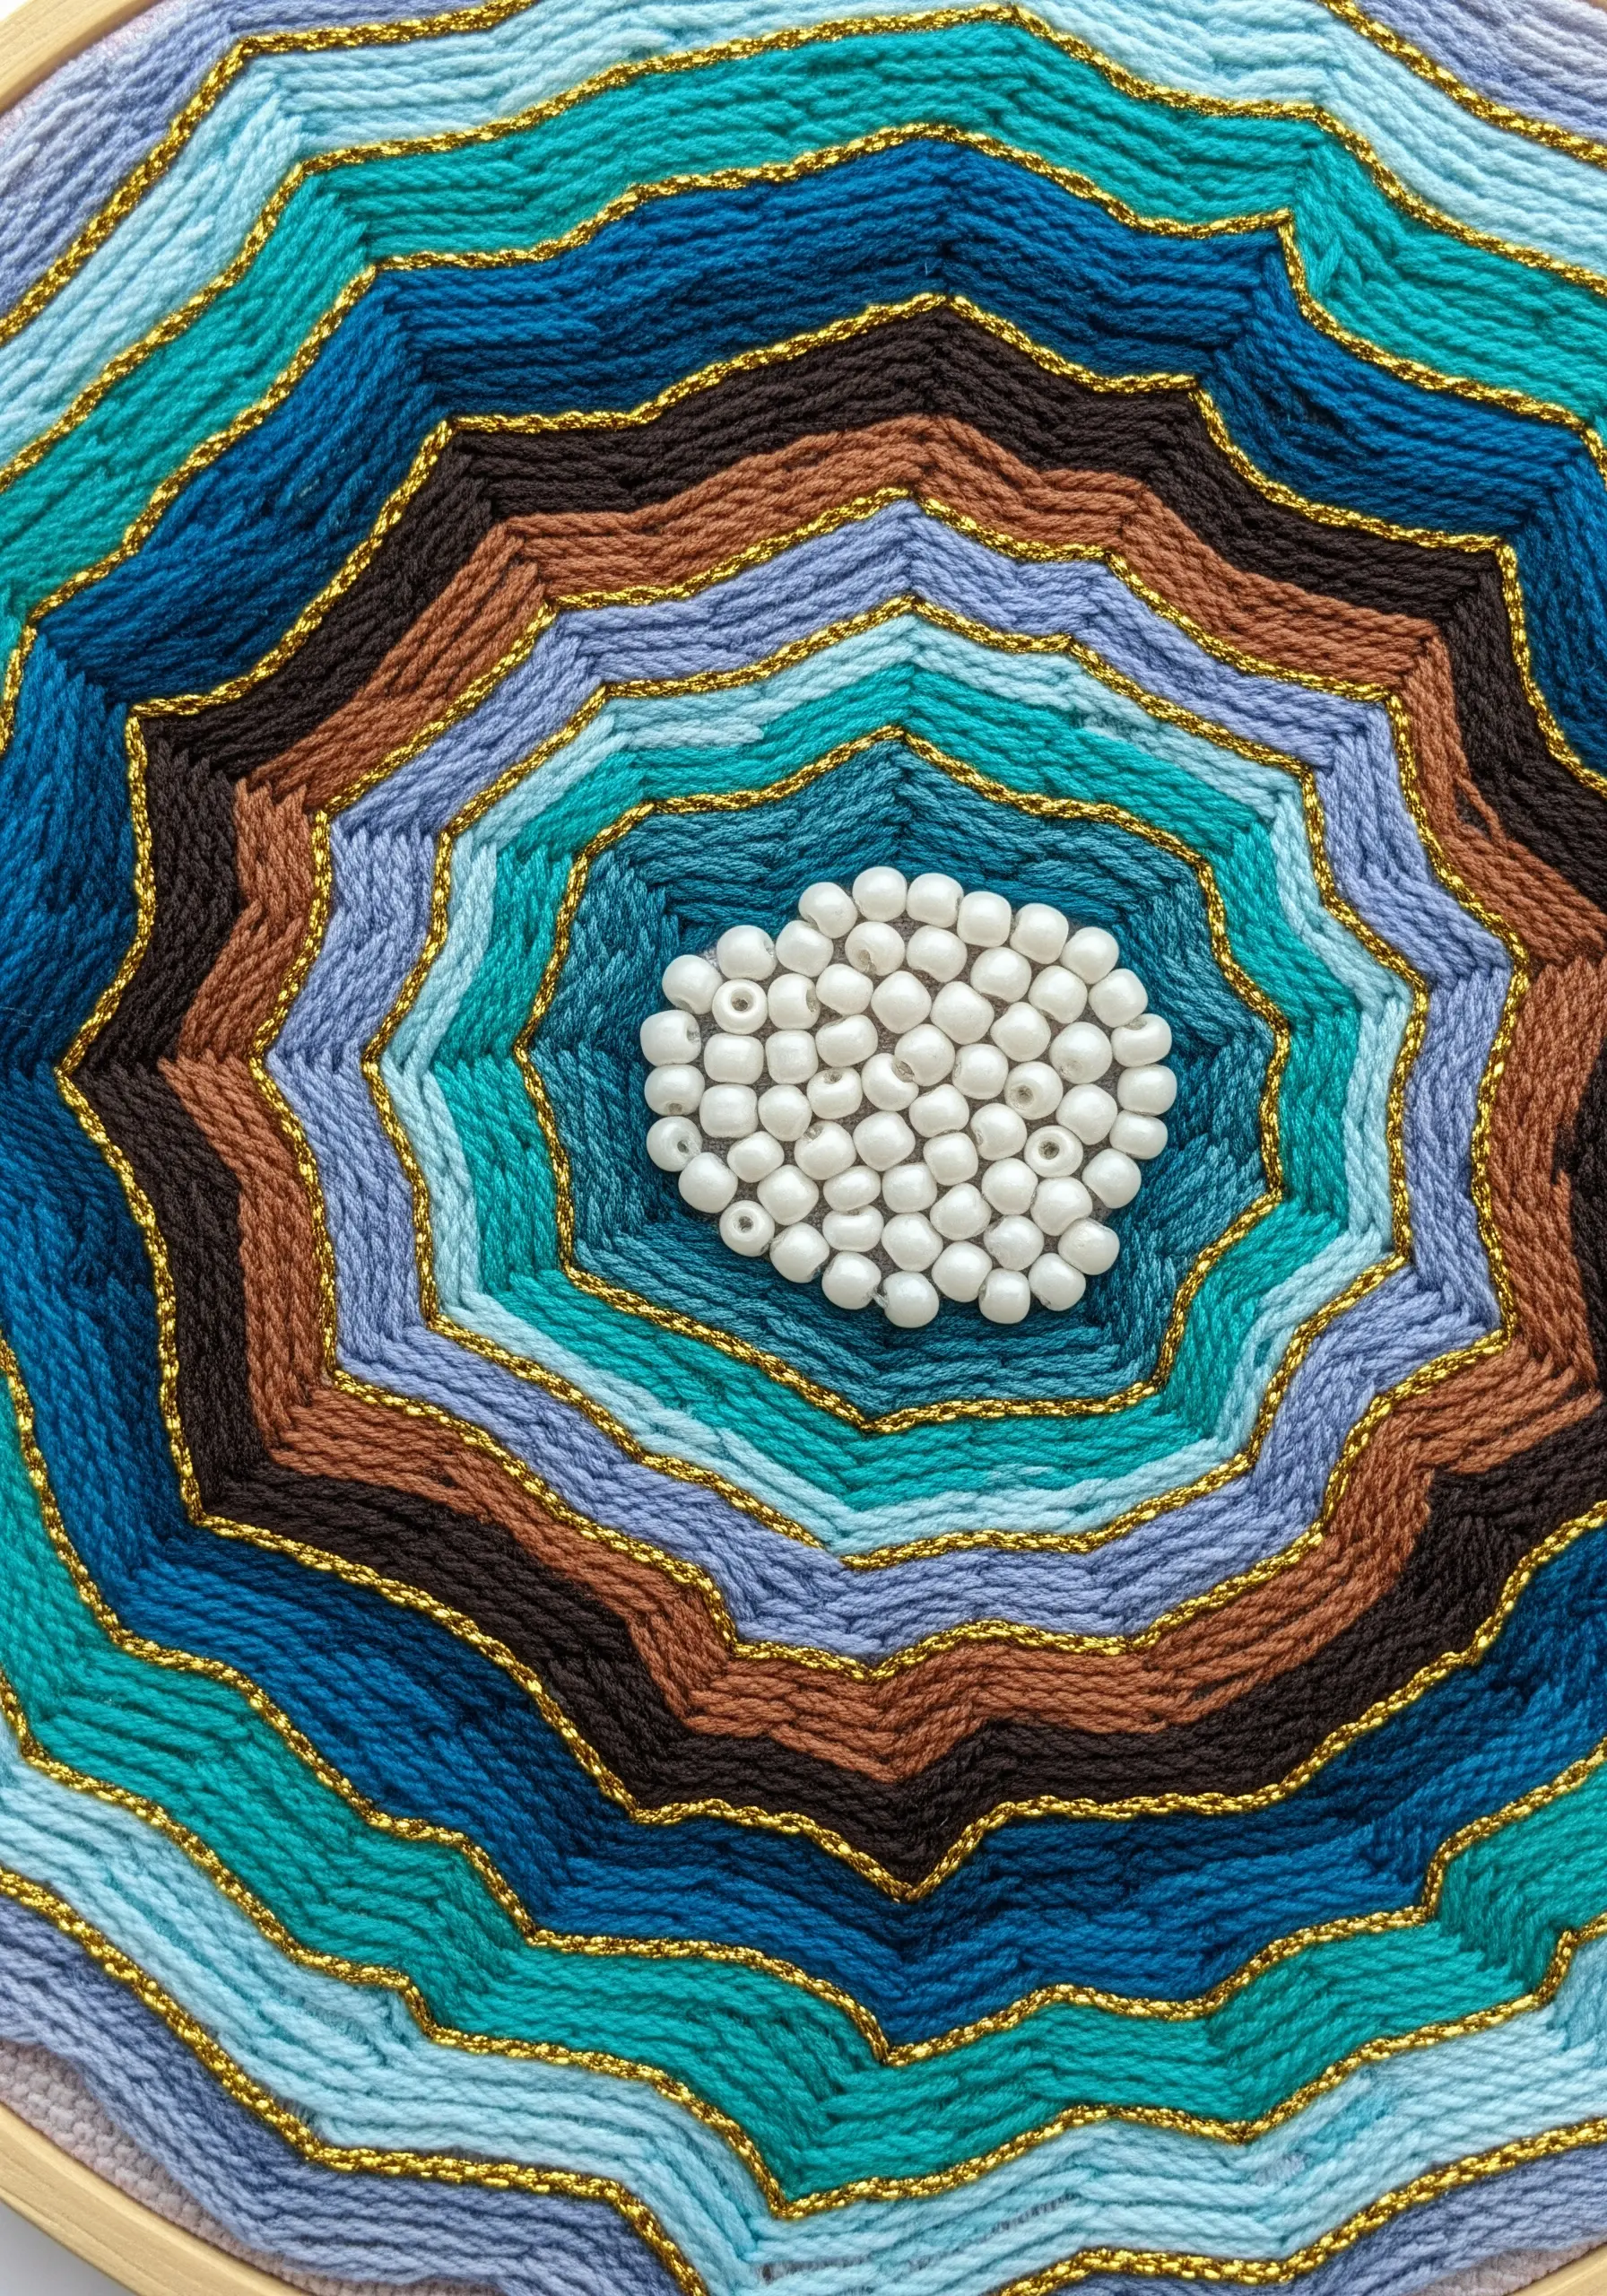
Create a mesmerizing, agate-like pattern by weaving threads around a central point.
Start by creating a spokelike structure with straight stitches radiating from the center of your hoop.
Then, take a new thread and weave it over and under these spokes, working your way outwards. Change your thread color every few rows to create concentric rings.
For a touch of elegance, add a thin metallic thread alongside your main color to create shimmering outlines between the bands.
This is a perfect project for calming, meditative embroidery.
21. Construct a Bird’s Nest with Natural Fibers
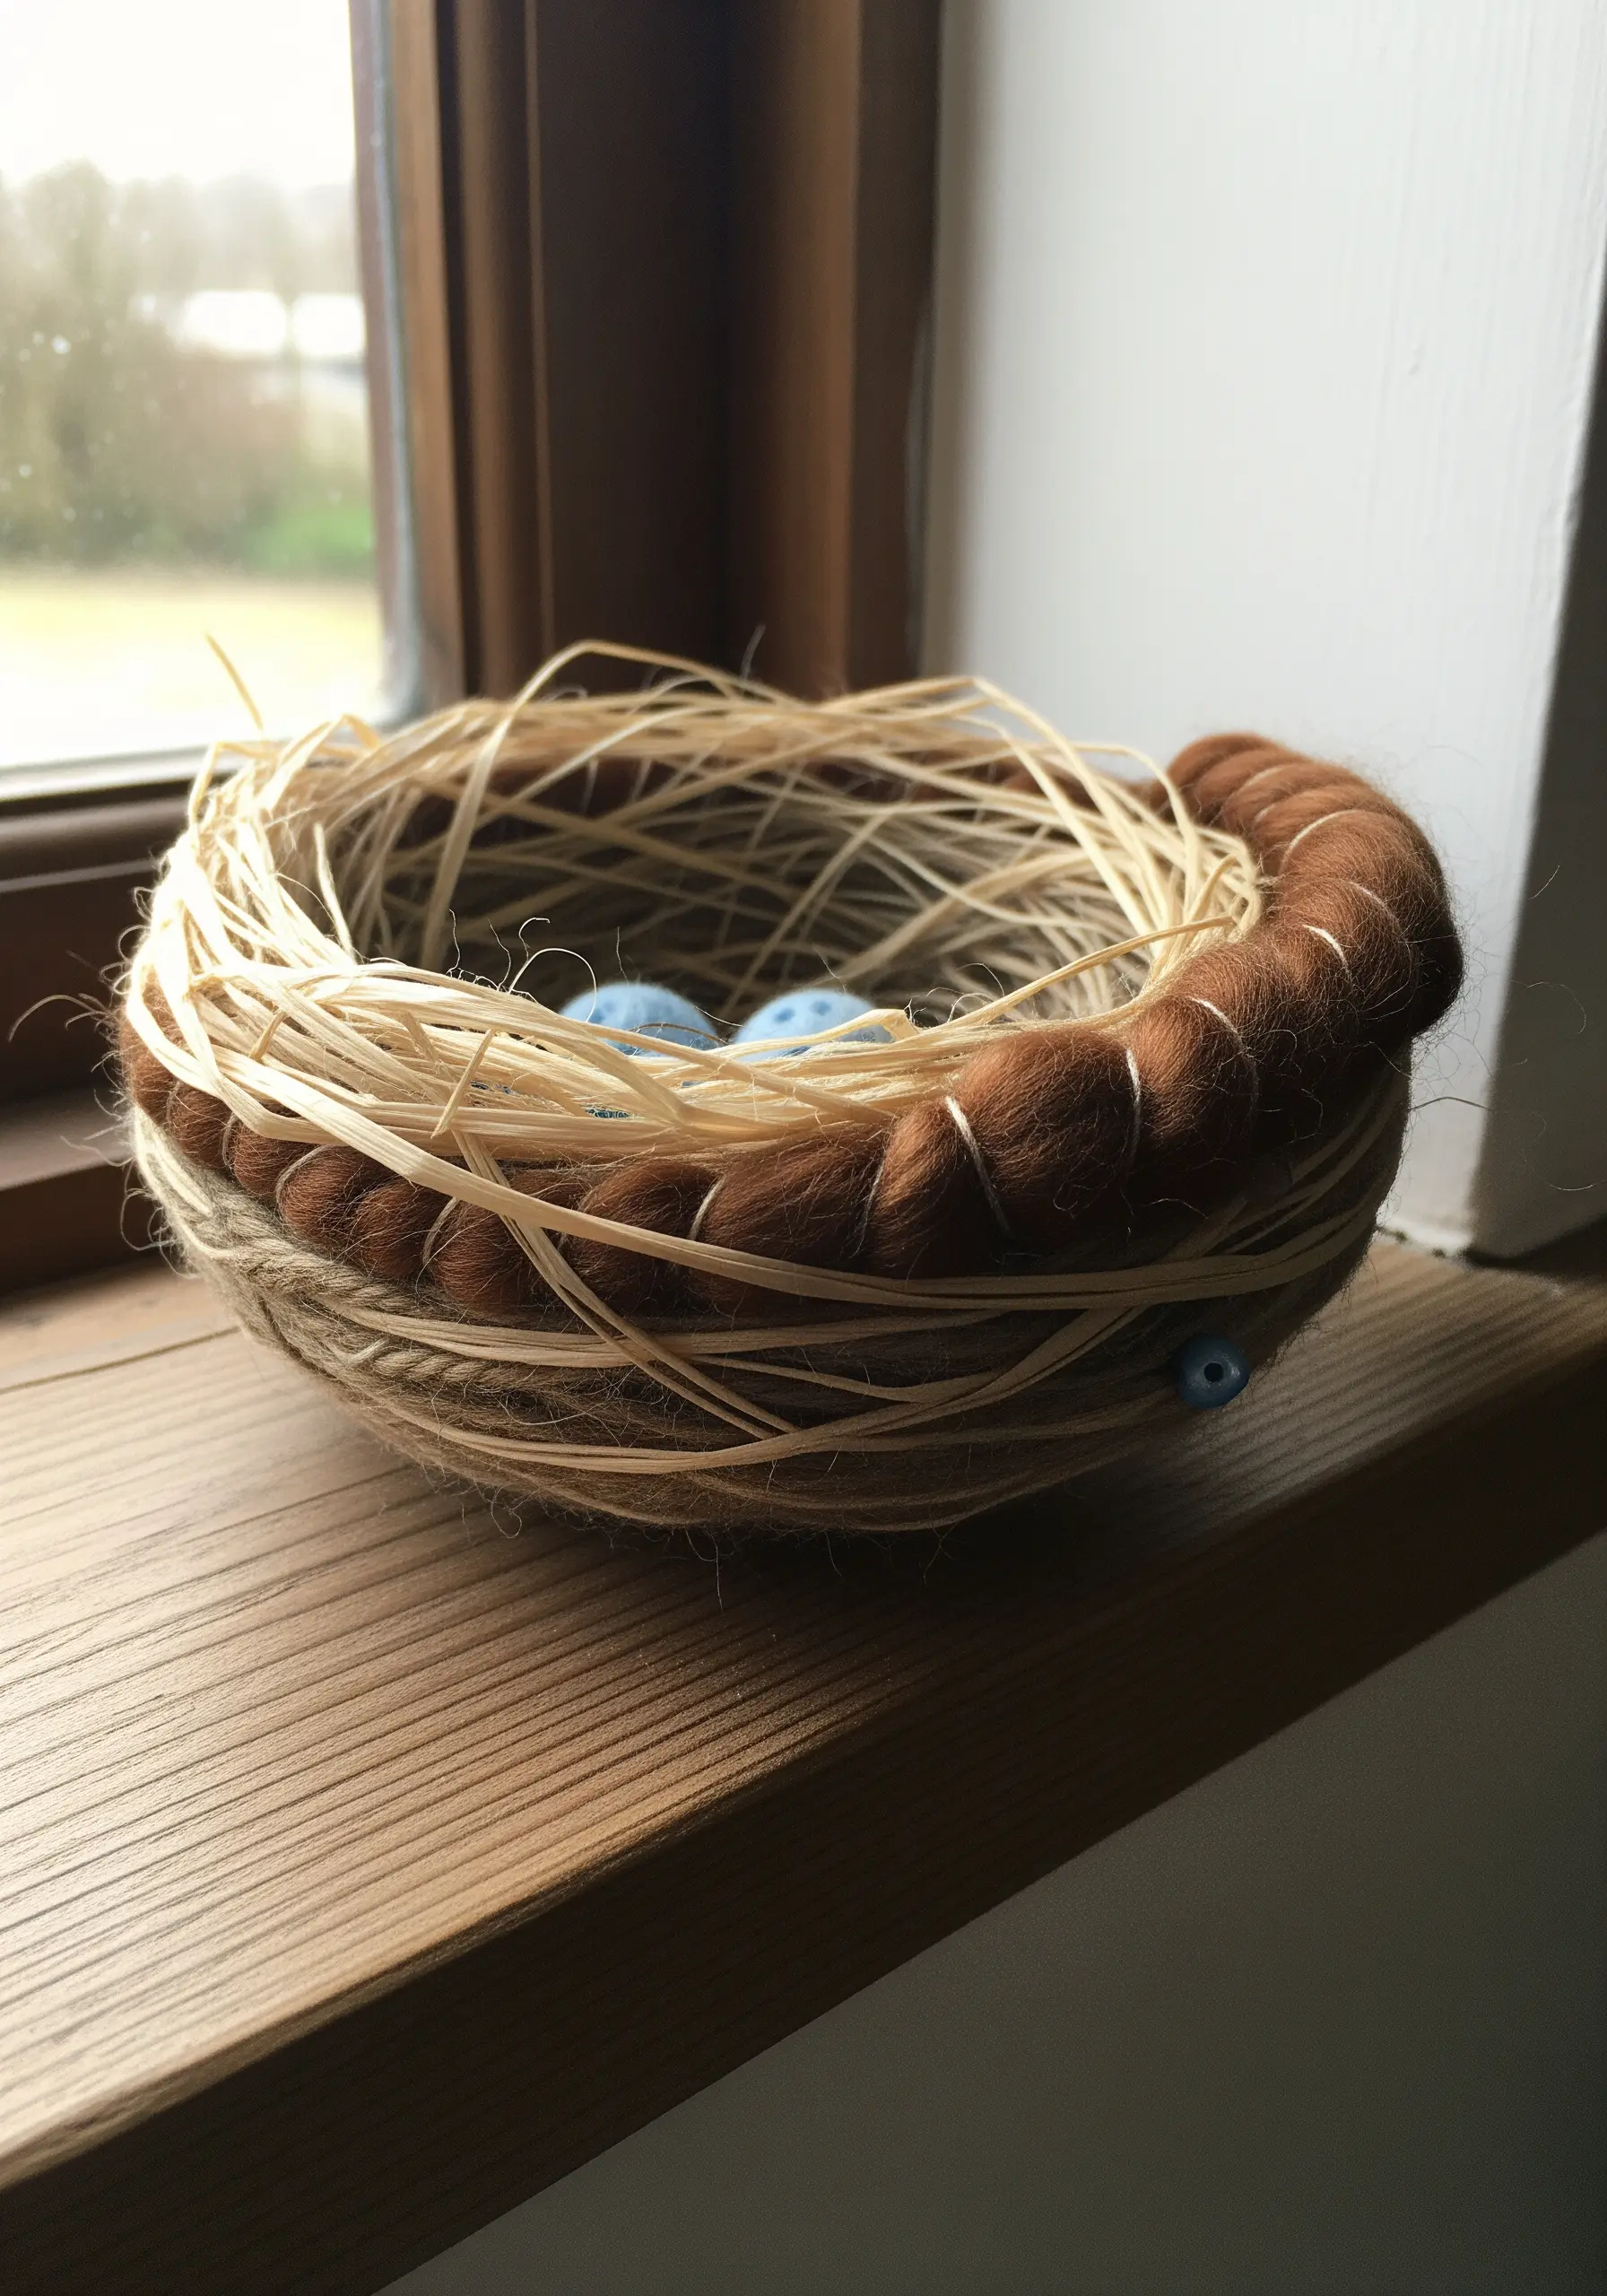
Move beyond thread to create a sculptural bird’s nest using unconventional, natural materials.
Form the basic bowl shape of the nest by coiling and stitching down jute twine or thick rope.
Then, weave strands of natural raffia or dried grasses through the coiled base, leaving the ends loose and messy for an authentic look.
Finally, wrap a section of the rim with soft wool roving to add a touch of softness and contrast against the rougher textures.
22. Block in Mountain Faces with Bold Stitches
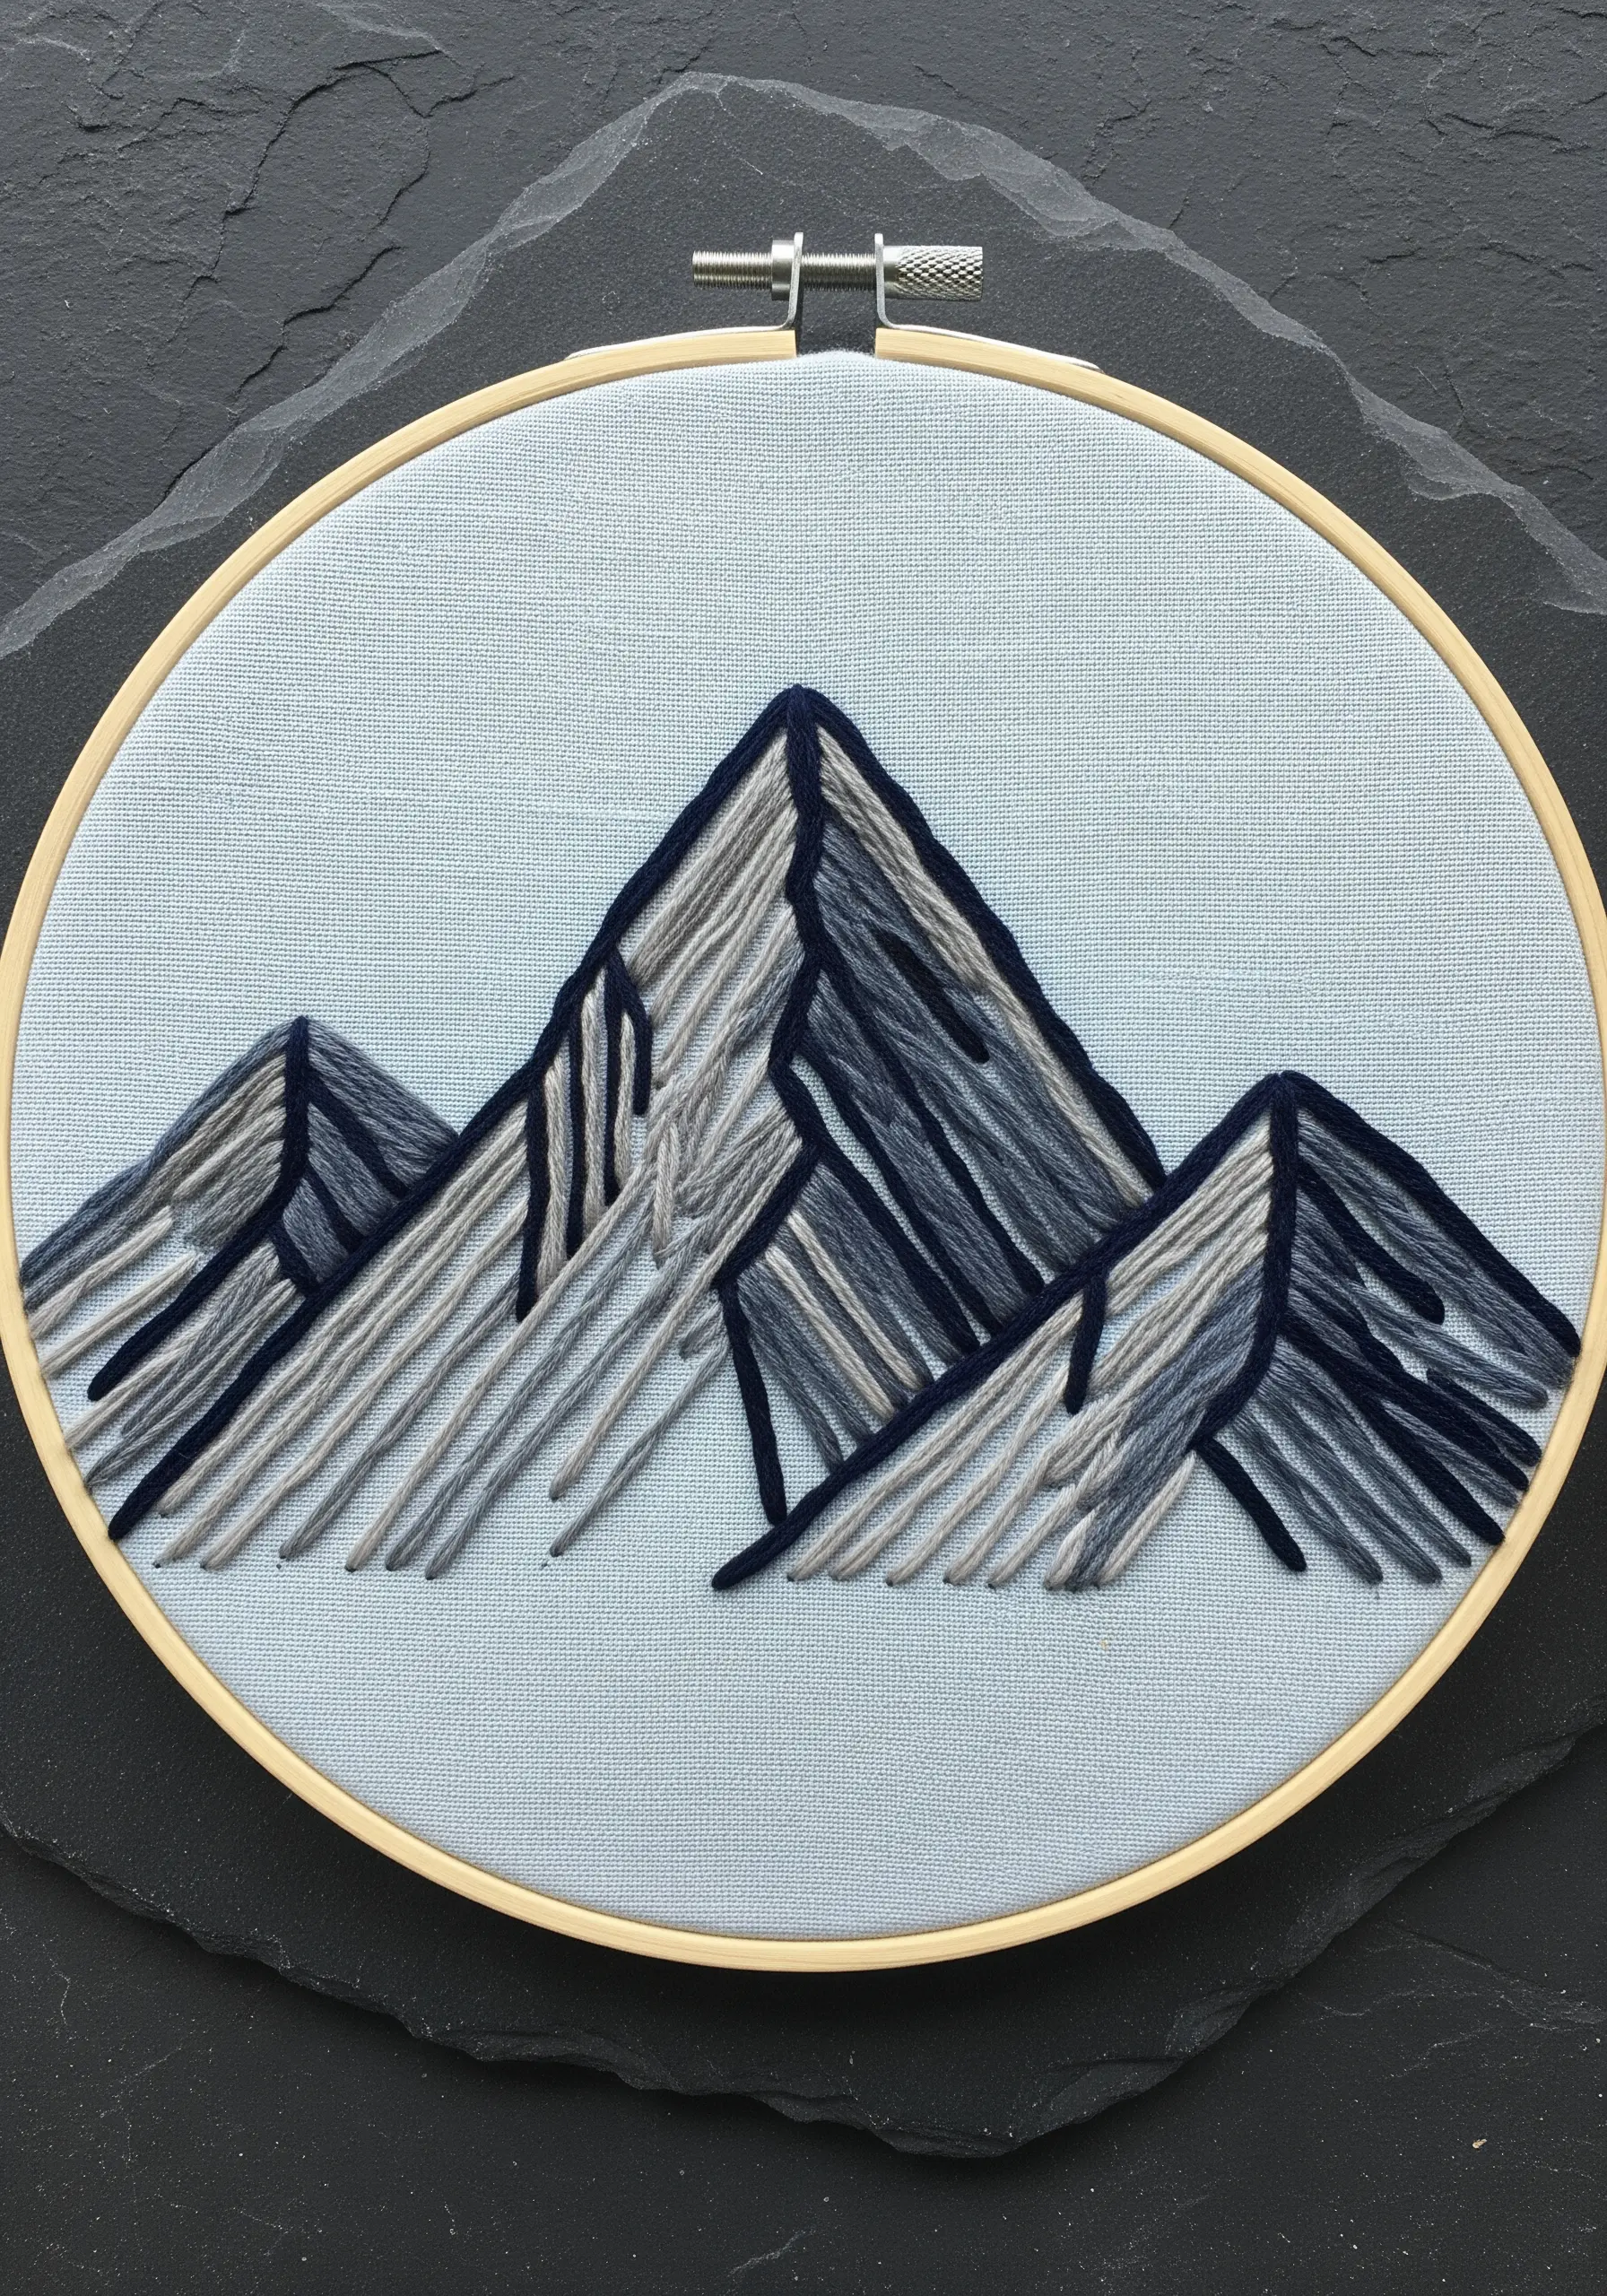
Capture the stark, geometric beauty of mountain ranges with a graphic, color-blocked approach.
Outline the main peaks and ridges with a dark, strong backstitch or stem stitch.
Fill in the different faces of the mountain with long, dense straight stitches, using a different shade of grey or blue for each plane to indicate light and shadow.
Keep your stitches parallel within each section to create a clean, faceted look. This technique transforms a complex landscape into a powerful, minimalist statement.
Master this with mountain landscape thread painting techniques.
23. Spin a Dew-Kissed Spiderweb
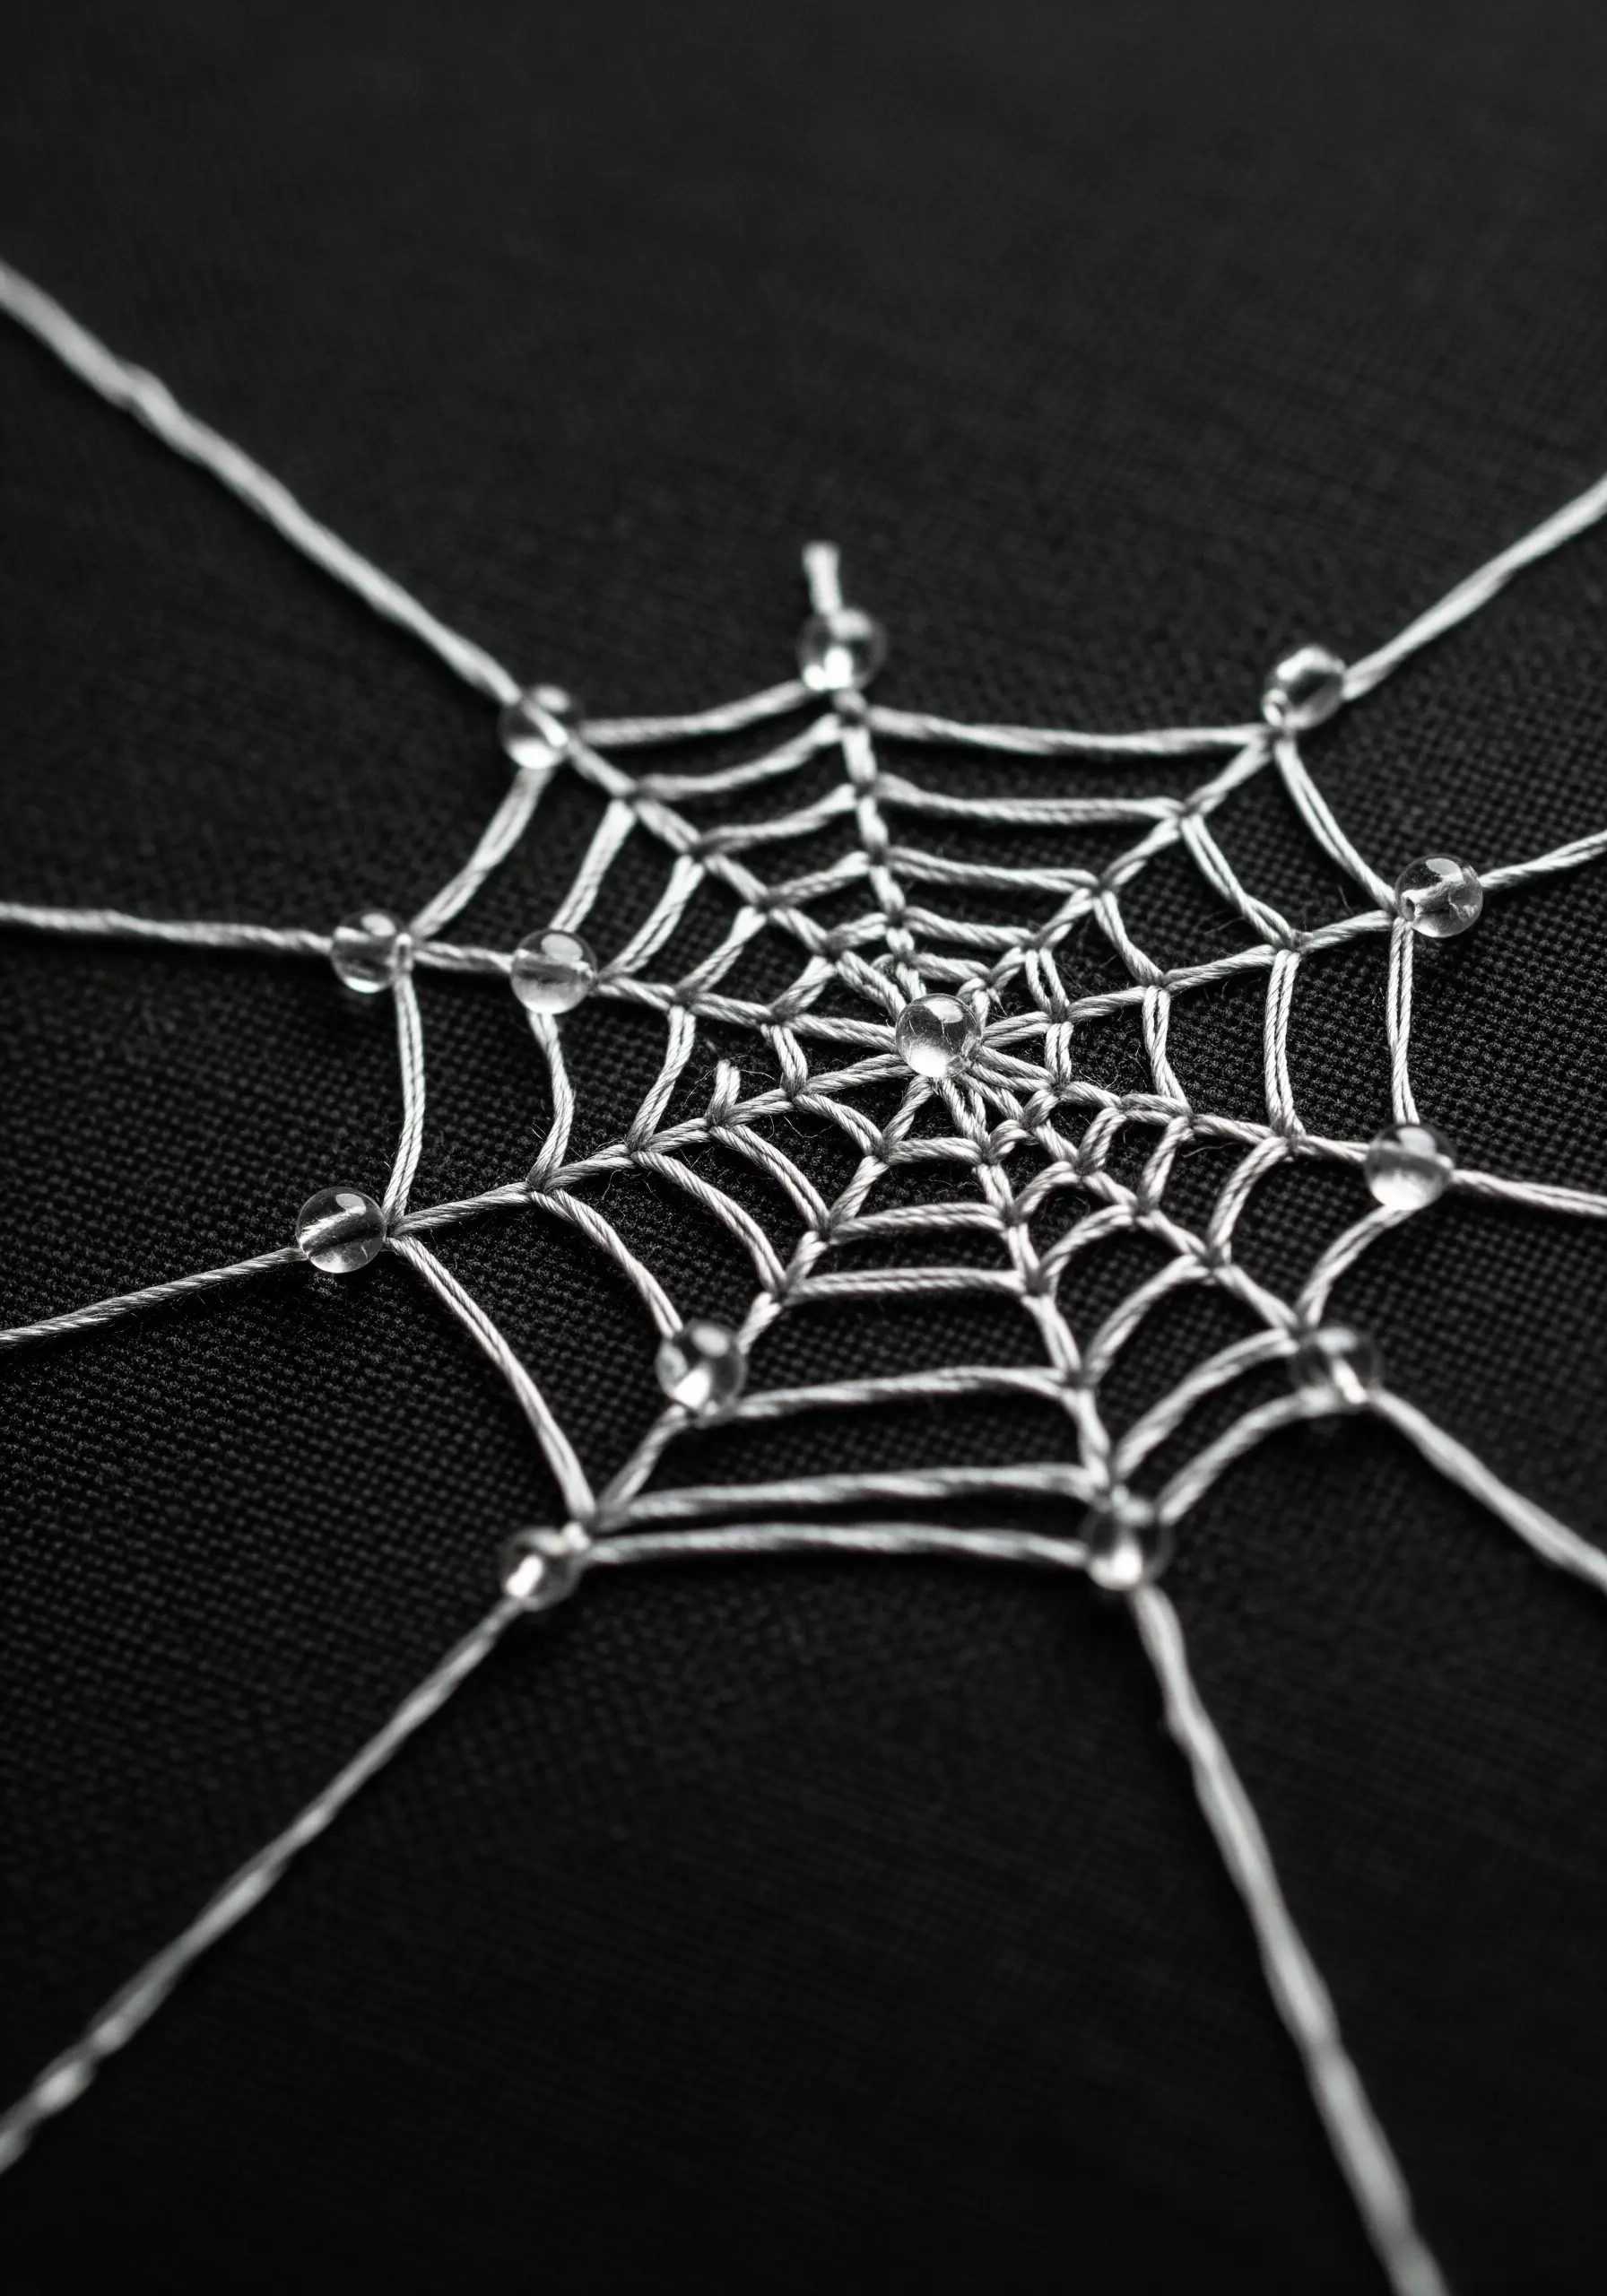
Create a delicate and realistic spiderweb that appears to be glistening with morning dew.
Use a fine, single strand of silver metallic or white thread to couch the main radial lines of the web.
Weave the spiral threads using the same thread, securing it with a tiny stitch where it crosses each radial line.
The final, magical touch is adding tiny, clear seed beads or glass beads at irregular intervals along the threads to catch the light and mimic shimmering dewdrops.
24. Replicate a Seashell with Raised Stem Stitch Bands
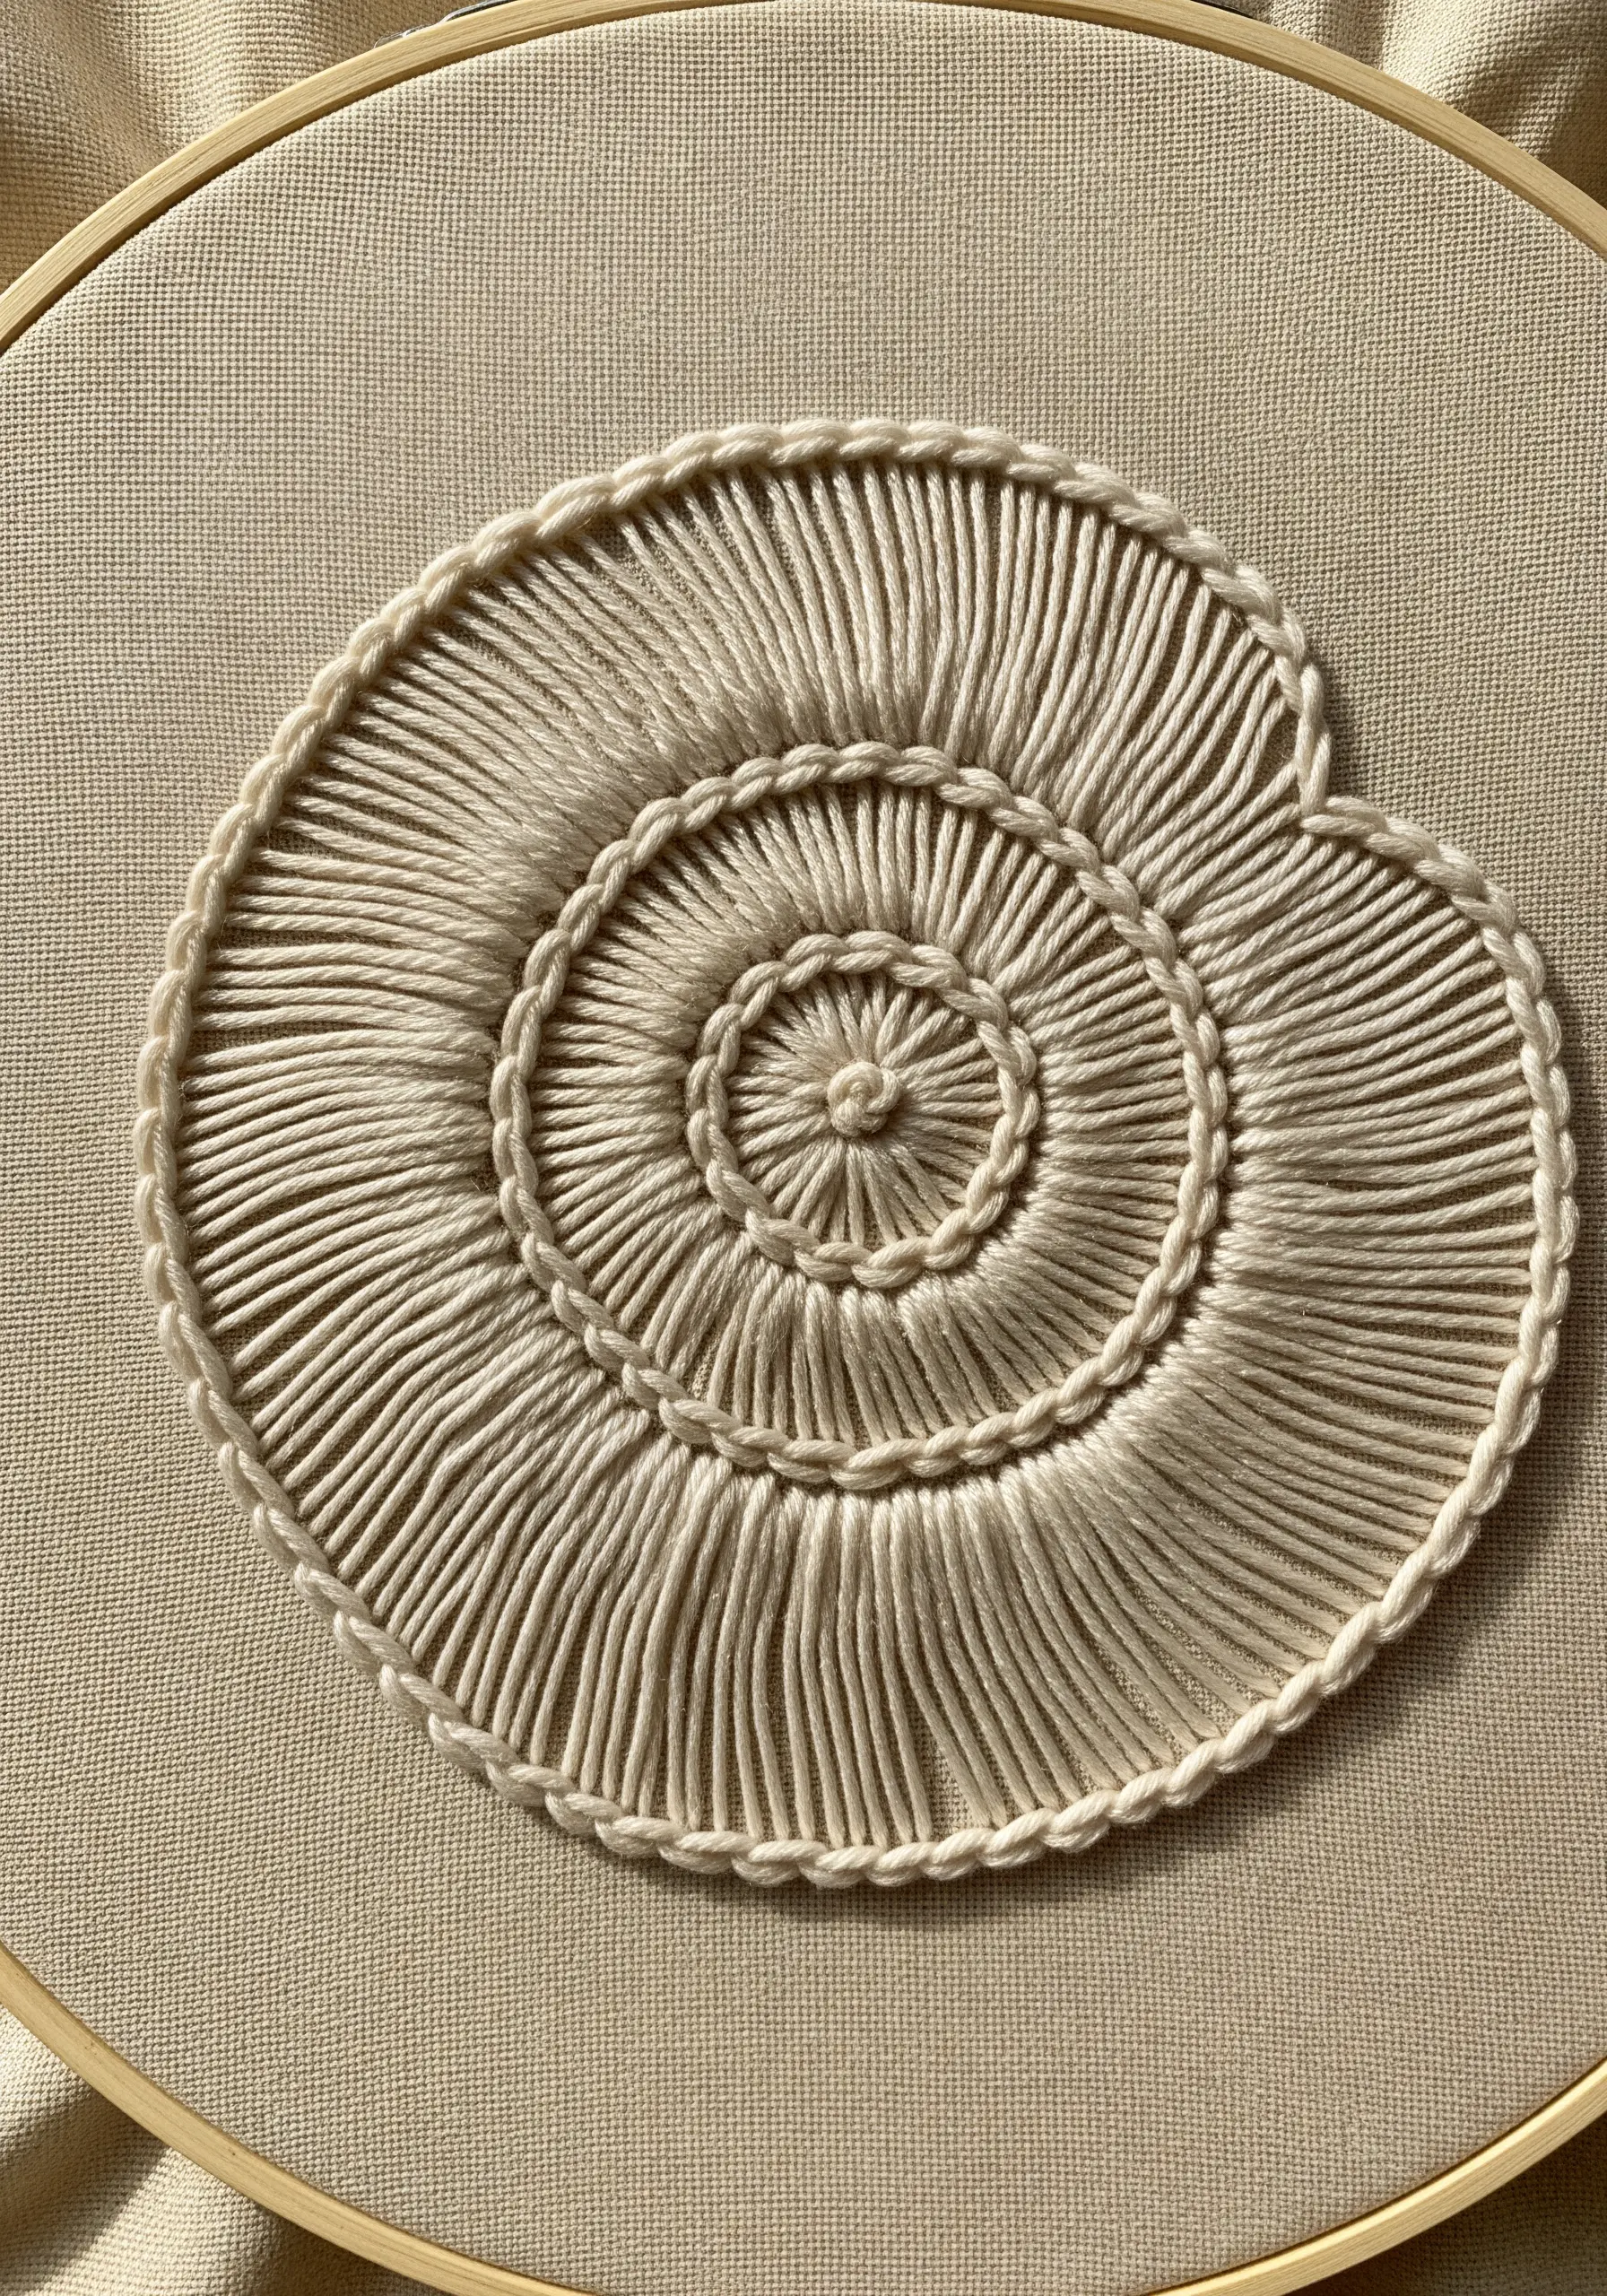
Mimic the radiating ridges of a seashell using a simple but highly effective stitch: the raised stem stitch band.
Begin by creating a foundation of straight stitches that follow the shape of your shell, radiating from a central point.
Then, work stem stitches over these foundation bars (not into the fabric), creating raised, corded lines.
The density of these raised bands gives the piece a wonderful sculptural quality, perfectly capturing the texture of a shell in a single, neutral color.
25. Capture Ephemeral Frost on Sheer Fabric
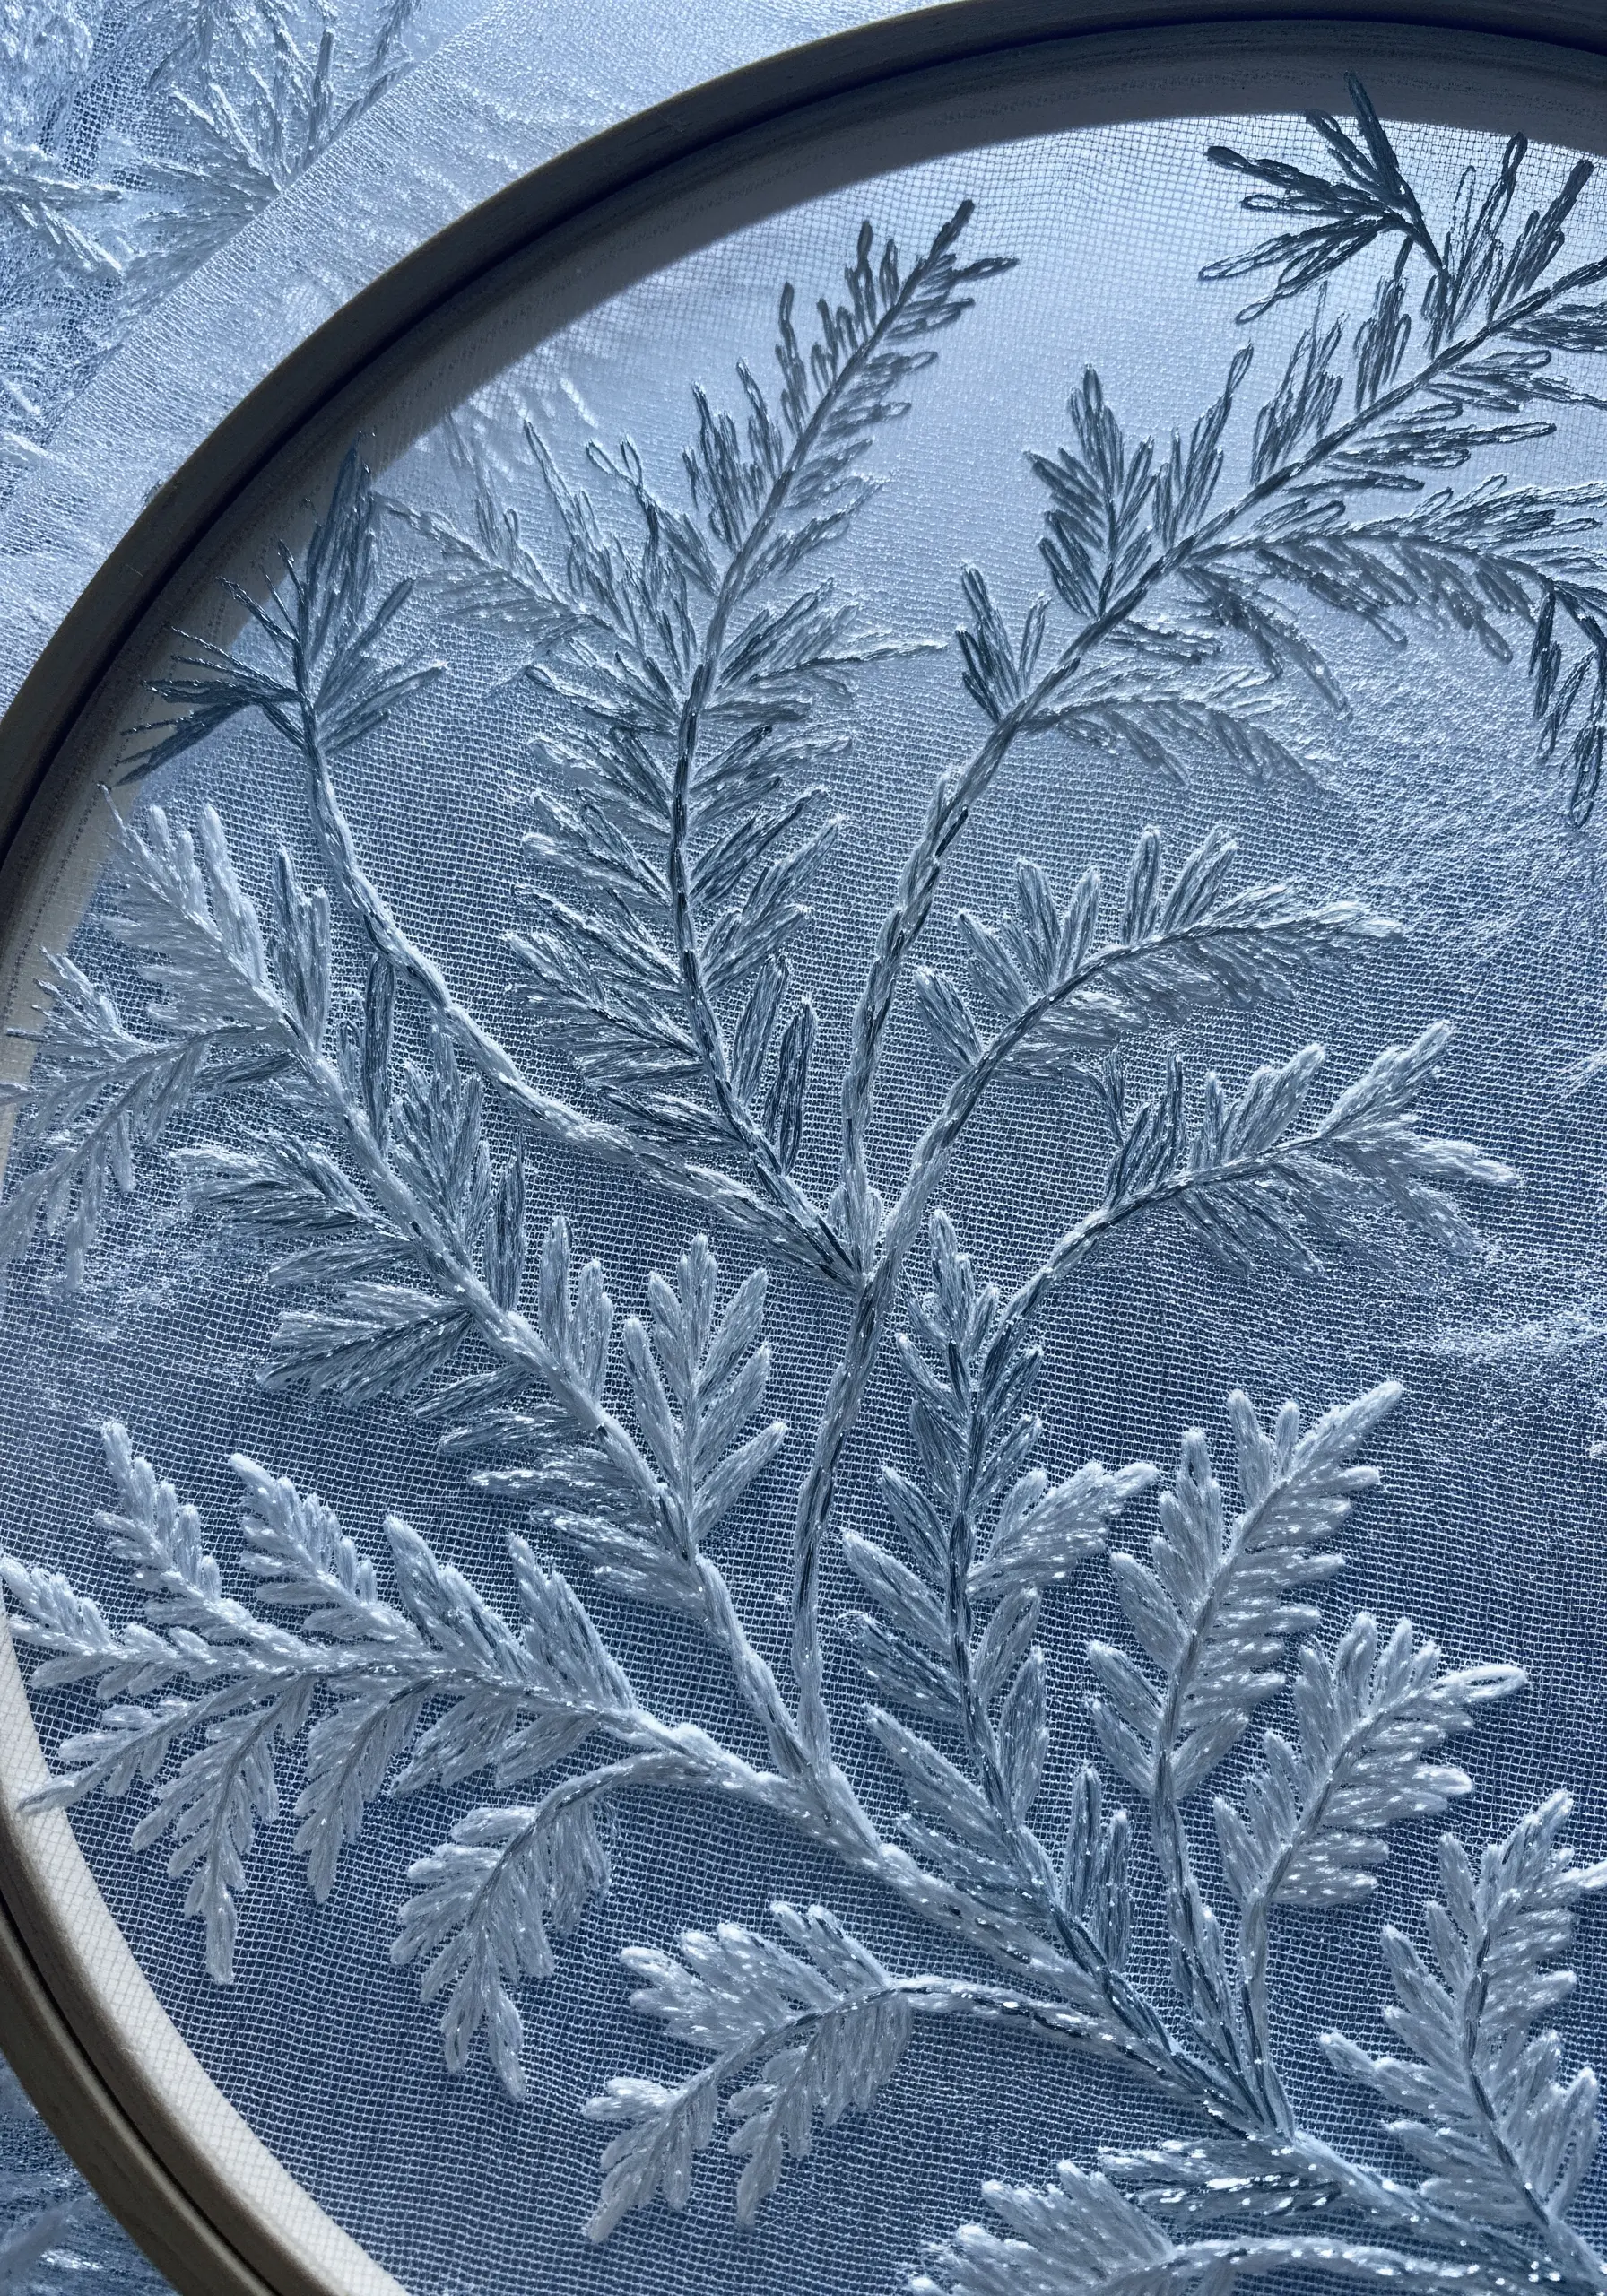
Stitch delicate frost patterns that seem to float in mid-air by working on a sheer fabric like tulle or organza.
To keep the fine fabric from puckering, secure it in your hoop with a layer of water-soluble stabilizer on top or underneath.
Use simple stitches like fern stitch or detached chain stitch with a fine white or light blue thread to create the branching, crystalline patterns of frost.
Once you are finished, rinse away the stabilizer to reveal your delicate stitches suspended on the transparent background.
26. Illustrate Soil Horizons with a Stitch Sampler
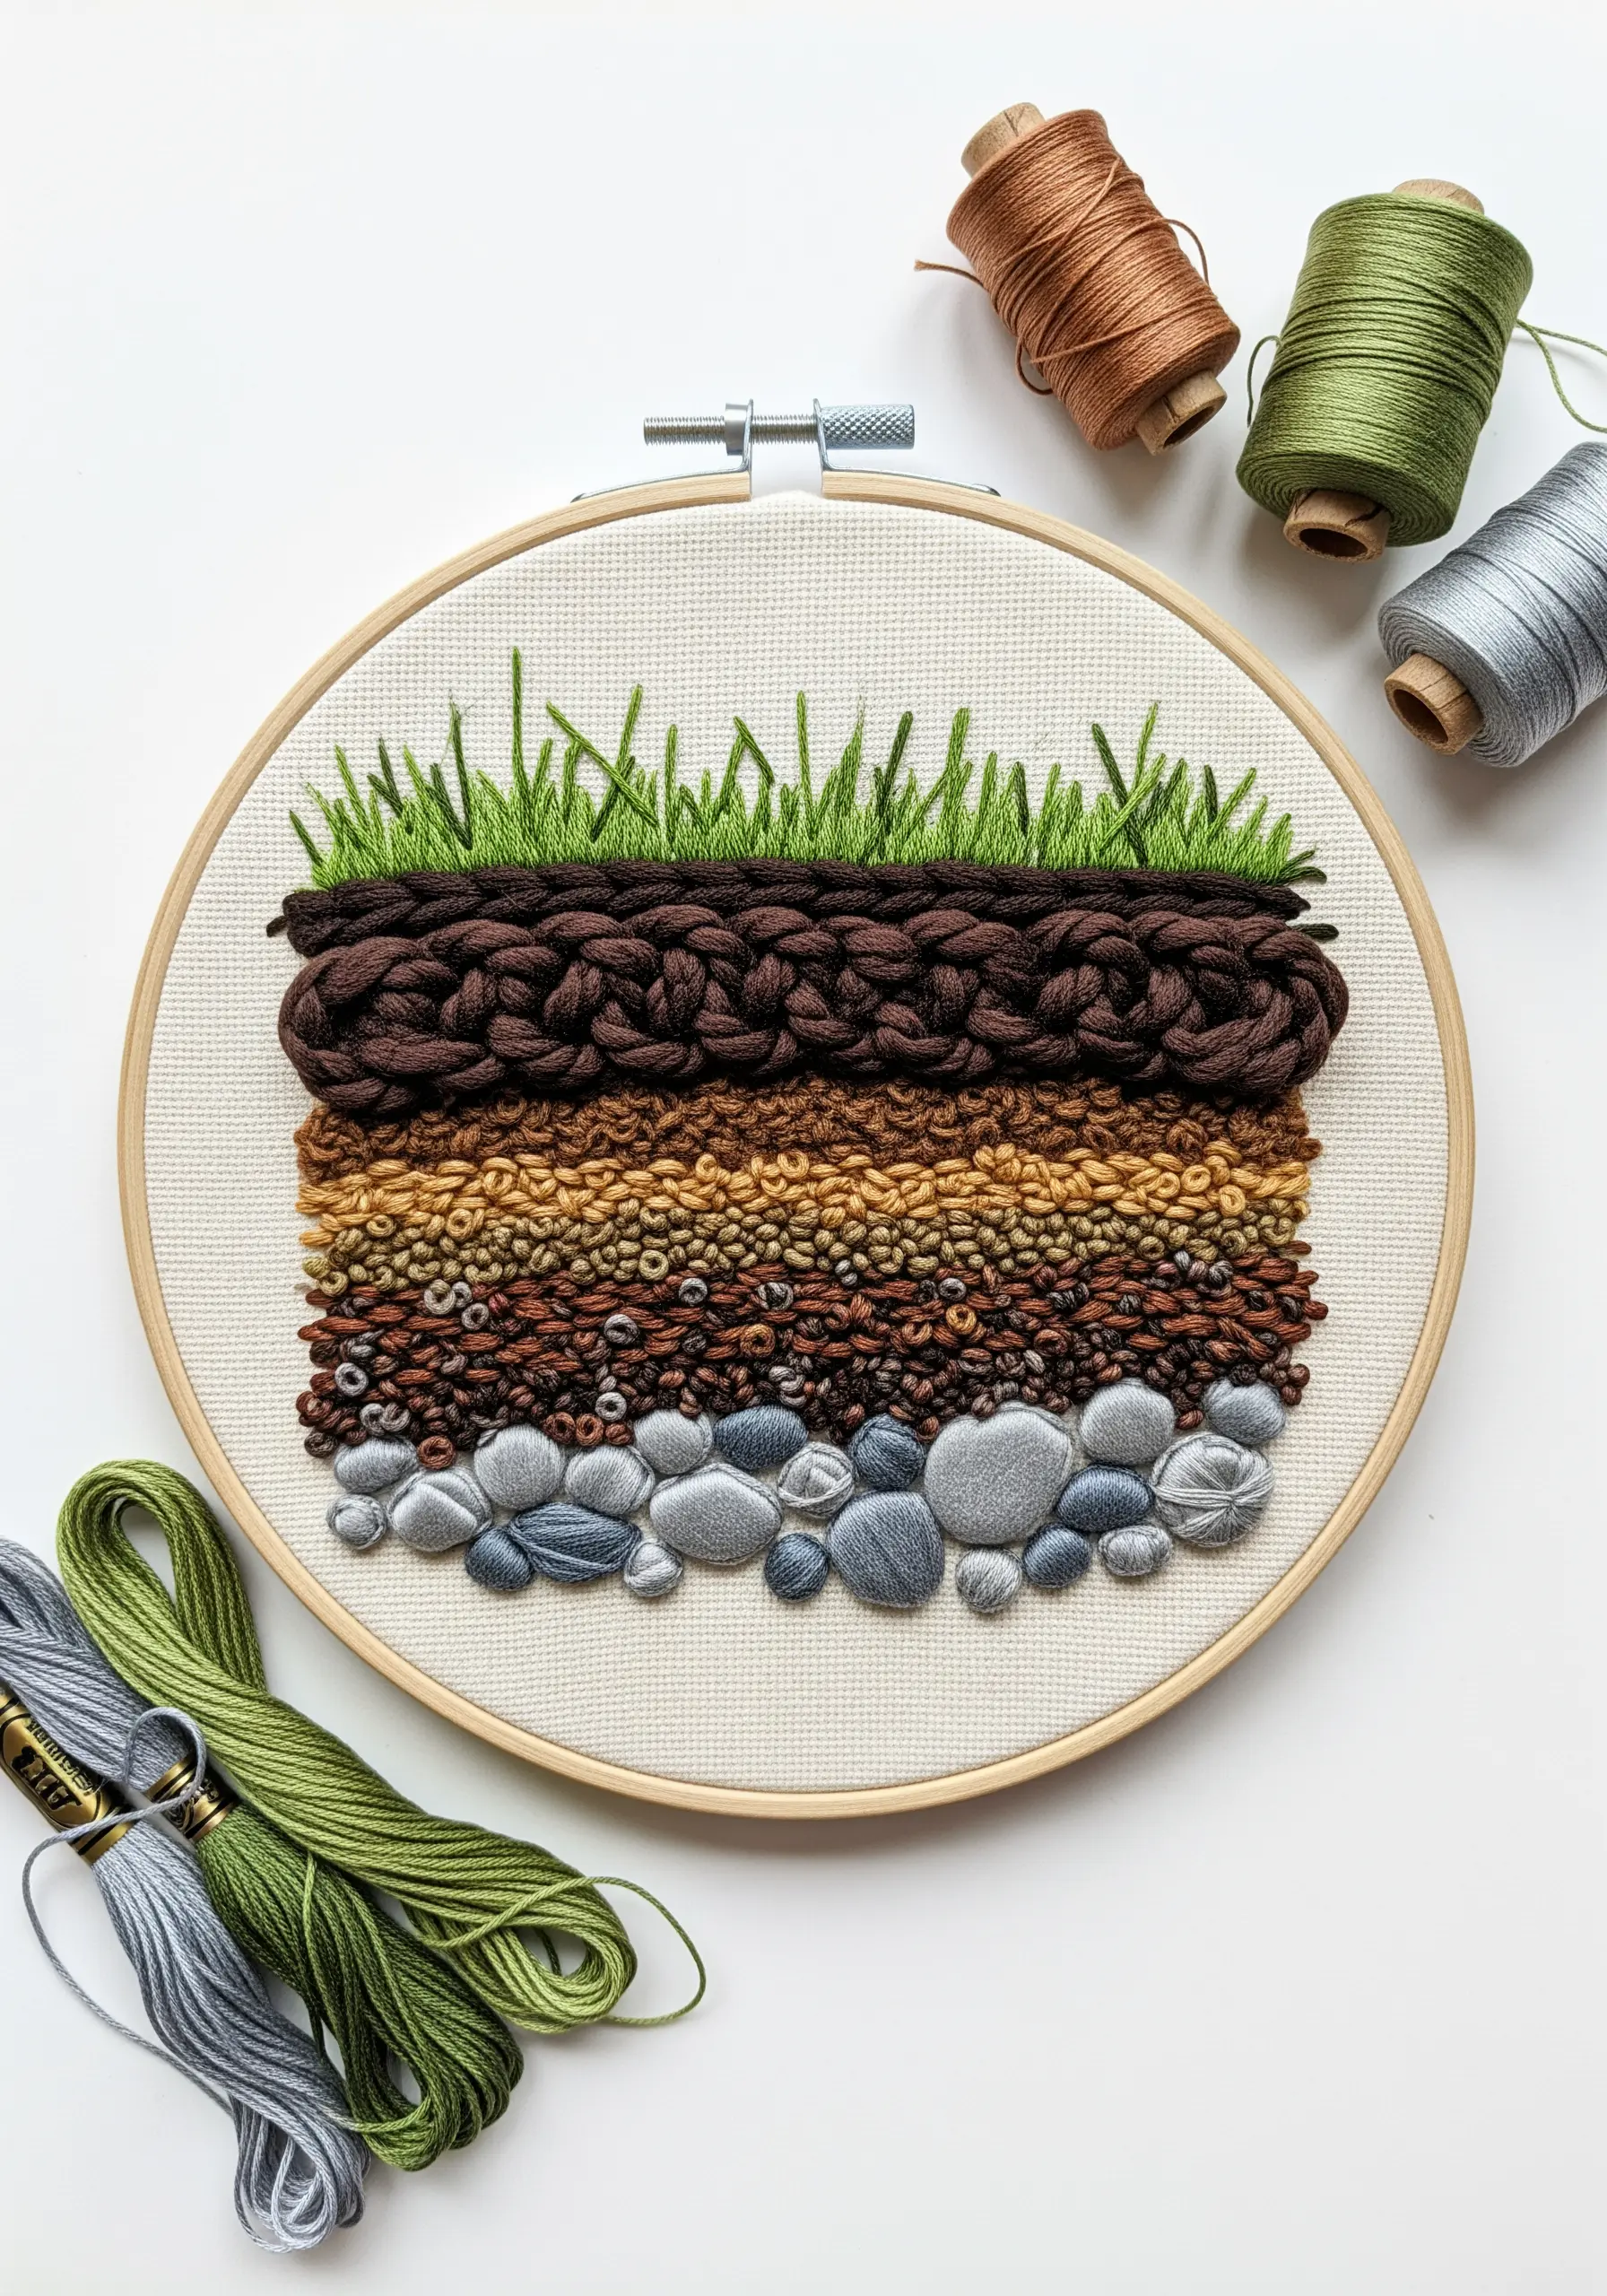
Create a visual and tactile guide to the layers of the earth by assigning a specific stitch to each soil horizon.
Use turkey work for the top layer of grass, leaving the loops long and then trimming them for a neat turf effect.
Mimic rich topsoil with thick, couched yarn, use French knots for gravel, and apply padded satin stitch for smooth, buried stones.
This approach turns a scientific cross-section into an engaging piece of fiber art and is a fantastic way to practice ways to capture nature’s textures.
27. Create a Dense Canopy with Layered Leaf Stitches
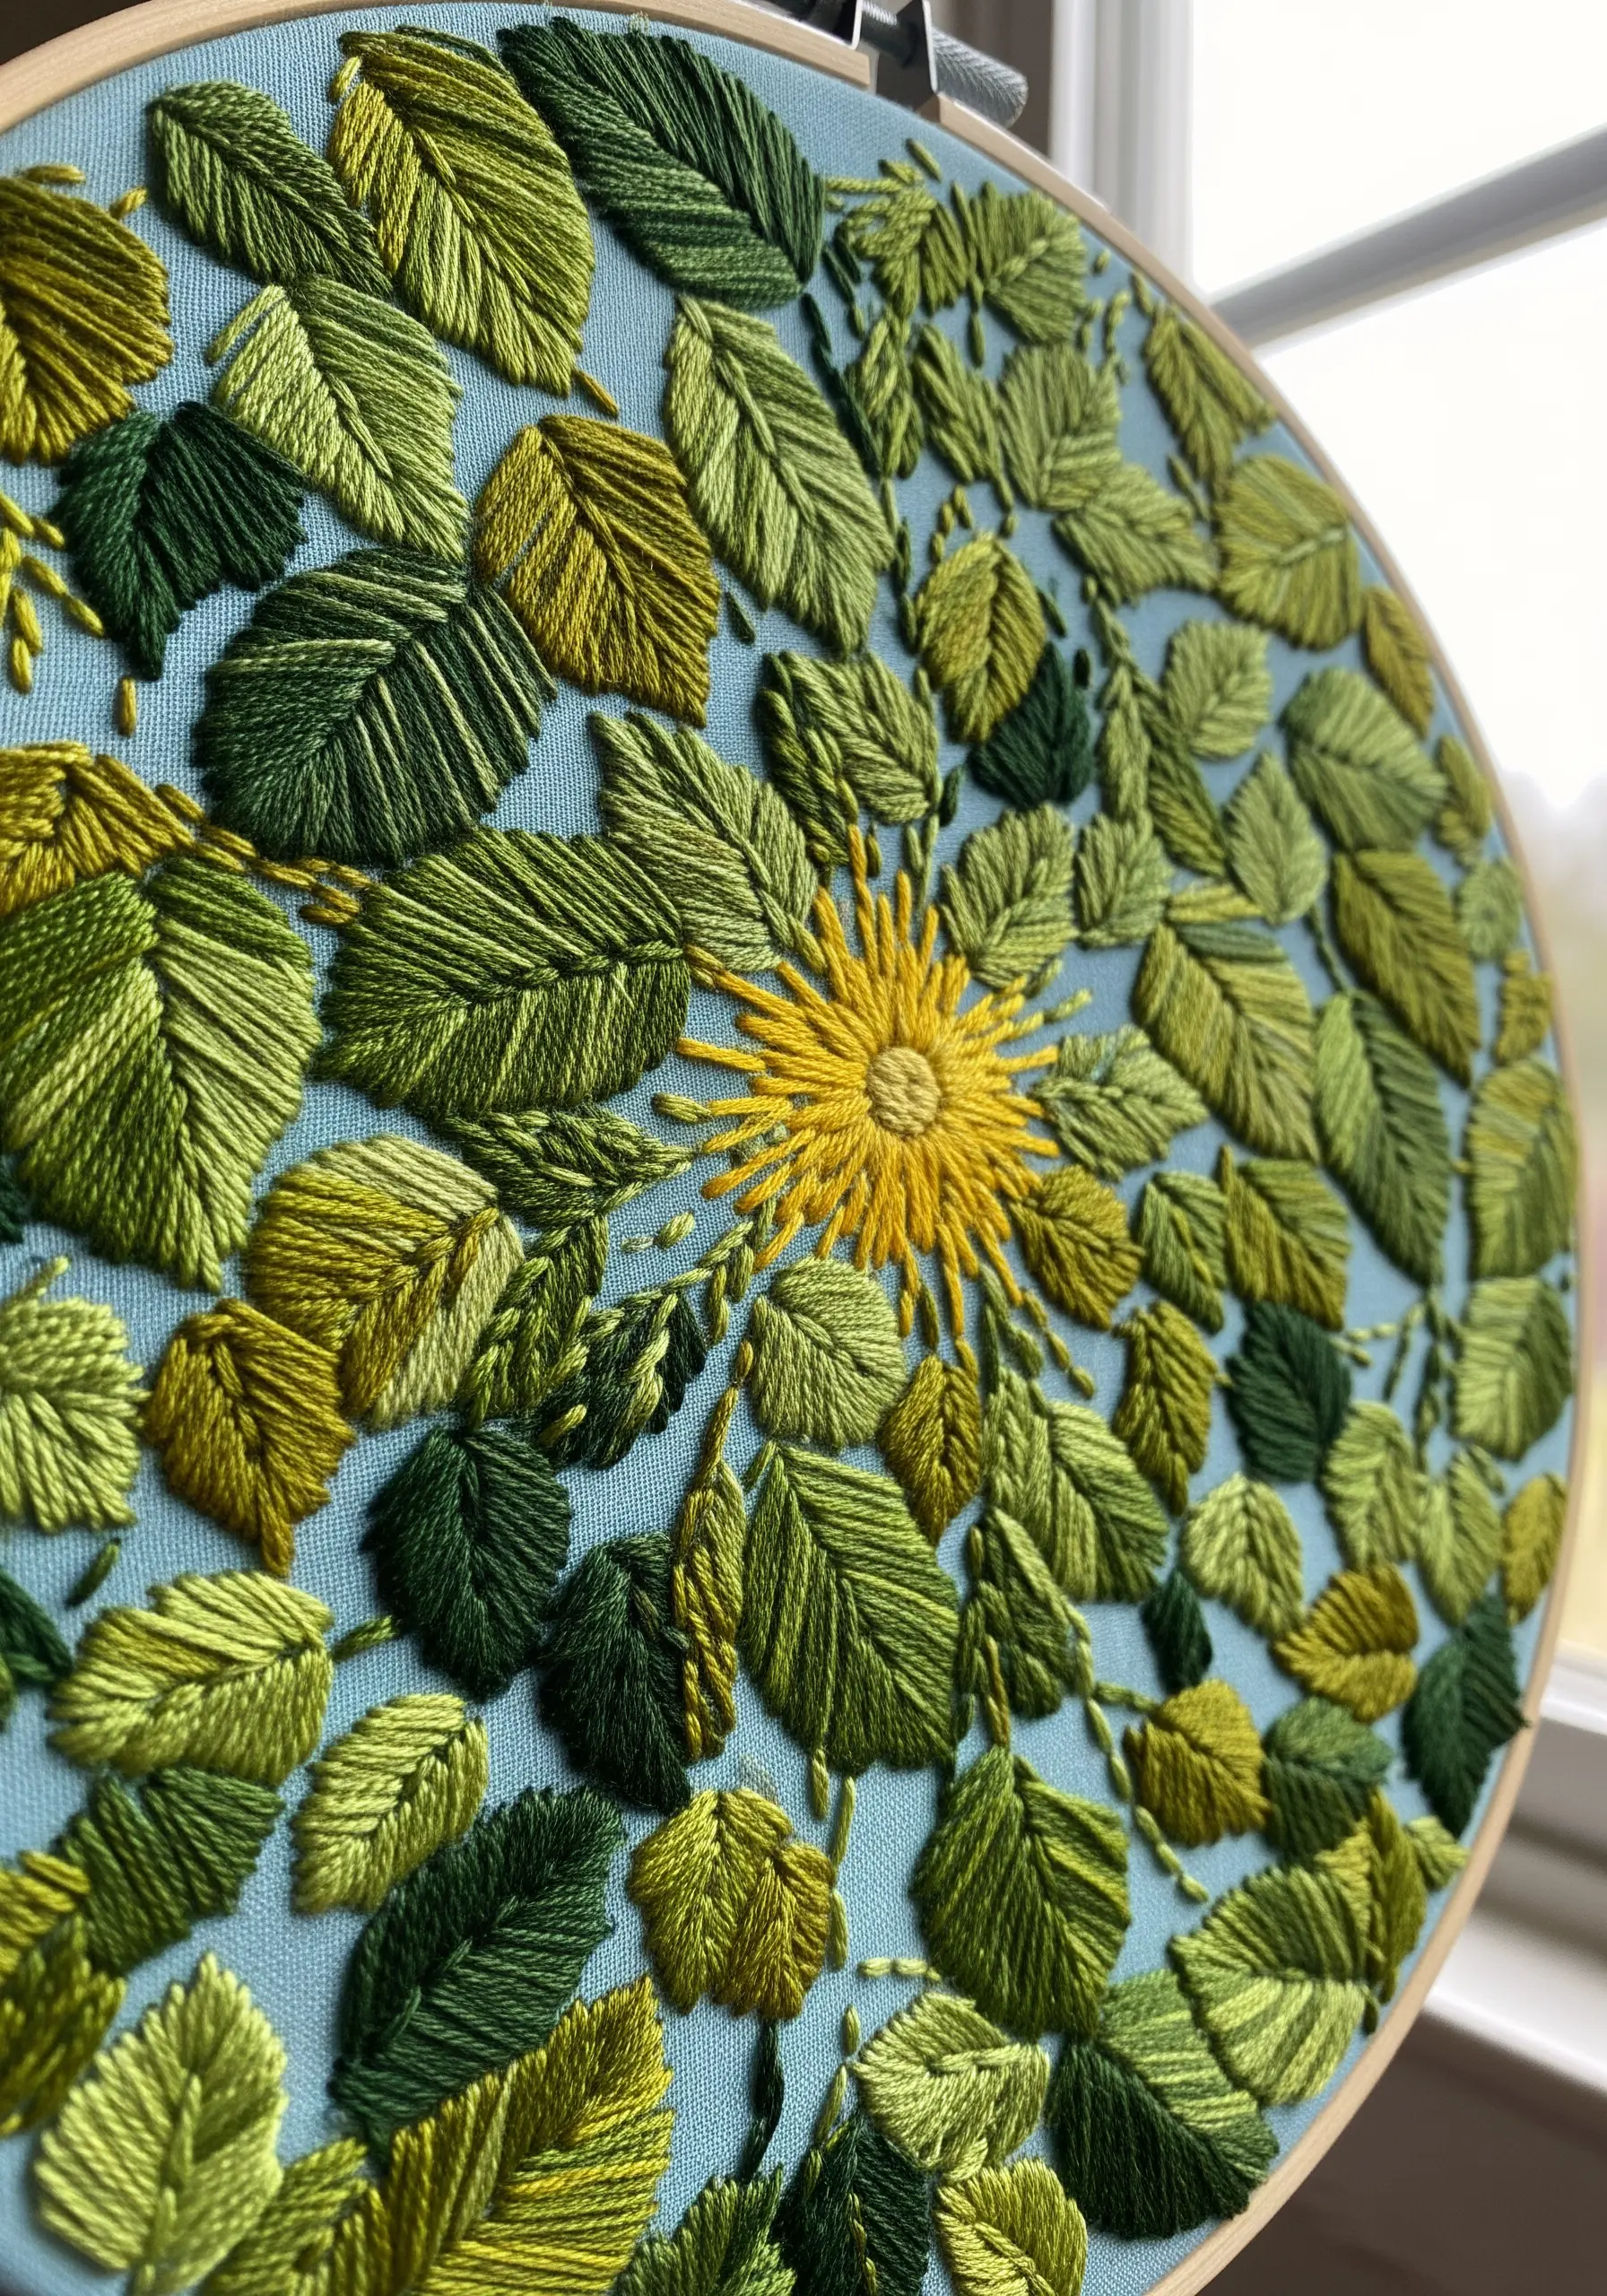
Build a lush, overlapping canopy of leaves that has real depth and dimension.
Start by stitching the leaves that are farthest away directly onto the fabric using a simple satin stitch or fishbone stitch.
For the middle ground, use a detached stitch like the cast-on stitch, anchoring it at the base but allowing the body of the leaf to lift slightly from the surface.
Finally, stitch the foreground leaves completely separately as detached elements (stumpwork) and attach them only at the stem, letting them sit on top of the other layers.
Learn new ways to layer leaf stitching for three-dimensional botanical texture that truly pops.
28. Form a Honeycomb with Wrapped Wool Roving
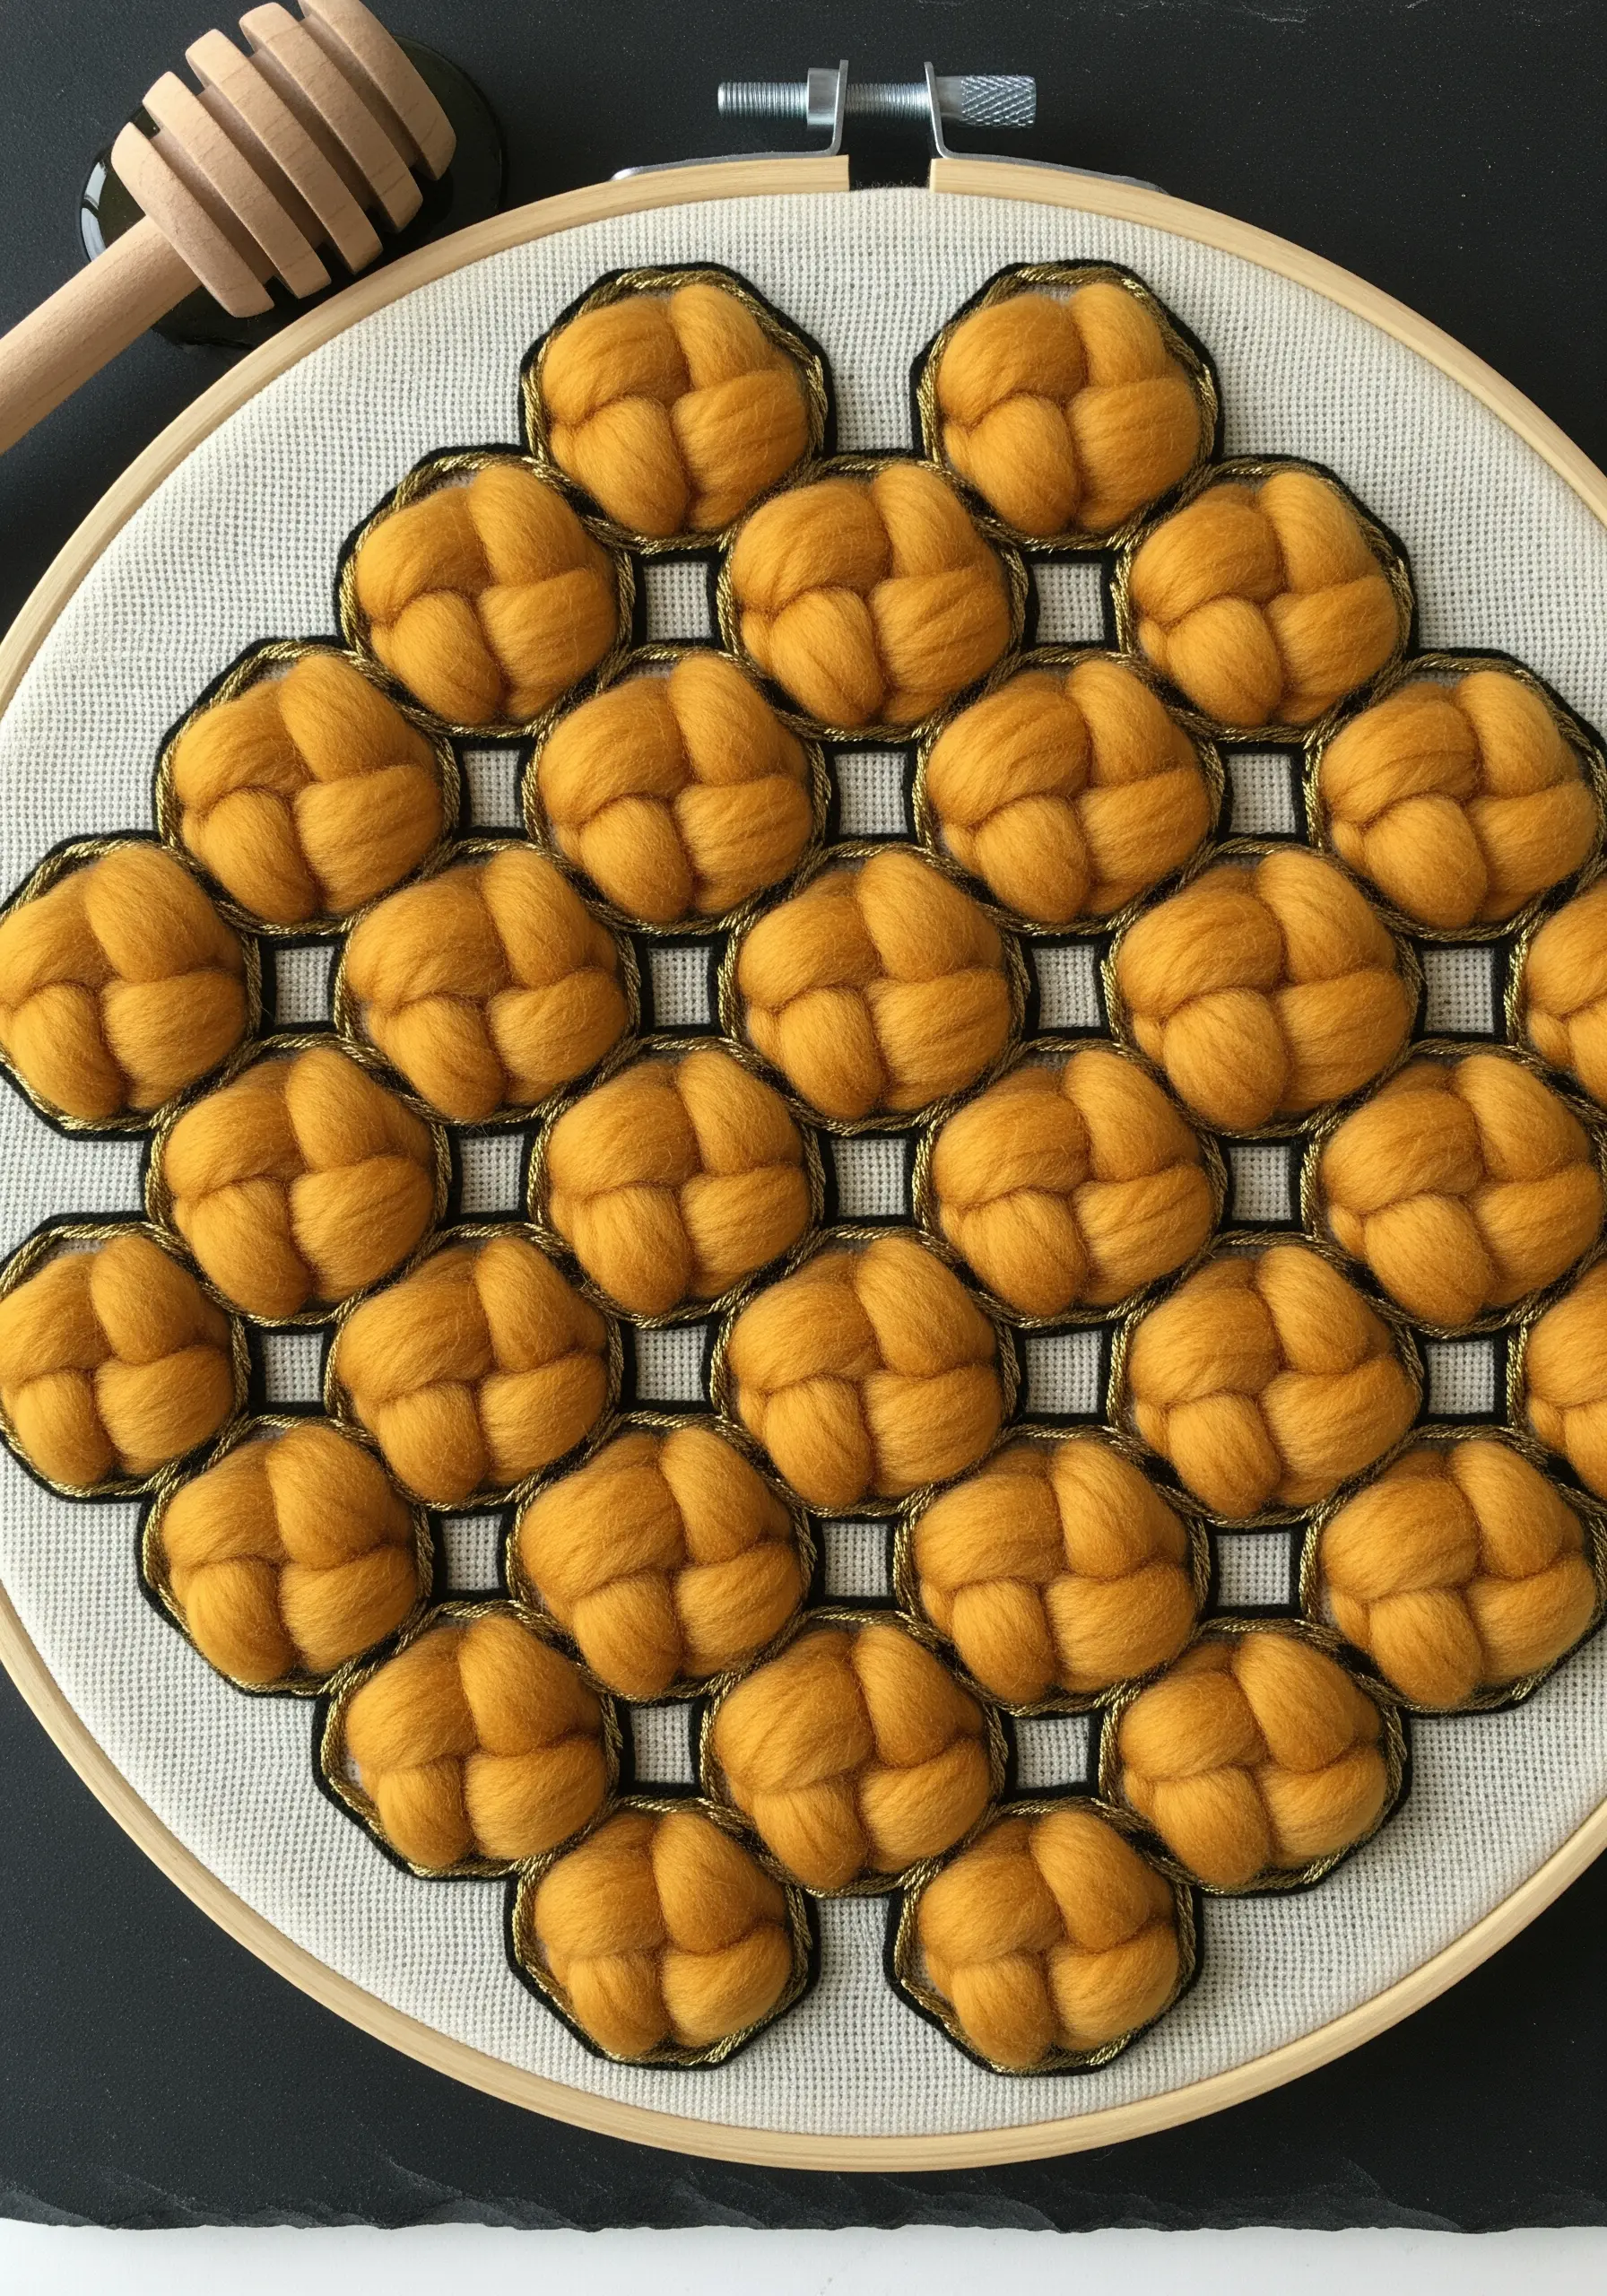
Achieve a soft, sculptural honeycomb effect using thick wool roving and fine metallic thread.
Create small, puffy bundles of wool roving and place them on your fabric in a grid pattern.
Secure each bundle by wrapping it tightly in the center with a fine gold or bronze metallic thread, pulling it taut to create a dimpled, four-lobed shape.
The contrast between the soft, matte wool and the sharp, shimmering metallic thread is what gives this technique its unique visual appeal.
29. Combine Stitching and Sculpting for a Coastal Scene

Merge two distinct crafts to create a powerful mixed-media piece that evokes the shoreline.
On the top portion of your canvas, create swirling ocean waves by couching down variegated blue and white yarn.
For the bottom section, create a pebble beach by gluing down small, smooth polymer clay stones that you’ve shaped and baked yourself.
The juxtaposition of the soft, flowing yarn and the hard, solid clay creates a striking and dynamic representation of where the water meets the land.
30. Replicate Lichen with Colonial Knots and French Knots

Capture the beautifully complex, clustered texture of lichen growing on a rock.
First, create a base texture on your fabric to represent the rock, perhaps using a wash of grey fabric paint or dense seed stitches.
Then, build the lichen formations on top. Use French knots for the tiny, granular background clusters.
For the larger, cup-like structures, use Colonial knots—their distinct shape and slightly raised profile perfectly mimic the fruiting bodies of many lichen species.
Varying the colors between pale green, grey, and ochre will enhance the realism.
31. Stitch Shimmering Fish Scales with Metallic Threads
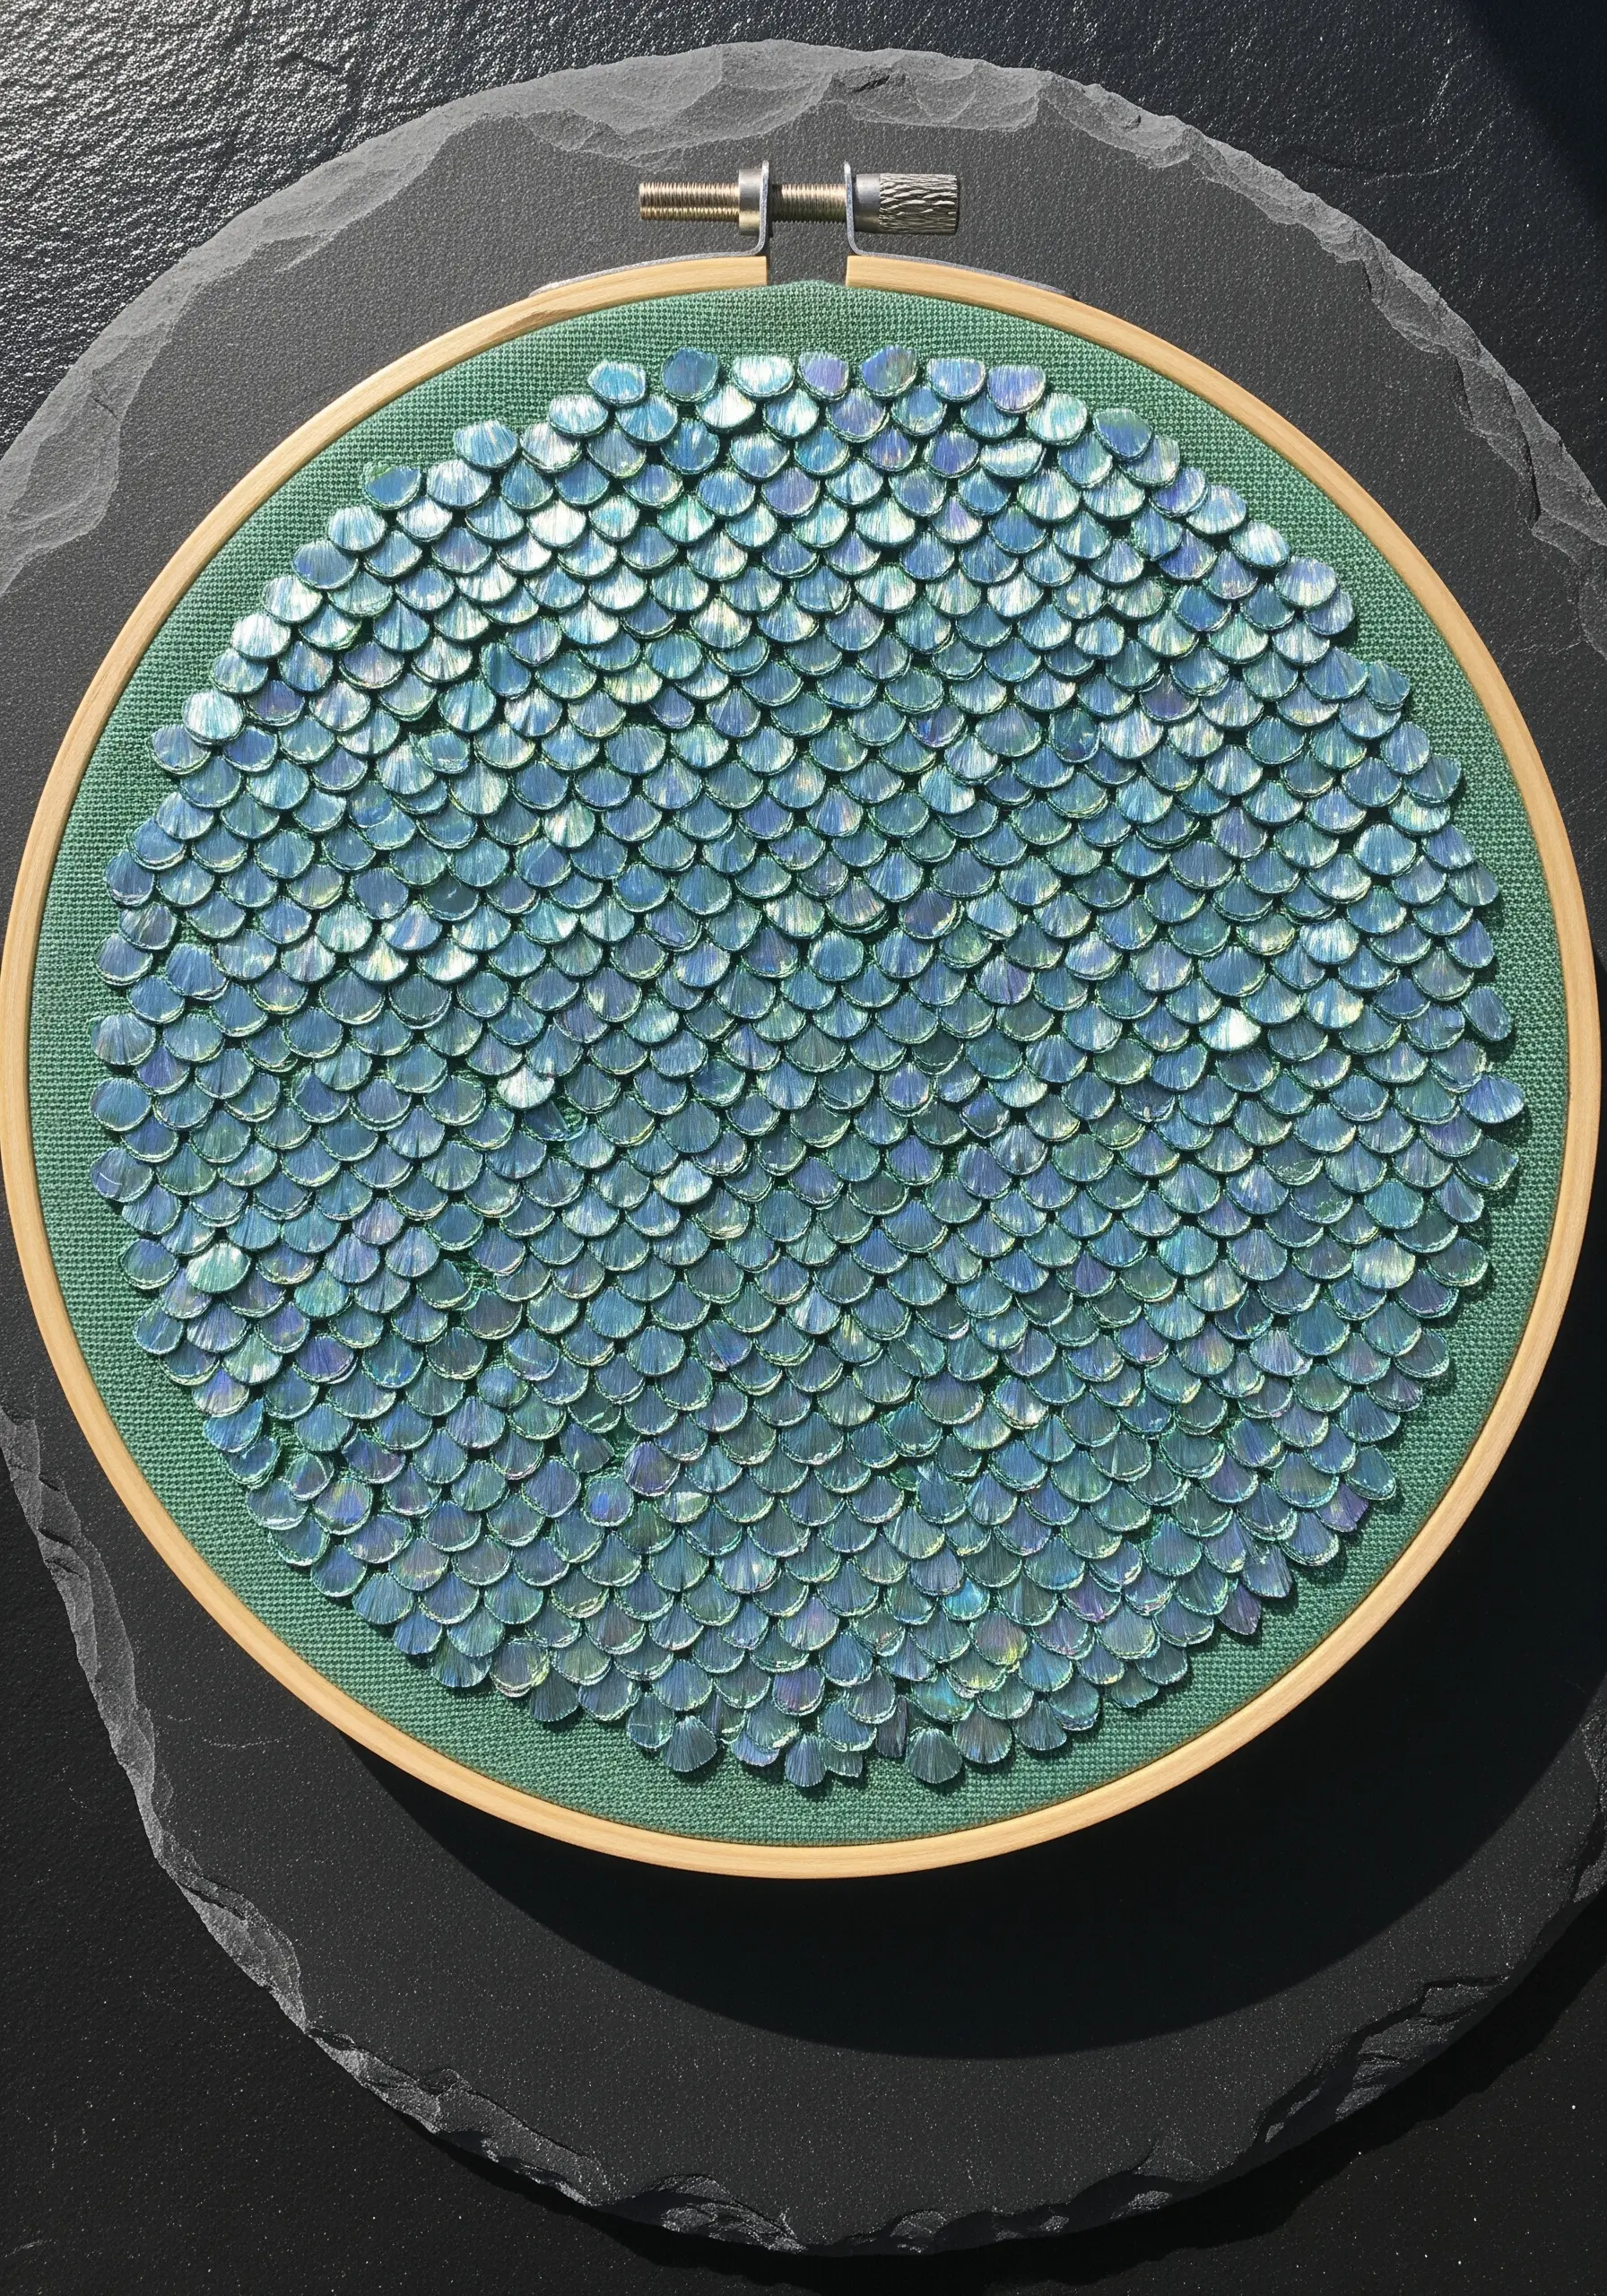
Create an iridescent, light-catching surface that mimics fish or mermaid scales.
Instead of using sequins, stitch each scale individually using a fishbone stitch or a wide, flat satin stitch.
The key to the shimmer is using a flat, holographic metallic thread or a variegated rayon floss that reflects light from different angles.
Work in overlapping rows from the bottom up, just as scales grow on a fish. This ensures each new row neatly covers the top edge of the one below it, creating a seamless, shimmering texture.


