
You’ve mastered the basic stitches, and your work is neat and lovely—but you feel a creative plateau. You sense there’s another level to embroidery, one that feels more expressive and dimensional, but you’re not sure how to get there.
The secret isn’t necessarily learning more complicated stitches. It’s about rethinking your materials. By moving beyond cotton floss and inviting new fibers into your work—wool, silk ribbon, yarn, even raffia—you give your needle a whole new vocabulary.
Think of these techniques not as rules, but as invitations. Each one is a chance to add a layer of texture, a touch of unexpected sheen, or a bold sculptural element that will transform your embroidery from a flat image into a tactile experience. Let’s explore how to make your work not just seen, but felt.
1. Sculpt Volumetric Clouds with Wool Roving
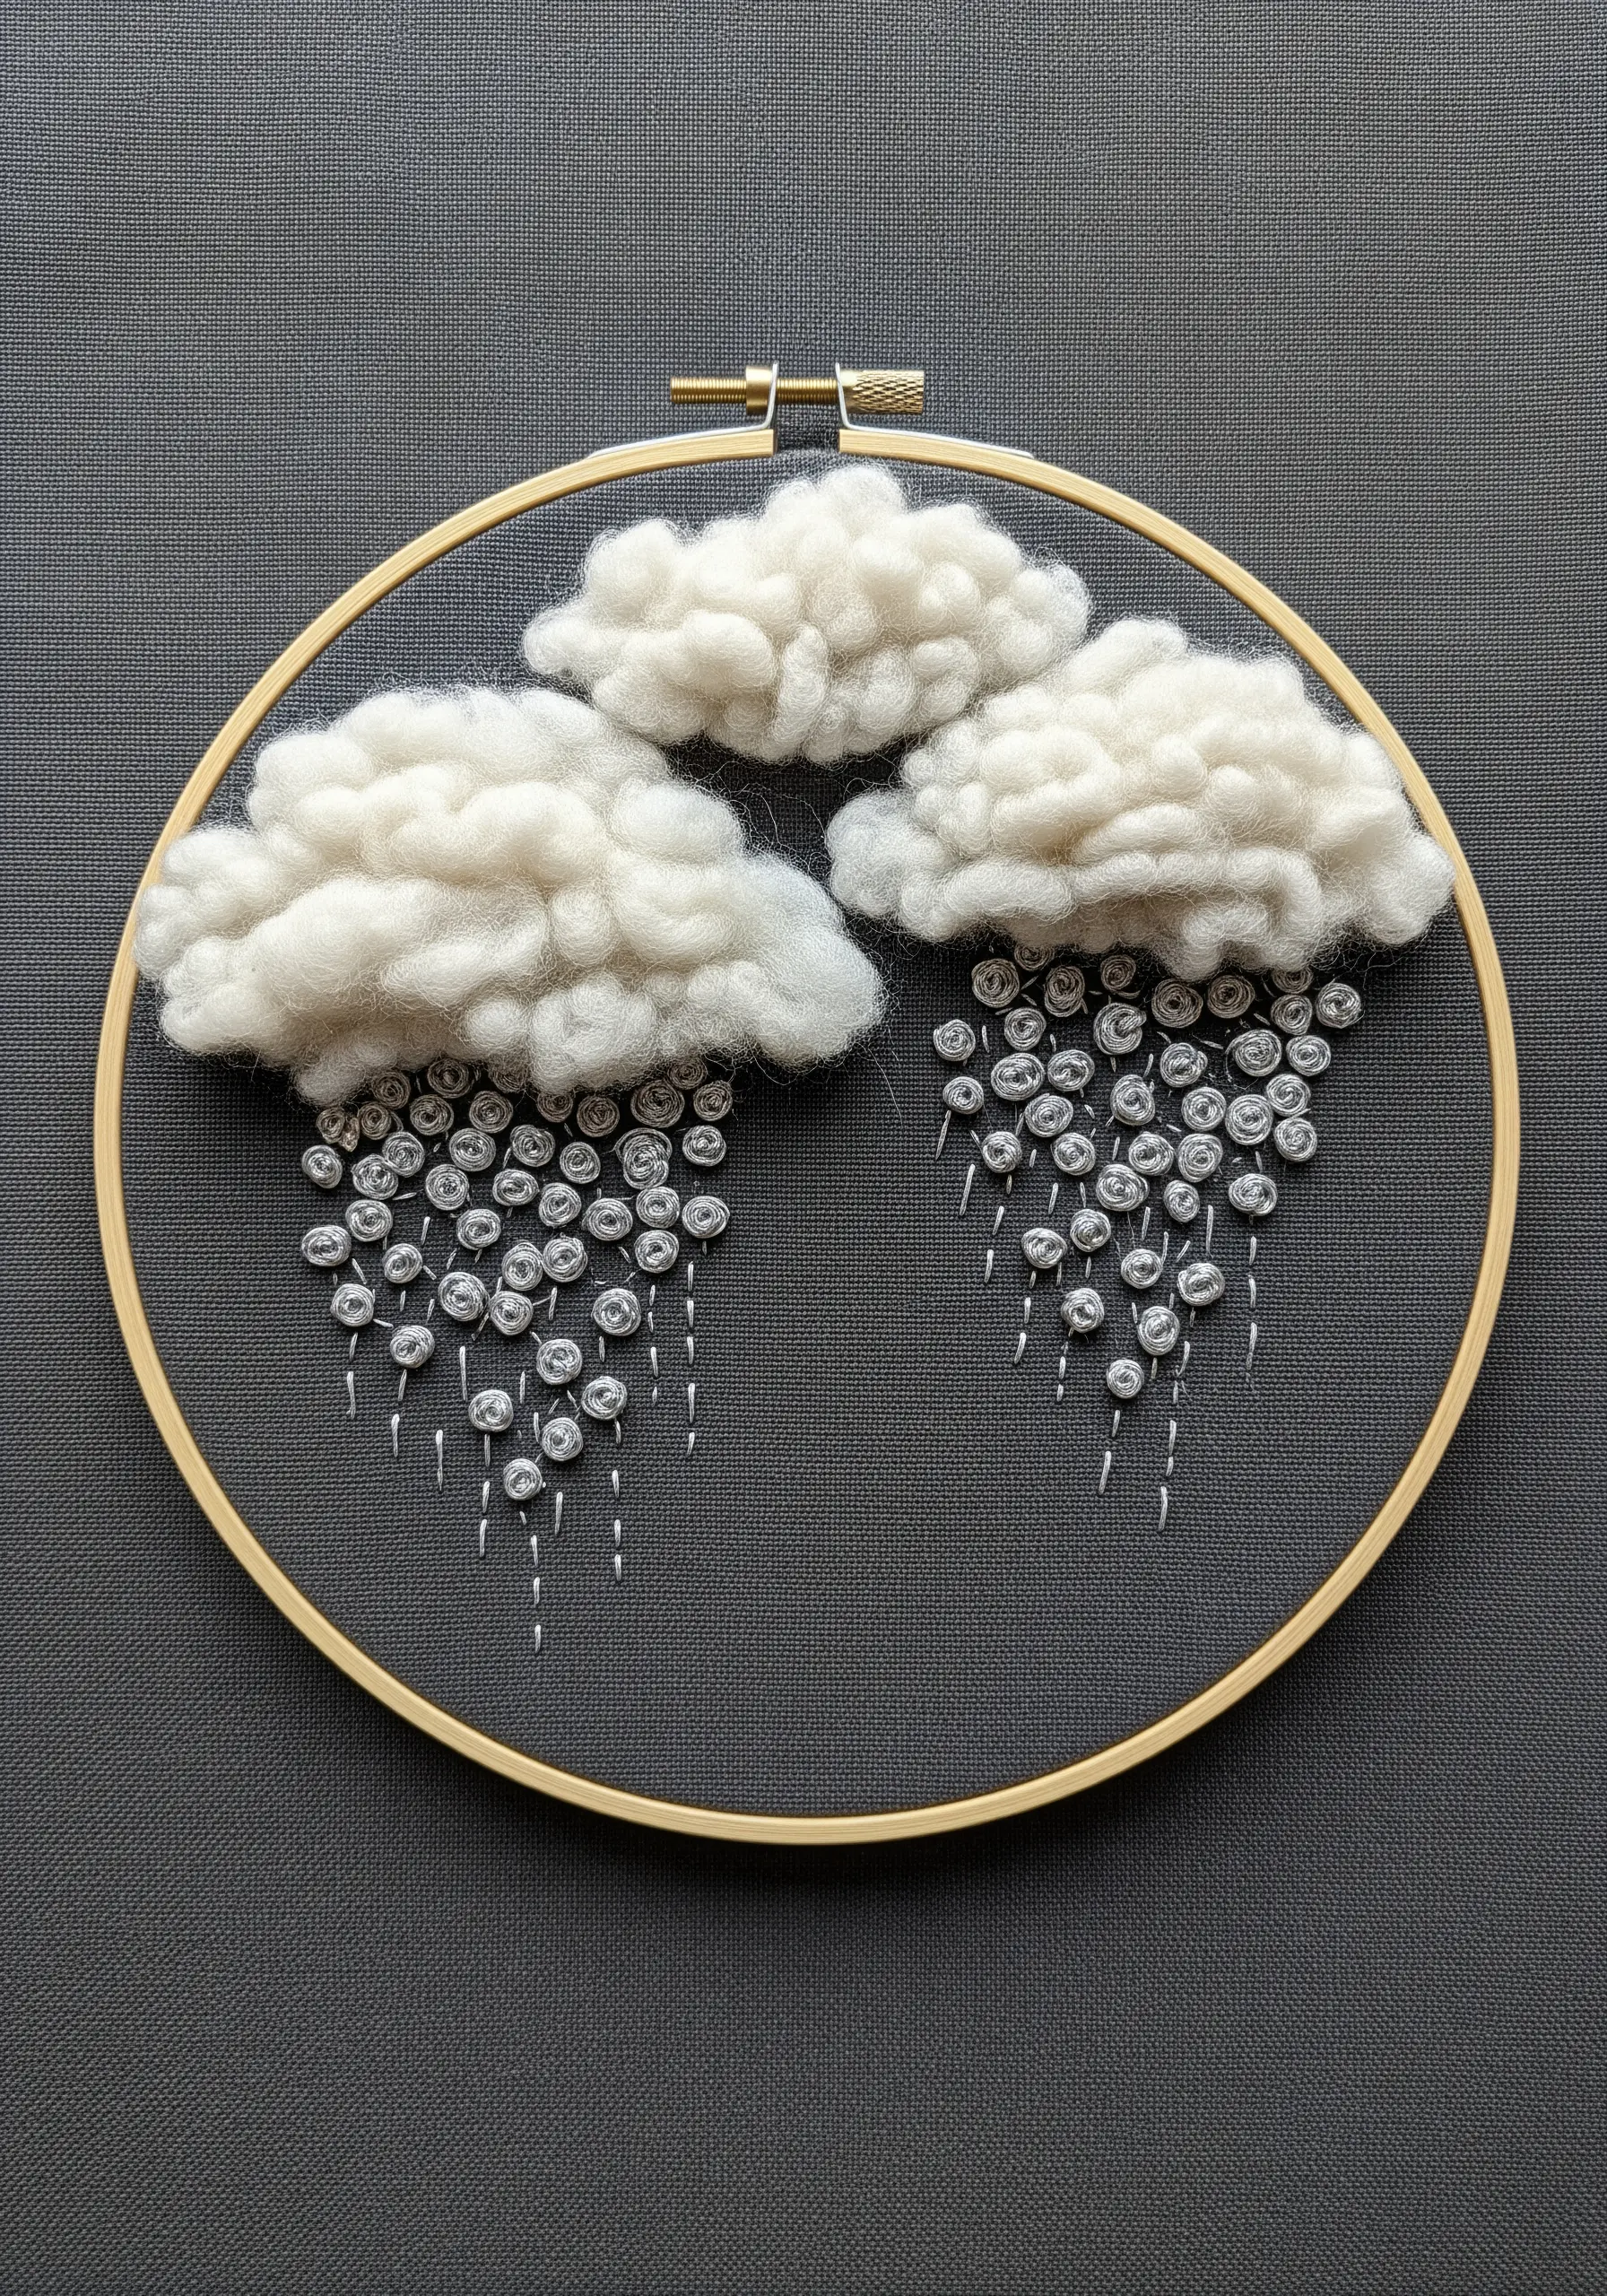
Create dramatic, fluffy clouds by needle-felting wool roving directly onto your background fabric.
Use a felting needle to gently tack and shape the loose fibers, building up layers for a three-dimensional effect that stands in soft contrast to the sharp precision of thread.
For the raindrops, use bullion knots or French knots with a metallic or silky thread to mimic the glint of water, connecting them with single straight stitches to convey movement.
This technique works because it introduces a completely different texture—soft, diffuse, and matte—making your traditional stitches feel even more defined and intentional.
2. Achieve Lifelike Petals with Silk Ribbon
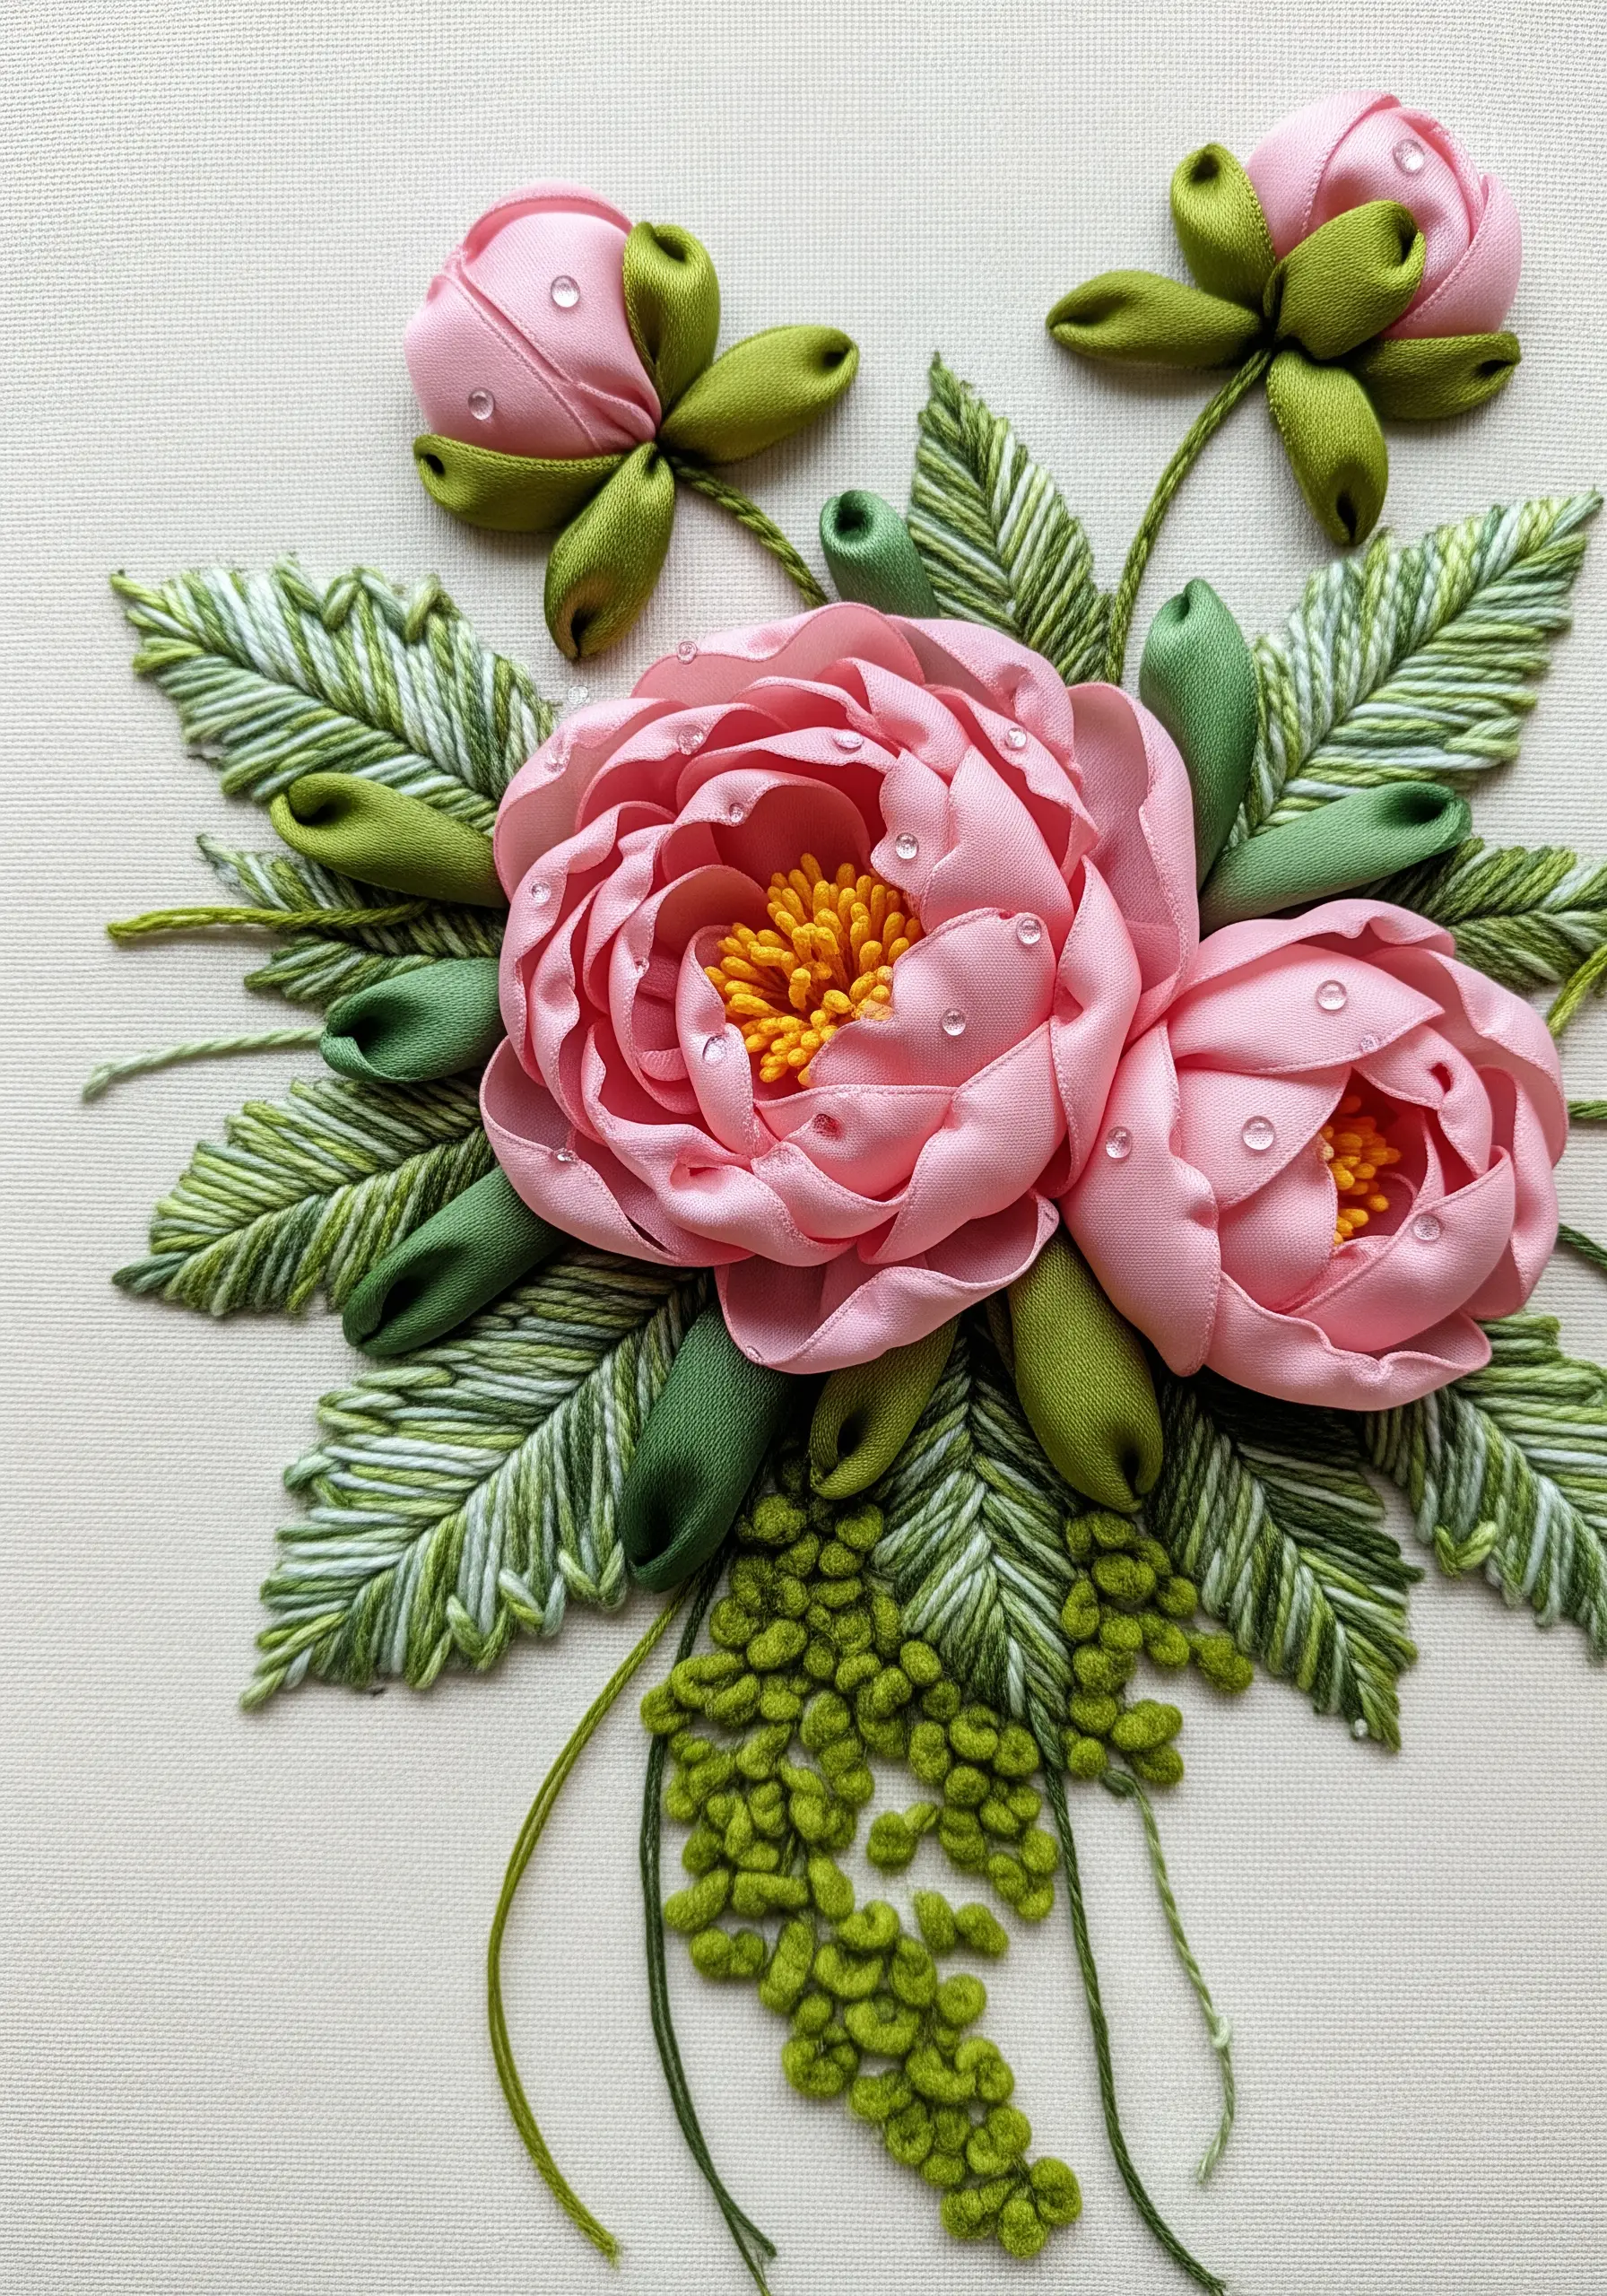
Move beyond floss to give your florals a lustrous, realistic dimension using silk ribbon.
Instead of a simple straight stitch, gently twist or fold the ribbon as you pull it through the fabric to create the natural creases and highlights found in real petals.
Use a large-eyed chenille needle, which parts the fabric threads rather than piercing them, preventing snags and protecting the delicate ribbon.
The ribbon’s wider surface catches light differently than thread, providing instant volume and a subtle sheen that makes flowers feel lush and alive.
3. Define Graphic Shapes with Couching
For clean, bold outlines with undeniable texture, lay down a thick cord or braid and tack it into place with a thinner, contrasting thread.
This technique, known as couching, allows you to incorporate fibers that are too thick to pull through fabric, such as jute, metallic braids, or even fine rope.
Place the tacking stitches at regular intervals or group them to create secondary patterns, adding another layer of detail.
This method is perfect for creating sharp, geometric motifs or elegant outlines that have a raised, sculptural quality and high-impact color contrast.
4. Create Fuzzy Texture with the Turkey Stitch
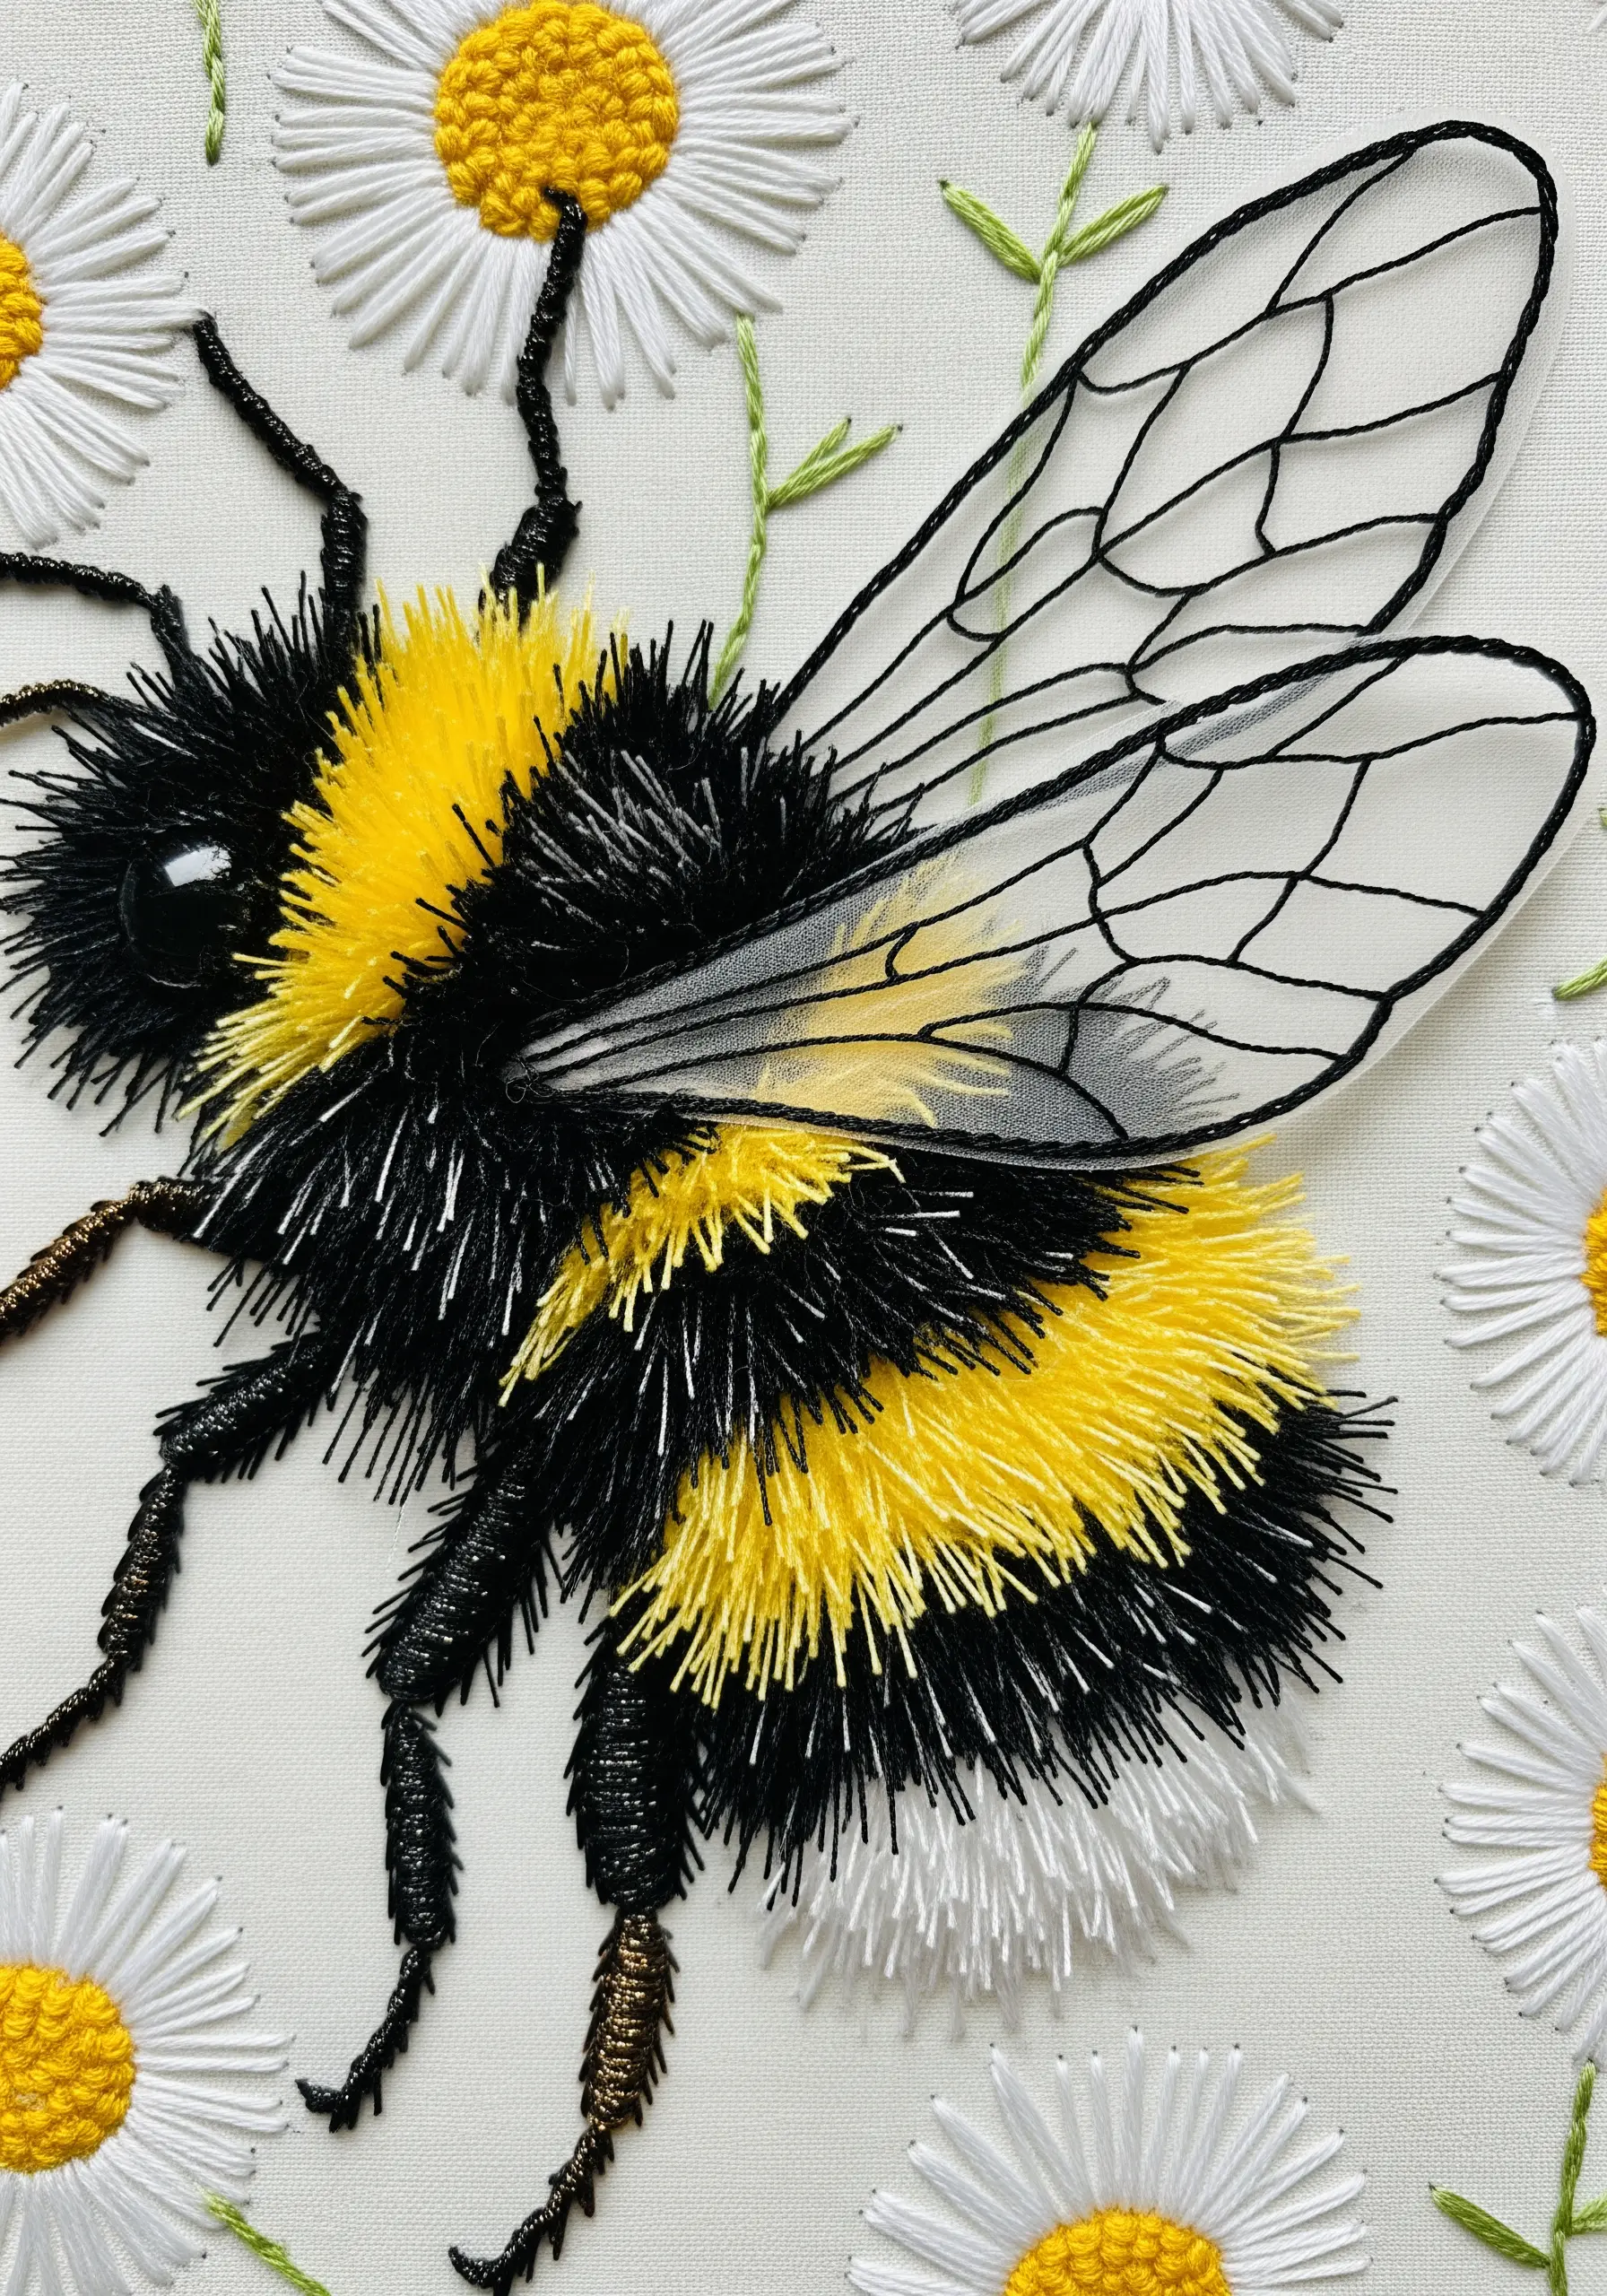
To mimic the soft fuzz of a bumblebee or the fur of an animal, the turkey stitch is your best tool.
You create a series of loops, anchoring each one with a small tacking stitch, and then trim the loops to your desired length to create a plush, three-dimensional pile.
For a more natural look, trim the fibers at slightly different heights and gently fluff them with your needle tip.
Combine this technique with sheer organza for insect wings to create a stunning juxtaposition of soft, dense texture and delicate transparency.
5. Weave in Raffia for Sun-Kissed Effects
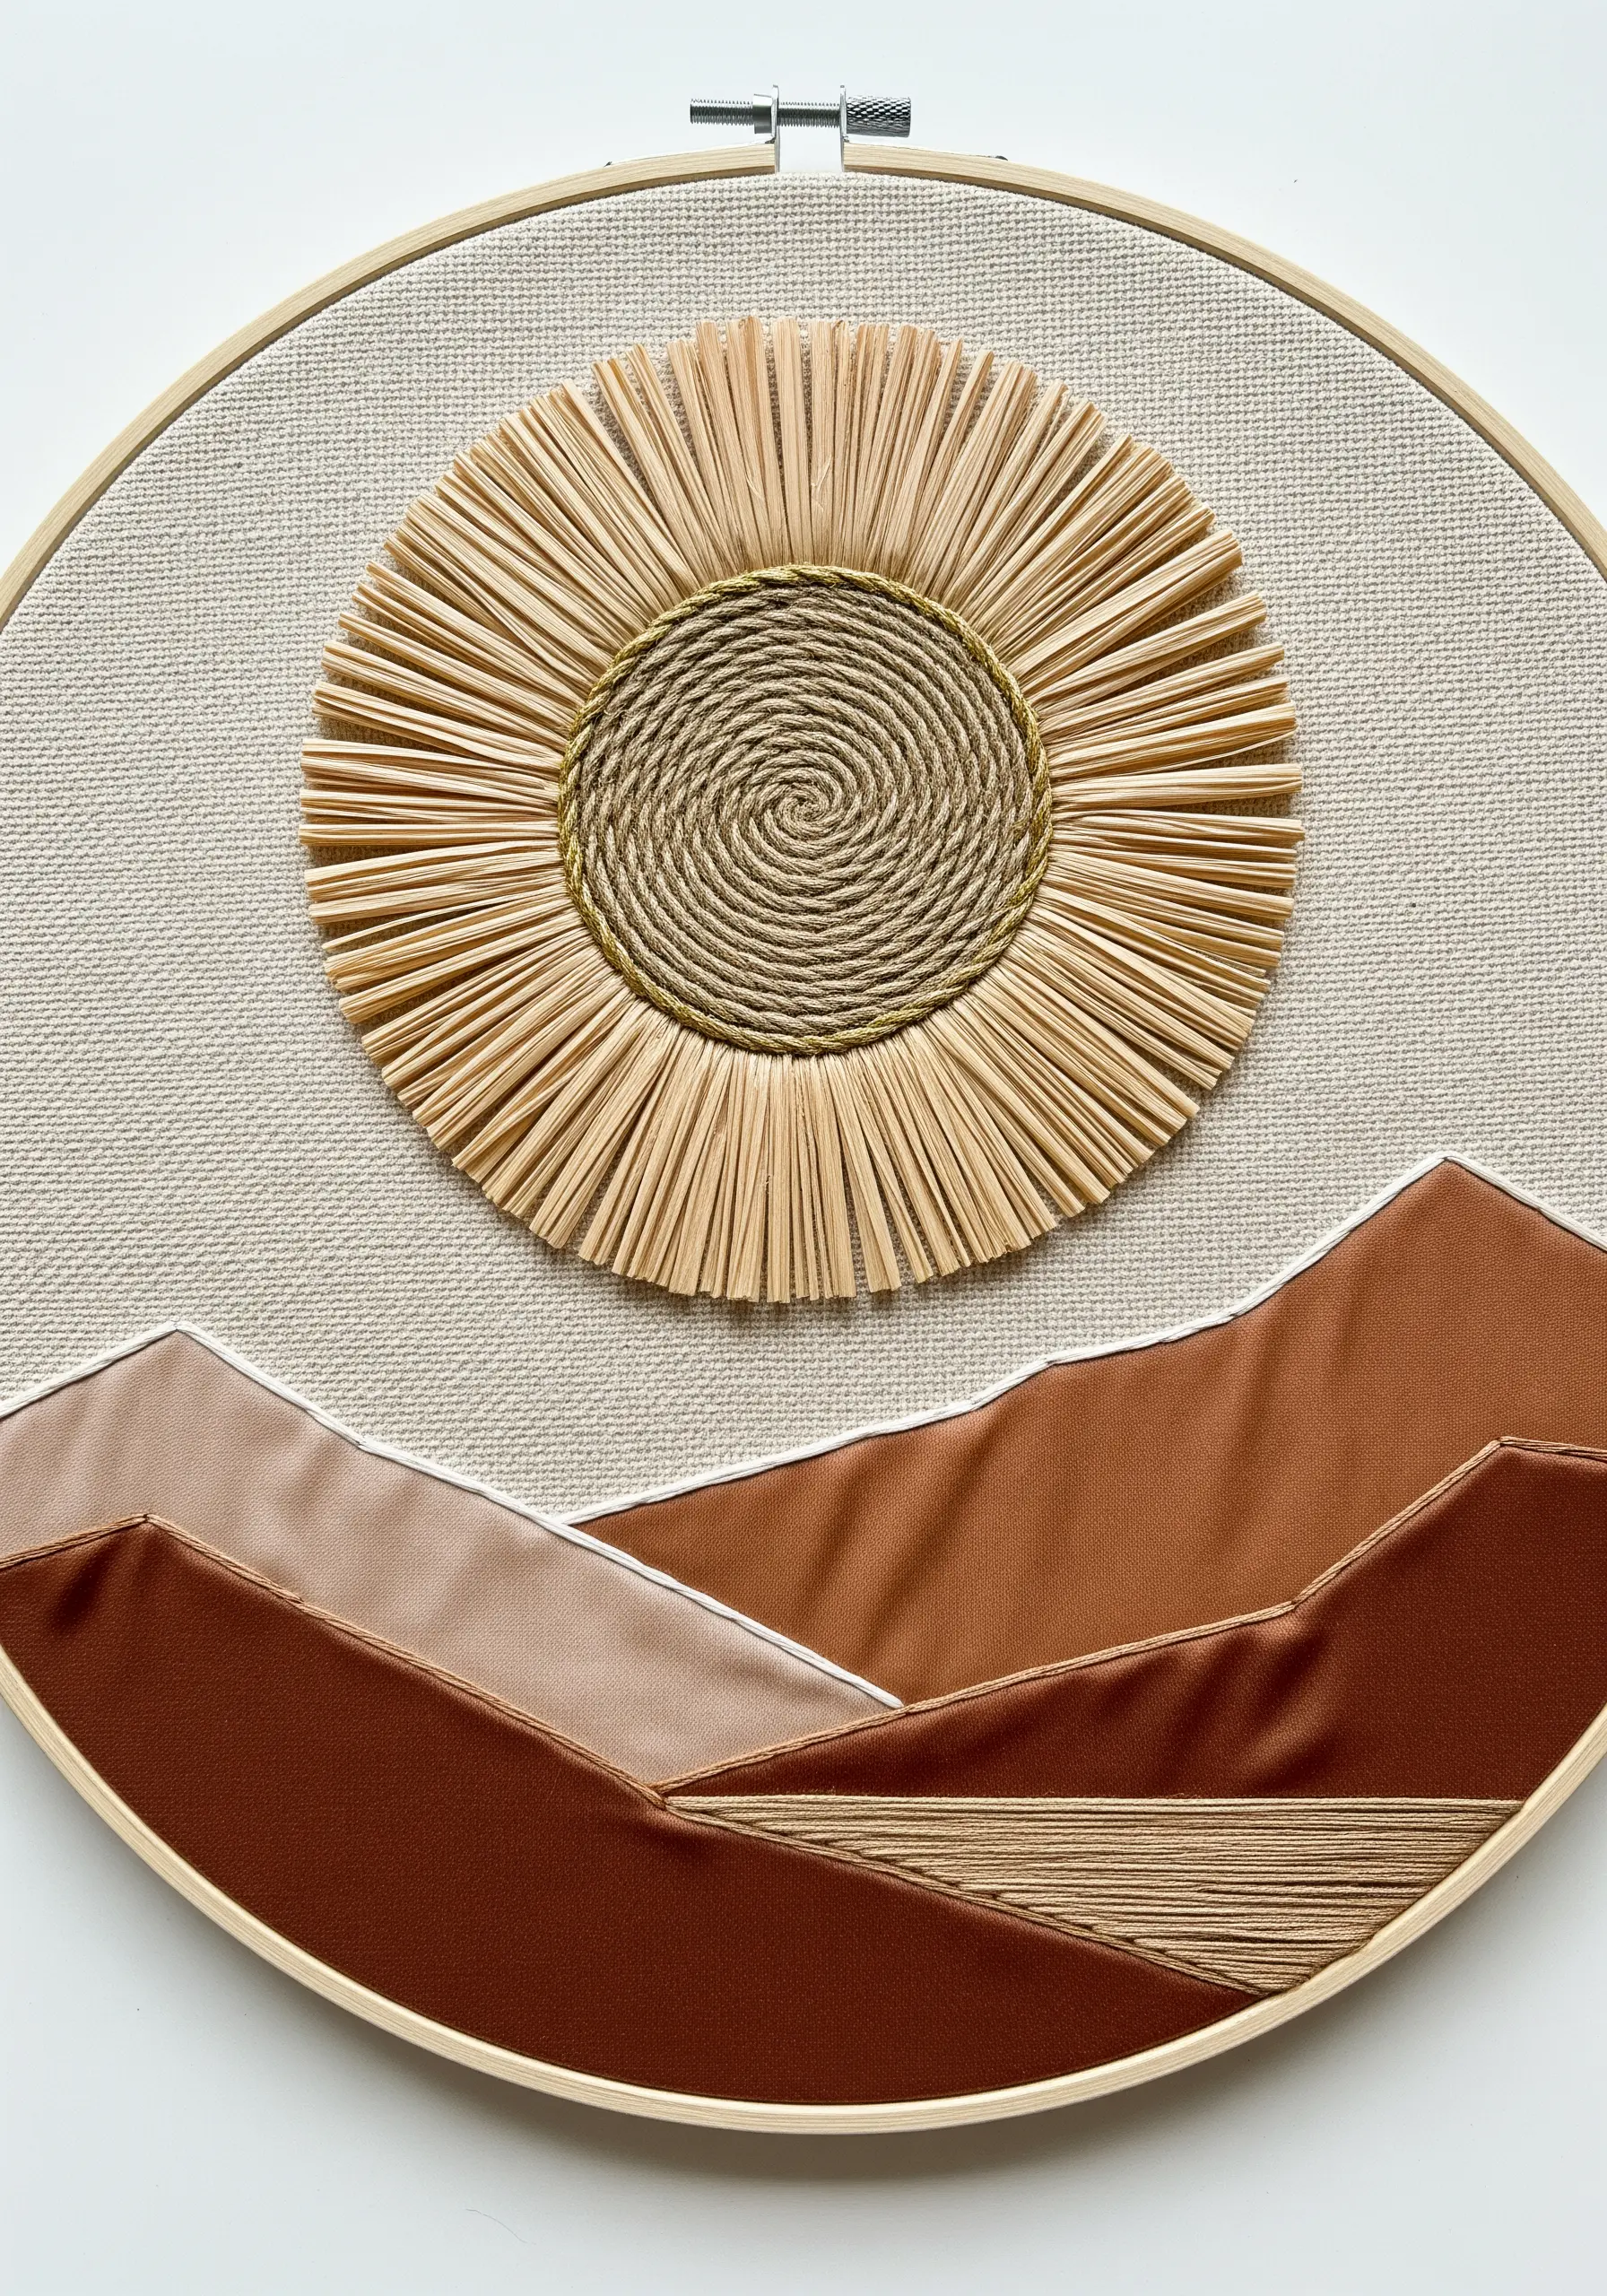
Introduce a rustic, earthy element by incorporating raffia into your landscapes.
Because raffia is brittle, avoid pulling it through the fabric. Instead, lay bundles of it on the surface and couch them down with a matching or contrasting thread.
Combine the dry, matte texture of raffia with smooth fabric appliqué for the foreground to create a sophisticated composition based on textural contrast.
This is an excellent way to capture the feeling of dry grasses, sun rays, or thatched roofs, adding a natural, almost architectural, element to earth-inspired embroidery textures.
6. Build Dimensional Worlds with Stumpwork
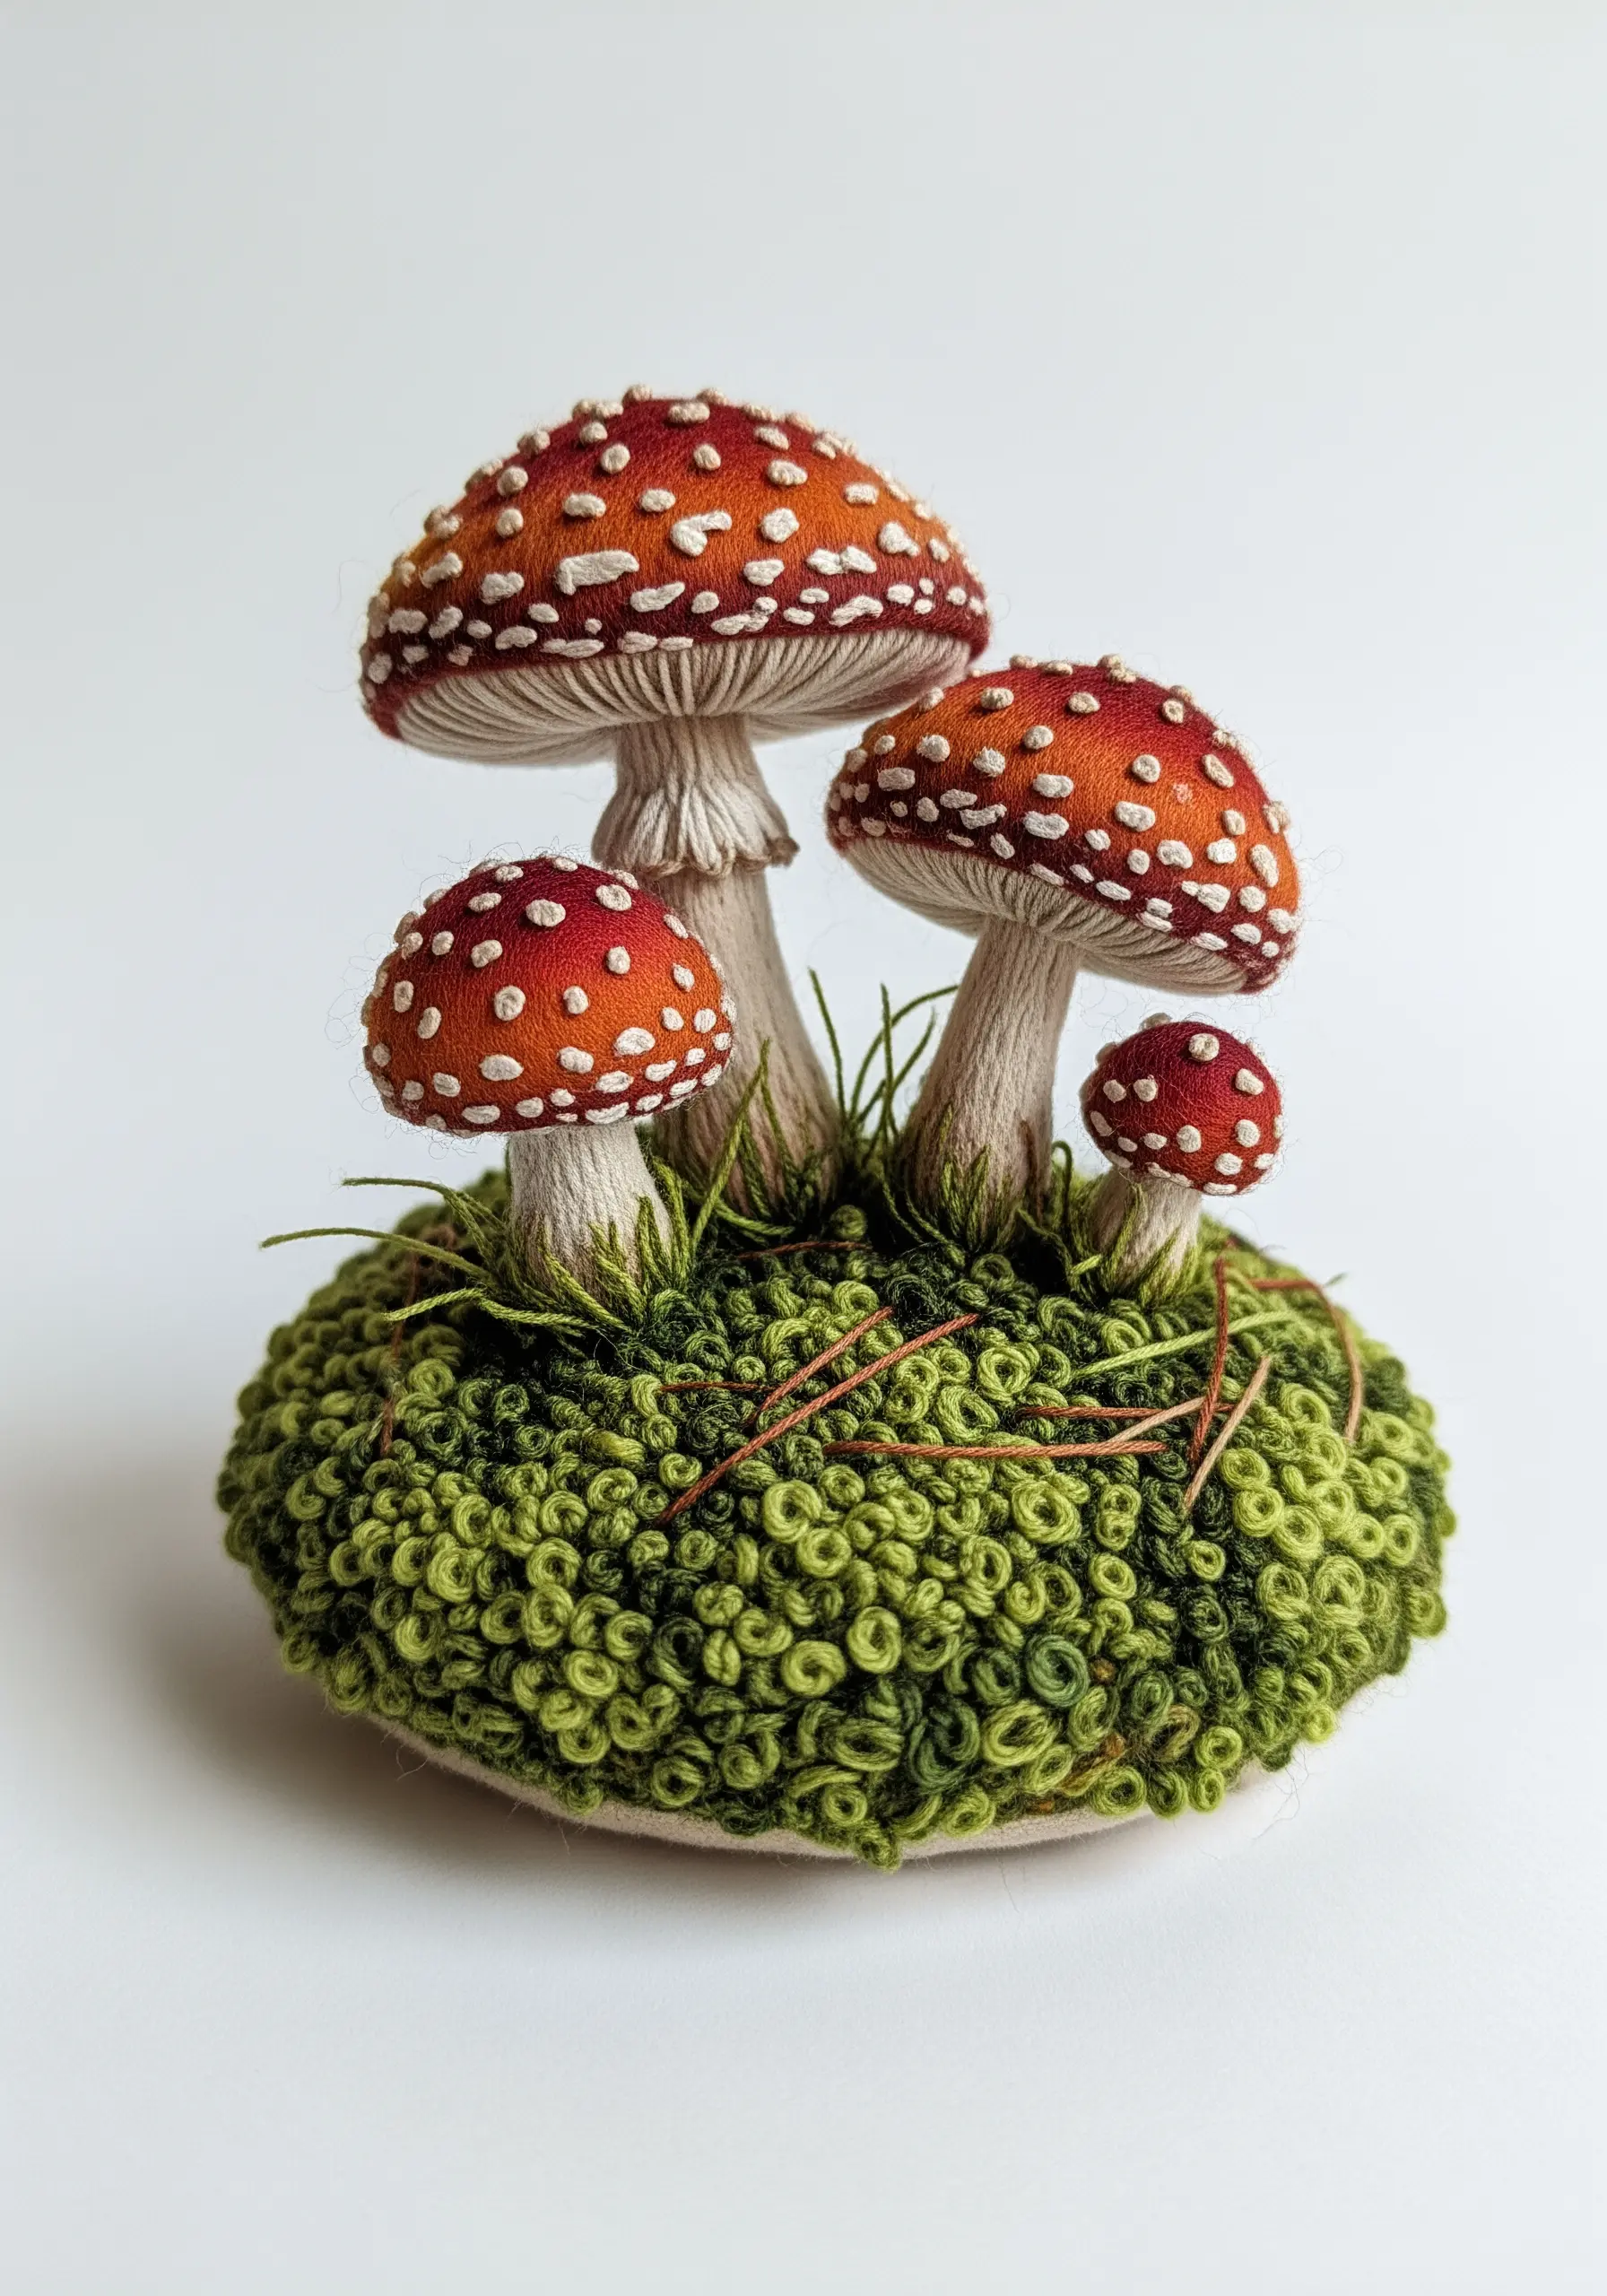
Take your embroidery off the page by creating three-dimensional elements using stumpwork techniques.
Embroider motifs like mushroom caps or petals onto a separate piece of fabric that has a fine wire stitched along its outline.
Once complete, carefully cut the shape out, and the wire will allow you to bend and form it before attaching it to your main embroidery piece.
This technique literally adds a new dimension to your art, allowing you to create handmade sculptures that cast real shadows and interact with their environment.
7. Illustrate Expressive Hair with Yarn
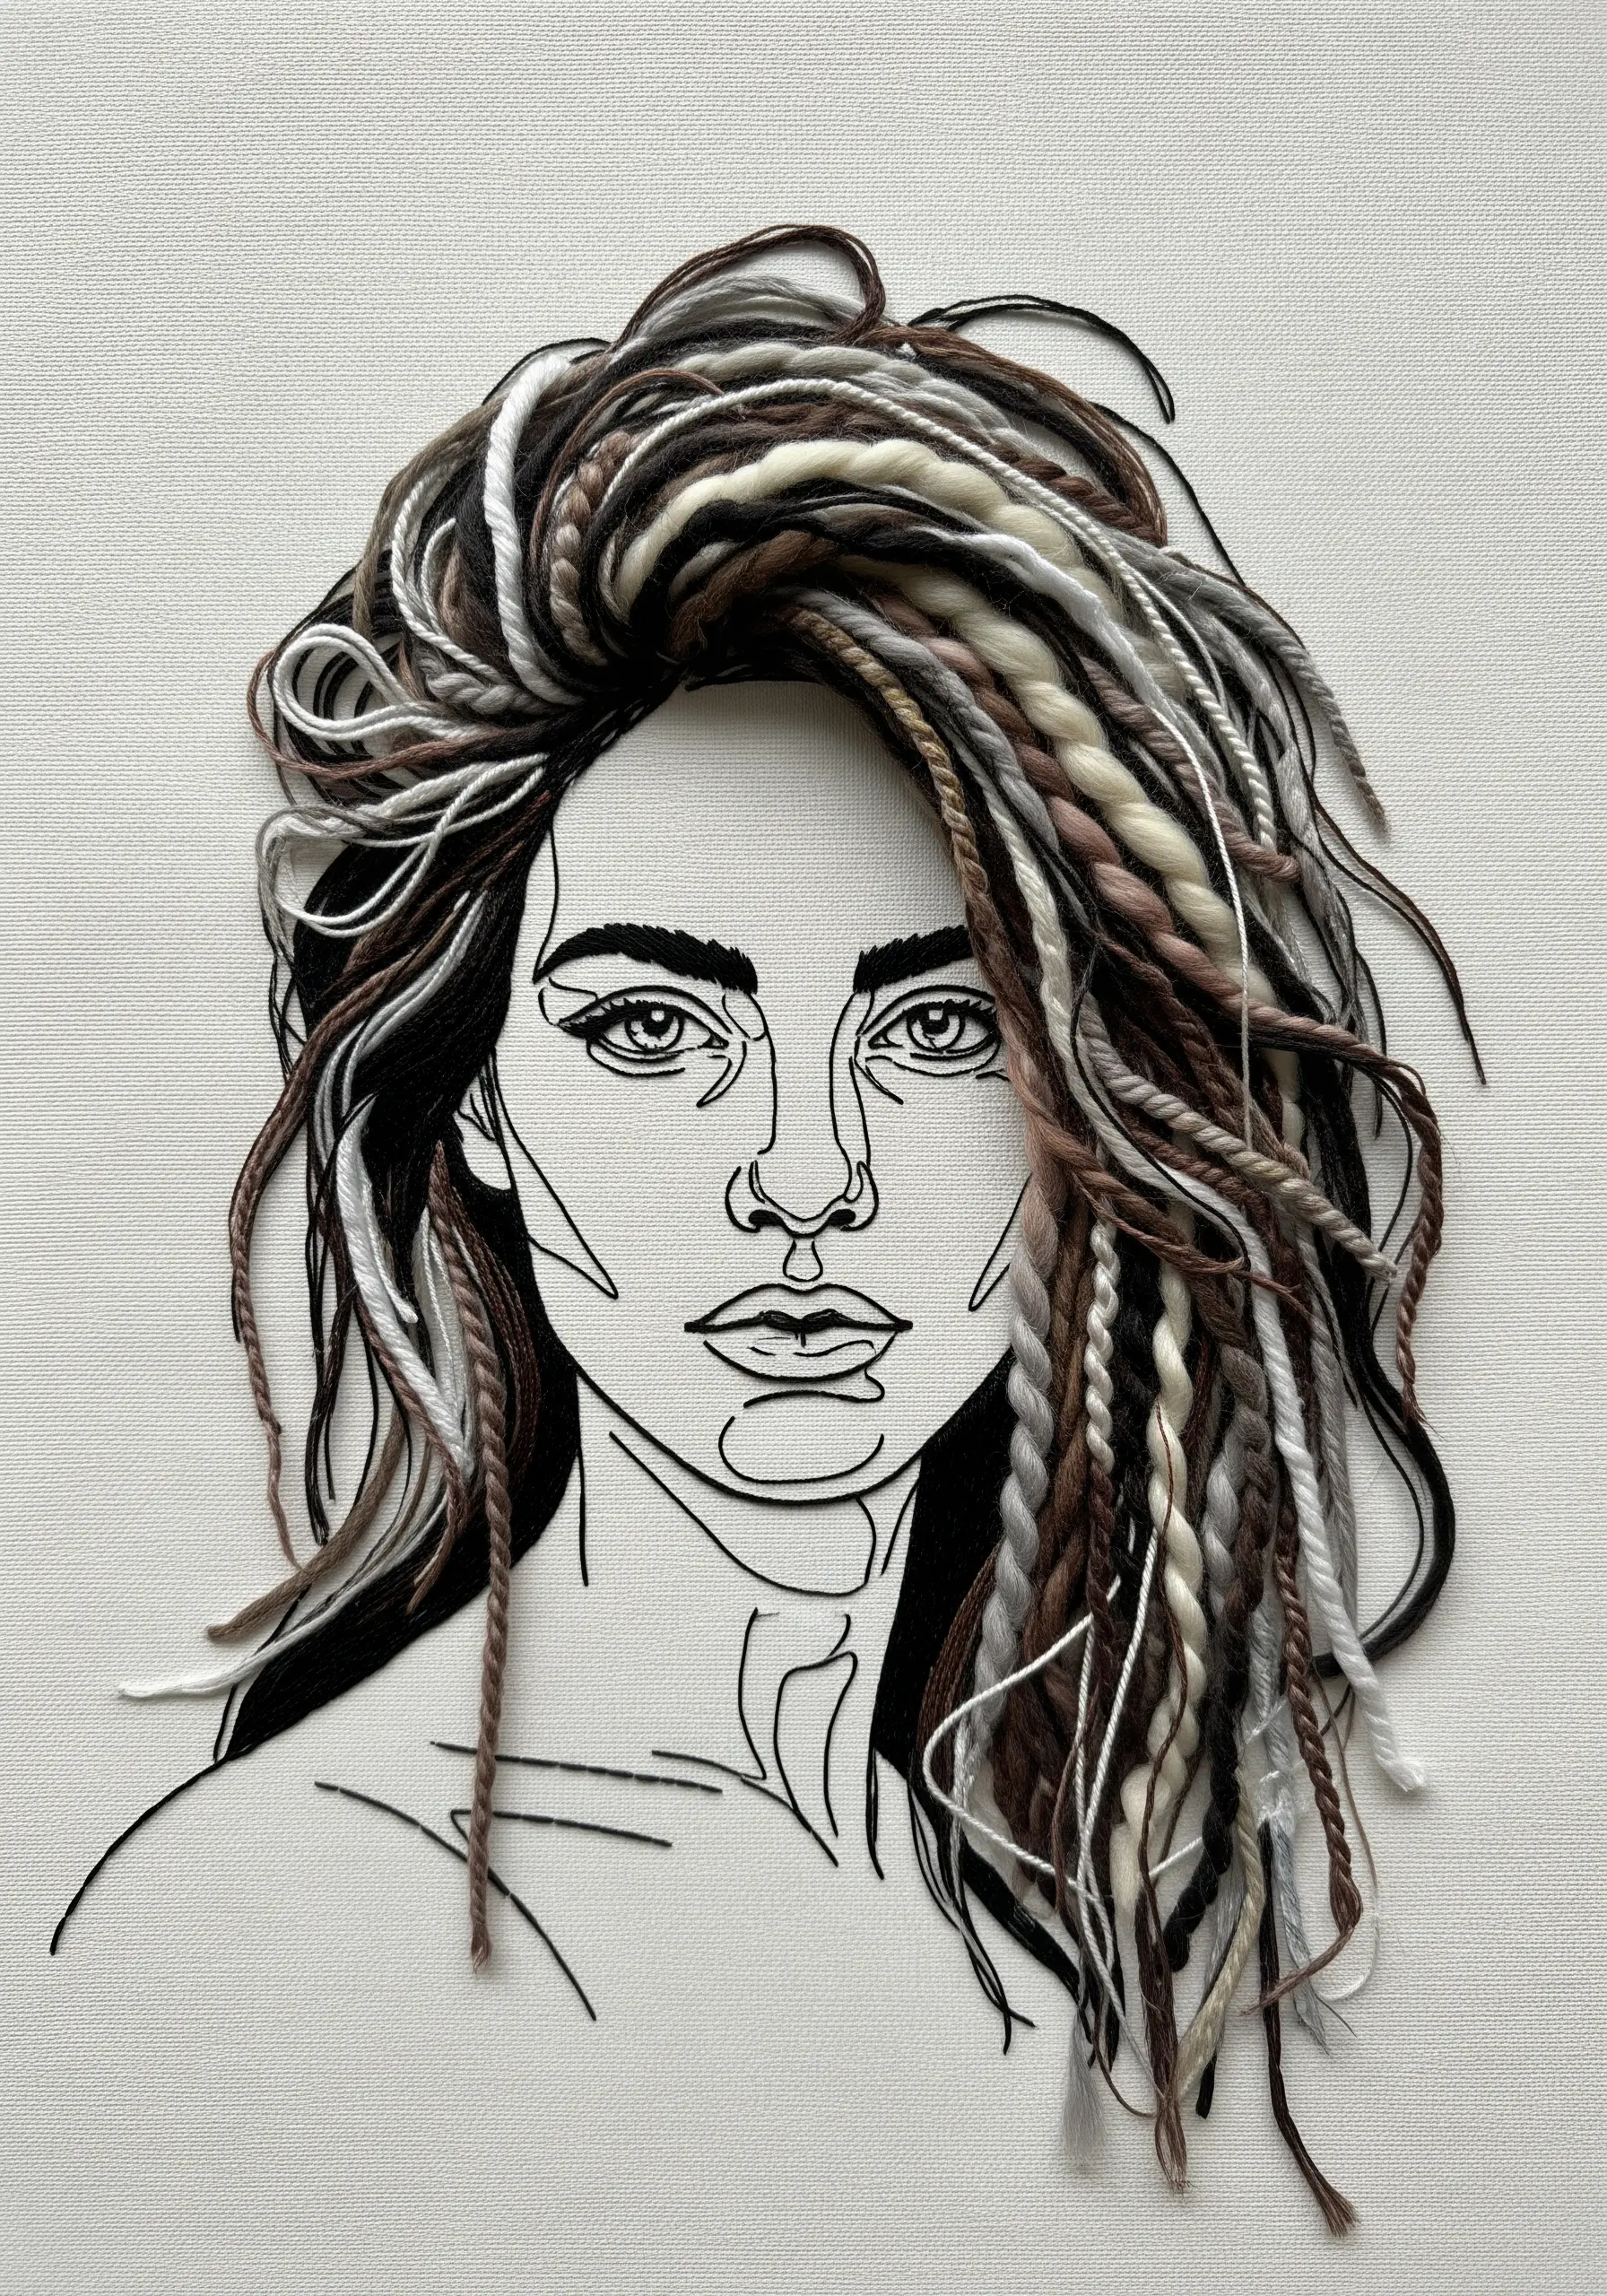
When stitching portraits, move beyond single-strand floss to capture the volume and texture of hair with yarn.
Use a fine backstitch for the facial features to keep the lines crisp, then introduce various weights and textures of yarn for the hair.
You can braid thicker yarns, let loose strands fall freely, or couch down textured fibers to create incredible movement and realism.
This contrast between the delicate linework of the face and the chunky, textural quality of the yarn makes the entire piece dynamic and visually arresting.
8. Blend Colors Seamlessly with Thread Painting
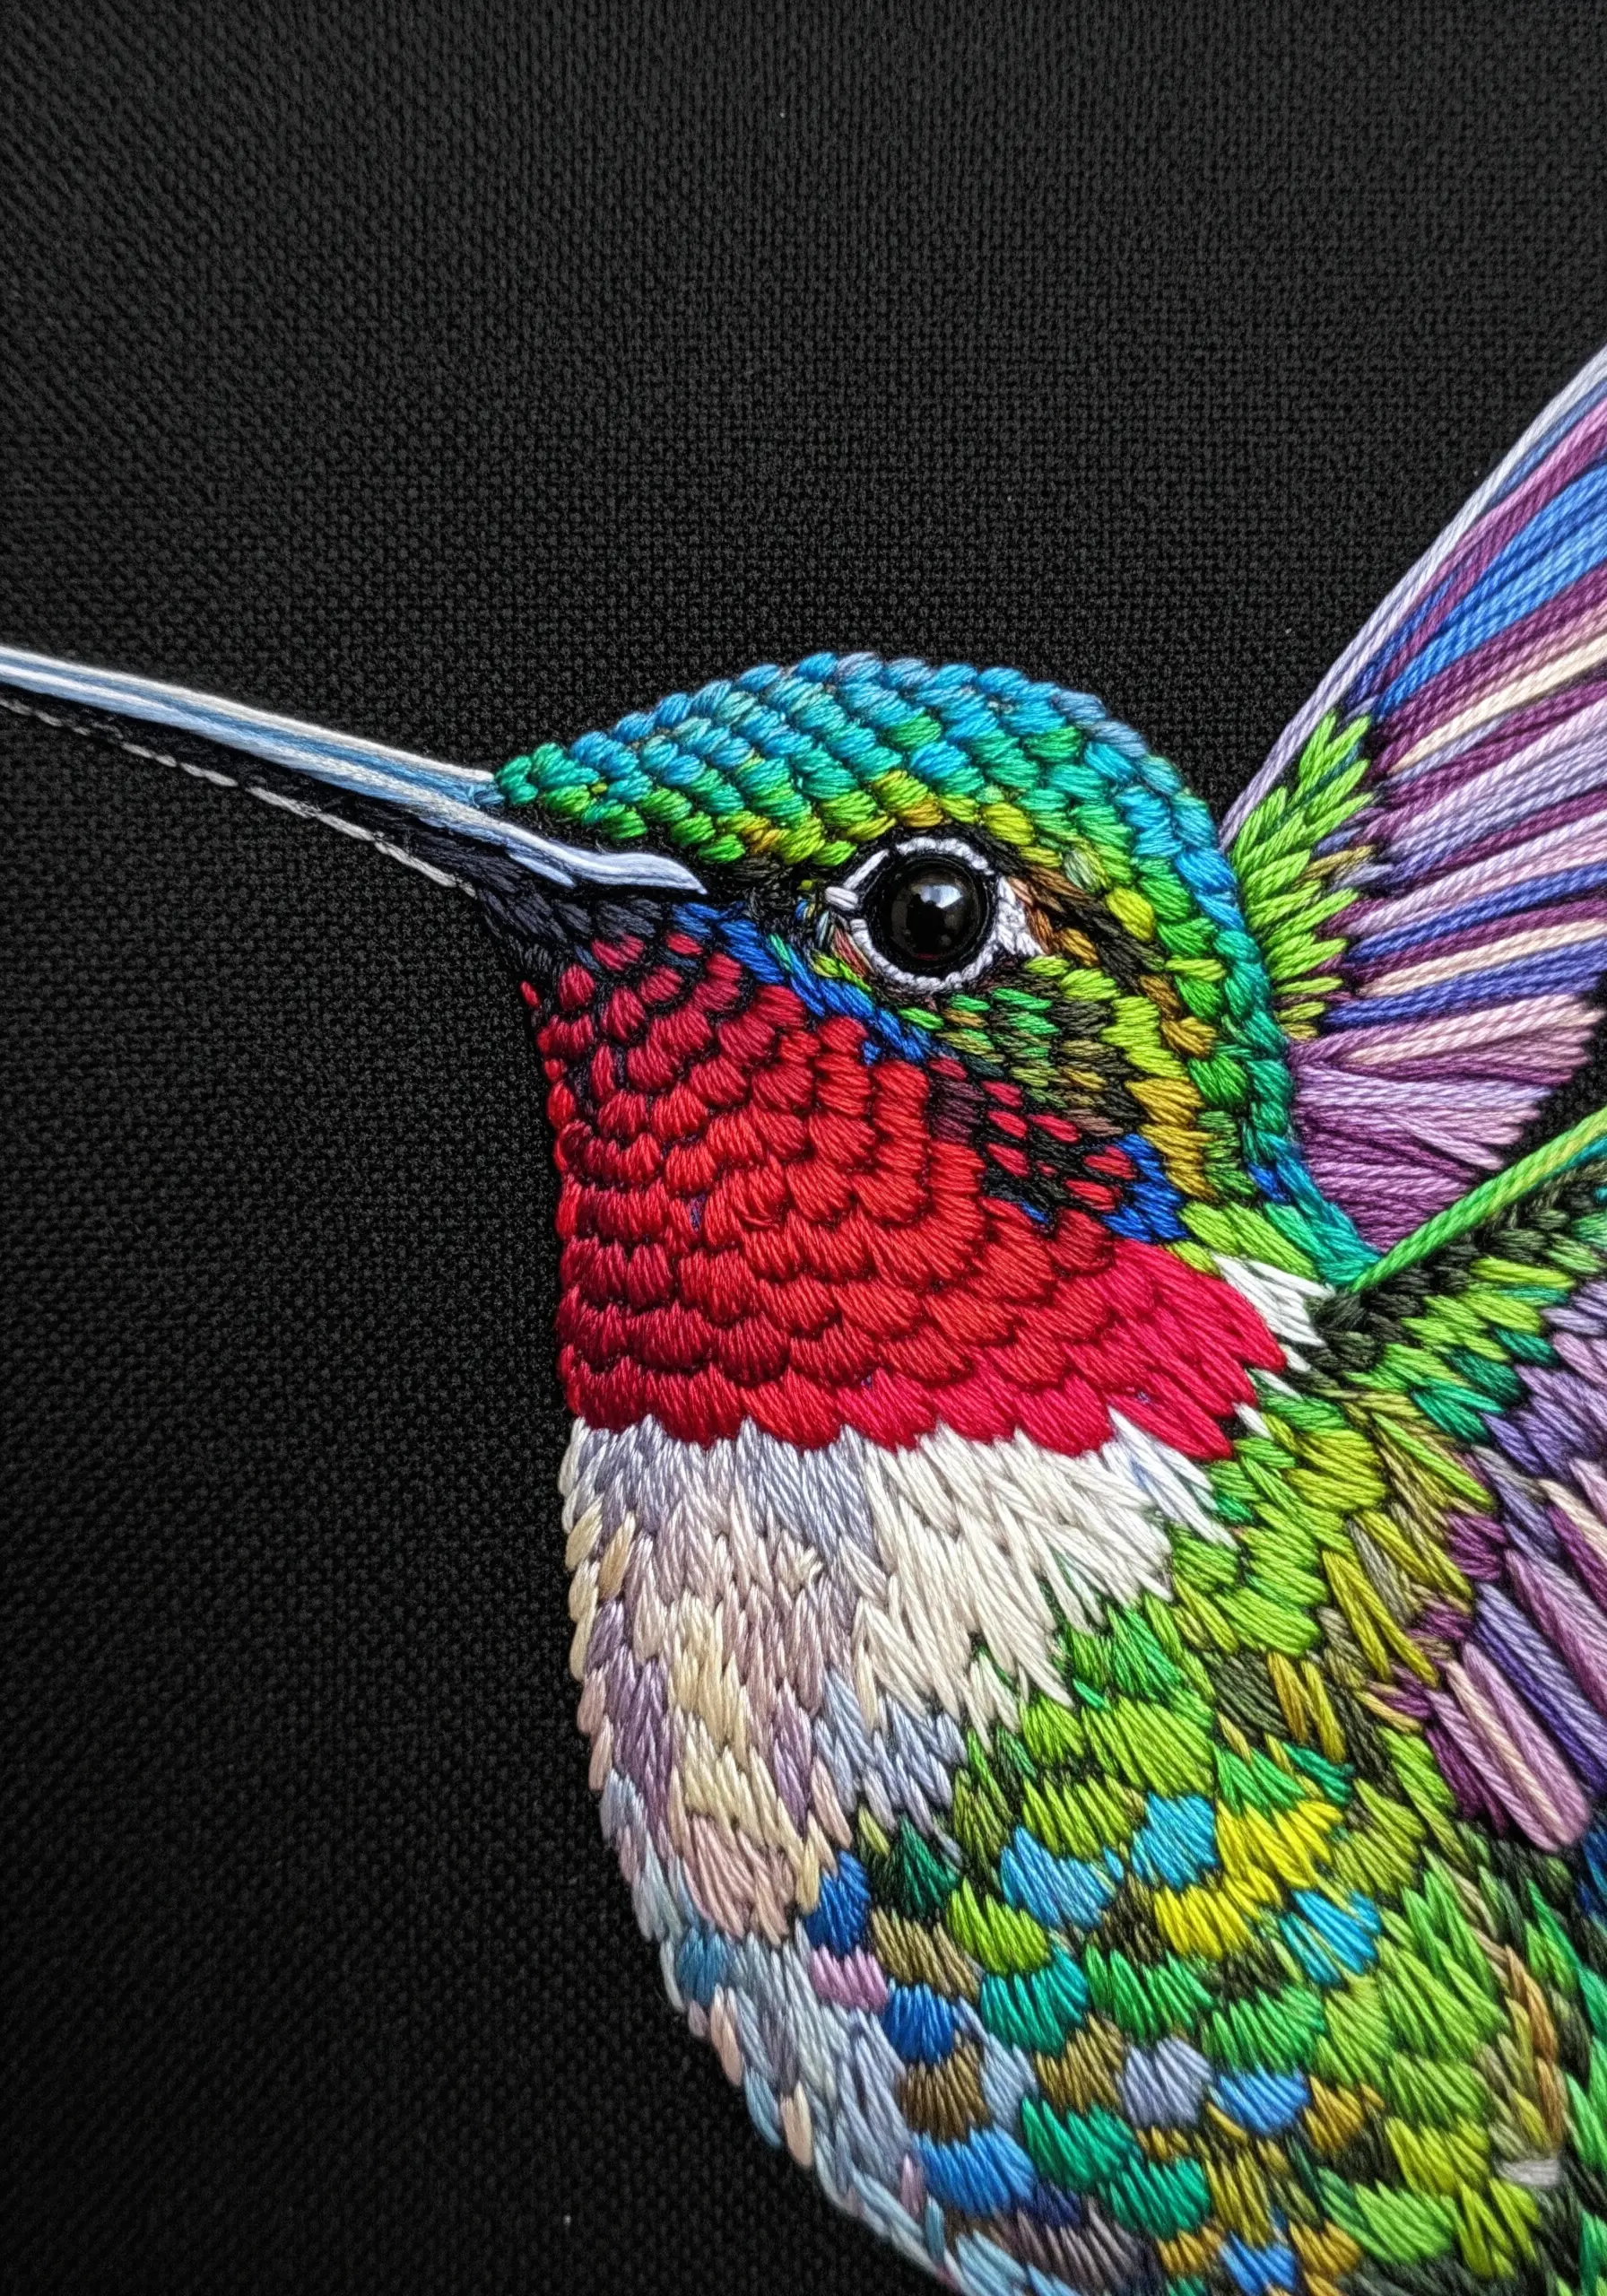
For photorealistic shading and seamless color transitions, master the art of thread painting.
Using a single strand of floss and the long-and-short stitch, you can blend colors together just like paint, creating the subtle gradients needed for an animal’s fur or a bird’s iridescent feathers.
Work in sections, following the natural contours and direction of the form you’re stitching—this is key to achieving realism.
The precision of this technique, especially against a stark black background, creates a powerful, high-definition effect that makes your subject feel incredibly lifelike.
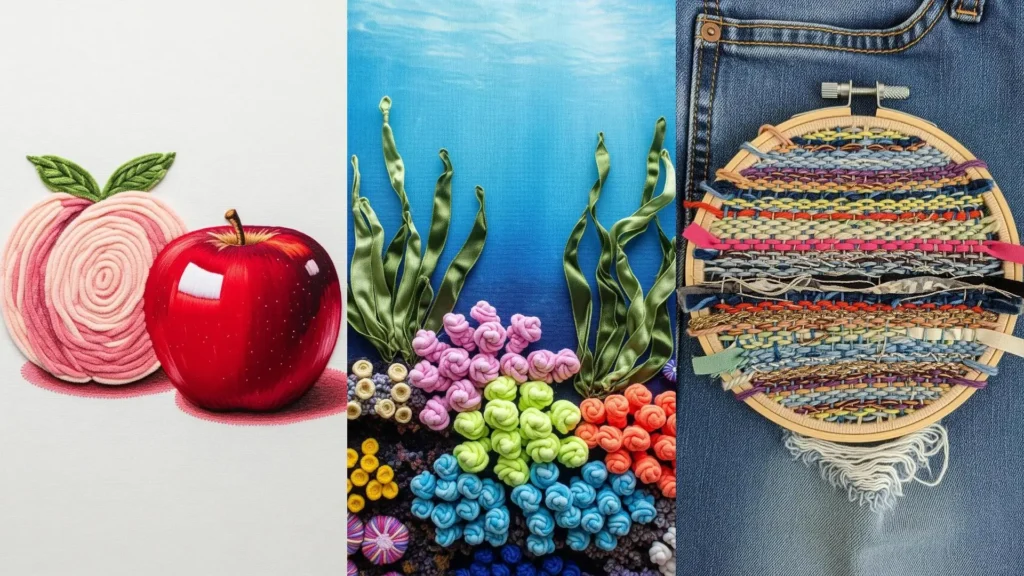
9. Integrate Weaving within the Hoop
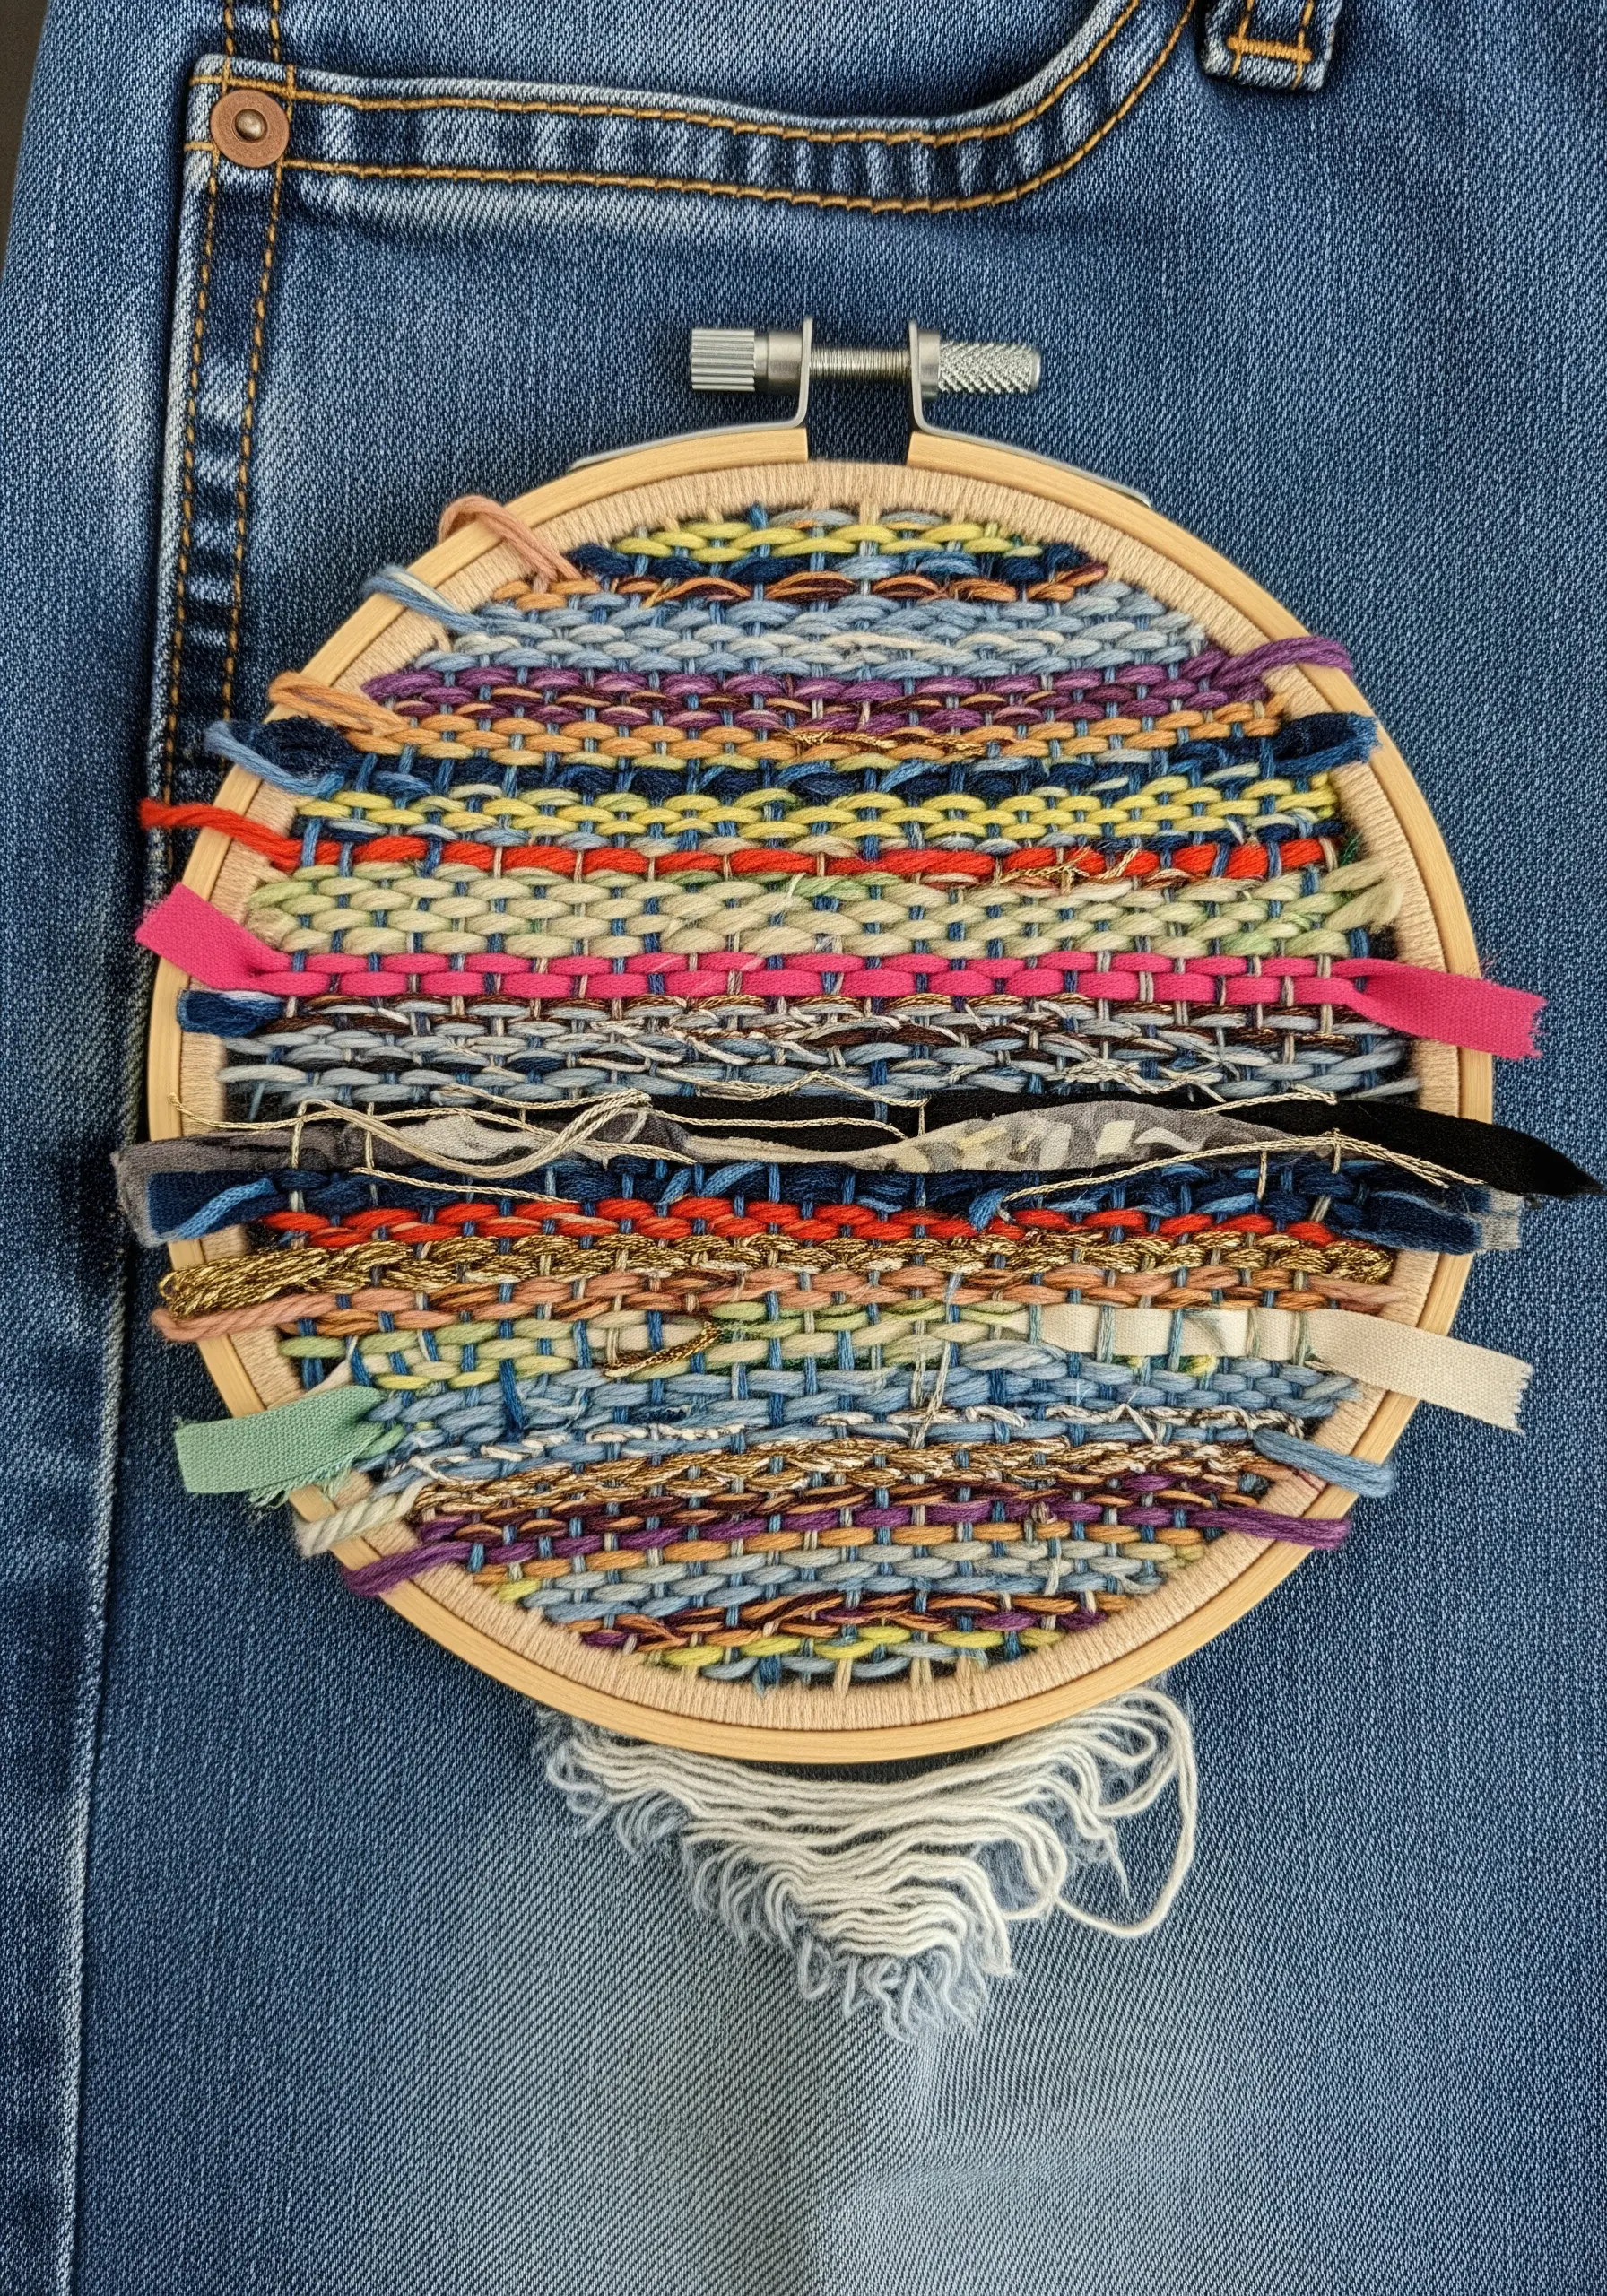
Transform your embroidery hoop into a miniature loom by weaving with mixed fibers.
Create a warp by stretching strong threads vertically across the hoop, then use a tapestry needle to weave various materials—like fabric strips, ribbon, and chunky yarn—horizontally through the warp.
This is a fantastic way to use up fabric scraps and create a dense, textural background or a standalone abstract piece.
It’s an expressive technique that celebrates imperfection and turns mending into a visible, beautiful art form, especially on well-worn denim.
10. Construct Art by Spanning Threads
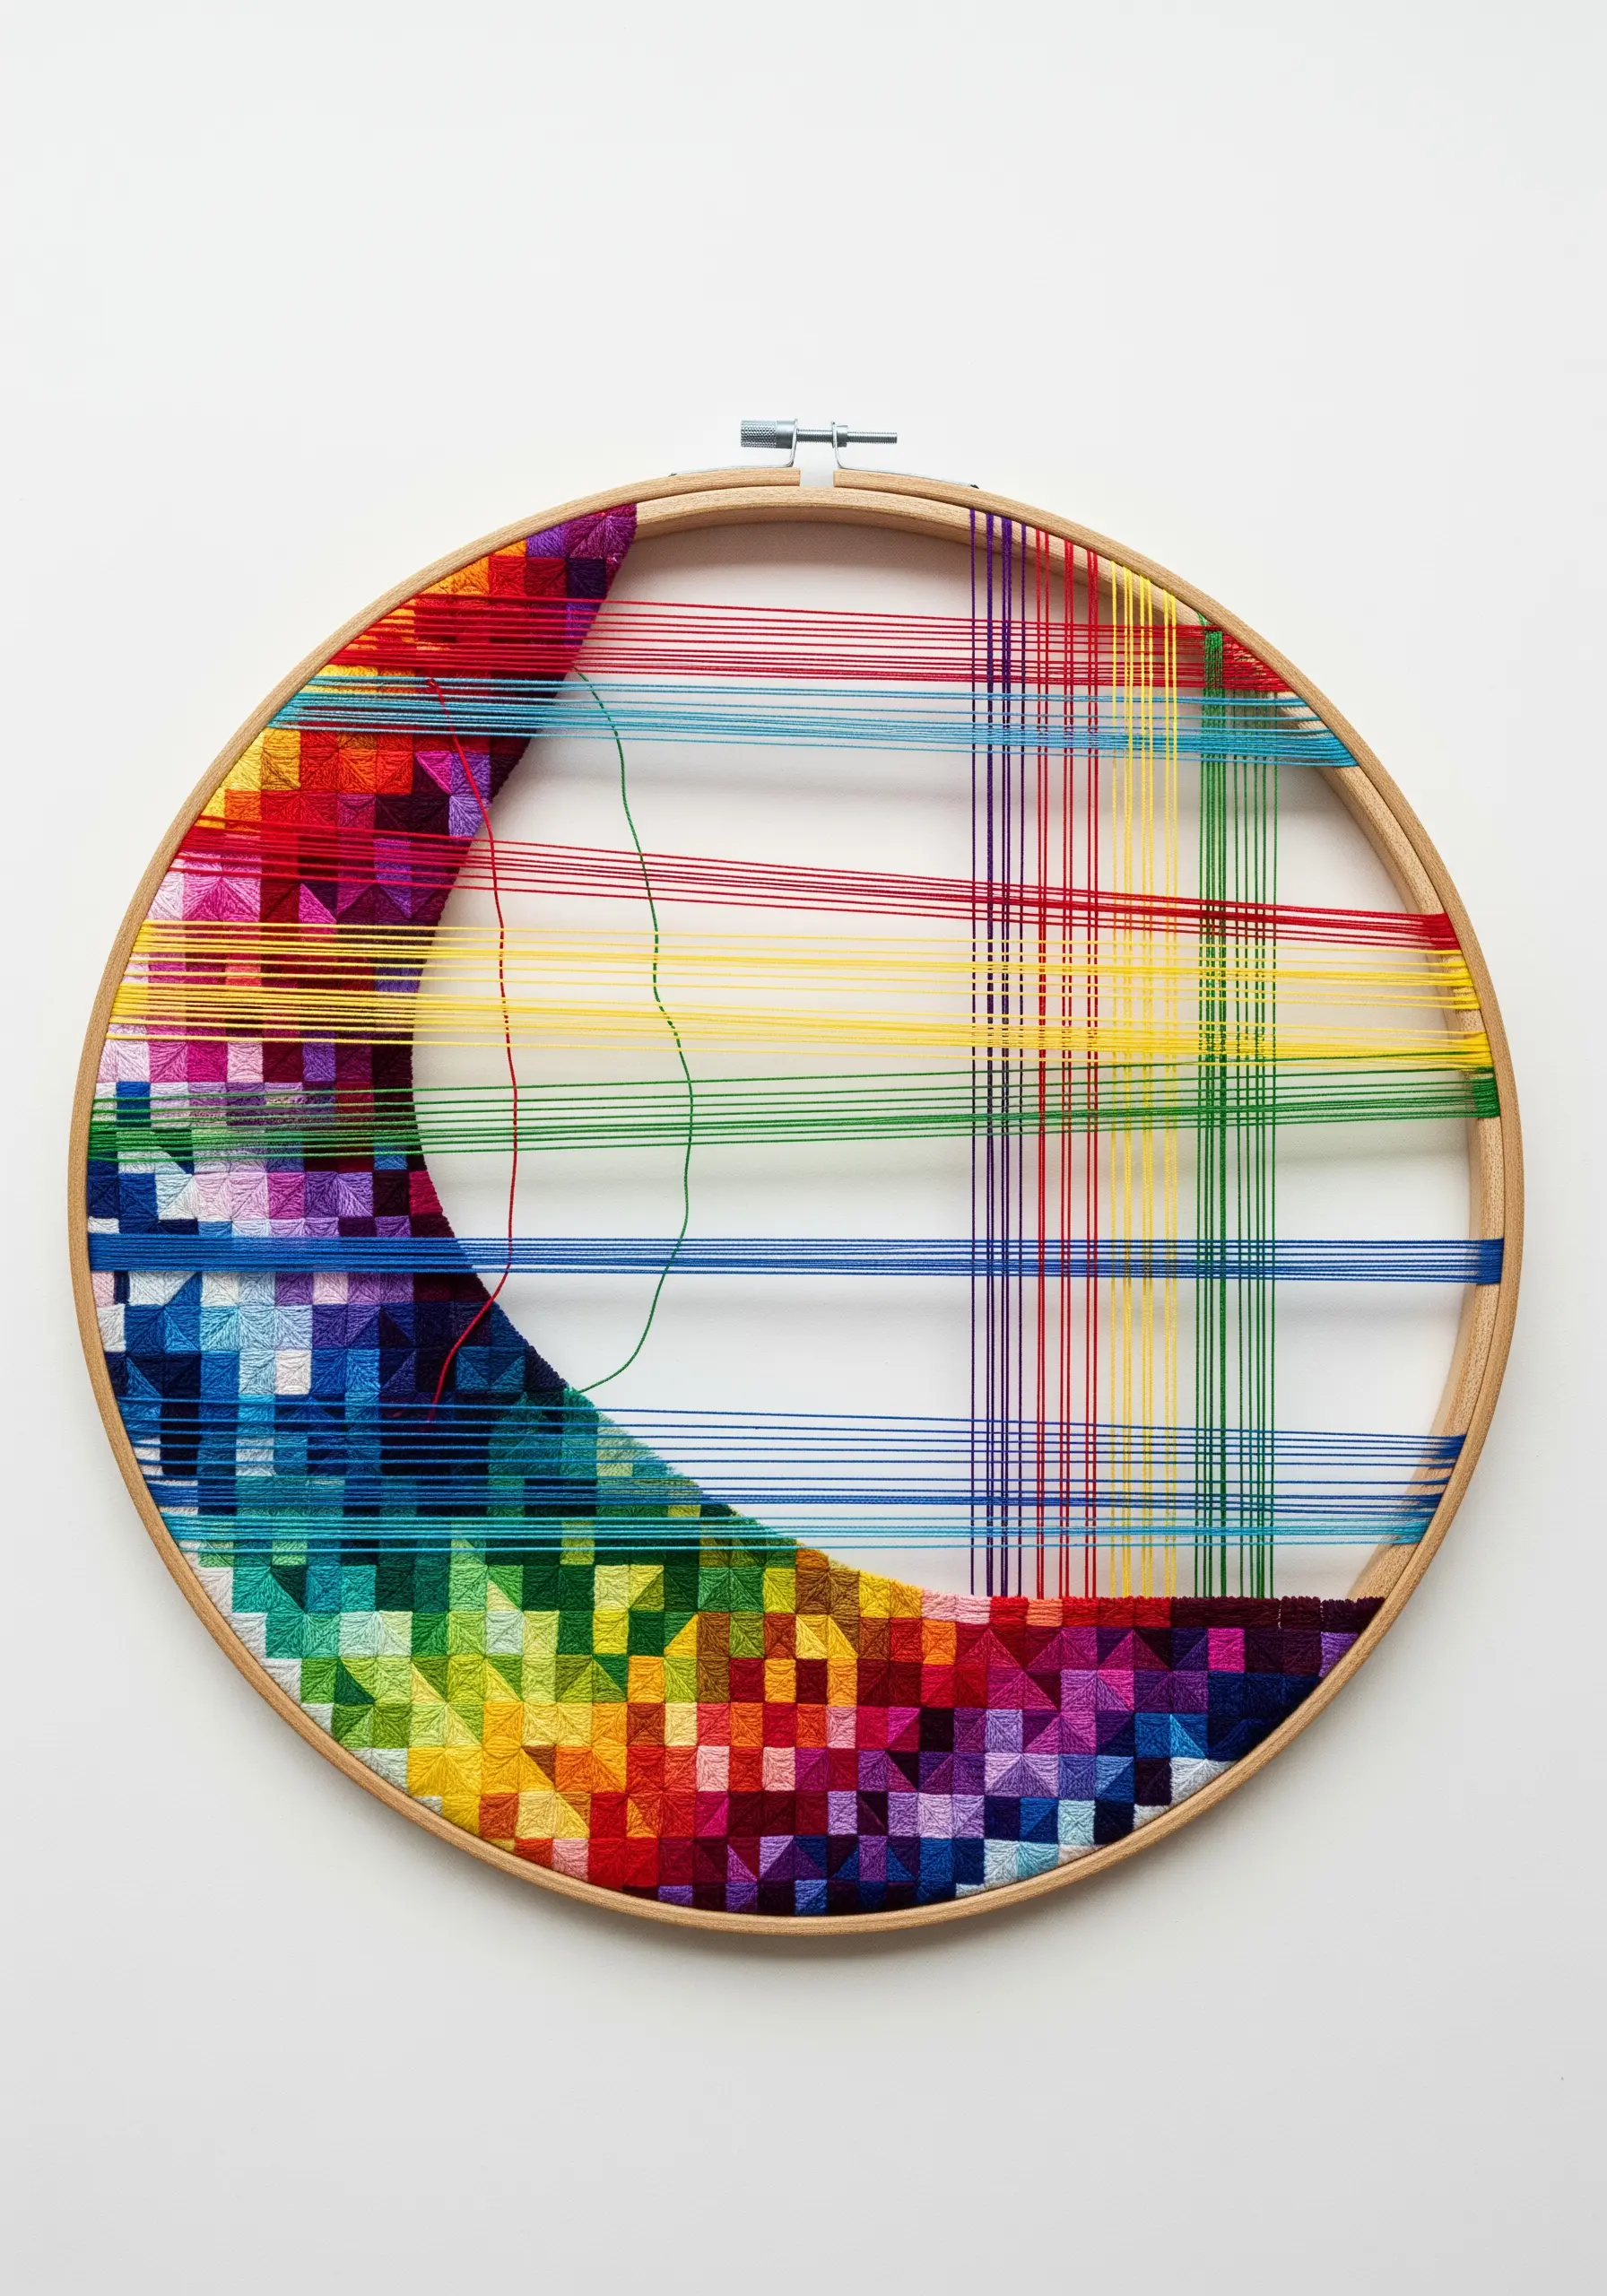
Use your hoop not just to hold fabric, but as a frame for geometric string art.
Combine areas of dense, pixel-like satin stitch on the fabric with long strands of thread stretched from one side of the hoop to the other.
This interplay between the filled fabric surface and the open negative space creates a stunning sense of depth and architectural form.
It’s a modern approach that feels both structured and delicate, transforming simple floss into a graphic installation.
11. Mimic Coral Reefs with Knotted Fibers
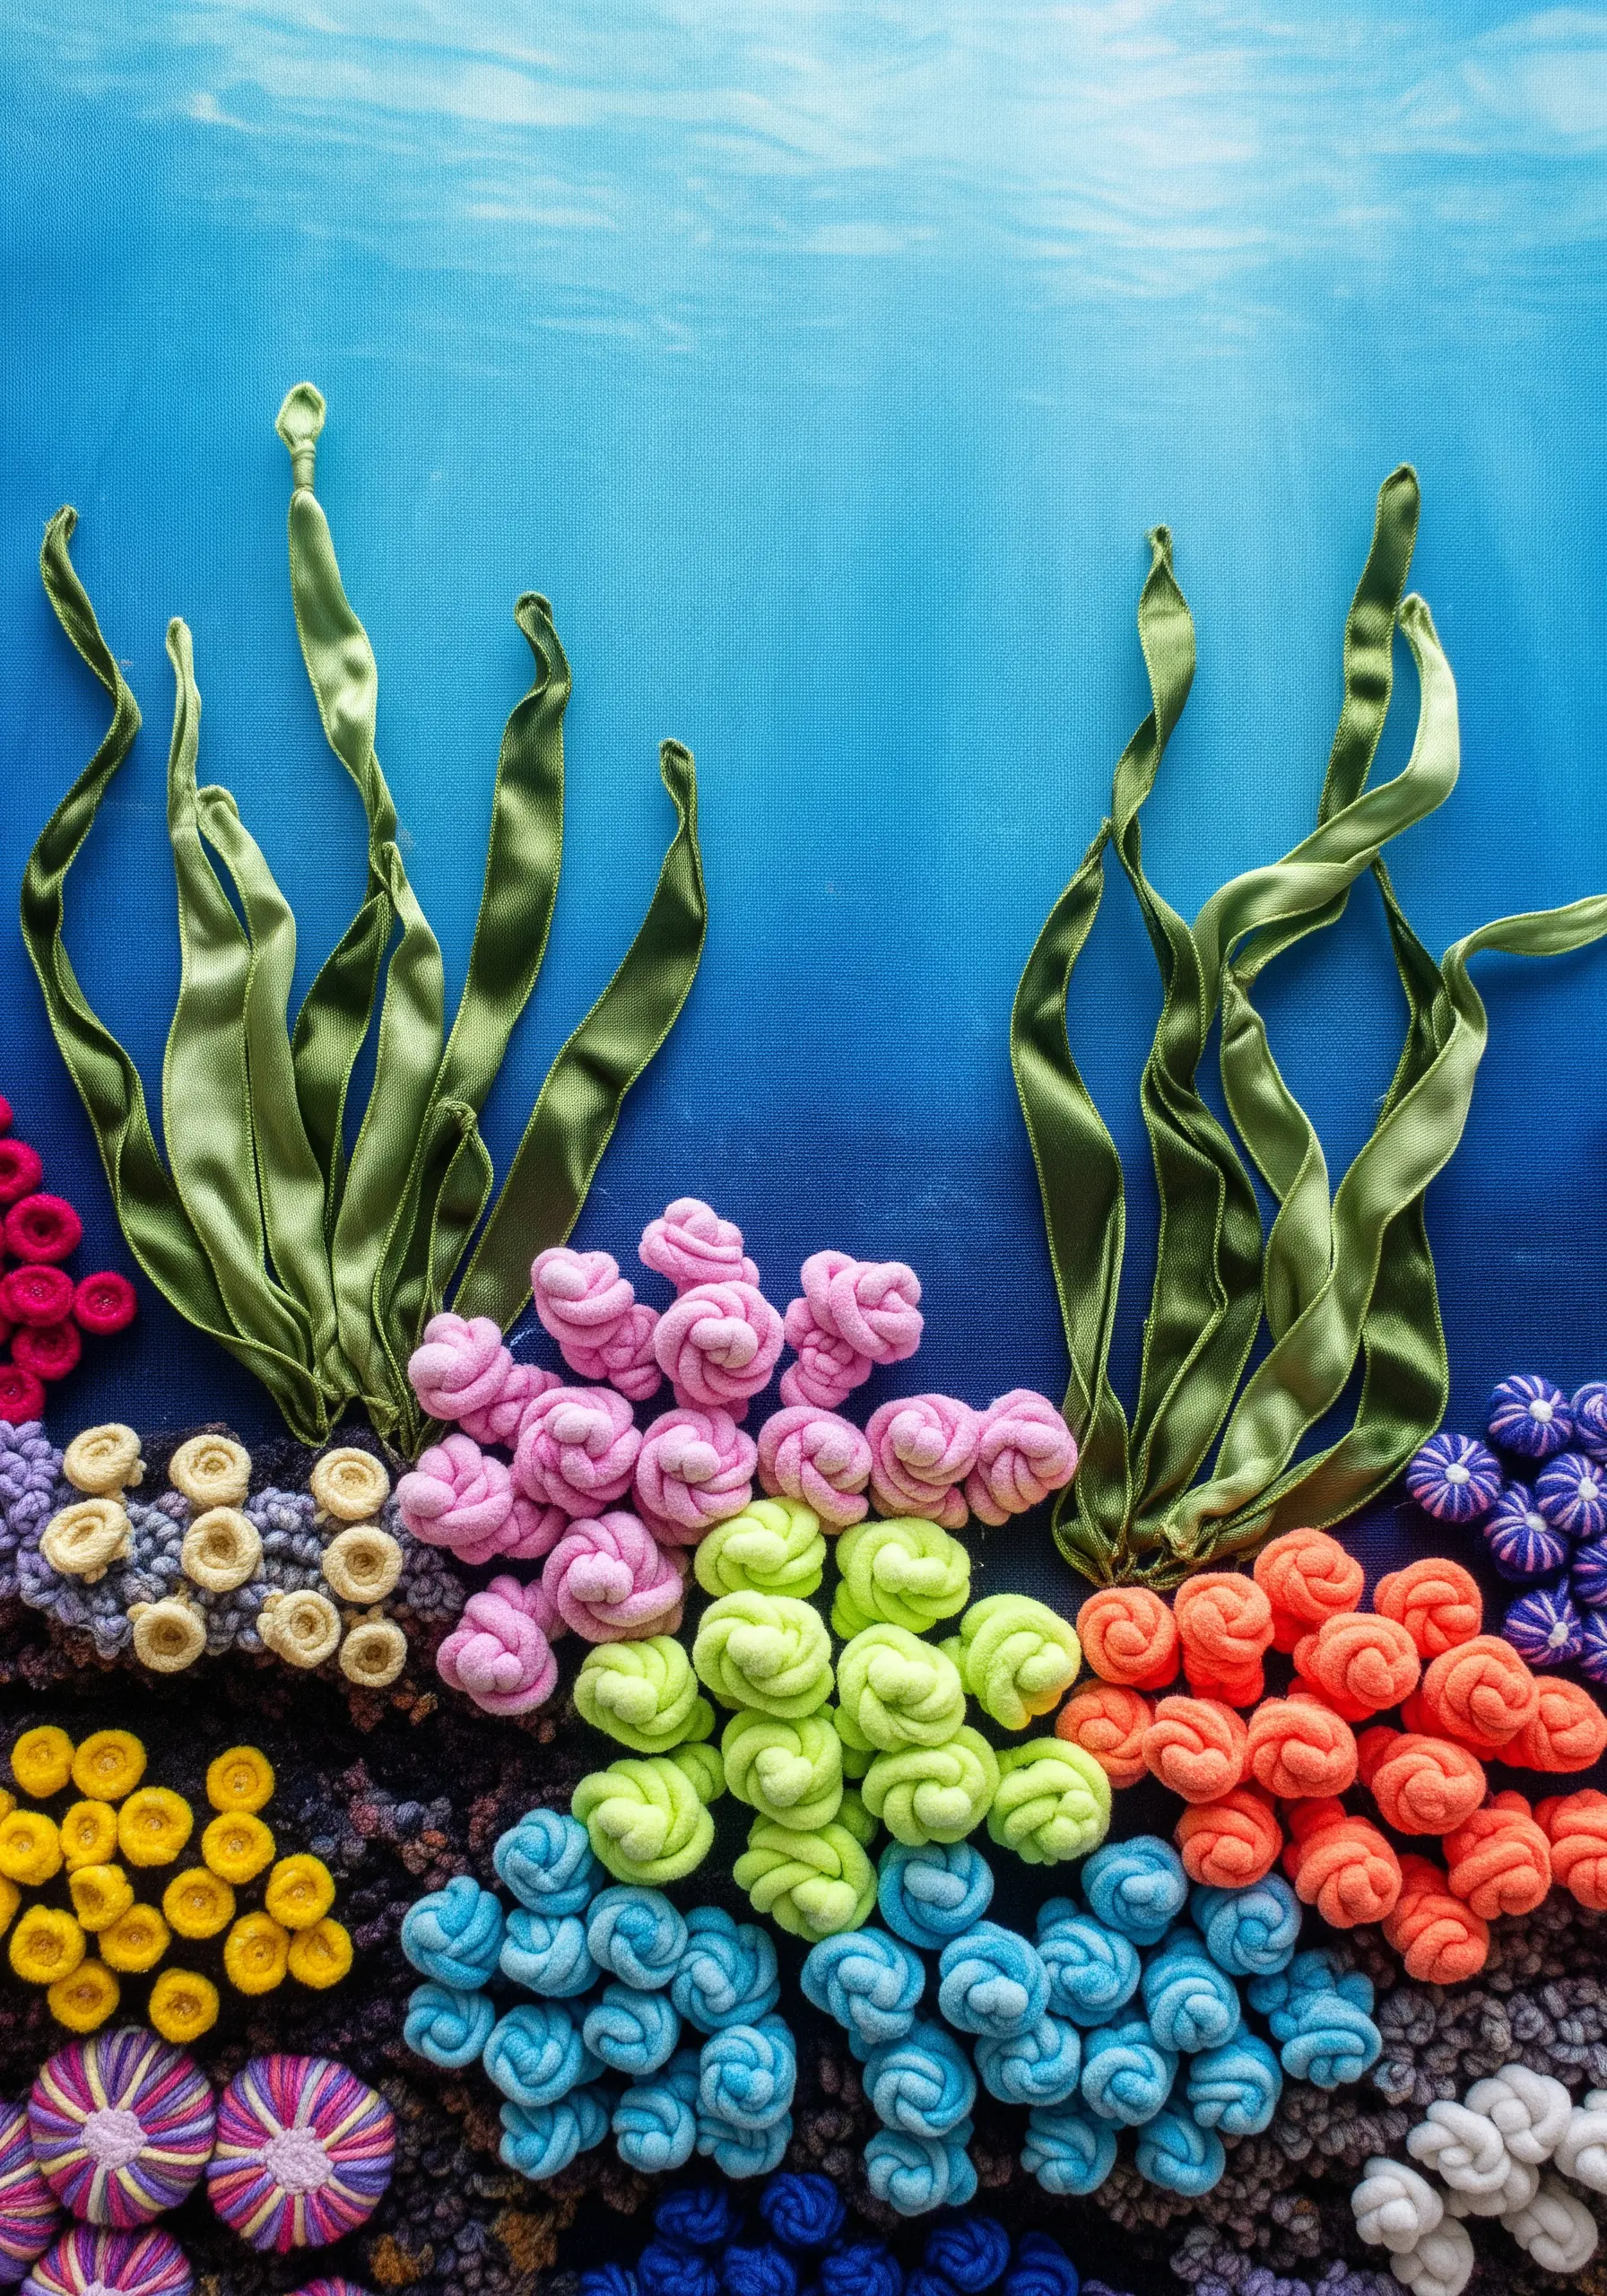
Build a vibrant, tactile underwater world by clustering knotted stitches made from different fibers.
Use soft cotton or wool yarn to make dense groupings of French knots, bullion knots, and Danish knots to simulate the texture of coral.
Vary the size of the knots and the thickness of the yarn to create visual interest and depth.
Incorporate twisted ribbon stitches for seaweed to add a contrasting texture and sense of movement, completing your ocean-inspired scene.
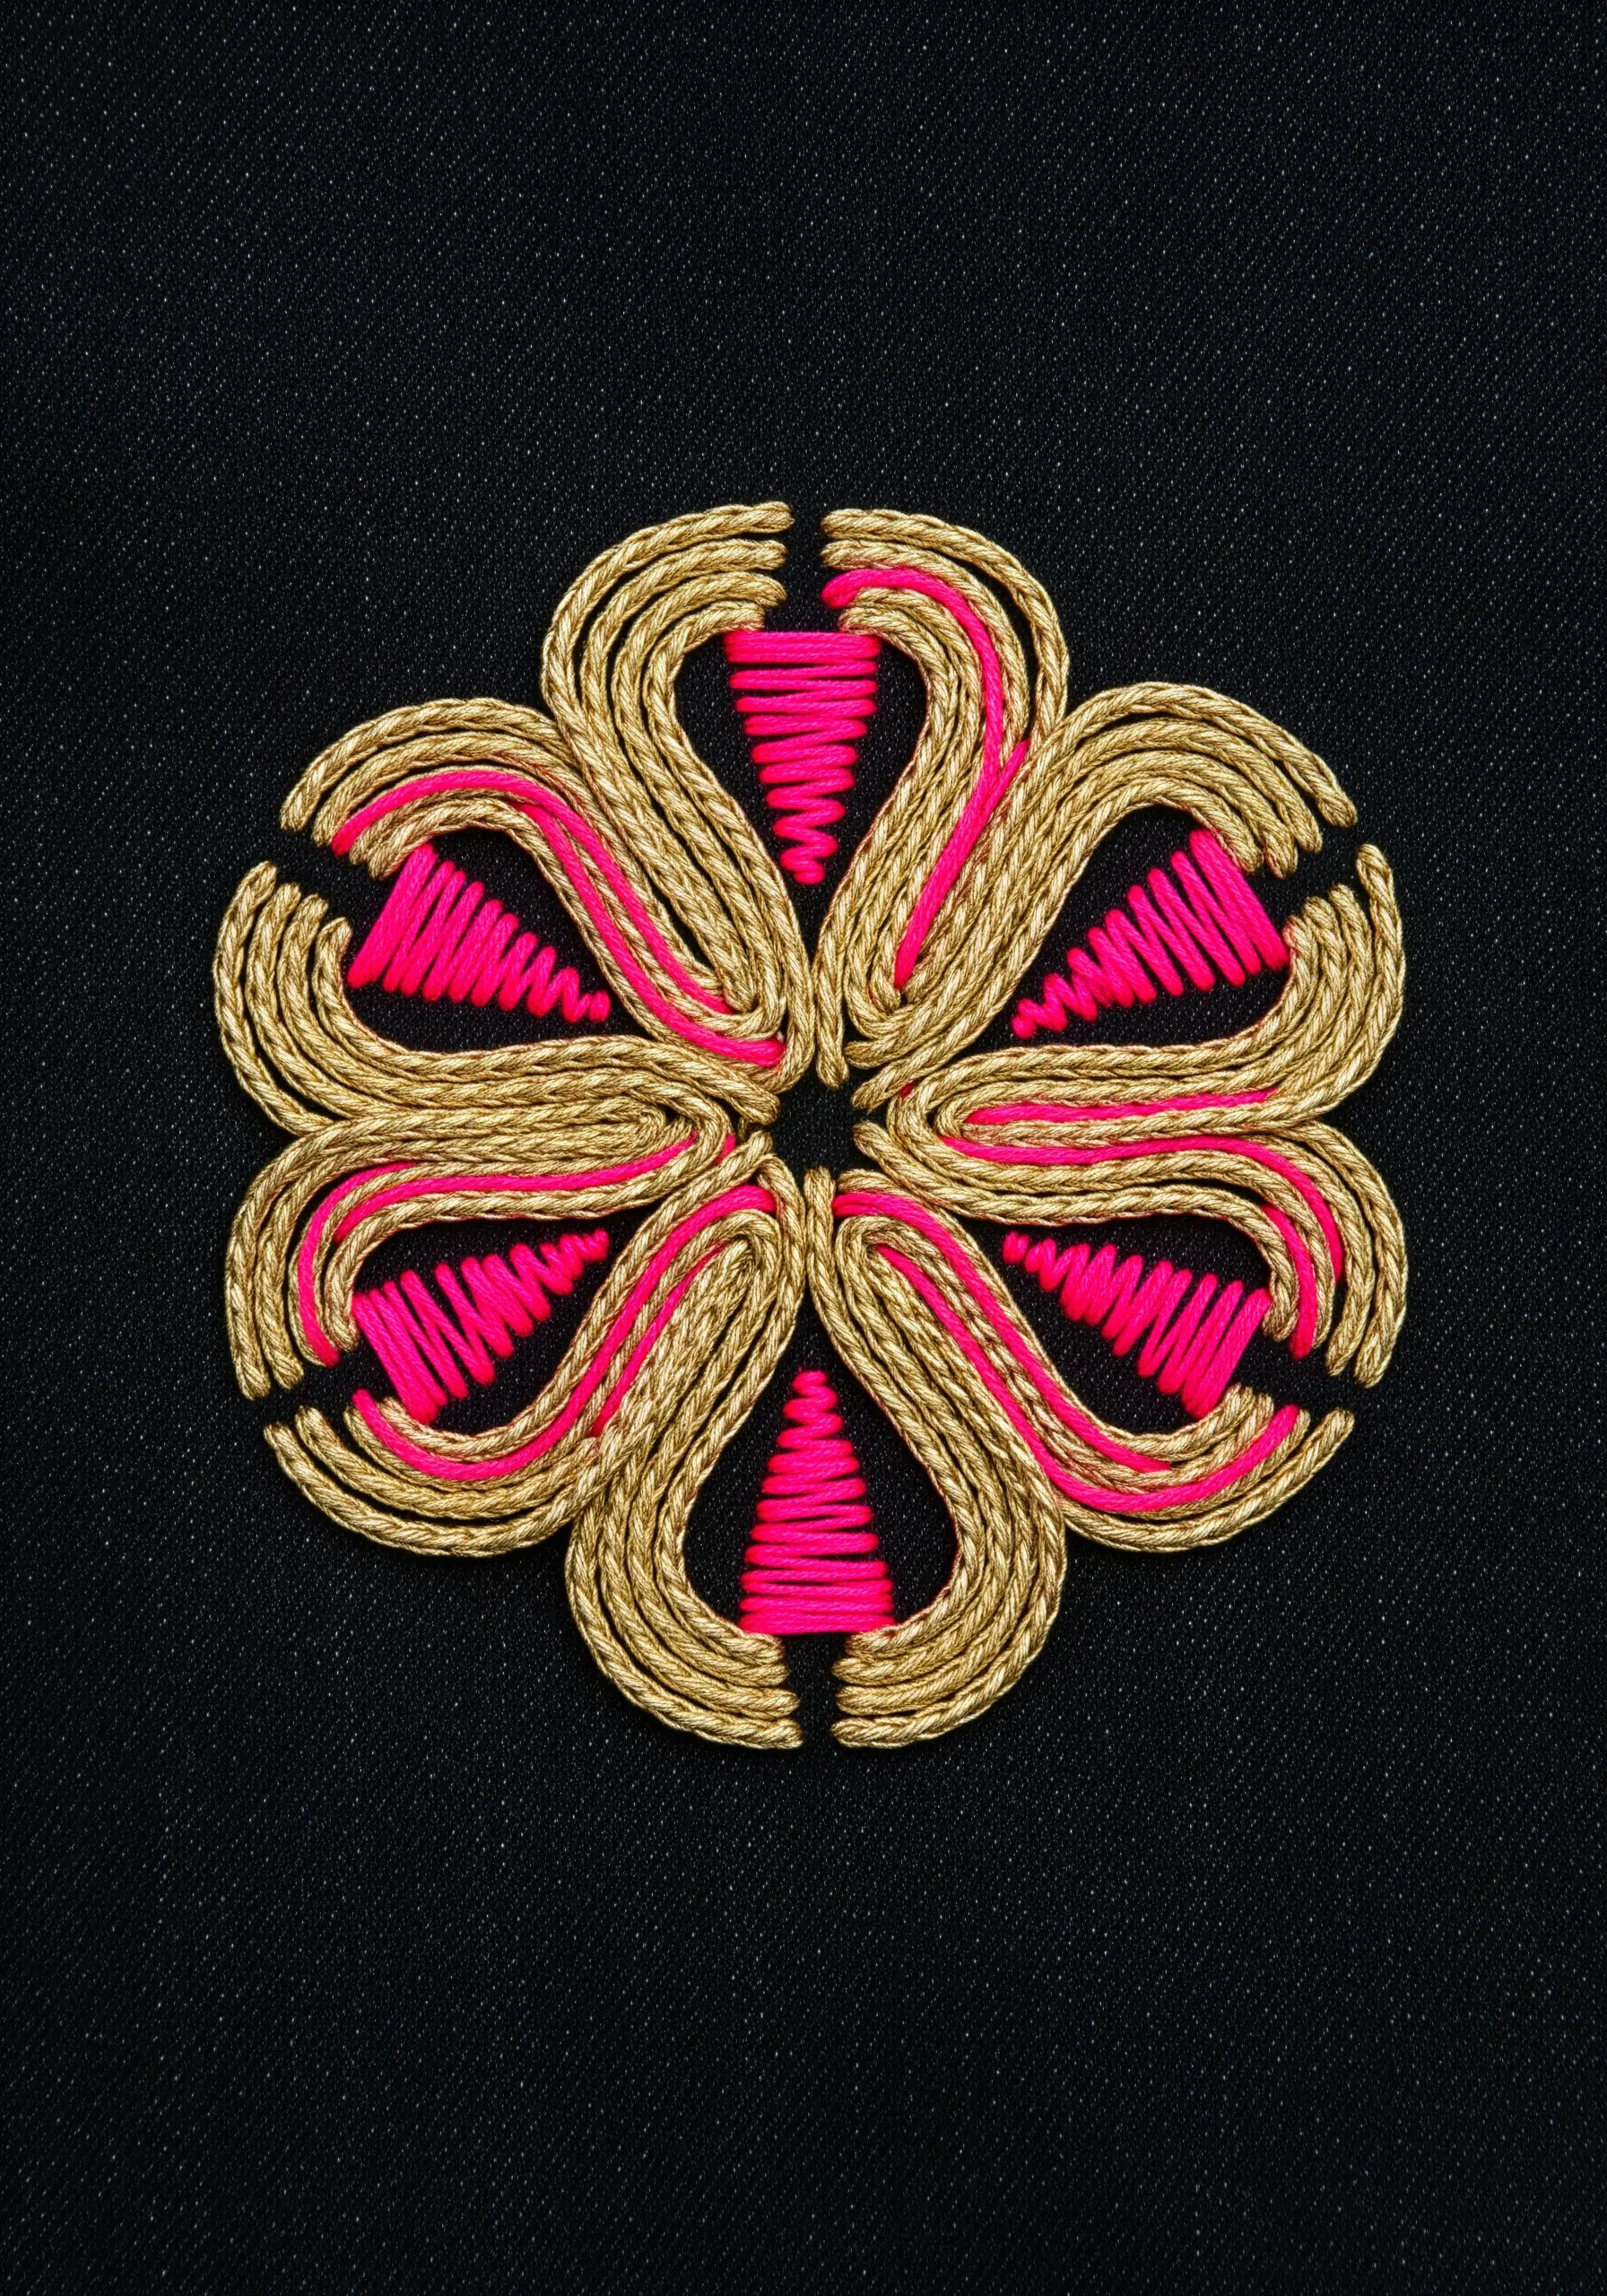
12. Introduce Opulence with Goldwork
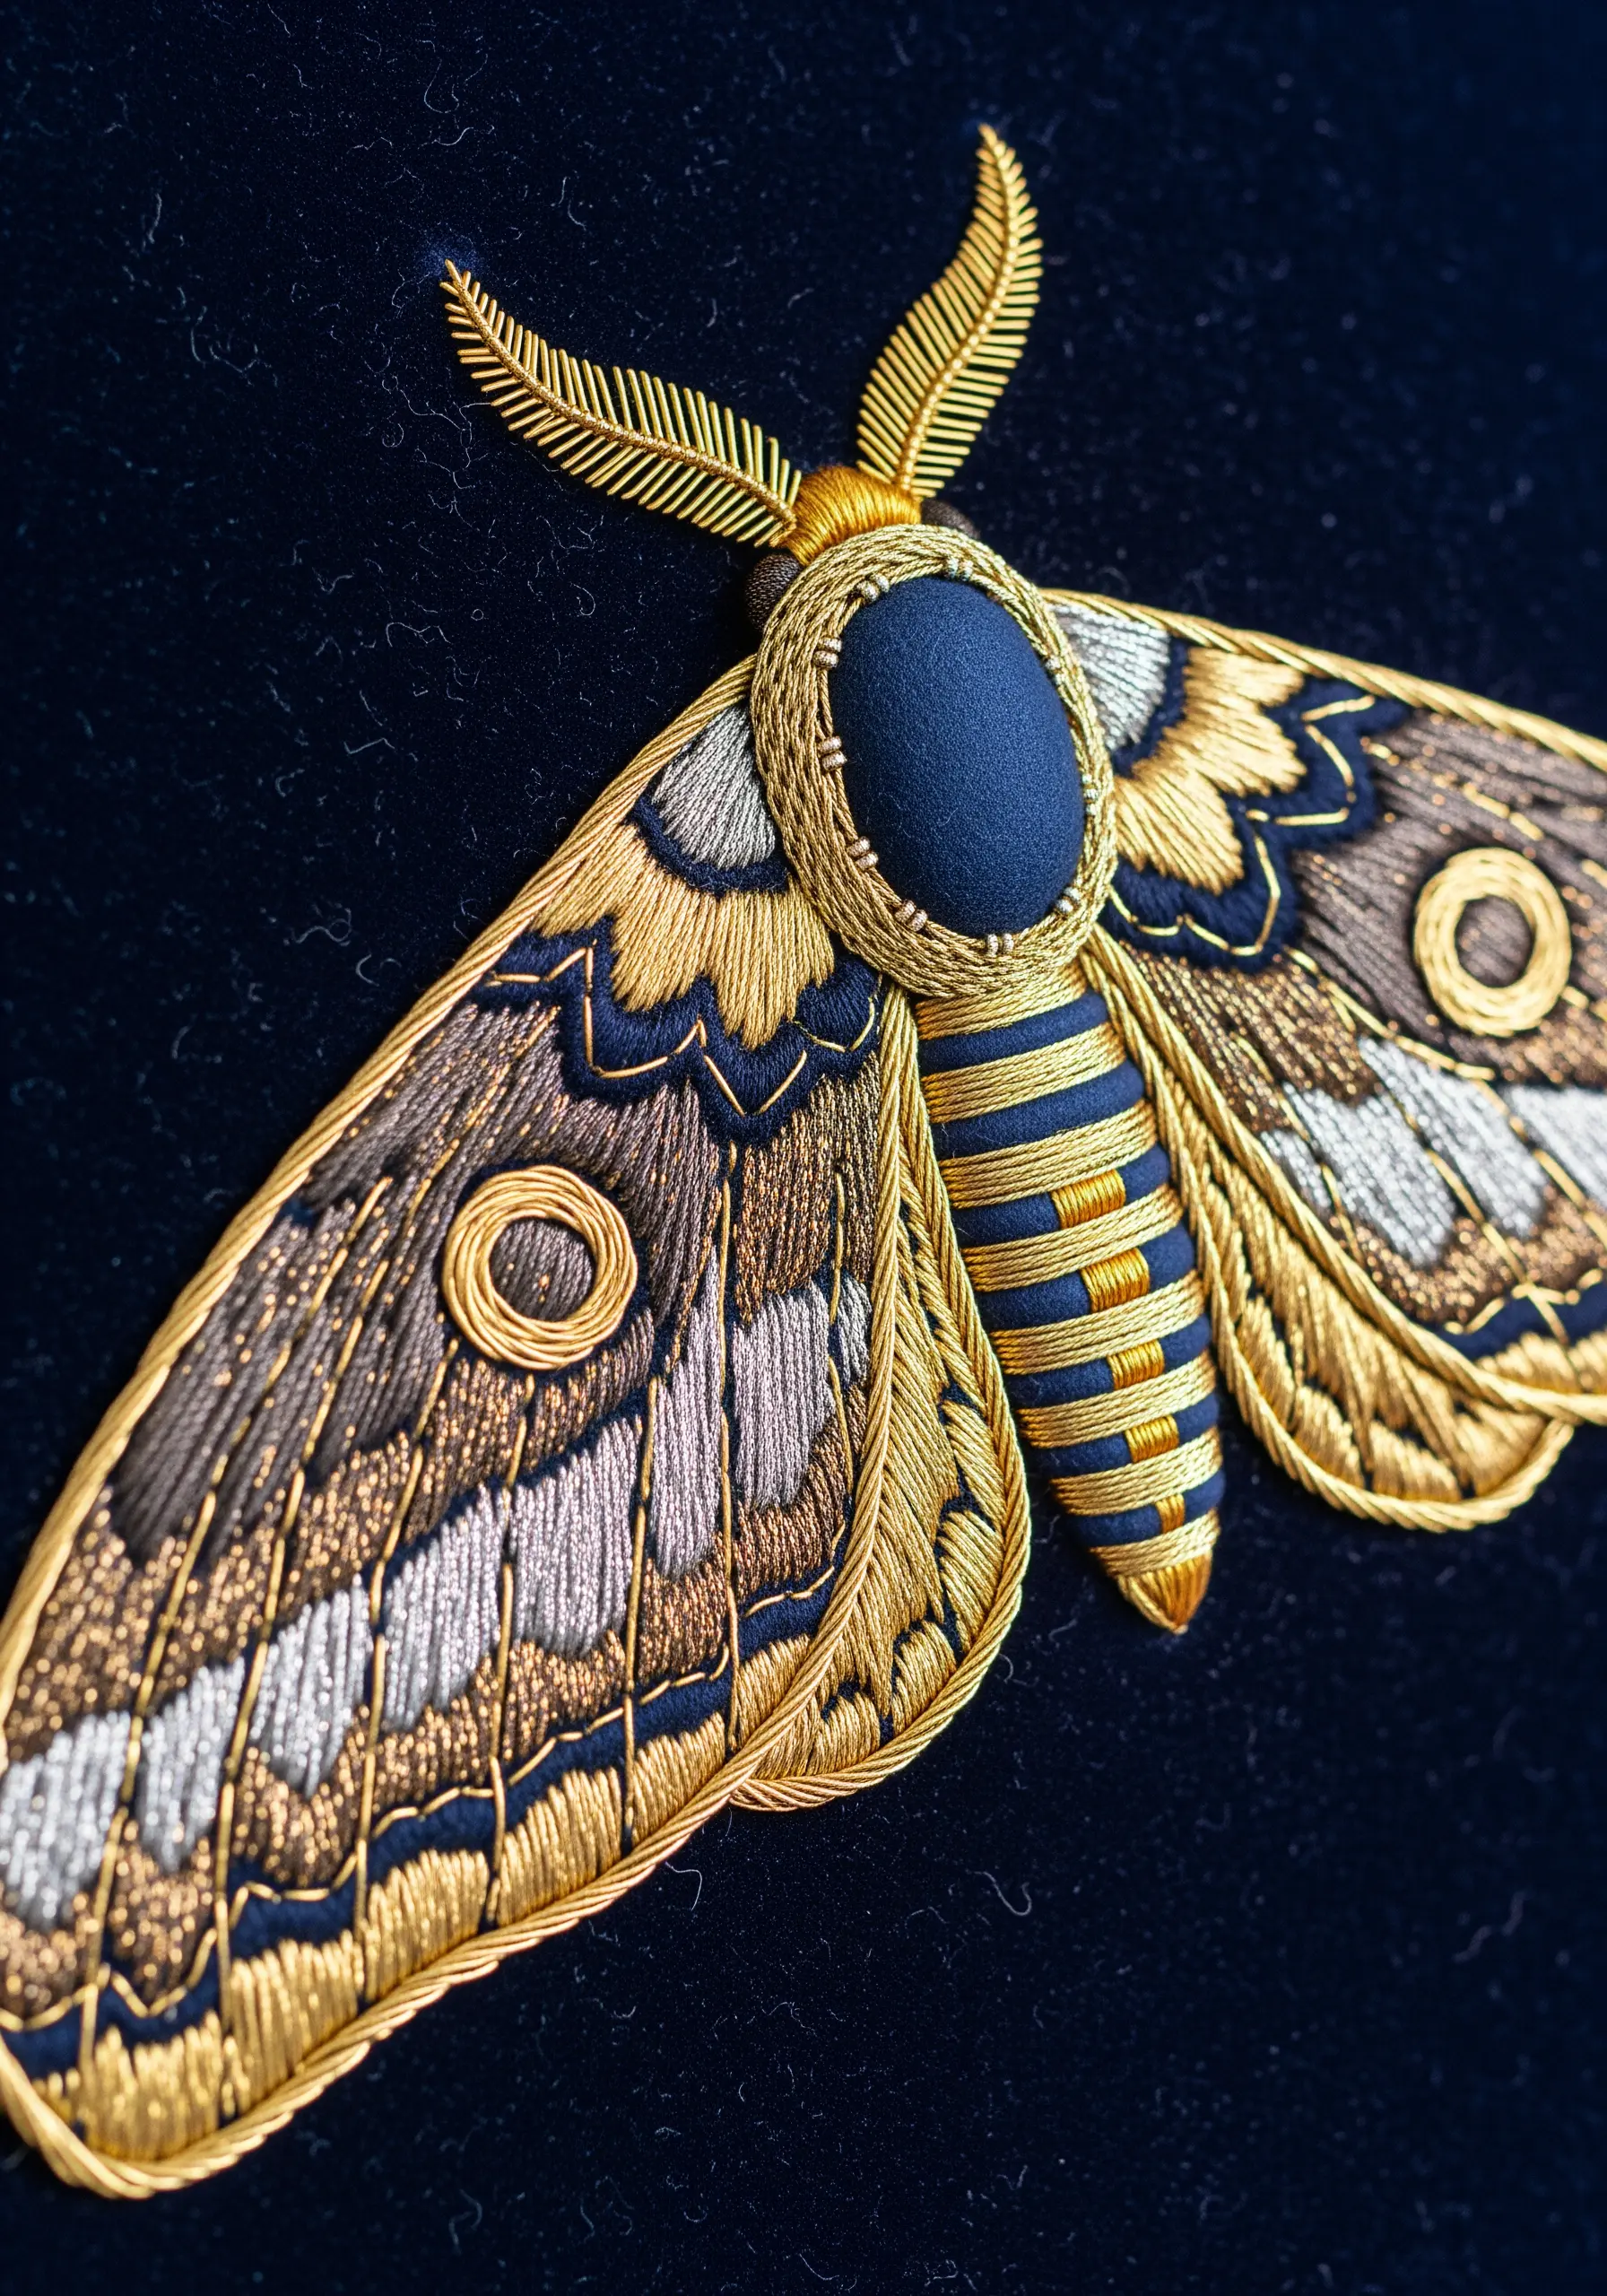
Elevate your work with the luxurious sheen and texture of goldwork embroidery.
This technique involves using metal threads, which are often too delicate or stiff to be stitched normally. Instead, you couch them onto the fabric surface with a fine, strong silk thread.
For raised effects, add a layer of felt or string padding underneath the metal threads before couching them down. This technique, called padding, gives the work a regal, bas-relief quality.
The combination of metallic surfaces and raised forms creates an unparalleled sense of richness and detail.
13. Create Bold Outlines with Braided Cord
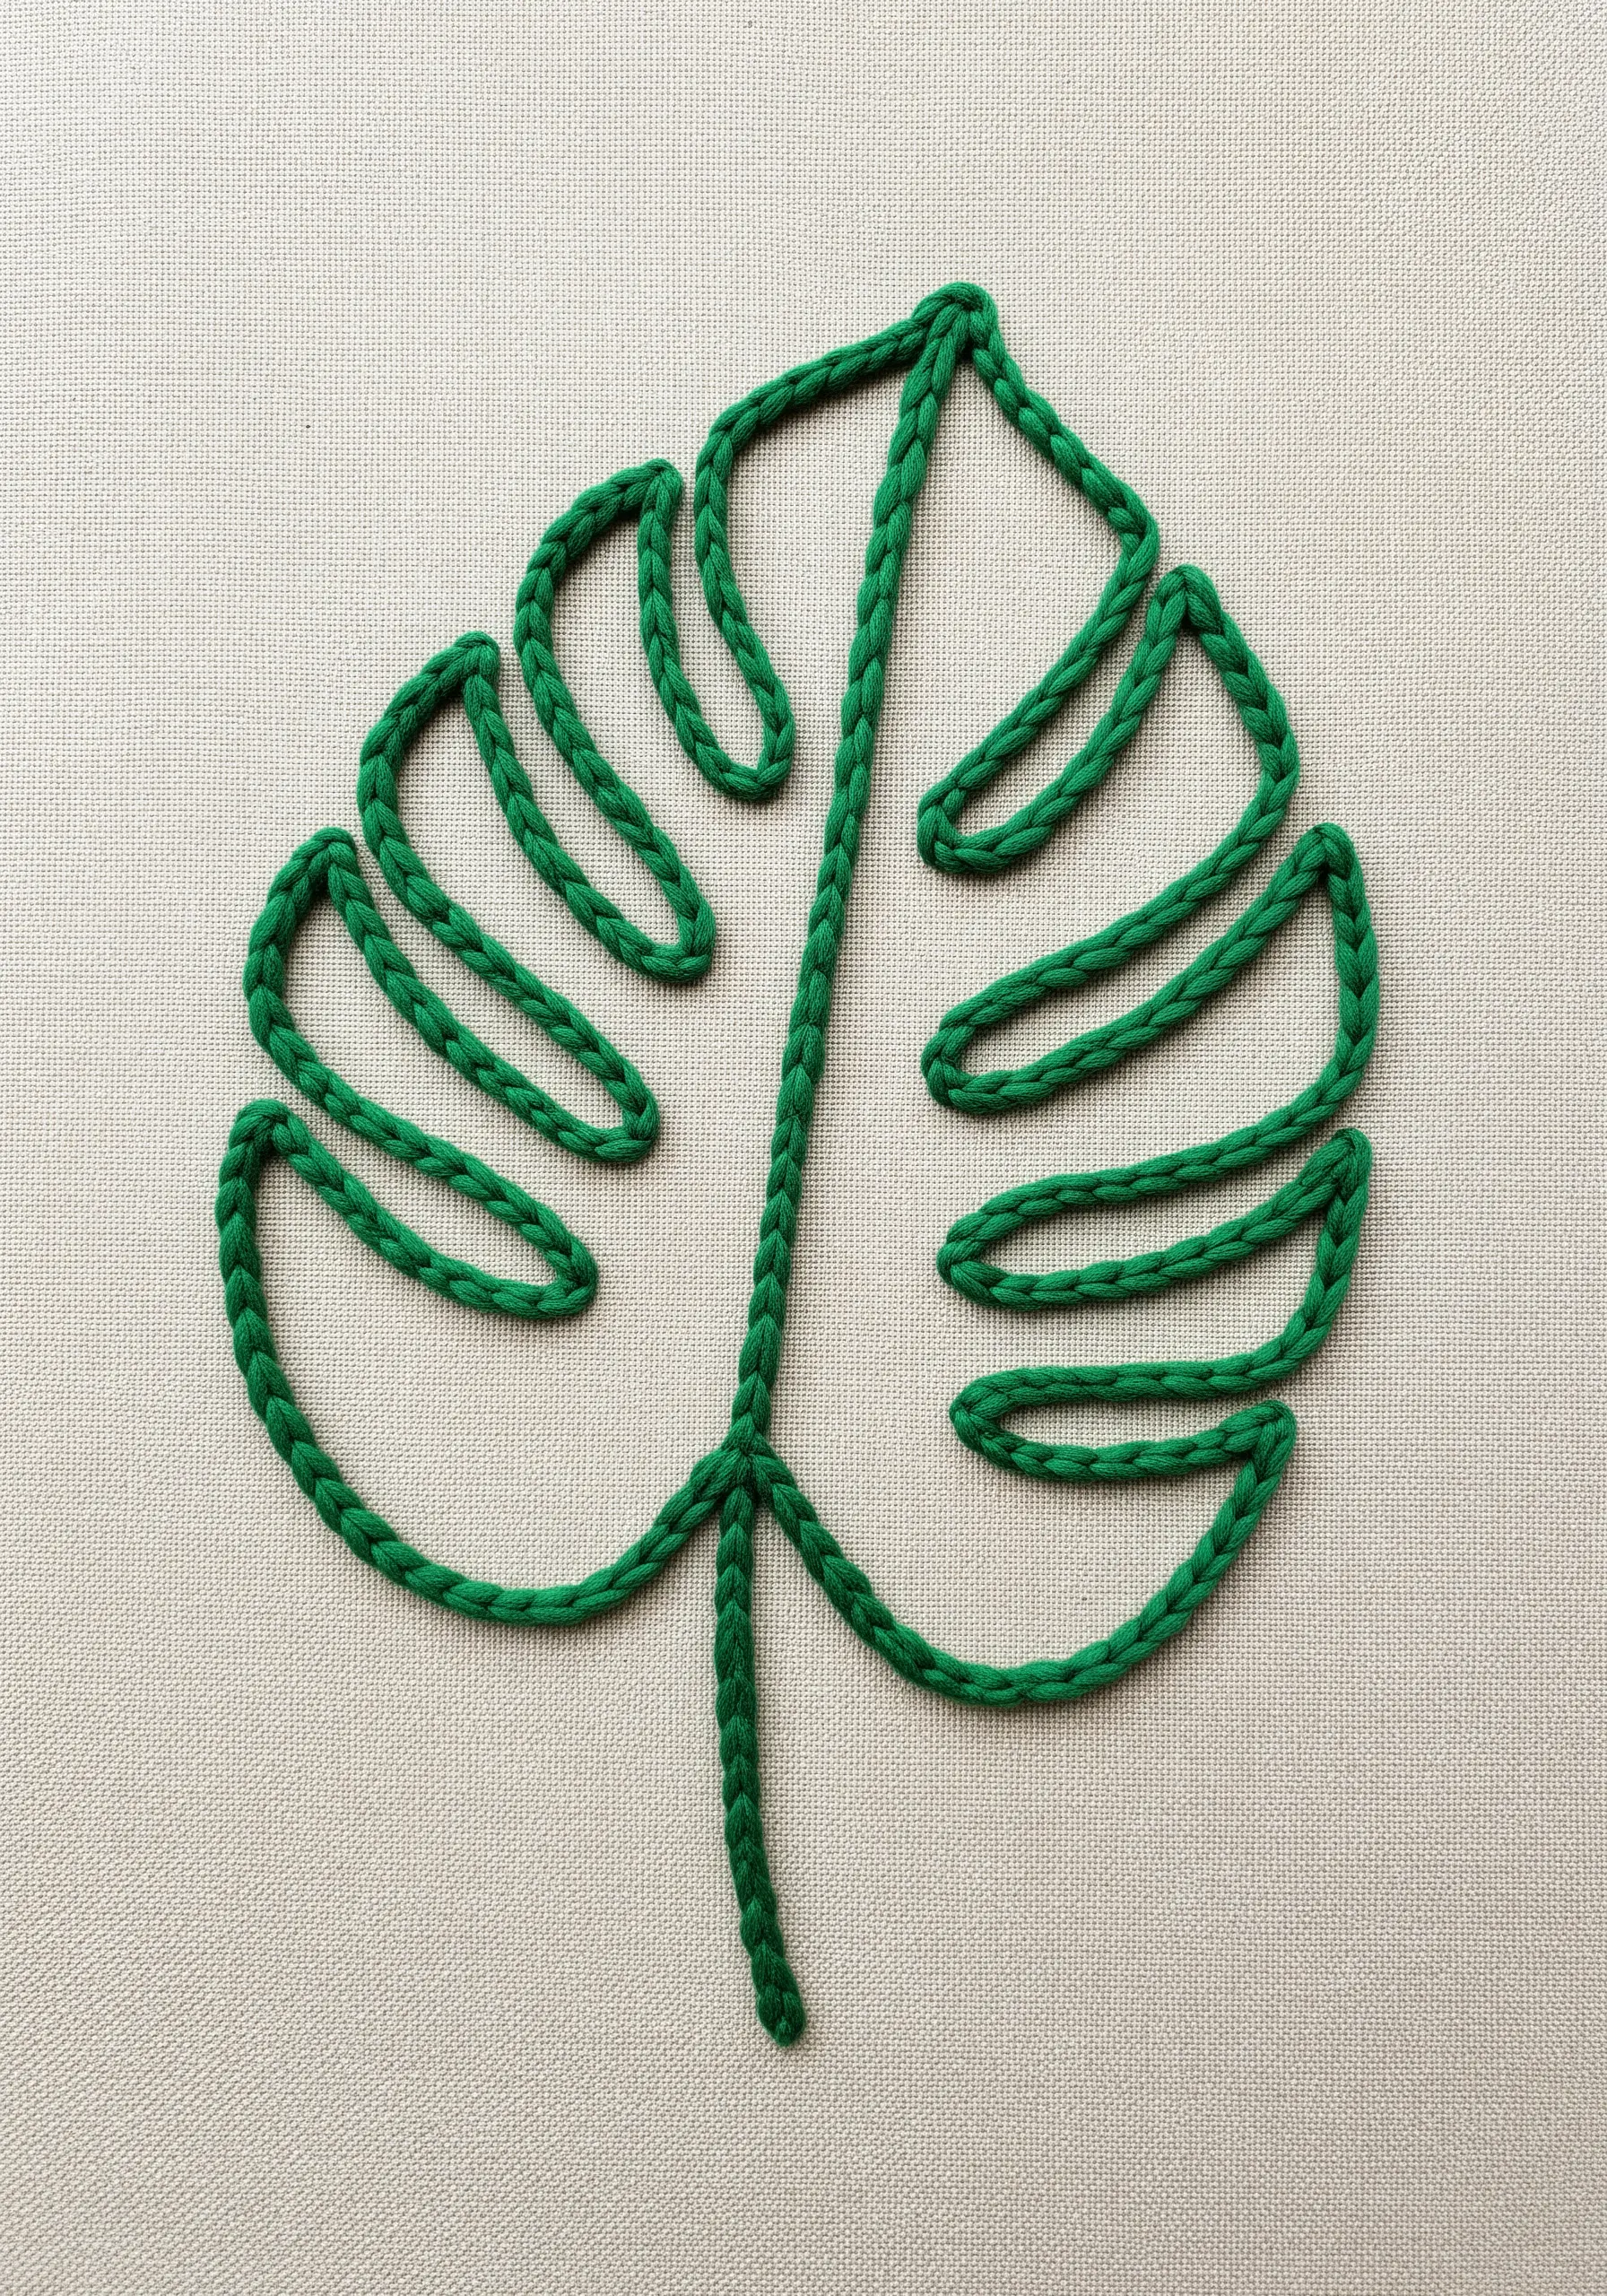
For a clean, minimalist statement, outline your design using a thick, braided cord instead of fine floss.
Use a simple couching stitch with a thread that matches your cord to discreetly tack it onto the fabric, allowing the cord’s texture and form to be the focus.
This method adds instant dimension and a graphic, almost sculptural quality to simple line art, making it perfect for minimalist patterns on linen.
It’s an efficient way to make a big impact with very few stitches, ideal for modern home décor.
14. Explore Texture with Monochromatic Knots
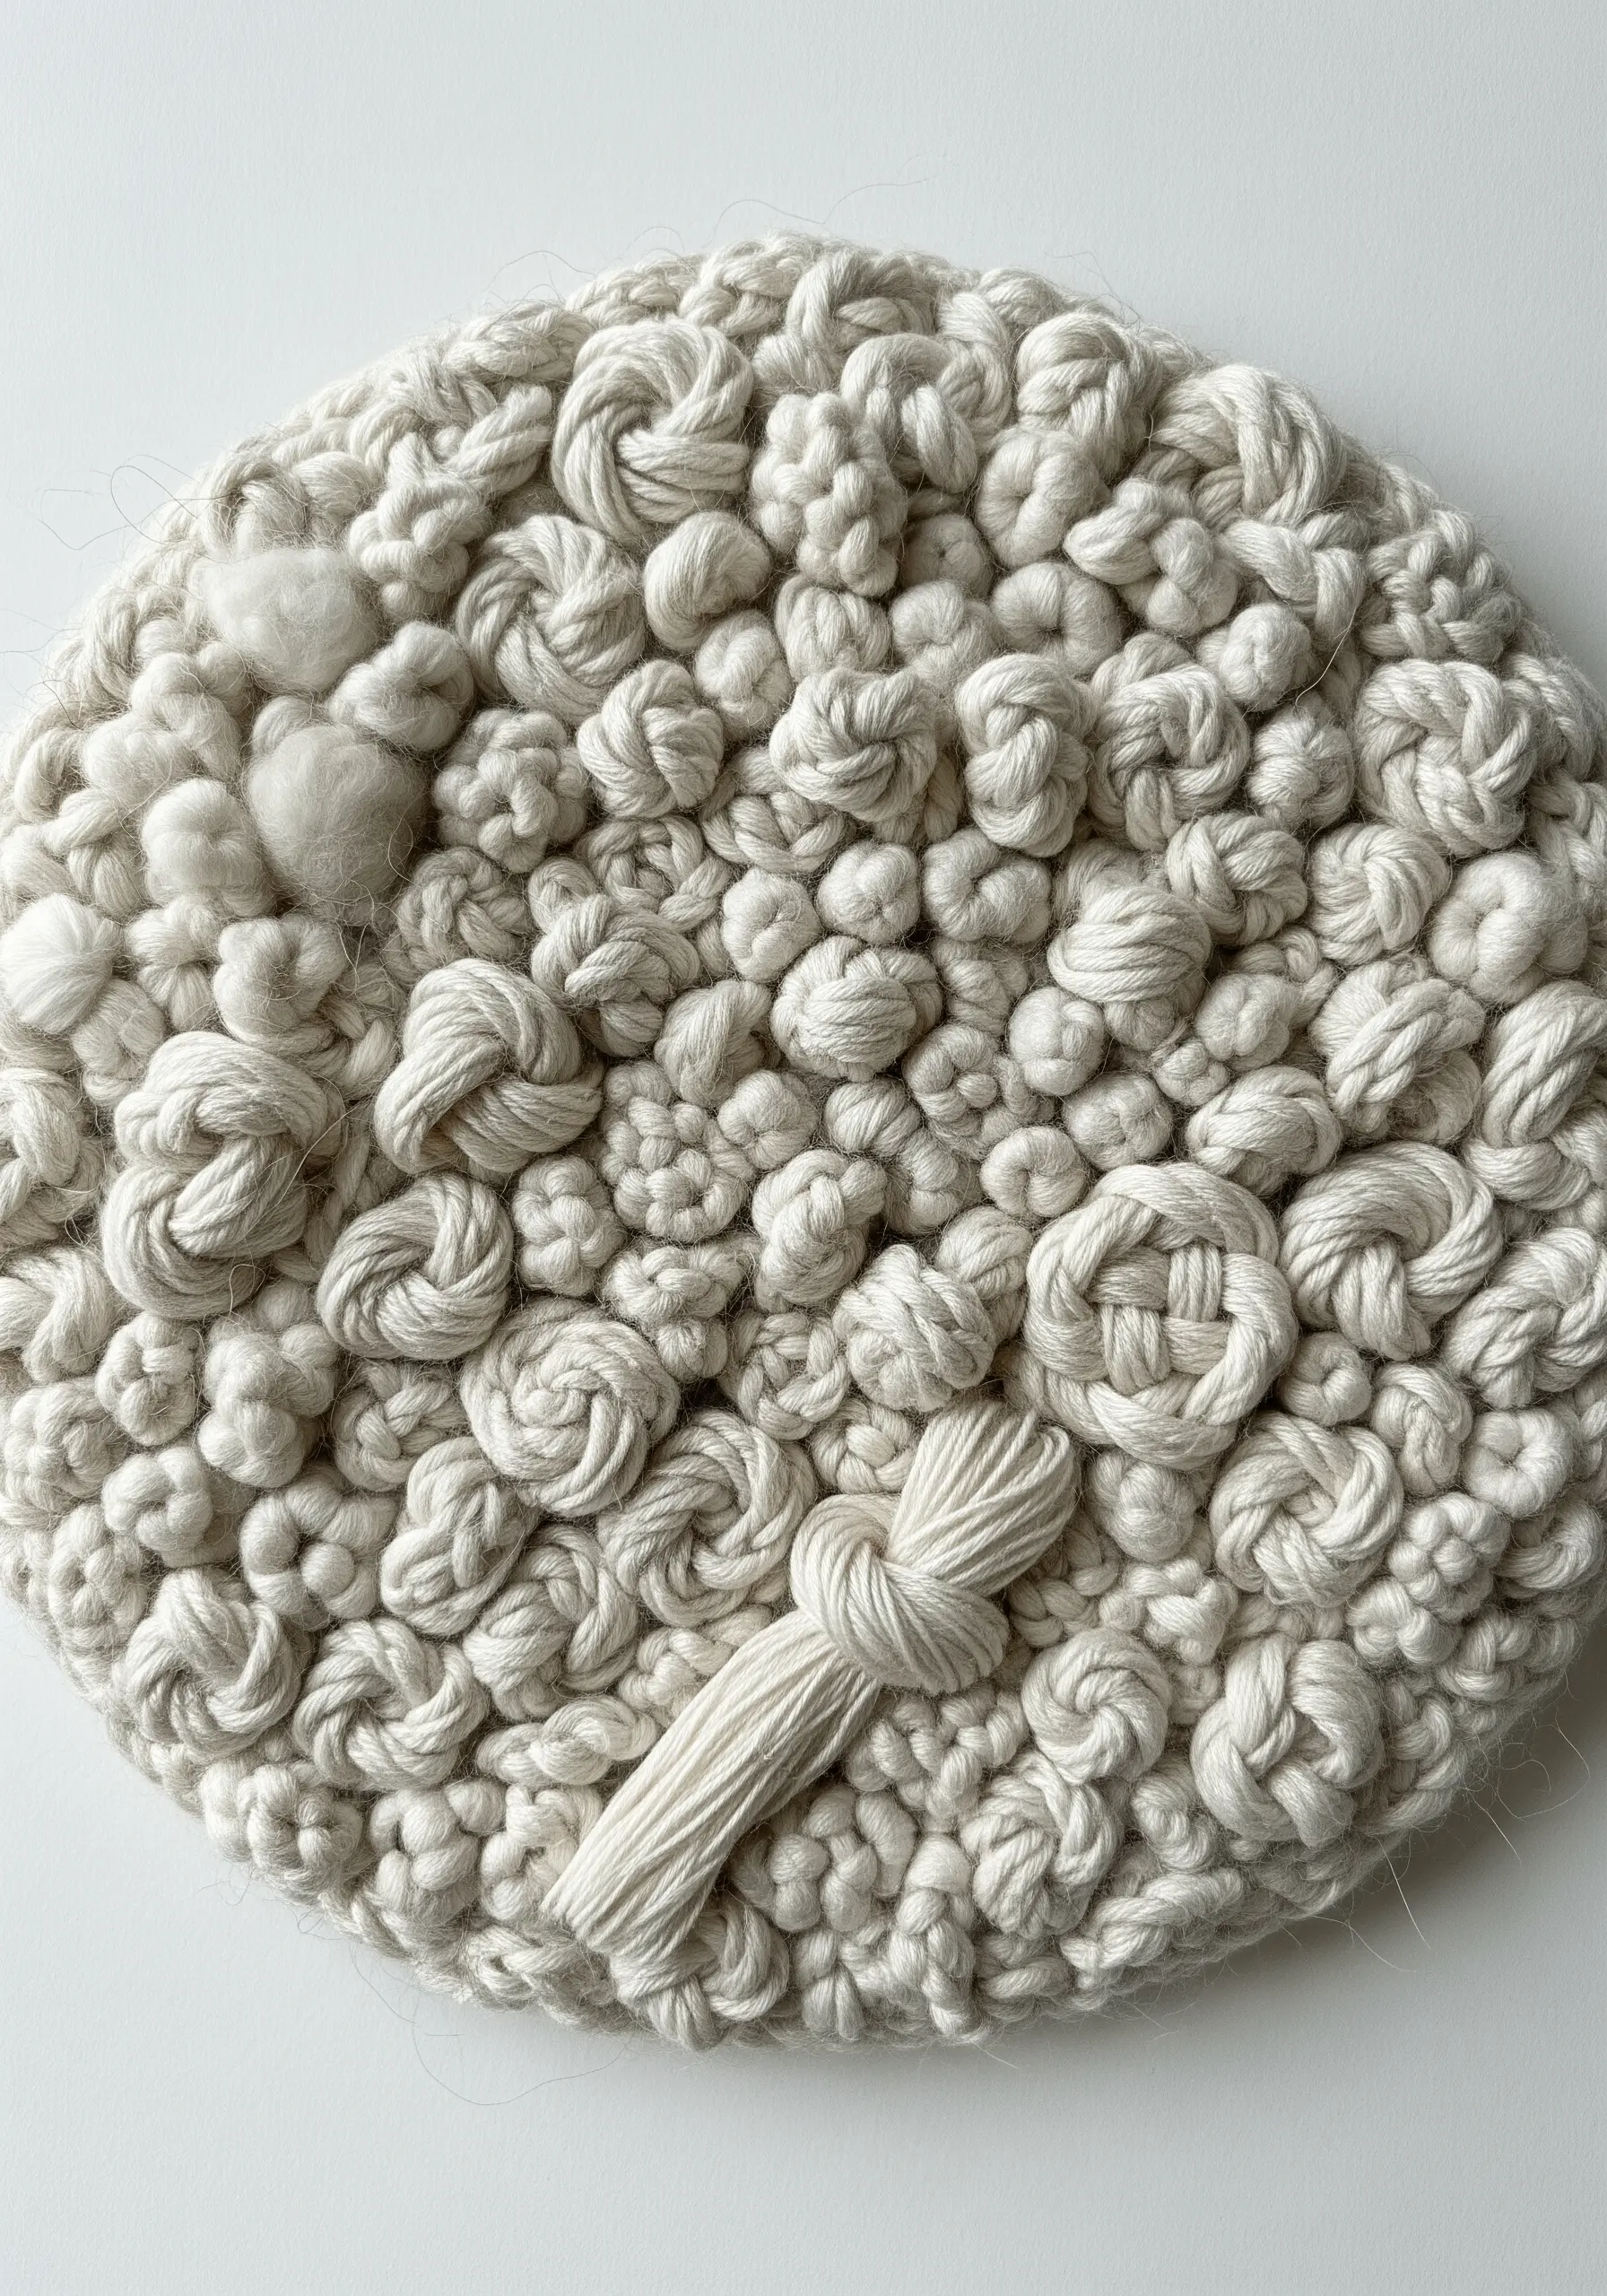
Challenge yourself to create a composition that relies solely on texture, not color.
Using a single shade of yarn or cord, fill a space with a dense variety of knots: French knots, colonial knots, bullion knots, and even sailor’s knots like the Celtic or sailor’s cross.
By varying the size, density, and type of knot, you can create a surprisingly complex and captivating surface where light and shadow do all the work.
This is a powerful exercise in understanding how form and texture can communicate just as effectively as a full color palette.
15. Incorporate Gemstones with Bead Embroidery
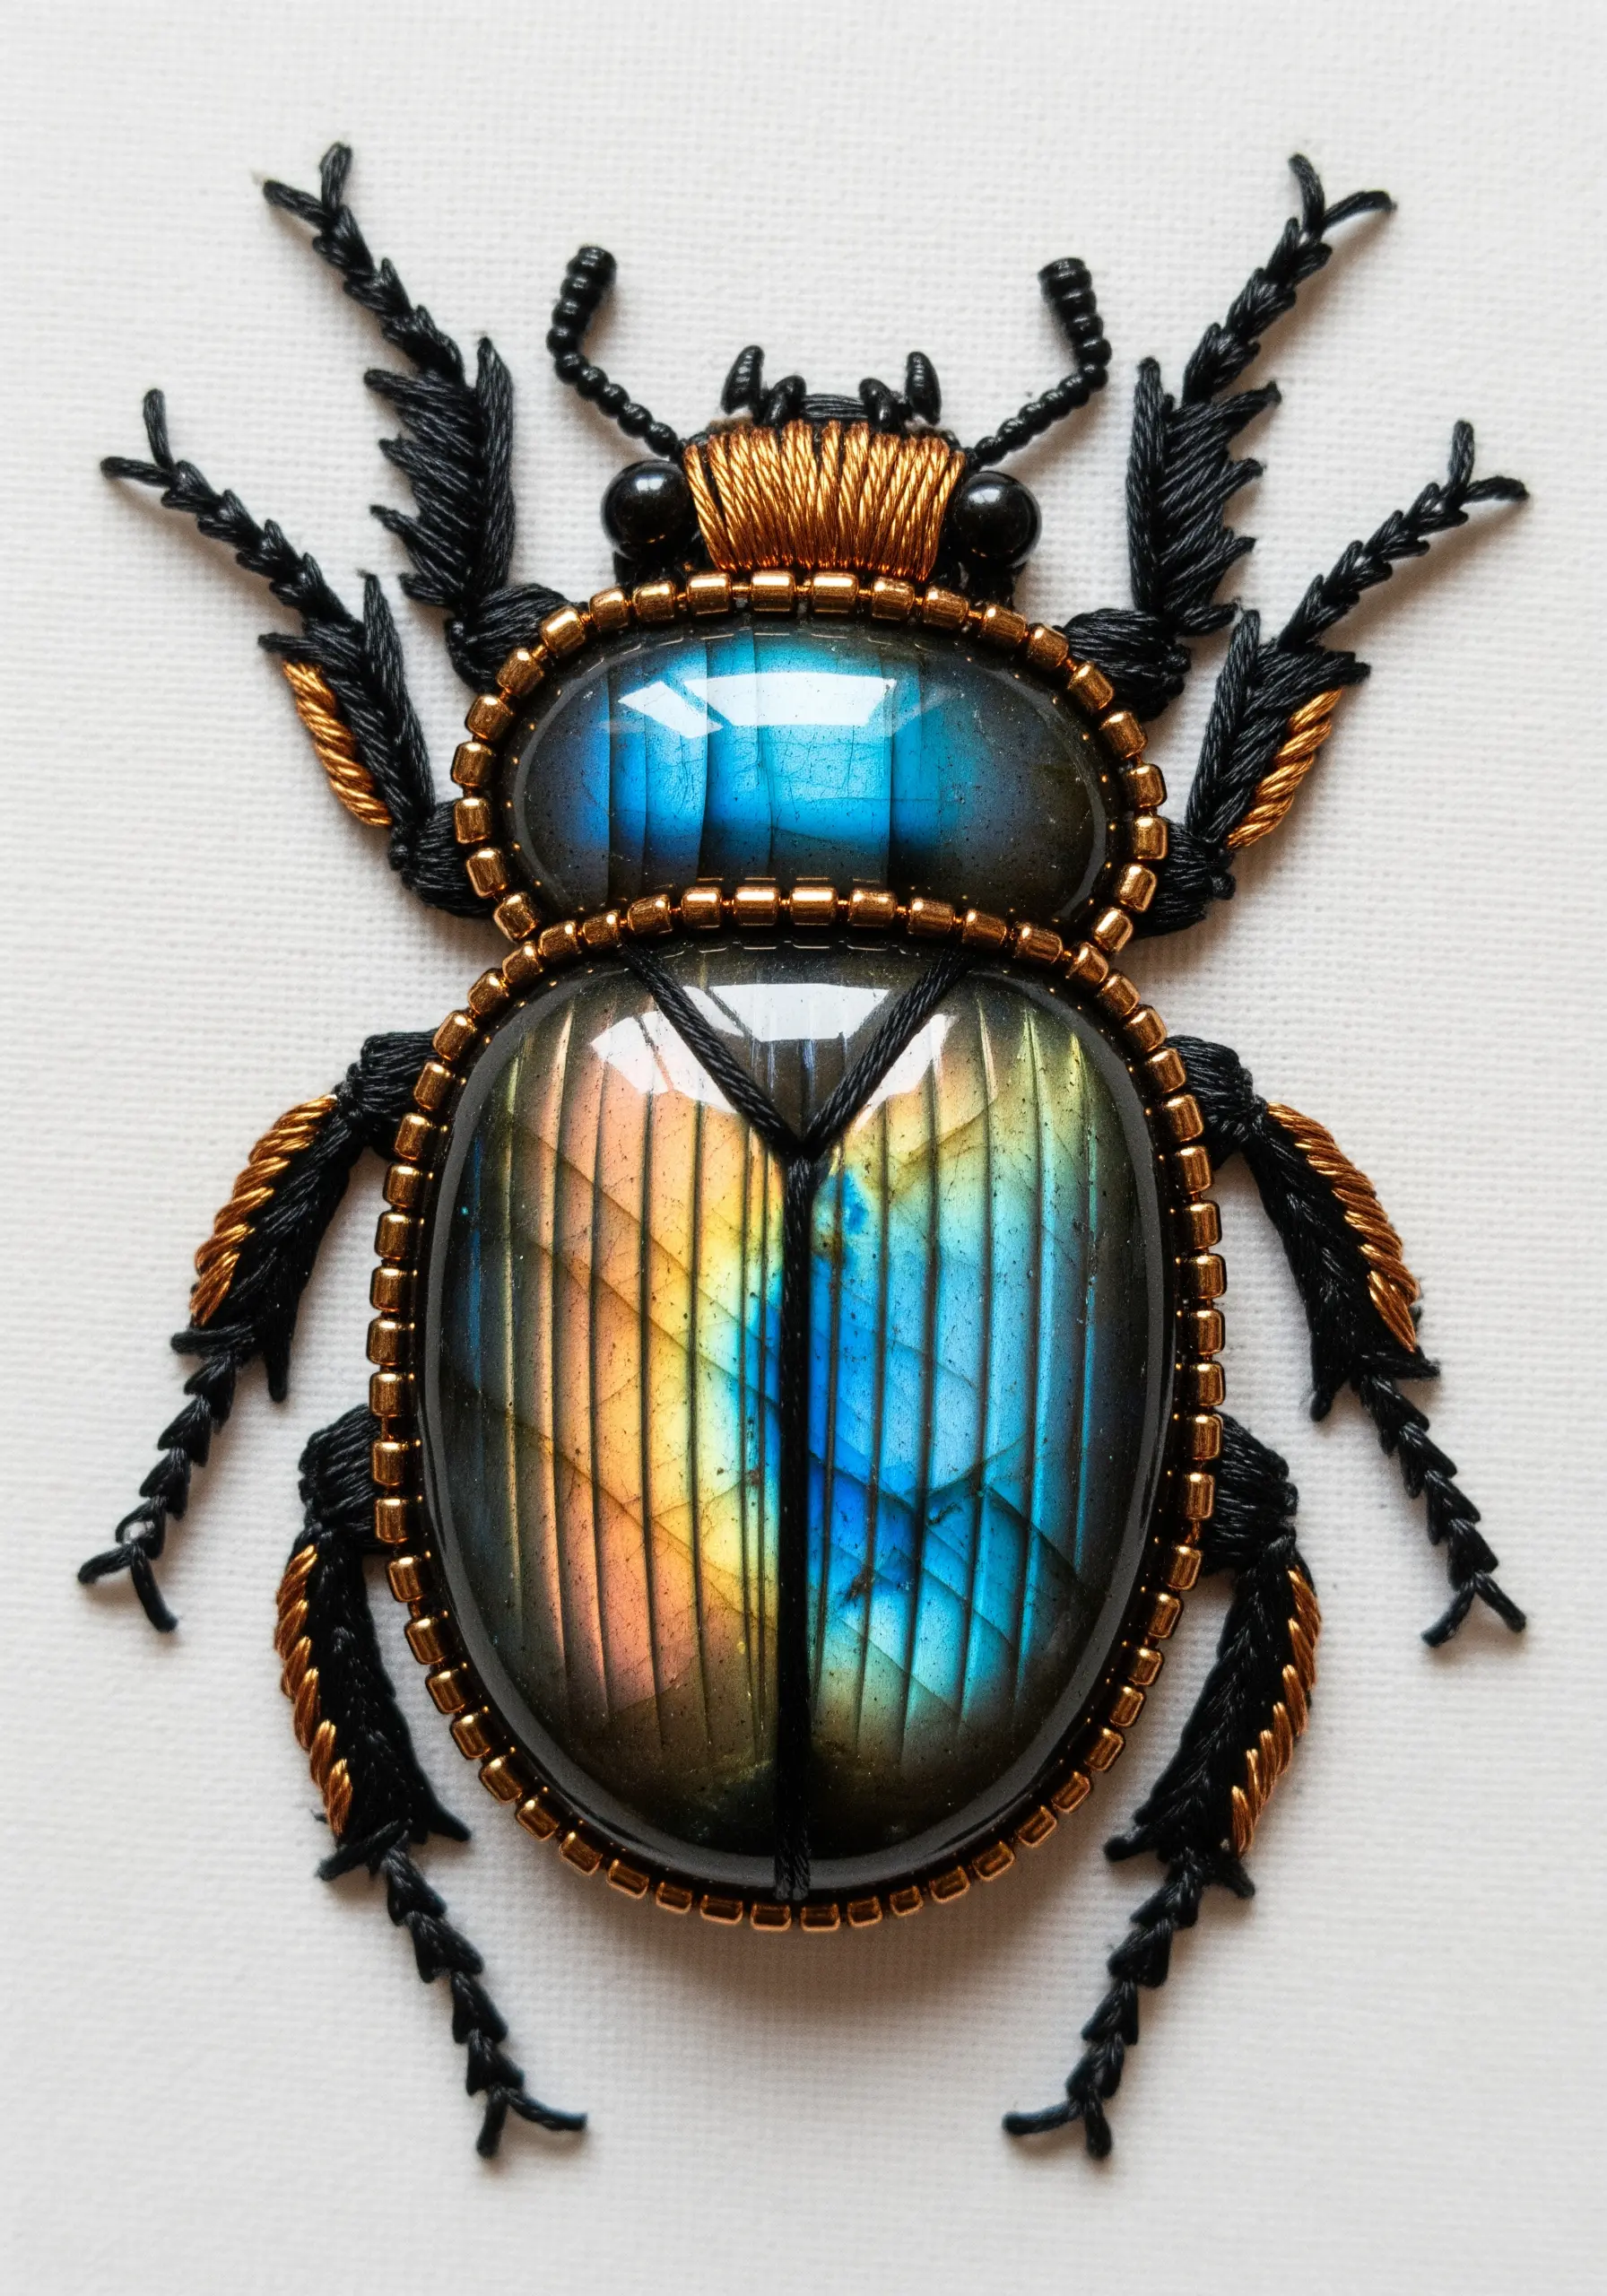
Make a semi-precious stone or cabochon the centerpiece of your design by securing it with beadwork.
First, glue the stone to a stiff backing material like felt or Lacy’s Stiff Stuff. Then, build a bezel around it using rows of seed beads, stitching them down securely into the backing fabric.
From there, you can add traditional embroidery, couched metallic cords, and further beadwork to create an intricate setting.
This transforms your embroidery into a piece of wearable art or a precious object, blending the worlds of lapidary and fiber art.
16. Create Floating Effects by Stitching on Tulle
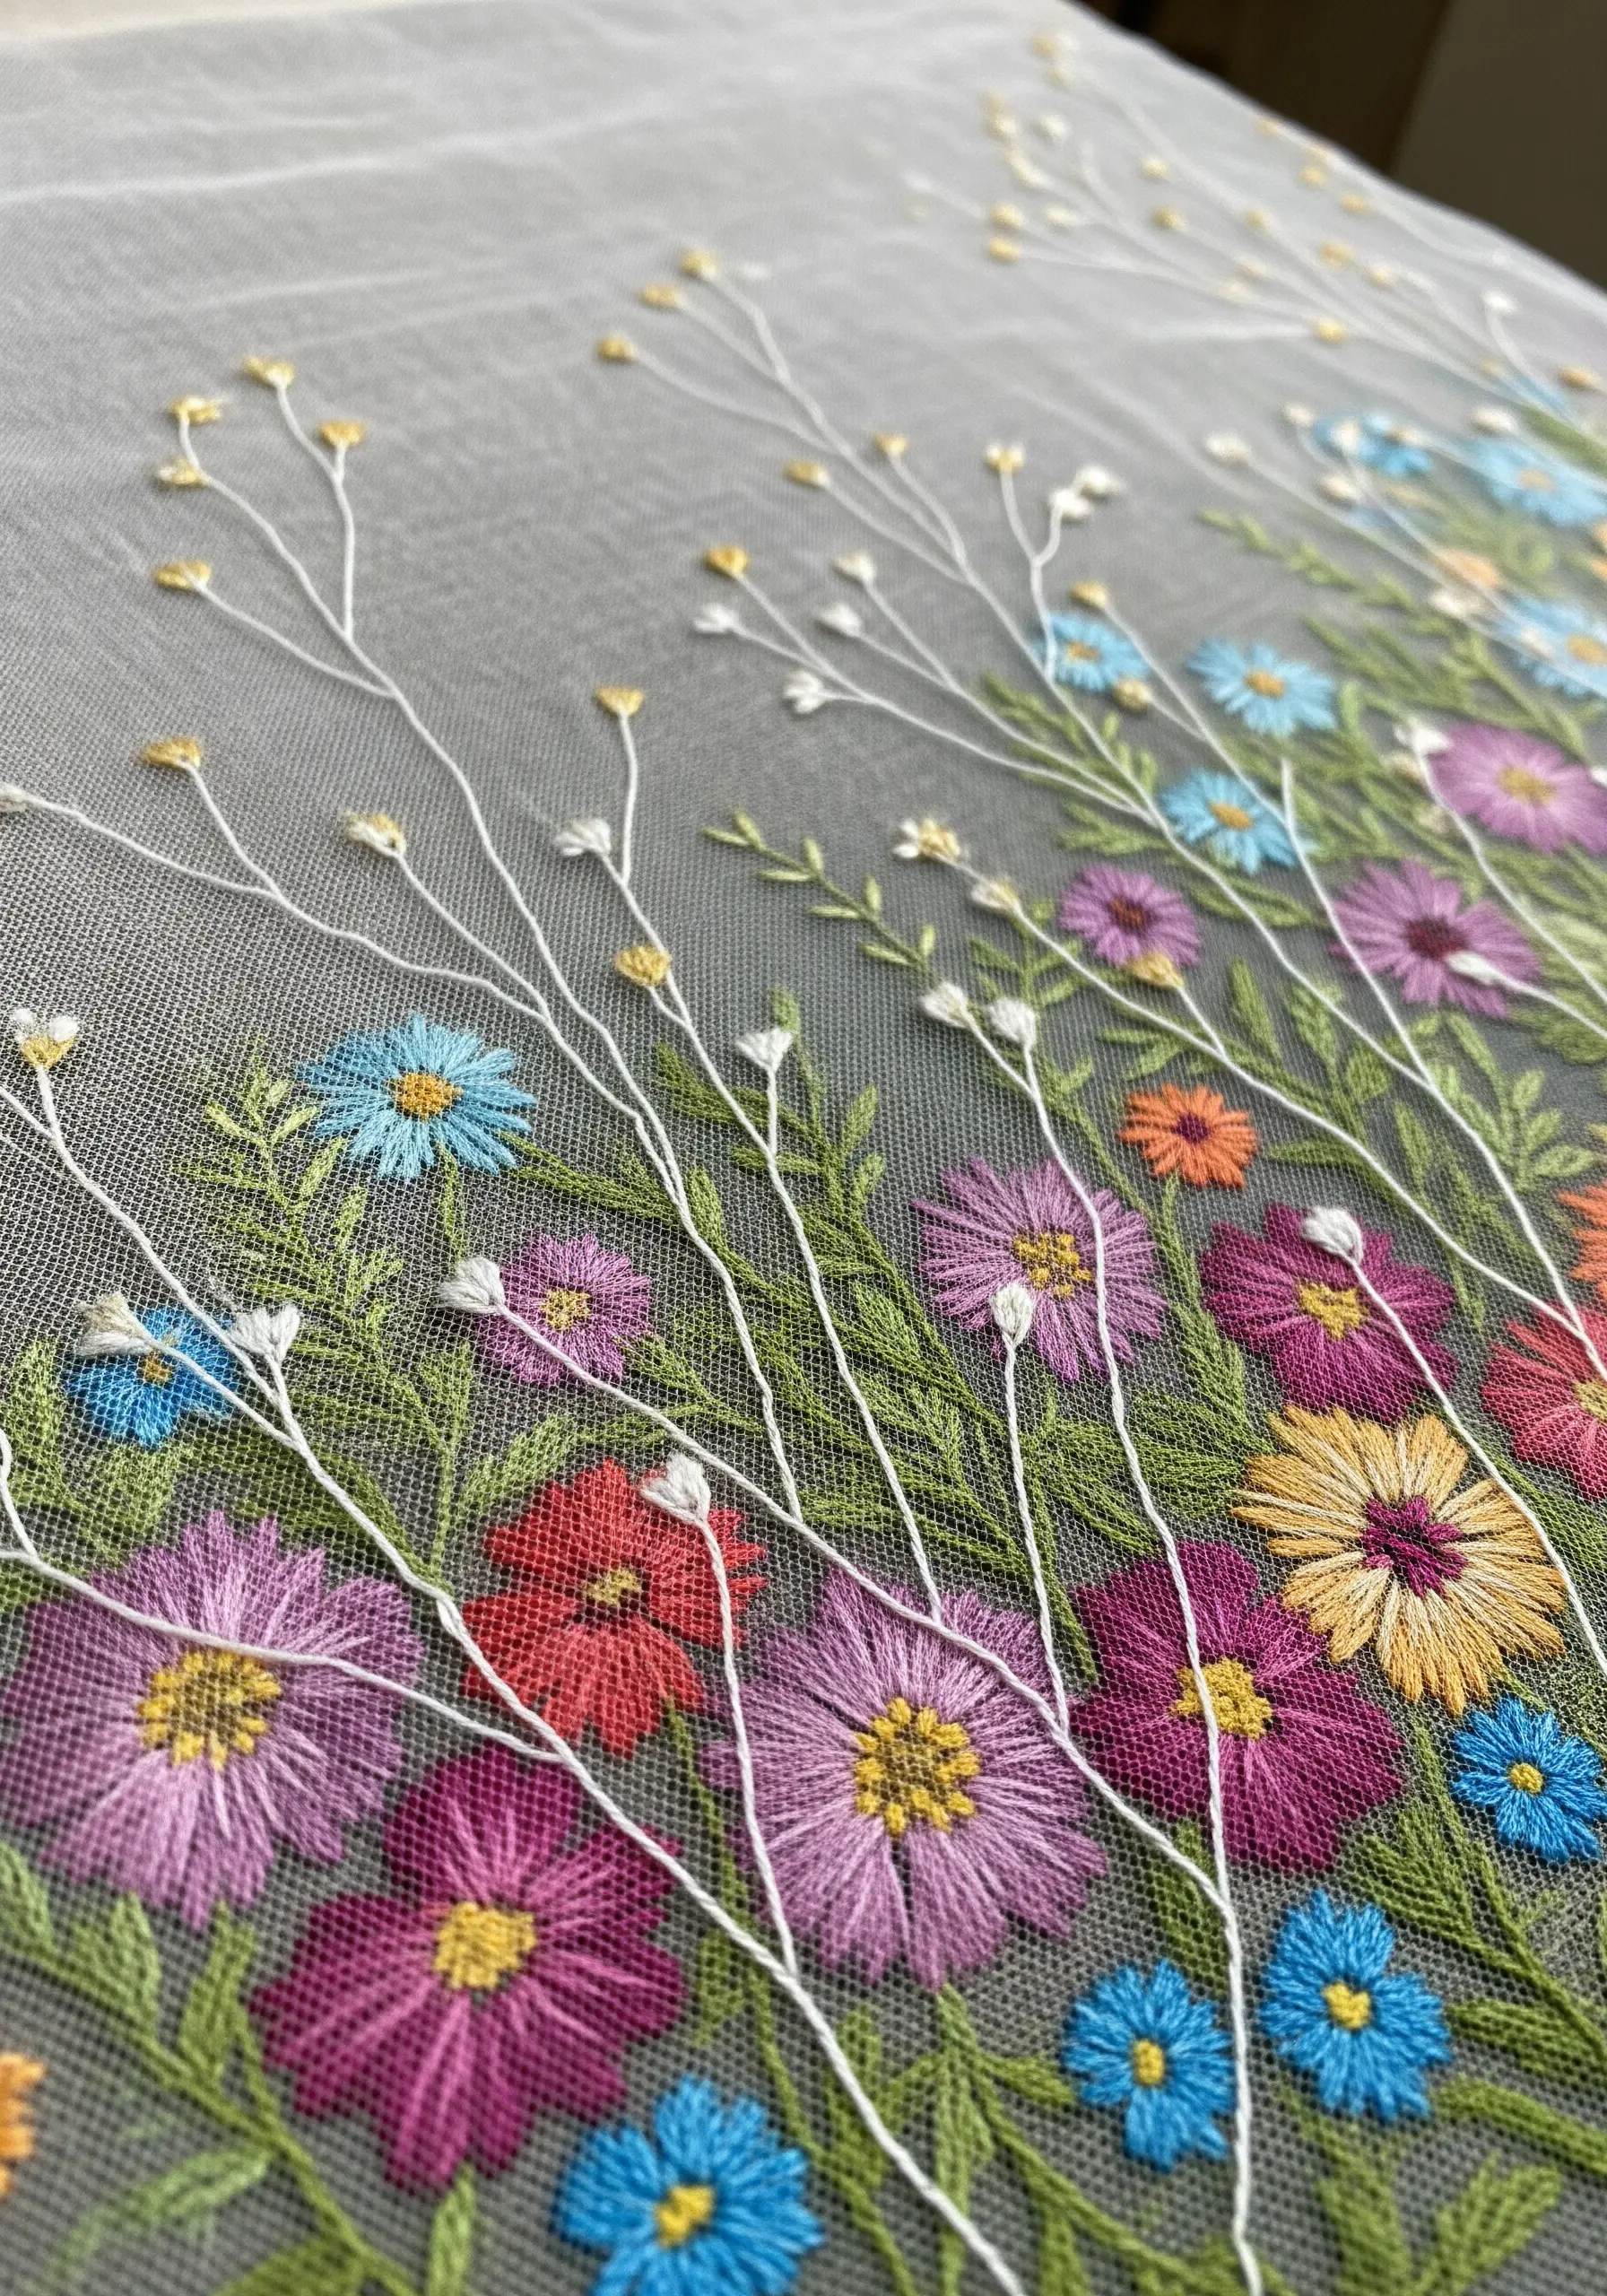
For an ethereal, delicate look, use tulle or sheer organza as your base fabric.
Because tulle is so open, you must use a stabilizer to prevent your stitches from distorting the fabric. A water-soluble stabilizer is ideal, as it can be completely washed away after you finish stitching.
The final result is a design that appears to float in mid-air, creating a magical, almost weightless quality.
This technique is perfect for delicate botanicals, constellations, or any design where you want to emphasize lightness and transparency.
17. Paint Landscapes with Needle-Felted Wool
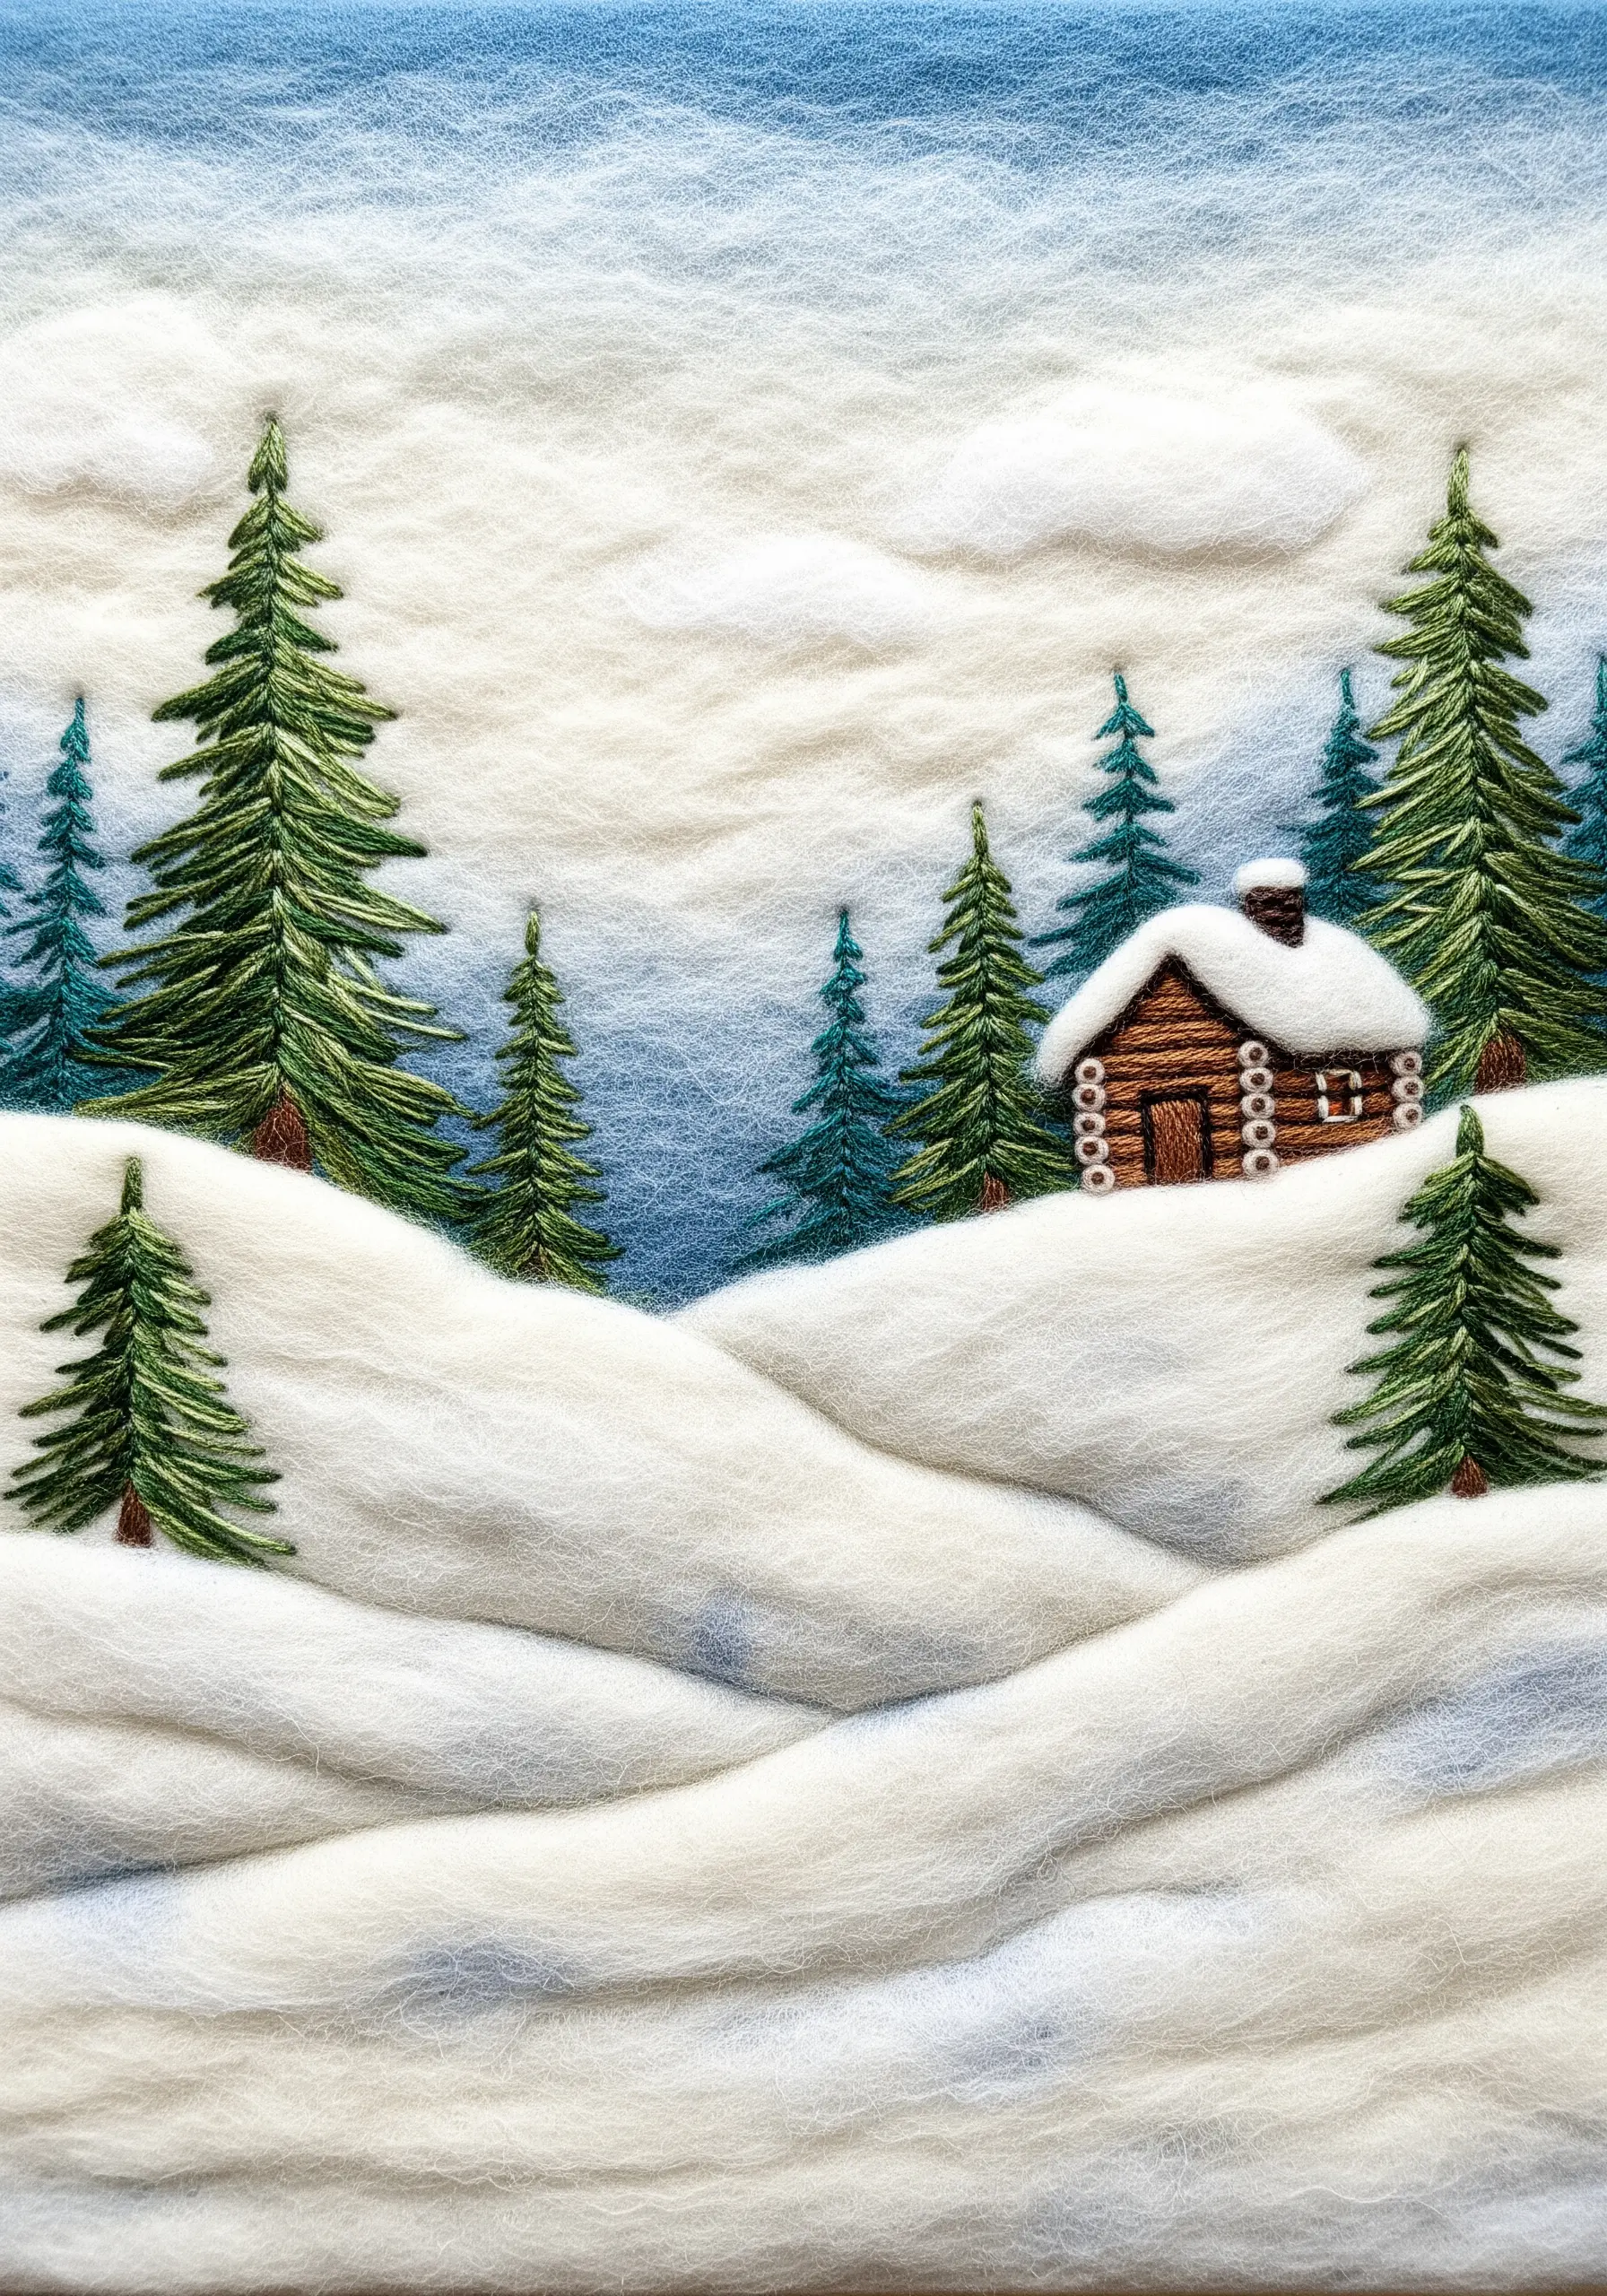
Instead of stitching a background, create soft, atmospheric landscapes by needle-felting wool roving directly onto a wool-felt base.
Lay down different colors of roving and use a felting needle to blend them together, creating soft-focus hills, skies, and clouds with a beautiful, painterly quality.
Once your felted background is complete, add sharp, detailed elements like trees and houses with traditional embroidery floss.
This layering of techniques provides incredible depth, perfectly capturing the contrast between a soft, misty background and crisp foreground details.
18. Achieve Ghostly Layers with Sheer Fabrics
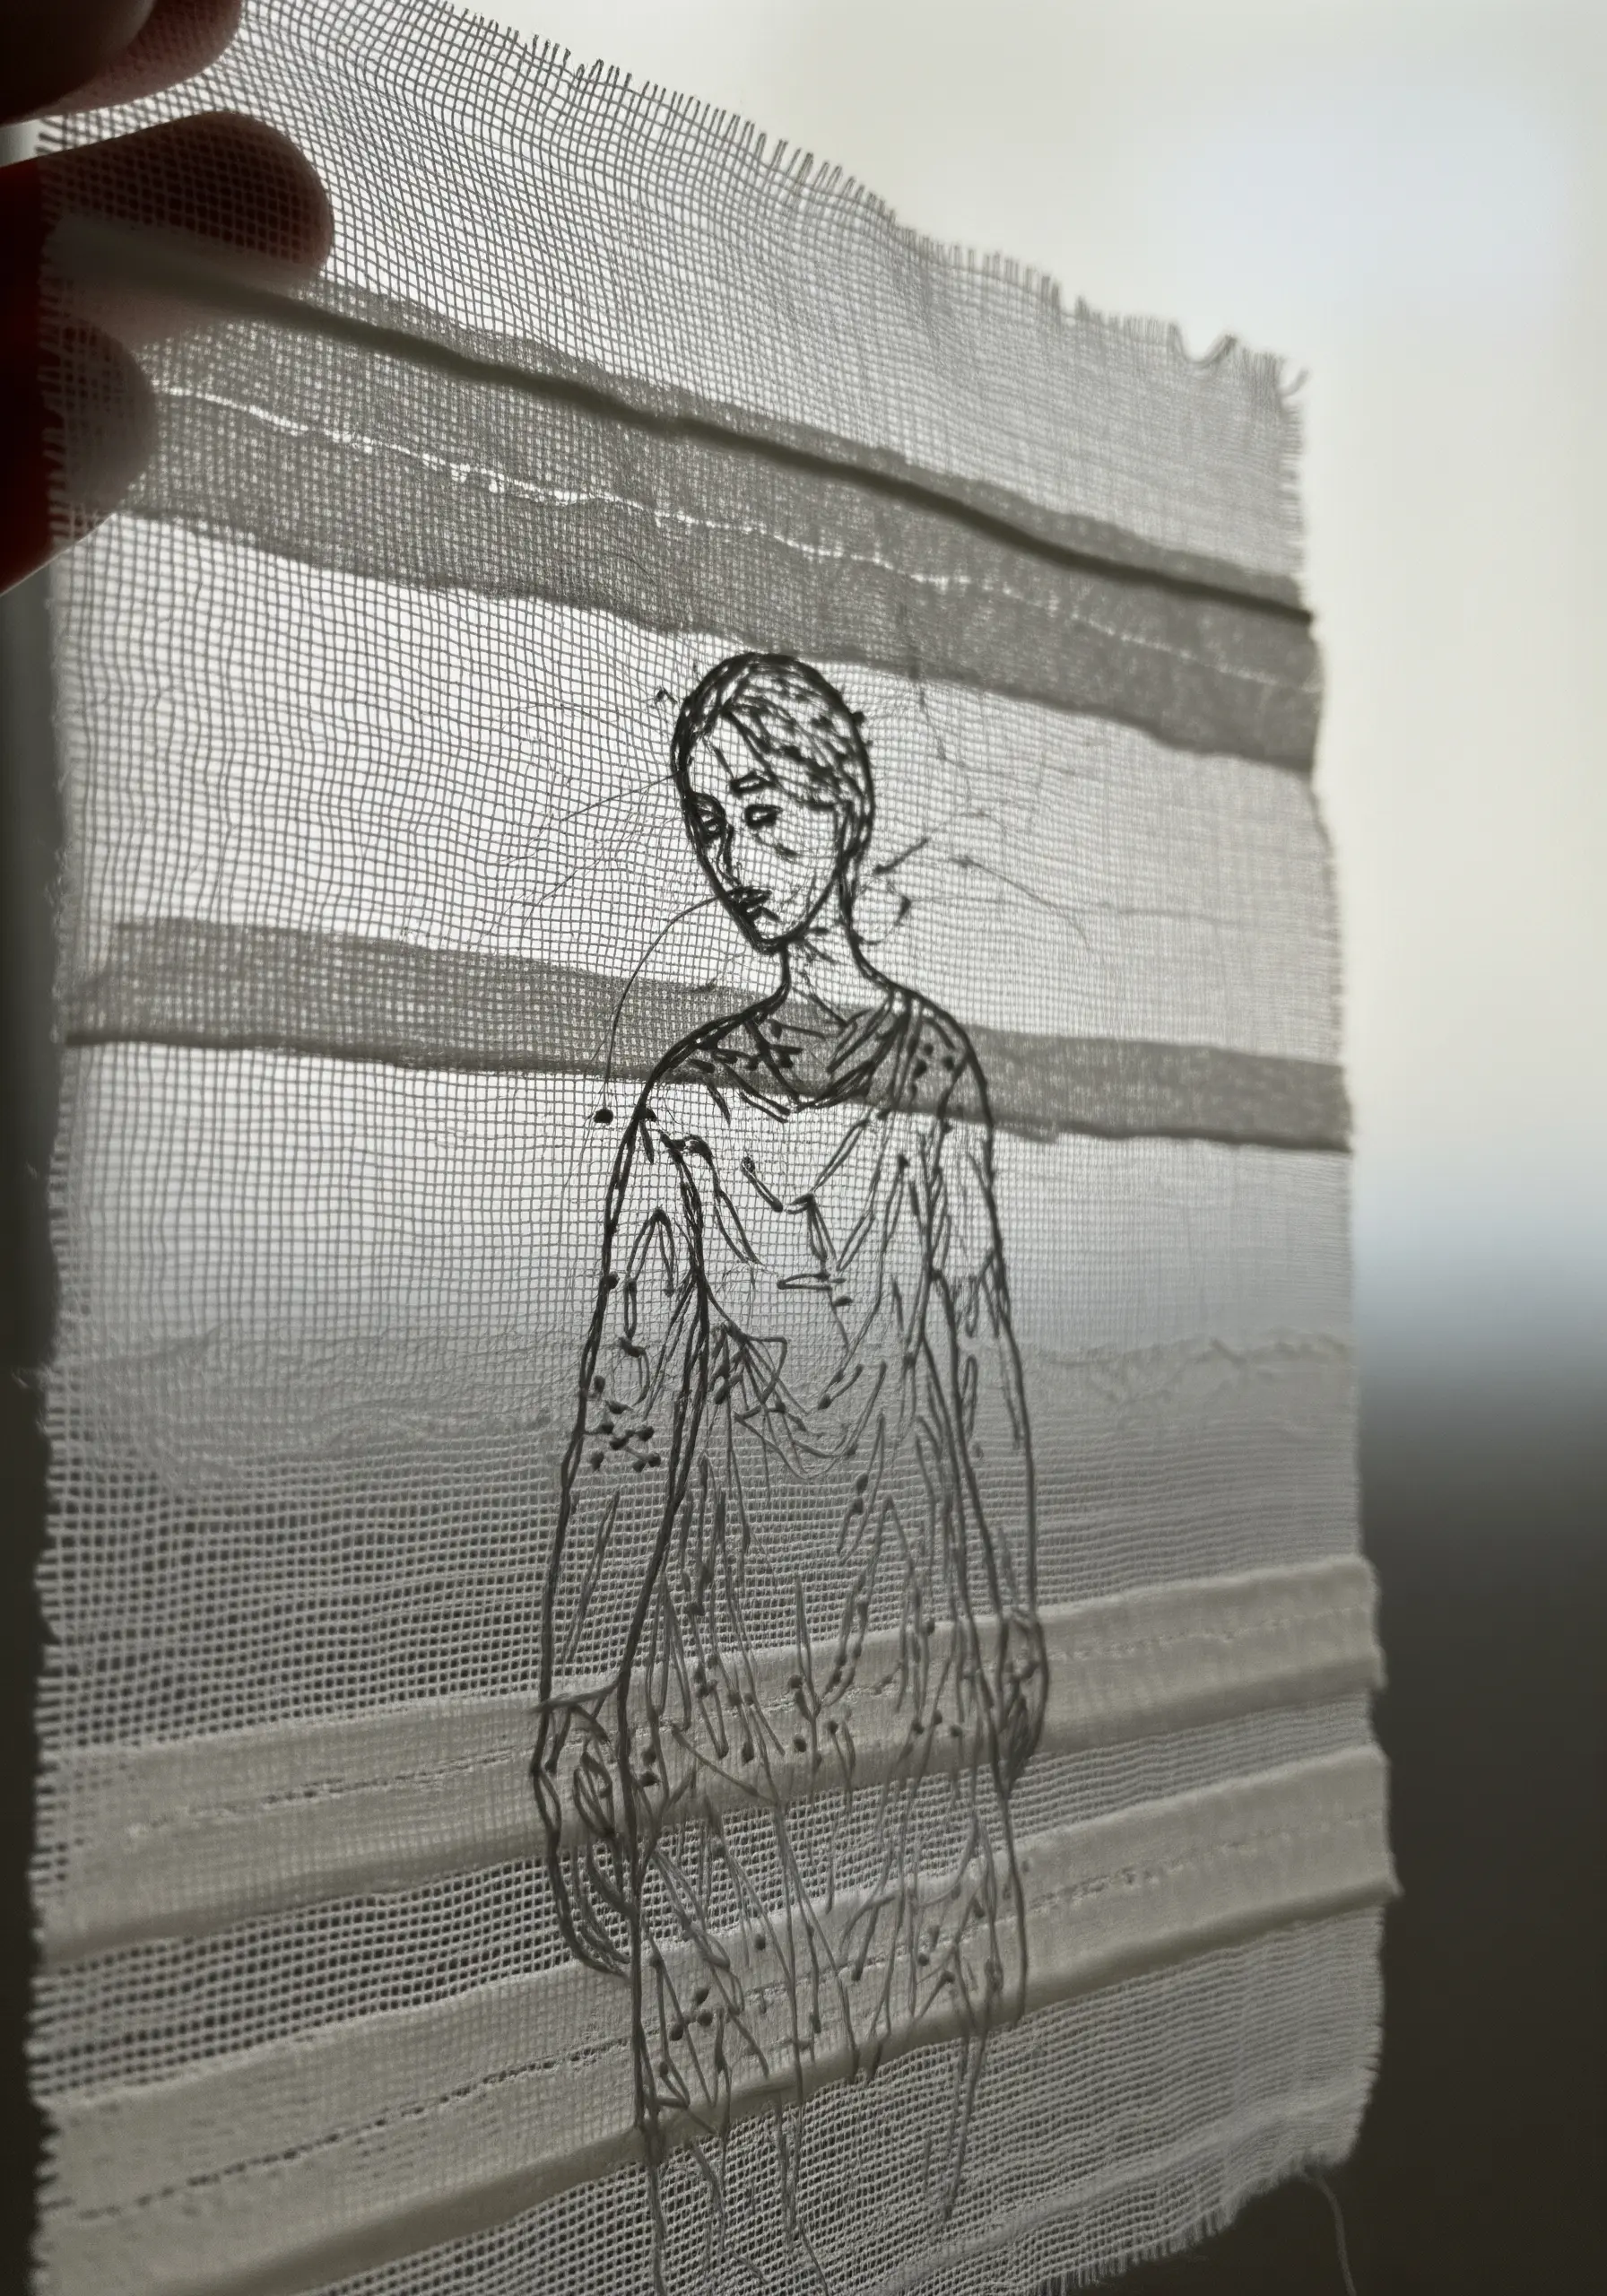
Create a sense of depth, memory, or transparency by stitching on layered sheer fabrics like organza or silk gauze.
You can stitch a complete image on the top layer, allowing hints of color or texture from plain layers underneath to show through.
Alternatively, stitch partial elements on different layers; when stacked, they combine to form a complete, multi-dimensional image.
This technique plays with light and shadow, producing a delicate, ethereal effect that feels both fragile and profound.
19. Add Texture with Upcycled Plastics

Introduce unexpected texture and vibrant, glossy color into your work by incorporating upcycled materials like plastic bags.
Cut the bags into thin strips to create “plarn” (plastic yarn), which you can then couch, weave, or stitch onto your fabric.
The crinkled, reflective quality of the plastic offers a striking contrast to the matte finish of traditional threads or a rustic burlap background.
It’s a bold, sustainable choice that pushes the boundaries of what embroidery can be and is one of many mixed-fiber projects that adds a unique modern twist.
20. Contrast Rustic Twine on Smooth Leather
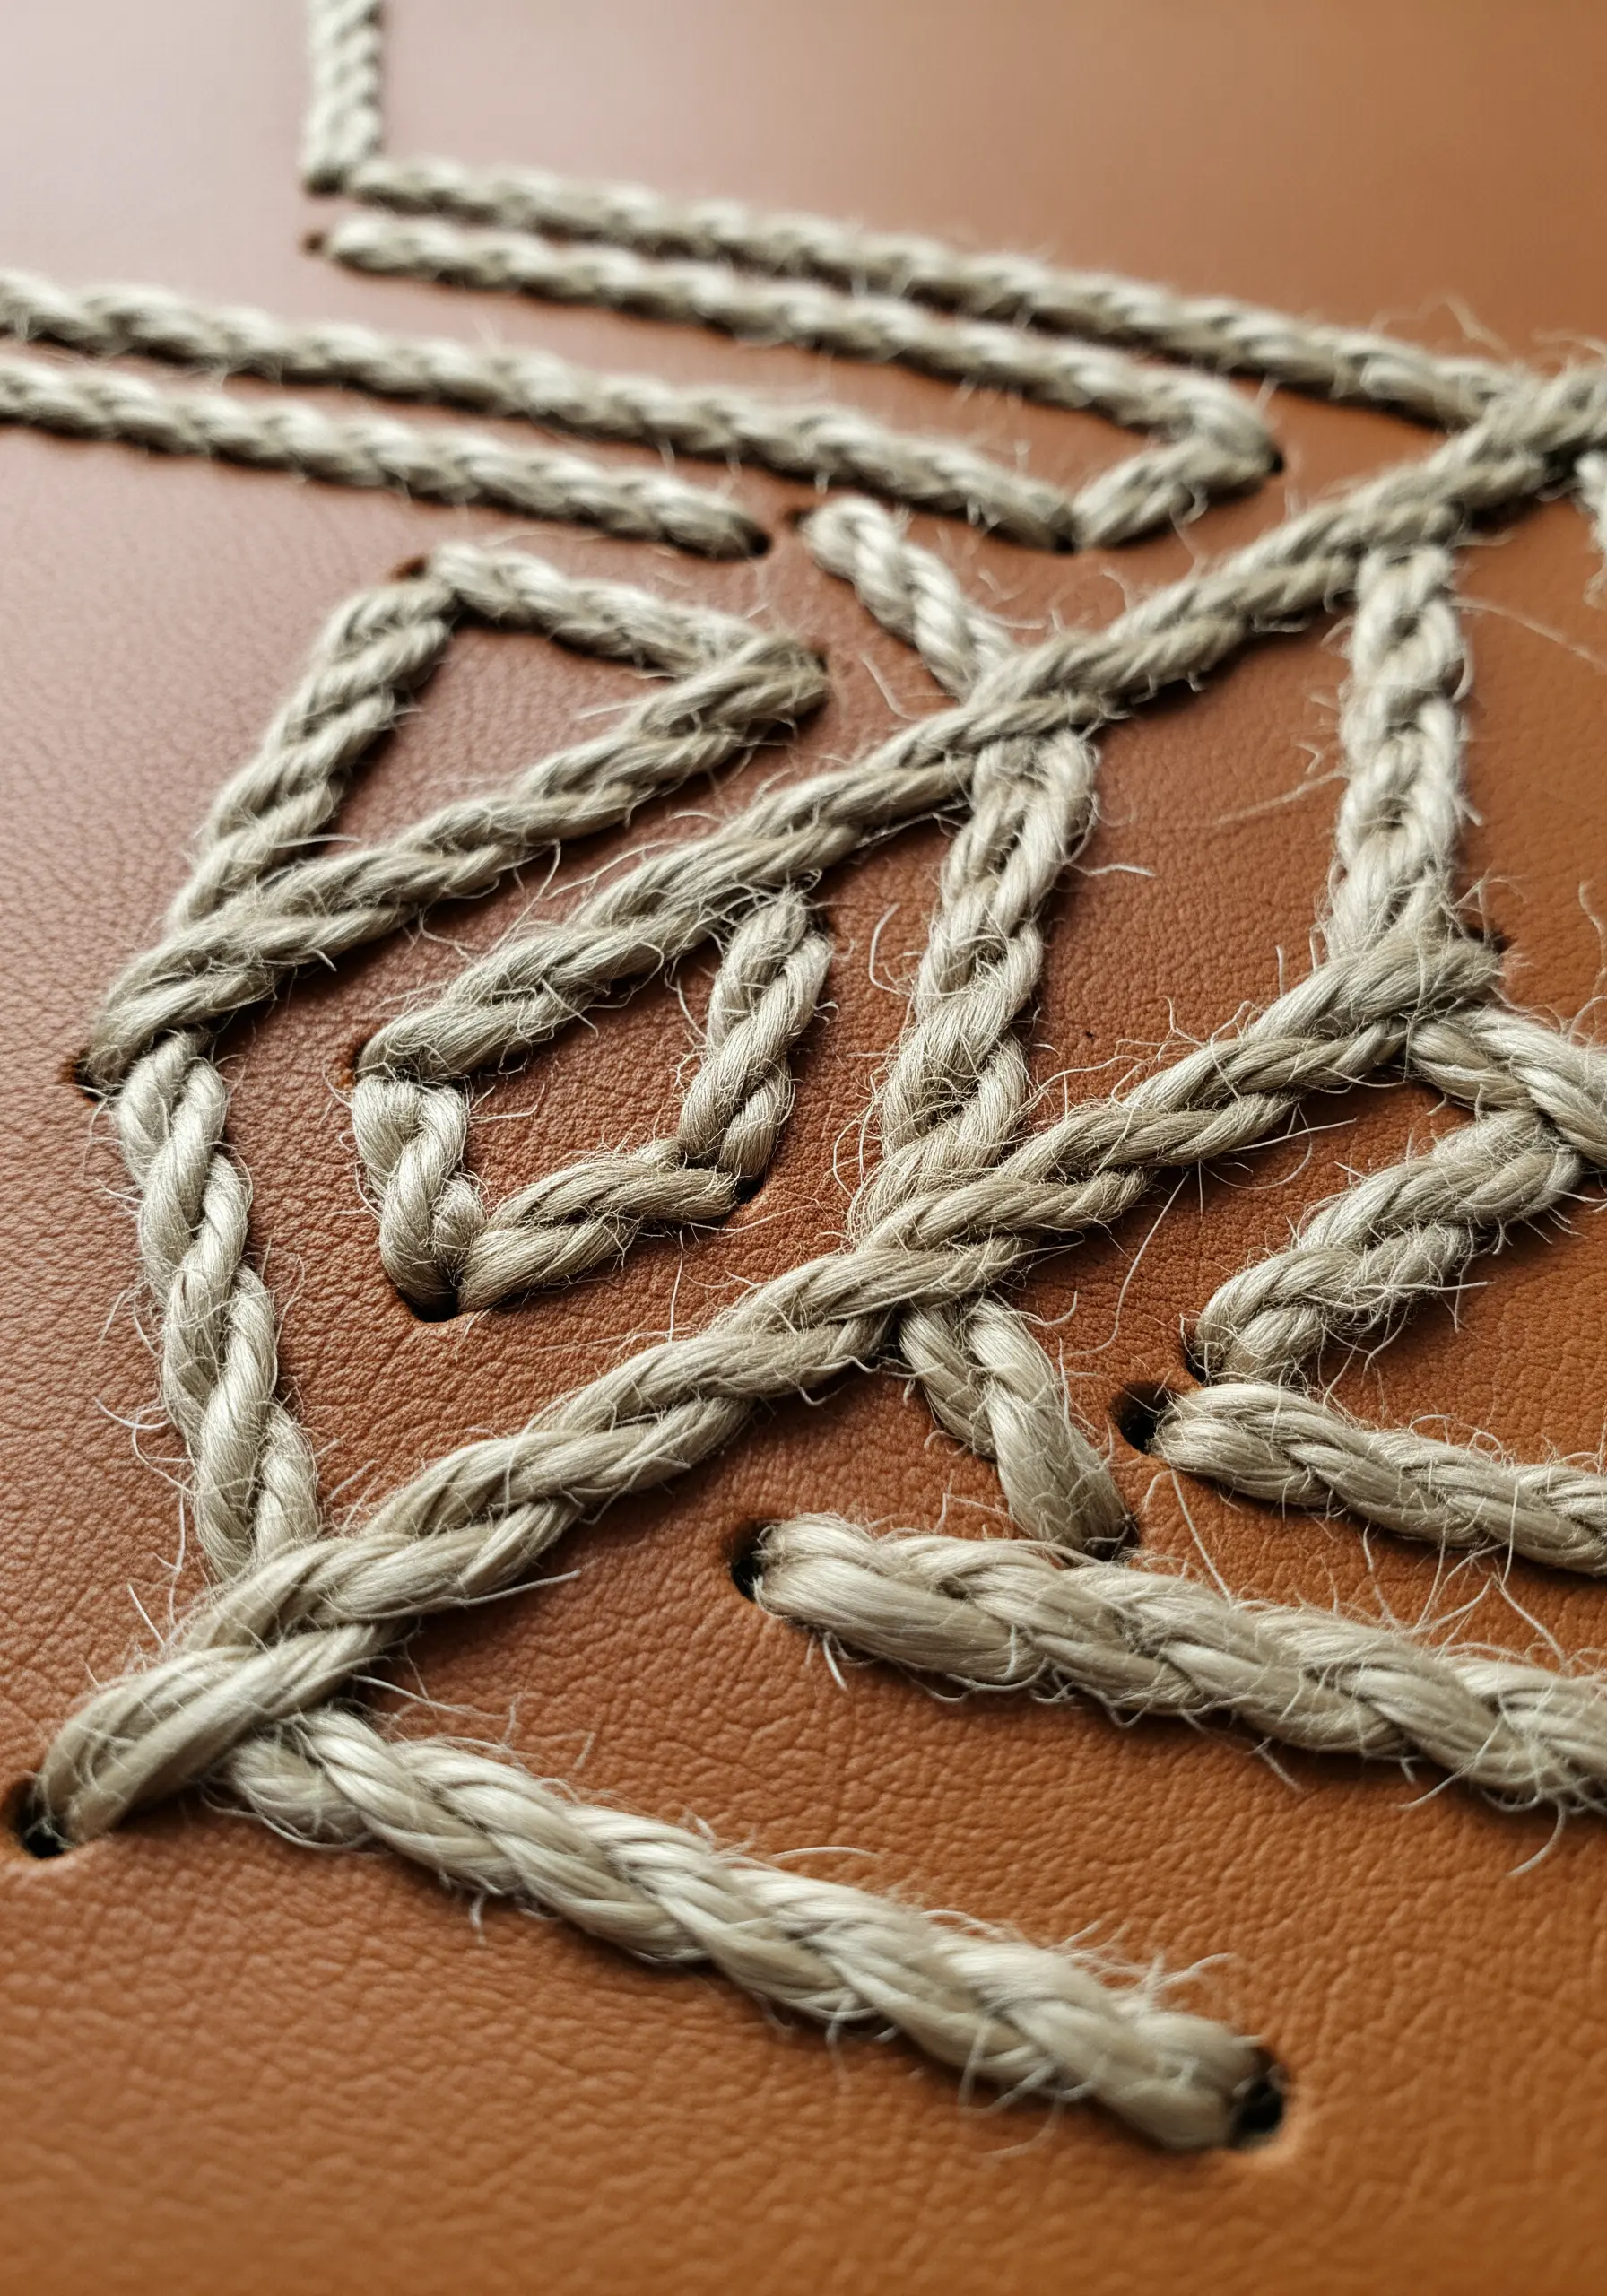
Explore the powerful textural contrast between raw, fibrous twine and smooth, supple leather.
Because leather is not a woven fabric, you must pre-punch your stitching holes with an awl or a leather punch to guide your needle and prevent tearing.
Use a strong, blunt tapestry needle and a sturdy fiber like jute twine or waxed linen cord to create your design.
The combination of these materials feels elemental and timeless, lending a sophisticated yet earthy quality to your stitched work.
21. Play with Stylized vs. Realistic Textures

Explore how different fibers can interpret the same subject in completely different ways.
Create one half of a design with a stylized, sculptural approach, like using couched yarn to form the concentric rings of a sliced peach.
For the other half, aim for realism with traditional thread painting, using long-and-short stitches to blend colors smoothly and create a glossy, lifelike apple.
Placing these two techniques side-by-side highlights how your choice of fiber is just as important as your choice of stitch in defining the mood and style of your piece.
22. Sculpt Delicate Forms with Wire and Thread
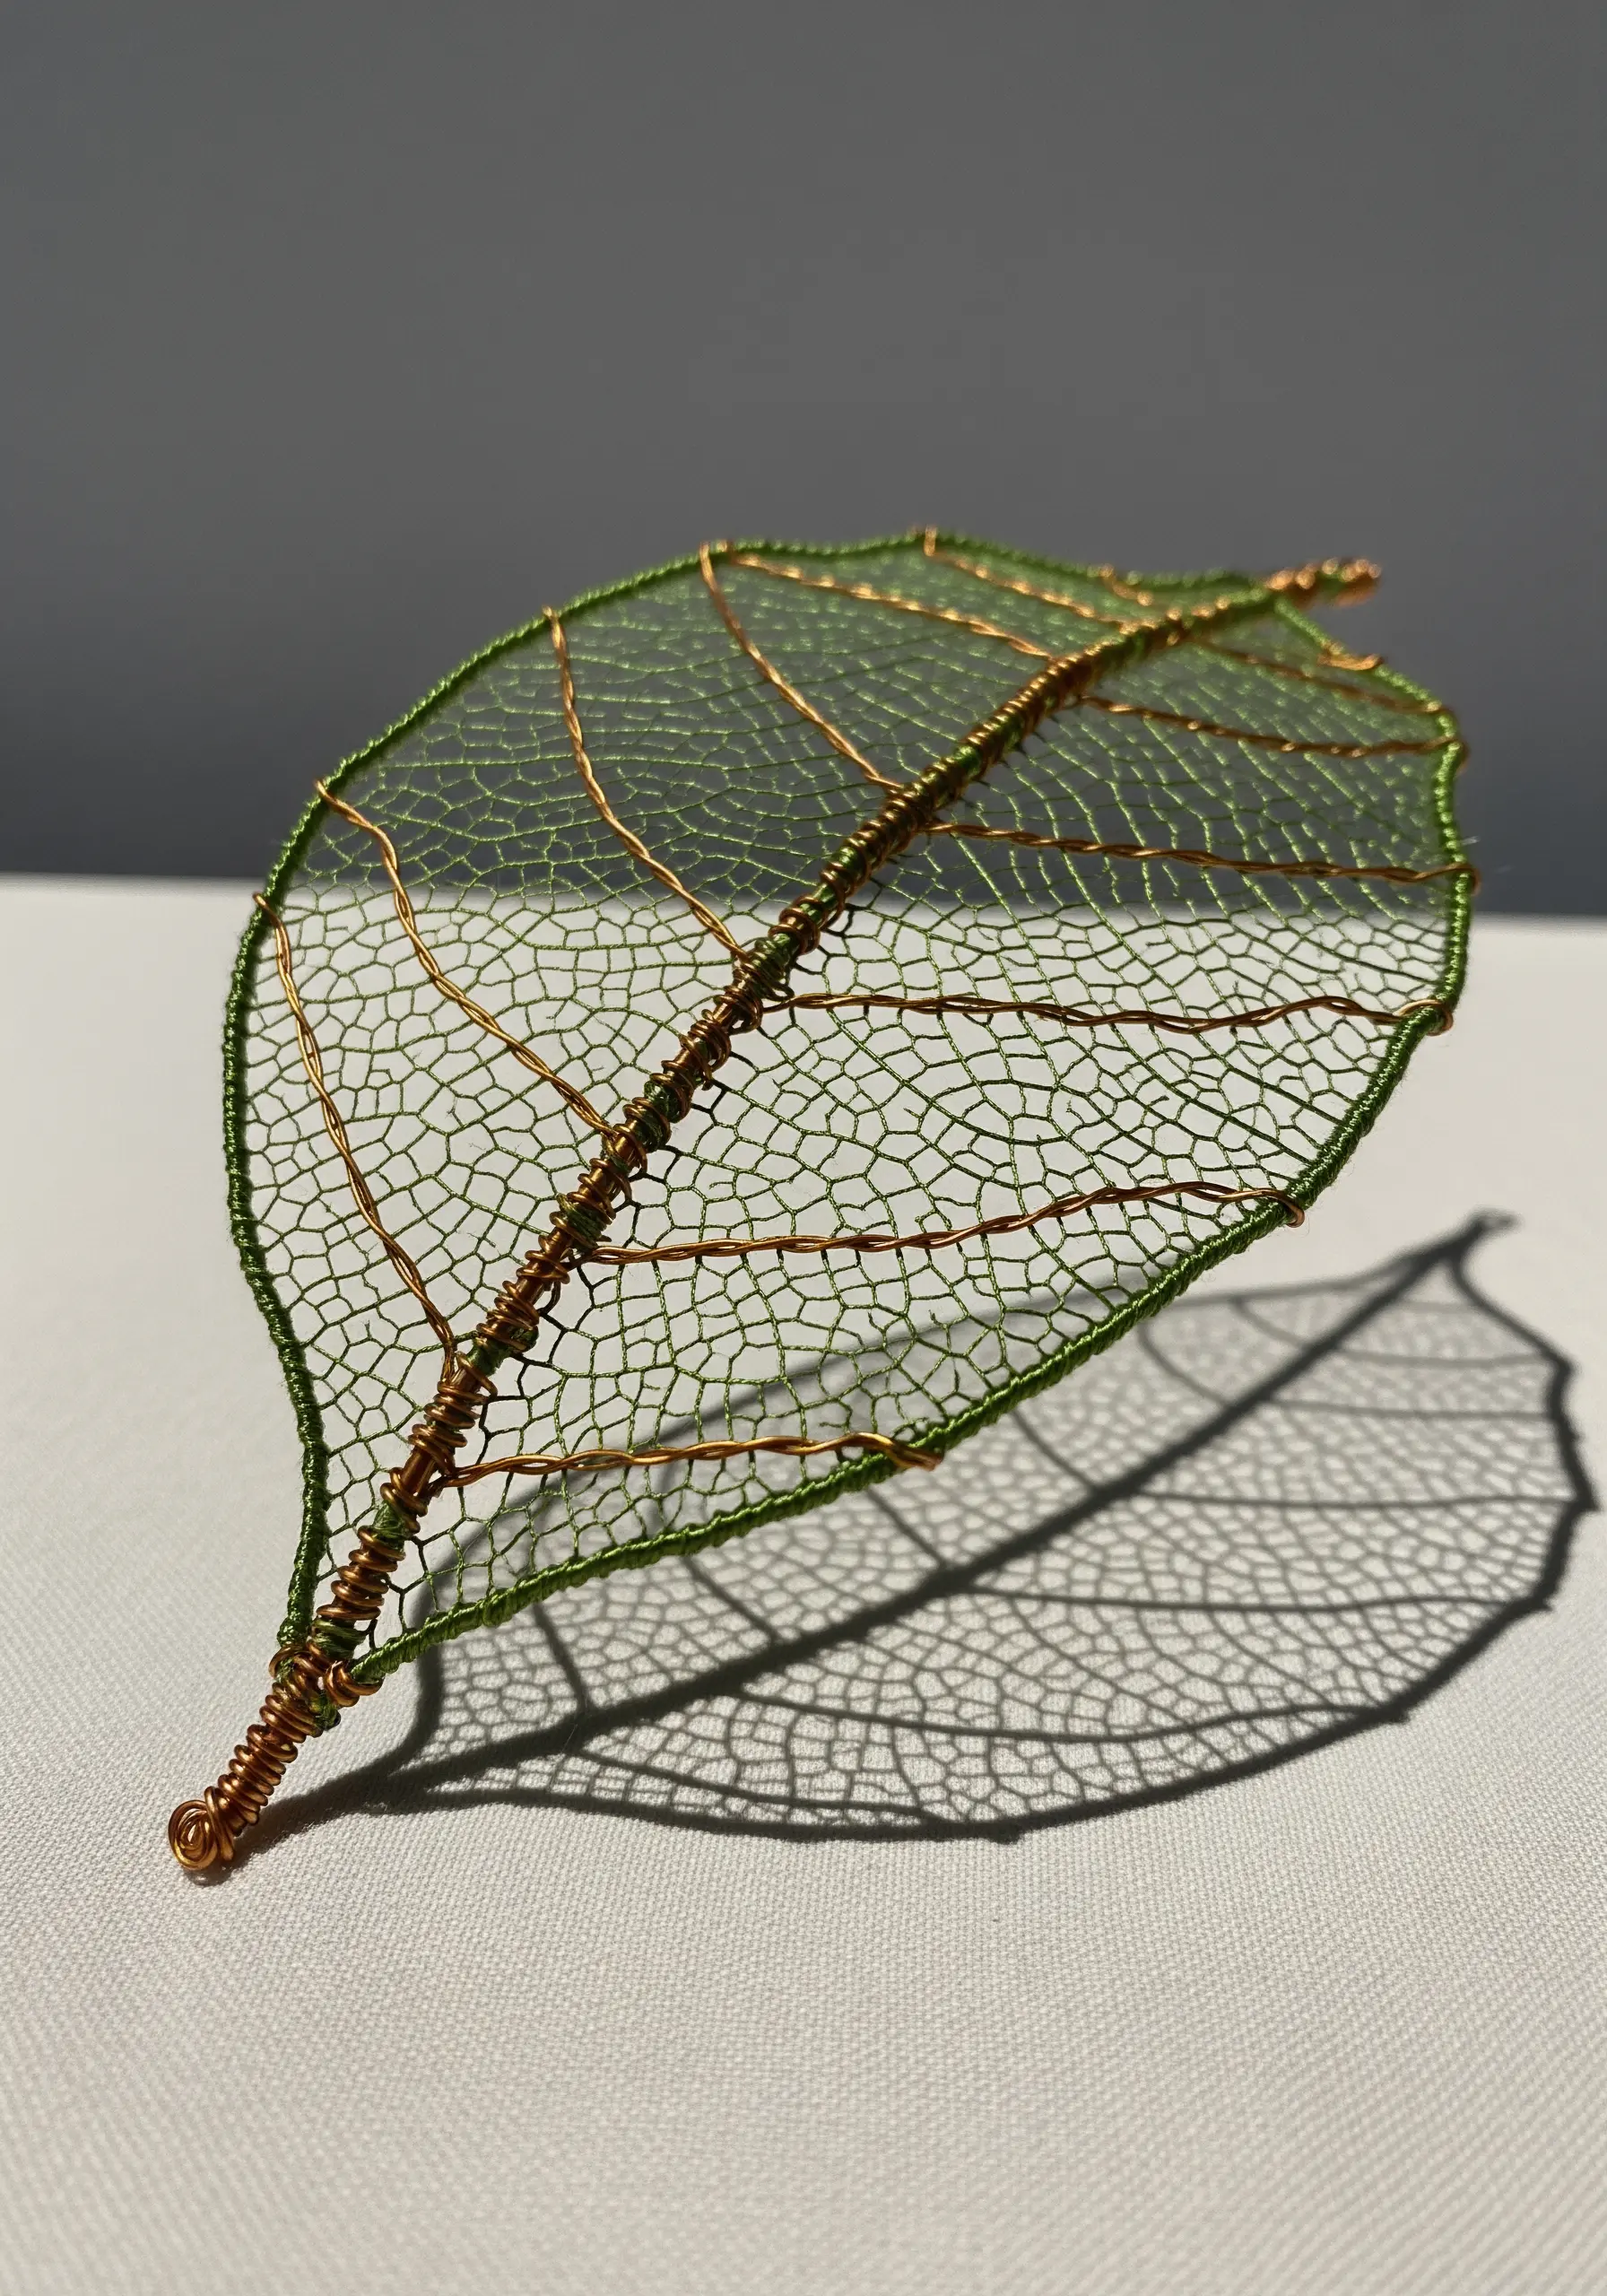
Create freestanding, three-dimensional elements by using wire as an armature for your stitches.
Bend a fine-gauge wire into the desired shape, such as a leaf outline. Then, use buttonhole stitches or other lace-like fillings to create a “fabric” of thread within the wire frame.
This method allows you to make delicate, almost skeletal structures that can be shaped and attached to your main embroidery, casting intricate shadows.
It’s a foundational technique in stumpwork that turns thread into a structural, sculptural material.
23. Create Wispy Textures with Frayed Floss
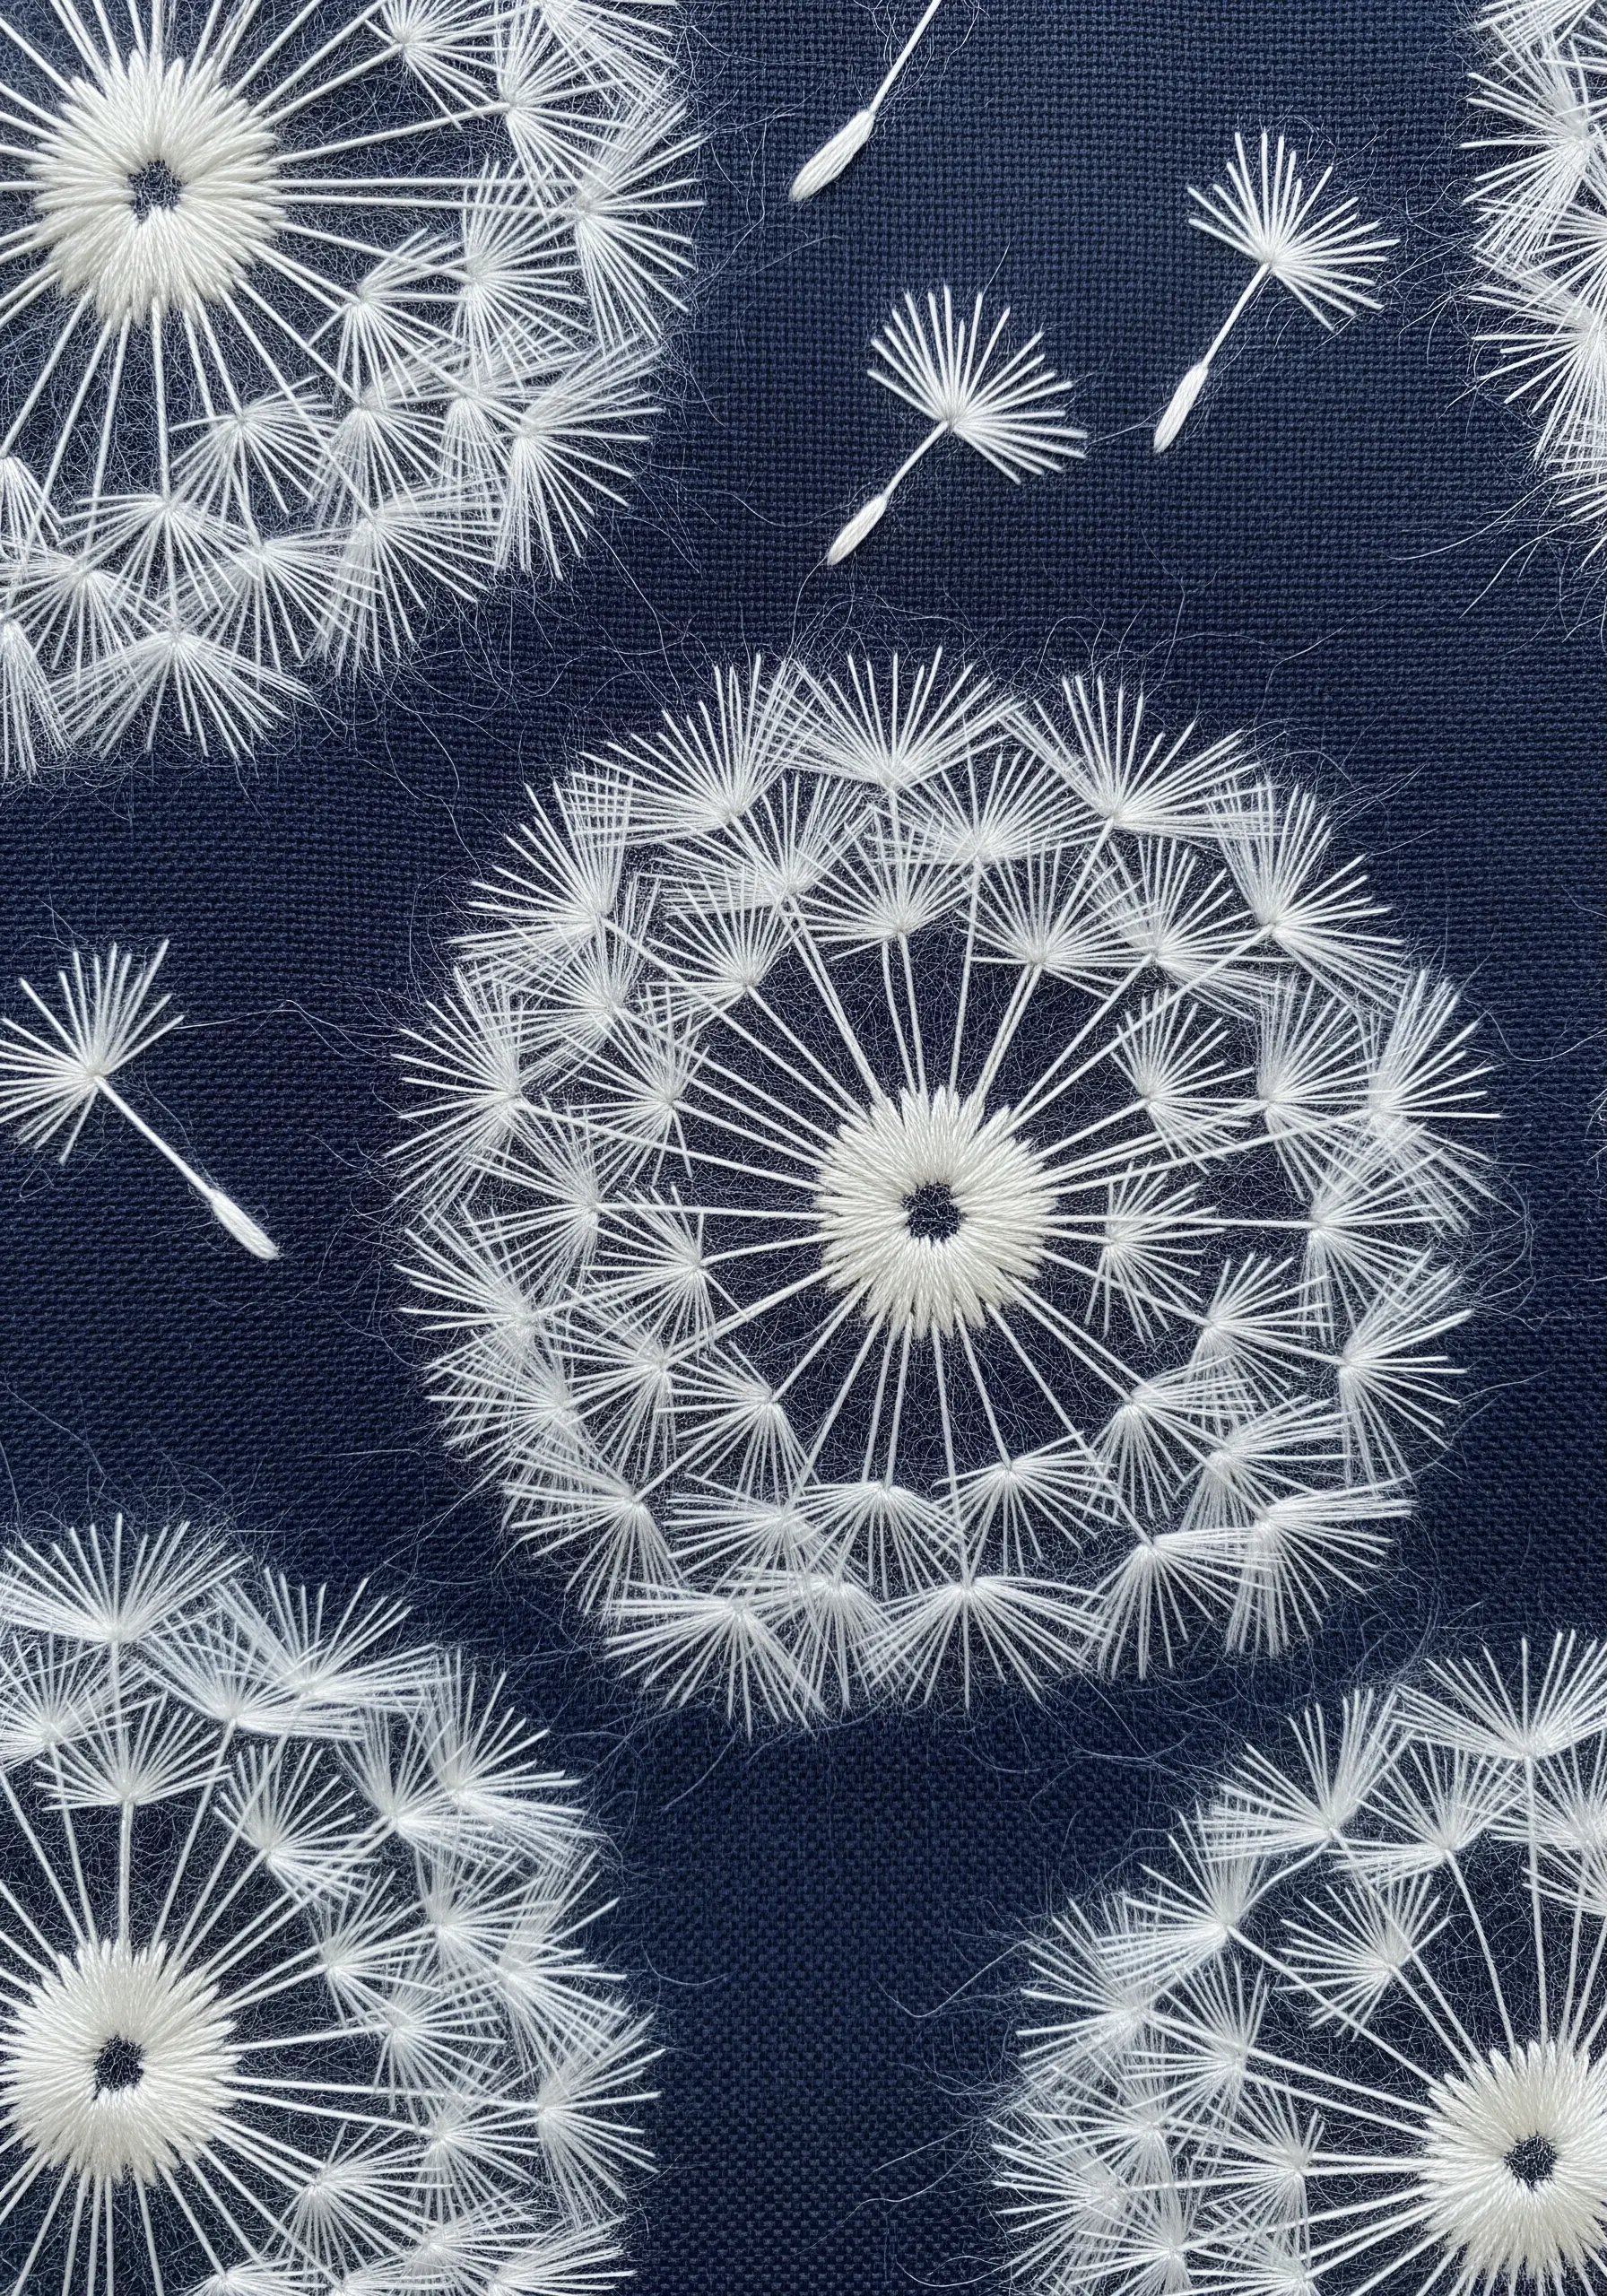
To capture the airy, delicate structure of a dandelion clock, use the thread itself to create the texture.
First, make a series of straight stitches radiating from a central point. Then, take your needle and carefully un-ply the final portion of each stitch, separating the individual strands of the floss.
Gently fluff these separated strands to create the fine, wispy pappus of each seed.
This technique beautifully mimics nature’s fragility and is far more effective than trying to stitch each tiny filament individually.
24. Combine Knitting and Embroidery in One Hoop
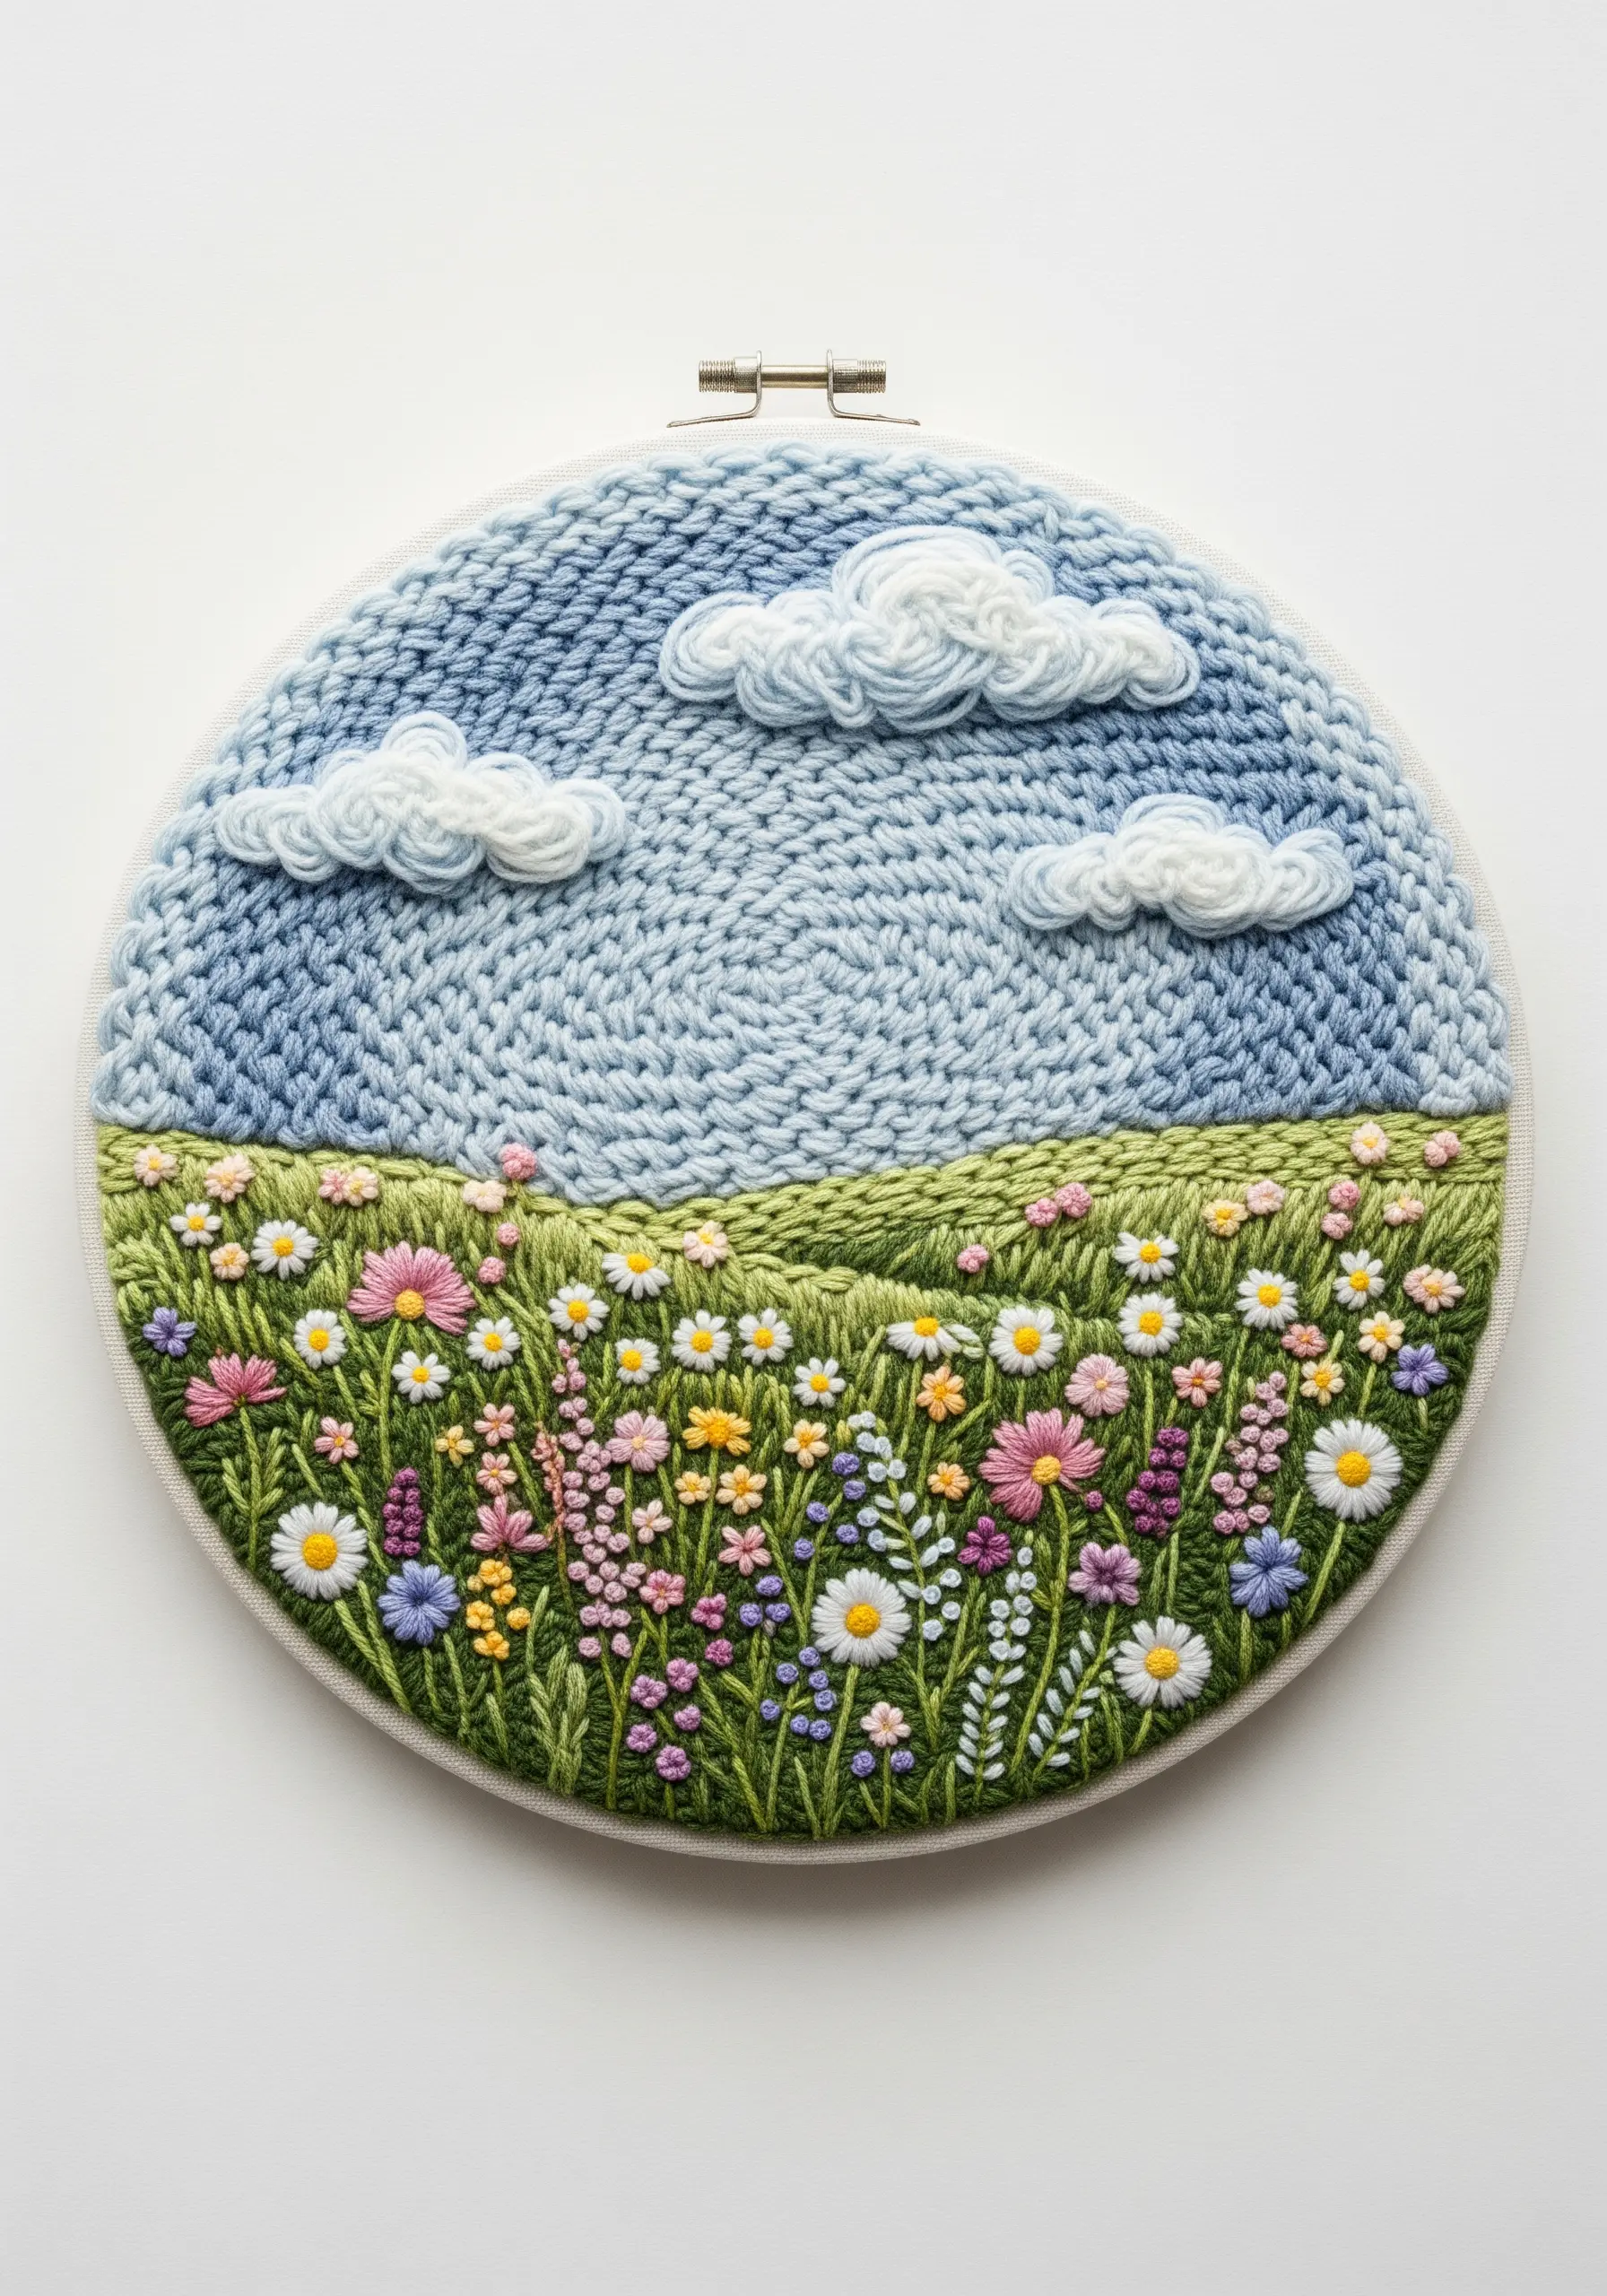
Merge two fiber arts by incorporating a knitted or crocheted panel into your embroidery design.
You can knit a section for the sky, for example, and carefully stitch it onto your background fabric before embroidering the landscape below.
The regular, looped structure of the knitting provides a wonderful textural contrast to the varied and detailed stitches of the embroidery.
This method creates a unique, cozy, and highly tactile piece that celebrates the beauty of different fiber constructions.
25. Sculpt with Thread Using a Soluble Stabilizer
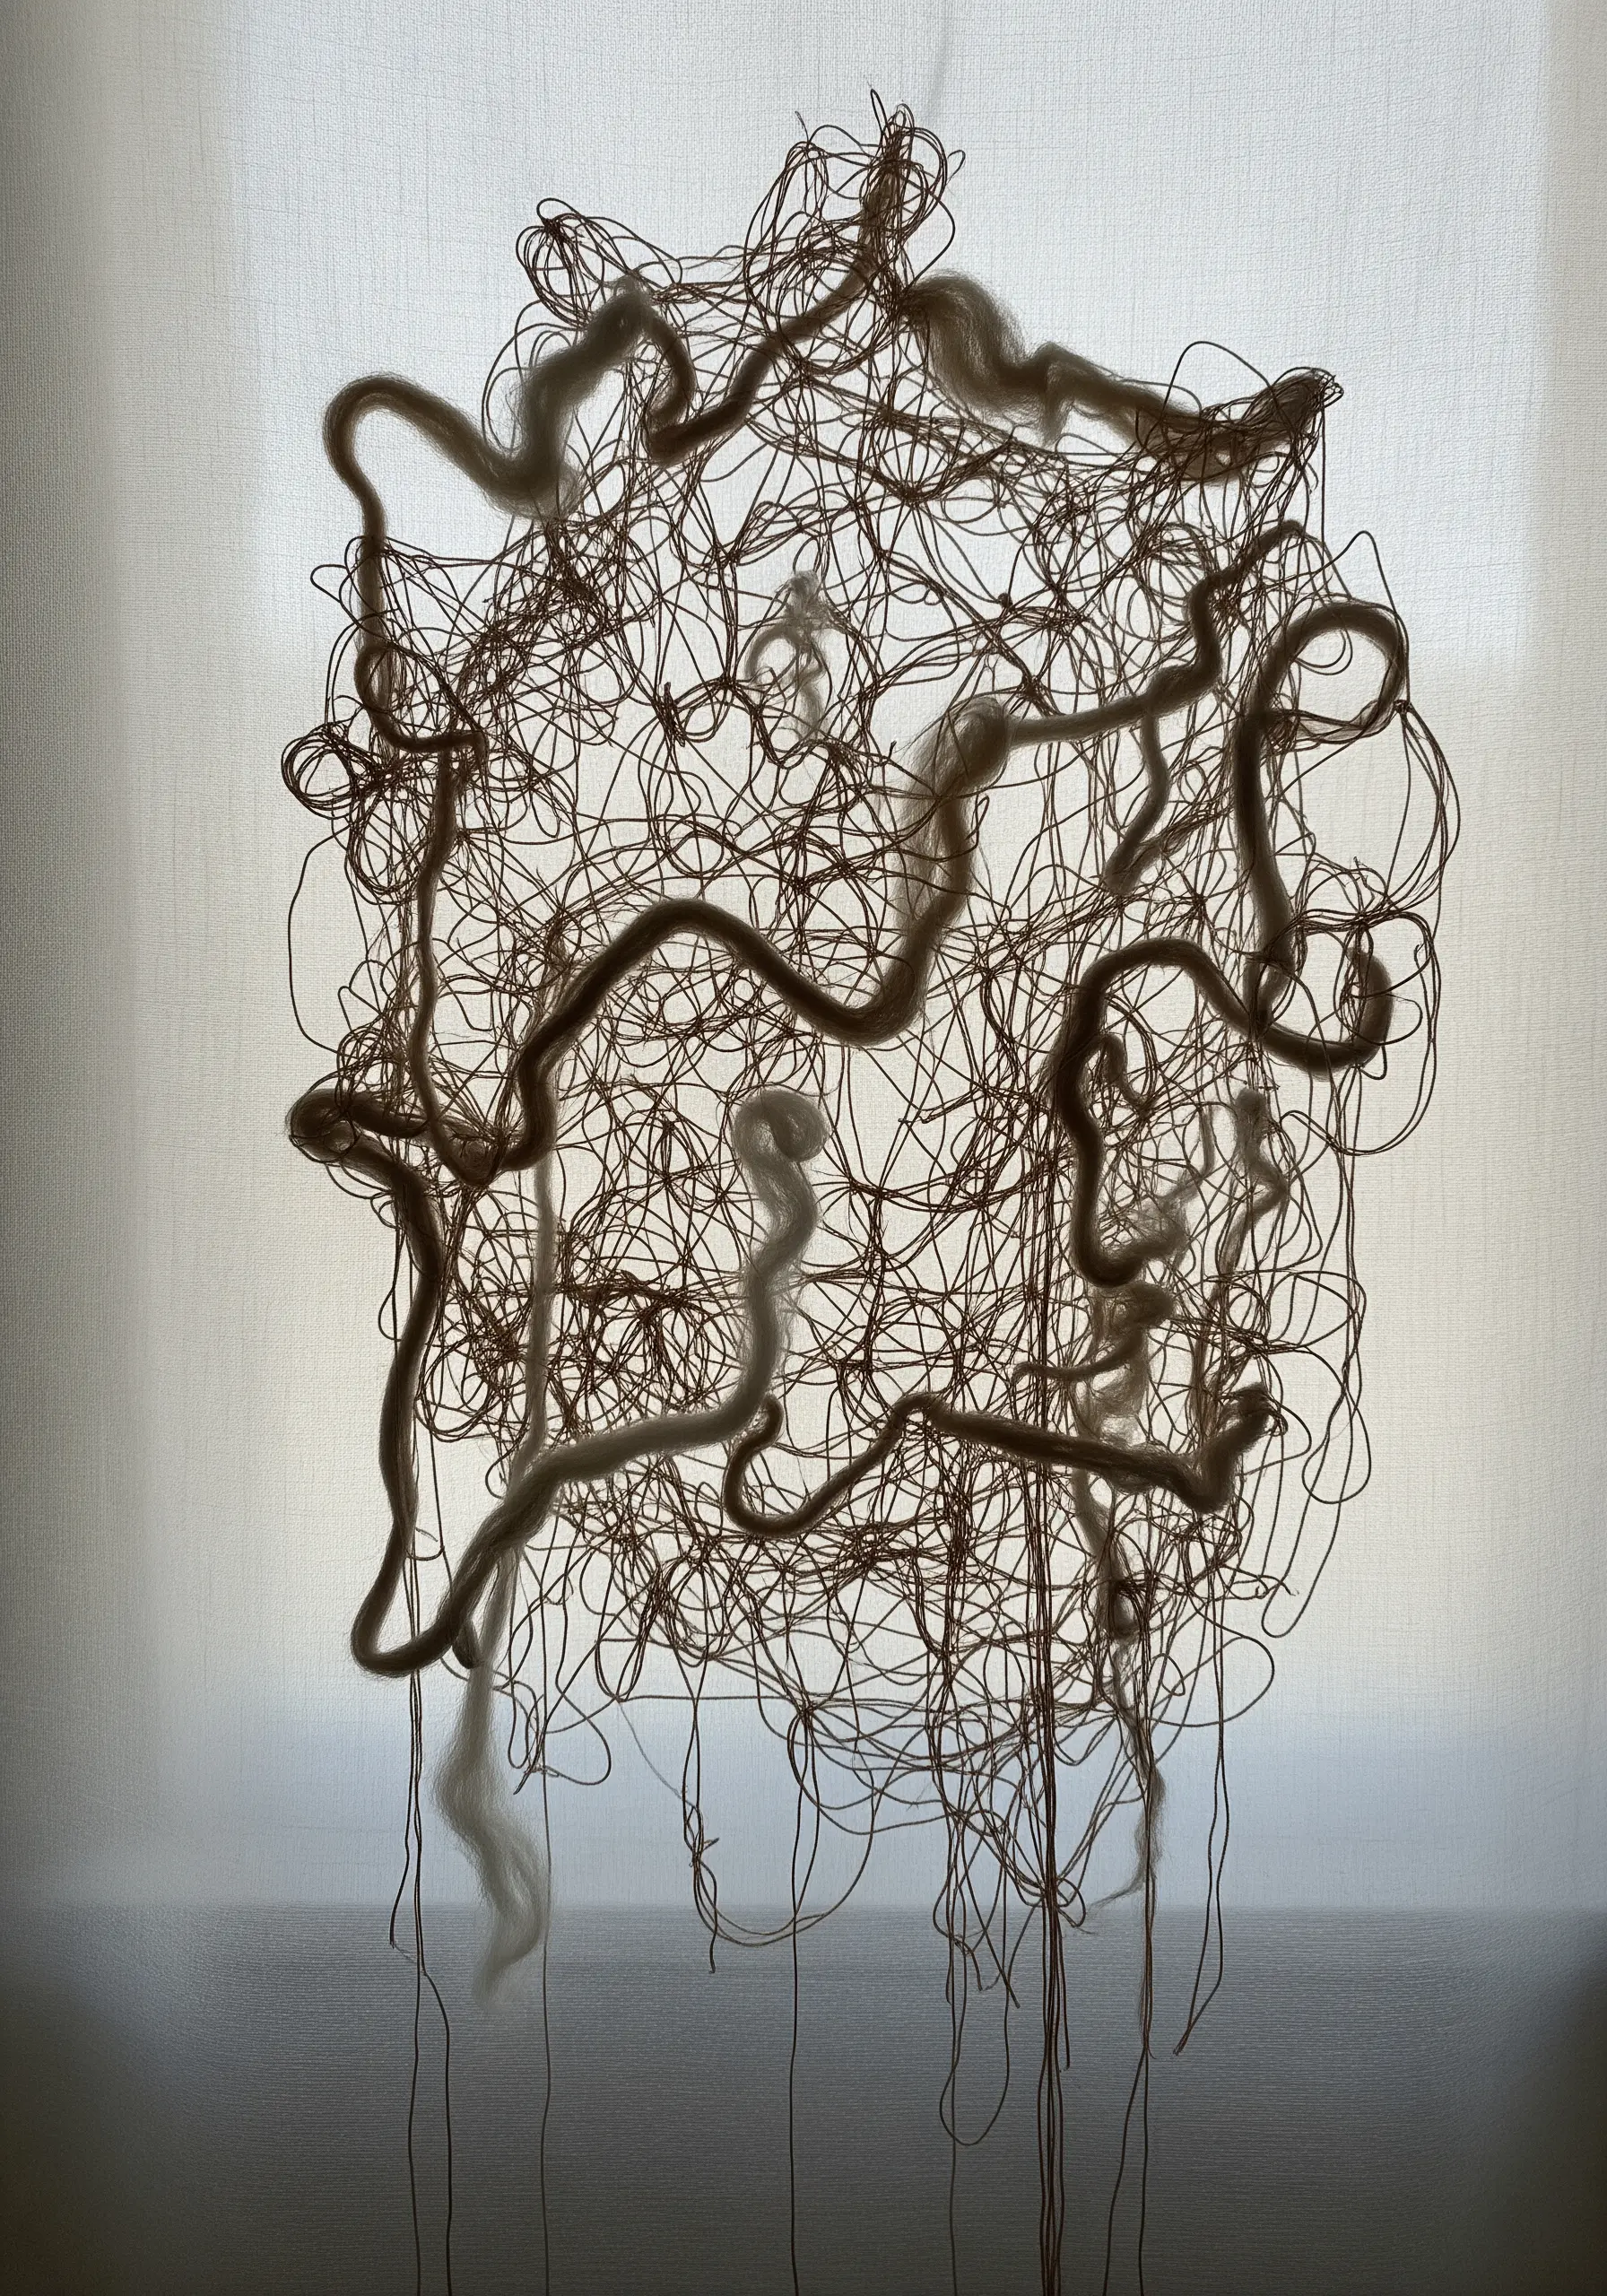
Push your embroidery into the realm of sculpture by creating freestanding objects made entirely of thread.
To do this, you’ll stitch your design heavily onto a sheet of water-soluble stabilizer. For more structure, you can sandwich your stitches between two layers of it.
Once you are finished, dissolve the stabilizer in water, and you will be left with a stiff, lace-like structure of pure thread.
This advanced technique allows you to create abstract thread sculptures that defy gravity and challenge the traditional definition of embroidery.
26. Convey Reflection with Directional Stitches
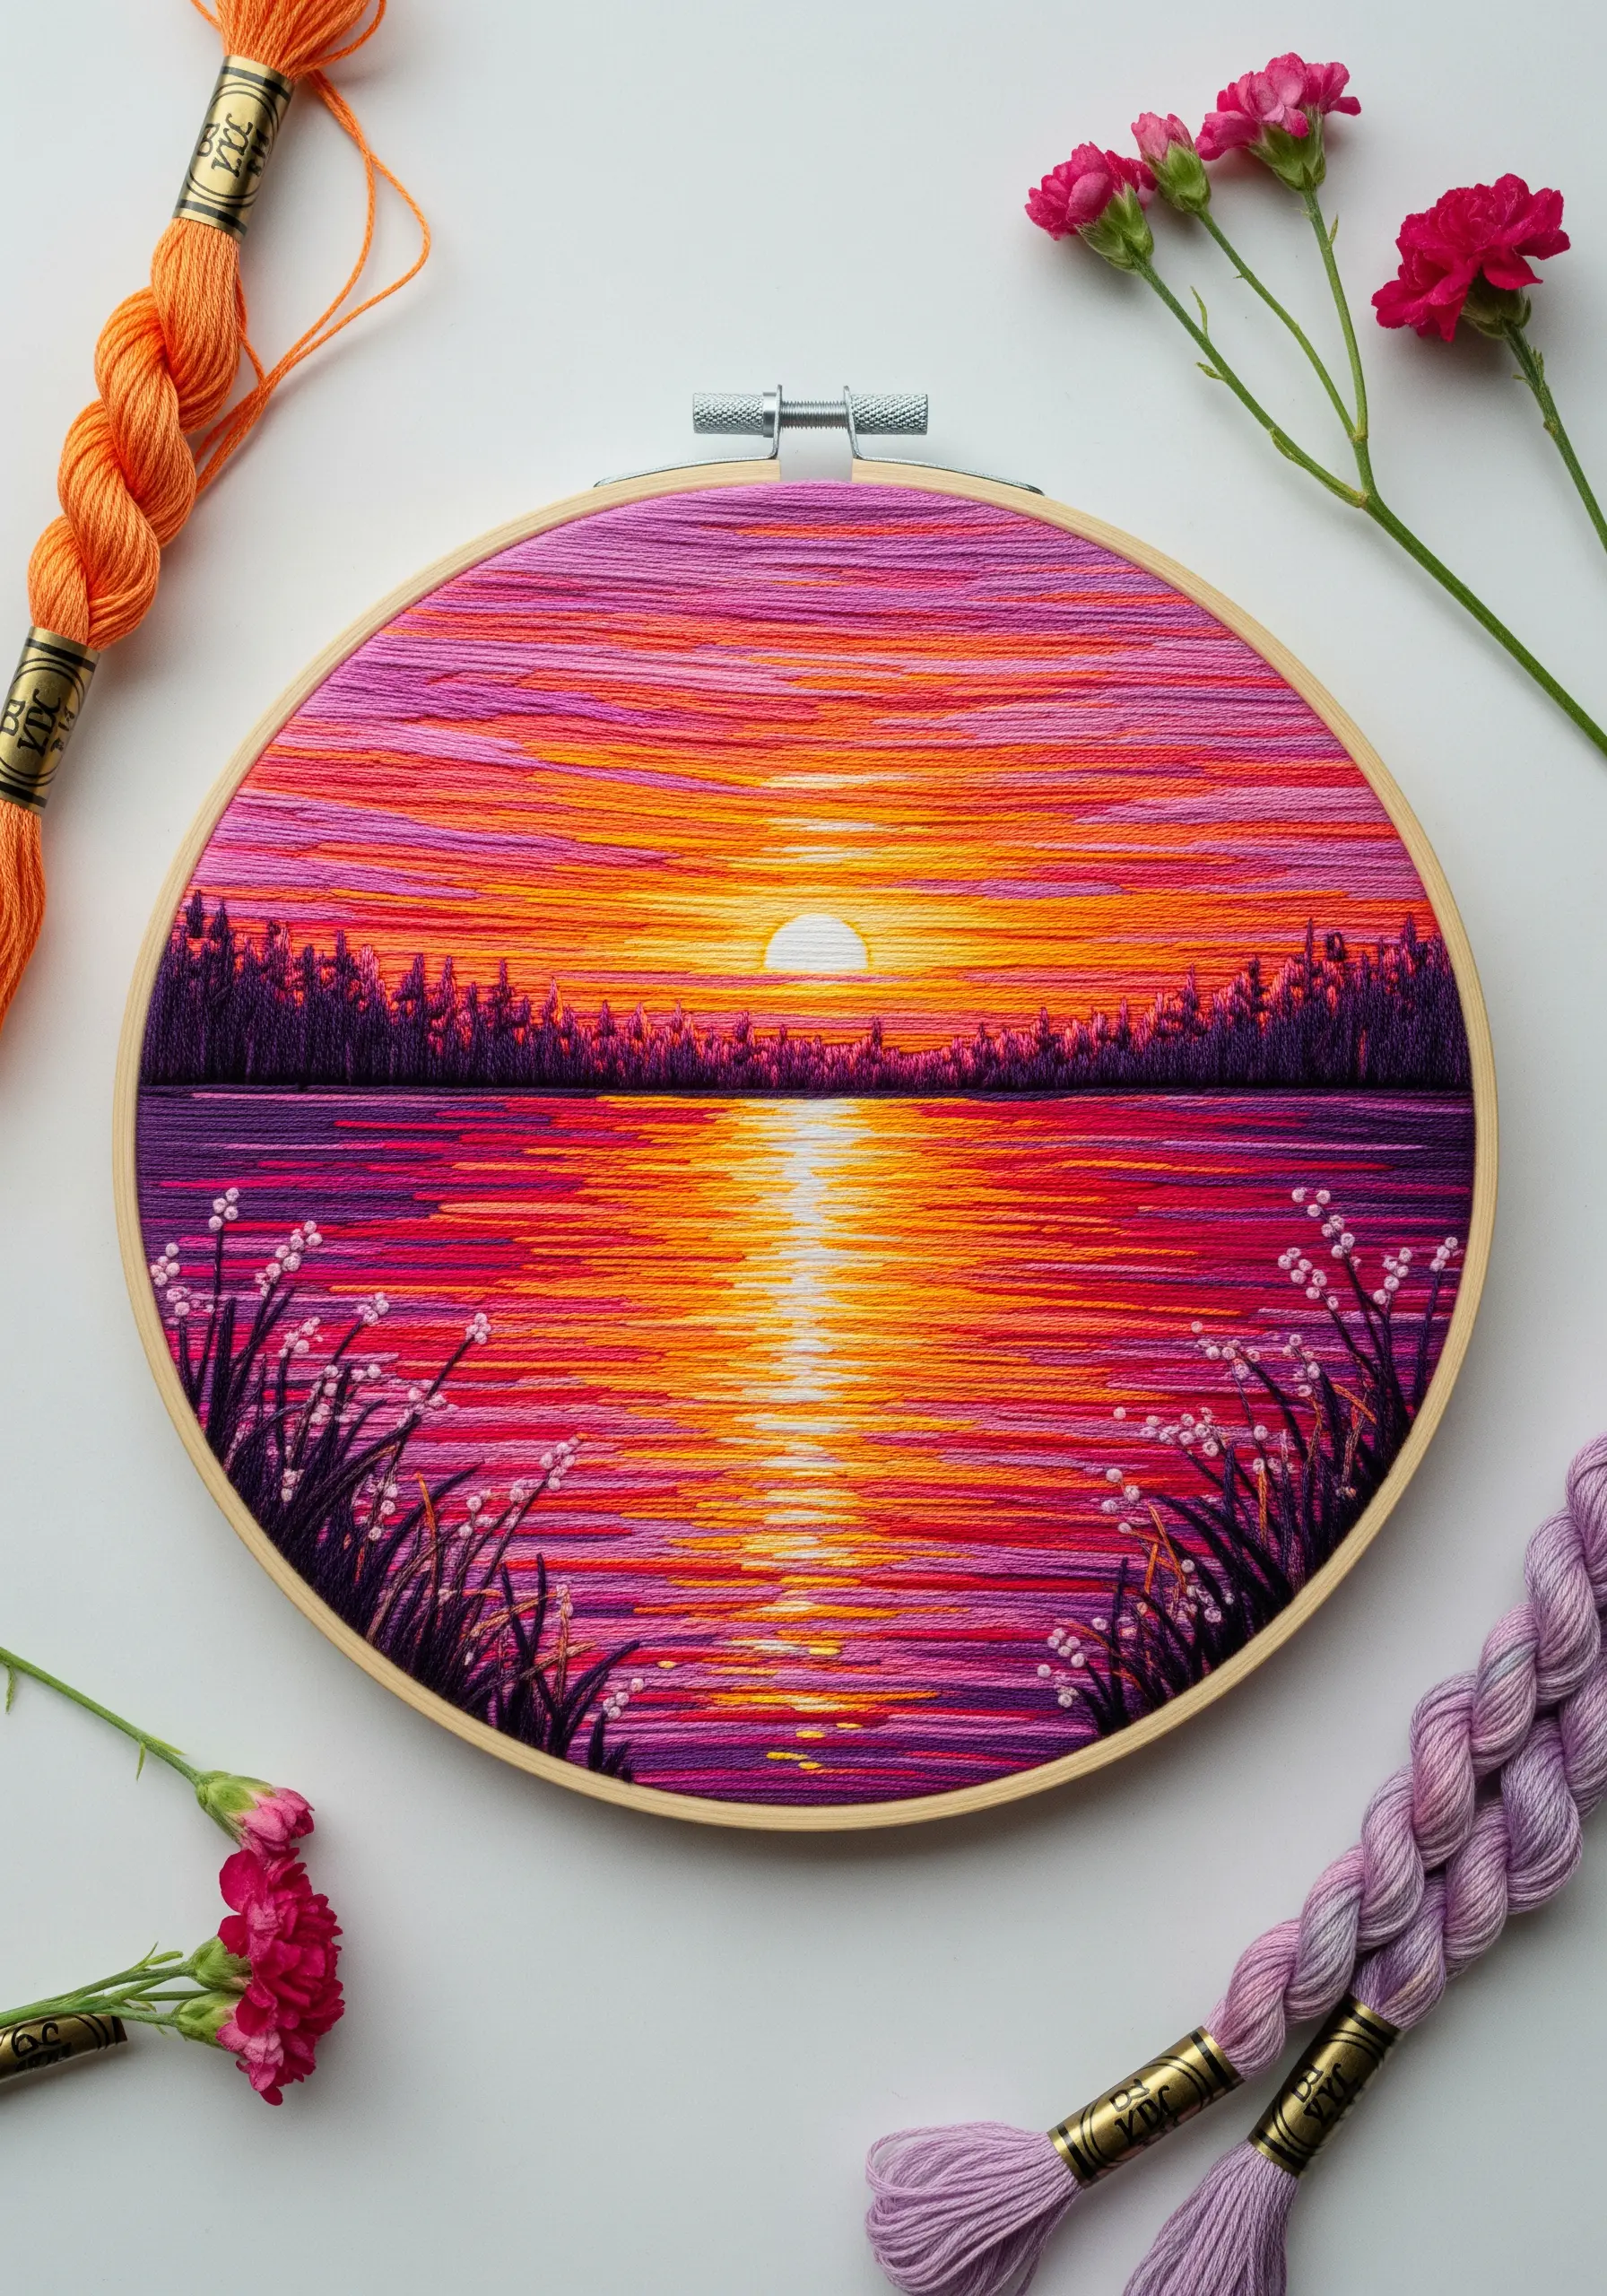
Use the direction of your stitches as a powerful compositional tool, especially for depicting water.
Instead of filling in shapes traditionally, lay long, horizontal satin or straight stitches across the entire piece.
By changing thread colors horizontally, you can create the shimmering, broken reflections of a sunset on water. The consistent direction of the stitches unites the composition and sells the illusion of light and movement.
This thread painting technique transforms your floss into brushstrokes, capturing an entire atmosphere with simple, directional lines.
27. Create Custom Cords with Thread Wrapping
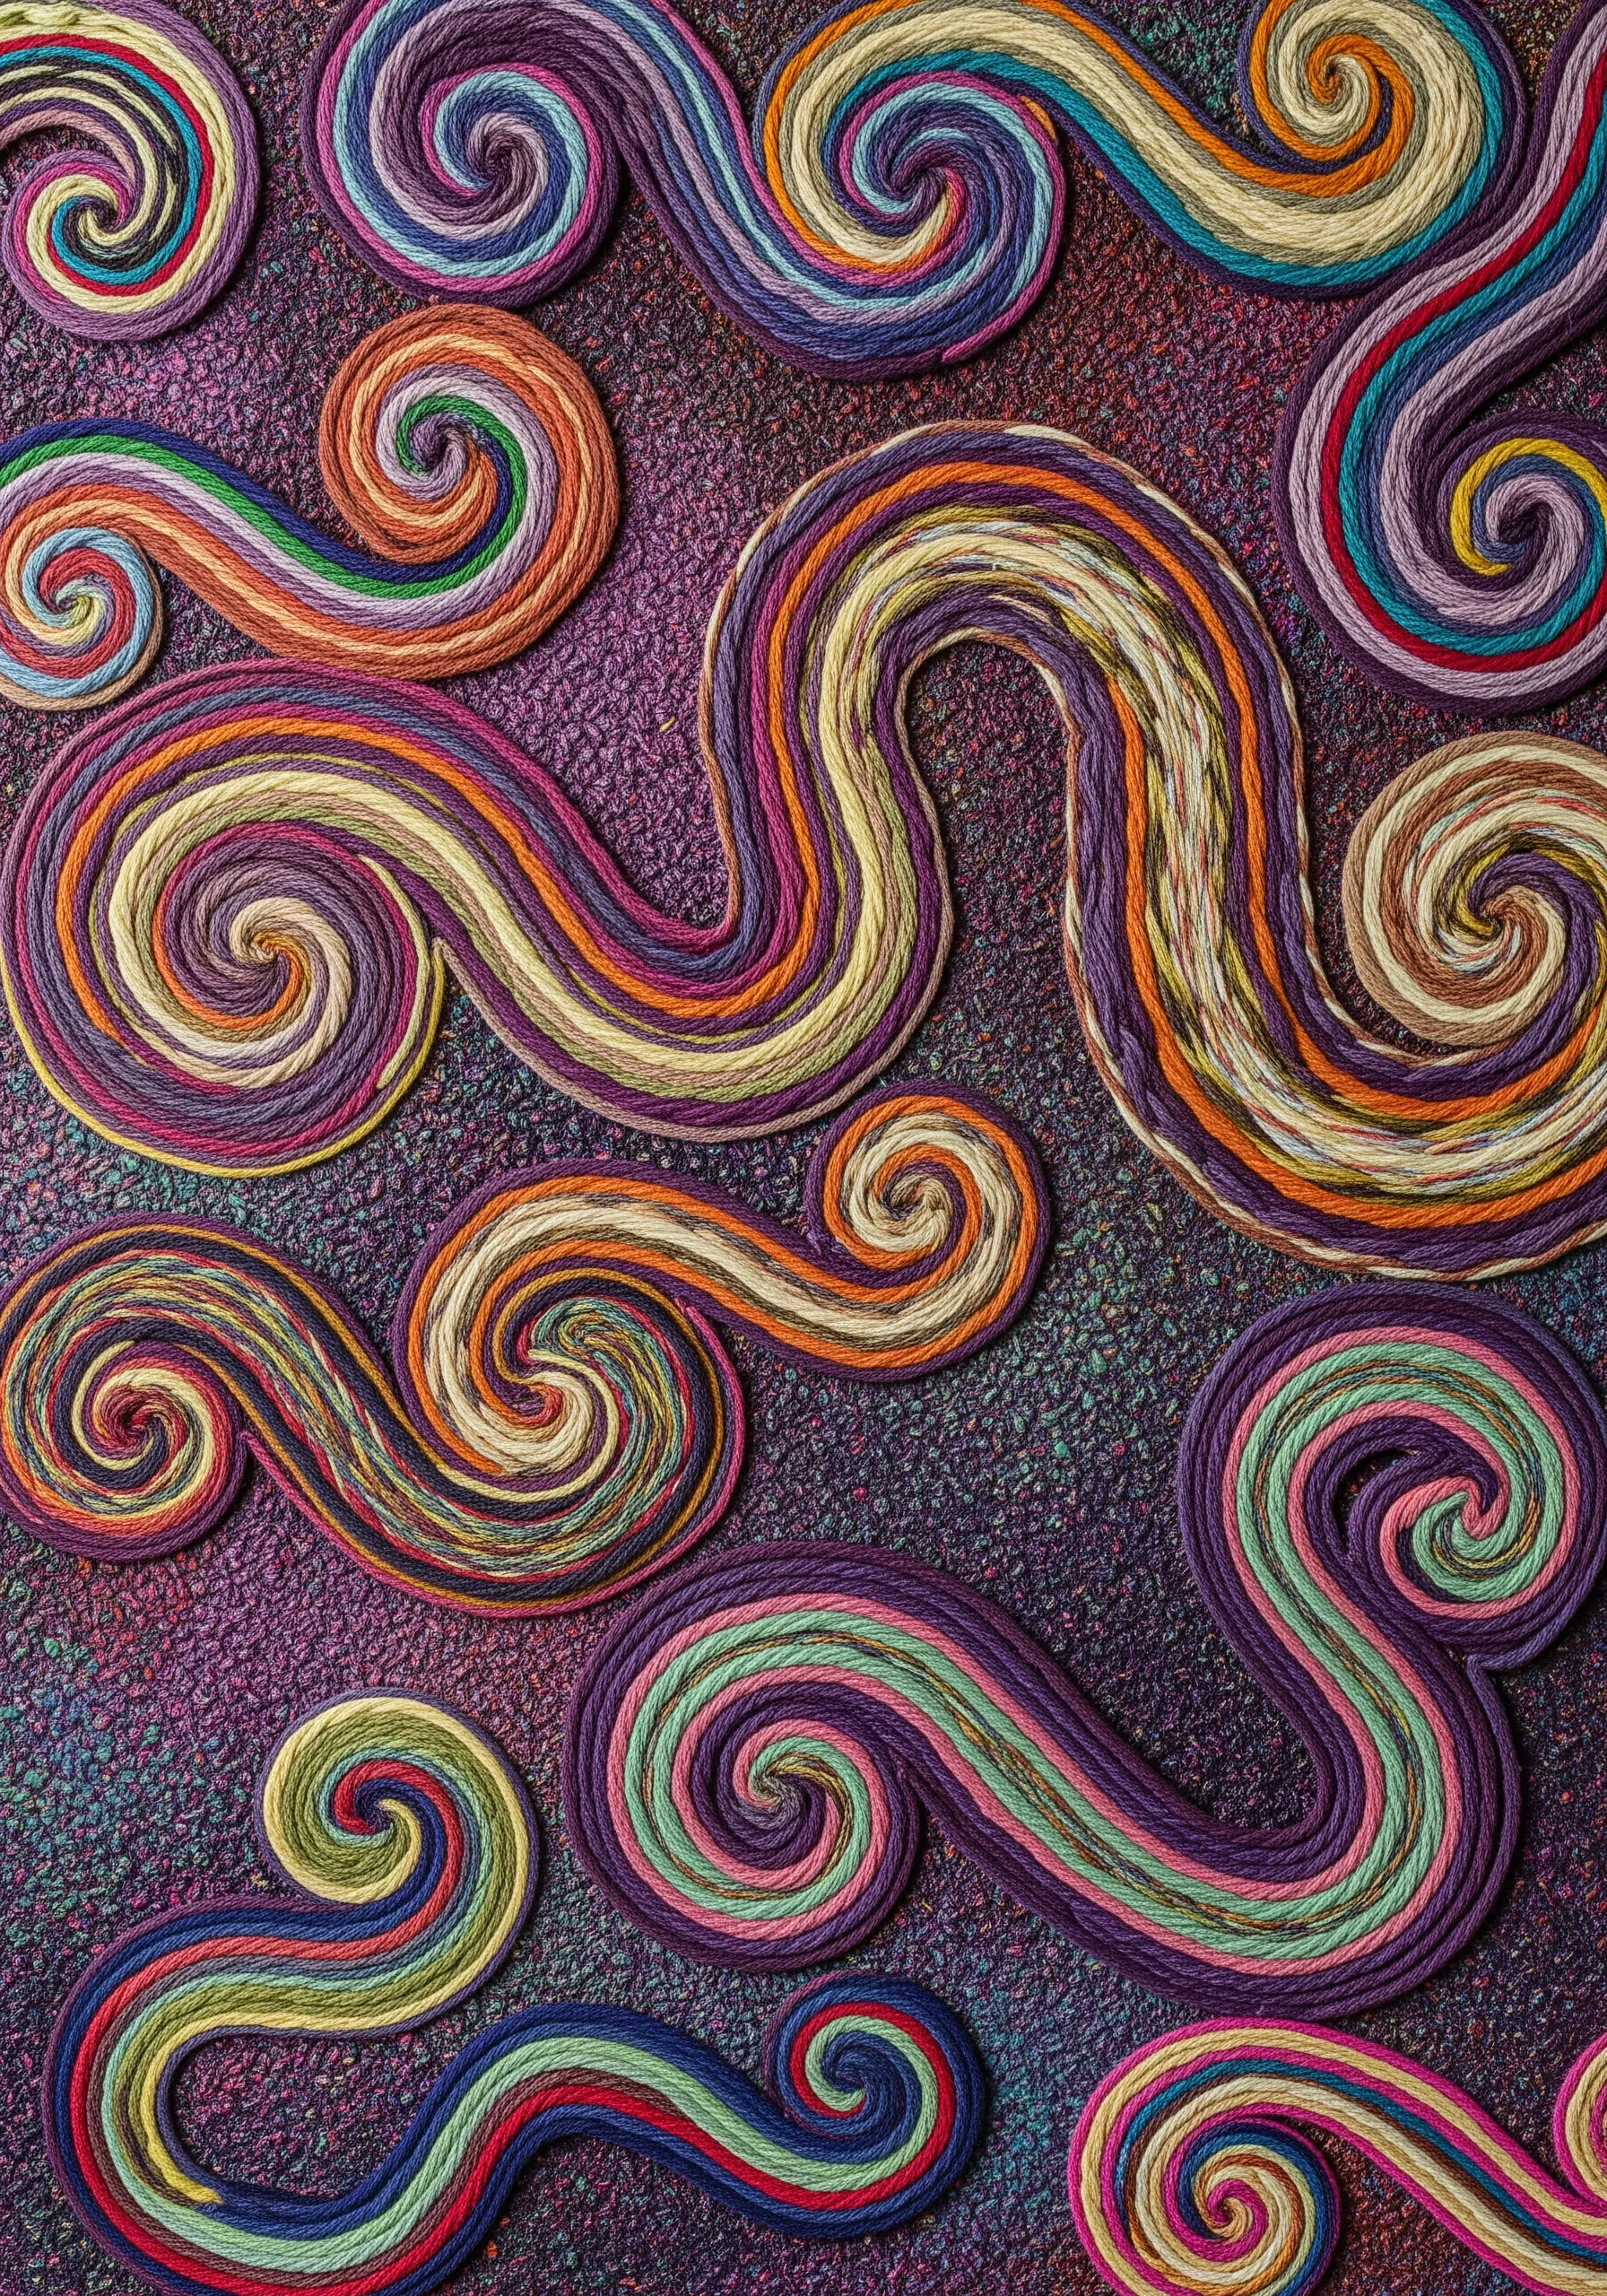
Instead of searching for the perfect cord, make your own by wrapping multiple strands of floss around a thicker core thread.
By combining several different colors in your wrapping floss, you can create unique, variegated cords with a subtle barber-pole effect.
Once your custom cord is made, couch it onto your fabric to create bold, swirling lines with incredible texture and bespoke color blends.
This gives you complete creative control and ensures your linework is as unique as the rest of your design.
28. Give Planets Dimension with Padded Appliqué
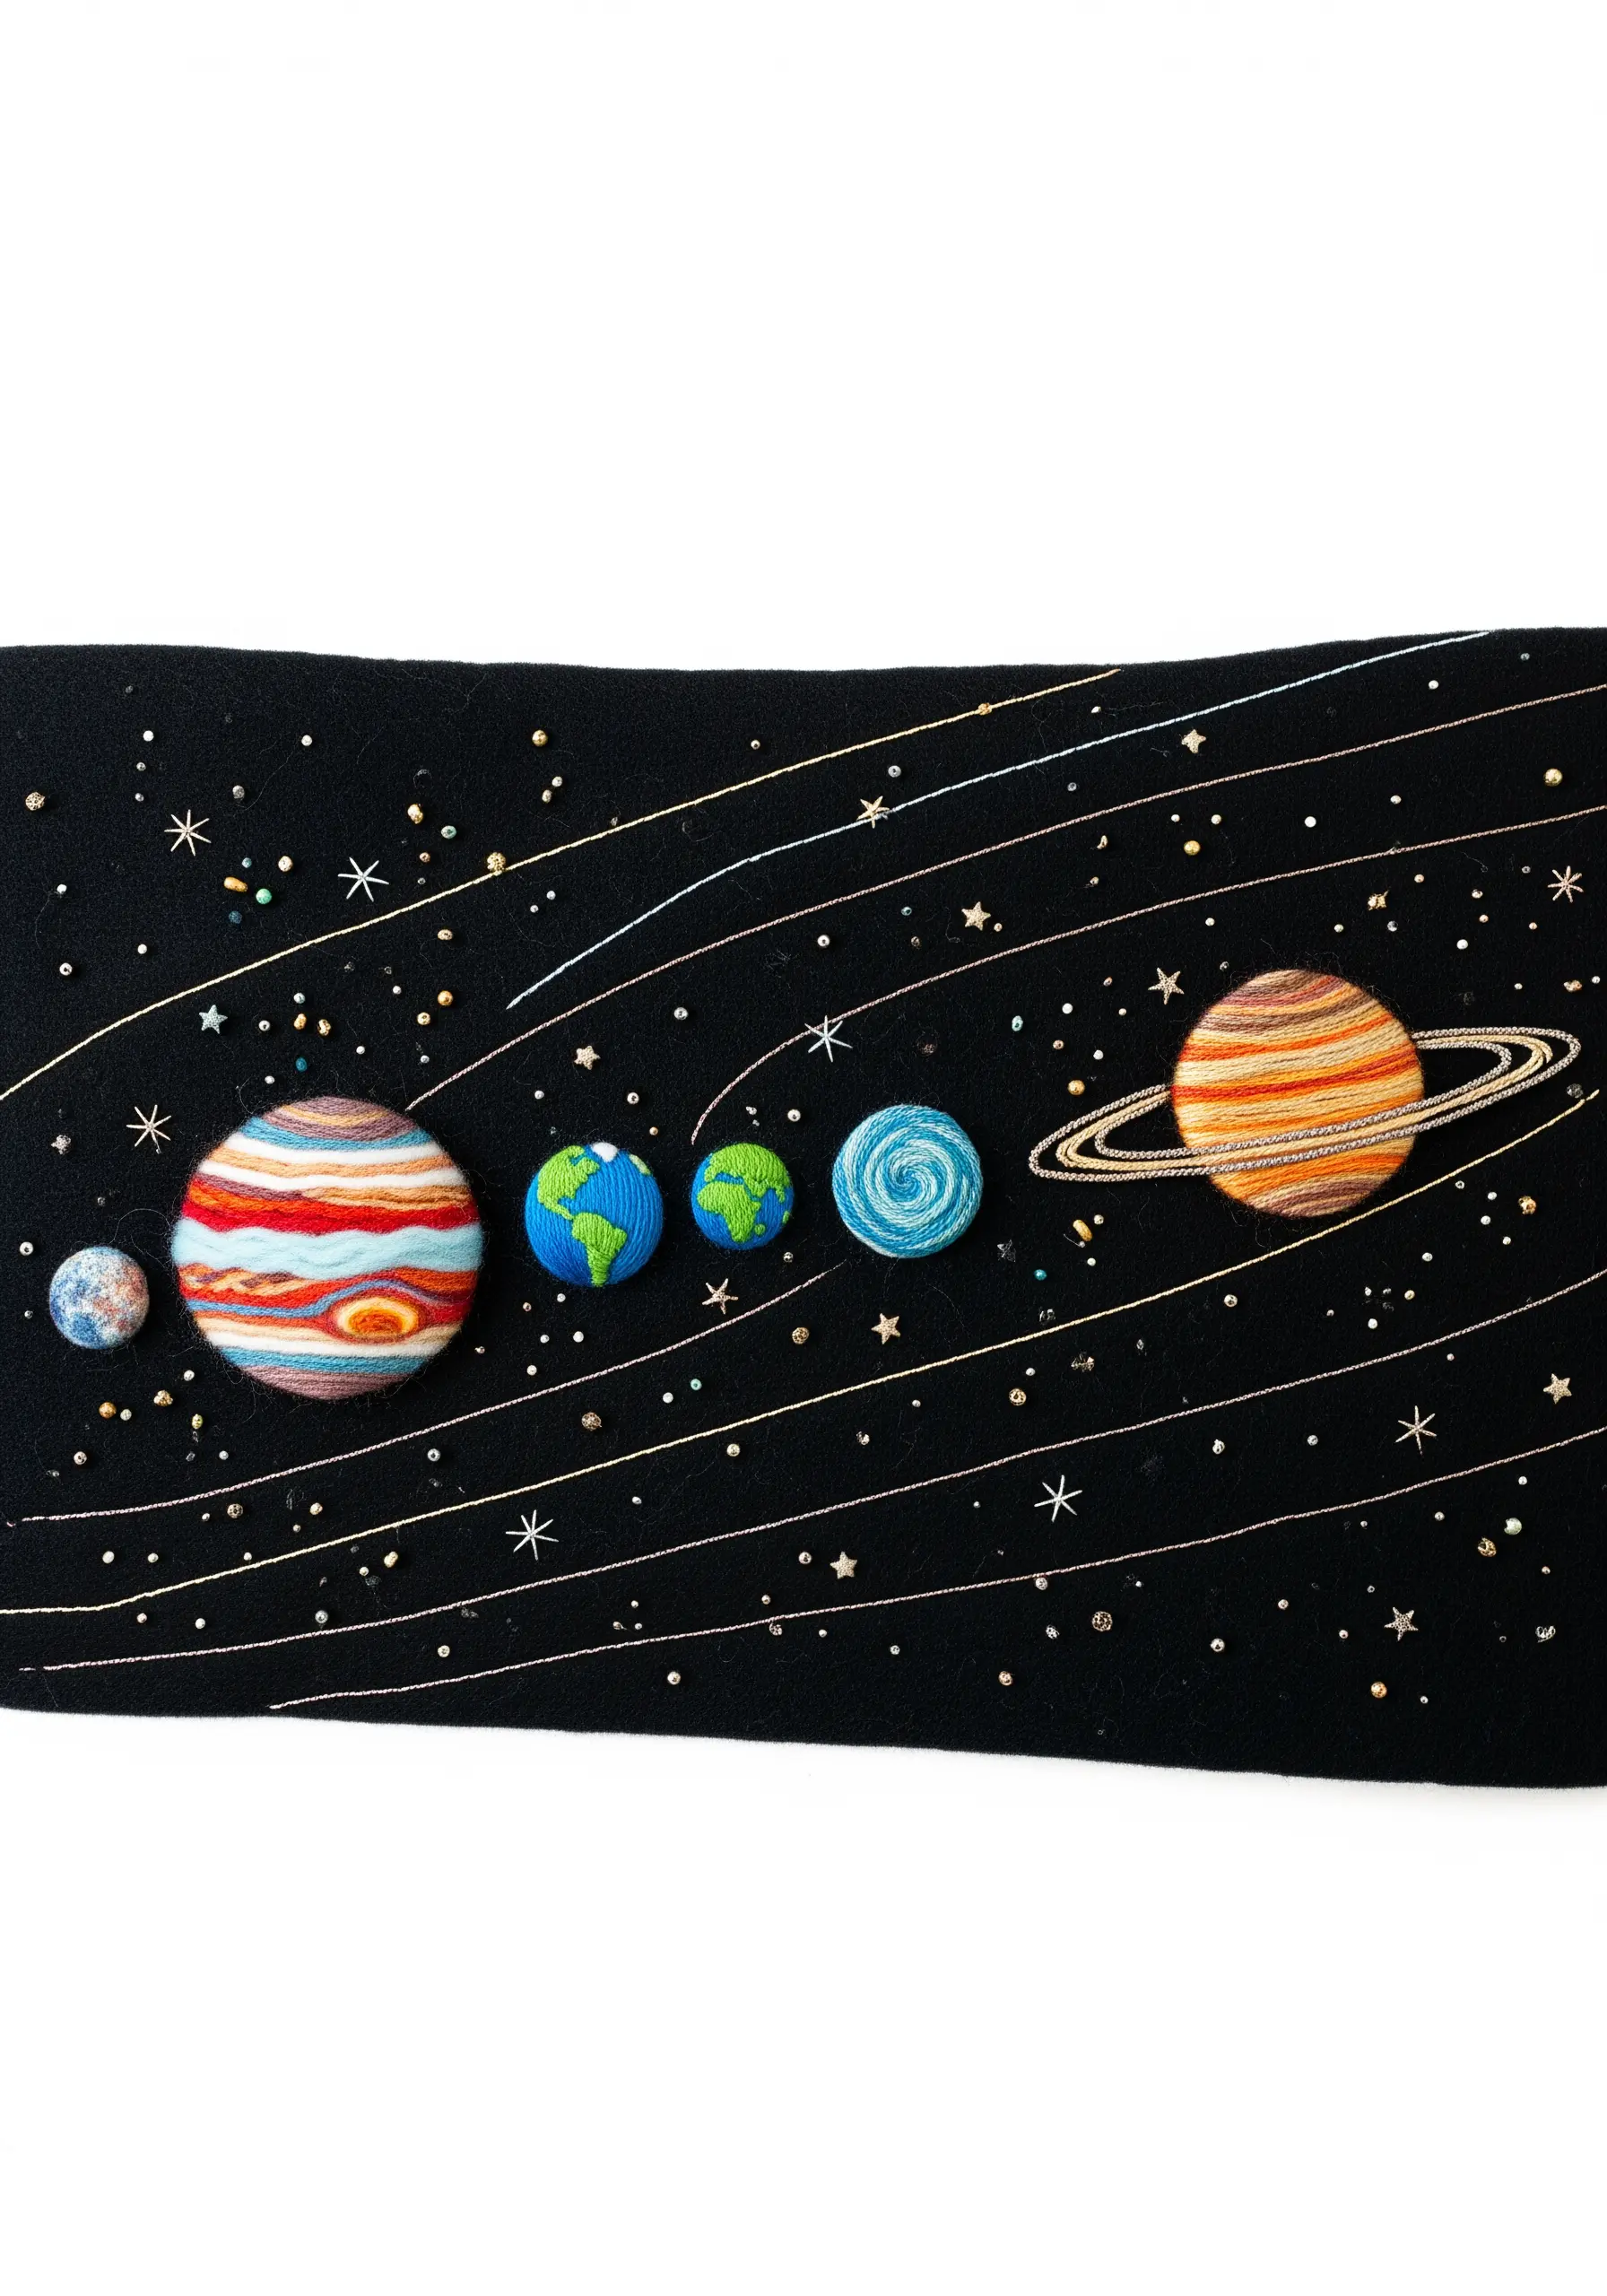
To create perfectly round, three-dimensional shapes like planets or fruits, use padded appliqué.
Cut a circle of fabric slightly larger than your desired shape, then place a small amount of stuffing or batting in the center. Gather the edges of the fabric around the stuffing and pull tight to create a firm ball.
Secure this padded shape to your background fabric with small, discreet stitches around the base.
You can then add surface details with embroidery, like the rings of Saturn or continents on Earth, creating a charming and sculptural solar system.
29. Weave Your Stitches into Vintage Lace
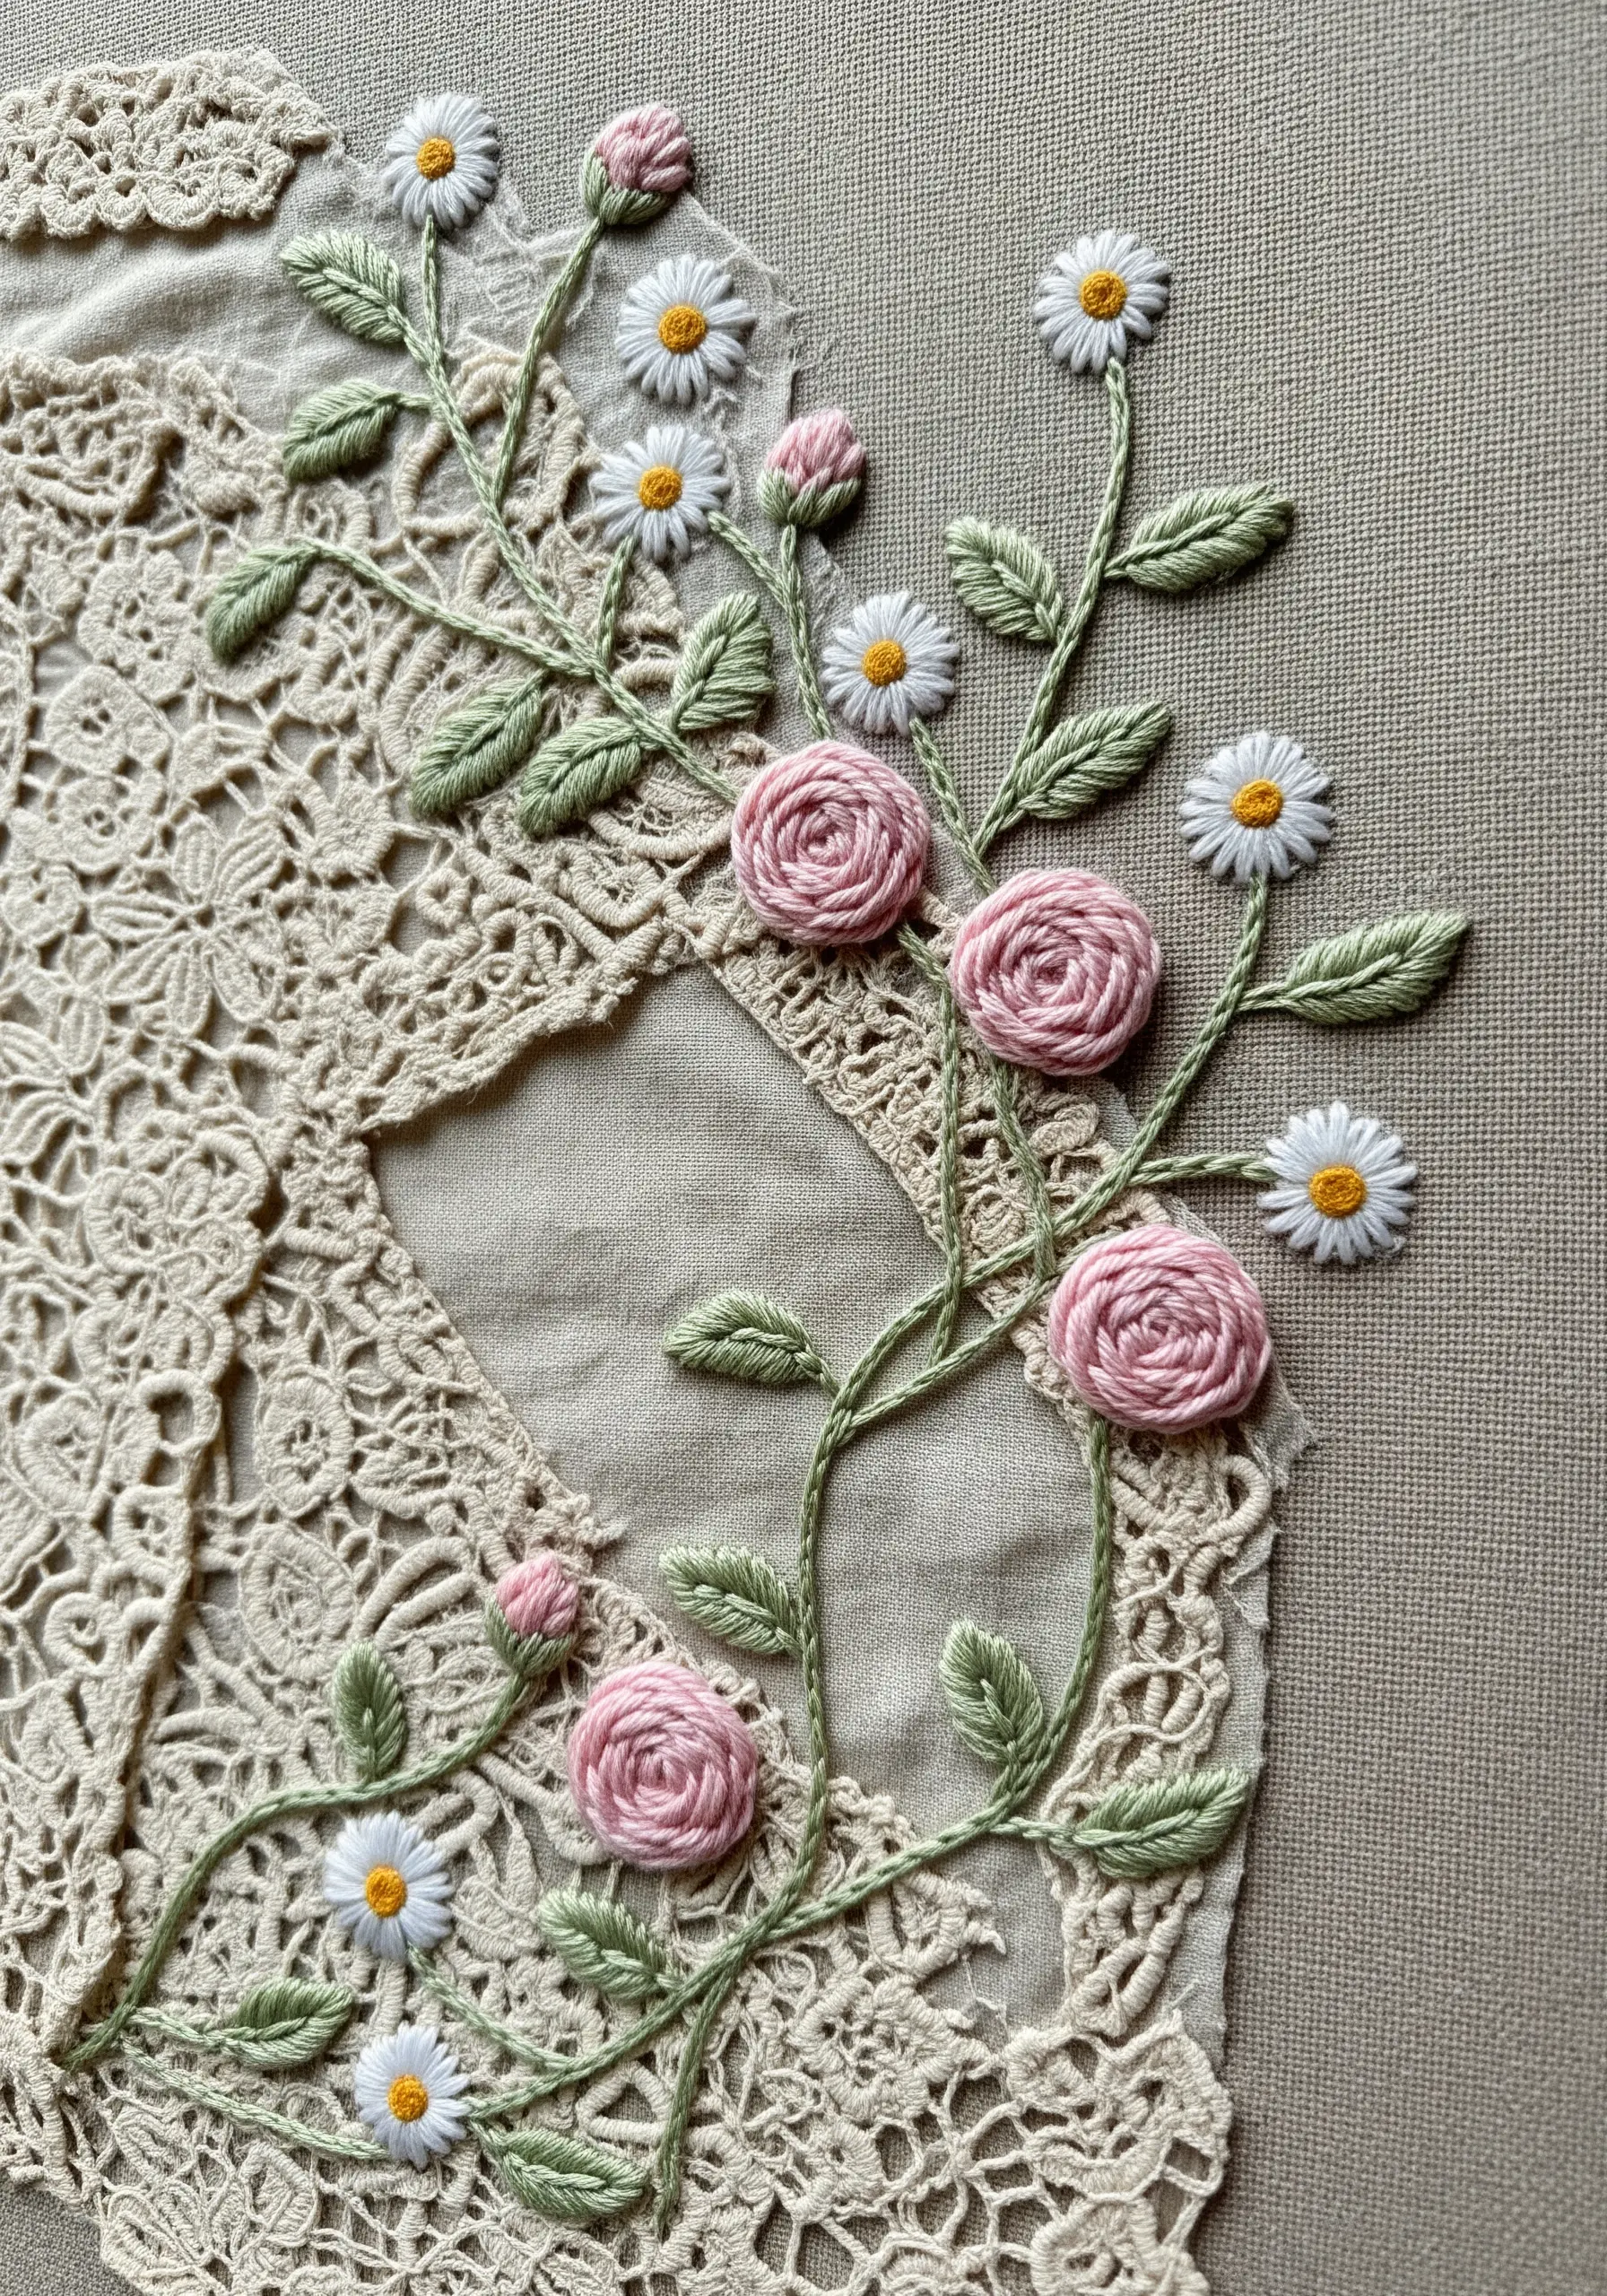
Use a piece of found vintage lace as your canvas to create a piece rich with history and texture from the very start.
Instead of imposing a completely new design, allow the existing patterns in the lace to inspire your work. You can trace the floral motifs with stem stitch or fill in negative spaces with delicate seed stitches.
This technique creates a beautiful conversation between the old and the new, resulting in a unique piece of vintage lace embroidery that feels layered and meaningful.
30. Curate a Monochromatic Fiber Sampler
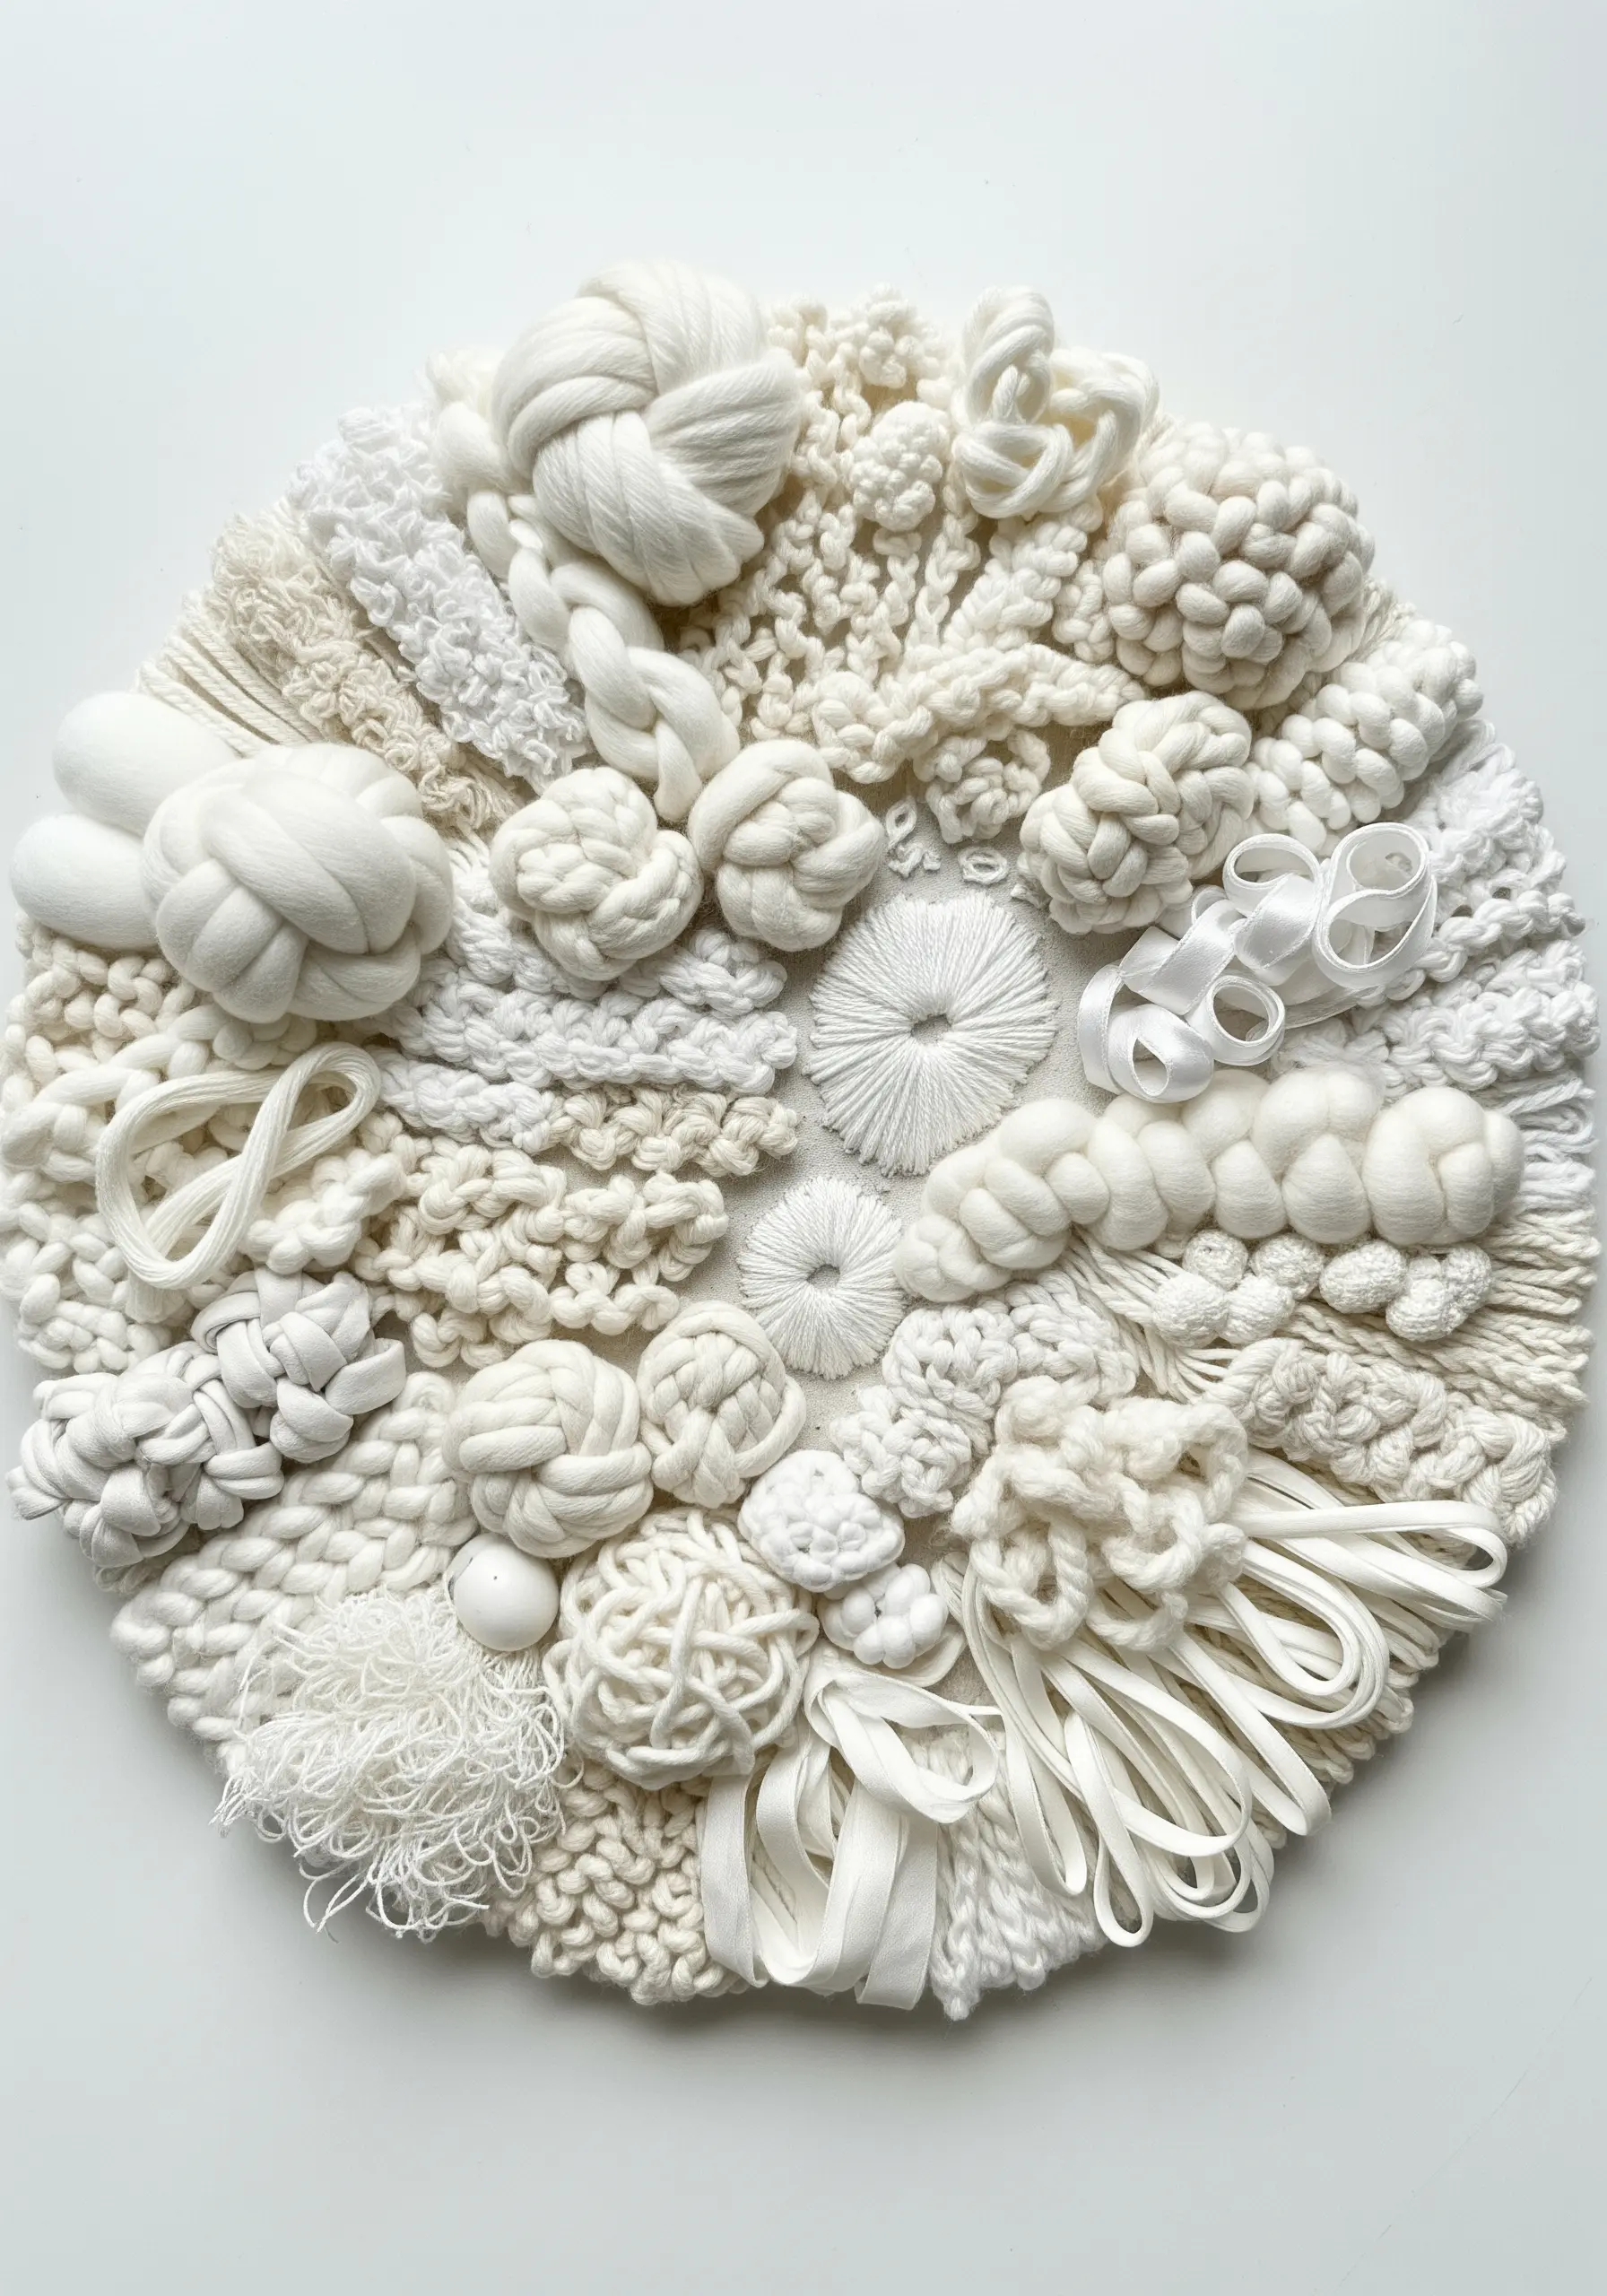
Deepen your understanding of texture by creating a composition using only one color but many different fibers.
Gather a collection of materials in shades of white or ivory: thick wool yarn, soft roving, silk ribbon, elastic bands, perle cotton, and standard floss.
Fill a hoop with a collage of different techniques—knots, loops, weaves, and stitches—focusing on how the various materials catch the light and create shadows.
Removing color forces you to see the unique personality of each fiber, making this a powerful design exercise that will inform all your future colorwork.


