
A journal cover is more than just a protective layer; it’s a canvas waiting for your story to begin. Before you even write the first word, you can infuse it with personality and texture using the art of embroidery and mixed media.
Forget the idea that you need complex patterns or dozens of colors. Often, the most striking designs come from a thoughtful combination of materials—the texture of yarn against a painted surface, the shimmer of metallic thread on a dark cover, or the delicate shadow of a pressed flower beneath stitched vellum.
Here, you’ll discover how to use simple stitches and creative materials to transform a blank notebook into a personal work of art. These techniques are designed to give you a beautiful, tactile result that feels both intentional and deeply you.
1. Layer Vellum for a Botanical Shadow Effect
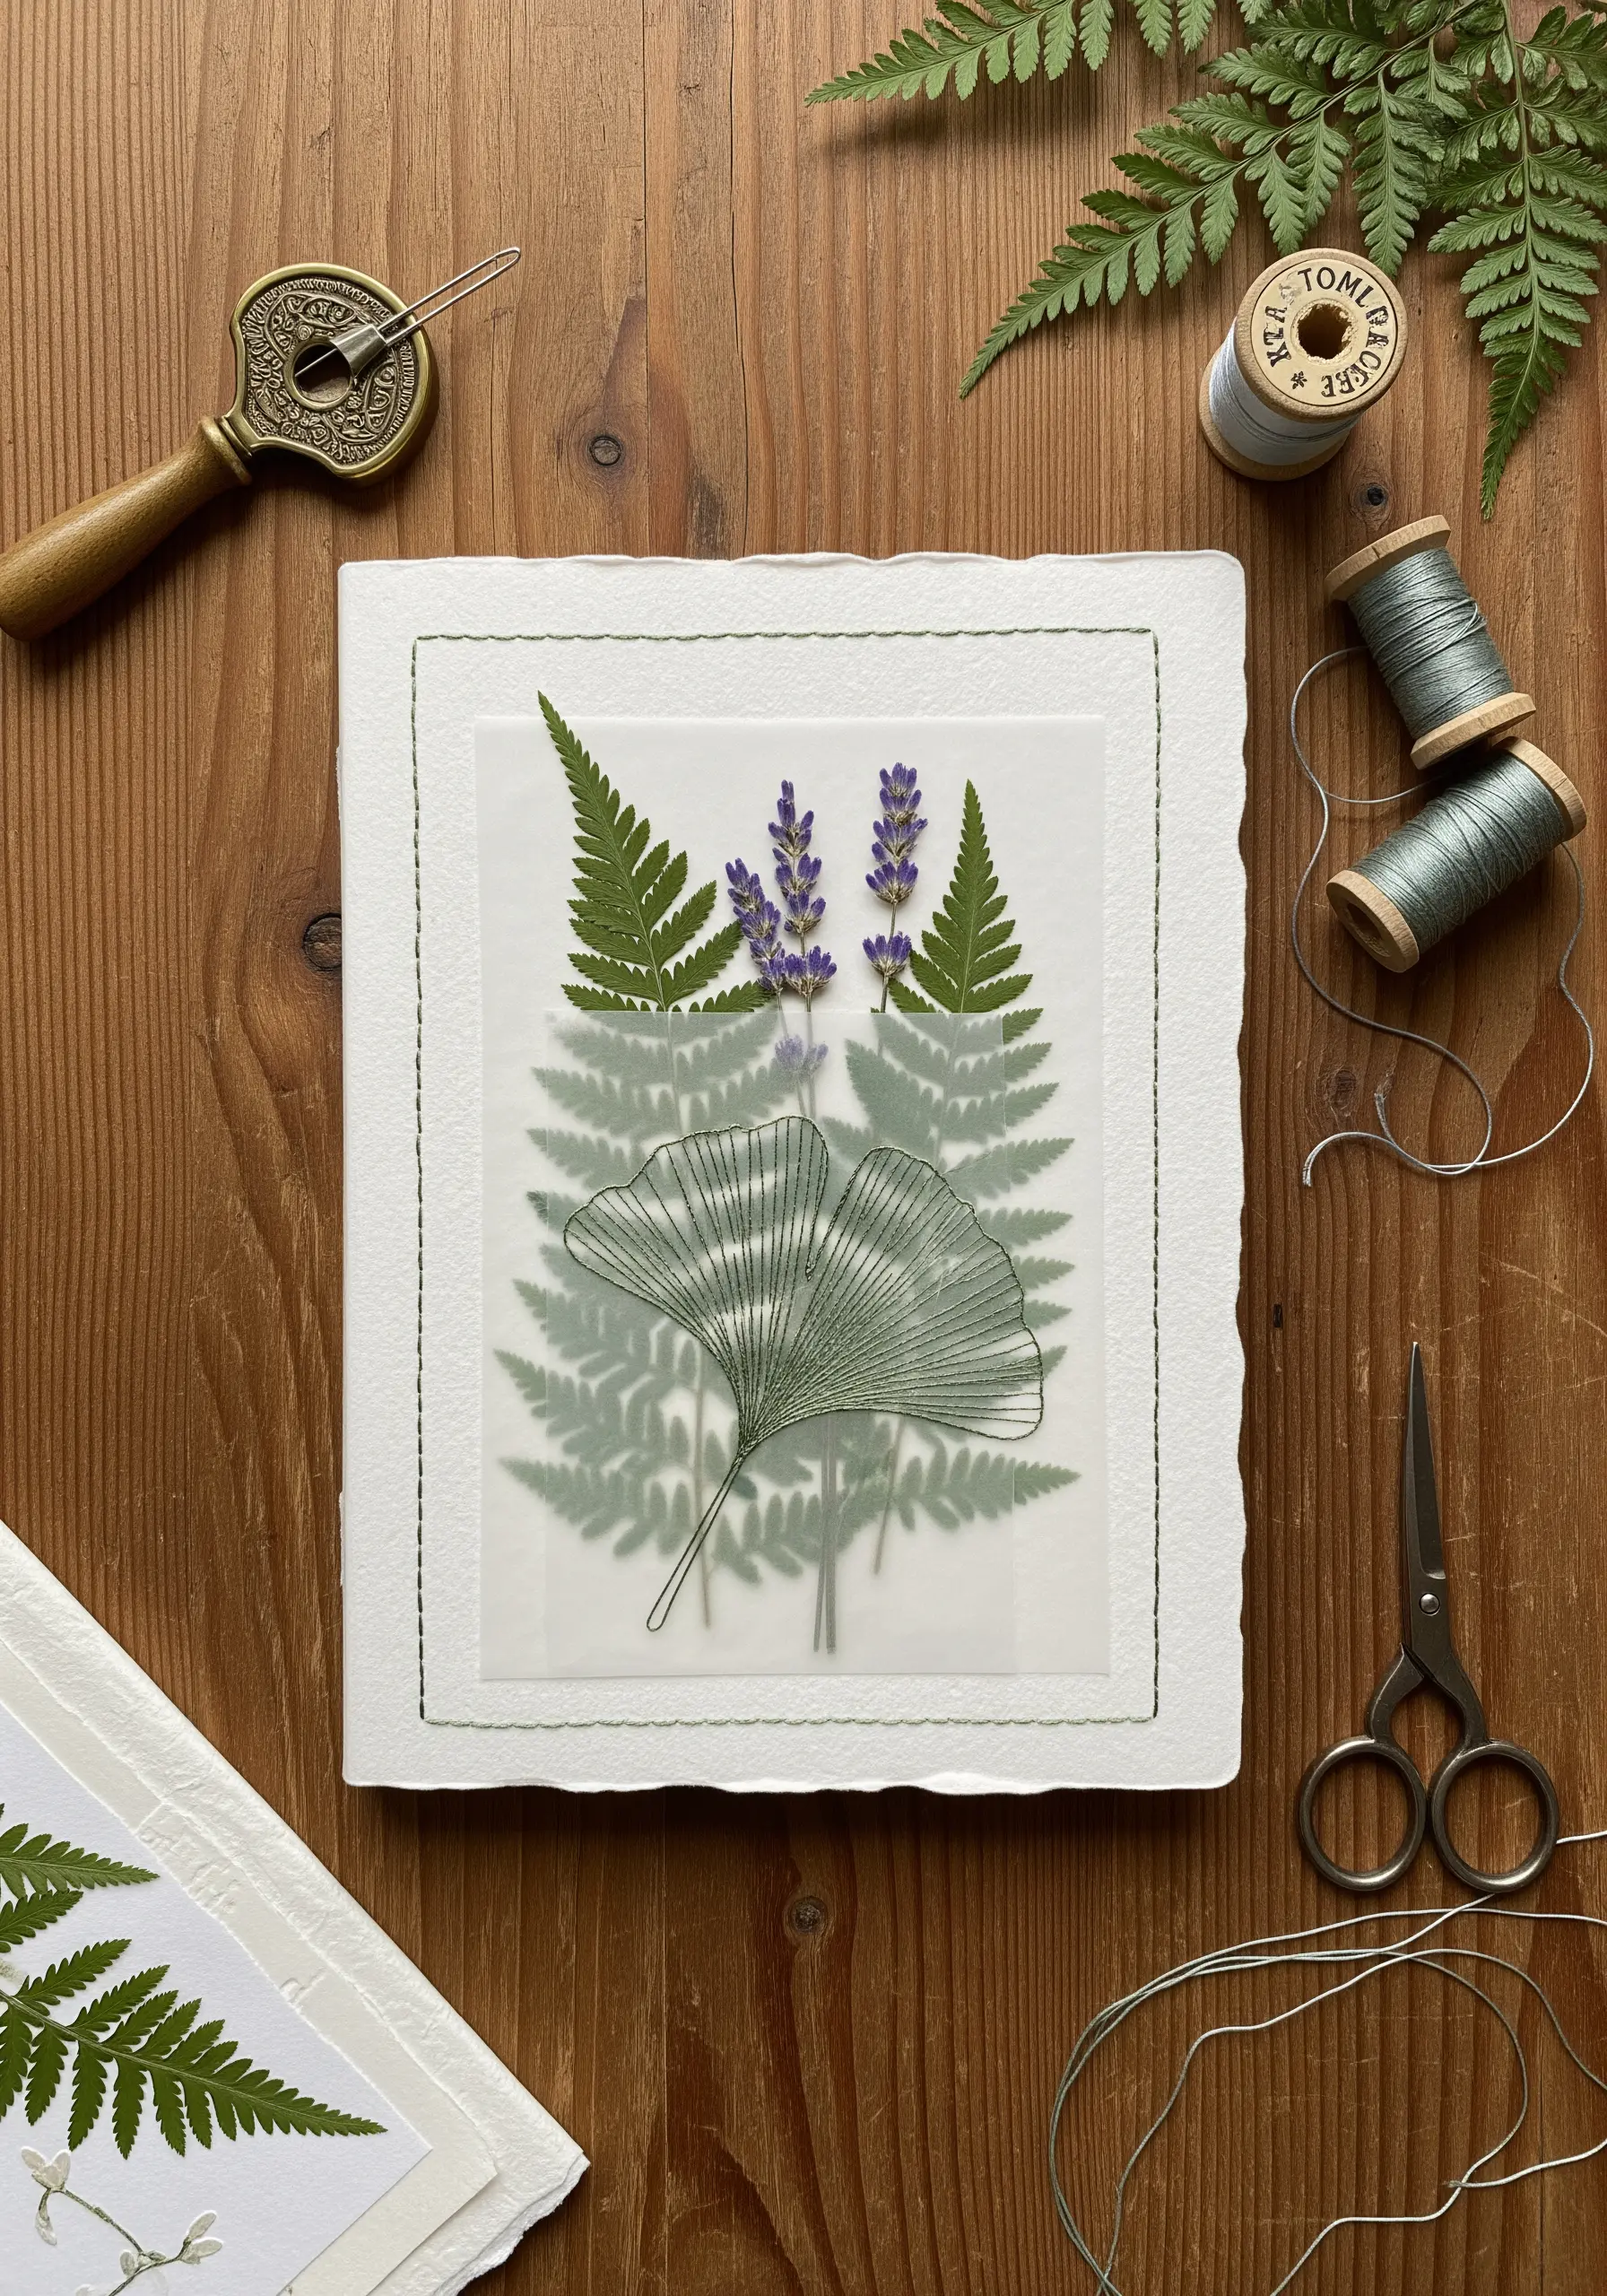
Create an ethereal, layered look by stitching over pressed botanicals and a sheet of translucent vellum.
First, arrange your pressed ferns and flowers on sturdy watercolor paper.
Place a sheet of vellum over the arrangement and secure it with a simple running stitch along the border using a single strand of thread.
This technique protects the delicate botanicals while adding a soft, diffused shadow effect that elevates the composition from a simple craft to a refined piece of paper art.
Use a very fine, sharp needle to perforate the paper cleanly without tearing.
2. Render a Luminous Moon with Metallic Thread and Beads
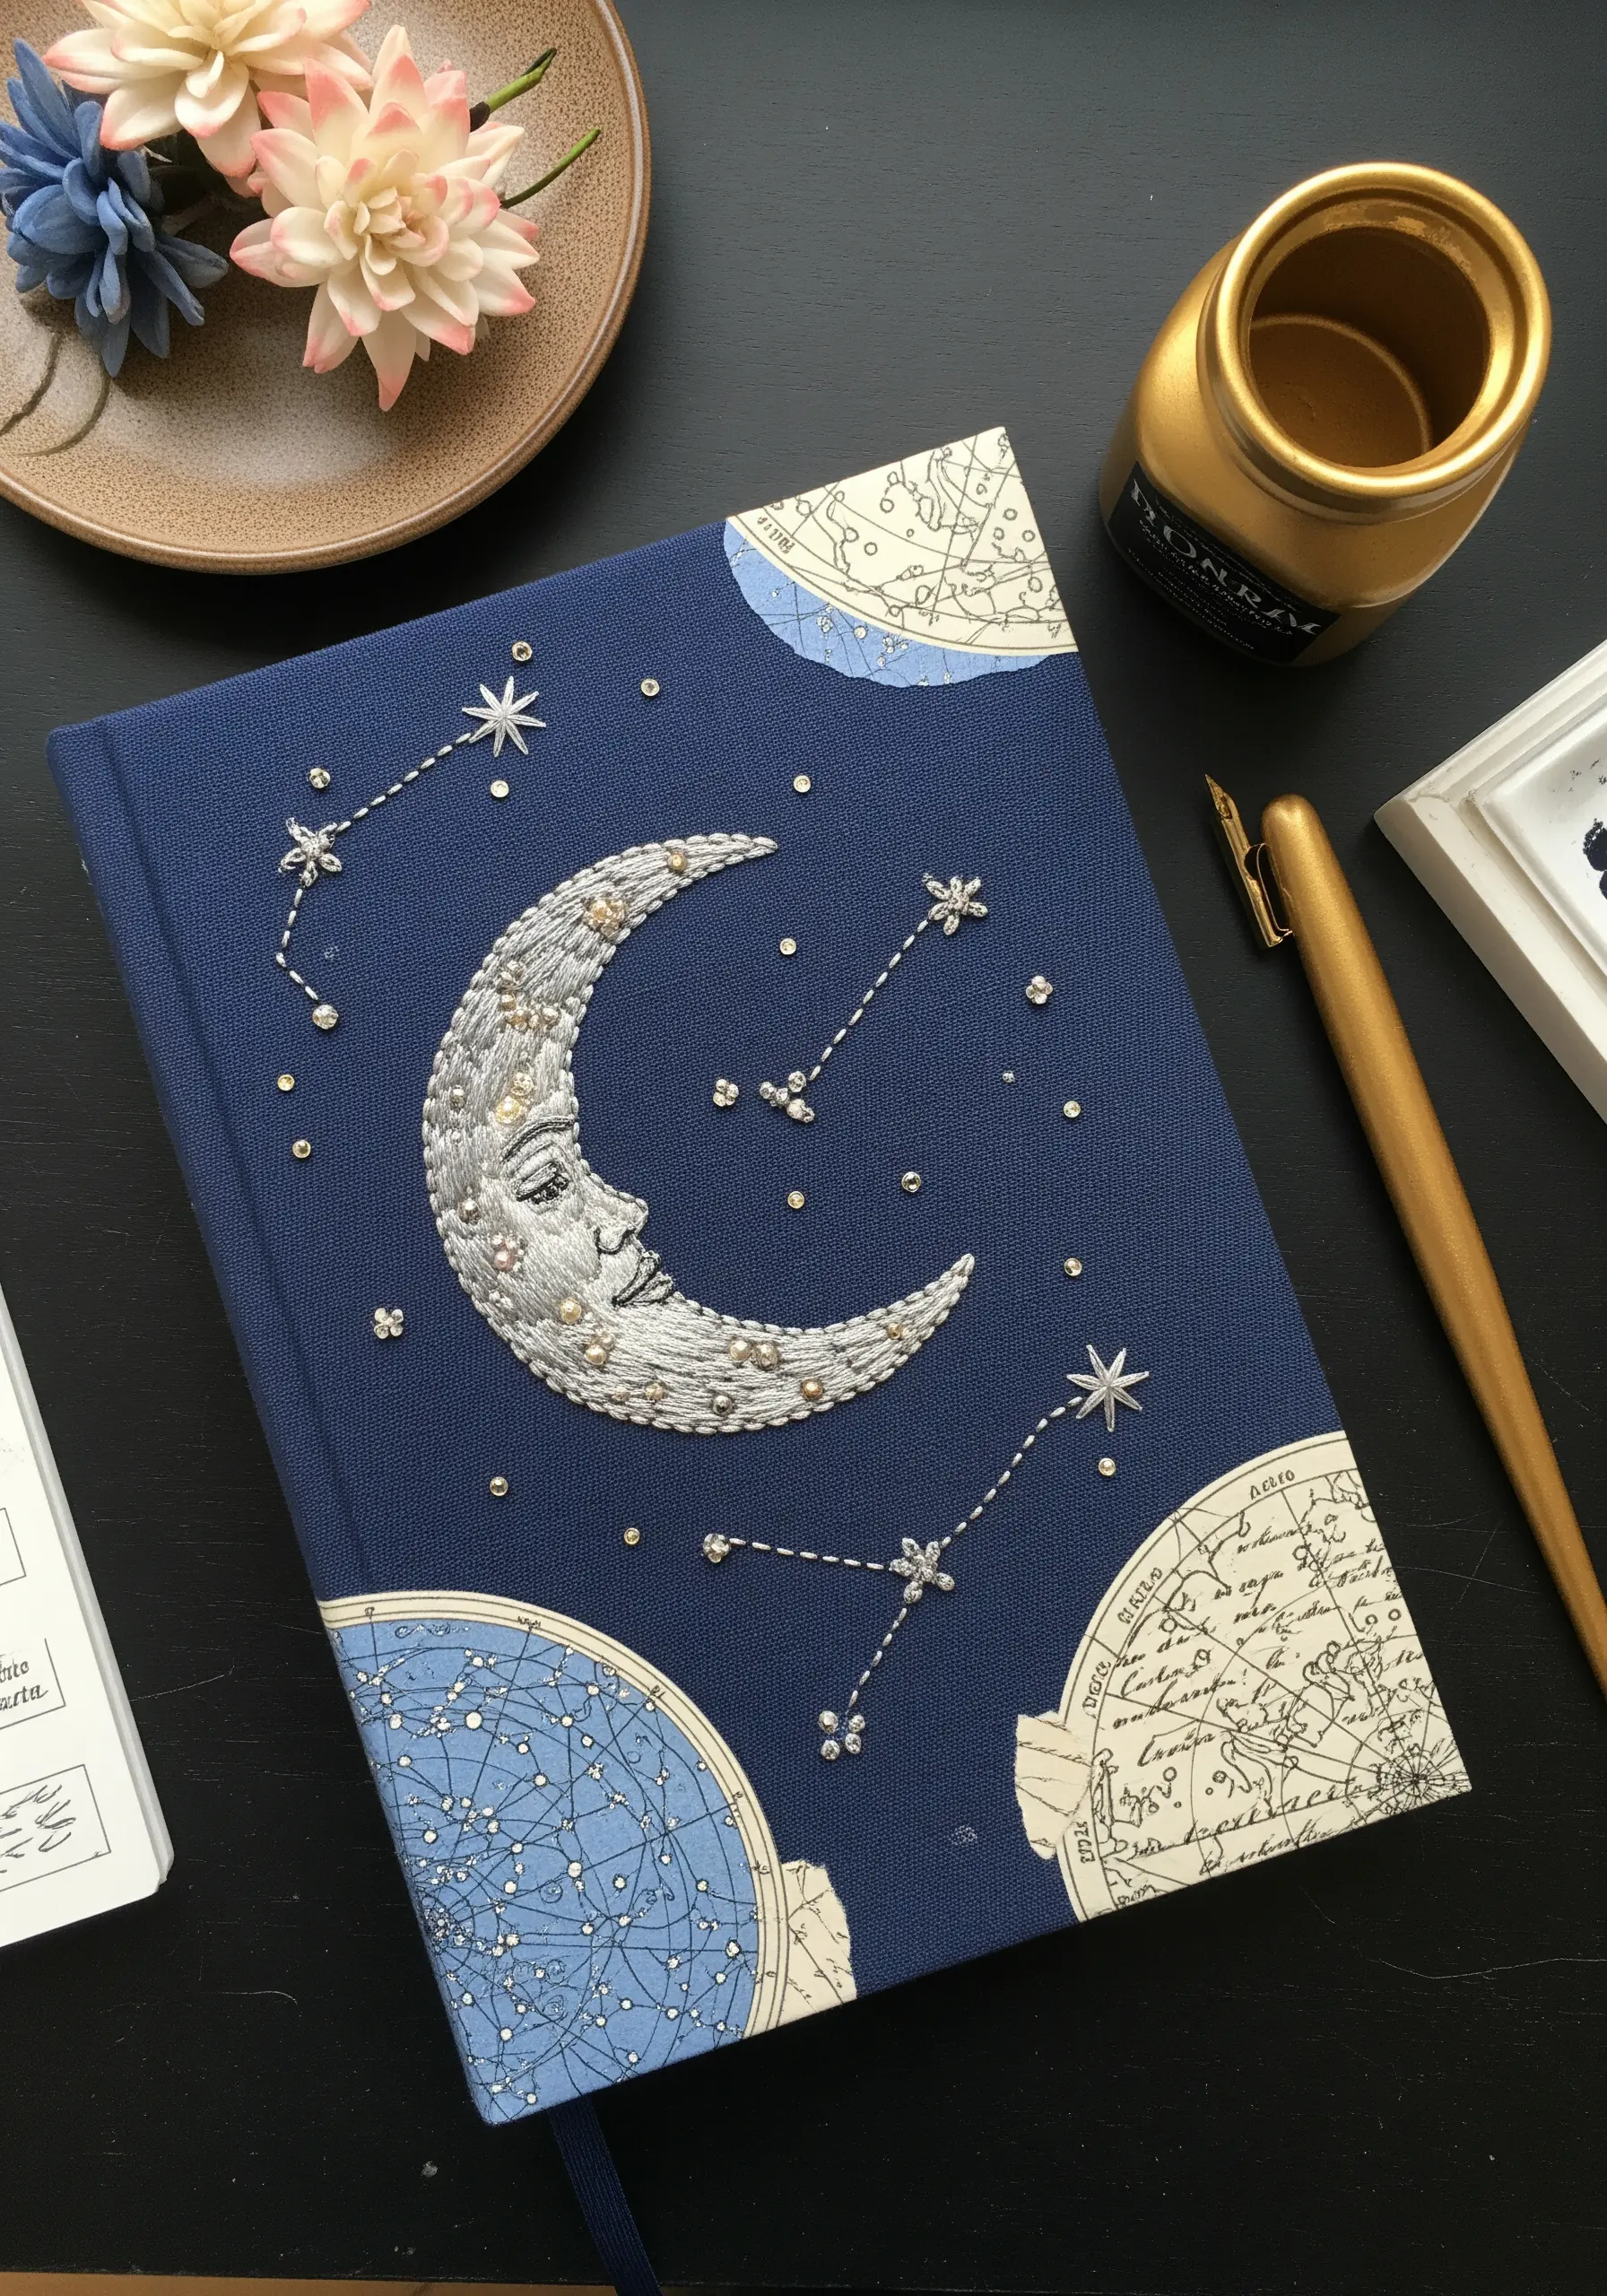
Give your celestial designs a realistic shimmer by blending metallic and standard cotton threads.
Fill the body of the moon using a directional satin stitch, mixing one strand of silver metallic floss with one strand of light gray cotton.
This combination tames the often-unruly nature of metallic thread while creating a subtle, sophisticated luster rather than a flat shine.
For the constellations, use a single strand of metallic thread for sharp lines, and secure tiny silver beads with a single, taut backstitch to represent stars.
This ensures they sit flat against the fabric and won’t snag.
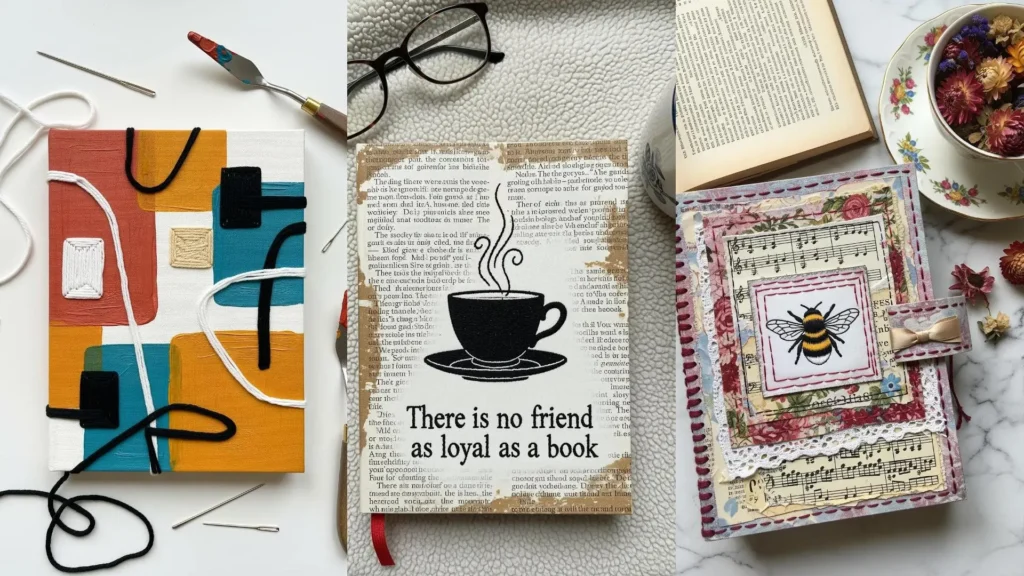
3. Create Abstract Compositions with Painted Canvas and Couched Yarn
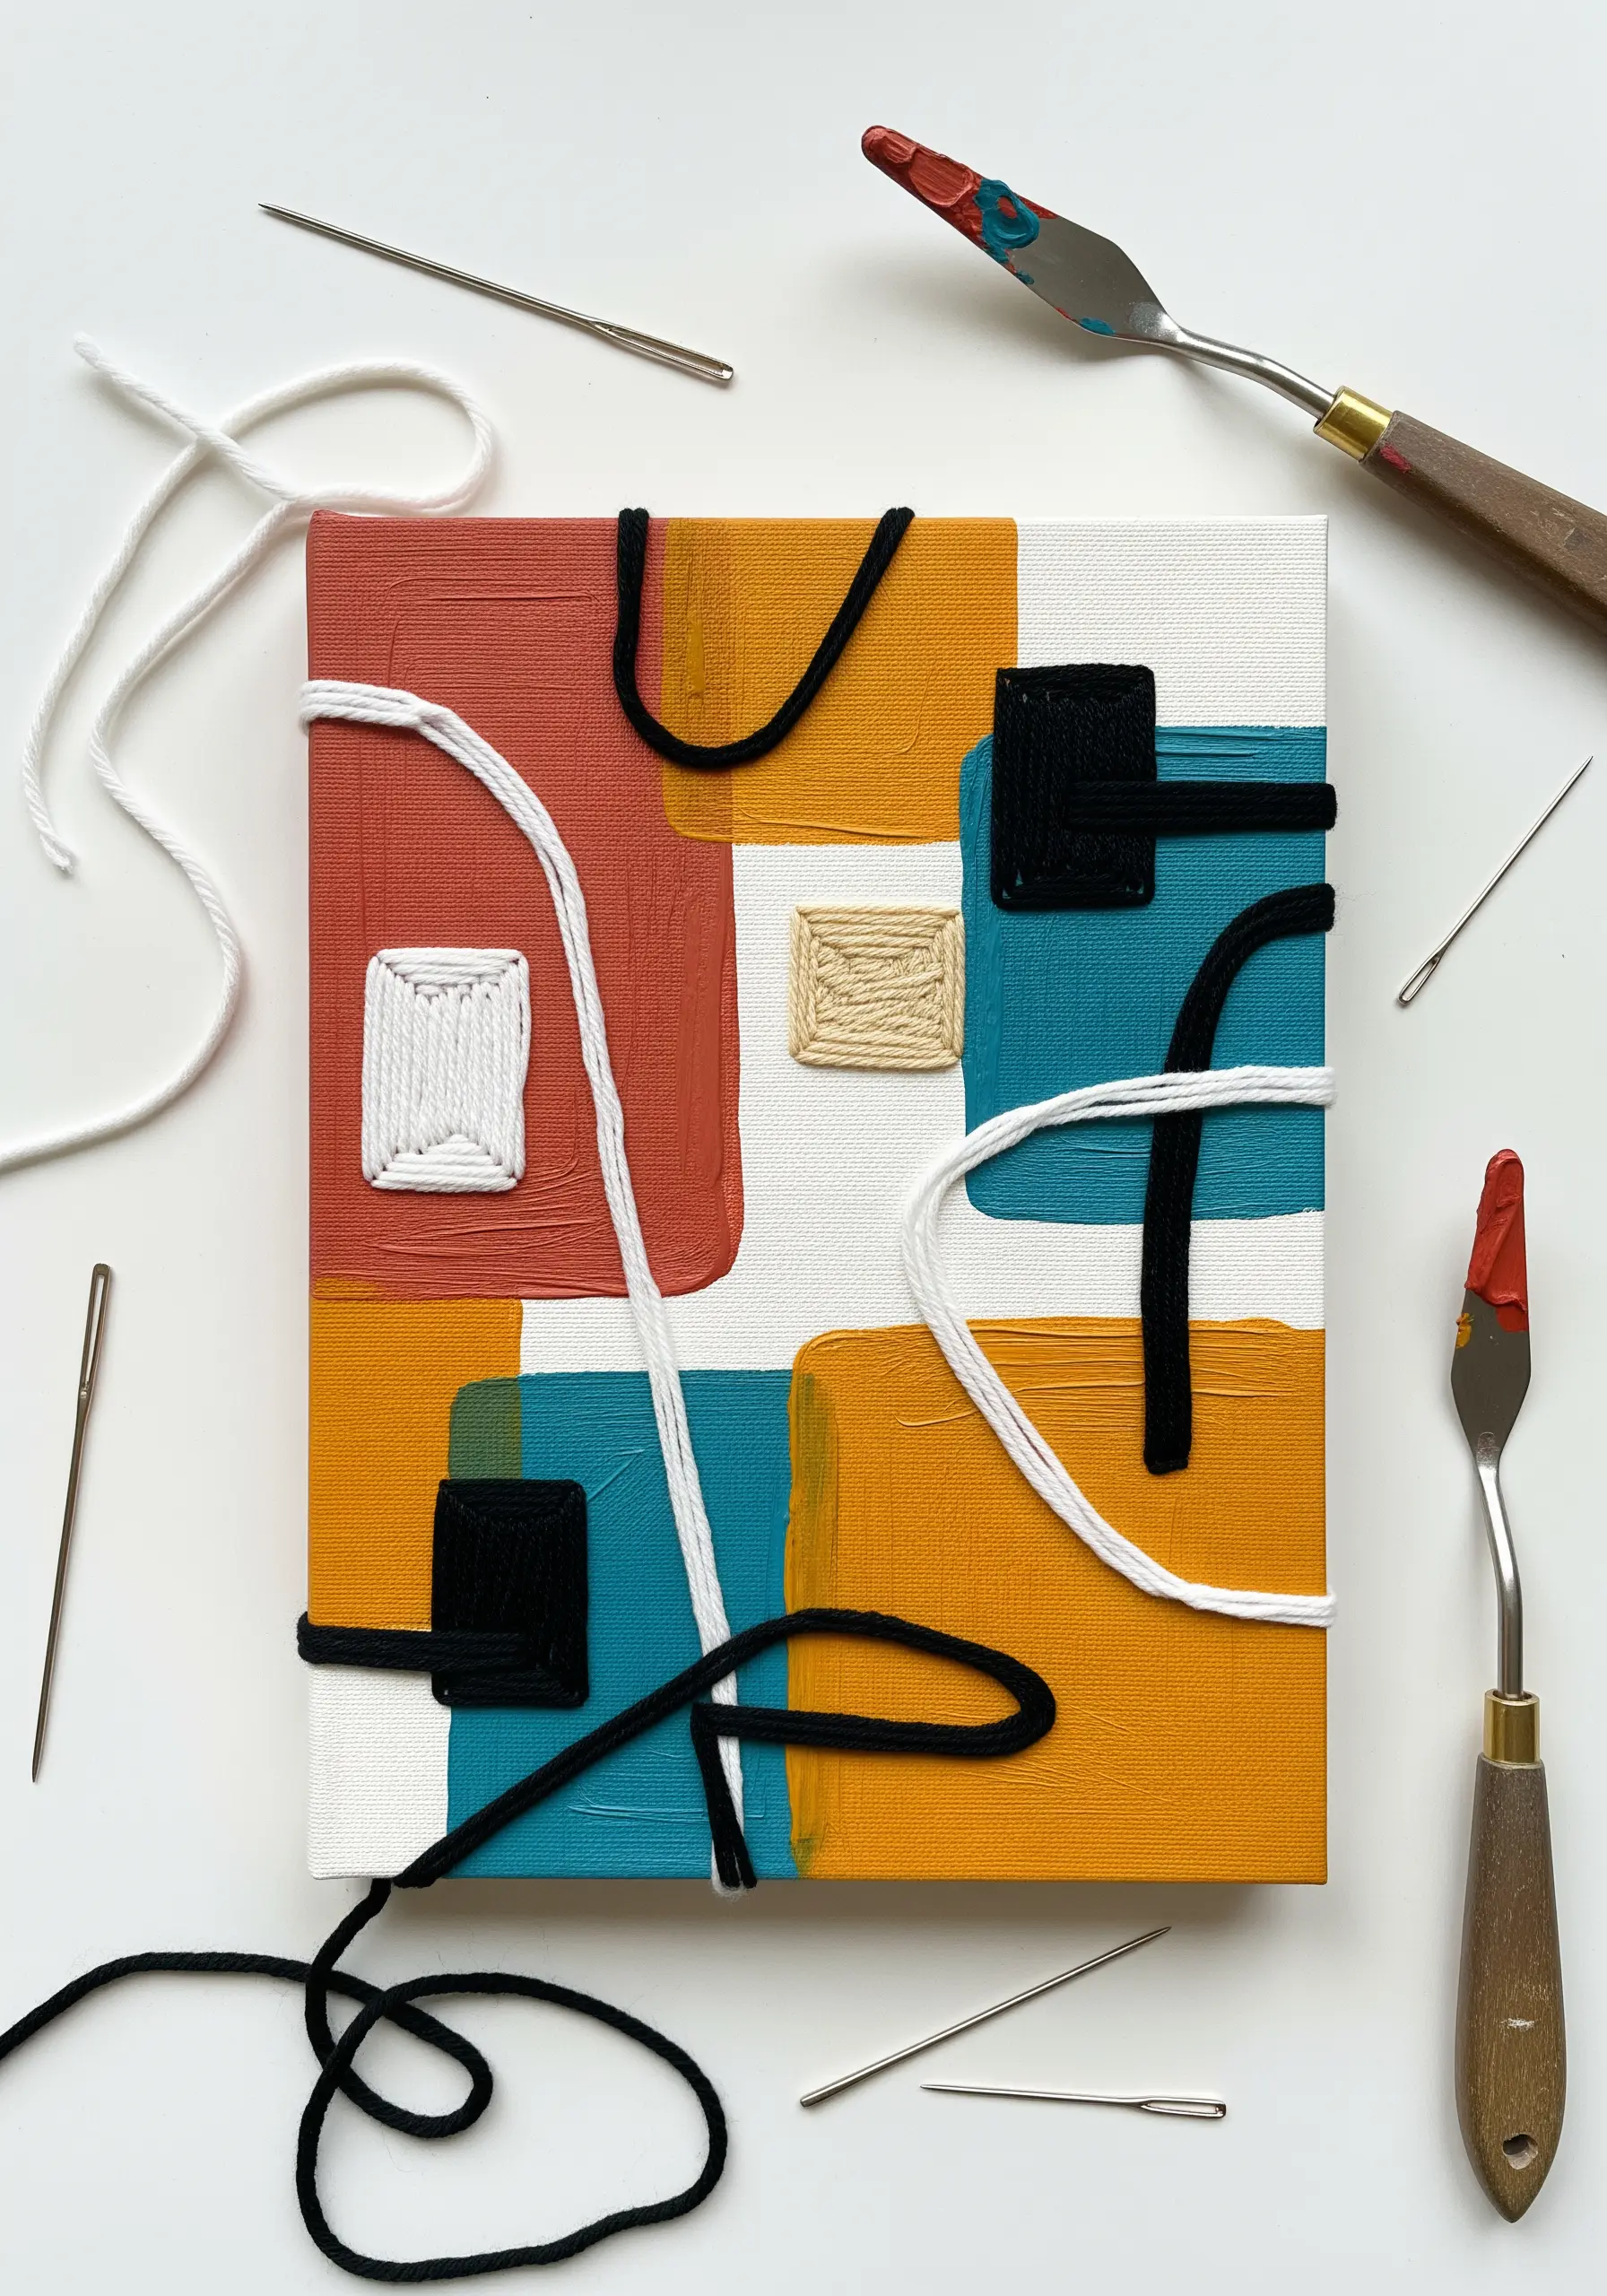
Turn your journal cover into a piece of modern art by combining a painted canvas with sculptural yarn accents.
Start by painting abstract color blocks onto a small canvas panel using acrylics.
Once dry, arrange thick yarn or fiber cord over the painted surface and secure it using a couching stitch—a technique where a thinner, matching thread tacks down the thicker fiber from above.
This method allows you to create bold, graphic lines and textures that would be impossible with traditional embroidery stitches, turning your journal into a tactile piece of abstract thread art.
4. Unify Collages with a Decorative Edge Stitch
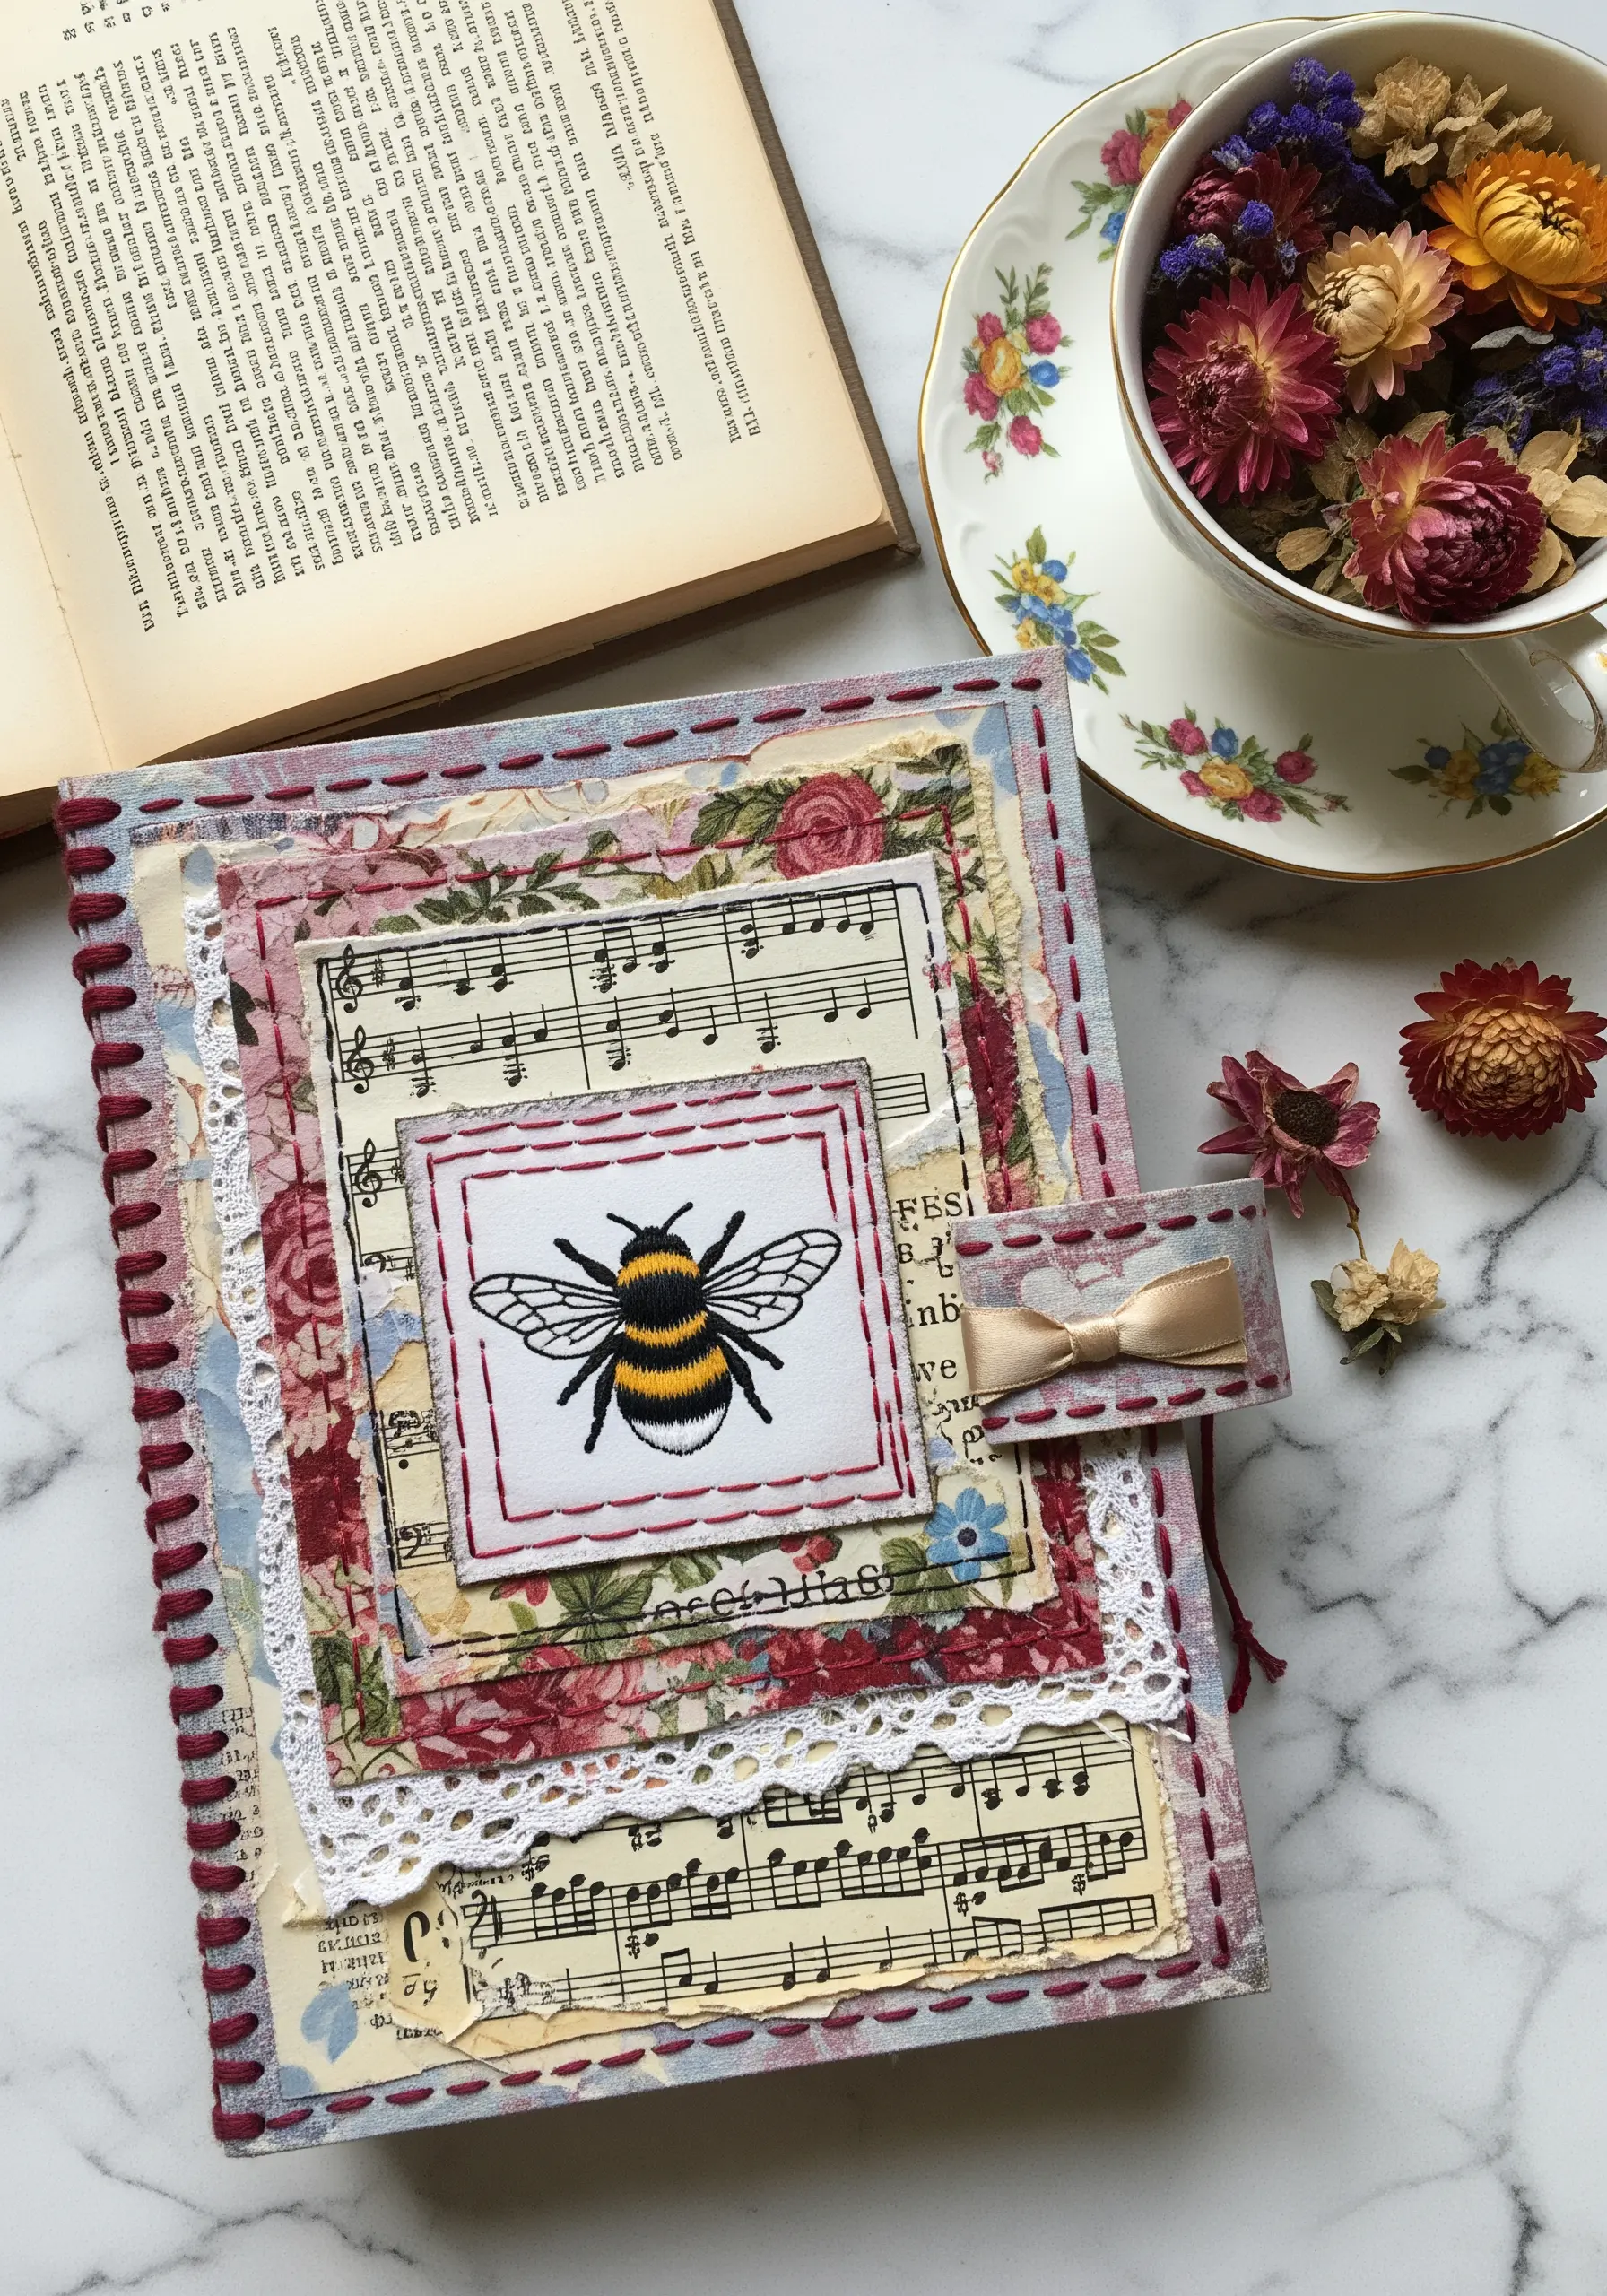
When layering multiple paper and fabric elements, a consistent edge stitch is key to creating a cohesive, polished look.
After arranging your vintage papers, lace, and fabric scraps, use a decorative blanket stitch or a simple cross stitch around the border of each piece.
This not only secures the layers but also frames each element, drawing the eye inward and preventing the composition from looking chaotic.
Choose a thread color that complements the overall palette—like this deep burgundy—to tie all the disparate pieces of your fabric collage together.
5. Sculpt Ocean Waves with I-Cord and Seed Beads
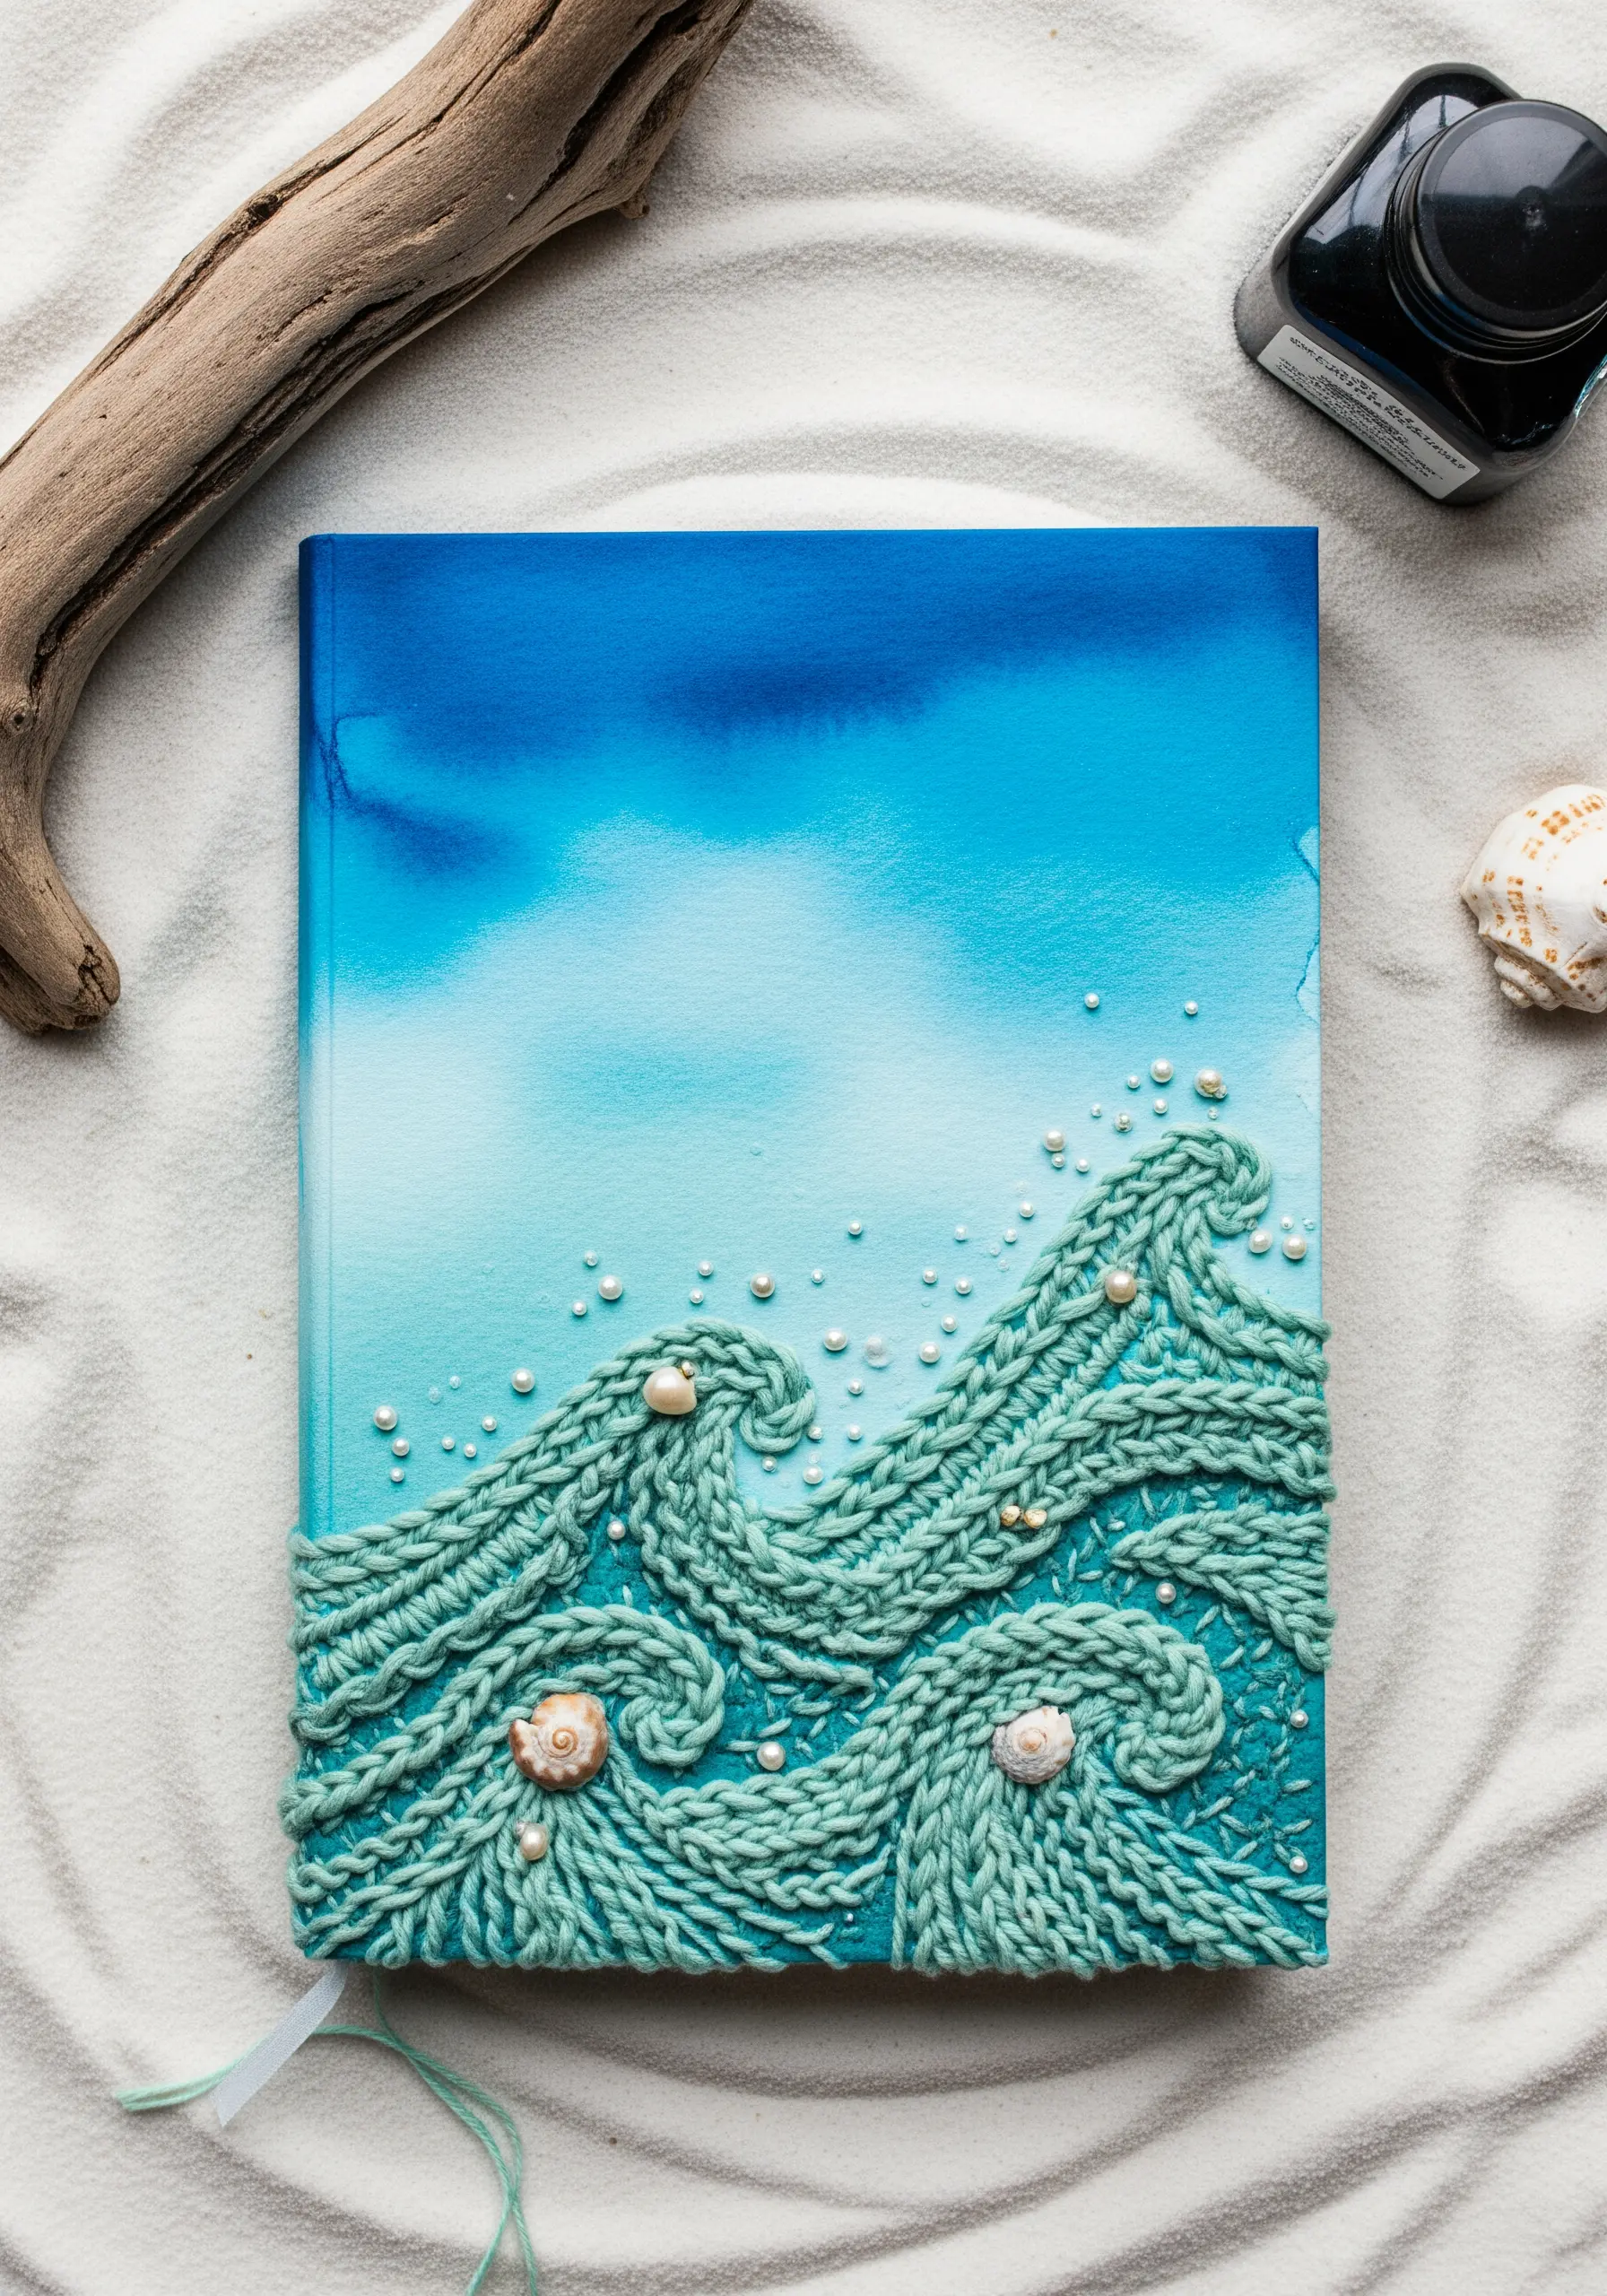
Mimic the frothy texture of ocean waves by attaching knitted I-cord or thick crochet chains directly onto your journal cover.
Knit a long tube of I-cord (or crochet a chain) using a soft, seafoam-green yarn.
Arrange the cord in swirling wave patterns on your pre-painted watercolor cover and stitch it down securely with a matching, finer thread.
Scatter tiny white or iridescent seed beads and a few small shells where the waves crest, stitching each one down individually to represent sea spray and foam.
This is one of the most effective mixed-fiber embroidery techniques for creating dynamic, three-dimensional texture.
6. Define Animal Fur with Directional Satin Stitch
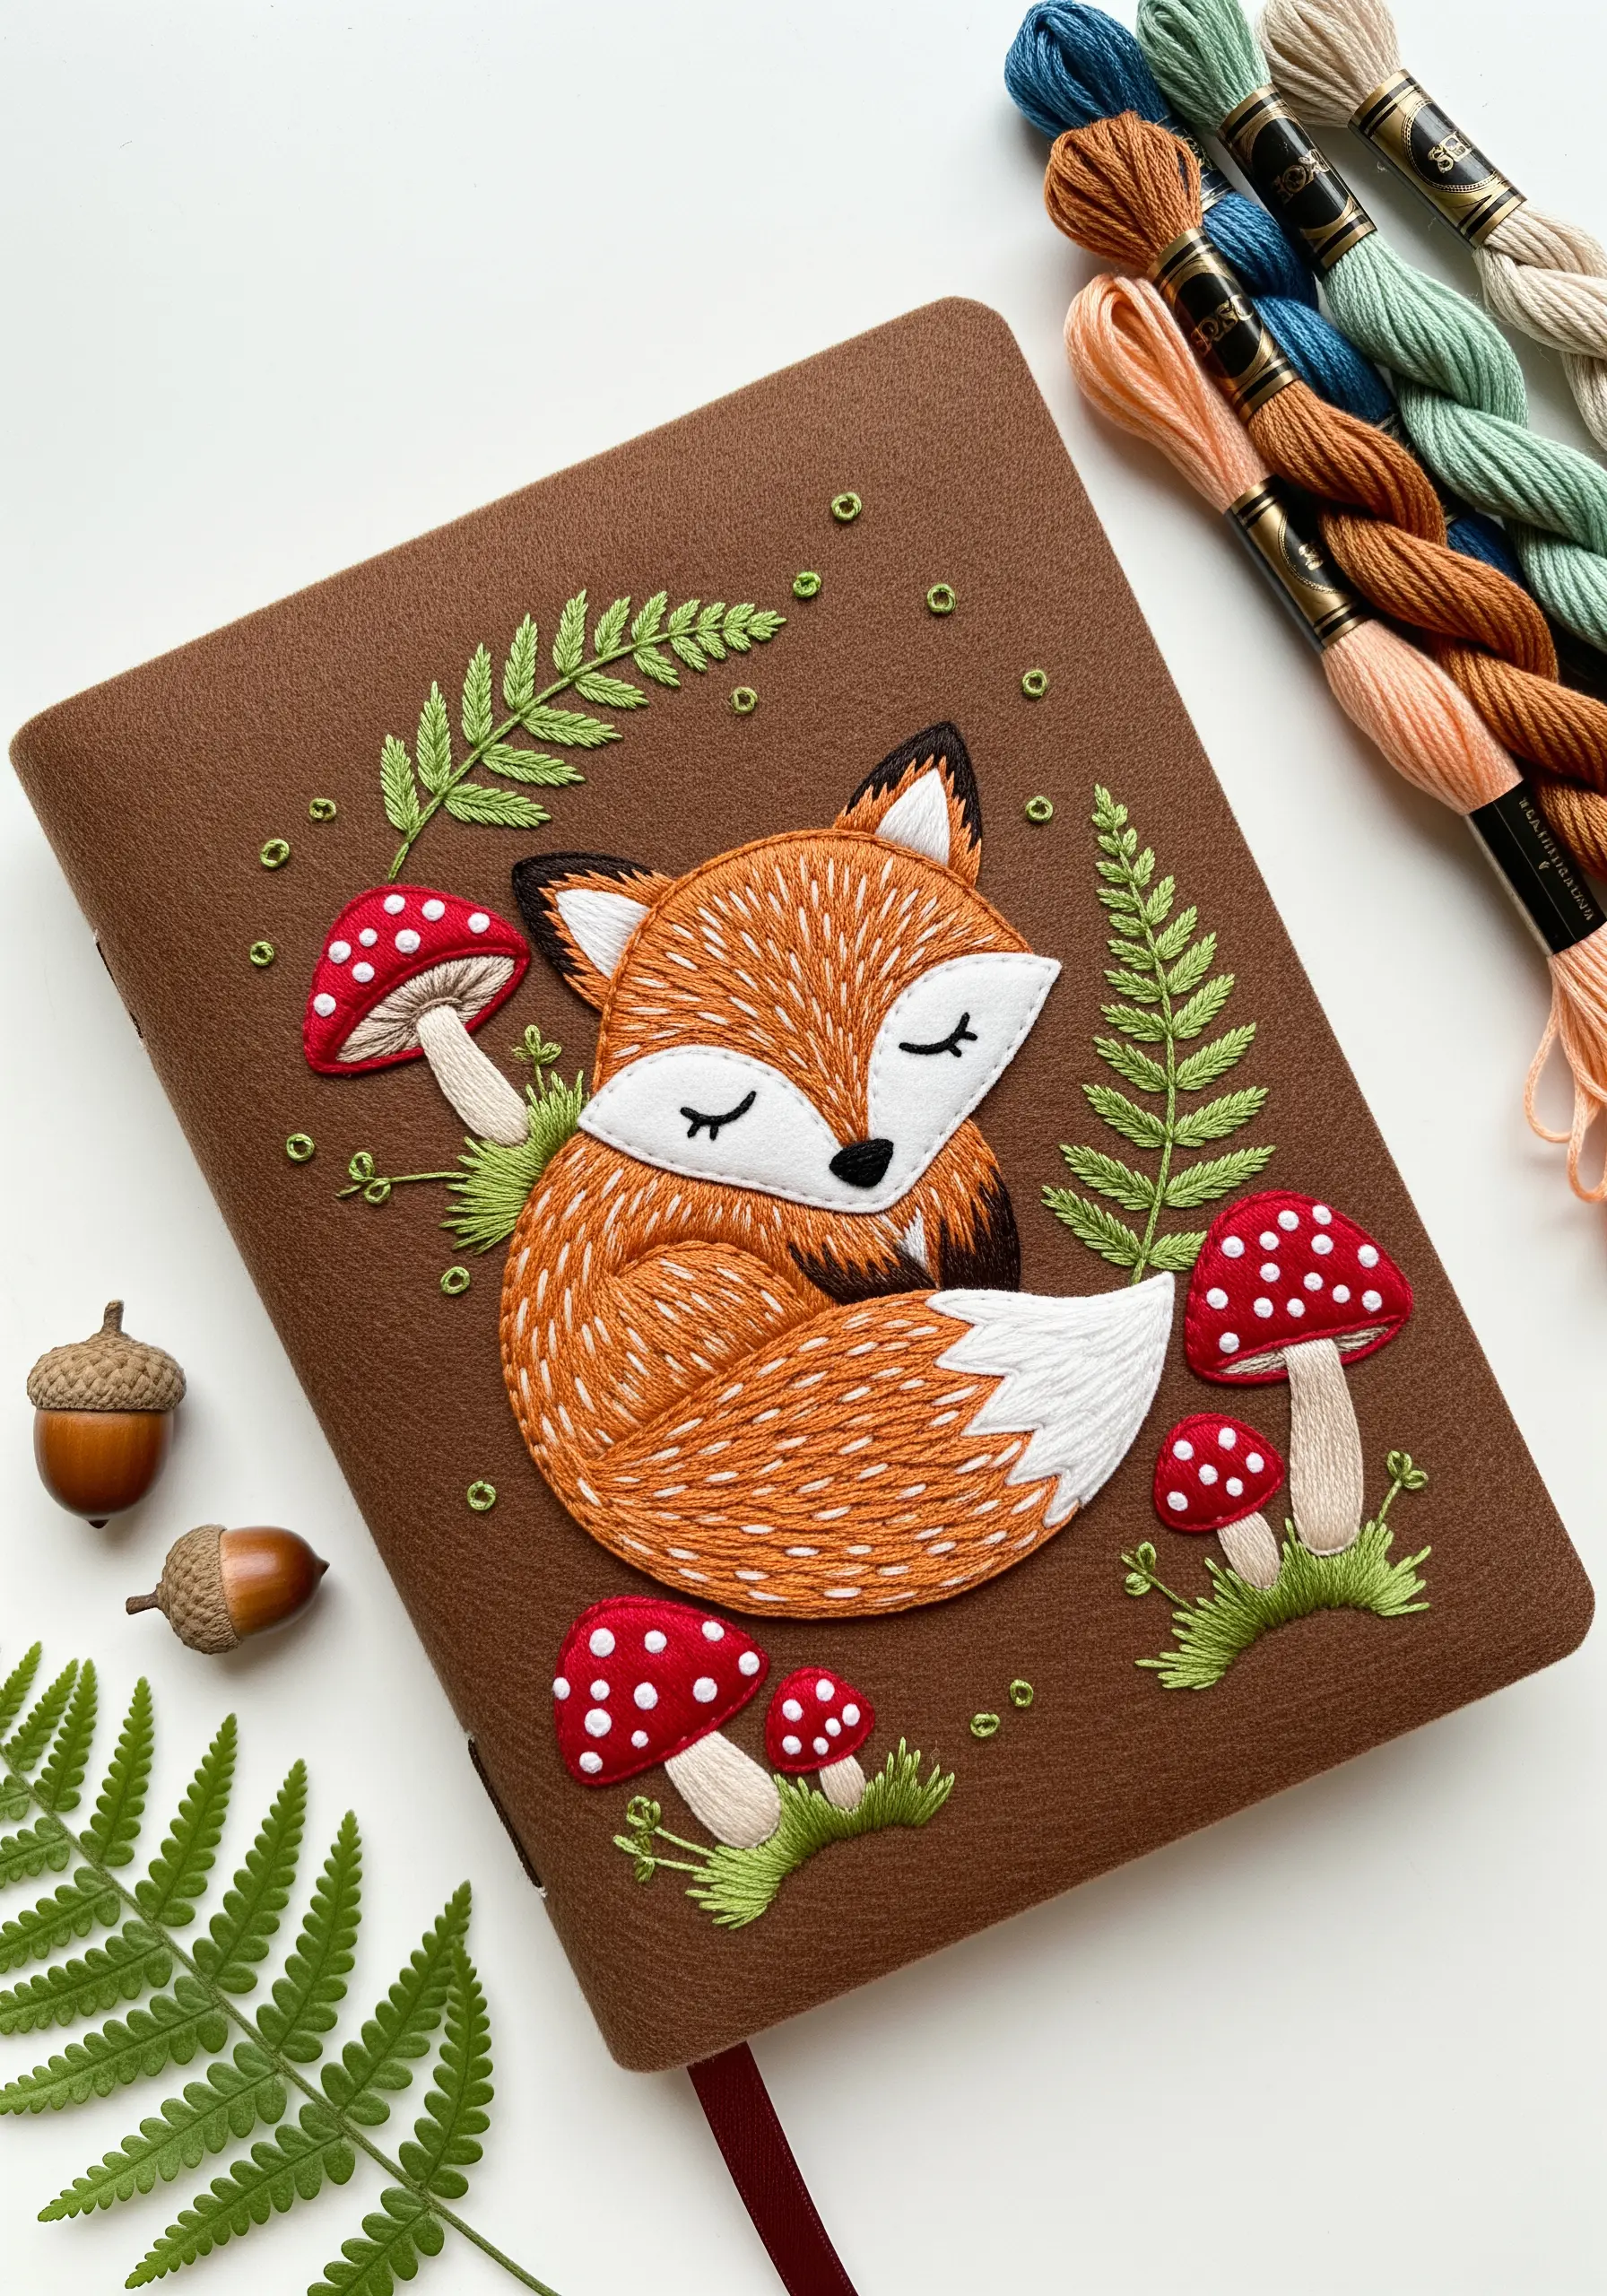
To prevent your embroidered animals from looking flat, use the direction of your satin stitches to create the illusion of fur and form.
Before you begin, lightly sketch lines on your fabric to map the direction in which the fur grows on a real fox—outward from the nose, curving around the body, and down the tail.
By angling your long-and-short fill stitches to follow these paths, you create movement and realism without adding complex shading.
Always outline each section with a split stitch first to ensure a crisp, clean edge that makes the entire design pop.
7. Trace Journeys with a Delicate Backstitch
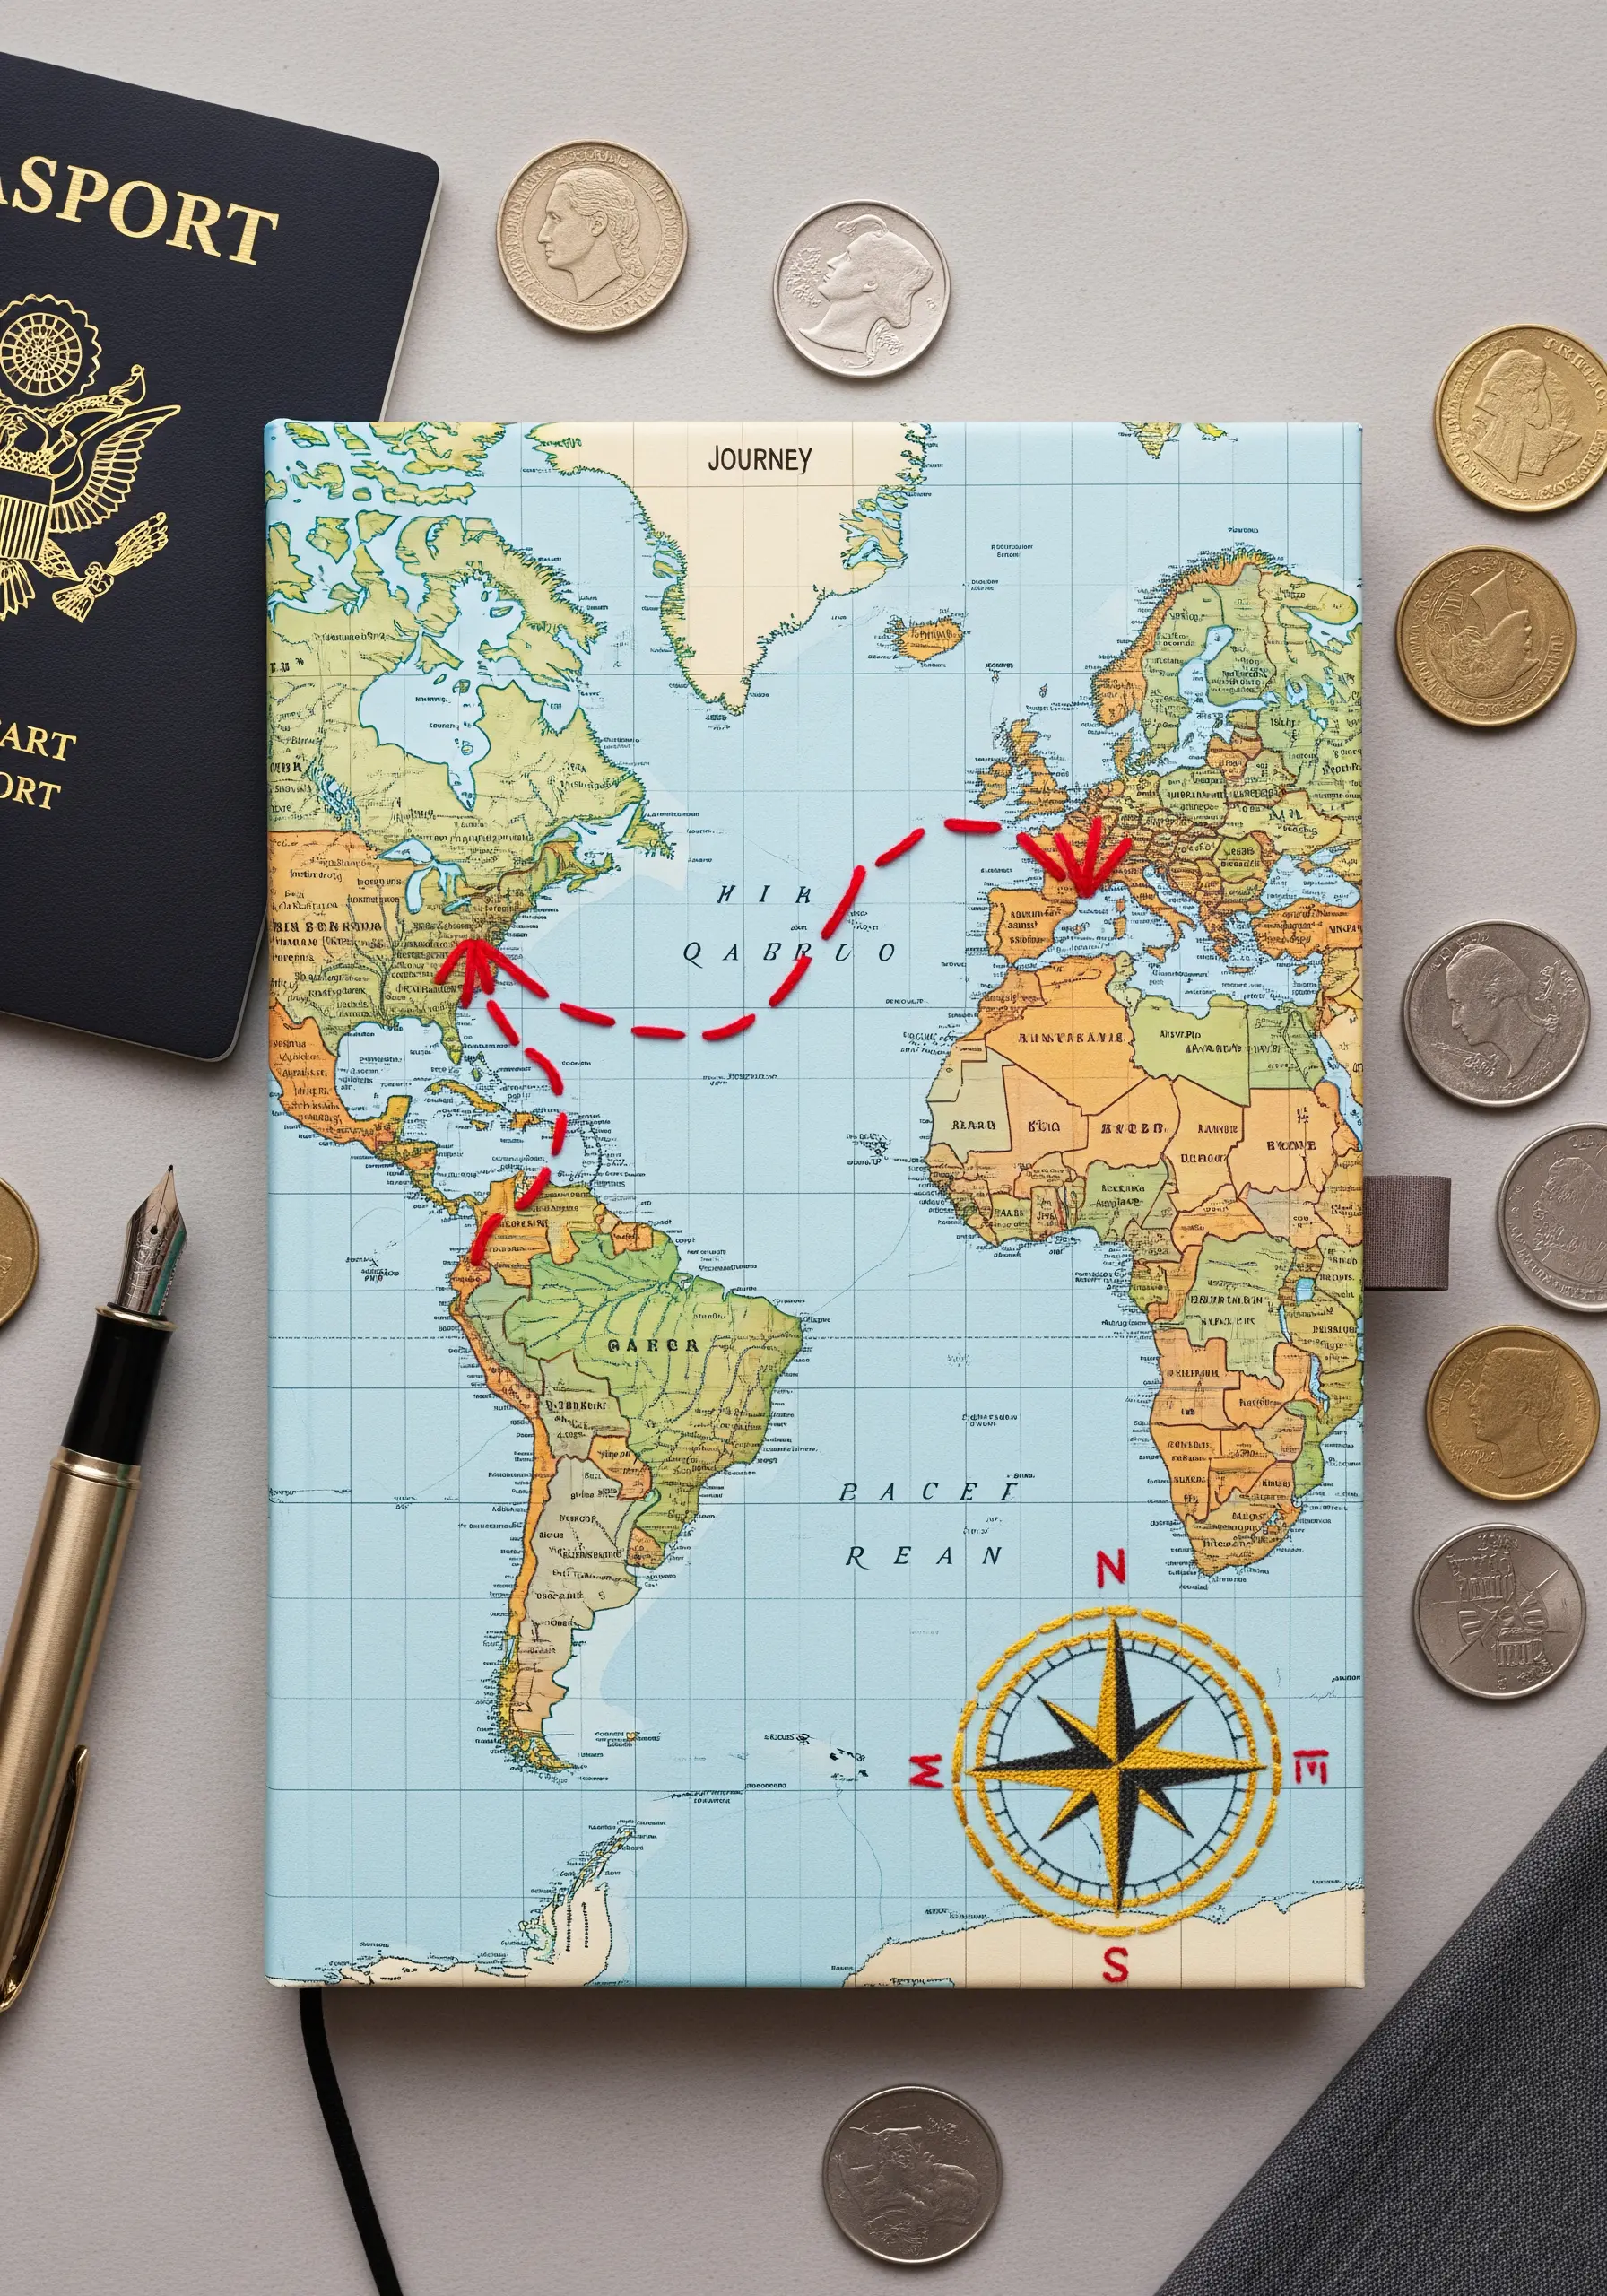
When embroidering on a detailed surface like a map, your stitching should enhance, not overpower, the original design.
Use a single strand of bright red six-strand floss to create a clean, delicate line that stands out visually without obscuring the countries and cities beneath it.
A simple backstitch is the perfect choice, creating a dashed line that clearly marks a path of travel.
This technique turns a simple journal into a personalized keepsake for your travel-inspired embroidery hoops and projects.
8. Achieve Clean Lines on Hardcovers by Pre-Punching Holes
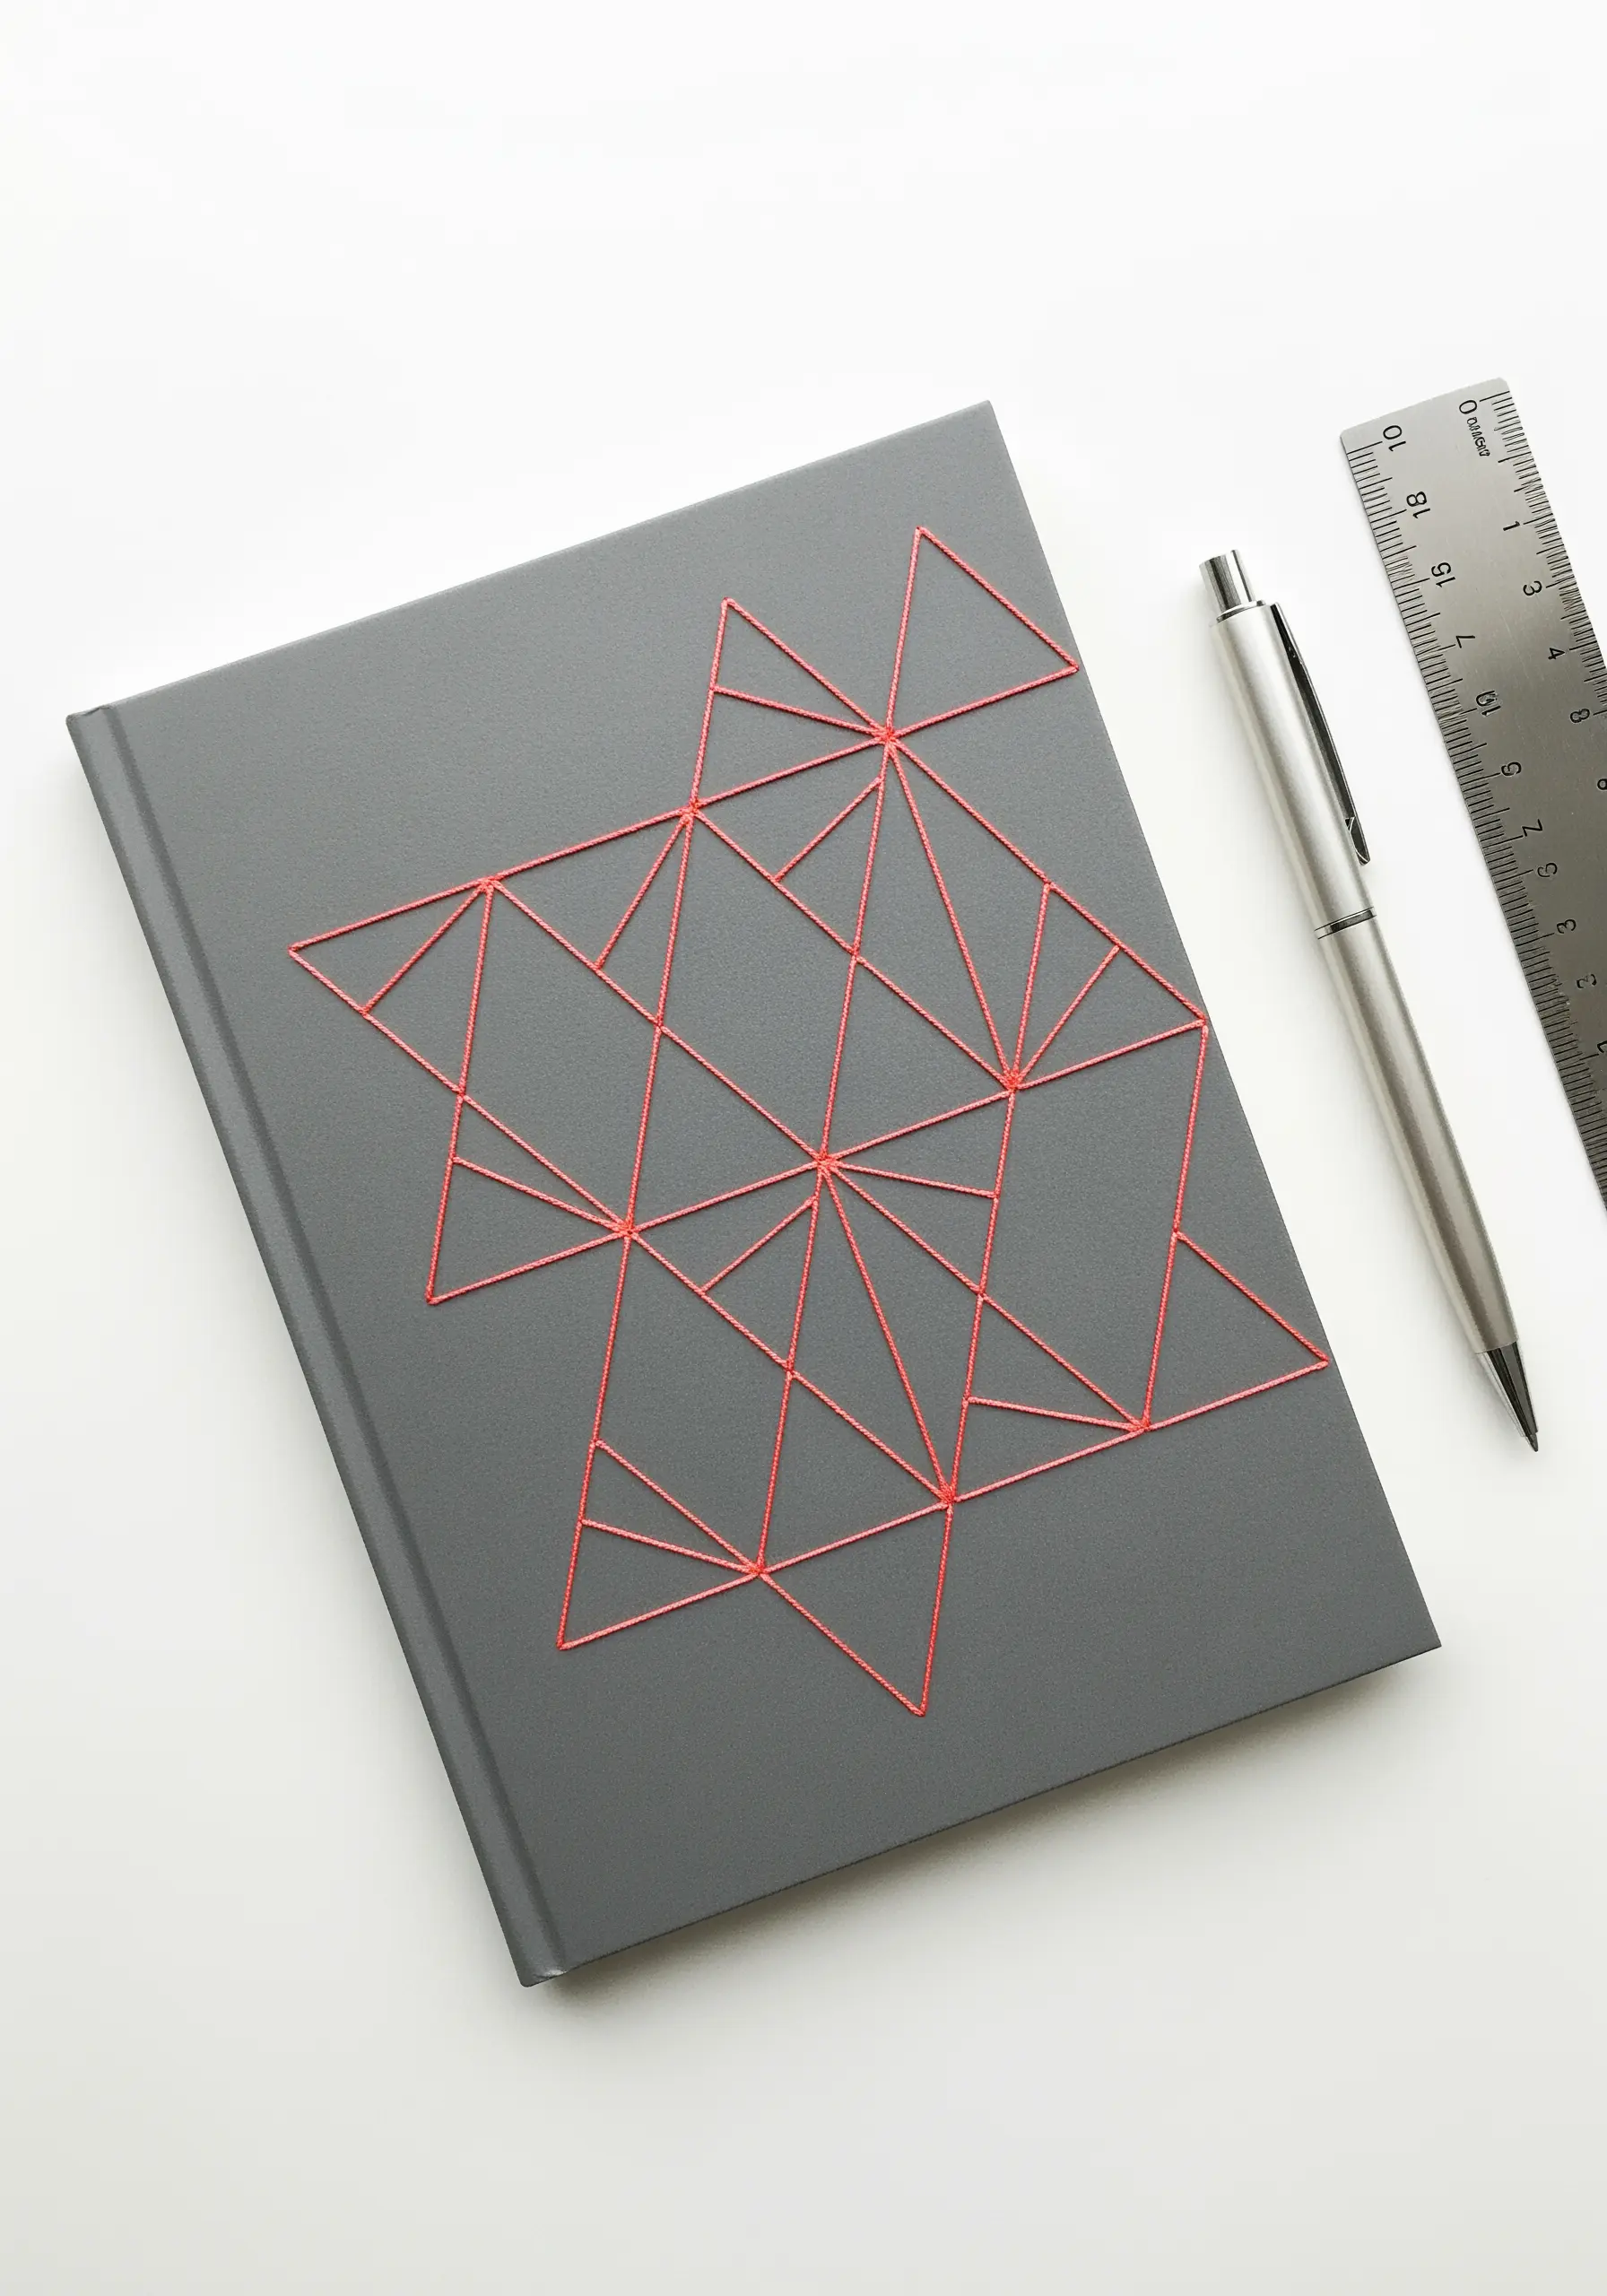
Stitching directly onto a hardcover journal requires a different approach than fabric, but the key to a professional finish is preparation.
Lightly draw your geometric design onto the cover with a pencil.
Using a thumbtack or a bookbinding awl, carefully pre-punch holes at every intersecting point of your design.
This allows you to pass the needle and thread through without damaging the cover or struggling with tension.
Use a strong, smooth thread like perle cotton for taut lines that define your geometric framed embroidery patterns with precision.
9. Build a Textured Garden with Woven Wheels and Bullion Knots
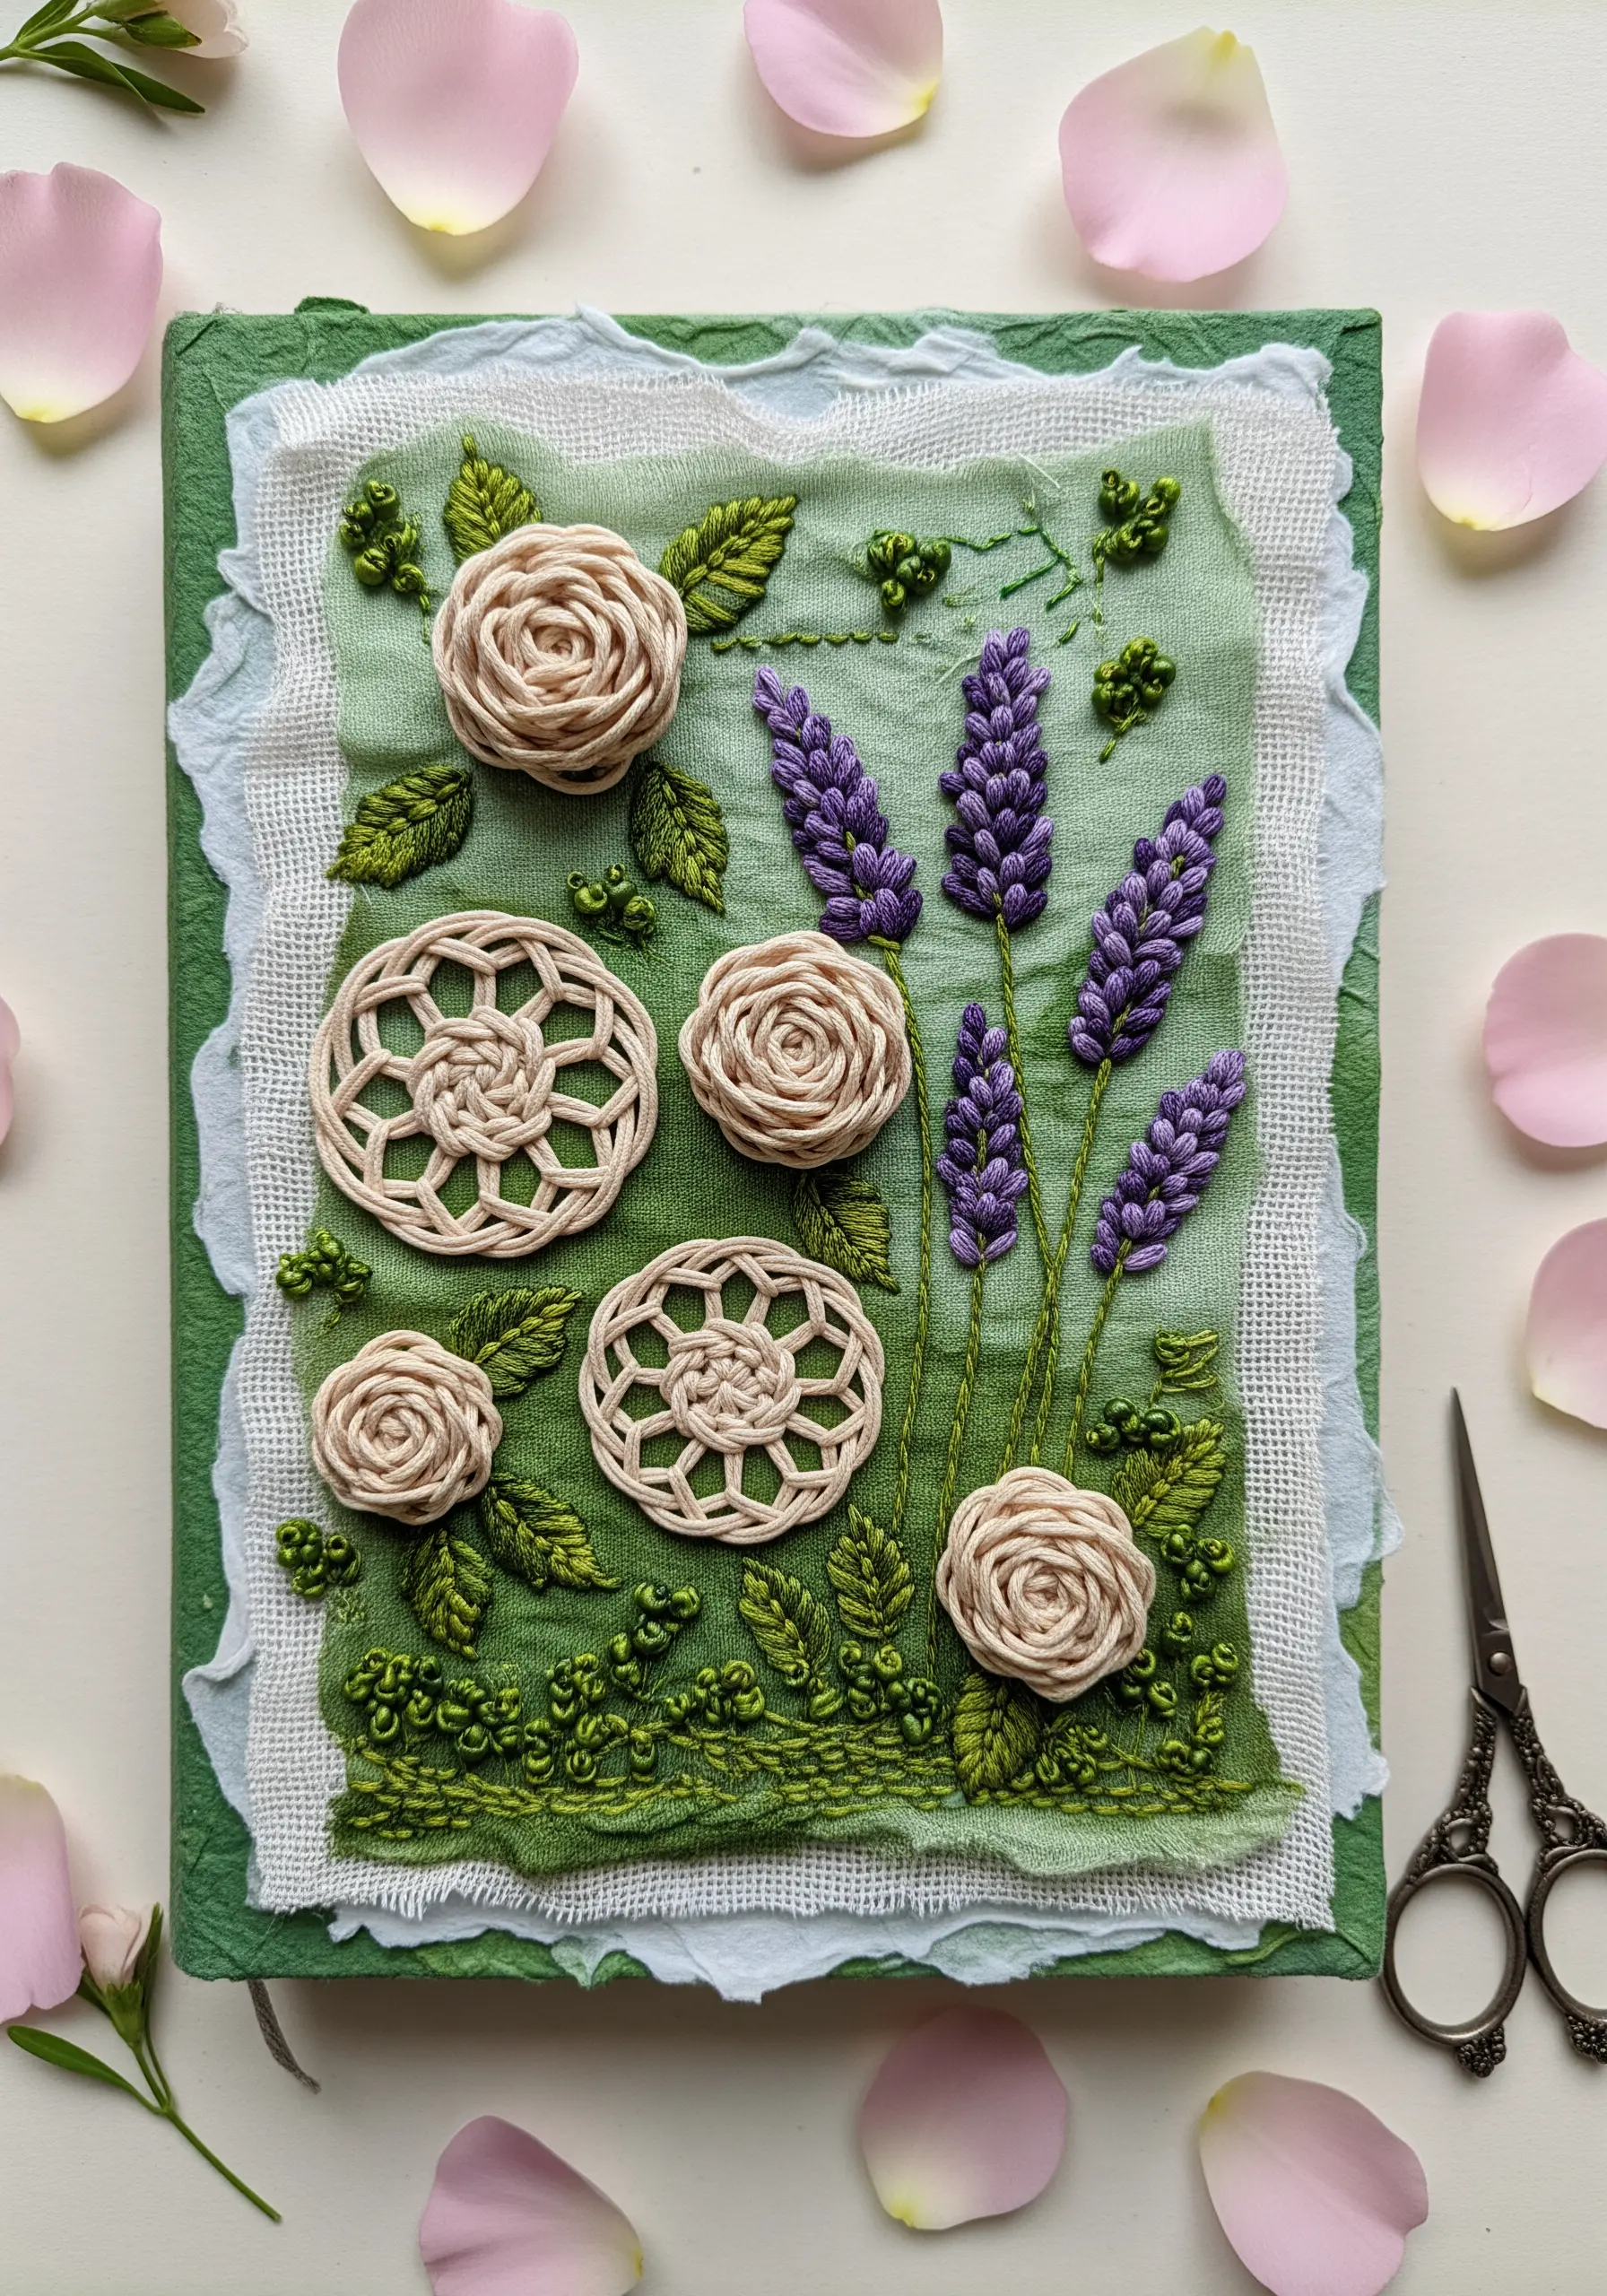
Move beyond flat florals by incorporating highly textural stitches that give your embroidery a sculptural quality.
Create plush, dimensional roses using the woven wheel stitch (also known as the wagon wheel rose stitch).
For the lavender stalks, use bullion knots, varying the number of wraps around the needle to create buds of different sizes for a more organic look.
Combine these with simple leaf stitches and French knot clusters to create a rich, tactile garden that invites touch, making it one of the most satisfying 3D floral embroidery techniques to master.
10. Integrate Embroidery on Layered Paper Cutouts
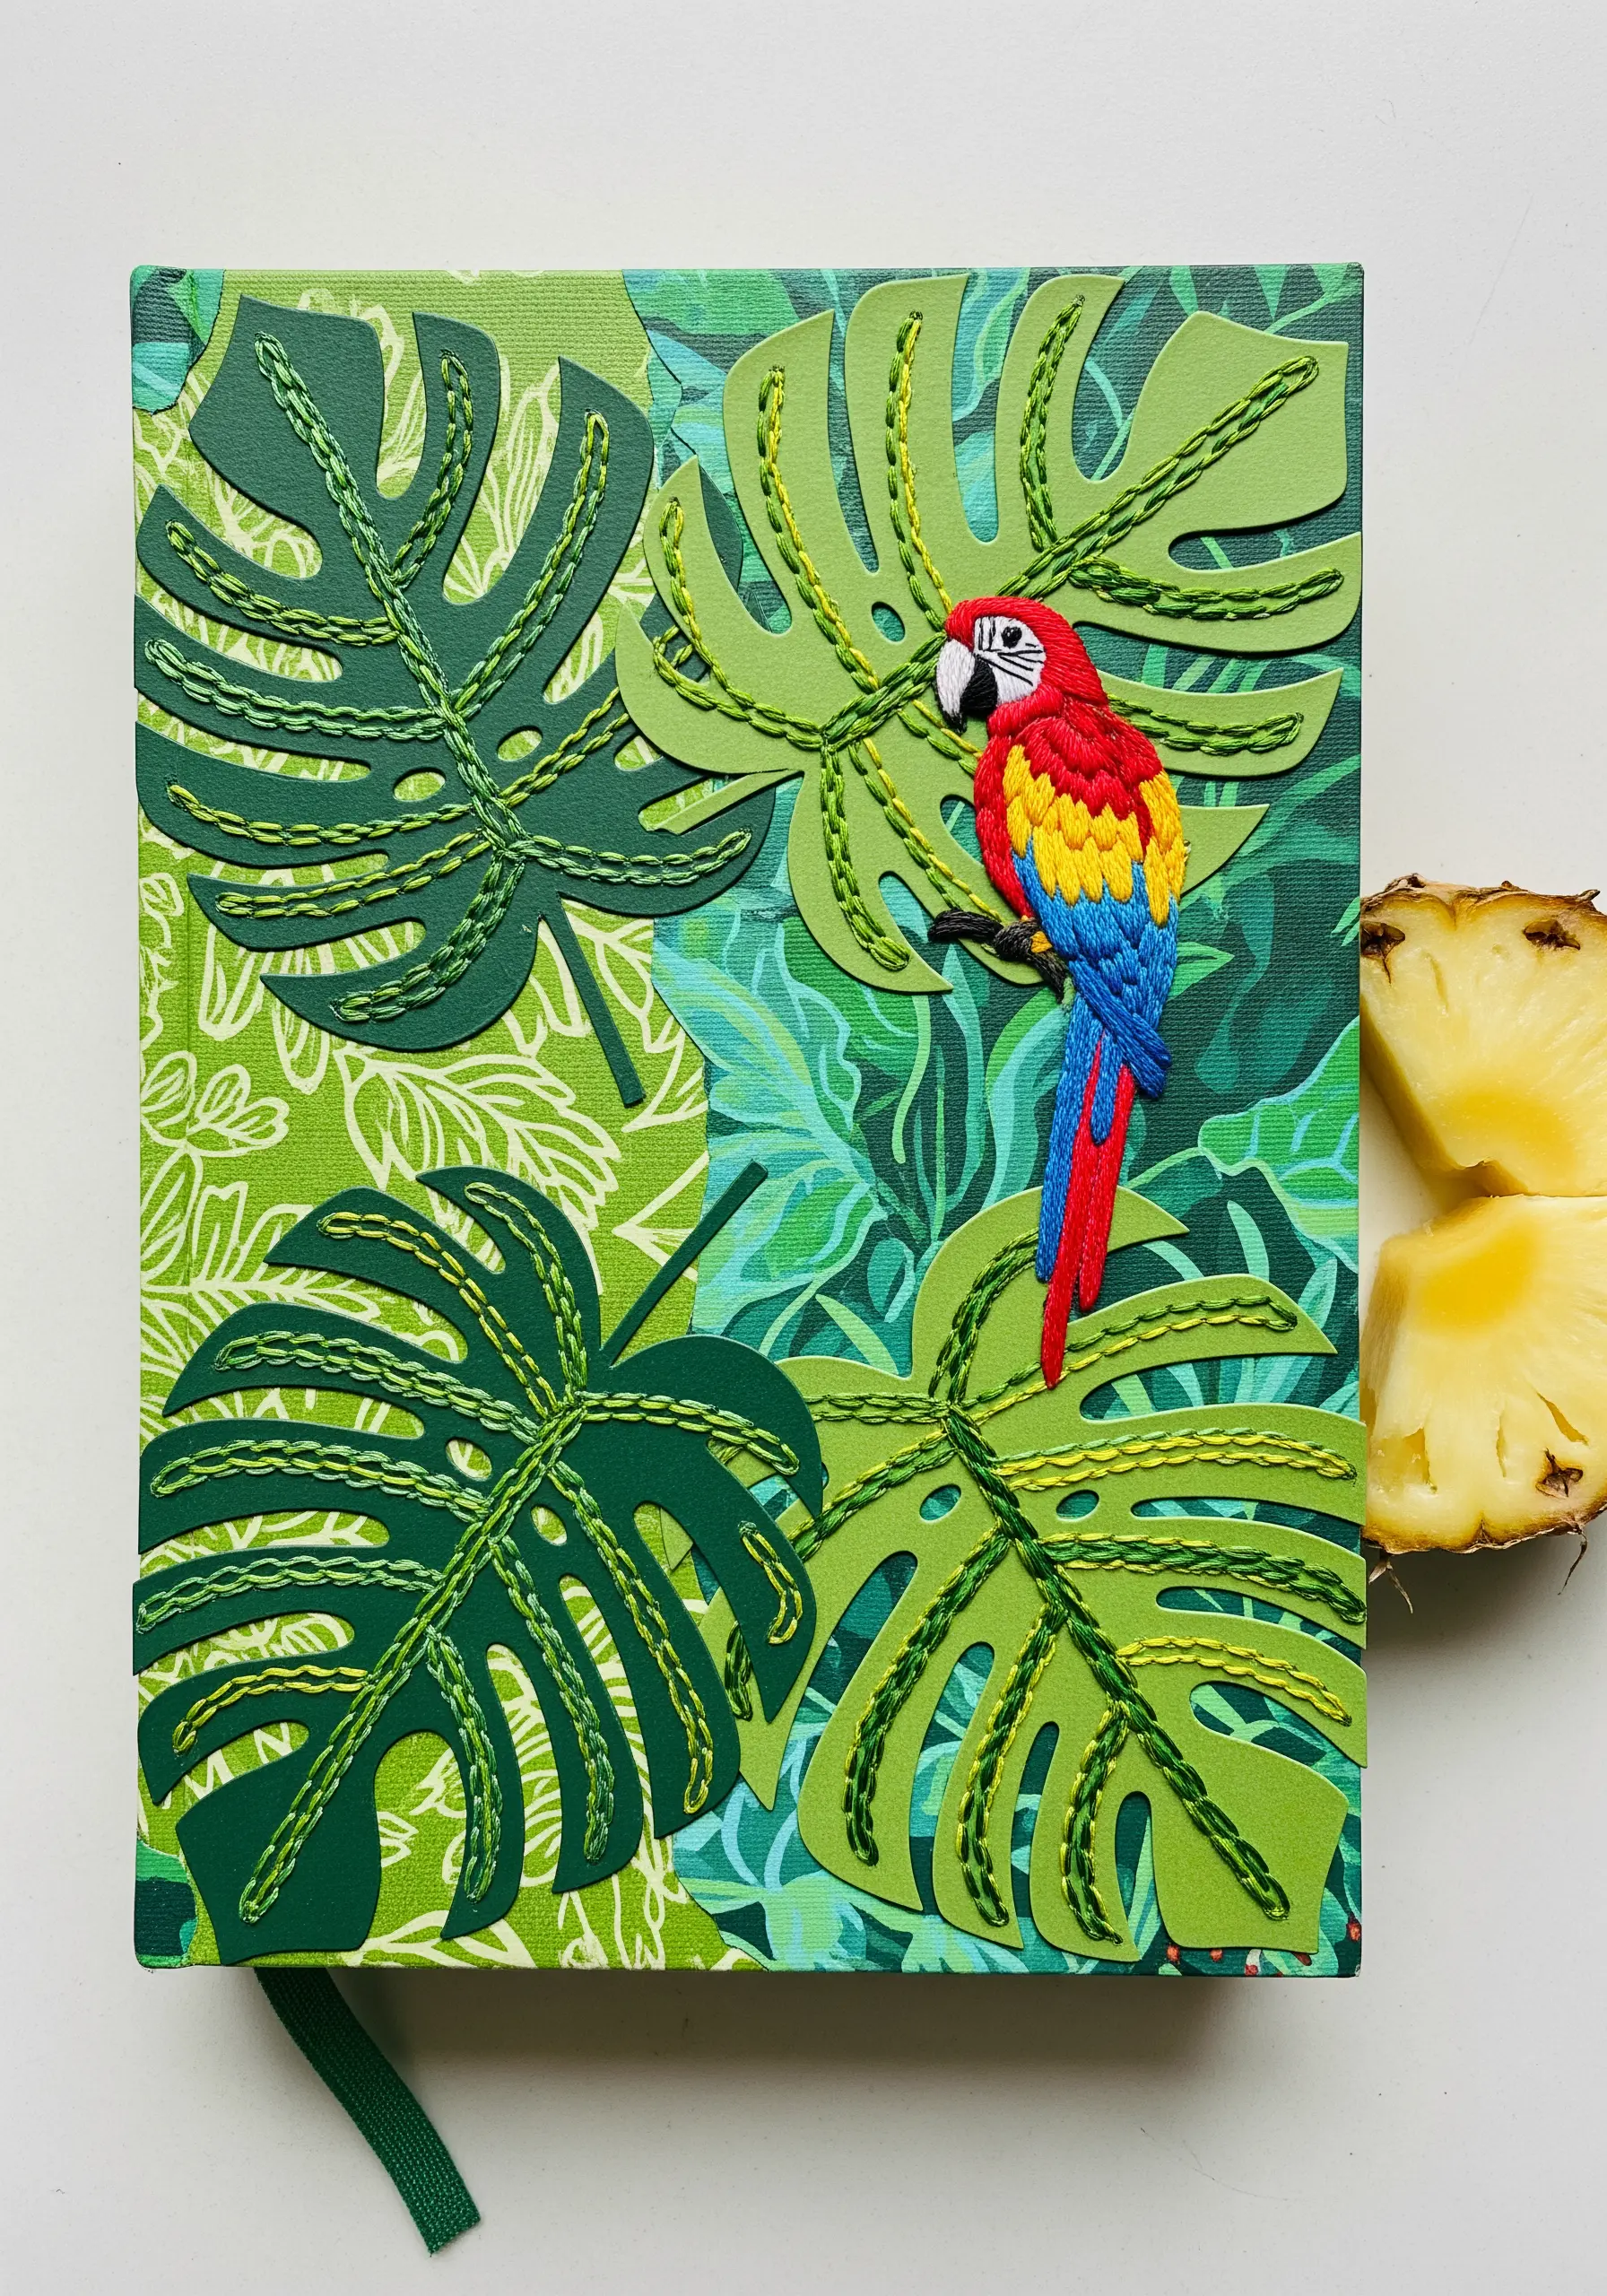
Combine the precision of papercraft with the texture of embroidery for a vibrant, multi-layered design.
Cut your monstera leaf shapes from different shades of green cardstock.
Before gluing them down, use a simple backstitch or running stitch in a contrasting green thread to add vein details.
This subtle stitching adds a handcrafted feel that elevates the paper cutouts.
Reserve the more detailed long-and-short stitch for the focal point—like this colorful parrot—to ensure it stands out against the leafy background.
11. Create a Crisp Silhouette with Appliqué on Paper
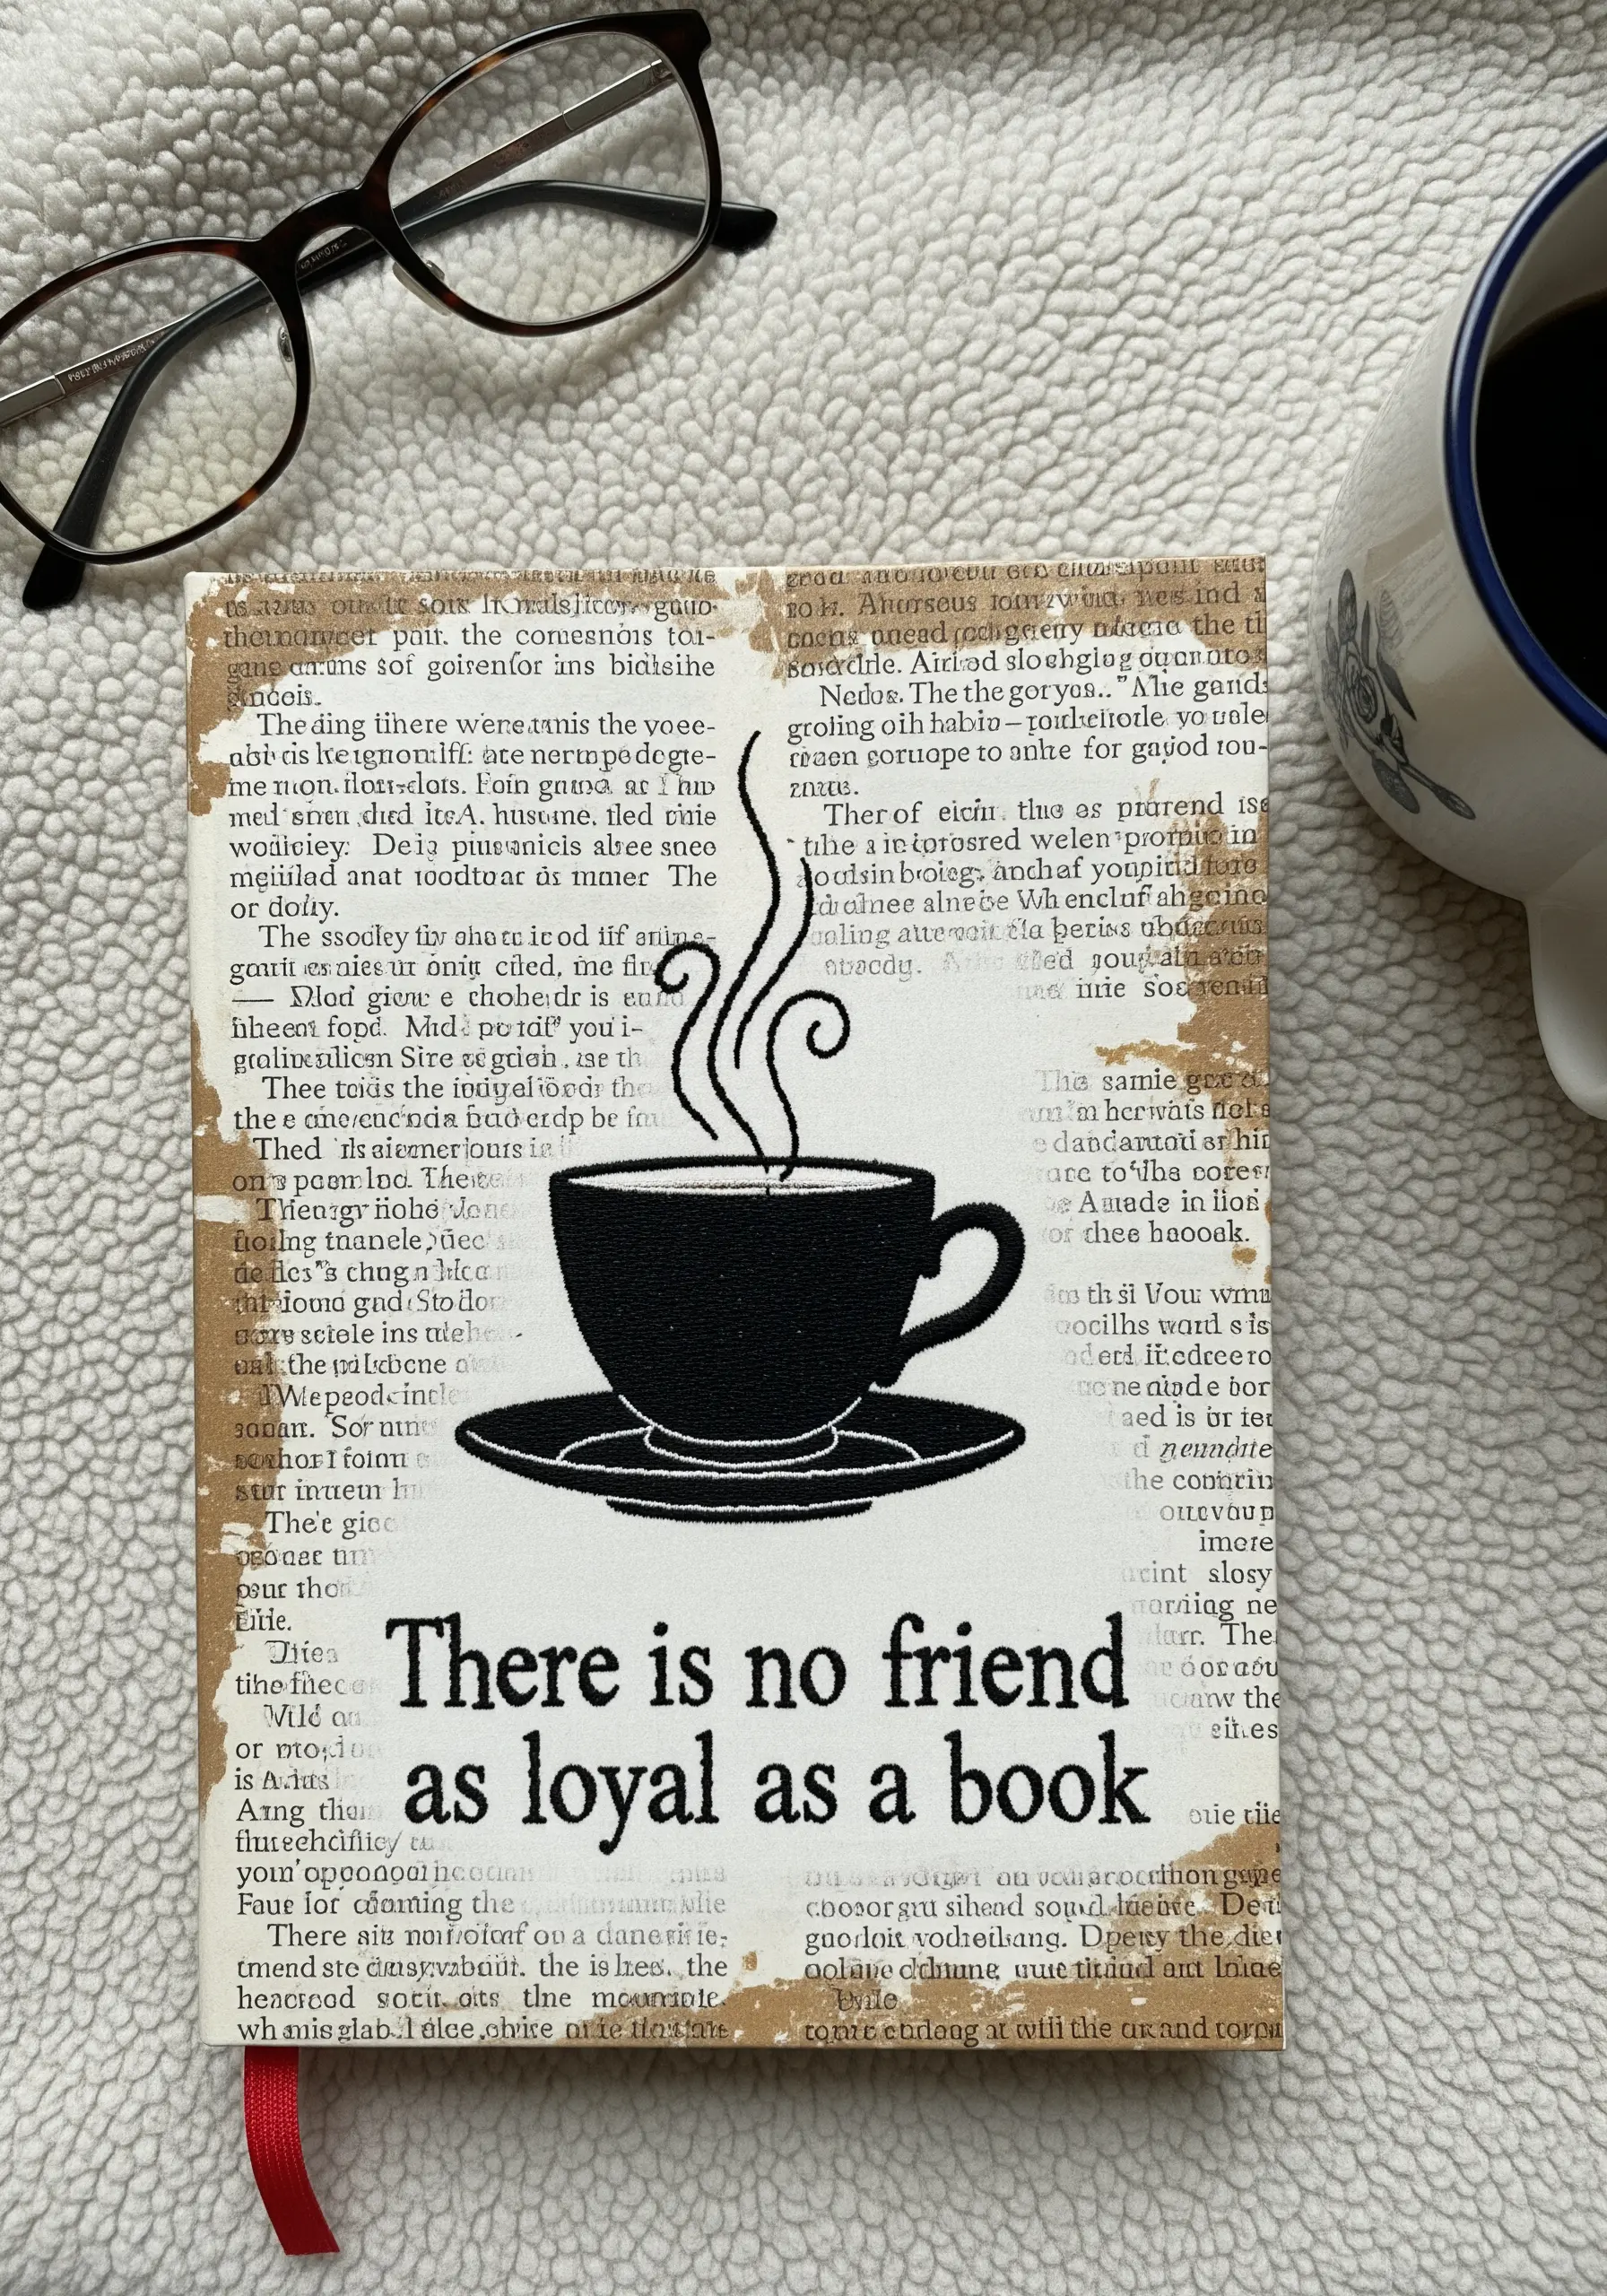
For bold, graphic shapes on a paper surface, appliqué is a faster and cleaner alternative to dense satin stitch.
First, iron a sheet of lightweight fusible web to the back of your black fabric.
Cut out your coffee cup shape and fuse it onto the collaged book pages of your journal cover.
Secure the edges with a neat, tight backstitch using a single strand of matching black thread.
This method ensures your silhouette has perfectly sharp edges and a uniform, solid fill that makes your monochrome black thread designs truly stand out.
12. Accentuate a Gradient with Minimalist Stitching
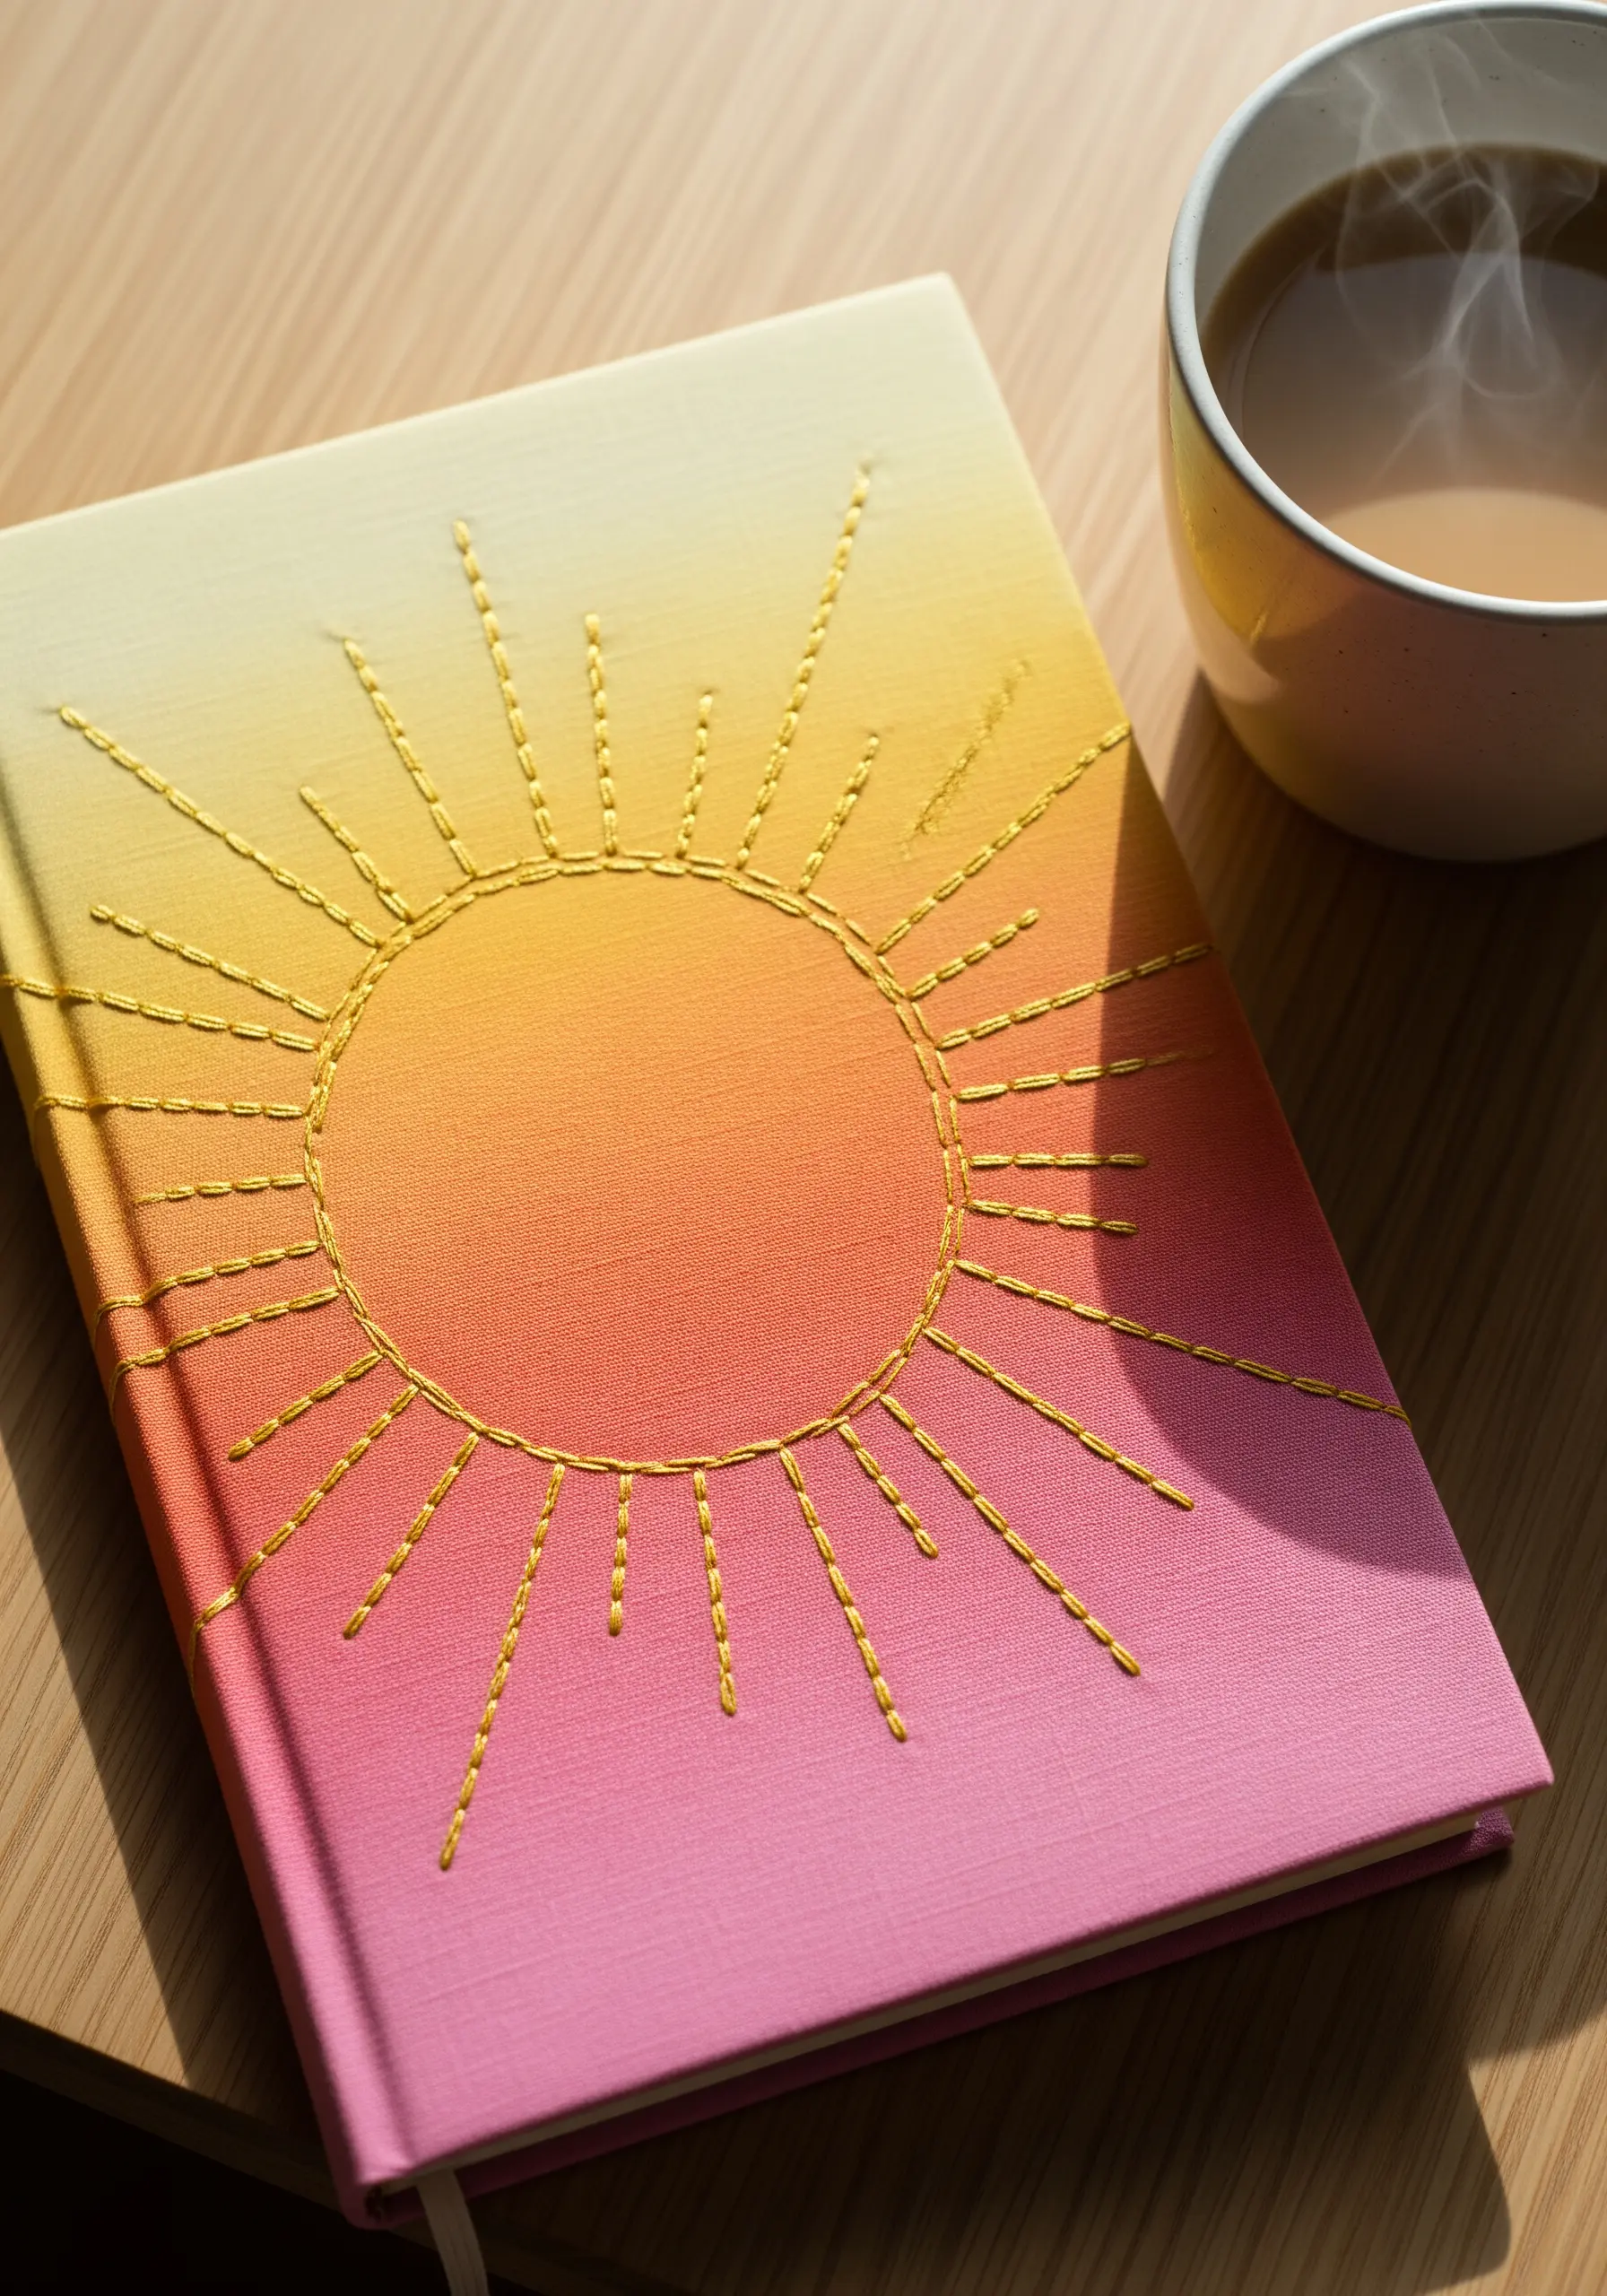
When your journal cover already has a beautiful gradient, a simple stitch pattern is all you need to elevate it.
Let the color do the heavy lifting and use a single, high-contrast thread—like this metallic gold—to add a touch of radiance.
Simple straight stitches or a sparse backstitch forming a sunburst pattern complements the background without competing with it.
This minimalist approach ensures the final piece feels intentional and balanced, making it a perfect technique for gentle gradient embroidery designs.
13. Explore Texture and Form with a Monochrome Palette
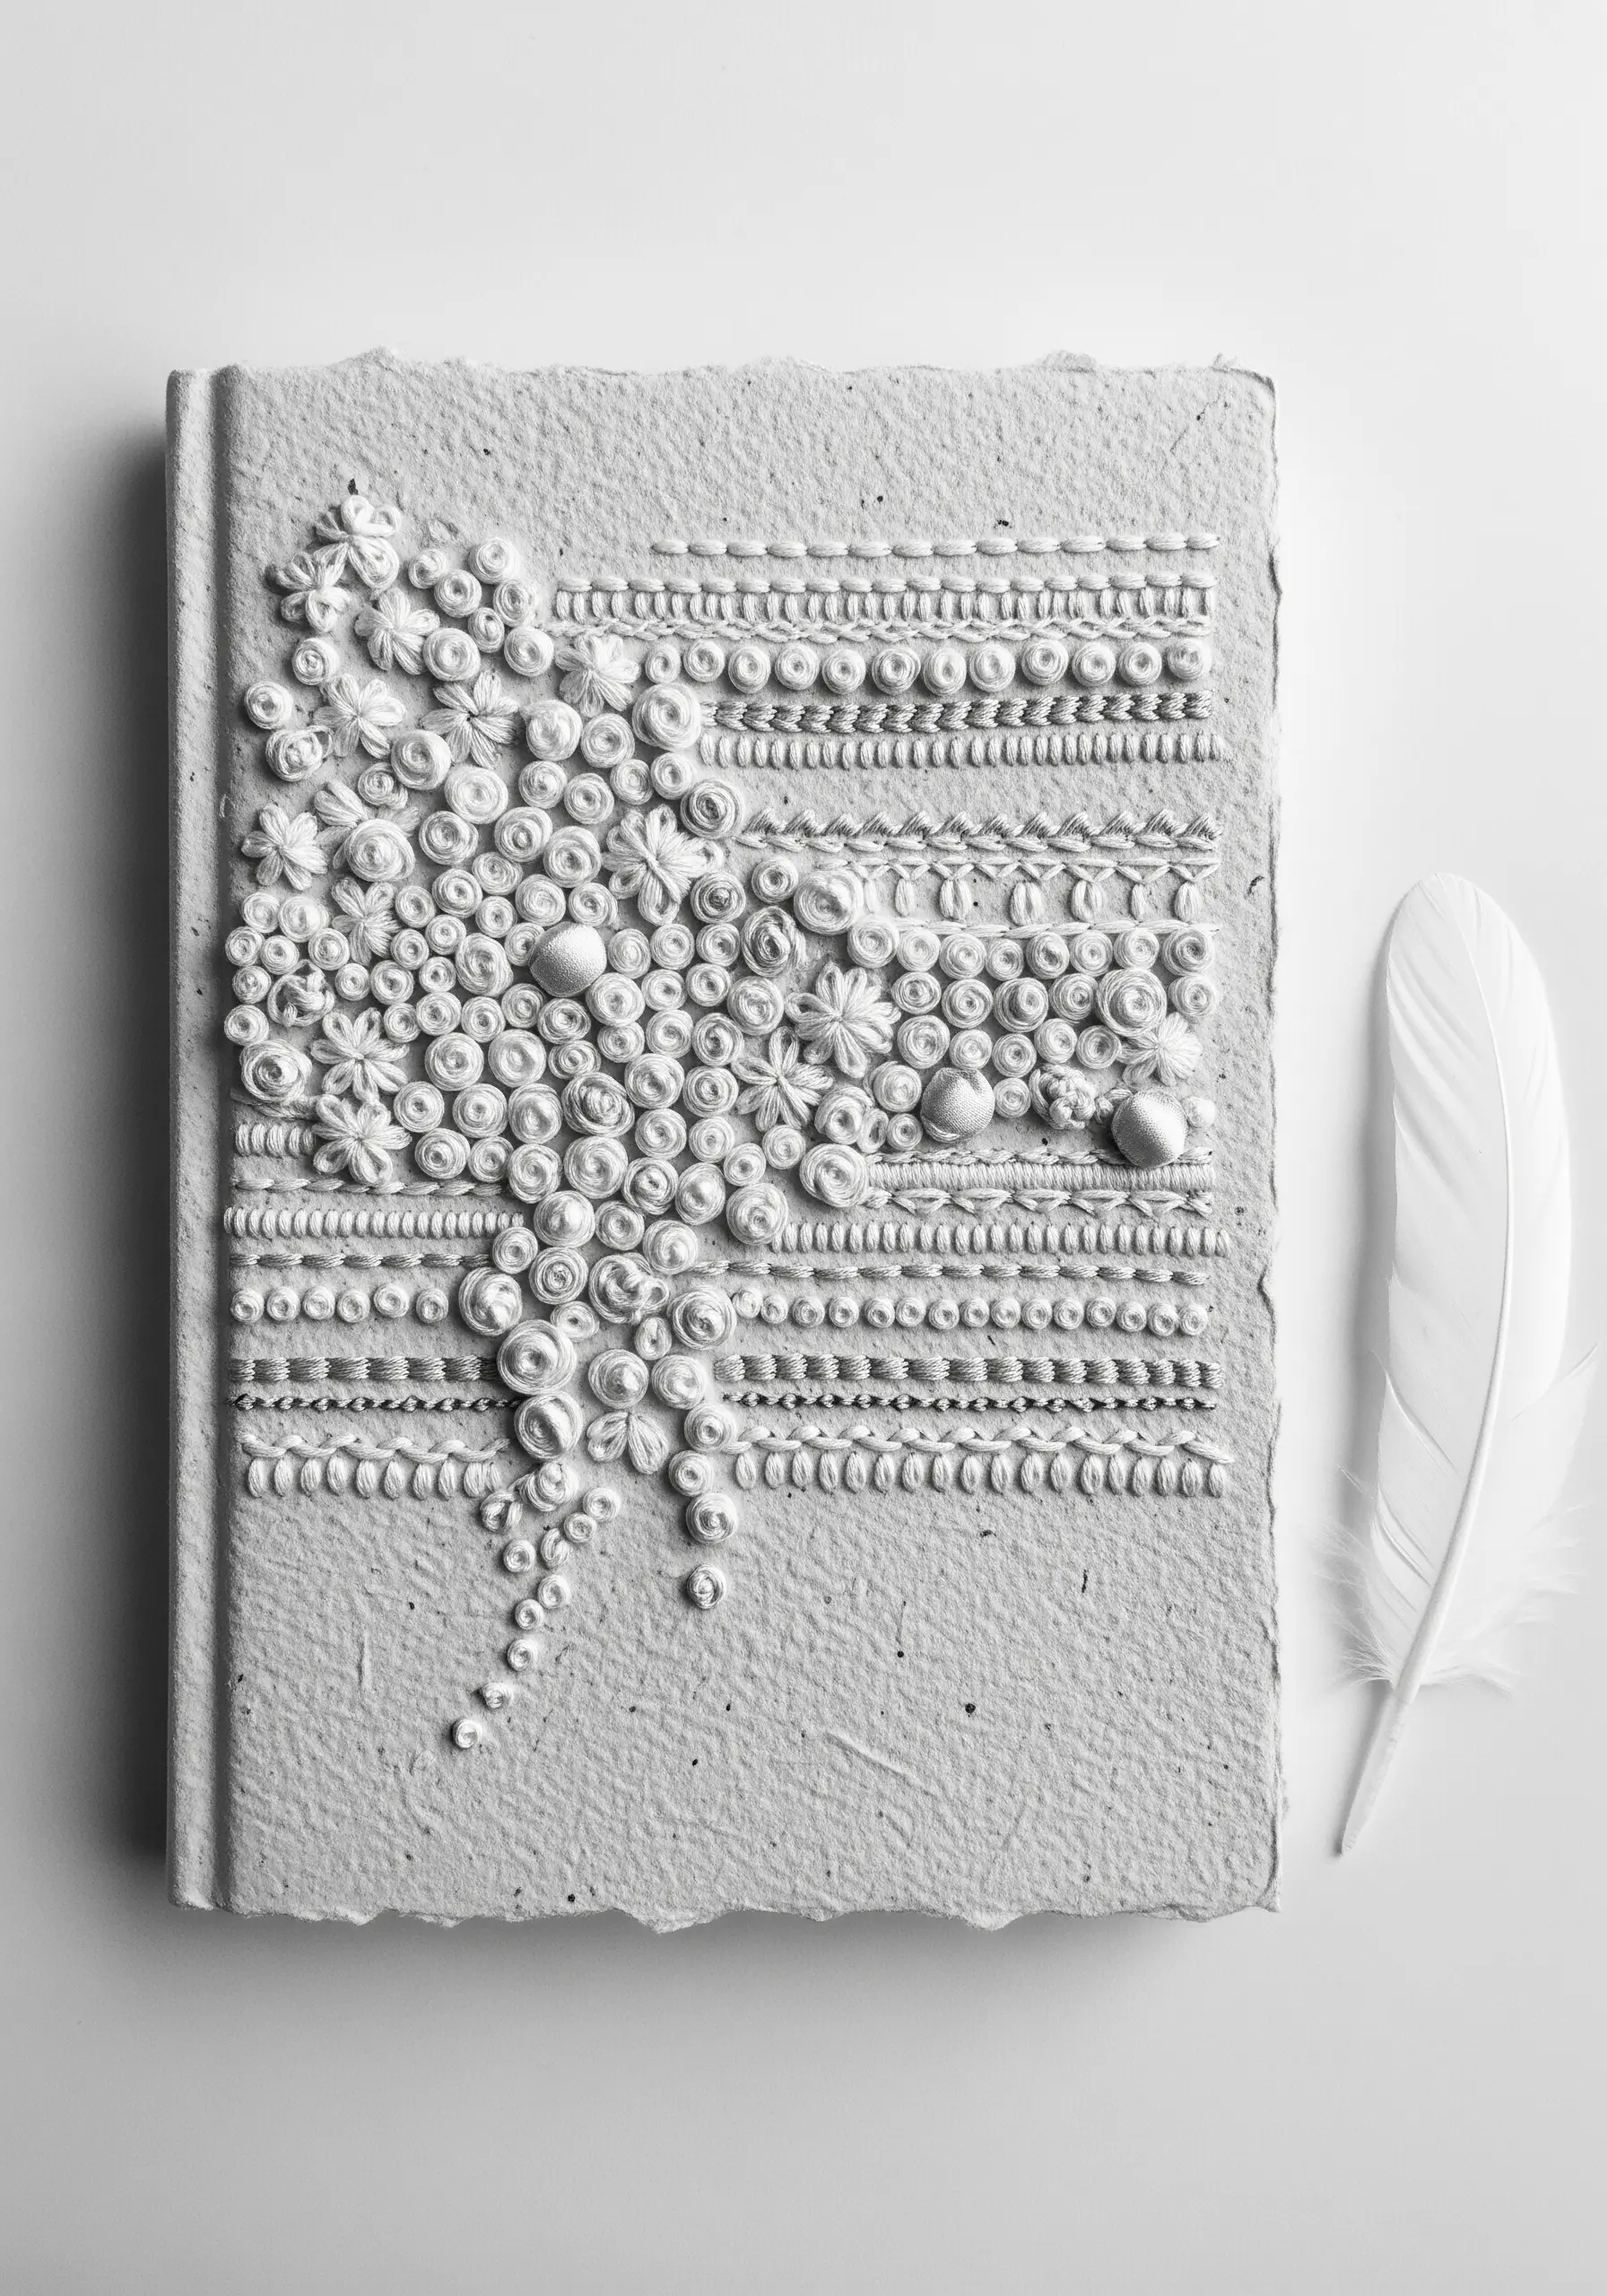
Challenge yourself by removing color and focusing entirely on texture.
Using a single shade of thread on a matching textured paper cover forces you to explore the sculptural possibilities of different stitches.
Combine dense clusters of French knots, padded satin stitch circles, raised bullion knots, and tightly packed seed stitches to create a composition rich in depth and shadow.
These tone-on-tone embroidery techniques prove that you don’t need a wide color palette to create a visually complex and captivating piece of art.
14. Define Watercolor Shapes with Stitched Outlines
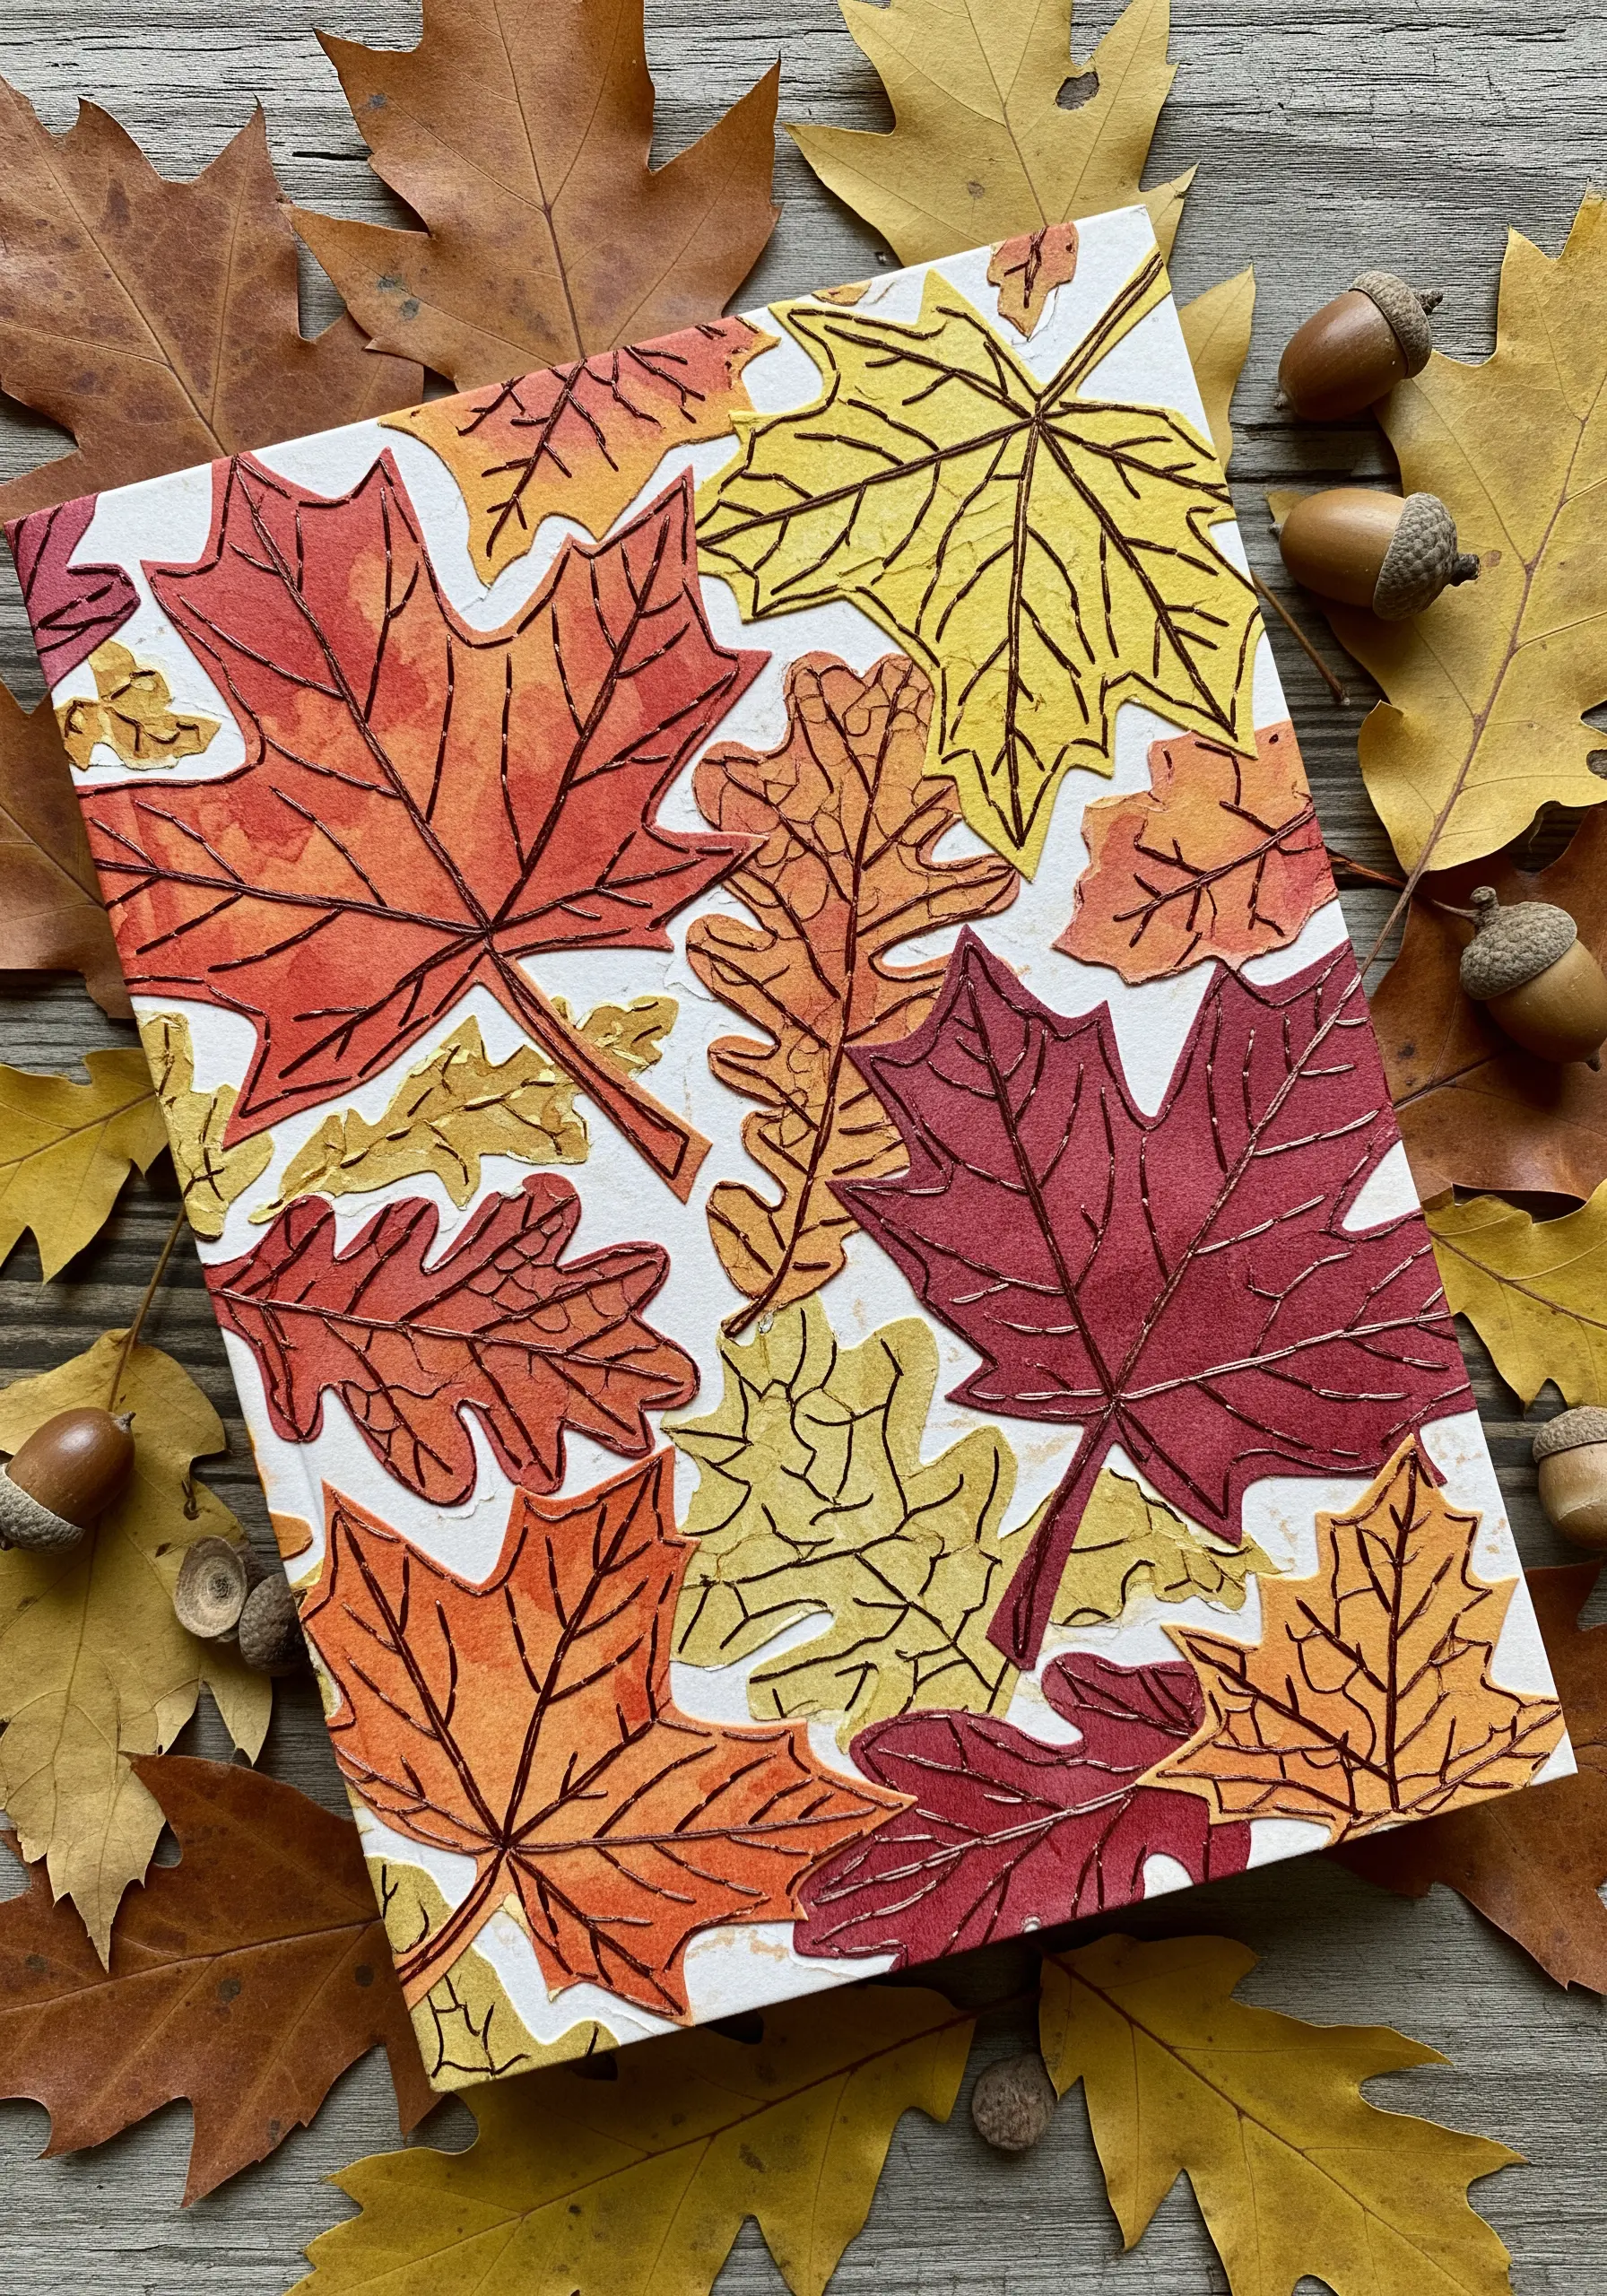
Combine the soft, fluid nature of watercolor with the sharp definition of embroidery thread.
Start by painting loose leaf shapes onto thick watercolor paper using autumnal shades of red, orange, and yellow.
Once completely dry, use a dark brown or black thread and a simple backstitch to outline the leaves and add delicate vein details.
The contrast between the blended colors and the crisp stitched lines creates a beautiful, illustrative effect that feels both artistic and handcrafted.
15. Capture a Skyline with a Single Continuous Line
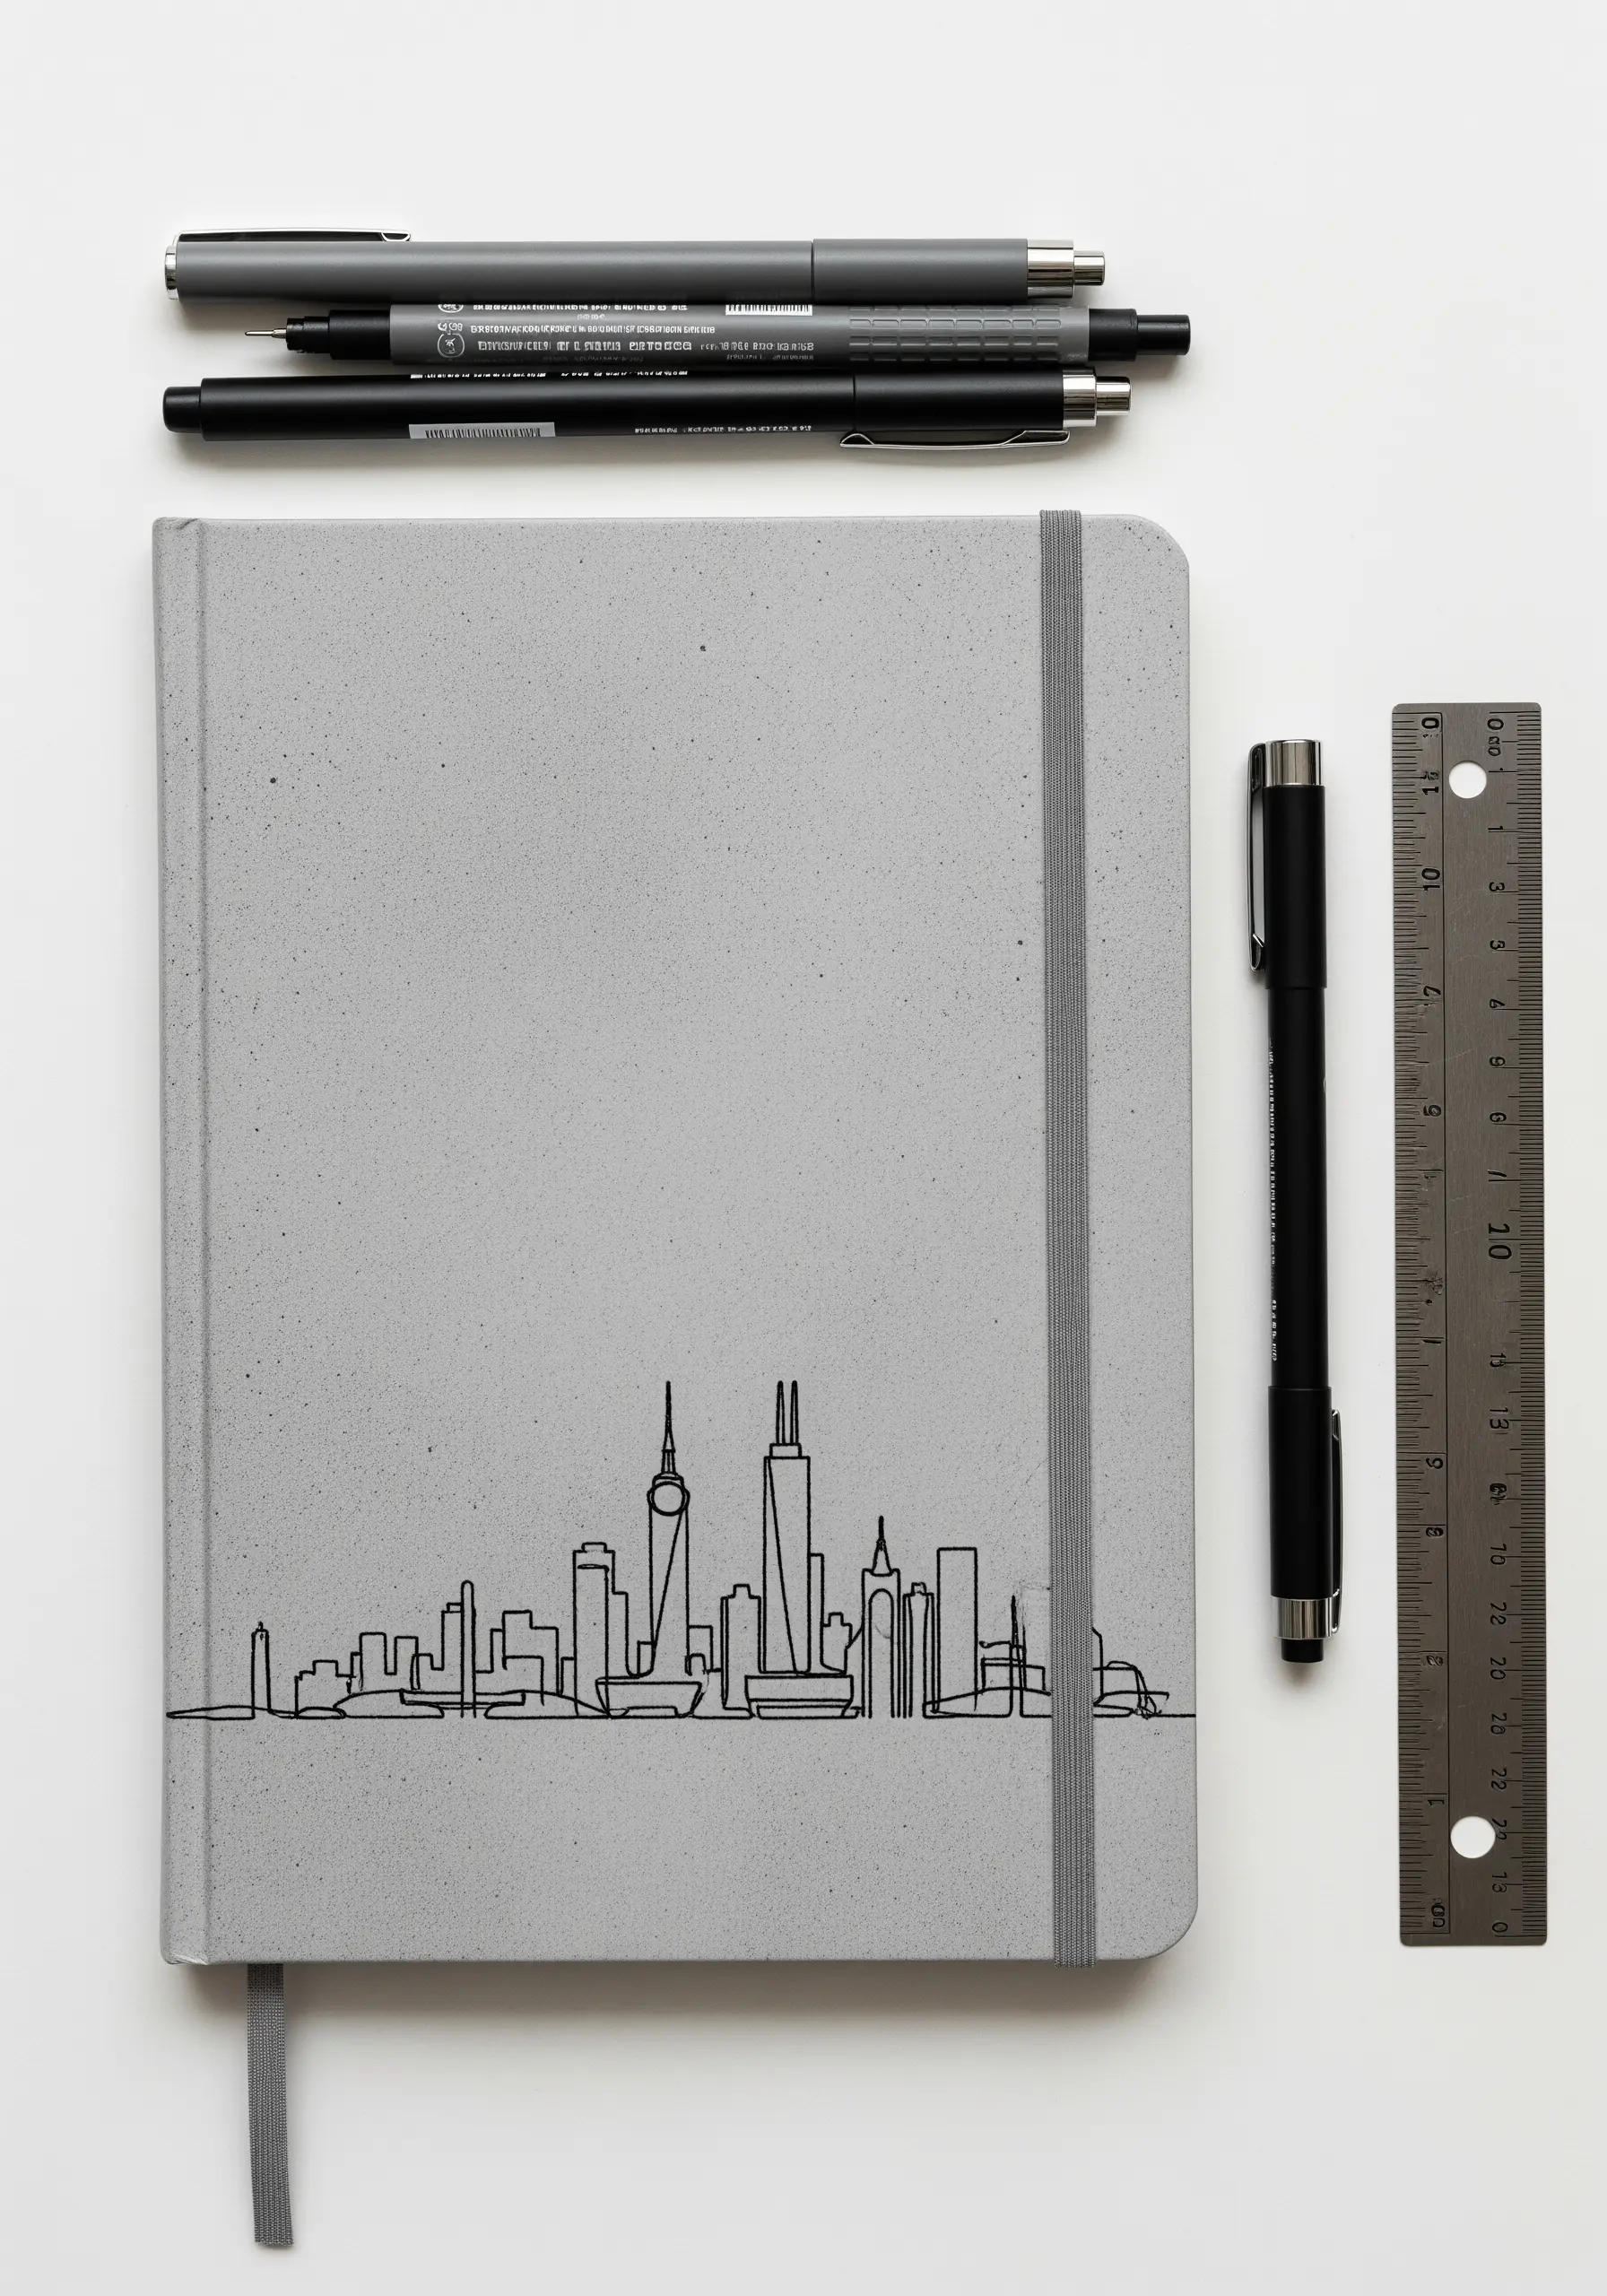
Embrace minimalism by reducing a complex cityscape to its essential form with a single, unbroken line.
This technique, known as contour line art, challenges you to capture a silhouette without lifting your needle.
Use a stem stitch or a whipped backstitch to create a smooth, solid line that flows seamlessly from one building to the next.
Working with a single strand of black thread on a neutral, concrete-textured cover results in a sophisticated, modern design that feels both effortless and intentional.
16. Achieve Realism with Thread Painting
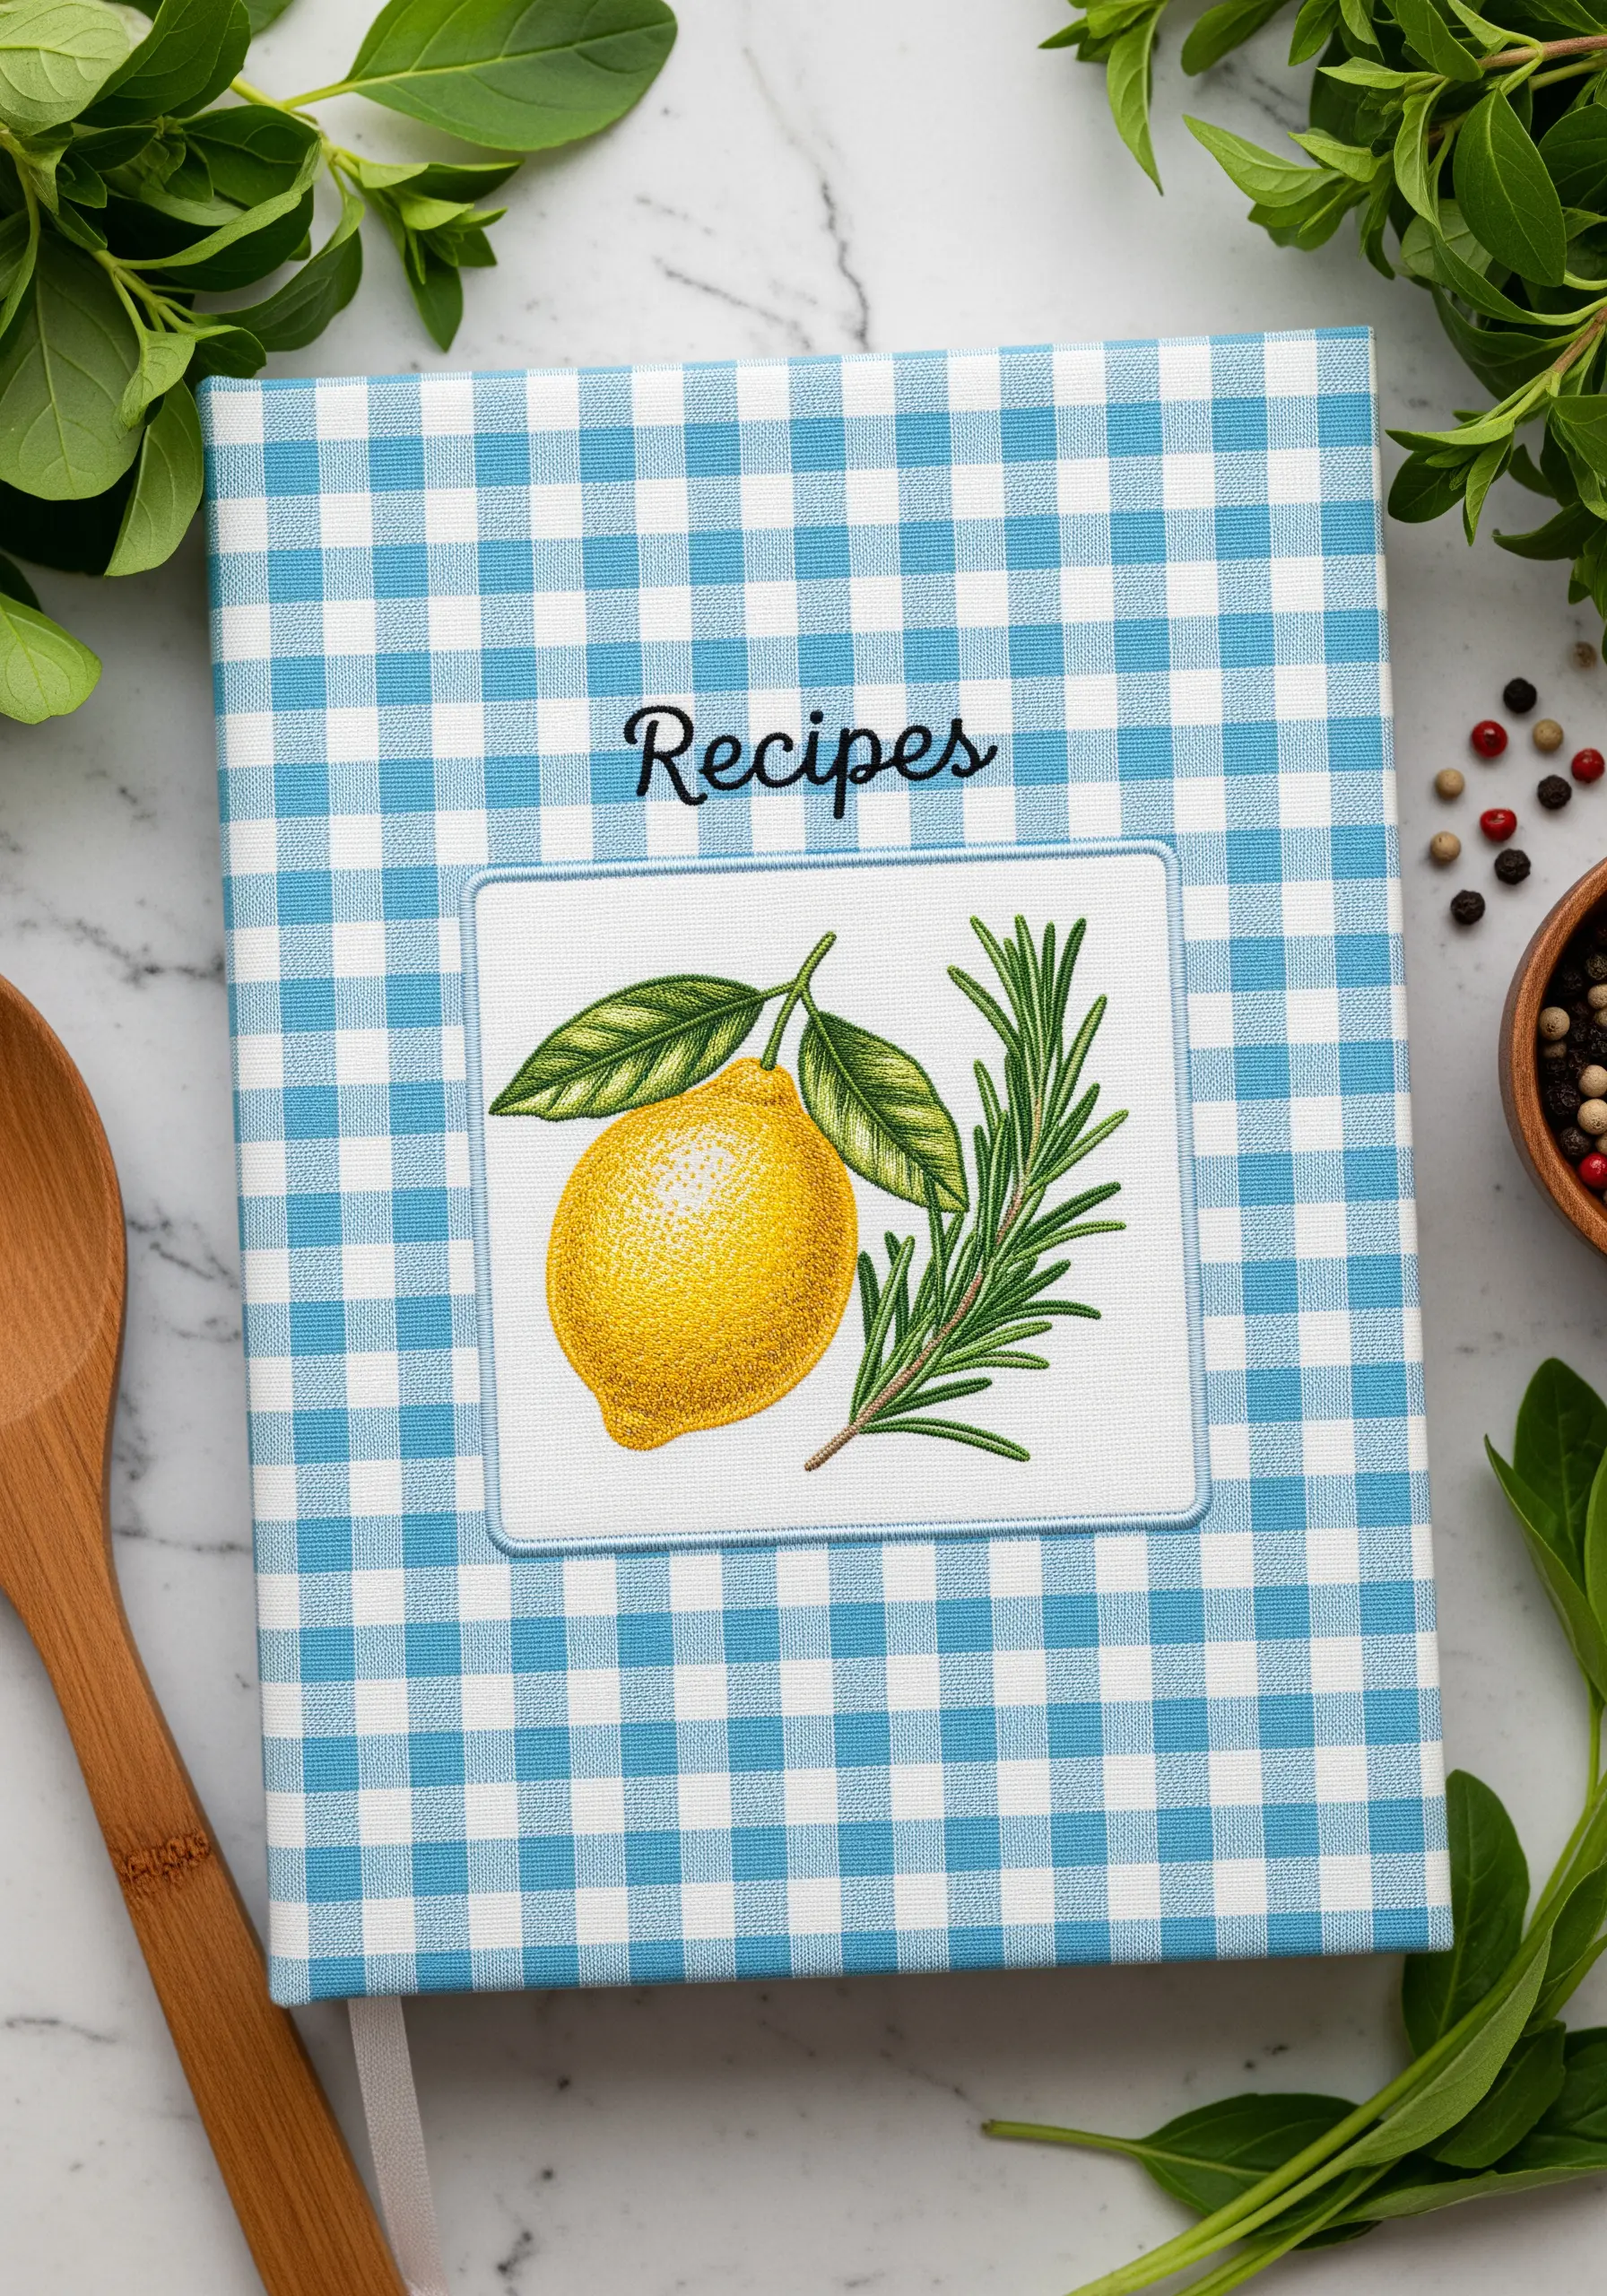
Elevate simple motifs by using the long-and-short stitch to blend colors seamlessly, a technique often called ‘thread painting’.
To create the lemon’s textured skin, use single strands of three or four different shades of yellow floss.
Work in sections, allowing the stitches of one color to overlap slightly with the next to create a natural, photorealistic gradient.
This meticulous technique transforms simple line art fruit & food motifs into stunning, lifelike representations that look almost good enough to eat.
17. Create Bold Folk Art with Thick Thread and Satin Stitch

Capture the vibrant, joyful spirit of folk art by using bold colors and stitches with a strong presence.
Choose a thick, high-sheen thread like pearl cotton No. 8 for your satin stitches.
Its twisted composition gives your fill stitches a beautiful, raised texture and a subtle gloss that makes the colors pop against the bright red background.
Outline each shape with a contrasting color using a chain stitch or a heavy backstitch to create the clean, graphic divisions characteristic of this art style.
18. Weave a Dreamcatcher with Taut, Precise Stitches
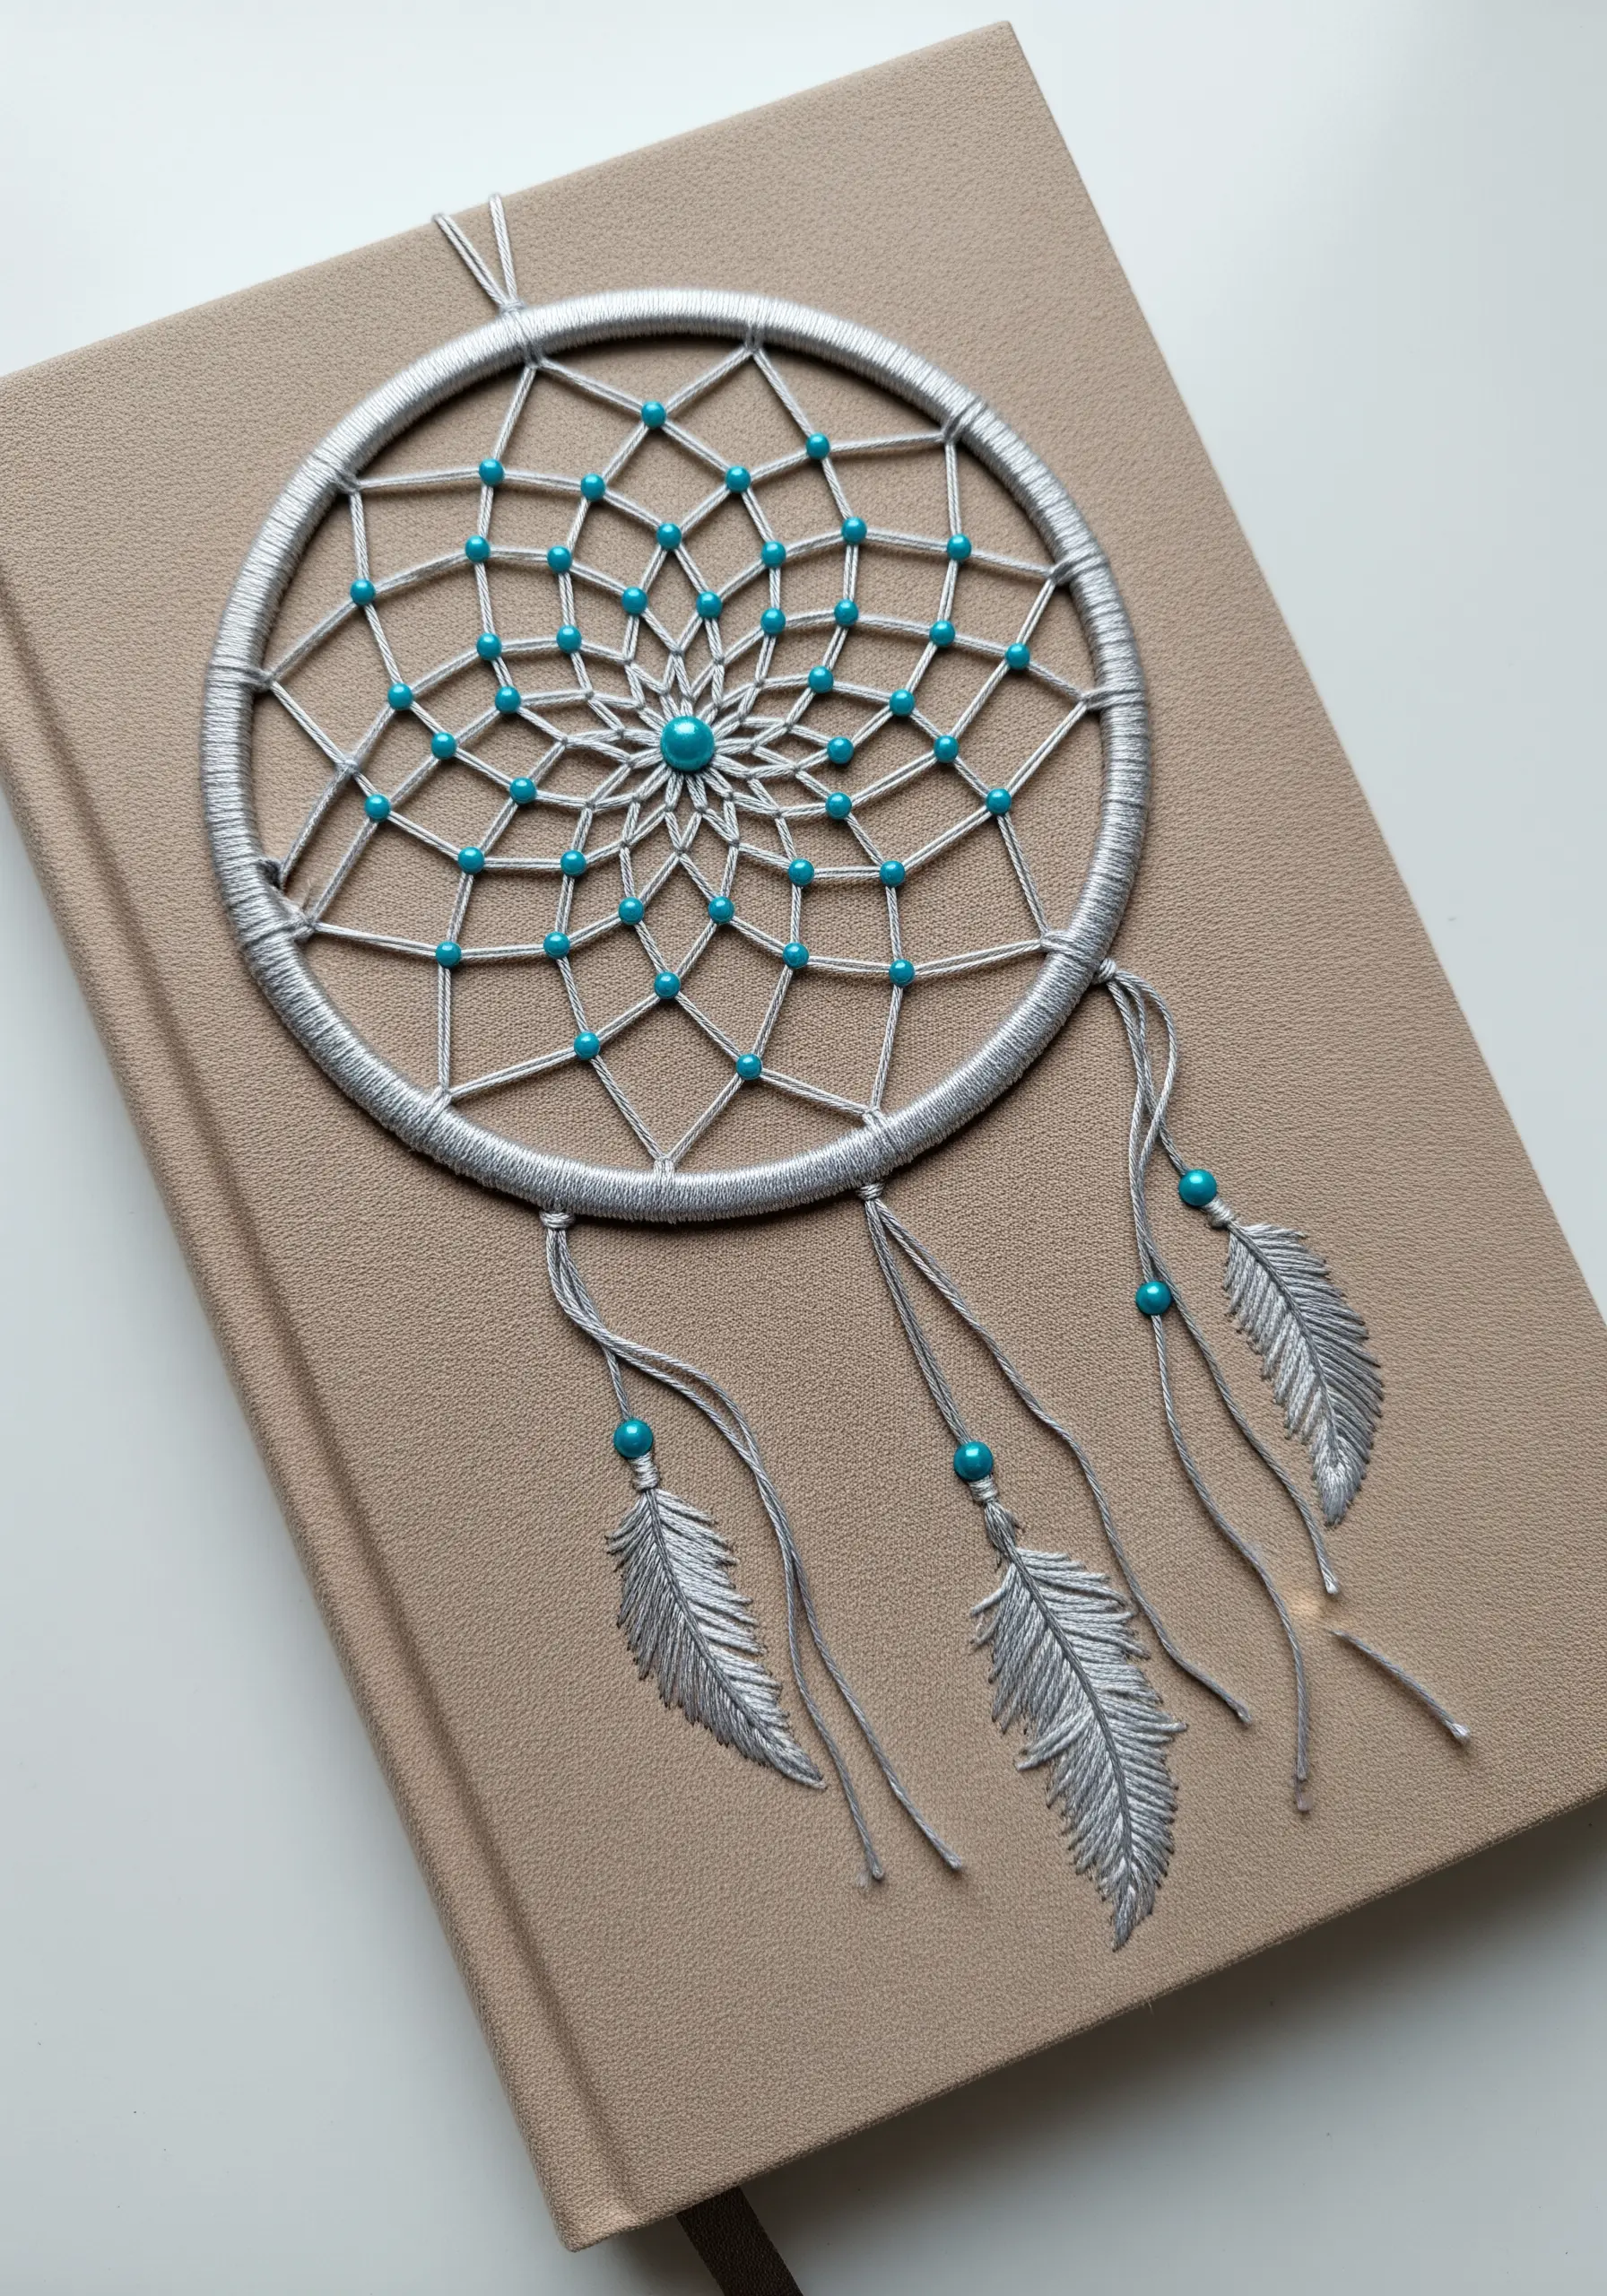
To create a delicate yet strong dreamcatcher design, focus on achieving perfect tension in your stitches.
First, create the outer hoop using a tightly wrapped thread or a padded satin stitch.
Then, stretch long straight stitches across the circle to form the ‘spokes’ of the web, ensuring each is taut and evenly spaced.
Weave the inner web by looping your thread around these spokes, adding beads as you go.
This method, borrowed from traditional craft, translates beautifully into boho-inspired textile wall art patterns and journal covers.
19. Secure Woven Paper with Decorative Cross Stitches
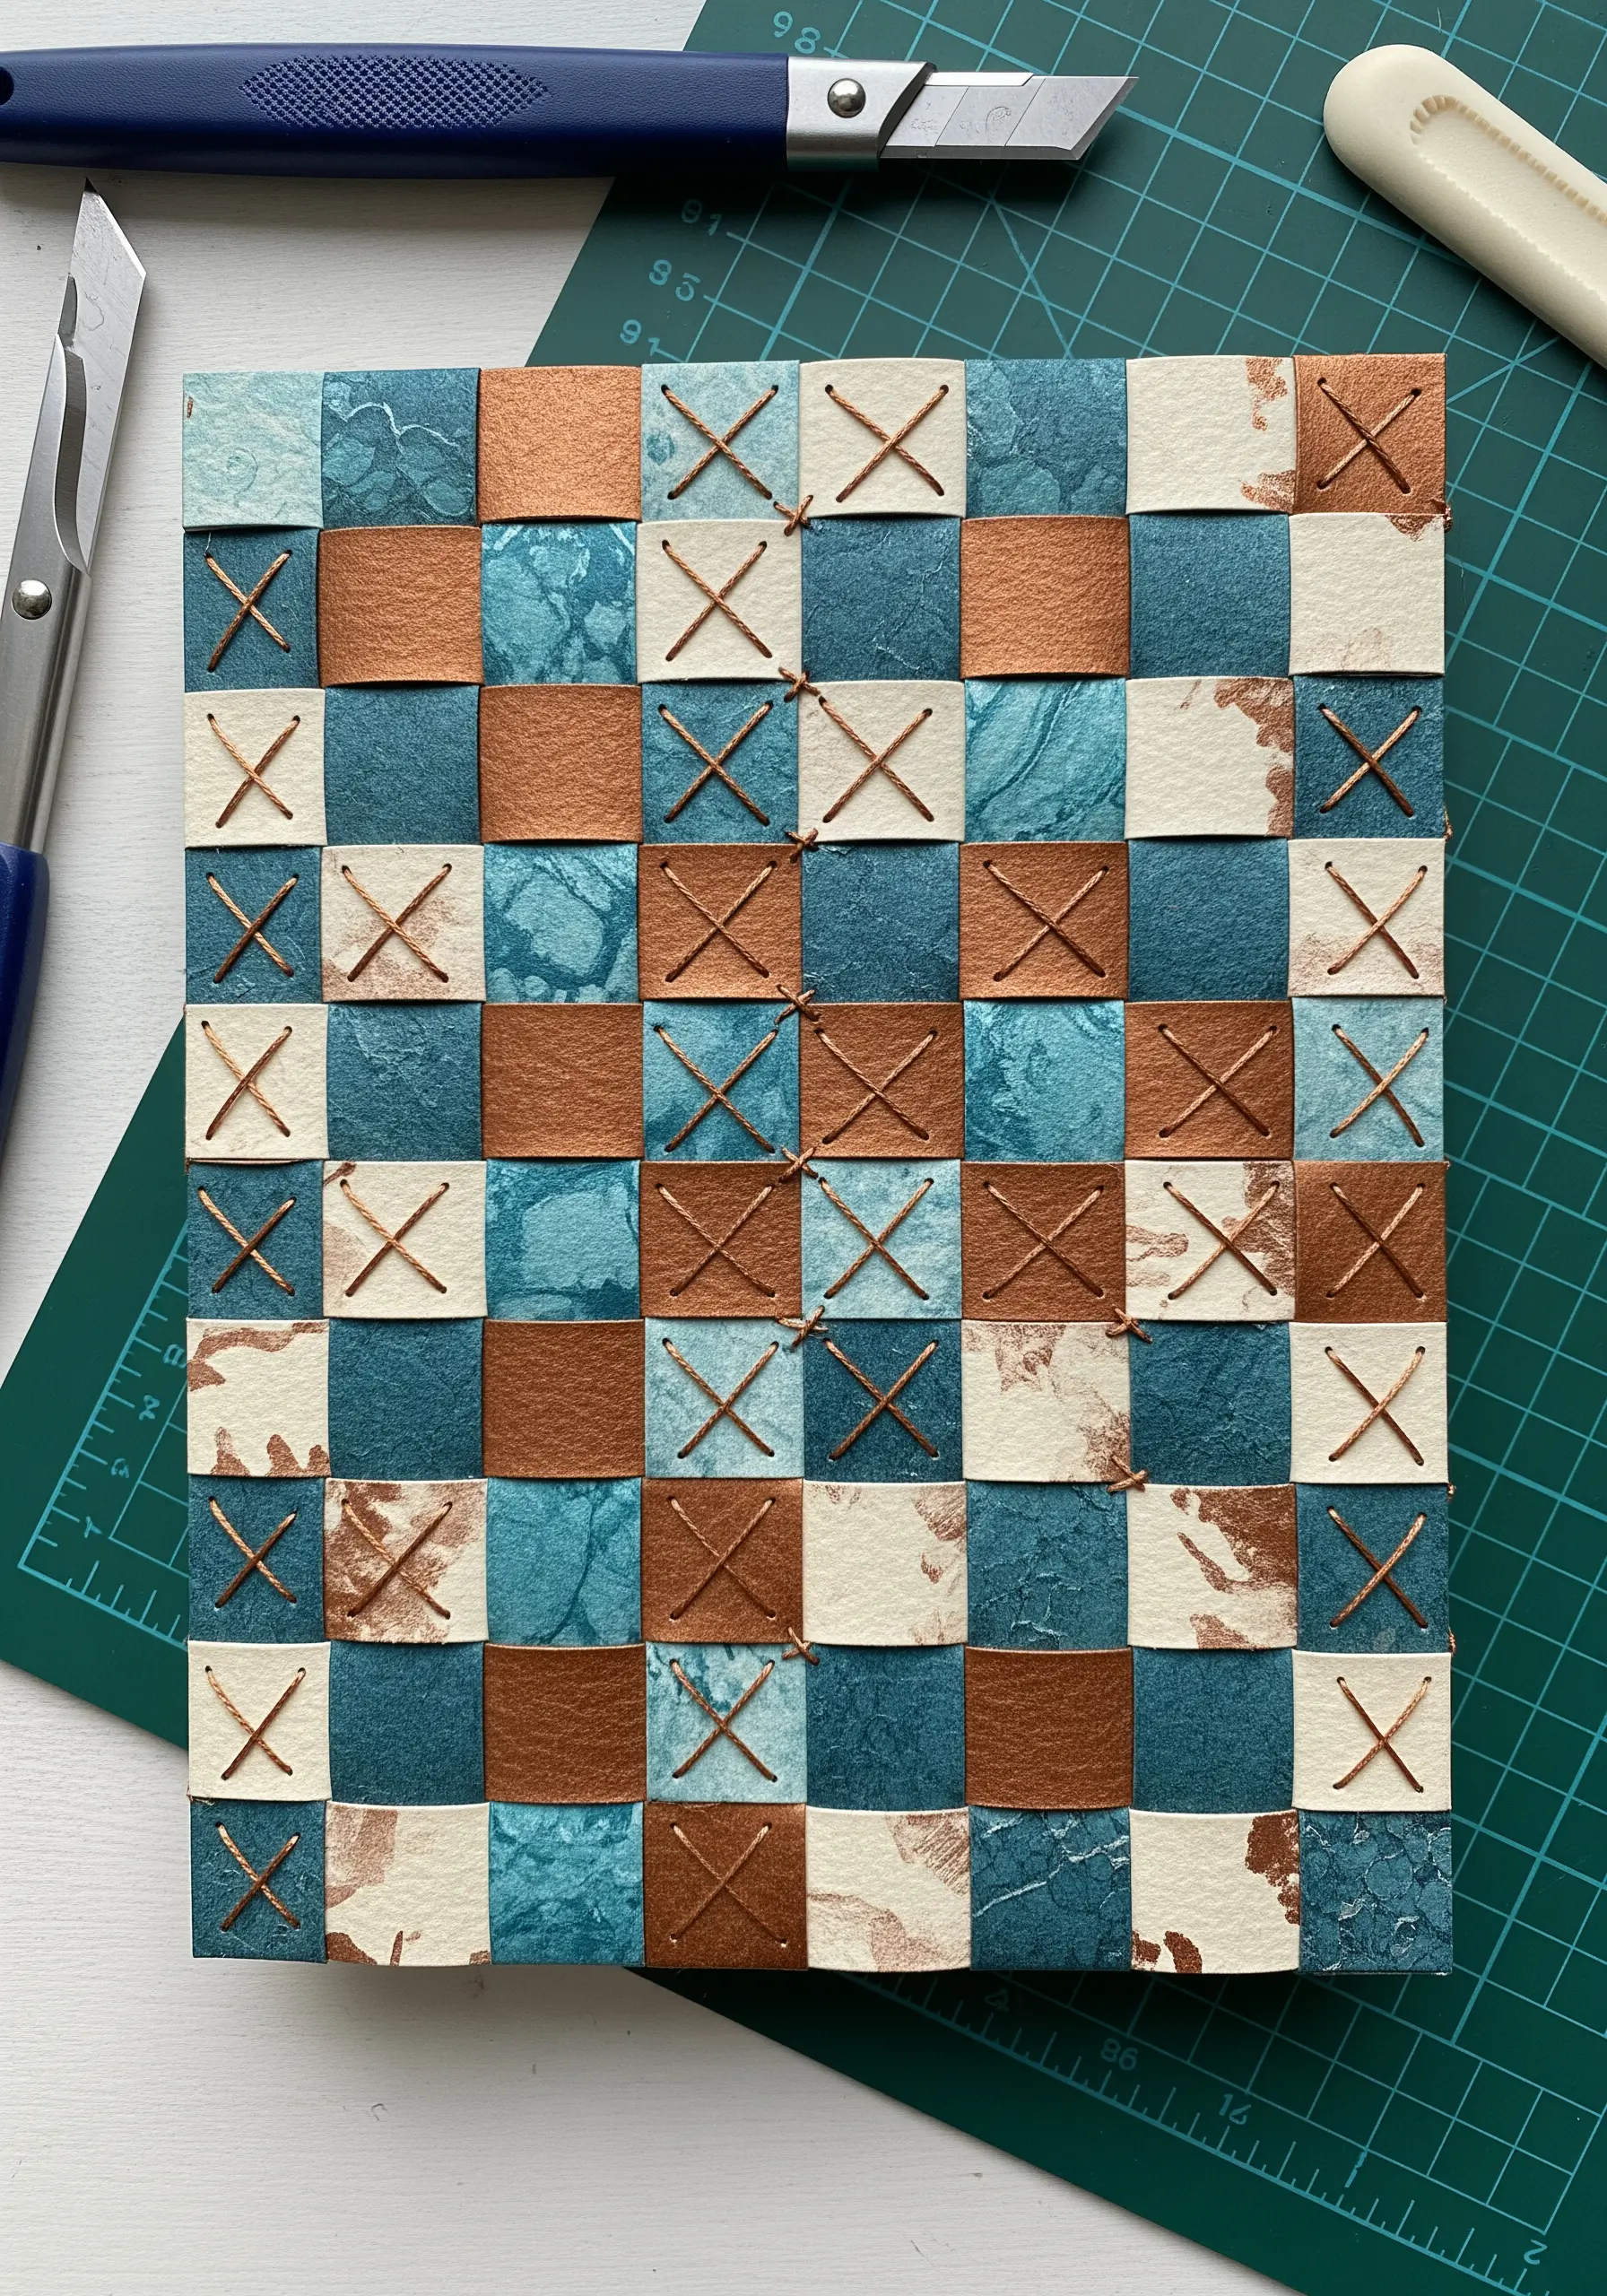
Add a subtle, handcrafted touch to a woven paper design by incorporating simple embroidery stitches.
After weaving strips of metallic and marbled paper to create your checkerboard cover, use a contrasting thread to add a small cross stitch at each intersection.
This not only adds a charming decorative detail but also cleverly secures the woven strips in place, ensuring your design is durable.
It’s an elegant way to combine mixed media paper ideas with functional, beautiful stitching.
20. Form a Swirling Galaxy with Variegated Thread
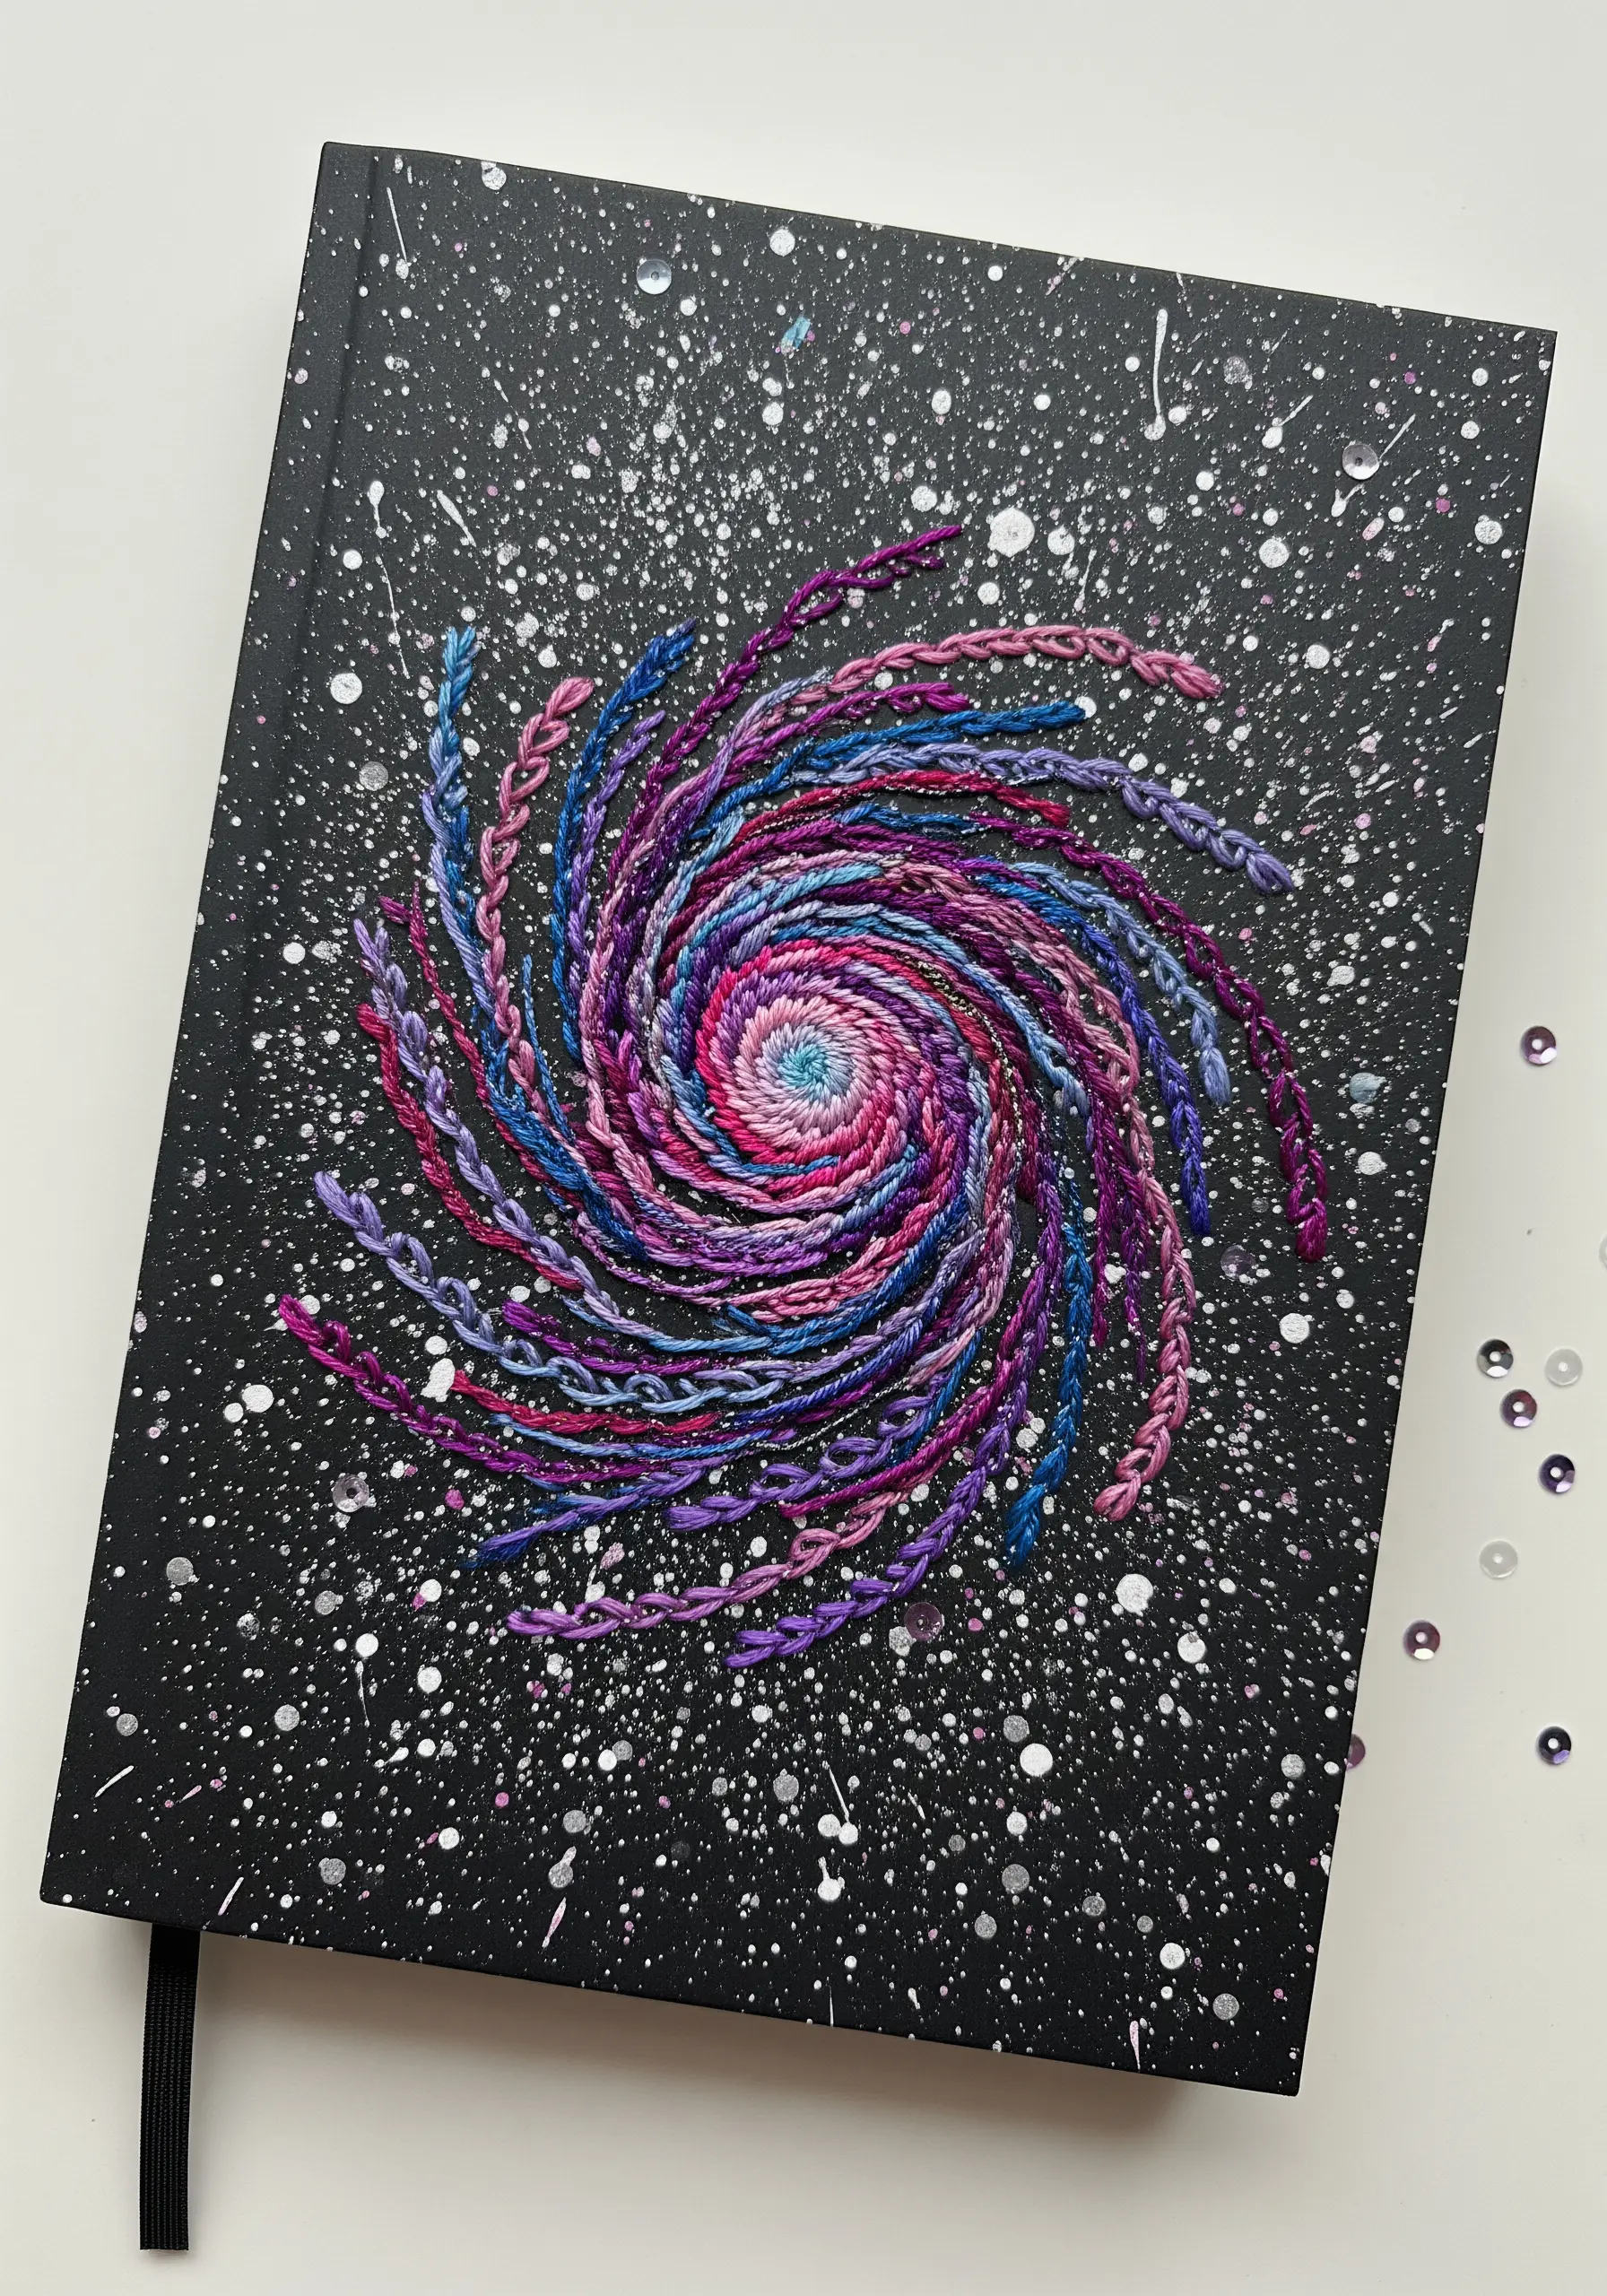
Create a dynamic, swirling galaxy with minimal effort by letting variegated thread do the color work for you.
Choose a floss that contains all the shades of your desired nebula—pinks, purples, and blues.
Use a textured, rope-like stitch, such as a heavy chain stitch or a Palestrina knot stitch, and work in a spiral from the center outward.
The stitch itself provides the texture, while the thread’s natural color changes create the illusion of a complex, blended galaxy without the need for constant color switching.
21. Create a Faceted Look with Angled Satin Stitch
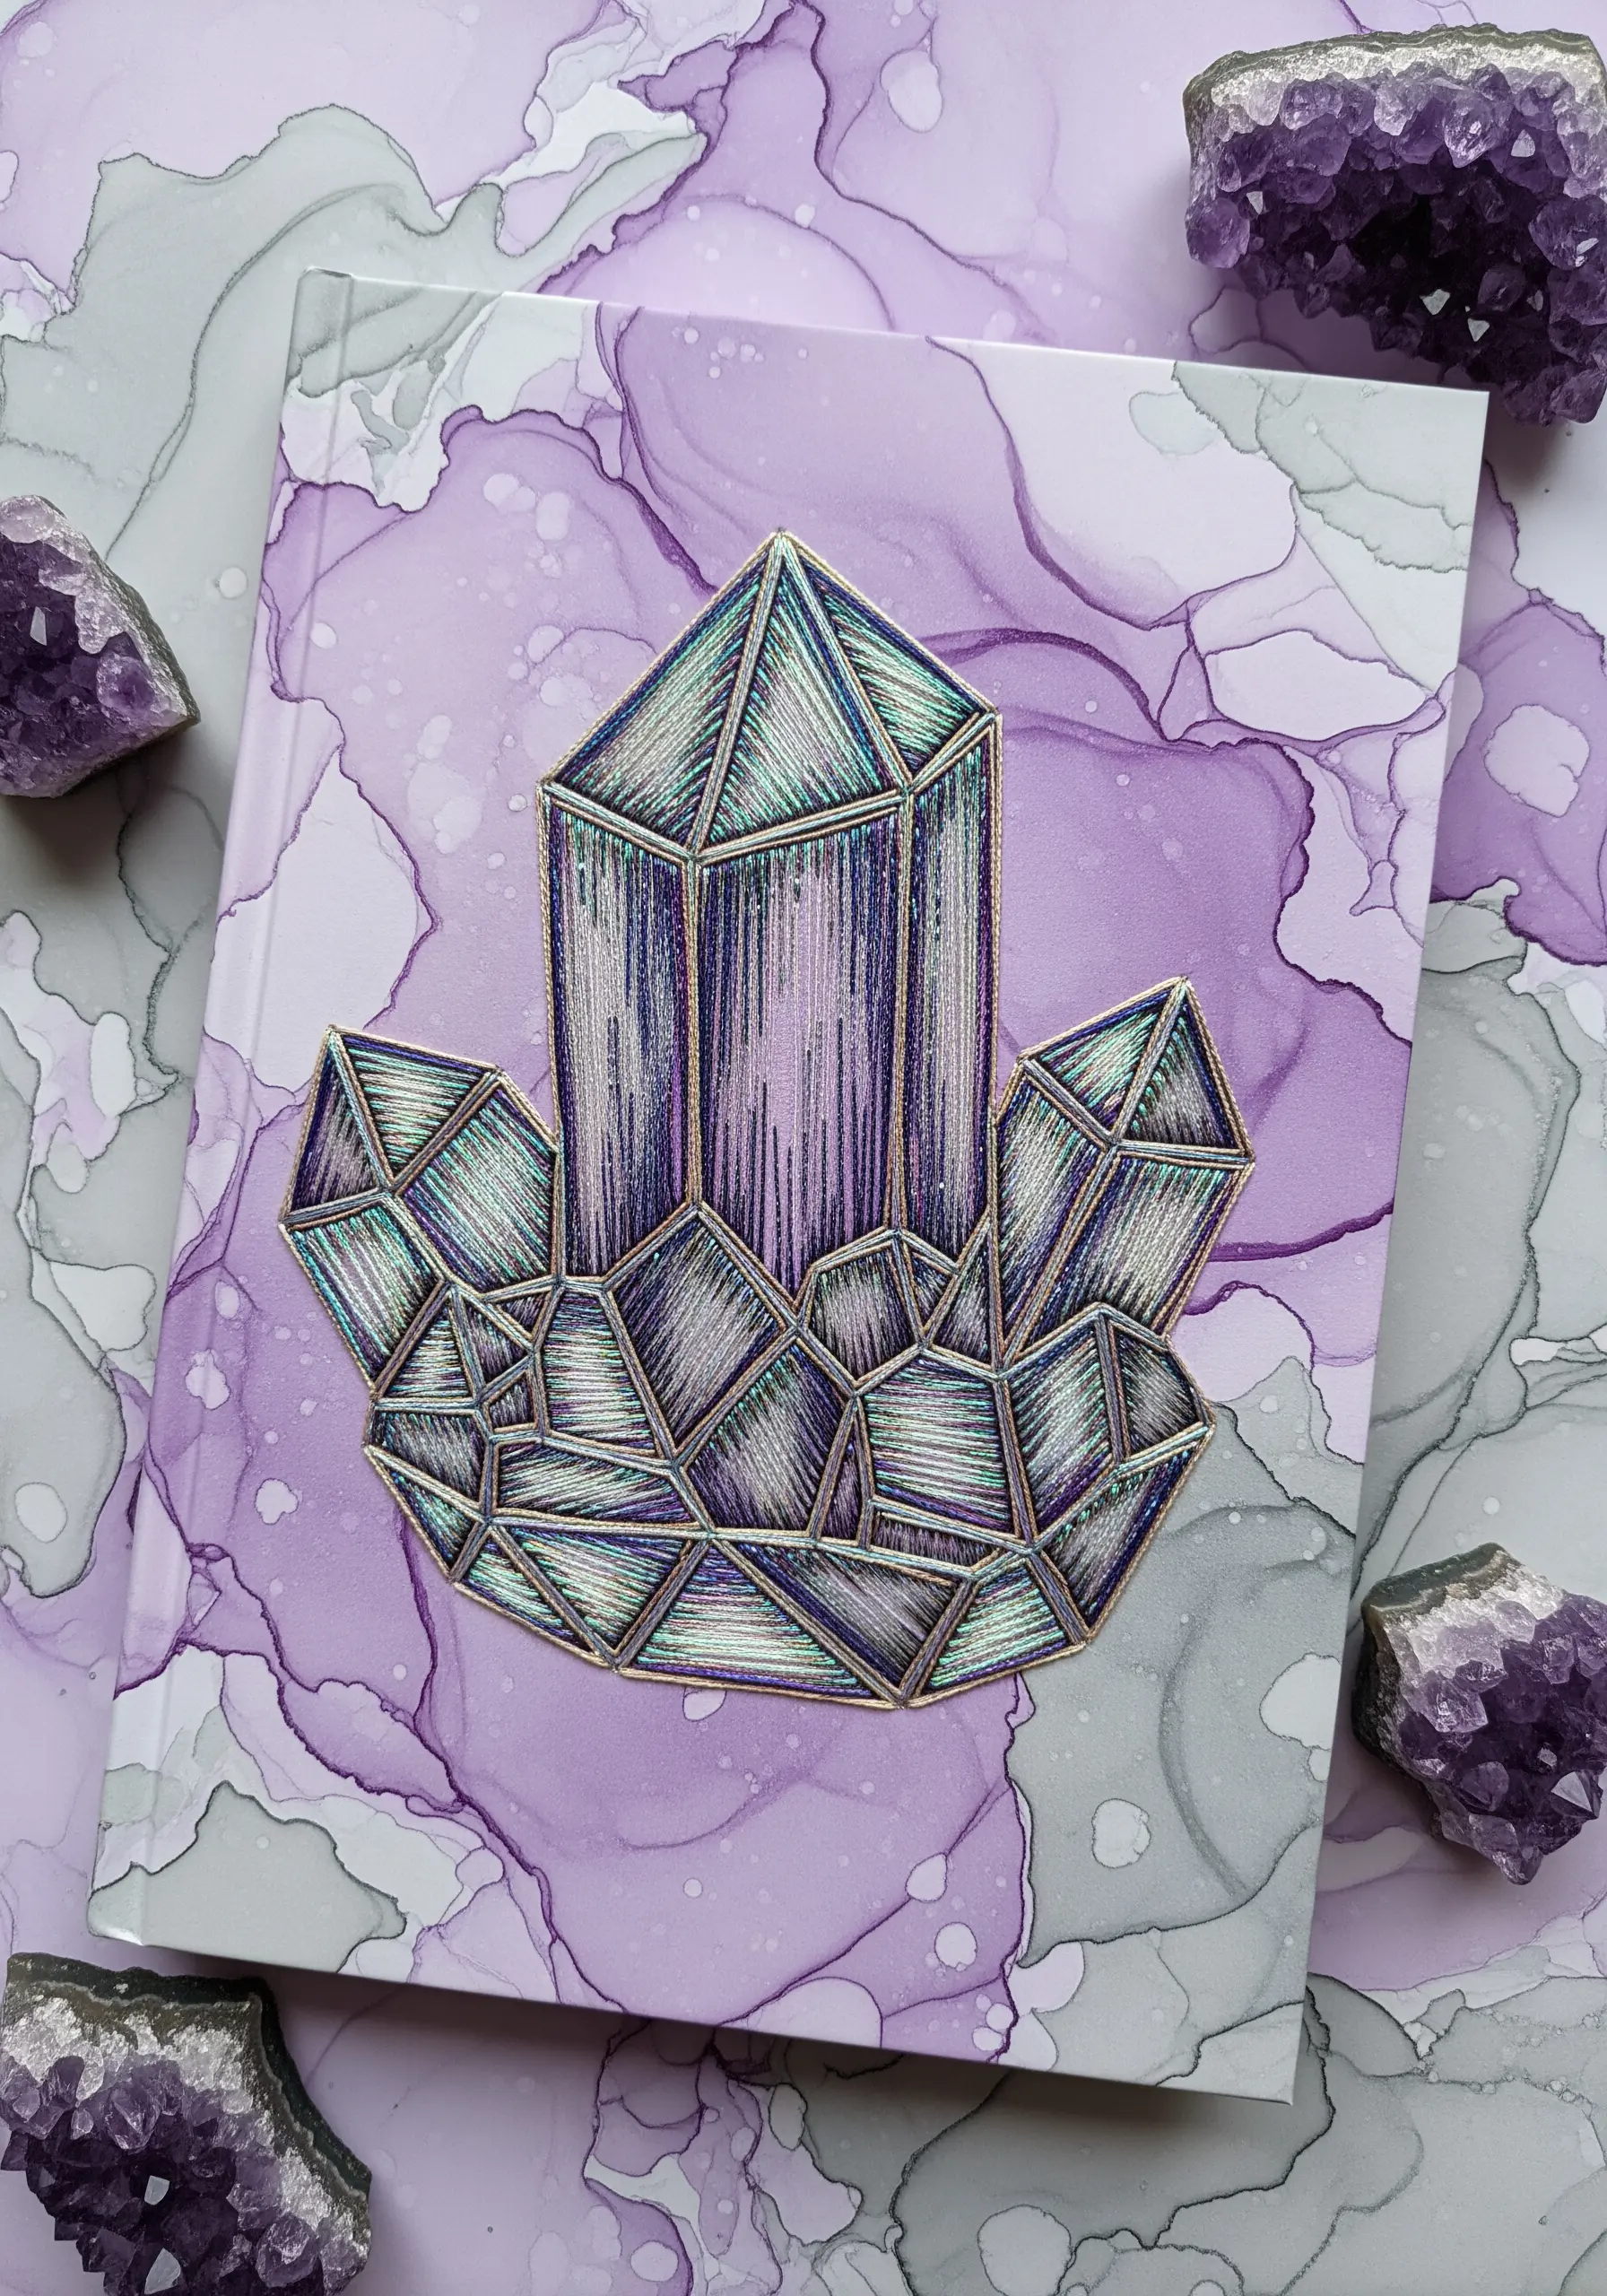
To give your embroidered crystals and gems a realistic, faceted shine, the direction of your stitches is everything.
Divide your crystal into small, angular sections (facets).
Fill each section with a dense satin stitch, but slightly alter the angle of your stitches for every adjacent facet.
This subtle shift in direction causes light to reflect differently off each plane, creating the illusion of depth, dimension, and sparkle.
Outlining the design with a metallic thread further enhances this luminous effect, making your geometric abstract thread patterns look like real gems.
22. Craft Translucent Wings with Stitched Organza
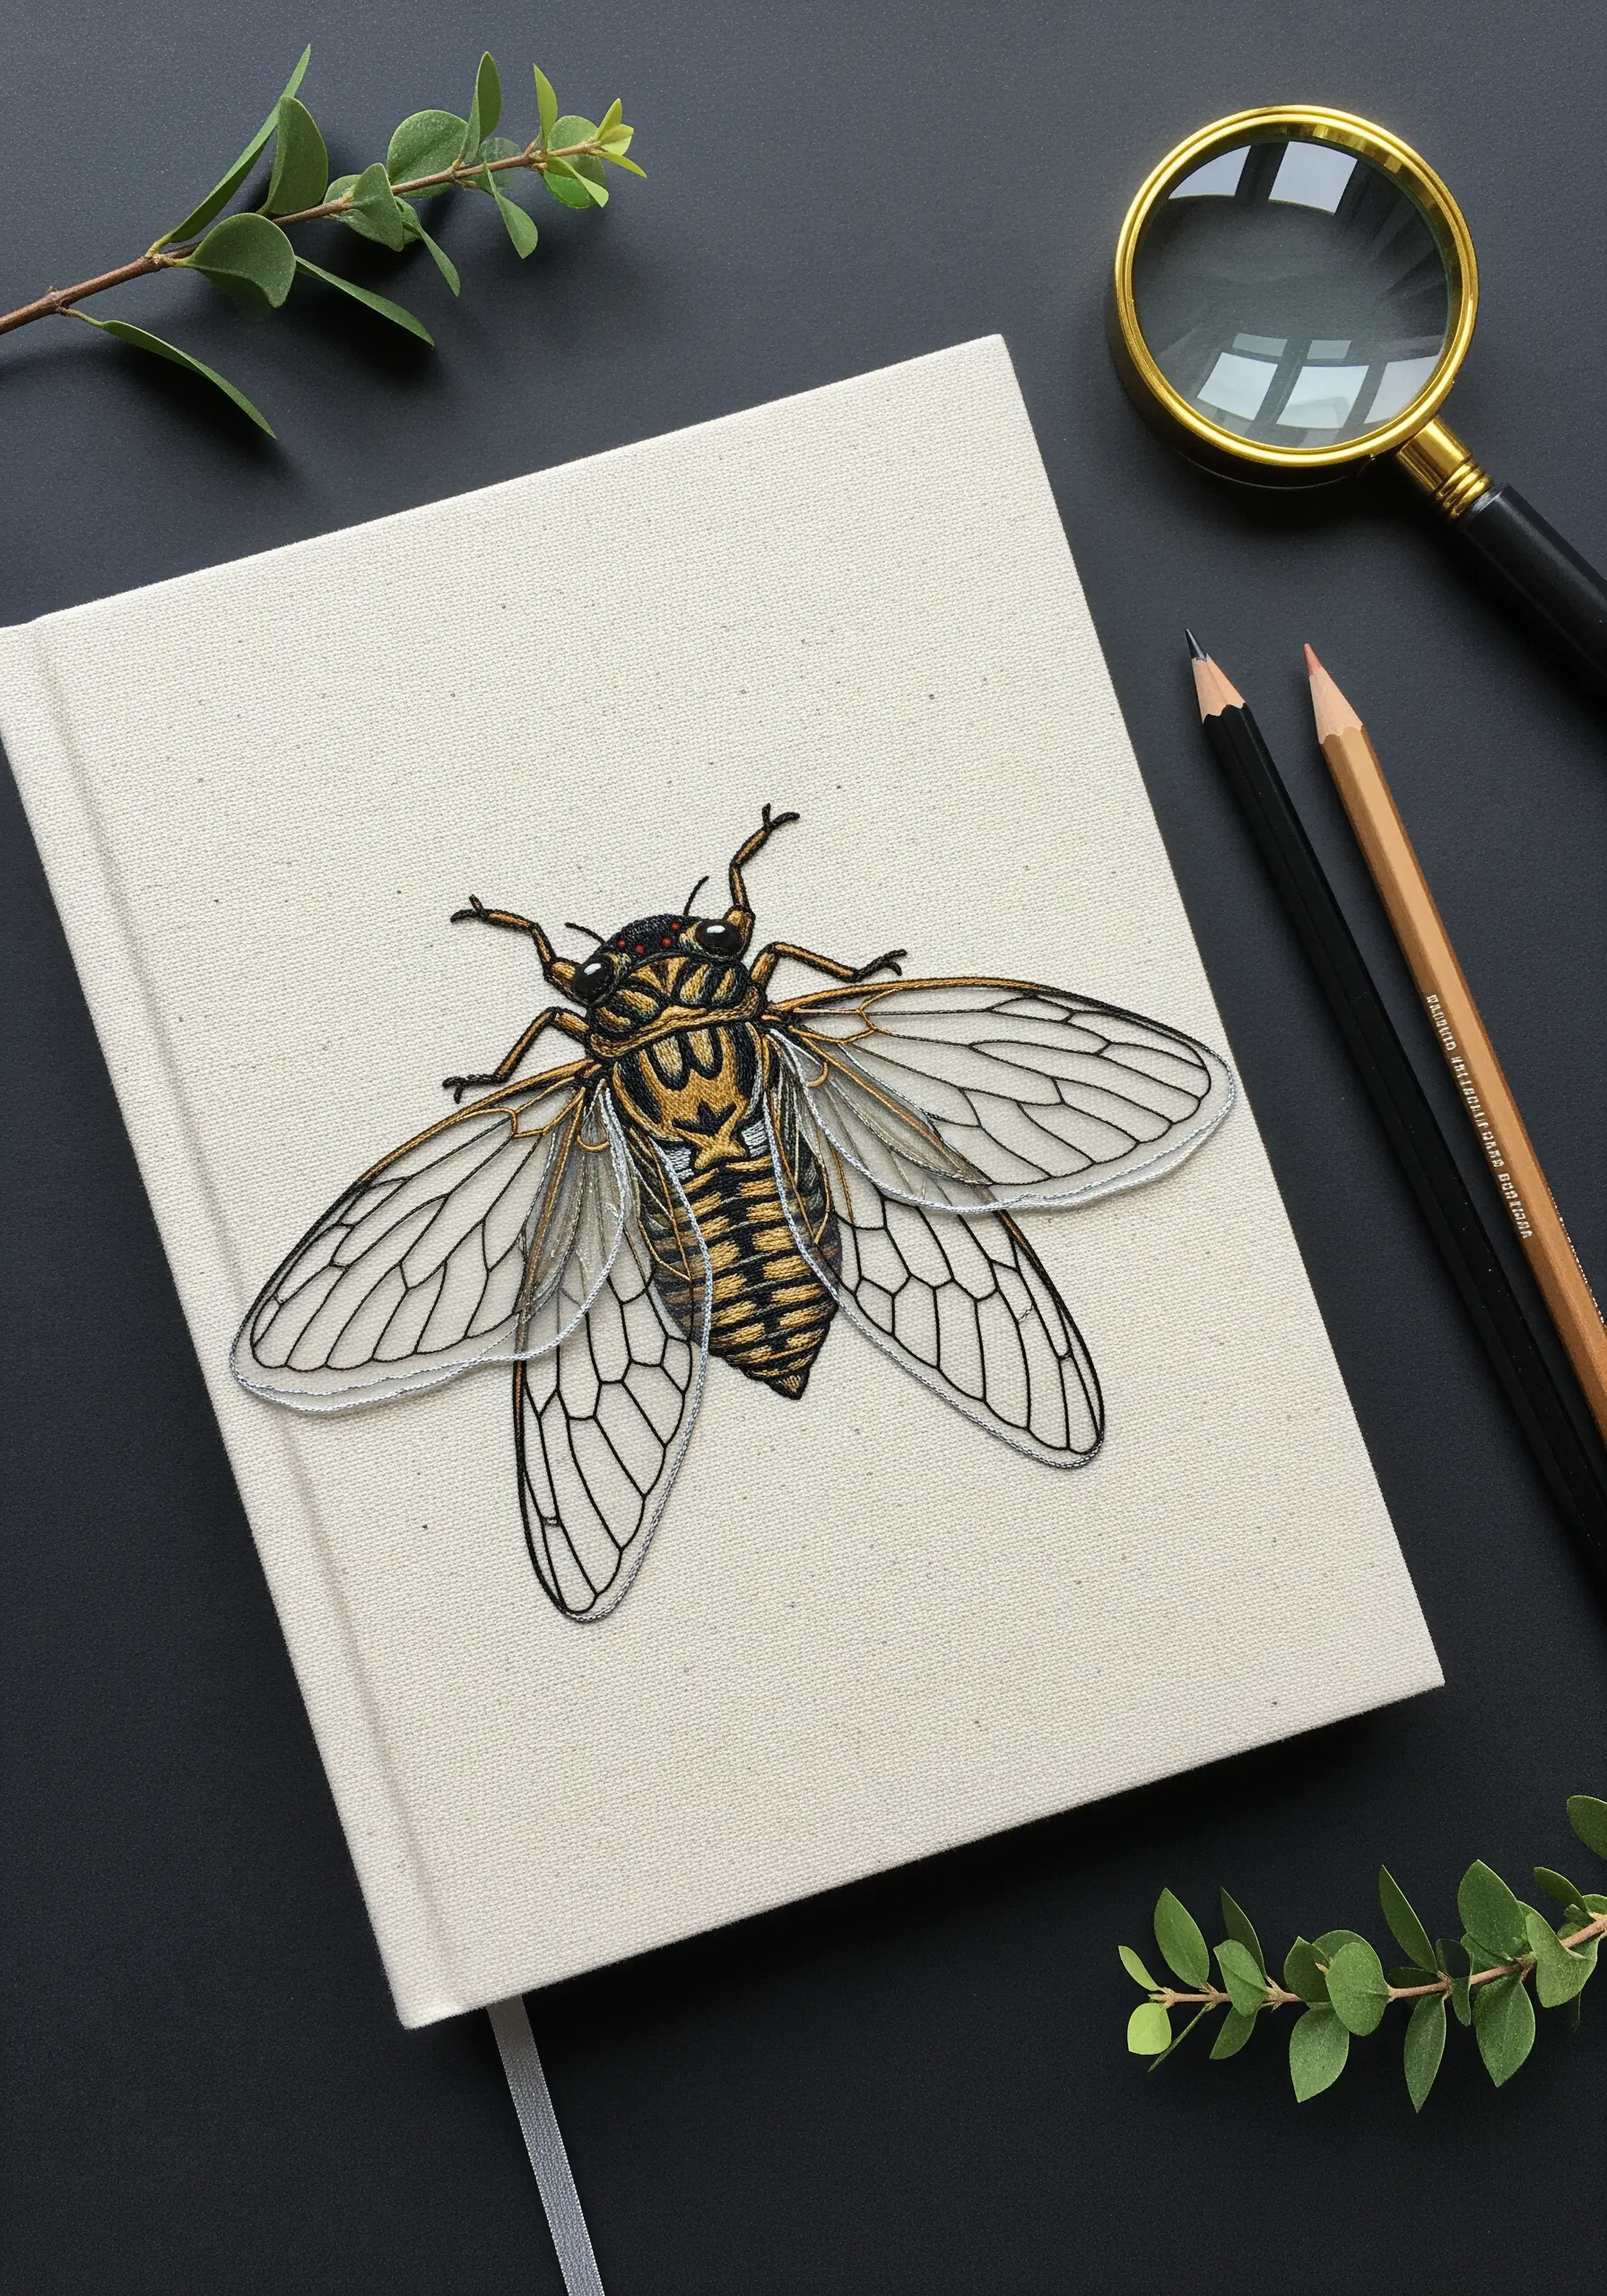
For insects like cicadas, dragonflies, or butterflies, you can achieve stunningly realistic translucent wings using organza fabric.
Stretch a piece of sheer organza in a hoop and stitch the delicate vein pattern using a fine thread and a simple backstitch.
Carefully cut out the wing shape, leaving a tiny margin of fabric around the stitching.
Position the organza wings on your main embroidery (the insect’s body) and tack them down with a few tiny, invisible stitches at the base.
This appliqué technique adds a layer of delicate realism to all your bird & butterfly embroidery patterns.
23. Achieve Saturated Color with Padded Satin Stitch
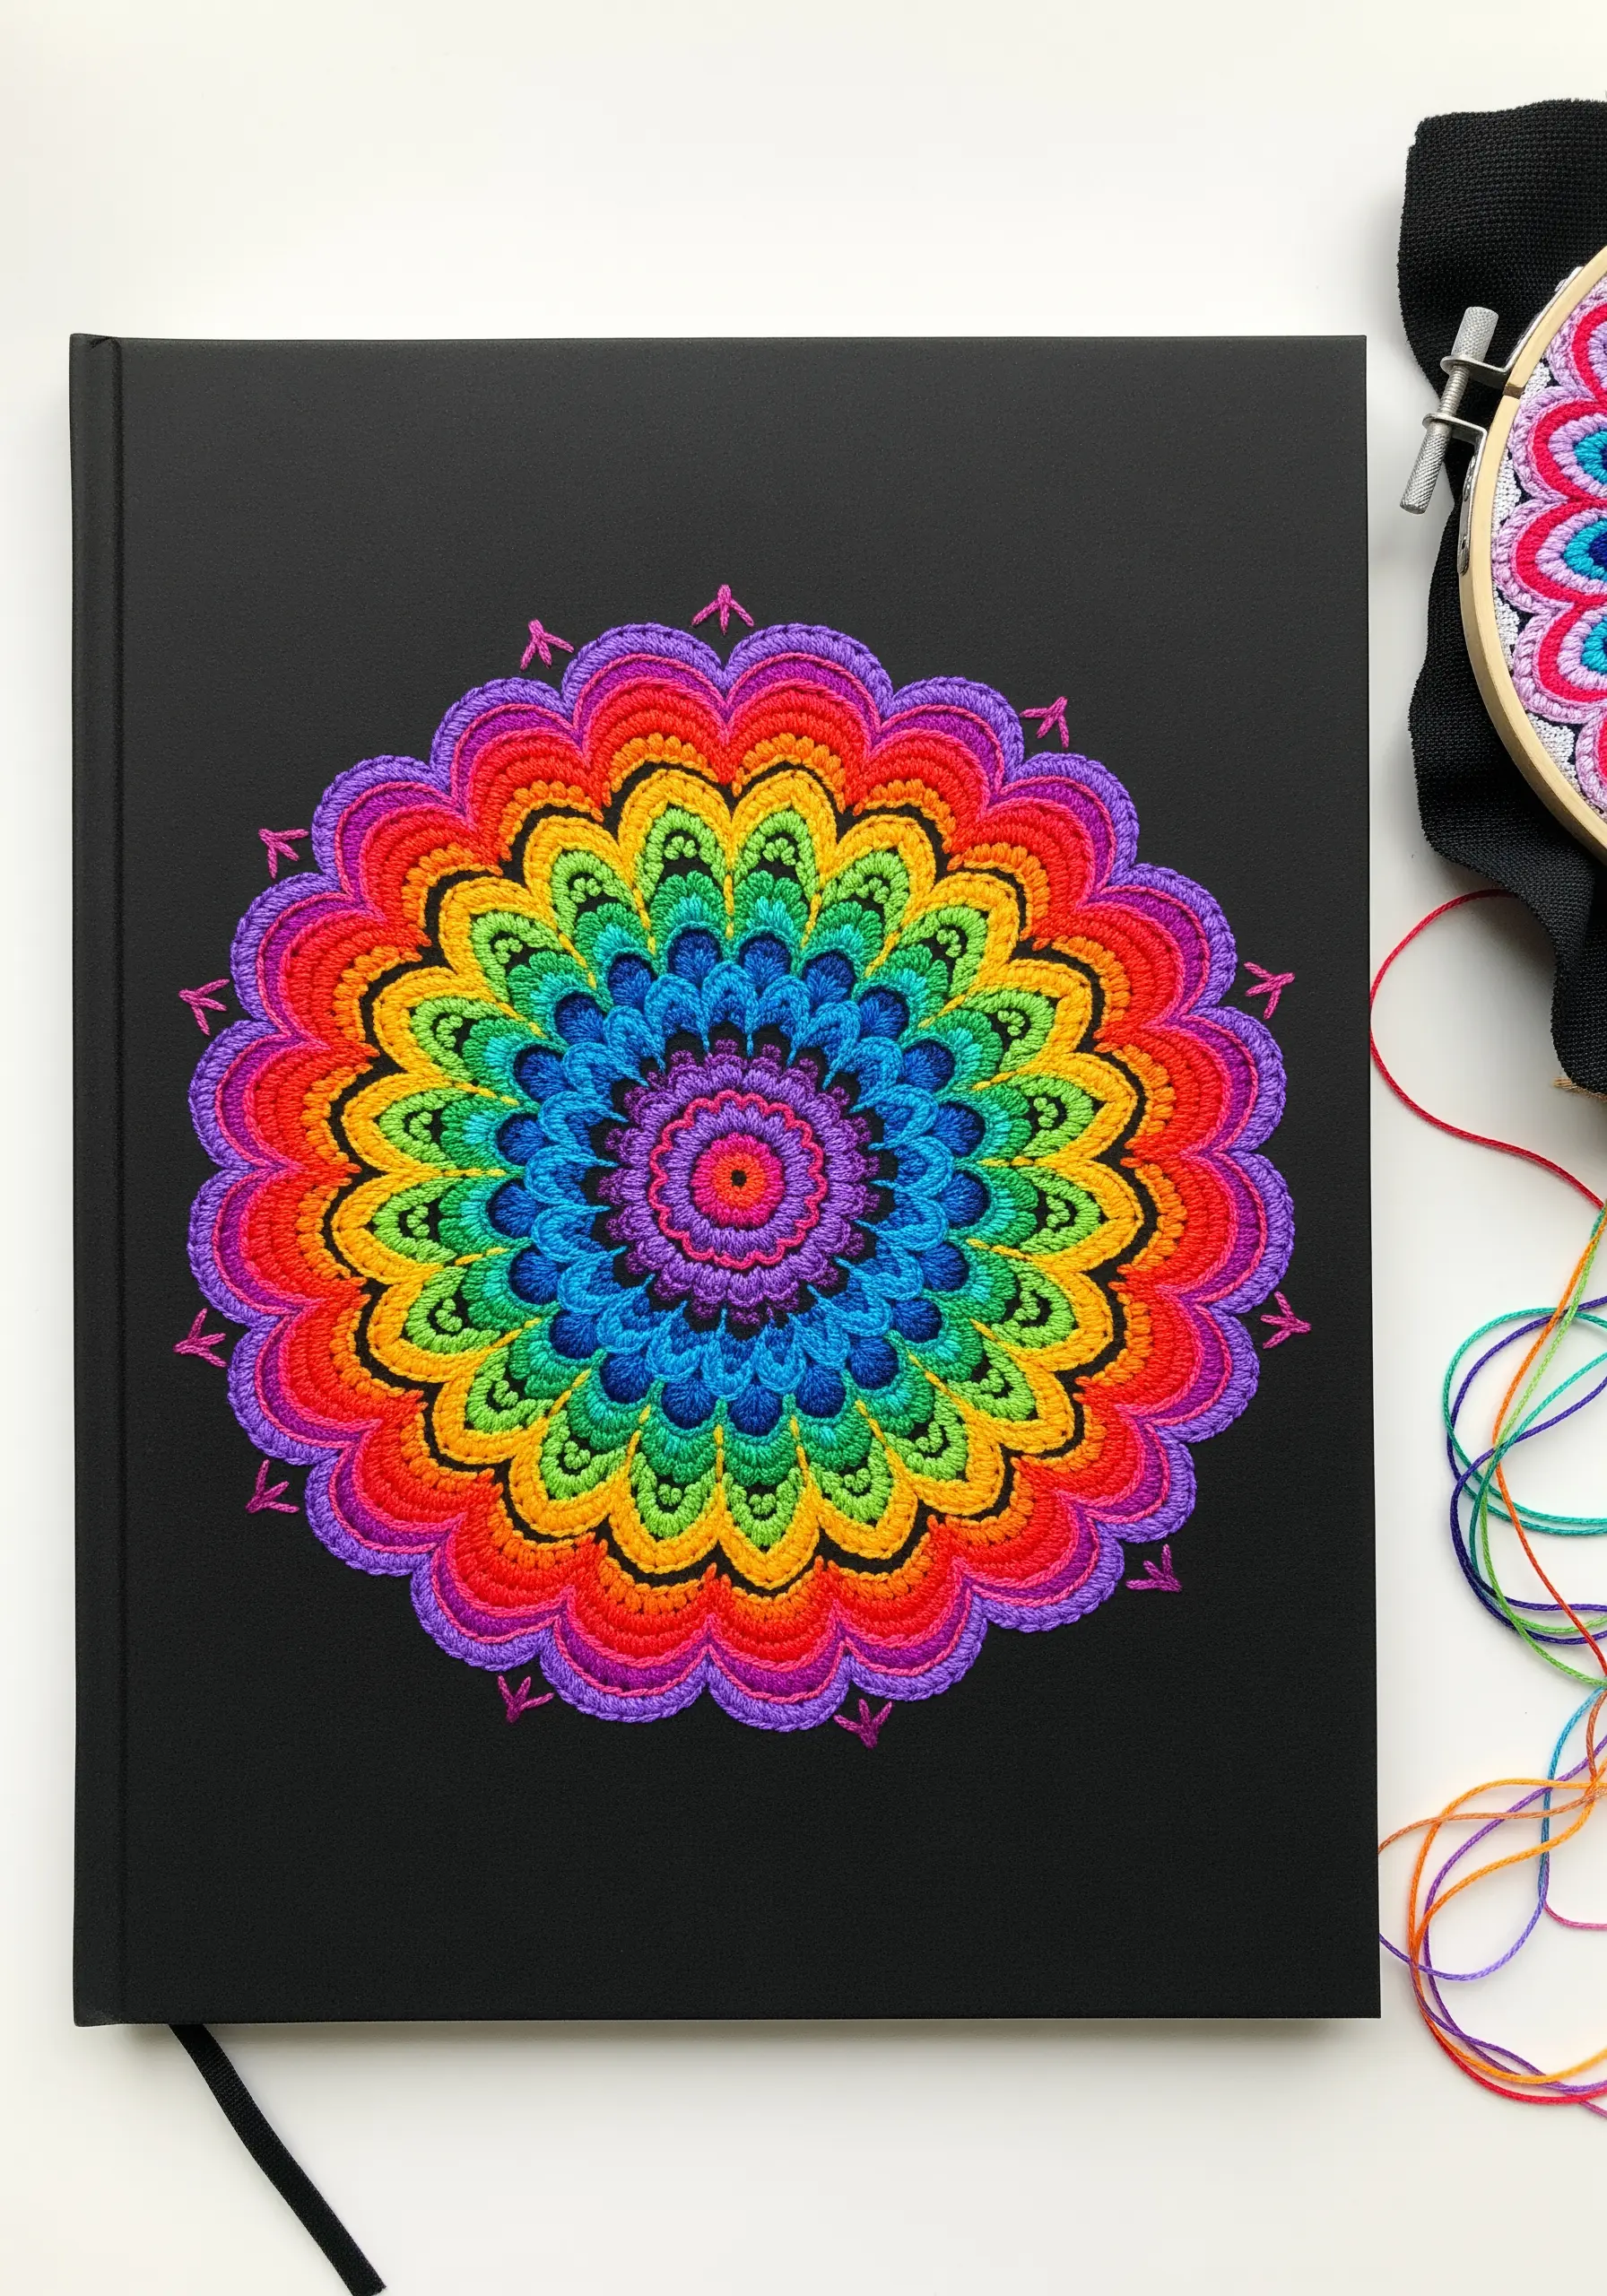
To make the colors in your mandala pop against a dark background, use a padded satin stitch.
First, fill each section of the design with a layer of small underlying stitches (like seed stitches or a simple satin stitch in a neutral color).
Then, work your final, colorful satin stitch layer directly on top.
This padding raises the surface of your embroidery, creating a subtle three-dimensional effect that catches more light and makes your colors appear richer and more saturated.
It’s the professional’s secret to making modern thread mandala ideas look exceptionally vibrant.
24. Frame a Wax Seal with a Minimalist Stitched Outline
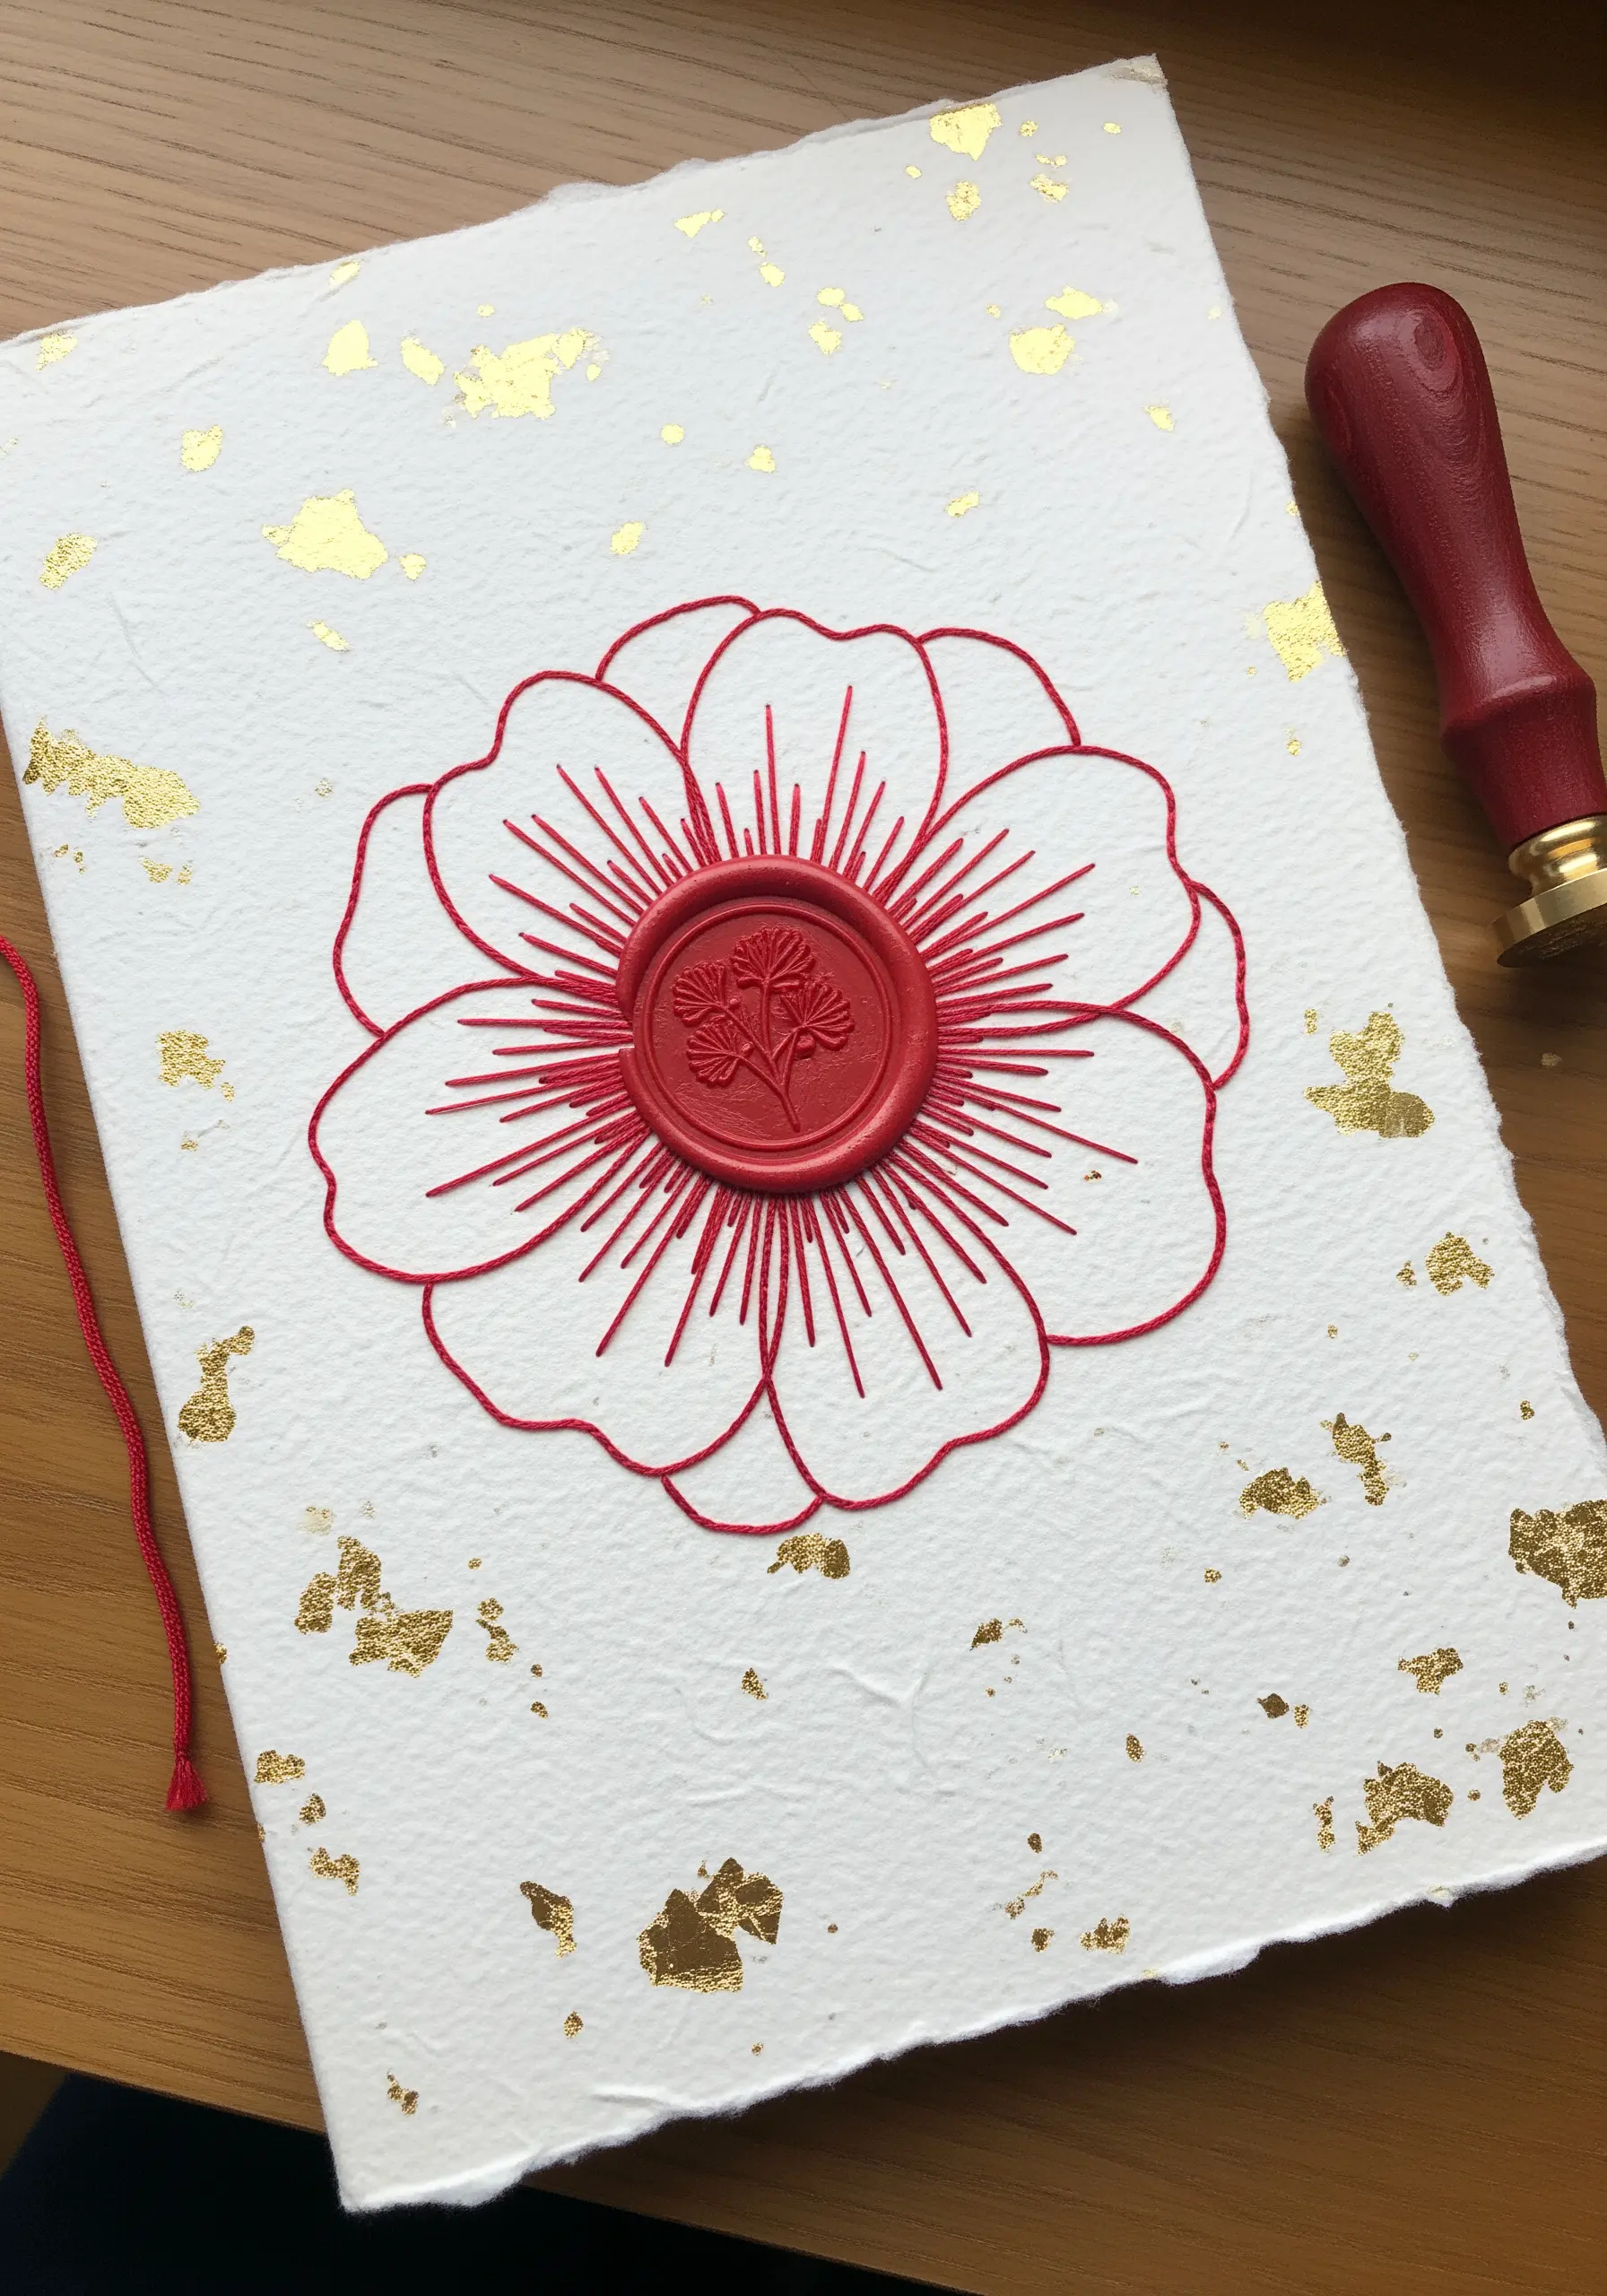
Combine the elegance of embroidery with the vintage charm of a wax seal for a truly unique journal cover.
Start by creating a clean, simple floral outline using a backstitch or stem stitch in a single, bold color.
Then, carefully make your wax seal directly in the center of the stitched design, allowing it to become the undeniable focal point.
This thoughtful combination of textures—the smooth wax, the stitched thread, and the flecked paper—turns a simple project into one of the most charming DIY embroidered mixed media cards or covers you can make.


