

Your pillowcase is more than just a place to rest your head; it’s a small canvas waiting for a quiet, personal touch. Imagine transforming that simple piece of fabric with just a needle and thread, adding a detail that brings you a tiny moment of joy every time you see it.
You don’t need complex patterns or hours of time to create something beautiful. True elegance in embroidery often comes from the thoughtful application of a simple stitch, a well-chosen color, or perfect placement. These small designs are your opportunity to practice that intention—to see how changing the direction of a stitch can create light, or how a single line can convey so much grace.
Think of this as a creative exercise in calm. Each stitch is a small, deliberate act of making. Choose a design that speaks to you, take a deep breath, and let’s begin adding a little more beauty to your everyday life.
1. A Minimalist Lavender Corner
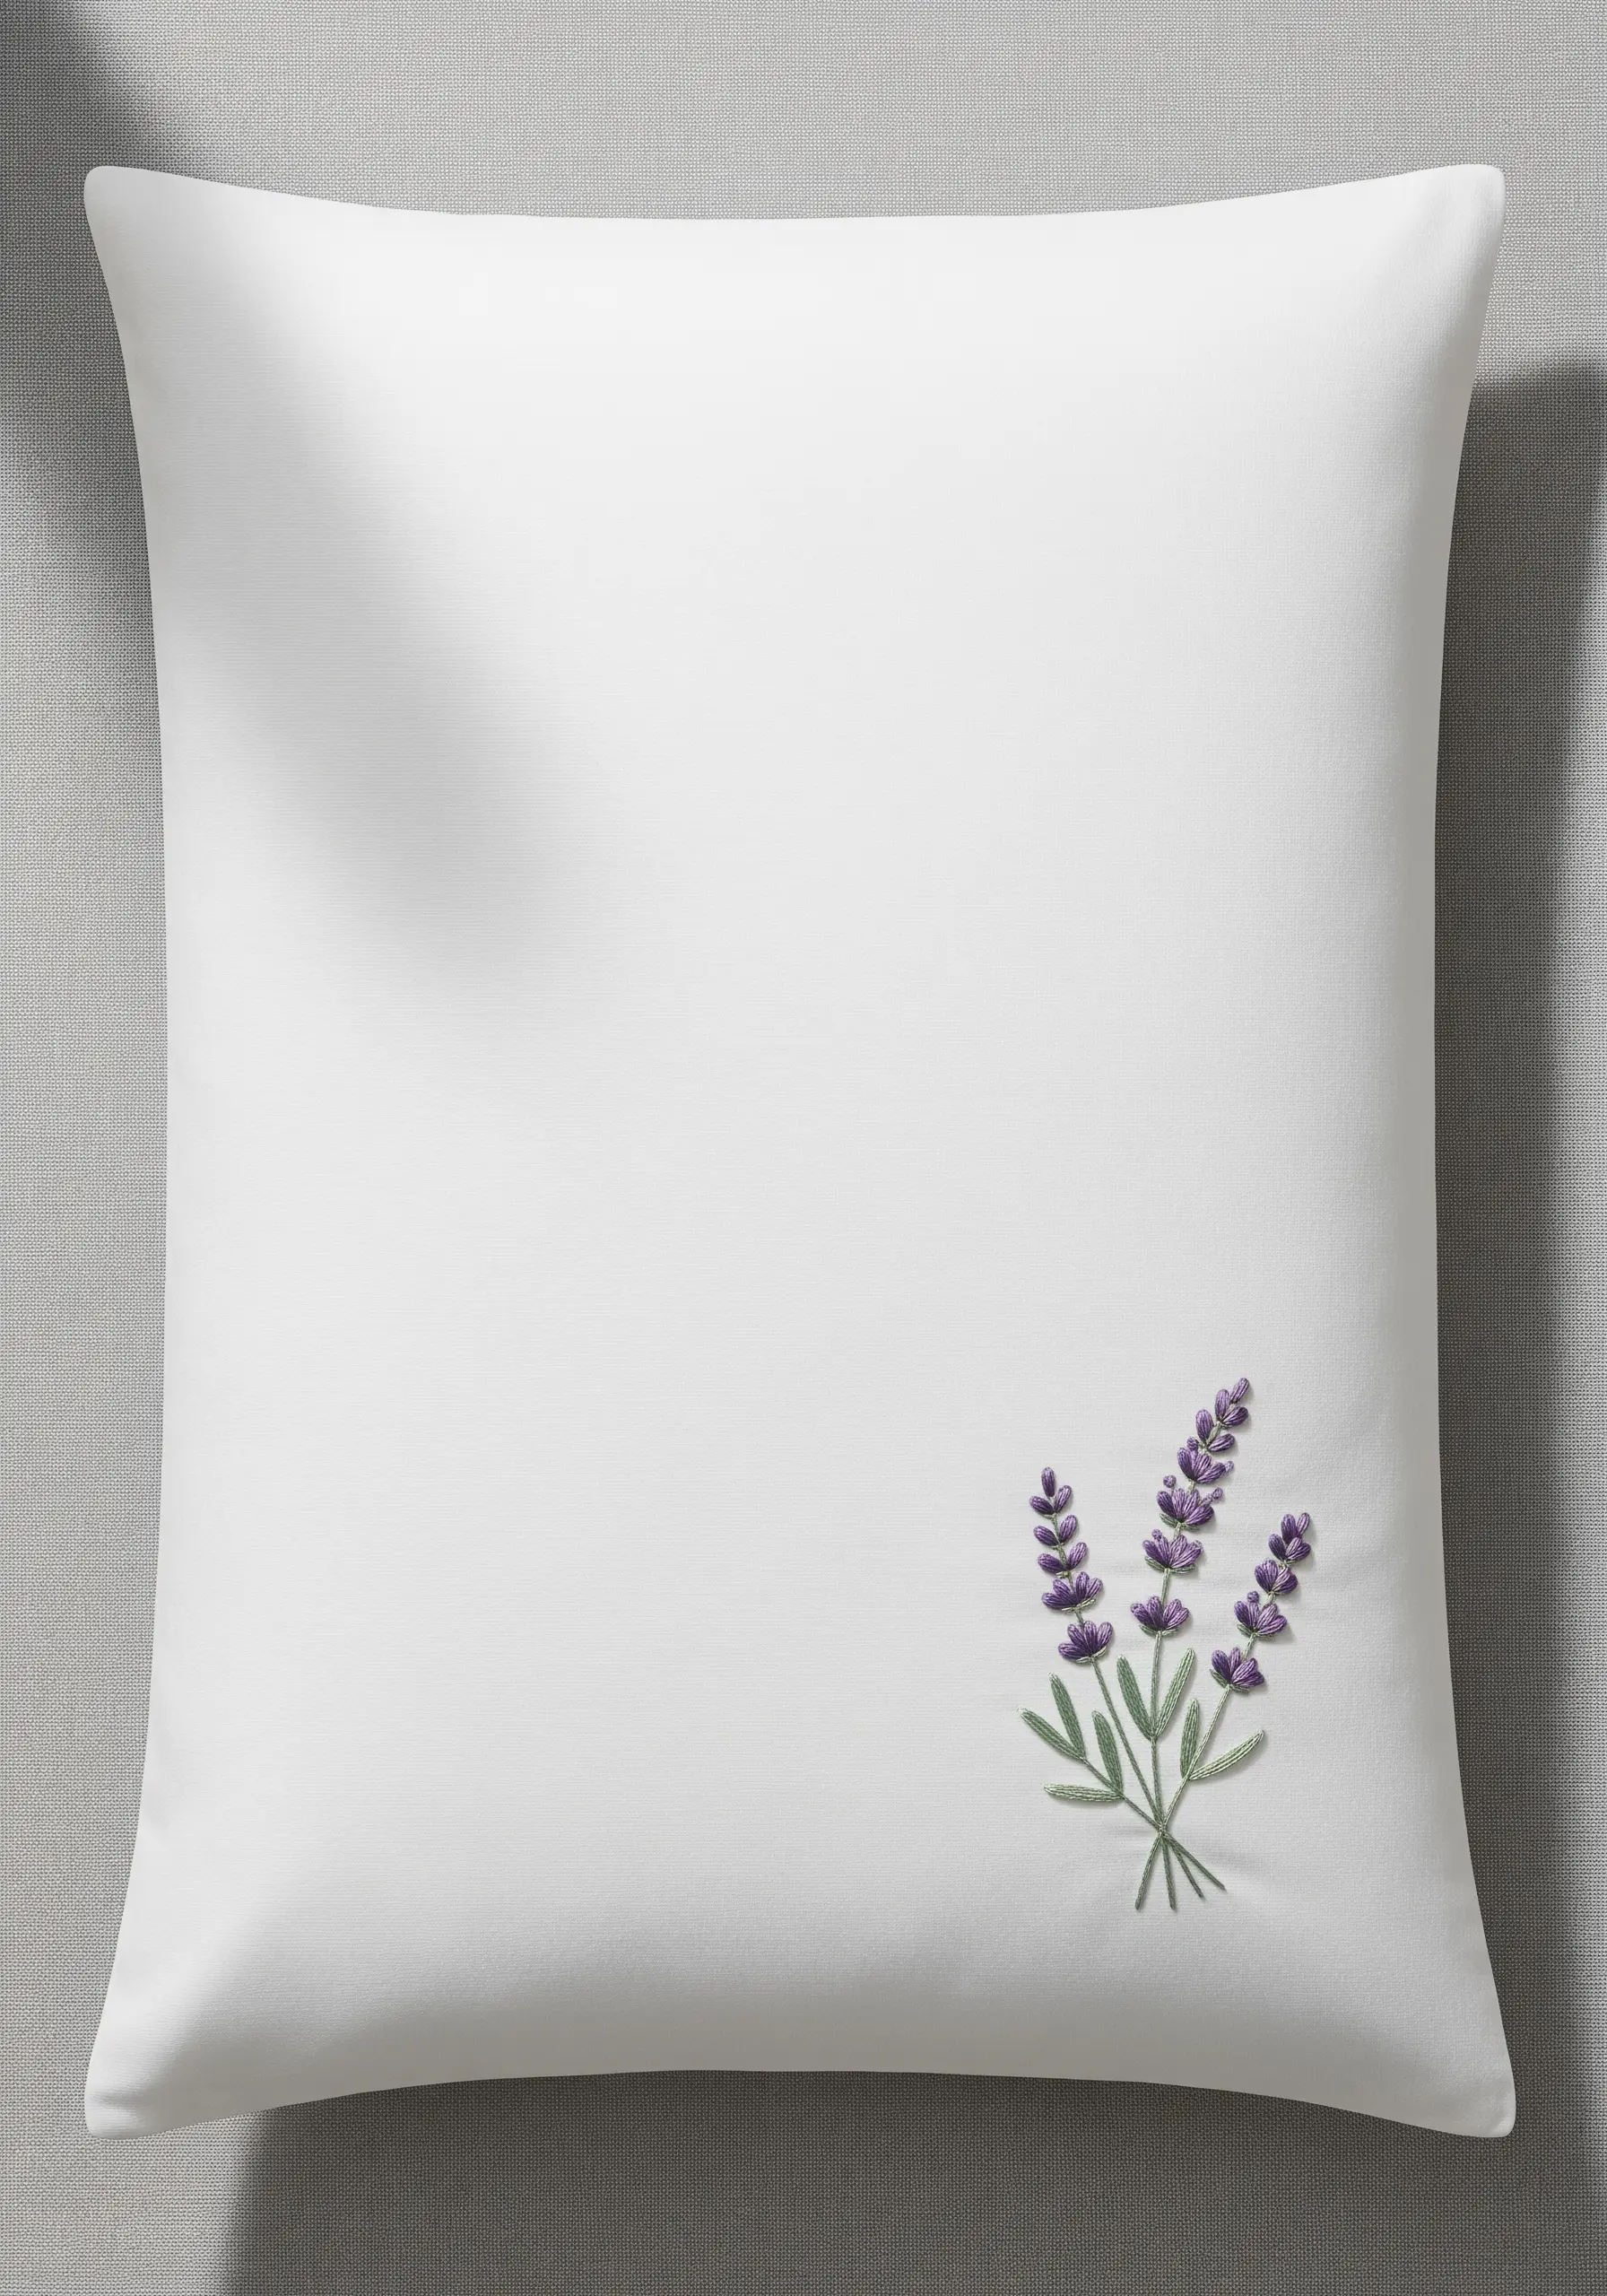
Place a small botanical design in a corner to create an elegant, asymmetrical composition.
For the lavender blossoms, use French knots or tiny bullion stitches in two or three shades of purple to give them dimension and texture.
Use a fine, single-strand stem stitch for the stalks to maintain a delicate look that doesn’t overpower the soft blossoms.
This design masterfully uses ways to combine thread and negative space, allowing the simple white fabric to feel like part of the artwork itself.
2. Woven Crescent Moon
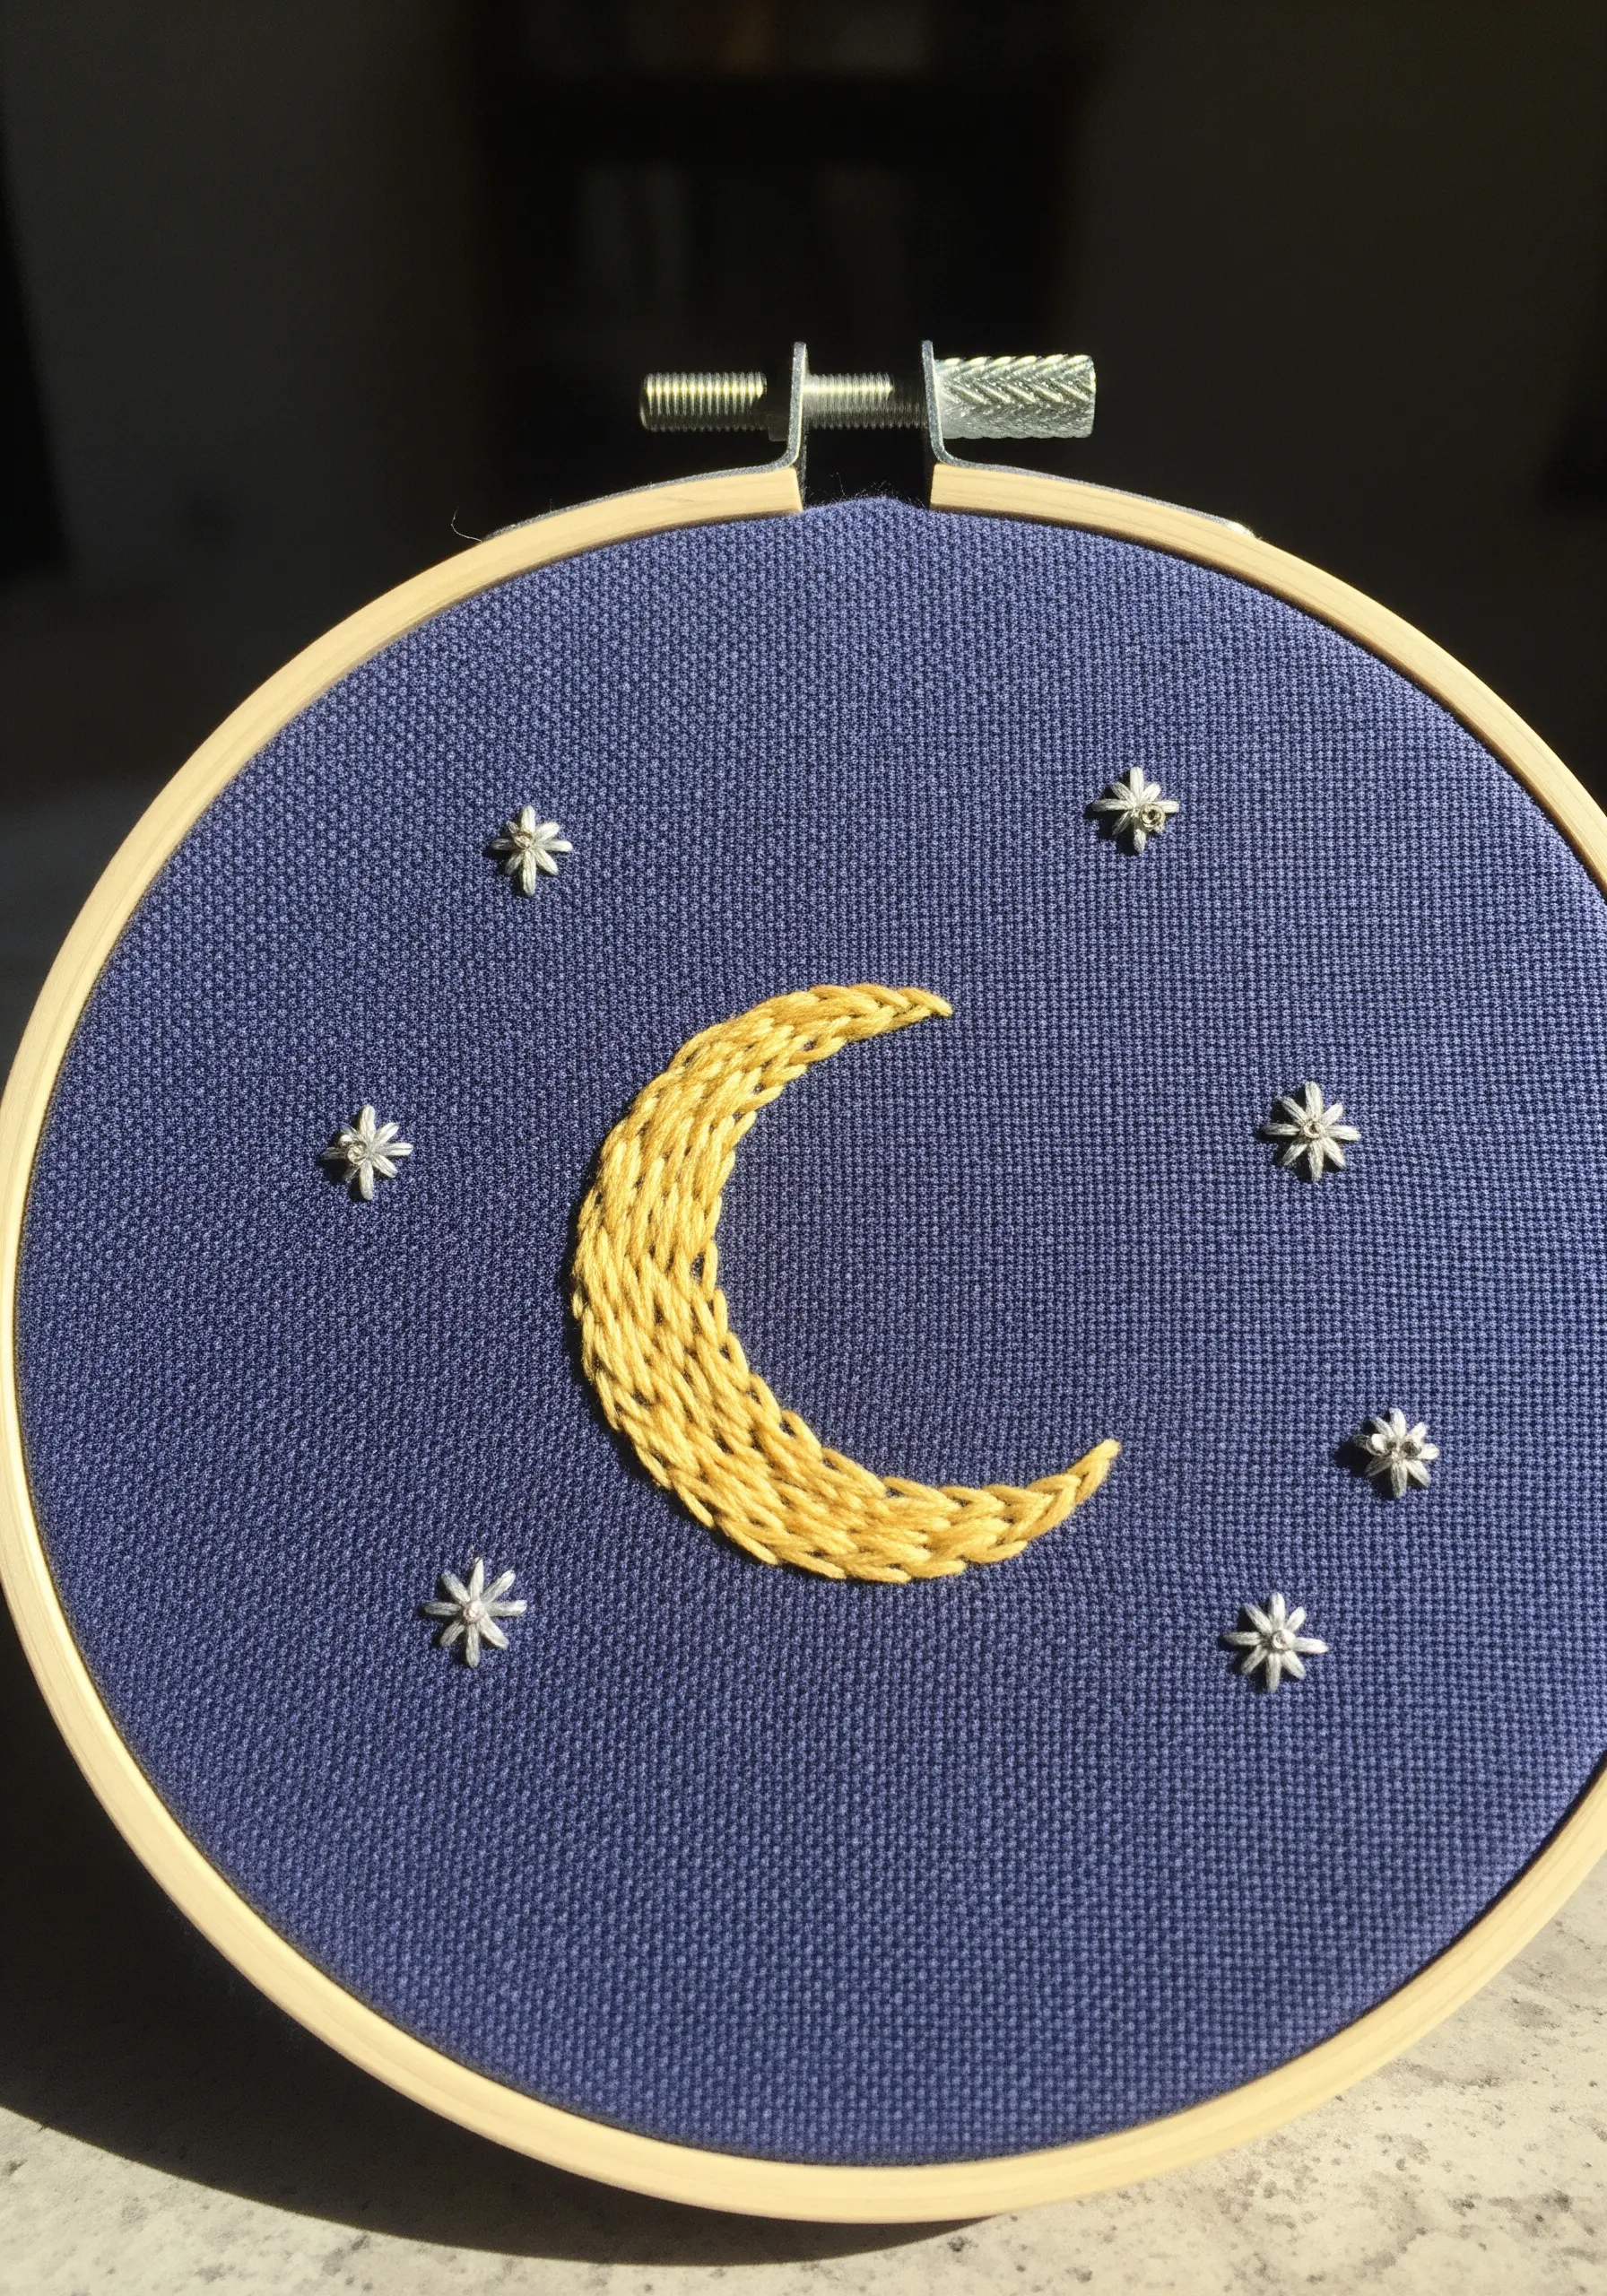
Create a stunningly textured moon by using a woven wheel stitch (or spider web stitch) adapted to a crescent shape.
First, create a foundation of straight stitches radiating from the inner curve to the outer curve of the moon.
Then, weave your main thread over and under these spokes without piercing the fabric until the shape is filled, creating a raised, dimensional effect.
For the stars, use a simple star stitch with a silvery metallic thread to catch the light and contrast with the matte cotton of the moon.
3. Bold Graphic Bee
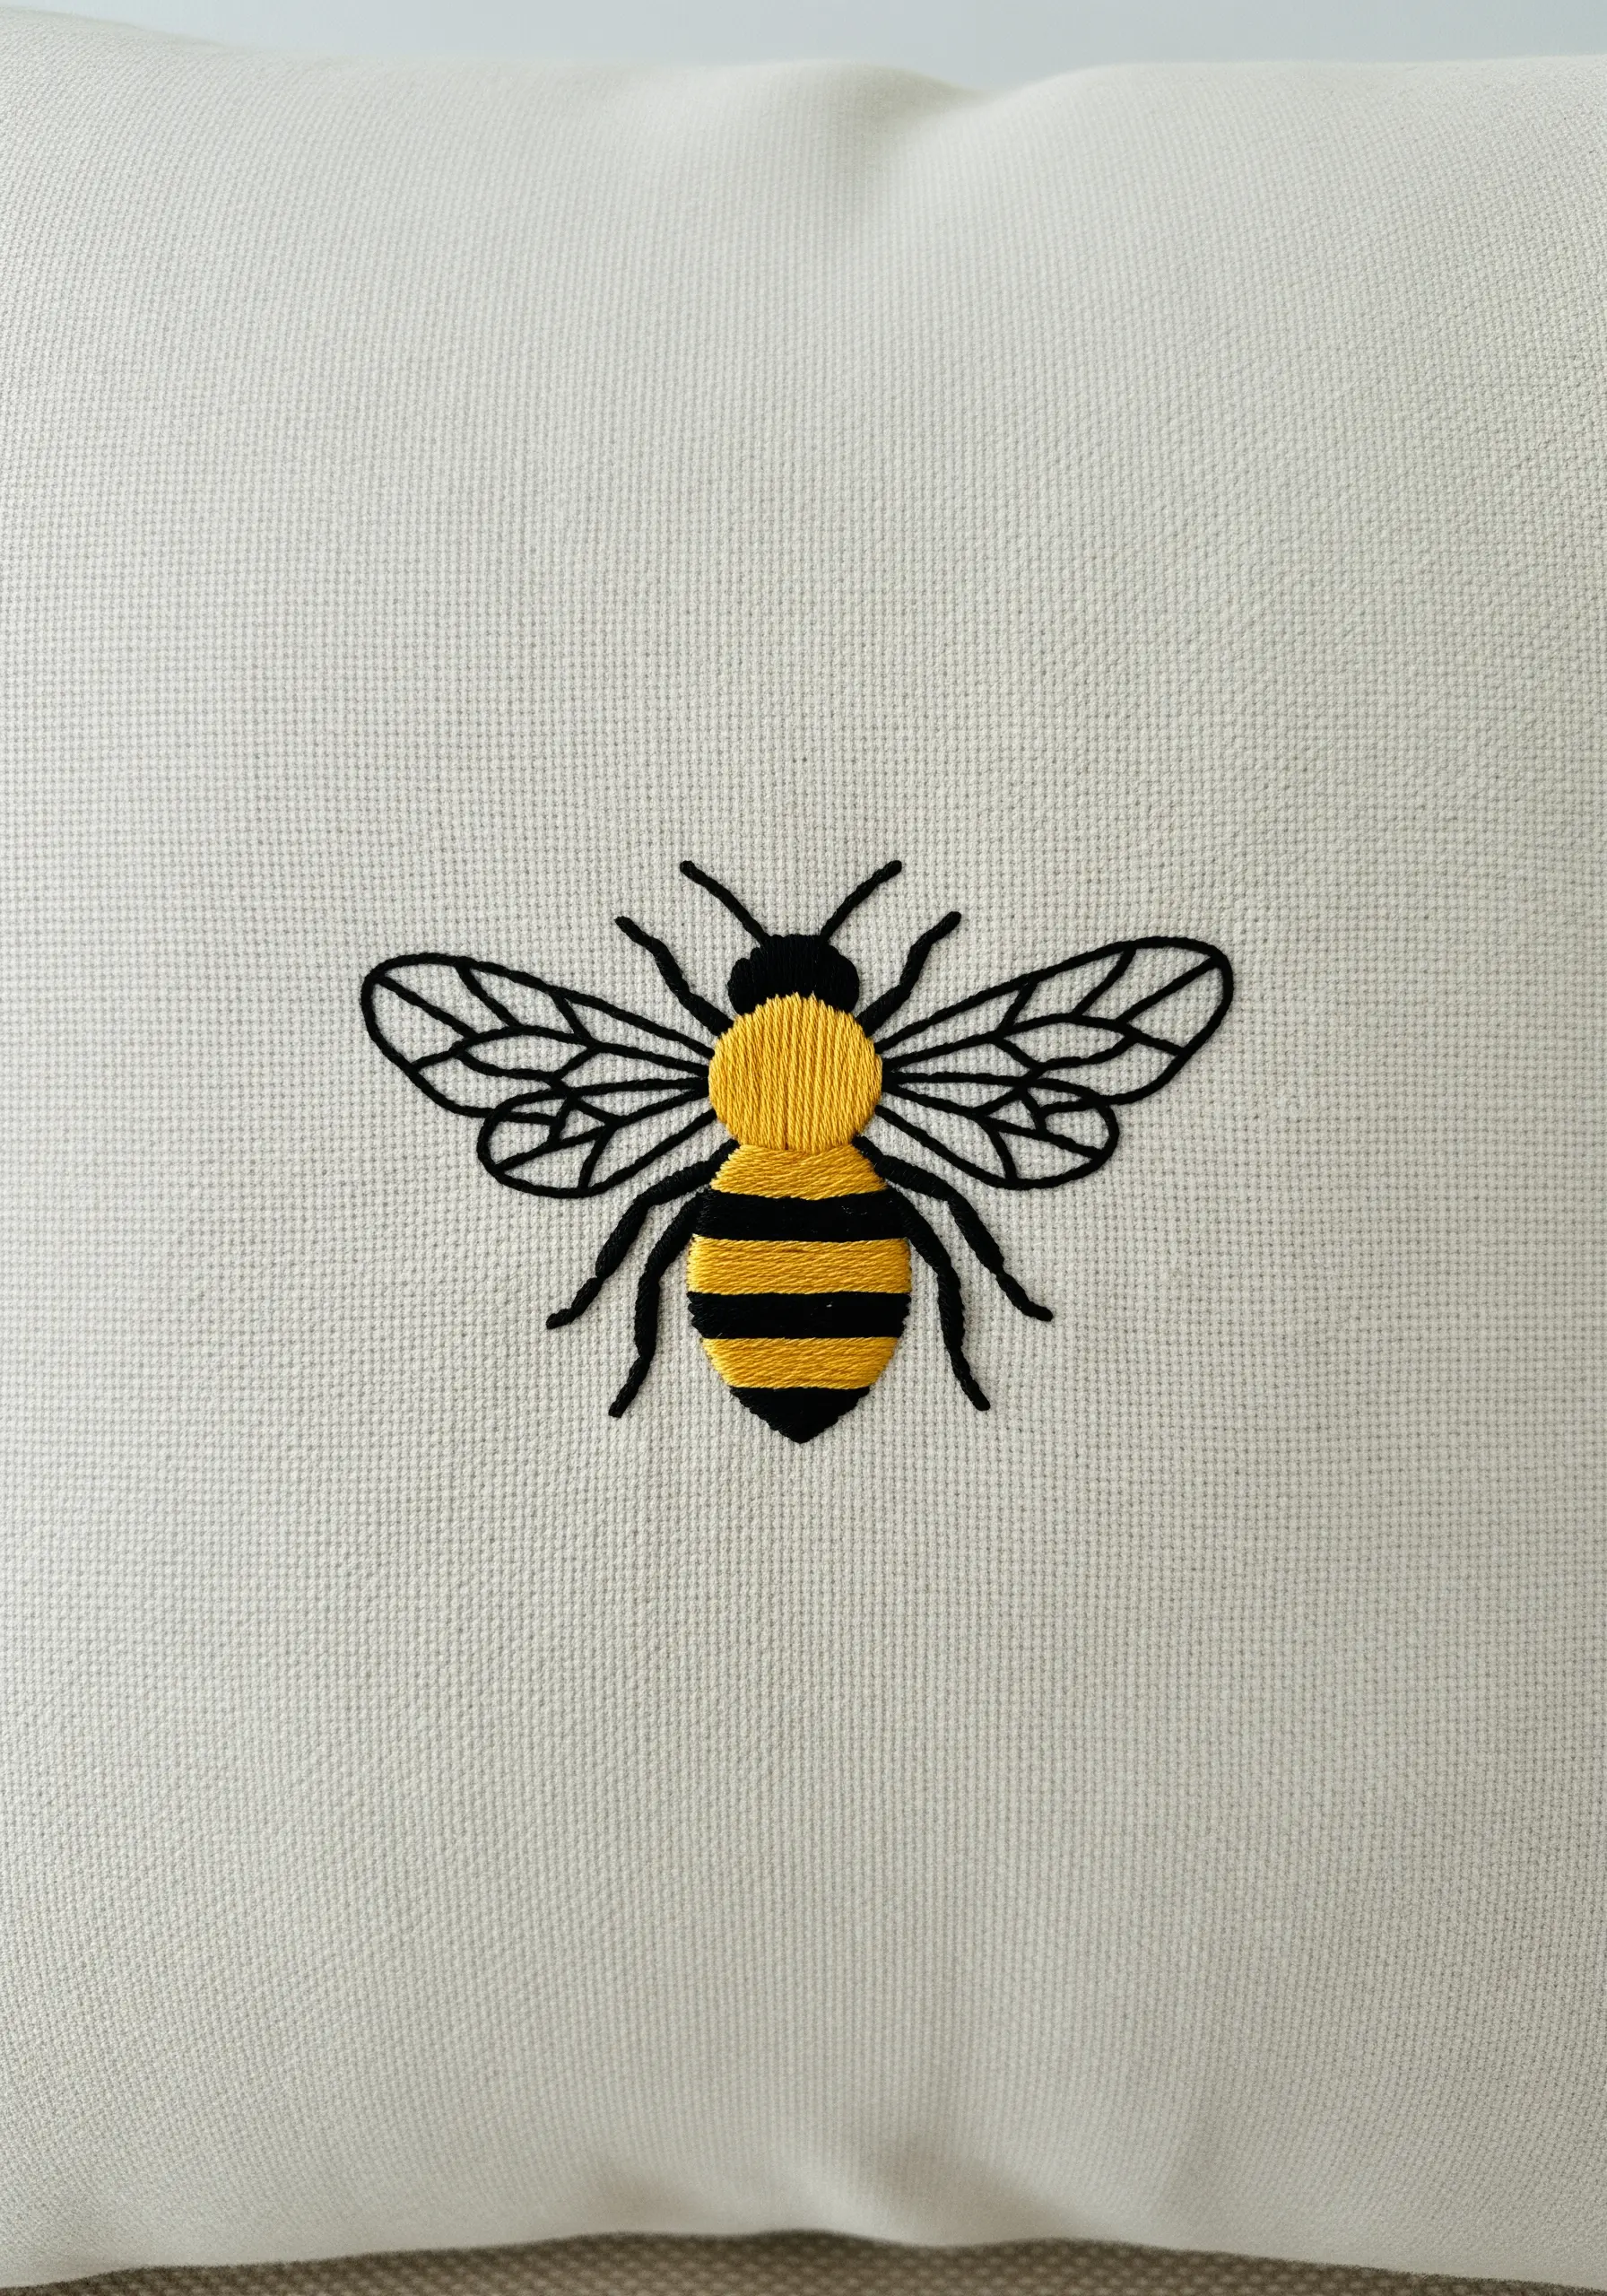
Achieve this clean, graphic look by first outlining the entire bee with a precise two-strand backstitch or split stitch.
Fill the stripes with a dense satin stitch, ensuring your stitches lie flat and parallel.
To create that subtle, plush texture on the body, alternate the direction of your satin stitch in the yellow and black stripes—one horizontal, the next vertical.
This sharp contrast between the fine lines of the wings and the solid fill of the body makes the design pop.
4. Expressive Single-Line Portrait
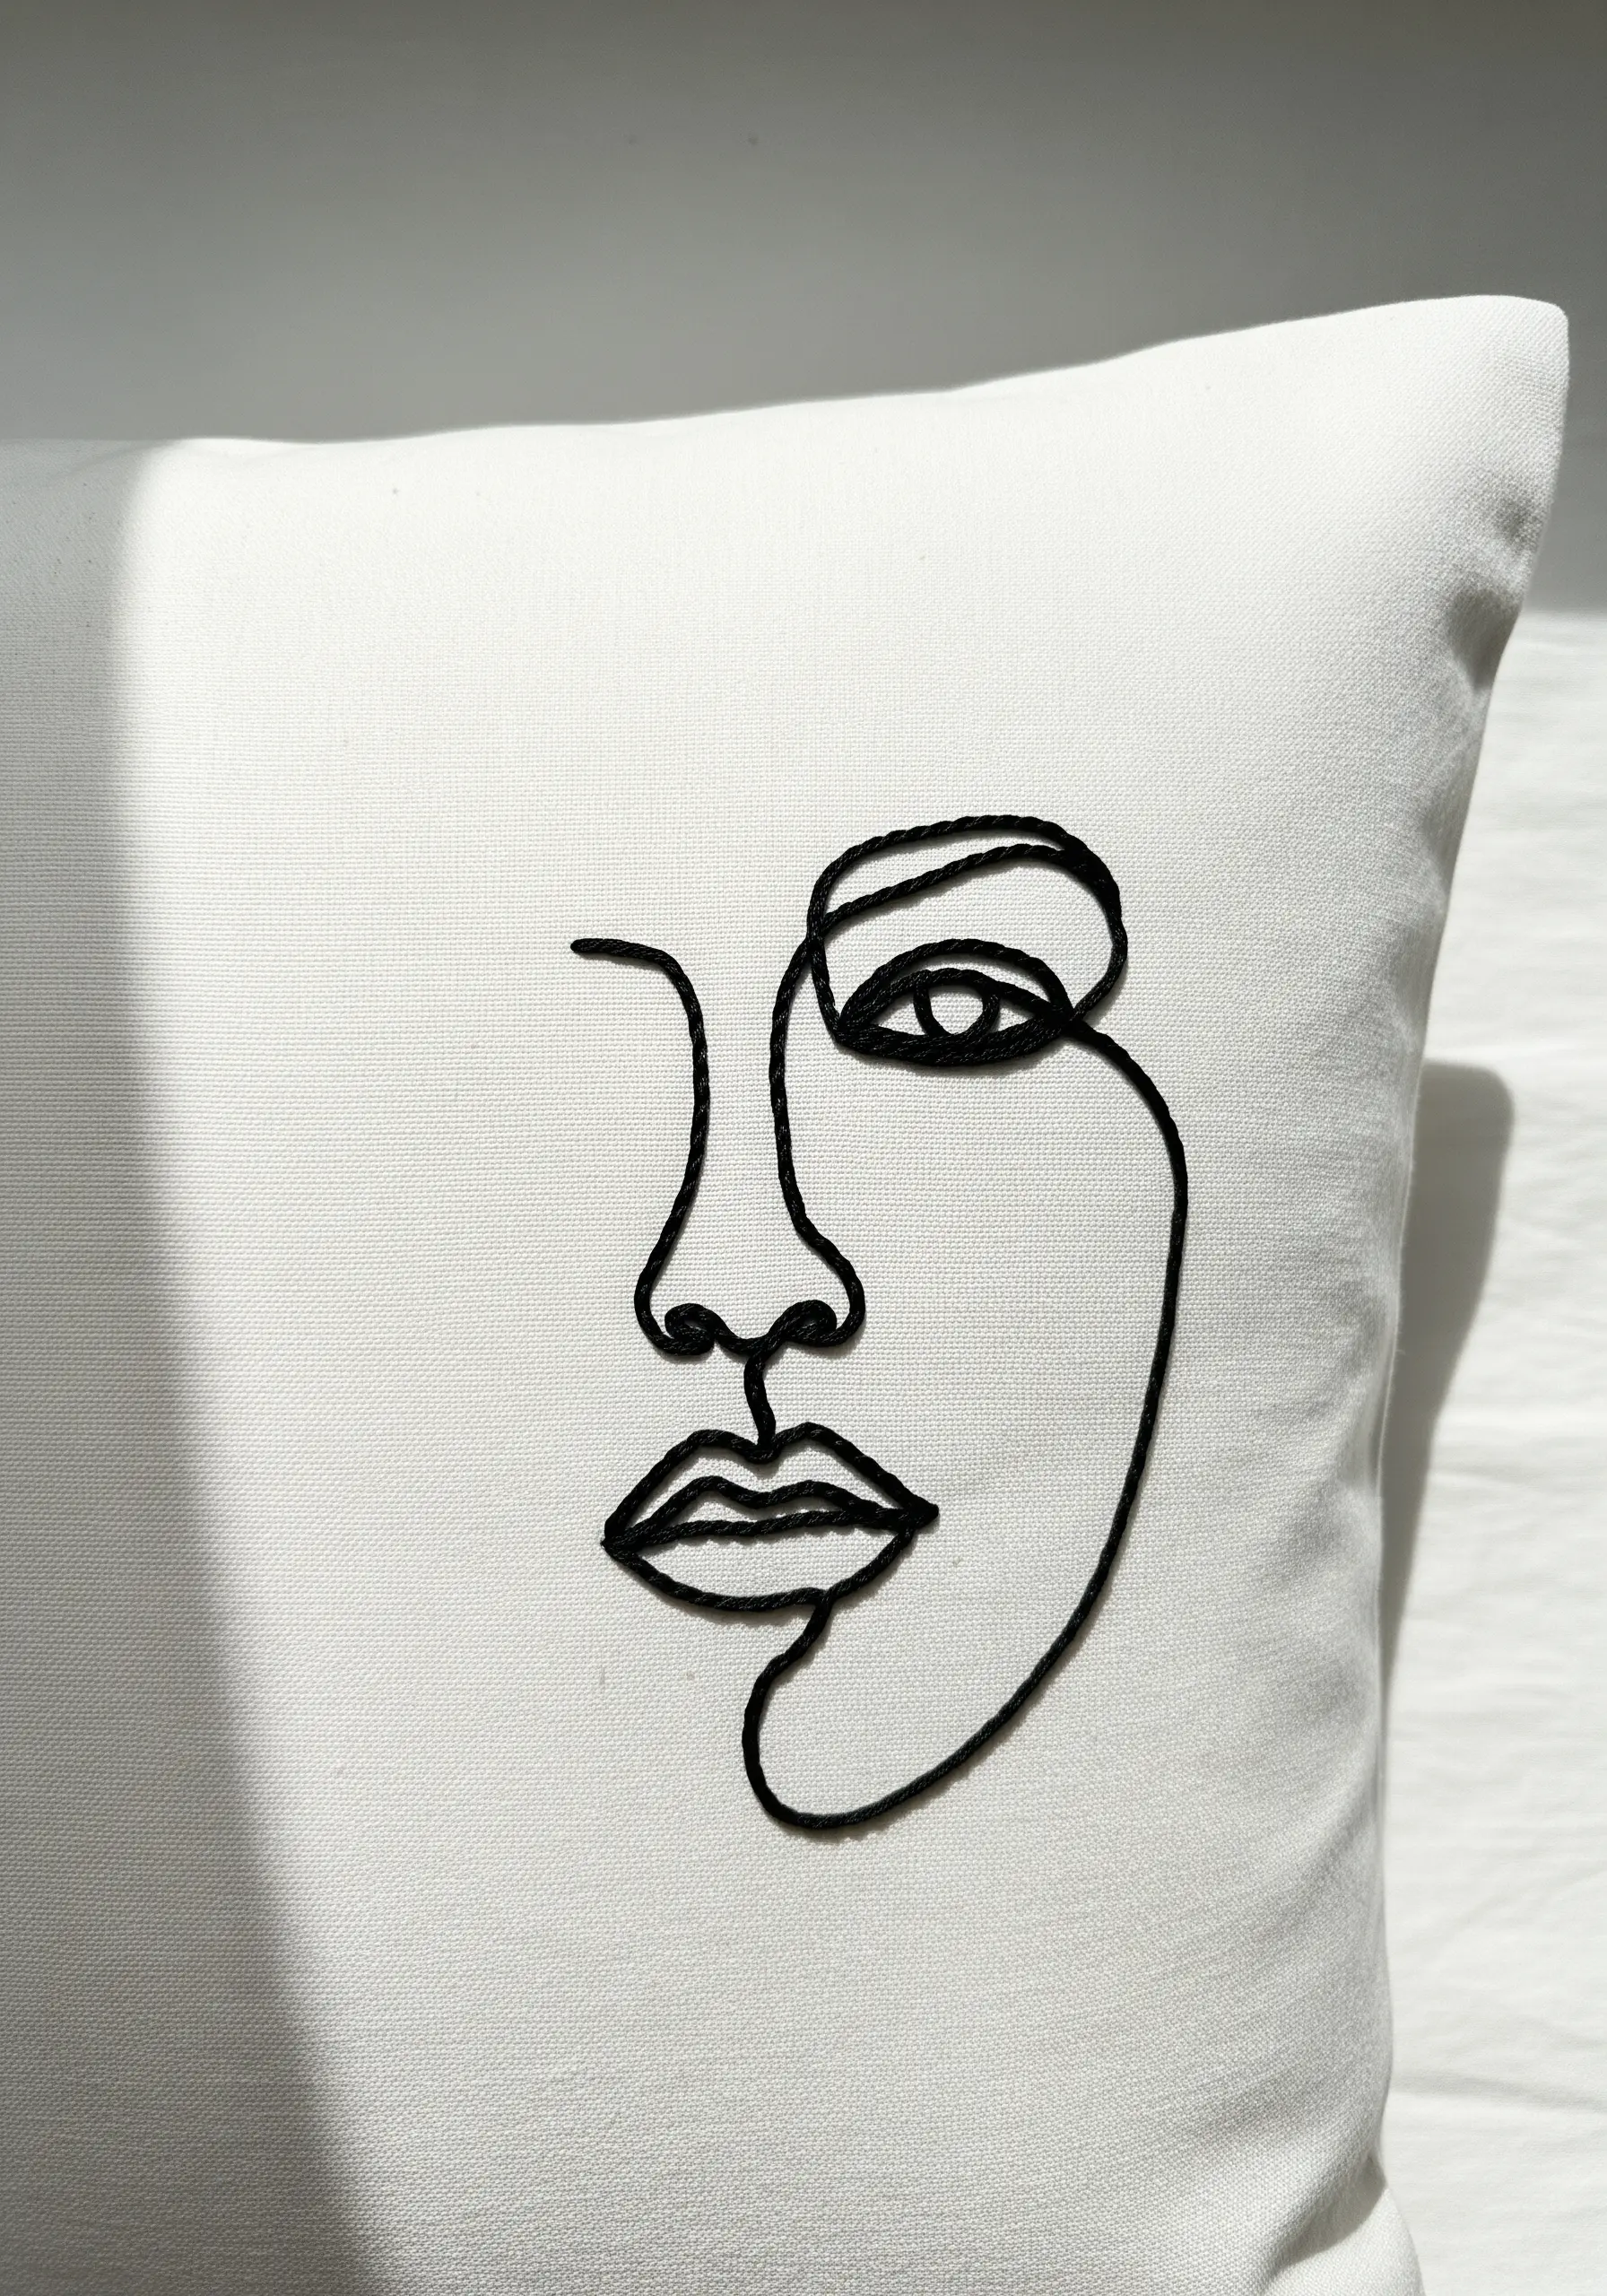
The power of this design is its continuous, fluid line, which you can replicate using a whipped backstitch or a stem stitch with all six strands of floss.
Using a thicker thread or cotton perle gives the line weight and presence, turning a simple drawing into a tactile statement piece.
Maintain even tension as you navigate the curves to ensure the line doesn’t pucker or distort the fabric.
This is one of the most elegant abstract line art embroidery styles you can try, adding instant sophistication to a plain pillowcase.
5. Serene Two-Tone Rain Cloud
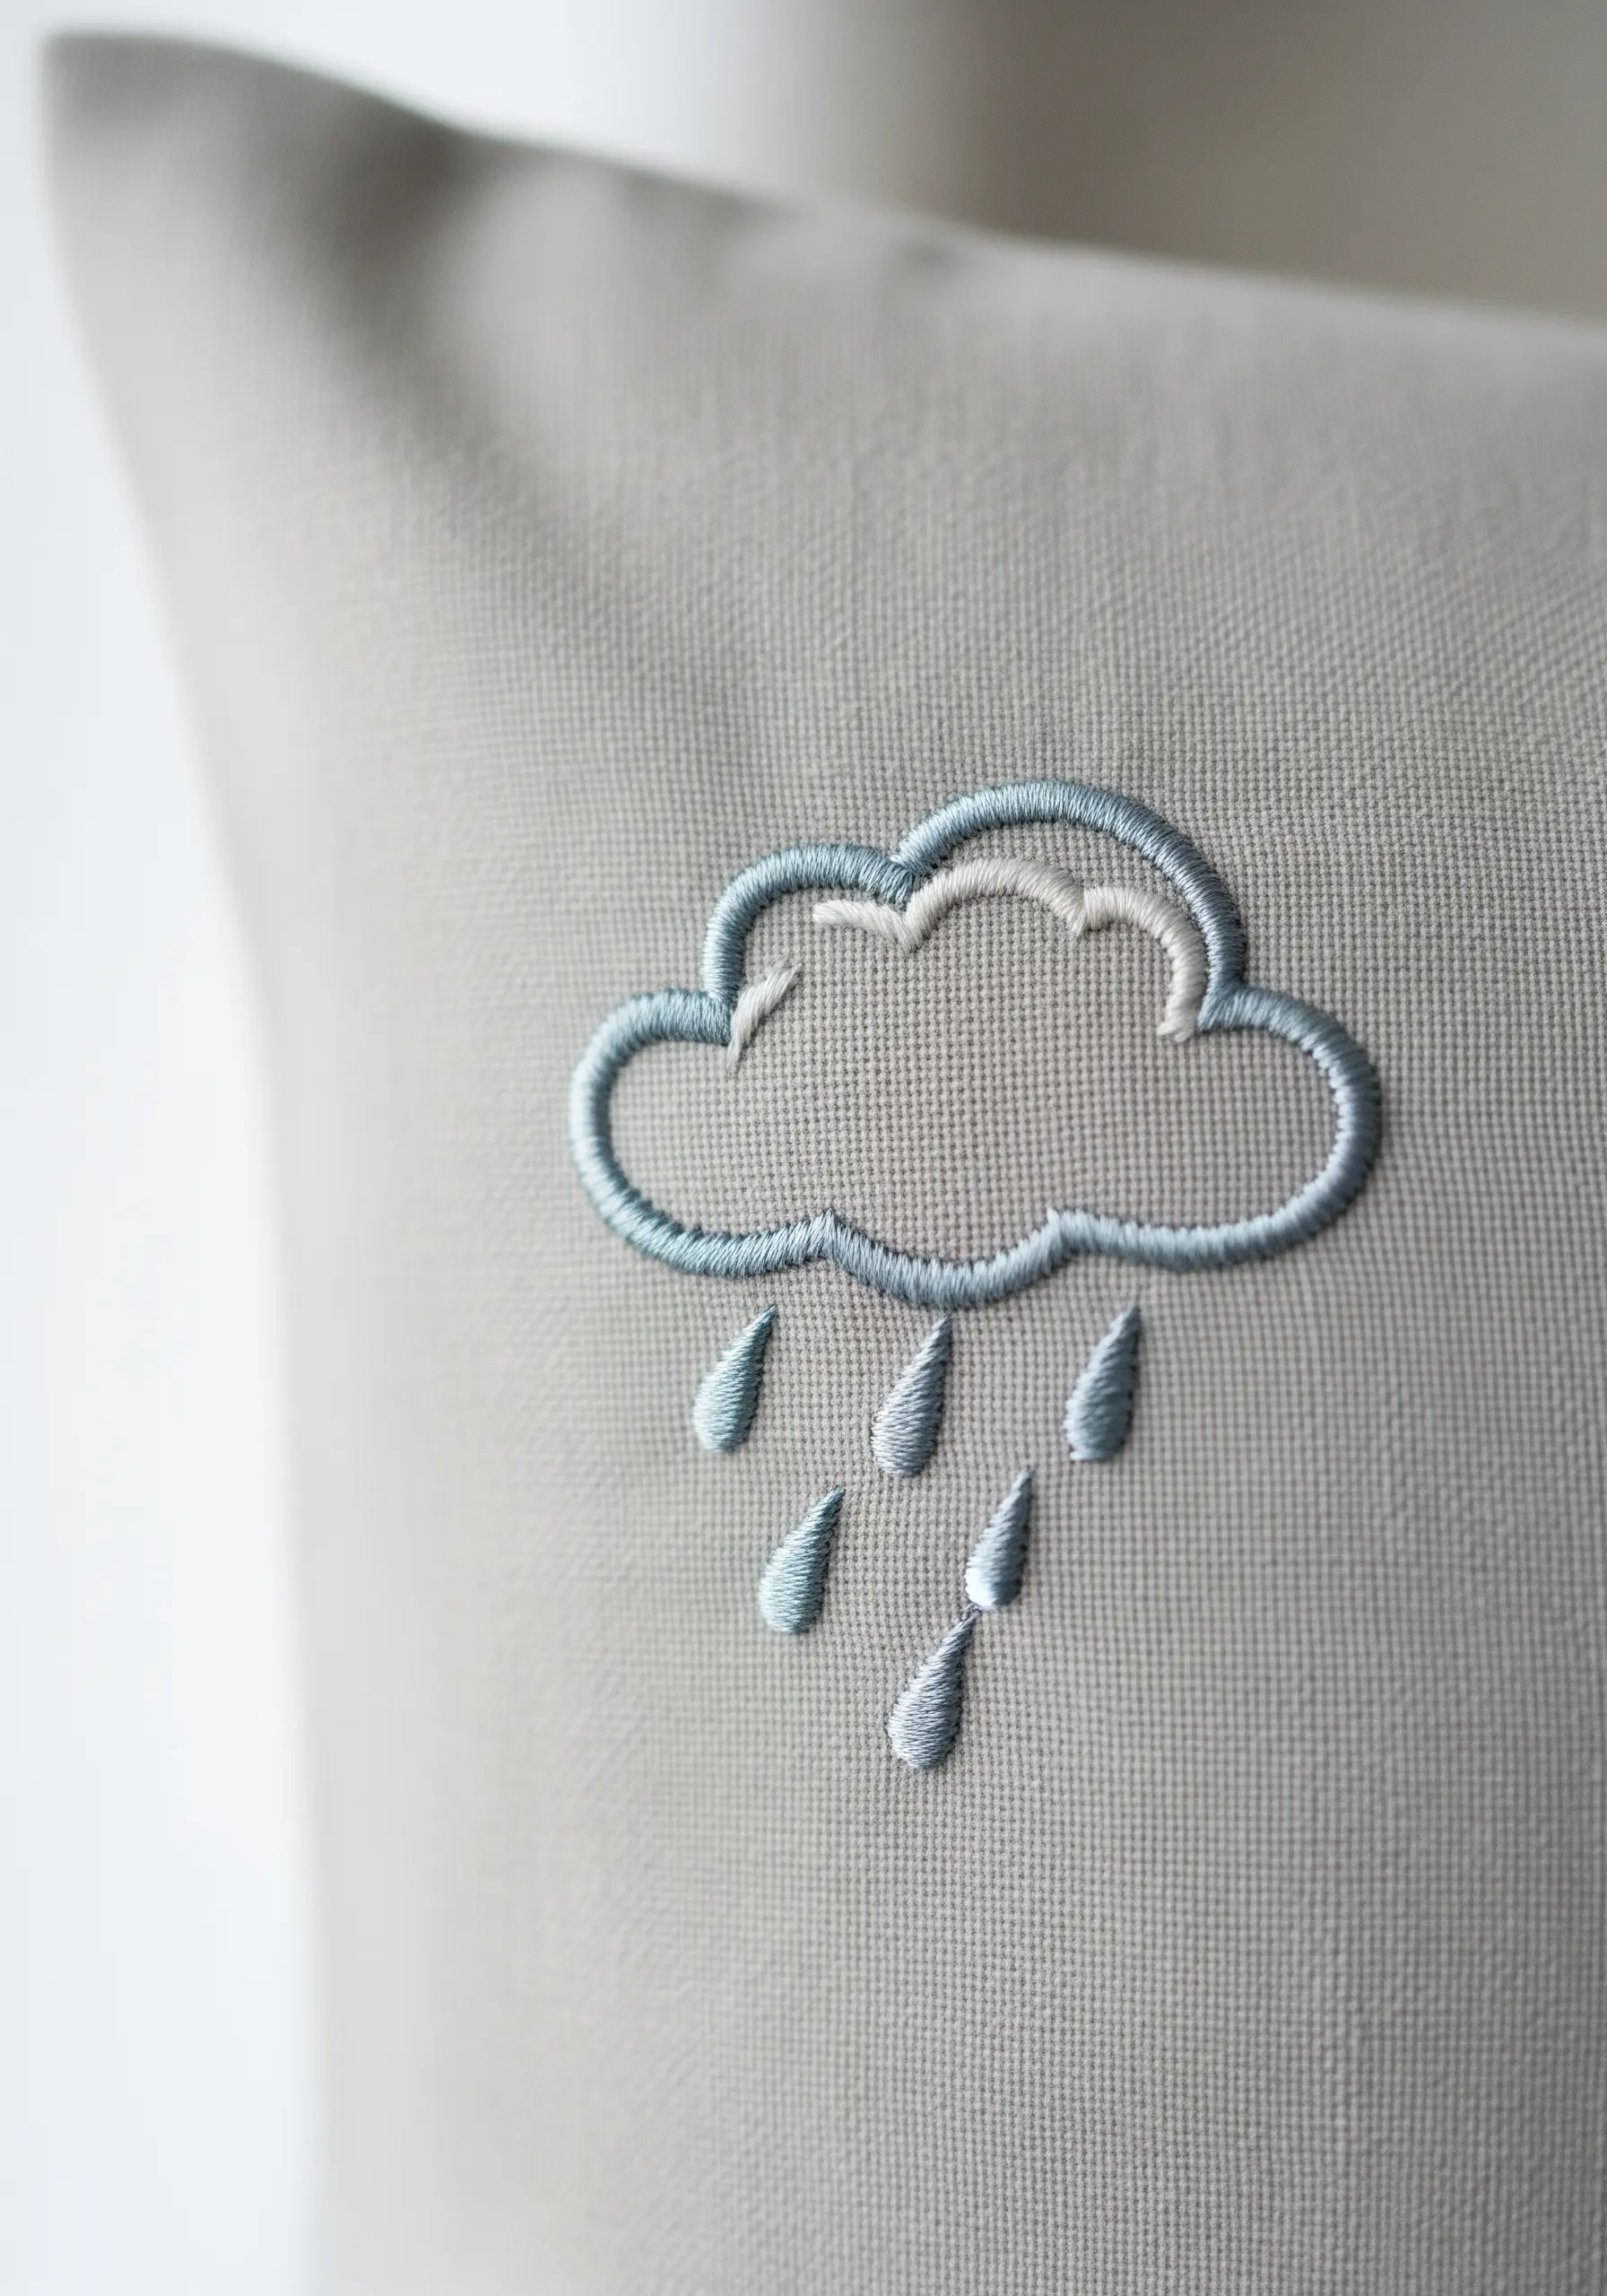
Elevate a simple shape by using two shades of the same color for the outline.
Work the main cloud outline in a light blue satin stitch, then add a delicate inner highlight with an off-white backstitch to create subtle depth.
For the raindrops, use a teardrop satin stitch: start with a tiny stitch at the top and gradually widen your stitches as you move down, finishing with a single horizontal stitch at the base for a clean edge.
This technique creates plump, uniform drops that look far more polished than a simple outline.
6. Minimalist Mountain Range
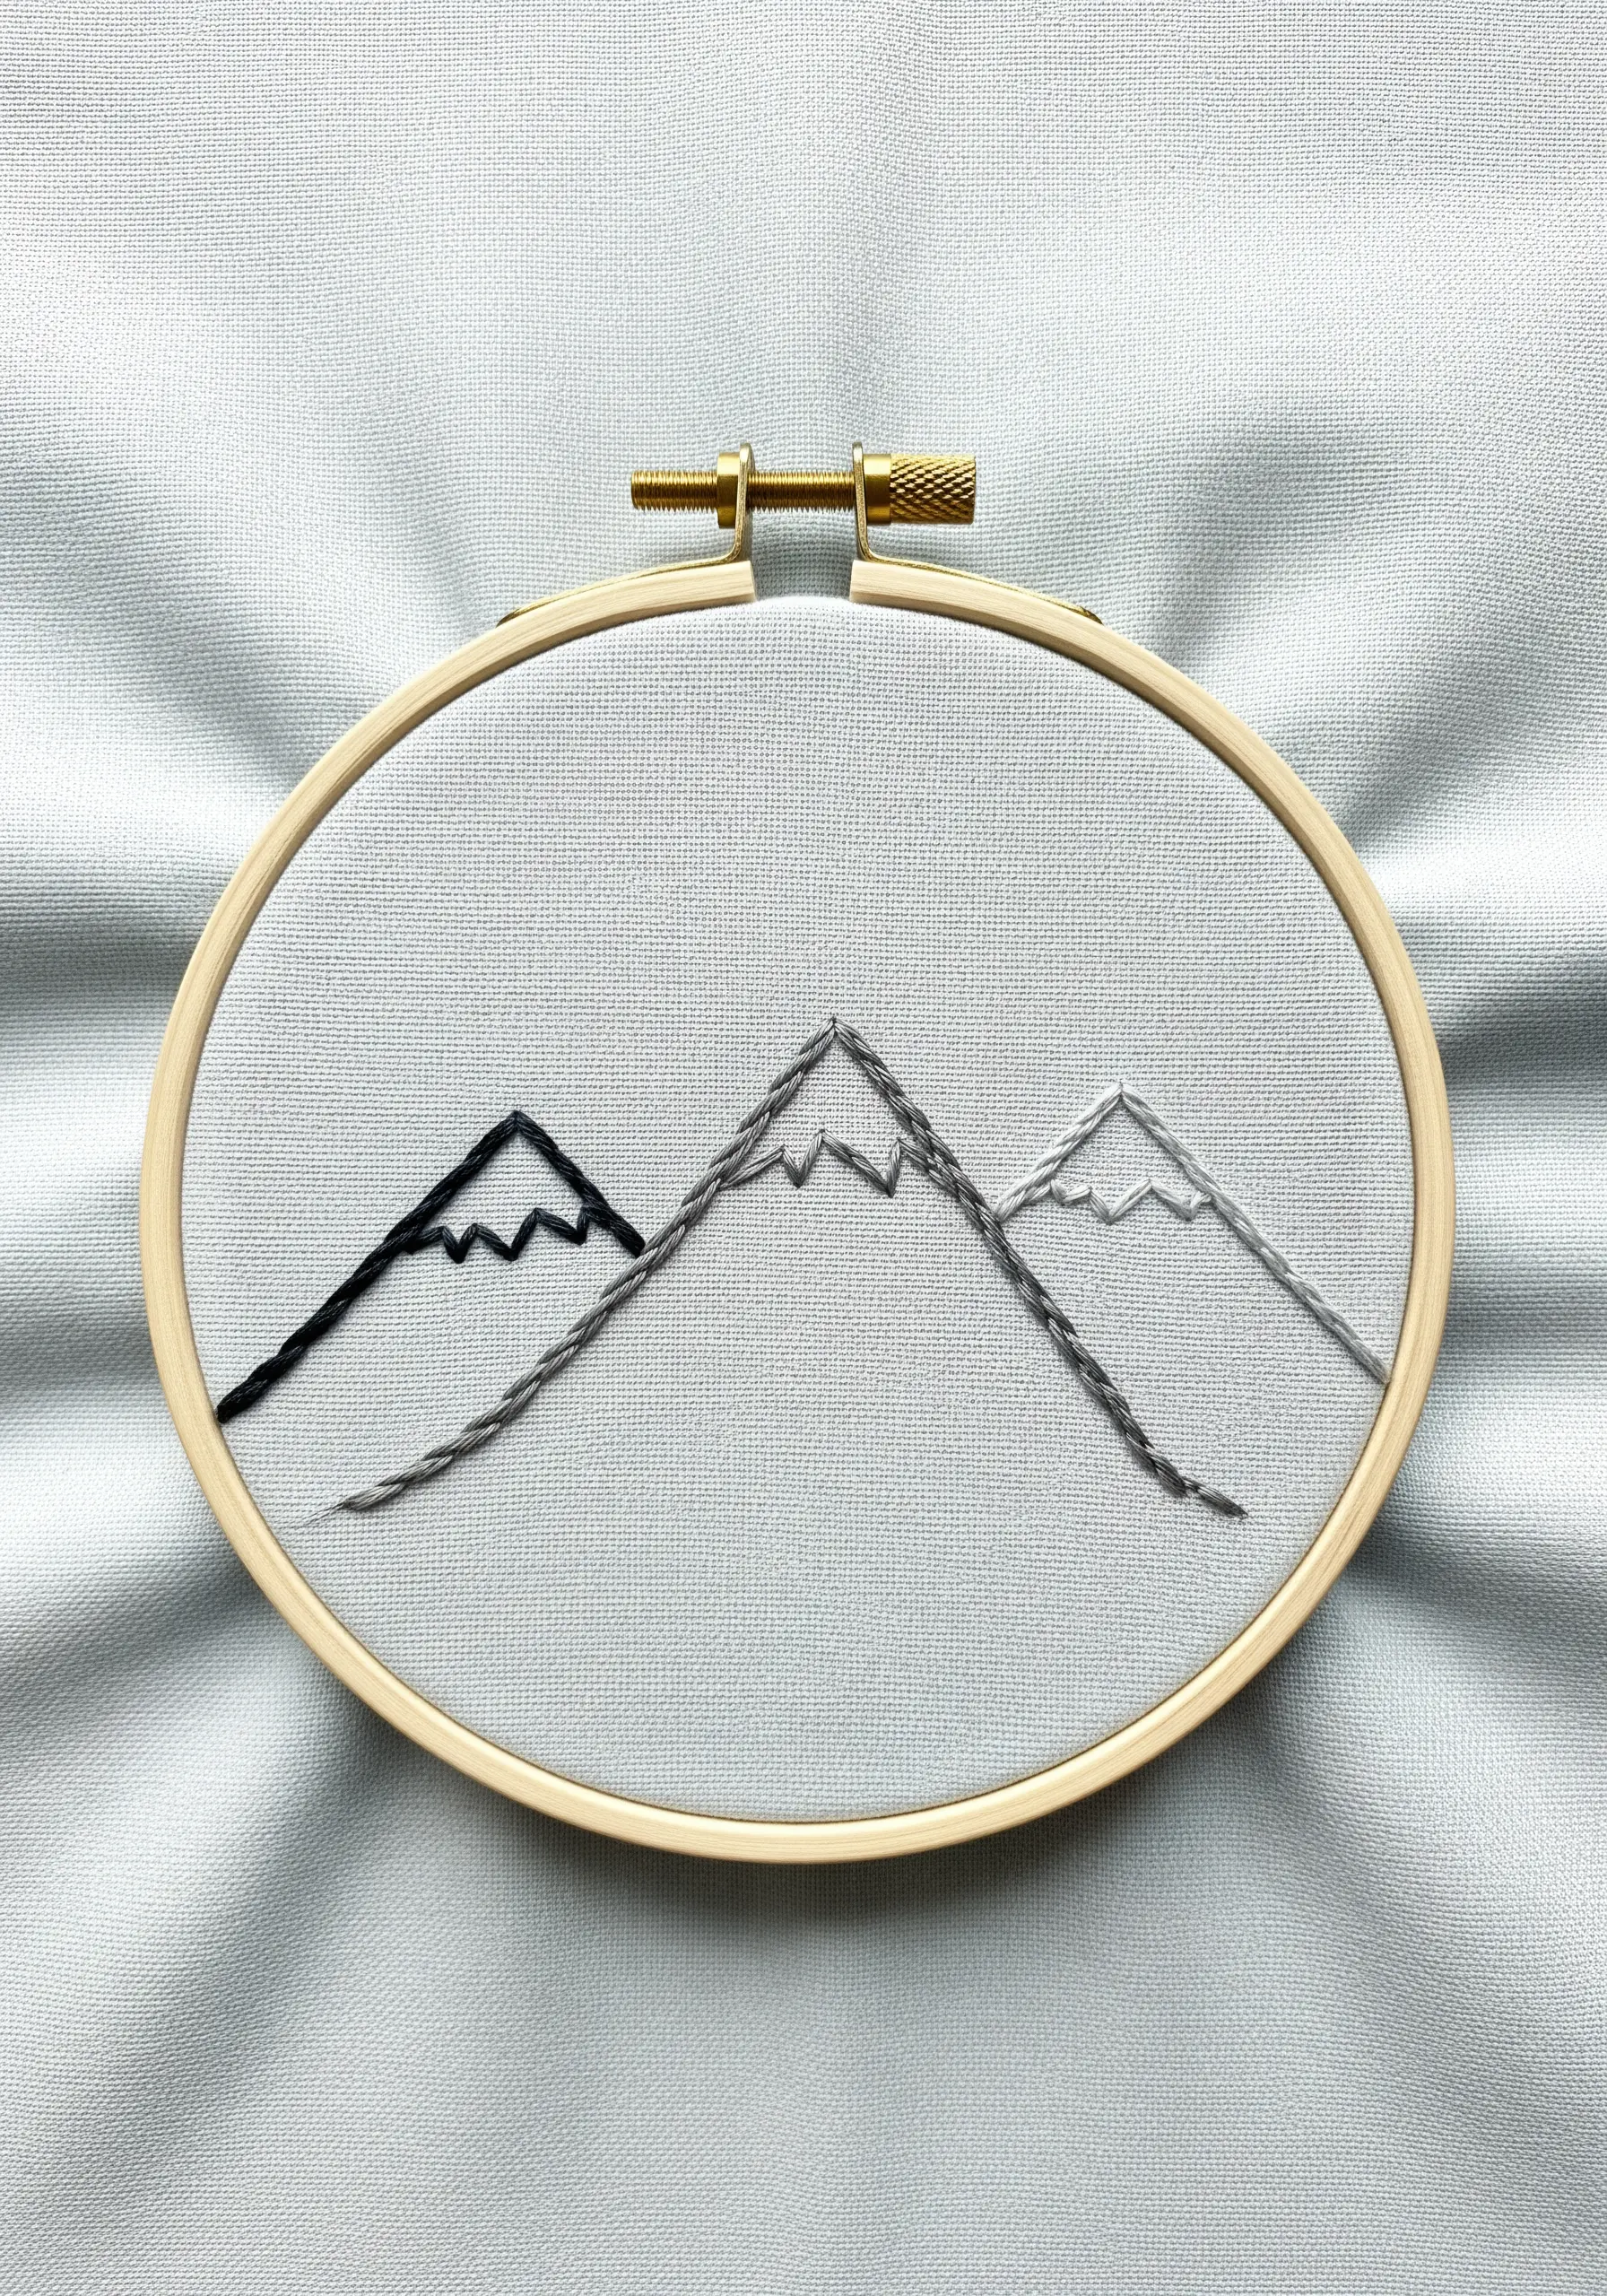
This design proves that simplicity is powerful. Create a sense of distance and atmosphere using just three shades of grey and a basic backstitch.
Use a darker thread and more strands (e.g., three or four) for the foreground mountain to give it weight.
For the middle and background peaks, use progressively lighter shades and fewer strands (two, then one) to make them recede visually.
Vary the length of your stitches on the snowy caps to create a more organic, uneven texture that mimics a natural ridgeline.
7. Cursive Chain Stitch Script

For beautifully rounded, rope-like lettering, the chain stitch is your best choice.
Instead of a thin backstitch, each chain link builds upon the last, creating a substantial line that flows beautifully in cursive.
To keep your curves smooth, make your individual chain stitches slightly smaller as you navigate tight turns in letters like ‘e’ or ‘a’.
Using all six strands of floss will give the word a bold, raised presence on the fabric, making it a focal point.
8. Directional Satin Stitch Leaves
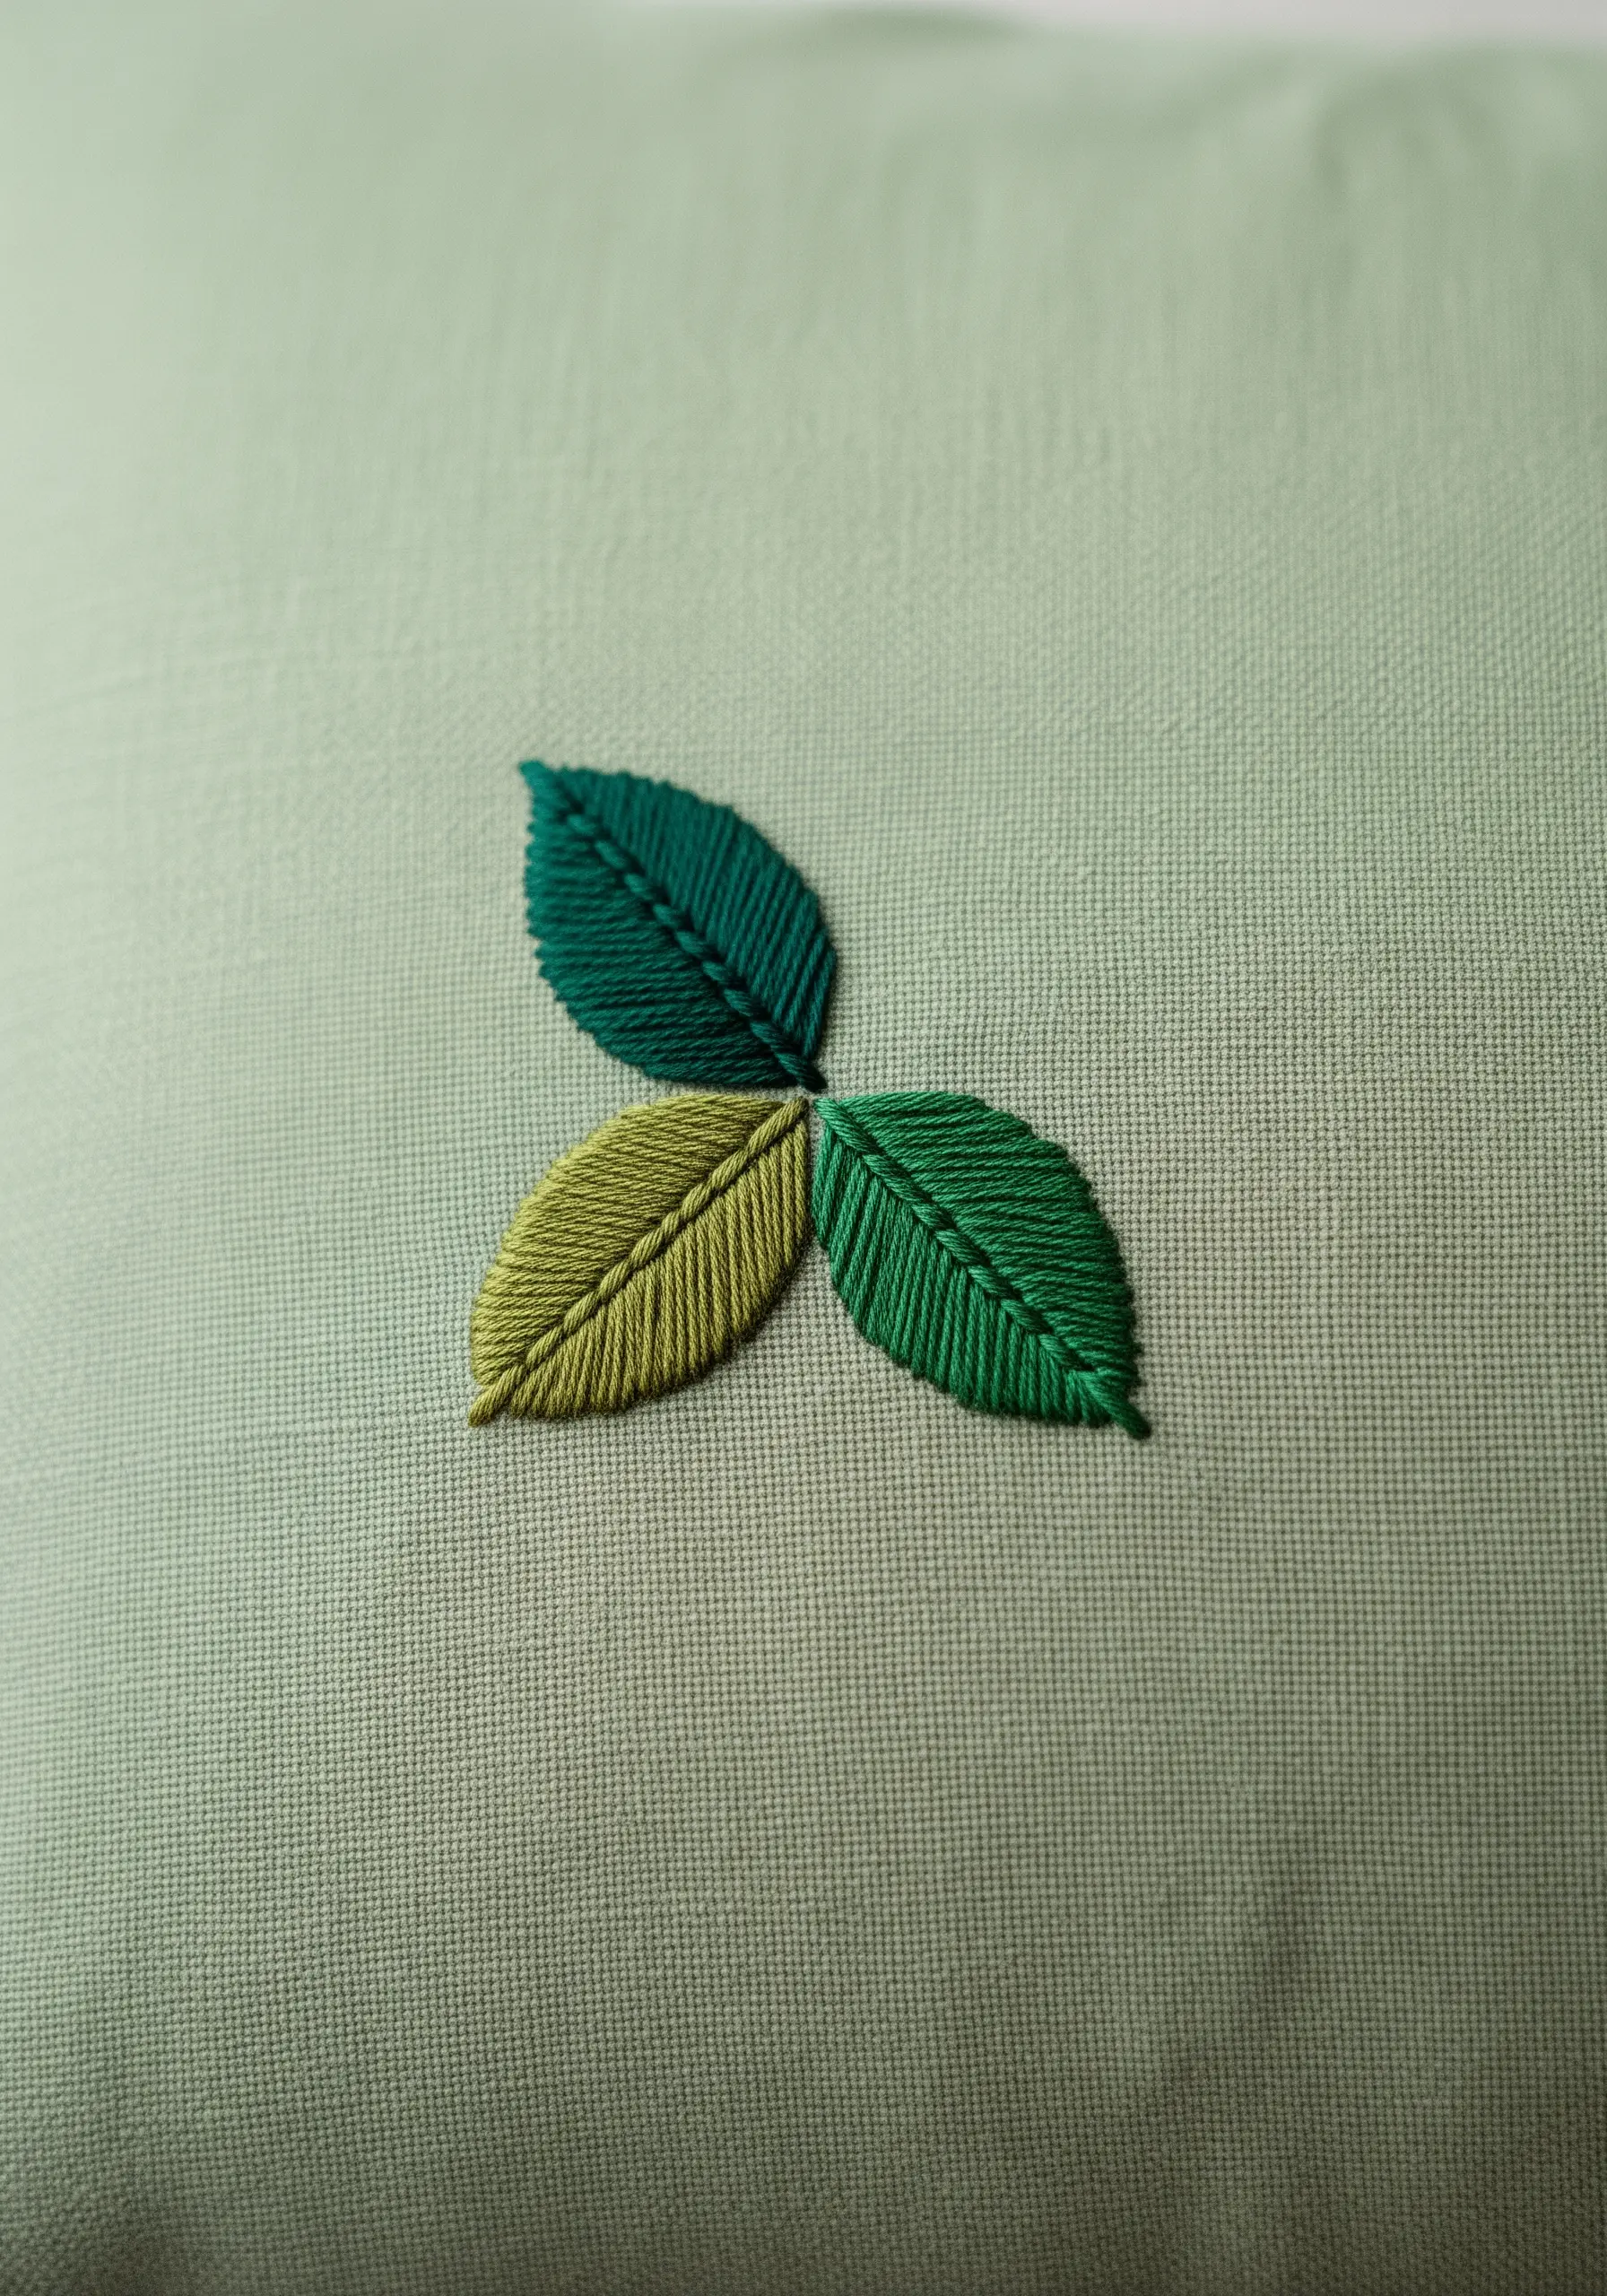
The magic here is in the direction of the satin stitch. Instead of filling the leaves with uniform horizontal stitches, angle them to create a central vein.
Imagine a line running down the center of each leaf and angle your stitches from that line outwards to the edge, creating a V-shape pattern.
This single adjustment adds immense realism and dimension without any extra steps.
Experiment with a tonal color palette to add subtle interest, and master these delicate leaf embroidery stitches for any botanical project.
9. Radiant Sunrise Motif
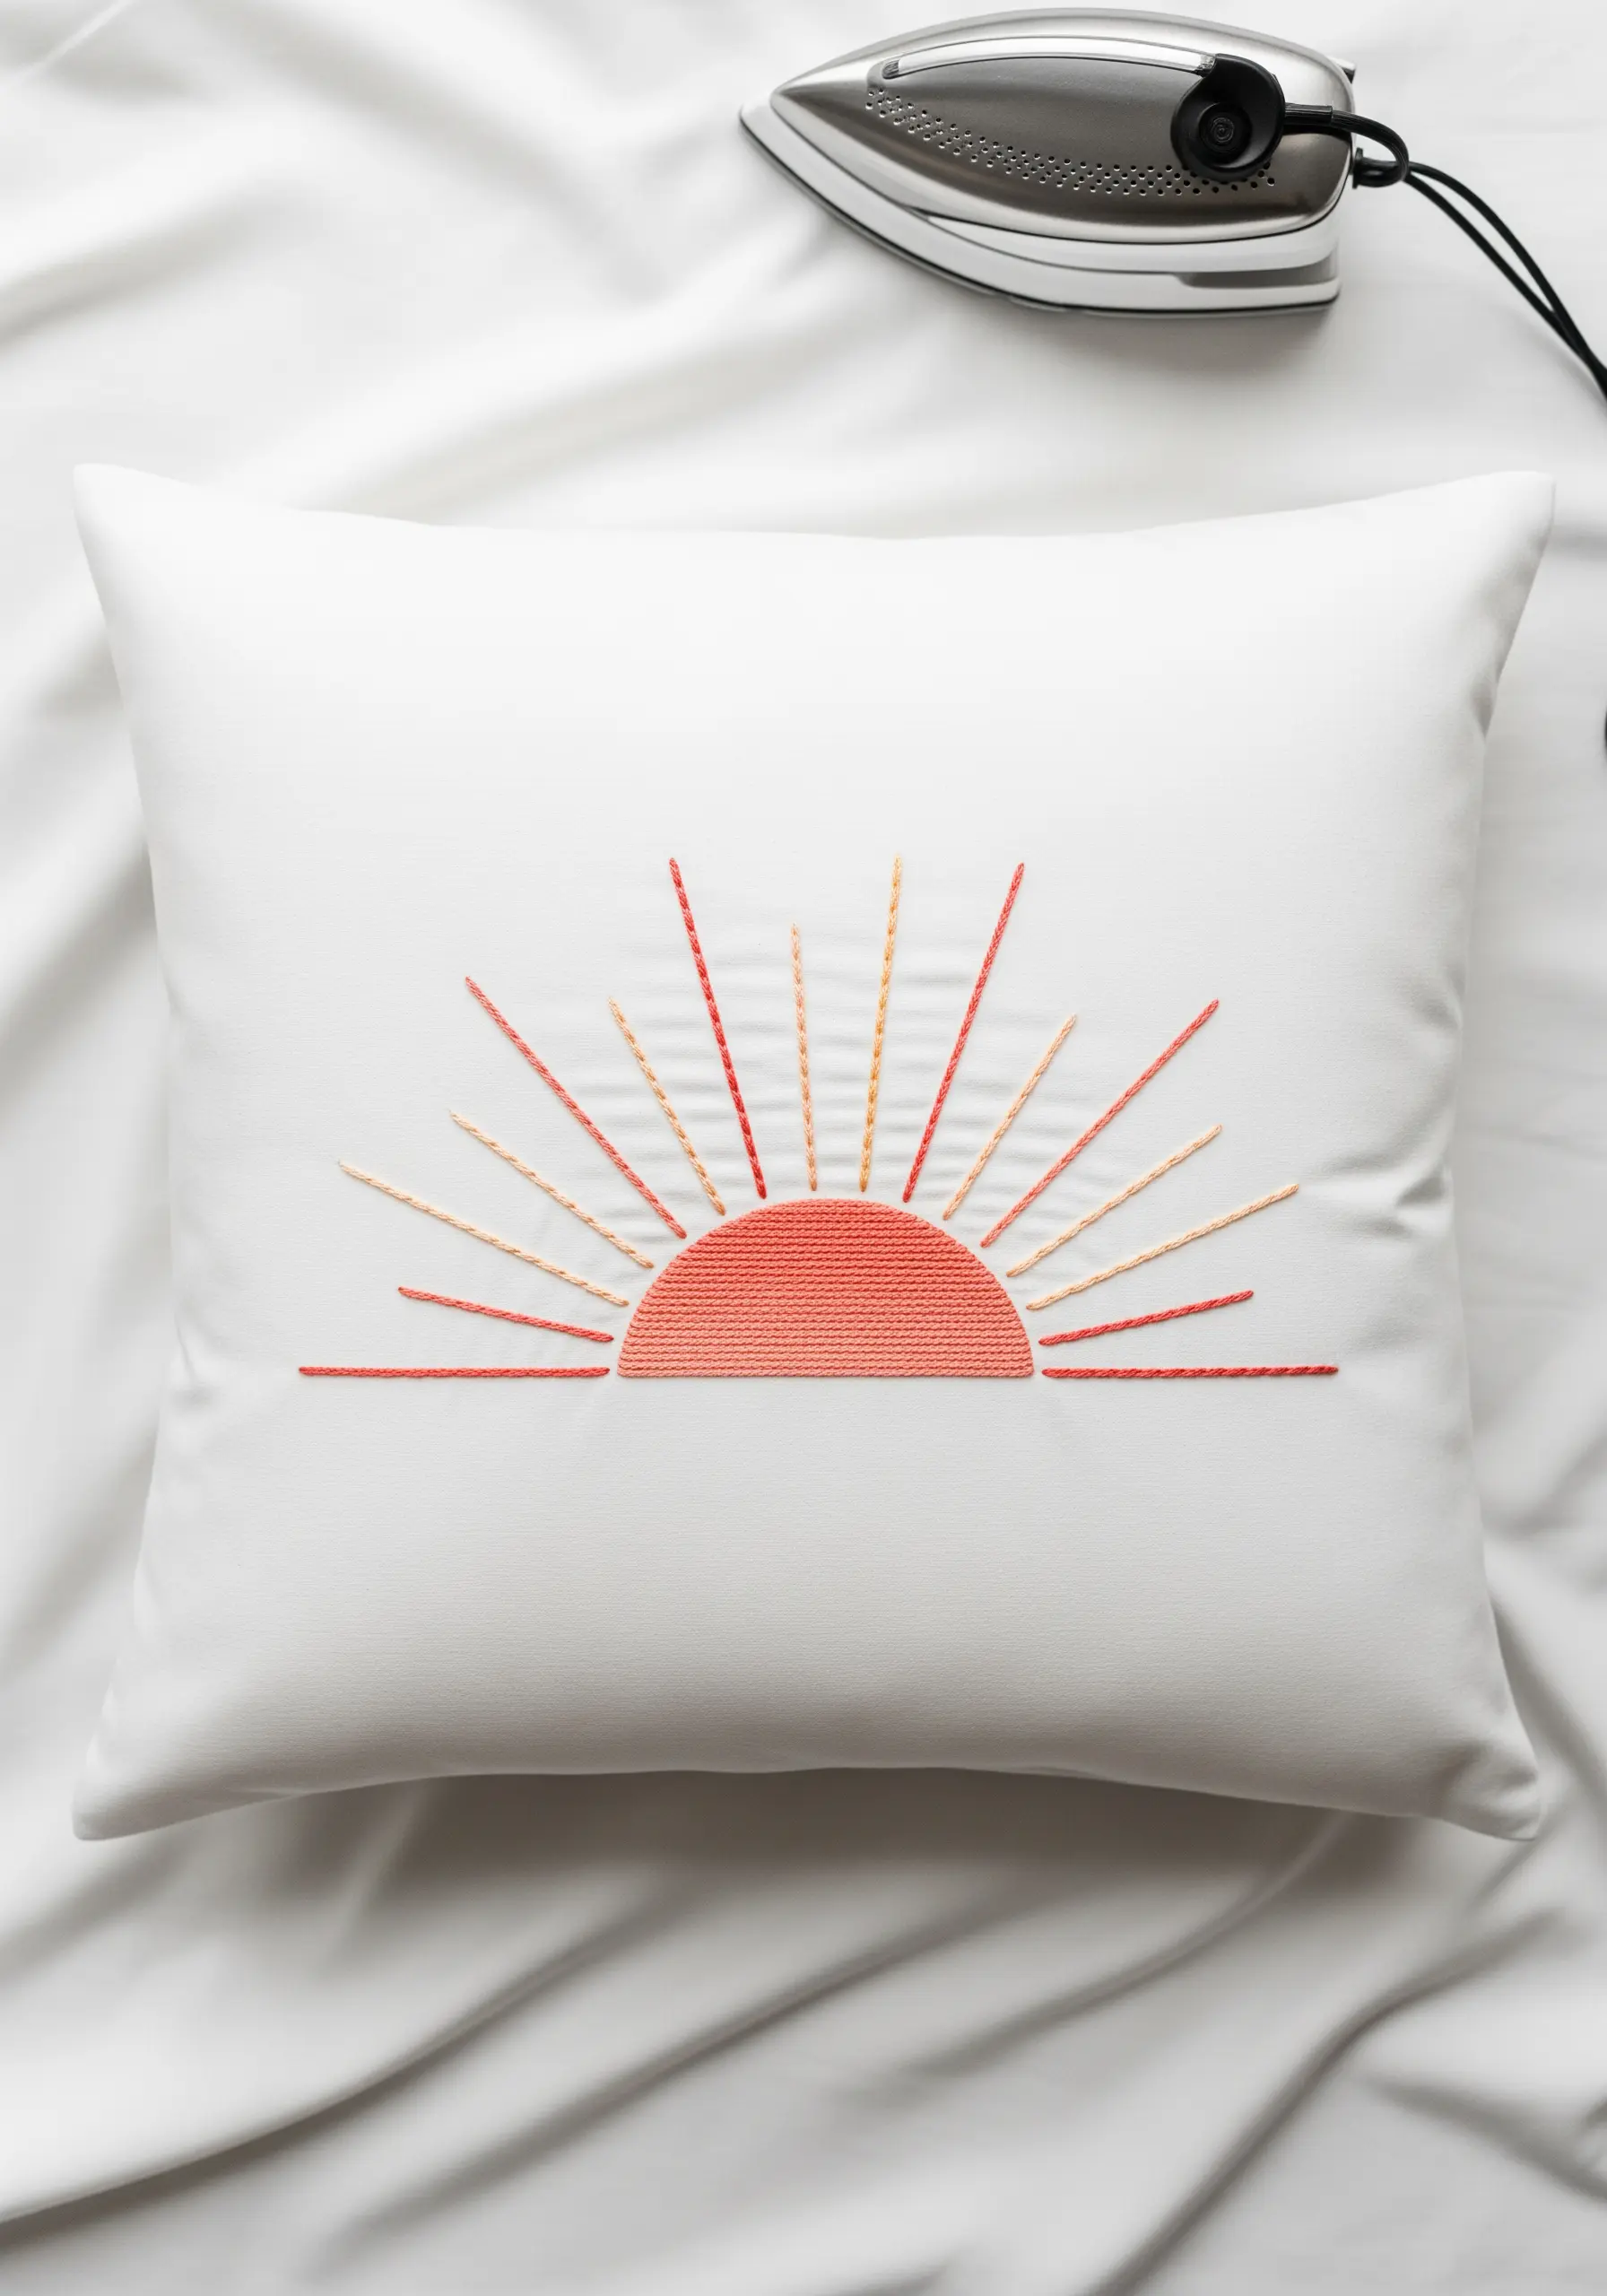
Combine two simple stitch types for this cheerful design: a satin stitch for the sun and straight stitches for the rays.
To achieve a perfect semi-circle, fill it with horizontal satin stitches, keeping the edges crisp and even.
For the rays, use a ruler and a water-soluble pen to draw guidelines first, ensuring they are evenly spaced and radiate correctly from the sun.
Alternate two or three warm colors for the rays to create a vibrant, glowing effect that feels dynamic and optimistic.
10. Whispers of a Dandelion
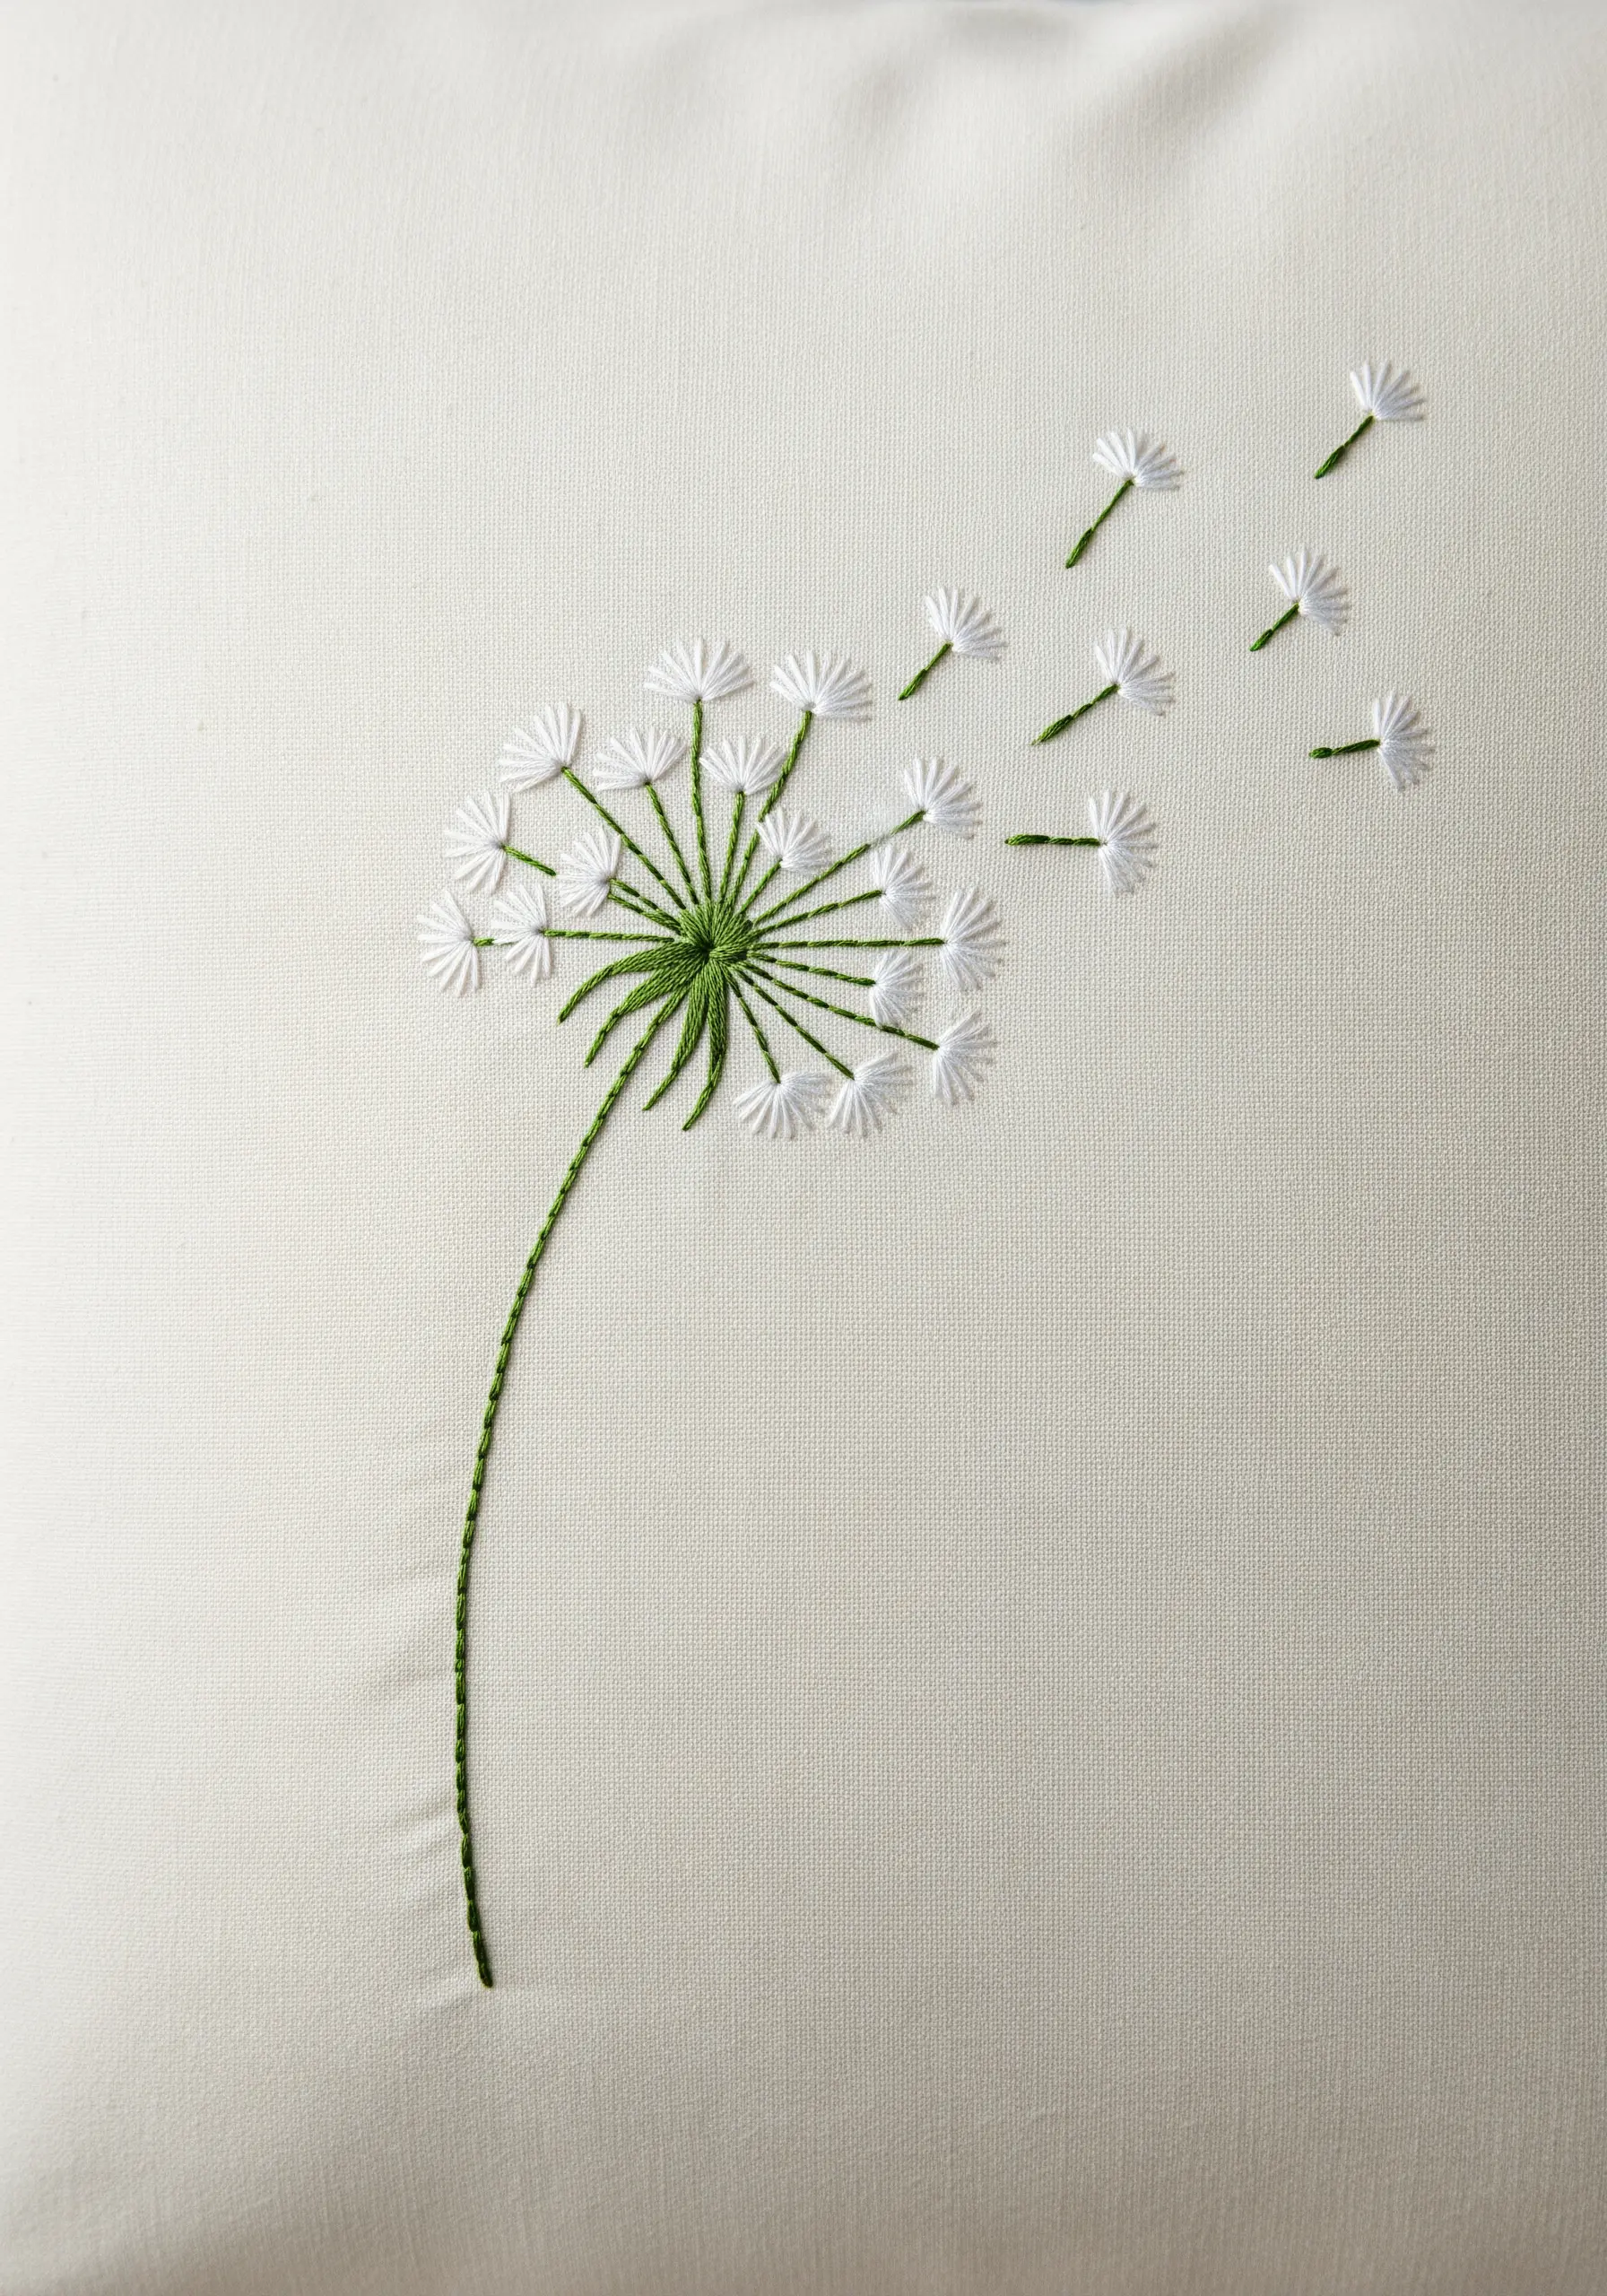
Capture the feeling of movement by combining detached chain stitches (lazy daisies) with simple straight stitches for the seeds.
For the main dandelion head, arrange your lazy daisy stitches in a radial pattern around a central point.
To show the seeds blowing away, stitch individual lazy daisies at varying angles and distances, adding a small straight stitch ‘tail’ to each one.
This creates a convincing illusion of flight and delicacy that a static design couldn’t achieve.
11. A Subtle Coffee Corner Accent
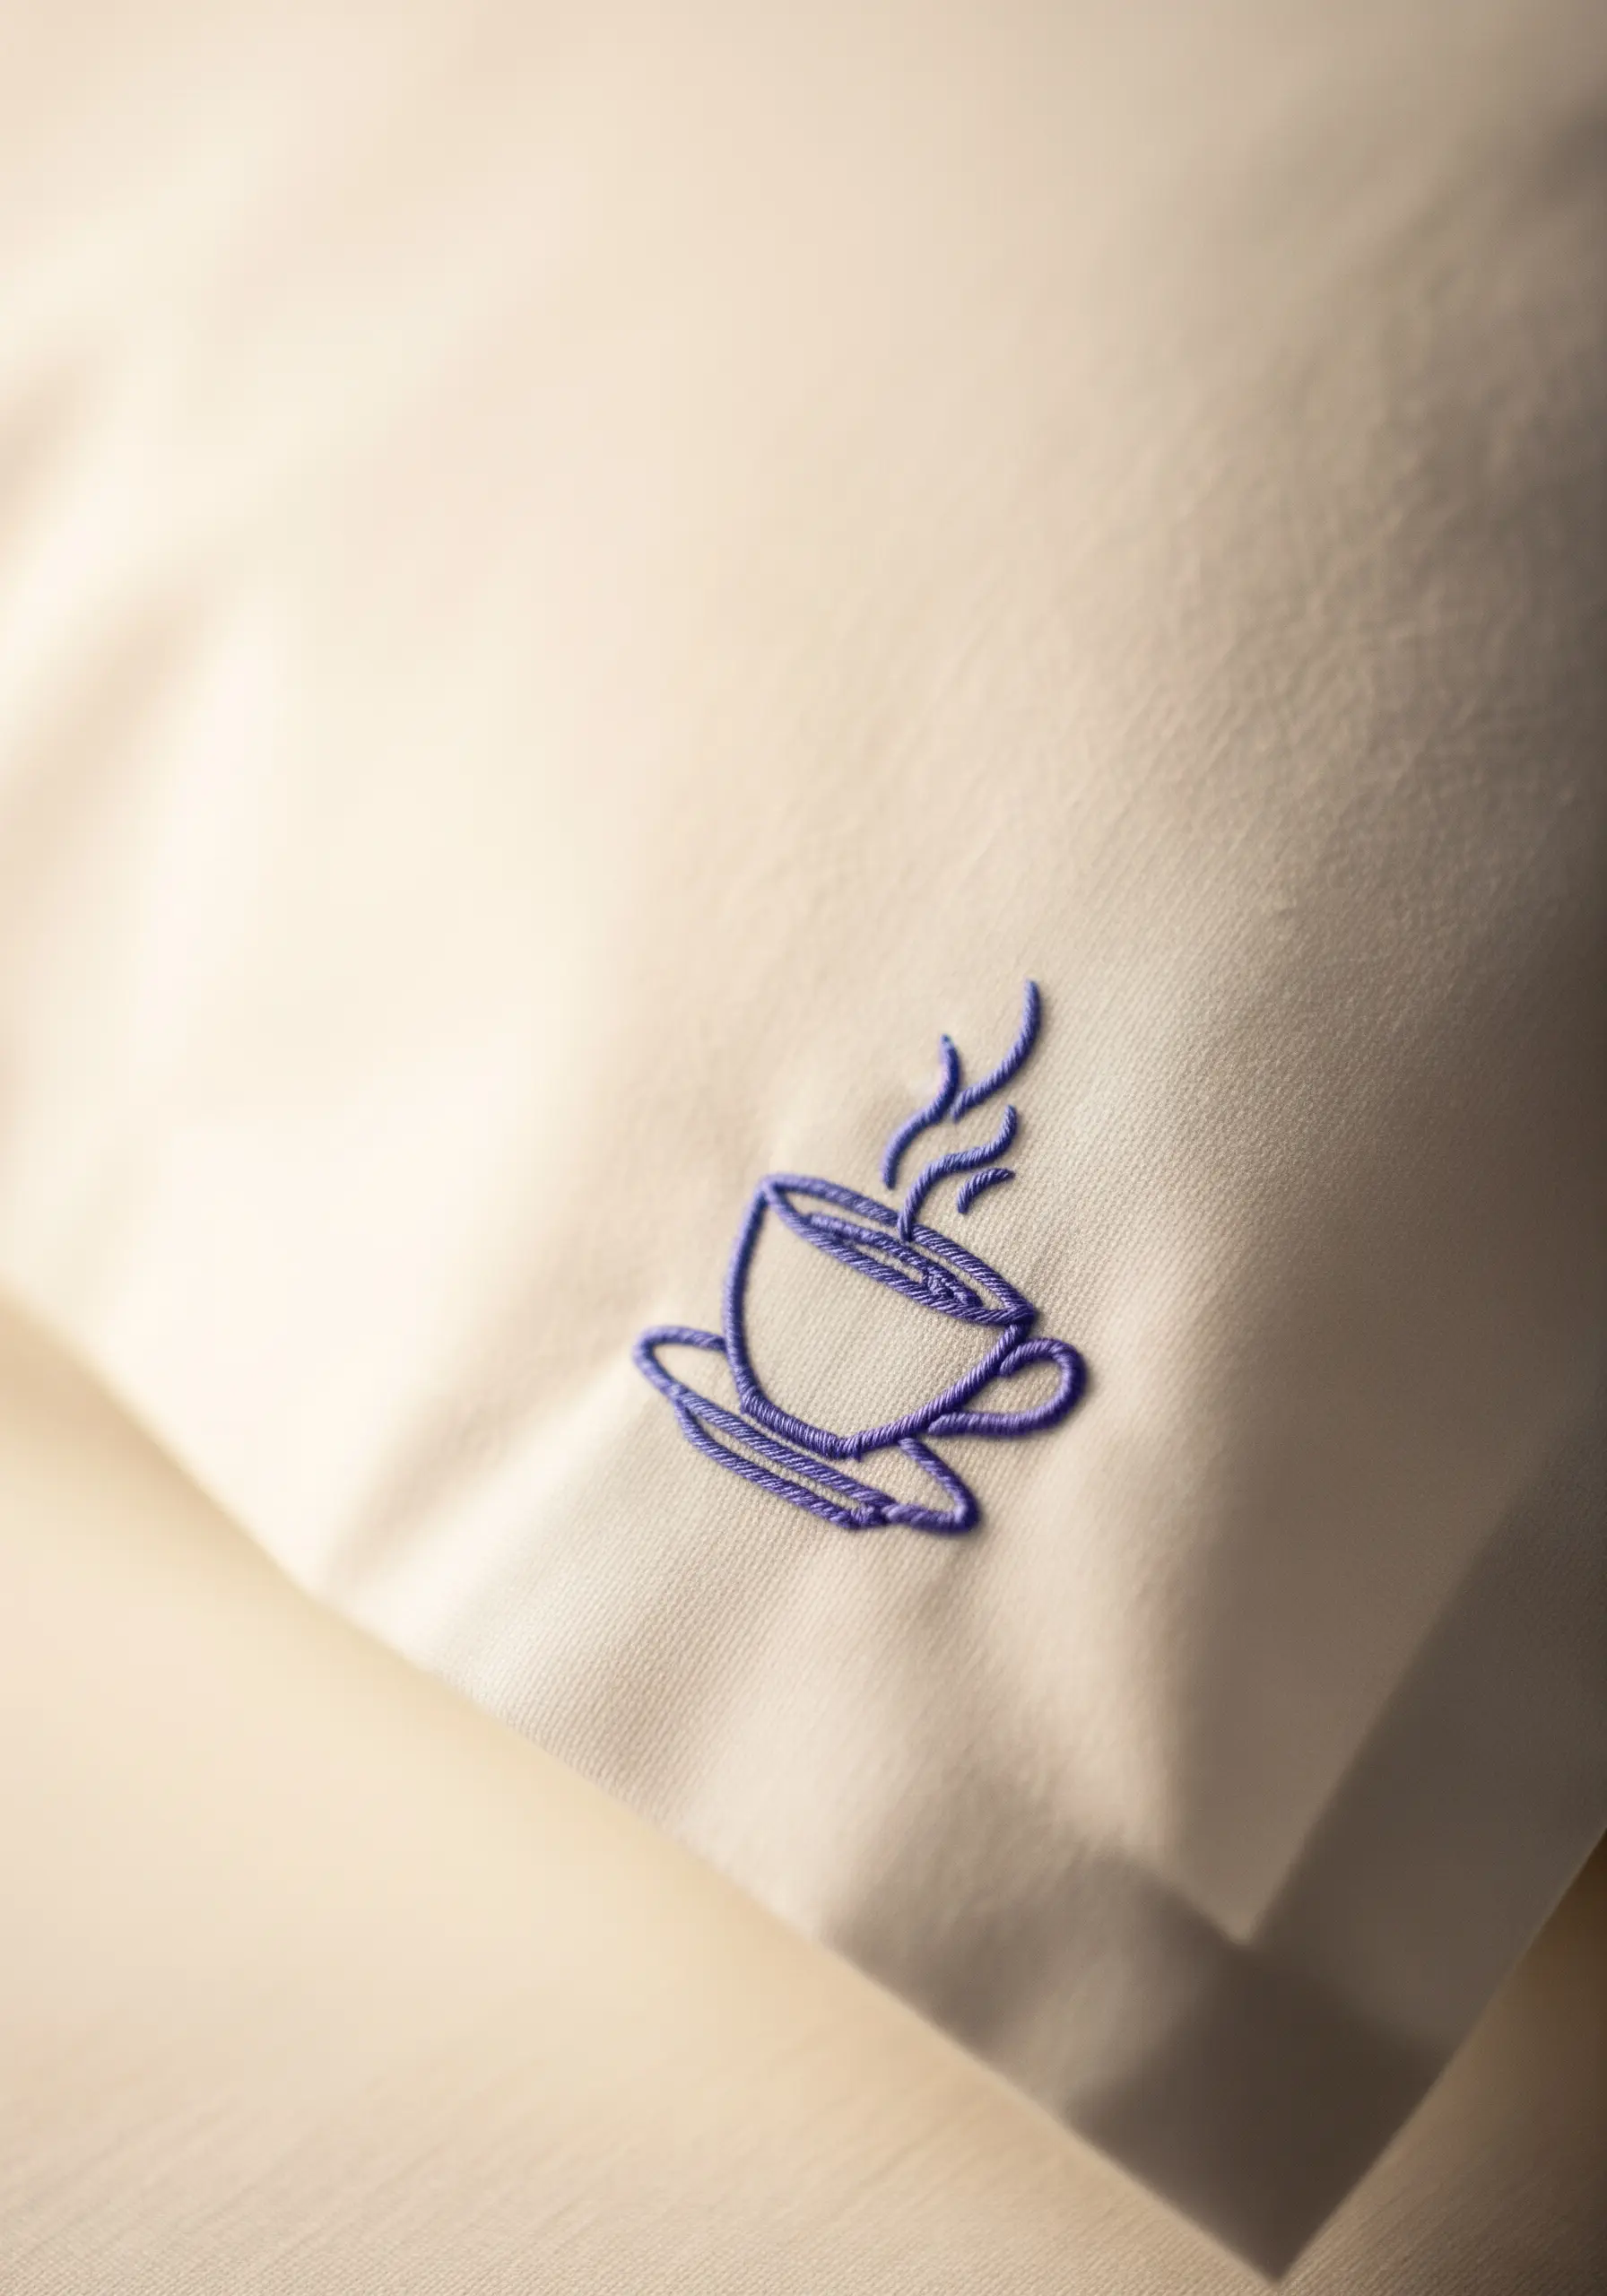
A tiny, well-placed motif can have more impact than a large central one. Tuck this simple design into a corner for a charming surprise.
Use a simple backstitch or split stitch with two or three strands of floss to keep the lines clean and understated.
The key to making this design look refined is consistency—ensure every stitch is the same length, especially around the curves of the cup and steam.
This is one of those tiny embroidery ideas that adds personality without overwhelming the space.
12. The Minimalist Paper Plane
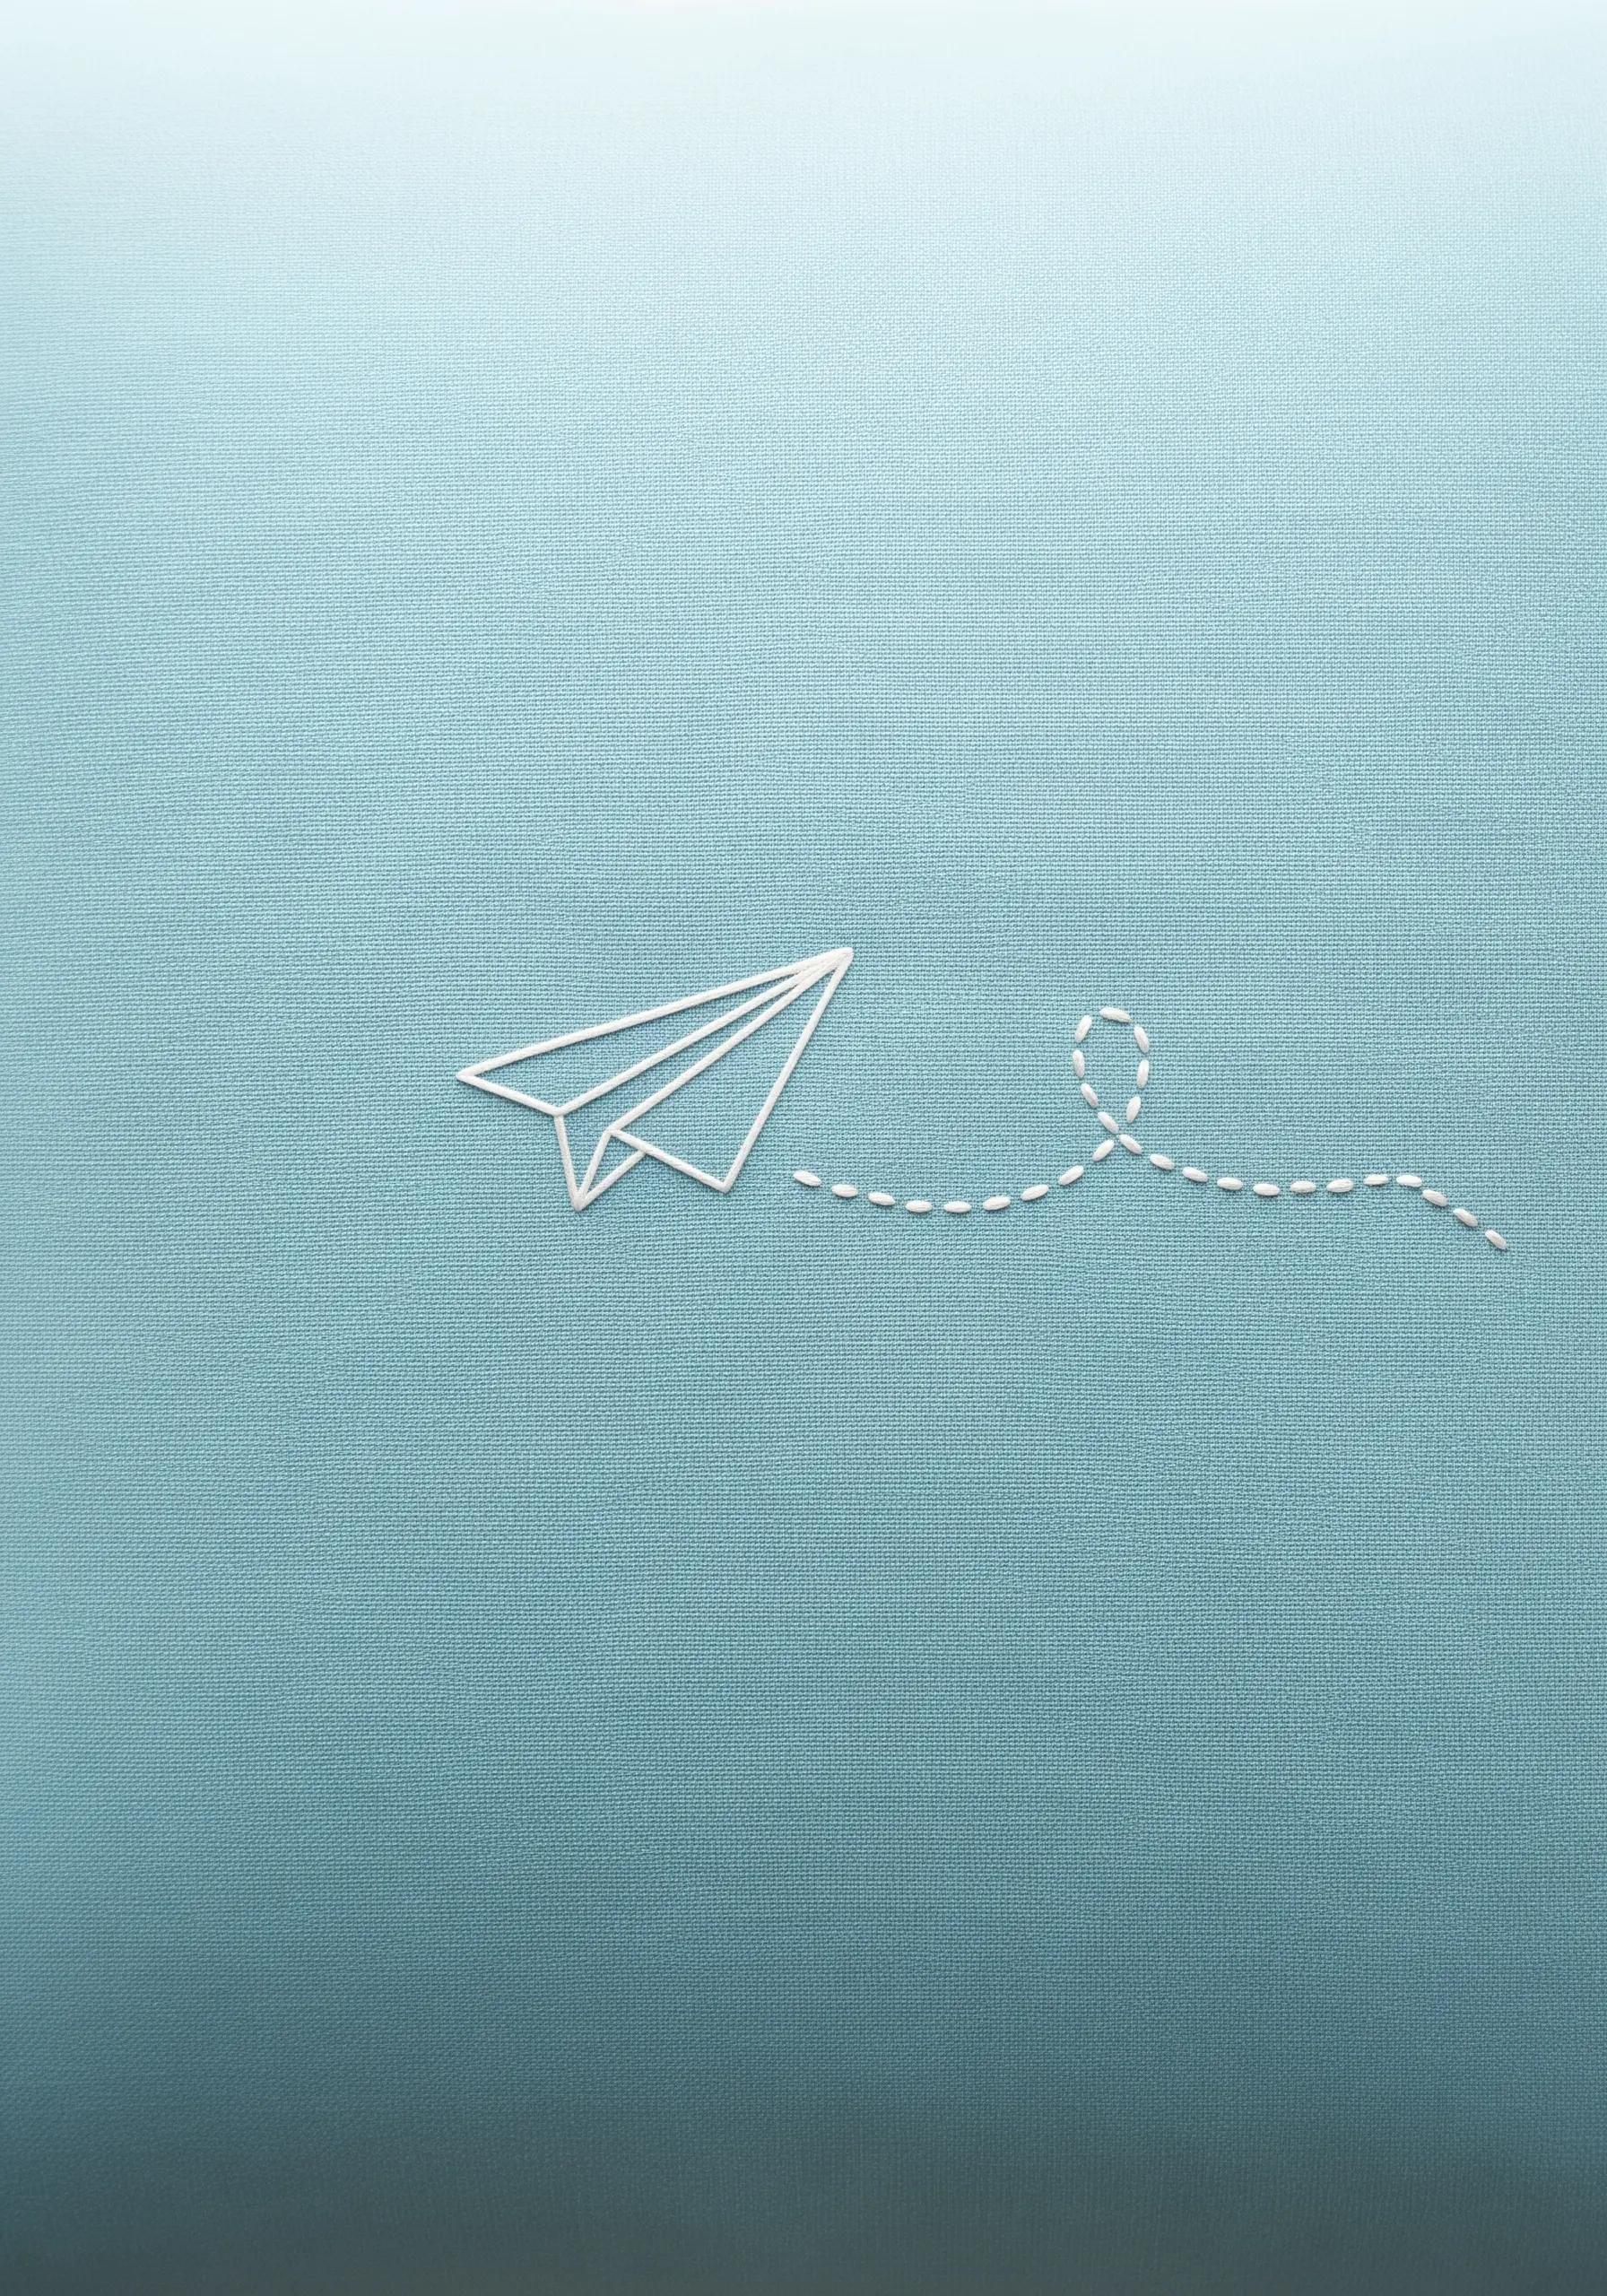
This design excels in its simplicity and use of different line styles to tell a story.
Use a clean, two-strand backstitch for the solid outline of the paper airplane to give it structure and definition.
For the flight path, switch to a simple running stitch. The gaps between the stitches create a dotted-line effect that perfectly illustrates movement and direction.
The contrast between the solid object and its implied path is what makes this minimalist embroidery design so clever and effective.
13. A Graceful Feline Silhouette
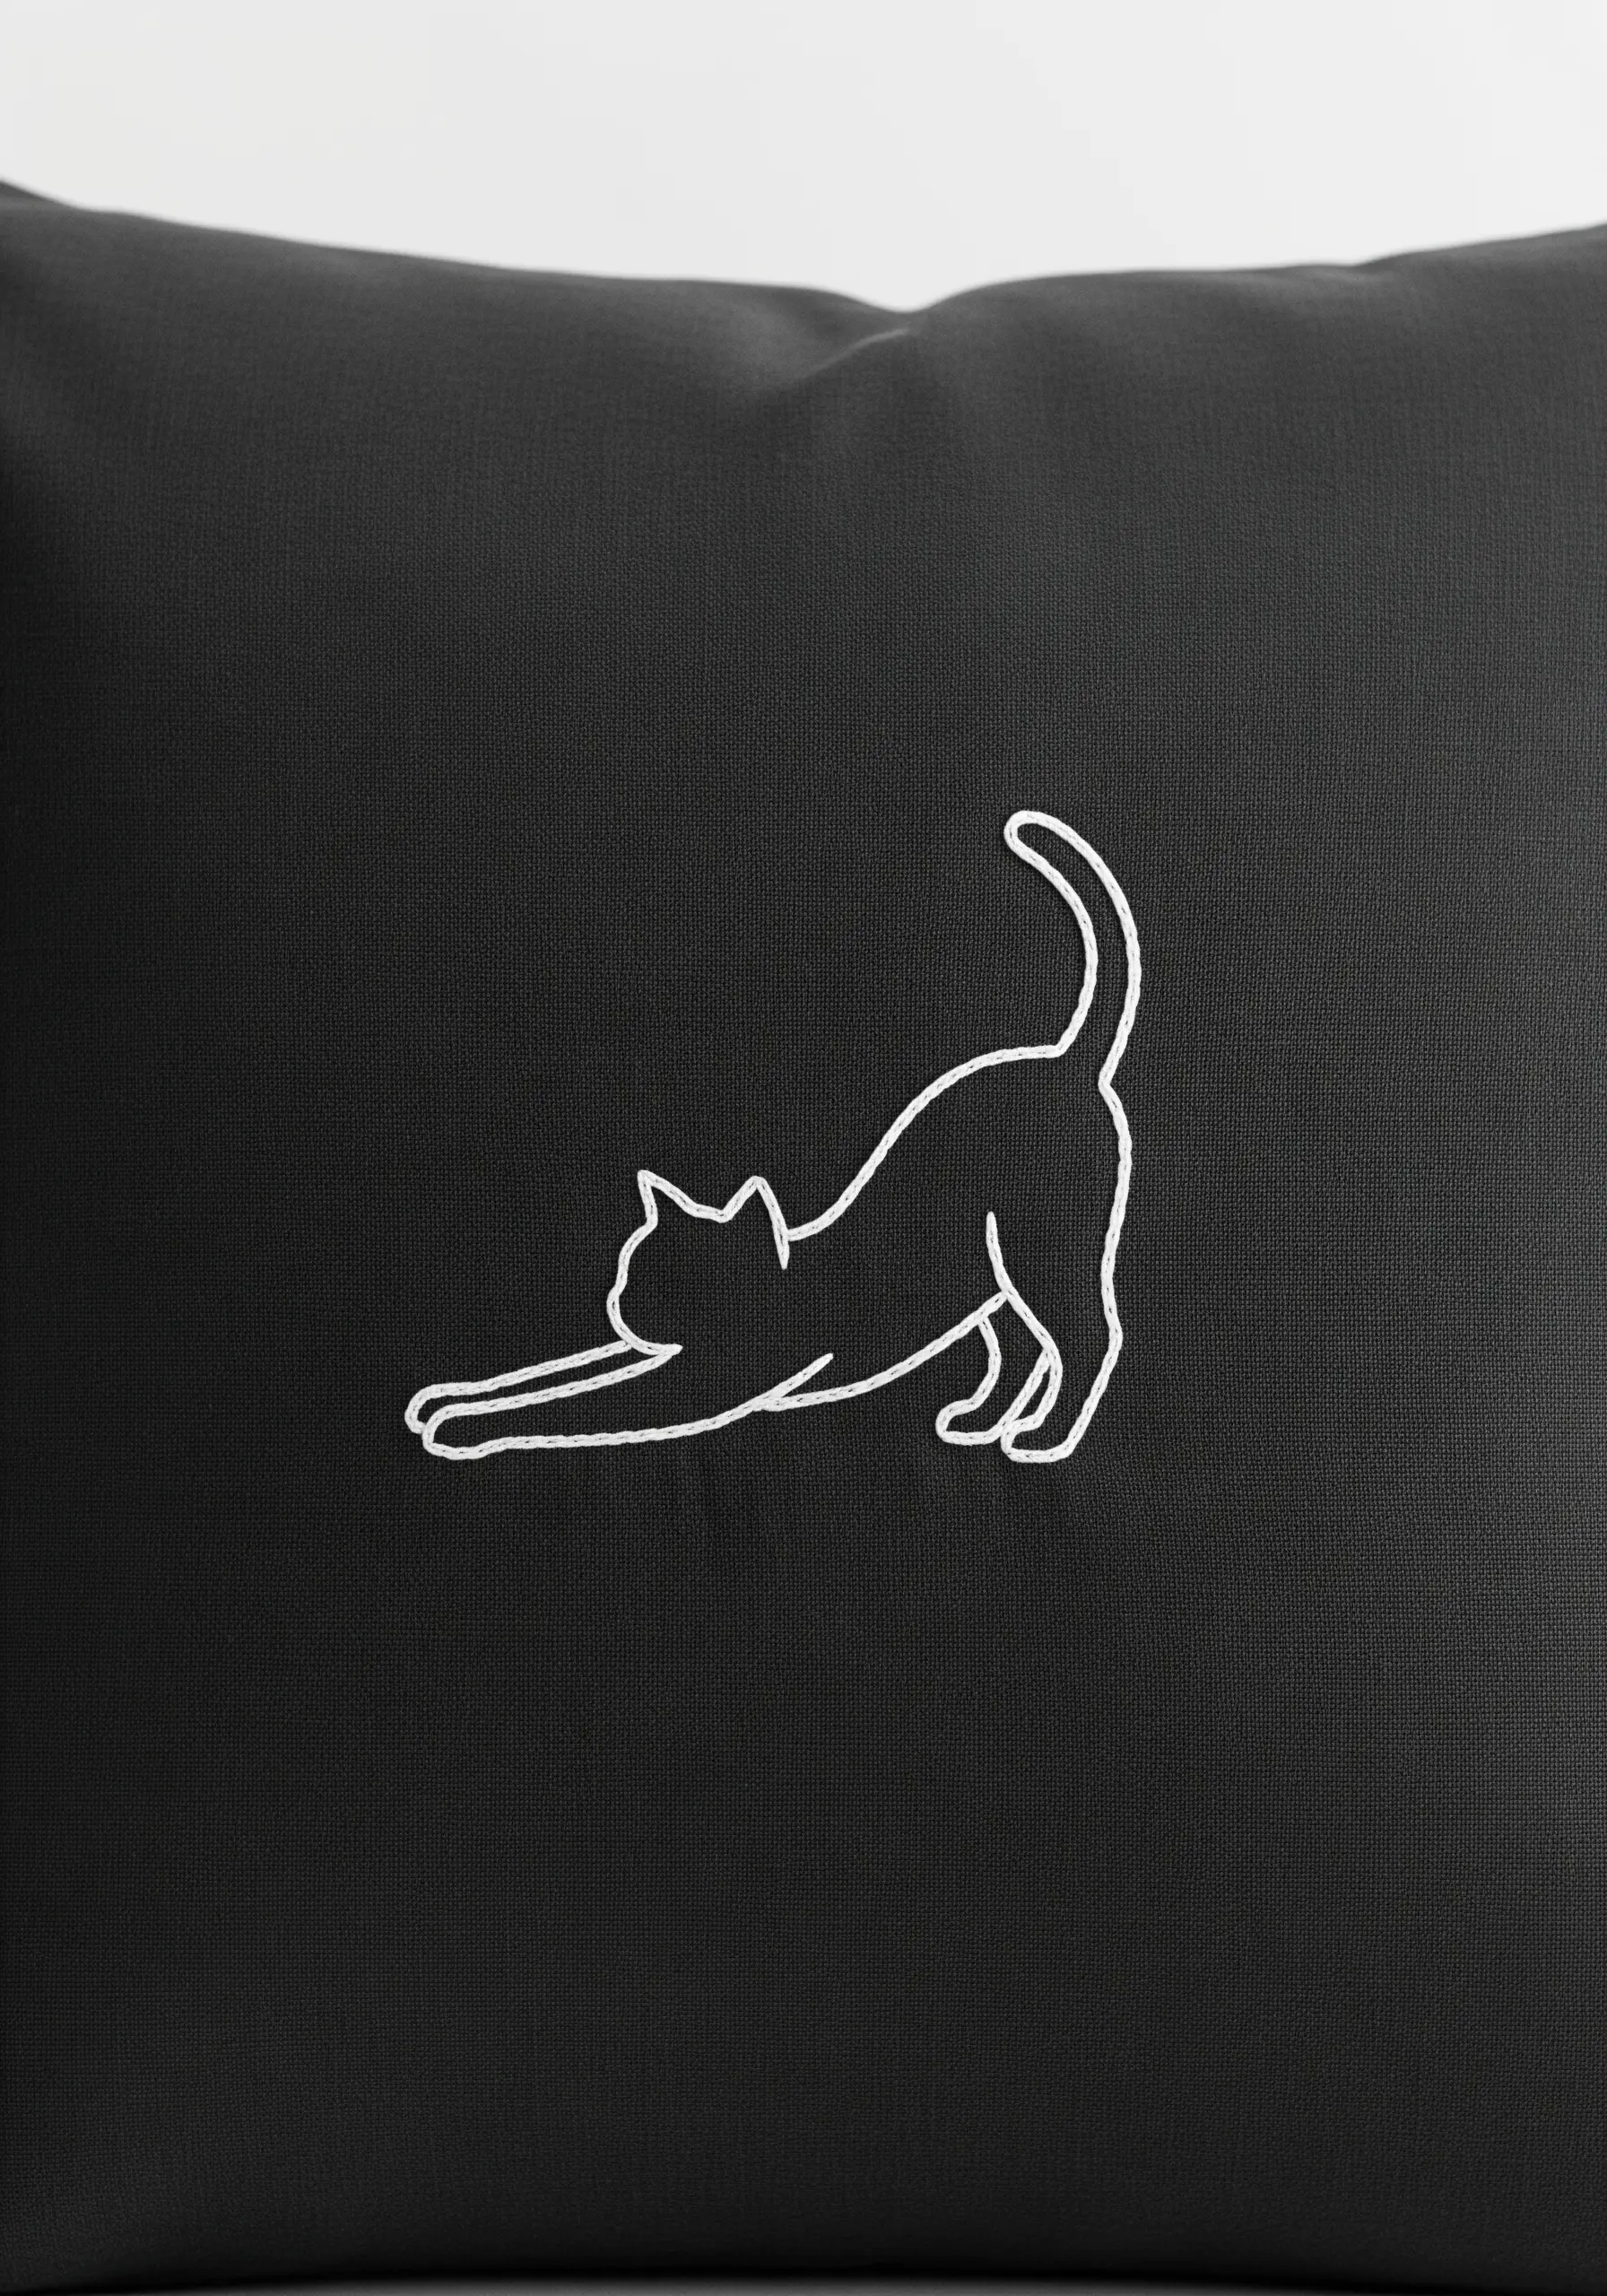
When embroidering a simple silhouette on dark fabric, a bright, solid line is essential for visibility and impact.
Instead of a basic backstitch, use a whipped backstitch. First, complete the outline with a standard backstitch, then whip the thread around each stitch without piercing the fabric.
This technique covers the gaps between stitches, creating a smooth, raised, and continuous line that stands out beautifully.
Choose a high-contrast thread, like white on black, to make the elegant form the true hero of the design.
14. A Charming Forget-Me-Not Bouquet
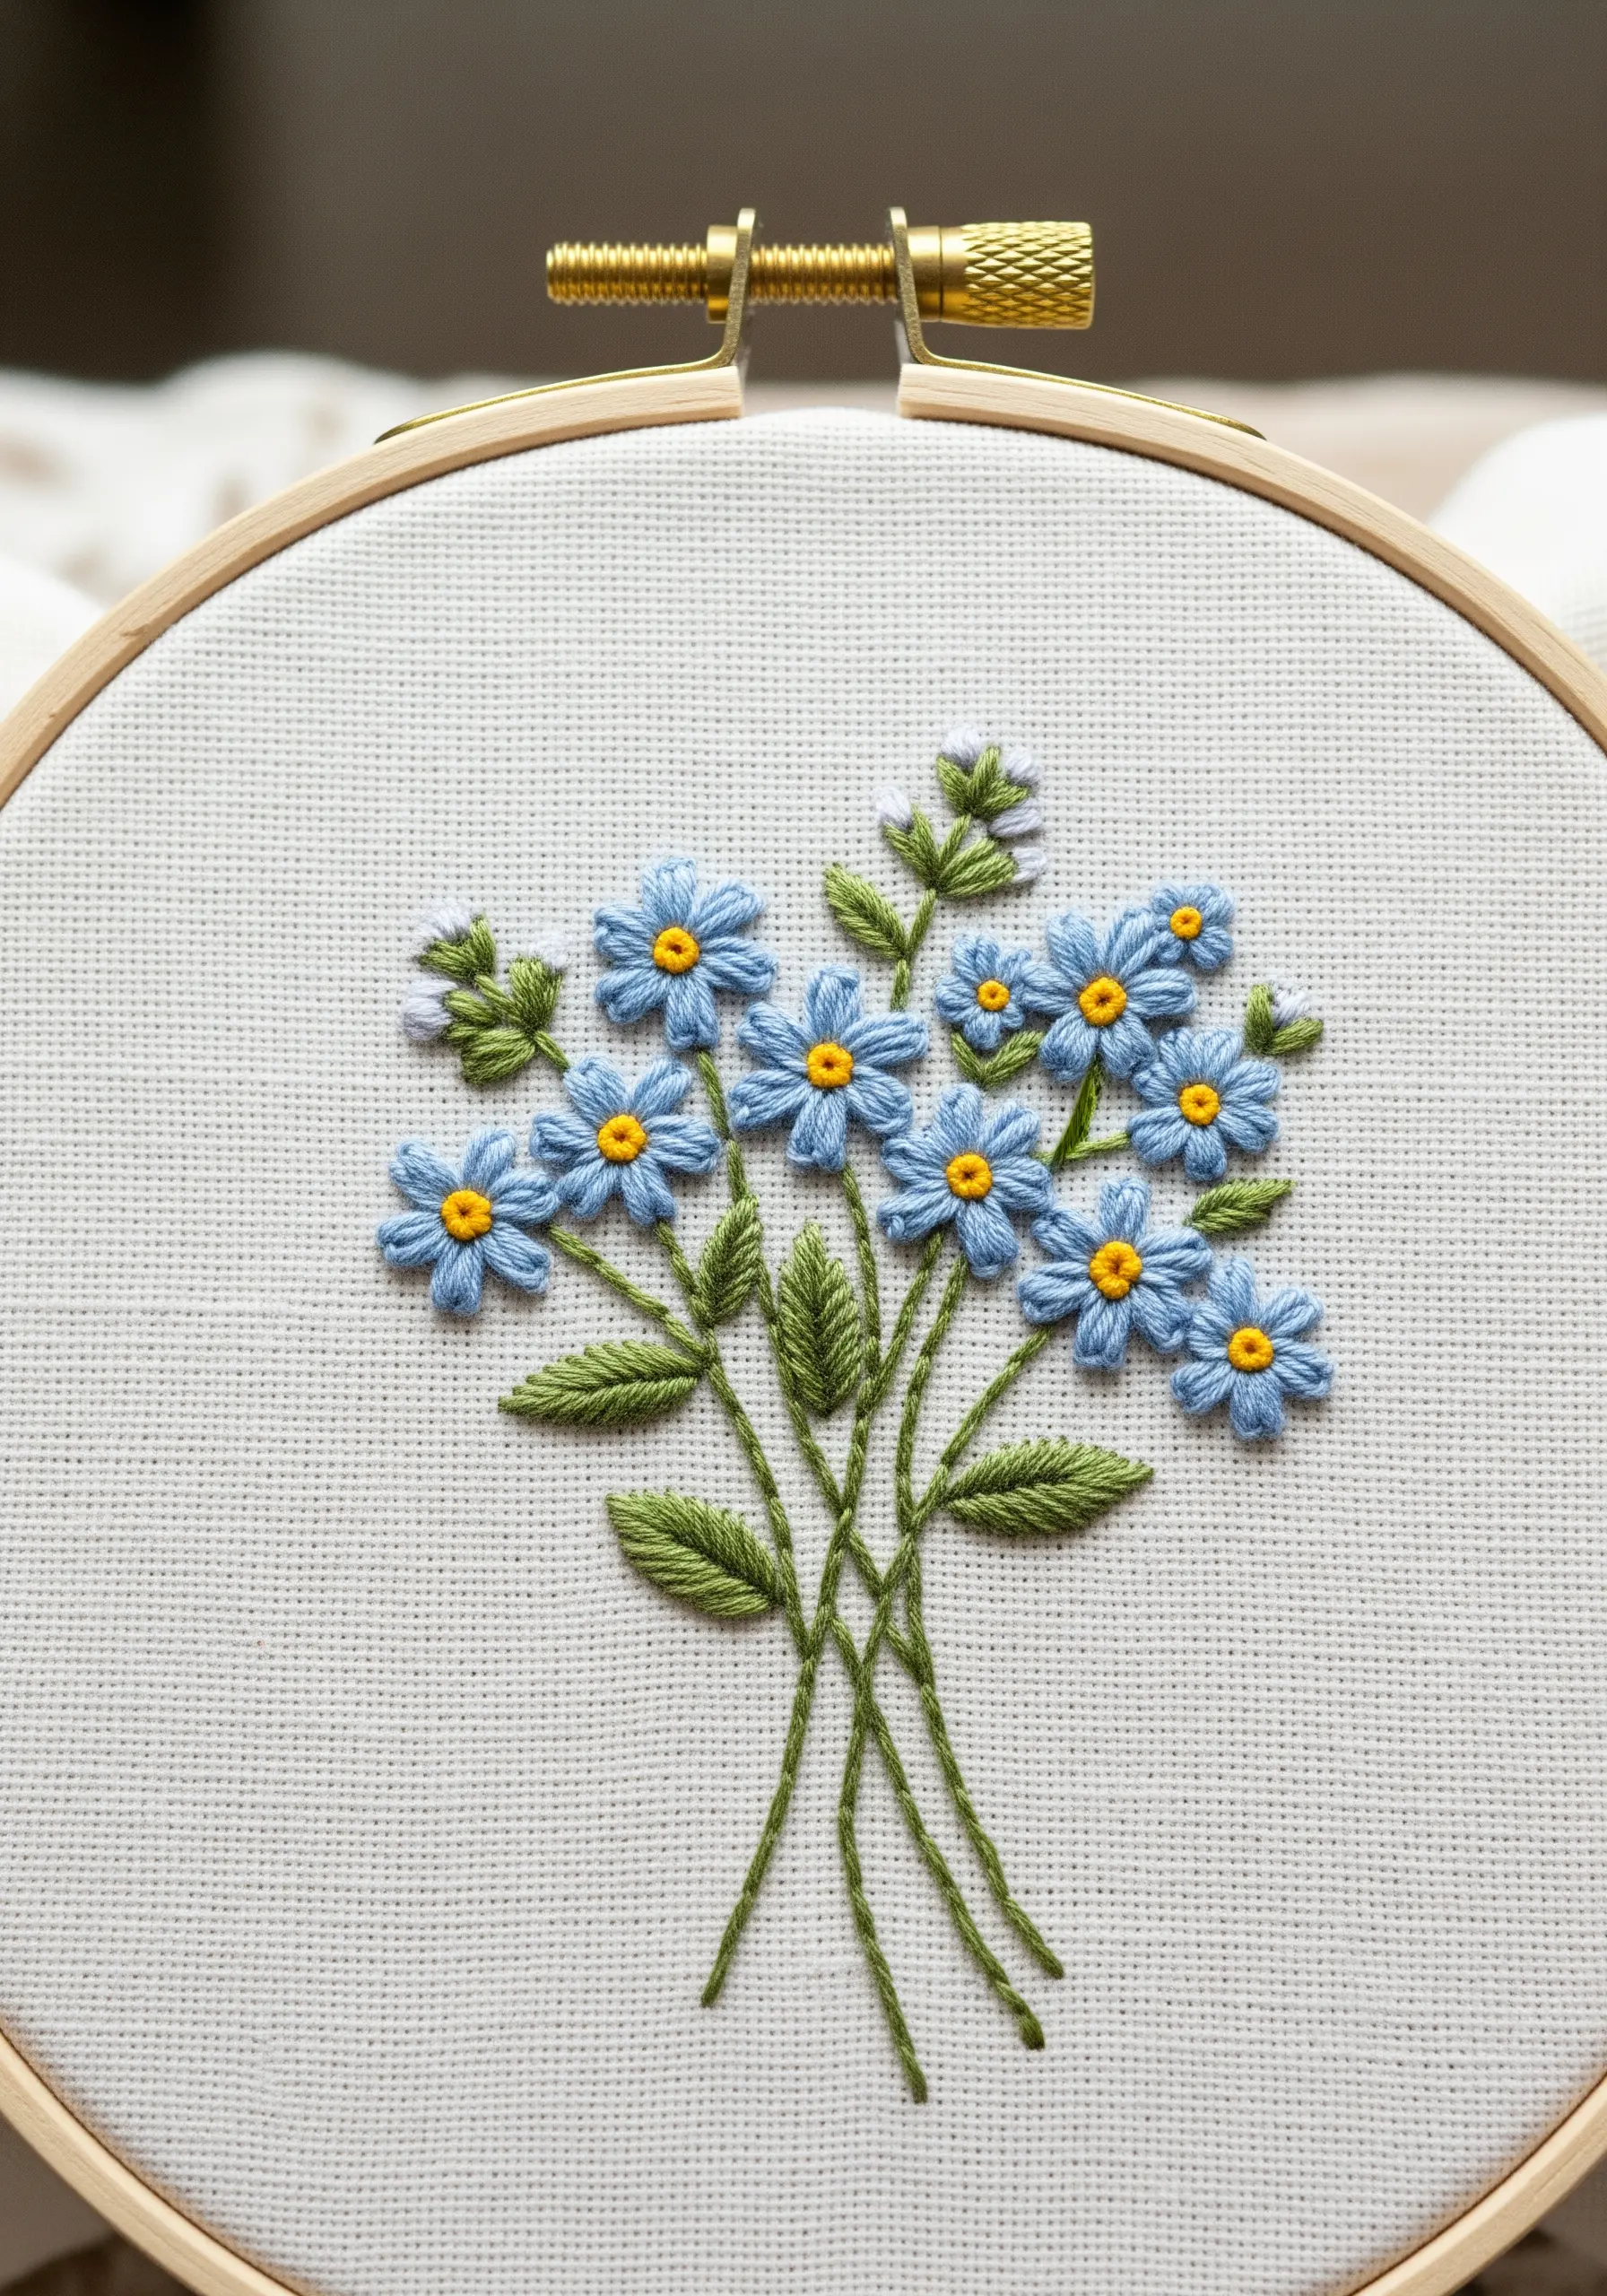
Build this lovely floral cluster with three basic stitches: lazy daisy, French knot, and stem stitch.
Create each flower with five lazy daisy stitches for the petals, arranged around a central point.
Place a single yellow French knot in the center of each flower for a pop of contrasting color and texture.
Connect them all with graceful, overlapping stem stitches to form a natural-looking bouquet. These gentle botanical embroidery stitches are perfect for creating a serene feel.
15. Sculpted Satin Stitch Seashell
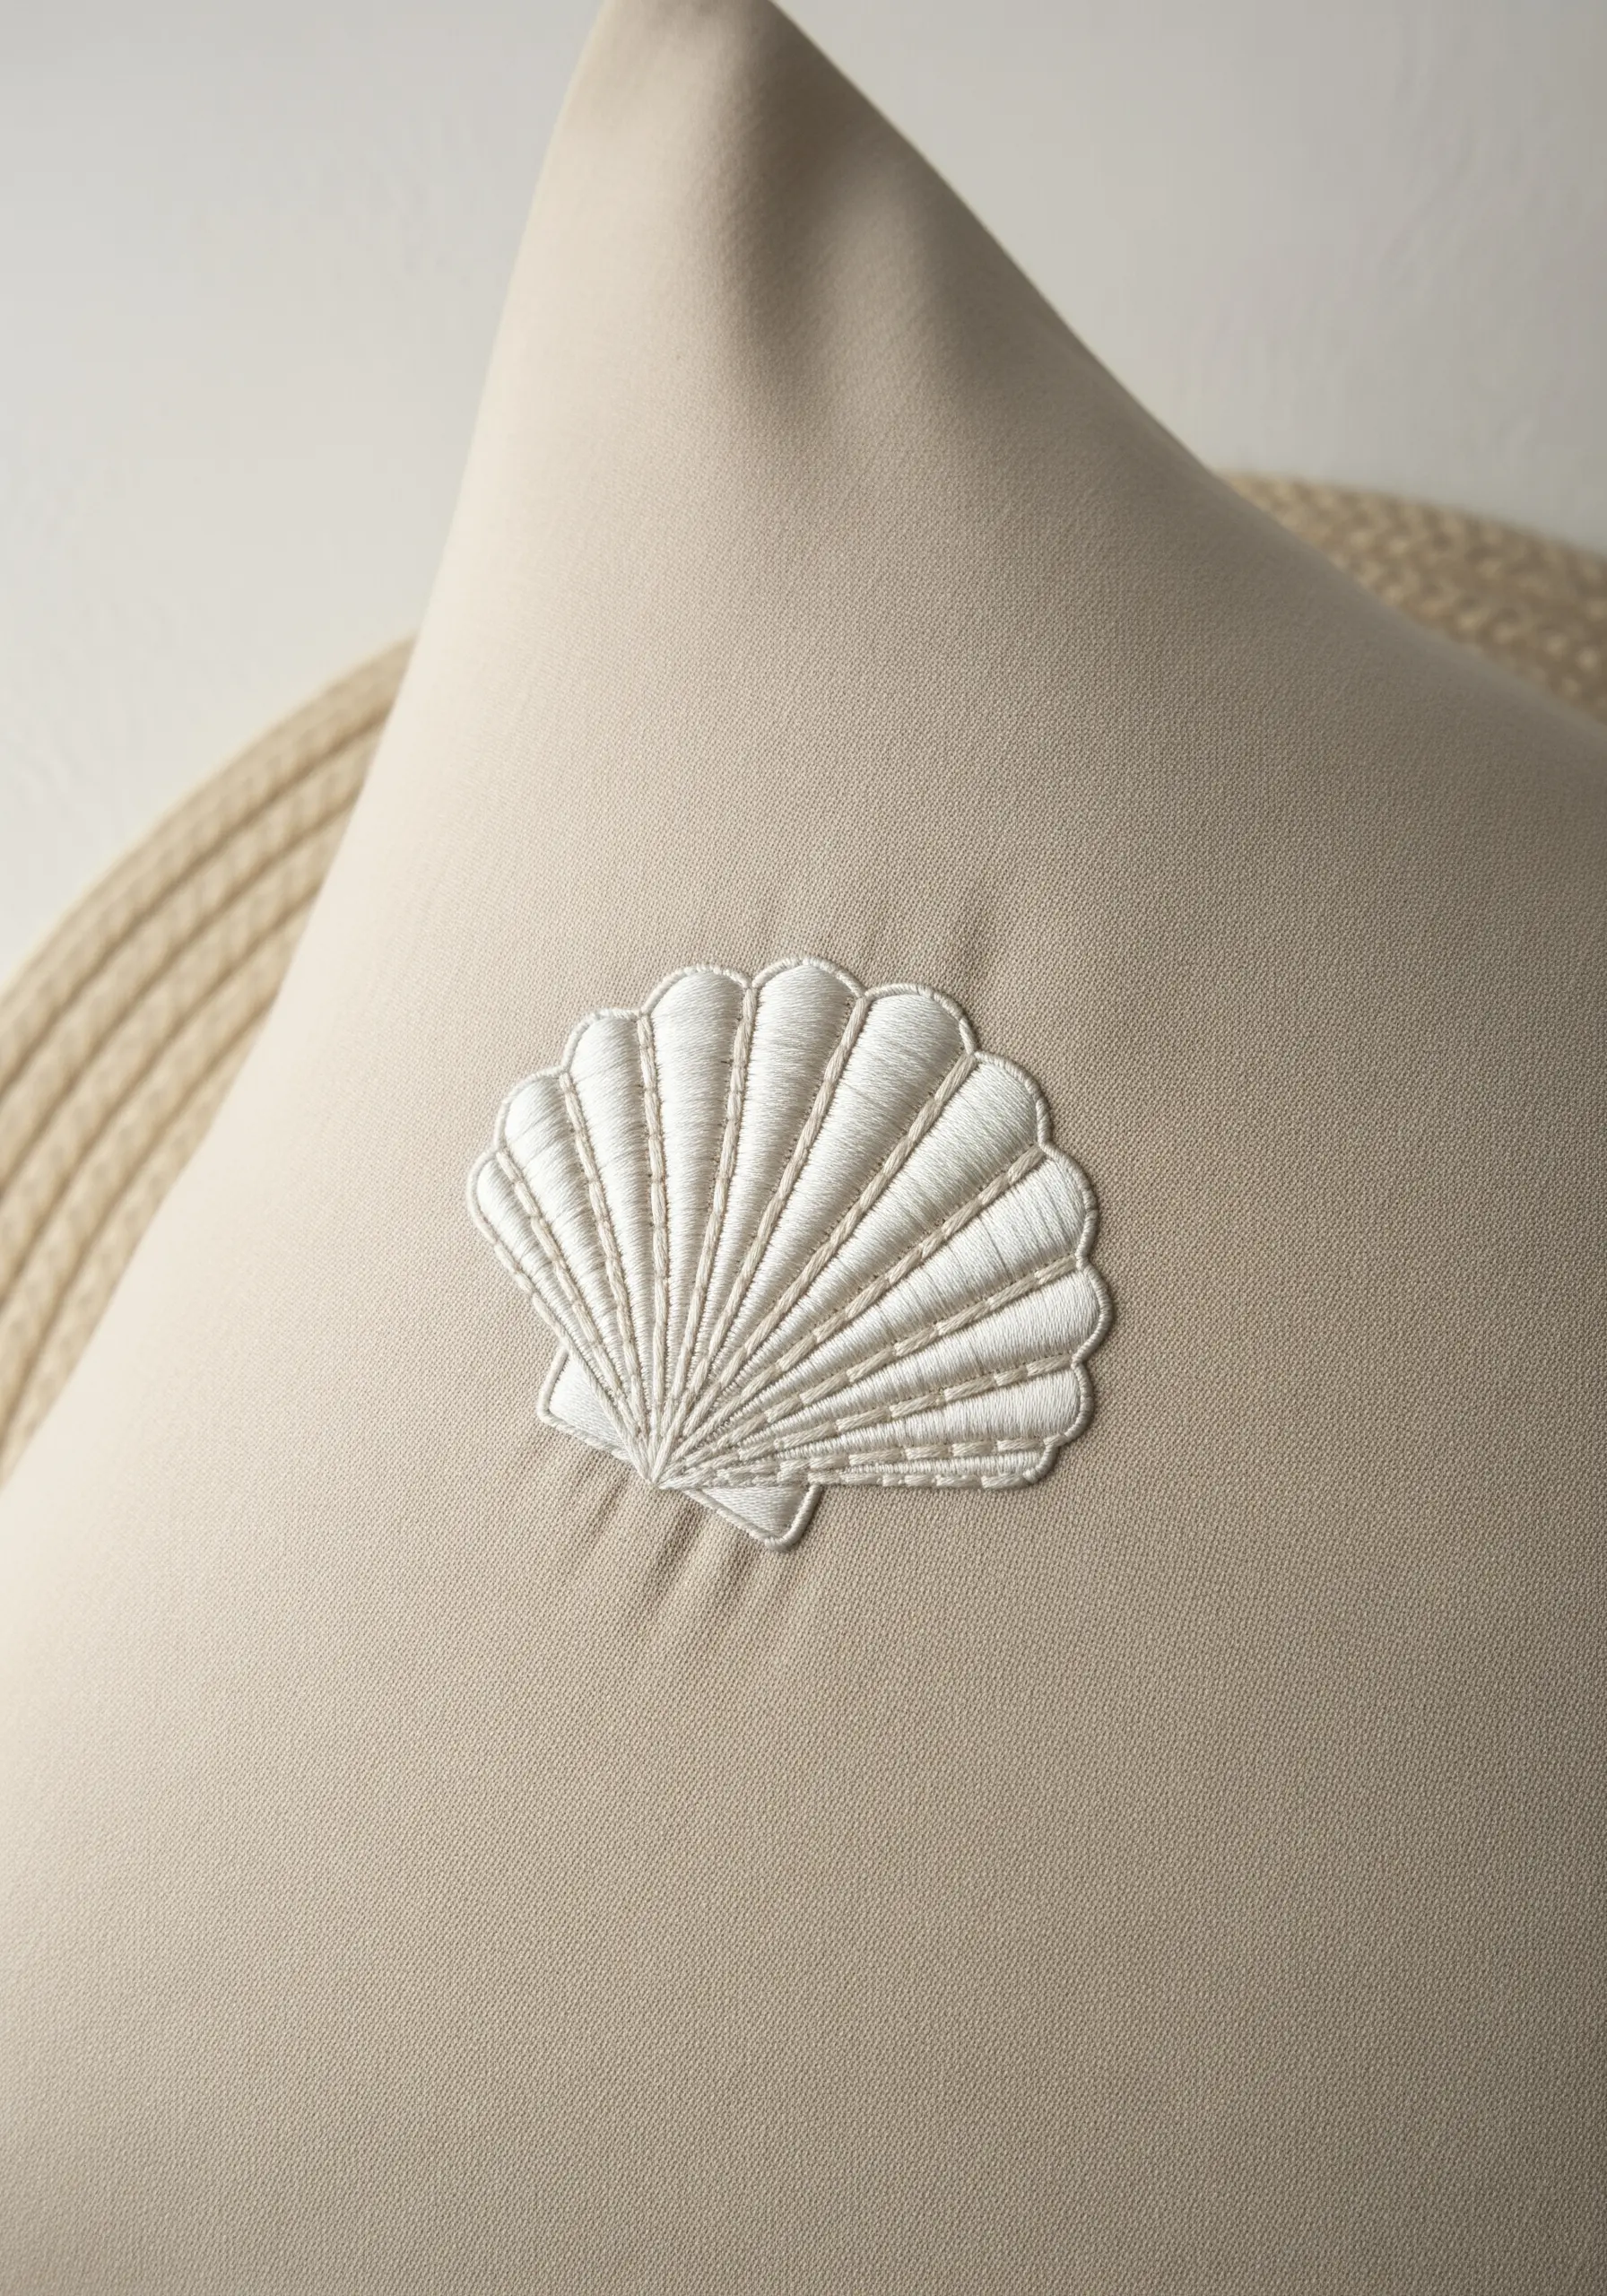
This seashell is a perfect study in how directional stitching can create shape and dimension.
Lightly draw radiating lines on the shell shape, all originating from the base. These will be your guides.
Fill each segment with long satin stitches that follow these guidelines. The changing angle of the stitches is what mimics the shell’s natural ridges and creates the illusion of a curved surface.
Finish with a clean backstitch outline to define the scalloped edge. This is one of the loveliest coastal-themed pillow stitching ideas for a calm, serene aesthetic.
16. The Delicate Feather
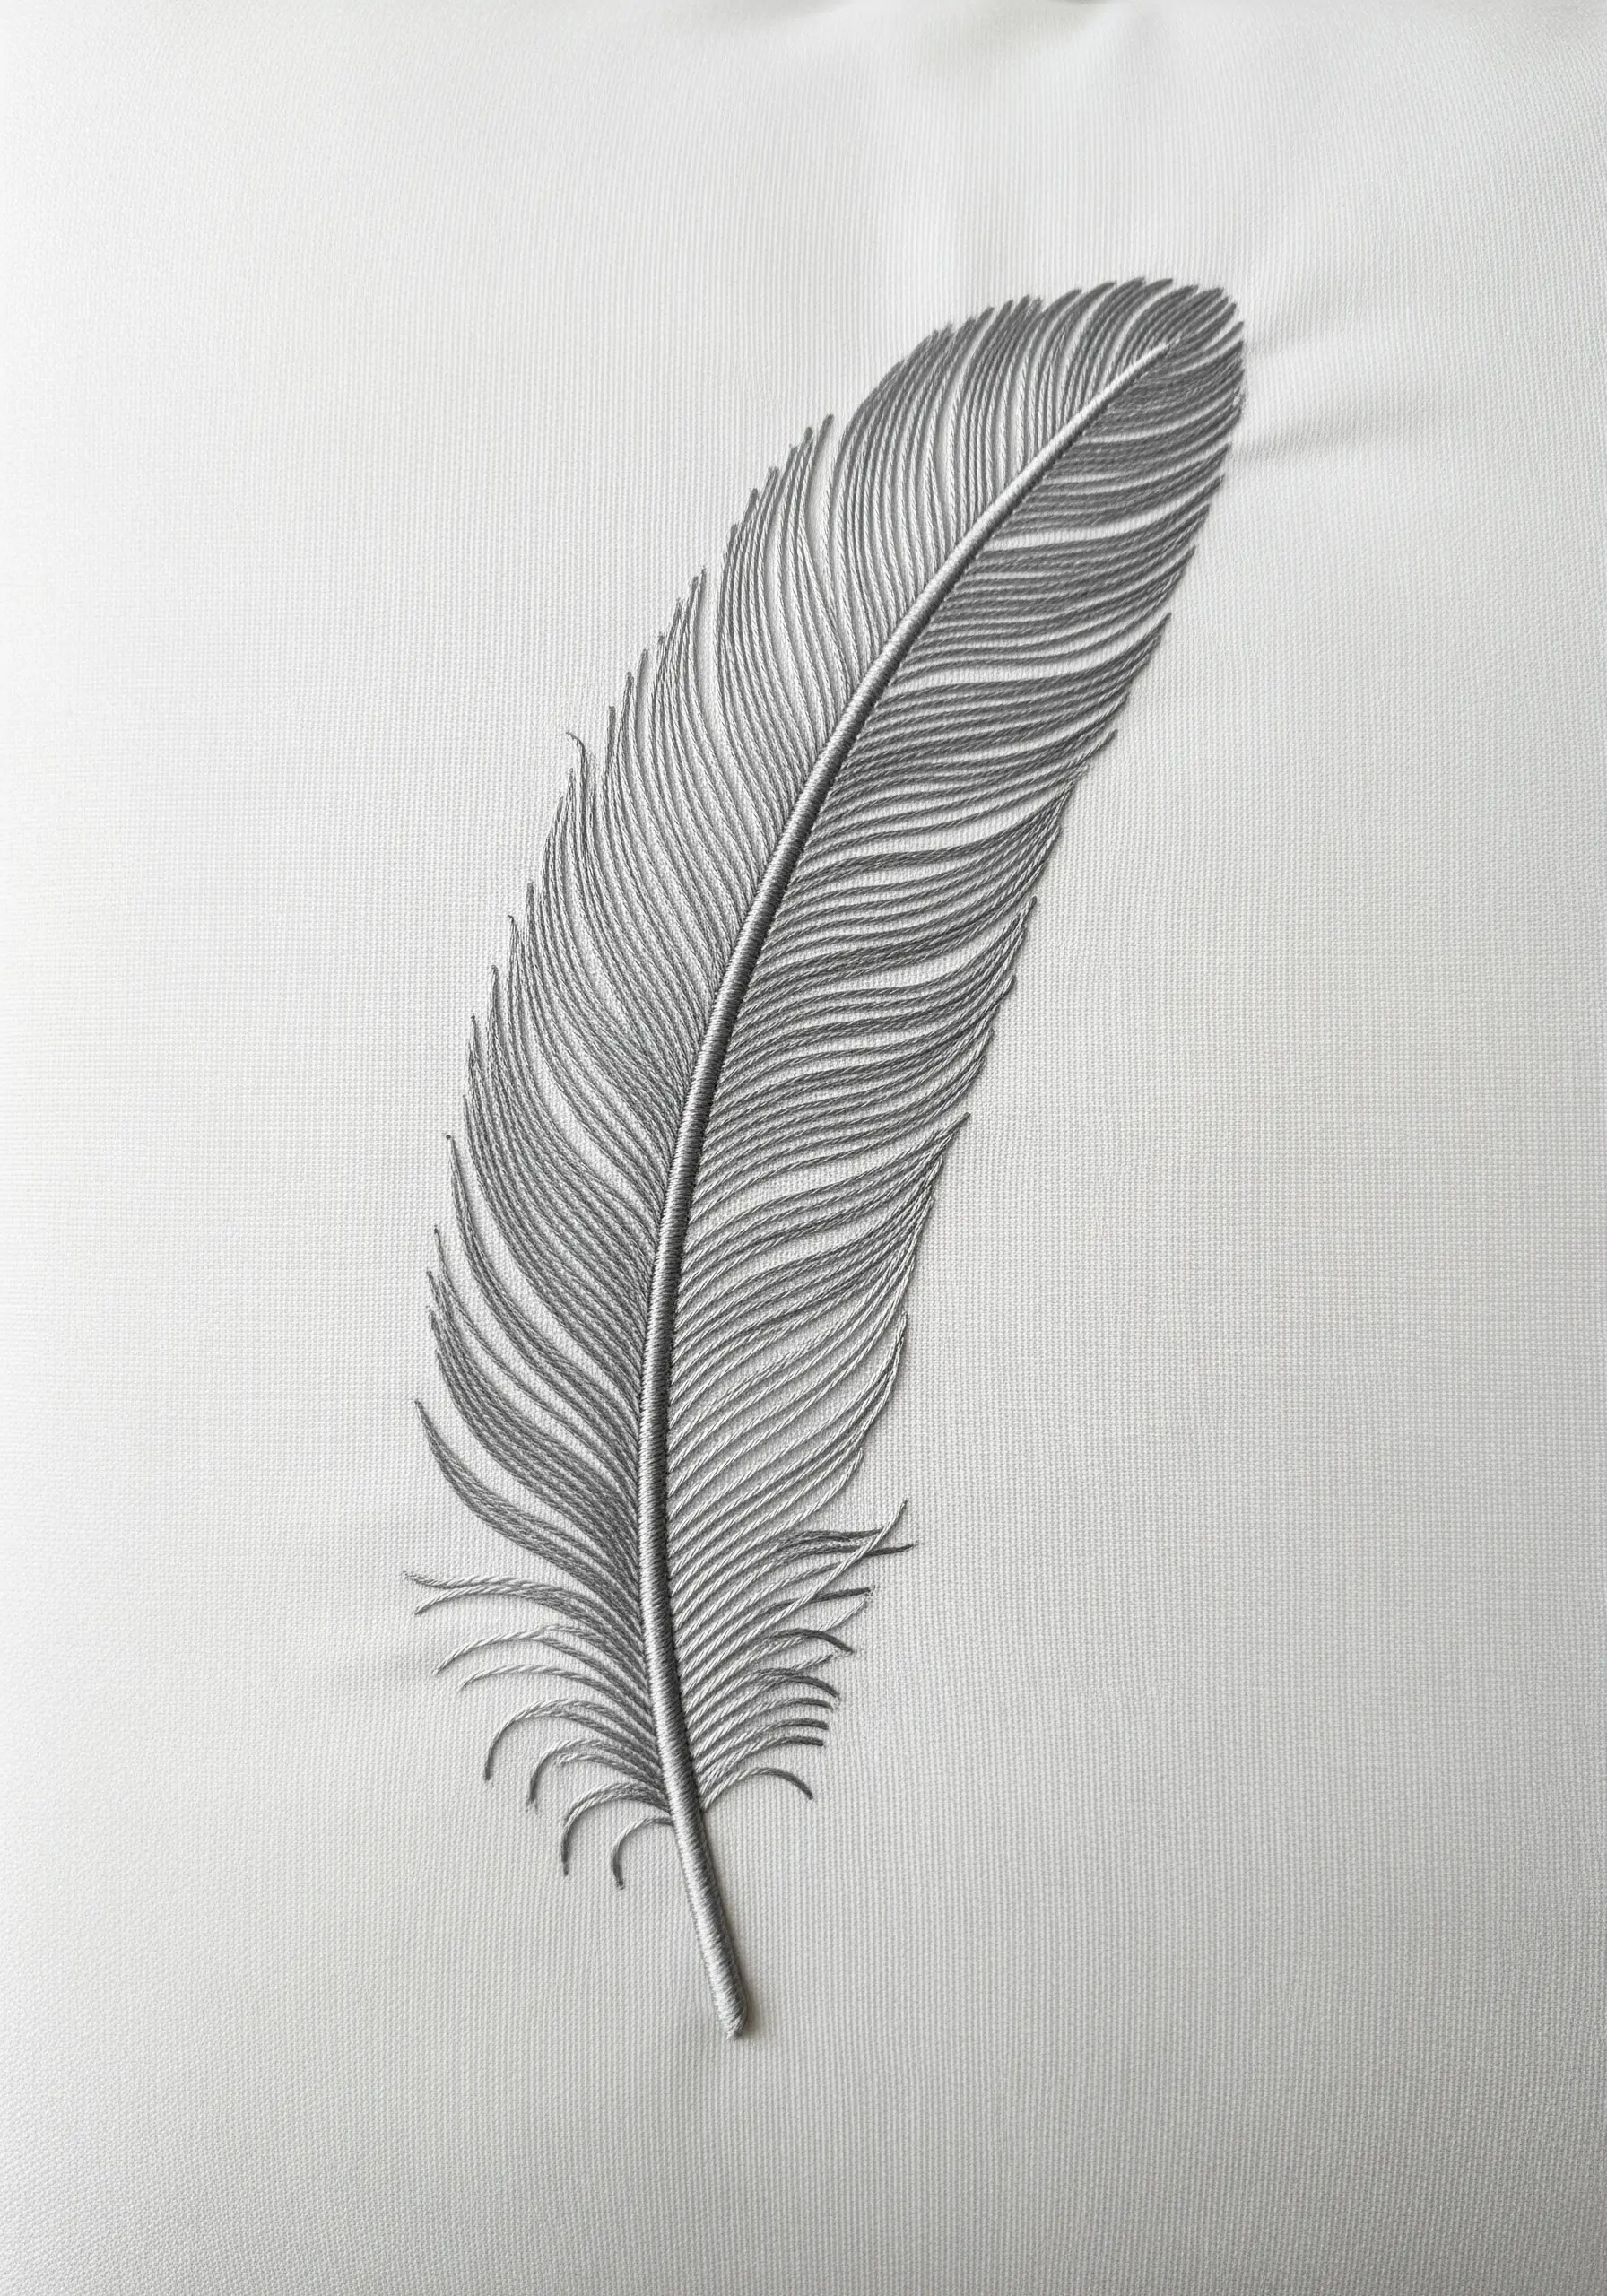
To achieve this feather’s realistic, airy quality, the fishbone stitch is an excellent choice.
Start with a single straight stitch down the center spine. Then, bring your needle up on one side of the outline and make a diagonal stitch that crosses over the spine.
Repeat on the other side, creating an overlapping, V-shaped pattern that fills the shape and forms a central rib simultaneously.
Use a single strand of thread for the wispy, detached barbs at the base to enhance the feather’s delicate appearance.
17. A Trio of Textured Fish
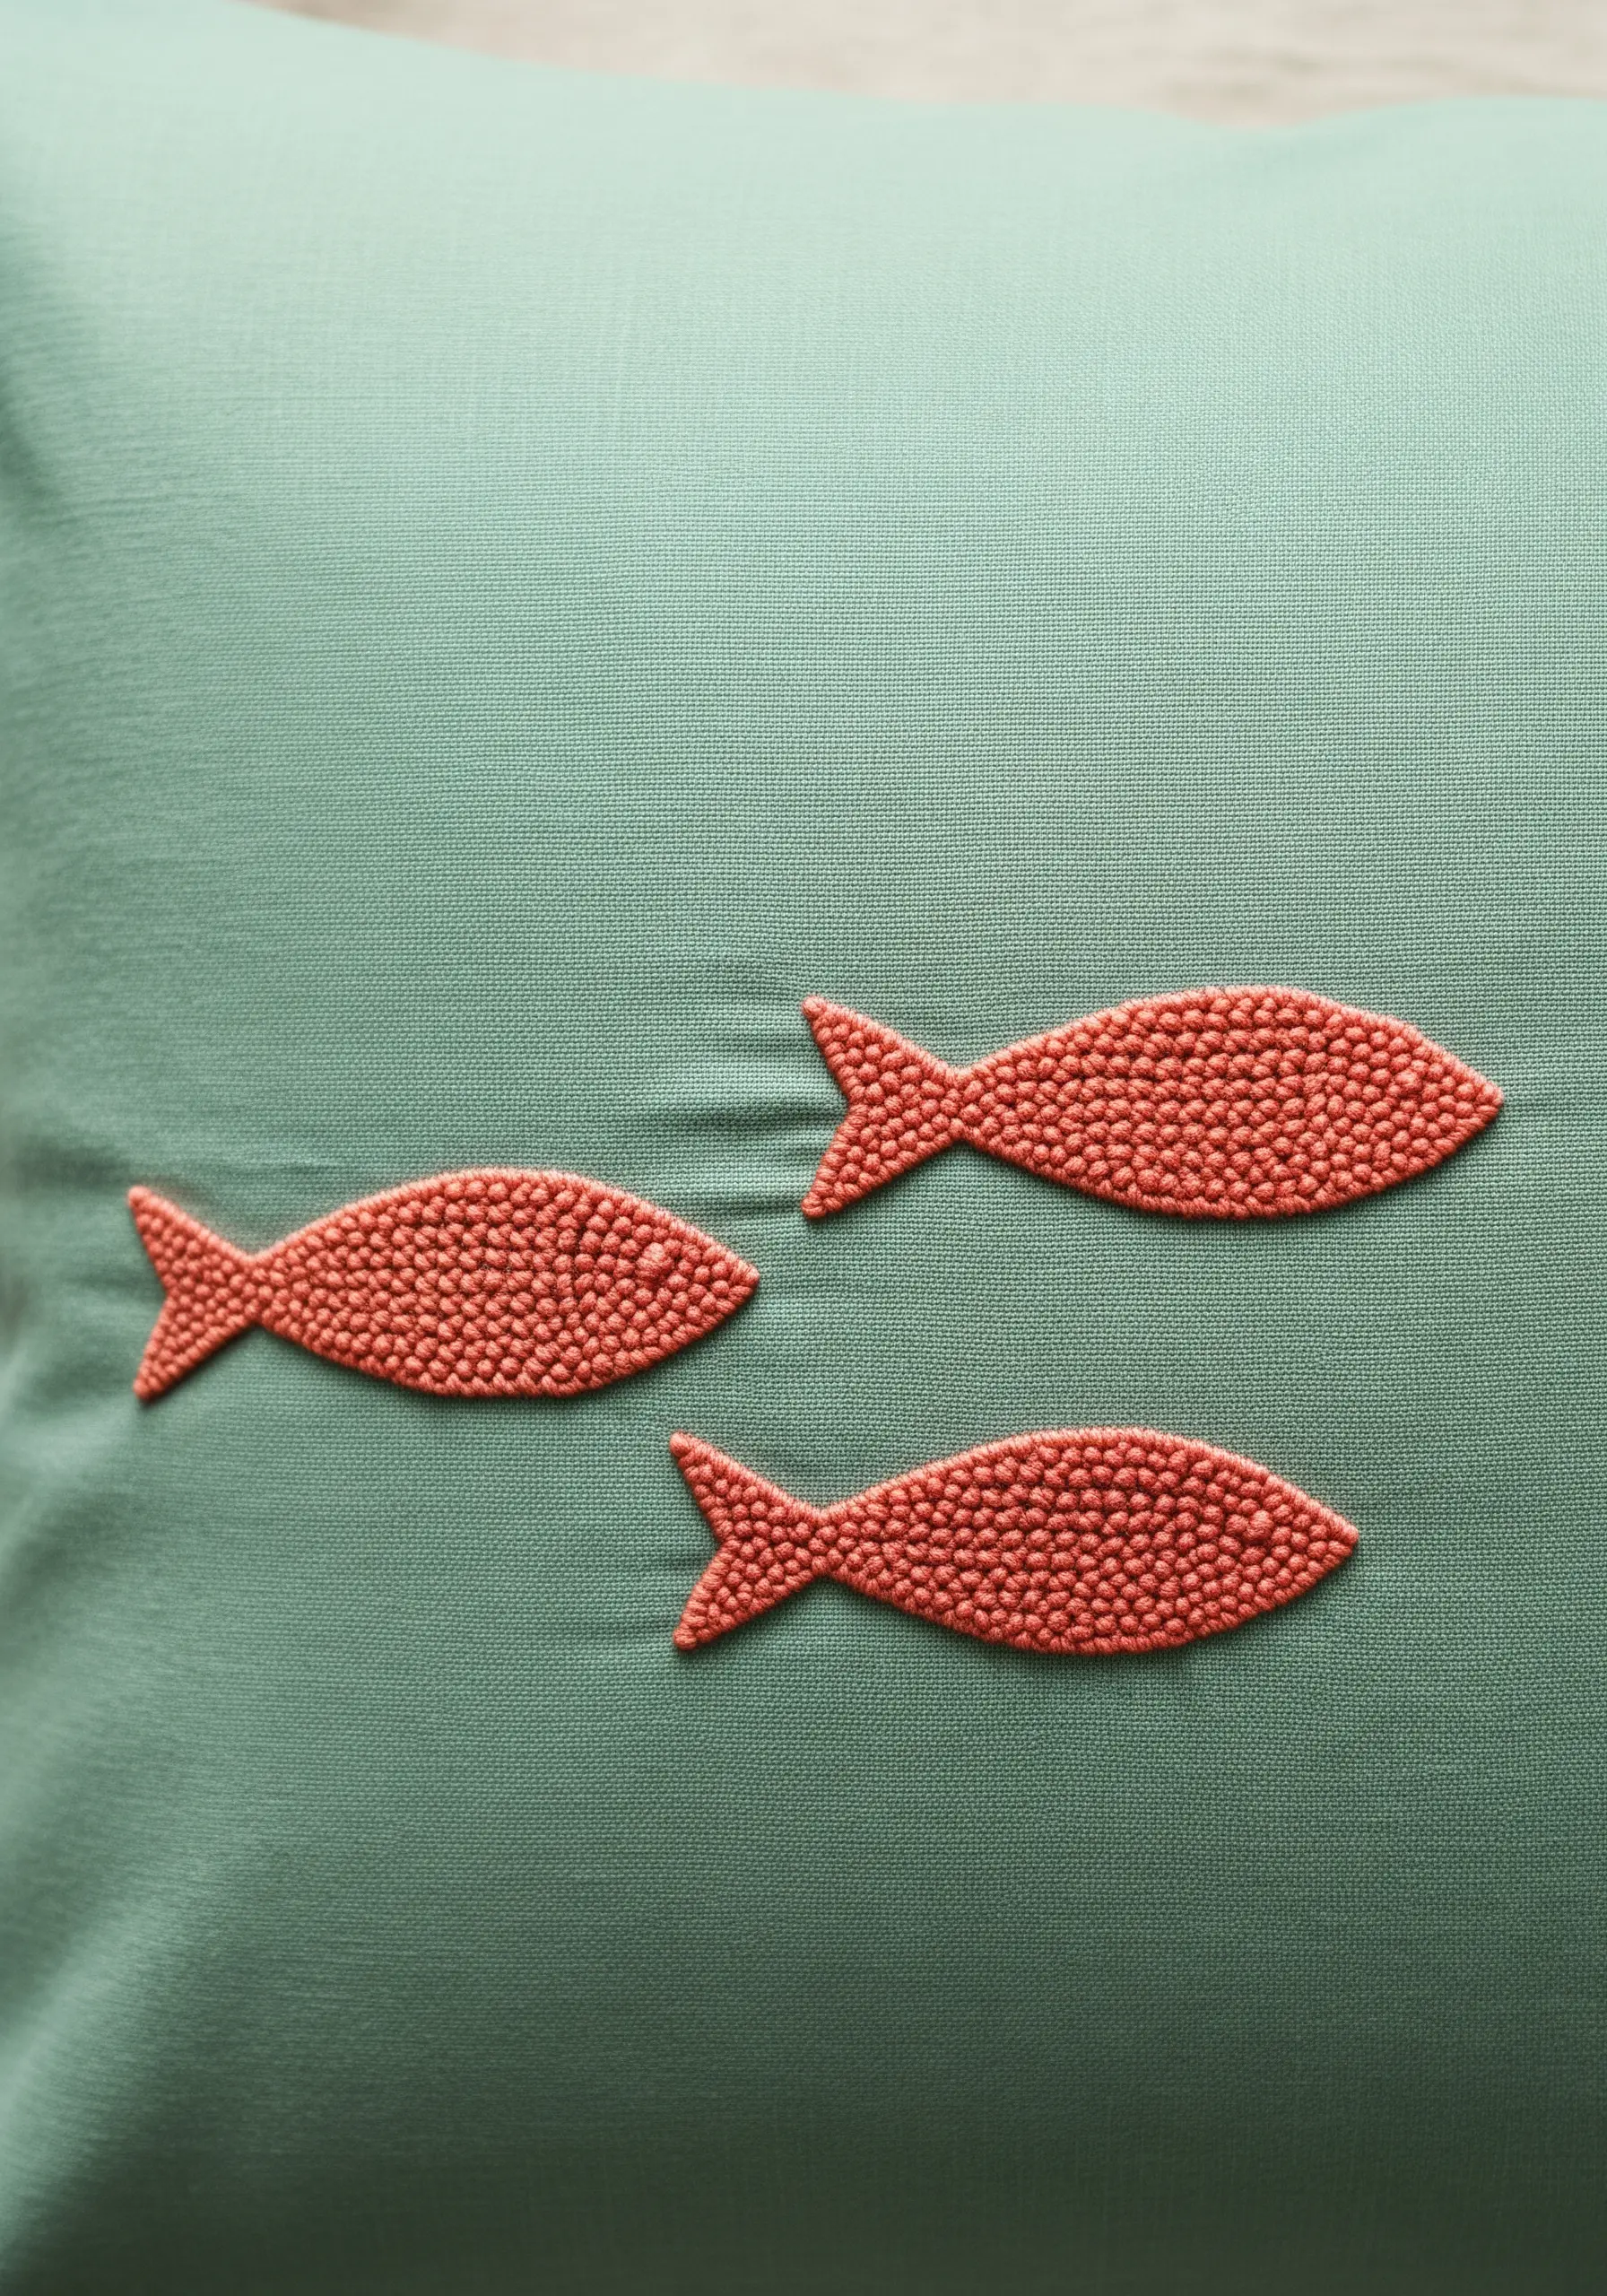
For a wonderfully tactile and visually interesting fill, use French knots to color in these simple fish shapes.
Outline your shapes first with a removable marker. Then, fill the entire area with tightly packed French knots, working from the outside in.
Using a single, bright color like this coral creates a bold statement against the muted green fabric.
This technique is surprisingly meditative and results in a raised, pebbly texture that invites touch, adding a playful element to your decor.
18. A Minimalist Constellation
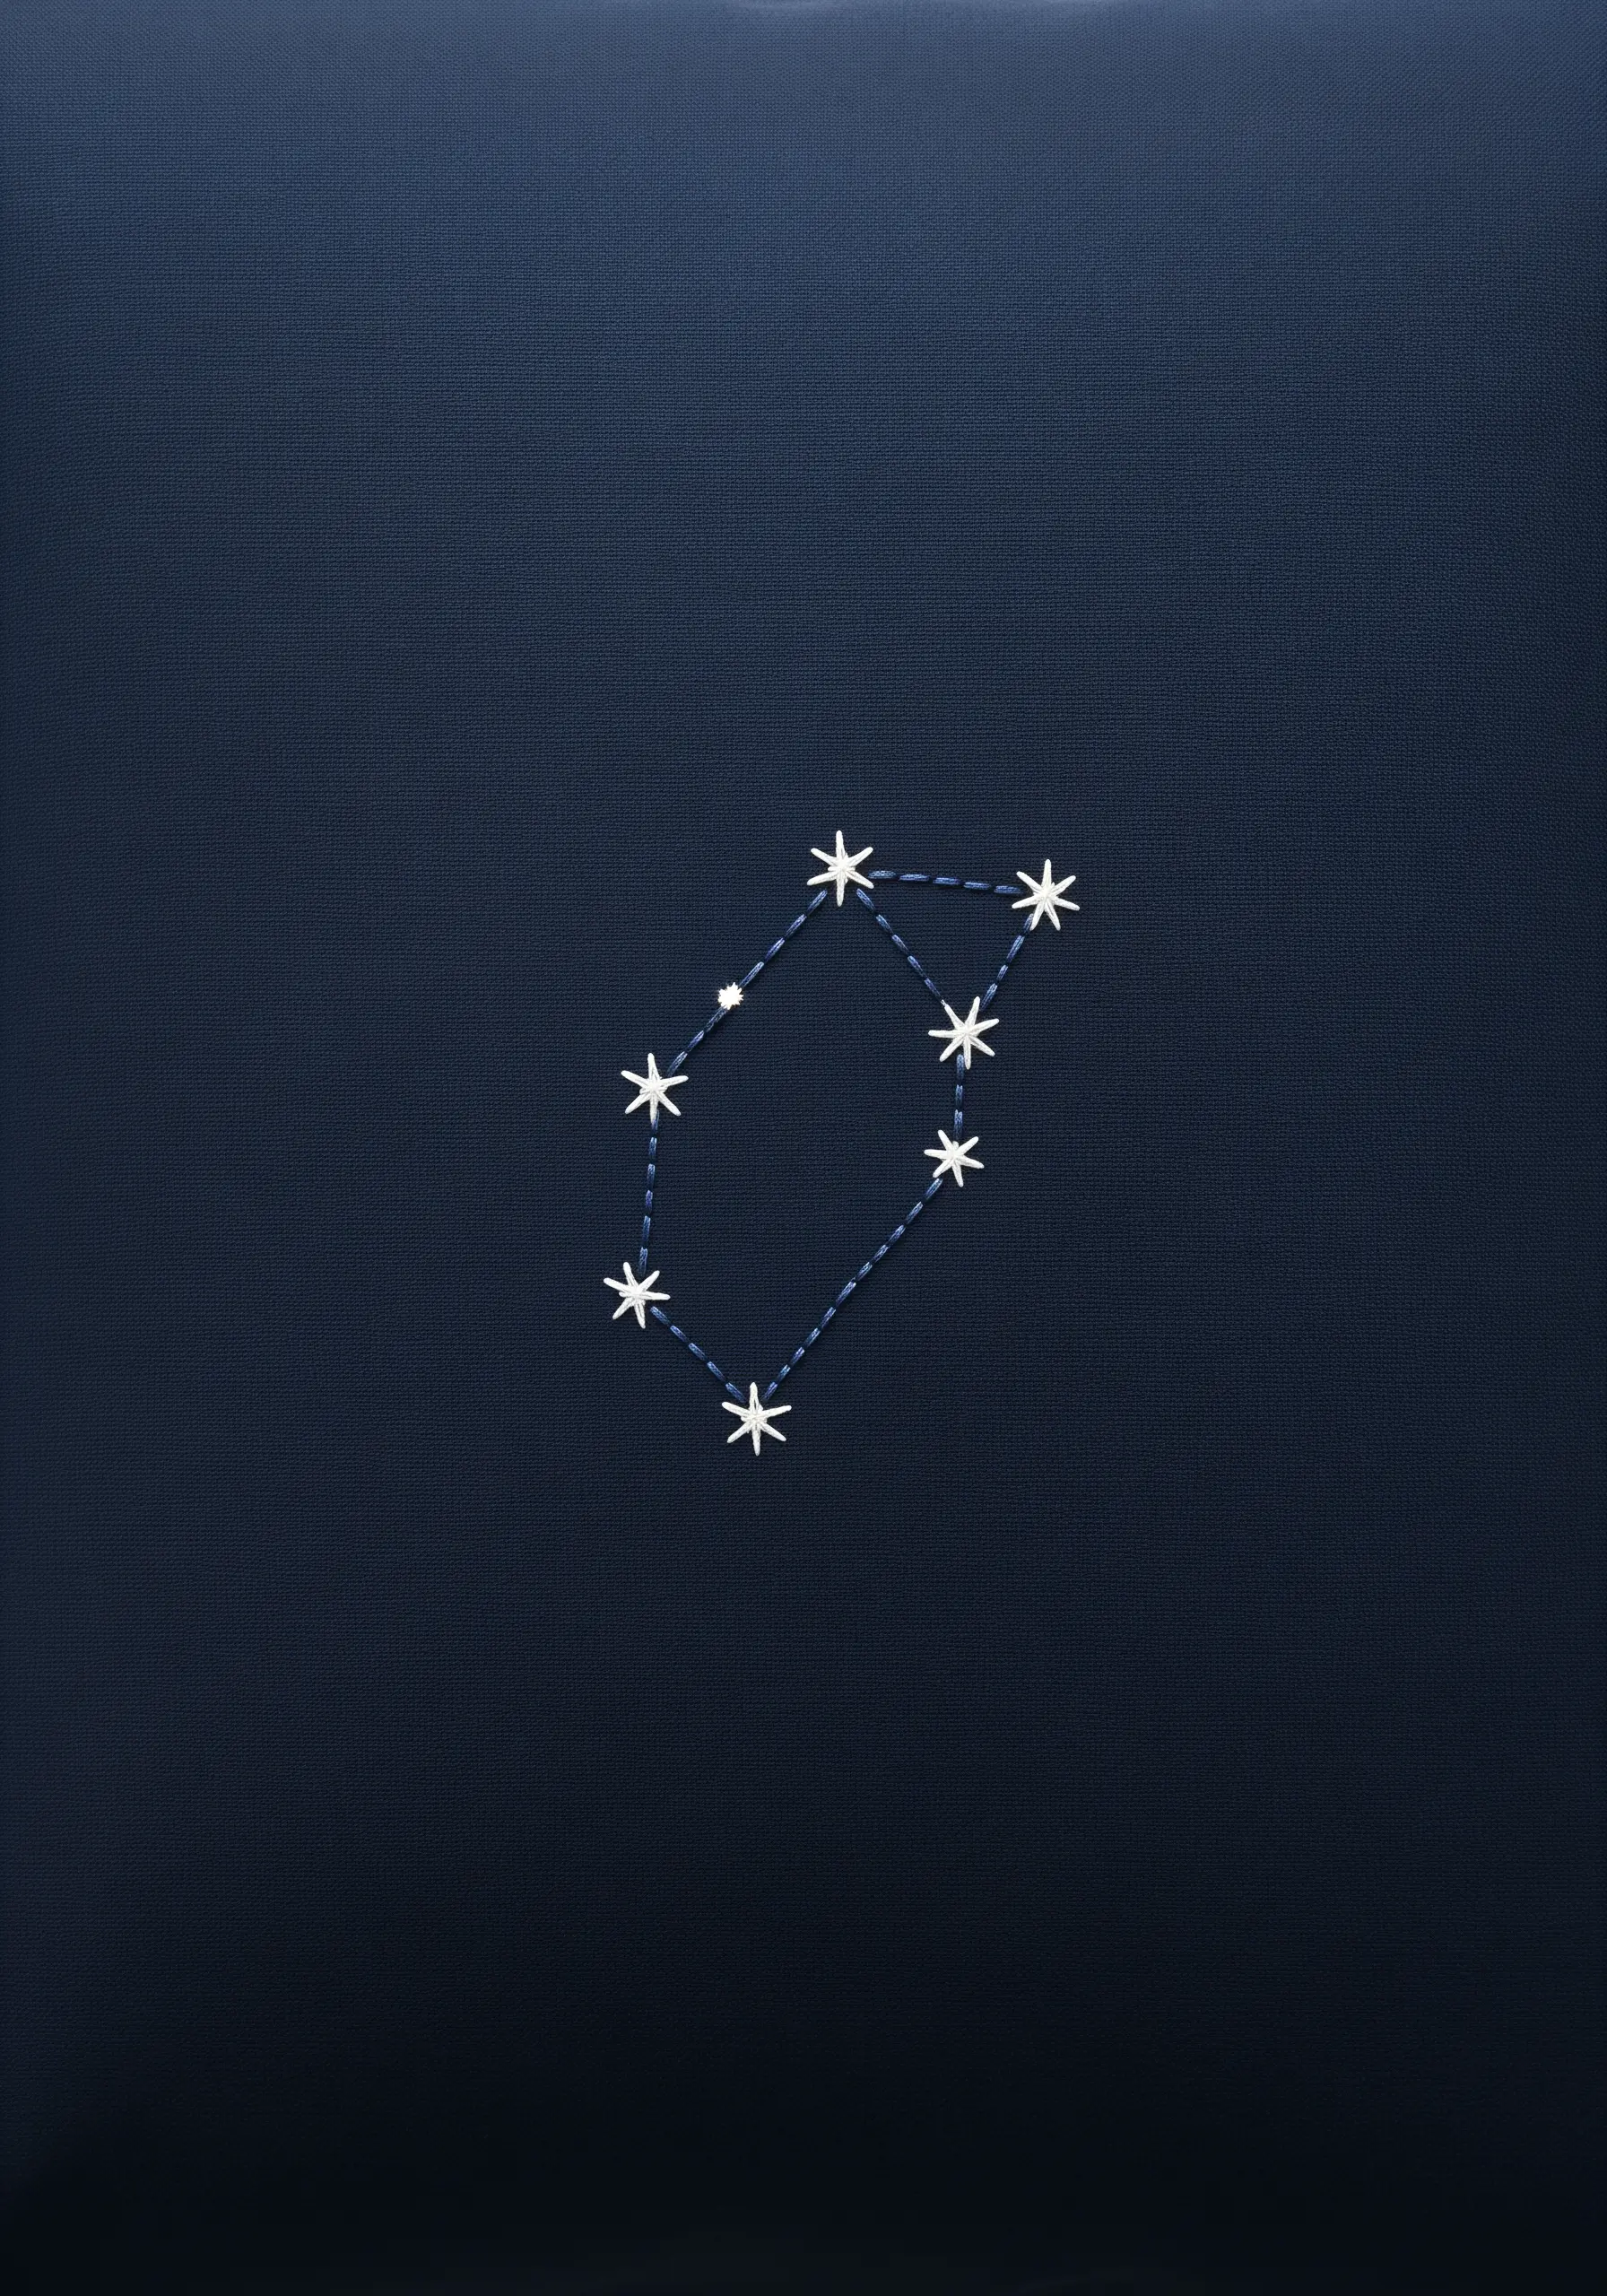
Transform your pillowcase into a piece of the night sky with a simple constellation design.
Use a bright white or metallic silver thread for high contrast against a dark navy or black fabric.
Stitch each star using a simple star stitch or a few overlapping straight stitches to form an asterisk shape.
Connect them with a clean, understated backstitch. The beauty of this design lies in its precision and the elegant use of negative space.
19. Sprig with Bullion Knot Buds

Create exquisite, dimensional flower buds using the bullion knot stitch. This stitch creates a small, raised coil that looks just like an unopened rosebud.
Wrap the thread around your needle 5-7 times before pulling it through to create a plump, tight knot.
Contrast the textured buds with a smooth, delicate branch stitched with a simple split stitch or stem stitch.
This combination of textures—the smooth branch and the sculptural knots—is what makes the design so visually captivating and elegant.
20. A Modern Swiss Cross Pattern
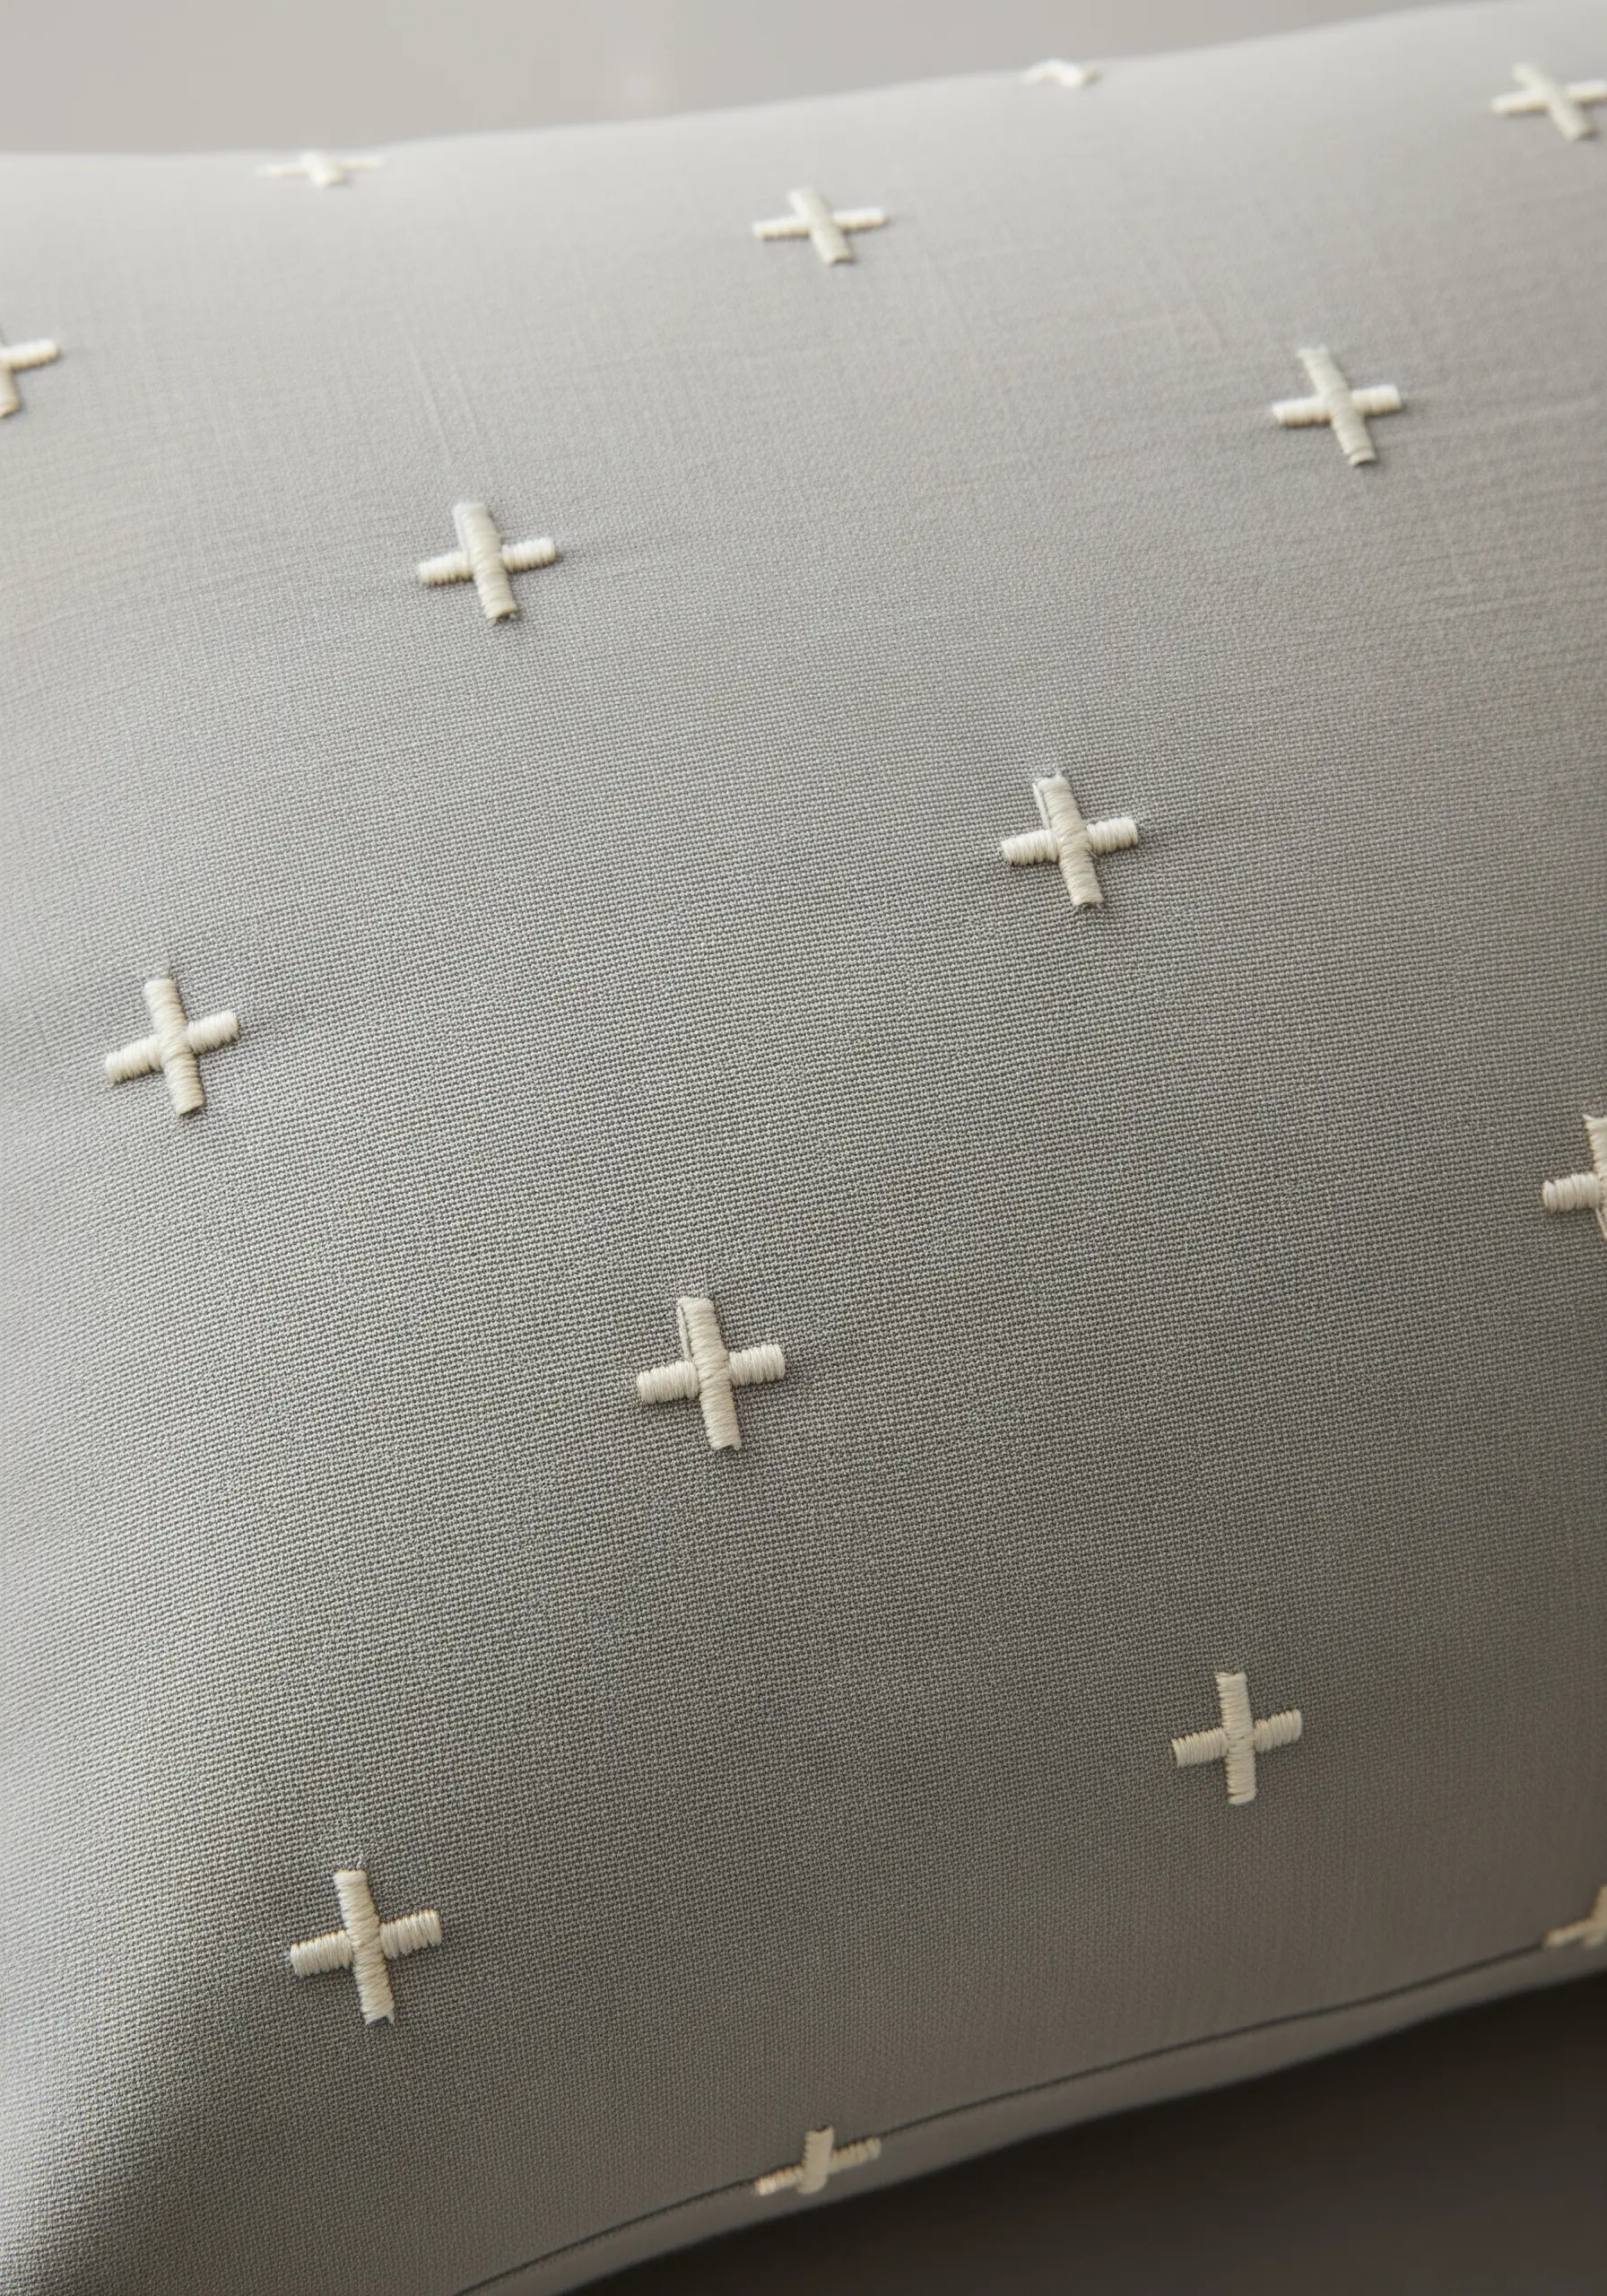
For a clean, modern, and geometric effect, an evenly spaced pattern is key. Use a water-soluble marker and a ruler to create a precise grid on your fabric first.
Each cross is simply two small, intersecting straight stitches. The secret to a polished look is absolute consistency in stitch length and placement.
Use a contrasting thread color, like off-white on grey, to highlight the pattern’s graphic nature.
This design can easily be adapted into hand-stitched cushion borders or an all-over pattern for a contemporary feel.
21. Realistic Woodland Mushrooms
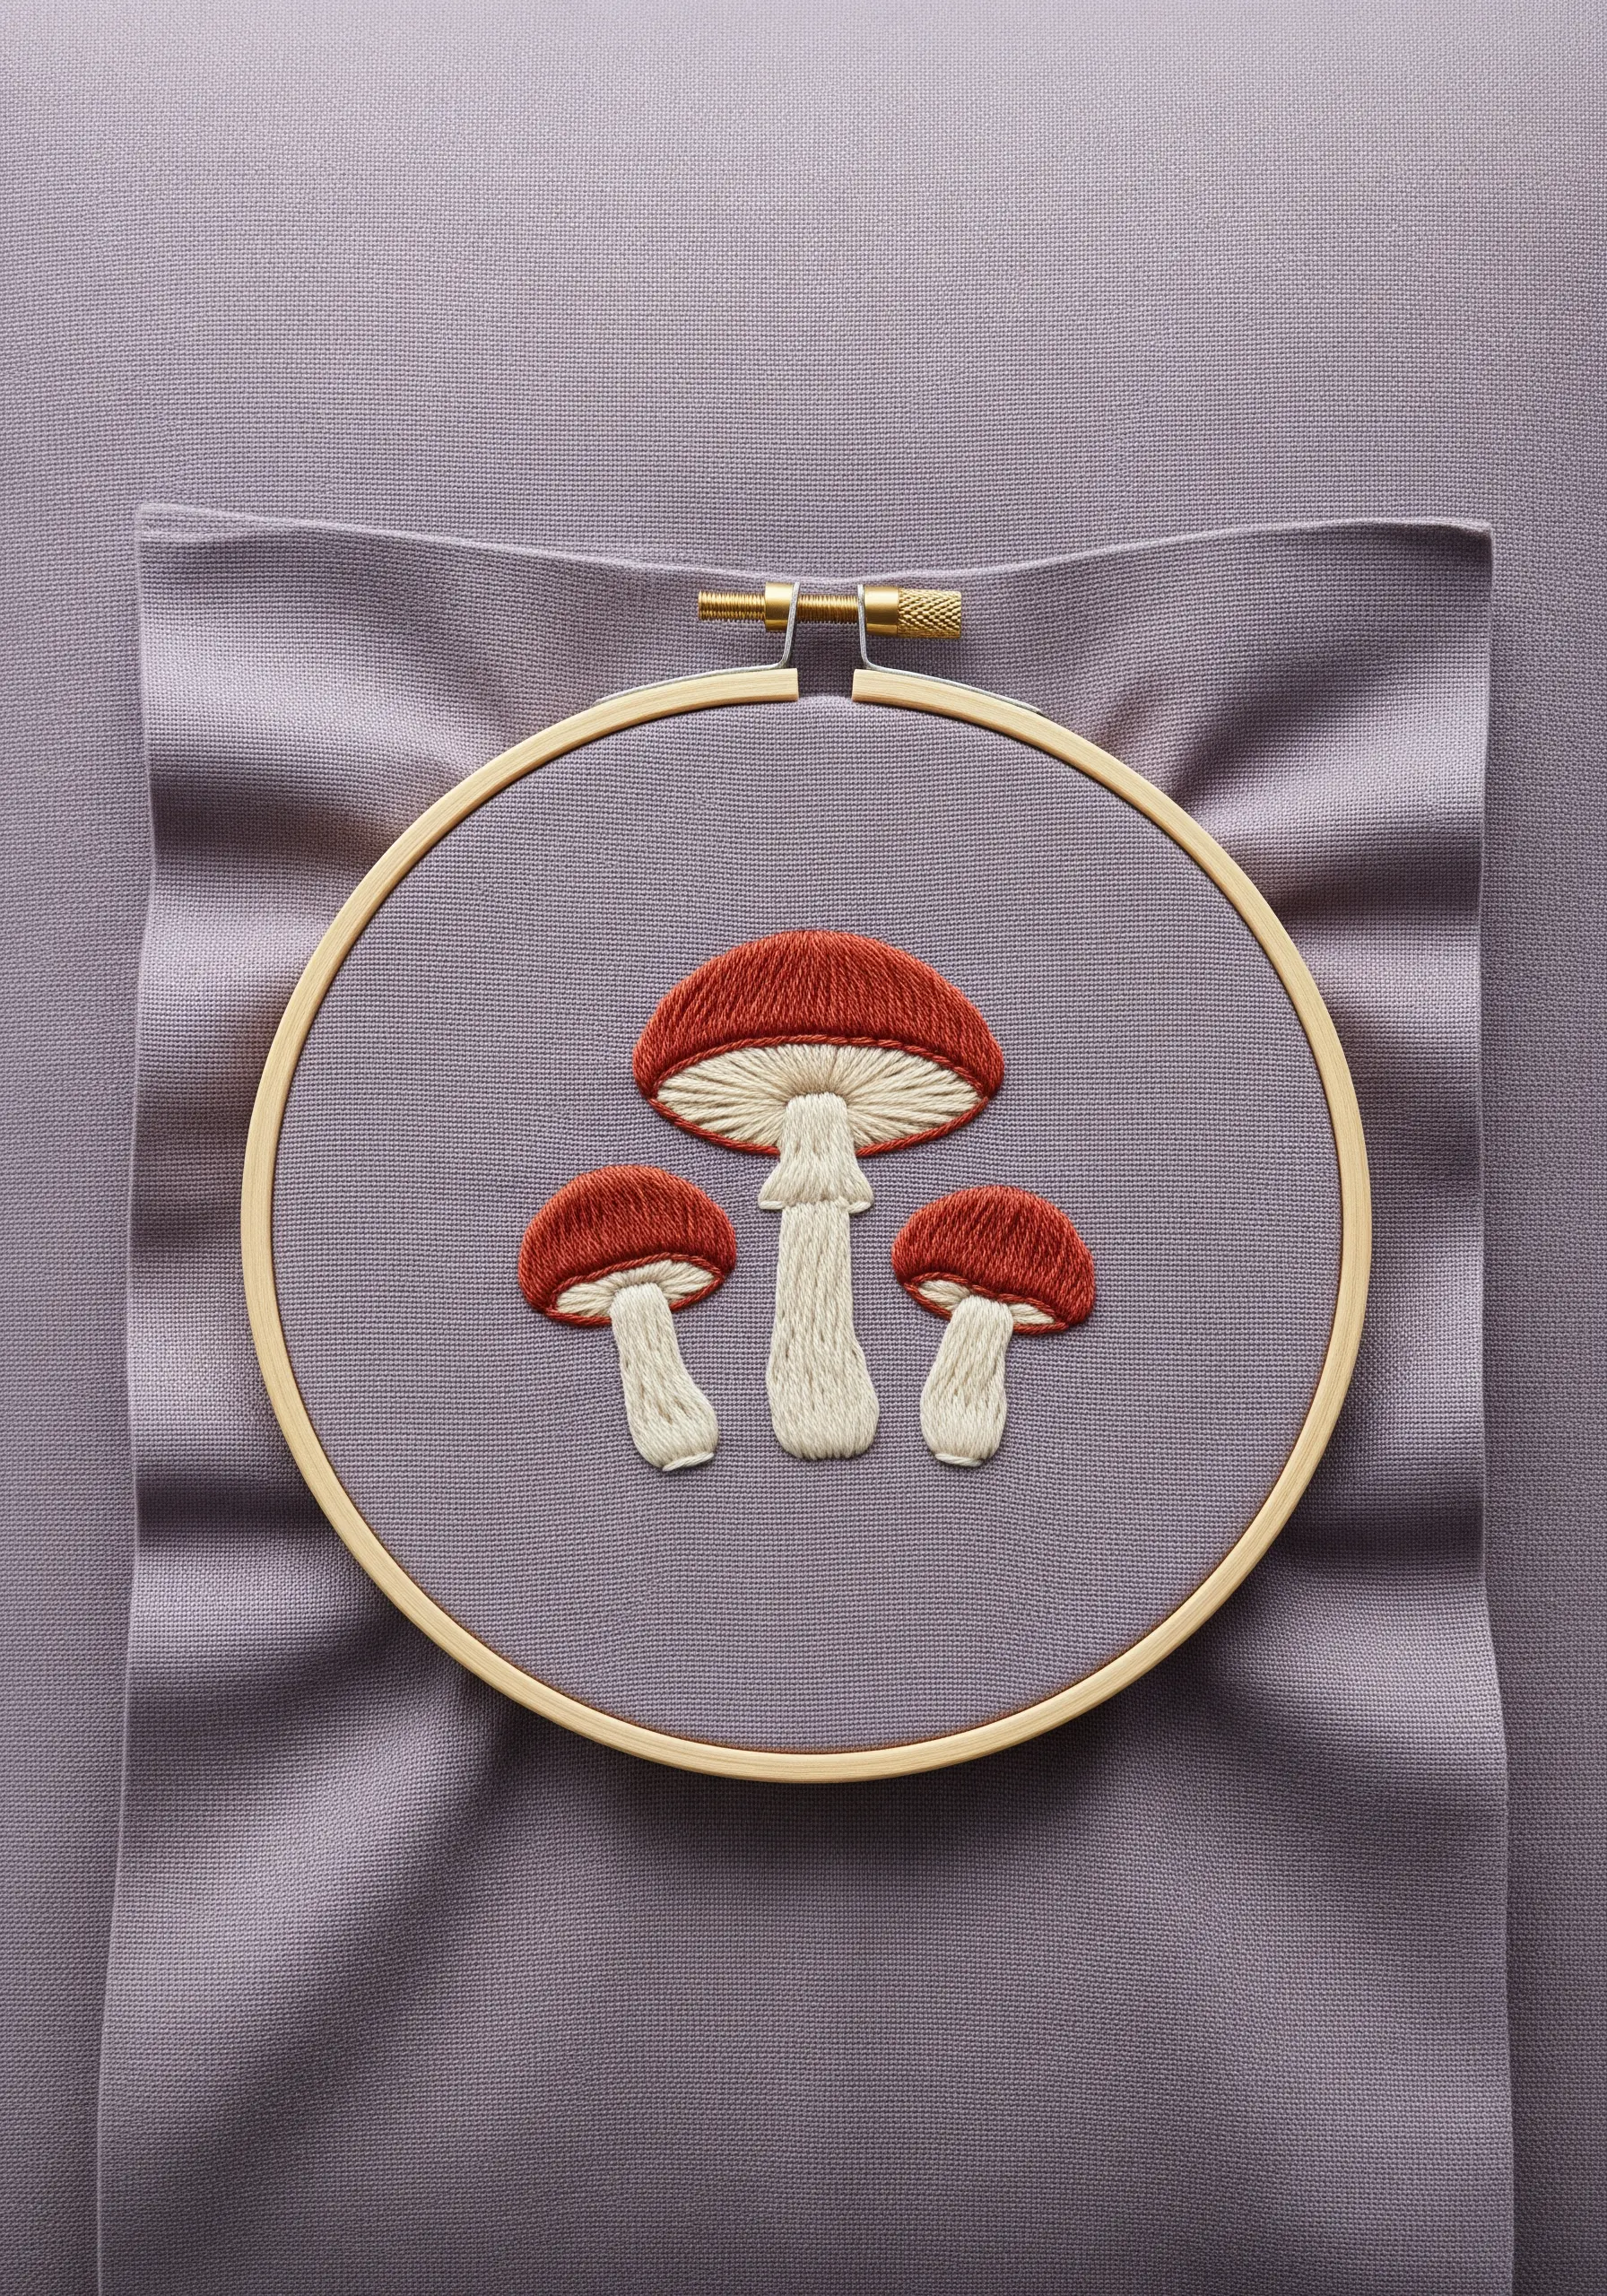
Achieve this stunning realism by using the long-and-short stitch to blend colors on the mushroom caps.
Start with a row of alternating long and short satin stitches along an edge, then fill in the subsequent rows by stitching into the previous layer, creating a seamless gradient.
For the gills underneath the cap, use vertical straight stitches or satin stitches in an off-white or beige to create shadow and depth.
This turns a simple motif into a detailed, miniature work of textile art, perfect for adding a touch of enchanting woodland charm.


