

If you’ve ever looked at your embroidery and felt that something was missing—a certain polish, a touch of life—I want you to know that the solution is often found in the tiniest adjustments.
It’s not about learning dozens of complex new stitches. It’s about understanding how to use the ones you know with more intention: changing the direction of a stitch to suggest form, varying thread thickness to create texture, or outlining a shape first to make your fill stitches perfectly clean.
These tiny animal projects are your playground for mastering these subtle, powerful techniques. Each one is small enough to finish quickly, giving you an immediate sense of accomplishment and building the confidence you need to infuse every future project with artistry and precision.
1. Create Form with Directional Satin Stitch
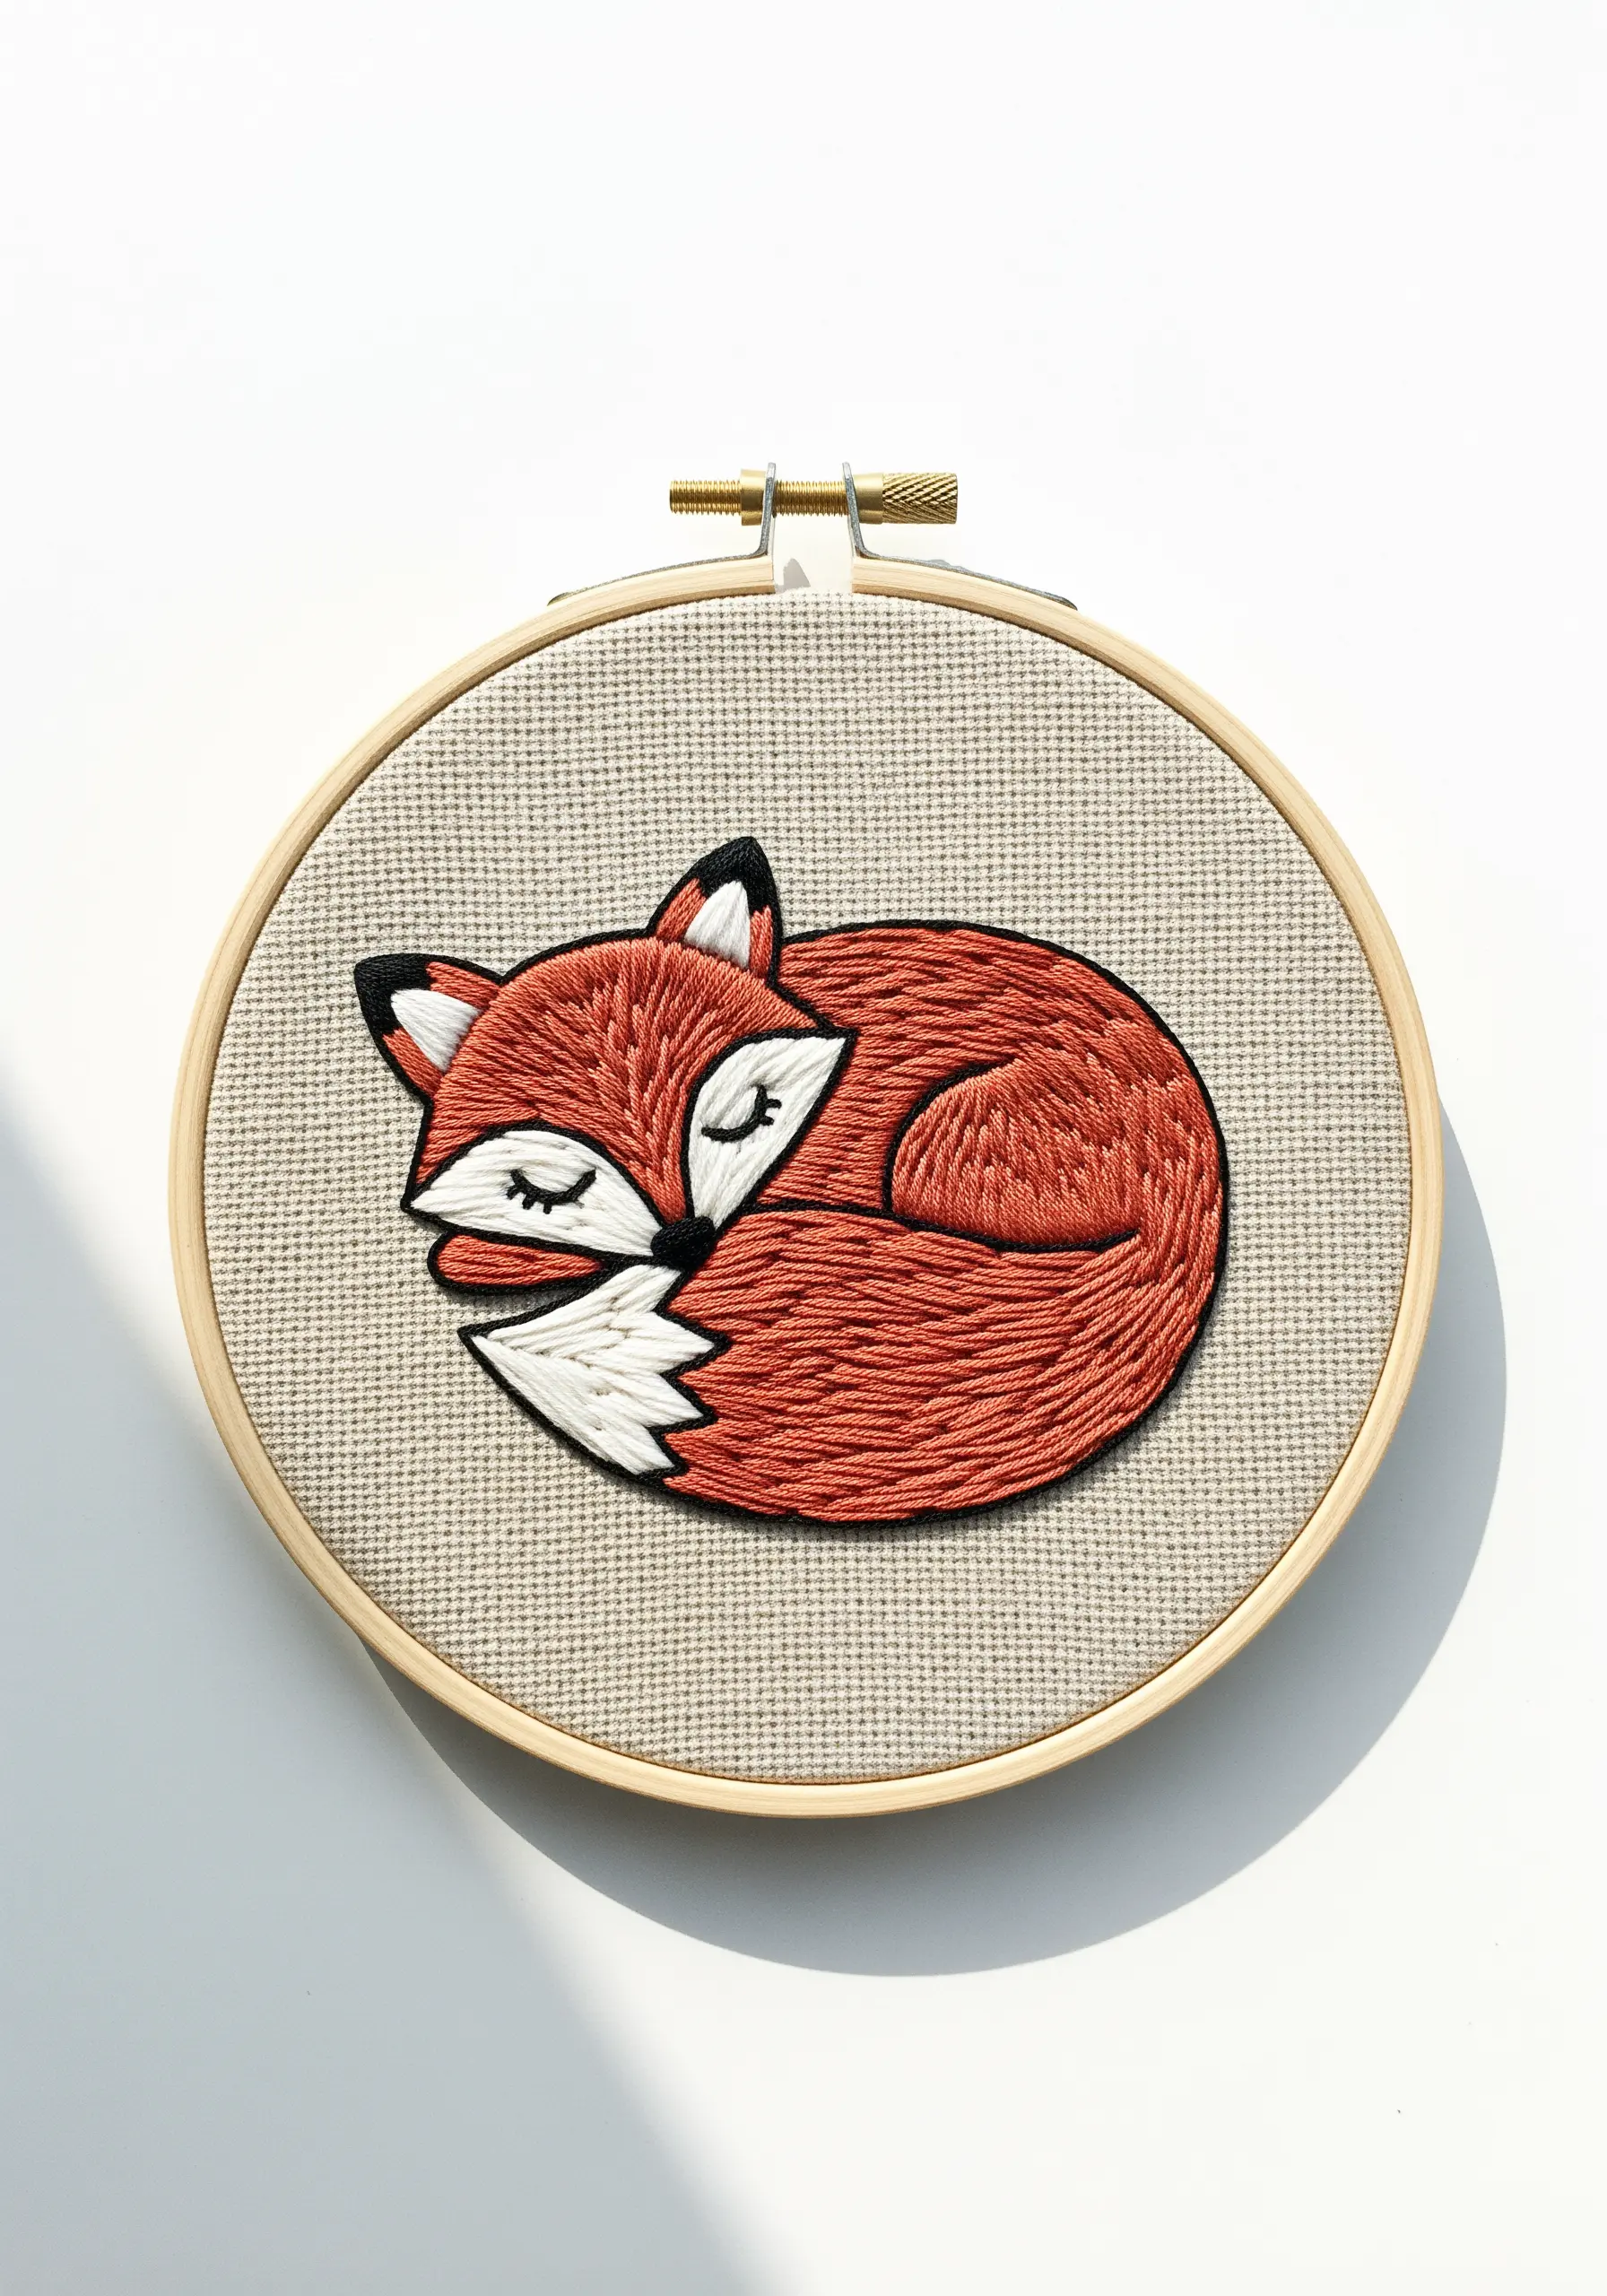
To give your sleeping fox a sense of soft, realistic fur, let your satin stitches follow the natural curves of its body.
Before you begin, lightly draw guide lines with a fabric pen to map the direction your stitches will travel—around the haunch, along the back, and over the tail.
This simple step transforms a flat fill into a dynamic, three-dimensional shape by mimicking the way light hits the fur.
Contrast the full-bodied stitches of the fur with a sharp split stitch outline in black and delicate, single-strand straight stitches for the eyelashes.
2. Build Sculptural Texture with Knotted Stitches
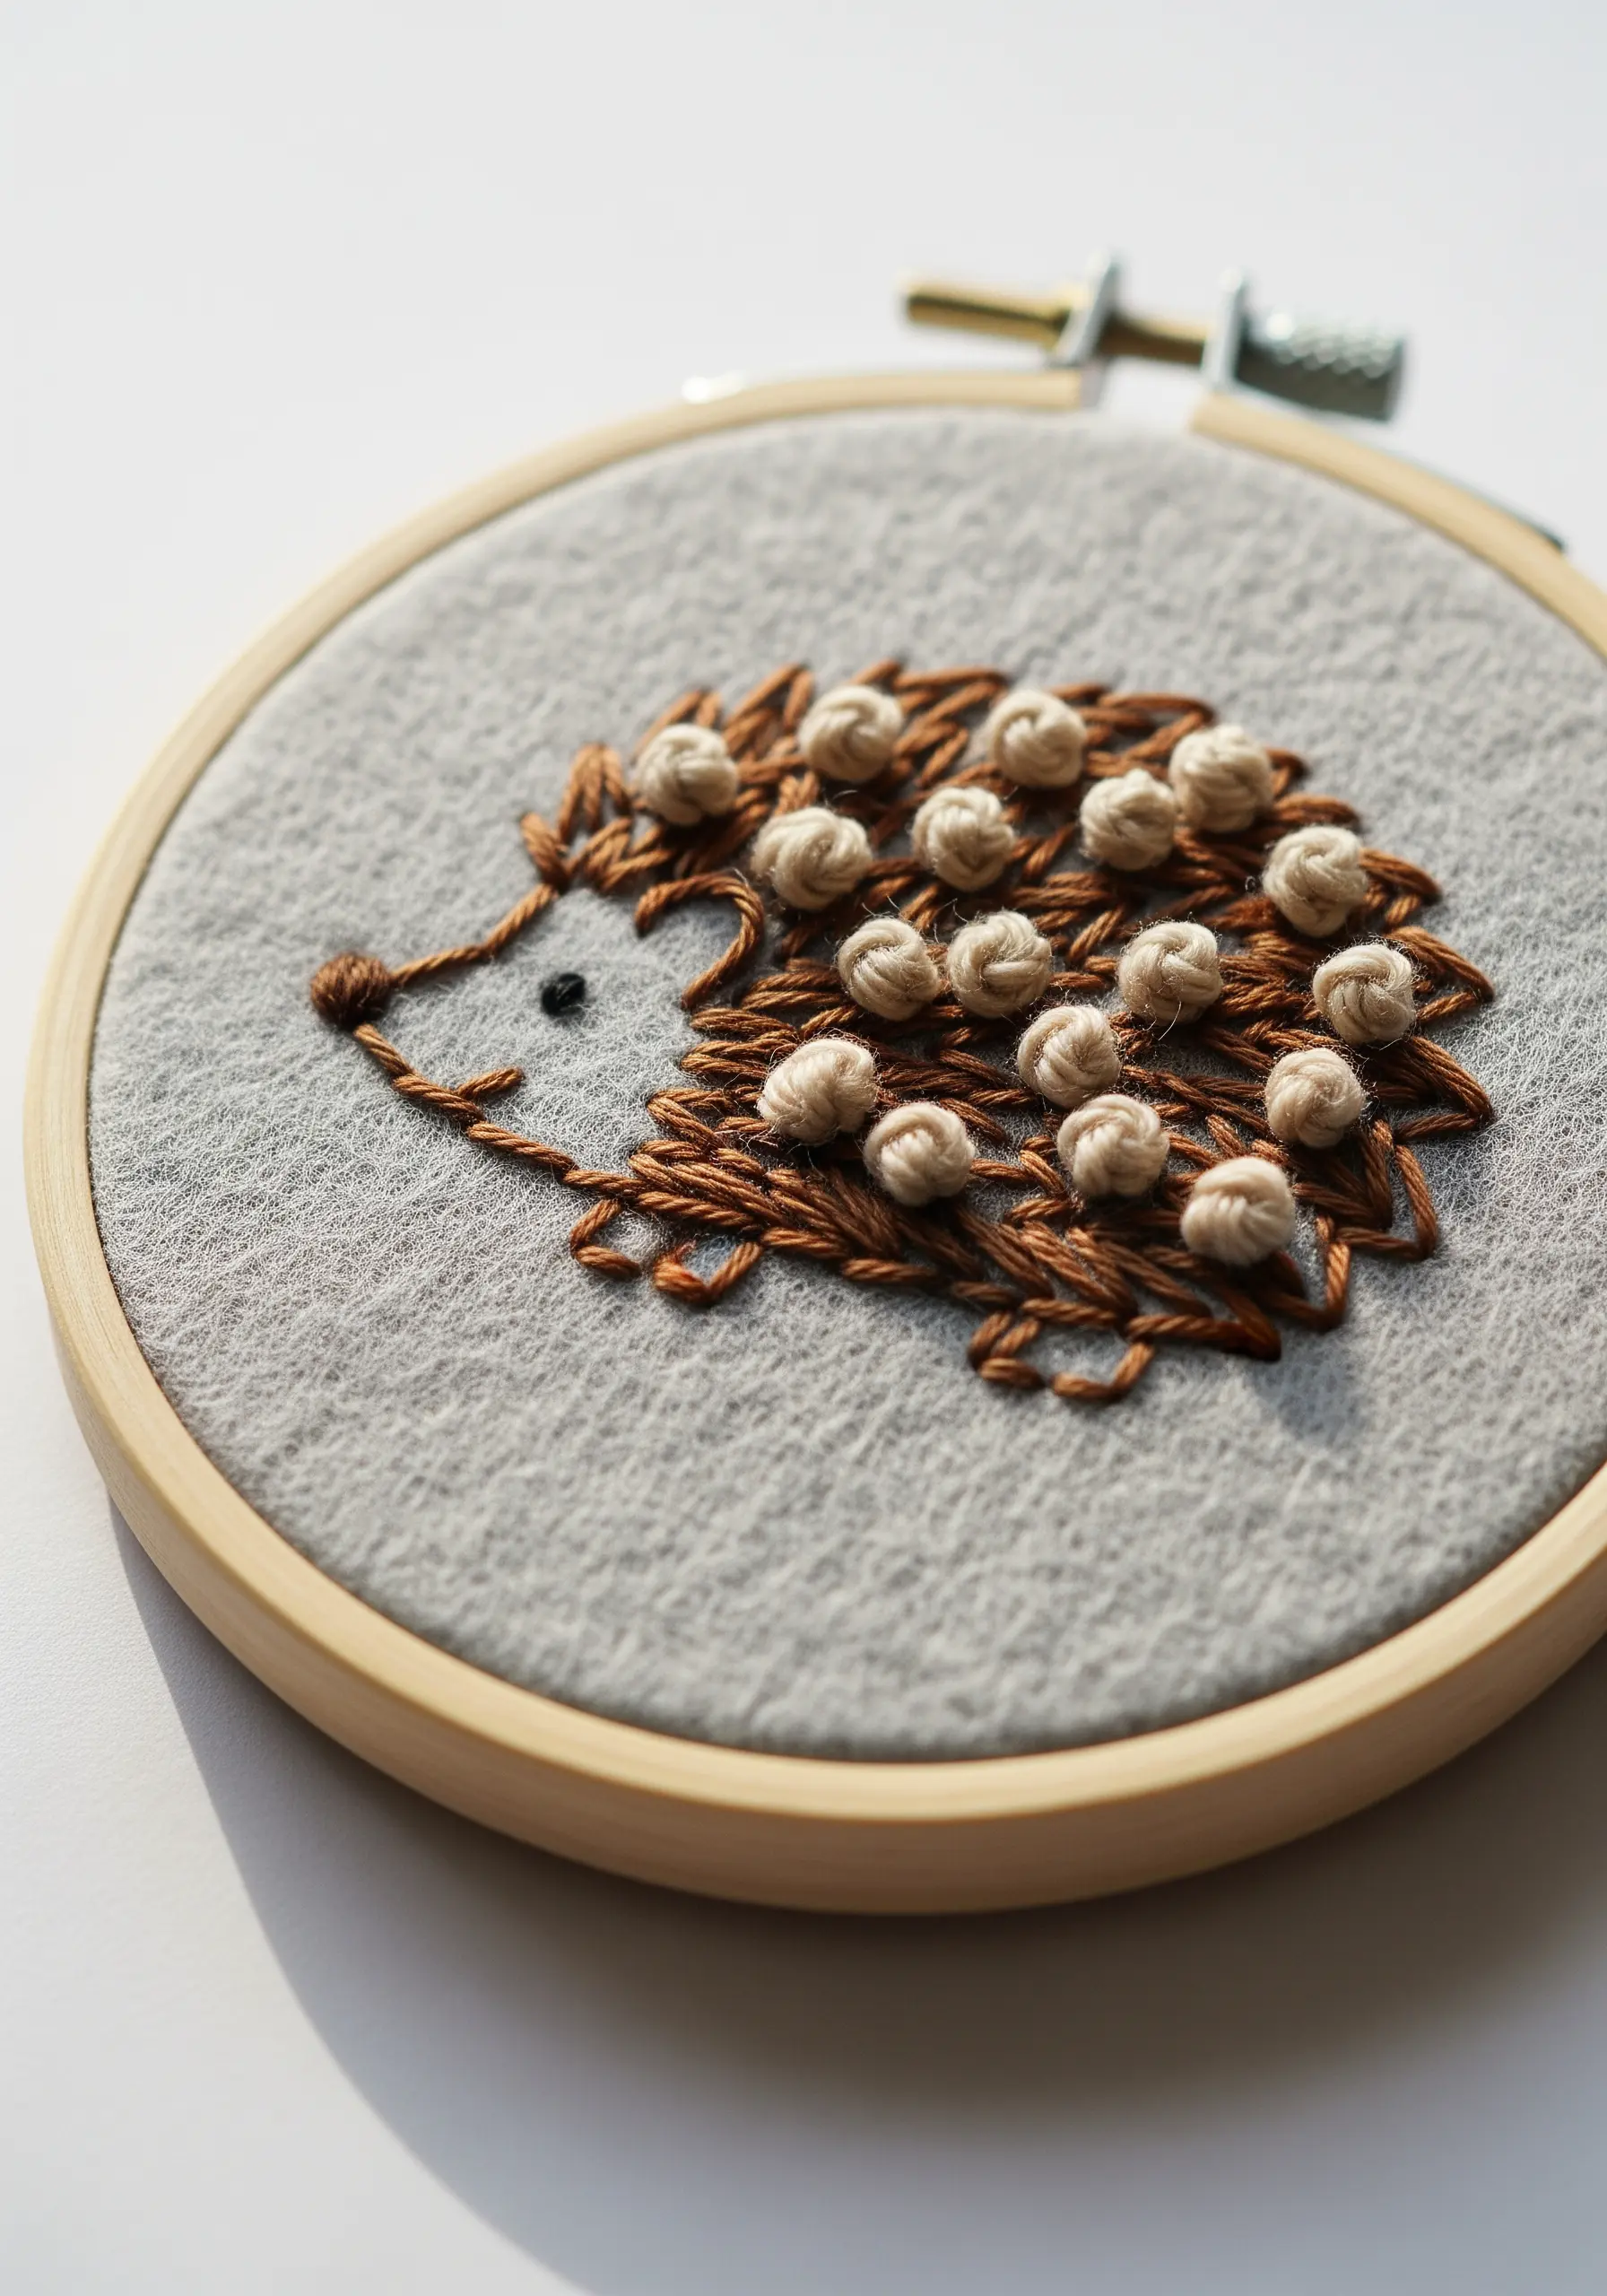
Instead of filling the hedgehog’s back with flat stitches, create a delightful, touchable texture using French or Colonial knots.
Use all six strands of your floss, or even a thicker perle cotton, to give the knots substantial volume.
For a more organic look, vary the size of the knots by changing how many times you wrap the thread around the needle.
By contrasting this highly textured area with a simple backstitch outline for the face, you draw immediate focus to the spiky quills.
3. Master Clean Stitches on Denim

Stitching on a thick, stretchy fabric like denim can be challenging, but a stabilizer is the key to crisp, professional results.
Apply a stick-and-stitch or iron-on tear-away stabilizer to the collar before you begin; it prevents the fabric from puckering and keeps your stitches even.
For the bee’s delicate wings, use a single strand of white thread in a sparse pattern to suggest translucence, contrasting with the bold, solid body.
Adding a whimsical, looping flight path transforms the single motif into a tiny story.
4. Imply Contour with Tonal Blending
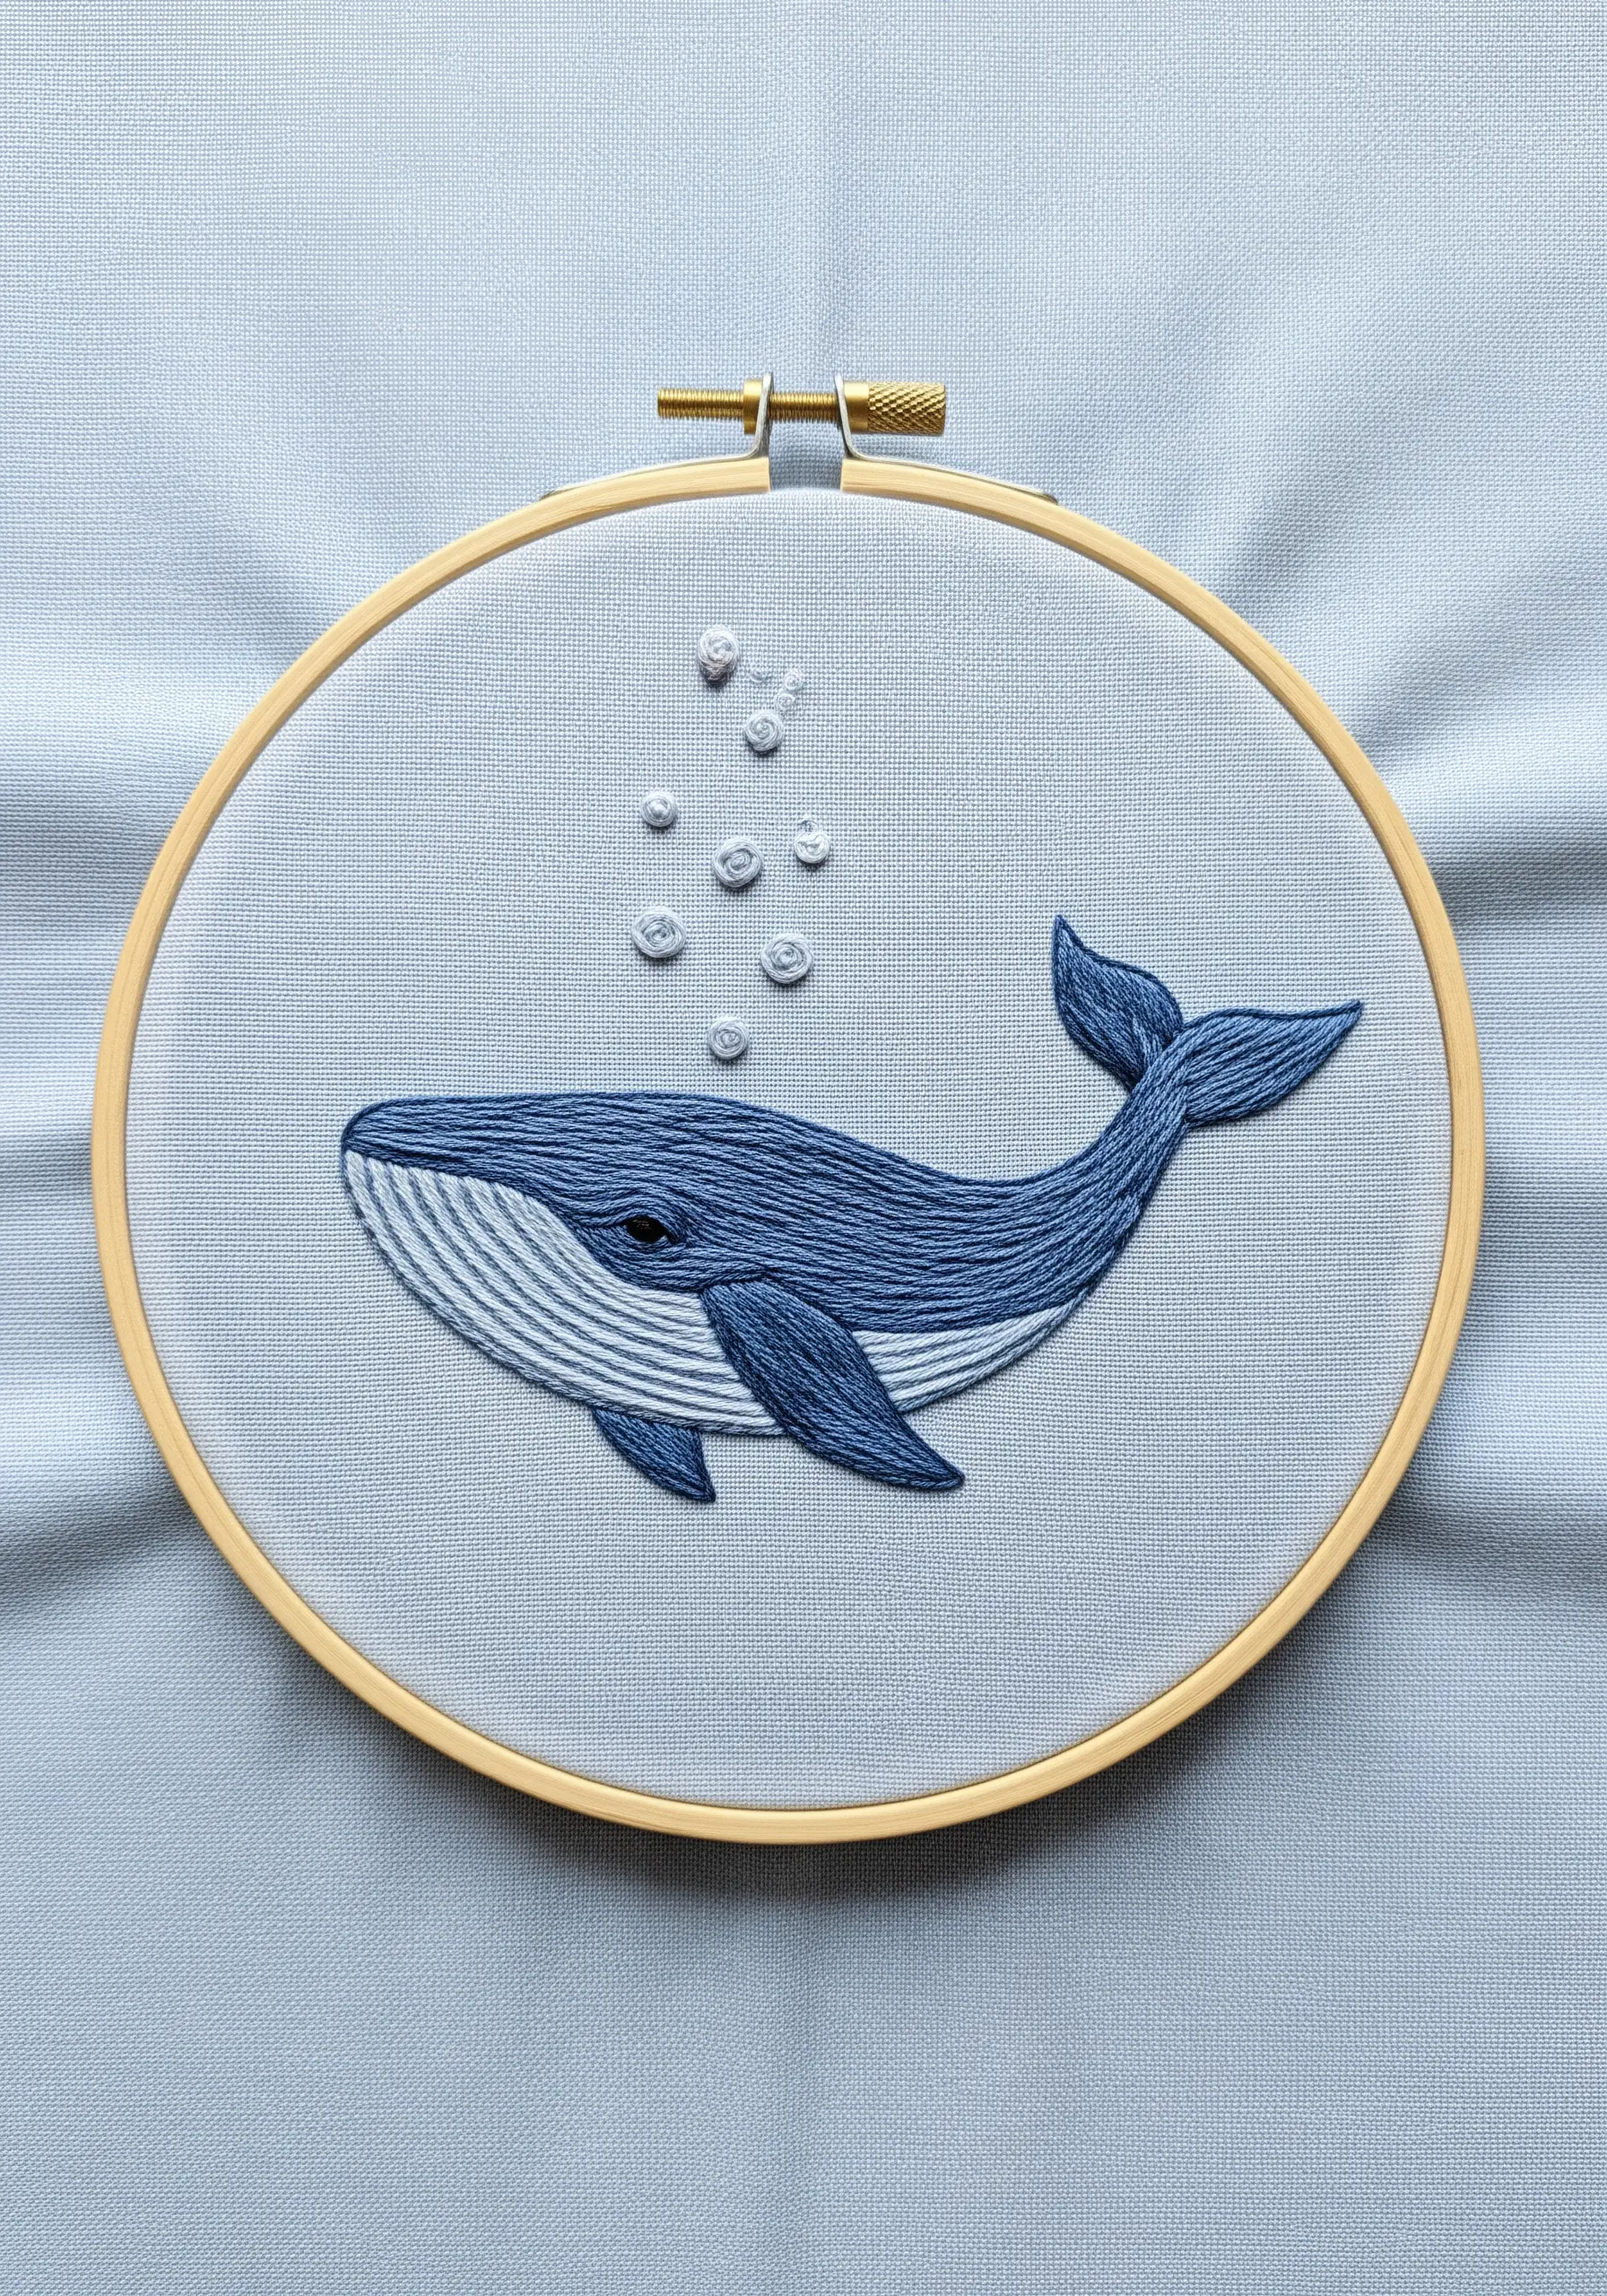
To give the whale a rounded, voluminous form without complex shading, use the long-and-short stitch with two or three closely related shades of blue.
Fill the top section with the darkest blue, then gradually introduce the lighter shades as you work down the body, angling your stitches to follow its curves.
This subtle gradient creates the illusion of light and shadow, making the animal feel three-dimensional.
Use tiny French knots for the bubbles to add a touch of playful detail and a sense of environment.
5. Use Open Fills for a Light, Illustrative Feel
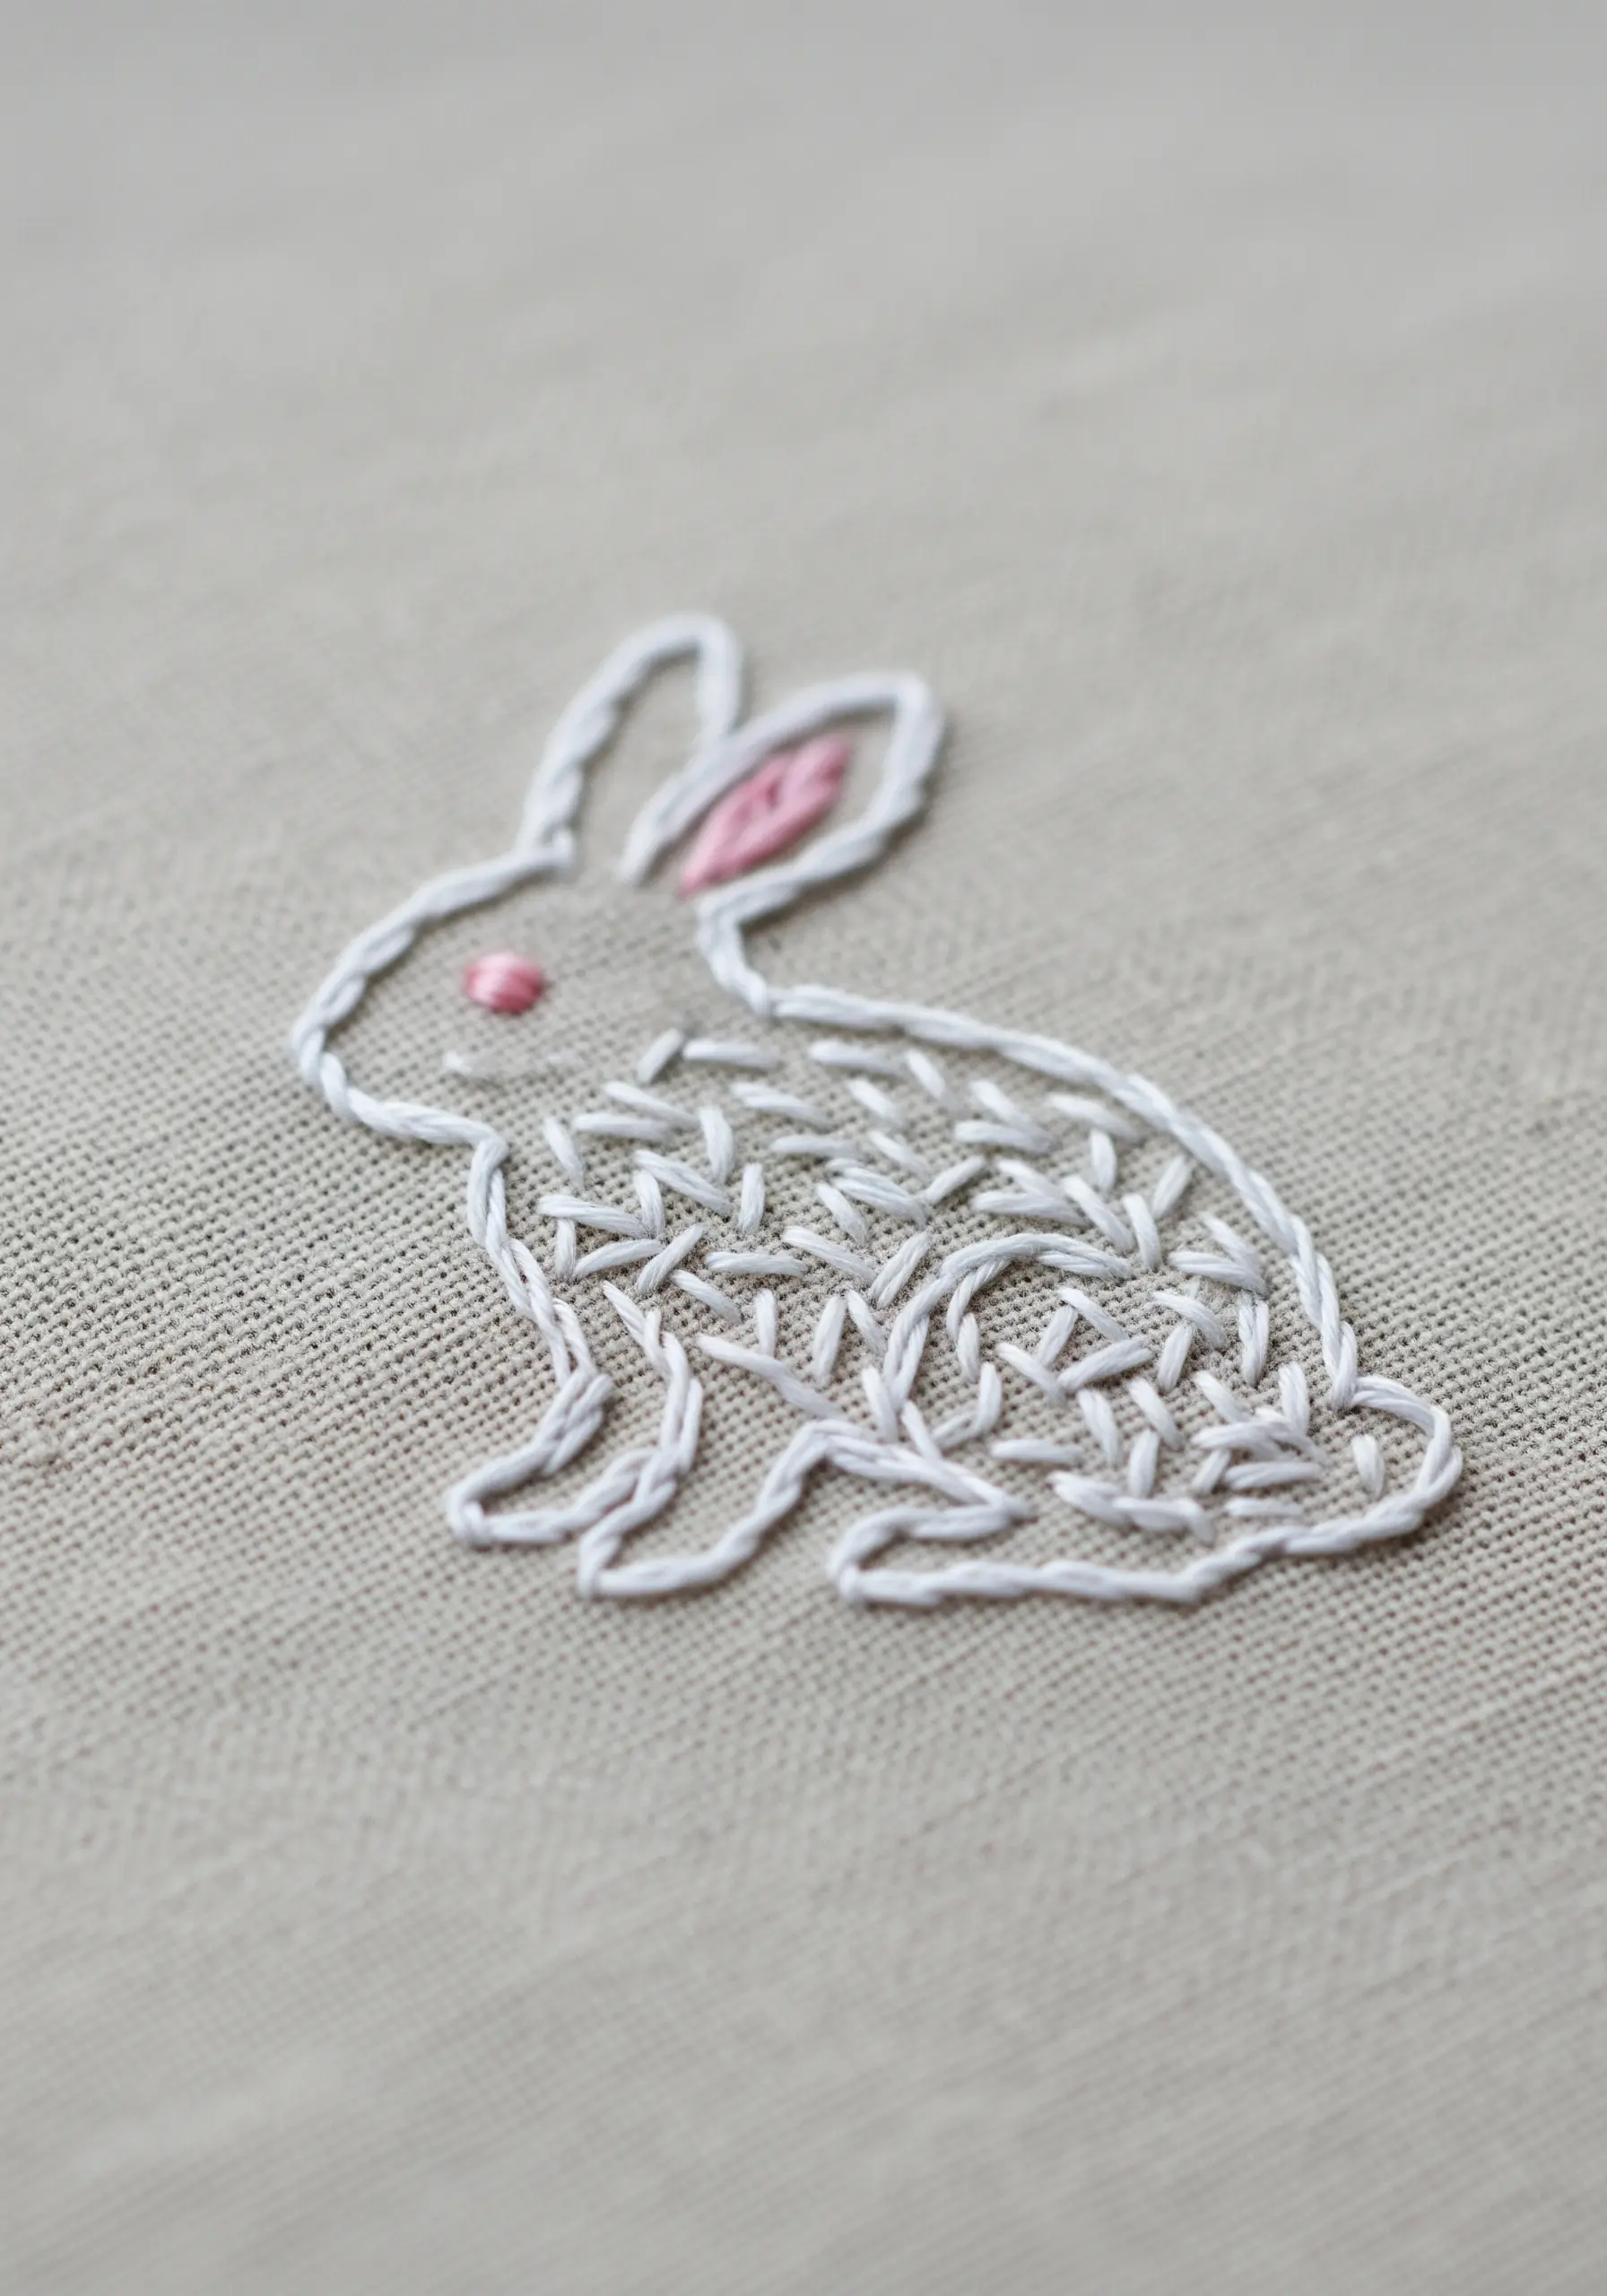
When you want to add texture without creating a heavy, solid patch, an open fill stitch is the perfect solution.
After creating a clean outline with a backstitch or stem stitch, fill the rabbit’s body with a trellis stitch or spaced-out seed stitches.
This technique allows the background fabric to show through, maintaining a delicate, airy quality that feels modern and light.
It works beautifully for minimalist designs where the focus is on form and texture rather than solid color.
6. Elevate Line Art with a Perfect Outline
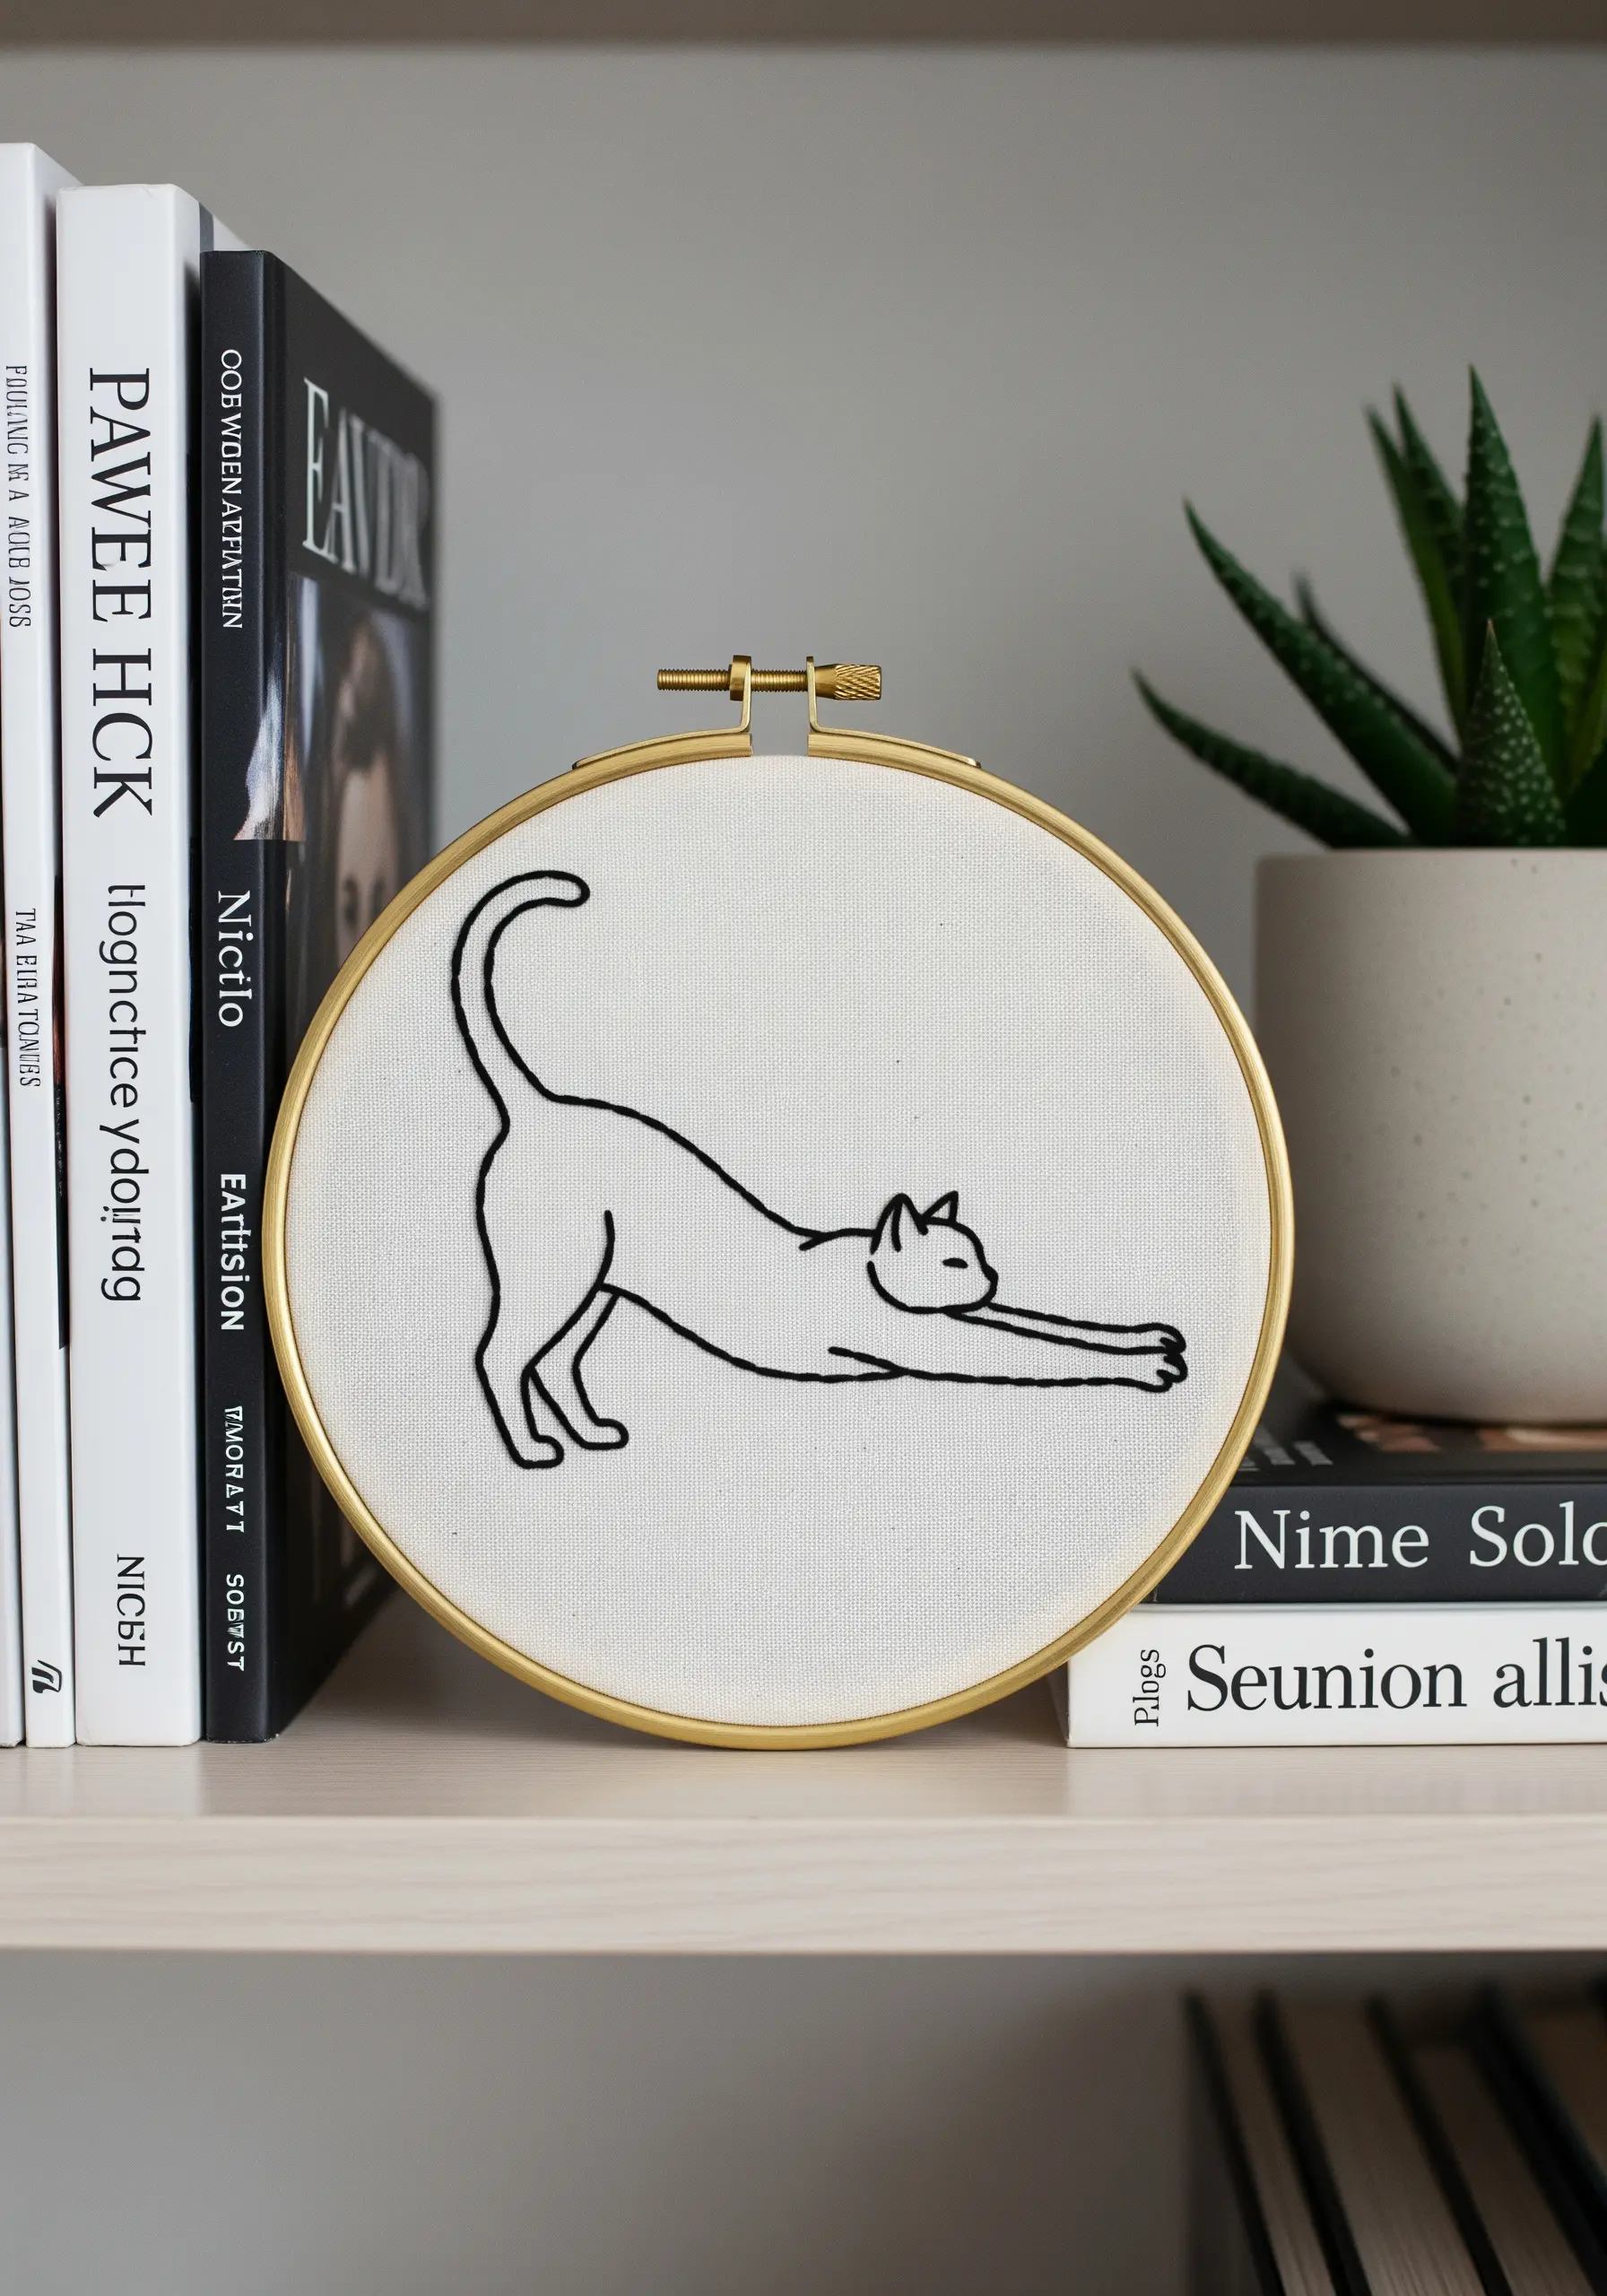
For minimalist designs, the quality of your line is everything. To achieve a perfectly smooth and solid outline, upgrade from a standard backstitch to a whipped backstitch.
First, create a foundation of simple backstitches. Then, using a second thread, whip it around each stitch without piercing the fabric.
This technique completely covers the gaps between stitches, resulting in a fluid, continuous line that feels incredibly polished and professional.
It’s the core technique for creating elegant and impactful minimalist line art animal designs that rely on clarity and precision.
7. Thread Paint Fluffy Fur with Single Strands
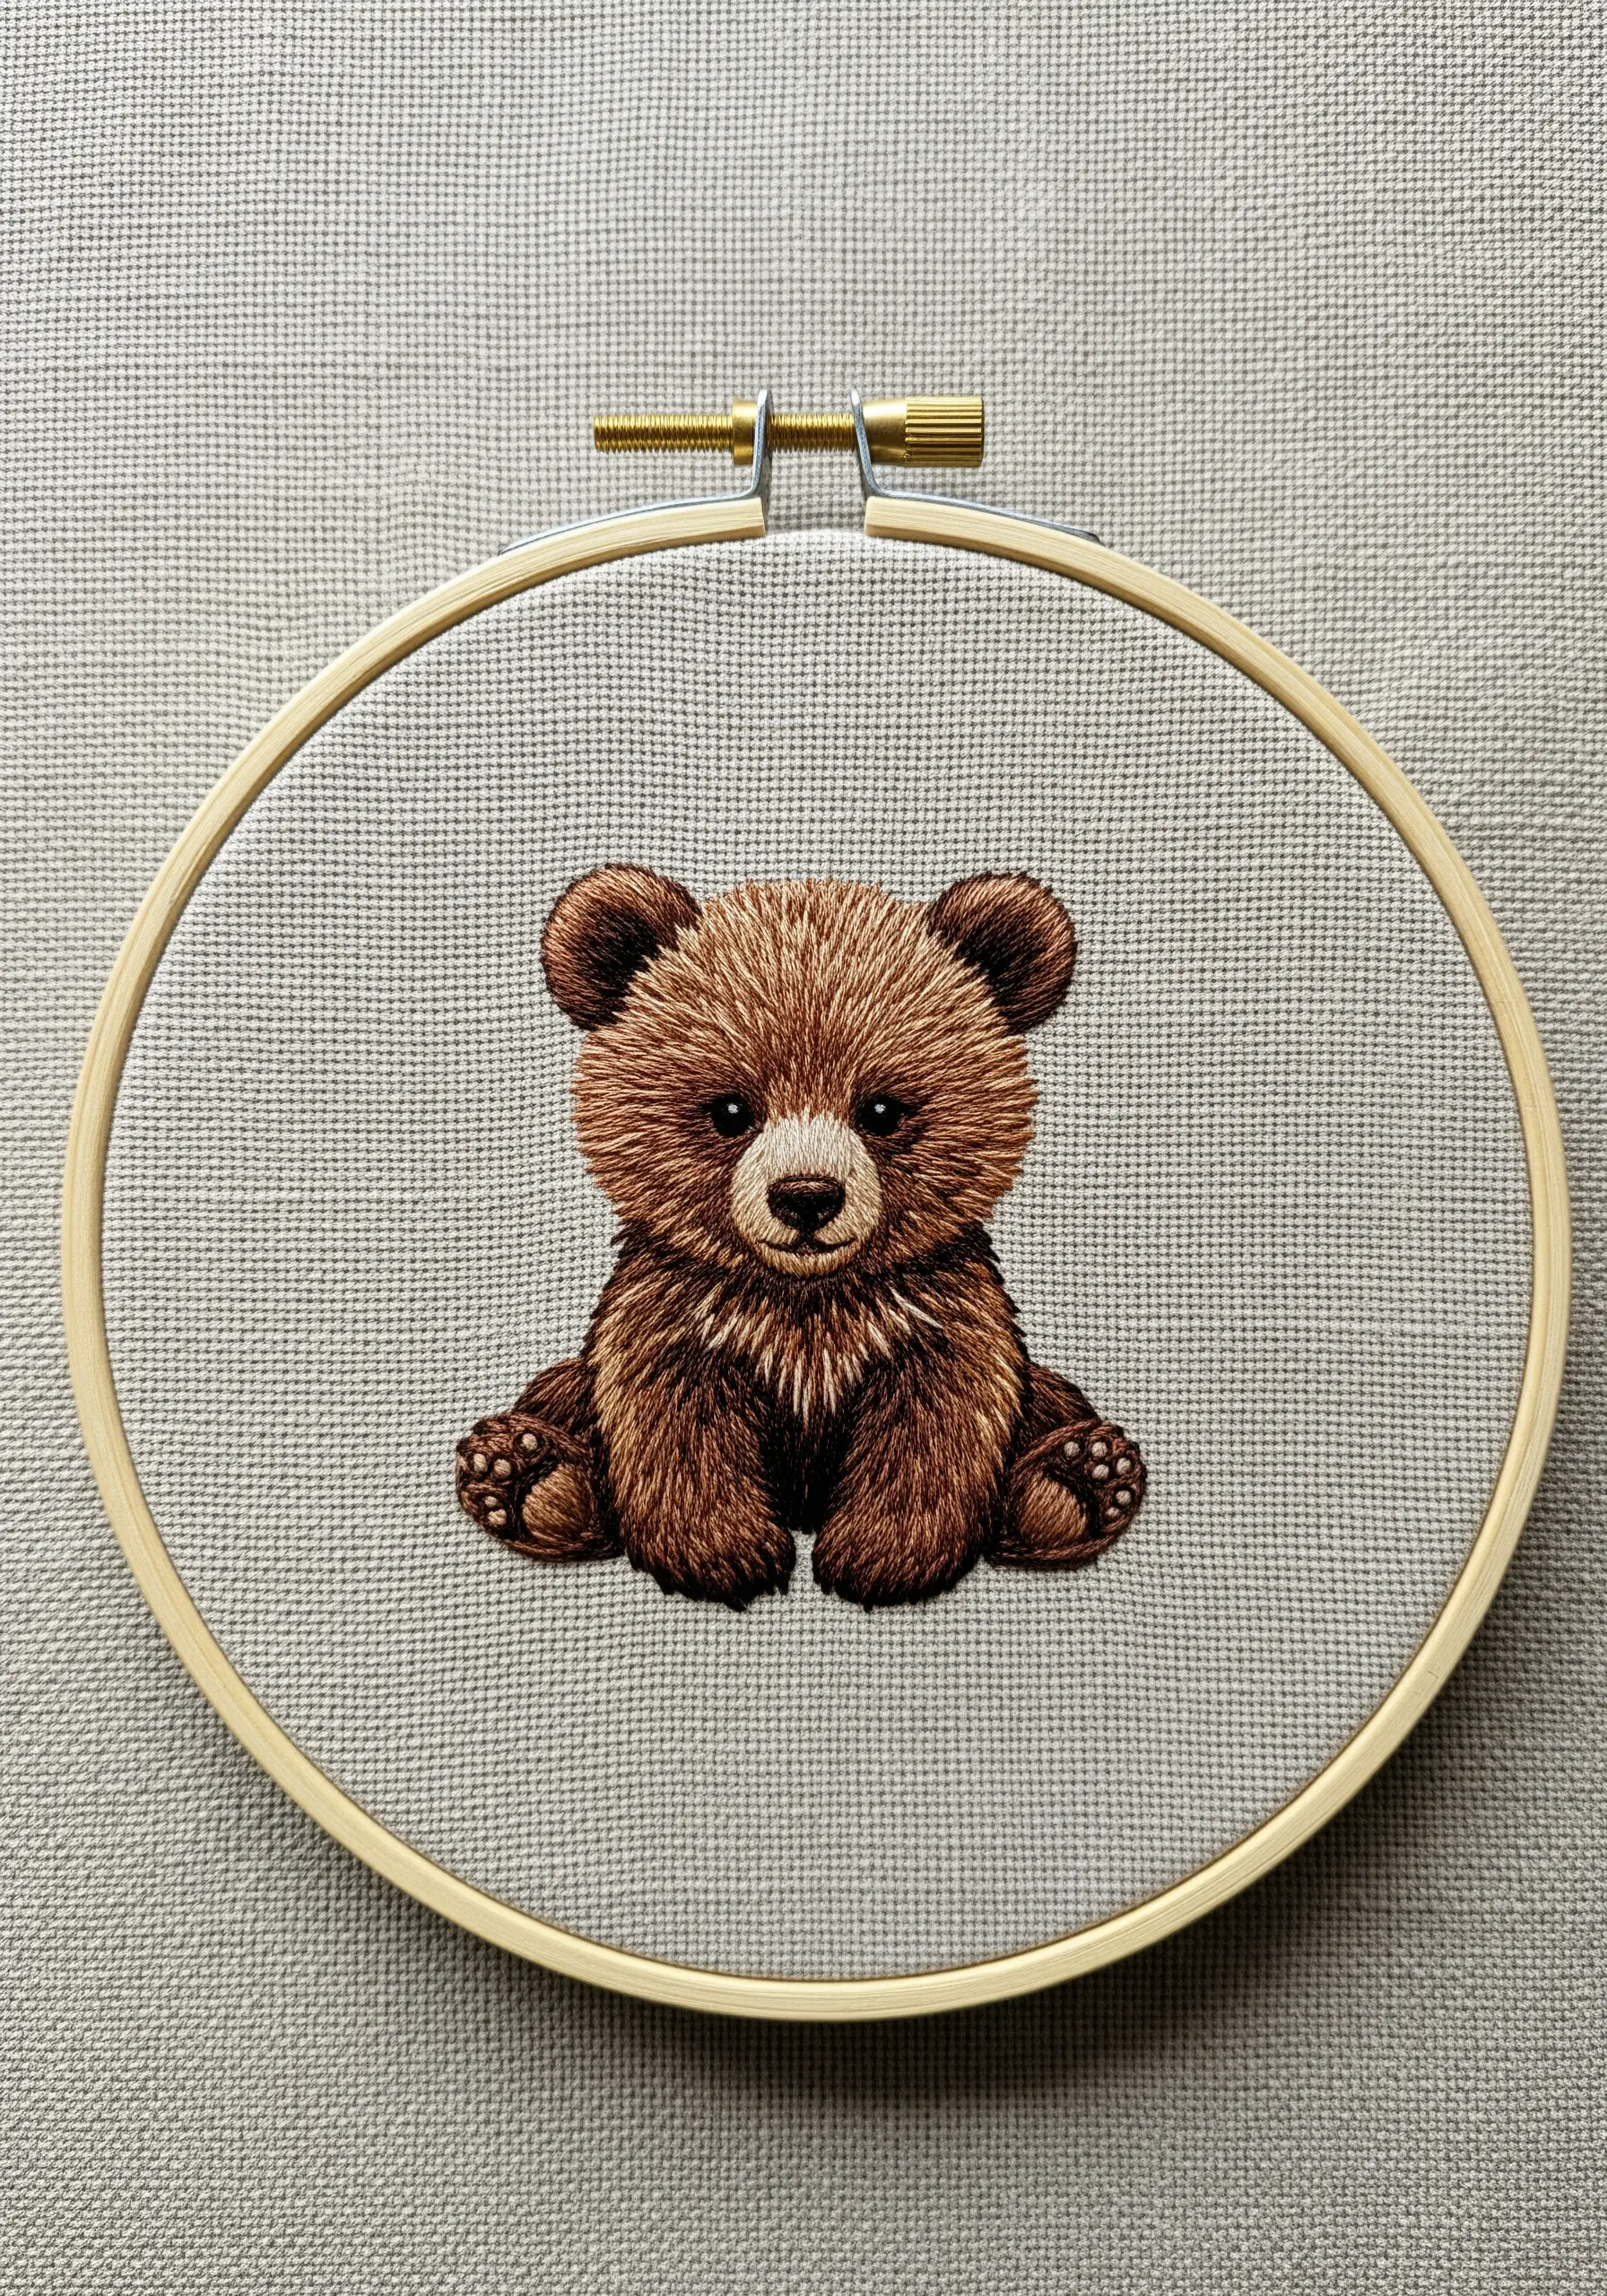
The secret to realistic, soft-looking fur is thread painting with a single strand of floss.
Work with a palette of several browns, from dark chocolate to light tan, and use short, directional long-and-short stitches to mimic the growth pattern of fur.
Place your stitches in small, layered patches, blending the colors seamlessly by angling new stitches into the previous row.
Avoid a hard outline; let the soft, feathered edges of your stitching define the bear’s shape for a more naturalistic finish.
8. Create Depth by Layering Stitched Sections
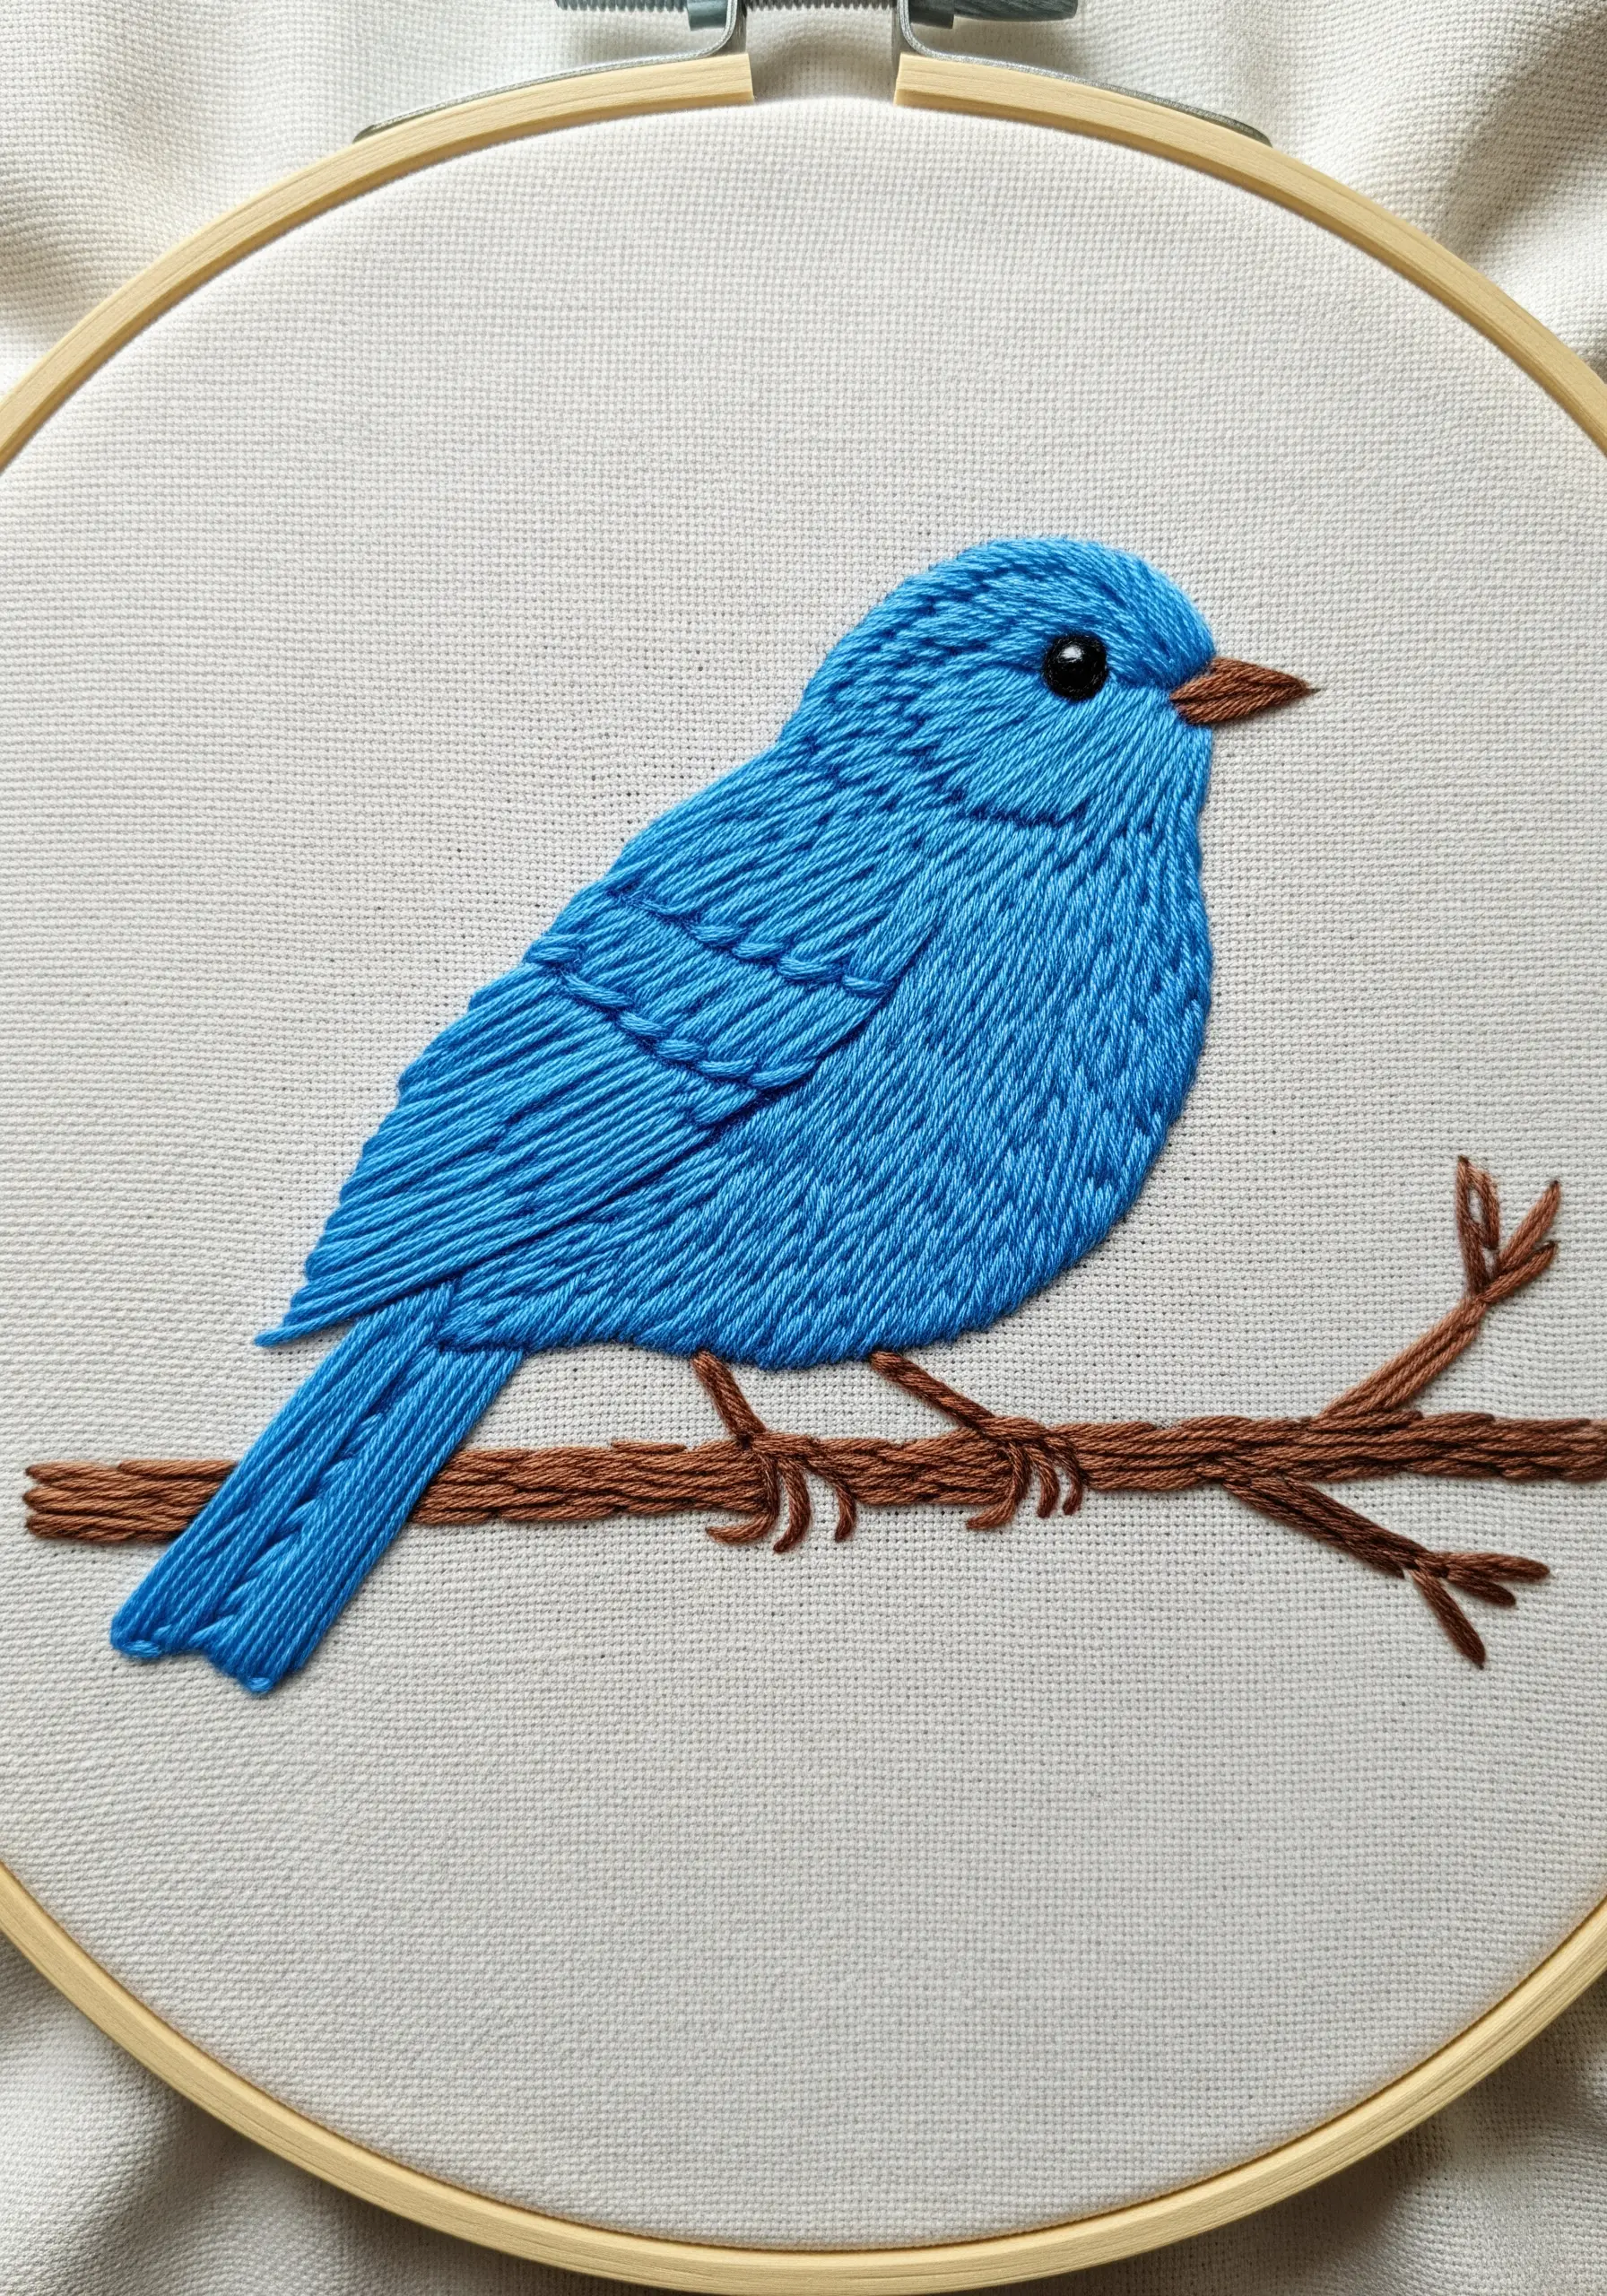
To make the bluebird’s feathers appear layered and distinct, embroider the motif in logical sections, from back to front.
Begin with the tail feathers, then stitch the primary wing section that sits on top of it, and finally, stitch the body, slightly overlapping the wing’s edge.
This method of layering creates clear definition and adds a subtle, realistic dimension to the final piece.
Ensure the satin stitches within each section follow the direction of feather growth for added realism.
9. Suggest Texture with Varied Outline Stitches

You can create textural interest in a simple line design just by changing your stitch.
Instead of using one stitch for the entire squirrel, use a smooth backstitch for the body and switch to a looped chain stitch for the fluffy tail.
This simple adjustment instantly communicates a difference in texture without adding any complexity or color changes.
It’s one of those small embroidery ideas that look complex but are super easy to make, yet it adds a thoughtful, professional touch.
10. Balance Detail with Negative Space

For a delicate animal portrait, focus on balancing filled areas with clean lines and untouched fabric.
Use a soft satin stitch to fill the fawn’s face and neck, then add raised French knots for the spots to create tactile dimension.
By leaving the inner ears and parts of the muzzle as simple outlines, you allow the design to breathe, preventing it from feeling overworked.
This intentional use of negative space is crucial for creating an elegant, illustrative style.
11. Add Dimension with Padded Satin Stitch
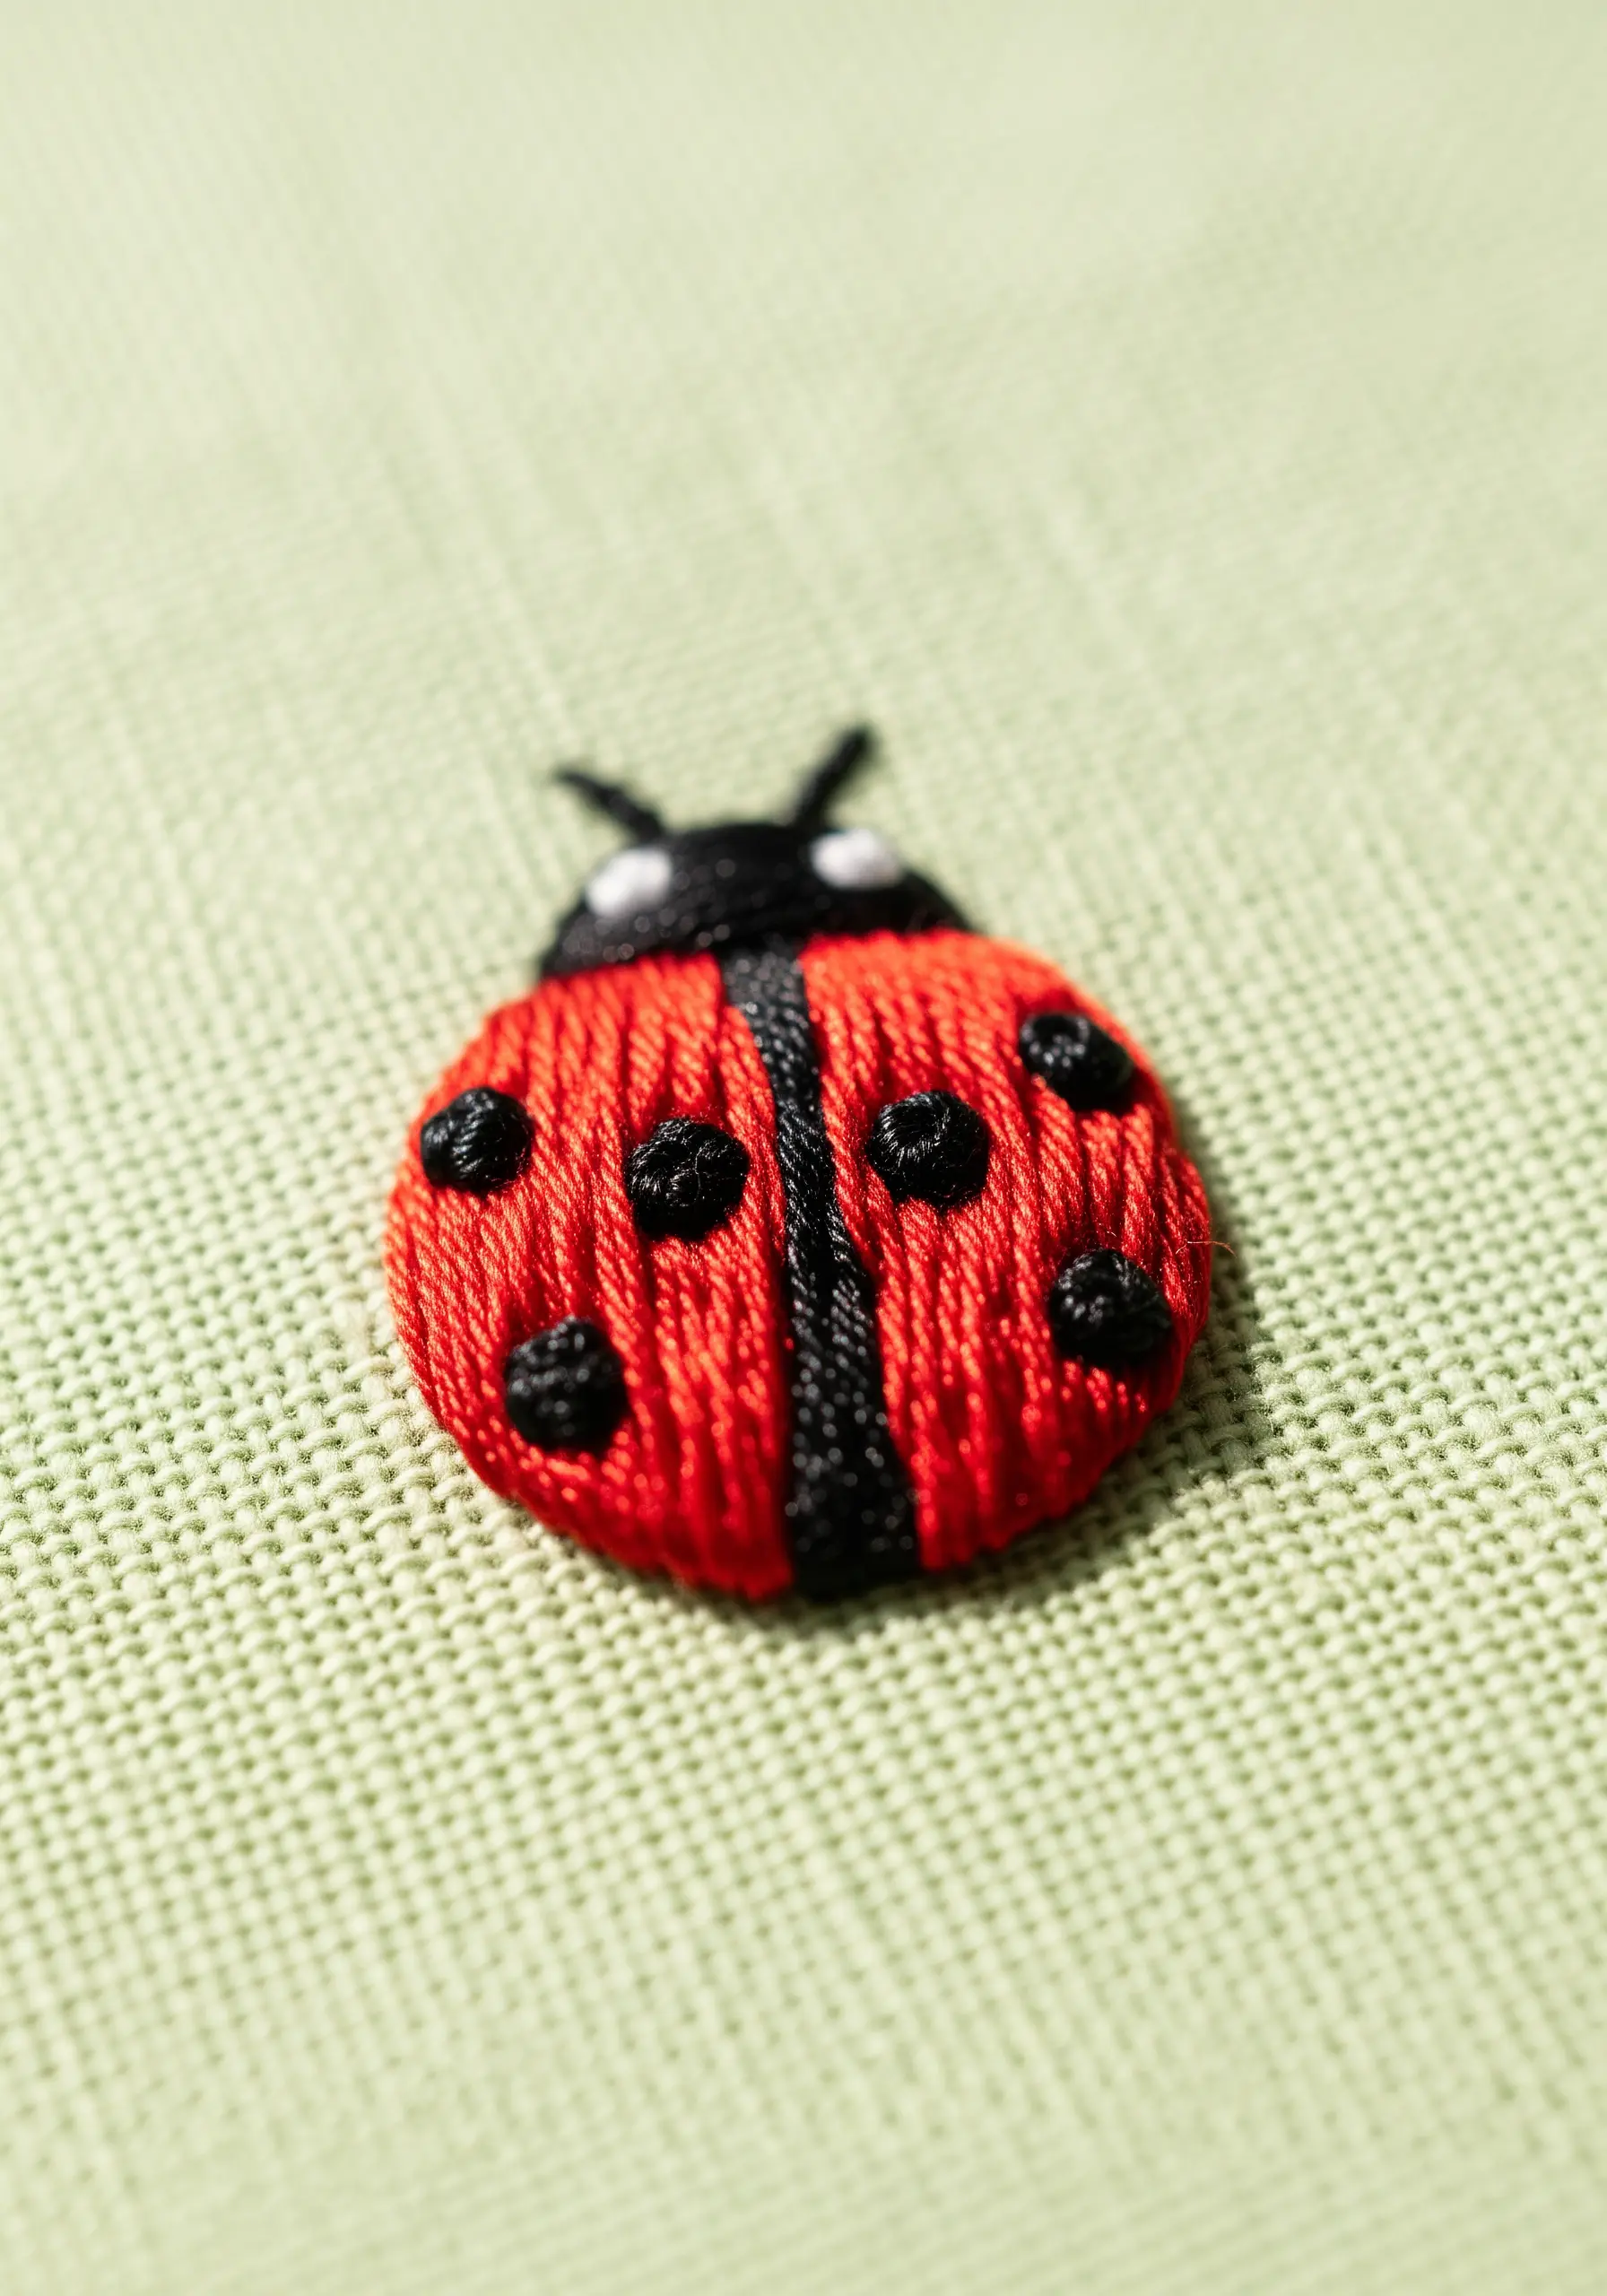
To make your ladybug’s shell look beautifully rounded and three-dimensional, use a technique called padded satin stitch.
First, fill the red sections with a foundation of small straight stitches running in the opposite direction of your final layer.
Then, stitch your final satin stitch layer directly on top of this padding. The underlying stitches will raise the surface, creating a smooth, convex shape that catches the light beautifully.
Finish with tiny, tight French knots for the spots.
12. Create Shape with Angled Fill Stitches
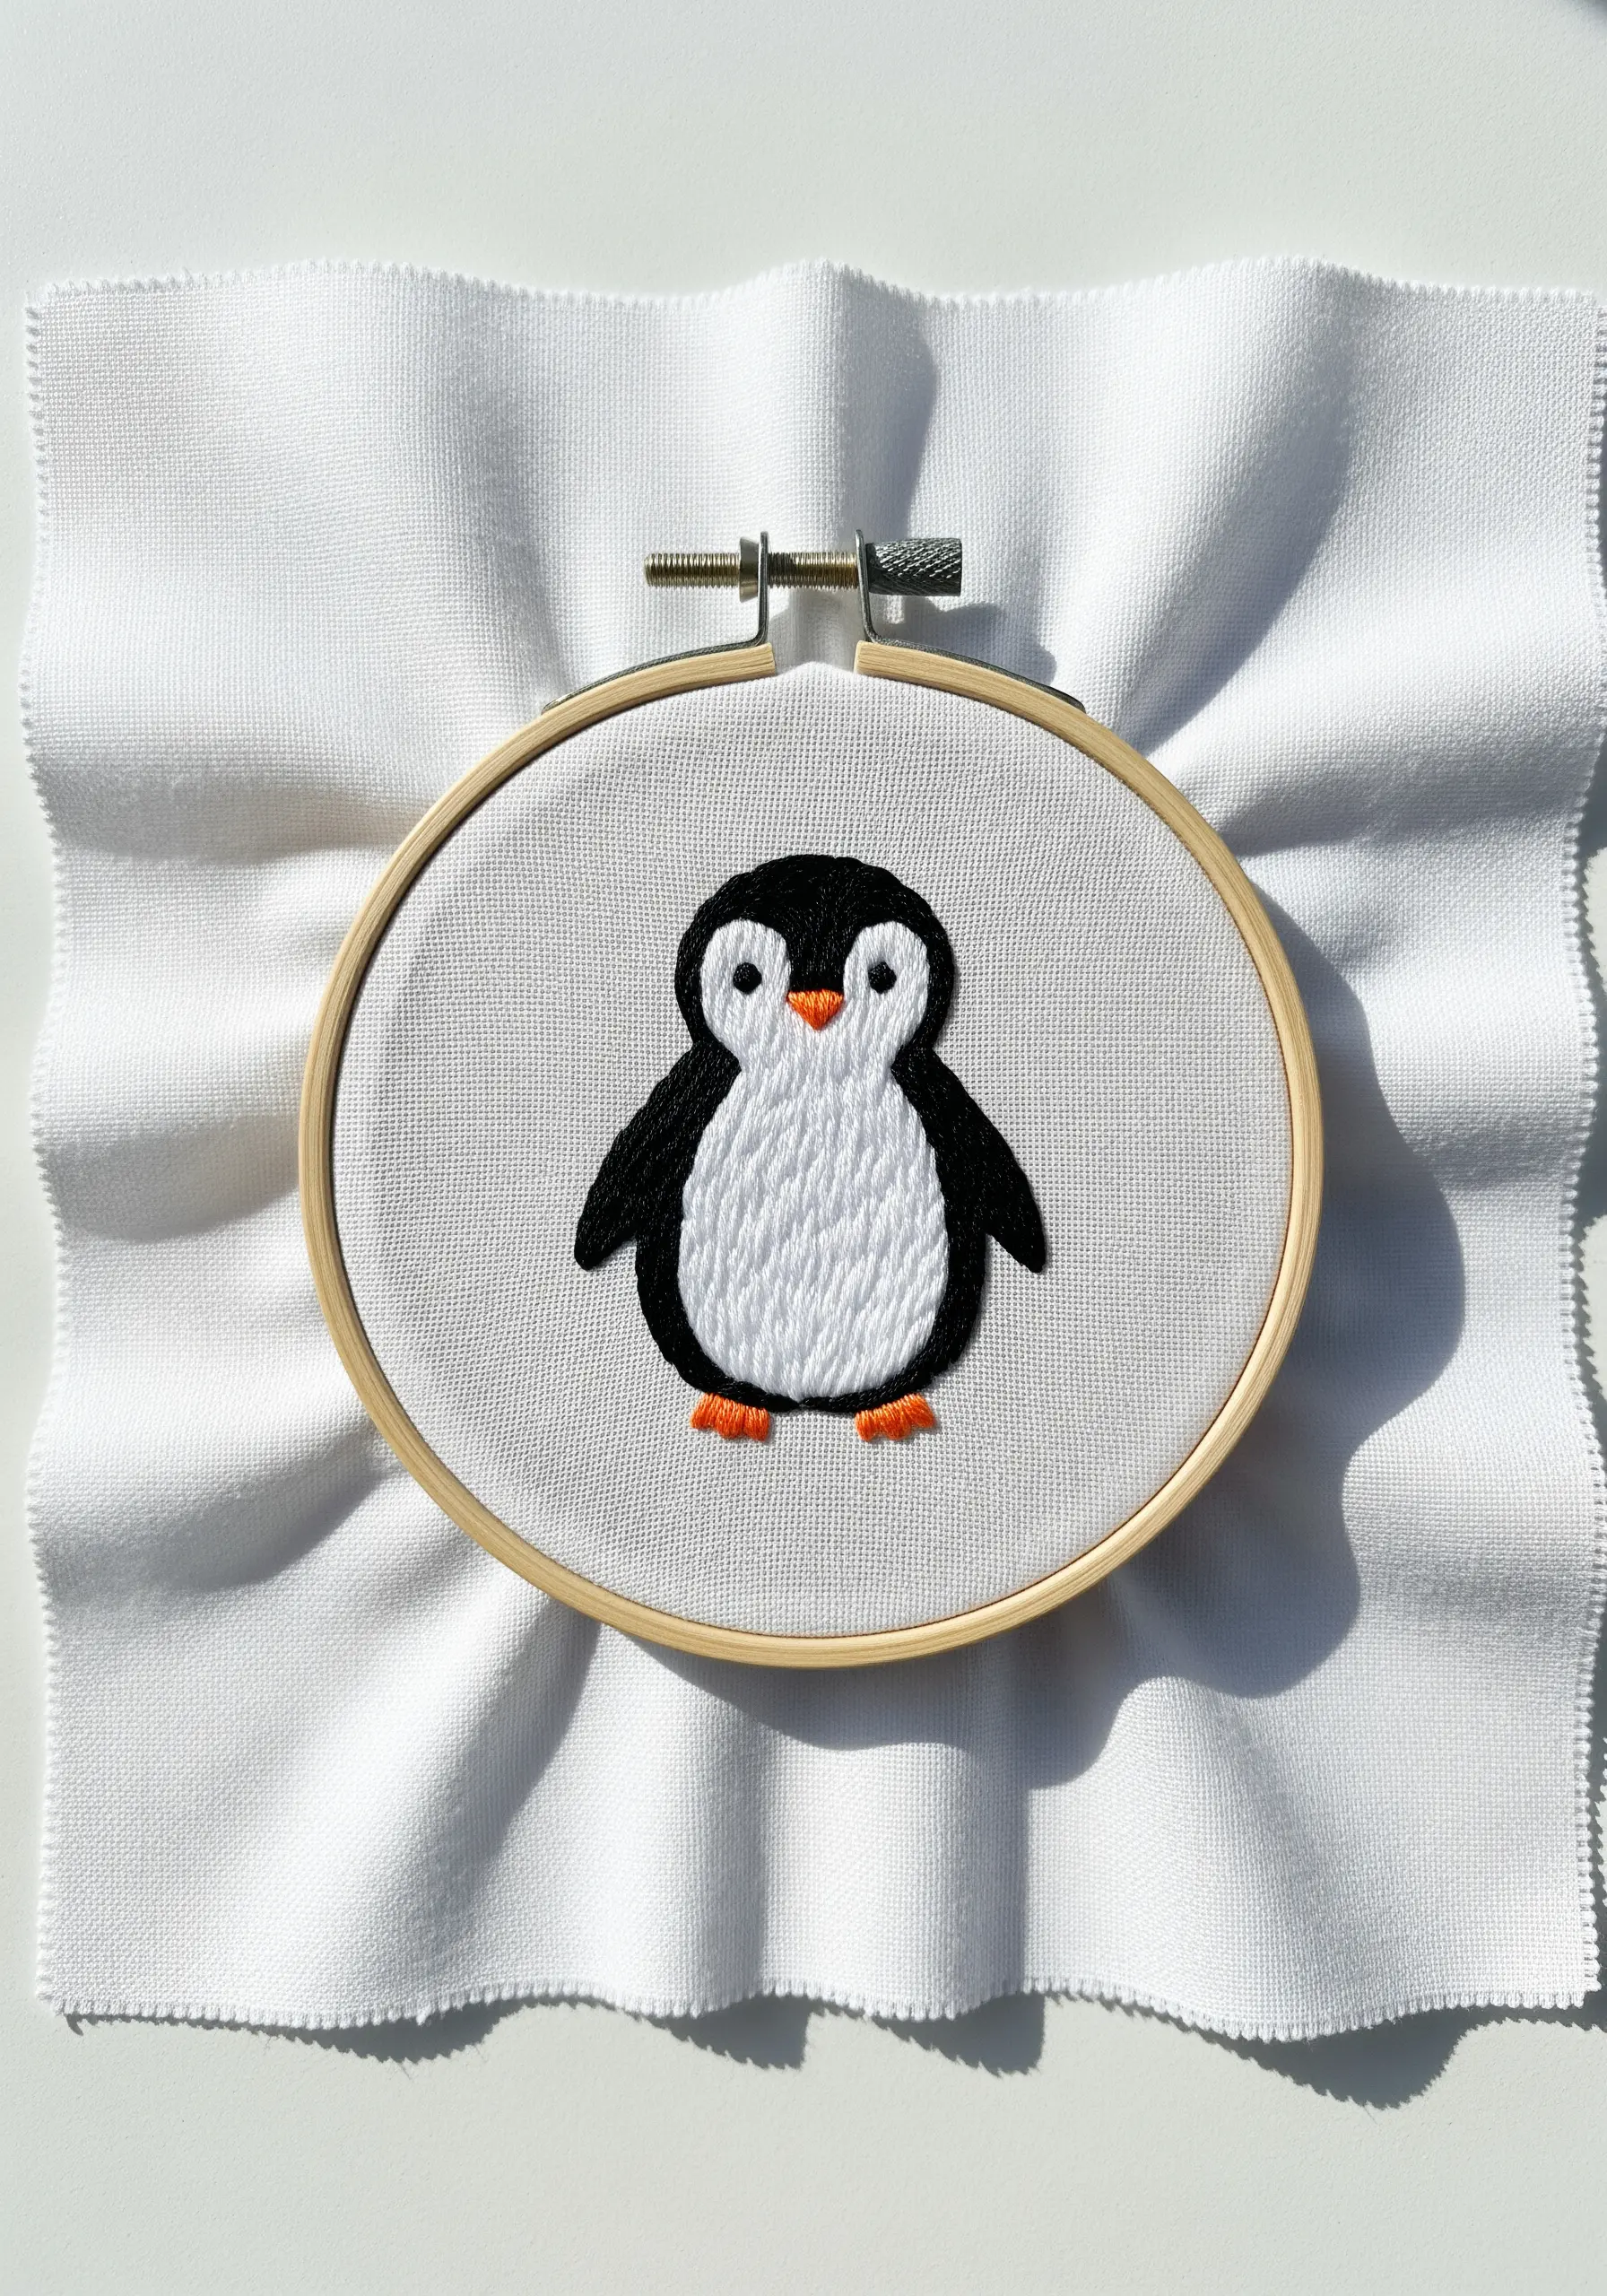
The key to the penguin’s plump, smooth belly is the careful direction of your fill stitches.
Using a long-and-short stitch, angle the stitches from the outer black outline slightly inward, meeting at an invisible line down the center of the belly.
This technique subtly suggests a rounded form without any shading, tricking the eye into seeing a curved surface.
A crisp, two-strand split stitch for the black outline provides the sharp contrast needed to make the white fill pop.
13. Transform Embroidery into a Felt Ornament
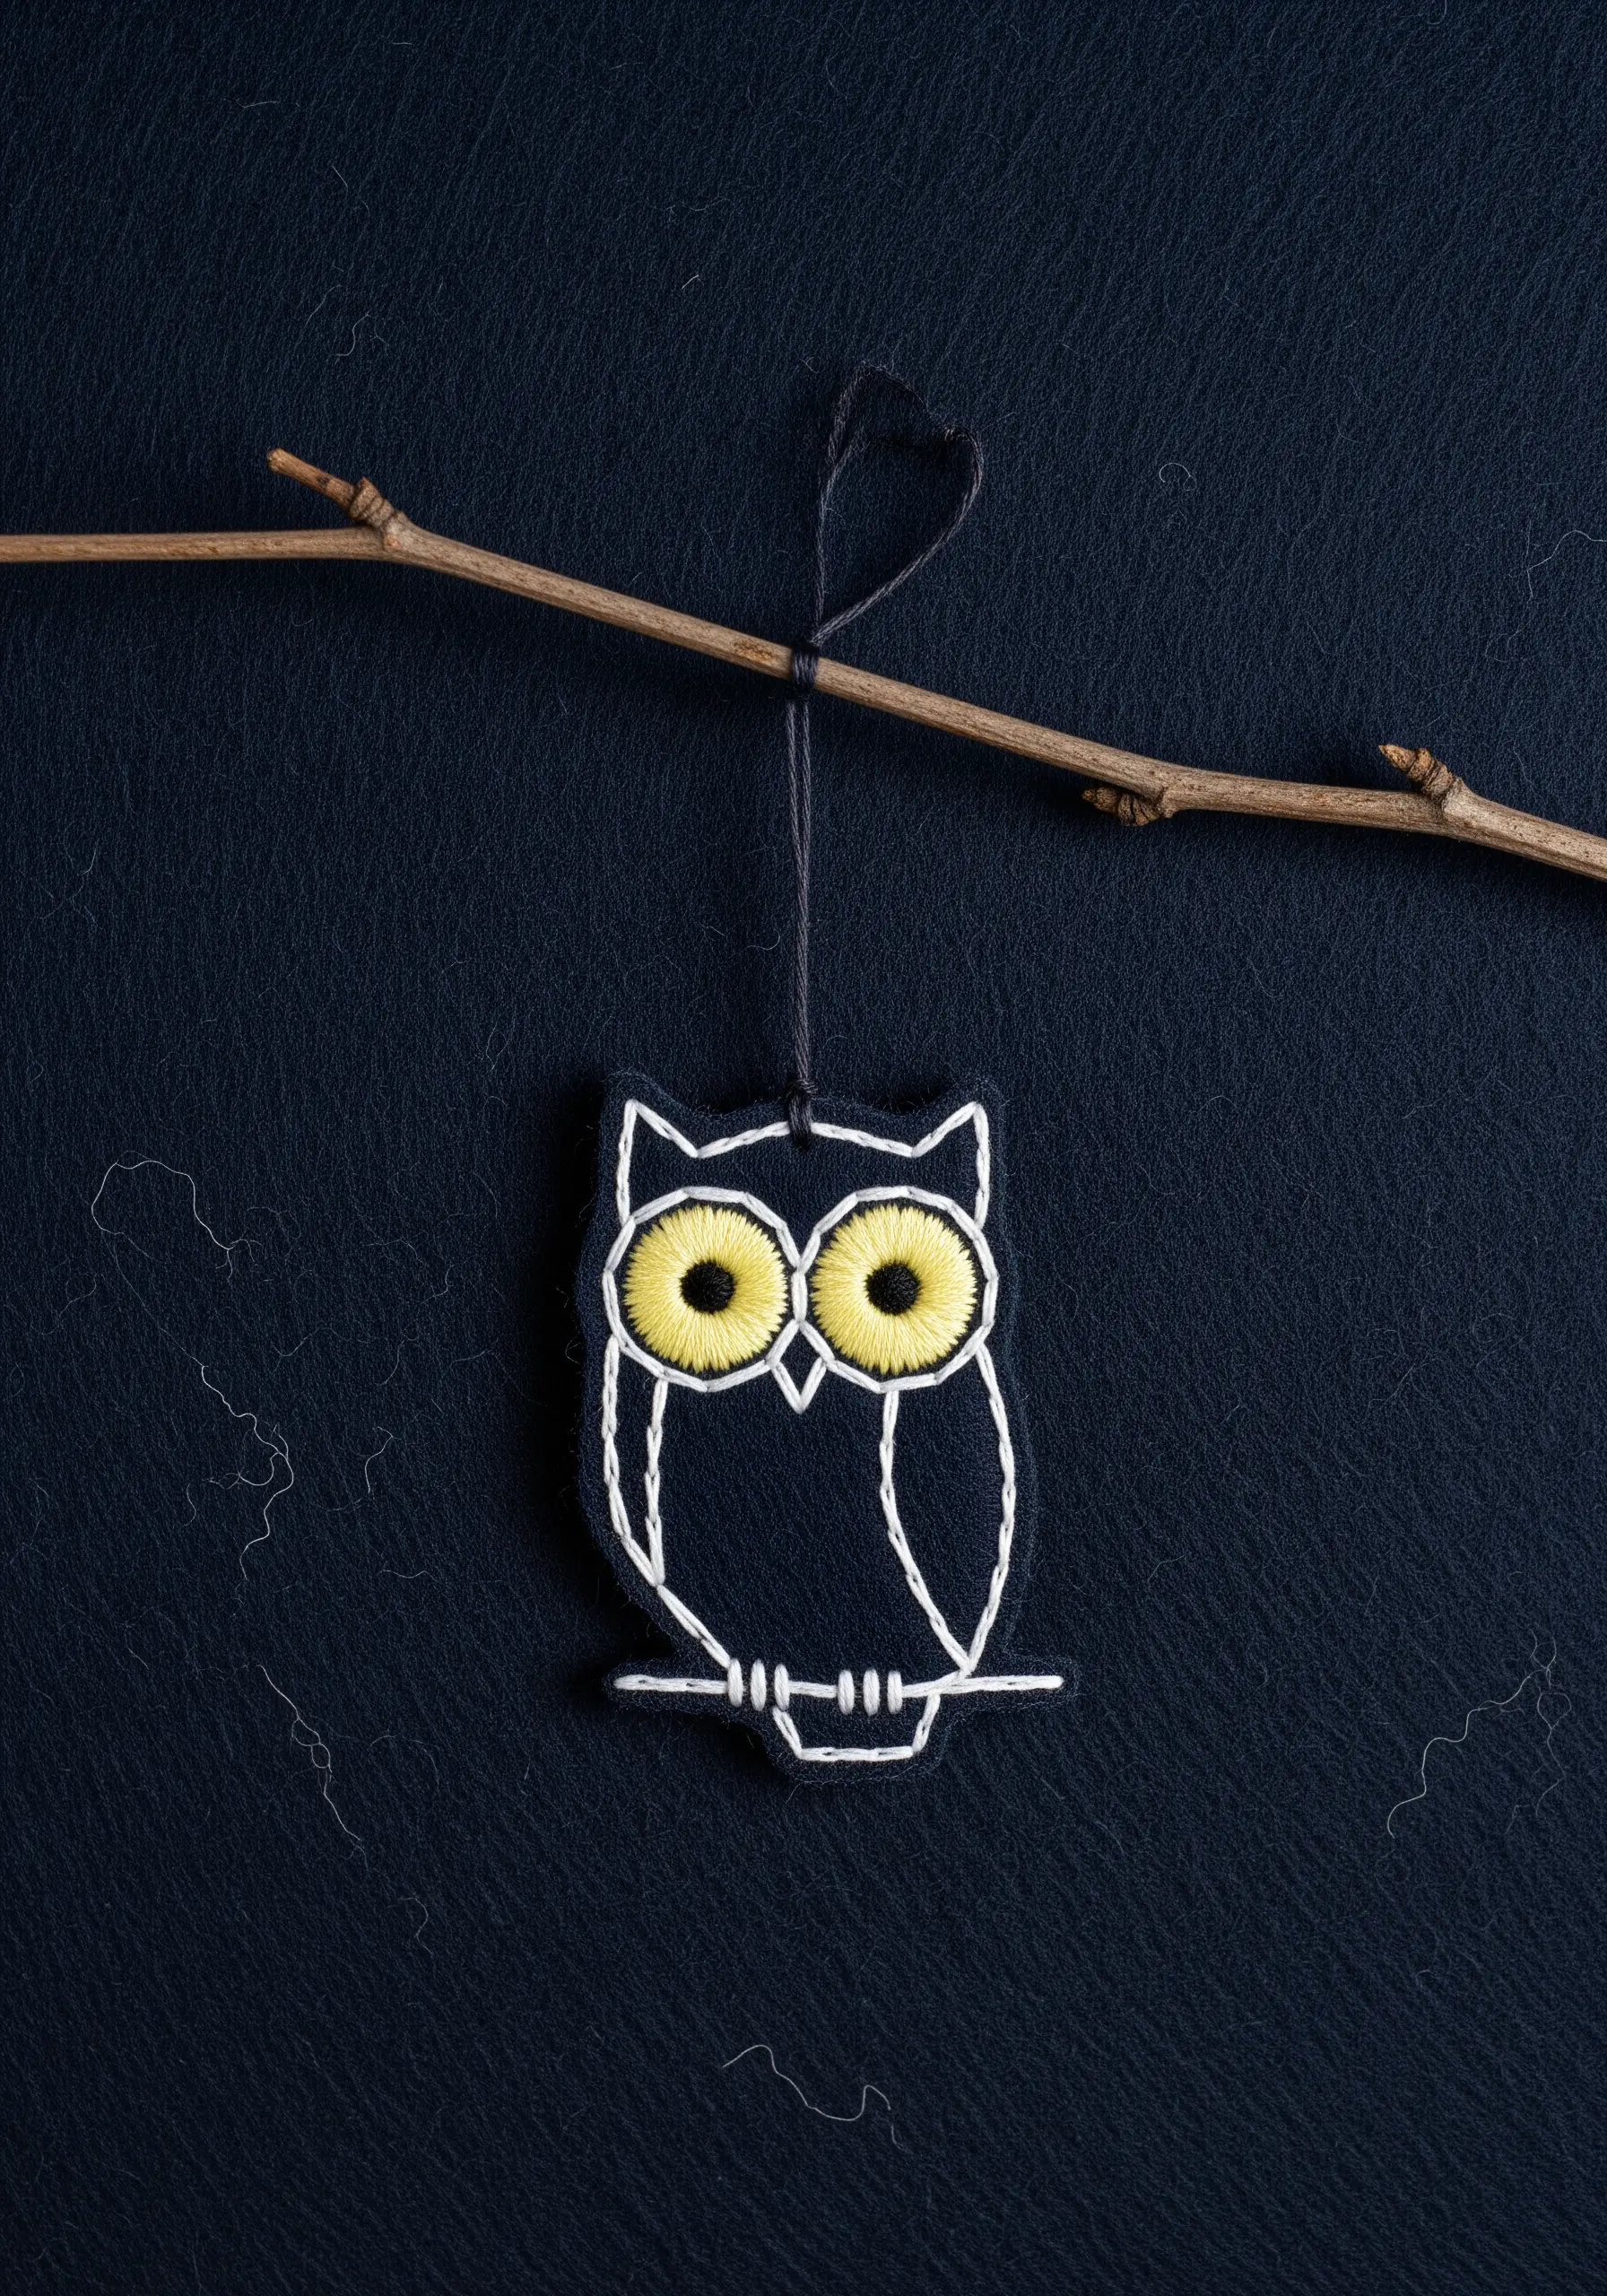
Take your embroidery off the hoop by stitching it onto a piece of sturdy felt.
Once your design is complete, carefully cut around the shape, leaving a small felt border.
To create a finished ornament or patch, cut a second piece of felt to match the shape, place it on the back, and use a blanket stitch around the edges to sew the two pieces together.
These are such adorable forest animal embroidery ideas for baby room decor or holiday decorations.
14. Achieve Softness by Shading with Greys
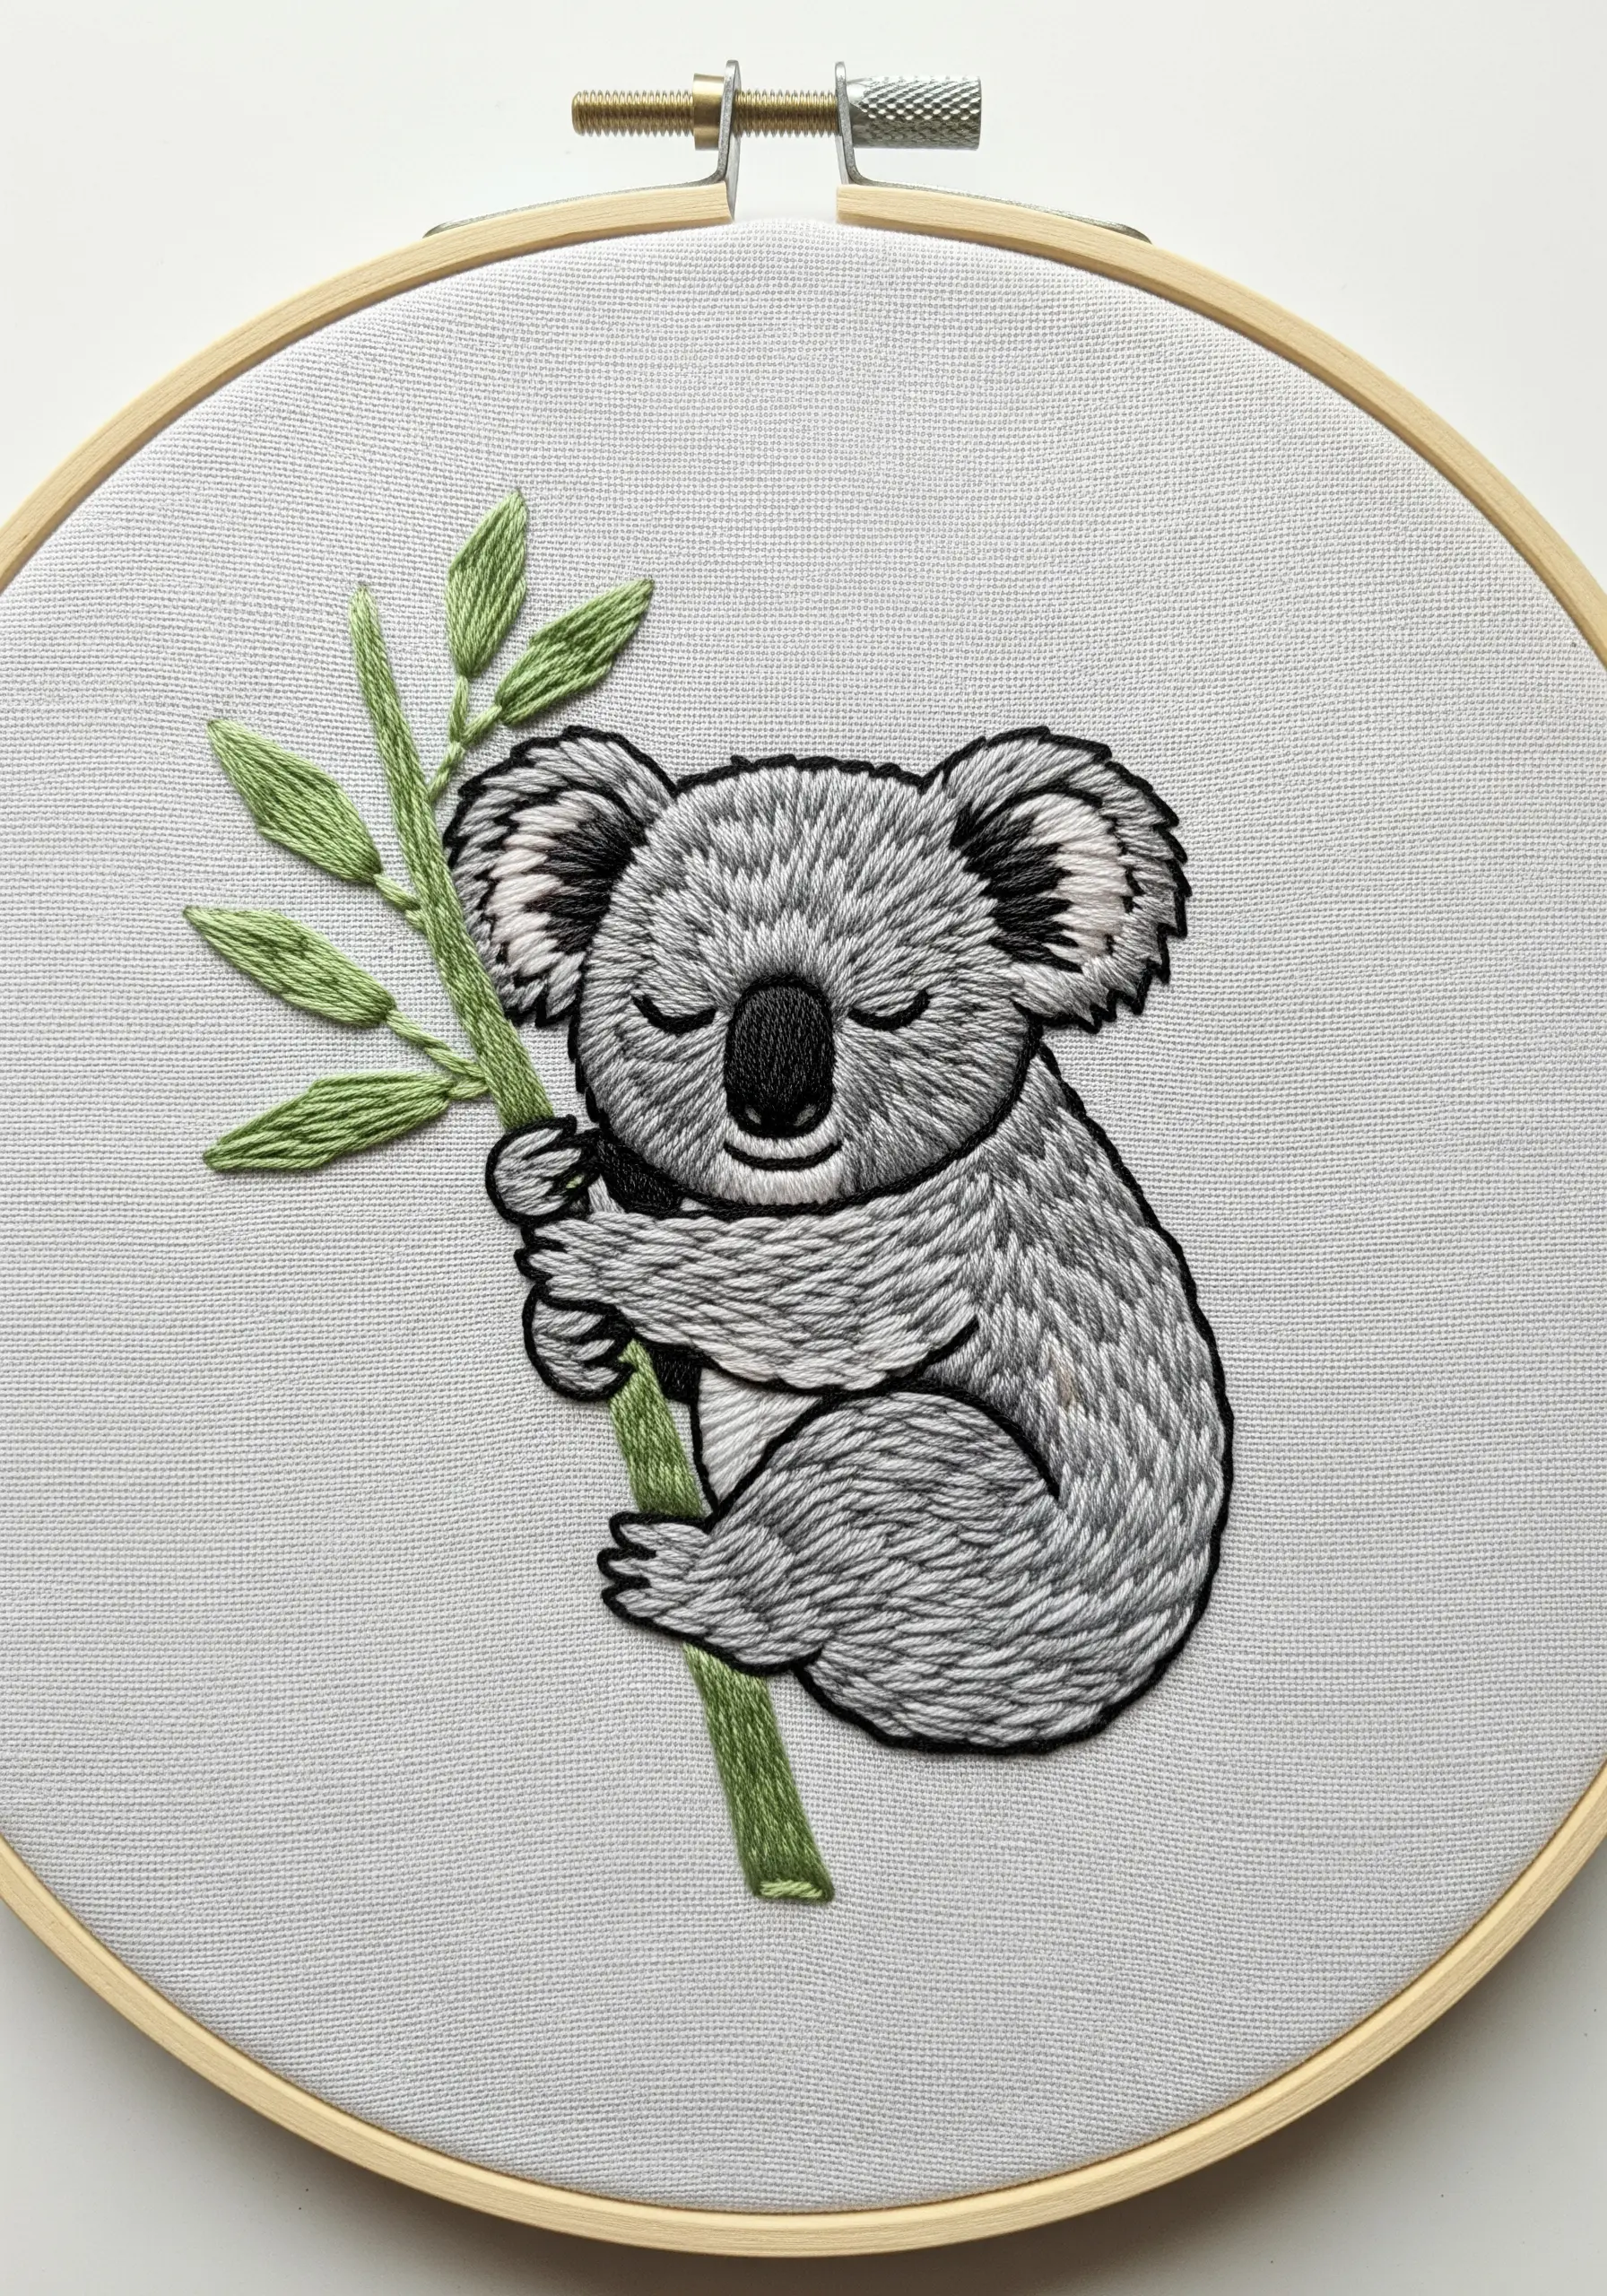
To embroider realistic grey fur that doesn’t look flat, a tonal palette is essential.
Work with at least three shades of grey: a light, a medium, and a dark charcoal. Use single strands of floss for delicate blending with the long-and-short stitch.
Place the darkest grey in natural shadow areas—like under the chin, between the limbs, and inside the ears—and use the lightest grey for highlights.
This creates a convincing sense of form and a soft, fluffy texture that brings the koala to life.
15. Add Presence with a Textured Outline
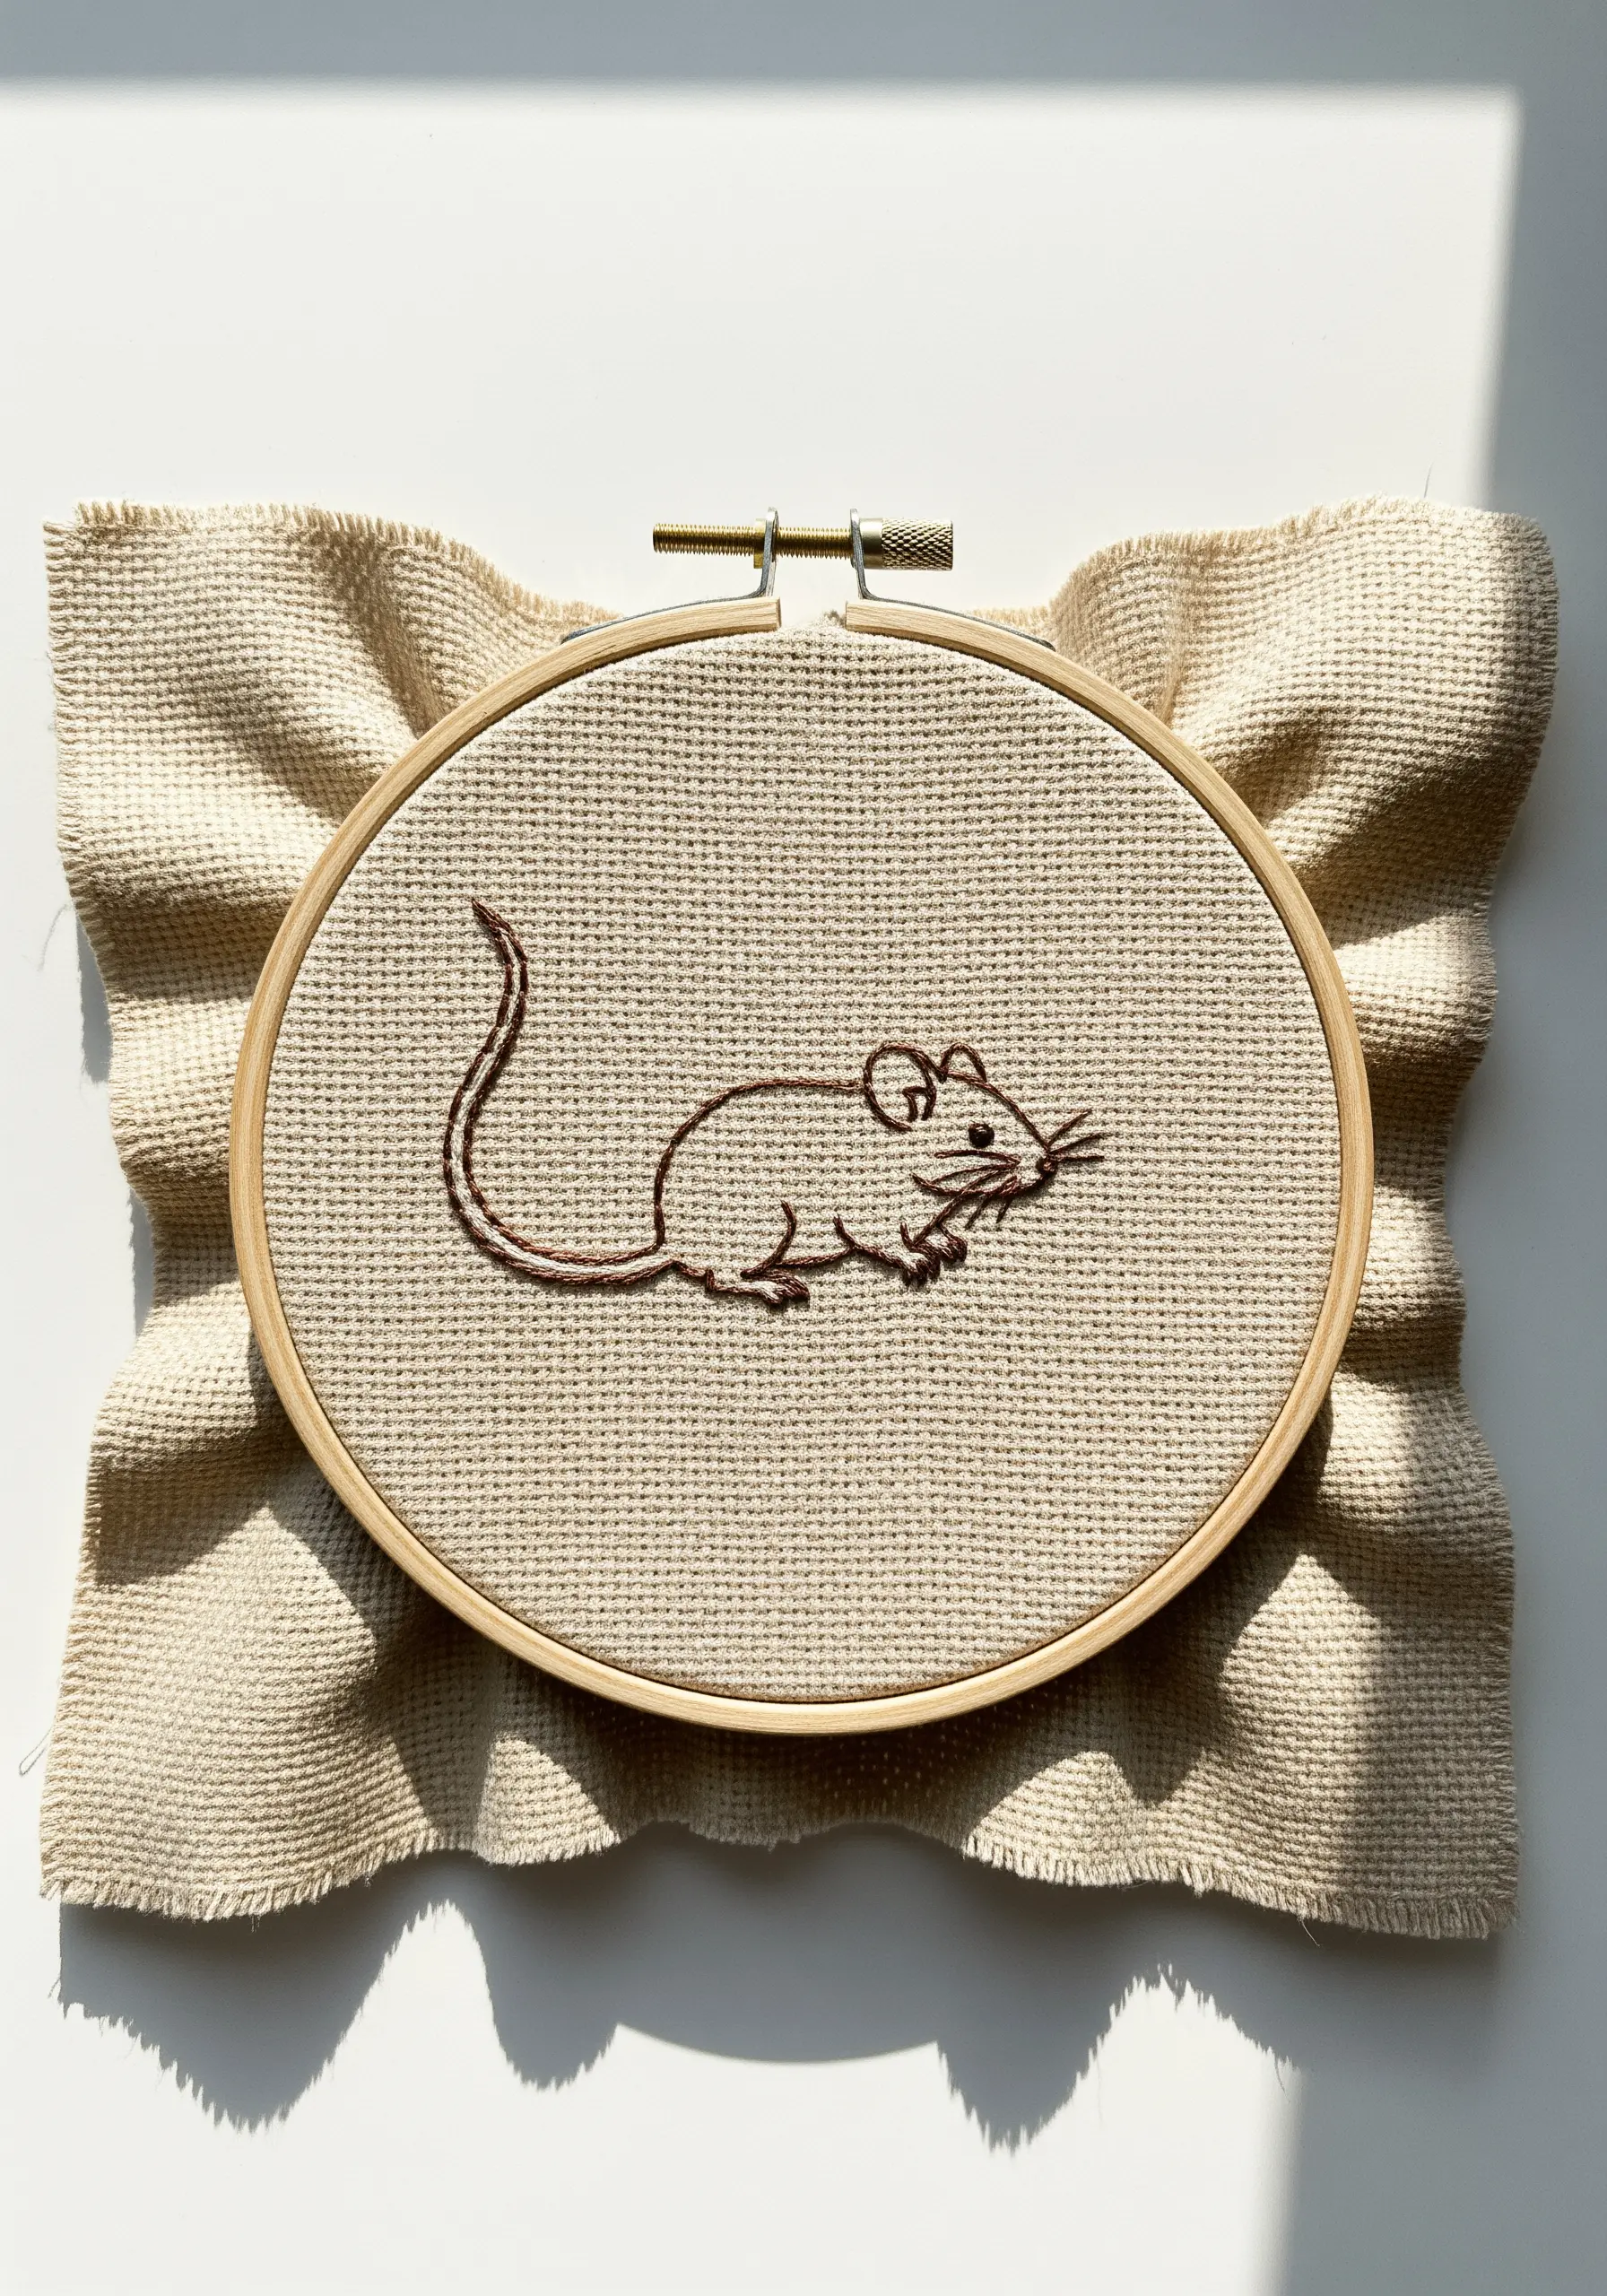
A single-color outline can feel exceptionally elegant, but the choice of stitch makes all the difference.
Instead of a flat backstitch, use a stem stitch. This stitch creates a slightly raised, rope-like line that has more weight and textural presence on the fabric.
It turns a simple sketch into a more substantial piece of textile art.
Pairing a rich brown thread with a natural, unbleached linen enhances the rustic, hand-drawn charm.
16. Create a Playful Moment with Strategic Placement
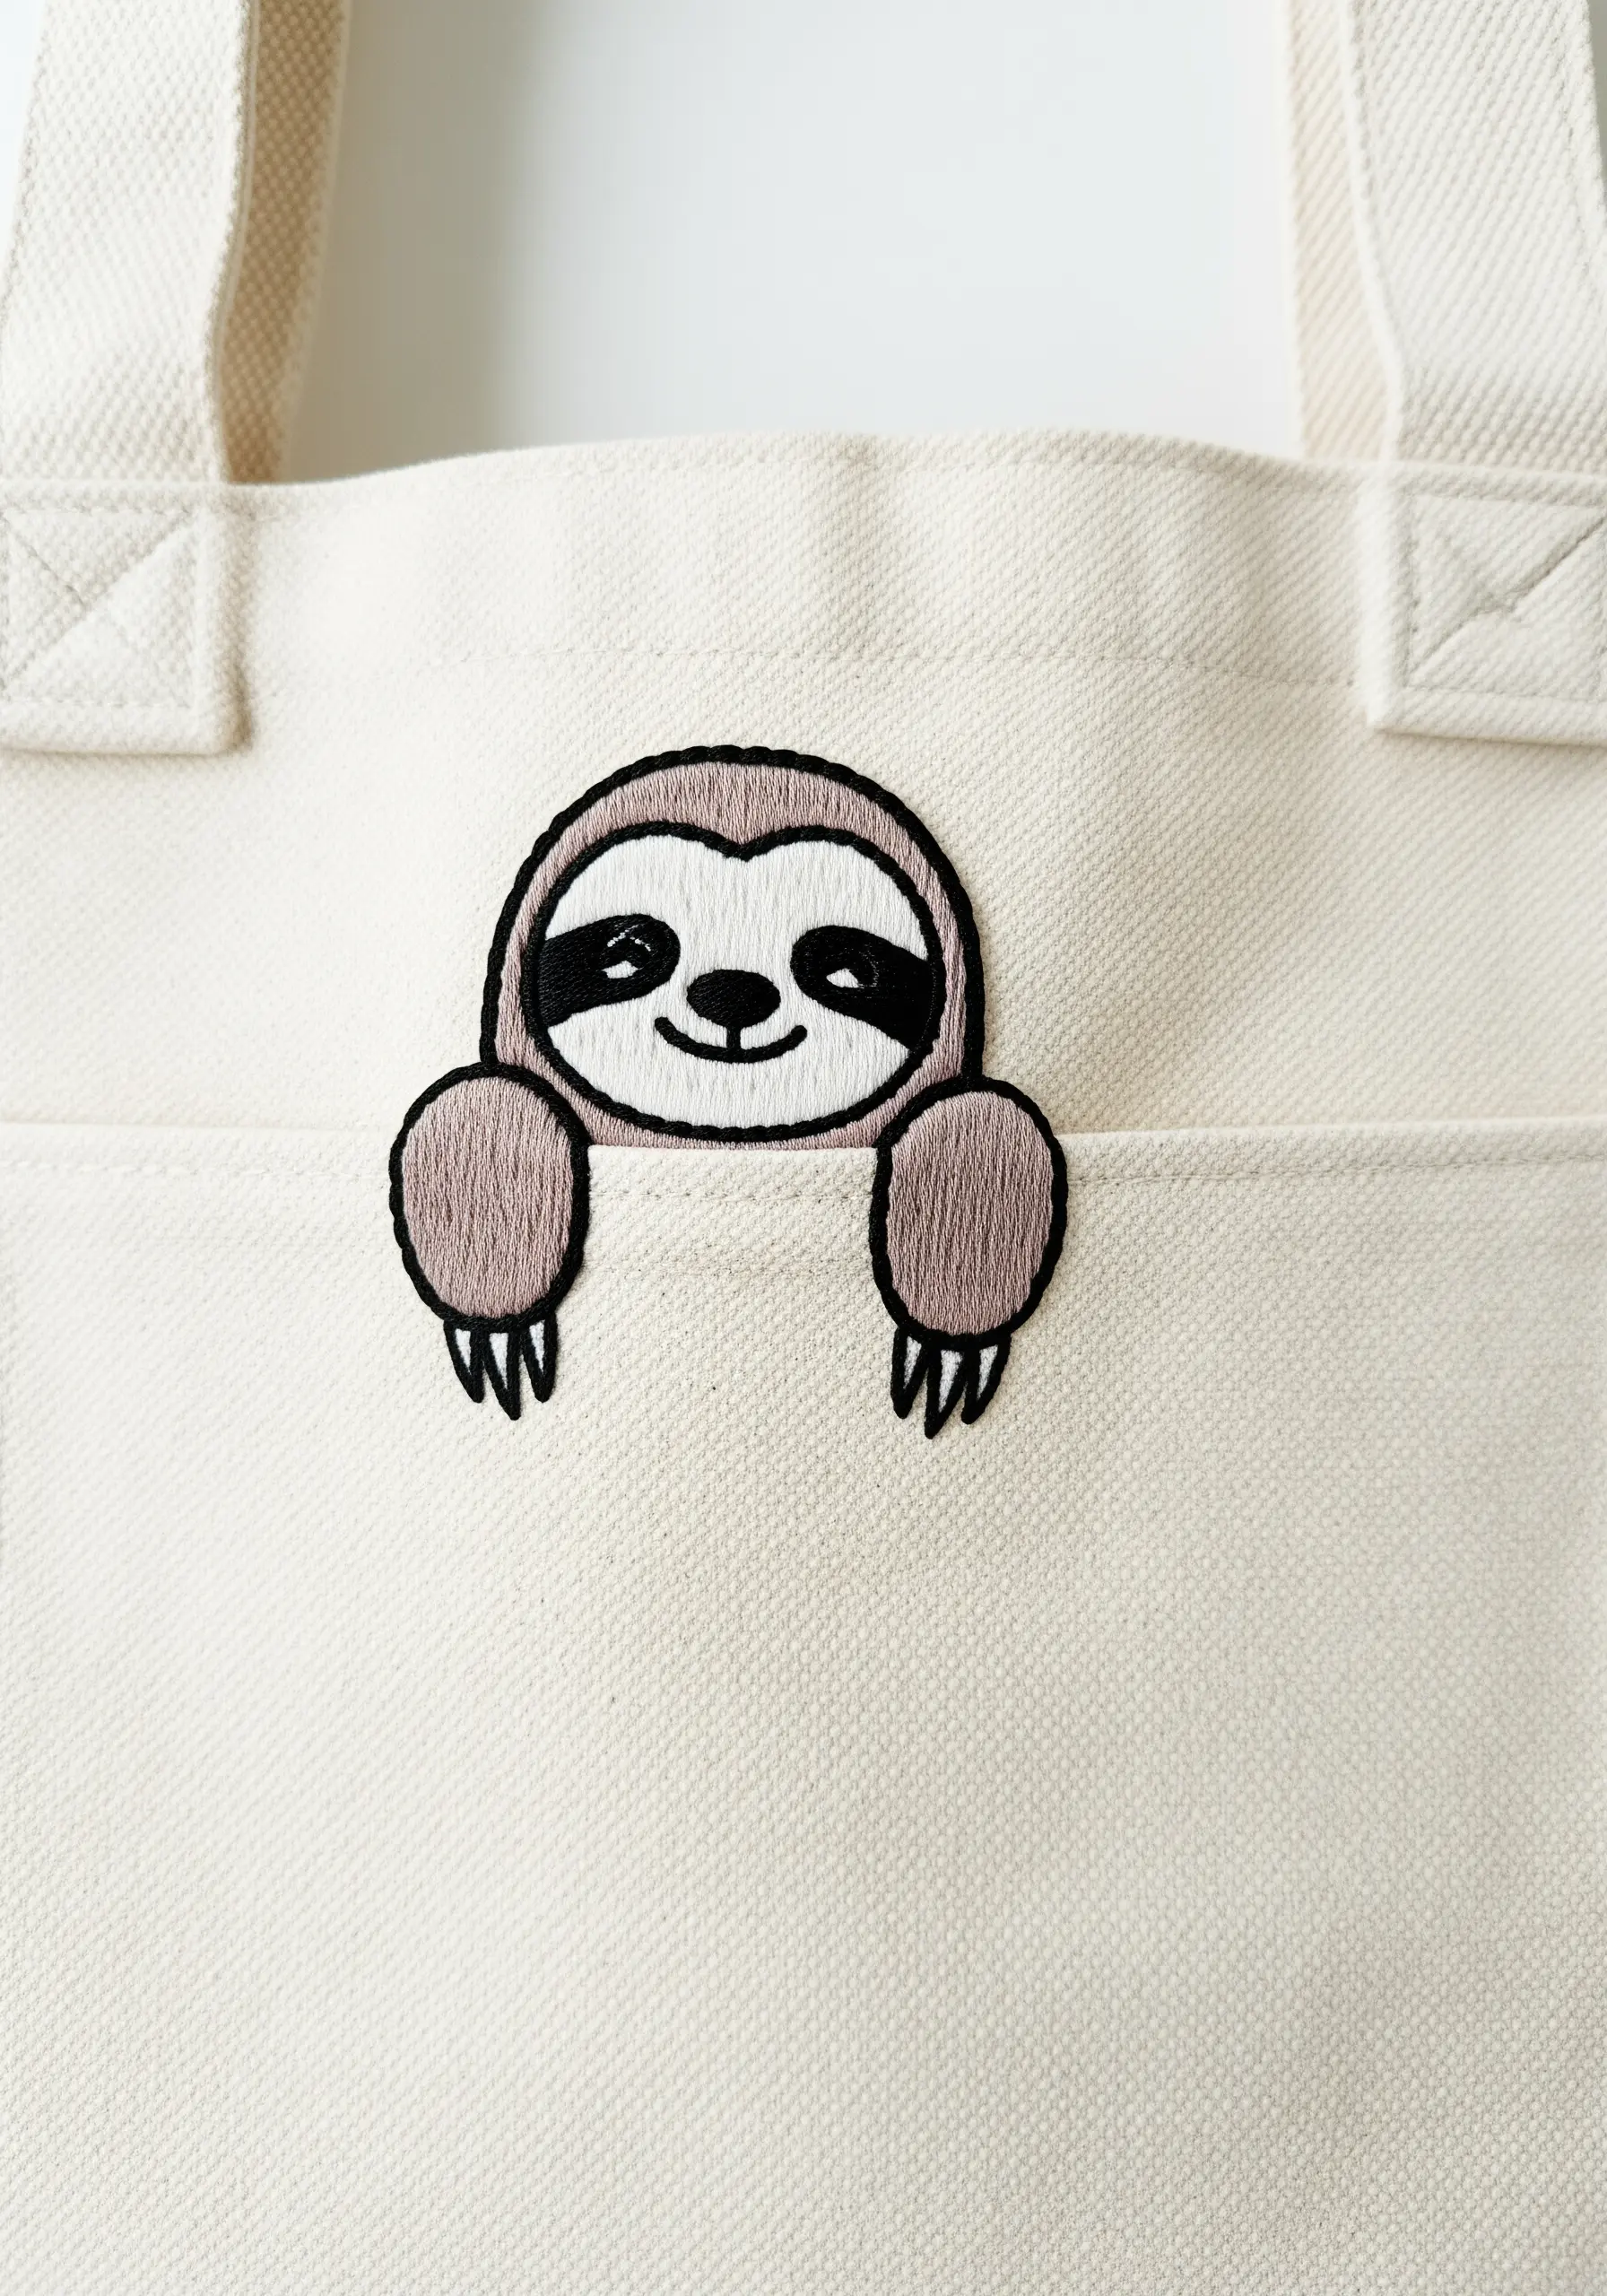
Elevate a simple motif by considering its interaction with the object it’s stitched on.
Placing this peeking sloth on the edge of a pocket creates a delightful surprise and a sense of narrative.
To ensure your design is durable enough for a functional item like a tote bag, use a permanent stabilizer on the inside and double-check that your thread tails are securely knotted.
This thoughtful placement transforms a cute animal into a clever, personalized detail, perfect for personalized tote bag embroidery designs.
17. Design with Patterned Fills
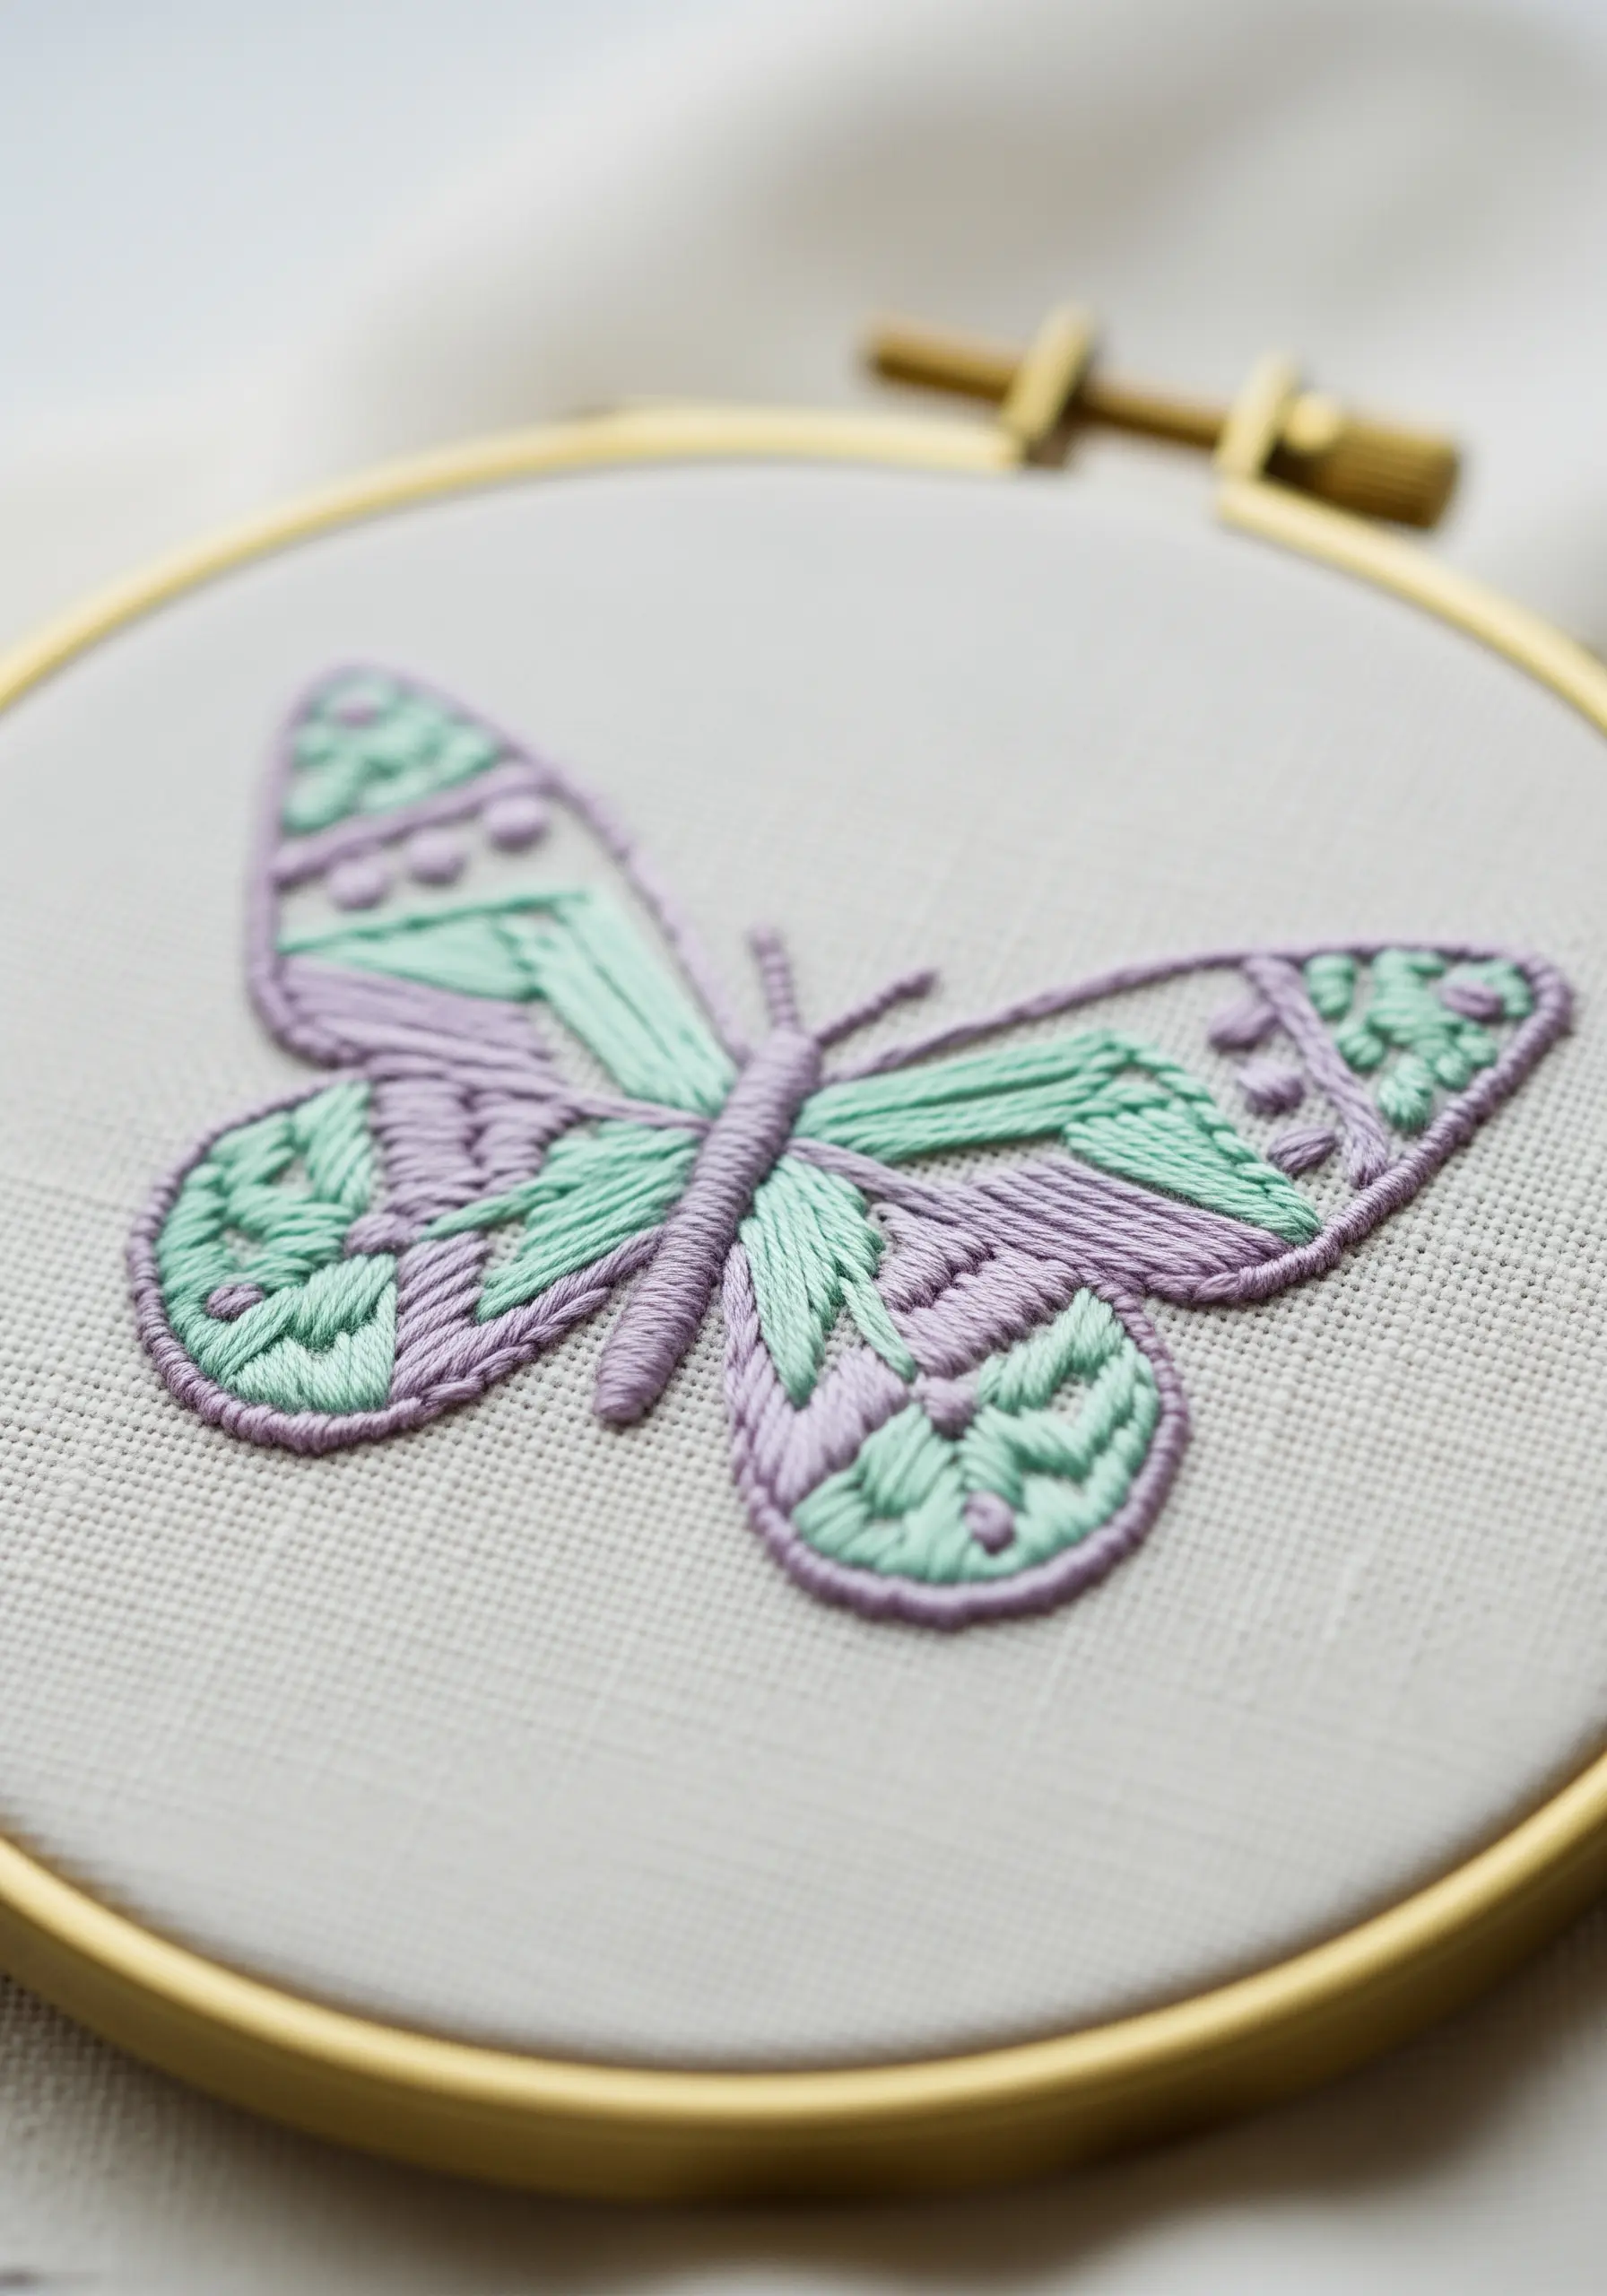
Move beyond solid fills and introduce intricate detail by using patterns within a shape.
Divide the butterfly’s wings into smaller, manageable sections with your pattern transfer.
Alternate filling these sections with classic satin stitch and geometric patterns made from simple straight stitches or seed stitches.
This approach adds a mosaic-like quality to the design, allowing you to play with texture and color blocking in a controlled, elegant way.
18. Define Edges with a Split-Stitch Border
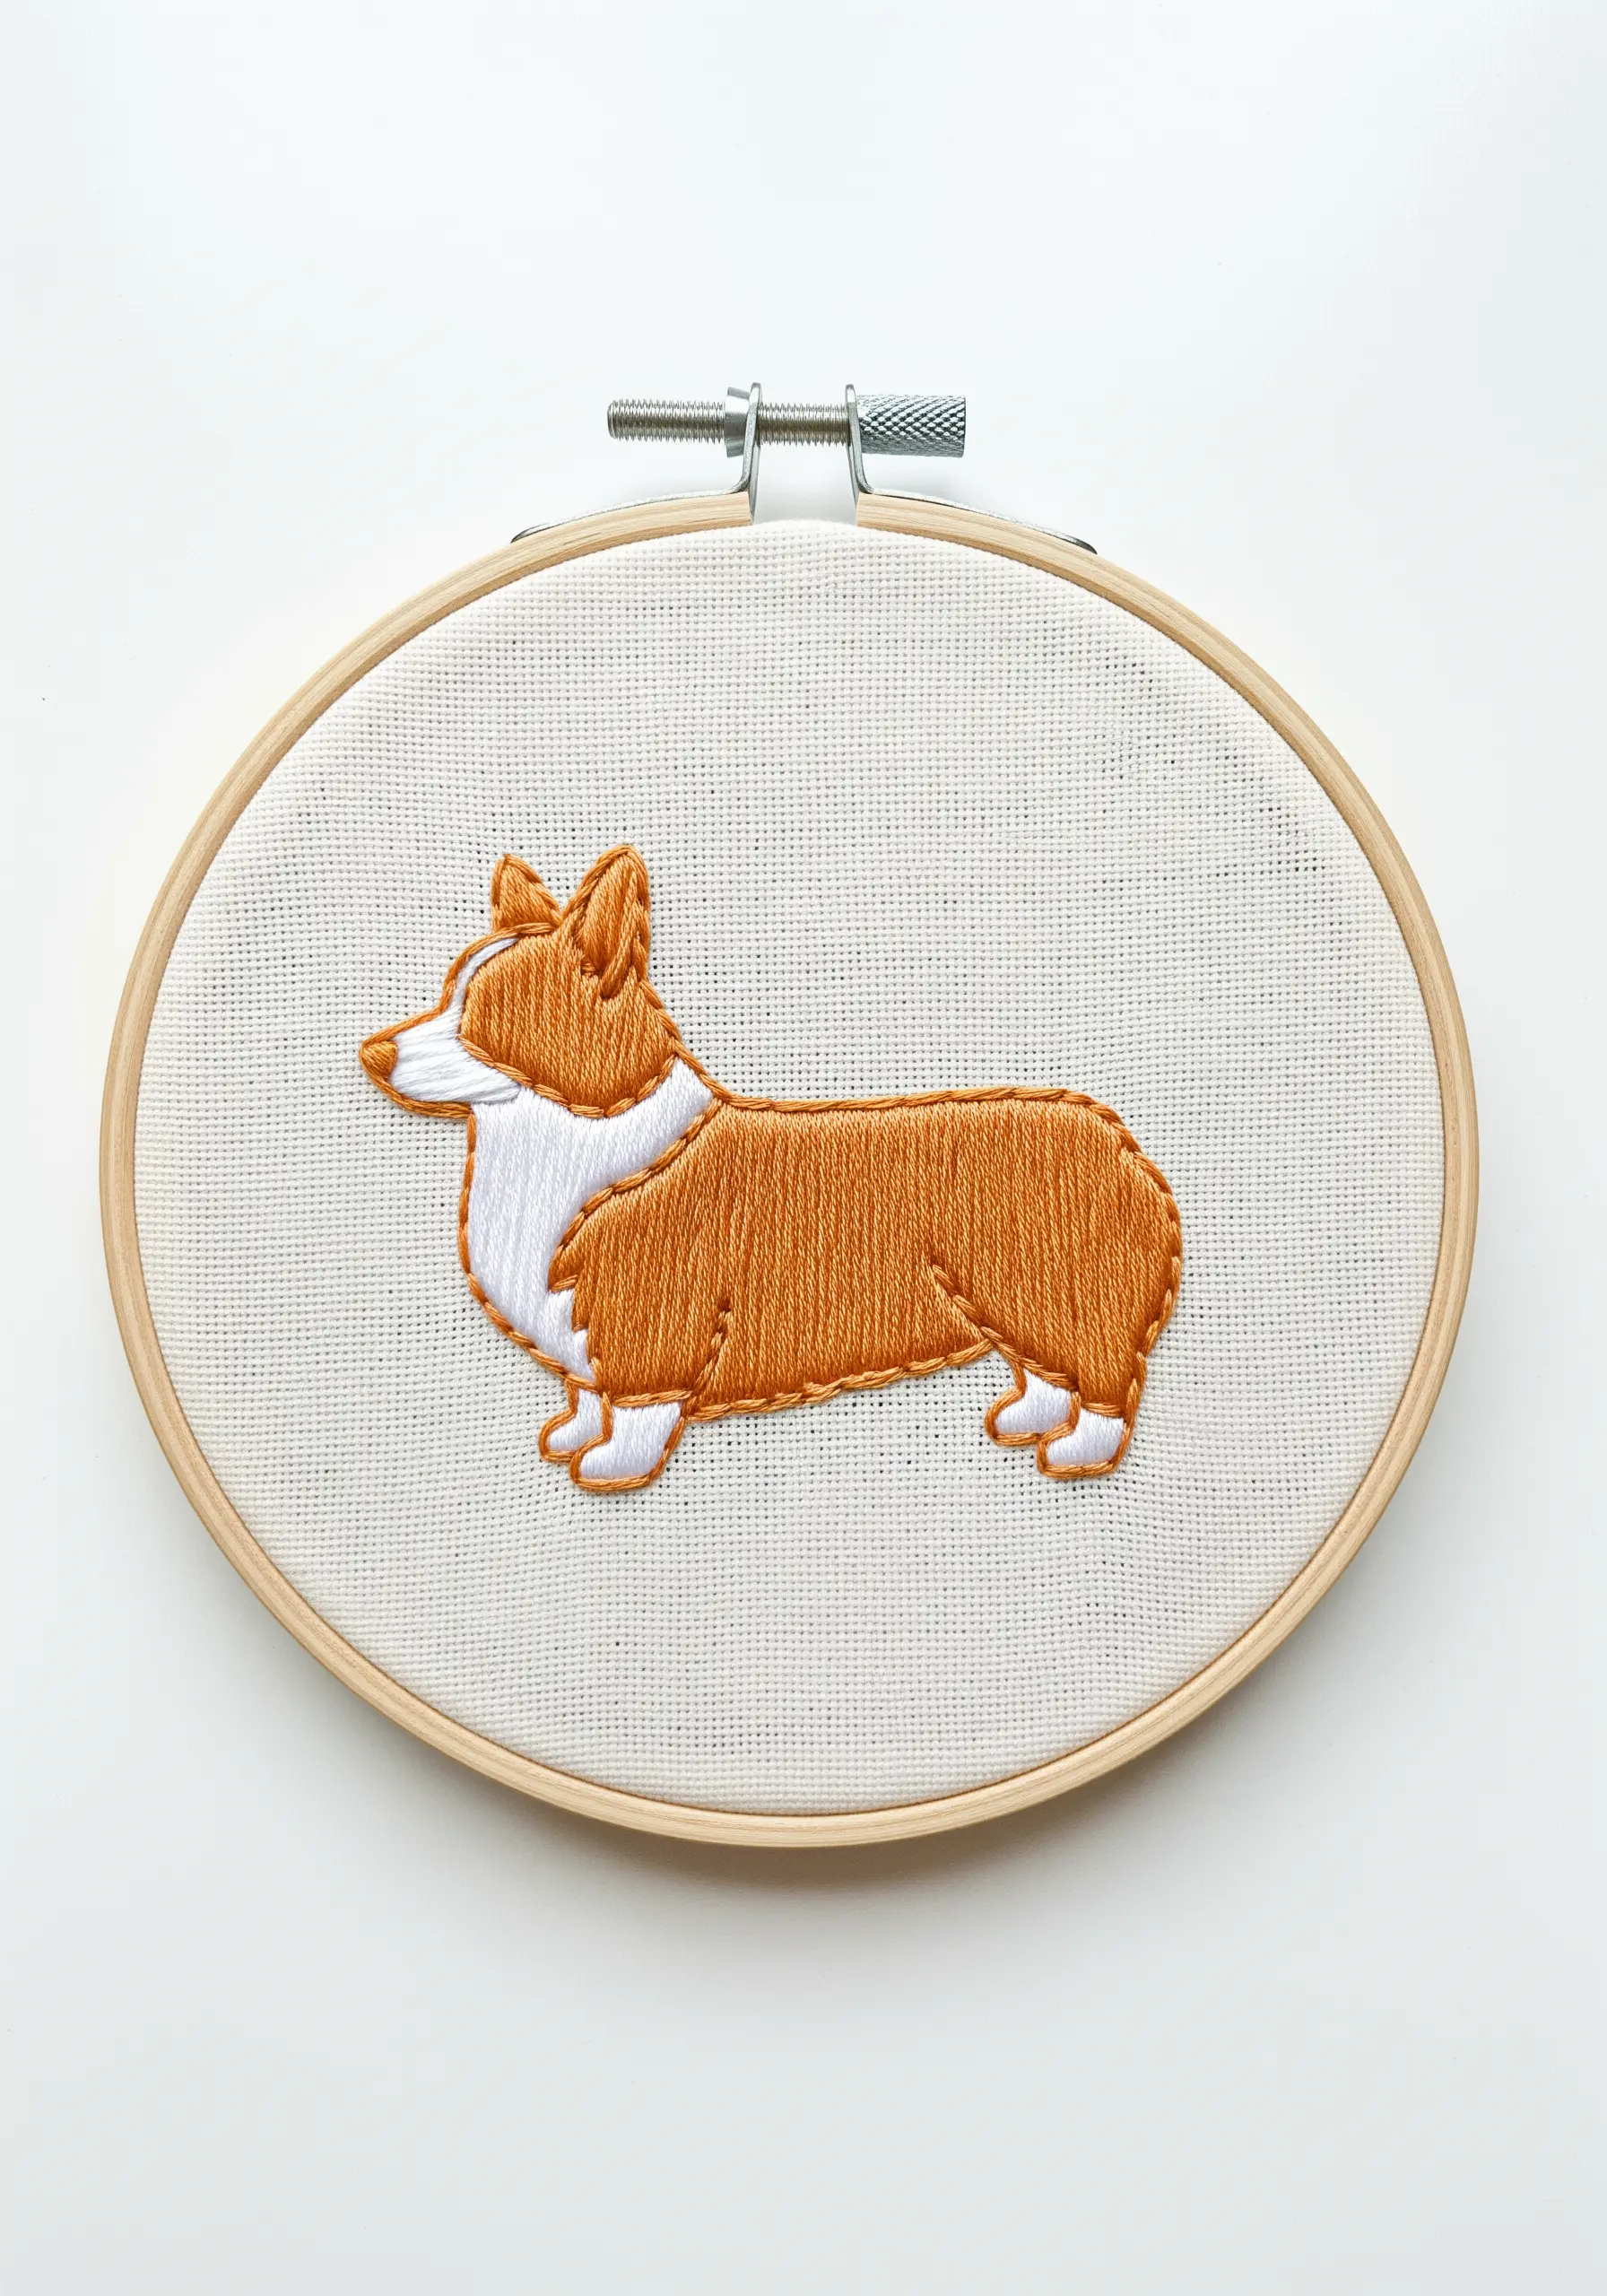
For exceptionally crisp, clean satin-stitched shapes, give yourself a guideline to stitch against.
Before filling each color block, outline it with a tight split stitch using one or two strands of the matching floss.
This creates a slightly raised edge that acts as a perfect border for your satin stitches, preventing them from bleeding into one another and ensuring a neat, uniform shape.
This technique is the key to achieving that bold, graphic, and perfectly polished finish.


