

Adding a personal touch to your favorite clothes can feel like a big commitment. What if the stitches aren’t perfect? What if you change your mind? Instead of stitching directly onto your garment, I want you to try creating tiny, self-contained works of art that you can move, swap, or remove whenever you wish.
Think of these small hoop projects as patch-making. You work your design on a separate piece of fabric, finish it beautifully, and then apply it to a jacket, a tote bag, or a shirt collar. This approach frees you from the fear of making a mistake on your beloved denim jacket. It’s pure creative freedom.
This is your chance to build a library of personal symbols—a tiny flower, a meaningful word, a celestial motif. Each patch is a low-pressure opportunity to practice a new stitch or play with color. Over time, you’ll have a collection of your own art, ready to tell your story, one stitch at a time.
1. Render Lavender with Textured Knots
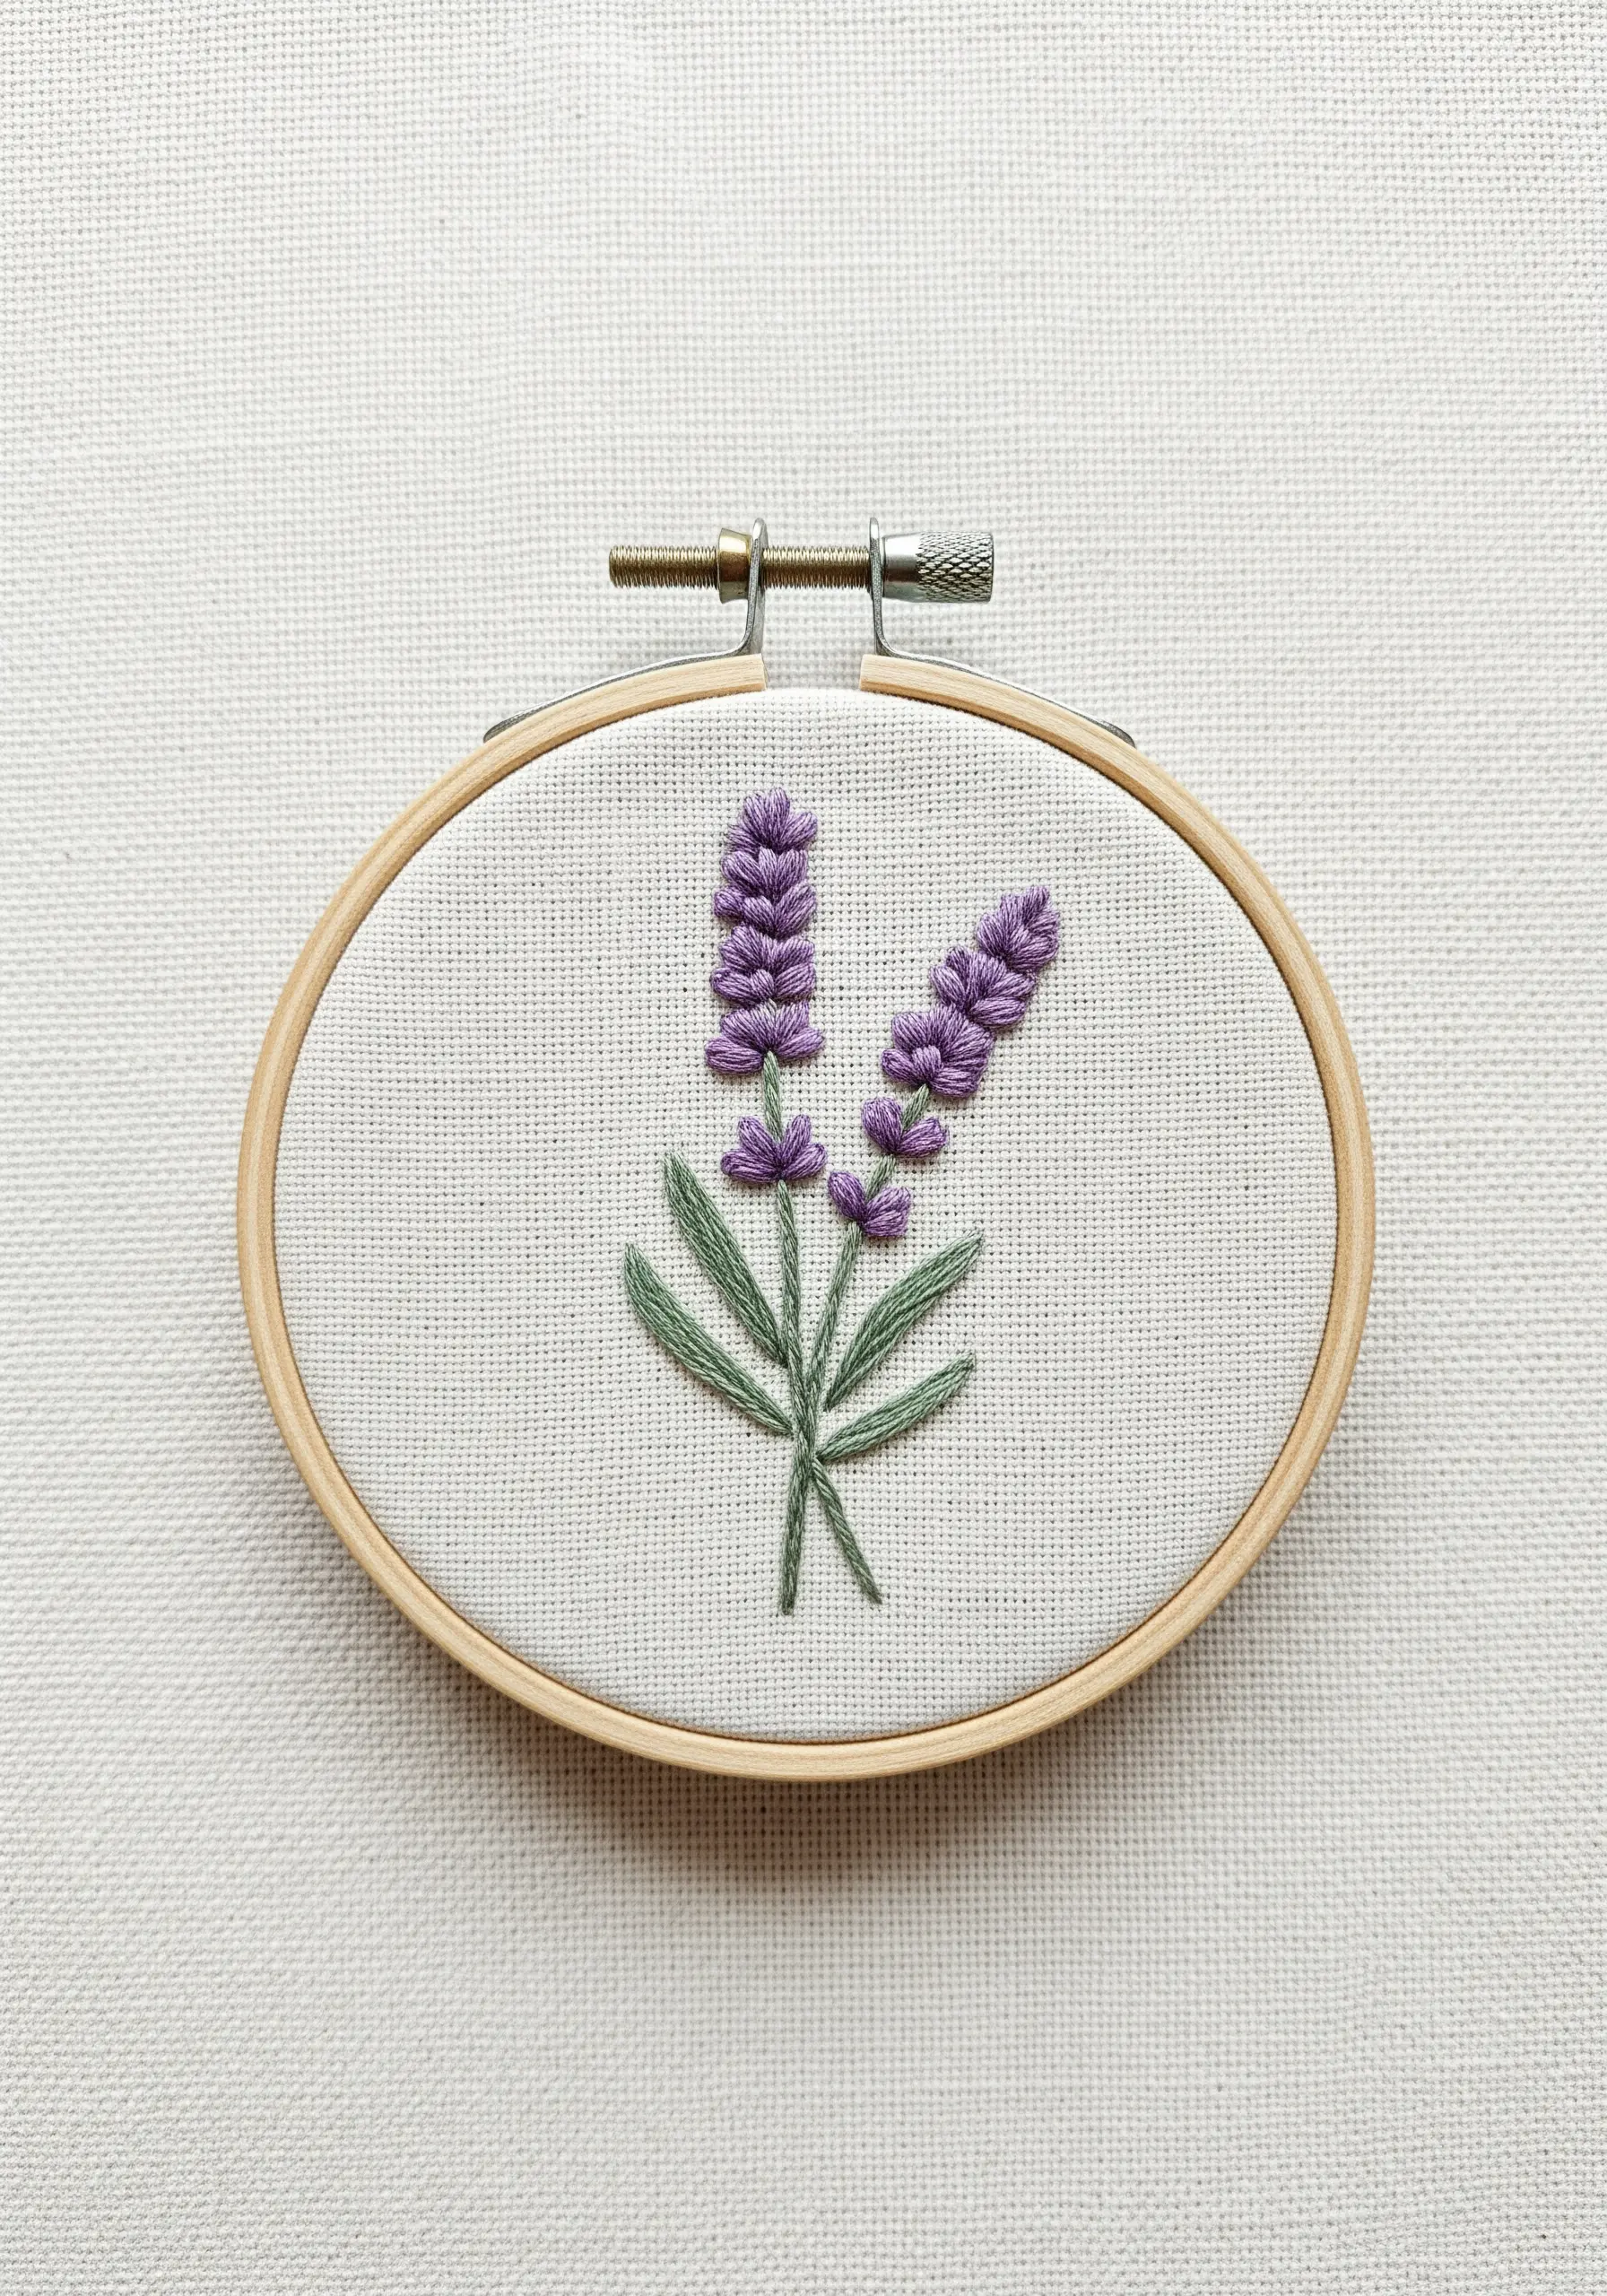
To give your lavender buds a realistic, plush texture, use French knots instead of satin stitch.
Work with two strands of floss for smaller, tighter knots, or three strands for a fuller, more robust appearance.
For the leaves, a fishbone stitch creates that beautiful central vein naturally, giving them a more organic shape than a simple satin stitch would.
This combination of textures makes the simple design feel sophisticated and detailed, perfect for a collar or cuff accent.
2. Master the Metallic Thread Gradient
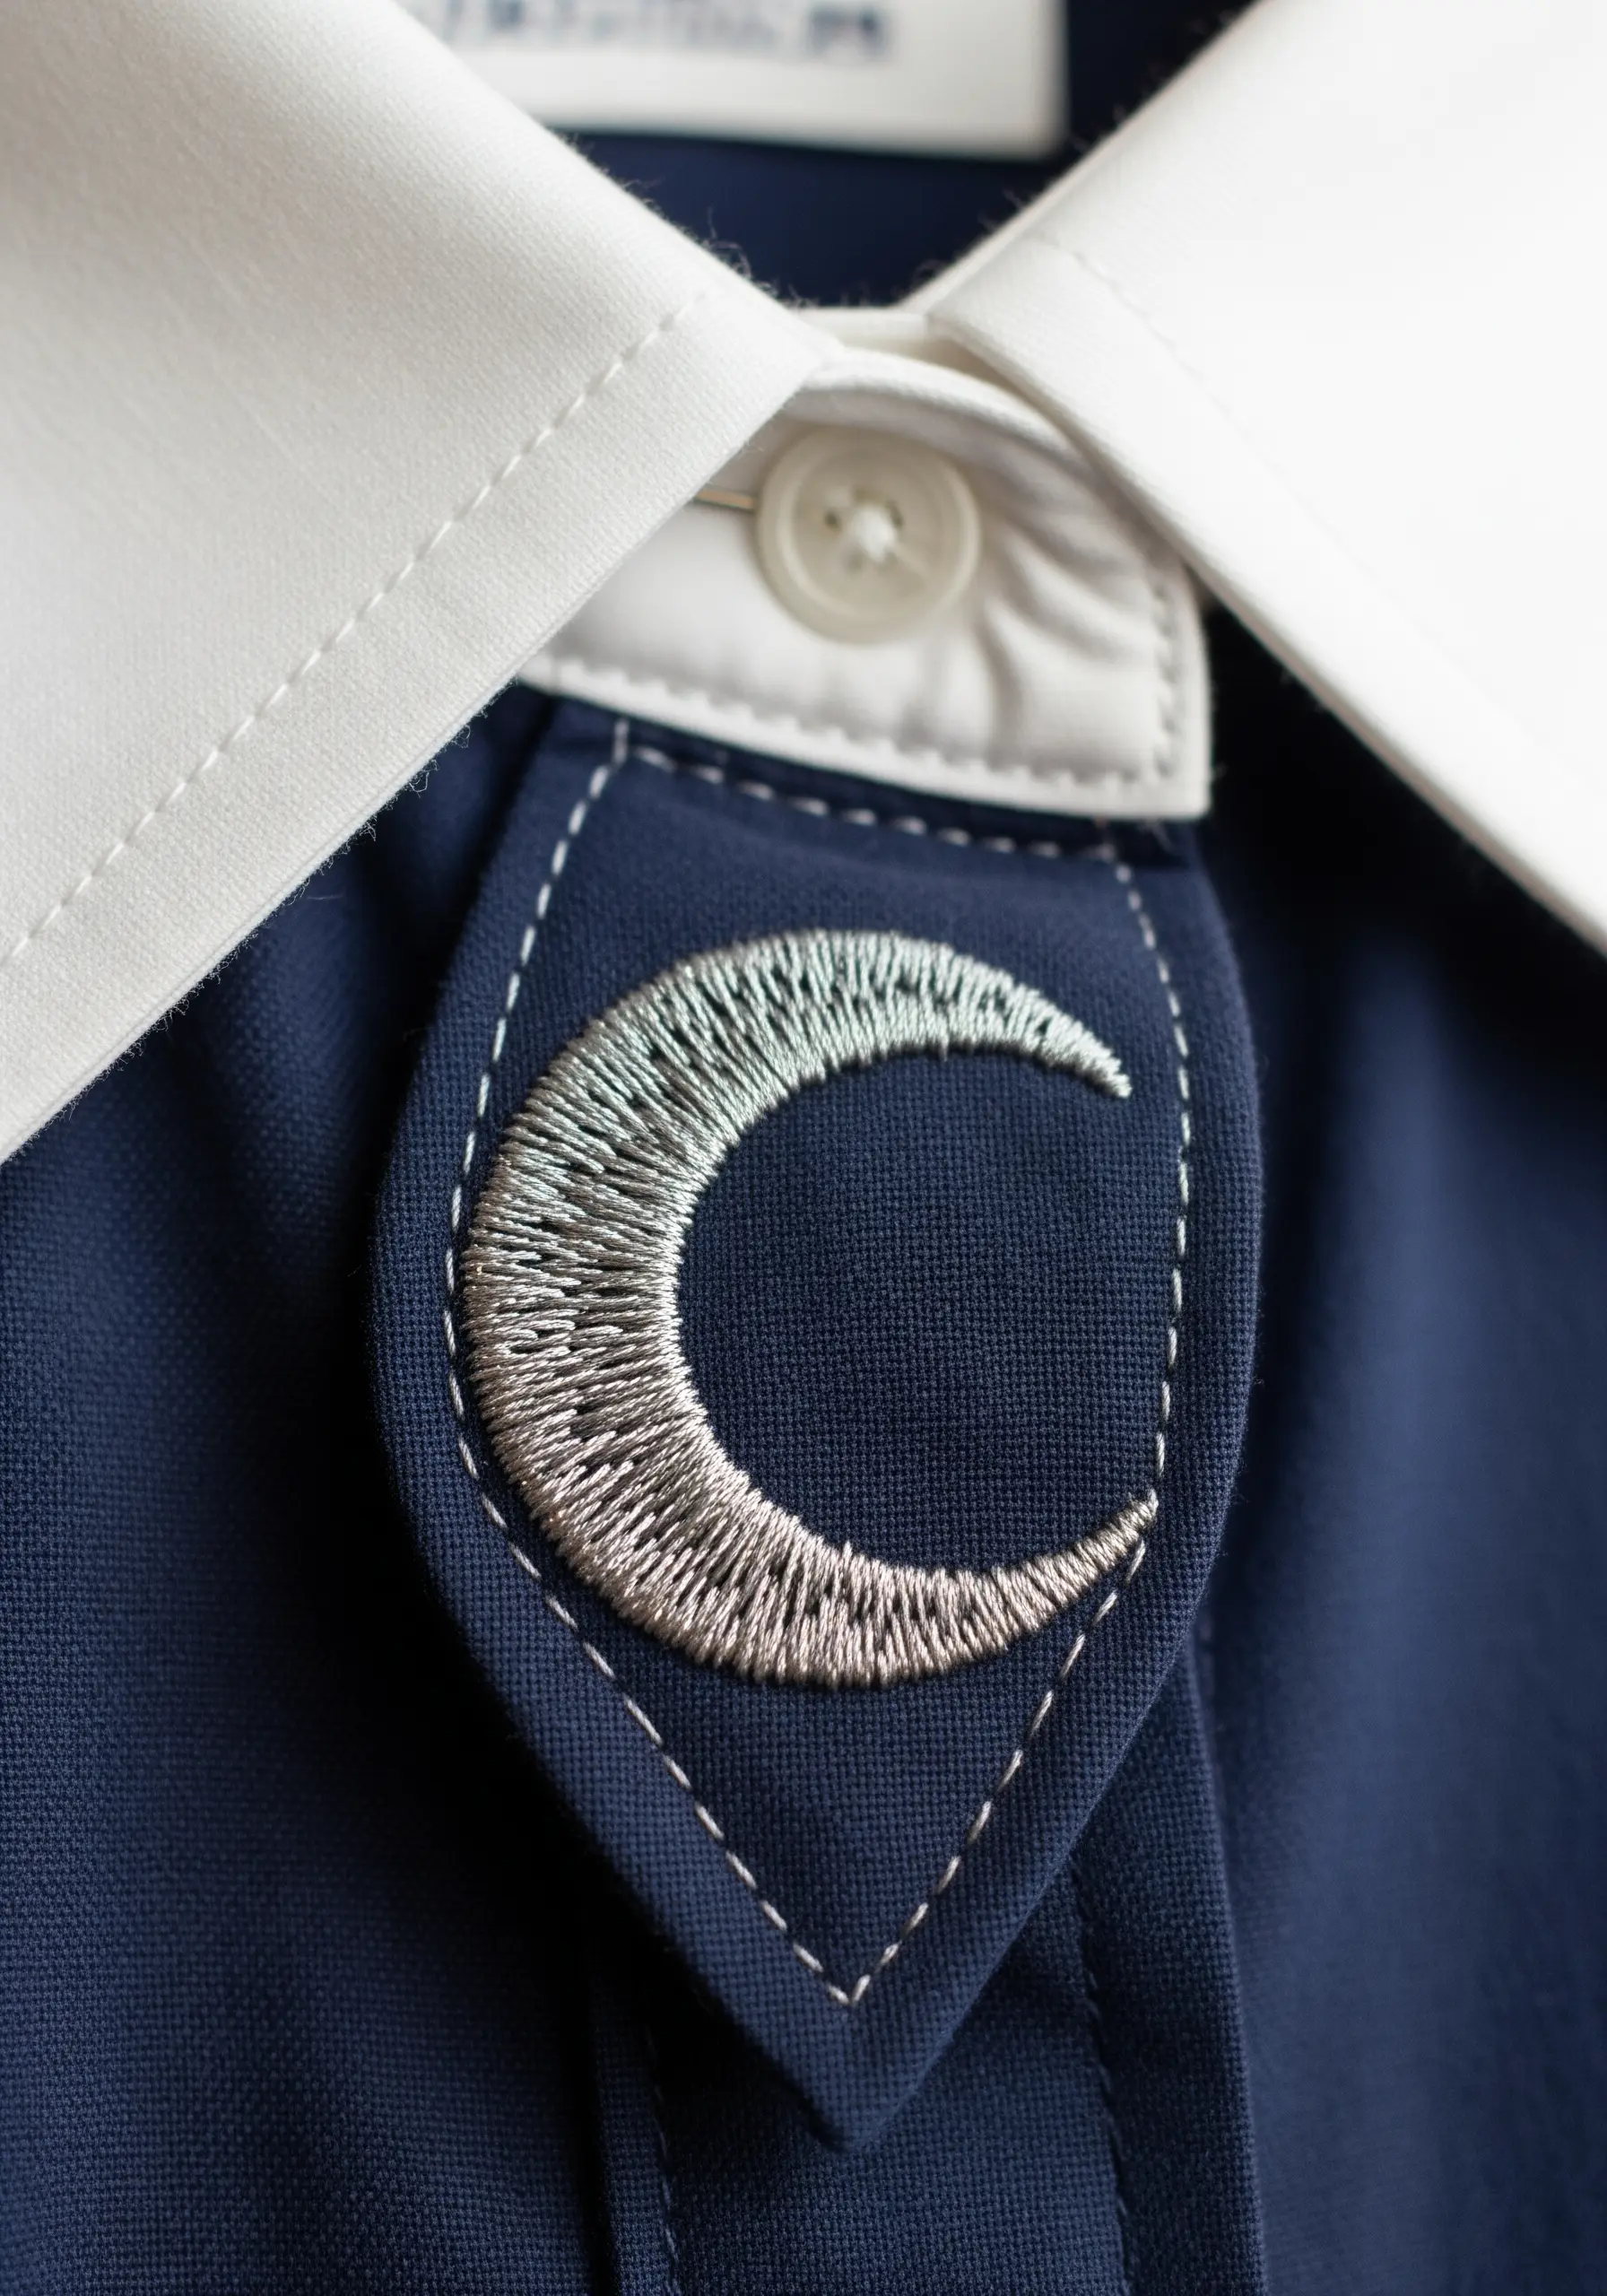
Create a luminous crescent moon by mastering a smooth gradient with metallic thread.
Use a thread conditioner or a tiny bit of beeswax to prevent snagging and fraying, which is common with metallics.
Start with the darkest metallic shade at the outer edge, working inwards with progressively lighter shades using a satin stitch.
To ensure your stitches lie flat and smooth, work with shorter lengths of thread. This technique elevates a simple shape into a piece of abstract metallic thread embroidery.
3. Achieve Precision with Geometric Outlines
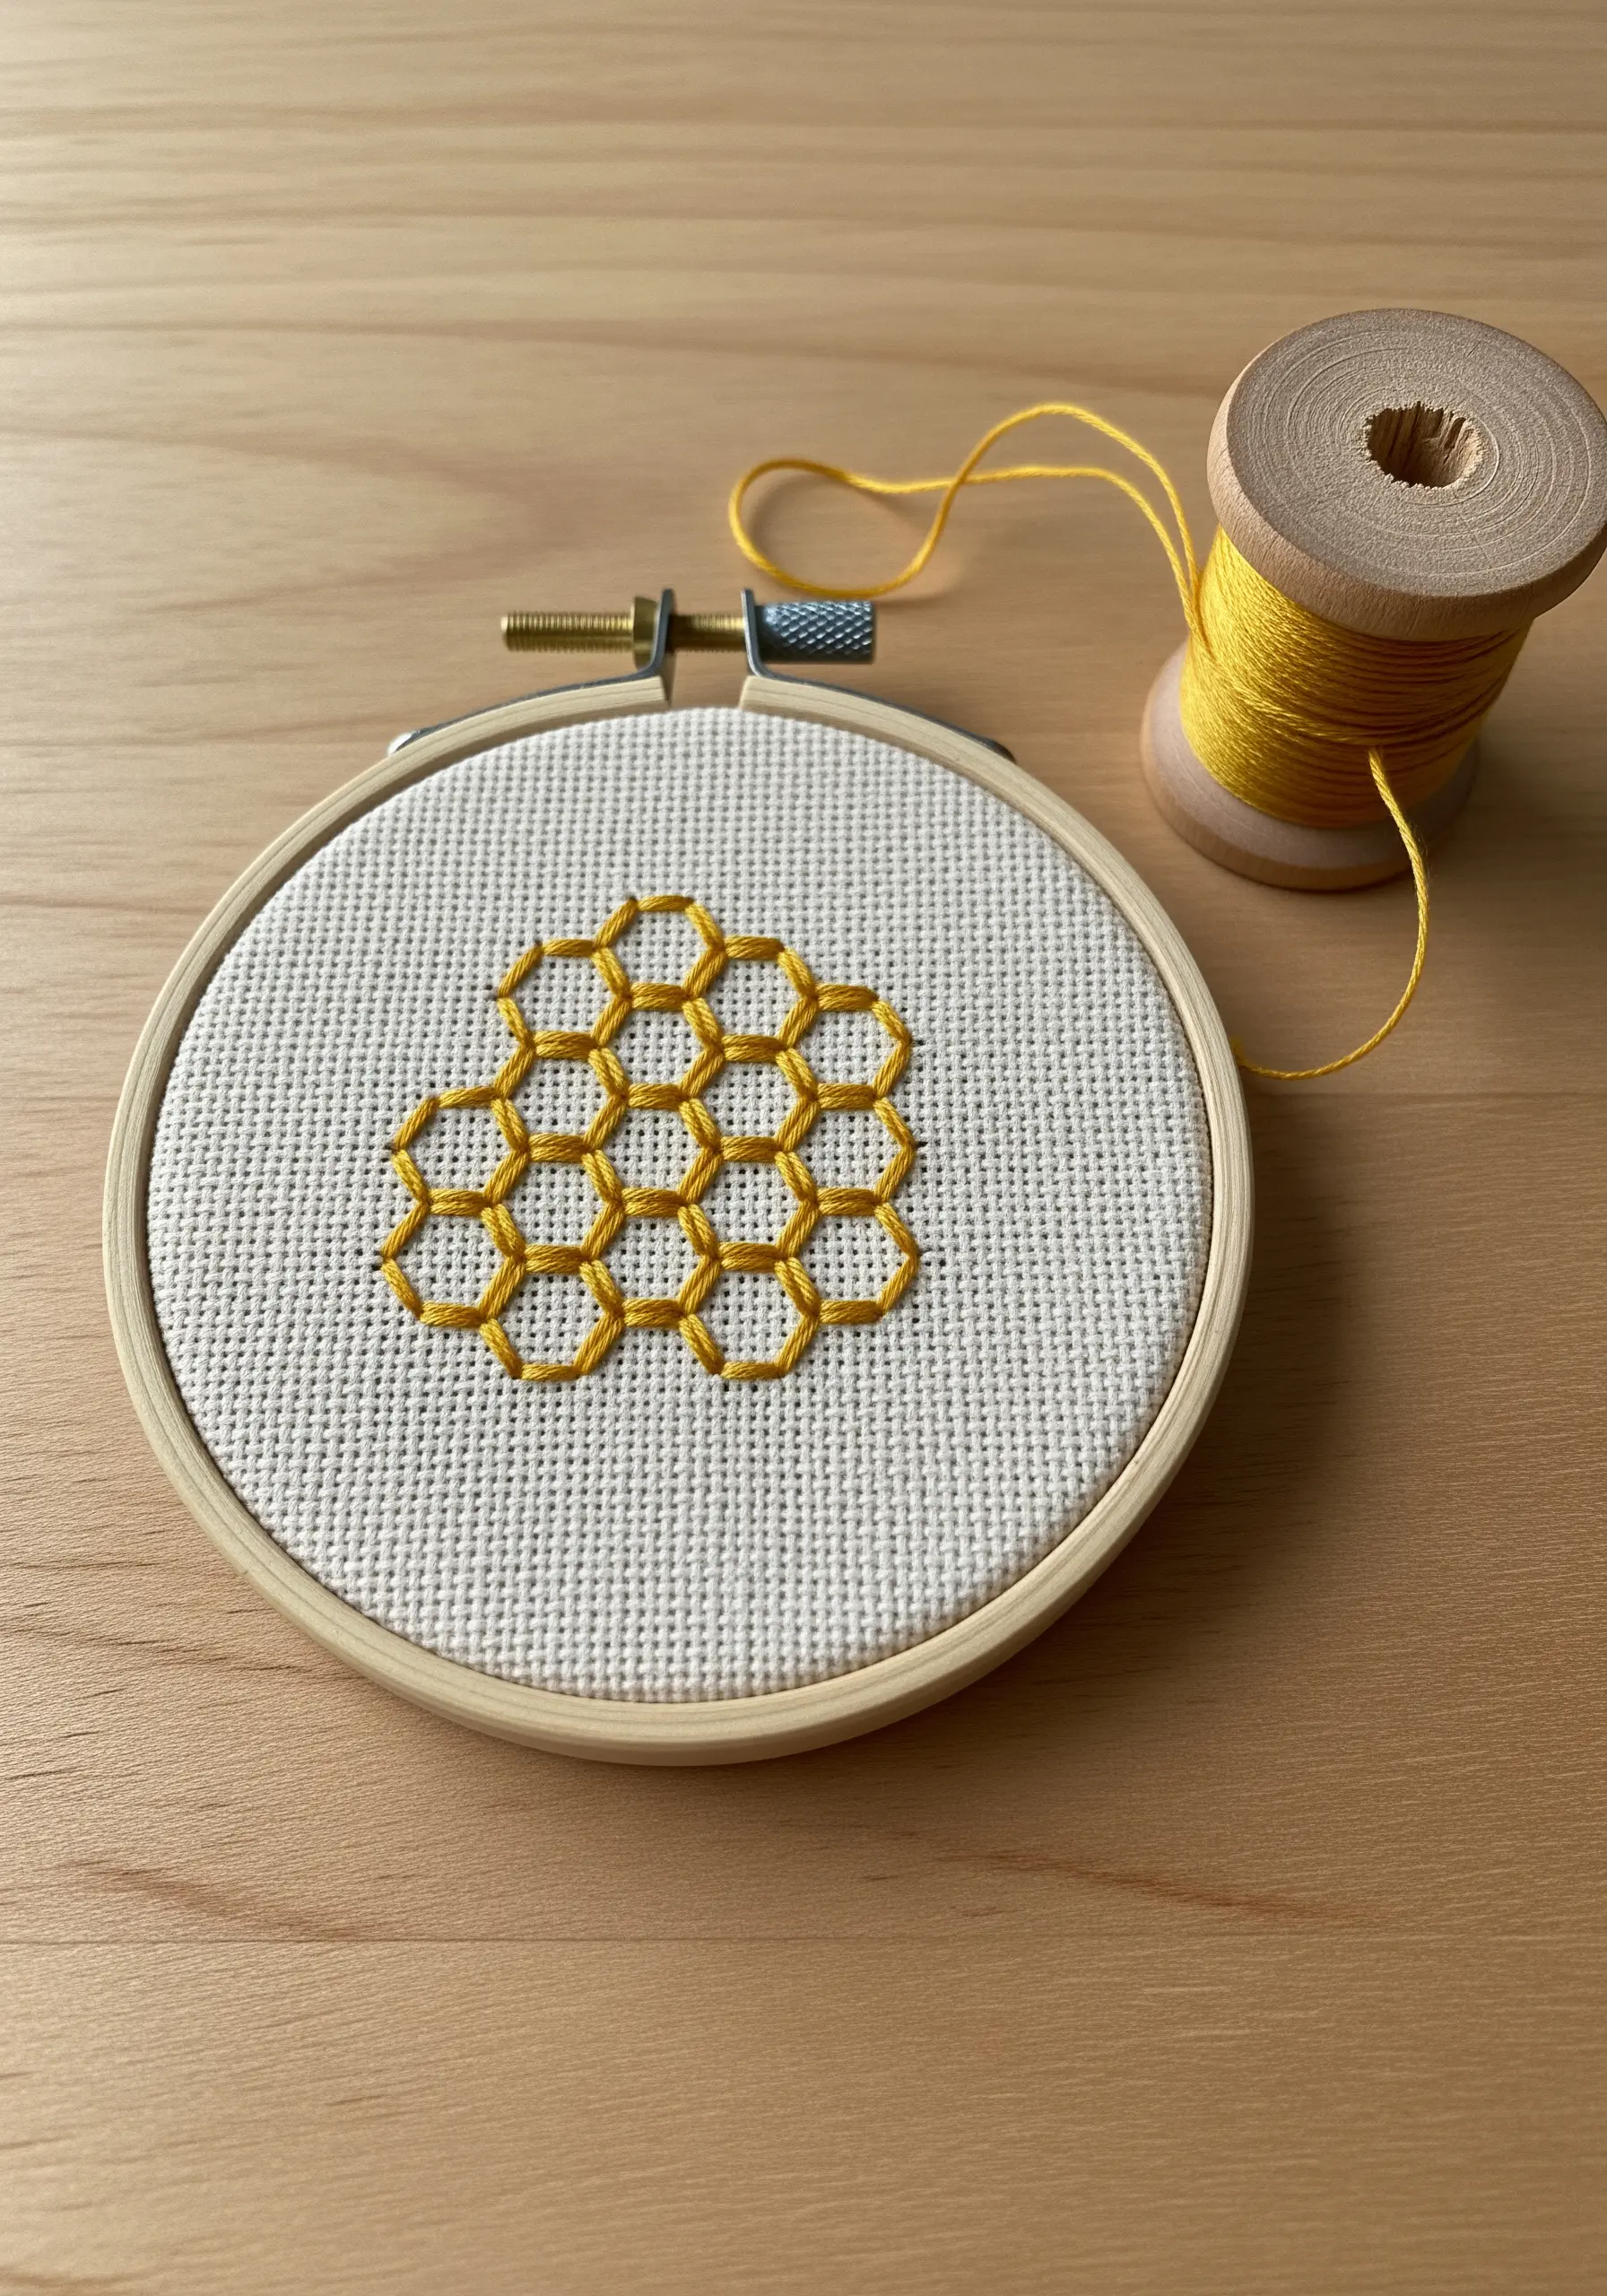
For clean, modern geometric patterns like this honeycomb, consistency is your most important tool.
Use a single strand of floss and a simple backstitch, focusing on keeping every stitch the exact same length.
Aida cloth or a similar even-weave fabric can act as a natural grid, helping you maintain perfect symmetry.
This minimalist approach turns a basic outline into a sharp, graphic statement that works beautifully on jacket pockets or tote bags.
4. Create Fluidity with Single-Thread Line Art
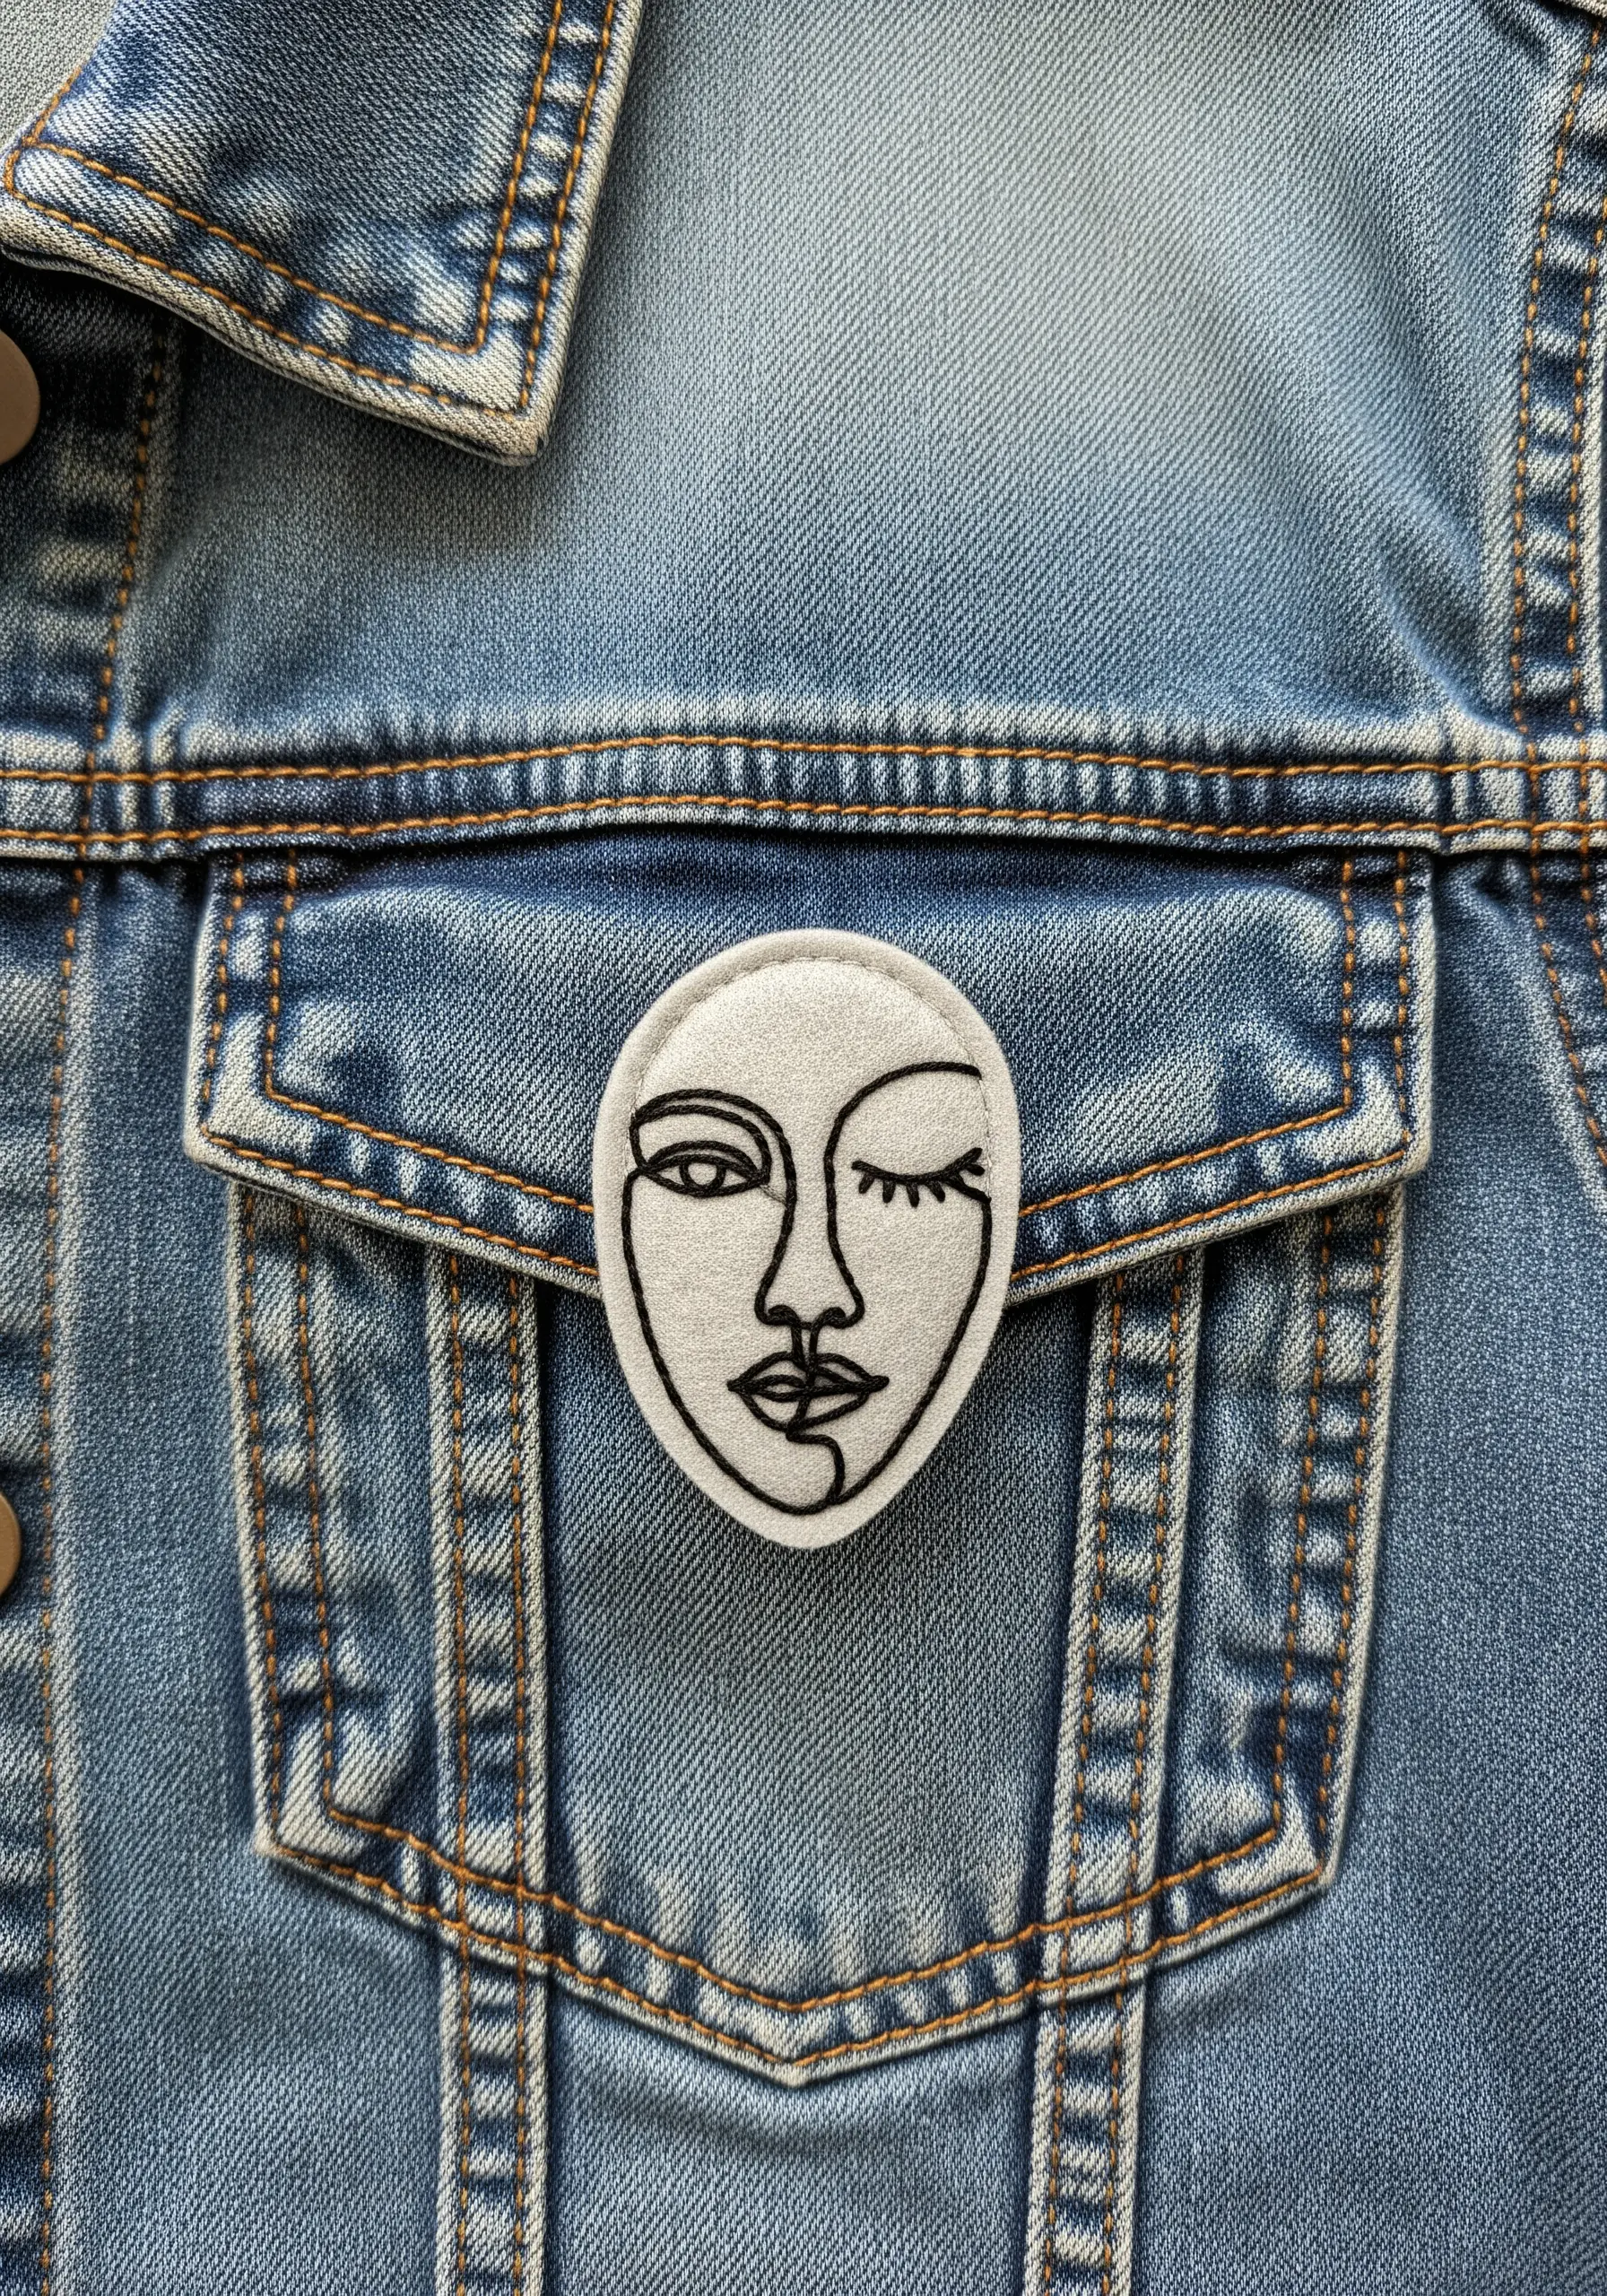
To capture the expressive quality of a continuous line drawing, stitch your design using a single strand of black floss.
Use a split stitch, which creates a solid, smooth line that mimics ink more effectively than a standard backstitch.
Stitch this on a piece of felt, then cut it out to create a durable, flexible patch you can pin or sew onto denim.
This method transforms one-line embroidery into a wearable piece of art.
5. Add Dimension with Directional Satin Stitch
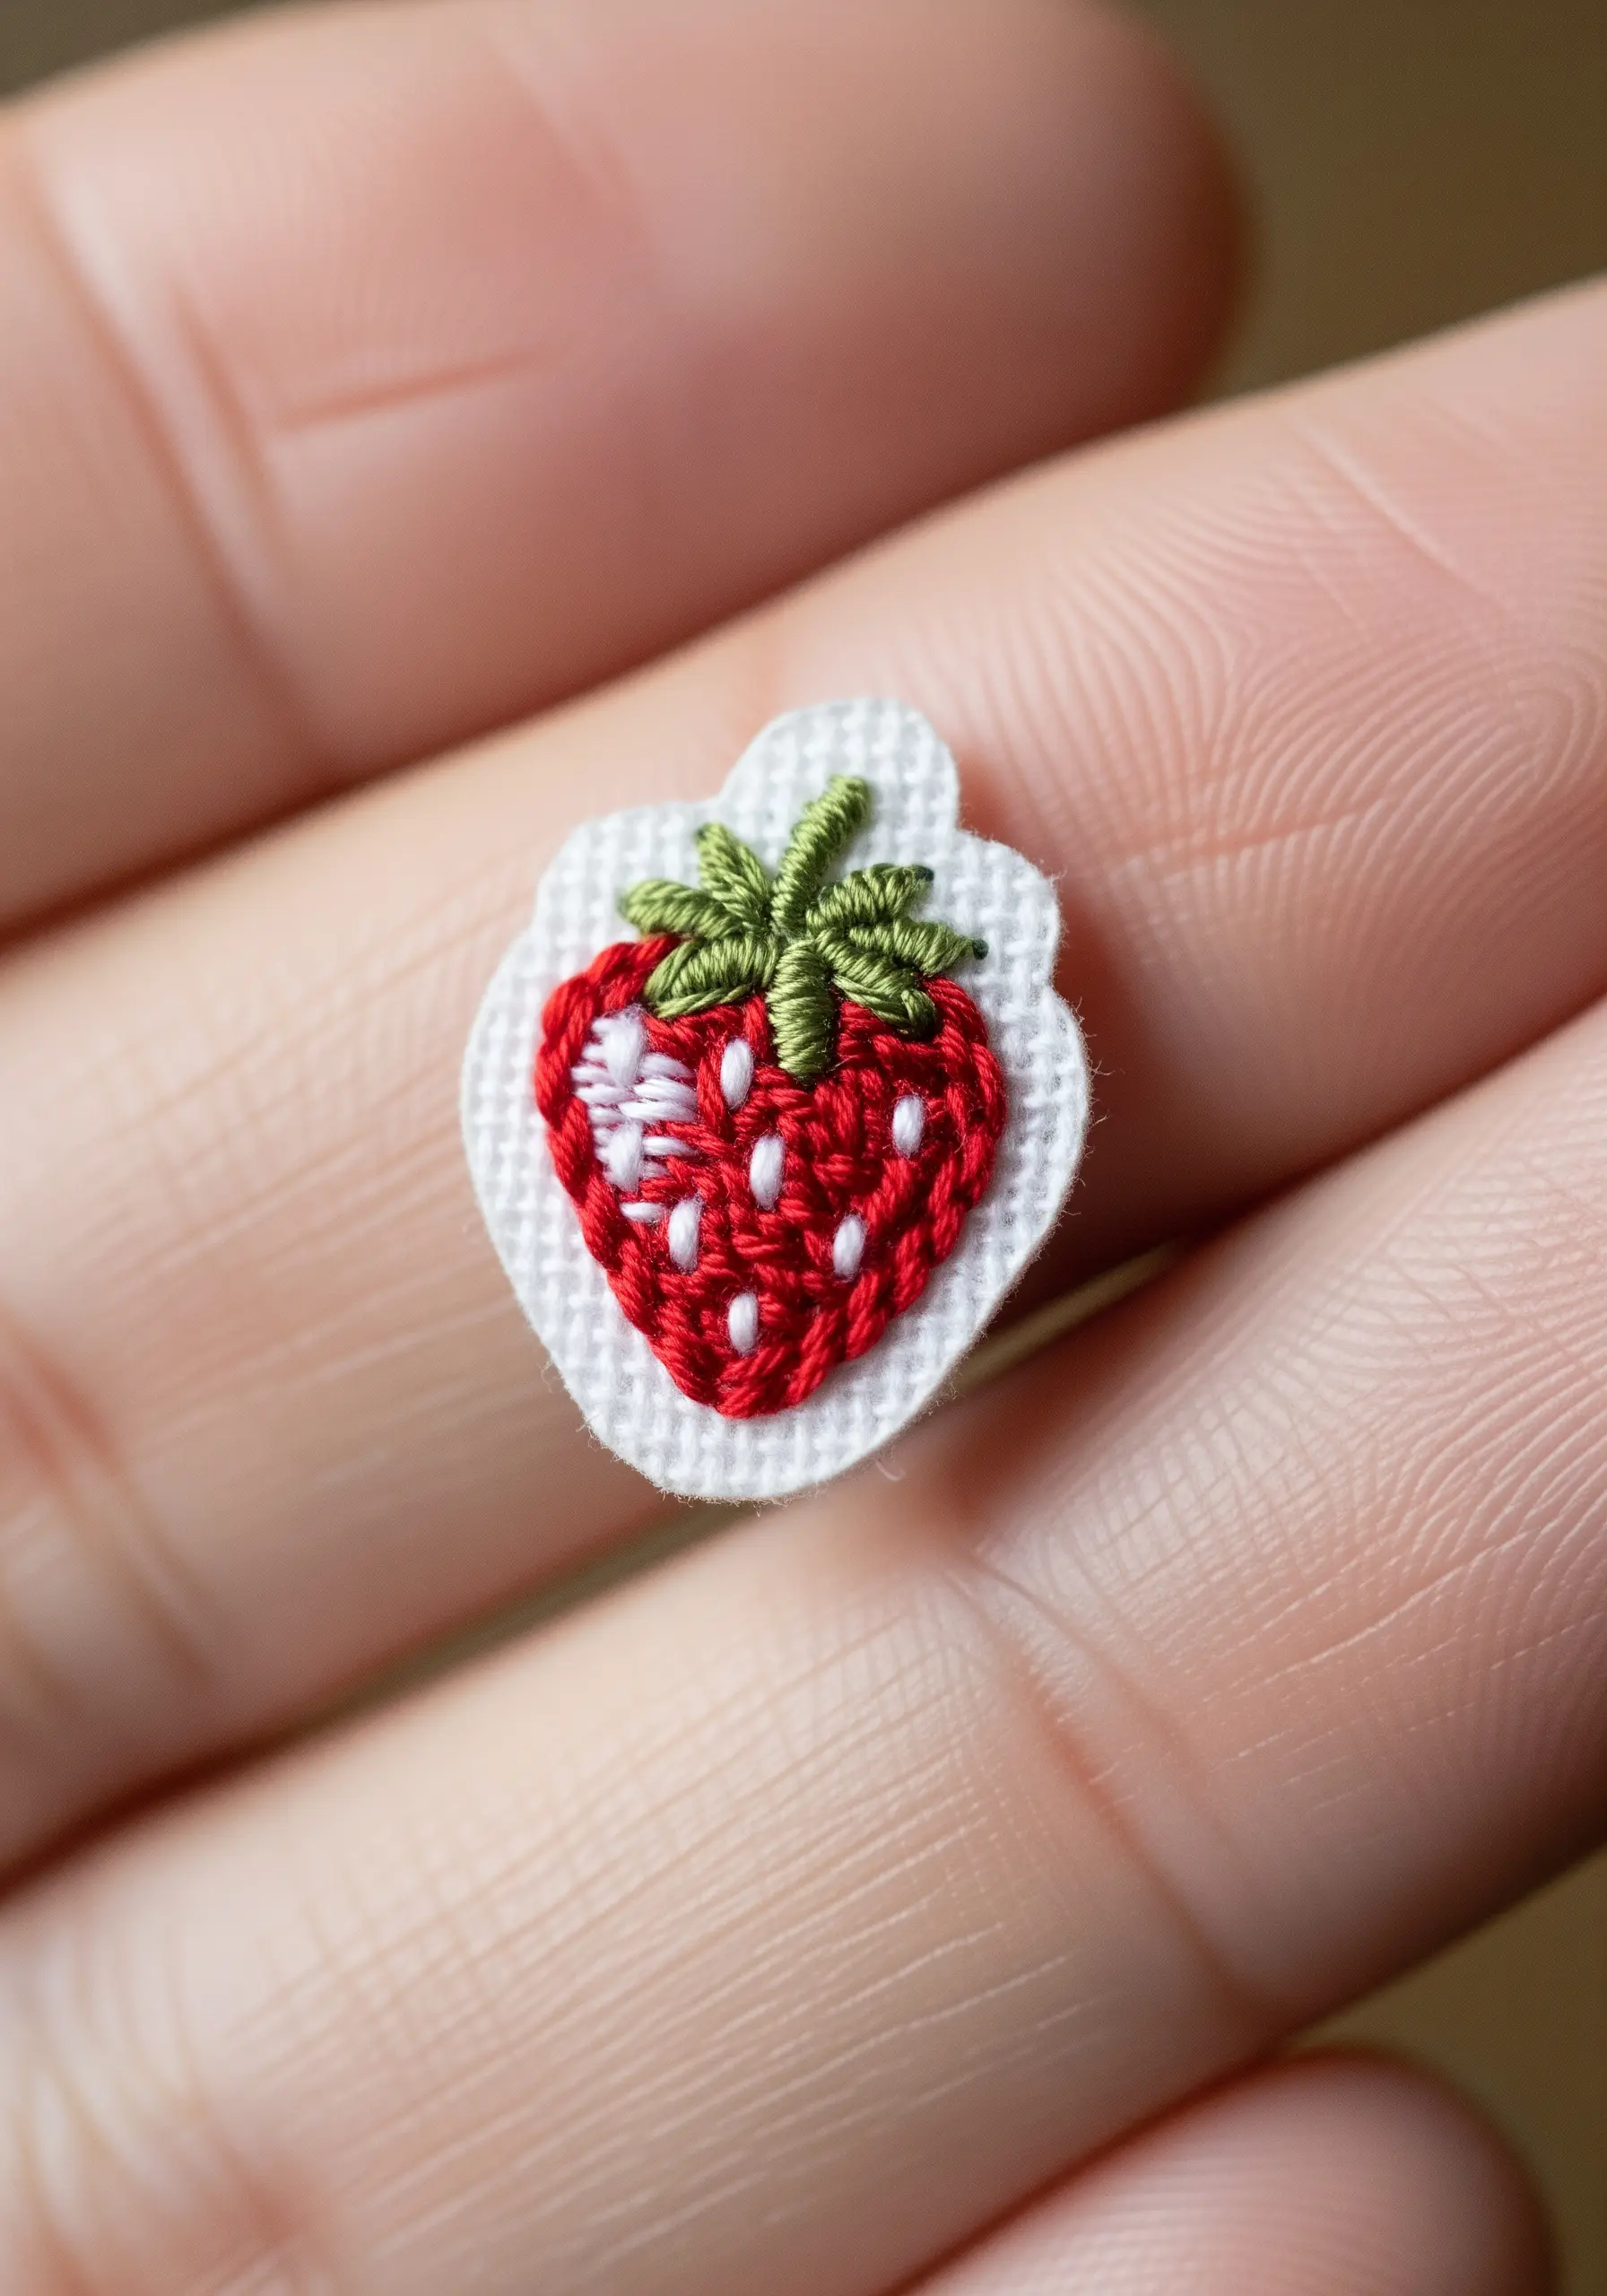
Make a tiny strawberry feel plump and realistic by paying close attention to the direction of your satin stitches.
Angle the stitches to follow the natural curve of the fruit, creating a subtle, rounded effect.
Use just one or two strands of white thread to scatter tiny seed stitches (or French knots) across the surface for texture and realism.
This thoughtful approach to stitch direction is what separates a flat motif from a dynamic, lifelike one.
6. Define Silhouettes with a Satin Stitch Border
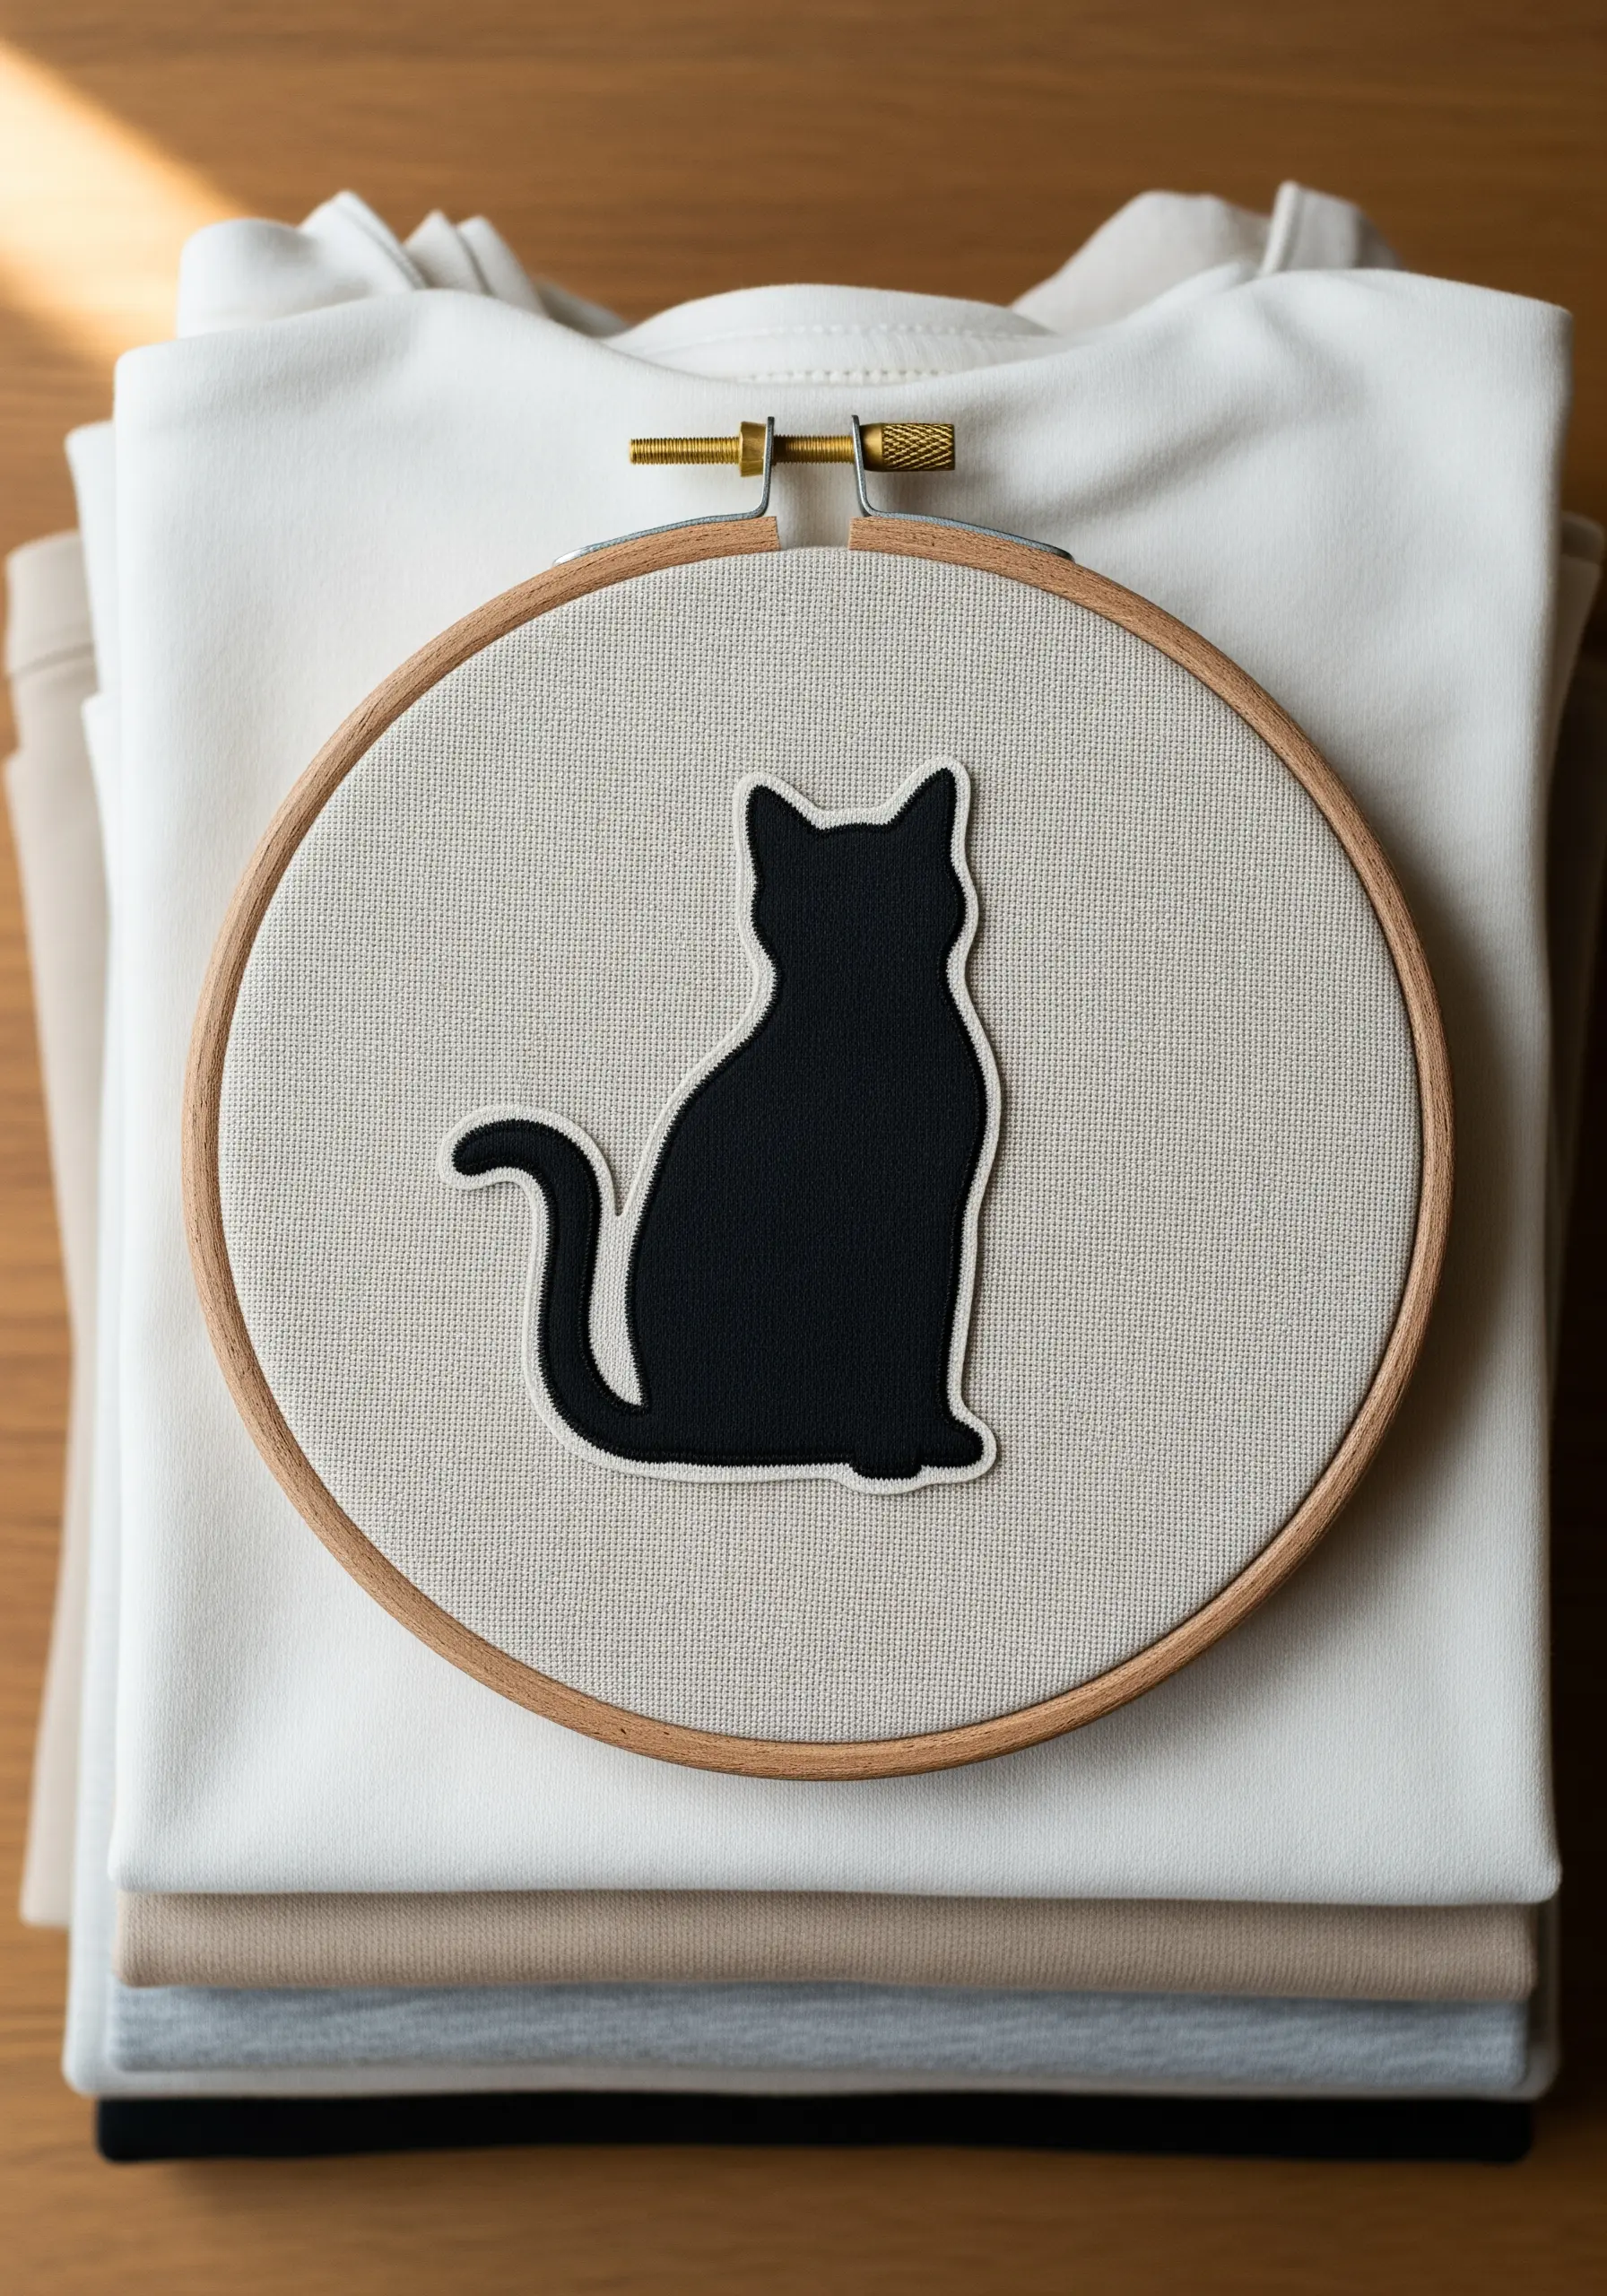
For a bold silhouette patch, start by cutting your shape from a piece of non-fraying fabric like felt or ultra-suede.
Tack it onto your base fabric with a few small stitches or fabric glue.
Then, create a clean, sharp edge by outlining the entire shape with a dense satin stitch, ensuring each stitch just covers the raw edge of the appliqué.
This technique provides a polished, professional finish that makes your patch look store-bought.
7. Elevate Lettering with a Whipped Backstitch
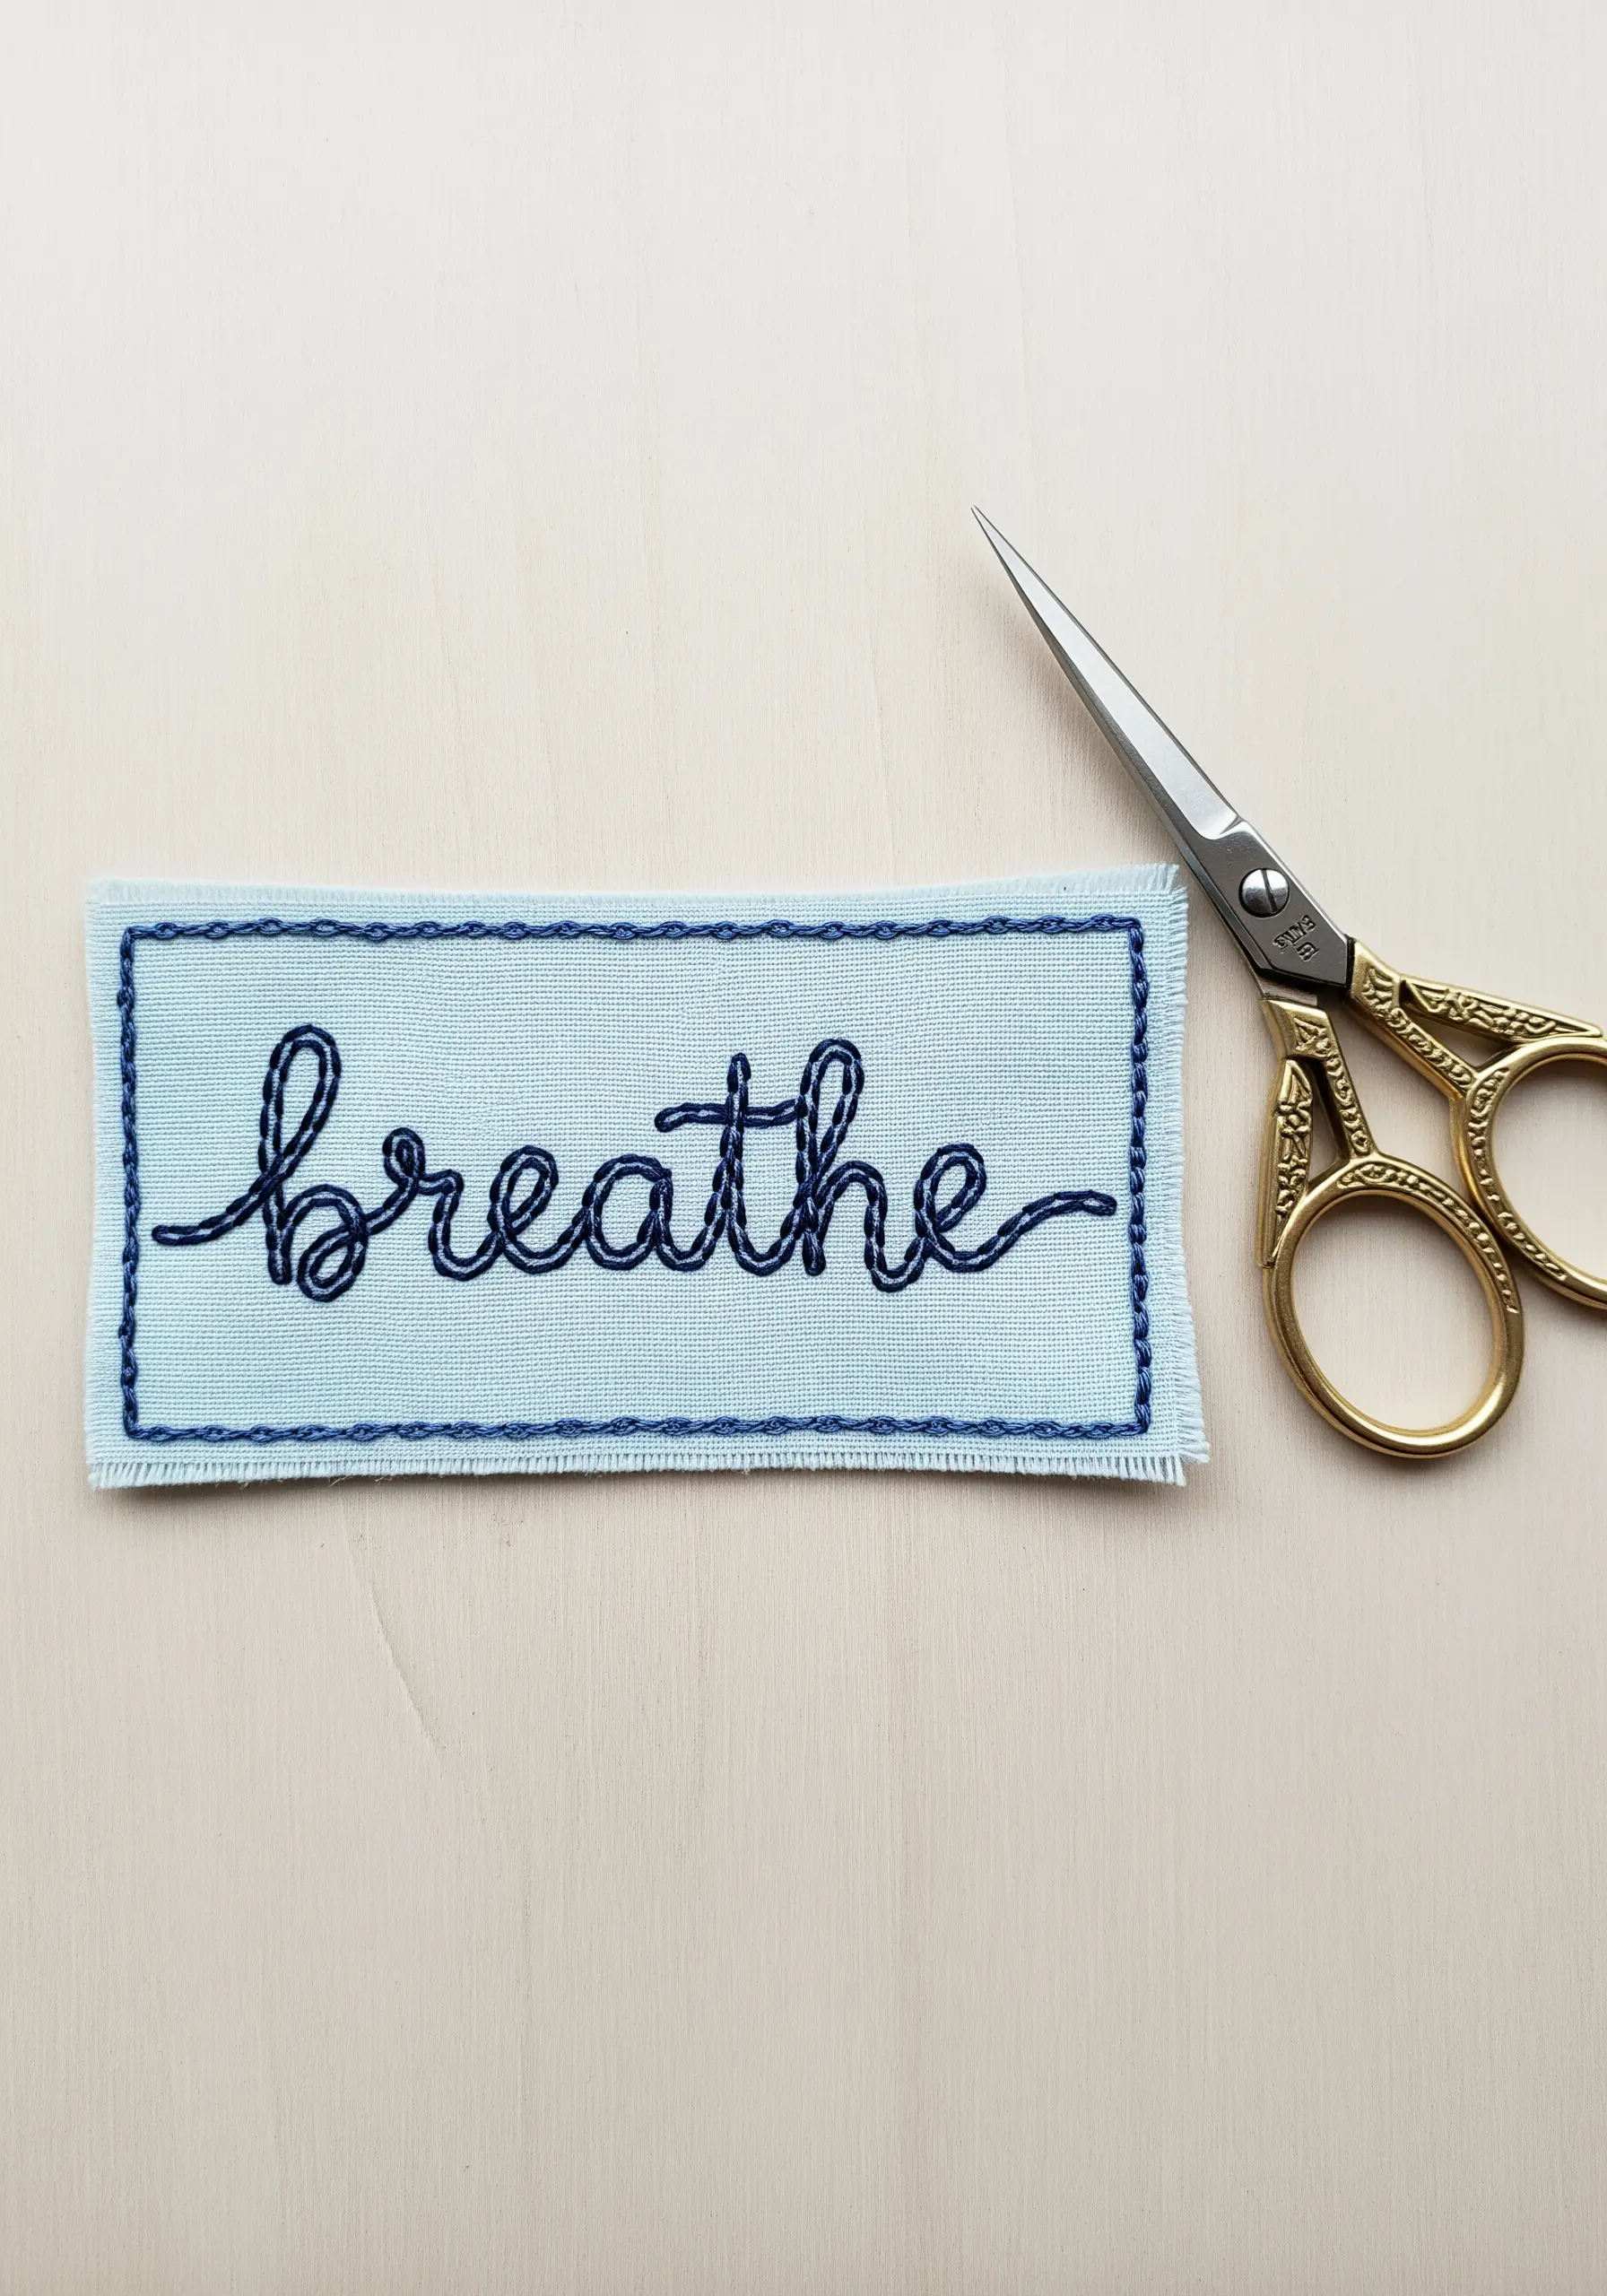
To make your embroidered script look exceptionally smooth and cord-like, use a whipped backstitch.
First, stitch your word using a standard backstitch. Then, without piercing the fabric, slide your needle under each backstitch, wrapping the thread around the stitched line.
This technique eliminates the segmented look of a regular backstitch, creating a fluid, continuous line perfect for contemporary typography.
Finish the patch with a simple running stitch border for a handmade feel.
8. Build Tactile Volume with Dense French Knots
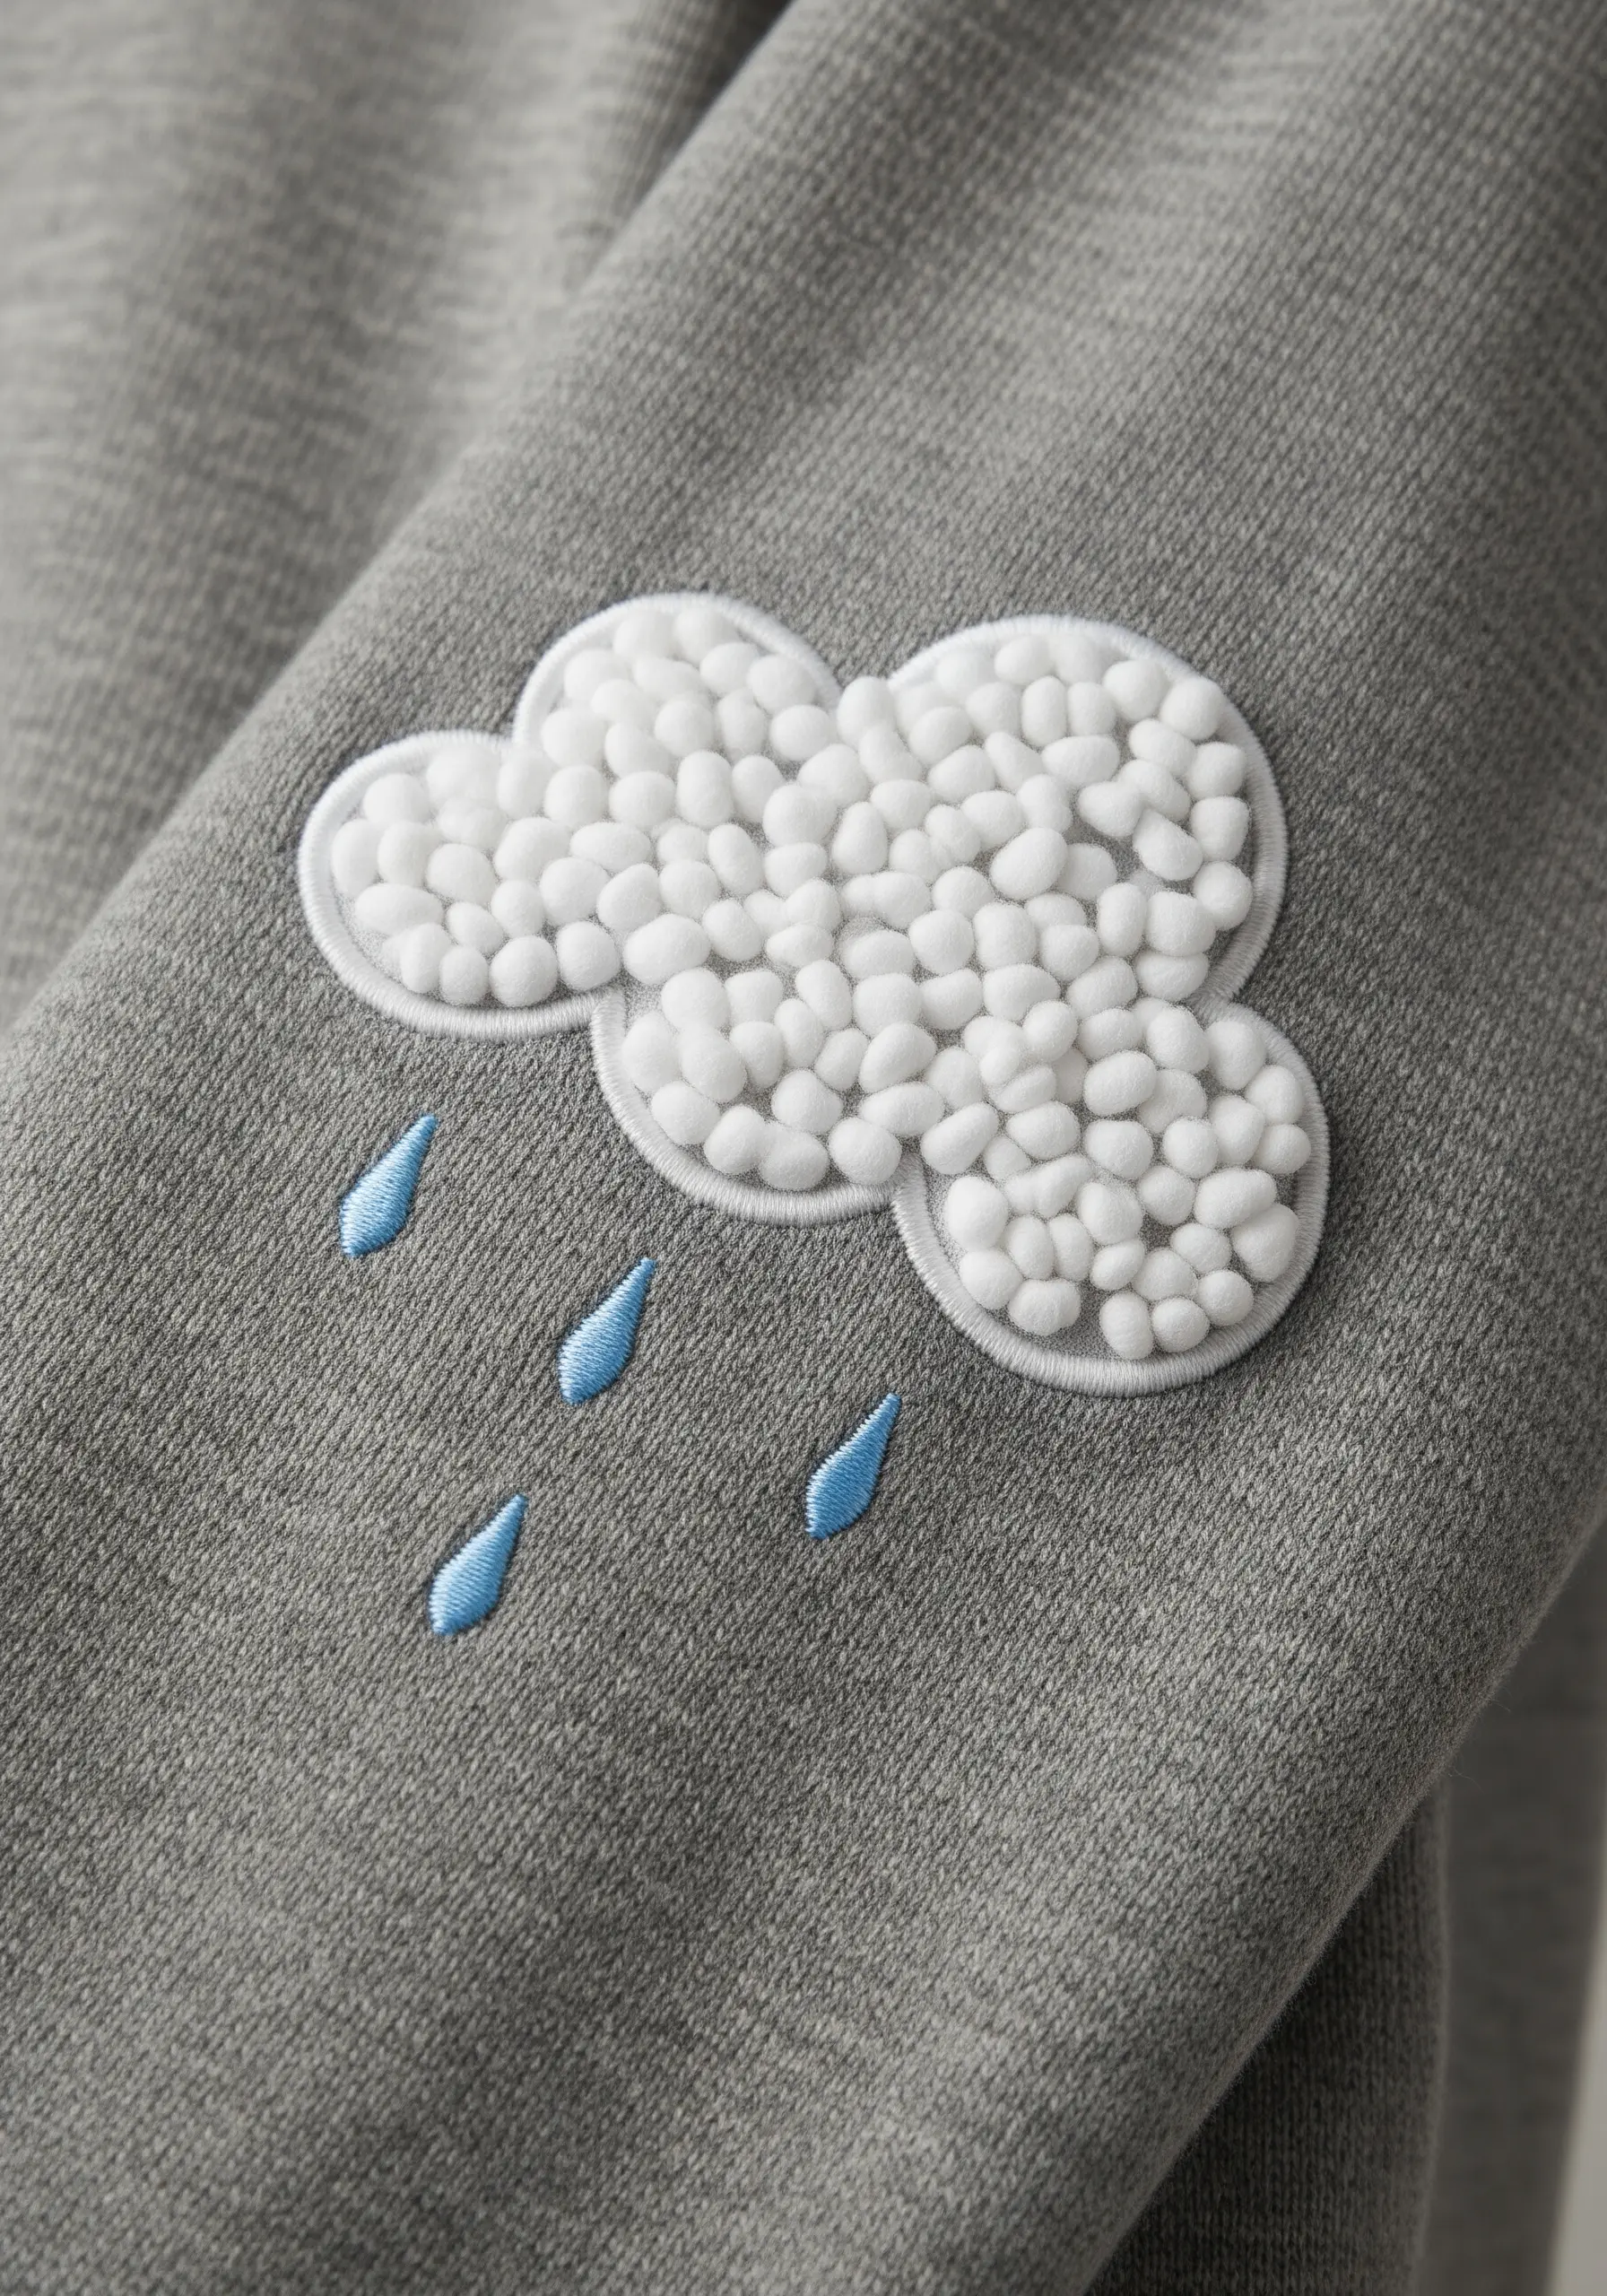
Create a wonderfully fluffy cloud by filling the shape with tightly packed French knots.
To achieve this plush, bubbly effect, outline your shape with a split stitch first. This gives you a firm boundary to fill.
Use a thicker thread (like all six strands of floss) and vary the tightness of your knots slightly to create a more organic, cloud-like surface.
This is one of the best soft texture embroidery patterns to add a playful, three-dimensional element to a sweater sleeve.
9. Paint with Thread for Depth and Realism
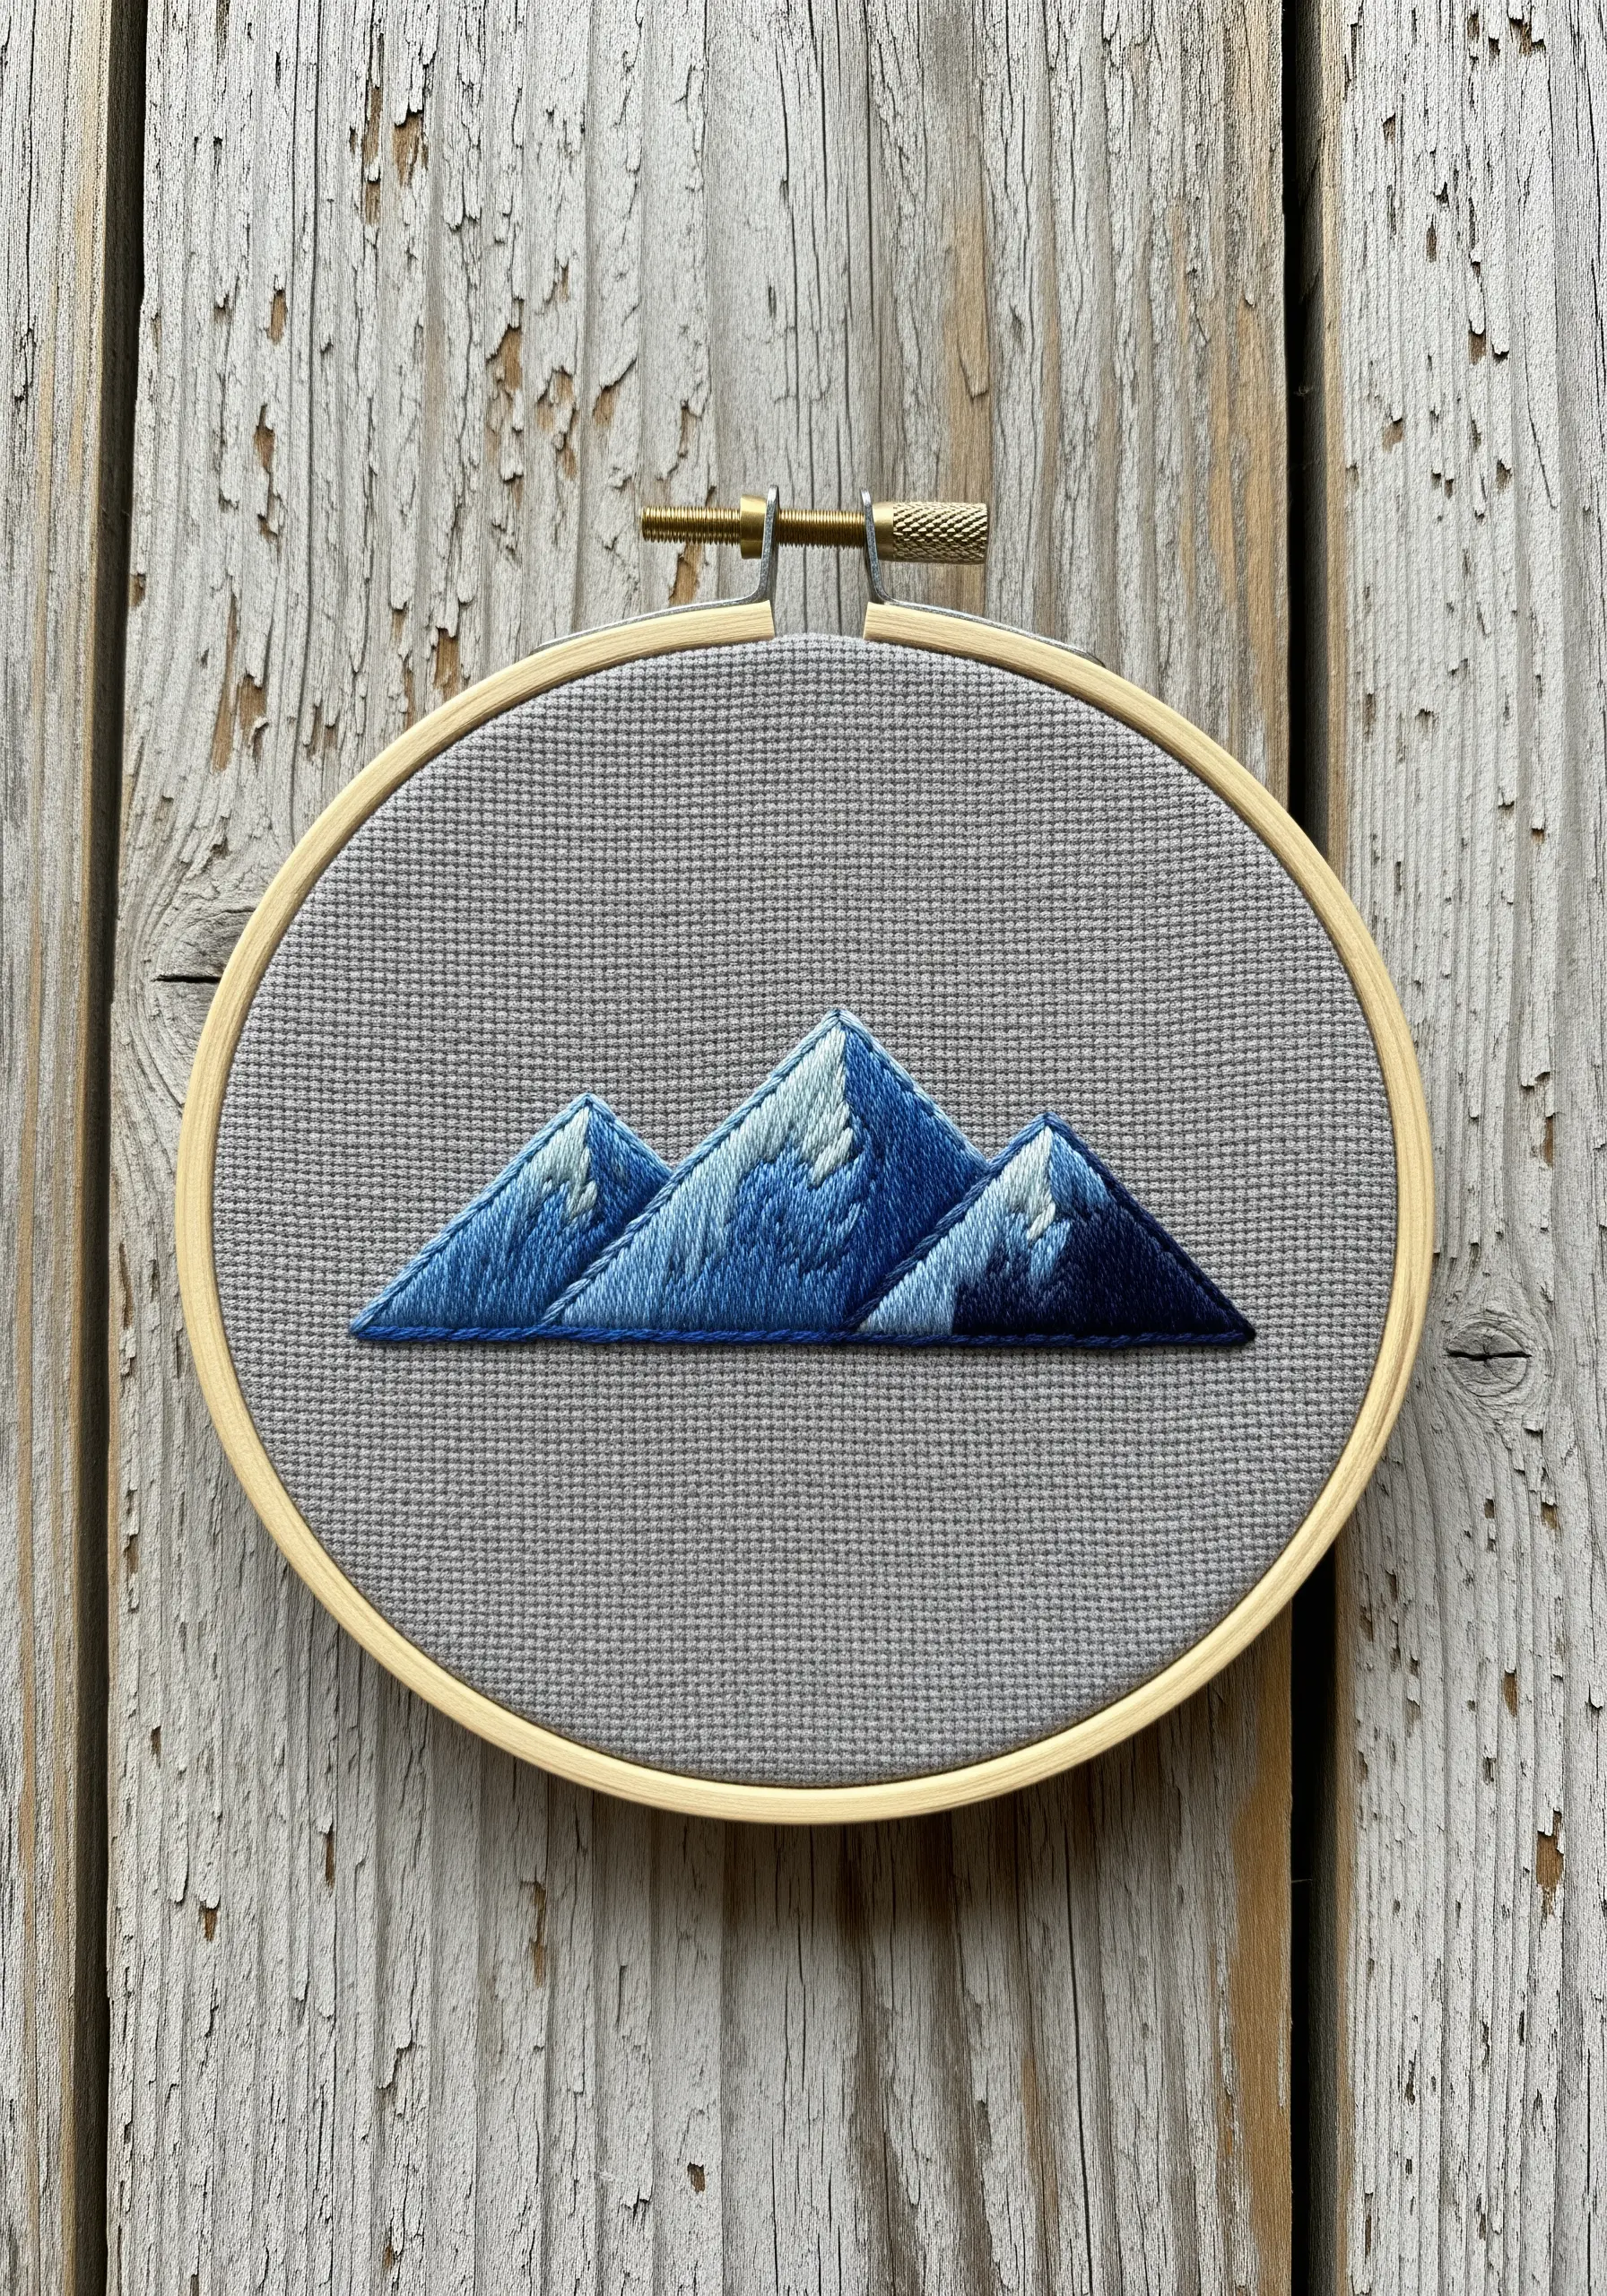
Capture the majesty of a mountain range using thread painting techniques.
Divide each peak into sections for shadows, mid-tones, and highlights, then fill them with long-and-short stitches.
Use single strands of floss to blend the colors seamlessly where they meet, creating soft, realistic transitions.
A few strategically placed white stitches at the peaks will give the impression of snow, adding the final touch to your mountain landscape.
10. Mimic Nature with Strategic Stitch Direction
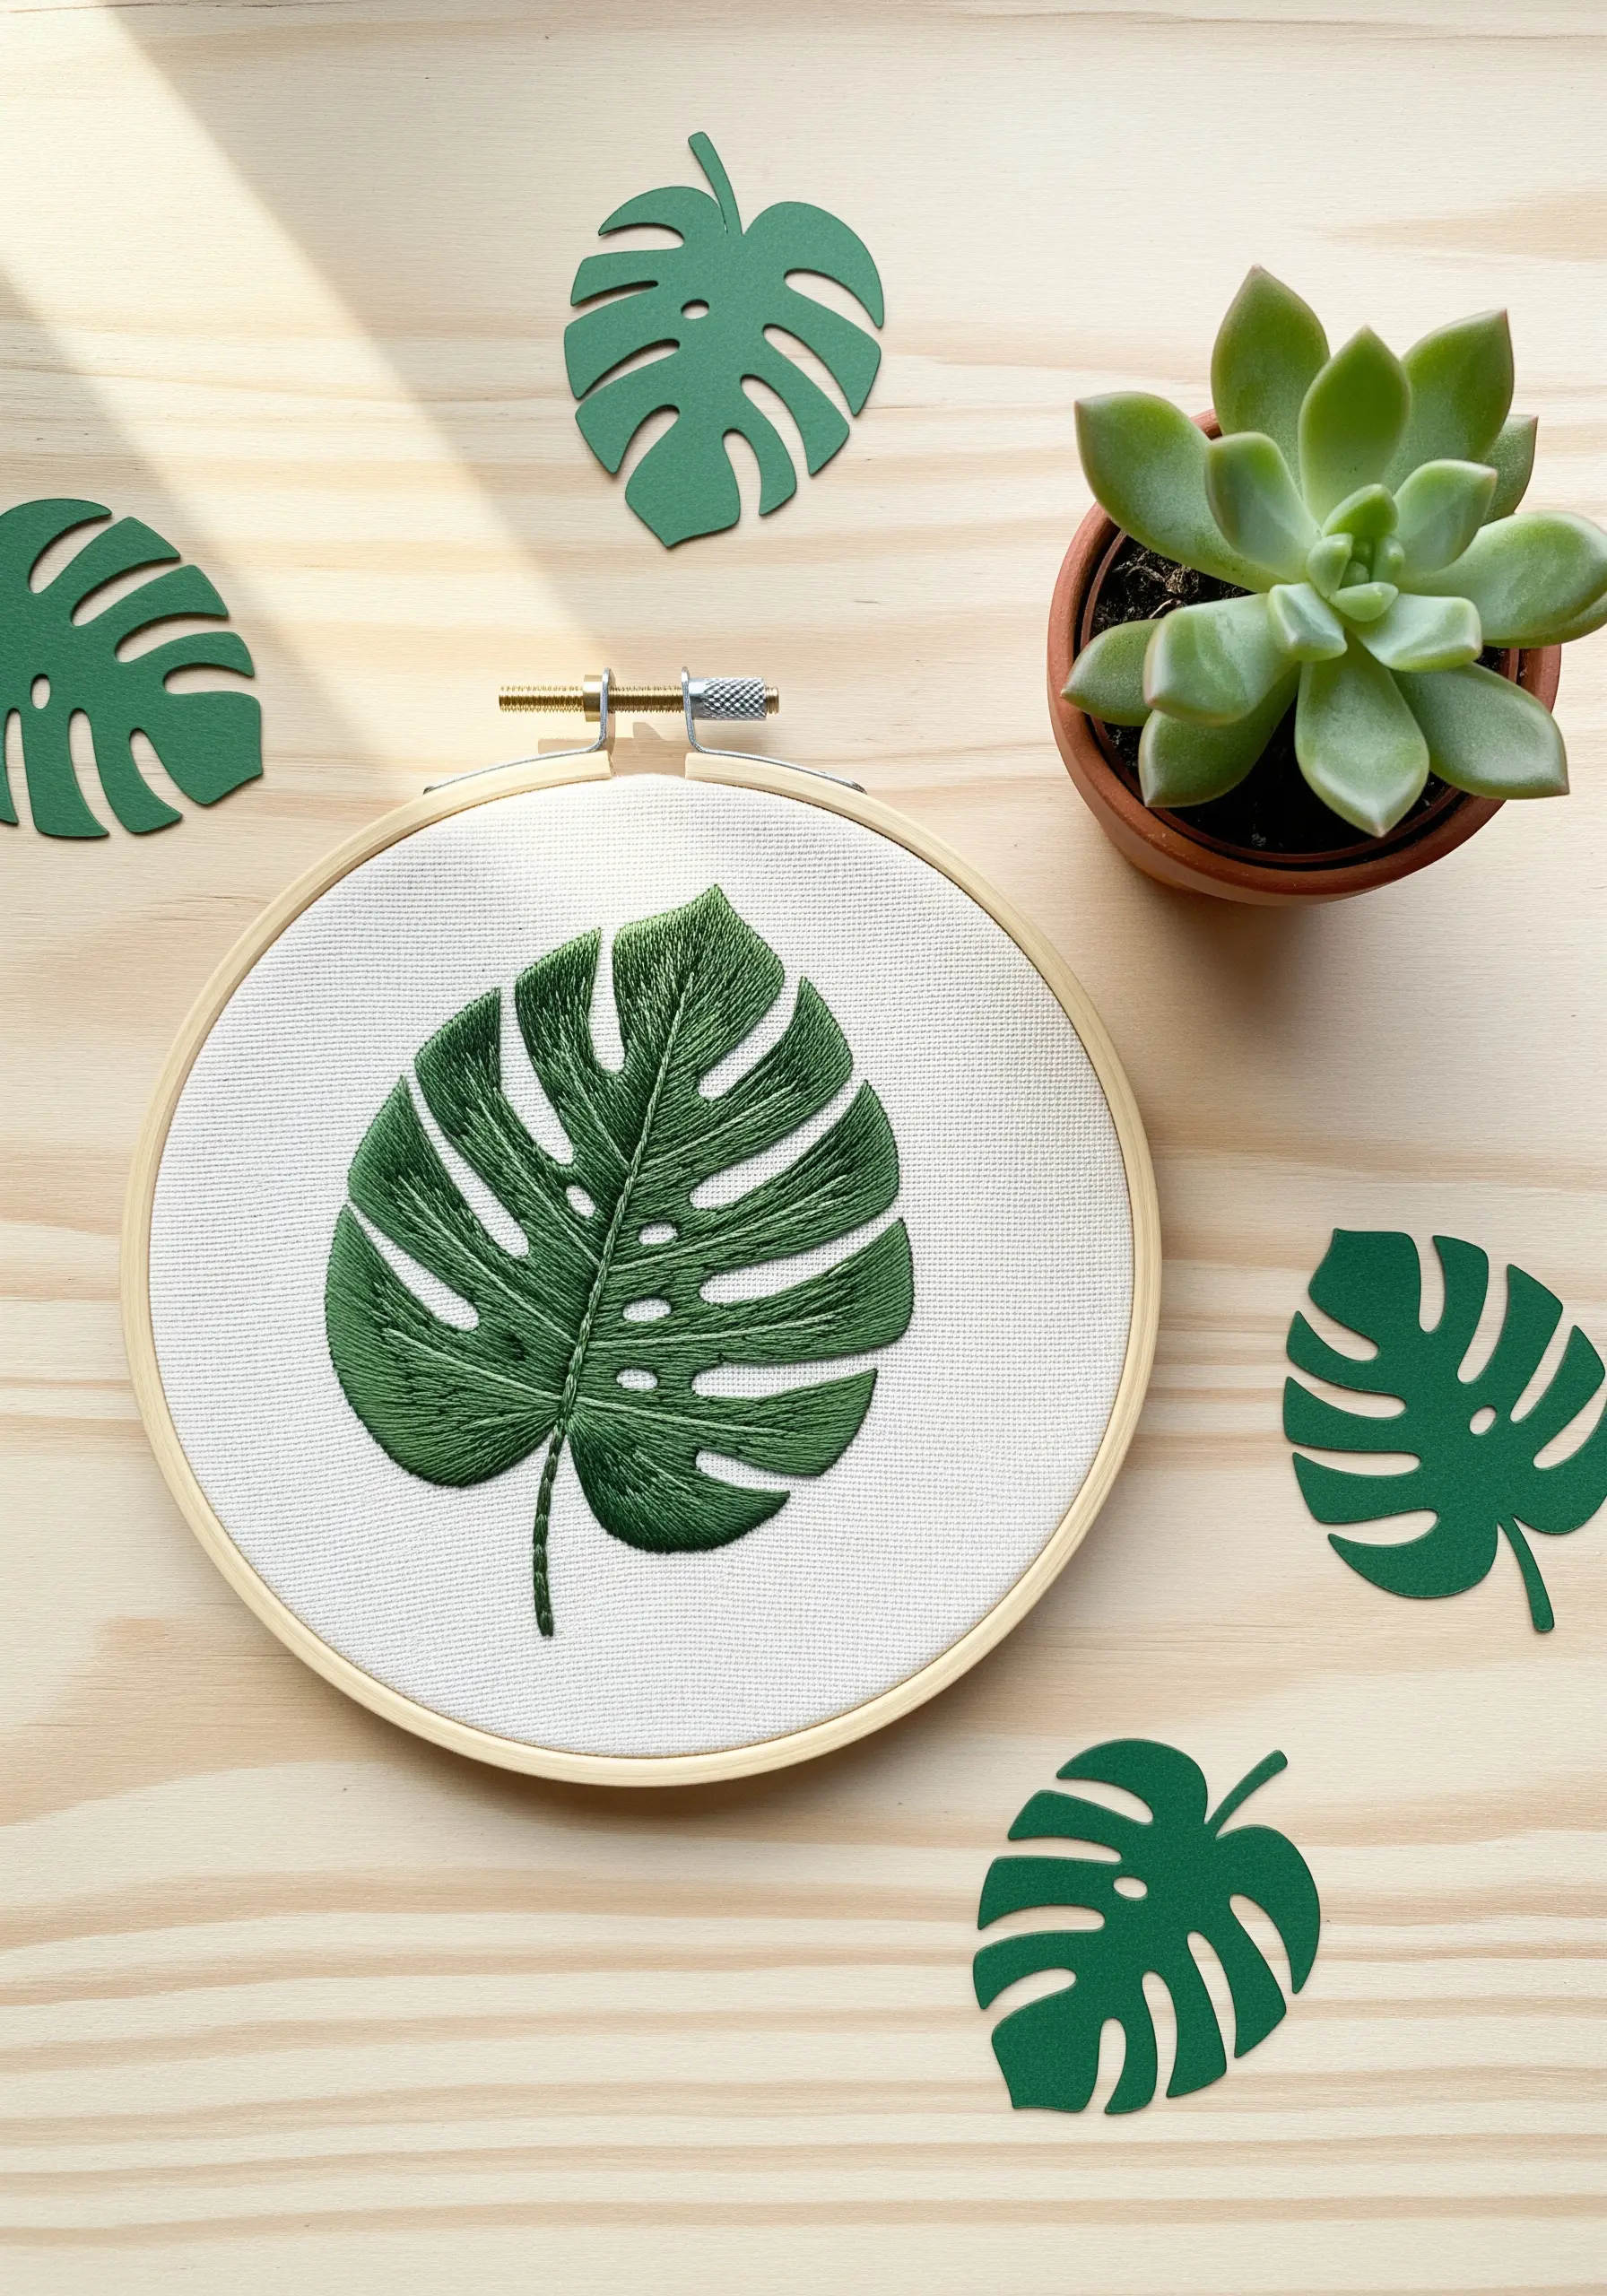
To embroider a realistic Monstera leaf, let the fishbone stitch do the work for you.
Stitch each segment of the leaf individually, angling your stitches from the outer edge down towards the central vein.
This method automatically creates the subtle lines and texture found in a real leaf, giving your work an organic, lifelike quality.
Mastering leaf-vein stitch methods like this will transform your botanical embroidery.
11. Illuminate Designs with Star Stitches
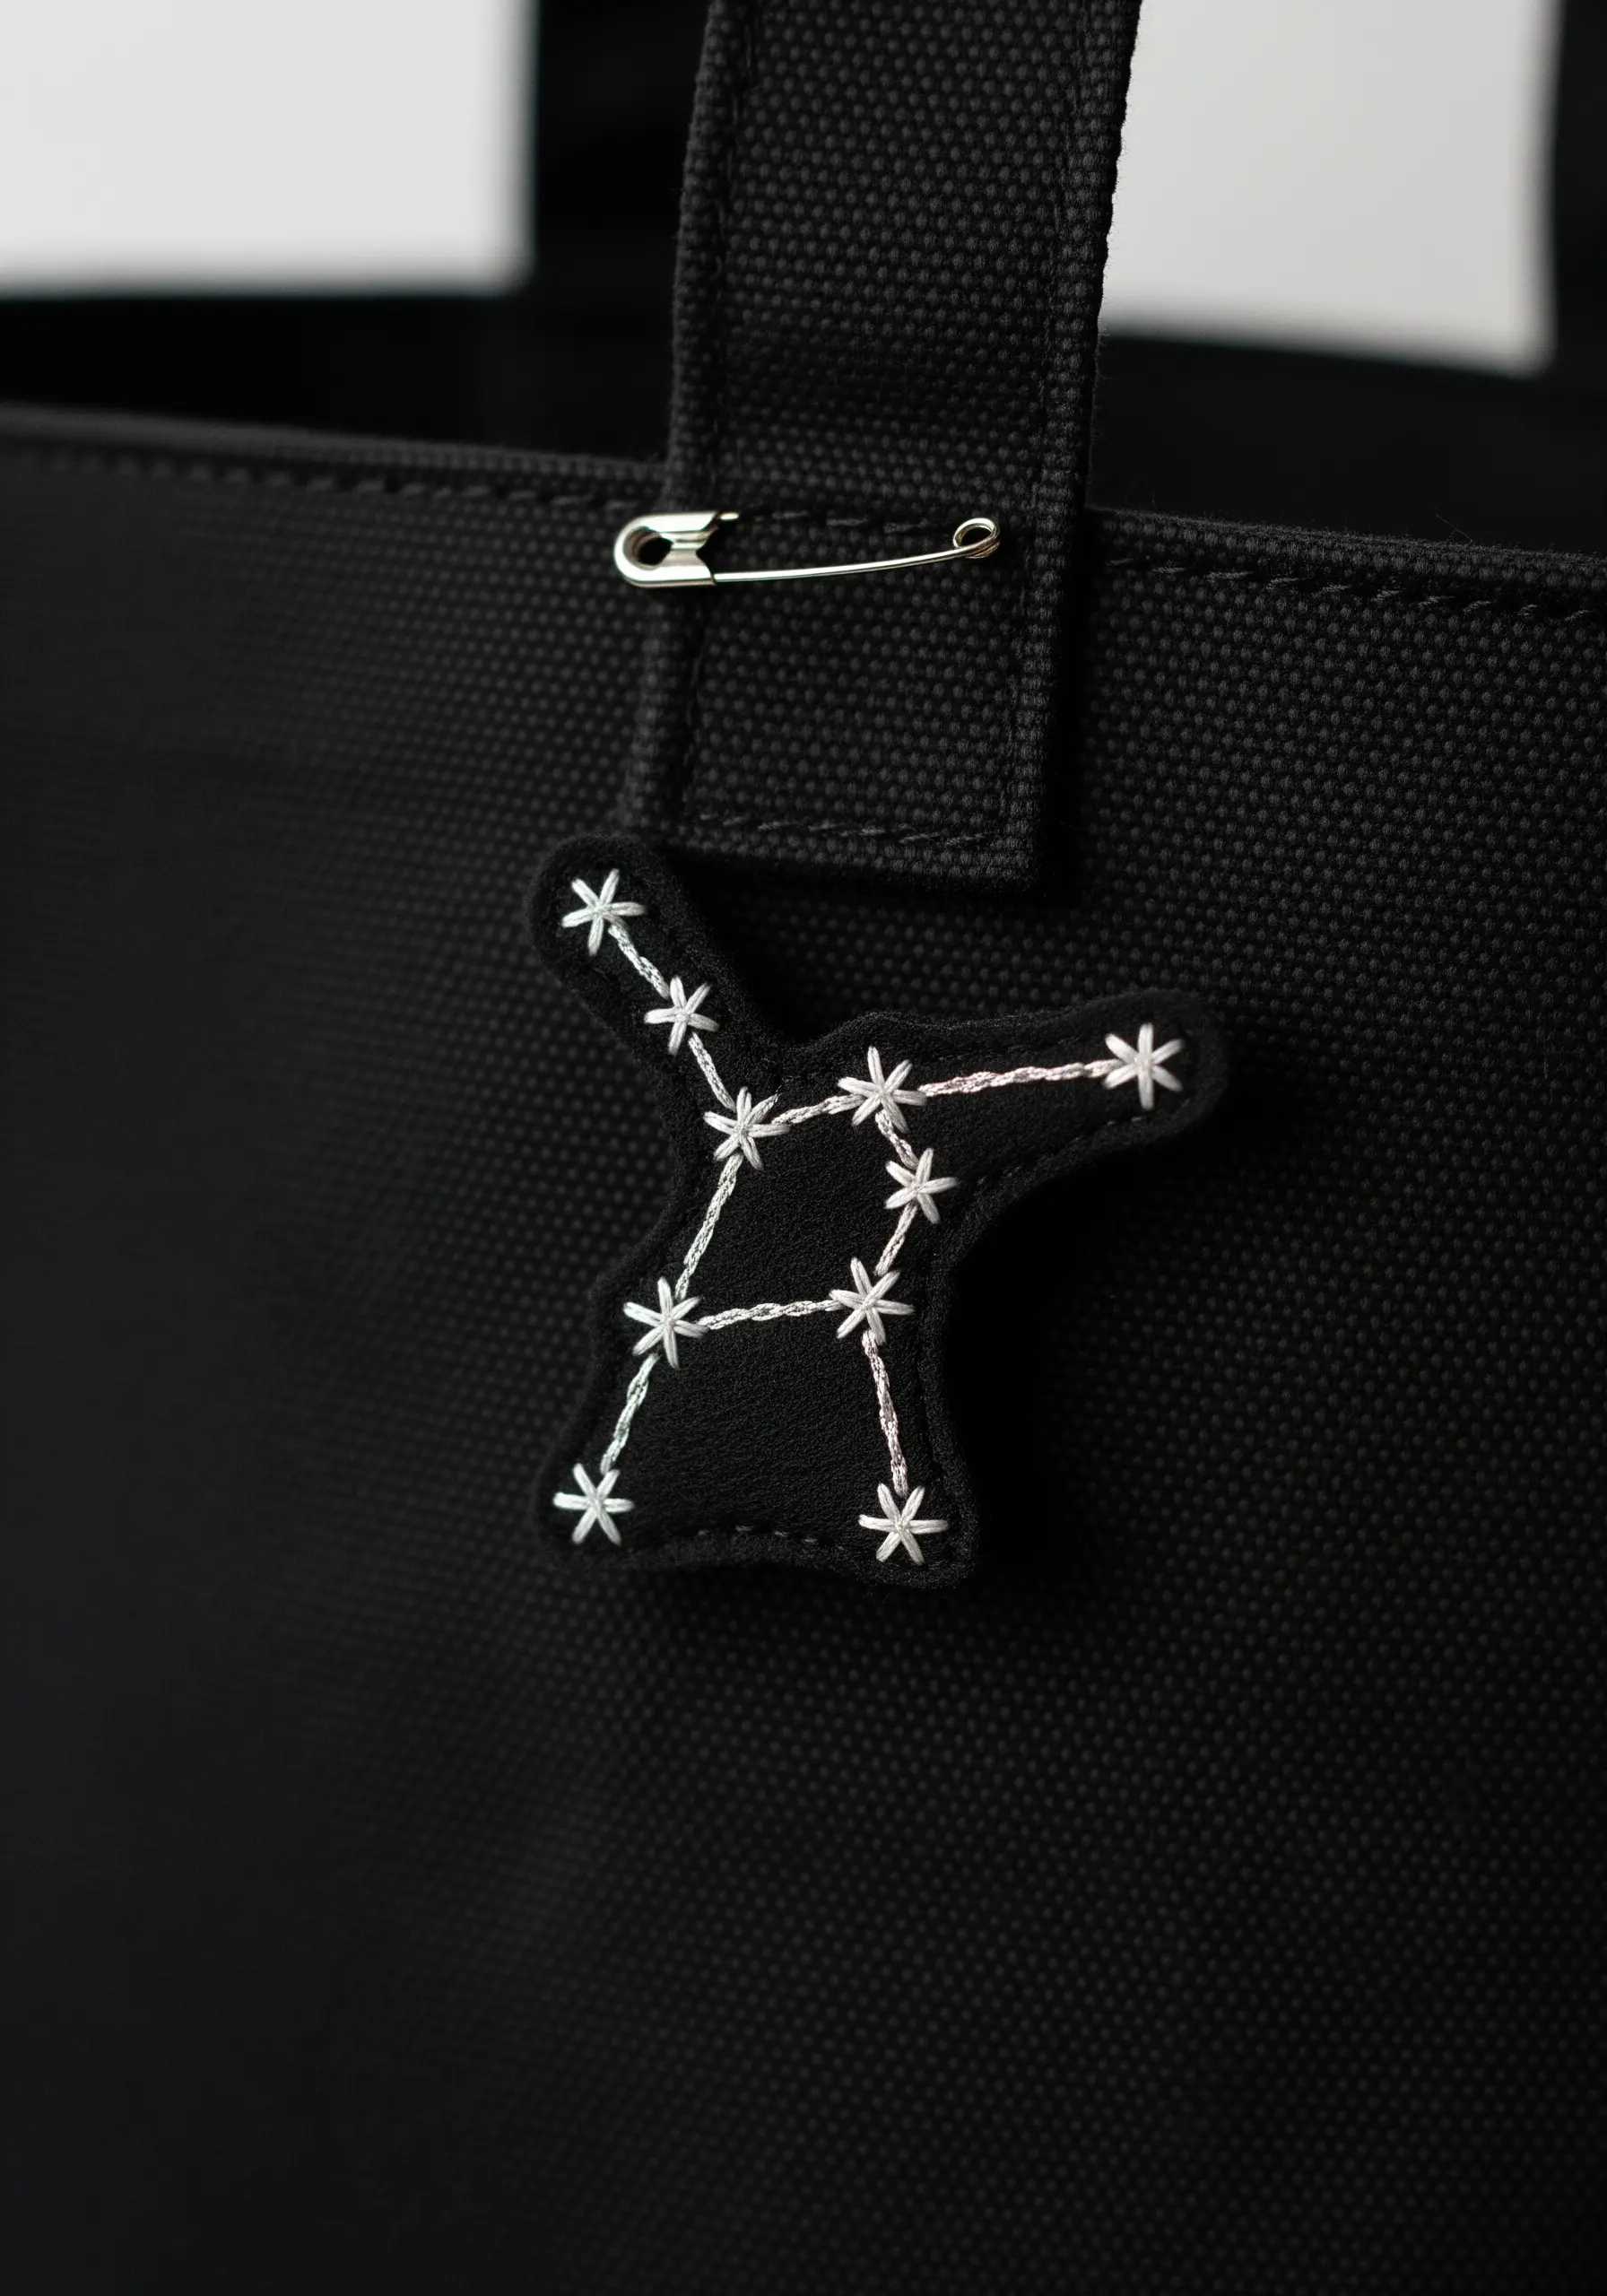
A simple constellation patch becomes magical when stitched with the right details.
Use a bright white or metallic silver thread on dark felt for high contrast.
Instead of simple dots, form each star using a star stitch or a small satin stitch asterisk, which gives them a distinct twinkle.
Connect them with a simple backstitch. This tiny detail makes the design feel intentional and special.
12. Create a 3D Effect with Padded Satin Stitch
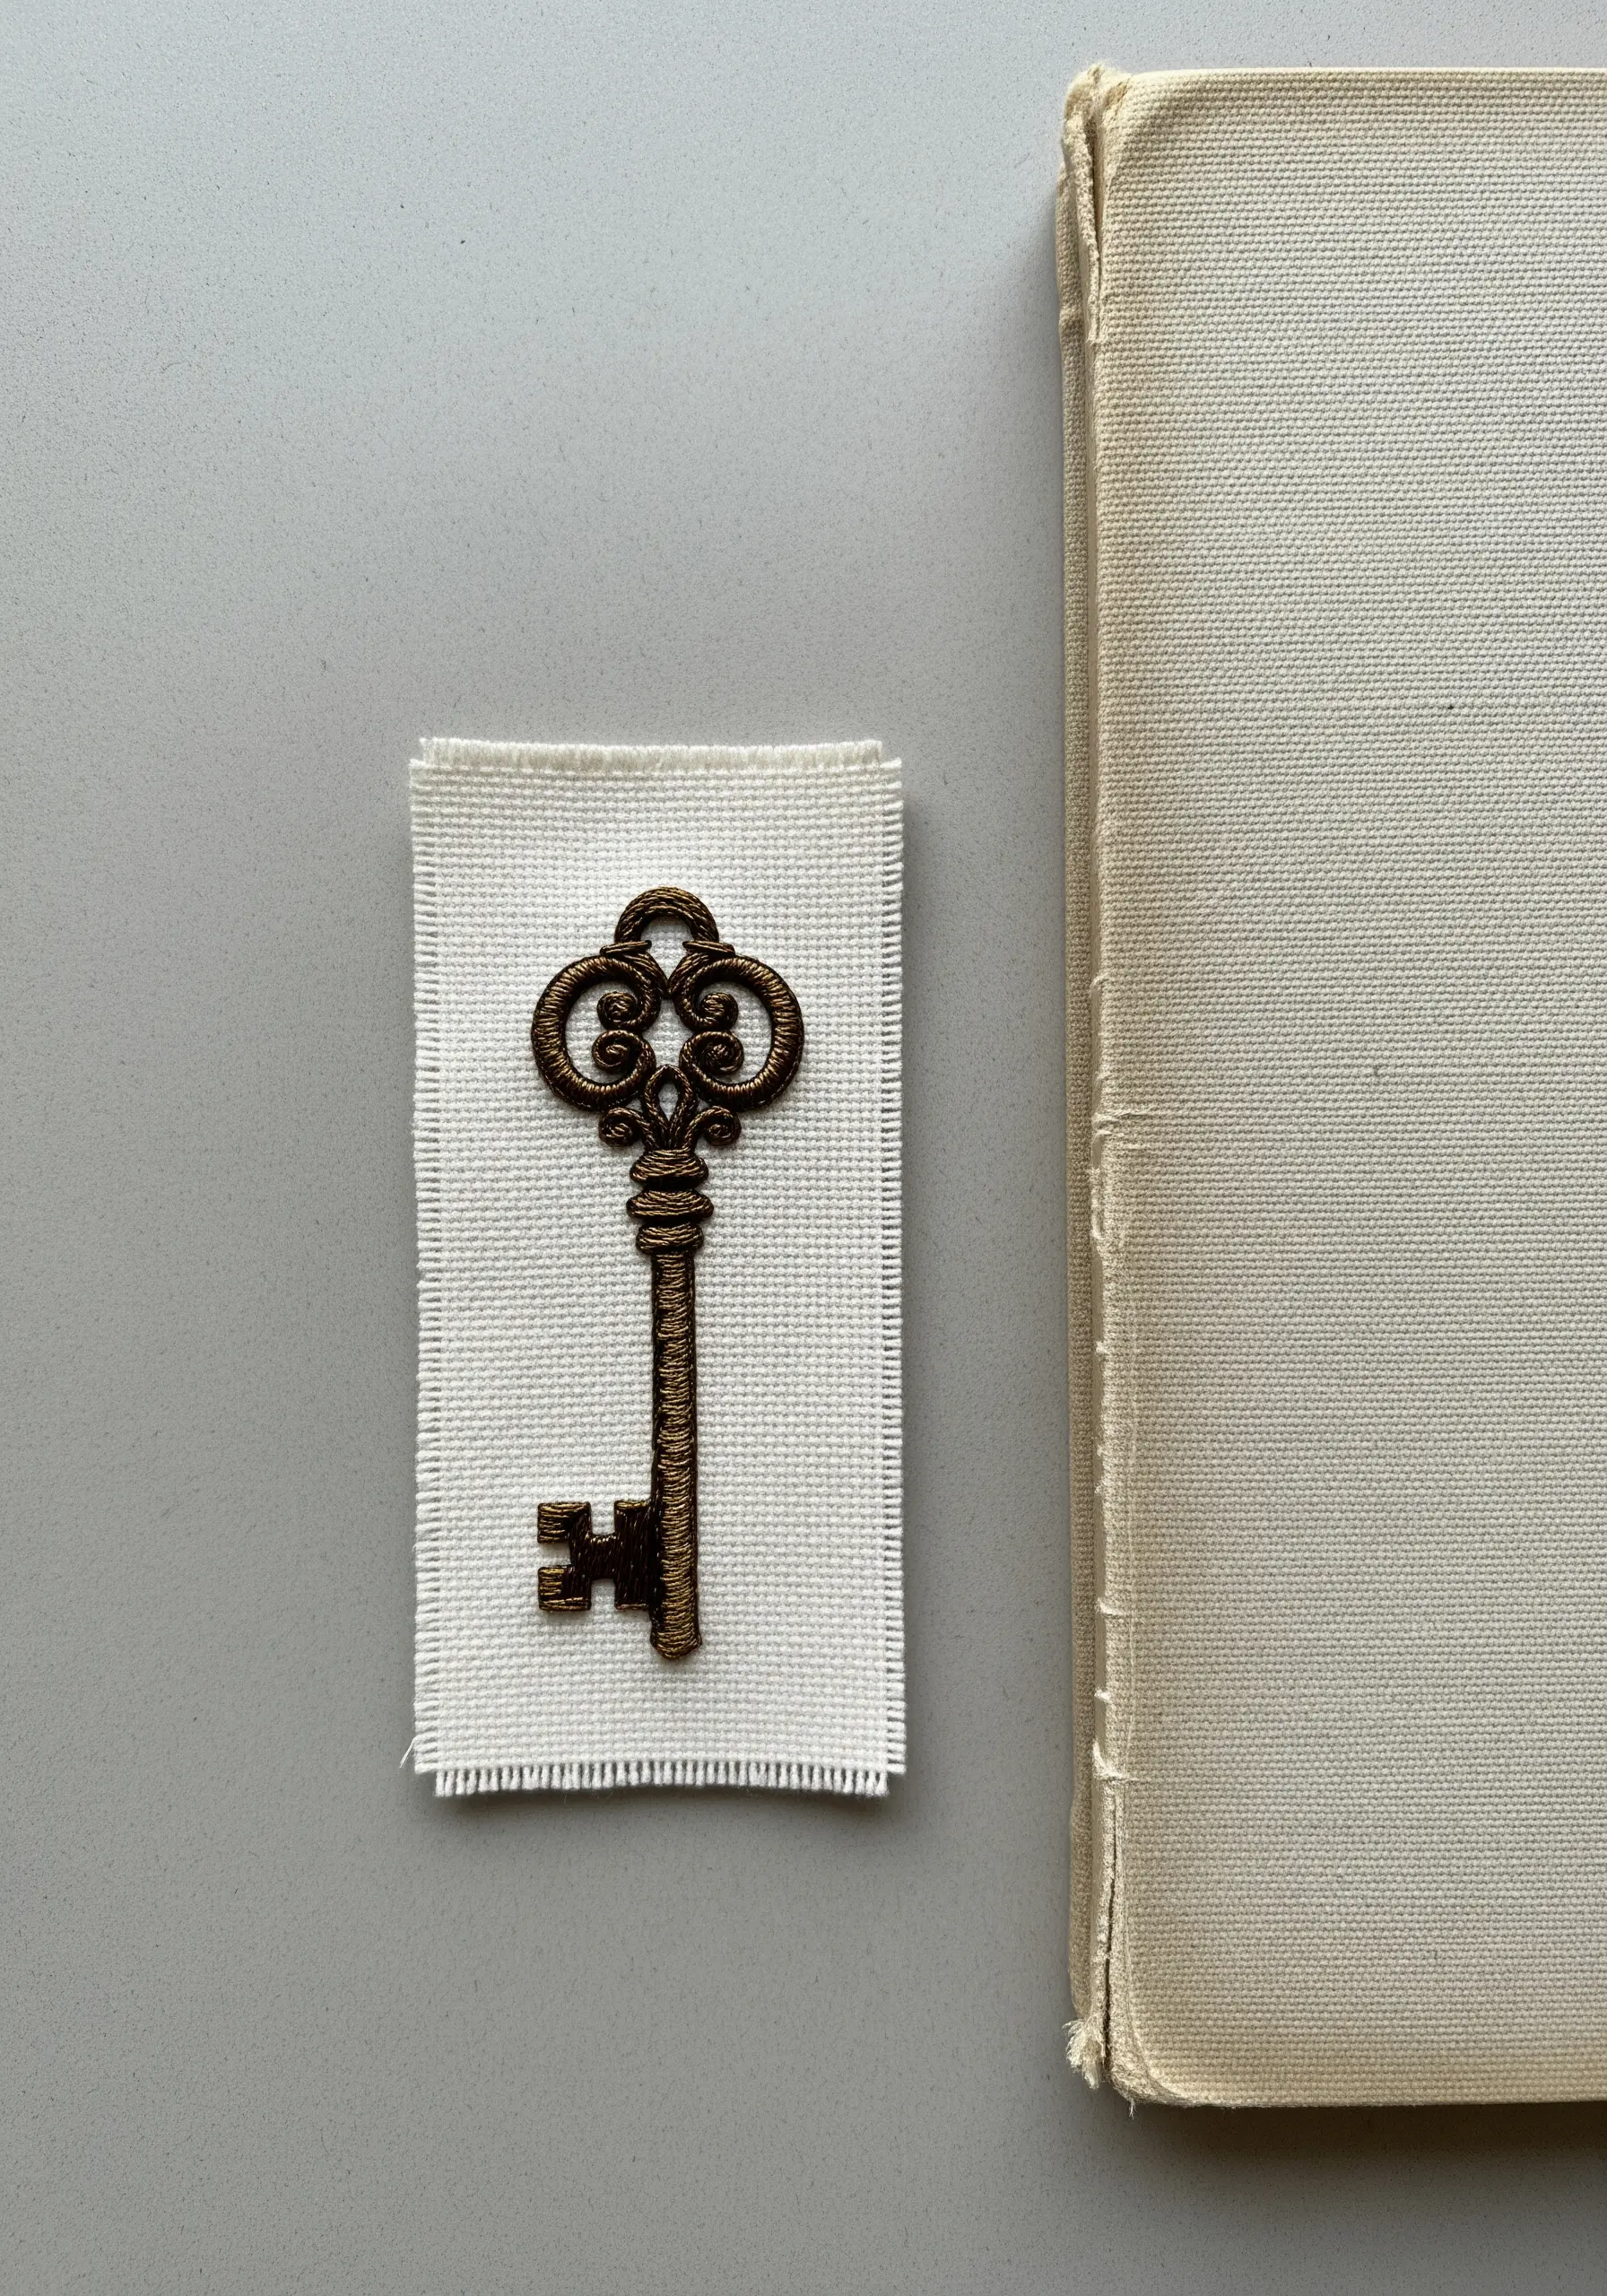
Give a motif like a vintage key a raised, three-dimensional quality using padded satin stitch.
First, fill the shape with a foundation of small, straight stitches or seed stitches worked in a contrasting direction to your final layer.
Then, cover this padding with smooth, tight satin stitches. The underlying layer will lift the top stitches, creating a sculptural, almost metallic effect that catches the light beautifully.
13. Reinvent Visible Mending with Bold Florals
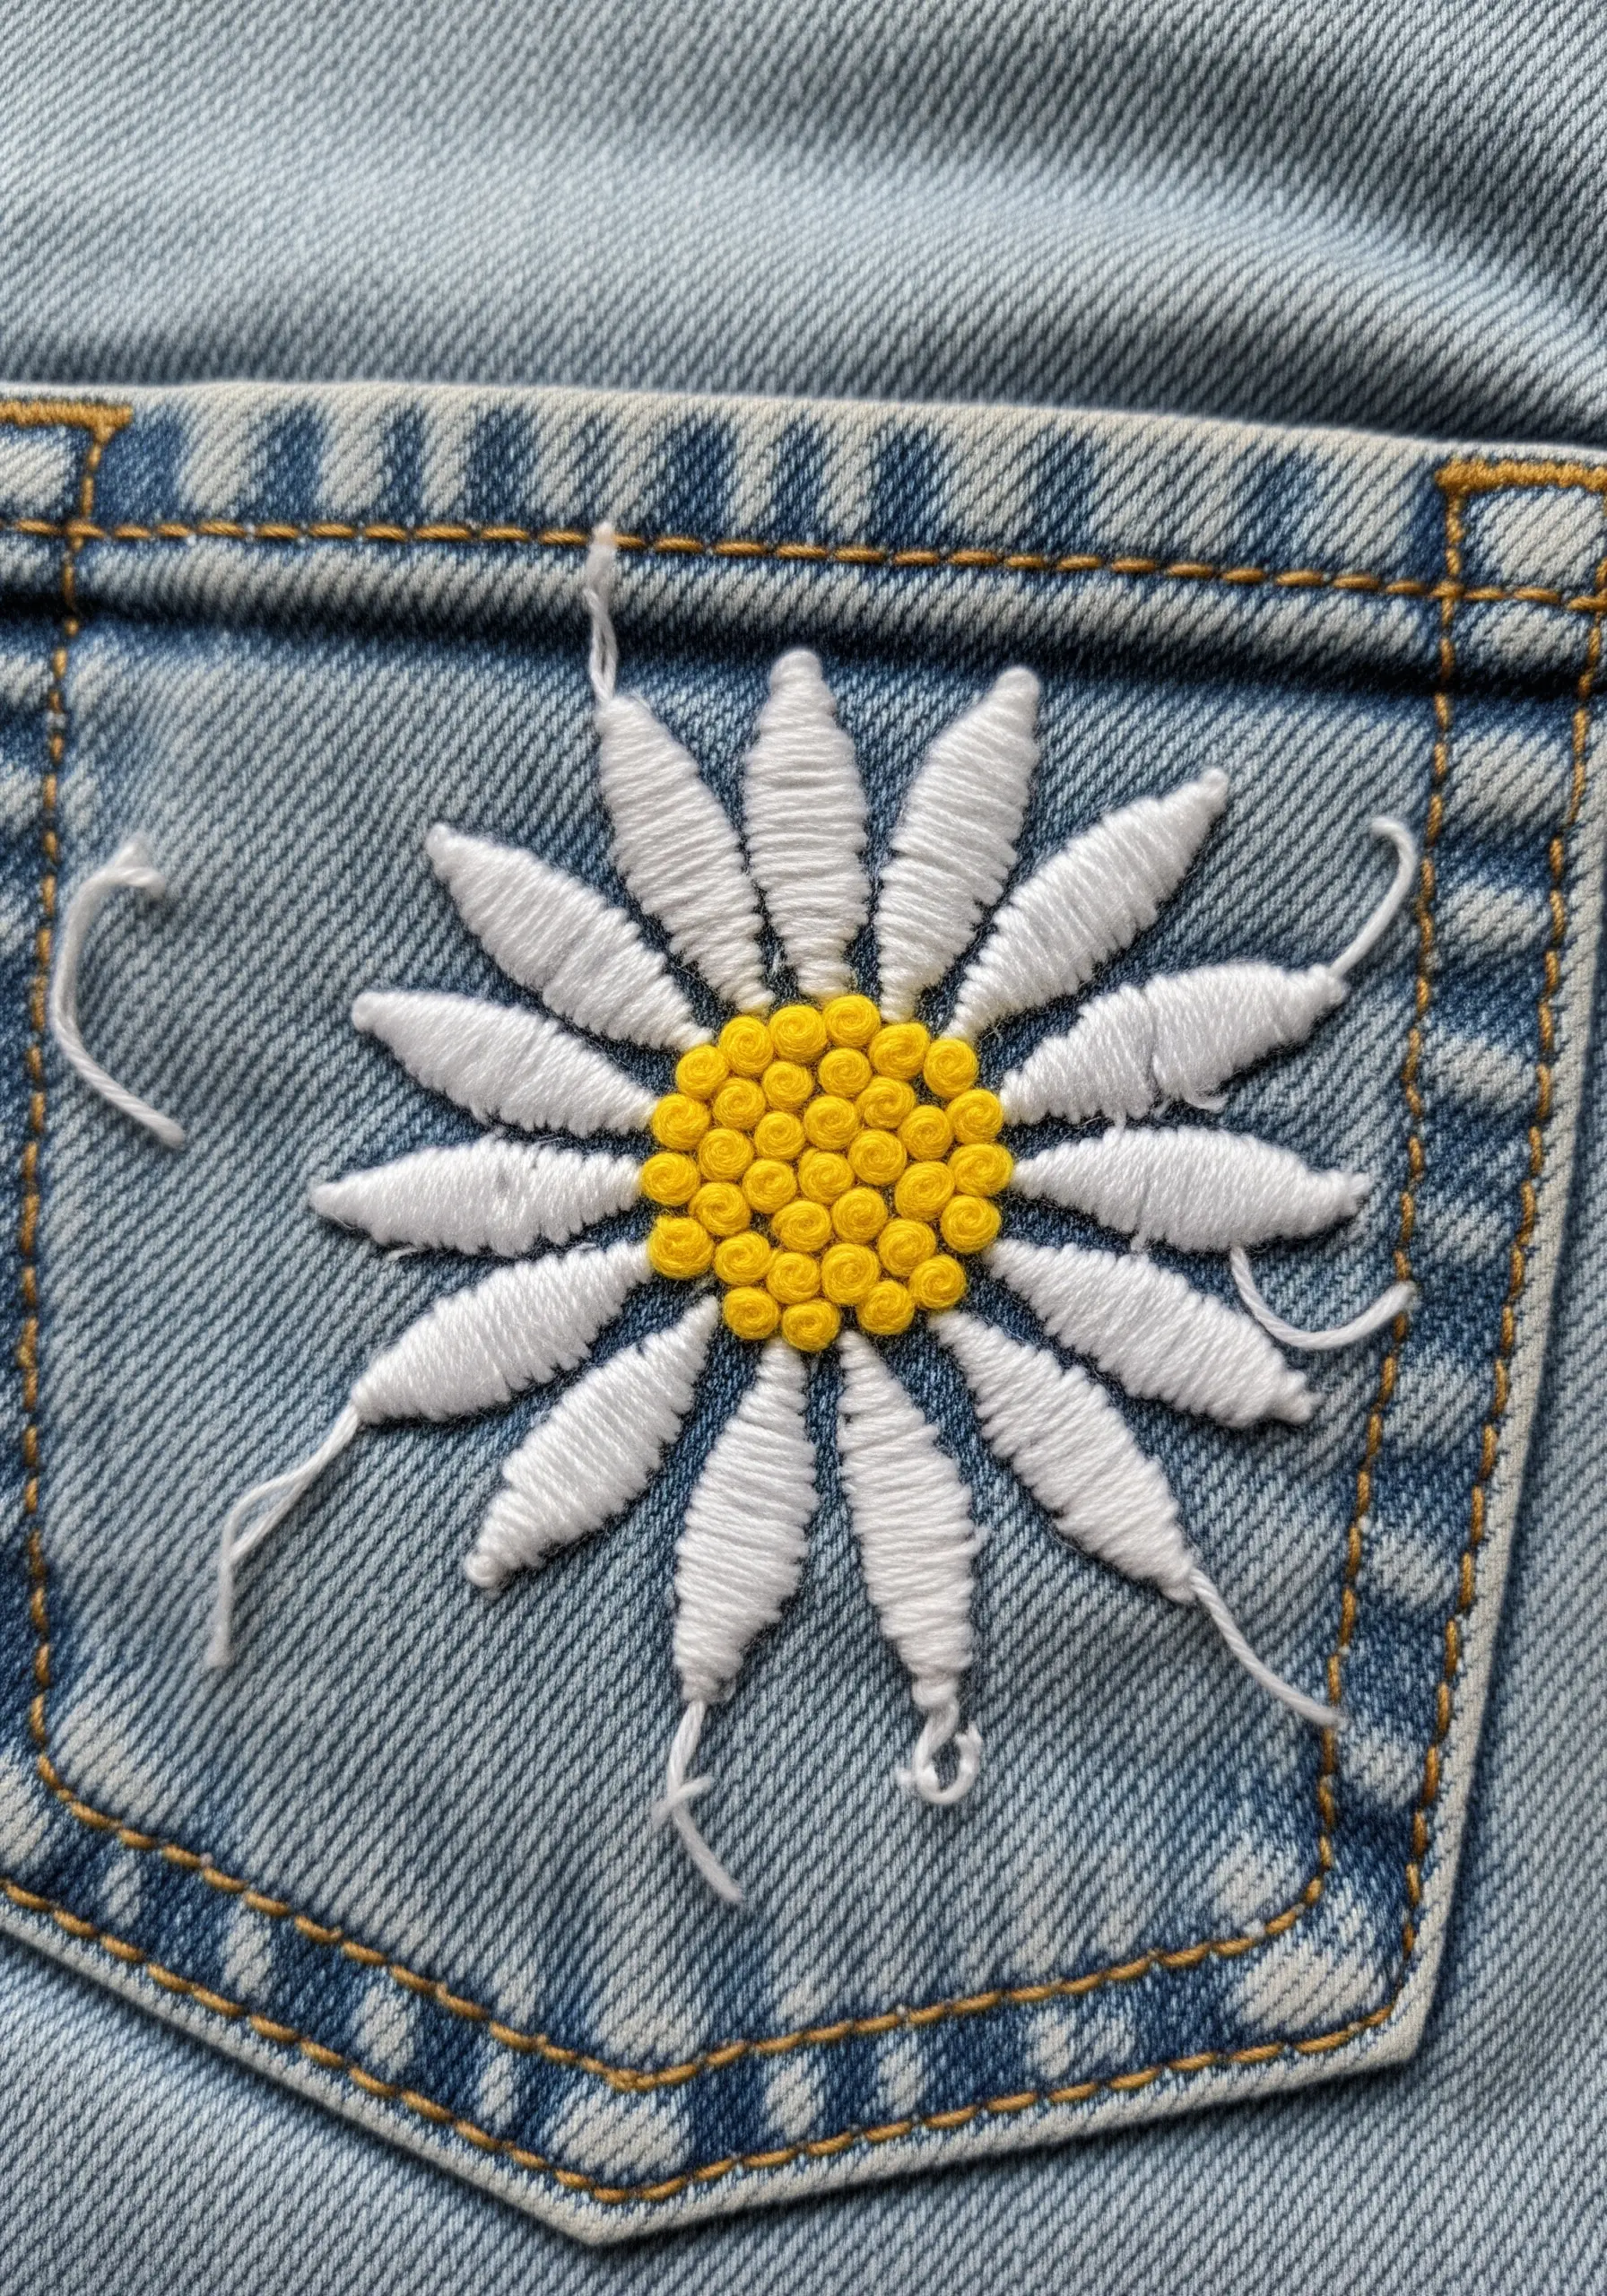
Turn a denim repair into a design feature with a bold, graphic daisy.
Use detached chain stitches (lazy daisies) for the petals, pulling the thread taut to create those sharp points.
Fill the center with a dense cluster of yellow French knots for a classic, cheerful texture. Leaving the thread ends loose adds a deconstructed, artistic touch that feels modern and intentional.
14. Explore Texture with Directional Chain Stitch
This abstract design is a beautiful study in texture and movement, created almost entirely with chain stitch.
Instead of filling the shapes with satin stitch, work the chain stitch in continuous spirals or rows.
This method builds a tactile, woven-like surface that draws the eye and invites touch.
It’s a meditative technique that transforms simple circles into compelling textured neutral embroidery.
15. Define Shapes with Contrasting Outlines
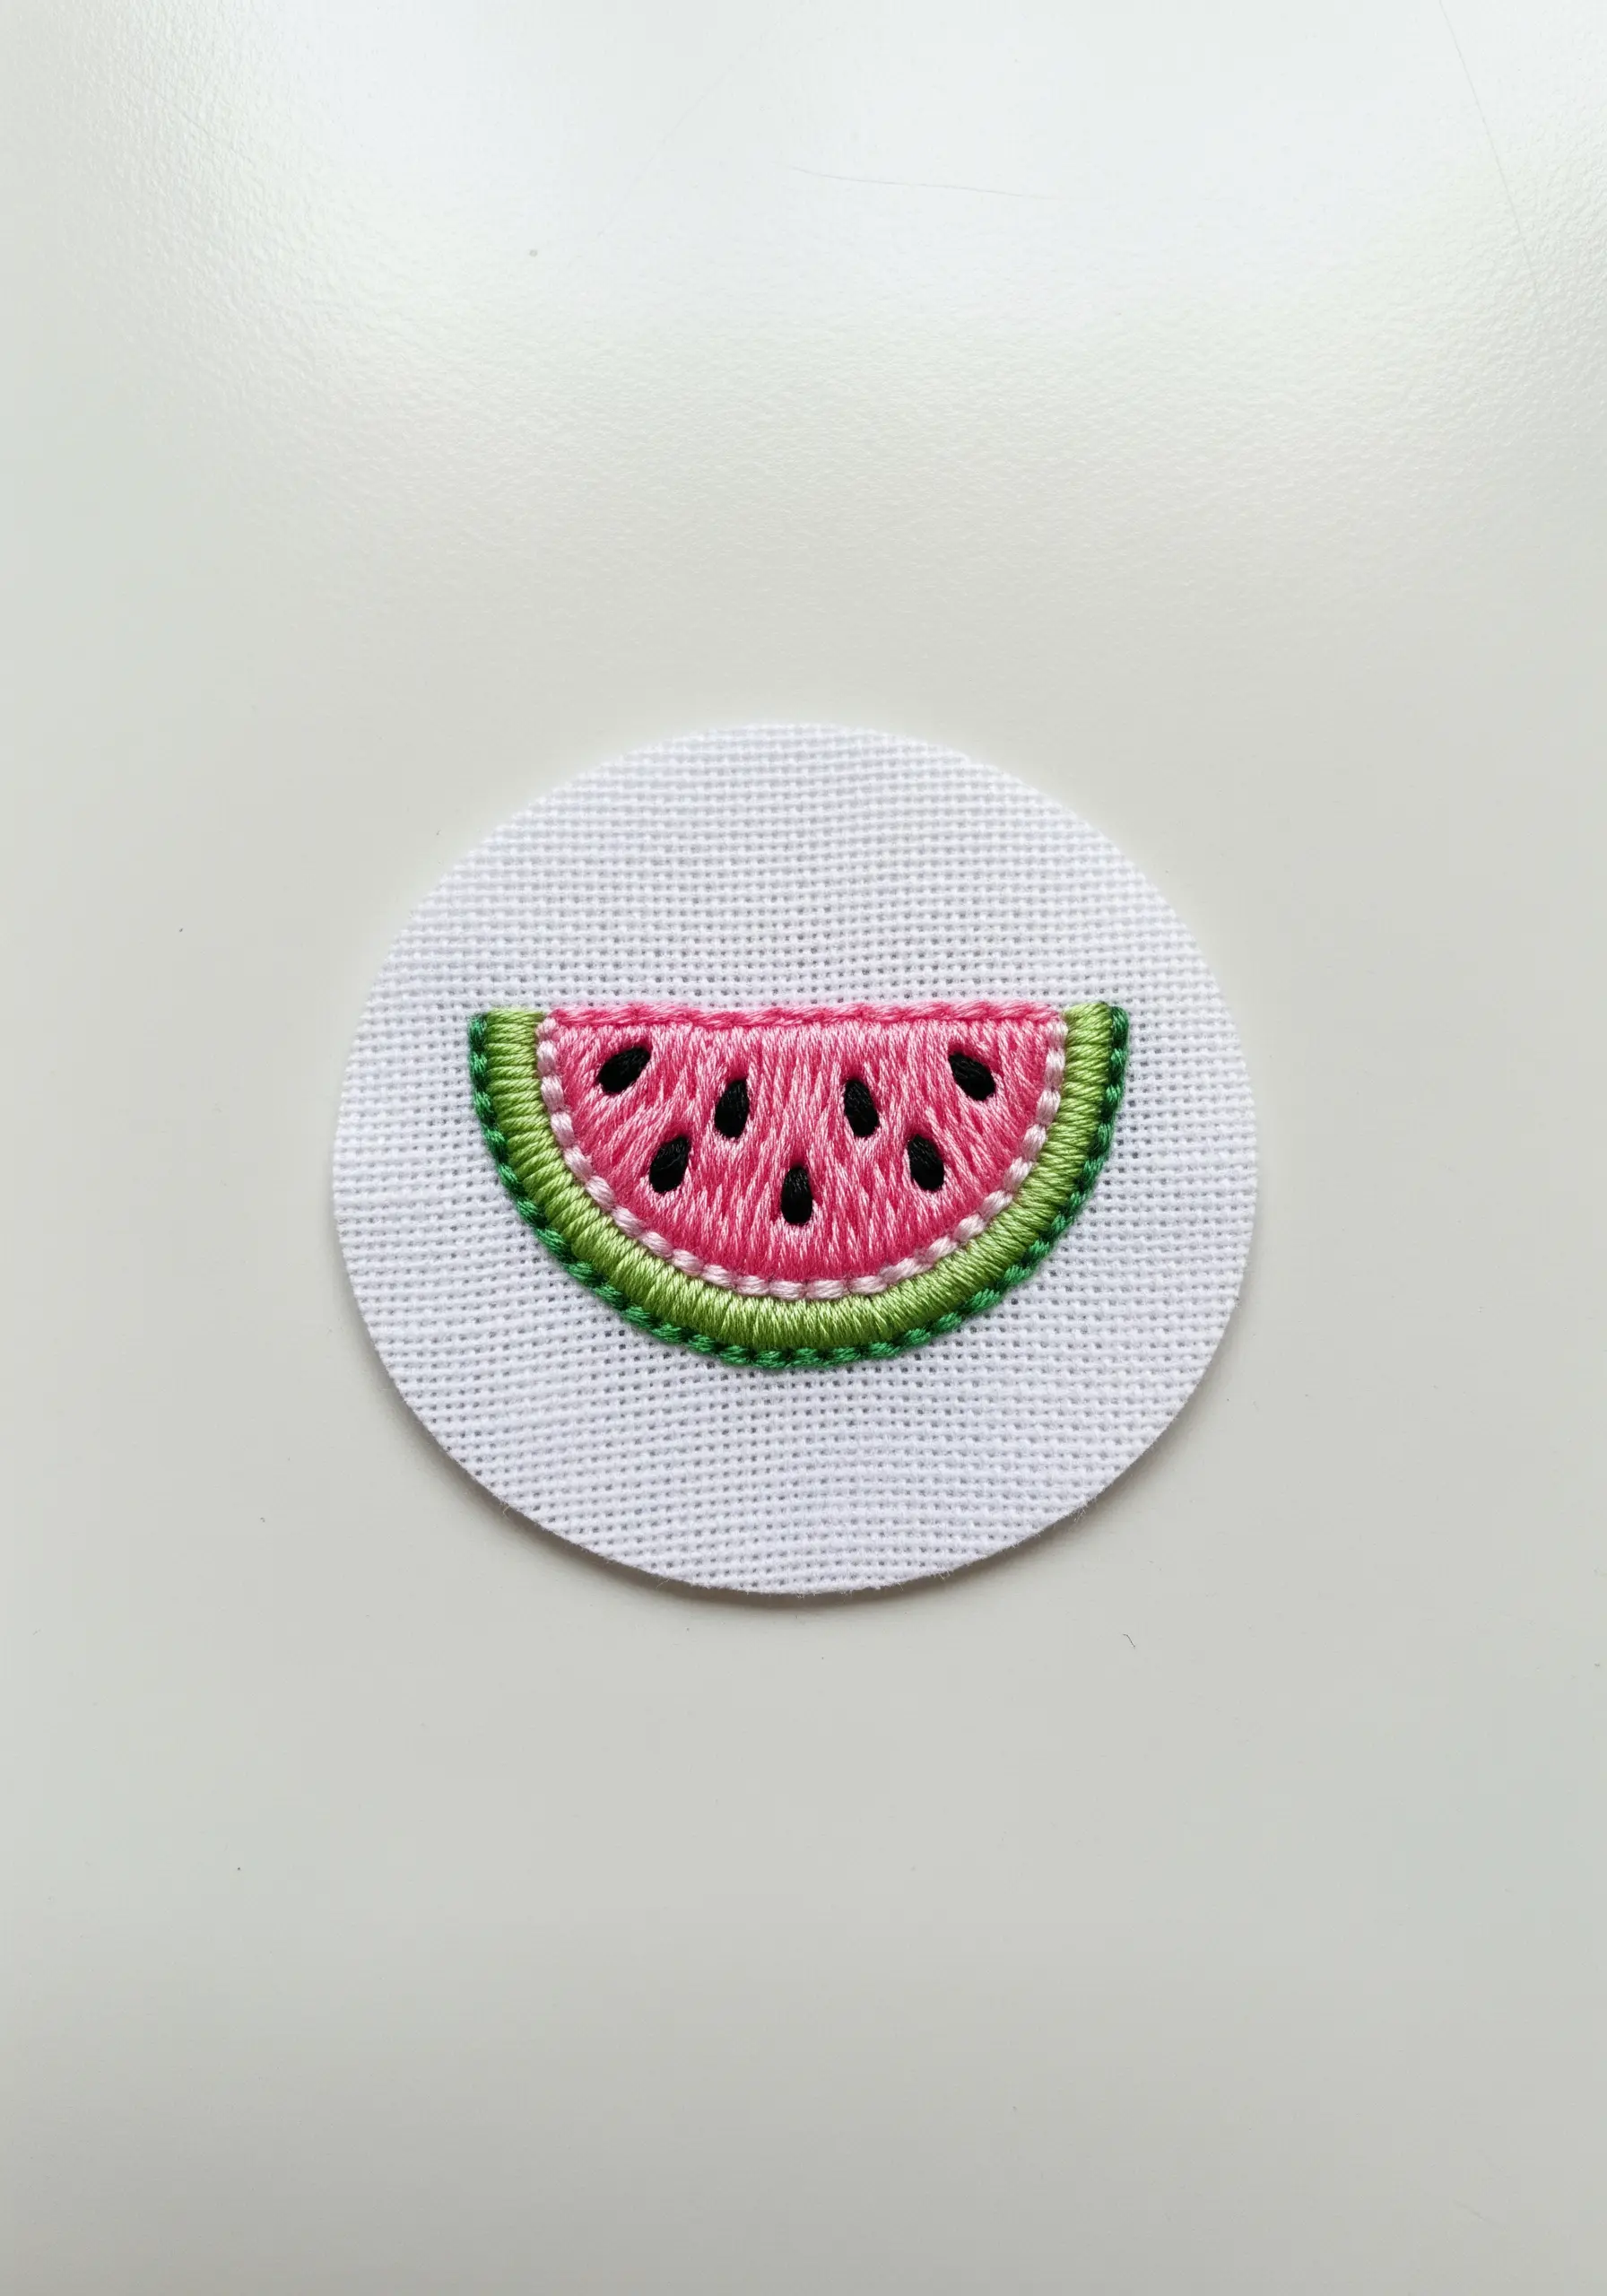
Make the colors in your watermelon slice pop by giving each section a clean, defining outline.
Use a darker shade of green for the rind and a crisp black for the pink flesh, stitched with a simple split stitch or backstitch.
This outlining technique acts like a frame, making the satin-stitched colors appear brighter and more deliberate.
Scatter a few black French knots for seeds to complete the playful look.
16. Create Bold Typography with Heavy Chain Stitch
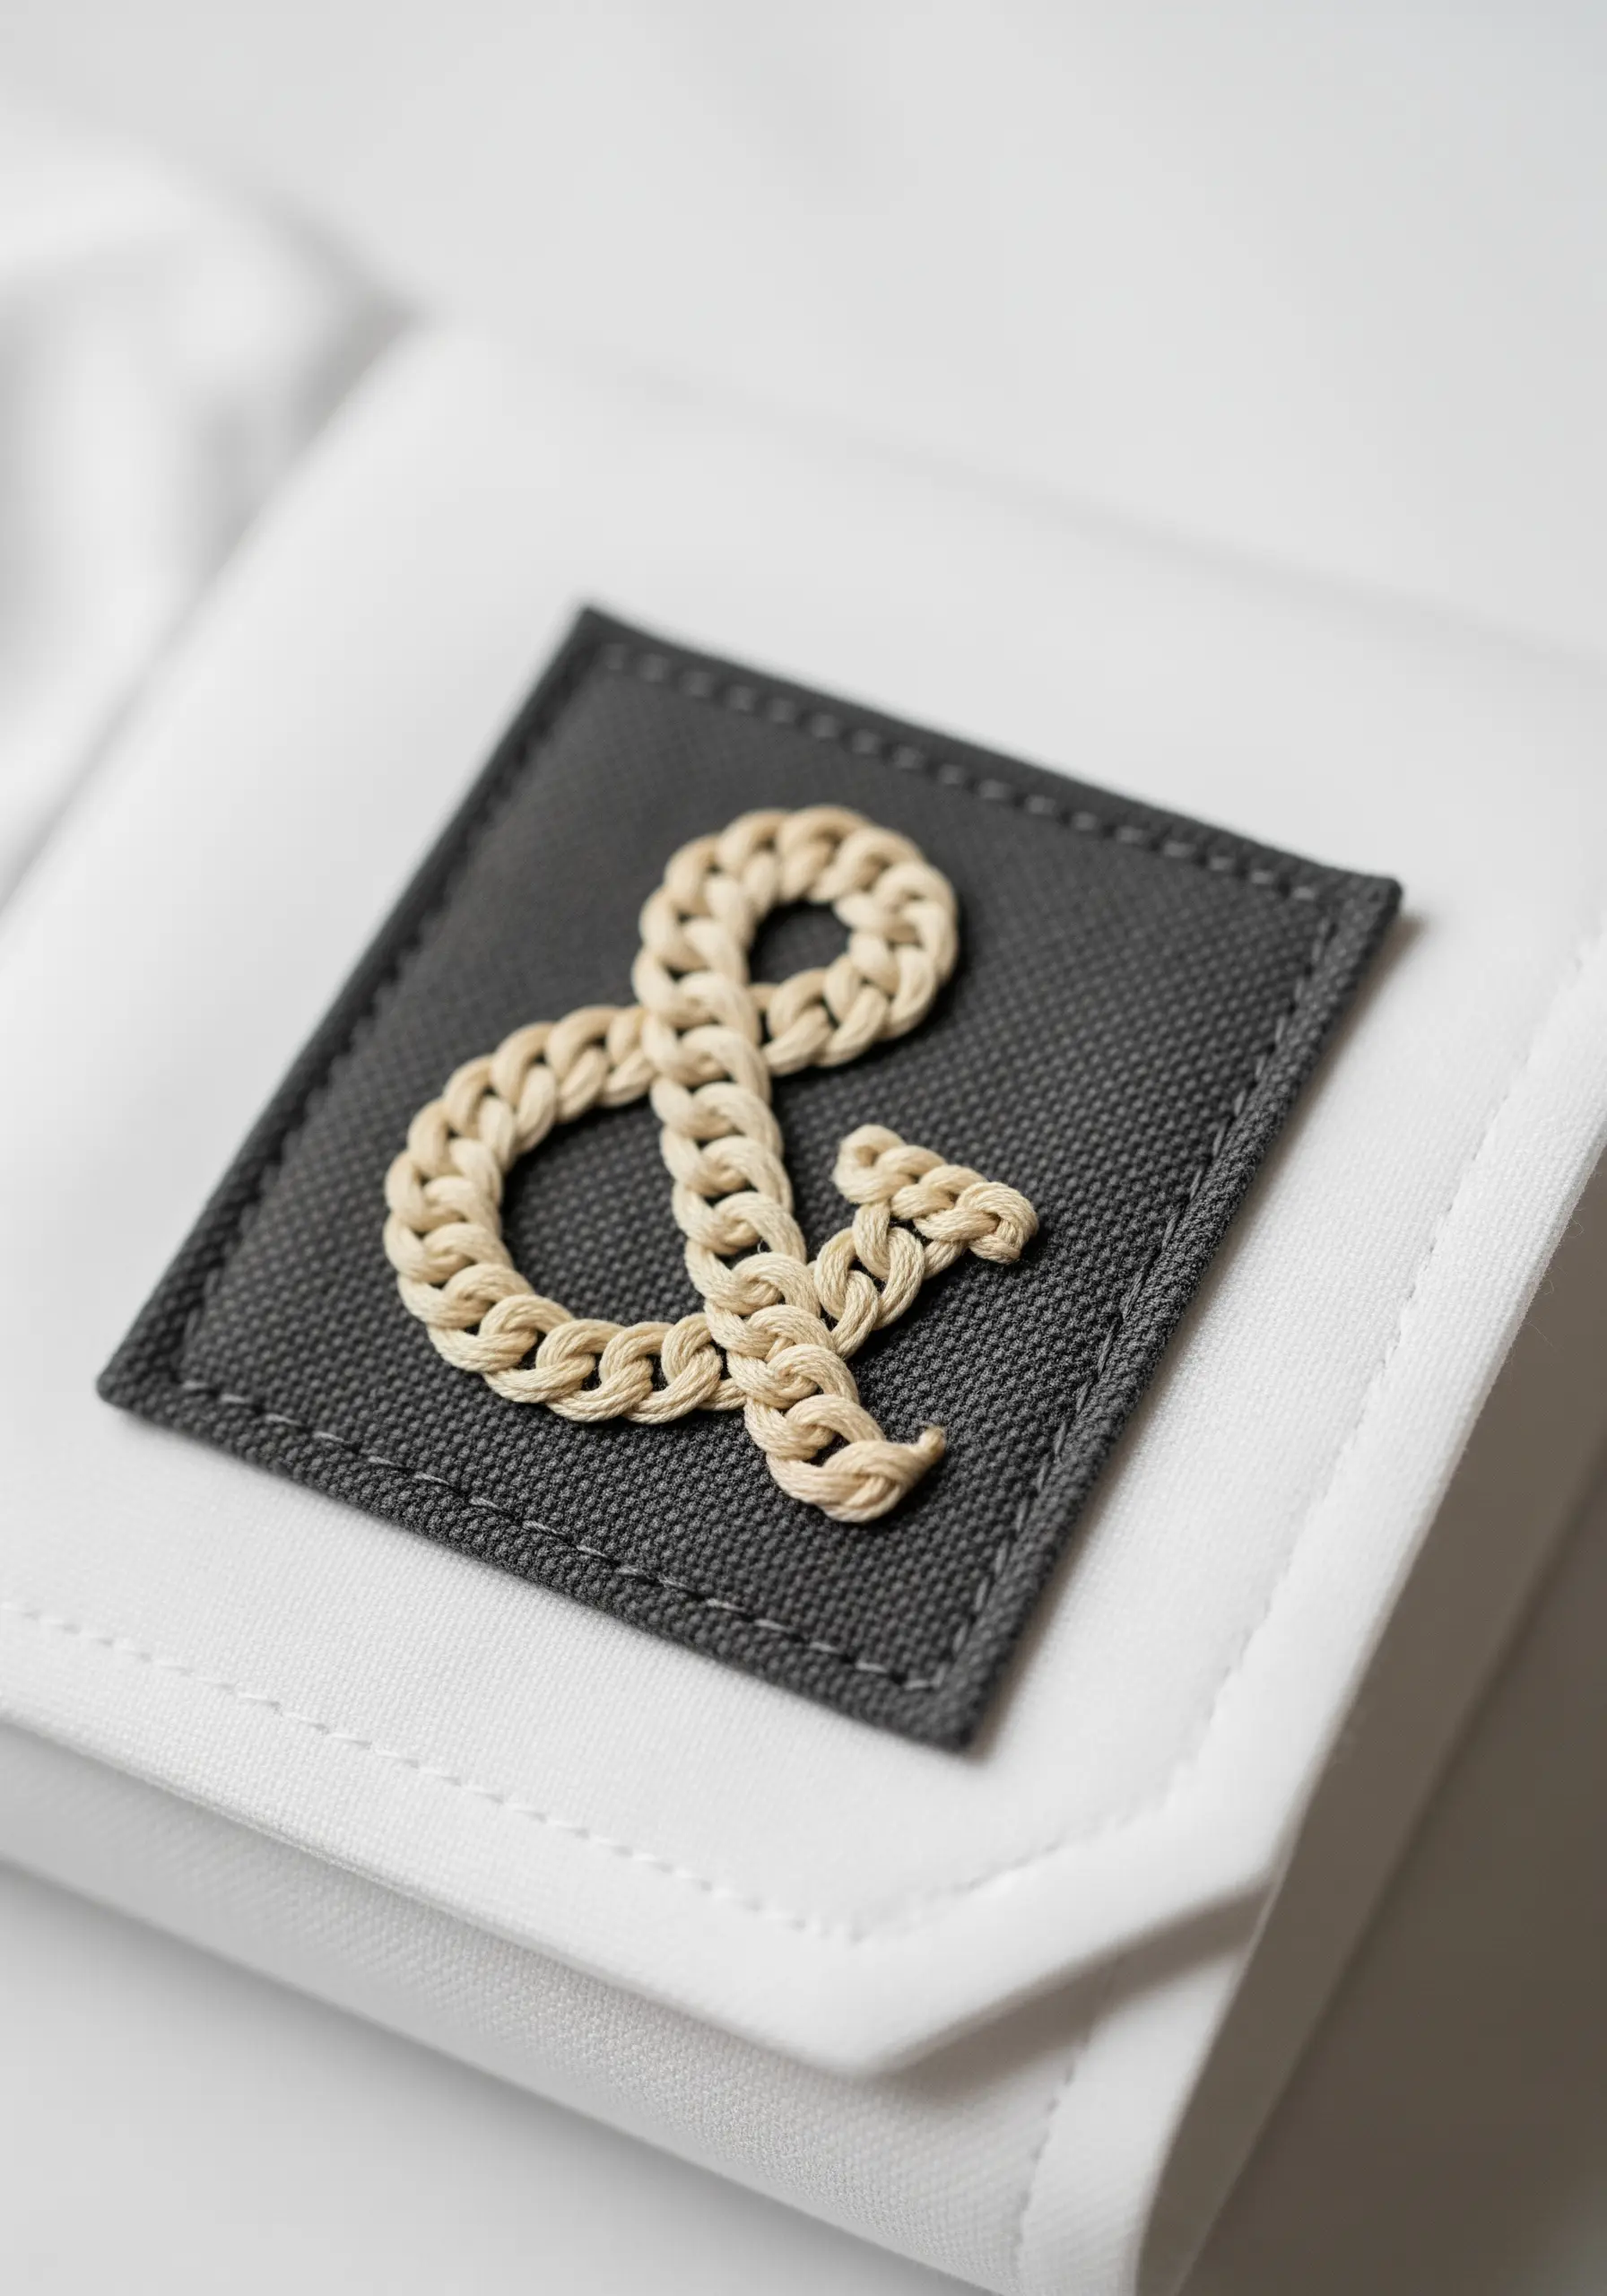
For a symbol or monogram that truly stands out, use a thick thread or yarn to create a heavy chain stitch.
This stitch builds a chunky, braid-like texture that has significant visual weight and dimension.
Apply it to a sturdy, contrasting background like canvas or faux leather to create a patch that feels both rustic and modern.
It’s a perfect way to add a tactile focal point to a minimalist garment.
17. Achieve a Fiery Gradient with Thread Painting
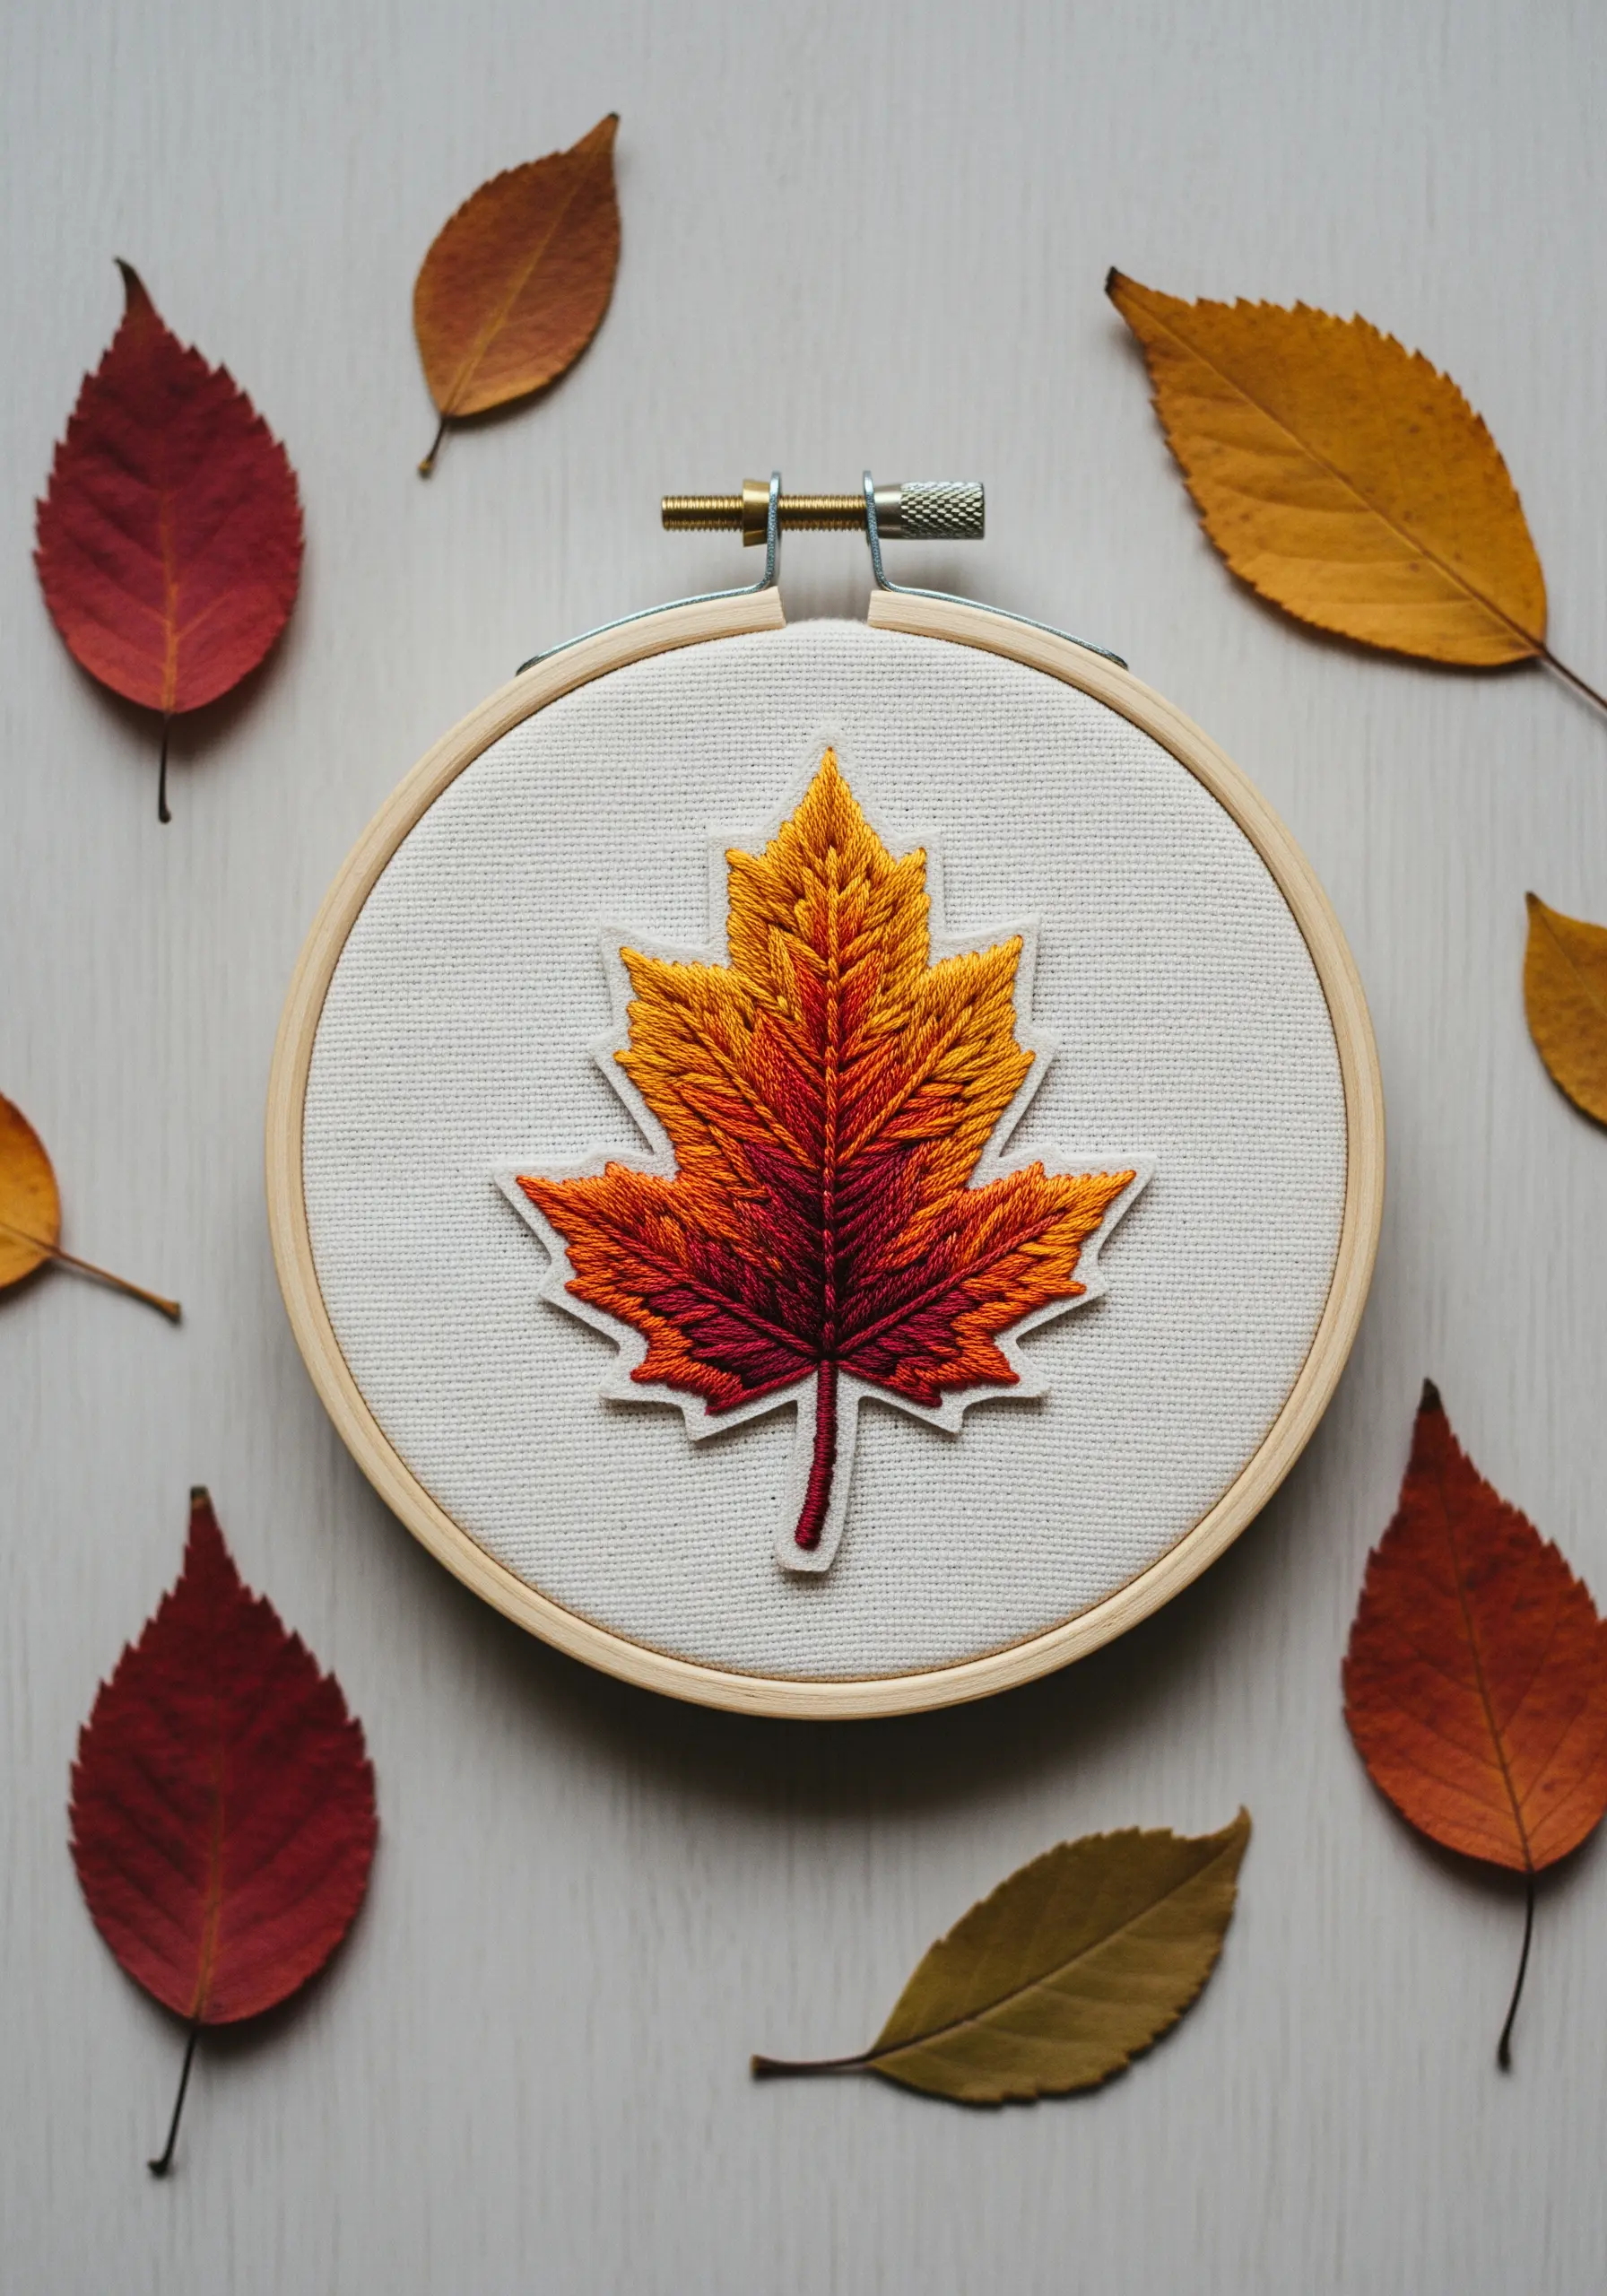
Capture the essence of autumn in a single leaf by blending a vibrant gradient of reds, oranges, and yellows.
Use the long-and-short stitch, working with a single strand of floss to ensure the color transitions are soft and seamless.
Start with the lightest color at the tips and work your way down, overlapping the stitches to create the blend.
This method of abstract thread painting allows you to create stunningly realistic color shifts.
18. Convey Motion with a Dashed Line
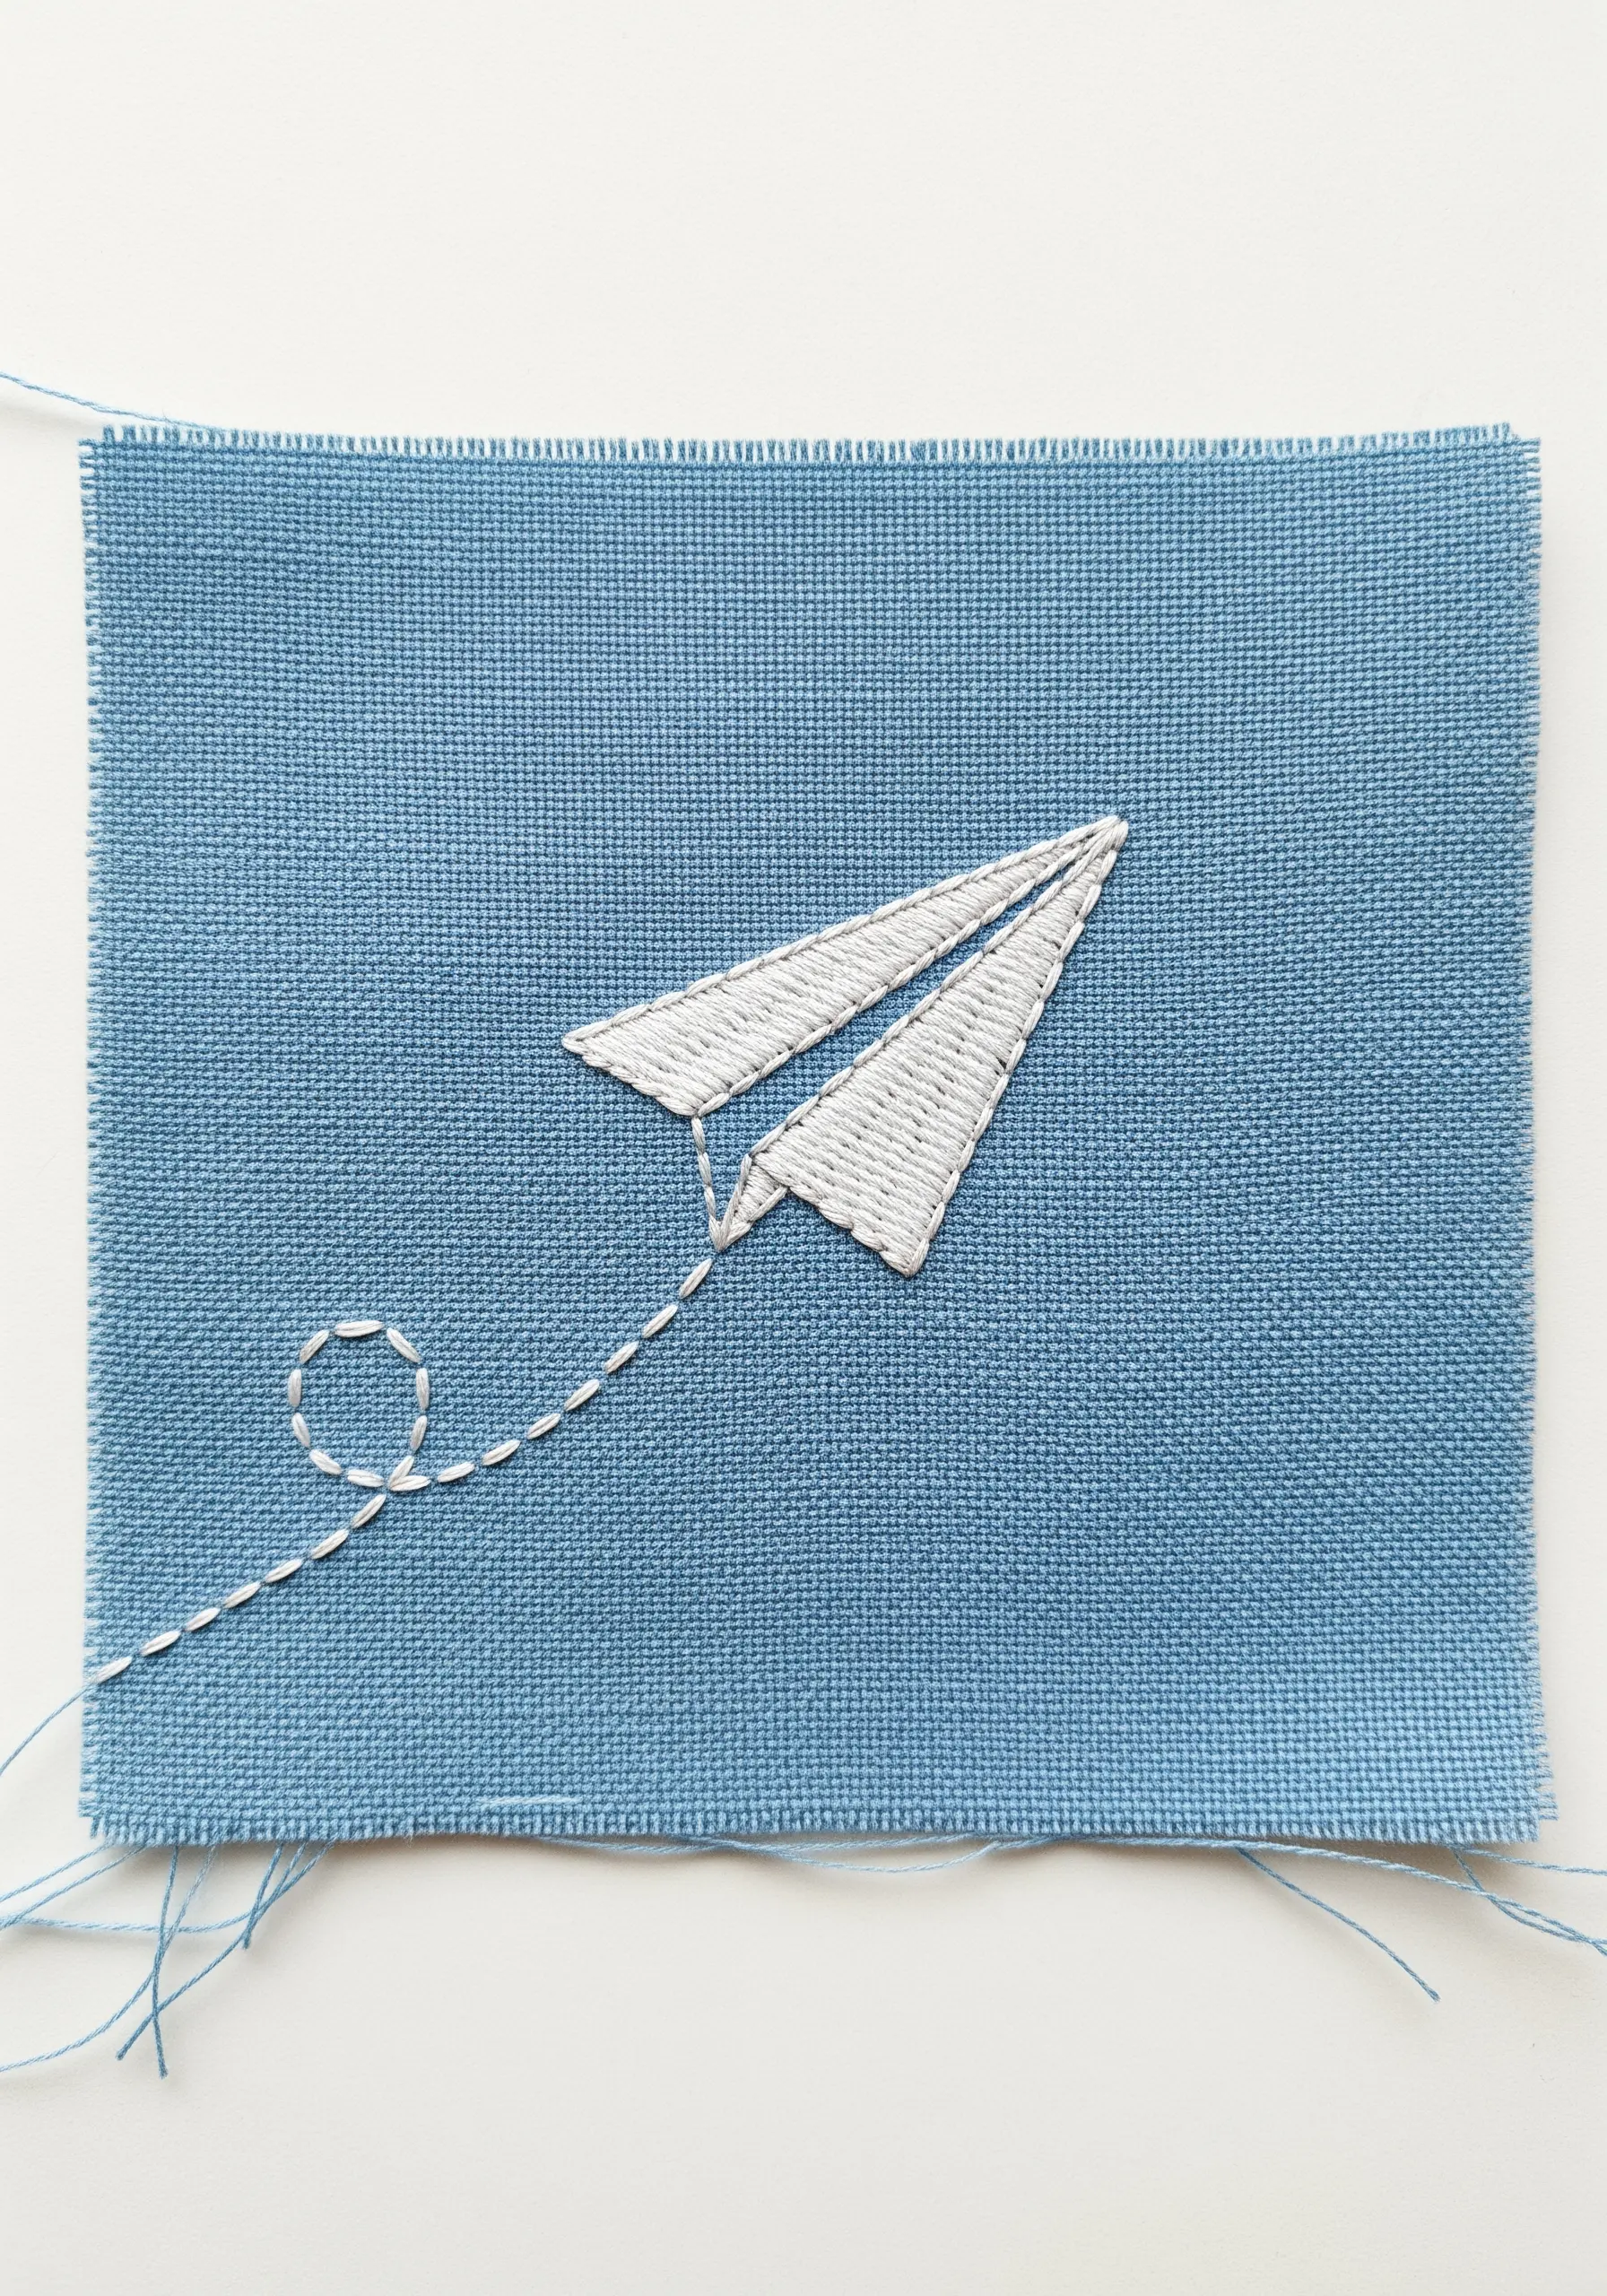
Bring a simple motif like a paper airplane to life by adding a sense of movement.
After stitching the airplane with a clean satin stitch fill and a split stitch outline, add a looping trail behind it using a simple running stitch.
This small detail tells a story and guides the viewer’s eye across the fabric, transforming a static image into a dynamic one.
It’s a simple but incredibly effective compositional trick.
19. Add Rustic Charm with a Frayed Edge
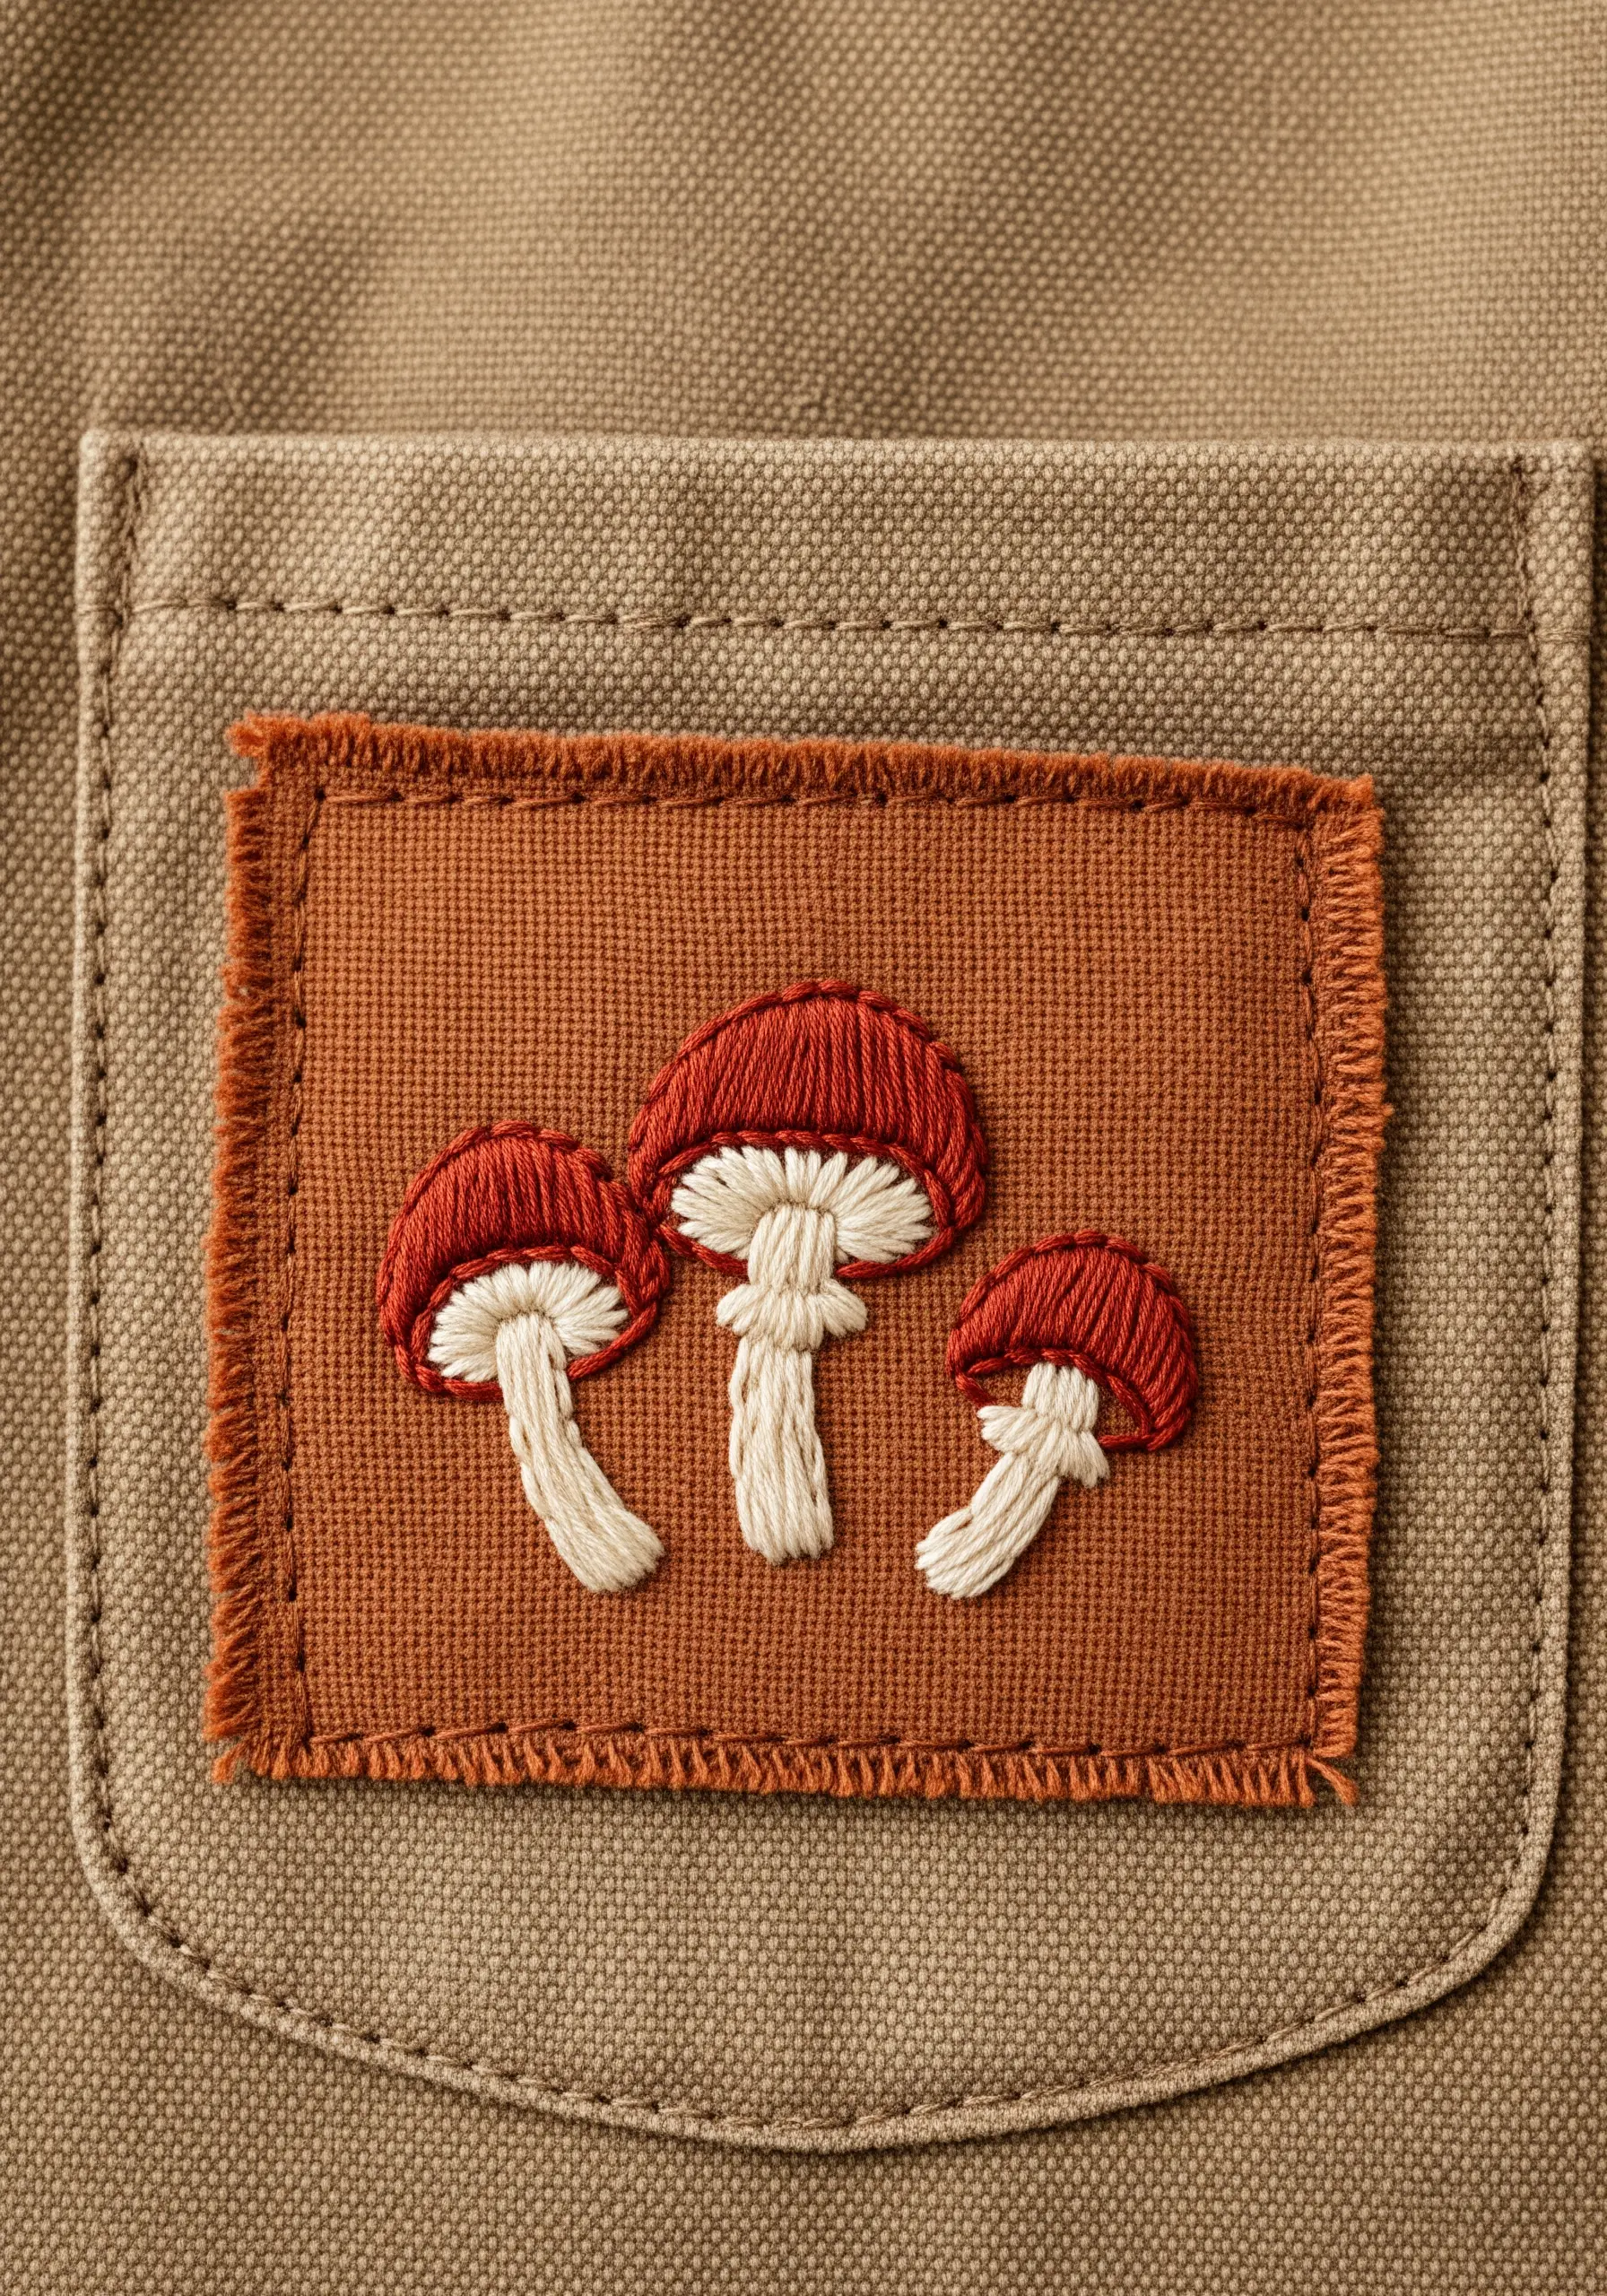
Enhance the earthy, organic feel of a mushroom motif by turning it into a frayed-edge patch.
After completing your embroidery on a piece of canvas or linen, leave a small border of fabric around the design.
Carefully pull away the threads along the edges to create a soft, rustic fray.
This finishing touch complements nature-themed designs perfectly and adds a layer of handmade texture to any garment.
20. Weave Texture into Your Stitching
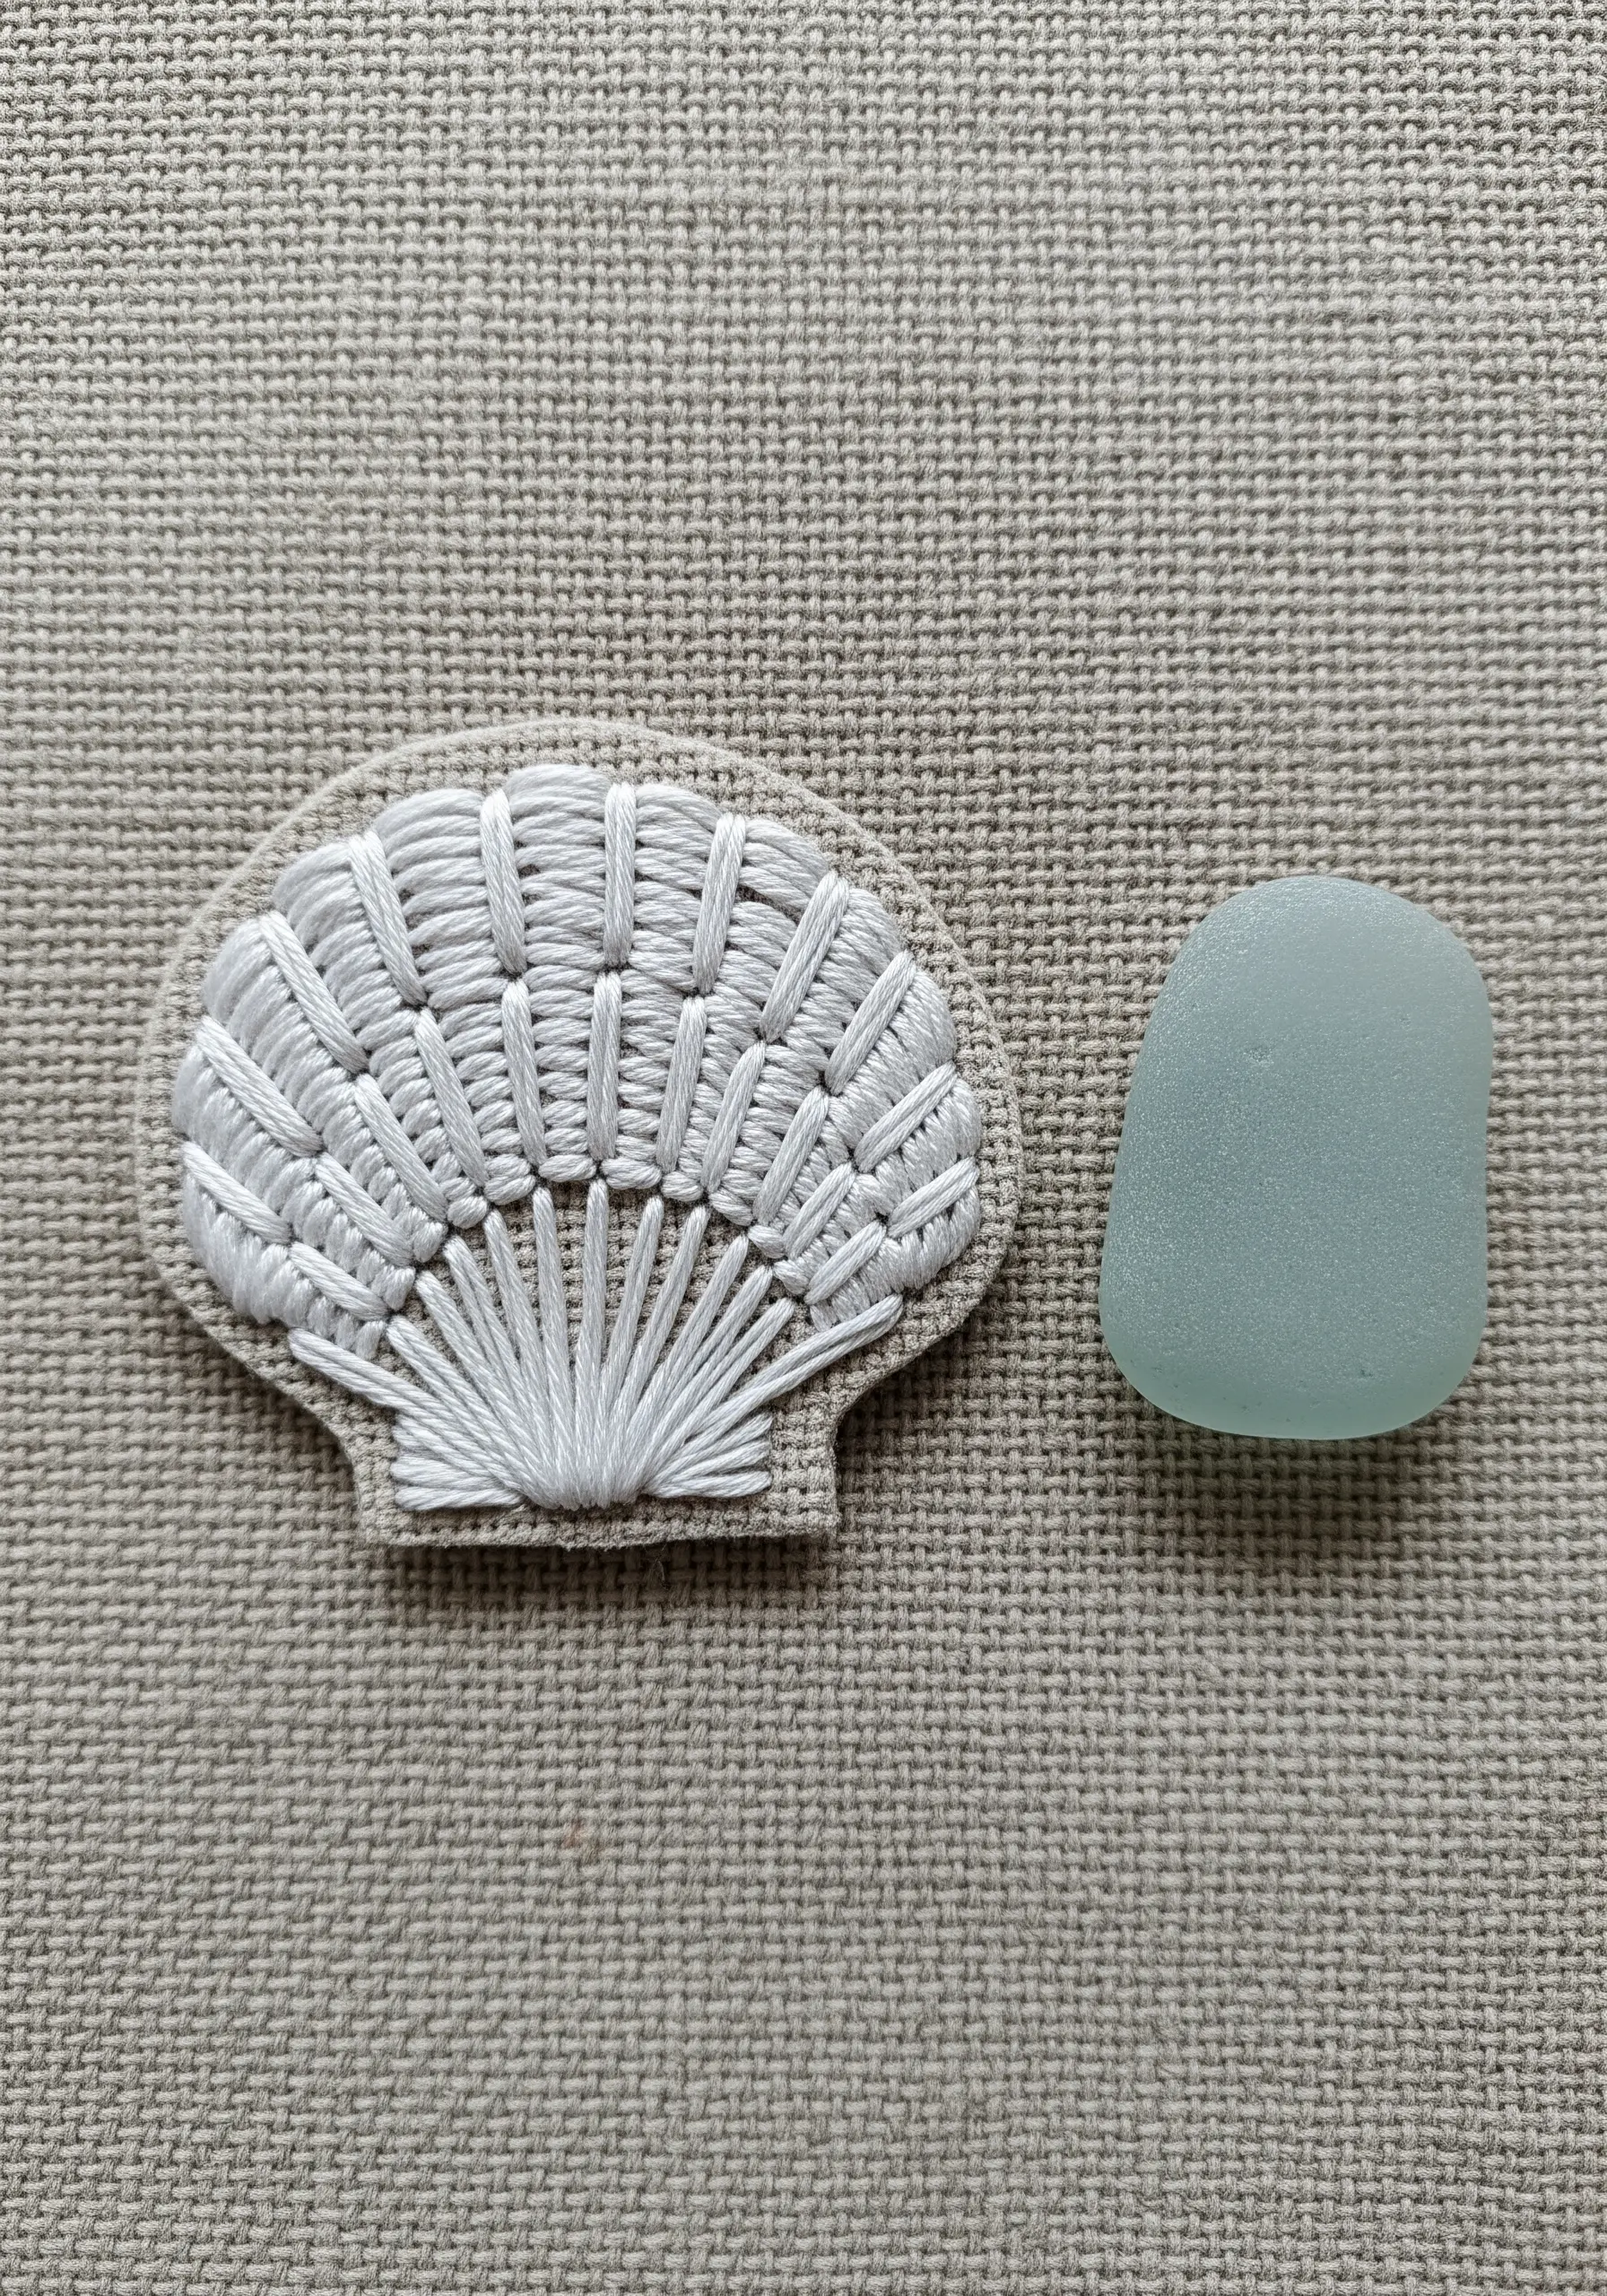
Create the intricate ridges of a seashell using woven stitches, which add incredible dimension.
First, create a ‘spoke’ of straight stitches fanning out from the base. Then, weave your main thread over and under these spokes without piercing the fabric.
This technique builds a raised, basket-like texture that is far more interesting than a simple satin stitch fill. It’s an ideal way to explore creative ways to stitch natural textures.
21. Use Negative Space for Graphic Impact
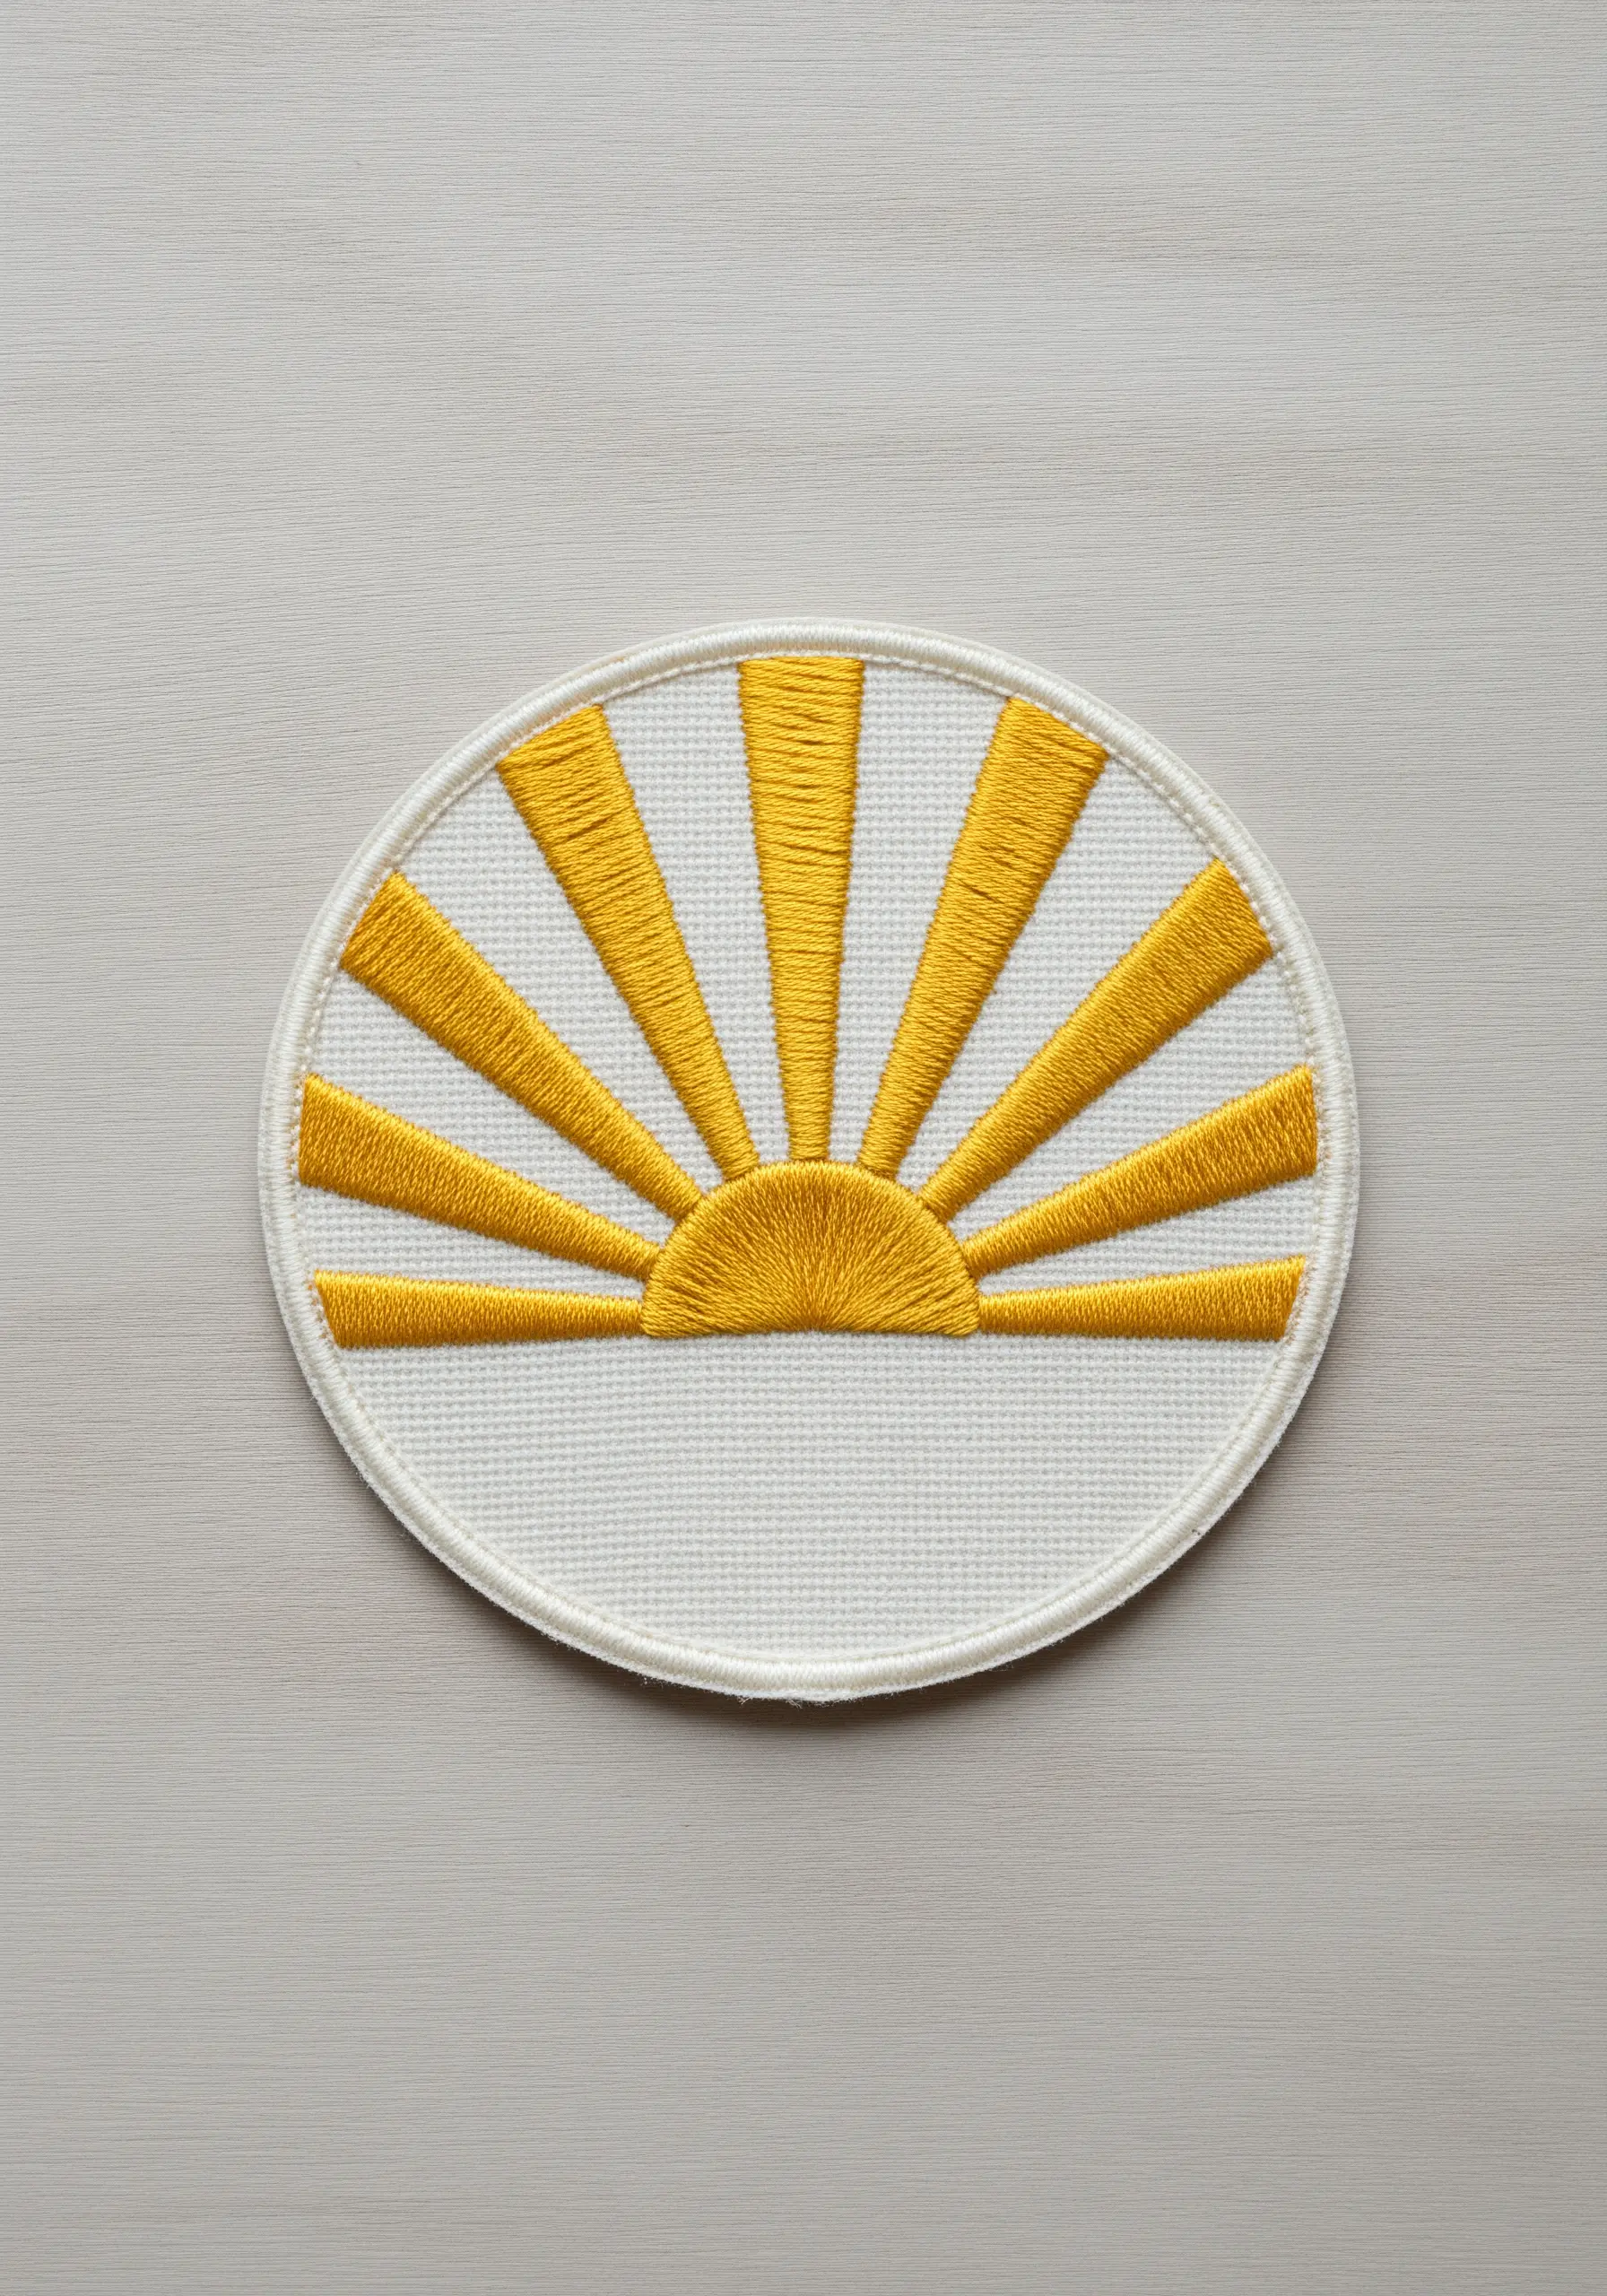
Make a simple sunrise design feel bold and modern by strategically using negative space.
Instead of filling the entire circle, let the clean, un-stitched fabric become part of the design itself.
Focus on creating perfectly smooth, radiating satin stitches for the sun rays, ensuring they are evenly spaced and taut.
This minimalist approach is confident and graphic, proving that what you don’t stitch can be as powerful as what you do.
22. Achieve Fine Detail with a Single Strand
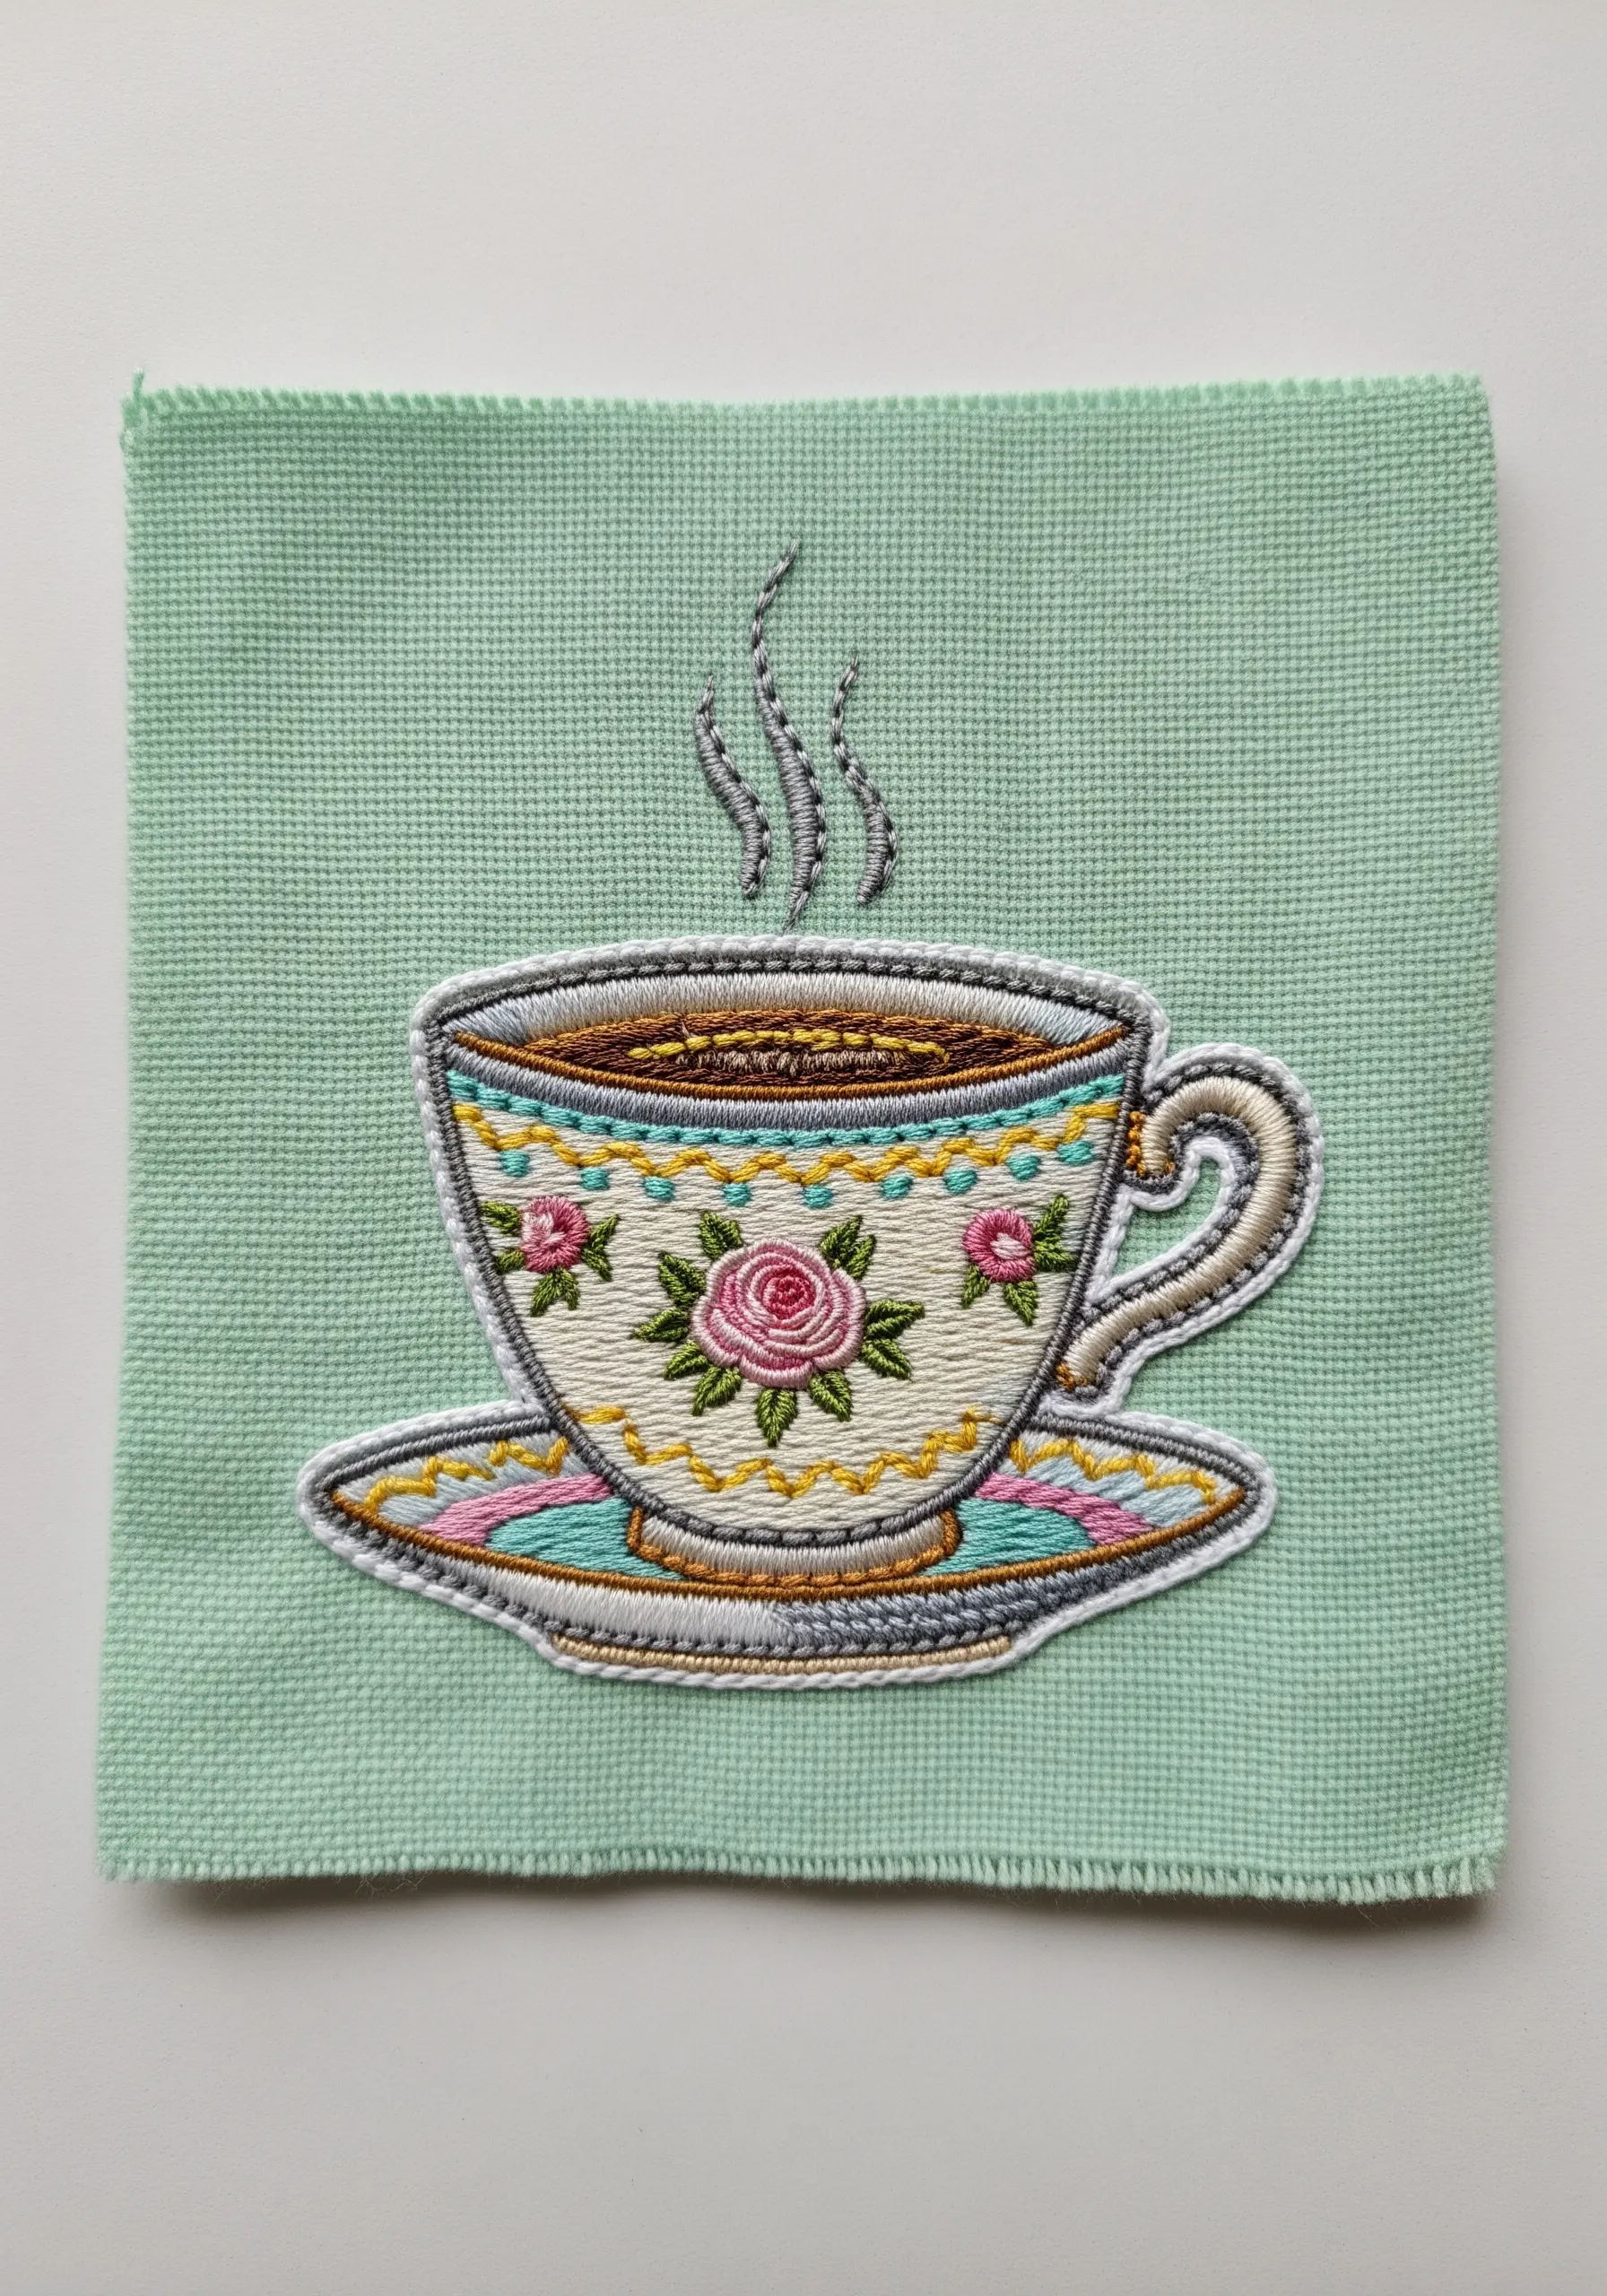
For intricate designs like a patterned teacup, working with a single strand of embroidery floss is essential.
Using one strand allows you to stitch delicate lines, tiny floral motifs, and subtle shading that would be impossible with thicker thread.
It requires patience, but the result is a refined, almost illustrative quality that makes your patch a true miniature work of art.
Outline the final patch with a tight satin stitch border to frame your detailed work.
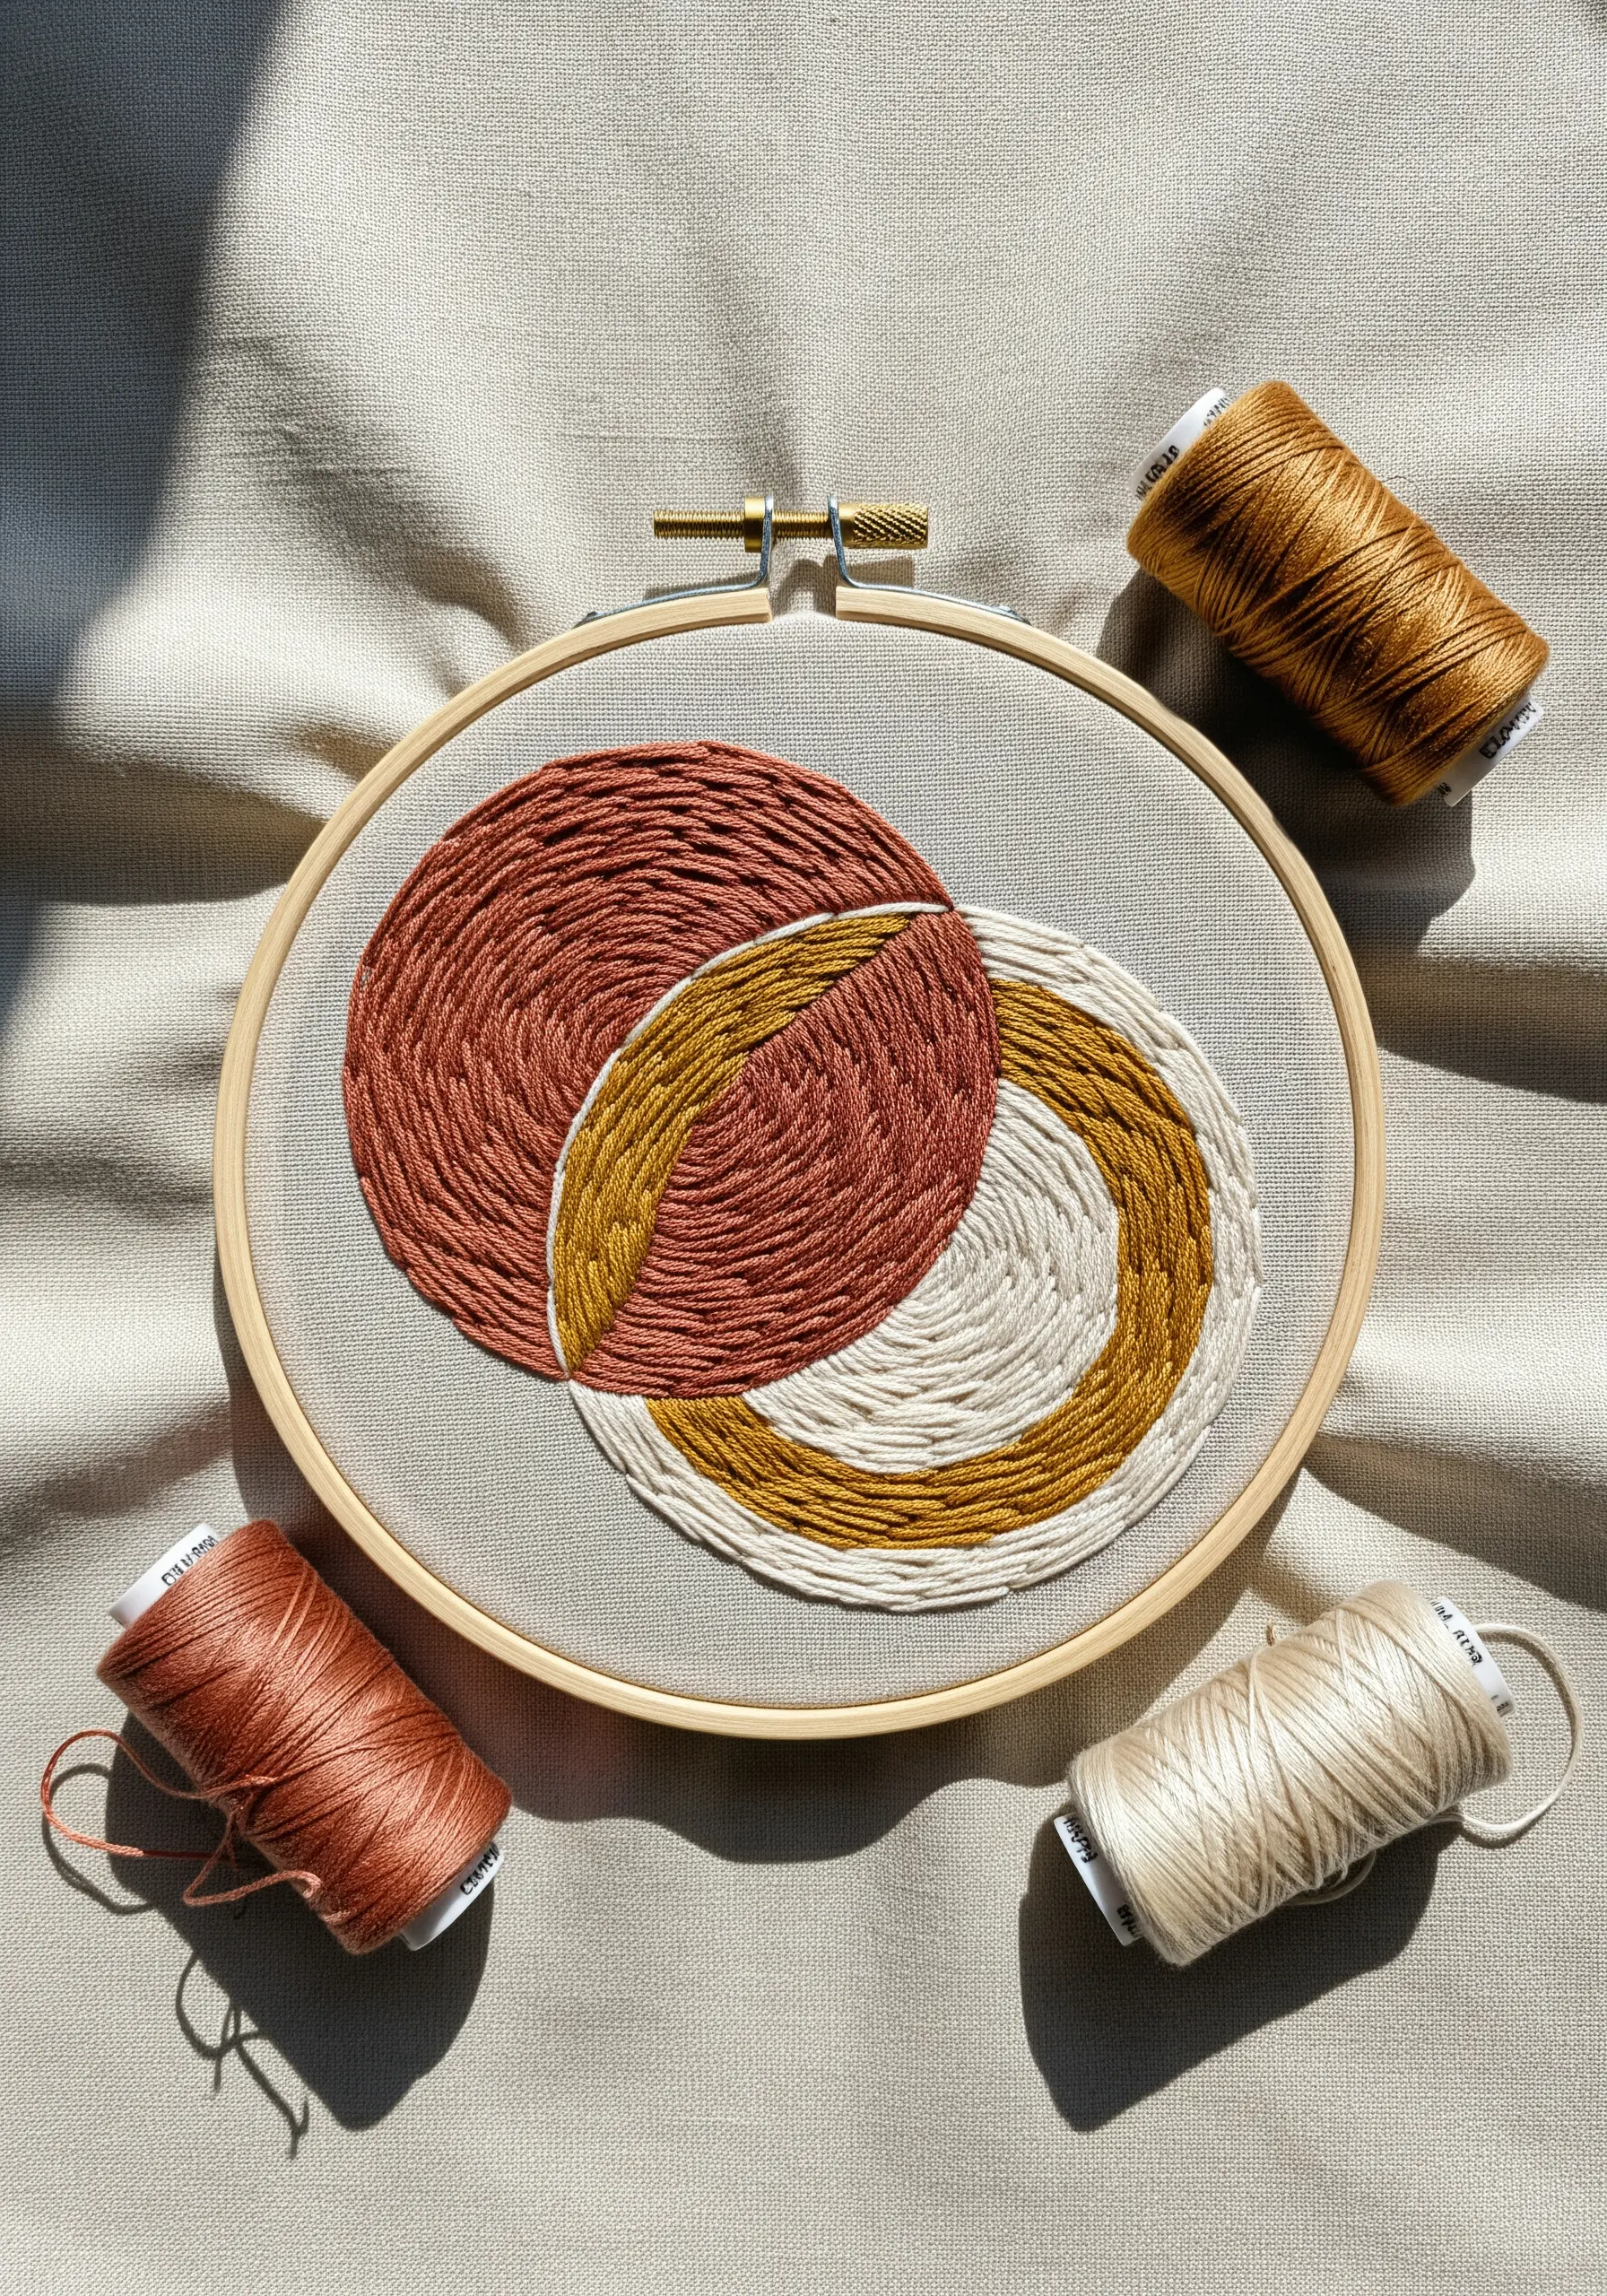
23. Create Crisp Edges in Color-Blocked Designs
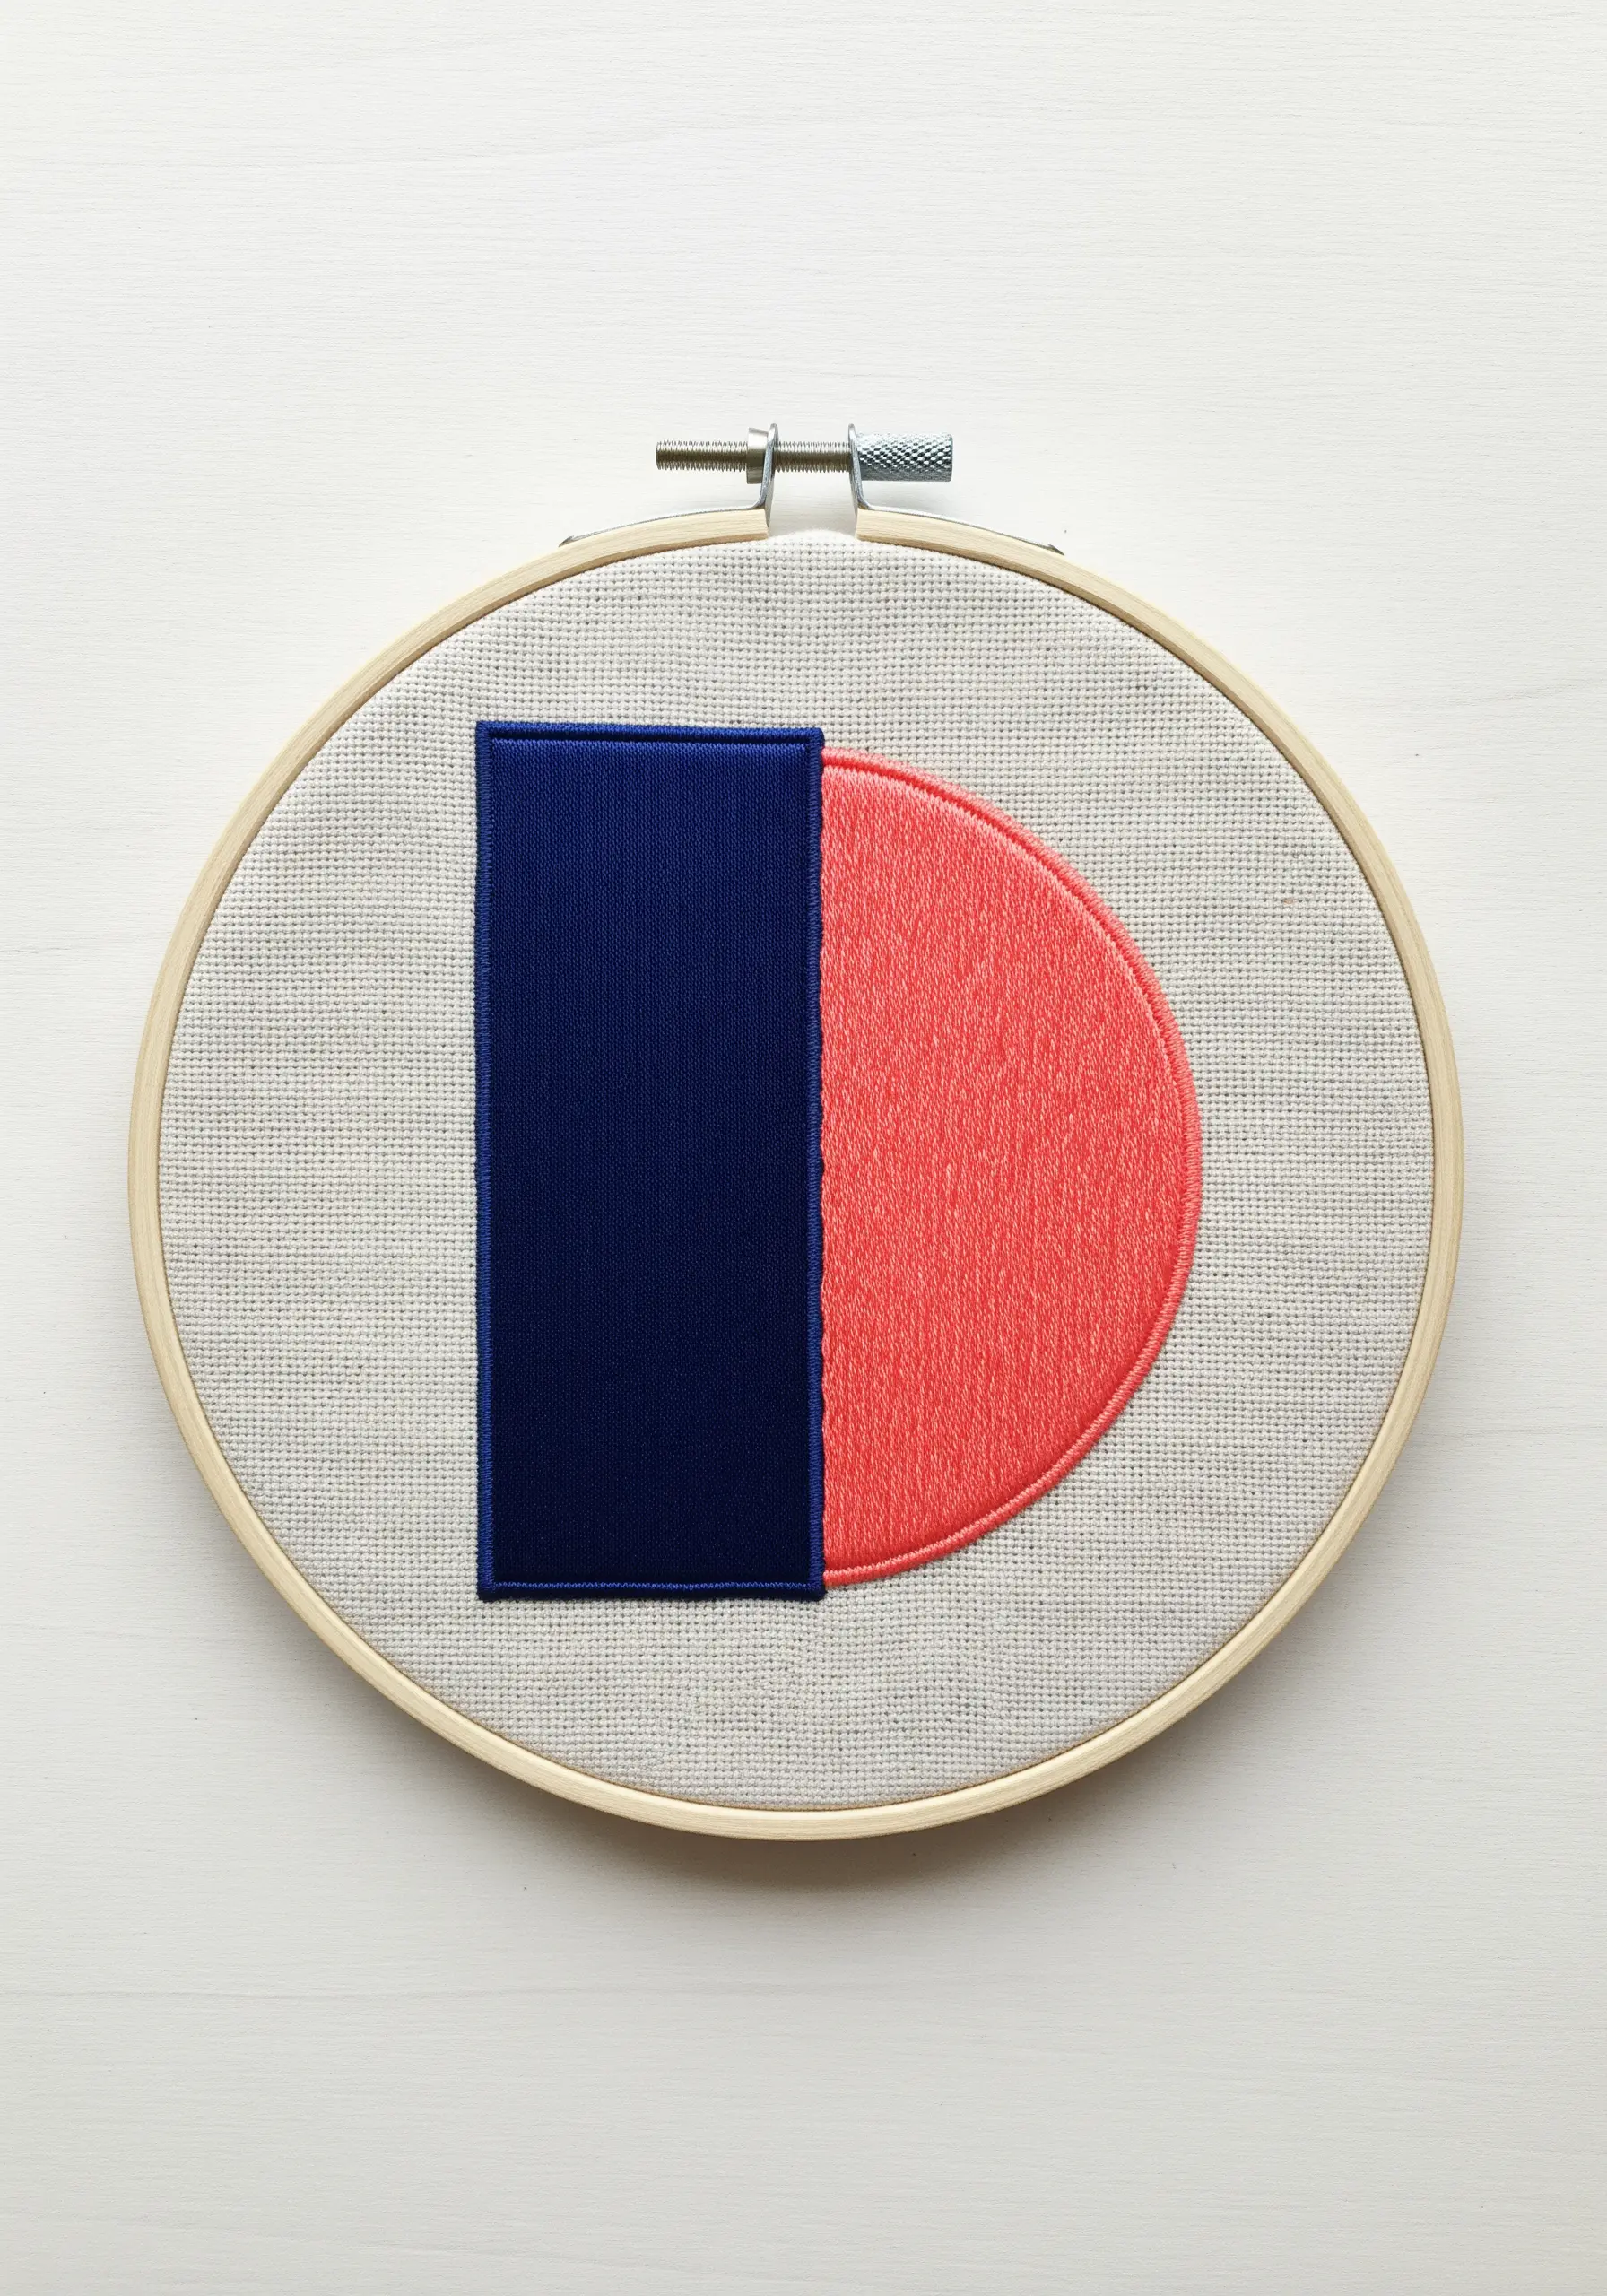
For sharp, geometric color-blocking, the key is creating a flawless edge where the two colors meet.
Complete one color section with satin stitch first. Then, for the second color, bring your needle up just on the outside of the first color’s edge and go down inside it, slightly overlapping.
This technique, known as split satin stitch, creates a razor-sharp dividing line.
It gives your abstract pieces a clean, graphic, and highly polished finish.
24. Add a Playful Accent to an Unexpected Place

Elevate an everyday item by adding a small, meaningful patch to an unconventional spot, like a backpack strap.
A bright, simple design like a lightbulb creates an immediate focal point and adds a touch of personality.
Keep the design graphic with a bold satin stitch fill and a clean backstitch outline to ensure it’s easily readable and impactful, even from a distance.
It’s a small detail that makes a big statement.
25. Replicate a Clean, Modern Typographic Style
Achieve this clean, sans-serif typographic look by outlining your letters with a precise backstitch.
Stitch directly onto a sheet of stiff felt, which won’t fray when you cut it out.
Use a contrasting thread color for a simple running stitch around the border to create a framed effect.
This method produces a sharp, modern patch that feels both handmade and impeccably designed, perfect for minimal typography quotes.
26. Blend Stitches for Lifelike Insect Wings
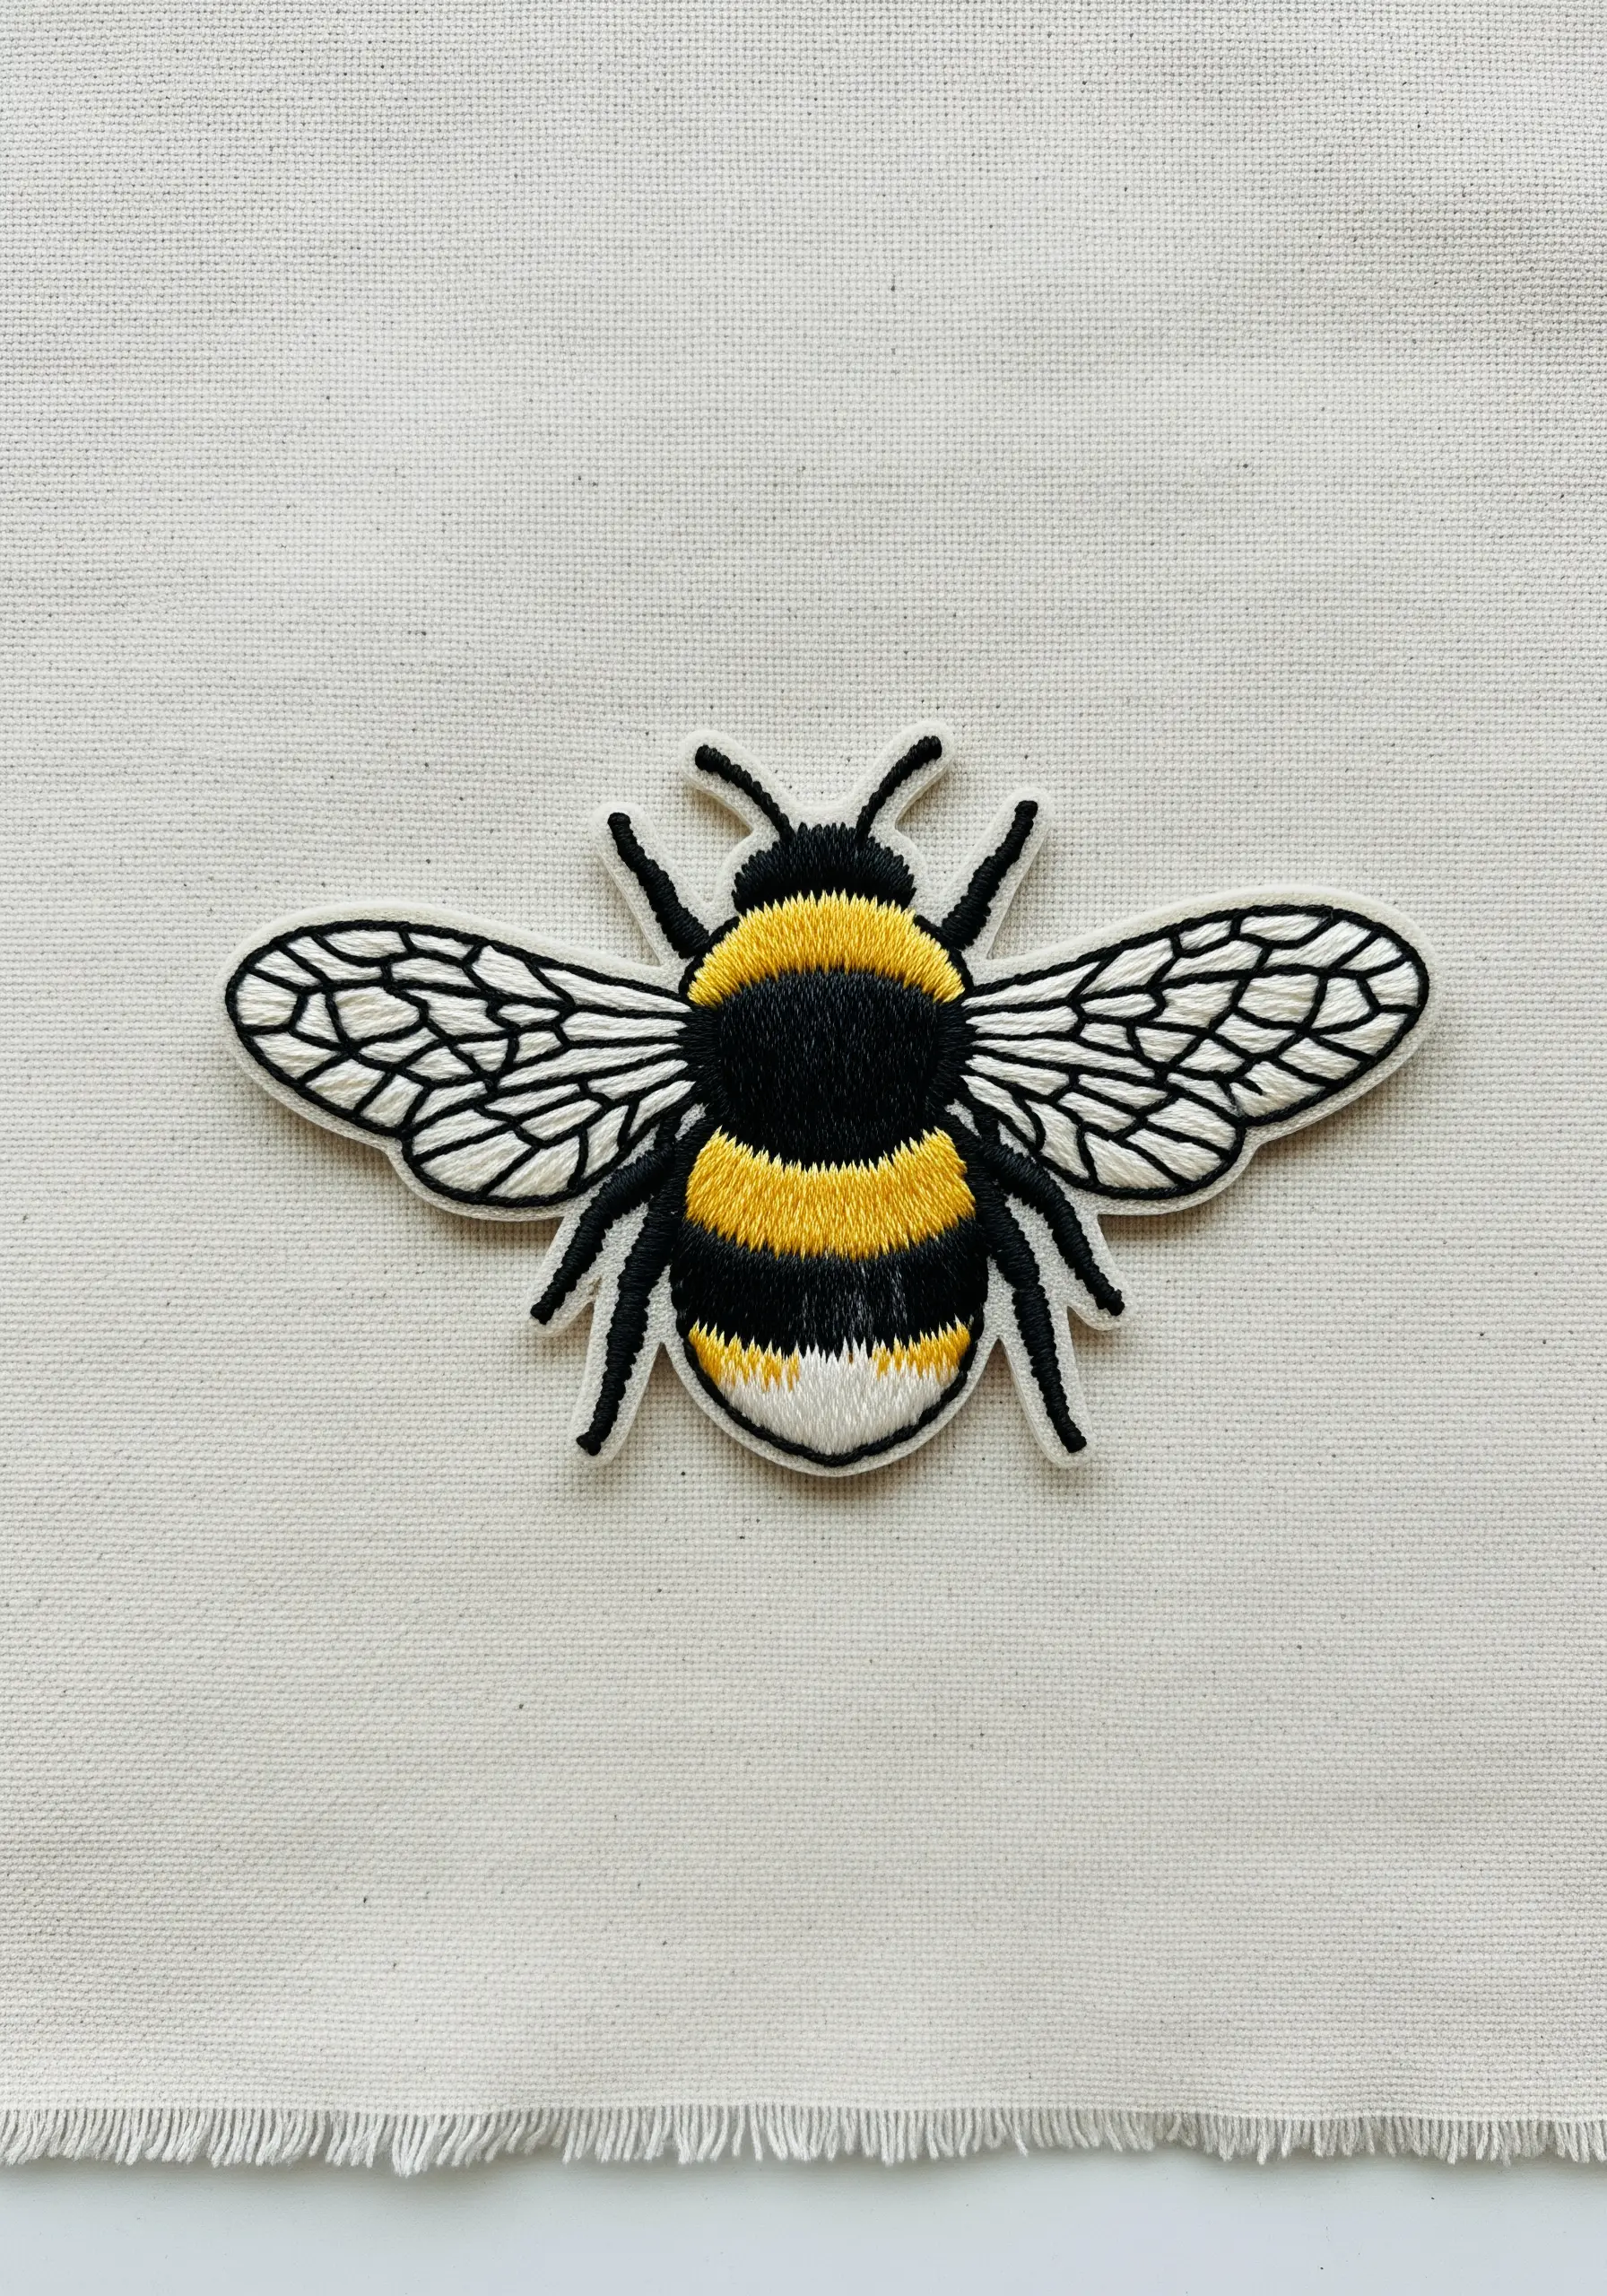
To create the delicate transparency of a bee’s wings, avoid a heavy satin stitch fill.
Instead, use an open fill stitch like the fly stitch or a sparsely spaced seed stitch over a simple backstitch outline.
For the fuzzy body, use a long-and-short stitch to blend yellow, black, and white threads for a soft, textural effect.
This contrast between the delicate wings and the plush body is what makes bird & butterfly embroidery patterns so lifelike.
27. Embrace Understated Elegance with Tone-on-Tone Stitching
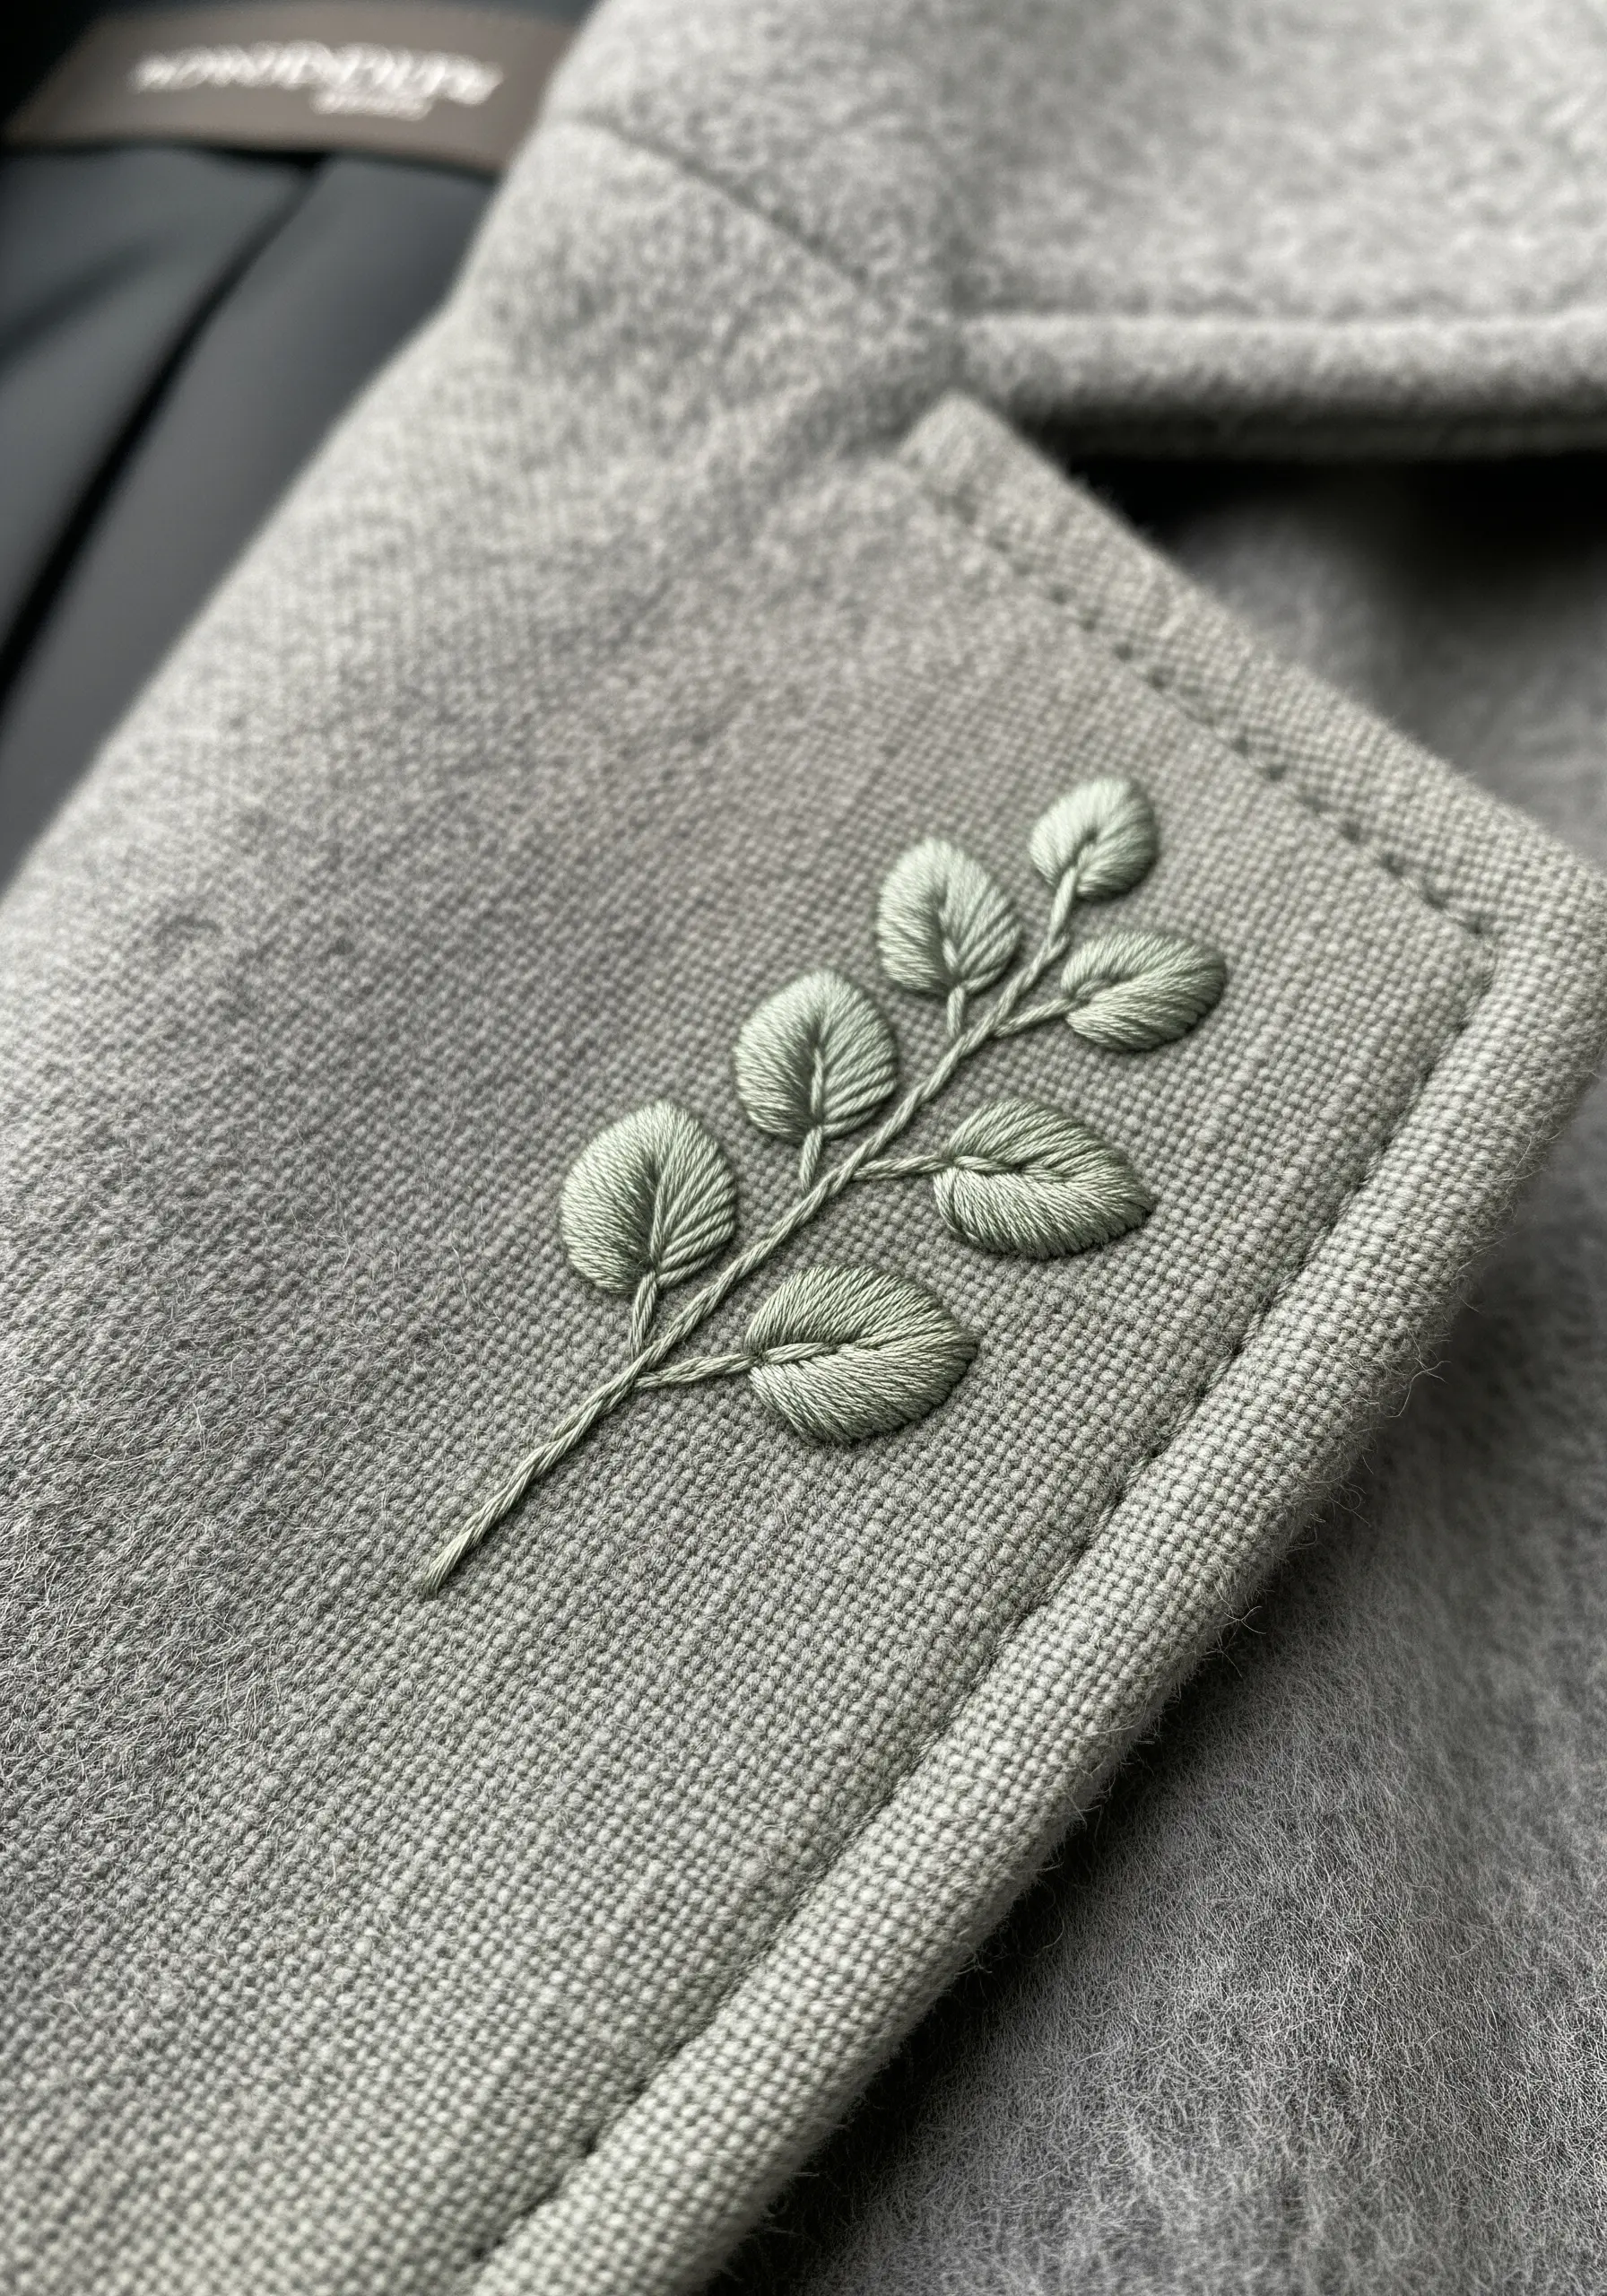
For a subtle, sophisticated embellishment, use a thread color that is only a few shades lighter or darker than your base fabric.
This tone-on-tone embroidery technique creates a design that is discovered rather than announced, focusing on texture over color.
A simple fishbone stitch for the leaves allows the texture of the stitch and the woolen fabric to take center stage.
It’s a perfect way to add a touch of quiet luxury to a classic coat lapel.


