

Perhaps you’ve mastered the basic stitches, but now you find yourself pausing, wondering how to make your work feel less like a kit and more like your own art. You’re searching for that subtle shift that transforms a pleasant pastime into a truly expressive practice.
That shift doesn’t come from learning dozens of complicated new stitches. It comes from intention—from understanding how a single strand of thread can create a more delicate line than three, or how changing the direction of your satin stitch can make a flat shape feel curved and alive.
These small, vintage-inspired motifs are your perfect laboratory. Treat each one not just as a pattern to be copied, but as a focused exercise. In one, you’ll explore texture; in another, the art of a clean line. This is how you build a visual language, one small, thoughtful stitch at a time.
1. Render Lavender with Dimensional Knots
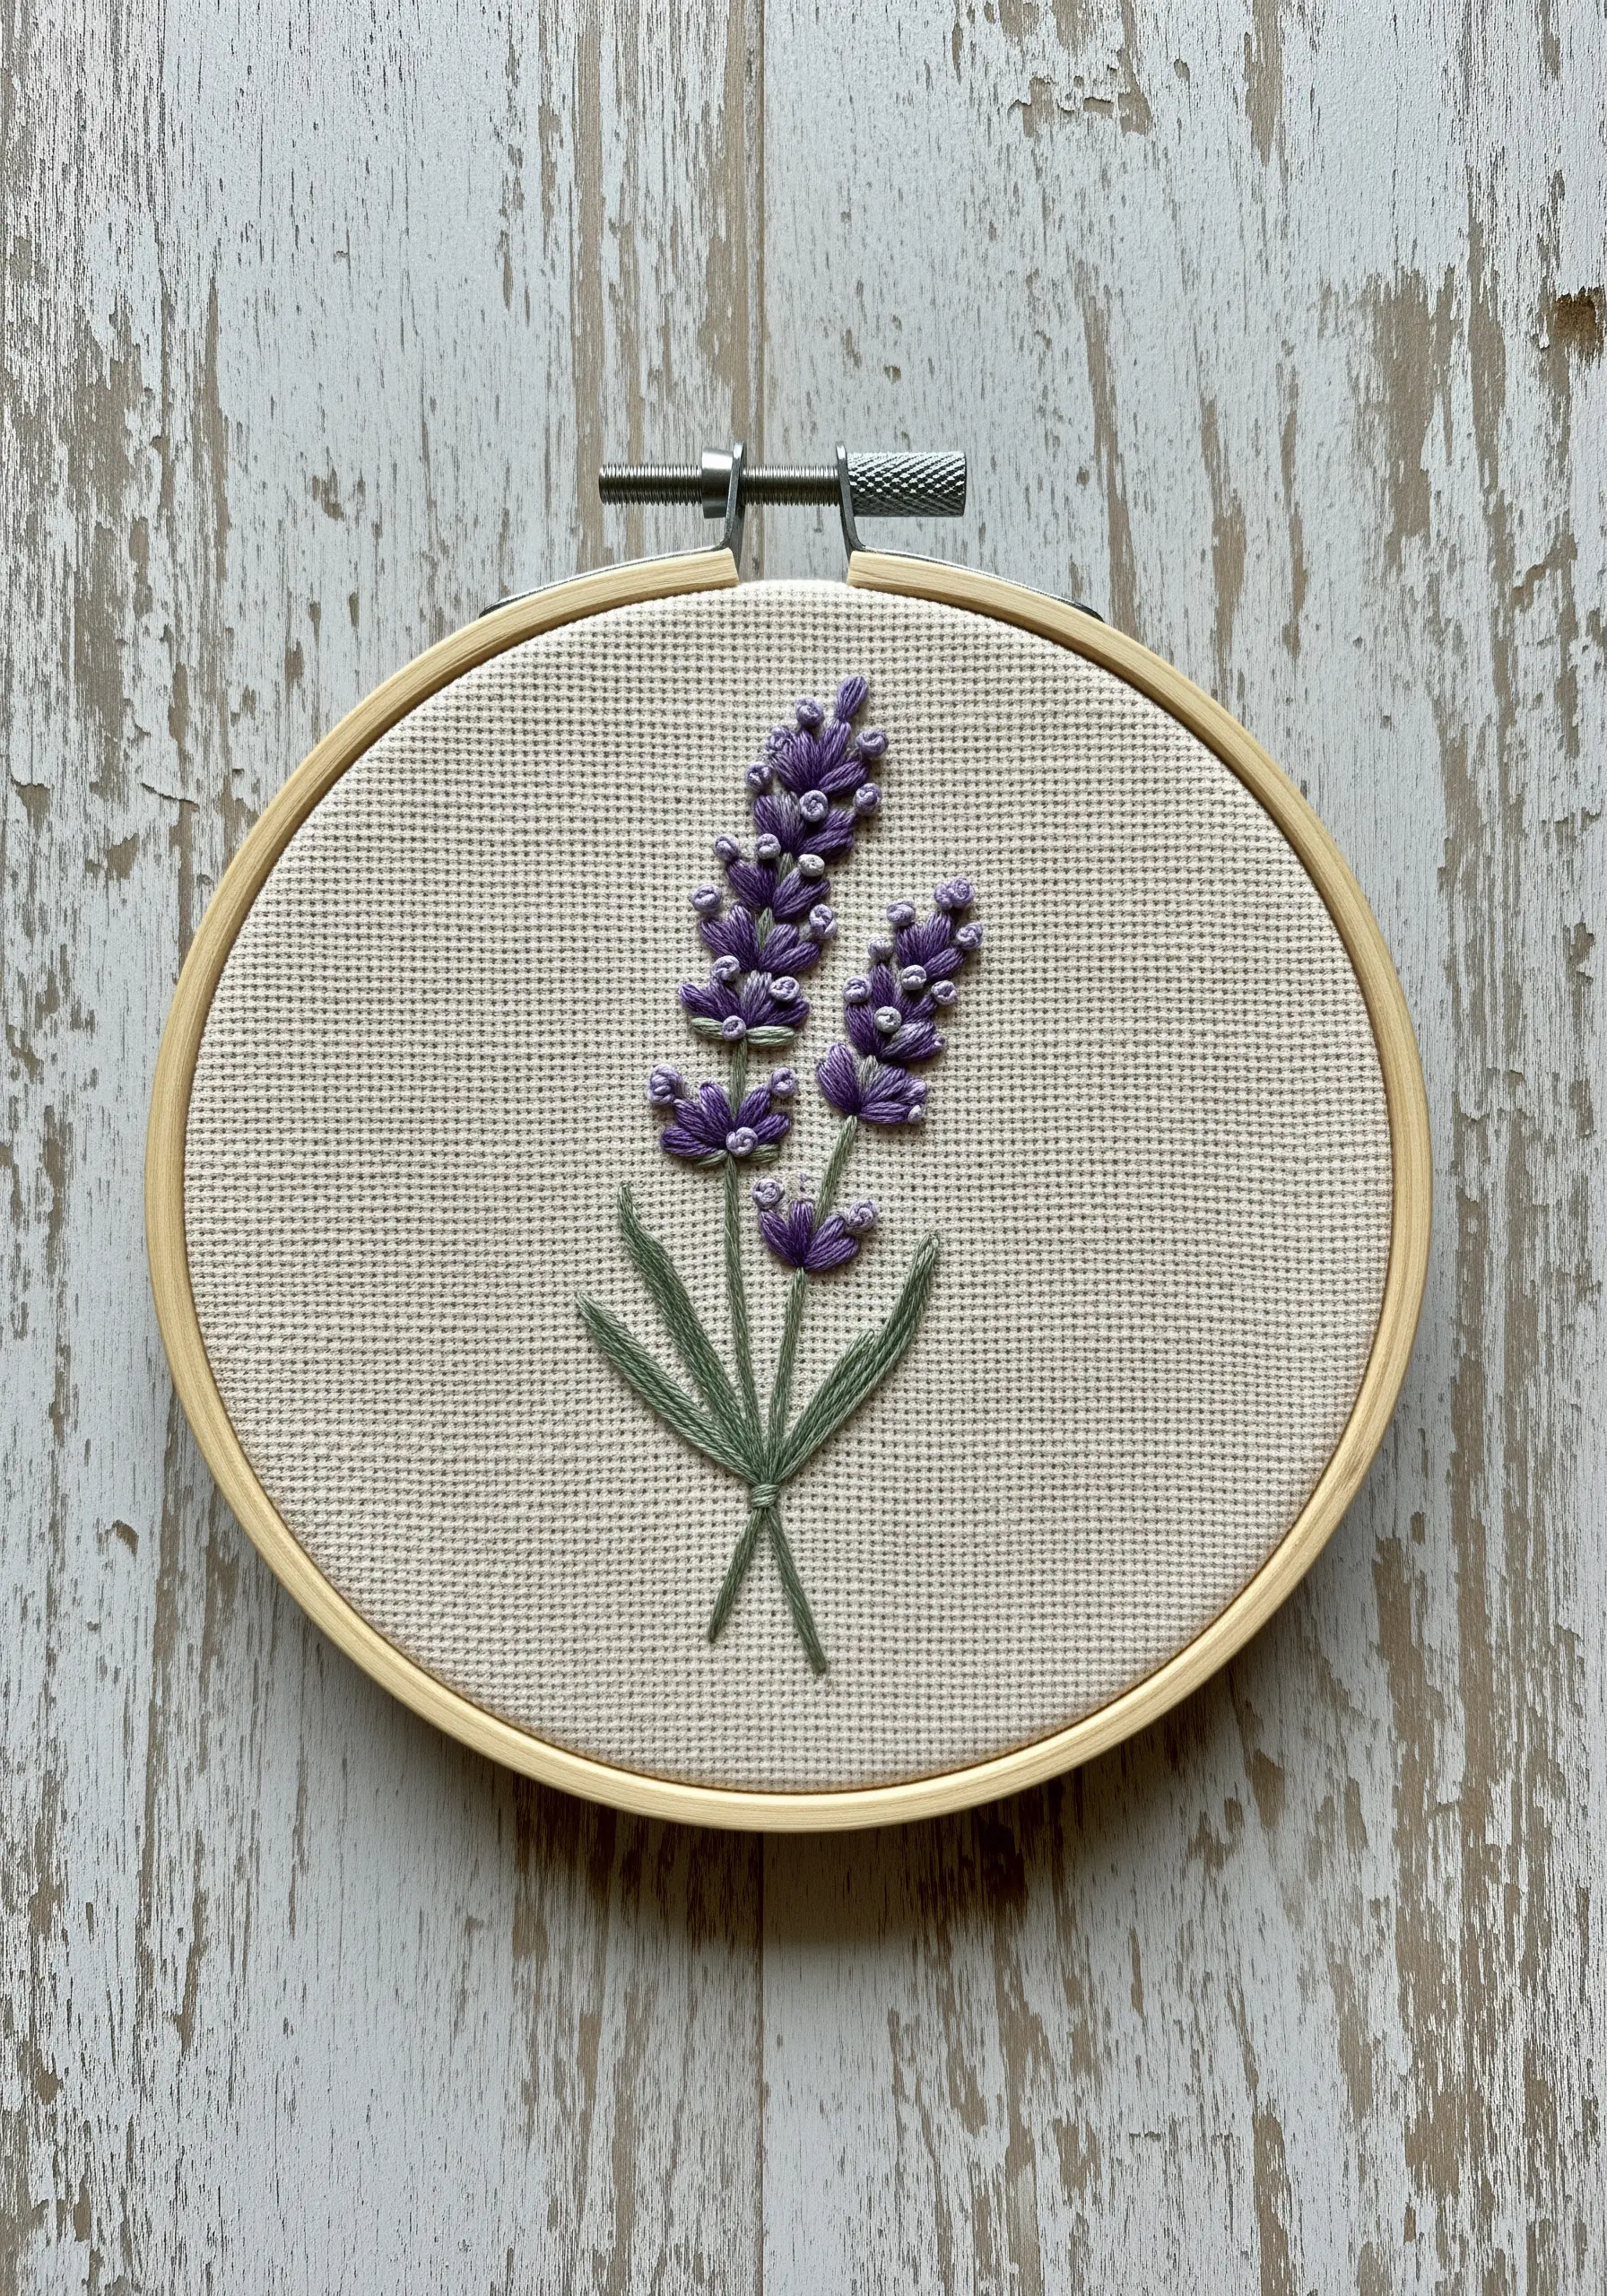
Instead of using satin stitch for the lavender buds, create them with French knots or colonial knots.
Use three strands of floss for the lower, larger buds and taper to two strands, then one, as you move toward the tip of the stem.
This variation in thread weight creates a natural, delicate taper and adds realistic texture that invites touch.
For the stems, a simple stem stitch works perfectly, while a detached chain stitch can form the base of each floret cluster.
2. Master Thread Painting for Lifelike Insects

To achieve a fuzzy, realistic bee body, use the long-and-short stitch technique.
Begin with one color, then introduce the next by stitching up into the previous row, blending the shades seamlessly.
For the delicate, transparent wings, switch to a single strand of gray or off-white thread and outline the veins with a simple backstitch.
This contrast between the soft, blended body and the crisp, linear wings is what gives the design its lifelike quality.
3. Elevate Linework with a Single Thread
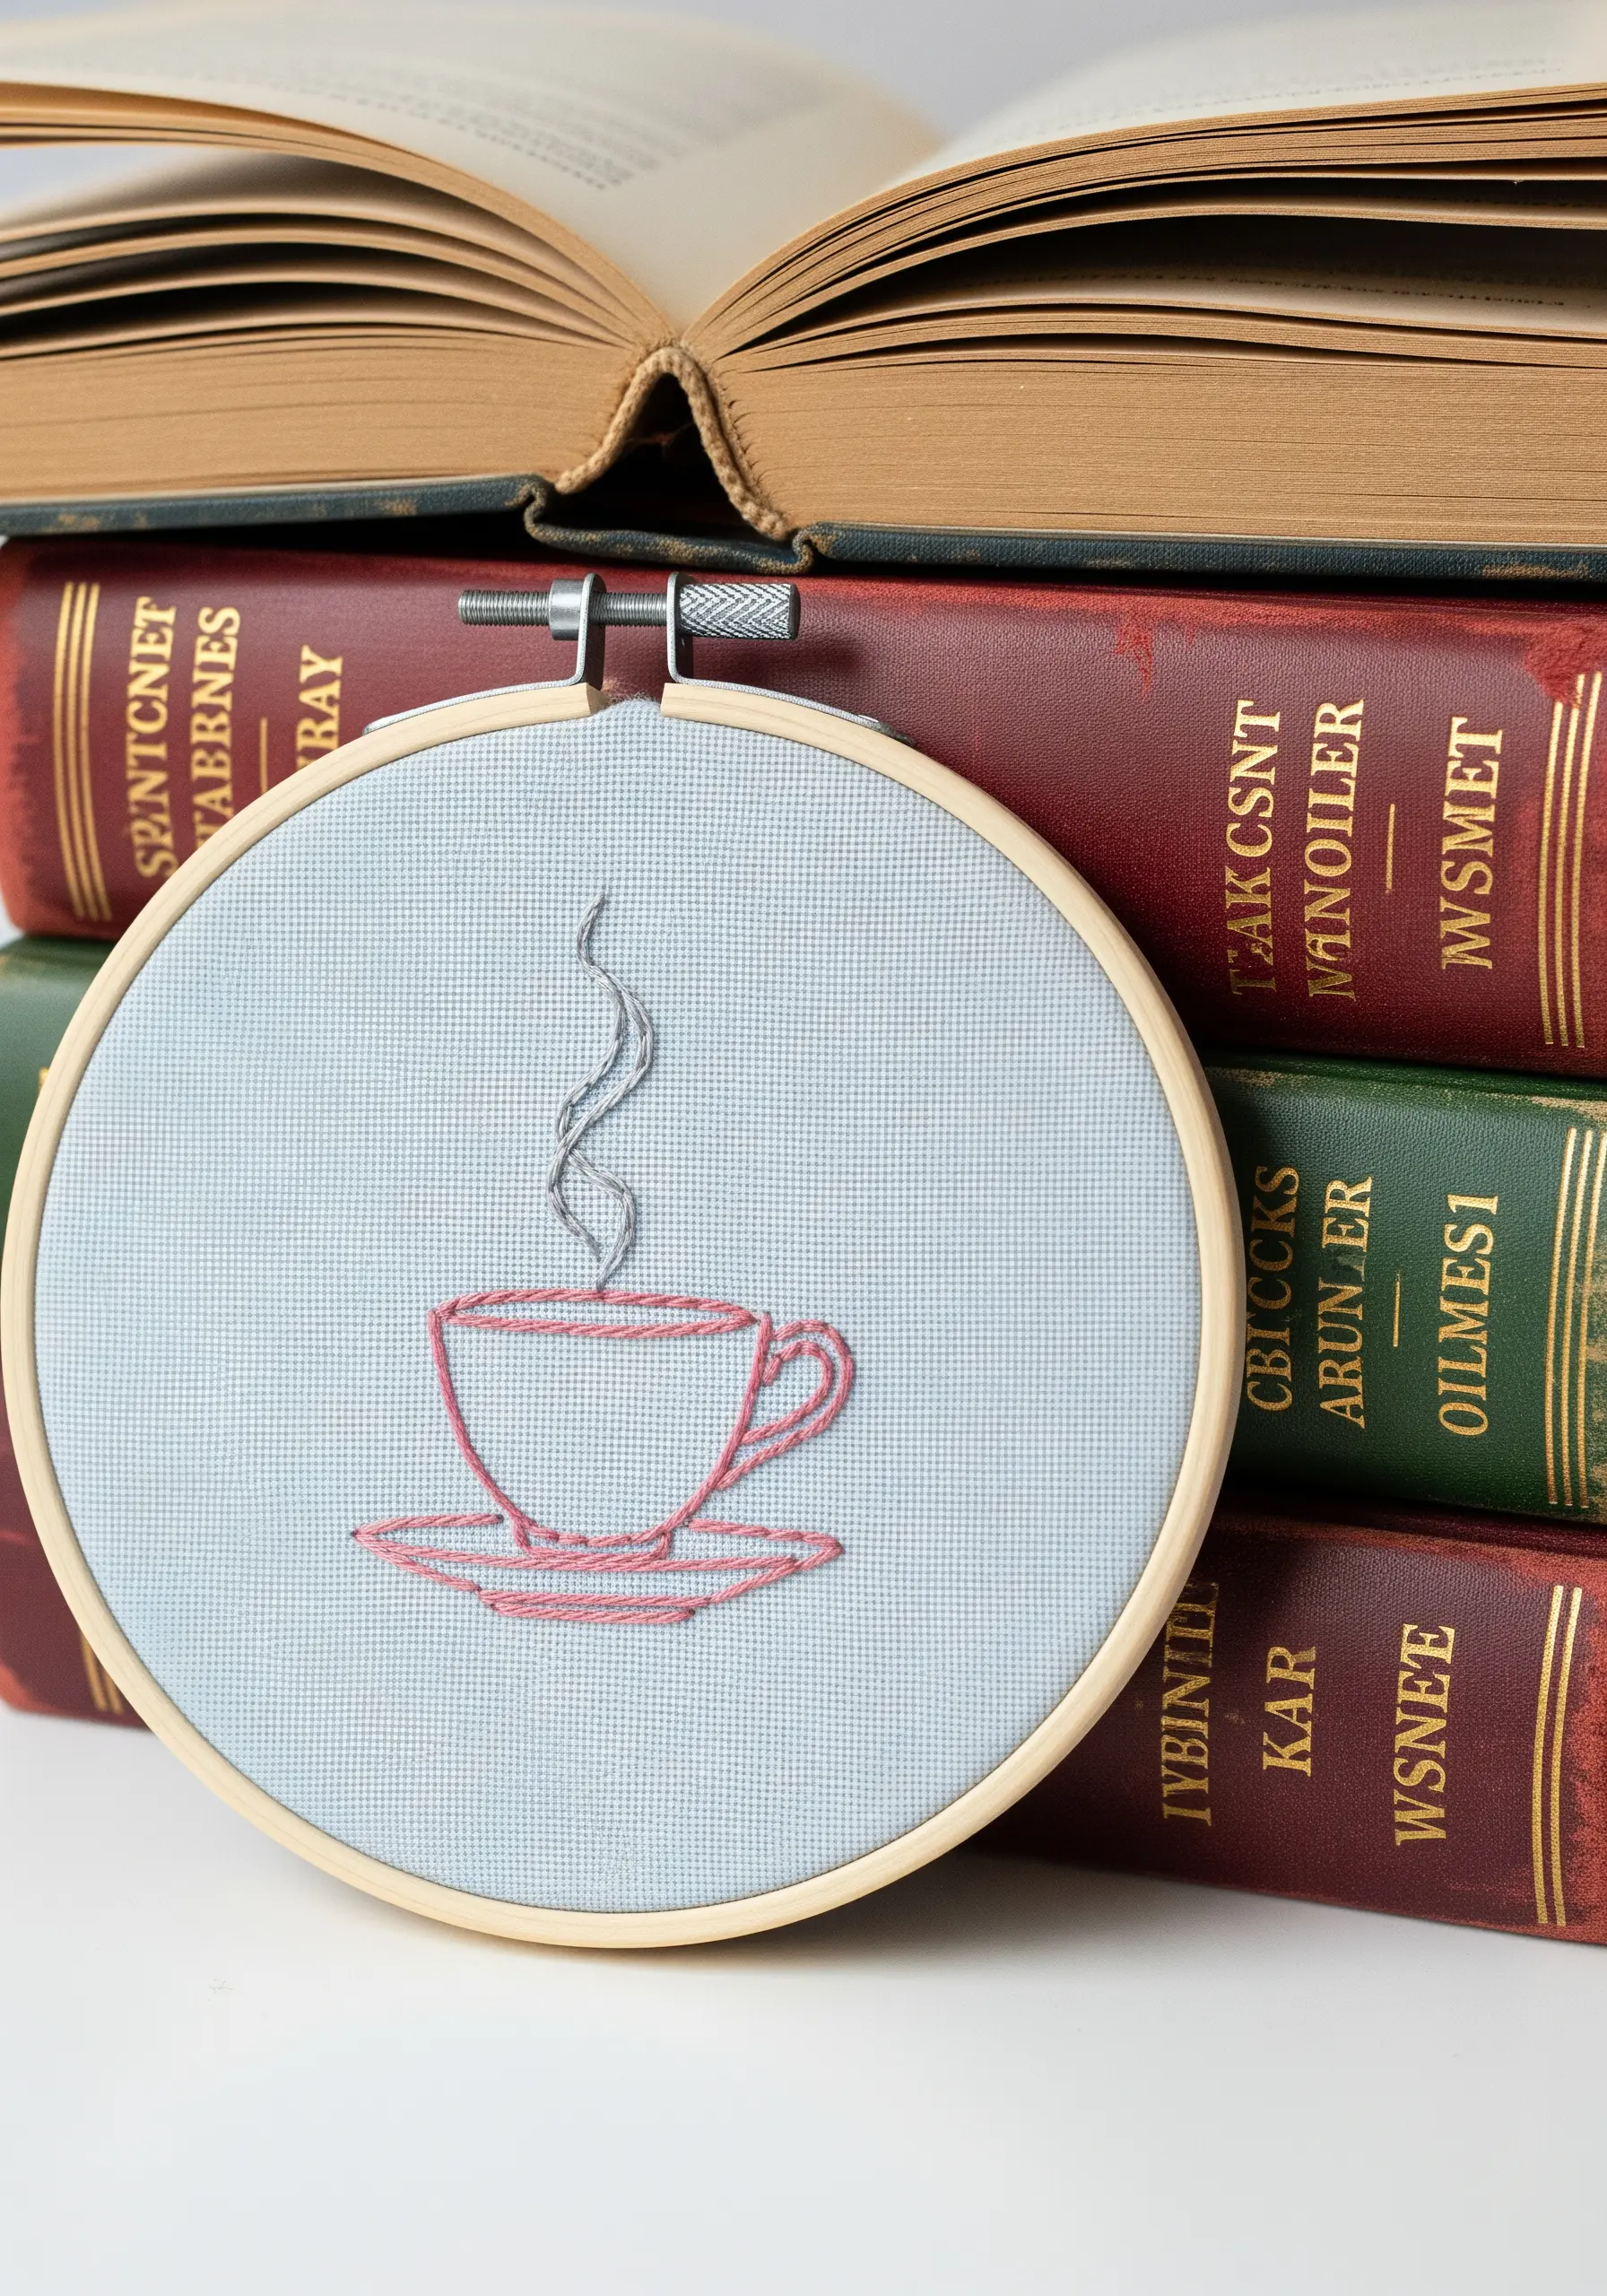
A simple outline motif gains instant elegance when you reduce your thread count.
Use a single strand of six-strand floss to stitch this design with a backstitch or a stem stitch.
The result is a crisp, delicate line that looks more like a pen illustration than a series of stitches, giving it a modern, graphic feel.
For the steam, make your stitches slightly longer and wavier to create a sense of gentle movement.
4. Create Natural Texture with Seed Stitch
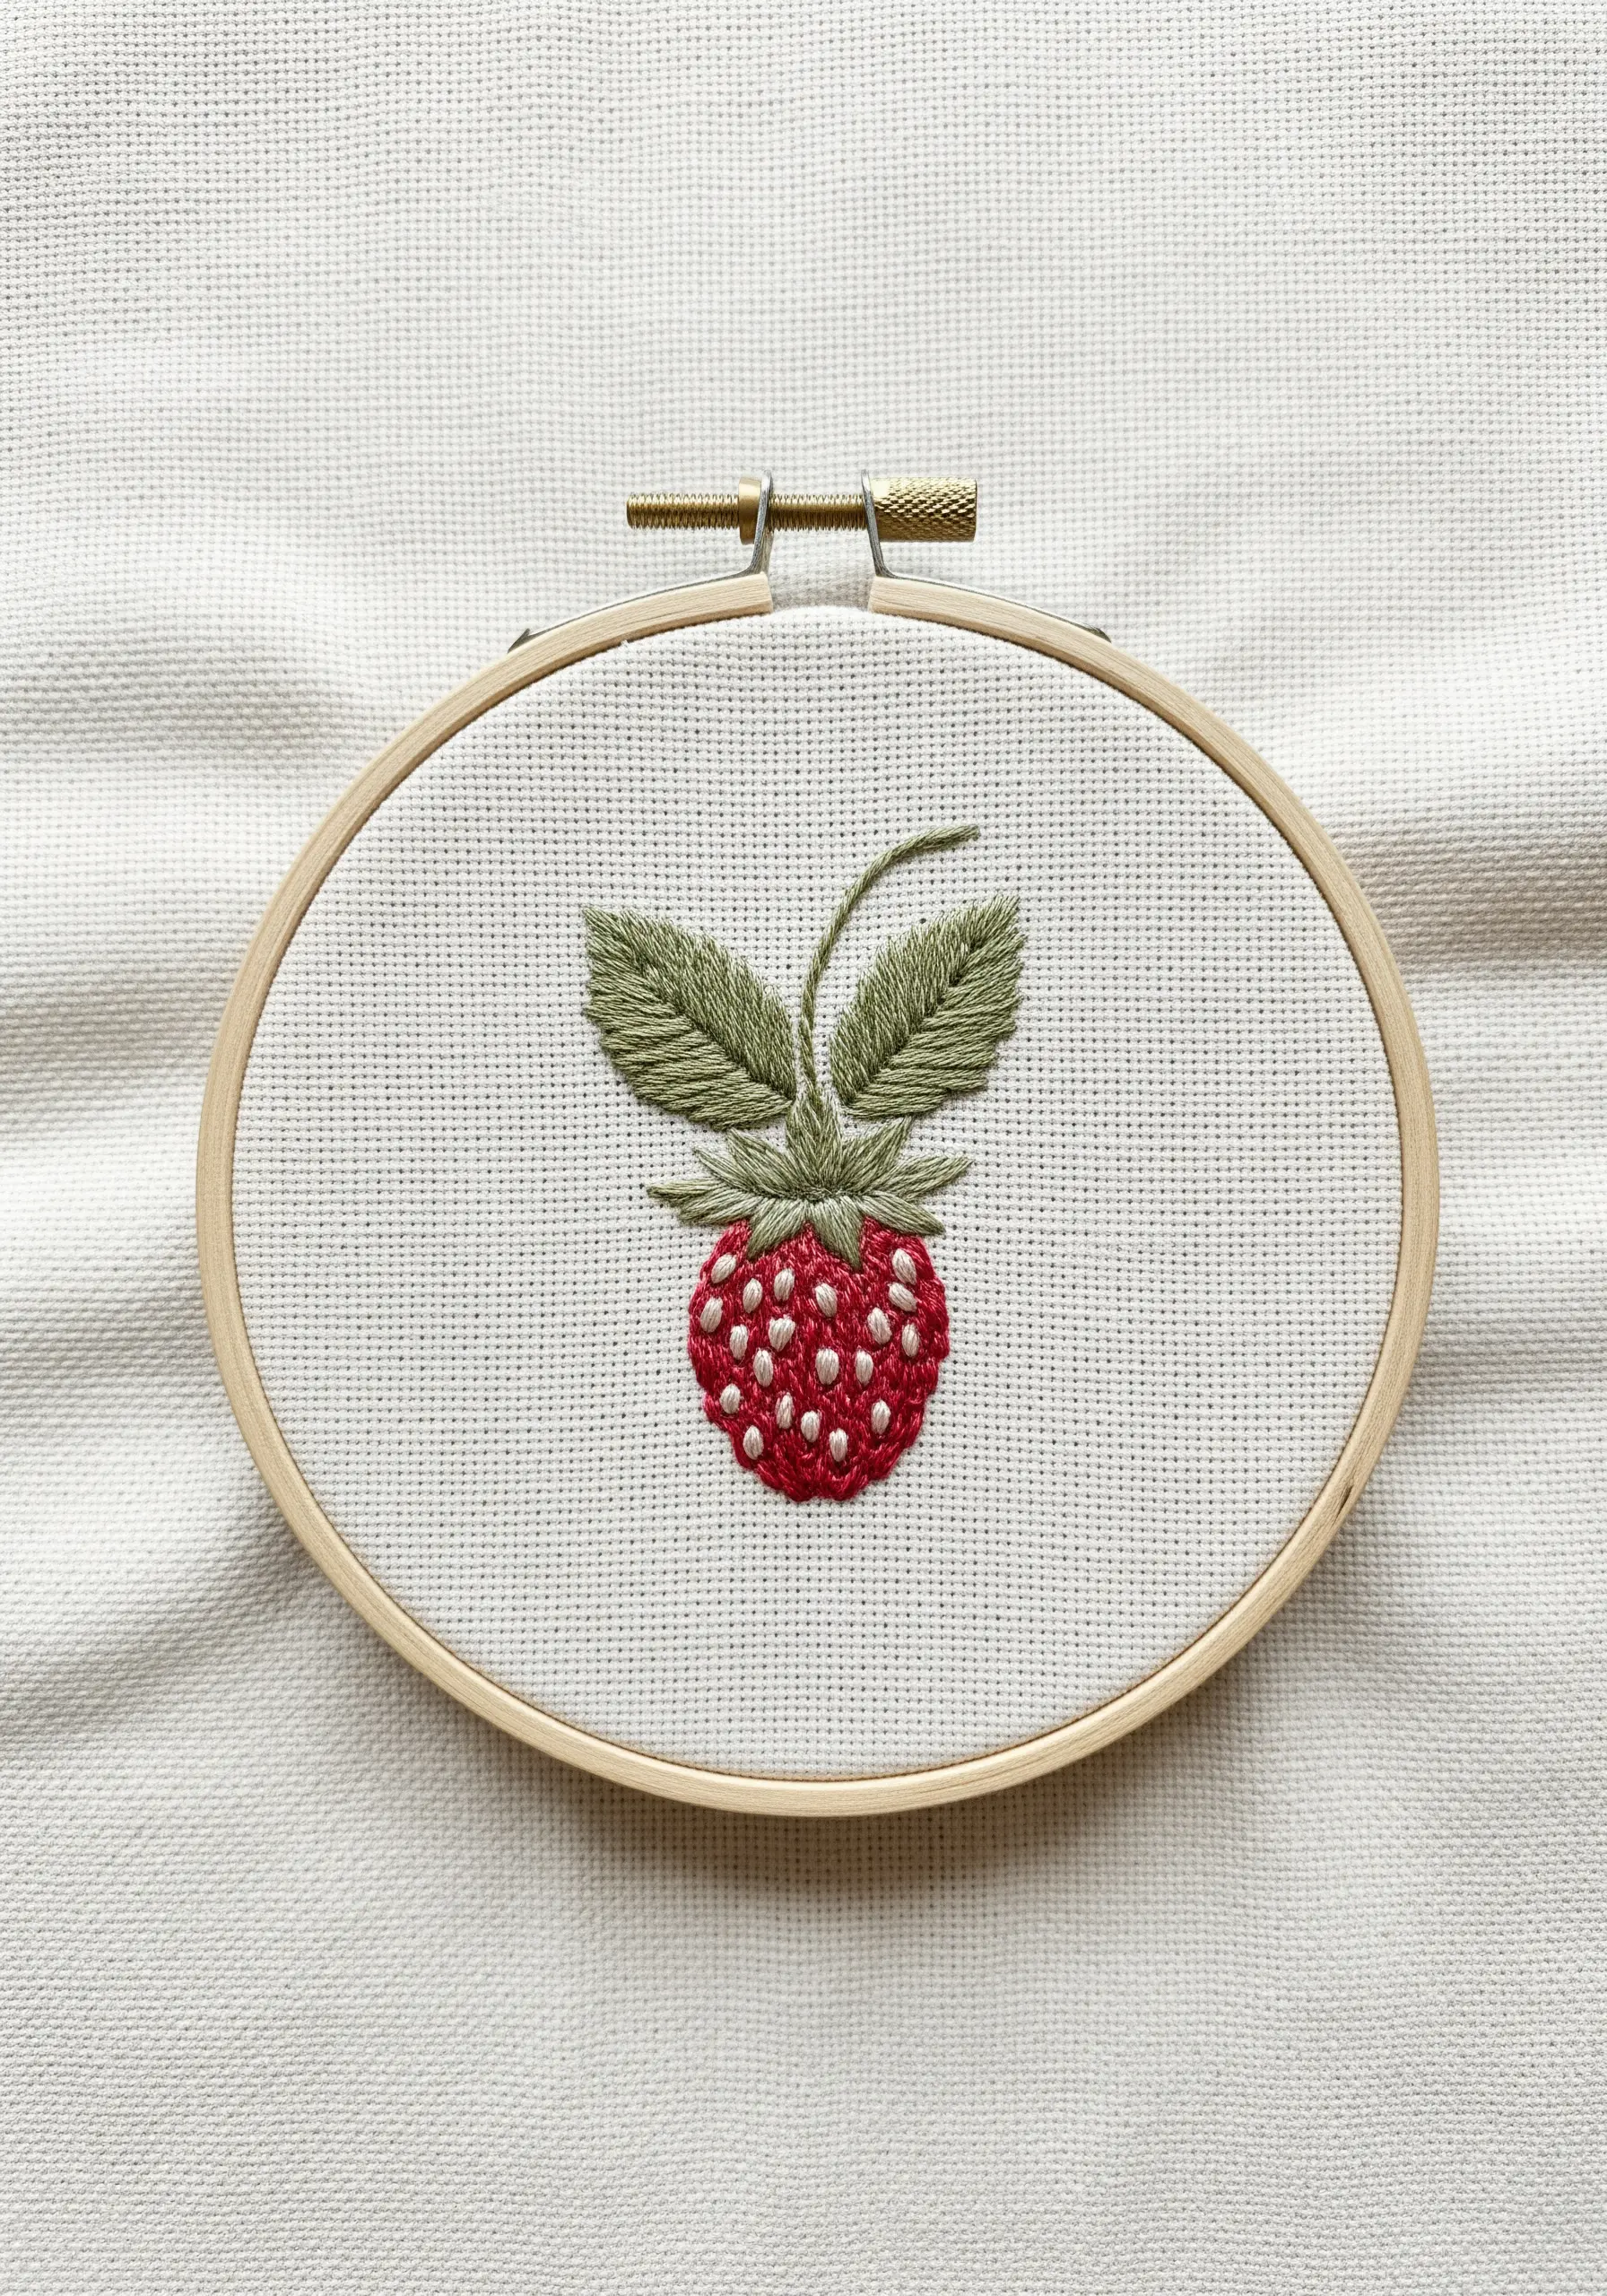
For the strawberry seeds, resist the urge to use French knots, which can sit too high on the surface.
Instead, scatter tiny, straight seed stitches across the berry’s surface using a contrasting off-white or pale yellow thread.
This technique integrates the seeds into the fruit’s texture rather than making them look like additions.
Fill the berry with a satin stitch, angling your stitches to follow the natural curve of the fruit for a more rounded appearance.
5. Build a Padded Satin Stitch Monogram
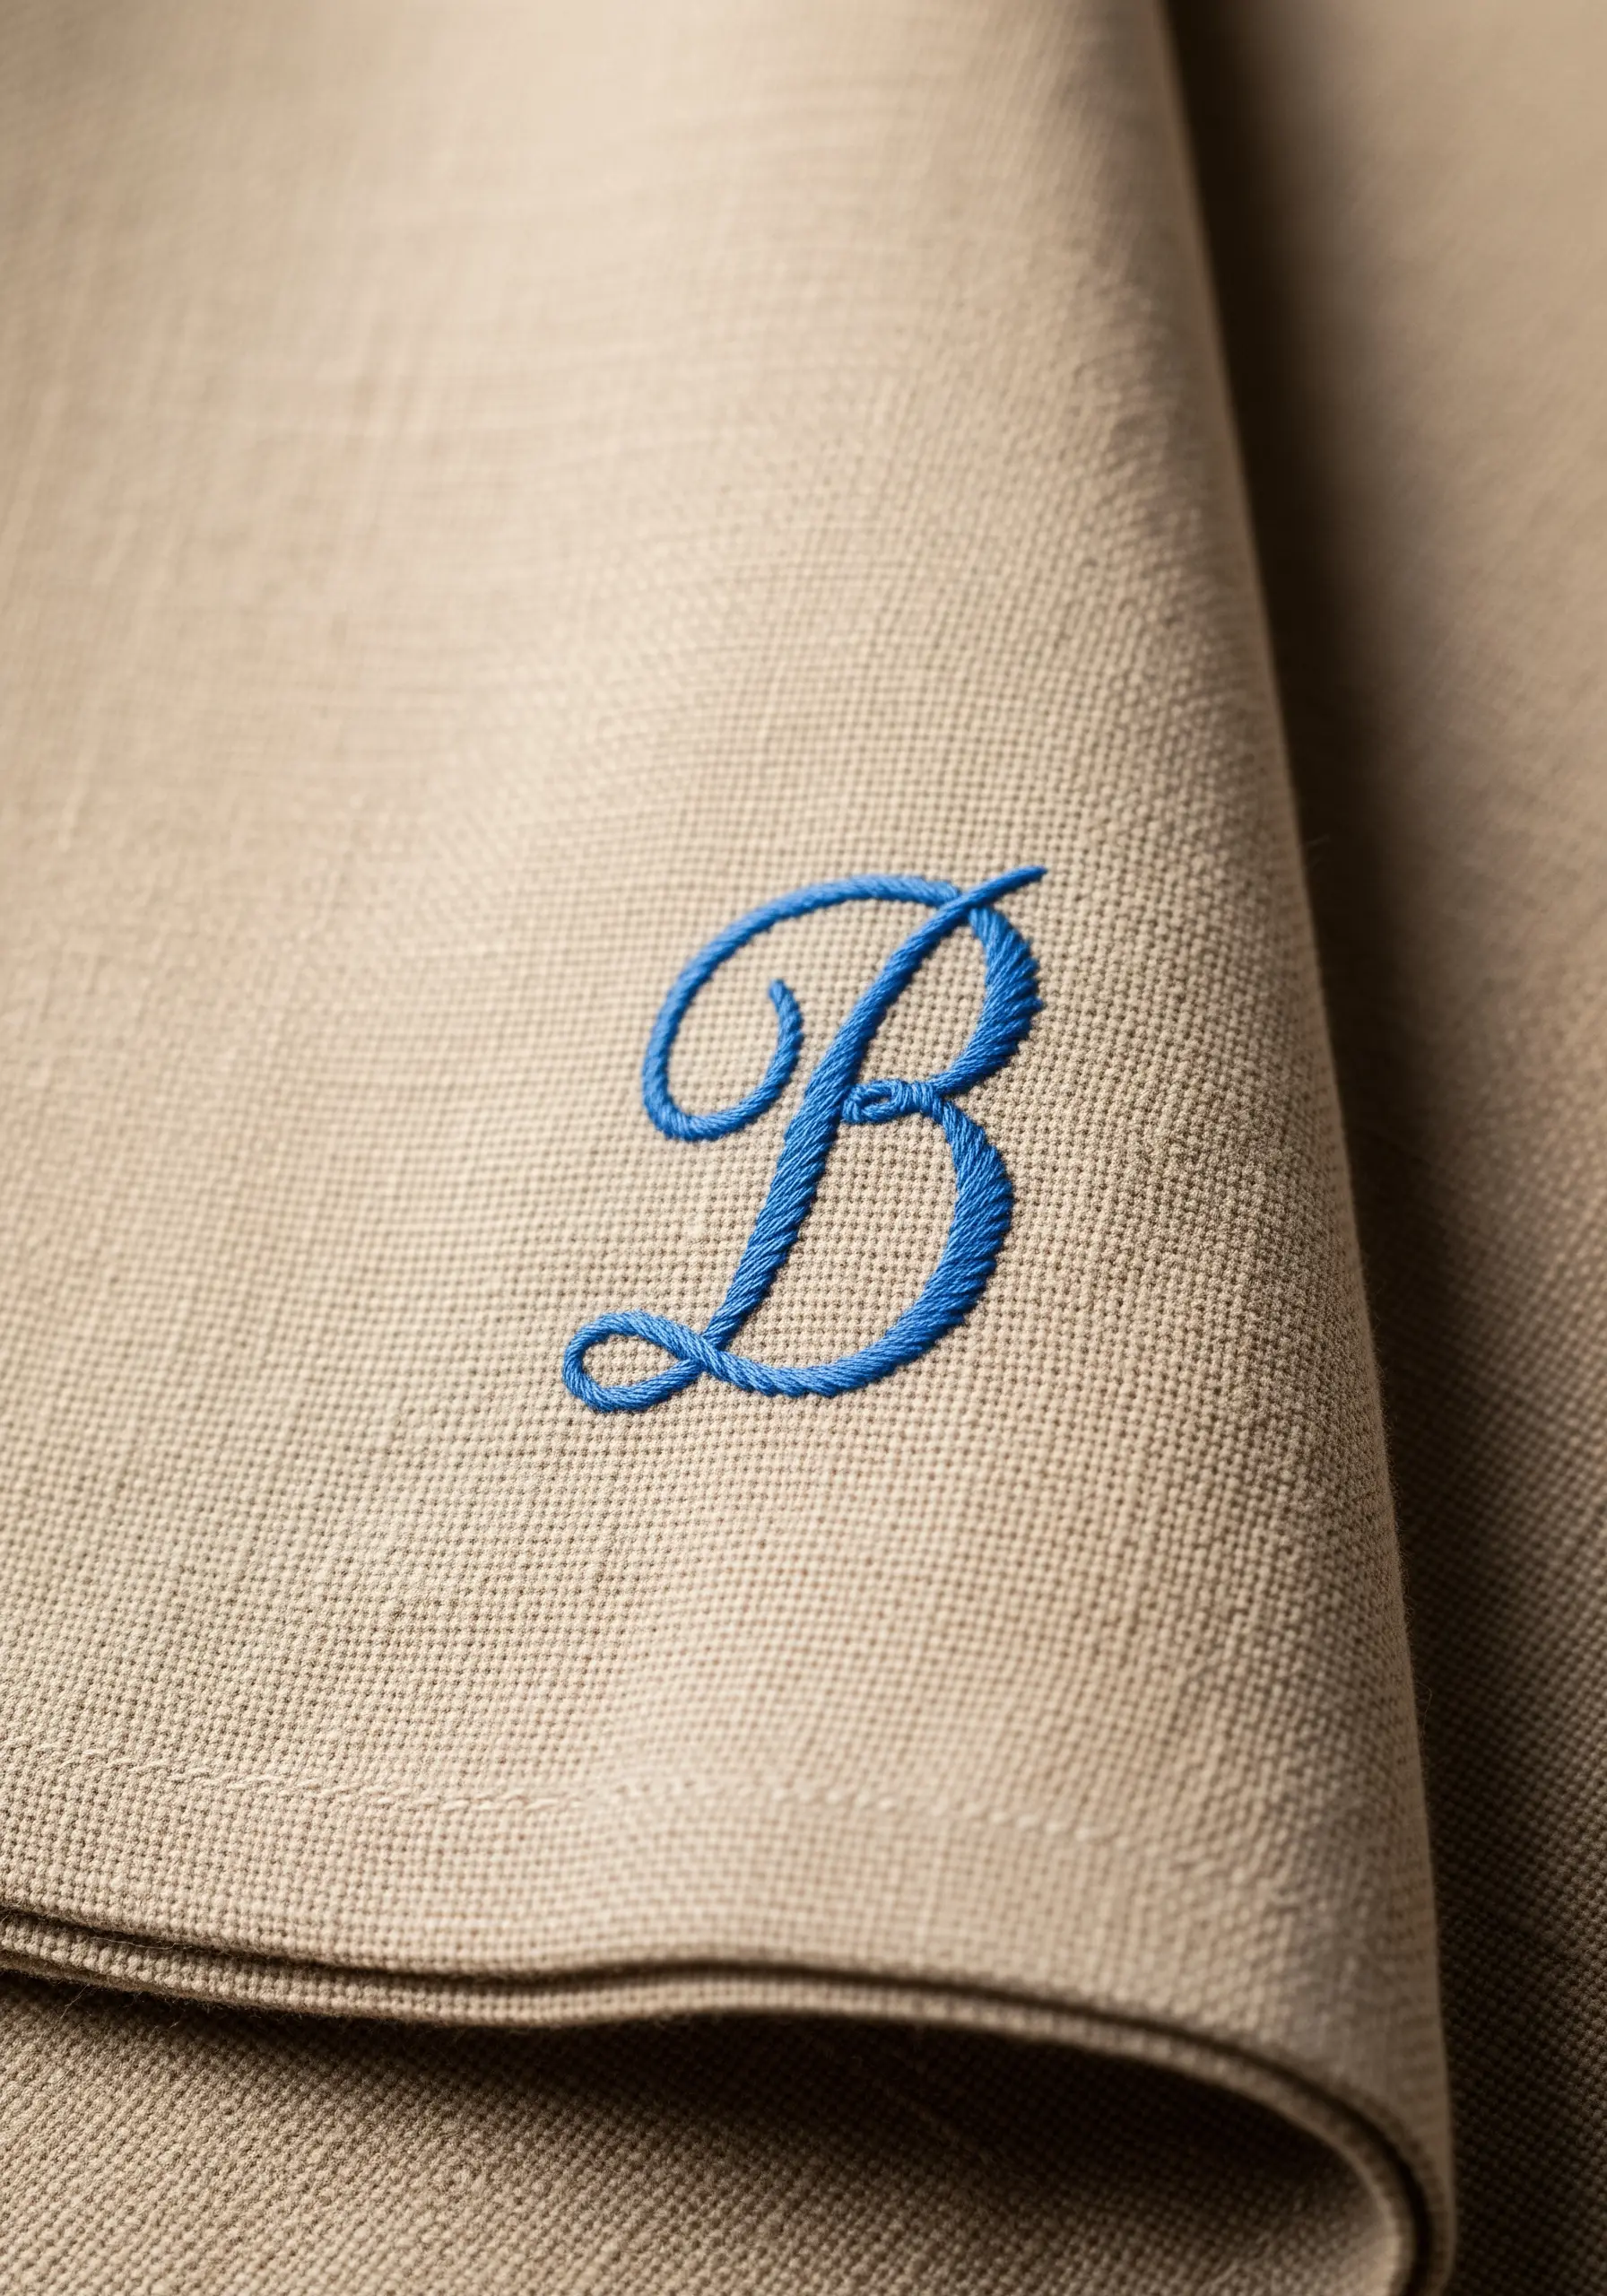
To give your monograms a luxurious, raised dimension, don’t just stitch the final layer.
First, create an underlay by filling the letter’s shape with small, horizontal running stitches or a layer of satin stitch perpendicular to your final direction.
Then, work your final satin stitch over this padding.
This simple preparation step elevates the monogram from flat to embossed, creating a professional finish on napkins, towels, or handkerchiefs.
6. Achieve a Flawless Silhouette with Felt

When creating a solid-fill silhouette, your choice of fabric is as important as your stitch.
Stitching on a piece of wool-blend felt provides a stable, forgiving surface that absorbs the thread slightly, minimizing gaps in your satin stitch.
To ensure a perfectly smooth finish, first outline the entire shape with a split stitch, then fill with satin stitch, making sure your needle goes down just outside the outline.
This technique creates a sharp, contained edge that defines the silhouette beautifully.
7. Weave Texture into a Crescent Moon
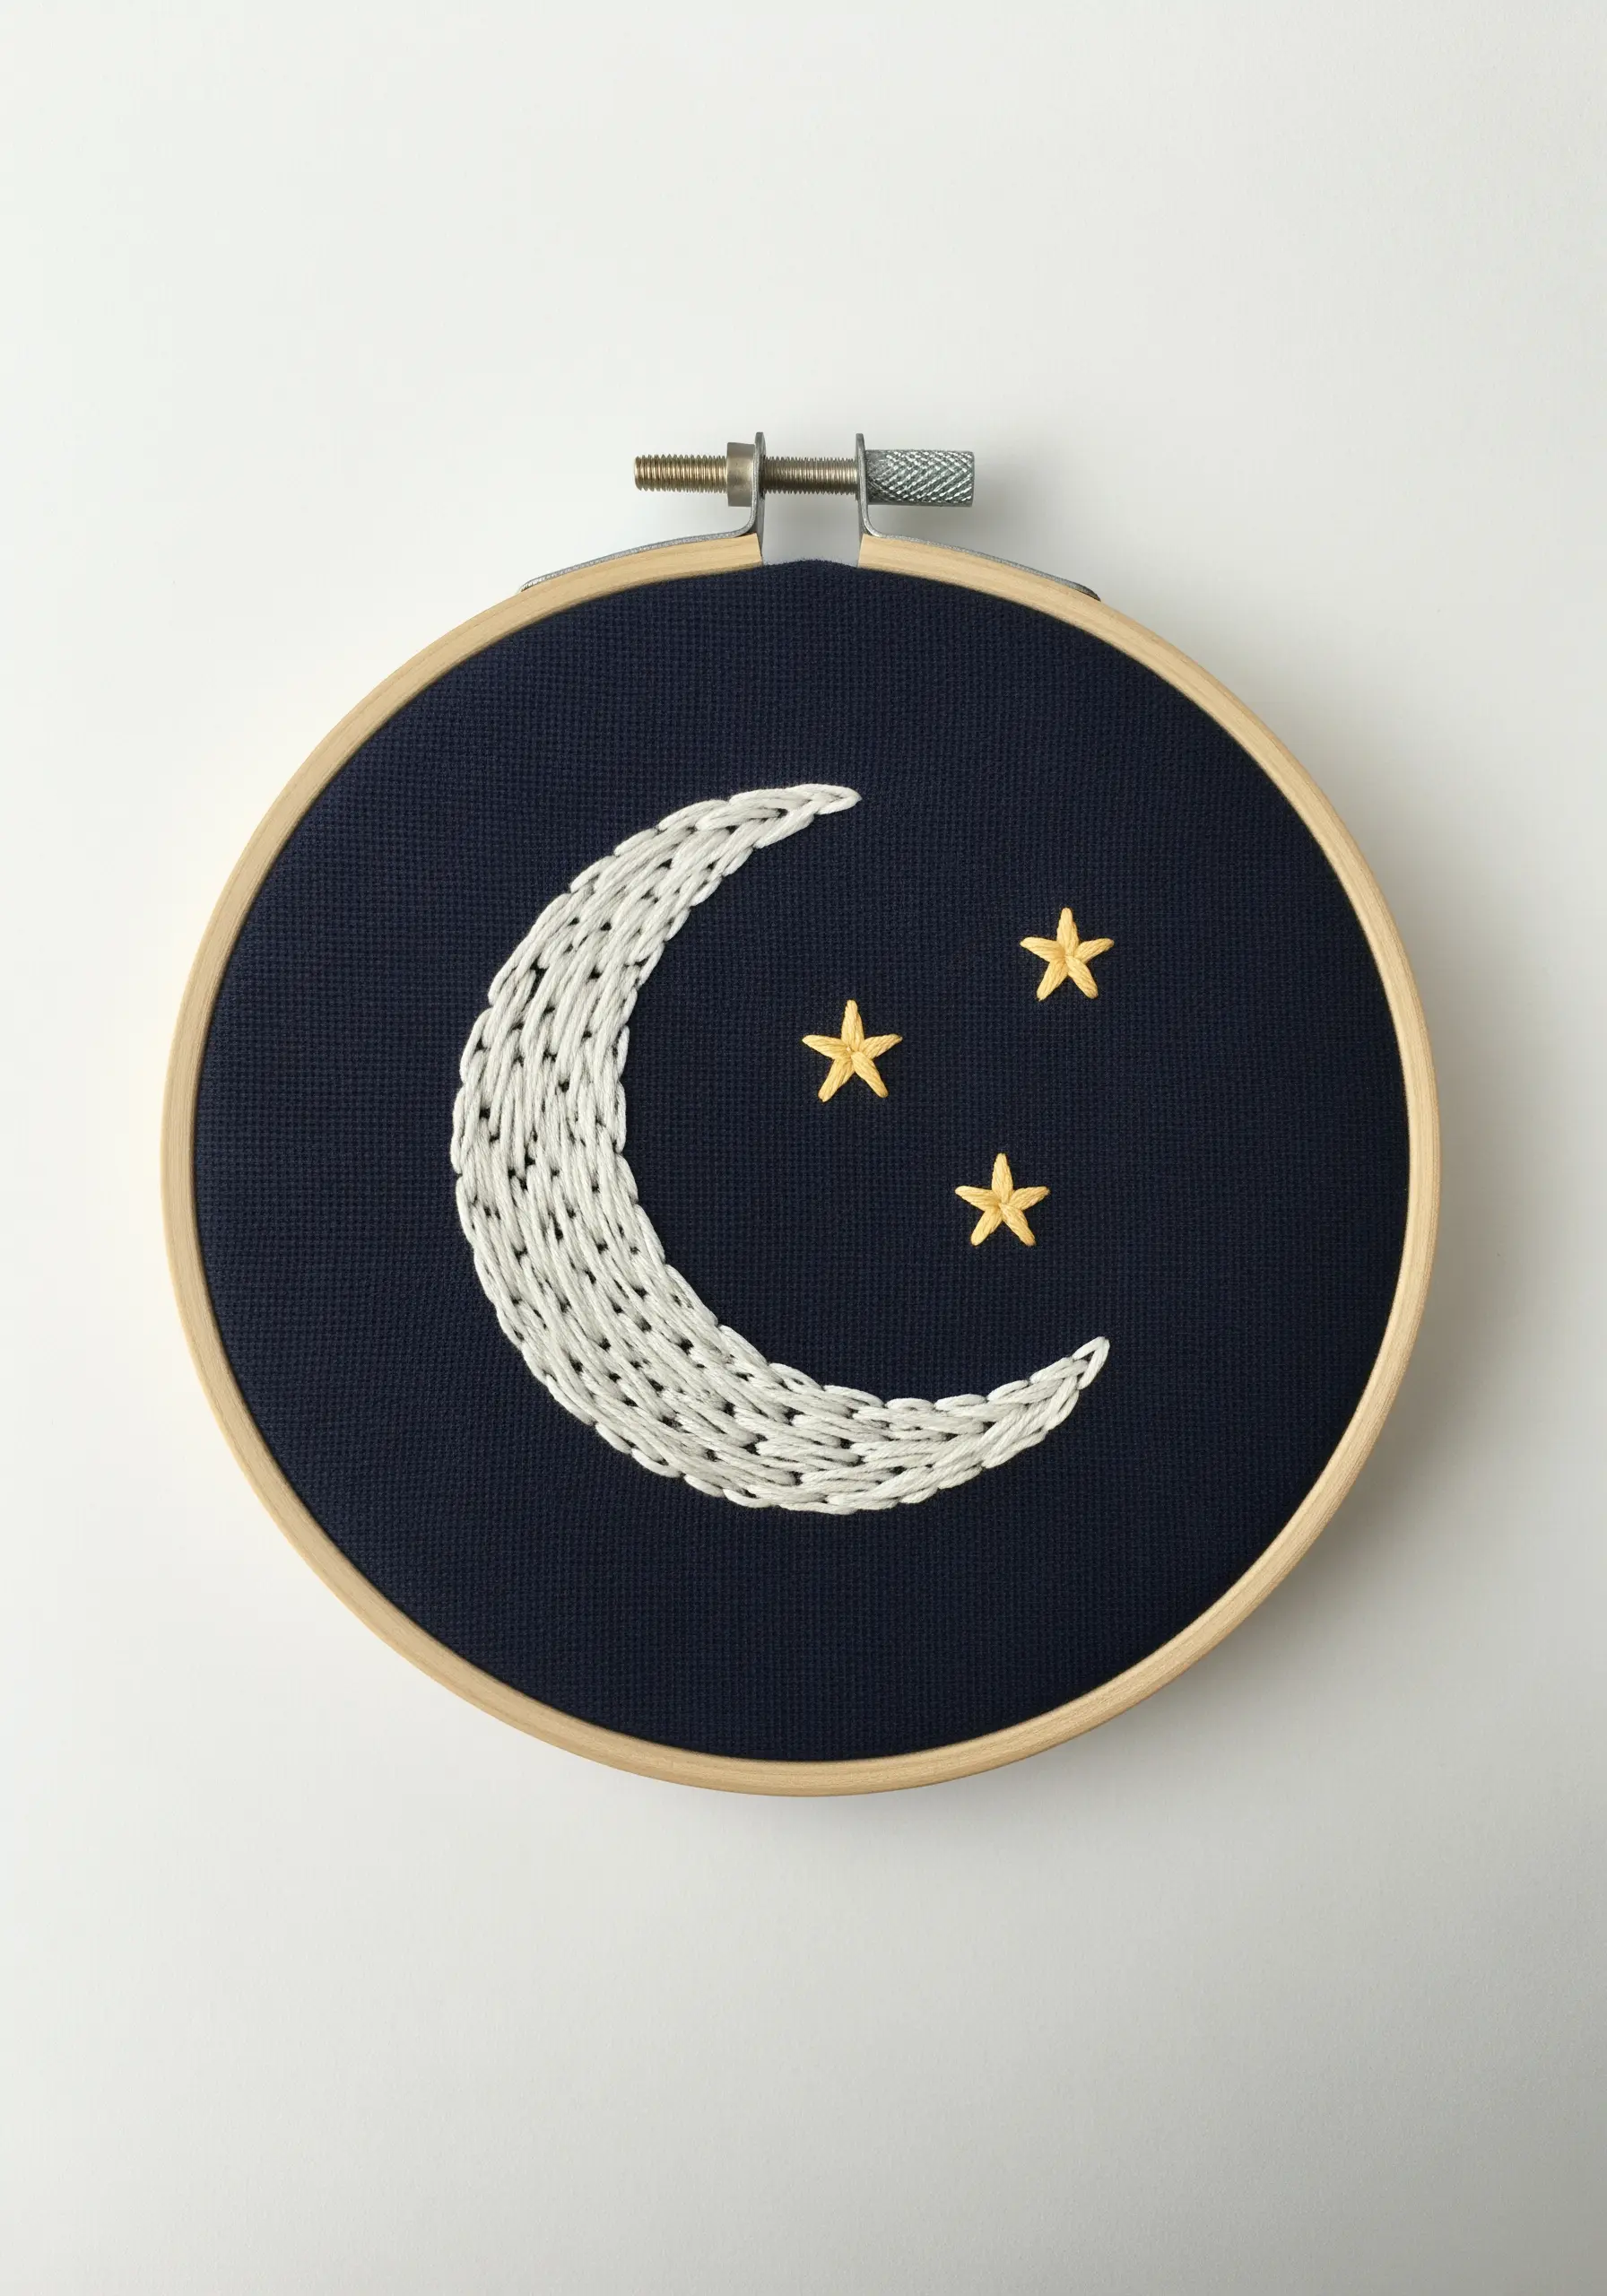
Create a dynamic, woven texture by filling the moon with an open stitch like a long-armed chain stitch or laid work.
Place your stitches perpendicular to the curve of the moon, leaving small gaps of the dark fabric showing through.
This negative space adds depth and pattern, making the moon feel more intricate than a simple satin stitch fill.
Contrast this textured moon with solidly stitched satin stars for a balanced composition.
8. Capture a Sketch-Like Quality in Your Stitches

To give your embroidery a charming, hand-drawn look, use a simple backstitch for the main outlines.
Then, instead of a solid fill, add shading and highlights with just a few carefully placed straight stitches or a sparse satin stitch.
Use a darker thread for shadow areas and a lighter thread for highlights, just as you would with a pencil.
This minimalist approach to filling creates a light, illustrative effect perfect for whimsical motifs.
9. Define Leaf Veins with Fishbone Stitch
The fishbone stitch is the ideal choice for creating realistic leaves in a single step.
The stitch’s structure, with its central spine, automatically forms the midrib of the leaf as you work.
By angling your stitches from the center line out to the leaf’s edge, you create both the fill and the veining simultaneously.
For a more organic look, slightly vary the length and angle of each stitch to avoid a perfectly uniform appearance.
10. Impose Order with a Geometric Sunburst
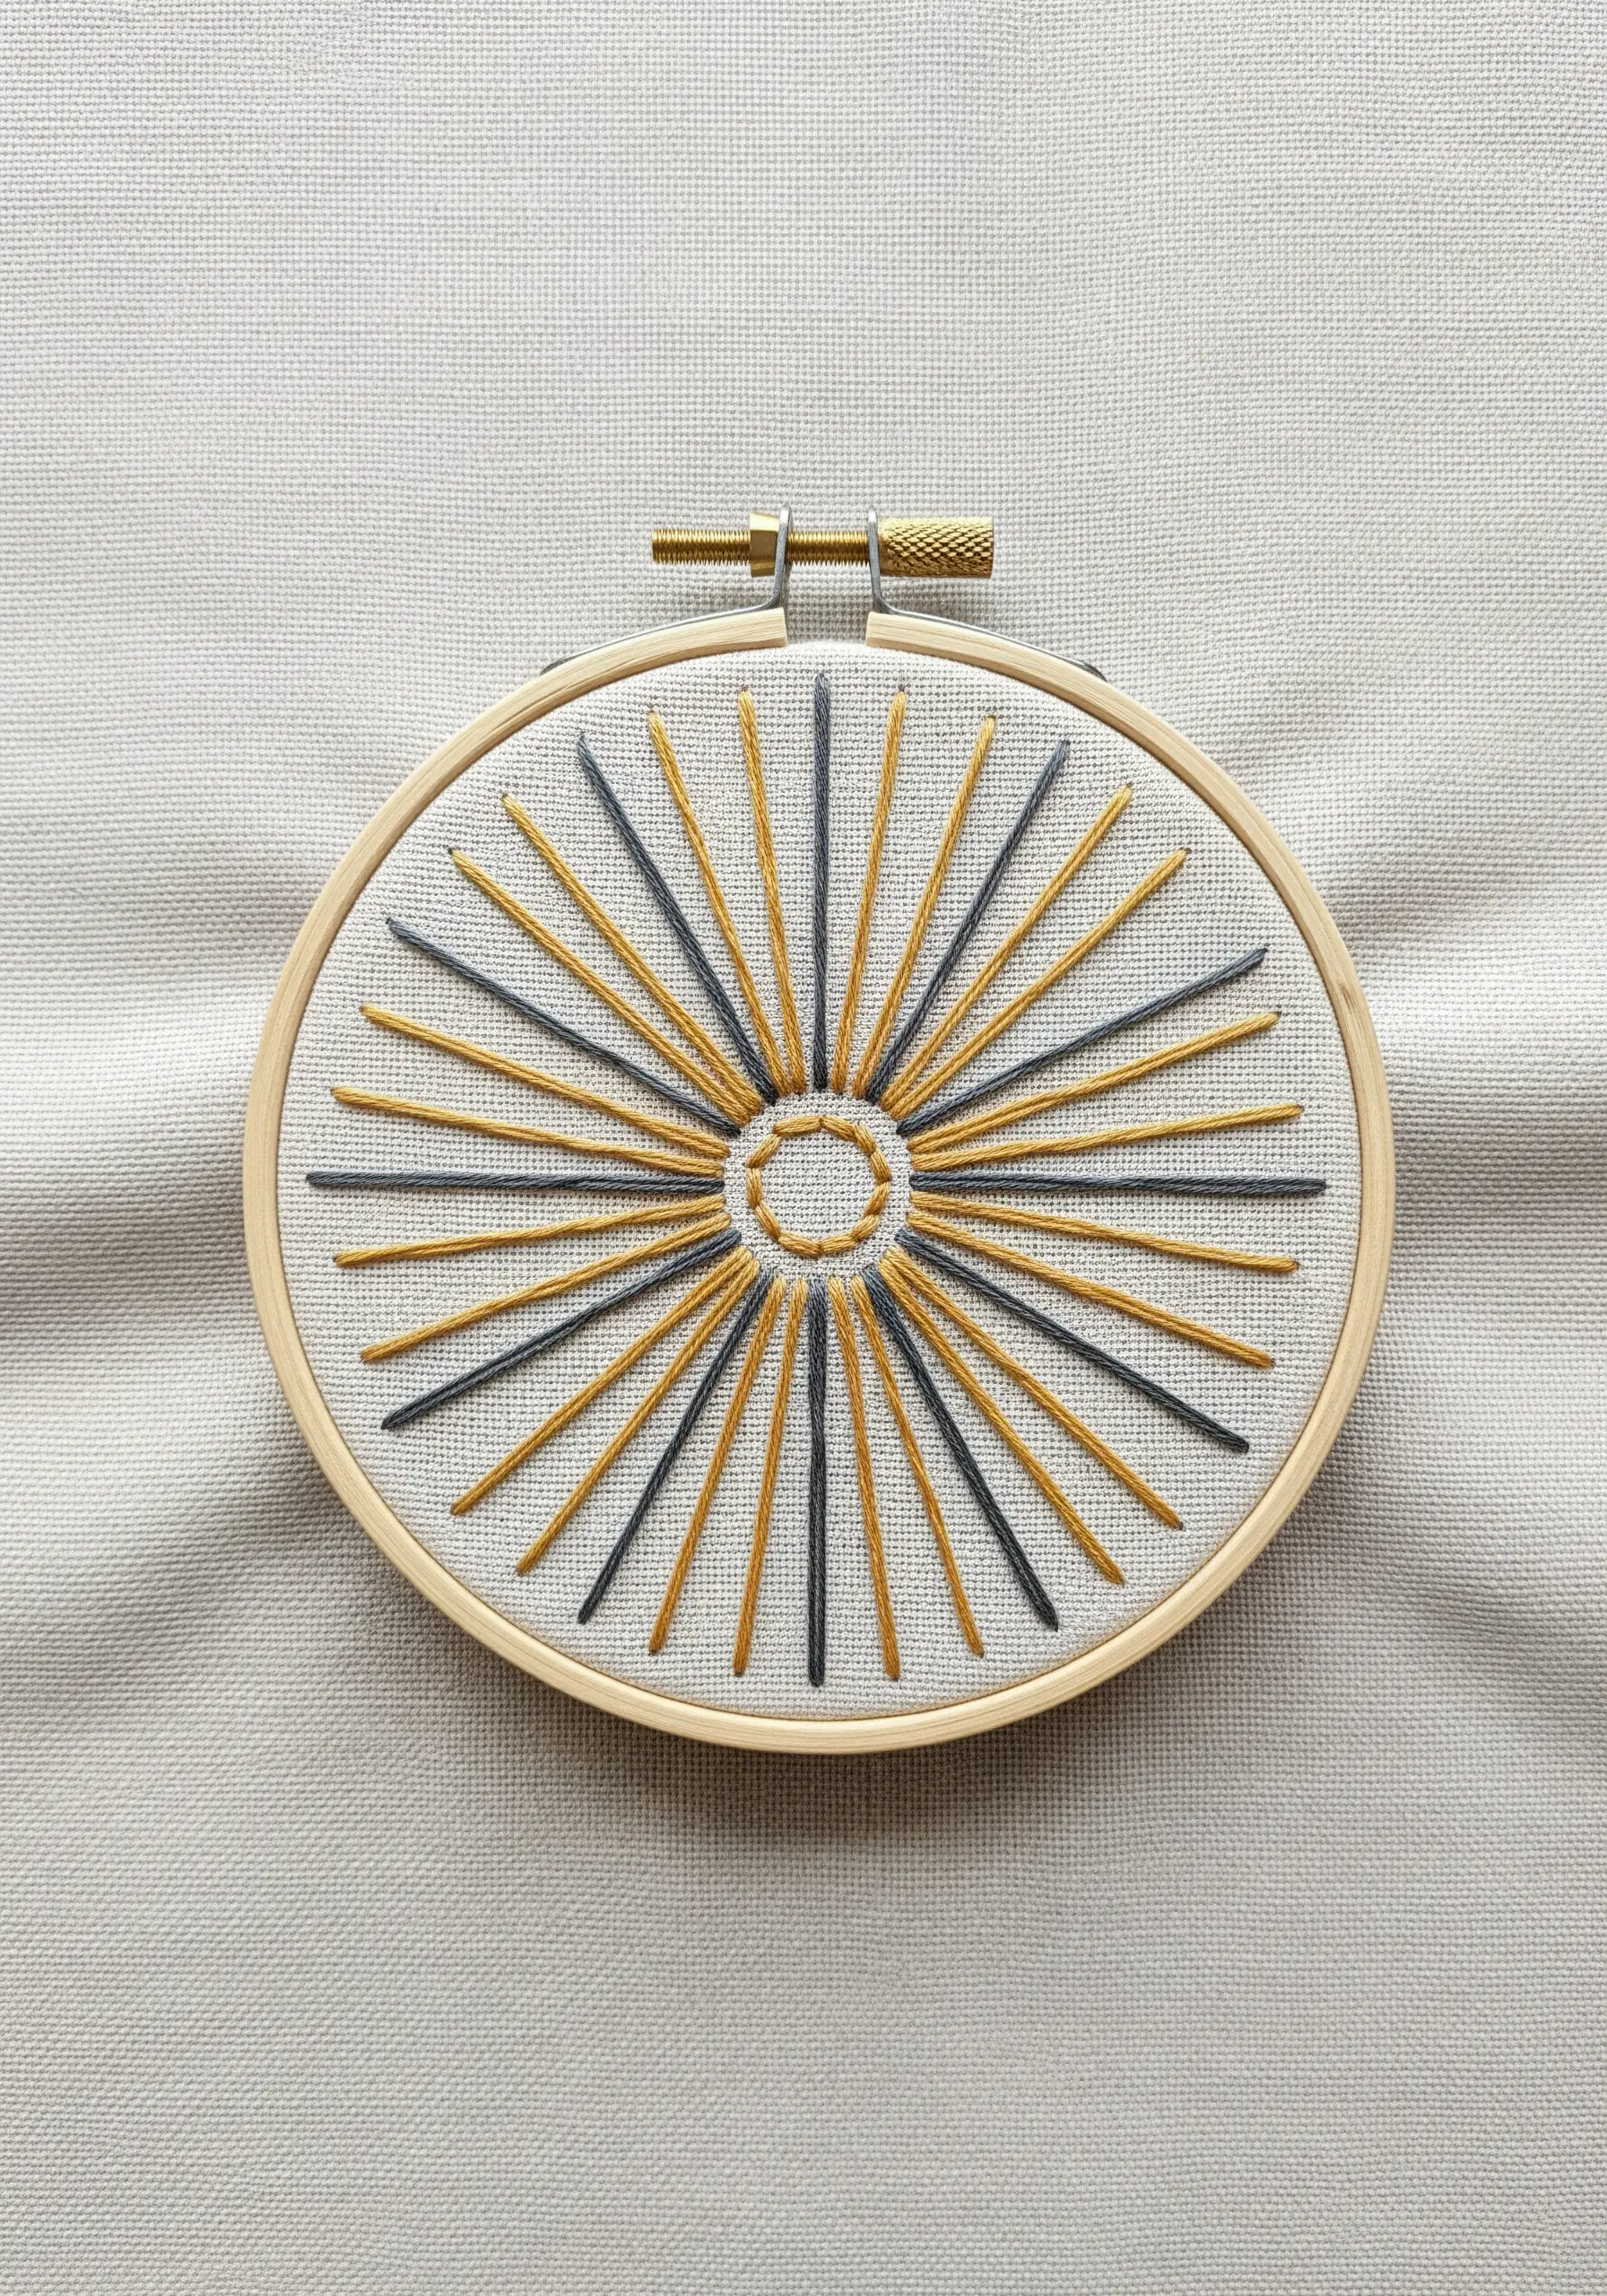
For a crisp, geometric design, precision is key.
Use a water-soluble pen and a circular guide to mark both the central circle and the endpoints of each ray before you begin stitching.
Work the design from the center outwards to avoid pulling on previously laid threads.
Alternating two contrasting colors, like gold and charcoal, enhances the radial pattern and creates a sophisticated, mid-century modern aesthetic.
11. Add a Polished Accent to Apparel

When embroidering on clothing, especially a crisp shirt collar, stability is everything.
Always use a temporary stabilizer on the back of the fabric to prevent puckering and distortion as you stitch.
For a clean, dense satin stitch on a small scale, outline the shape first with a split stitch. This provides a raised edge for your satin stitches to butt up against, resulting in a sharp, professional finish that makes your clothes look custom-made.
12. Blend Soft Gradients on Butterfly Wings

Create a painterly, soft-focus effect on butterfly wings using the long-and-short stitch.
Work with single strands of floss in closely related shades—like blush, peach, and gray—and blend them by staggering the length of your stitches.
The key is to avoid hard lines between colors; your stitches should interlock like fine brushstrokes.
Add tiny French knots or seed stitches in a contrasting color to define the wing edges and add detail.
13. Create Metallic Detail with Couching
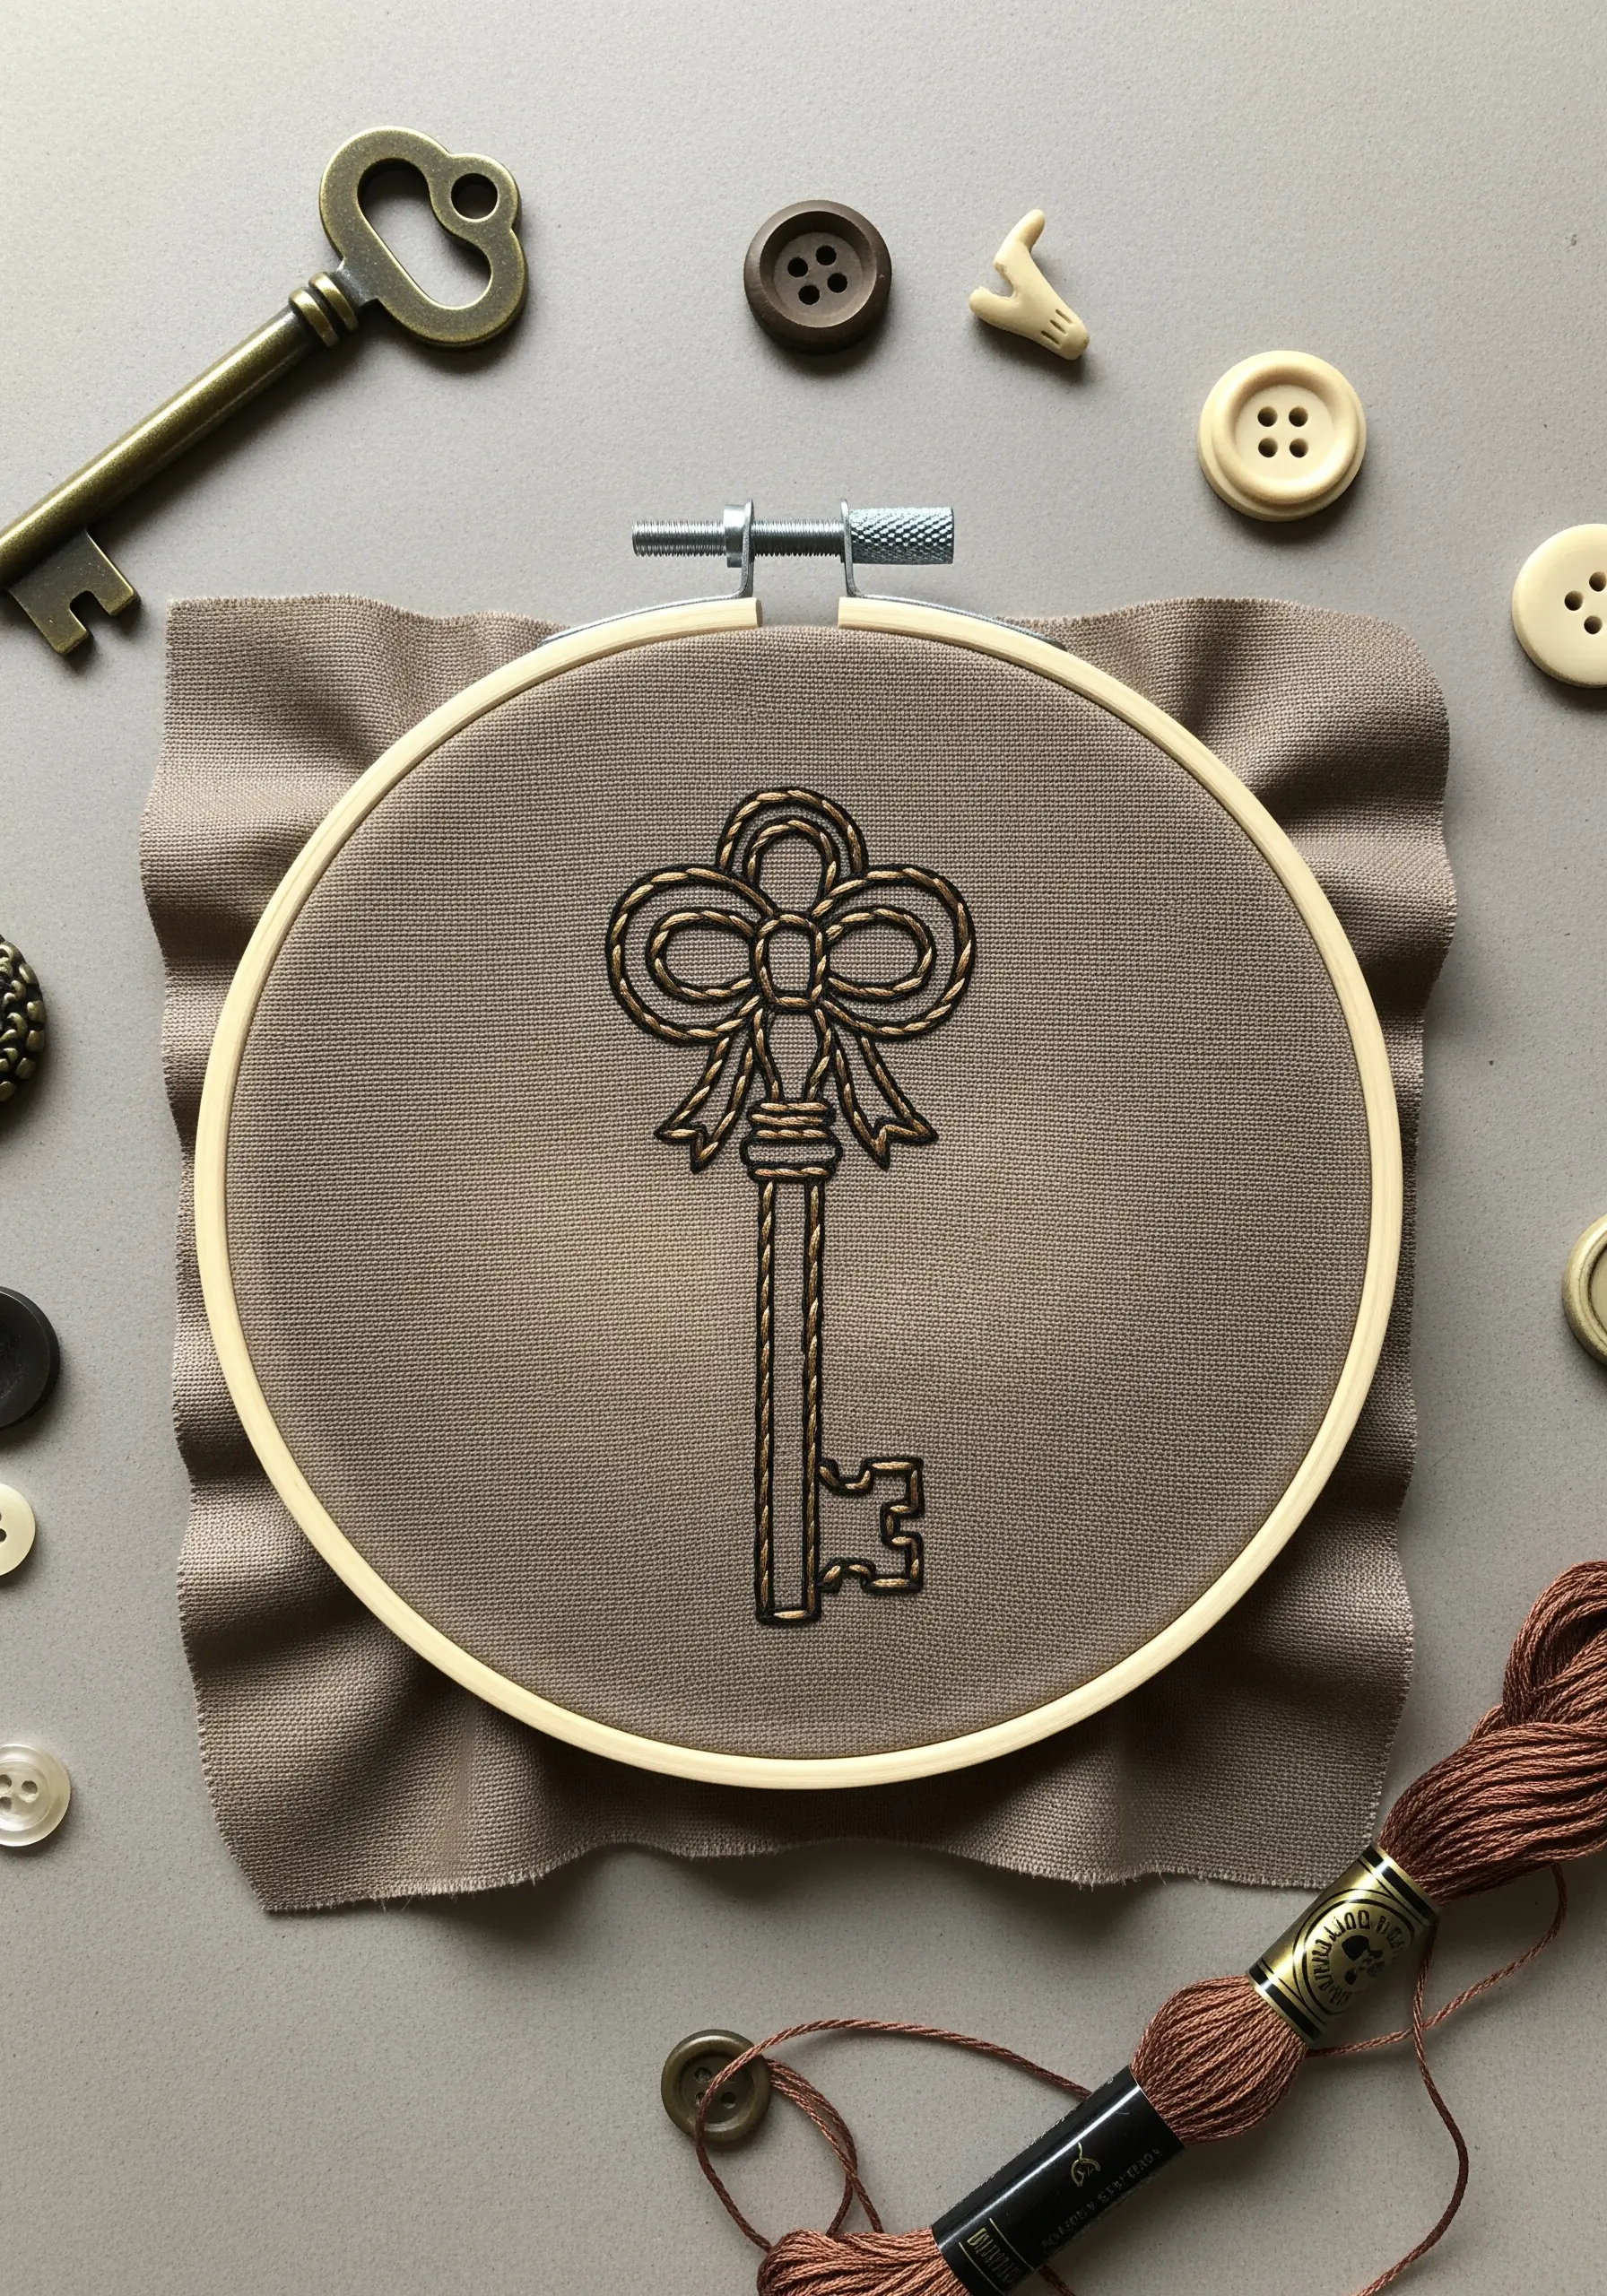
Metallic threads can be challenging to work with in traditional stitches, but they are perfect for couching.
To create the twisted rope effect on this key, lay down a thicker metallic cord or several strands of floss along your design line.
Then, using a second, finer thread in a matching color, secure the cord to the fabric with tiny, perpendicular stitches at regular intervals.
This technique gives you a bold, textured line with perfect control.
14. Add Depth to a Mushroom Cap

To create the curved look of the mushroom cap, direct your satin stitches to radiate from a central point at the top.
Slightly curve each stitch to follow the dome shape. For the gills underneath, use long straight stitches in an off-white or cream, fanning out from the stem.
The contrast between the dense, colored cap and the linear, lighter gills creates an immediate sense of three-dimensional form and makes this one of those realistic mushroom forest floor embroidery projects.
15. Isolate Shapes with a Defining Outline

To make a simple motif pop, especially on a neutral background, use a bold, dark outline.
First, stitch the complete outline of the sailboat using a whipped backstitch or a stem stitch for a solid, rope-like line.
Then, fill the sails with a contrasting off-white satin stitch. This technique, borrowed from vintage illustration, cleanly separates the elements and gives the design a classic, graphic clarity.
This is a great example of coastal theme tiny embroidery art that feels timeless.
16. Form Delicate Leaves with Fly Stitch
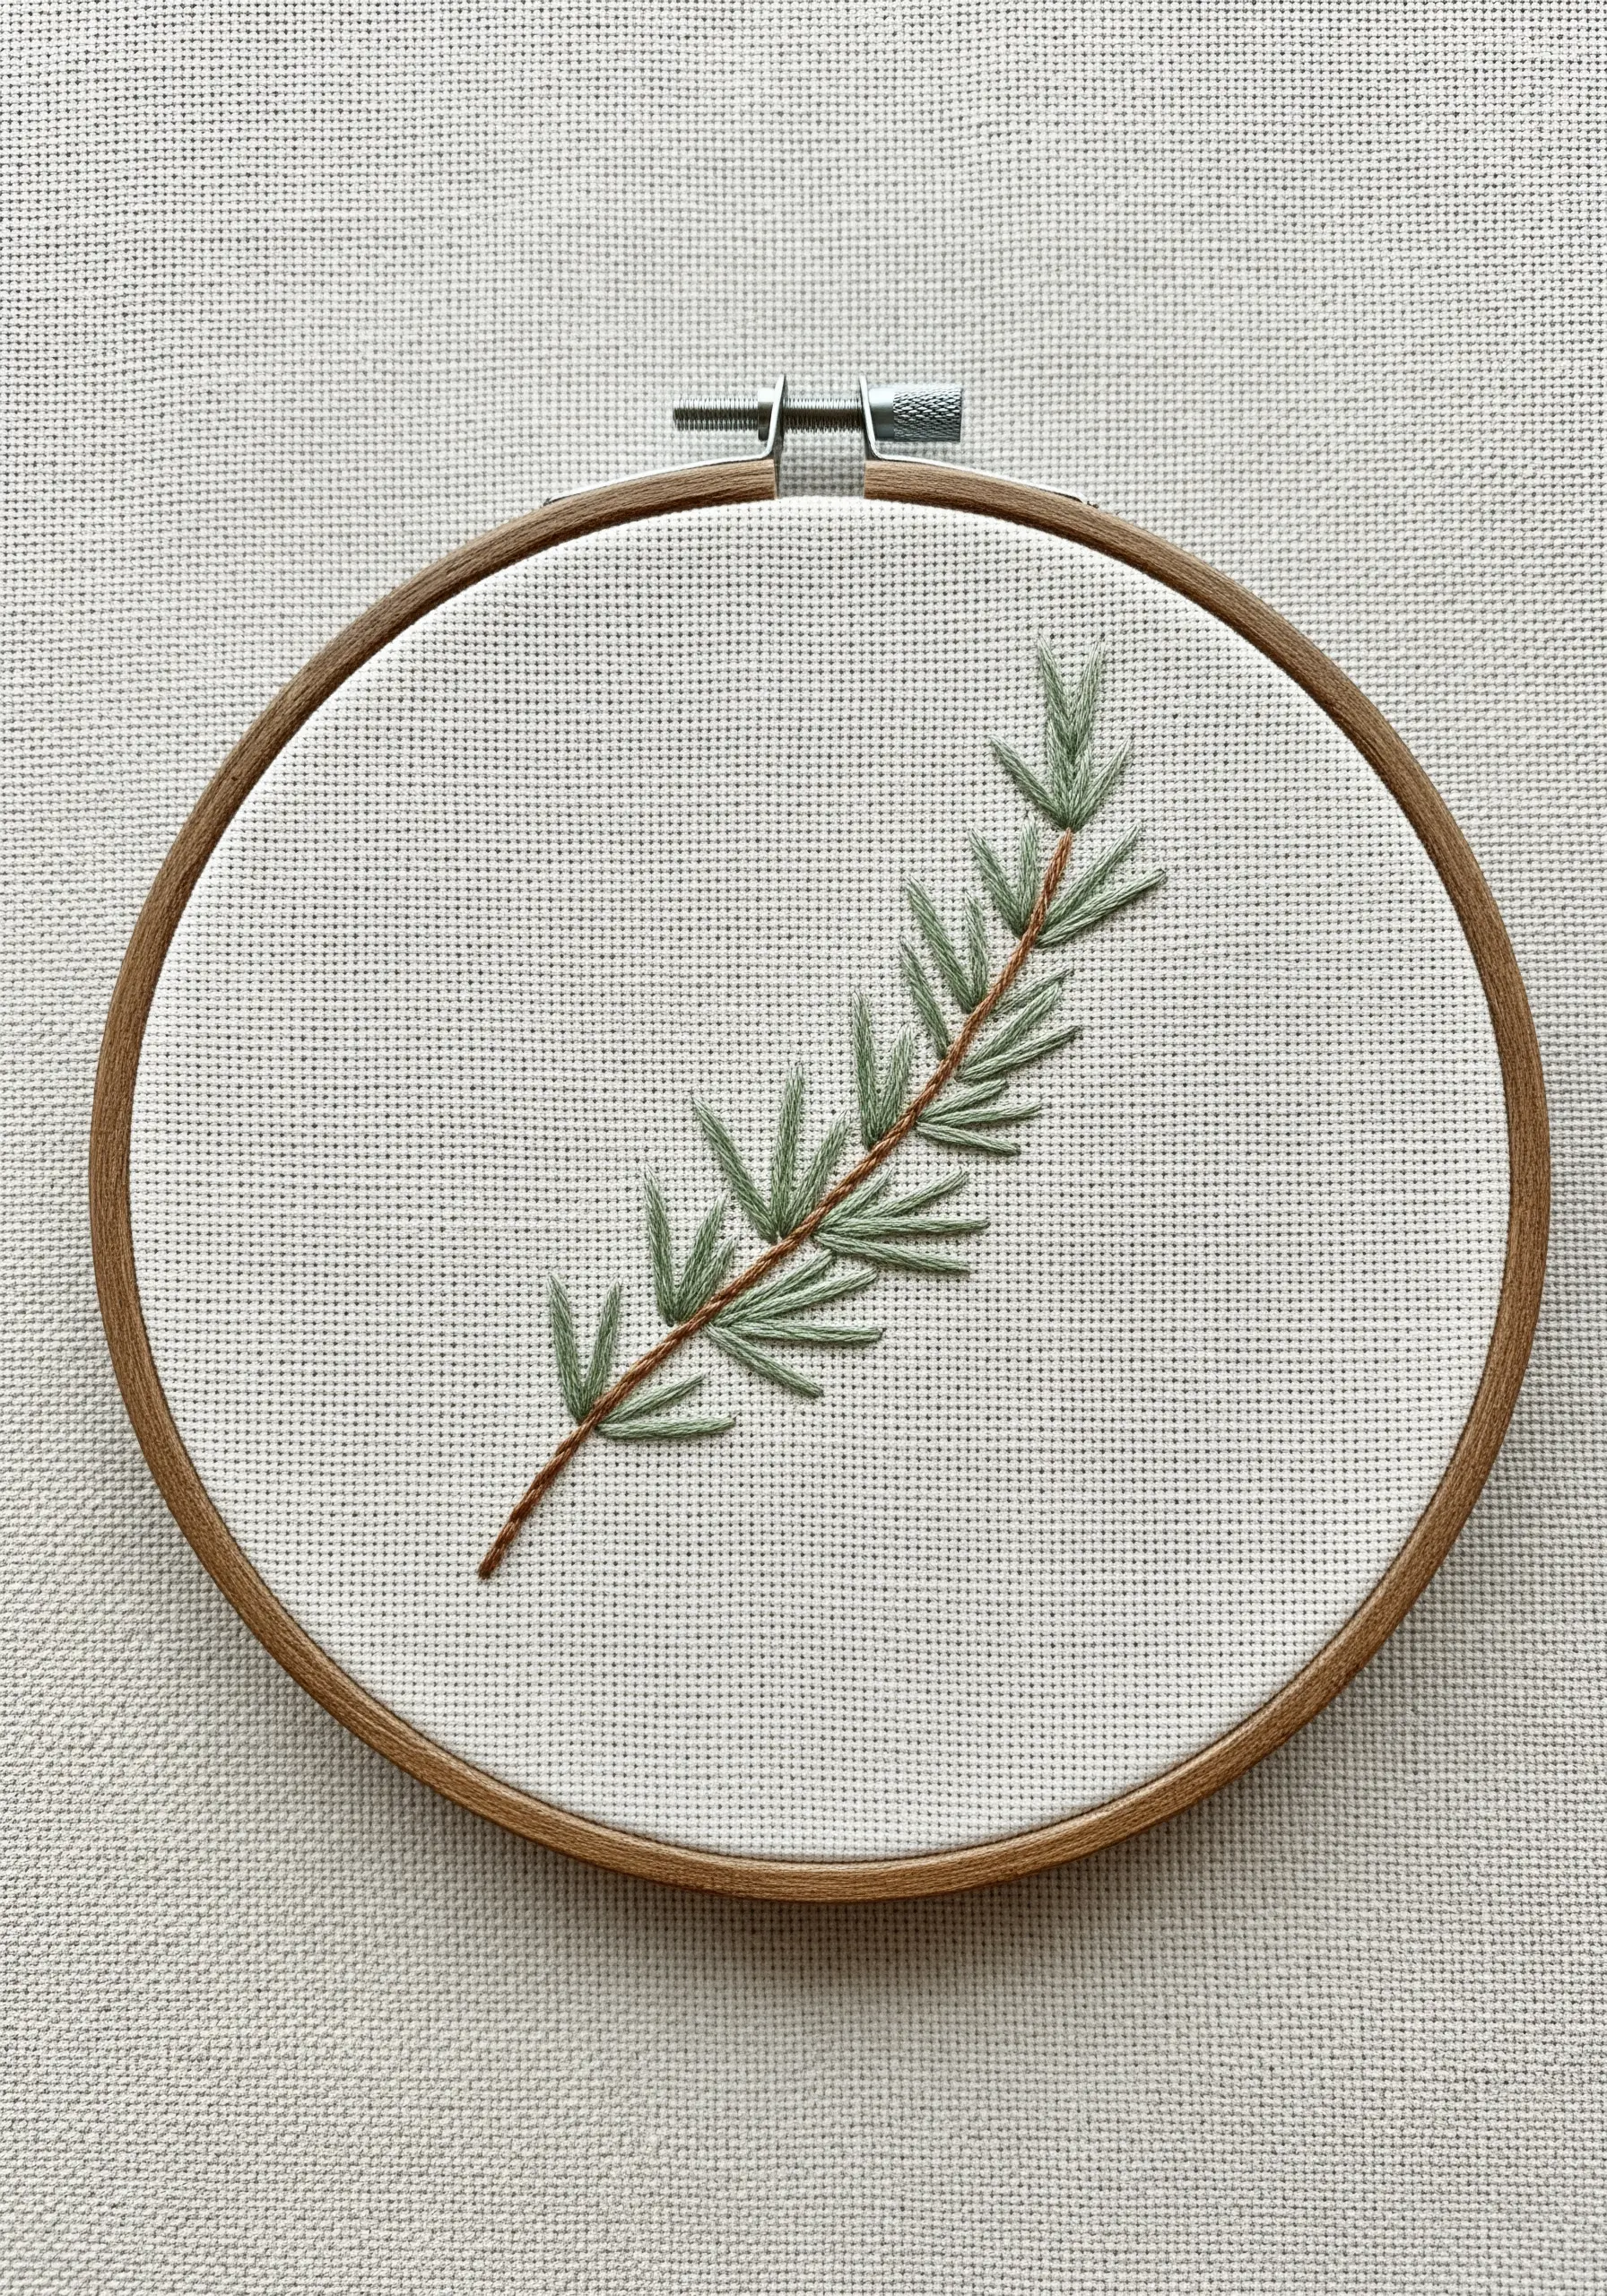
The fly stitch is exceptionally efficient for creating small, V-shaped leaves like those on a rosemary sprig.
First, create the central branch with a single line of stem stitch.
Then, work your fly stitches on either side, angling them slightly upwards. Each stitch forms a perfect leaf in one motion.
This method is faster than using detached chain stitches and gives the plant a more delicate, spiky texture.
17. Combine Bold Lines with Soft Fill

For a clean, stylized animal motif, focus on the quality of your outline.
Use a two-strand chain stitch to create a substantial, textured line that defines the fox’s head.
Then, fill only a small area—like the nose—with a tight satin stitch. This selective filling draws the eye and adds a touch of softness without overwhelming the minimalist design.
It’s a simple way to create minimal pet-themed line art stitches with personality.
18. Capture Weightlessness on a Dark Canvas
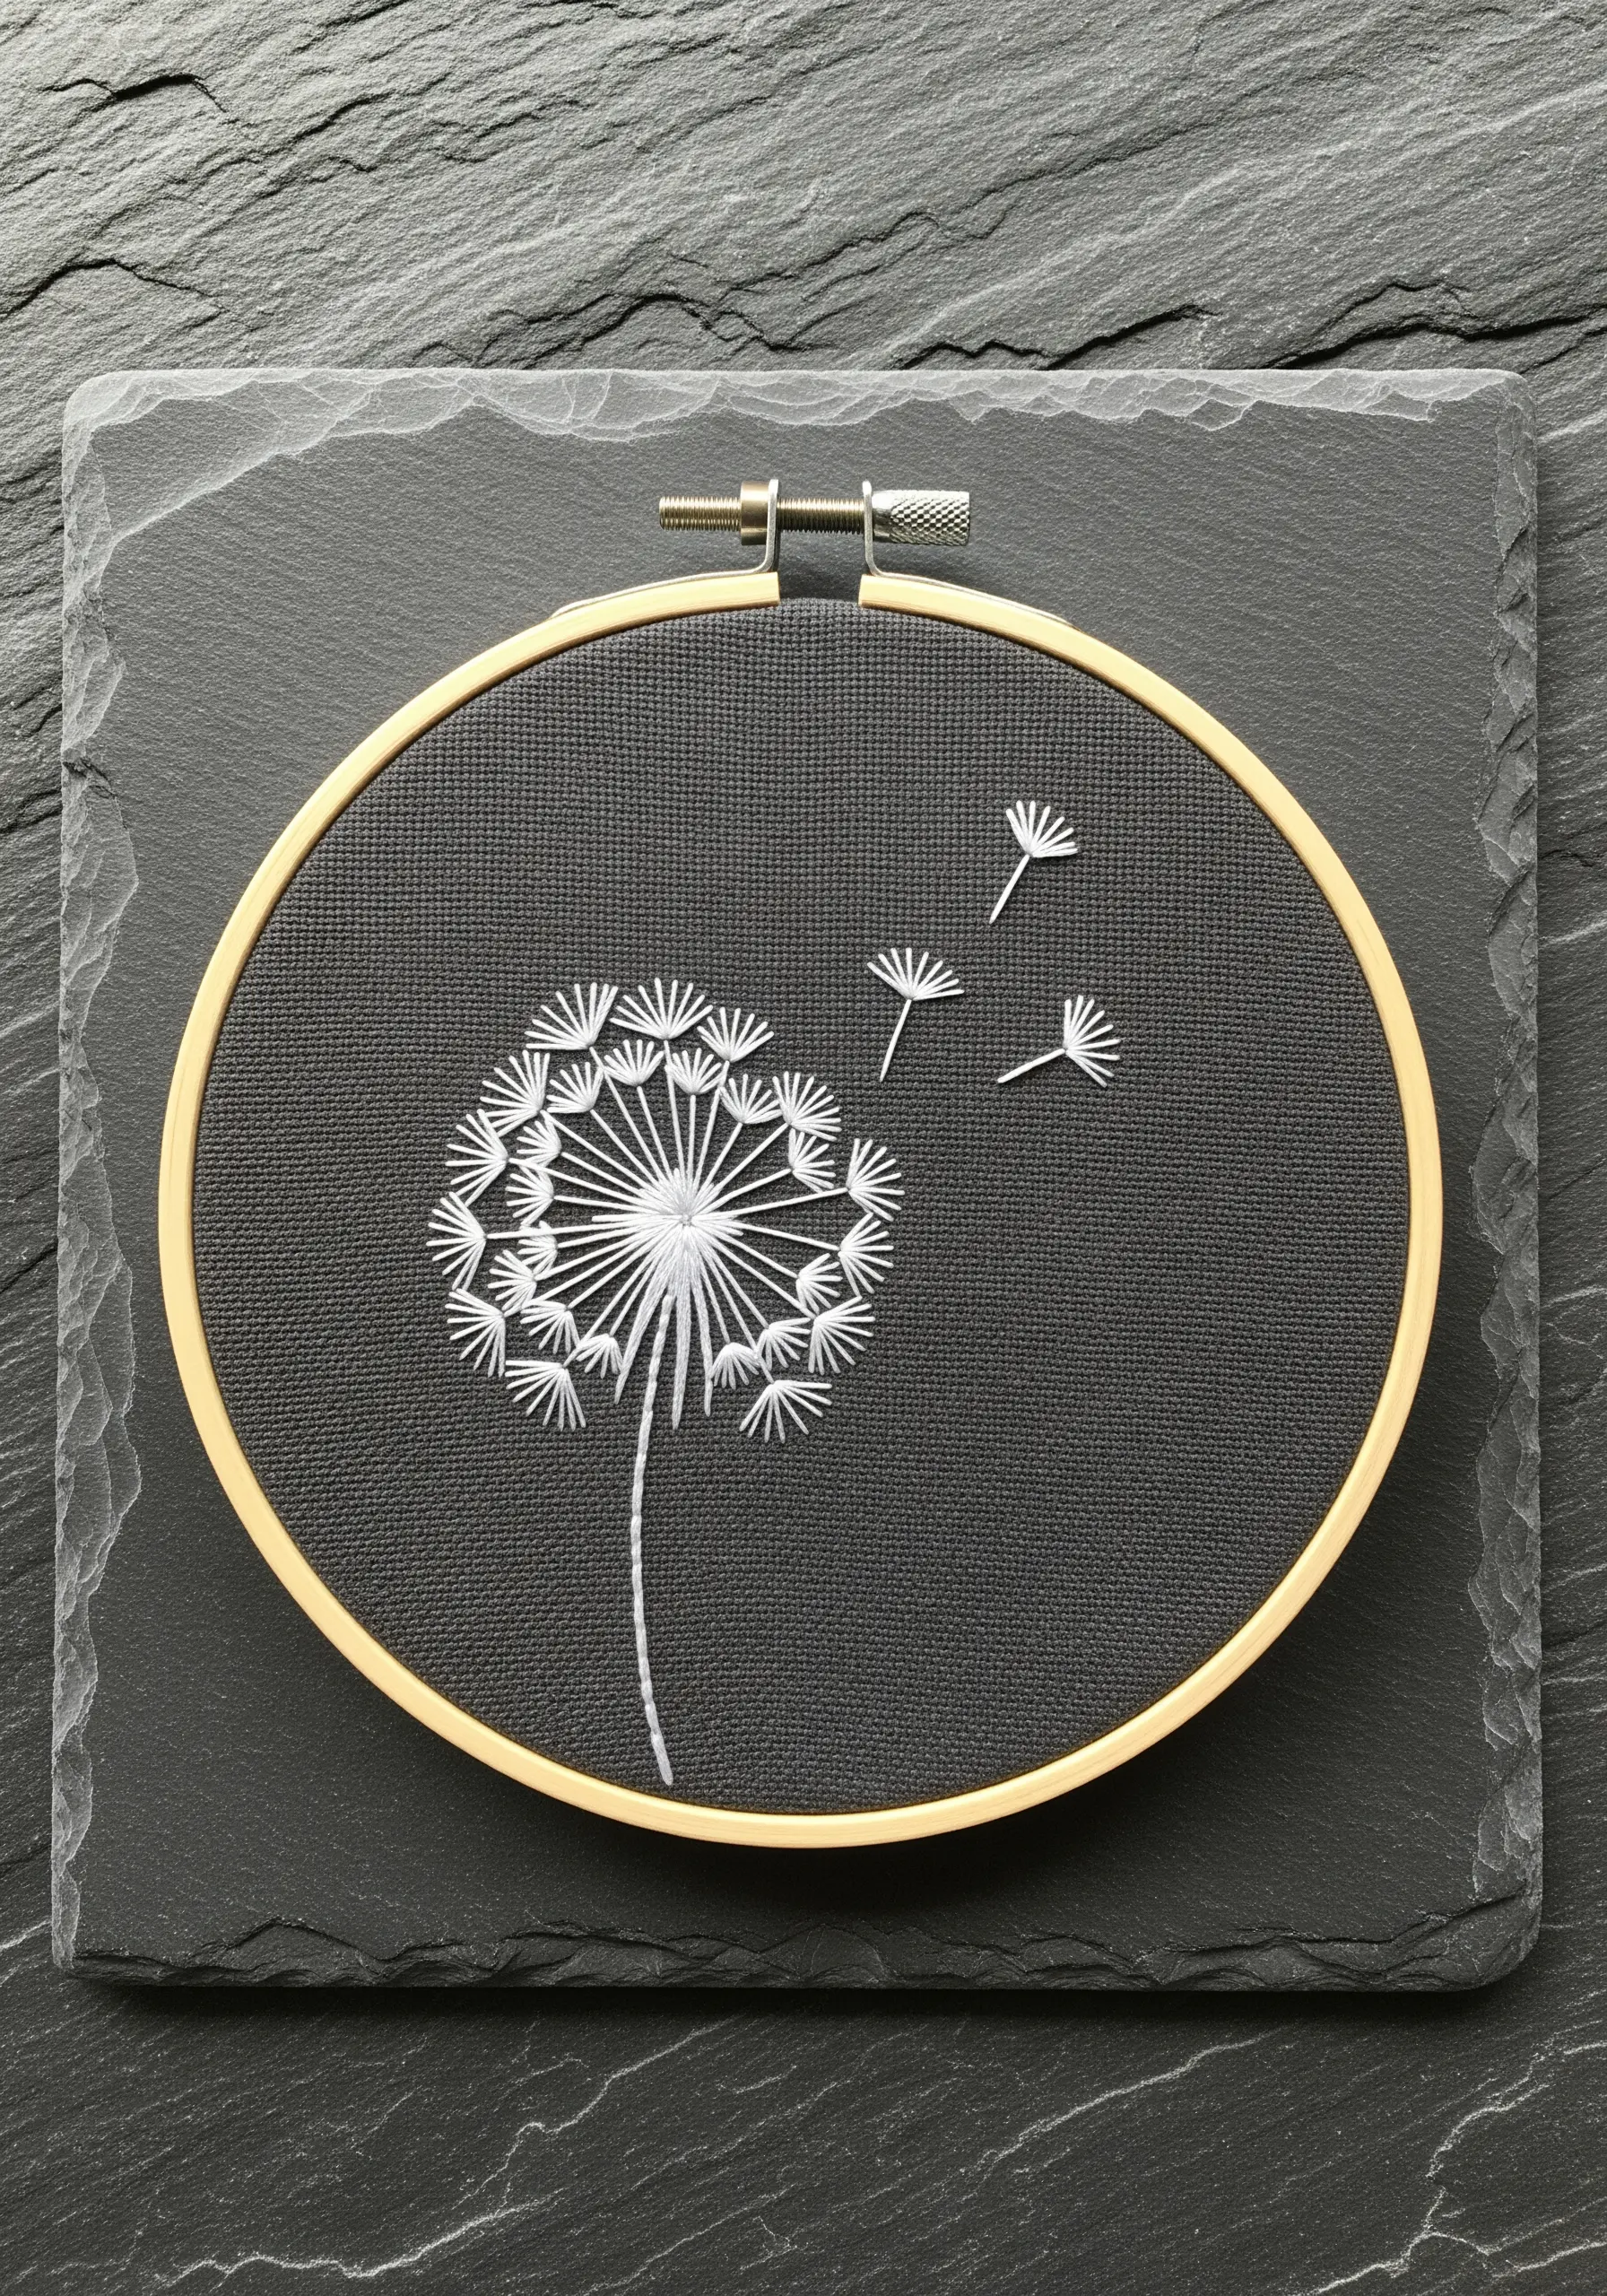
To embroider something as ephemeral as a dandelion, your technique needs to be light and airy.
Use a single strand of white floss on a dark, high-contrast fabric like black or navy linen.
Use simple straight stitches for the seed head, radiating from a central point. For the floating seeds, use a combination of a tiny detached chain stitch and a straight stitch.
The negative space of the dark fabric is crucial here, defining the delicate forms.
19. Weave a Pattern for a Playful Lid

Instead of a simple satin stitch, create a woven pattern for the jam jar lid.
First, lay down a grid of parallel straight stitches in one color (e.g., red).
Then, using a second color (e.g., blue), weave your needle over and under the red stitches without piercing the fabric.
This weaving technique adds a delightful, graphic pattern and textural interest to an otherwise simple outline design.
20. Integrate Your Design with a Hemstitch Border
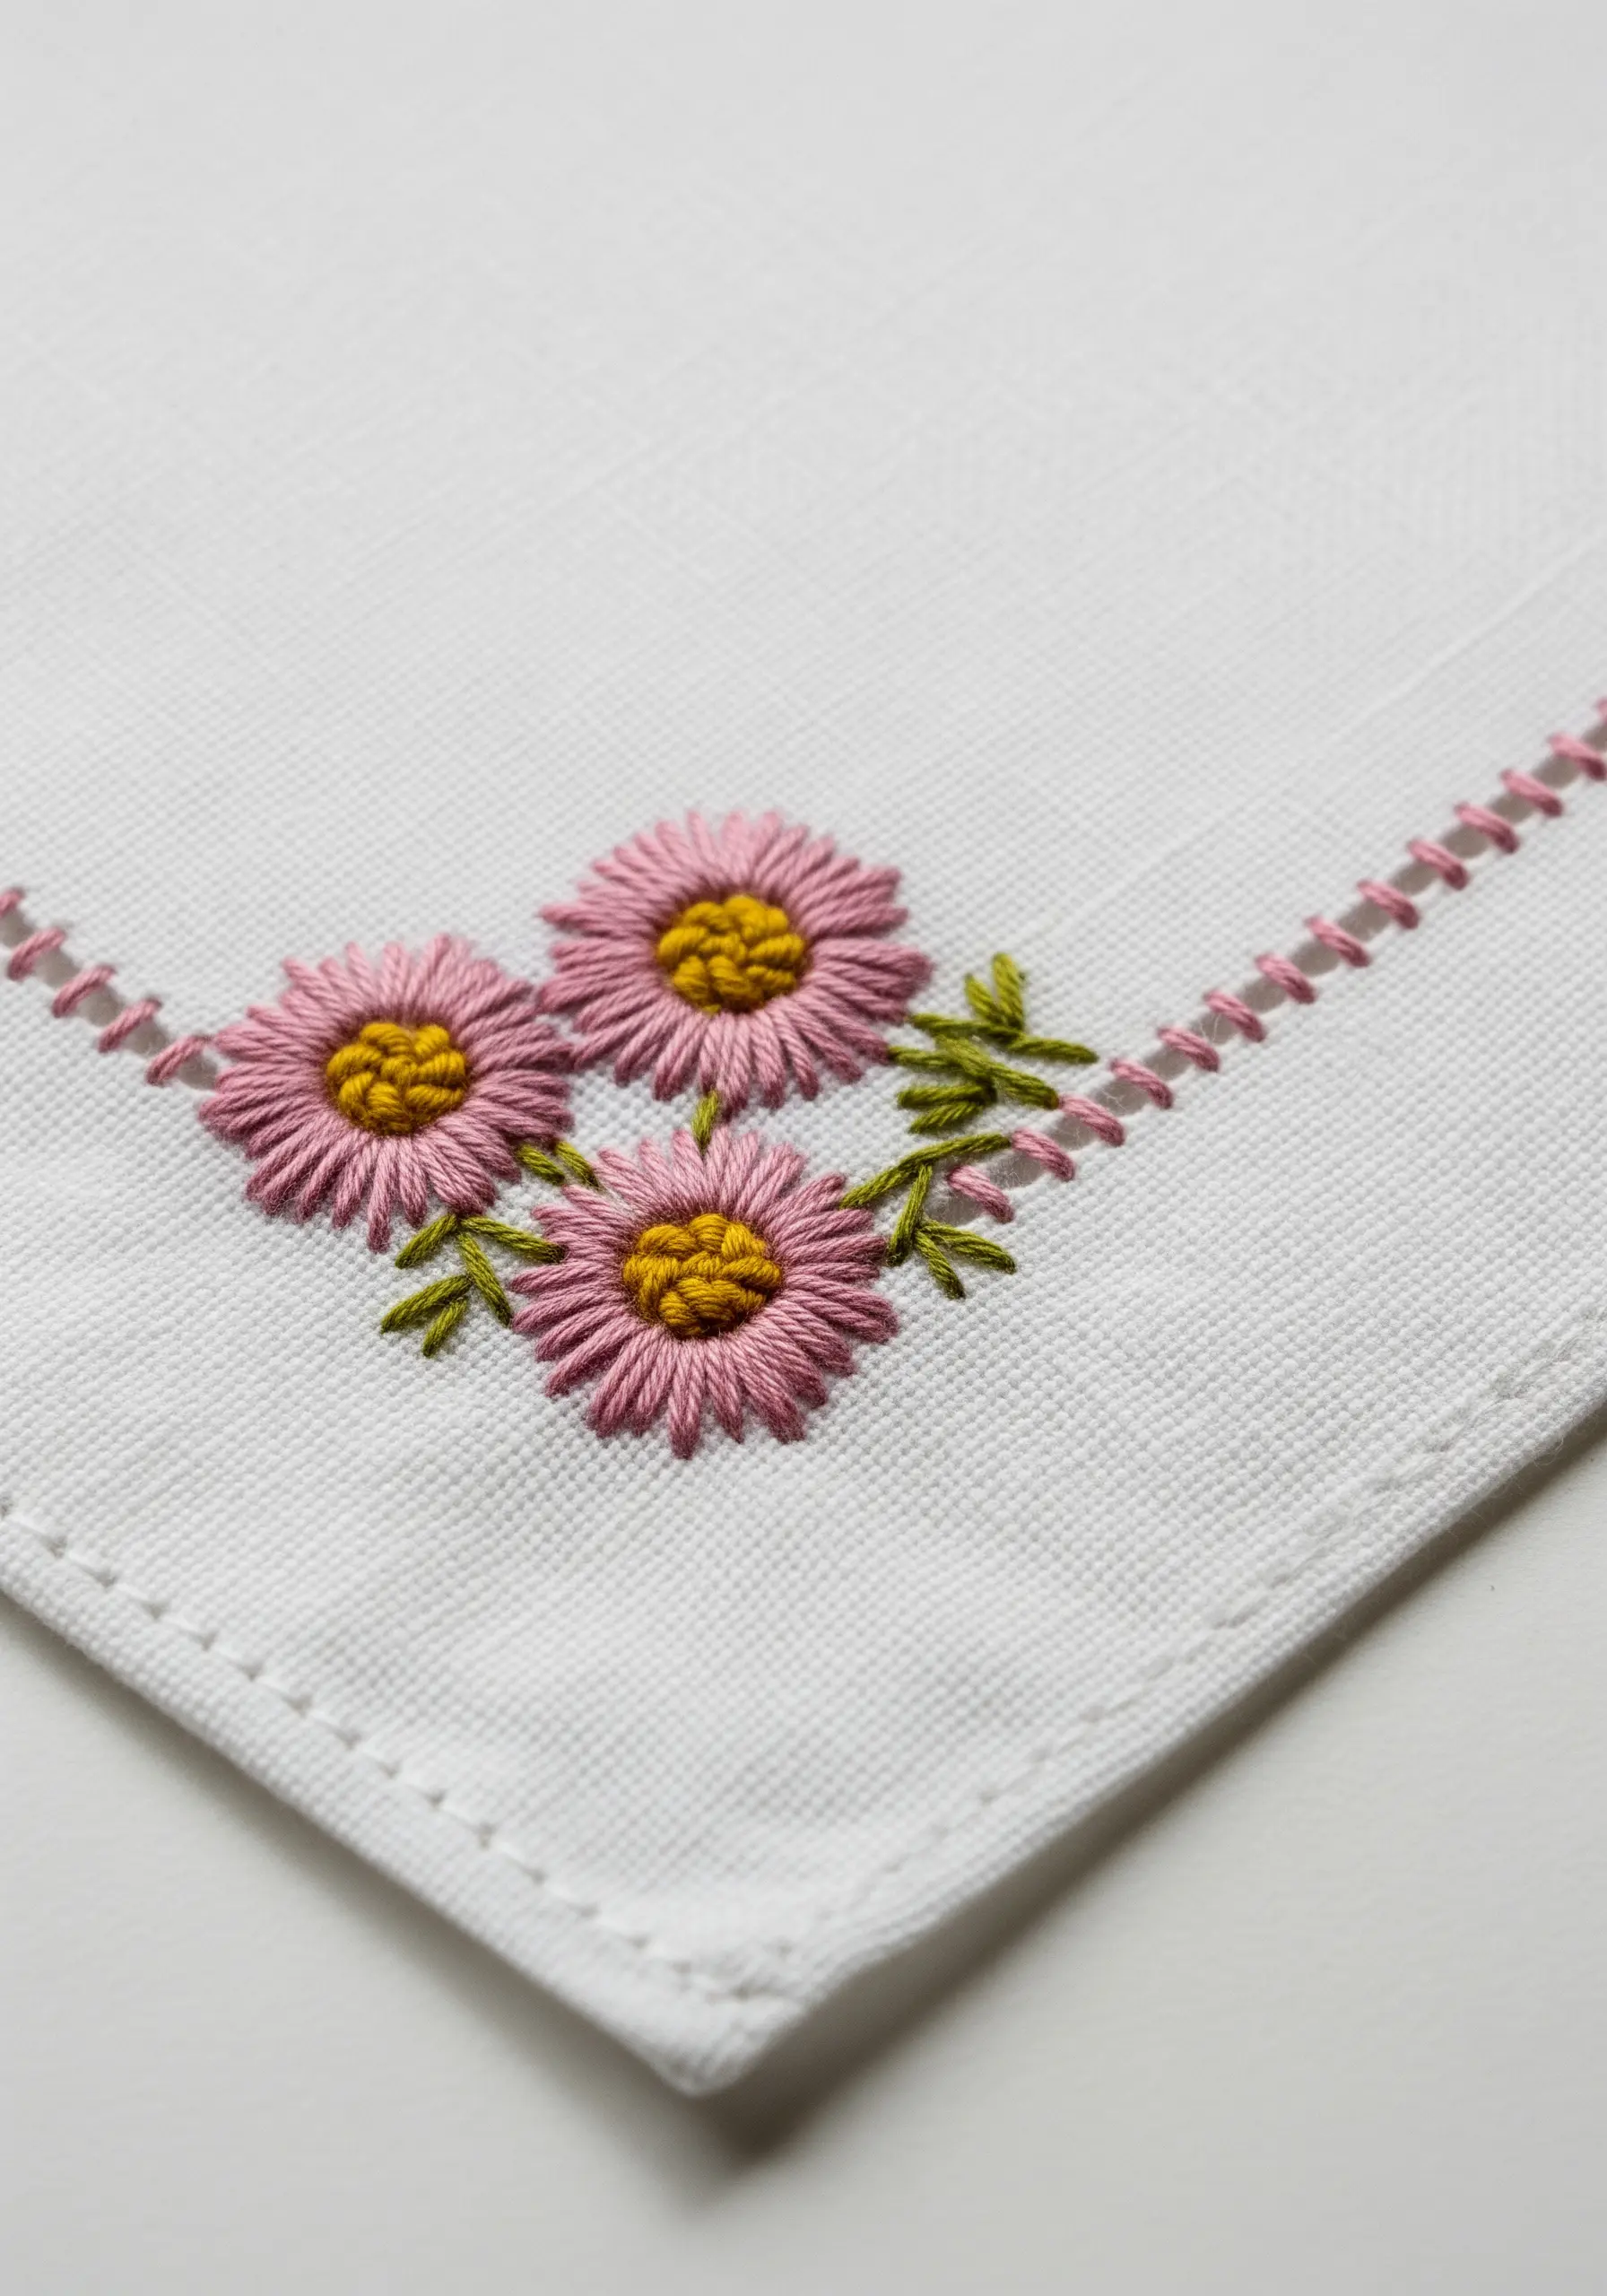
Make your corner motifs feel intentional by connecting them to the fabric’s edge.
A simple ladder stitch or hemstitch worked along the border of a handkerchief or napkin creates a decorative frame.
By using the same color thread in both the floral motif and the border, you create a cohesive, unified piece.
For the flowers, use lazy daisy stitches for the petals and dense French knots for the centers to add dimension.
21. Use Patterned Fabric as a Dynamic Background
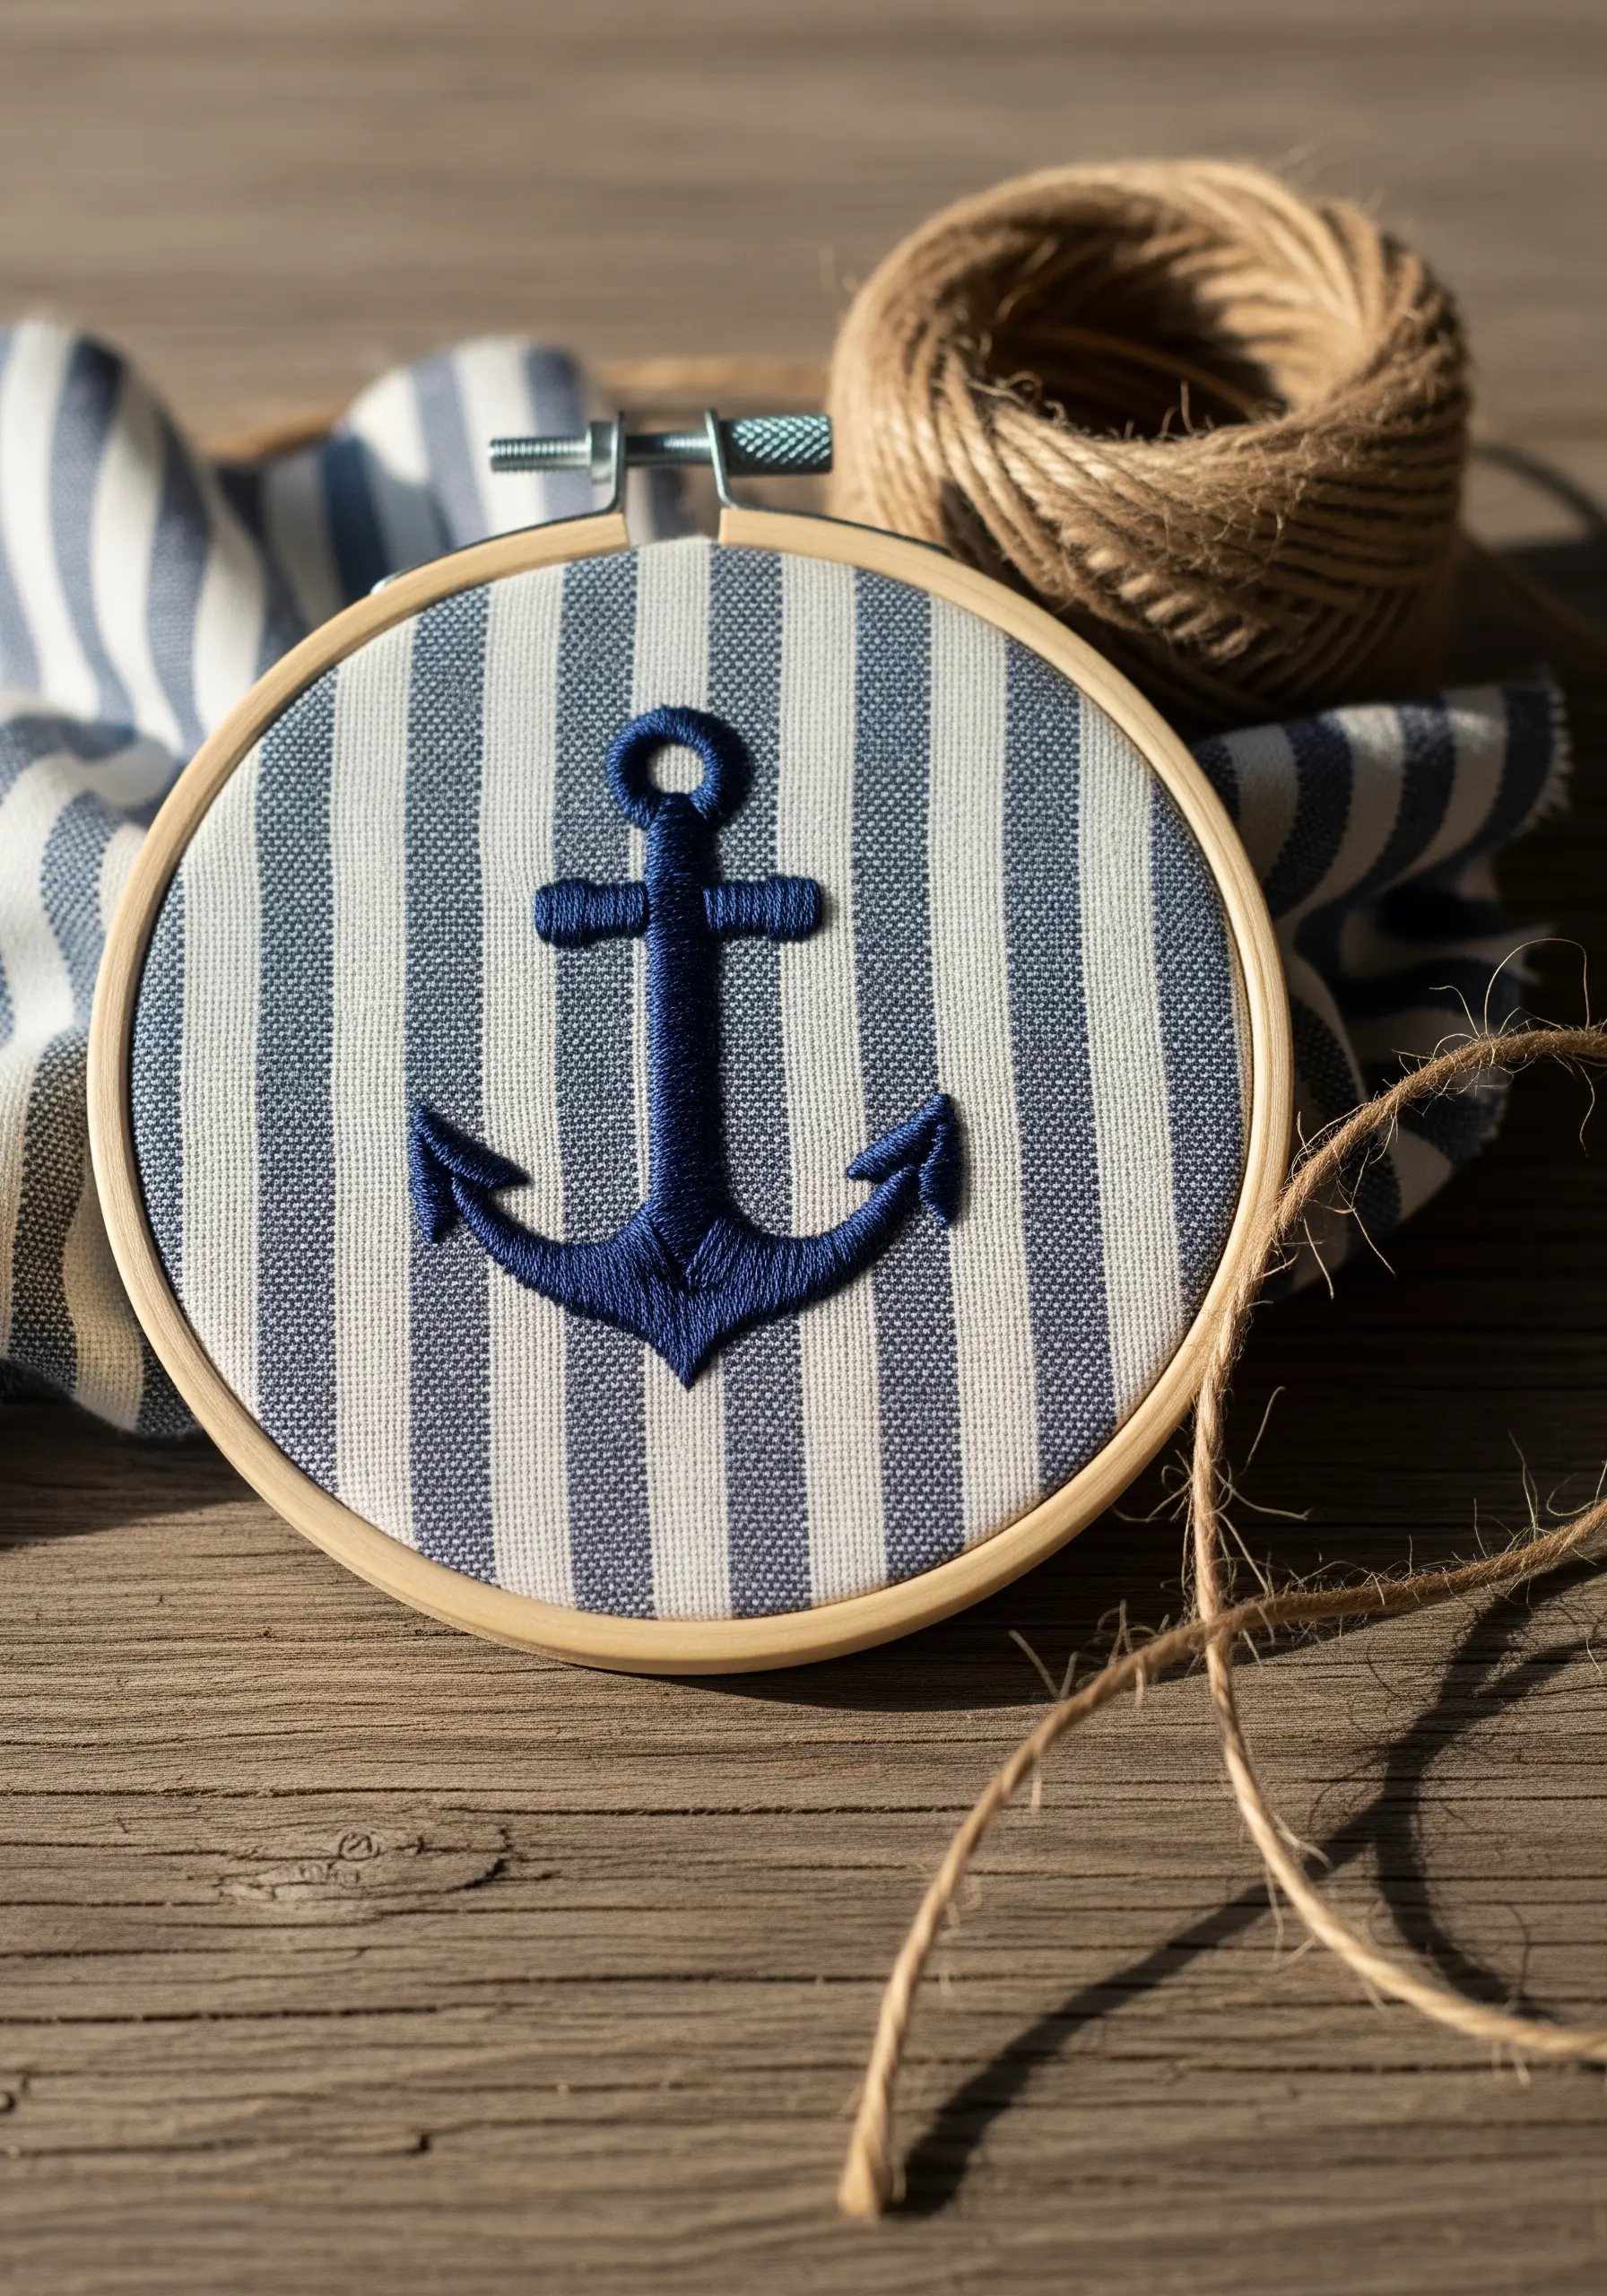
Don’t limit yourself to solid-colored fabrics. A patterned background, like this classic blue and white stripe, can add energy and context to a simple motif.
To ensure your design stands out, choose a solid, bold subject like this anchor and fill it with a dense, dark satin stitch.
The solid shape against the linear pattern creates a strong visual contrast, making the simple design feel dynamic and purposeful.
22. Create Softness with Directional Shading
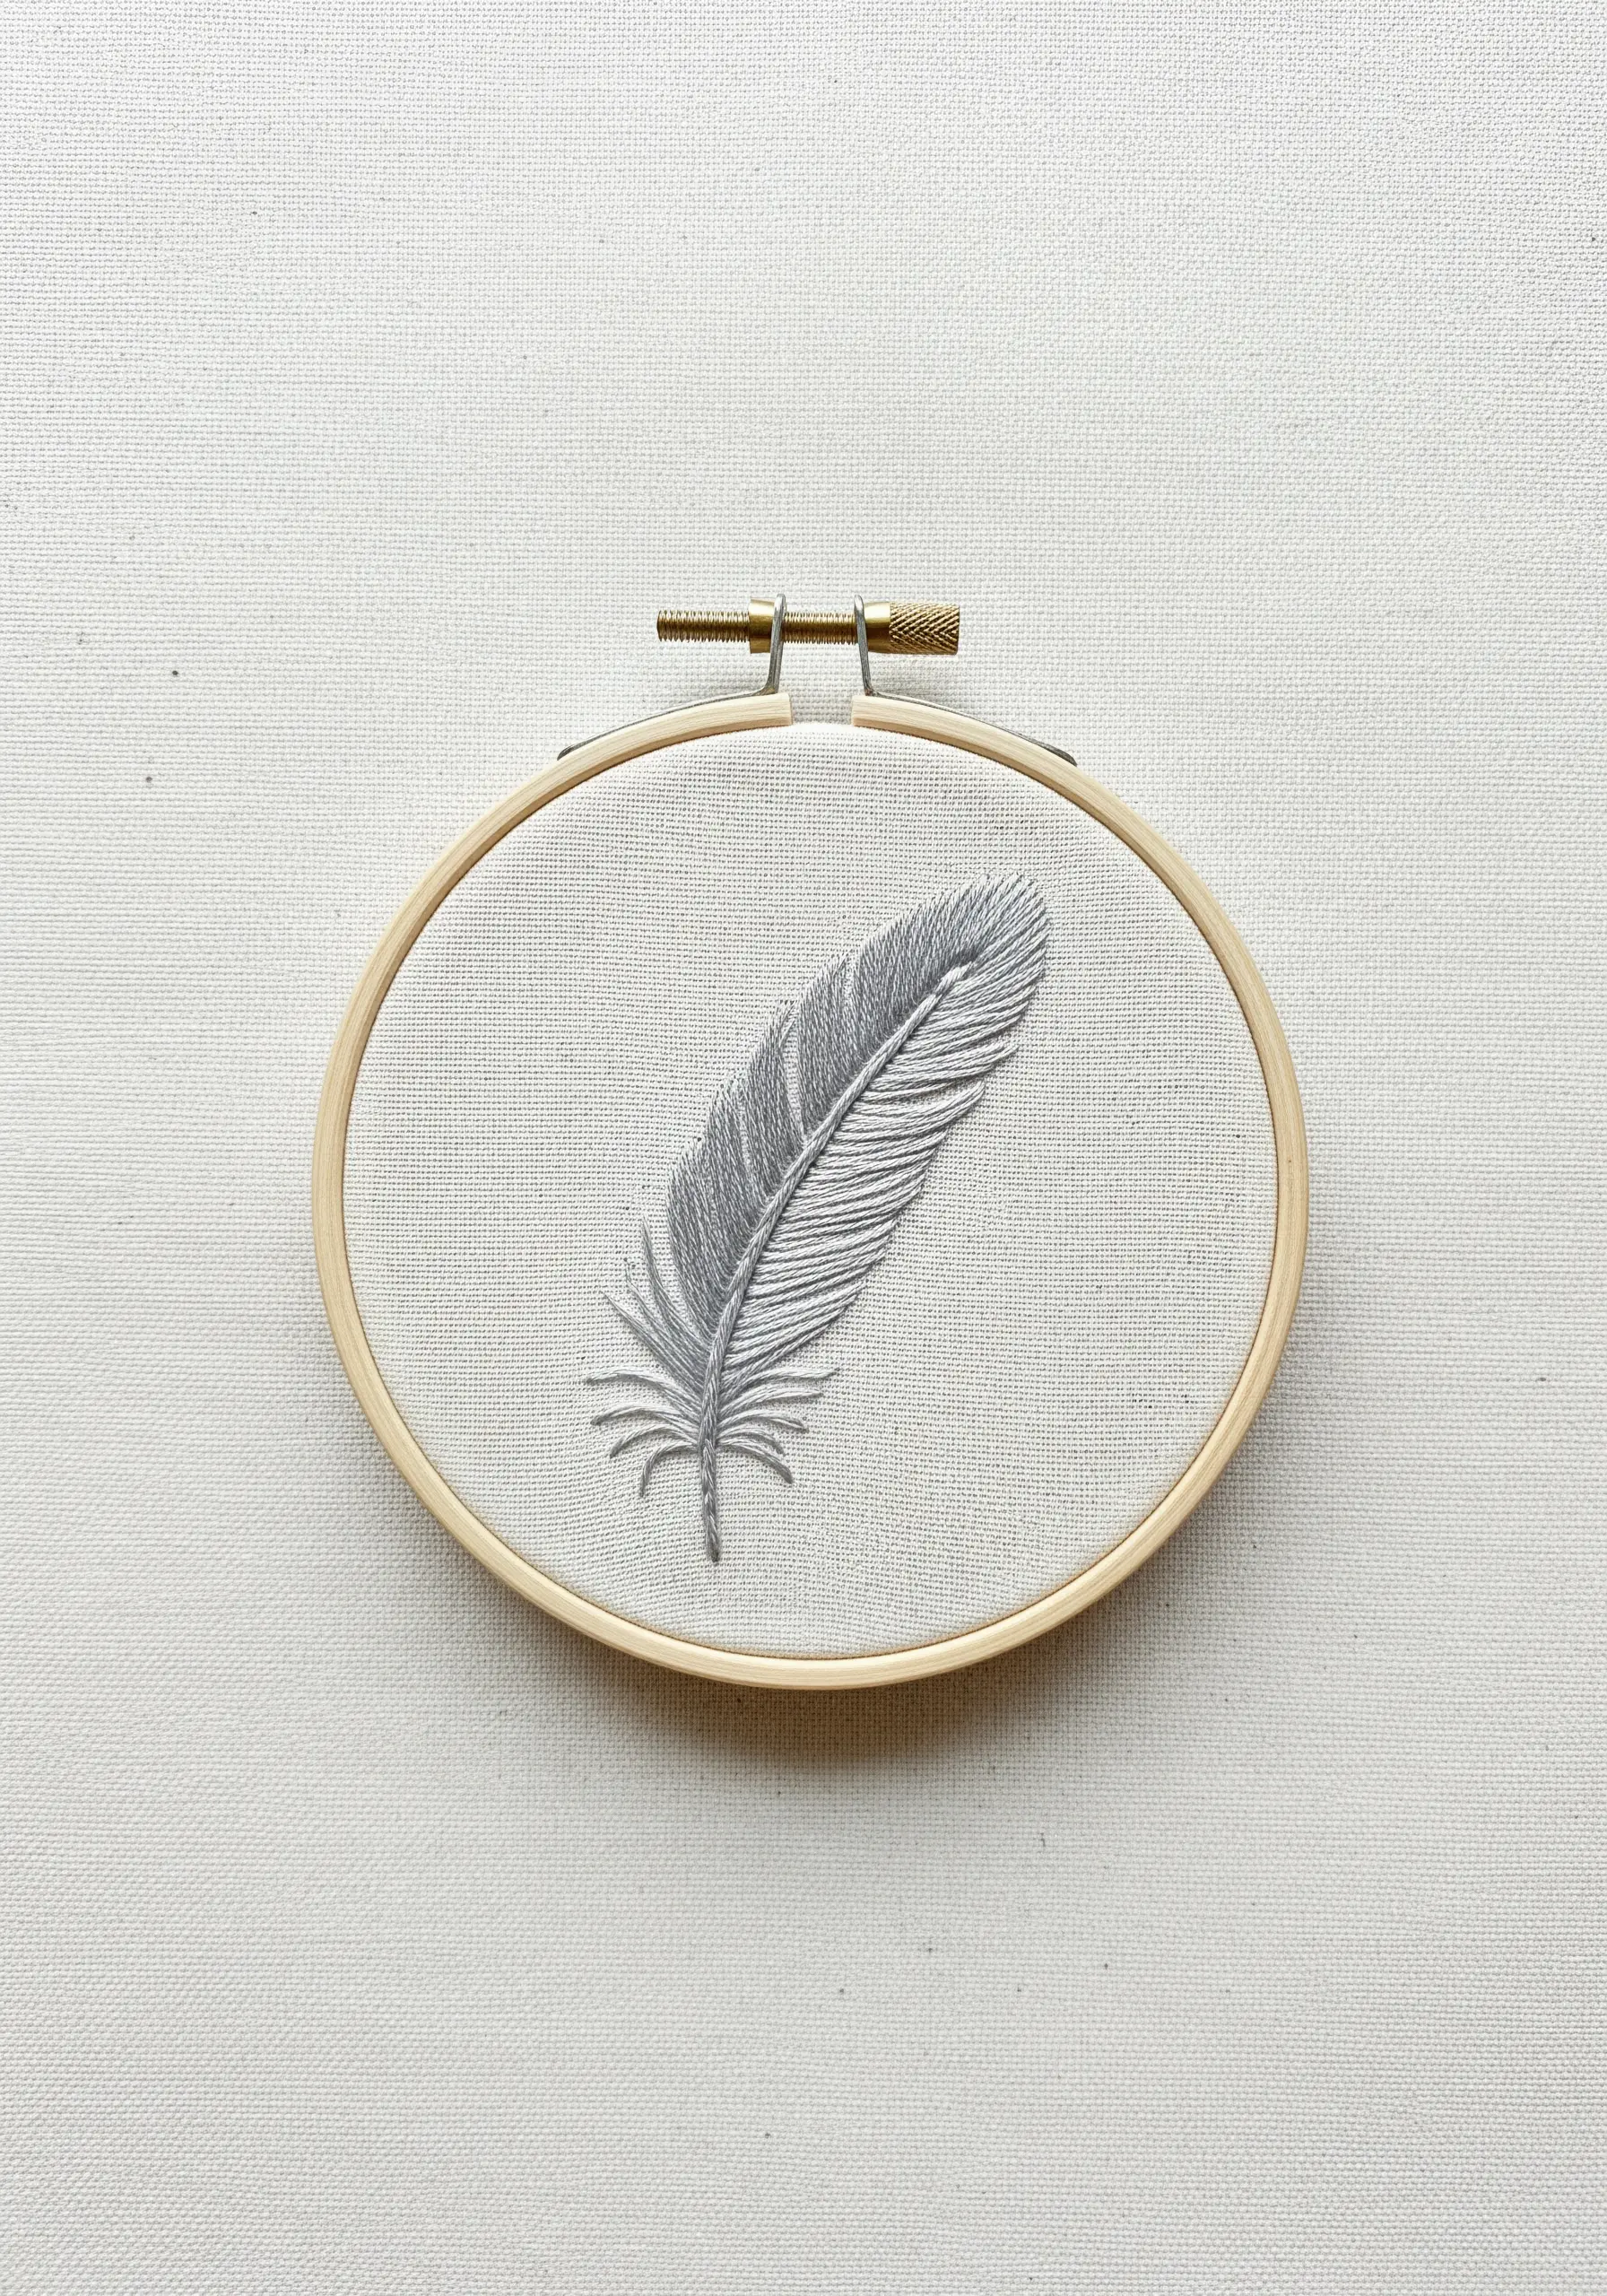
To give a feather a soft, realistic look, the direction of your stitches is paramount.
Use a fishbone stitch for the central spine and then fill the barbs with long, angled straight stitches or a long-and-short stitch.
Ensure all stitches flow outward and slightly downward from the center, mimicking the structure of a real feather.
Using a few closely related shades of gray, rather than one solid color, will enhance the illusion of depth and softness.
23. Choose Fabric That Enhances Your Subject

The texture of your background fabric can amplify your embroidery’s theme.
Stitching wheat stalks on a coarse, open-weave fabric like burlap or hessian instantly evokes a rustic, natural feeling.
Use a wheat stitch or stacked fly stitches for the grains to create a braided, dimensional effect that stands out against the fabric’s rugged texture.
This pairing of stitch, subject, and surface creates a cohesive, tactile piece.
24. Embrace the Simplicity of a Single Line

A minimal outline can be more powerful than a fully rendered image.
Using Aida cloth for a geometric design like this house provides a built-in grid, making it easy to achieve perfectly straight lines and sharp corners with a simple backstitch.
The negative space inside the outline becomes part of the art, inviting the viewer to fill in the details.
This is a perfect example of how tiny handmade decor ideas can make a big impact.
25. Guide the Eye with Directional Fill Stitch
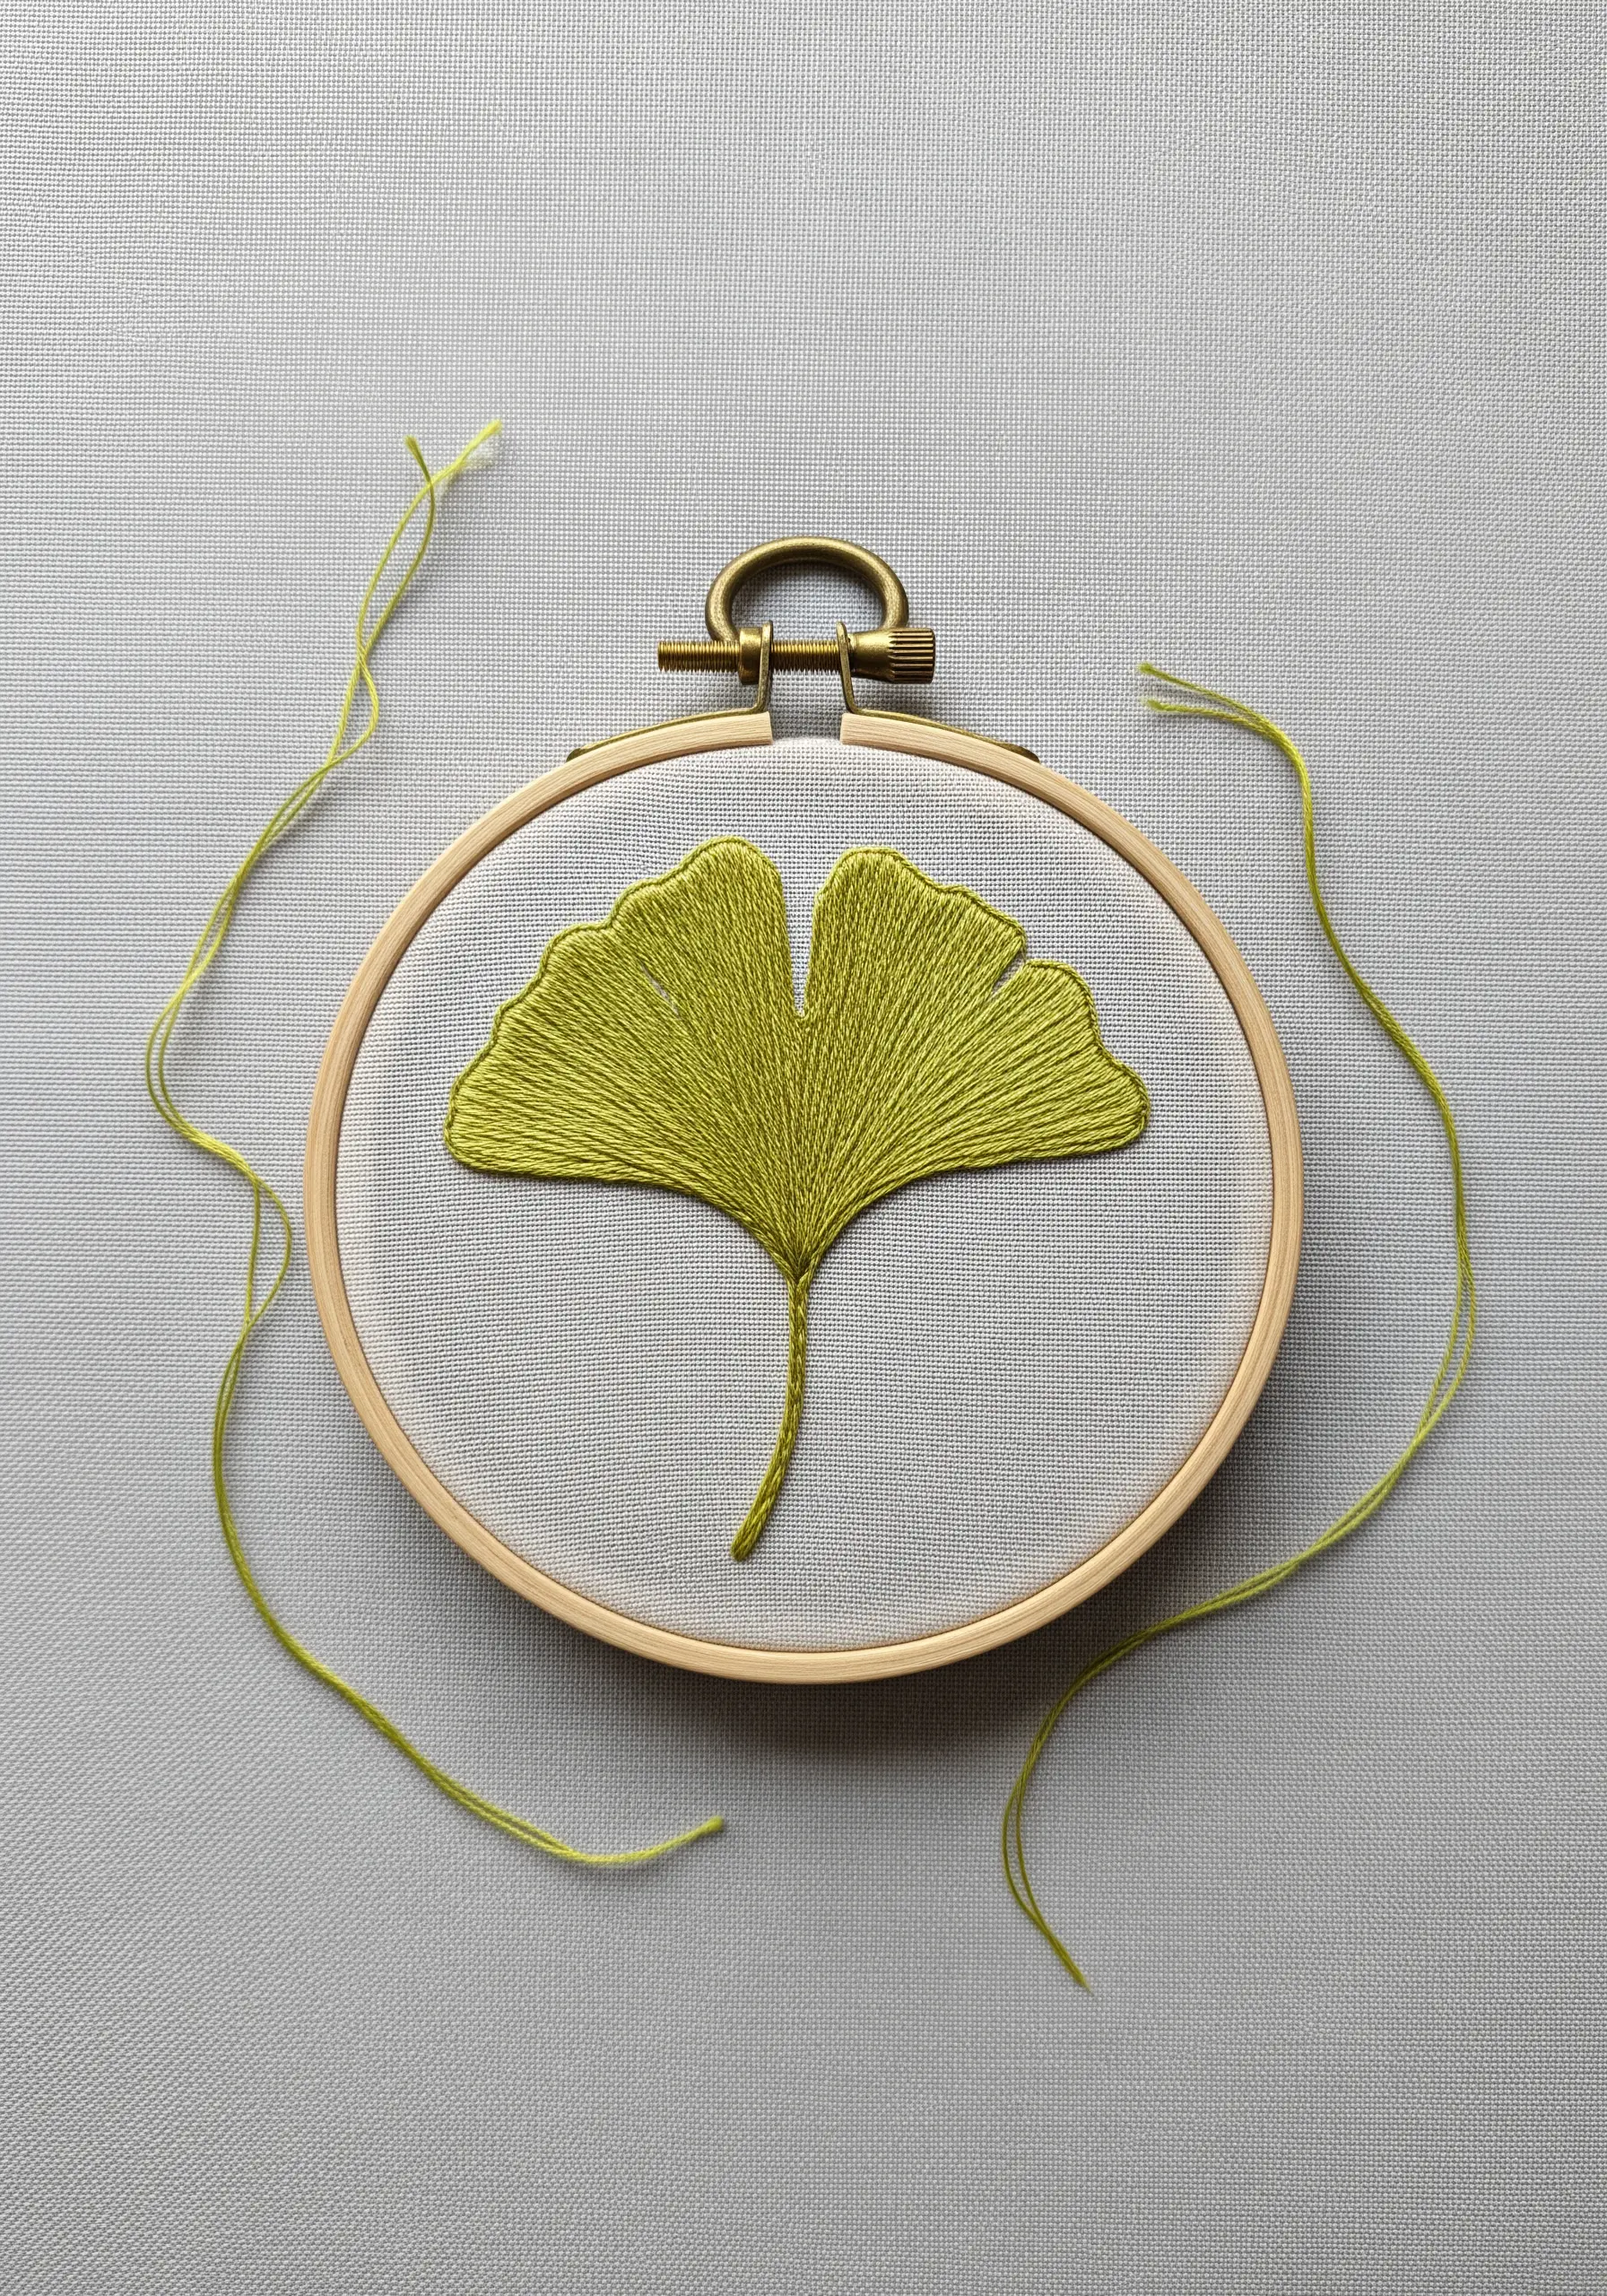
The fan-like shape of a ginkgo leaf is perfect for practicing directional satin stitch, also known as thread painting.
Instead of stitching straight across, angle all of your stitches to radiate from the single point where the leaf meets the stem.
This technique not only fills the shape but also creates the illusion of the leaf’s delicate, radiating veins.
The result is a design that feels fluid, organic, and full of movement.
26. Define a Silhouette with a Split Stitch Edge

To achieve an impeccably sharp edge on a filled silhouette, preparation is key.
First, outline the entire shape using a single strand of floss and a tiny split stitch. This creates a subtle, raised boundary.
Then, fill the shape with a satin stitch, bringing your needle down just on the outside of your split stitch outline.
This simple trick contains your fill stitches and results in a crisp, clean edge that looks almost like a patch.
27. Add Vintage Character with Variegated Thread
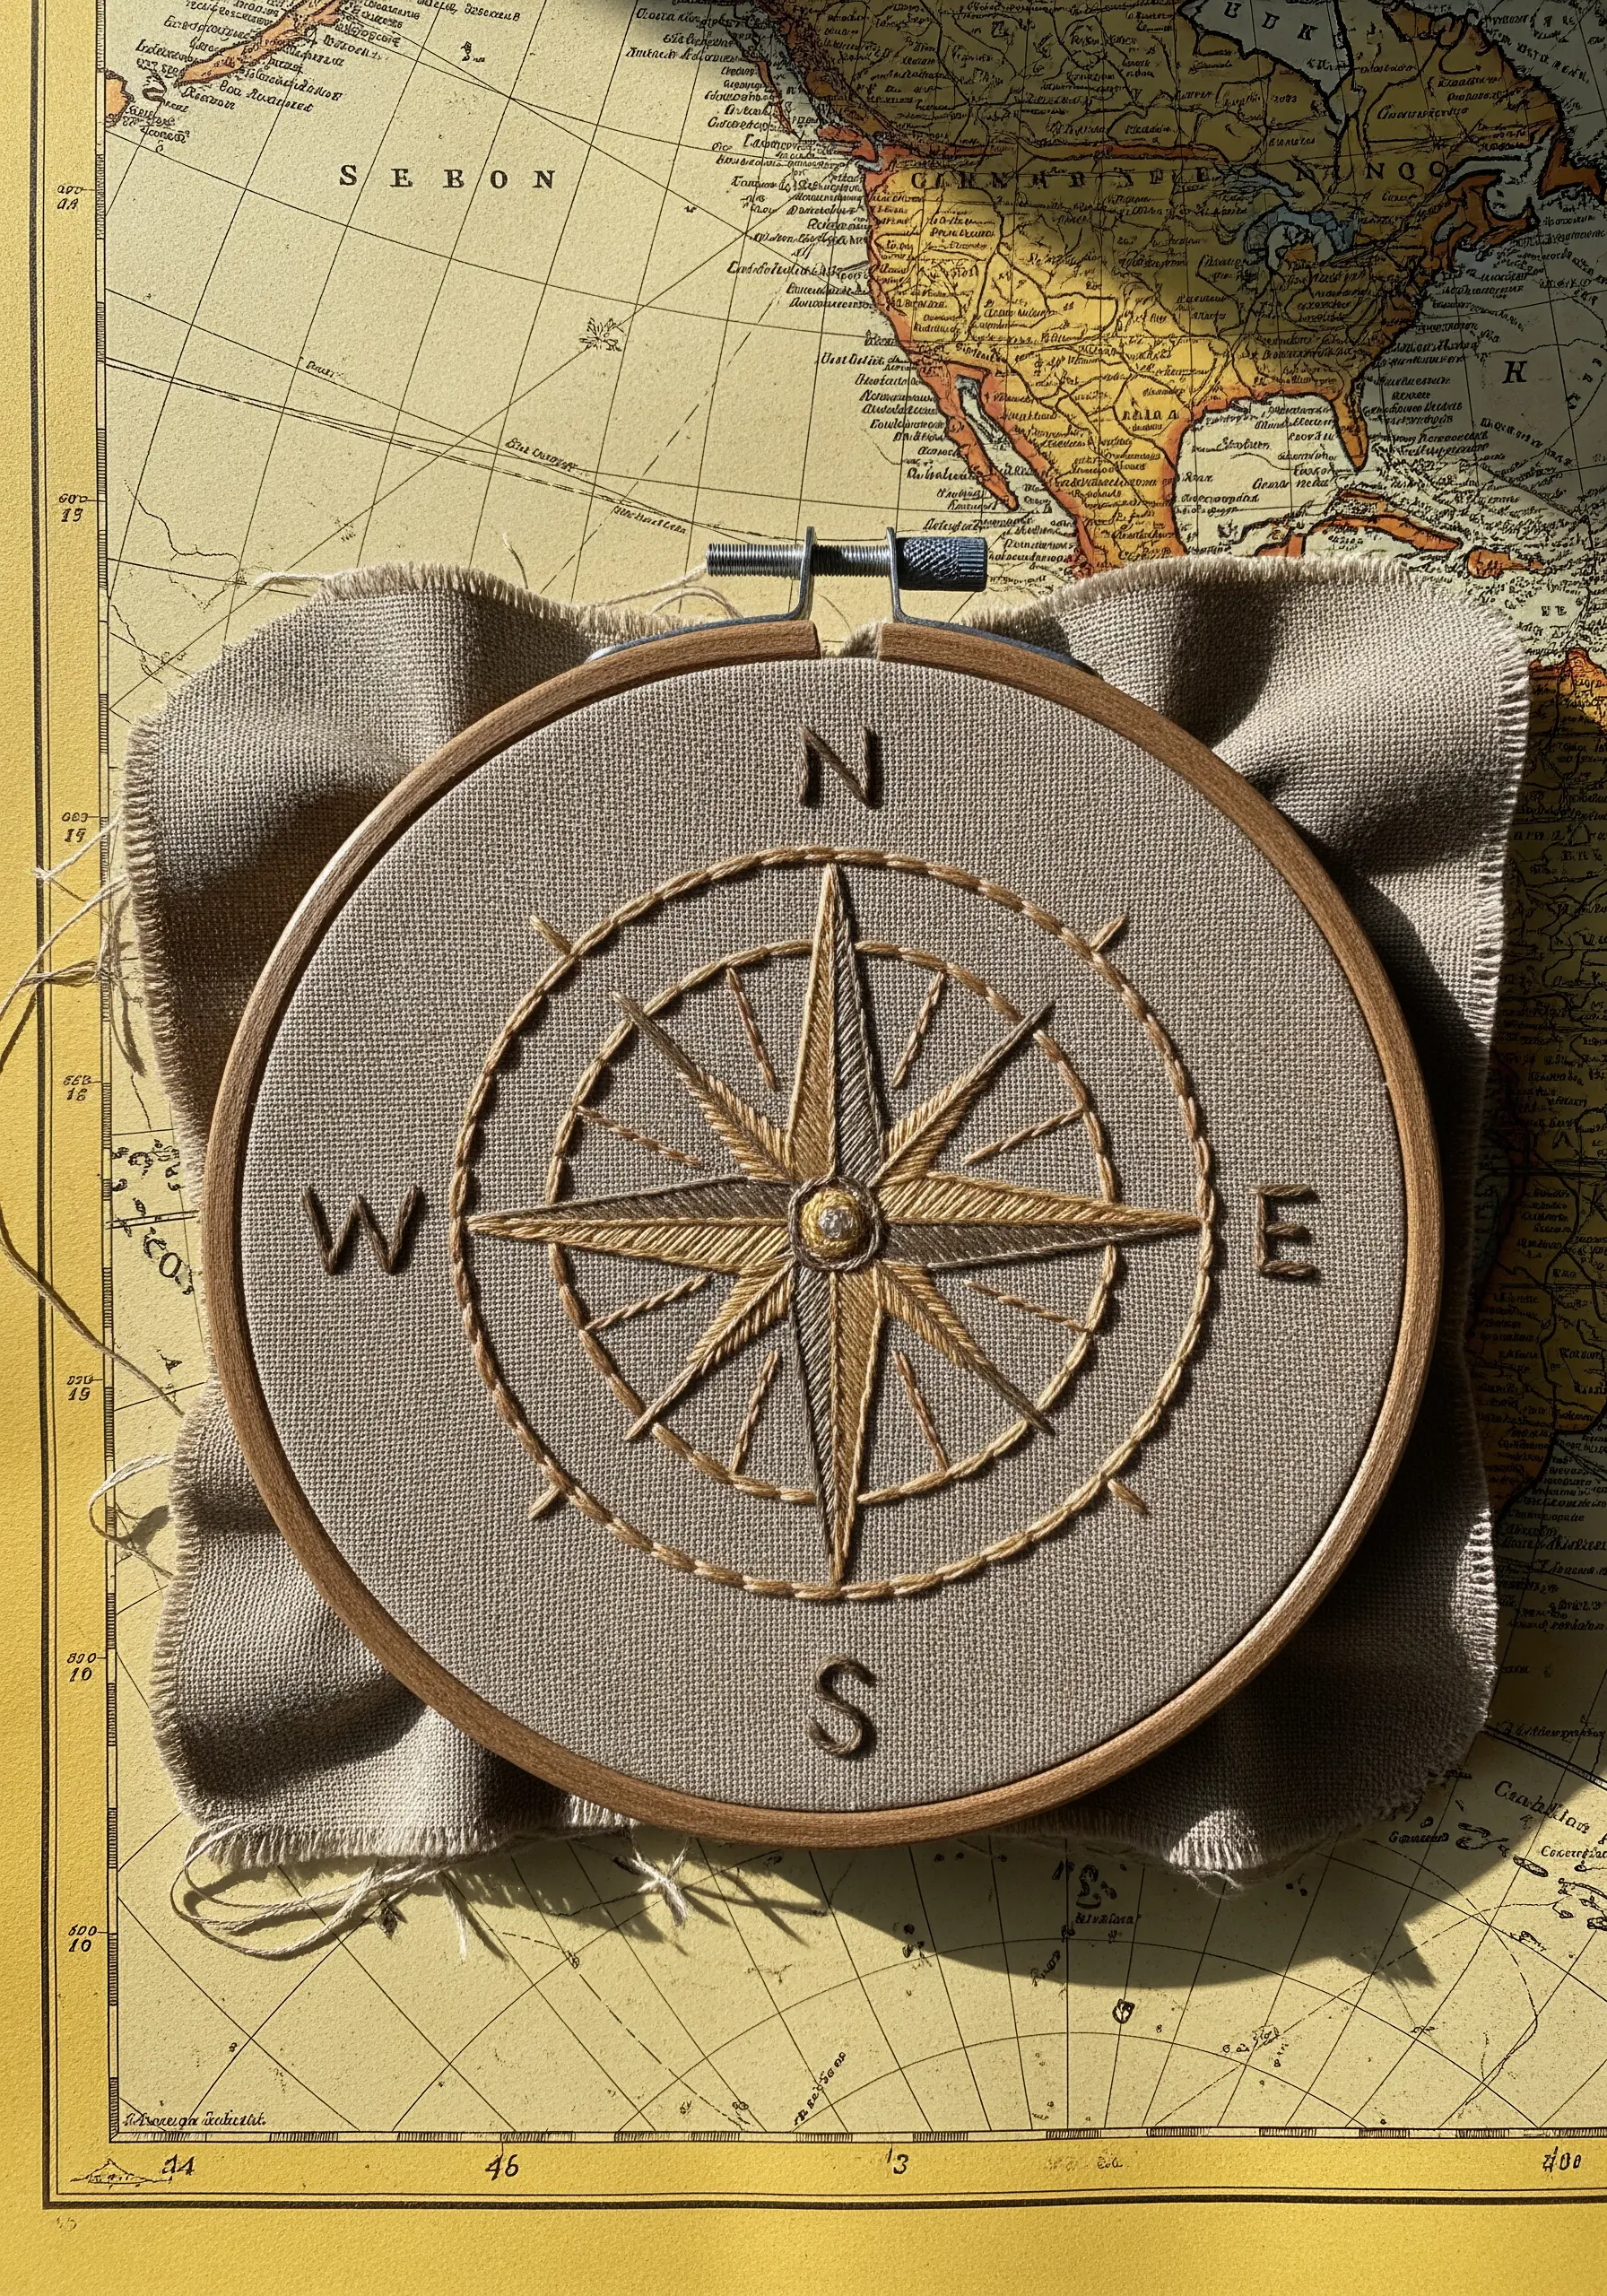
To give a motif like this compass rose an instantly aged, sun-bleached look, use a single variegated thread that moves between shades of beige, gold, and brown.
As you stitch, the colors will shift randomly, creating subtle variations and depth without any extra effort on your part.
Combine a simple backstitch for the lines with a satin stitch for the filled points to create textural contrast within this single-color design.
28. Build a Textured Center with French Knots

Give your floral designs a realistic, pollen-dusted center by filling it with a dense cluster of French knots.
Use two or three complementary shades of thread (like gold and light orange) and vary the number of wraps around your needle to create knots of different sizes.
This variation mimics the natural texture of a flower’s stamen.
Contrast this highly textured center with smooth satin stitch petals for a balanced and visually interesting botanical.
29. Create 3D Leaves with a Padded Stitch

For a truly dimensional, sculptural effect, use the padded satin stitch or cast-on stitch to create the small leaves of this branch.
These stitches are worked over a foundation (like a pin or another needle) to create raised, loopy shapes that stand away from the fabric.
Work a single French knot in the center of each leaf position first, then build your padded stitches around it to create these delightful, button-like forms.
This is one of the best DIY embroidery tricks to transform plain fabric instantly.
30. Incorporate Found Objects into Your Design
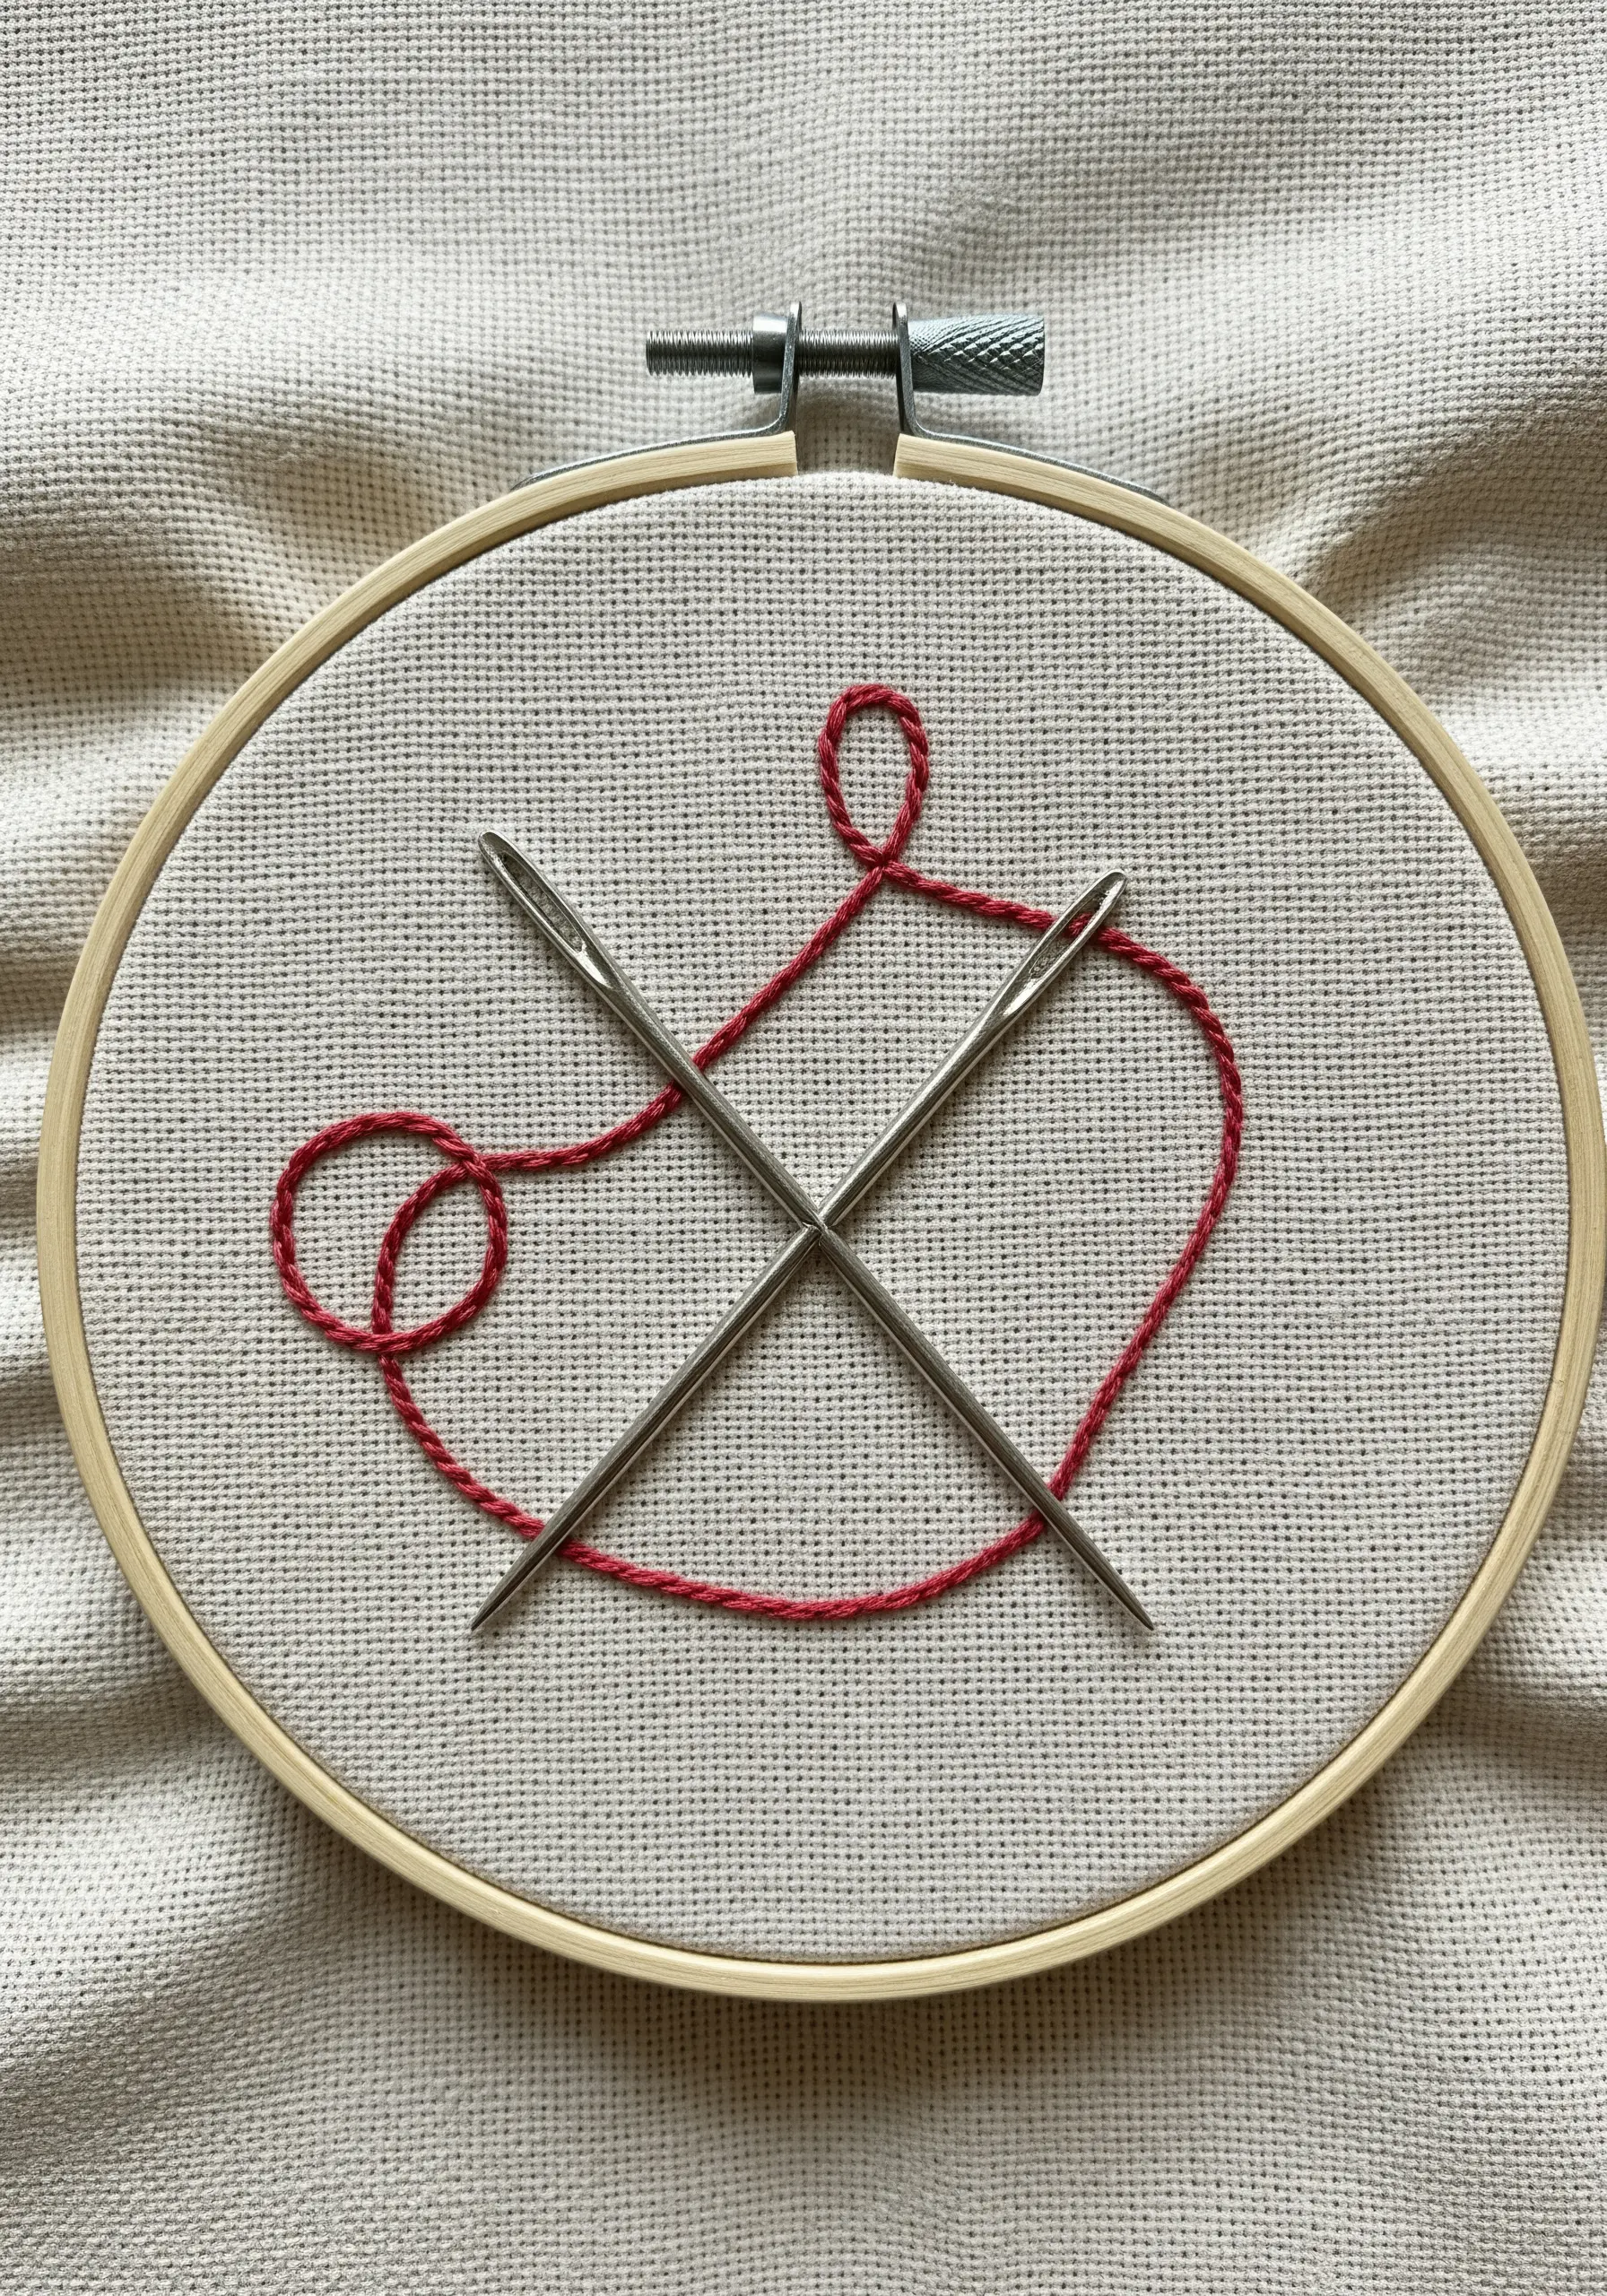
Turn your embroidery into a clever, mixed-media piece by incorporating real objects.
Here, two actual sewing needles are laid on the fabric and held in place by the embroidered thread that loops and weaves around them.
This playful, self-referential design celebrates the tools of the craft itself and adds an unexpected layer of dimension and narrative.
Secure the needles on the back with a few strong stitches to ensure they stay in place.
31. Suggest Form with an Open Outline

You don’t need a solid fill to create a recognizable shape.
Use a simple backstitch or stem stitch to create the coiled lines of a beehive, leaving the interior space open.
This minimalist approach keeps the design feeling light and modern, and it works up very quickly.
The viewer’s eye connects the lines to complete the form, making it an efficient and effective way to represent an object.
This technique is perfect for tiny embroidery designs inspired by everyday life.


