

You have the thread, the needle, and the desire to make your clothes feel more like *you*. But perhaps you hesitate, worried that your embroidery will look more clumsy than custom. I want you to set that thought aside.
True custom style isn’t about covering a garment in complex stitches. It’s about a single, perfectly placed detail—a tiny work of art that tells a story. It’s the difference between adding decoration and adding intention.
In the ideas that follow, we’re not just looking at patterns; we’re exploring technique. You will learn how a change in stitch direction can alter the way light hits the thread, how a padded satin stitch creates luxury, and how a tiny motif on a cuff can have more impact than a loud print. This is your guide to making your embroidery look as refined and intentional as you feel.
1. Add Delicate Botanicals to a Crisp Collar
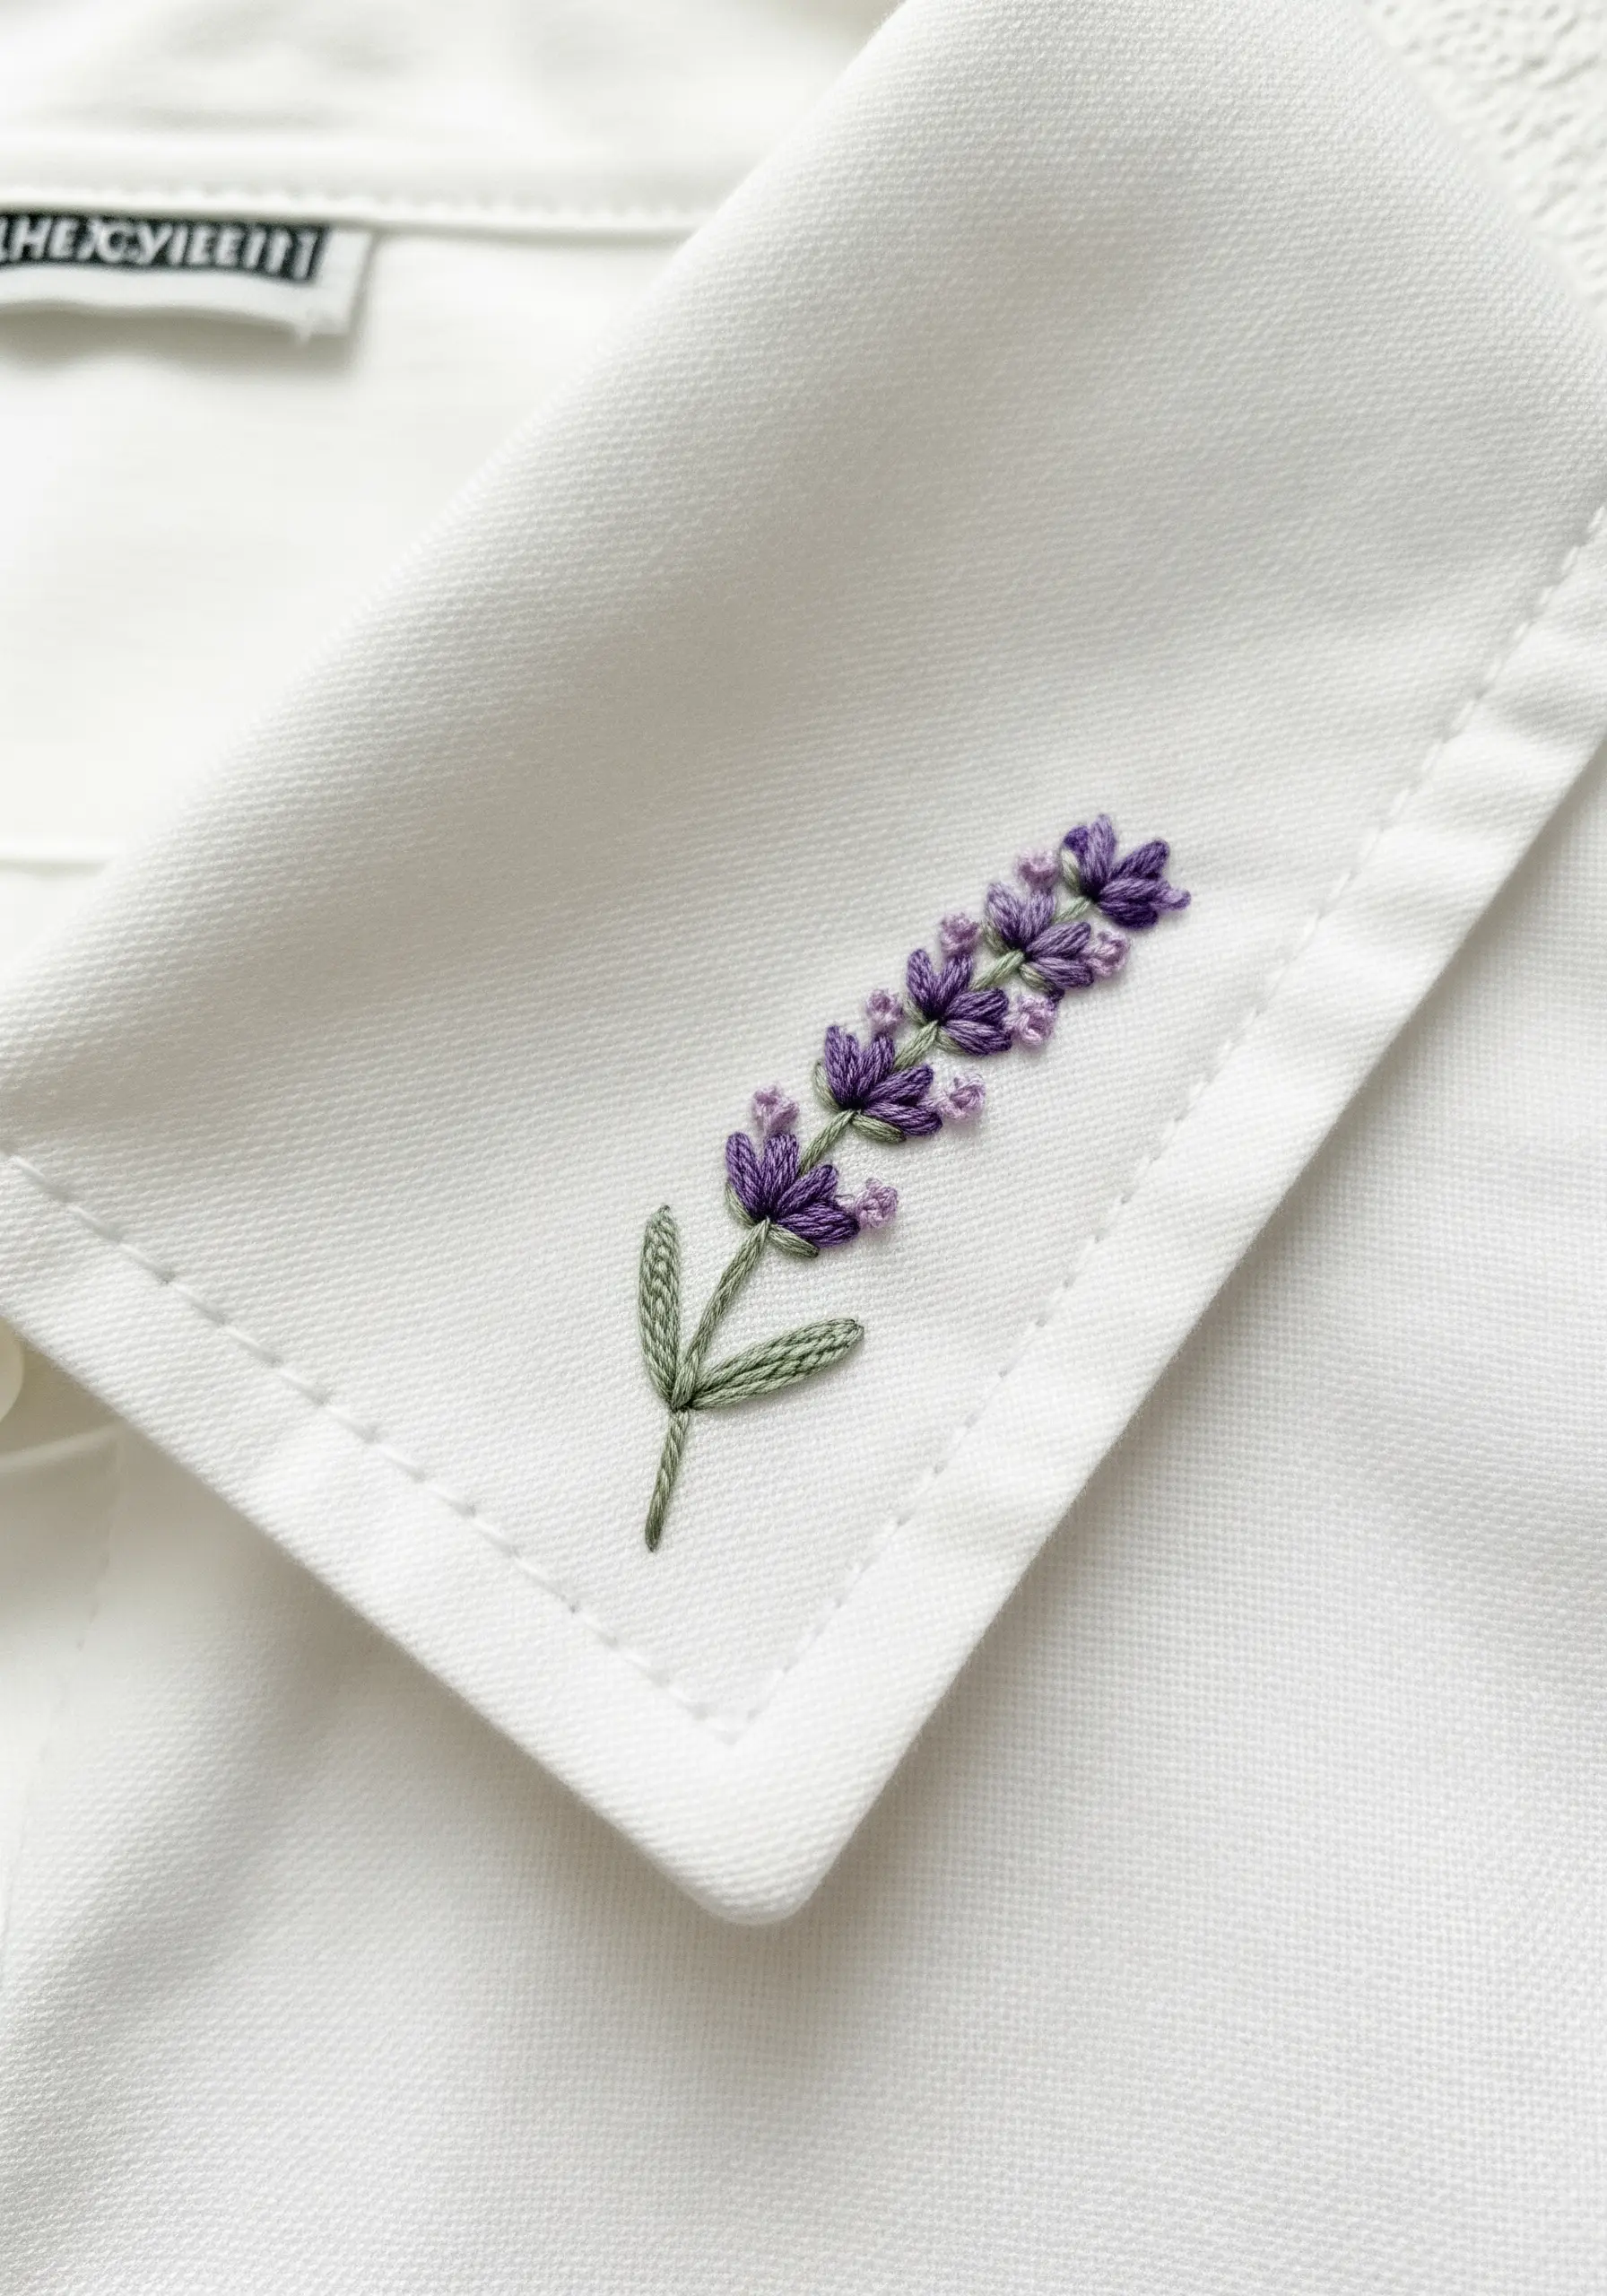
Place a single sprig of lavender on a collar point for an unexpected, elegant detail.
Use a single strand of embroidery floss for the stems and two strands for the blossoms to create subtle dimension.
For the purple buds, use a combination of satin stitch and French knots to mimic the texture of a real lavender flower.
This approach transforms simple botanical line art into a rich, textural embellishment that feels both delicate and intentional.
2. Define Your Motifs with a Crisp Outline

To make a motif pop, especially on a textured fabric like denim, stitch the outline first.
Use a two-strand split stitch for the black outline of the bee; this creates a solid, raised edge that contains your fill stitches perfectly.
Fill the sections with a directional satin stitch, ensuring your stitches lie flat and parallel.
For the wings, switch to a single strand of white or light gray to give them a sheer, delicate appearance against the bold body.
3. Master Geometric Fills with Overlapping Layers
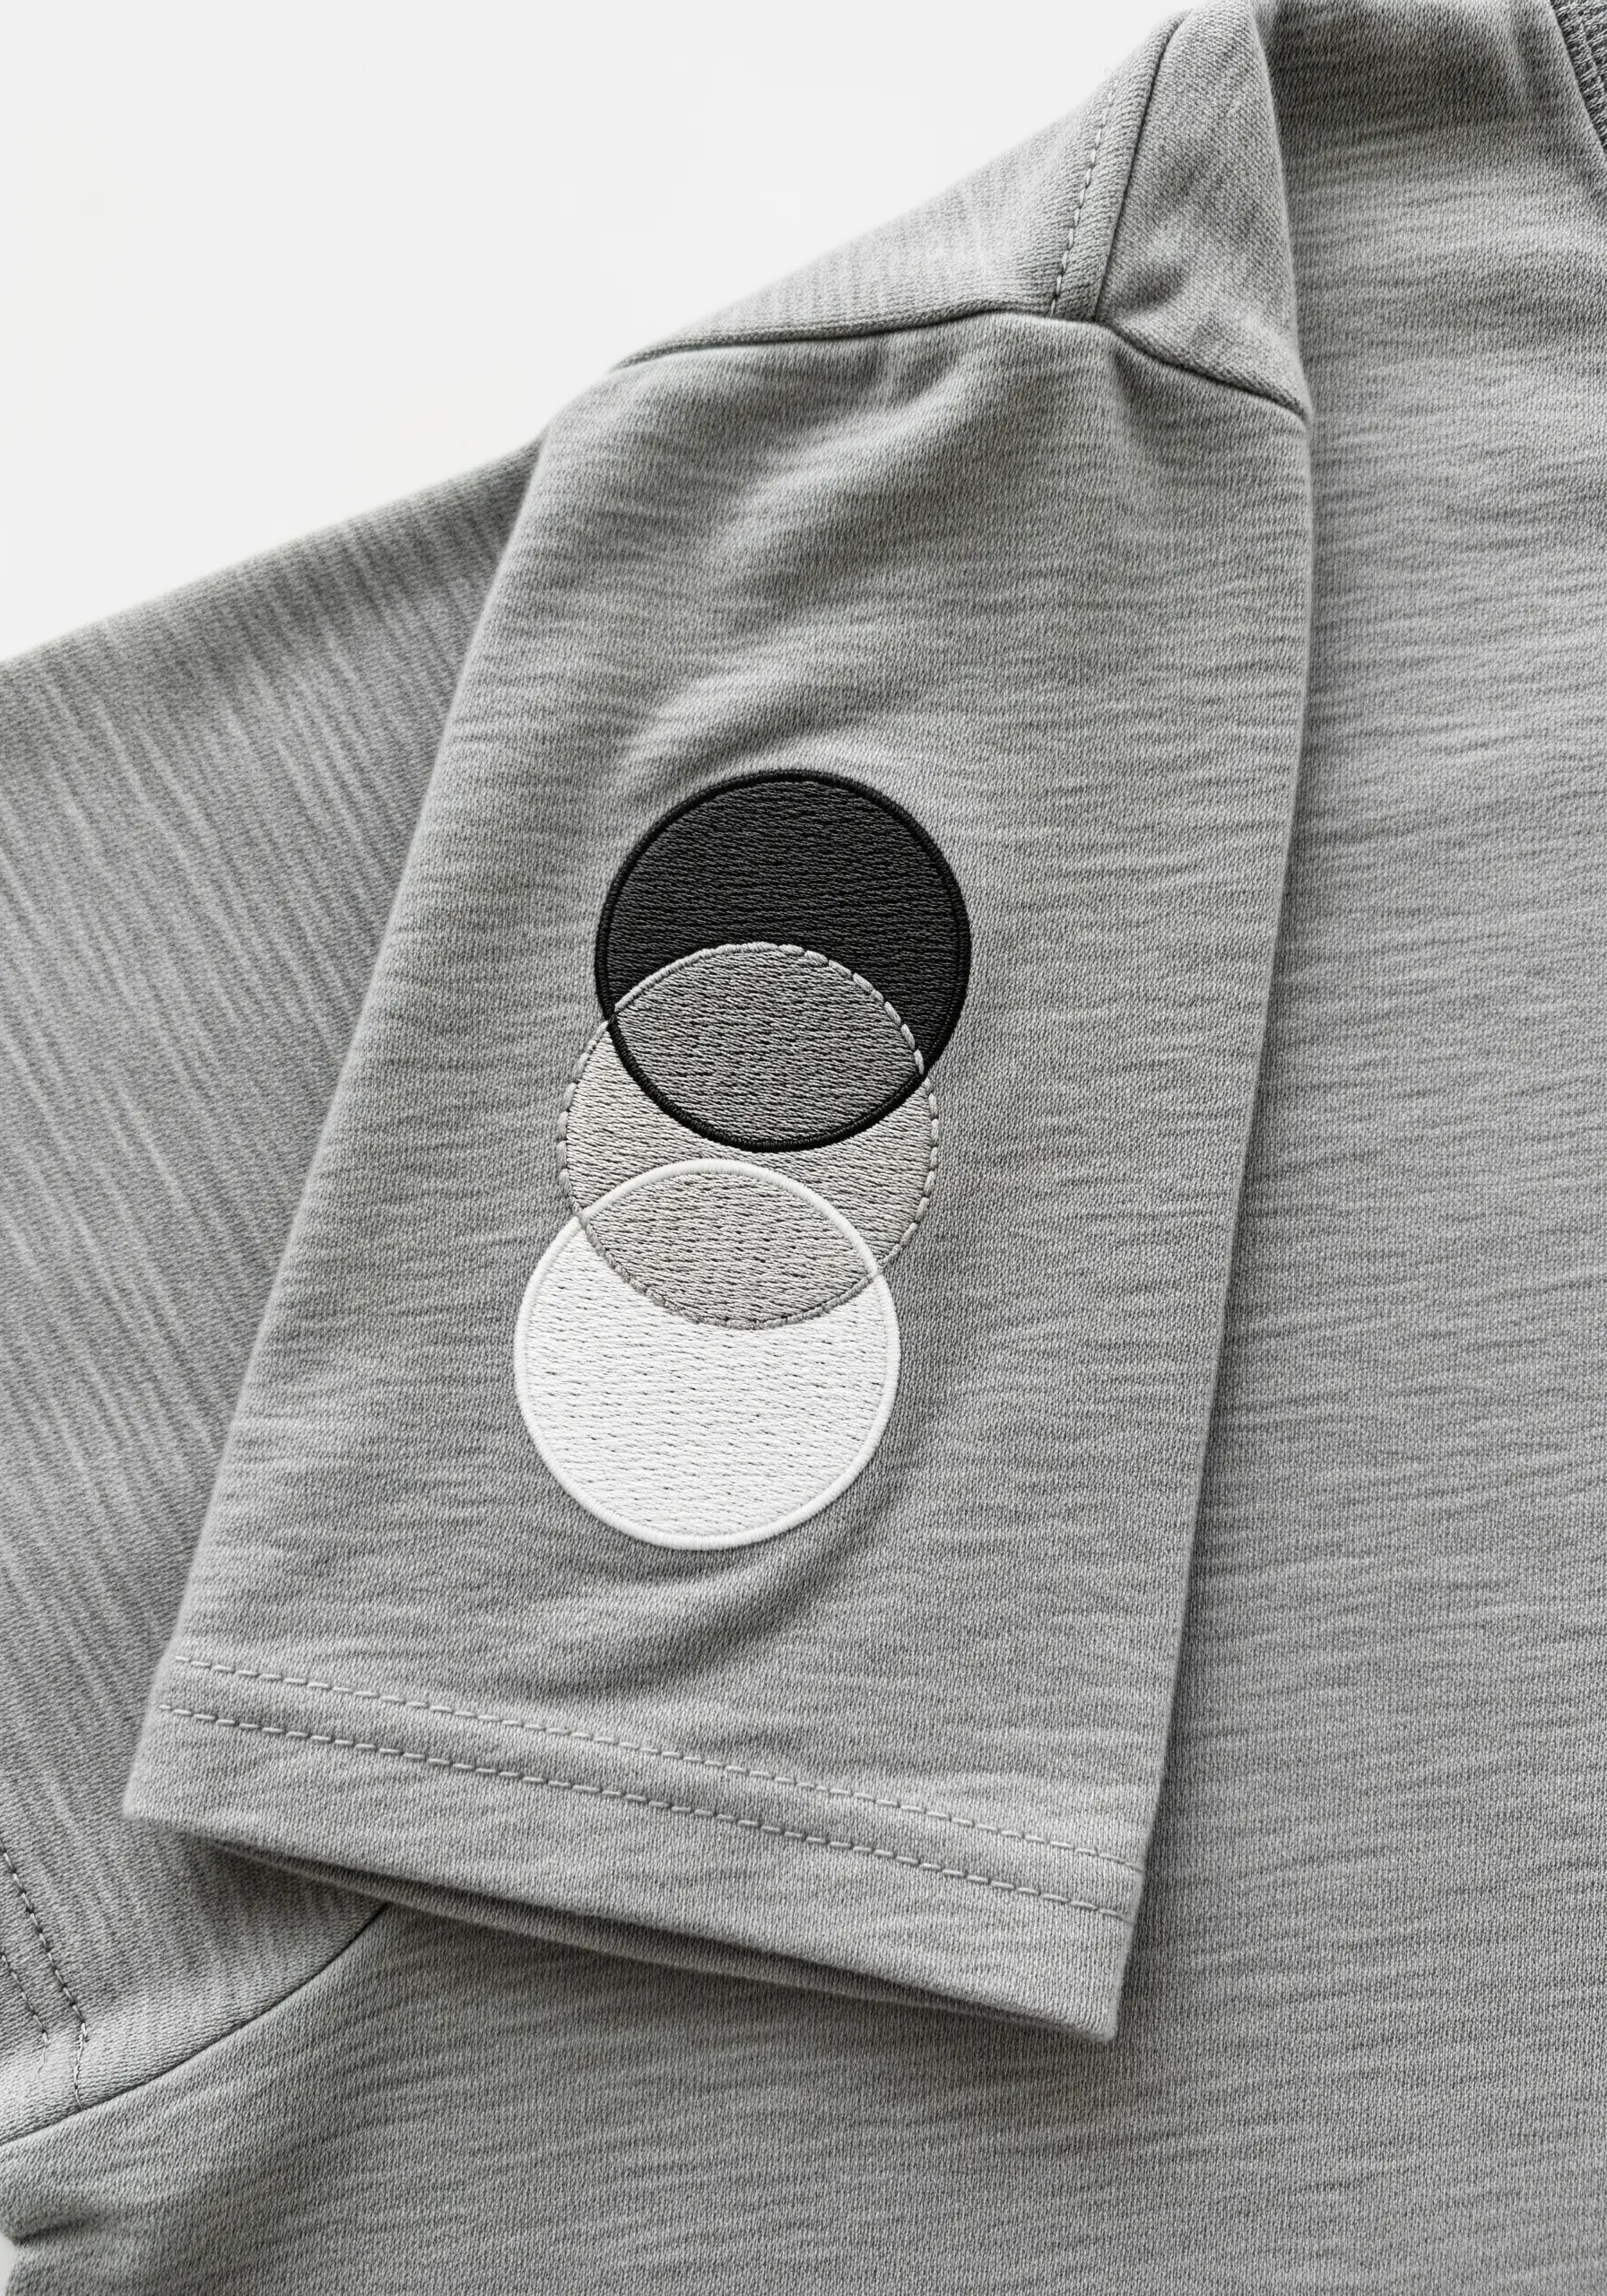
Elevate a simple sleeve with a modern, geometric design based on color theory and transparency.
Use a dense, perfect satin stitch for each circle, paying close attention to stitch direction to control how light reflects off the thread.
The illusion of transparency is created by stitching the overlapping sections in a new, blended color.
To achieve a subtle color gradient within each circle, you can introduce a thread one shade lighter or darker, using long-and-short stitches for a smooth transition.
4. Use Metallic Thread for Celestial Accents
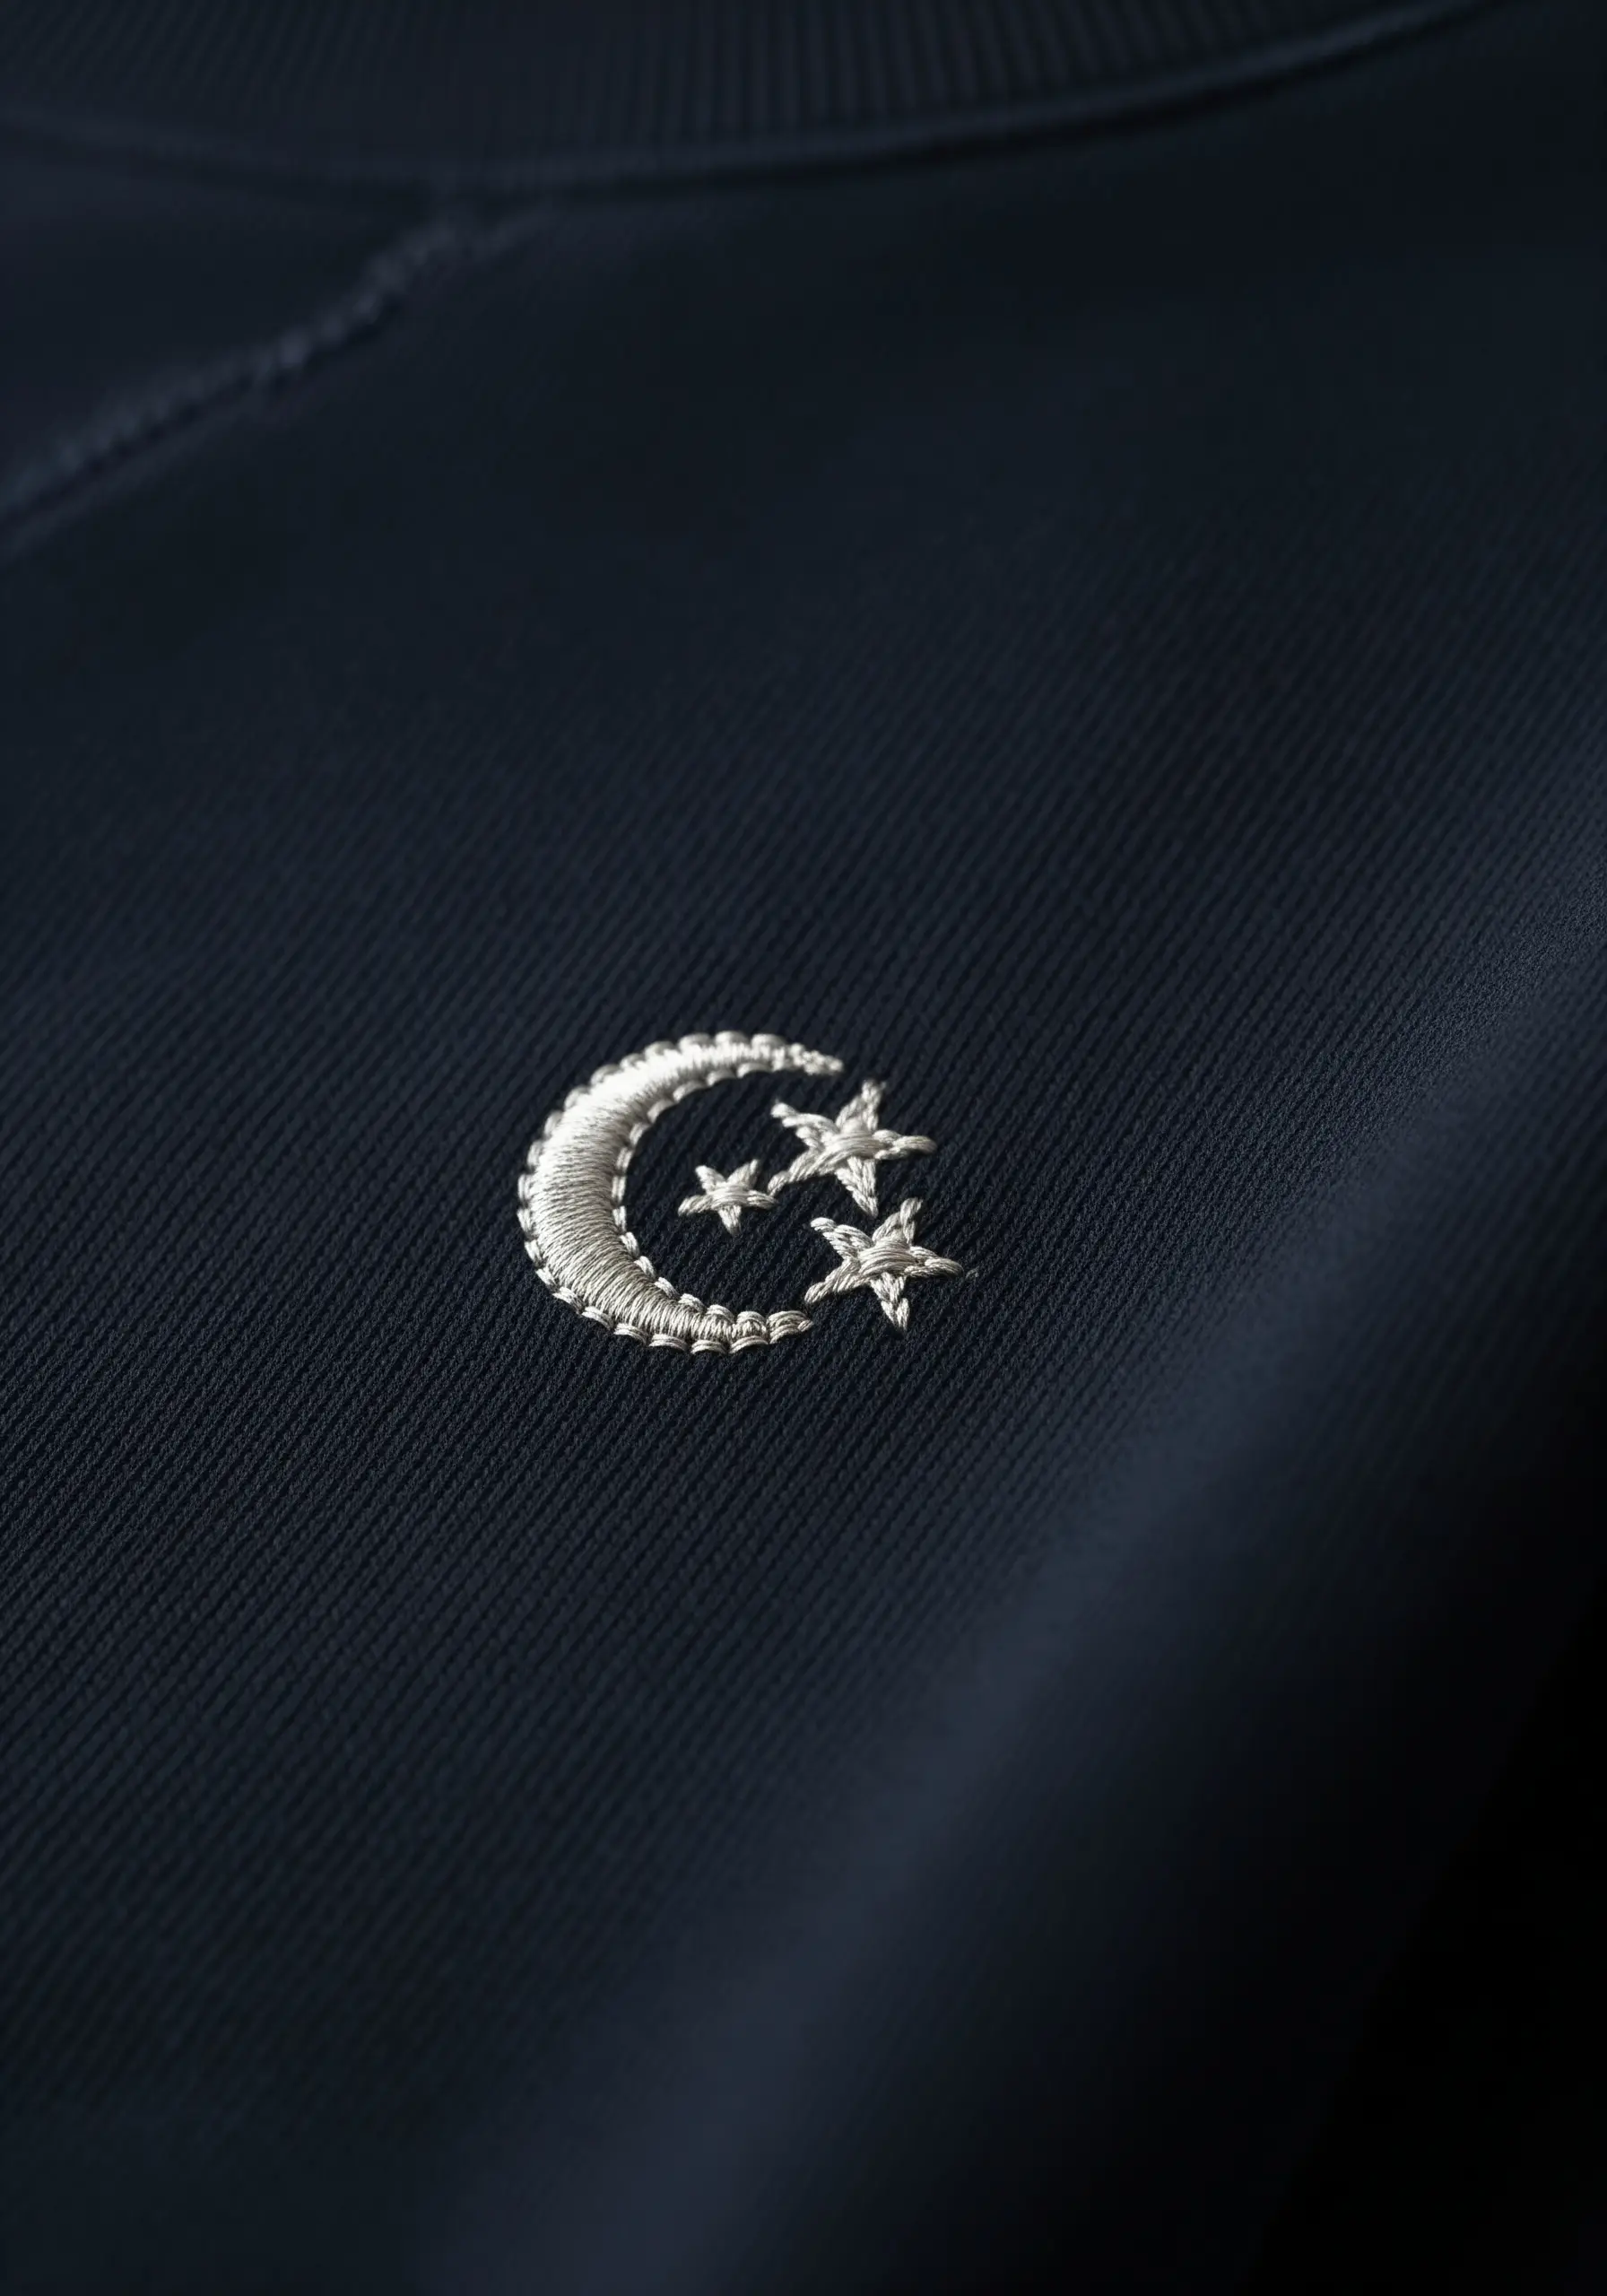
Add a touch of magic to dark fabrics with high-contrast metallic thread.
When working with metallics, use shorter lengths of thread (about 12 inches) to prevent fraying and tangling.
Create texture on the moon by varying the direction of your satin stitches and adding small seed stitches or French knots for a cratered effect.
This is one of the most effective ways to create minimal festive motifs that feel sophisticated rather than flashy.
5. Combine Stitch Textures for Dynamic Linework
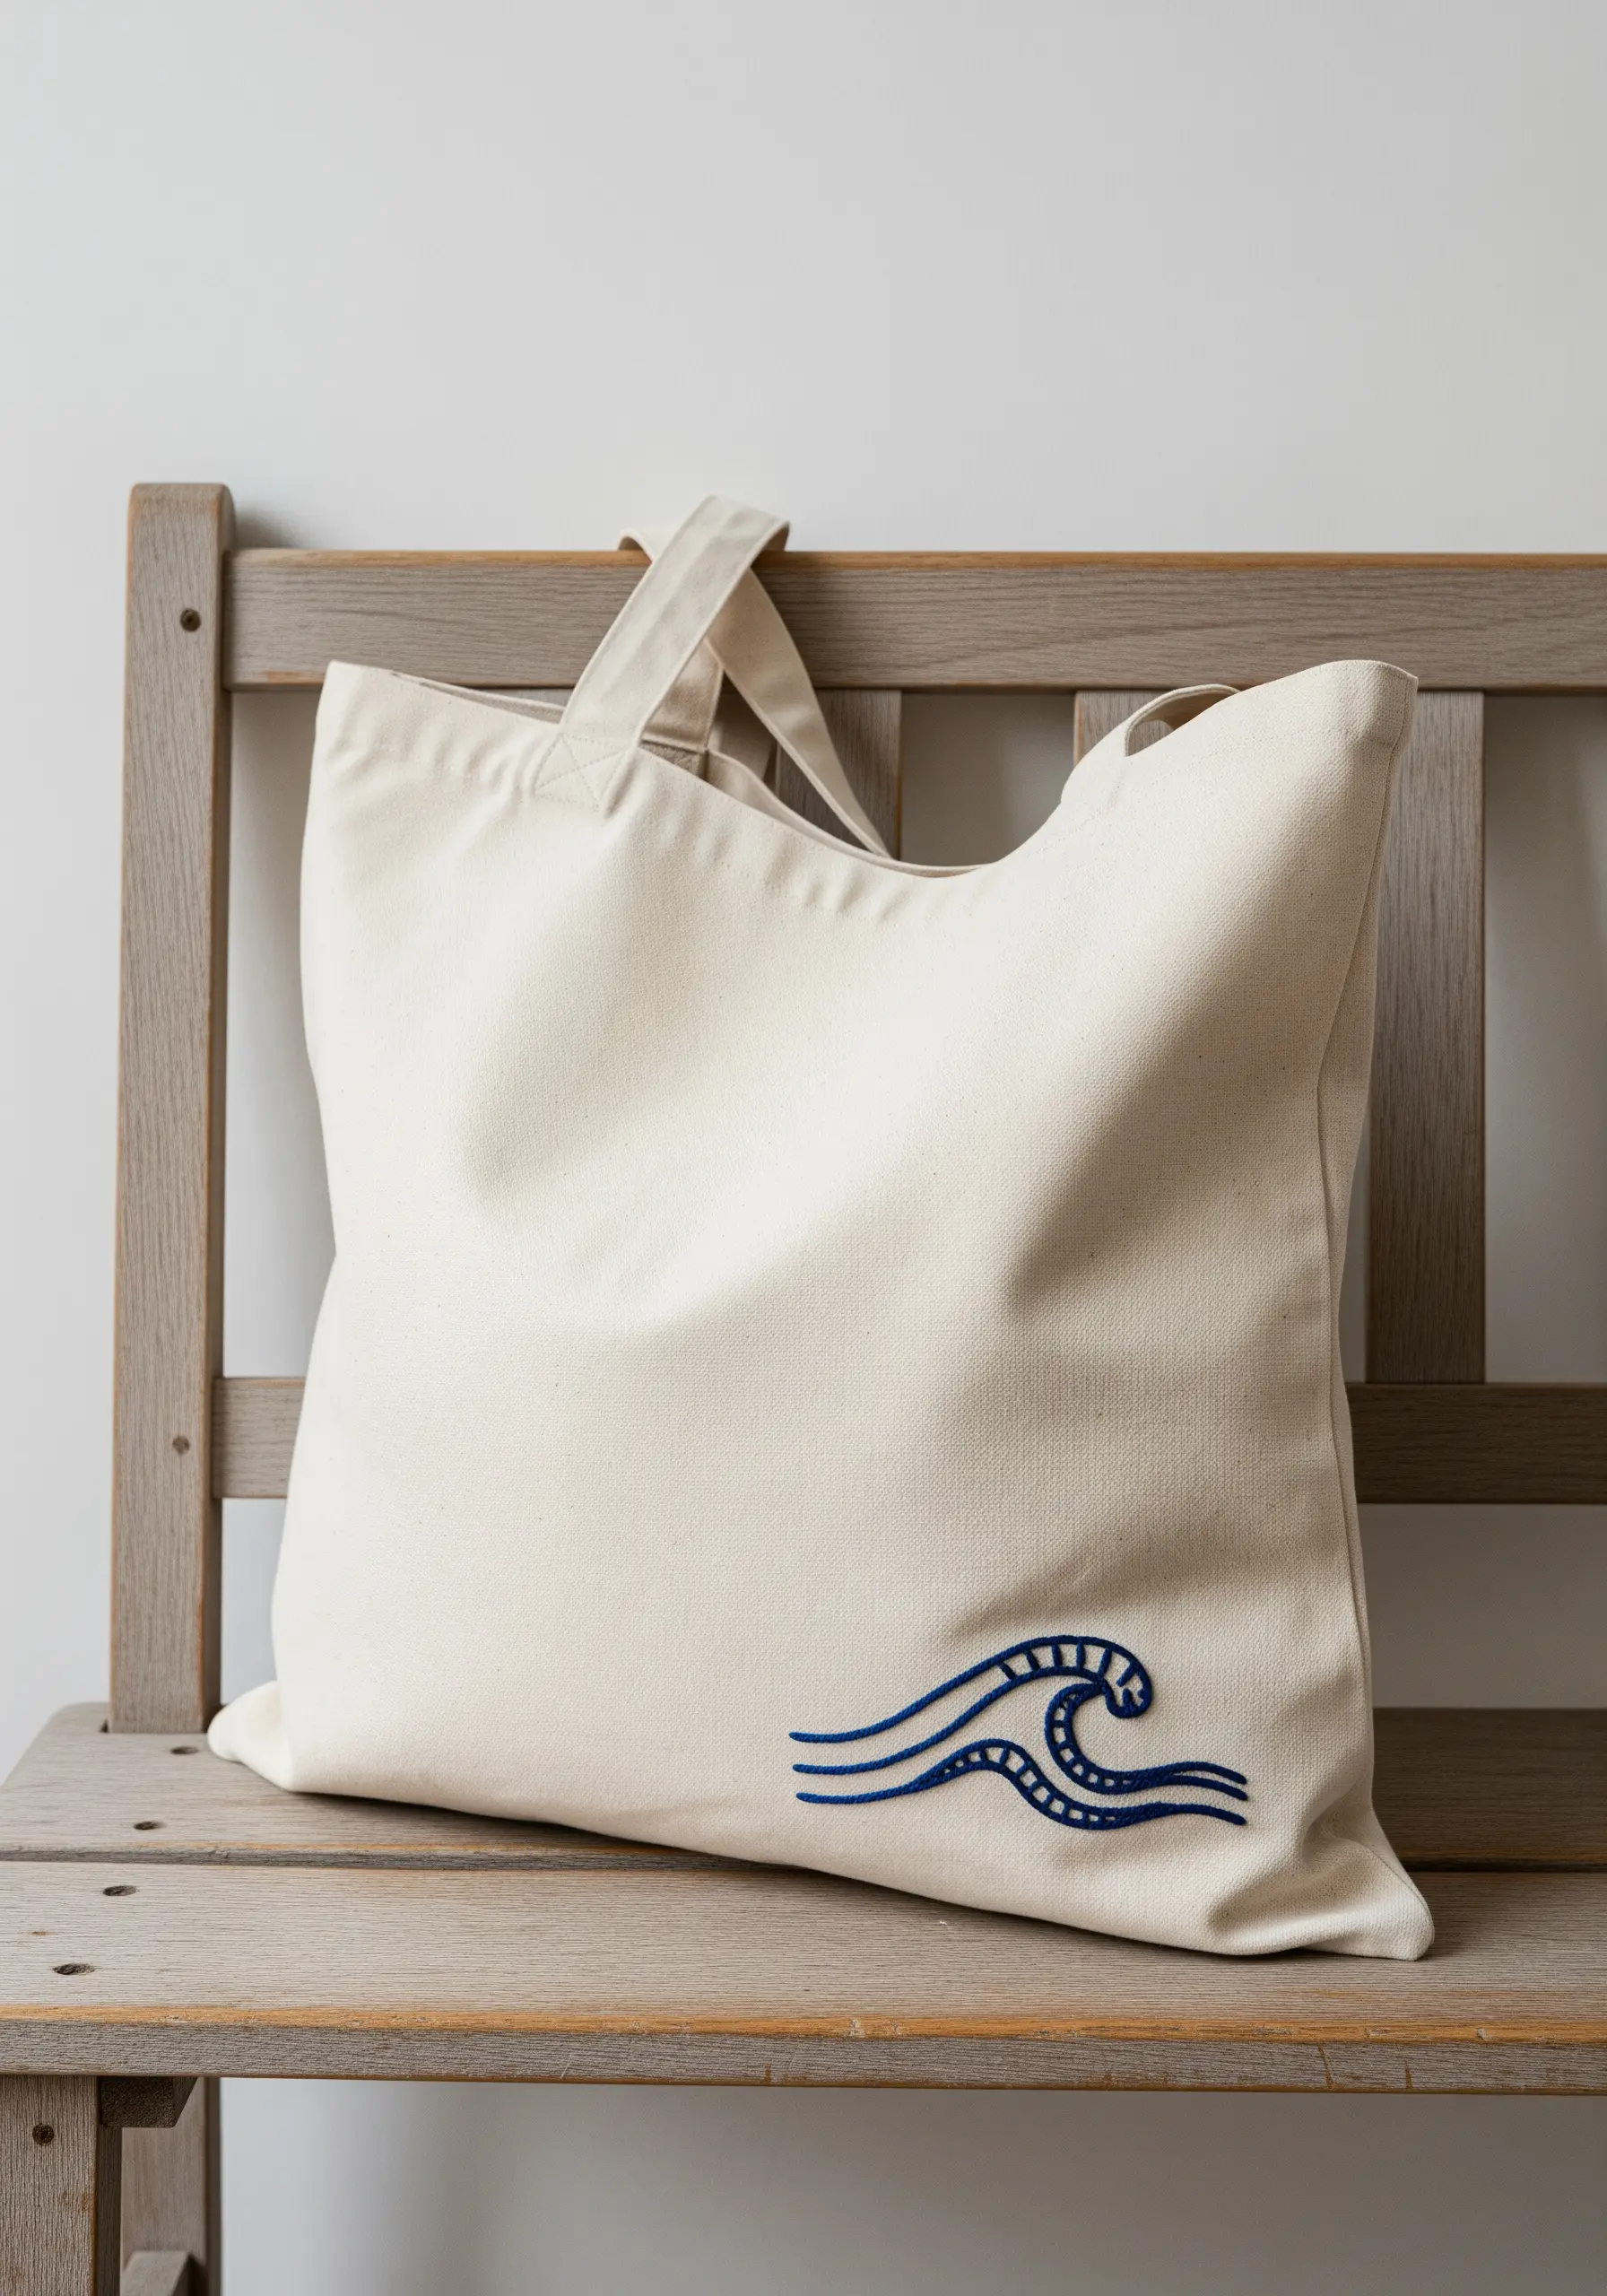
Turn a simple canvas tote into a piece of wearable art with a stylized wave motif.
Use a thick stem stitch or chain stitch for the main outlines of the wave, giving it substance and a strong graphic presence.
Fill the interior with parallel running stitches or seed stitches to suggest the texture of seafoam without overwhelming the design.
This technique shows how even simple line art can gain depth through varied stitch weights and textures.
6. Perfect the Lazy Daisy for Symmetrical Florals
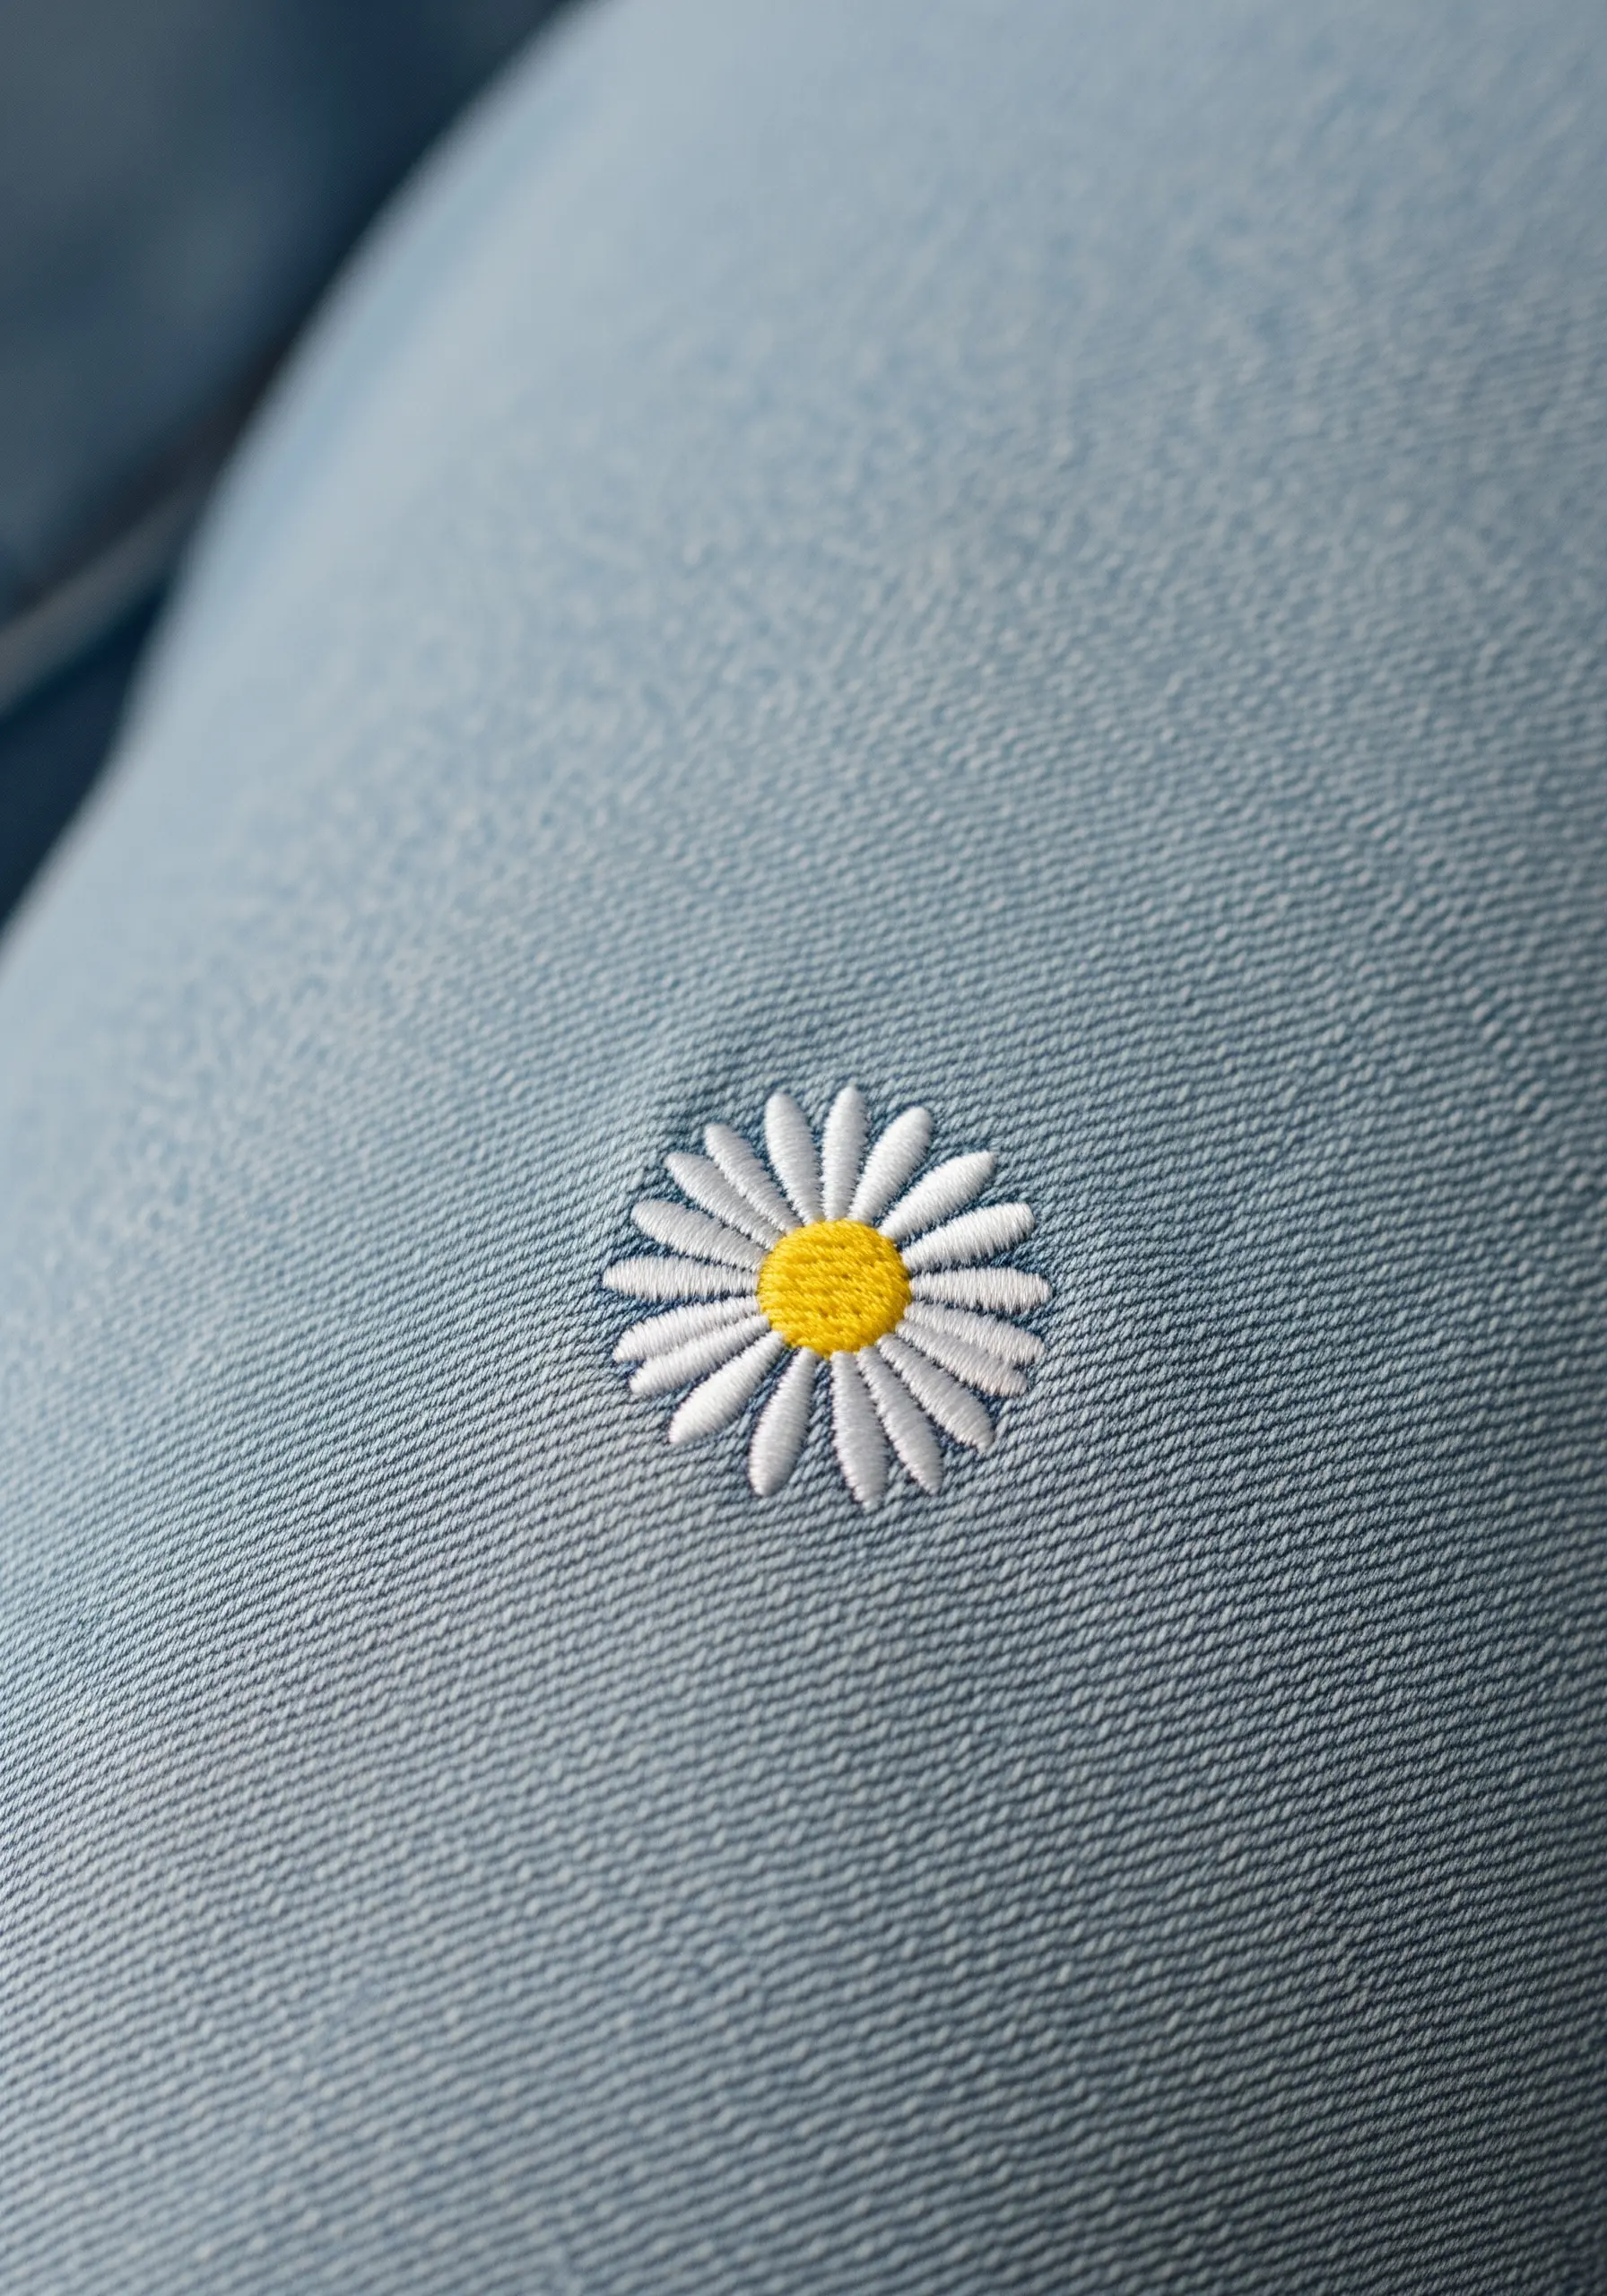
A single, perfectly stitched daisy can have more impact than an entire bouquet.
Use the detached chain stitch, often called the lazy daisy, for the petals. The key to a clean look is uniform tension and stitch length for every petal.
Create the center with a tight cluster of French knots, using a contrasting color like yellow or gold to draw the eye.
Place it in an unexpected spot—like the knee of your jeans or near a pocket—for a subtle, custom detail.
7. Integrate Designs with Garment Seams
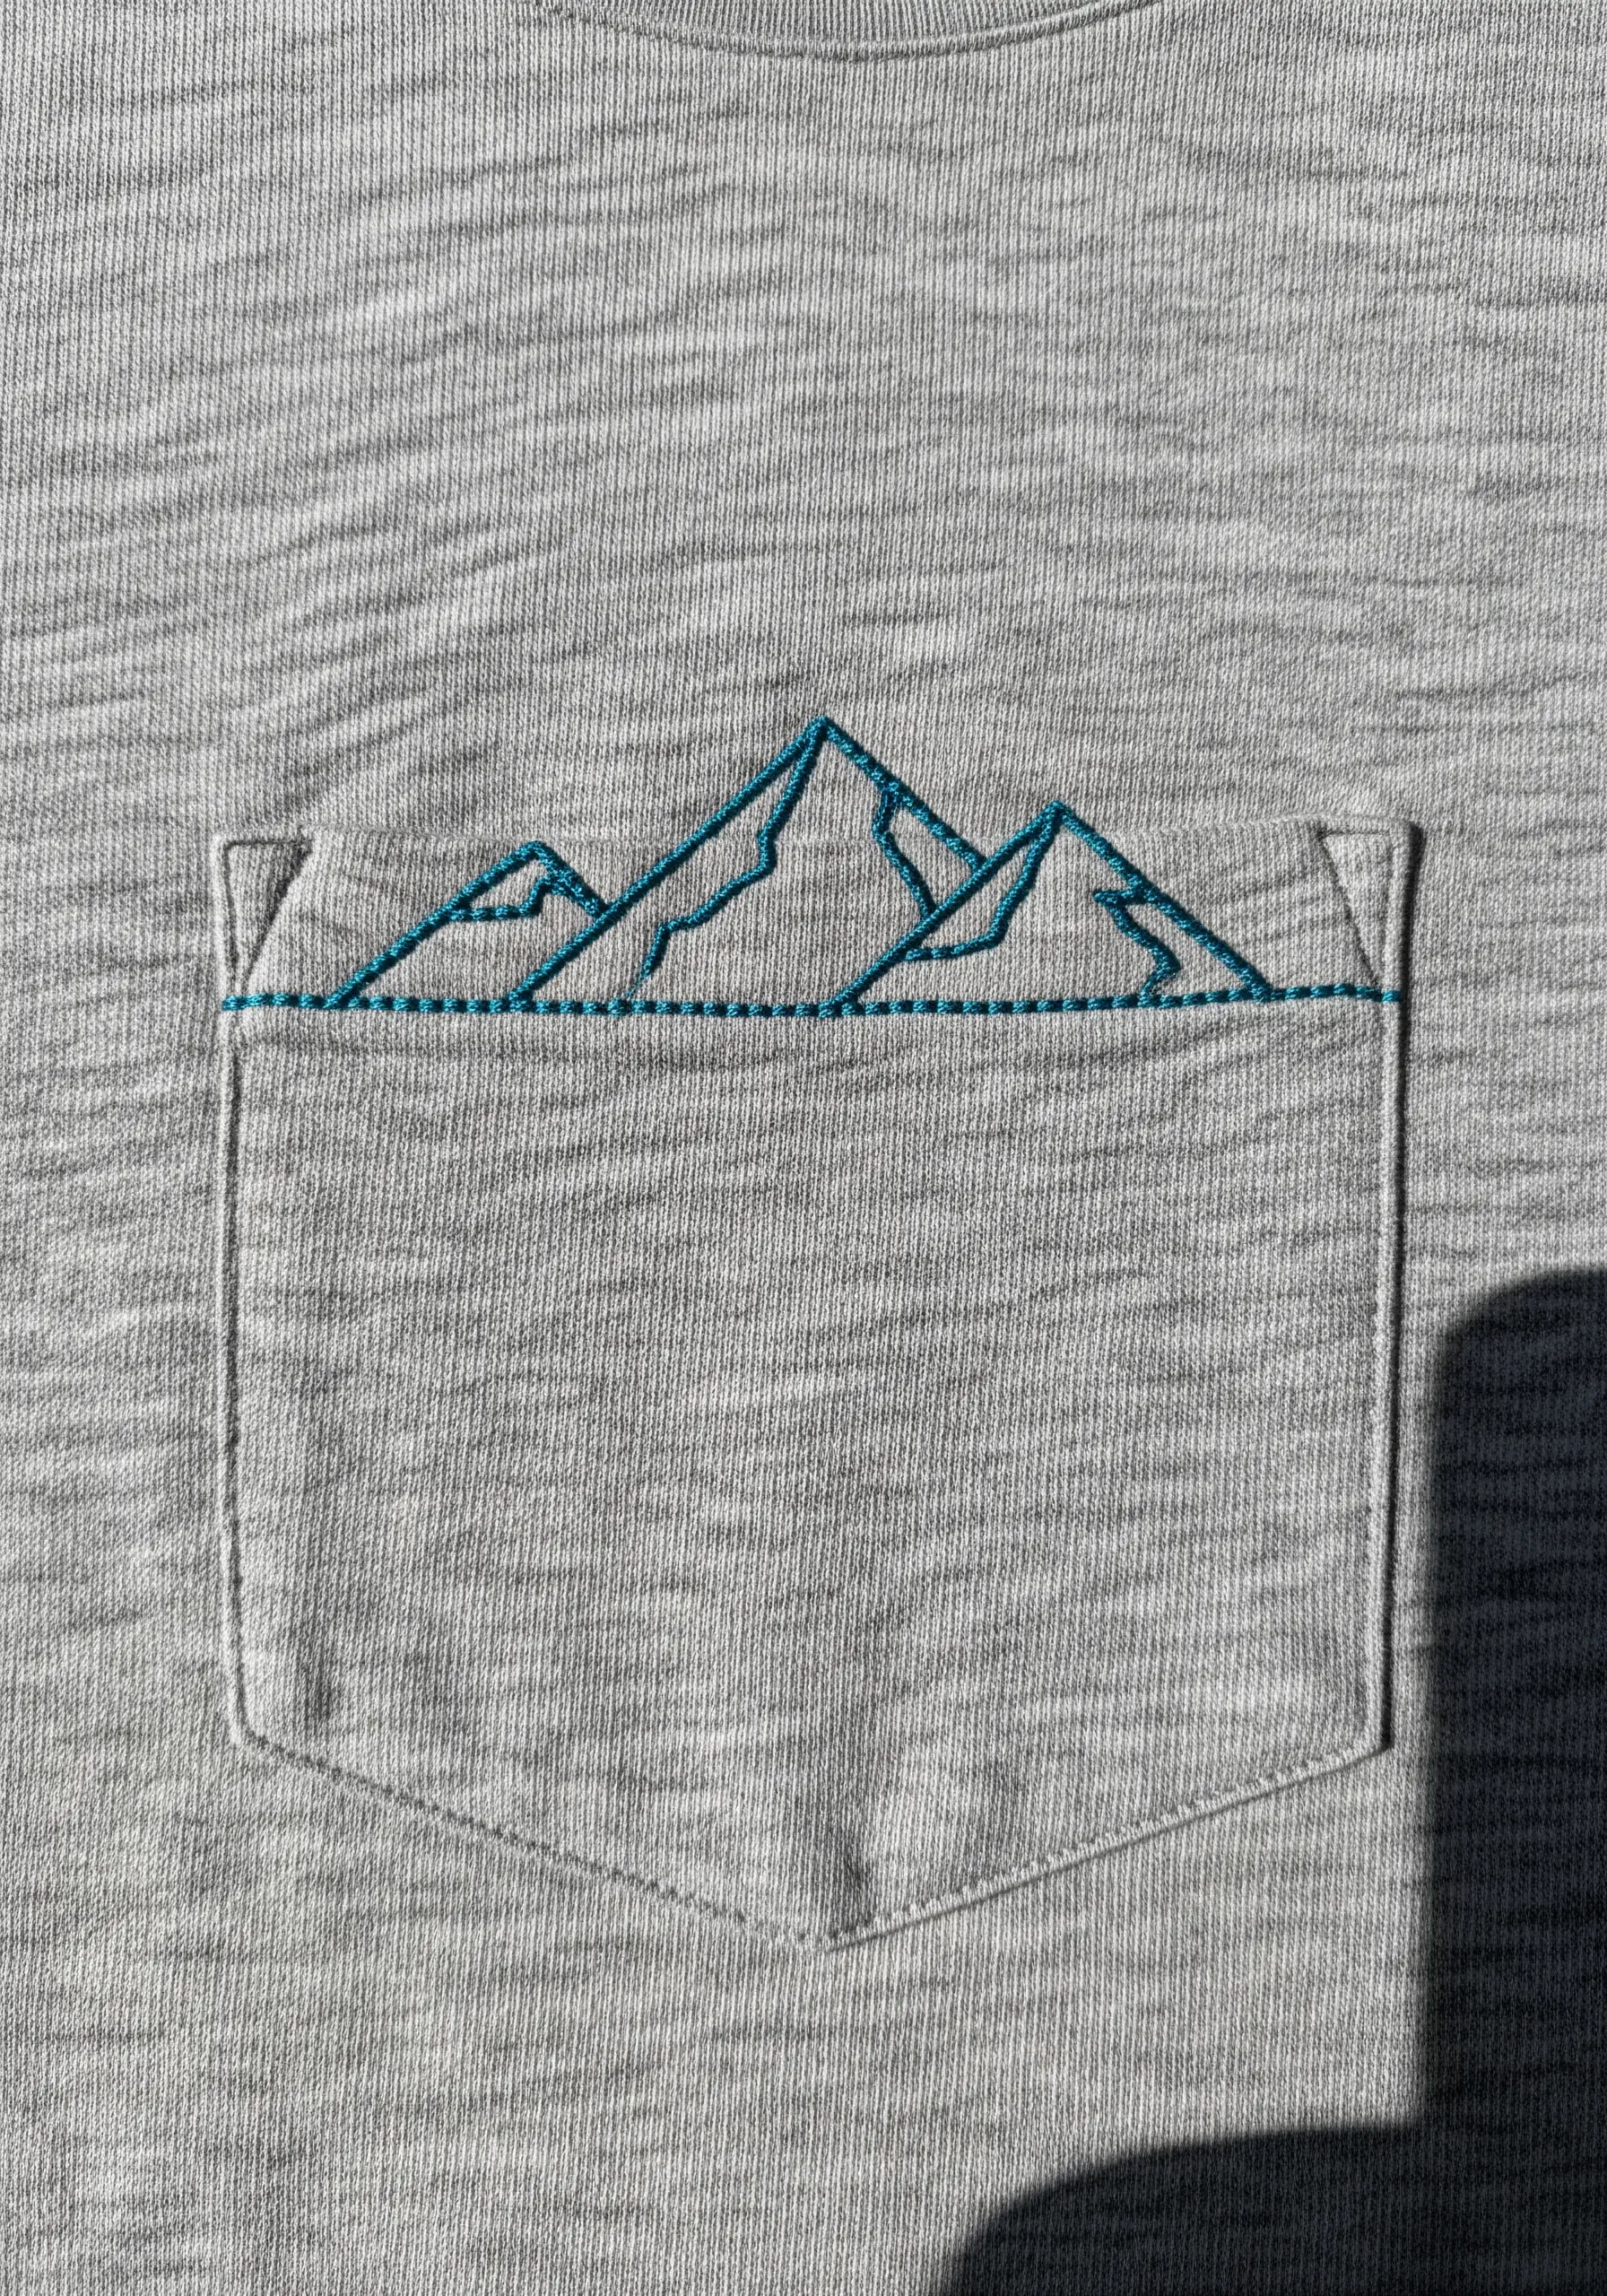
Make your embroidery look like it was part of the original design by integrating it with existing seams.
Stitch a simple mountain range outline just above a t-shirt pocket, using the pocket’s top seam as the mountain’s base.
A simple backstitch or stem stitch in a contrasting color is all you need to create a crisp, graphic statement that feels intentional.
Always use a stabilizer on knit fabrics like t-shirts to prevent the stitches from stretching or distorting the material.
8. Convey Motion with a Single, Flowing Line
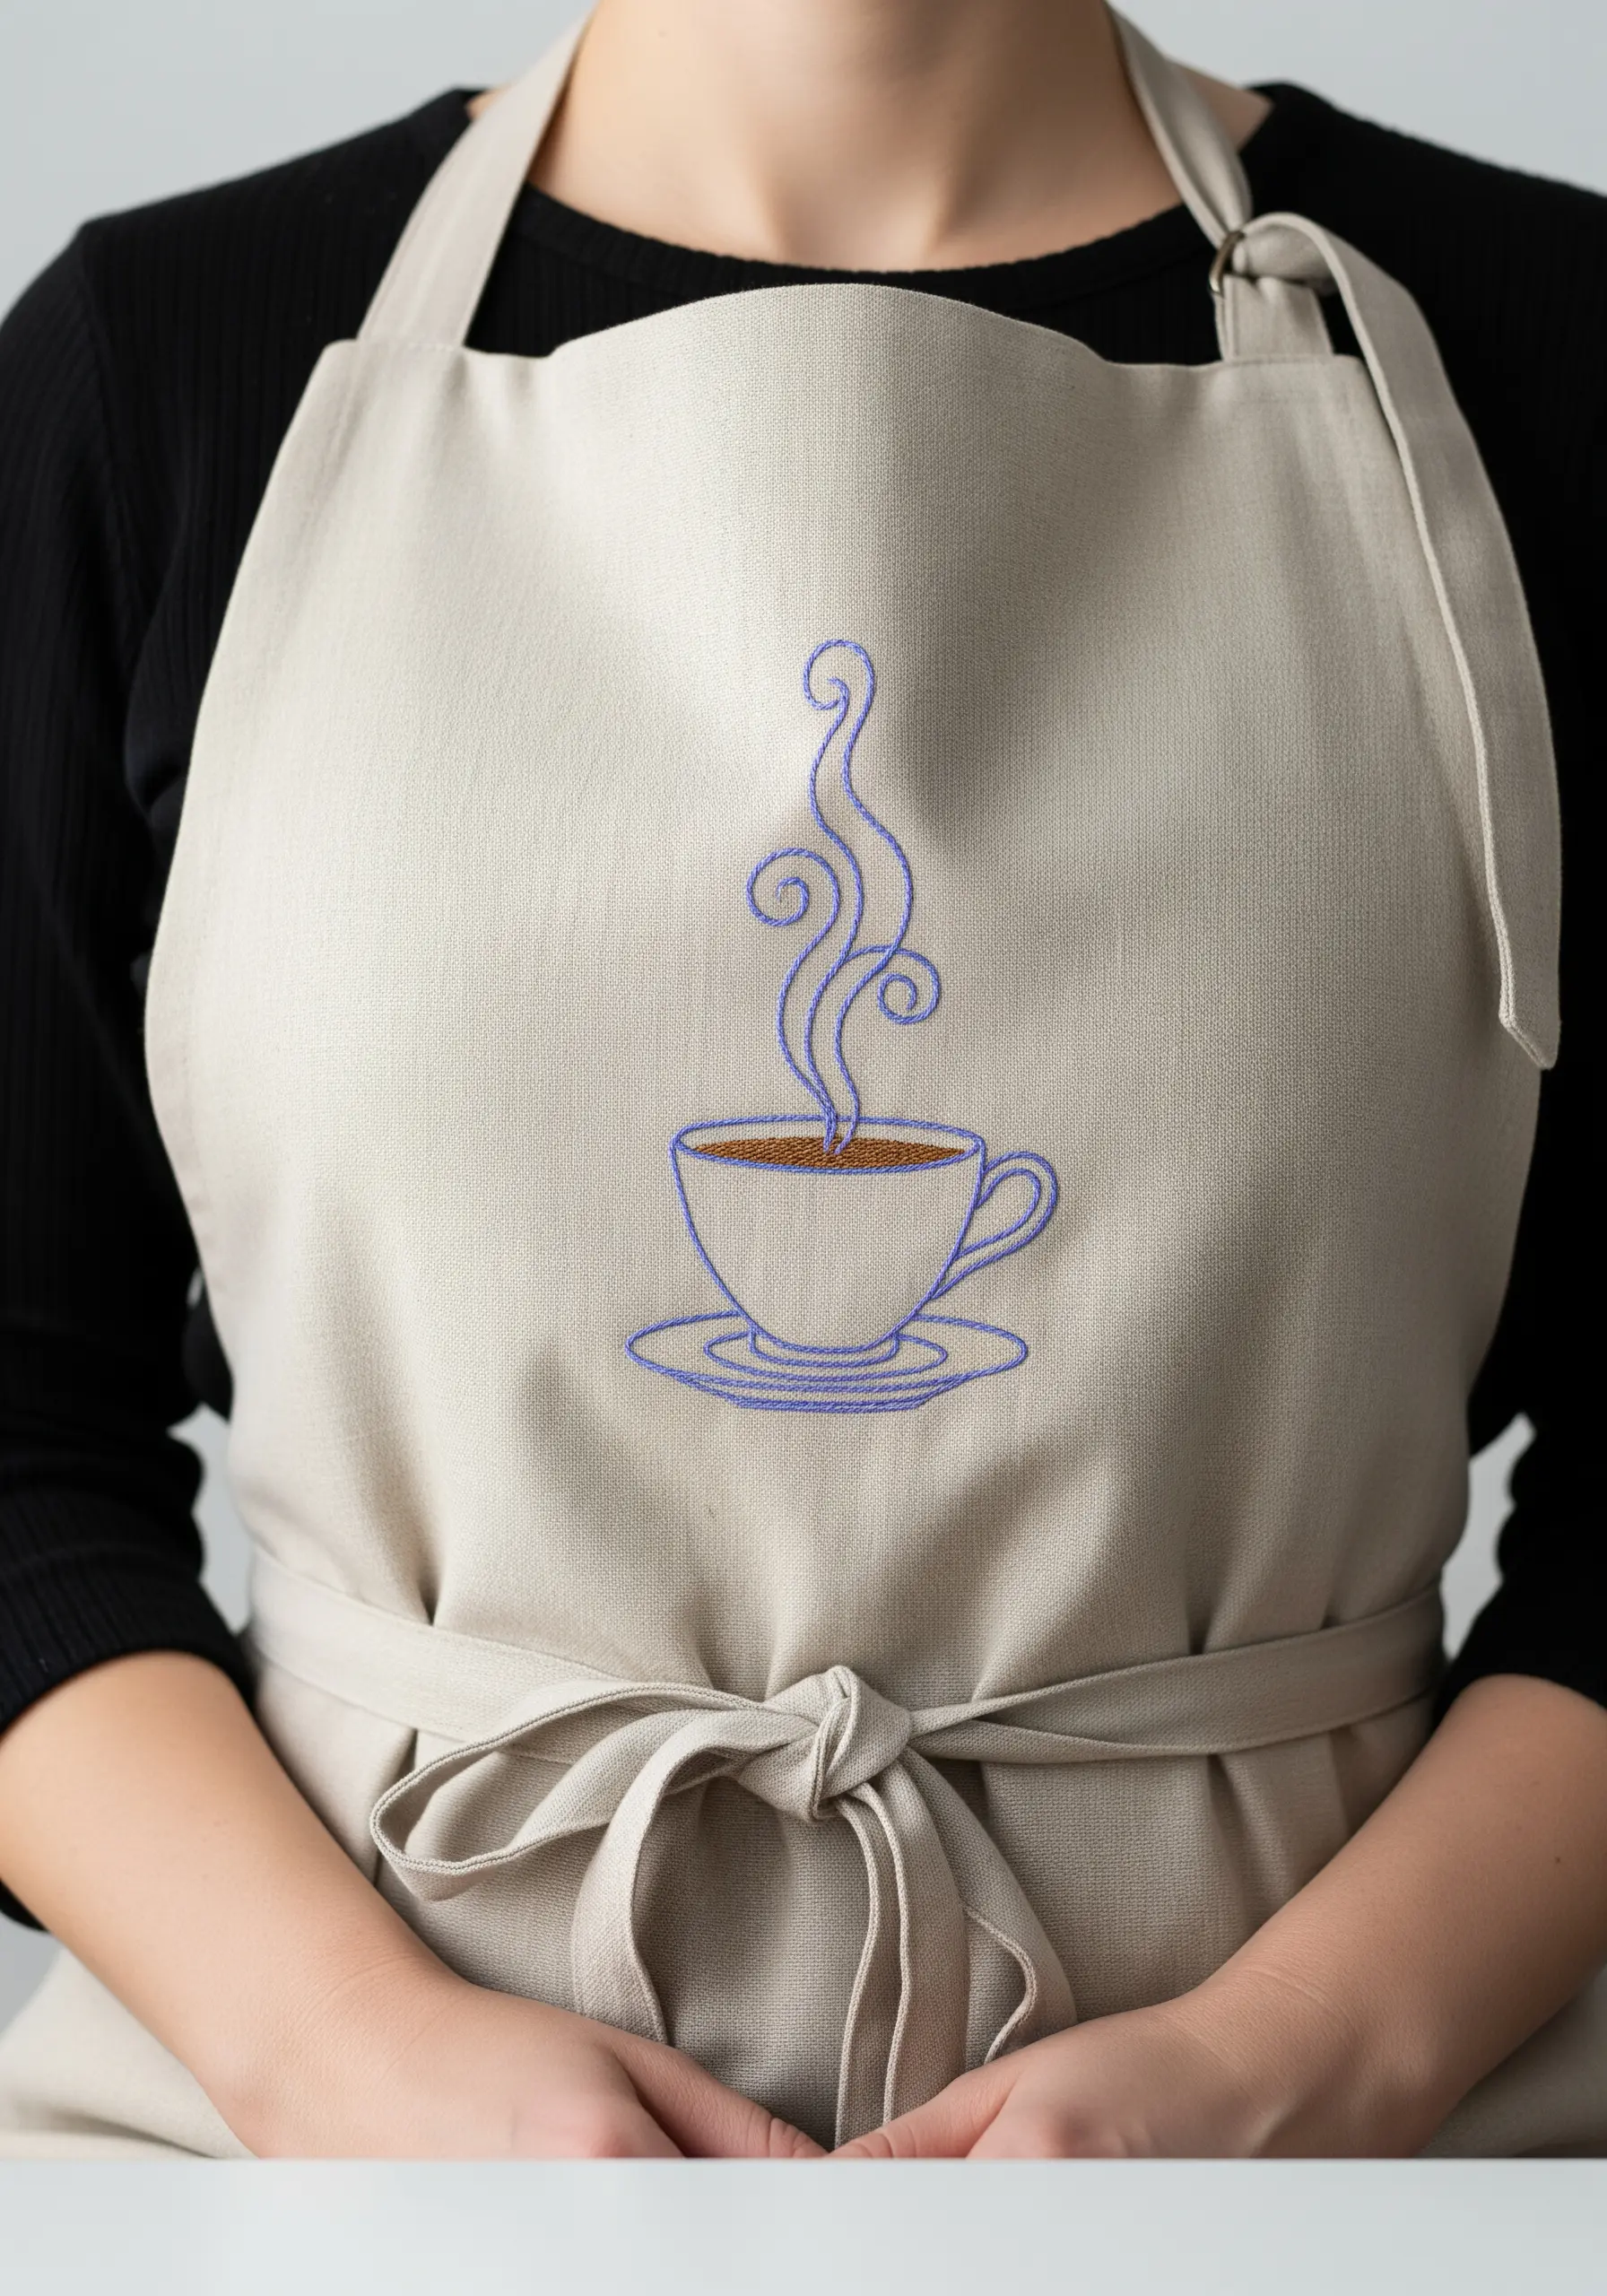
Suggest warmth and aroma by stitching the steam rising from a coffee cup with a delicate, continuous line.
Use a stem stitch for this, as its twisted, rope-like effect is perfect for creating smooth, unbroken curves.
Choose a thread color that contrasts sharply with your base fabric—like this vibrant blue on neutral linen—to make the design stand out.
Fill the cup with a simple satin stitch to ground the delicate linework of the steam.
9. Stitch a Personal Constellation on Denim
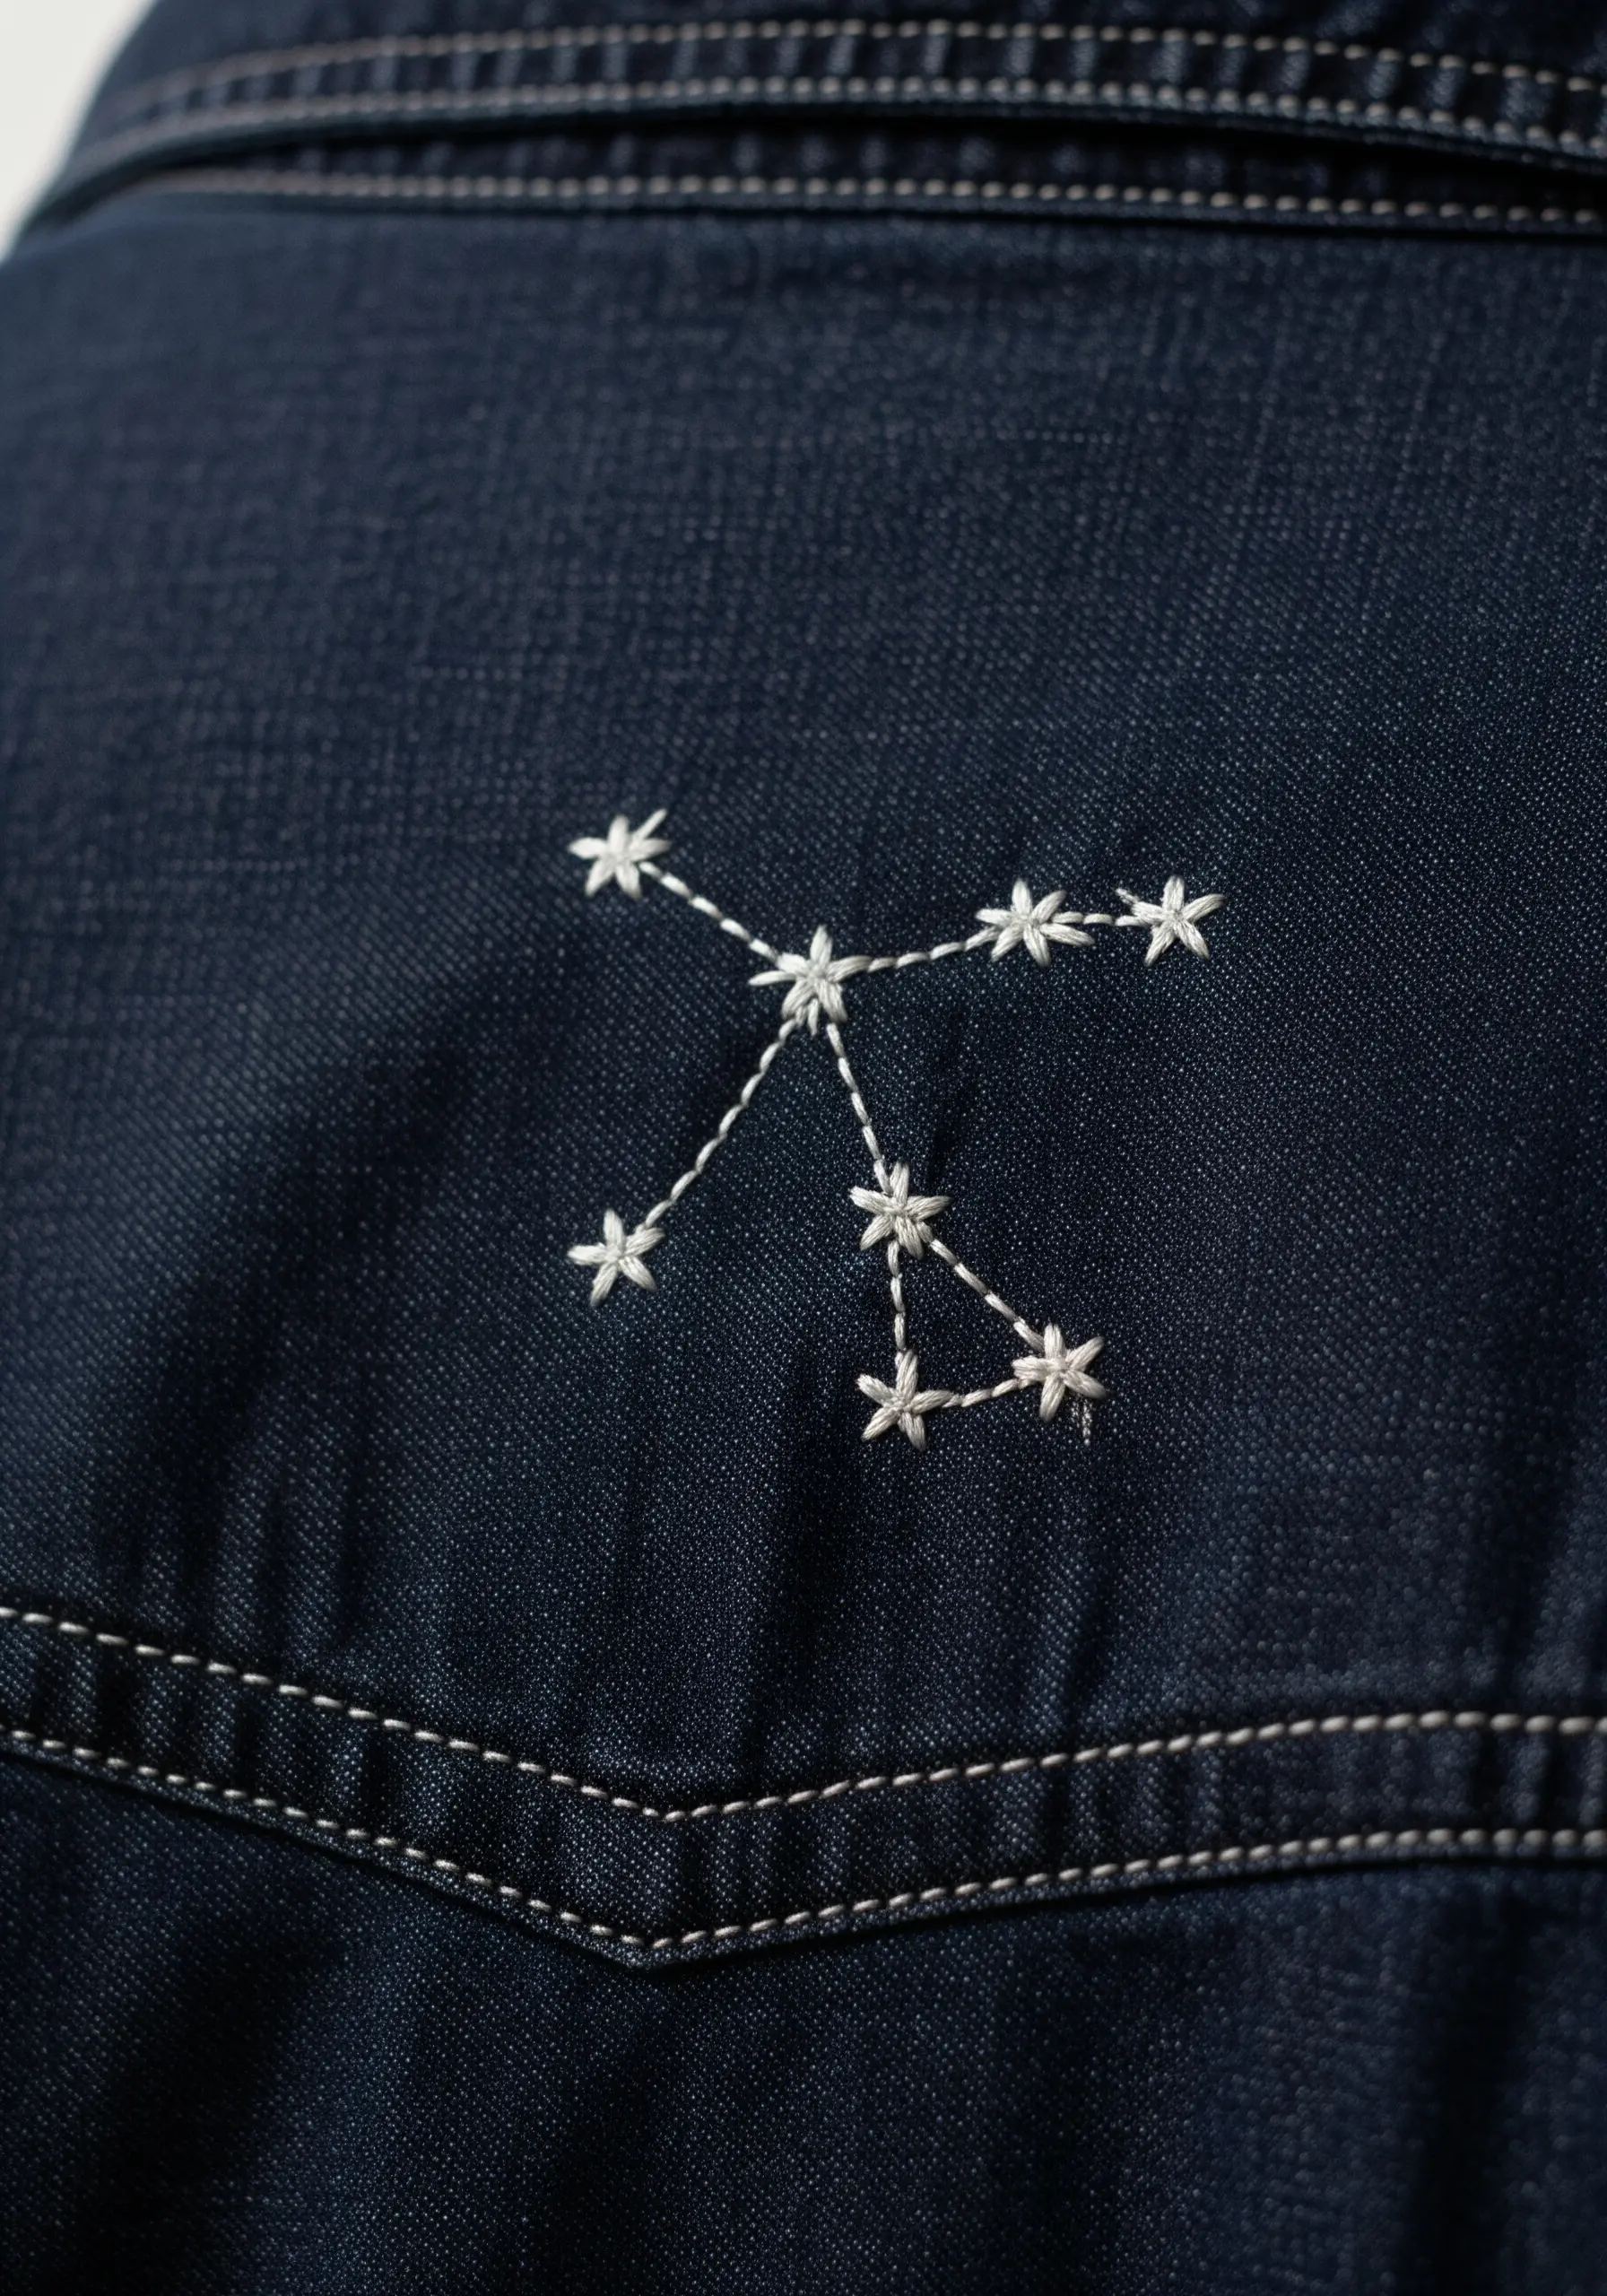
Embellish a denim jacket or jeans with a personal zodiac constellation for a subtle, meaningful detail.
Use a star stitch or simple straight stitches for the stars and a clean backstitch for the connecting lines.
Choose a bright white or silver thread to mimic the look of stars against a dark night sky.
To ensure accuracy, print a small template of your chosen constellation, pin it to the fabric, and stitch directly through the paper before gently tearing it away.
10. Place Intricate Details on a Dress Cuff
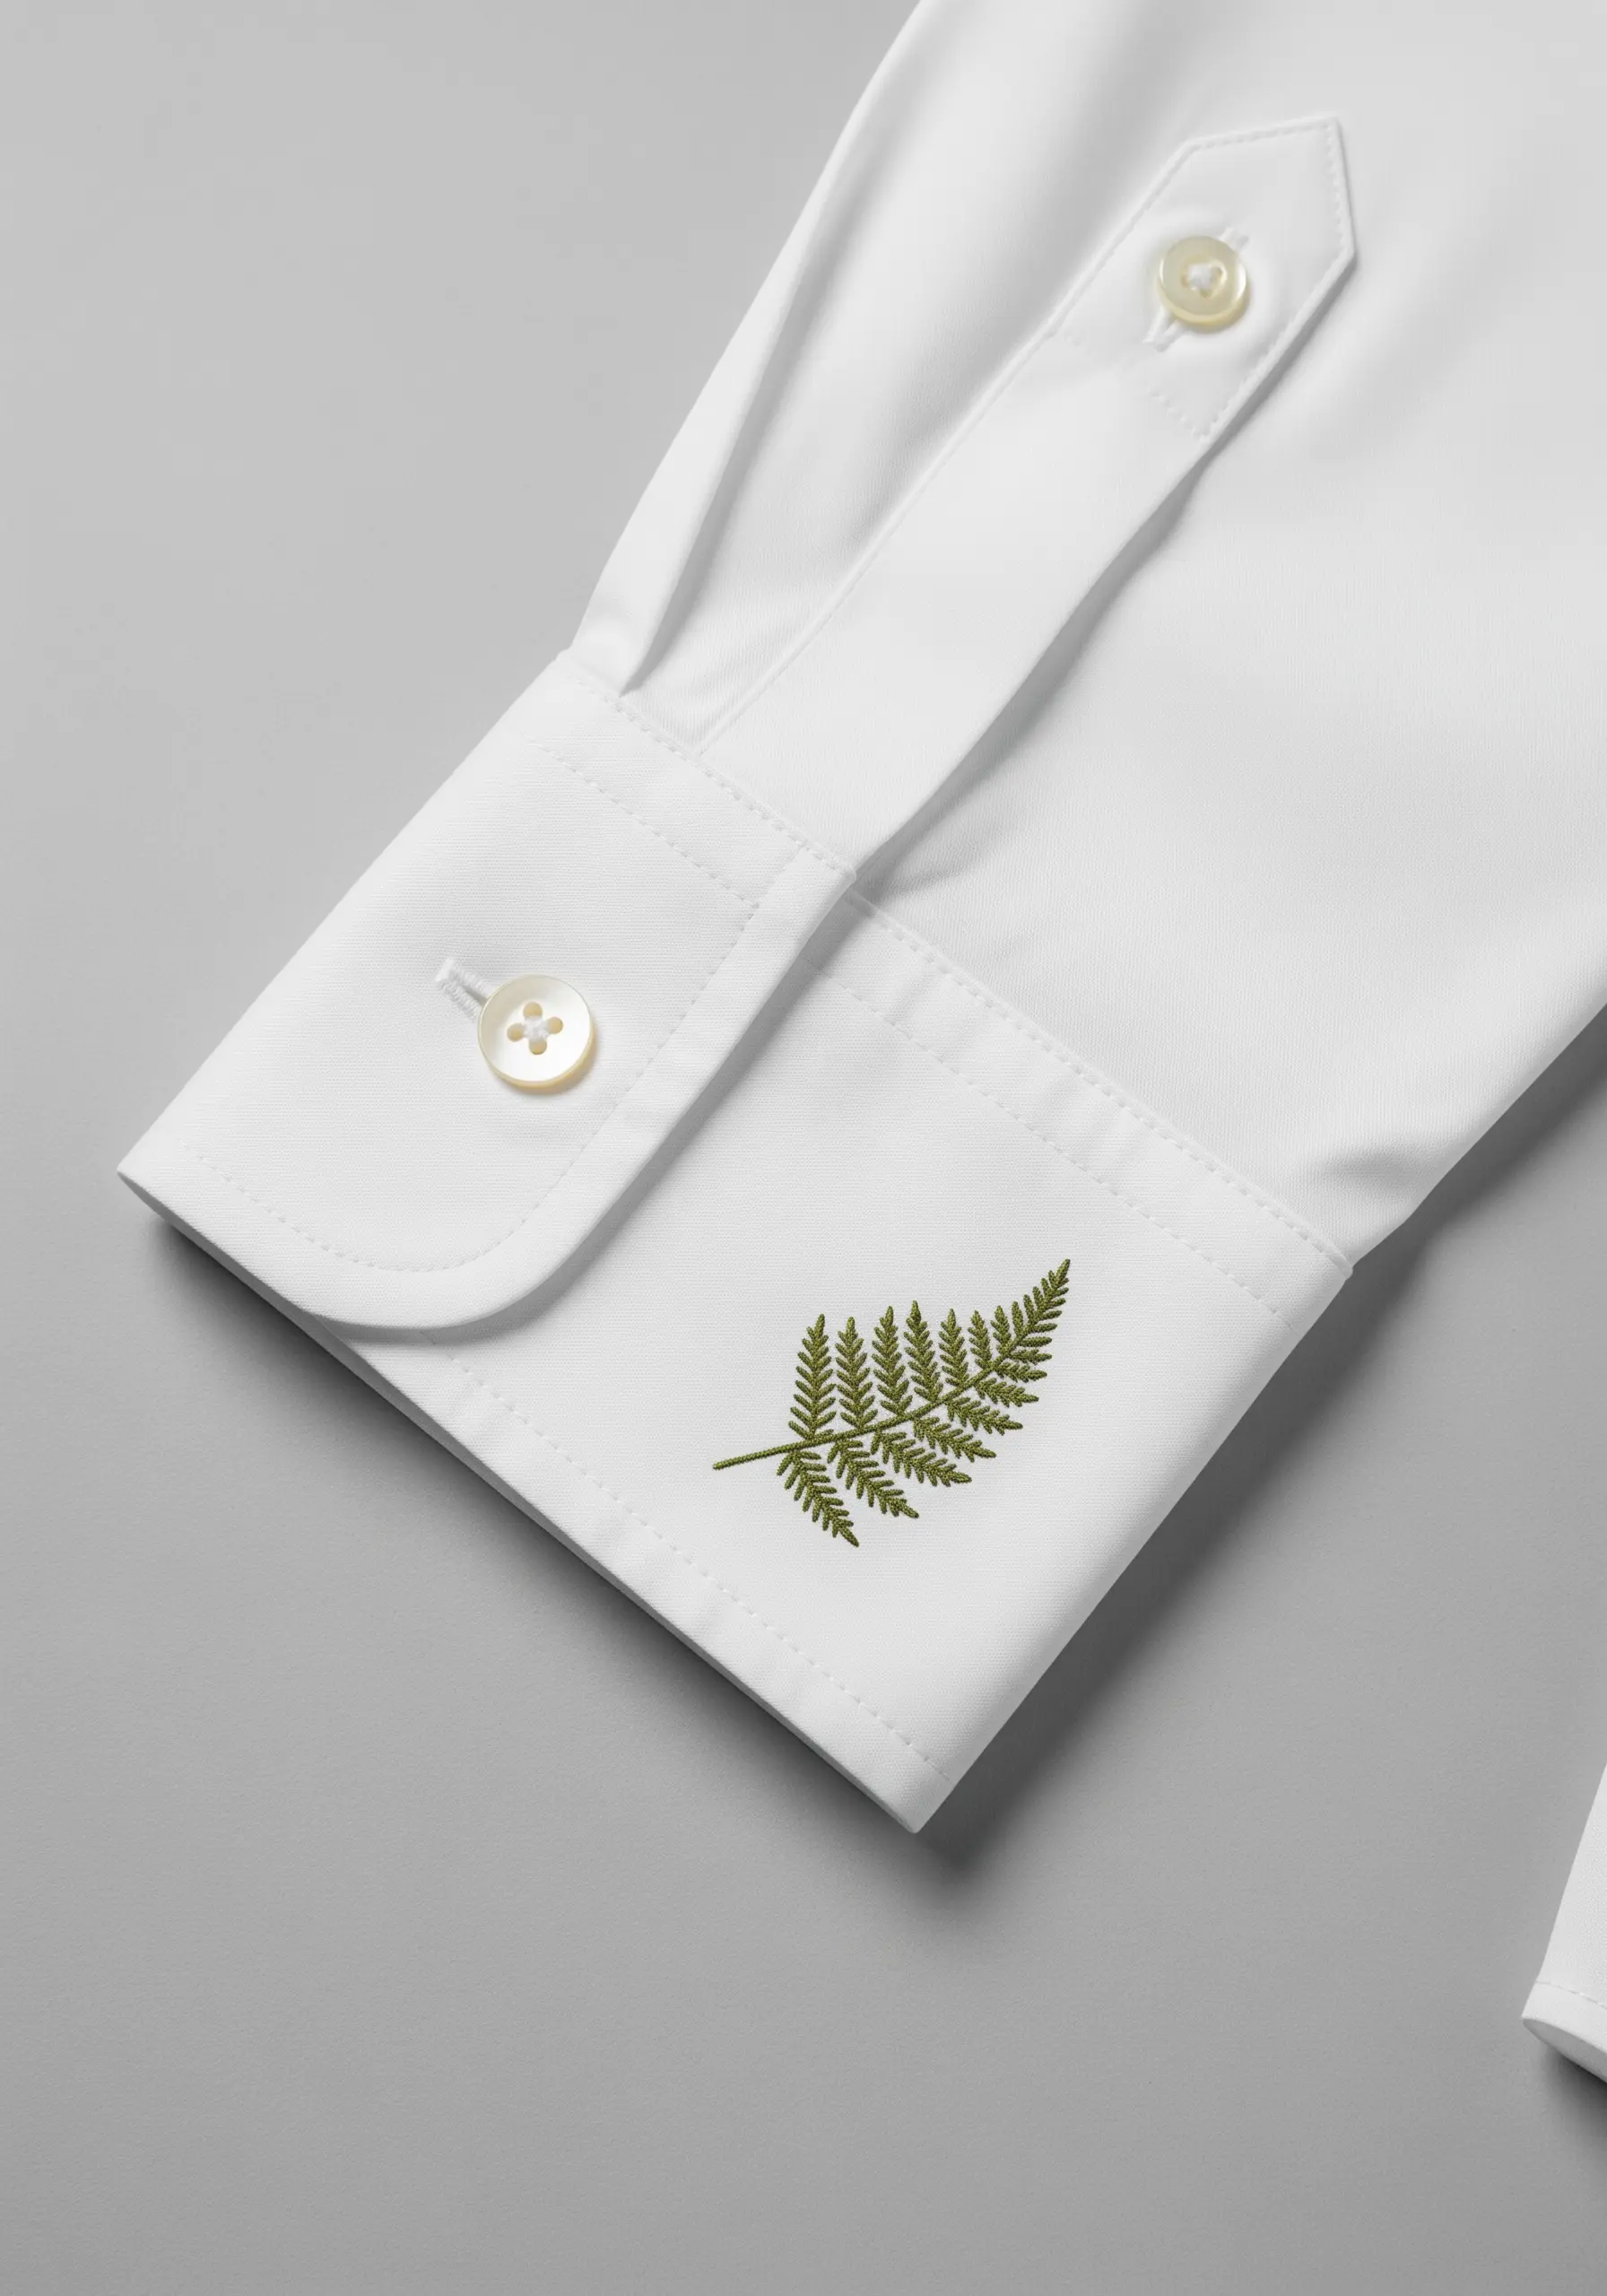
A dress cuff is the perfect canvas for a small, sophisticated detail that peeks out subtly.
For a design as intricate as a fern, use a single strand of floss to keep the stitches fine and prevent the motif from looking bulky.
Use a fishbone stitch for the main leaf structure, which creates the central vein automatically as you work your way down.
This small touch adds a bespoke quality to a ready-to-wear shirt, making it uniquely yours.
11. Create a Sense of Narrative with Dotted Lines
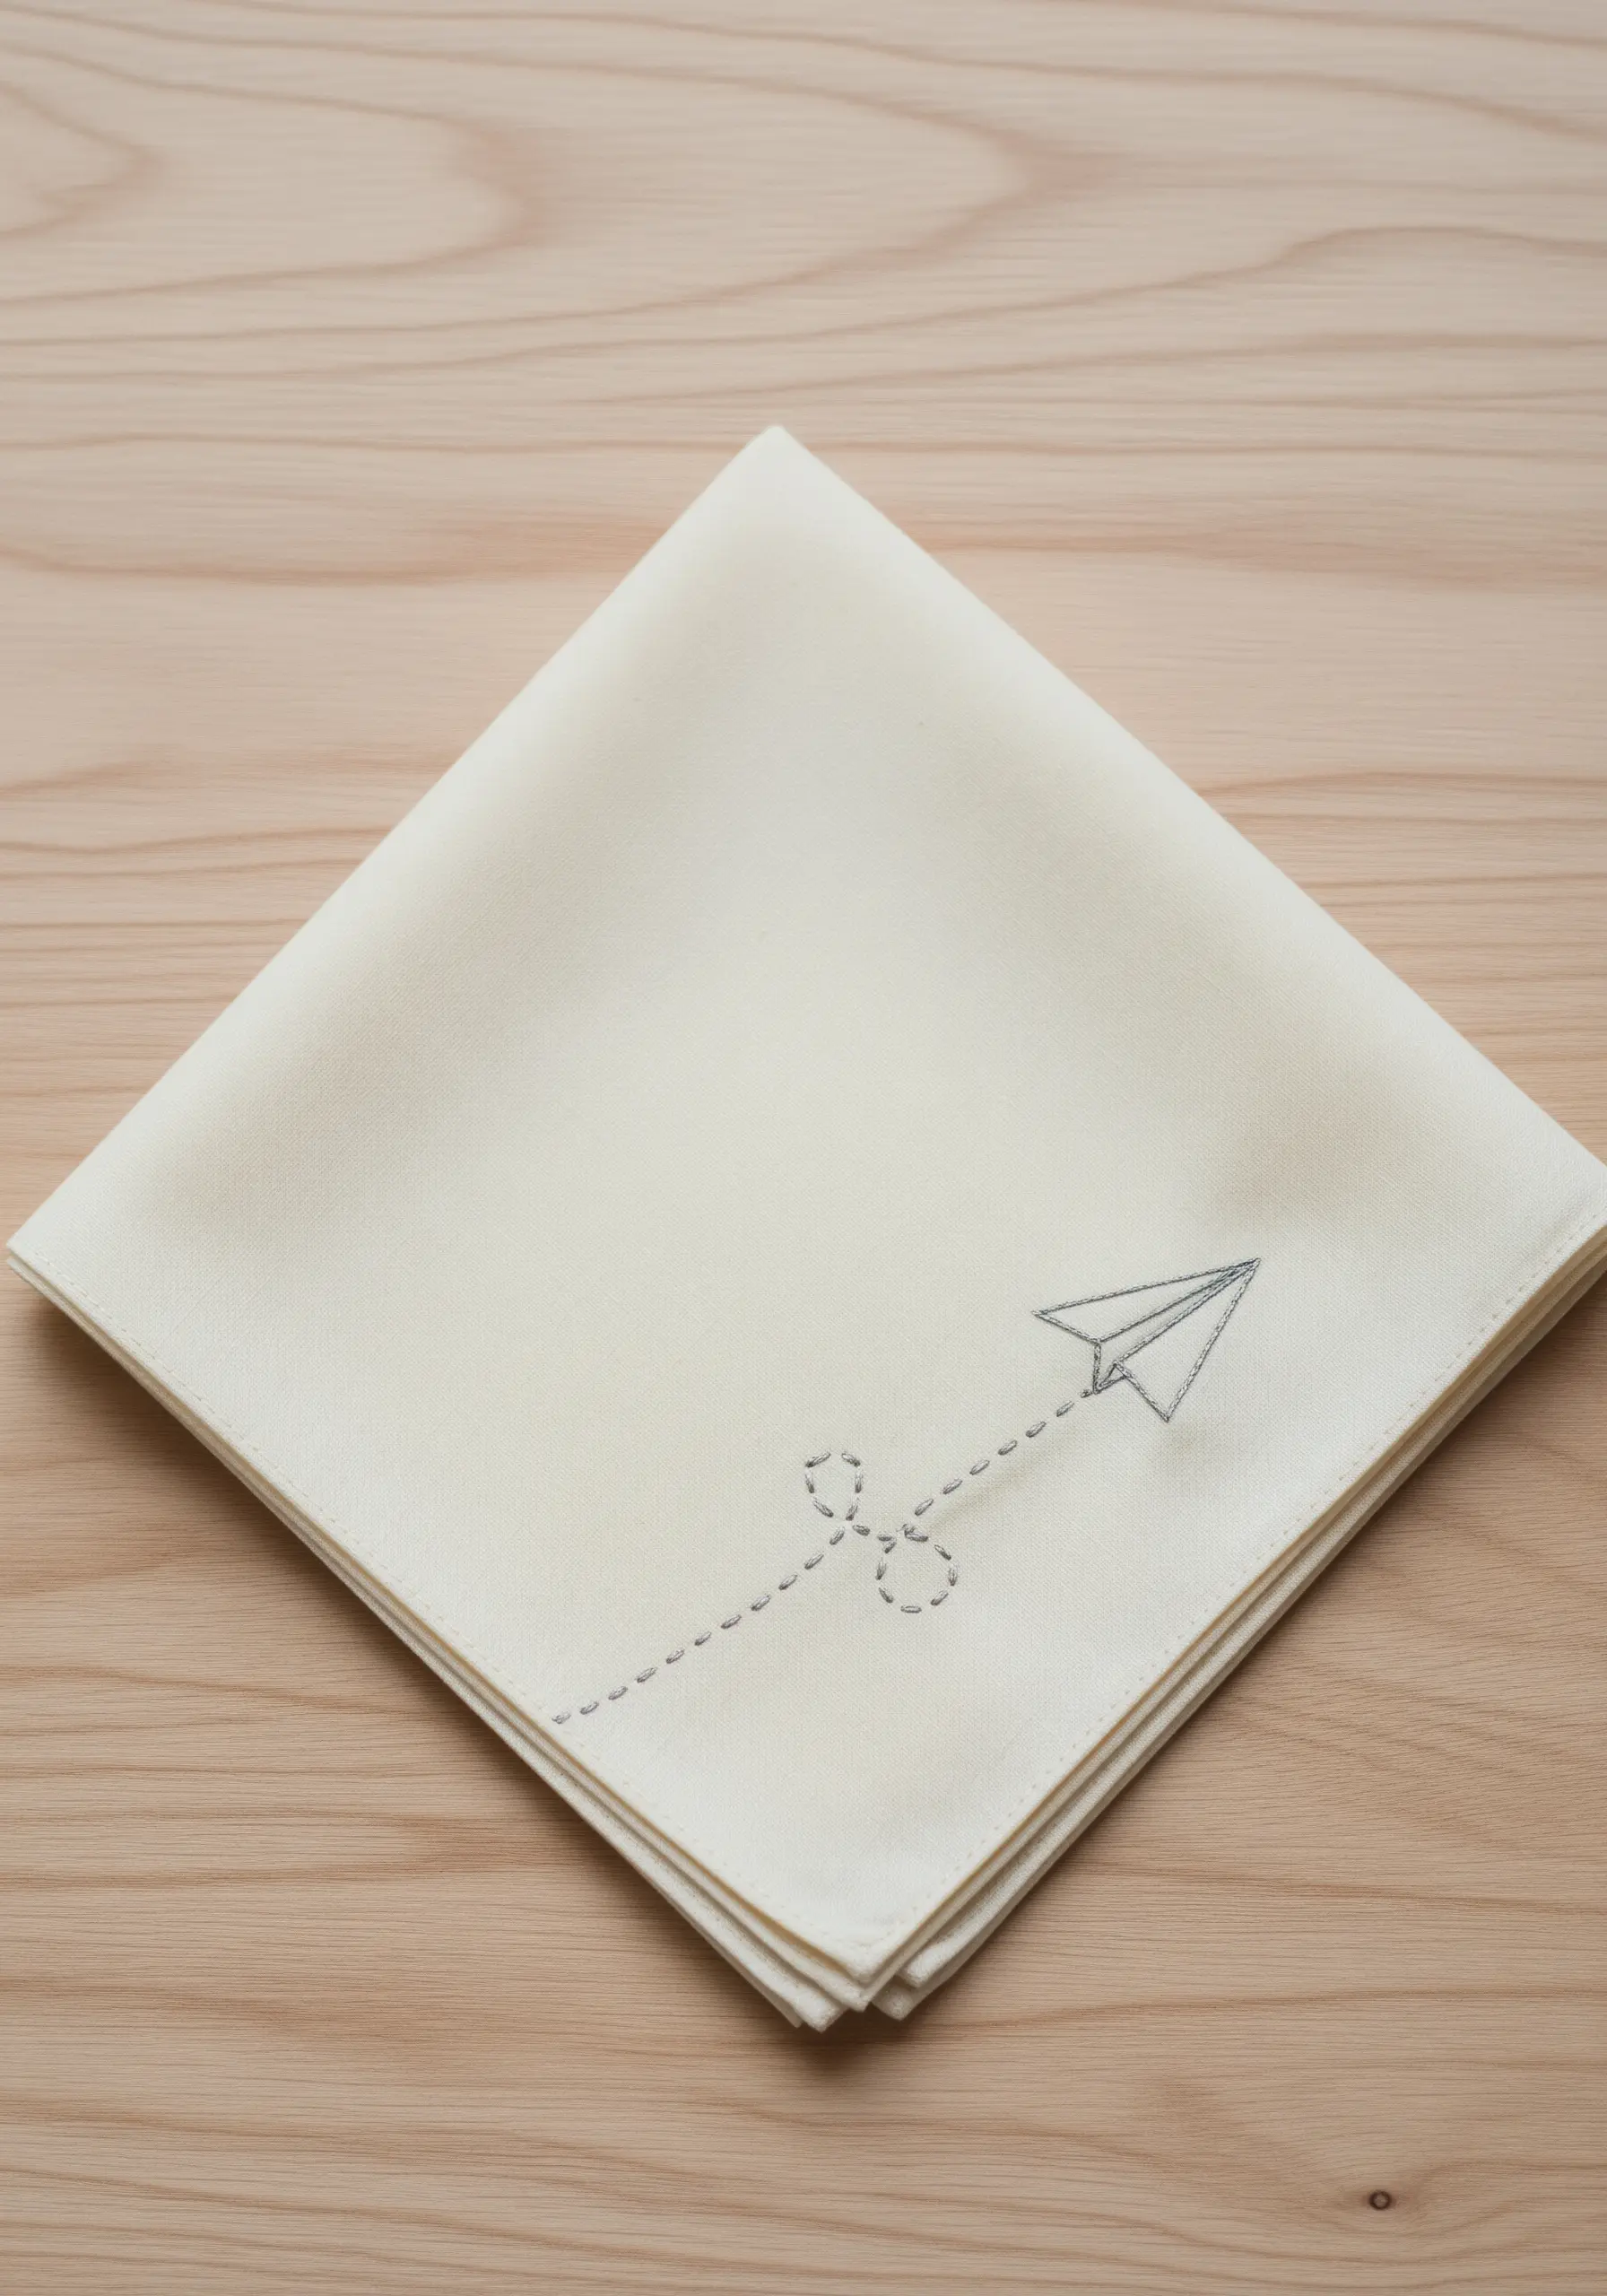
Tell a small story with your embroidery by adding a trail of motion to your main motif.
A simple backstitched paper plane is elevated by a trailing dotted line made of tiny running stitches.
This technique creates a dynamic visual path for the eye to follow, adding a touch of whimsy and movement to an otherwise static design.
It works beautifully on items like napkins, handkerchiefs, or the corner of a pillowcase.
12. Build Dimension with Textured Fill Stitches
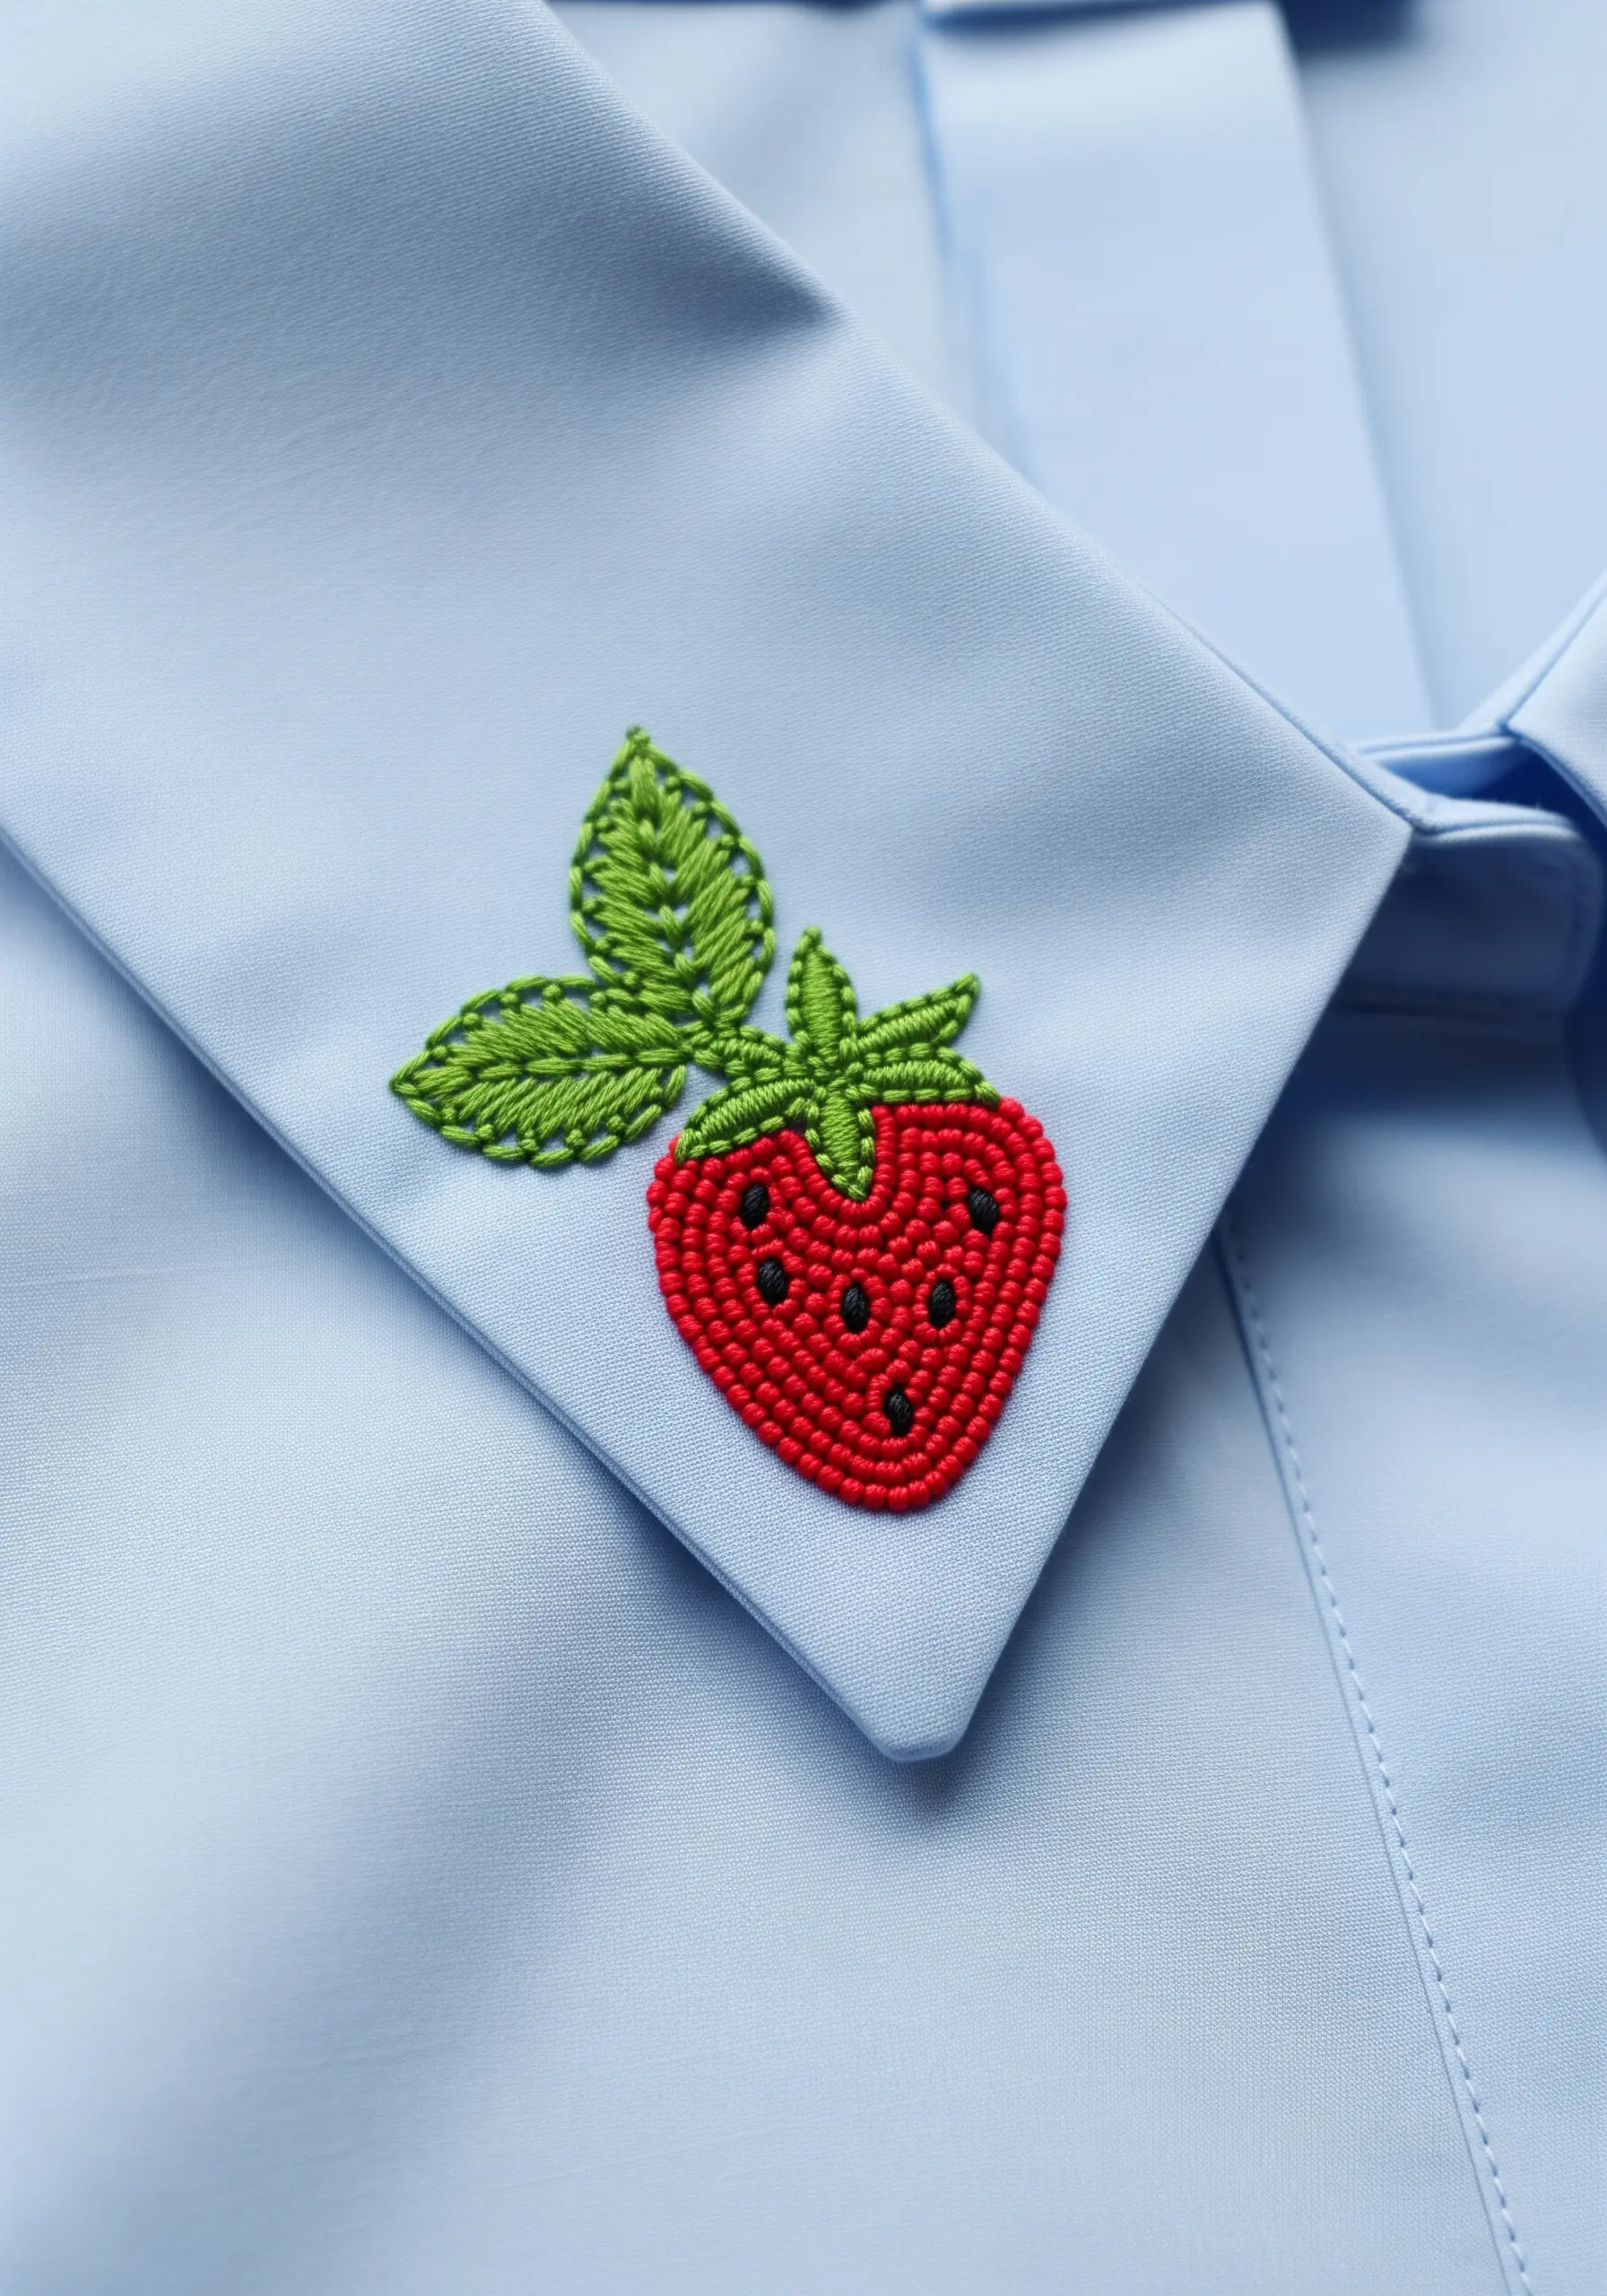
Move beyond satin stitch to create motifs that are compelling to both see and touch.
For this strawberry, the body is filled with a woven wheel stitch, which creates a raised, circular texture that mimics the fruit’s shape.
Use tiny black French knots for the seeds, scattered across the woven fill to add another layer of detail.
Outline the leaves with a split stitch and fill them with satin stitch to create a smooth contrast against the textured berry.
13. Use a Stabilizer for Clean Lines on Knits
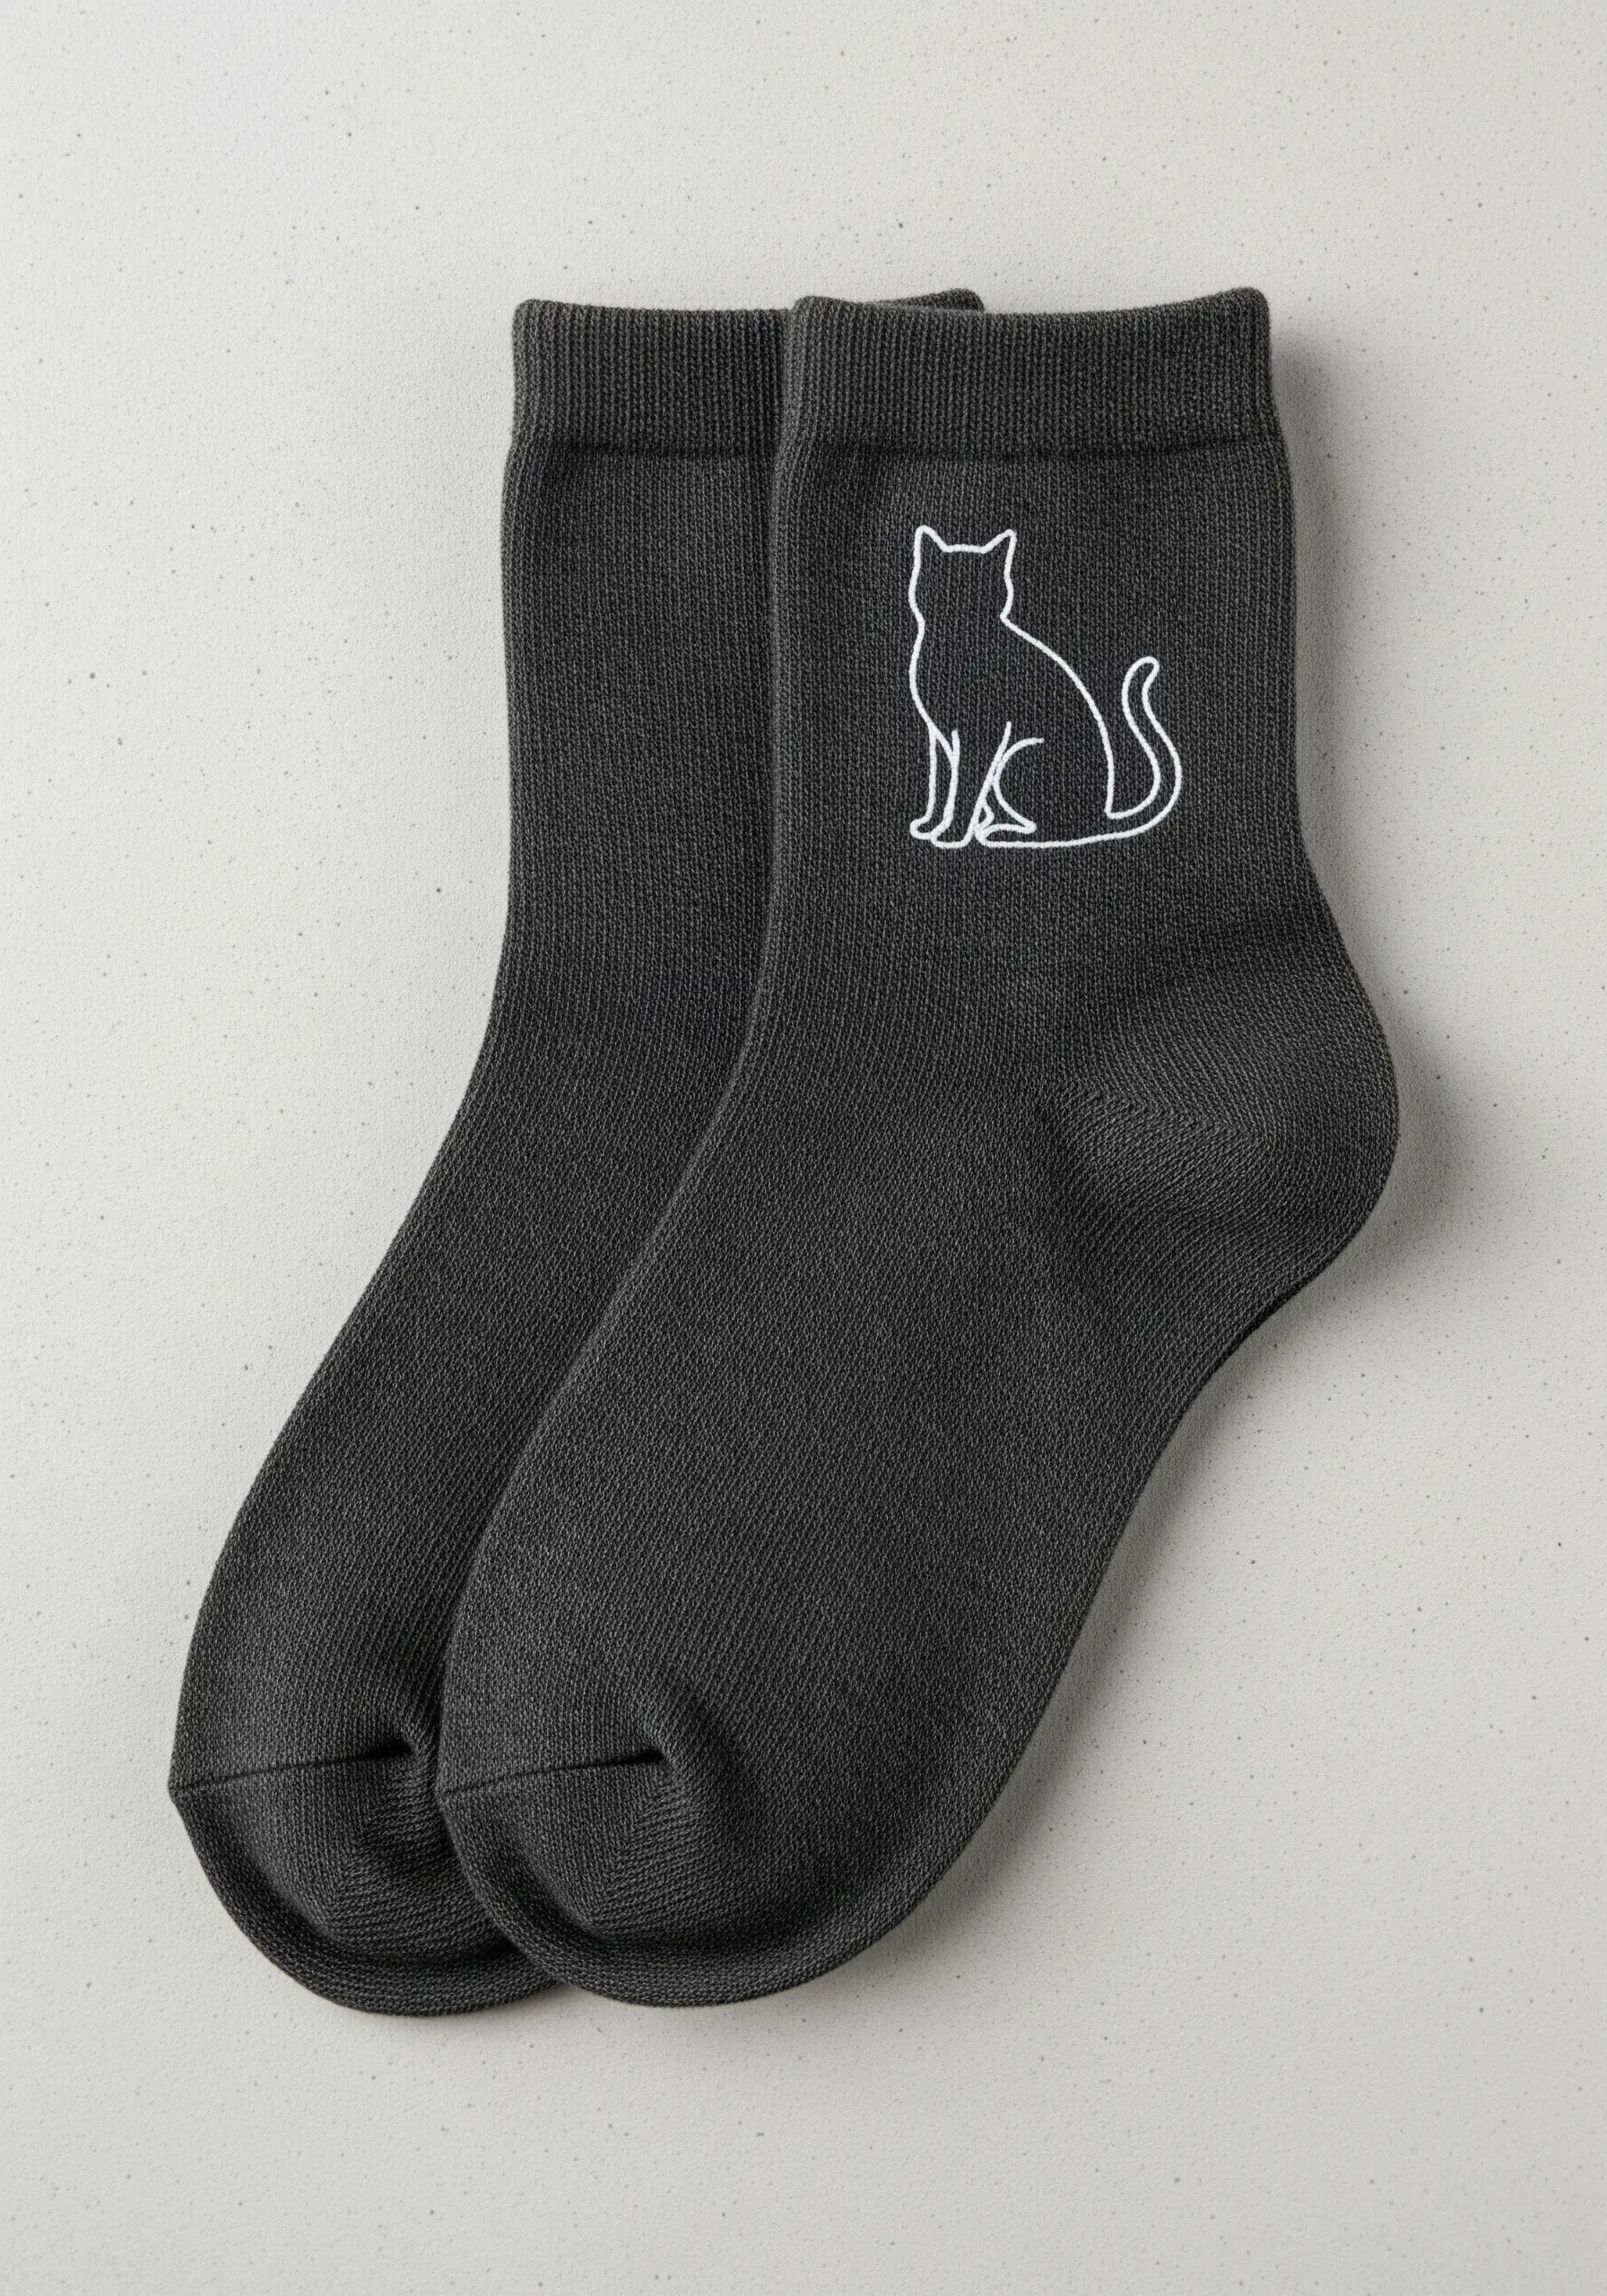
Stitching on stretchy fabrics like socks can be challenging, as the stitches can sink into the knit or distort the material.
To solve this, apply a water-soluble stabilizer to the surface before you begin stitching. This provides a smooth, stable ground for your work.
Use a simple backstitch or stem stitch for clean, continuous simple line-art motifs like this cat silhouette.
Once you’re finished, the stabilizer dissolves in water, leaving behind a crisp, professional-looking design that doesn’t pucker.
14. Add 3D Embellishments to Knitwear
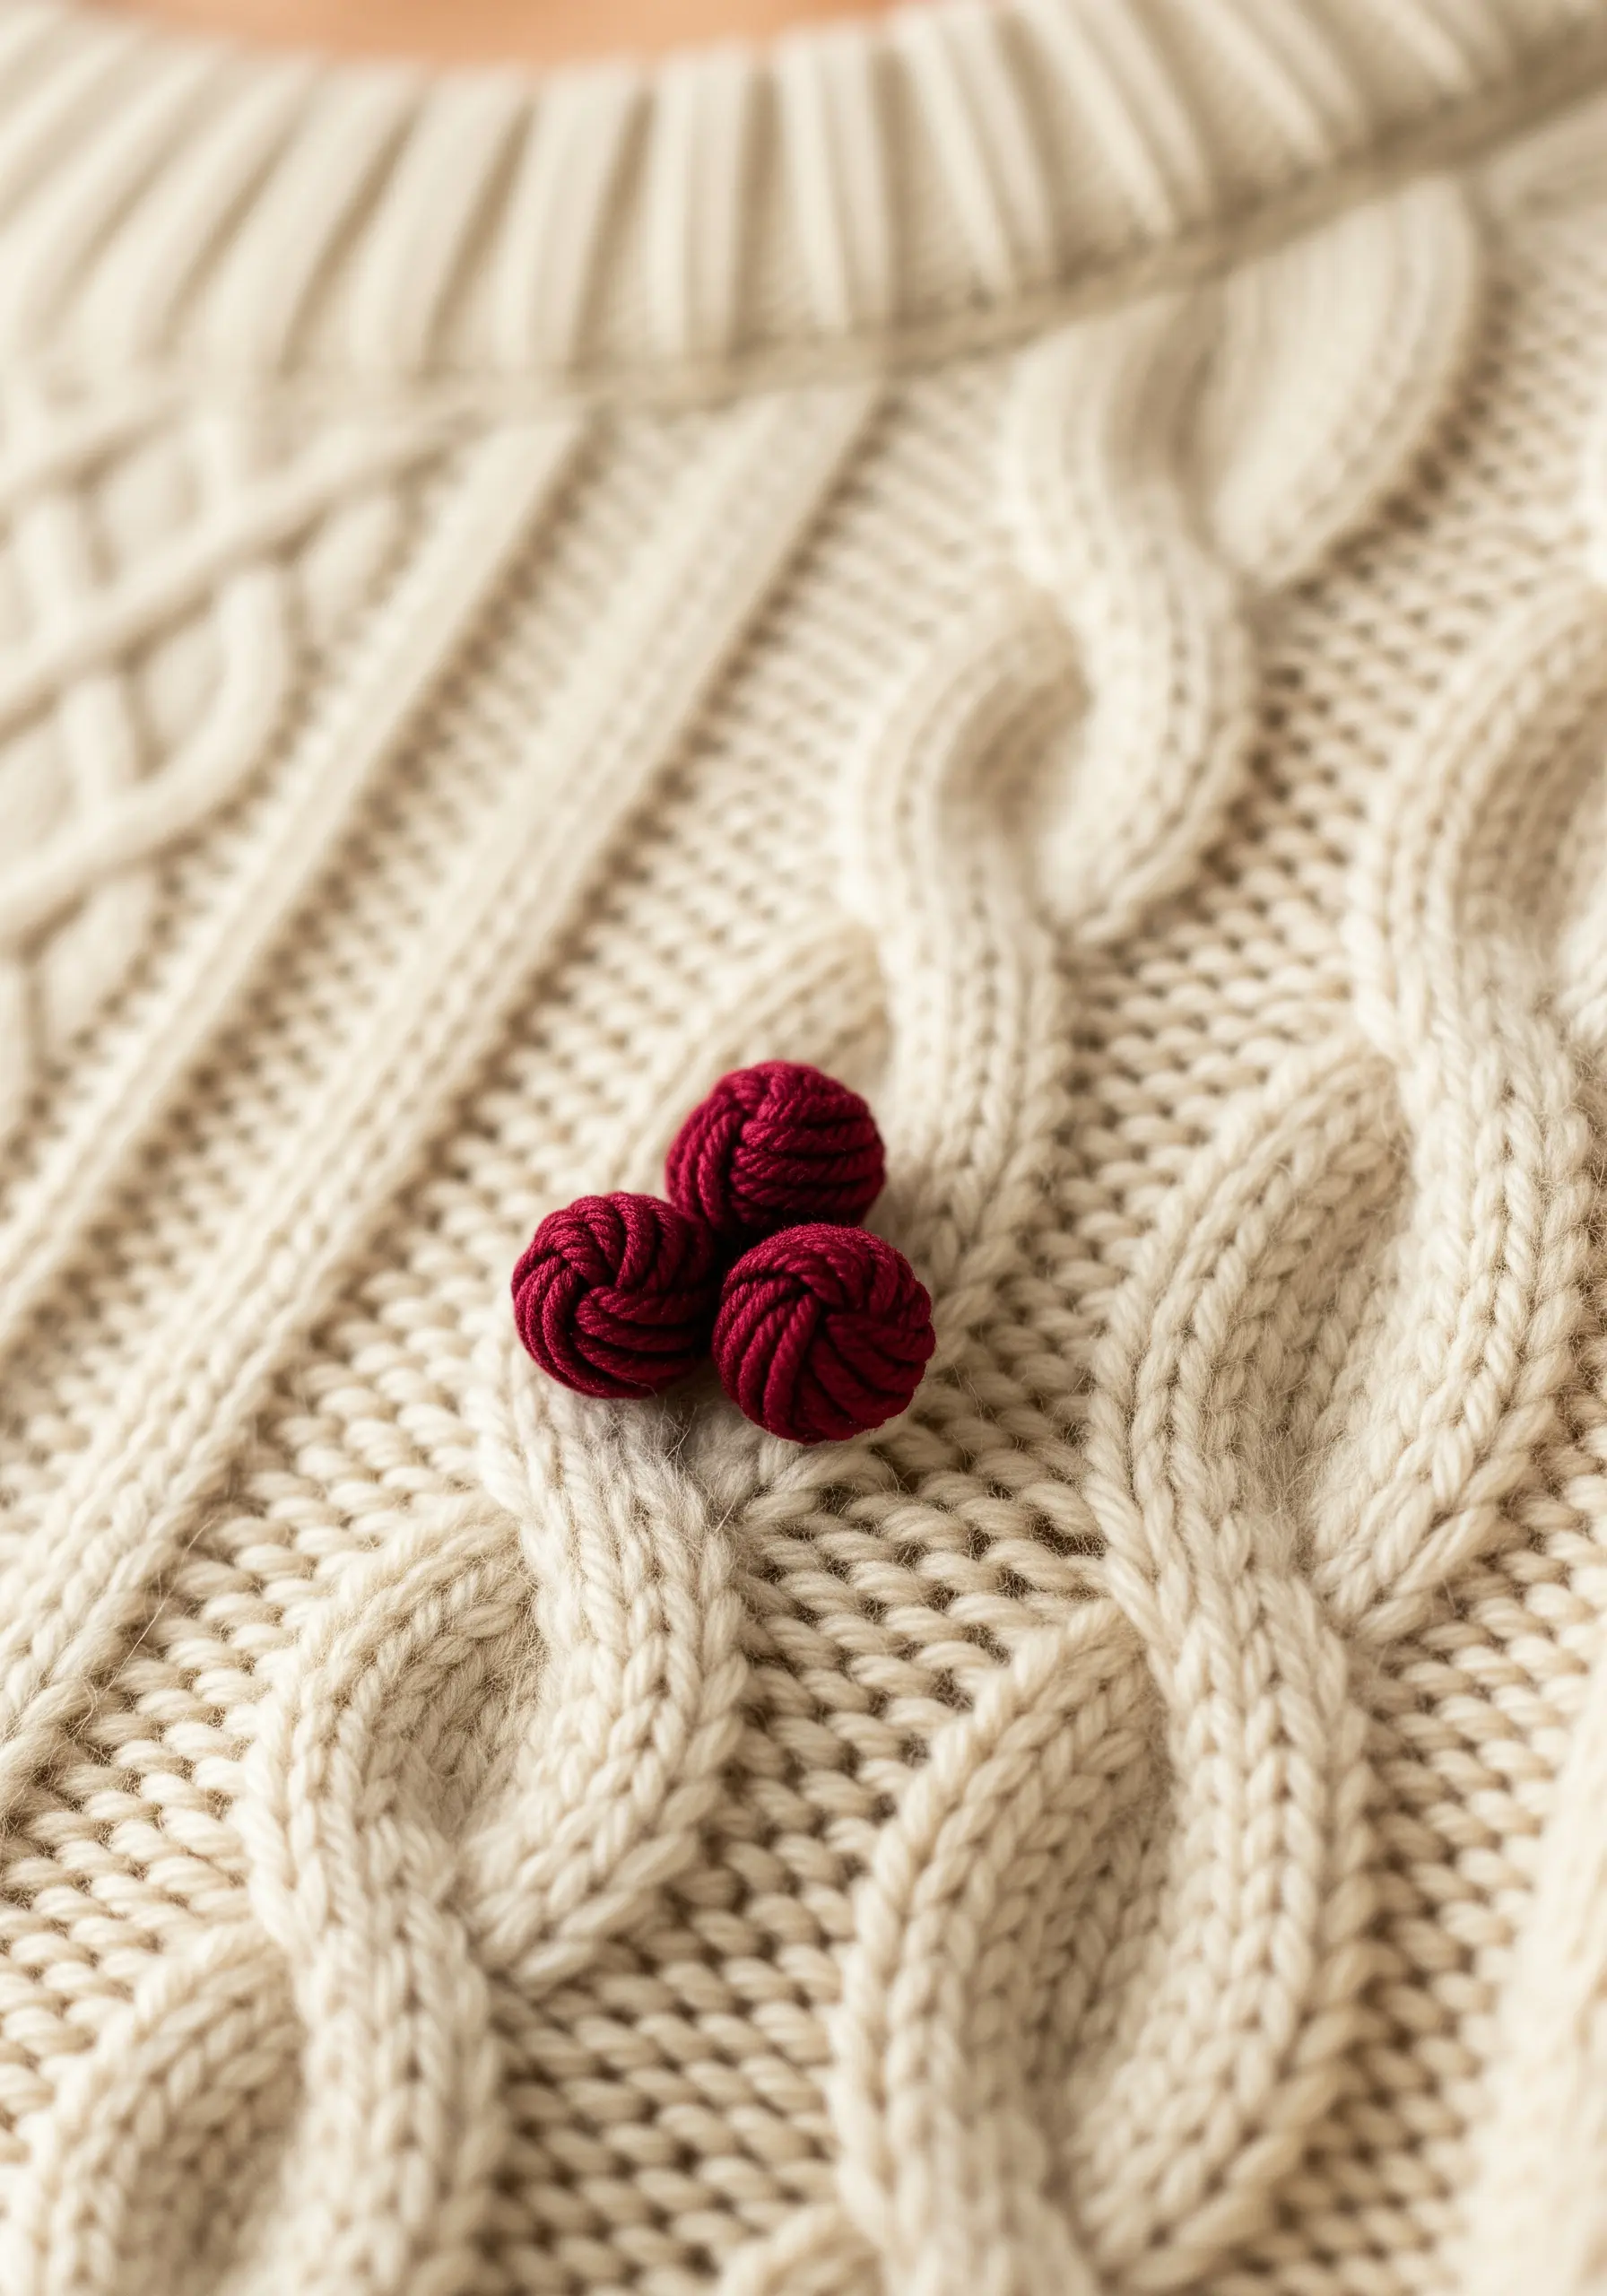
Elevate a cozy cable-knit sweater by adding small, three-dimensional embroidered details.
These small berry-like clusters are made using bullion knots, which are created by wrapping the thread multiple times around the needle before pulling it through the fabric.
Stitch them directly onto the raised cables of the knit to create focal points that enhance the sweater’s existing texture.
Use a thicker thread, like pearl cotton or all six strands of embroidery floss, to give the knots a full, robust shape.
15. Create a Raised Monogram with Padding
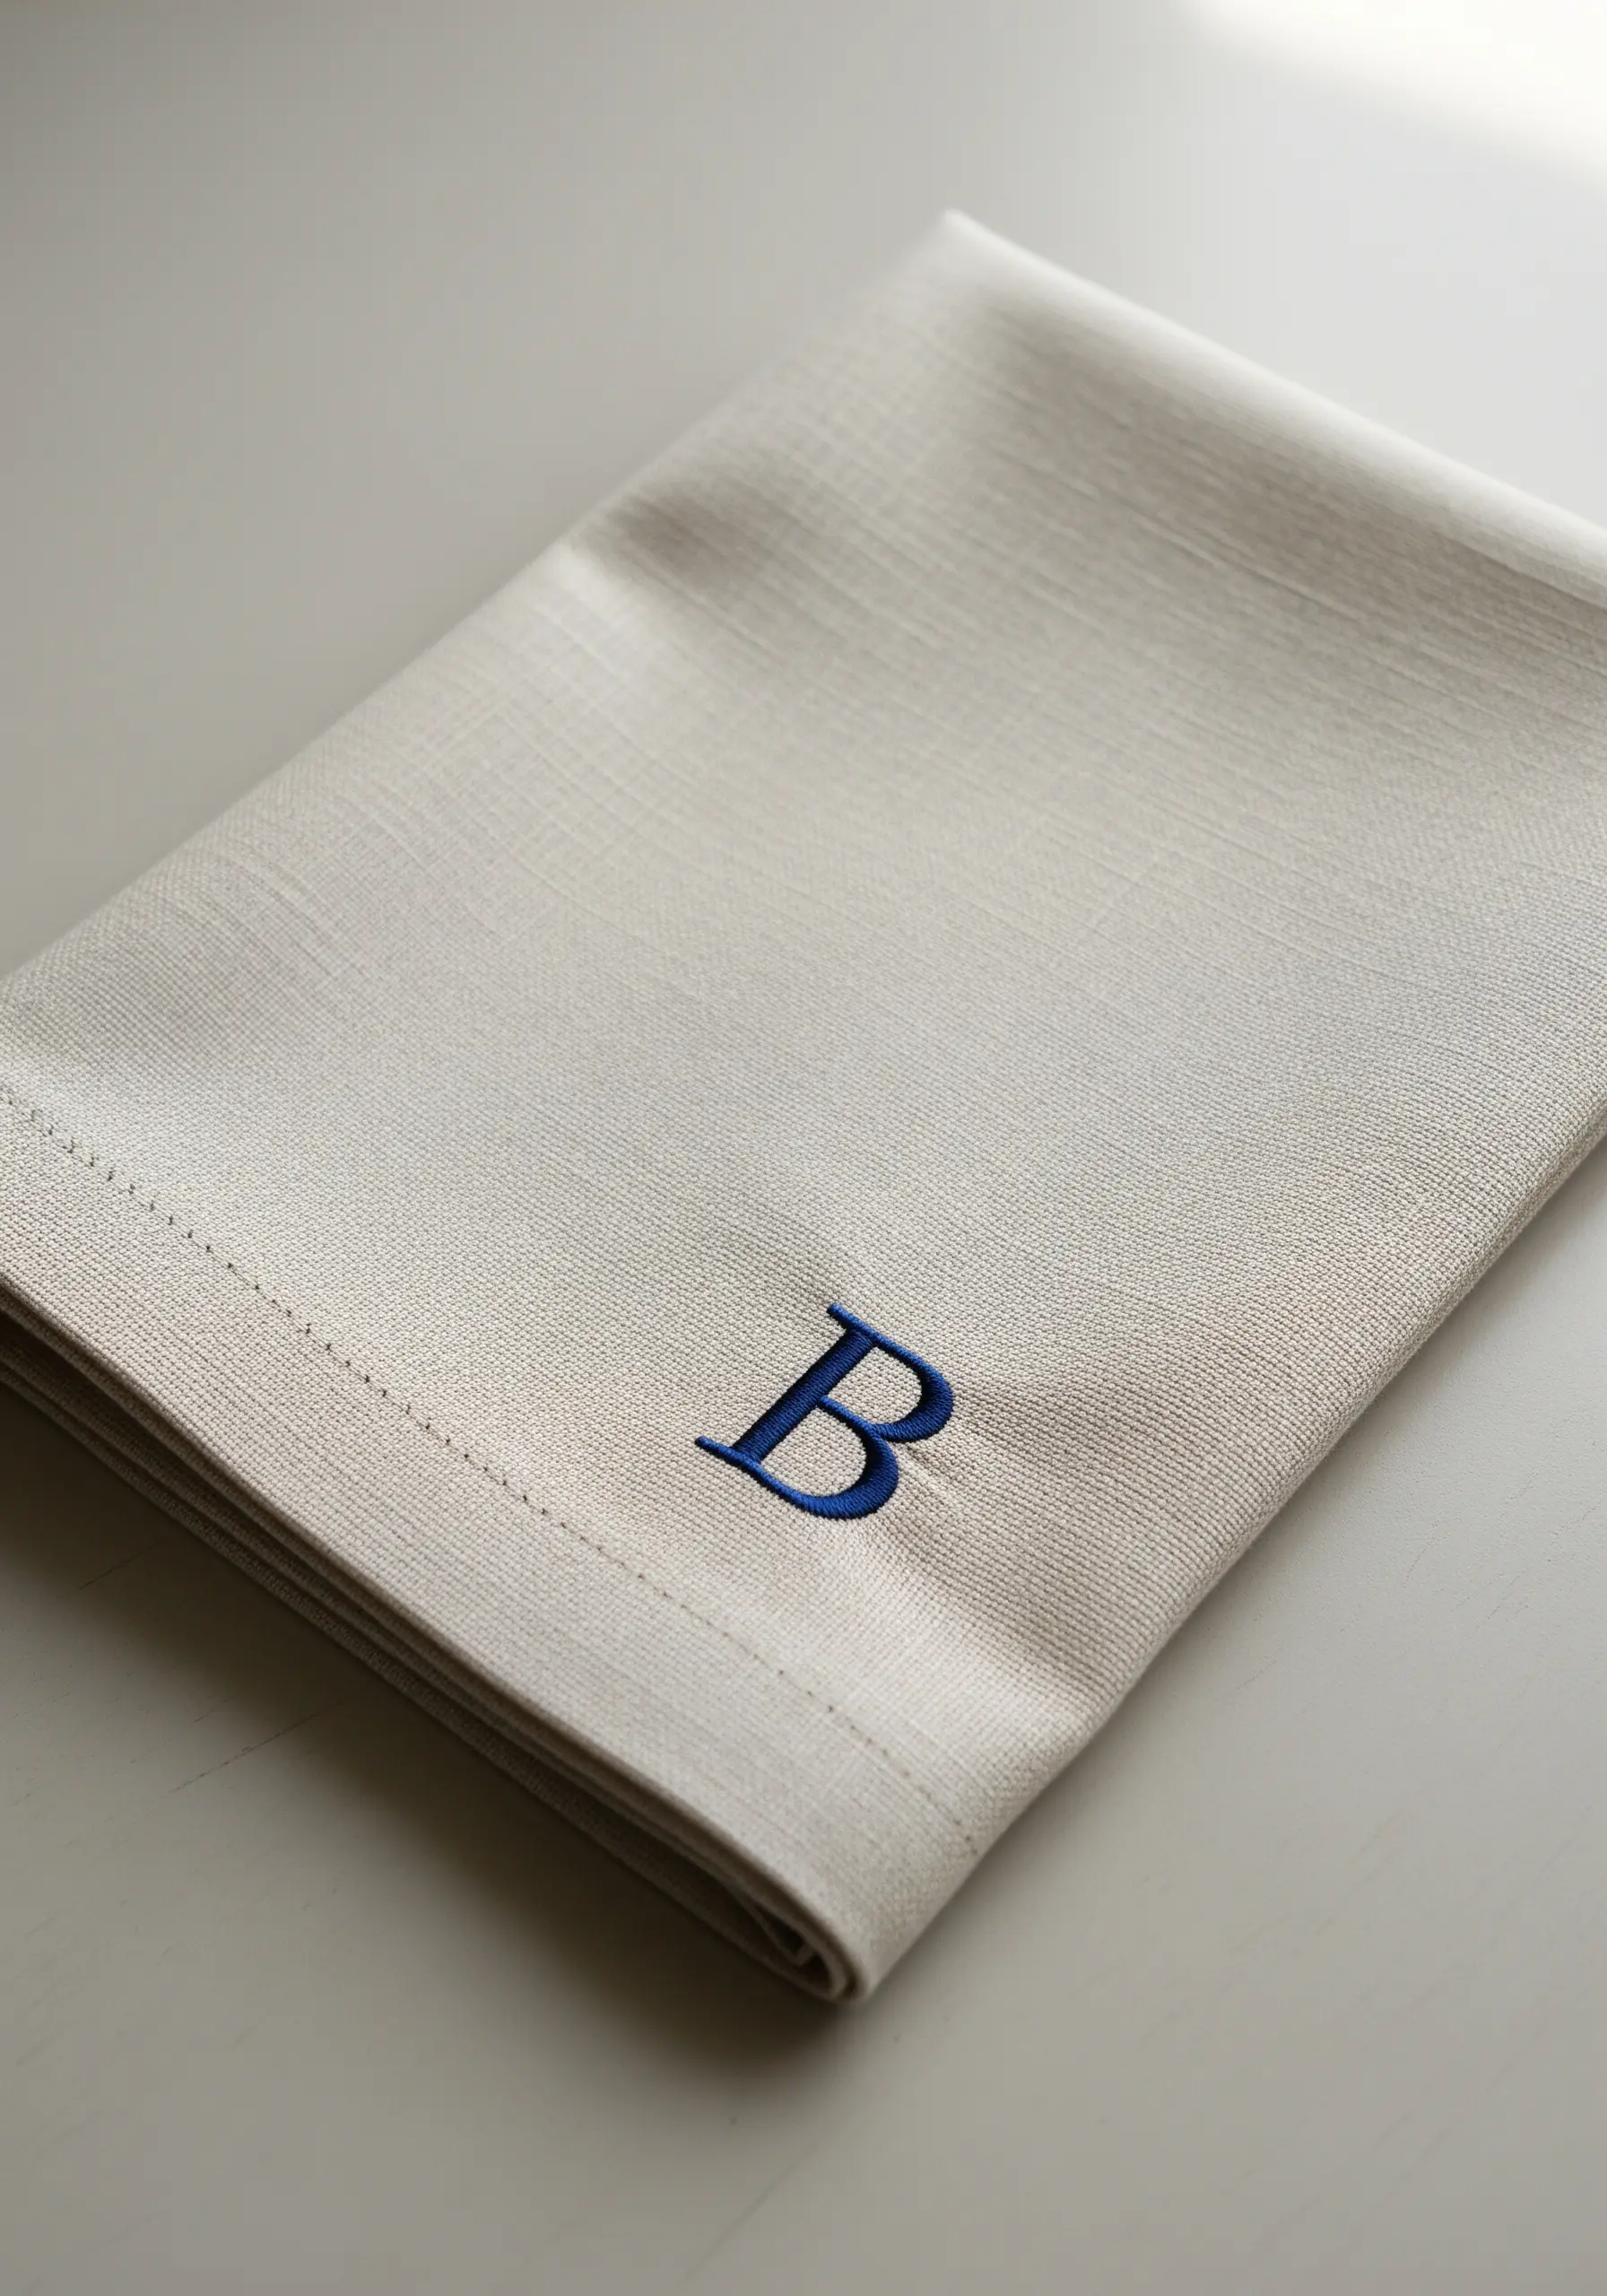
For a classic, high-end monogram, the secret is to build a padded foundation before you begin your satin stitch.
First, stitch the outline of the letter using a split stitch. Then, fill the inside of the letter with small, horizontal running stitches.
Finally, cover this entire padded base with a smooth, vertical satin stitch. The underlying stitches will give your monogram a raised, professional dimension.
This technique works best on tightly woven fabrics like linen or high-quality cotton.
16. Fill a Shape with Radiating Stitches
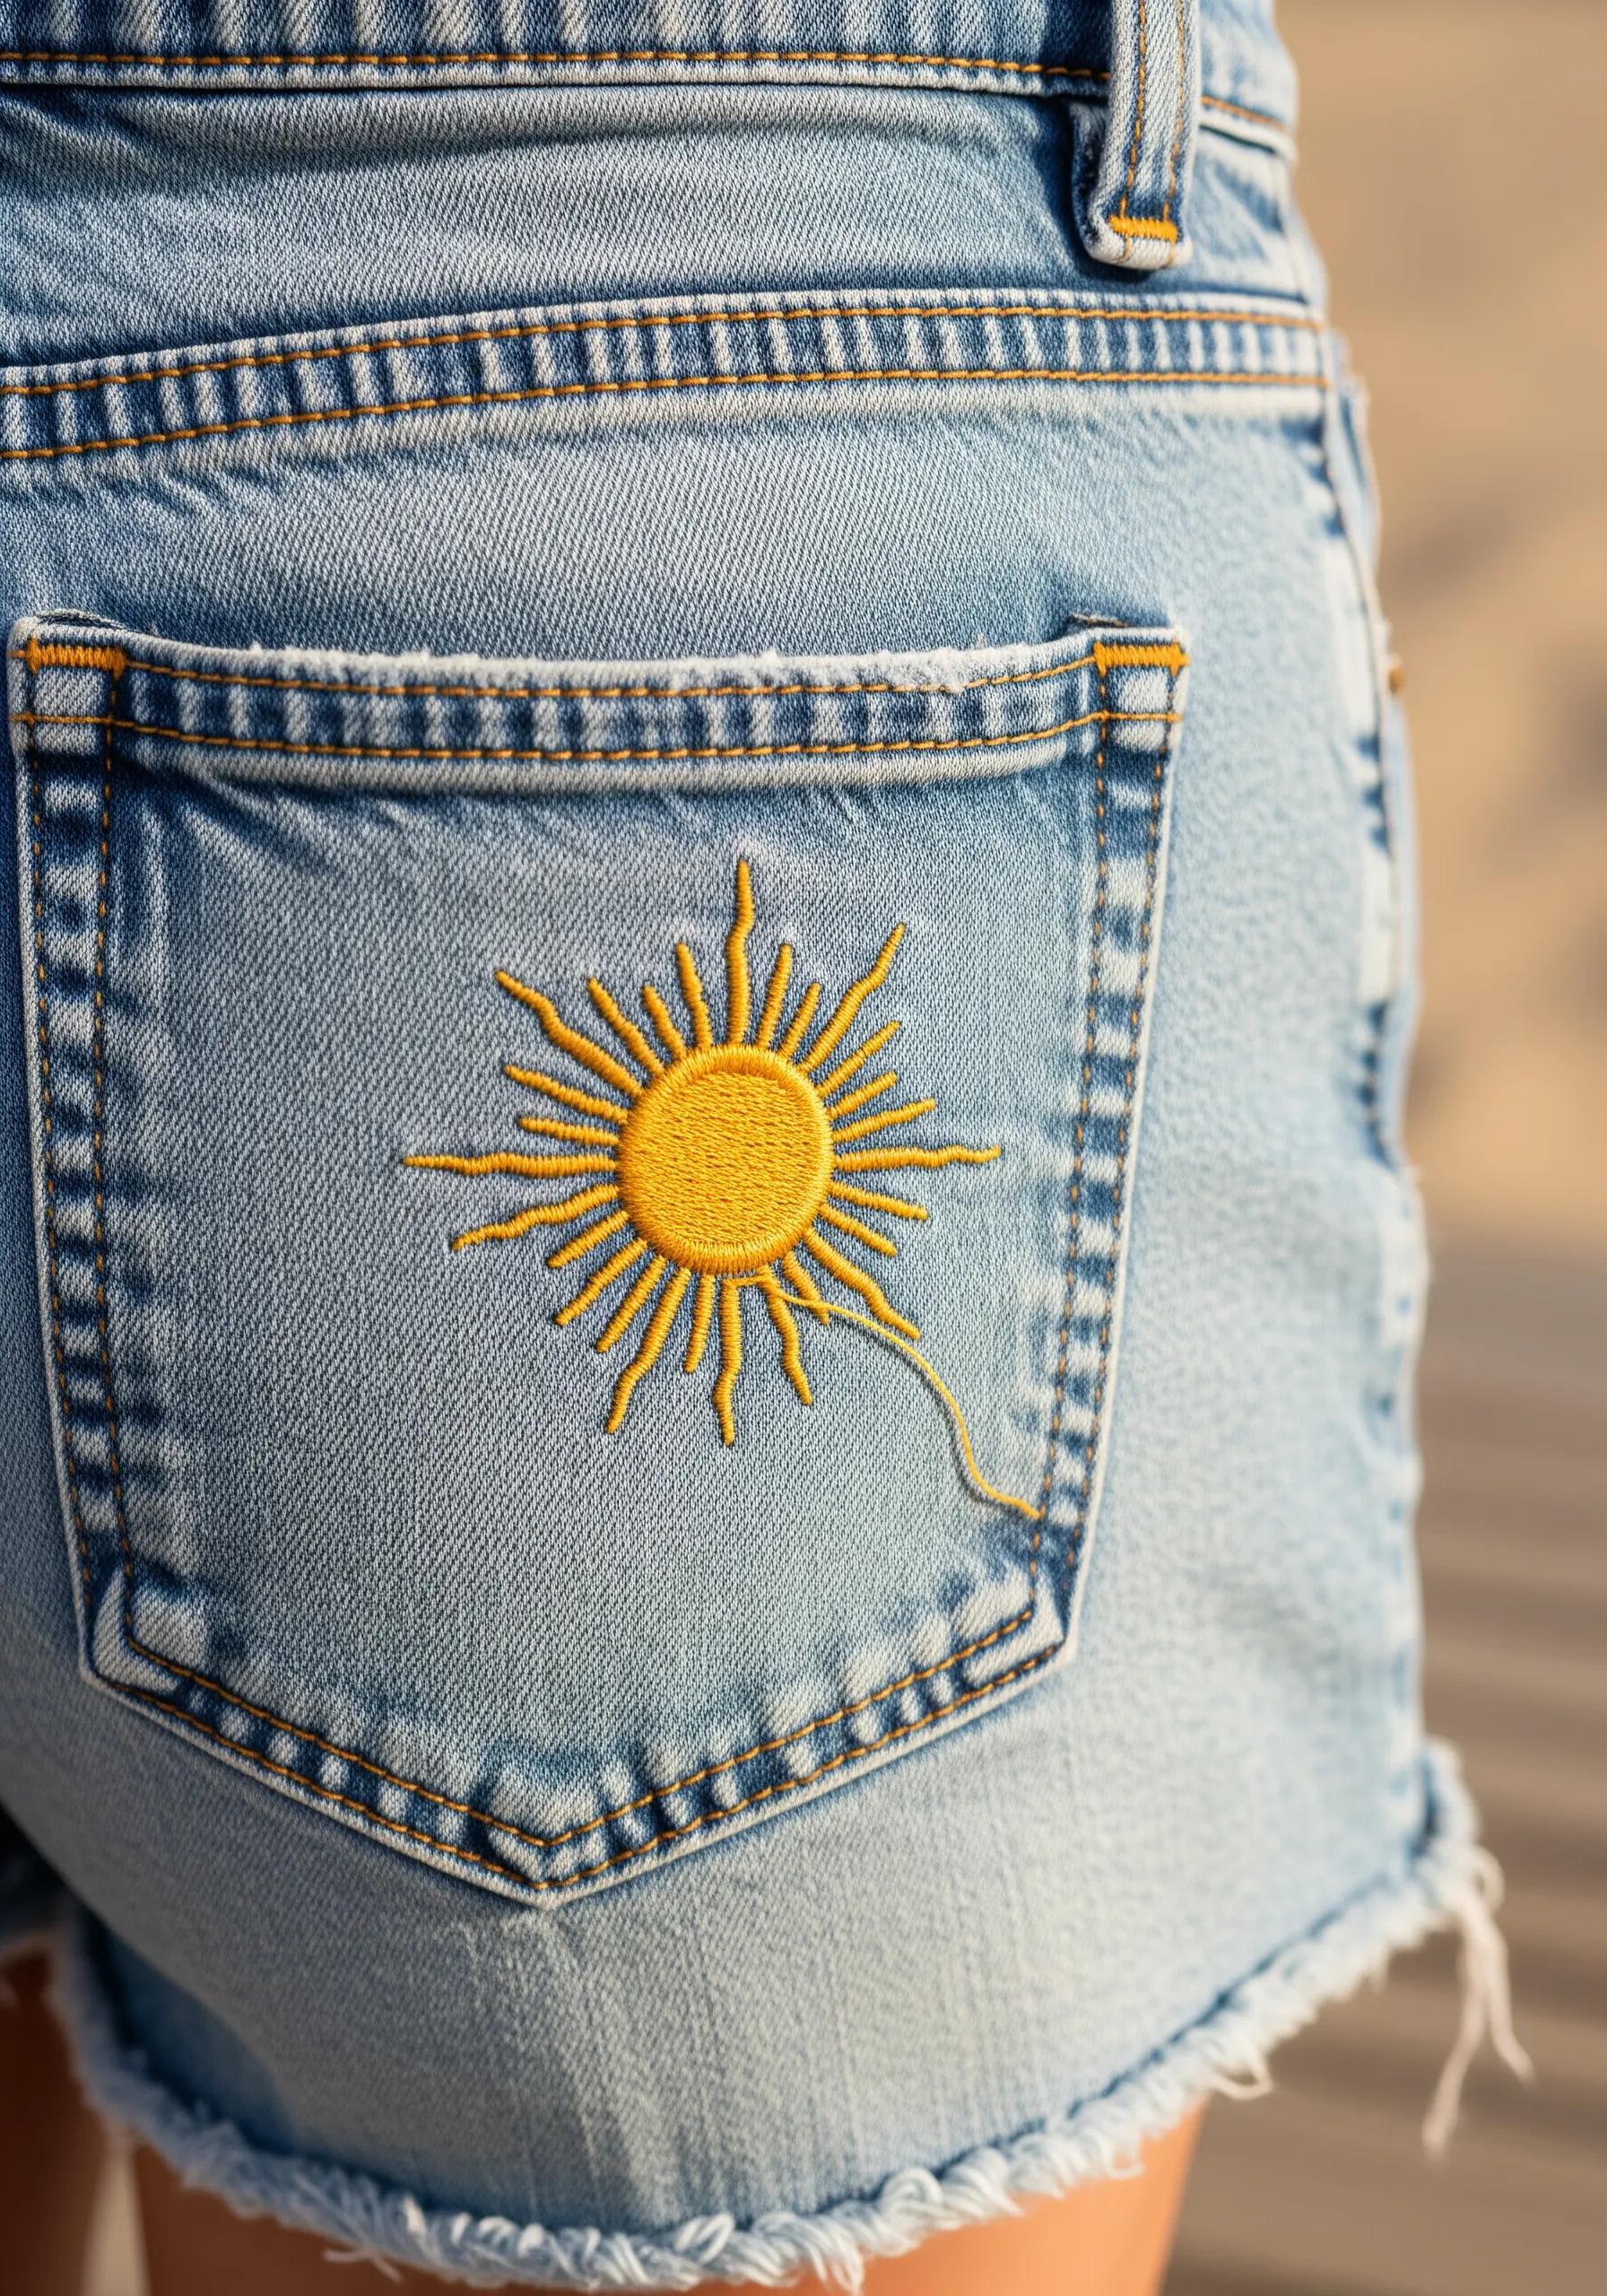
Create a sense of energy and light by using stitches that radiate from a central point.
For the sun’s center, use a circular fill like a woven wheel or a spiraling split stitch to establish a strong focal point.
Stitch the sun’s rays using long, straight stitches of varying lengths, fanning out from the center.
The slight irregularity in the rays’ lengths and angles gives the design a hand-drawn, artistic quality that feels more organic than a perfectly symmetrical sunburst.
17. Capture Delicate Motion Across a Garment
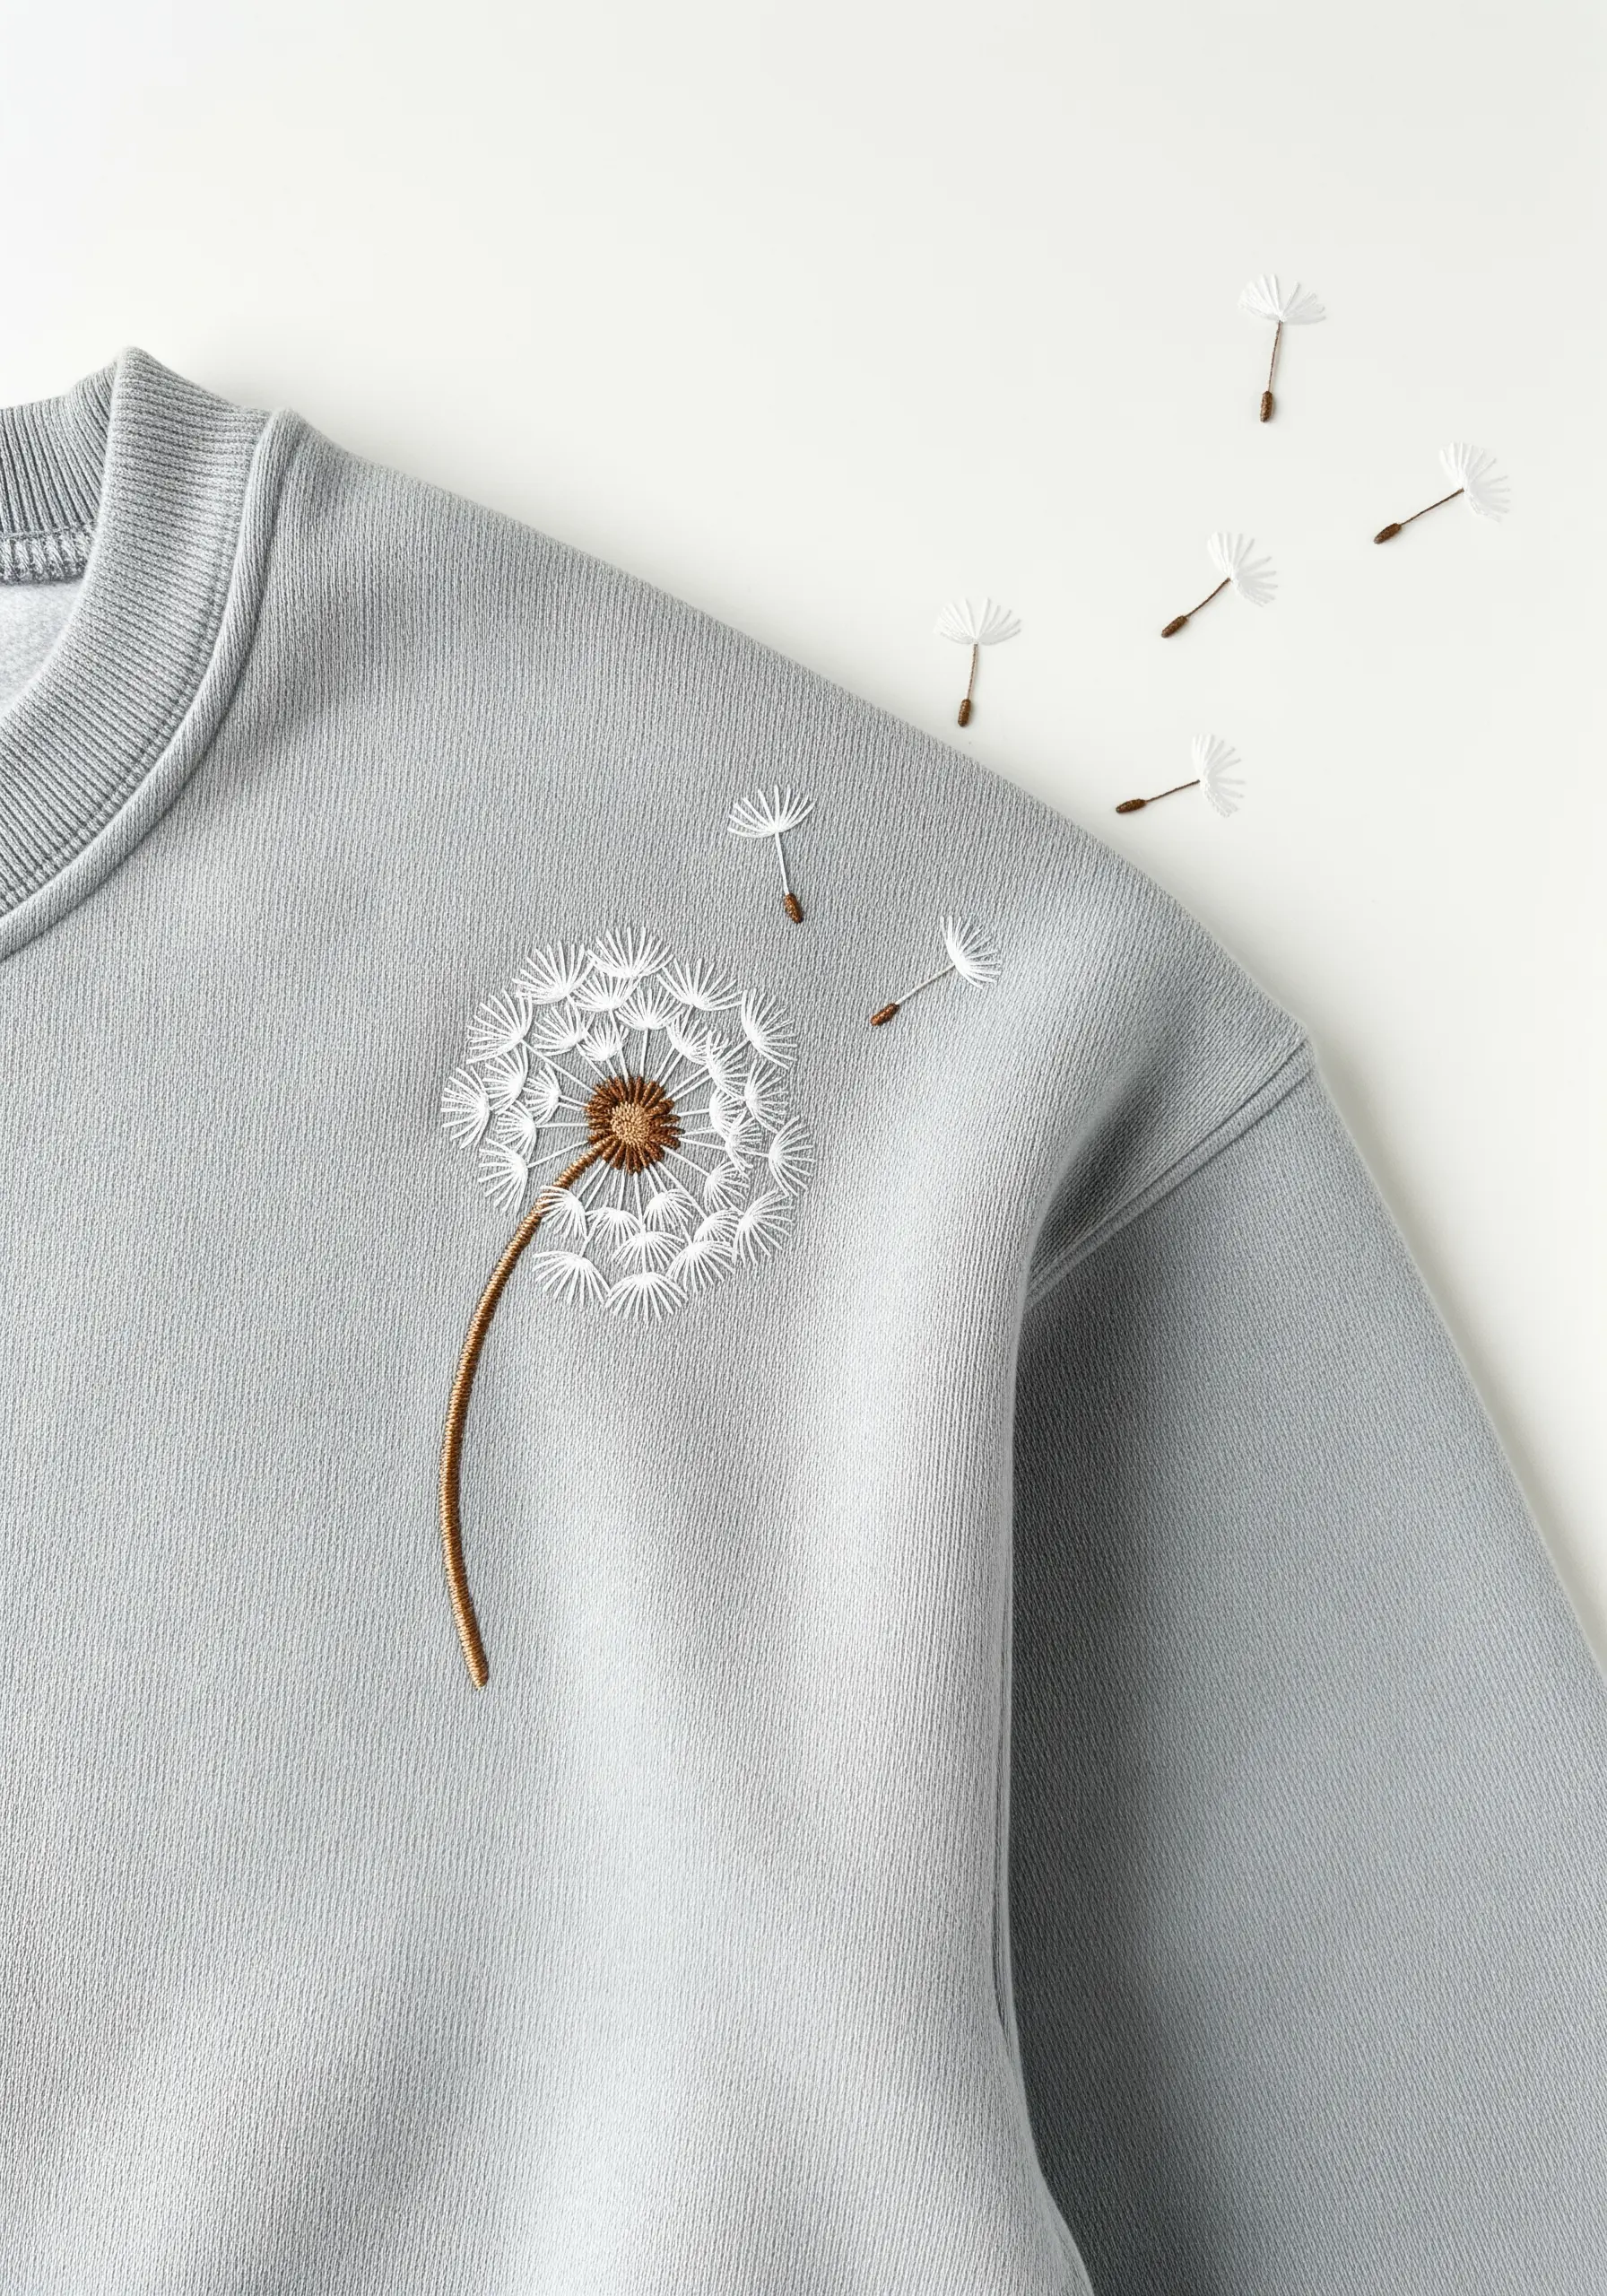
Make your design feel alive by extending it beyond a single, contained motif.
Use a combination of detached chain stitches and straight stitches for the dandelion seed head to create a light, airy texture.
To create the floating seeds, use a single strand of thread to stitch a few tiny straight stitches in a ‘V’ shape, with one longer stitch for the stem.
Scattering these seeds across the shoulder and collarbone gives the piece a sense of movement and helps create radial balance across the garment’s surface.
18. Contrast Stitch Densities for Visual Effect
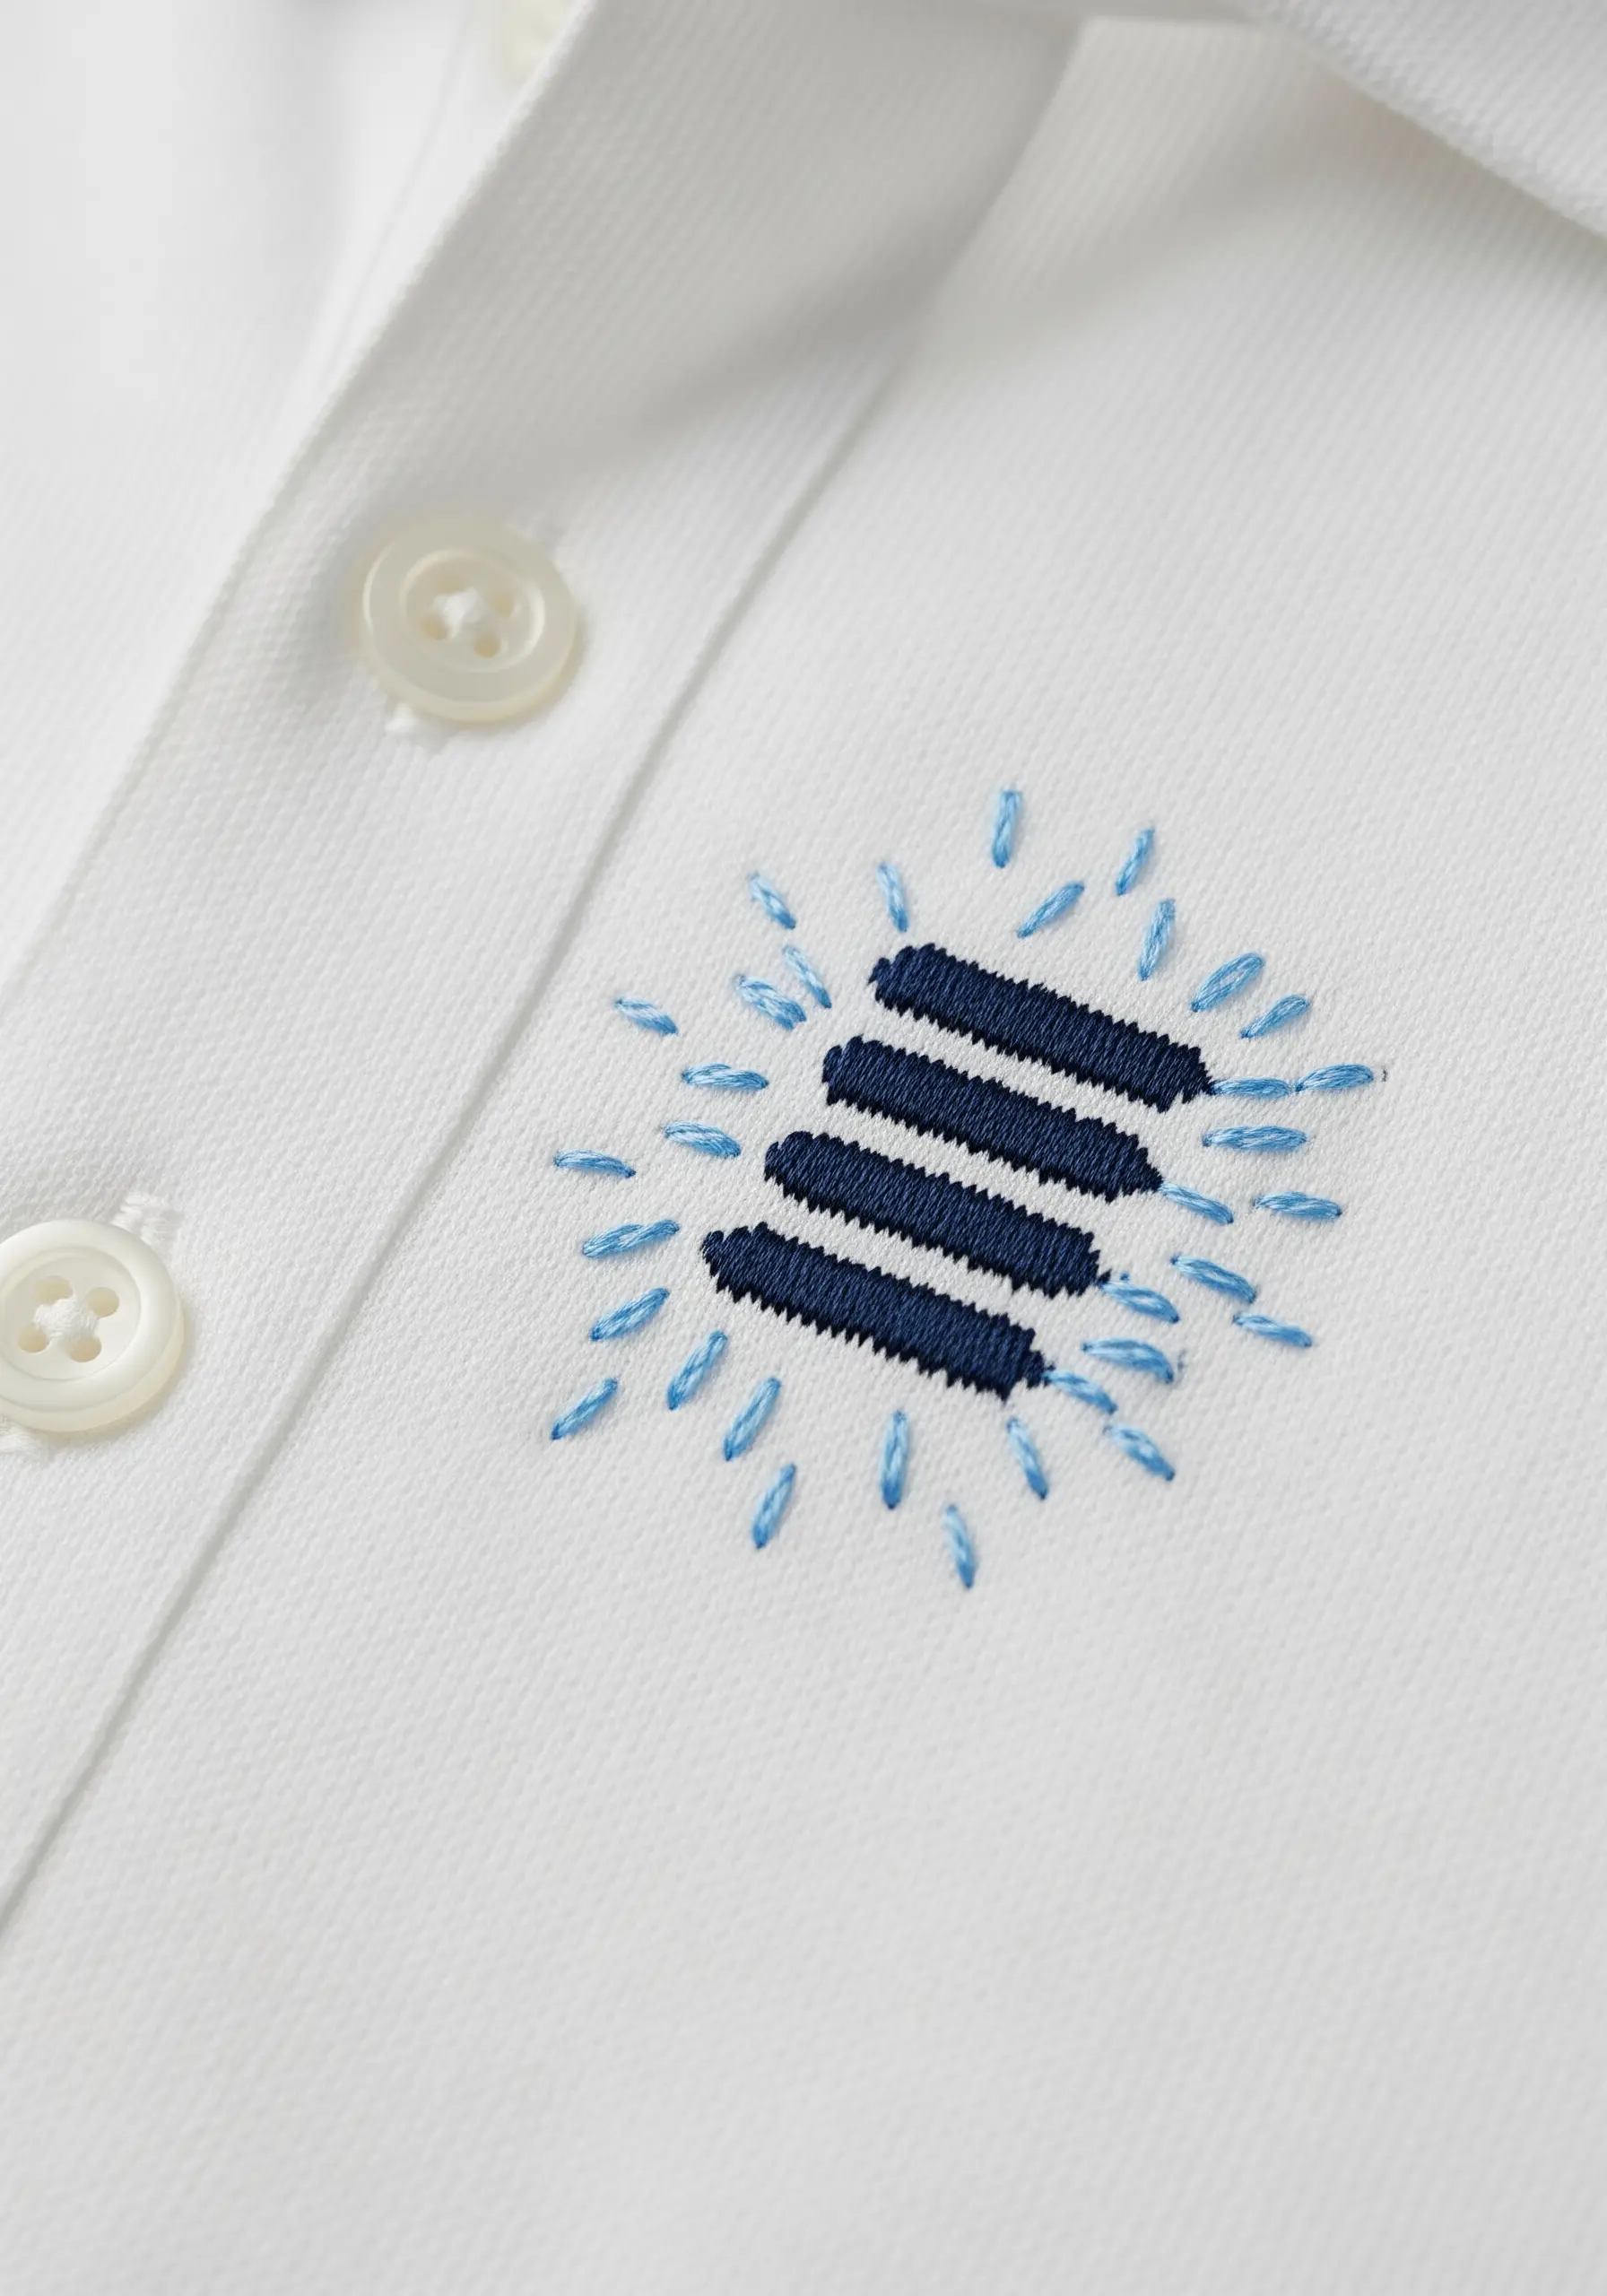
Create the illusion of a glow or energy field by playing with the density of your stitches.
Embroider the central shape with a tight, dense satin stitch to make it feel solid and grounded.
For the radiating ‘glow,’ use sparsely placed seed stitches or short straight stitches in a lighter, contrasting color.
This contrast between the dense fill and the light, scattered stitches creates a powerful visual vibration and makes the central motif appear to shine.
19. Tuck a Tiny Motif Along a Hemline
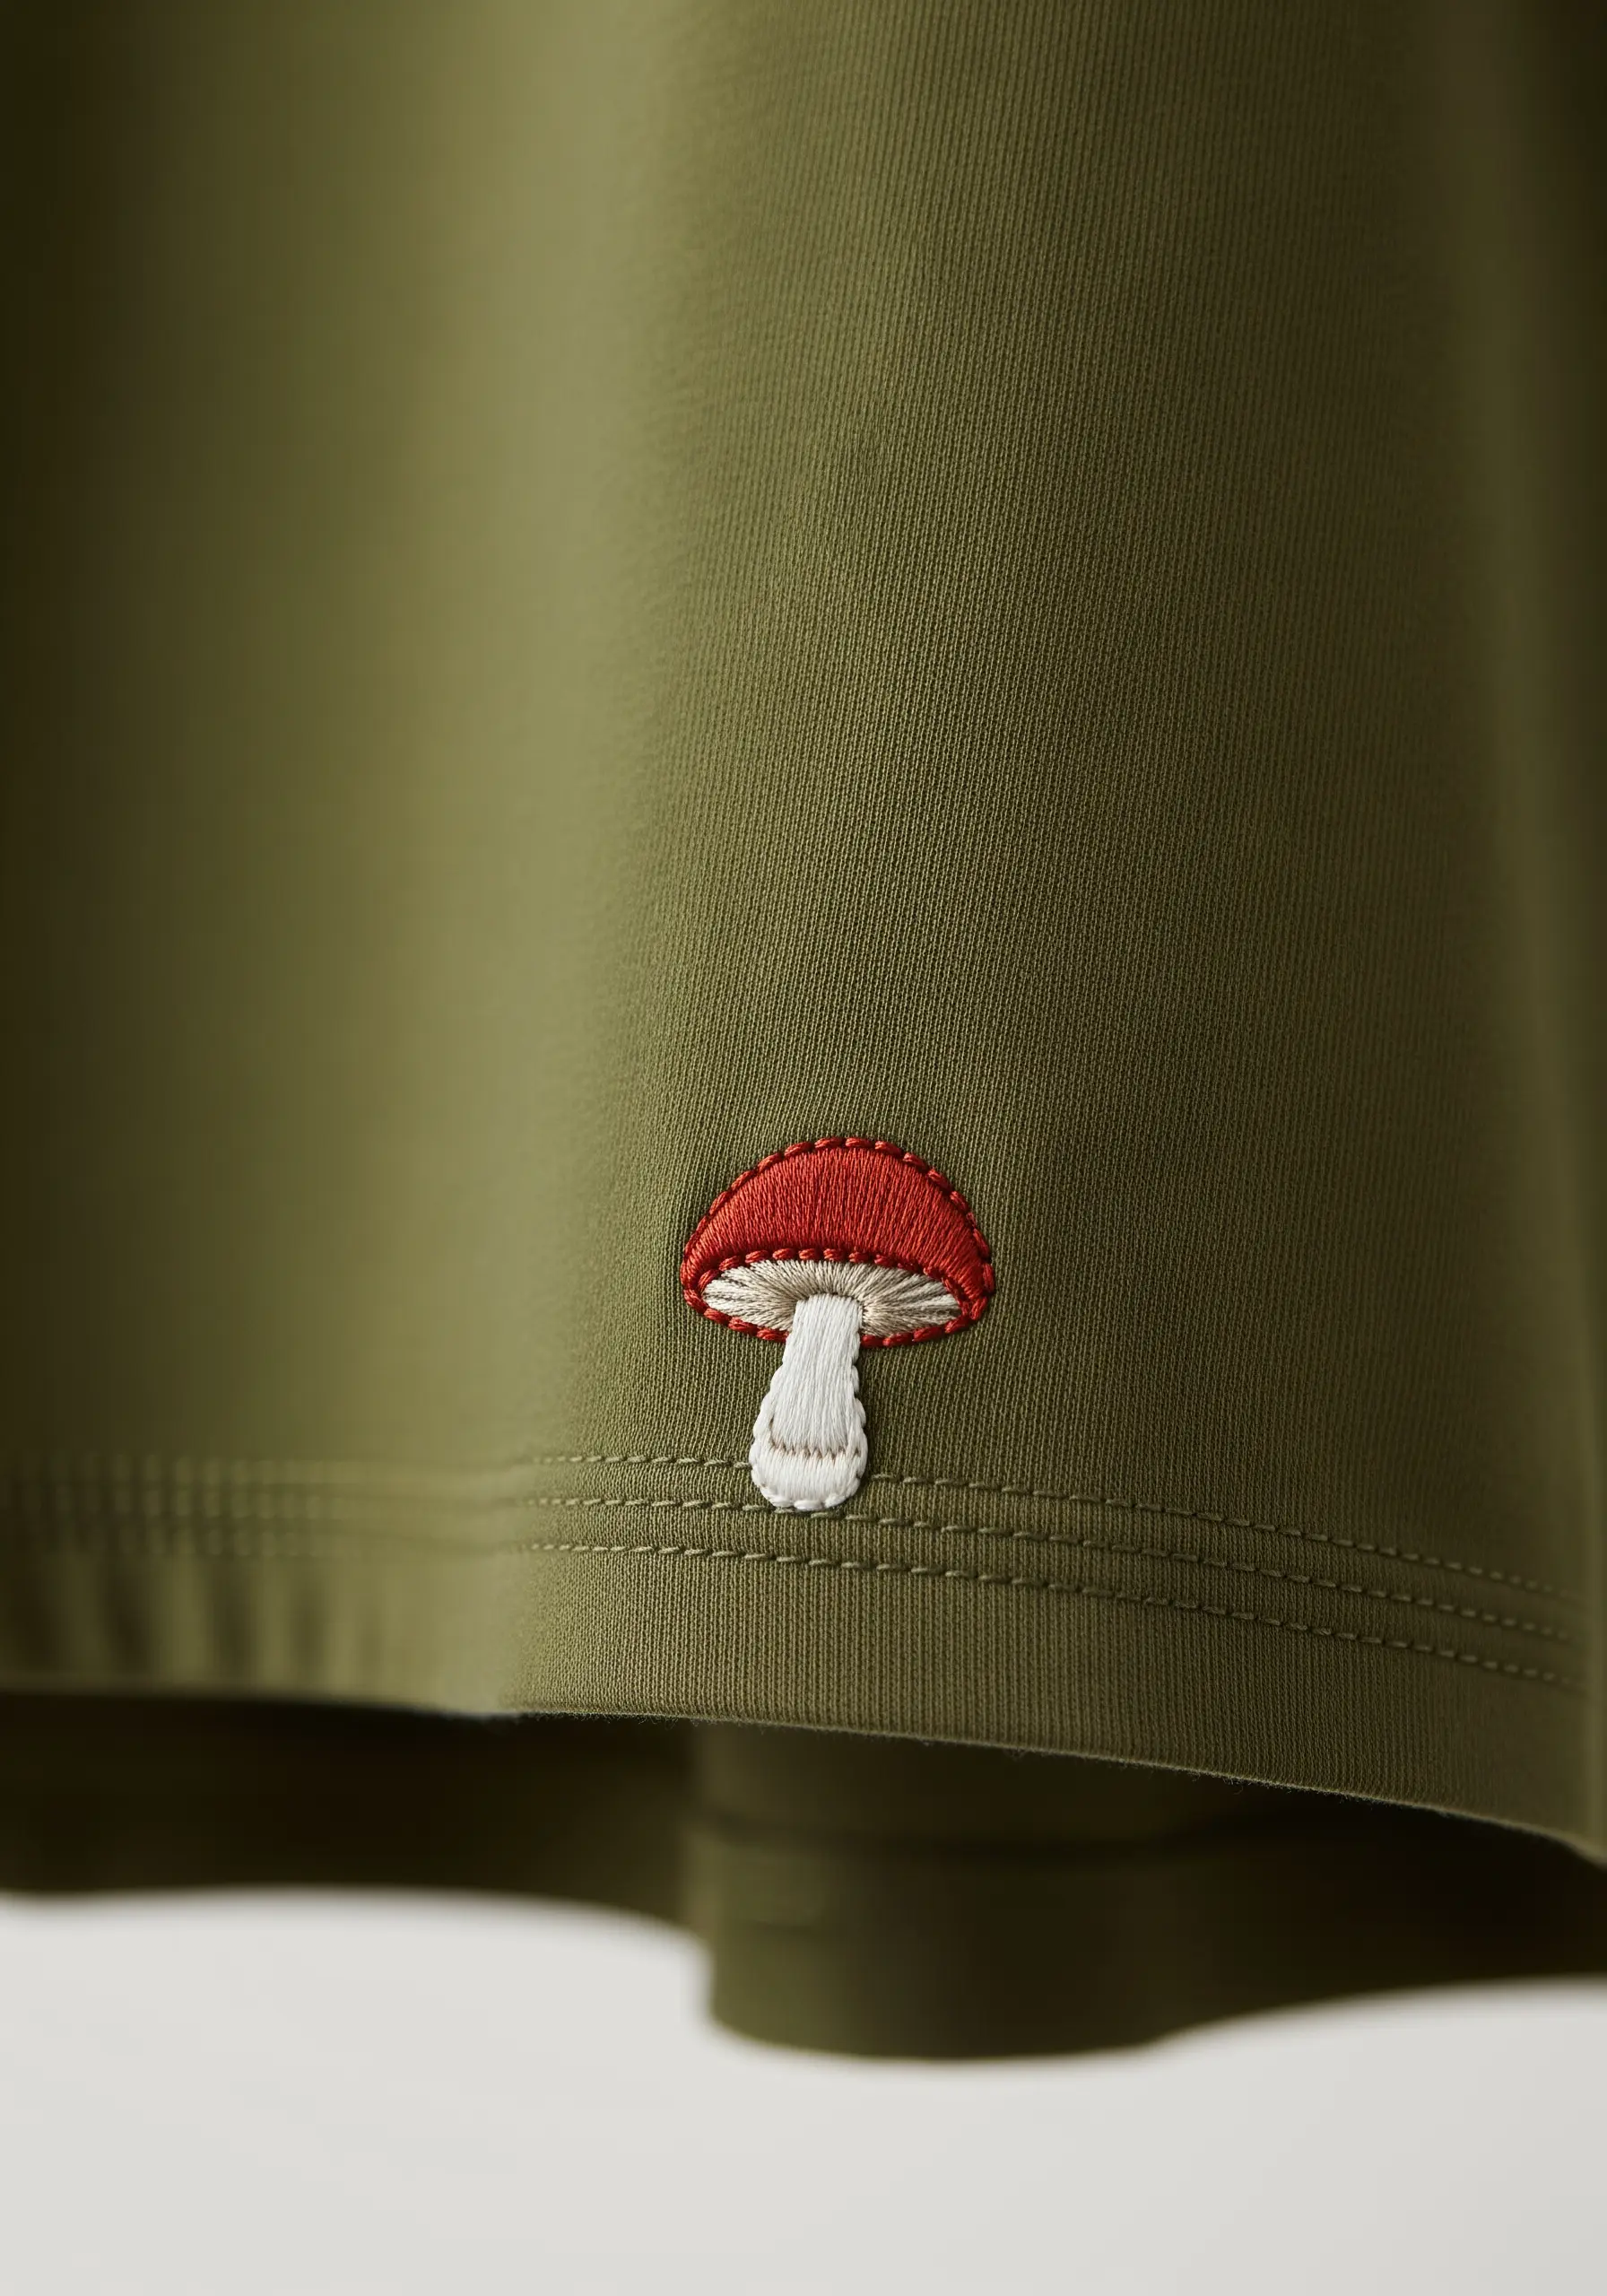
The most charming embellishments are often the ones you don’t see right away.
Placing a tiny motif, like this mushroom, just above the hem of a shirt or dress creates a delightful, hidden surprise.
Use long-and-short stitch to blend two shades of red on the mushroom cap for a subtle, realistic gradient.
A simple running stitch outline in a contrasting color defines the shape and adds a touch of illustrative charm.
20. Add a Sophisticated Detail to a Lapel
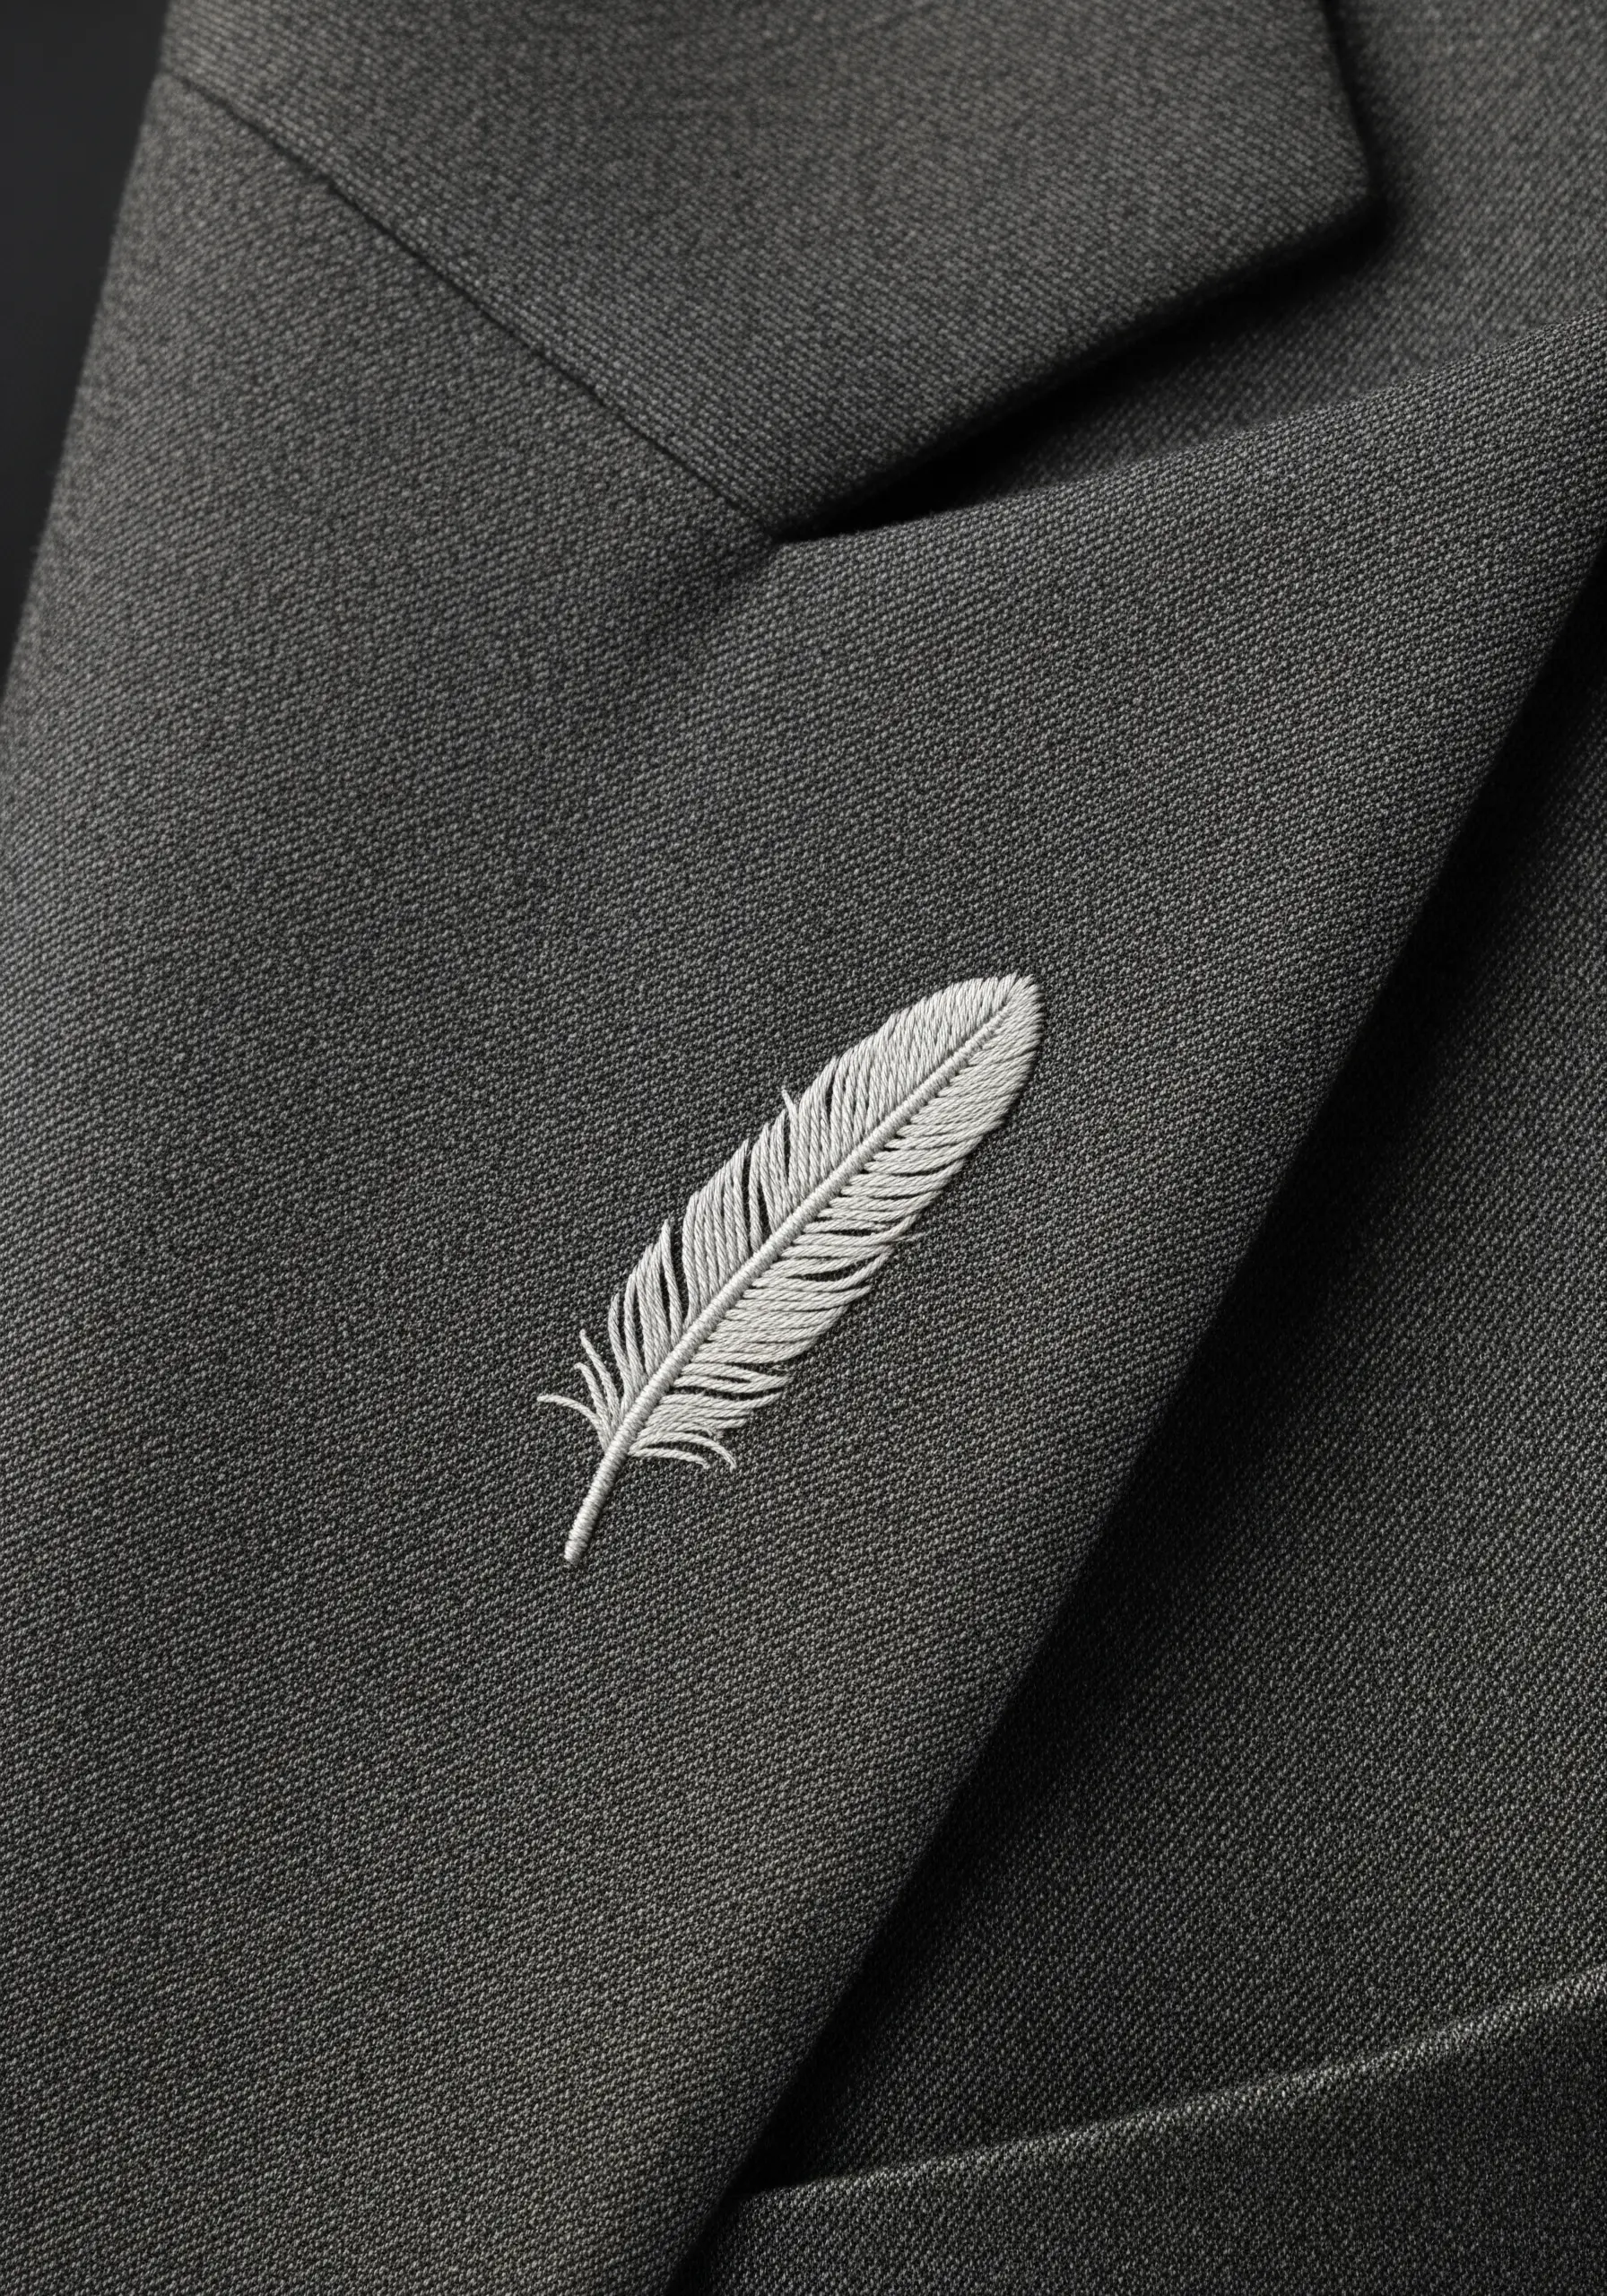
Transform a classic blazer with a single, exquisitely stitched motif on the lapel.
A feather is a perfect choice, as its shape is both elegant and timeless. Use a fishbone stitch to create the natural, V-shaped pattern of the barbs.
Choose a thread color that offers a subtle contrast to the fabric—like this silvery-white on charcoal gray—for a look that is refined, not distracting.
Using a single strand of thread is essential here for achieving the necessary fineness and detail.
21. Use a Whipped Stitch for Bold Outlines
When you want an outline to be strong and prominent, a simple backstitch might not be enough.
First, create a standard backstitch line for your entire design. Then, take a second thread and ‘whip’ it around each backstitch without piercing the fabric.
This technique, called a whipped backstitch, creates a thick, smooth, and slightly raised line that looks like a miniature cord.
It’s perfect for making bold, graphic designs stand out on textured fabrics like canvas.
22. Create Rhythm with Spaced Repetition

Turn a simple outline into a sophisticated design element through repetition and thoughtful spacing.
Stitch a series of simple leaf outlines cascading down a sleeve, maintaining consistent spacing between each one.
Create a subtle ombré effect by using a harmonious color palette, transitioning from one shade to the next.
This approach gives the garment a sense of flow and transforms a basic sweatshirt sleeve into a deliberate design feature.
23. Choose the Right Stitch for Curves and Lines
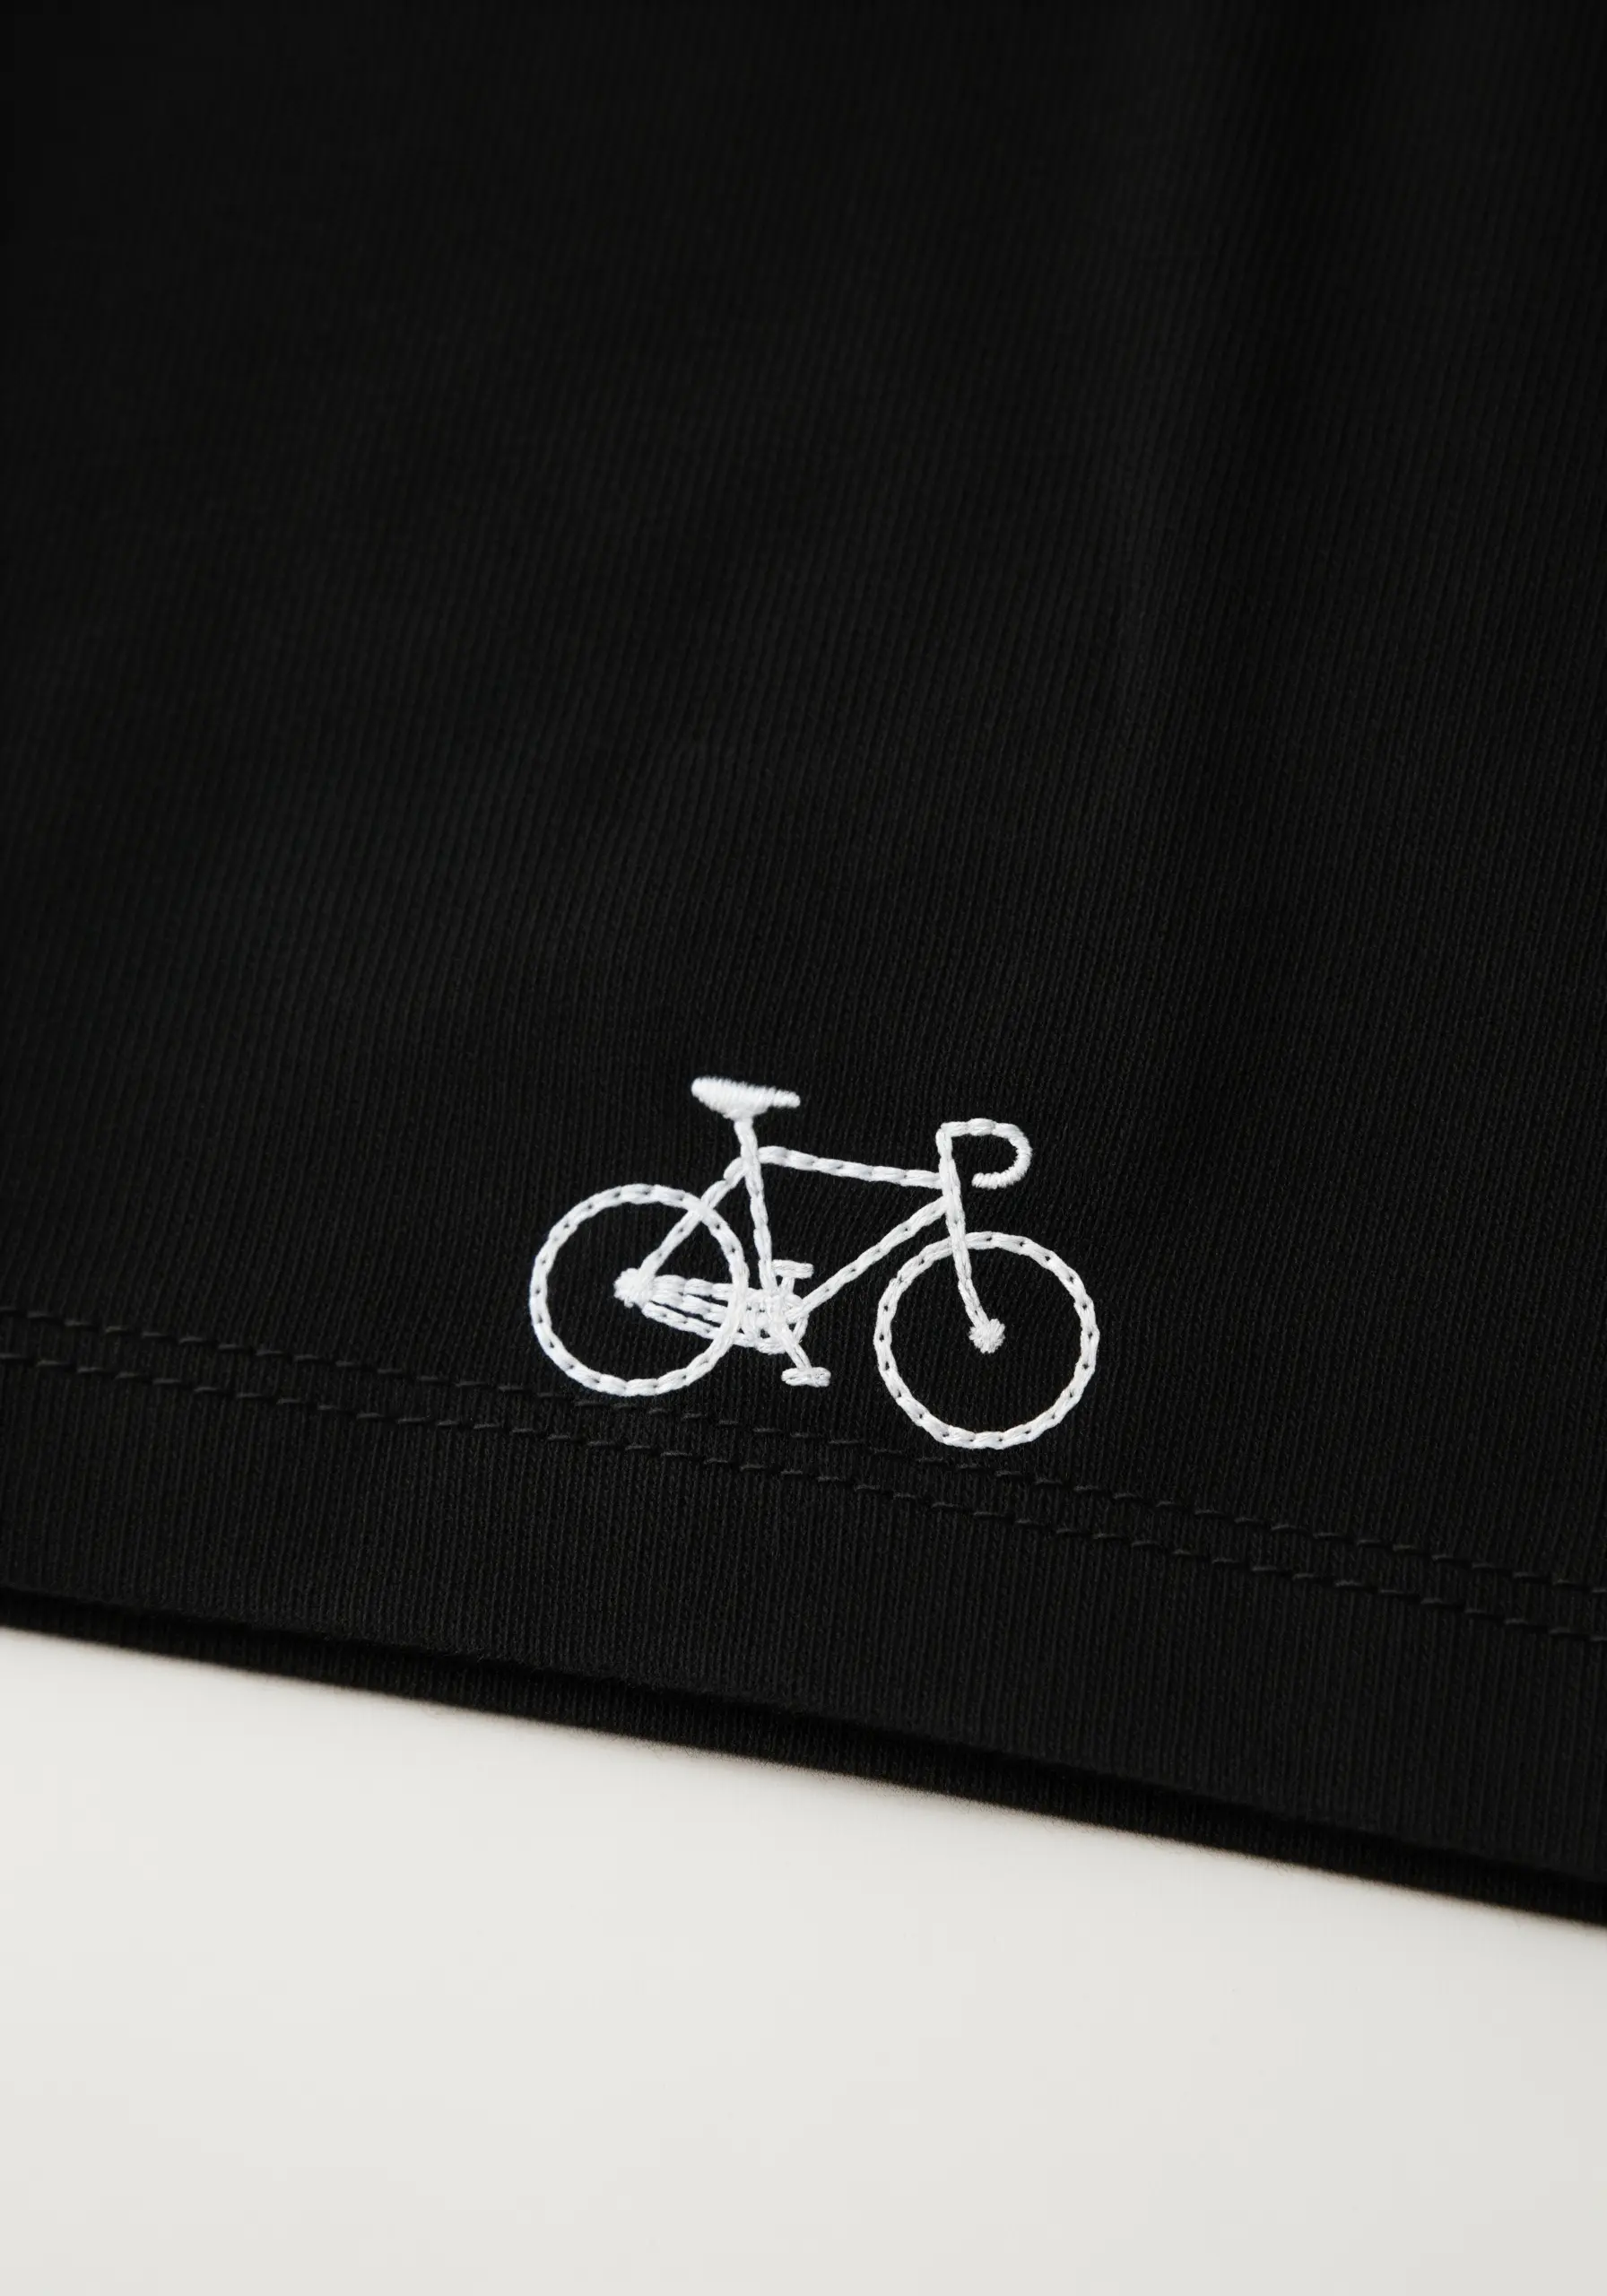
To keep tiny line-art motifs crisp, select your stitch based on the shape you’re creating.
Use a standard backstitch for the straight parts of the bicycle frame to ensure clean, sharp lines.
For the curved elements like the wheels and handlebars, switch to a split stitch. By splitting the previous stitch, you create a smoother, less jagged curve.
This technical nuance is what makes a tiny, complex shape look precise and polished rather than clumsy.
24. Achieve Geometric Precision with a Stabilizer
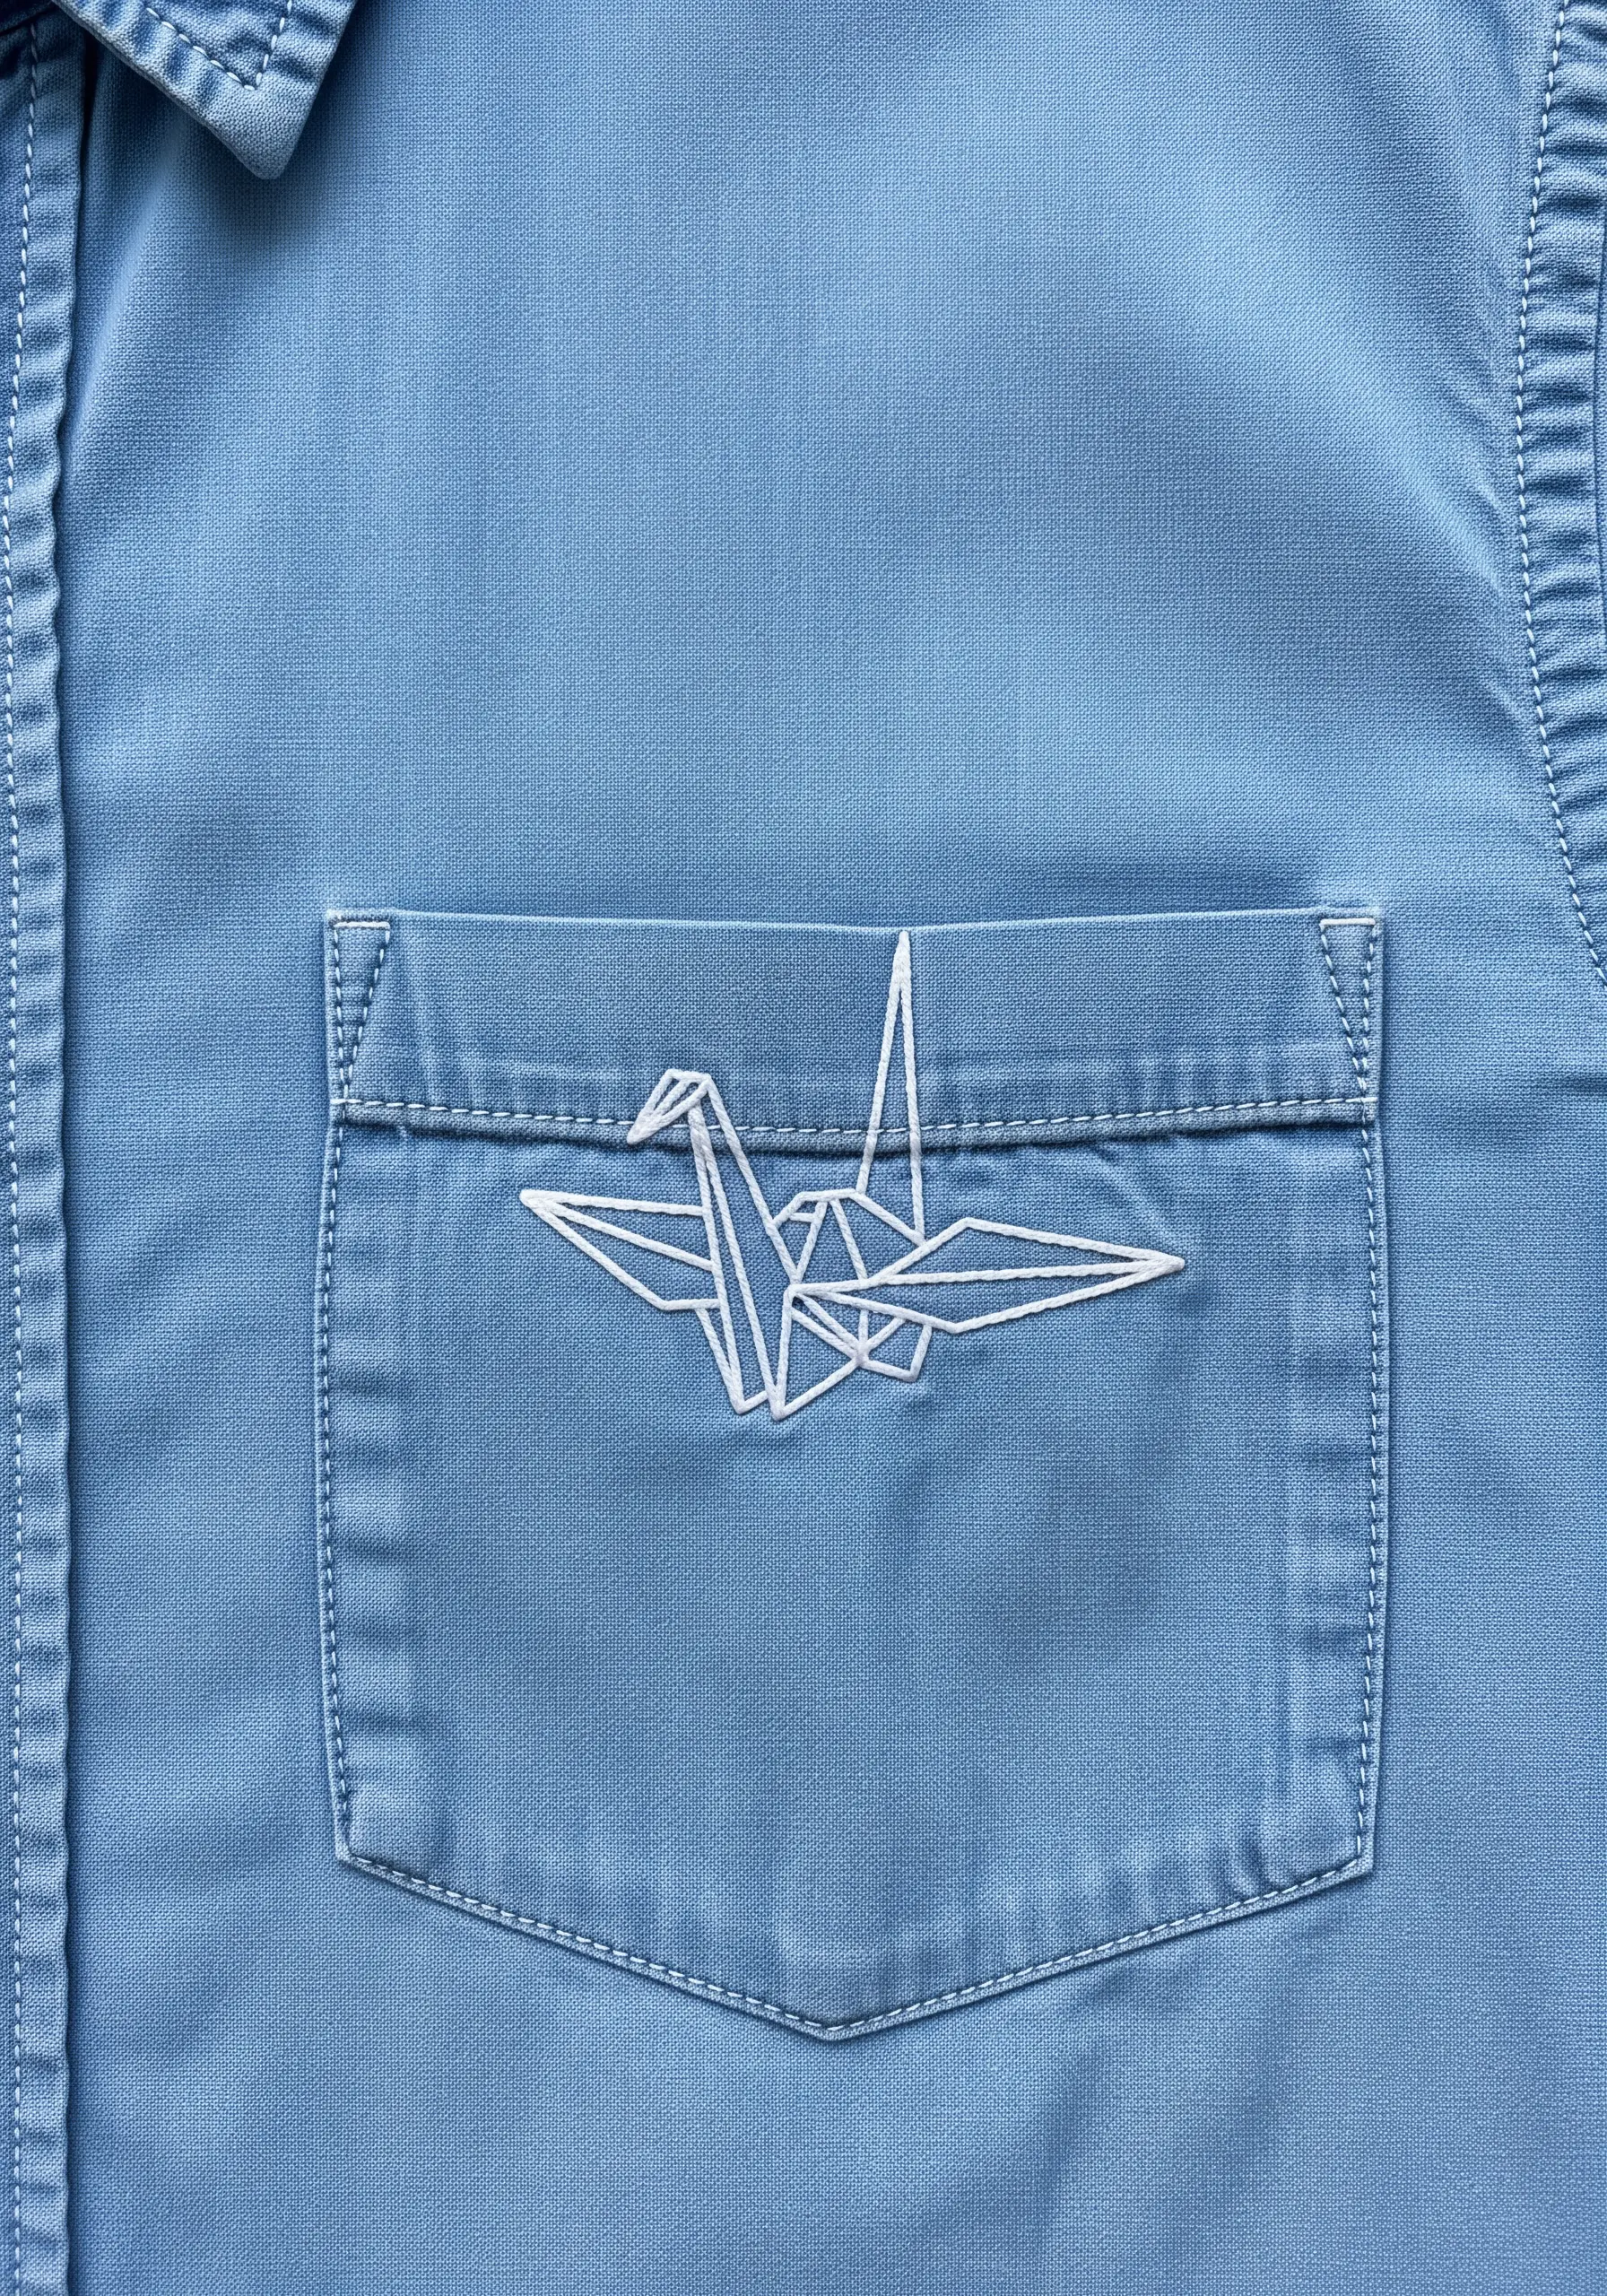
For designs with sharp angles and straight lines, like this origami crane, preventing fabric puckering is your top priority.
Always use a non-stretchy stabilizer on the back of your fabric, even on wovens like this chambray shirt.
Use a simple, clean backstitch and ensure your needle enters and exits the fabric at precise points to create sharp, geometric corners.
The combination of a stable base and exact stitching is what gives the final piece its crisp, paper-like quality.


