
You have the threads, the fabric, and the desire to create something beautiful. But how do you move from simply following a pattern to making a piece that feels uniquely yours, polished, and intentional? The secret isn’t in mastering dozens of complex stitches. It’s in the small, thoughtful decisions you make before the first stitch is even sewn.
The difference between an adequate piece and a stunning one often comes down to nuance. It’s choosing to work on dark velvet to make beads shine brighter, layering felt to create soft depth, or using a single, bold line to convey a powerful emotion. These aren’t complicated tricks; they are accessible techniques that elevate your work instantly.
Think of these tiny wall hangings not as minor projects, but as focused explorations. Each one is a chance to experiment with texture, to see how different fibers interact, and to build the confidence that comes from finishing something you are truly proud to display. Here, you’ll find the inspiration to do just that.
1. Master the Woven Coil for Instant Texture
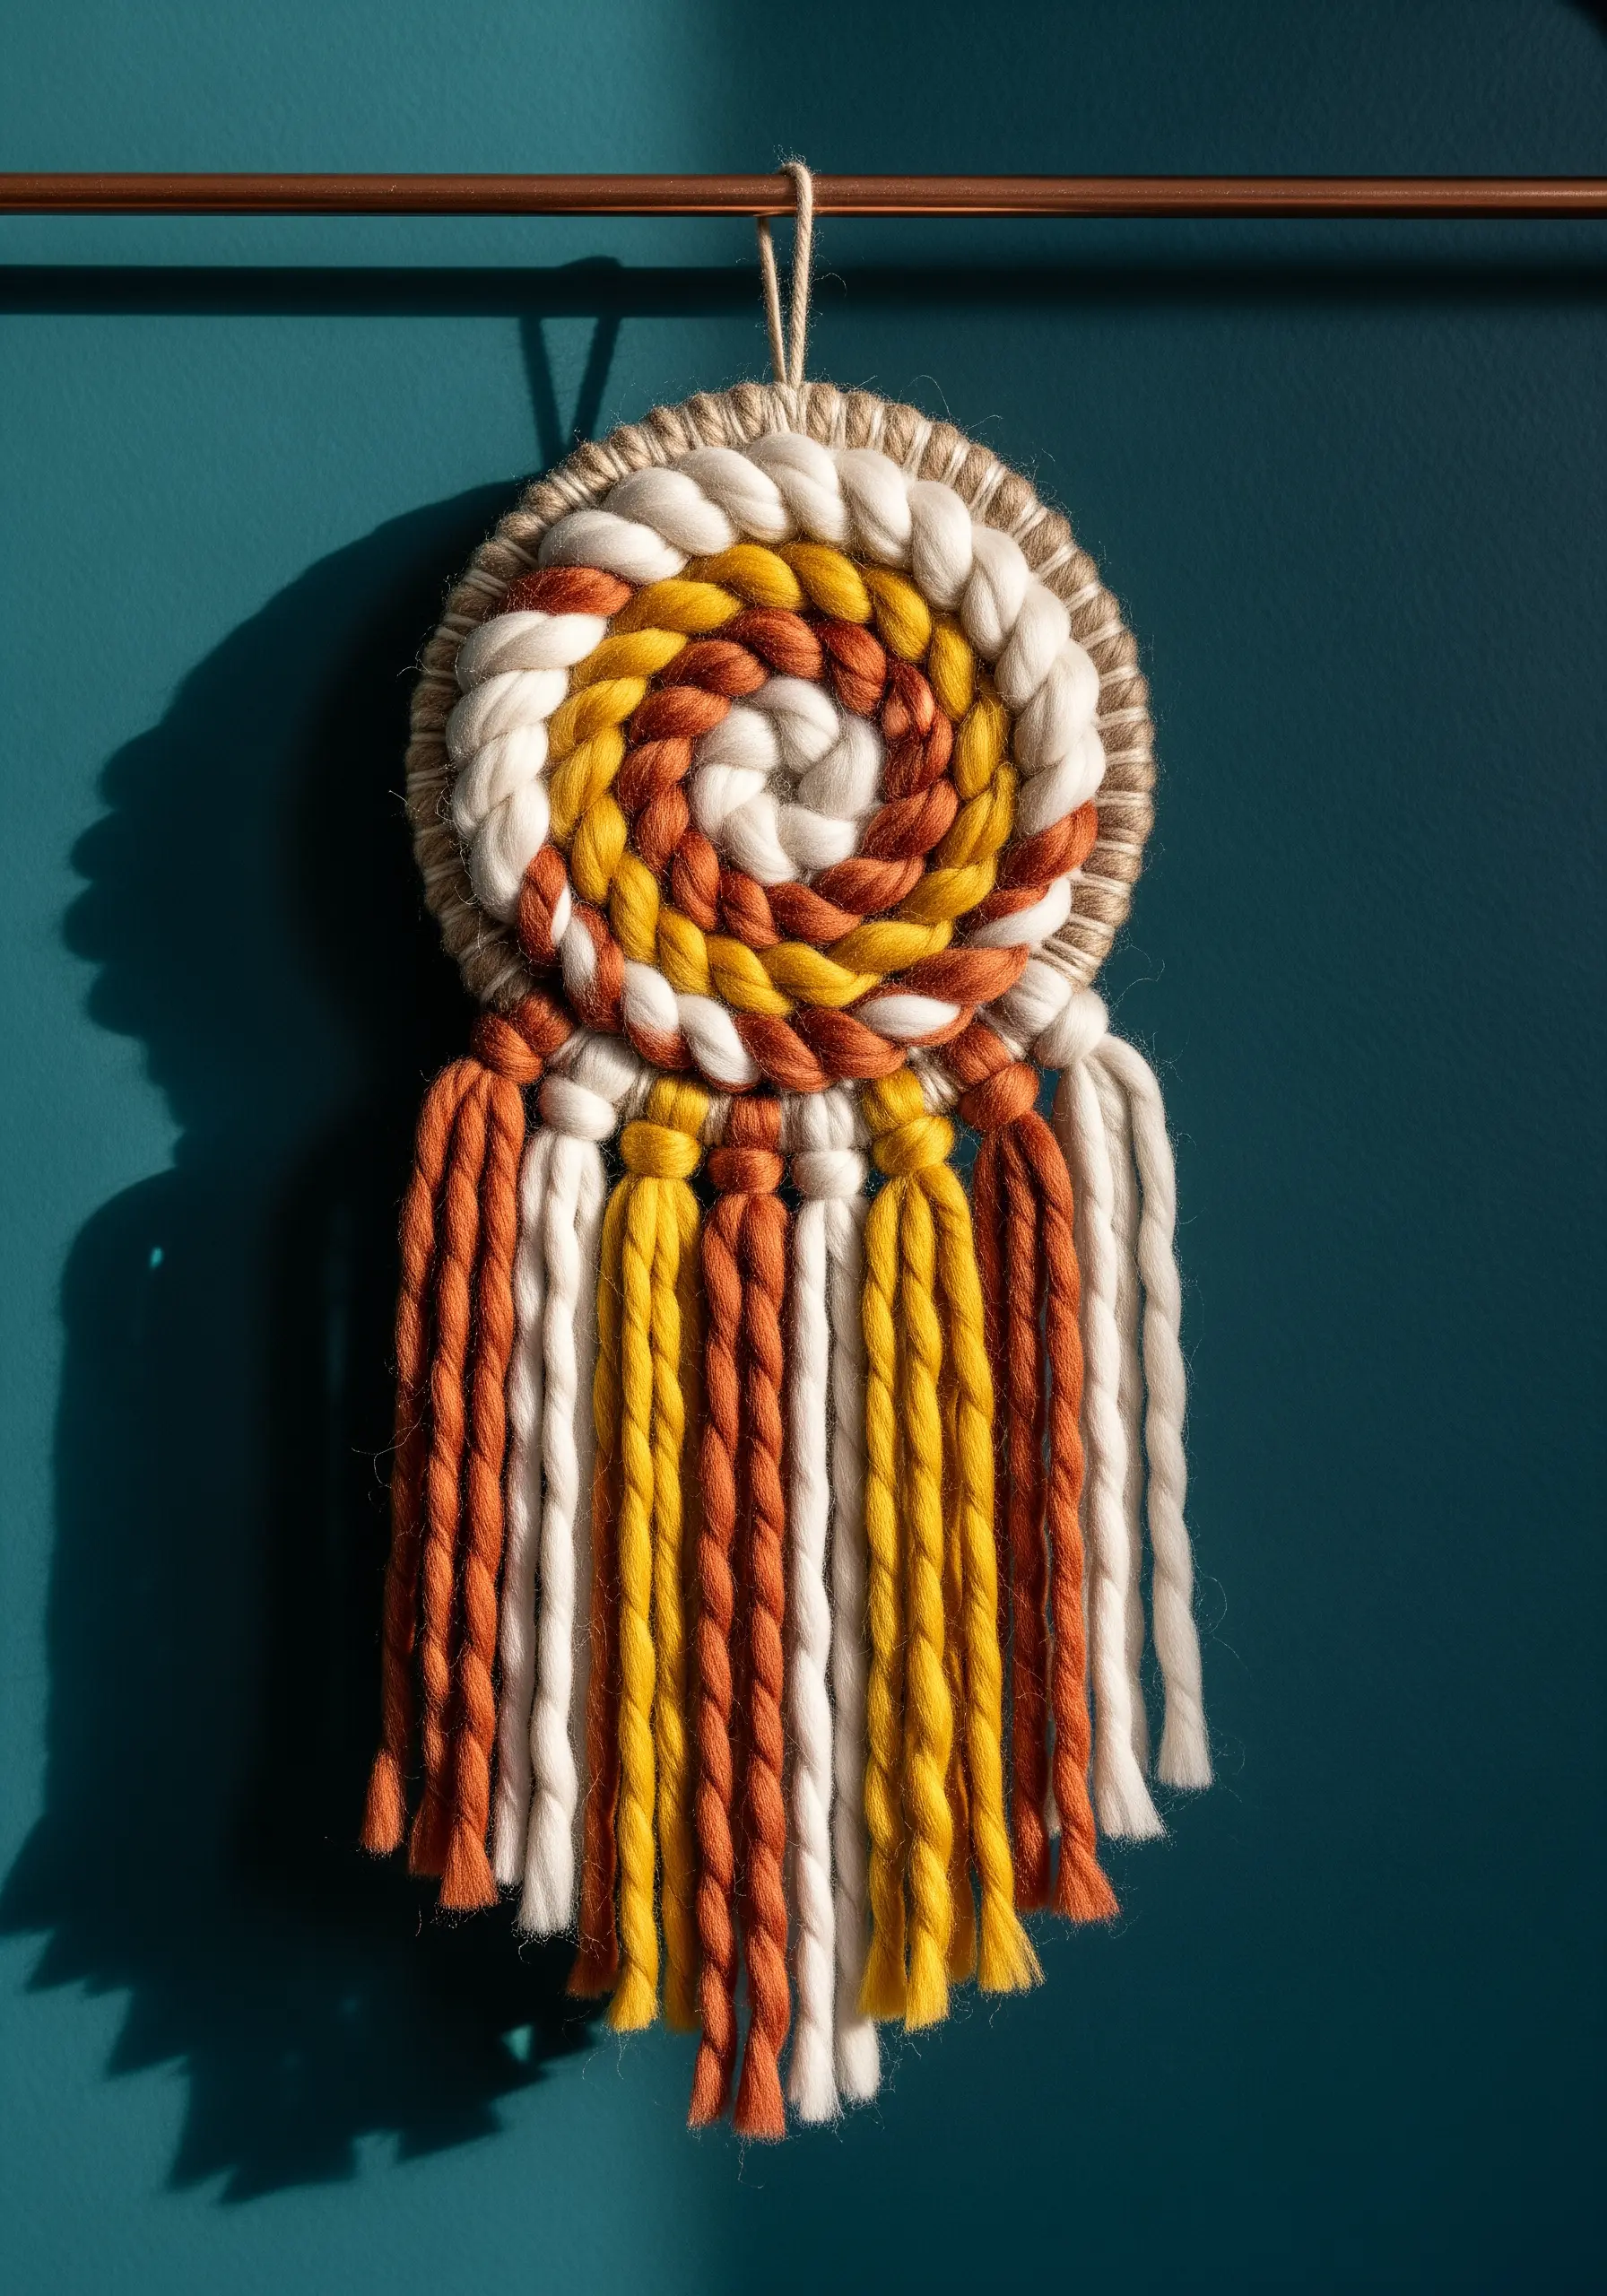
Move beyond the hoop with circular weaving, a technique that builds texture and color with satisfying speed.
Instead of embroidery floss, use chunky yarn wrapped around a simple cardboard loom or a metal ring.
To create the vibrant spiral, change your yarn color every few rows, tucking the tails neatly on the backside.
The key to its visual rhythm is varying the tension and thickness of your yarn; a looser wrap creates a fuller, softer look while a tighter wrap gives you more definition.
Finish by adding tassels or fringe at the base to add length and balance the circular shape, turning a simple coil into one of many mixed fiber wall hangings.
2. Let Your Stitches Float on Tulle

Embroidering on tulle or sheer organza gives your subject an ethereal, floating quality that’s impossible to achieve with opaque fabric.
To prevent puckering, use a temporary stabilizer behind the tulle while you stitch, which you can later trim or wash away.
For the butterfly’s wings, use long-and-short stitch to blend oranges and blacks seamlessly, creating a realistic gradient.
Use single-strand thread for the finest details, like the antennae and white dots, ensuring they look delicate, not heavy.
Finally, scatter a few tiny gold beads to catch the light—this small addition introduces a touch of luxury and dimension.
3. Achieve Graphic Impact with Punch Needle
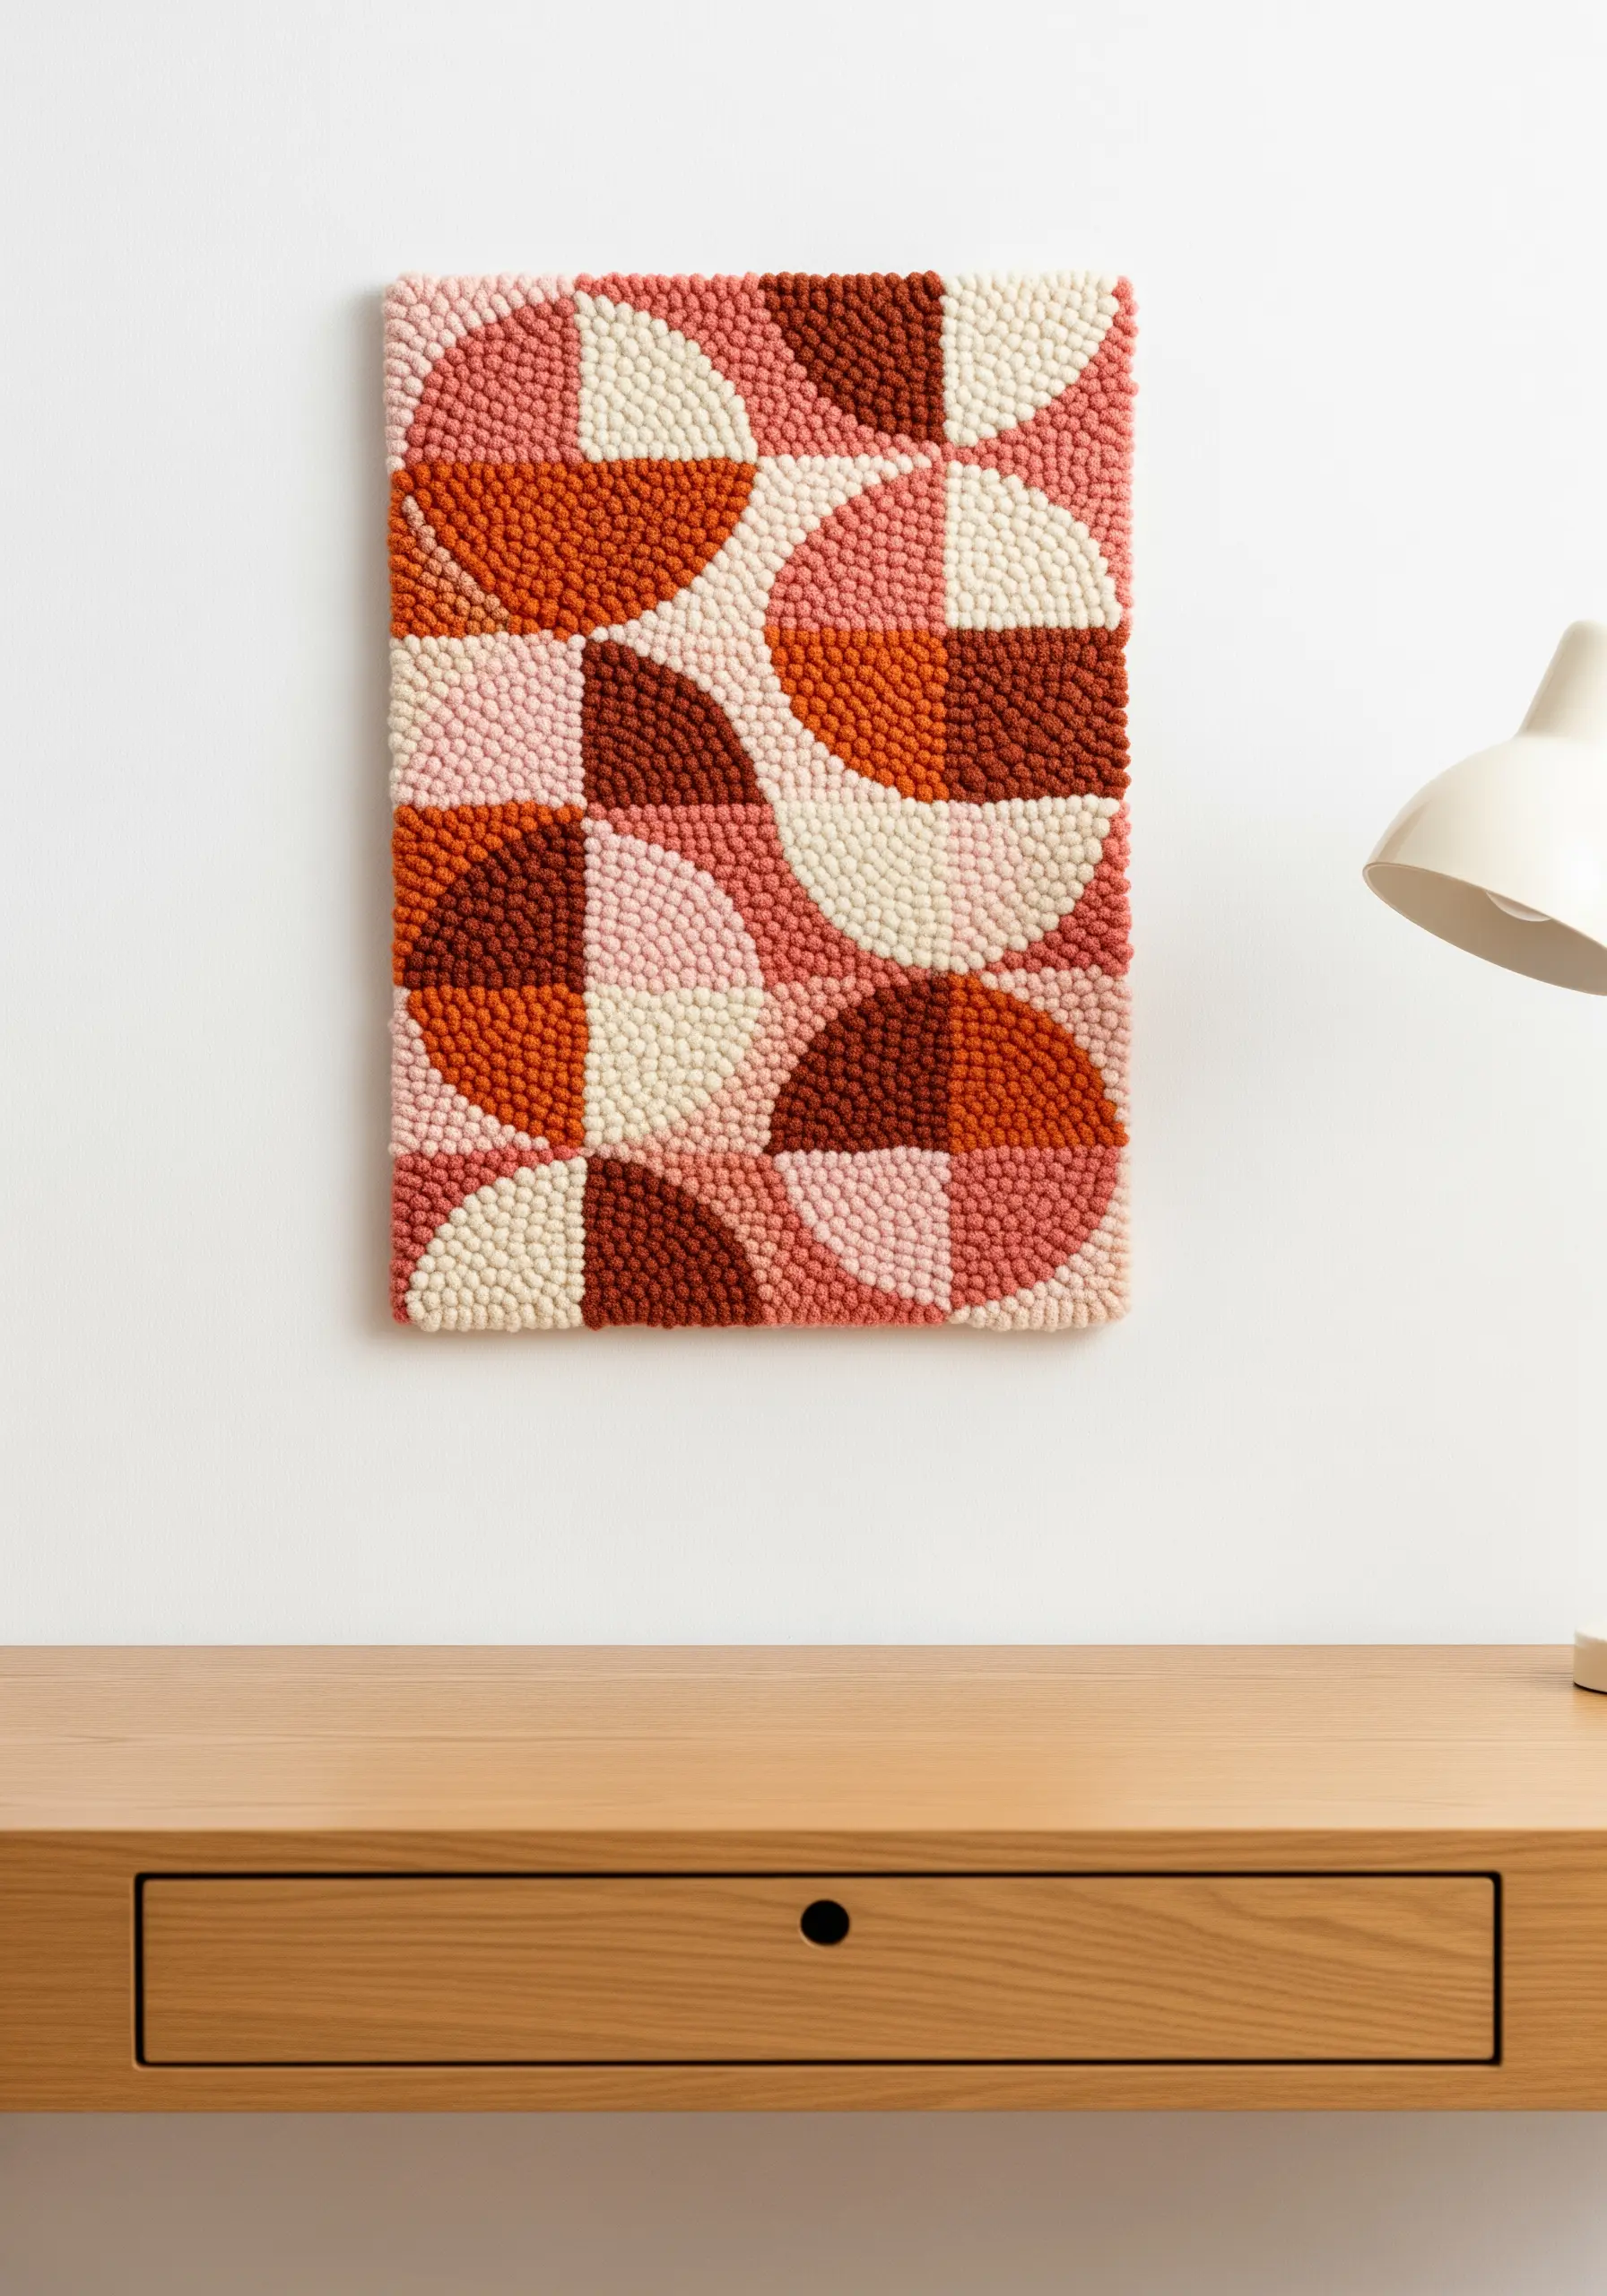
For filling large color blocks with satisfying texture, nothing beats the speed of punch needle embroidery.
The uniform loops create a dense, rug-like surface that feels incredibly lush and looks professionally finished.
To achieve this clean, geometric look, ensure your punch needle depth is consistent for every loop and pack your stitches tightly together.
Working with a limited color palette of five or six complementary shades allows the pattern—not the color—to be the focus.
This is one of the most effective modern embroidery techniques for turning simple shapes into impactful abstract art.
4. Shape Soft Sculpture Leaves with Macrame Knots
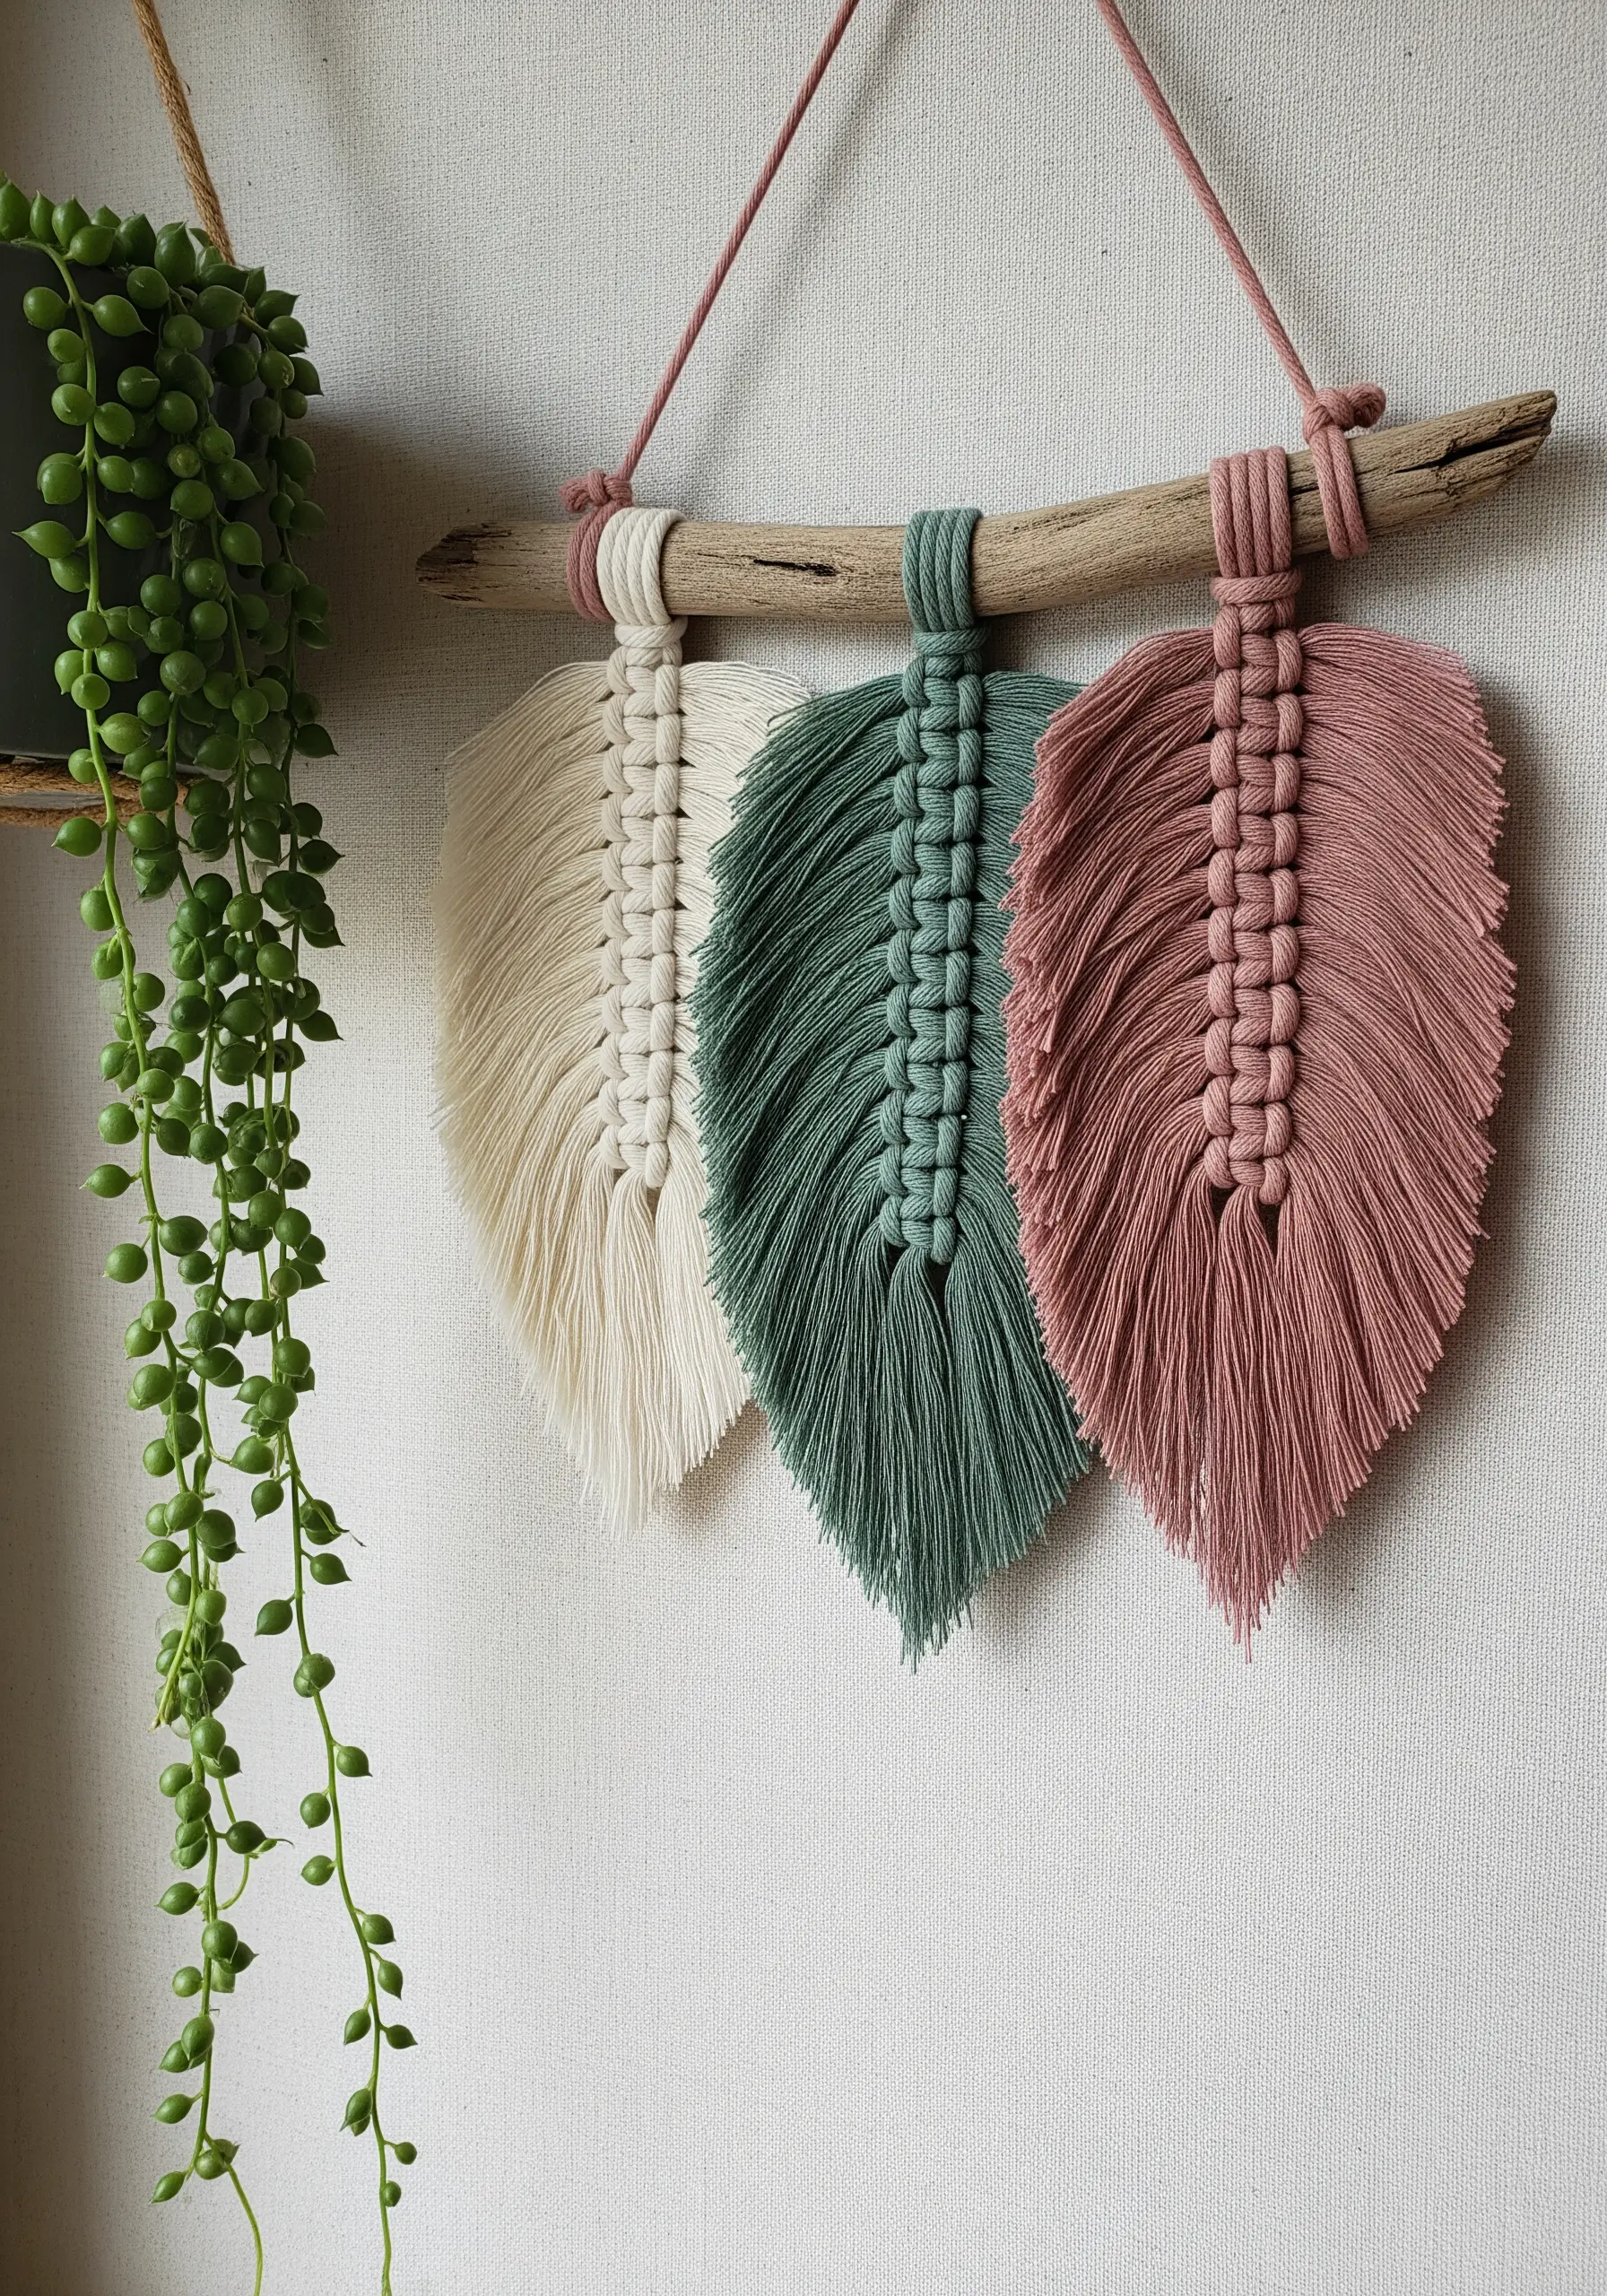
Explore fiber art beyond the needle by creating macrame leaves, which offer a soft, sculptural alternative to stitched botanicals.
Start with a central spine of square knots, then attach shorter pieces of cotton cord to each side using lark’s head knots.
Once all your cords are attached, the magic happens when you unravel the twists of each cord with a fine-tooth comb.
Combing the fibers creates that feathery, leaf-like texture. Trim the edges to your desired leaf shape and set with a light mist of fabric stiffener to hold its form.
5. Elevate Motifs with Bead and Sequin Embroidery
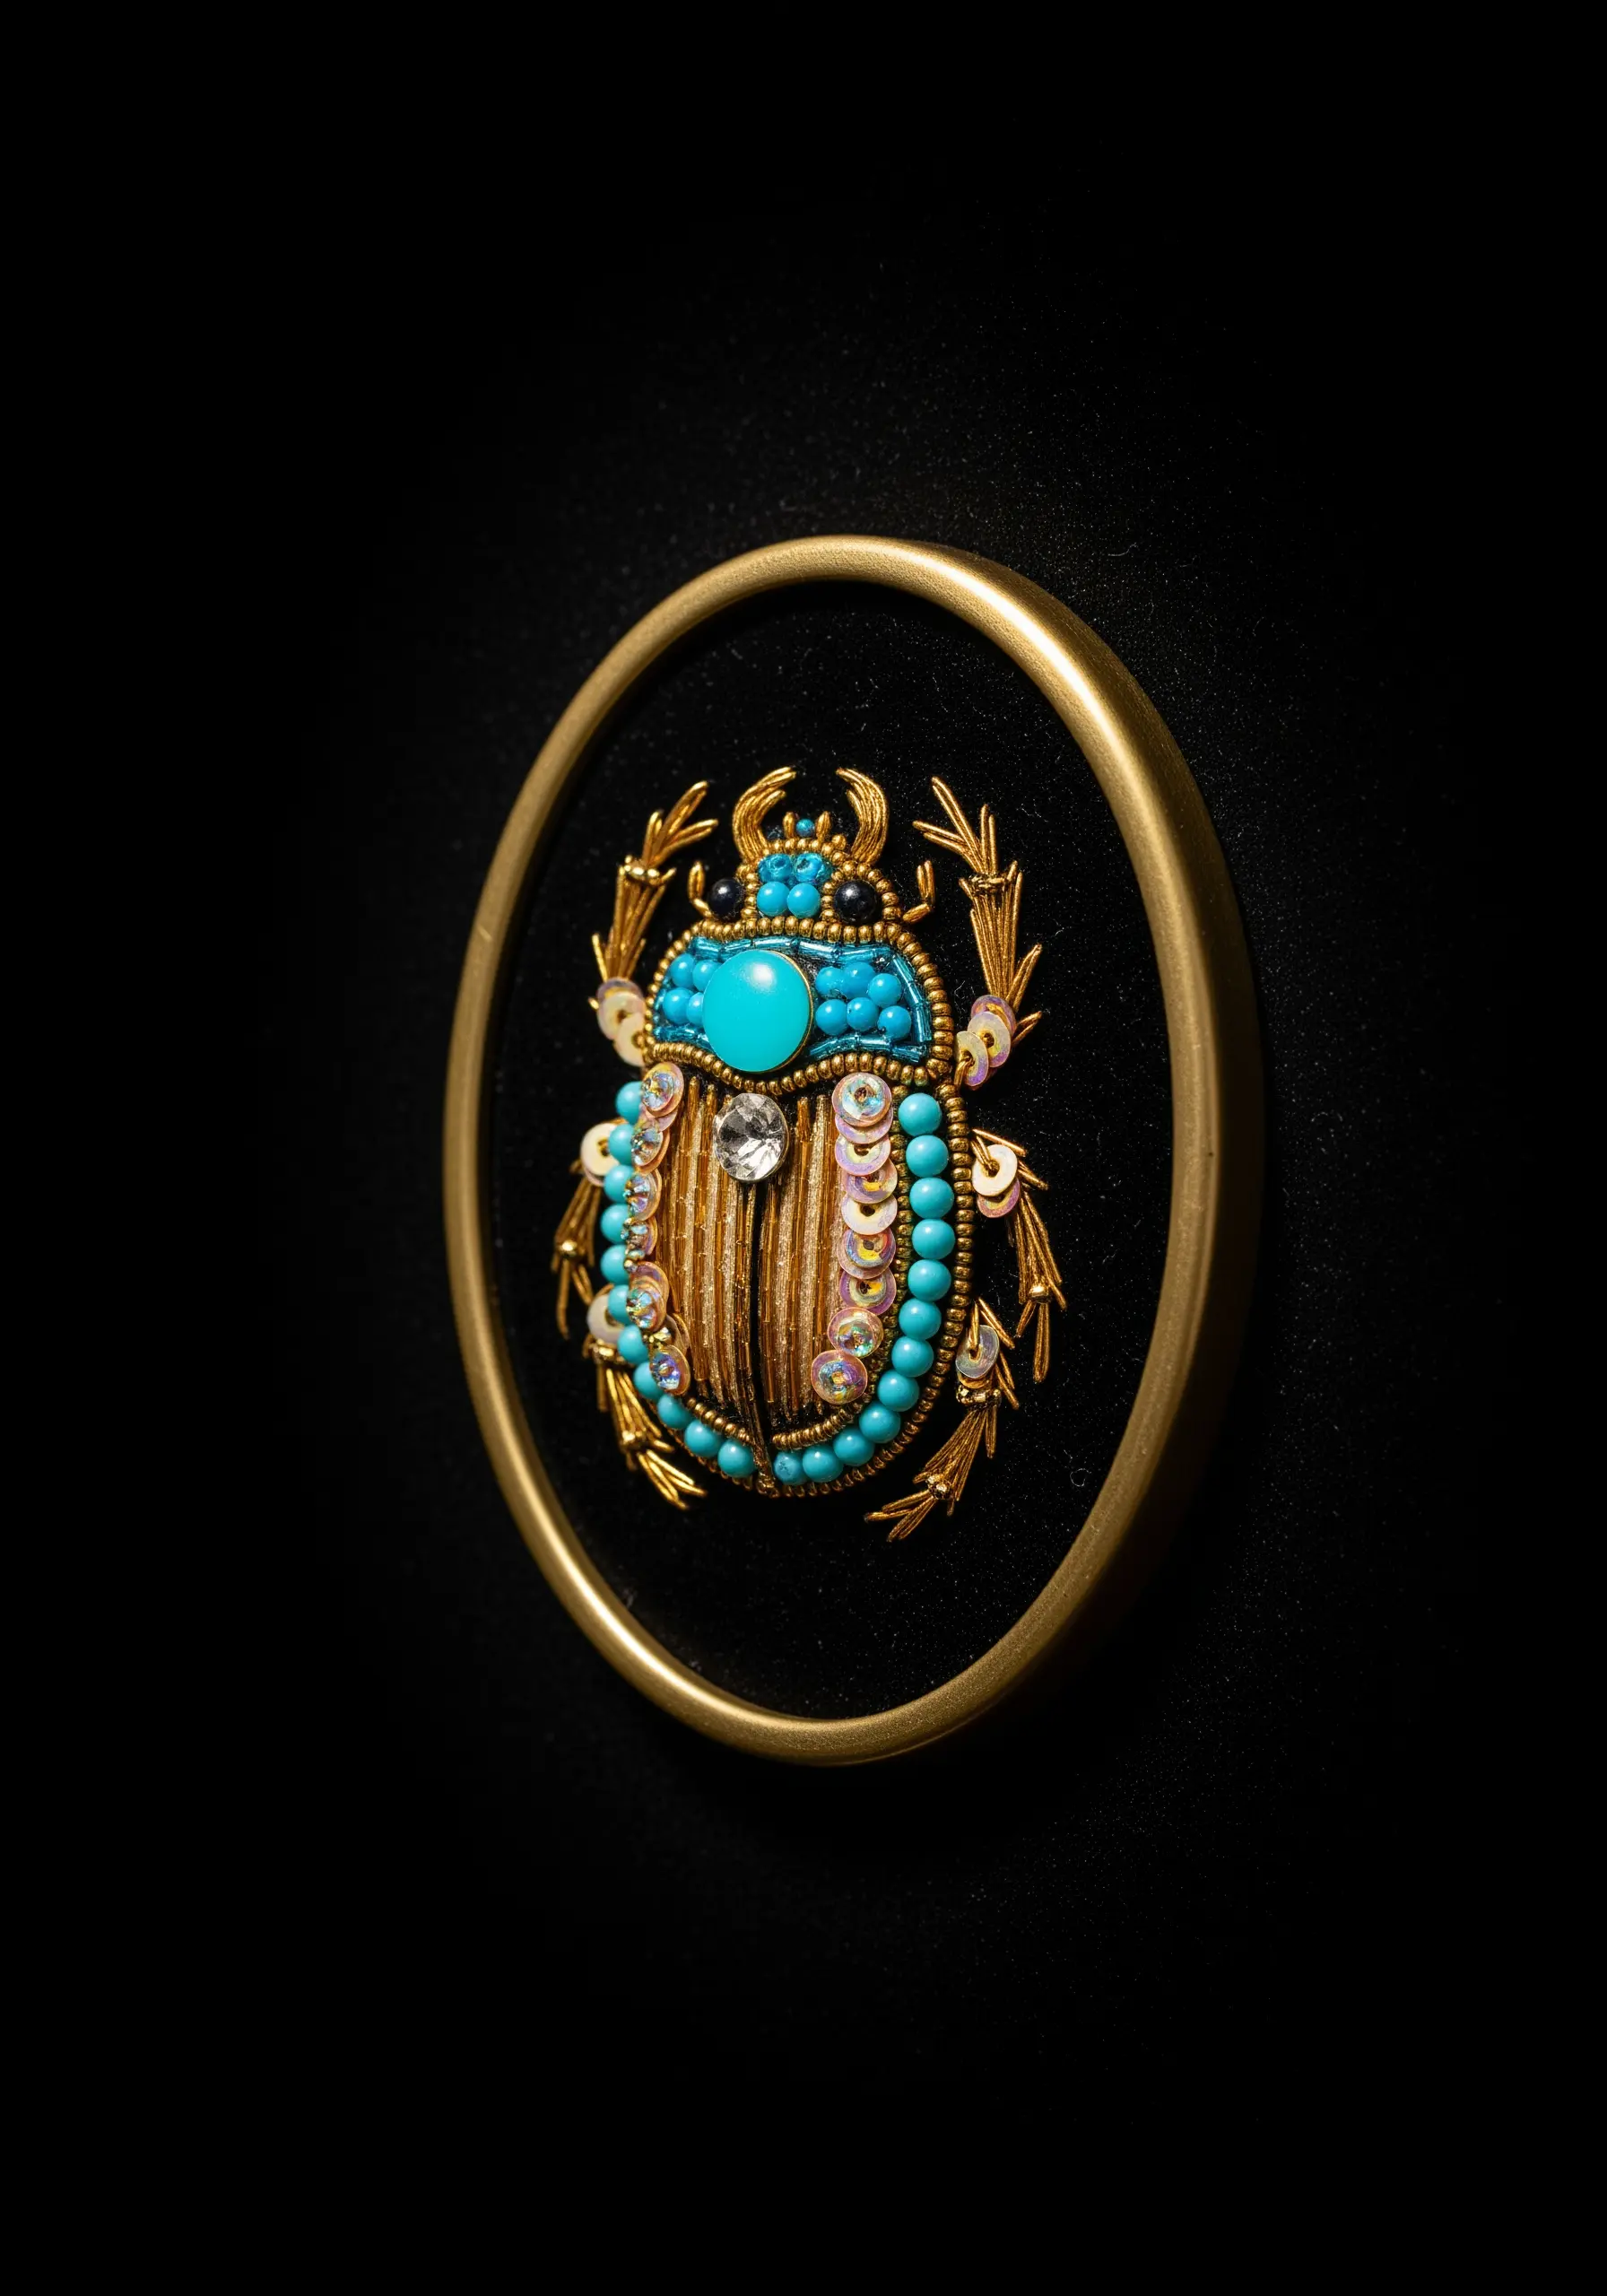
Introduce dimension and light into your work by incorporating beads, metallic threads, and sequins—a technique often called tambour embroidery.
Work on a dark, rich fabric like velvet; its deep pile absorbs light, making your embellishments appear even more luminous.
Create a subtle 3D effect by first stitching a small felt pad onto your fabric, then embroidering beads over it to create a raised, cabochon-like surface.
Outline your primary shapes with metallic thread or a row of seed beads to define the form before filling it with texture.
6. Build Soft Landscapes with Layered Felt
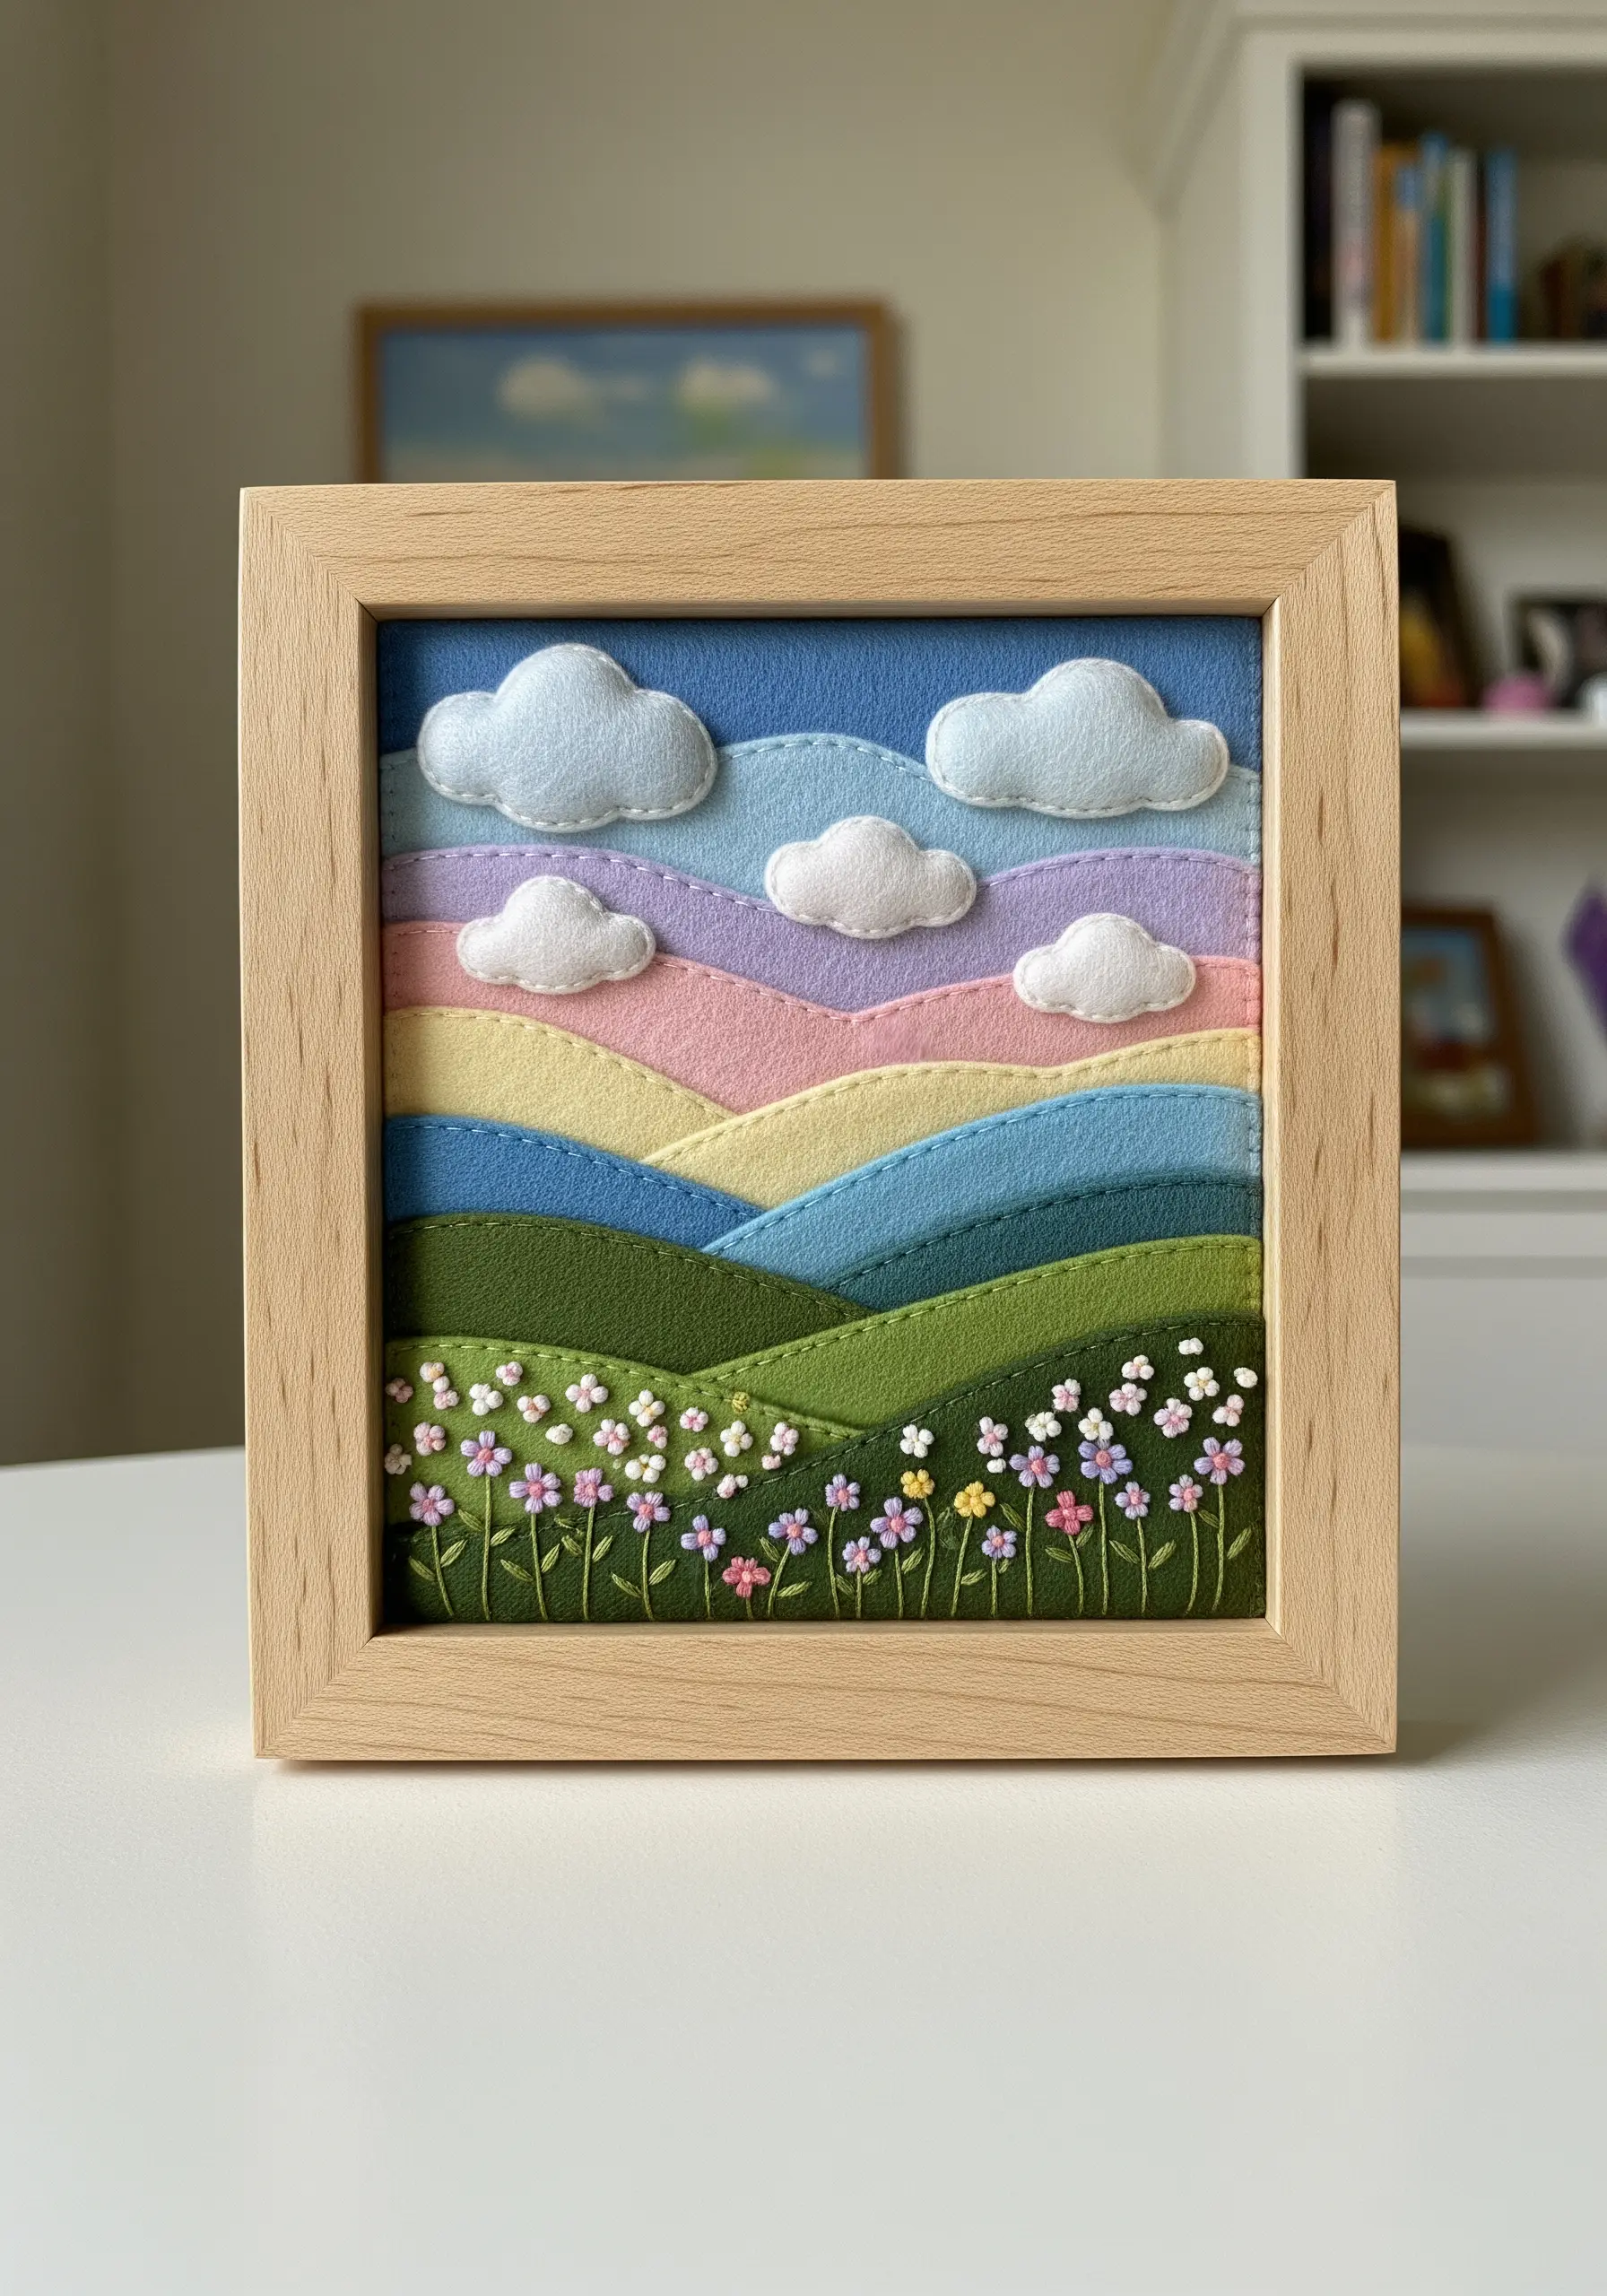
Create depth and perspective with minimal effort by using layered felt appliqué as your base.
Cut rolling hills and distant mountains from different colored felt sheets, layering them to build your scene.
A simple running stitch in a matching thread is all you need to secure the felt pieces and add subtle contour lines.
Once your landscape is built, add tiny floral motifs with French knots and lazy daisy stitches to the foreground—this small detail instantly brings the scene to life.
The contrast between the soft, matte felt and the slight sheen of the embroidery floss adds a beautiful textural interest.
7. Tell a Story with a Multi-Hoop Installation
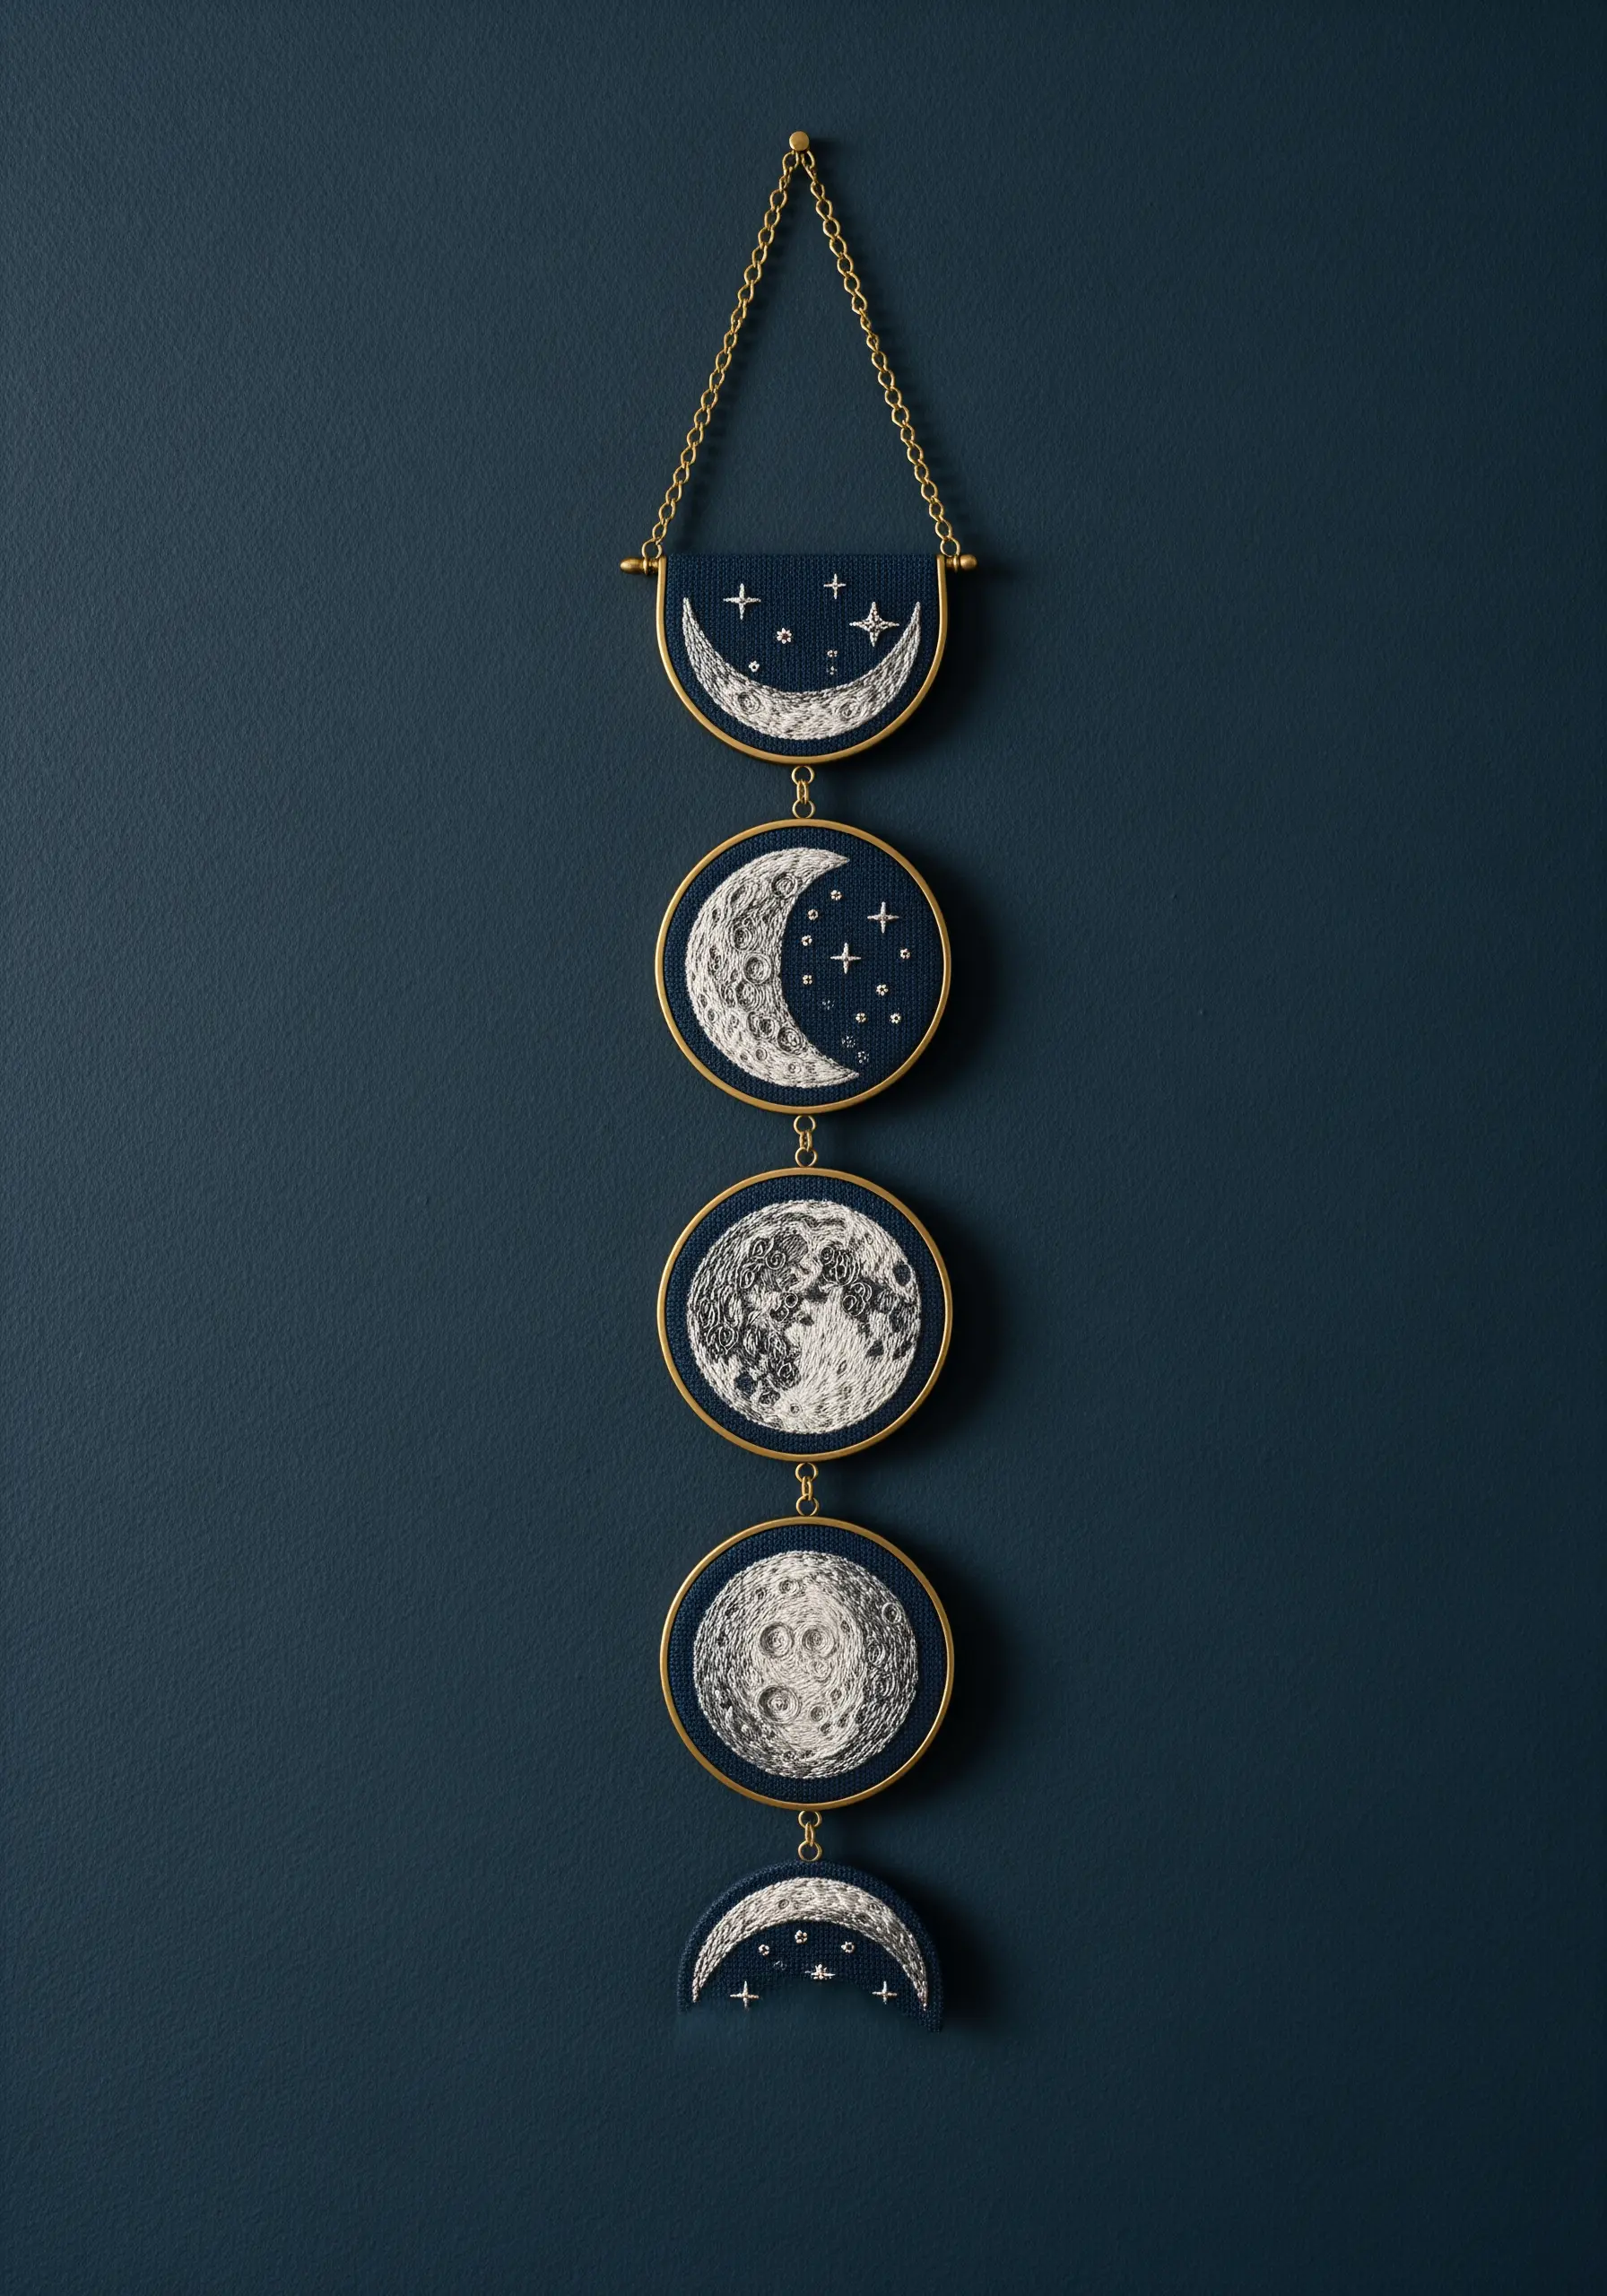
Transform a simple embroidery pattern into a significant piece of wall art by displaying it across multiple hoops.
This vertical moon phase design works because each hoop acts as a distinct chapter in a larger narrative.
To create the textured lunar surface, use dense satin stitches, French knots, and layered straight stitches in shades of white, grey, and silver.
Connect your hoops with small brass chains and jewelry findings for a polished, professional finish.
Grouping your work this way turns micro hoop embroidery collections into a single, cohesive statement piece.
8. Paint with Thread for Realistic Botanicals

Capture the subtle color variations of a monstera leaf using the long-and-short stitch, also known as thread painting.
Select at least three or four shades of green, from deep forest to bright lime, to create a natural-looking gradient.
First, outline the leaf shape with a split stitch to create a sharp, stable edge. Then, fill the sections with angled long-and-short stitches, blending one shade into the next.
The key to realism is ensuring your stitches follow the natural direction of the leaf’s veins, which adds movement and life to your work. Mastering these delicate leaf embroidery stitches elevates any botanical piece.
9. Weave a Functional Pocket Wall Hanging

Combine form and function by weaving a small pouch that doubles as a piece of wall art.
Using a simple lap loom, you can create this piece with basic tapestry weaving techniques.
To form the pocket, simply fold the bottom third of the woven panel upwards and stitch the sides together.
The geometric pattern is achieved by interlocking different colored yarns. This method prevents gaps in the fabric and creates clean diagonal lines.
It’s a perfect way to add both texture and a touch of practical storage to a narrow wall or entryway.
10. Combine Punch Needle with Natural Wood
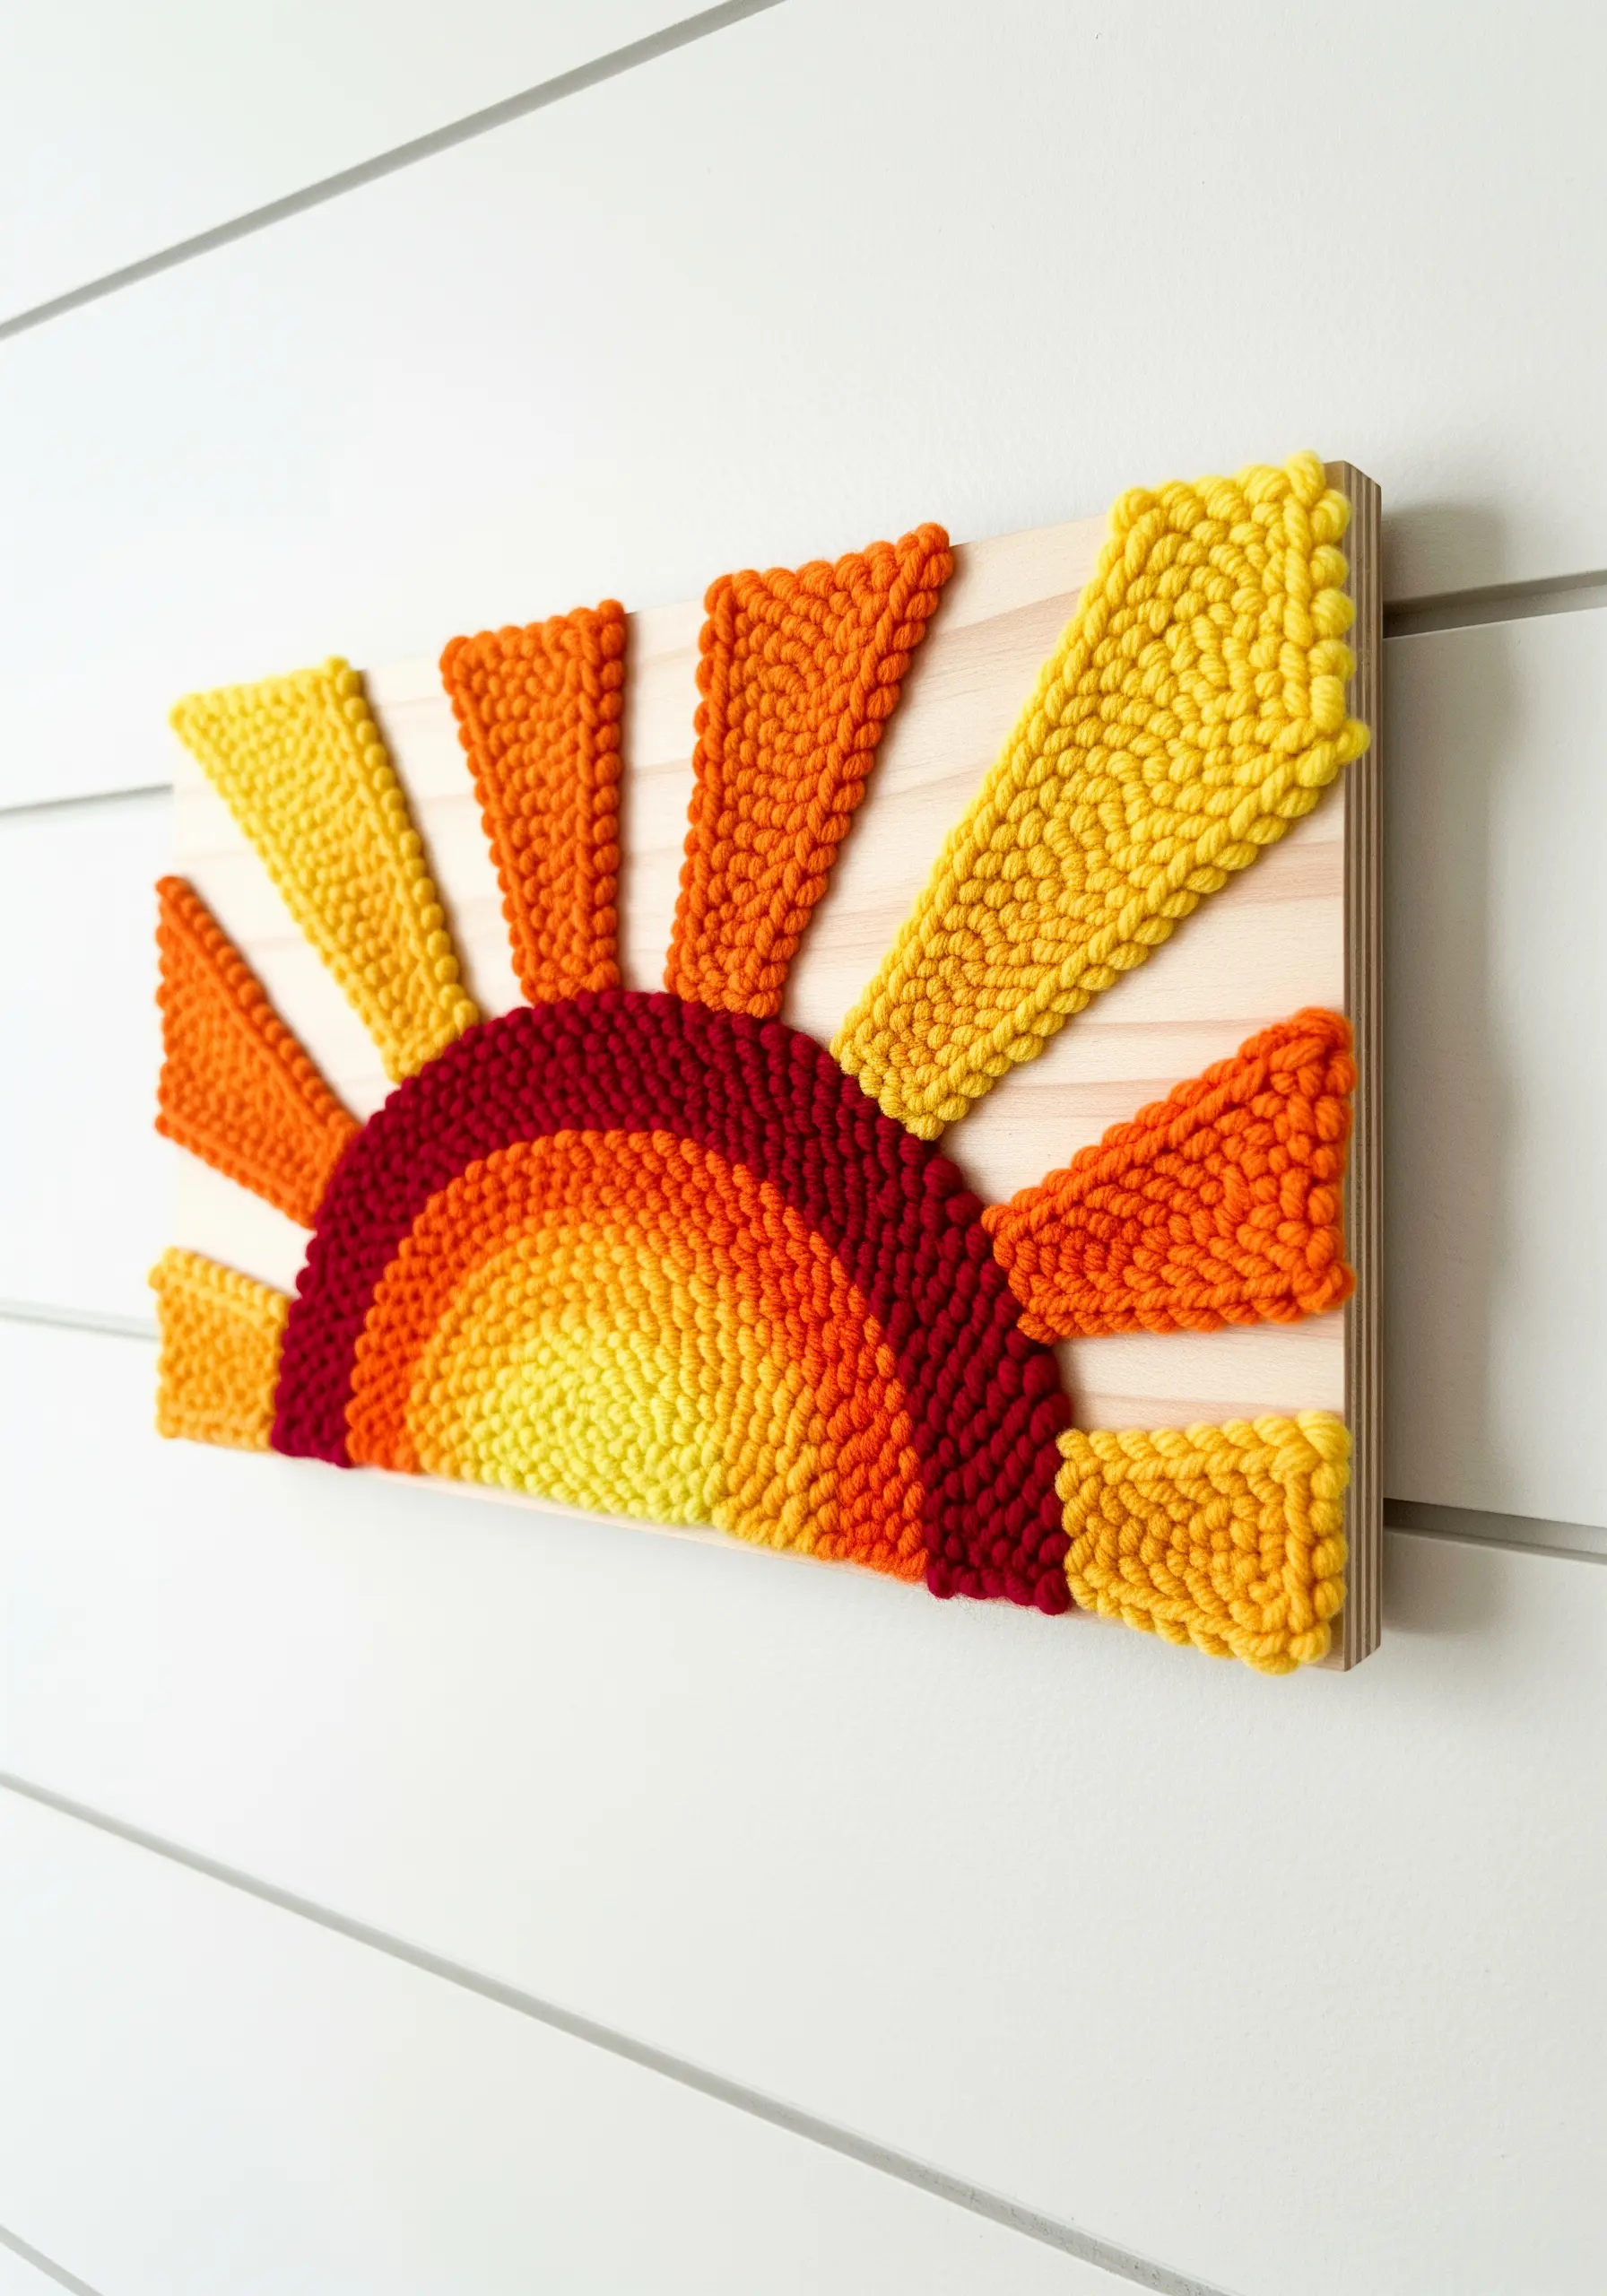
Create a striking contrast by mounting your punch needle art on a natural wood panel instead of stretching it in a hoop.
The negative space of the exposed wood grain makes the colorful, textured yarn pop, giving the piece a modern, sculptural feel.
You can achieve this by punching your design onto monk’s cloth, cutting it out with a generous border, and then securing it to the wood with a strong craft adhesive.
The radiating lines of the sun are perfect for practicing smooth curves and sharp points with your punch needle.
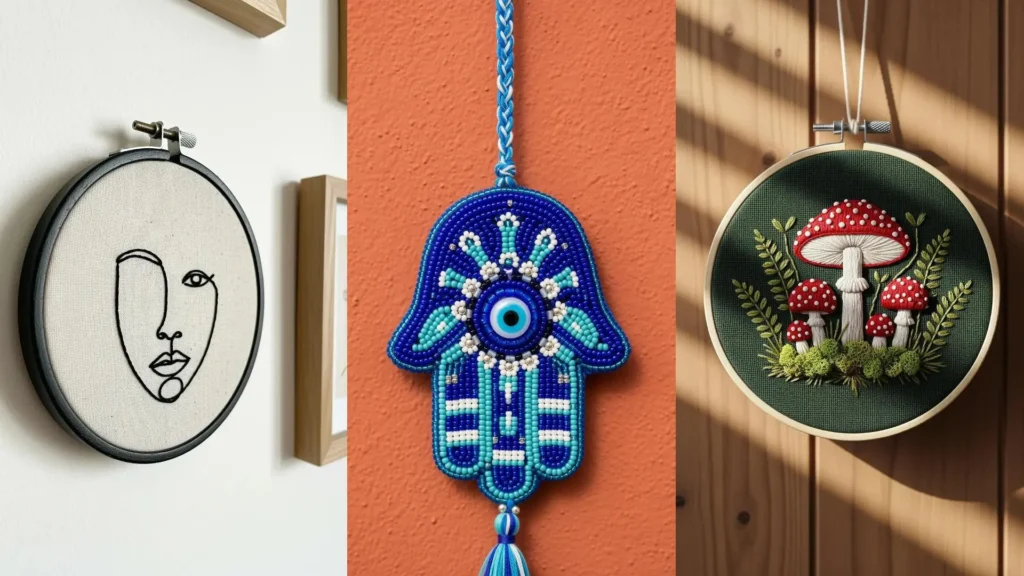
11. Embrace the Power of a Single Line
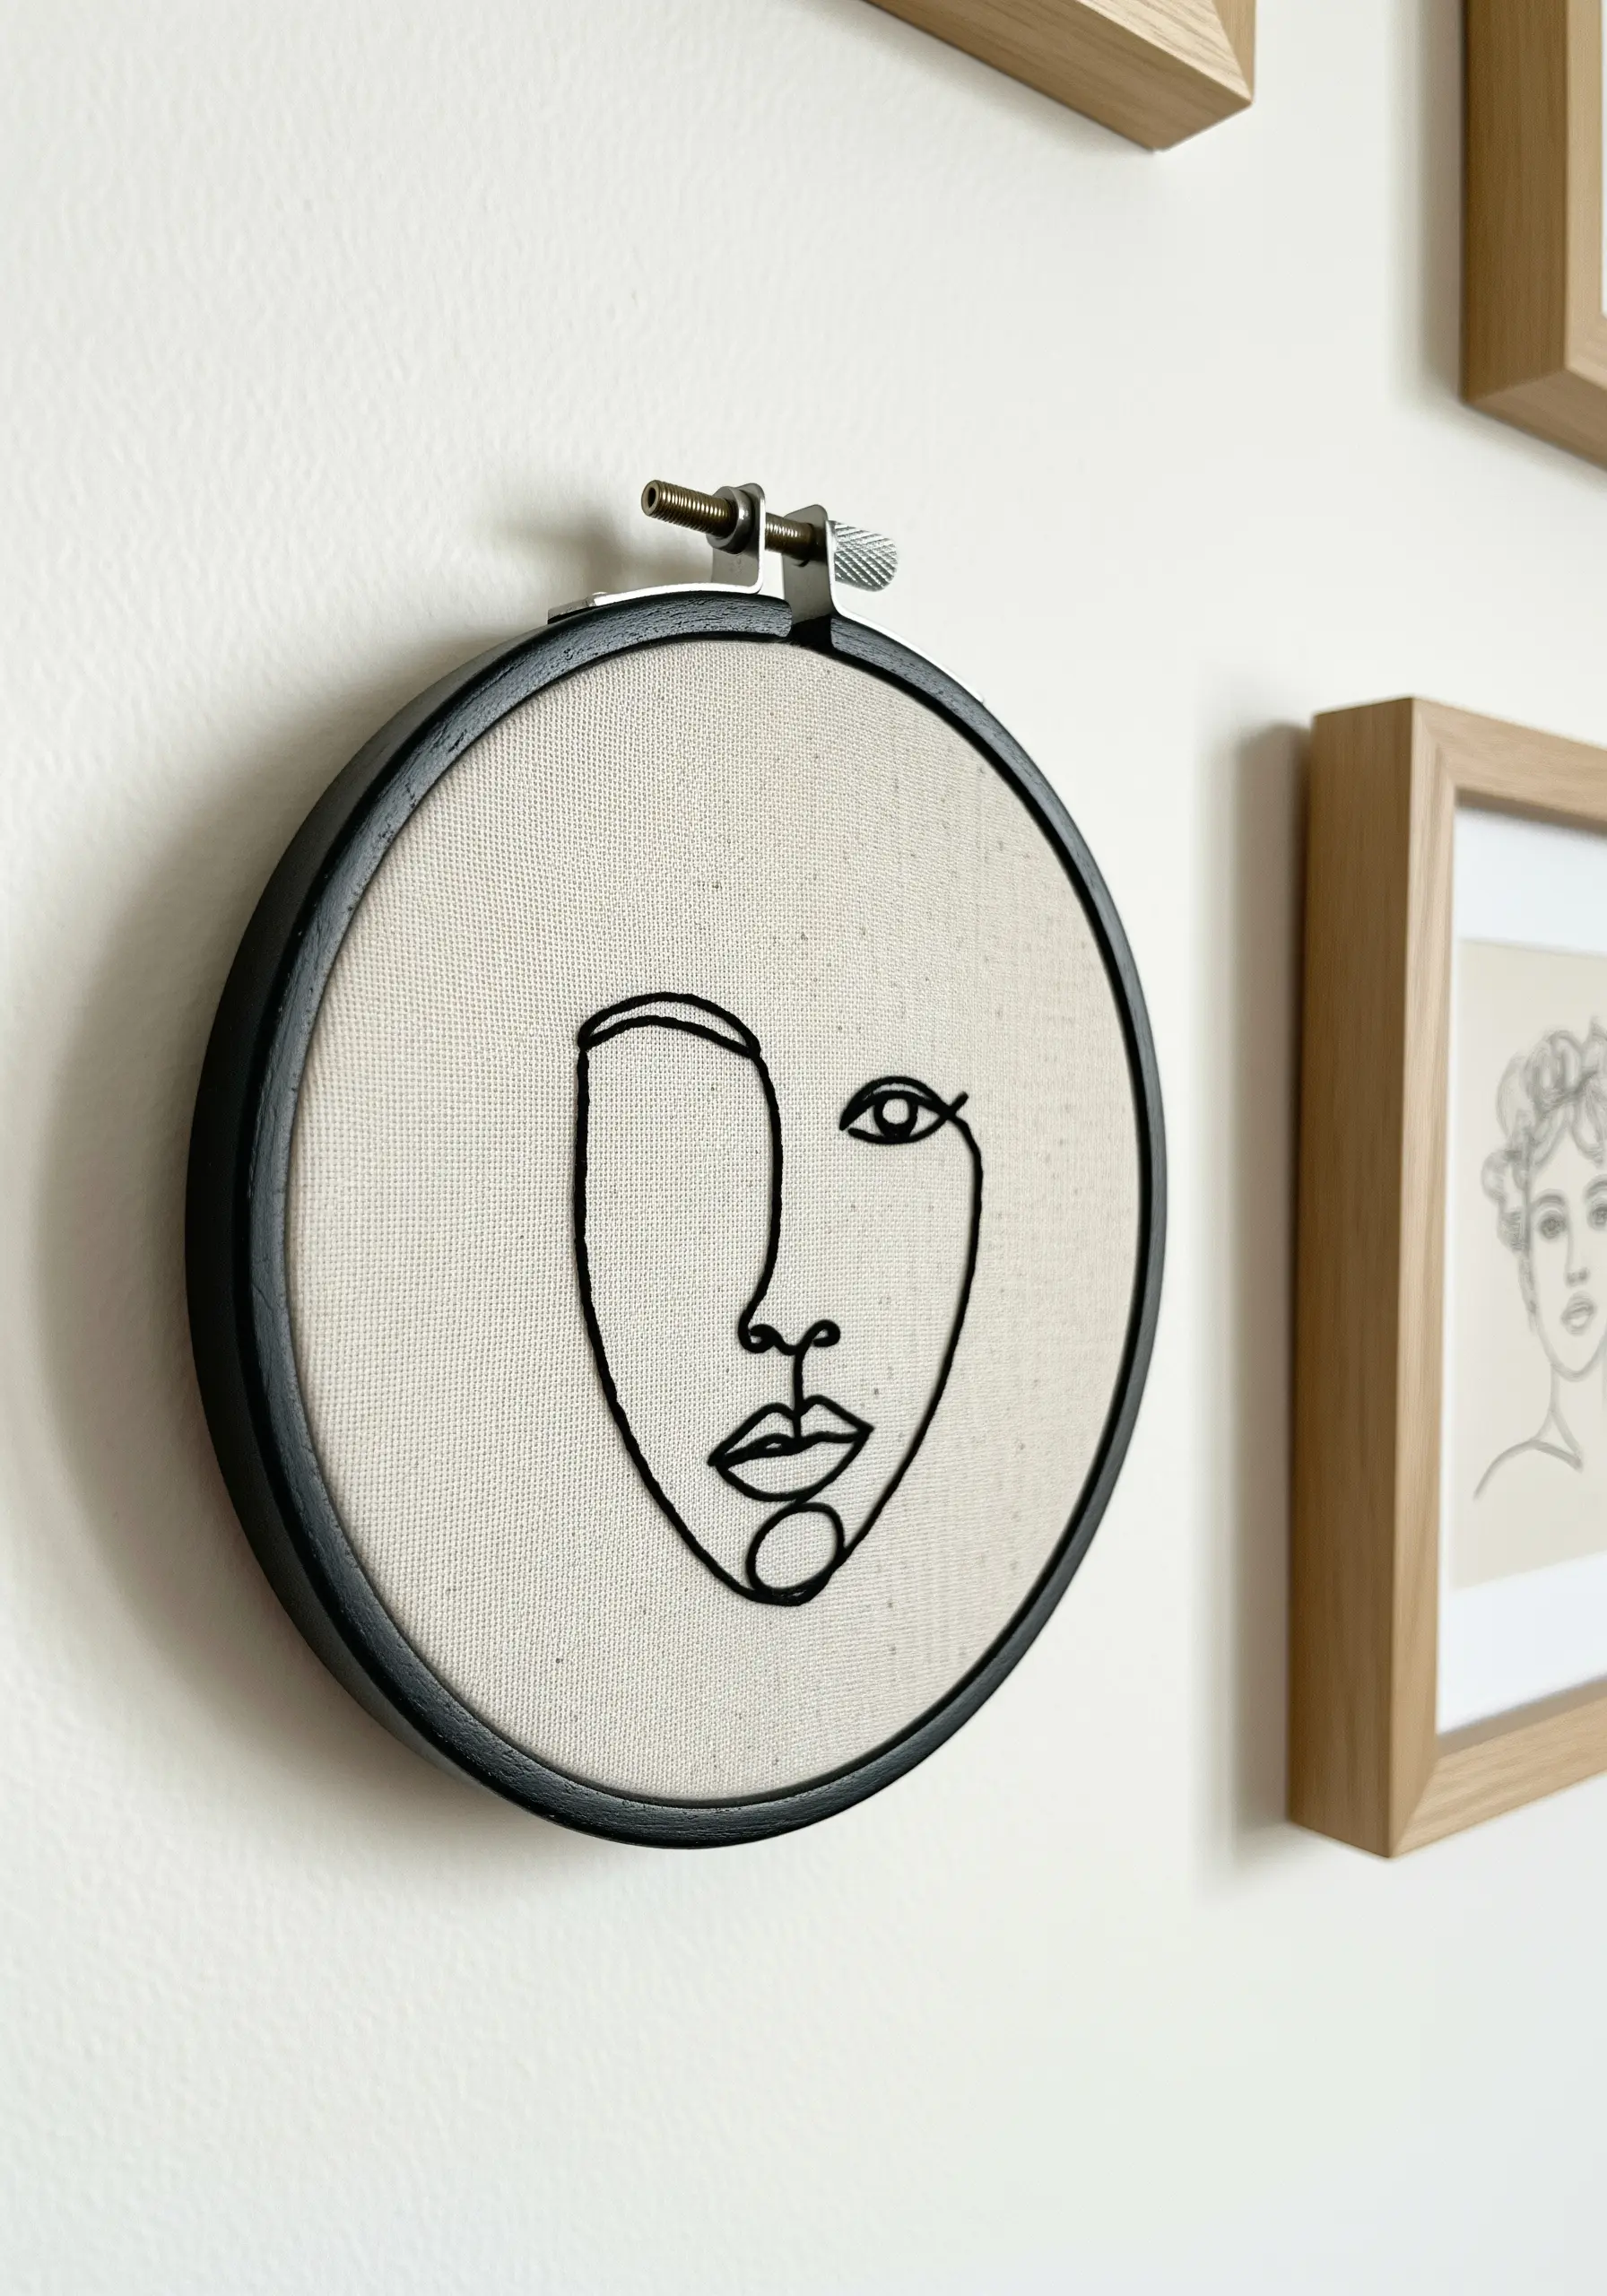
Make a bold statement with a single, continuous line. This minimalist line art approach feels both modern and timeless.
To get that clean, unbroken look, use a whipped backstitch or a stem stitch, which creates a smooth, rope-like line.
Choose a thicker thread—like all six strands of embroidery floss or a size 8 Perle cotton—to give your line weight and presence against the neutral fabric.
Framing the finished piece in a contrasting black hoop adds a graphic quality that enhances the simplicity of the design.
12. Create Mosaics with Precisely Placed Beads
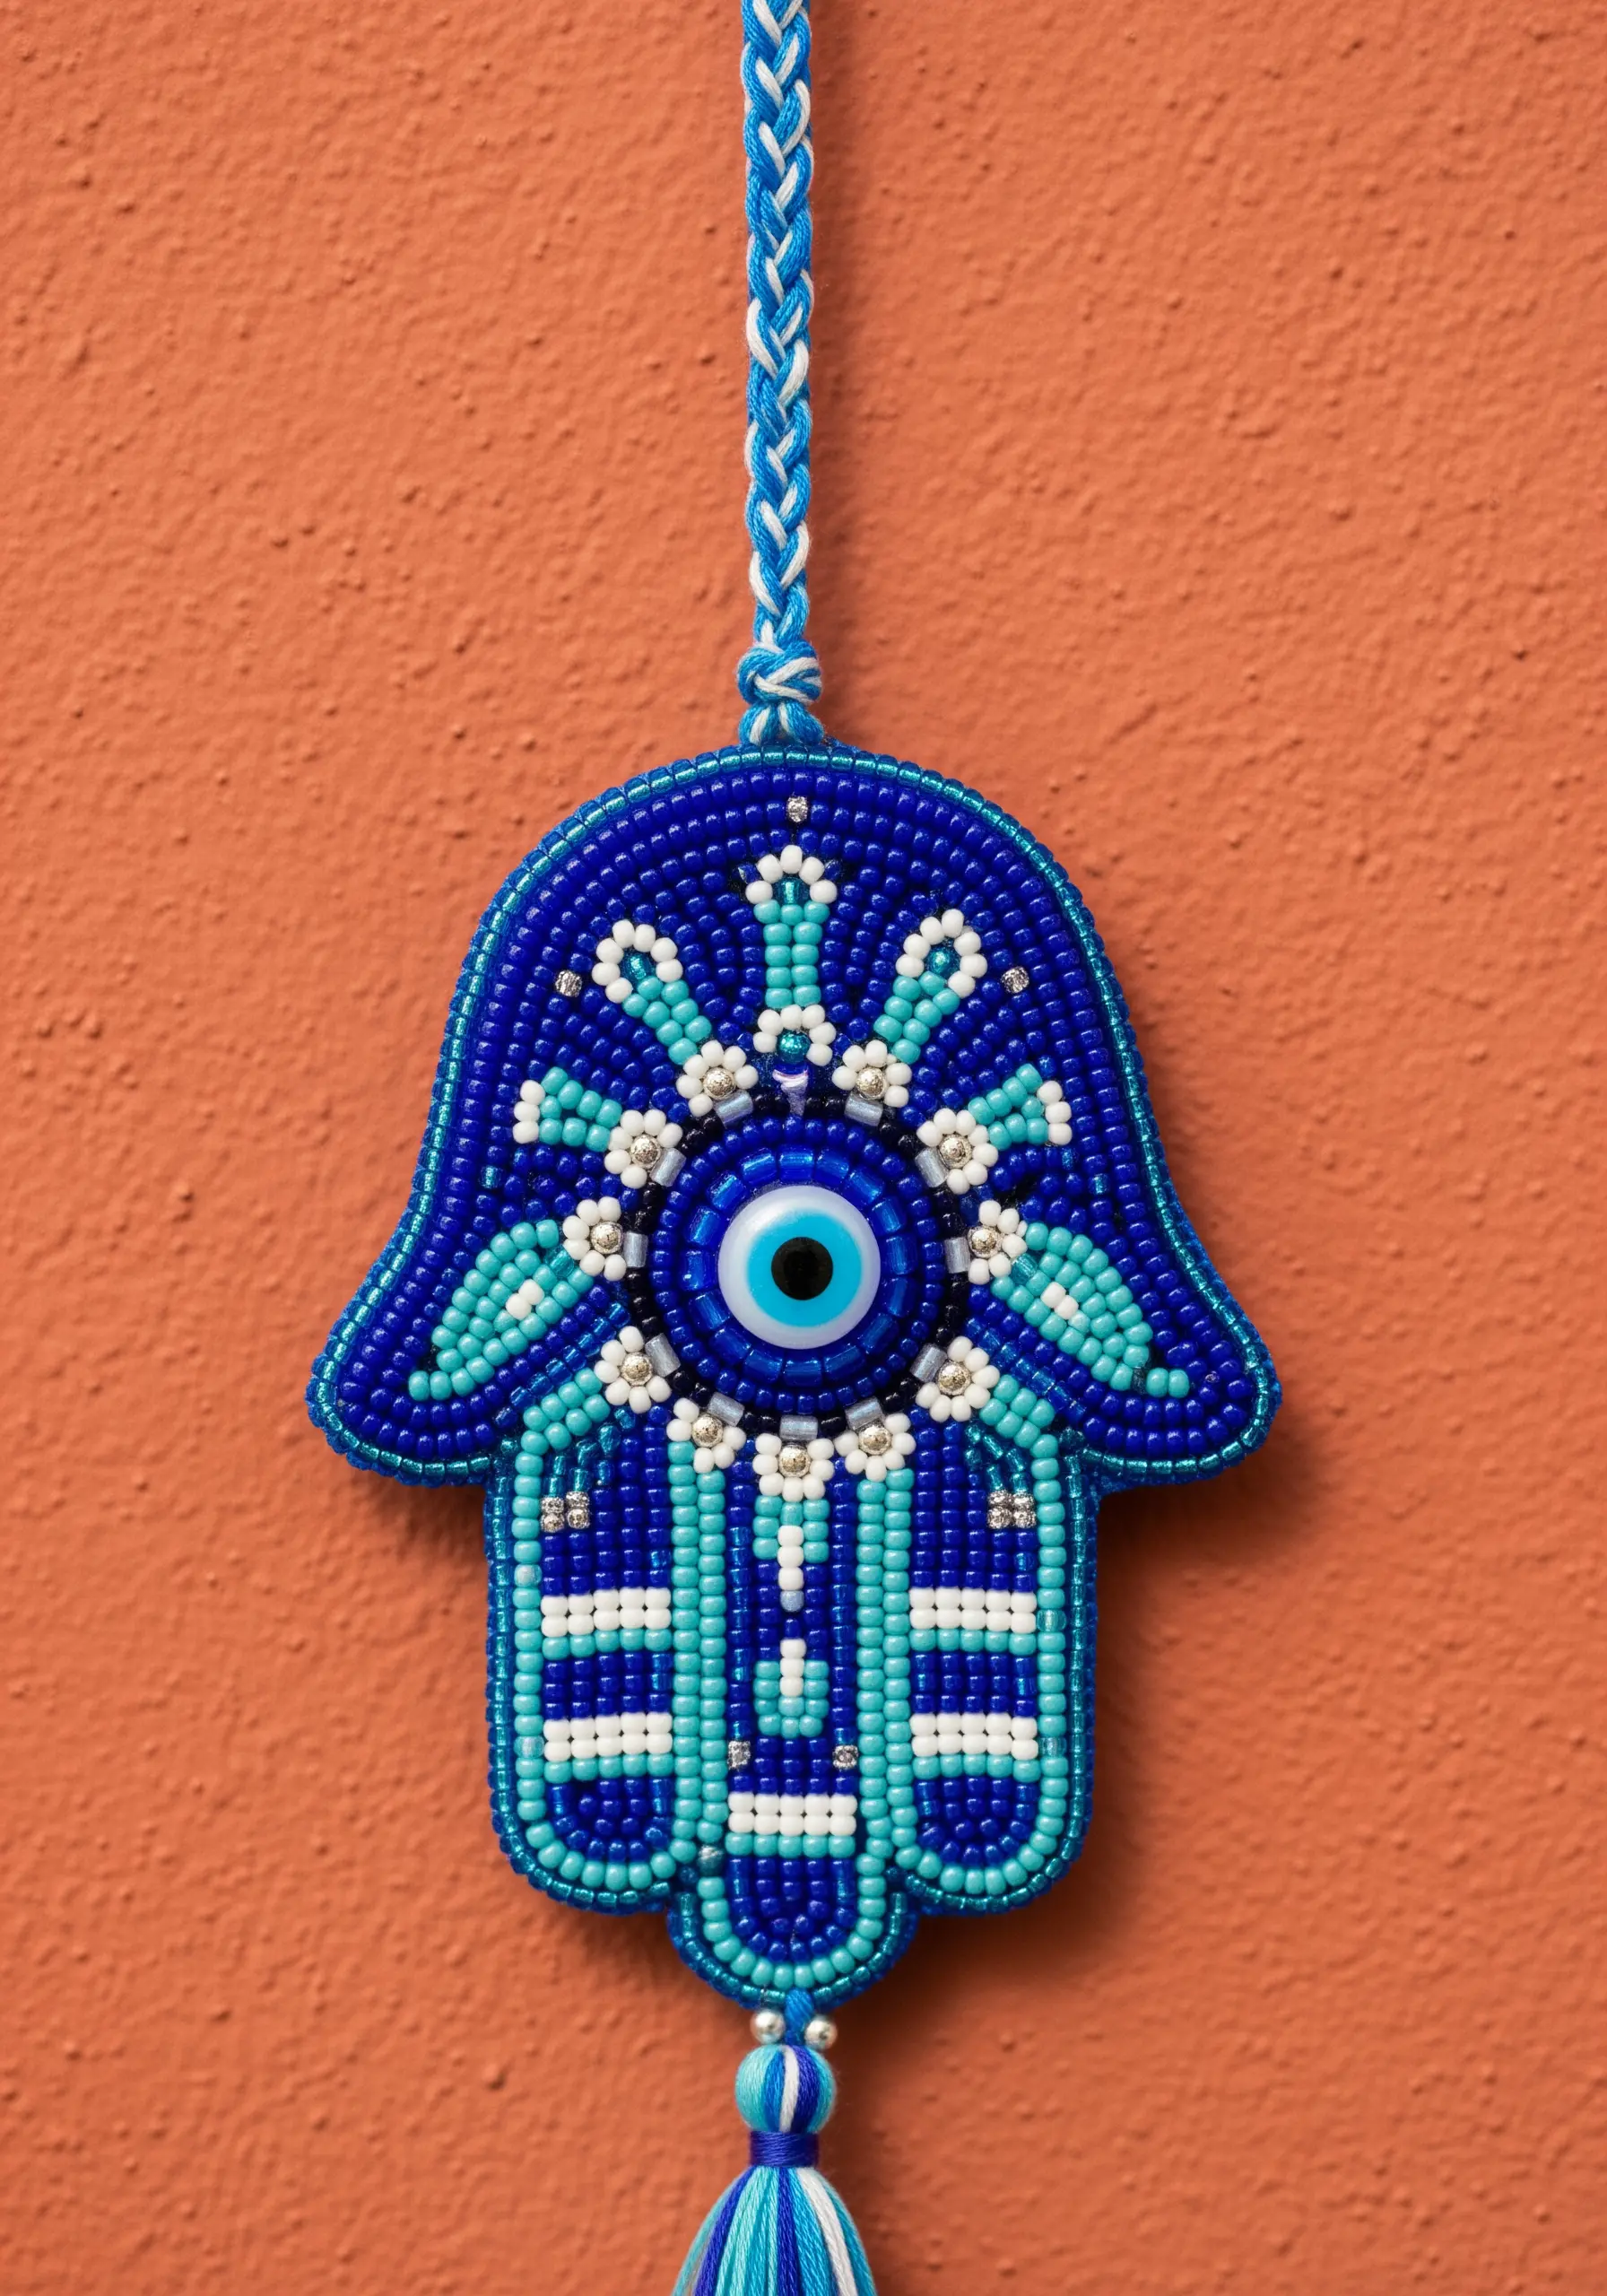
Think of beading as creating a mosaic with thread instead of grout. This Hamsa hand demonstrates how uniform rows of beads create a clean, graphic effect.
To achieve this precision, use a beading needle and a strong thread like Nymo, applying two or three beads at a time with a simple backstitch.
Outline each colored section first, then fill it in with concentric or straight rows of beads for a tidy, intentional look.
The contrast between matte, shiny, and metallic beads adds a subtle layer of complexity and visual interest.
13. Build a 3D Forest Floor with Varied Stitches
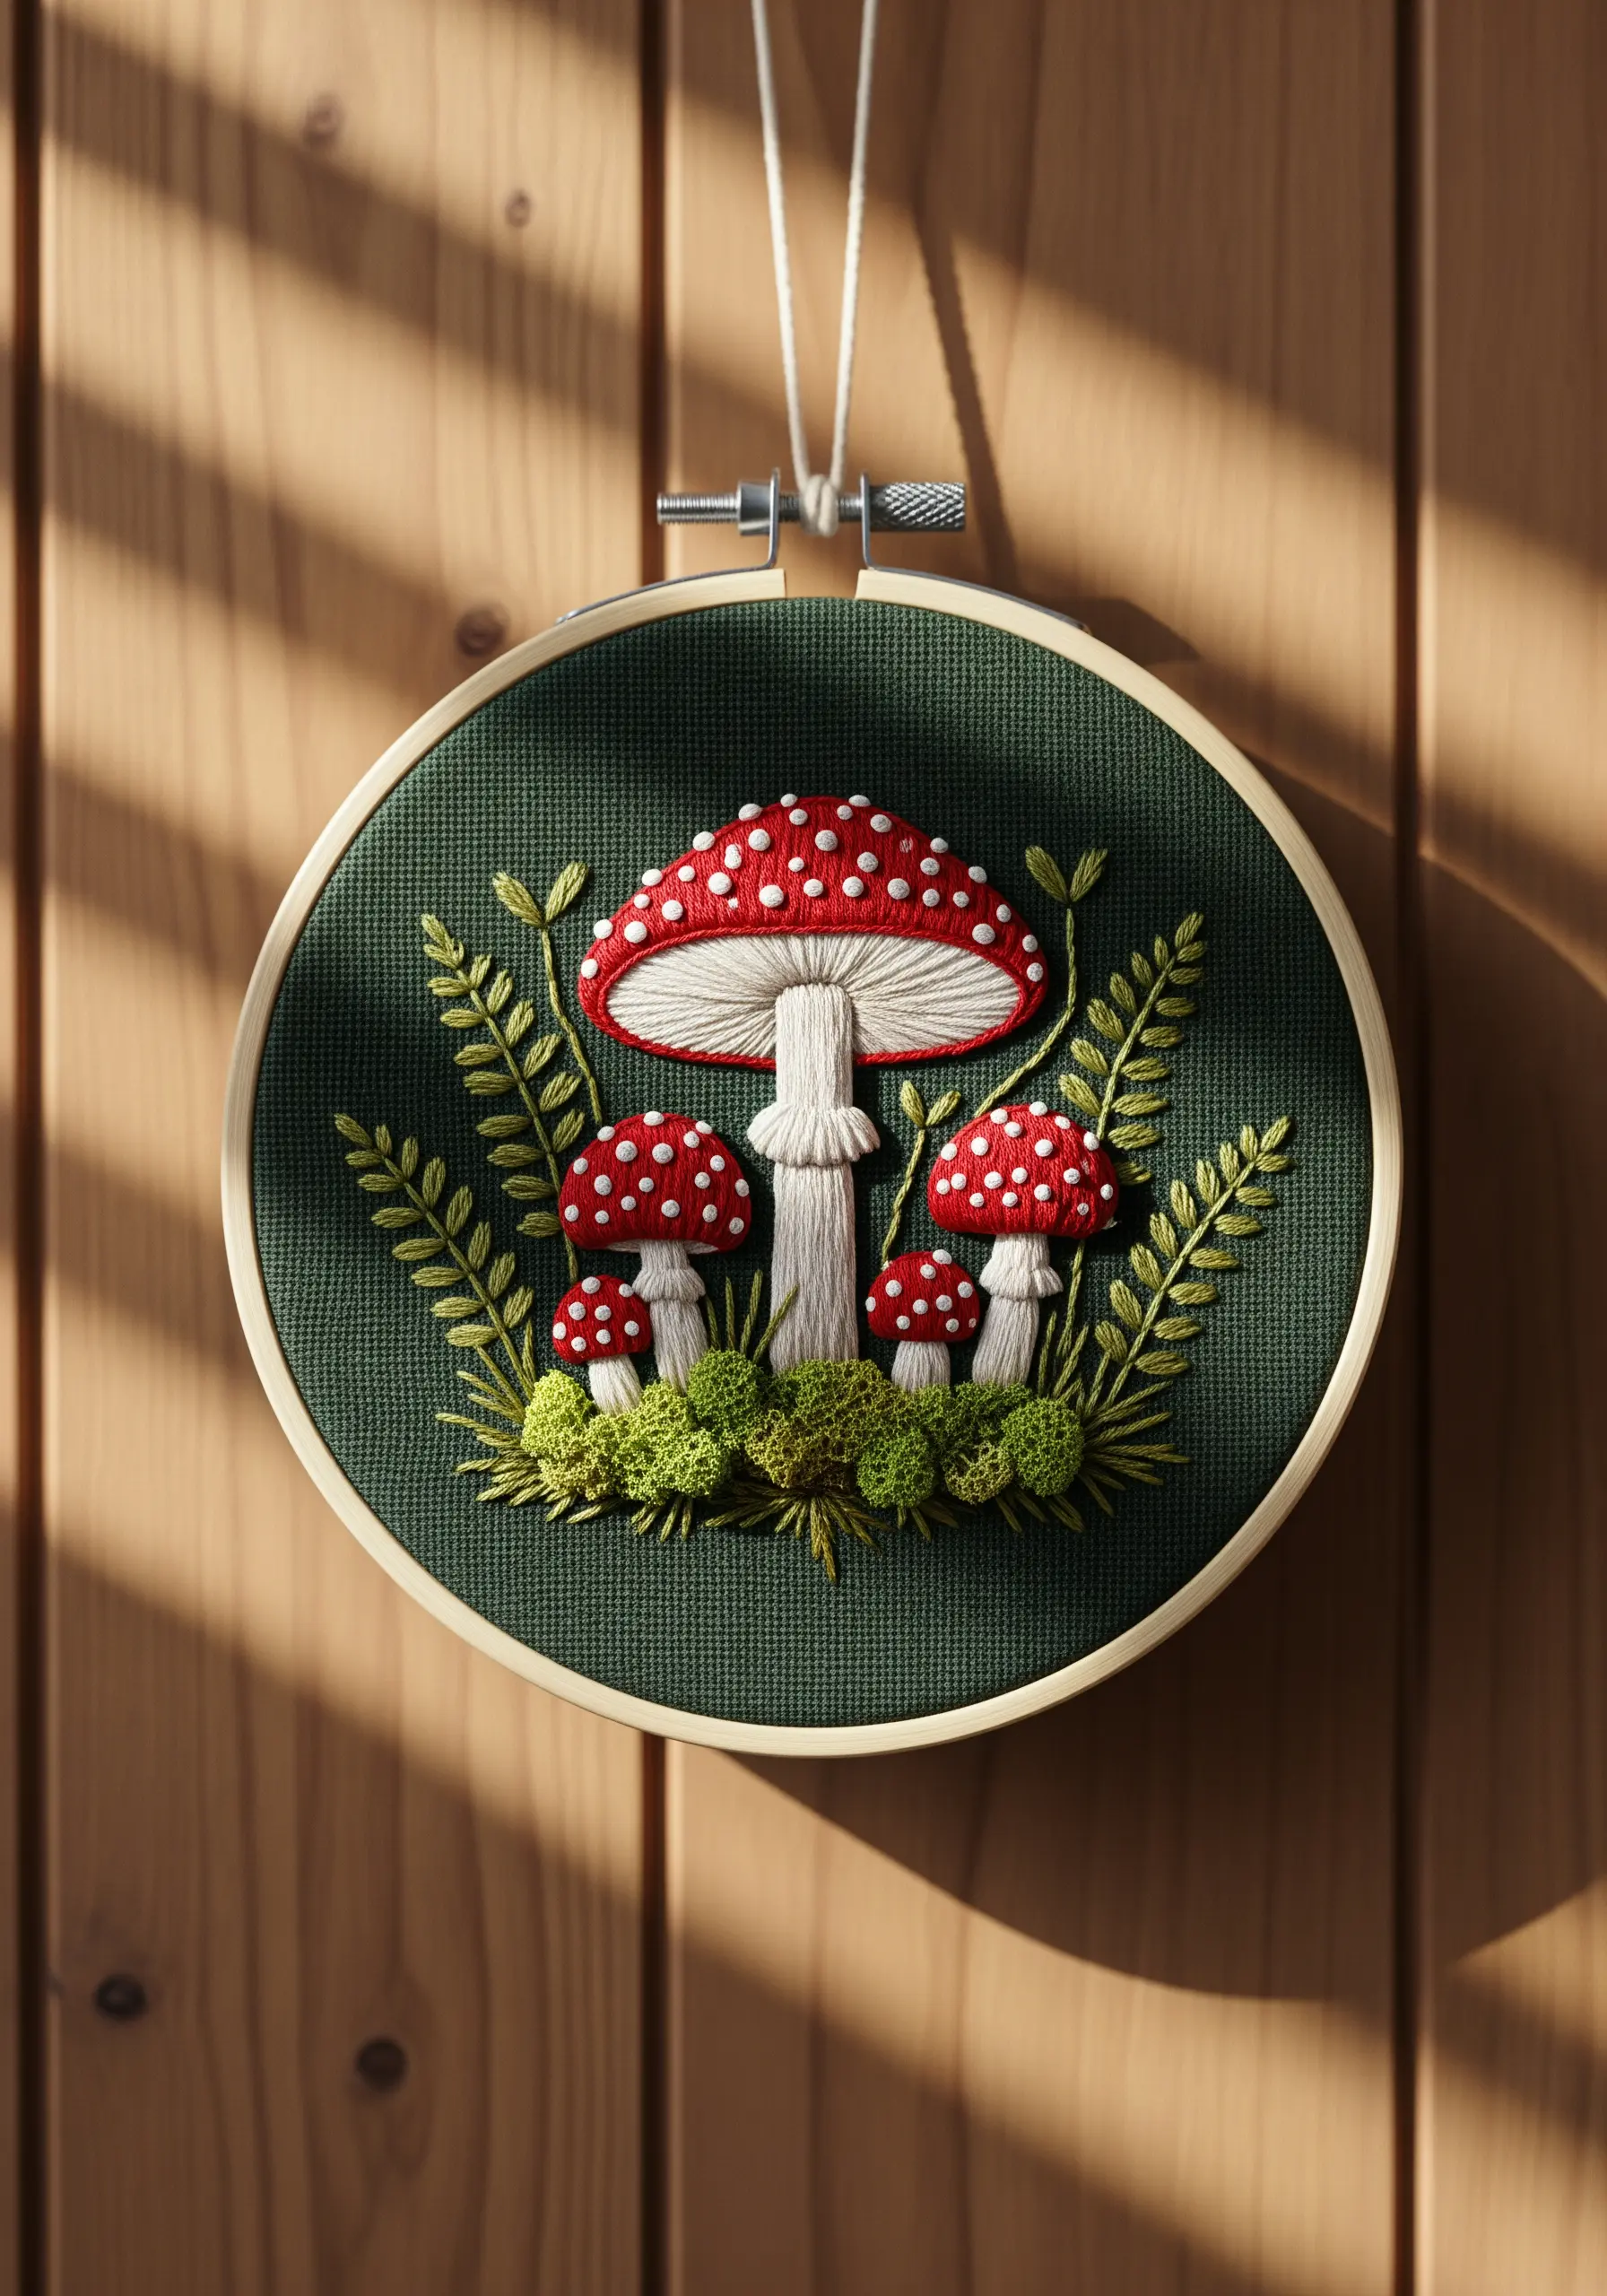
Bring a woodland scene to life by assigning different stitches to create specific textures.
For the mushroom caps, a smooth, dense satin stitch gives a perfect sheen. Underneath, use vertical straight stitches in a darker shade to suggest gills.
The real magic is the mossy ground. Create this with a dense collection of French knots in various shades of green and brown, or for even more dimension, use the Turkey stitch to make shaggy, trim-able loops.
These forest floor botanical stitch ideas transform a flat image into a tactile world.
14. Play with Texture Using Rya Knots
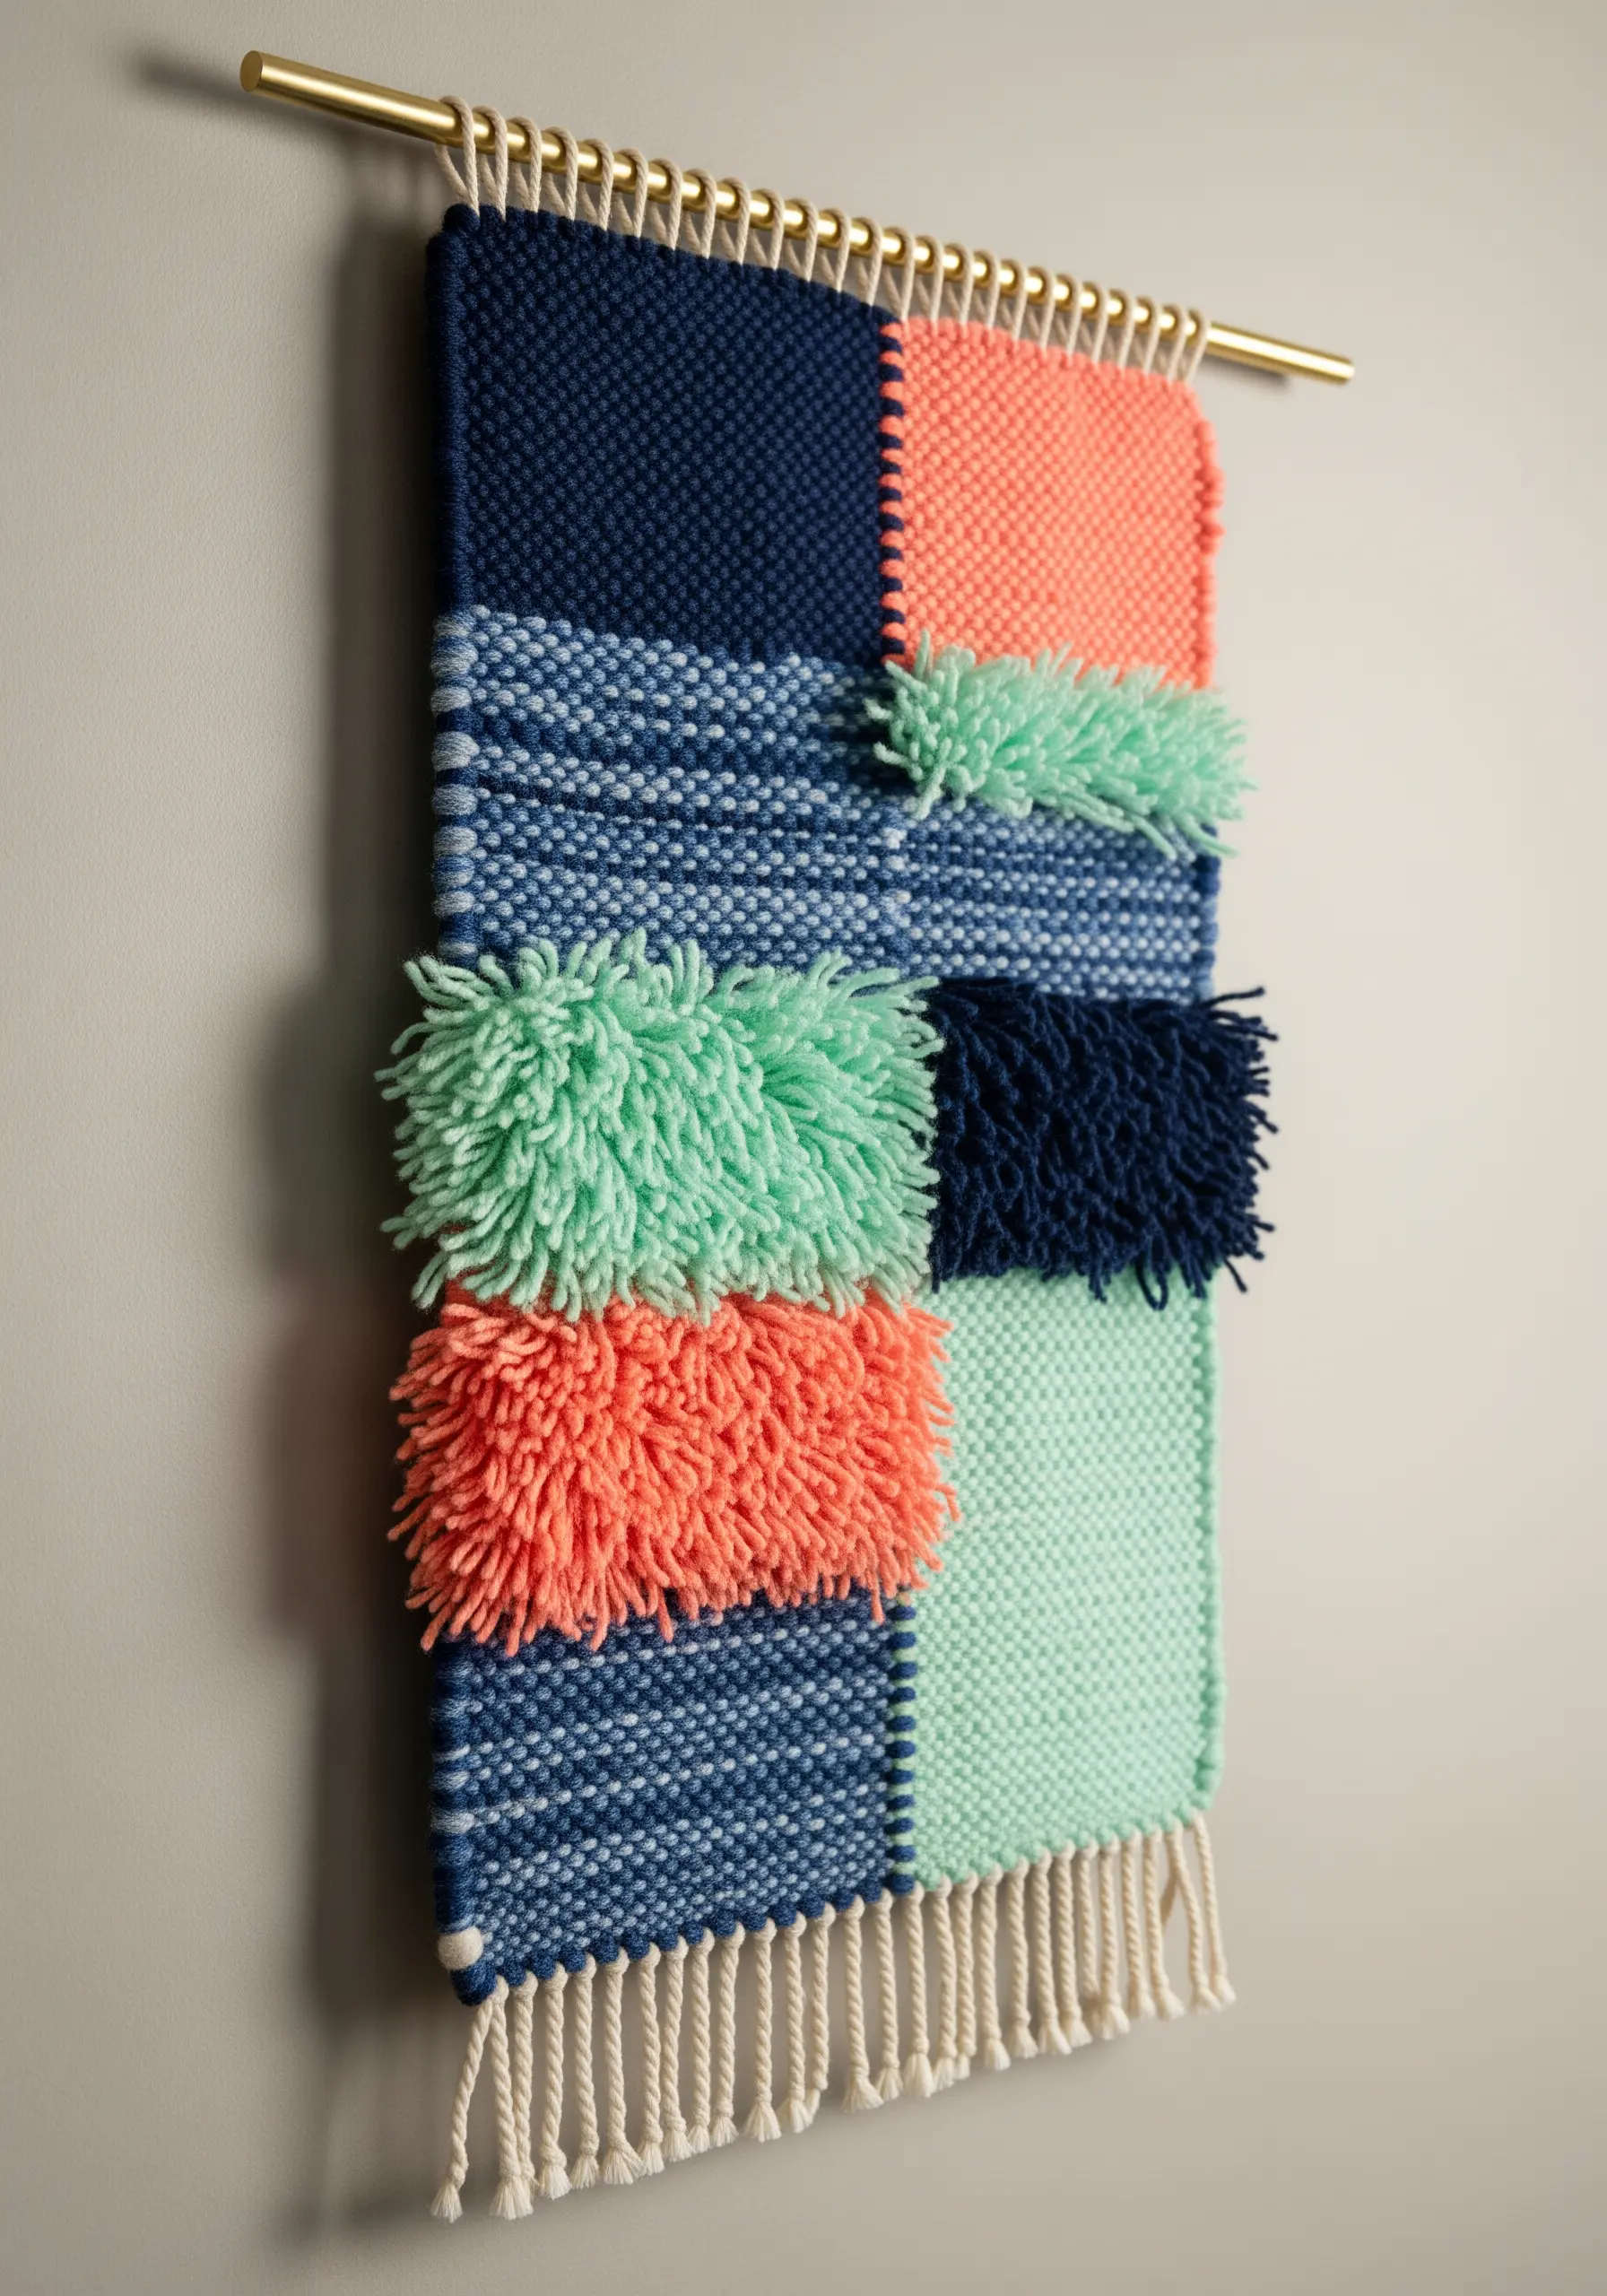
Add unexpected bursts of texture to a simple woven piece with Rya knots, which create the fluffy, shaggy sections.
These knots are tied around the warp threads between rows of plain weave, creating loops that can be left as is or cut for a fringed effect.
This technique is perfect for adding a playful, three-dimensional element that contrasts beautifully with the flat, woven blocks of color.
By arranging these textured squares in a checkerboard pattern, you create a dynamic balance between smooth and shaggy surfaces.
15. Construct a Sculptural Yarn Rainbow
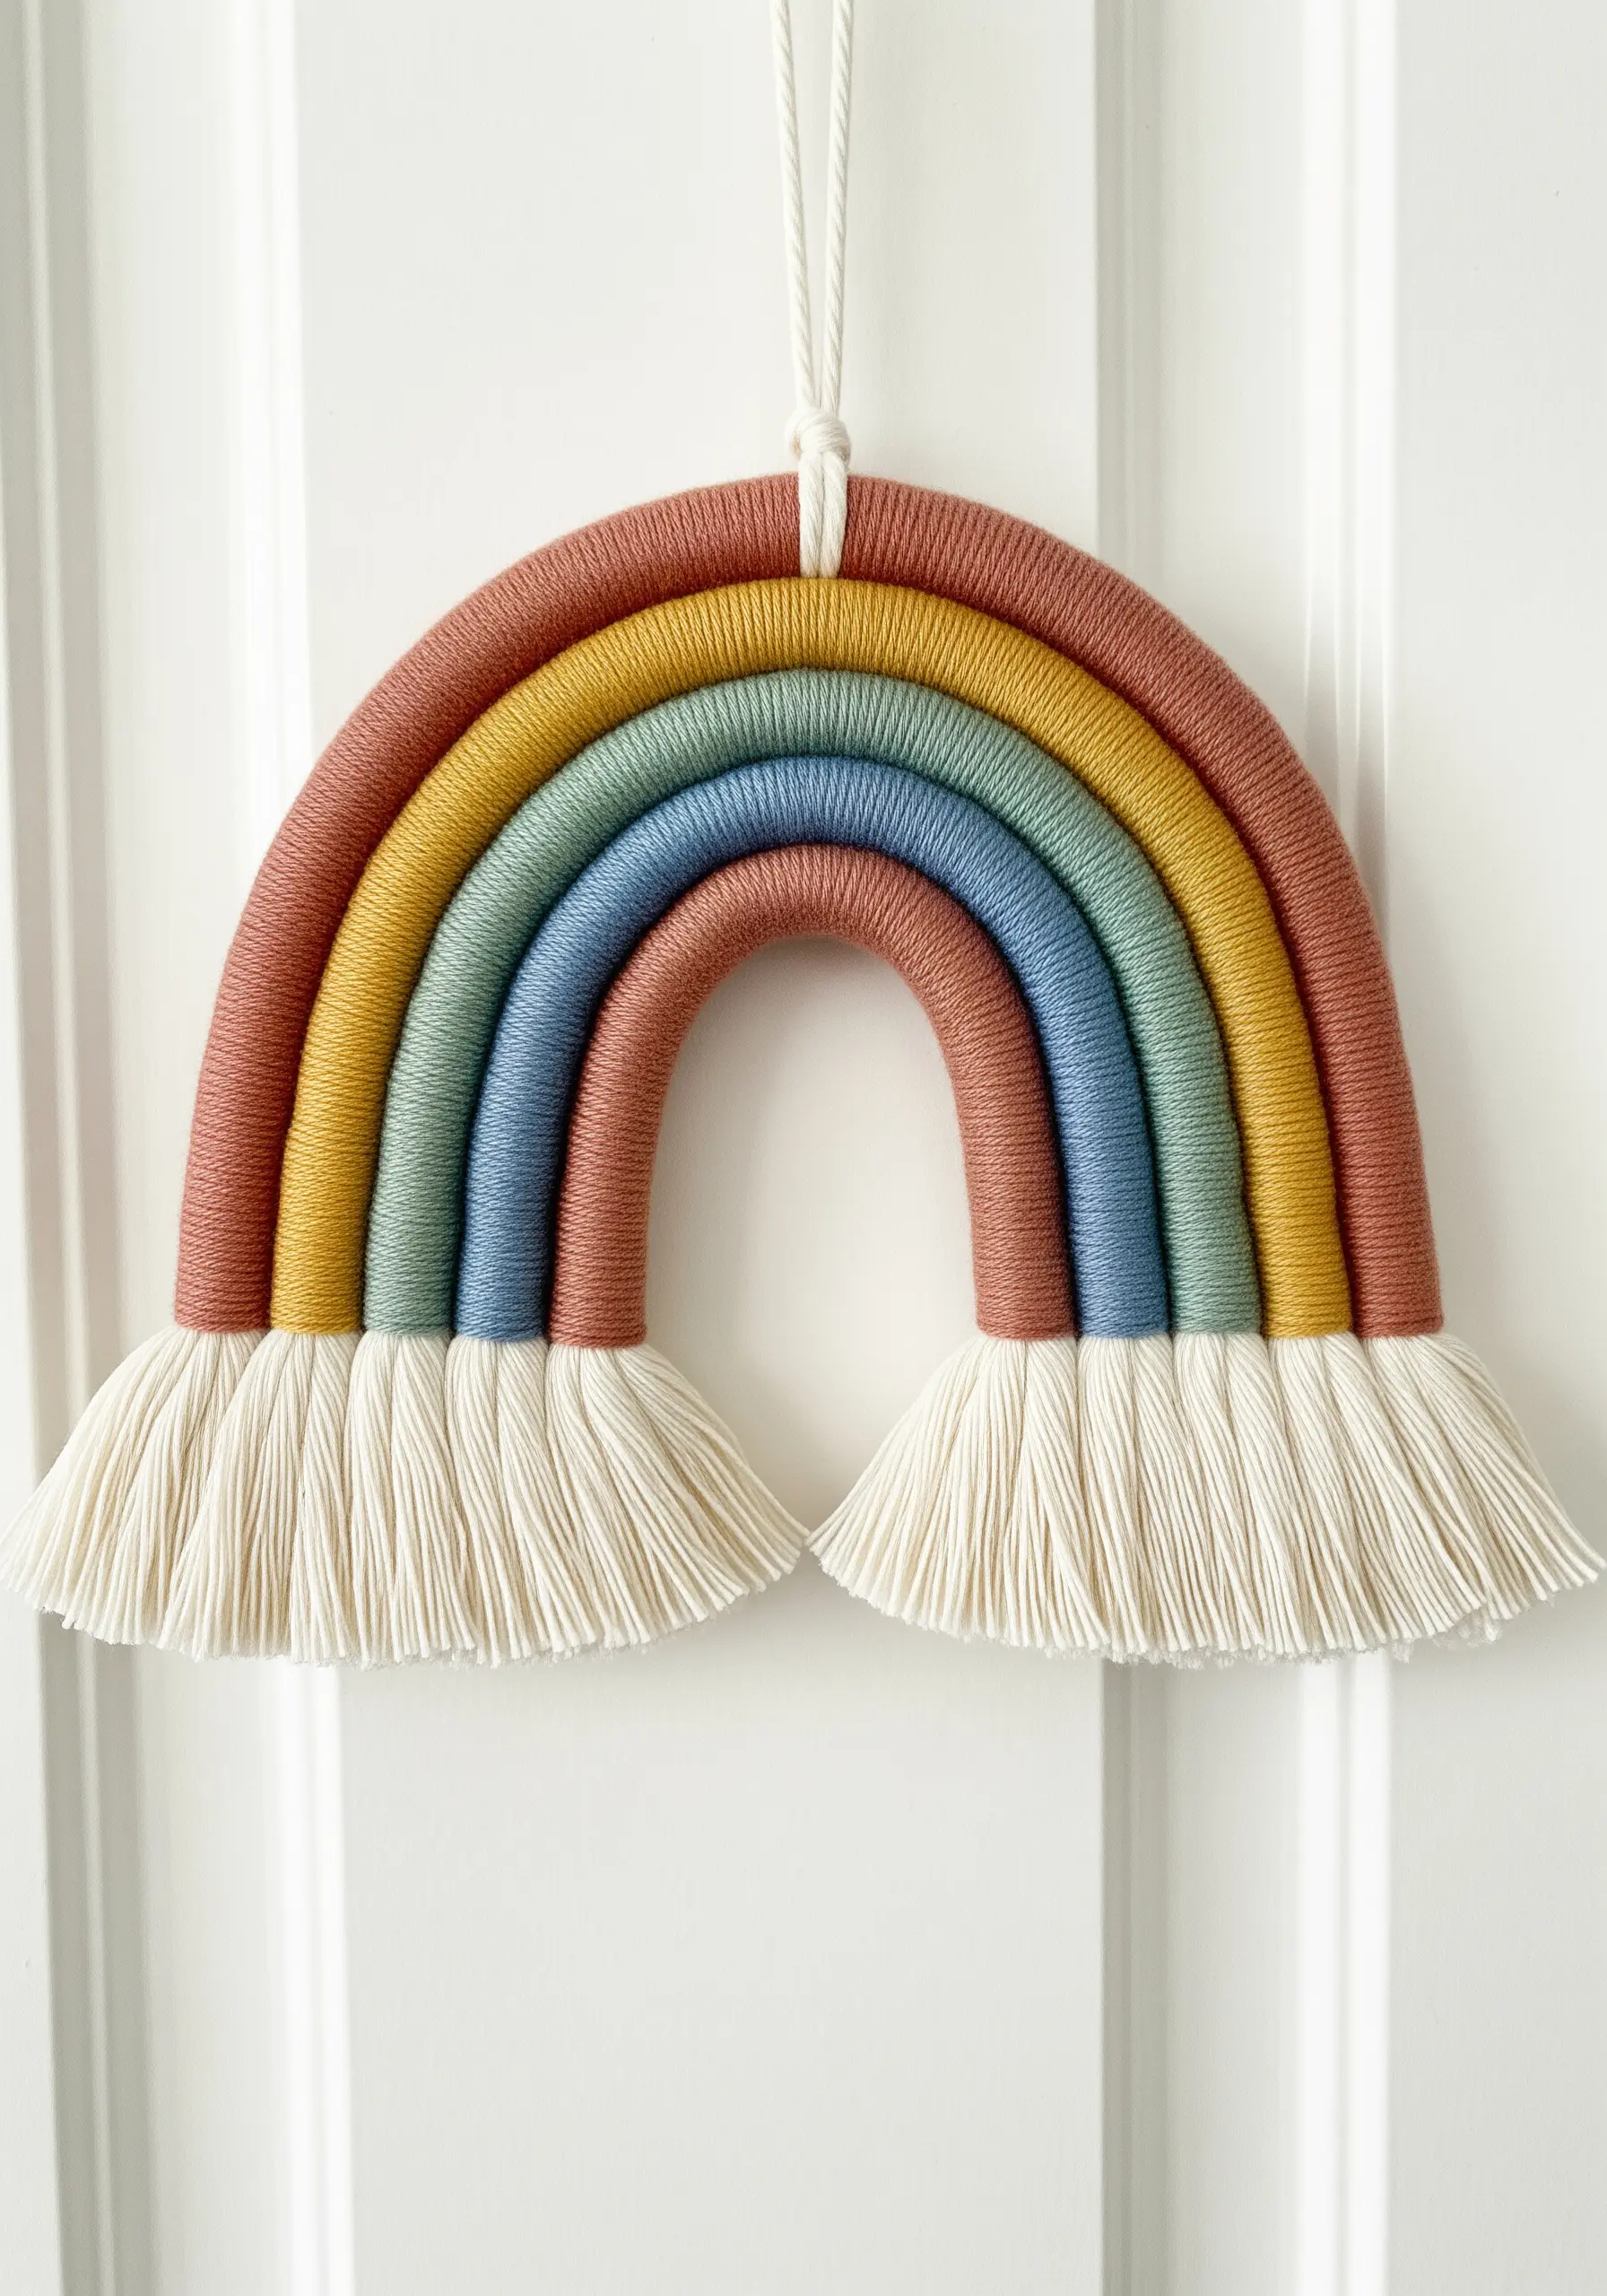
Create a perfectly formed rainbow arch by wrapping yarn around thick cotton cord or rope.
The key to a smooth, professional finish is to wrap the yarn tightly and consistently, ensuring no gaps of the inner cord show through.
Secure the ends of the yarn on the back side with a dab of fabric glue or by stitching them firmly in place.
Once all your arches are wrapped, stitch them together into the rainbow shape. Comb out the ends of the cotton cord to create the soft, cloud-like fringe.
These yarn wall art designs rely on neatness and a well-chosen color palette.
16. Stitch an Abstract Galaxy with Couching
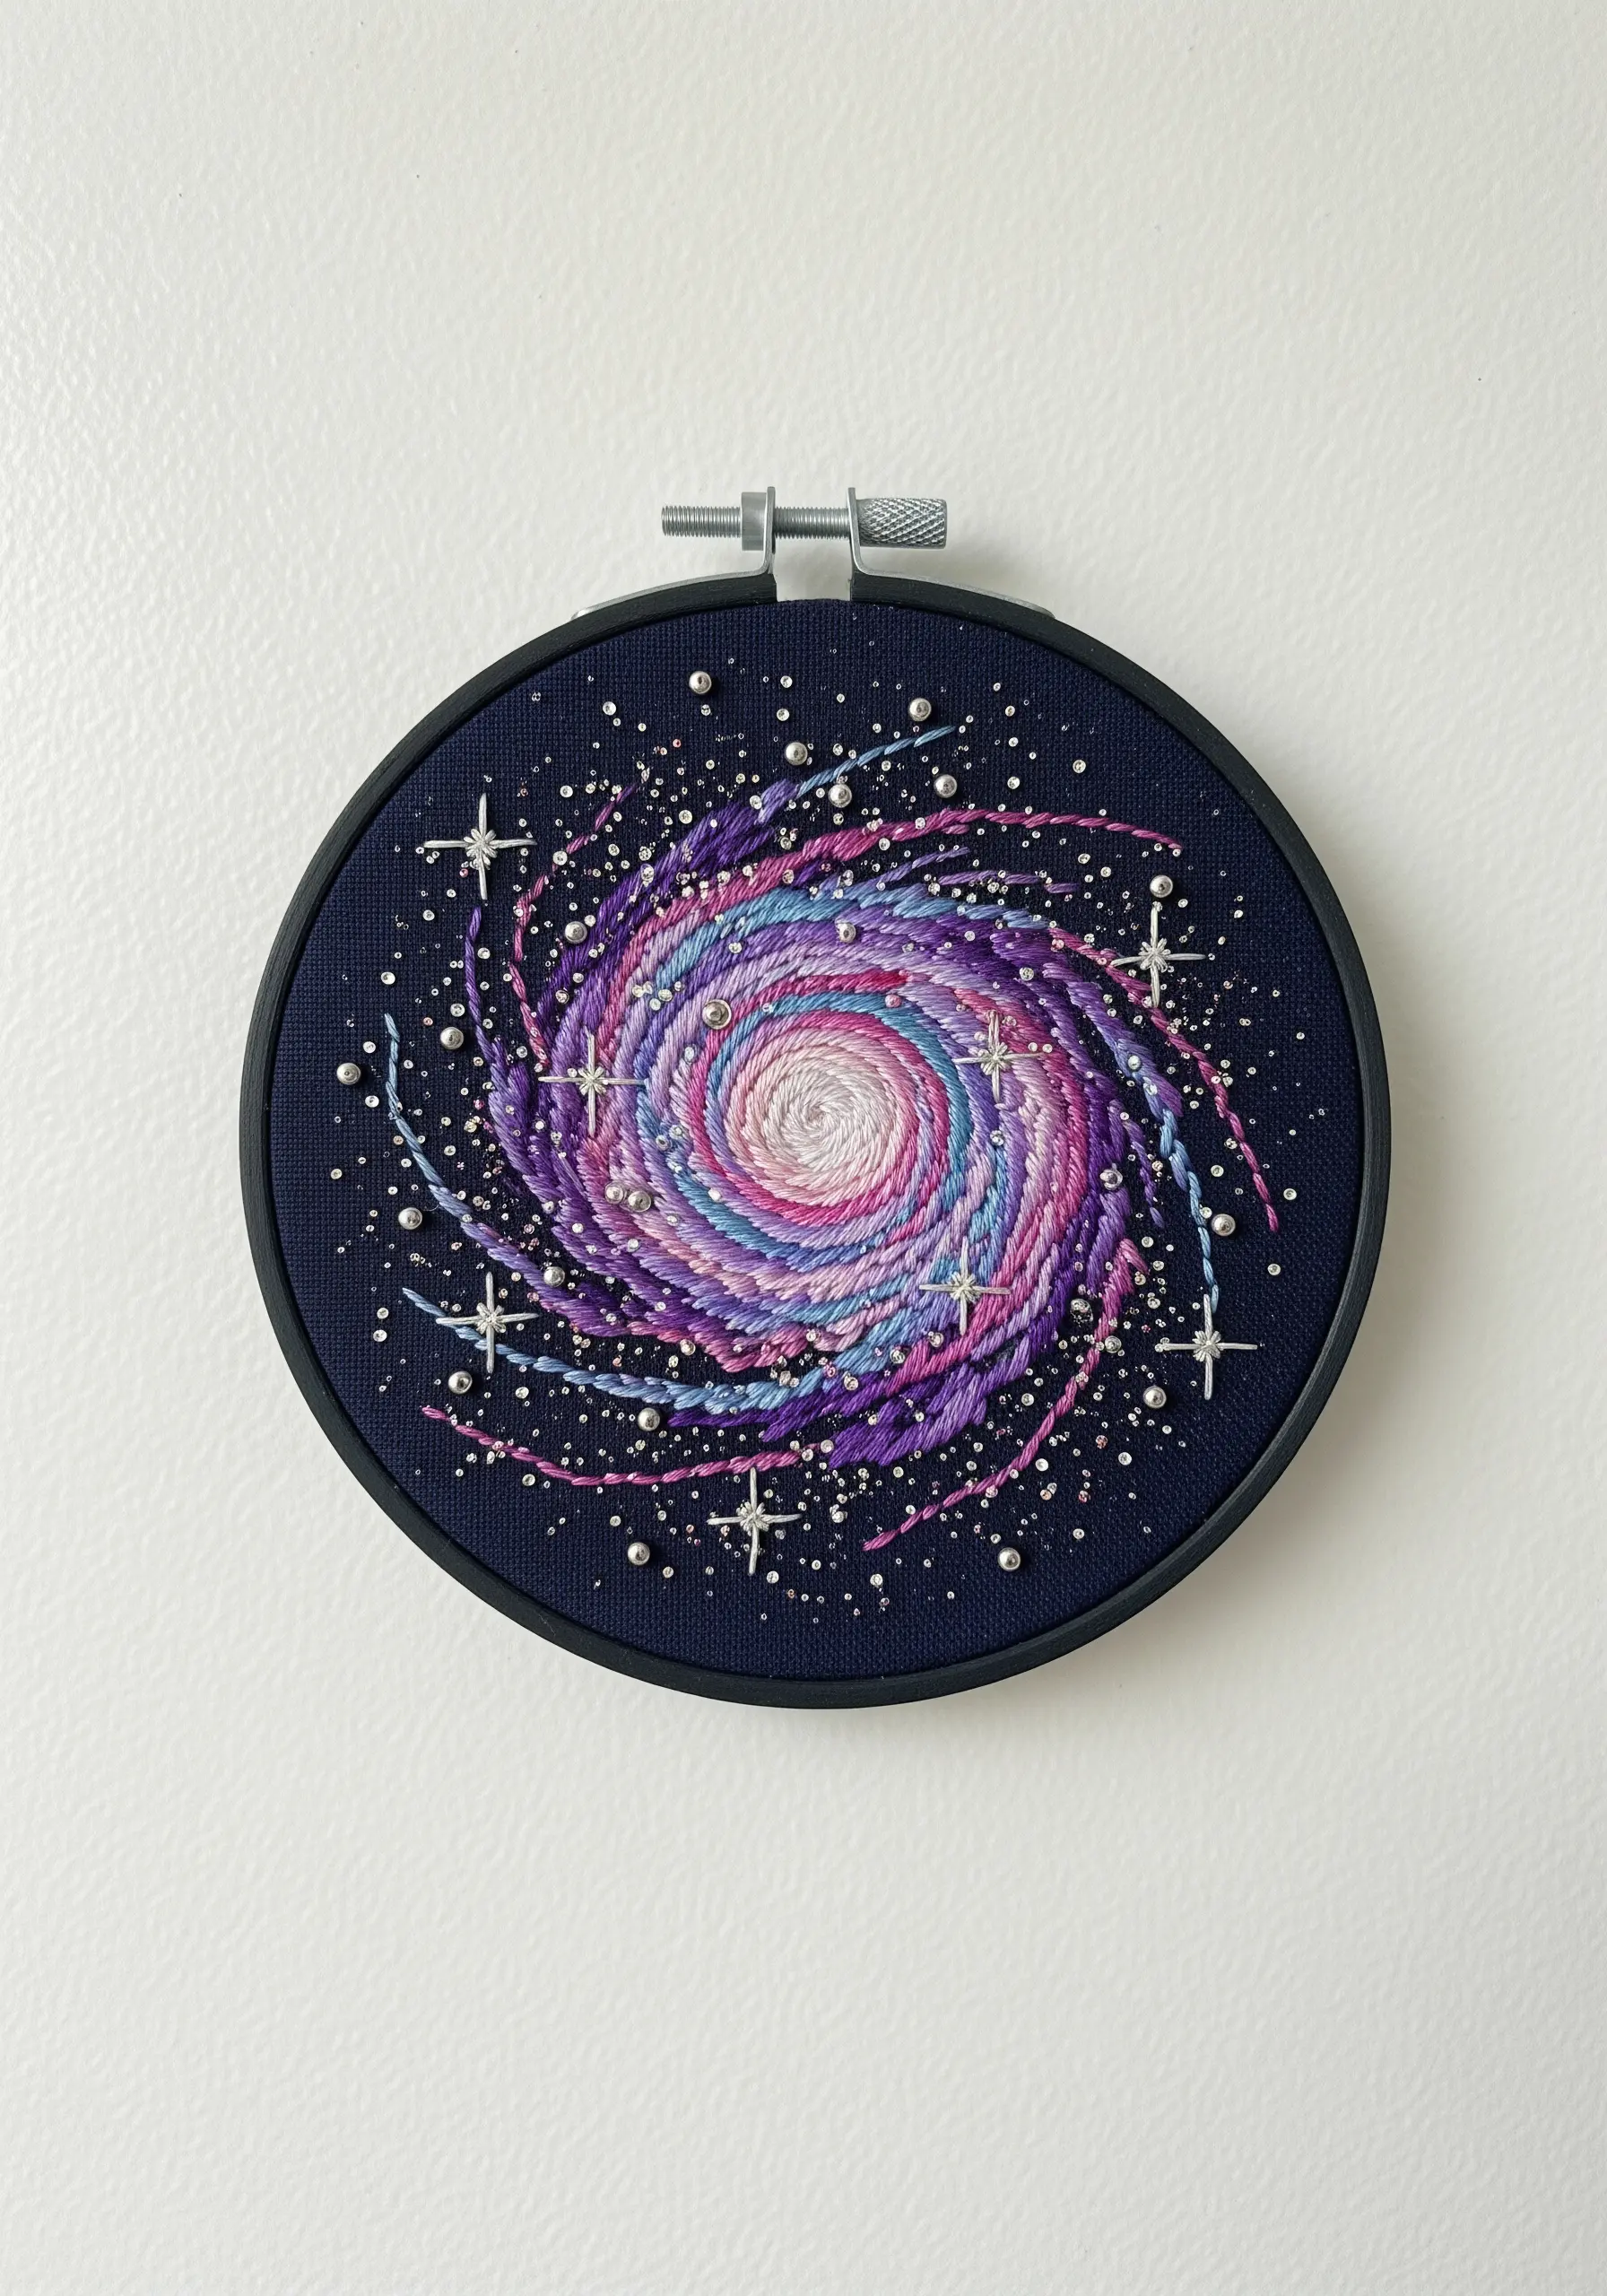
Capture the movement of a spiral galaxy using couching, a technique where you lay down thick or multiple threads and tack them in place with a second, finer thread.
This allows you to create smooth, sweeping curves that would be impossible with standard stitches.
Use variegated floss, metallic threads, and different weights of yarn together to create the swirling arms of the galaxy.
Scatter silver seed beads and single French knots across the dark fabric to represent distant stars, adding depth and sparkle to your cosmic scene. This is one of many abstract thread layering techniques that yields stunning results.
17. Sculpt with Paper Using Quilling Techniques
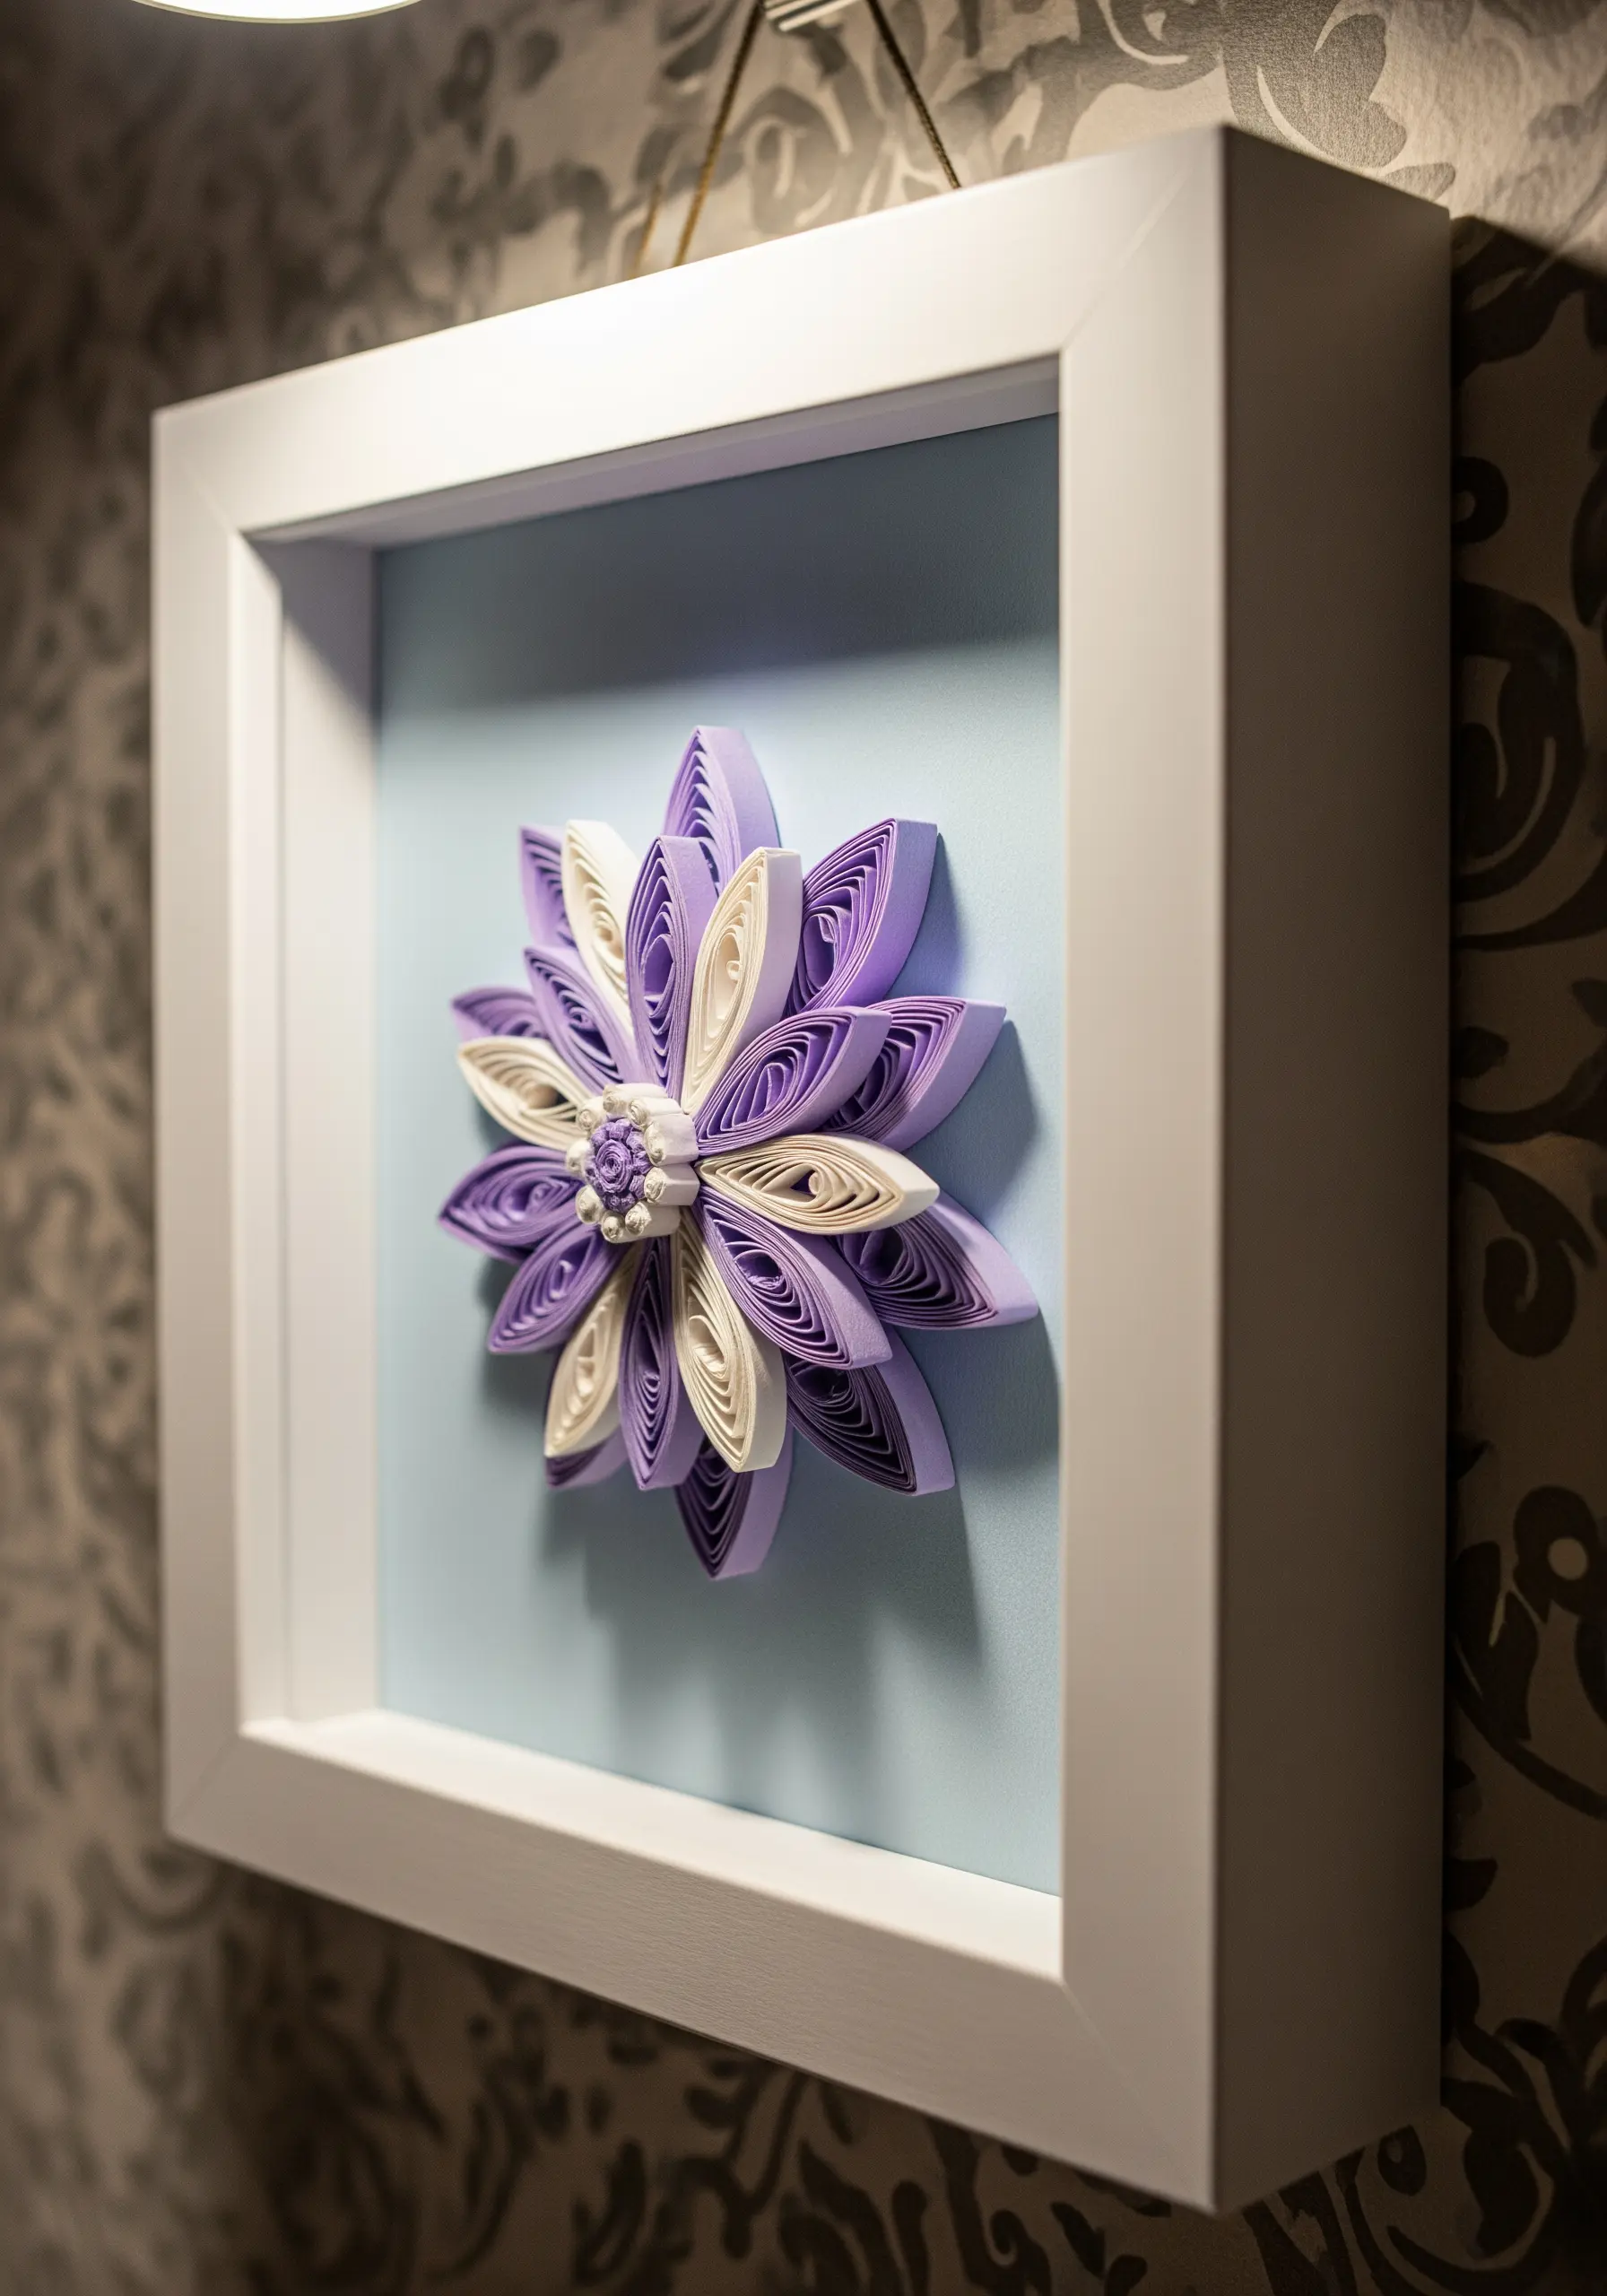
Explore dimension in a new way with paper quilling, a craft that involves rolling and shaping thin strips of paper into intricate designs.
Though it isn’t thread, the principles of building form and color are similar to embroidery.
Create petals by rolling a strip of paper around a tool, then pinching it into shape. Arrange these delicate coils to form a flower.
The best way to display a quilled piece is in a shadow box frame, which protects its 3D structure while turning it into a stunning piece of wall art.
18. Create a Bohemian Vibe with Ribbons and Bells

For a quick and impactful wall hanging, move beyond thread and embrace other materials.
This piece achieves its rustic charm by using hand-torn strips of fabric and silk ribbons instead of yarn, giving it a softer, more organic feel.
Simply tie the ribbons onto a piece of driftwood or a cinnamon stick for a fragrant touch.
Incorporate texture and sound by stringing wooden beads and adding small brass bells, which provide a gentle weight and a subtle chime.
This is less about technique and more about the thoughtful curation of materials.
19. Cultivate a Garden with 3D Stumpwork
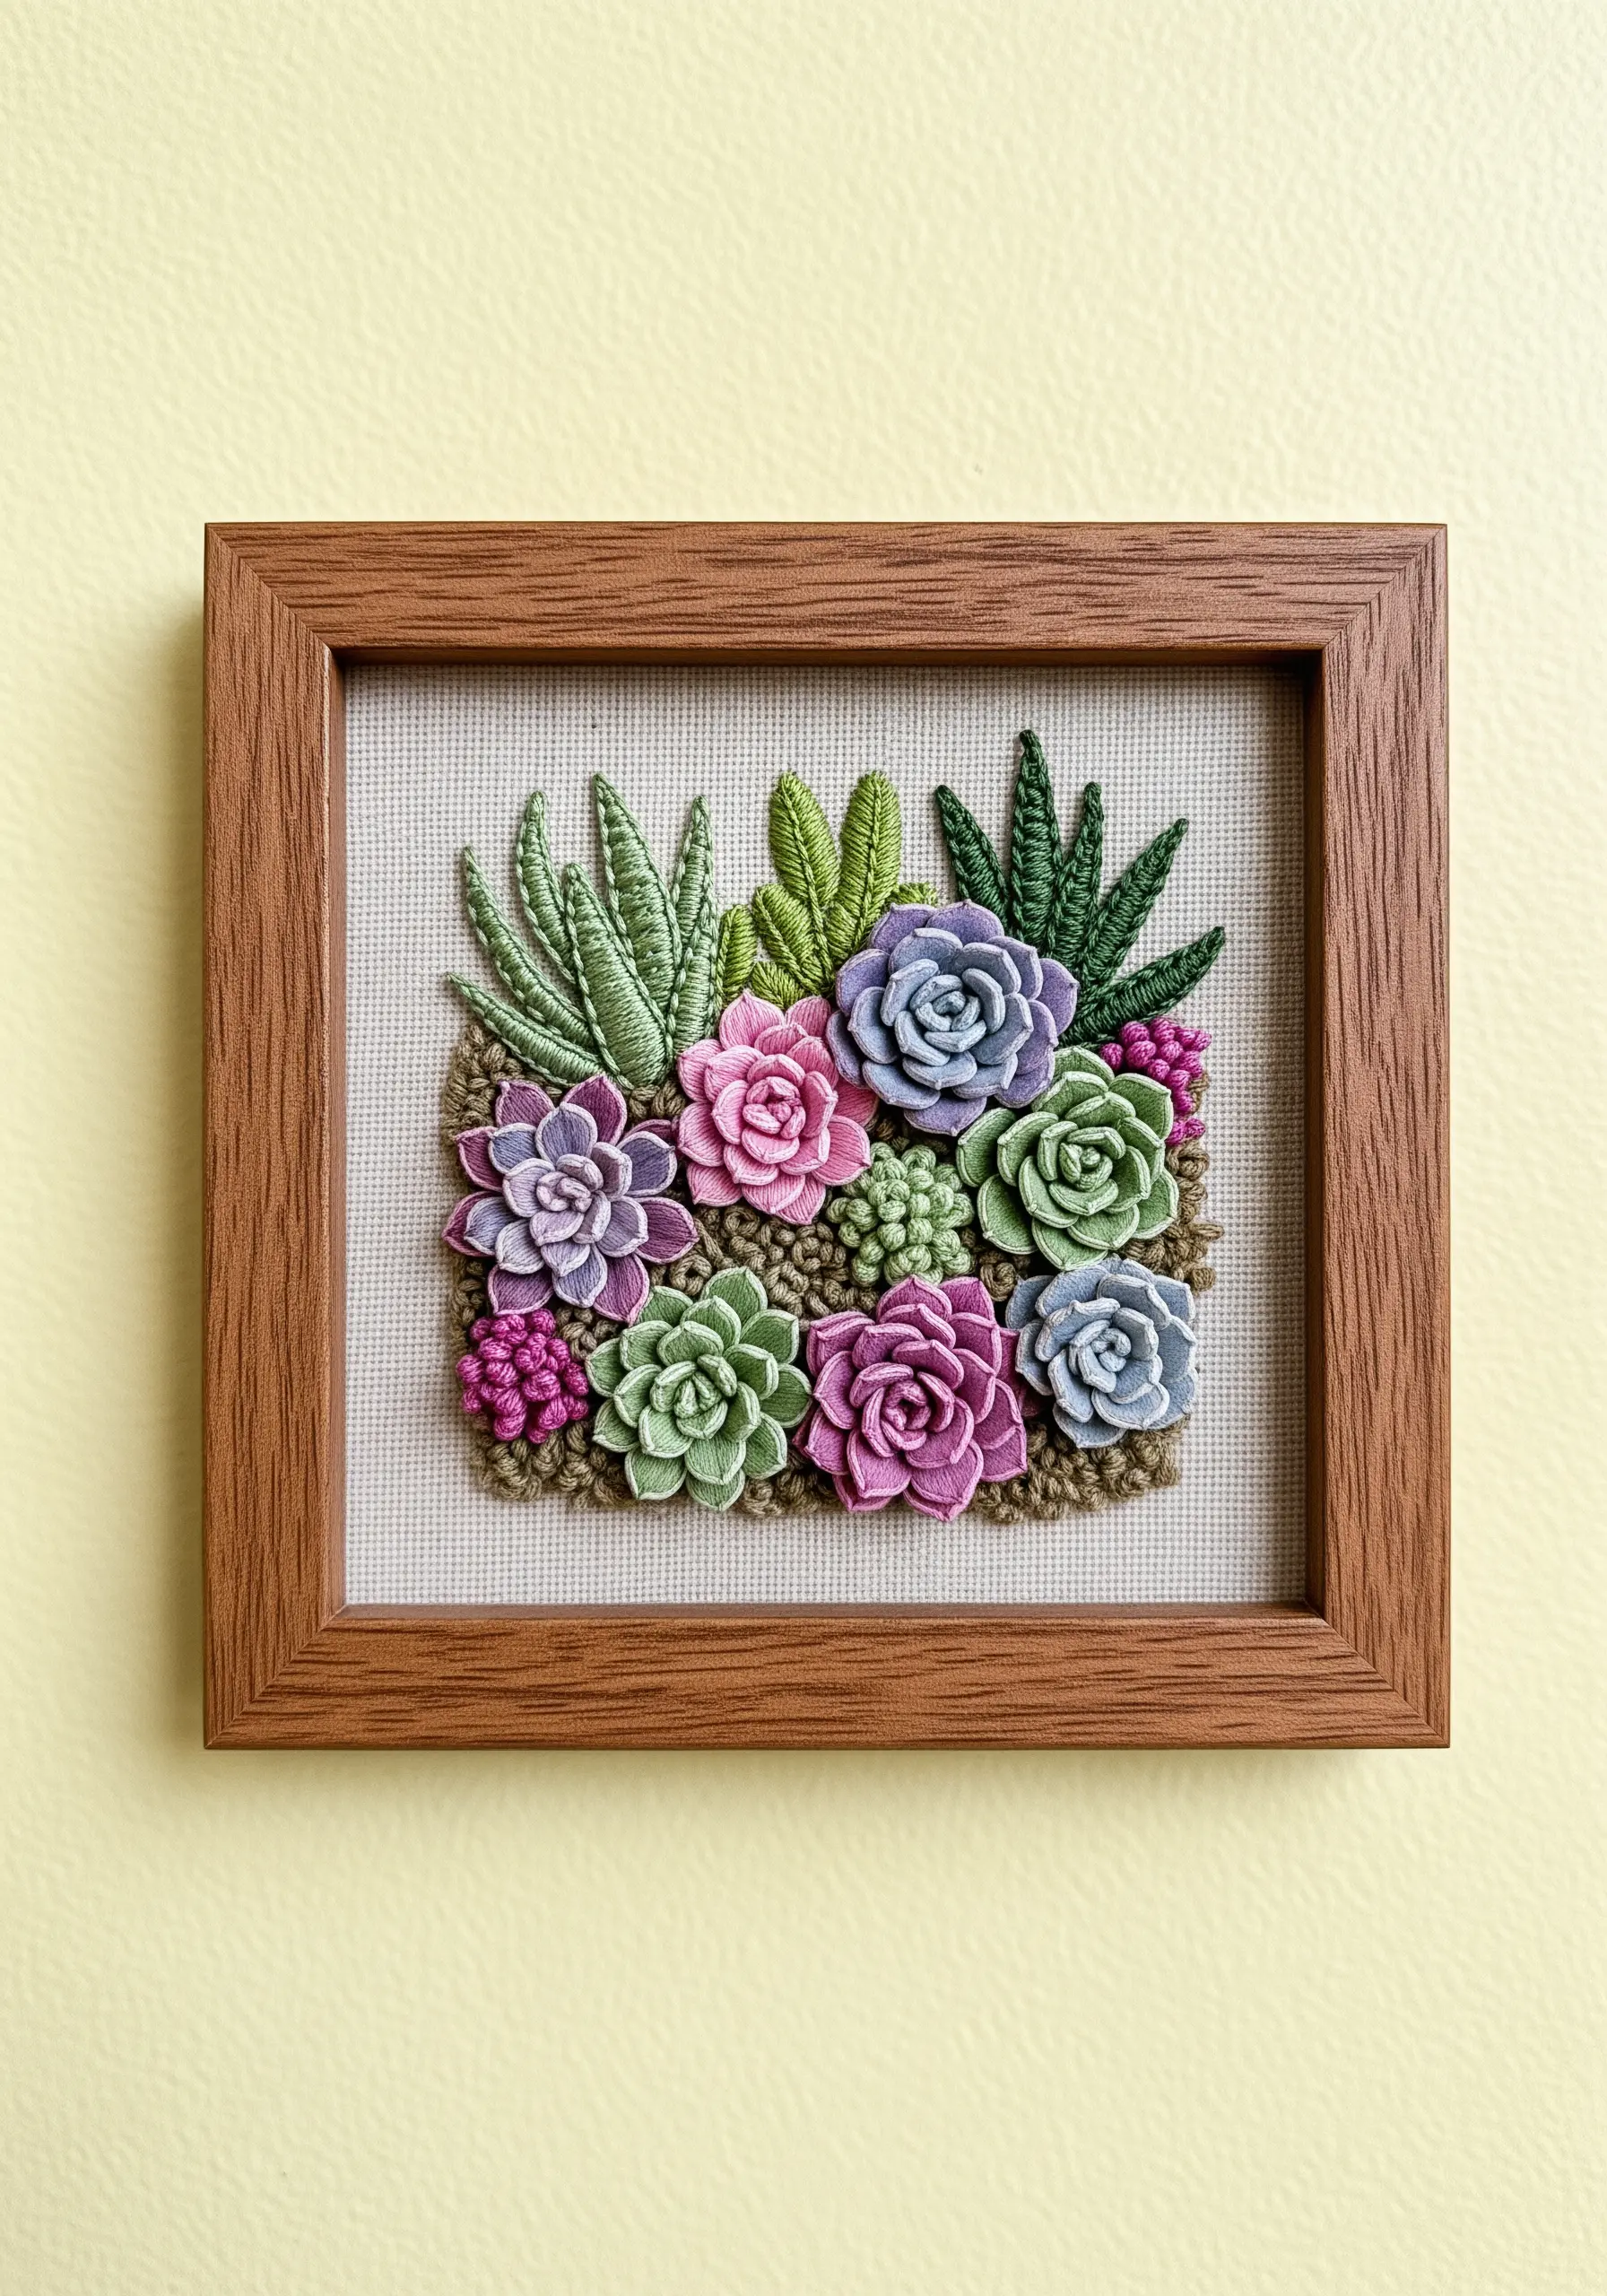
Create a hyper-realistic succulent garden using stumpwork, a form of raised embroidery that gives your work a sculptural quality.
Form individual petals and leaves with stitches like the cast-on stitch or woven picot, or create them separately on felt and attach them to the base fabric.
Layer these dimensional elements to mimic the dense growth of real succulents, playing with different shades of green, pink, and purple for realism.
These statement textured embroidery techniques transform your hoop into a miniature, no-watering-required garden.
20. Make a Statement with Abstract Metallic Thread
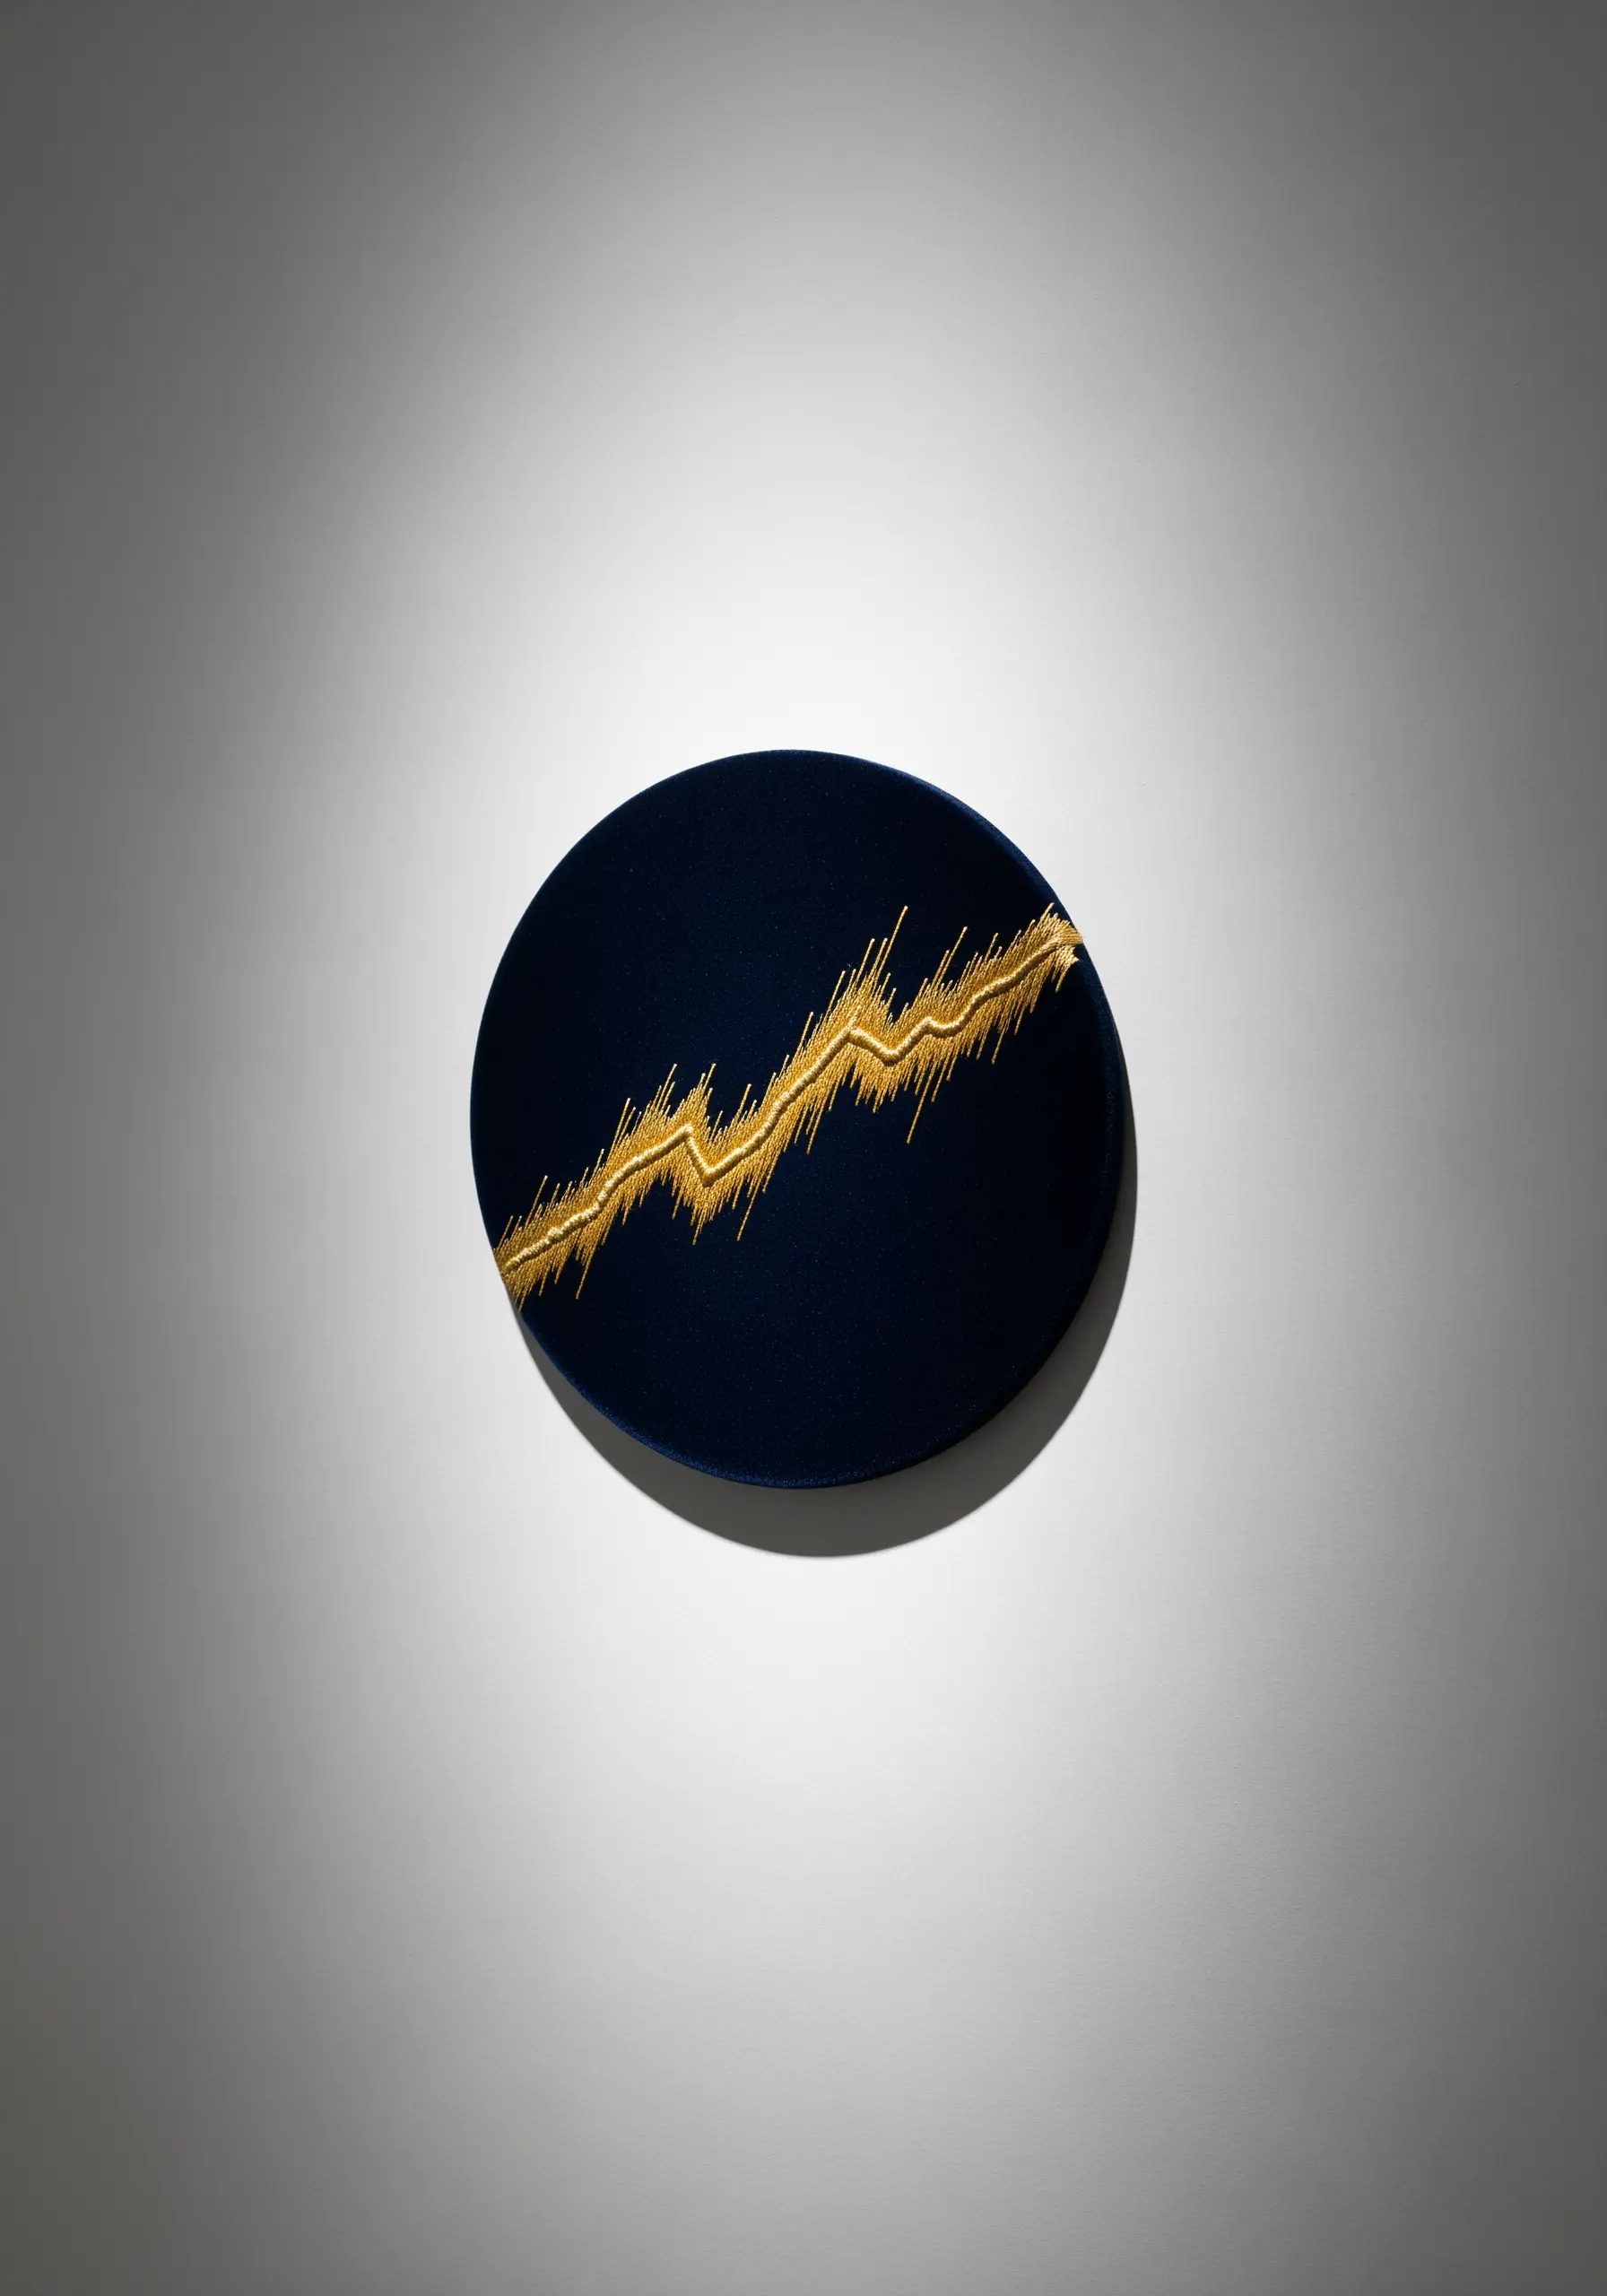
Channel the Japanese art of Kintsugi by using metallic thread to create a design that is both minimal and incredibly luxurious.
On a dark, tightly woven fabric, use dense straight stitches to build an abstract shape, like a soundwave or a golden crack.
Vary the length and angle of your stitches to create a dynamic, light-reflecting surface. The key is to pack the stitches tightly so the fabric below does not show through.
There are many unexpected ways to use metallic thread, and this high-contrast approach creates a powerful focal point in any room.
21. Translate Painted Art into Stitched Designs
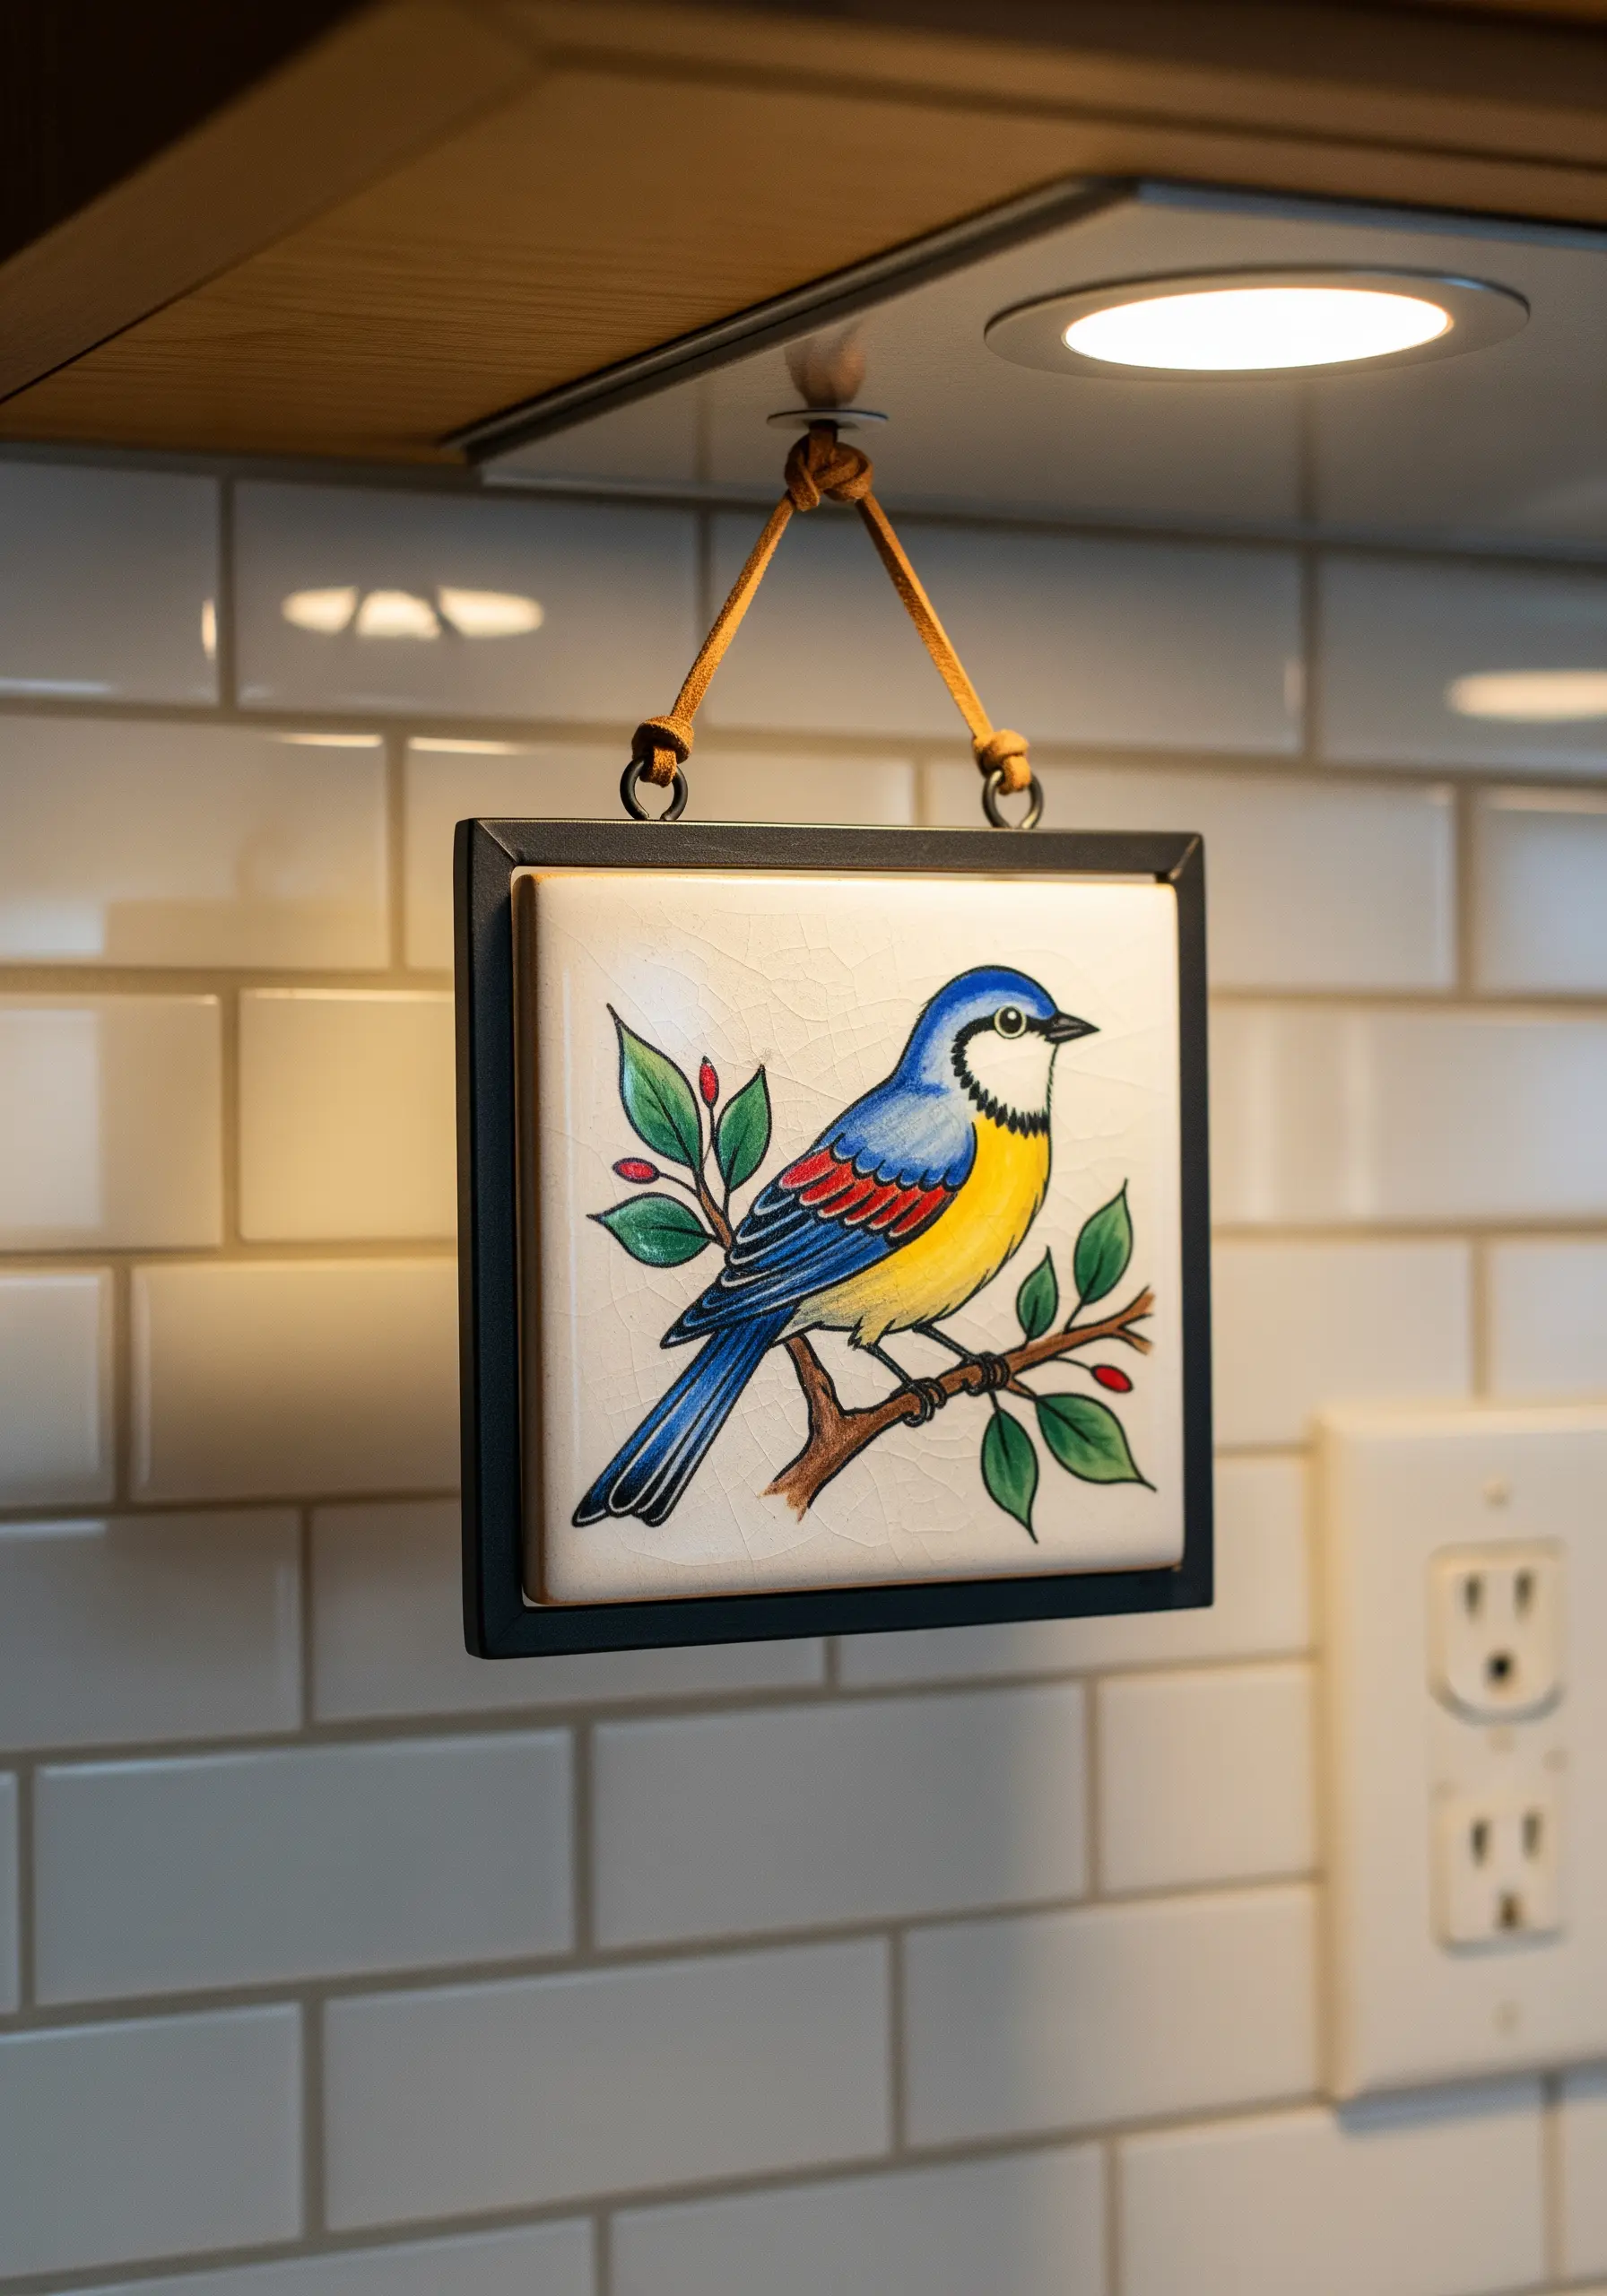
Use other art forms, like this painted ceramic tile, as direct inspiration for your next embroidery project.
To capture the clean, graphic quality of the bird, you would translate the black outlines into a crisp backstitch or stem stitch using two strands of black floss.
Fill the colored sections with a smooth, directional satin stitch, ensuring your stitches all lie flat and parallel to one another for a paint-like sheen.
Analyzing art this way—breaking it down into line and color—is a powerful exercise for training your eye and planning your stitch strategy.


