

What if the boundary between paper and thread could simply dissolve? Often, we treat our mediums as separate worlds—the sharp edge of collage, the soft line of a stitch. But the most expressive art happens when you invite them to meet.
This is where your work can find a new voice. It’s not about complex new stitches or expensive materials. It’s about seeing thread as more than decoration—it can be a line that connects, a texture that grounds, or a structure that holds your story together. It’s about letting a simple running stitch add a quilted quality to paper, or using a bold knot as a tiny sculpture.
Here, you’ll find ways to think like a mixed-media artist. You’ll see how to blend paper, paint, and drawing with the textile language you already know. Let these ideas give you the confidence to pierce the paper, to stitch through a photograph, and to create pieces with layers of meaning you can both see and feel.
1. Stitch the Stars with Metallic Thread on Paper
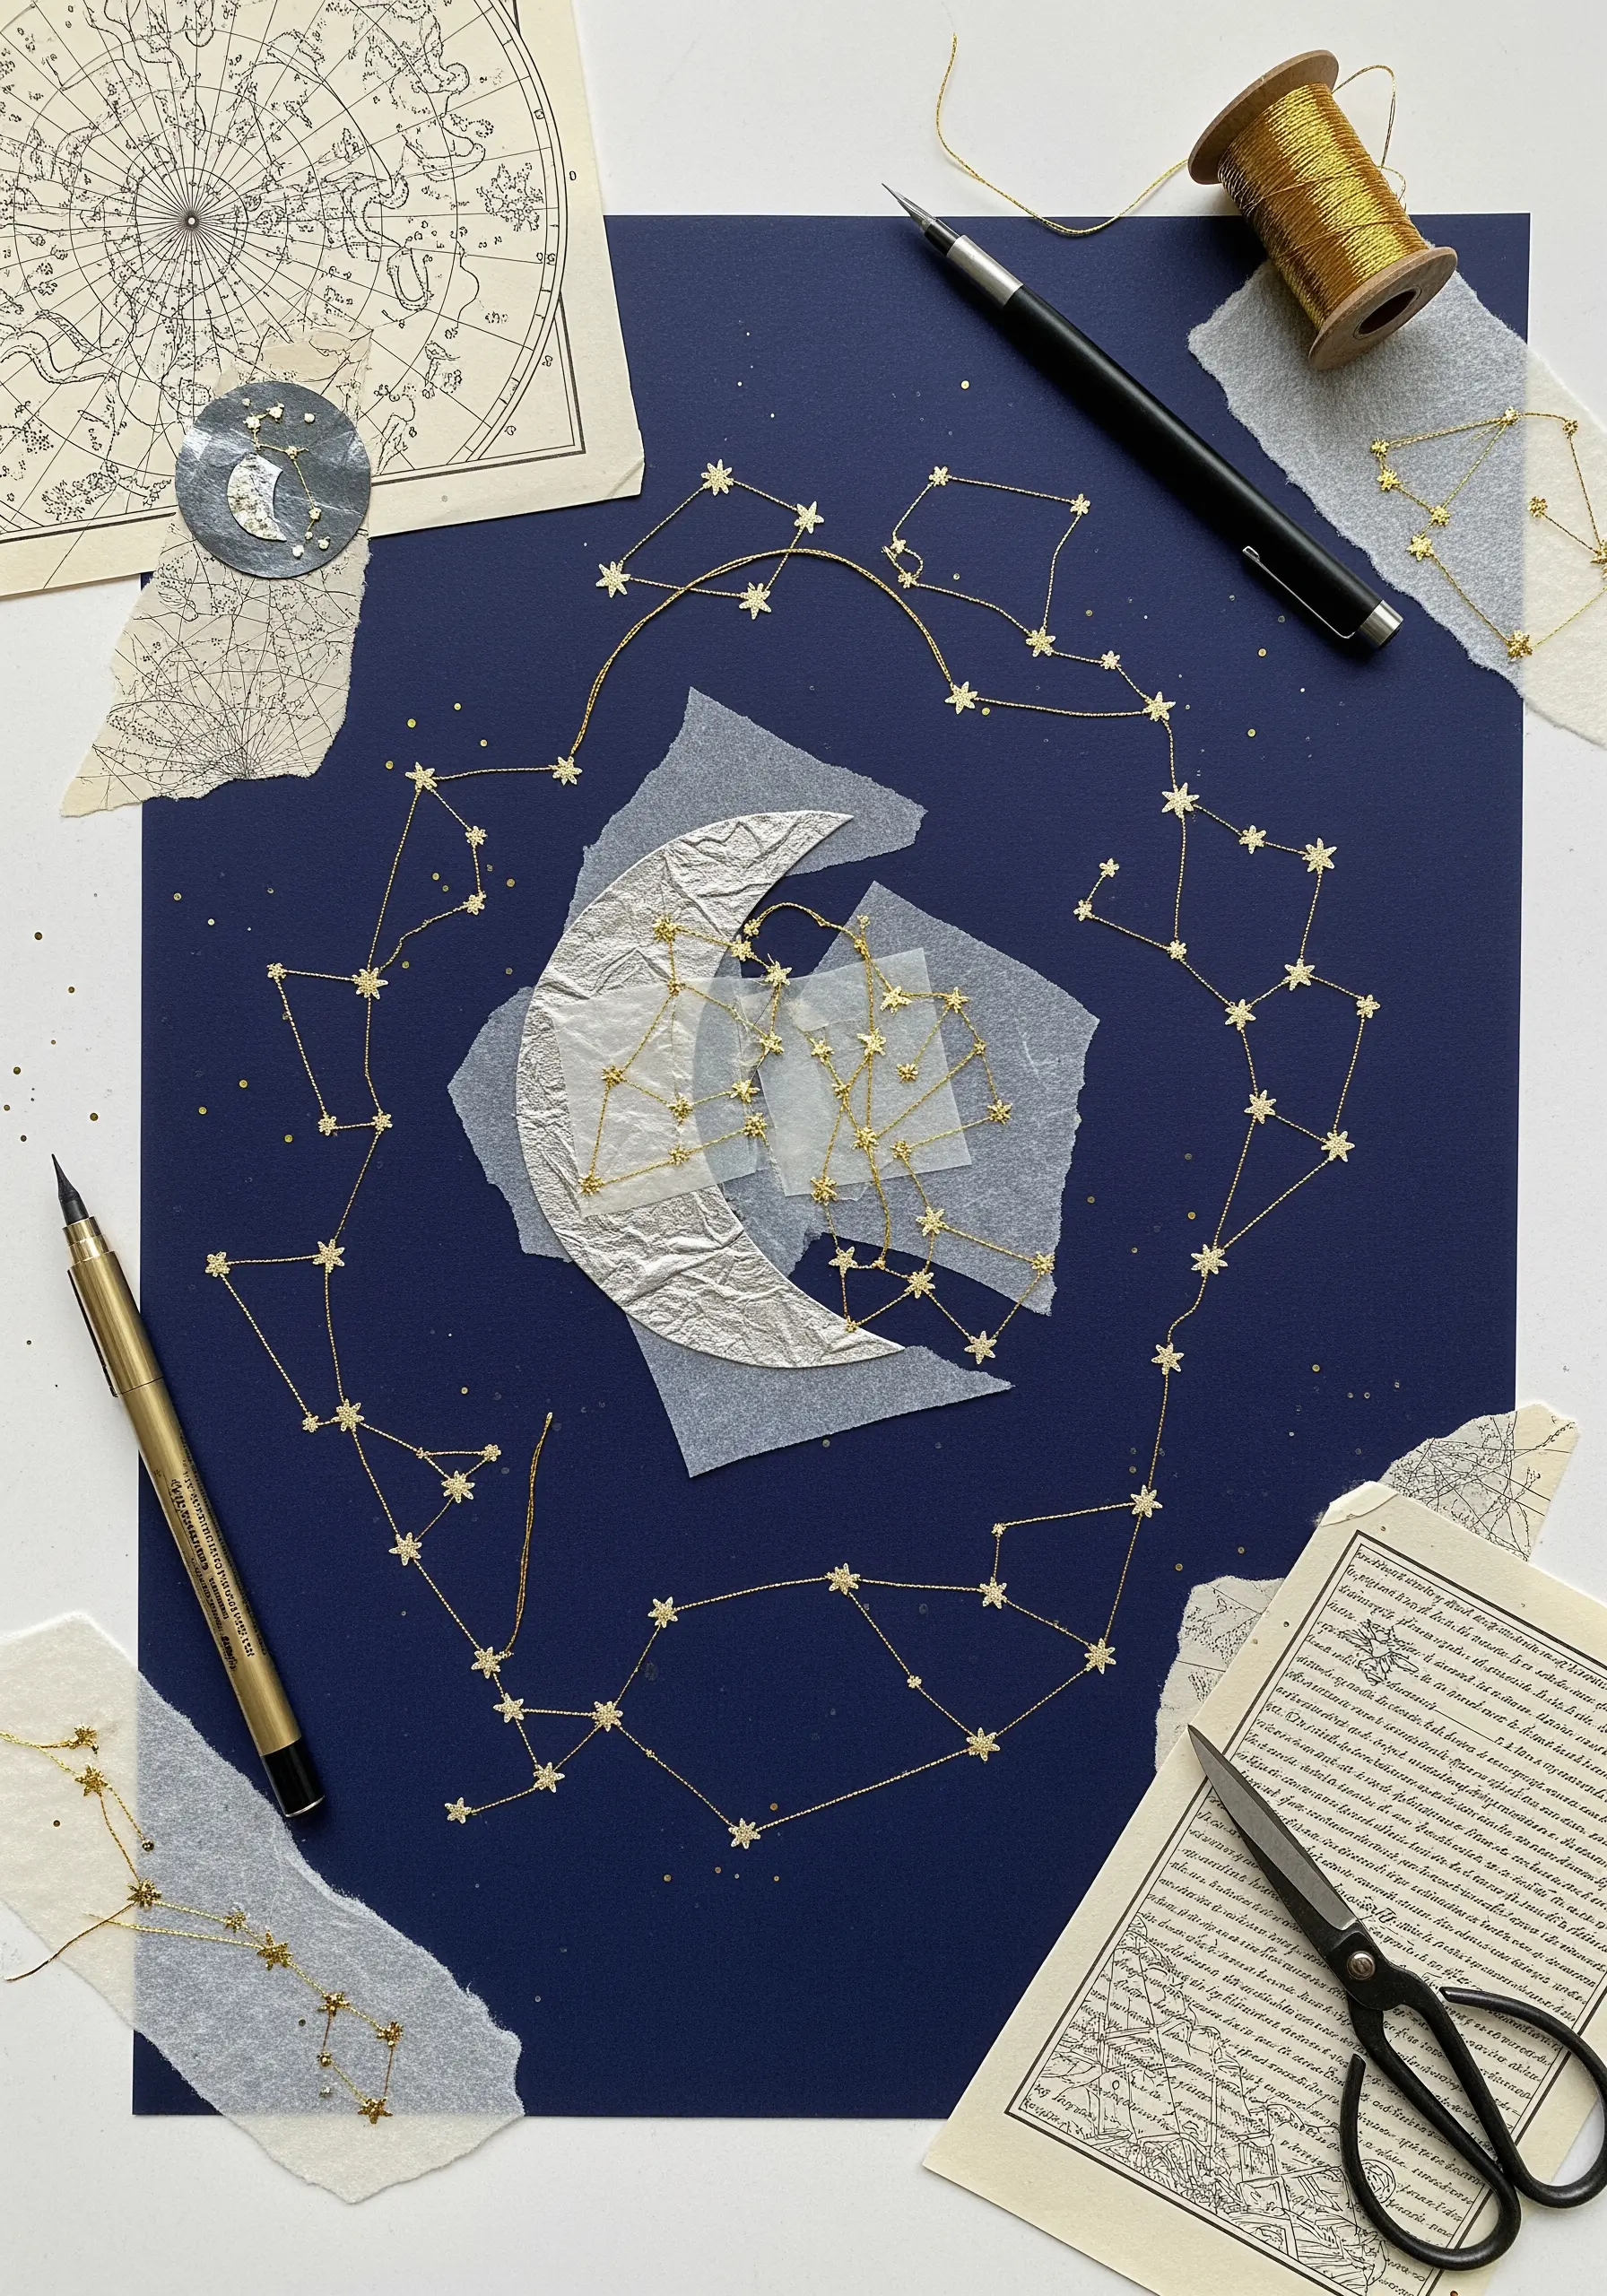
Transform a simple sheet of heavy cardstock into a celestial map by piercing it with a fine needle before stitching.
Use a single strand of gold metallic thread for delicate, shimmering constellations that catch the light.
To create depth, layer translucent vellum or tracing paper over parts of your design, stitching through both the paper and vellum to secure them.
This technique avoids the need for glue, creating a cleaner, more integrated collage where thread is the primary structural and decorative element.
2. Combine Paper Petals with a Textured Thread Center
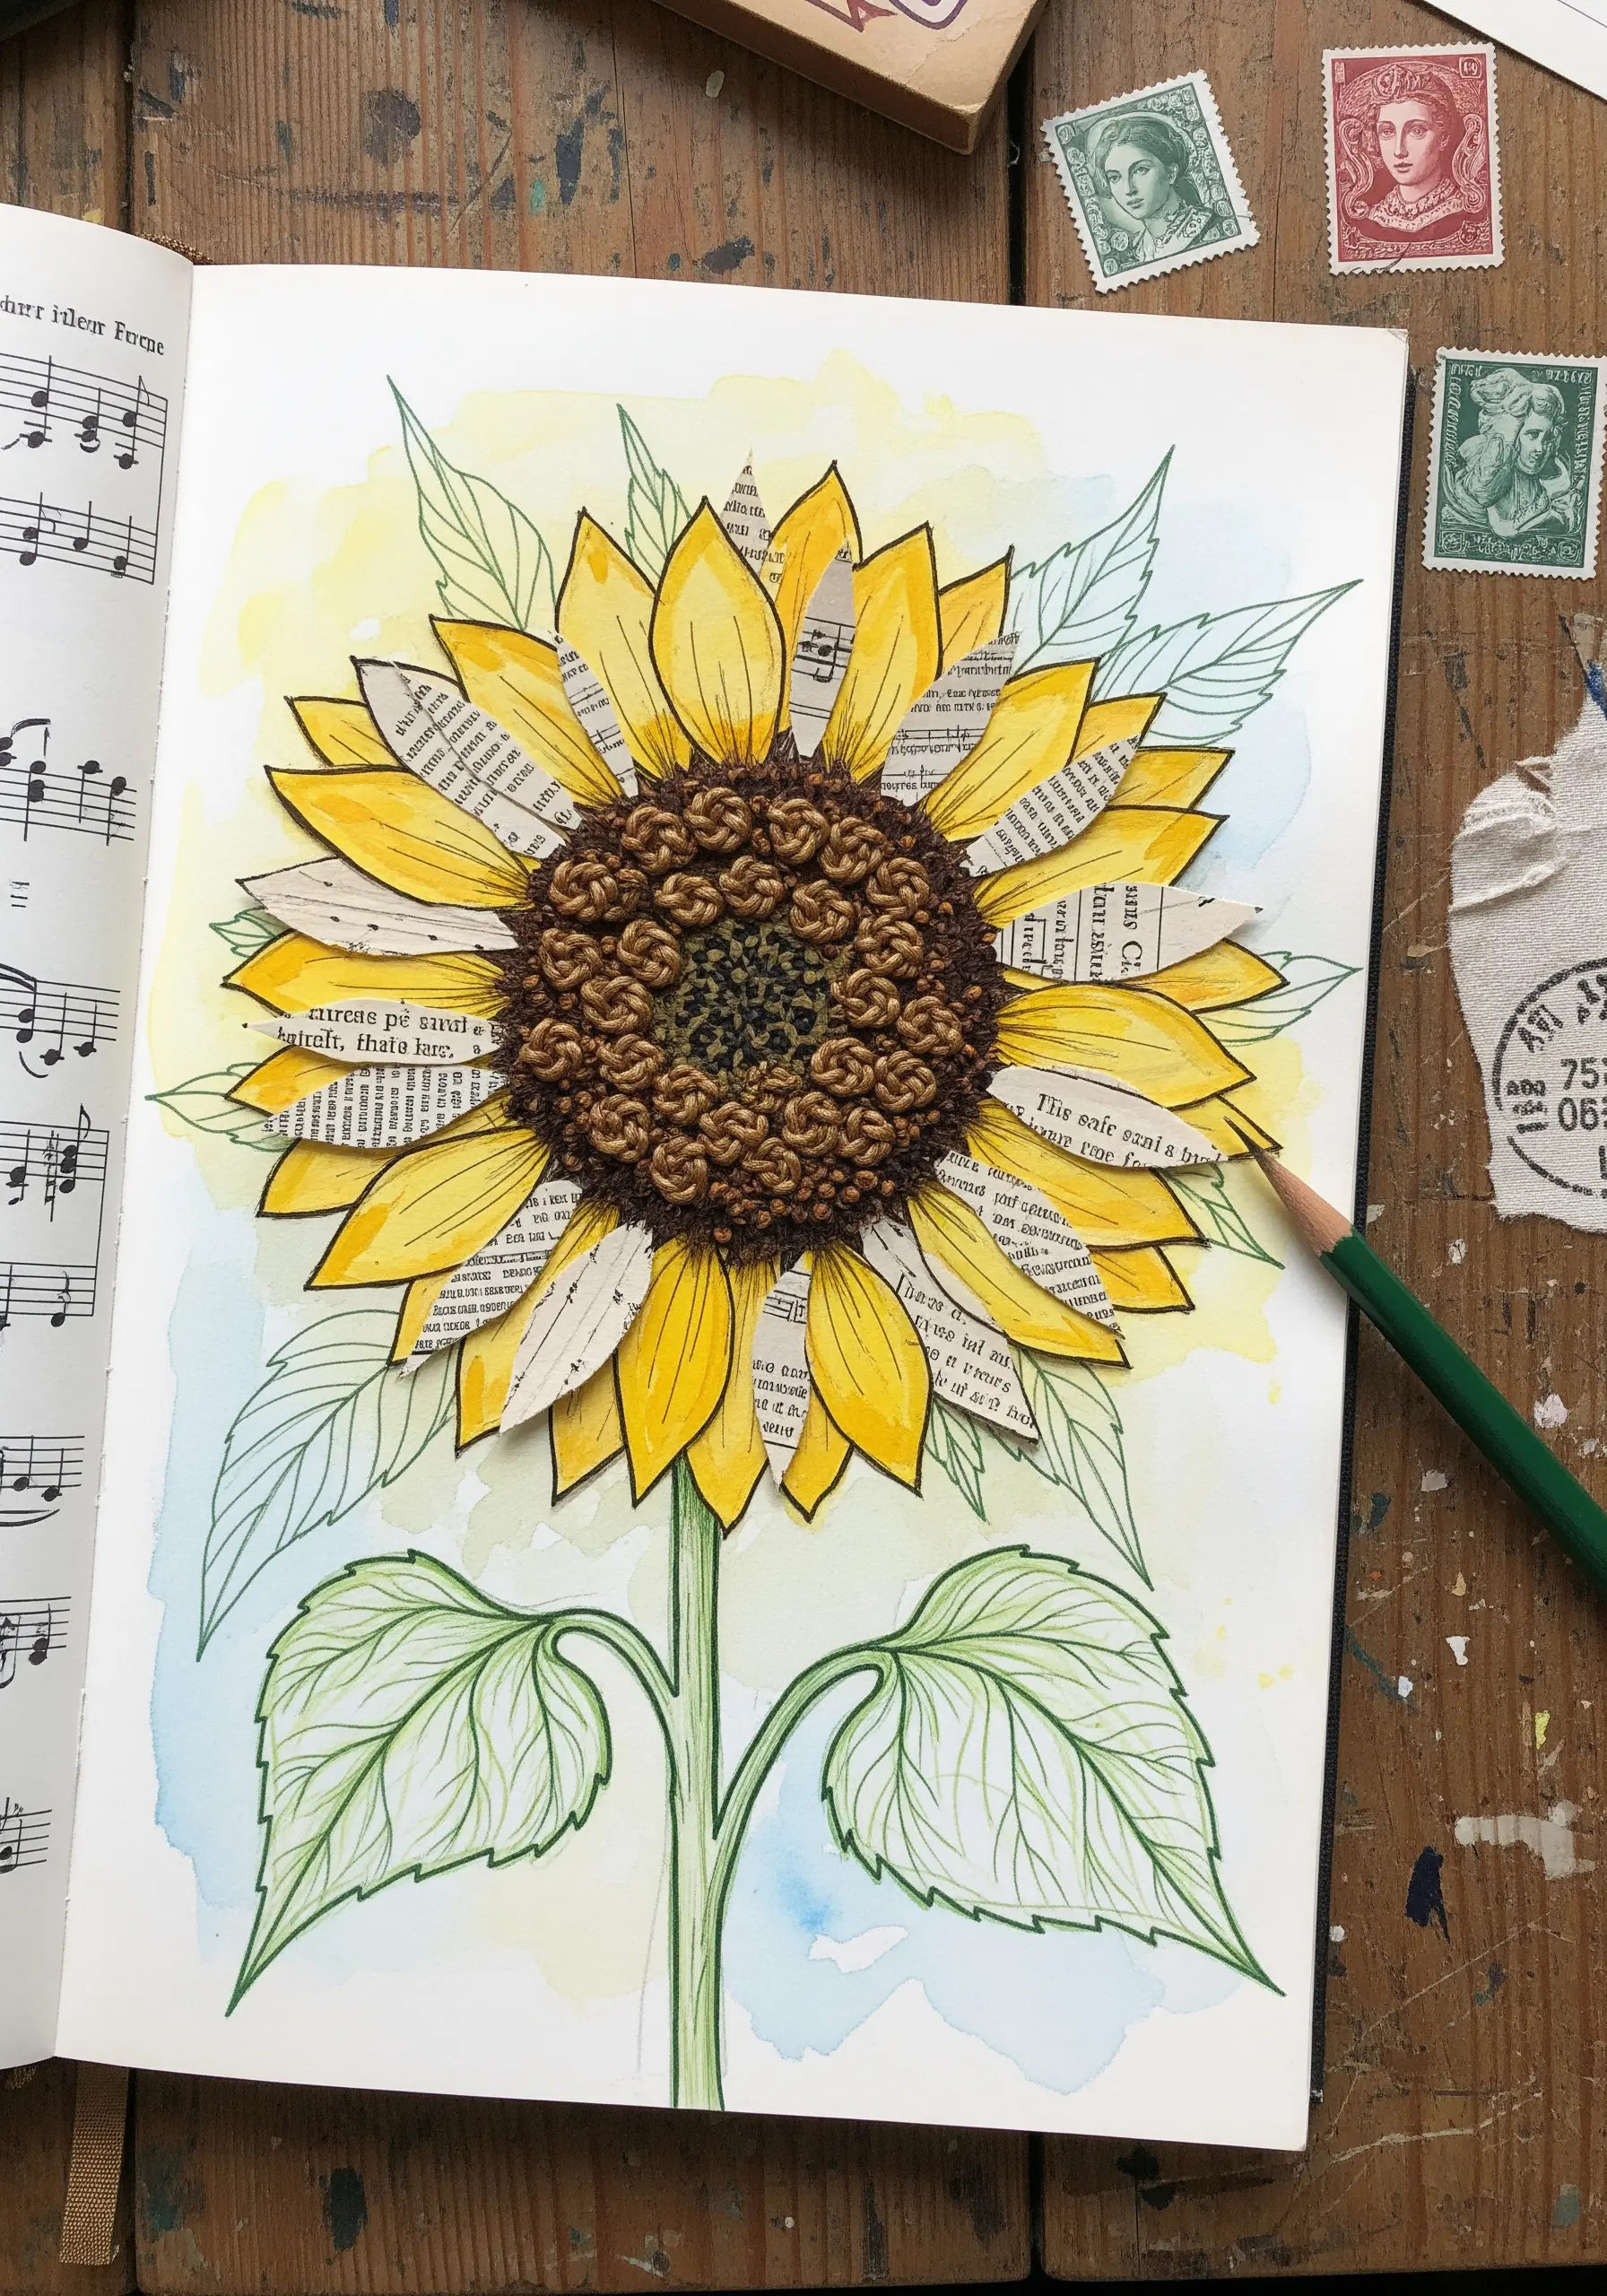
Build your flower’s structure with paper petals cut from vintage books or sheet music for a soft, narrative quality.
Create a dense, tactile center using a mass of French knots or bullion knots worked directly onto the background page.
Use two or three shades of brown and ochre thread to give the center realistic dimension and depth.
The contrast between the flat, printed paper and the highly textured, three-dimensional thread work makes the entire piece feel alive.
3. Guide the Eye with Architectural Thread Lines
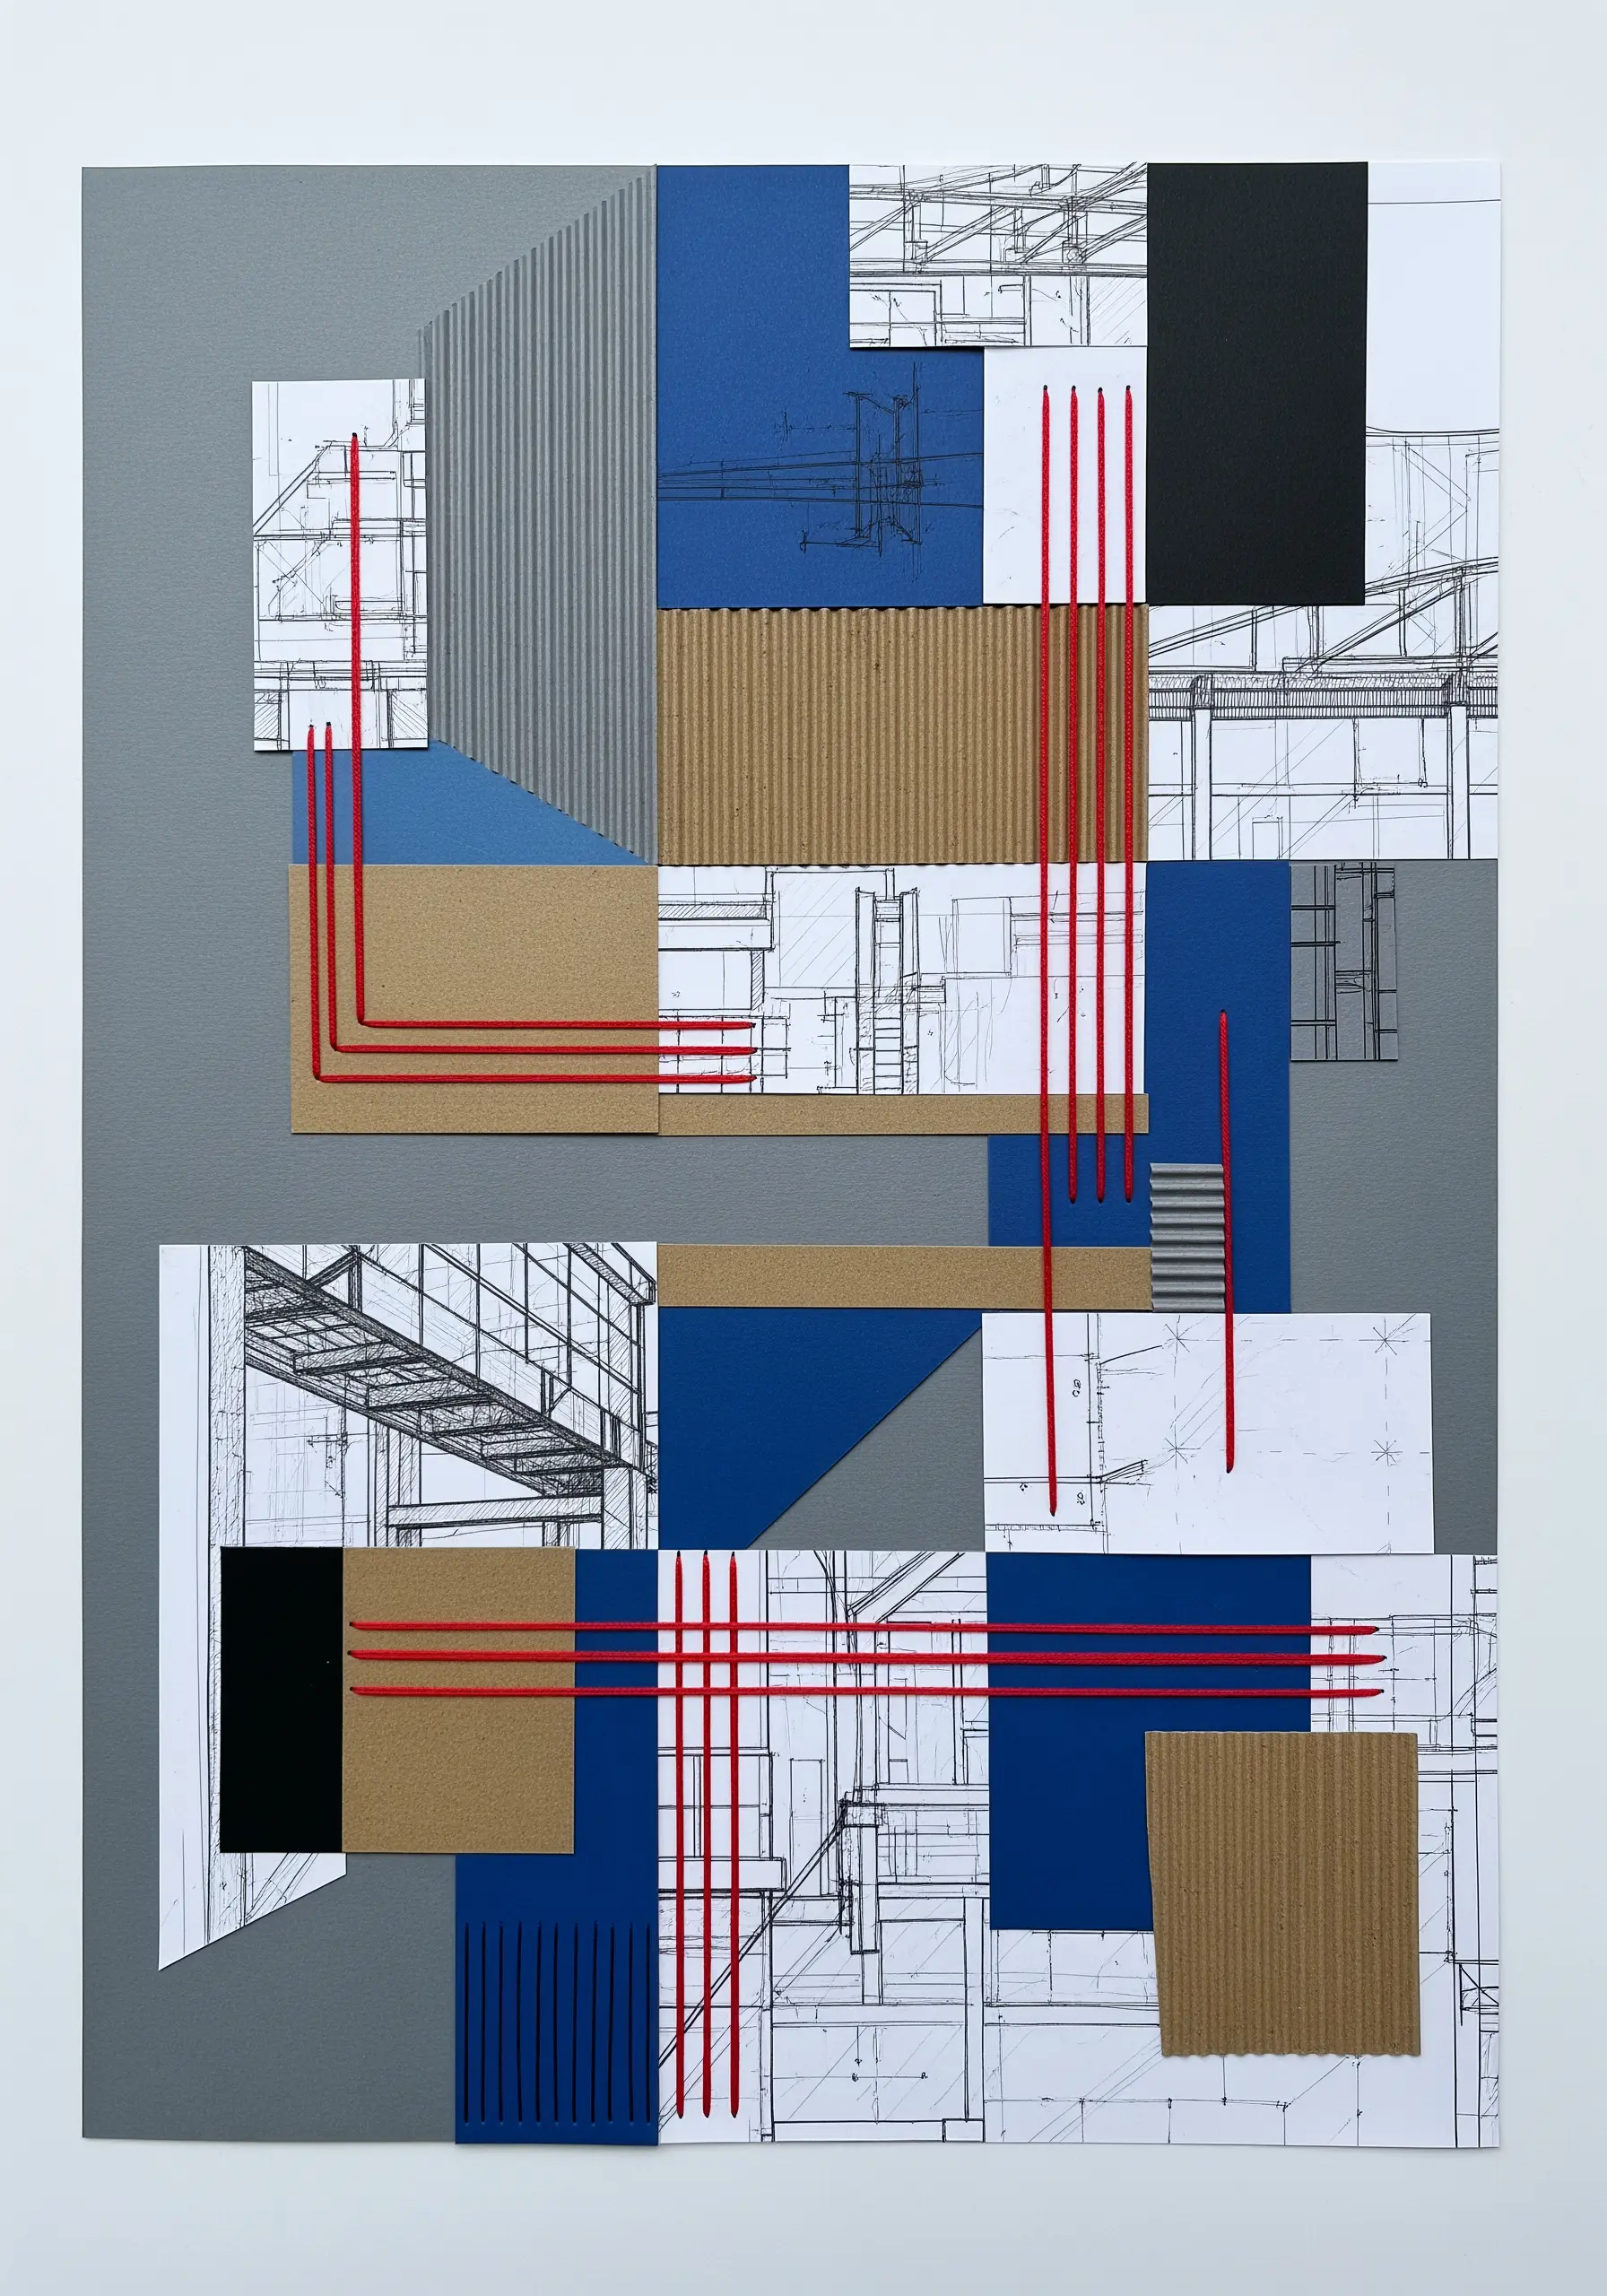
Use thread to create bold, directional lines that unify a fragmented architectural collage.
Select a thick, vibrant thread, like a red pearl cotton, to stand out against neutral paper and monochrome prints.
Stitch long, parallel lines that travel across different paper elements, visually connecting them and creating a sense of movement and order.
This transforms your stitches from mere decoration into a powerful compositional tool that directs the viewer’s gaze.
4. Create Realistic Hair with Braided Yarn
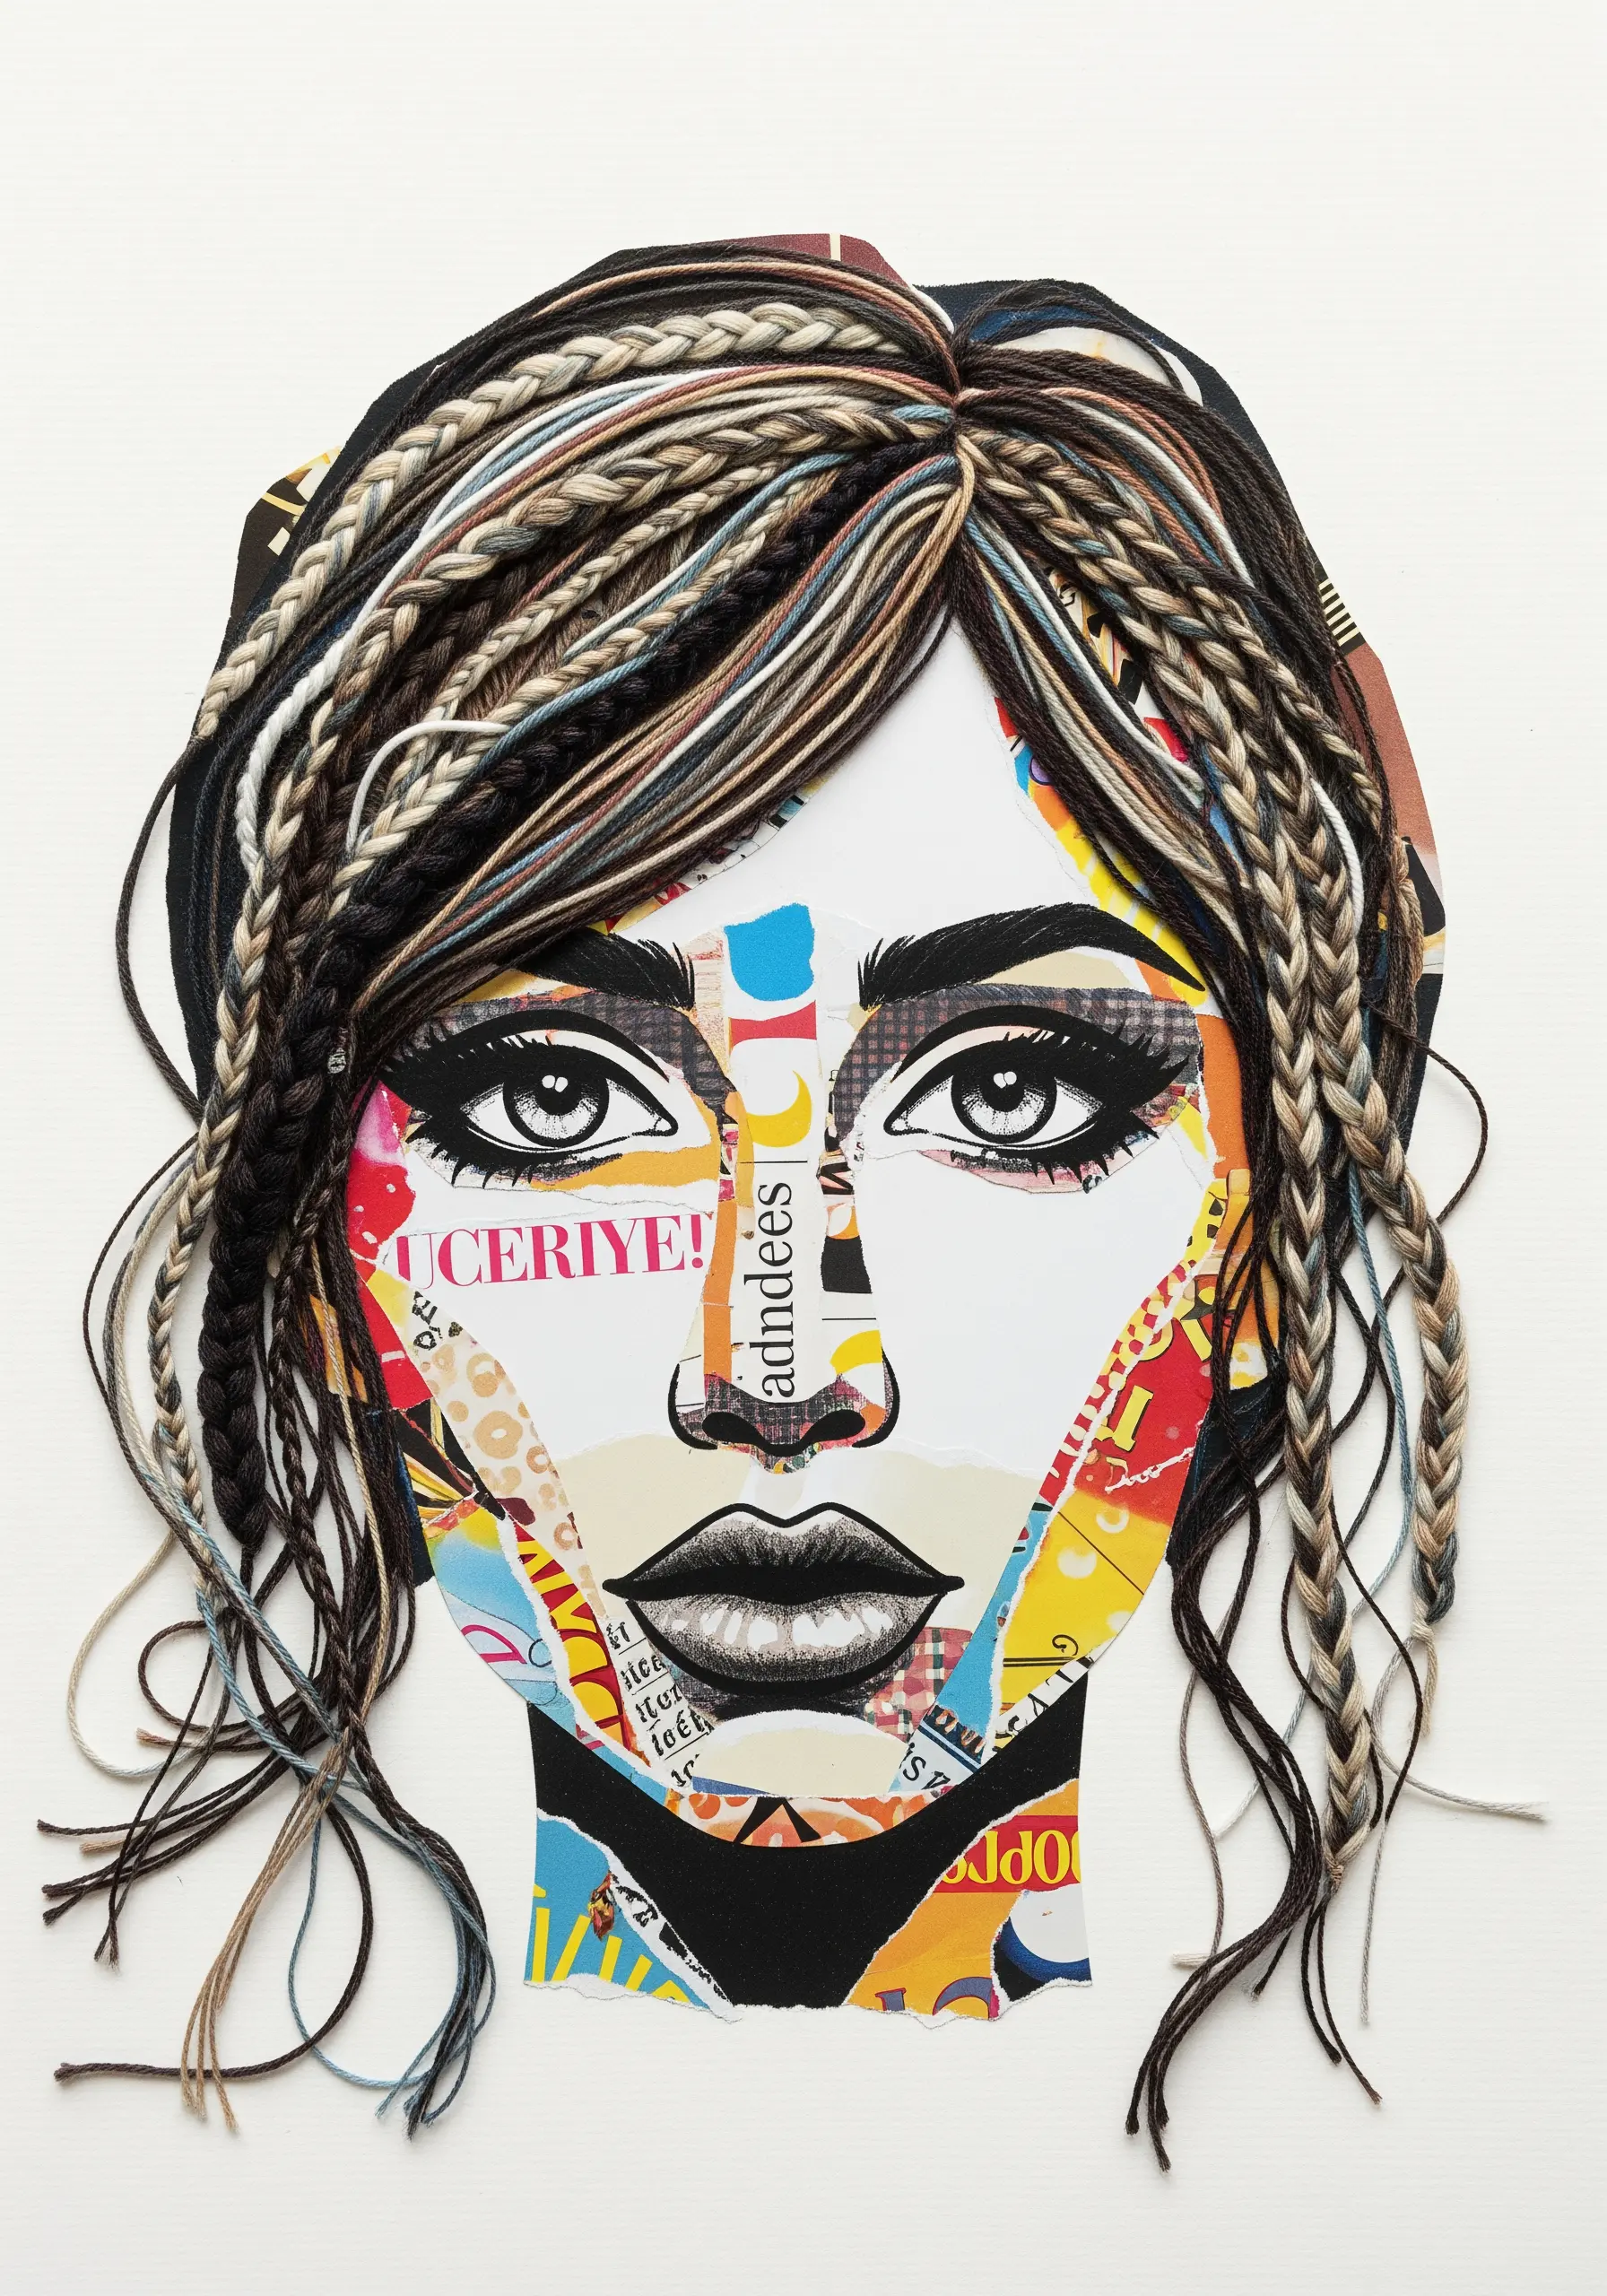
Give your paper collage portraits astonishing realism by using yarn and embroidery floss for the hair.
Braid multiple strands of yarn in various neutral tones—black, brown, grey, and cream—to mimic natural highlights and depth.
Secure the braided sections to the paper base with a few discreet couching stitches, allowing the ends to hang freely for movement.
This mixed-fiber technique adds a sculptural quality that paper alone cannot achieve.
5. Define Shapes on a Painted Canvas with Simple Stitches

After building up thick, textural waves with acrylic paint and modeling paste, introduce a stitched element for clean, graphic contrast.
Create a paper-pieced sailboat and use a simple backstitch along its edges before adhering it to the canvas.
The clean, predictable lines of the thread provide a calming focal point against the chaotic, expressive energy of the painted sea.
A few simple straight stitches for the birds add a final hand-drawn touch, integrating the different media seamlessly.
6. Unify Patchwork Paper with a Decorative Running Stitch
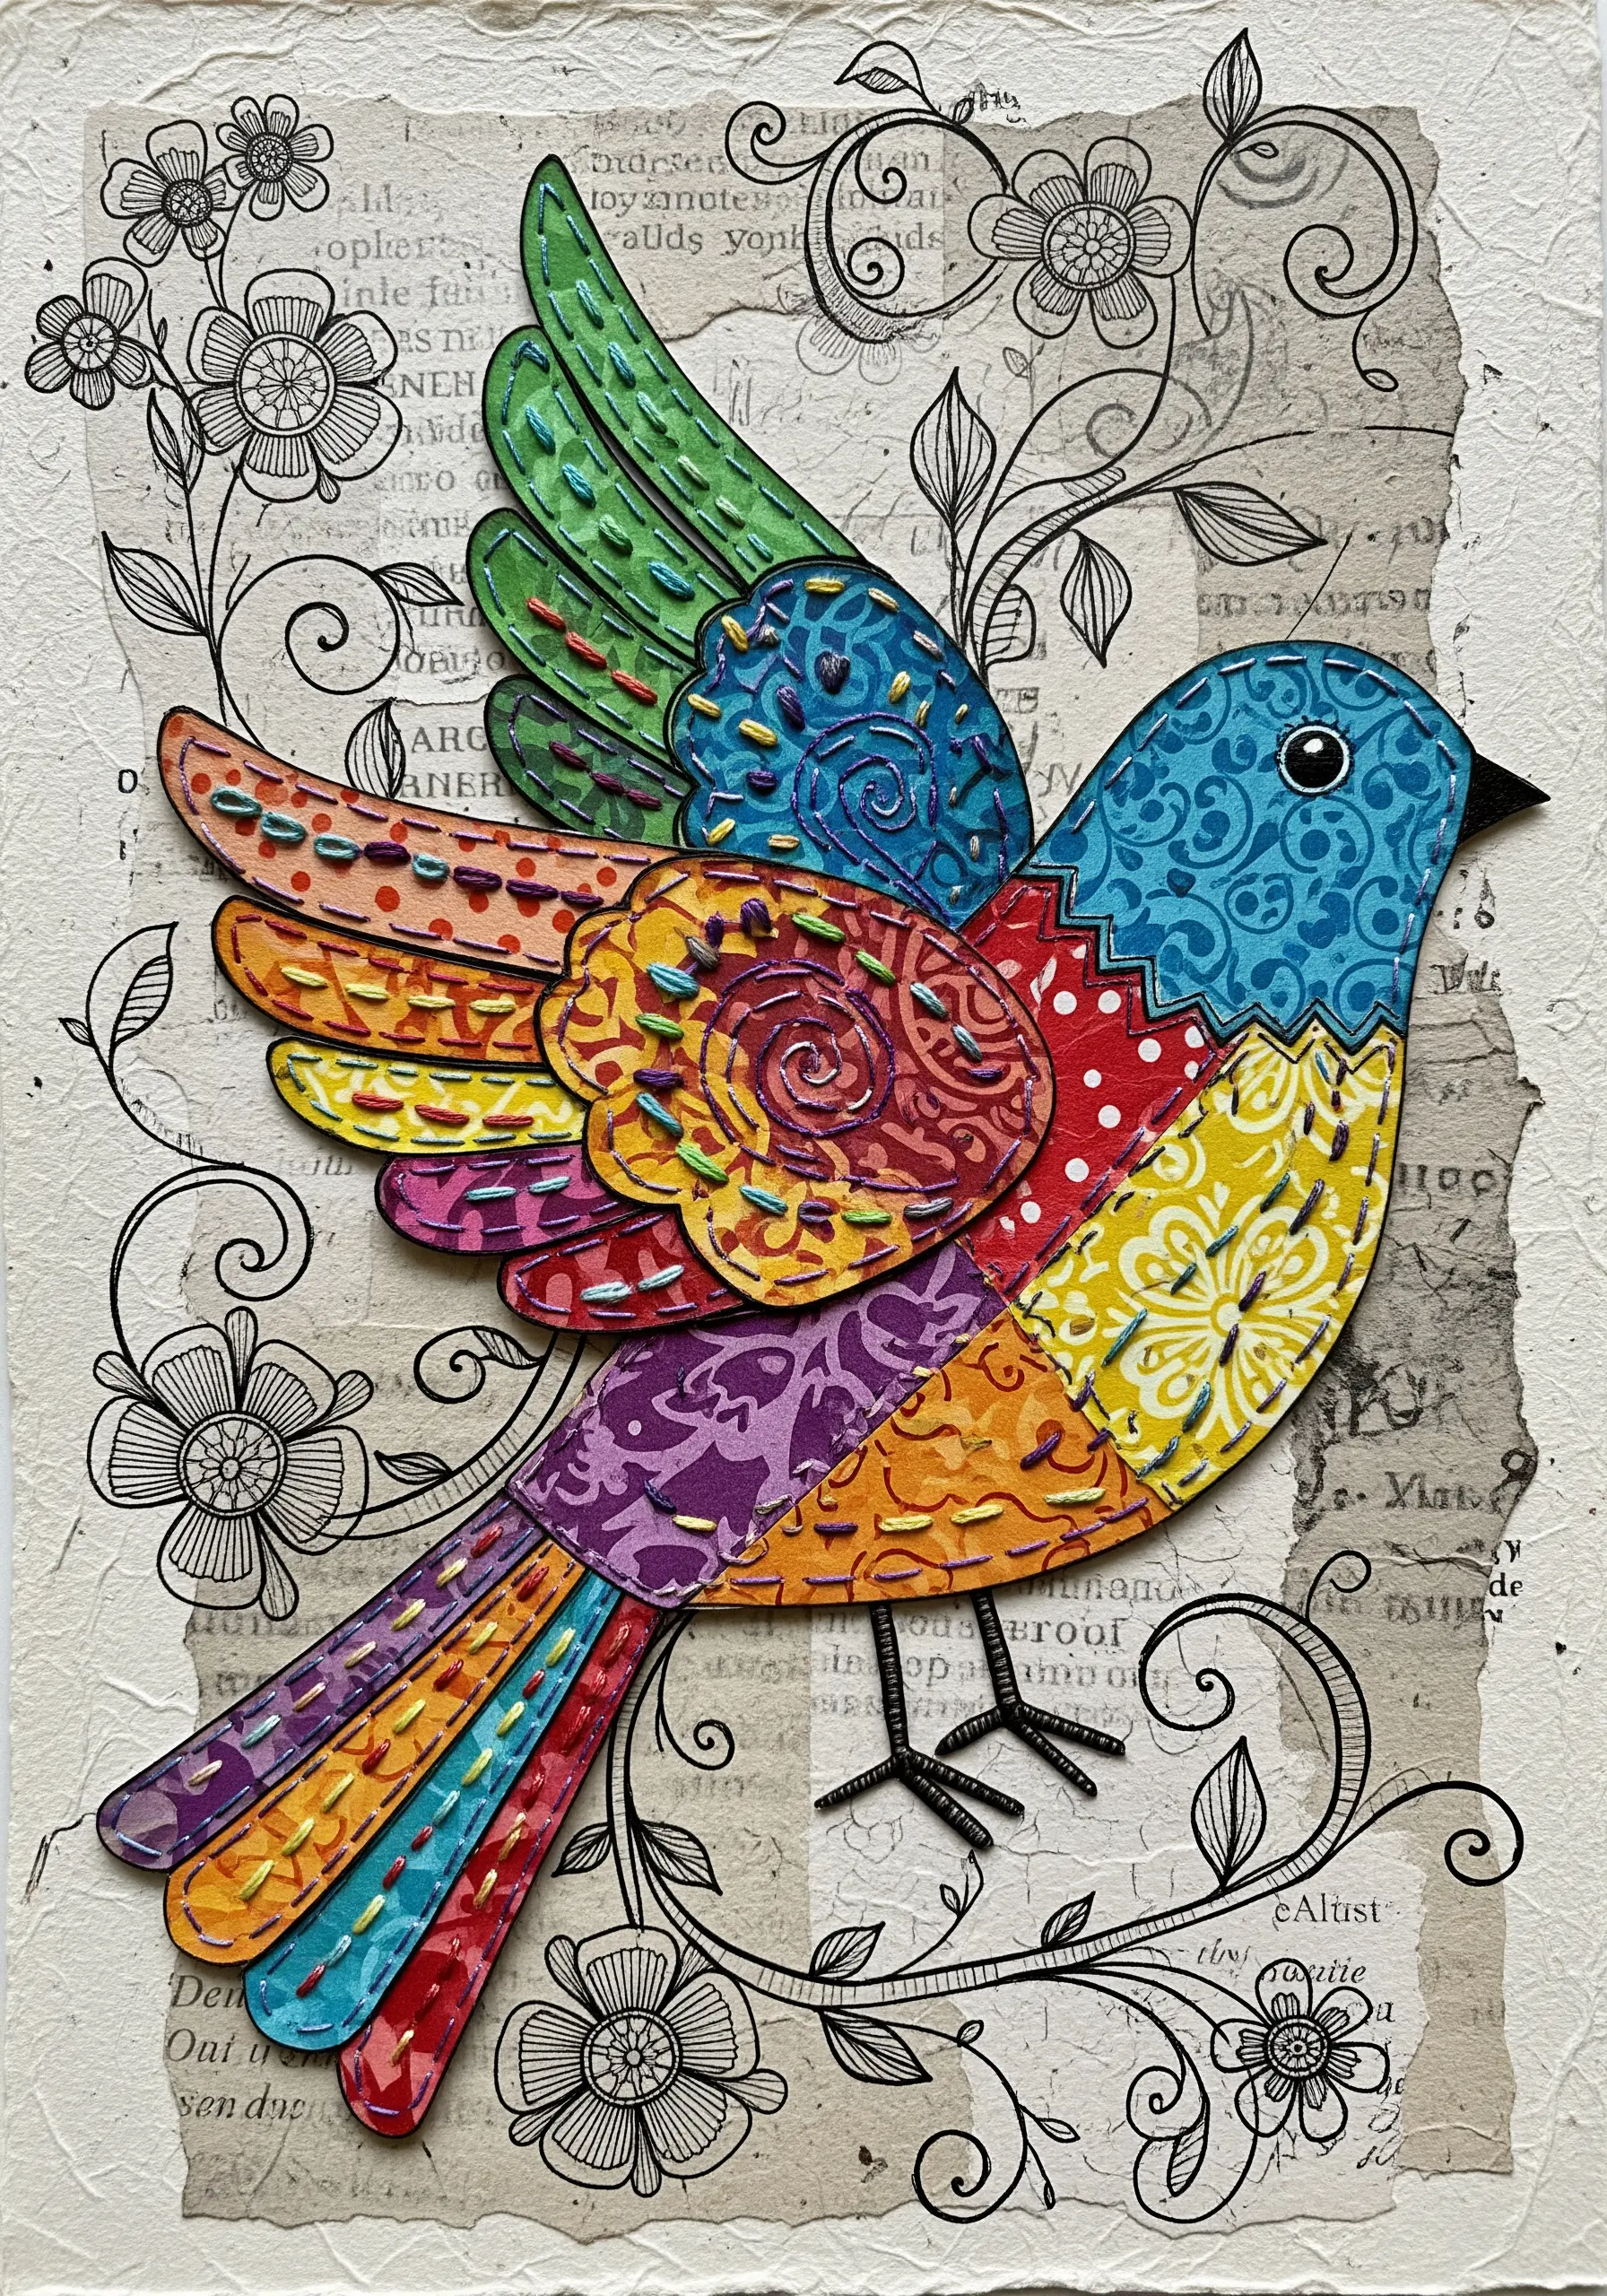
Assemble a creature or motif from various scraps of patterned paper to create a vibrant, patchwork effect.
Instead of just gluing the pieces down, use a contrasting running stitch along the edges of each paper segment.
This not only secures the paper but also adds a charming, quilted look that makes the collage feel cohesive and intentionally crafted.
The stitches become a key part of the design, outlining shapes and adding a soft, textile finish.
7. Build Monochromatic Depth with Layered Textures
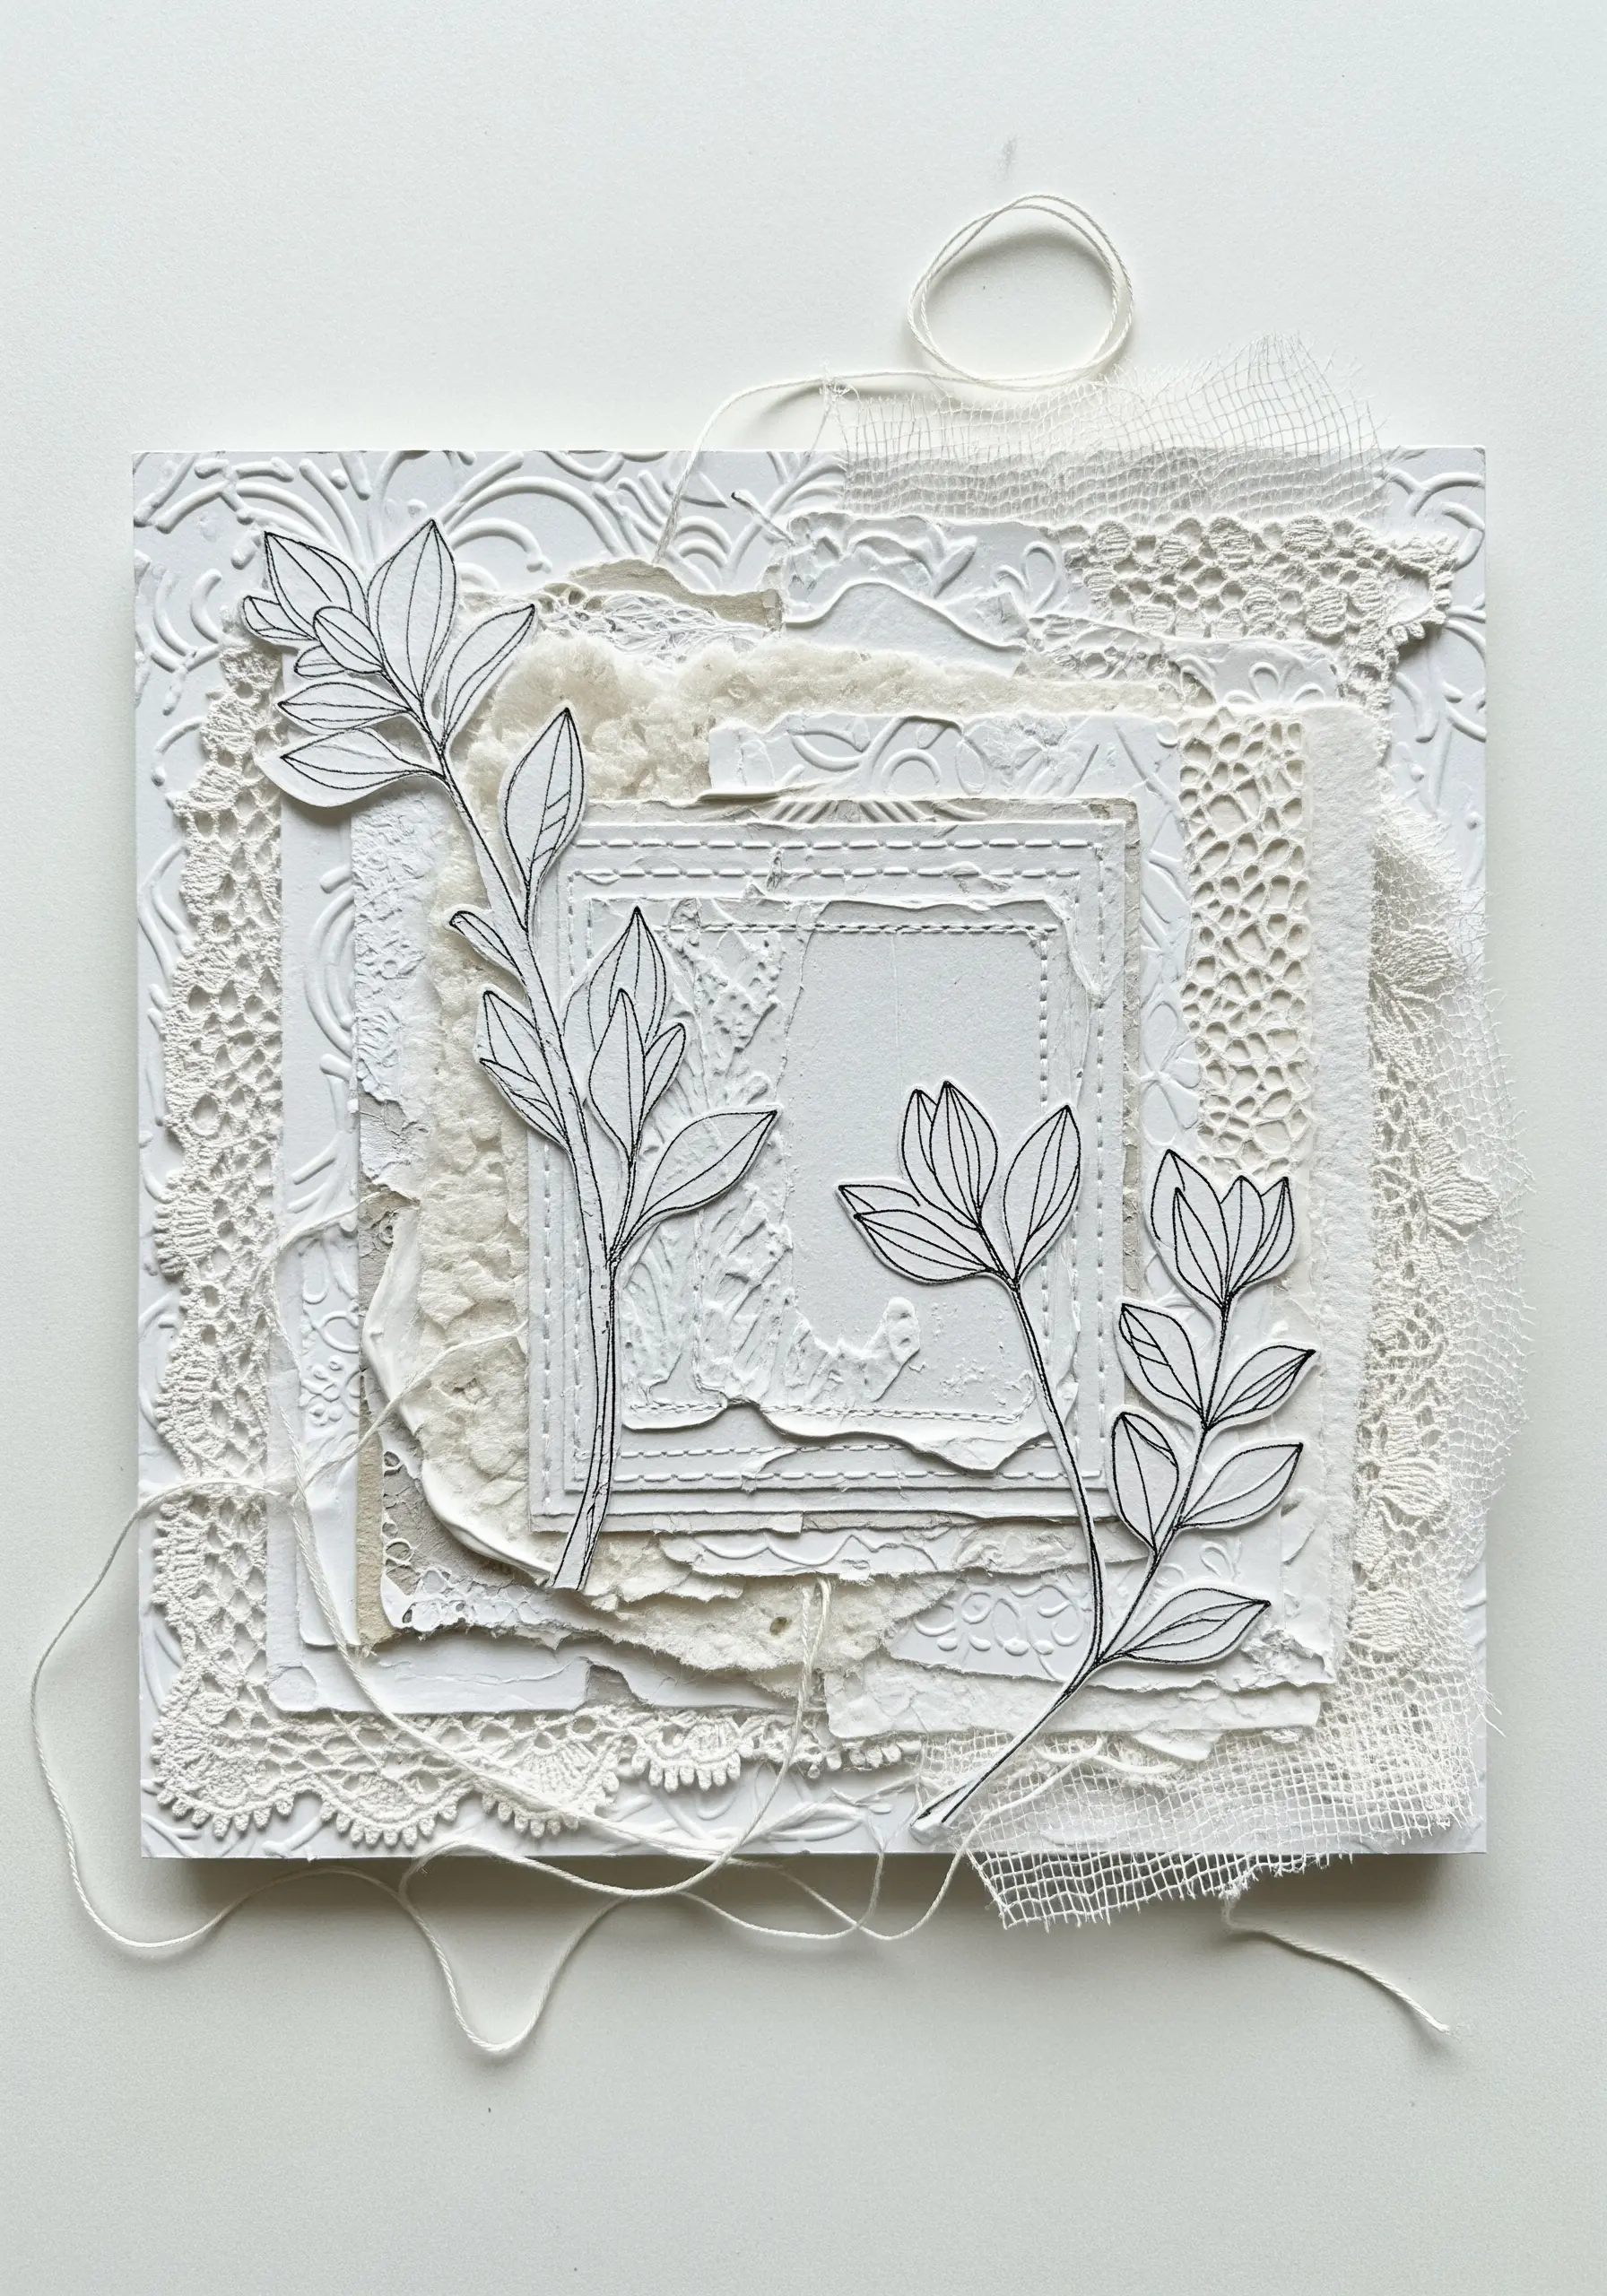
Explore the power of a single color by layering various white and cream materials.
Combine embossed cardstock, delicate lace, ripped handmade paper, and loosely woven gauze to create a rich tactile landscape.
Introduce a hand-drawn botanical element on smooth paper and stitch it onto the textured background with a simple running stitch.
This focus on texture over color results in a sophisticated piece where light and shadow do all the work, creating a quiet, elegant composition.
8. Integrate Newspaper Collage for Urban Grit
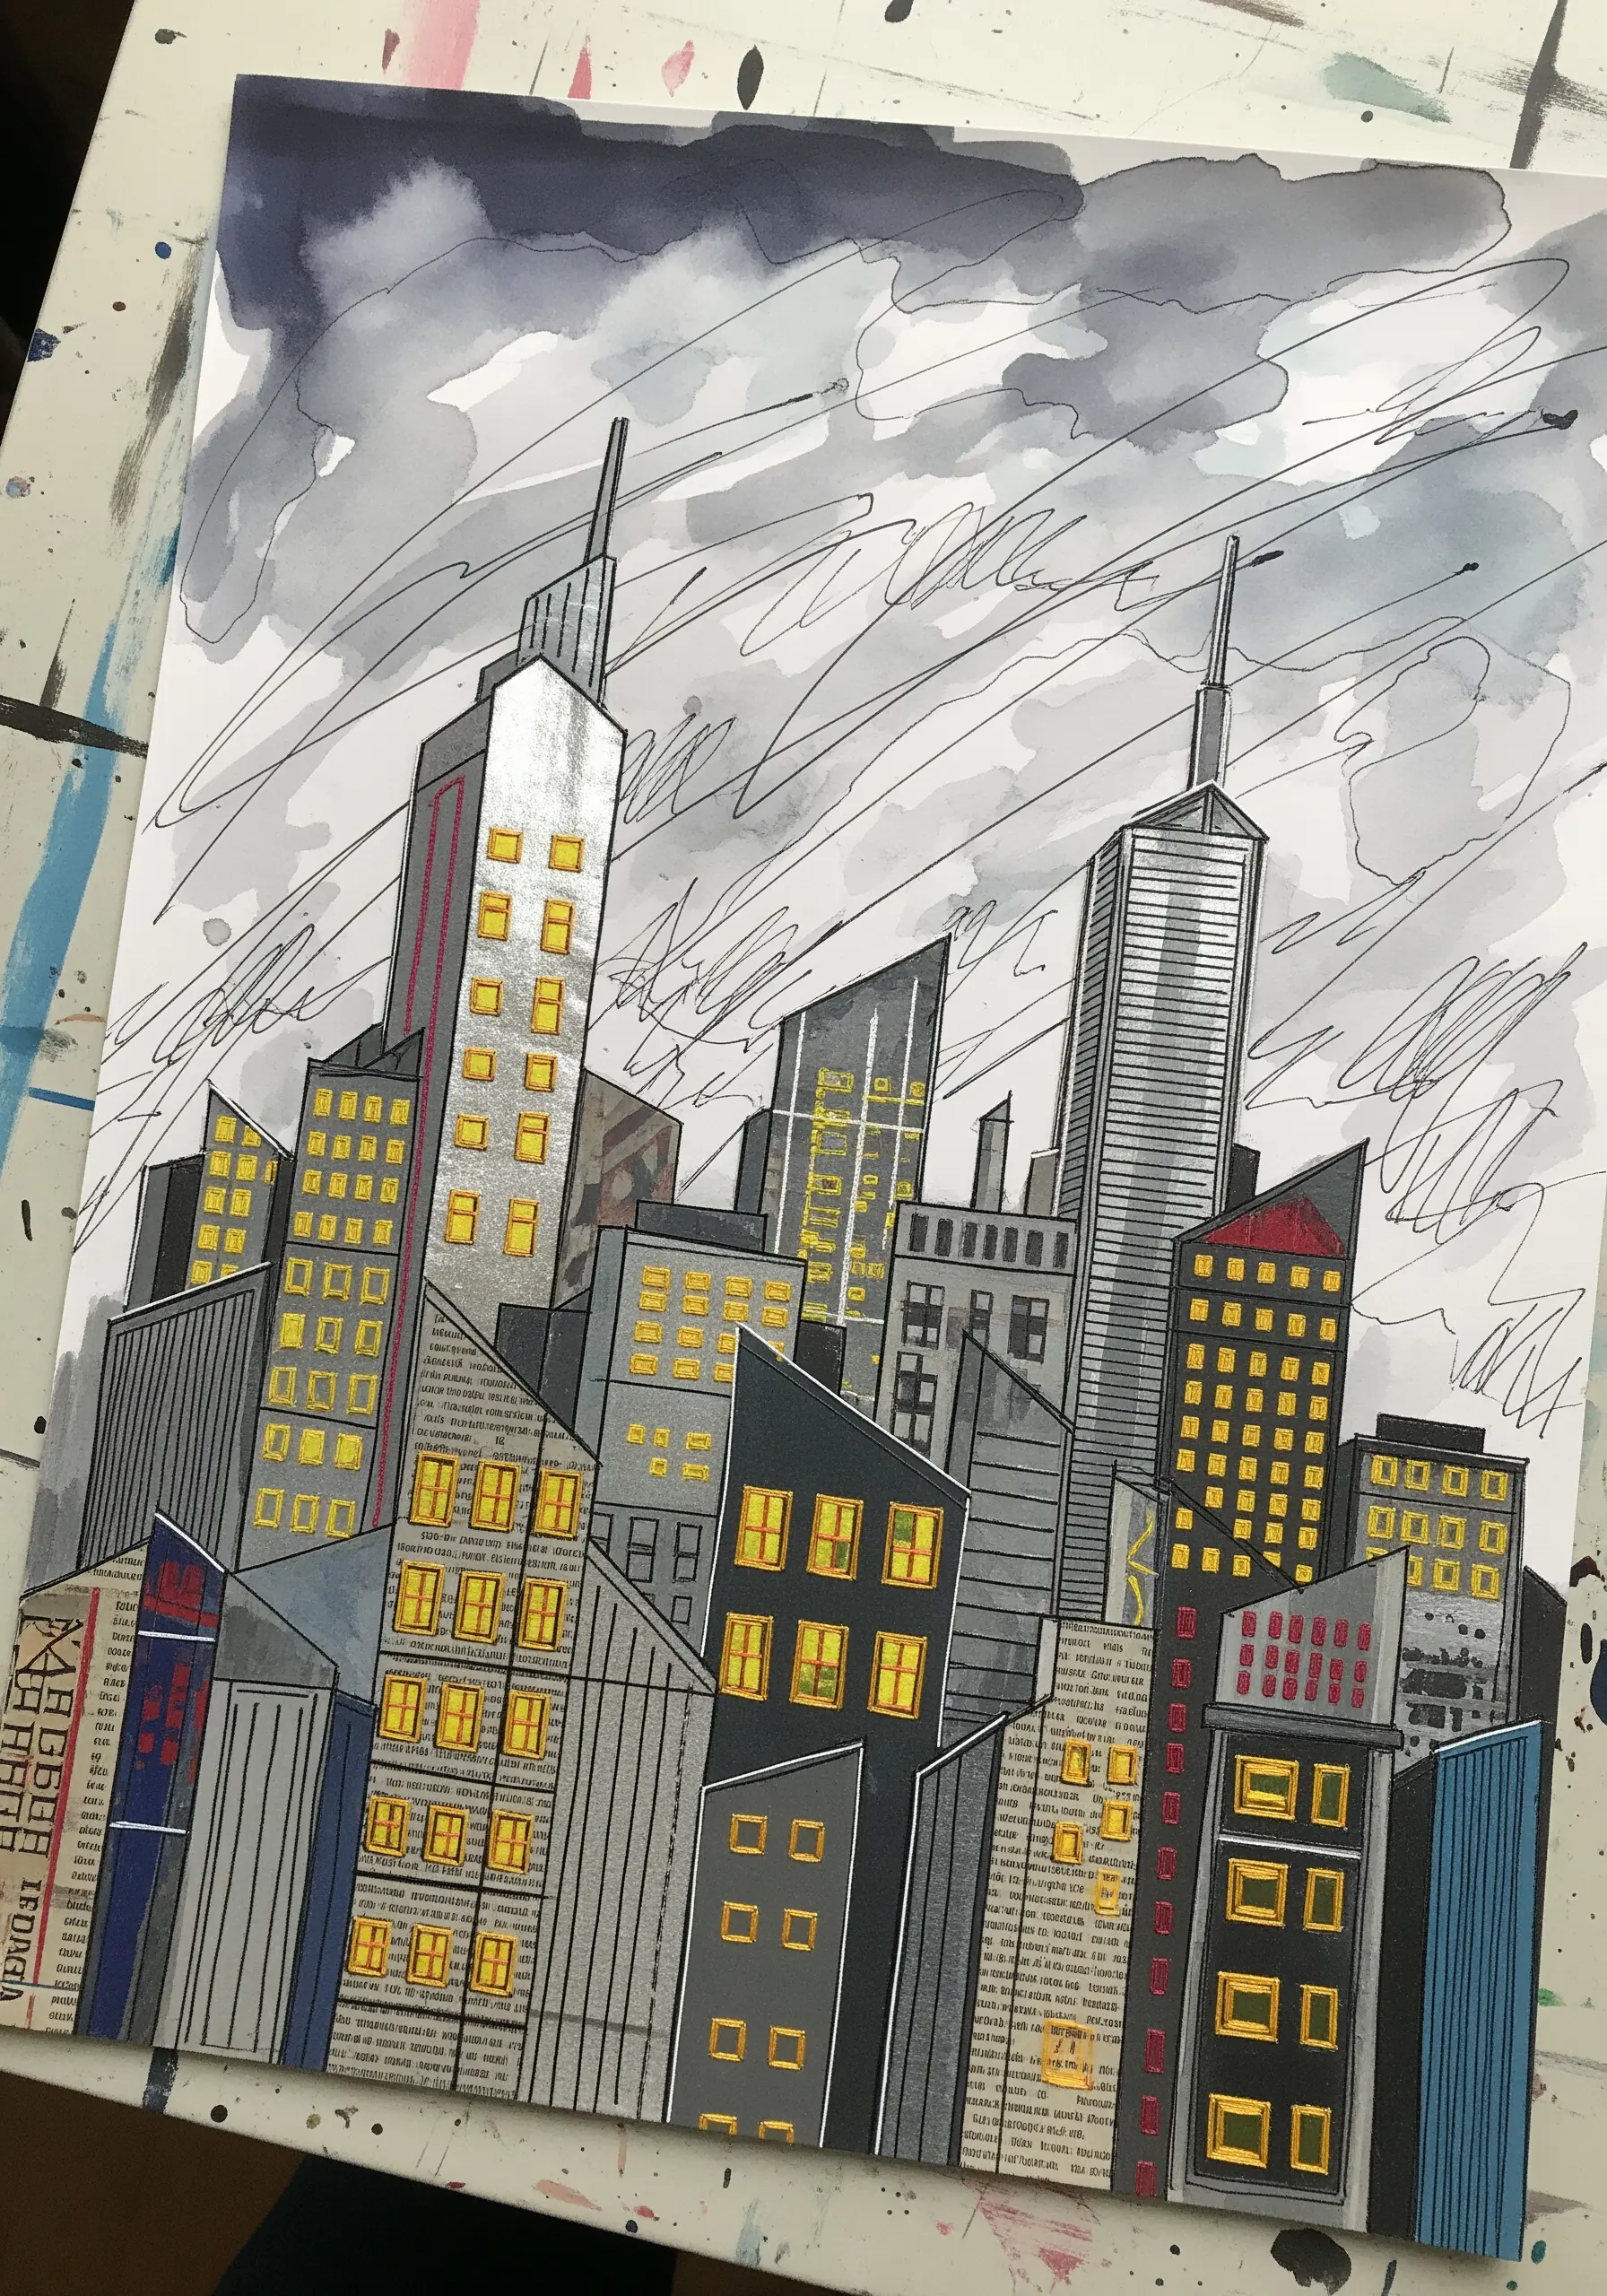
Use newspaper clippings as a ready-made texture for buildings in a cityscape illustration.
Instead of drawing every window, let the columns of text suggest architectural detail and rhythm.
Add selective highlights with metallic paper or paint for windows to create a sense of glowing light against the monochrome text.
Keep thread minimal—perhaps a few straight stitches for antennas—to let the powerful contrast of ink, paper, and metallic shine take center stage.
9. Use Decorative Knots as Sculptural Elements
Move beyond simple stitches and incorporate dimensional knots as the focal point of your design.
Learn a few basic decorative knots, like the Celtic button knot or Josephine knot, and create them with soft cord or thick yarn.
Arrange the finished knots on a textured paper background, securing them with a few hidden stitches from behind.
This approach turns thread into a small-scale sculpture, offering a unique texture that draws the eye instantly.
10. Frame a Scene with Stitched Borders
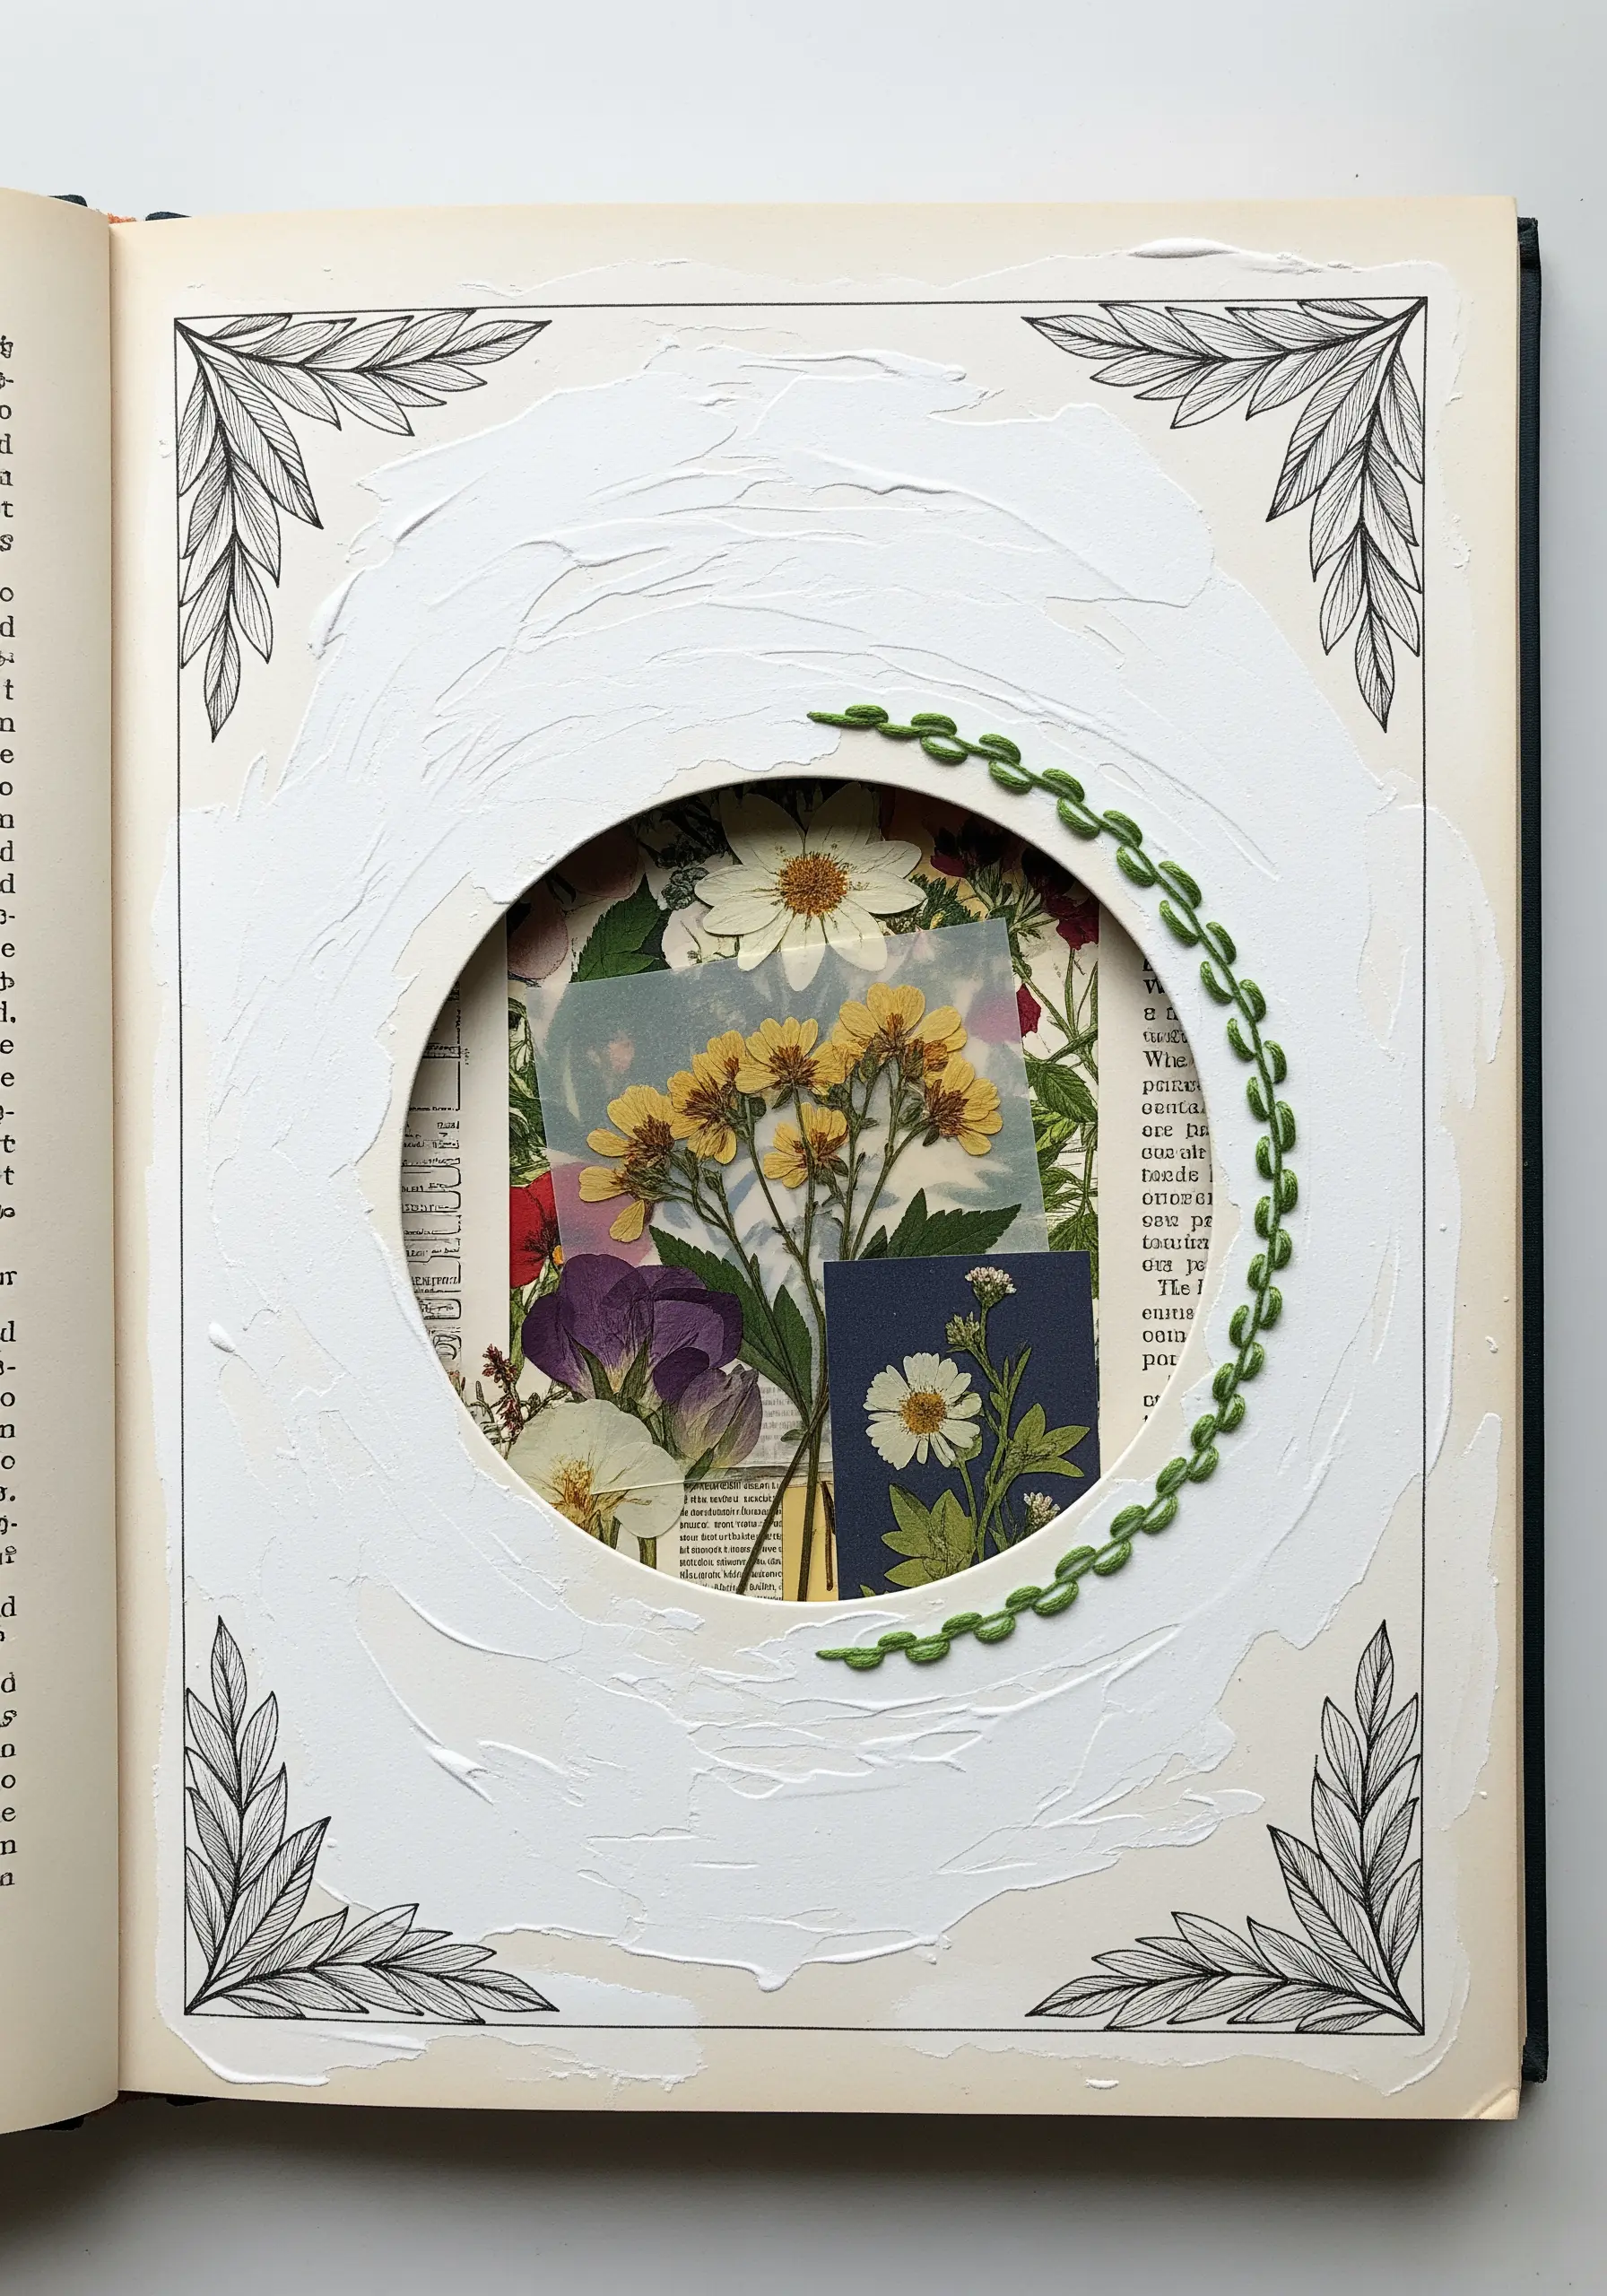
Create a portal or window in your artwork by cutting an aperture into a page or piece of cardstock.
Frame this opening with a decorative stitch, like a Cretan stitch or a simple whipped backstitch, to add texture and definition.
Layer your collage elements—such as pressed flowers or vintage photos—behind the opening so they are revealed through the stitched frame.
This technique elevates a simple collage into a thoughtful, multi-layered narrative piece.
11. Add Definition to Layered Paper with a Single Thread
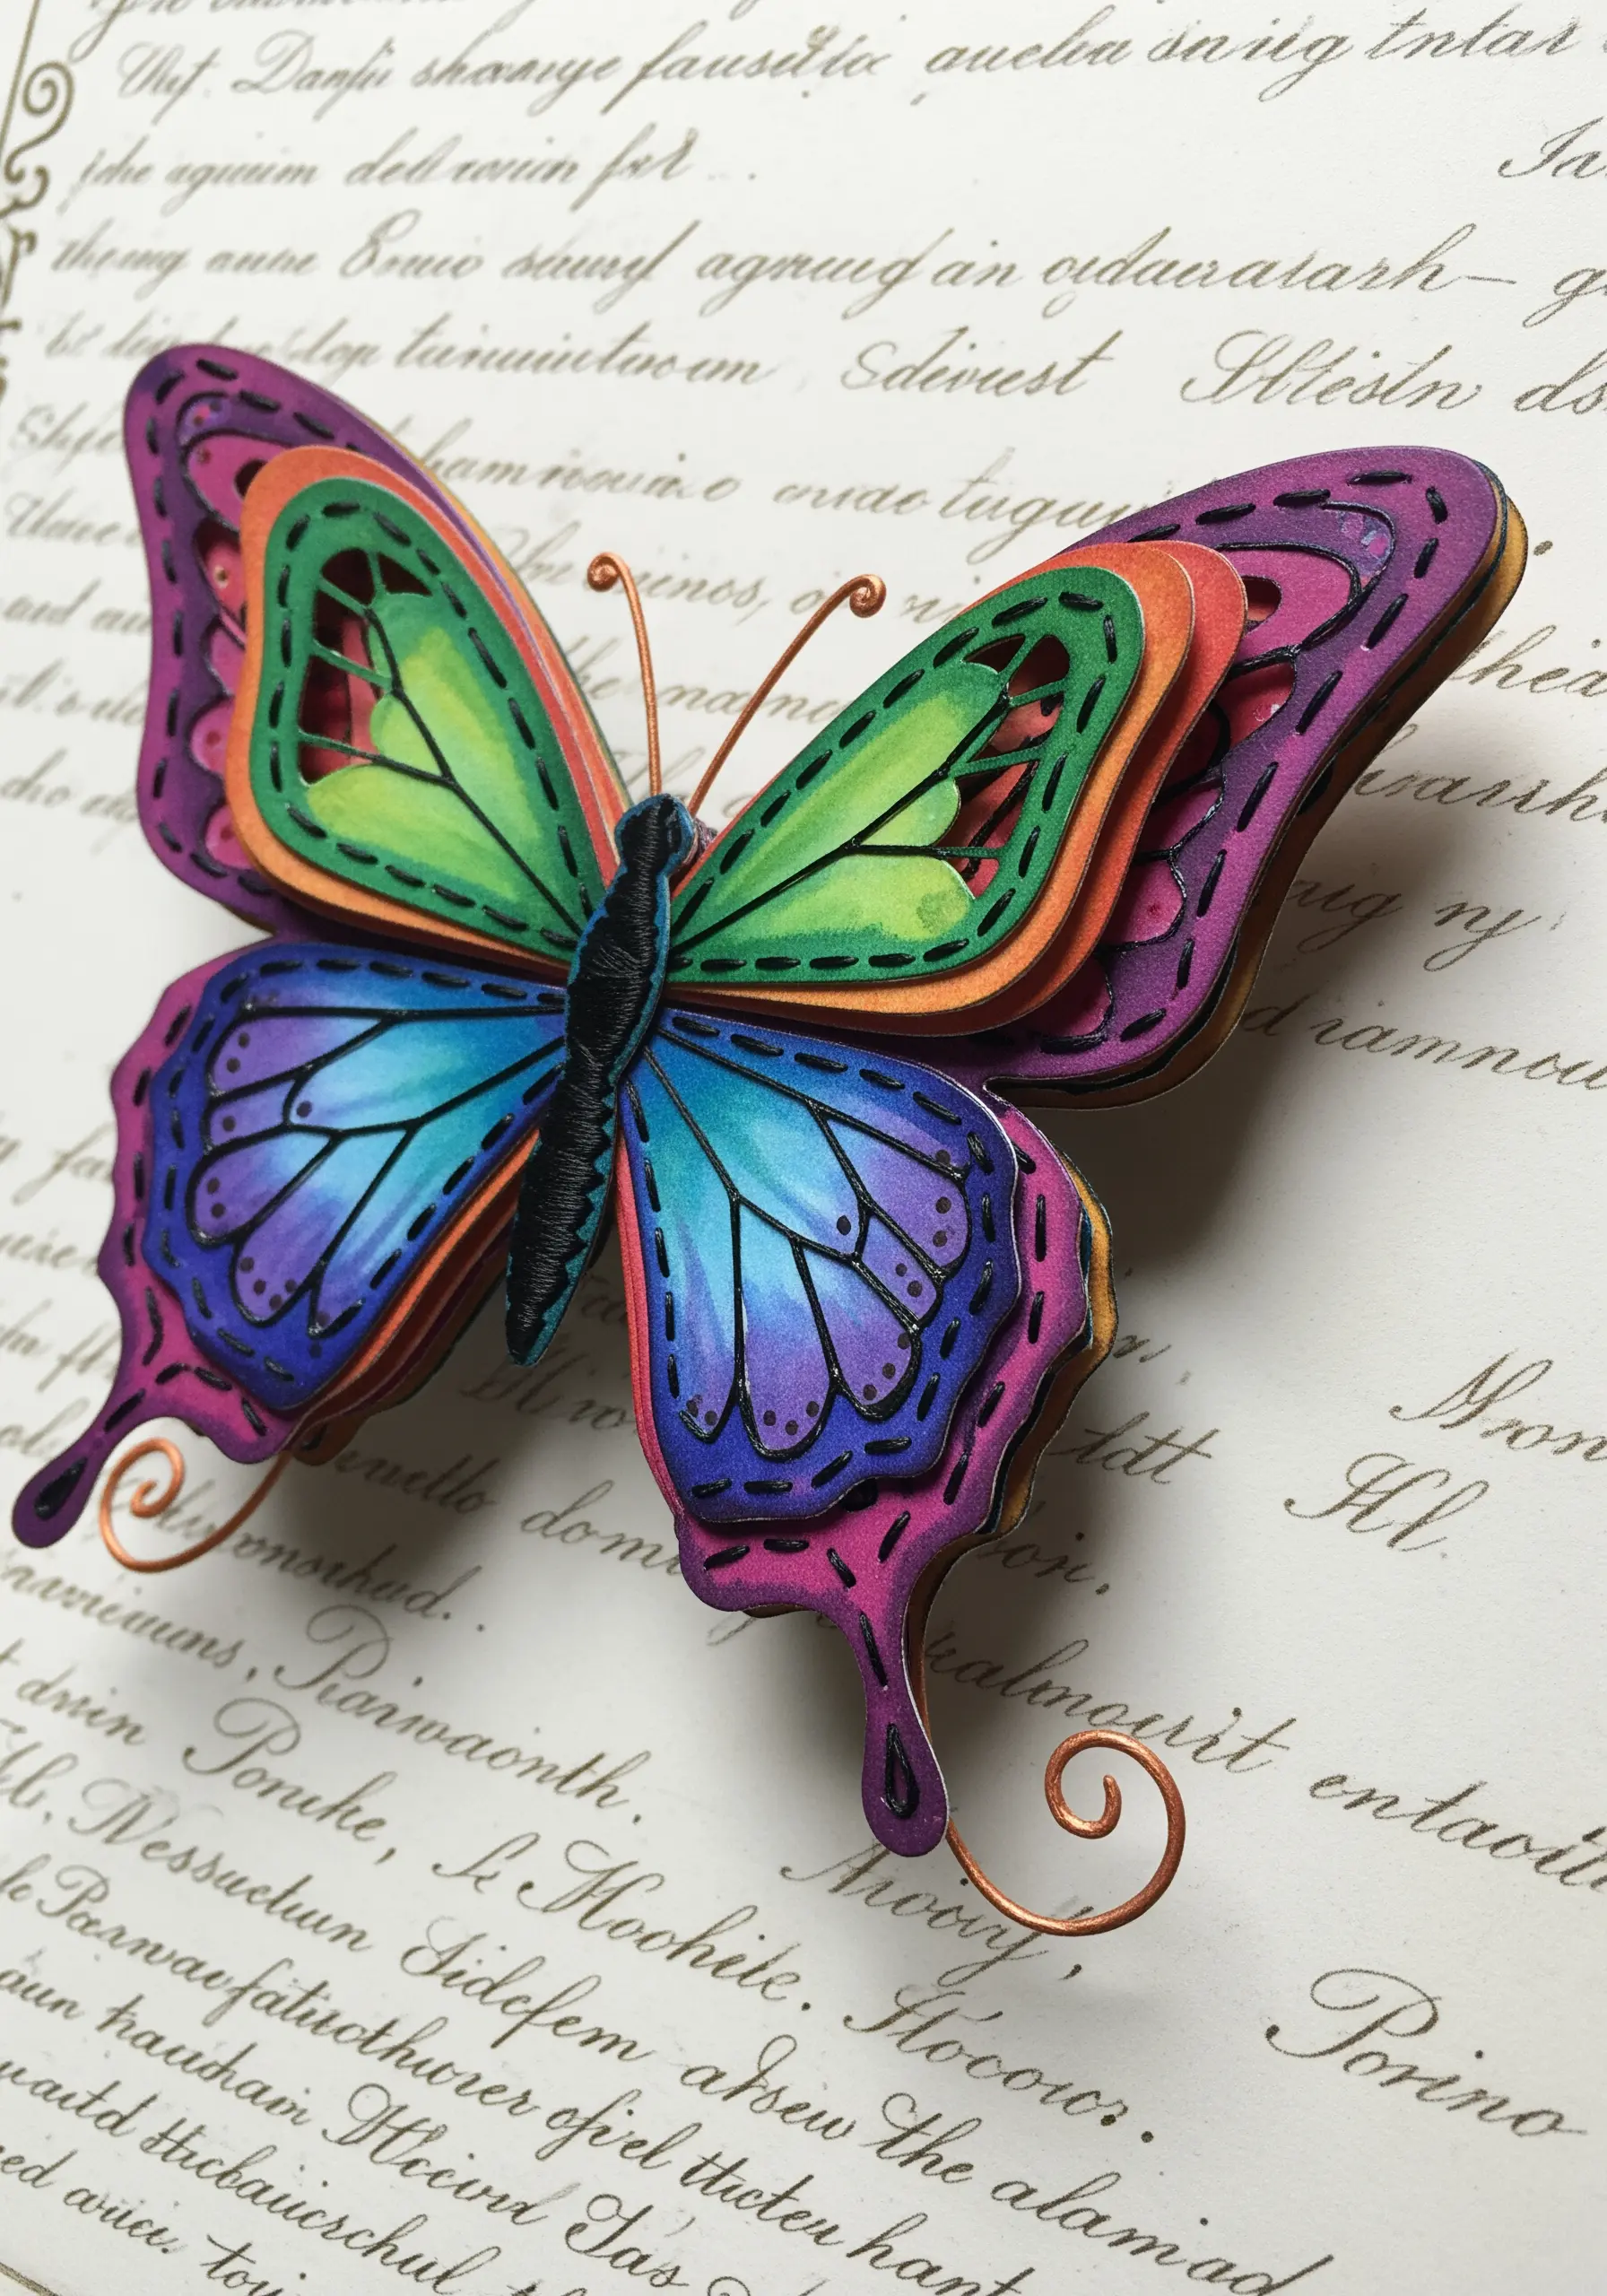
When working with intricately cut and colored paper layers, a small amount of stitching can add crucial definition.
Use a single strand of black embroidery floss to stitch the butterfly’s body with a tight satin stitch.
Add a few backstitches along the edges of the wings to emphasize their shape without overwhelming the delicate paper gradients.
This subtle use of thread grounds the papercraft, adding a touch of textile richness and sharp detail where it matters most.
12. Create Energy with Free-Motion Scribble Stitching
Embrace chaos by layering energetic, free-form stitching over bold, organic paper shapes.
You can achieve this effect with a sewing machine by dropping the feed dogs, which allows you to move the paper freely in any direction.
Alternatively, use a single strand of thread and a needle to create loose, loopy hand stitches that overlap and build up in density.
The scribbled threads add a raw, dynamic energy that contrasts beautifully with the clean edges of the cut paper.
13. Craft Miniature Worlds with 3D Stitches
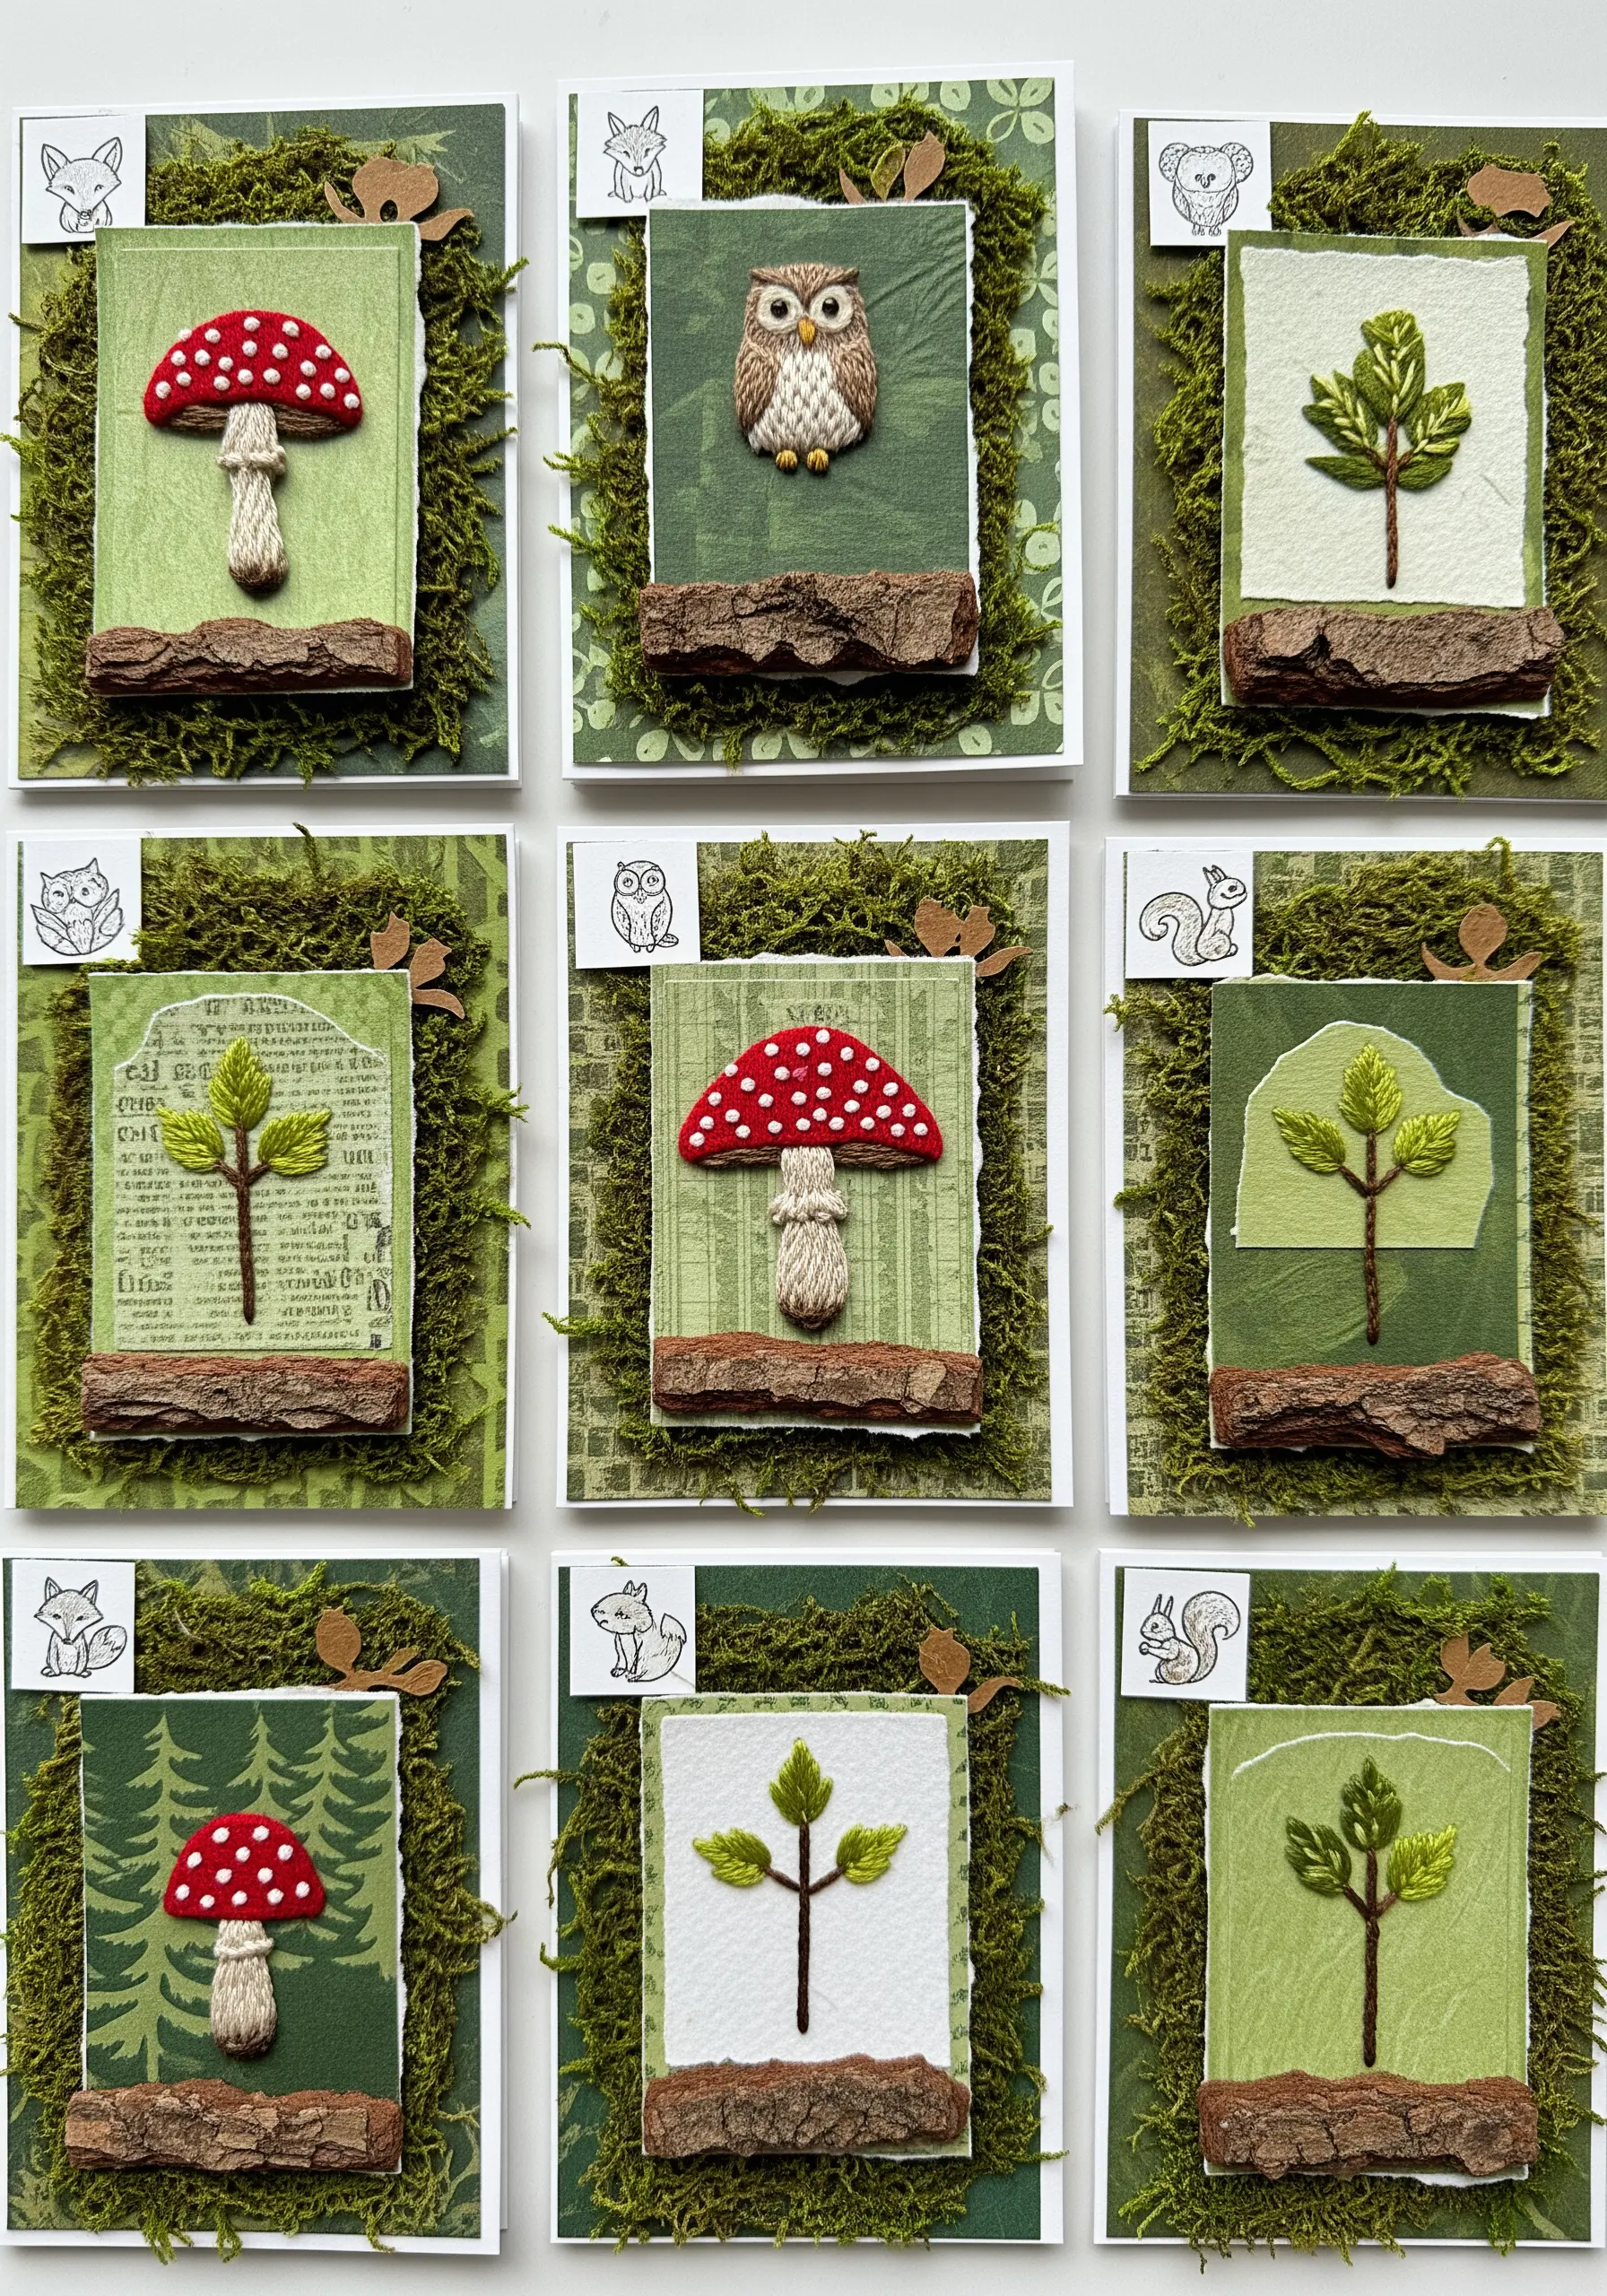
Build tiny, enchanting scenes by combining paper, natural elements, and dimensional embroidery.
Use padded satin stitch to create a plump, rounded mushroom cap, giving it a soft, touchable quality.
For leaves or trees, try stumpwork techniques or woven picot stitches to make them lift off the page.
Placing these tiny artistic home touches against real bark and moss creates a magical mixed-media diorama.
14. Trace Anatomical Pathways with Thread

Use thread to represent the intricate systems of the body—veins, nerves, or meridians—over a collaged figure.
Begin by sketching a branching, tree-like structure down the center of your paper collage.
Use a stem stitch or split stitch in a bold color like magenta to create raised, organic lines that flow across the different map and paper segments.
This powerful metaphor turns simple stitches into a story about connection, life, and the internal landscapes we carry.
15. Add a Homespun Finish with Faux Stitching
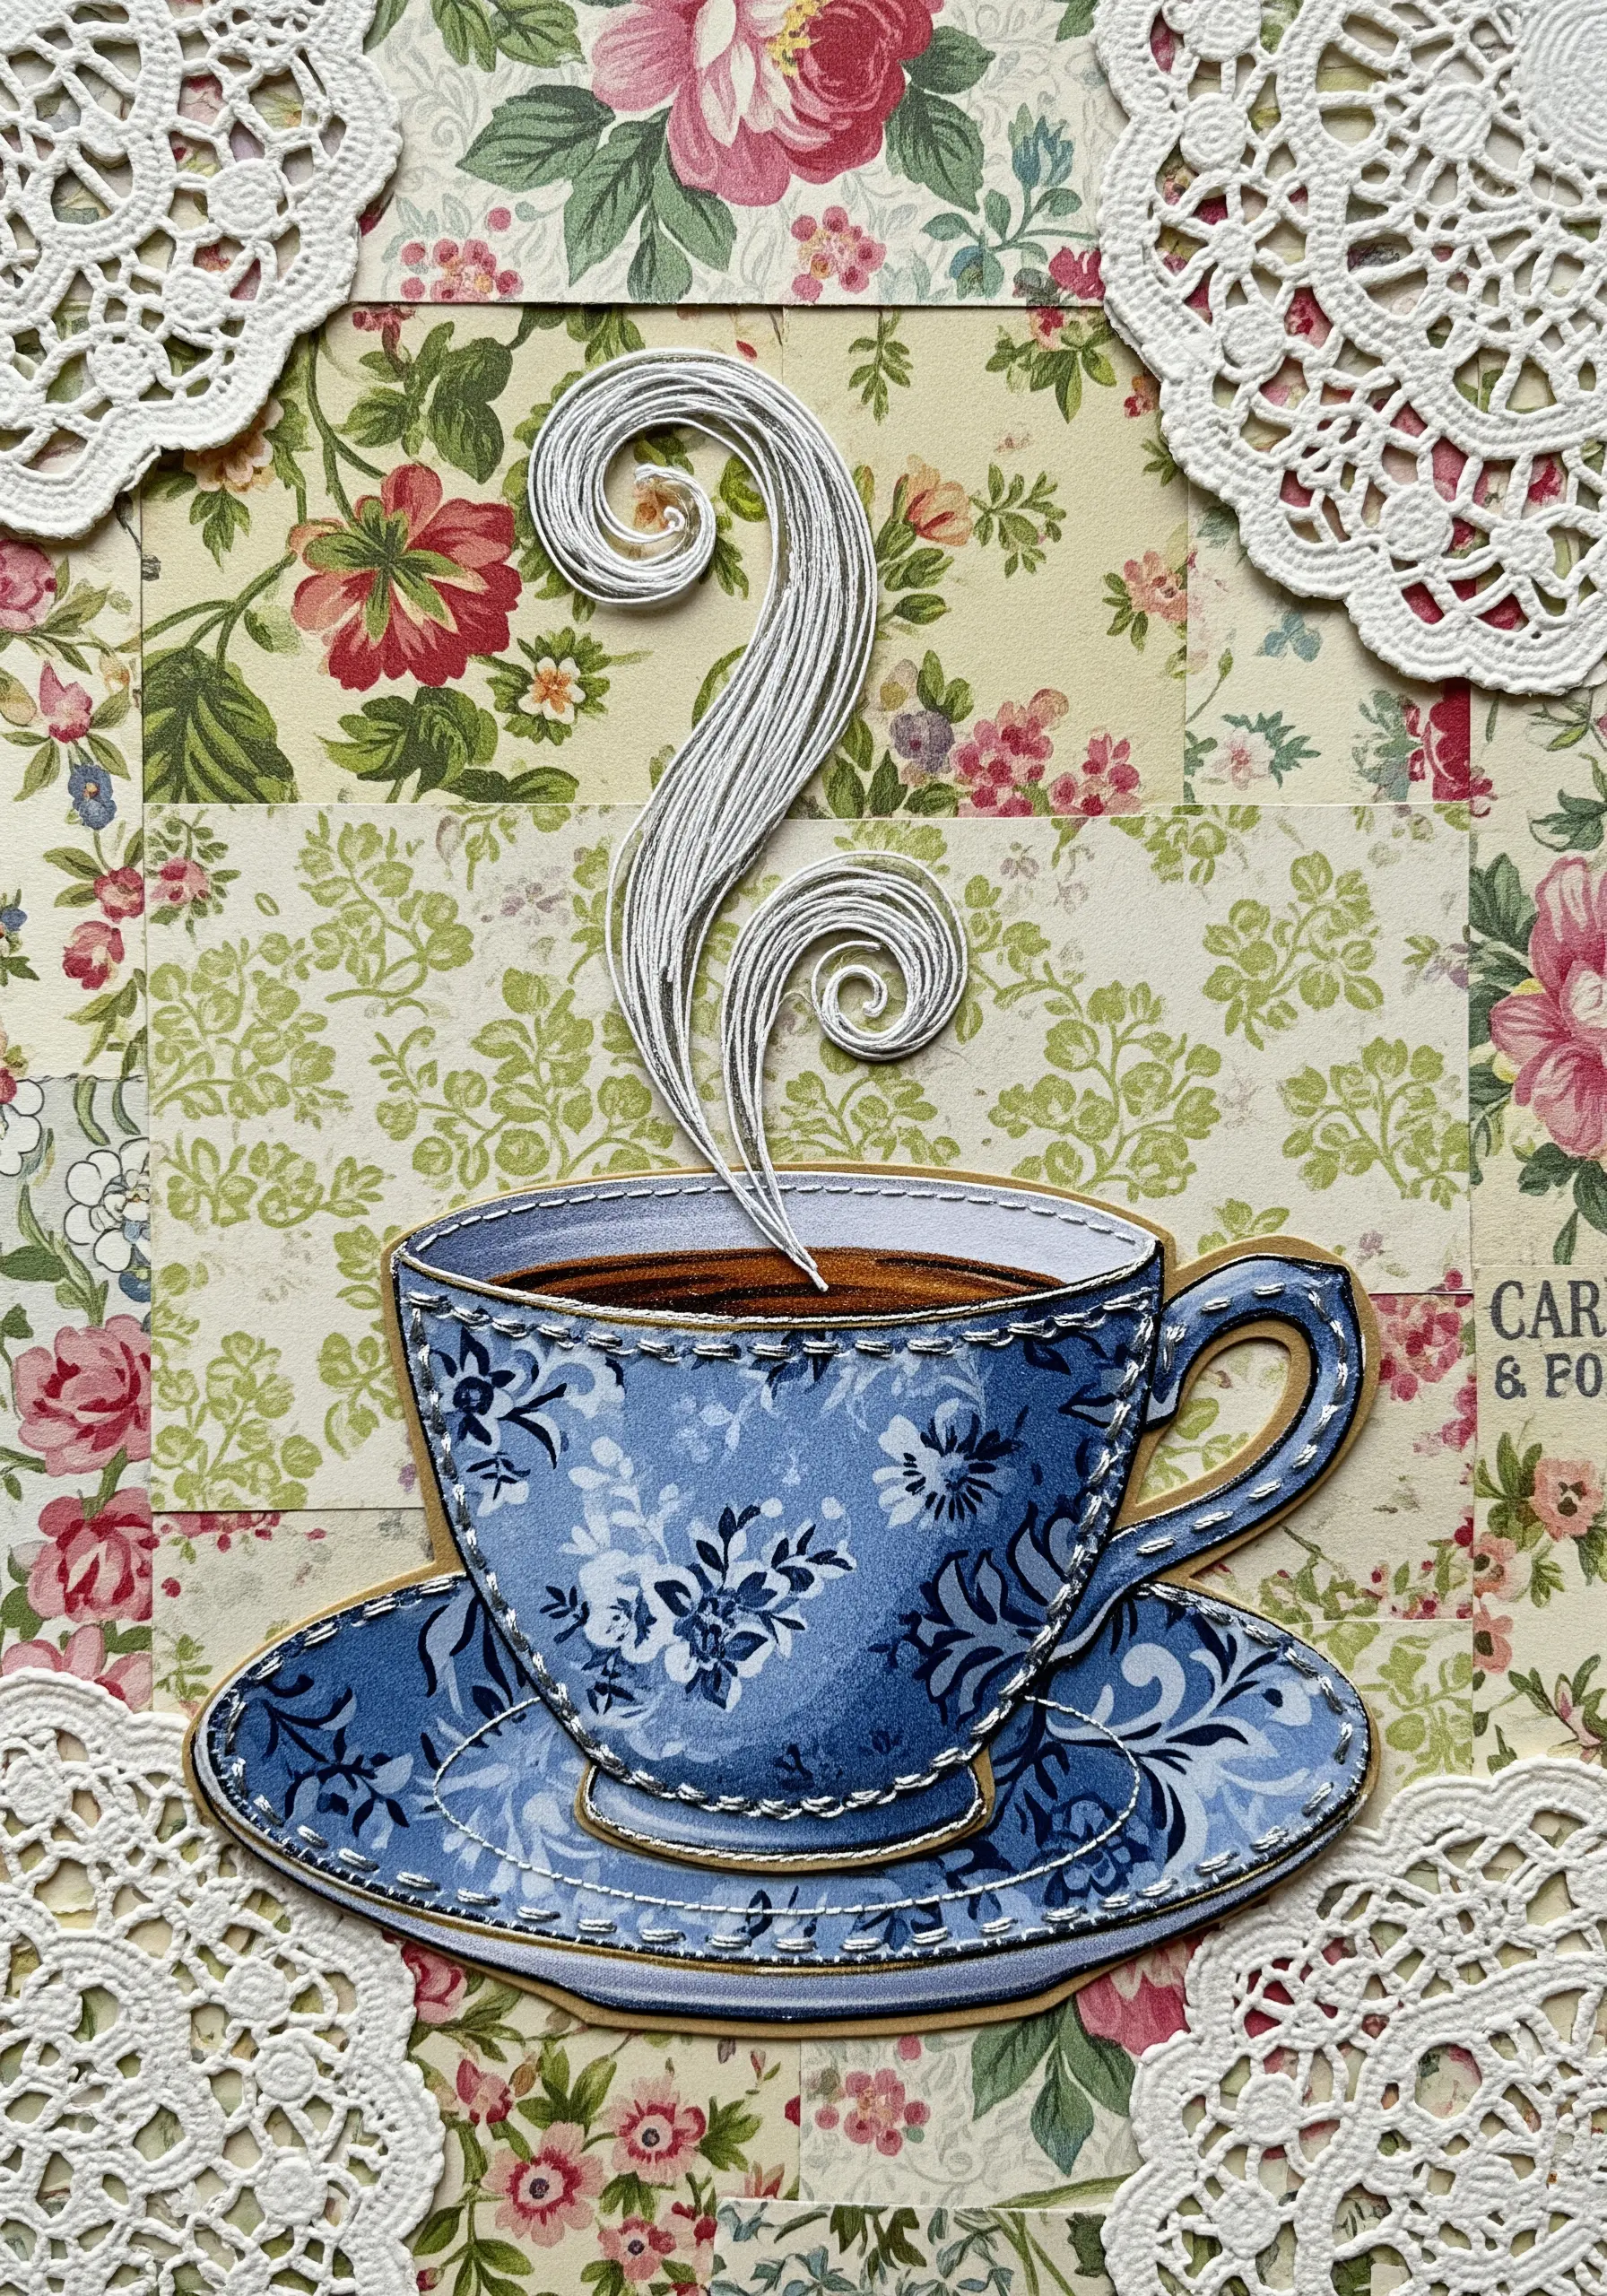
Give paper cutouts a charming, hand-stitched feel without piercing the paper at all.
Use a fine-tipped white gel pen to draw a simple dashed line just inside the edge of your paper elements, like the teacup.
This trompe-l’œil effect mimics a running stitch and adds a delicate, crafty detail that enhances the vintage aesthetic.
It’s a perfect way to add a textile touch when working with paper that is too delicate to stitch through directly.
16. Weave Gradients with String Art Techniques
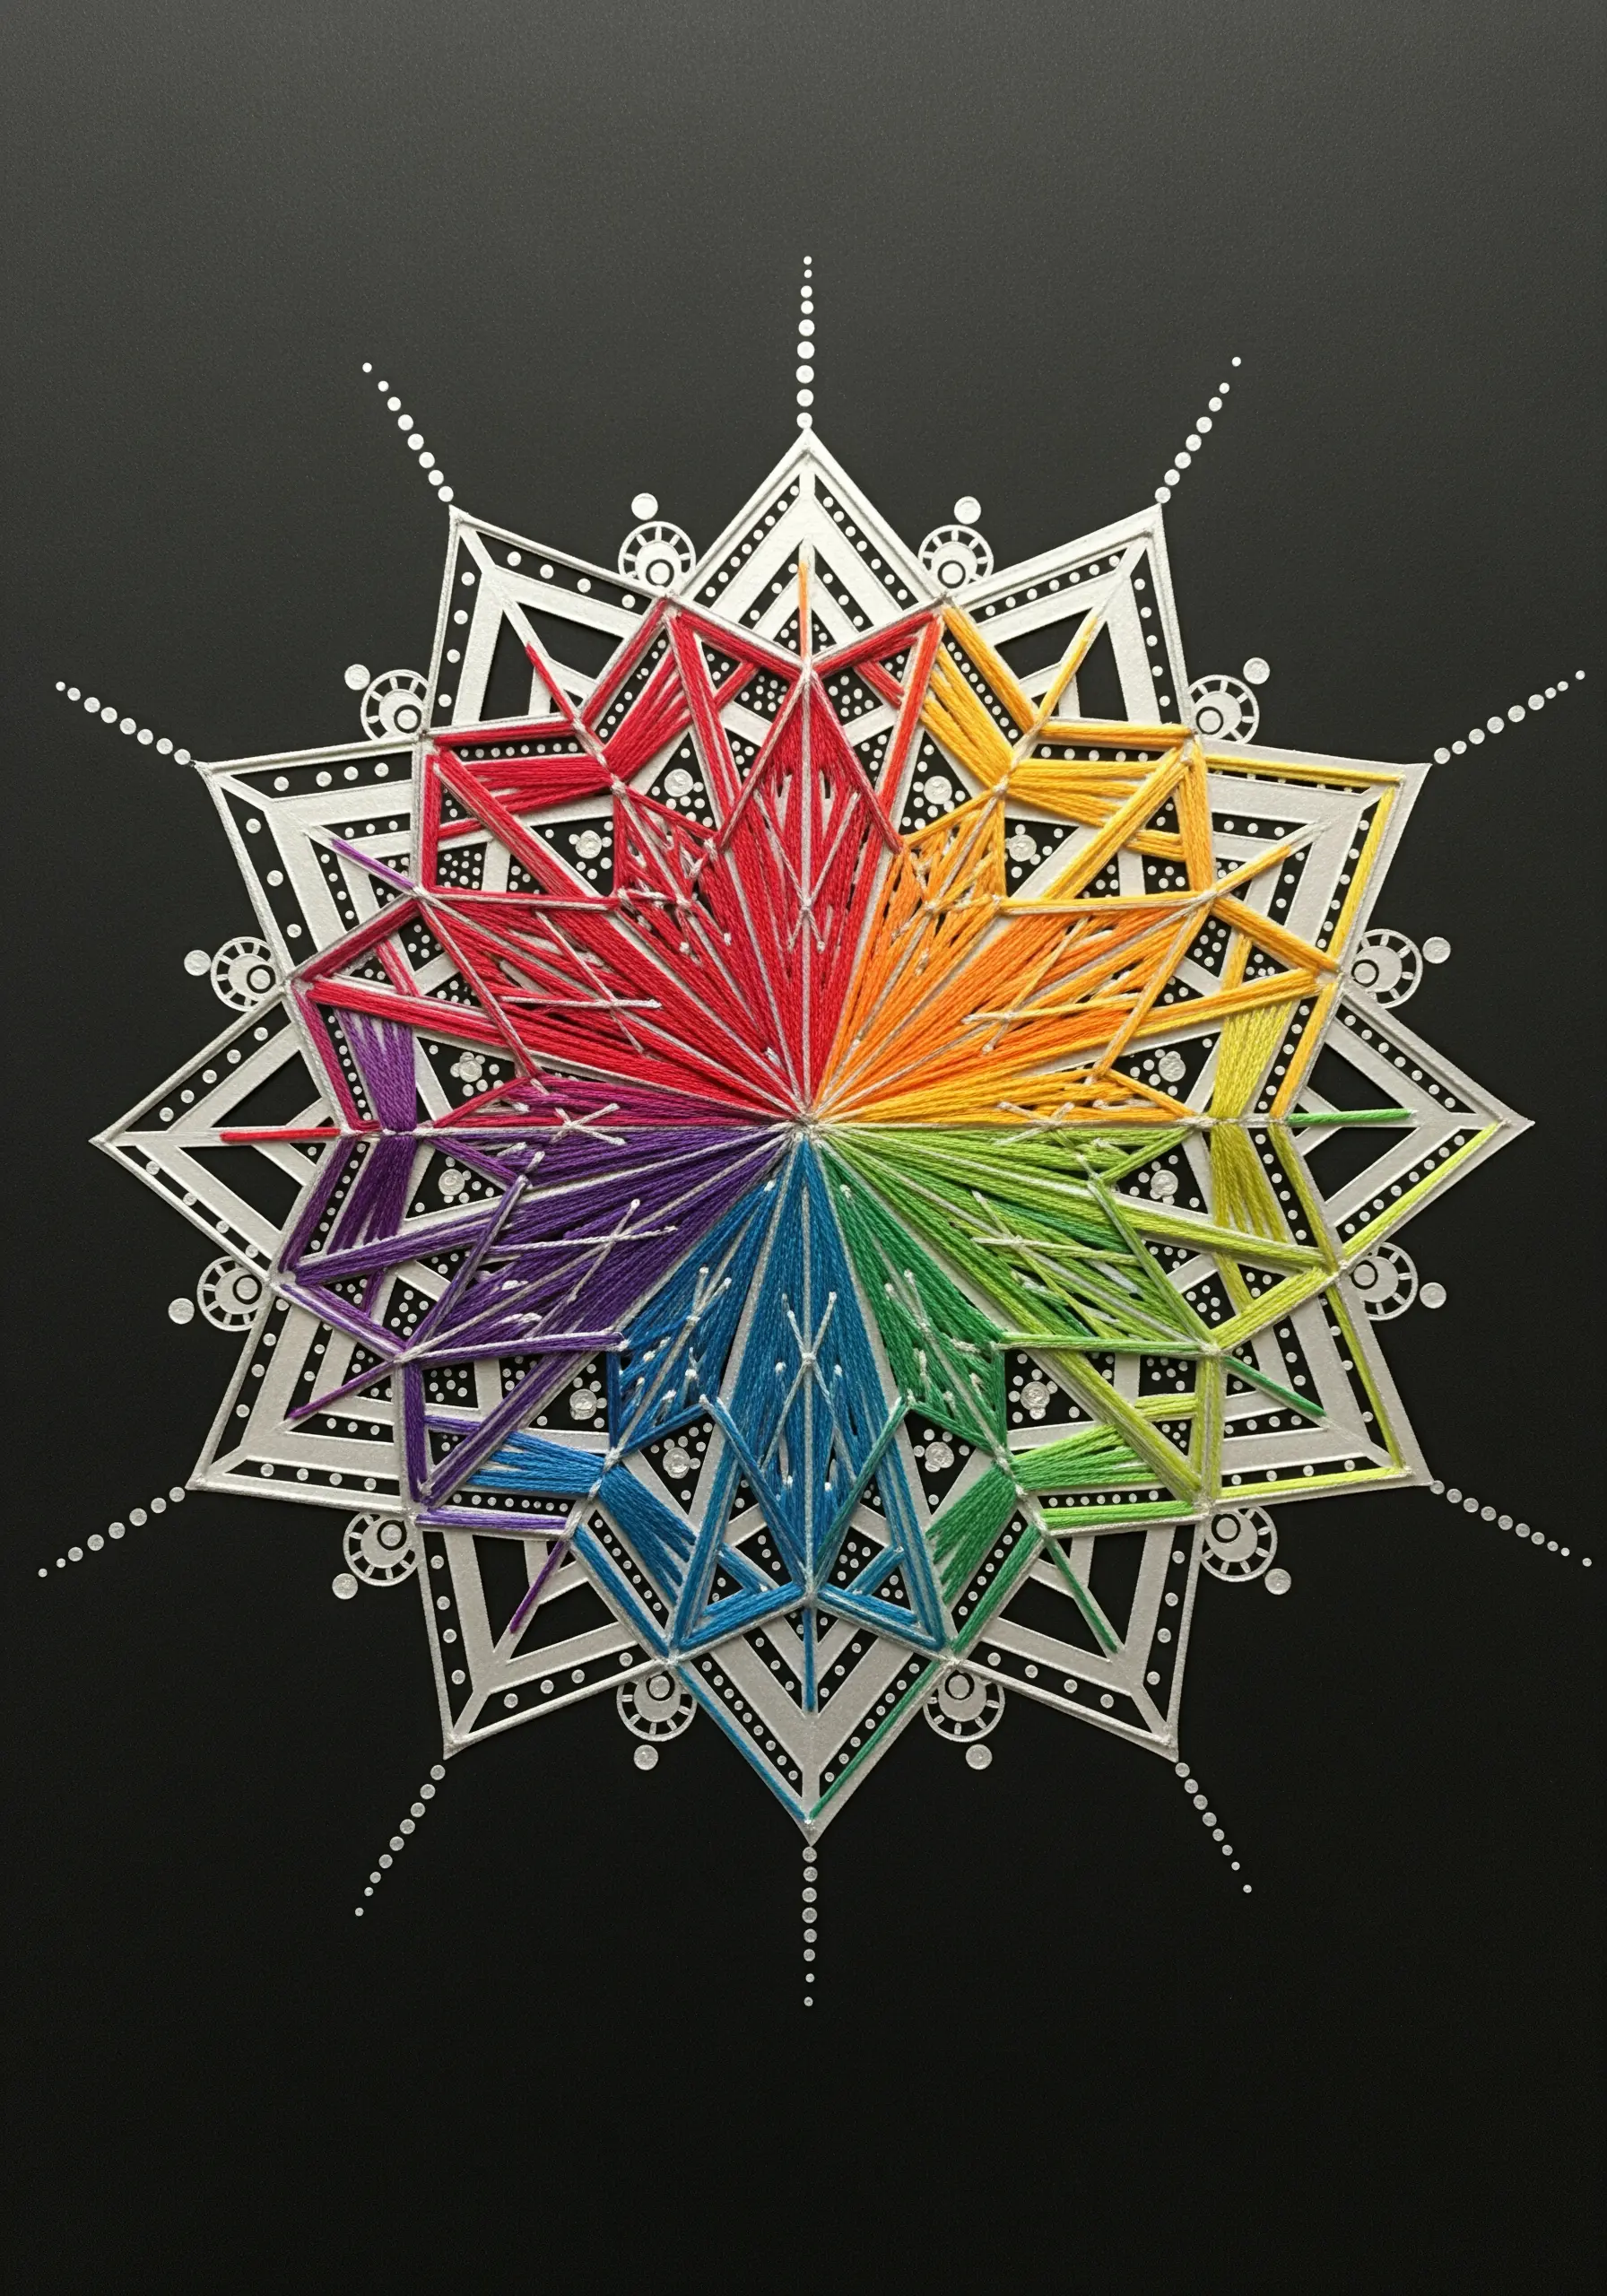
Create stunning geometric designs by stretching thread between points on a paper or card base.
Start with a printed or drawn mandala, then use a pin to pierce holes at key intersections and endpoints.
Weave colorful embroidery floss between the holes, layering different colors to create smooth, vibrant gradients.
The tension of the thread creates perfectly straight lines, forming a crisp, mathematical beauty that is mesmerizing to look at.
17. Construct a Narrative in a Shadow Box

Extend your collage into three dimensions by building it inside a shadow box.
Line the box with meaningful papers like letters, photos, or maps to create an immersive backdrop.
Create a central element by threading twine with paper beads or other lightweight objects, suspending it across the center of the box.
Layering translucent papers with printed illustrations, like the feathers, adds a final layer of ethereal depth.
18. Secure Paper Elements with Intentional Stitches
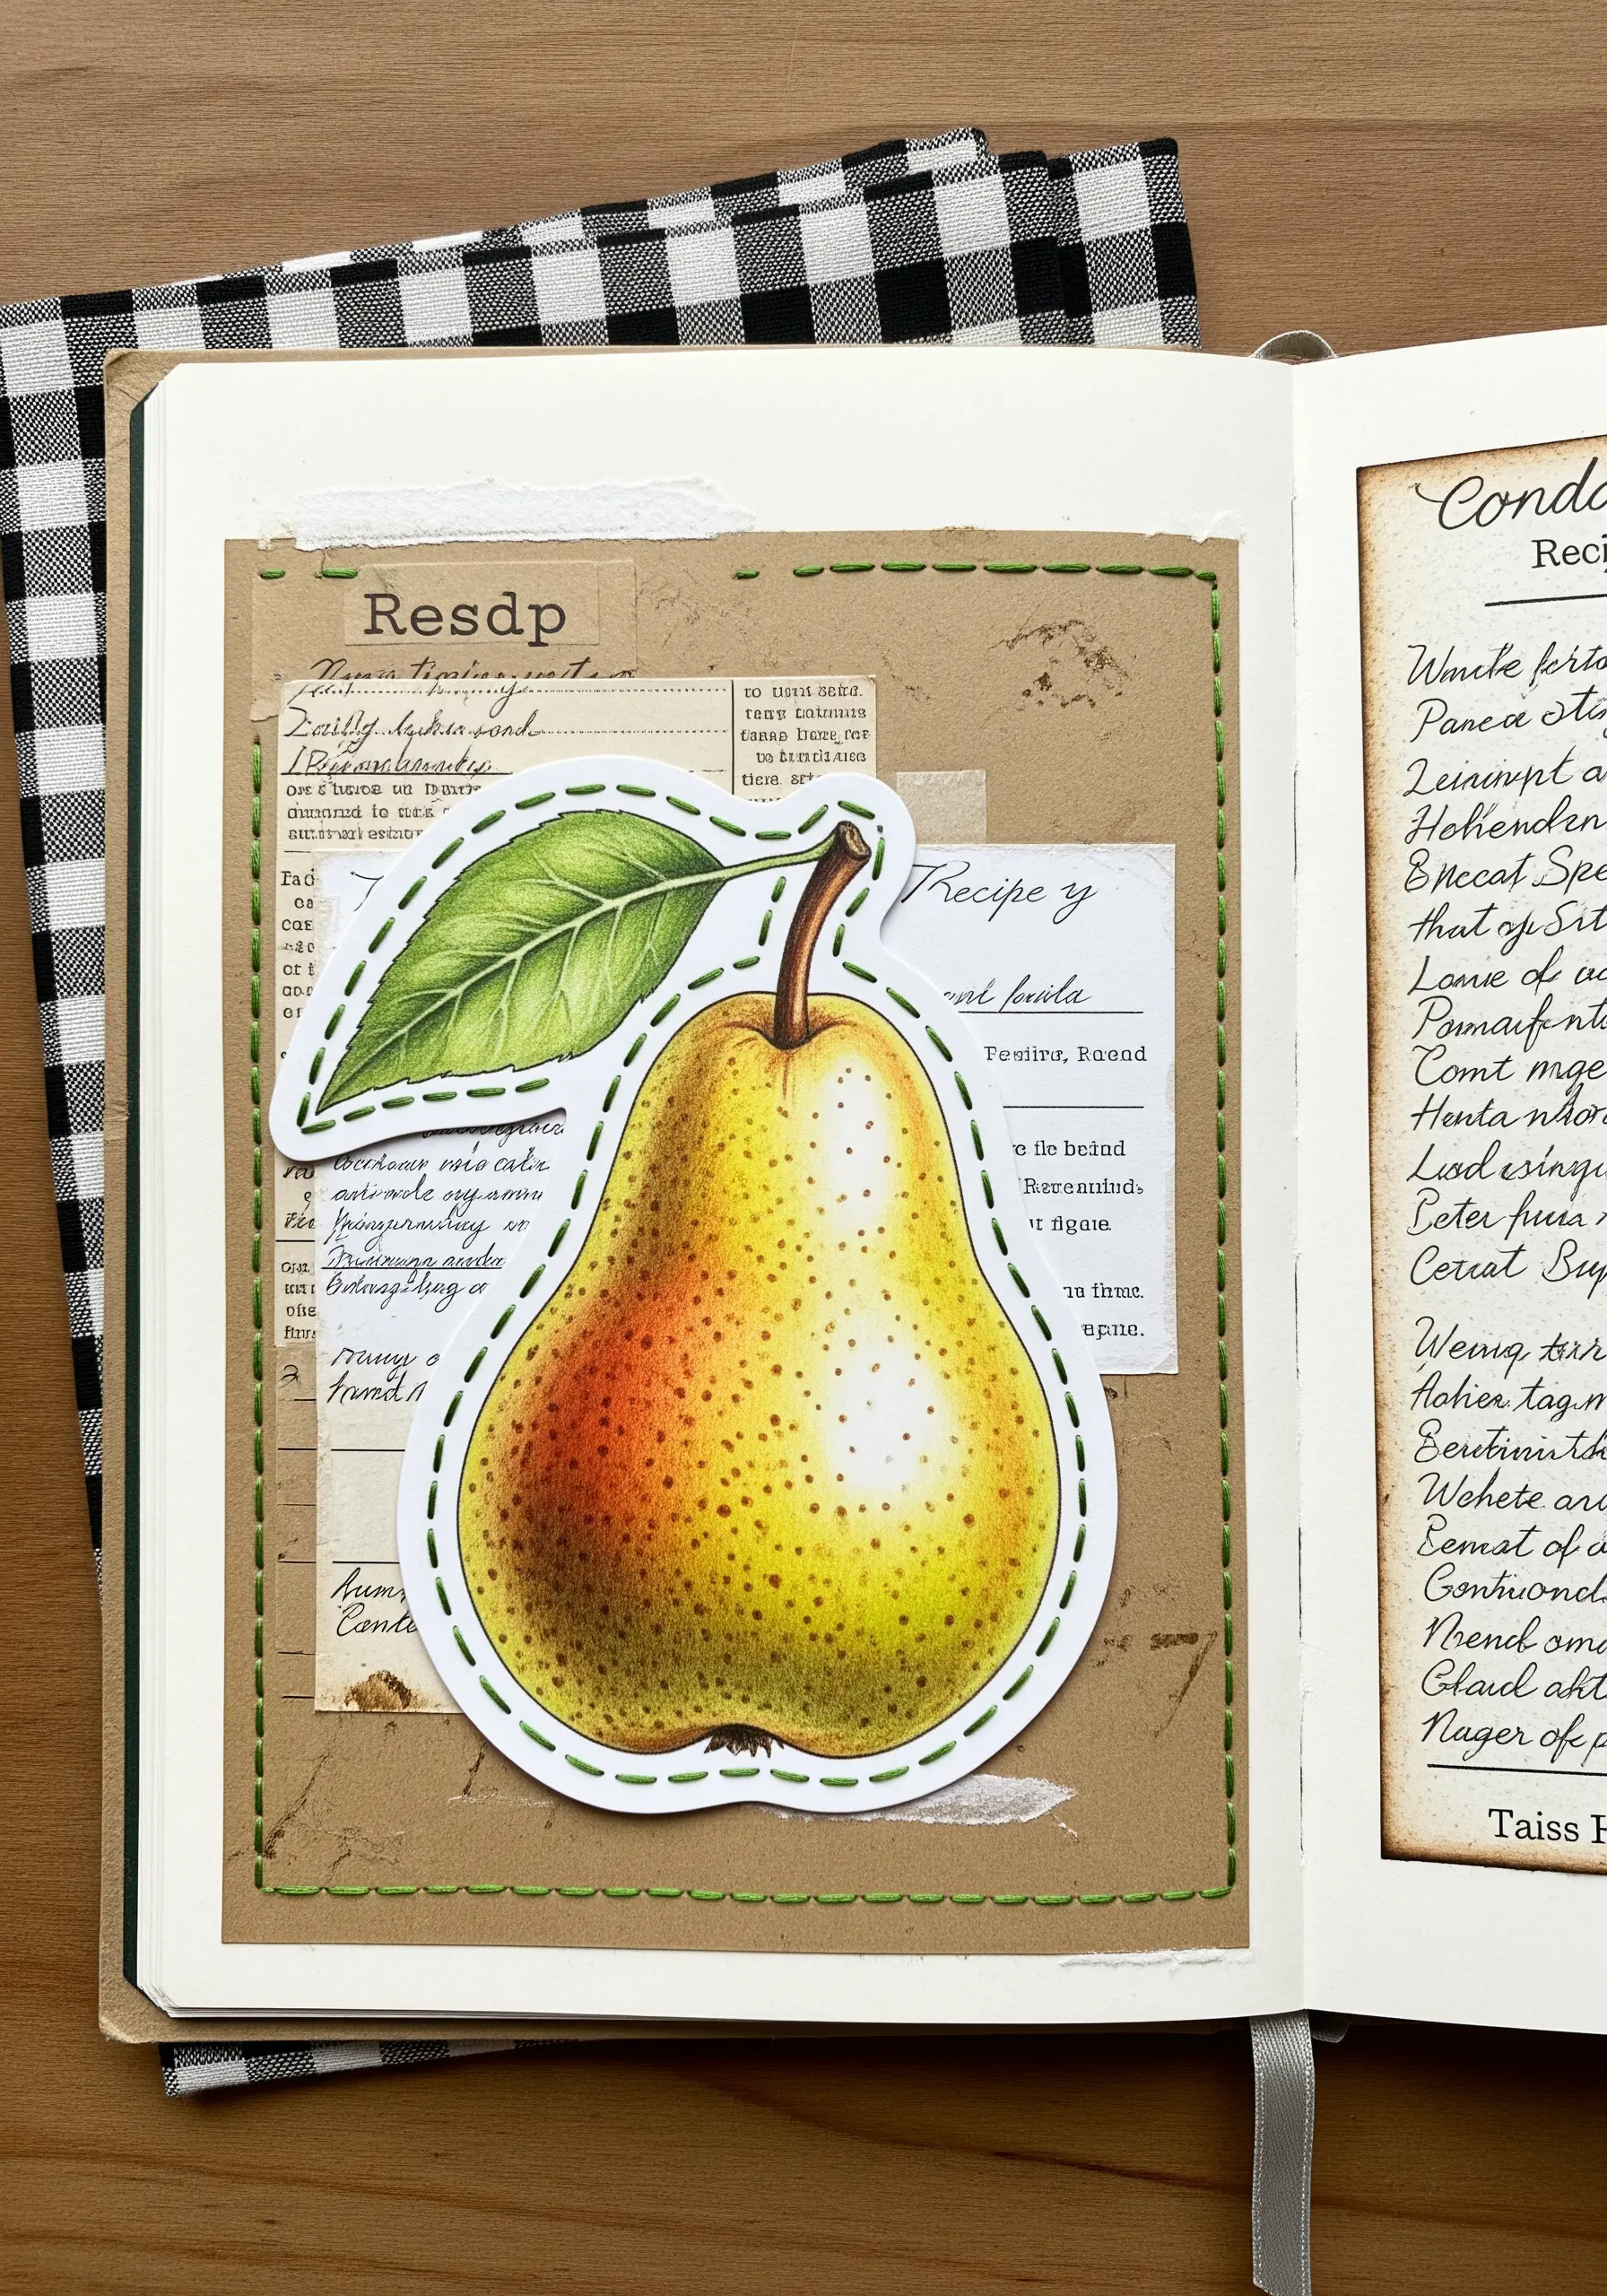
When adding a paper cutout to a journal, use thread to make its placement feel deliberate and artistic.
A simple running stitch around the edge of the paper not only holds it firmly in place but also integrates it into the page as a textile element.
Choose a thread color that complements both the paper element and the background, like this olive green thread on kraft paper.
This thoughtful detail turns a simple scrapbook-style page into a cozy cottage-core fabric collage.
19. Map Your Story with Thread and Photos
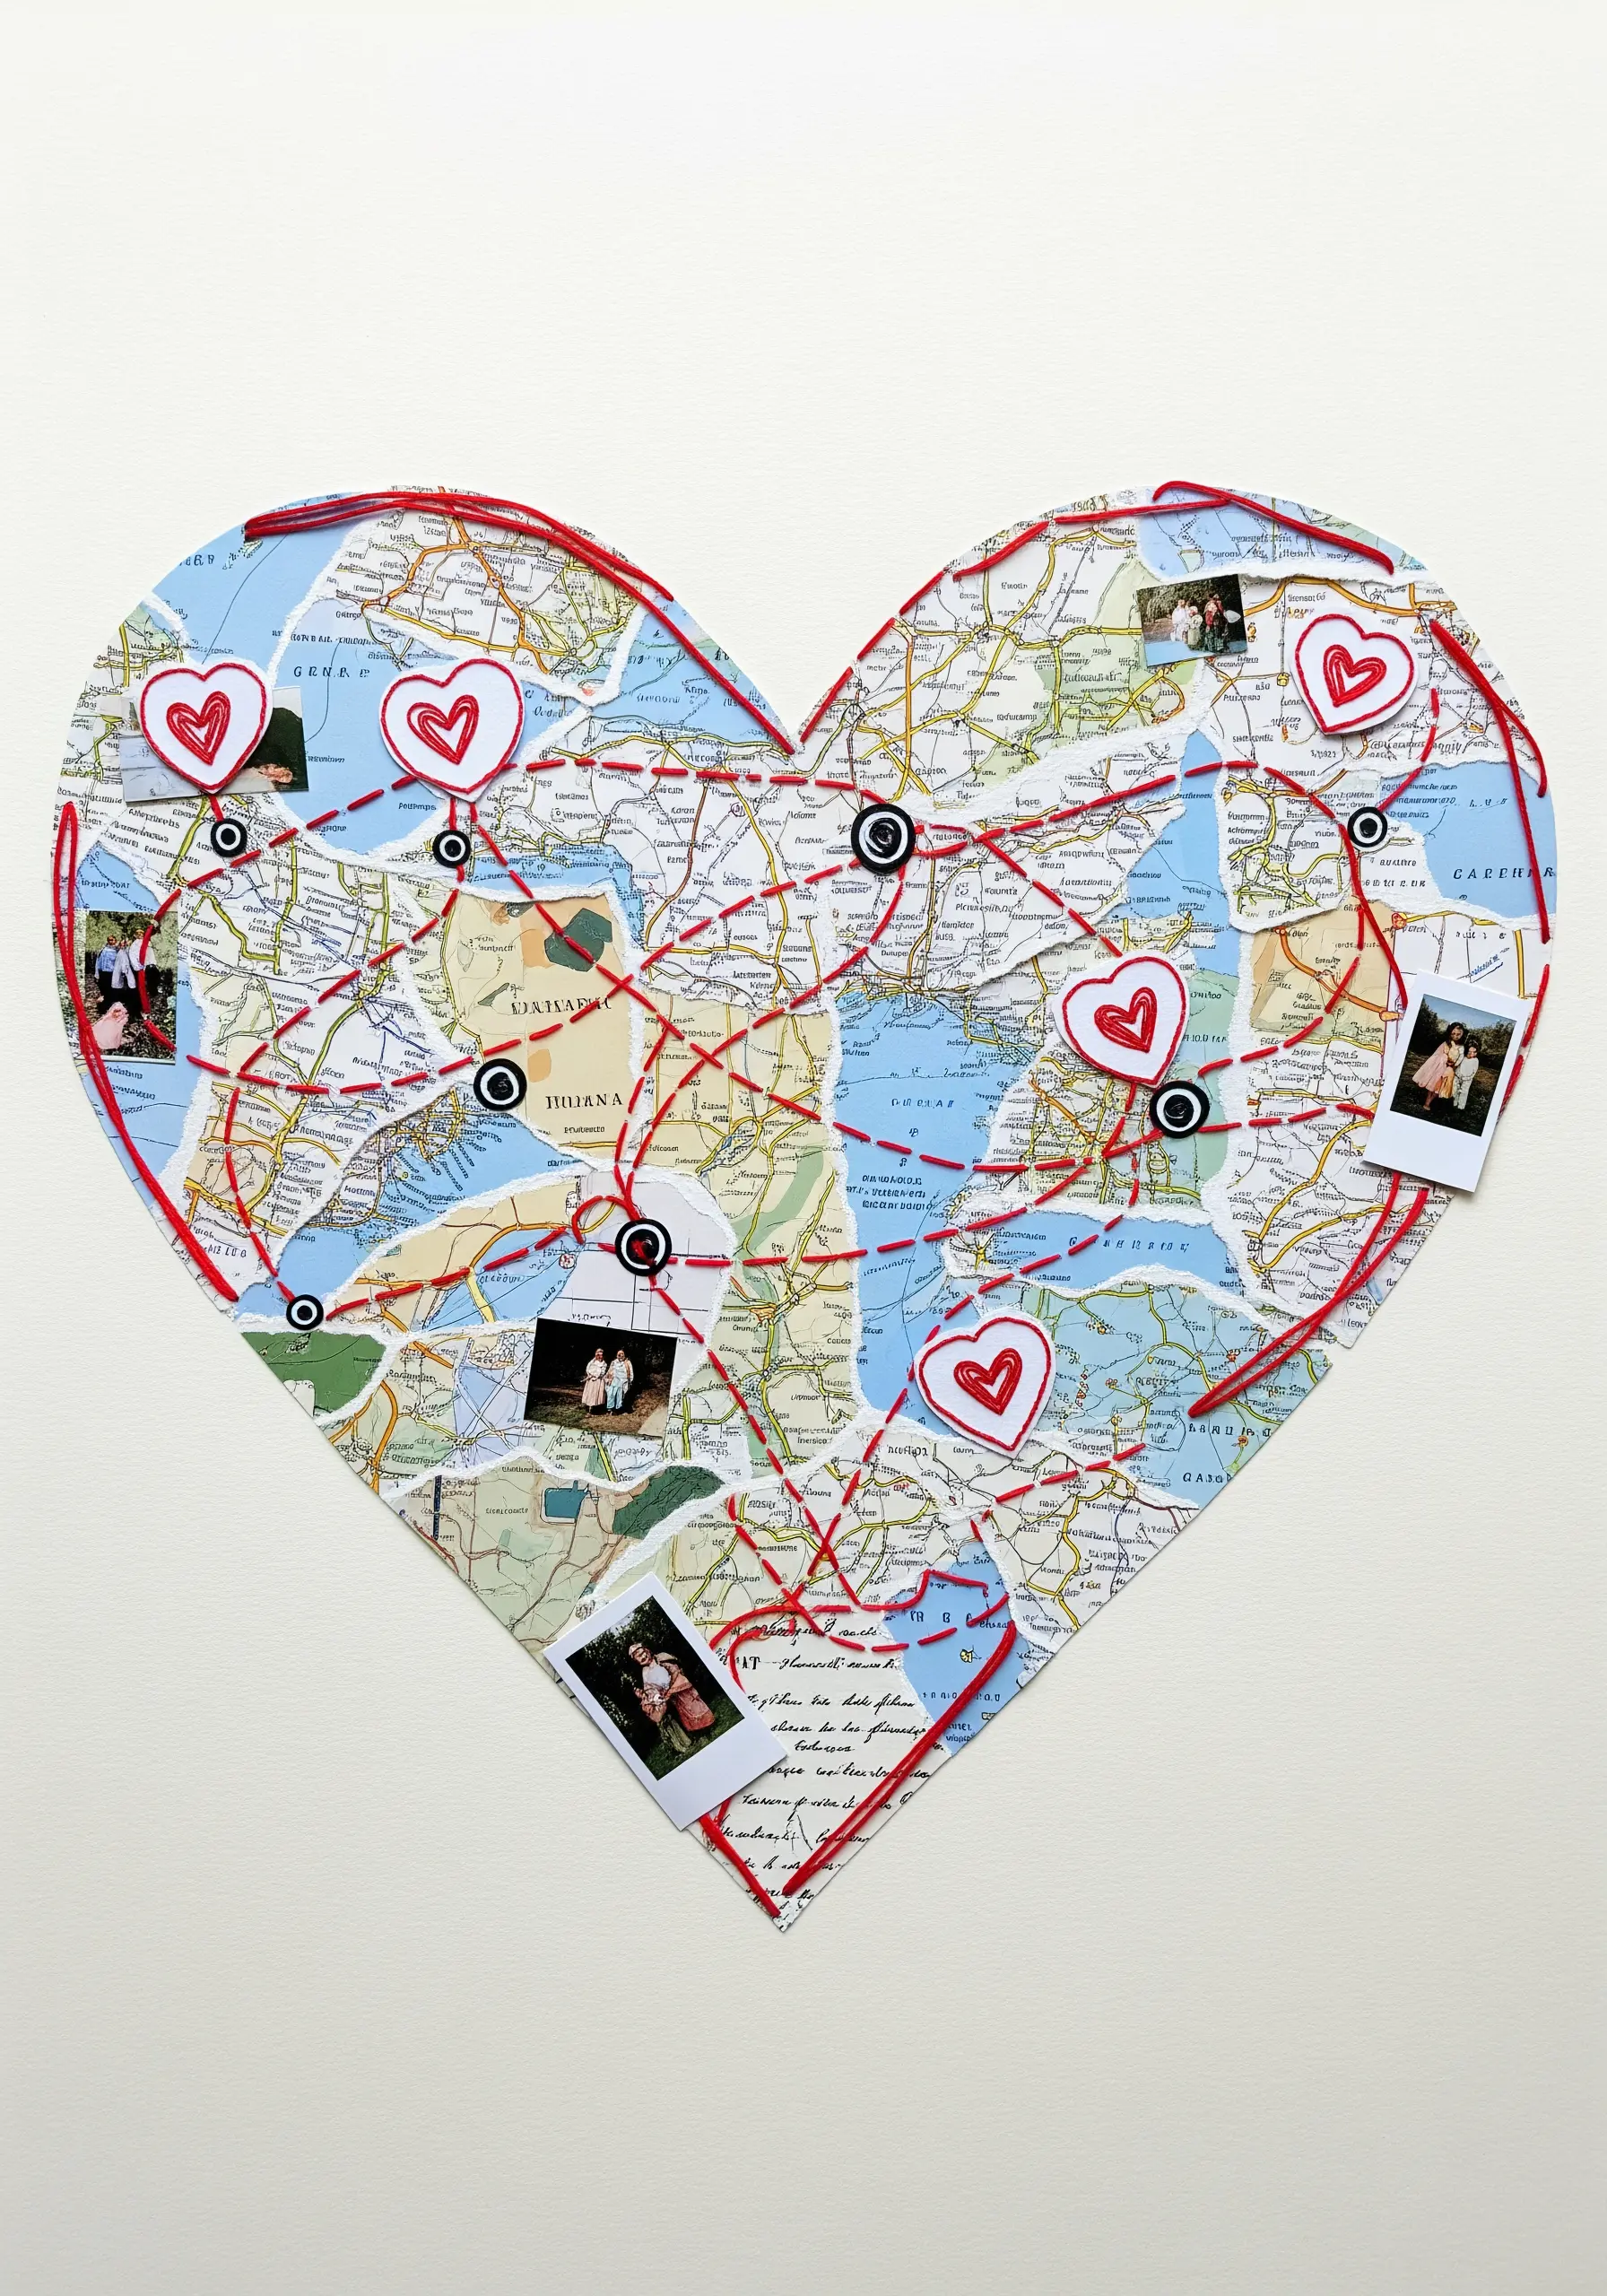
Turn a map into a personal narrative by connecting significant locations with thread.
Use a heart-shaped map as your base and attach small photos of people or places with pins or eyelets.
Weave a bold red thread between these points, creating a visual web of your travels, relationships, or history.
This is a powerful way to visualize connections and create a deeply personalized embroidered gift that tells a story at a glance.
20. Mimic Natural Forms with Coiled Yarn
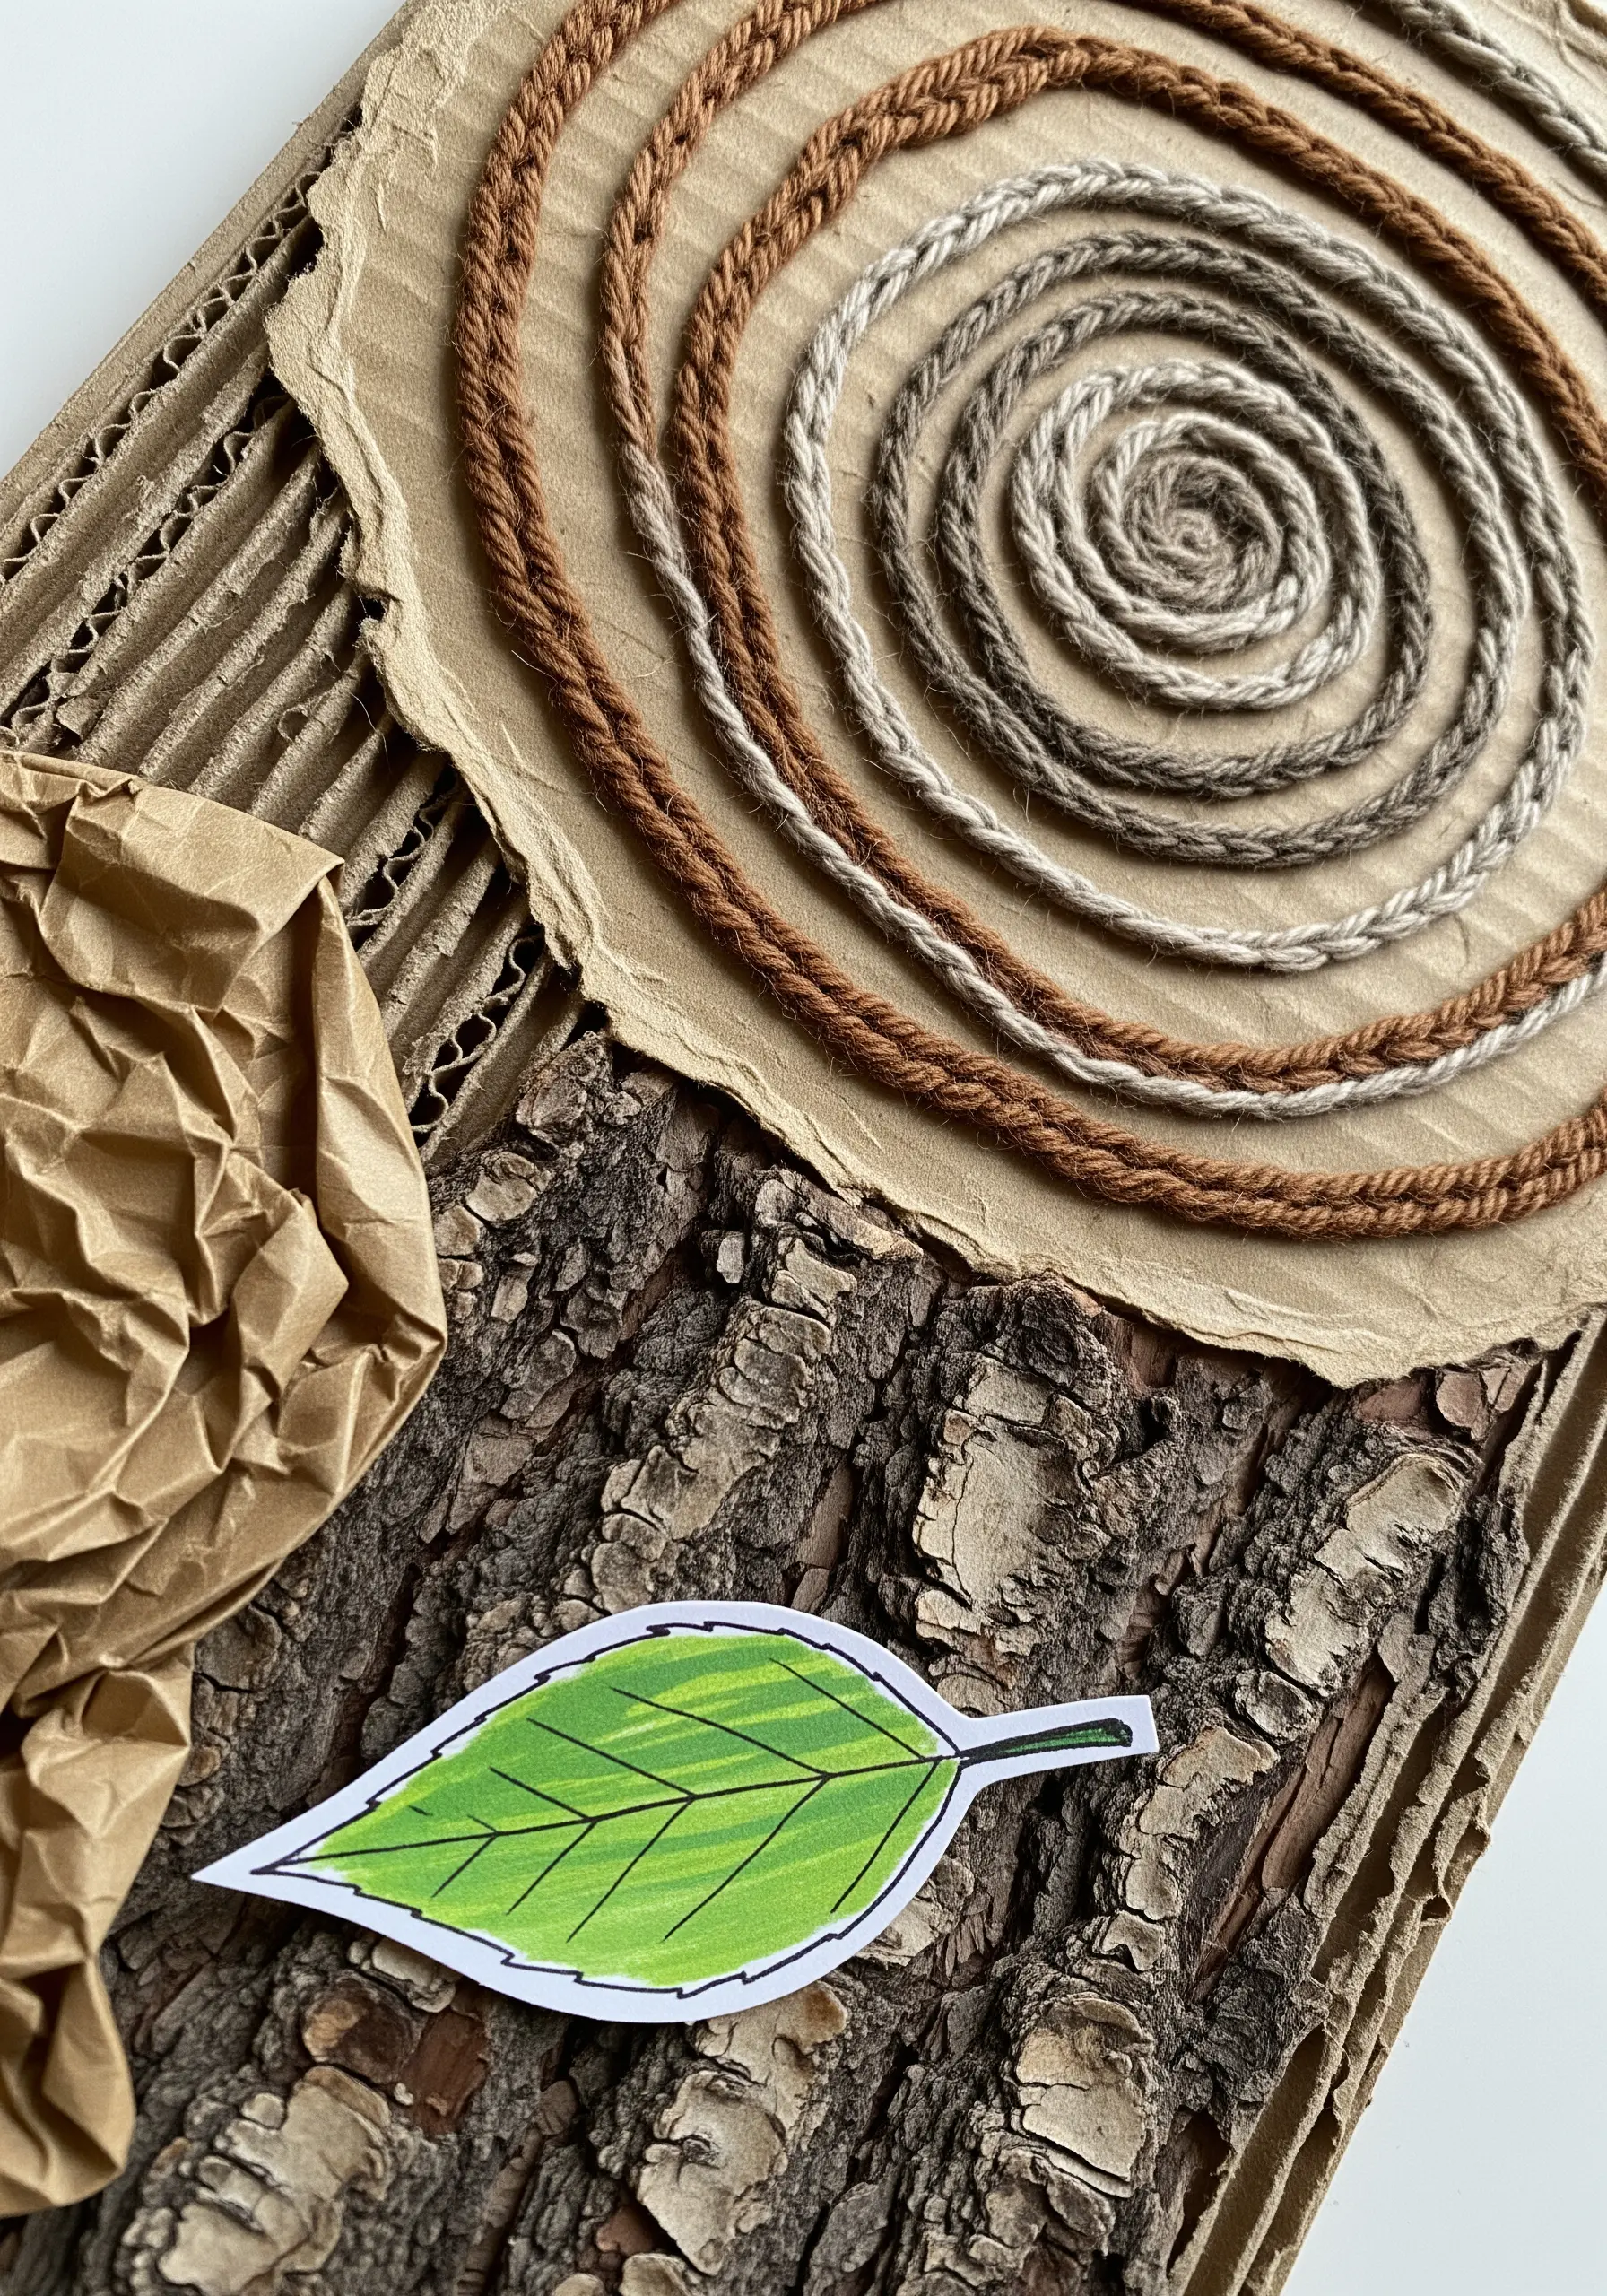
Explore the textures of the natural world by combining organic materials with simple yarn techniques.
Create spirals by couching thick, earthy-toned yarn onto a piece of kraft paper or cardboard.
This coiling method effectively mimics the patterns of tree rings, shells, or ripples in water.
Juxtaposing this soft, spiraled yarn next to the rough texture of real tree bark creates a beautiful dialogue between crafted and natural forms.
21. Create an Underwater Scene with Knots and Gauze
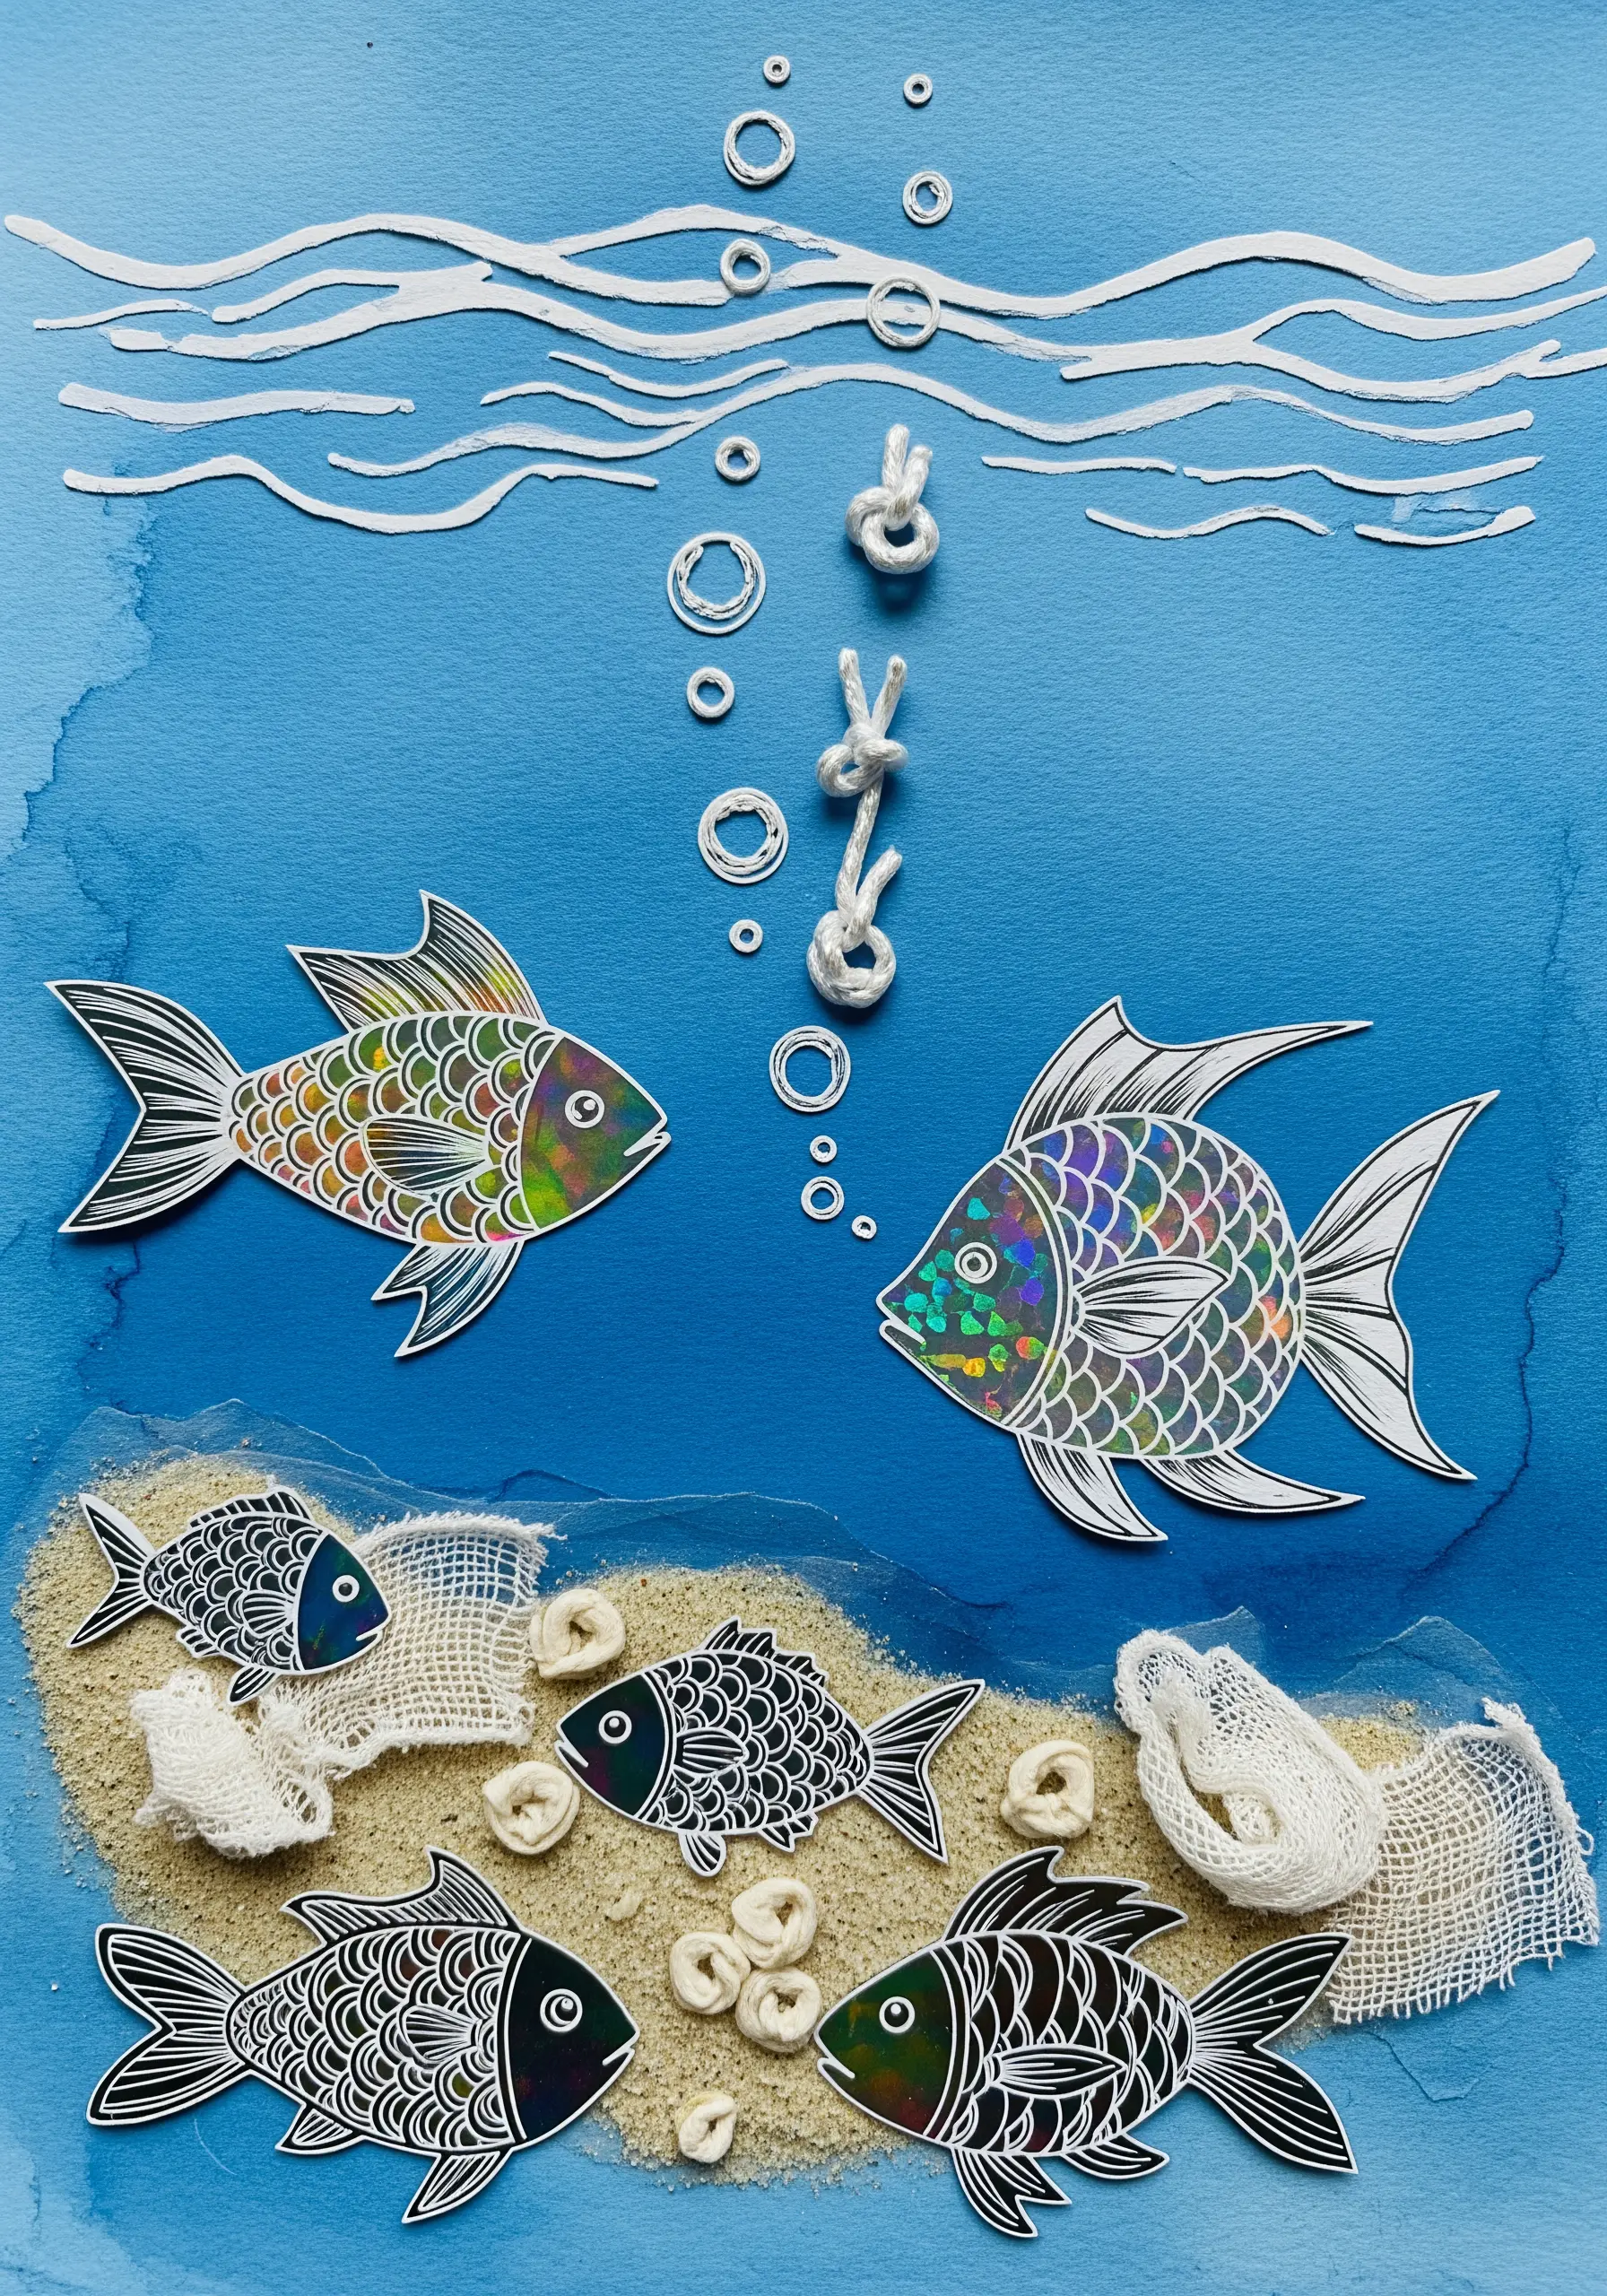
Evoke the textures of the sea by using unconventional materials in your collage.
Use small scraps of white medical gauze, slightly frayed at the edges, to represent seafoam or underwater plants.
Tie small, loose knots in a white cord or thick yarn and scatter them across the background to look like bubbles rising to the surface.
These simple additions add a surprising amount of realism and tactile interest to a watercolor and paper composition.
22. Add Dimension with Padded Satin Stitch Appliqué
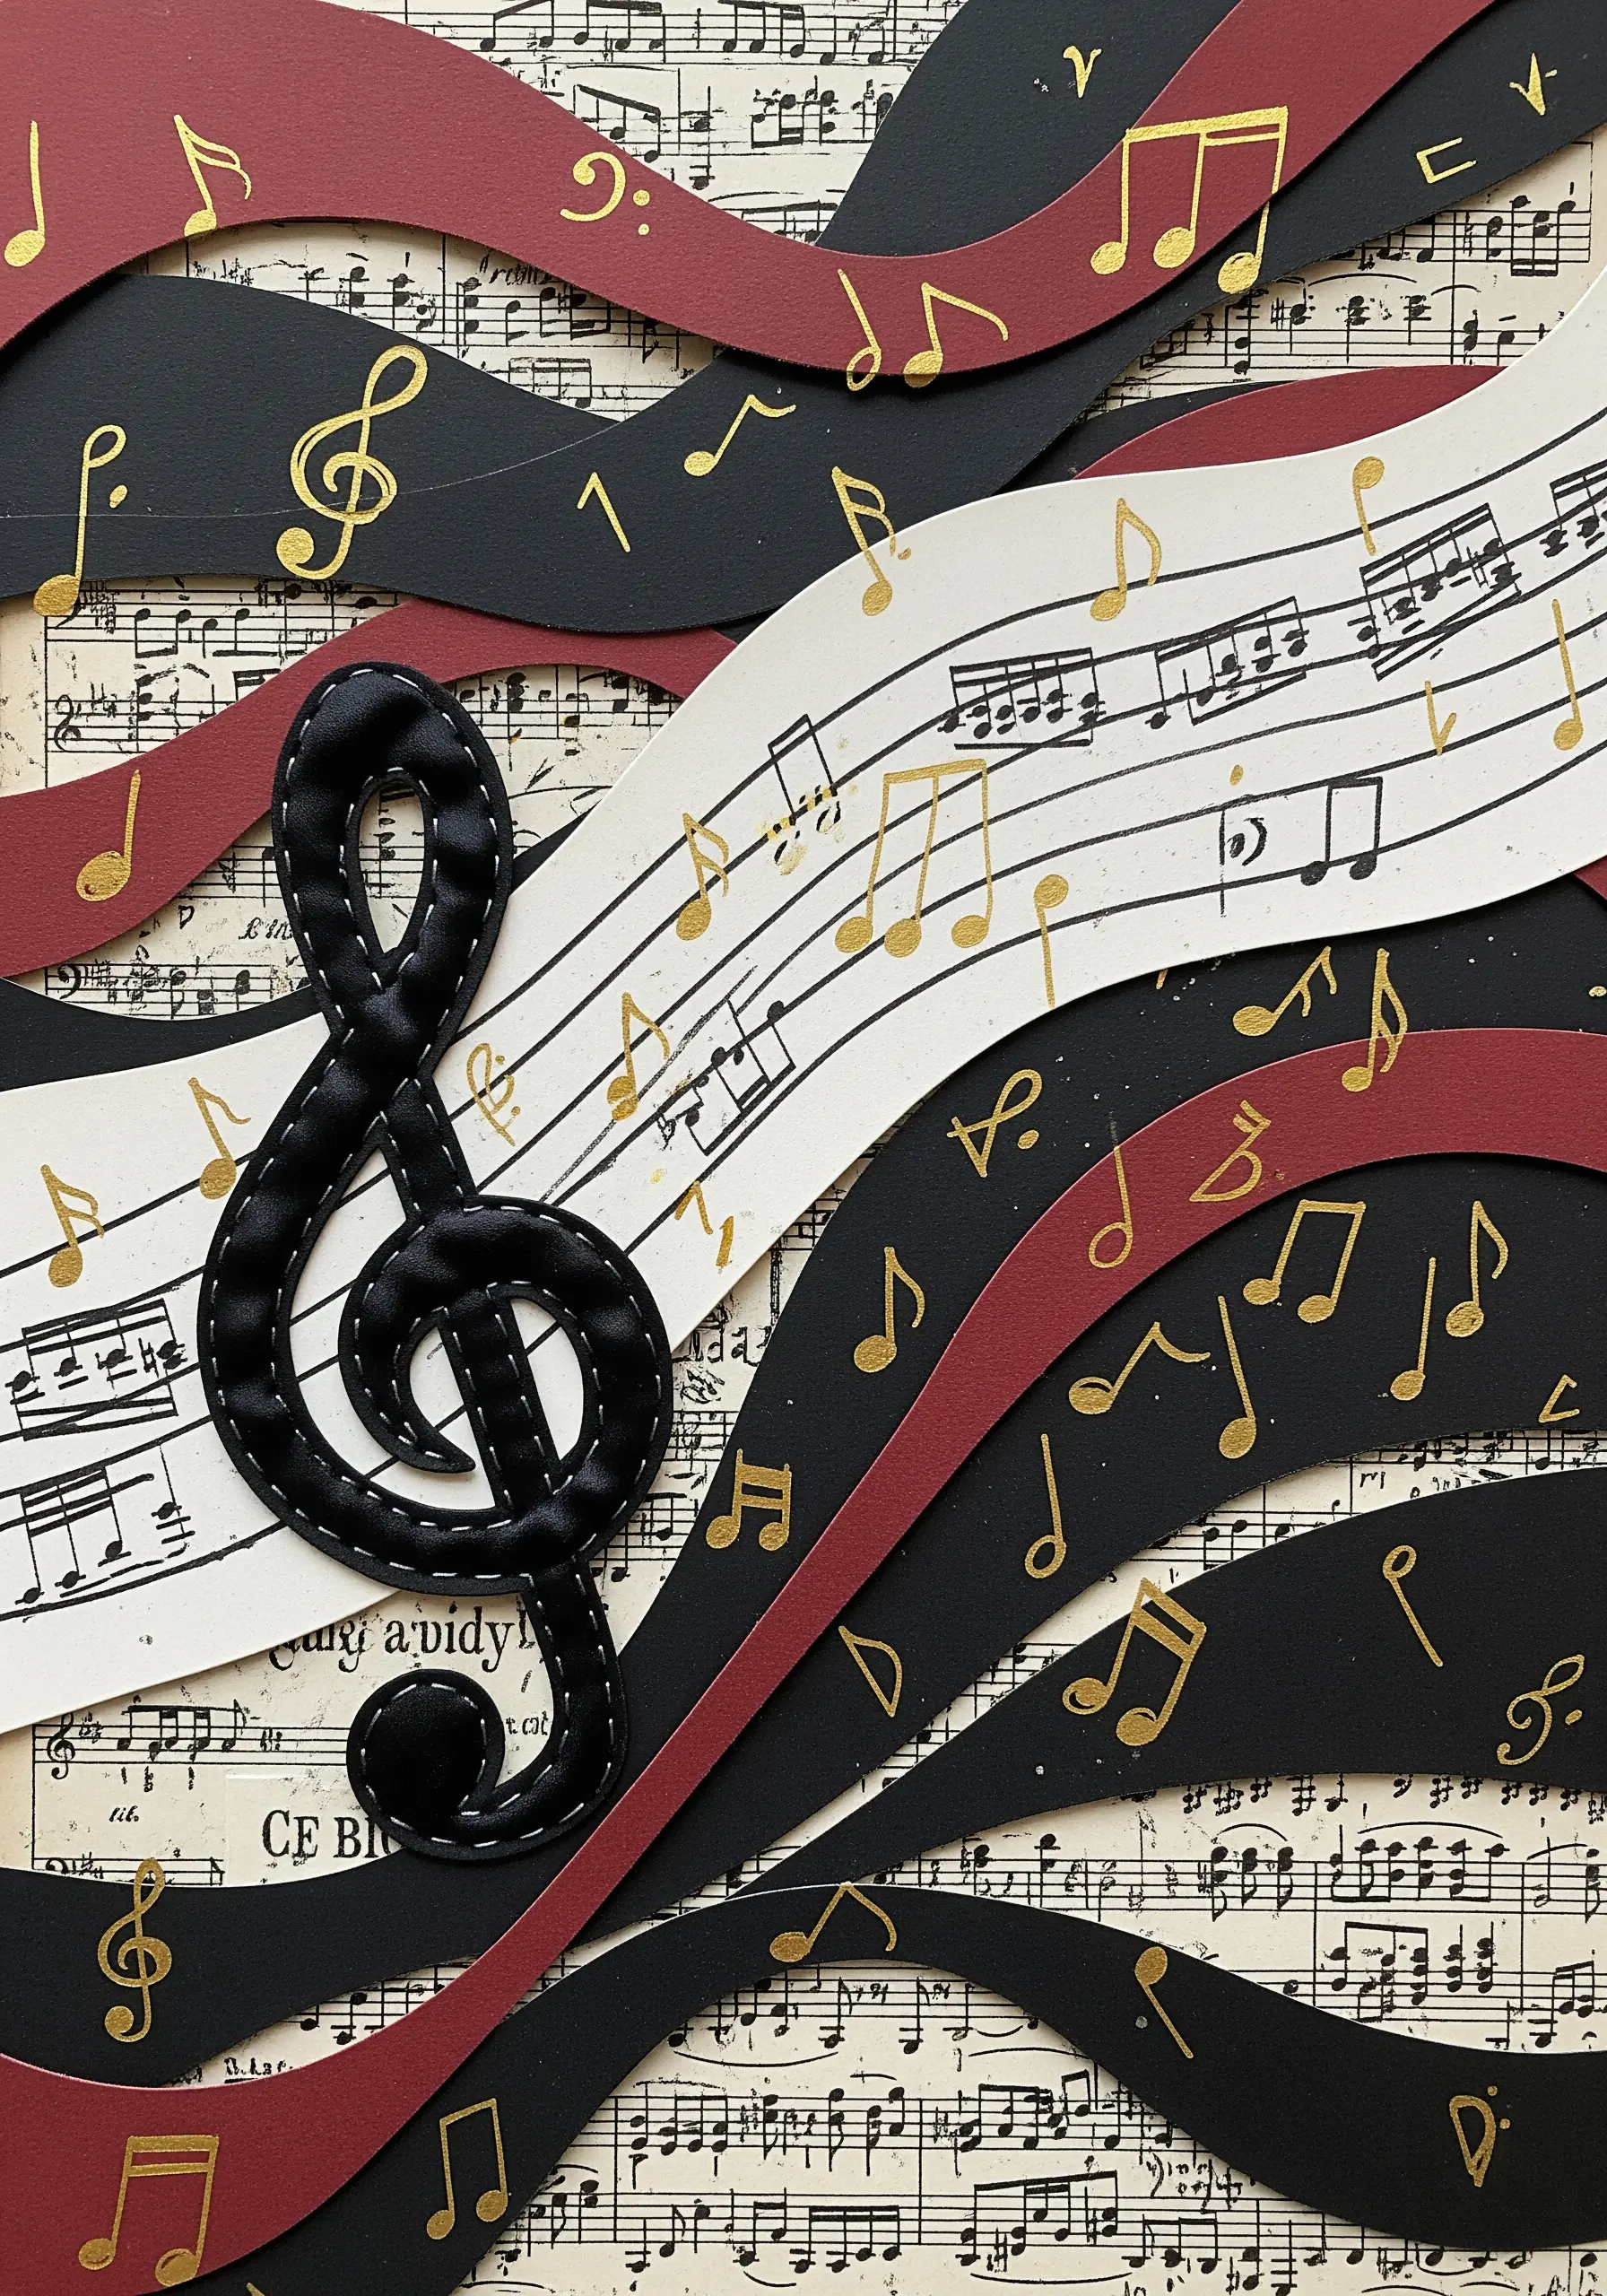
Make a central element of your collage pop by turning it into a three-dimensional appliqué.
Cut your shape—like this G-clef—from a piece of felt or fabric. Place a thin layer of batting or a second piece of felt underneath it before you start stitching.
Work a smooth, tight satin stitch around the entire edge of the shape, pulling the thread firmly to compress the padding.
This technique gives your motif a raised, beveled edge that adds a professional and highly tactile finish.
23. Radiate Energy with Long-Spoke Stitches
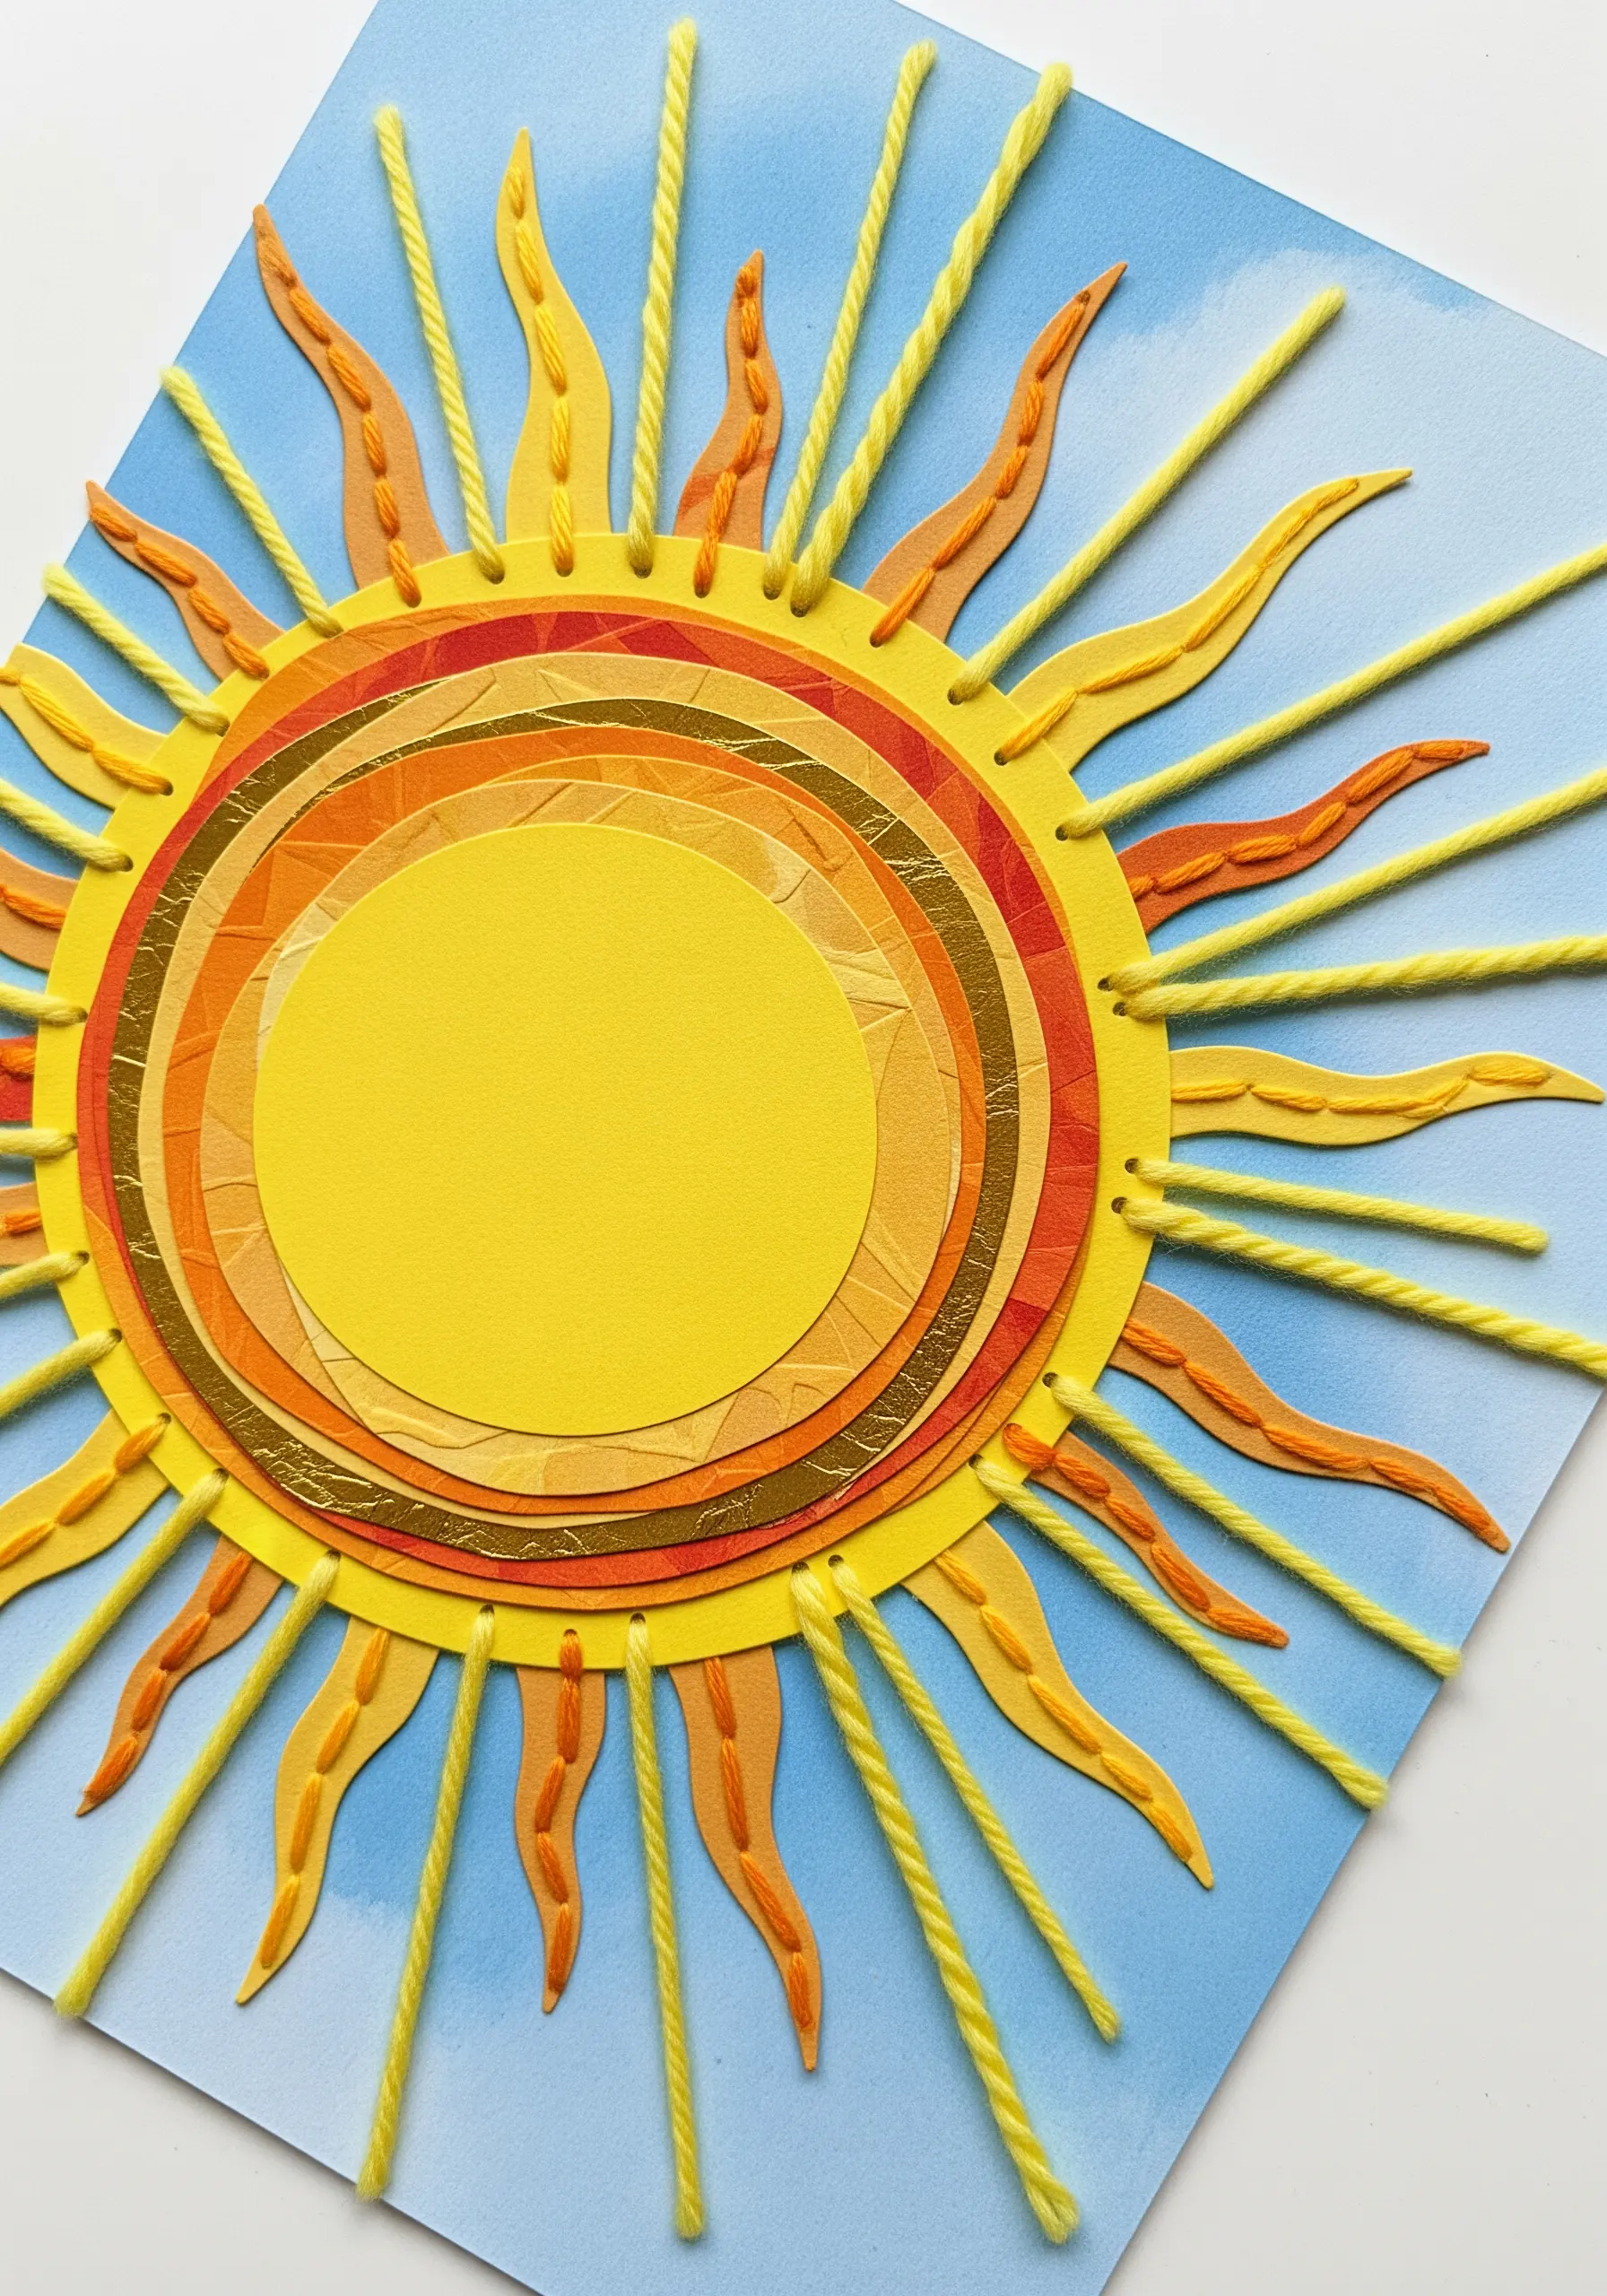
Capture the radiant energy of the sun by using thread for its powerful rays.
On a layered paper sun, pierce holes evenly around the circumference and use them as anchor points for your stitches.
Work long, straight stitches with a thick, bright yellow yarn, pulling them taut to create sharp, graphic lines.
For added texture, alternate the straight yarn rays with shorter, looped satin stitches to create a dynamic, multi-layered corona effect.


