

I know that feeling. You love the rhythm of pulling thread through fabric, but you sense there’s something more your work could be. You’re ready for your embroidery to feel less like a hobby and more like an art form—thoughtful, polished, and distinctly yours.
The secret isn’t necessarily learning more complex stitches. Often, it’s about expanding your definition of the canvas itself. By thoughtfully combining thread with other materials like paper, paint, or even found objects, you introduce layers of texture, color, and story that stitches alone cannot achieve.
Consider these ideas not as strict rules, but as gentle invitations to experiment. You don’t need a sprawling studio or expensive supplies to begin. You just need the curiosity to see what happens when your needle ventures beyond the fabric, allowing your creativity to find its voice in new and unexpected ways.
1. Watercolor Wash with Celestial Beading
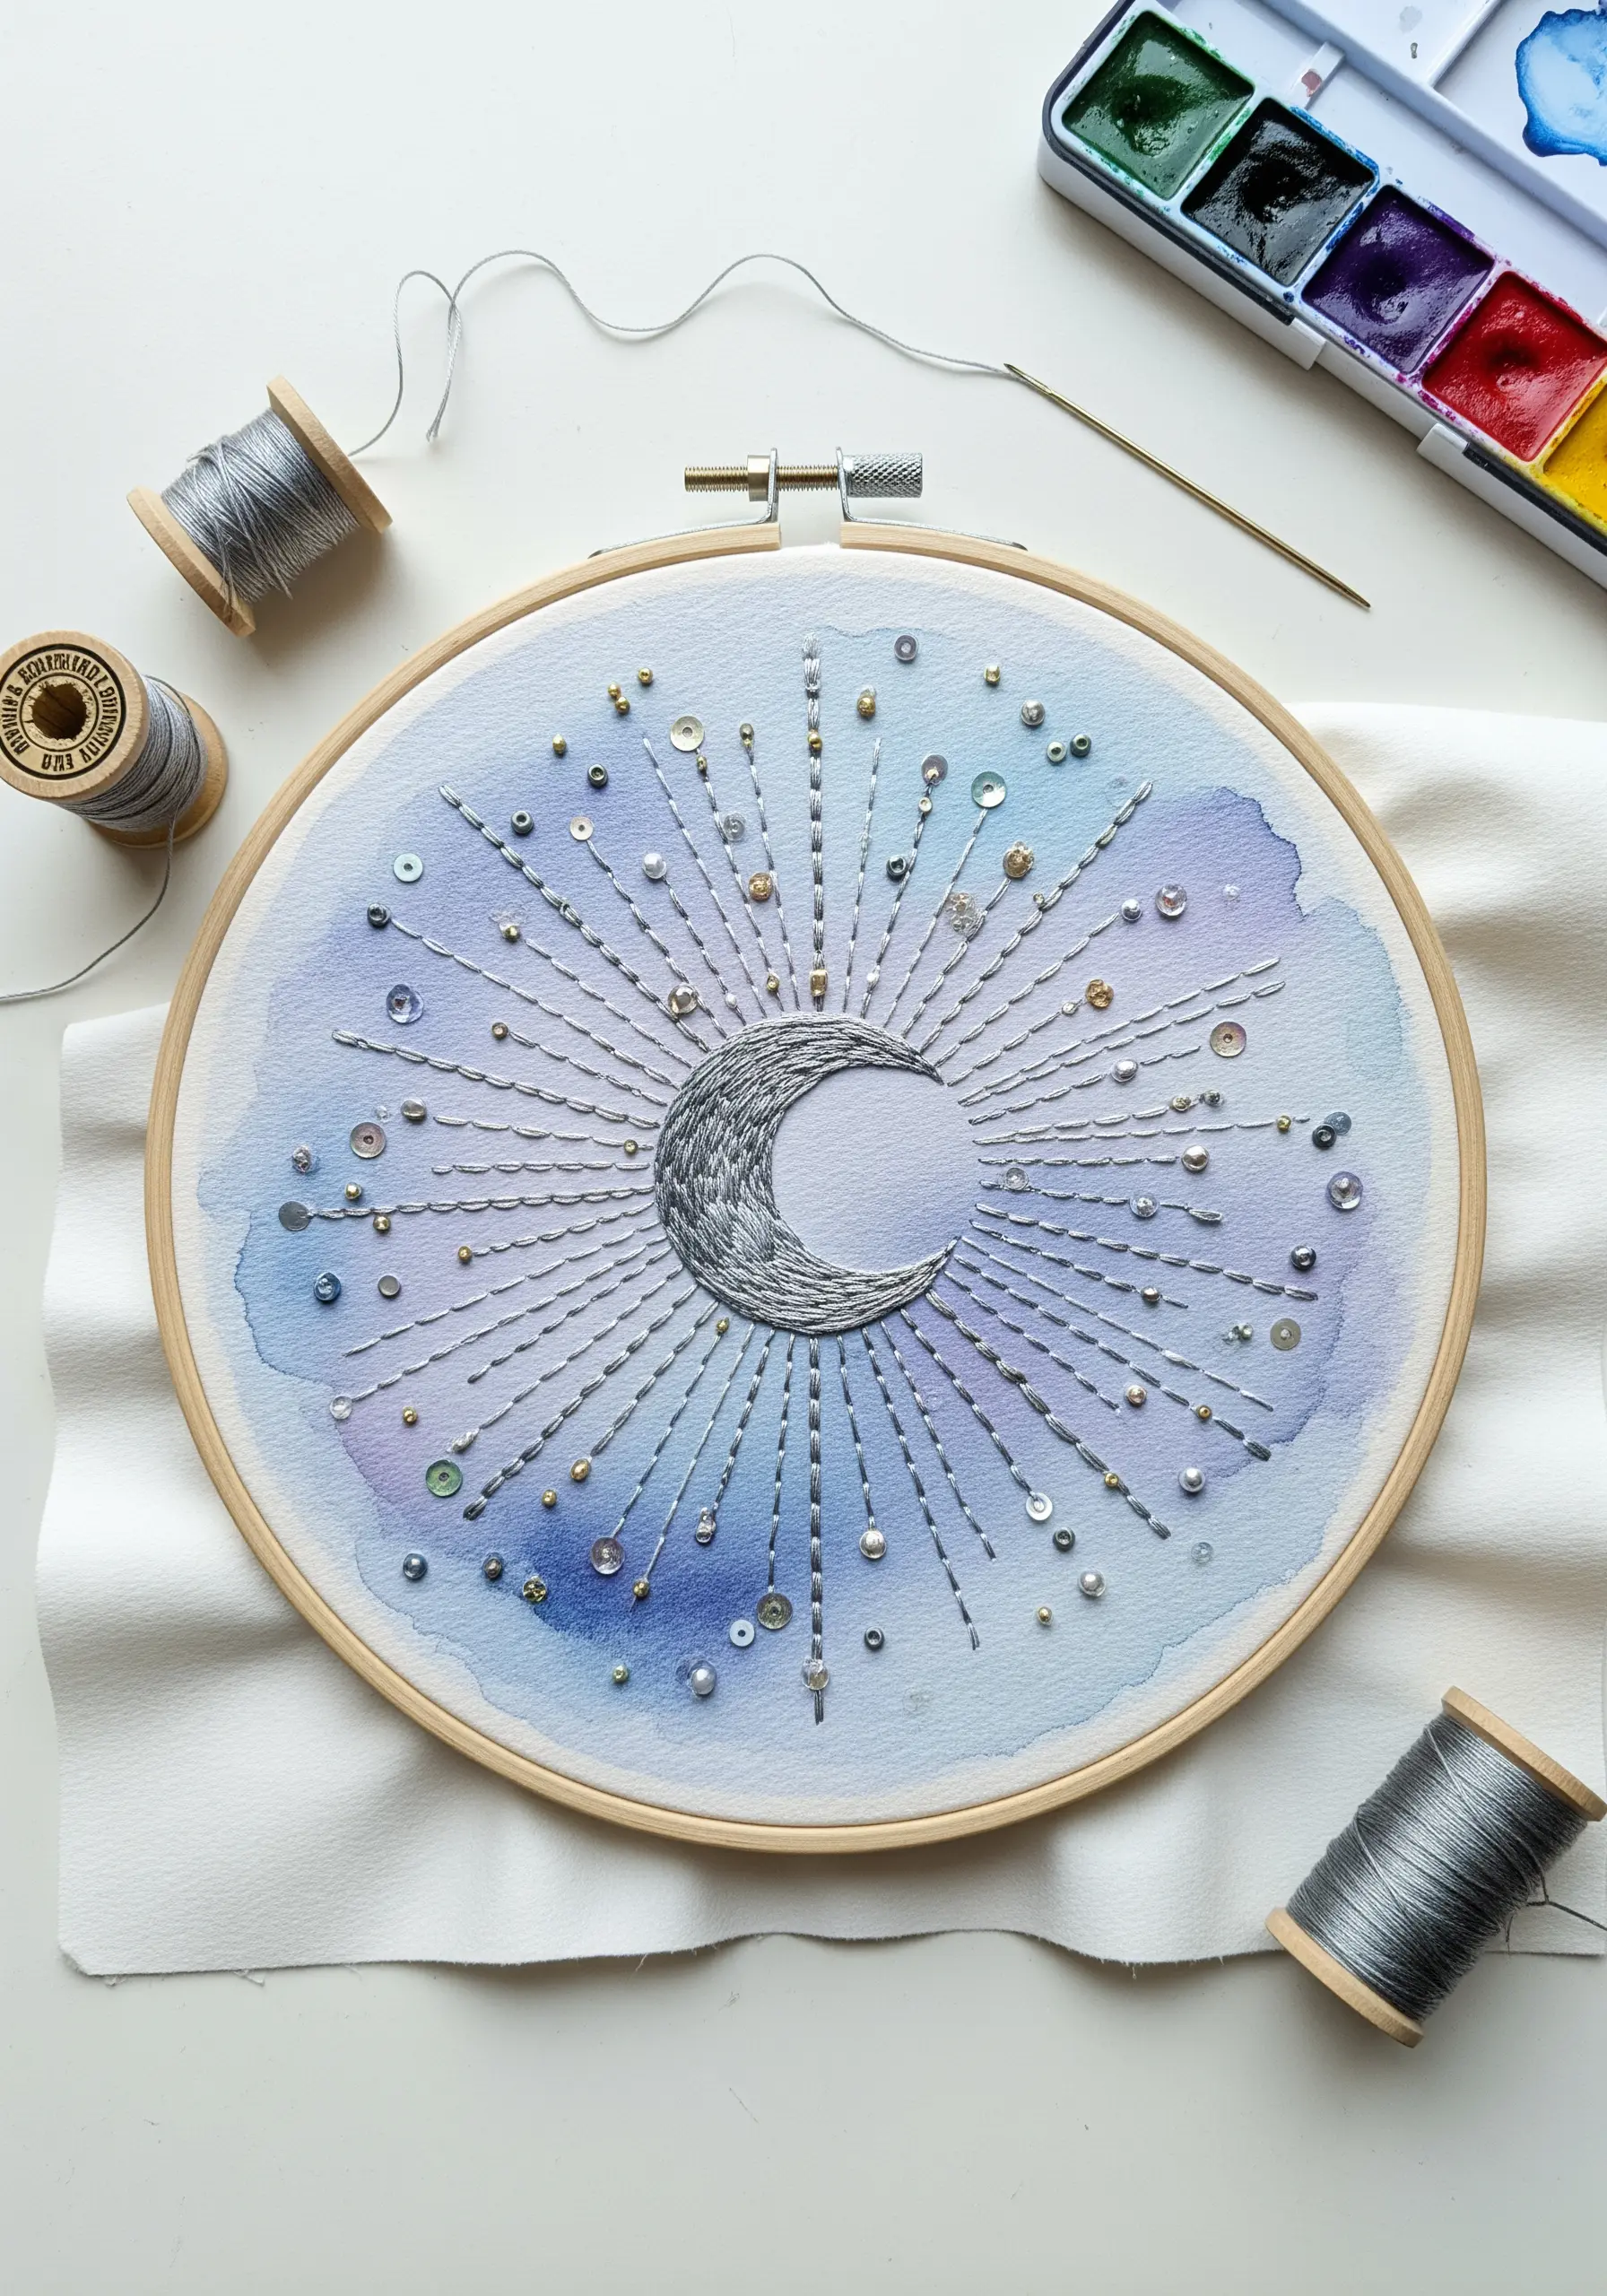
Begin by applying a soft watercolor wash directly onto your embroidery fabric, allowing it to dry completely before you start stitching.
This technique creates an atmospheric, one-of-a-kind background that thread alone cannot replicate, providing instant depth and color variation.
For the central moon, use a metallic silver thread in a brick stitch pattern to create a textured, light-catching surface.
Instead of French knots, scatter seed beads, sequins, and metallic beads along the radiating lines to add a three-dimensional sparkle that feels more refined and intentional.
2. Stitching on Faux Leather and Paper
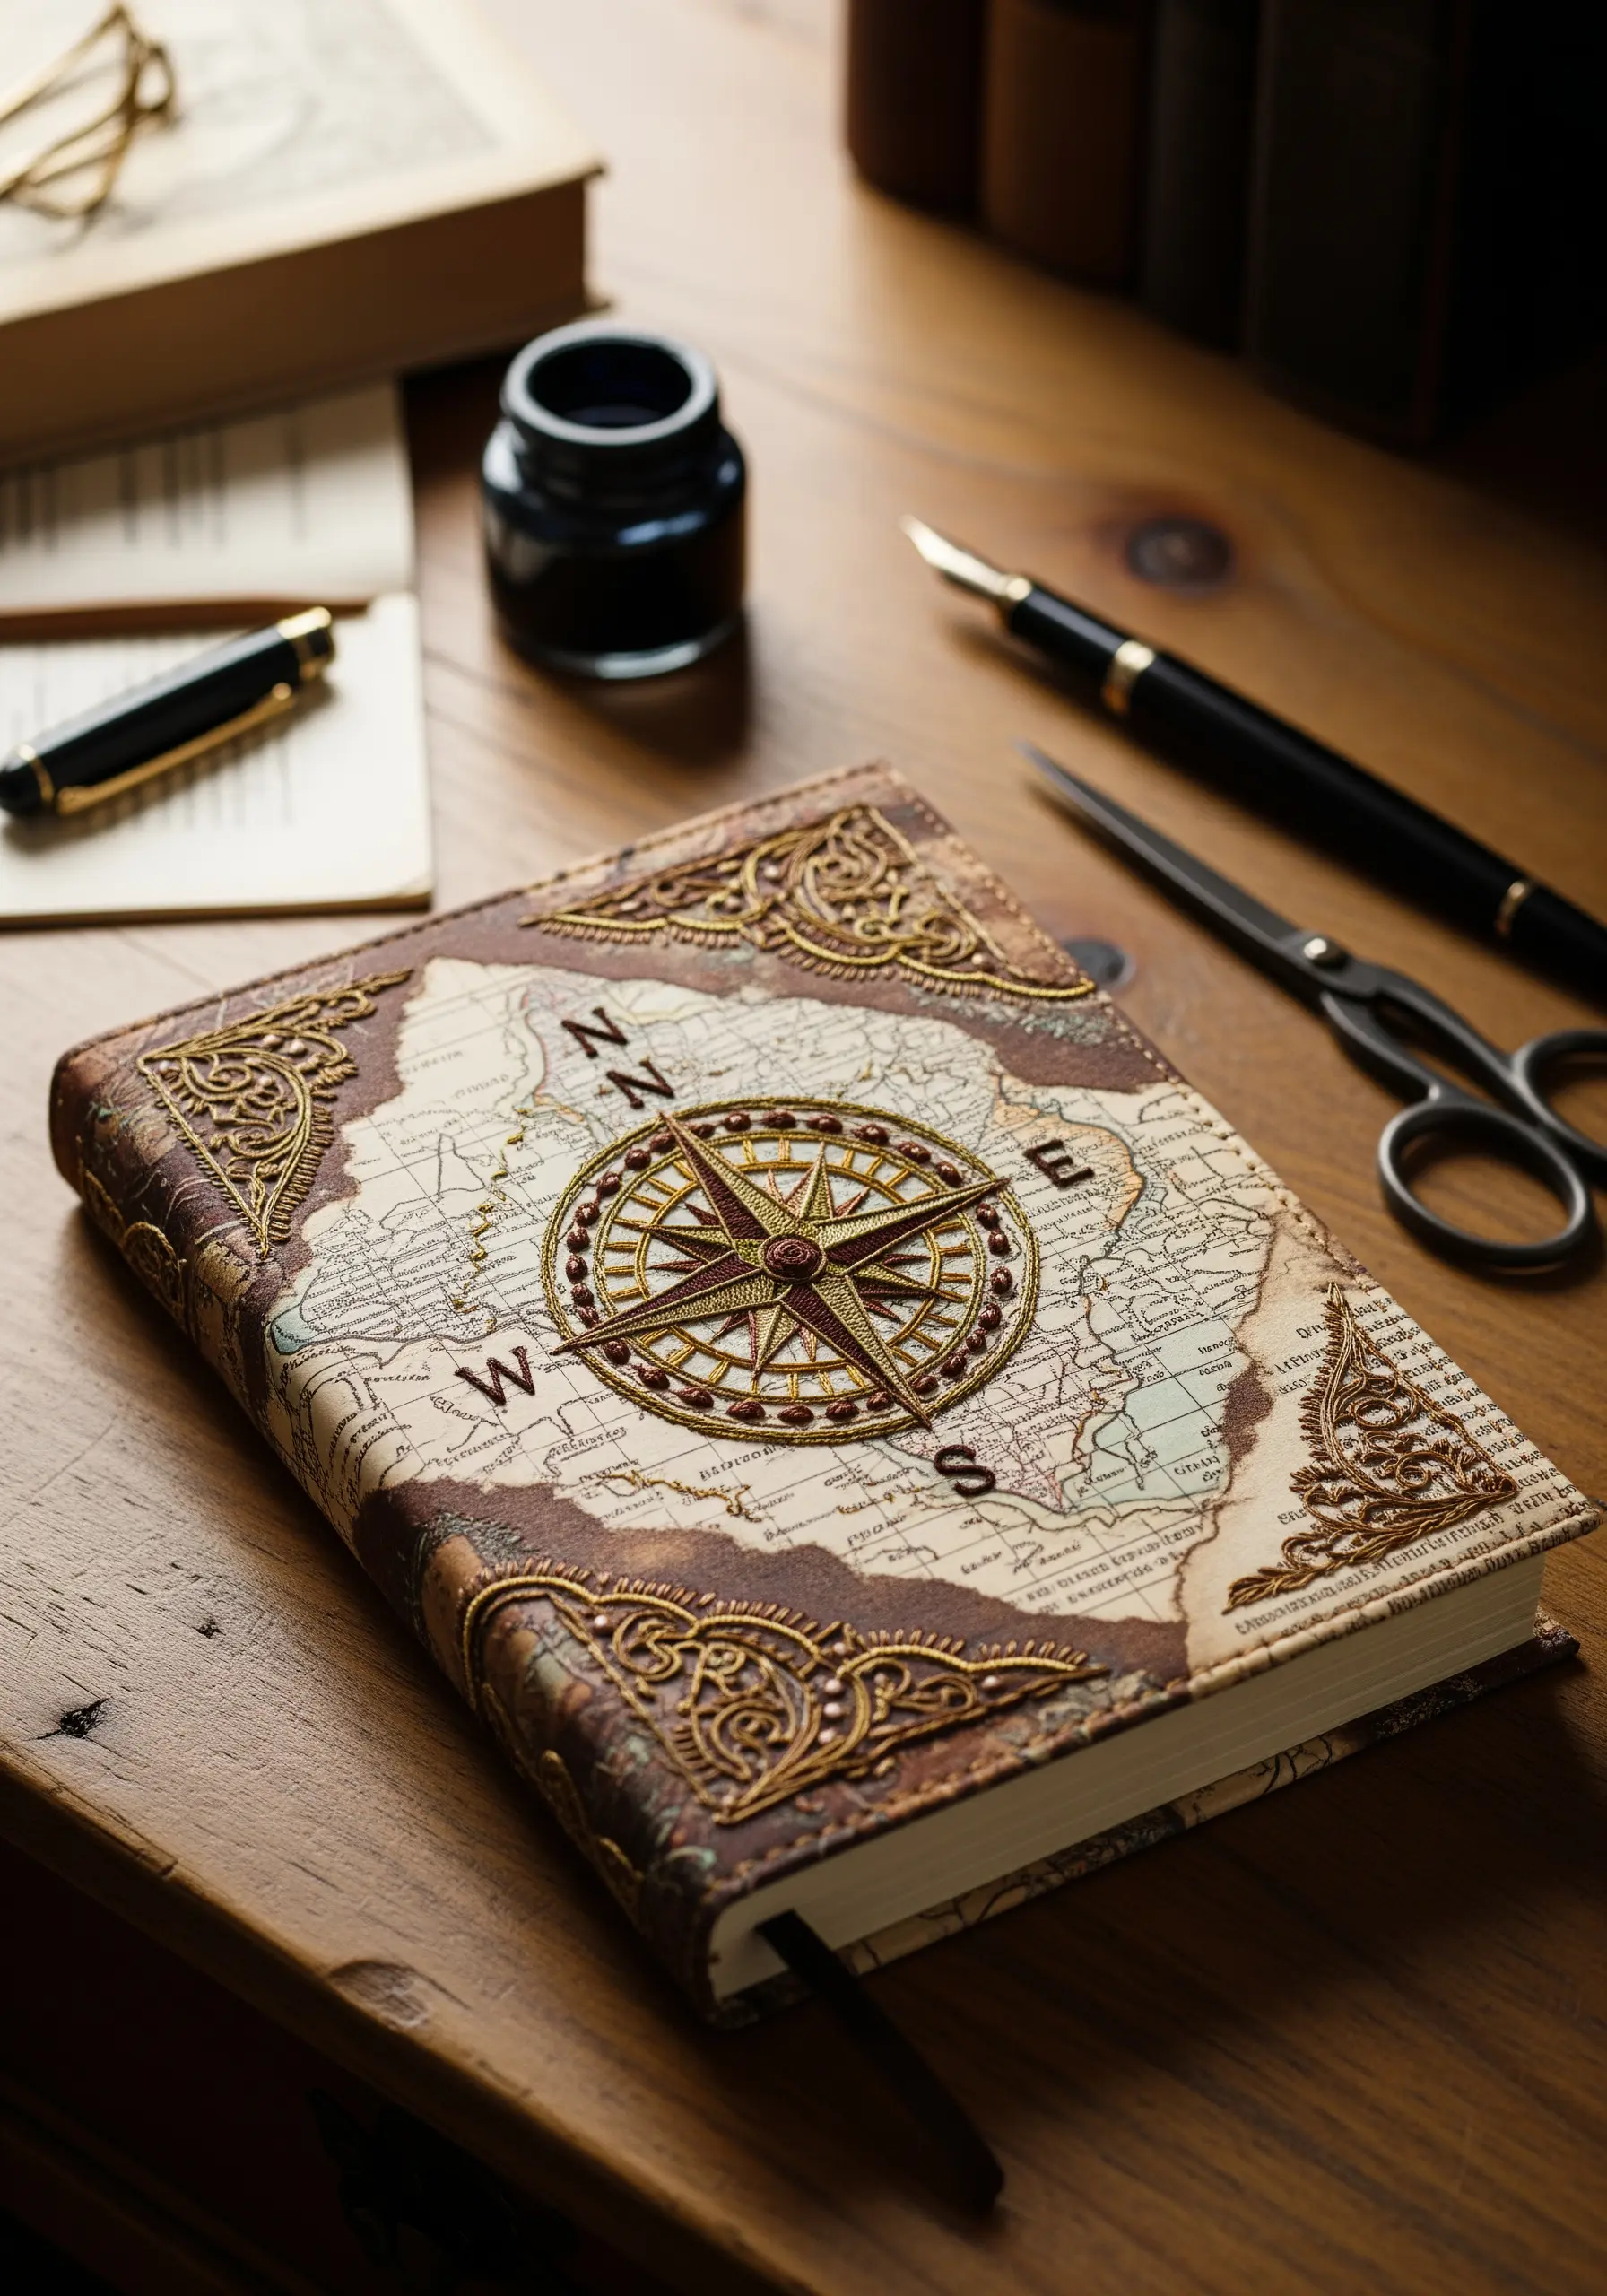
When embroidering on non-fabric surfaces like a faux leather journal, a sharp, sturdy needle is essential to prevent thread breakage.
To ensure clean stitches and avoid tearing the material, pre-pierce your holes along the design lines using a fine awl or a spare needle.
Use a single strand of floss or a fine-weight thread to avoid overwhelming the delicate details of the paper map underneath.
For raised metallic accents, try couching: lay down a thicker metallic cord and tack it in place with a thinner, matching thread for a luxurious finish that stands out.
3. Thread as Line Art on Painted Canvas
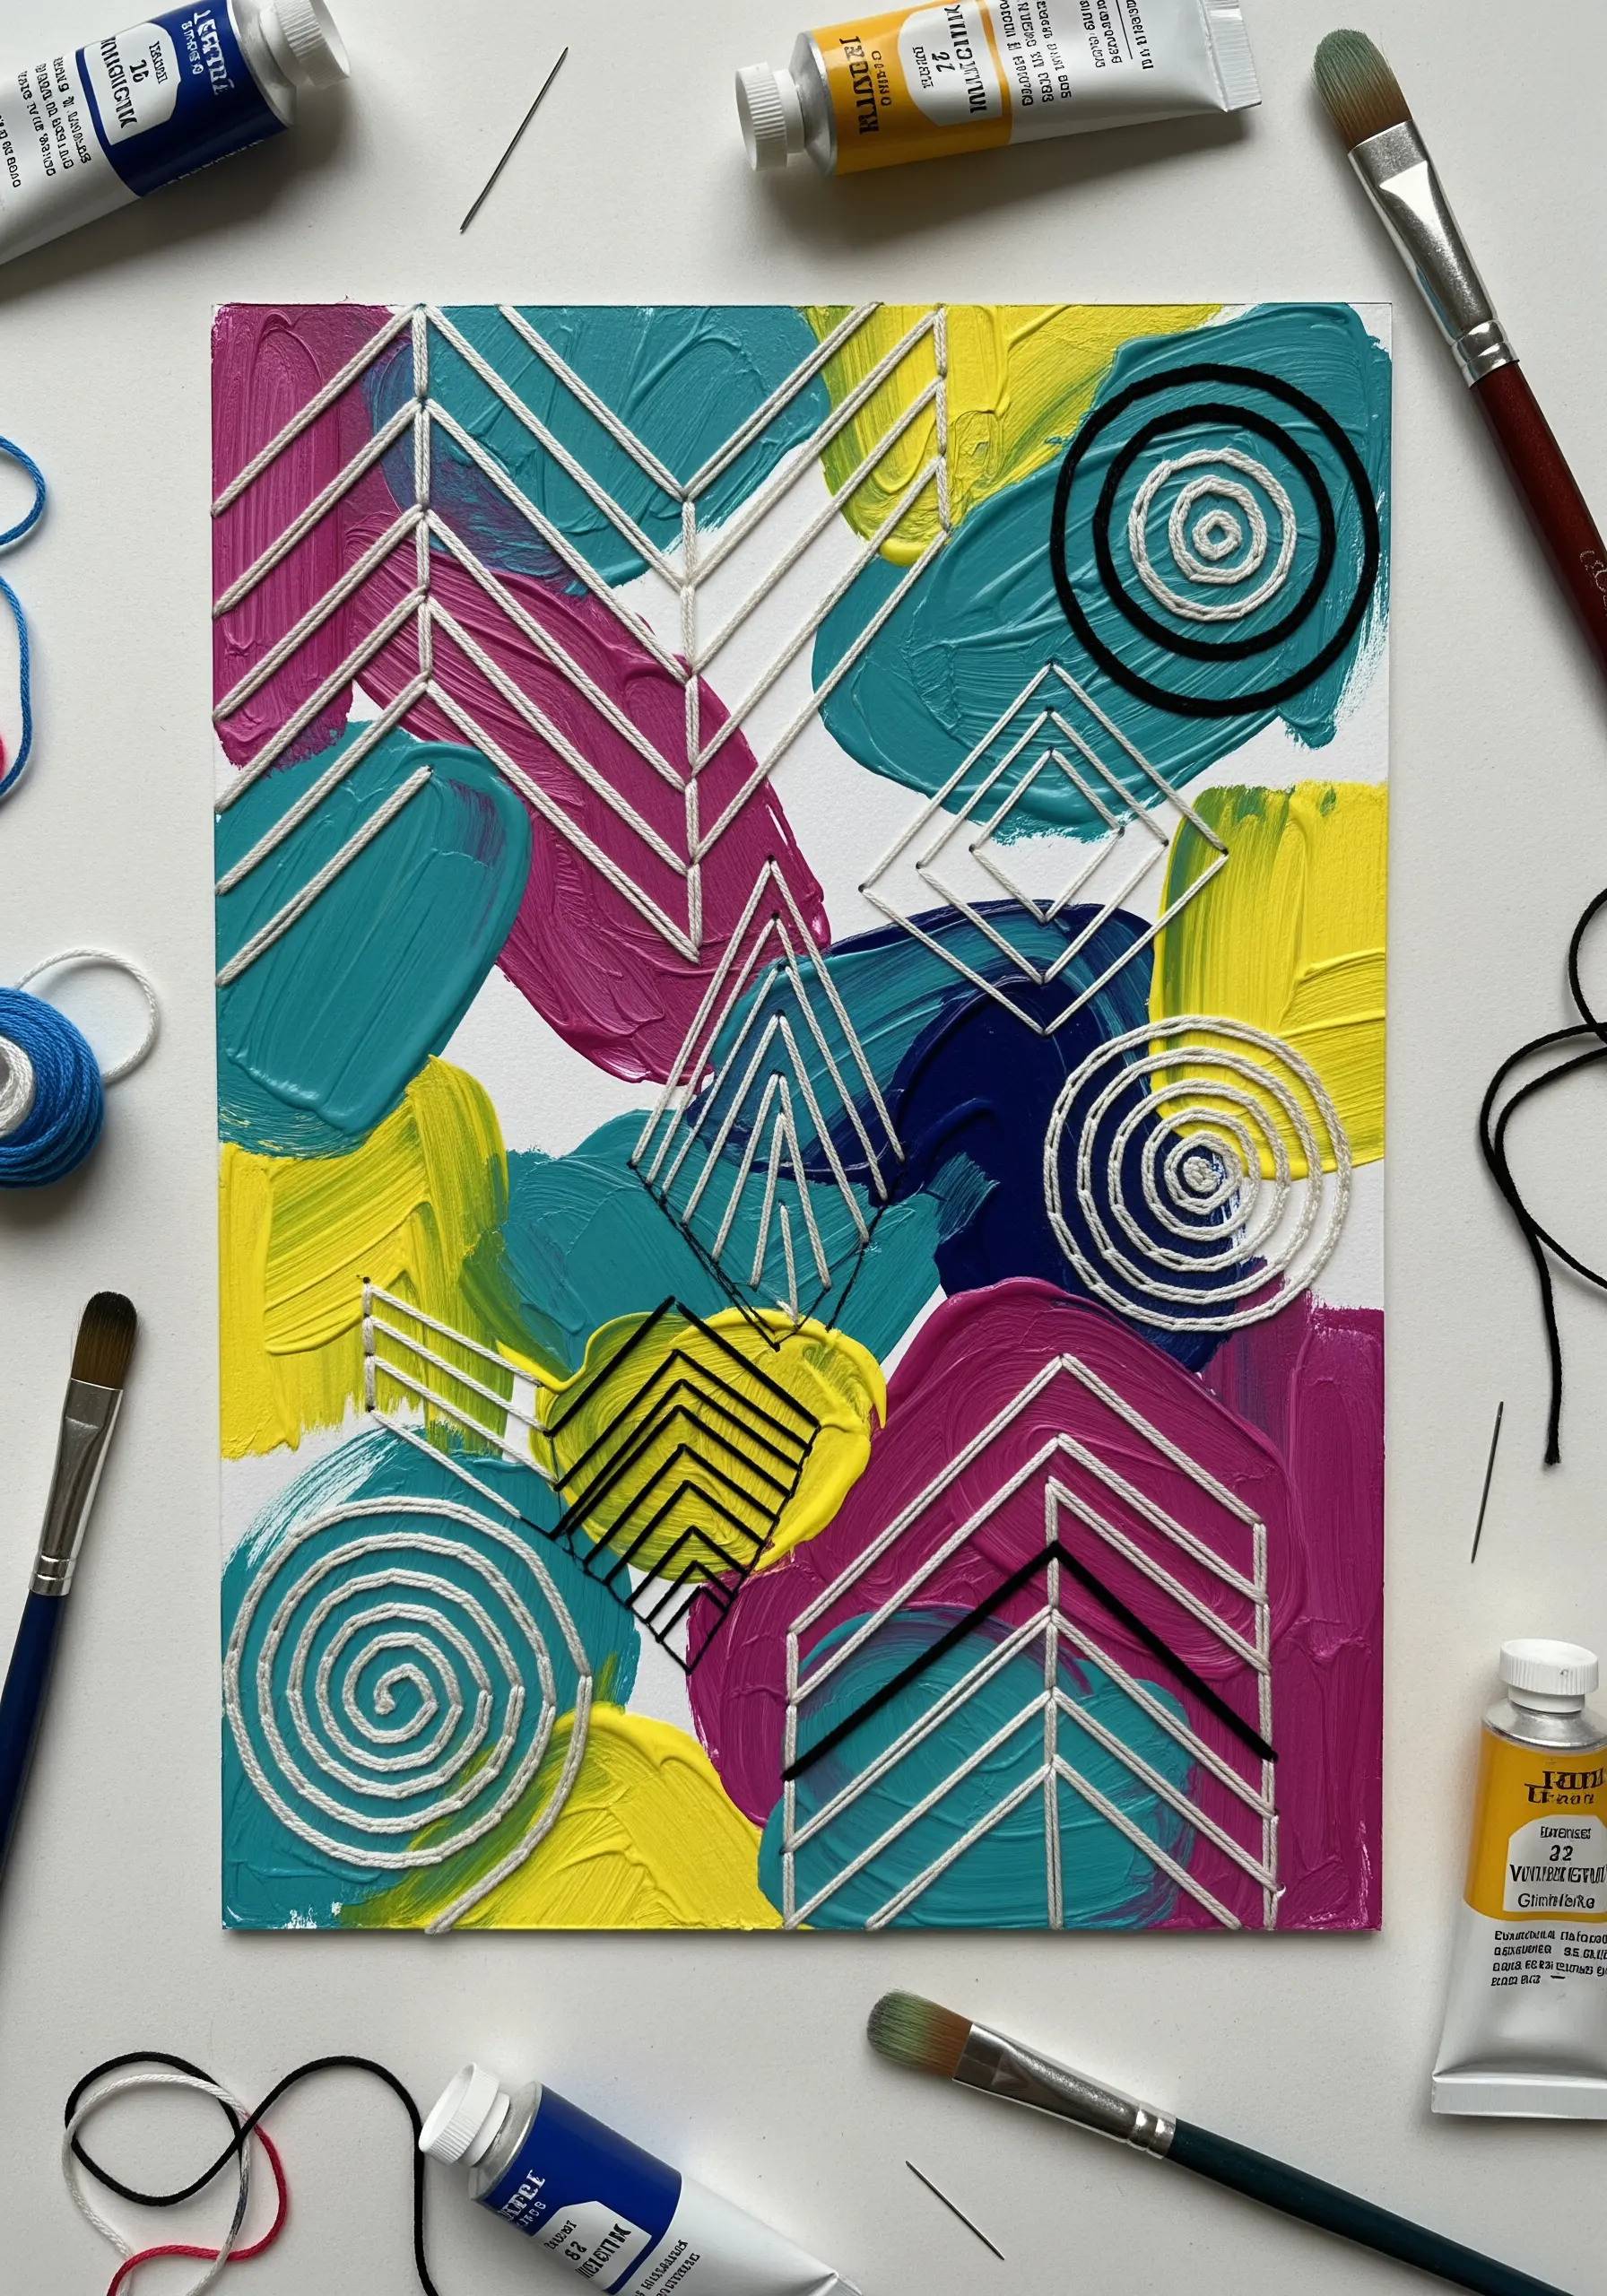
Transform a simple abstract painting by adding a graphic layer of stitched lines directly onto the canvas.
After the acrylic paint is fully cured, use a thimble and a strong needle to stitch your geometric or organic patterns through the canvas.
Select a high-contrast thread color—like crisp white against bold magenta and teal—to create sharp definition and make your linework pop.
Vary the direction and density of your stitches to either follow or contradict the brushstrokes below, adding an intentional, structural texture to the finished piece.
4. Integrating Pressed Botanicals with Stitches

Combine the organic fragility of pressed flower art with the clean precision of minimalist line embroidery for a truly elegant composition.
First, carefully arrange and affix your dried botanicals onto high-quality, textured paper using a clear, acid-free craft adhesive.
Once the flowers are secure, stitch your design directly onto the paper, allowing the thread to interact with the natural elements.
A simple backstitch outline keeps the focus on the preserved flora, creating a beautiful and balanced dialogue between nature and craft.
5. Watercolor Paper Embellishments
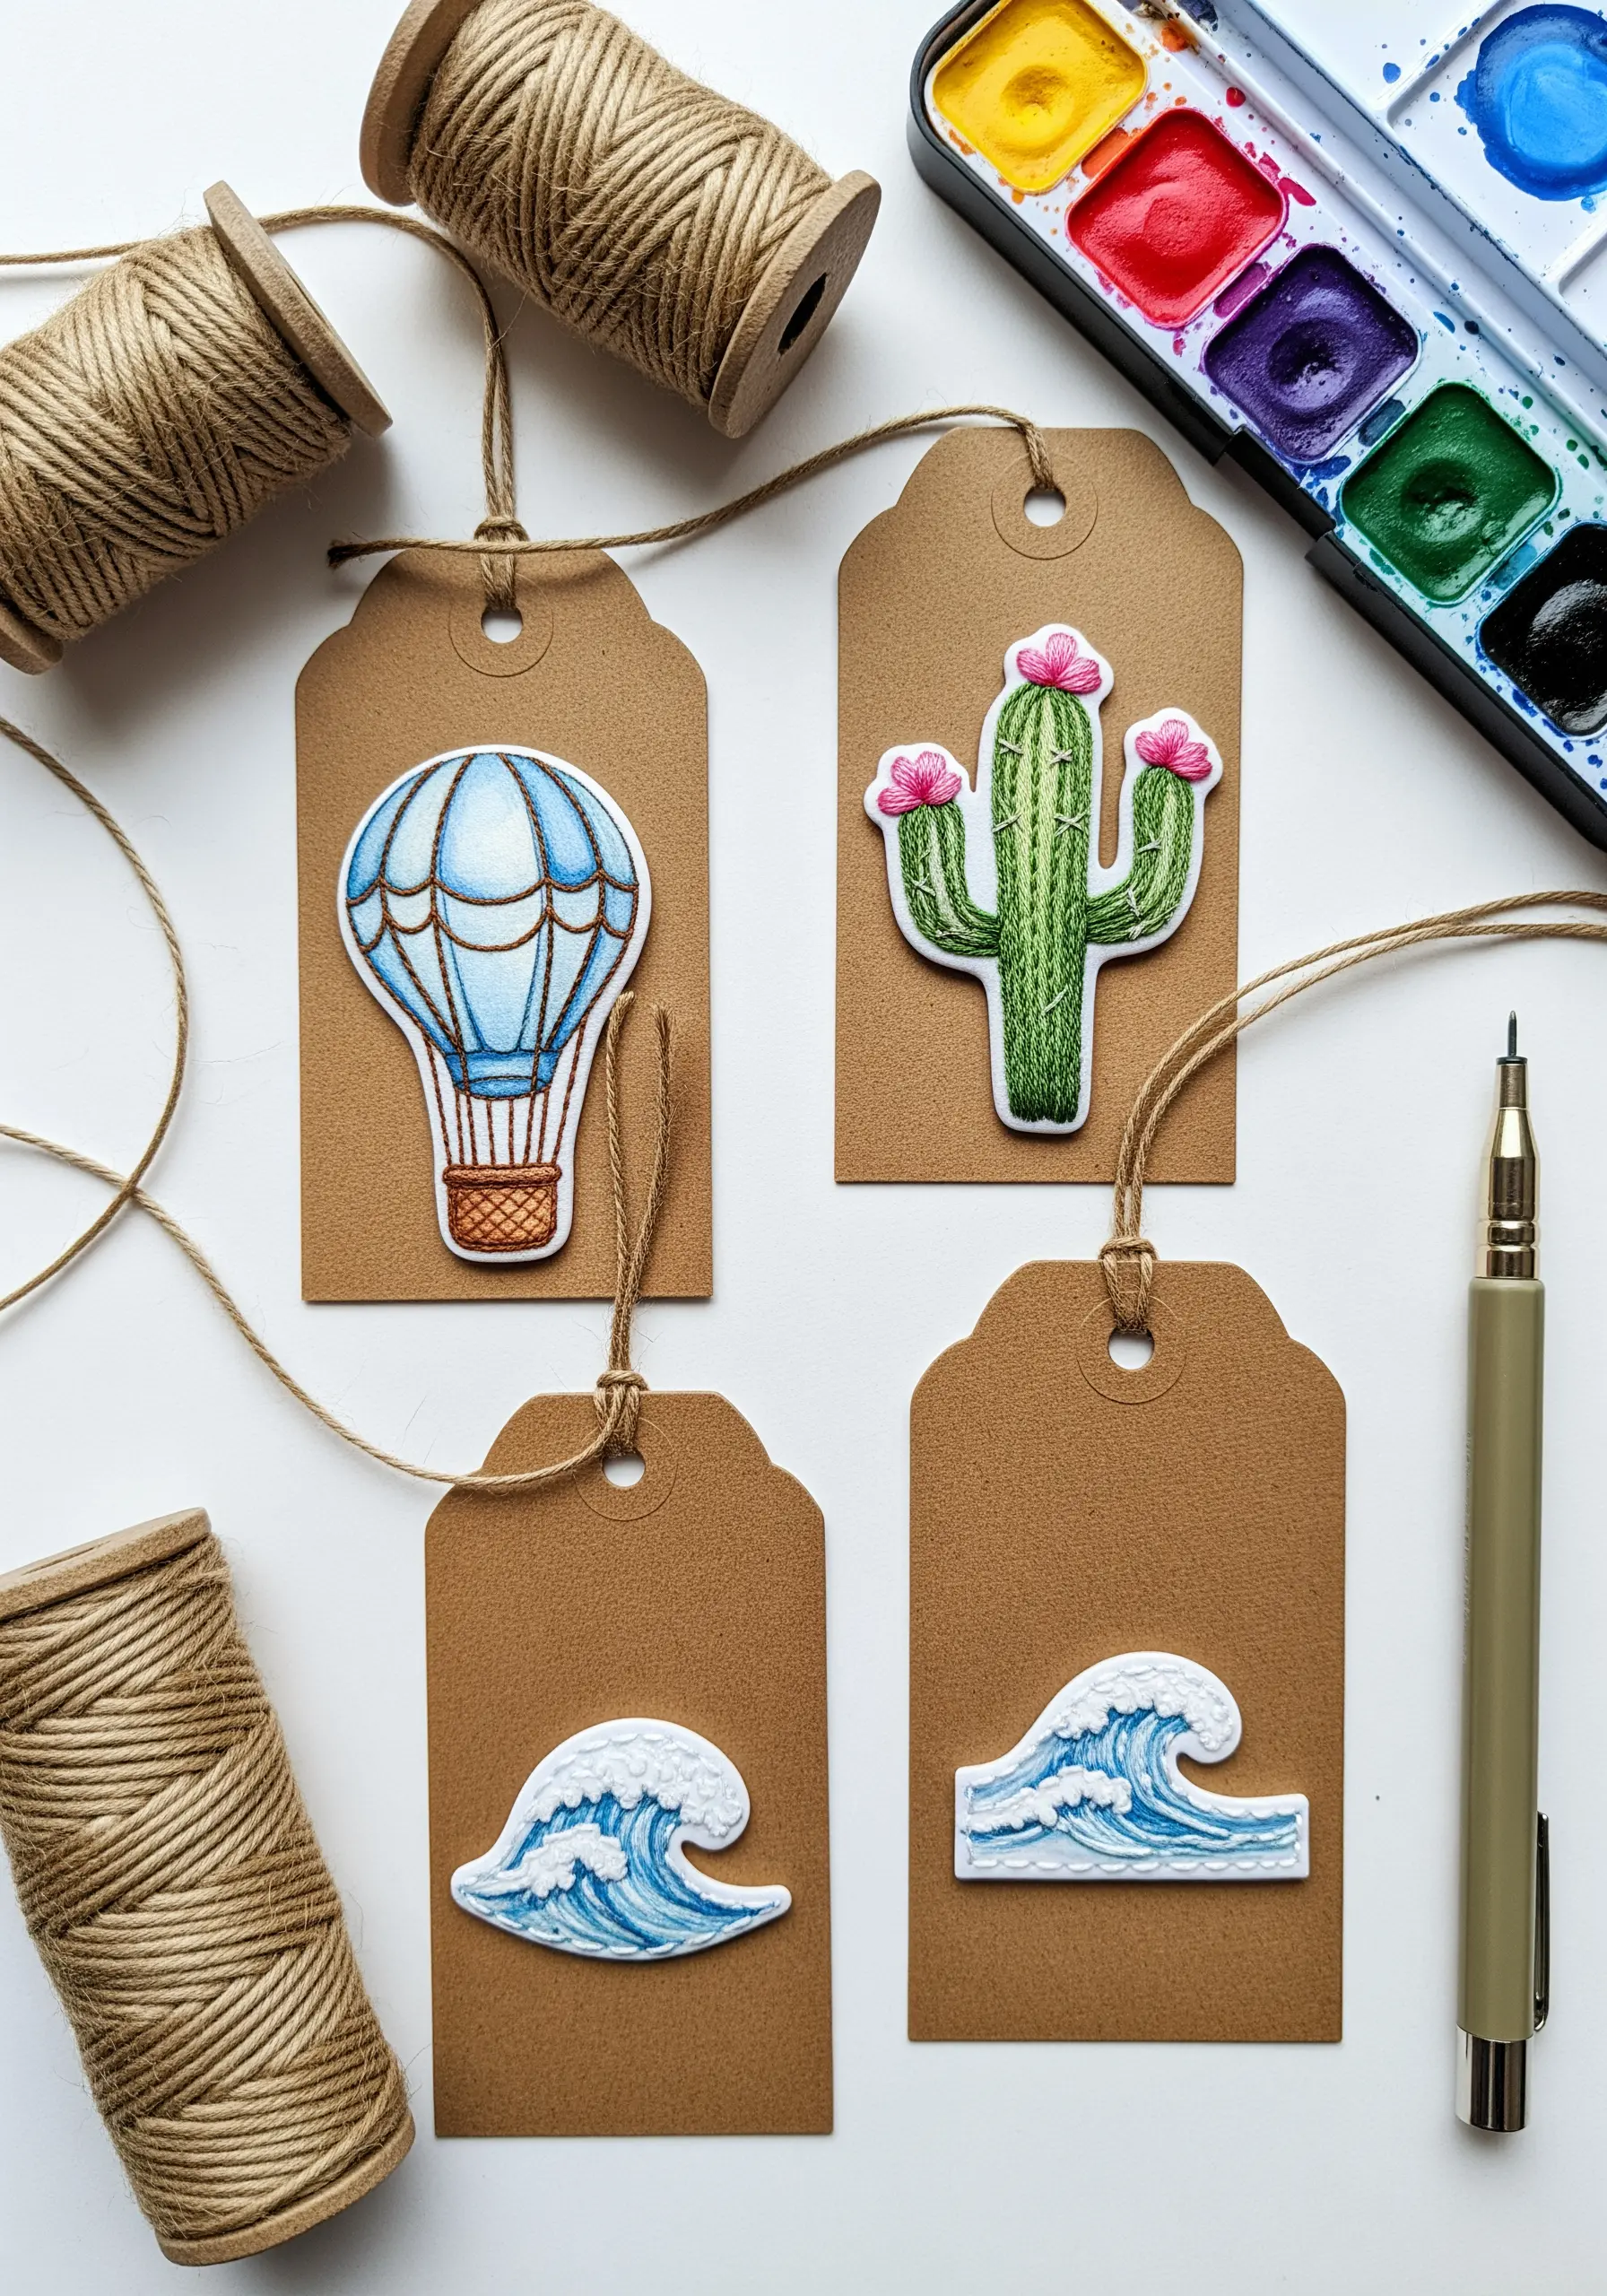
This technique uses layering to achieve a dimensional effect reminiscent of appliqué embroidery, but without any thread.
Paint your chosen motifs—like waves, cacti, or balloons—on watercolor paper and allow them to dry completely before carefully cutting them out.
Mount the cutouts onto kraft paper tags or greeting cards using small foam adhesive dots hidden on the back.
This method creates a raised, 3D effect that gives simple illustrations a professional, tactile quality, similar to a raised satin stitch or felt appliqué.
6. Three-Dimensional Thread on Photography

Elevate a portrait by having it printed on matte photo paper or a sturdy canvas and then embroidering directly onto it.
To create realistic and tactile hair, use a mix of embroidery floss, yarn, and thicker cords, incorporating braids, twists, and loose strands for variety.
Anchor the threads securely on the back of the canvas or frame.
This technique transforms a flat image into a sculptural, multi-sensory piece, and the contrast between a monochrome photo and colorful threads is especially powerful.
7. Glitter Thread Simulation on Paper
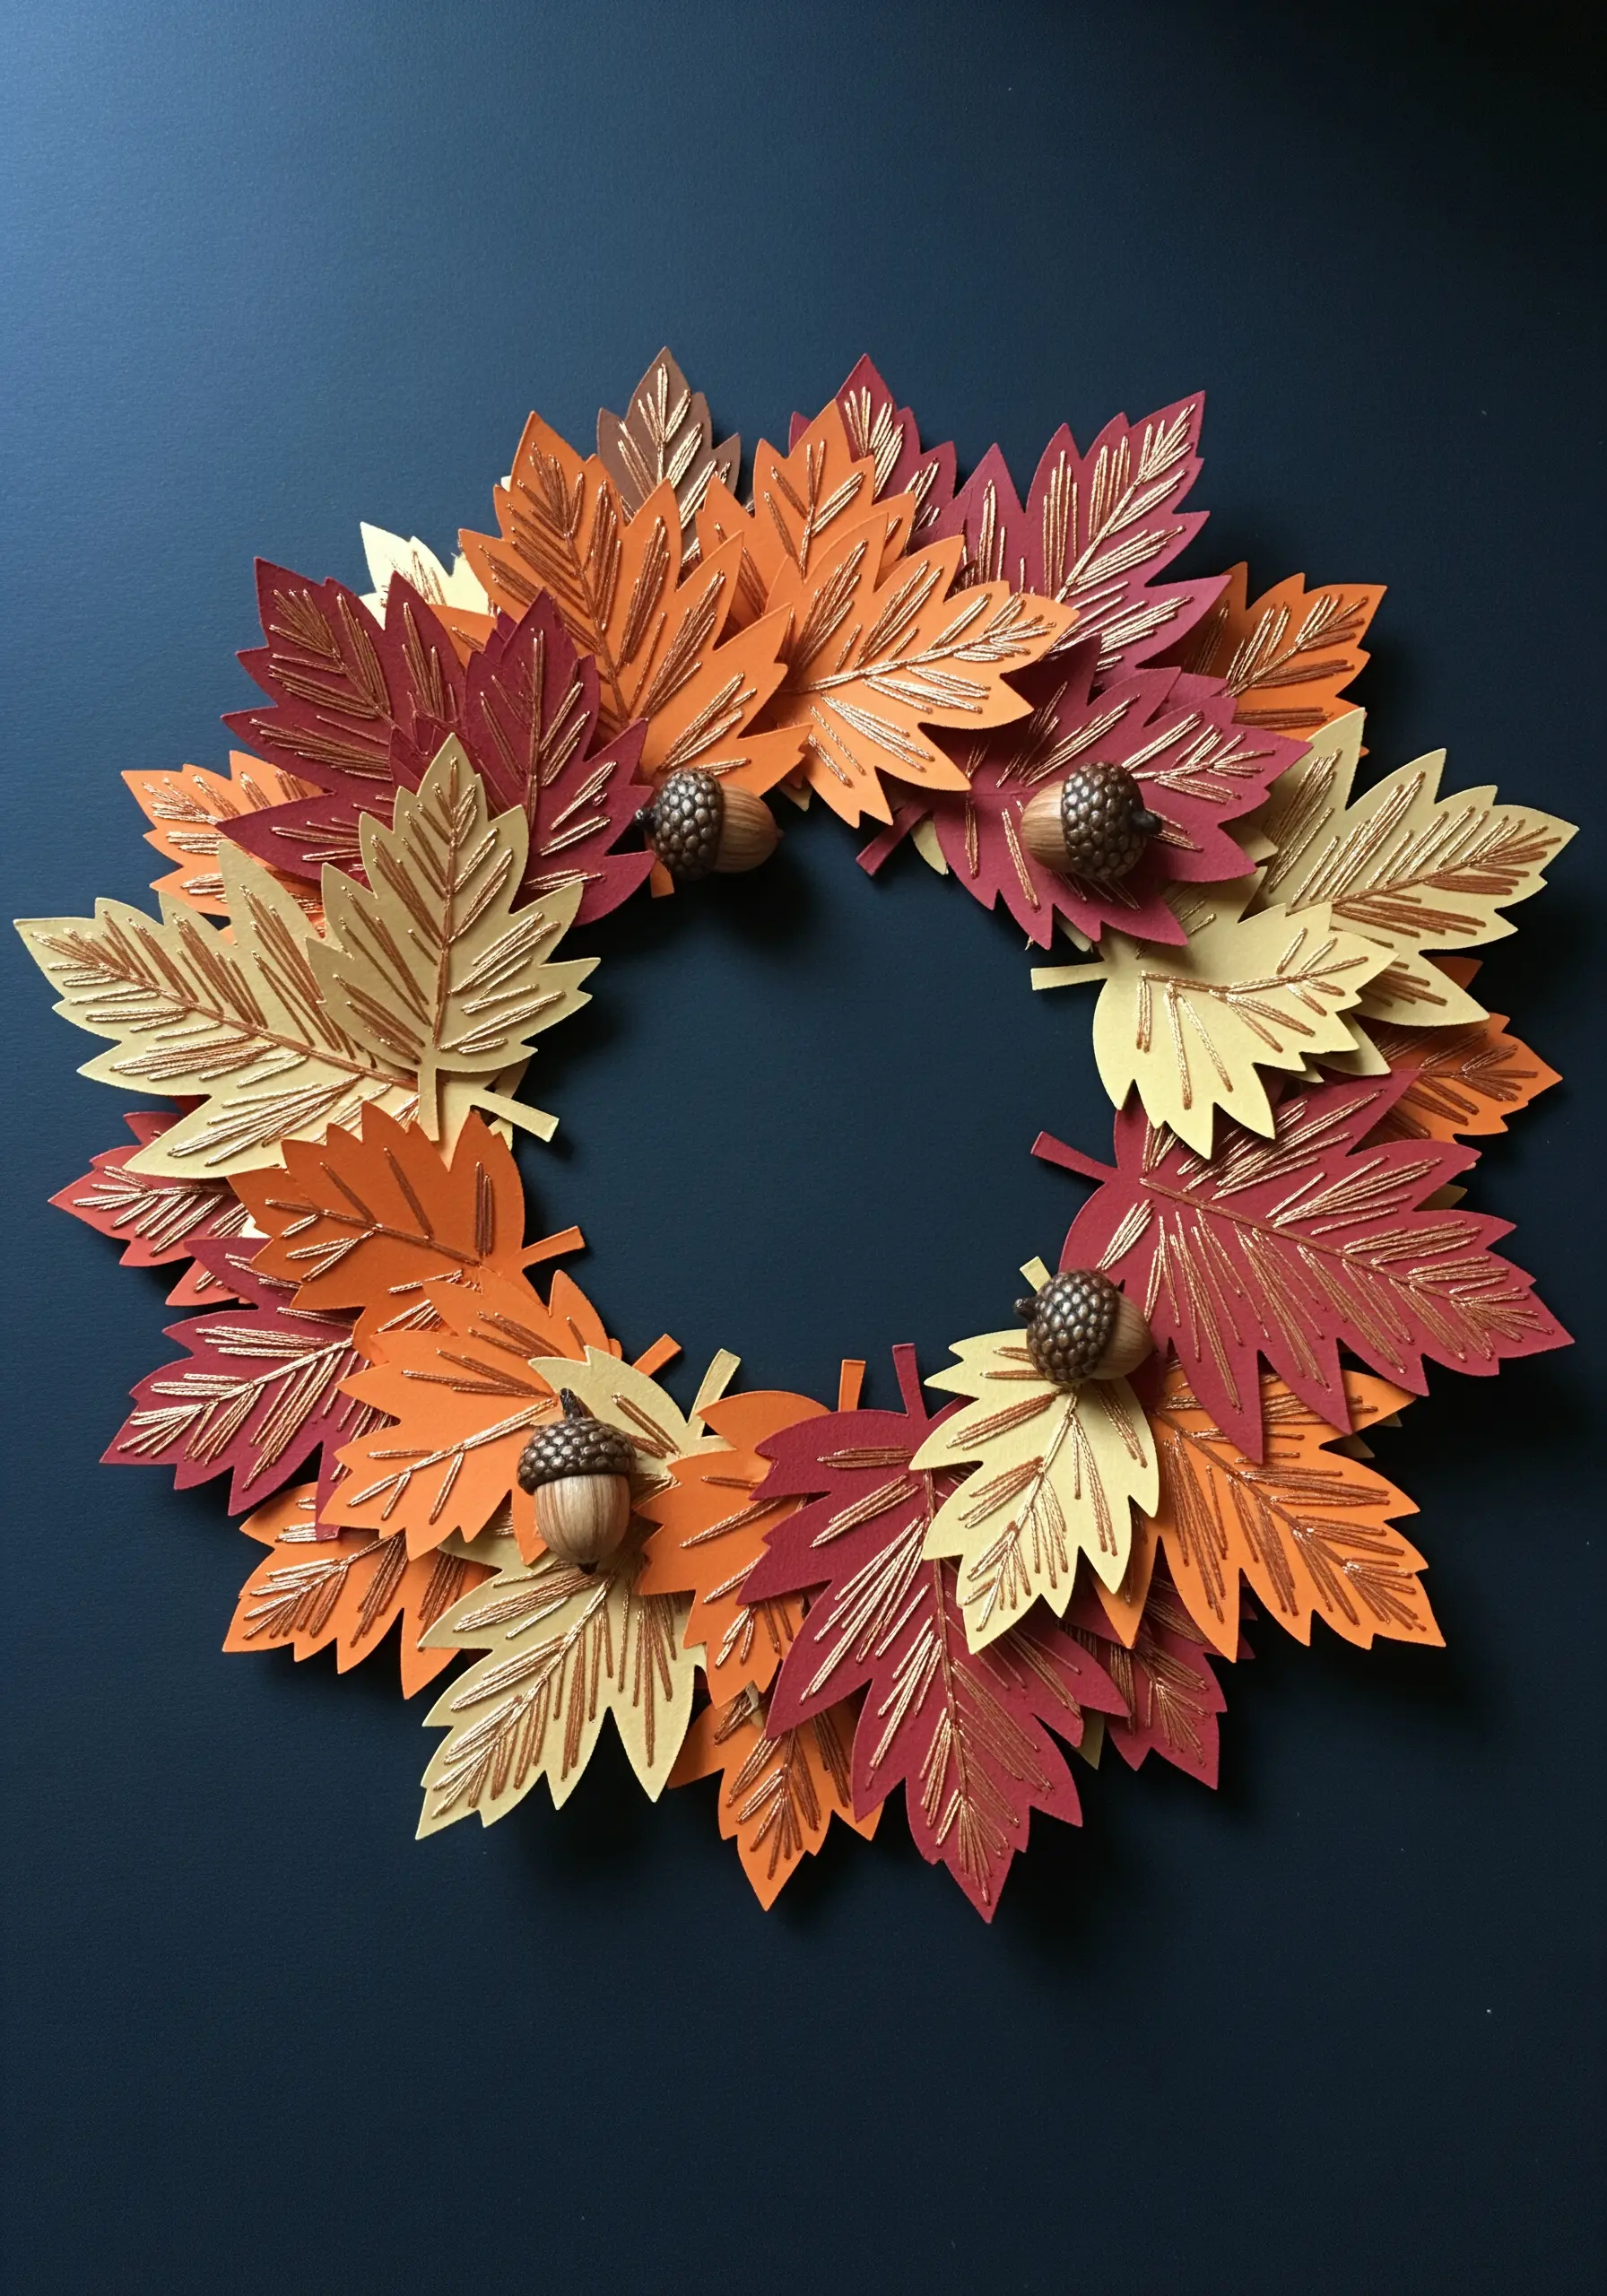
Achieve the shimmer of metallic thread on a paper-craft project without needing a needle or floss.
After cutting your leaf shapes from autumnal-toned cardstock, use a fine-tipped glitter glue pen to draw the delicate veins.
The glue dries to create raised, sparkling lines that catch the light beautifully, mimicking the texture and sheen of a decorative backstitch or stem stitch.
This is an excellent way to add dimension and a luxe finish to wreaths, cards, and other paper-based creations.
8. Appliqué Storytelling with Fabric Scraps
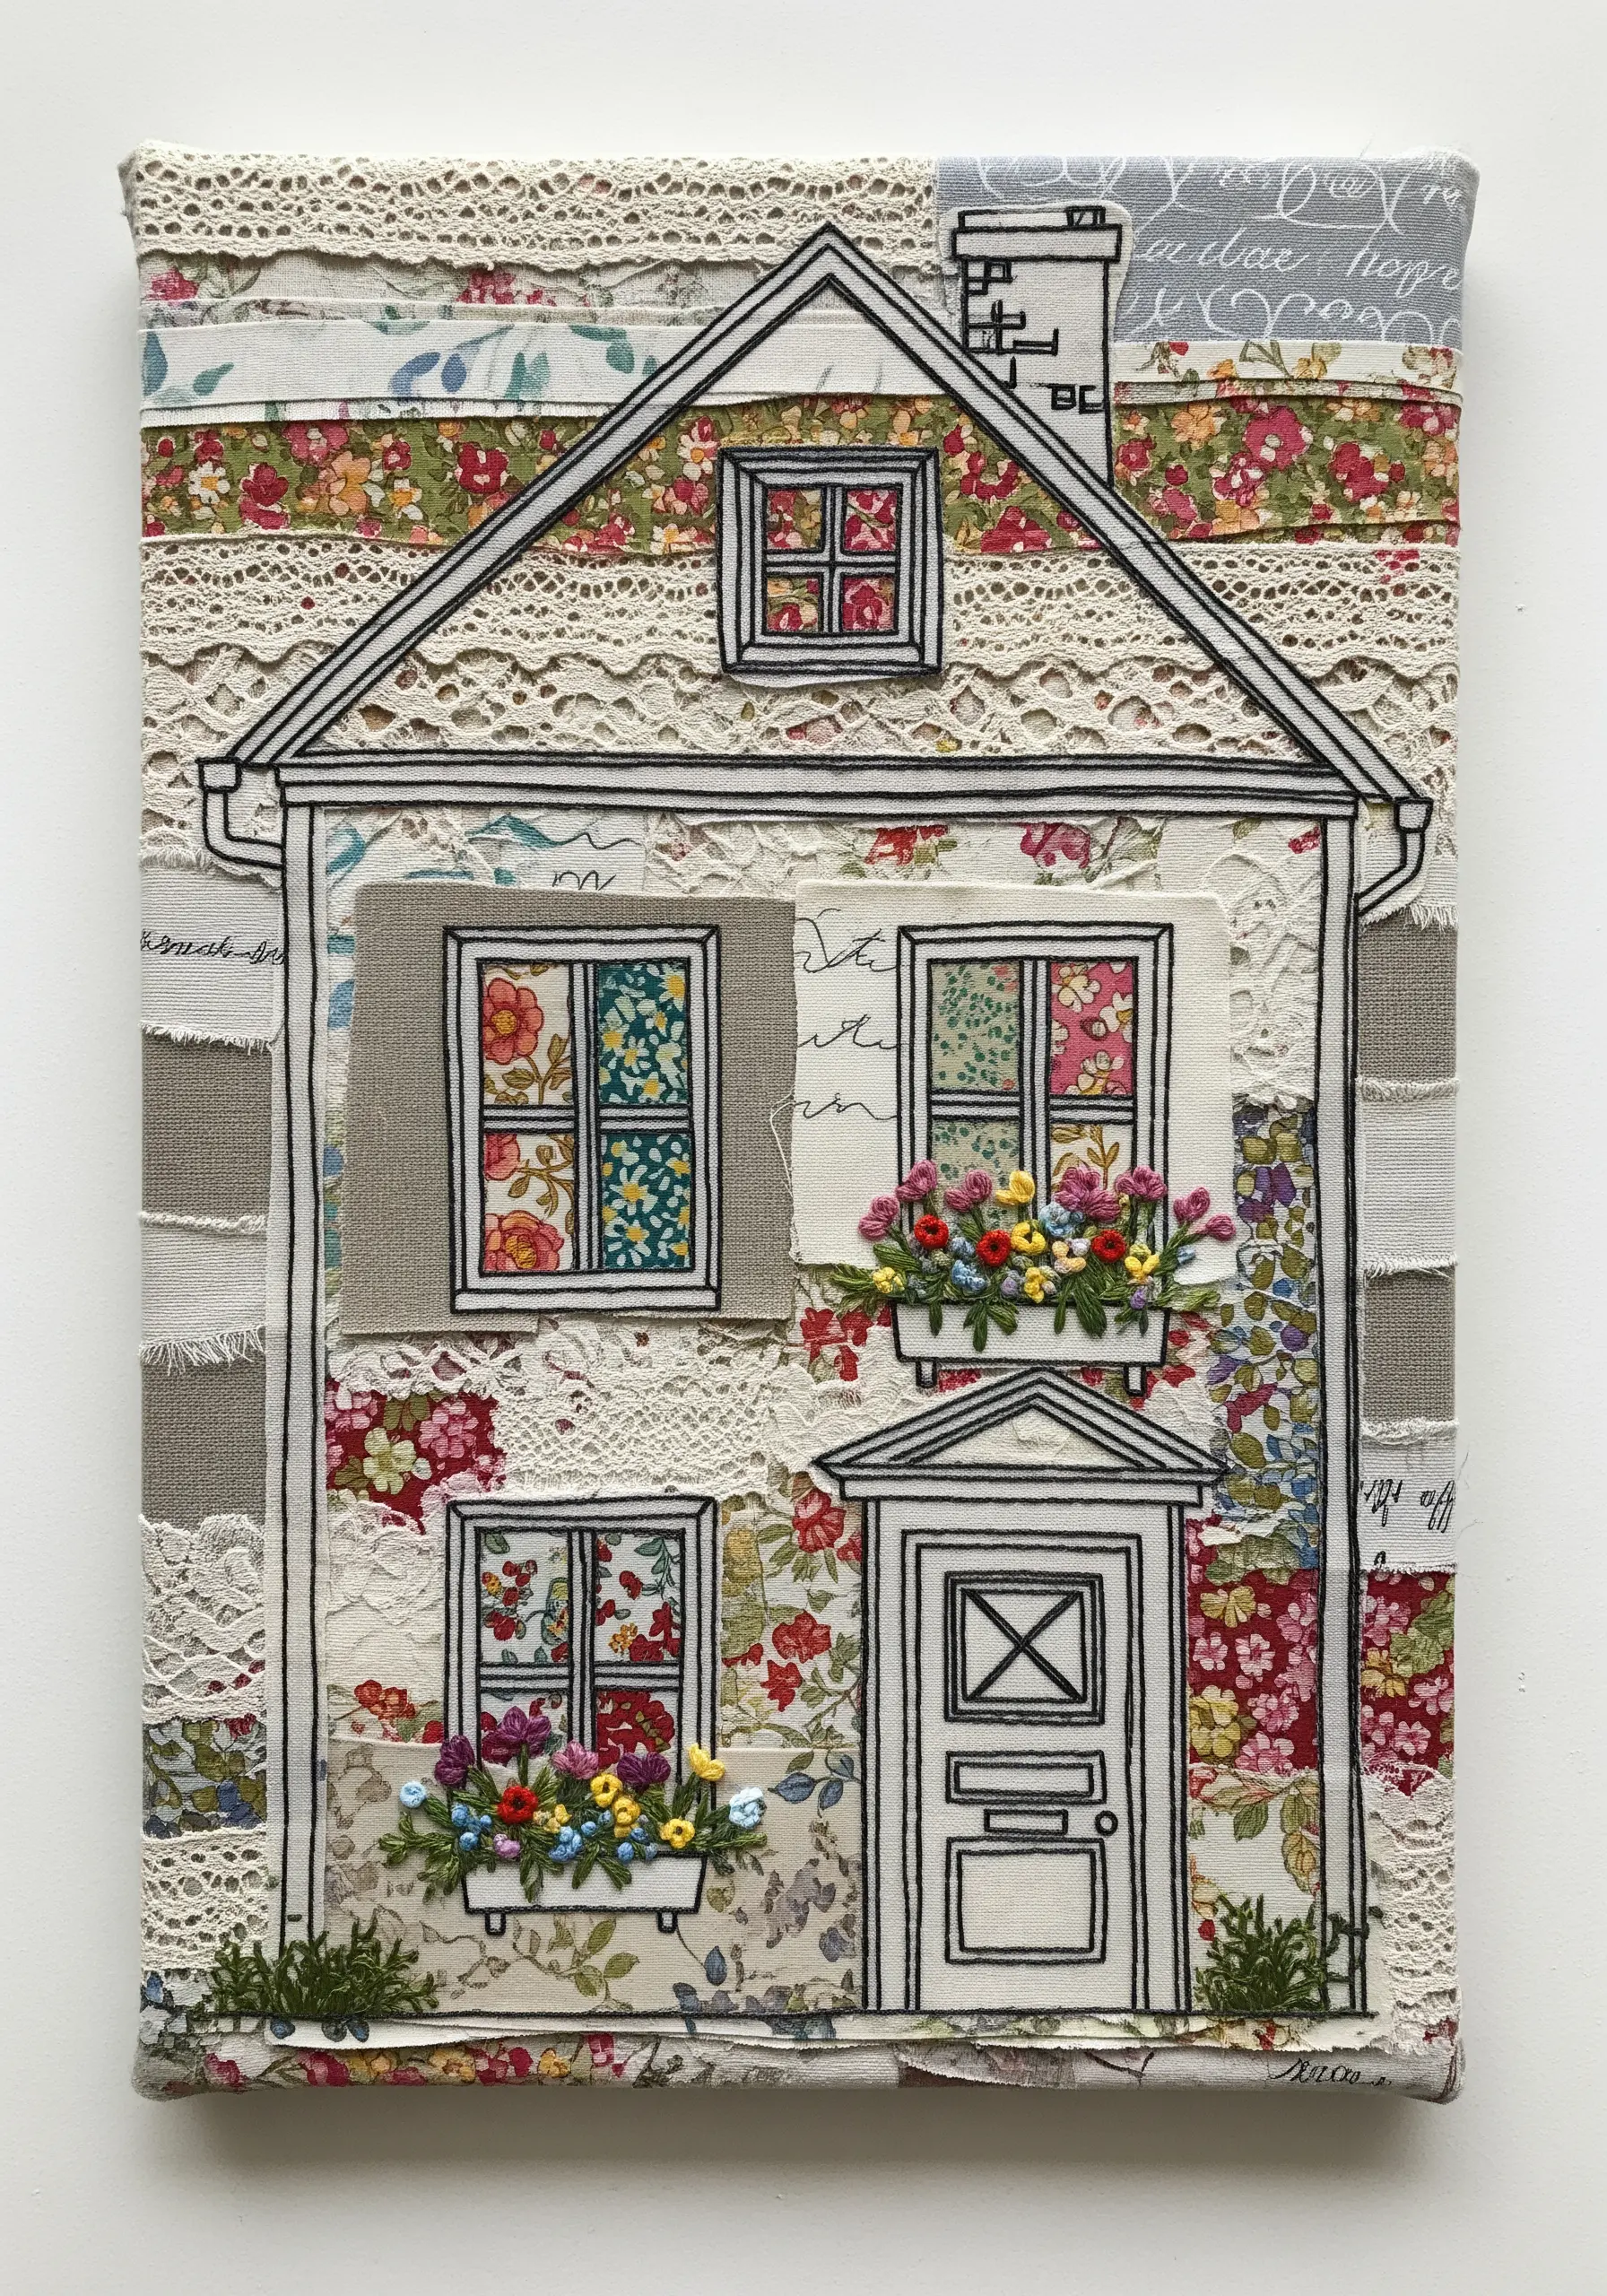
Create a narrative piece by building a fabric collage and unifying it with simple line embroidery.
Begin by layering scraps of lace, floral prints, and textured solids to form your background scene.
Then, stitch over the top to define the primary shapes, such as the outline of a house. The black thread acts as the ‘ink,’ transforming disparate patterns into a cohesive illustration.
Use dense clusters of French knots for details like flowers to add pops of vibrant, touchable texture that draw the eye.
9. Paper Puncture Constellation Art

Stitching on paper offers unparalleled precision, making it ideal for clean, geometric, or scientific designs.
First, print or draw your constellation map onto heavy cardstock. Use a pin tool or a thumbtack to pre-punch holes at every stitch point.
This crucial step ensures your paper will not buckle or tear as you stitch.
Use a glow-in-the-dark or metallic floss to connect the dots, creating a crisp, graphic effect that feels both minimalist and magical.
10. Incorporating Foil for Metallic Sheen
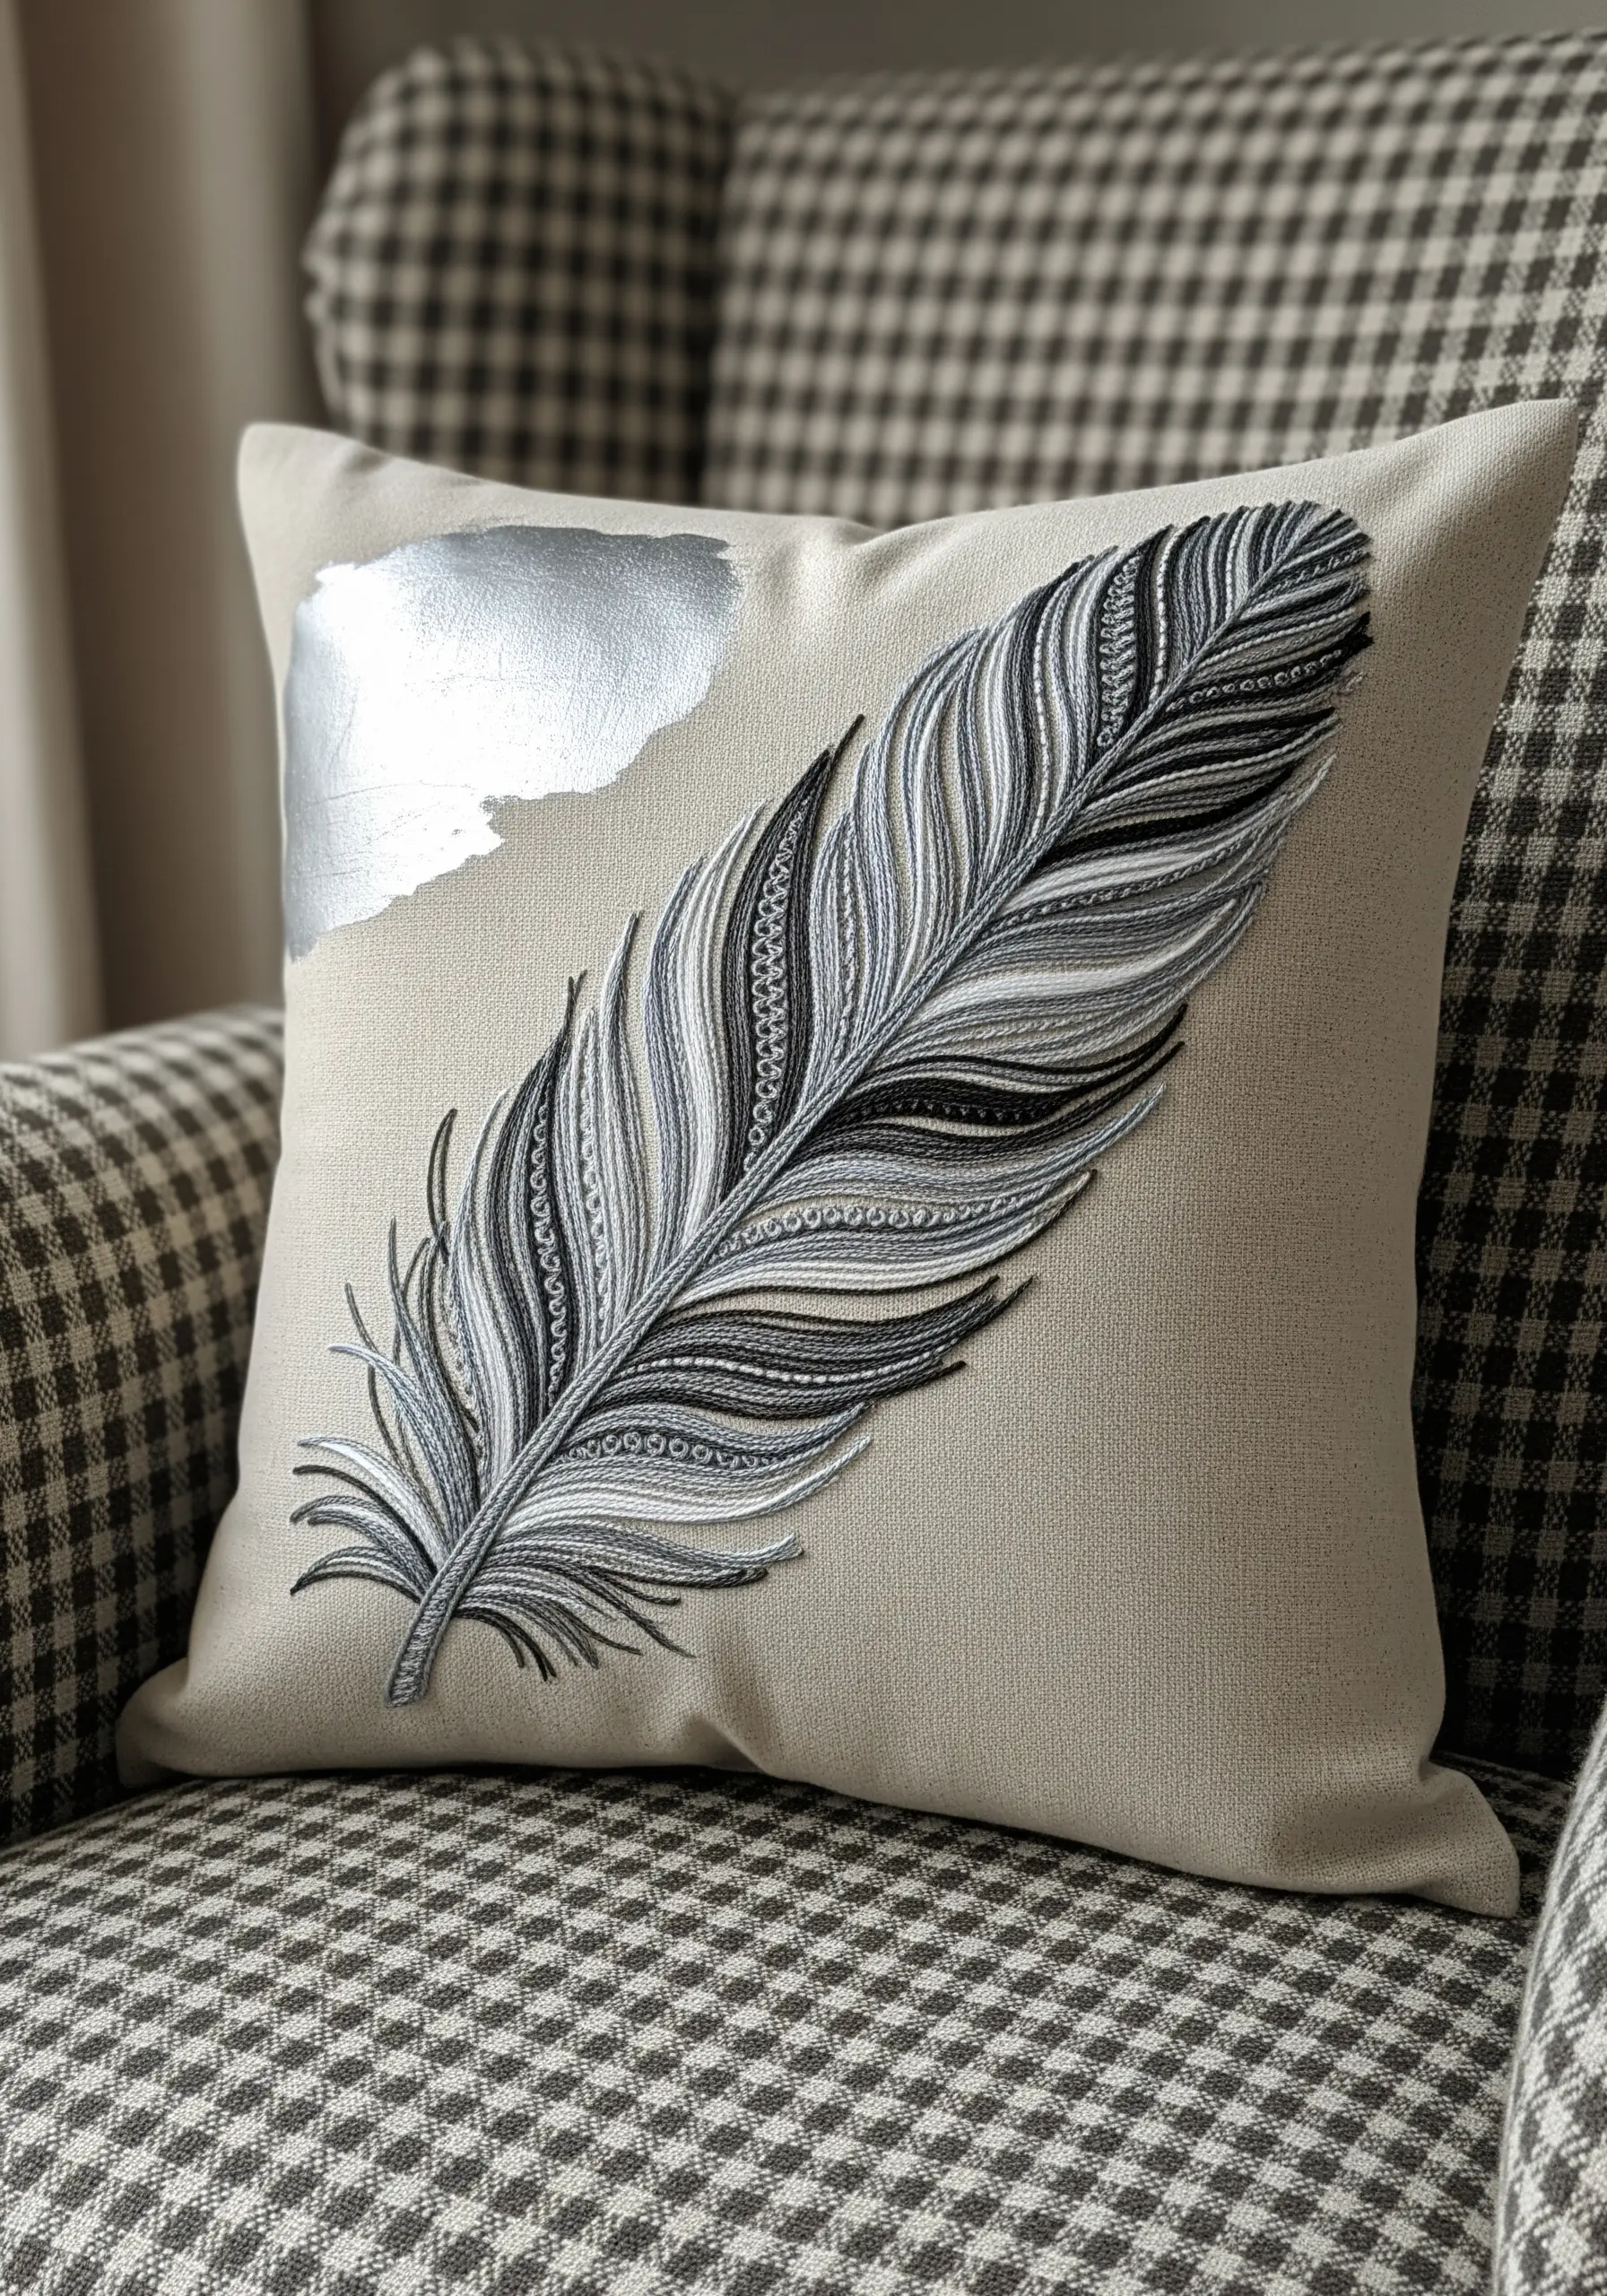
Introduce a modern and unexpected finish to your embroidery by incorporating heat-transfer foil.
Before you begin stitching, apply a small section of metallic foil to your fabric using a specialized fabric adhesive and a hot iron.
Design your embroidery to interact with this new element. The smooth, liquid-like surface of the foil provides a stunning contrast to the detailed, soft texture of the thread painting.
11. Felt Appliqué for Bold, Playful Shapes
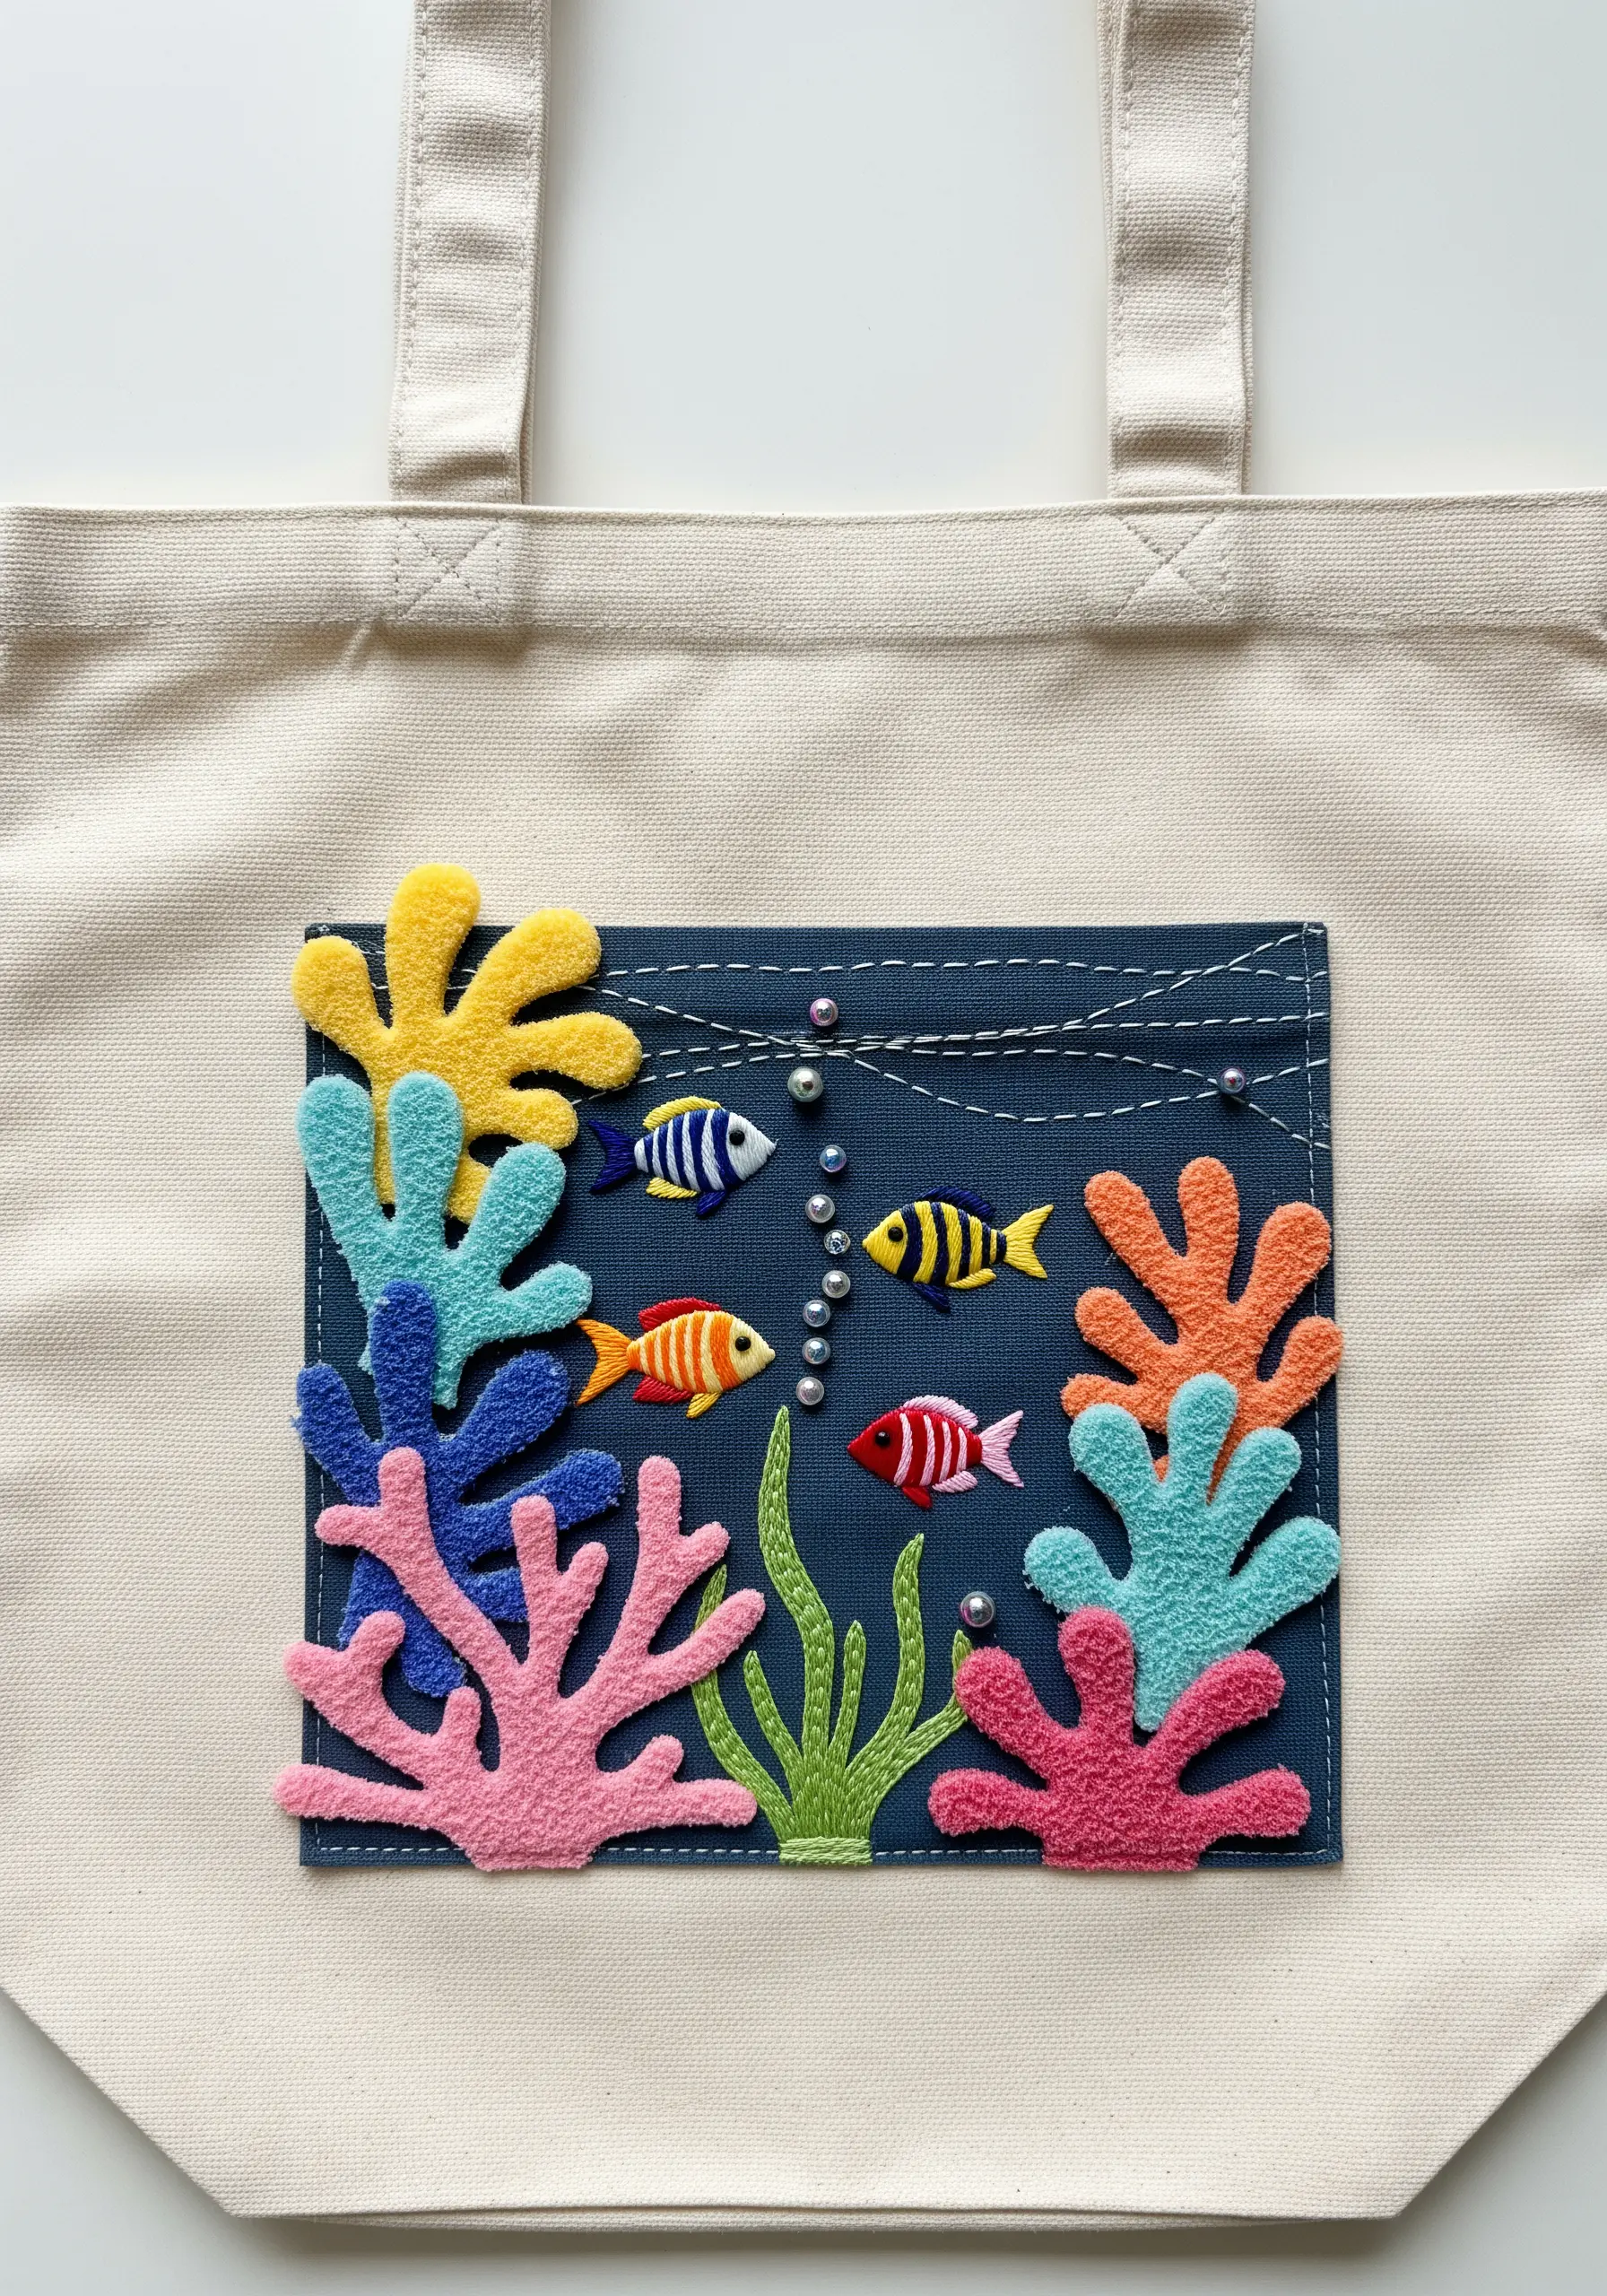
For vibrant, graphic designs on items like tote bags or children’s apparel, felt is an ideal and forgiving medium.
Cut your shapes from different colors of felt and arrange them on a fabric panel before stitching them down.
Secure the pieces with a simple running stitch around the edges, which is much faster than filling large areas with satin stitch.
This technique creates a soft, raised effect that is both durable and charming. Add small embroidered details and pearl beads for a final touch of polish.
12. Paper and Thread Taxidermy
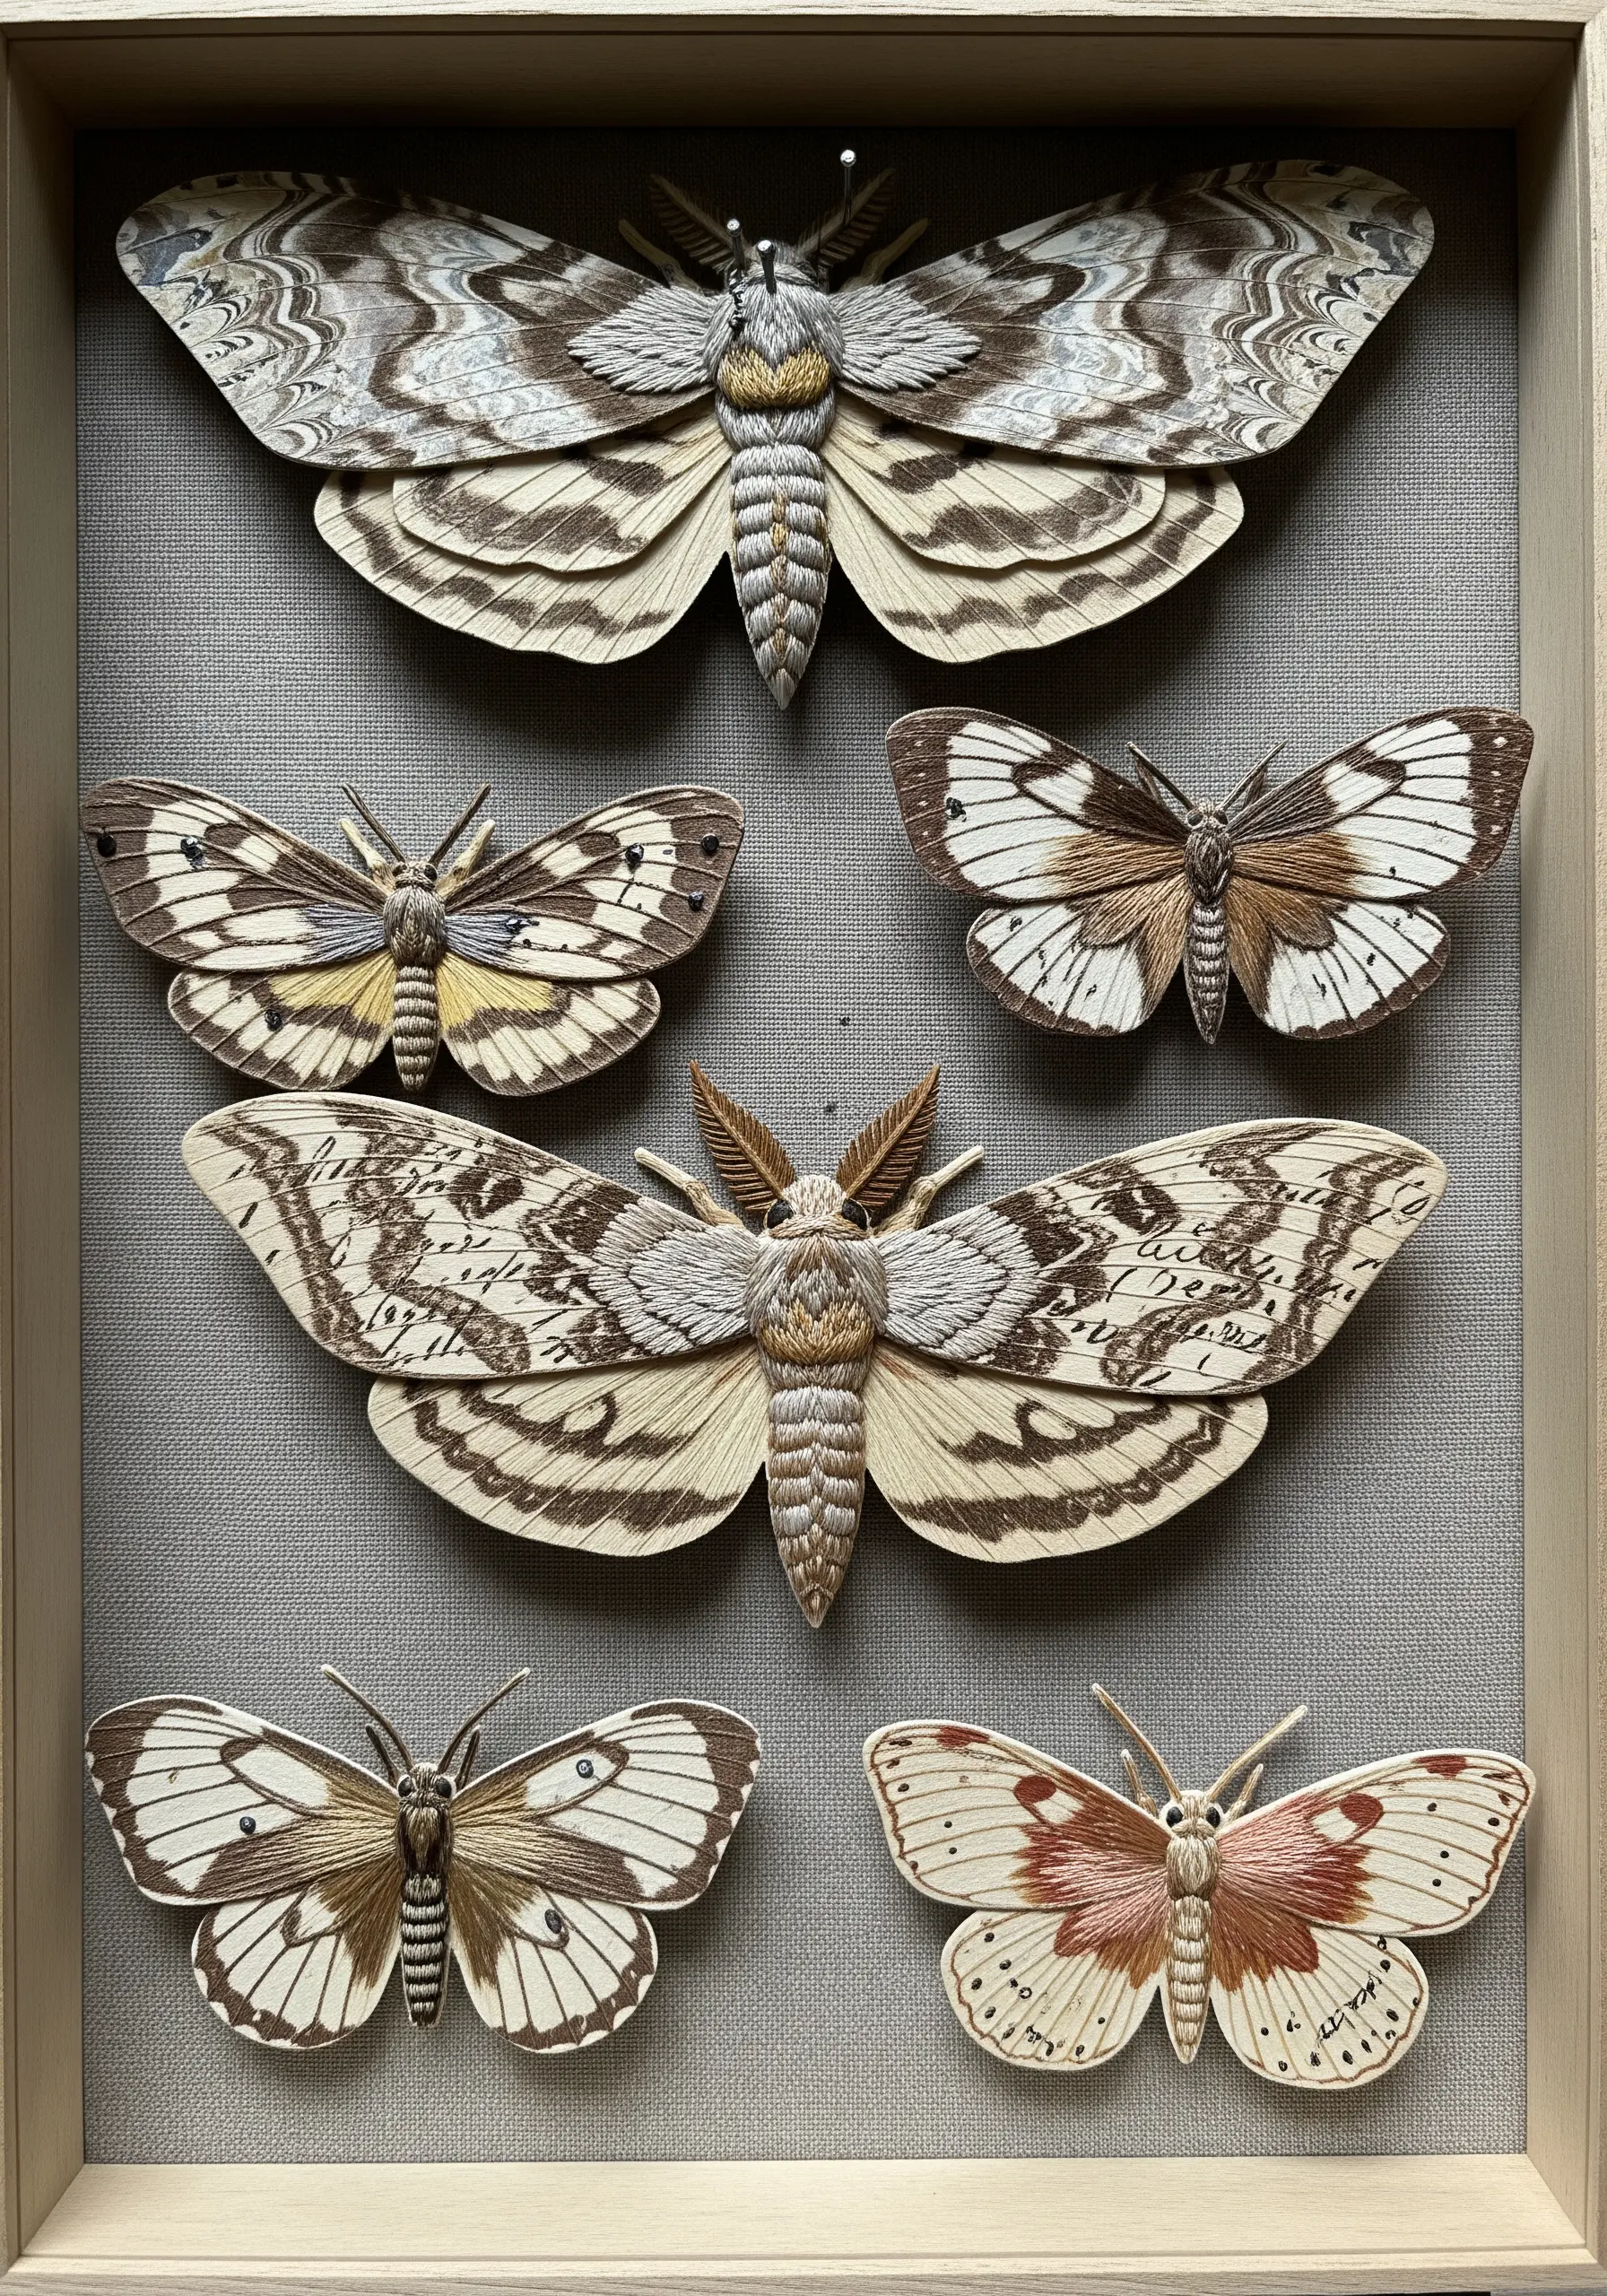
Construct intricate, lifelike moths and butterflies by skillfully combining paper and thread.
Print or draw detailed wing patterns onto sturdy paper and cut them out with precision.
On a fabric-covered backing board, embroider the insect bodies using satin stitch for smoothness and French knots for a fuzzy texture.
Finally, carefully attach the paper wings underneath the embroidered bodies, creating a stunning 3D effect that captures both delicate and tactile qualities.
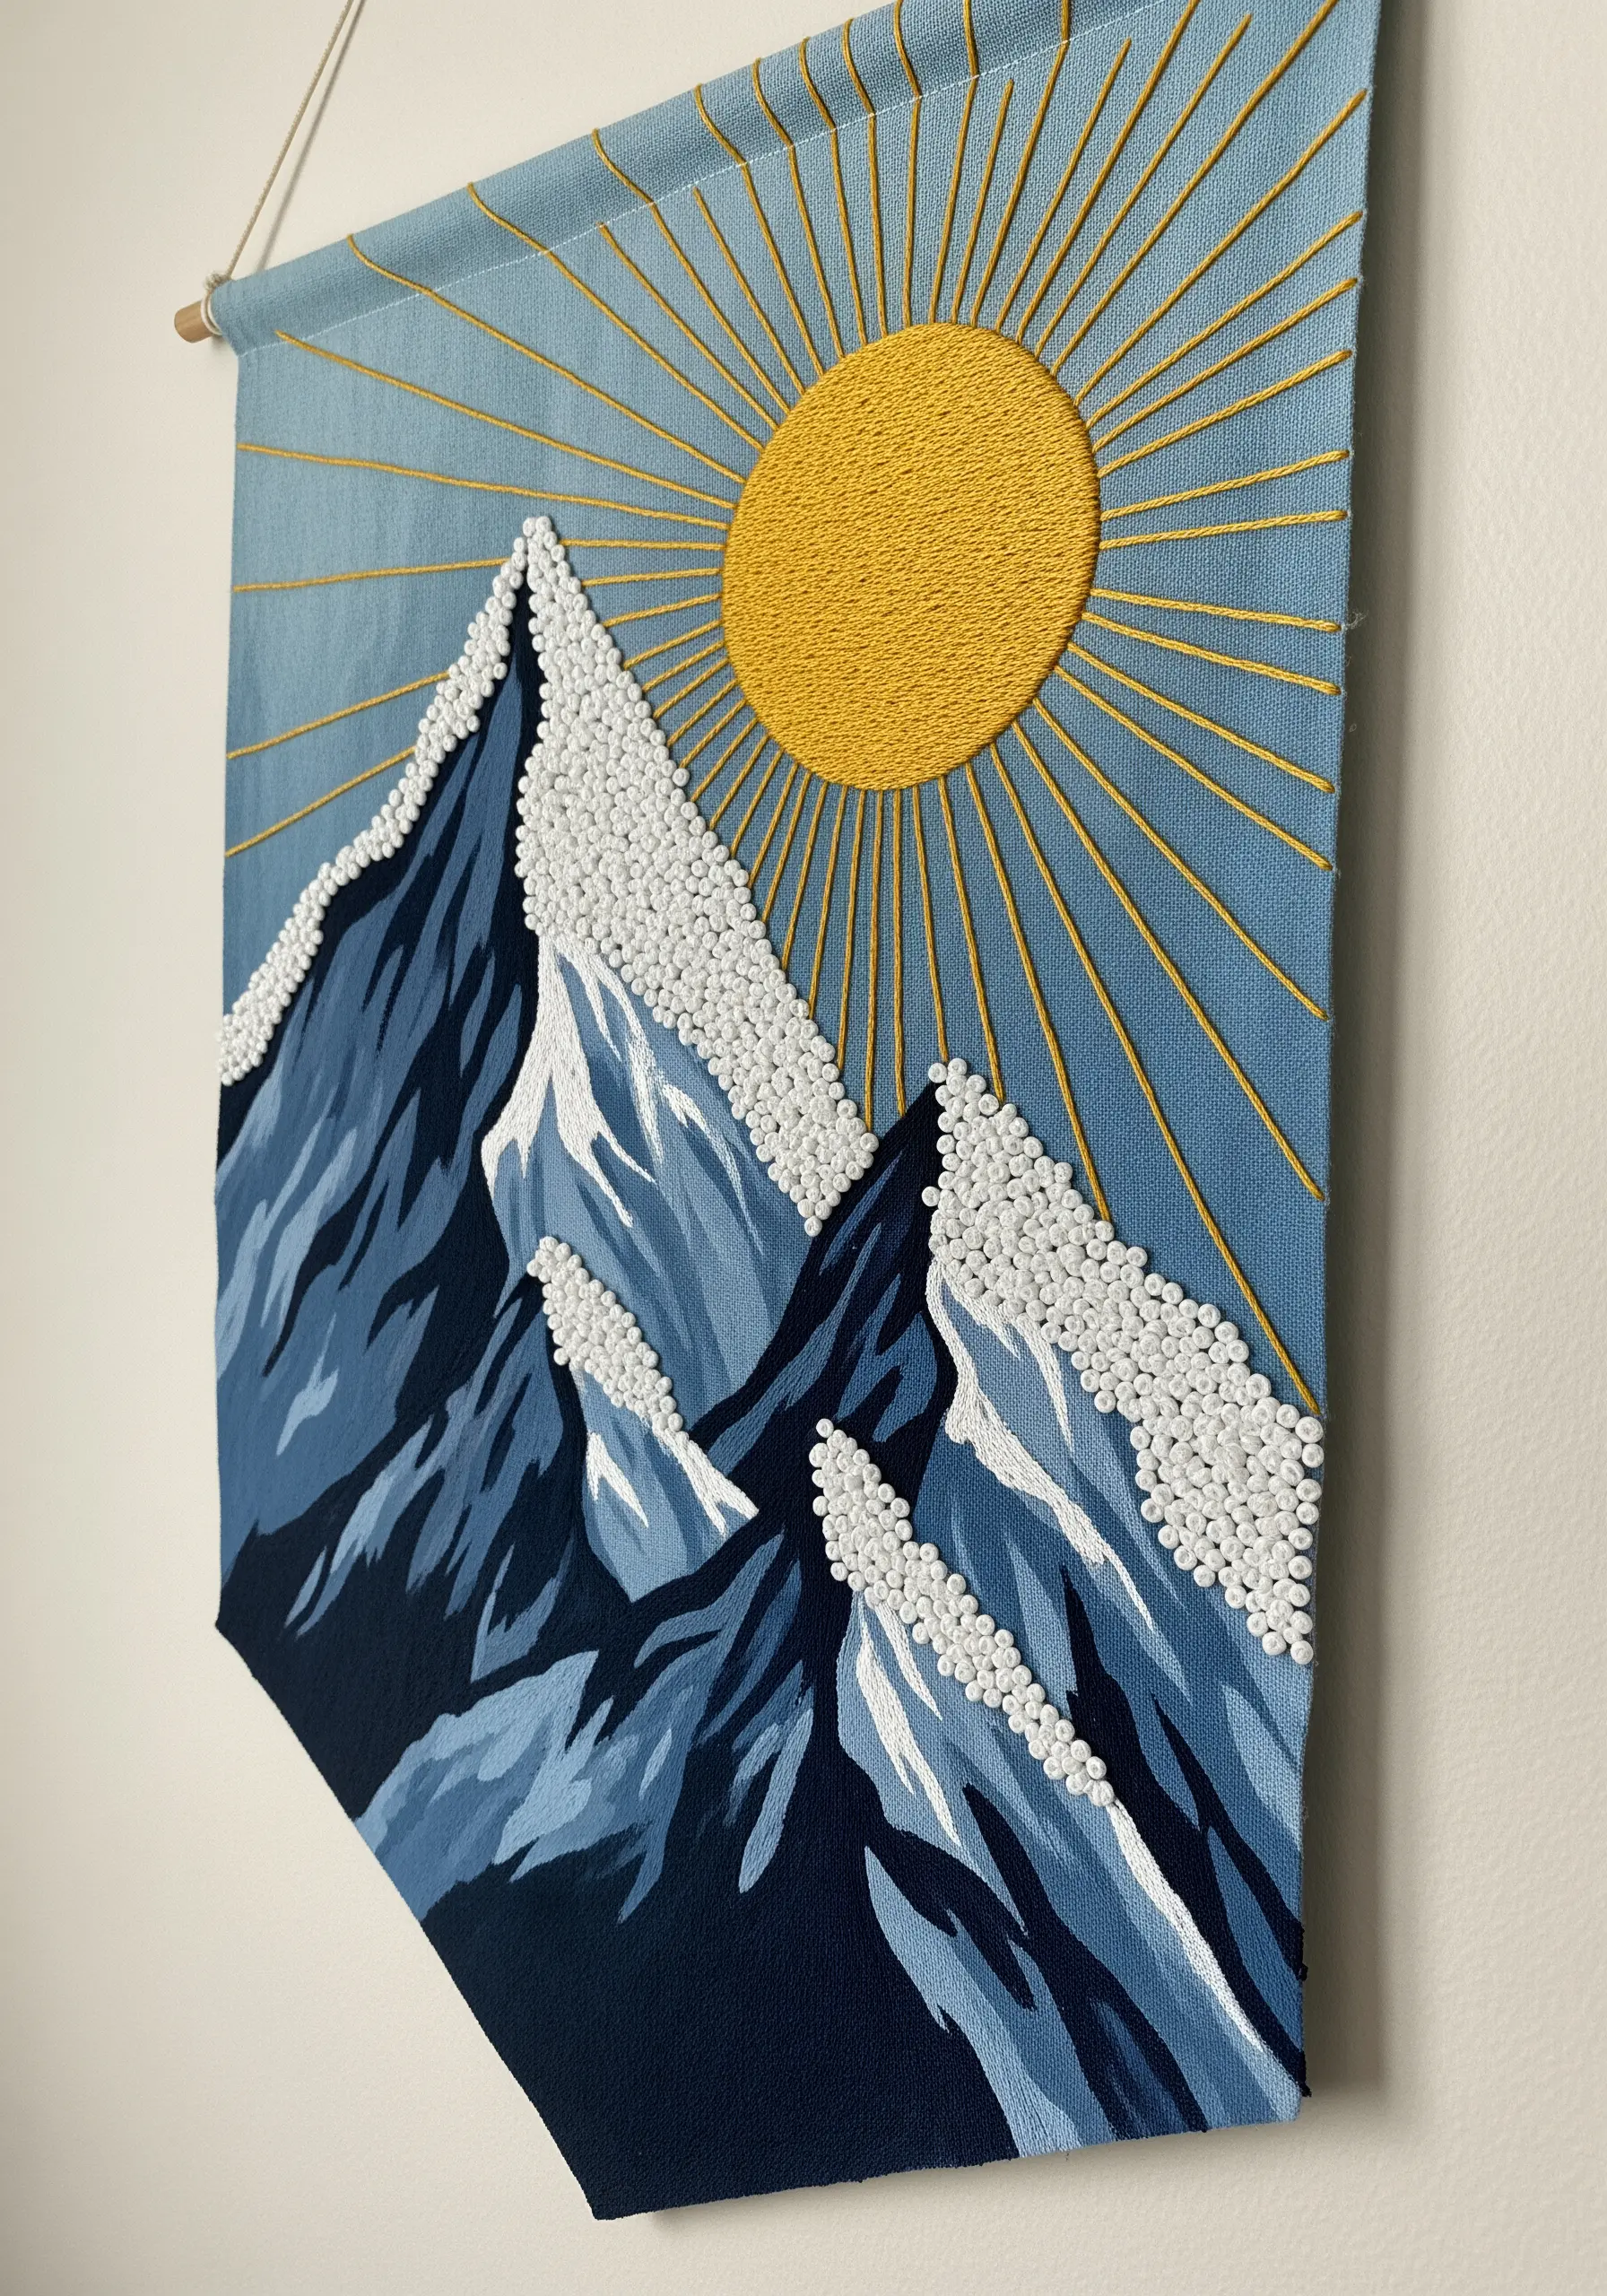
13. Selective Stitching on Canvas Prints
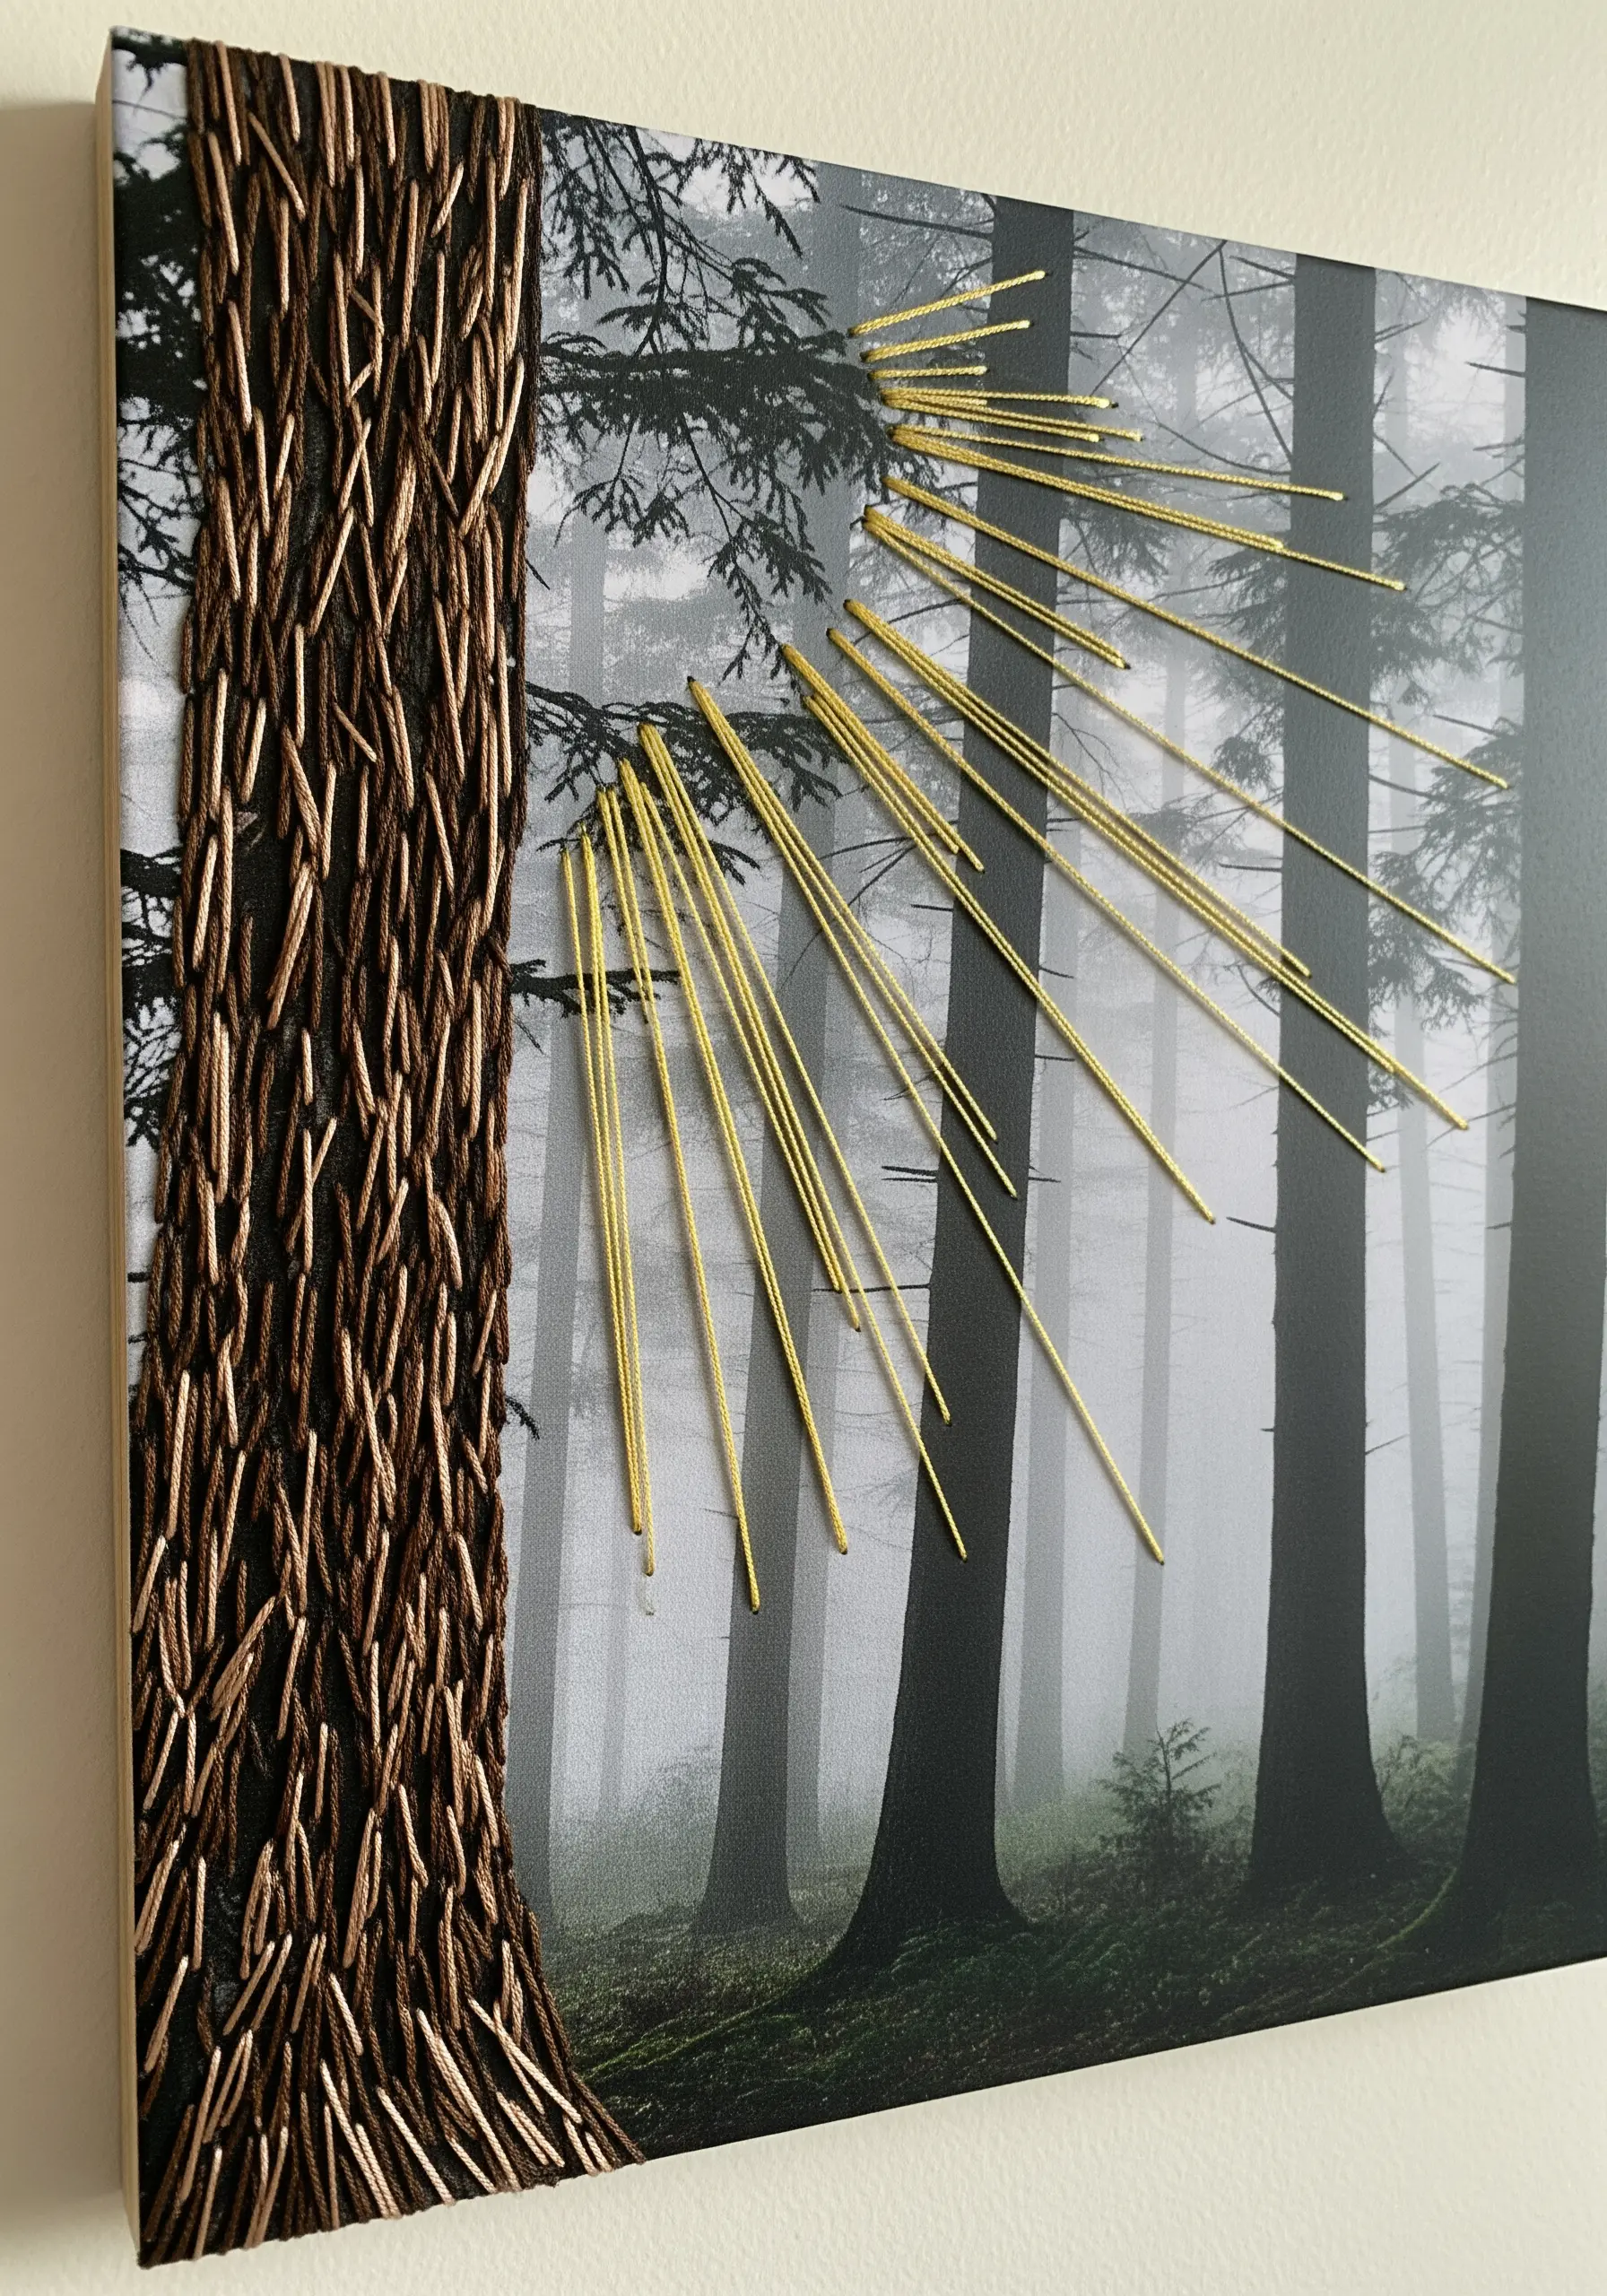
Choose a photographic canvas print and identify key areas to enhance with embroidery rather than trying to stitch the entire image.
Focus on adding texture or light. Here, coarse, layered straight stitches are used to mimic the rough texture of tree bark, making it feel tangible.
Long, taut stitches in a metallic gold thread create dramatic sun rays that cut through the misty background.
This selective approach adds physical depth and draws the eye, transforming a flat photo into a multi-sensory piece.
14. Faux Stitched Paper Bookmarks
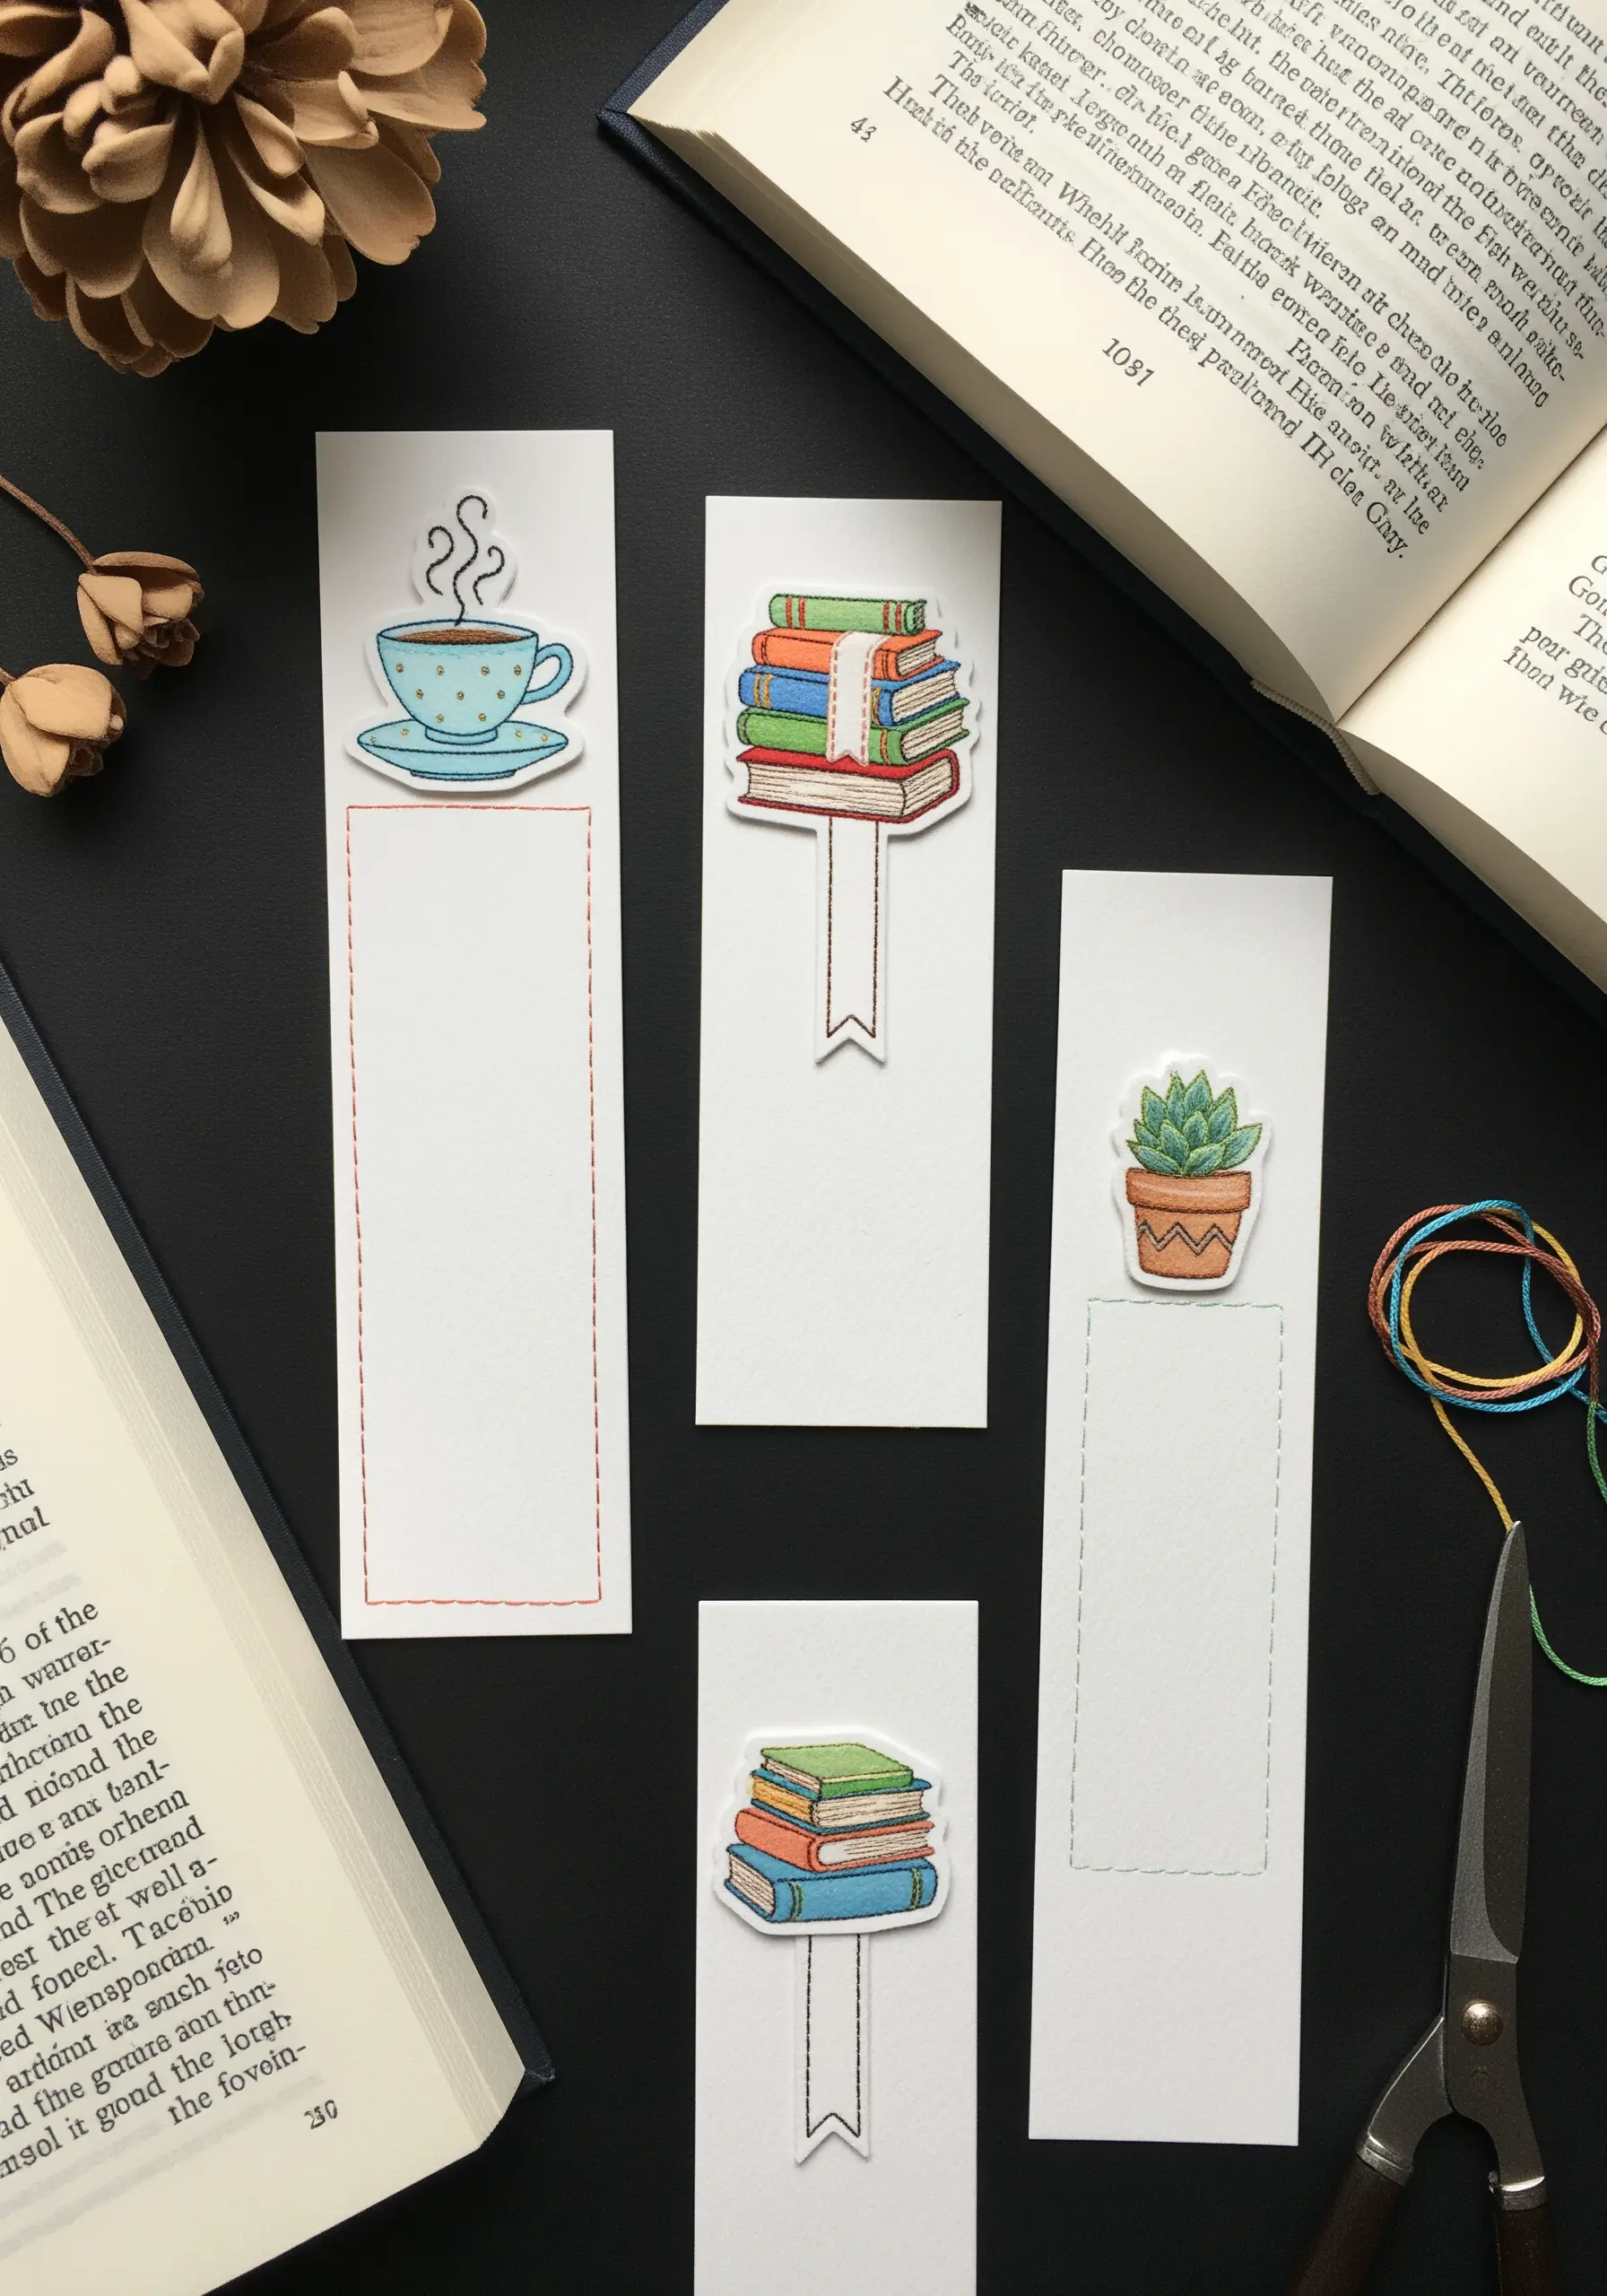
Give your paper crafts a subtle, charming textile feel without any actual sewing.
Create your main illustrations on watercolor paper, cut them out, and mount them onto bookmark-shaped cardstock.
Then, using a fine-liner pen in a contrasting color, carefully draw a simple ‘running stitch’ border around the edge of the bookmark or illustration.
This tiny detail cleverly references hand-stitching and gives the paper object a polished, crafted finish.
15. Geometric String Art on Wood
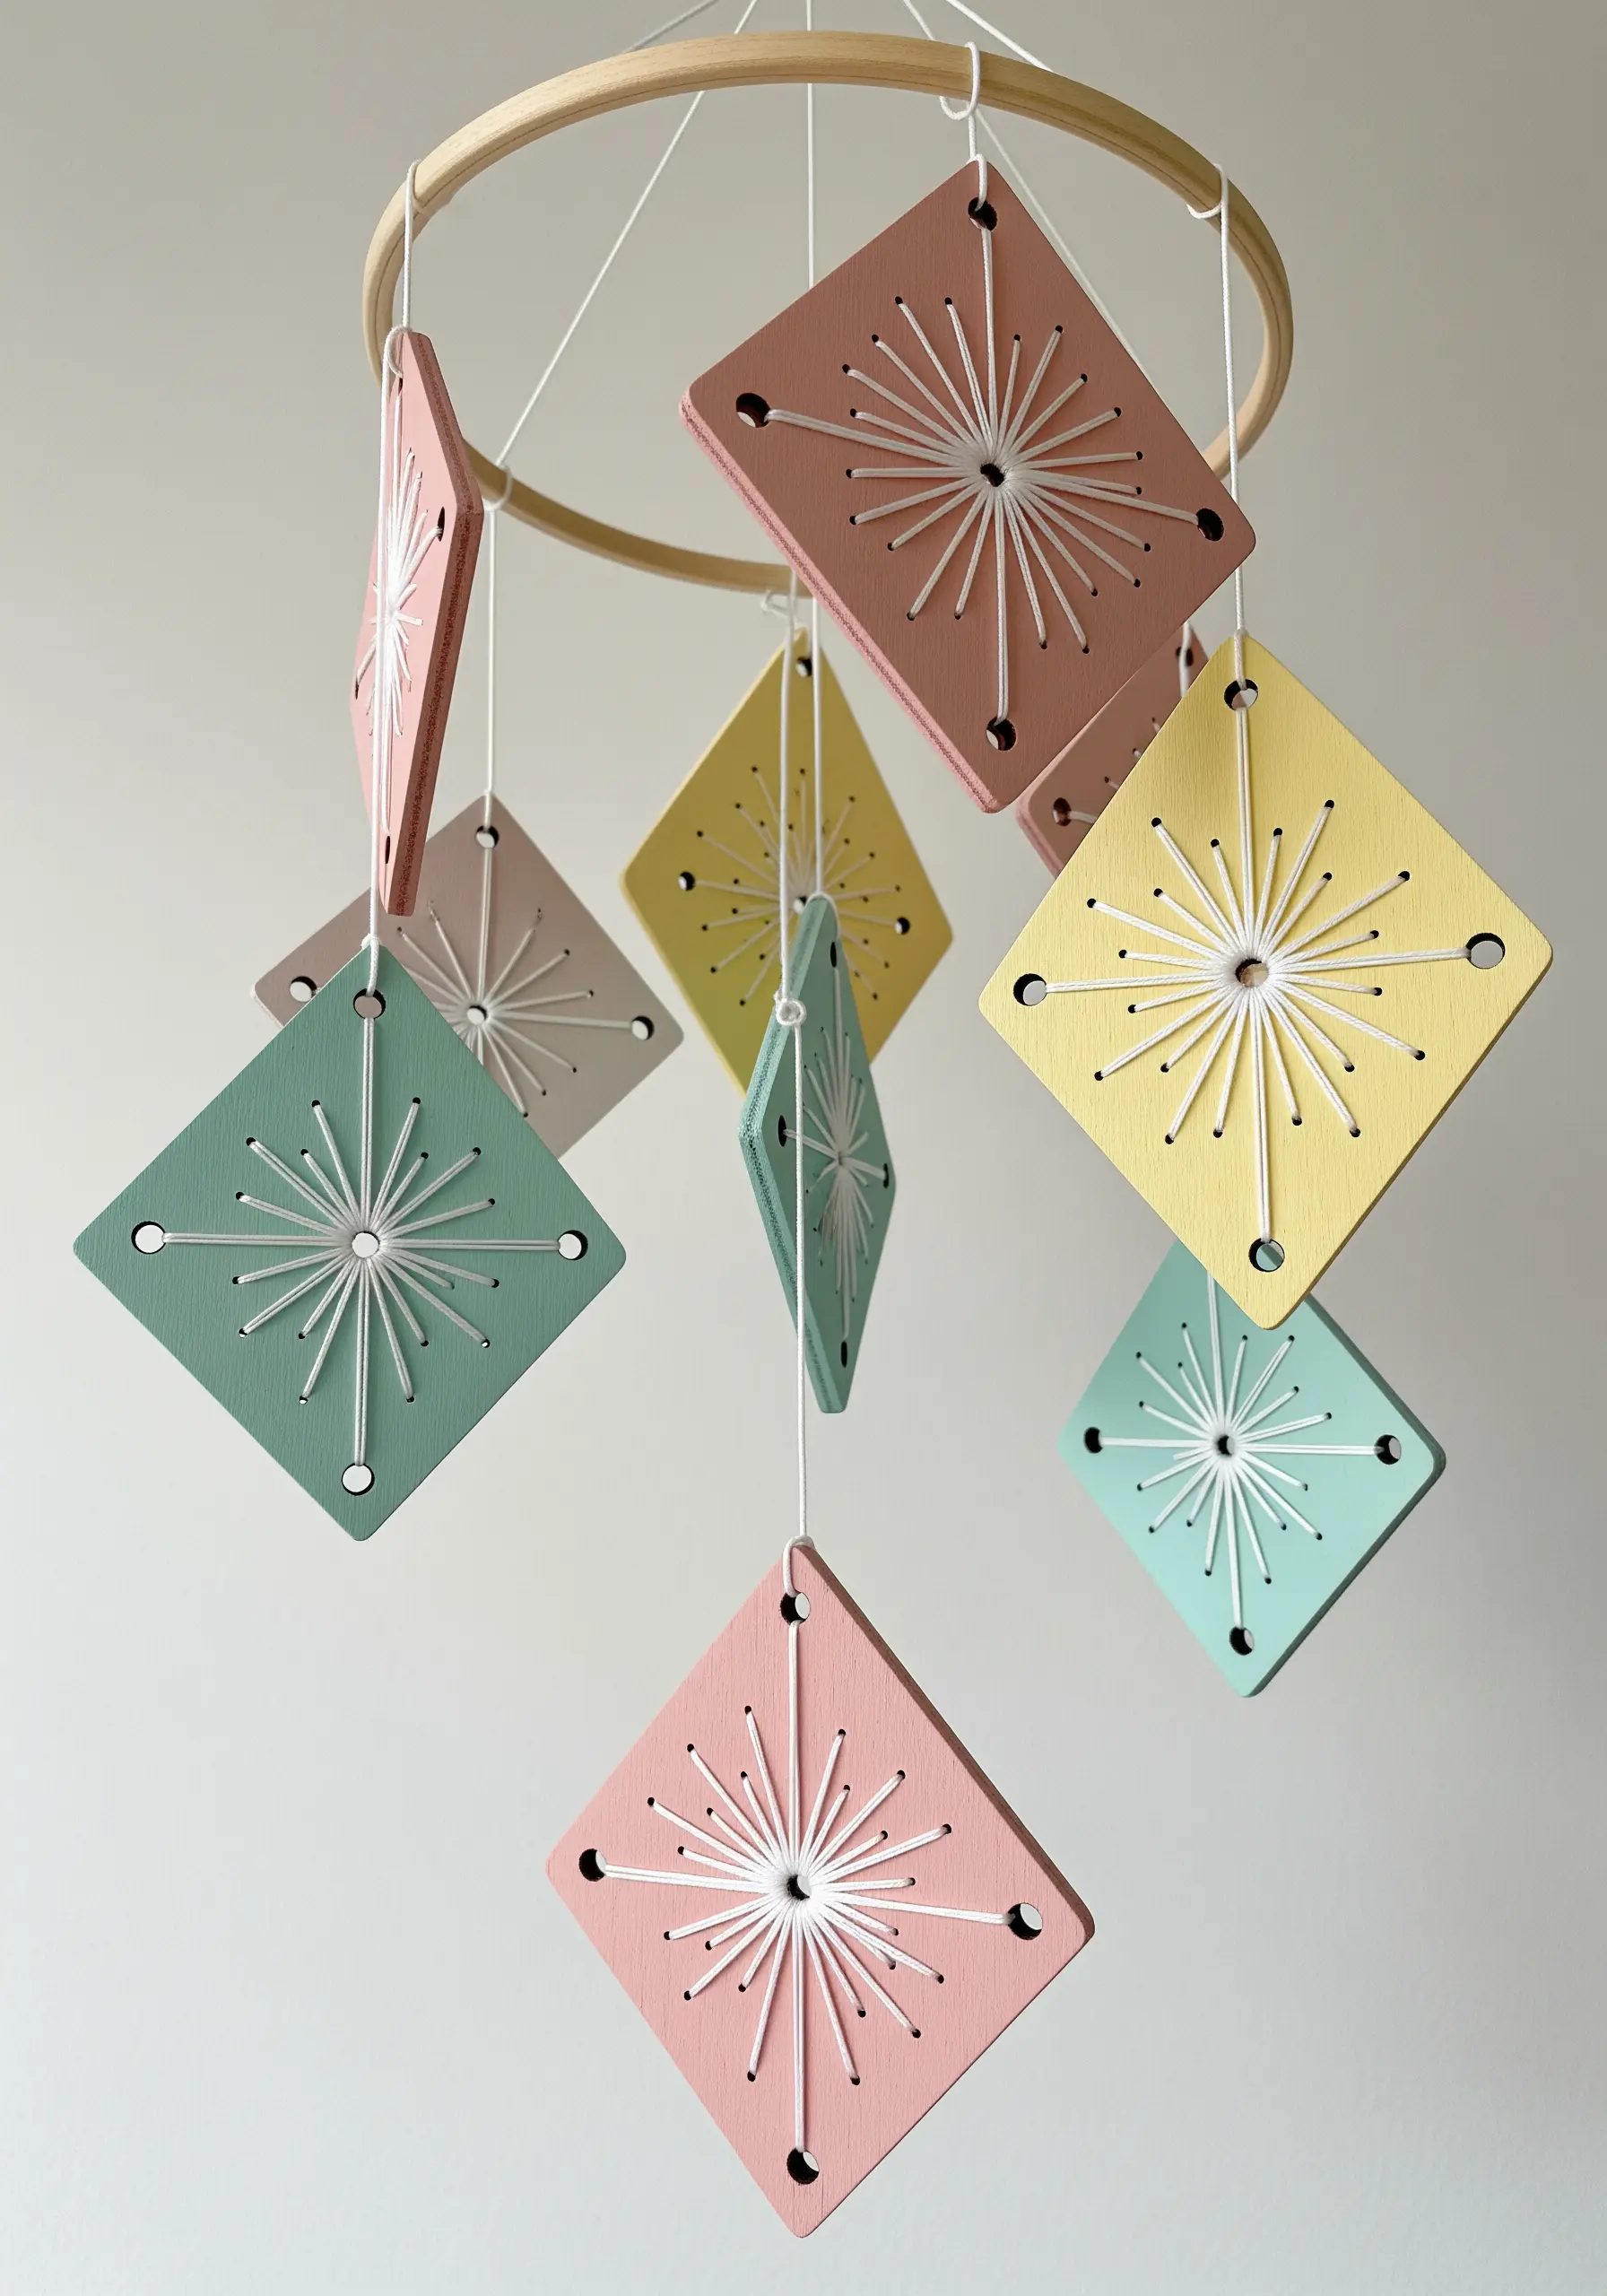
Take embroidery principles off the fabric and onto a rigid surface like painted wood.
Drill small, evenly spaced holes into your wooden shapes to act as anchor points for your thread.
Weave string or perle cotton through the holes to create striking geometric patterns, relying on thread tension and layering to build the design.
This technique is a wonderful way to explore radial patterns and line work on a larger, more structural scale, perfect for mobiles or wall decor.
16. Illustration as an Embroidery Pattern
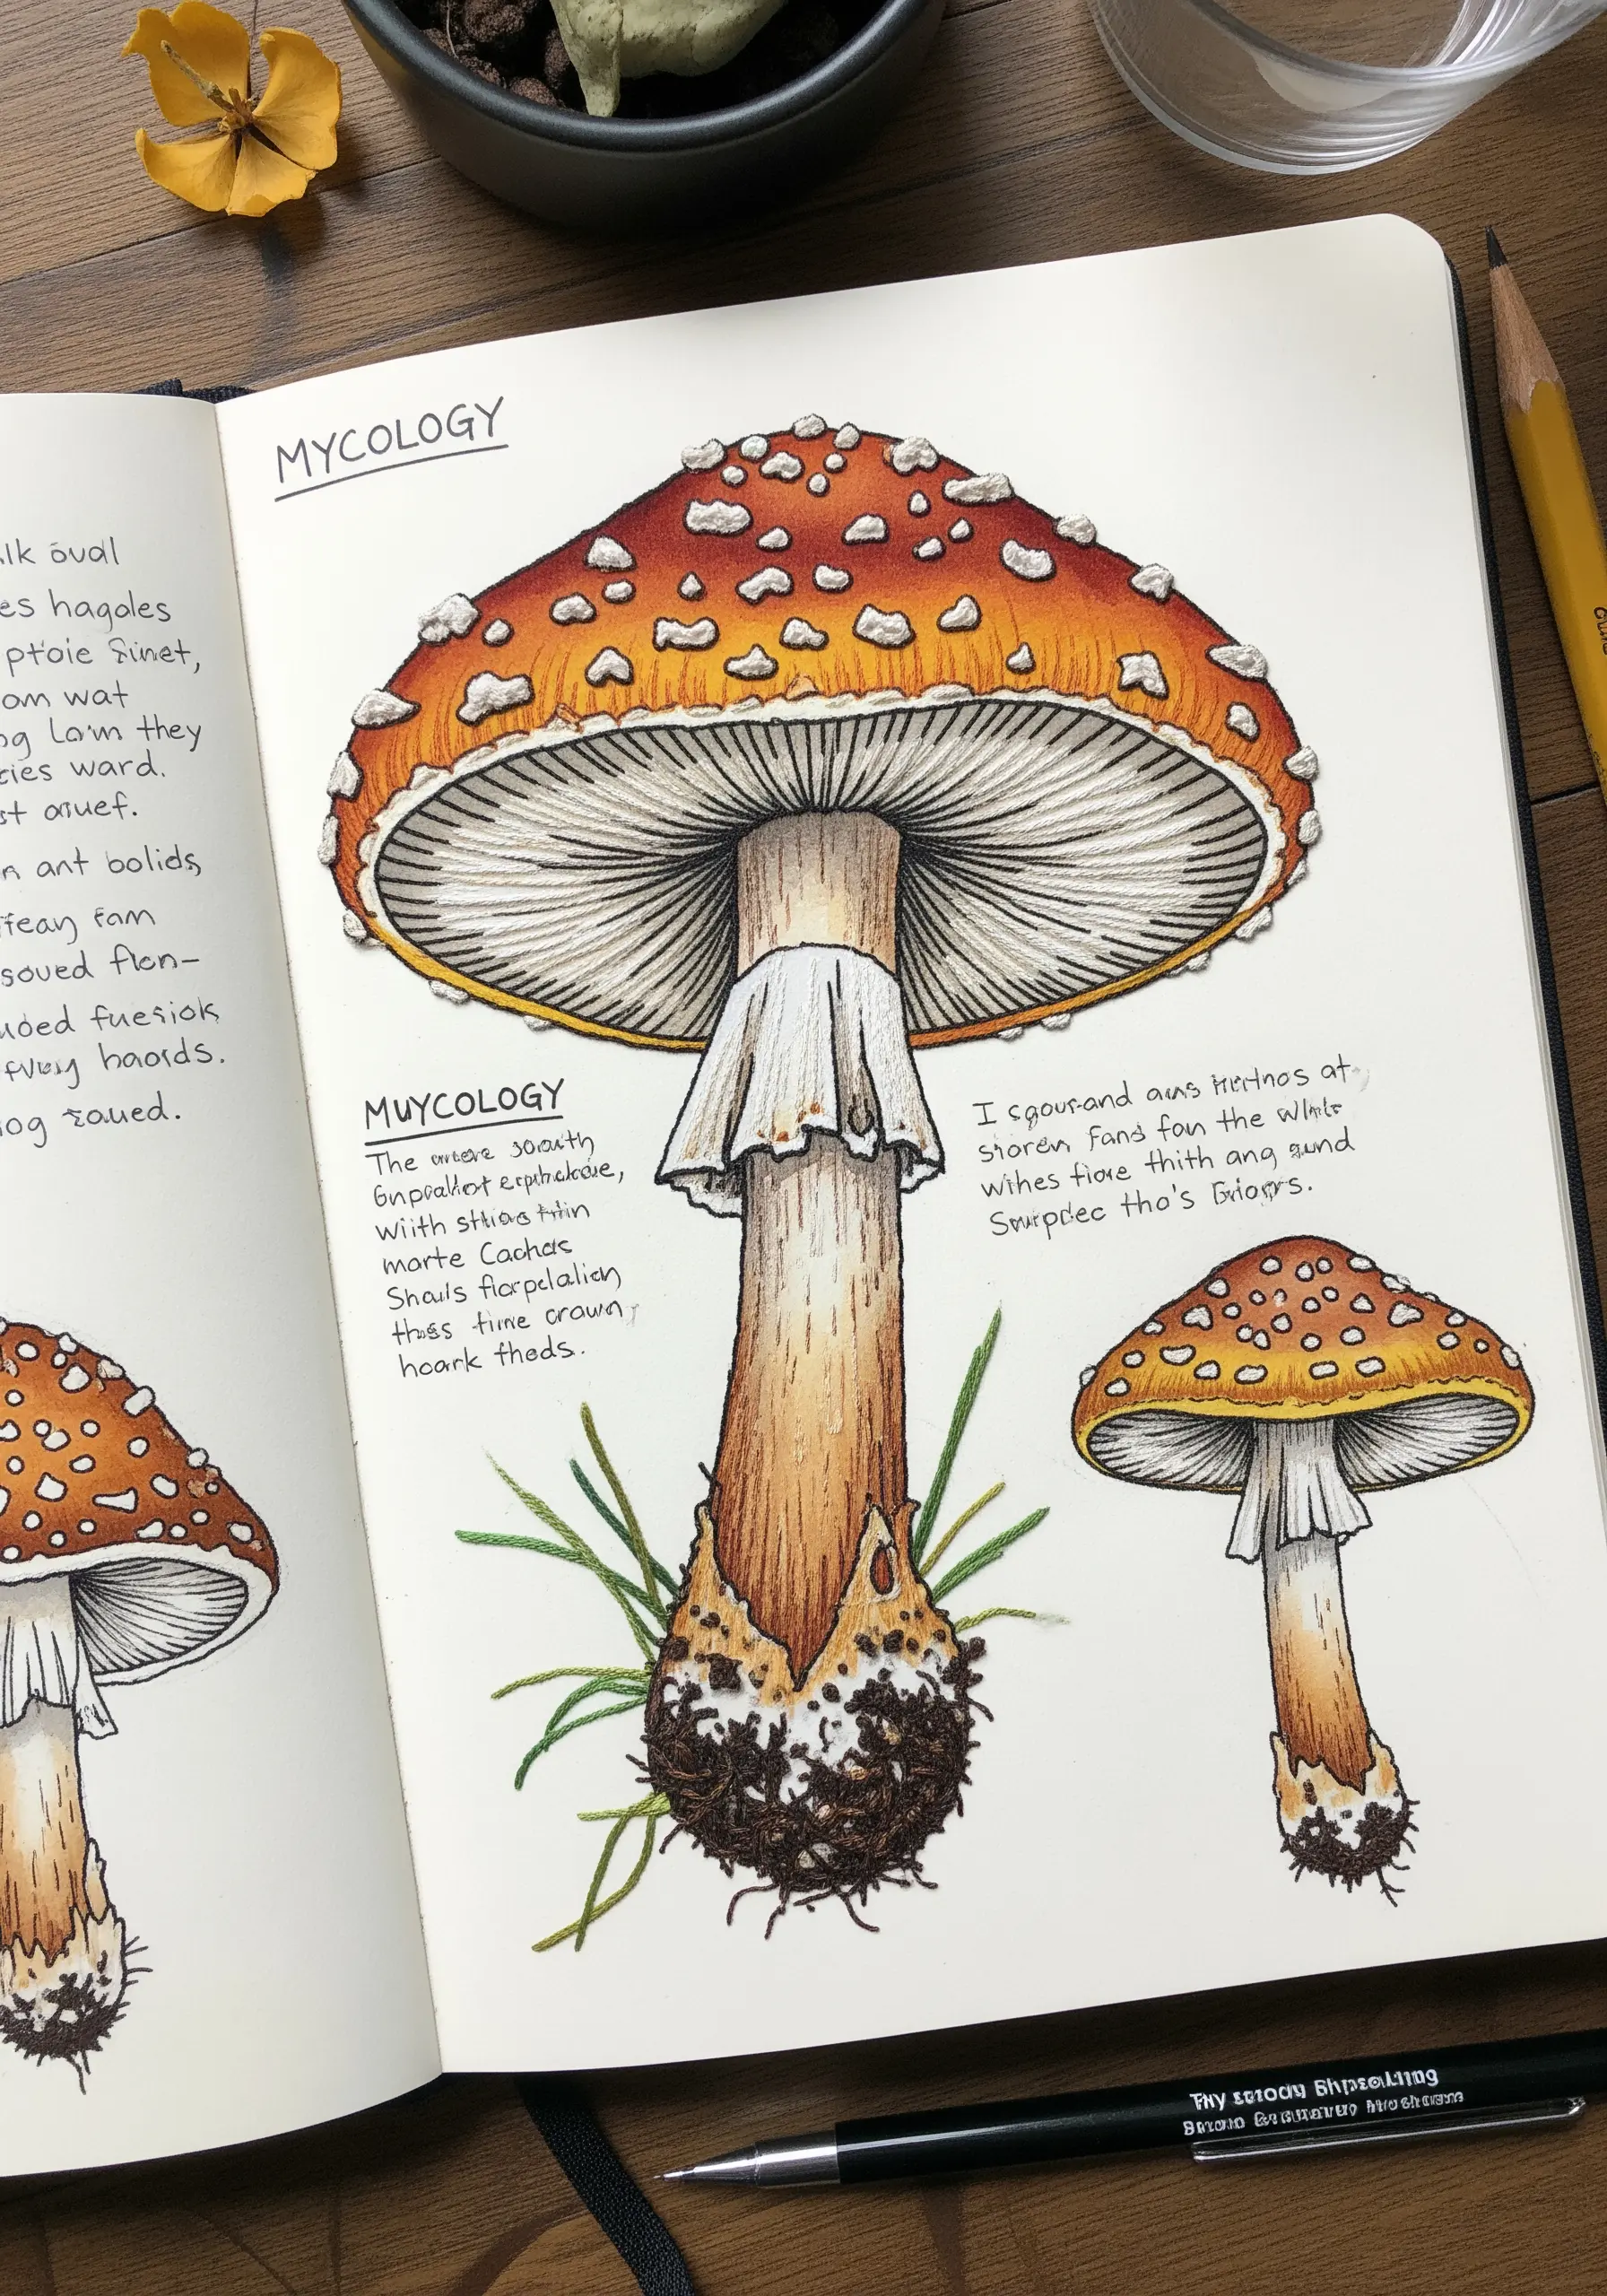
Before you commit to fabric and floss, fully resolve your design with ink and watercolor in a sketchbook.
This practice allows you to perfect your composition, color blending, and shading before you ever thread a needle.
A detailed illustration serves as an ideal ‘master copy’ for a thread painting project.
You can then transfer the lines to fabric and use your original drawing as a precise color and texture guide, ensuring a more confident and successful outcome.
17. Woven Paper as a Textured Canvas
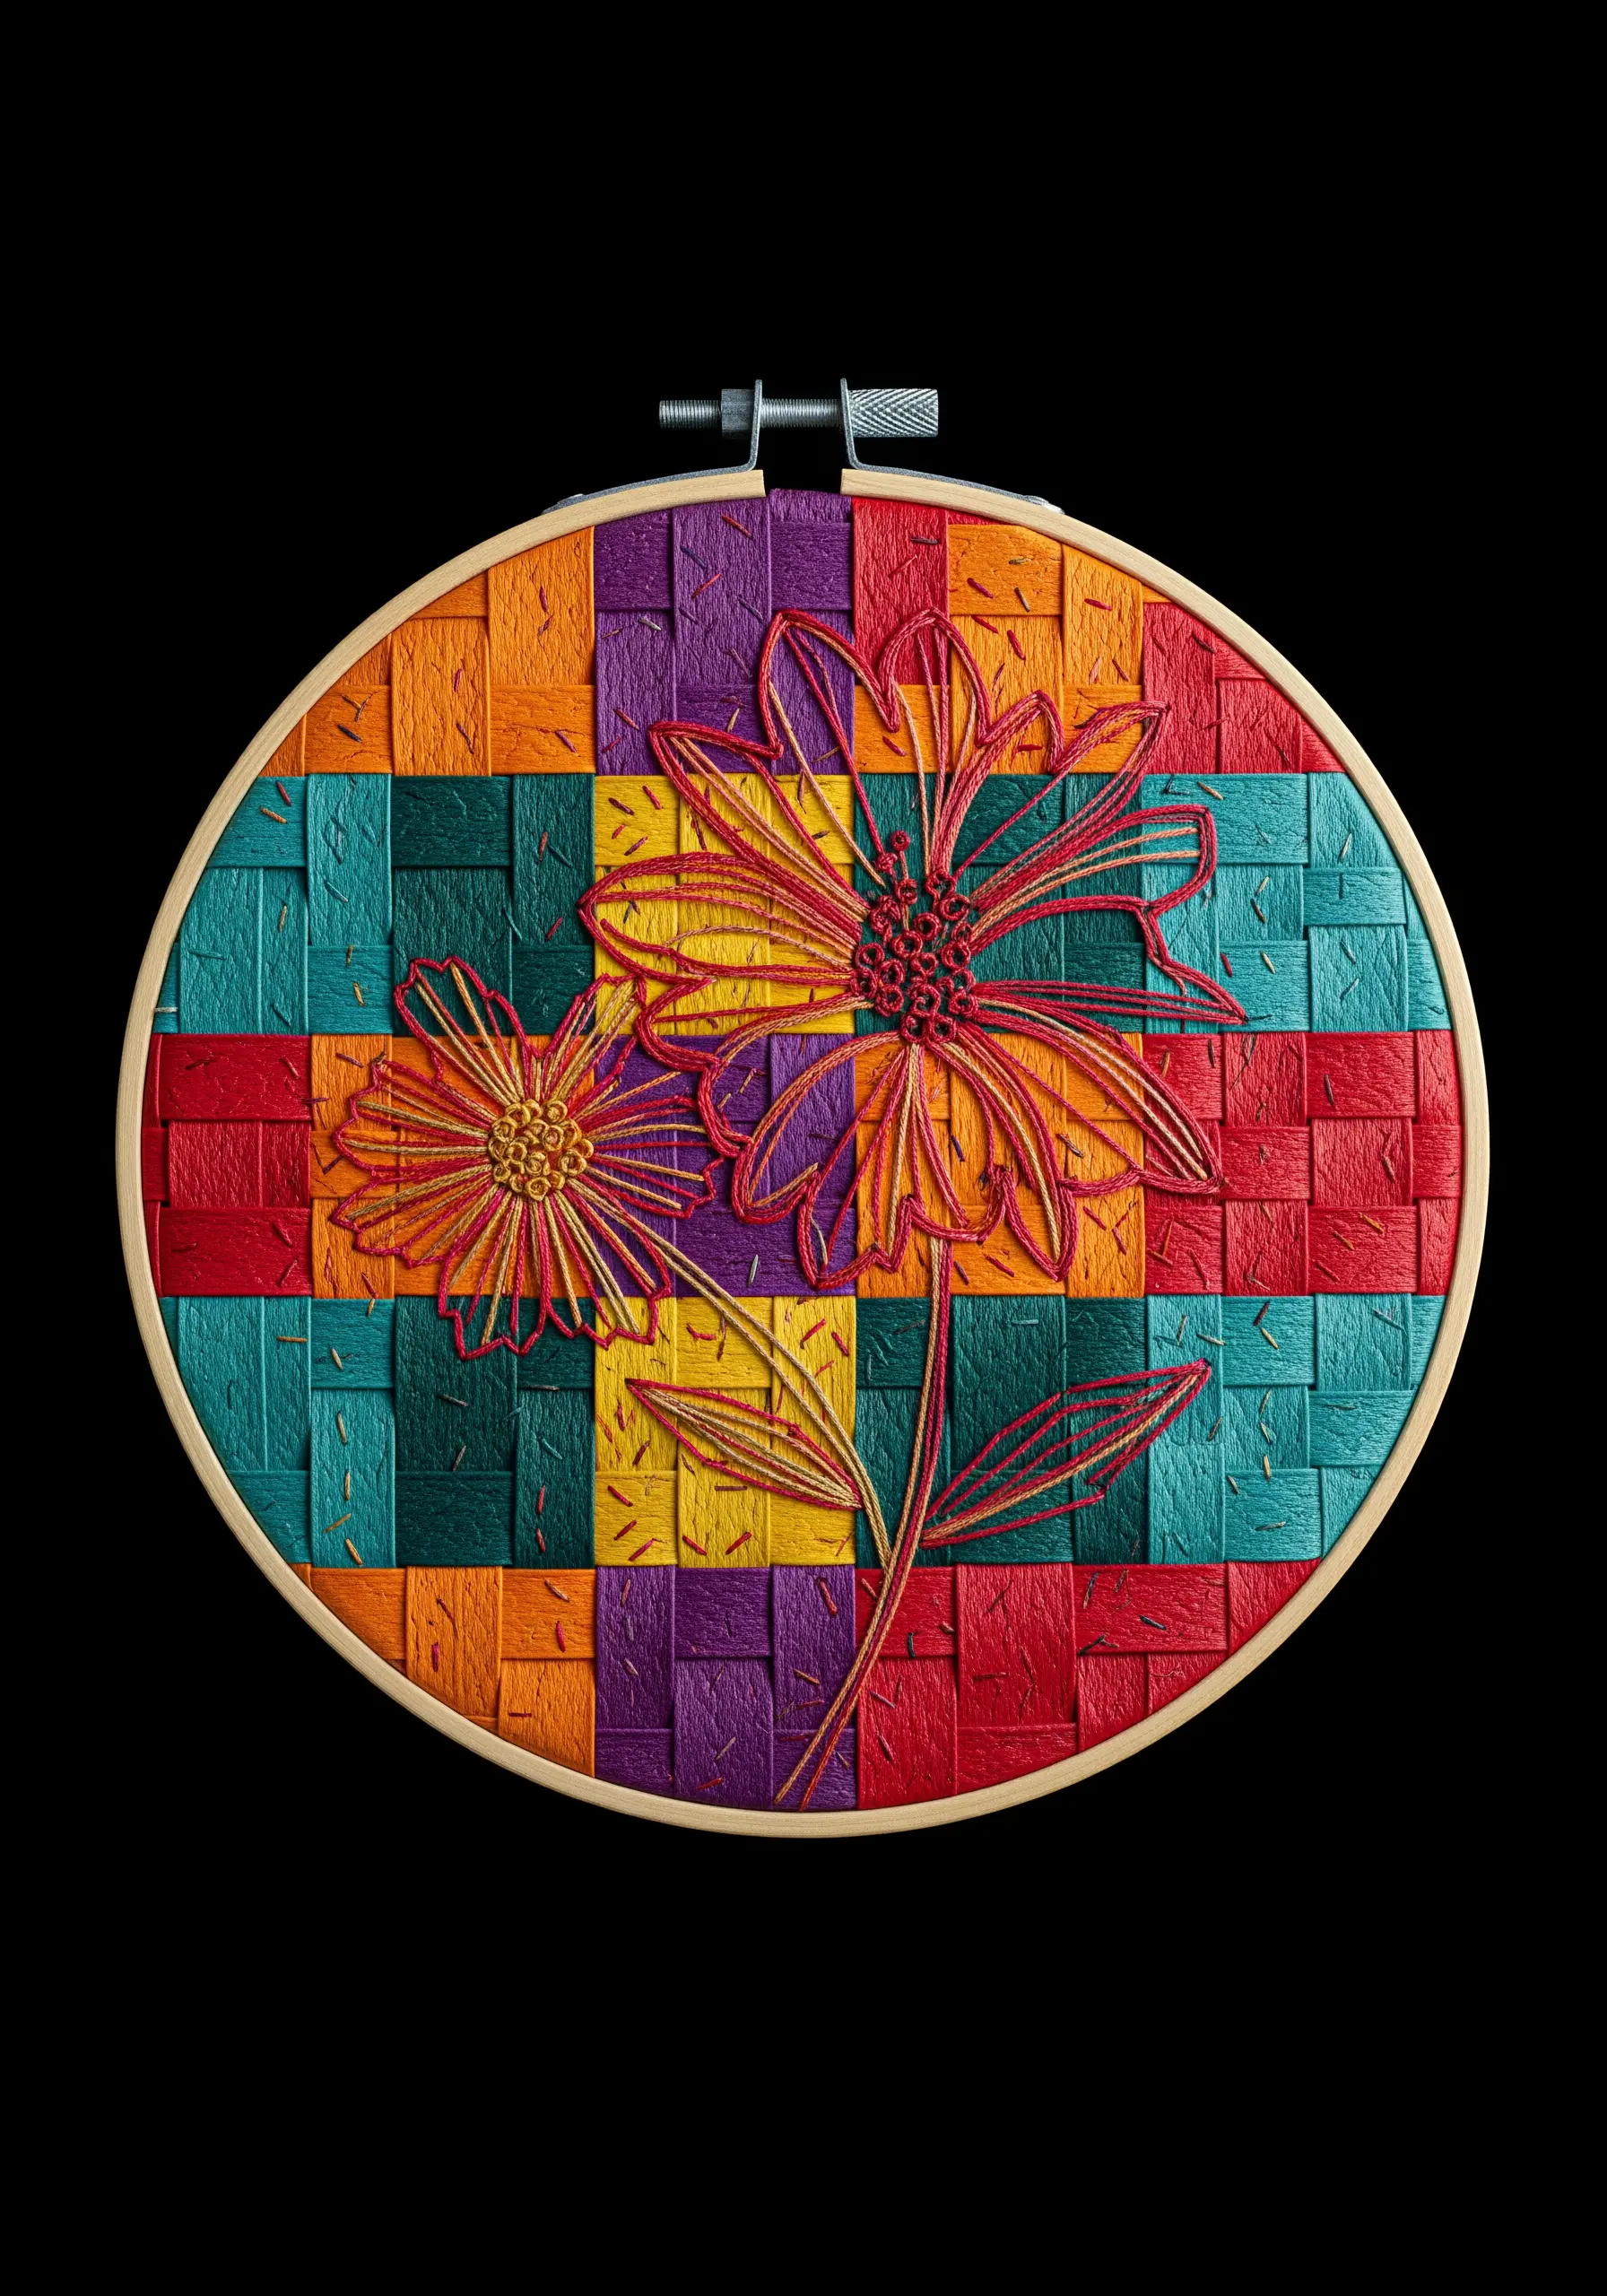
Create a dynamic, graphic background by weaving strips of colored cardstock together before you begin to stitch.
This checkerboard pattern provides a vibrant, dimensional base that is far more engaging than plain fabric.
Once your woven canvas is secure, you can stitch your design directly through the paper intersections, using an awl to pre-pierce the holes.
Use a contrasting thread color to ensure your line art stands out against the colorful, complex backdrop.
18. Alcohol Ink on Wood for Vibrant Backgrounds

Give small wooden embroidery blanks an artistic upgrade before you make your first stitch.
Apply a few drops of alcohol ink to the surface and gently tilt the wood, letting the colors bleed and blend organically.
The ink sinks into the wood grain, creating a translucent, gem-like background that is unique every time.
Once it’s completely dry, stitch your delicate floral motifs on top. The contrast between the free-flowing ink and the precise stitches is exquisite.
19. Felt Silhouette for Dramatic Lighting
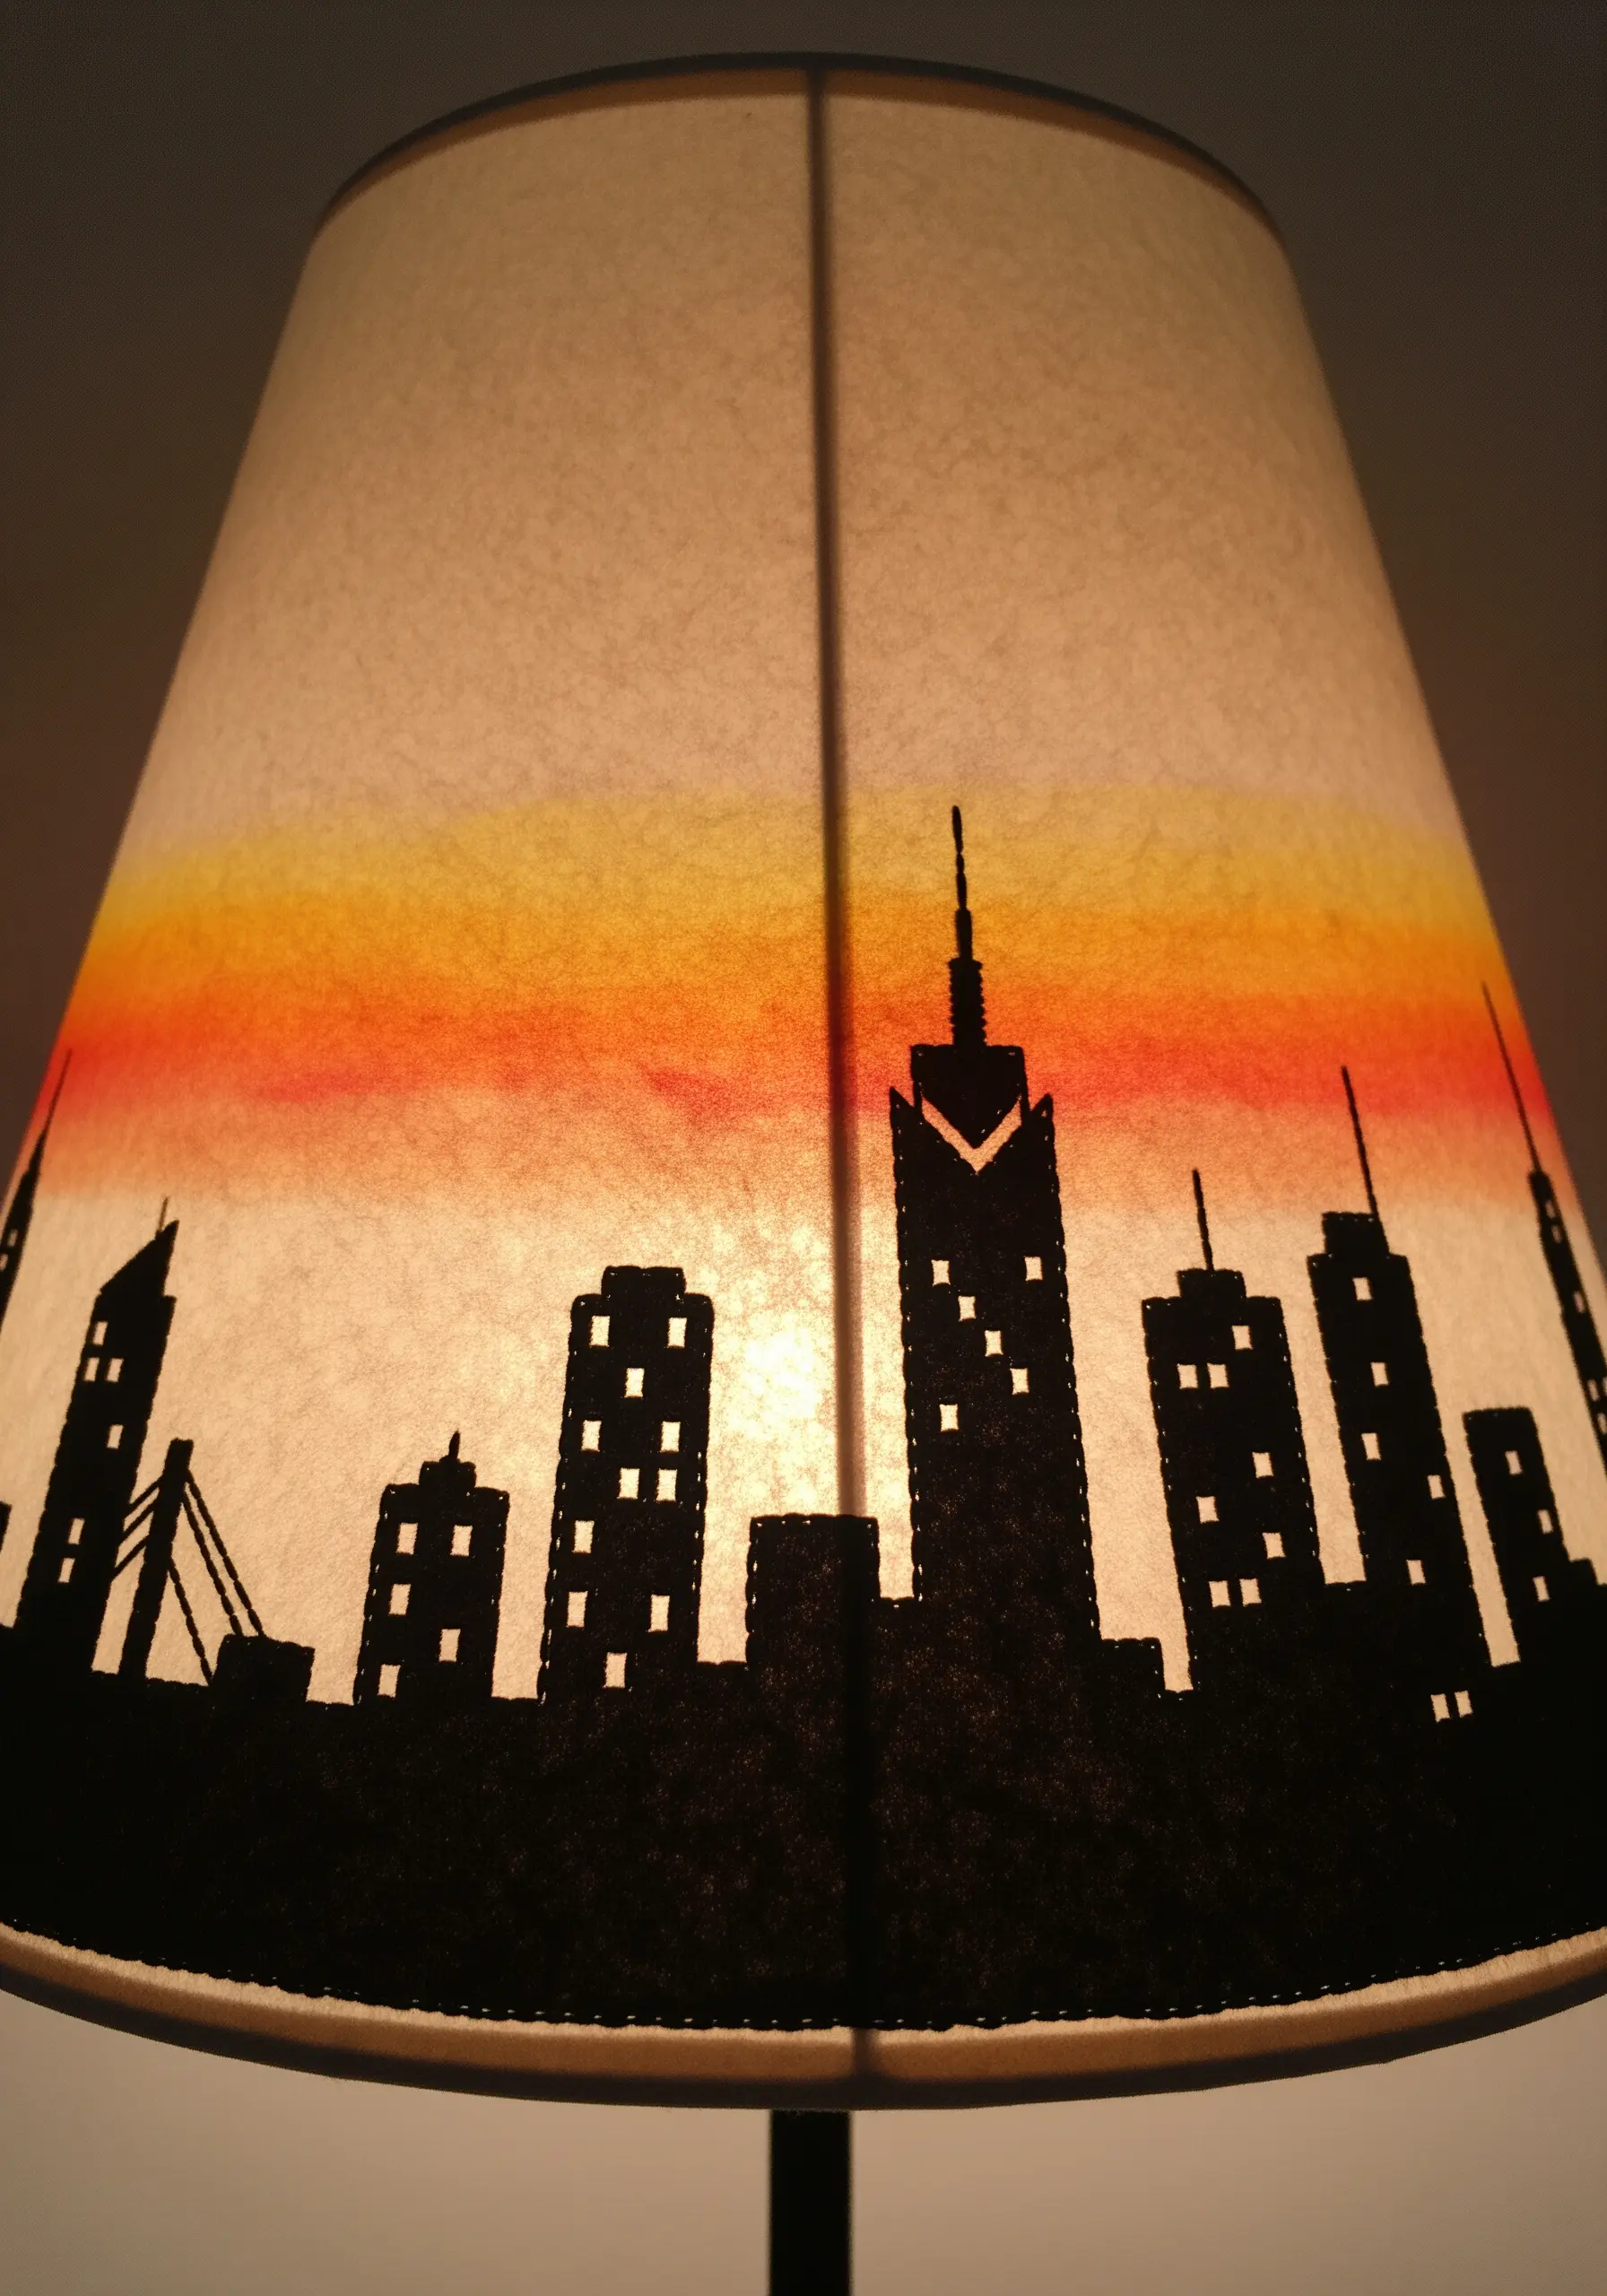
Use the opacity of felt to create bold silhouettes on a translucent lampshade for a high-impact, no-sew project.
First, lightly paint or dye the lampshade to create a soft gradient, like a sunset.
Next, cut a detailed city skyline from black felt and attach it with a strong fabric glue.
When the lamp is turned on, the felt becomes a stark silhouette against the glowing background, and any cut-out windows will shine brightly.
20. Collage and Stitch for Narrative Depth

Build layers of meaning in your work by combining collage, drawing, and embroidery into one piece.
Start with a background of vintage book pages or sheet music to set the tone.
On a separate piece of vellum or translucent paper, create your line art portrait and lay it over the top of the collage.
Finally, add textural embroidery to a key element—stitching through all the layers—to unite the piece and create incredible visual depth.
21. Thread Sculptures on Natural Objects
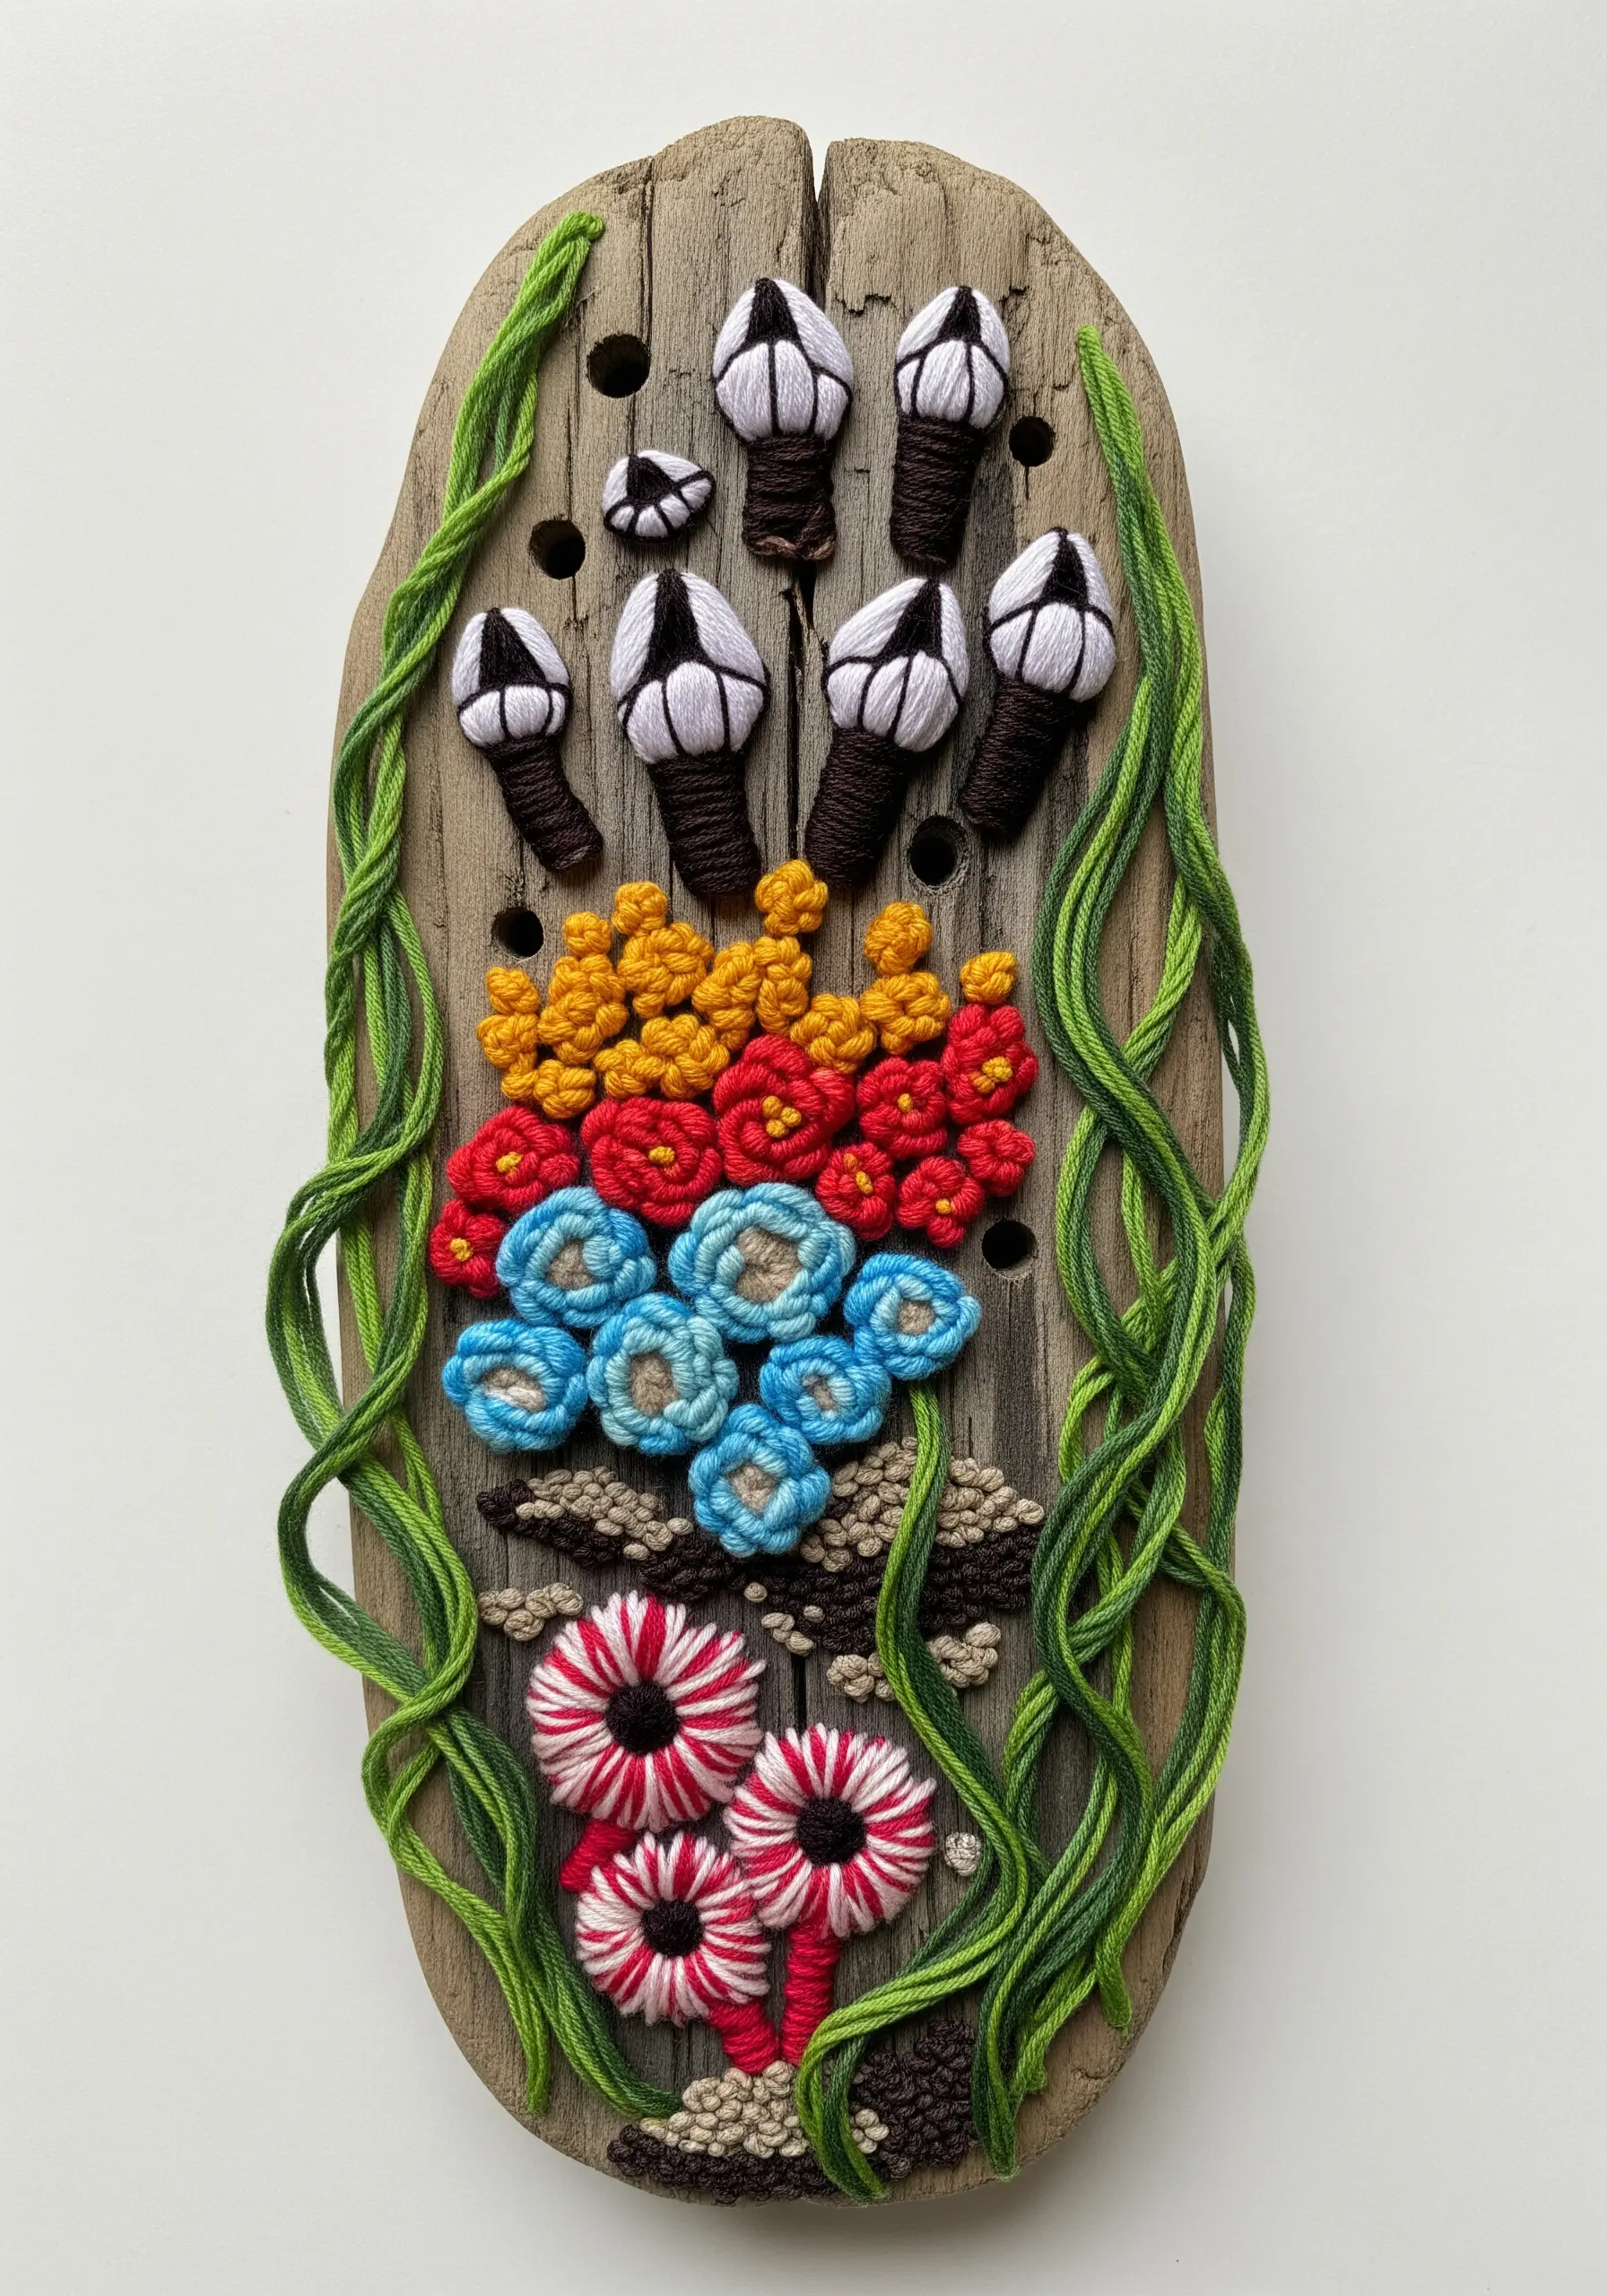
Move beyond the hoop by using a natural object like driftwood as your embroidery canvas.
Use a small drill bit to create holes that will serve as anchor points for your stitches.
Build up three-dimensional forms, like barnacles and sea anemones, using dimensional stitches like French knots, woven wheel stitches, and stumpwork techniques.
You can also wrap thread tightly around the wood to create graphic elements like seaweed, turning your embroidery into a truly sculptural medium.
22. Stitching on Delicate and Unconventional Surfaces
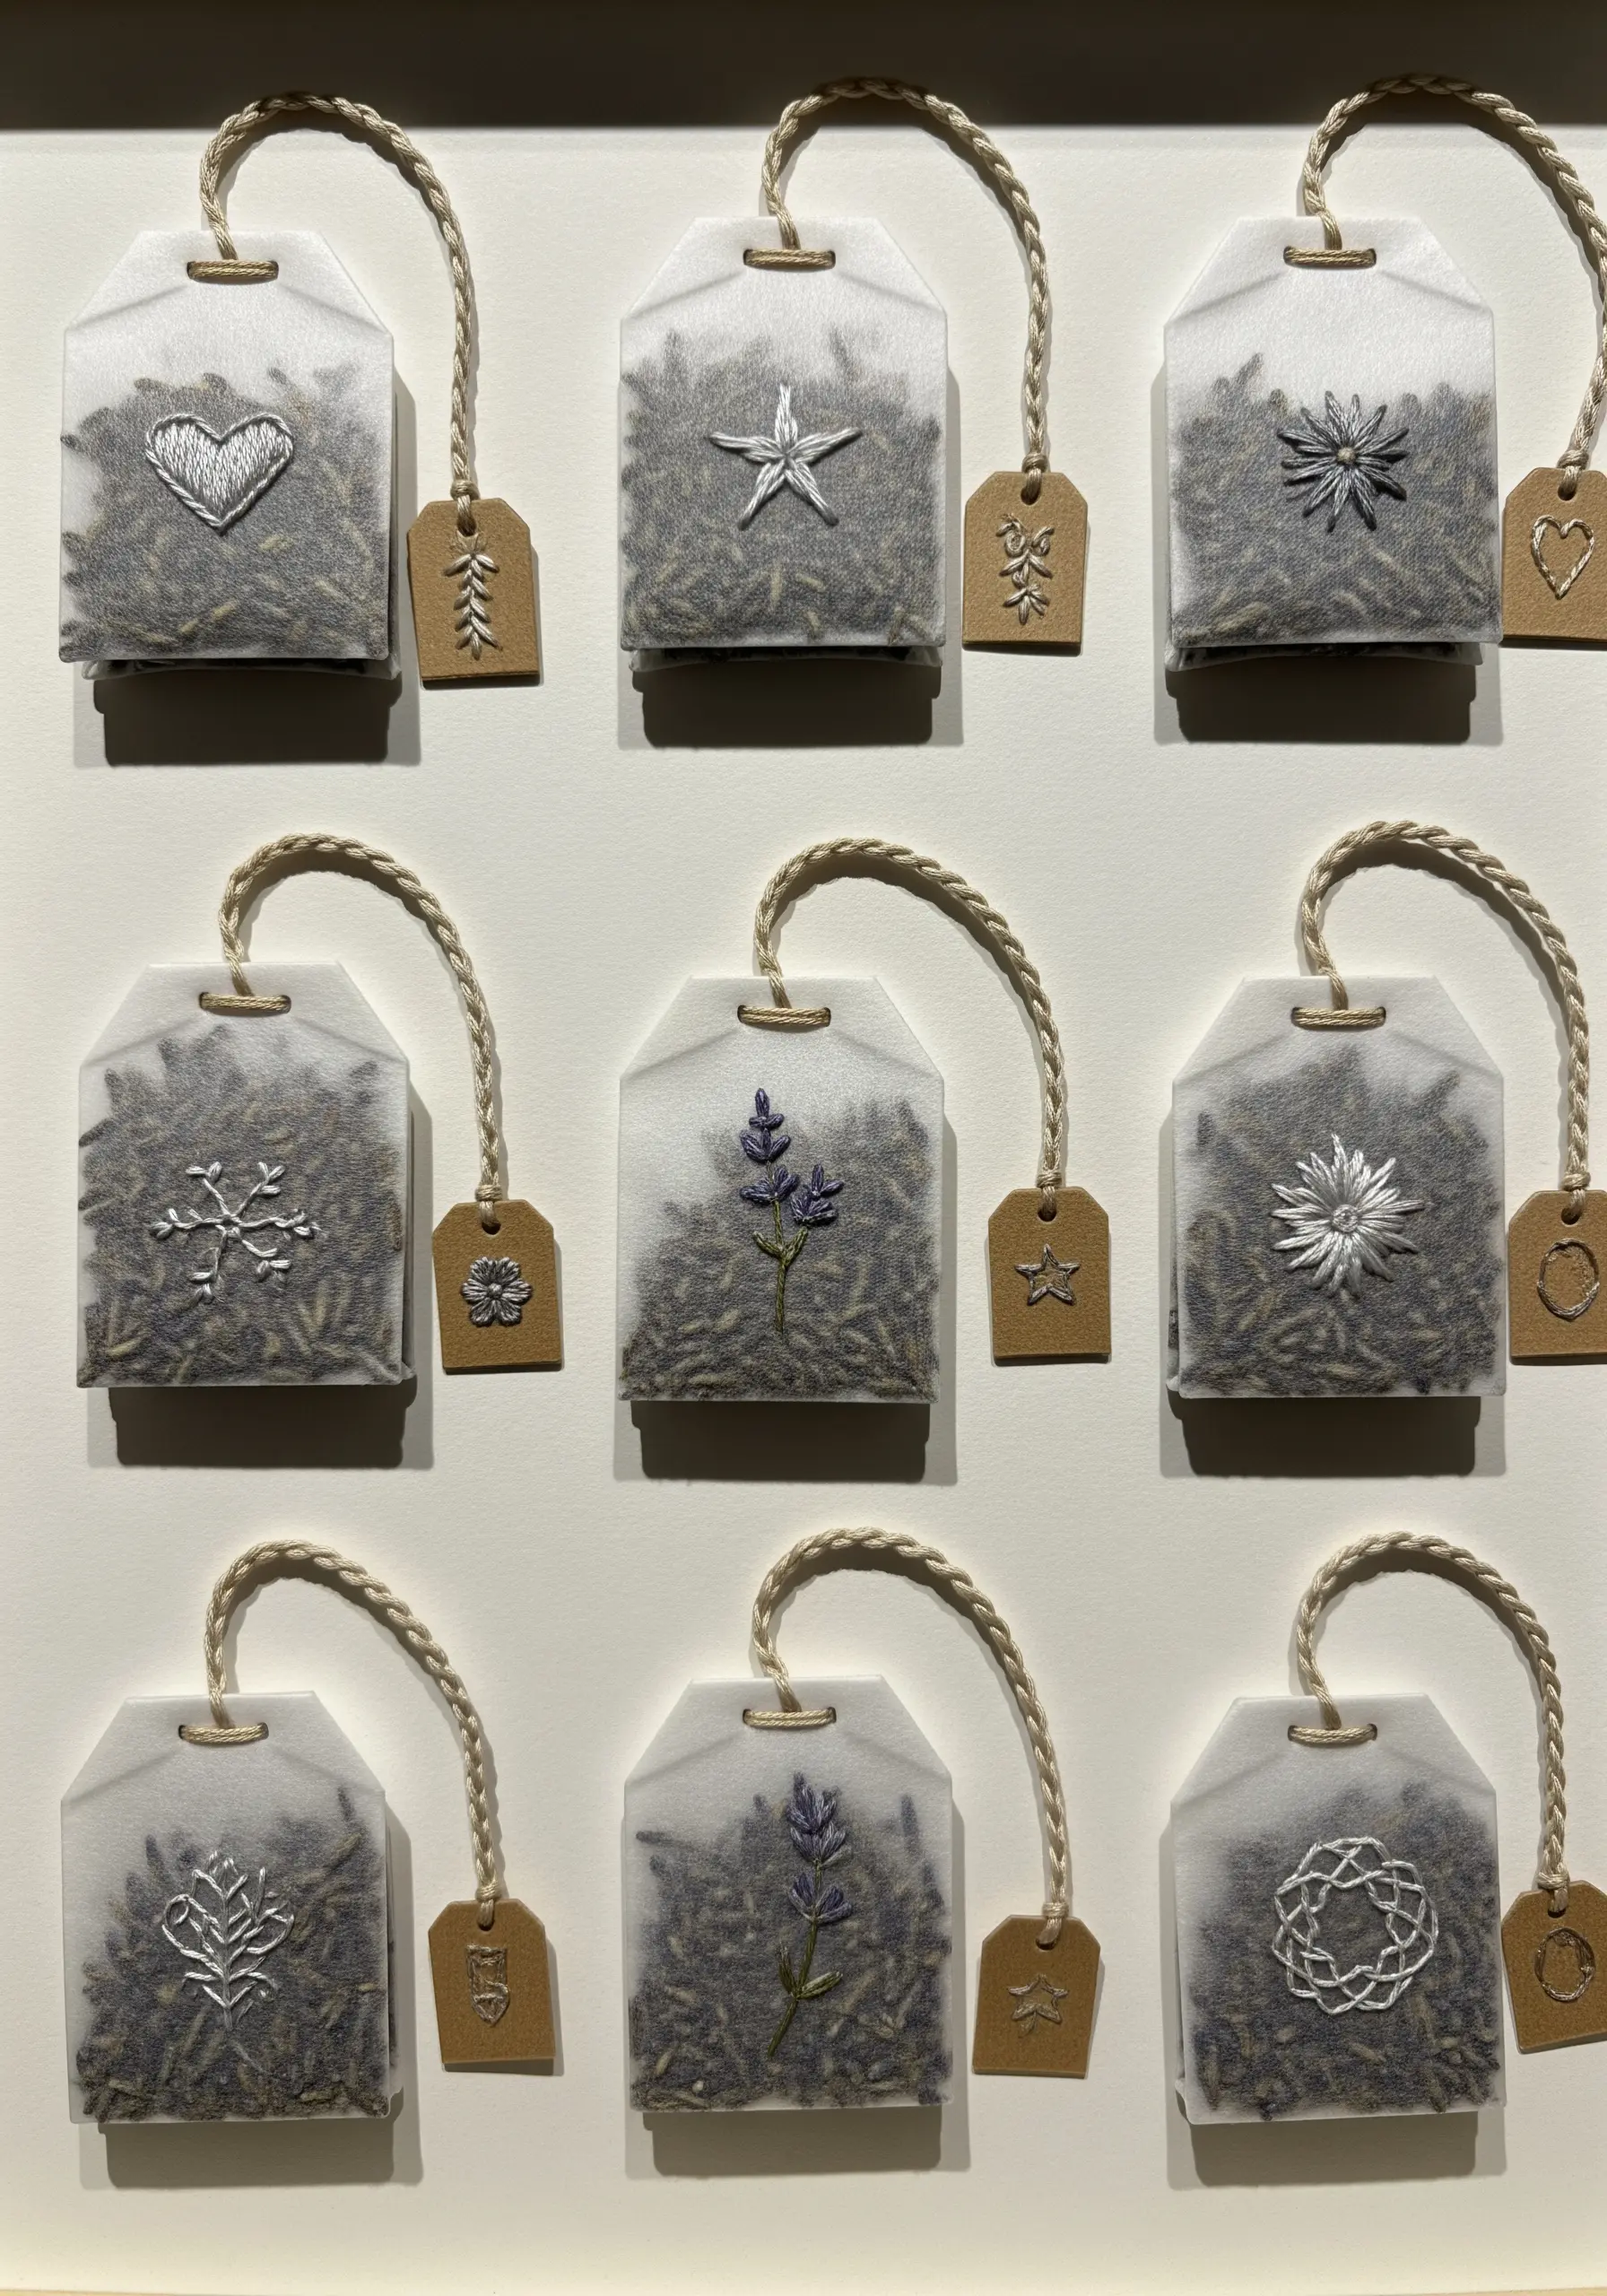
Challenge your skills and refine your control by stitching on something truly unexpected, like a paper tea bag.
Carefully empty the tea, stitch your tiny design on the fragile paper, and then refill it.
This requires a very fine needle (#10 or #12), a single strand of floss, and perfect tension—not too tight to tear, not too loose to sag.
This exercise is a masterclass in delicacy, resulting in a unique and memorable piece of miniature art.
23. Embroidered Paper for Luxe Stationery

Elevate simple paper goods by adding a sophisticated, tactile touch of embroidery.
Stitch your monogram or a small design onto a separate piece of heavy cardstock or fabric-covered paper.
Then, mount this embroidered medallion onto your stationery items like cards or envelopes.
This layered technique is more durable than stitching directly onto thin paper and gives the final piece a polished, professional, and high-end appearance.
24. Combining Paint, Clay, and Thread
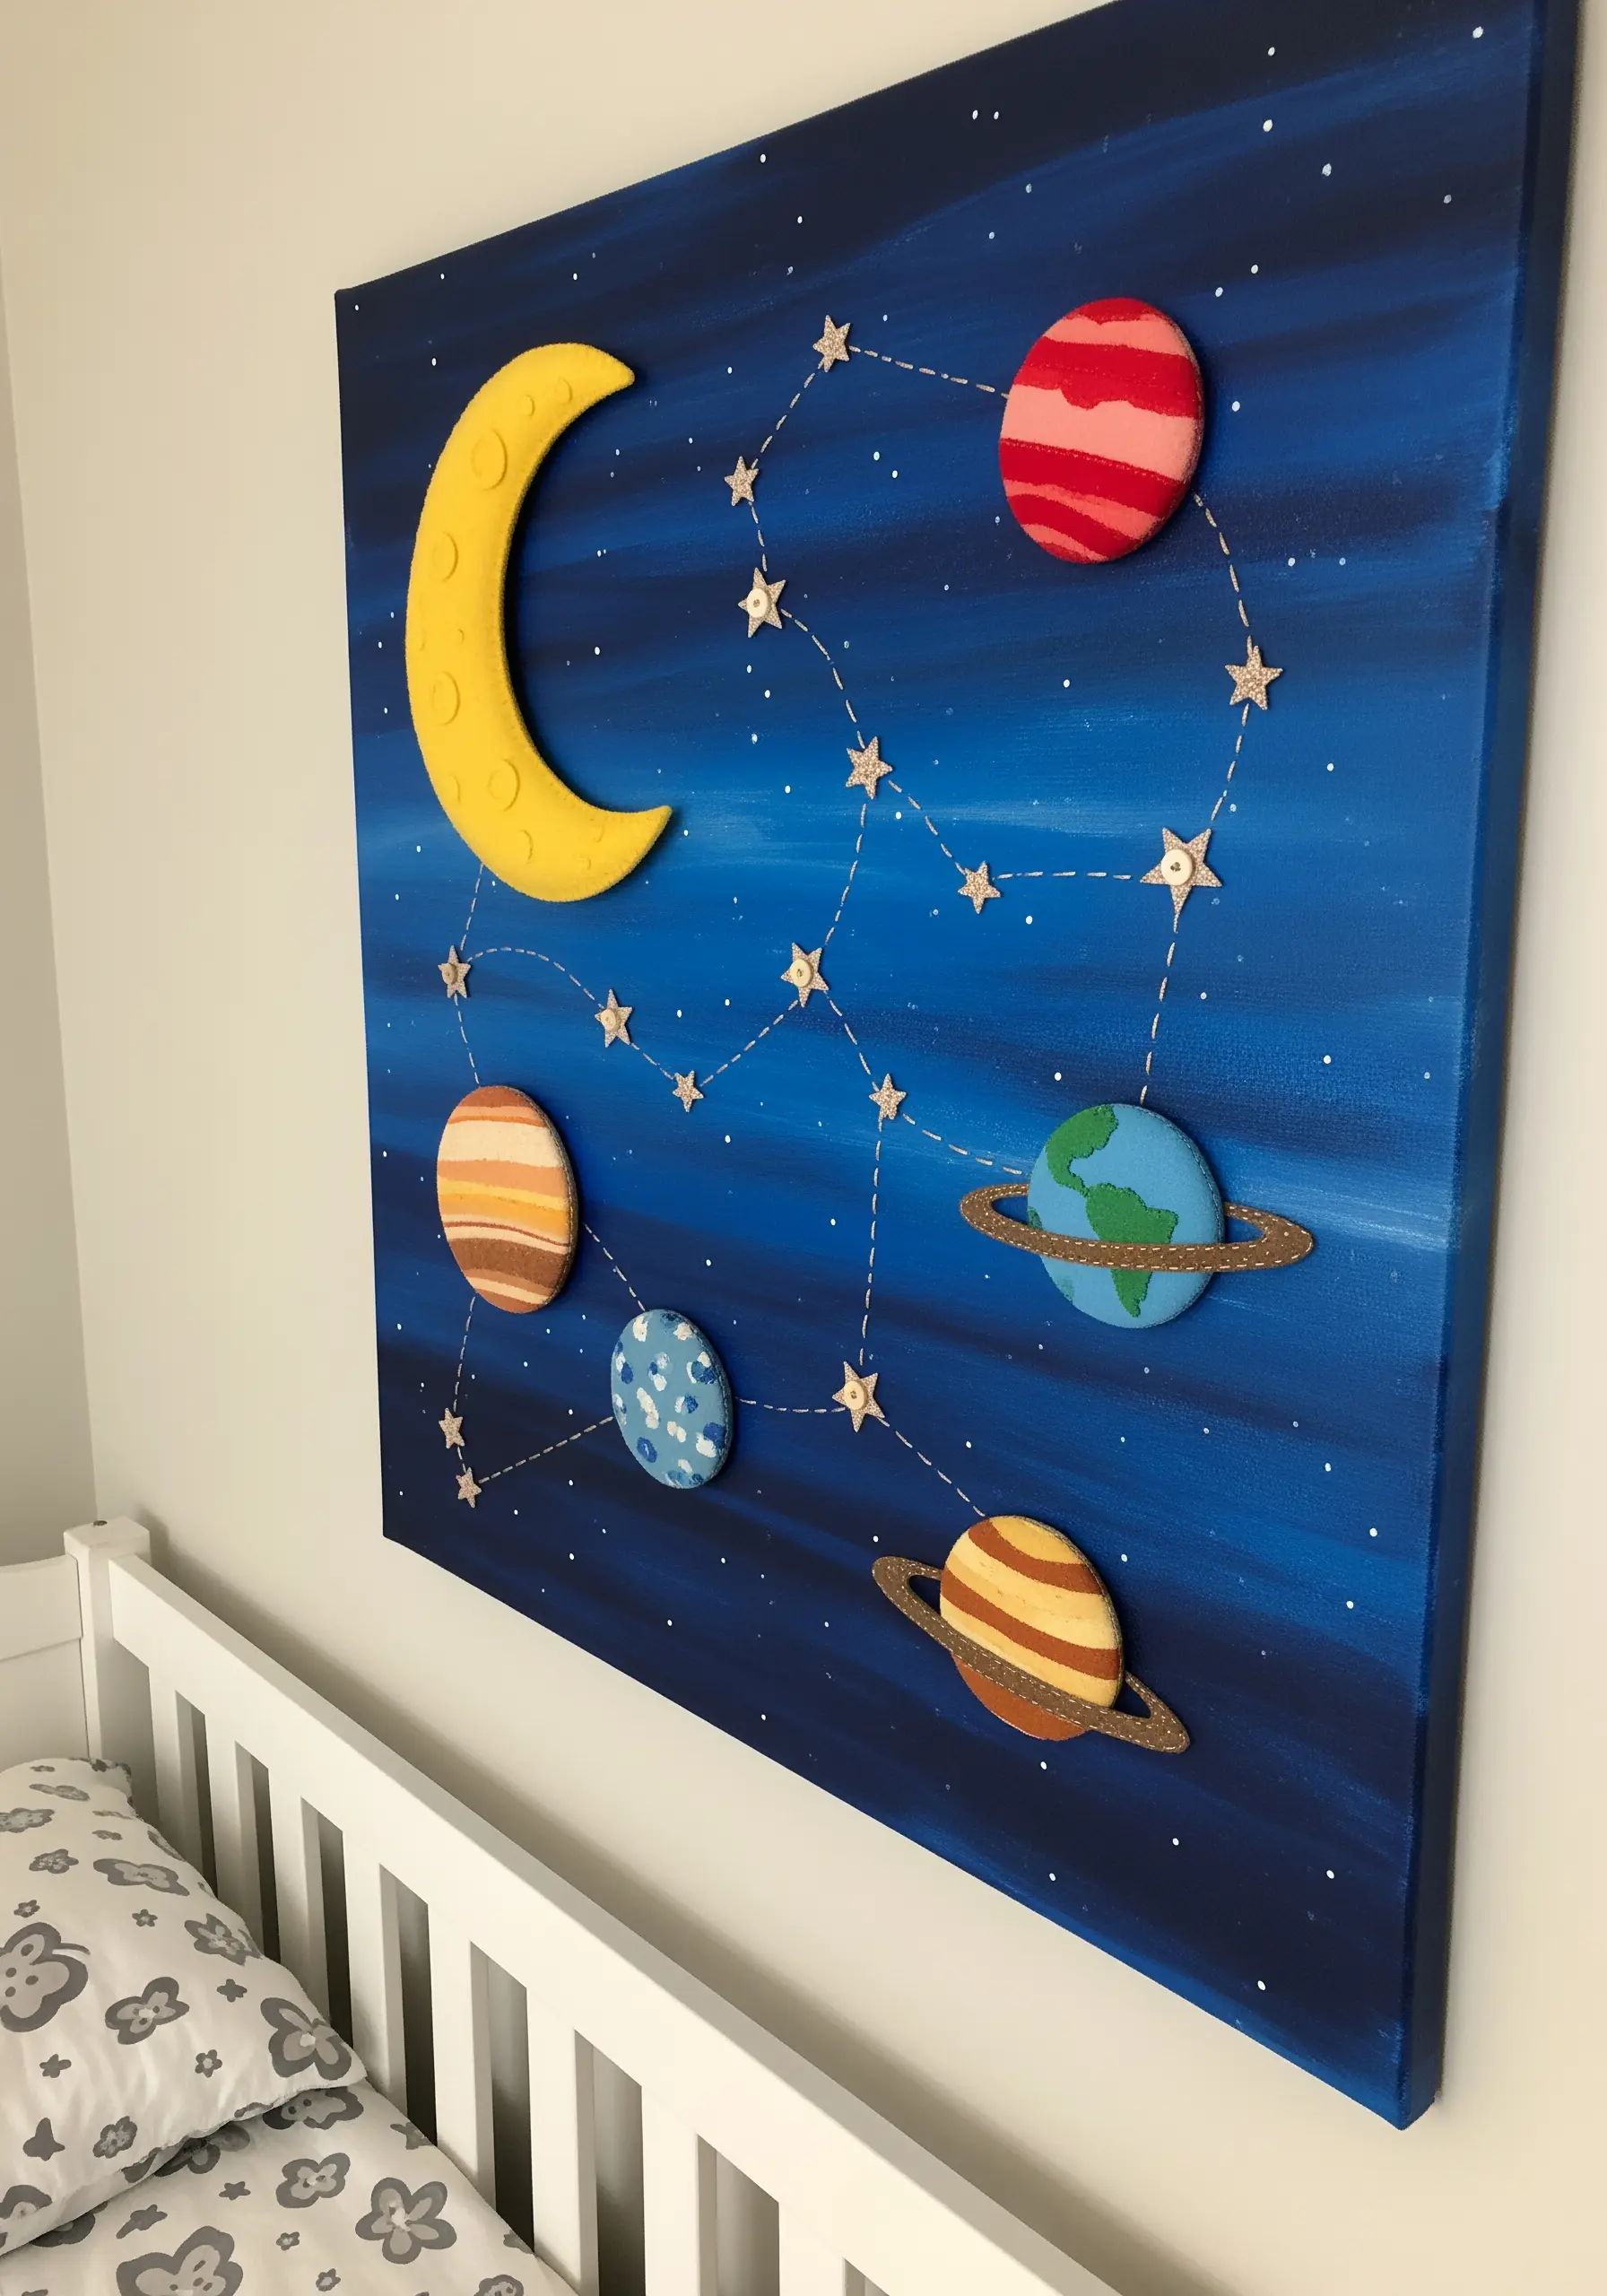
Build a truly mixed-media piece by layering different materials for a tactile and engaging result.
Start by painting a background scene, like a galaxy, on a stretched canvas.
Create key elements, like planets, from lightweight modeling clay, paint them once dry, and then glue them in place.
Finally, use a thick metallic thread to add stitched details, like constellation lines, which unite the painted and sculpted elements into a cohesive whole.
25. Sculptural Relief with Gesso and Fabric
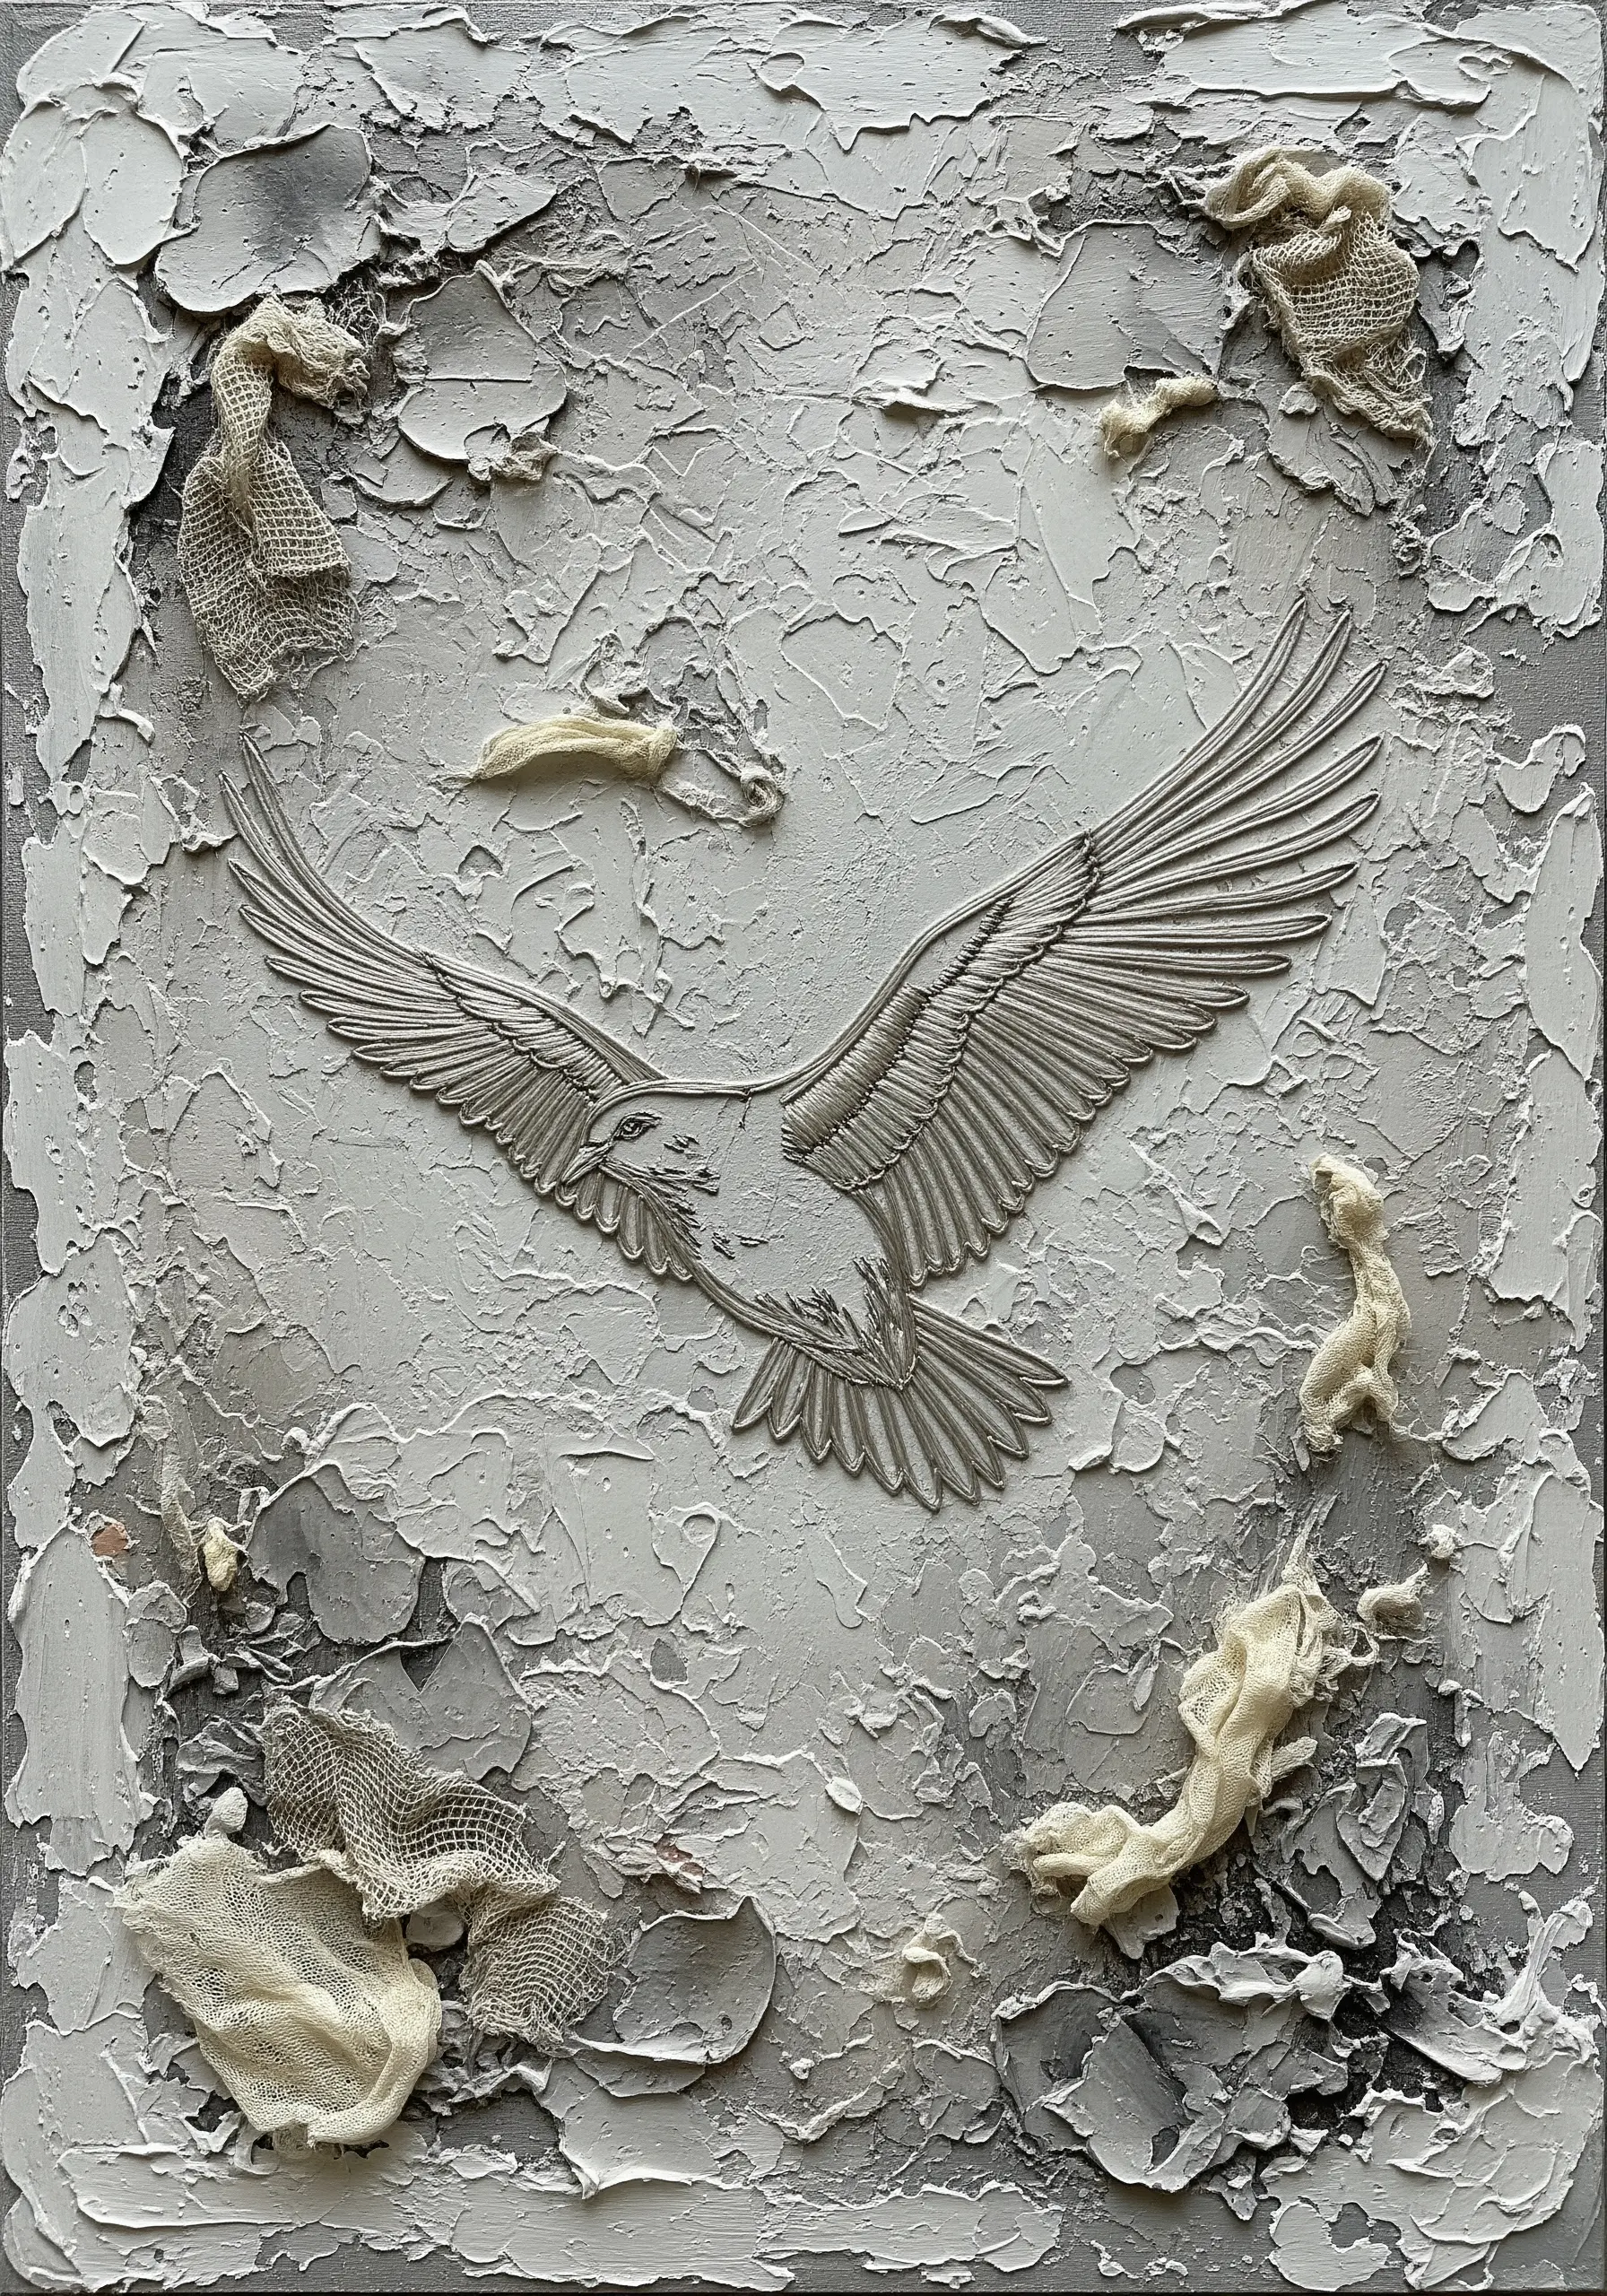
Create intense, organic texture by combining heavy body gesso or modeling paste with scraps of fabric.
Apply the paste thickly to a canvas, then embed pieces of gauze or cheesecloth directly into it while it’s still wet.
Once dry, this creates a rugged, uneven surface full of peaks and valleys. Place a smooth, central element—like this embossed metal bird—on top to create a striking contrast between the machine-made relief and the chaotic, handmade background.
26. Reinforcing Papier-Mâché with Stitches
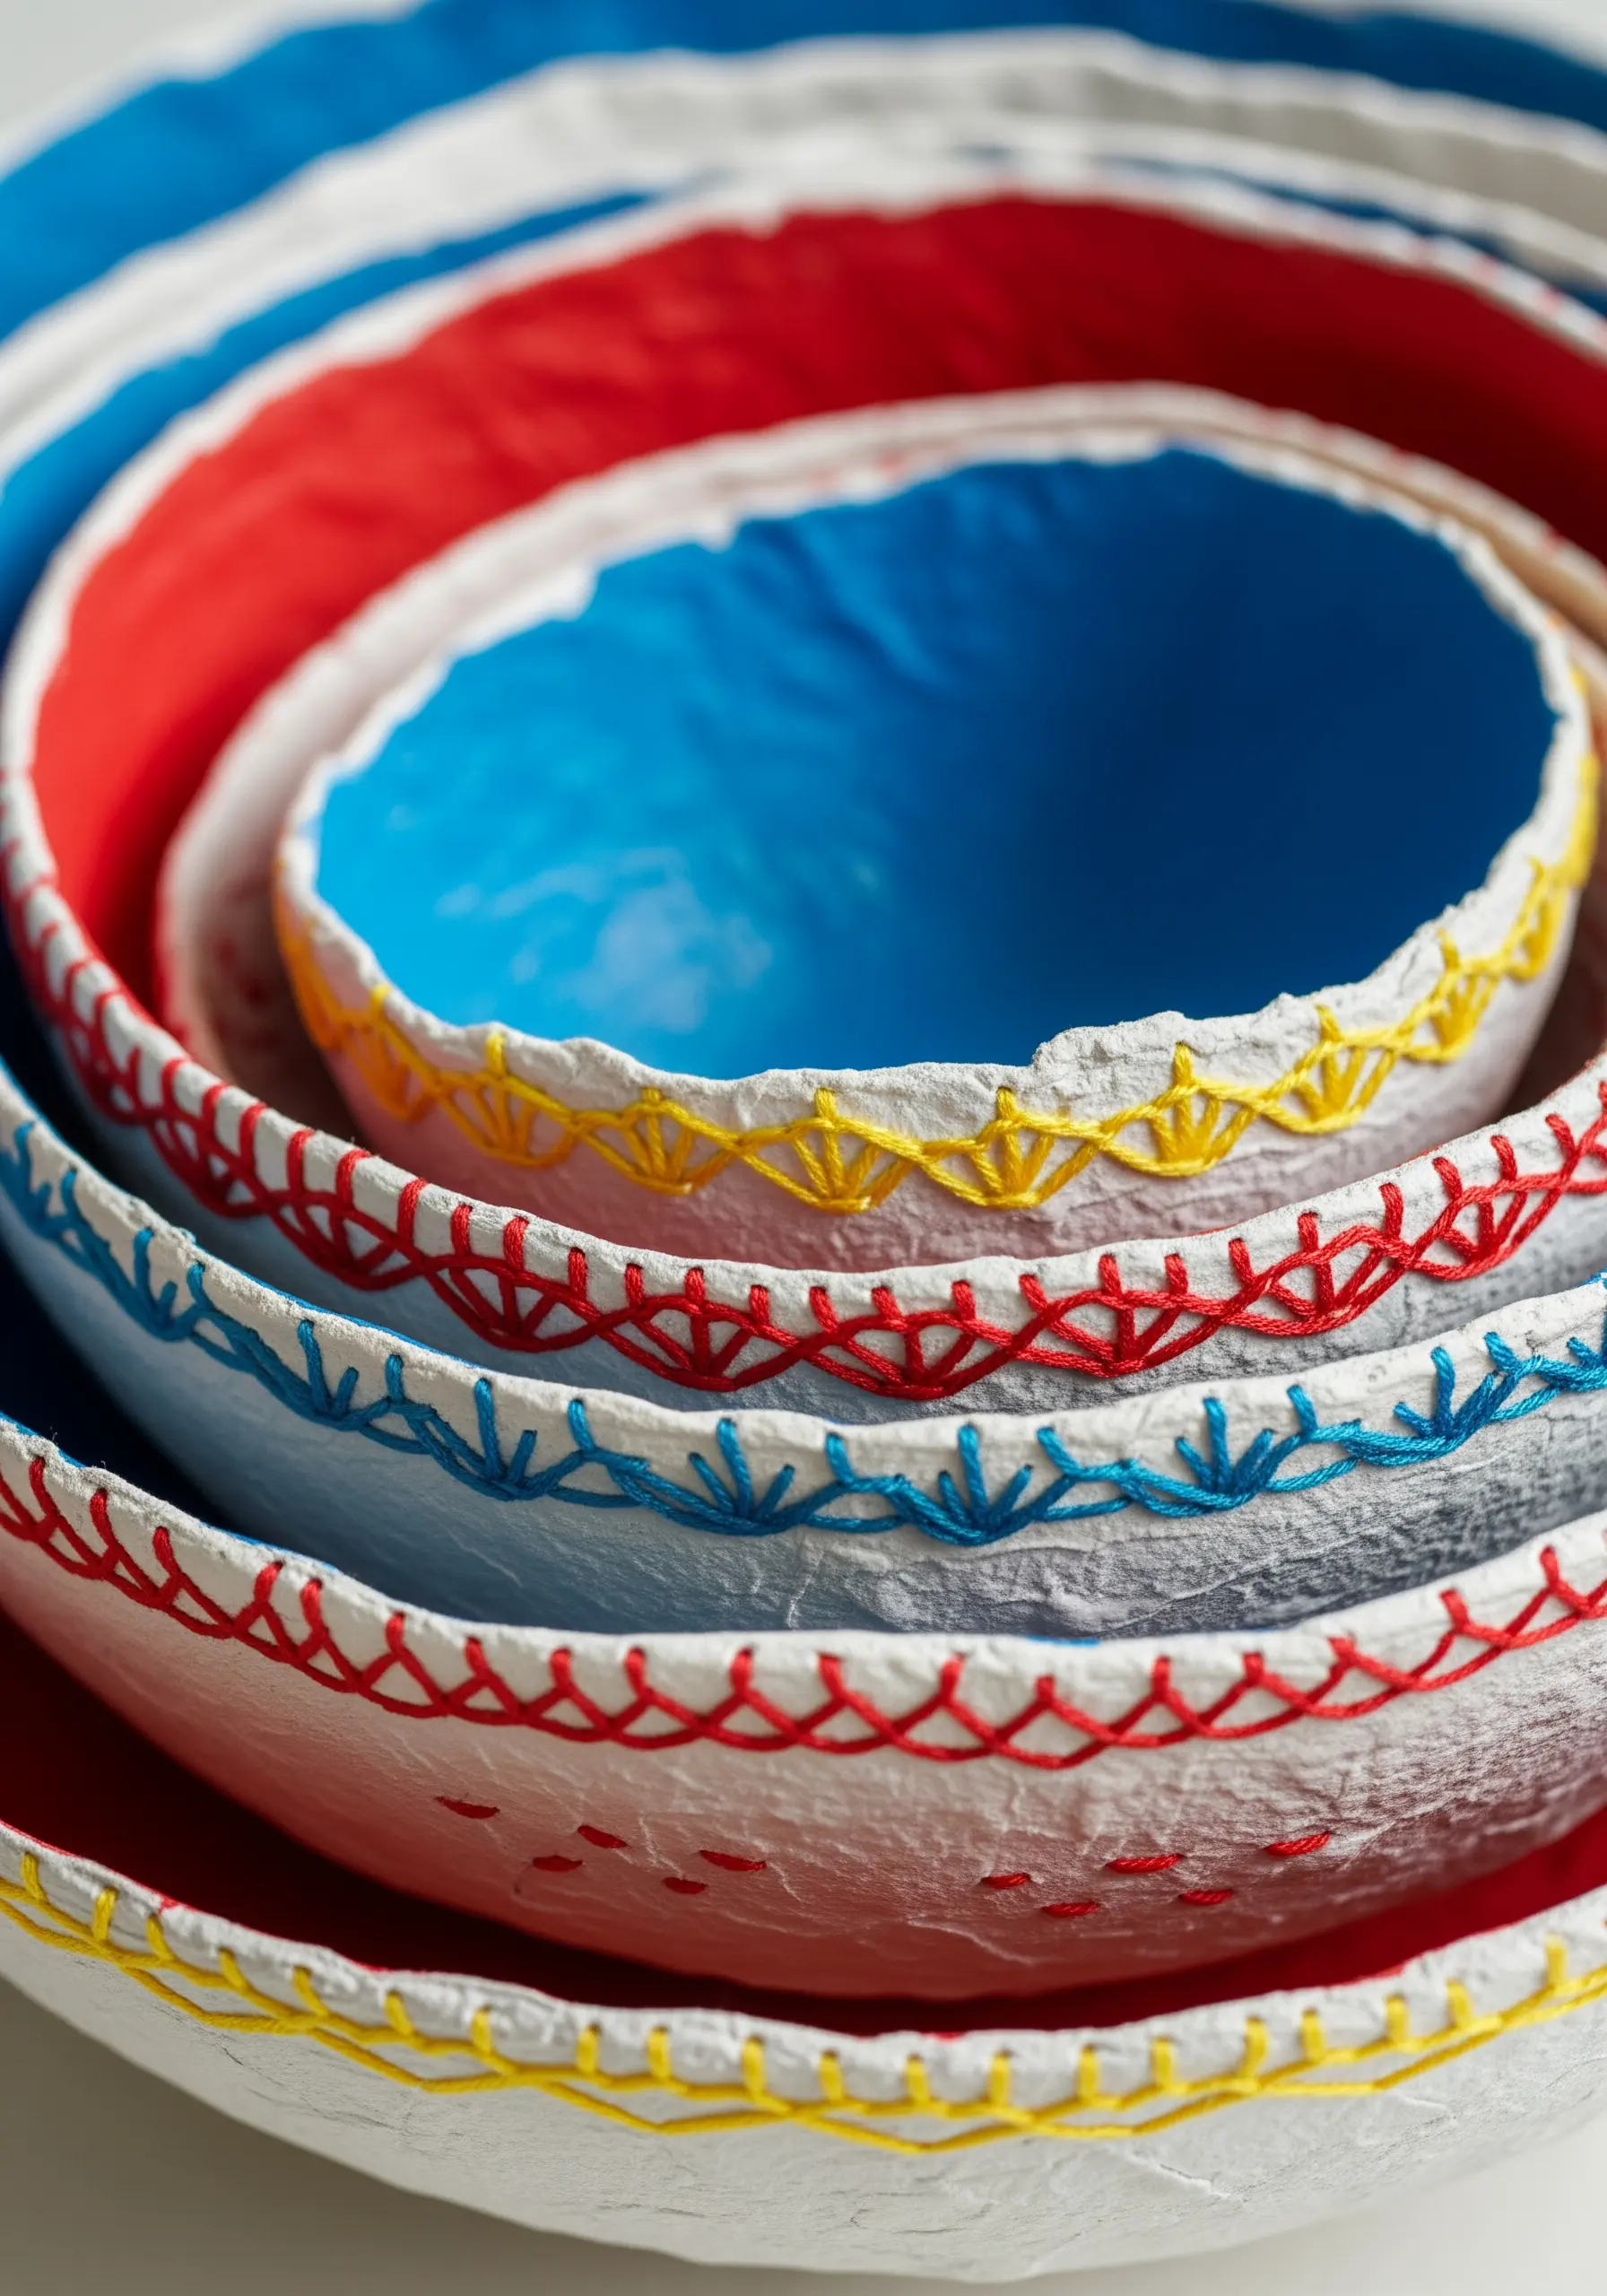
Add both a decorative finish and structural integrity to papier-mâché objects with a simple stitched edge.
Once your bowls or shapes are fully dry and painted, use an awl or a thick needle to carefully punch evenly spaced holes along the rim.
Use a sturdy thread or fine yarn to work a blanket stitch or cross stitch around the edge.
This technique not only adds a beautiful, handmade detail but also helps protect the fragile rim from chipping or damage.
27. Embroidering on Vintage Photographs
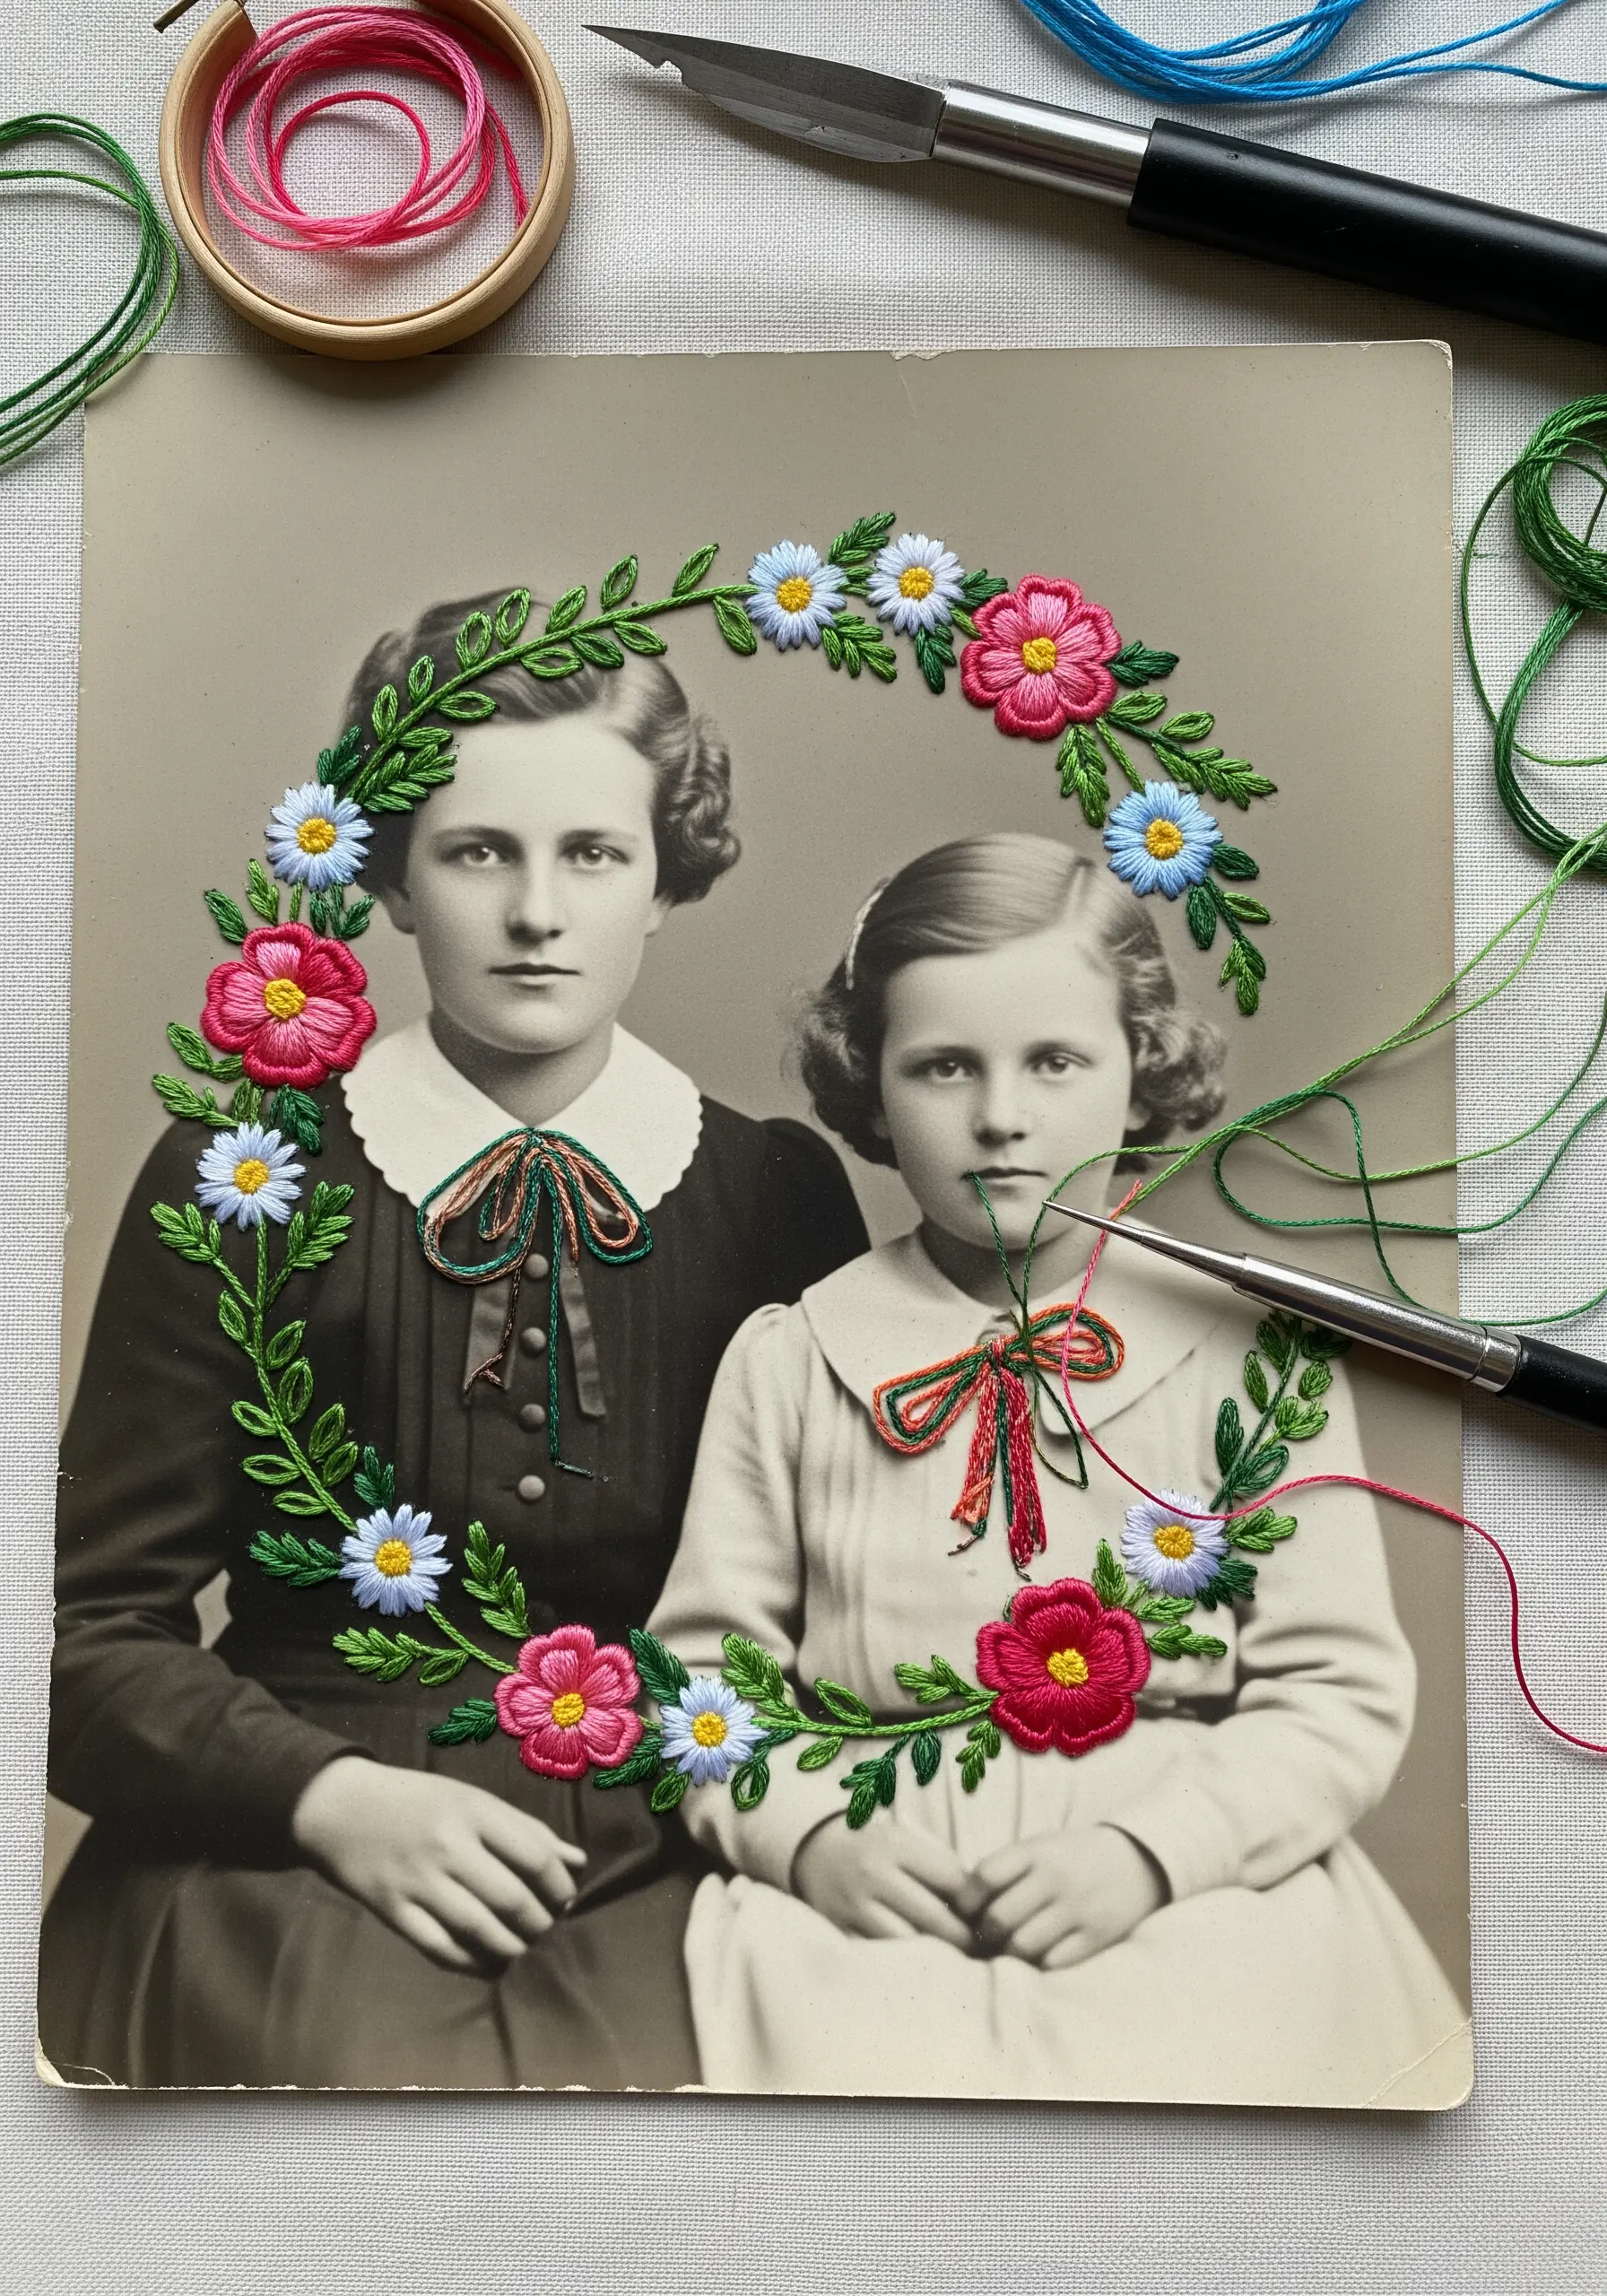
Breathe new life into an old photograph by adding selective color and texture with hand embroidery.
Work with a high-quality reproduction printed on matte photo paper, as this surface is more receptive to stitching.
Use simple, classic stitches—like satin stitch for petals, lazy daisies, and stem stitch for leaves—to frame the subjects.
This thoughtful technique adds a layer of tenderness and personal history to the original image, connecting past and present through thread.
28. Paint and Knots for Landscape Texture
Create a dynamic landscape by first painting the broad blocks of color for the sky and mountains directly onto your canvas fabric.
Once the paint is completely dry, use embroidery to add fine detail and contrasting textures.
A satin-stitched sun provides a smooth, solid sheen, while dense clusters of white French knots create the perfect, nubby texture for snow-capped peaks.
This makes the snow appear dimensional, popping against the flat, painted surface below.
29. Thread Painting with Integrated Collage
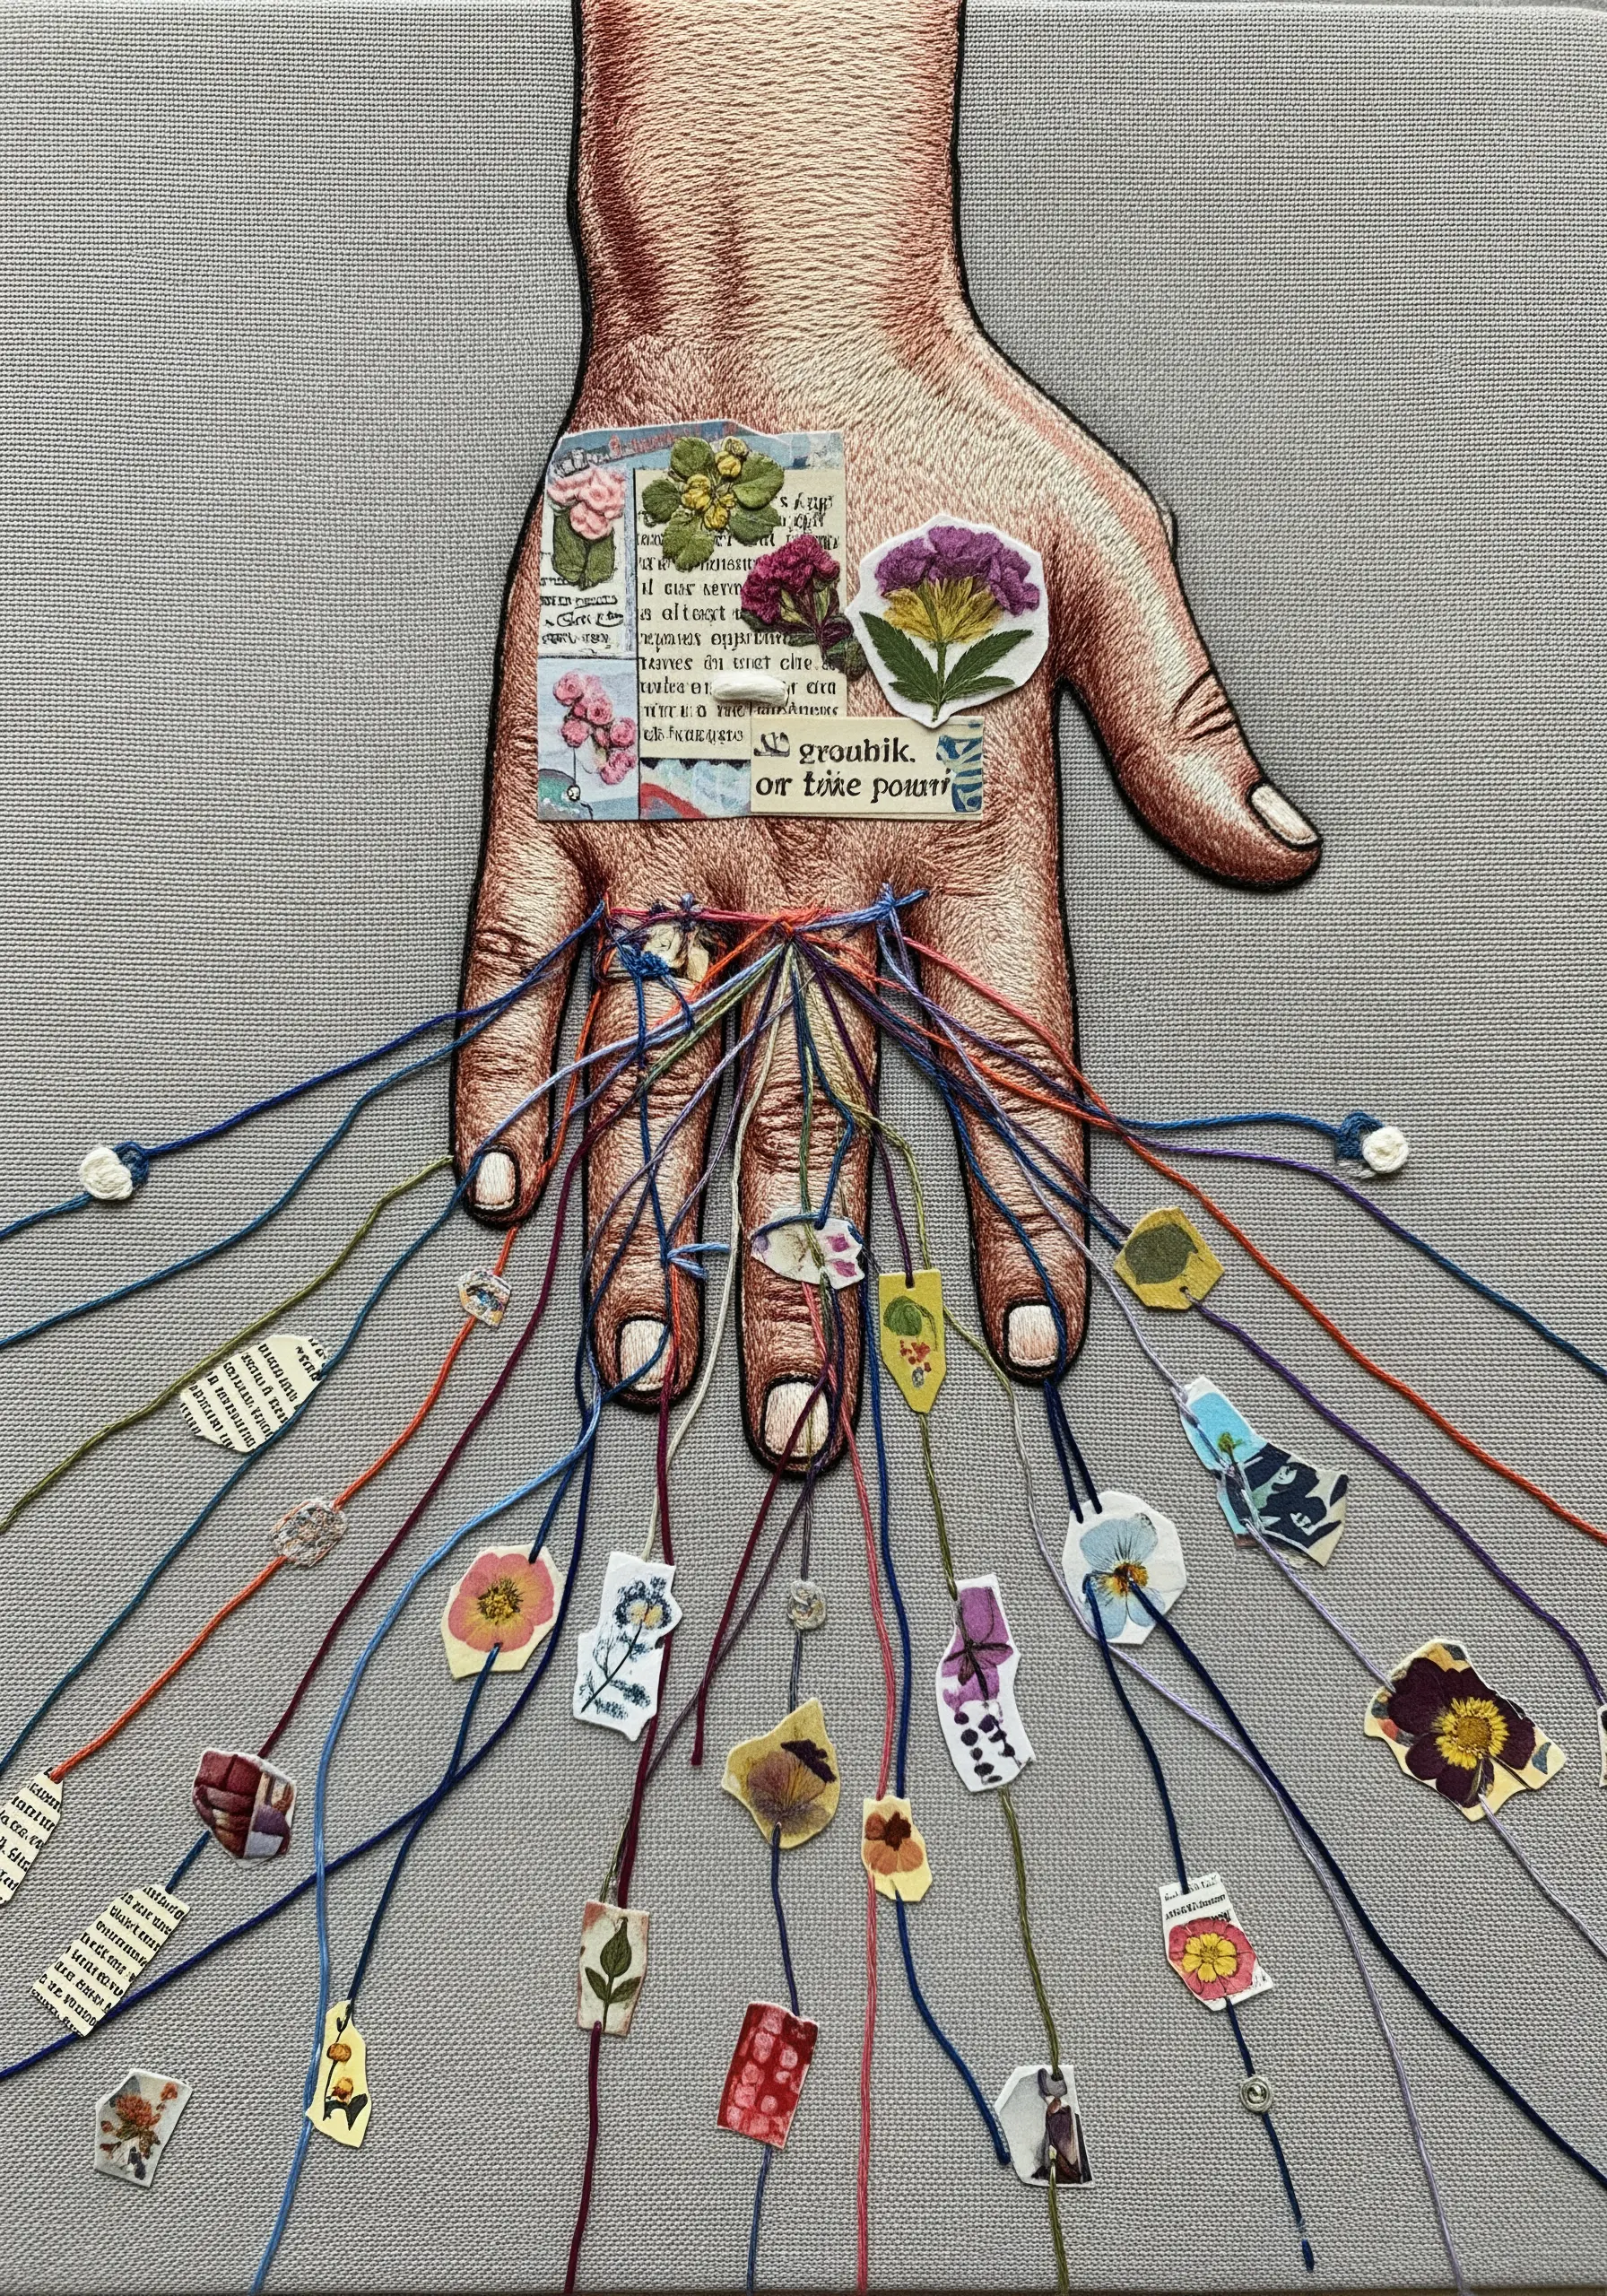
After completing a detailed thread-painted piece, you can add another layer of narrative with carefully chosen collage elements.
Use small, precisely cut pieces of paper—from old books, maps, or botanical illustrations—and affix them to your work with a dab of acid-free glue.
Arrange them so they appear to grow from or interact with the embroidery.
This thoughtful integration of text and image adds conceptual depth and invites closer inspection of your craftsmanship.
30. Embroidering on Printed Coasters
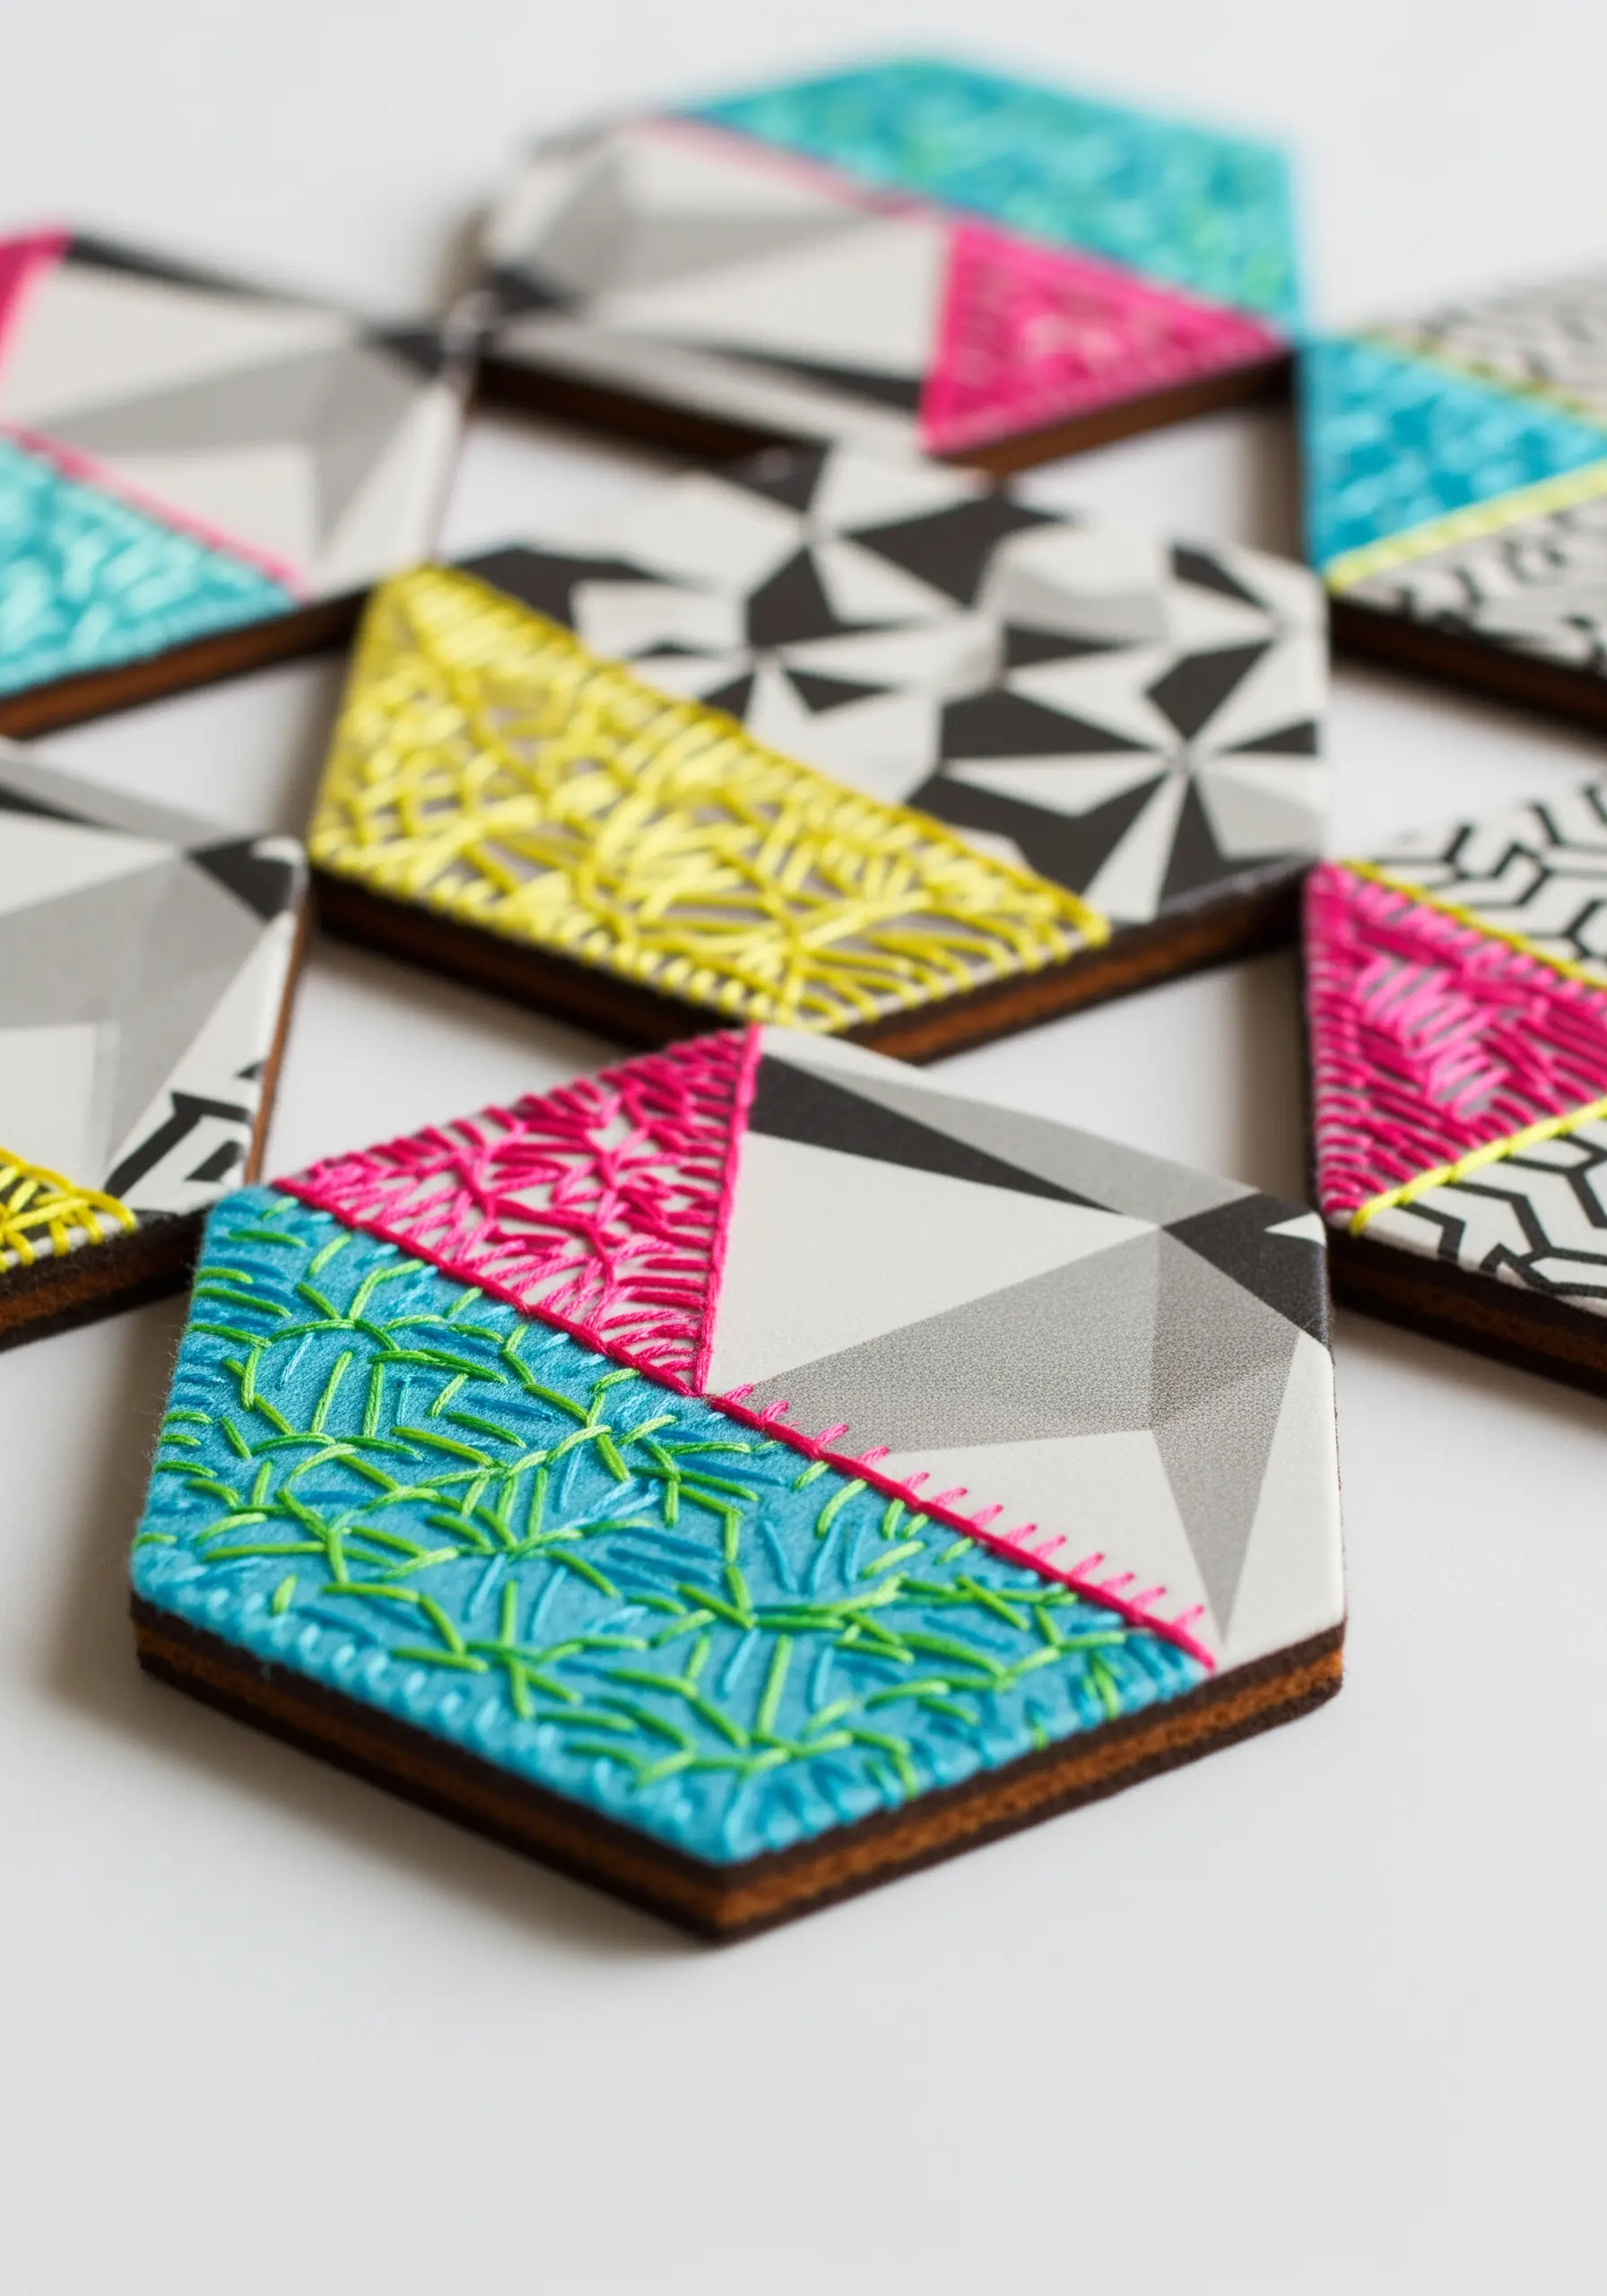
Transform ordinary household items, like cork or wooden coasters, into unique, tactile art objects.
If the surface is printed with a pattern, select specific colored sections to cover with dense, textural stitches like seed stitch or French knots.
Use a fine drill bit or a sturdy awl to pre-punch your holes for clean entry and exit points.
The contrast between the flat, graphic print and the raised, handmade texture of the thread creates a stunning effect.
31. Creating a Framed Embroidery Vignette
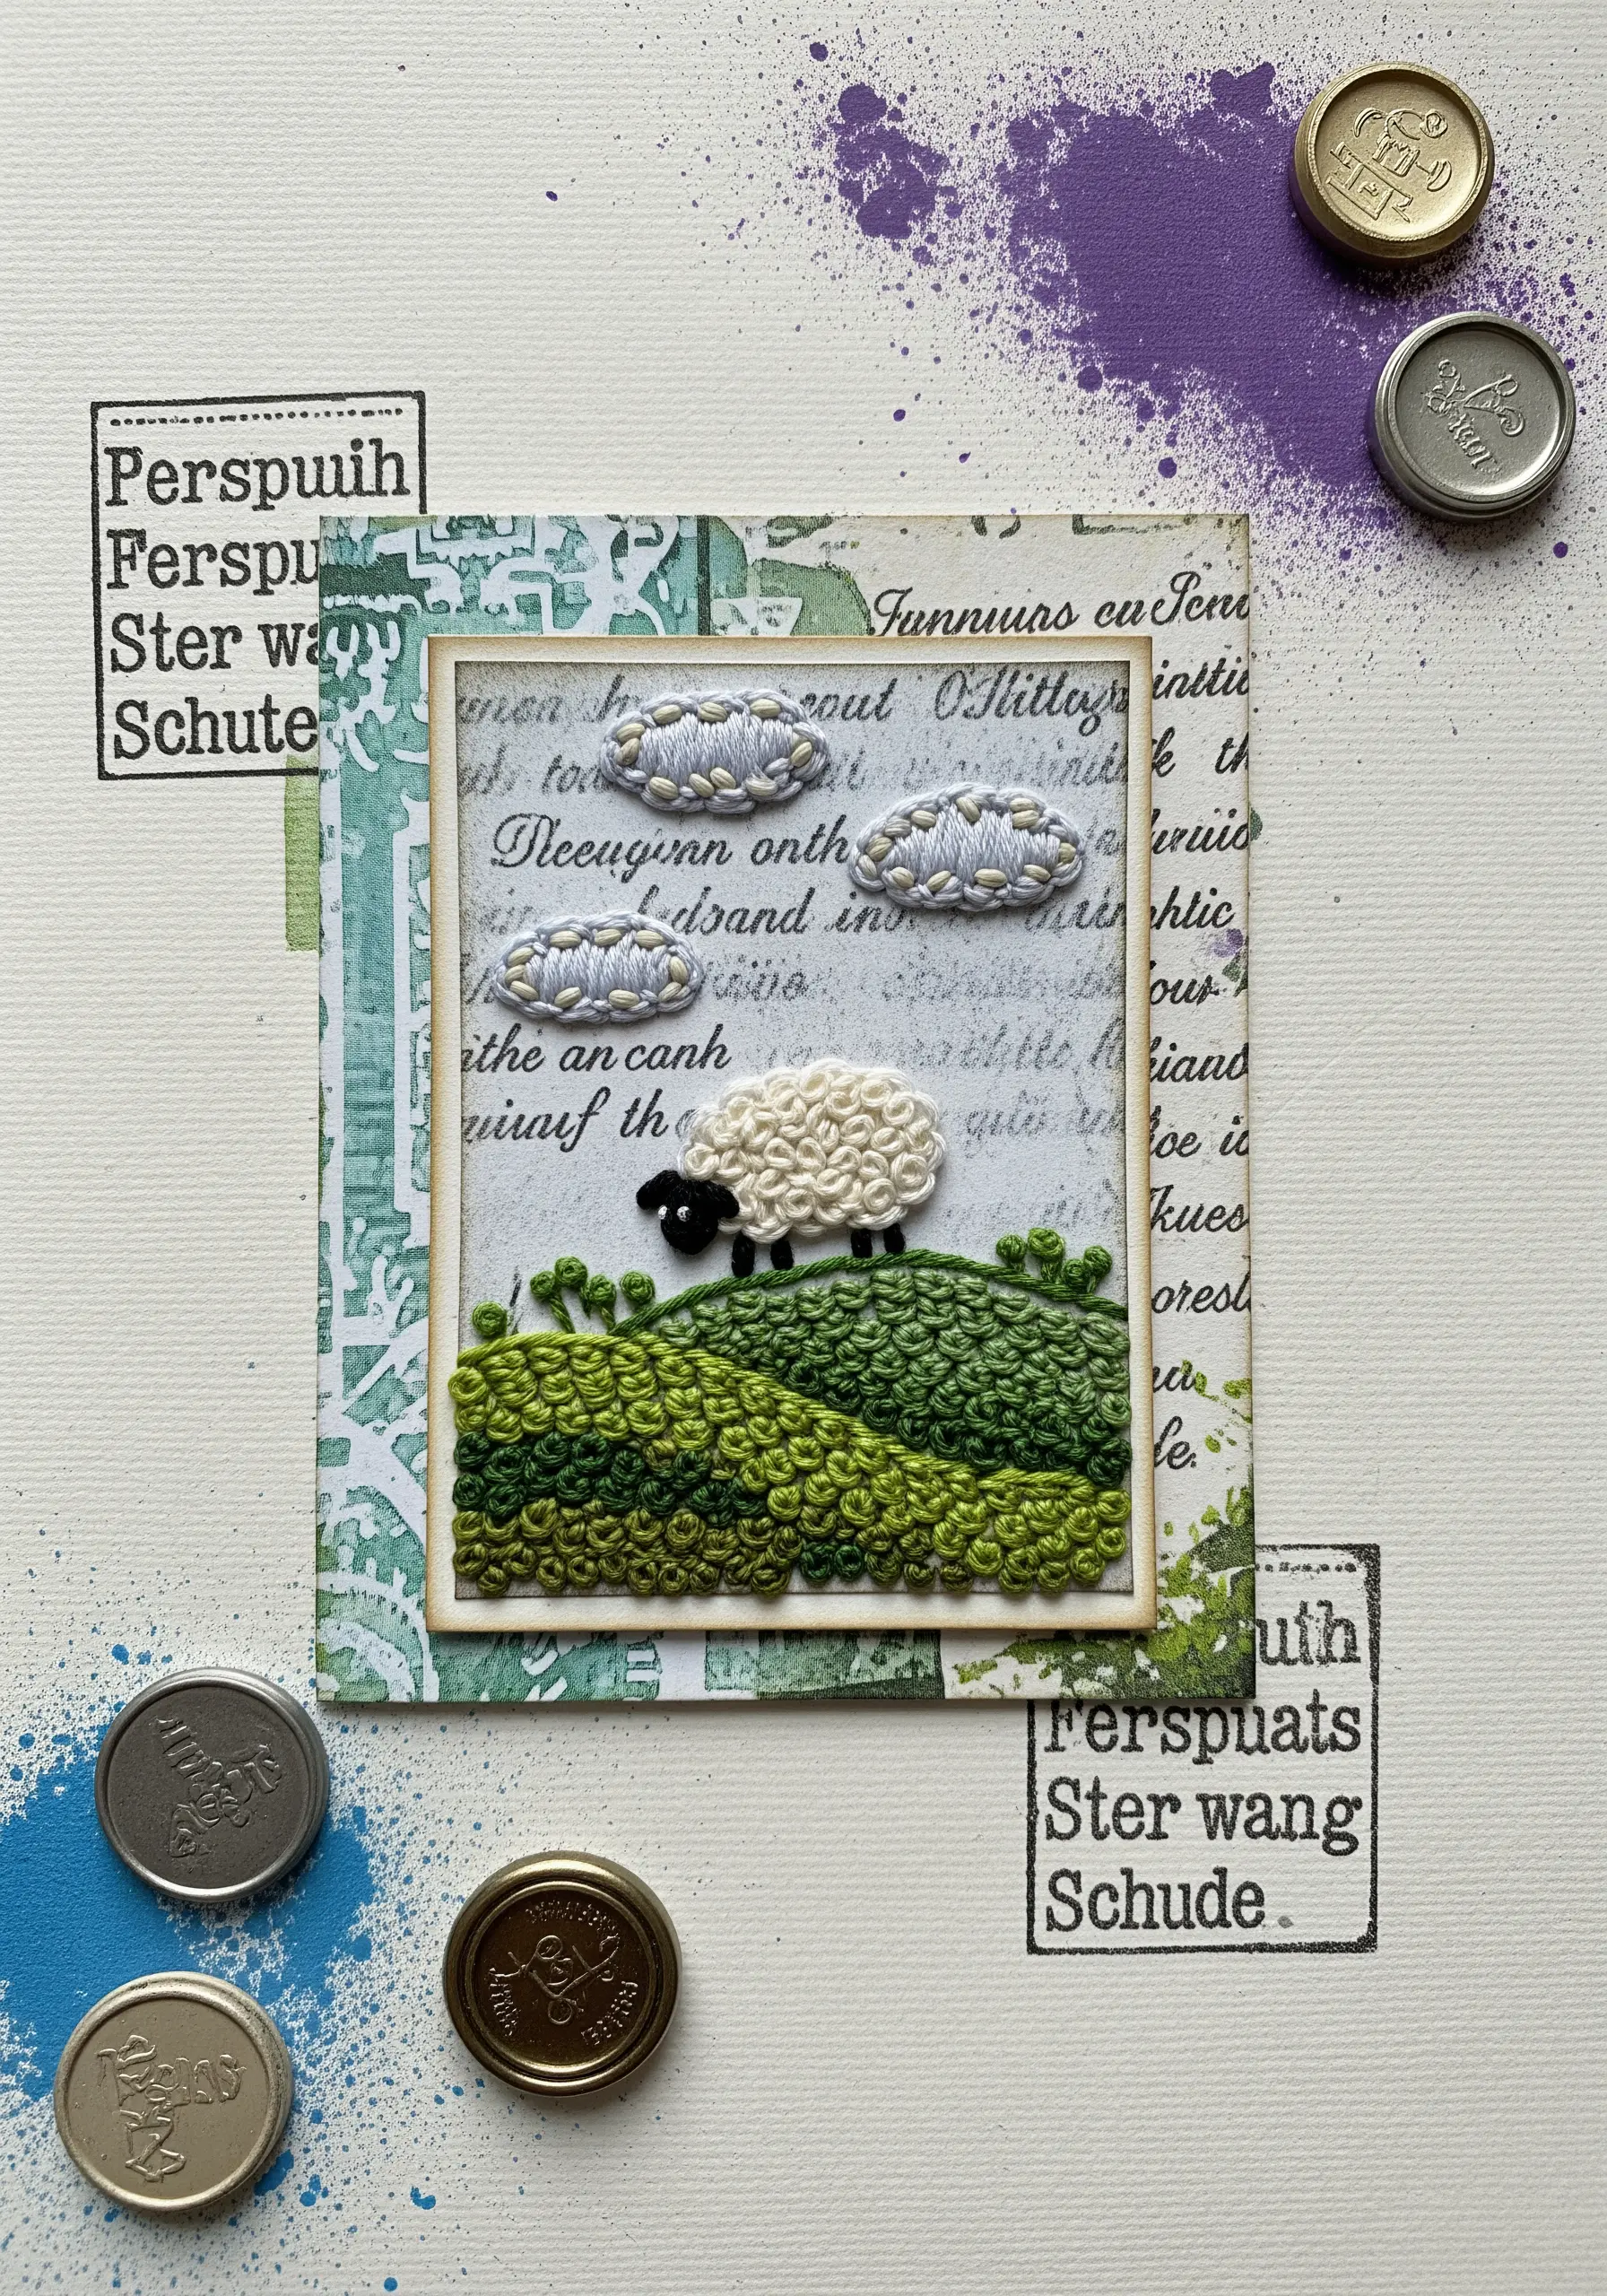
Present your embroidery as a finished piece of art by creating a curated mixed-media setting for it.
Stitch your central motif on a small piece of fabric, leaving clean edges.
Then, build a layered background on heavy cardstock using stamps, ink splatters, and textured paper.
Mount your finished embroidery in the center of the card, perhaps adding a small paper frame around it. This turns a simple stitched sample into a complete, composed artwork ready for display.
32. Precision Stitching on a Textured Surface
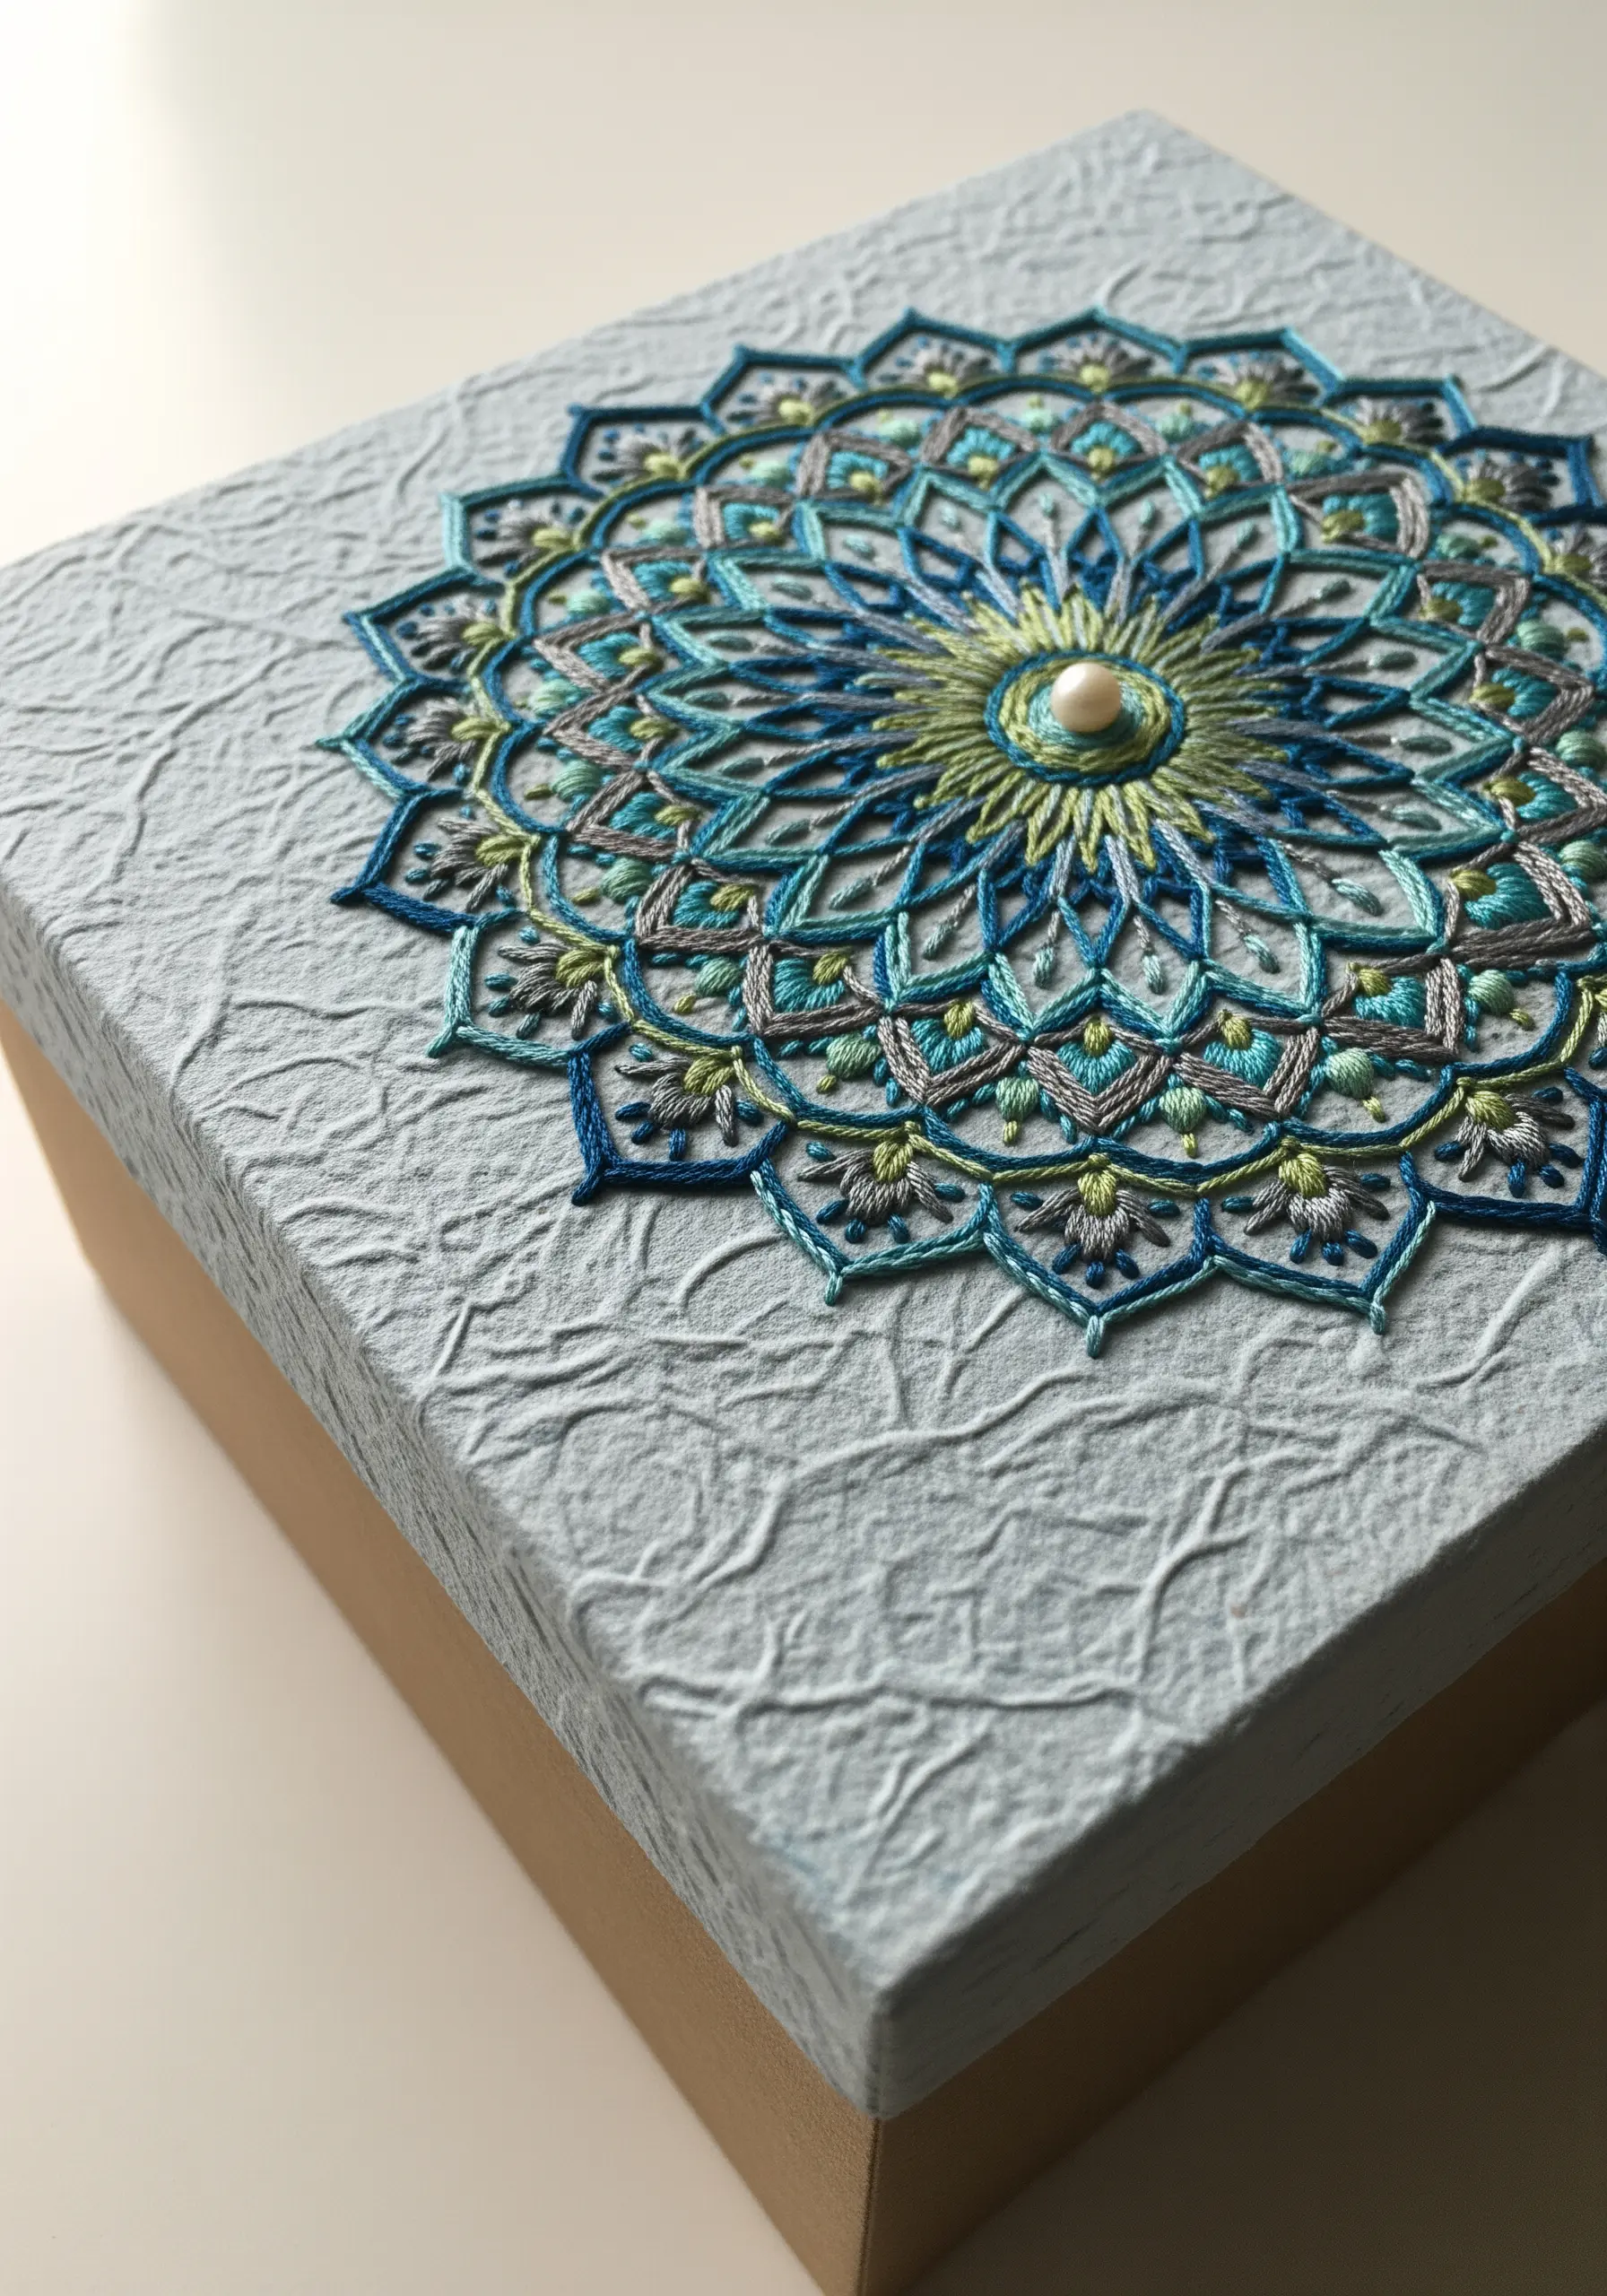
Add a luxurious, custom touch to a presentation box by embroidering directly on its lid.
Choose a box with a textured, paper-covered surface, which helps grip the thread and adds visual interest.
Use a water-soluble marker and a template to mark your pattern, then pre-pierce the holes for absolute accuracy.
For a complex mandala, using a variegated thread adds subtle color shifts without constant re-threading, enhancing the intricate geometry of the design. A central pearl bead provides a perfect focal point.


