

You’ve mastered the satin stitch, your French knots are perfect, and your lines are clean. But you feel a pull toward something more—something with depth, texture, and a voice that is unmistakably your own. This is where your embroidery evolves from a craft into an art form.
Mixing media isn’t about adding complexity for its own sake. It’s about making deliberate choices to express an idea more fully. It’s knowing when the soft haze of wool roving can create a better cloud than thread, or when the hard glint of a bead can capture light in a way stitches cannot.
Here, you won’t find vague suggestions. Instead, you’ll discover specific, thoughtful techniques for combining yarn, beads, fabric, and even found objects into your work. Each idea is designed to give you a new tool for your creative language, helping you build pieces that are not only beautiful to look at, but deeply compelling to experience.
1. Layer Sheer Fabrics for Atmospheric Landscapes
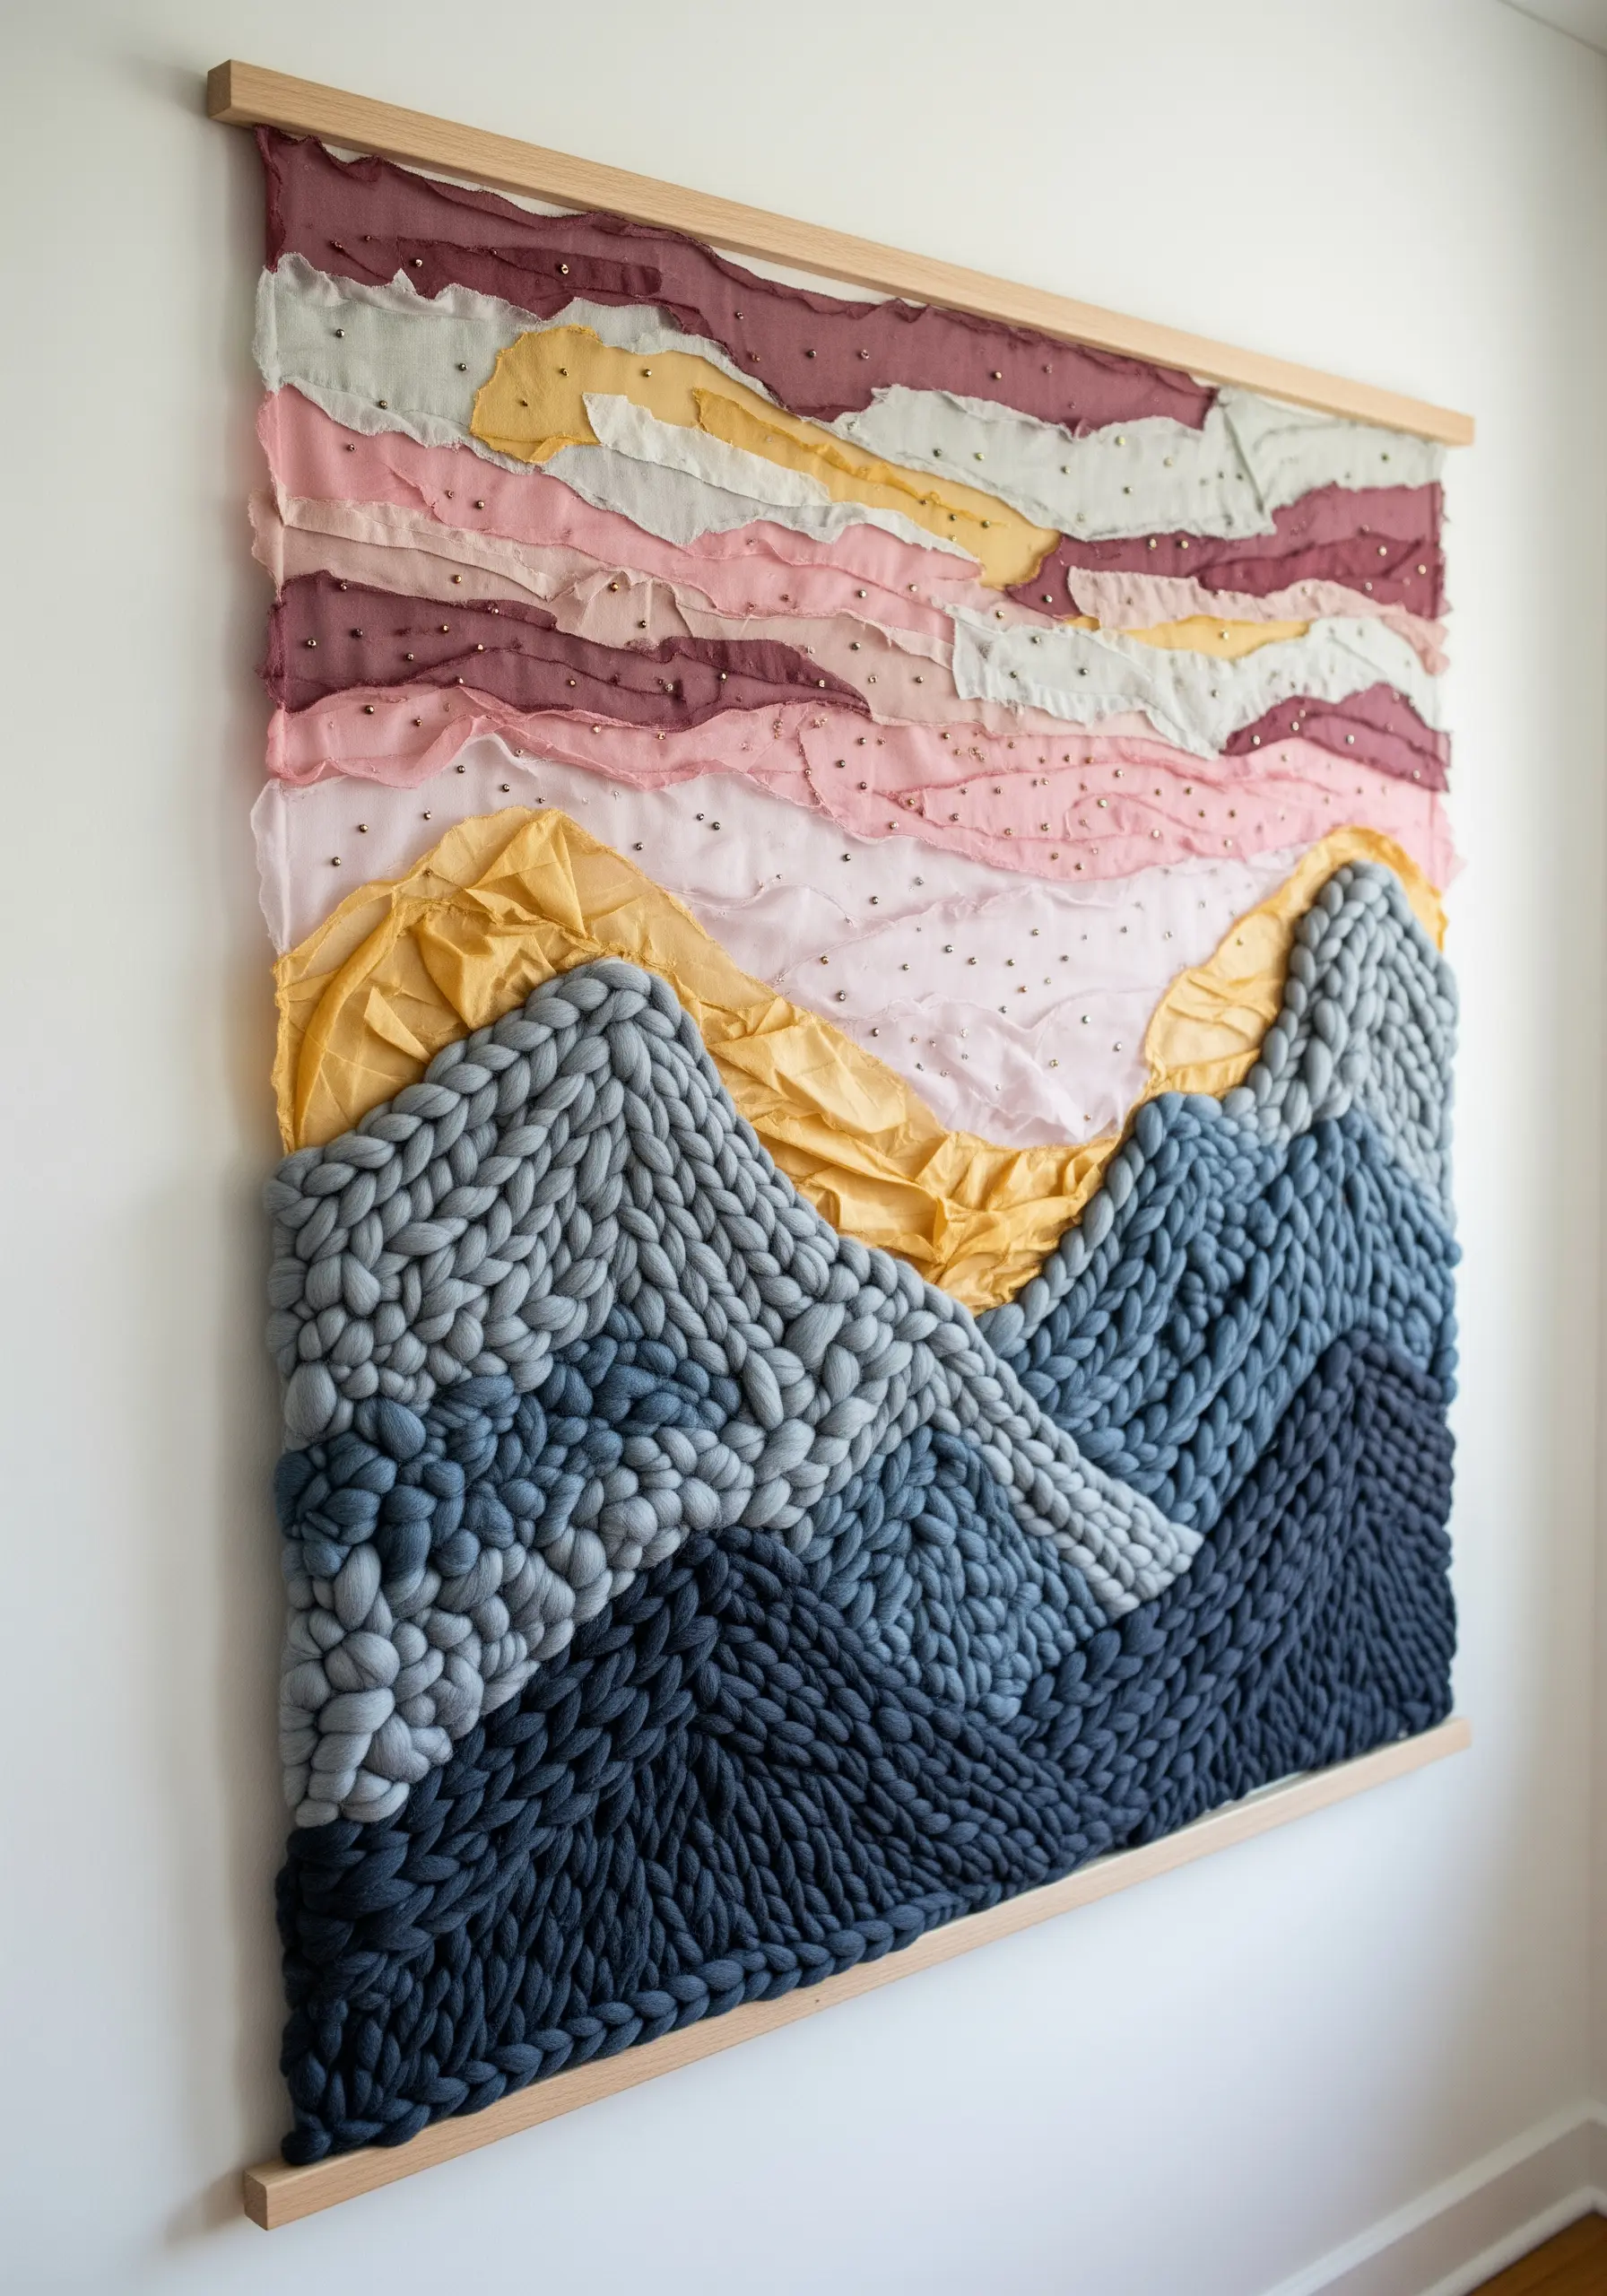
Create ethereal skies and misty mountains by layering sheer fabrics like organza or chiffon over your base cloth.
Instead of stitching a solid sky, cut or rip strips of fabric and arrange them to form clouds or horizons.
Secure the sheer layers with sparsely placed beads or seed stitches—this not only adds a delicate sparkle but also tacks down the fabric without creating heavy, visible lines.
For the foreground, contrast this delicacy with chunky, hand-knitted yarn sections to create a powerful sense of depth and tactile interest.
2. Create Luminous Texture with Gradient Beading

Transform a simple outline into a vibrant, light-catching surface using beads instead of thread.
To achieve a realistic, organic look on a leaf or petal, use multiple shades of green beads in various sizes and finishes (matte, translucent, shiny).
Stitch the veins of the leaf first with a contrasting thread or a line of beads to create a guide.
Fill each section by couching down strands of beads, following the natural contours of the shape. This technique makes the surface shimmer and appear more dimensional than flat satin stitch.
3. Sculptural Yarn Coiling for 3D Portraits
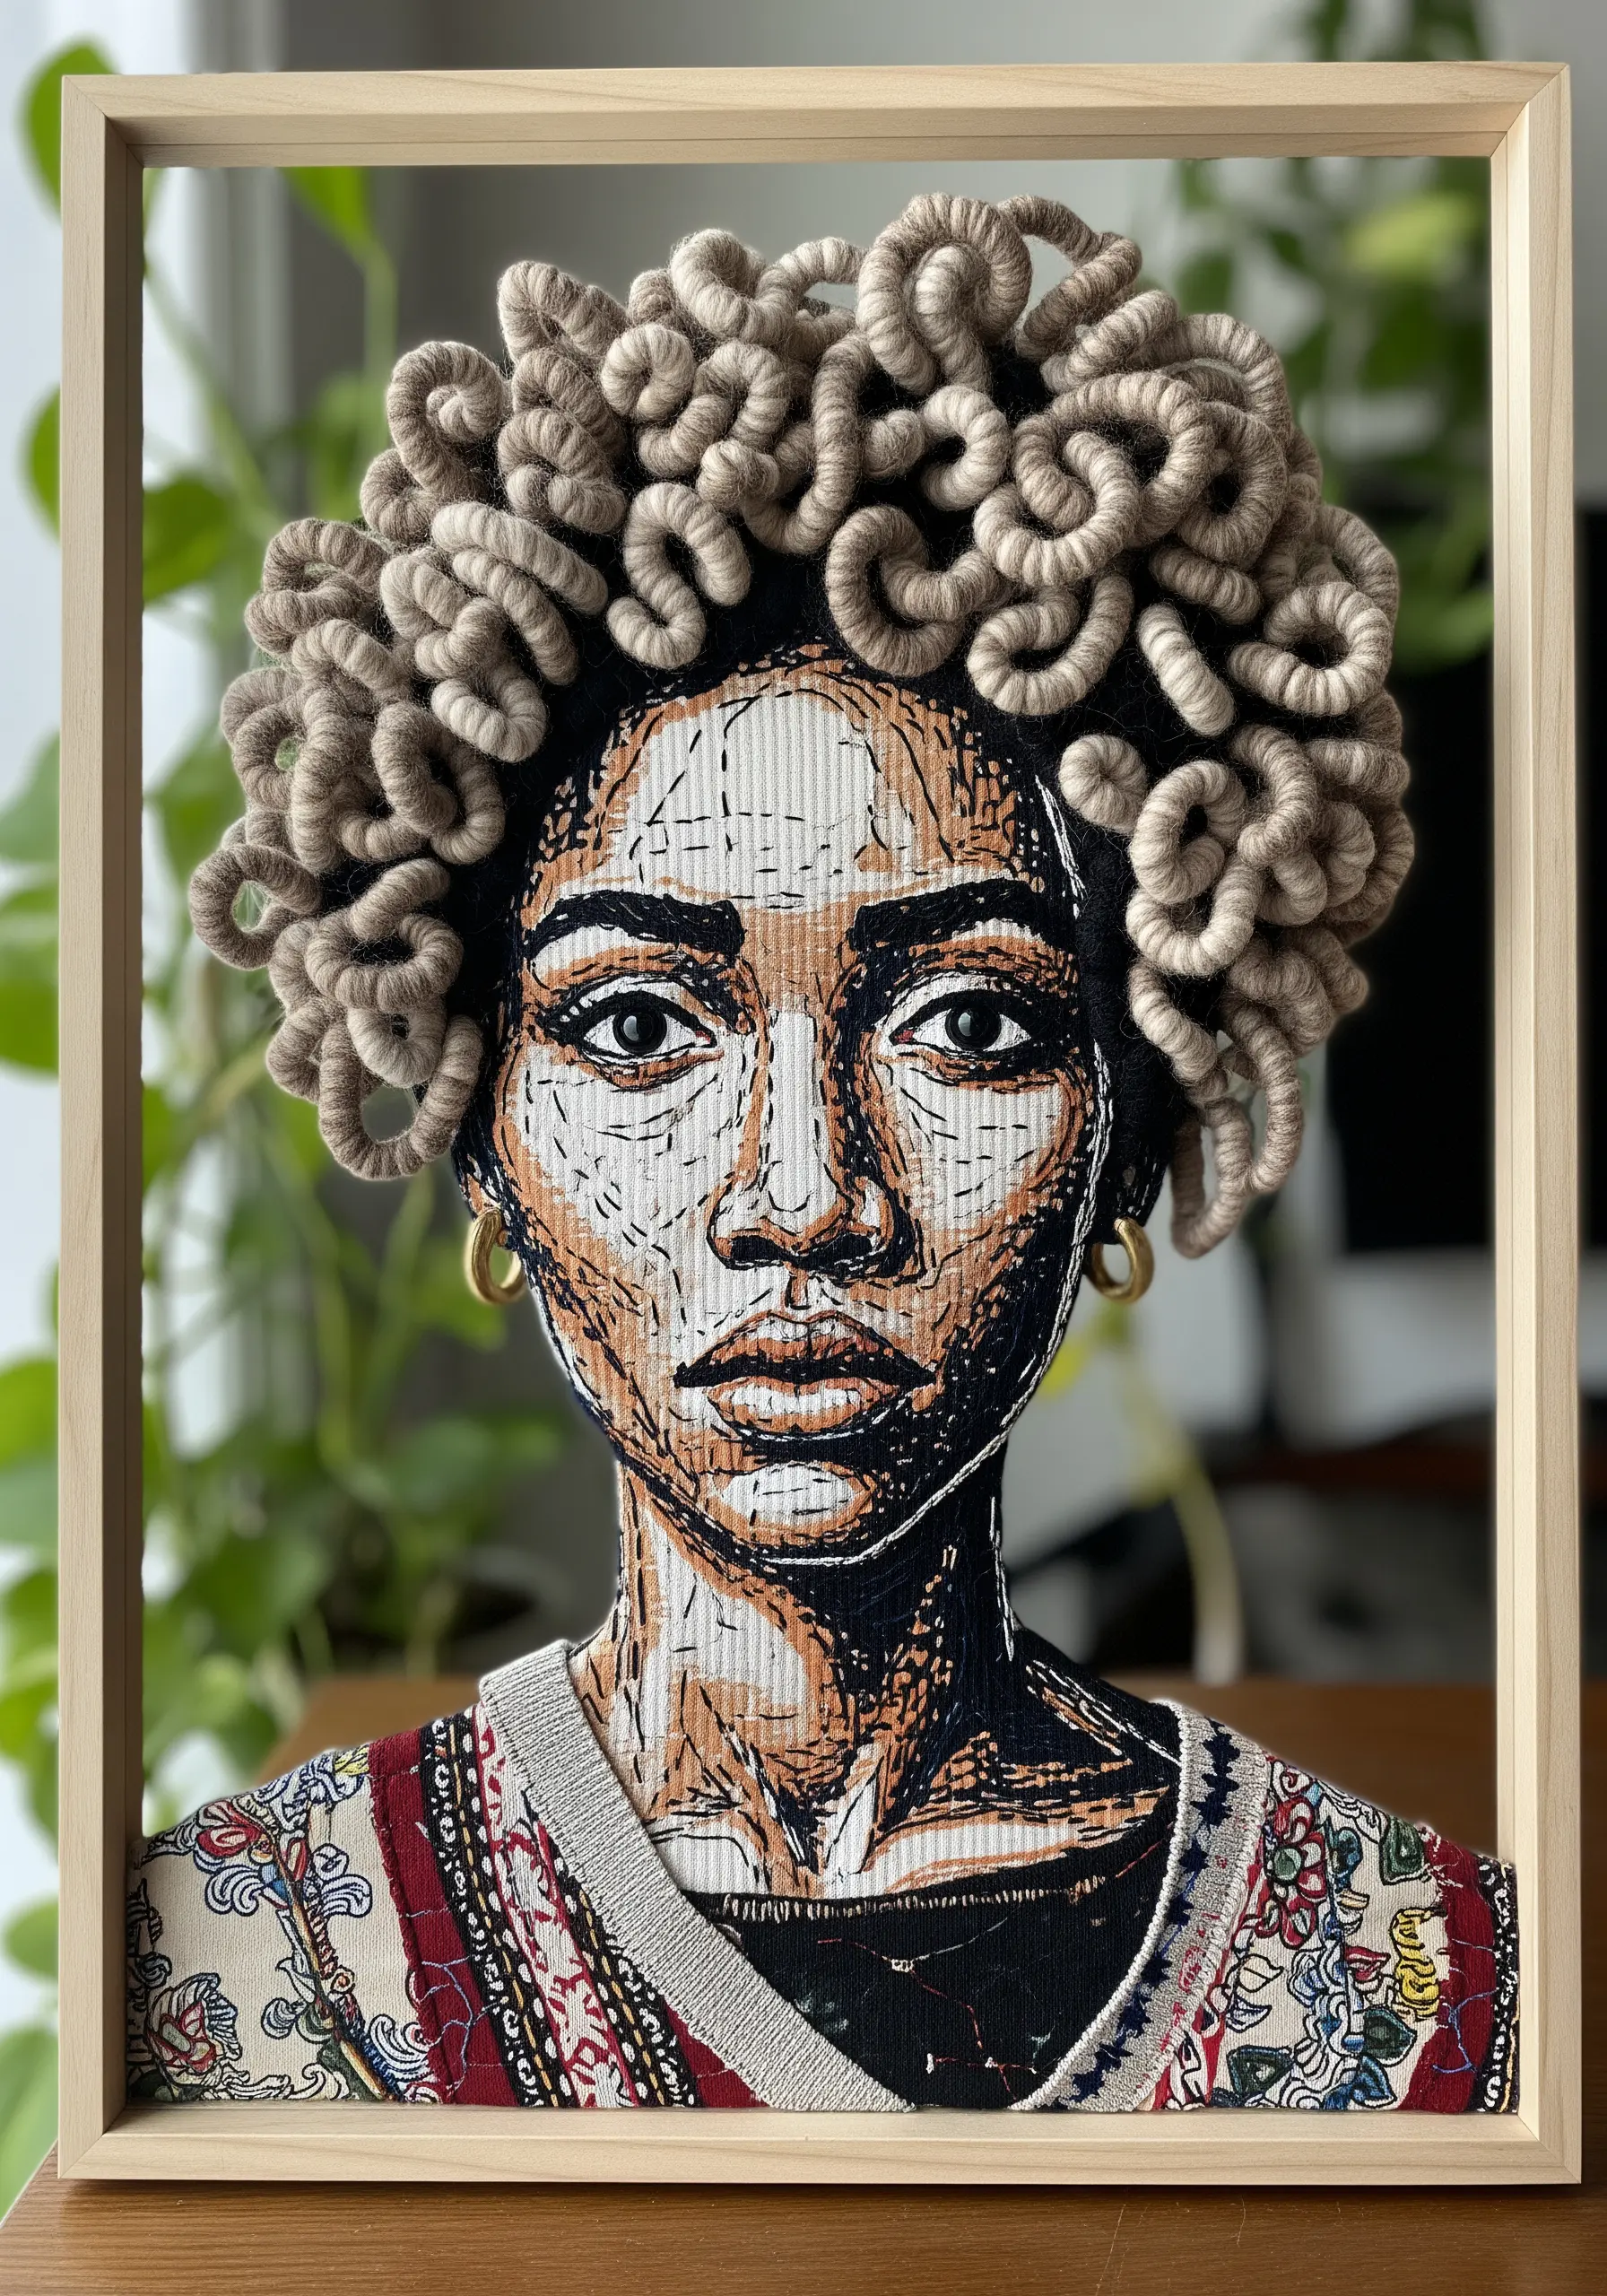
Give your portraits breathtaking dimension by creating sculptural hair from coiled yarn.
First, complete the flat embroidered or fabric-printed portrait on your base canvas.
Then, create the hair elements separately by wrapping yarn tightly around a thick cord or wire, securing the ends with fabric glue.
Coil these wrapped cords into desired shapes and stitch them firmly onto the canvas, allowing them to stand away from the surface. This technique turns the hair into a tactile, sculptural element that casts its own shadows.
4. Build a Coral Reef with Dimensional Stitches
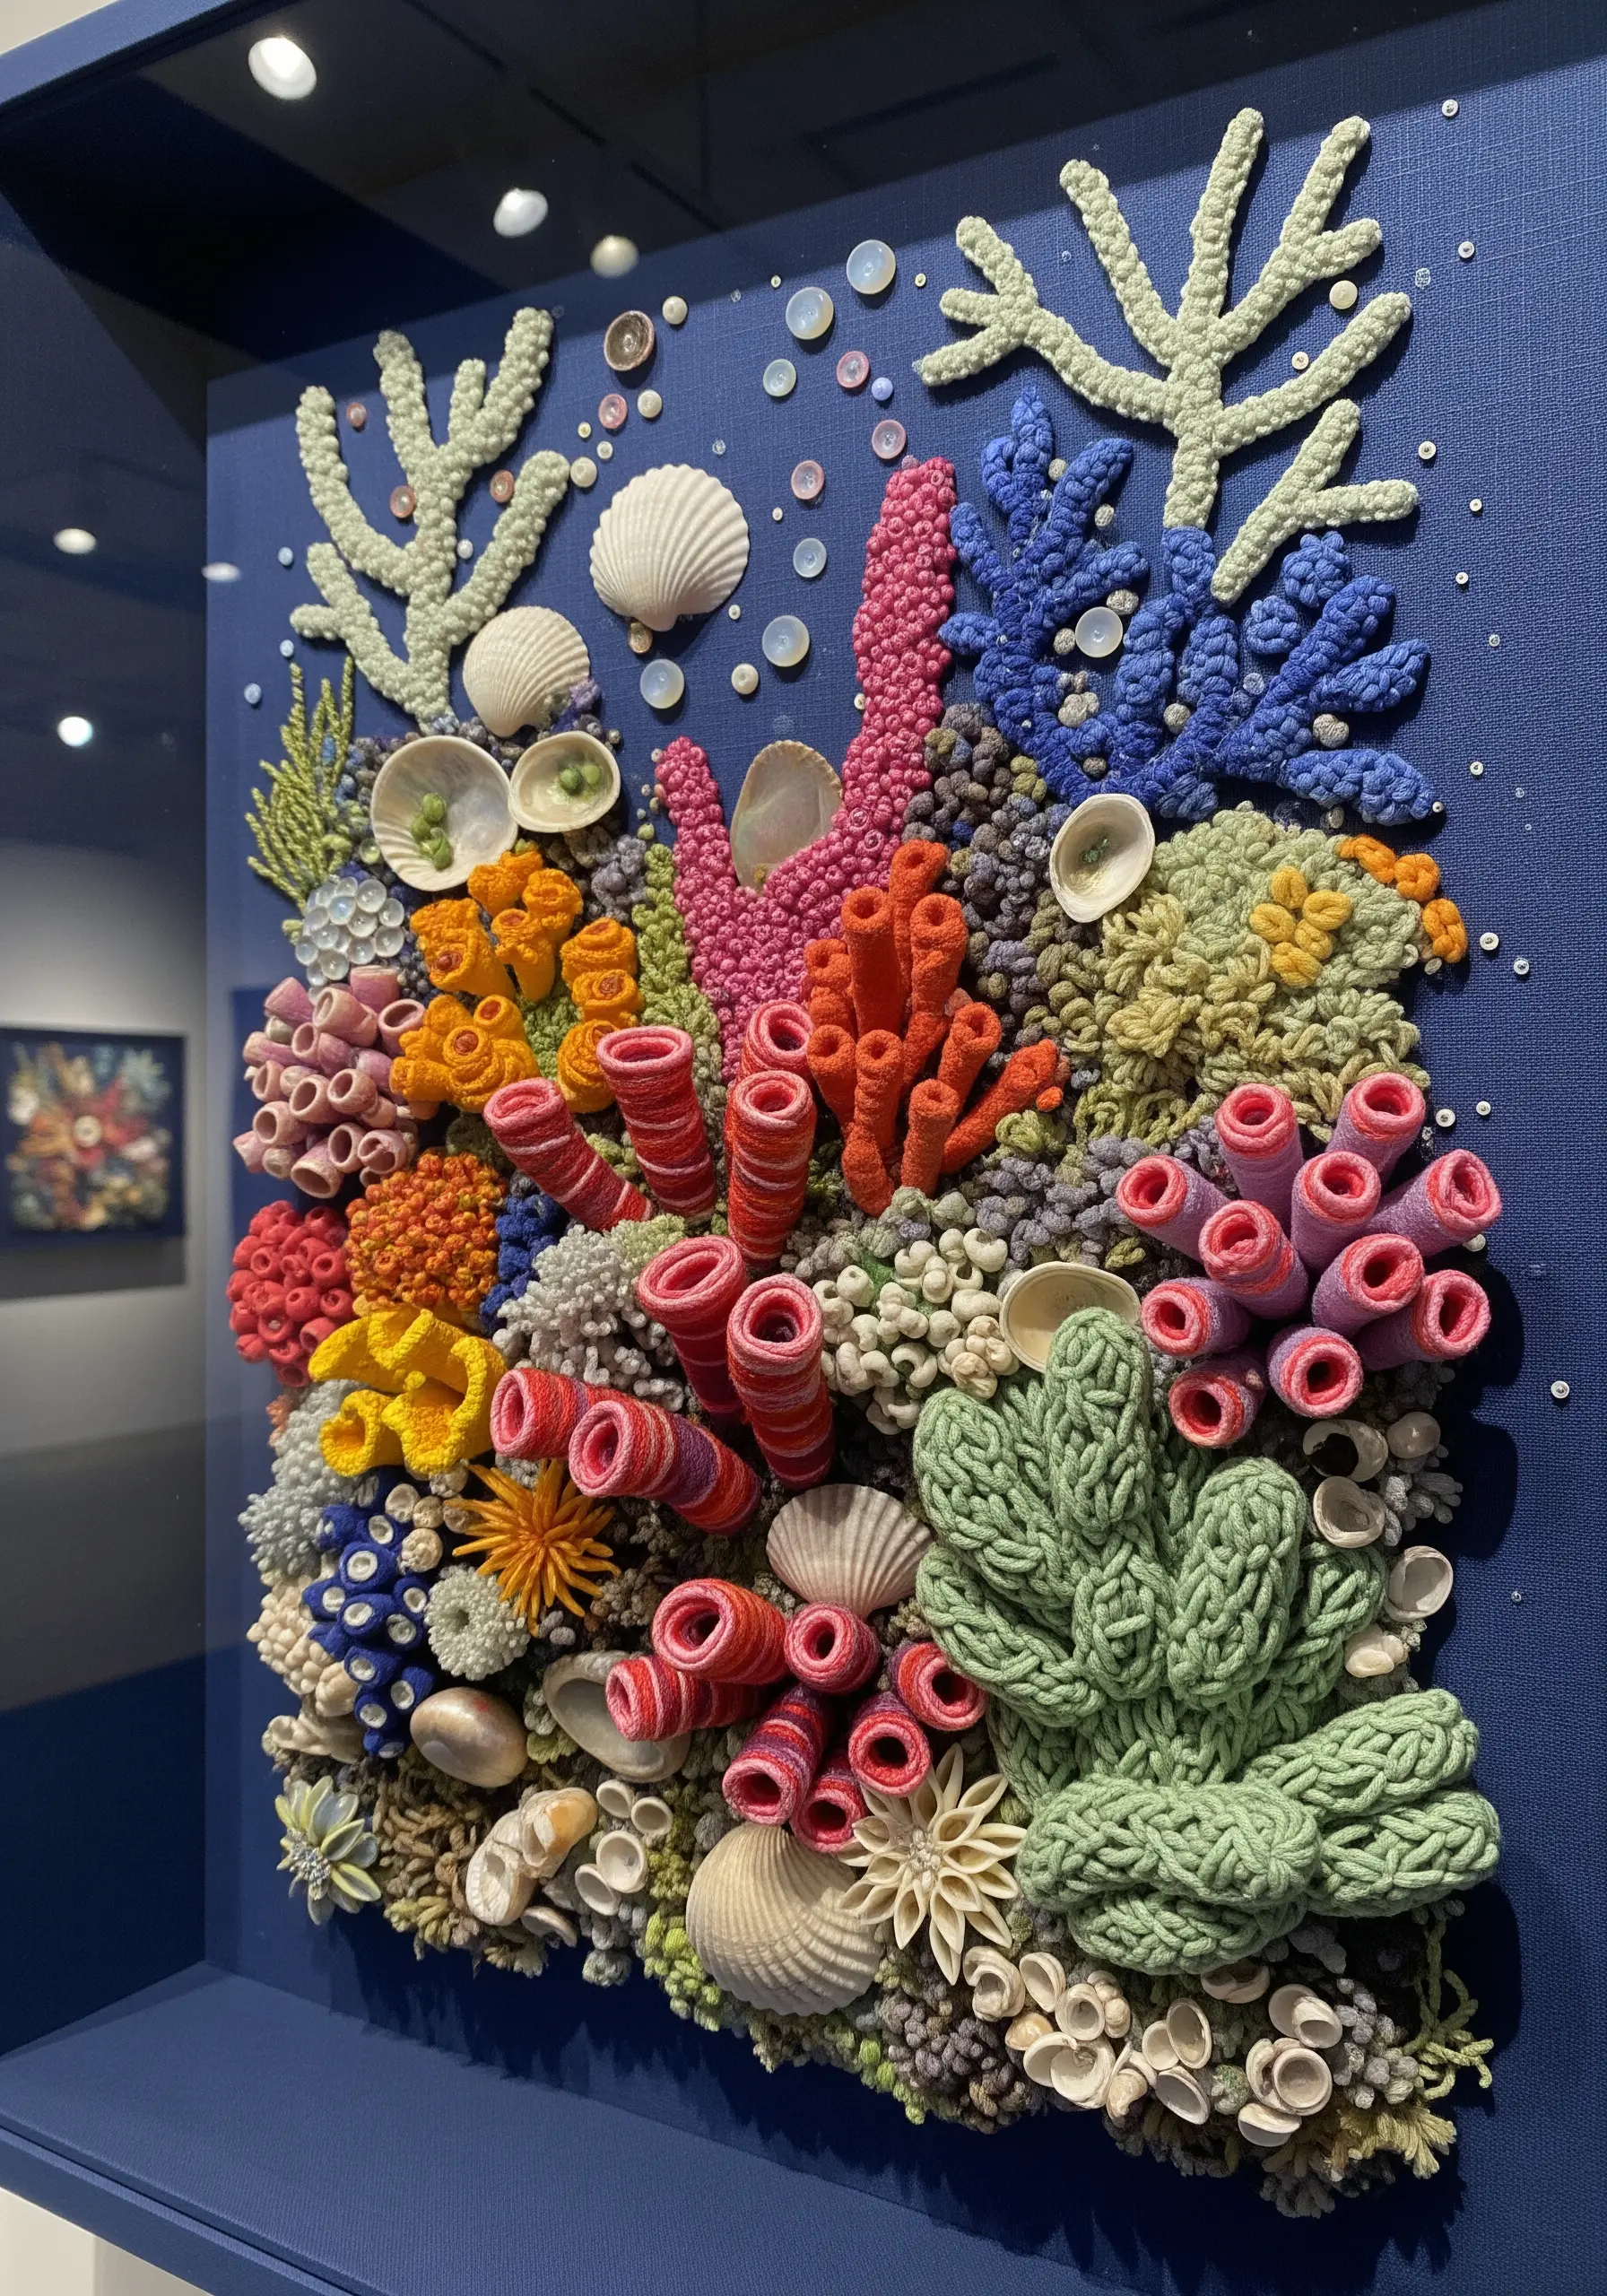
Construct an underwater world by combining raised embroidery techniques with found objects.
Use stumpwork—a technique involving padding and wire—to create the larger, tube-like coral structures that rise from the fabric.
For finer textures, use a dense field of French knots, turkey work, and bullion knots in vibrant colors.
Finally, integrate real miniature shells and mother-of-pearl beads, stitching them securely among your embroidered coral. This mix of handcrafted and natural elements gives the piece an authentic, tactile richness.
5. Illustrate a Galaxy with Couching and Crystals

Capture the depth of space by using black velvet as your canvas—its pile absorbs light, making your stitches and beads pop.
Create the swirling arms of the galaxy by couching down thick, textured yarns in shades of purple, pink, and white.
Instead of uniform stars, scatter a mix of Swarovski crystals, silver beads, and freshwater pearls of varying sizes to mimic constellations and cosmic dust.
Use a single strand of metallic thread to stitch faint constellation lines, connecting the larger crystals for a subtle, elegant detail.
6. Block-Fill with Yarn for Graphic Impact

Create bold, geometric wall decor by using yarn to fill large areas of color.
Start by drawing your abstract design onto a sturdy, neutral-colored canvas like linen or burlap.
Outline each shape with a thick, couched cord to create a clean, defined border.
Fill the shapes with chunky yarn using a simple satin stitch or weaving technique. The thickness of the yarn fills the space quickly and creates a plush, highly textured surface that feels both modern and handmade.
7. Frame Your Work with Geode-Inspired Layers
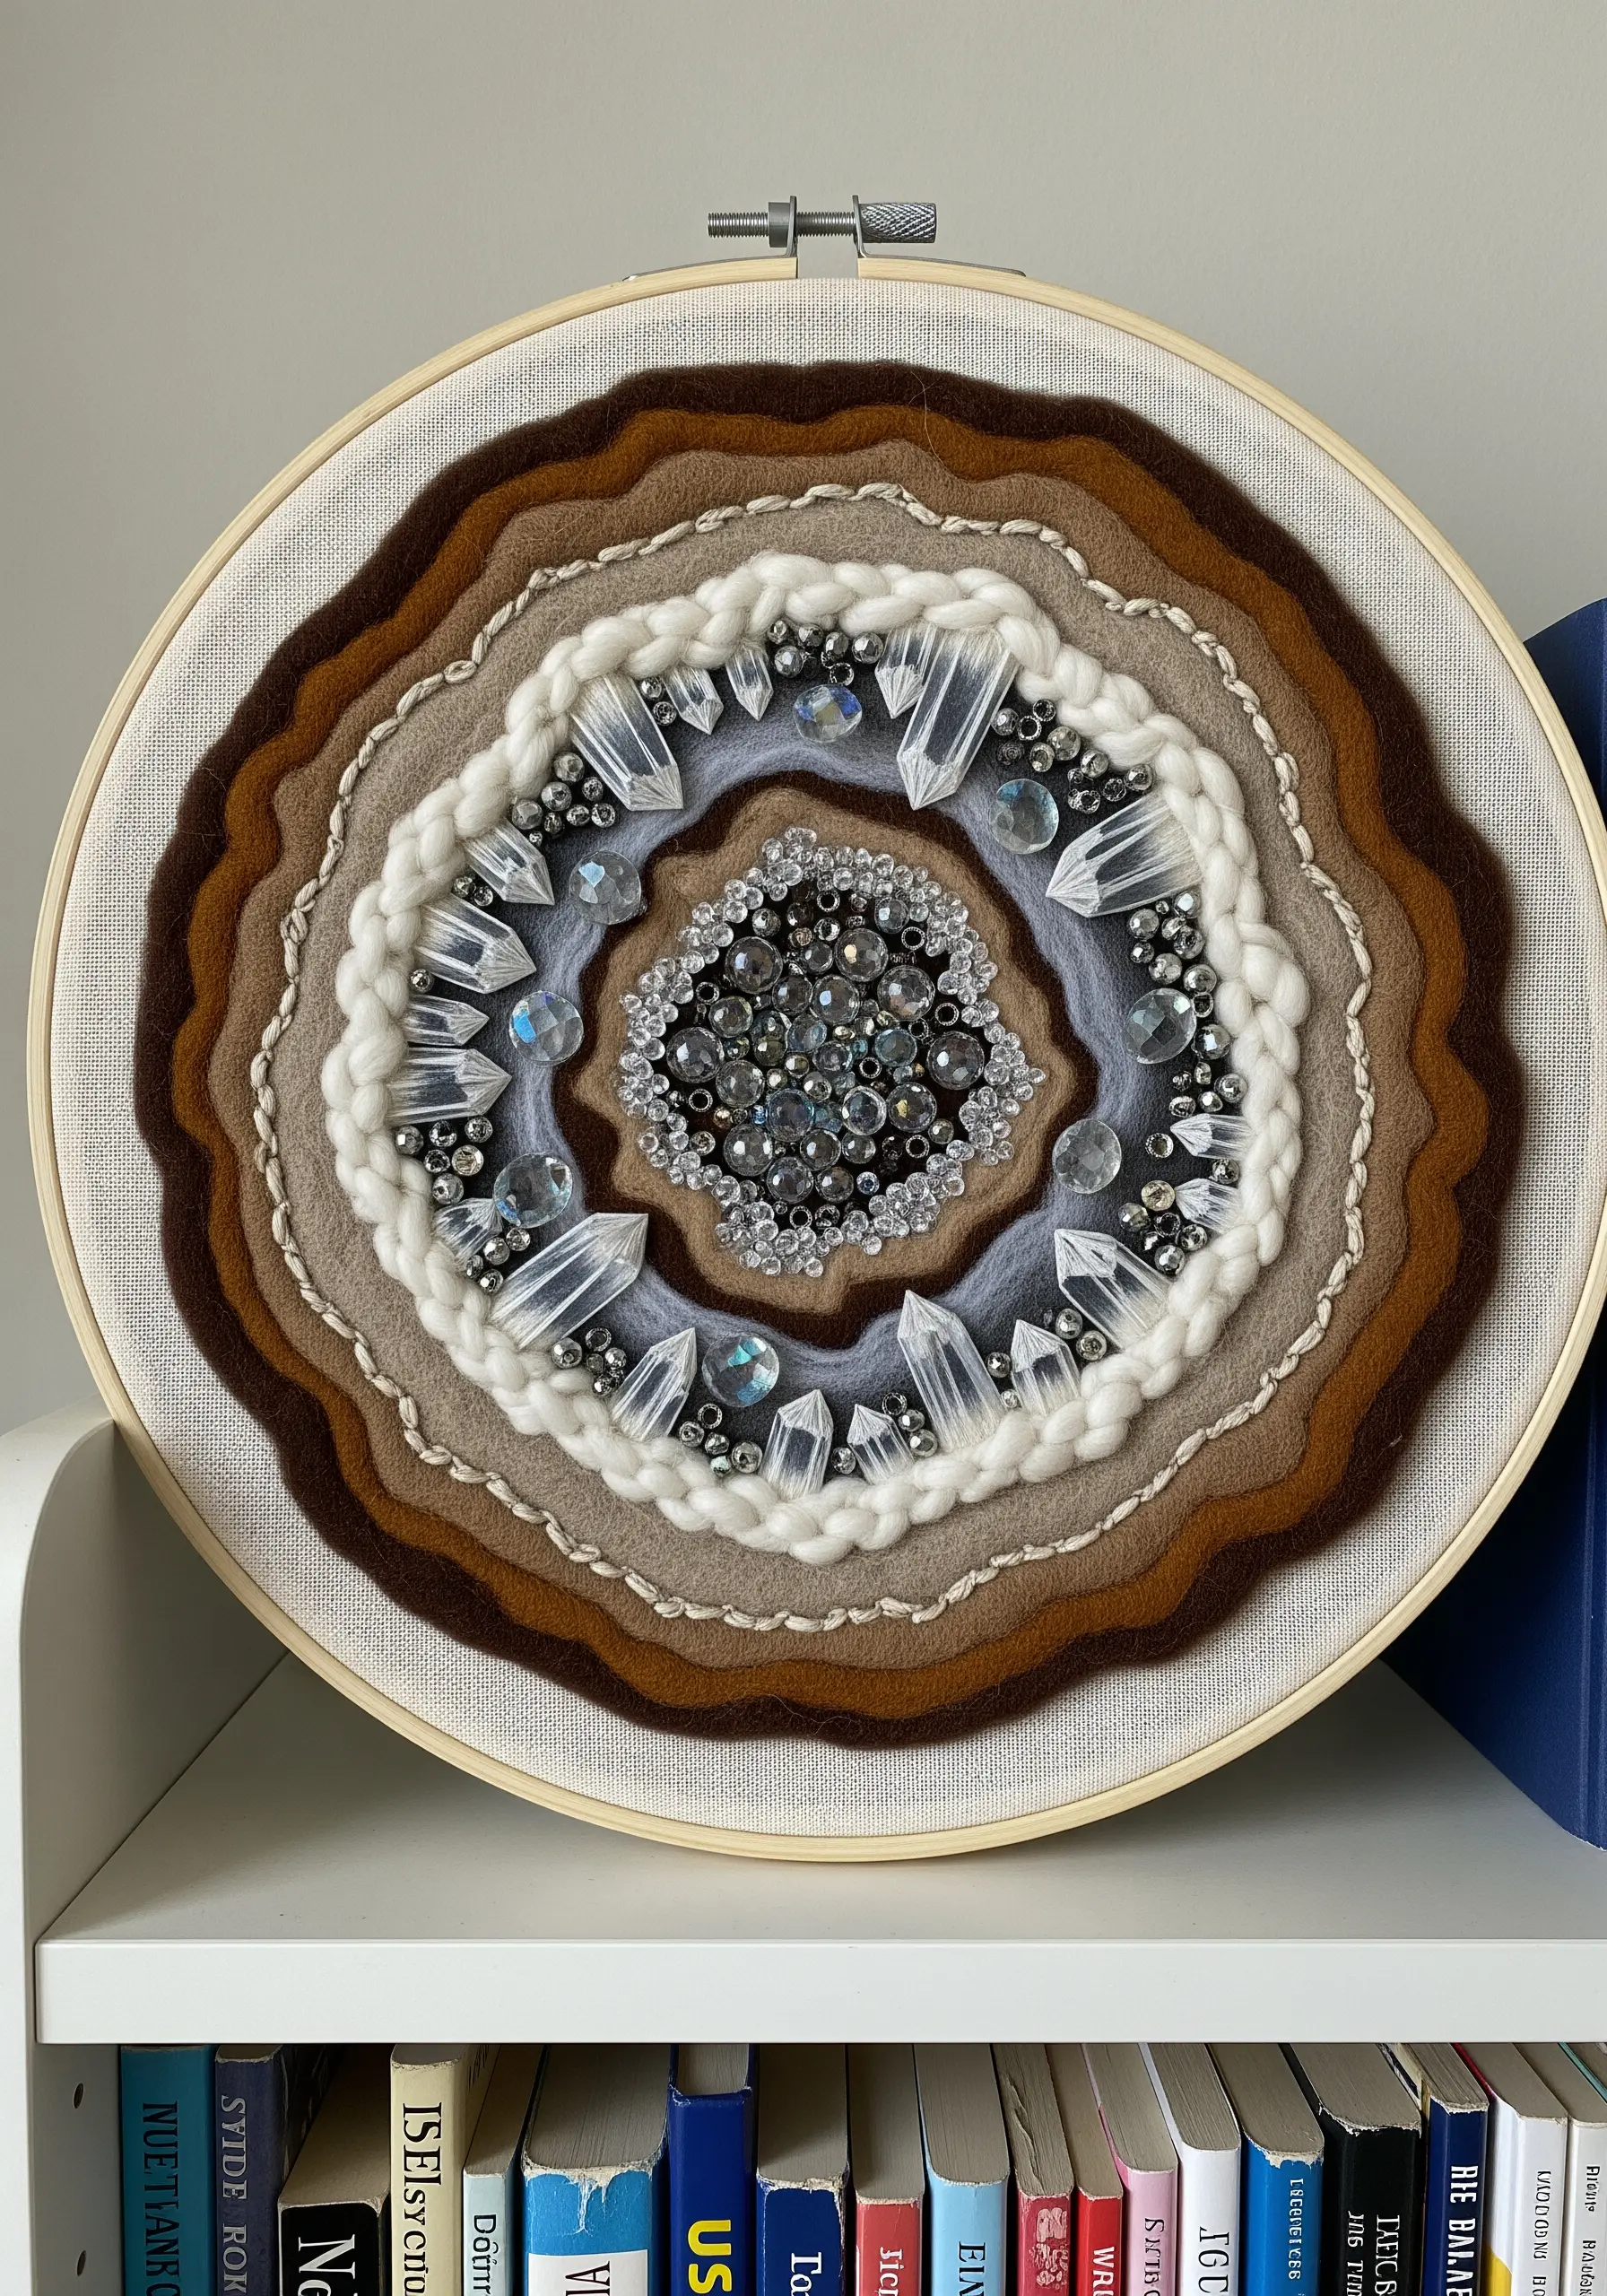
Create a stunning focal point by building concentric layers of texture, inspired by a natural geode.
Start from the center with a dense cluster of metallic beads and crystals.
Build outwards with rings of different materials: soft wool roving, couched chenille yarn, and smooth felt strips cut with a wavy edge.
Alternating between soft, light-absorbing textures (like felt) and hard, light-reflecting ones (like crystals) creates a mesmerizing sense of depth and luxury.
8. Integrate Macrame for a Bohemian Feel
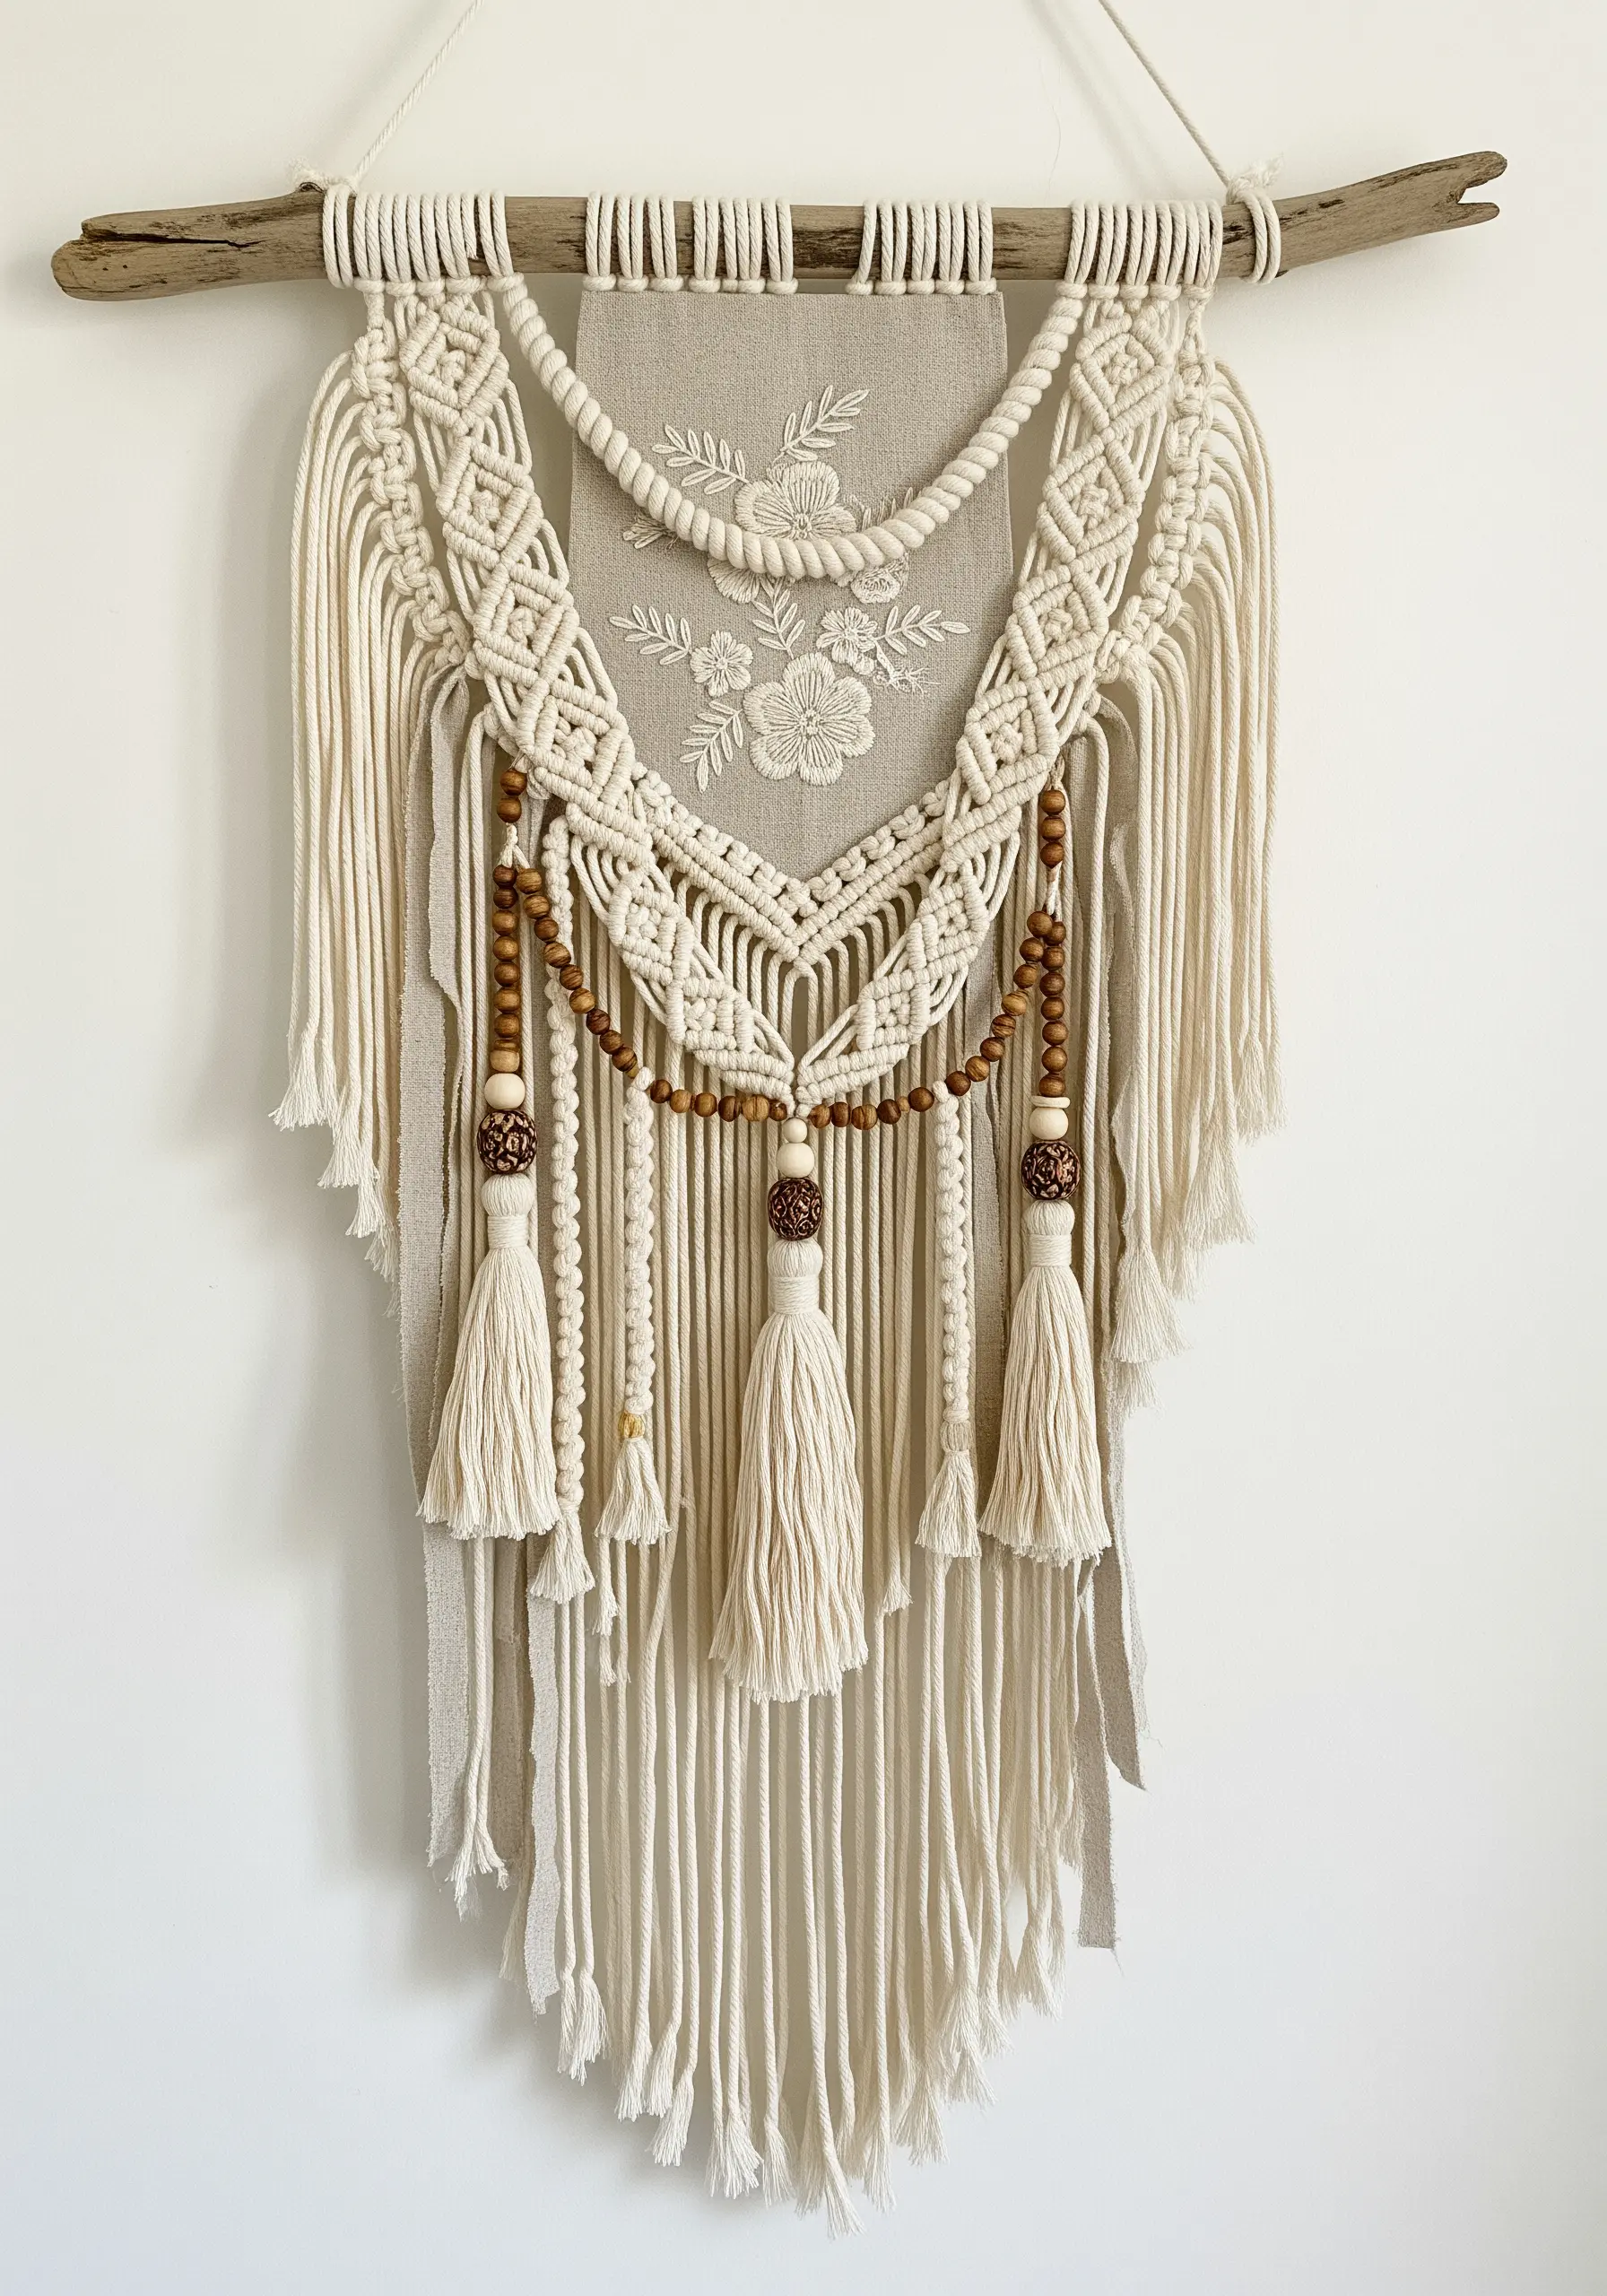
Combine the softness of embroidery with the structure of macrame for a truly unique wall hanging.
Embroider a central floral motif on a piece of heavy linen or canvas, leaving ample space around the edges.
Mount the finished embroidery onto a piece of driftwood or a dowel, then use the same support to attach your macrame cords.
Work your macrame knots around the embroidered panel, adding wooden beads and tassels that complement the tones in your threadwork. This frames the delicate stitching with bold, rustic texture.
9. Elevate Line Art with a Single 3D Element

Make minimalist art pop by adding one unexpected, three-dimensional object to your design.
Create a simple, continuous line portrait or abstract shape by couching a thick black yarn or cord onto a plain white canvas.
Then, interrupt the clean line with a single, high-contrast element like a glossy red ceramic heart, a polished stone, or a vintage button.
Securely attach it with strong, invisible thread or adhesive. The simplicity of the composition makes the single textured object the undeniable focal point.
10. Weave Sheer Fabric to Depict Water

Capture the movement and translucency of water by layering and manipulating sheer fabrics.
Create an ombré background by layering strips of hand-dyed organza or chiffon, from dark blue to light aqua.
For the seafoam, create a textured mass of loops and knots using a soft, thick white yarn, allowing it to sit loosely on the surface.
Scatter tiny, clear seed beads across the fabric to represent sea spray. This technique creates a sense of motion and light that thread alone cannot achieve.
11. Curate a Triptych of Pure Texture

Tell a story not with images, but with a progression of textures in a series of hoops.
Dedicate each hoop to a single material or technique. In the first, use a dense, uniform texture like woven yarn in a single color.
In the second, create a varied, pebbly surface with a mix of French knots, seed beads, and wooden pearls in earthy tones.
In the third, create an abstract collage using frayed scraps of linen, burlap, and canvas. Displaying them together turns a simple texture study into a sophisticated piece of abstract yarn wall art.
12. Design a Mandala with Upcycled Denim

Create a stunning, eco-conscious mandala by using the varied shades and textures of old denim.
Cut petals and geometric shapes from different pairs of jeans—light wash, dark wash, and even the patterned inside pockets.
Arrange these pieces in a radial pattern on a circular base and stitch them down.
Embellish the design with metallic studs, pearl beads, and couched white cord to unify the composition and add a touch of polished detail that contrasts beautifully with the rugged denim.
13. Sculpt Clouds with Needle Felting

Create soft, voluminous clouds by needle-felting wool roving directly onto your embroidered landscape.
After stitching the sky and sun, take loose tufts of wool roving in shades of orange, pink, and purple.
Arrange them into cloud shapes on your fabric and use a felting needle to repeatedly poke the fibers into the base cloth until they are secure and sculpted.
This technique produces a seamless, painterly blend of color and a fluffy texture that perfectly mimics sunset clouds.
14. Use Appliqué for Urban Architecture

Capture the sharp lines of a cityscape by using fabric appliqué for the buildings.
Select fabrics with subtle woven patterns, like tweed or herringbone, to represent the texture of concrete and glass.
Cut out your skyscraper shapes and affix them to a black canvas background using an iron-on adhesive for crisp edges.
Then, use bright yellow and red thread to add details like windows and light trails with simple straight stitches. The contrast between the broad fabric shapes and fine stitch work creates a dynamic, graphic effect.
15. Construct 3D Forms with Patchwork and Beading
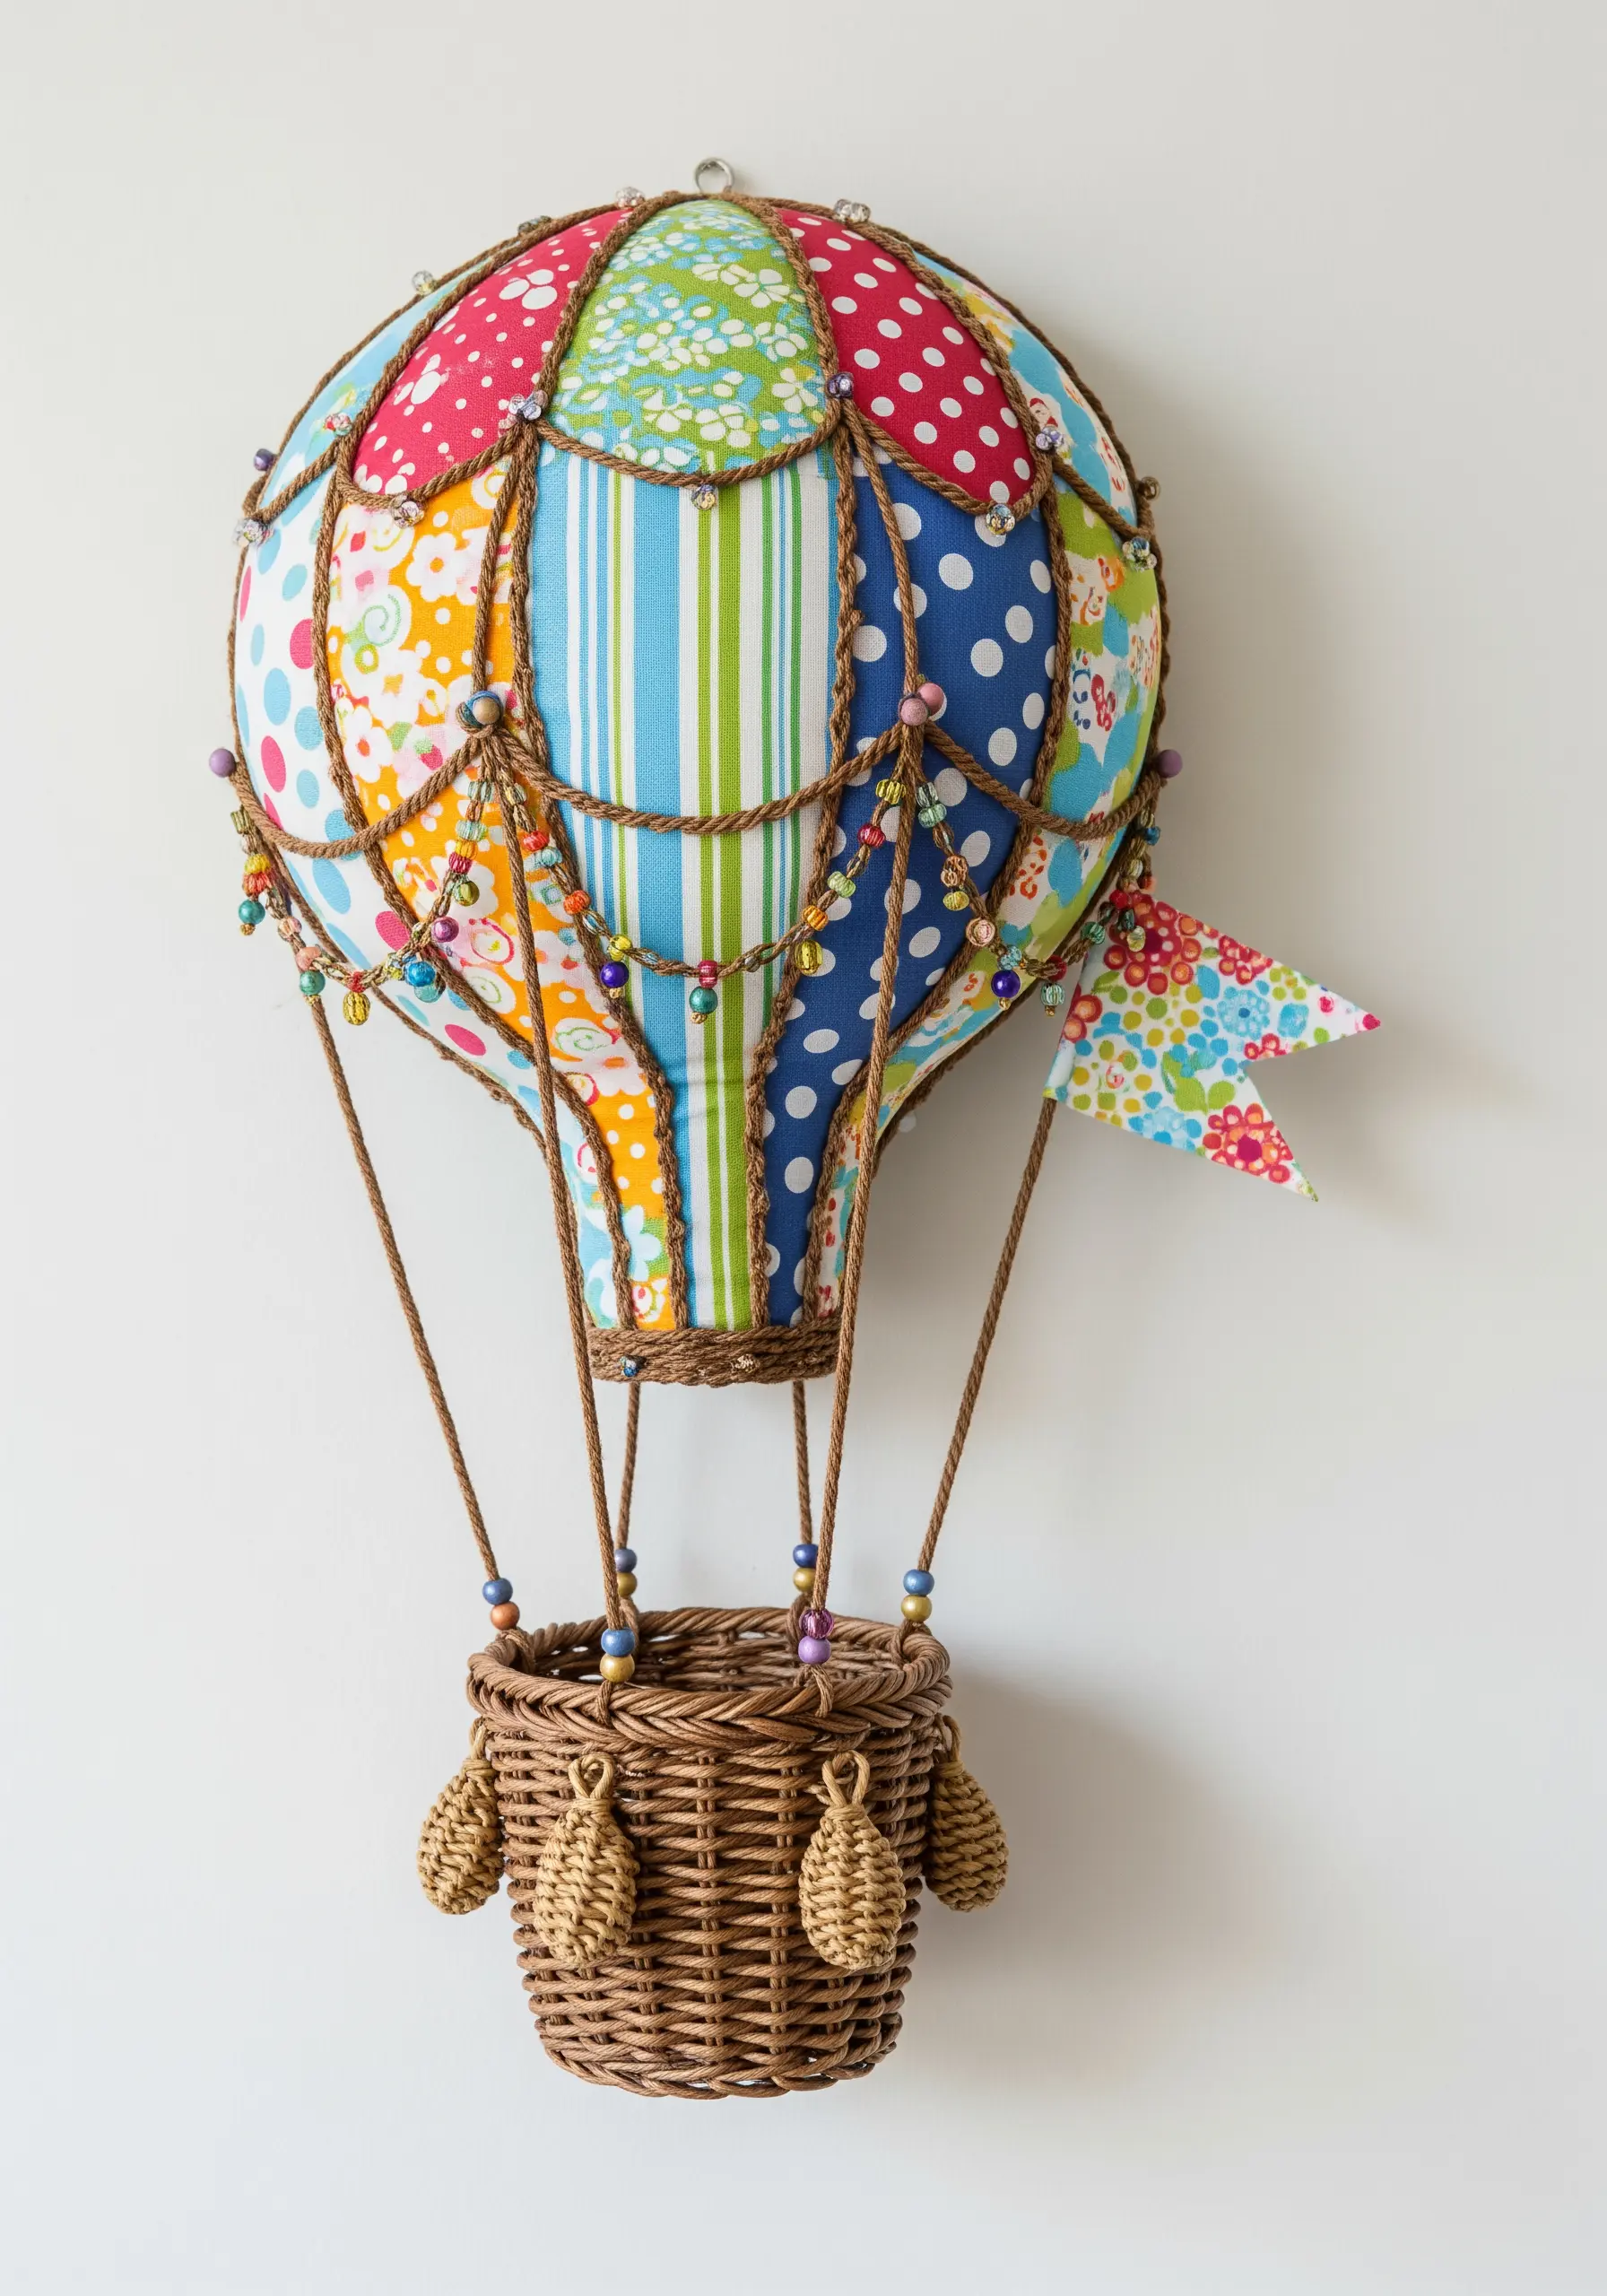
Move your embroidery off the wall by constructing a three-dimensional object like a hot air balloon.
Create the balloon’s envelope using patchwork, sewing together colorful printed fabric gores to form a sphere and stuffing it lightly.
Use braided cord or yarn to create the balloon’s ropes, embellishing the seams with strings of colorful beads.
Attach a small wicker basket to complete the sculpture. This approach turns embroidery and fabric craft into a playful, decorative object.
16. Create a Forest Floor with Turkey Work and Found Objects
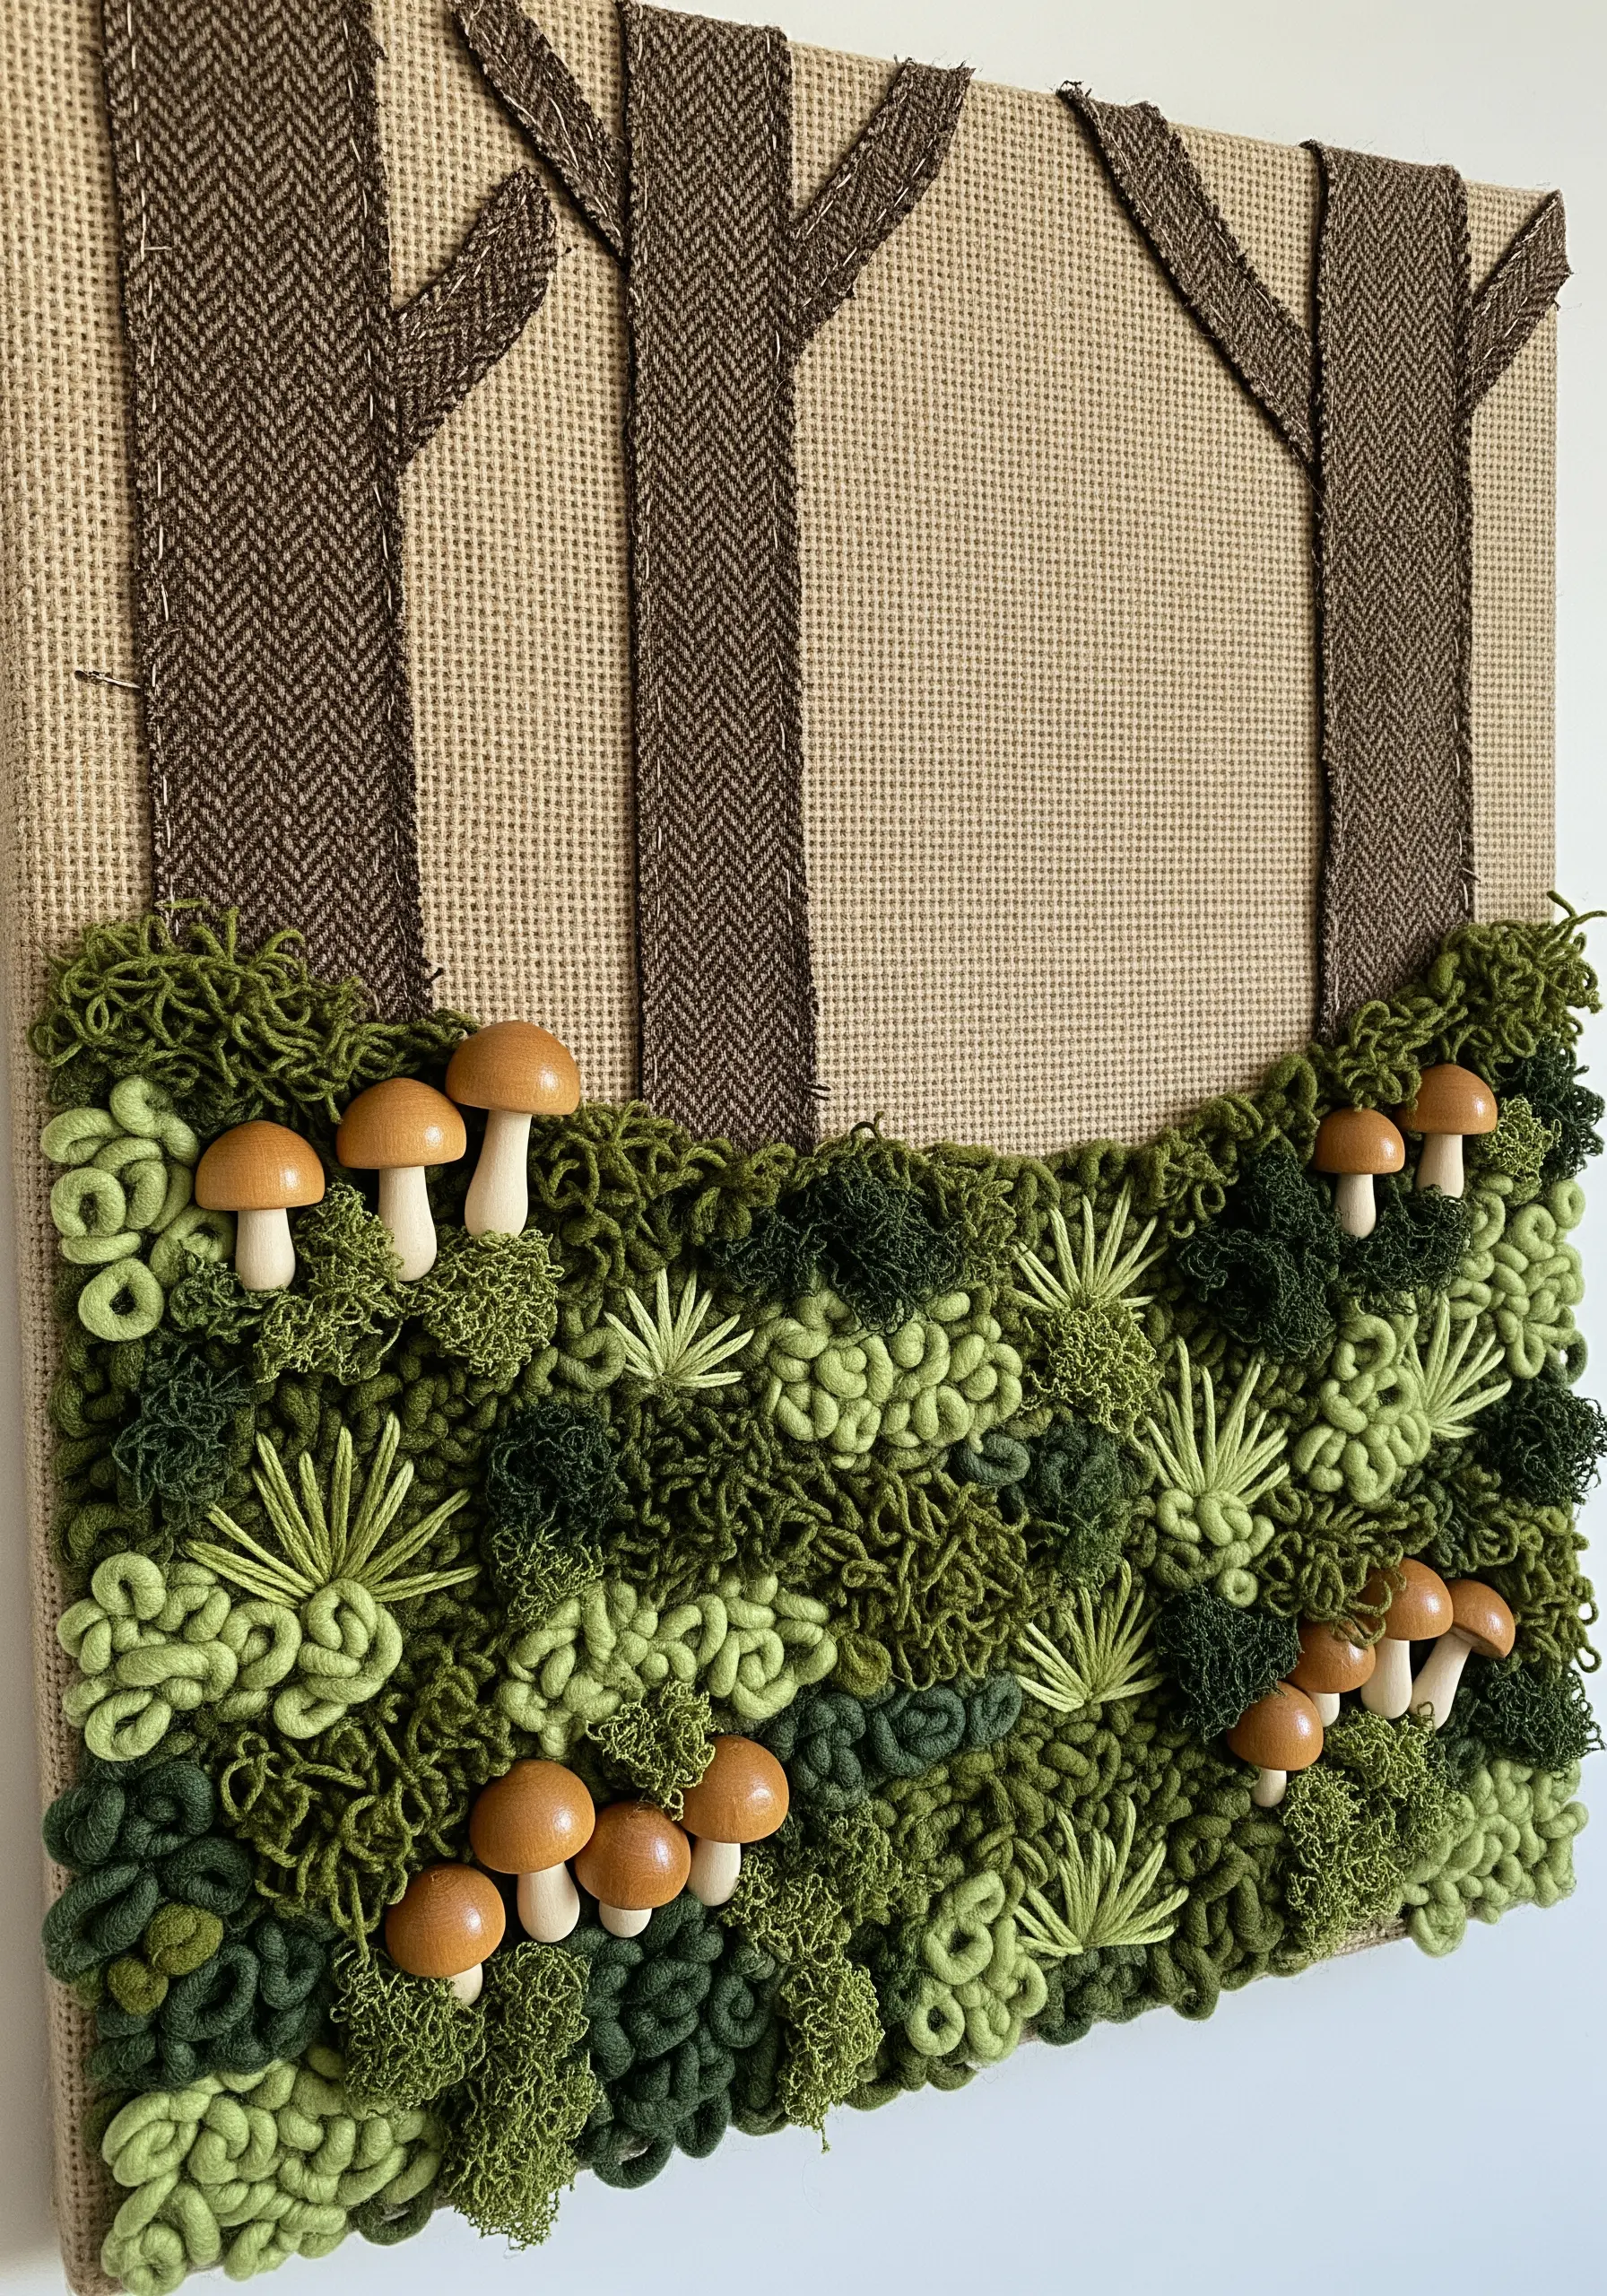
Build a lush, tactile forest floor by combining various yarn textures and natural elements.
Use different shades of green yarn to create a base of moss and grass with turkey work (ghiordes knot) stitches, trimming the loops to varying heights for a more organic look.
Incorporate pre-made moss and tiny wooden mushrooms, stitching them securely into the dense yarn.
For the tree trunks, use strips of tweed or herringbone fabric appliqué to add a contrasting, structured texture to the nature-texture wall hanging.
17. Achieve Art Deco Elegance with Ribbon and Metallics
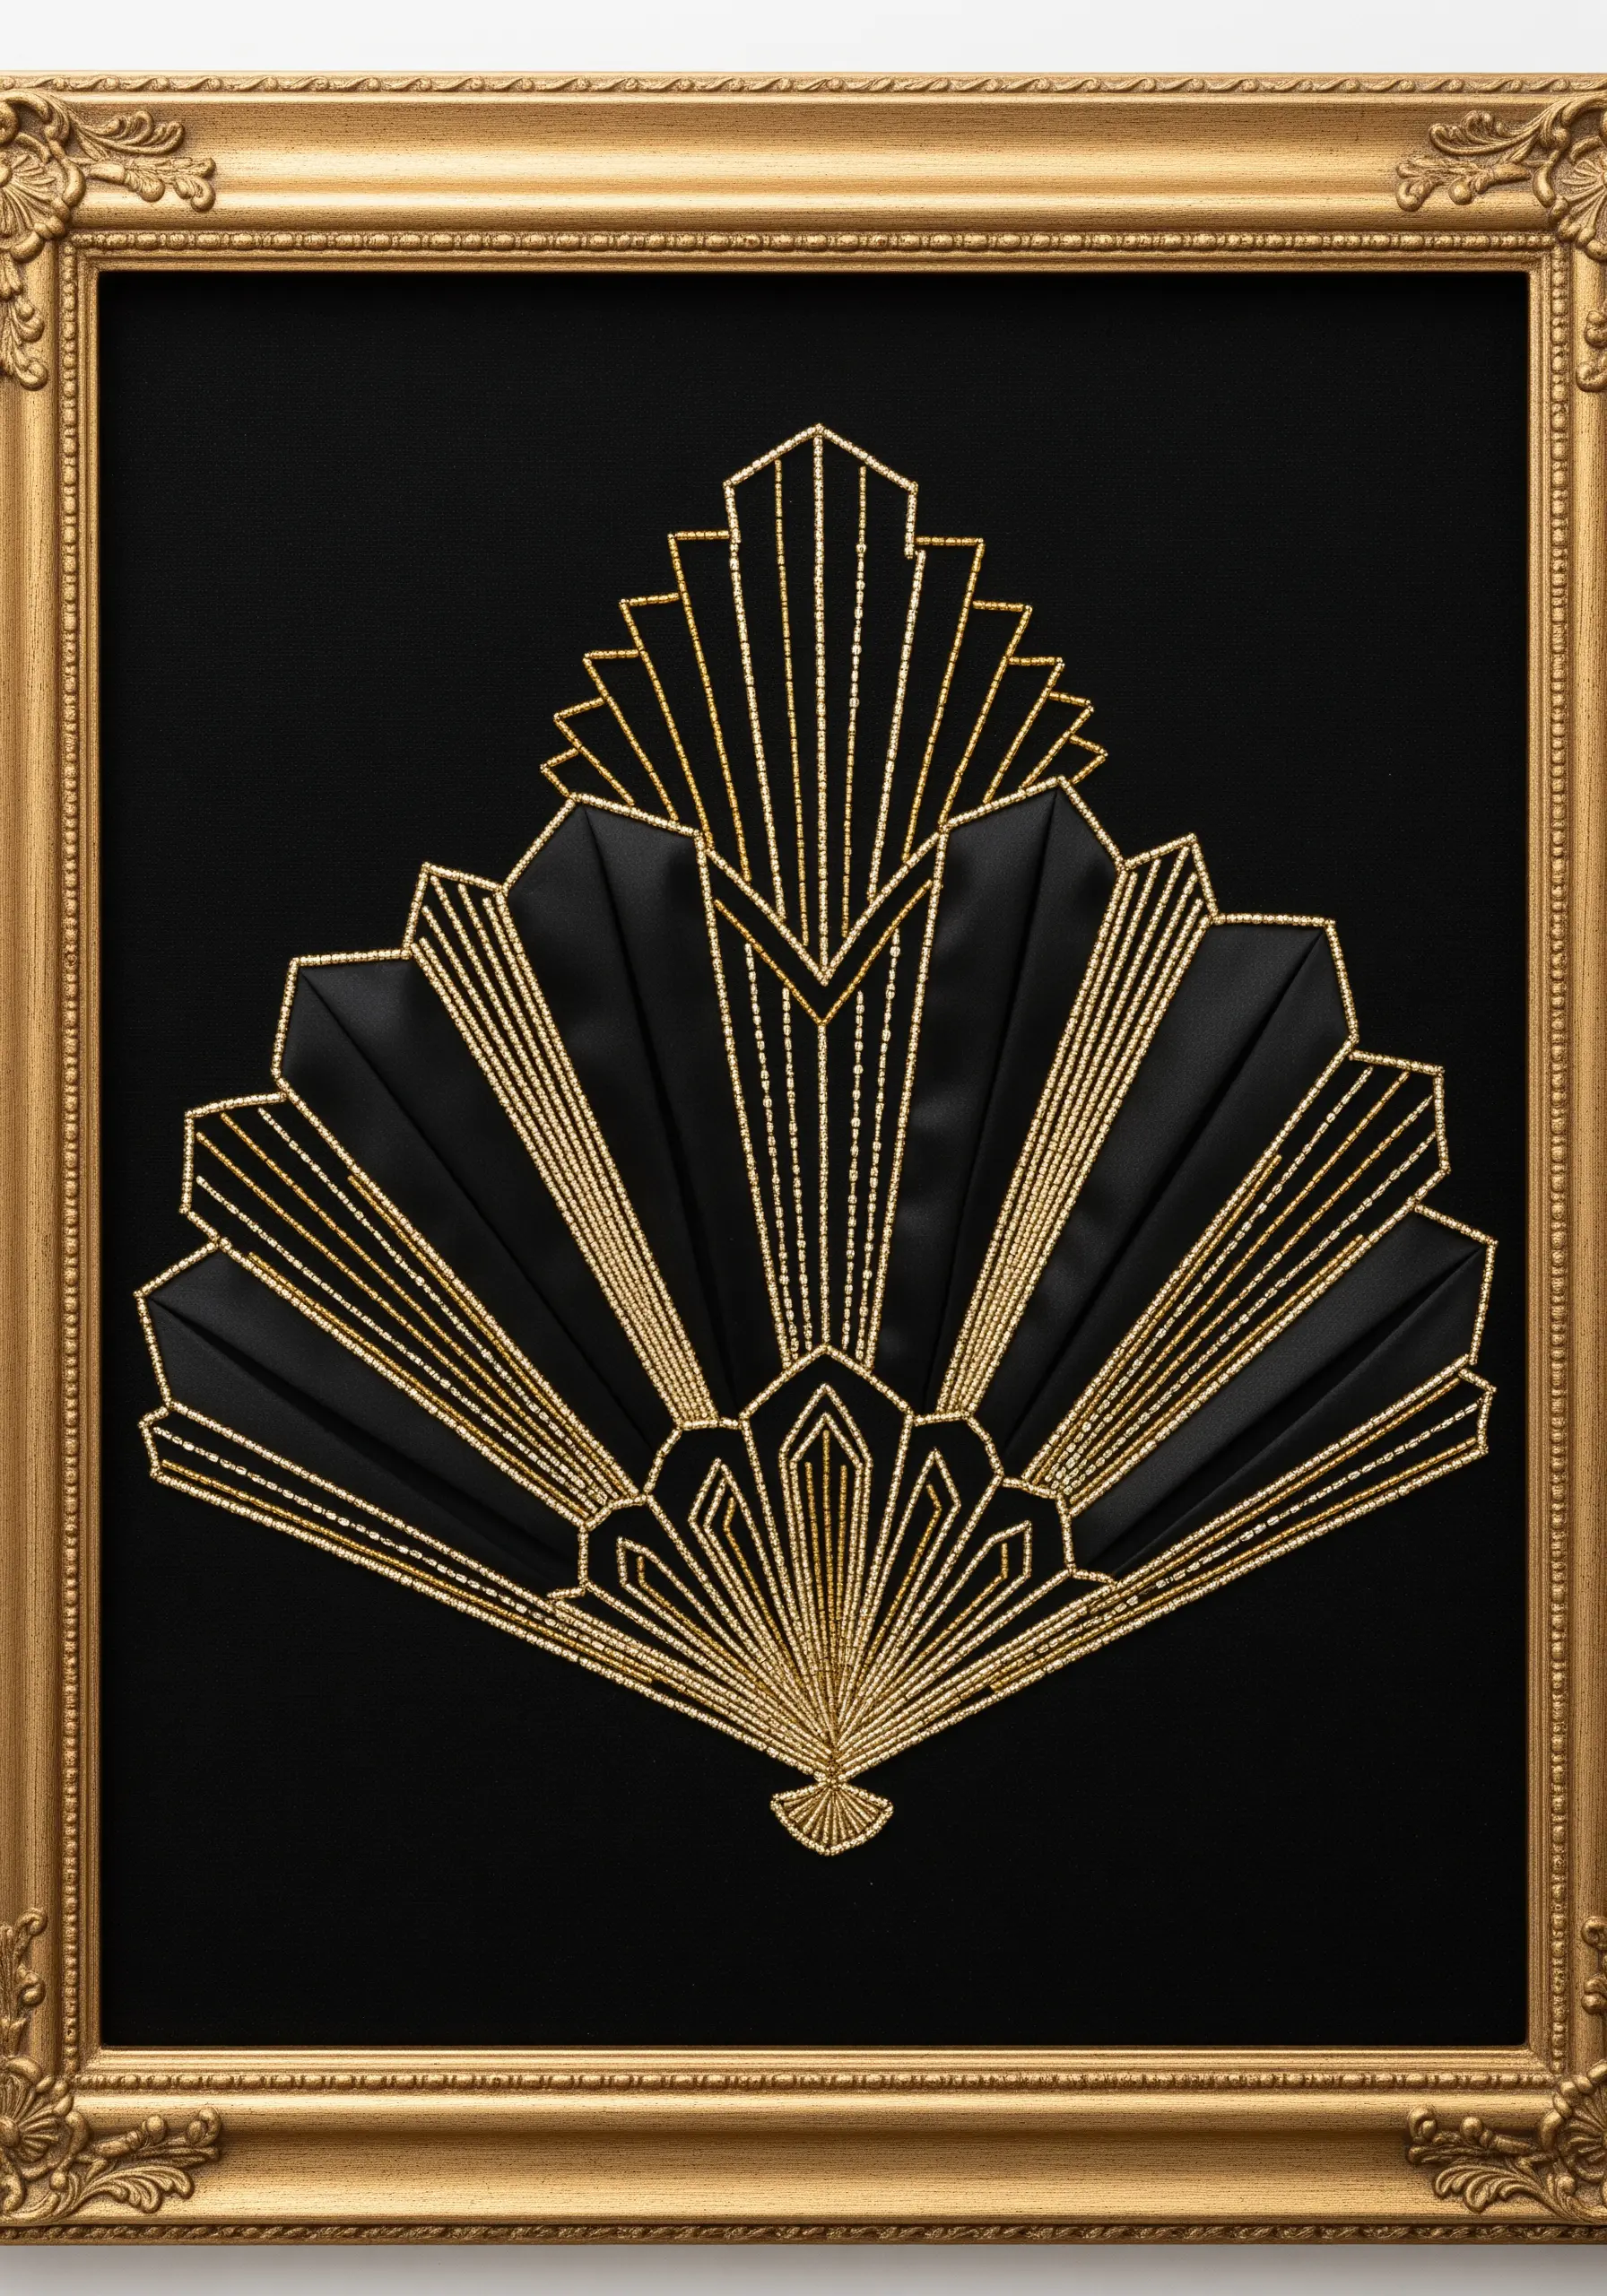
Capture the glamour of the Art Deco era by pairing satin ribbon with precise metallic threadwork.
Use black fabric as your base to create a dramatic contrast.
Create the bold, fanned shapes of your design with folded black satin ribbon, carefully stitching it in place along the pleats to create dimension and shadow.
Then, outline the entire design with pristine straight stitches using a high-shine gold metallic thread. The interplay between the ribbon’s soft sheen and the thread’s sharp sparkle is pure elegance.
18. Organize Textures in a Shadow Box Grid
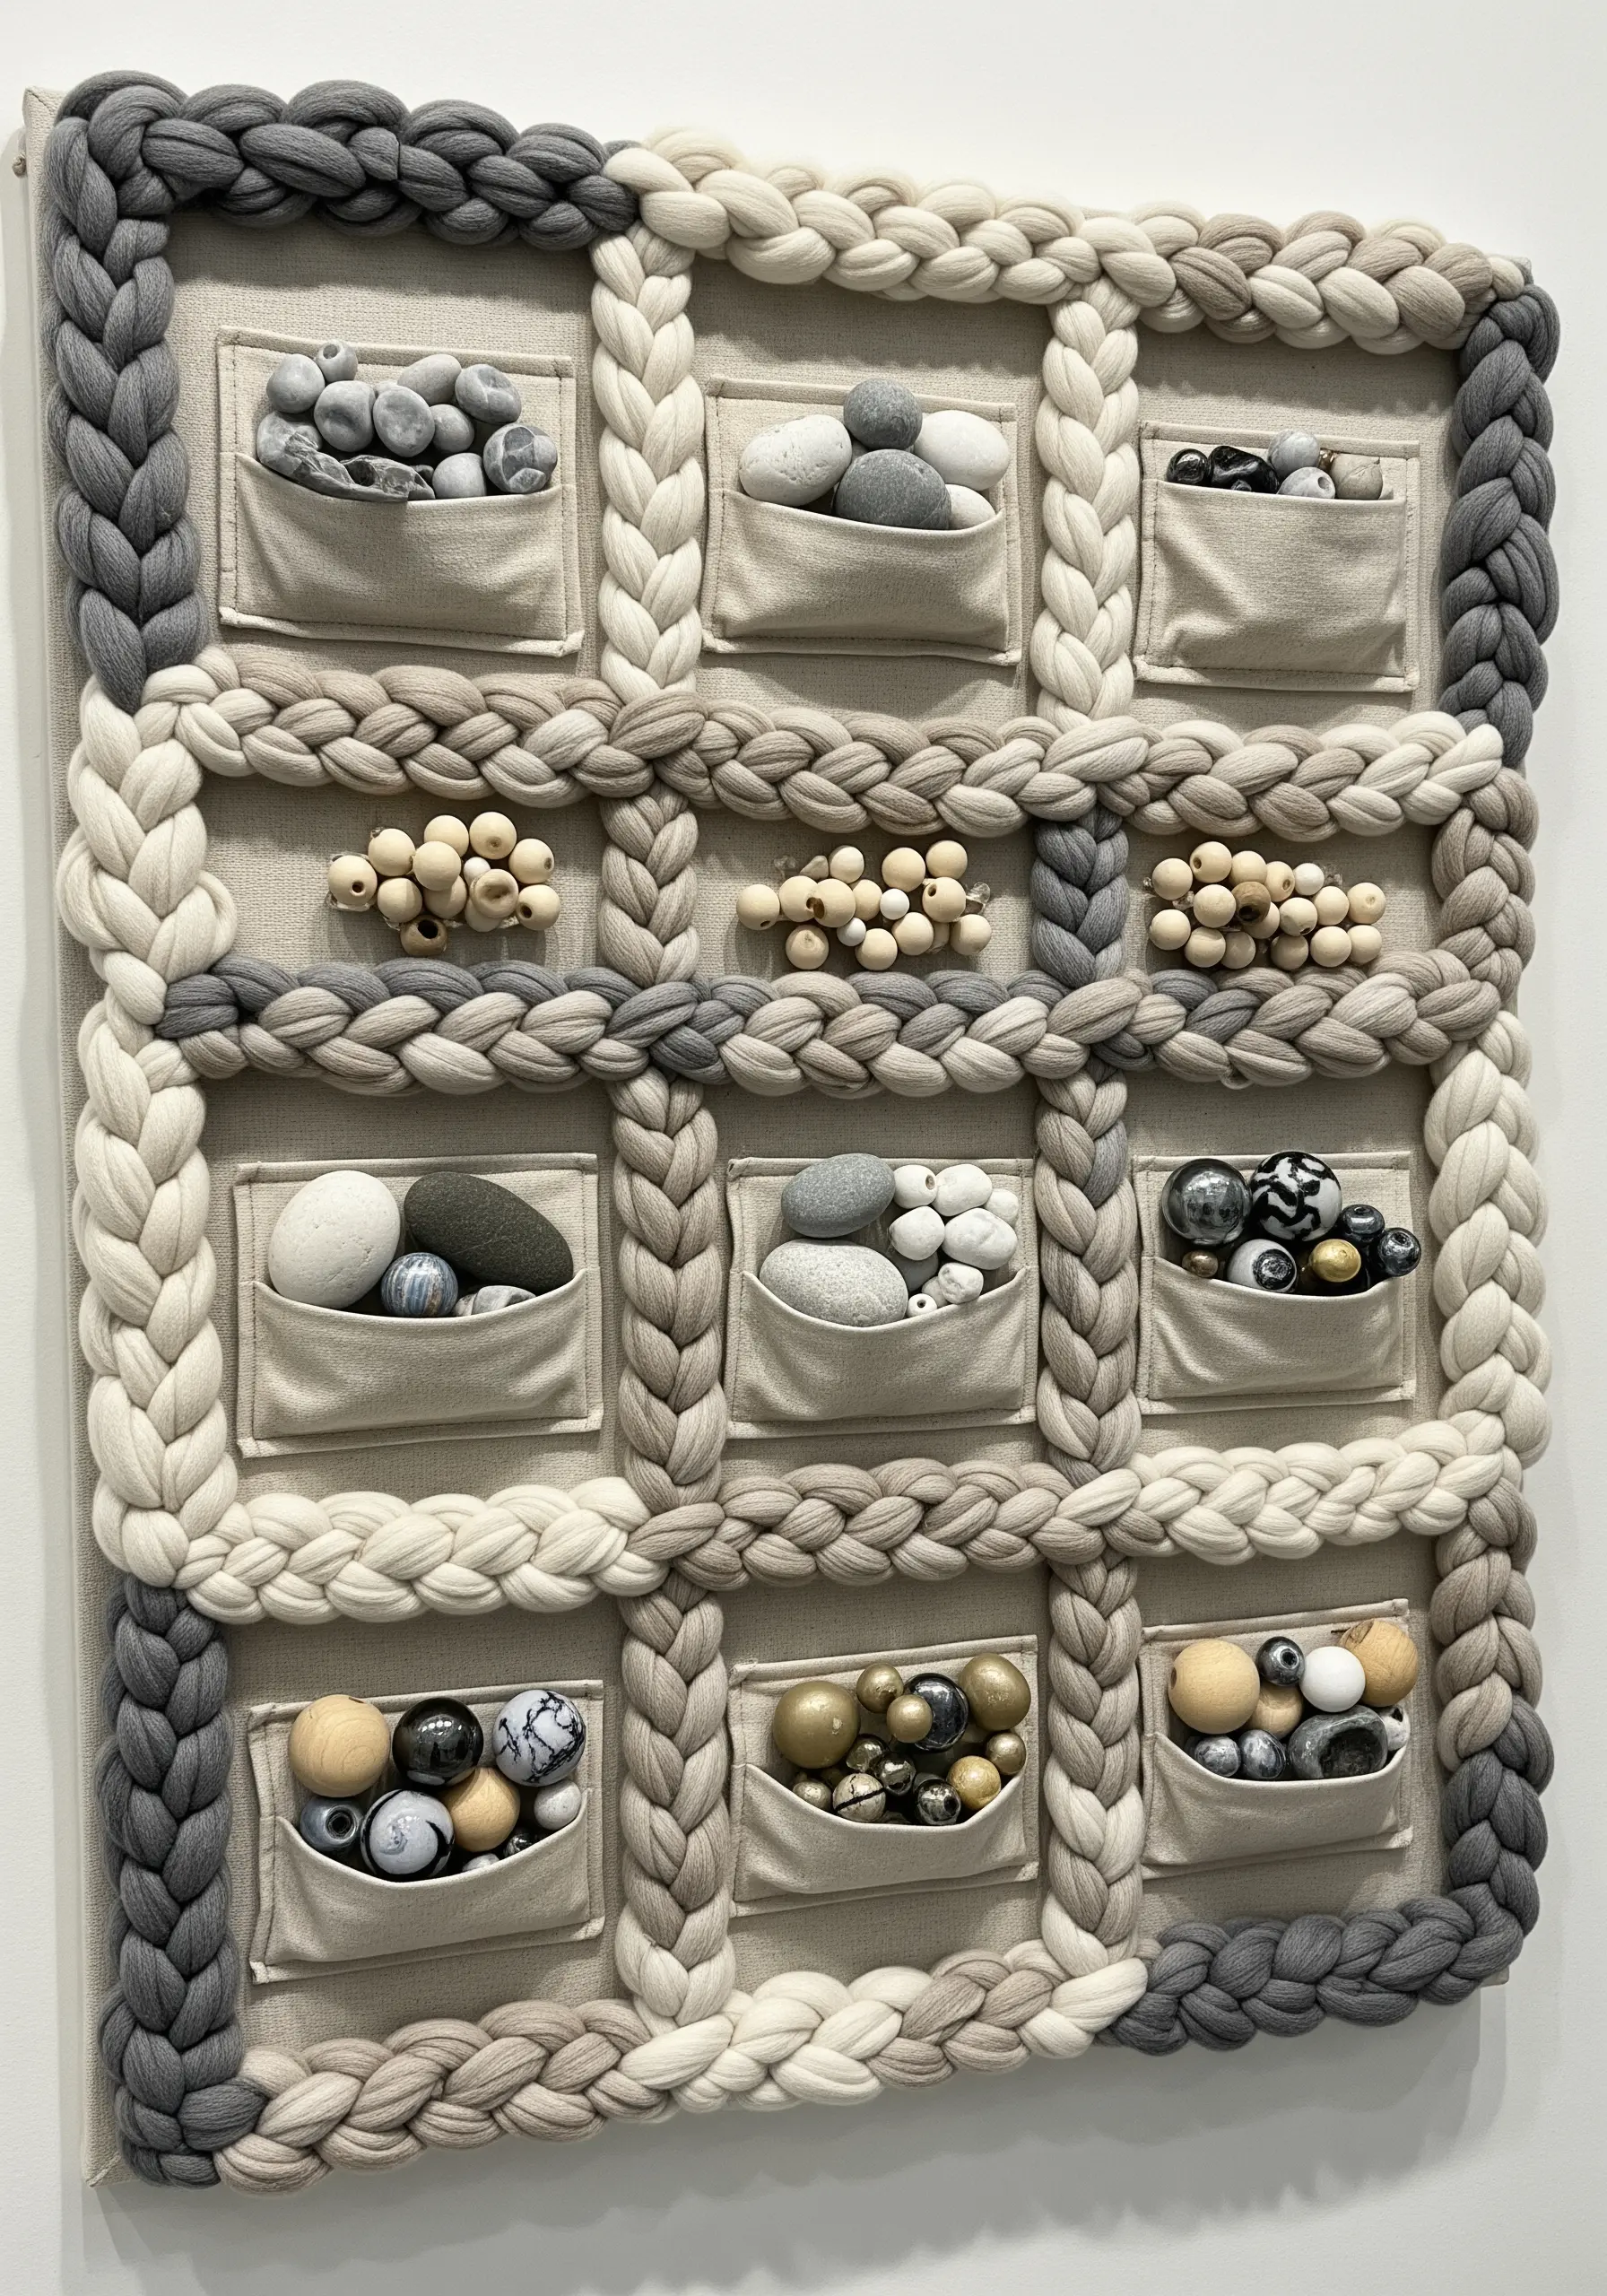
Elevate small, tactile objects by displaying them in a structured, grid-like composition.
Create a grid on your base fabric using thick, braided yarn couched in straight lines.
In each square of the grid, sew a small fabric pocket.
Fill the pockets with curated collections of beads, stones, or wooden balls, grouped by color and texture. This turns disparate elements into a cohesive, organized work of art that invites touch and exploration.
19. Deconstruct a Weaving for Abstract Expression
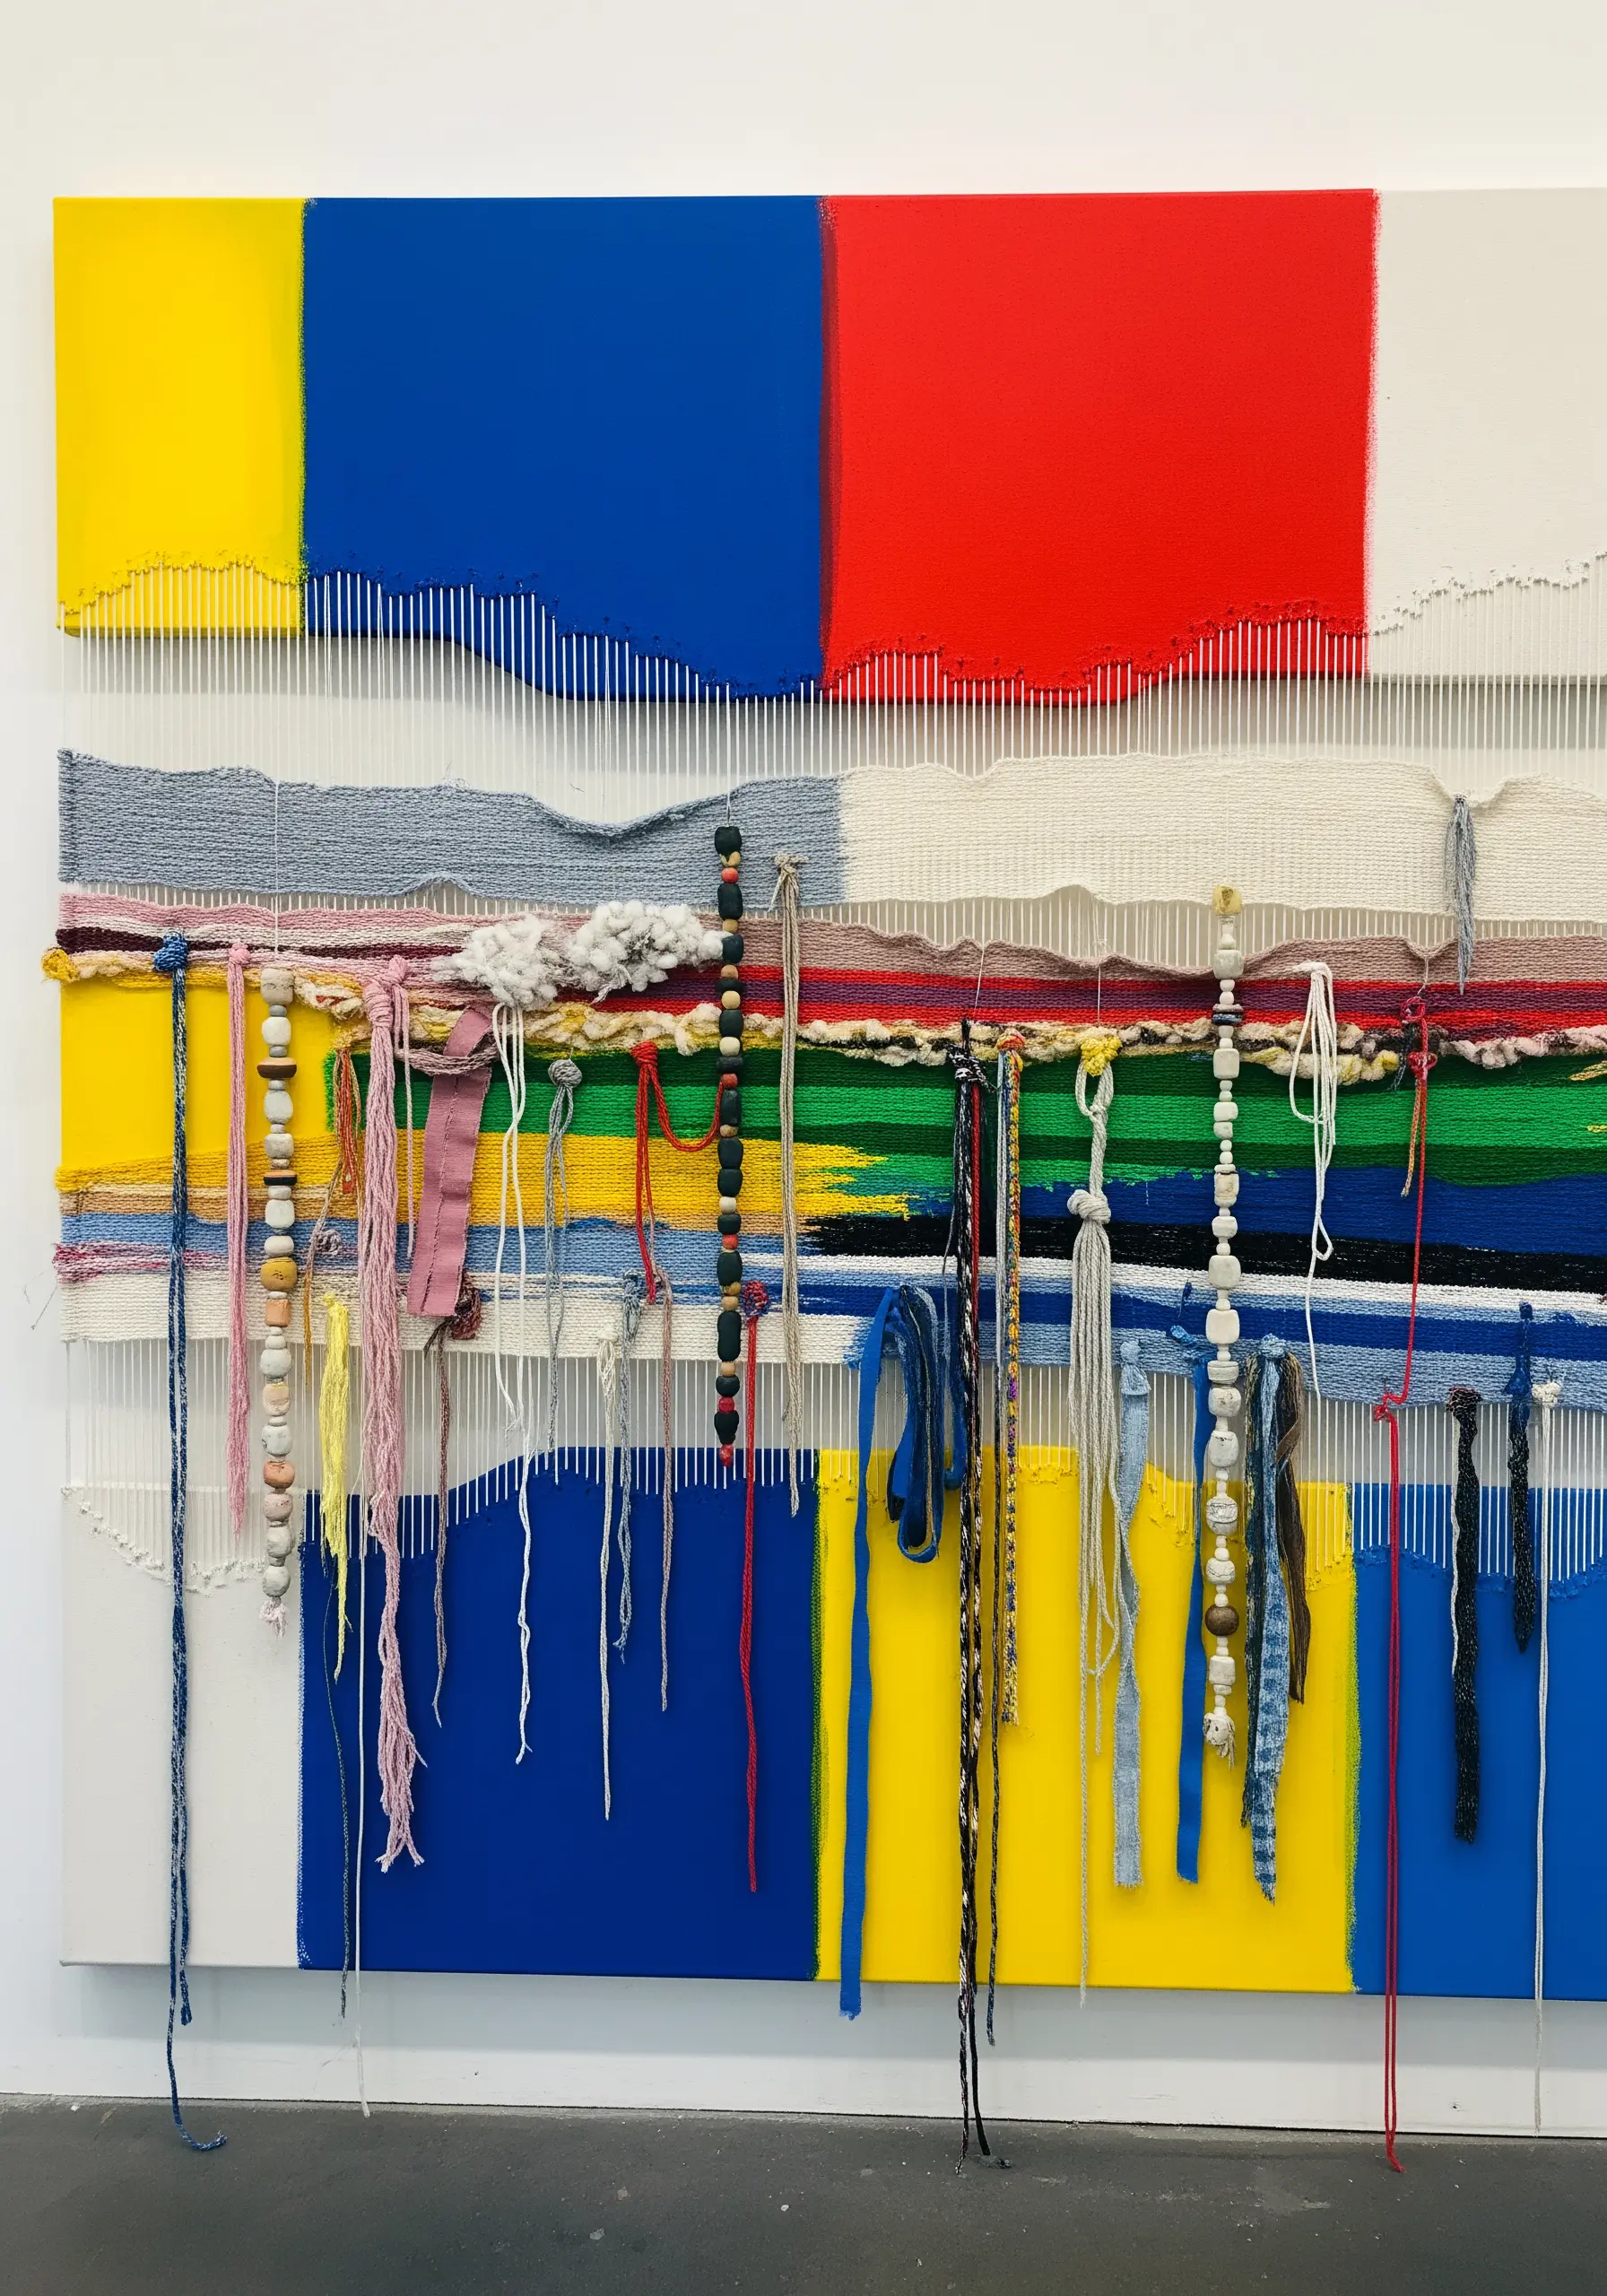
Create a powerful abstract piece by blending weaving, painting, and embellishment in a deconstructed style.
Start by painting bold blocks of color on a large canvas.
Stretch warp threads across the canvas and begin a simple weaving, leaving large gaps and allowing the painted background to show through.
Incorporate different materials into your weft—thick roving, thin silk ribbons, and even strings of beads. Let the ends hang loose and unfinished to emphasize the raw, expressive quality of the work.
20. Anatomical Accuracy with Appliqué and Beading

Create a stunning anatomical illustration by layering fabric appliqué with delicate beadwork.
Cut the primary shapes of the heart from different shades of red and blue satin or silk fabric. Use a satin stitch around the edges to create a smooth, raised border.
For the smaller arteries and veins, use fine lines of bead embroidery or single-strand stitches in a contrasting color.
This combination of broad fabric shapes and intricate stitched details gives the piece both visual clarity and exquisite texture.
21. Define Negative Space with Dimensional Stitches

Create a compelling silhouette by filling the background, rather than the subject, with a highly textured stitch.
Lightly trace your motif—like this simple bird—onto the fabric.
Instead of outlining it, fill the entire area *around* the bird with a dense field of dimensional stitches, such as French knots or turkey work loops, using a variegated thread for subtle color shifts.
The un-stitched canvas becomes the focal point, creating a minimal art piece that feels both soft and graphic.
22. Anchor Macrame Knots with Beads
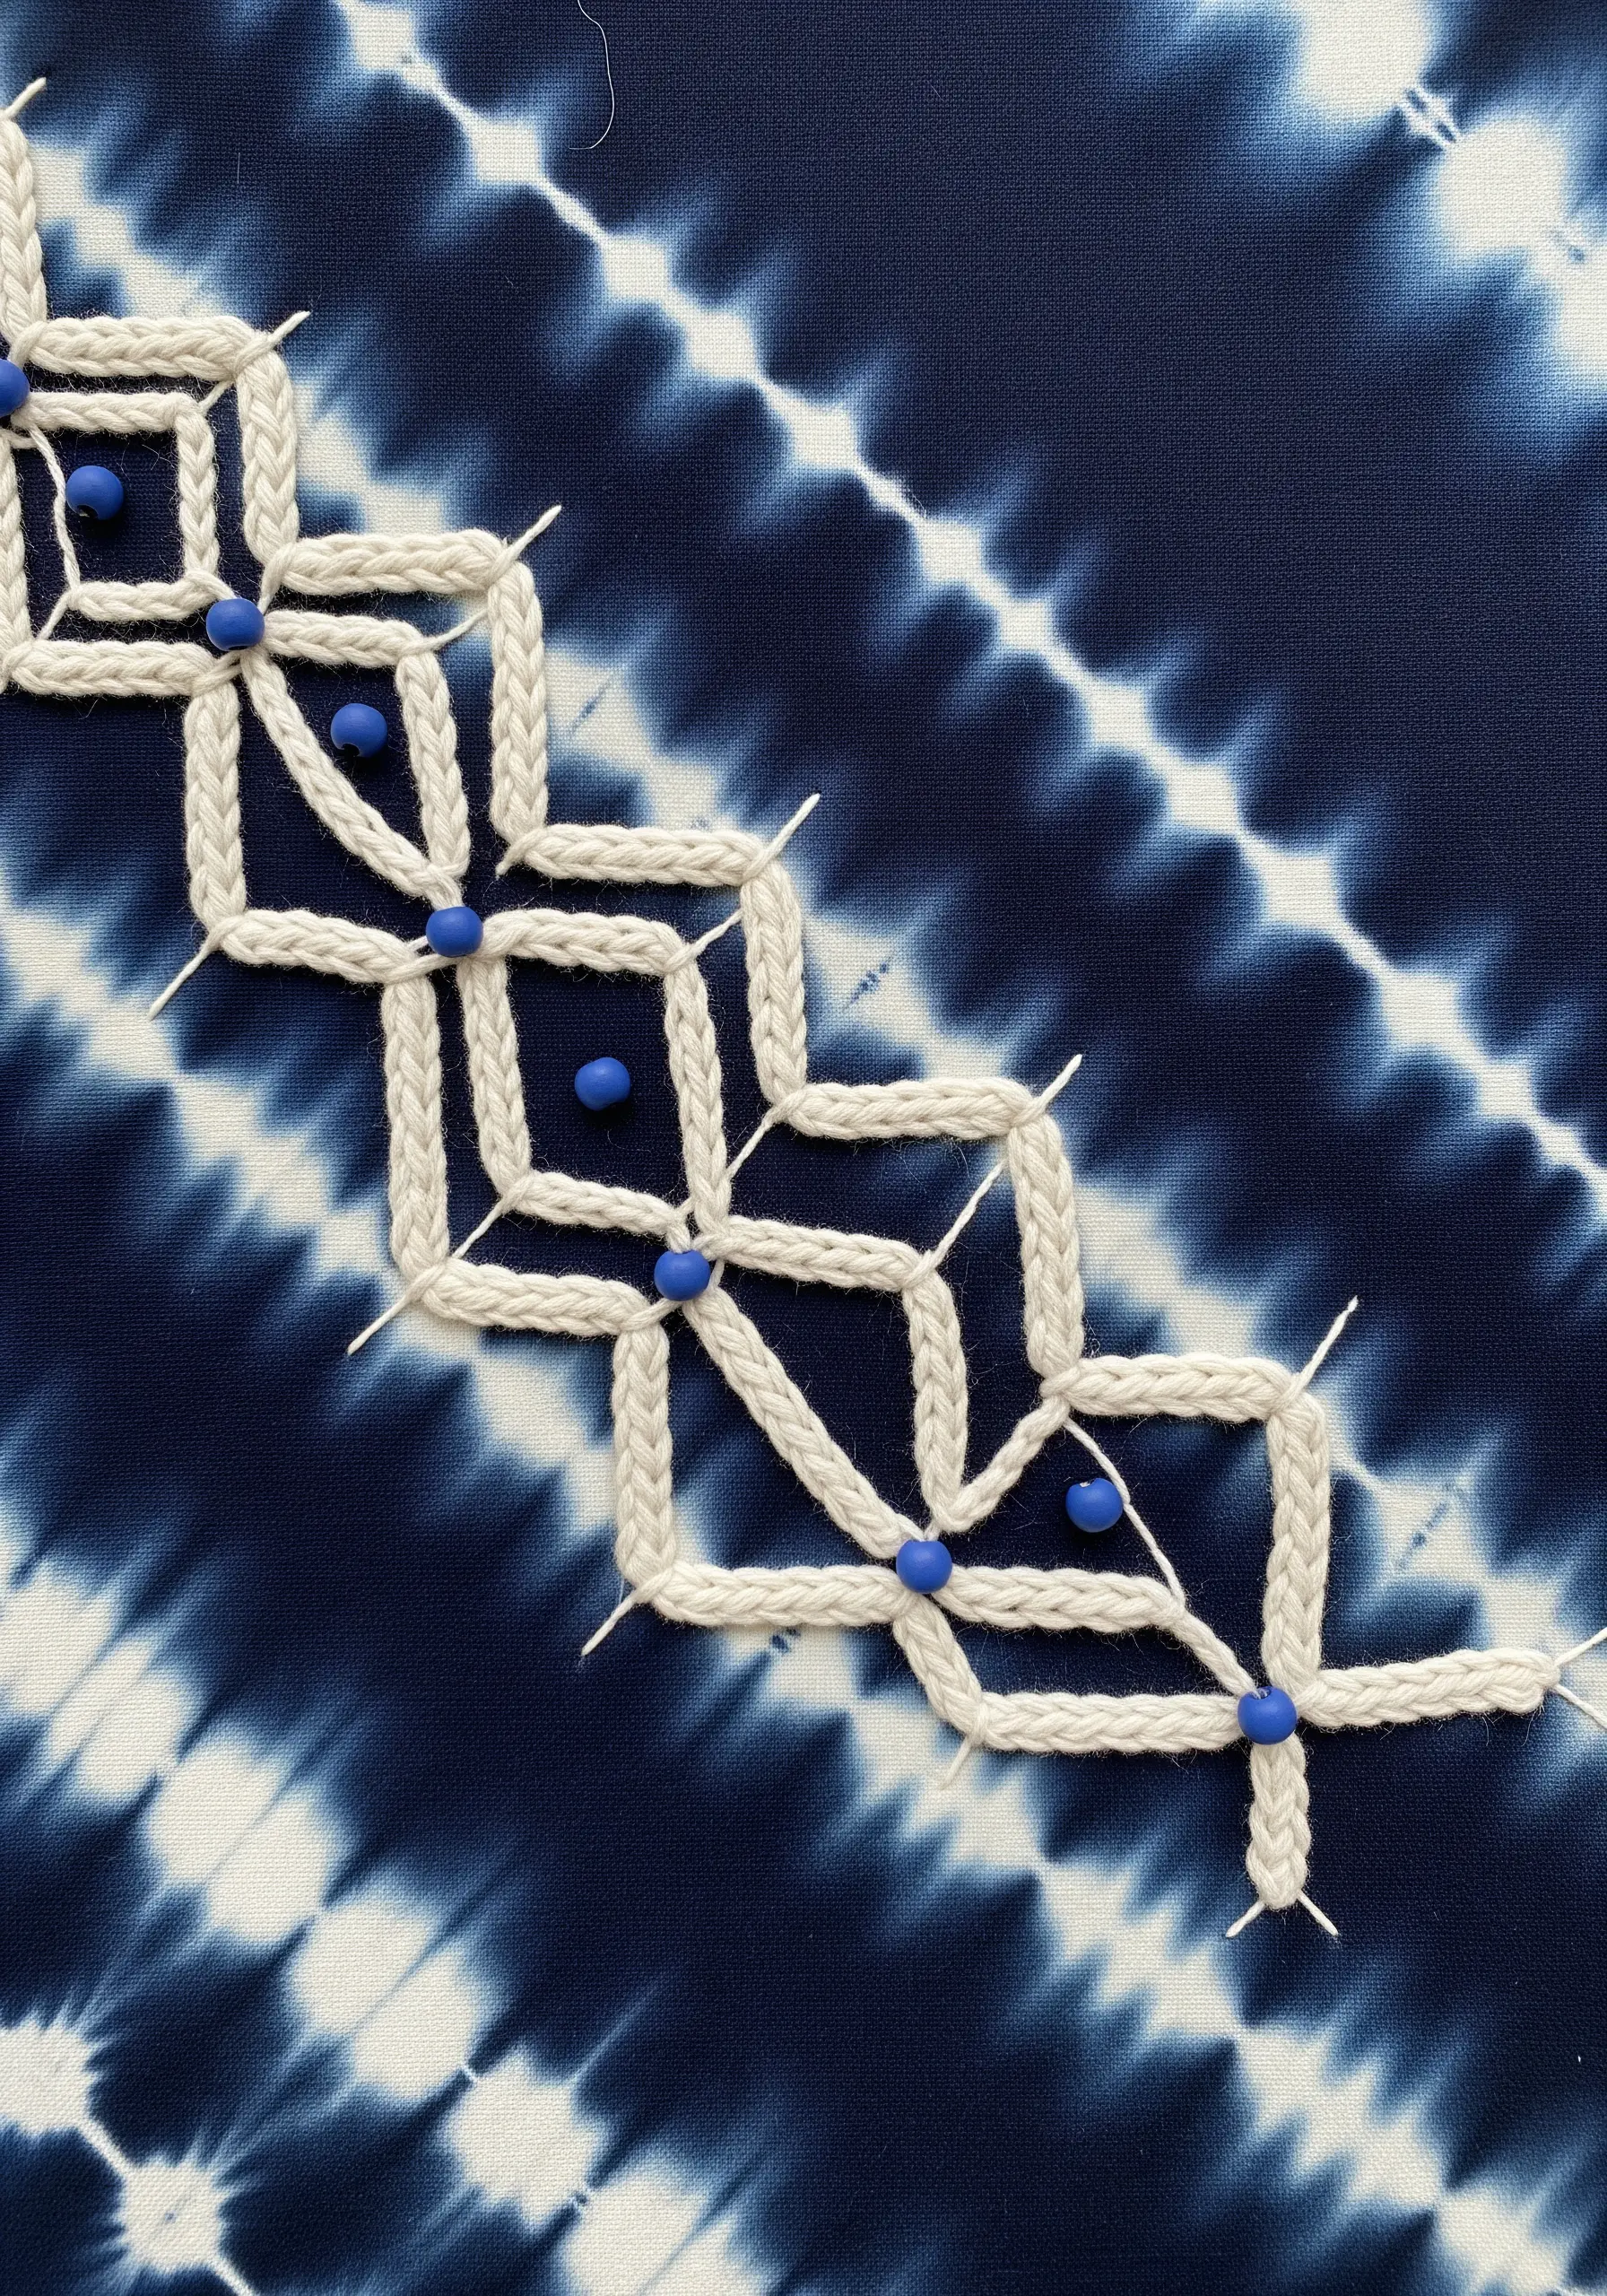
Add structure and a pop of color to open, geometric macrame patterns by incorporating beads at key intersections.
Instead of relying solely on knots, use a lacing technique with a sturdy cord on a pre-dyed fabric like this shibori indigo.
At each point where the cords cross, thread a brightly colored bead before continuing your pattern.
The beads not only secure the intersections and maintain the pattern’s tension but also serve as deliberate, decorative accents against the background.
23. Create Perspective with Layered Felt Appliqué
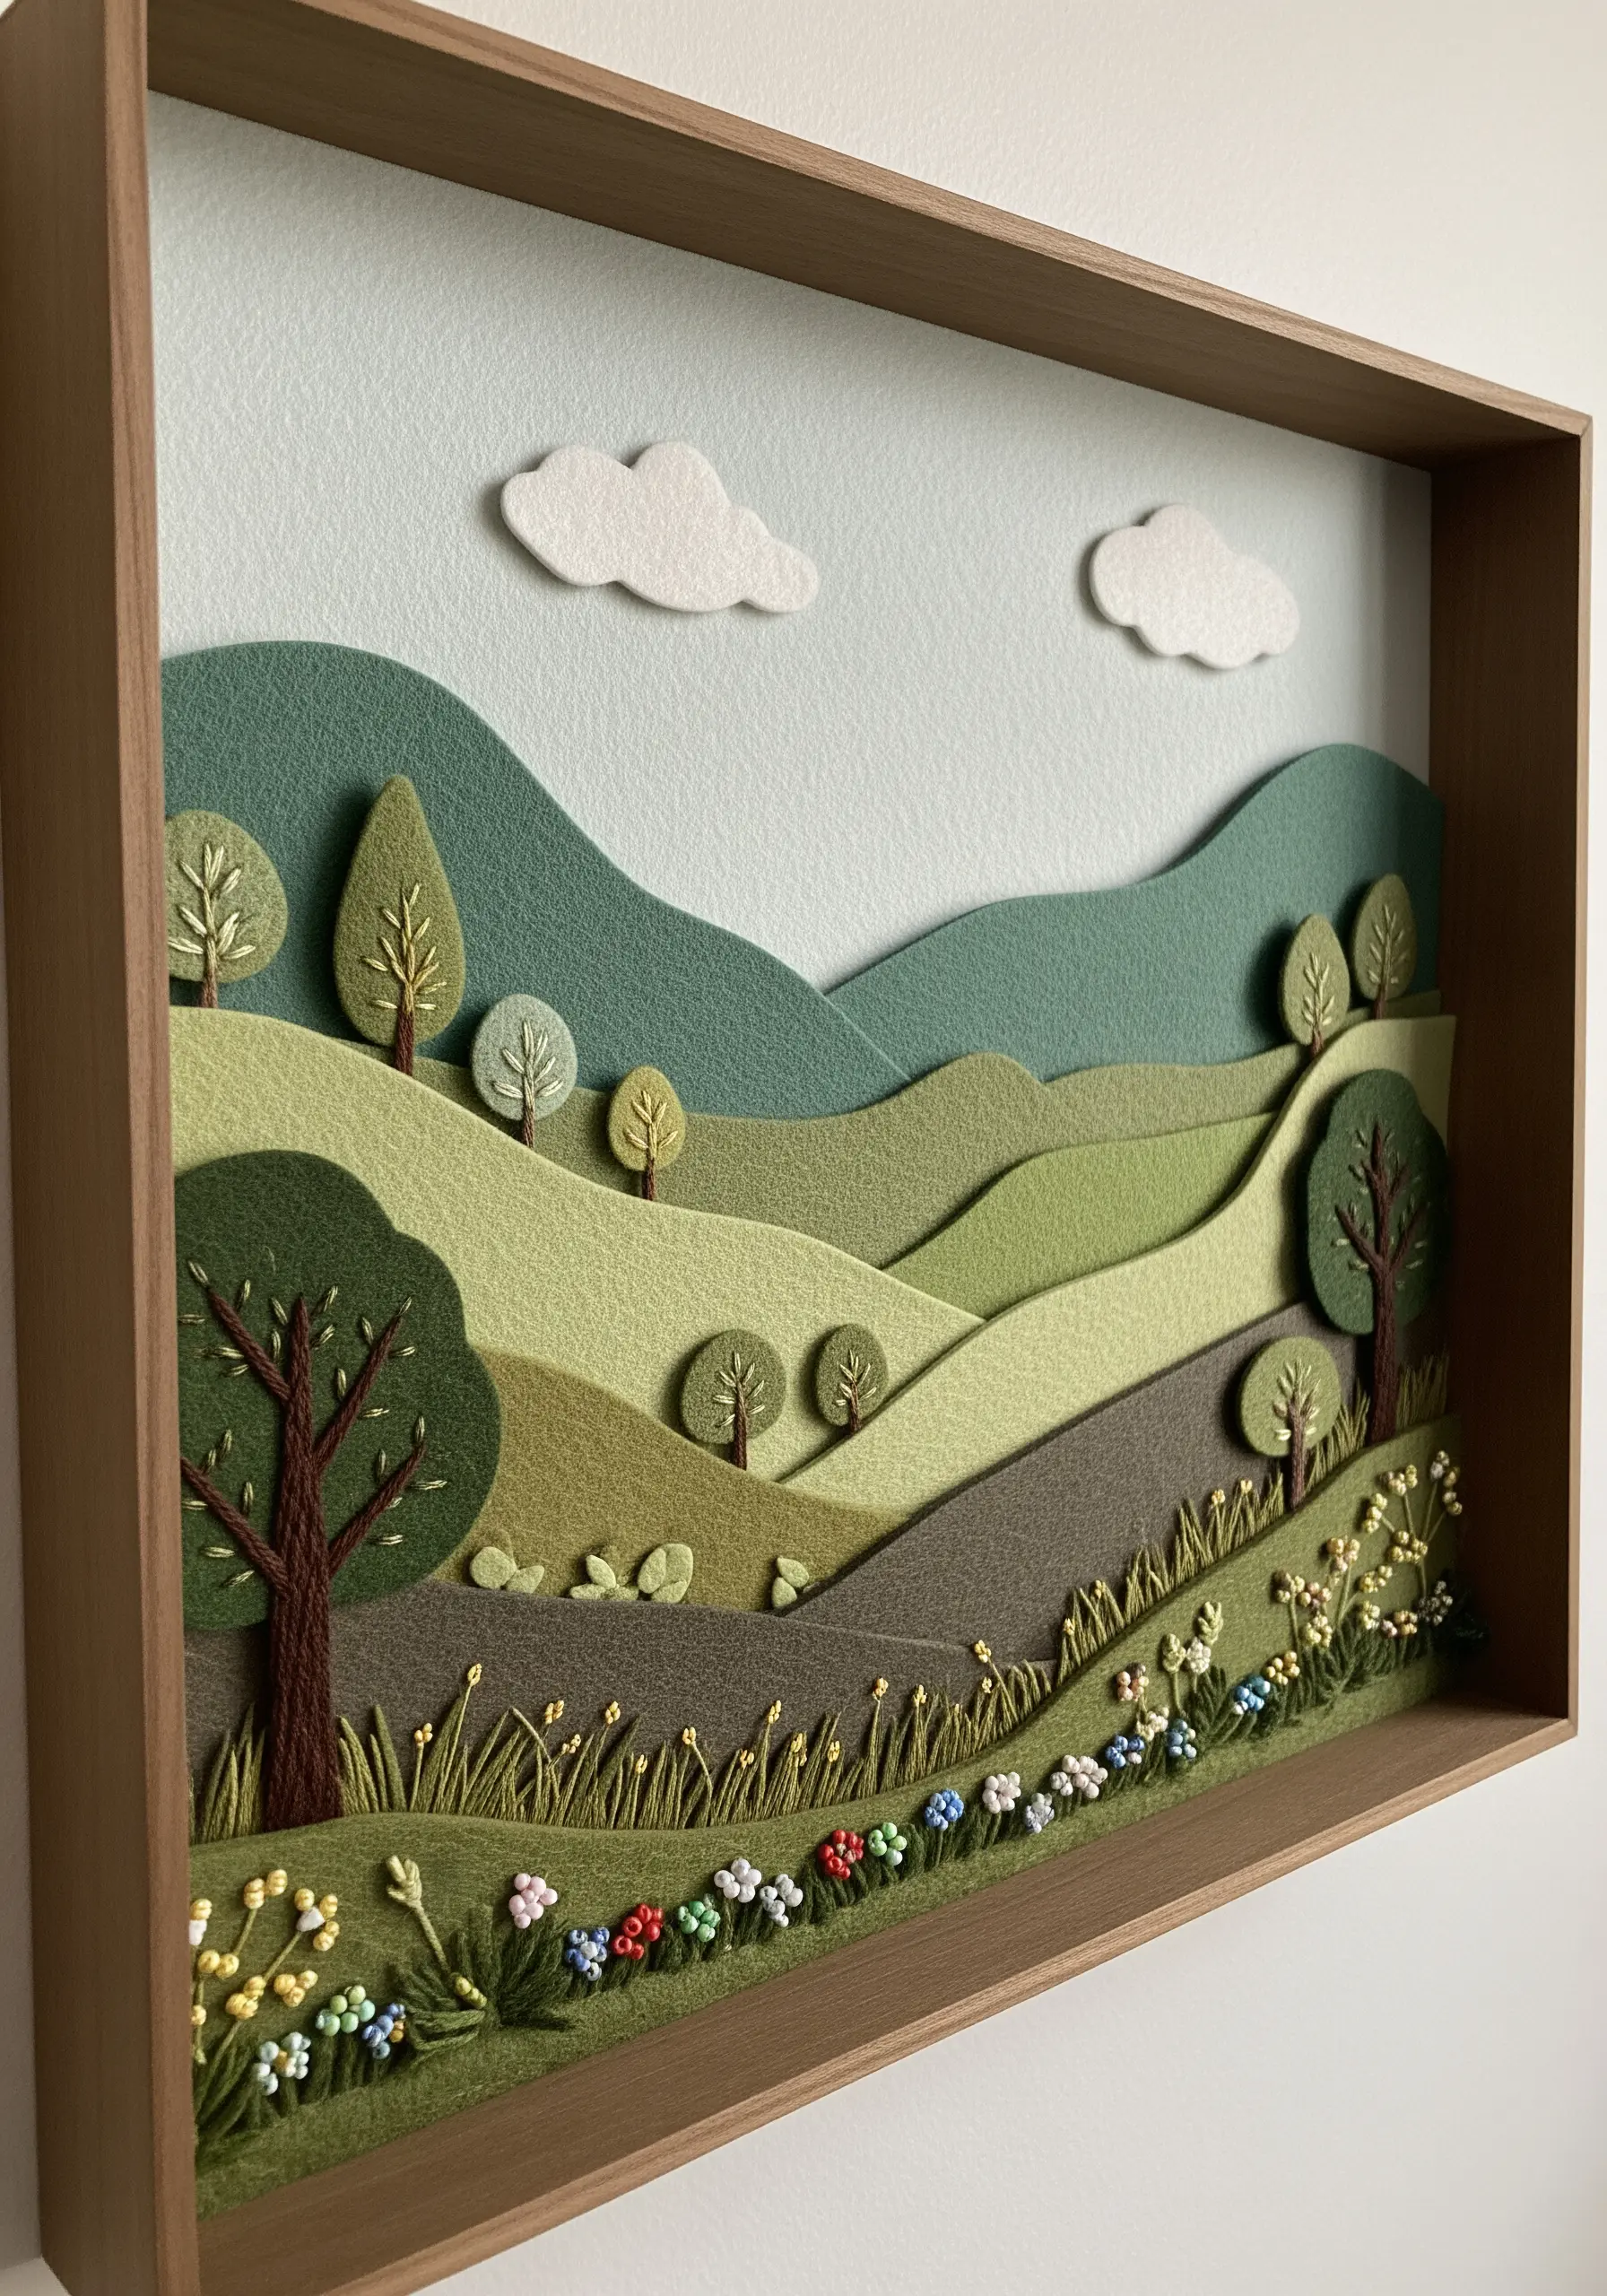
Build a landscape with a convincing sense of depth by layering cut pieces of felt.
Work from back to front: start with the sky, then layer on distant hills in lighter shades of green, followed by closer hills in darker, more saturated tones.
Use embroidery only for the foreground details, like flowers and tree trunks. This technique creates a clean, graphic style where the texture of the felt does most of the work, and the tiny floral motifs add a final touch of intricacy.
24. Compose a Sampler of Neutral Textures

Design a sophisticated wall hanging by focusing entirely on texture, using a monochrome or neutral color palette.
Divide your weaving or canvas into a grid of squares or rectangles.
Fill each section with a different textural technique: chunky knit stitches, tightly packed French knots, smooth weaving, and soft wool roving.
By removing color as a variable, you draw the viewer’s eye to the subtle interplay of light and shadow across the different surfaces, creating a piece that is both calming and complex.
25. Weave Fabric Scraps into Celestial Bodies

Give your planets and celestial objects unique character by creating them with woven fabric scraps.
Make miniature circular looms or use small embroidery hoops as a base.
Weave strips of tweed, cotton, and metallic fabrics to create the surfaces of your planets, letting the colors and textures suggest alien landscapes.
Mount these woven circles onto a dark canvas and surround them with a field of scattered silver and clear beads to represent stars and galaxies, creating a rich, multi-layered cosmic scene.
26. Integrate Beads and Fabric Strips into Weaving

Break up the rhythm of a traditional weaving by introducing unexpected materials into your weft.
As you weave with your primary yarn, periodically introduce a row of chunky wooden beads by threading them onto a sturdy weft thread.
You can also incorporate strips of ripped fabric, allowing their raw edges and varied textures to contrast with the smoother yarn.
This method adds an improvisational, bohemian feel to your work and is a perfect way to use up leftover craft supplies.
27. Construct a Garland from Embellished Felt
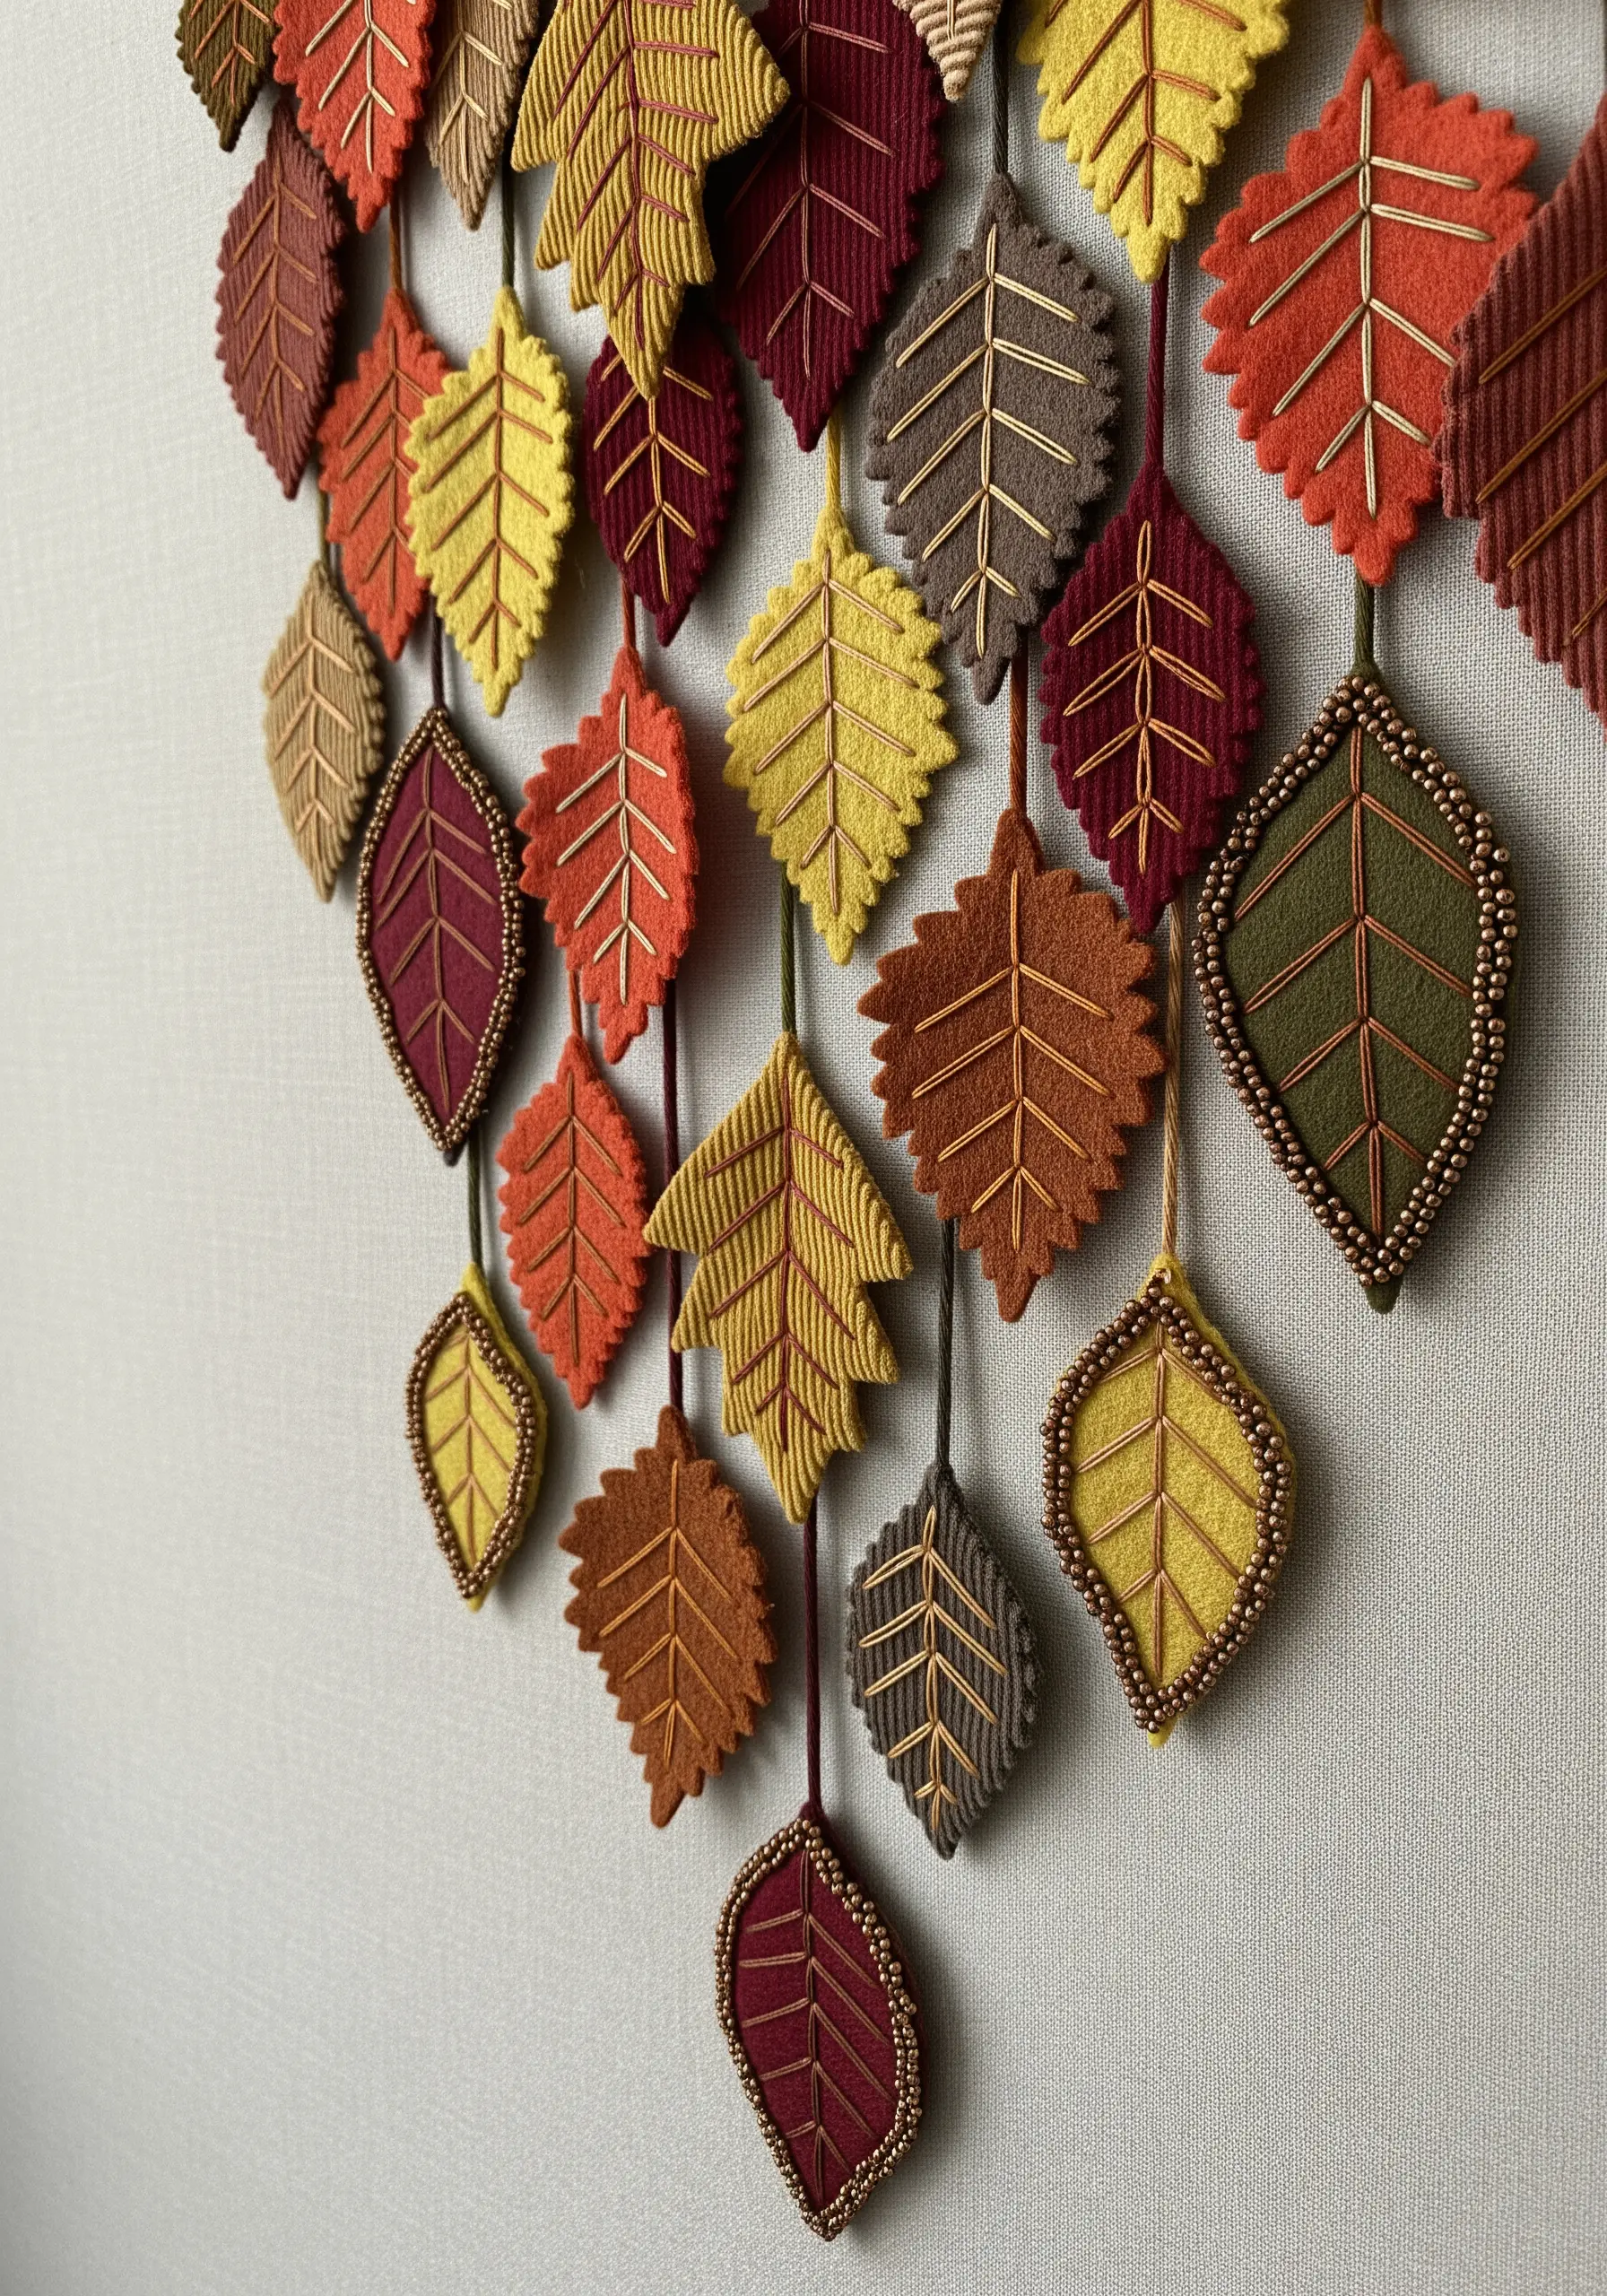
Create a beautiful, cascading wall hanging by constructing it from individual, embellished components.
Cut out leaf shapes from felt in various autumnal colors.
Decorate each leaf differently: some with simple straight-stitch veins in metallic thread, others with a delicate border of seed beads.
String the finished leaves together at varying lengths to create a garland that has movement, color, and a rich variety of textures. This modular approach is perfect for creating seasonal wall art.
28. Visualize Sound with Thread and Beads
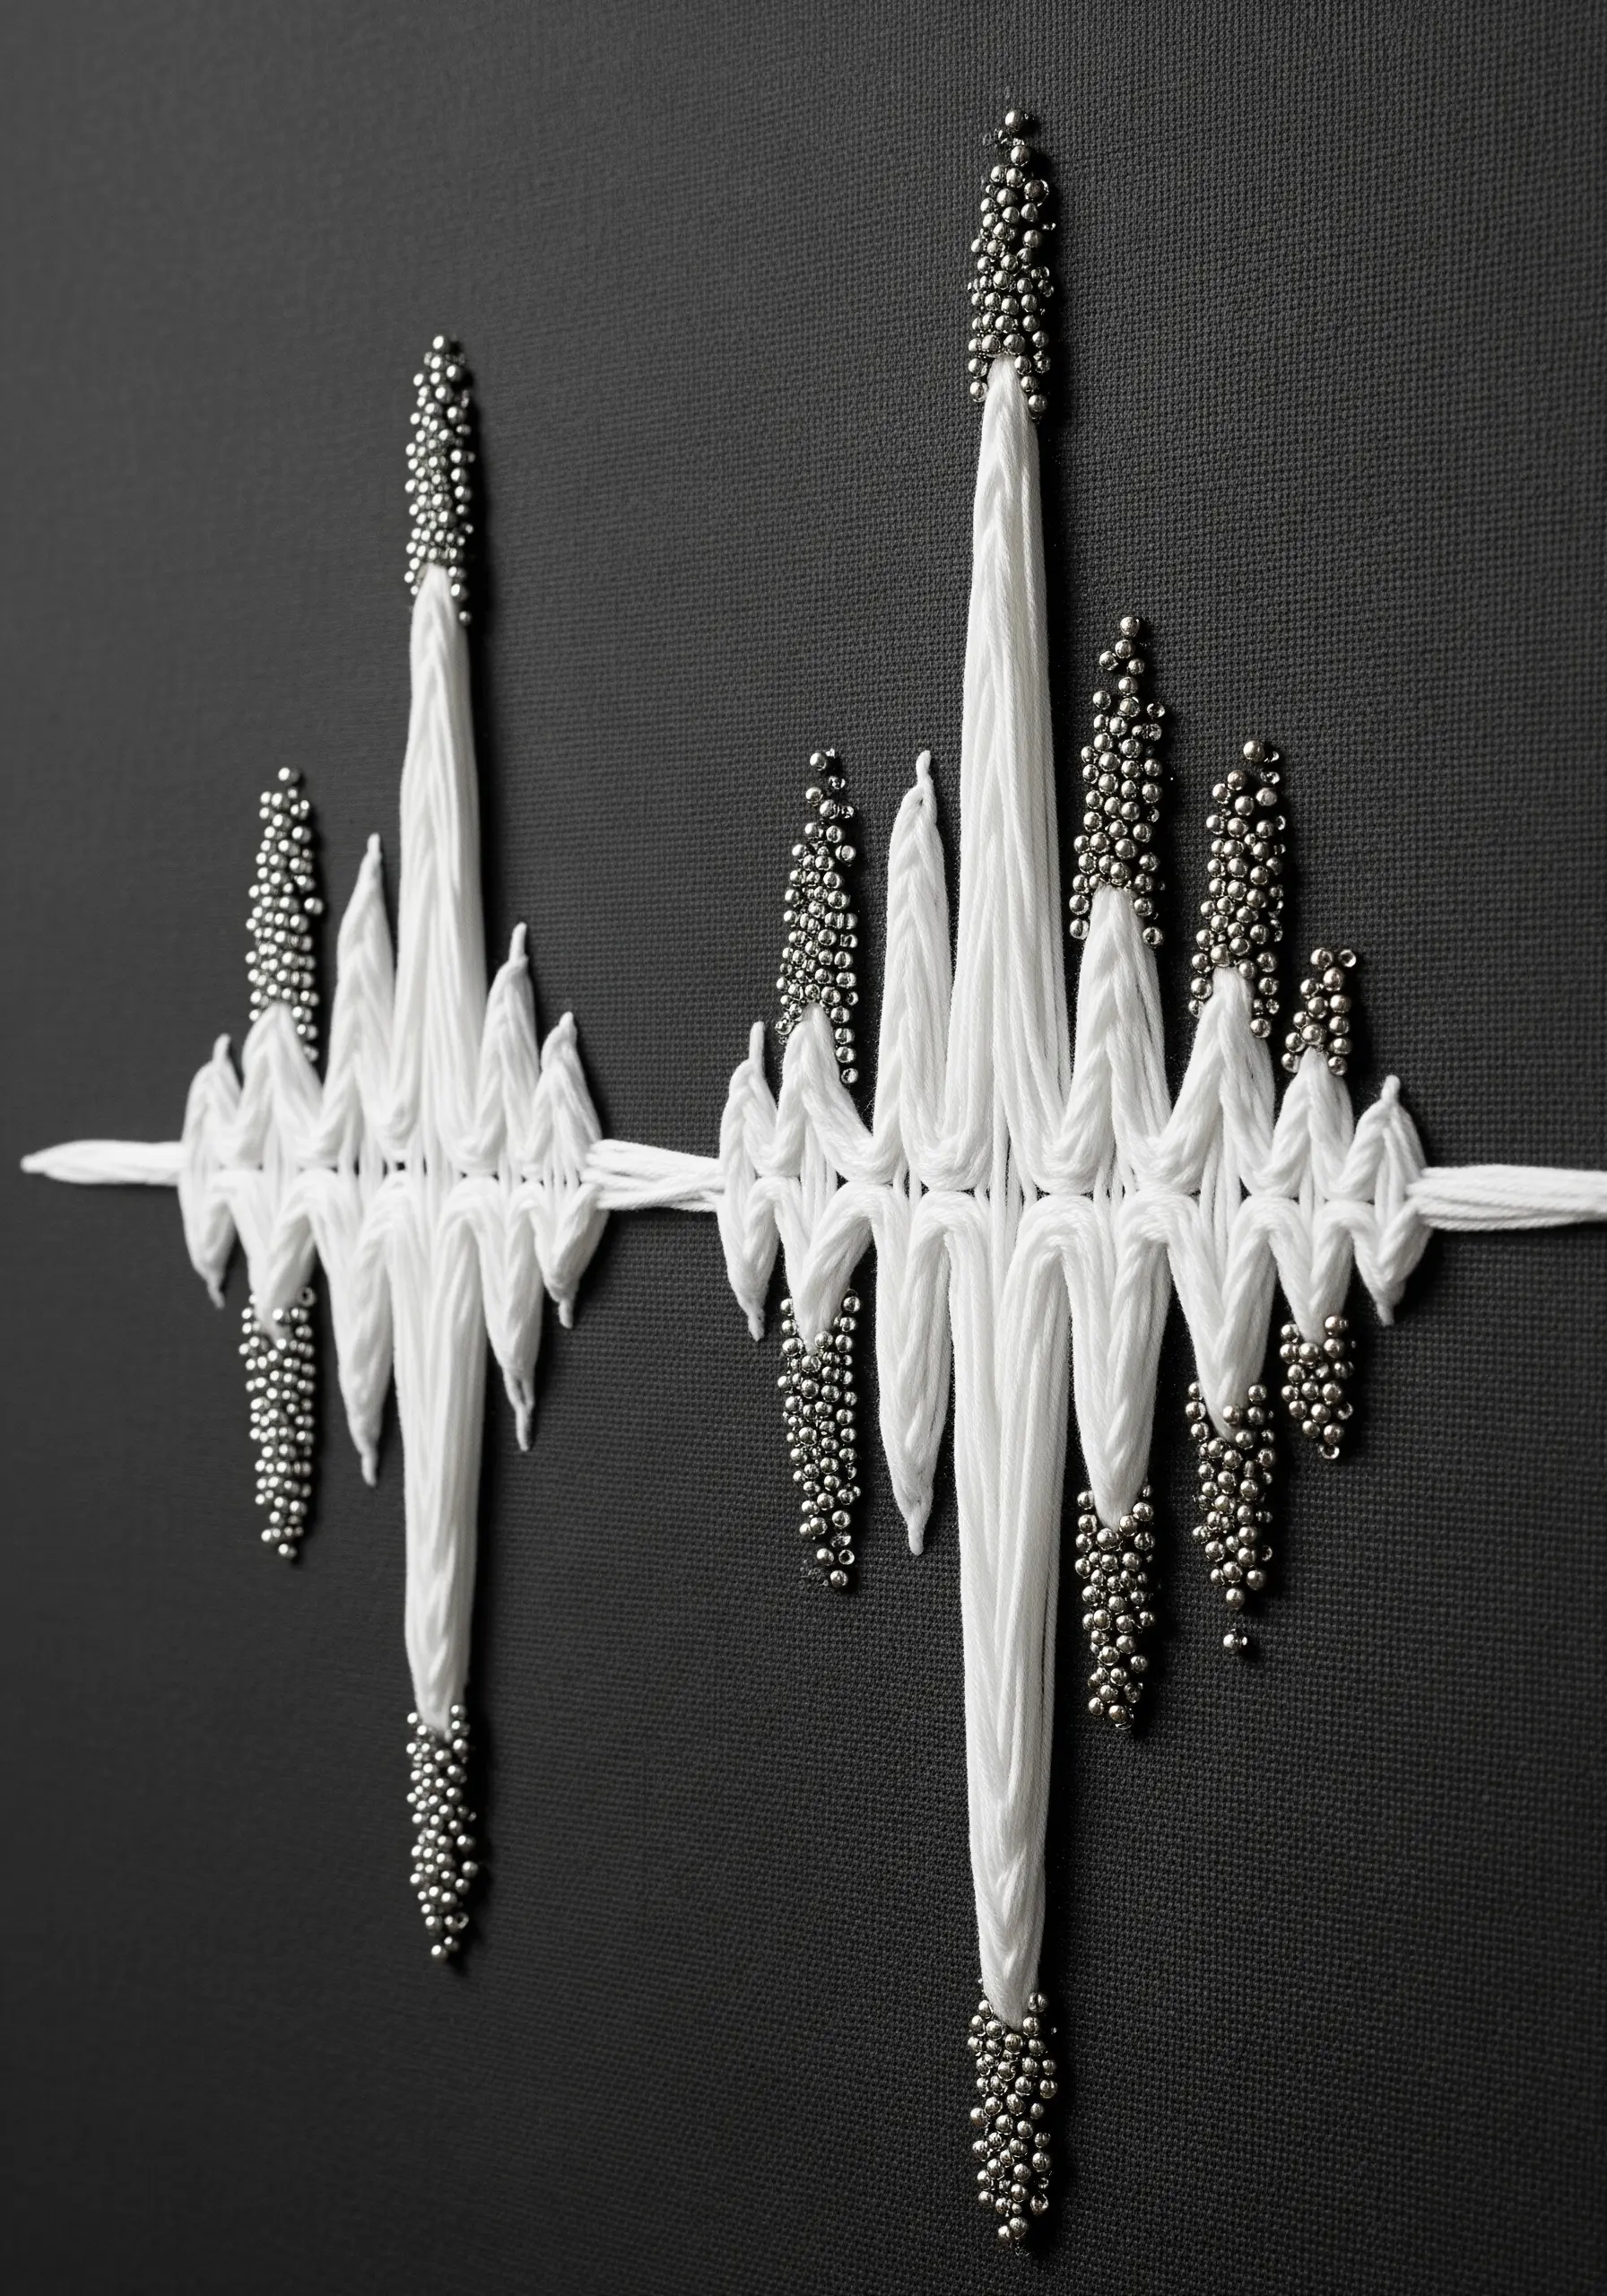
Translate a soundwave into a striking piece of abstract art using wrapped thread and metallic beads.
Print an image of a soundwave—like a baby’s heartbeat or a line from a favorite song—and transfer the outline to your canvas.
Create the shape of the wave by wrapping a thick white cord around pins or stitches along the outline.
Embellish the peaks of the soundwave with dense clusters of metallic beads. This adds a sleek, technological accent and visually represents the crescendo in the sound.
29. Layer Appliqué for a Dense Botanical Scene
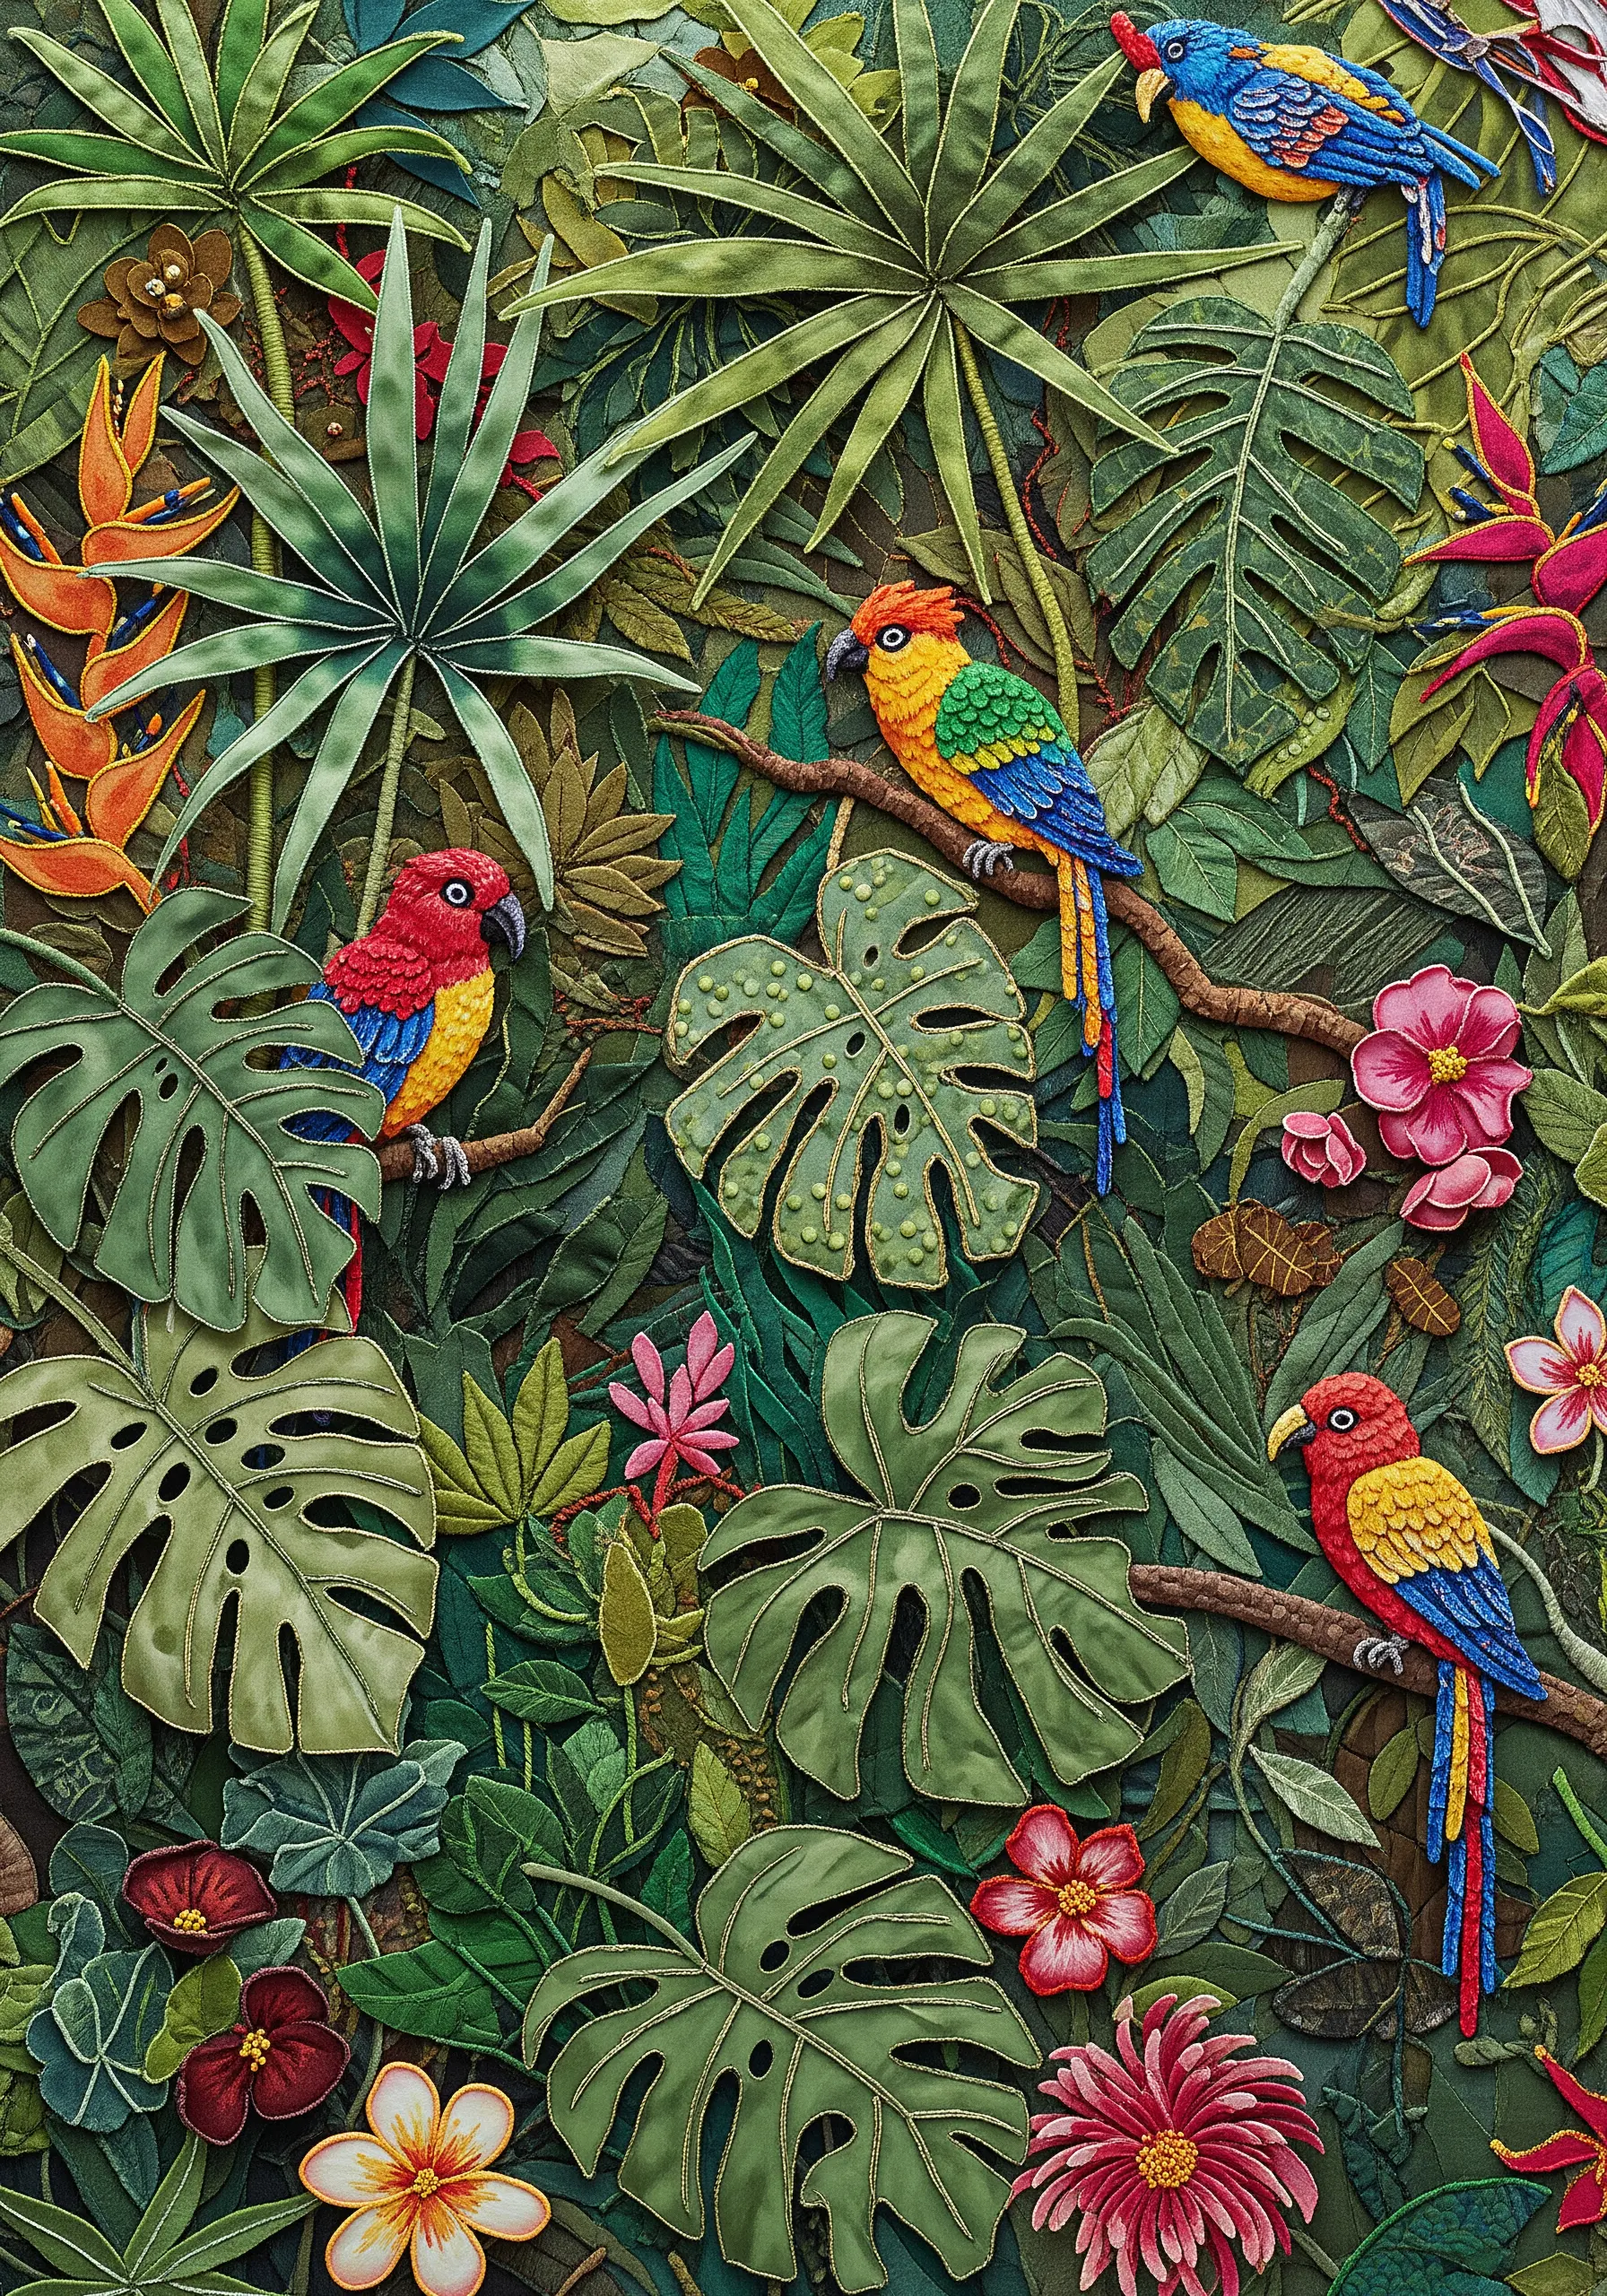
Create a lush, jungle-like effect by layering multiple pieces of fabric appliqué.
Cut leaf and flower shapes from various green and colored fabrics. To add definition, stitch the veins and outlines on each piece *before* attaching it to the base canvas.
Arrange the leaves in overlapping layers, stitching them down only in the center to allow the edges to lift slightly, creating natural shadows and a sense of depth.
This meticulous fabric collage embroidery technique results in a scene so rich it feels like you could step into it.
30. Replicate Technology with Hardware and Metallic Thread
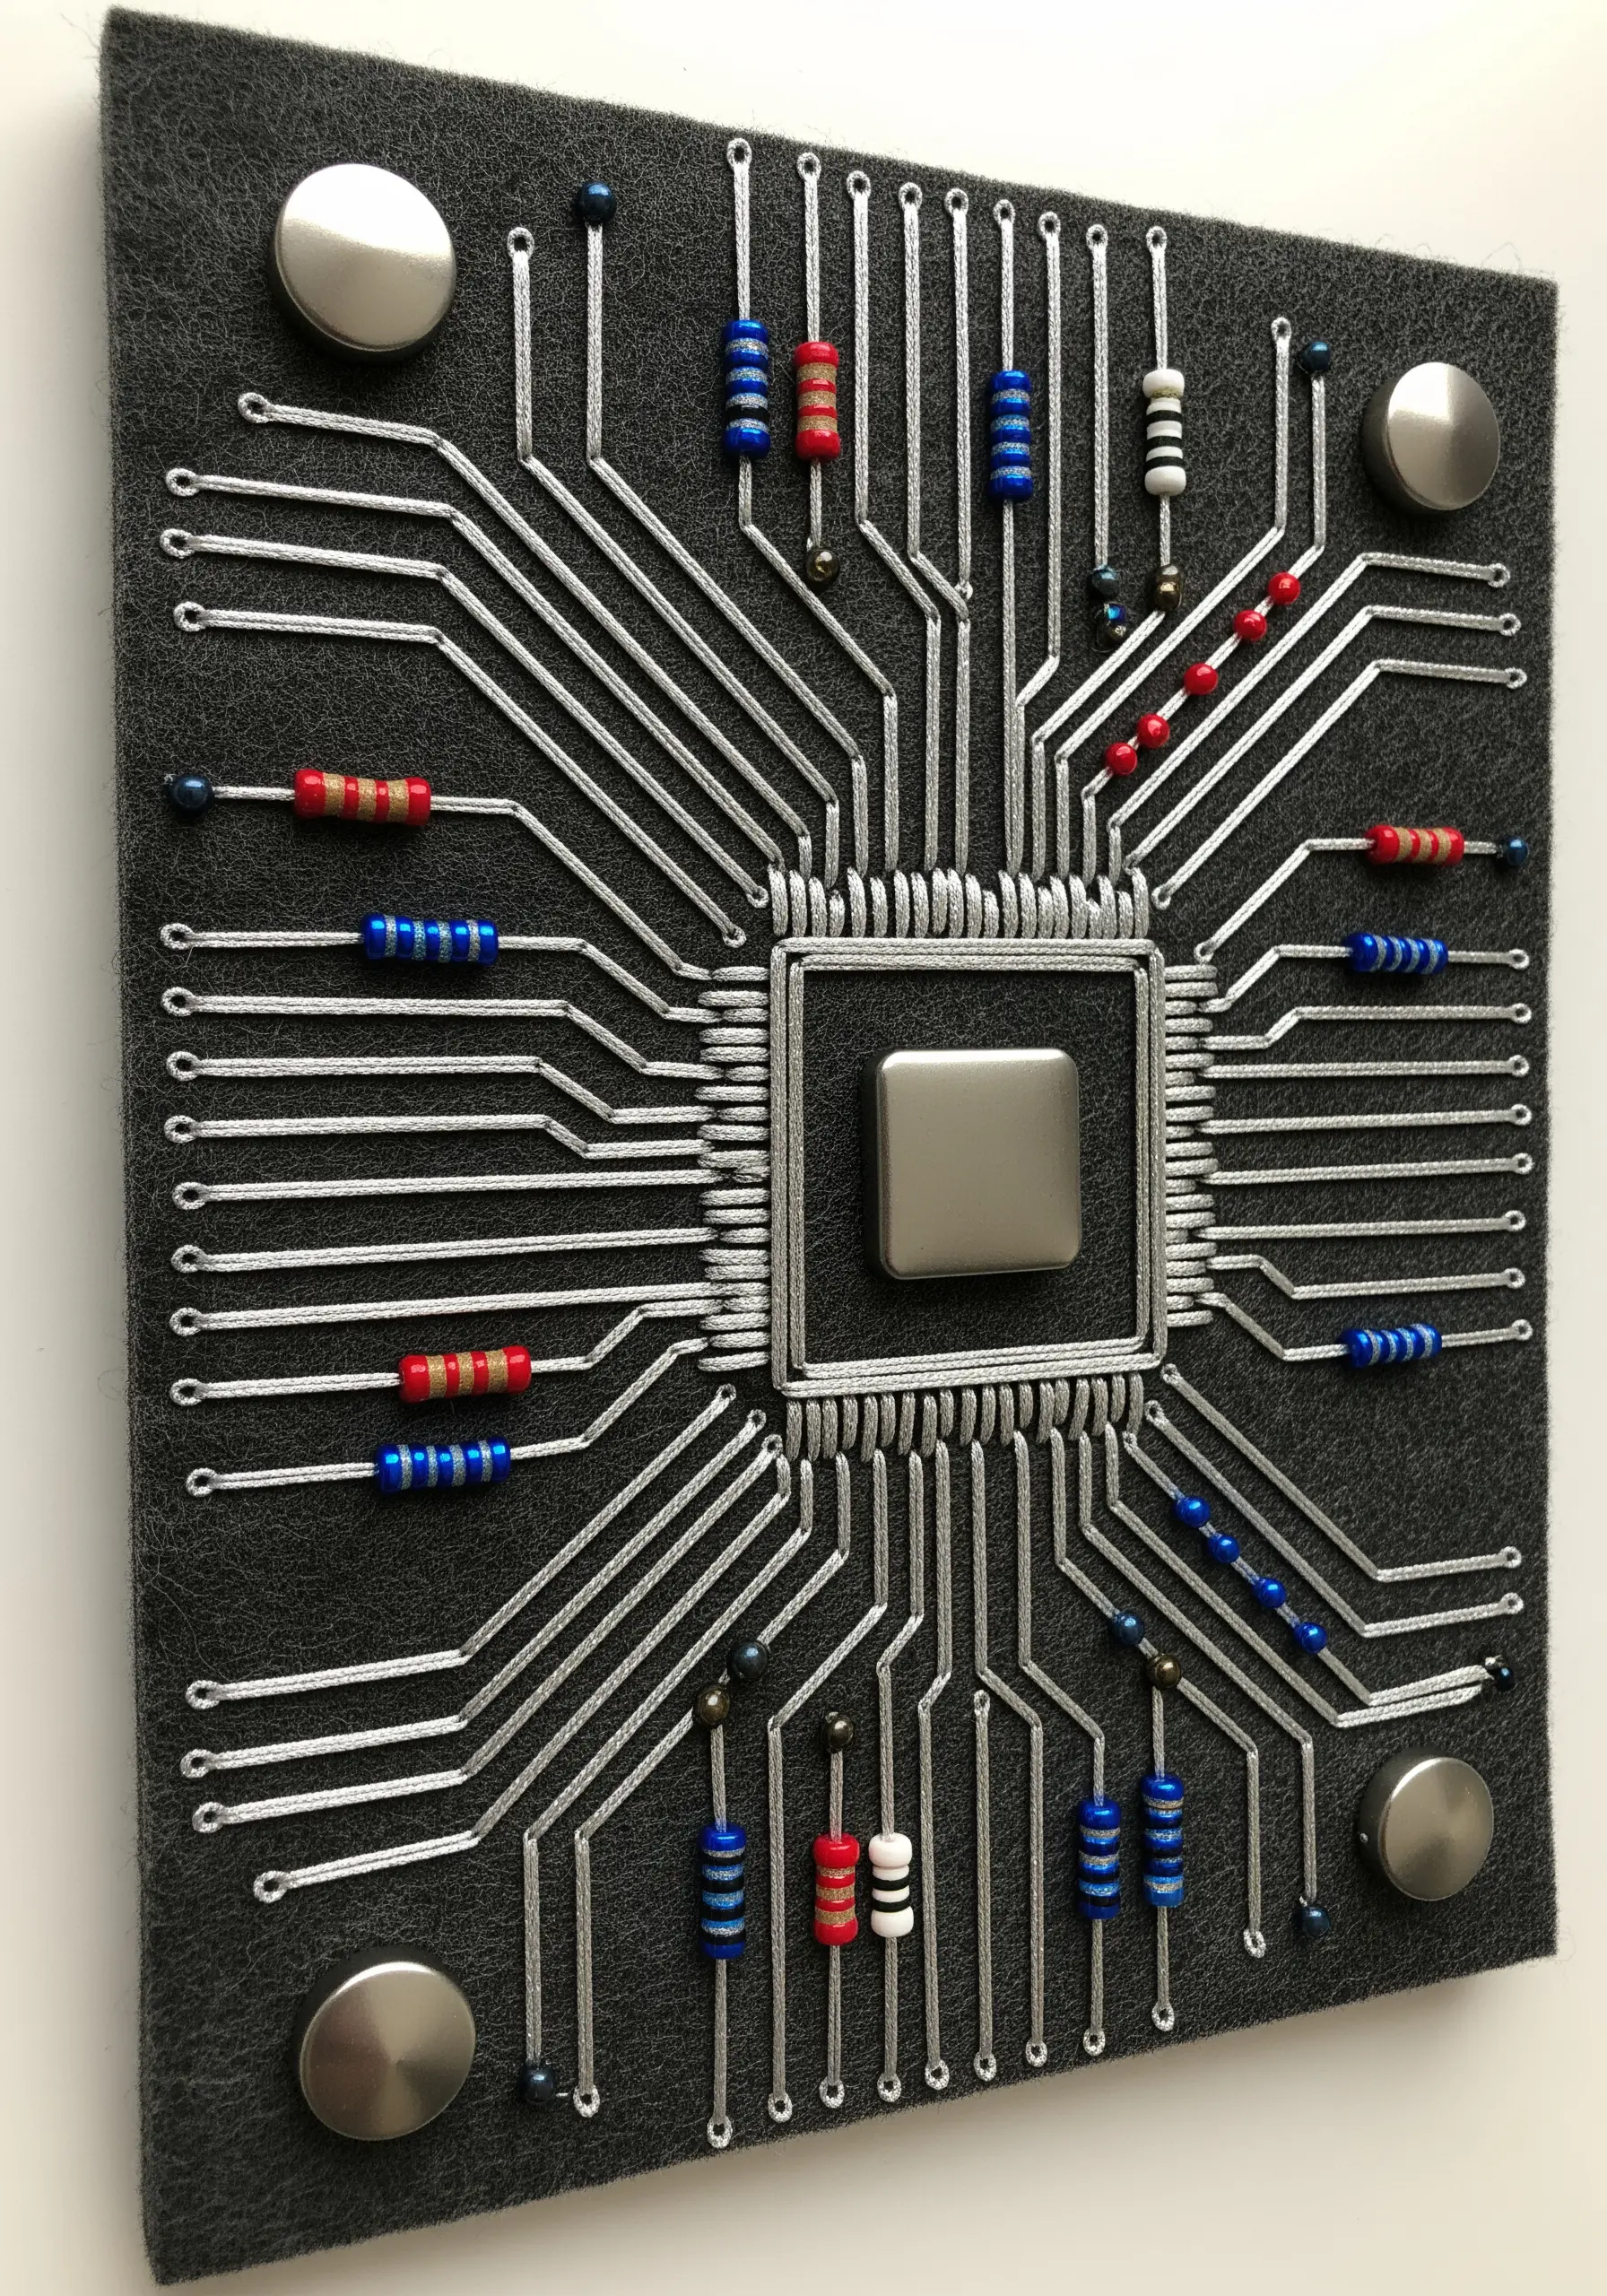
Create a stunningly unique piece by combining sleek hardware with precise stitching to mimic a circuit board.
Use a piece of industrial felt as your base for its clean, modern look.
Map out your circuit pathways and render them with perfectly straight lines of couched silver cord or metallic thread.
Incorporate real resistors, buttons, and other electronic components, stitching them into place as if they were beads. The result is a brilliant fusion of soft craft and hard technology.
31. Add Movement with Braided and Fringed Embellishments

Incorporate macrame techniques directly onto your fabric to create embellishments with substance and movement.
Instead of stitching a line, use a thick embroidery floss or fine cord to create a braid directly on the surface of your fabric, tacking it down at intervals.
You can then use the same material to create a fringe that hangs from the braid. This technique is perfect for adding a decorative border or a single, dramatic line to your composition.
32. Craft a Wreath with Ribbon Embroidery

Achieve plump, realistic flower petals by using silk or satin ribbon instead of thread.
The classic stitch for this is the ribbon stitch, where the ribbon is pulled through the fabric and tacked down to create a soft, folded petal shape. Use it to form roses and other multi-petaled flowers.
Combine these with simple French knots for smaller blossoms and detached chain stitches for leaves.
The varying widths and sheen of the ribbon create a lush, three-dimensional effect that mimics a real flower wreath.
33. Combine Pom-Poms and Beading for a Geometric Study
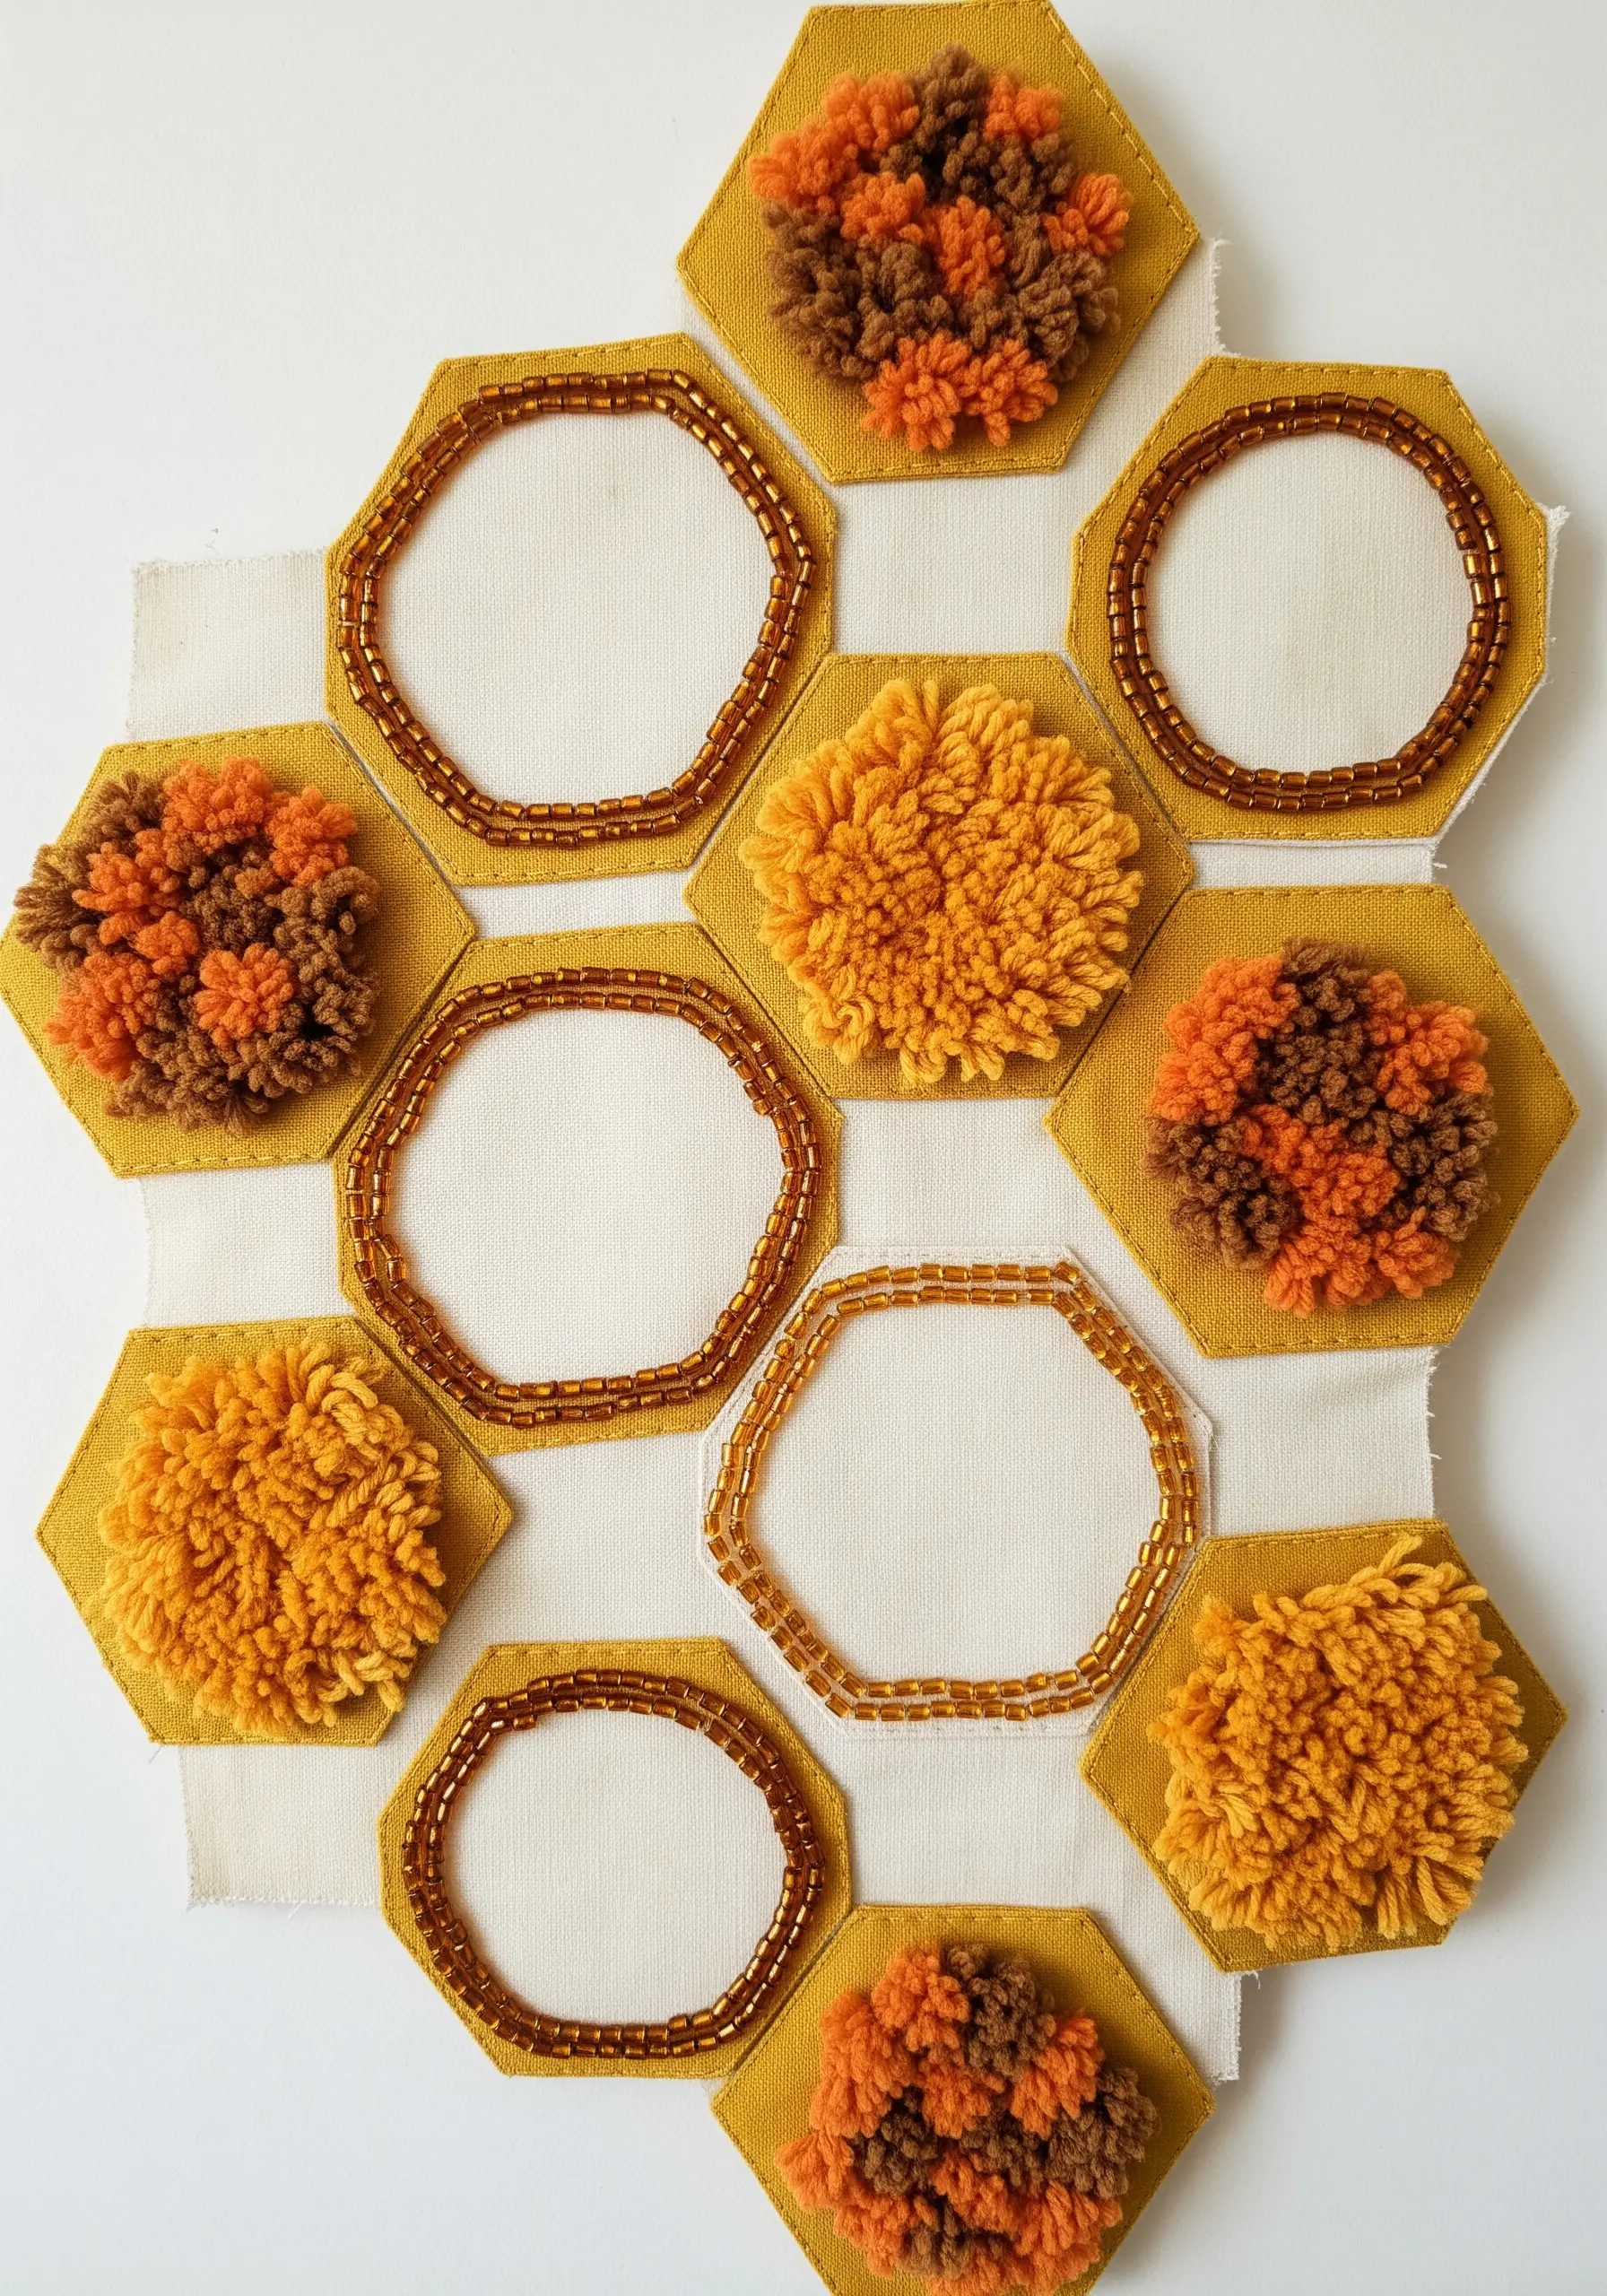
Explore the contrast between soft and hard textures within a structured, geometric framework.
Create a pattern with appliqué hexagon shapes on a neutral background.
Fill some of the hexagons with fluffy, handmade yarn pom-poms for a soft, diffuse texture.
Outline the empty hexagons with precise rows of seed beads for a hard, glittering line. This juxtaposition of textures creates a playful yet sophisticated piece that is highly tactile and visually engaging.
34. Achieve Hyperrealism with Thread Painting and 3D Lashes

Push the boundaries of realism by combining meticulous thread painting with sculptural elements.
Create the smooth gradients of the skin and the iris of the eye using the long-and-short stitch, blending single strands of thread as if you were painting.
For the ultimate touch of realism, use false eyelashes. Carefully trim and shape them, then securely attach them to the eyelid line with a strong, clear adhesive.
This unexpected mixed-media element creates a startlingly lifelike effect that bridges the gap between 2D and 3D art.


