
Sometimes, the key to unlocking your most expressive embroidery isn’t learning a more complex stitch—it’s inviting a new material to join the conversation.
Think beyond thread. Imagine the soft bleed of watercolor beneath a stitched flower, the delicate transparency of a pressed petal secured under sheer fabric, or the satisfying texture of stitching directly onto paper.
These are not complicated techniques. They are thoughtful additions that create depth, contrast, and emotion. By pairing your stitches with another medium, you’re not just making a project; you’re crafting a more compelling story, one that doubles as a truly unforgettable handmade gift.
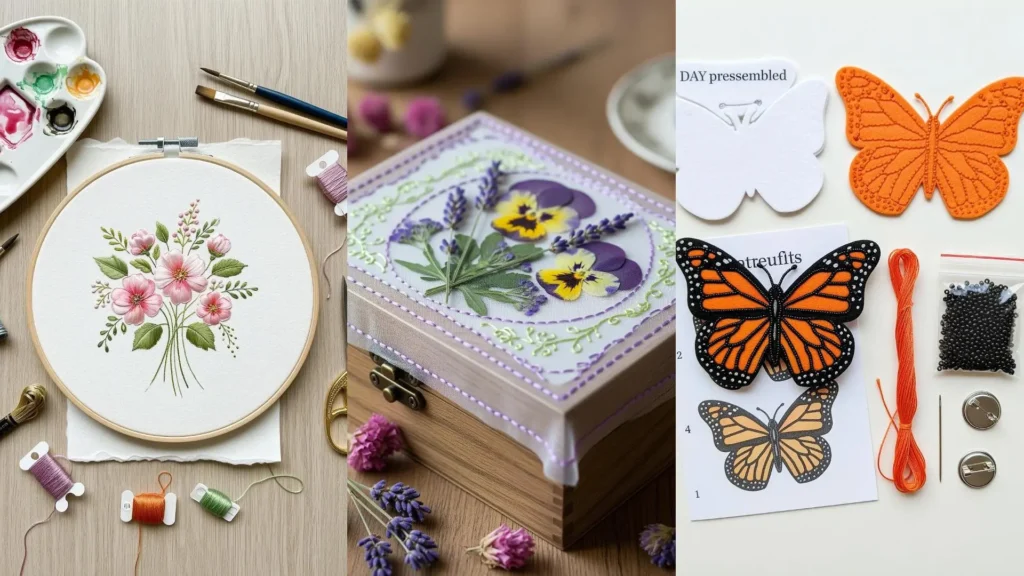
1. Paint with Watercolor Before You Stitch
Create a soft, atmospheric background for your florals by painting directly onto your fabric with watercolors before you begin stitching.
This technique adds depth and color gradients that would take hours to achieve with thread alone, making your embroidery pop against a dreamy, blended backdrop.
Use a quality cotton fabric that can handle moisture, and let it dry completely before hooping it up.
Focus your stitches on the finer details—outlines, petal edges, and leaf veins—allowing the paint to handle the broad color fields.
This method unifies the piece, making your threadwork look deliberate and painterly.
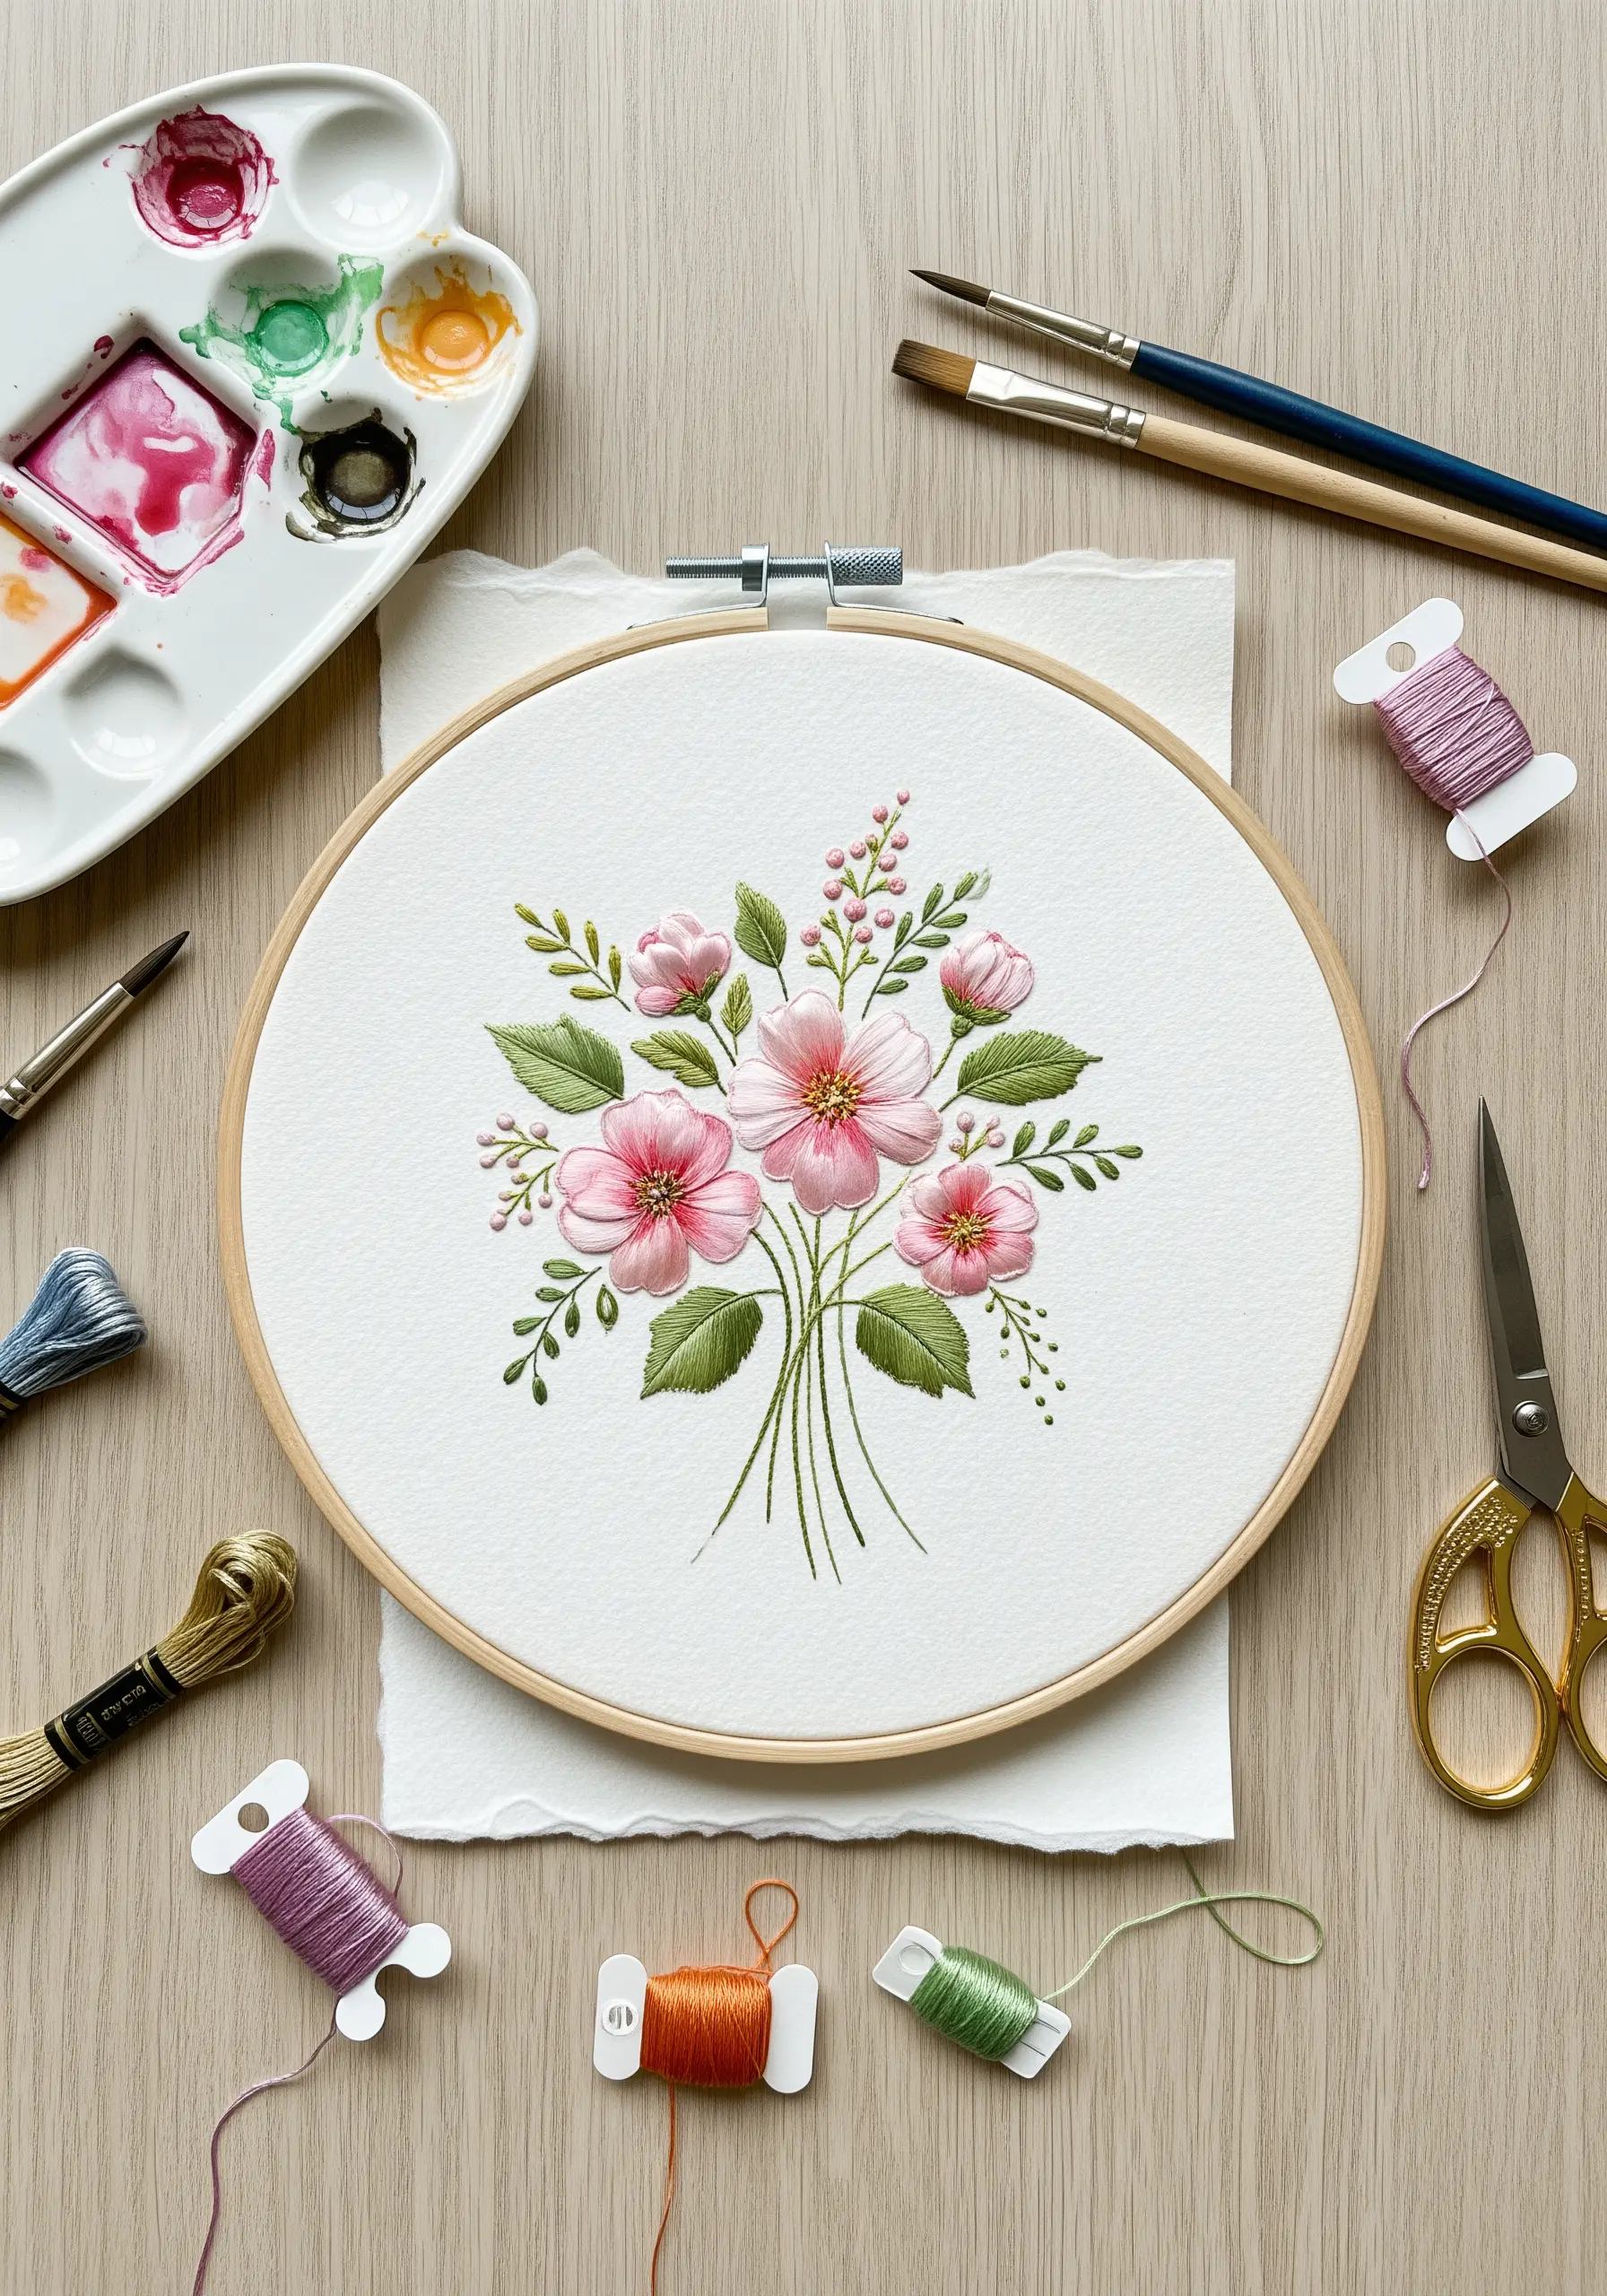
2. Embroider on Paper with Metallic and Beaded Accents
Elevate a journal or book cover by stitching directly onto the paper surface.
To prevent tearing, gently perforate your design’s stitch holes with a pin or awl before you begin sewing.
Combine shimmering metallic threads with tiny seed beads to create a celestial texture that catches the light.
The contrast between the flat paper and the raised, reflective embellishments gives the piece a tactile, luxurious quality.
Finish with a light splatter of white acrylic paint for a final, cosmic touch.
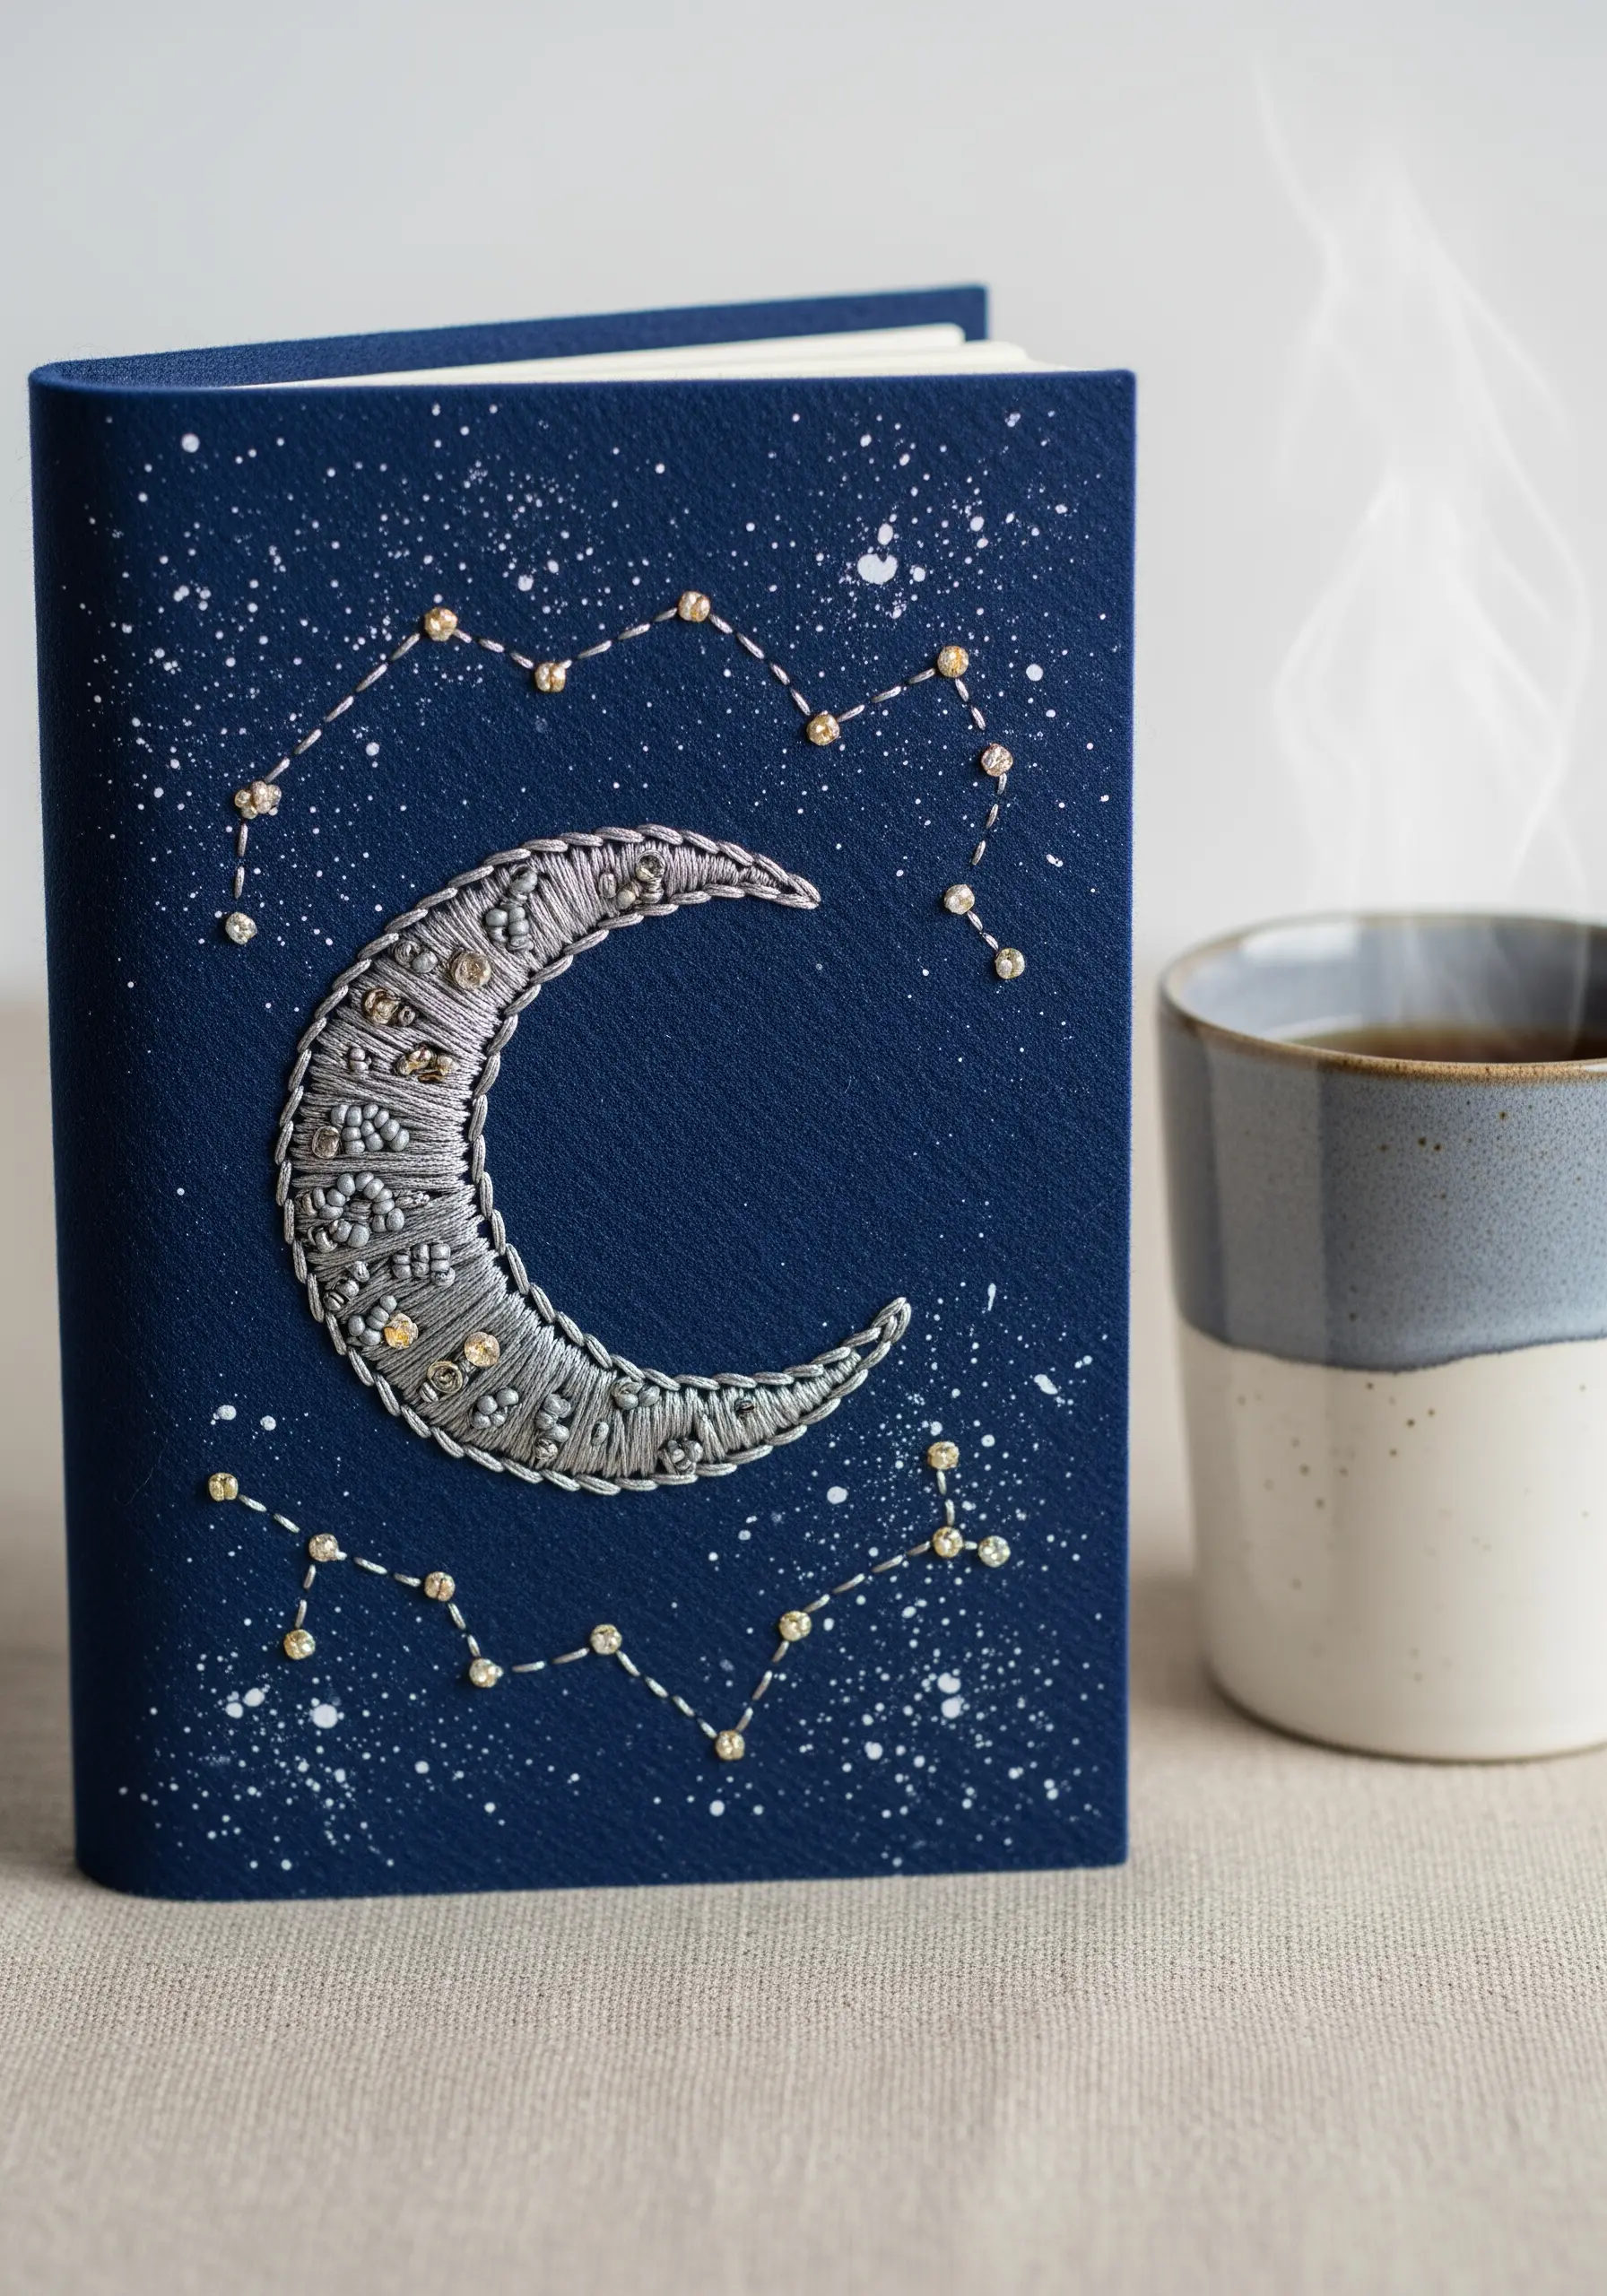
3. Combine Fabric, Paper, and Tassels for Literary Bookmarks
Construct elegant embroidered mixed-media bookmarks by layering stitched fabric onto a sturdy cardstock base.
Choose a tightly woven linen or cotton for your botanical stitches to ensure clean, sharp details.
Add a second layer of torn-edge paper printed with text to create a vintage, literary feel that complements the handcrafted motif.
A simple wooden bead and a silky tassel provide a polished, functional finish, turning a simple placeholder into a thoughtful gift.
4. Create Abstract Art with Fabric Scraps and Chunky Yarn
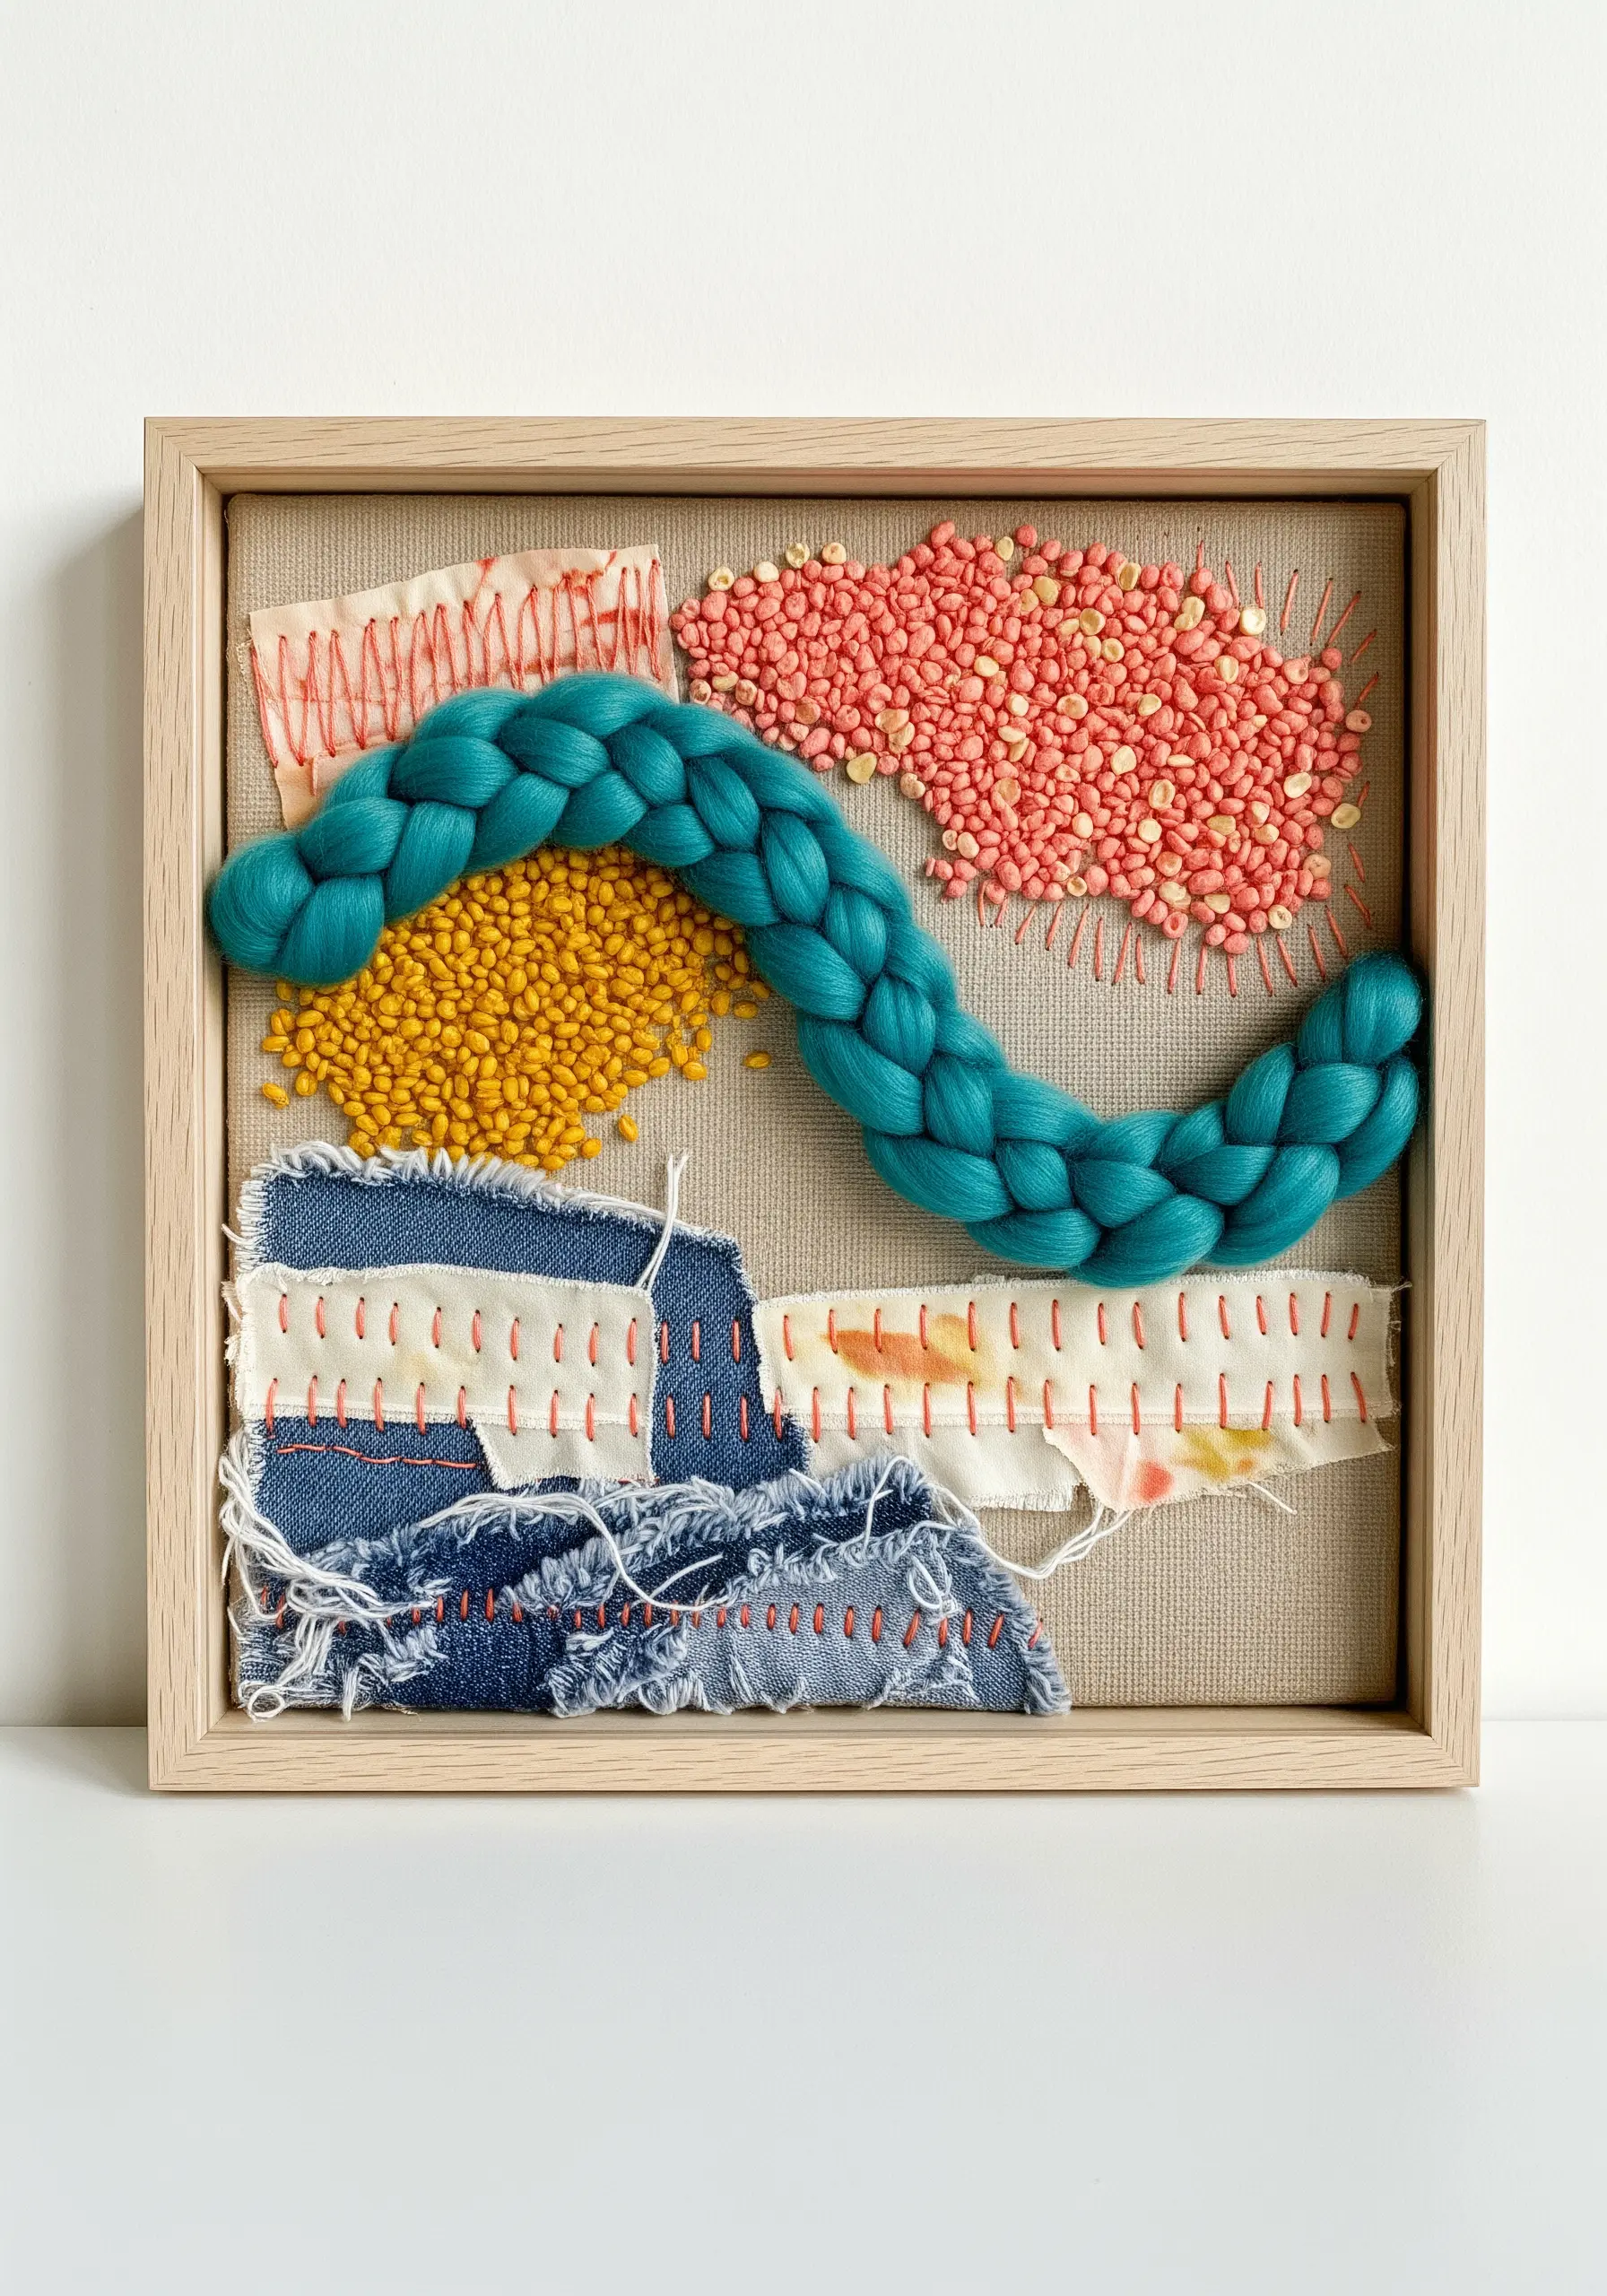
Move beyond thread and explore texture by creating a framed fiber collage.
Start by arranging larger, sculptural elements like braided chunky yarn to create movement and a strong focal point.
Build around it with frayed denim, stained fabric scraps, and areas of dense beading to introduce contrasting textures and colors.
Use a simple running stitch with thick thread to unify the composition, connecting disparate pieces and adding a final layer of handmade detail.
5. Personalize Pet Portraits with 3D Elements
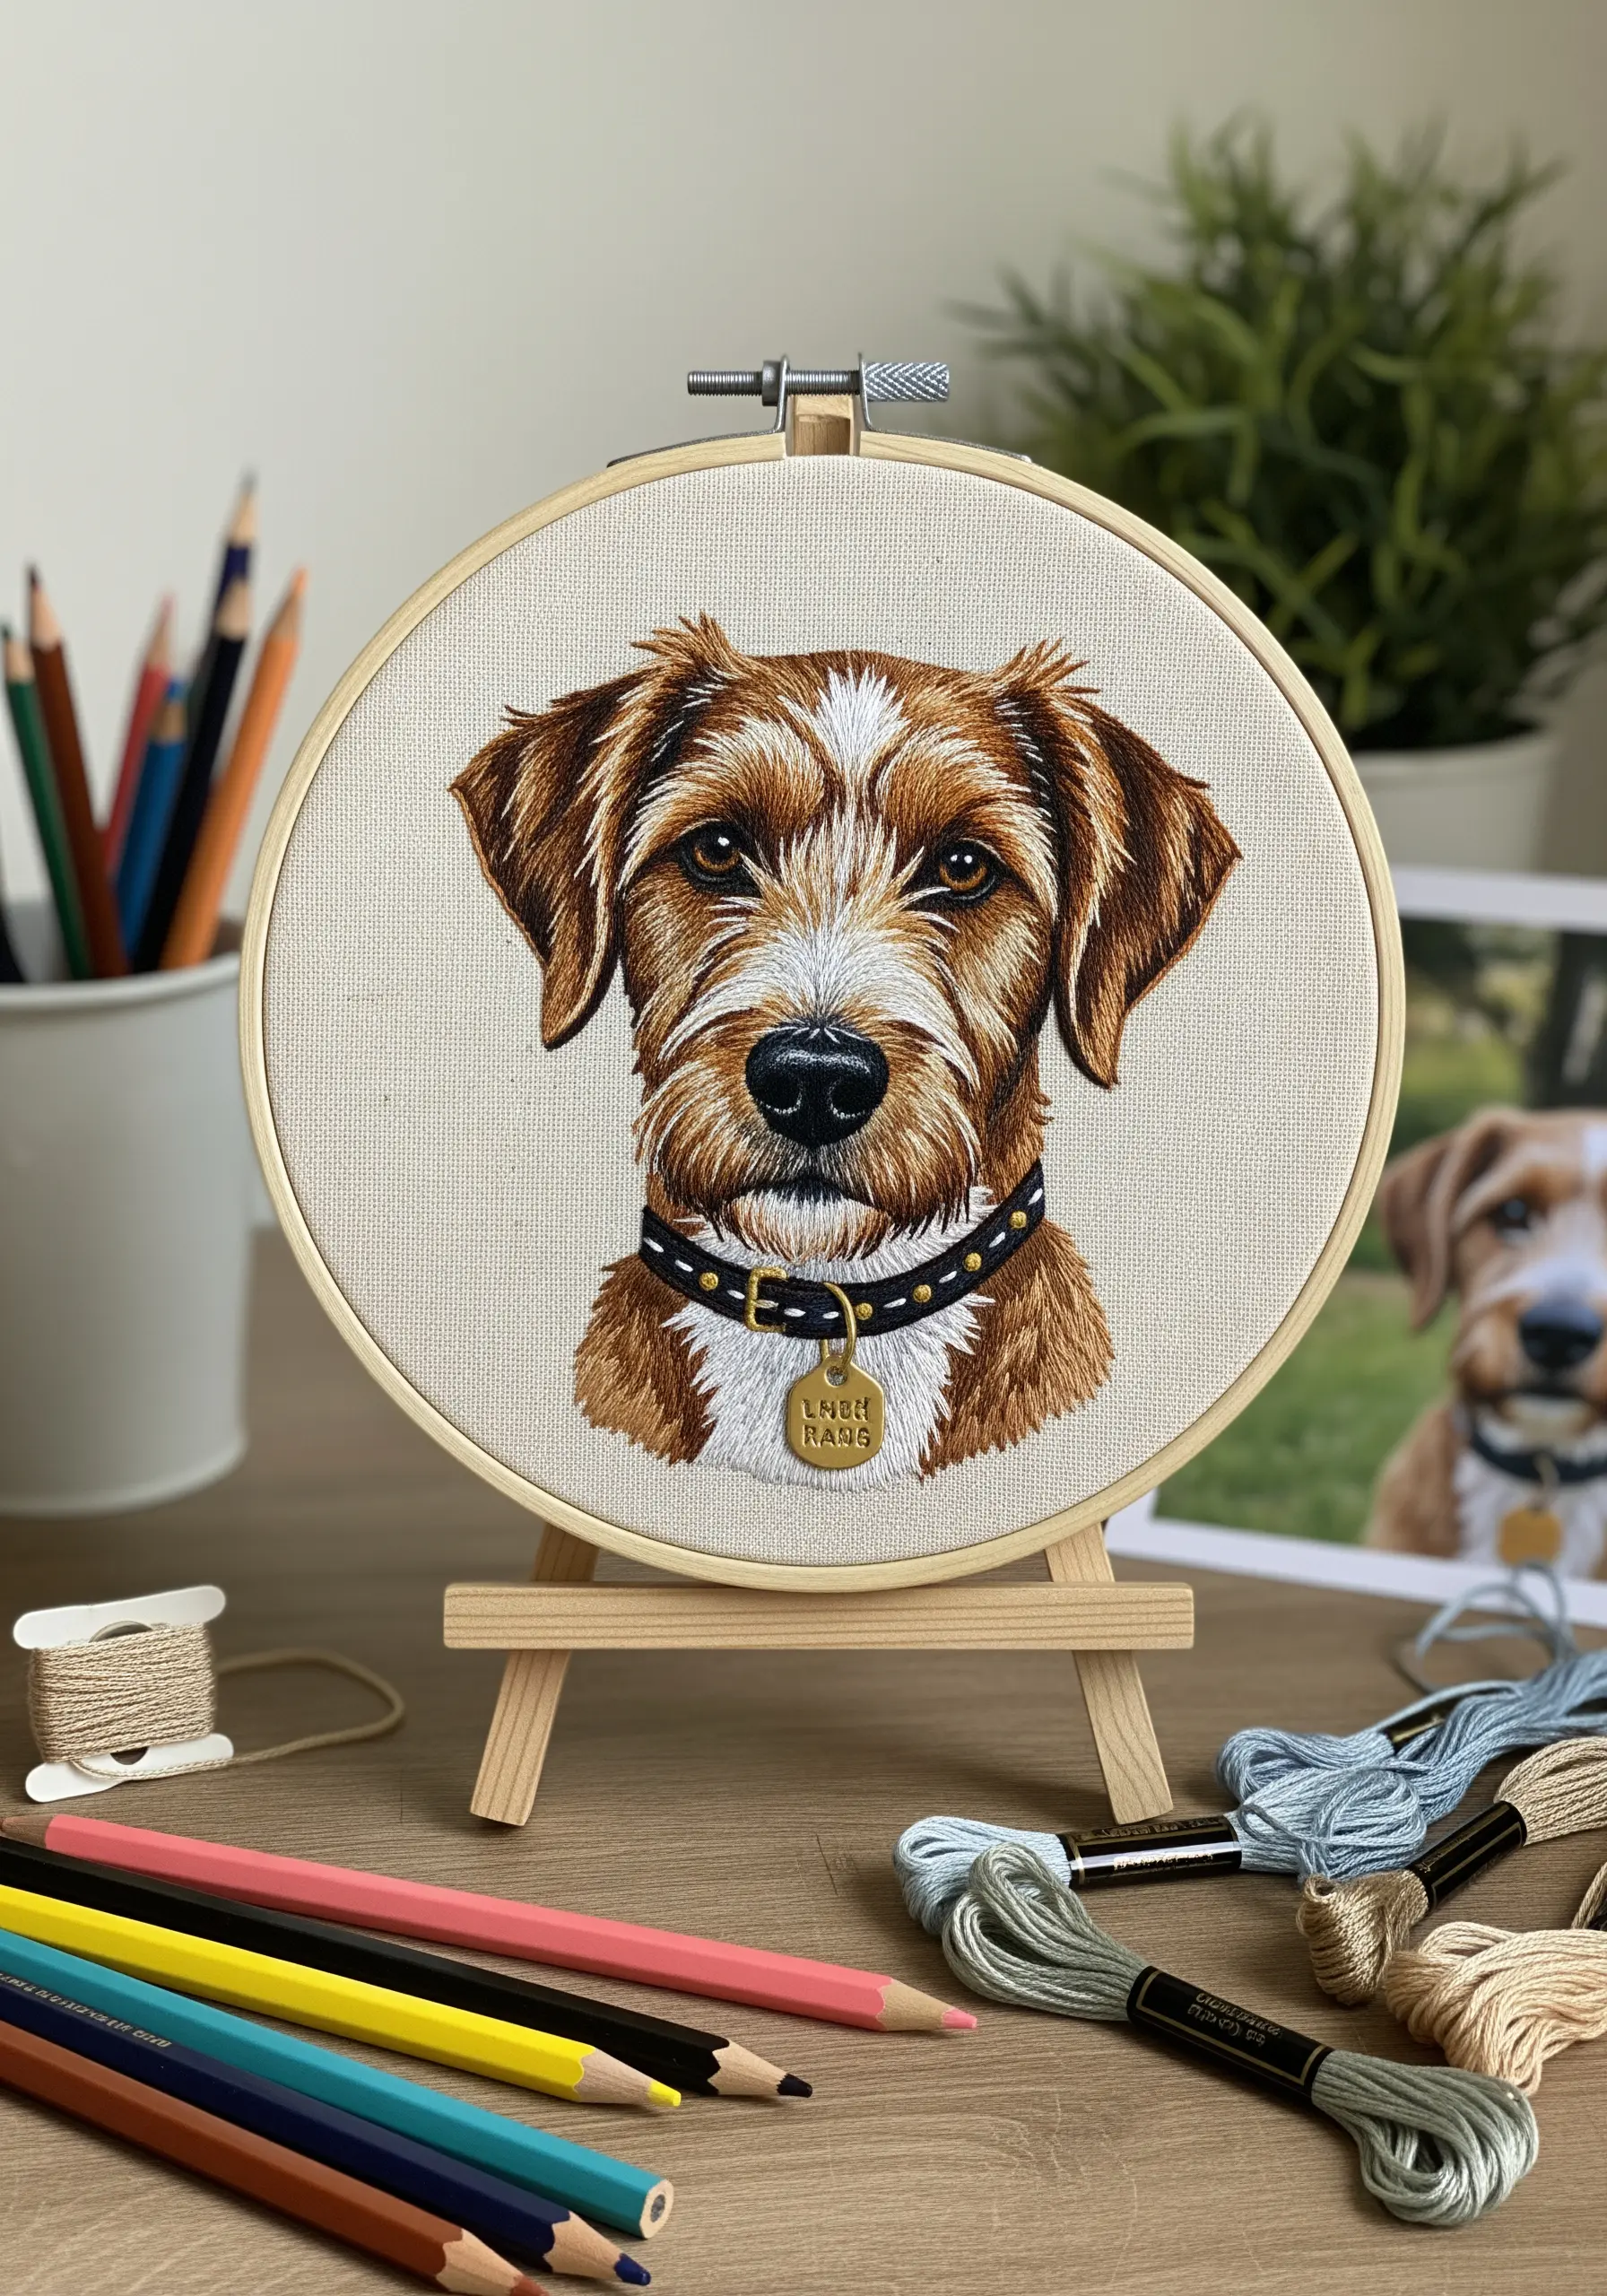
Capture the spirit of a beloved pet with detailed thread painting, focusing on the direction of your stitches to mimic the flow of fur.
Use single-strand floss for the finest details around the eyes and nose to achieve a realistic, soulful expression.
For the ultimate personal touch, incorporate a tiny, custom-made clay or metal name tag, stitching it directly into the collar.
This small mixed-media detail transforms one of the best pet portrait embroidery ideas into a cherished, three-dimensional keepsake.
6. Preserve Pressed Flowers Under a Sheer Overlay
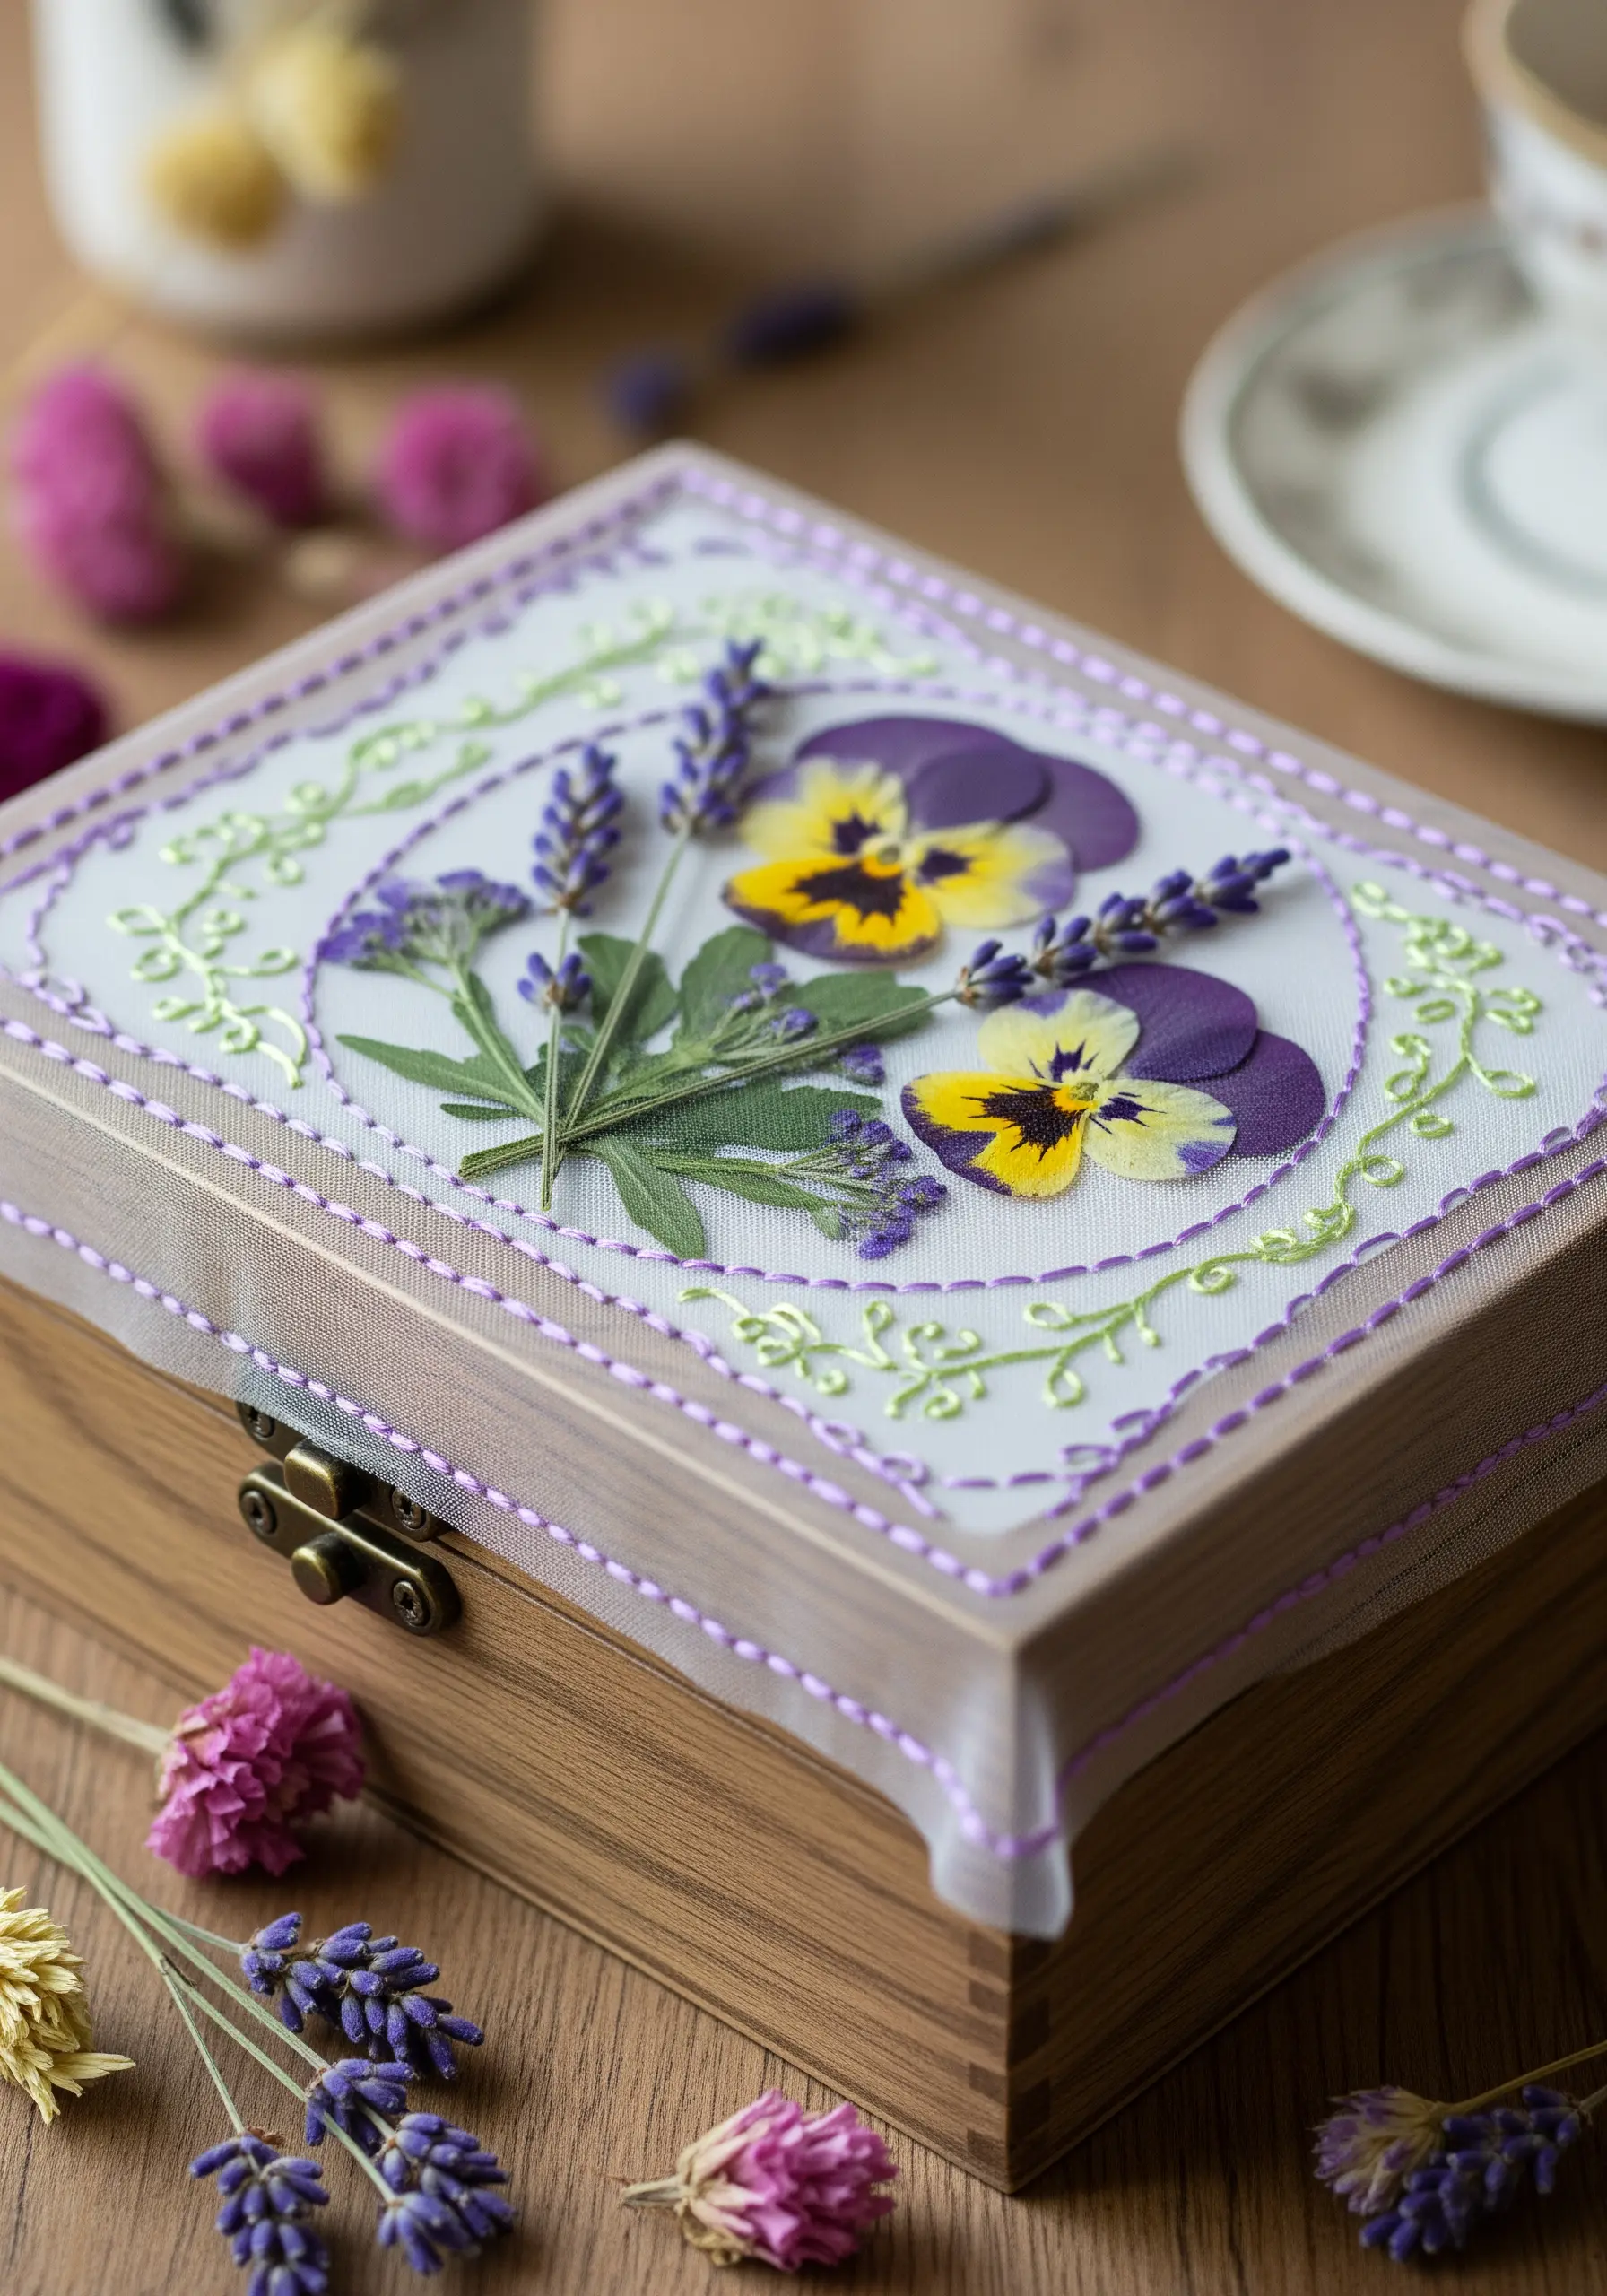
Combine the delicacy of real botanicals with embroidery by layering pressed flowers onto your fabric.
To protect the fragile petals without using glue, place a layer of sheer organza or tulle over your arrangement.
Hoop all layers together—base fabric, flowers, and organza—and stitch your decorative frame or accents through everything.
This technique elegantly secures the flowers, creating a beautiful, diffused effect while ensuring their longevity. This is one of the most elegant pressed flower embroidery creations you can make.
7. Craft 3D Brooches from Felt and Beads
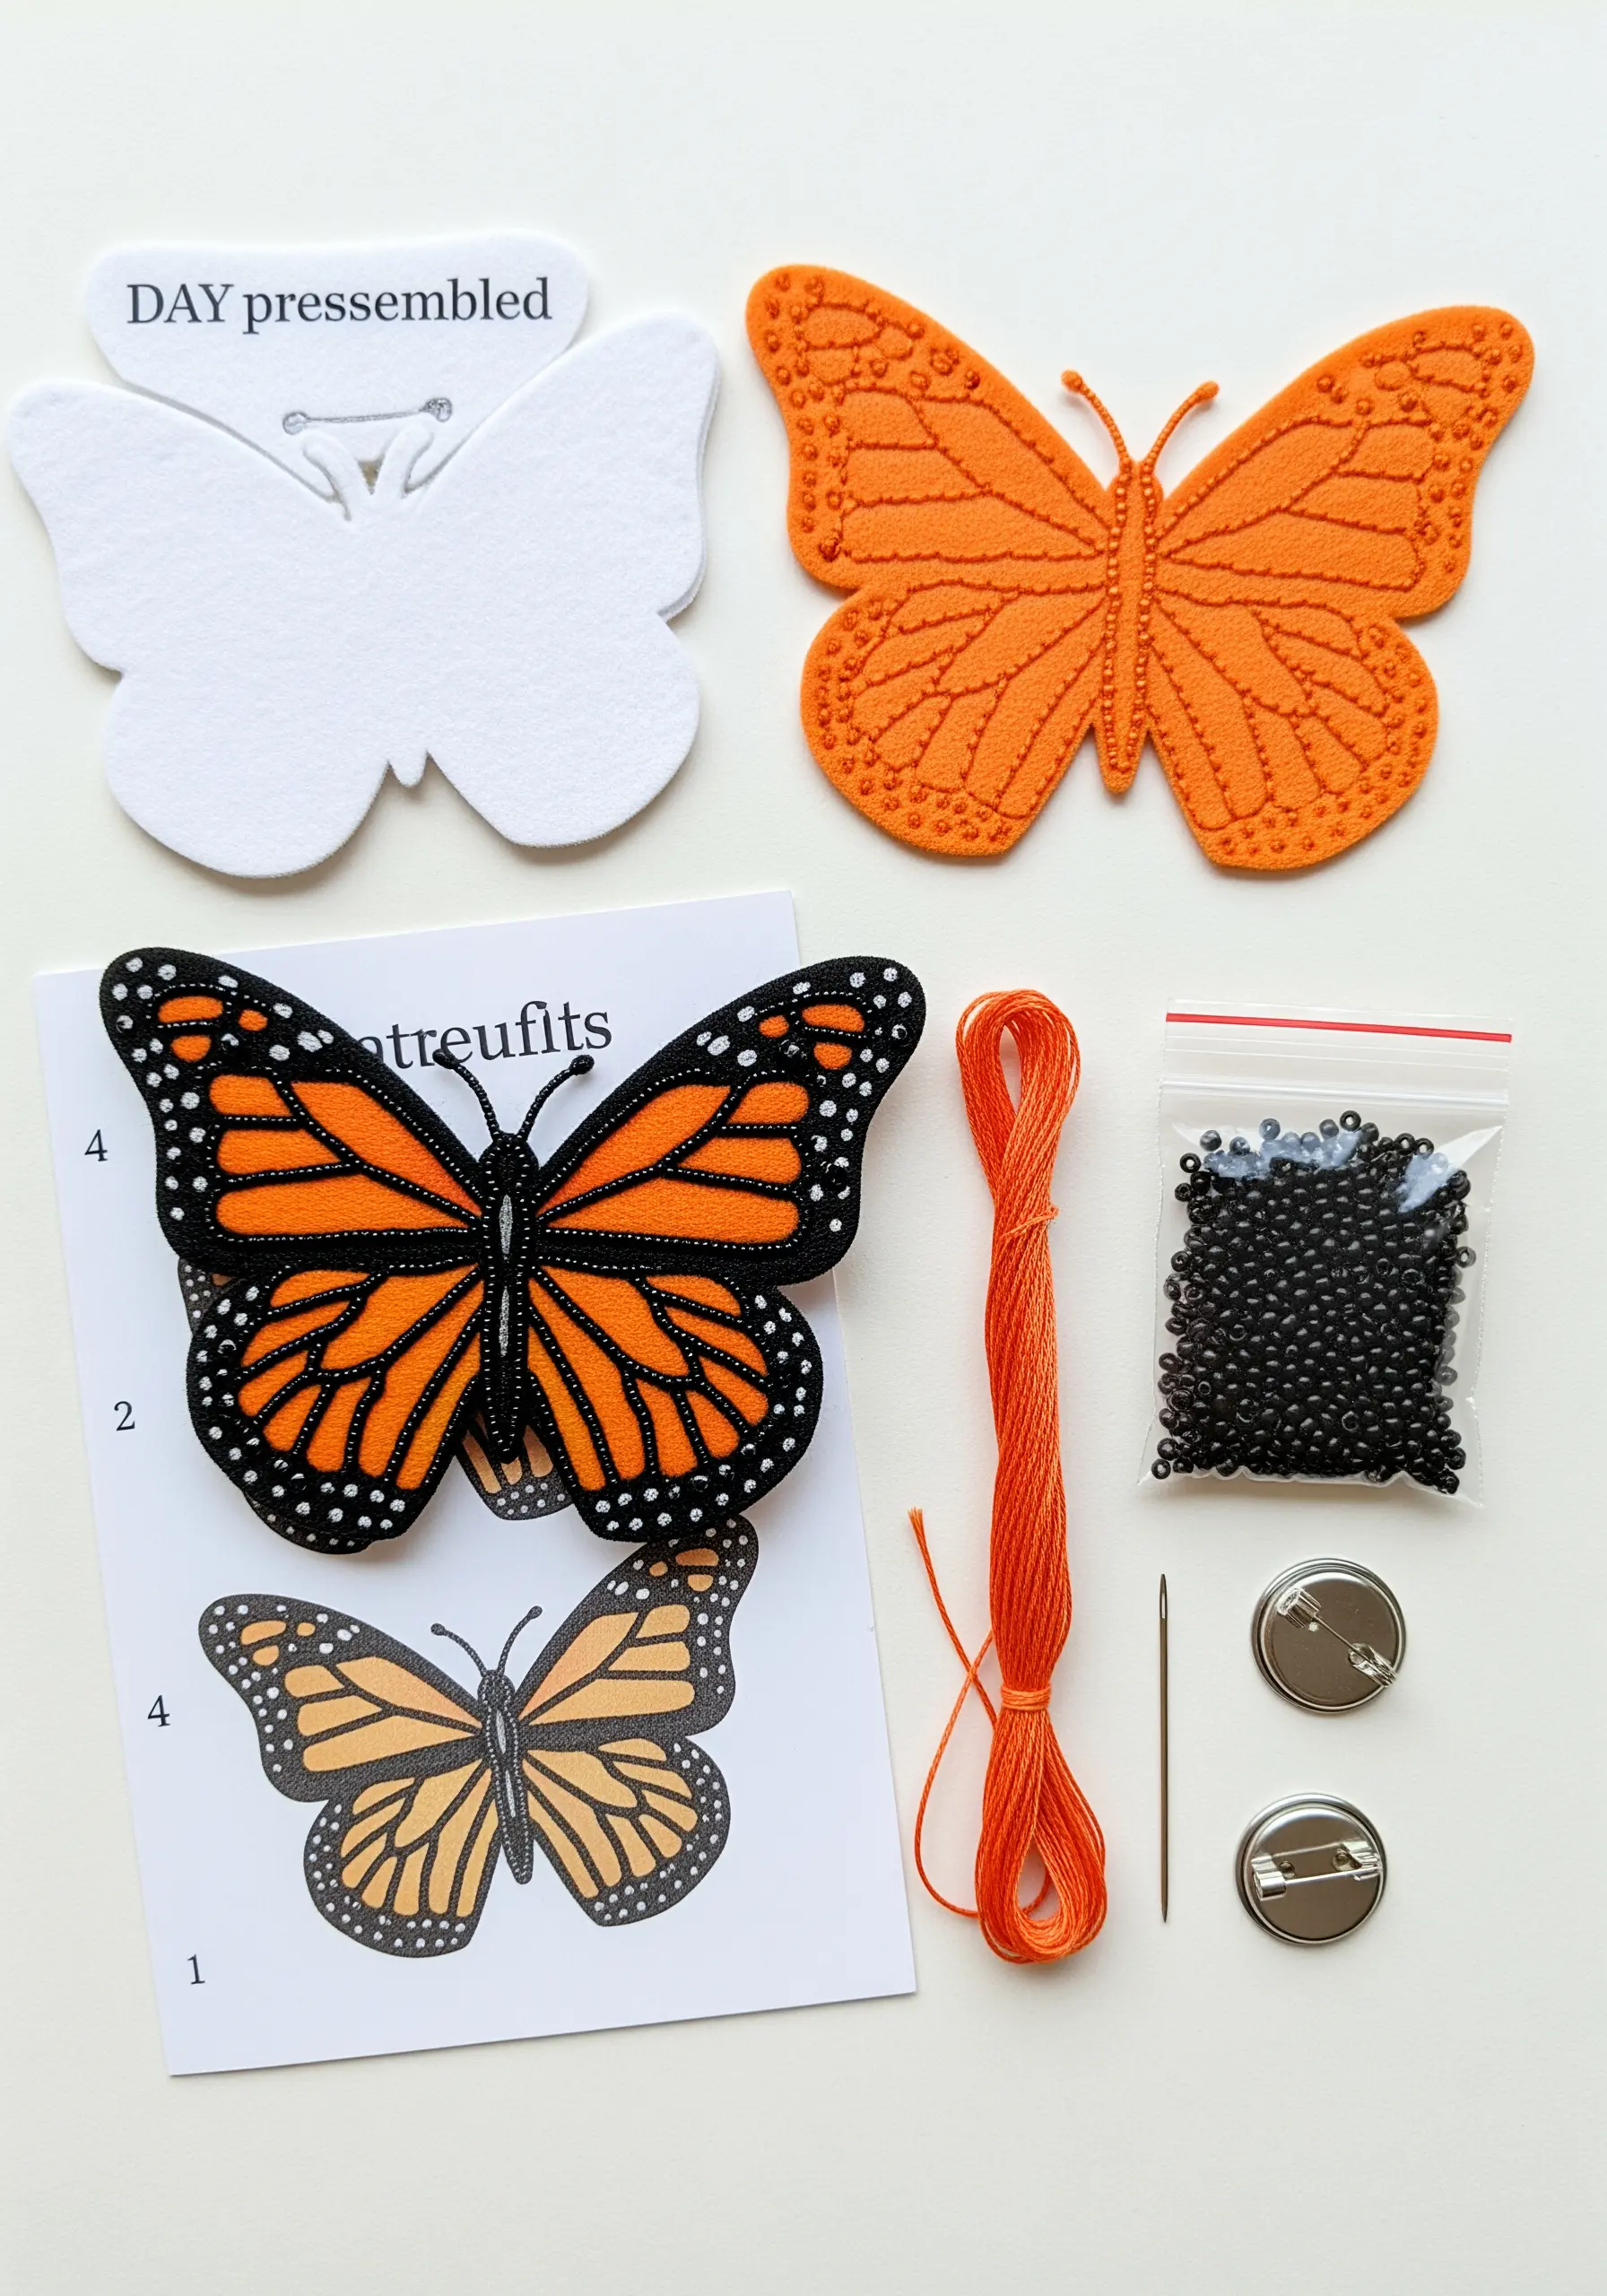
Use stiff felt as a sturdy, no-fray base for creating dimensional embroidered brooches or pins.
Outline your design with a simple backstitch, then fill the areas with dense satin stitch for a smooth, raised surface that mimics the finish of a machine-made patch.
Incorporate seed beads for eyes, spots, or shimmering accents, adding a final touch of texture and detail.
This process turns a flat pattern into a piece of wearable art, perfect for gifting.
8. Construct a Nursery Mobile with Felt, Paper, and Wood
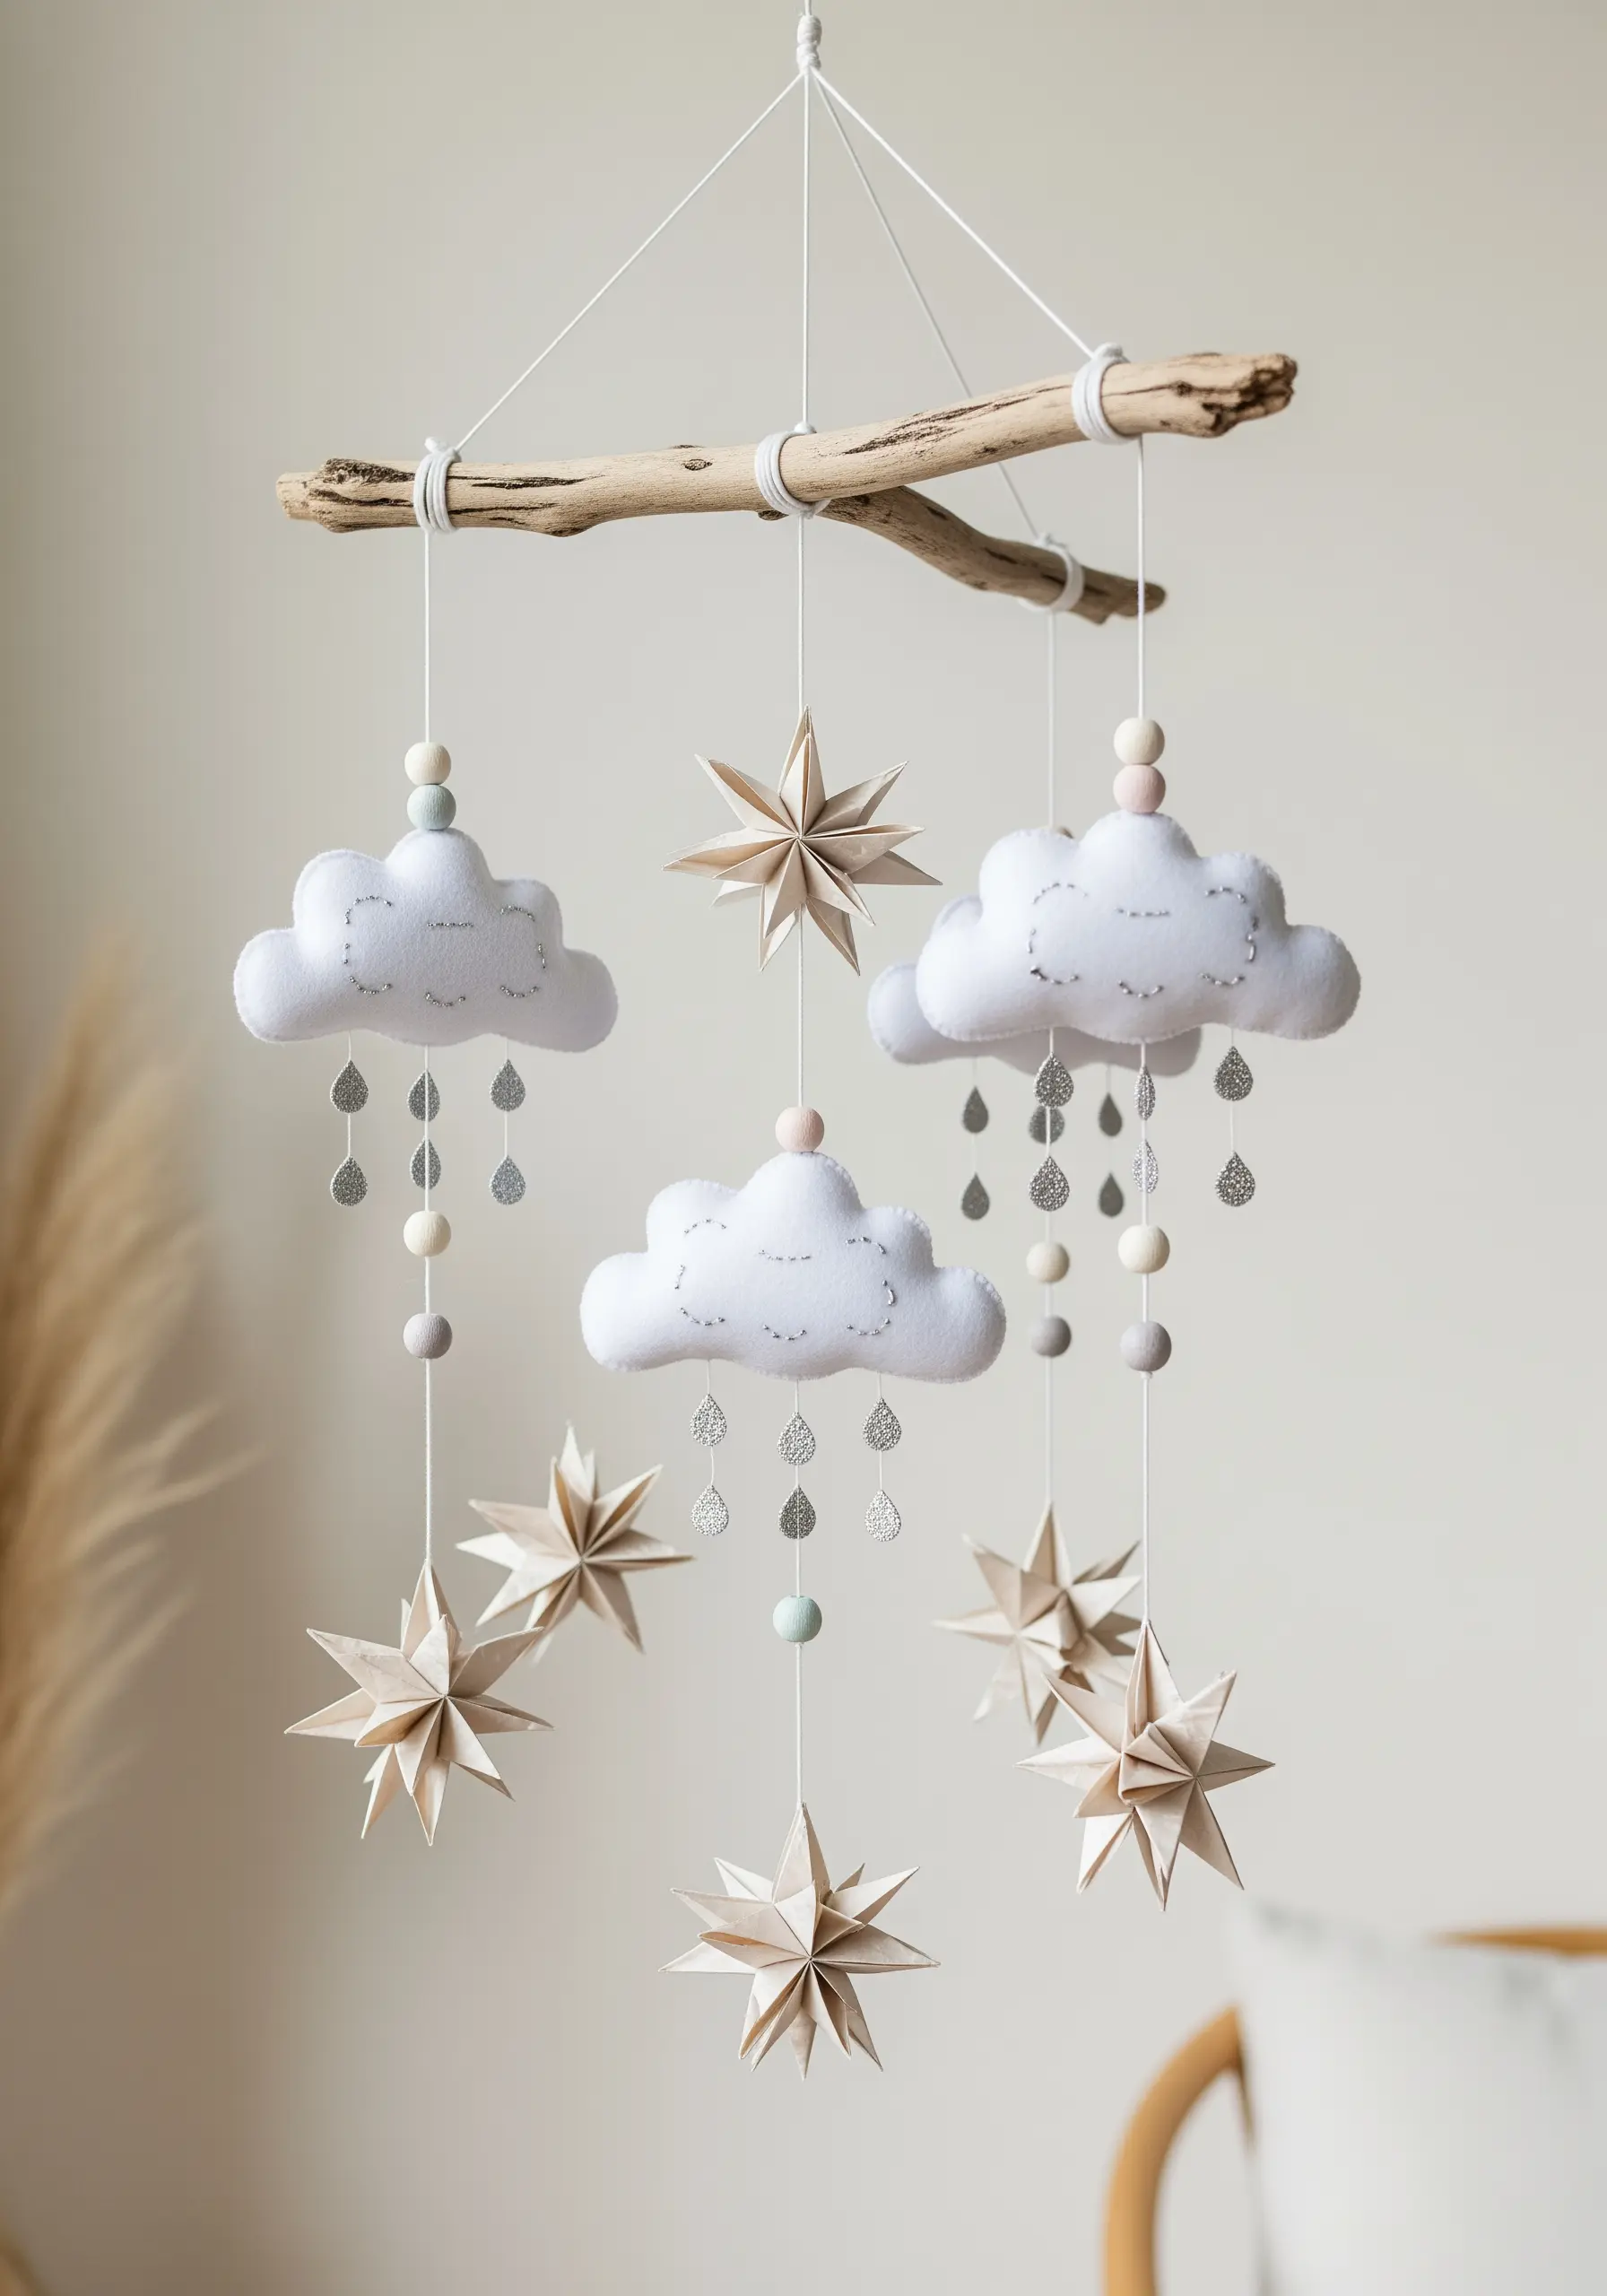
Design a gentle, calming nursery mobile by combining materials with different weights and textures.
Use soft, stuffed felt shapes for clouds, adding simple stitched details like raindrops with metallic thread.
Contrast the softness of the felt with crisp, folded paper stars that will catch the light and create sharp, geometric shadows.
Suspend all the elements from a piece of natural driftwood for an organic, balanced structure that is both soothing and visually interesting.
9. Accentuate a Watercolor Map with Metallic Stitches
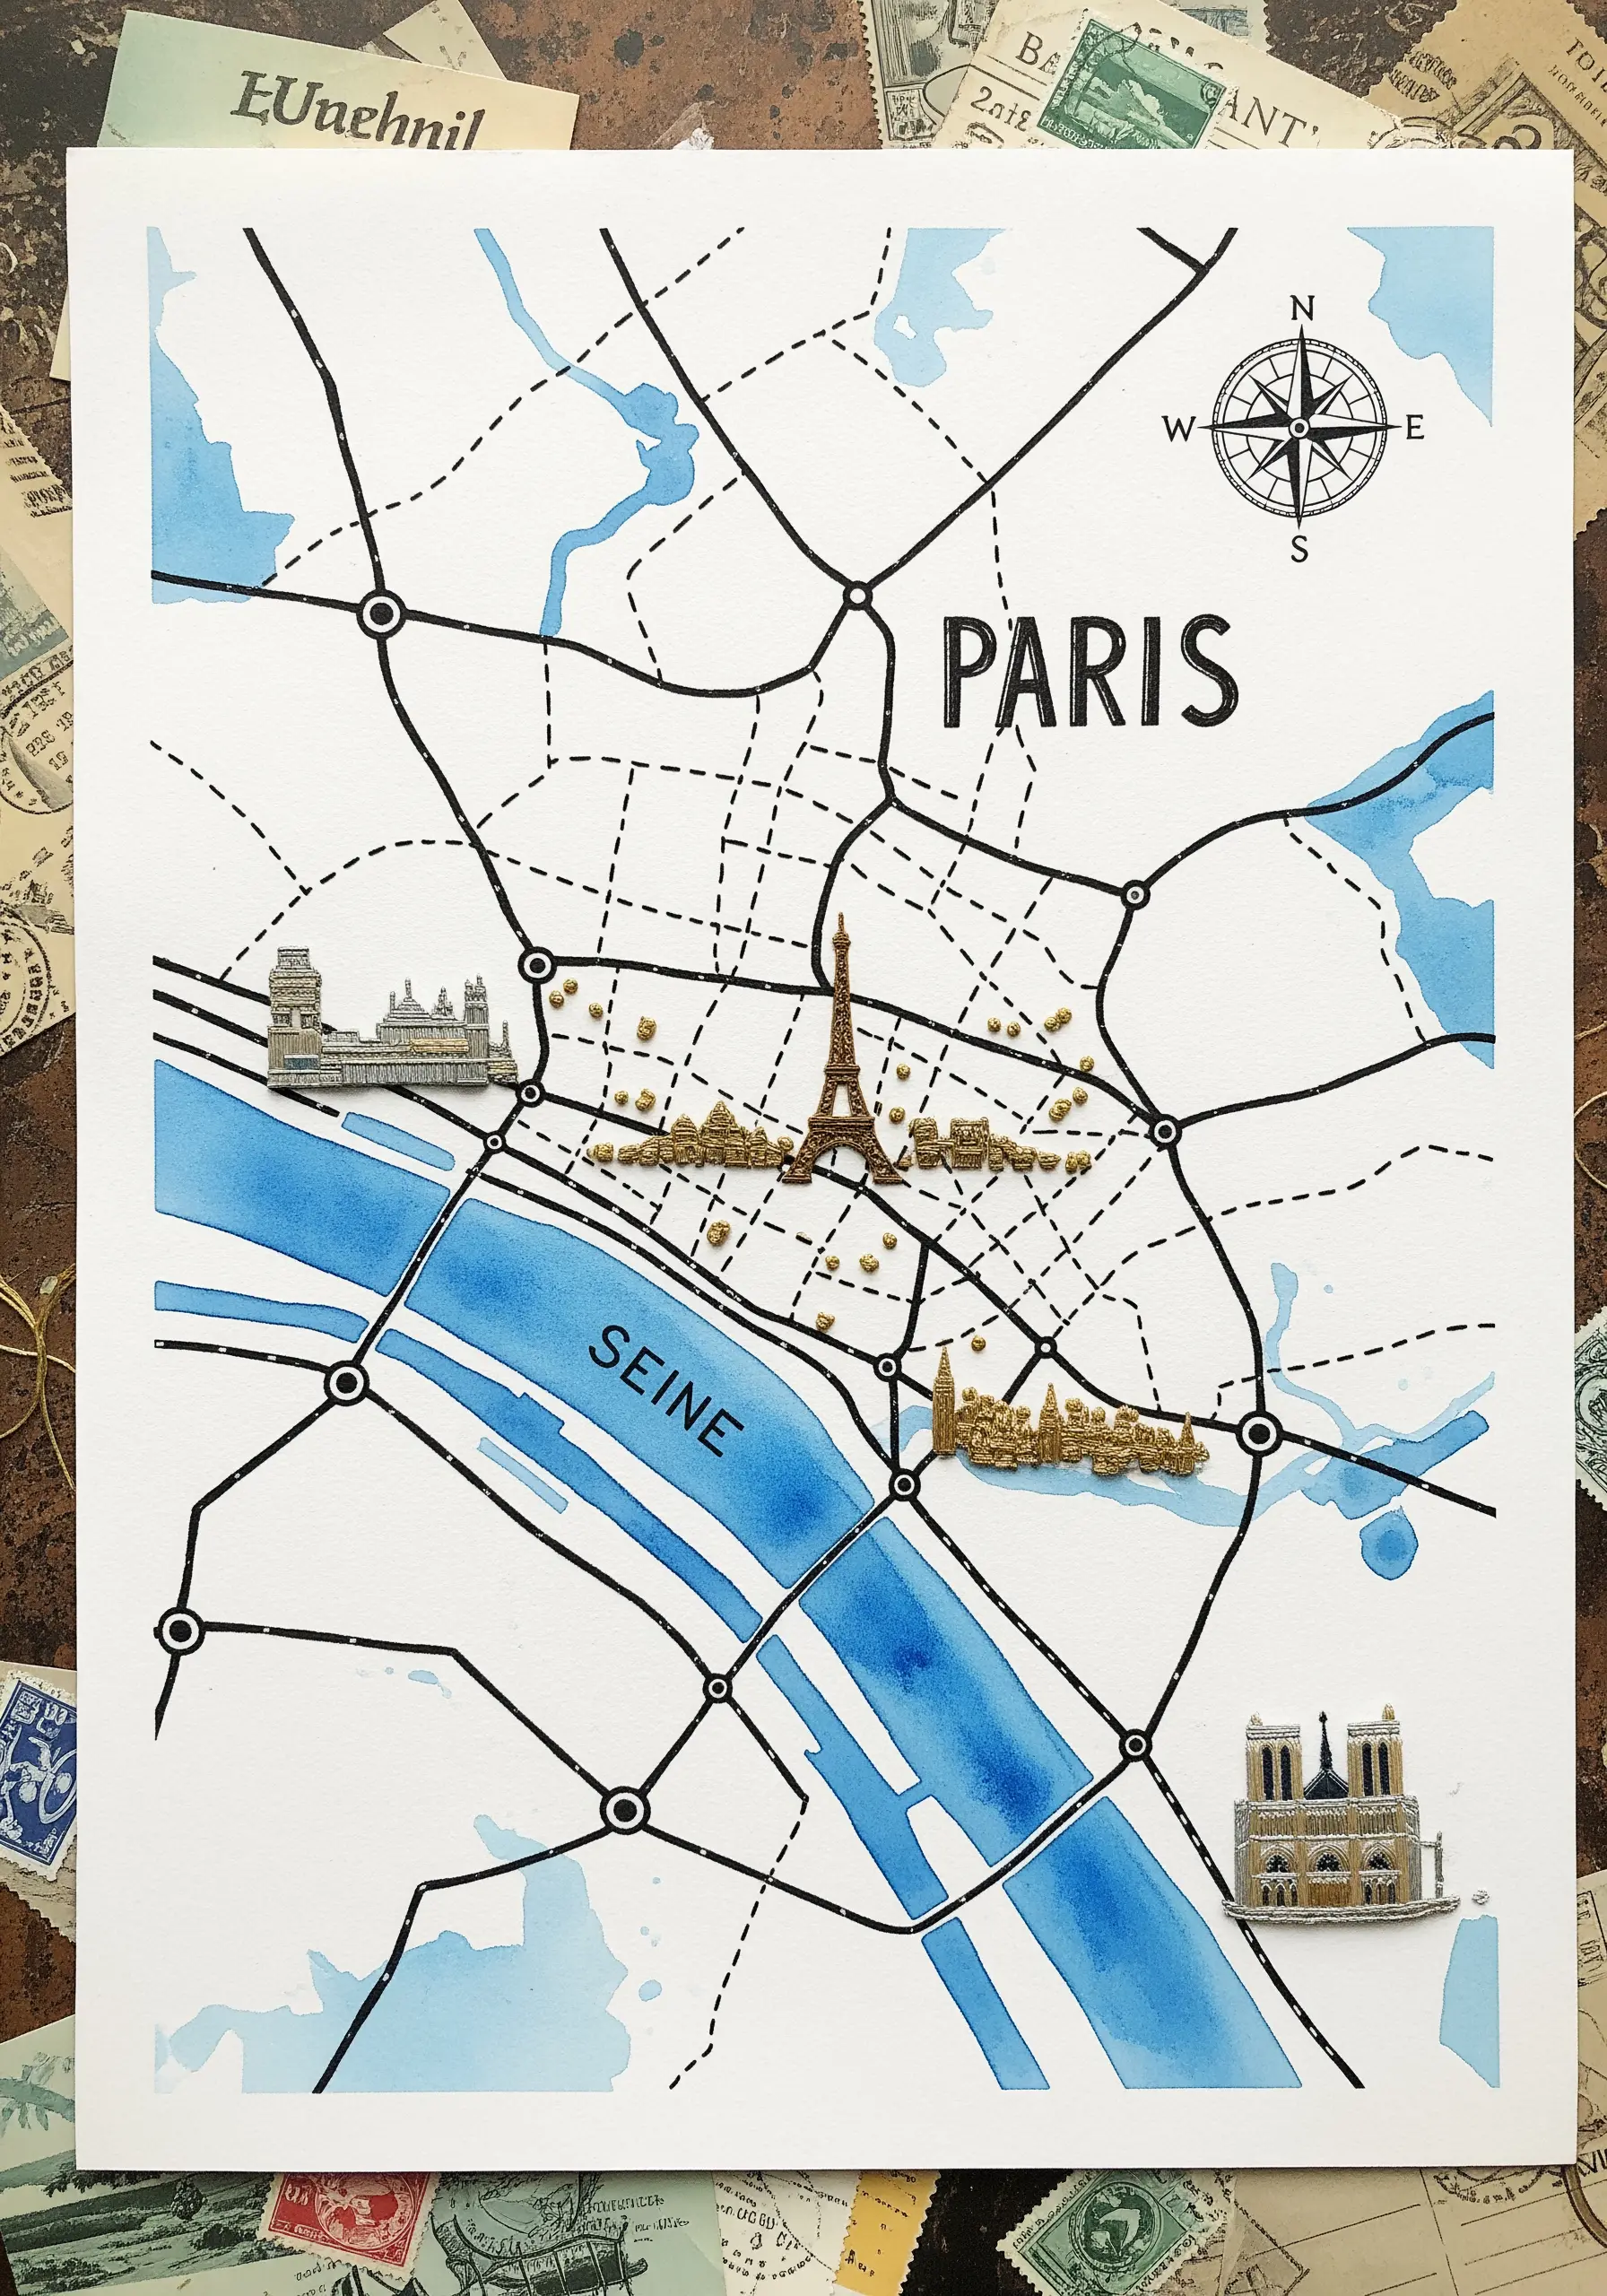
Transform a simple map into a piece of personal history by adding embroidered highlights.
Start by painting the basic shapes, like rivers and parks, with watercolor on heavy paper.
Once dry, use a lustrous metallic thread to stitch over important routes, pathways, or borders, adding a layer of texture and significance.
You can even add tiny charms or a cluster of French knots to mark special locations, turning a decorative map into a meaningful story.
10. Layer Felt Appliqué for Scenic Ornaments
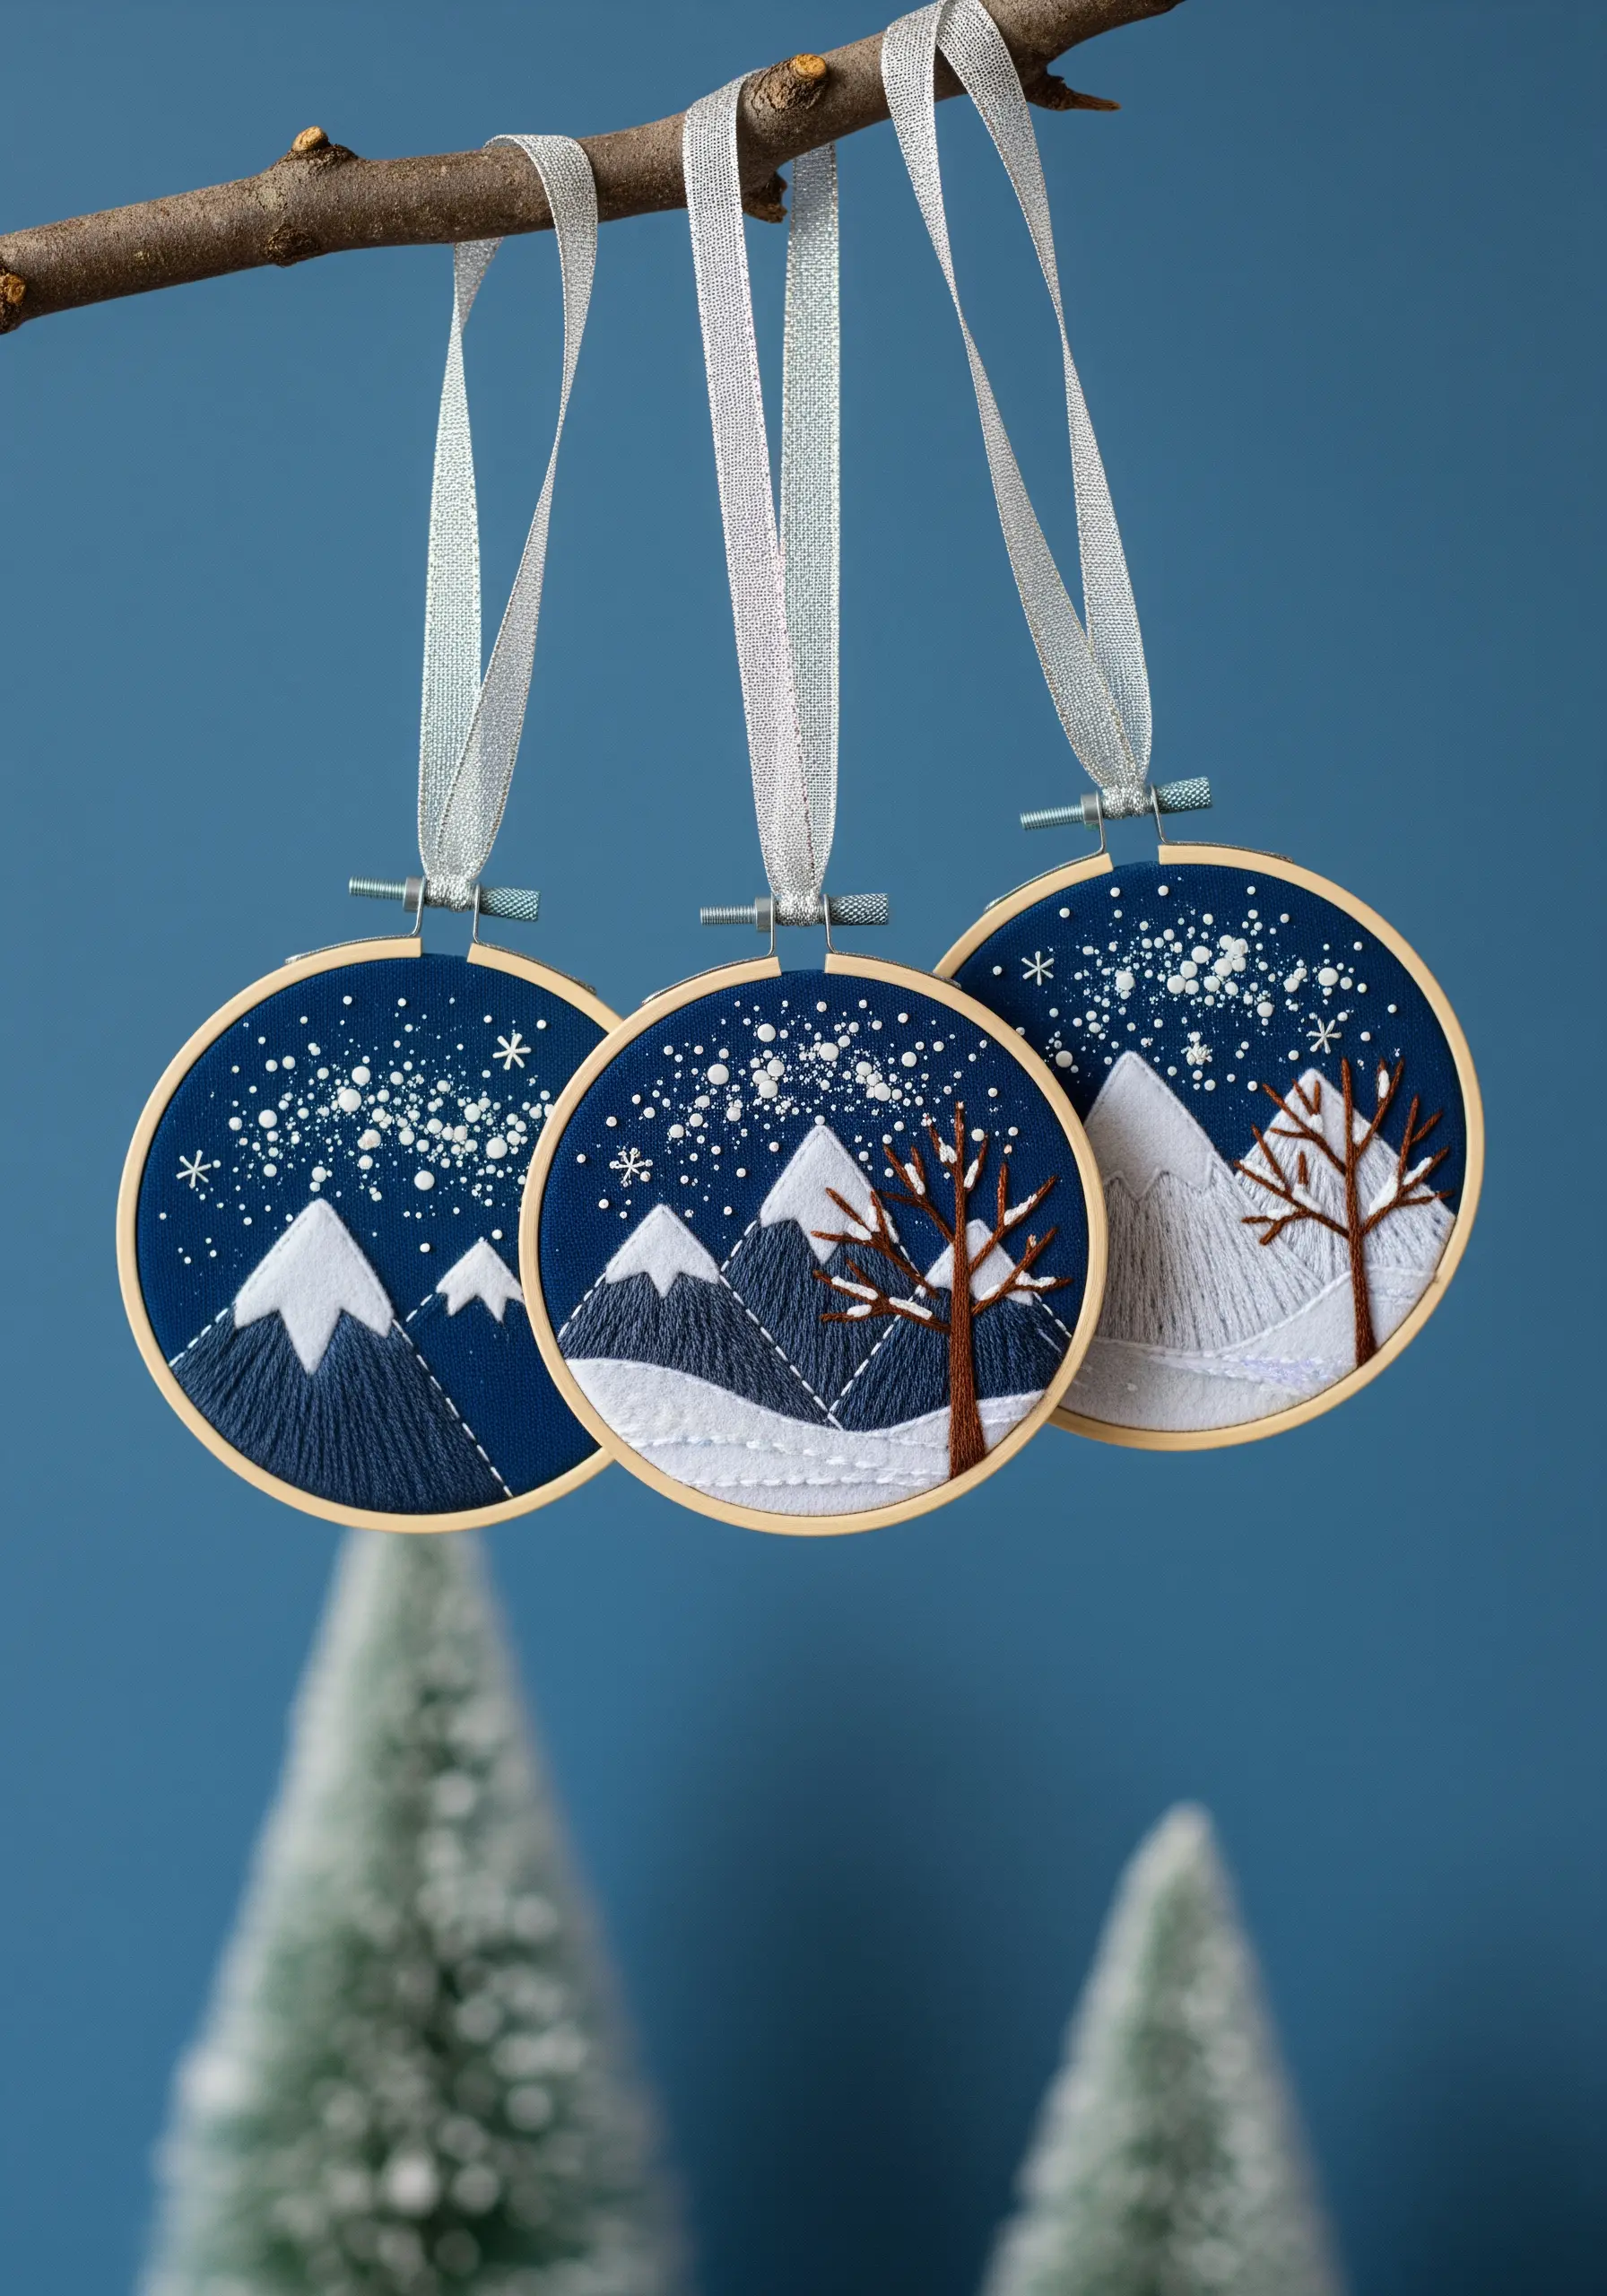
Create dynamic landscape ornaments by using felt appliqué to build your scene in layers.
Cut out and attach the background elements first, like the sky and distant mountains, then layer the foreground pieces on top to create instant depth.
Use simple embroidery stitches—like backstitch for tree branches or satin stitch for snow-capped peaks—to add fine detail and definition.
Finish with a scattering of white French knots for a flurry of snow, unifying the entire winter scene.
11. Add Architectural Elements to a House Portrait
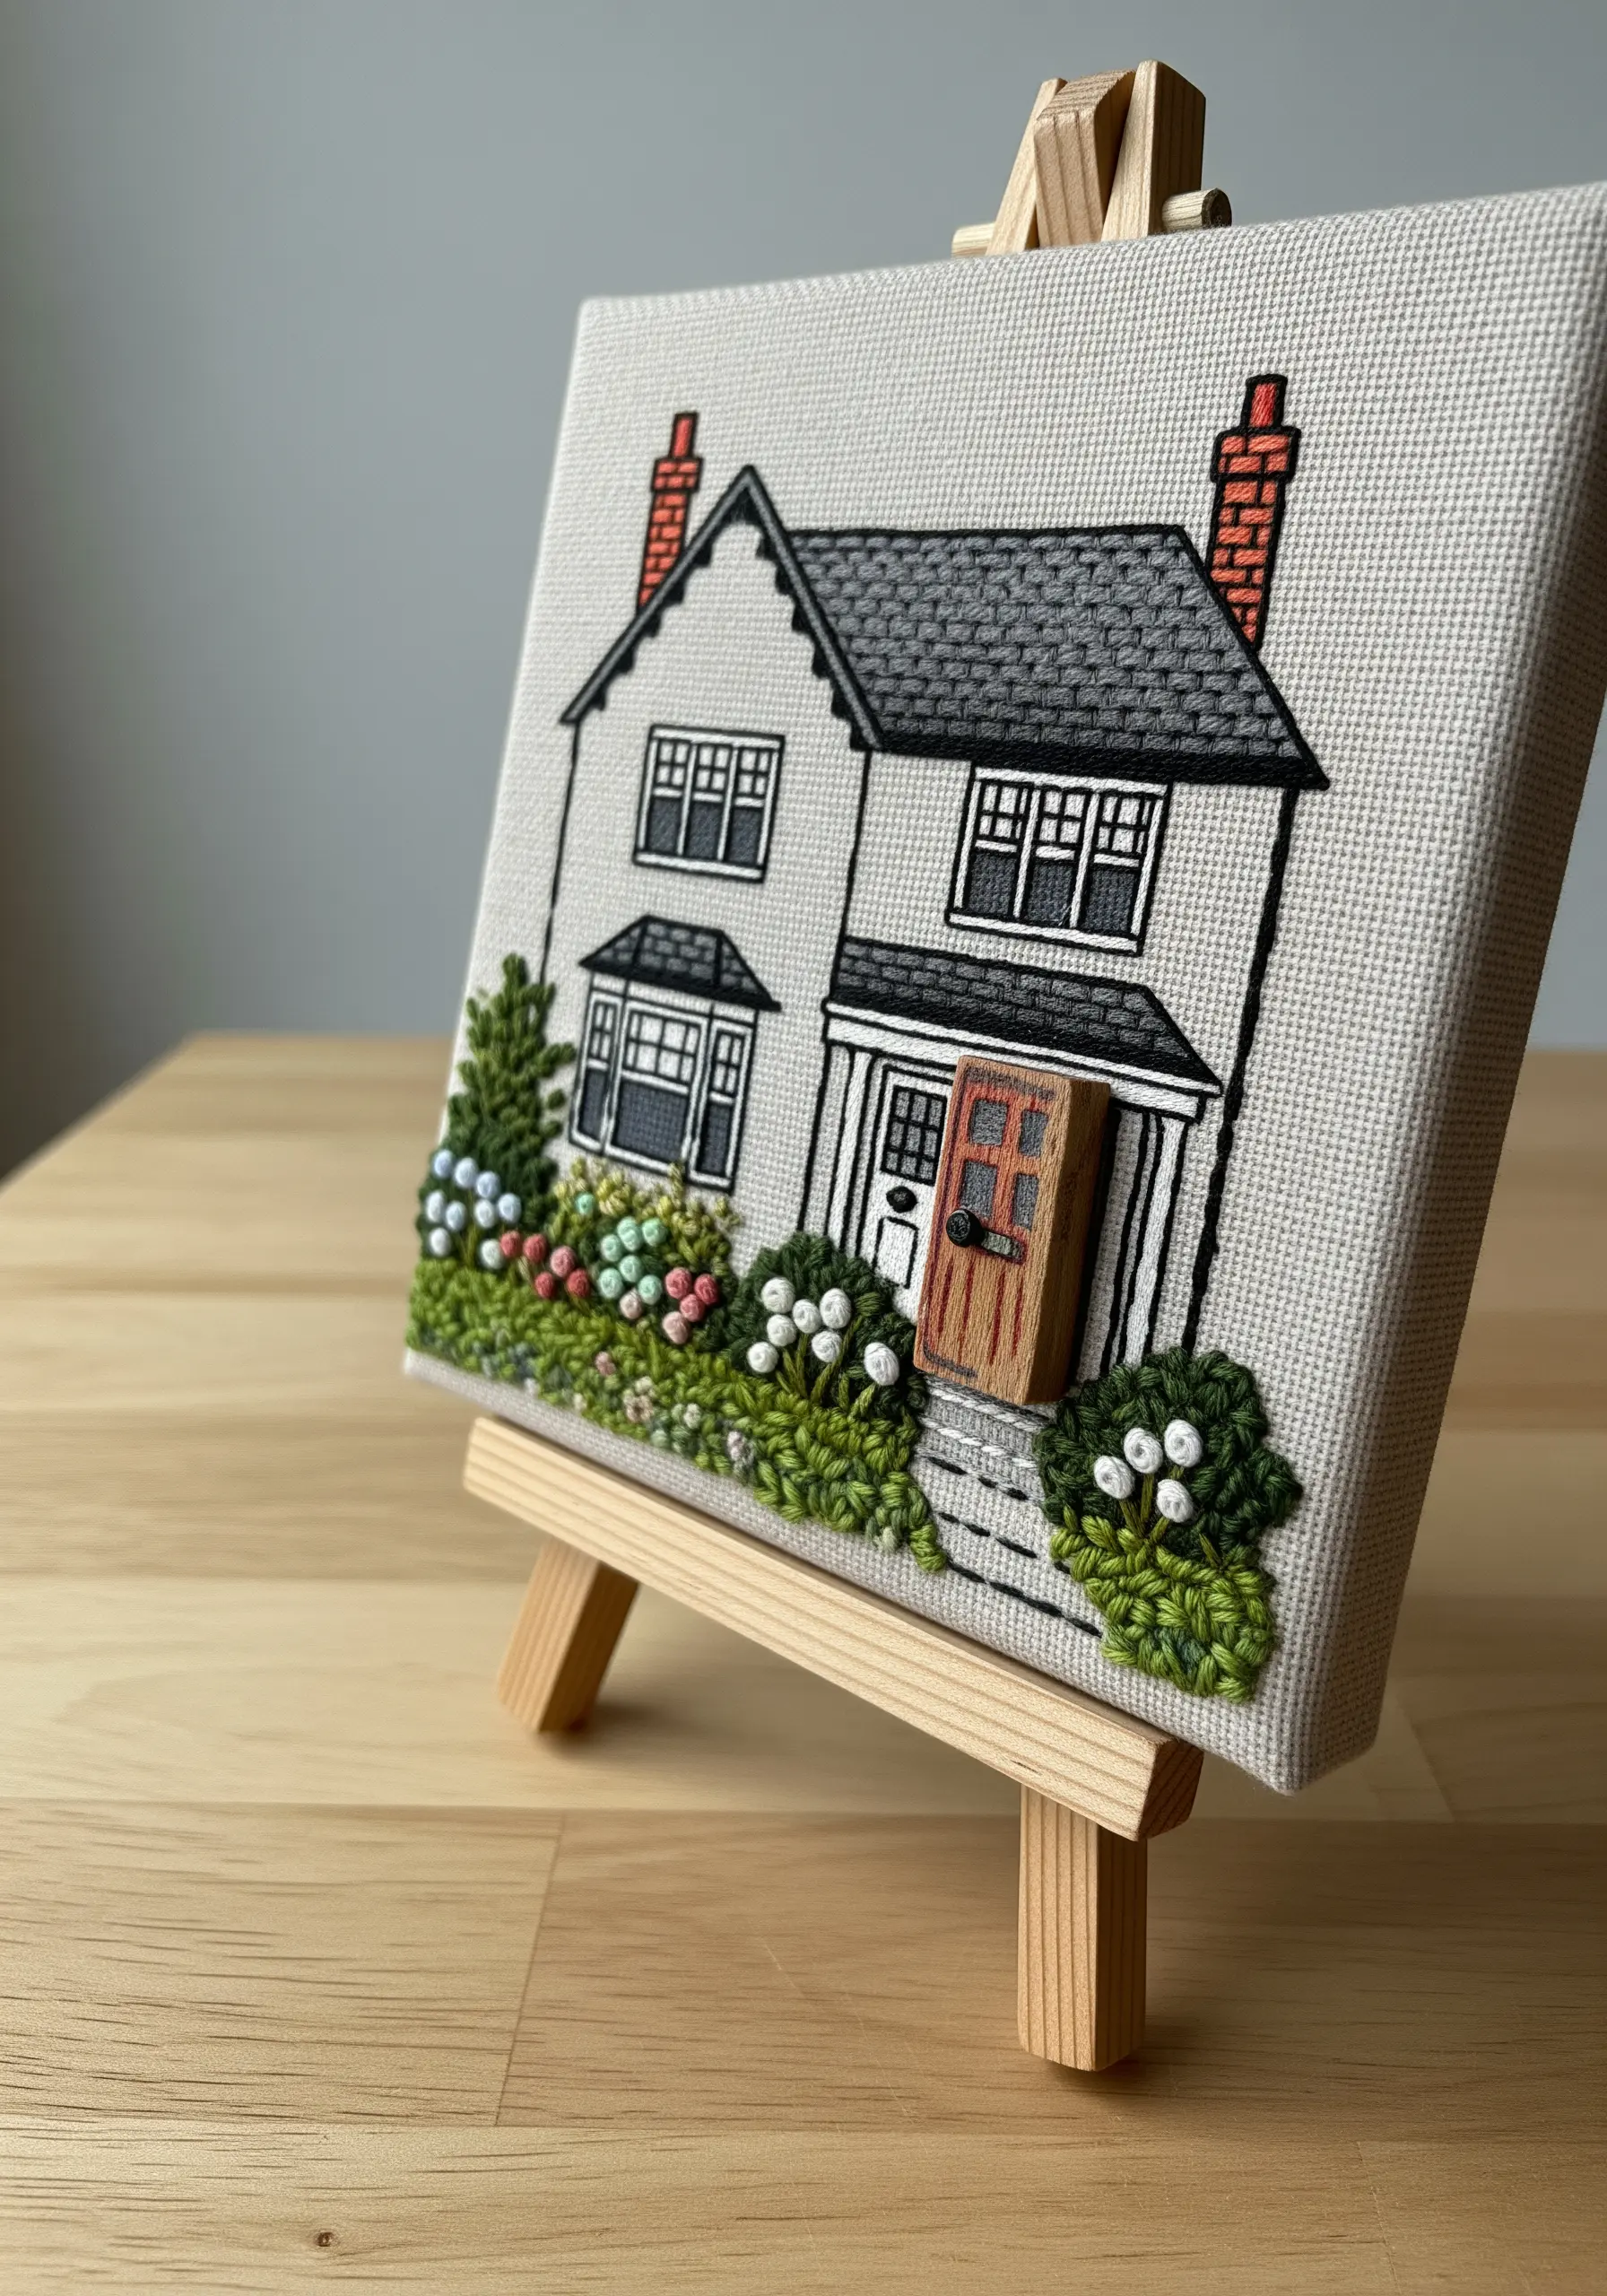
Give an embroidered house portrait a surprising touch of realism by incorporating a three-dimensional element.
Stitch the main structure on a stretched canvas, using directional satin stitches for roof shingles and clusters of French knots for shrubbery to create texture.
For the final touch, affix a small, pre-made wooden piece—like a miniature door, window box, or even a tiny wreath—to its corresponding spot.
This unexpected detail draws the eye and makes the entire piece feel more personal and alive.
12. Design a Patchwork Appliqué Tote Bag
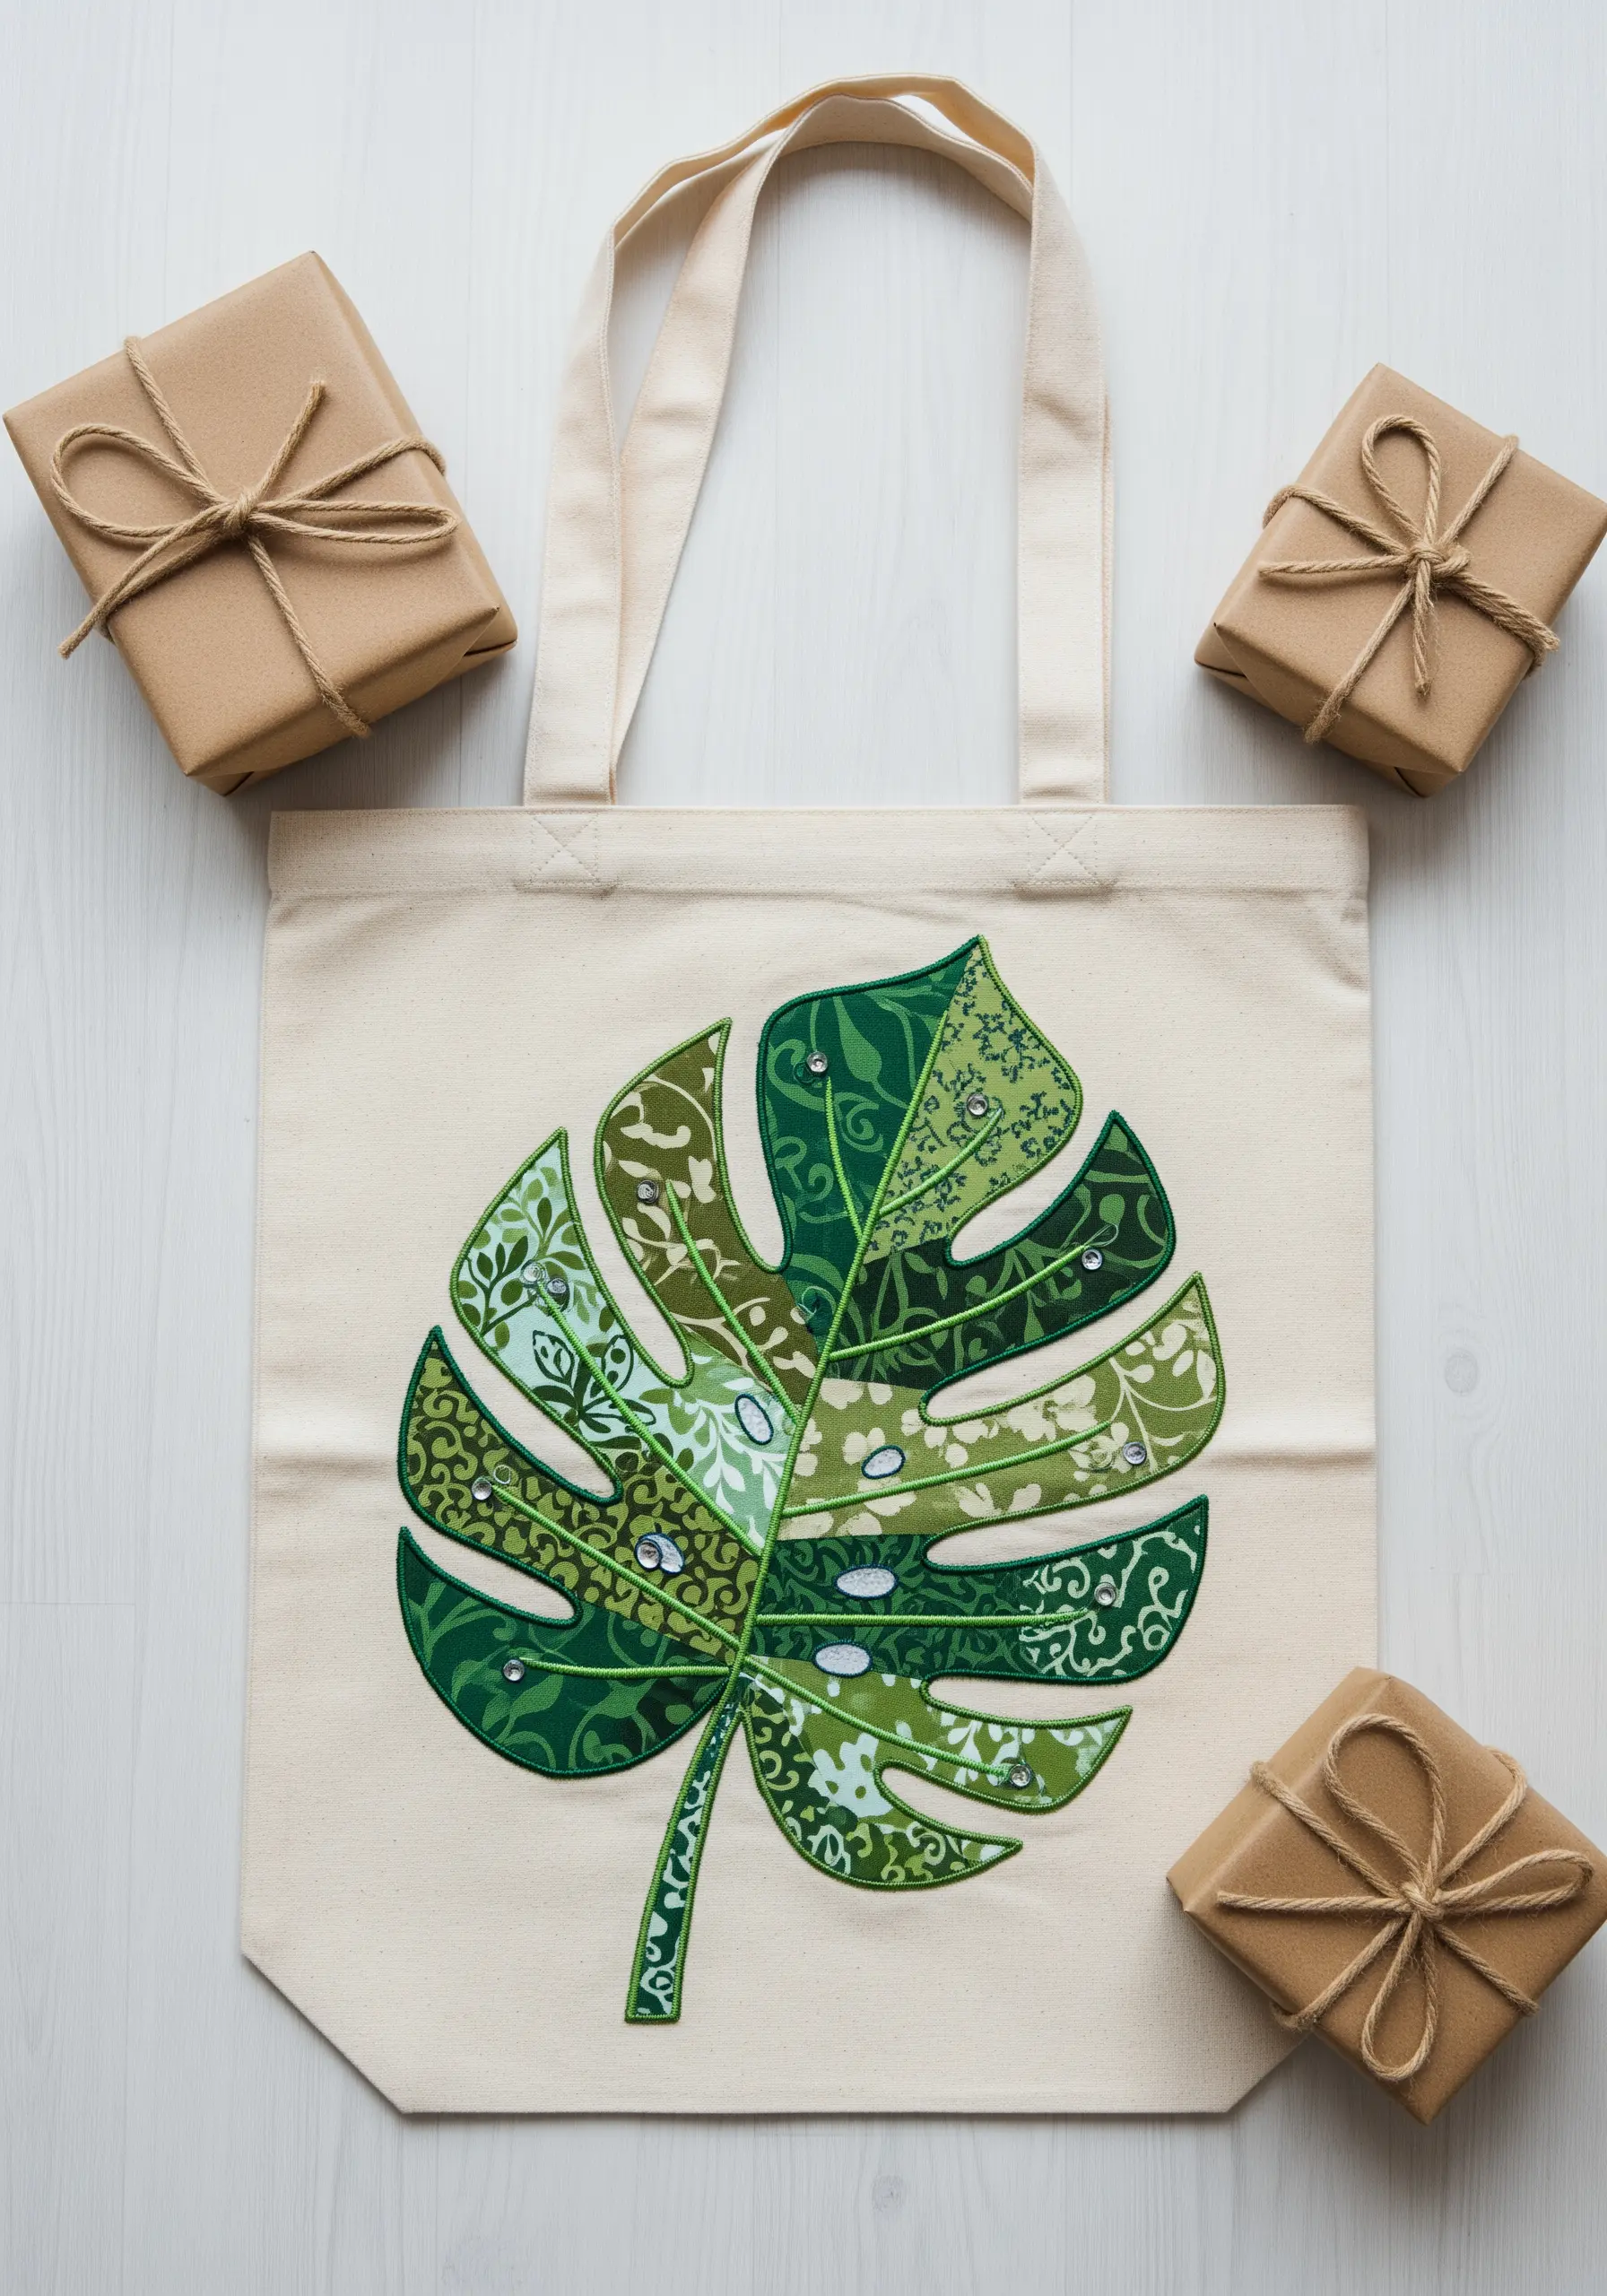
Create a vibrant monstera leaf or other bold motif using fabric collage embroidery on a sturdy canvas tote.
Cut segments of your design from various patterned cotton fabrics, arranging them like a mosaic to build your image.
Secure each fabric piece with an iron-on adhesive, then stitch around the edges with a decorative blanket stitch or a clean backstitch to add definition.
A few strategically placed beads or sequins will catch the light and give your functional art a polished sparkle.
13. Create a Functional and Beautiful Needle Book
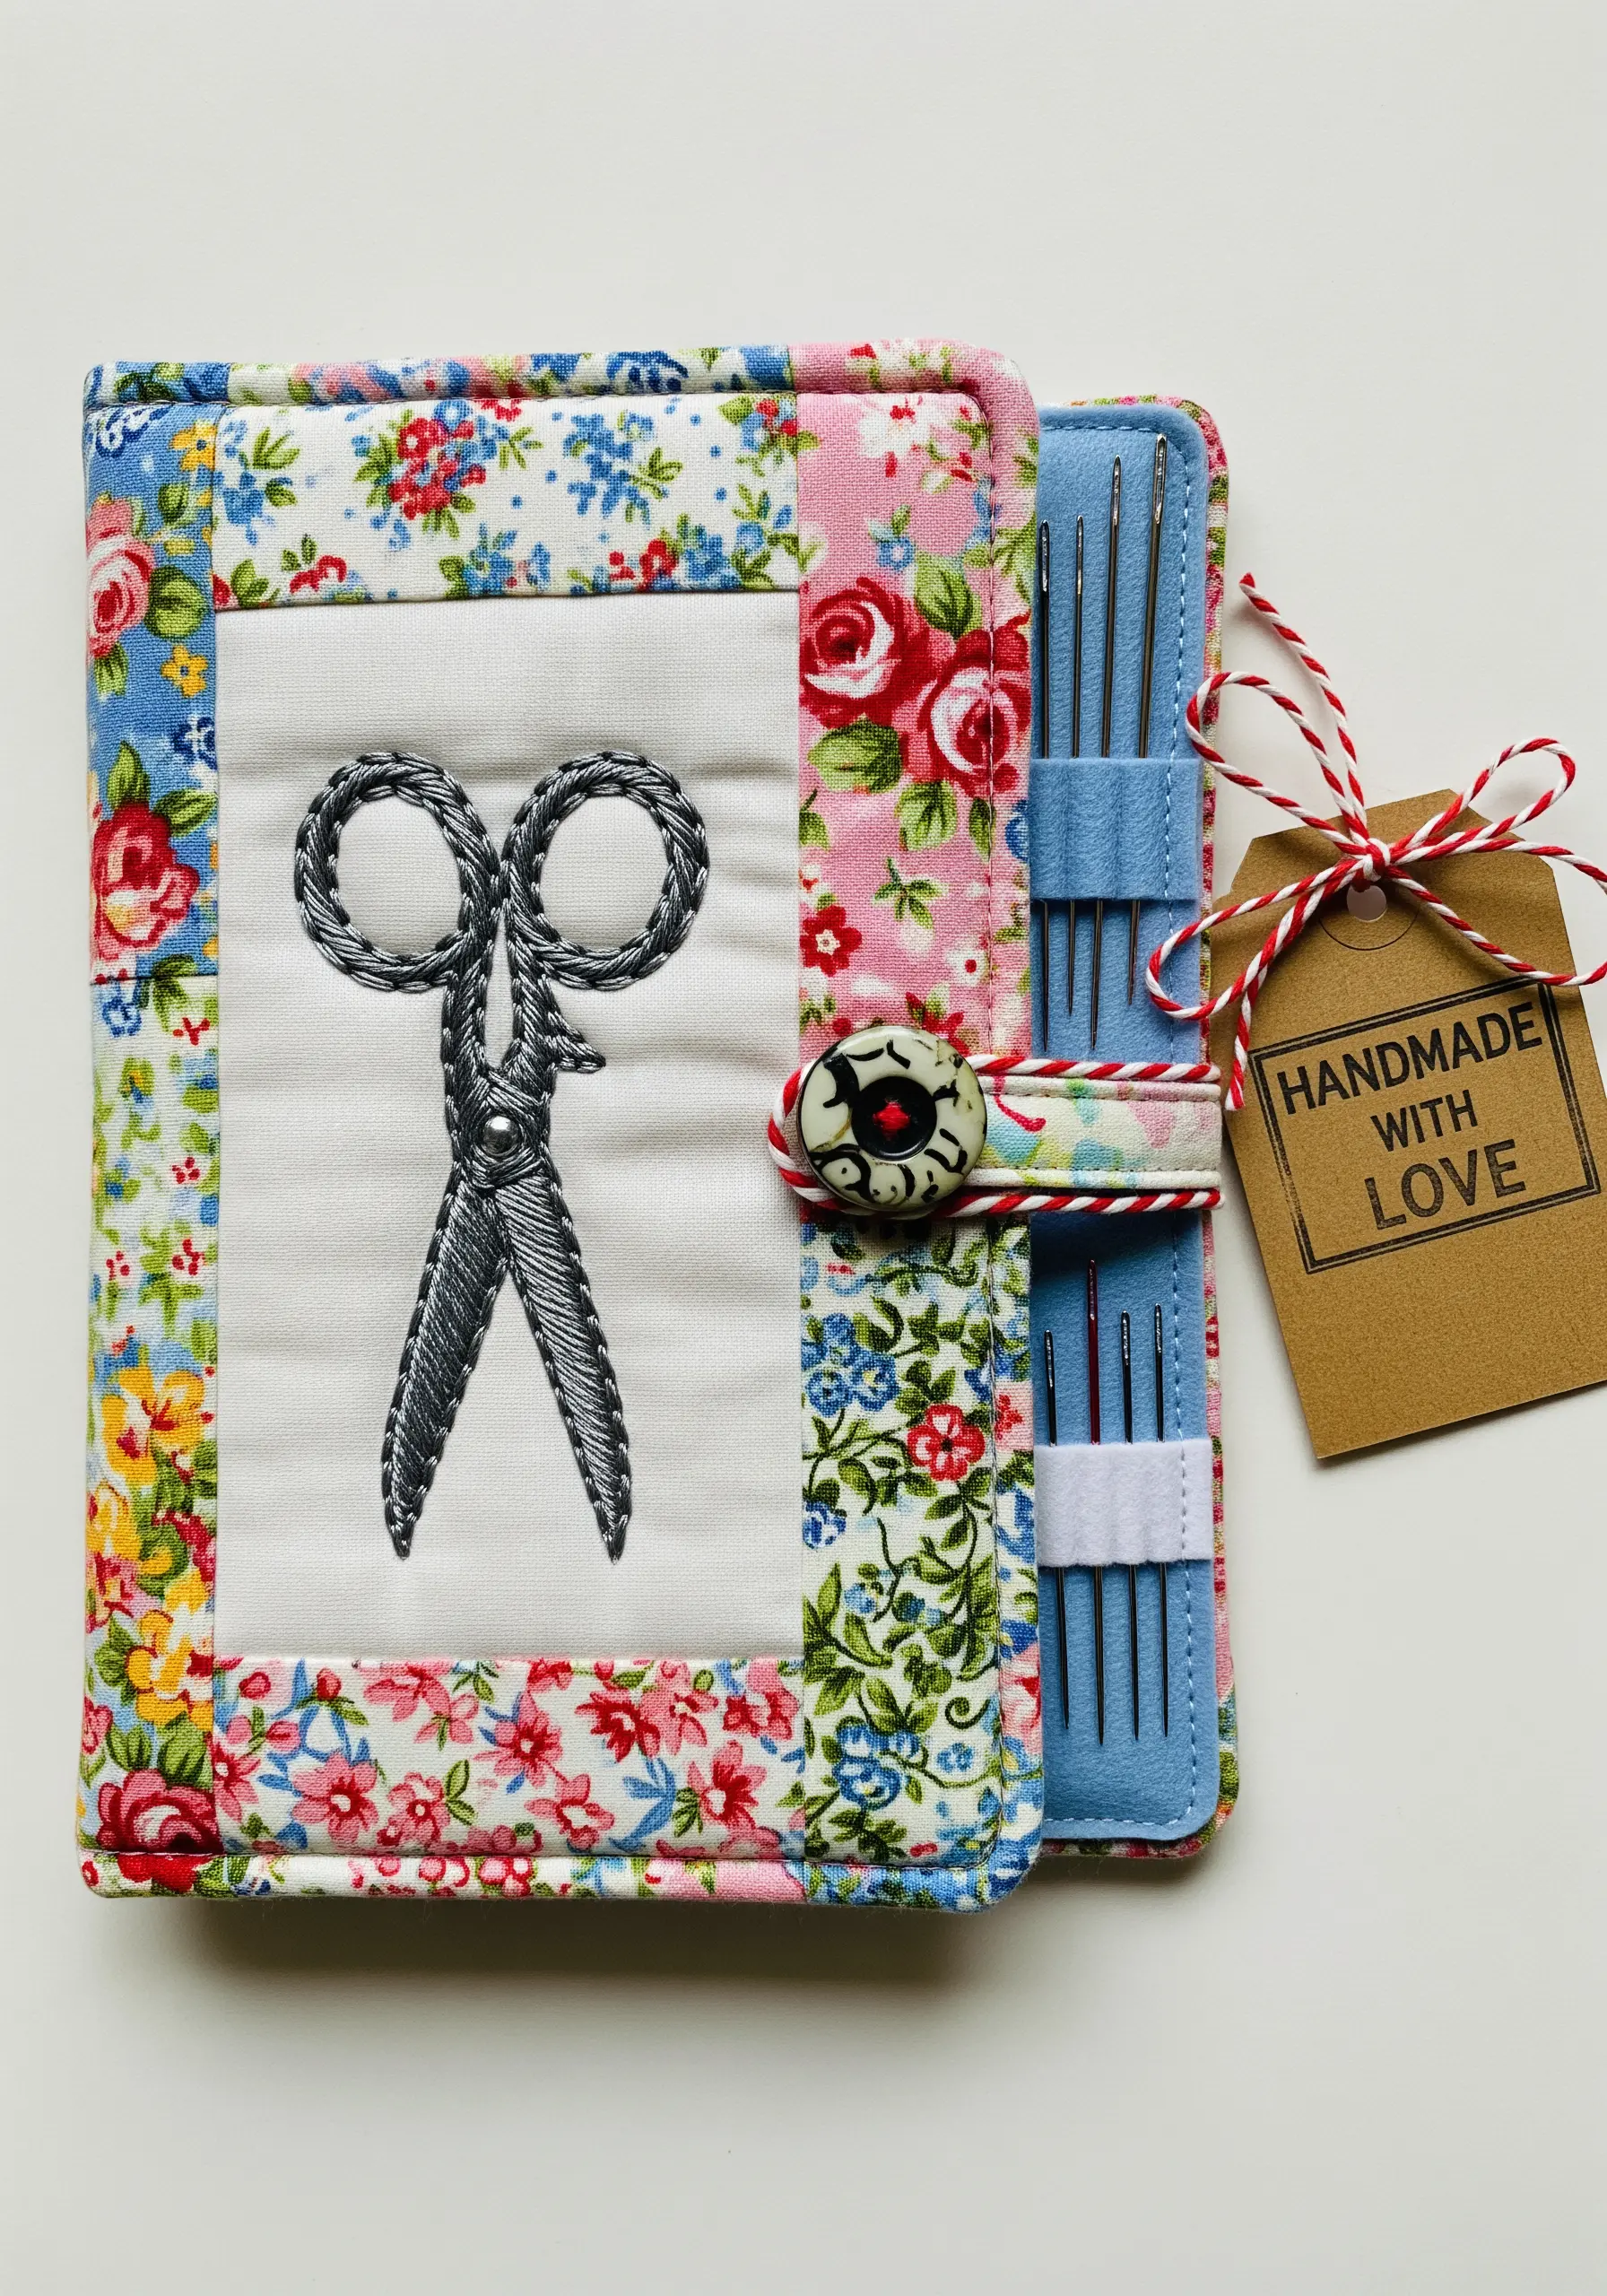
Combine embroidery, patchwork, and sewing to create a truly special gift for a fellow maker.
Make an embroidered motif the centerpiece of a patchwork cover, using a detailed design like vintage scissors to hint at the book’s purpose.
Inside, line the book with felt to hold needles securely and add pockets for other small notions.
This project is a perfect example of how embroidery can be integrated into a practical, beautiful object that is sure to be treasured.
14. Weave a Sunset Scene and Add Stitched Details
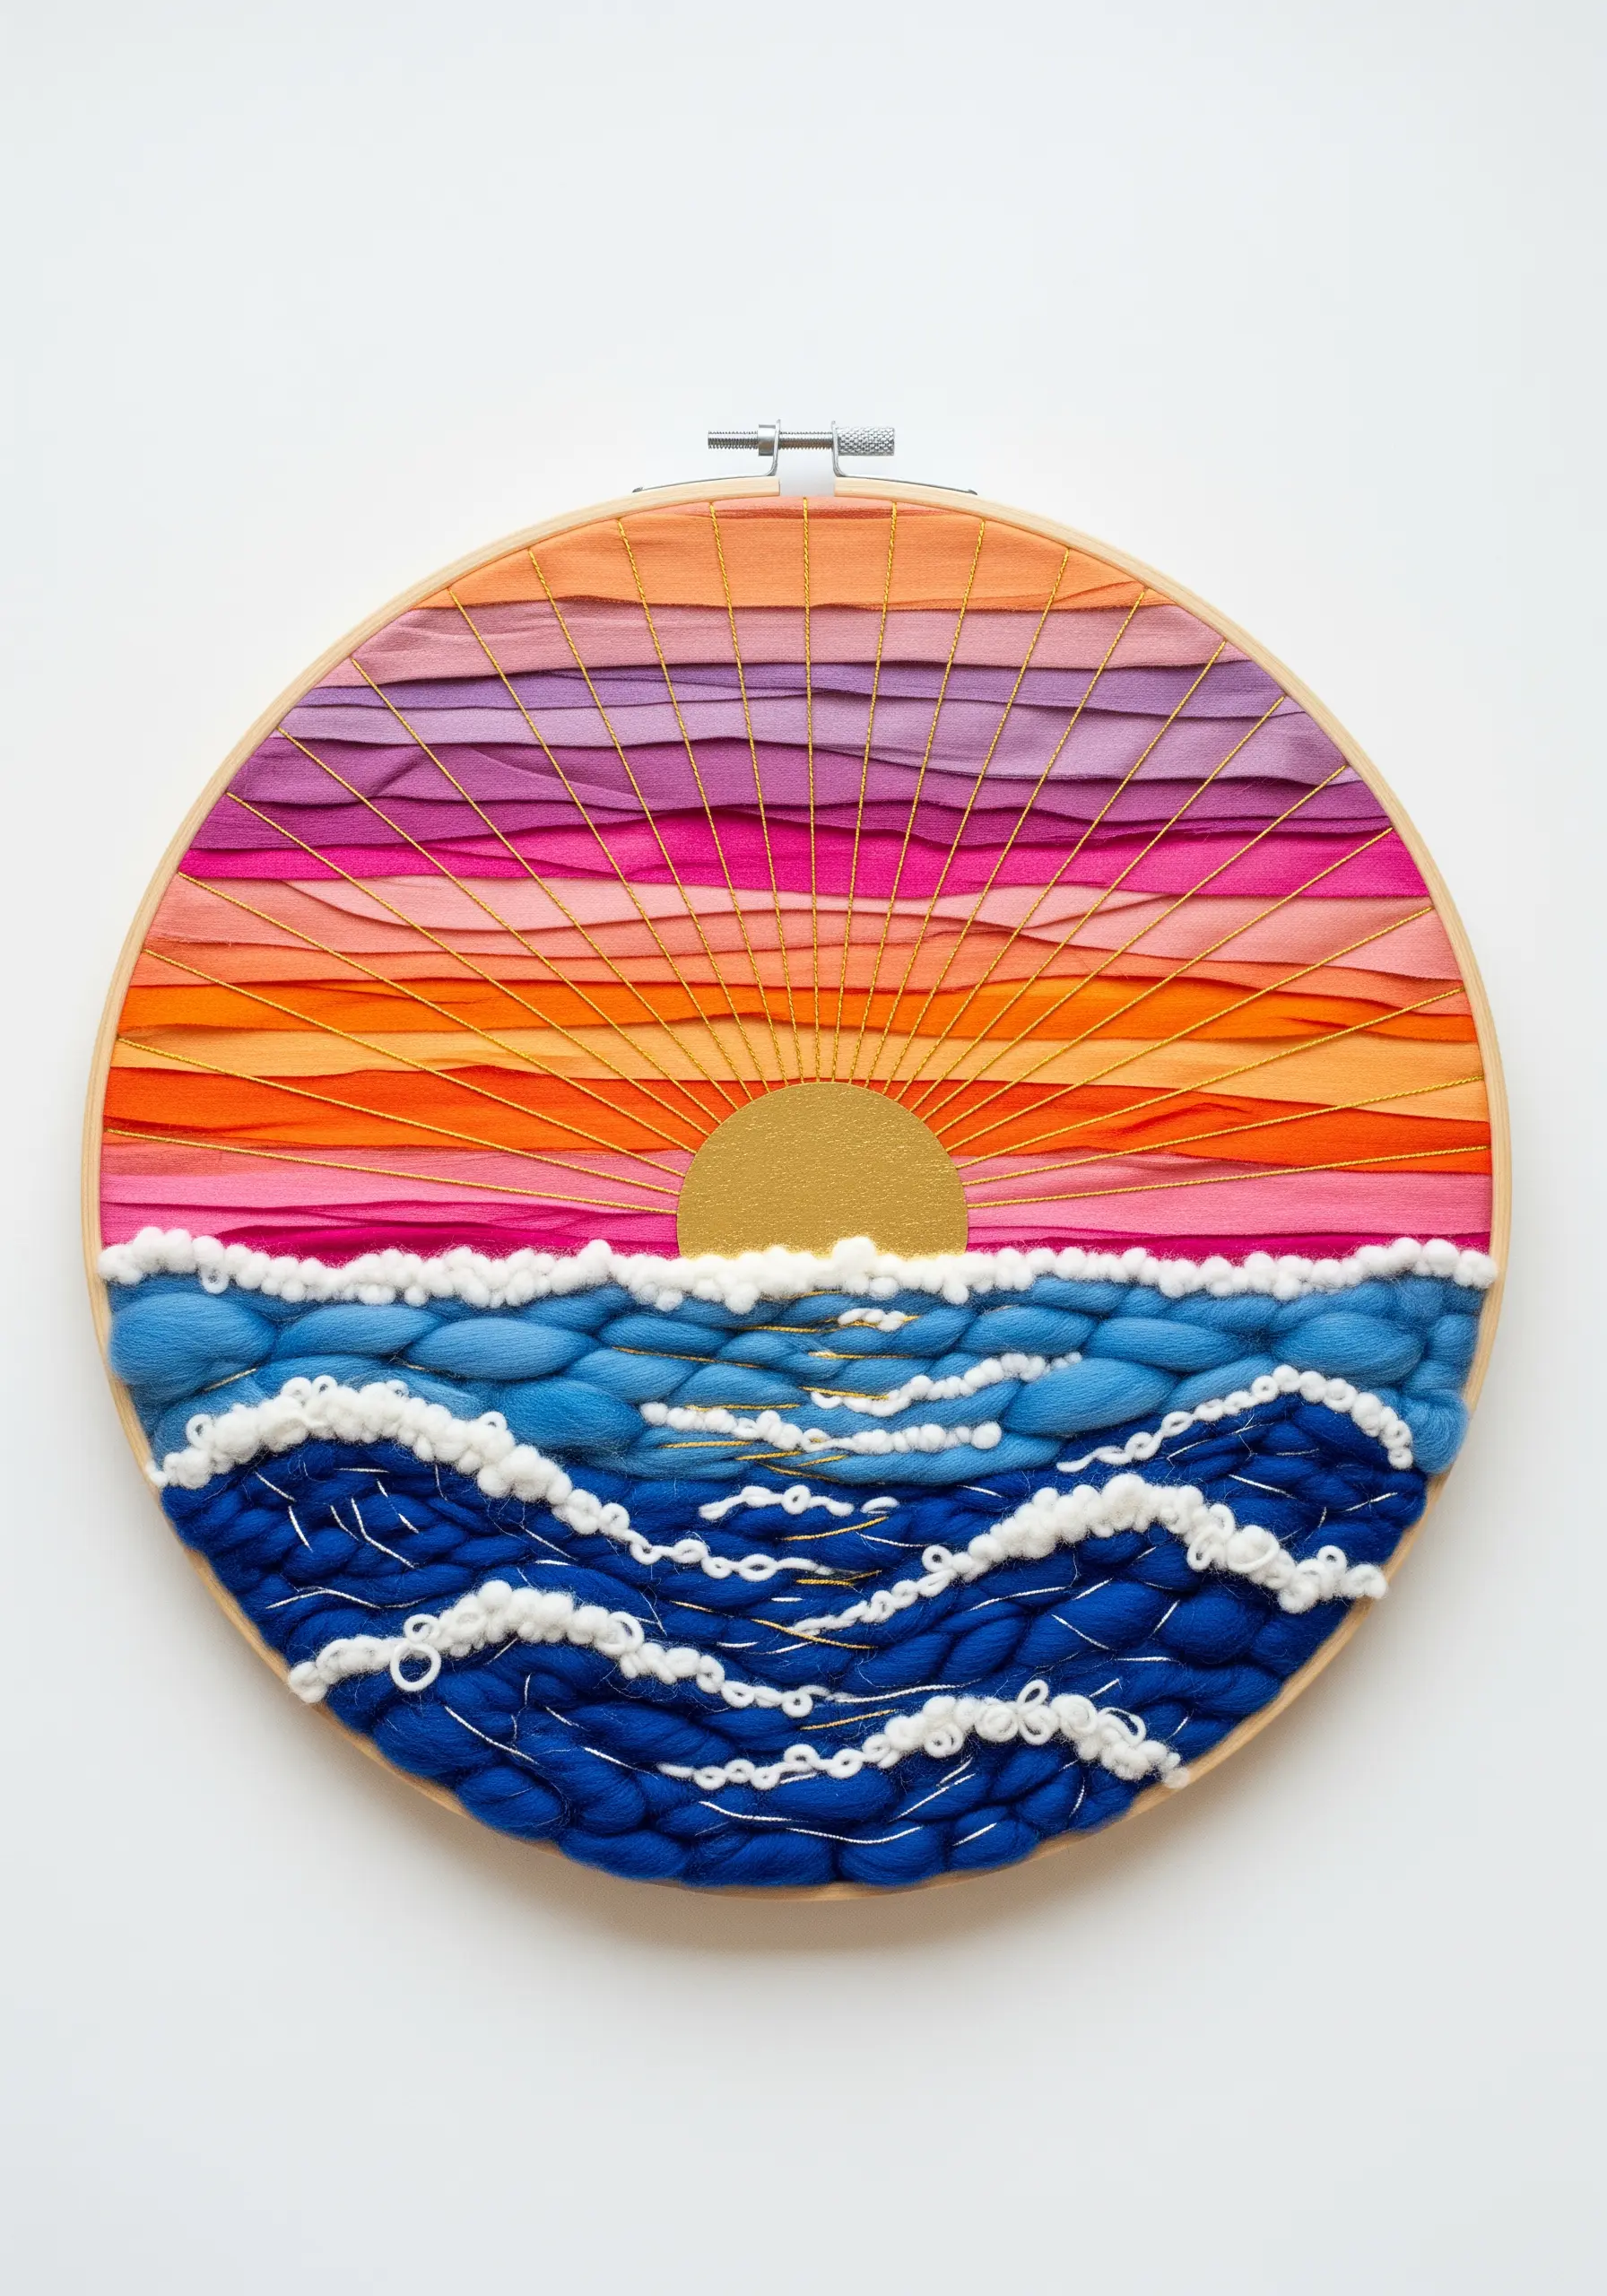
Combine weaving and embroidery in a single hoop to create stunning landscape embroidery wall pieces.
Warp your hoop with a strong base thread, then weave with fabric strips, chunky wool, and roving to create a textured sky and sea.
Once your woven base is complete, use fine metallic or cotton thread to stitch details directly over it—radiating lines for the sun’s rays or undulating stitches for sea foam.
This layering of textures results in a piece with incredible depth and visual interest.
15. Embellish Paper Gift Tags with 3D Stitches
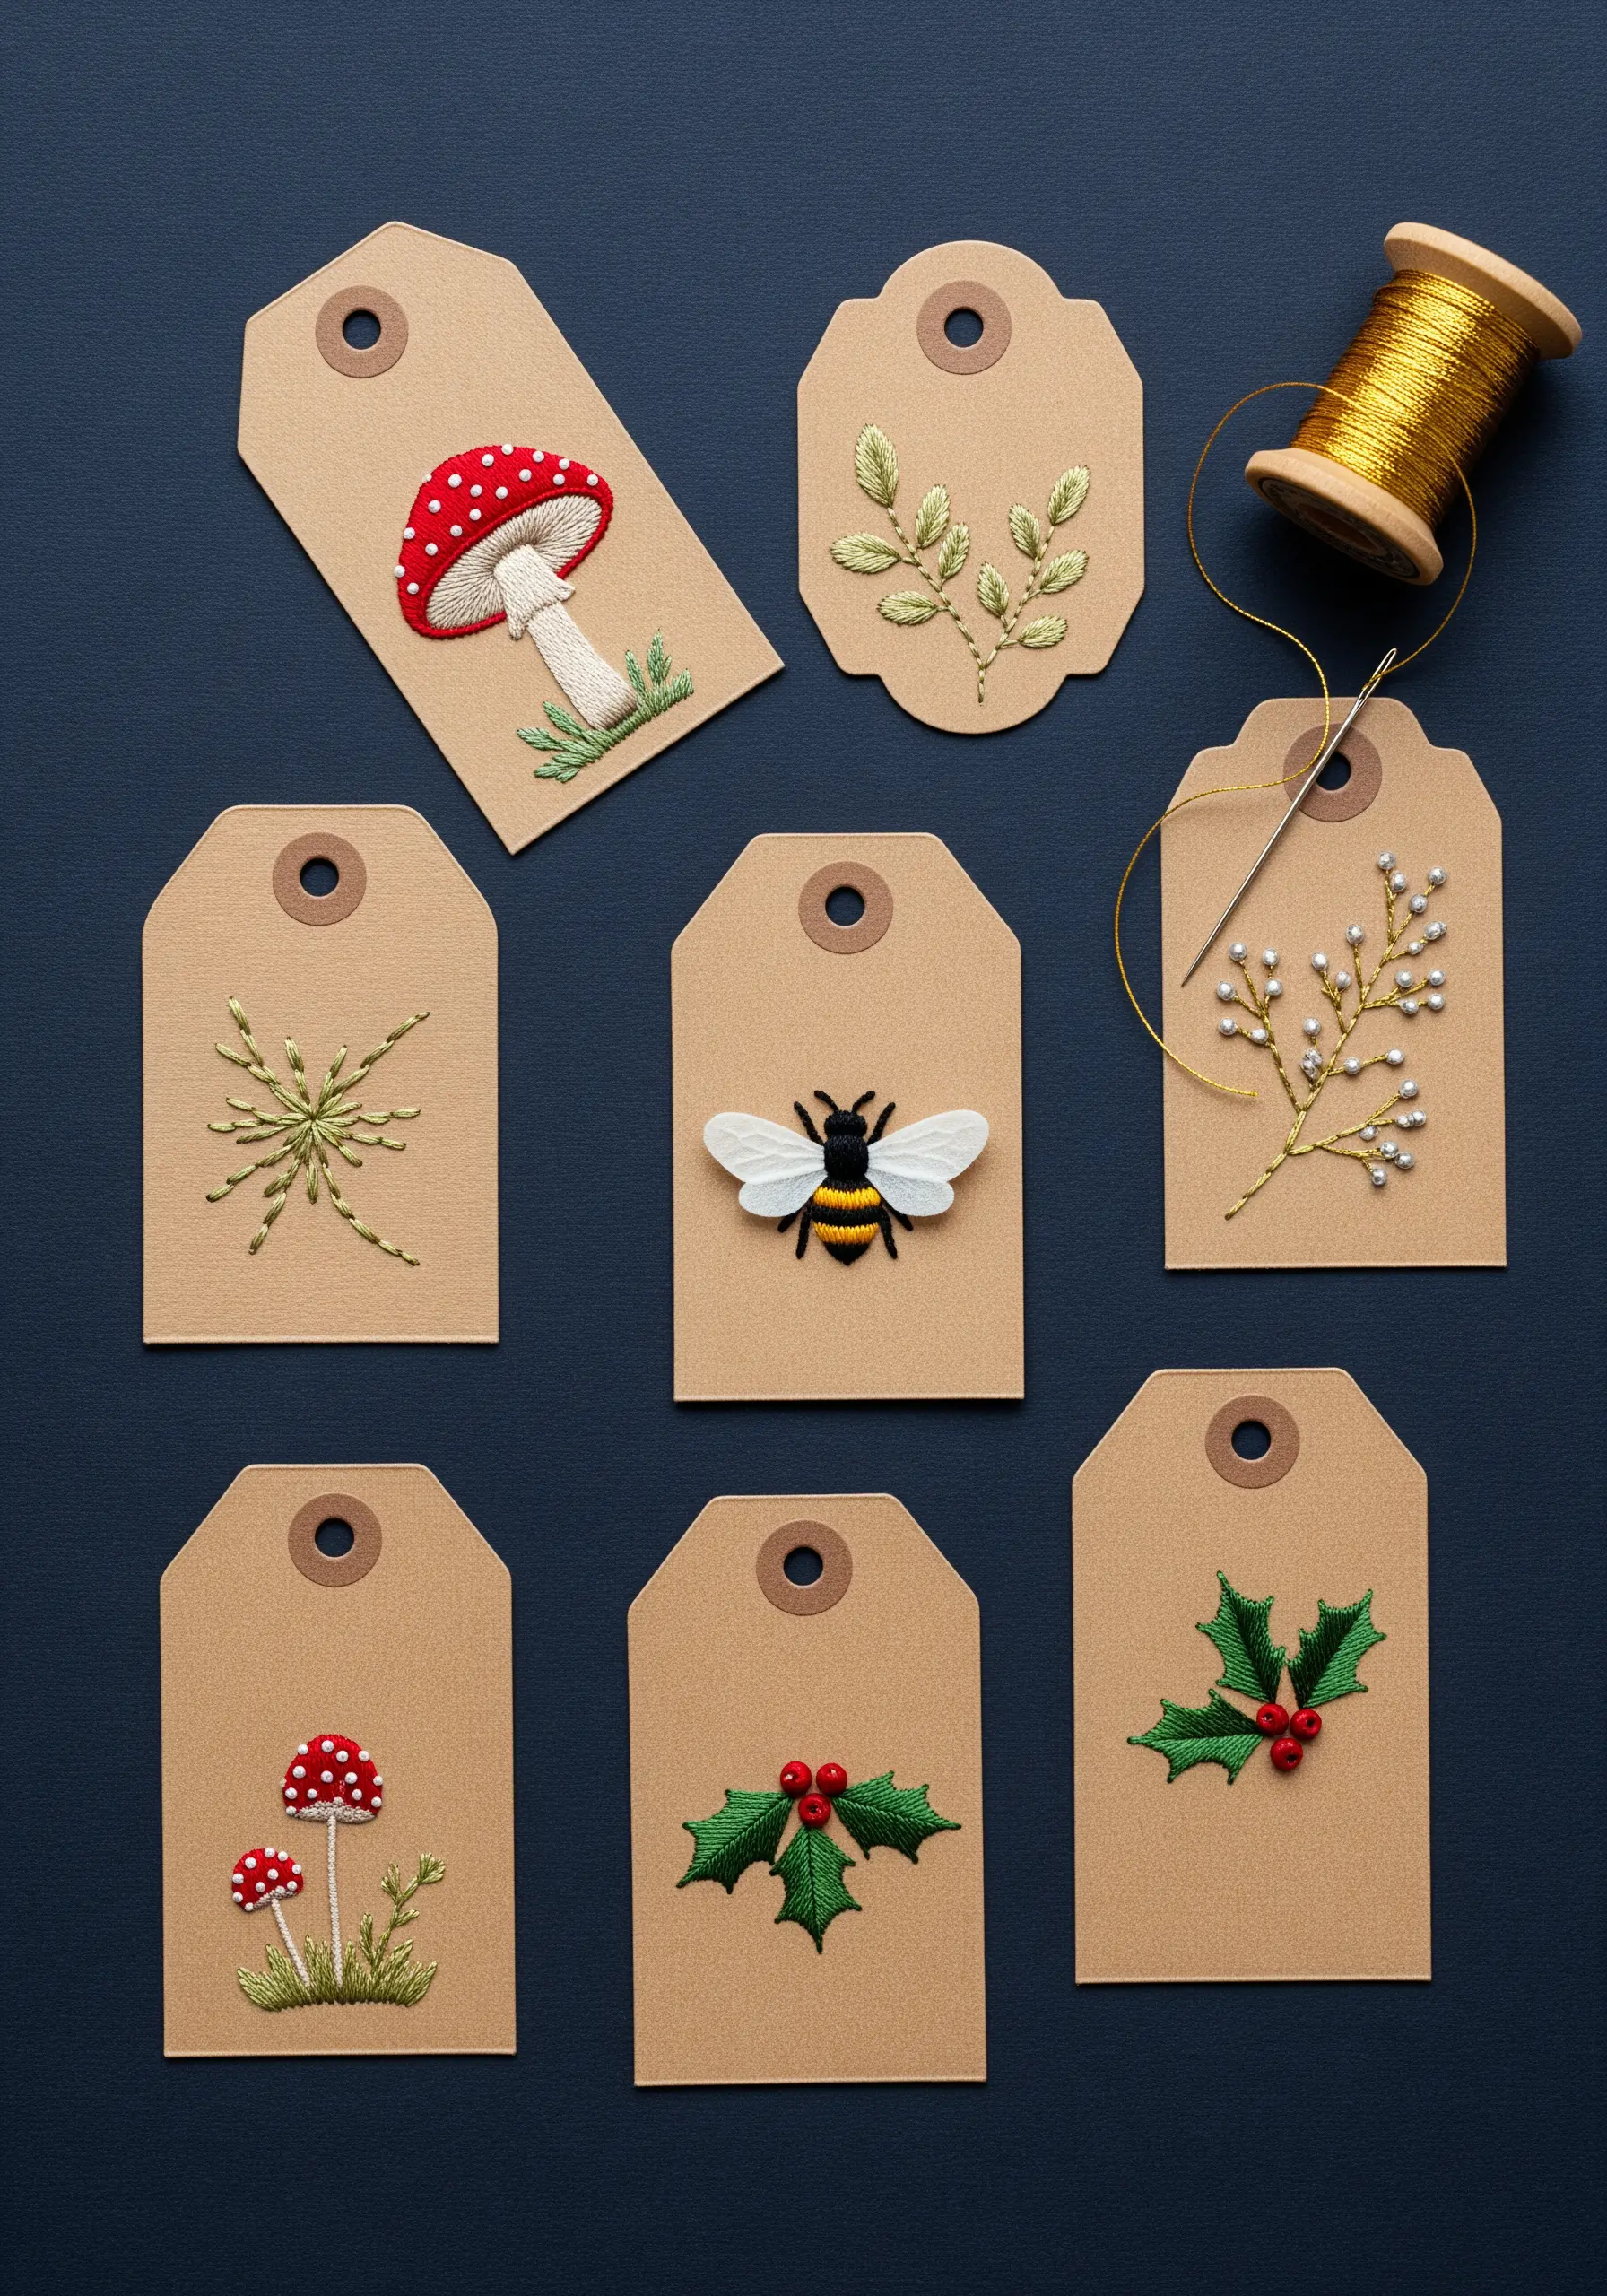
Turn simple kraft paper tags into miniature works of art that become part of the gift itself.
Carefully stitch small, festive motifs using a sharp needle to pierce the paper cleanly.
Experiment with dimensional stitches like padded satin stitch for mushrooms or French knots for holly berries to create texture.
For a truly unique touch, add a detached element, like vellum wings on a stitched bee, to give your design a delicate, three-dimensional lift.
16. Add a Watercolor Wash to Linen Napkins

Elevate simple table linen embroidery by adding a subtle wash of color behind your stitched design.
Use a fabric-safe ink or a textile medium mixed with watercolor paint, and apply it sparingly with a damp brush.
This creates a soft, organic shadow that grounds your embroidery, making the stitched motif look fully integrated into the fabric.
Let the paint dry completely before stitching your botanical design over it, ensuring the thread remains crisp and defined against the soft color.
17. Stitch an Inspirational Quote on Handmade Paper

Combine typography, collage, and stitchwork for a vibrant, motivational art piece.
Choose a textured, handmade paper as your canvas; its deckled edges and fibrous surface add immediate artistic character.
Use a firm chain stitch or backstitch to create bold, legible lettering for your quote.
Frame your text with playful collage elements like paper circles and ribbon, anchoring them with decorative stitches like woven wheels for a cohesive, joyful finish. These are collage projects that turn scrap paper into embroidery-inspired masterpieces.
18. Personalize a Photo Mat with Stitches and Pearls
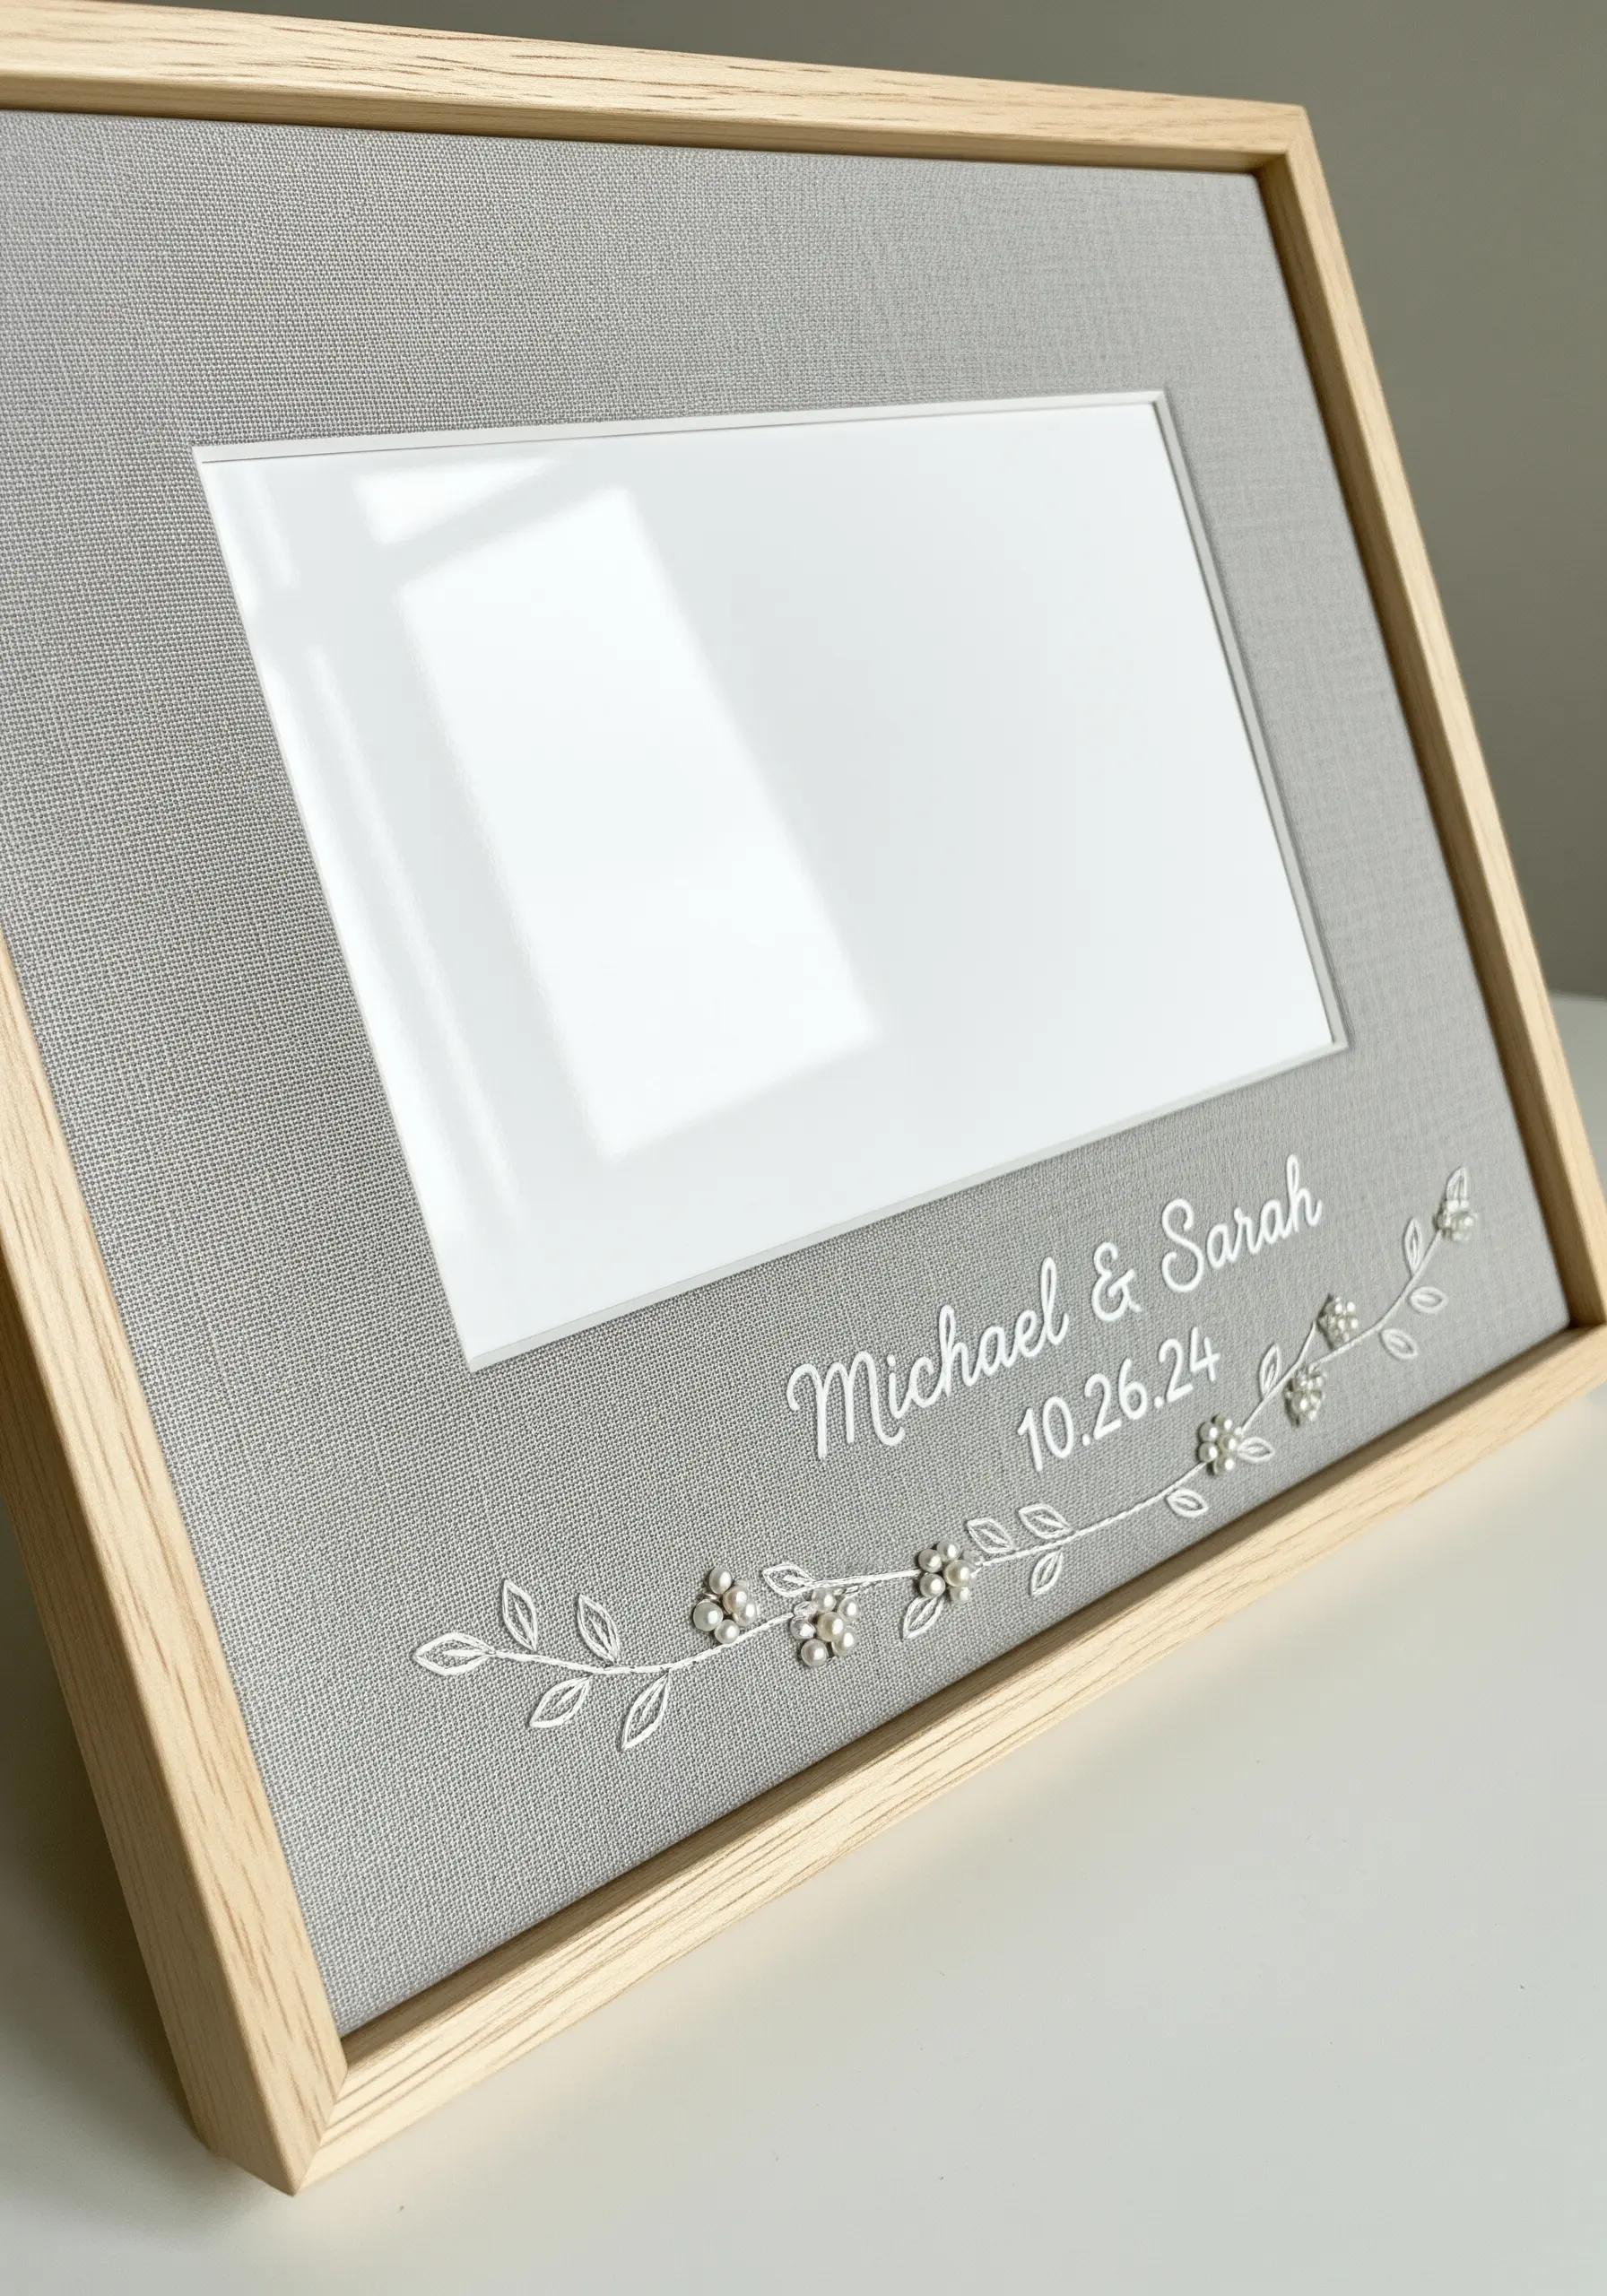
Turn a standard picture frame into a custom heirloom by embroidering the mat board.
Carefully remove the mat and lightly sketch your design—a delicate vine, names, or a significant date—in pencil.
Use a fine, sharp needle and just two or three strands of floss for elegant, clean lines.
Intersperse tiny seed pearls or beads among the stitches to add a touch of timeless sophistication, creating beautiful hand-stitched framed embroidery pieces perfect for a wedding or anniversary.
19. Create Freestanding Appliqué Patches
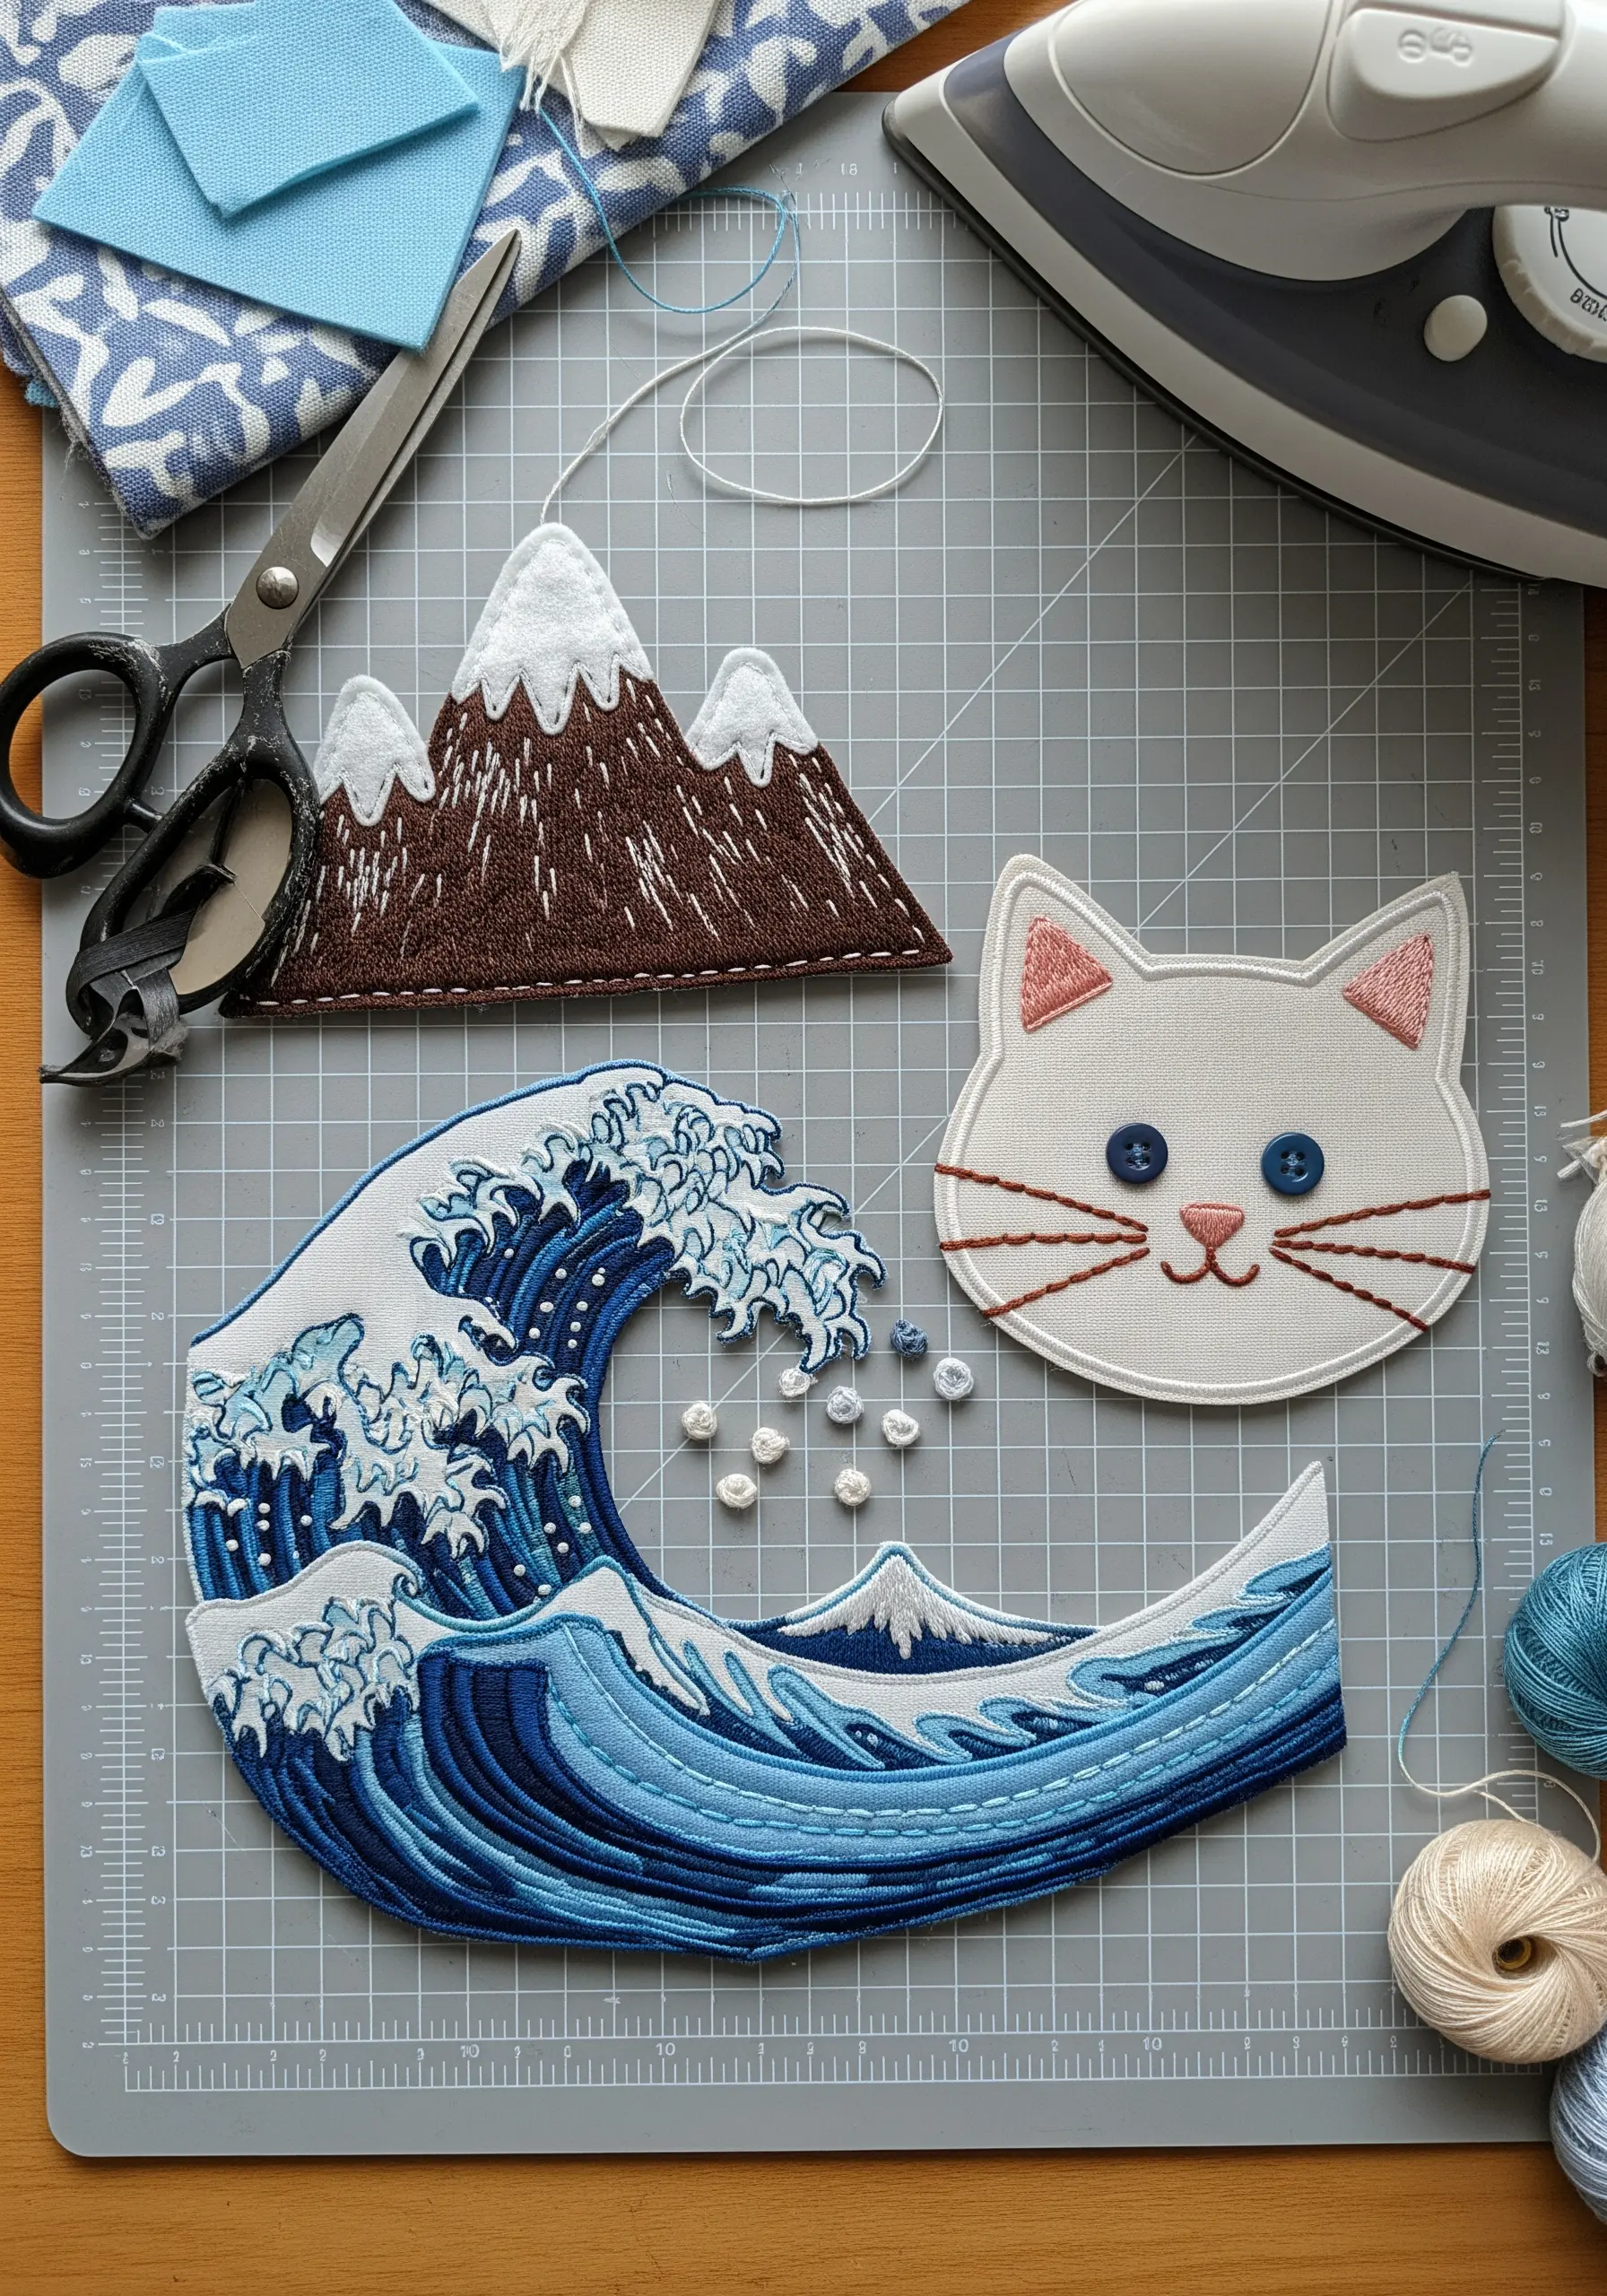
Design and create your own set of embroidered patches that can be gifted and applied to anything from jackets to backpacks.
Use a non-woven stabilizer or a piece of firm felt as your base fabric, and create your design with dense fill stitches.
Finish the edge with a tight, clean satin stitch, either by hand or machine, to prevent fraying and give it a professional look.
You can even add small, charming details like button eyes to make your characters more playful and unique.


