

Geometric patterns offer more than just structure; they provide a quiet confidence for your hands to explore the true star of fiber art: texture.
When the shapes are simple—a circle, a square, a repeating line—you are free to focus on the material itself. You can ask deeper questions. What happens if I use a chunky, unspun roving next to a sleek mercerized cotton? How does light catch a high-pile loop versus a flat weave?
Think of each project not as just a pattern to follow, but as a canvas for a tactile conversation. Let these ideas guide you toward creating yarn art that is not only beautiful to look at, but deeply satisfying to make and to touch.
1. Weave with Architectural Precision
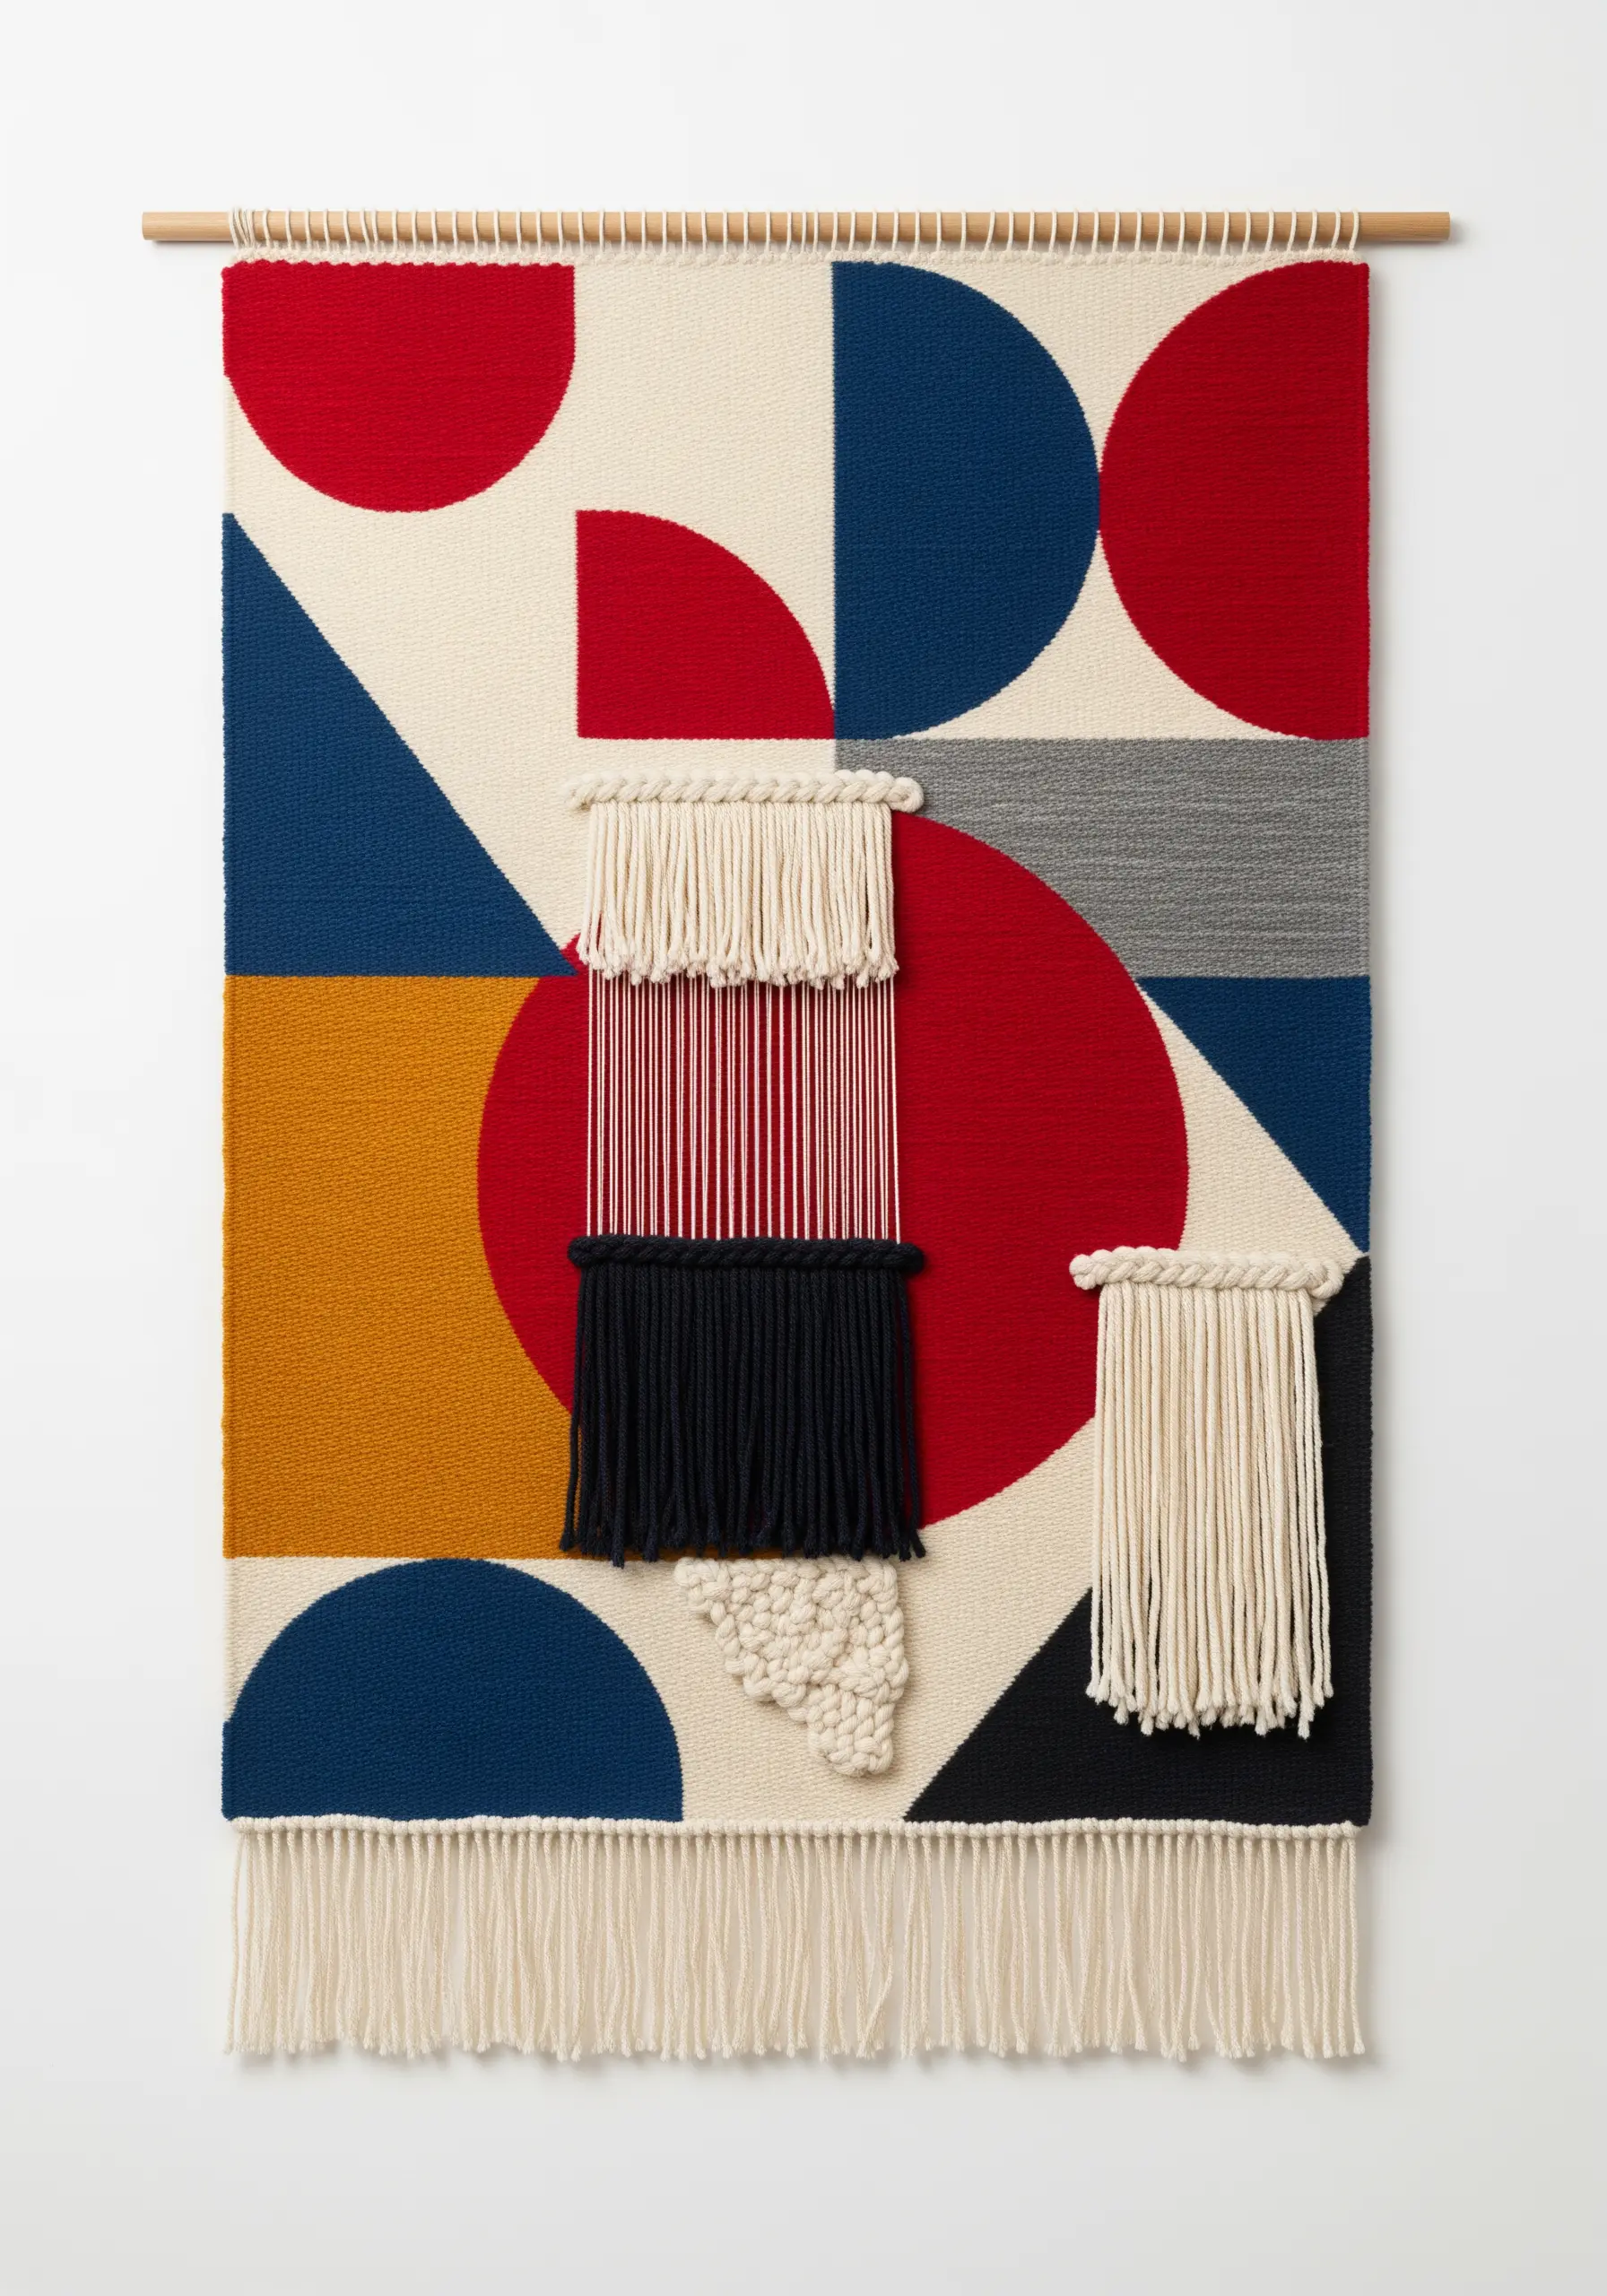
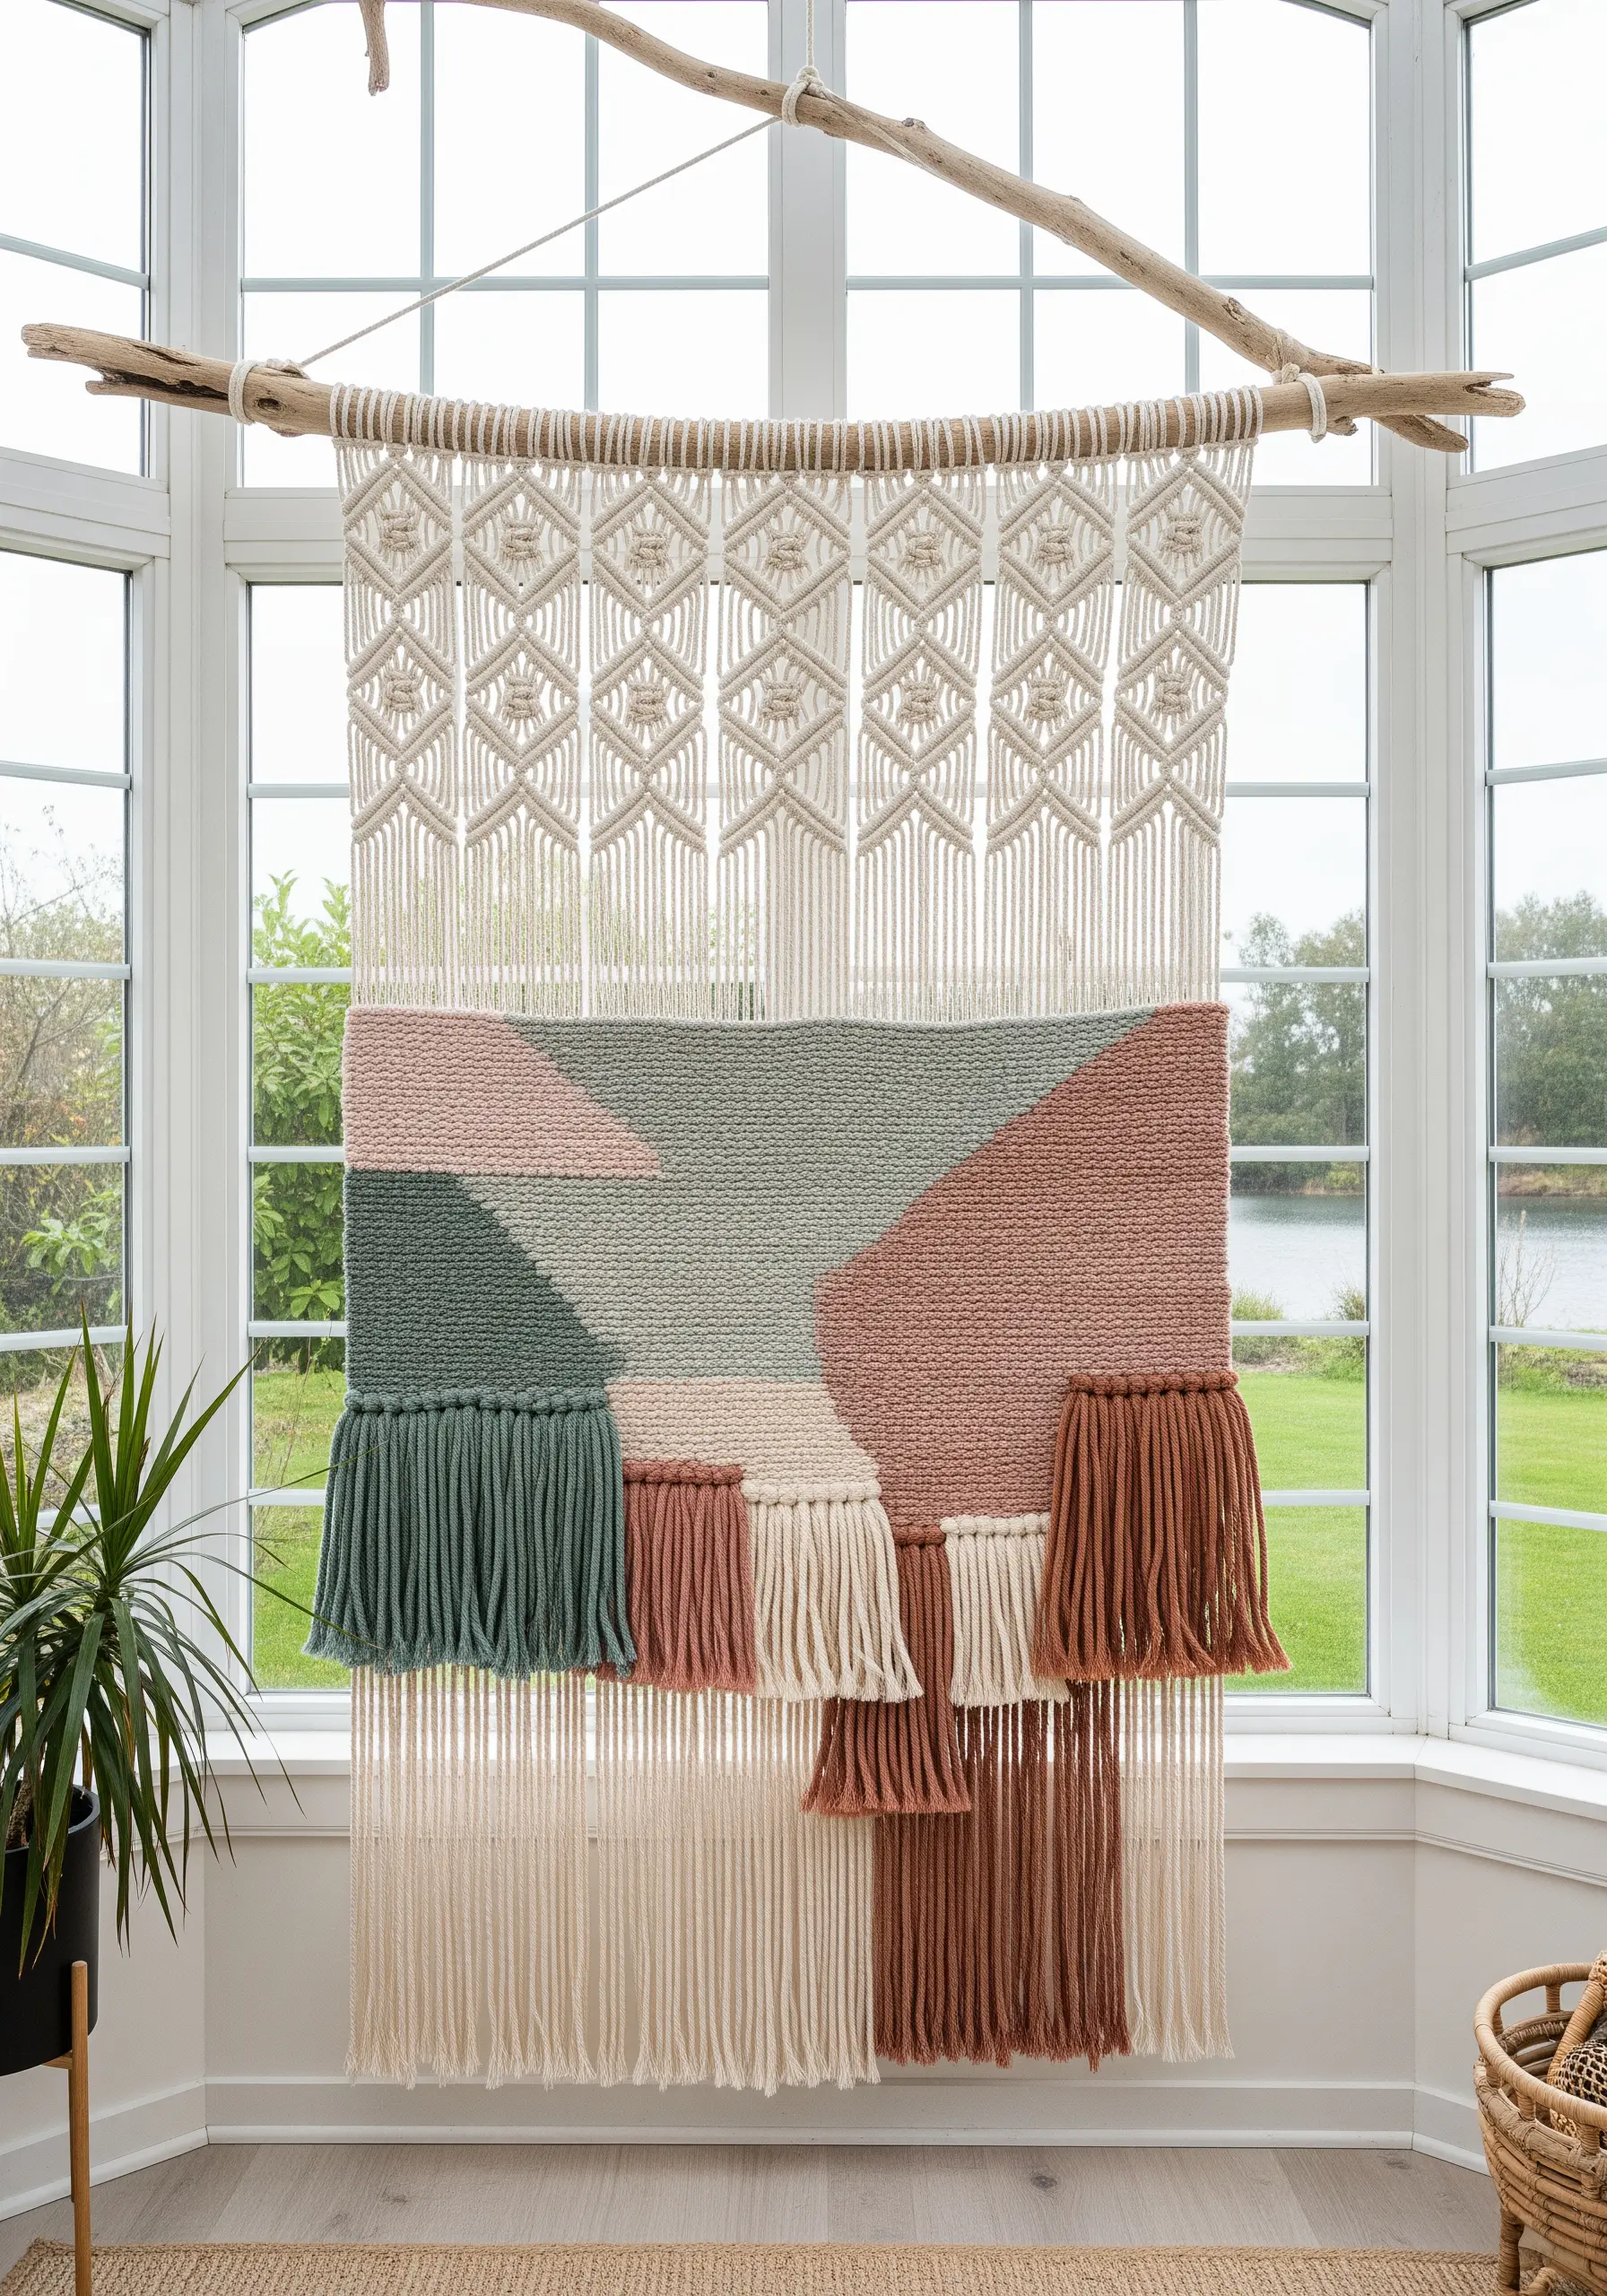
Create bold, graphic wall hangings by combining flat tapestry weaving with high-texture accents.
To achieve those crisp, clean lines between color blocks, use the interlocking or slit-weave technique.
Introduce focal points by adding sections of raised texture, like Soumak stitch or Rya knots, which contrast beautifully against the flat surface.
The key is balancing the simple geometry of the shapes with these moments of tactile surprise—it gives the piece rhythm and a modern, gallery-worthy finish.
2. Define Shapes with Contrasting Knots

In macrame, consistent tension is what gives your geometric patterns their structure and clarity.
Use a series of repeating square knots or double half-hitch knots to build your primary design, focusing on symmetry.
To make a pattern pop, introduce a contrasting color and texture with a finer cord.
Wrap or weave this secondary cord over your main design using a simple half-hitch—it creates a sharp, graphic outline that guides the eye and adds a layer of refined detail.
3. Create Cohesion with a Punch Needle Triptych
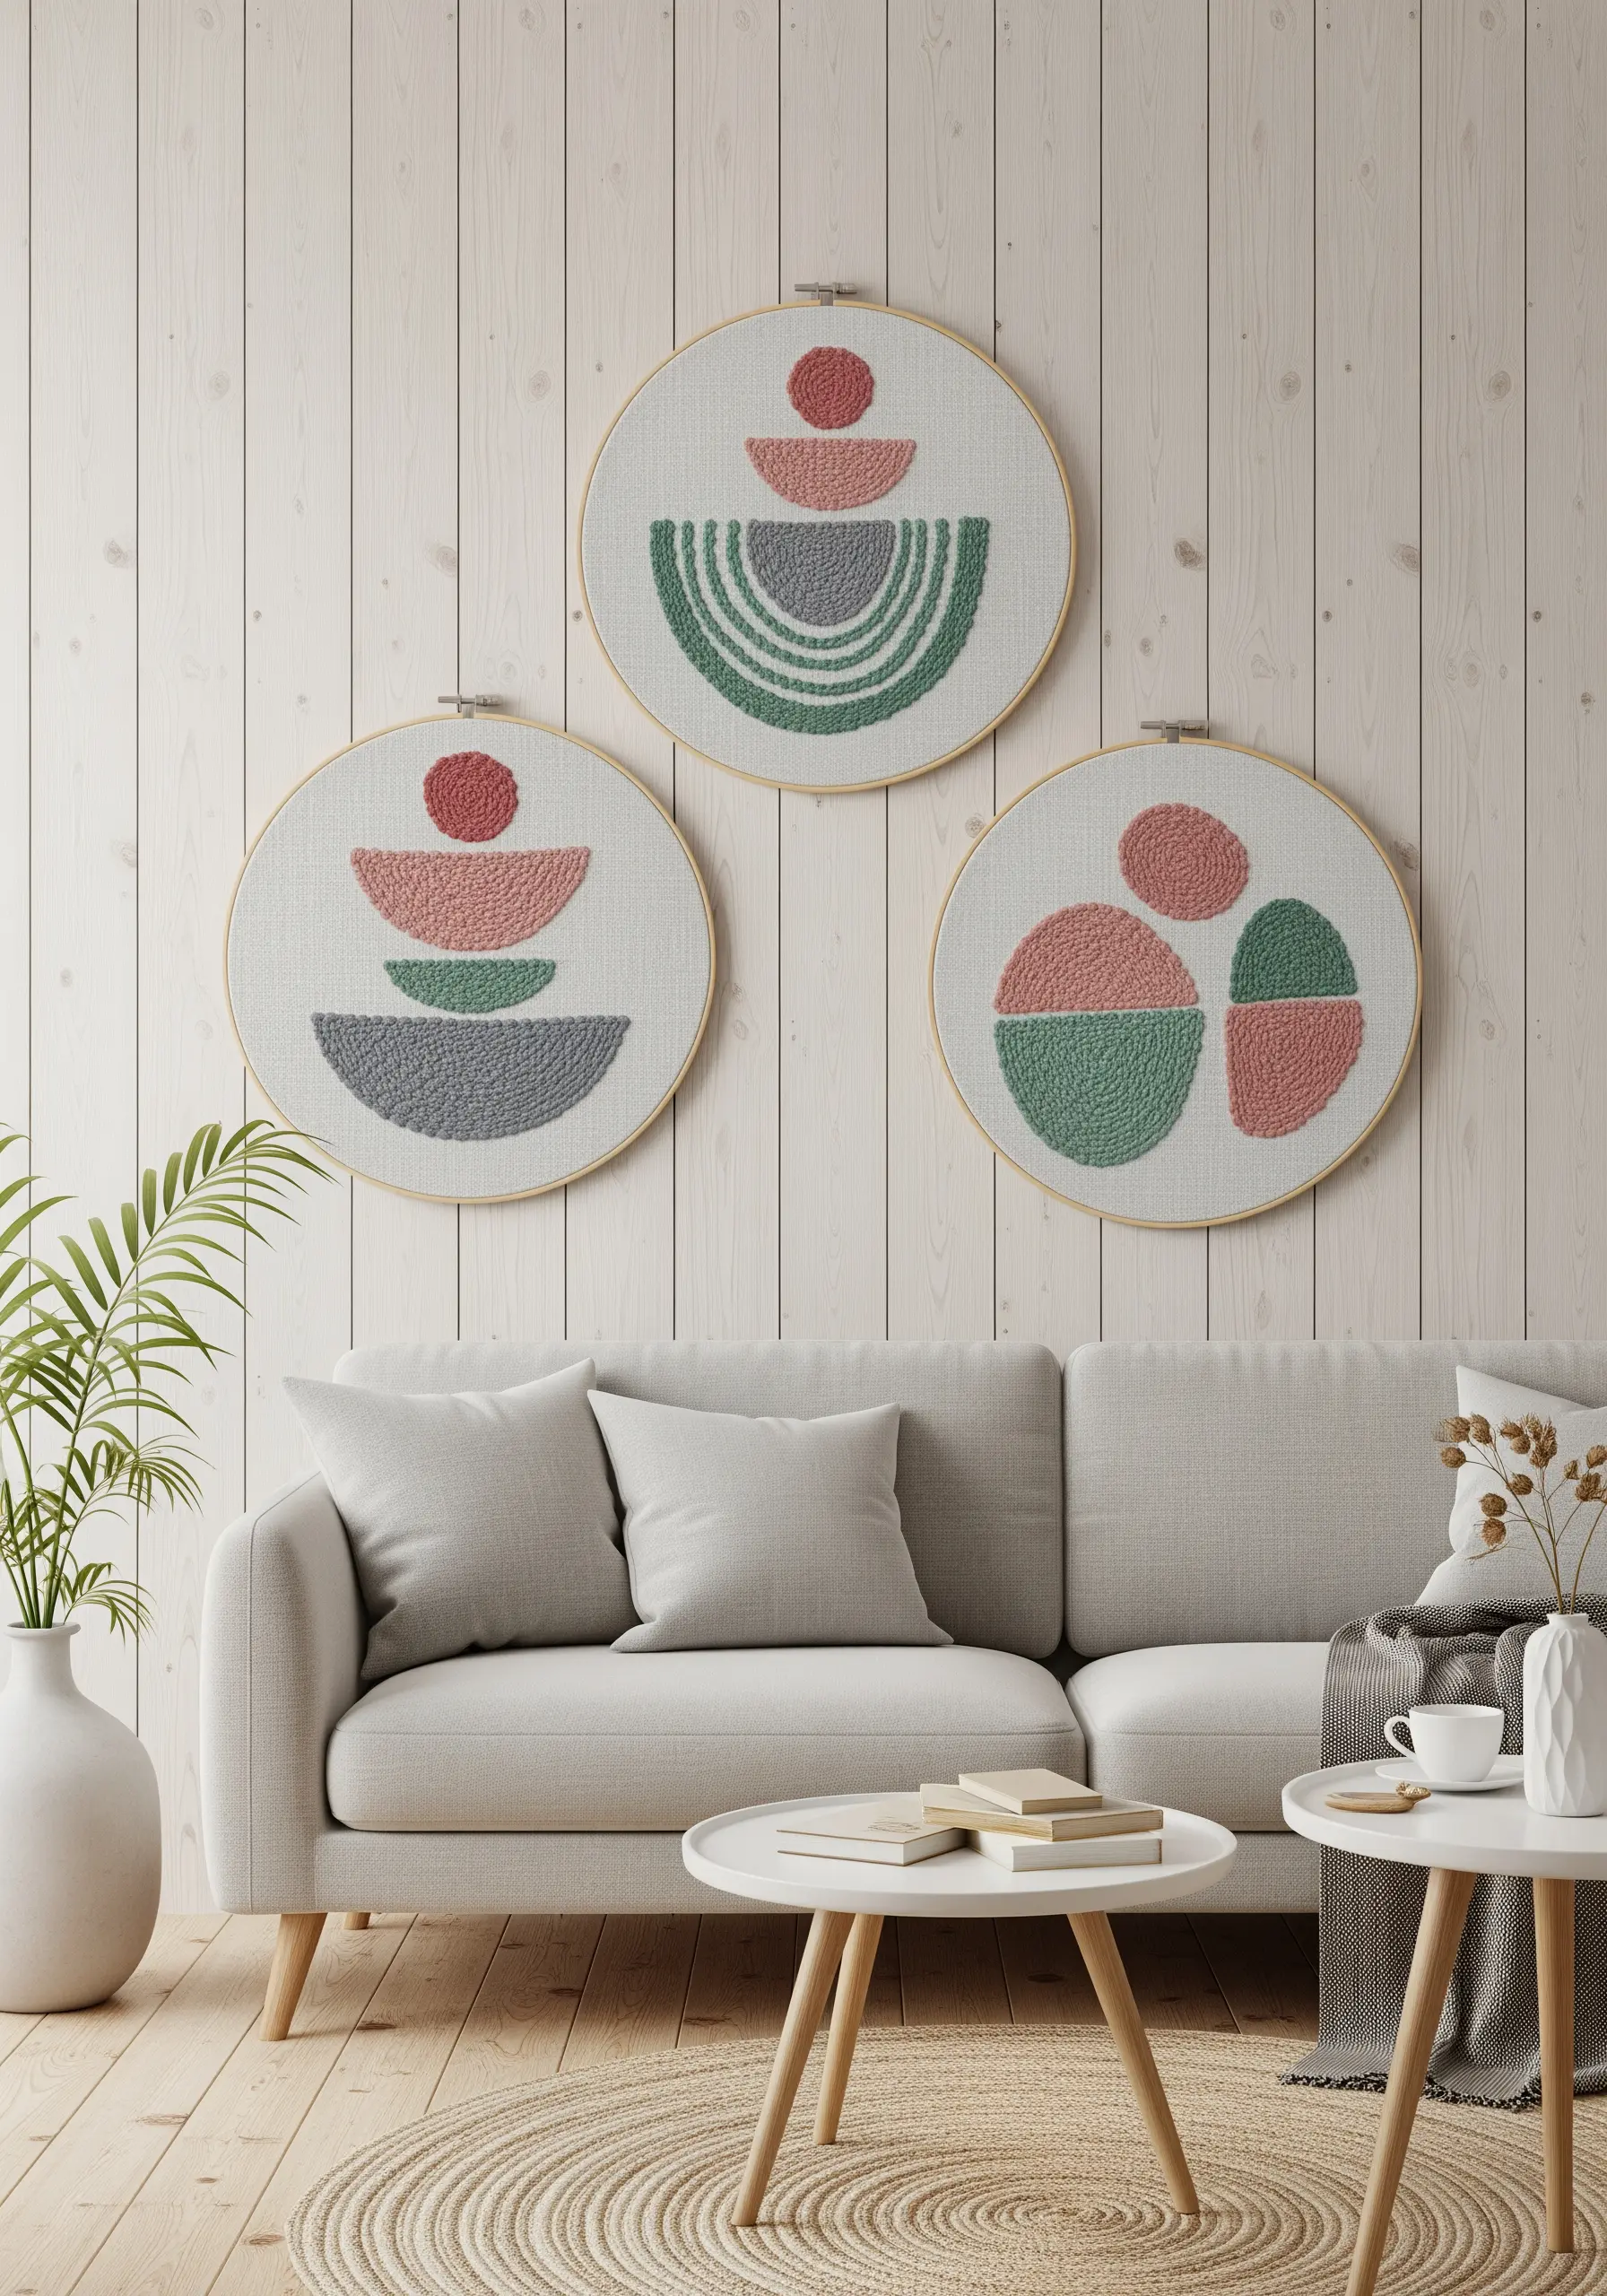
To design a set of stunning framed embroidery pieces, start with a unified color palette and a core set of shapes.
Use a punch needle to fill simple, abstract forms with plush, consistent loops; this technique is perfect for creating blocks of solid, satisfying color.
Vary the composition in each hoop by rearranging, flipping, or scaling your geometric elements.
This approach ensures the pieces work together as a harmonious collection while still being individually interesting.
4. Achieve Crisp Lines with Latch Hooking
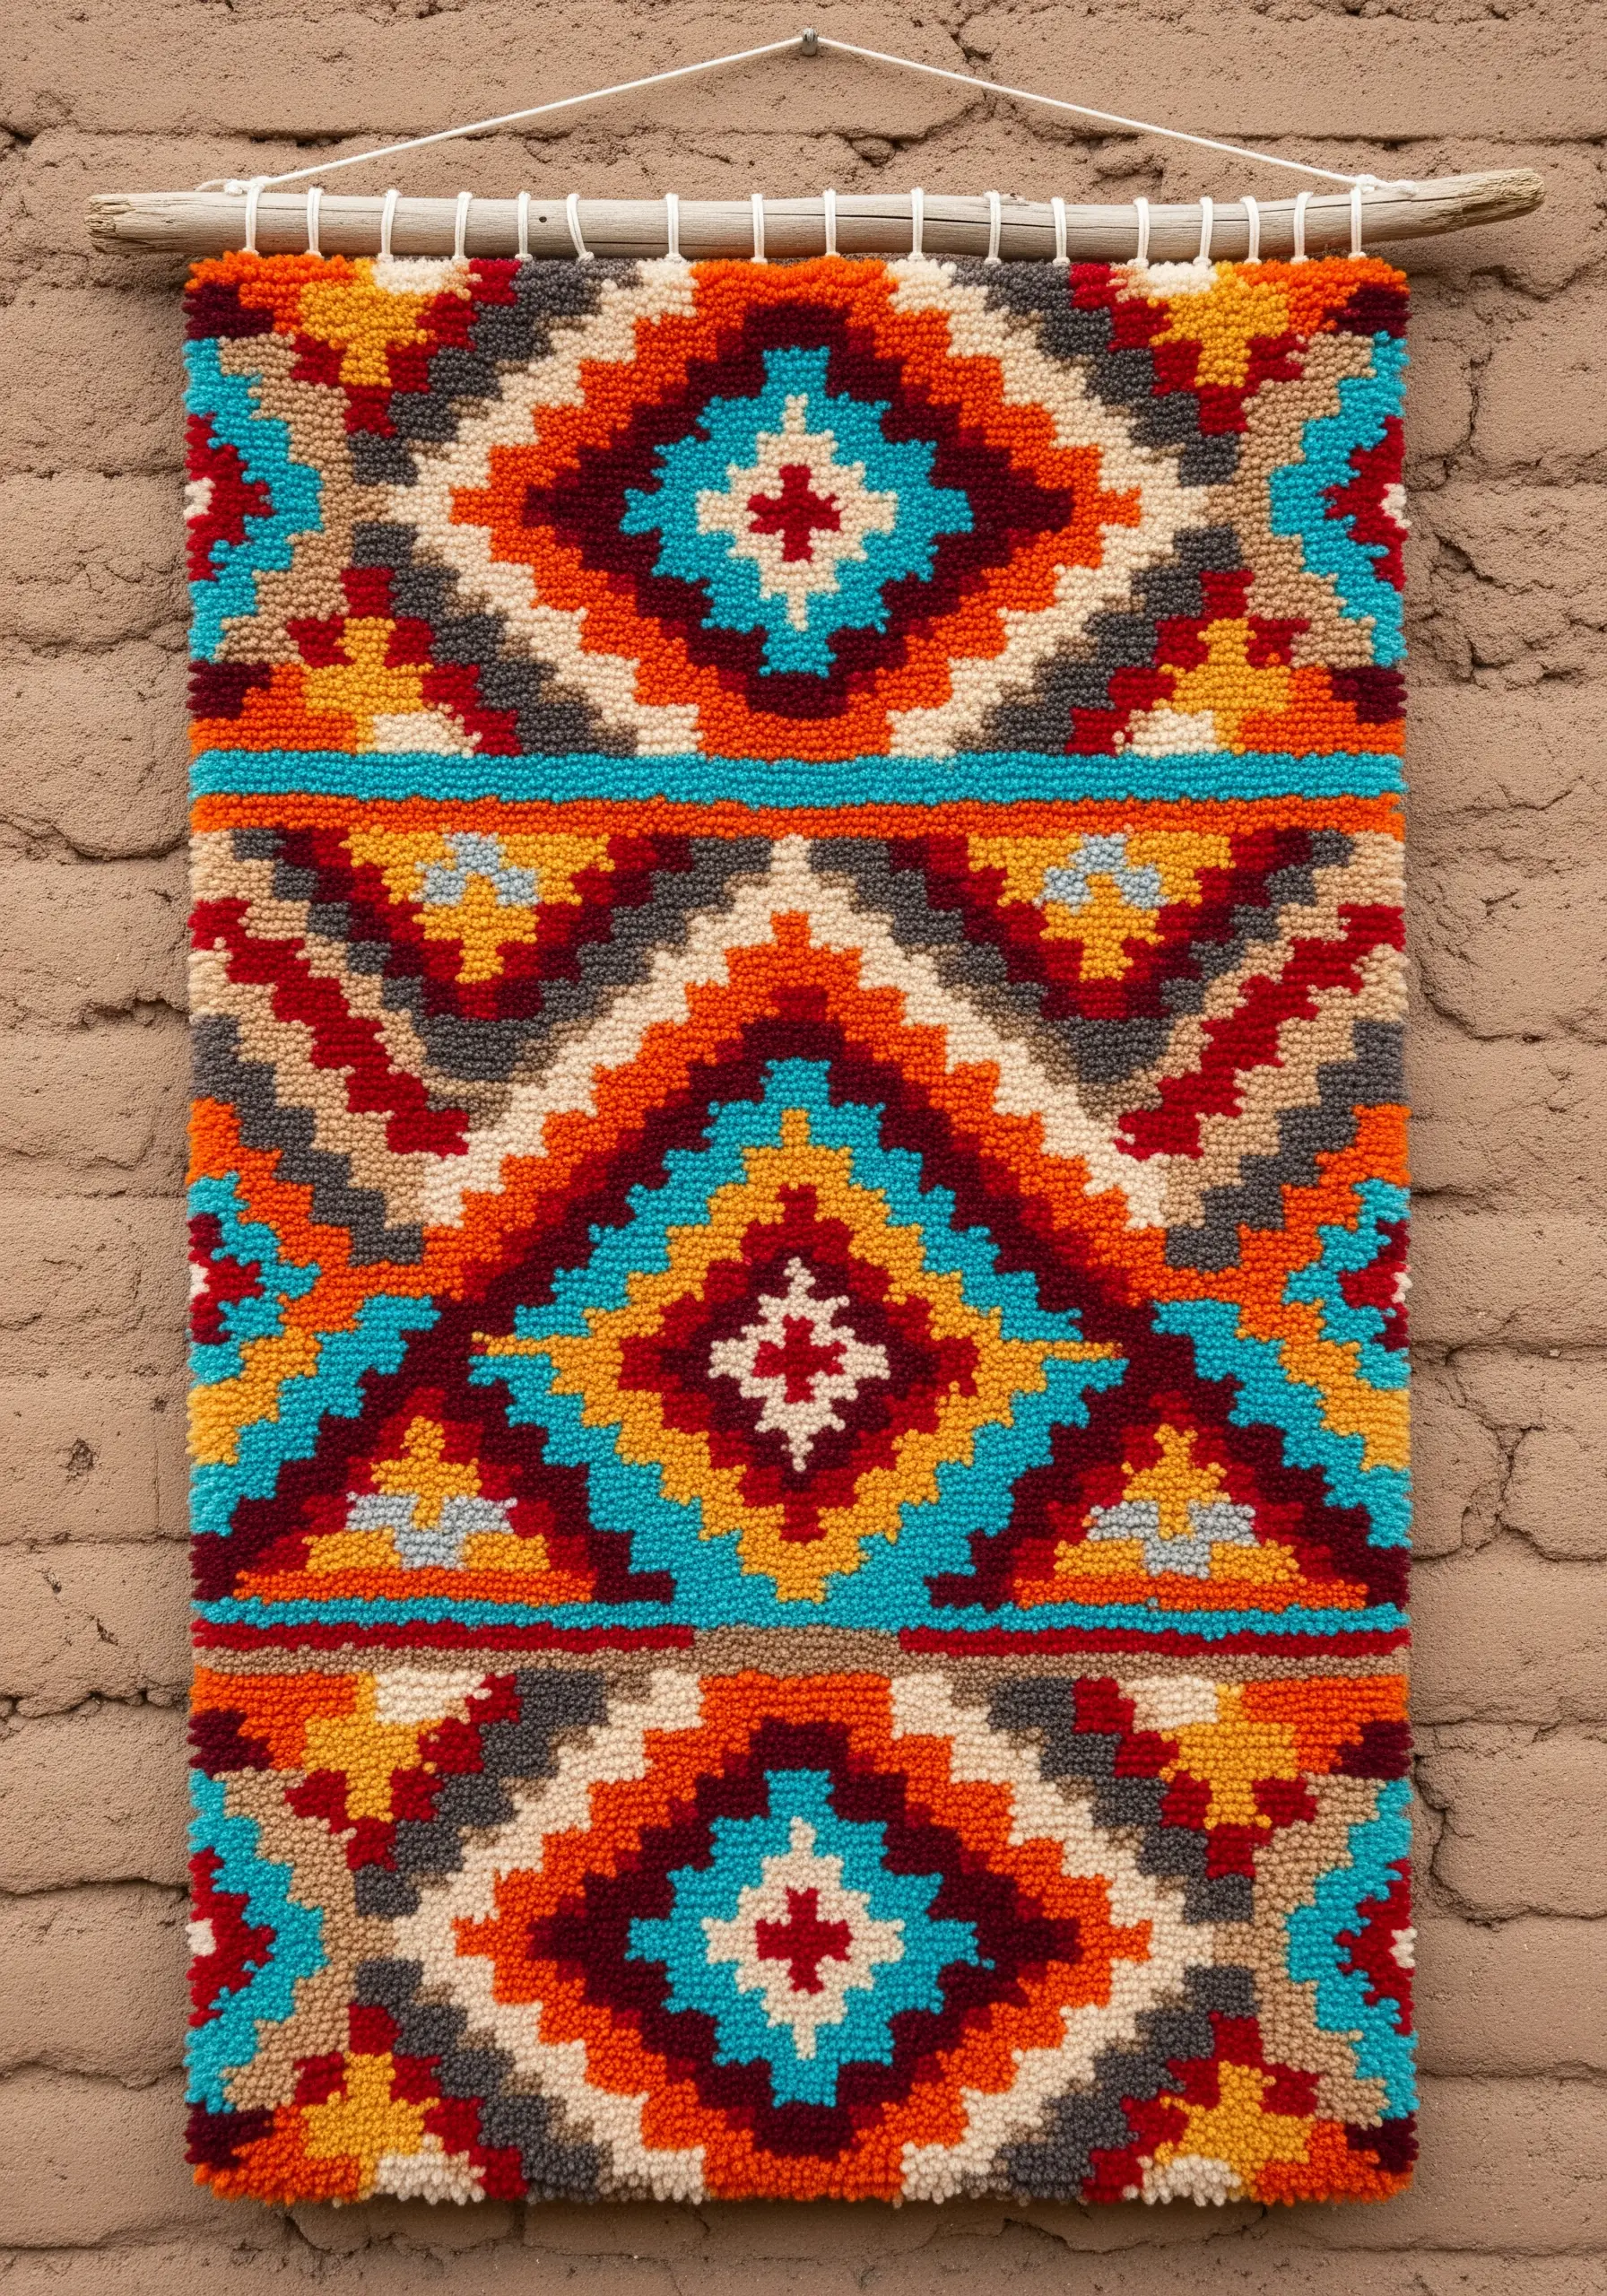
The high-pile texture of latch hooking is ideal for bold, graphic patterns inspired by Southwestern textiles.
To ensure your diamonds and zig-zags have sharp edges, work your design on a grid canvas and follow a color chart meticulously.
The density of the yarn loops naturally defines each shape, so the key is precise color placement.
Choose a vibrant, high-contrast palette to make the geometric motifs feel energetic and visually striking.
5. Weave a Landscape in a Circular Frame

Move beyond rectangular looms by weaving within a sturdy metal or wooden hoop to create a contained, scenic composition.
Assign different weaving techniques to different elements of your landscape to build texture and depth.
Use a flat tabby weave for the sky, a nubby Soumak stitch for mountains, and uncut Rya loops or fringe for snowy peaks or water.
This combination of textures transforms a simple geometric landscape into a tactile, multidimensional piece of art.
6. Sculpt with Thread on a 3D Frame

Construct a simple three-dimensional frame using wooden dowels to explore how straight lines can create elegant curves.
This string art technique relies on wrapping thread methodically from one point to another across open space.
The magic happens in the layering: as more threads overlap, they form parabolic curves and complex geometric intersections.
Use a high-contrast thread, like black and white, to emphasize the form and the intricate shadows it casts.
7. Emphasize Pattern Through Negative Space
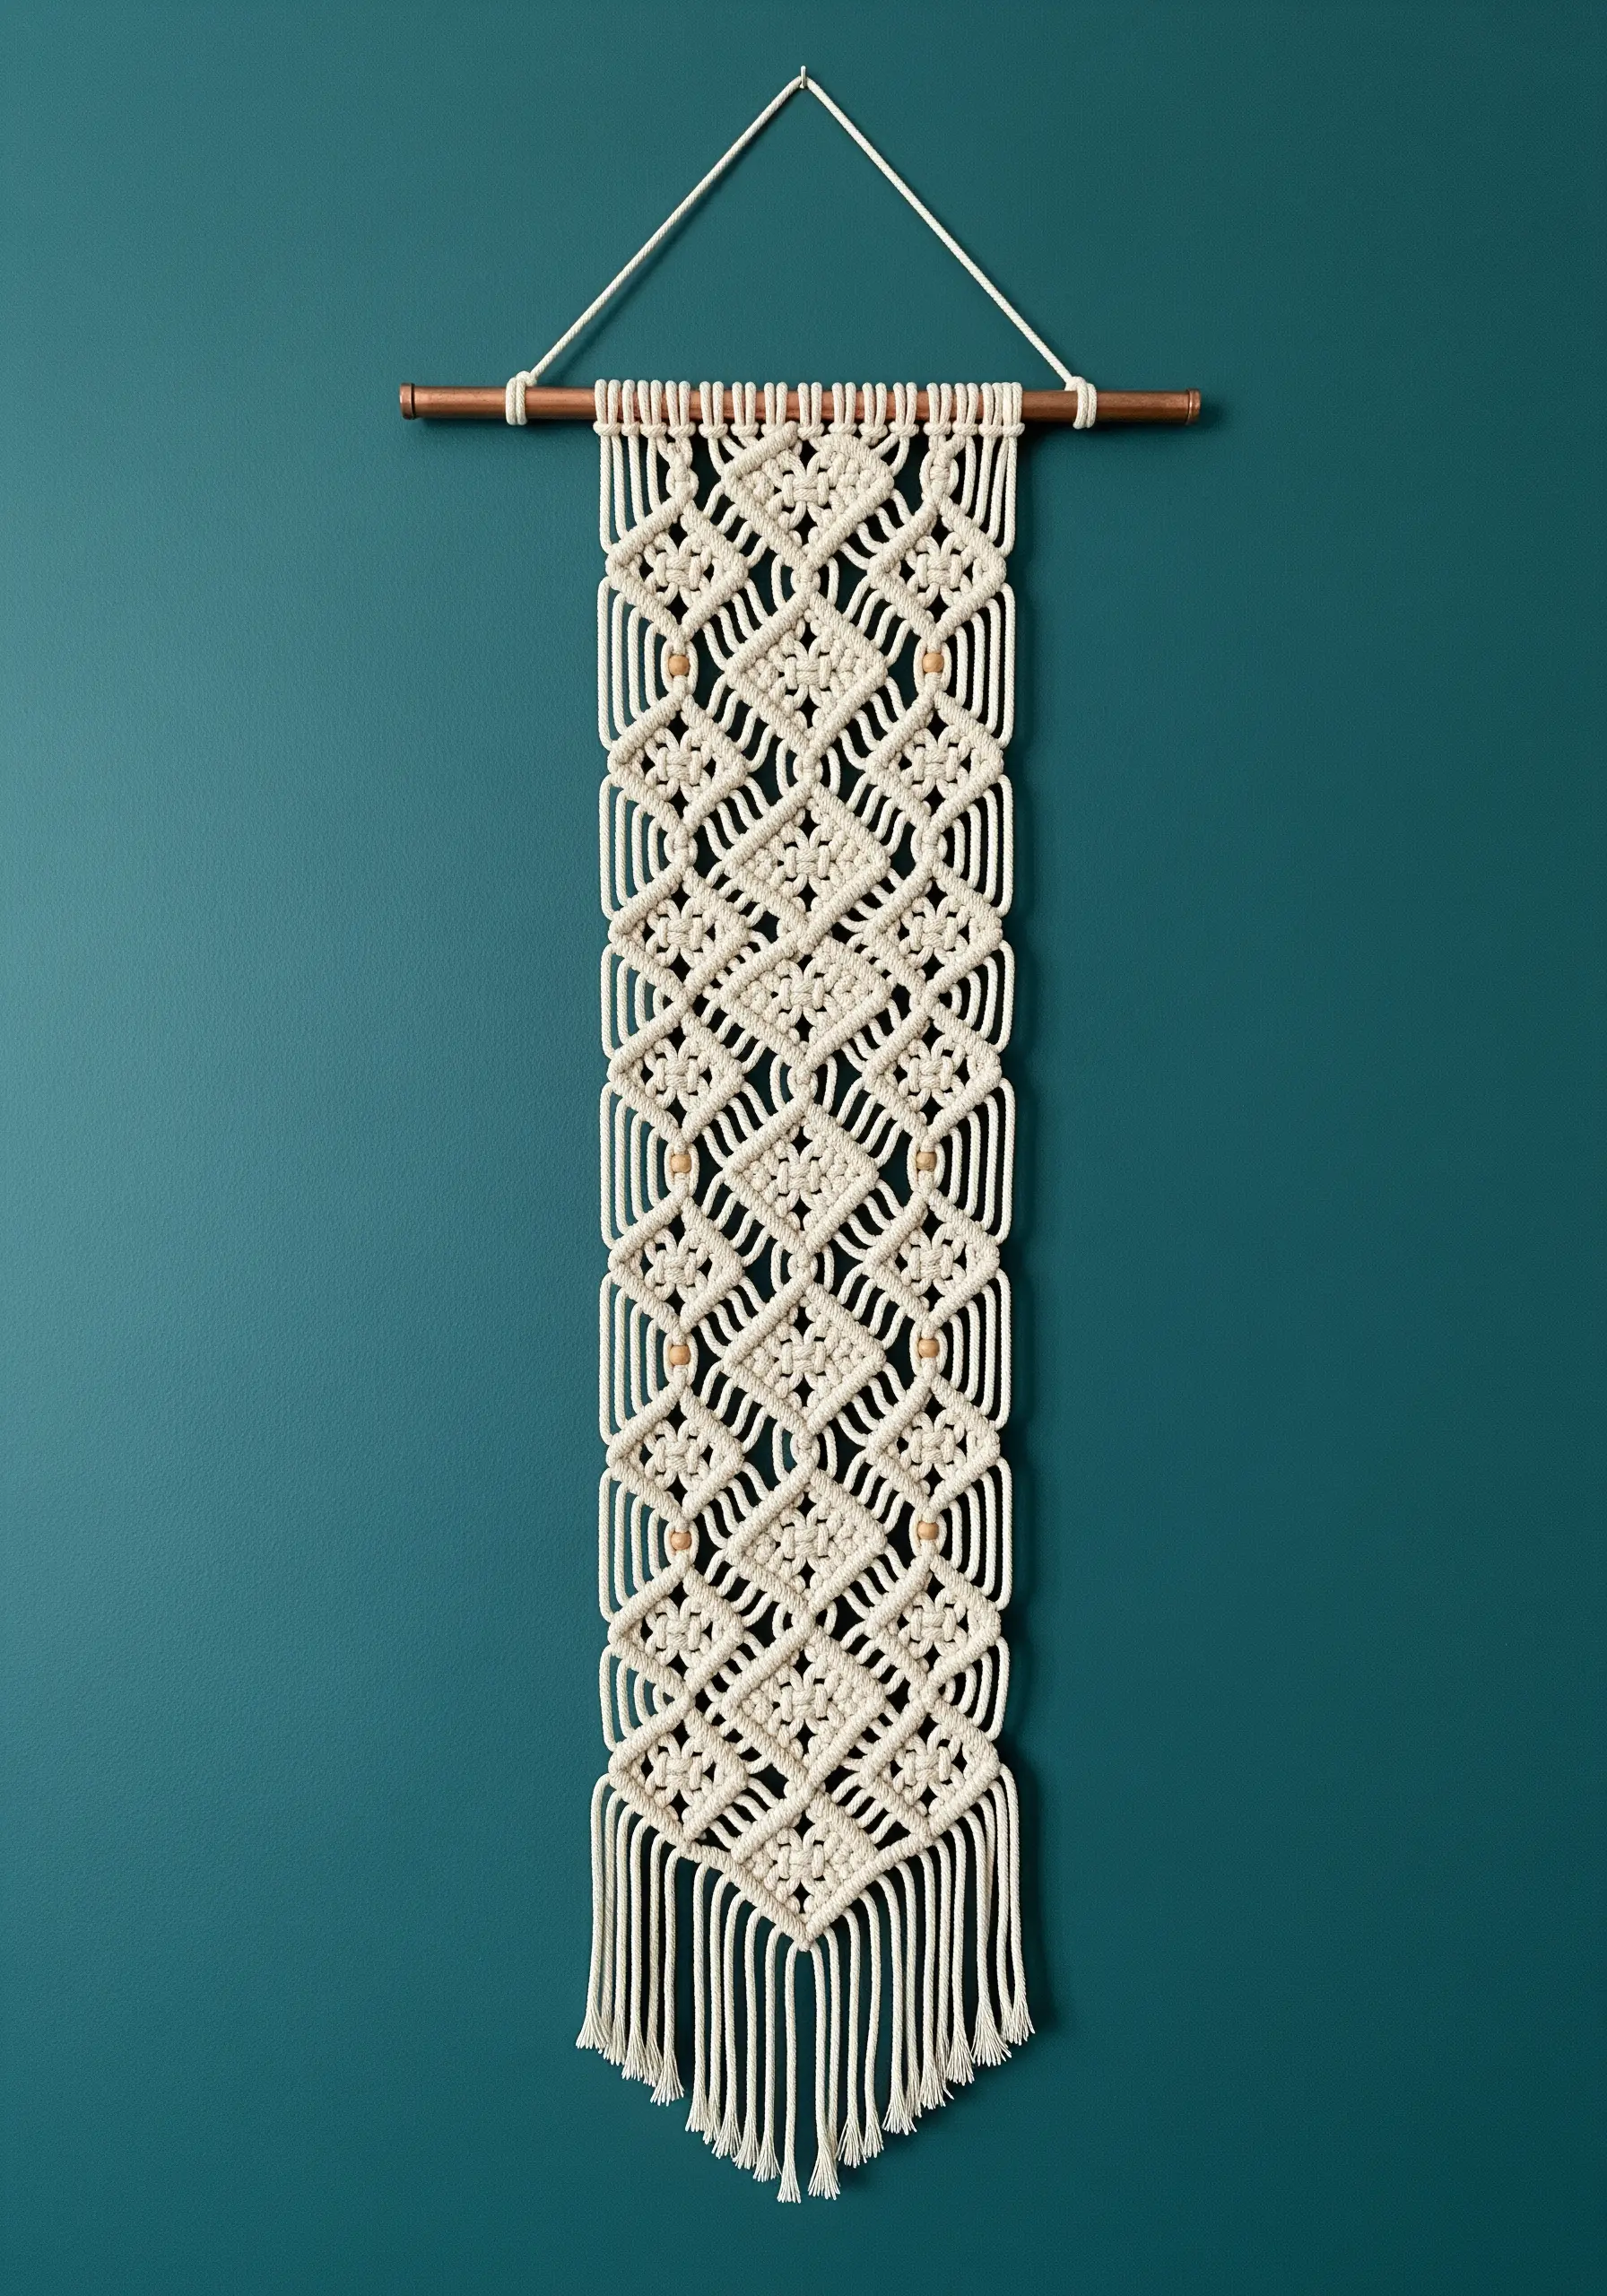
In this style of macrame, the empty space is just as important as the knots themselves.
Create a repeating diamond lattice using basic square knots, focusing on uniform spacing and tension to maintain the pattern’s integrity.
The open, airy structure allows light and the wall color to show through, making the piece feel delicate and architectural.
This technique turns simple knots into a sophisticated, lace-like textile that celebrates both form and void.
8. Explore Geometry with Minimalist Blackwork
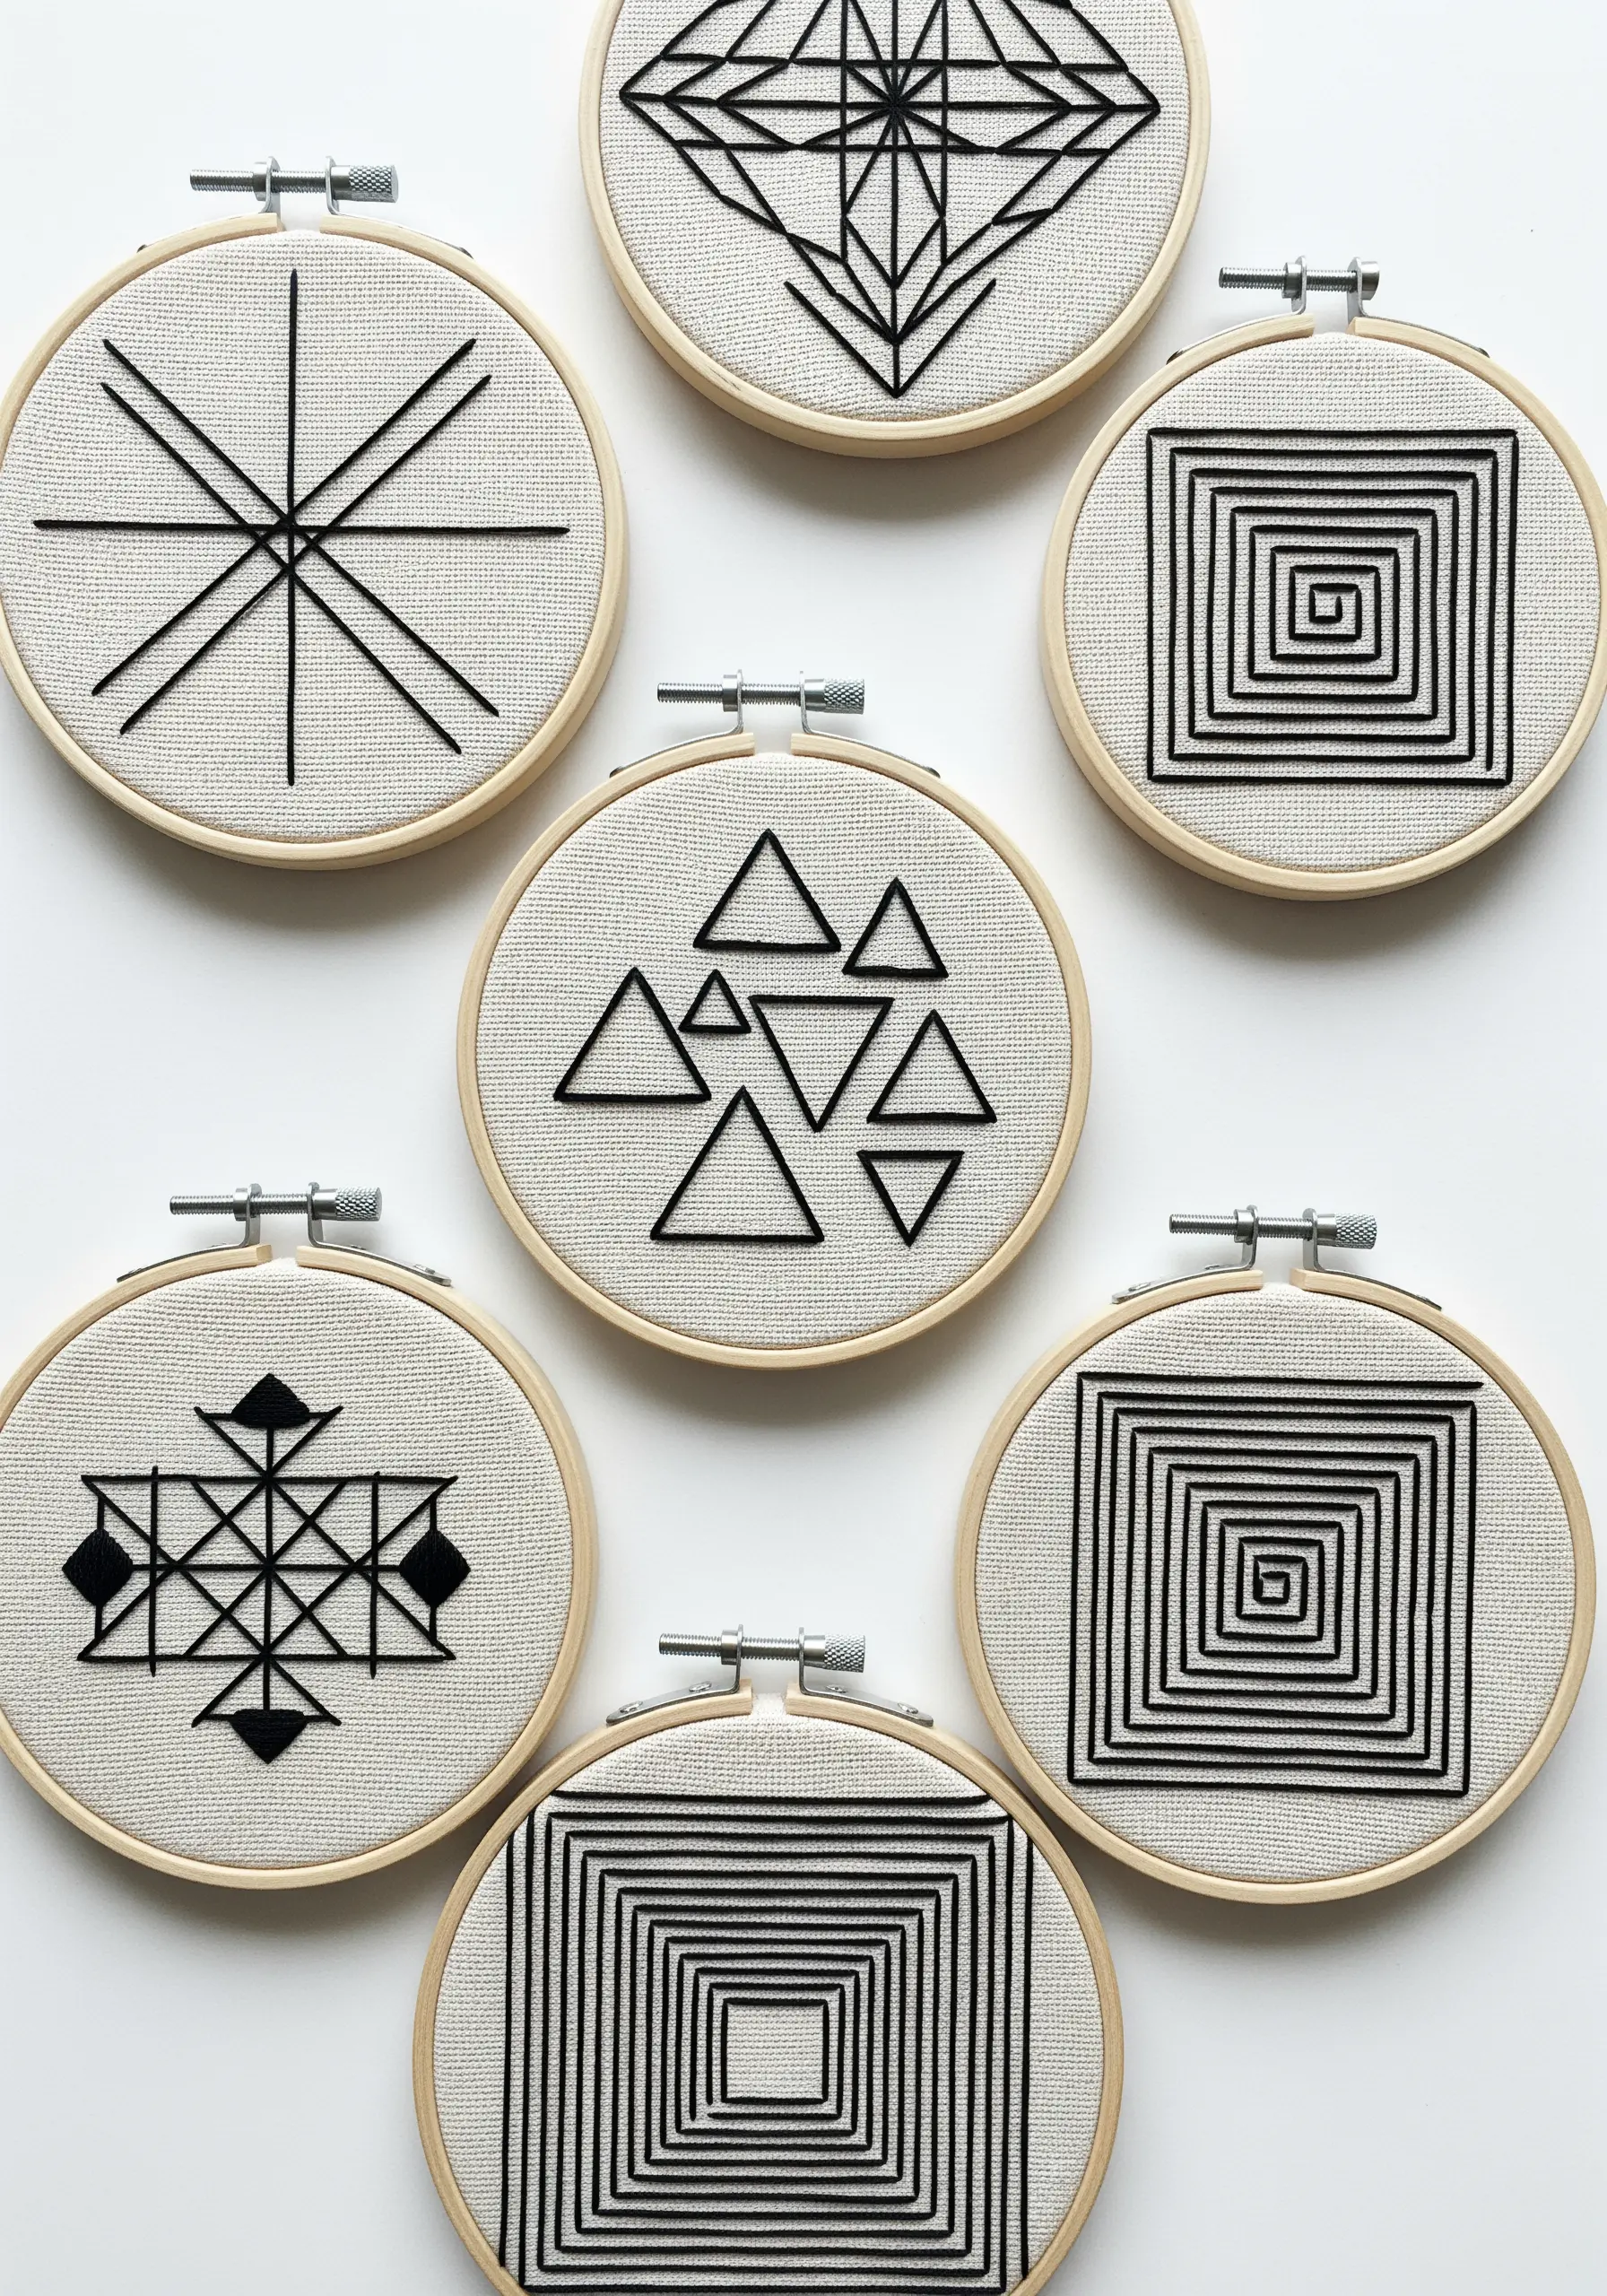
Blackwork embroidery proves that complex visual effects can be achieved with the simplest of stitches.
Using only backstitch or double running stitch, you can create intricate geometric fills and optical illusions.
To start, transfer a simple geometric outline—like a square, triangle, or star—onto your fabric.
Fill the shape with repeating lines or patterns, treating each hoop as a study in precision and graphic impact. These make for elegant, tiny embroidery patterns when scaled down.
9. Wrap Concentric Diamonds in an Ojo de Dios

The Ojo de Dios, or God’s Eye, is a meditative weaving craft built on a foundation of two crossed sticks.
You create the pattern by wrapping yarn around one stick, crossing through the center, and wrapping around the next, repeating in a circular motion.
The sharp diamond shape emerges from the color changes. Switch yarn colors every few rows to create vibrant, concentric bands.
Finish with tassels on the ends of the sticks for a traditional, playful touch.
10. Outline Organic Shapes for Graphic Contrast

Combine the plush texture of punch needle with the clean precision of line art for a contemporary feel.
First, fill your organic, abstract shapes with high-pile punch needle loops, focusing on creating a dense, uniform surface.
Then, use a single strand of dark yarn or embroidery floss to outline each shape with a simple backstitch or stem stitch.
This crisp outline contains the soft texture, giving the playful shapes definition and a sophisticated, illustrative quality.
11. Create Depth with Monochromatic String Art
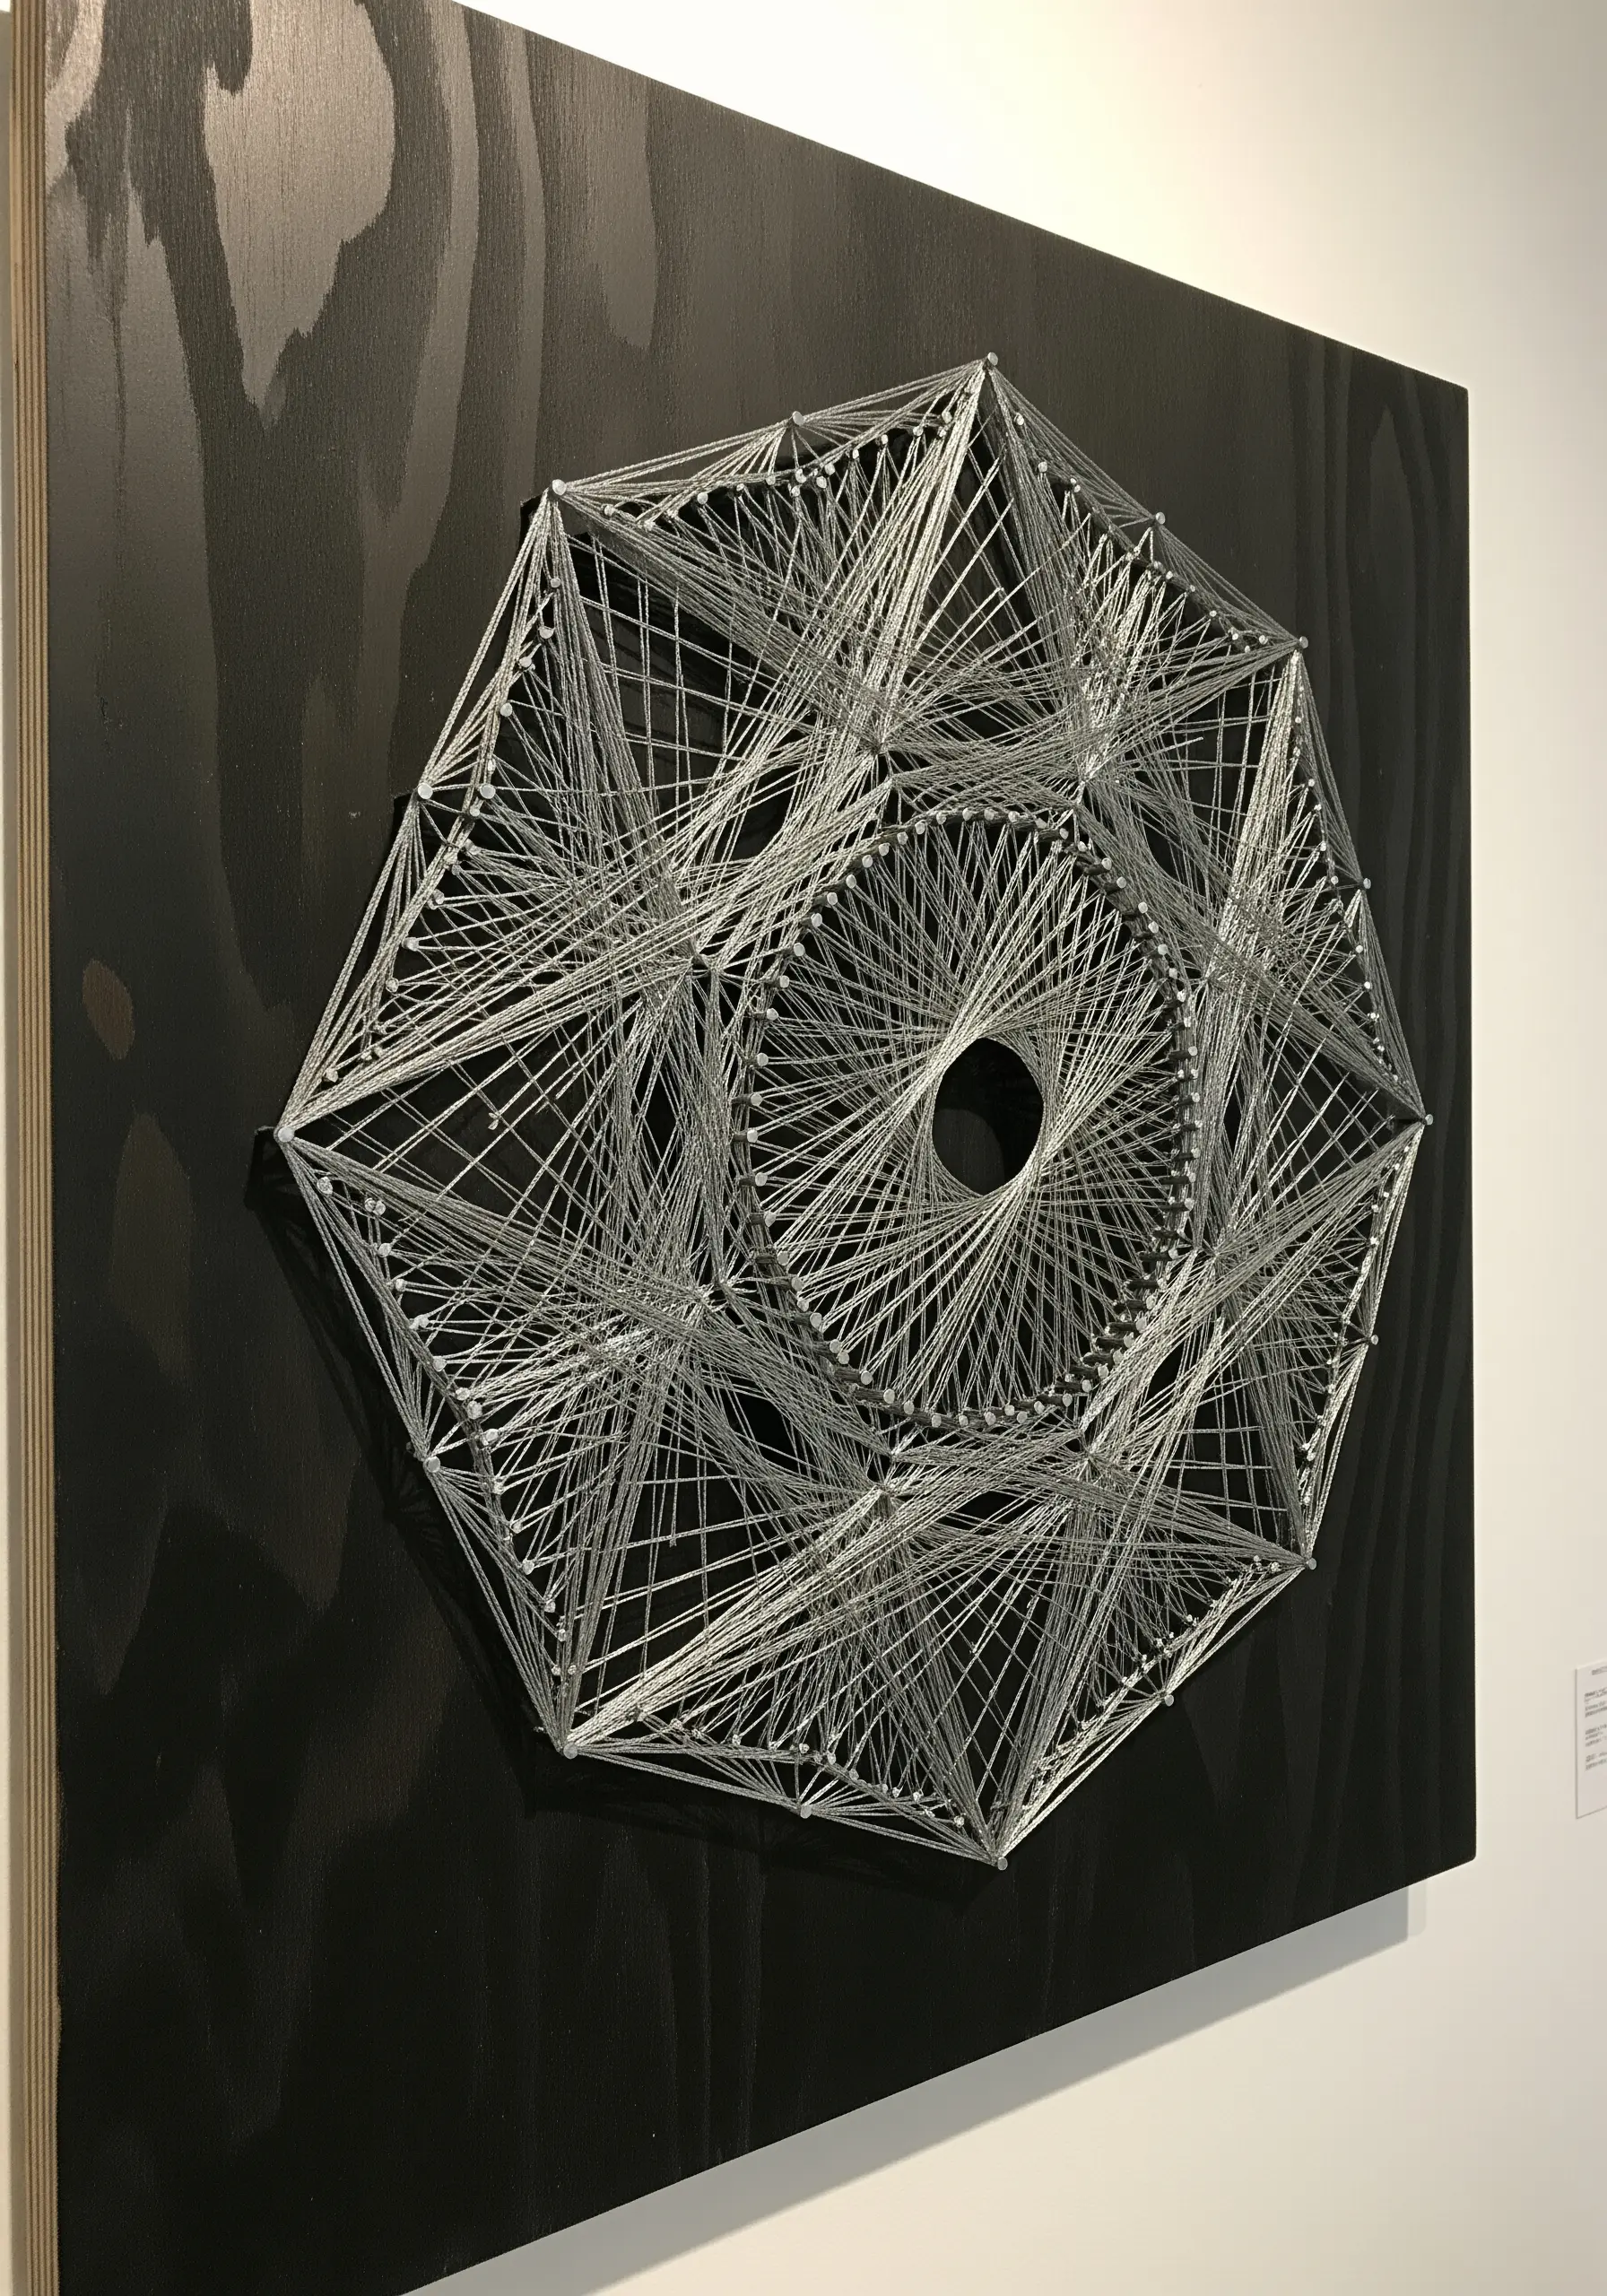
String art gains incredible sophistication when executed in a single color against a dark background.
The technique involves stretching threads between nails or pins arranged in a geometric pattern on a board.
By layering the thread multiple times and crossing it at different angles, you create tonal variations and the illusion of three-dimensional planes.
The finished piece plays with light and shadow, revealing its complex geometry as the viewer moves around it.
12. Stitch an Optical Illusion with Three Tones
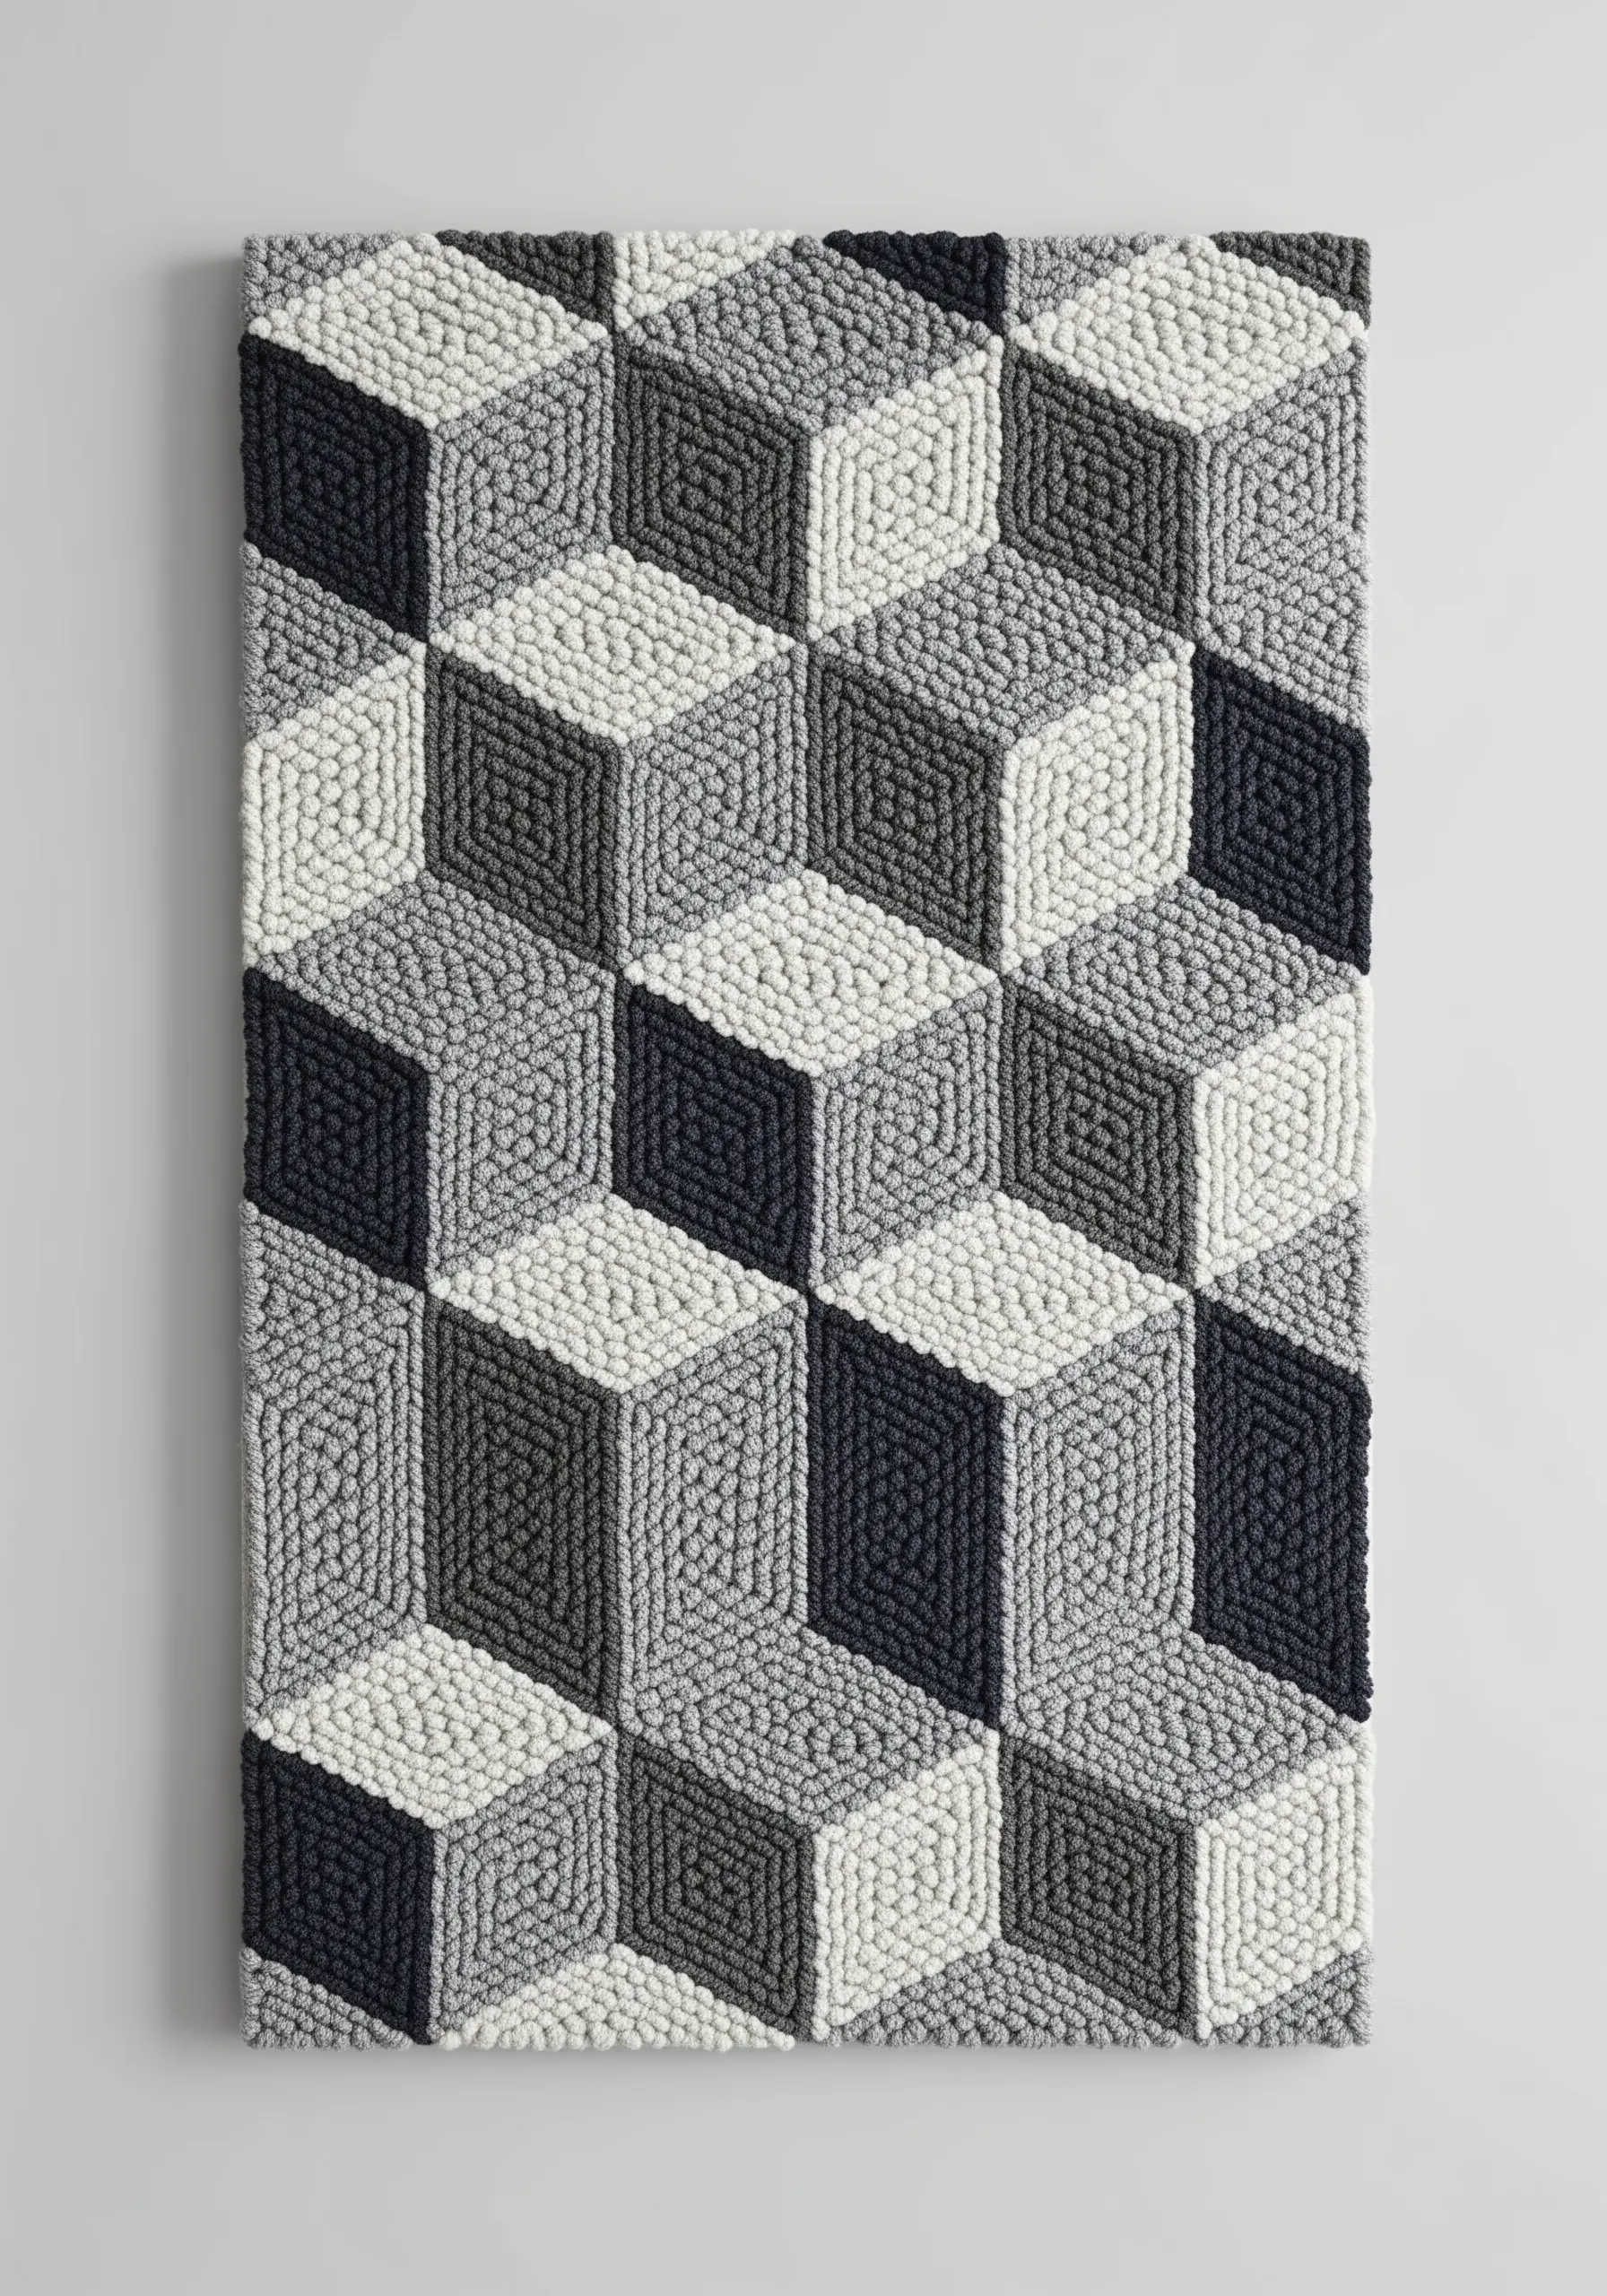
To create the illusion of 3D cubes, all you need is a single color in three distinct values: light, medium, and dark.
Assign one value to each of the three visible faces of the cube—typically light for the top, medium for one side, and dark for the other.
Use a dense punch needle loop or French knots to fill each section, ensuring the texture is consistent across the entire piece.
The brain interprets these value shifts as light and shadow, instantly transforming a flat surface into a dimensional pattern.
13. Wrap a Frame for a Perfect Gradient
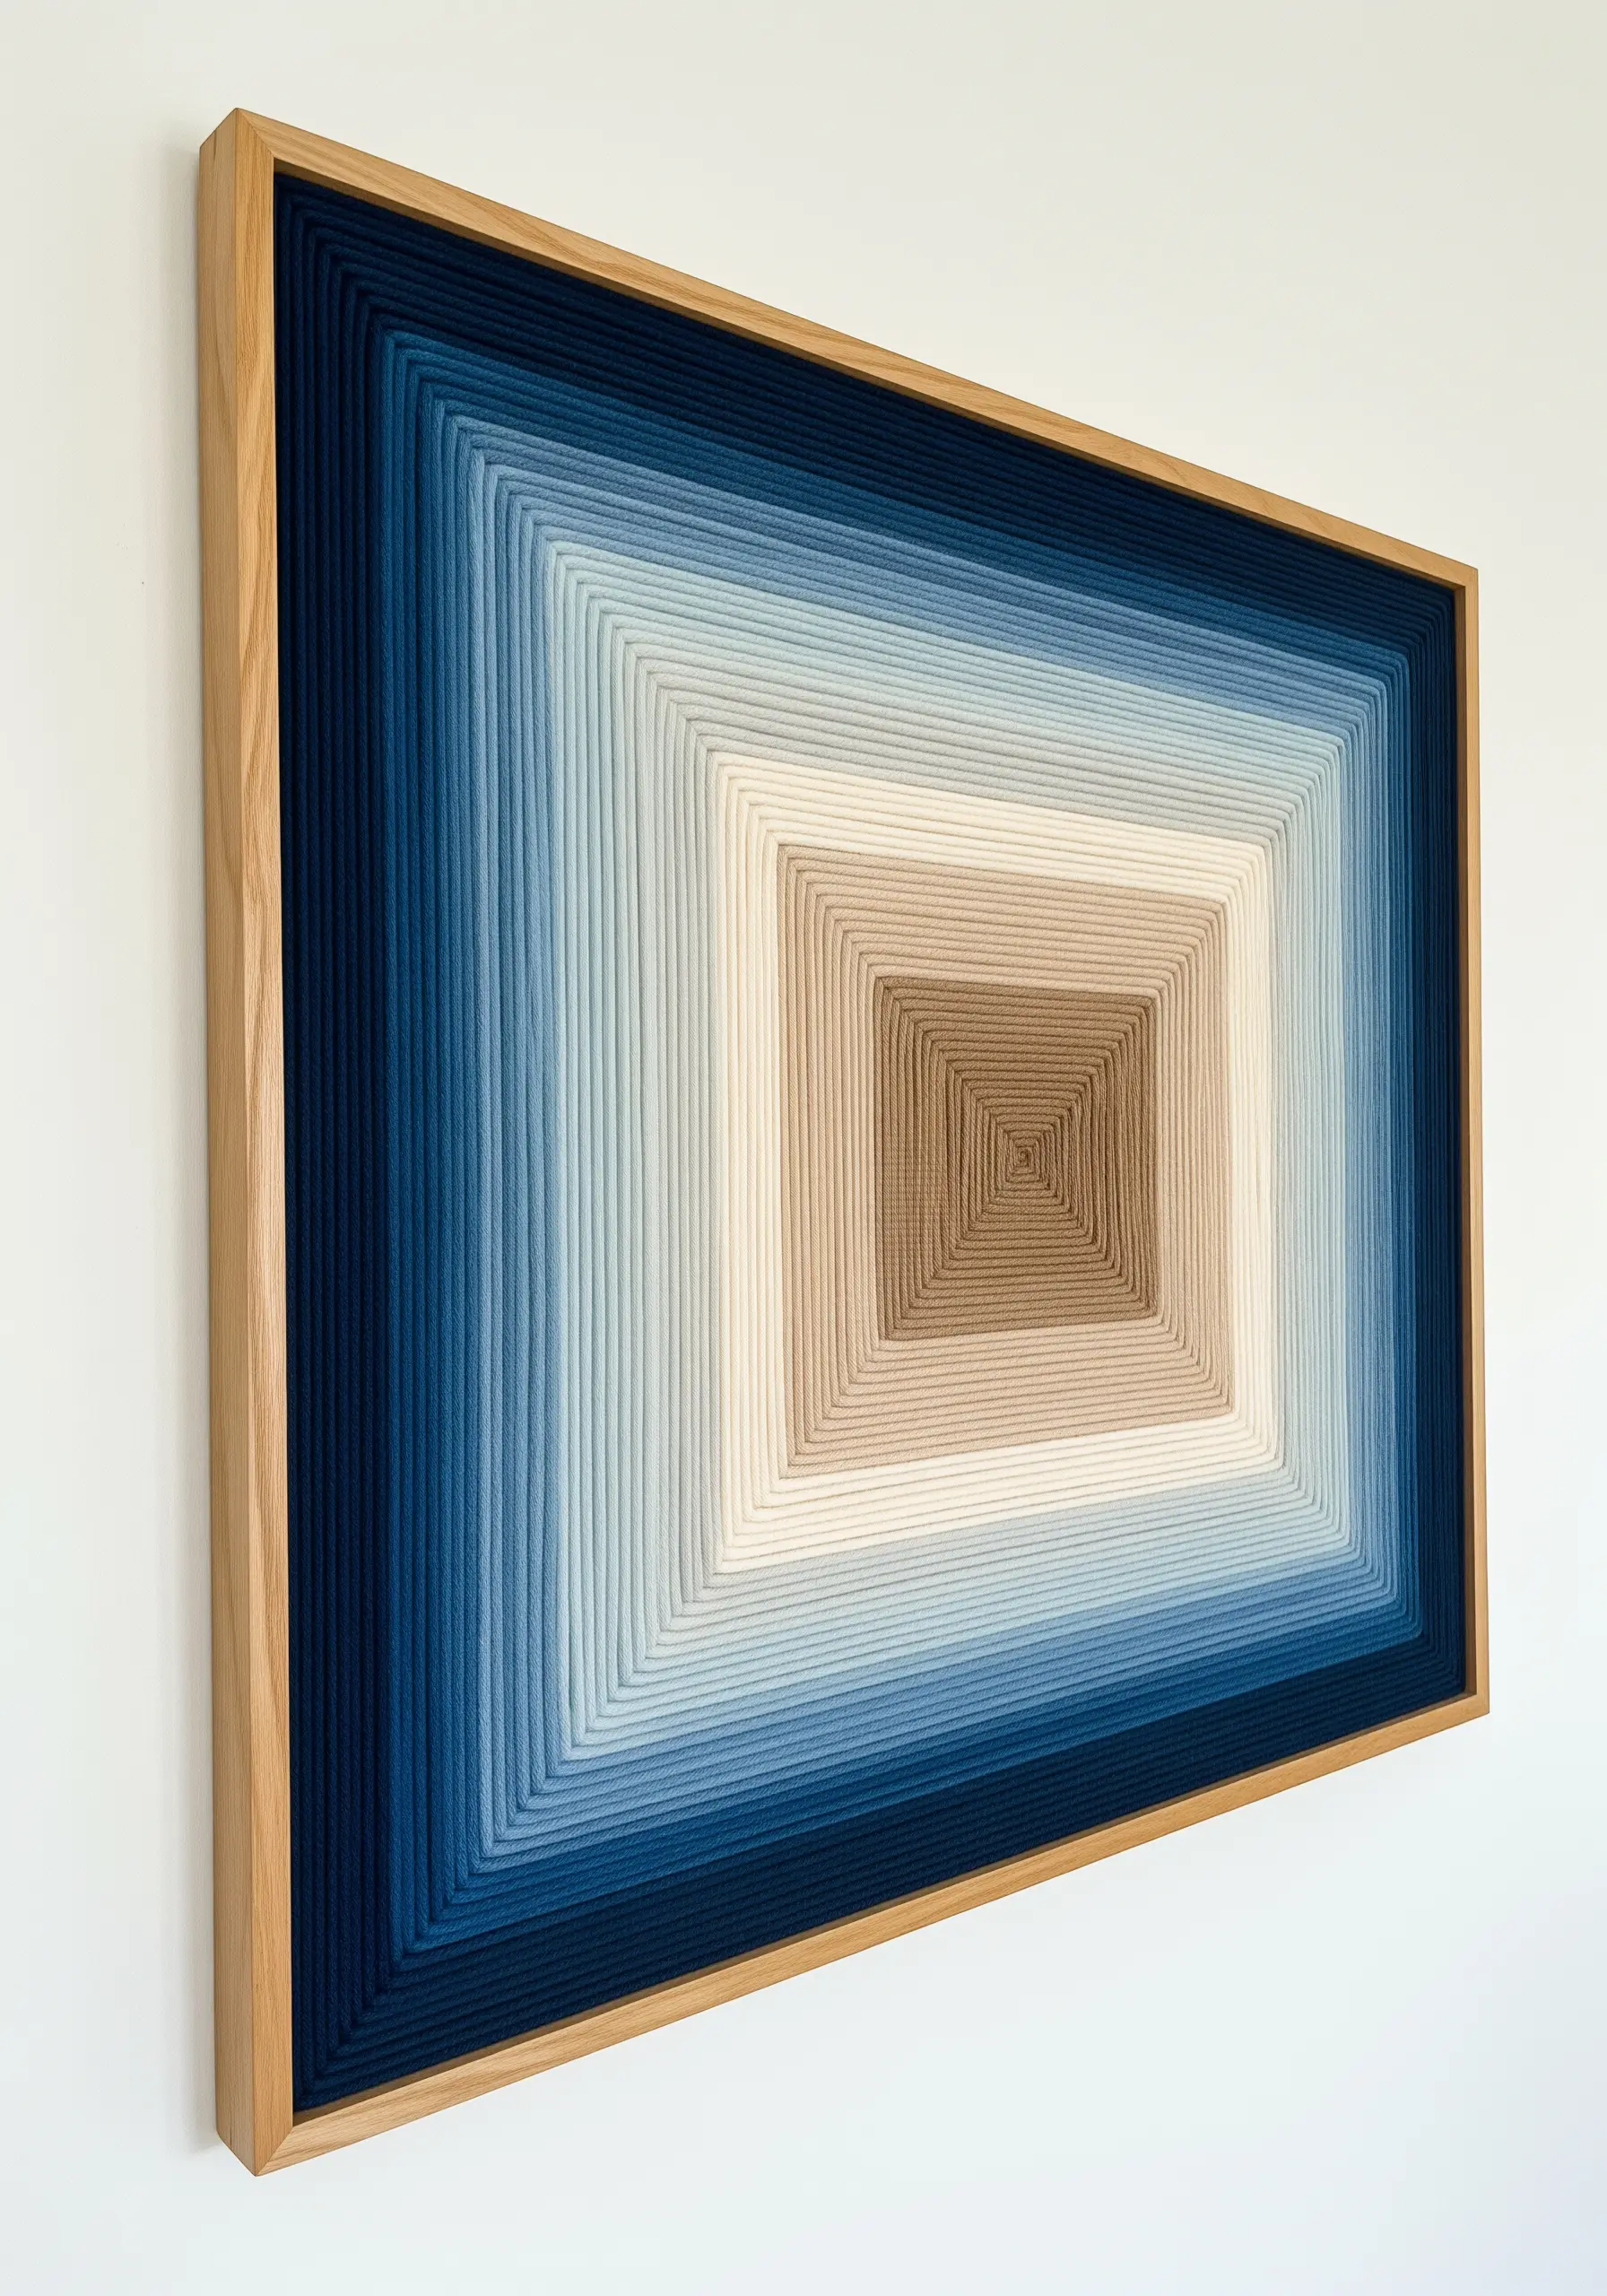
This technique turns a simple wooden frame into a canvas for a mesmerizing color study.
Plan your gradient by arranging your yarn skeins in the desired sequence before you begin.
Start at one corner and wrap the yarn tightly and evenly around the frame, ensuring each new strand sits snugly against the last.
The precision of the wrapping creates magical ombre effects, where the colors blend seamlessly into one another for a hypnotic, minimal result.
14. Weave Hexagons for a Honeycomb Effect

Tapestry weaving allows you to build patterns shape by shape, making it perfect for geometric designs like this honeycomb repeat.
To create the hexagonal forms, you’ll need to master diagonal weaving techniques, carefully increasing and decreasing the number of warp threads you cover in each row.
Use shading within each hexagon—placing lighter tones next to darker ones—to give the flat weave an illusion of depth and dimension.
15. Integrate Weaving into a Macrame Base
Combine two fiber arts into one spectacular piece by using a macrame header as the foundation for a woven tapestry.
Create the top section with your desired macrame knots, then use the hanging cords as the warp threads for your loom.
Weave directly into these threads, introducing new colors and textures with a tabby or Soumak weave.
This ‘macra-weave’ technique allows for large-scale, high-texture fabric collage projects with a seamless transition from knotted to woven sections.
16. Amplify Color with a Chevron Pattern
The simple, repeating chevron is the perfect vehicle for showcasing a dramatic color gradient.
Using punch needle or a dense loop stitch, the focus shifts entirely from the shape to the flow of color.
To create a smooth transition, select yarns that blend well, arranging them from your darkest to lightest shade before you start.
The uniform, high-pile texture absorbs light and makes the colors appear incredibly rich and saturated.
17. Appliqué Felt Shapes for Clean Color Blocking

For perfectly crisp geometric art, use wool felt as your color-blocking medium.
Cut your shapes precisely, arrange them on a neutral linen or cotton backing, and secure them with a hidden whipstitch or fabric glue.
Elevate the piece by adding decorative hand stitching, like a simple running stitch or chain stitch, along the edges or across the surface of the felt pieces.
This adds a layer of handcrafted detail and subtle texture to the minimal composition.
18. Create a Rainbow Mandala on a Hoop

Transform an embroidery hoop into a vibrant loom for a string art mandala.
The key to the pattern is the sequence of wrapping. Create the radiating starburst by stretching threads from one side of the hoop directly to the other.
To build the central woven eye, work in a smaller, circular pattern, weaving a single thread over and under the main spokes.
A carefully planned rainbow color progression gives the geometric form a joyful, energetic quality.
19. Build a Geometric Form with Tassels

This project uses tassels not just as decoration, but as the fundamental building blocks of the artwork itself.
Start by making a large batch of uniform tassels and pom-poms in your chosen color palette.
Create a simple warp by stretching vertical threads between two dowels, then tie your tassels onto the warp in a grid to form a diamond or other geometric shape.
This is a playful way to create holiday-themed string art patterns with incredible texture and movement.
20. Draw on Your Wall with a Single Cord

Achieve the effortless elegance of line art on a grand scale by using a single, continuous piece of thick rope or cord.
Use a material that has some structure but is still flexible, like a cotton piping cord or even a soft electrical wire covered in fabric.
Sketch your abstract, flowing line on paper first, then replicate the shape on the wall, securing it with small, discreet nails or clear command hooks placed at key curves and intersections.
The result is a minimalist, sculptural statement that feels both simple and profound.
21. Float a Constellation on a Transparent Surface
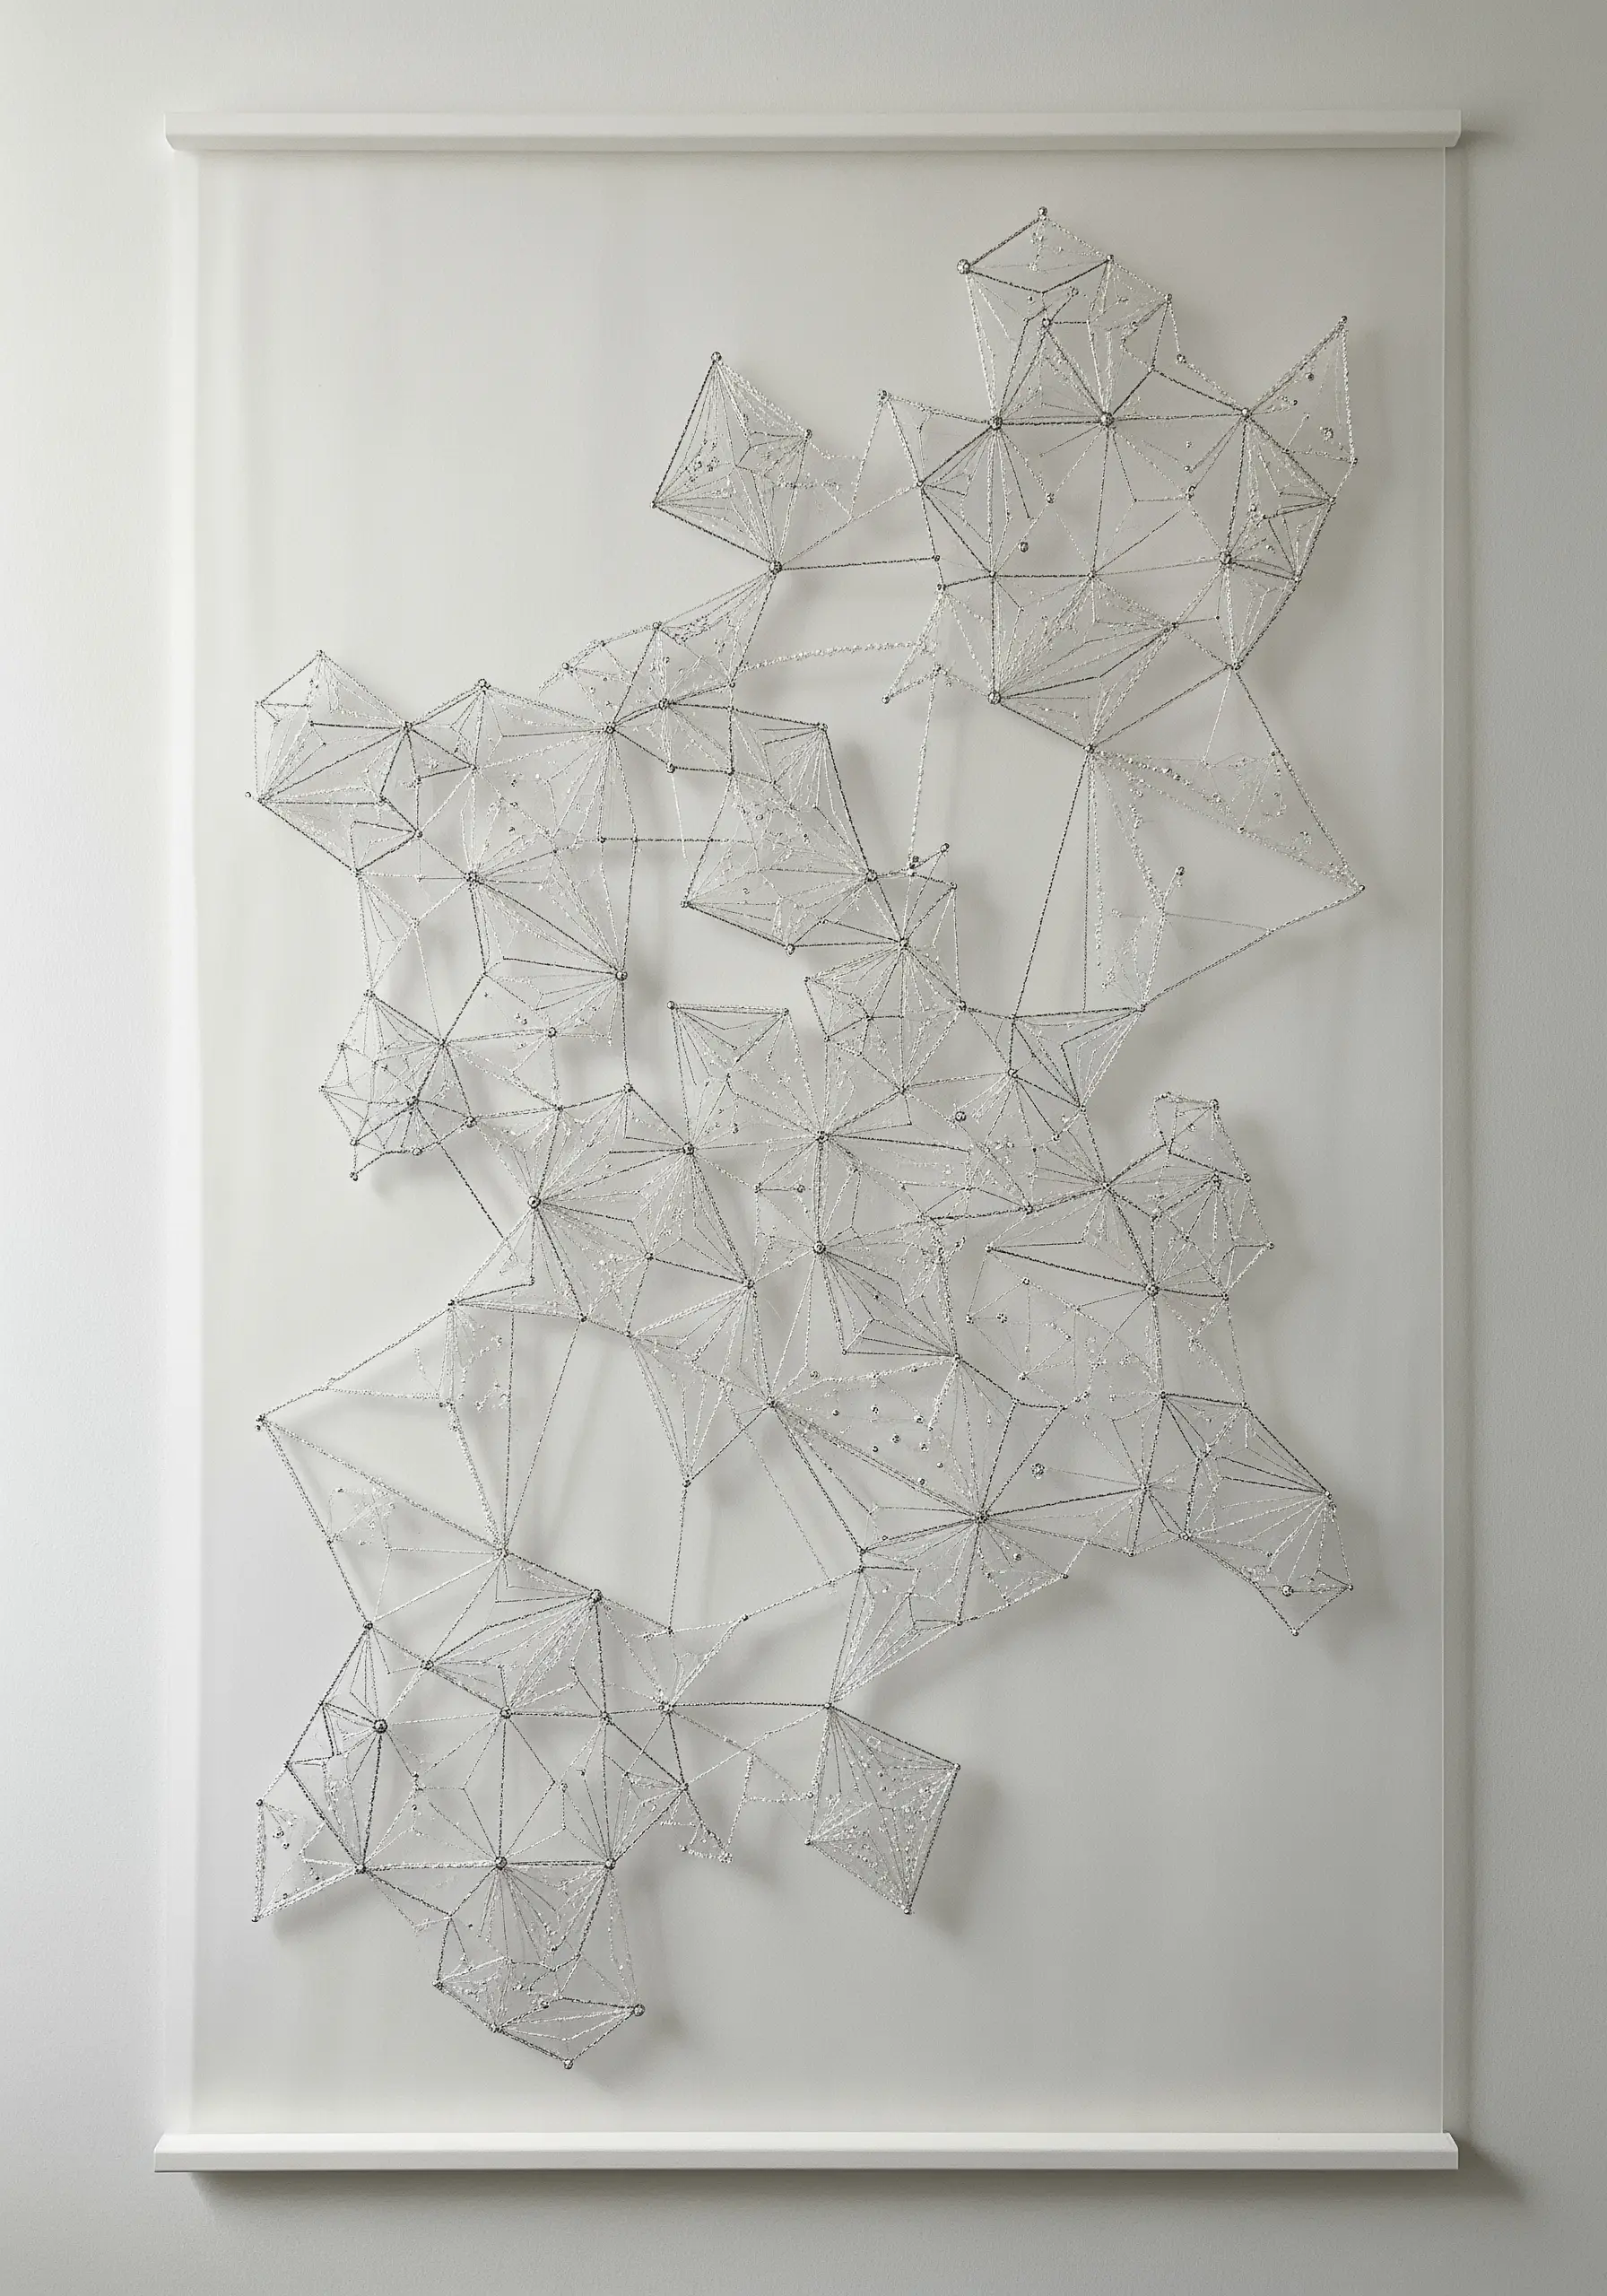
Create an ethereal, floating effect by making string art on a clear acrylic or glass panel.
Instead of nails, drill tiny, evenly spaced holes for your anchor points, or use strong, clear adhesive dots.
Stretch a fine, metallic, or silvery thread between the points to create interconnected geometric clusters.
When mounted slightly away from the wall, the piece casts intricate shadows, adding another layer of complexity and making the design feel weightless.
22. Weave the Illusion of Transparency

In weaving, you can create the look of overlapping, transparent colors through a technique called color-and-weave.
Where two different colored shapes would overlap, you intentionally weave a third section using threads from both colors, either alternating them or plying them together.
This blended area tricks the eye into seeing a new, mixed color, giving the flat textile a luminous, layered quality.
Careful planning of your color interactions is essential to making this illusion successful.
23. Juxtapose Textures for a Tactile Statement
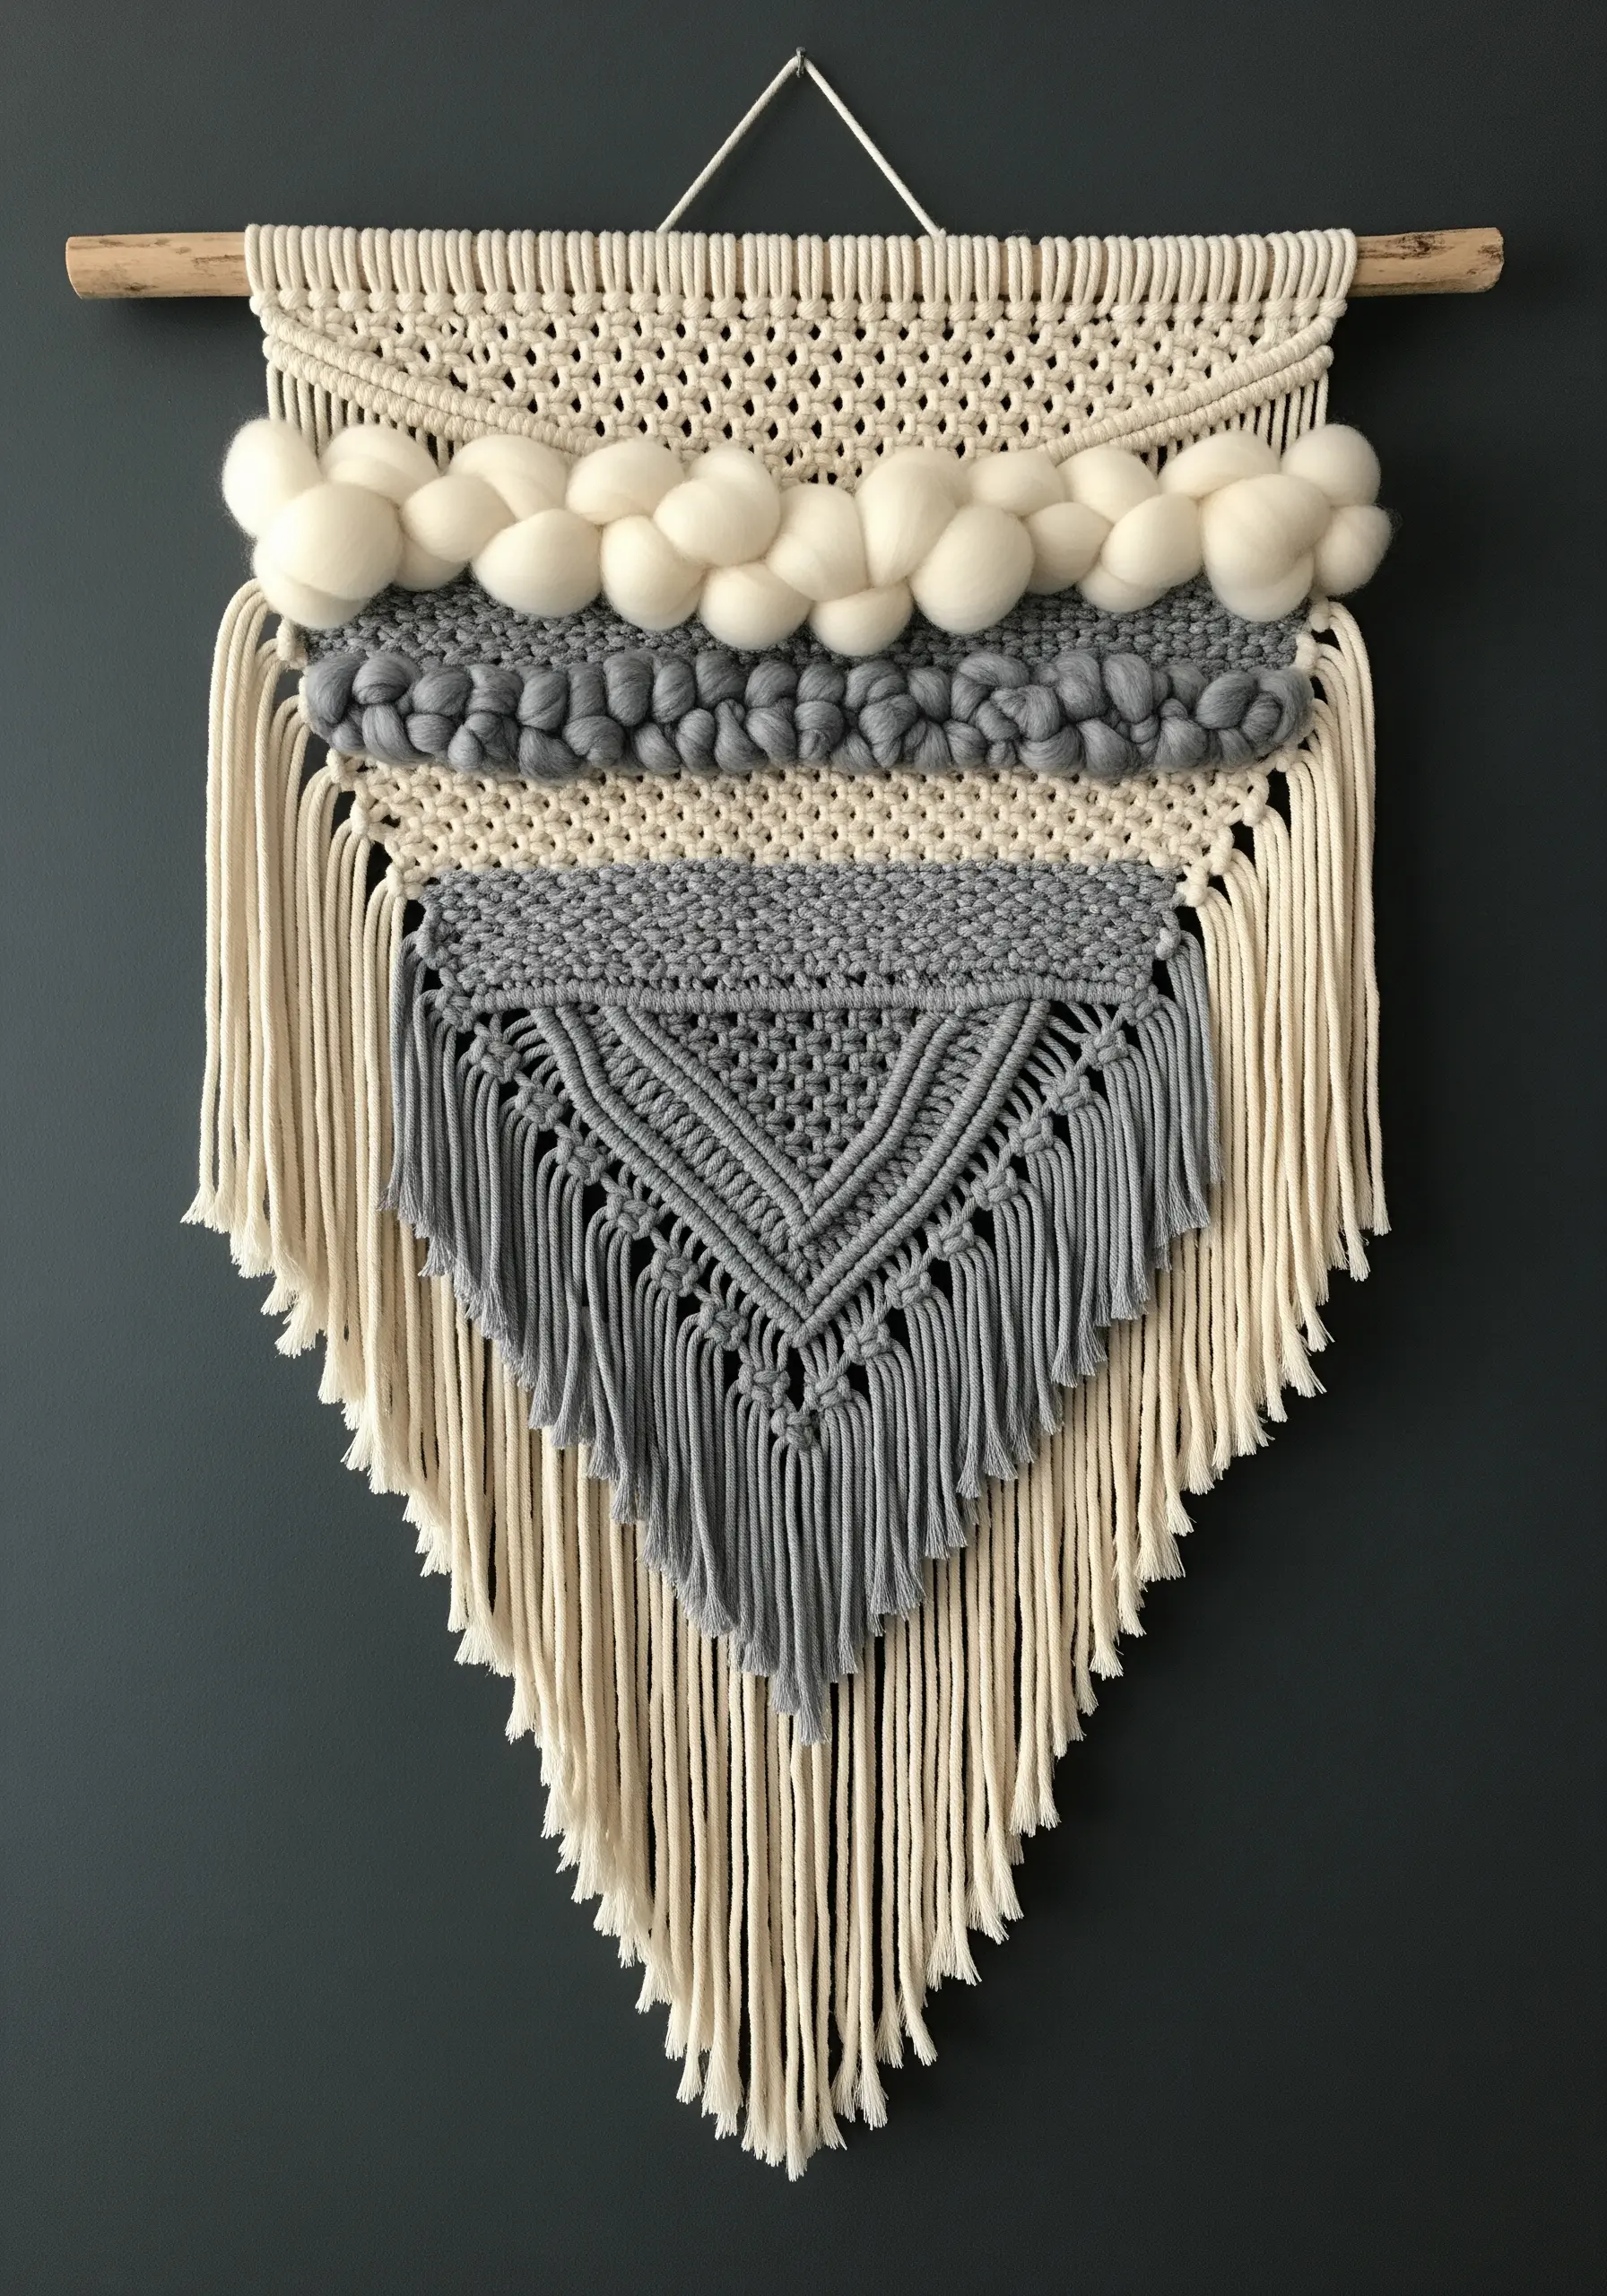
Design a wall hanging that is a true feast for the senses by intentionally combining yarns with dramatically different textures.
Pair the smooth, uniform lines of macrame cord with the soft, cloud-like volume of unspun wool roving.
Contrast a flat, tight Soumak weave with the nubby texture of a bouclé yarn.
Keeping the color palette restrained—like the creams and grays here—allows the rich textural differences to become the main focus of the piece.
24. Construct a Mosaic with Punch Needle Shapes

Instead of filling one large canvas, create individual geometric ’tiles’ with your punch needle.
Work each shape on a piece of monk’s cloth, leaving a small border of fabric around it.
Once punched, apply fabric glue to the back to secure the loops, then trim the excess fabric away neatly.
Arrange your finished shapes on a stretched canvas or linen background to create a scattered, mosaic-like composition with wonderful dimension.
25. Frame Color Blocks with Bold Outlines

Give your geometric compositions the graphic power of stained glass by separating each color block with a thick, black outline.
Whether you’re weaving, punch needling, or hooking, this technique provides structure and makes each color appear more vibrant.
The black yarn acts as a neutral border, preventing adjacent colors from visually bleeding into one another and clarifying the overall design.
For maximum impact, contrast flat, saturated color fills with a highly textured, braided, or knotted outline.
26. Build a Pattern with Pixel-Like Stitches
Techniques like tapestry crochet, knitting, or even needlepoint on a grid canvas allow you to build geometric designs one ‘pixel’ at a time.
Each stitch functions as a single unit of color in a larger grid, making it the perfect method for creating sharp, graphic patterns.
Start with a simple design on graph paper, assigning a color to each square, and translate it stitch by stitch.
This methodical approach is deeply satisfying and results in perfectly rendered geometric forms.
27. Explore Form and Shadow in a Single Color

Working with a monochromatic palette forces you to focus on the essential elements of design: texture, form, and shadow.
In this macrame piece, the interest comes from the interplay of different knot structures—dense sections of double half-hitch knots contrast with the more open areas.
The nested V-shapes create strong directional lines and cast subtle shadows that change with the light, adding depth and dimension without needing a single color change.
This is a powerful exercise in creating complexity through structure alone.
28. Let Texture Define Your Geometric Shapes
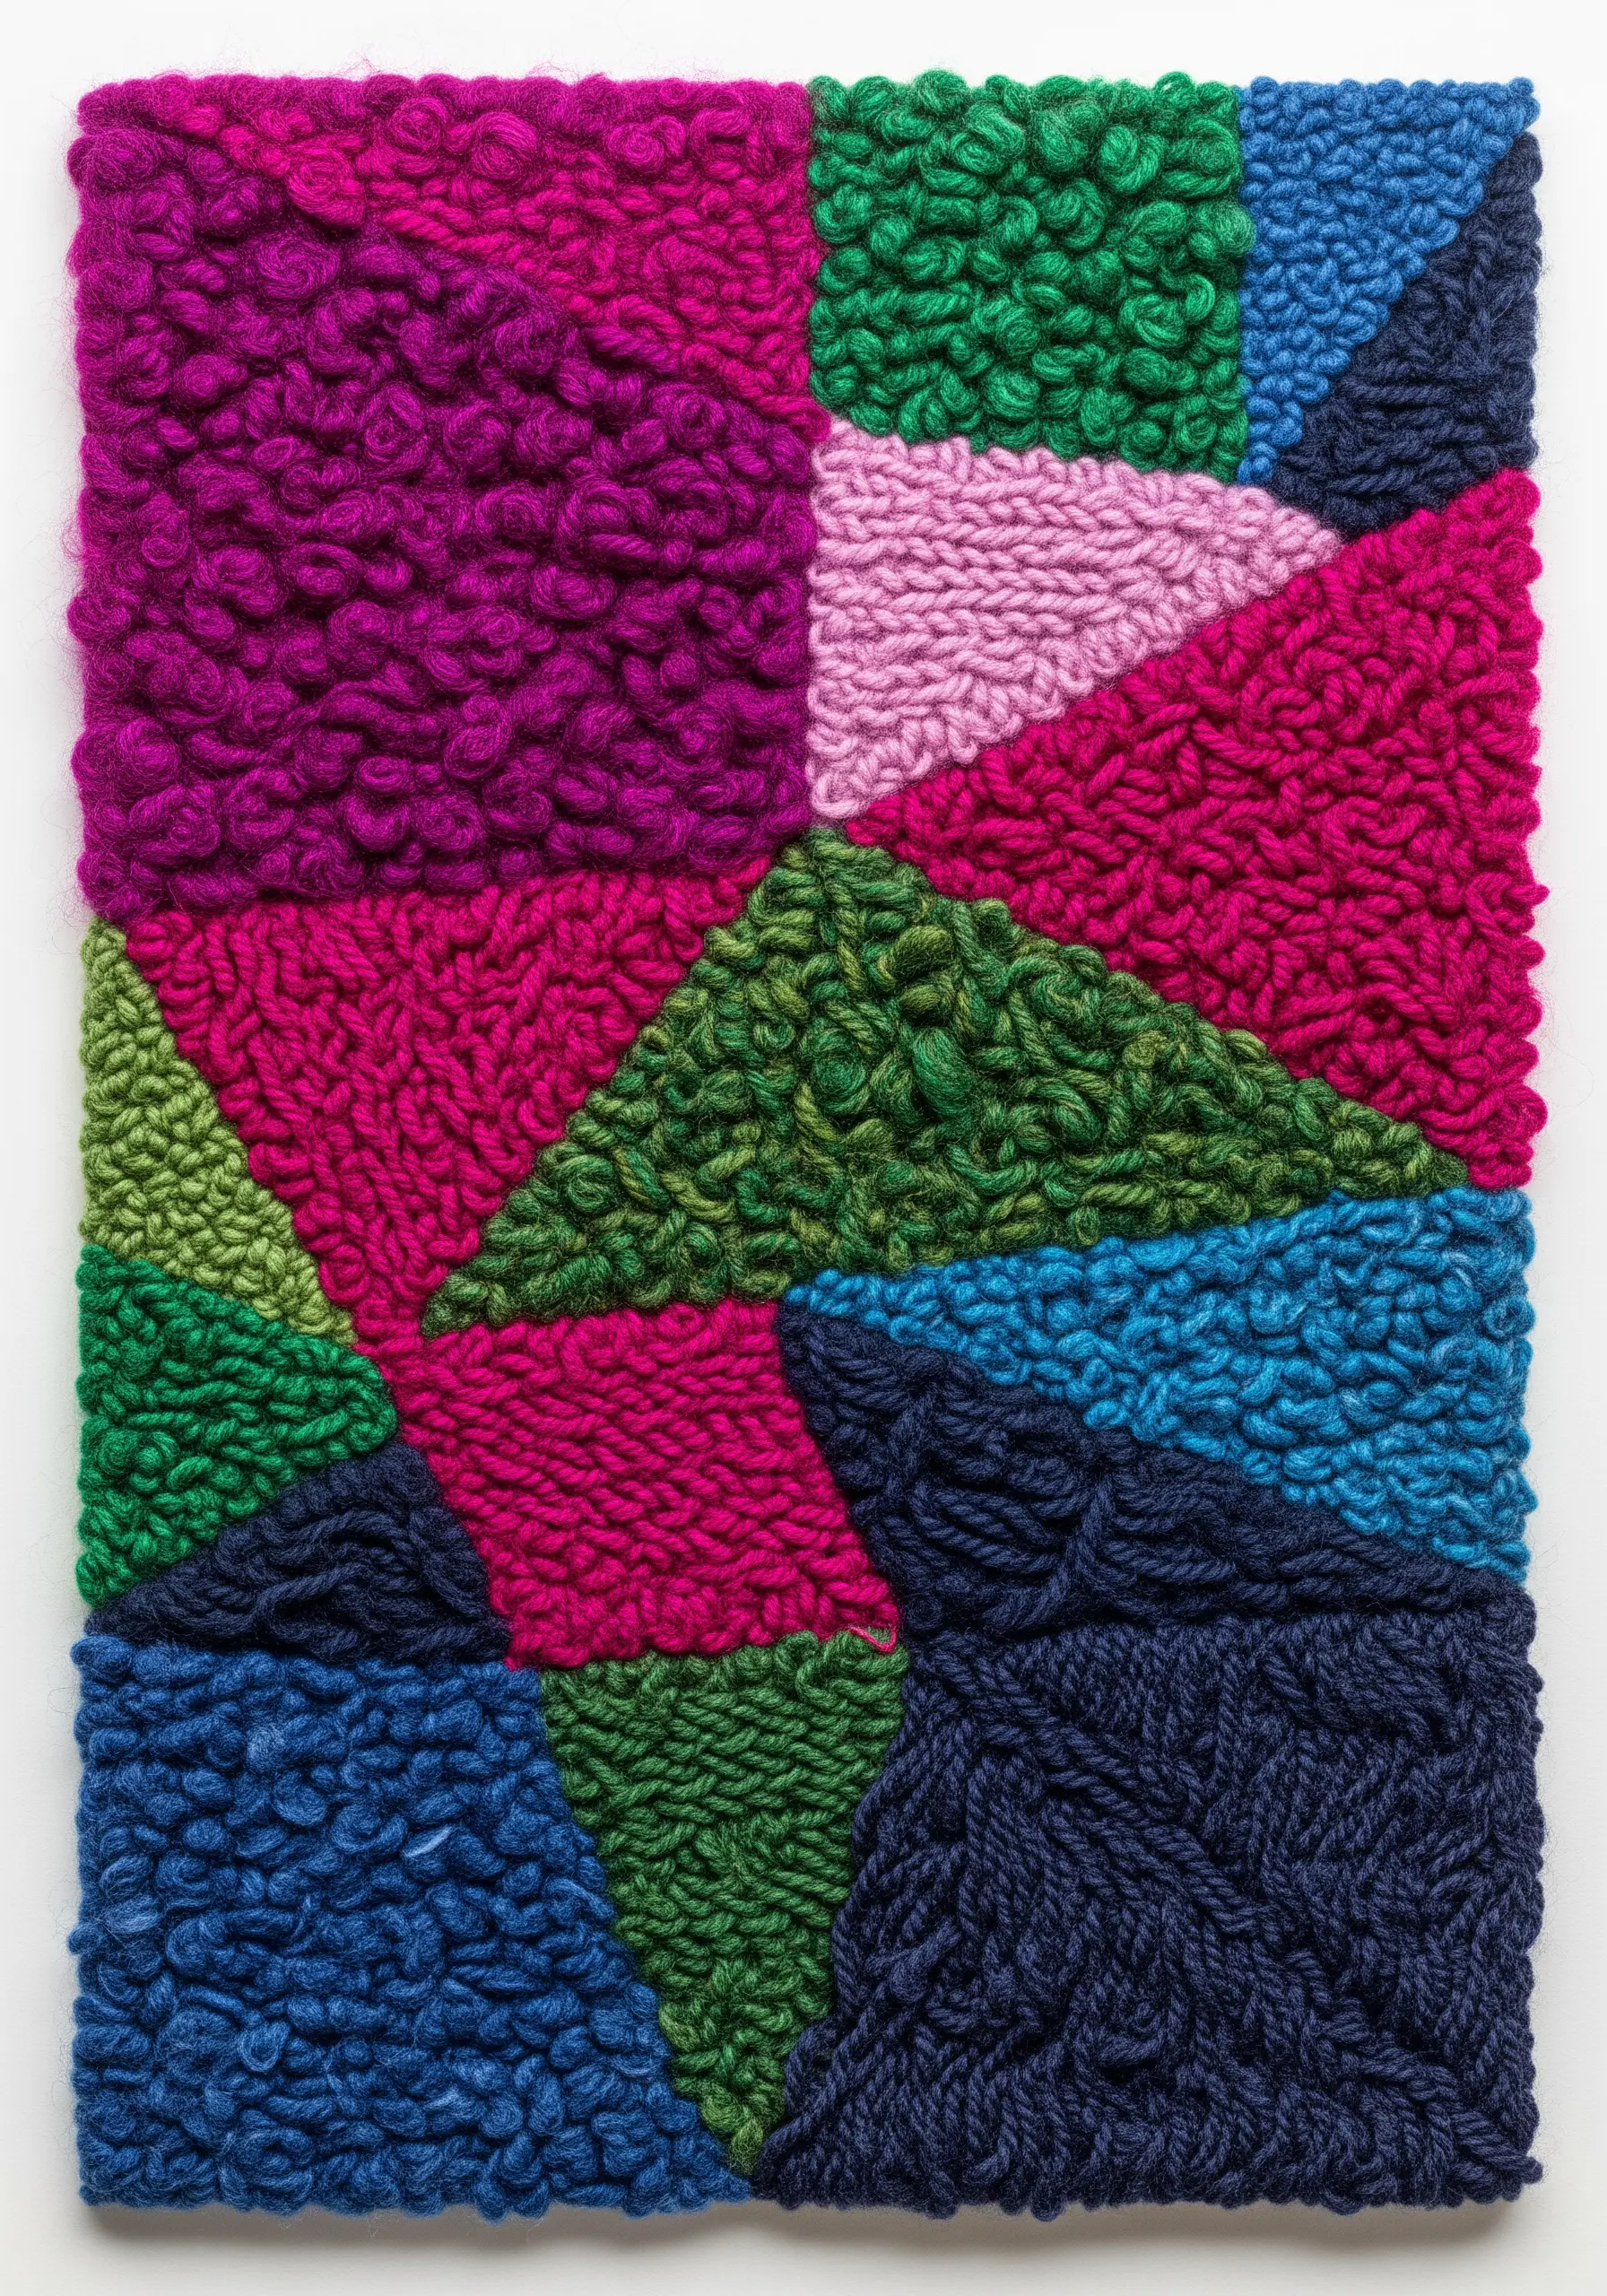
Instead of focusing on clean lines, let a highly textured yarn do the talking.
Use a thick, loopy, or bouclé yarn with a high-pile punch needle setting to create a surface that is irresistibly tactile.
When you fill simple geometric shapes—like triangles and squares—with this much texture, the edges naturally soften and blur.
The result is a piece that feels lush, energetic, and painterly, celebrating the material as much as the form.


