

Your hands already know the rhythm of needle and thread. But sometimes, you might feel a gap between the careful stitches you make and the art you truly want to create. It’s not about learning a hundred new stitches; it’s about learning to see your materials and your canvas with a designer’s eye.
Think of your embroidery not just as decoration on fabric, but as a medium in its own right—one that can be sculptural, architectural, and painterly. It’s about understanding how a change in thread weight can create perspective, how a shadow can be stitched with a single grey strand, or how leaving space empty can be more powerful than filling it.
This is where your work transforms. By focusing on texture, composition, and the thoughtful combination of materials, you can elevate your handmade objects into pieces that feel personal, intentional, and truly gallery-worthy. Let’s begin.
1. Build Topographical Texture with Punch Needle
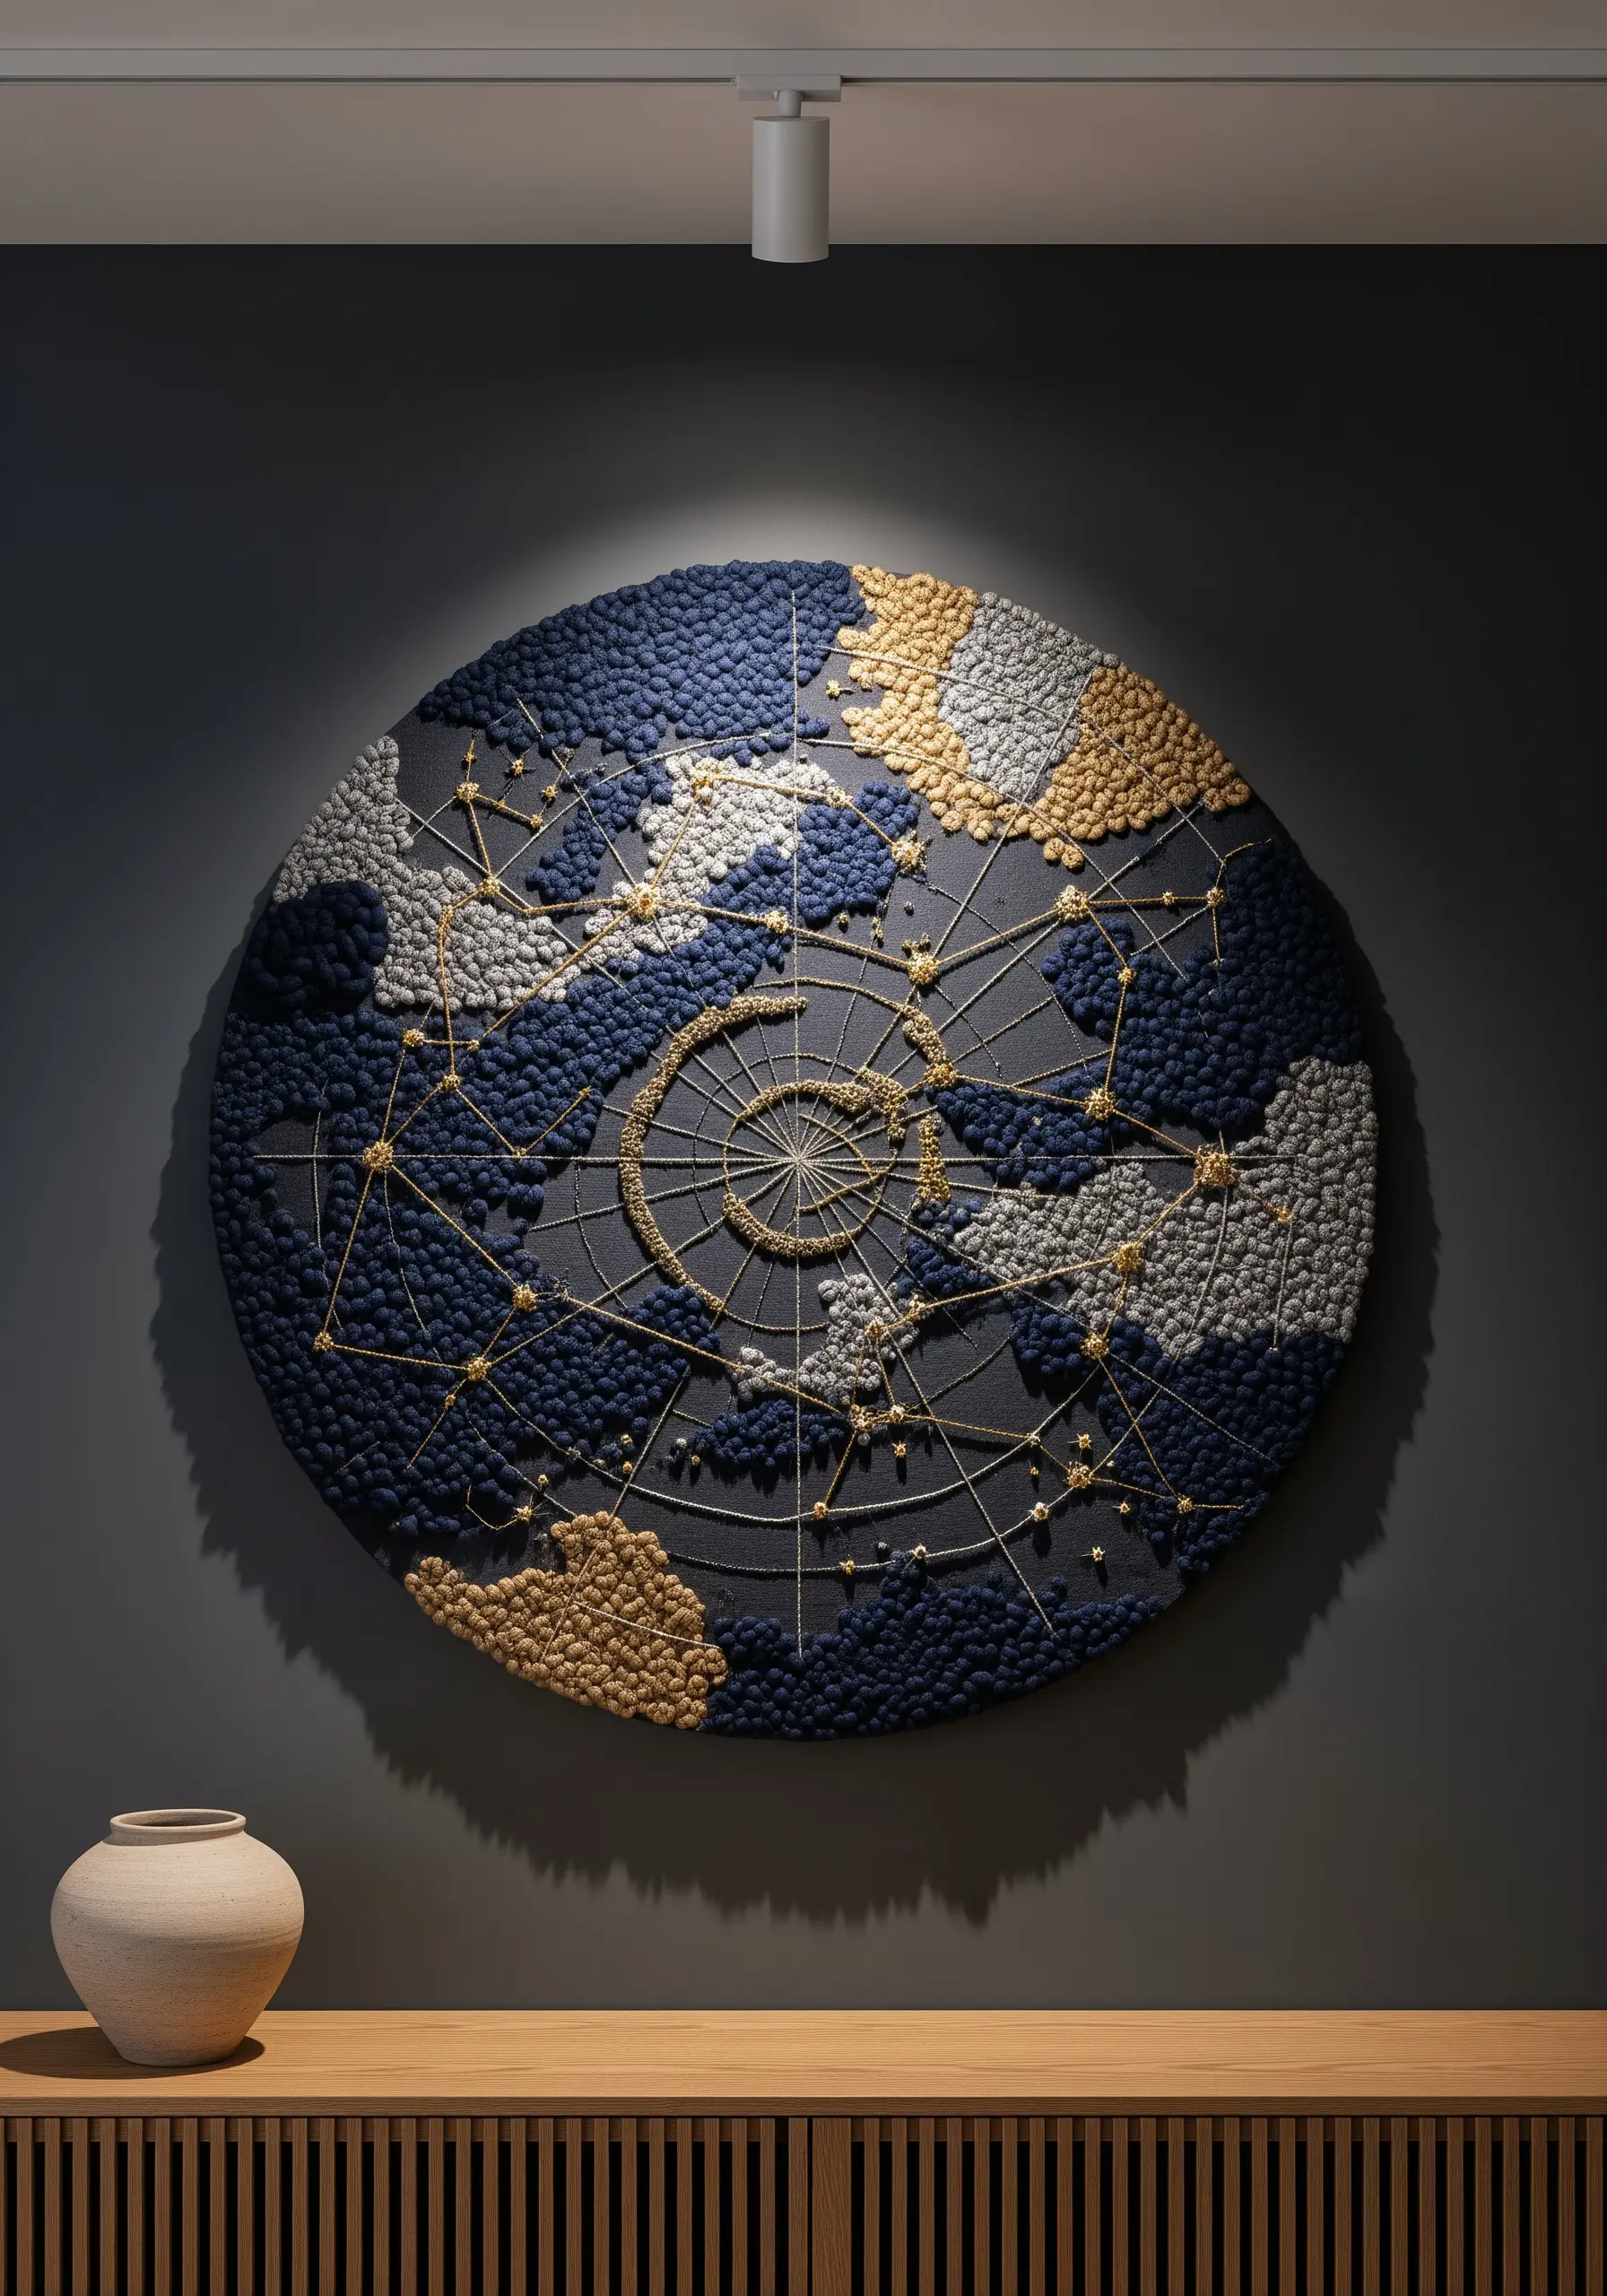
Move beyond flat surfaces by creating a statement piece with varied punch needle loops and French knots.
Use a taller loop setting for broad, soft areas like clouds or water, and a shorter, tighter loop for defined landmasses.
This contrast in height creates a sculptural, map-like effect that invites touch.
For the final layer, couch fine metallic thread over the top to represent grids or pathways, adding a delicate structure that contrasts beautifully with the soft, textural yarn.
This combination turns a simple hoop into a complex, gallery-worthy piece.
2. Design Architectural Macrame Dividers
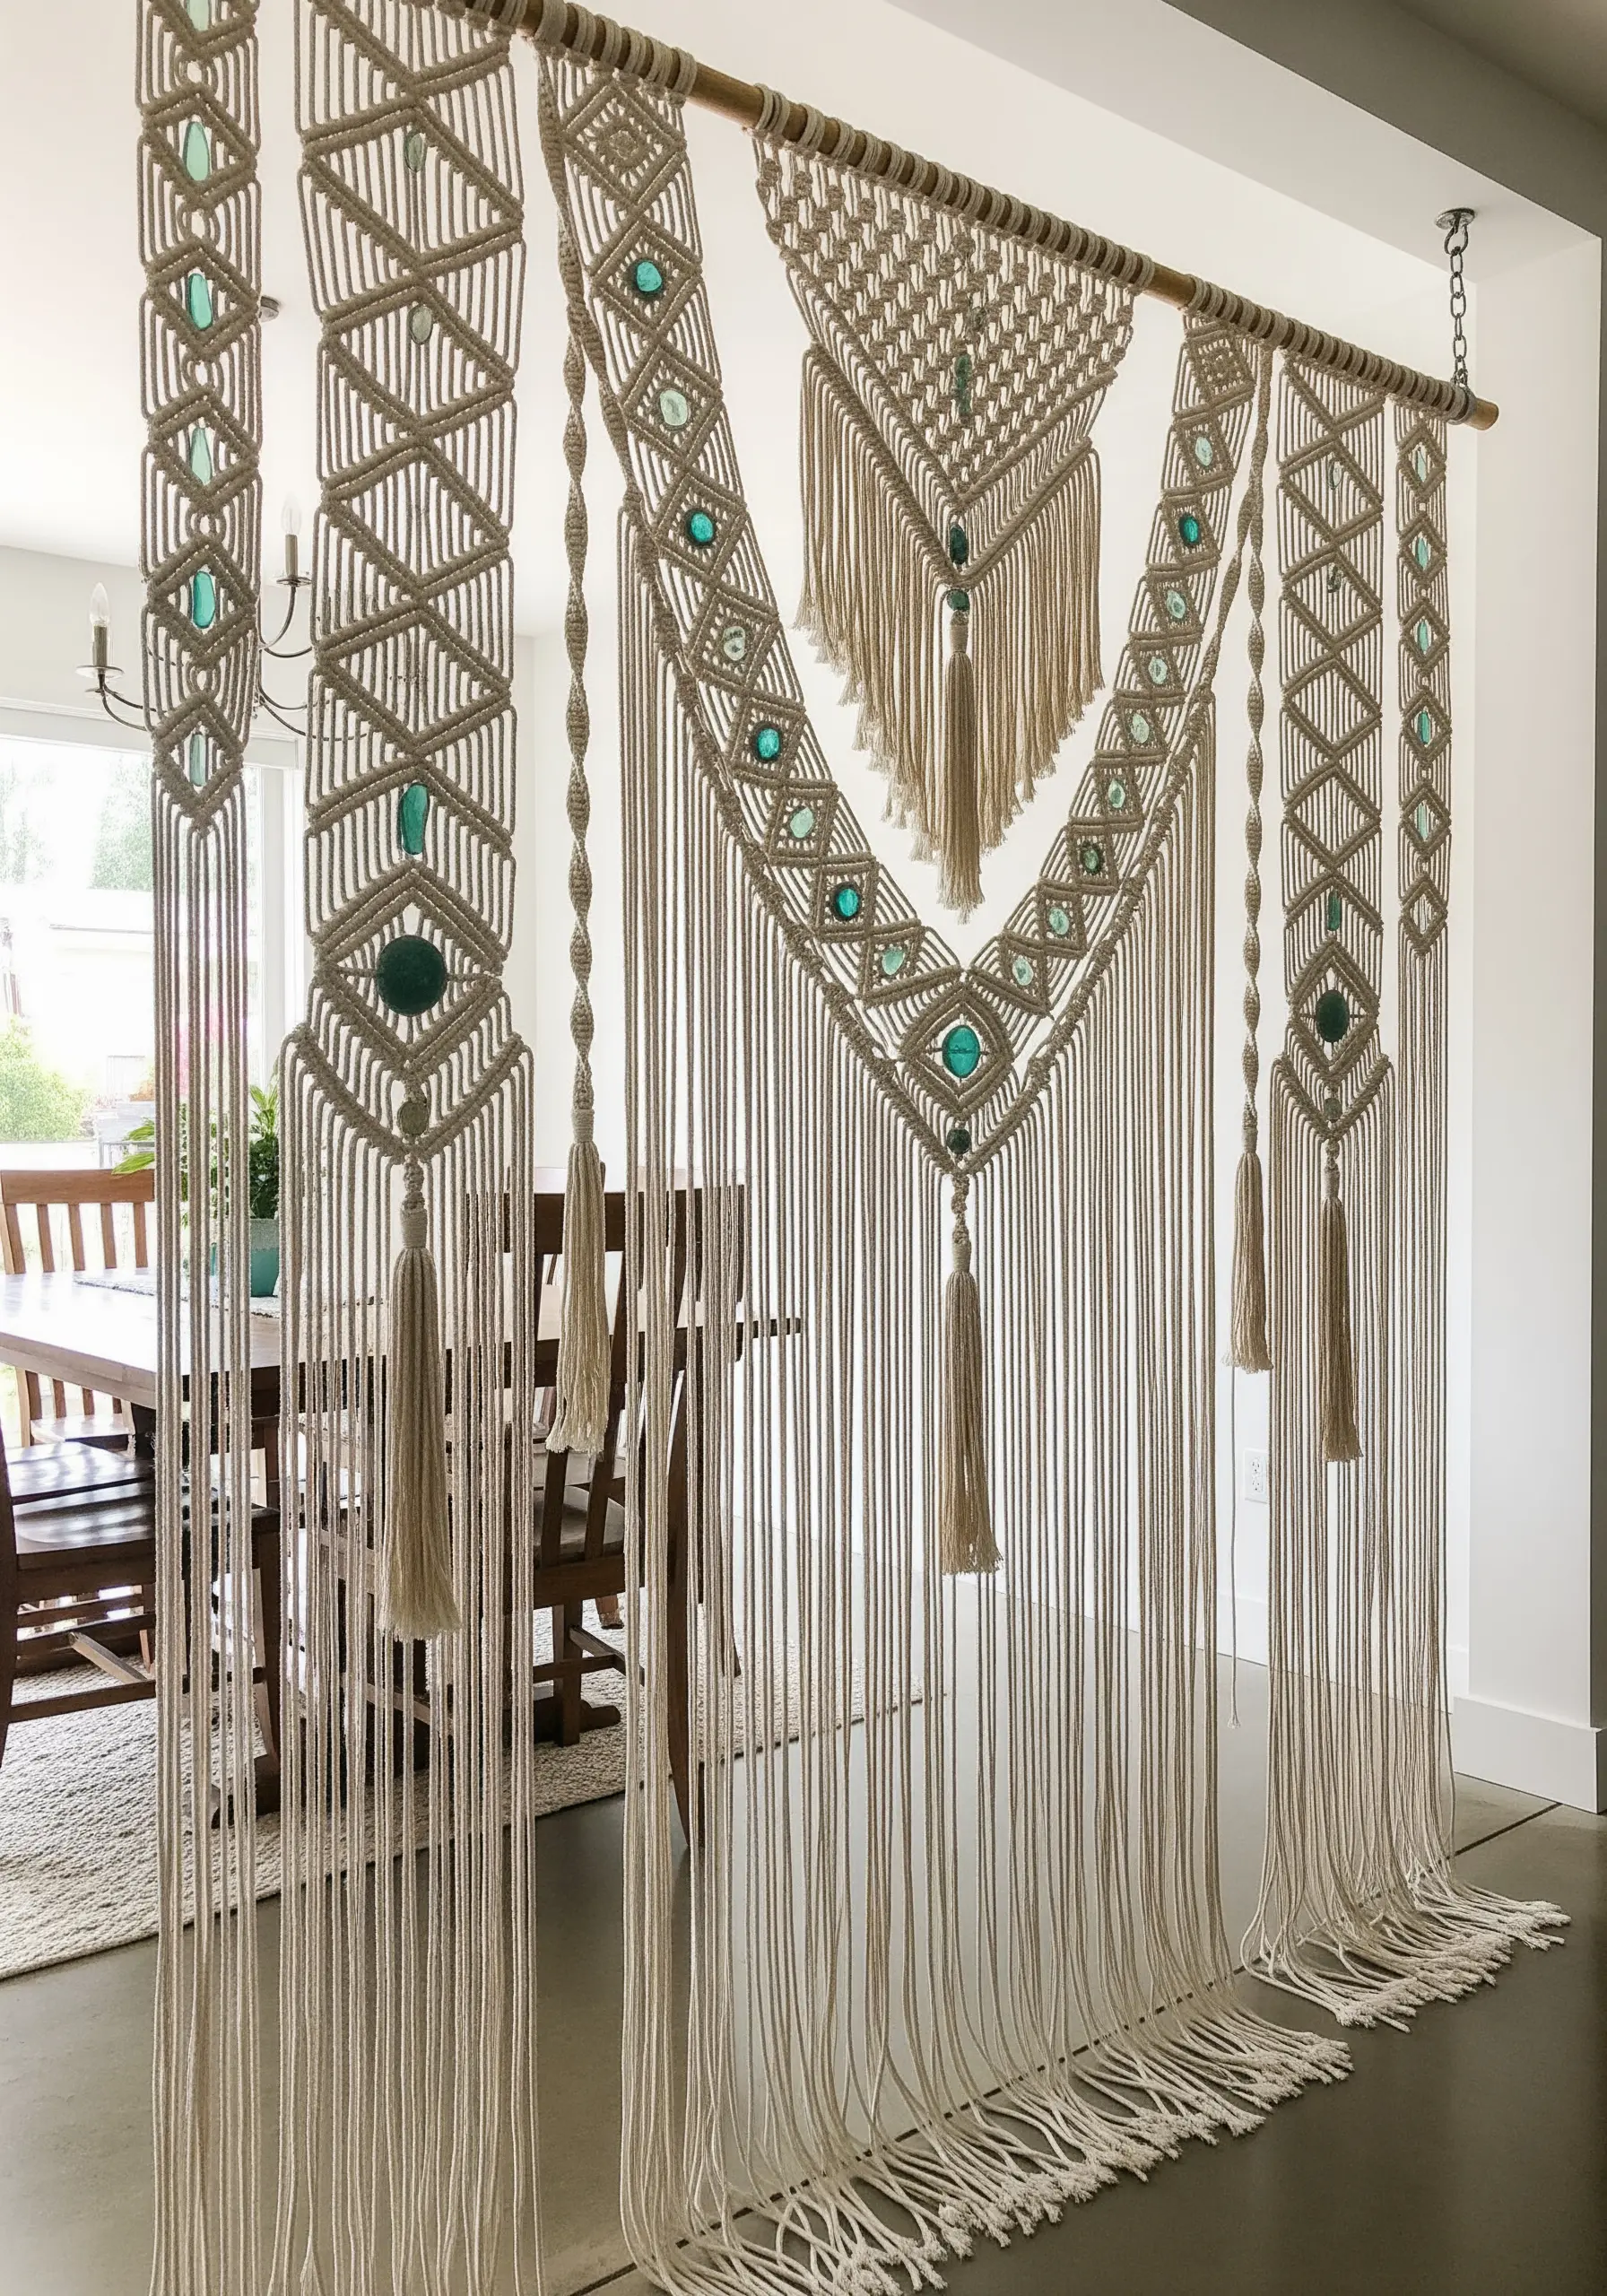
Use macrame to create functional art that defines a space without closing it off.
Plan your design on paper first, treating it like a blueprint. Use foundational knots like the square knot and double half hitch to build strong geometric structures.
Integrate polished stones or sea glass by creating a ‘net’ with lark’s head knots around the object before incorporating it into the main pattern.
This elevates a simple wall hanging into an architectural statement piece that interacts with the light and layout of your room.
3. Create a High-Contrast Botanical Triptych
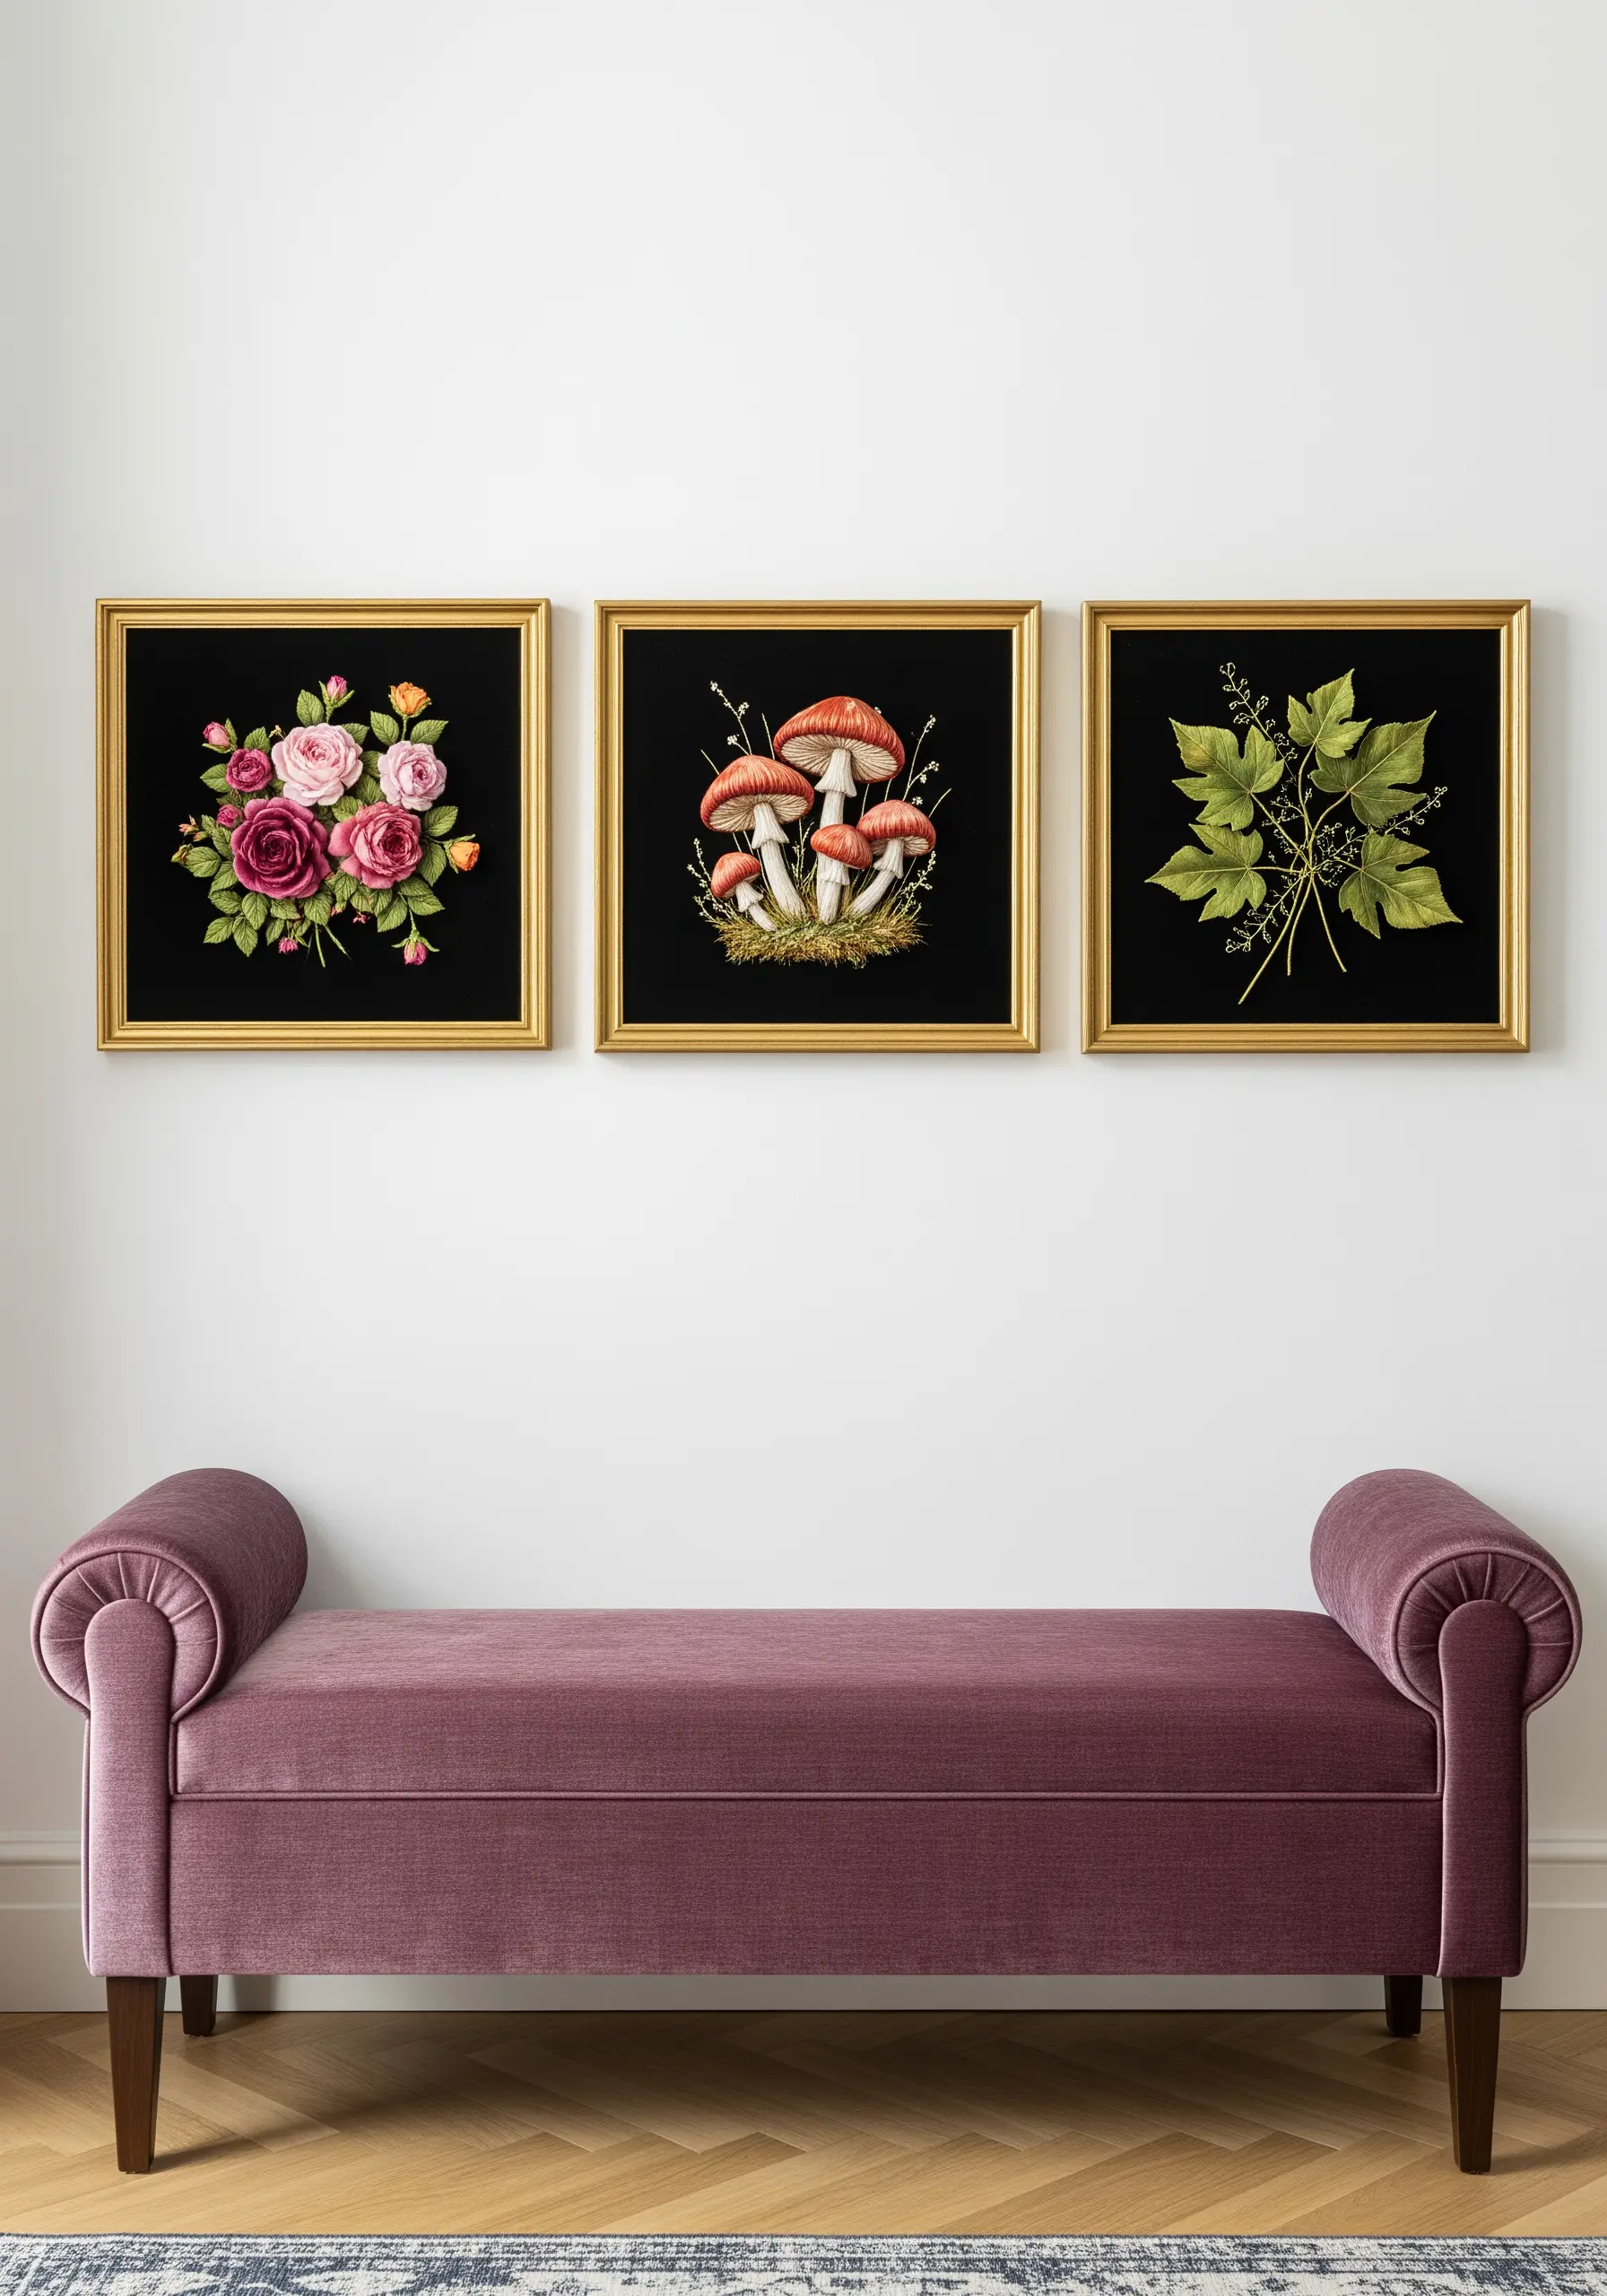
Elevate your floral or botanical subjects by stitching them on black fabric for a dramatic, fine-art effect.
The dark background makes every color pop, so choose a limited, harmonious palette for each piece to maintain sophistication.
Use long-and-short stitch to blend colors for realistic petals and leaves, letting the black fabric act as your deepest shadow.
Grouping three related but distinct subjects creates a cohesive narrative, turning individual embroideries into a curated collection of framed art.
4. Integrate Stitched Inlays into Wood
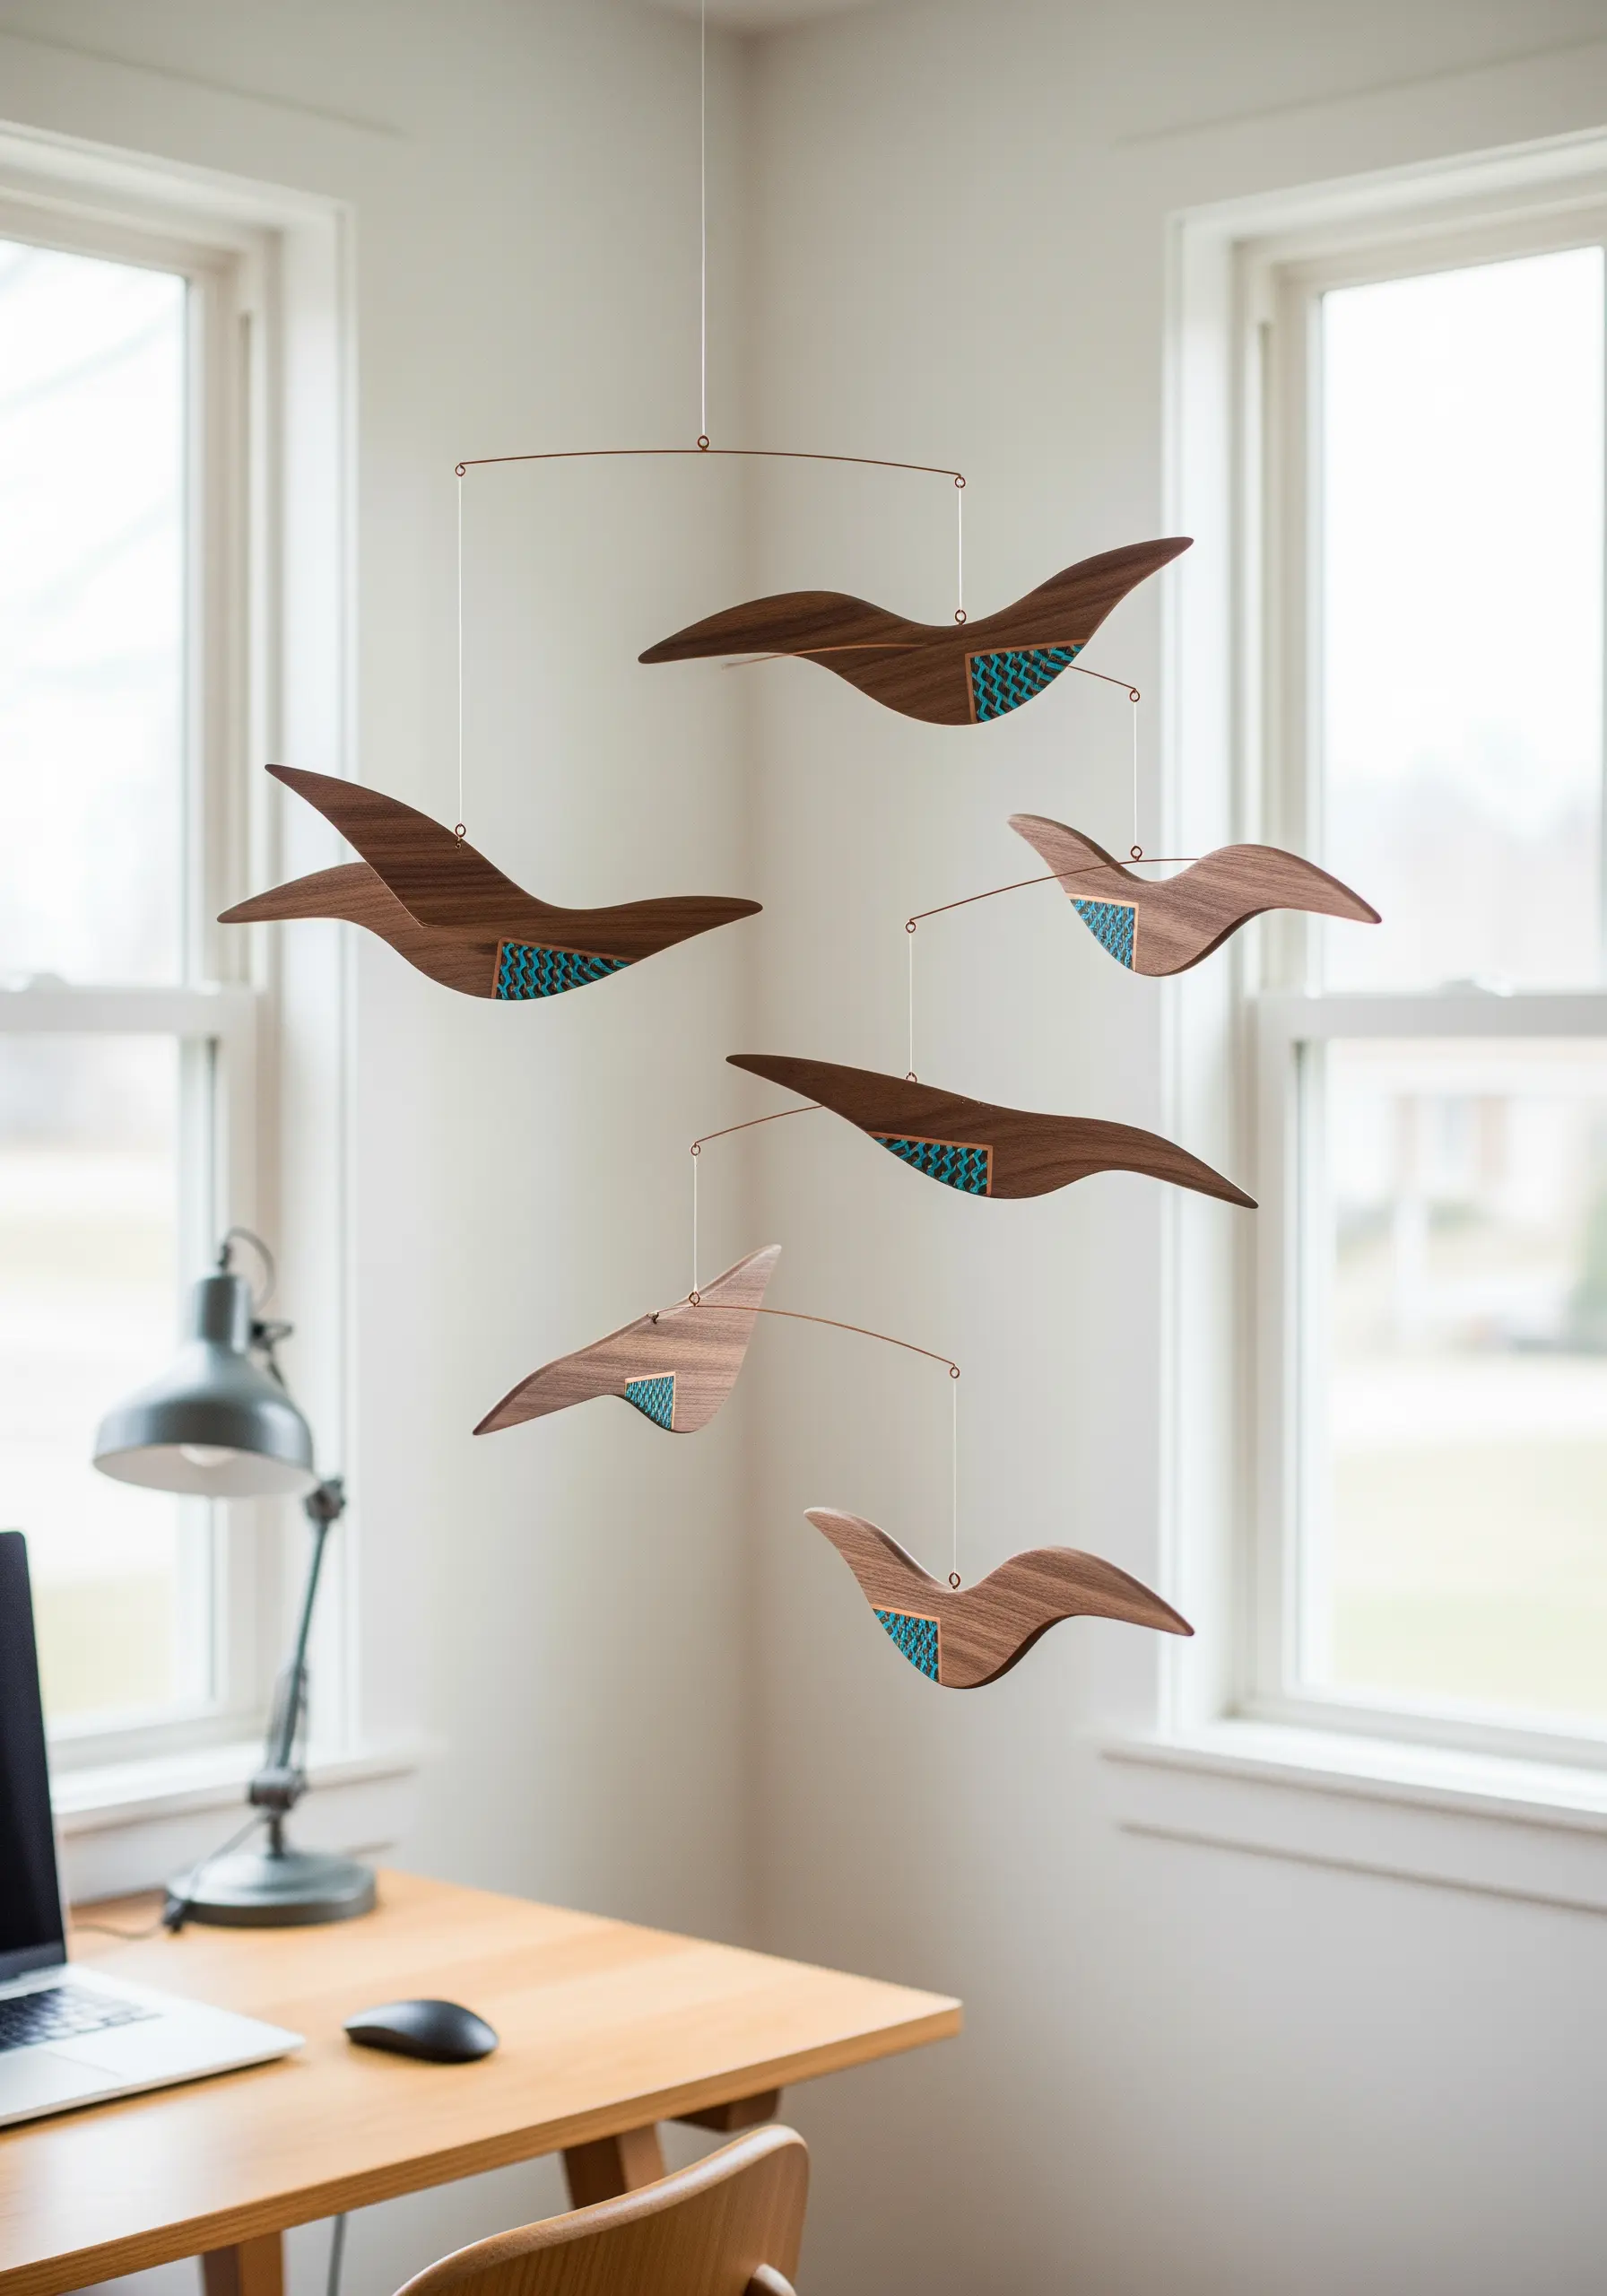
Combine the warmth of wood with the softness of thread in a mixed-media mobile.
Collaborate with a woodworker or use pre-cut wooden shapes with recessed areas.
Stretch a piece of evenweave fabric tightly across the recess and secure it at the back.
Fill the area with dense, geometric stitches—like satin stitch blocks or bargello patterns—to create a textured inlay that mimics mosaic tile.
This unexpected pairing of materials creates a sophisticated object that feels both handcrafted and highly designed.
5. Weave a Sculptural Landscape Tapestry
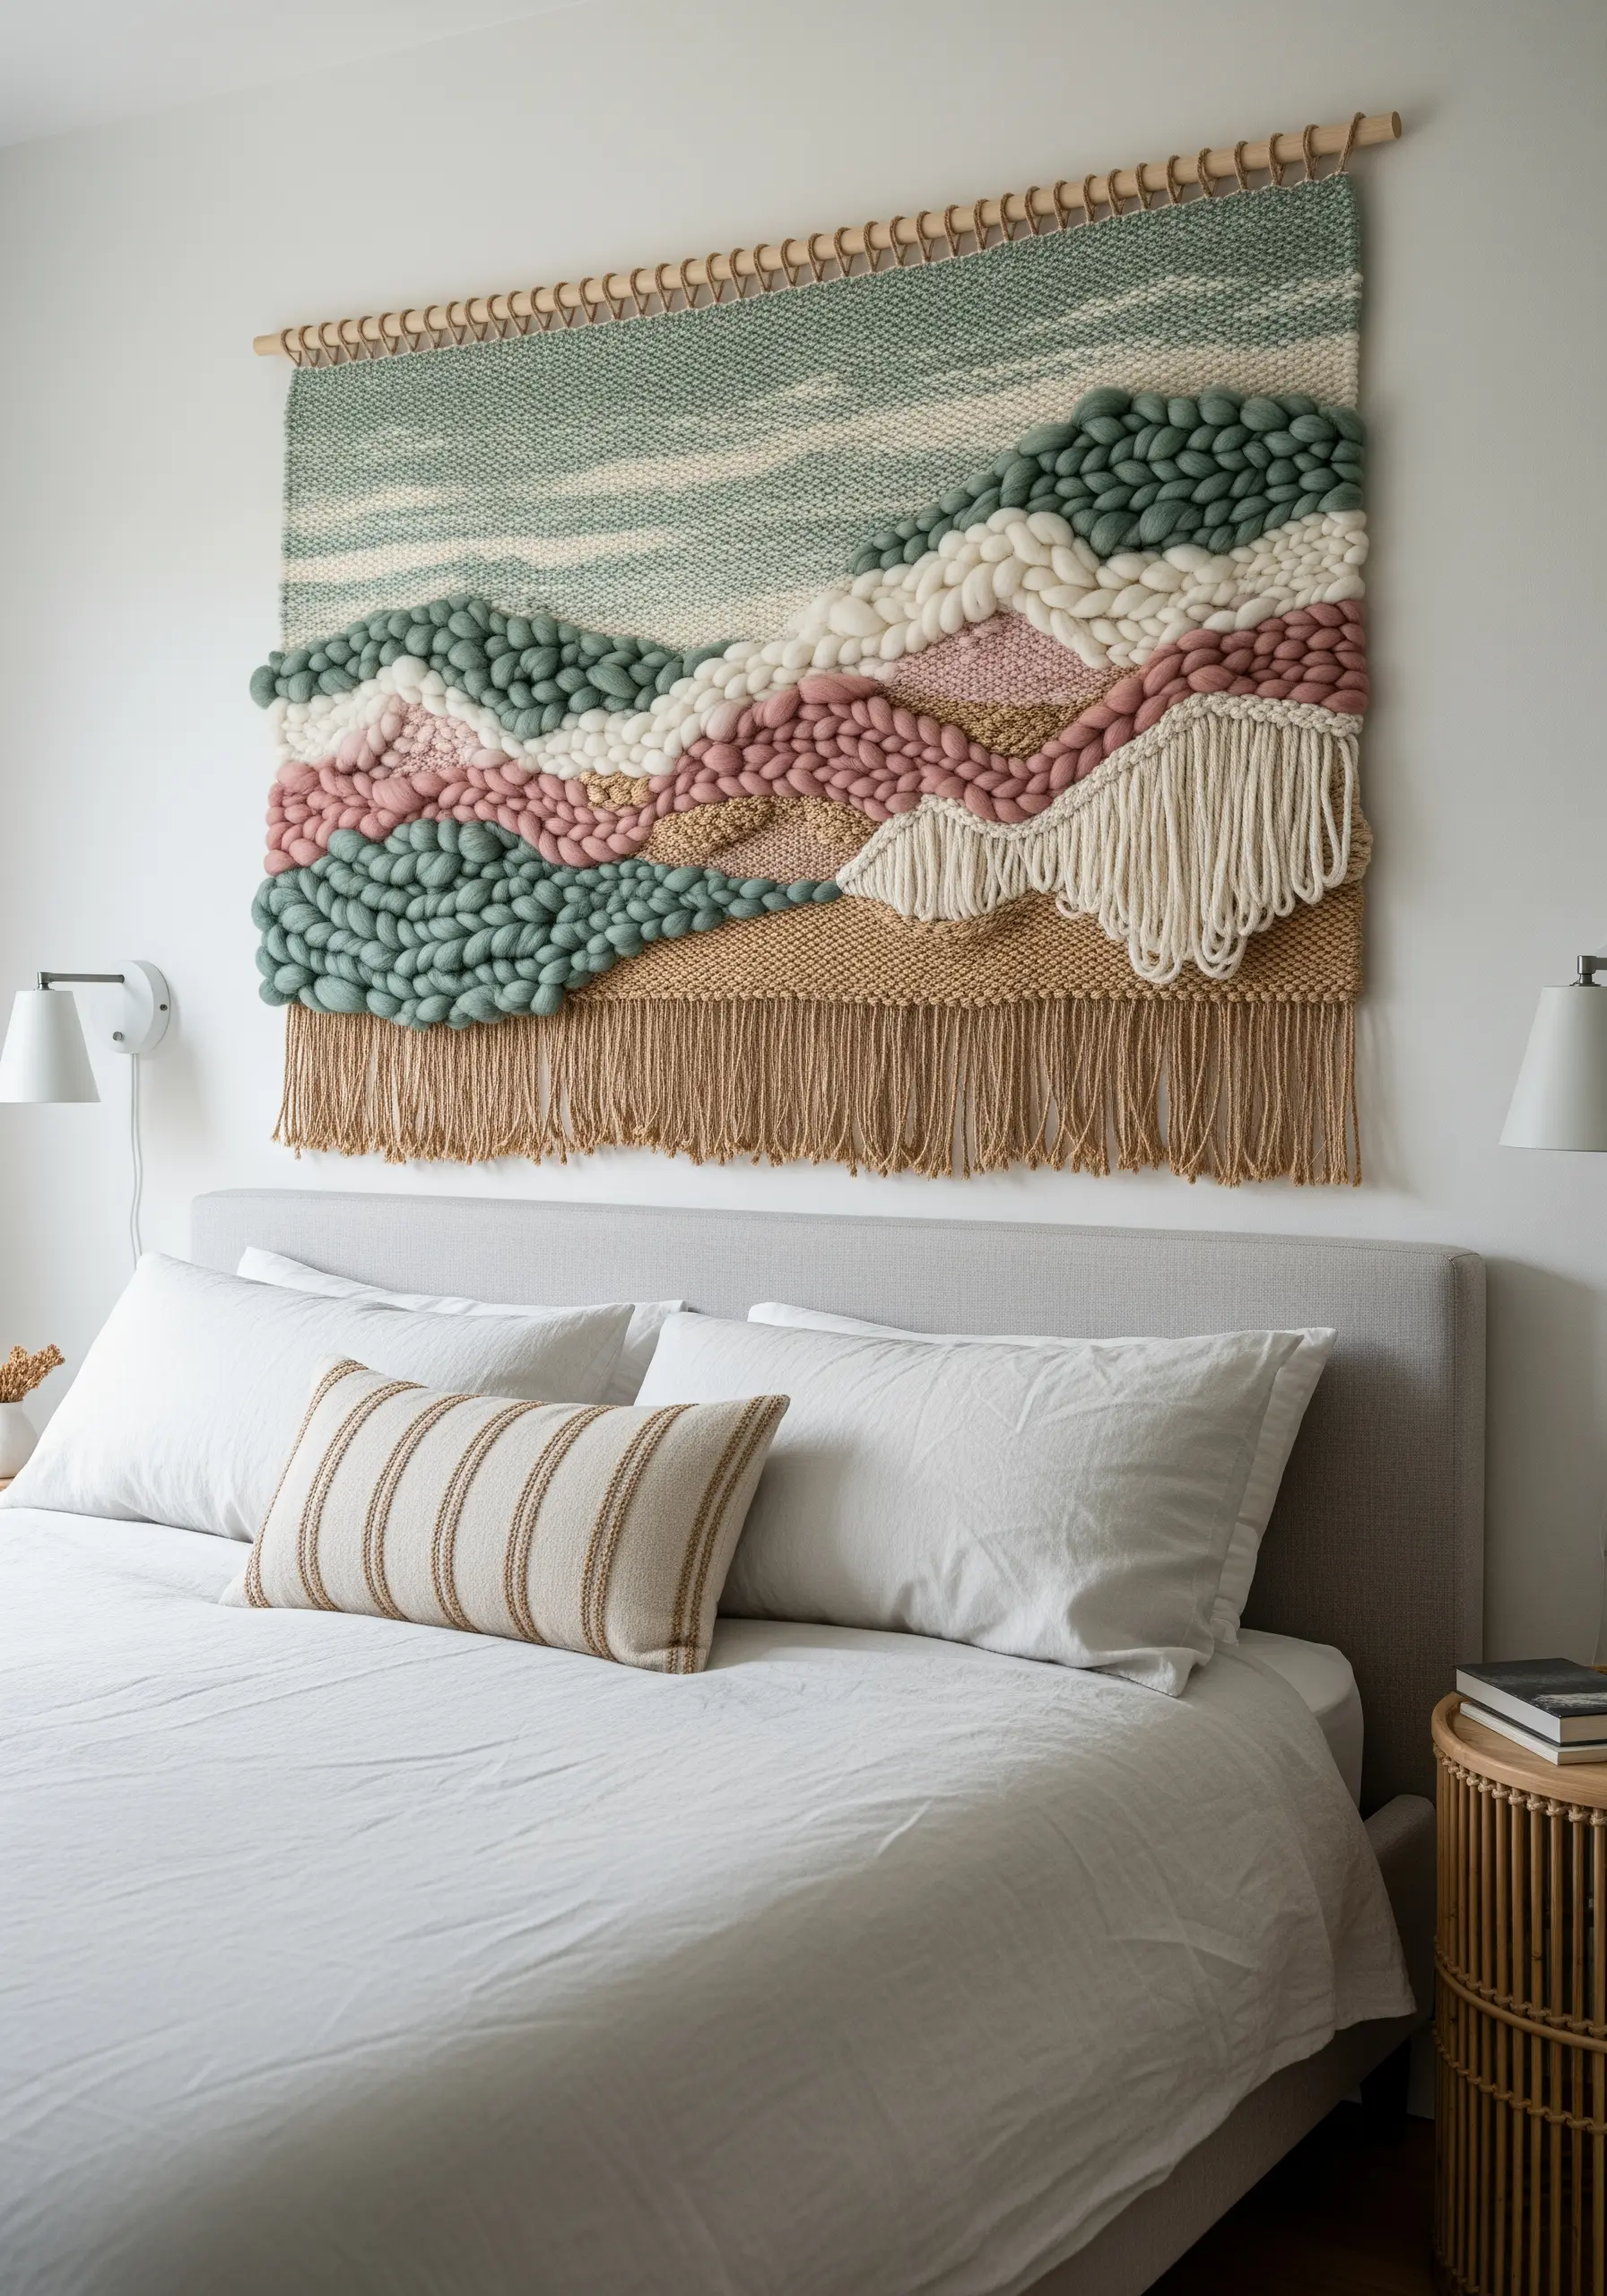
Move beyond flat weaving by incorporating chunky, unspun wool roving and soumak stitches to build three-dimensional texture.
Create rolling hills and soft clouds by weaving thick, bubbly sections of roving directly into your warp threads.
Use the soumak stitch—which creates a raised, braid-like line—to define the edges of your shapes and add graphic detail.
Varying the thickness of your yarns is the key to creating these tactile landscapes, turning a wall hanging into a piece of soft sculpture.
6. Replicate Ceramic Glazes with Thread
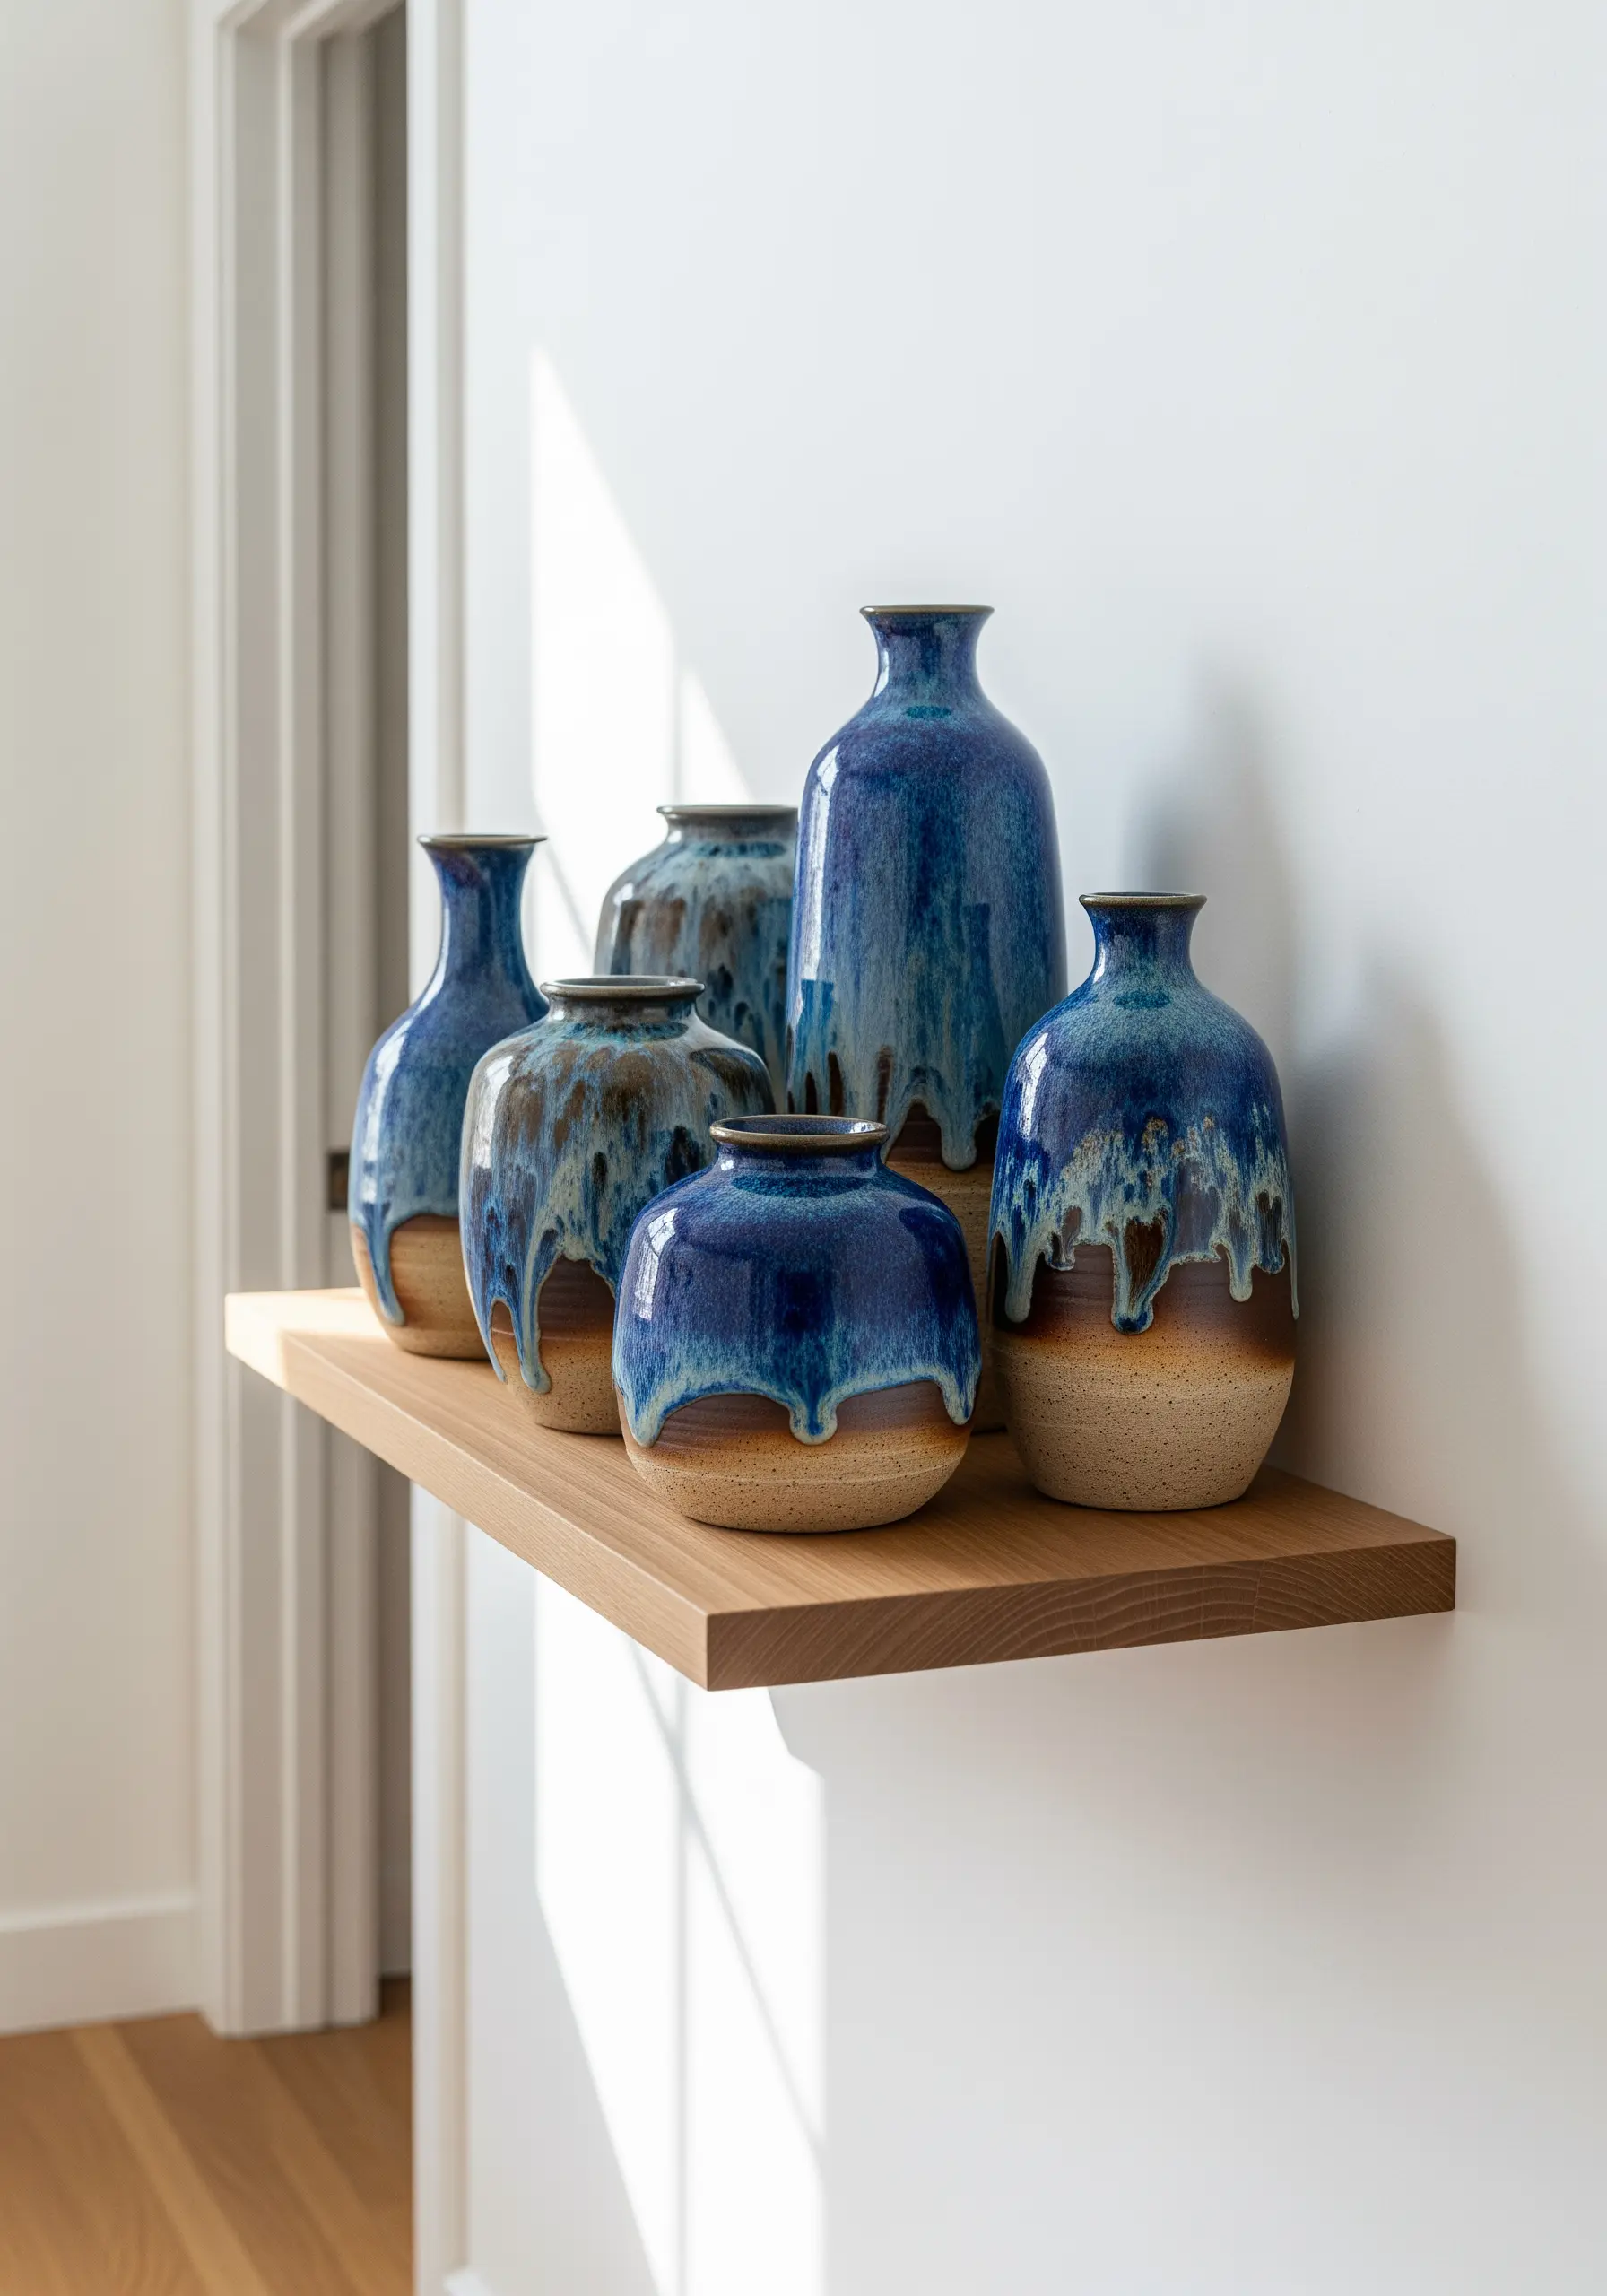
Capture the organic, unpredictable beauty of a ceramic glaze drip using carefully selected threads.
Choose a variegated or hand-dyed thread that contains multiple tones of a single color to mimic the subtle color shifts in fired glaze.
Use long, vertical satin stitches of varying lengths to create the ‘drip’ effect. Allow the stitches to overlap slightly and pull at different tensions to create an uneven, fluid edge.
This technique translates the artistry of another medium into fiber, adding a dynamic, painterly quality to your work.
7. Master Abstract Color Blocking with Punch Needle
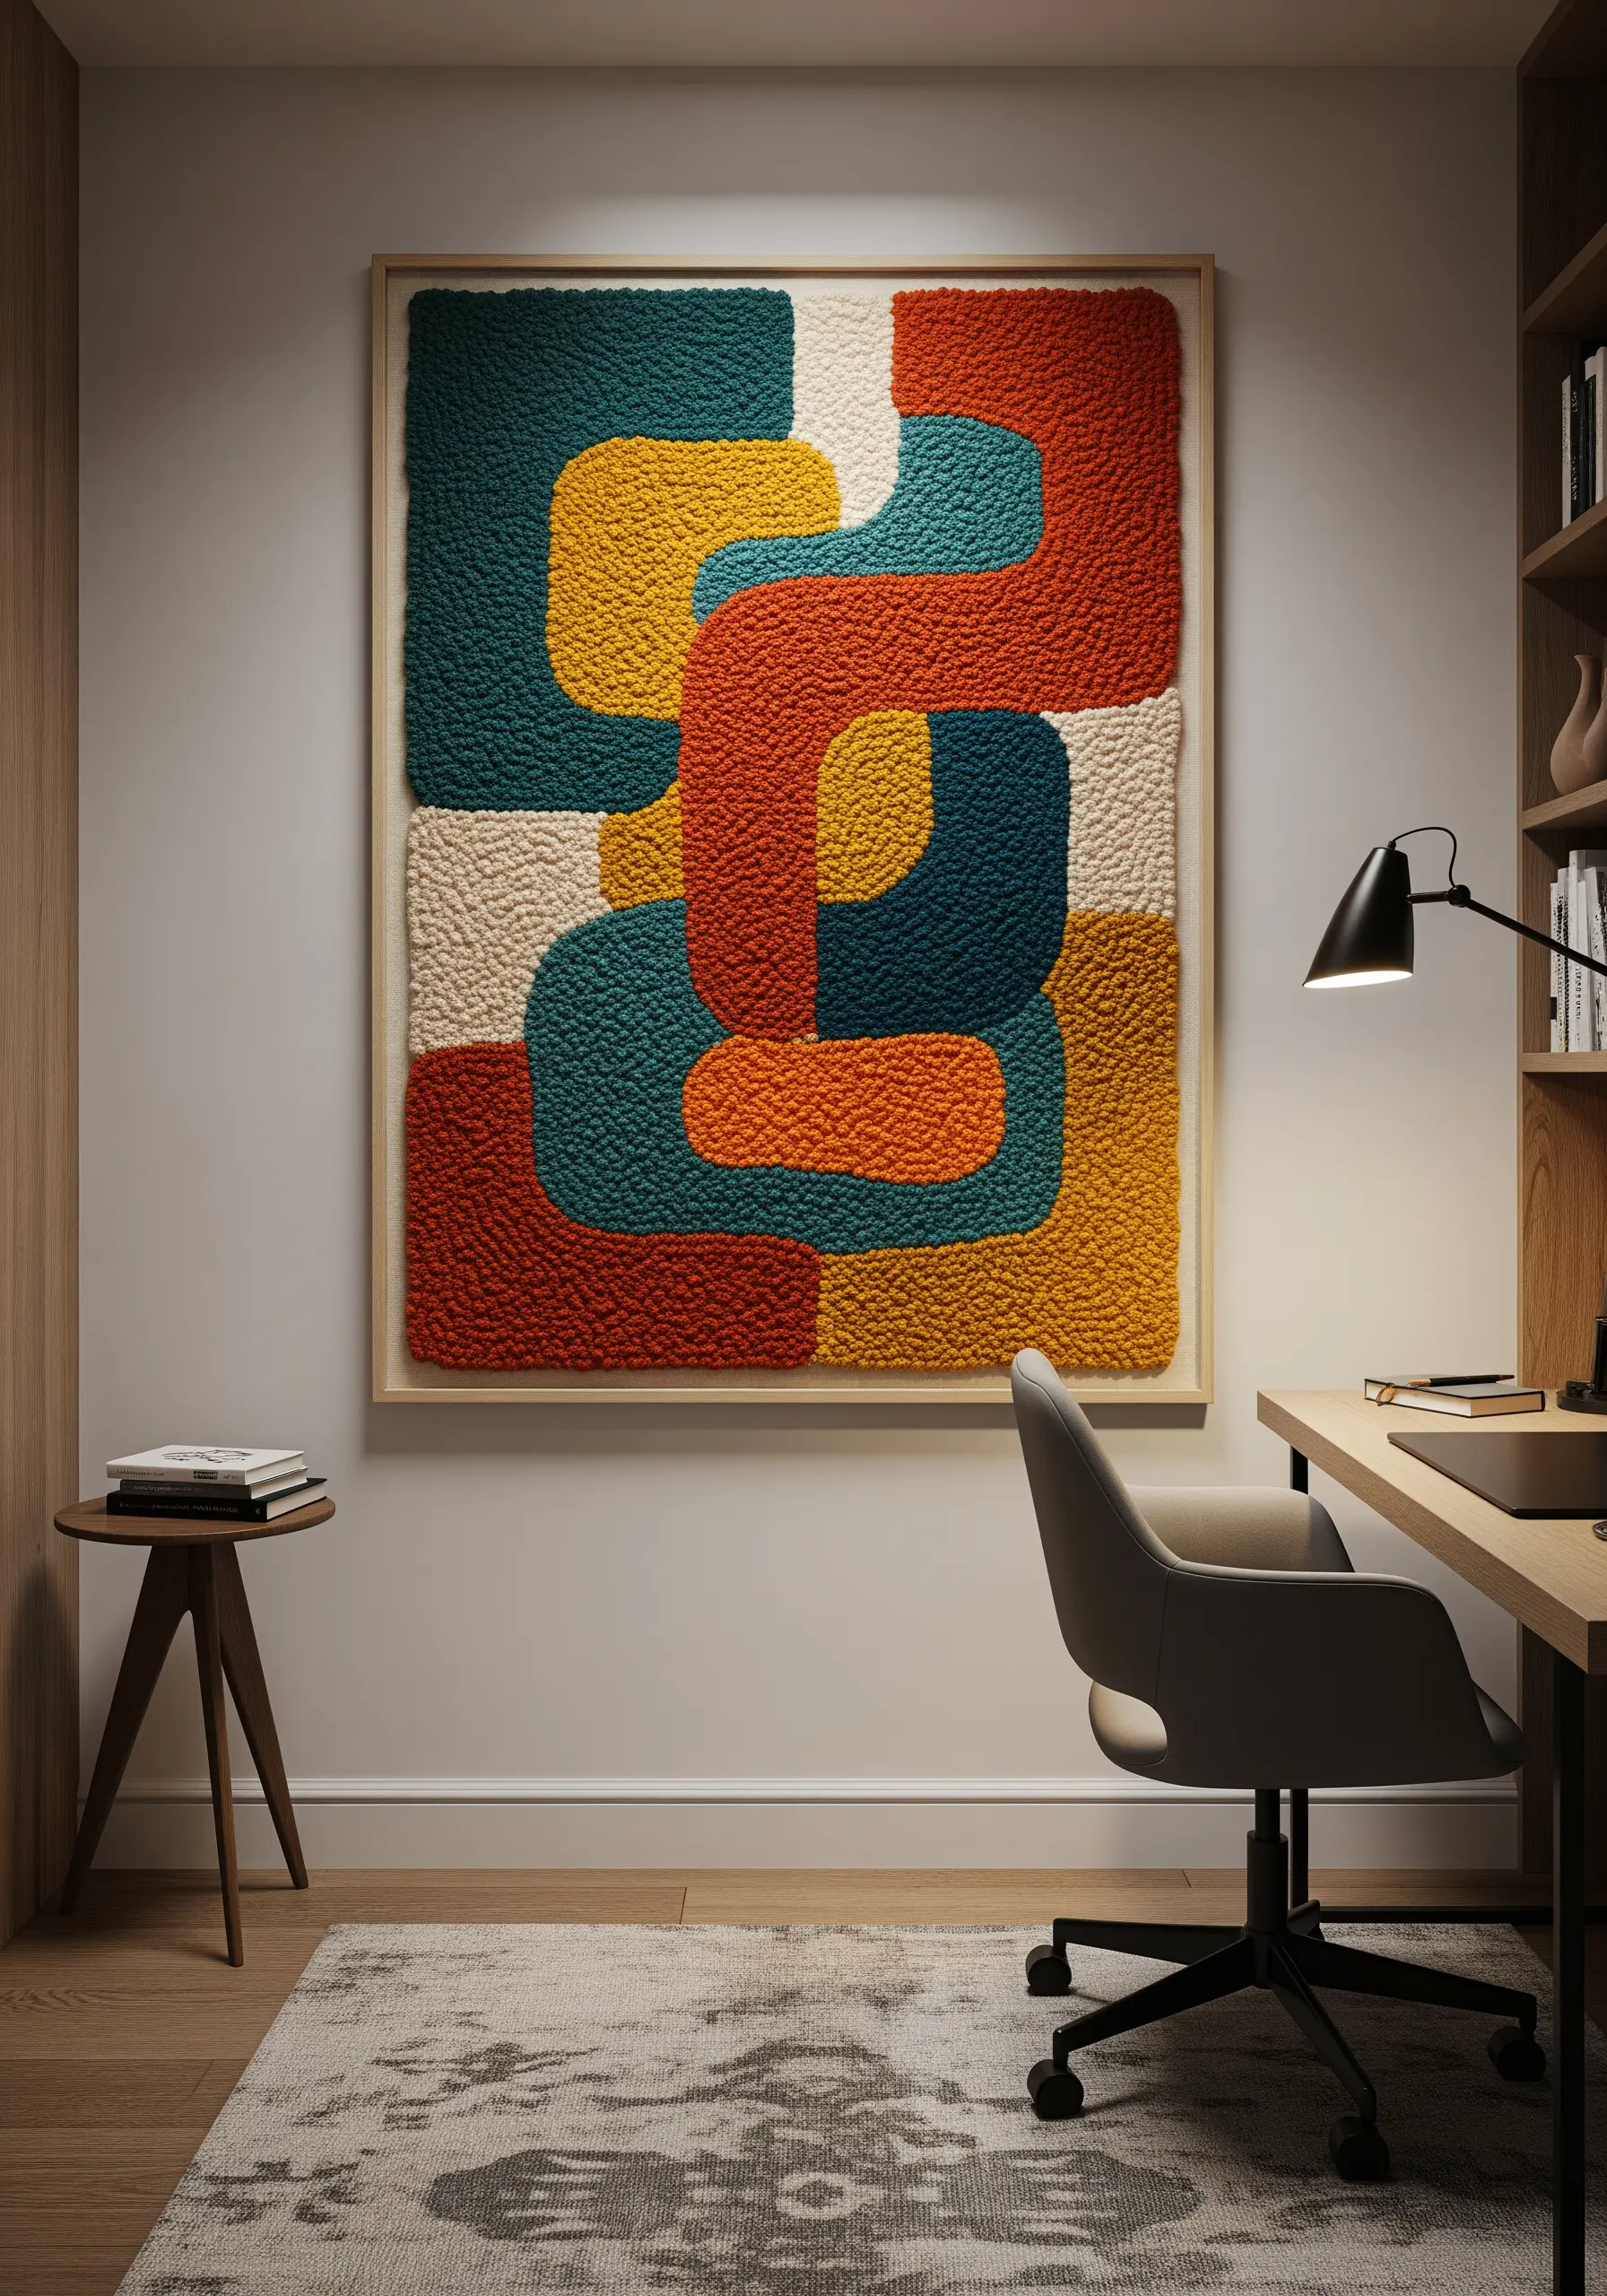
Use punch needle to create bold, abstract art with satisfyingly clean shapes and plush texture.
Sketch out your interlocking forms on the back of your monk’s cloth, then fill each section with a solid color, like a paint-by-number.
Work from the outside of a shape inward to ensure crisp, defined edges where colors meet.
The speed of punch needle makes it ideal for large-scale pieces, allowing you to create impactful wall art that feels both graphic and soft.
8. Explore Fiber Sculpture with Yarn Wrapping
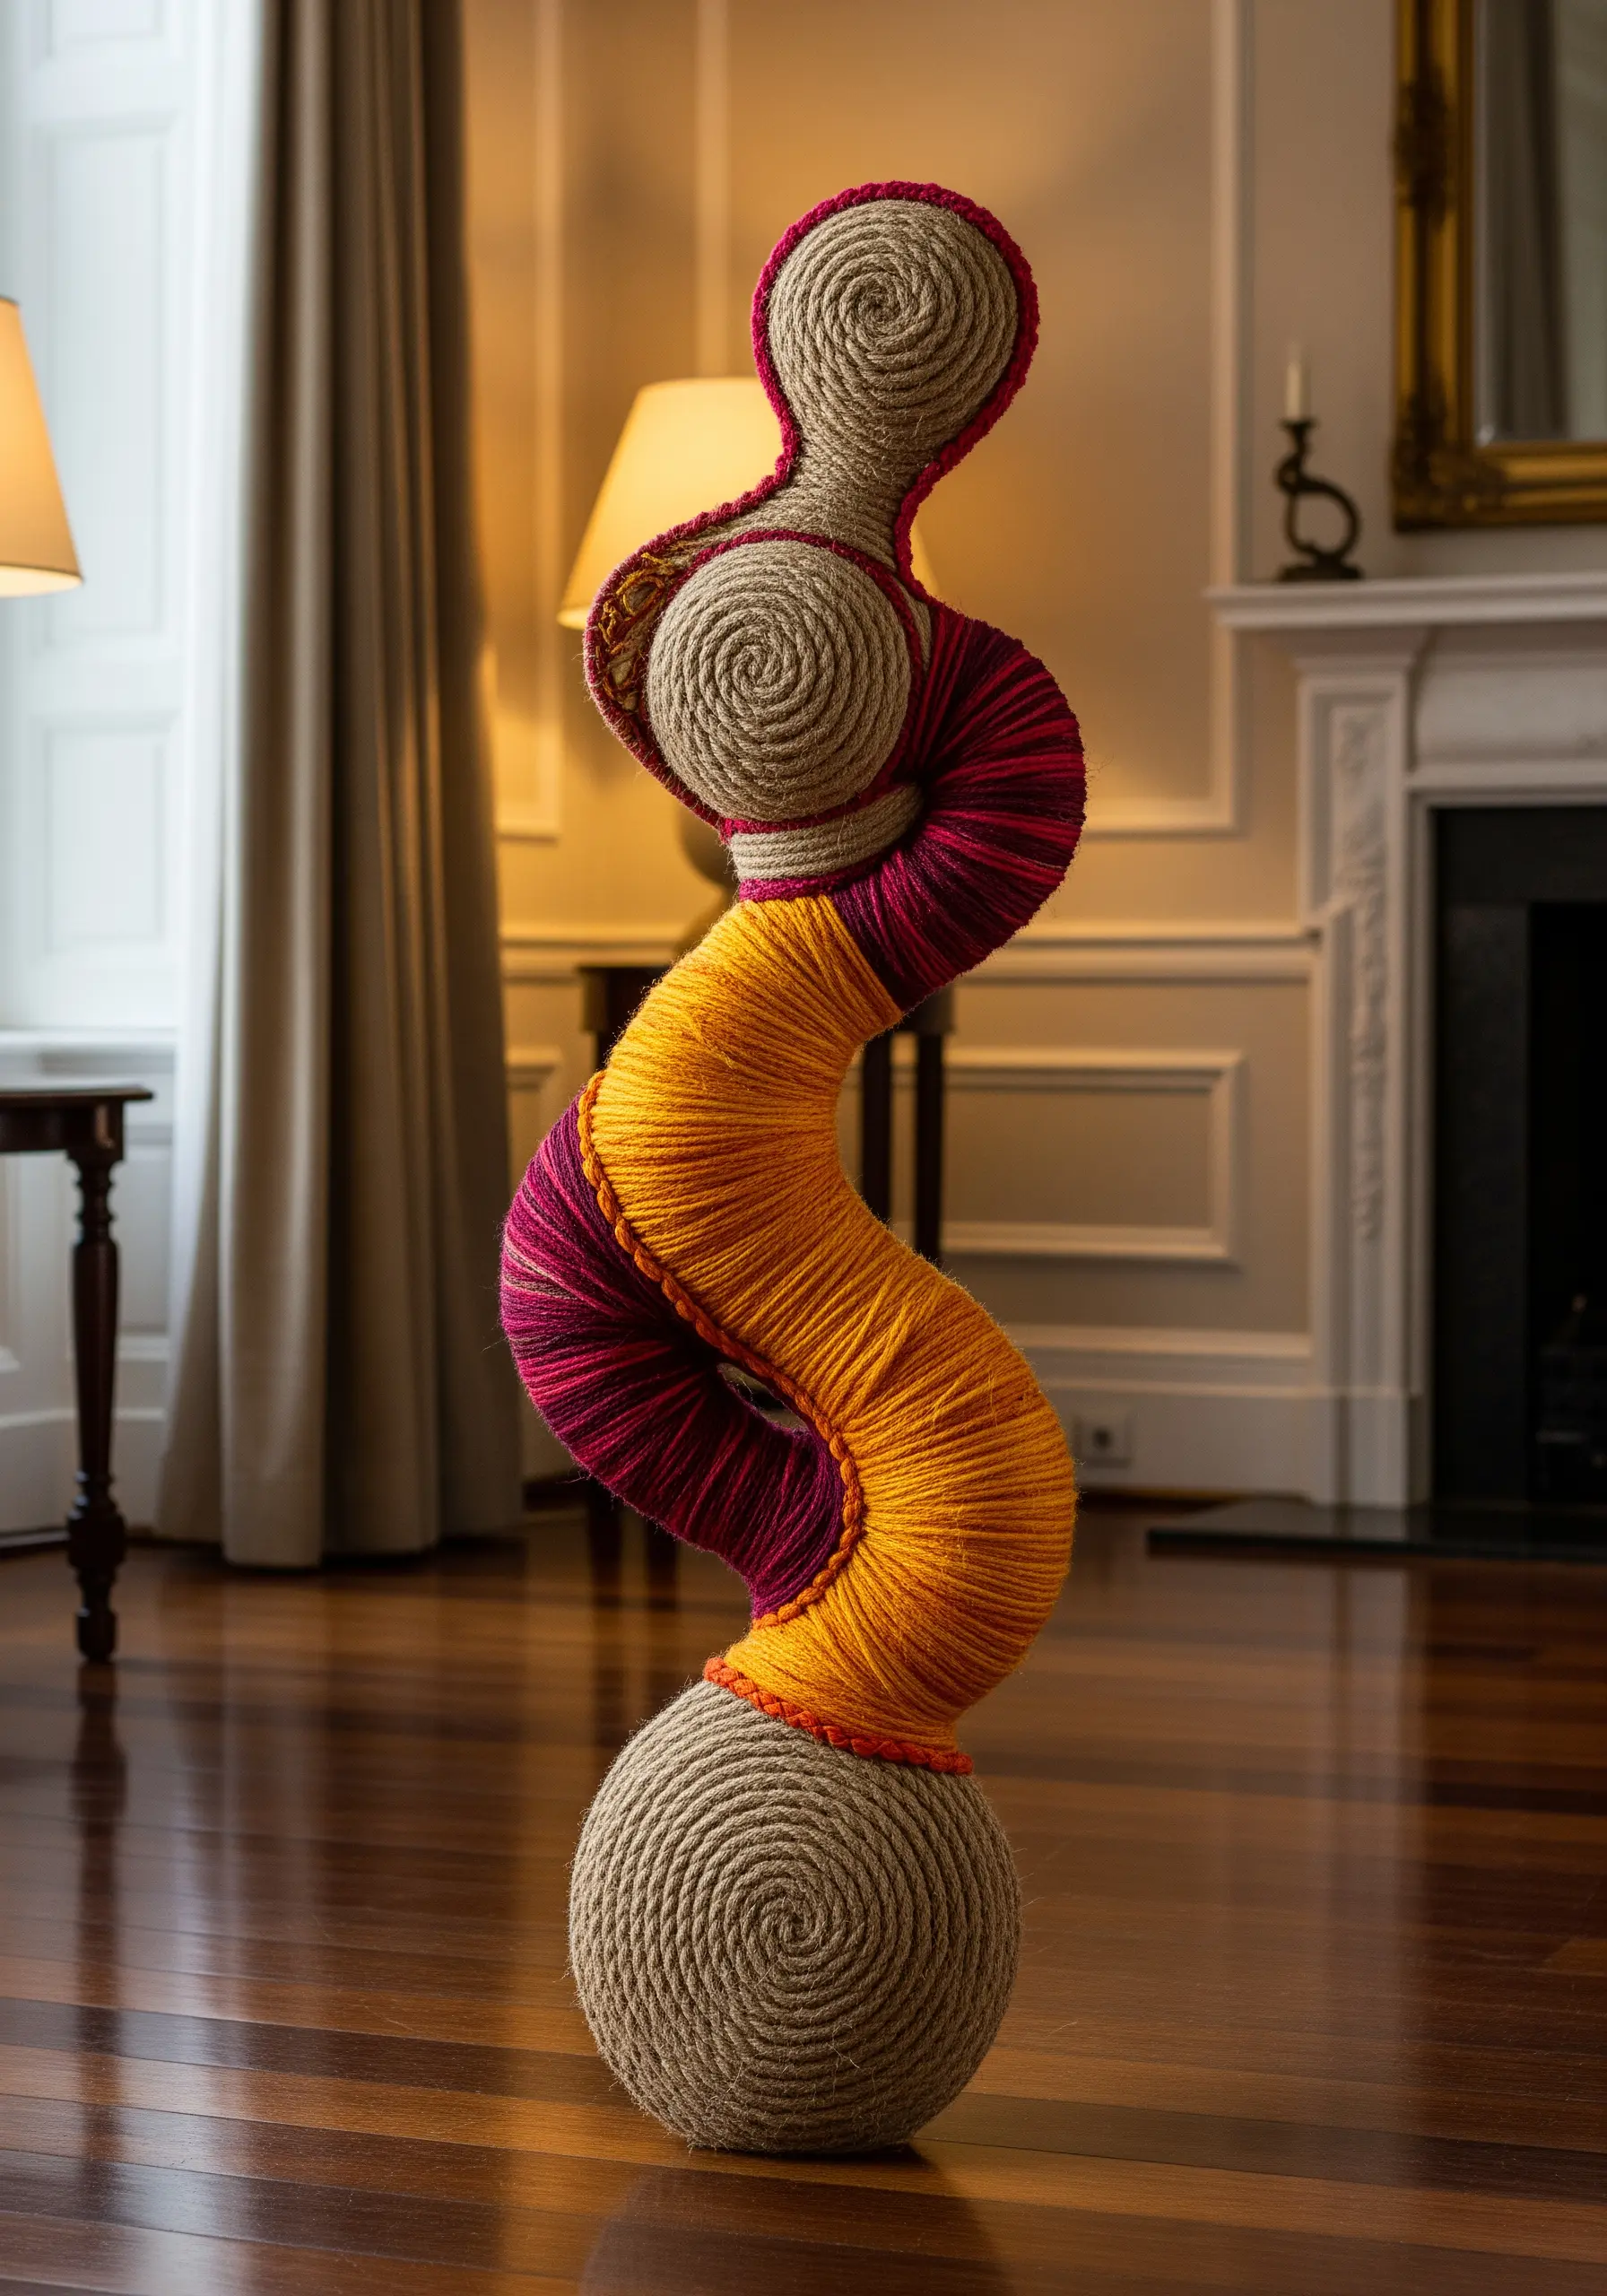
Take your thread off the fabric and onto a three-dimensional form to create a freestanding sculpture.
Build a simple armature from wire or carved foam. Apply a layer of glue and begin wrapping yarn tightly and evenly around the form.
Create visual interest by changing colors to define different sections of the sculpture. Wrap in a spiral pattern to add a subtle, hypnotic texture.
This technique transforms simple yarn into a solid, sculptural object that plays with form and color in a completely new way.
9. Design a Modern Art Quilt for Your Walls
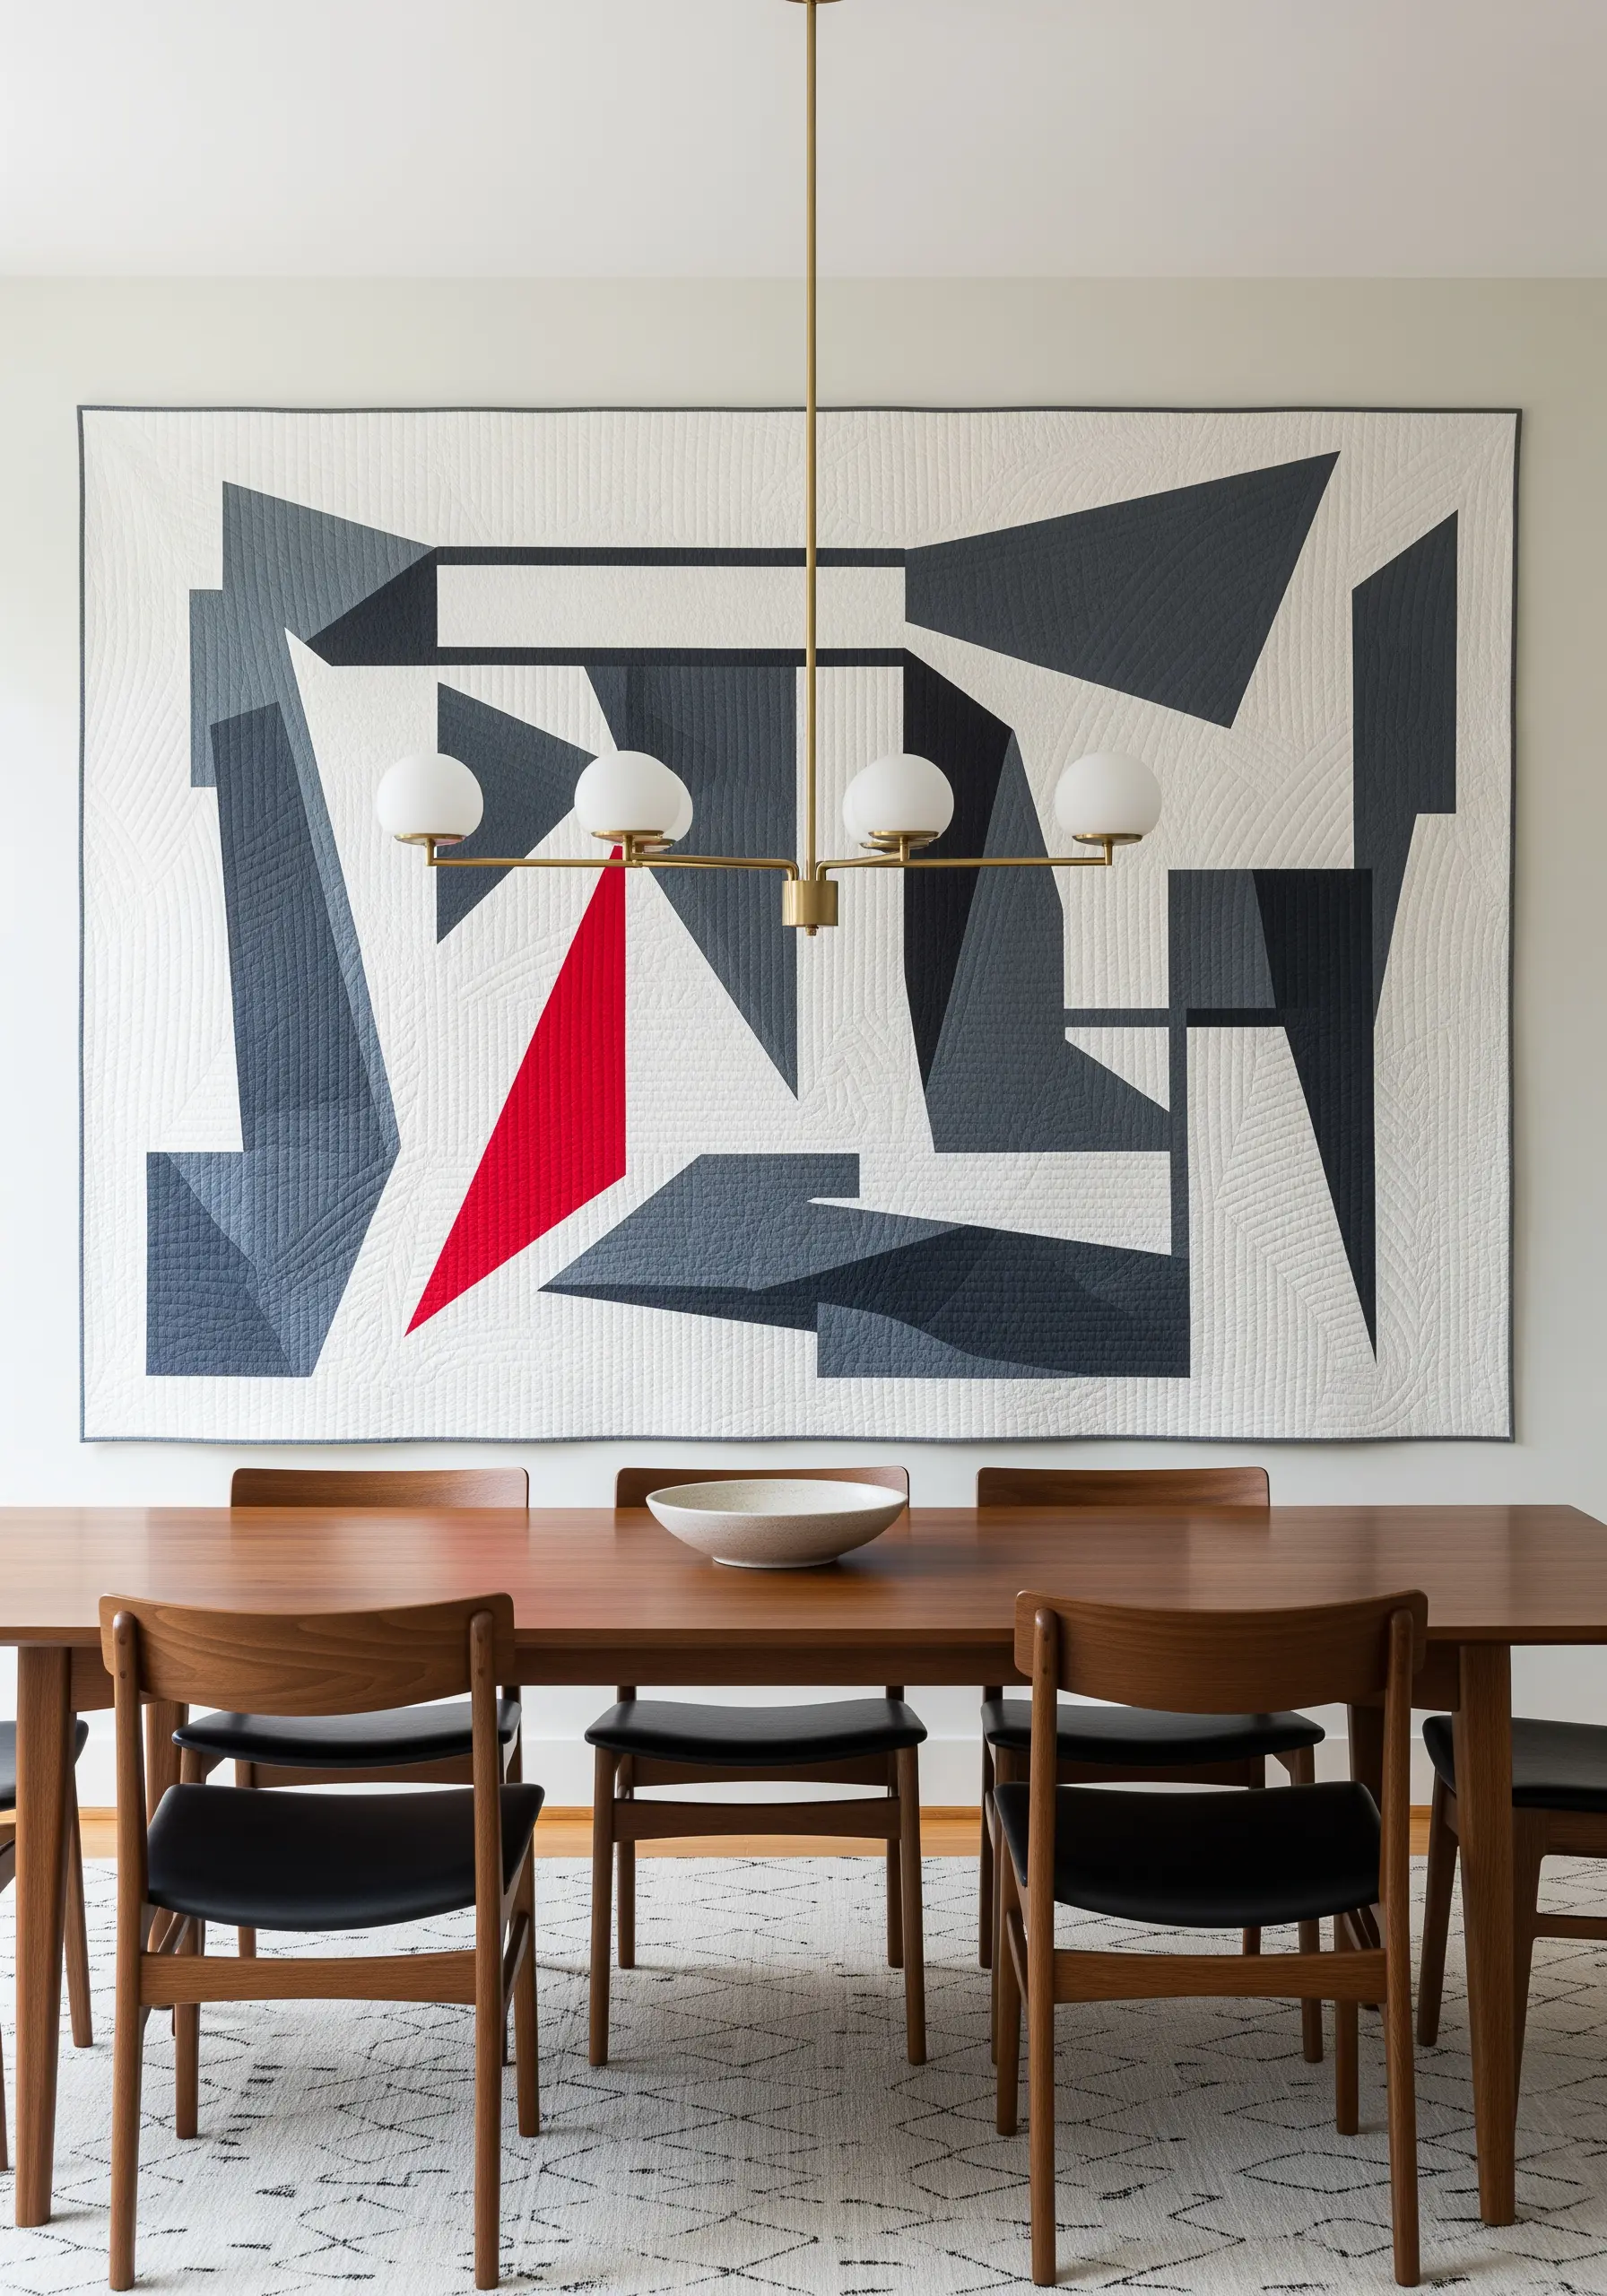
Treat quilting not as a craft for the bed, but as a medium for large-scale graphic art.
Use solid color fabrics and precision piecing to create sharp, geometric compositions inspired by abstract expressionism or brutalist architecture.
Instead of decorative quilting, use straight, parallel lines of stitching that run across the entire piece. This adds subtle texture and reinforces the modern aesthetic without distracting from the overall design.
Hanging a quilt on the wall provides color, texture, and sound absorption, making it a powerful piece of functional art.
10. Map a 3D Surface with Bead Embroidery
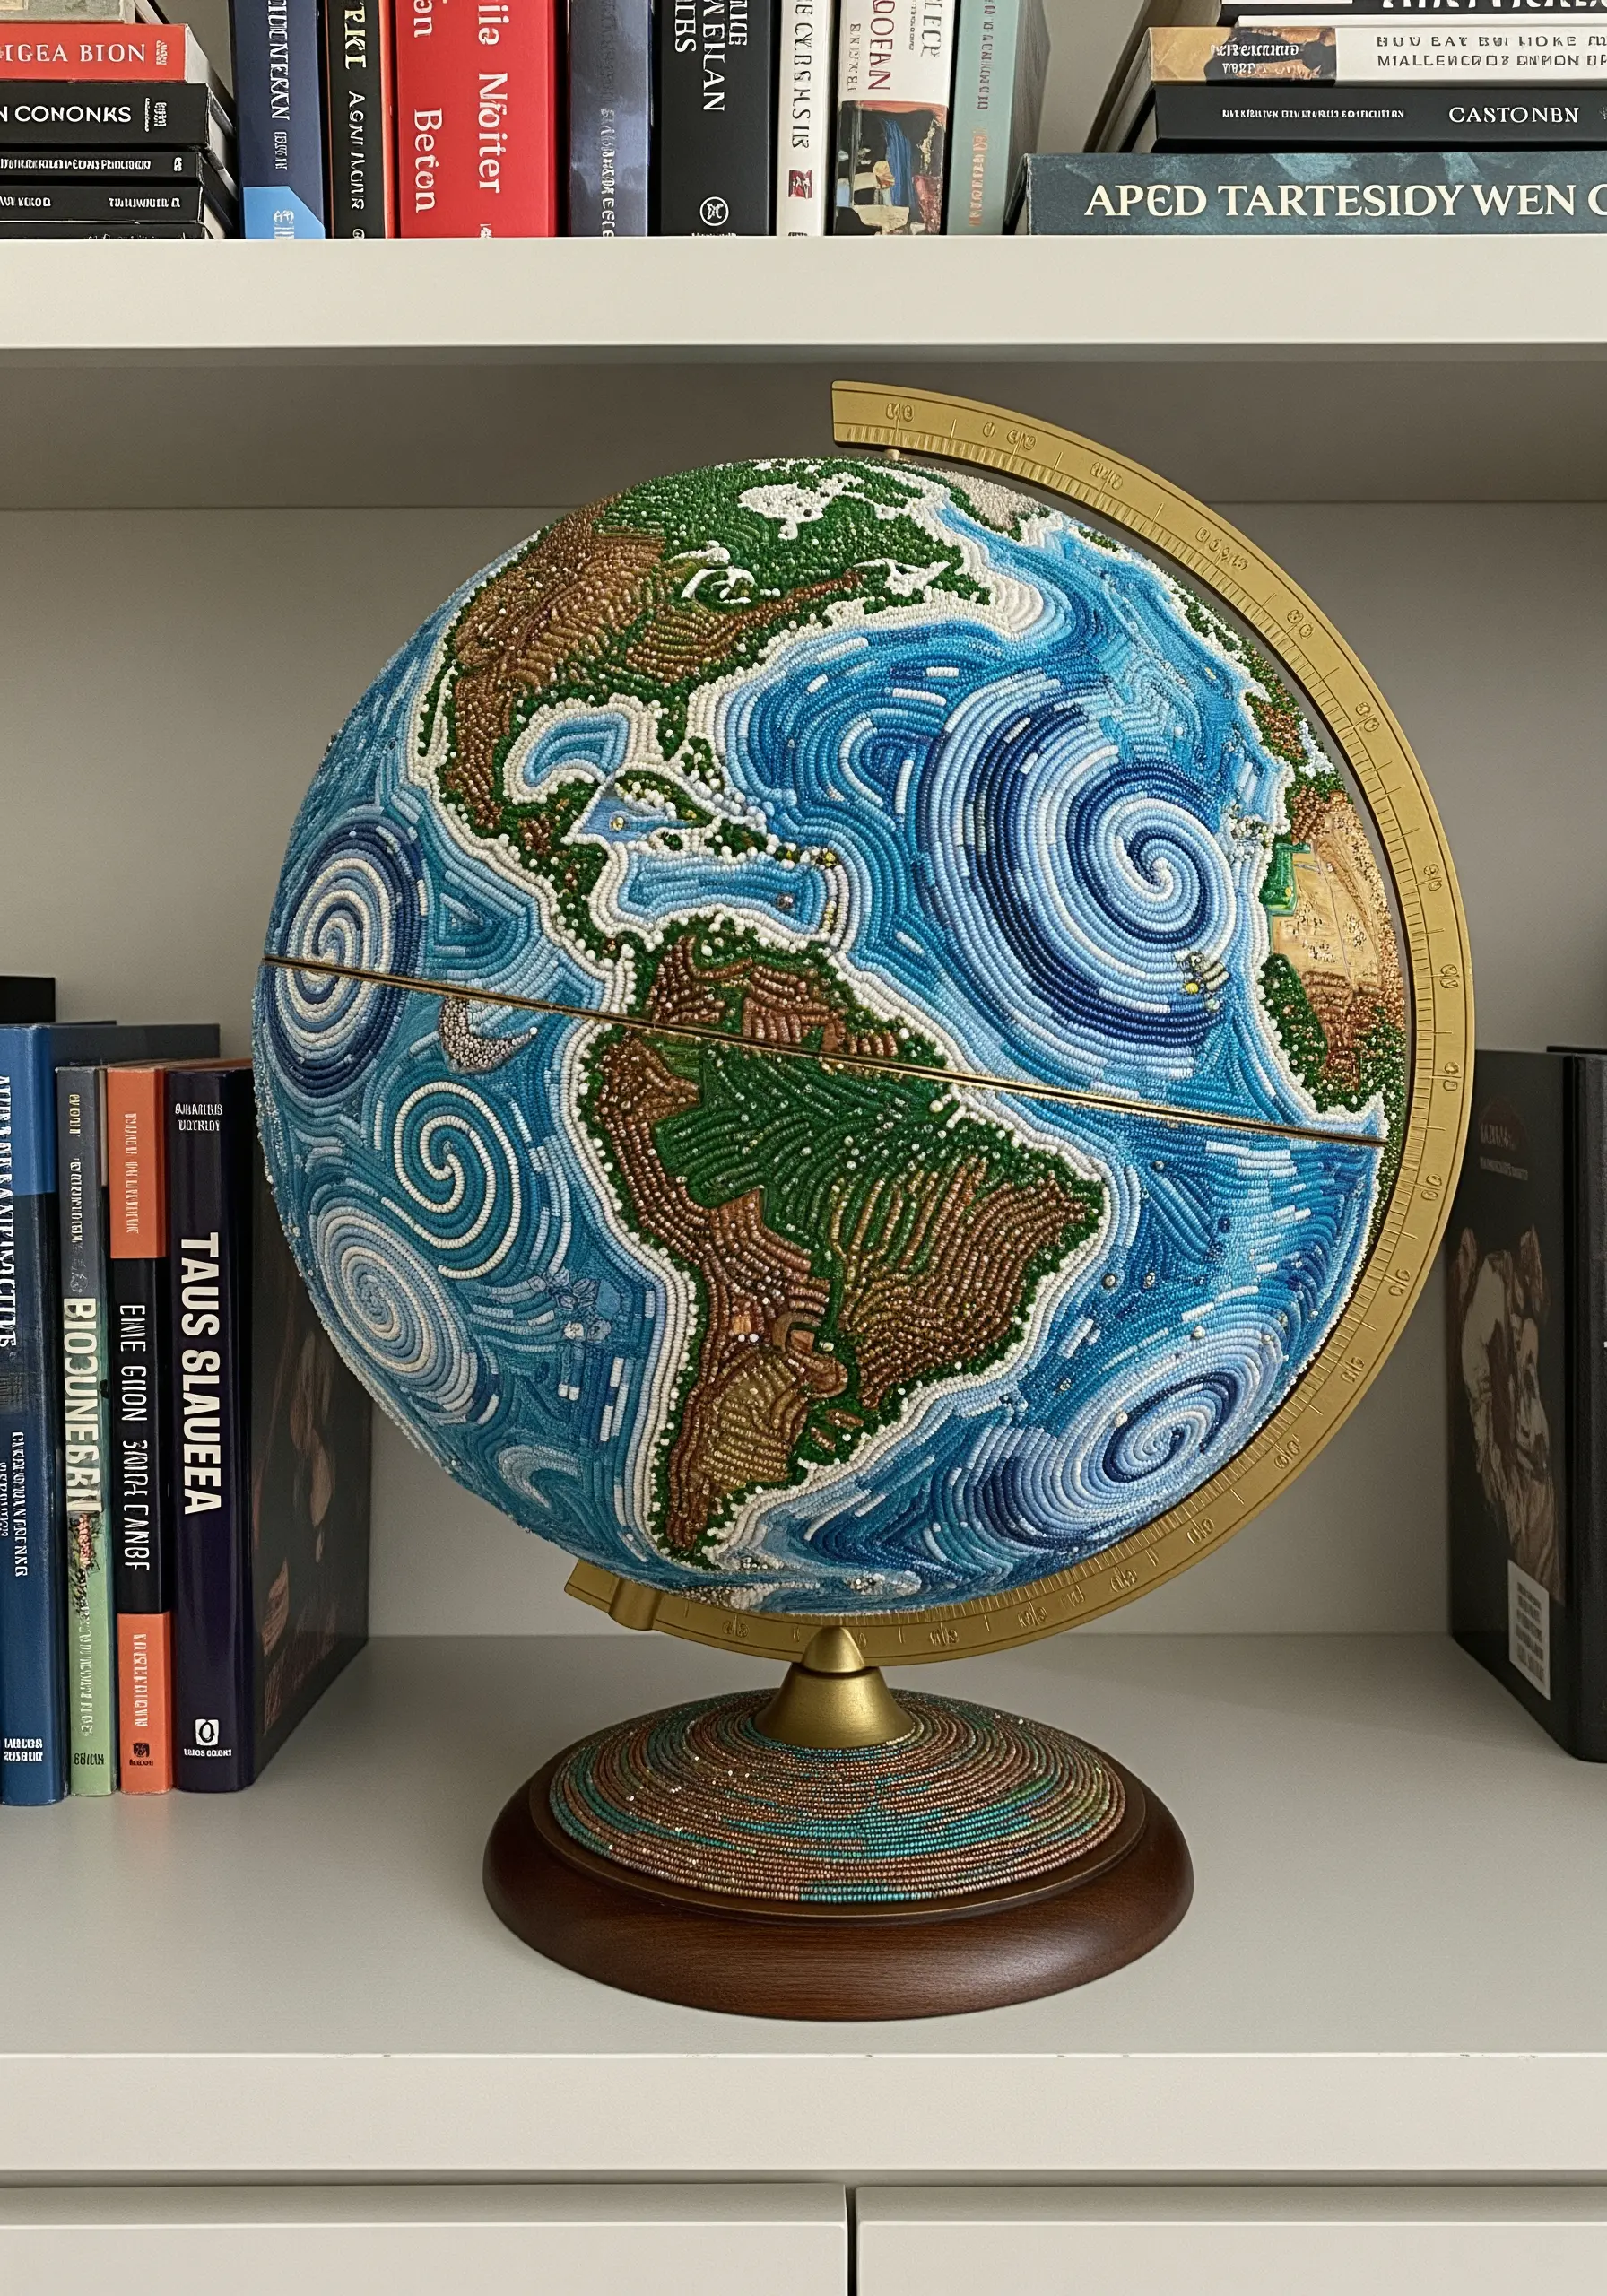
Transform an ordinary object, like a plain globe, into a jewel-like sculpture using bead embroidery.
Use a strong adhesive to glue down single lines of seed beads, following contour lines or creating swirling patterns to represent wind and ocean currents.
Alternate between matte, translucent, and metallic beads to create depth and visual interest.
This meticulous process allows you to ‘paint’ with beads, adding texture, color, and light to a three-dimensional surface in a way that thread alone cannot.
11. Stitch on Glass with Pressed Botanicals
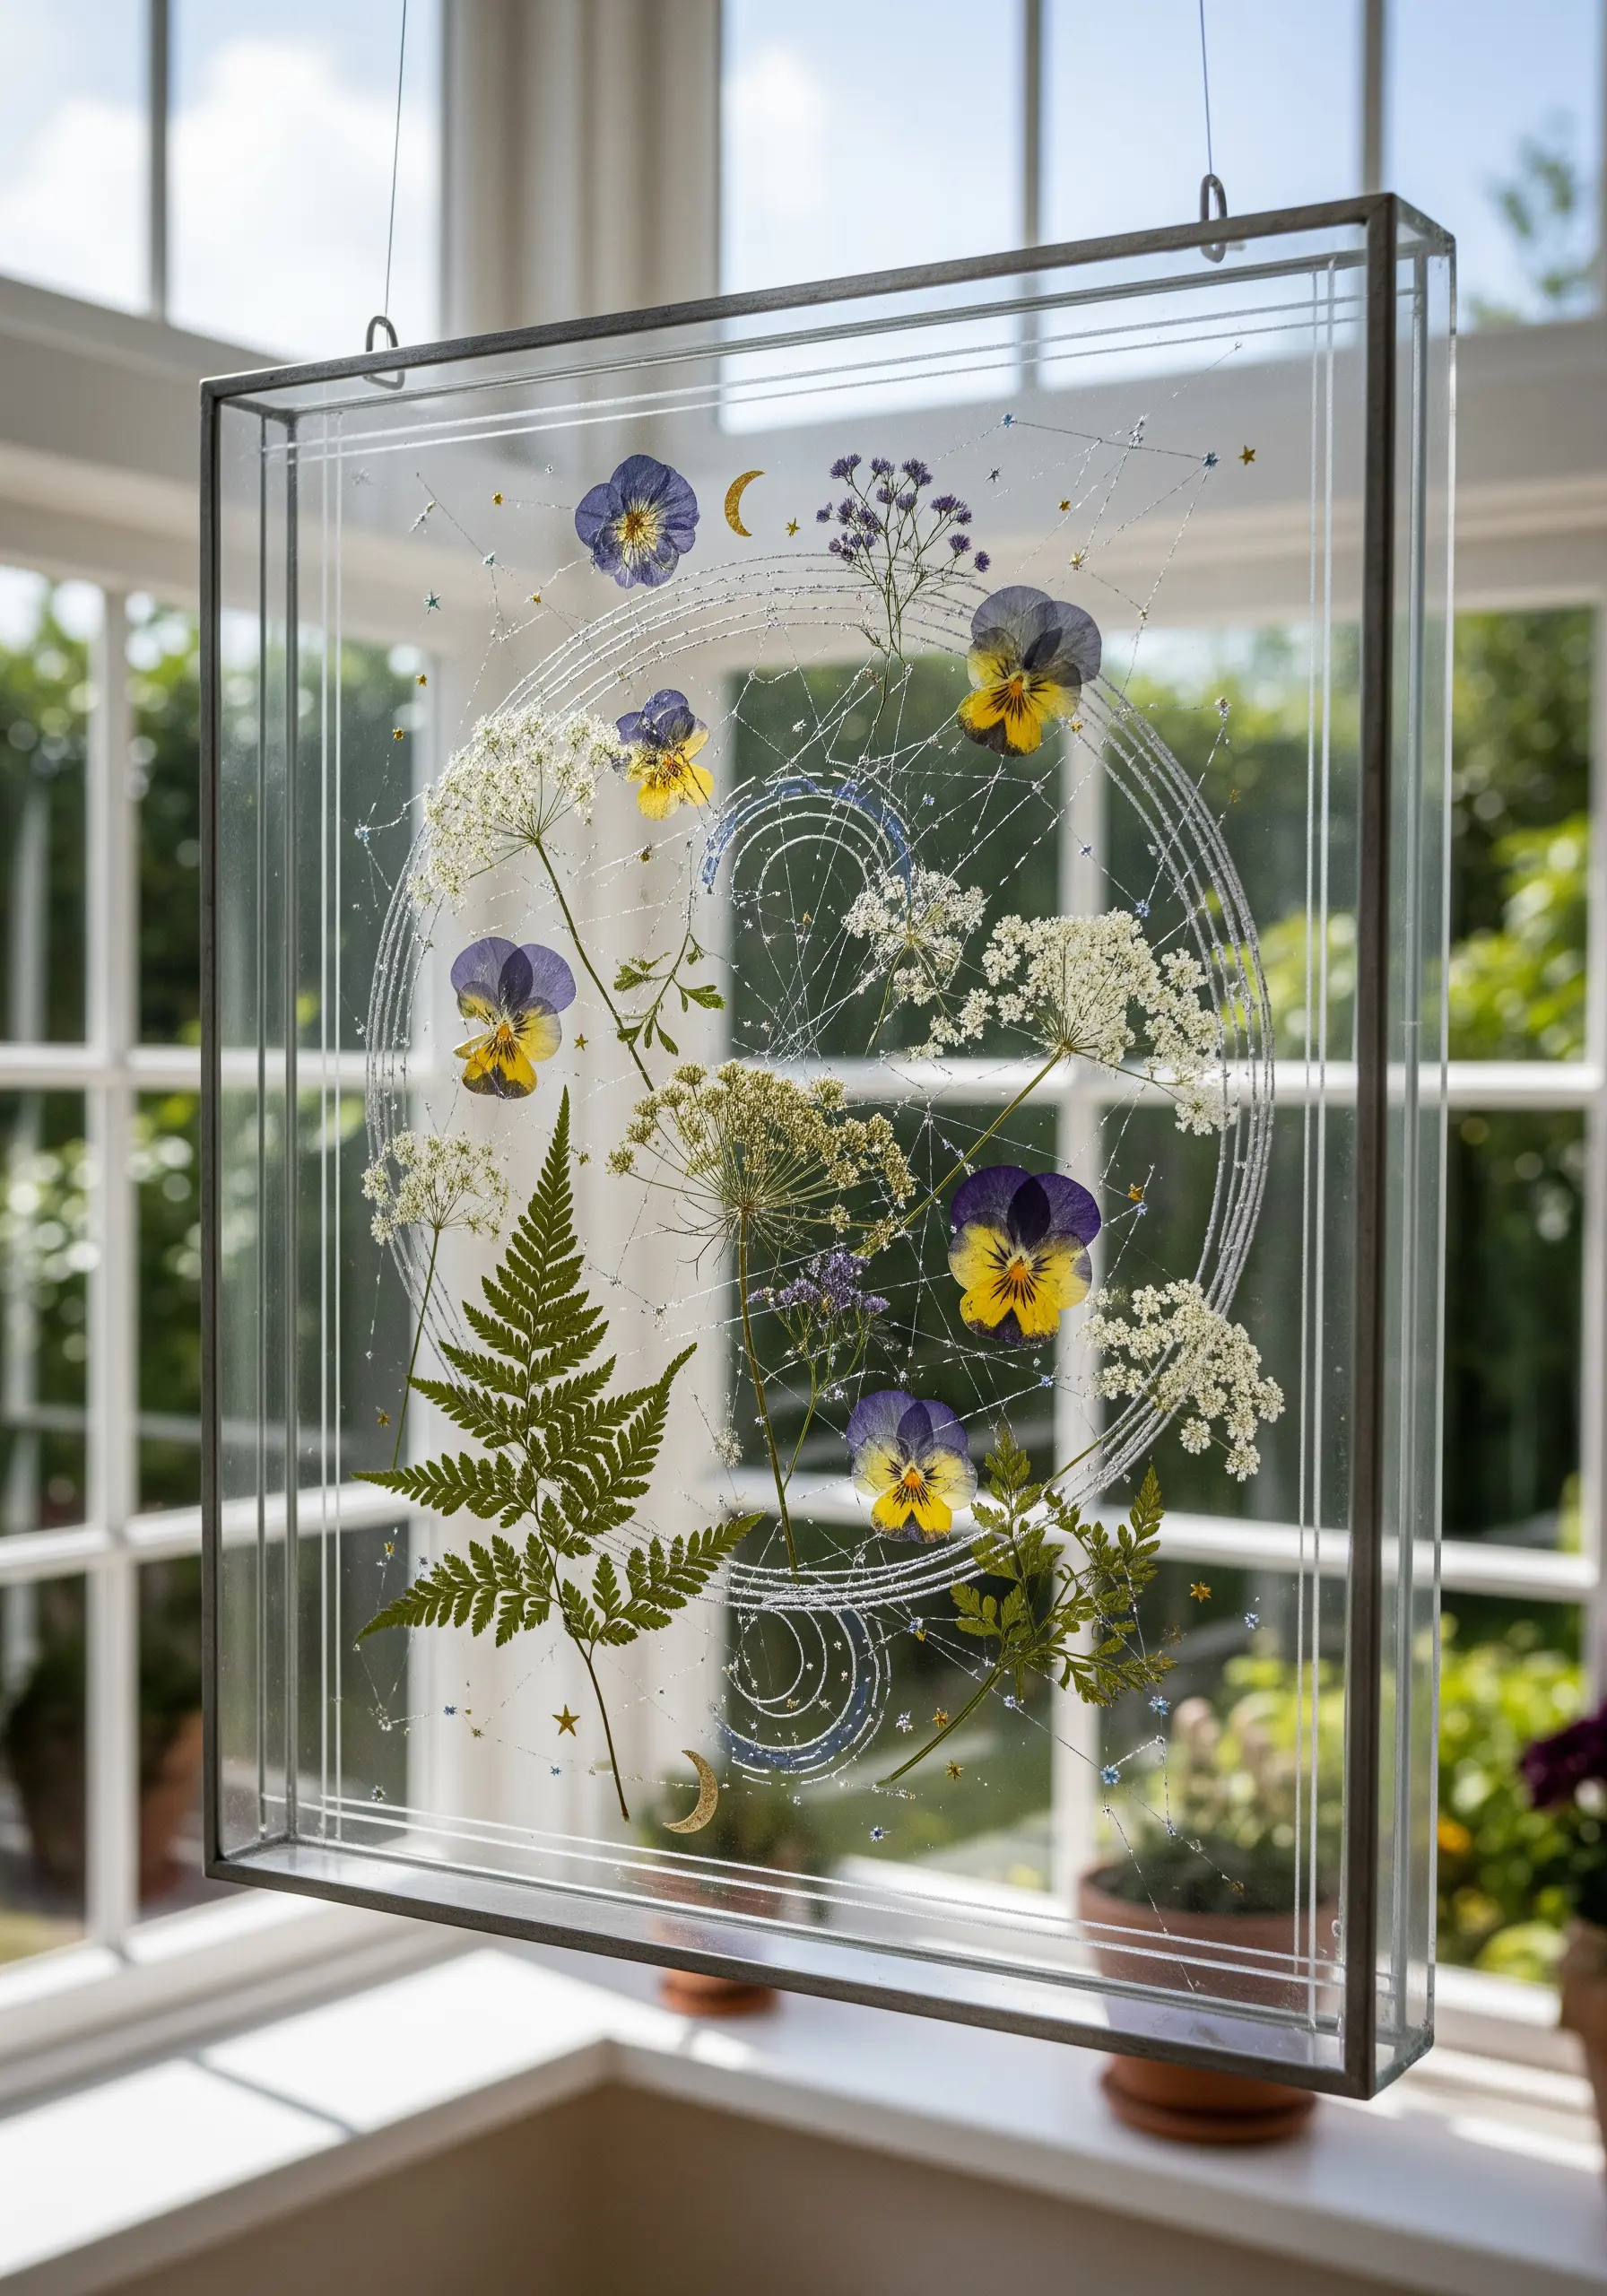
Combine the delicacy of embroidery with the permanence of pressed flowers by working within a floating glass frame.
Instead of fabric, stitch your design onto a fine, transparent mesh like tulle. This will become nearly invisible once pressed between the glass panes.
Arrange your pressed botanicals around your stitched motifs, then carefully secure everything between the glass.
The result is a magical, layered composition where thread and nature seem to float in mid-air, interacting with the light that passes through them.
12. Create High-Energy Art with Tufting
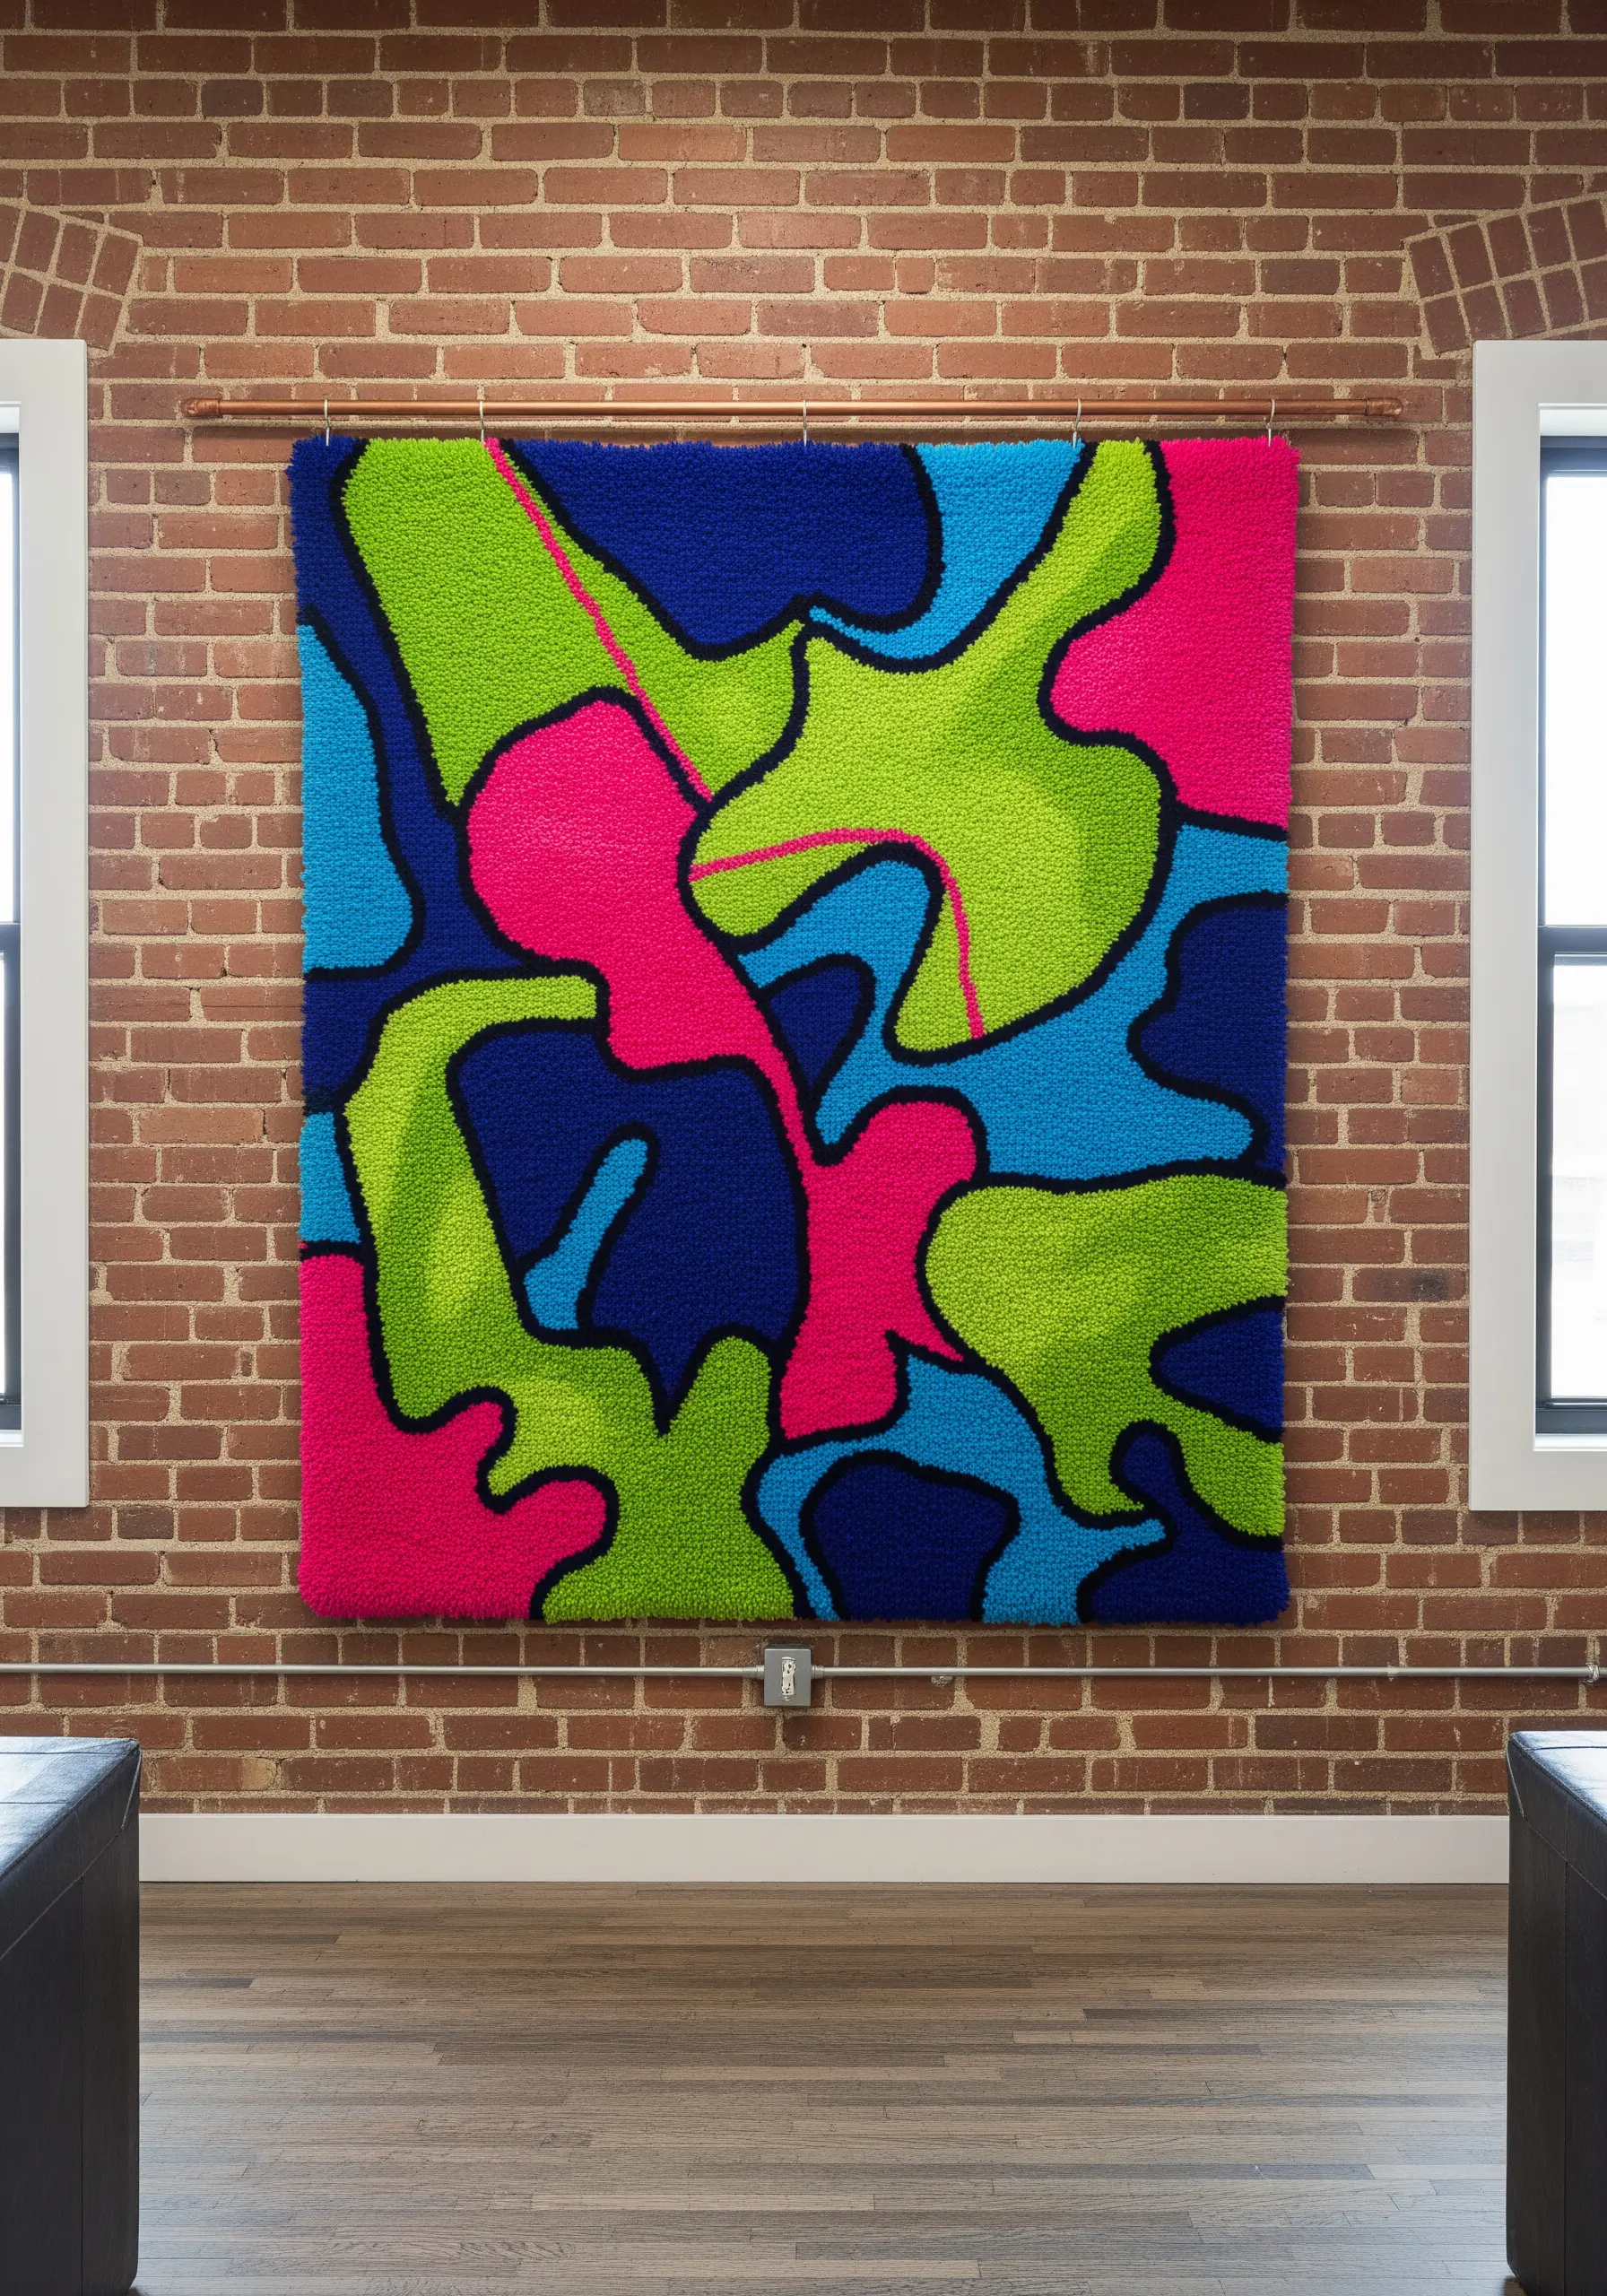
For large-scale, vibrant pieces, a tufting gun allows you to fill huge areas with plush texture at a speed hand-punching cannot match.
Embrace a bold, graphic style with high-contrast color combinations—like neon pink against deep blue—to create visual energy.
Use a thin, dark outline to define your abstract shapes. This simple trick contains the colors and makes your composition feel intentional and sharp, like a comic book cell.
This technique is perfect for creating statement rugs or wall hangings that dominate a room with color and personality.
13. Translate Ink Wash Painting into Thread
Capture the atmospheric quality of traditional ink wash paintings using embroidery on silk or another fine, semi-sheer fabric.
Use a single strand of black or grey thread to mimic the calligraphic brushstrokes for trees and birds. Vary your stitch length and direction to create a sense of movement.
For the misty mountains, use very sparse seed stitches with a slightly lighter grey thread, letting the empty space on the fabric do most of the work.
This minimalist approach focuses on the beauty of line and suggestion, creating a tranquil and elegant piece.
14. Embroider a Story onto a Lampshade
Turn a simple lamp into a piece of narrative art by embroidering a scene onto the shade.
Choose a dark, tightly woven fabric that will block light, making your stitched areas glow when the lamp is on.
Use a simple backstitch or stem stitch with a light-colored thread to create a silhouetted design, like a forest scene.
For elements like the moon or stars, use a dense satin stitch. The thickness of the thread will create an opaque area that shines brightly, turning your lamp into a captivating diorama.
15. Create a Mosaic Effect with Fabric Appliqué
Mimic the look of intricate tile mosaics using tiny, irregular scraps of fabric.
Cut your fabric pieces into small, angular shapes and arrange them on a base fabric, leaving a tiny gap between each piece.
Use a neutral-colored thread, like grey or beige, and a simple running stitch or couching stitch to outline each fabric scrap. This defines the shapes and acts as the ‘grout’.
This fabric collage embroidery technique is perfect for using up precious scraps and creates a richly textured, painterly surface.
16. Build 3D Mandalas with Raised Stitches
Translate the layered paper art of quilling into a highly sculptural embroidery piece.
Use stitches that create significant height and dimension, such as the cast-on stitch, bullion knot, and drizzle stitch, to form petals and swirls.
Work in concentric circles, layering your stitches to build up the design from the base fabric. You can even incorporate wire into your stitches to make elements that stand away from the surface.
Displaying the final mandala in a shadow box frame protects the delicate 3D elements and emphasizes its sculptural quality.
17. Embroider on Sheer Fabric for Room Screens

Create an elegant, functional room divider by embroidering onto panels of semi-transparent linen or organza.
A simple, continuous line design works best, as it allows light to pass through and creates a sense of flow across the panels.
To prevent puckering on the sheer fabric, use a water-soluble or heat-away stabilizer during stitching. A simple backstitch or stem stitch in a contrasting dark thread provides clean, graphic impact.
This delicate line art embroidery transforms a practical object into a piece of kinetic art that changes with the light.
18. Embellish a Leather-Bound Book Cover
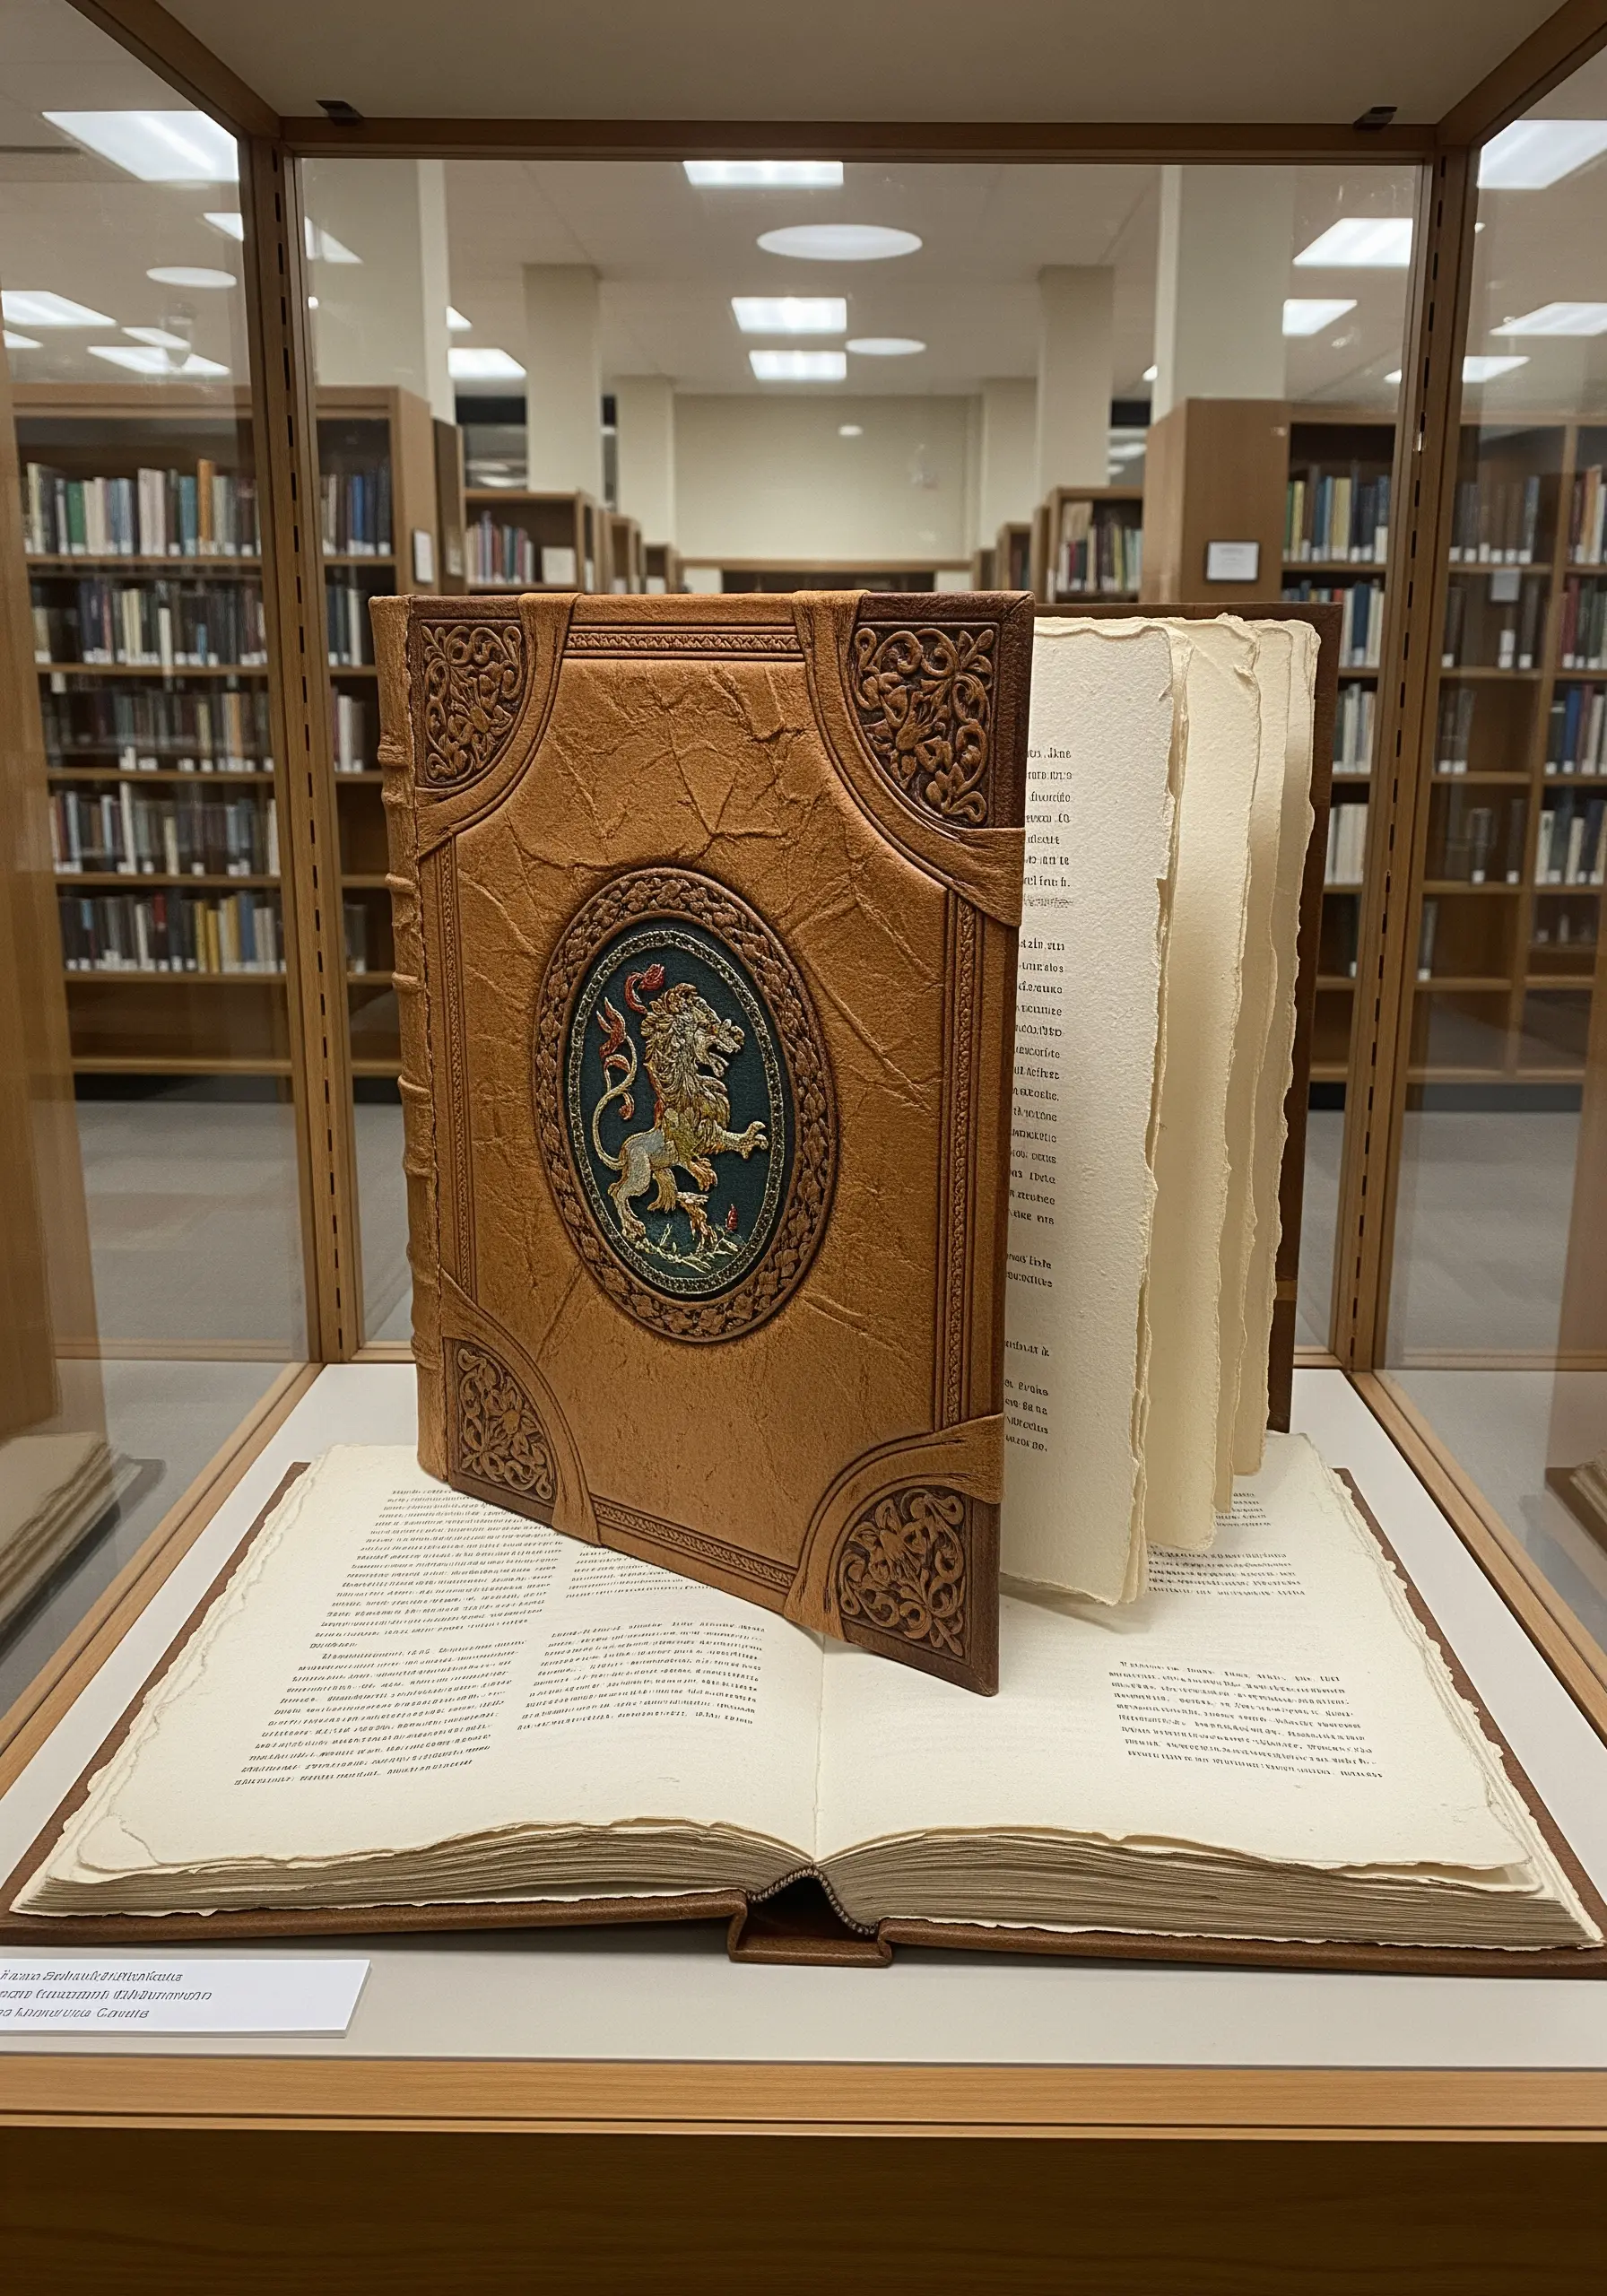
Turn a journal or sketchbook into a personal heirloom by adding an embroidered medallion to its cover.
Stitch your design—like a crest or monogram—onto a separate piece of sturdy fabric like canvas. Use dense satin stitches and metallic threads for a rich, heraldic feel.
Carefully cut out the finished embroidery and use a strong bookbinding glue to affix it into a debossed area on a leather cover.
This technique allows you to add the luxurious detail of embroidery to materials that are too thick to stitch through directly.
19. Add a Single, Perfect Motif to Hand-Dyed Fabric
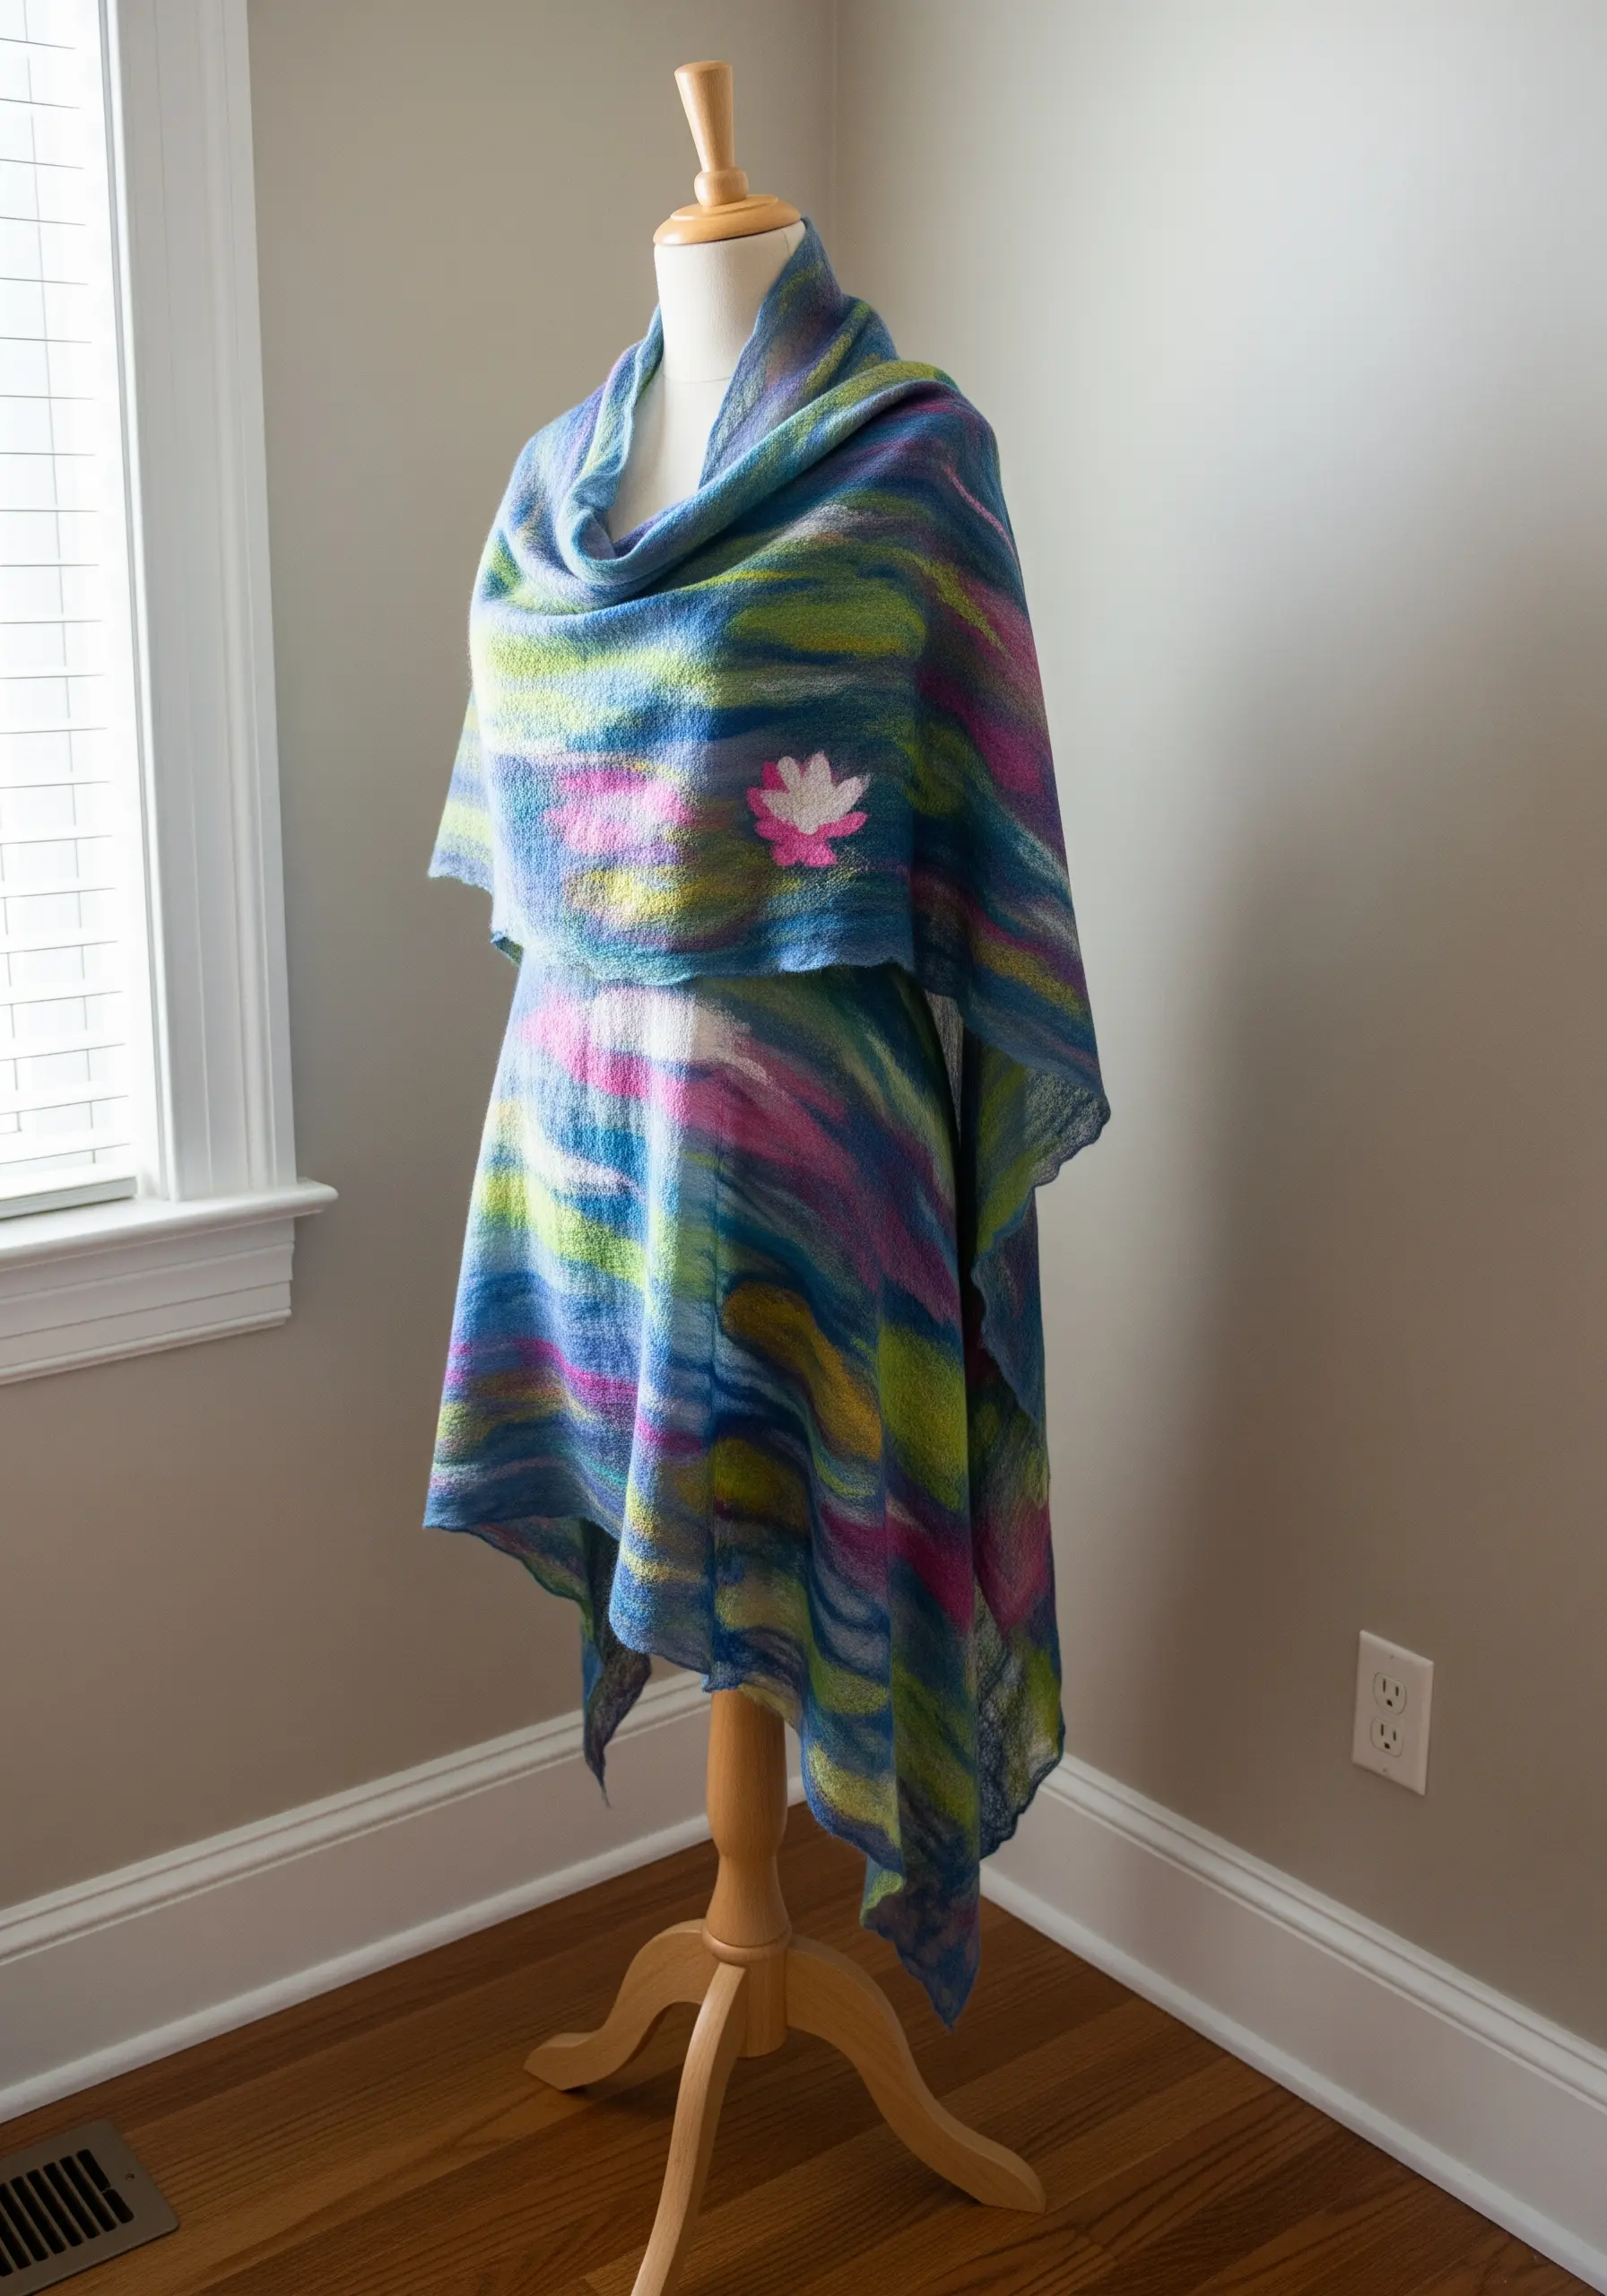
When working with a beautifully complex fabric, like a hand-dyed or felted piece, the key is restraint.
Don’t compete with the fabric’s existing pattern. Instead, choose one small, simple motif to act as a focal point.
Use a contrasting color and a clean, solid stitch like satin stitch to ensure your small addition stands out clearly.
This thoughtful placement of a single embroidered detail makes the entire piece feel more intentional and personalized, like an artist’s signature.
20. Use Found Natural Objects as a Weaving Frame

Integrate the natural world into your work by using a piece of driftwood or a unique branch as the base for a small weaving.
Warp your threads directly around the wood, letting its organic shape dictate the form of your tapestry.
Weave with natural, undyed fibers like wool, linen, and silk. You can also incorporate other found items like small shells, seed pods, or feathers directly into the weft.
These nature-inspired weavings feel deeply connected to their materials, creating a rustic and soulful piece of art.
21. Carve with Thread: Padded Satin Stitch Sculpture
Translate the smooth, clean lines of minimalist sculpture into embroidery by using padded satin stitch to create raised, three-dimensional forms.
First, create a base shape with layers of felt or stitches like split stitch. Then, cover this padding with smooth, tightly packed satin stitches.
To mimic the look of wood grain or stone, stitch in a consistent direction, letting the light catch the sheen of the thread.
This trapunto-like technique allows you to ‘carve’ soft sculptures directly onto your fabric, creating an elegant illusion of volume and solidity.
22. Assemble a Wall Installation from Mini Hoops
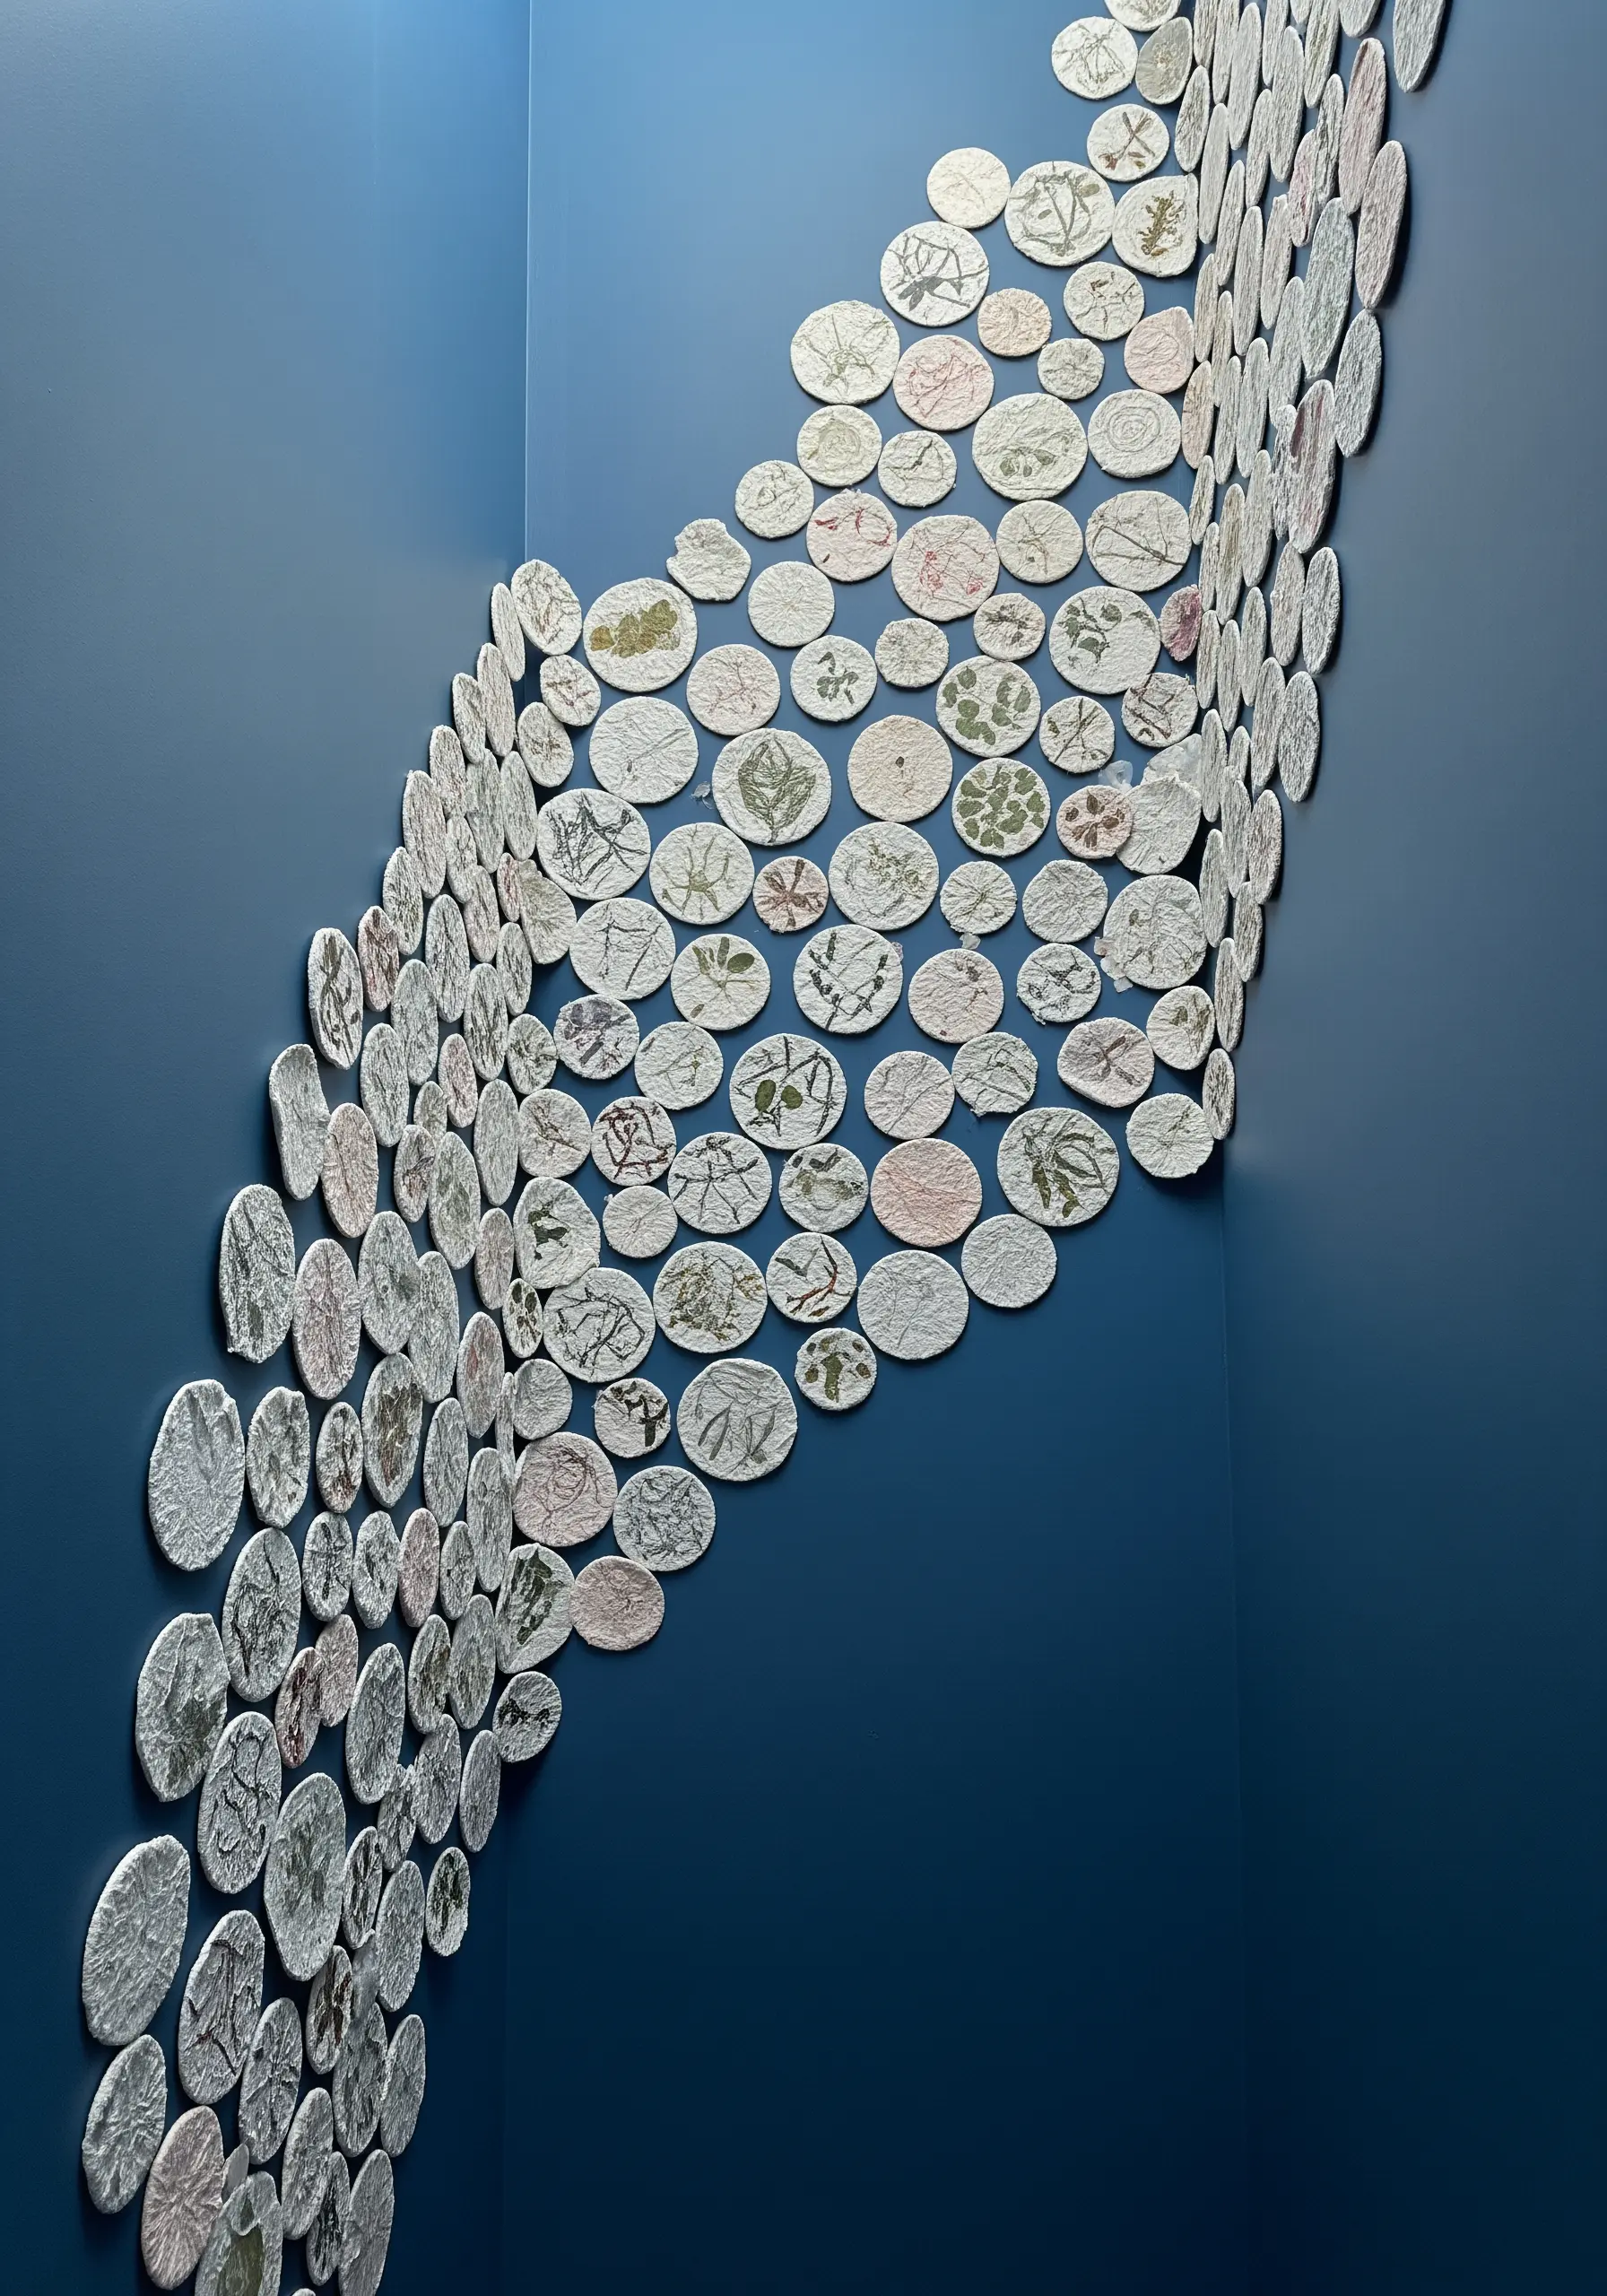
Create a large-scale, dynamic art installation by composing it from many small, individual pieces.
Choose a cohesive theme, like botanical illustrations, and stitch a different design in each mini hoop. Using a consistent color palette will tie the collection together.
Arrange the finished hoops on a wall in a flowing, organic shape rather than a simple grid. This creates movement and encourages the viewer to look closer at each individual element.
This approach makes a large project feel manageable and allows you to create an impressive piece of art that can grow and change over time.
23. Create Radiating Light with Metallic Threads
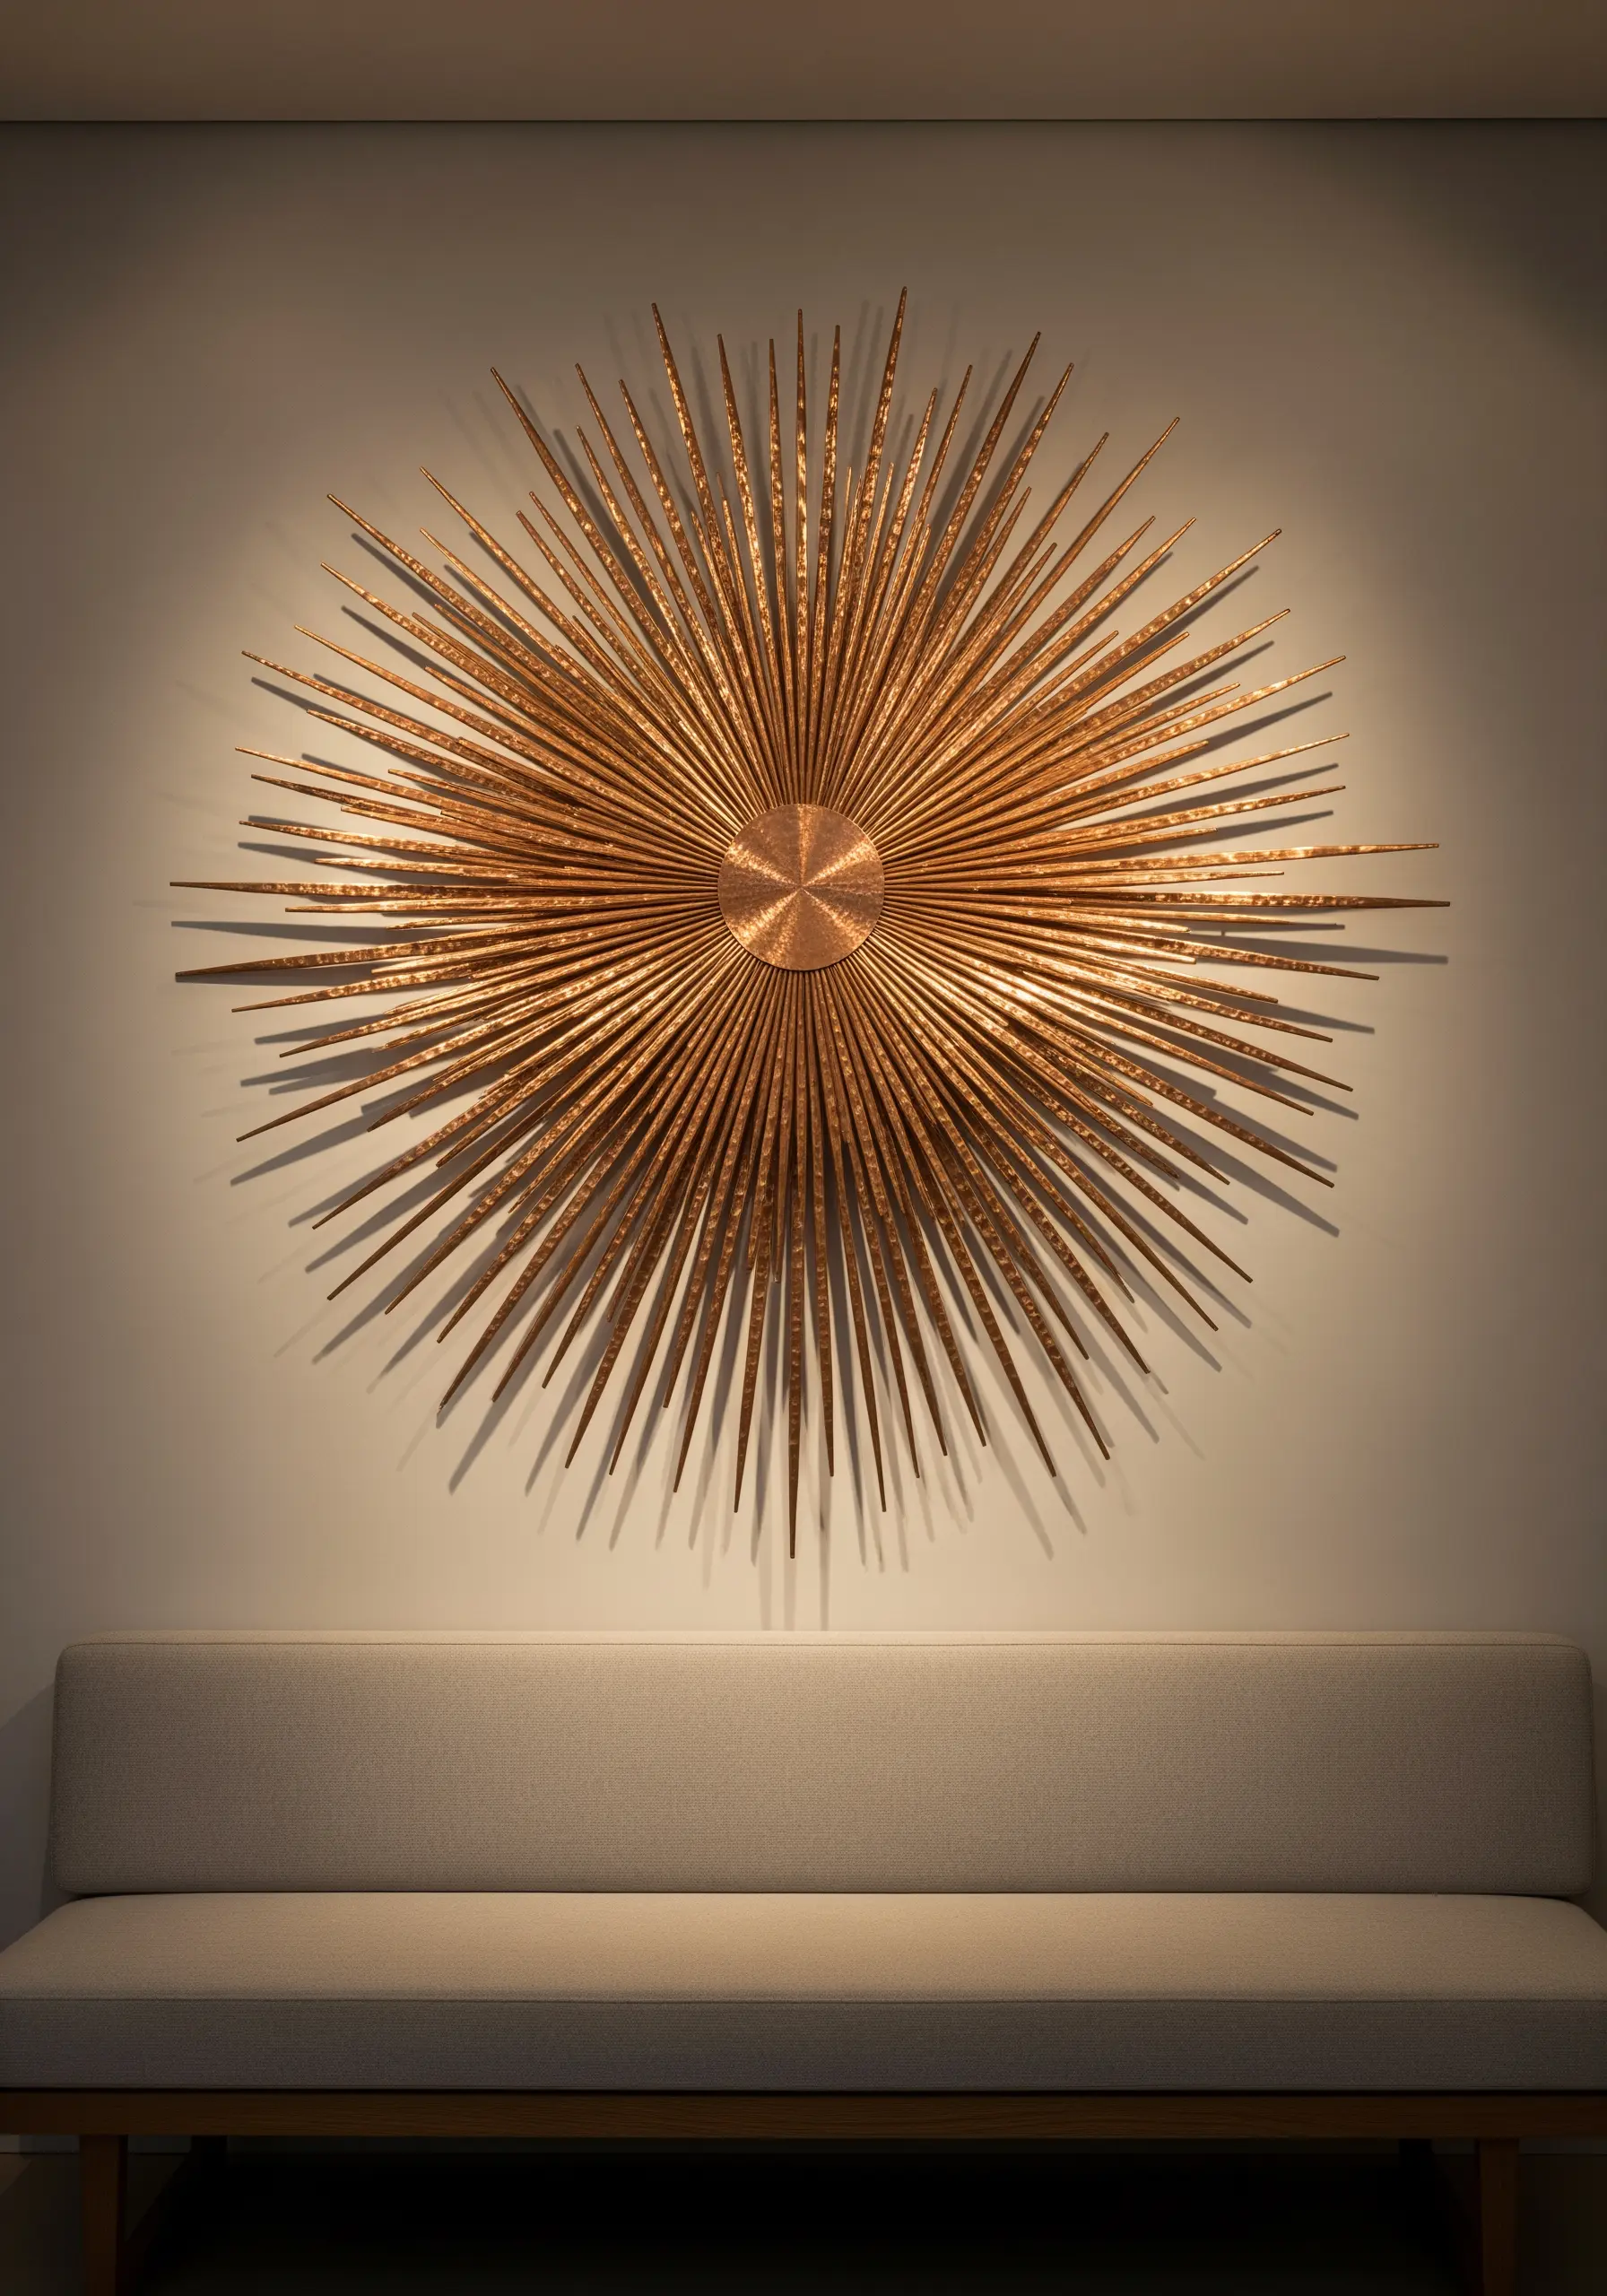
Capture the explosive energy of a sunburst using nothing but straight stitches and metallic thread.
Start with a small, central point and work your way out, stitching long, radiating lines. For a dynamic effect, vary the length of your stitches randomly.
Use several different shades of metallic thread—golds, coppers, and bronzes—to add depth and complexity. For extra long stitches that might sag, use the couching technique to tack them down invisibly at intervals.
This method turns the humble straight stitch into a powerful tool for creating light, energy, and movement.
24. Turn an Unconventional Object into Your Canvas
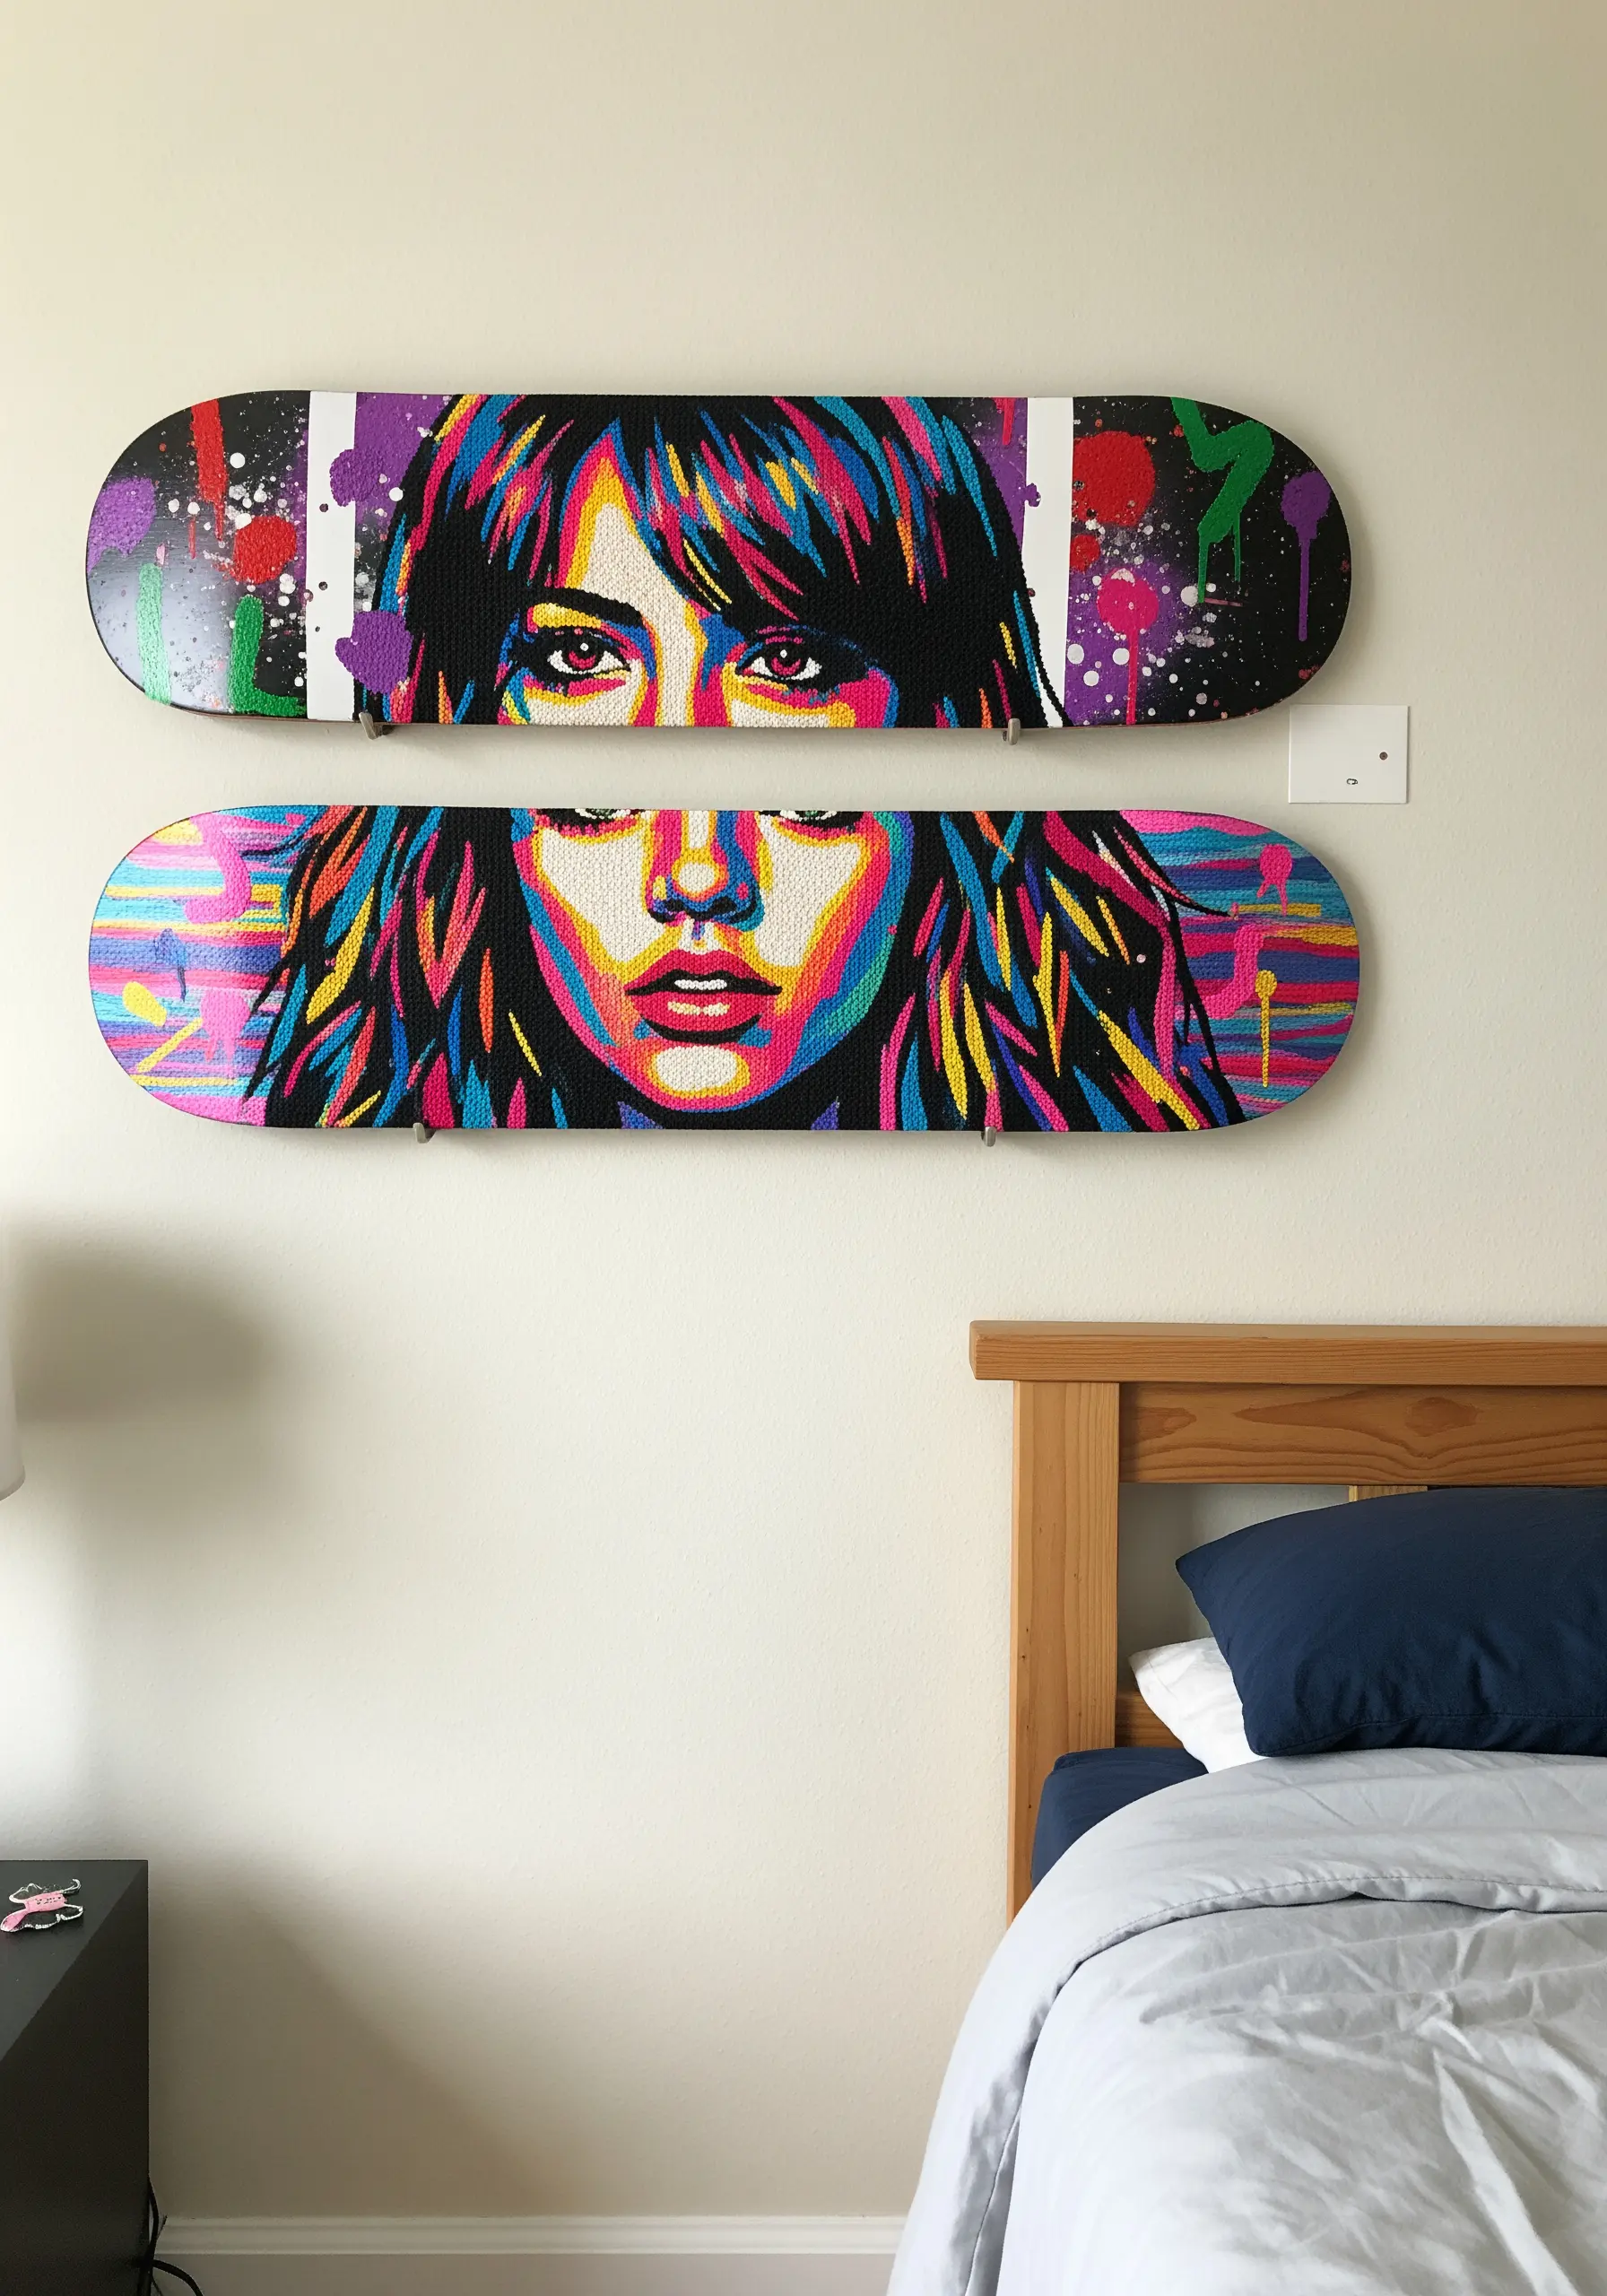
Challenge the boundaries of embroidery by using an unexpected object, like a skateboard deck, as your base.
Stretch and glue a piece of high-count Aida cloth or dense canvas over the surface. The fabric provides a stable grid for stitching, allowing you to create highly detailed work like cross-stitch portraits.
This fusion of traditional stitching with street art culture creates a surprising and memorable piece of art that defies categorization.
It proves that any surface can become a canvas if you approach it with creativity.
25. Build a Miniature World with Needle Felting and Thread
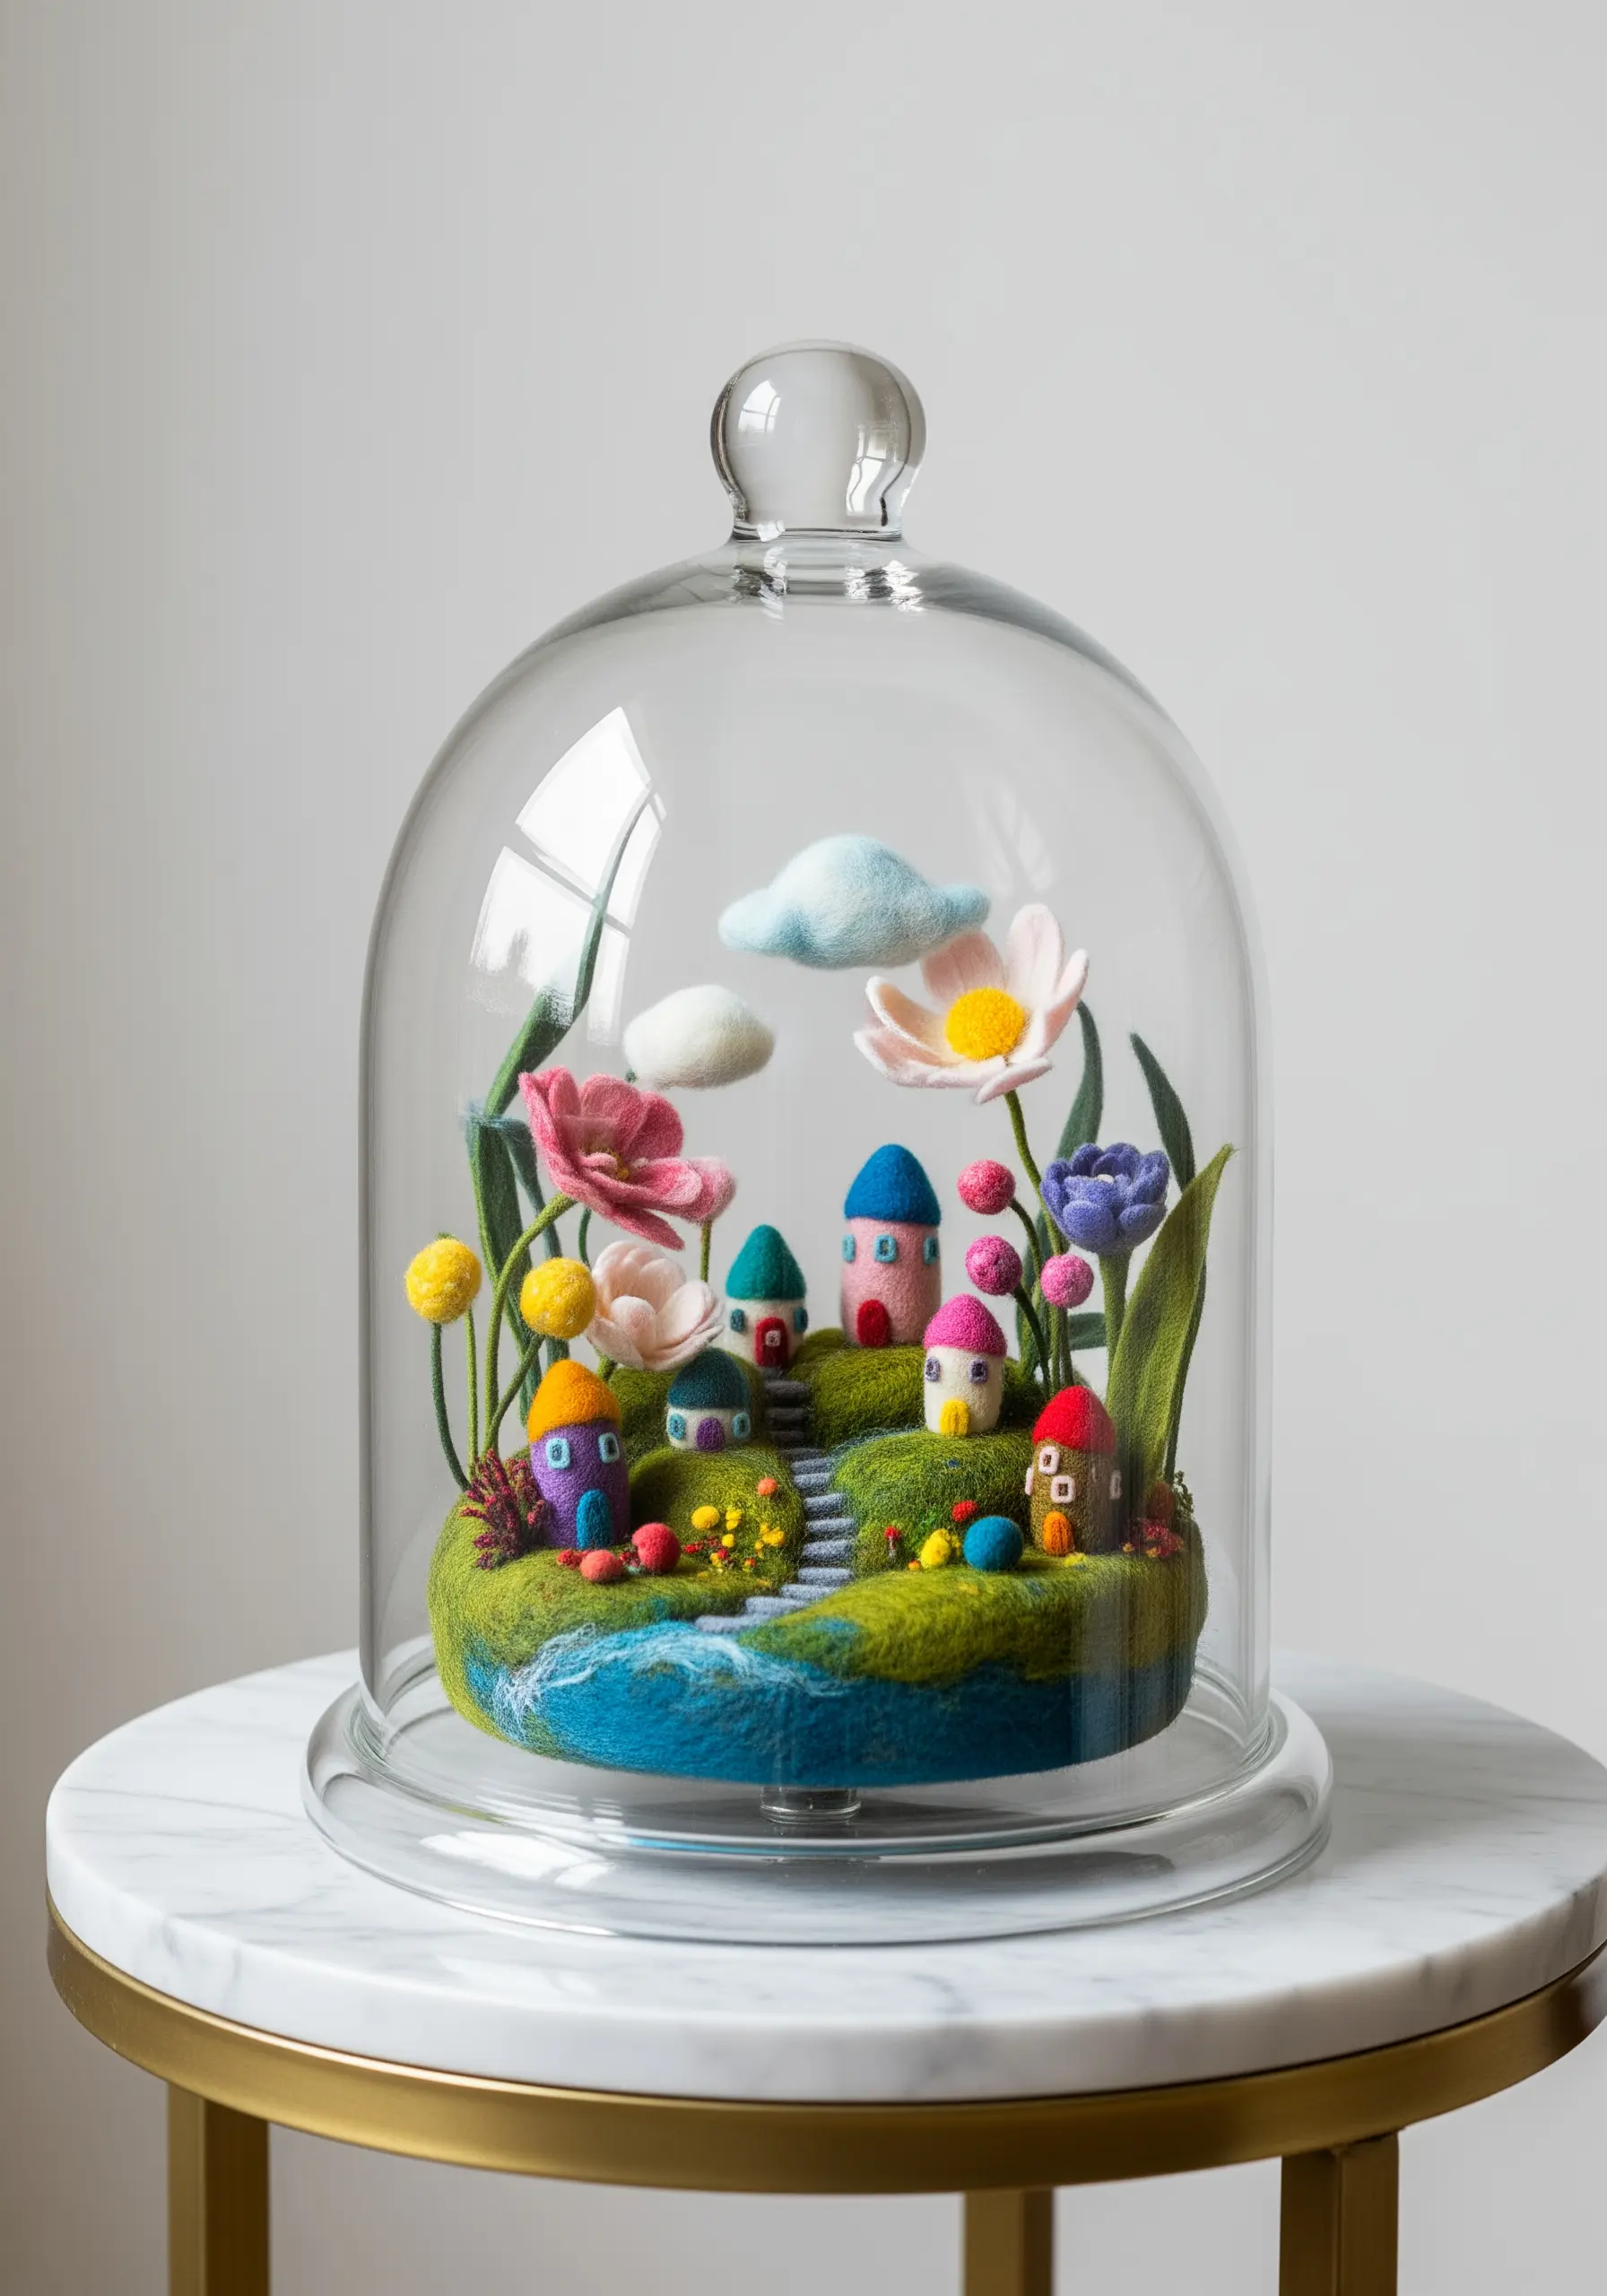
Create a charming, three-dimensional diorama by combining the soft forms of needle felting with the fine detail of embroidery.
Use wool roving to felt the larger shapes of your scene—the hills, houses, and flowers. This builds up volume quickly and creates a whimsical, soft-focus base.
Then, go in with embroidery thread to add the tiny details that bring it to life: delicate window panes on the houses, the veins on a leaf, or the tiny stamens in a flower.
Displaying the finished scene under a glass cloche protects it and transforms it into a magical, captured world.


