

You have the threads, the fabric, and the desire to create something beautiful and calm for your walls. But perhaps you feel stuck, repeating the same stitches, unsure how to translate the quiet beauty you envision into a polished, intentional piece of art.
Let’s move beyond simply filling in a pattern. Together, we will explore how a subtle shift in technique—like changing the direction of your stitches, embracing negative space, or building gentle texture—can transform your work. It’s not about complexity; it’s about making thoughtful choices that add depth and sophistication.
These ideas are designed to be grounding, inspired by the organic, imperfect forms found in nature. They are an invitation to slow down and create pieces that don’t just decorate a wall, but bring a sense of tranquility and quiet confidence to your entire space. You can make these right now, with the materials you already have.
Let’s begin, and help you transform your neutral home into a cozy nature haven, one stitch at a time.
1. Create Depth with Directional Stitching
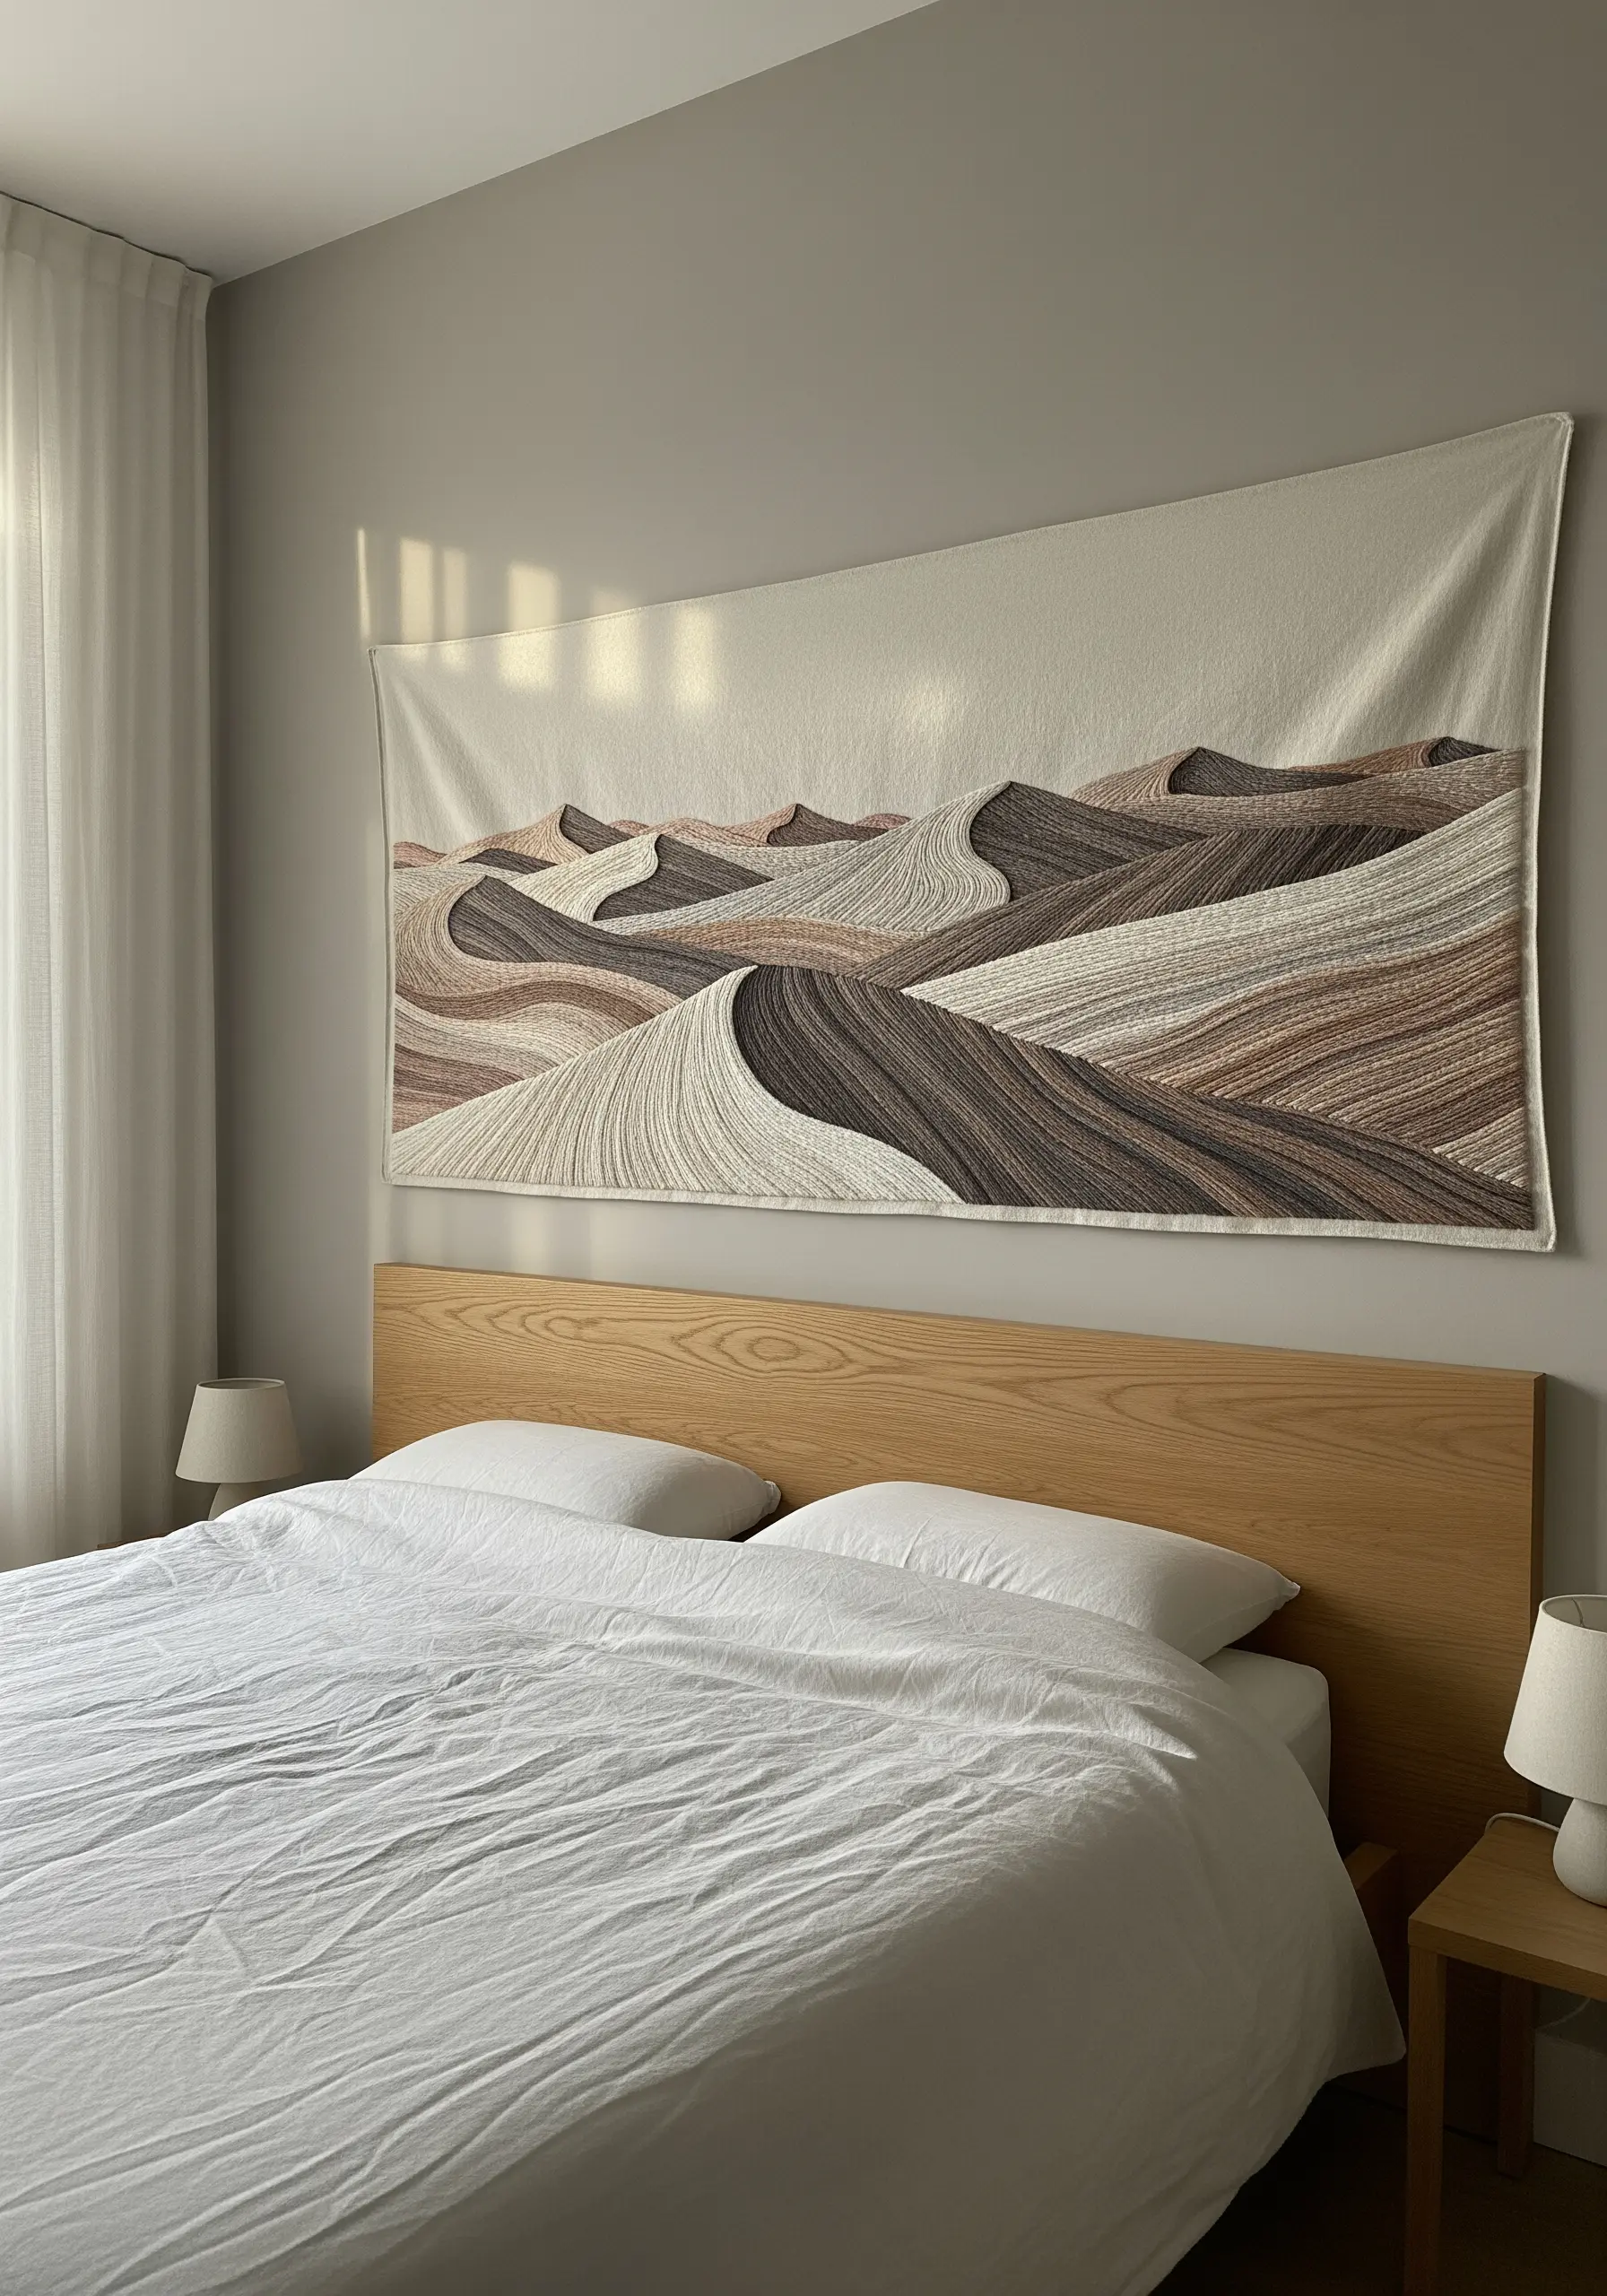
To capture the rolling feel of sand dunes, don’t just fill the shapes—guide the eye with the direction of your stitches.
Use a long-and-short stitch, angling your needle to follow the curve of each dune’s crest.
This technique creates a sense of shadow and movement that flat satin stitch cannot achieve.
For the smoothest transitions between colors, blend threads in your needle or use a palette of closely related shades like sand, taupe, and ivory.
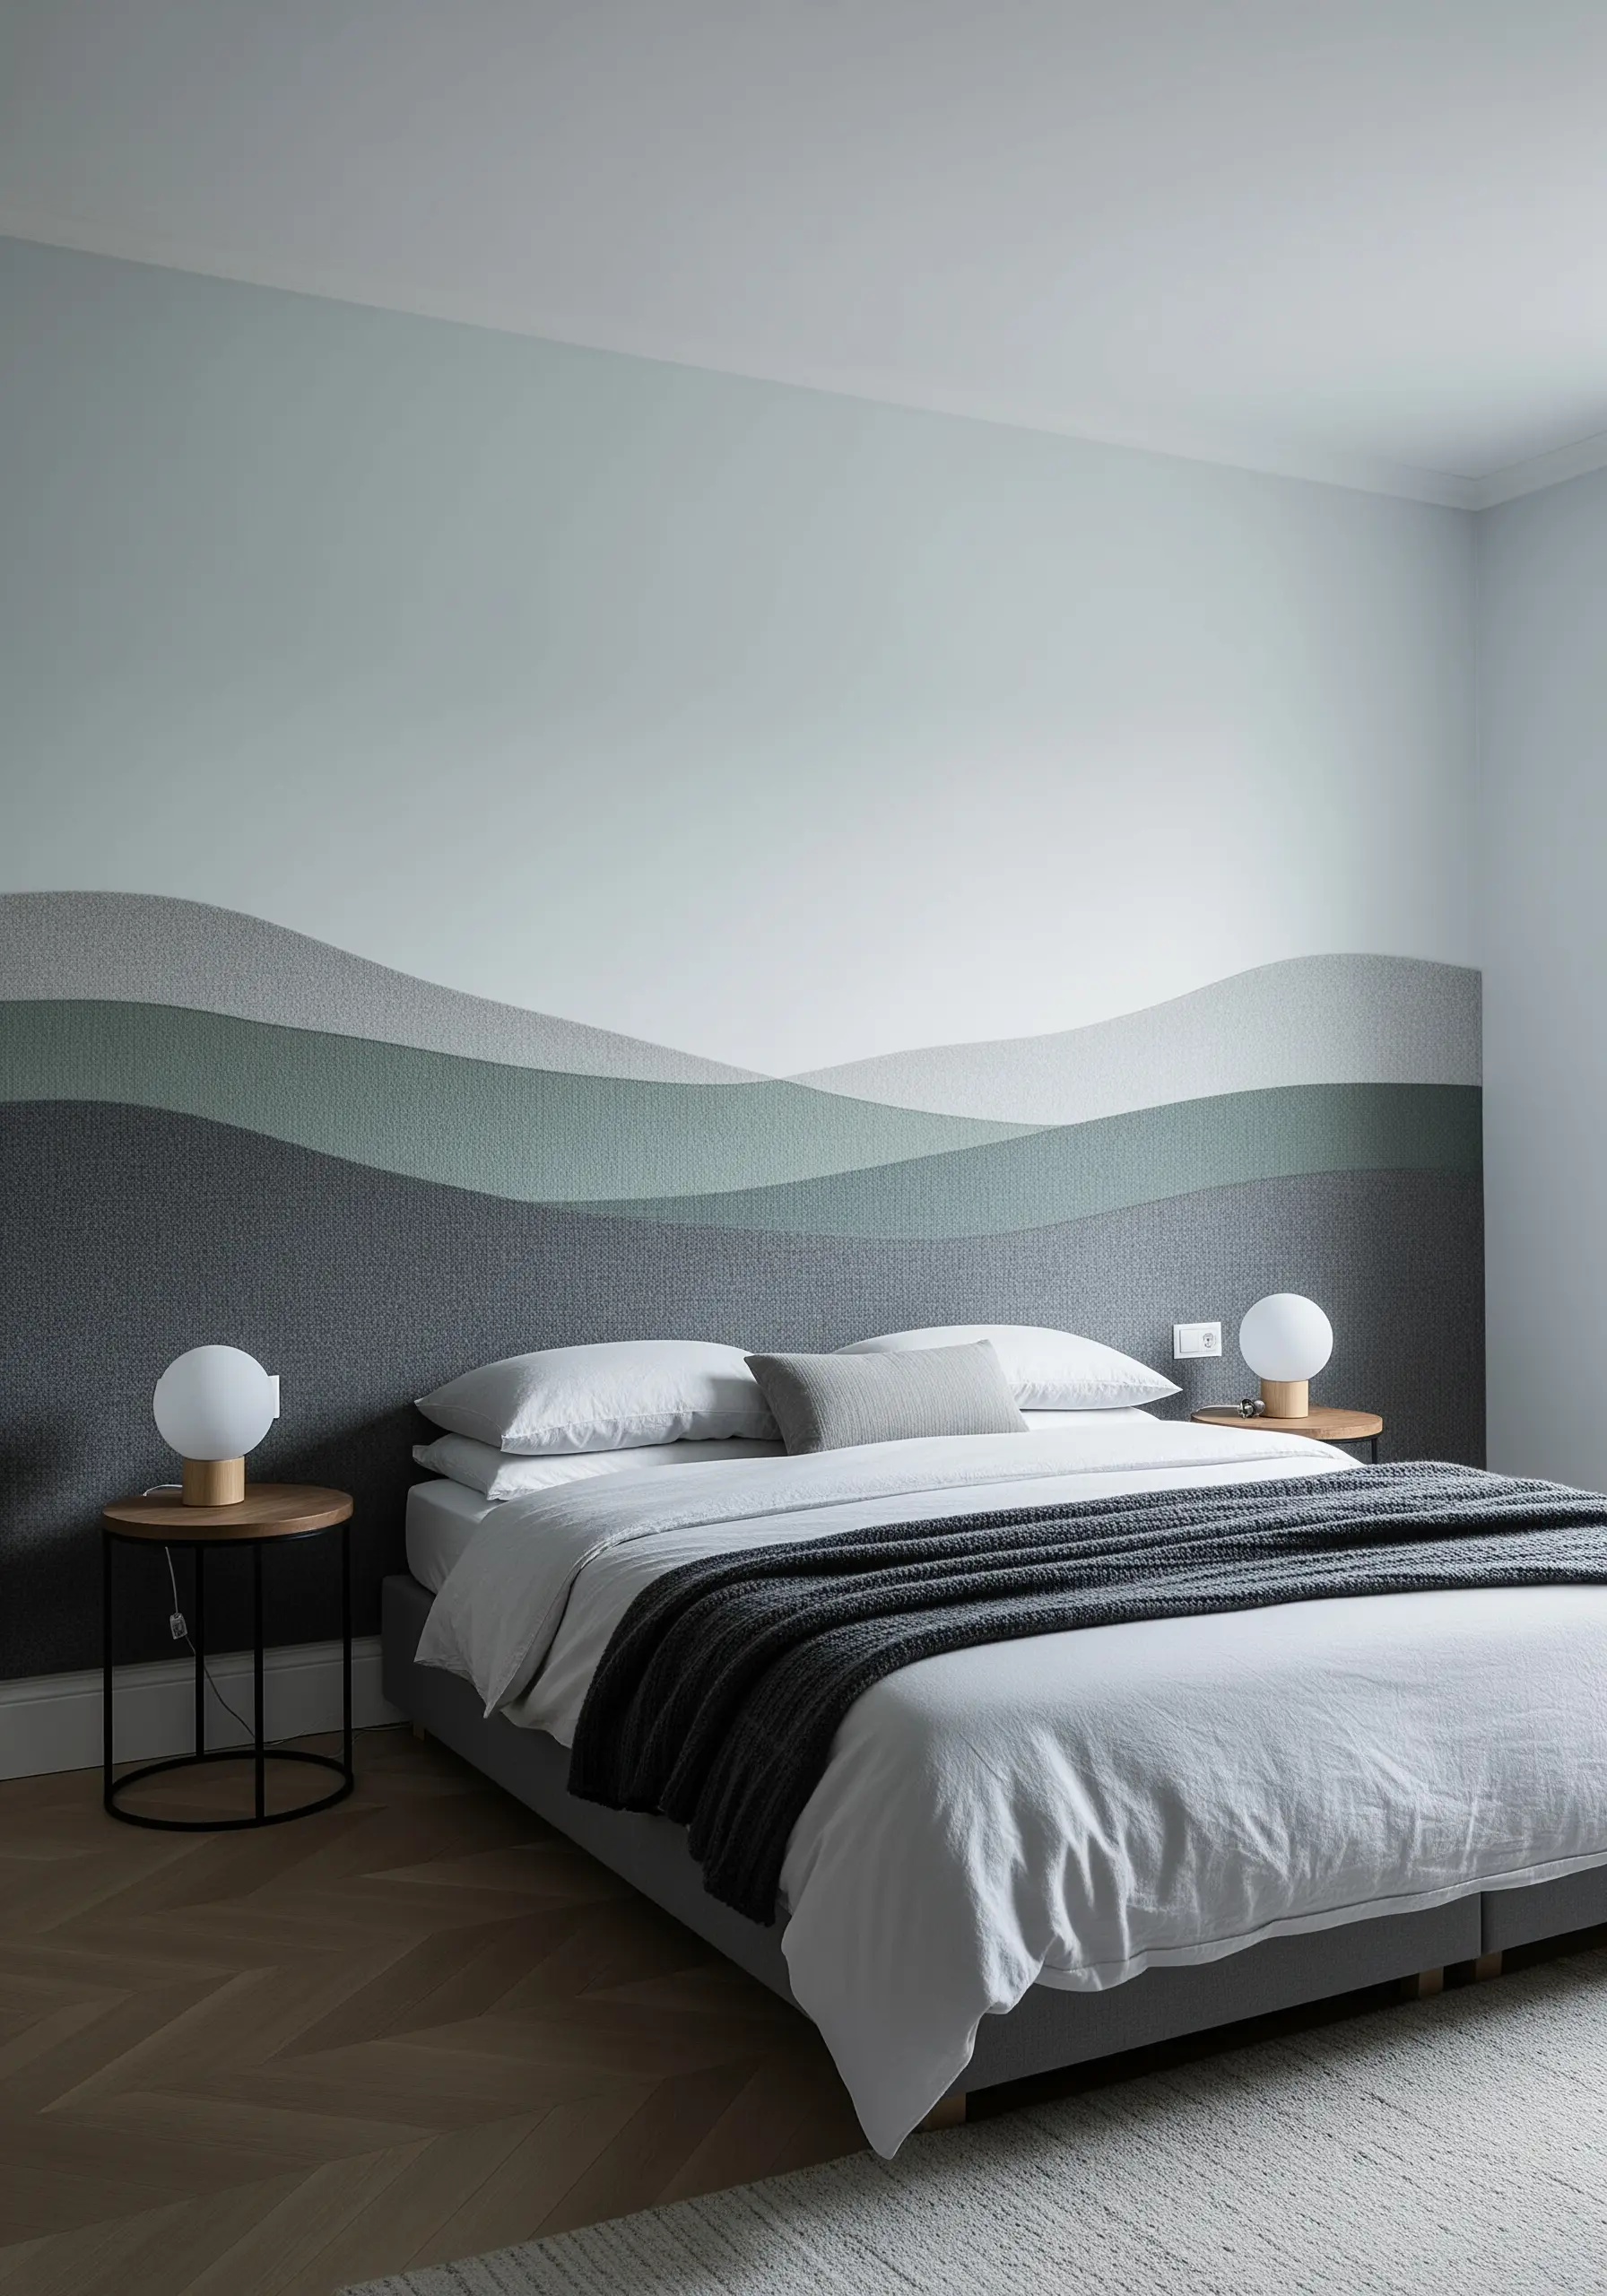
These neutral color gradient embroidery ideas are perfect for creating large, serene pieces that anchor a room.
2. Isolate Shapes with Negative Space

Instead of filling an entire hoop, use negative space to make your organic shapes feel intentional and clean.
Stitch only the concentric outlines of your amoeba-like forms, leaving the fabric between them bare.
Use a whipped backstitch or a heavy chain stitch to create bold, smooth lines that stand out.
Grouping hoops in complementary color palettes—like sage, terracotta, and slate blue—creates a cohesive triptych that feels both modern and natural.
3. Achieve Elegance with High-Contrast Line Work
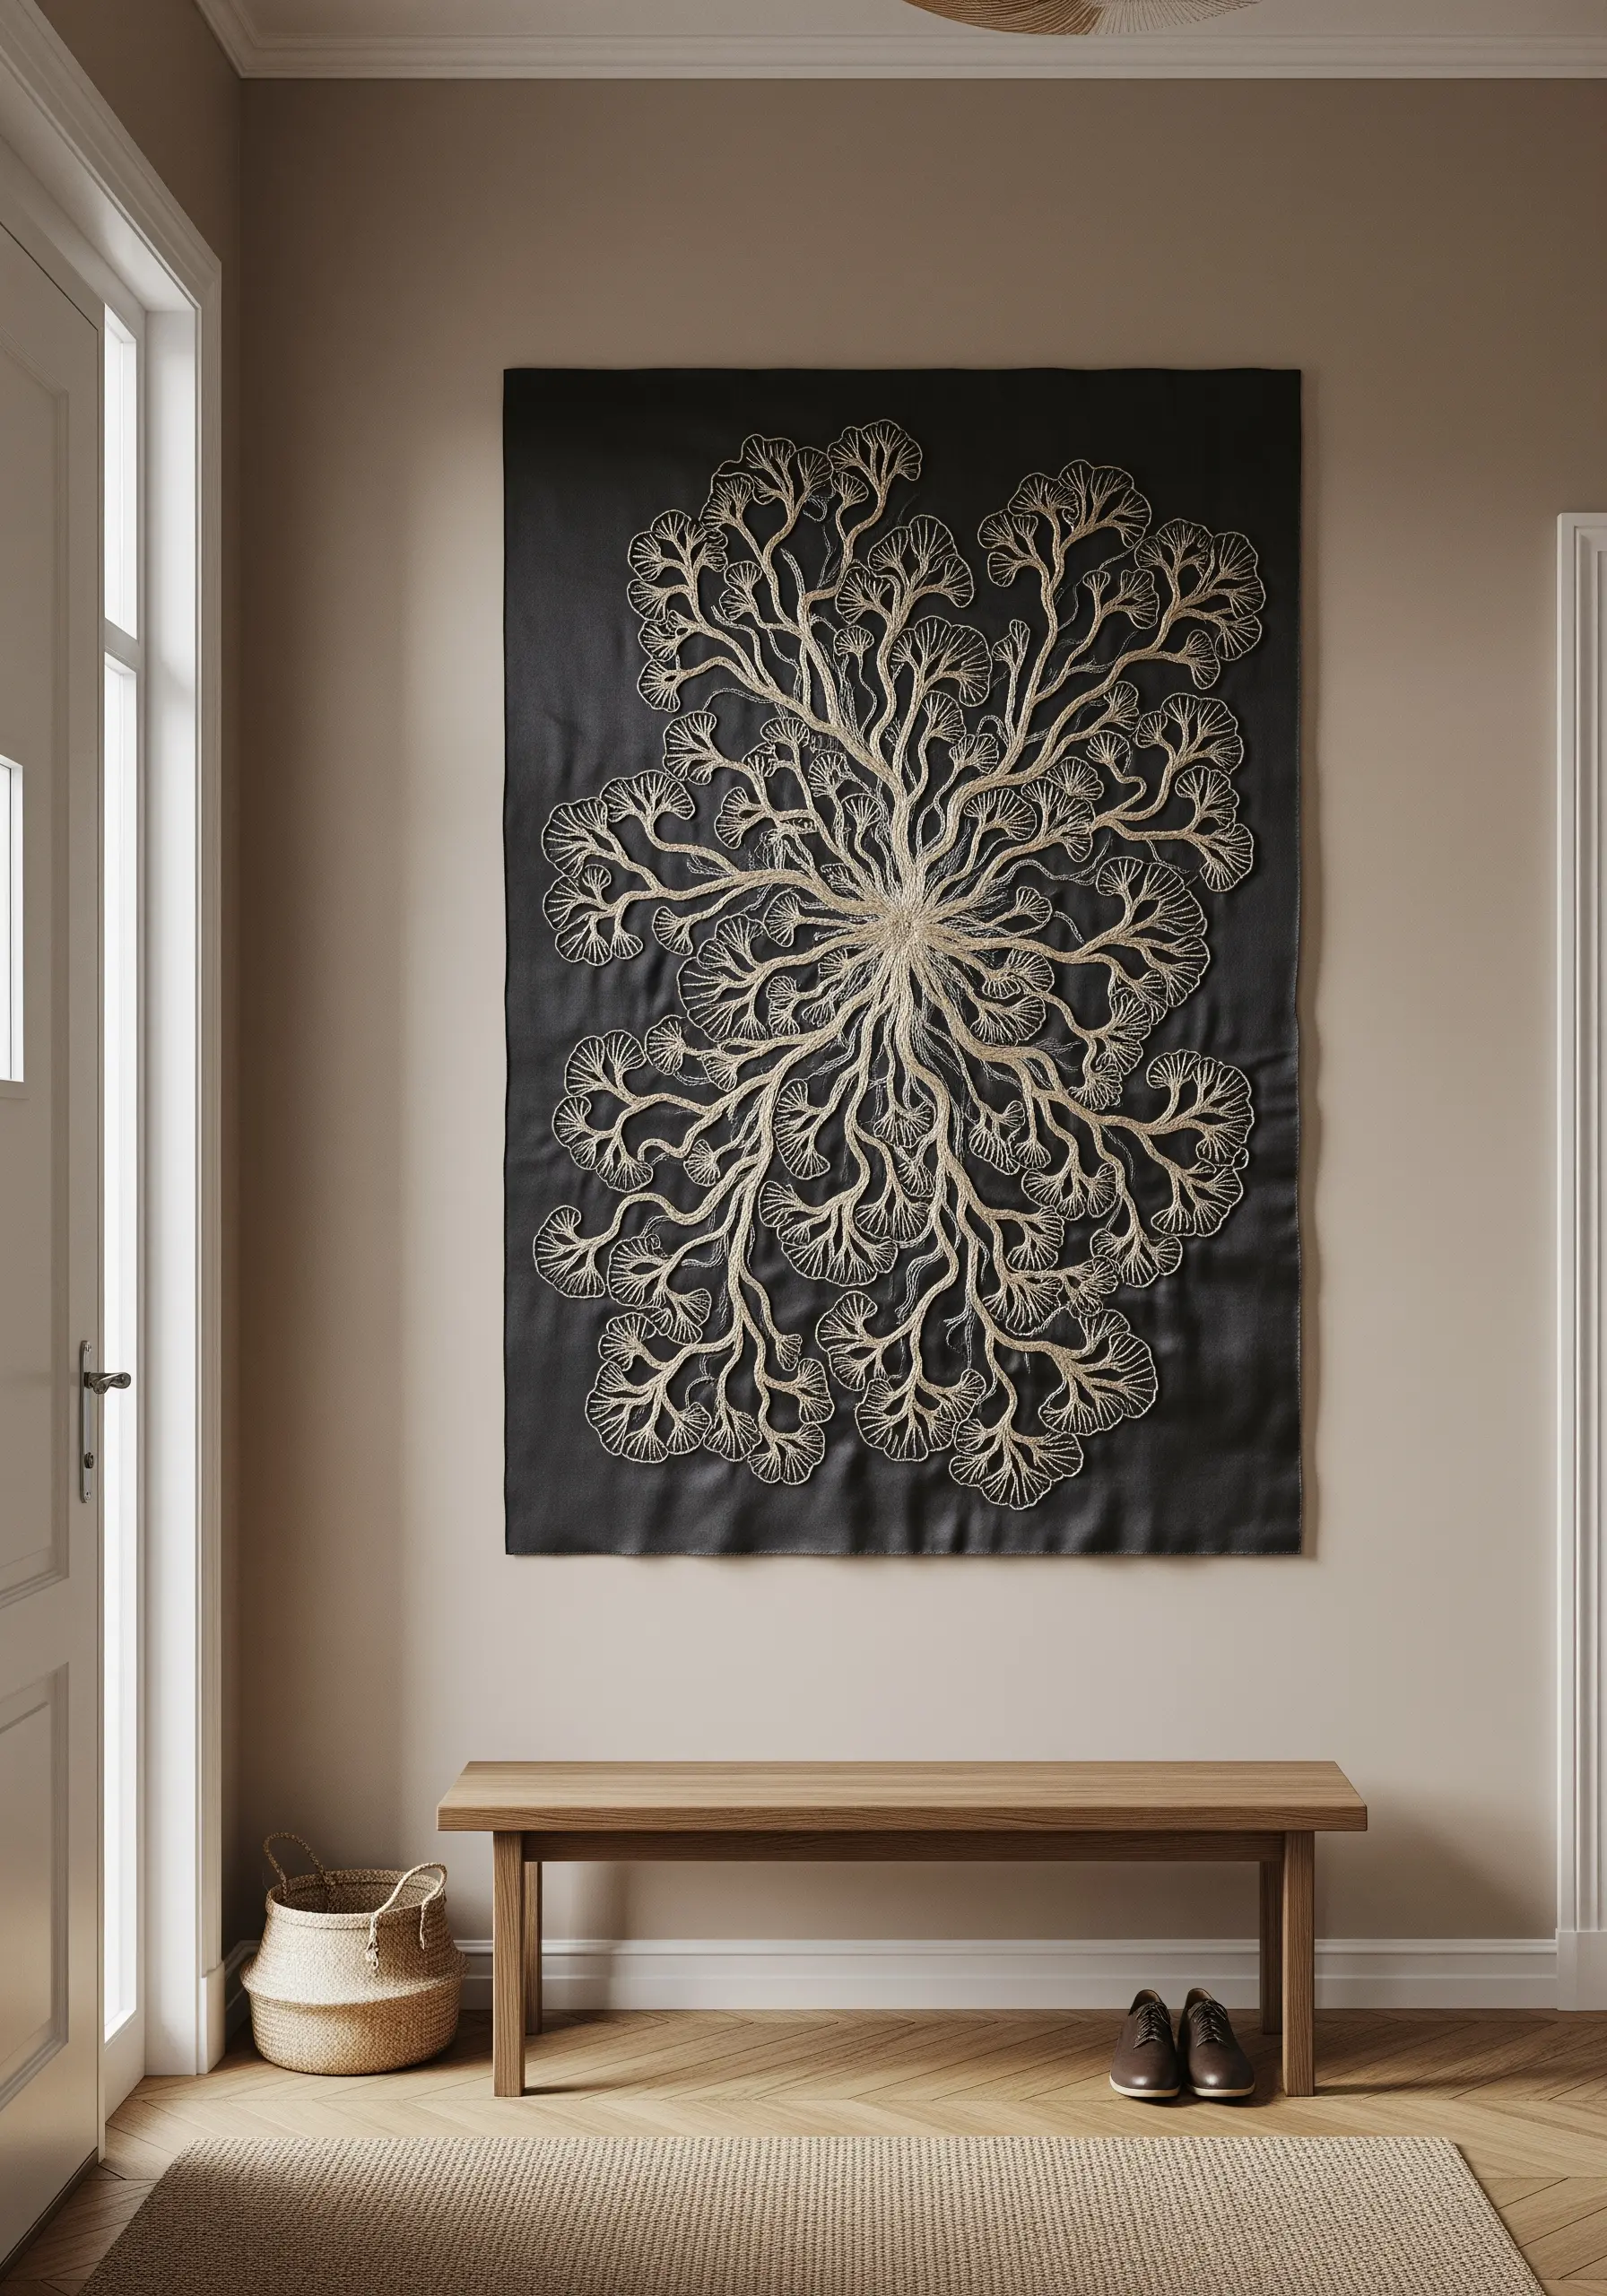
Create a dramatic statement by stitching a light, delicate pattern onto a dark, matte fabric like black linen or cotton twill.
For intricate, branching designs like coral or lichen, a simple stem stitch is your best tool.
It allows for sharp curves and a continuous, elegant line that mimics natural growth patterns.
Use a silk or metallic thread in gold or silver to catch the light, adding a touch of luxury without overwhelming the minimal aesthetic.
4. Build a Gallery Wall with Textural Studies
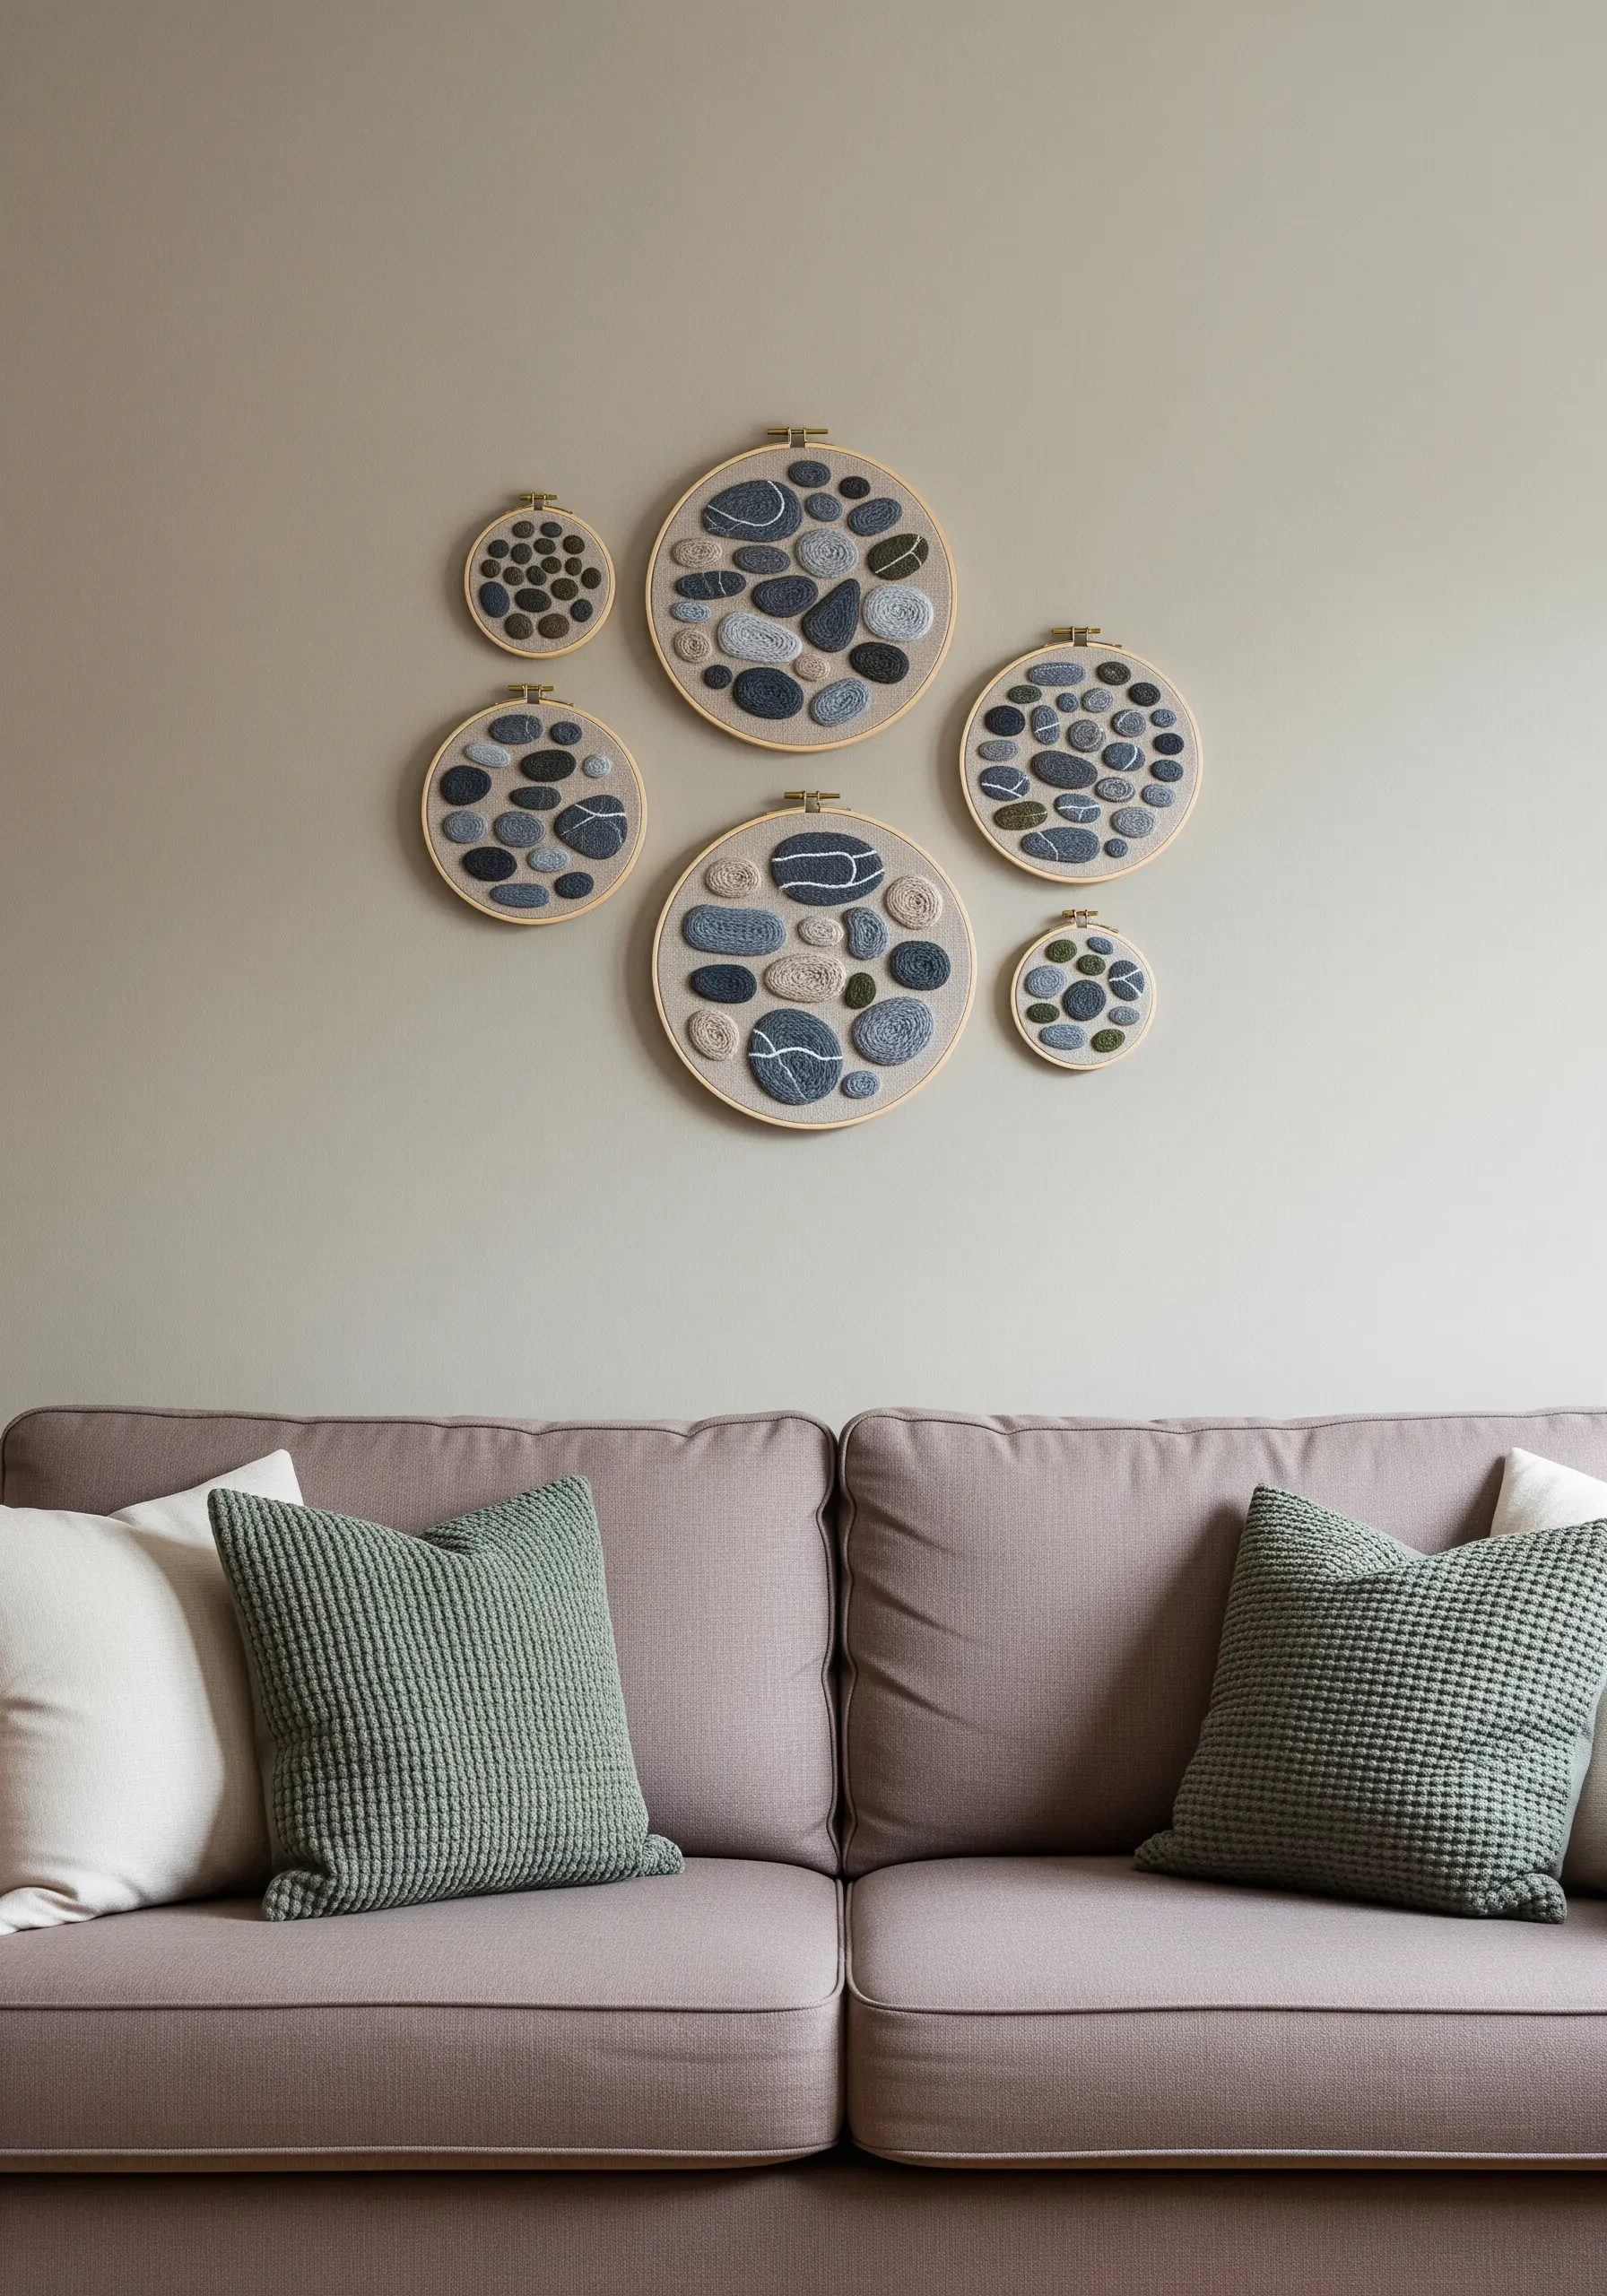
Turn simple pebble shapes into a sophisticated collection by focusing purely on texture.
Fill each shape with a different stitch: dense French knots for a bumpy surface, smooth satin stitch for a polished look, or chunky chain stitch for a coiled effect.
Vary the size of your hoops and arrange them in an organic cluster to mimic stones on a shoreline.
This approach transforms basic stitches into compelling minimal DIY embroidery pieces that invite a closer look.
5. Define Form with Radiating Straight Stitches

You don’t need complex fills to create a compelling botanical design.
Outline a simple shape like a ginkgo leaf with a clean backstitch.
Then, fill the interior with radiating straight stitches that fan out from the stem, mimicking the leaf’s natural veins.
This technique is not only fast but also creates a beautiful sense of light and structure.
These botanical line art embroidery patterns work especially well for large-scale framed pieces where simplicity makes a statement.
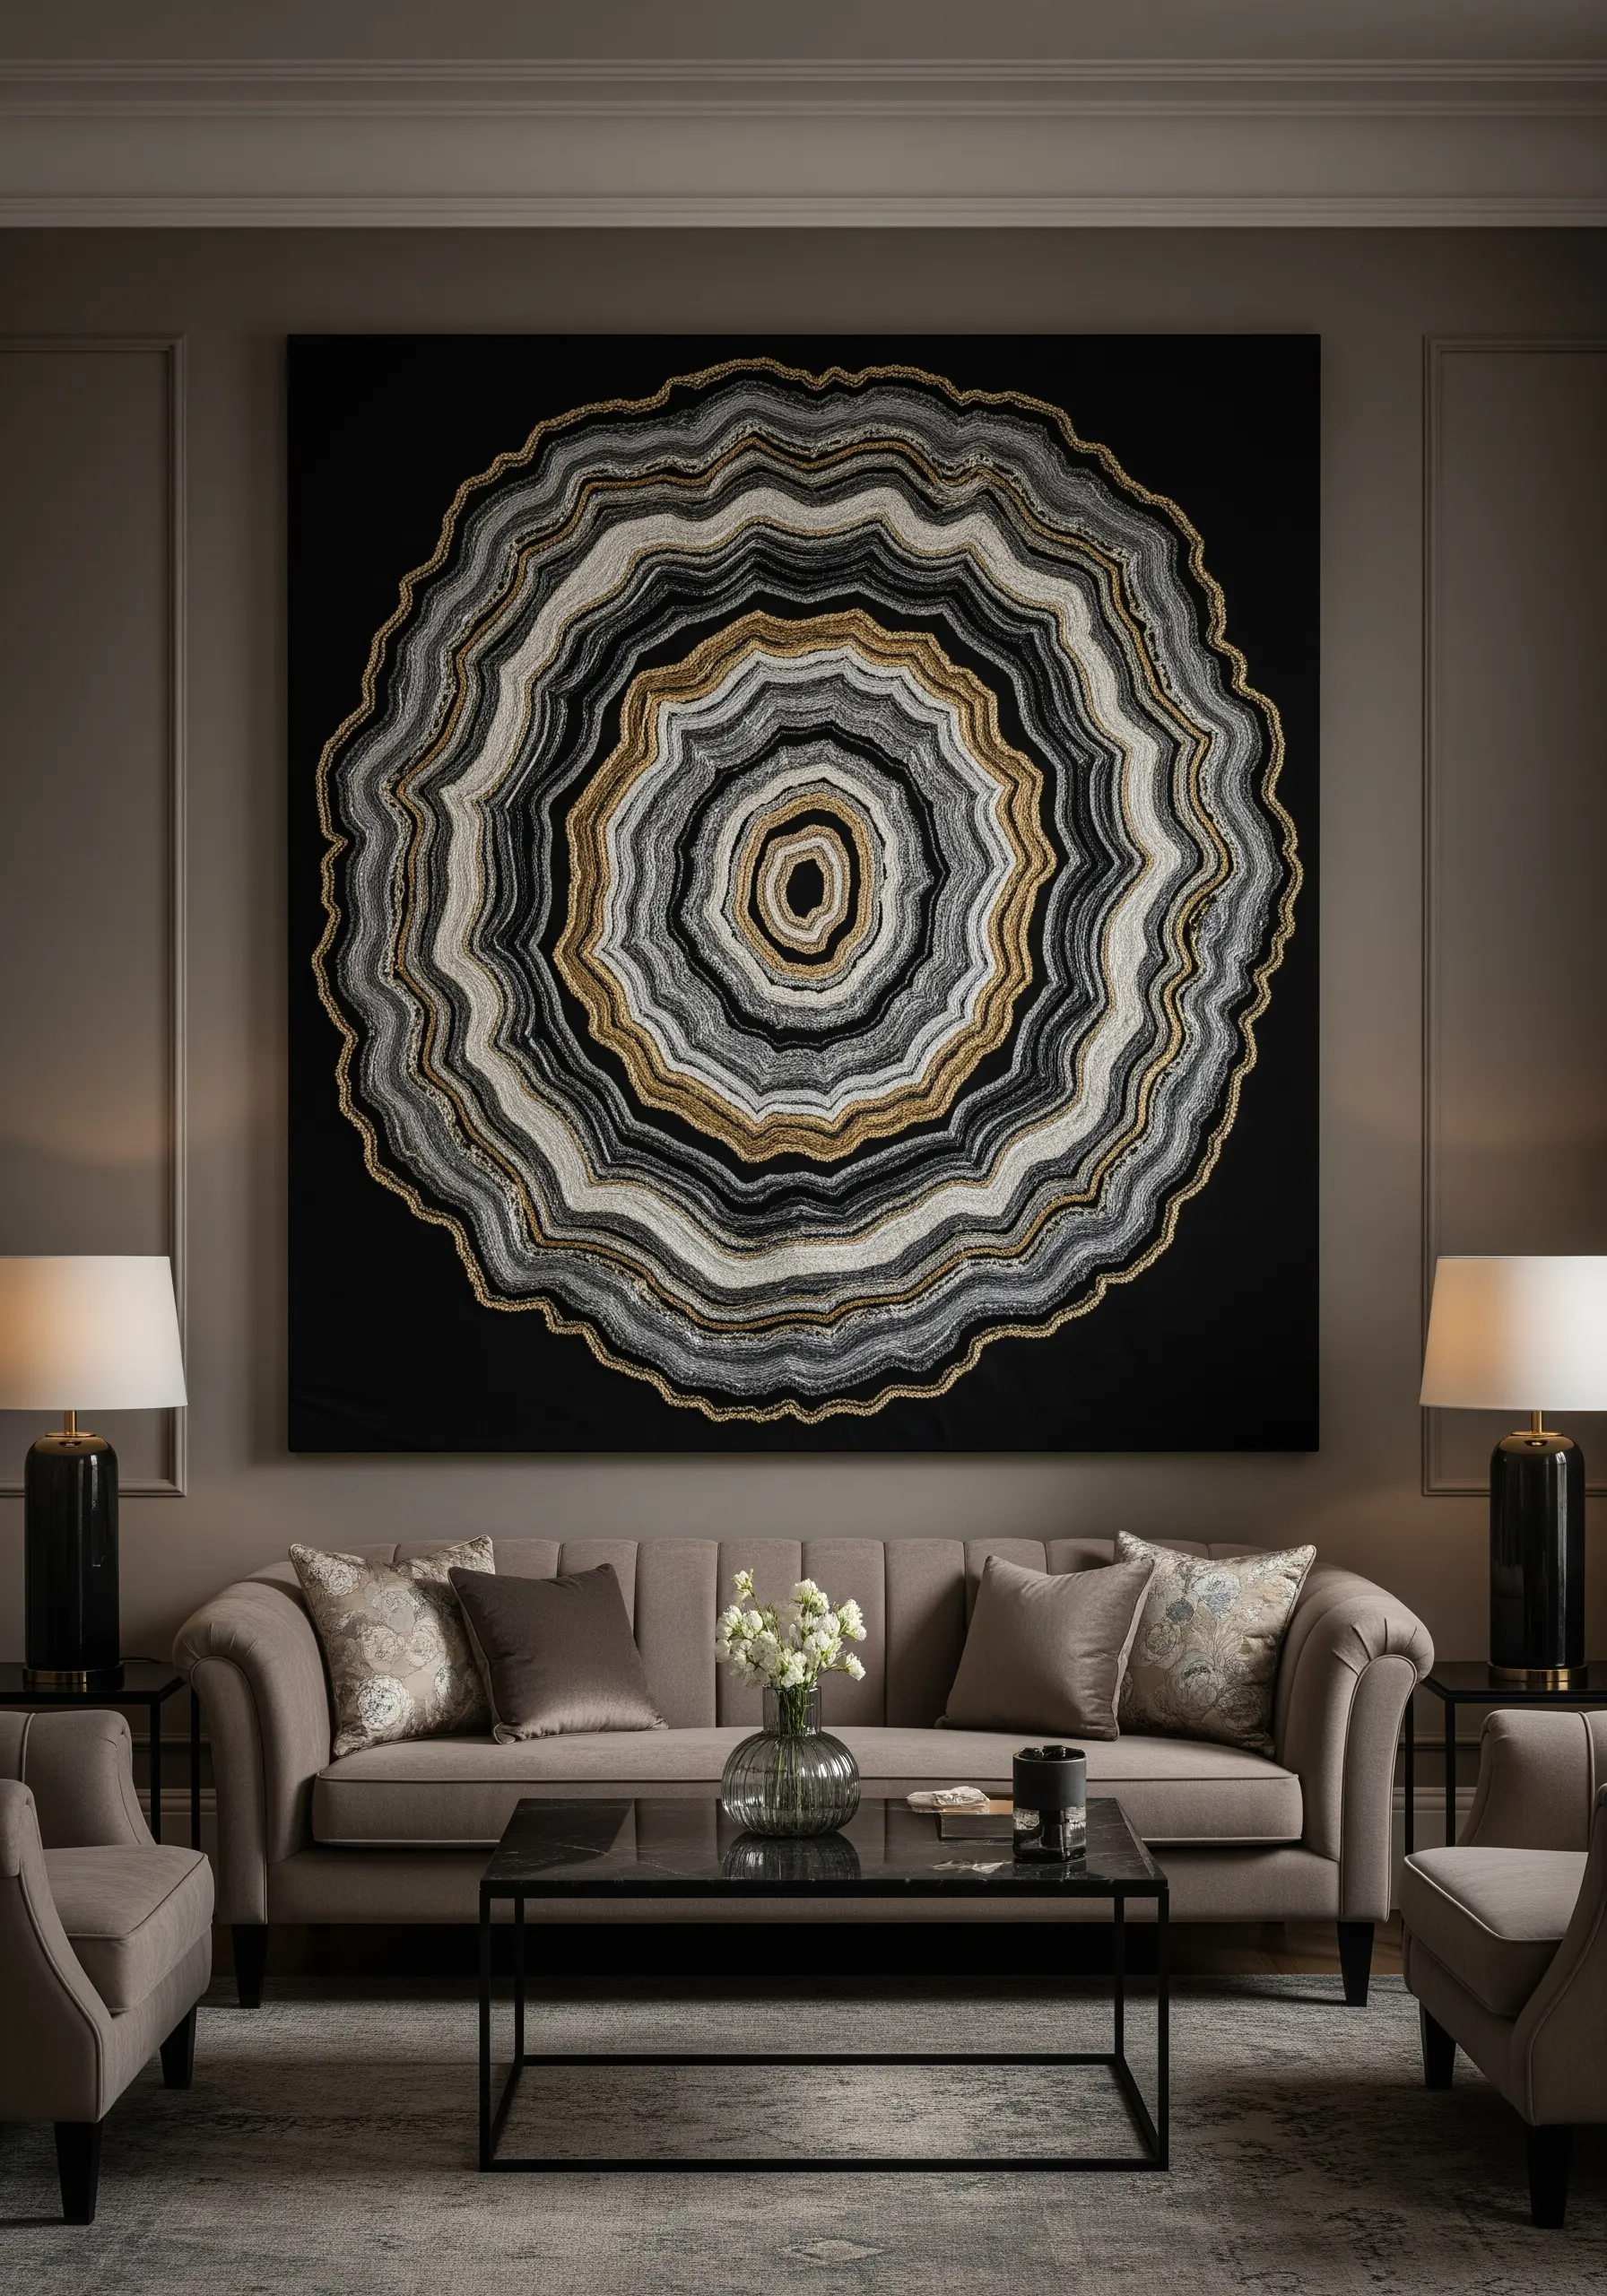
6. Create Visual Vibration with Concentric Lines

Transform a simple circle into a meditative focal point using only the running stitch or backstitch.
Instead of a single color, alternate between two or three threads—like white, silver, and sky blue—for each concentric ring.
This subtle variation creates a visual shimmer and depth that draws the eye inward.
Stitching on a dark navy or charcoal fabric enhances this effect, making the lines appear to float.
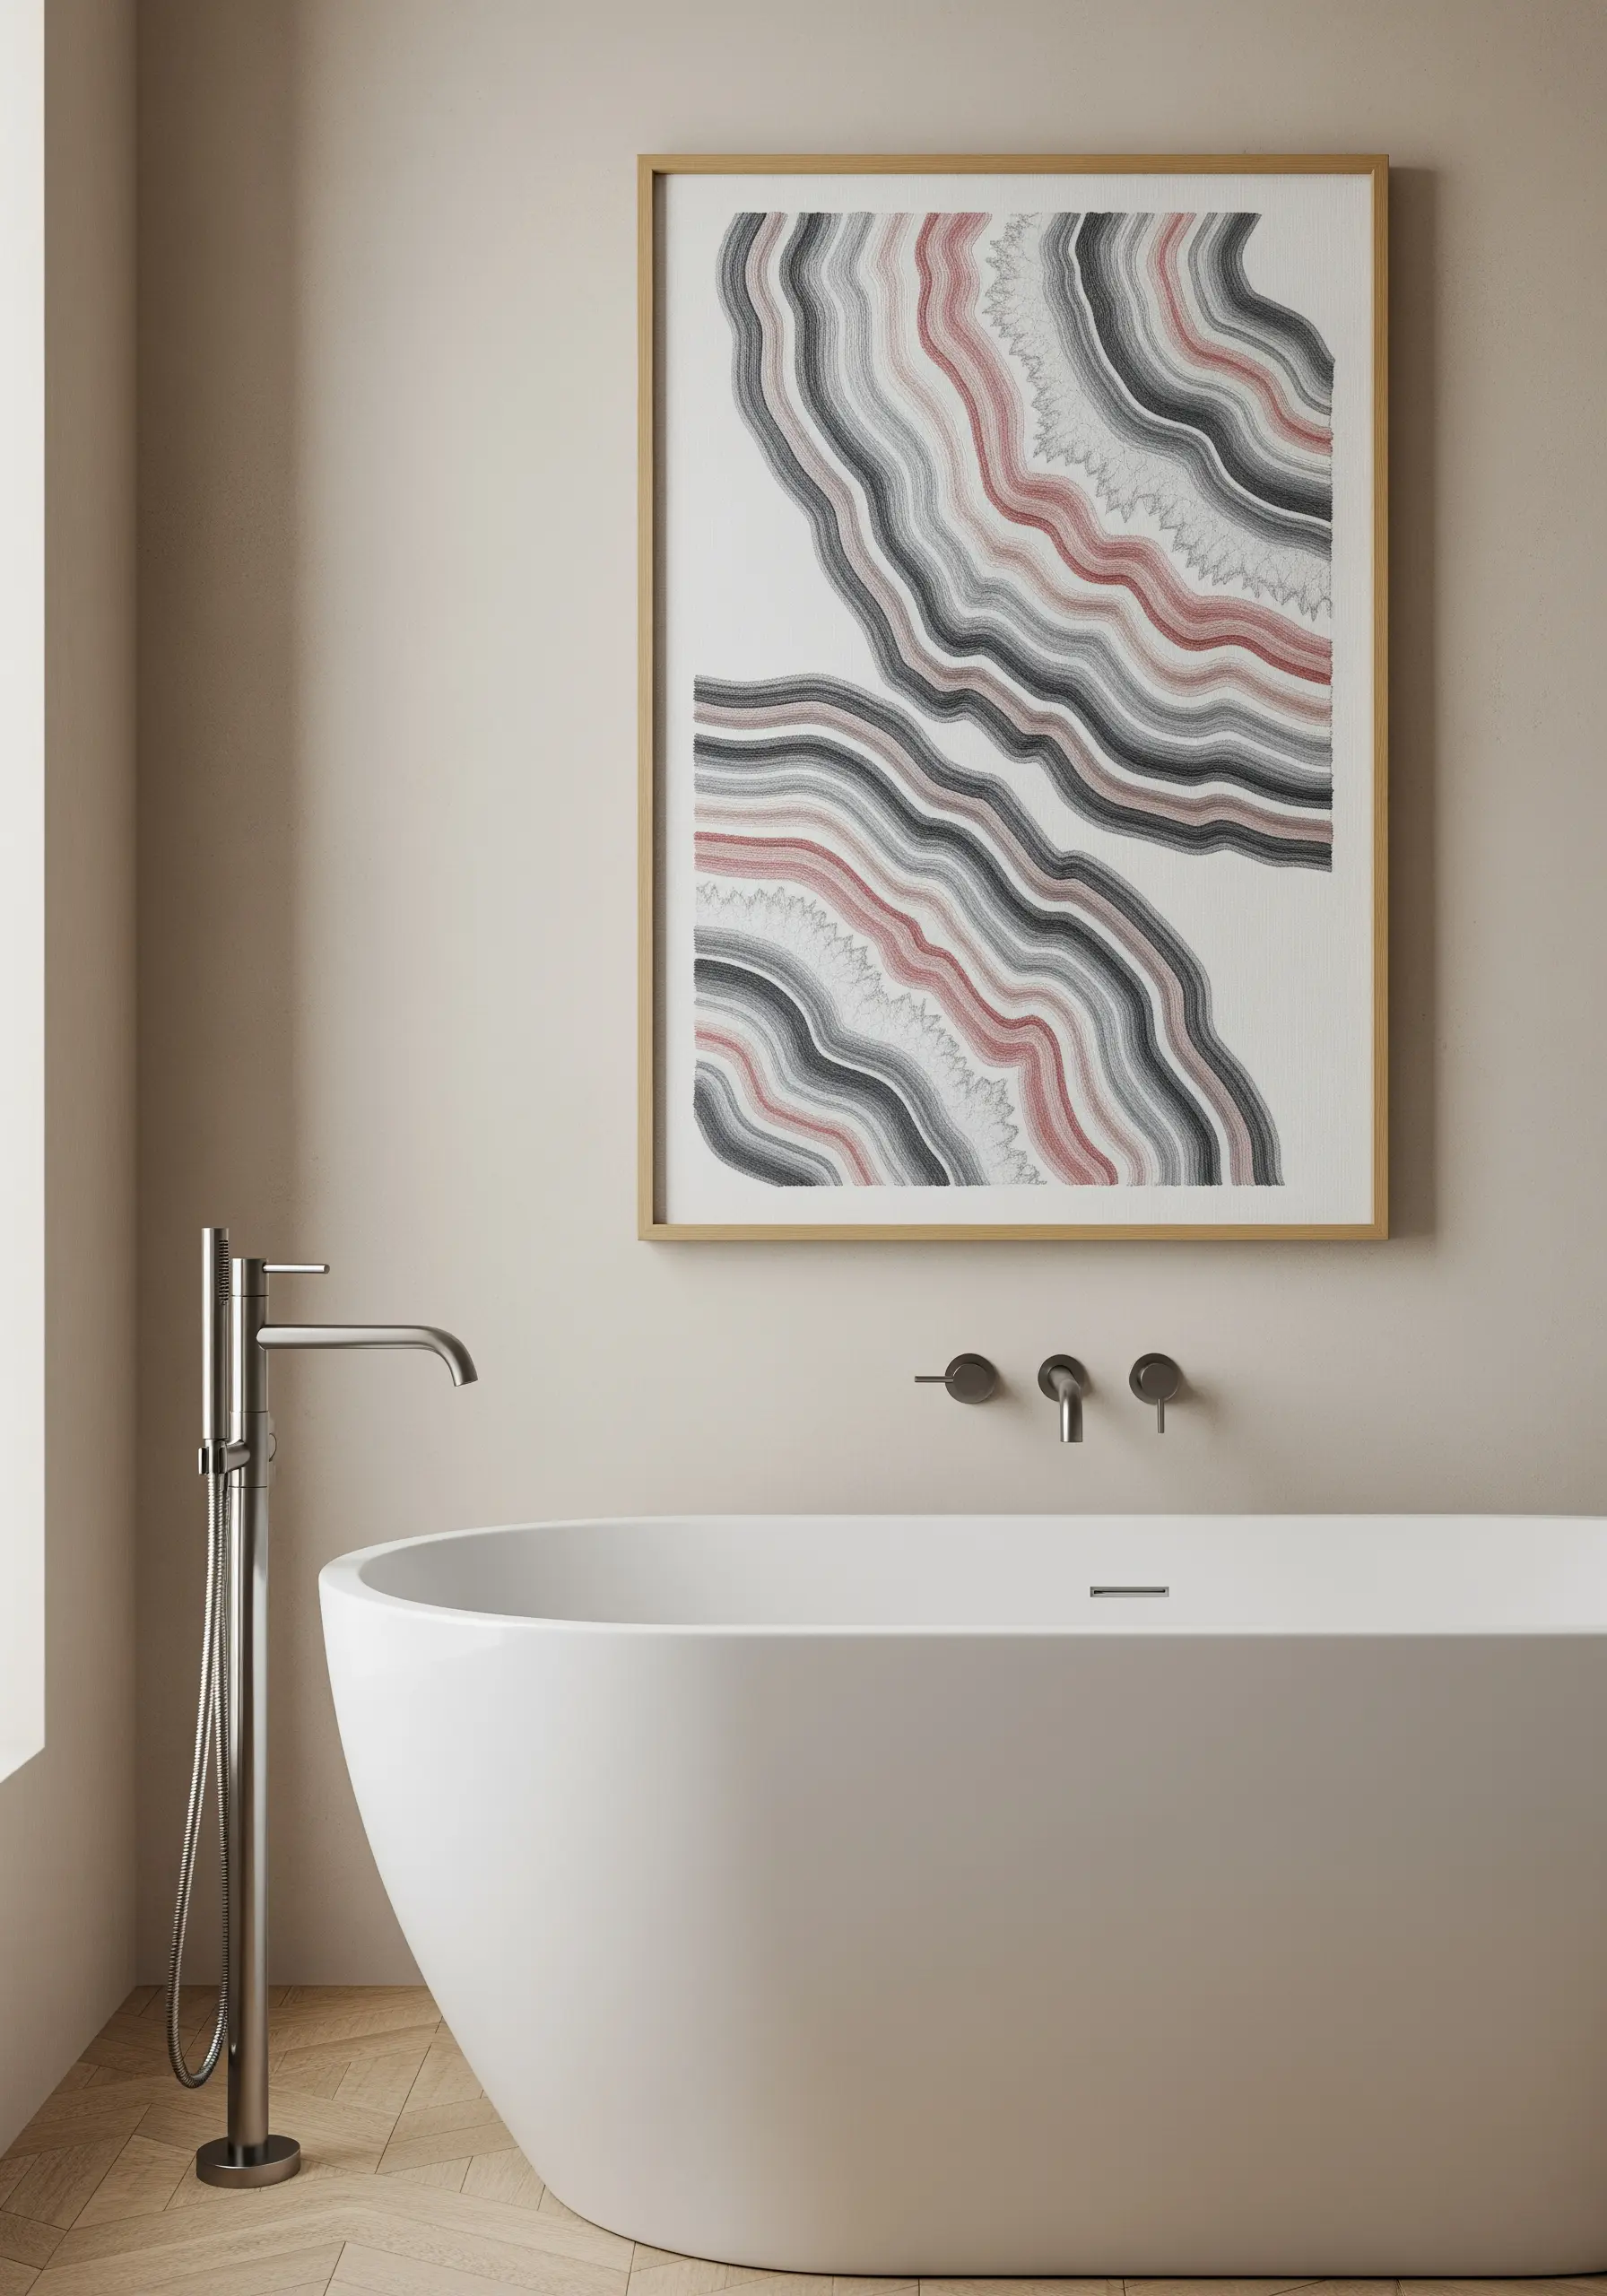
7. Capture Geologic Flow with Color Blocking
To recreate the layered look of agate or polished wood, think in flowing color blocks rather than distinct objects.
Use a chain stitch or couched yarn to outline and fill wide, meandering bands of color.
Lay your stitches parallel to the curves of the design to emphasize the organic, flowing movement.
A palette of earth tones—umber, sienna, stone, and cream—keeps the final piece grounded and serene, perfect for DIY calm cozy wall hangings.
8. Tell a Story with a Design Series
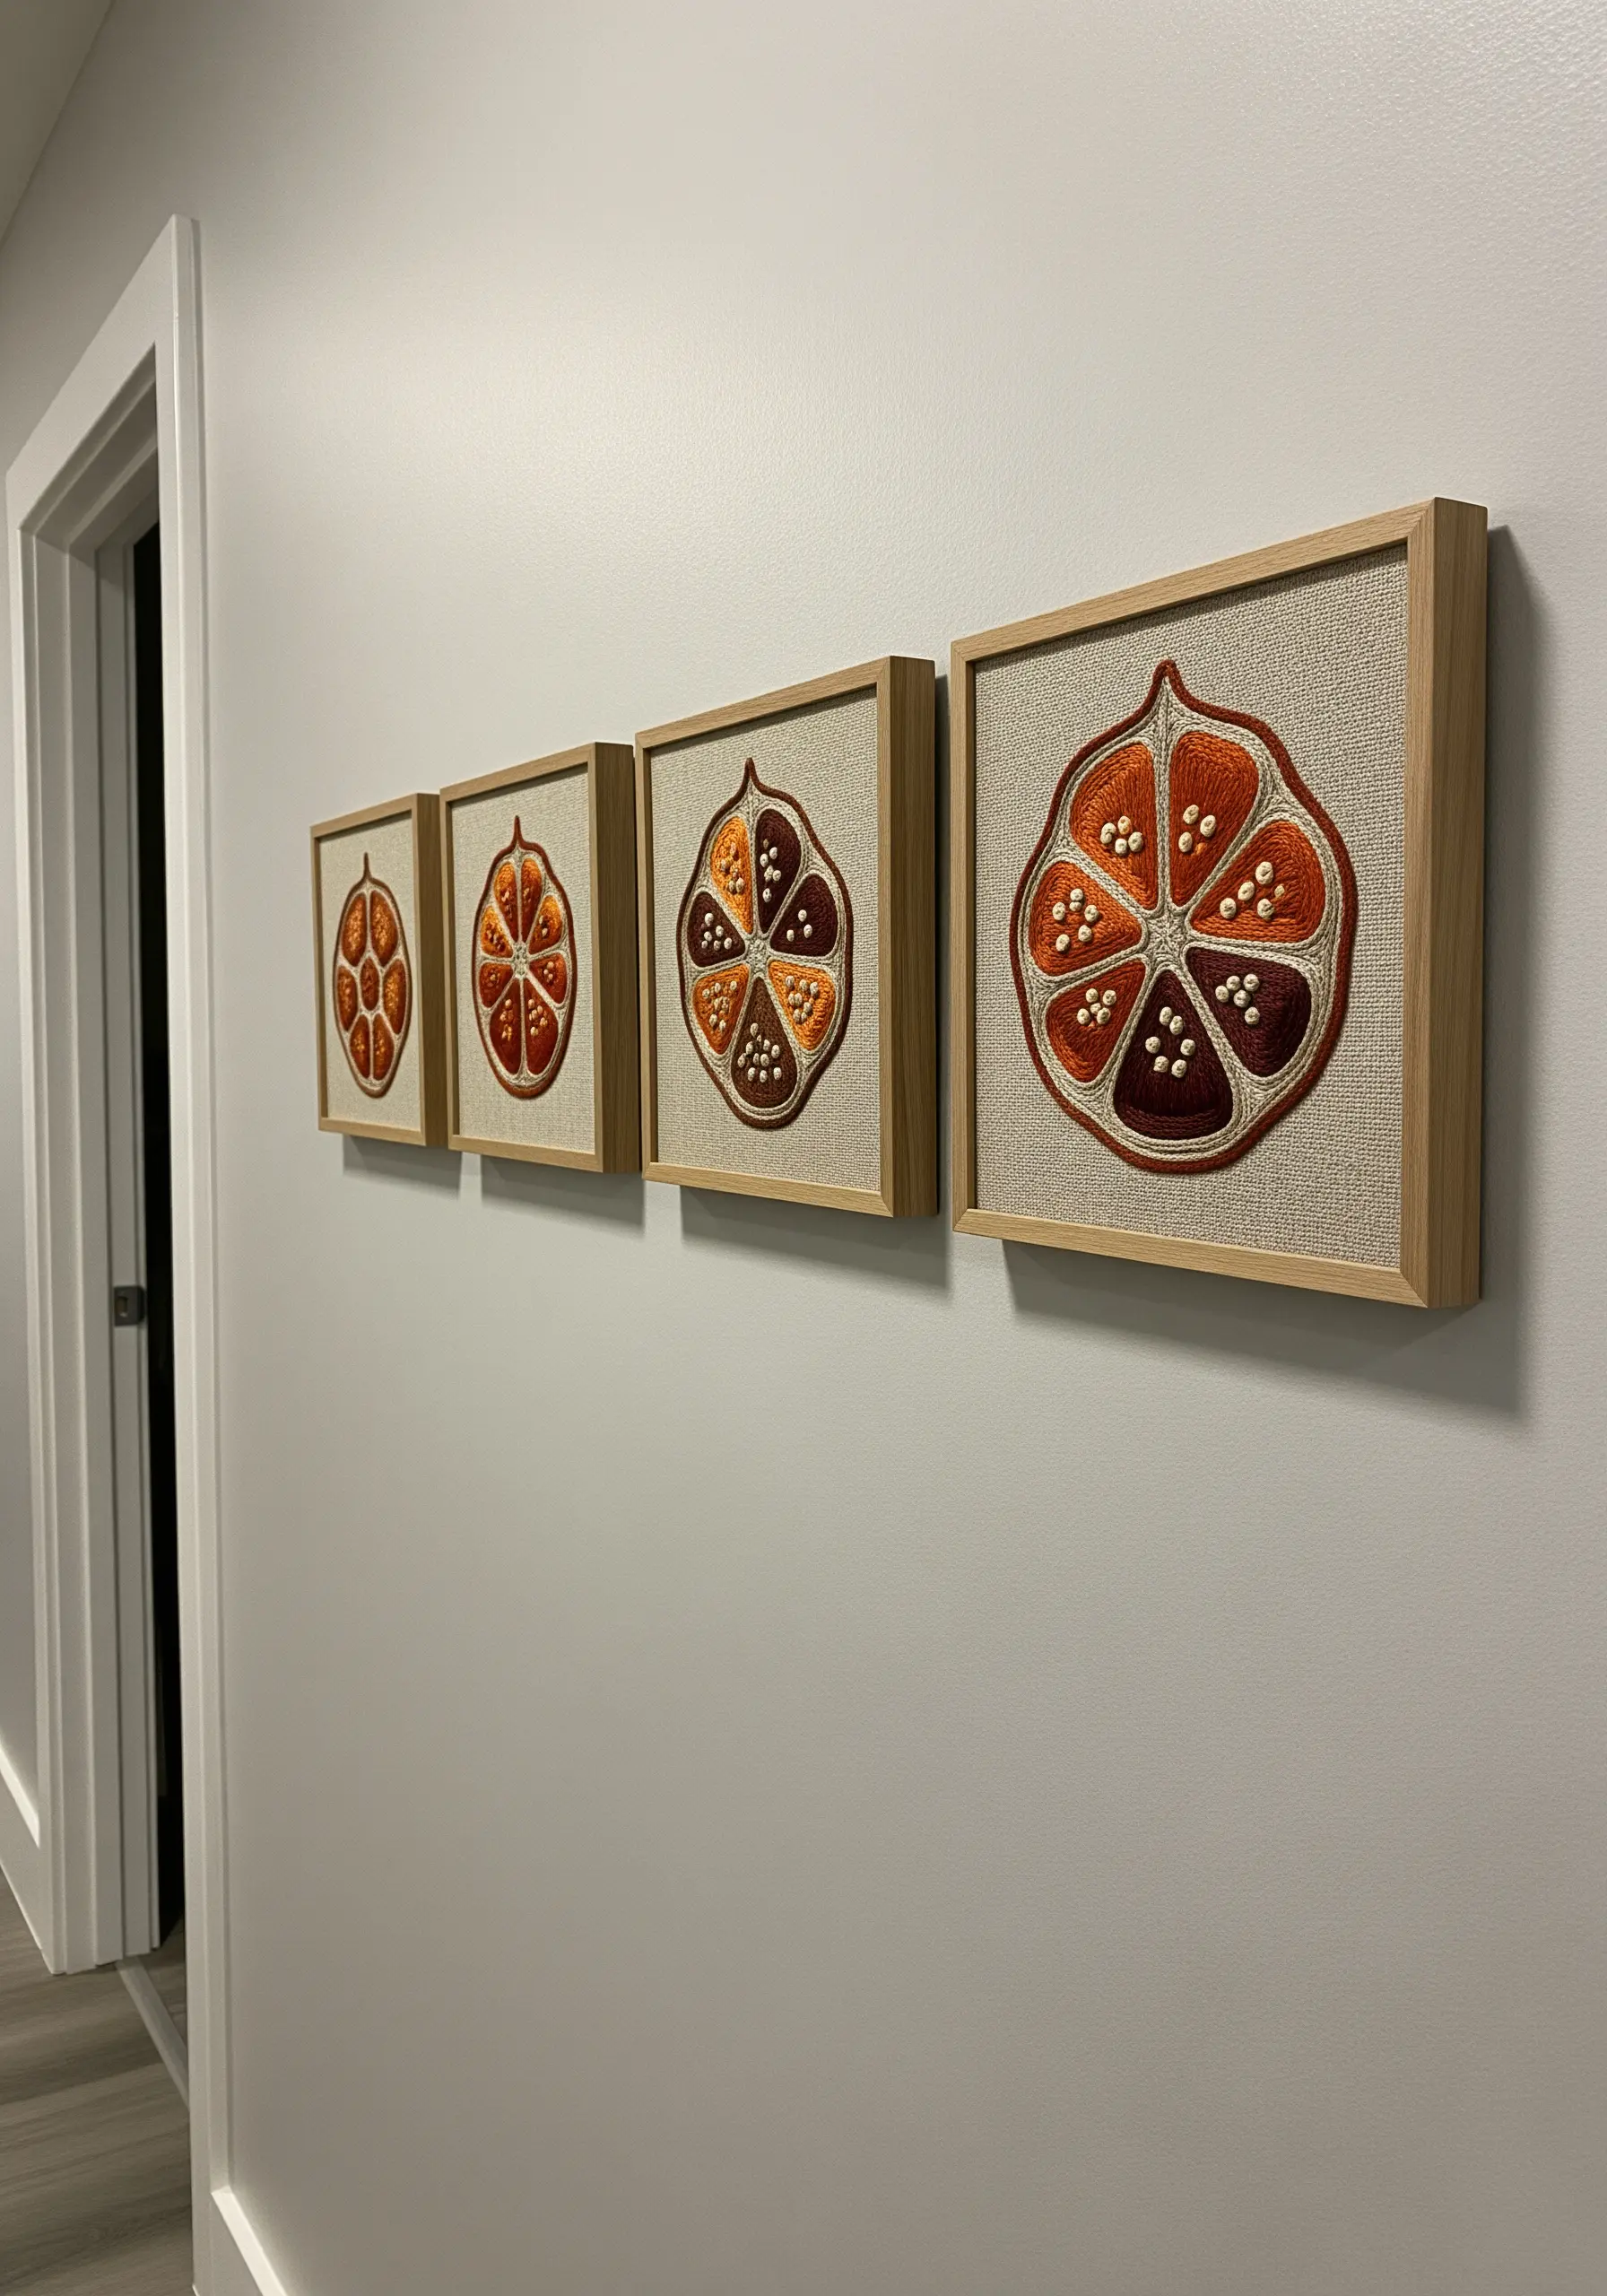
Elevate a simple motif by presenting it as a progressive series.
Embroider the same subject, like a cross-section of a fruit, in four slightly different stages of growth or abstraction.
Use bold satin stitch for the segments and accent with French knots for seed textures.
Framing each piece identically and hanging them in a linear progression turns a simple project into a thoughtful narrative collection.
9. Use Monochrome Texture for a Sophisticated Finish

Create a high-impact design using only one color of thread on a neutral fabric.
The key is to build dense, touchable texture that allows the shape to emerge from the background.
Fill your design—like this intricate coral tree—with thousands of tiny seed stitches or French knots packed closely together.
This meticulous technique produces stunning greige ivory embroidery art ideas that feel both organic and incredibly refined.
10. Master Bold Graphics with Consistent Line Weight
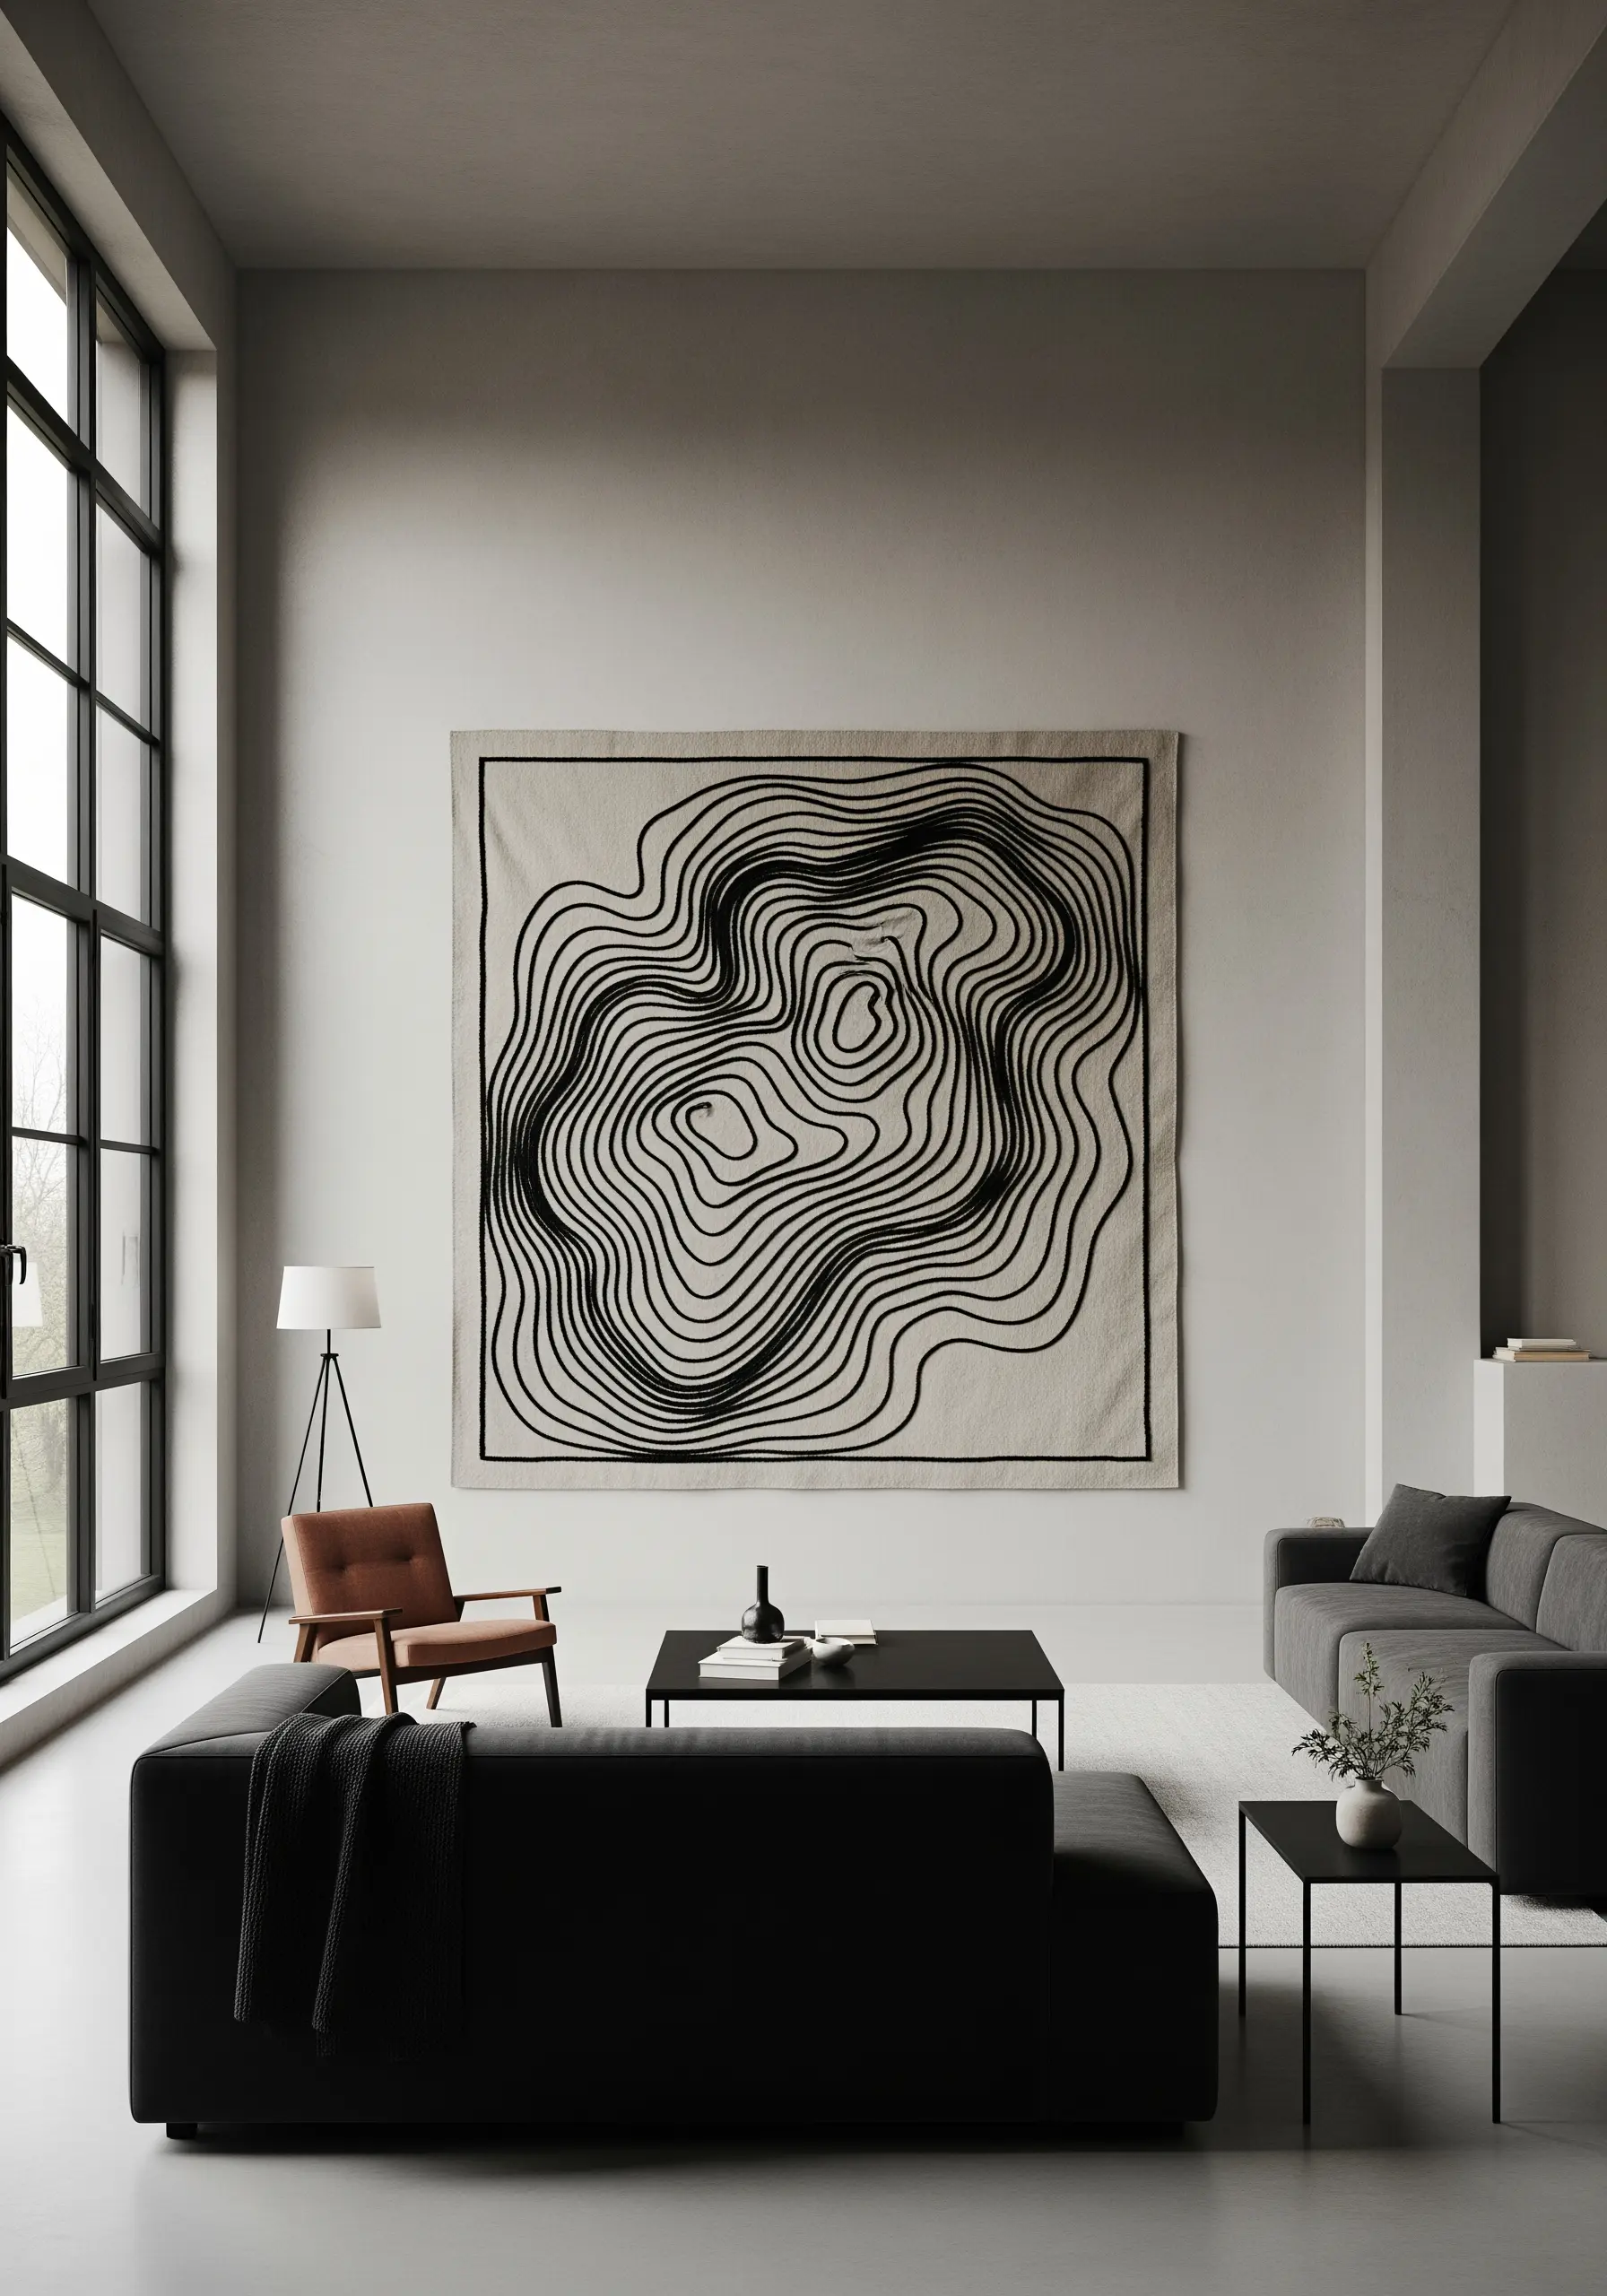
For a clean, topographic-inspired design, consistency is everything.
Choose a single, bold thread—like a black sashiko thread or all six strands of embroidery floss.
Use a uniform backstitch or stem stitch throughout the entire piece to ensure every line has the same visual weight.
This disciplined approach is what gives large-scale line art its powerful, graphic impact, creating delicate line art embroidery ideas that feel confident and modern.
11. Mimic Natural Textures with 3D Stitches
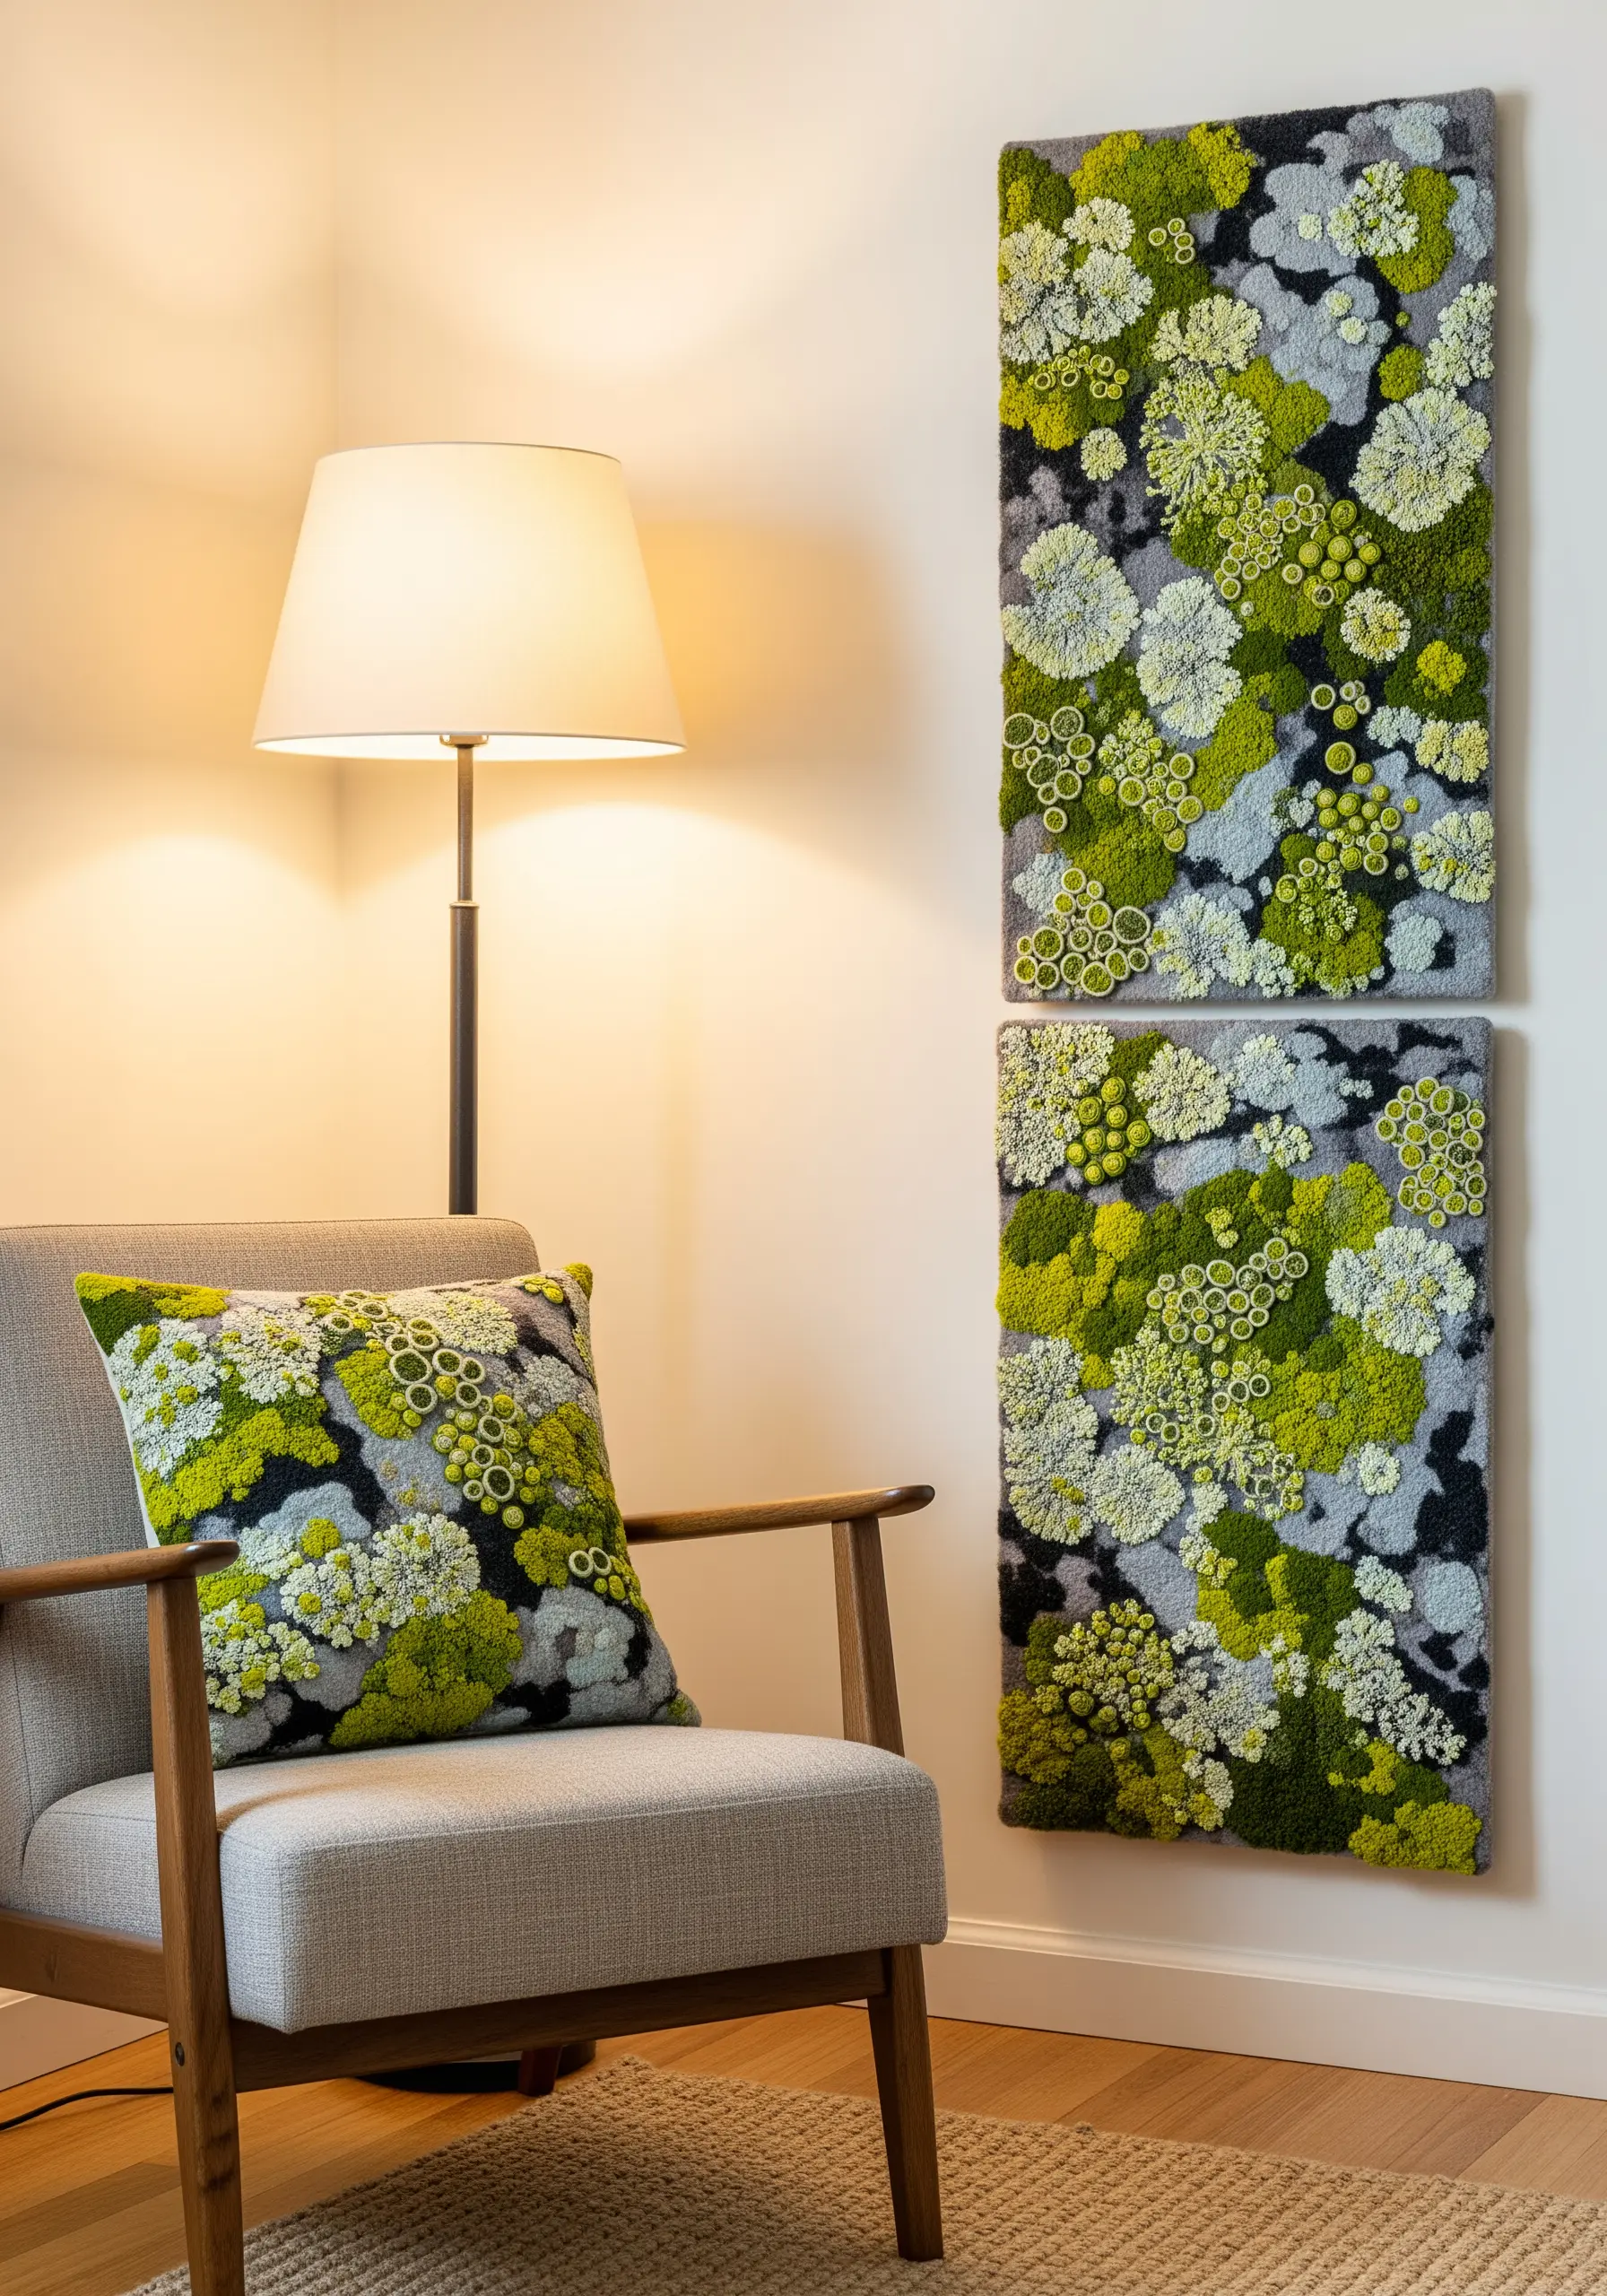
To capture the lush, varied surface of moss, you need to build texture outwards from the fabric.
Use turkey work (loop stitch) and snip the loops at different heights to create a fuzzy, velvety surface.
Combine this with dense clusters of French knots in various shades of green, grey, and chartreuse.
These moss fern embroidery textures are perfect for wall panels or pillows, adding a biophilic touch to your space.
12. Create a Sense of Movement with Scattered Motifs

Guide the eye down a long, vertical space by scattering motifs in a gentle, cascading pattern.
Alternate between filled leaves (satin stitch) and simple outlines (backstitch) to add visual interest and rhythm.
This variation prevents the design from feeling too repetitive and enhances the illusion of leaves gently falling.
Using a palette of warm autumnal tones against a pale linen background keeps the design light and airy.
13. Embrace Imperfection with Textural Circles
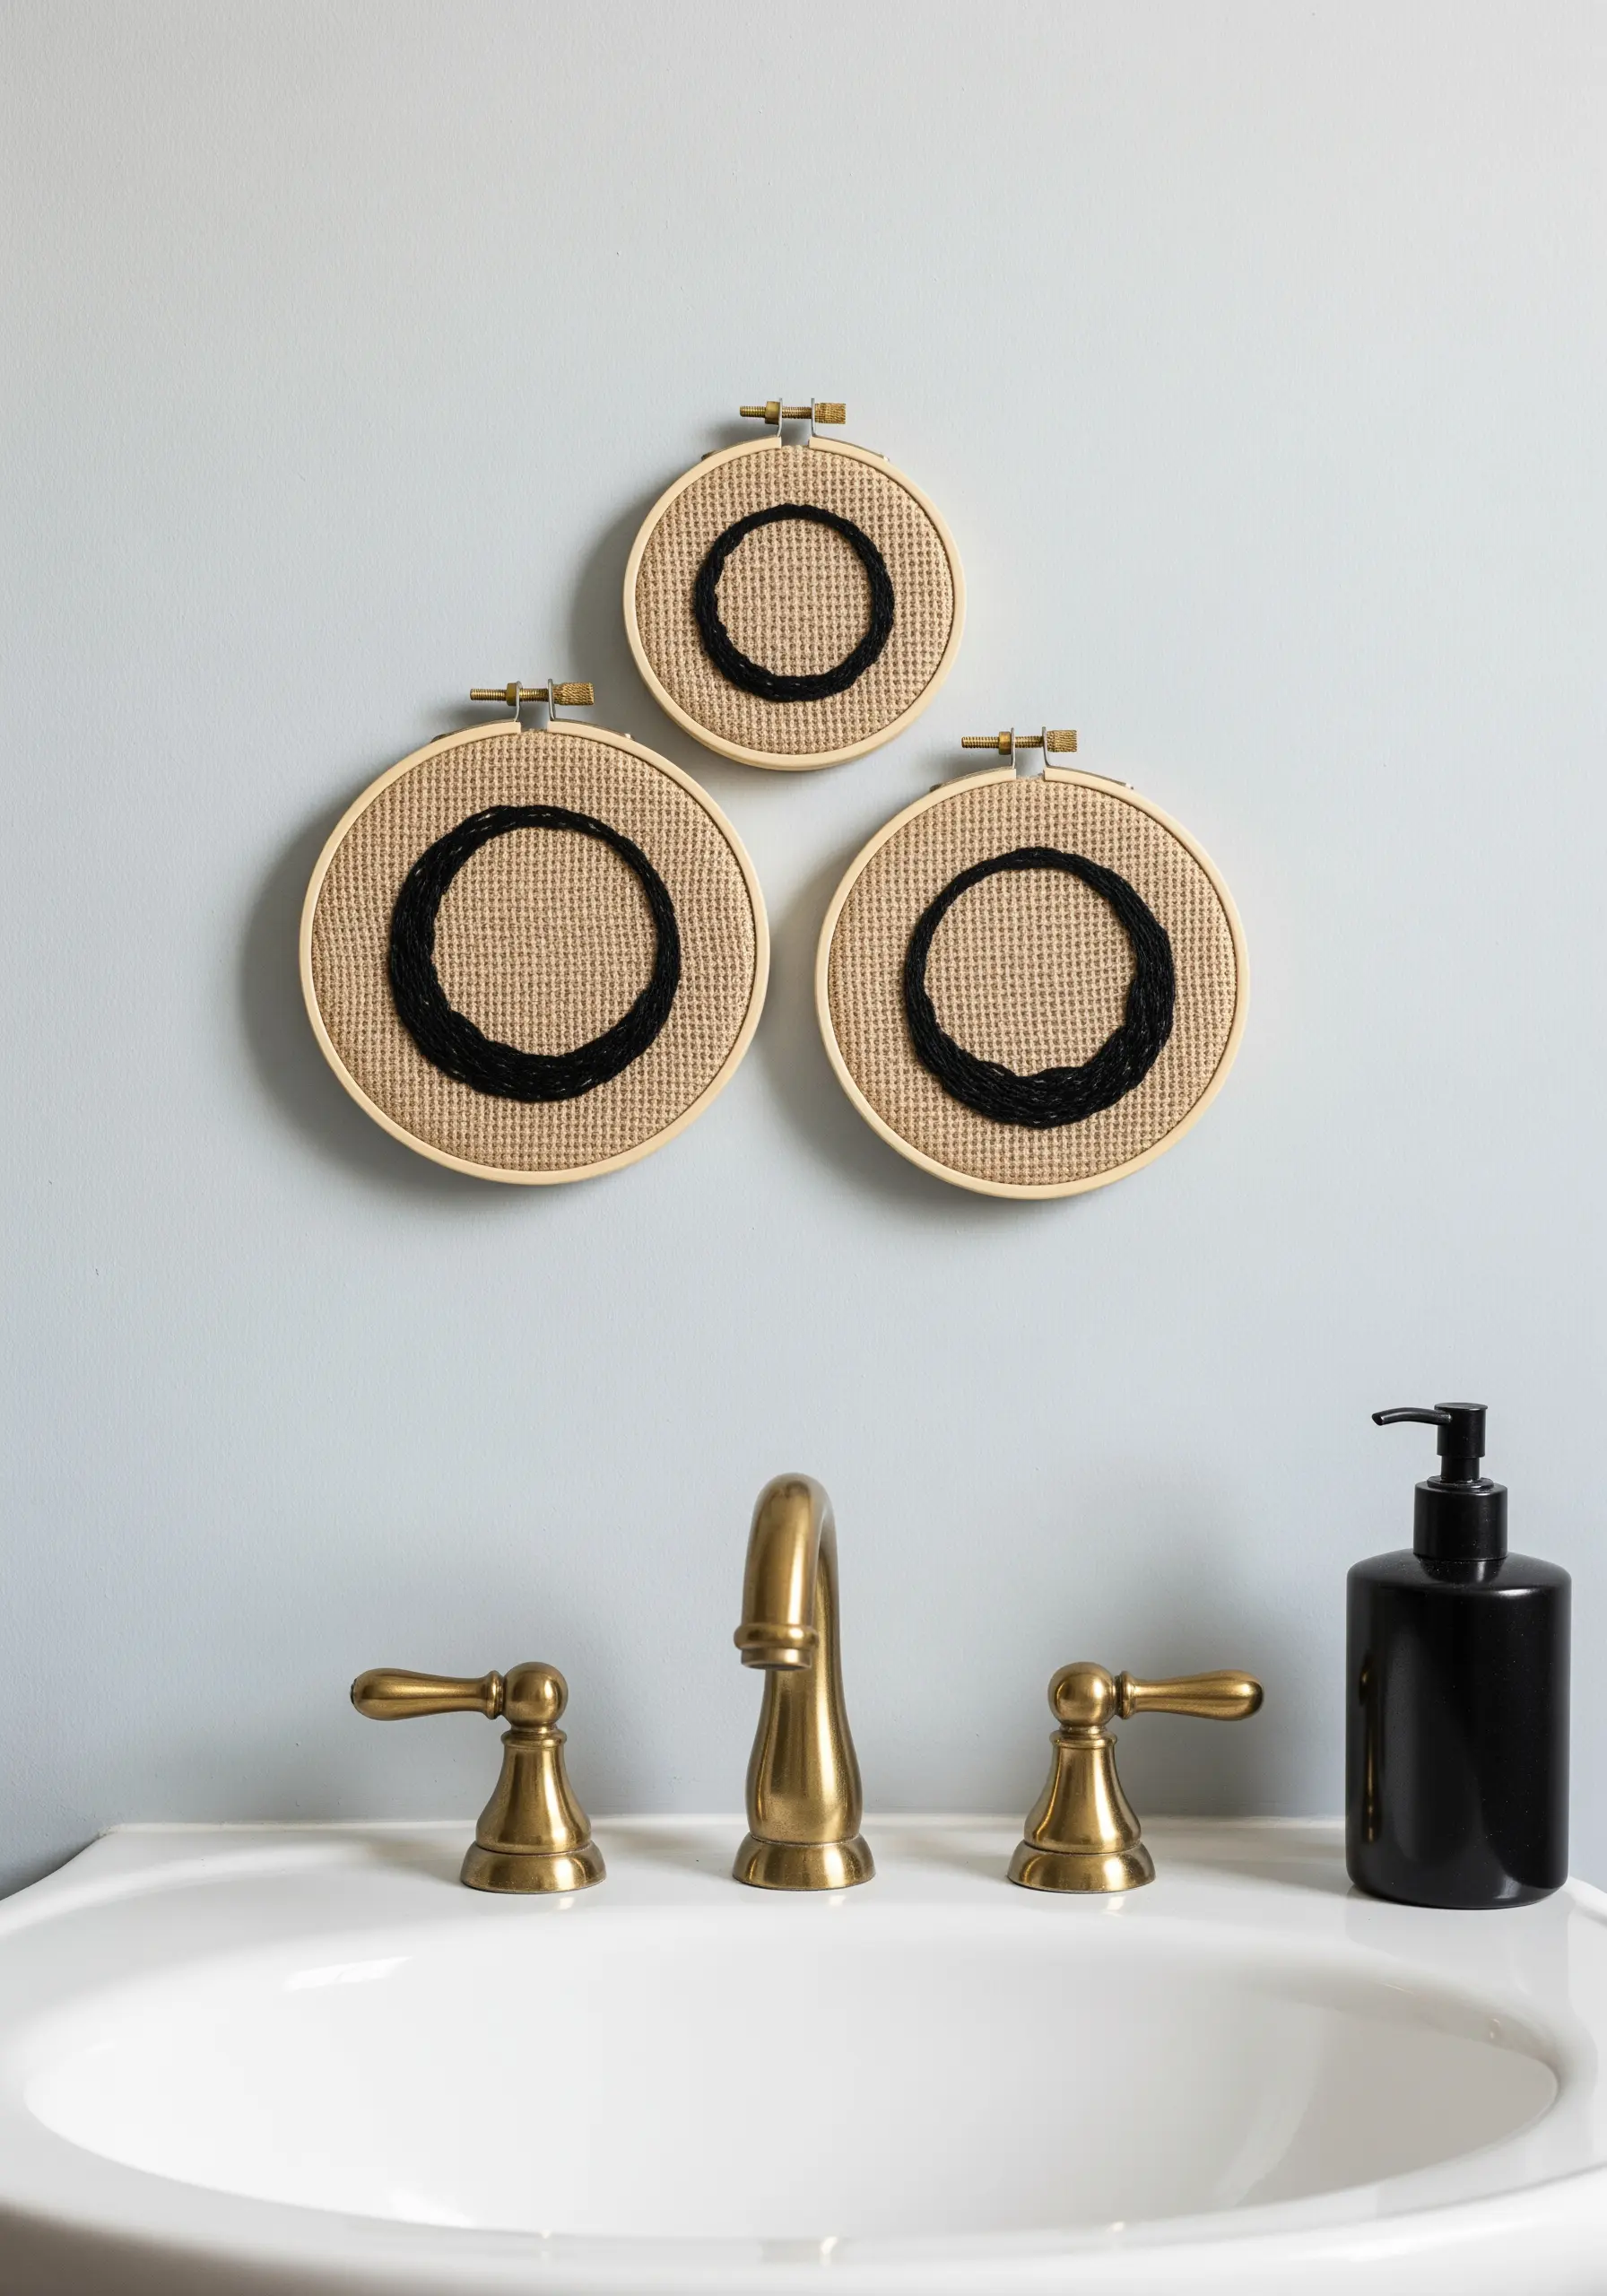
Channel the spirit of the Enso circle by focusing on texture rather than perfect geometry.
On a coarse fabric like burlap or Aida cloth, fill a hand-drawn circle with a dense, chaotic stitch like the seed stitch or overlapping straight stitches.
Use a thick black thread to create a stark contrast with the natural fabric.
The slightly uneven edges and dense fill give these simple forms a rustic, wabi-sabi elegance.
14. Capture Fine Detail with Single-Thread Stitching
For hyper-realistic botanical designs like a leaf skeleton, work with a single strand of embroidery floss.
Use a fine-tipped, water-soluble pen to draw your intricate vein pattern directly onto the fabric.
Trace every line with a tiny split stitch or backstitch, which provides more control and precision than a stem stitch for sharp angles and intersections.
This painstaking method results in a piece that looks less like stitching and more like a delicate scientific illustration.
15. Soften Abstract Shapes with Seed Stitch Fill
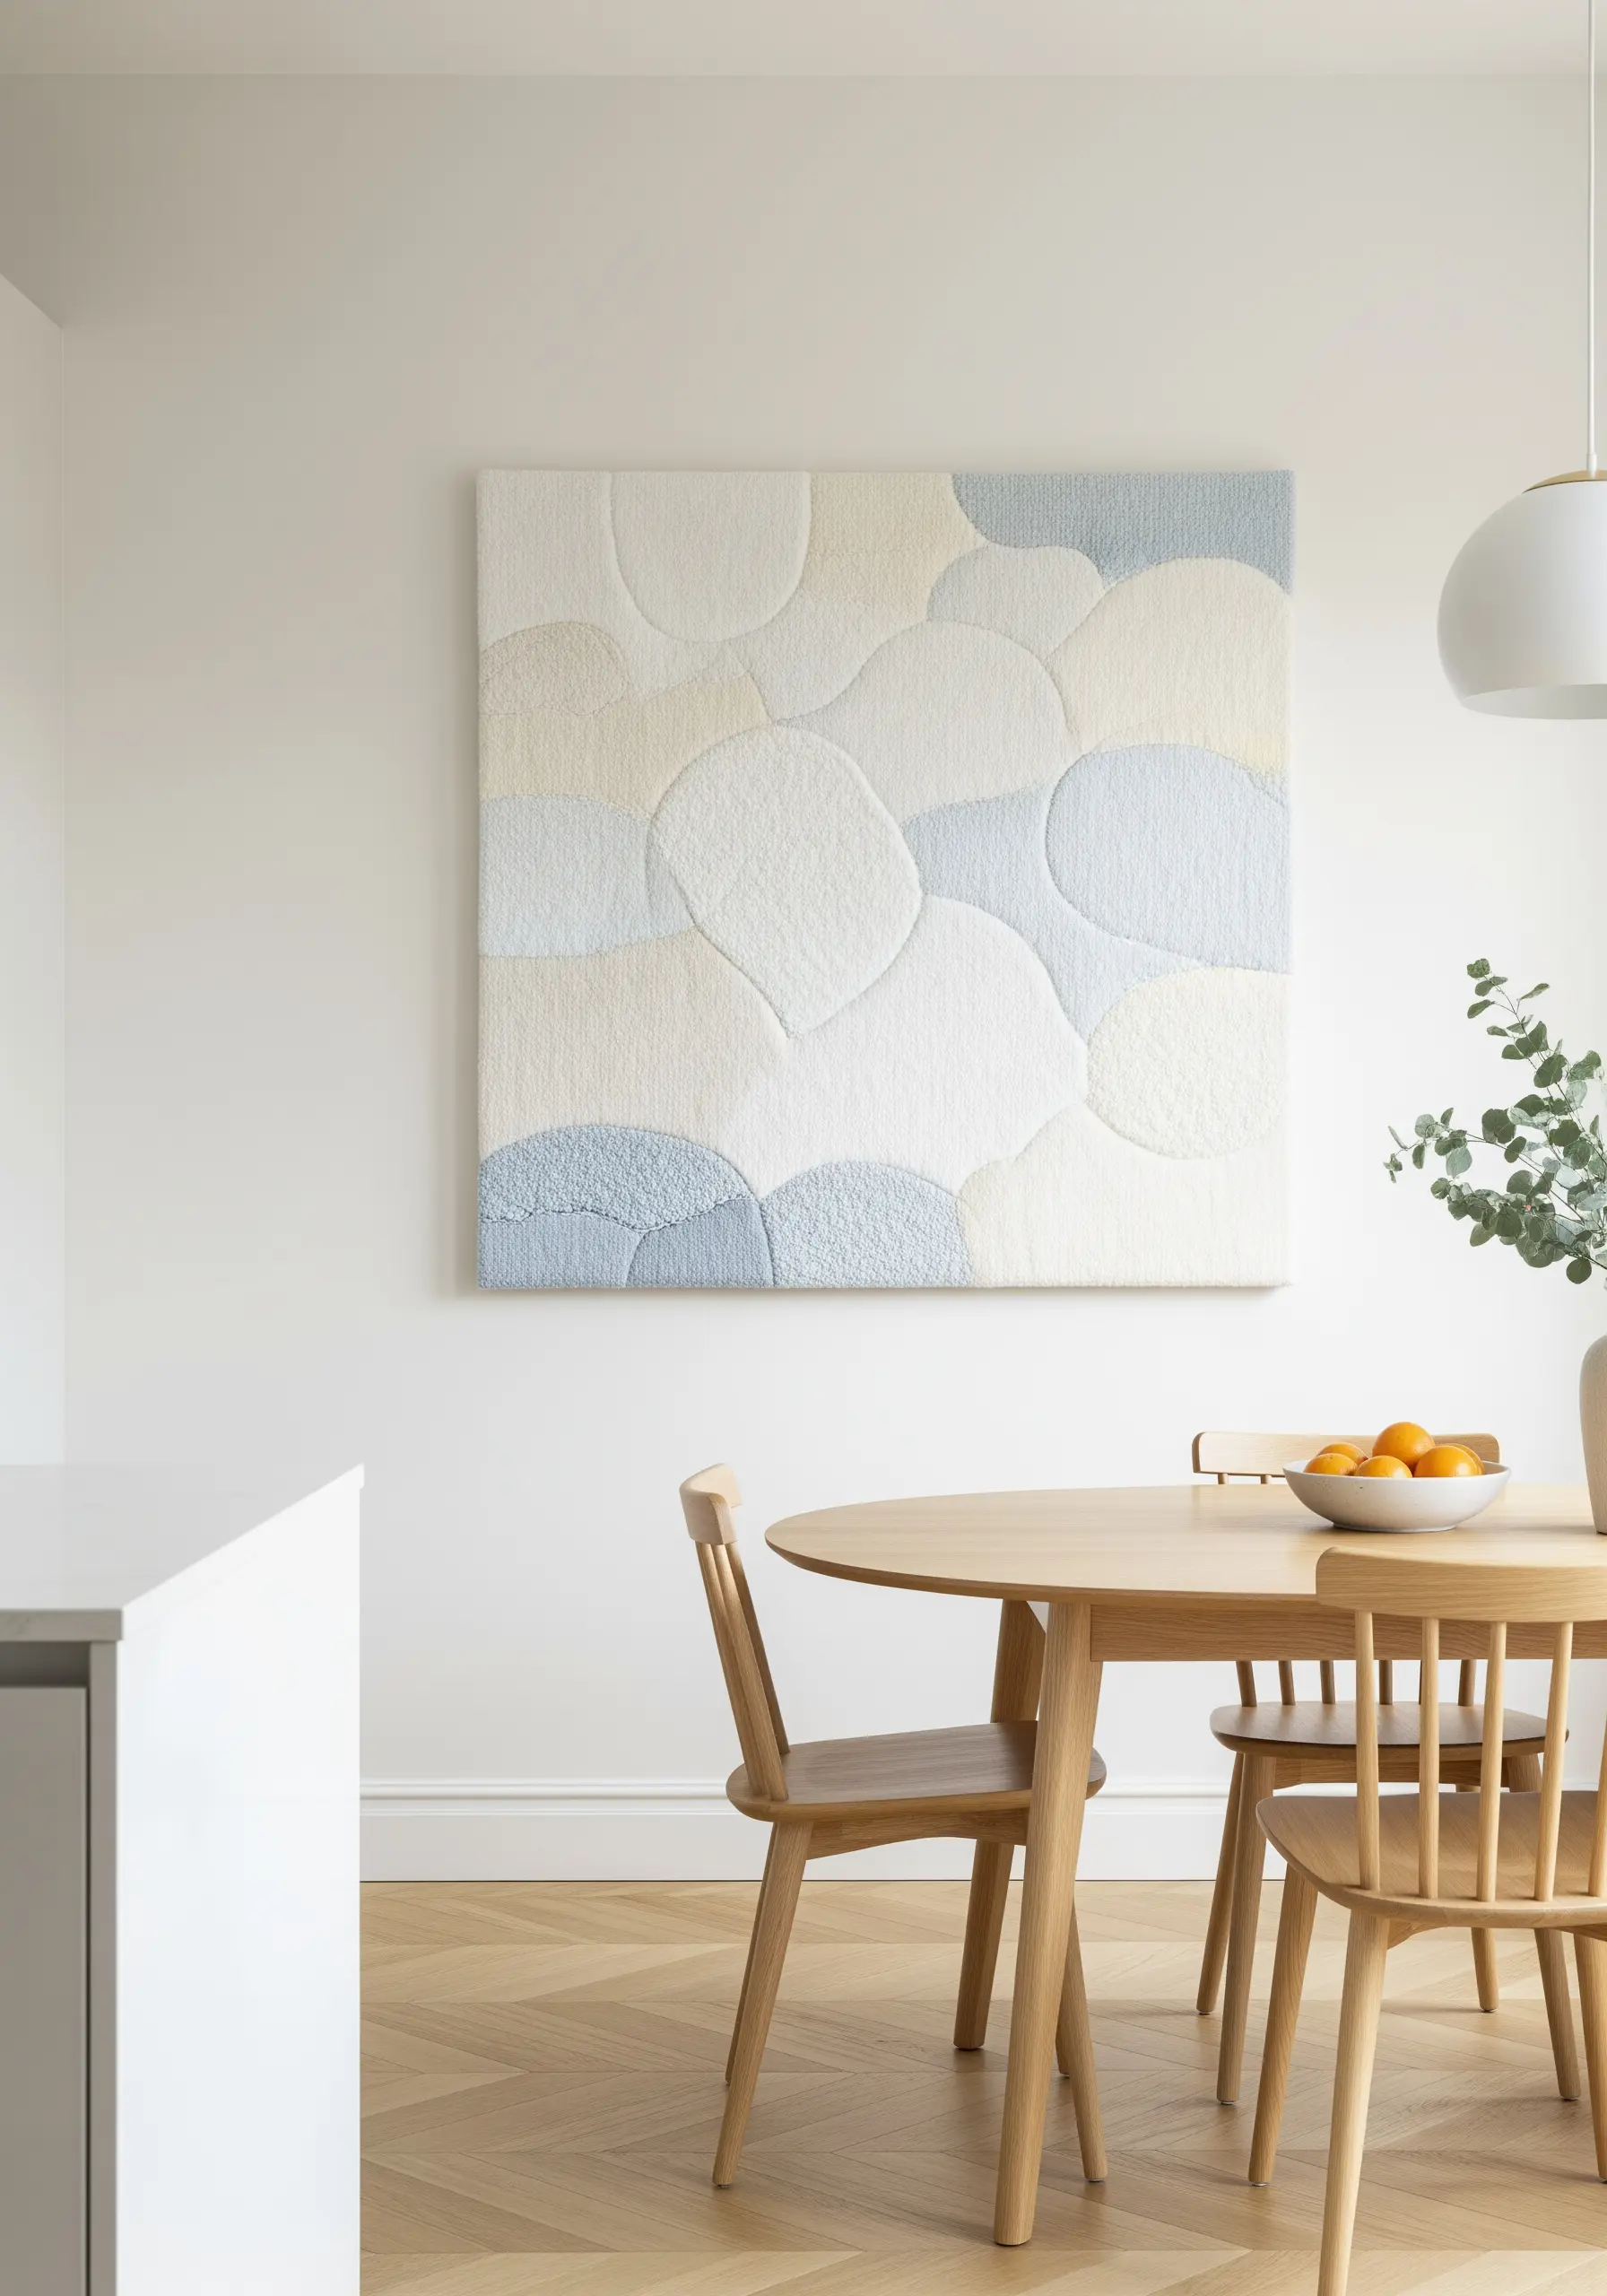
To create soft, cloud-like forms without harsh outlines, use a dense seed stitch fill.
Place tiny, random straight stitches throughout each shape, varying their direction slightly to create a gentle, painterly texture.
When shapes overlap, allow the seed stitches from each section to mingle slightly at the edges for a seamless blend.
This technique is perfect for creating stitched details that make plain walls pop elegantly with subtle, touchable softness.
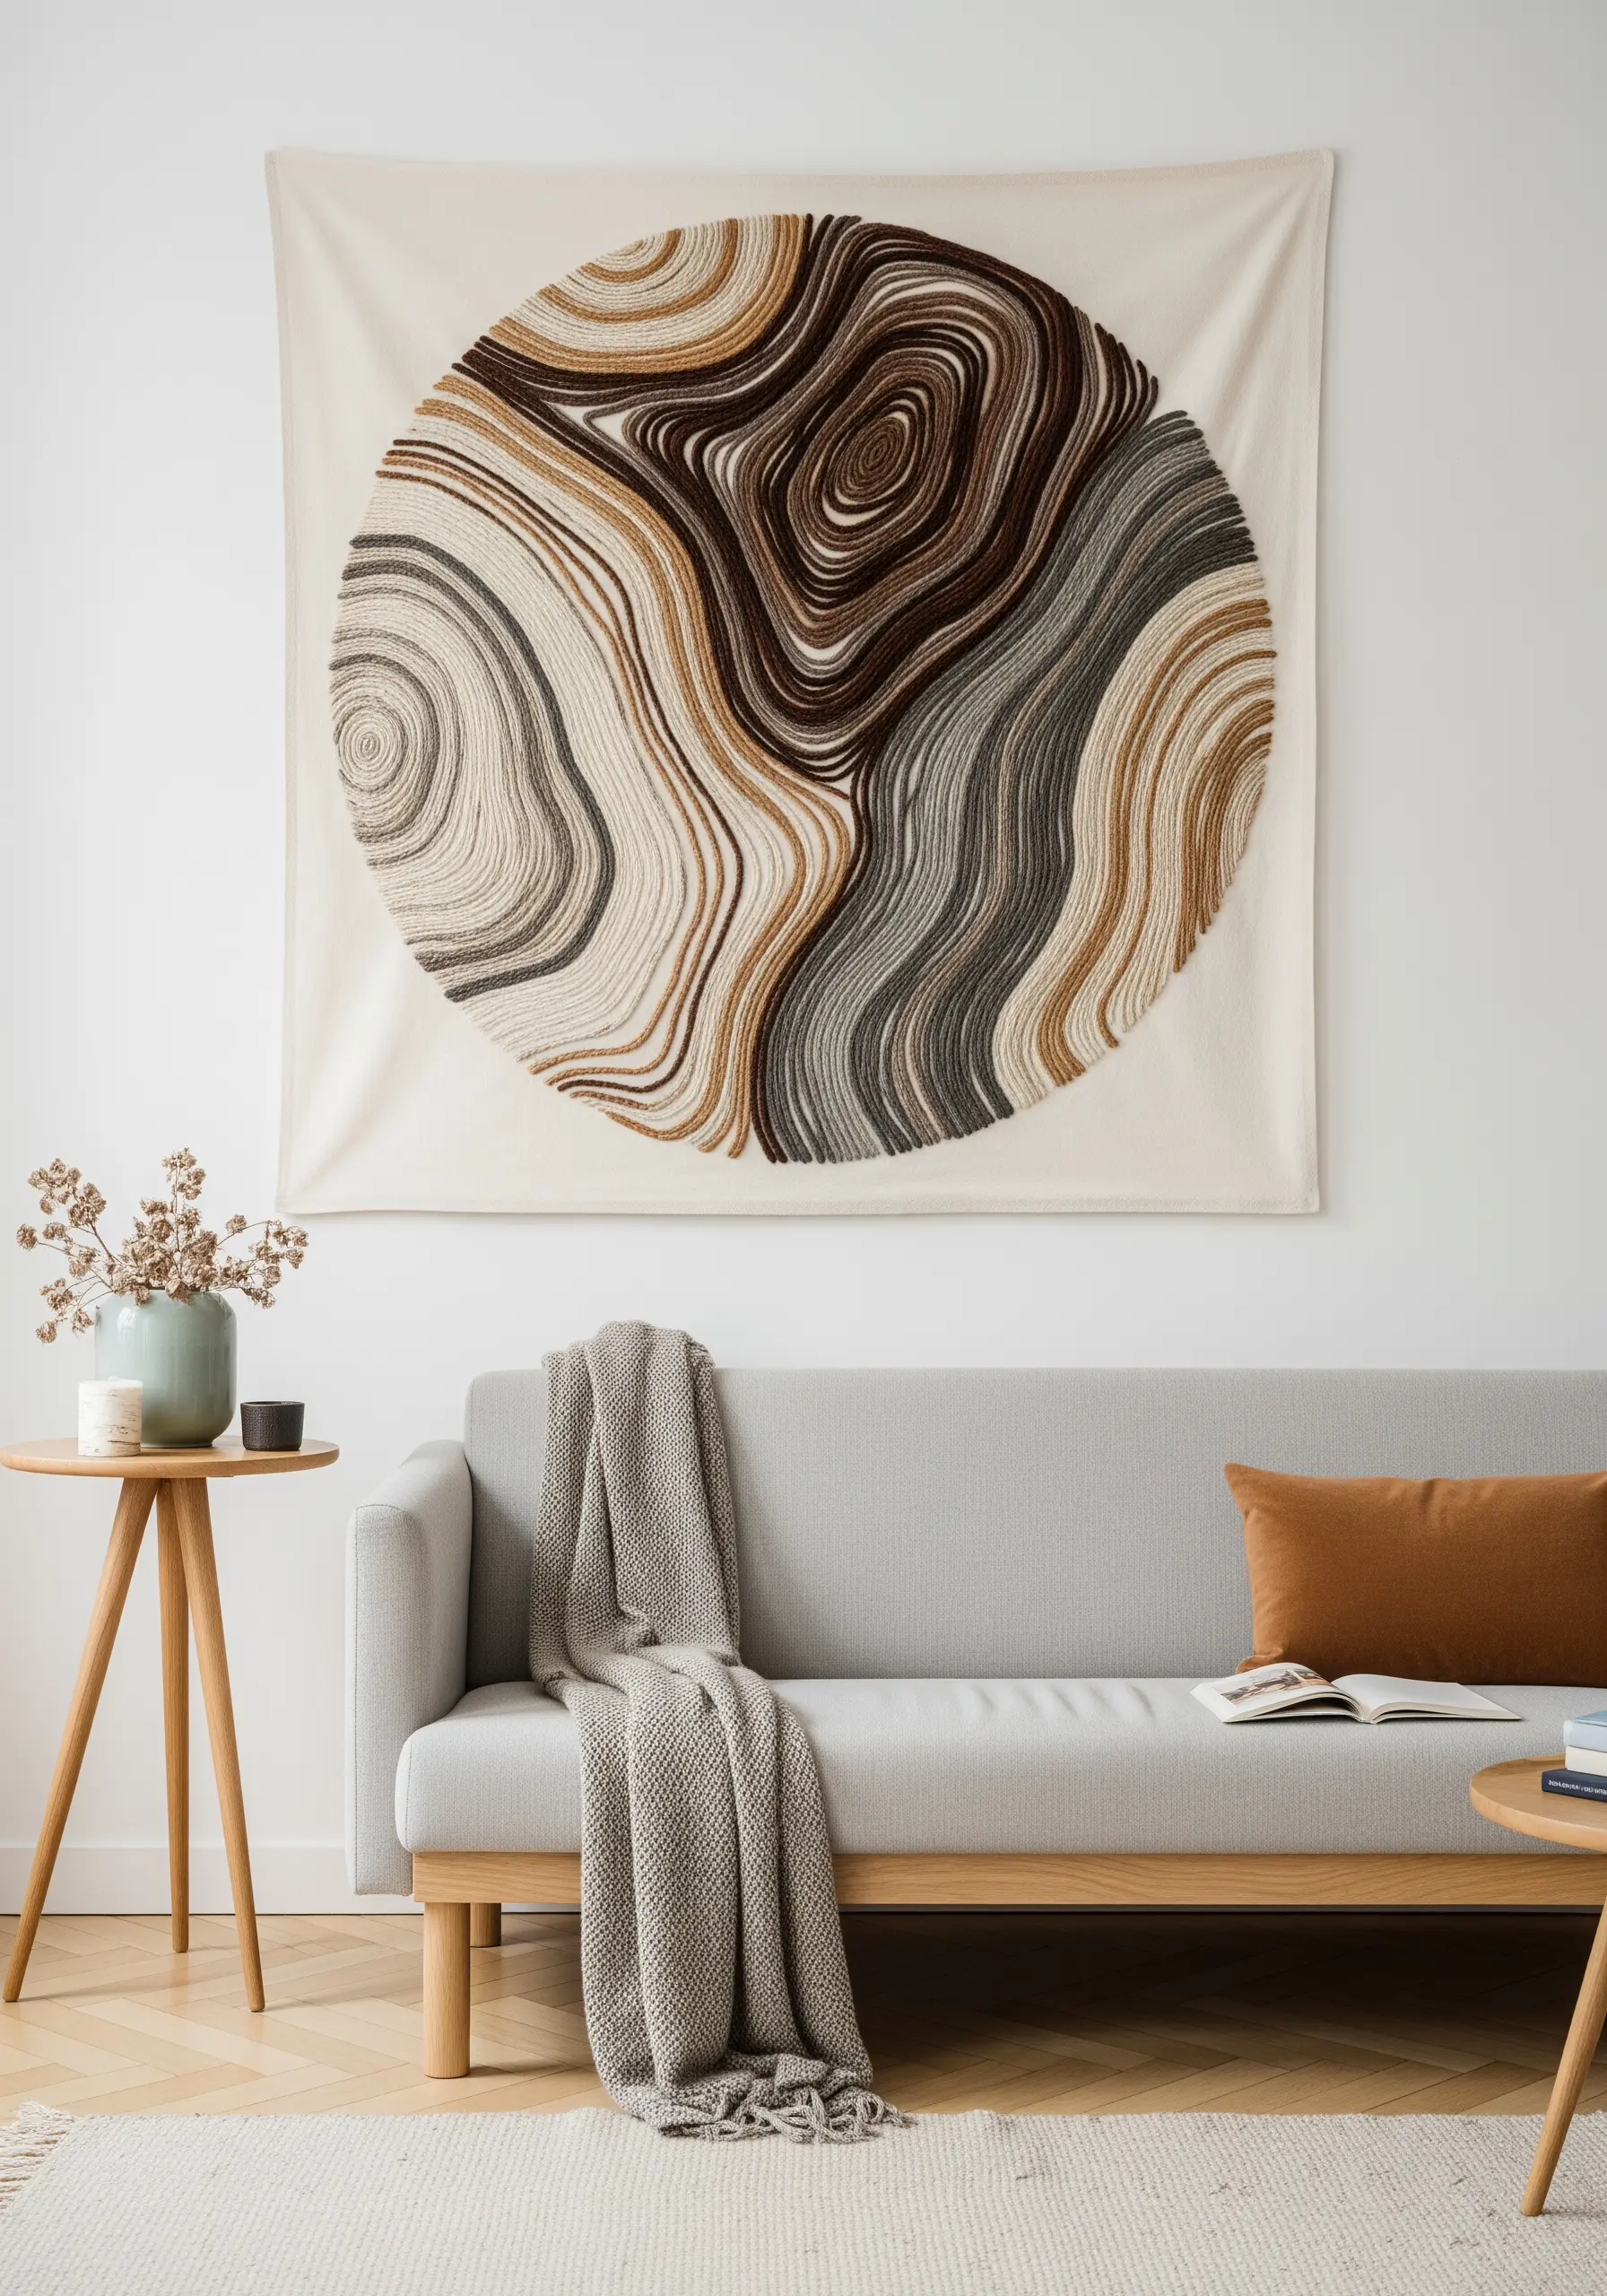
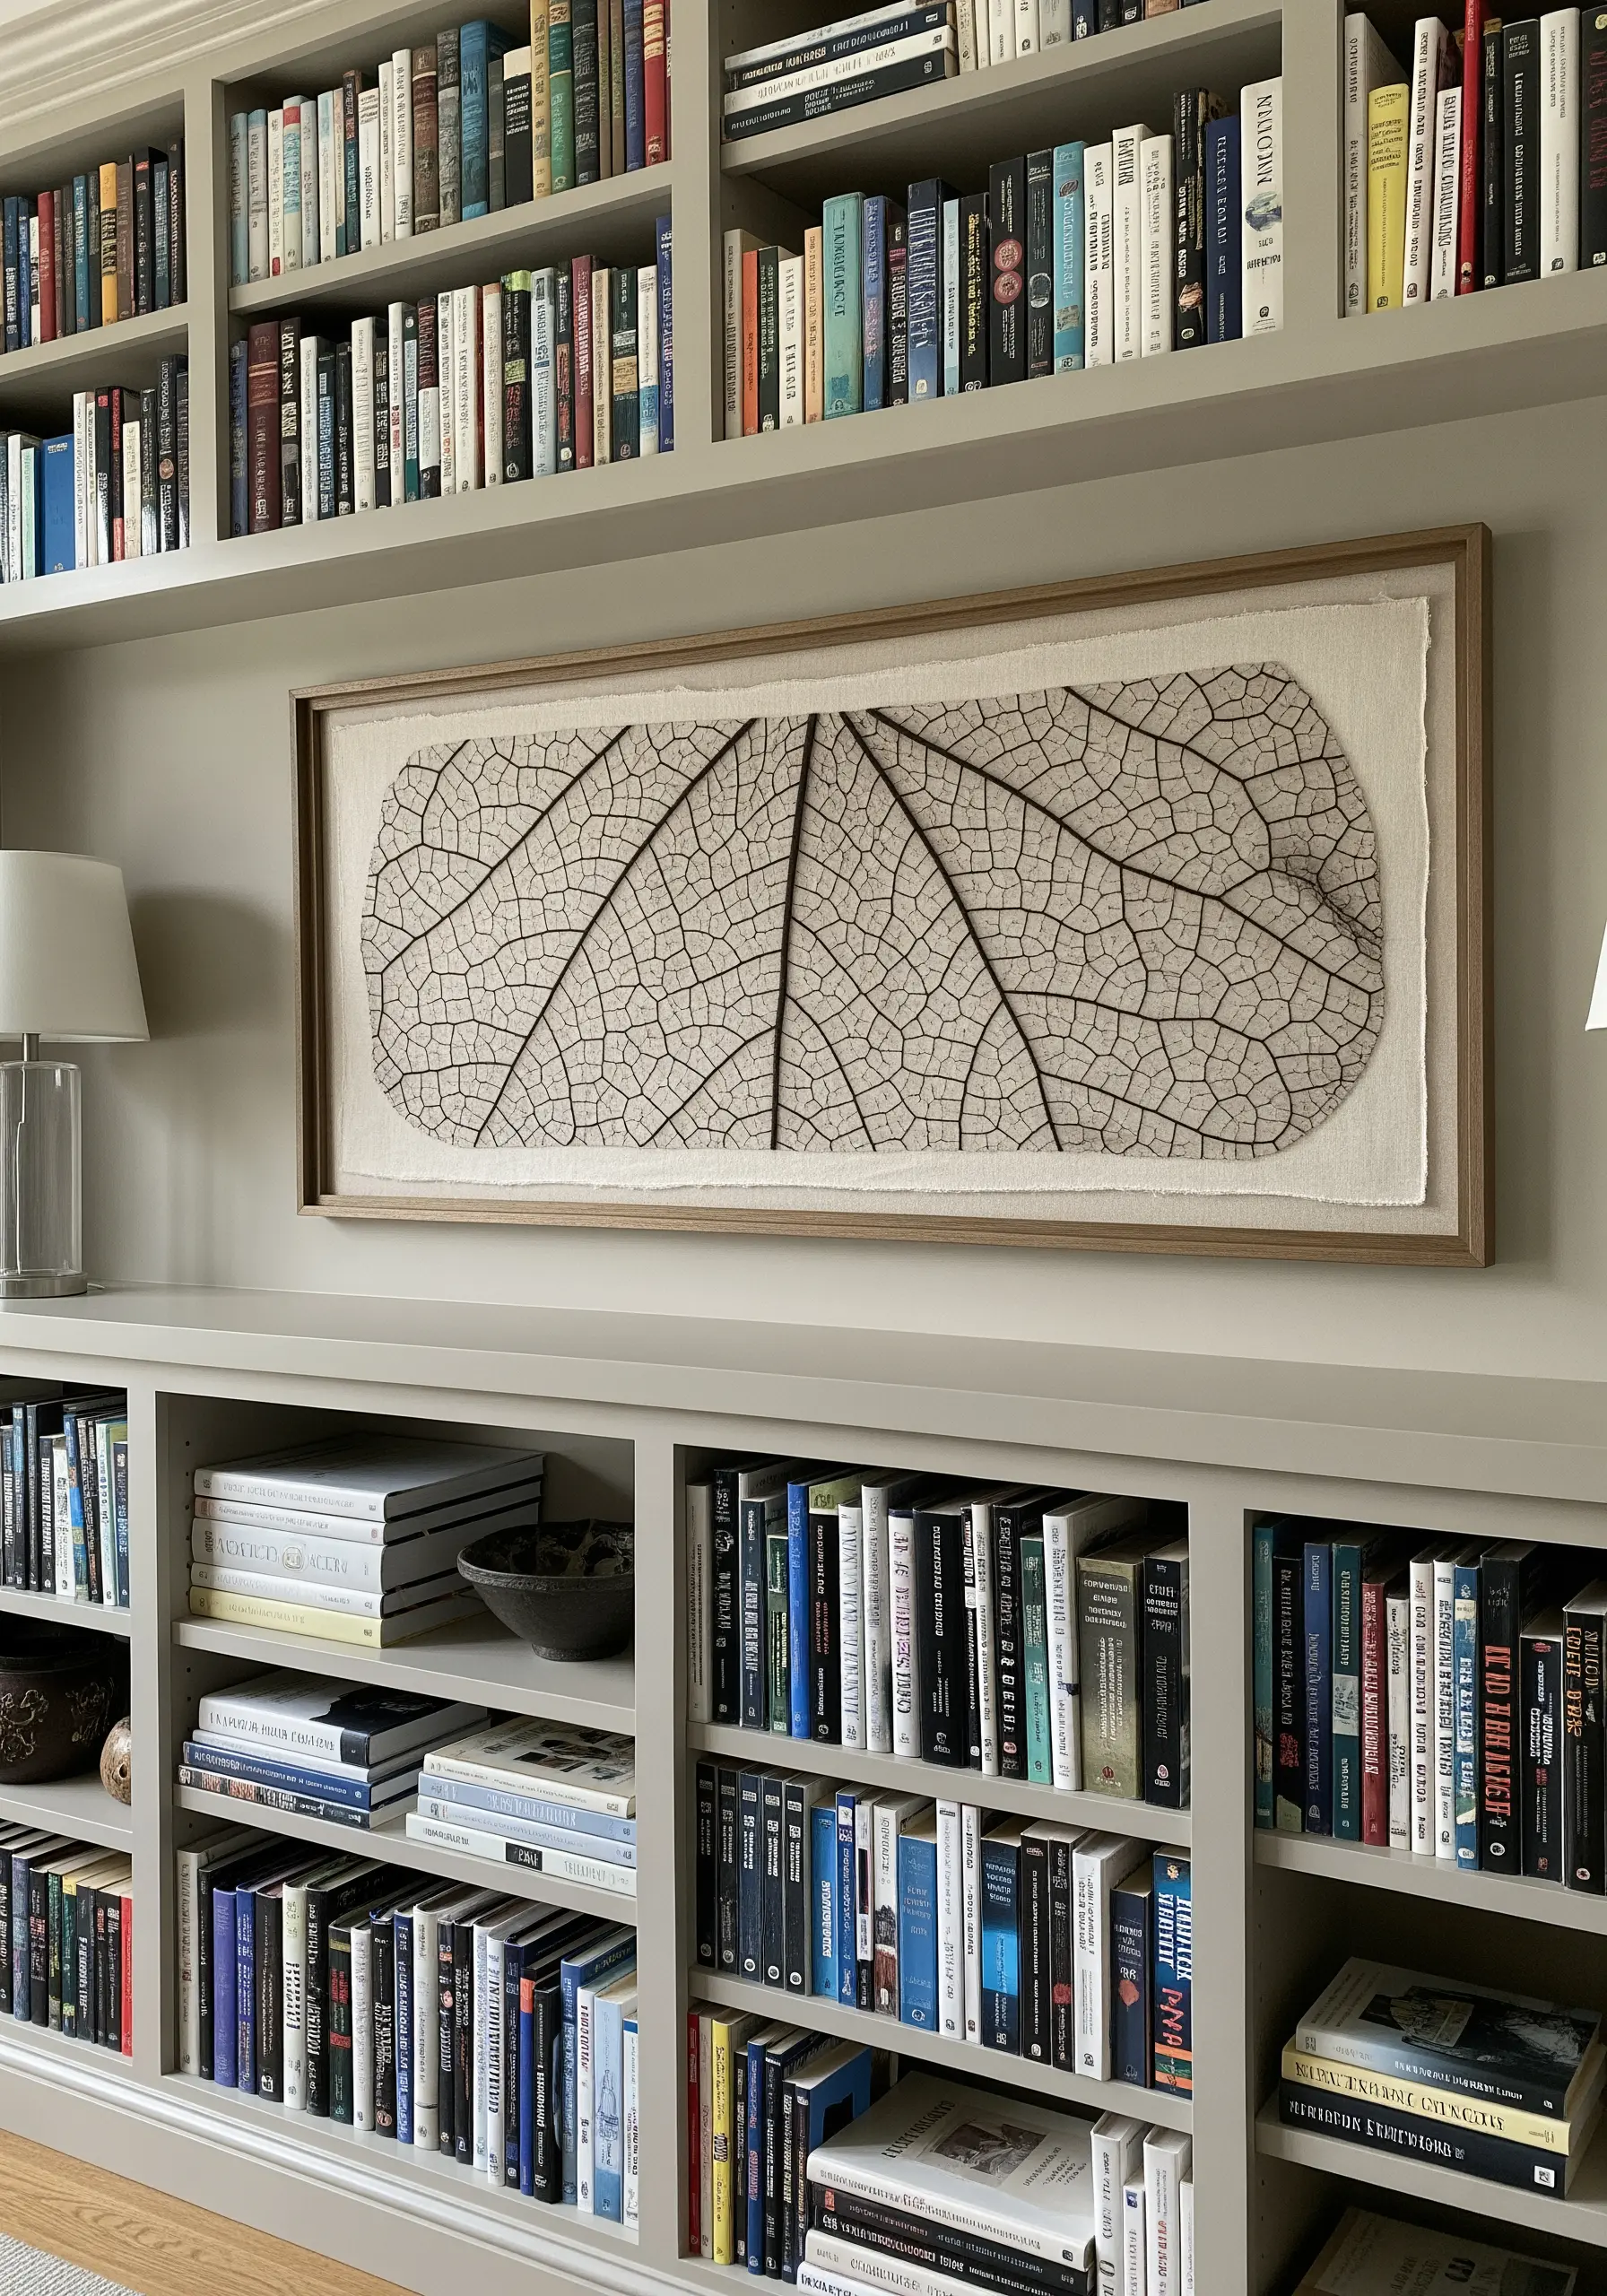
16. Map Natural History with Varied Line Stitches
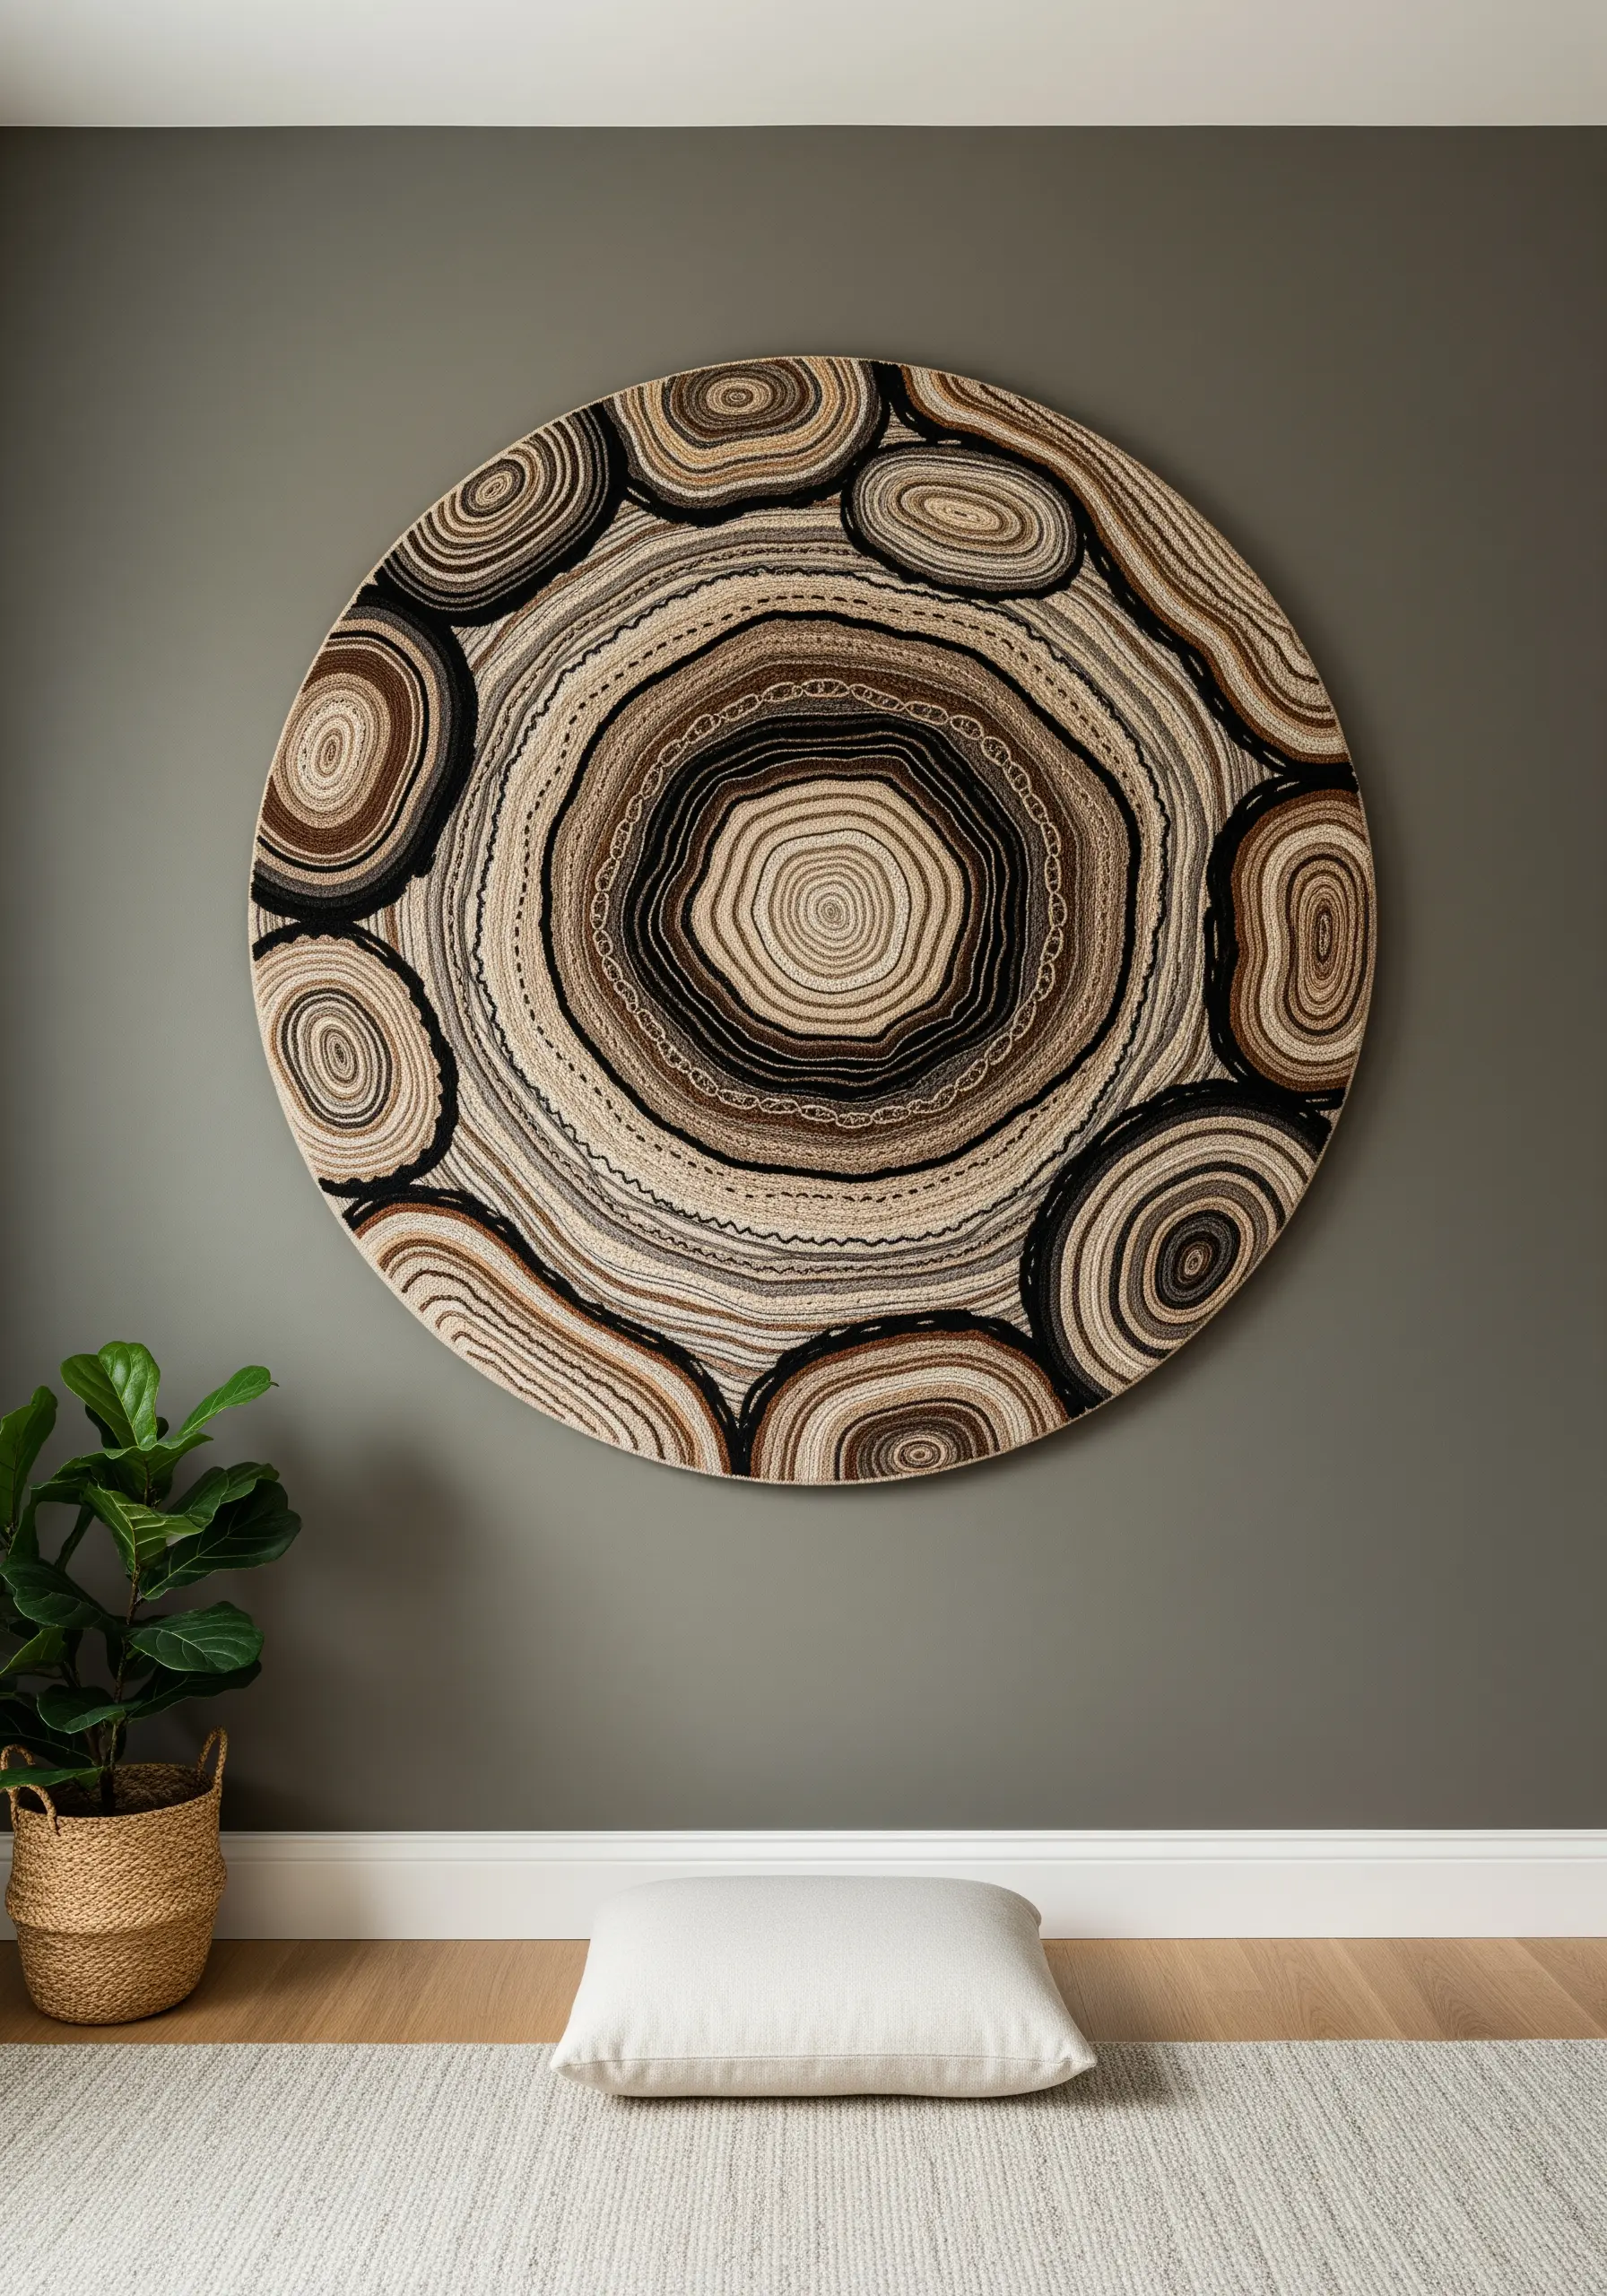
Recreate the organic complexity of tree rings by using a variety of line stitches.
Instead of relying on just one stitch, alternate between rows of backstitch, split stitch, chain stitch, and stem stitch.
This subtle shift in texture mimics the natural variations in a tree’s growth, making the design more dynamic and realistic.
Working on a large scale in an oversized hoop wall display turns this simple concept into a powerful statement piece.
17. Suggest Depth by Layering Botanical Stems
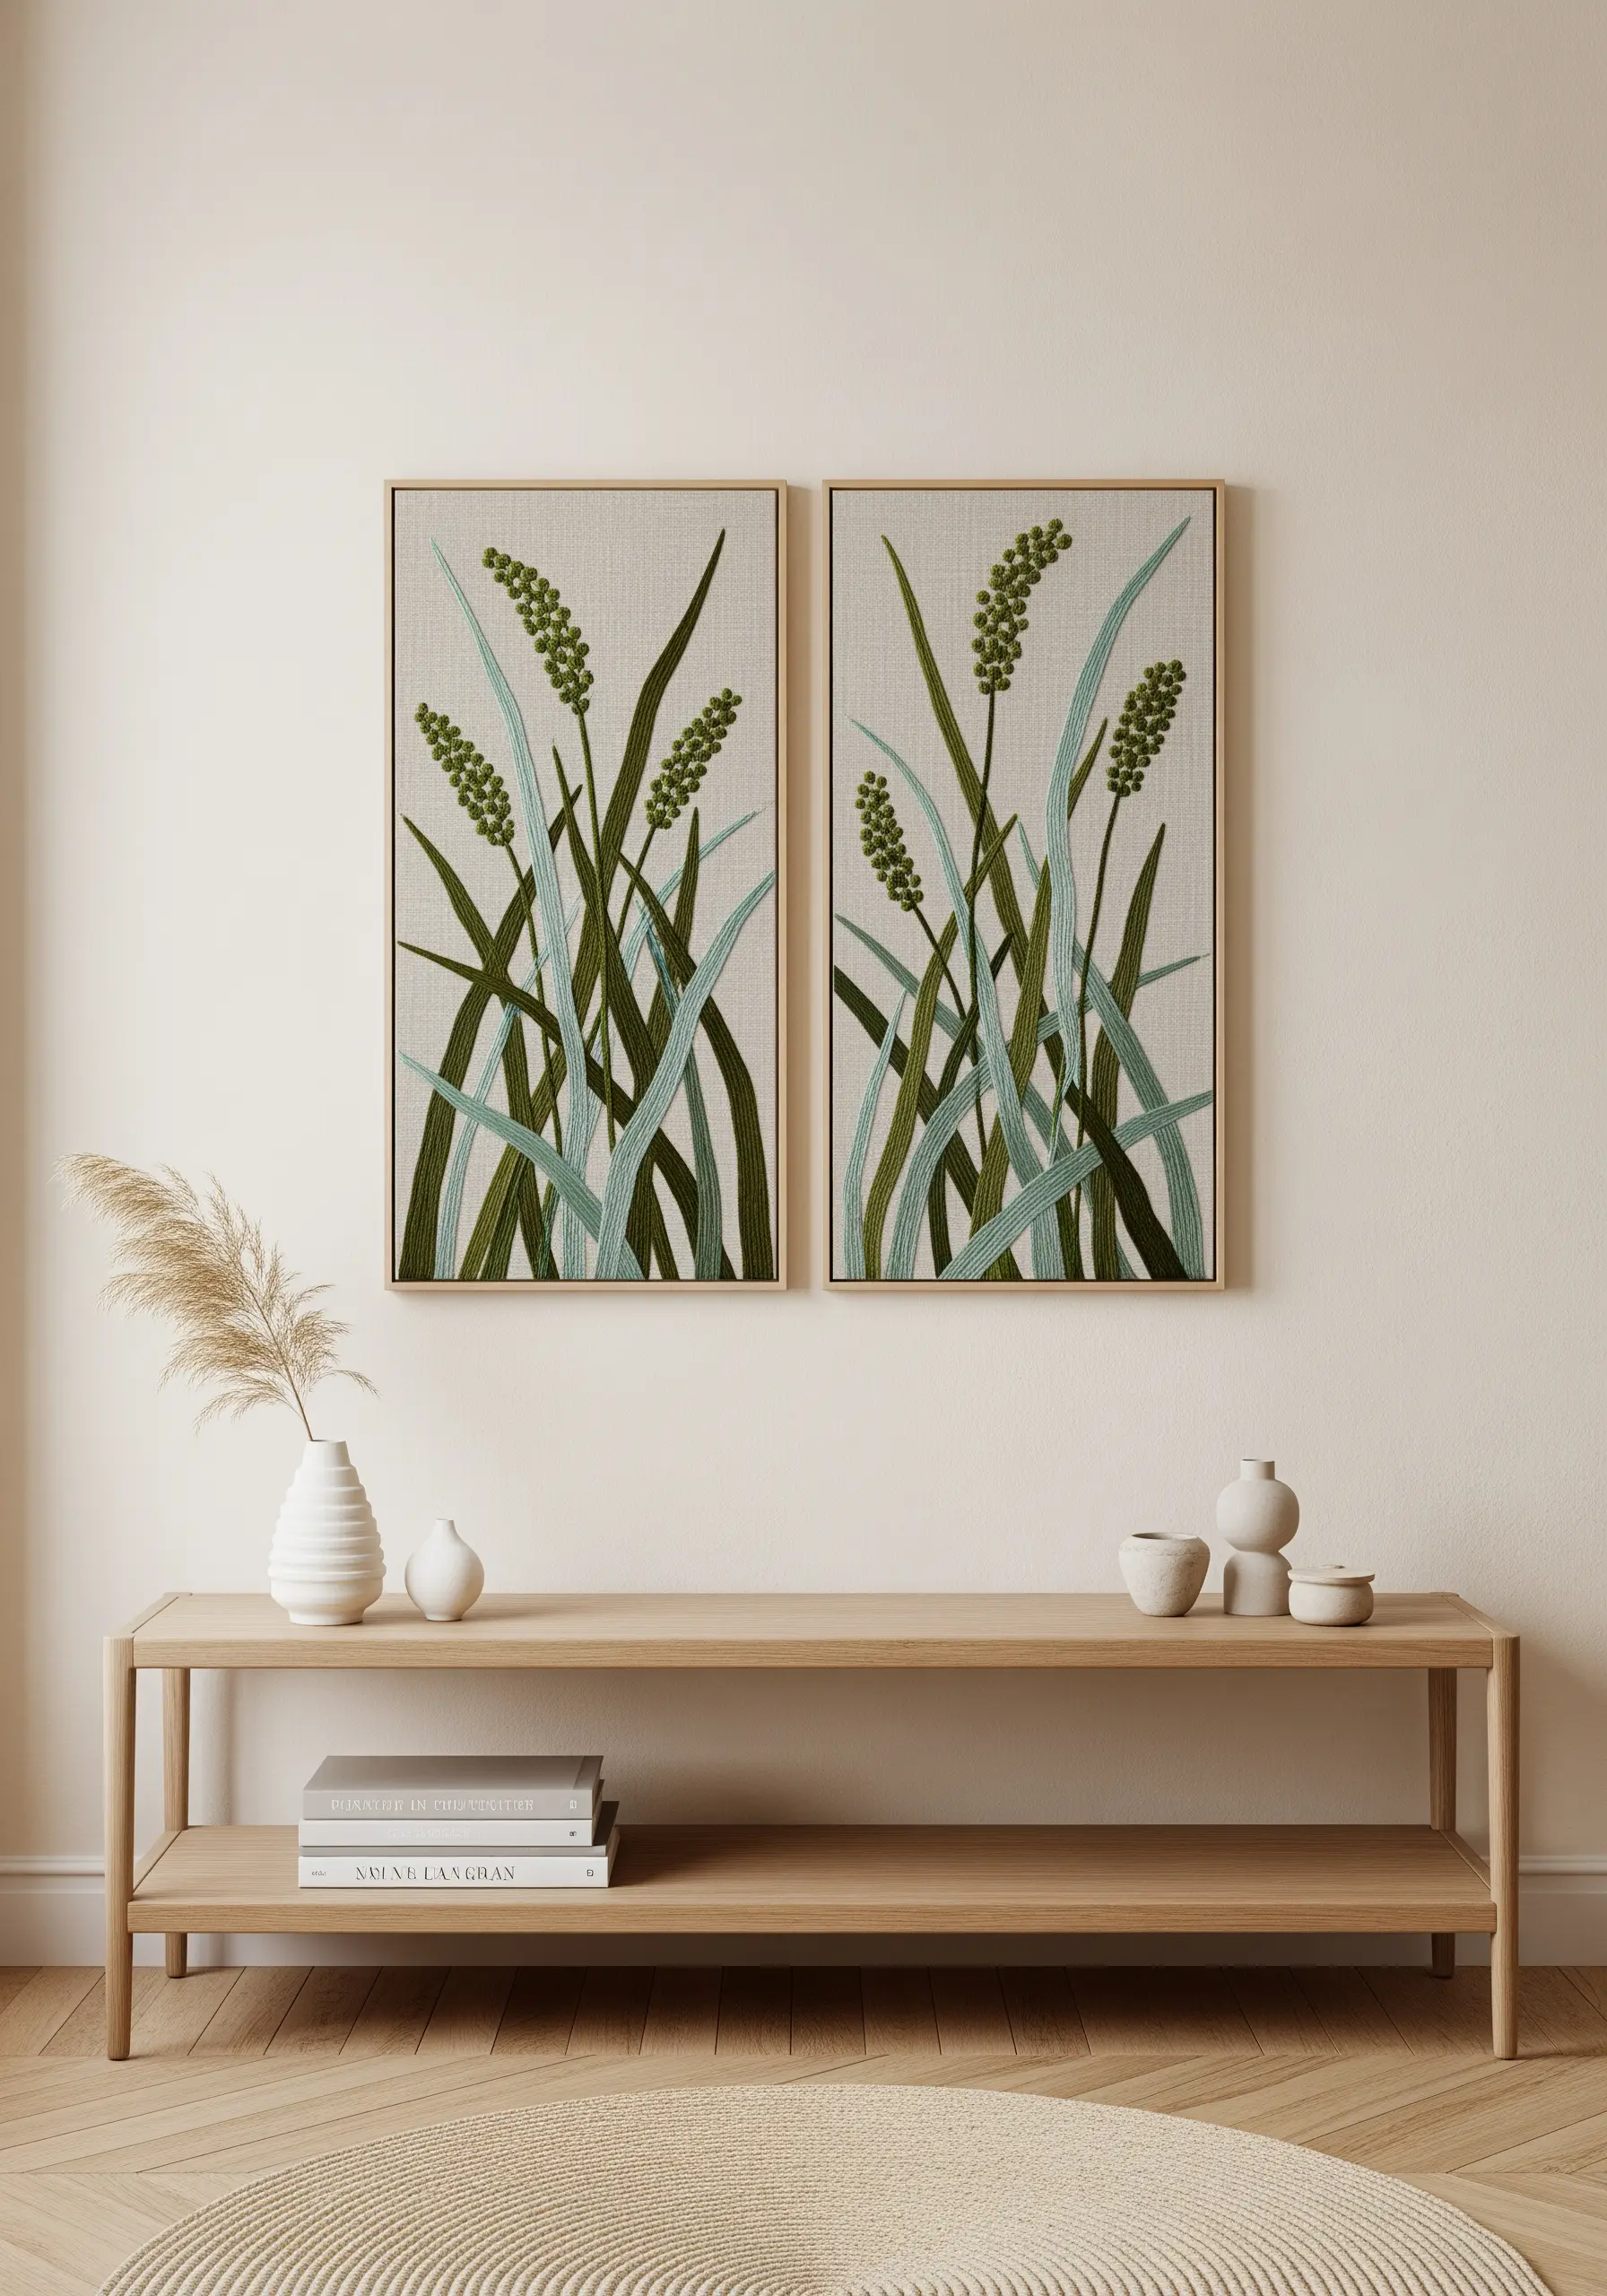
To create a sense of a lush, dense thicket of grass, think in layers.
First, stitch the elements that are furthest away using a lighter shade of thread or fewer strands.
Then, stitch the foreground elements directly on top of them using bolder colors and a heavier stitch, like a satin stitch or thick chain stitch.
This simple layering technique instantly adds depth and realism to your botanical compositions.
18. Go Beyond the Hoop with Textile Wall Treatments
For a truly immersive and modern effect, consider creating embroidered art directly onto large fabric panels that function like wallpaper.
Use techniques like punch needle or tufting to create a dense, textural surface that is both visual and tactile.
Working in large, organic waves of color creates a serene, seamless landscape that can define an entire room.
This approach merges craft with interior design for a uniquely personal space.
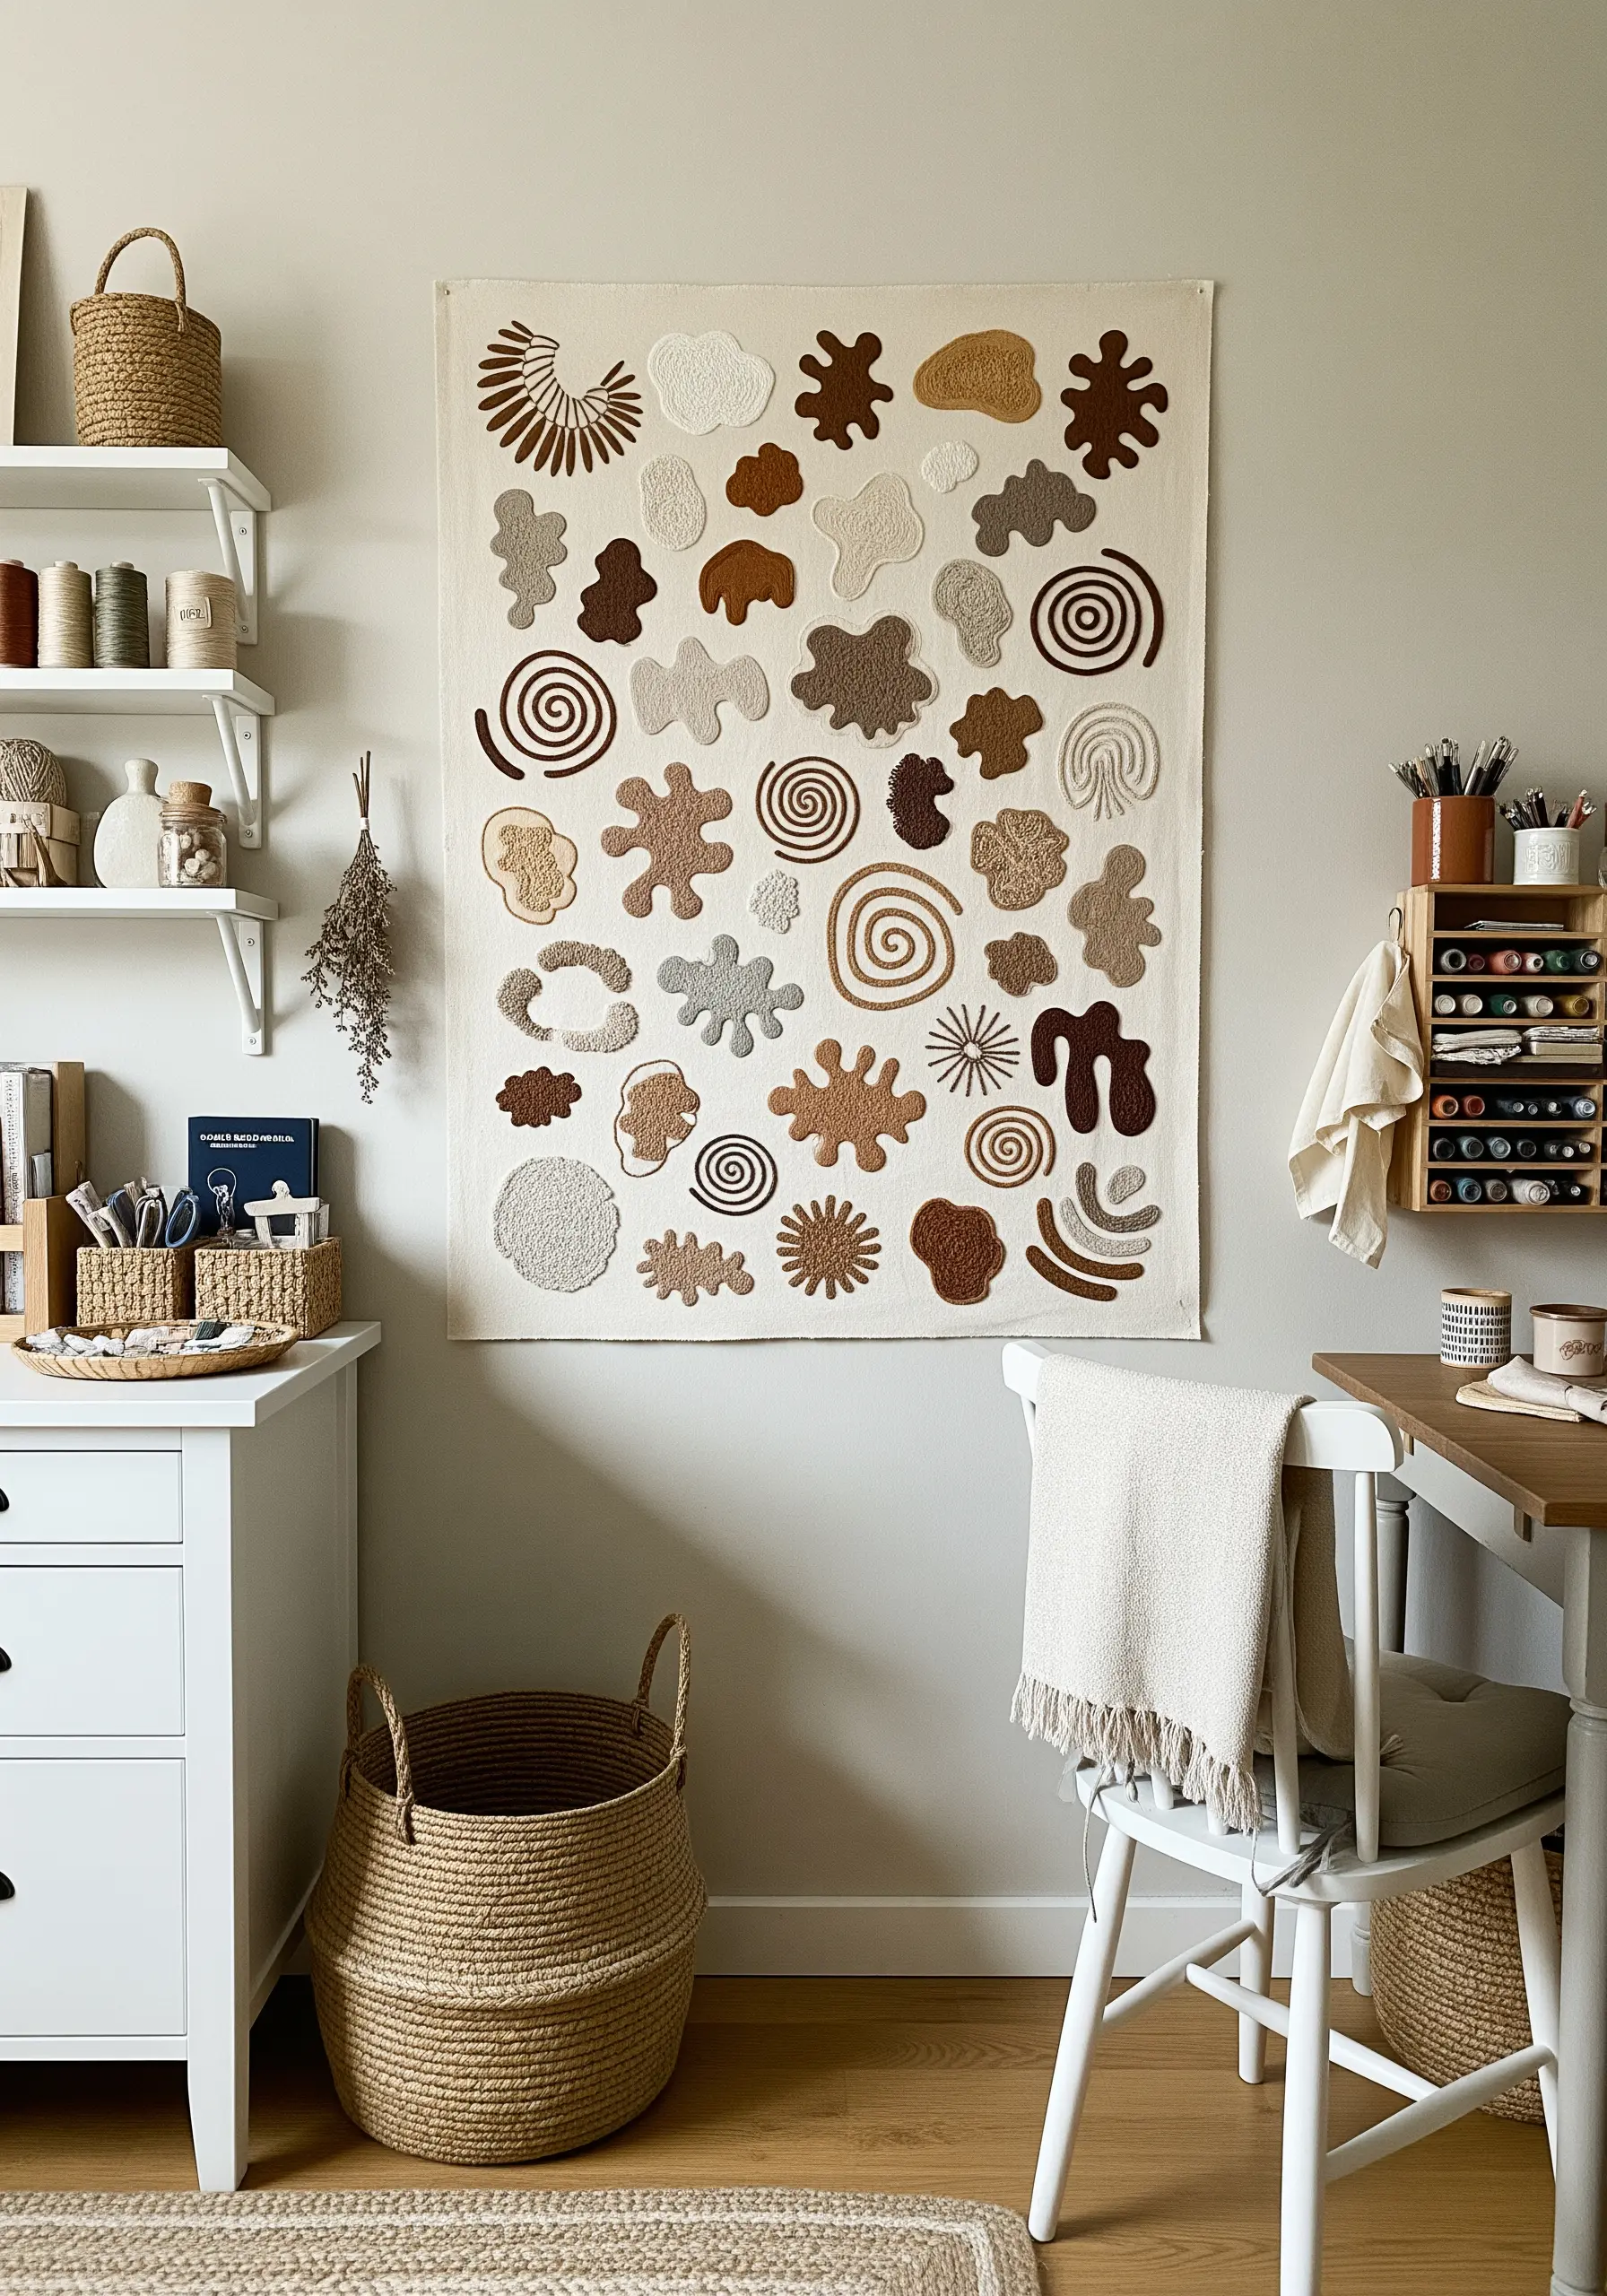
19. Curate a Grid of Stitched Color Swatches

Create a clean, modern gallery wall by stitching small, abstract motifs on identical square canvases.
Fill each organic ‘blob’ shape with a dense, textured stitch like French knots or seed stitch to give it substance and a handmade feel.
Arrange the canvases in a neat grid, allowing the unified format to balance the playful irregularity of the shapes and colors.
This is one of the best minimalist embroidery decor ideas for adding a pop of curated color to a small space.
20. Create Contrast with Textural Opposites
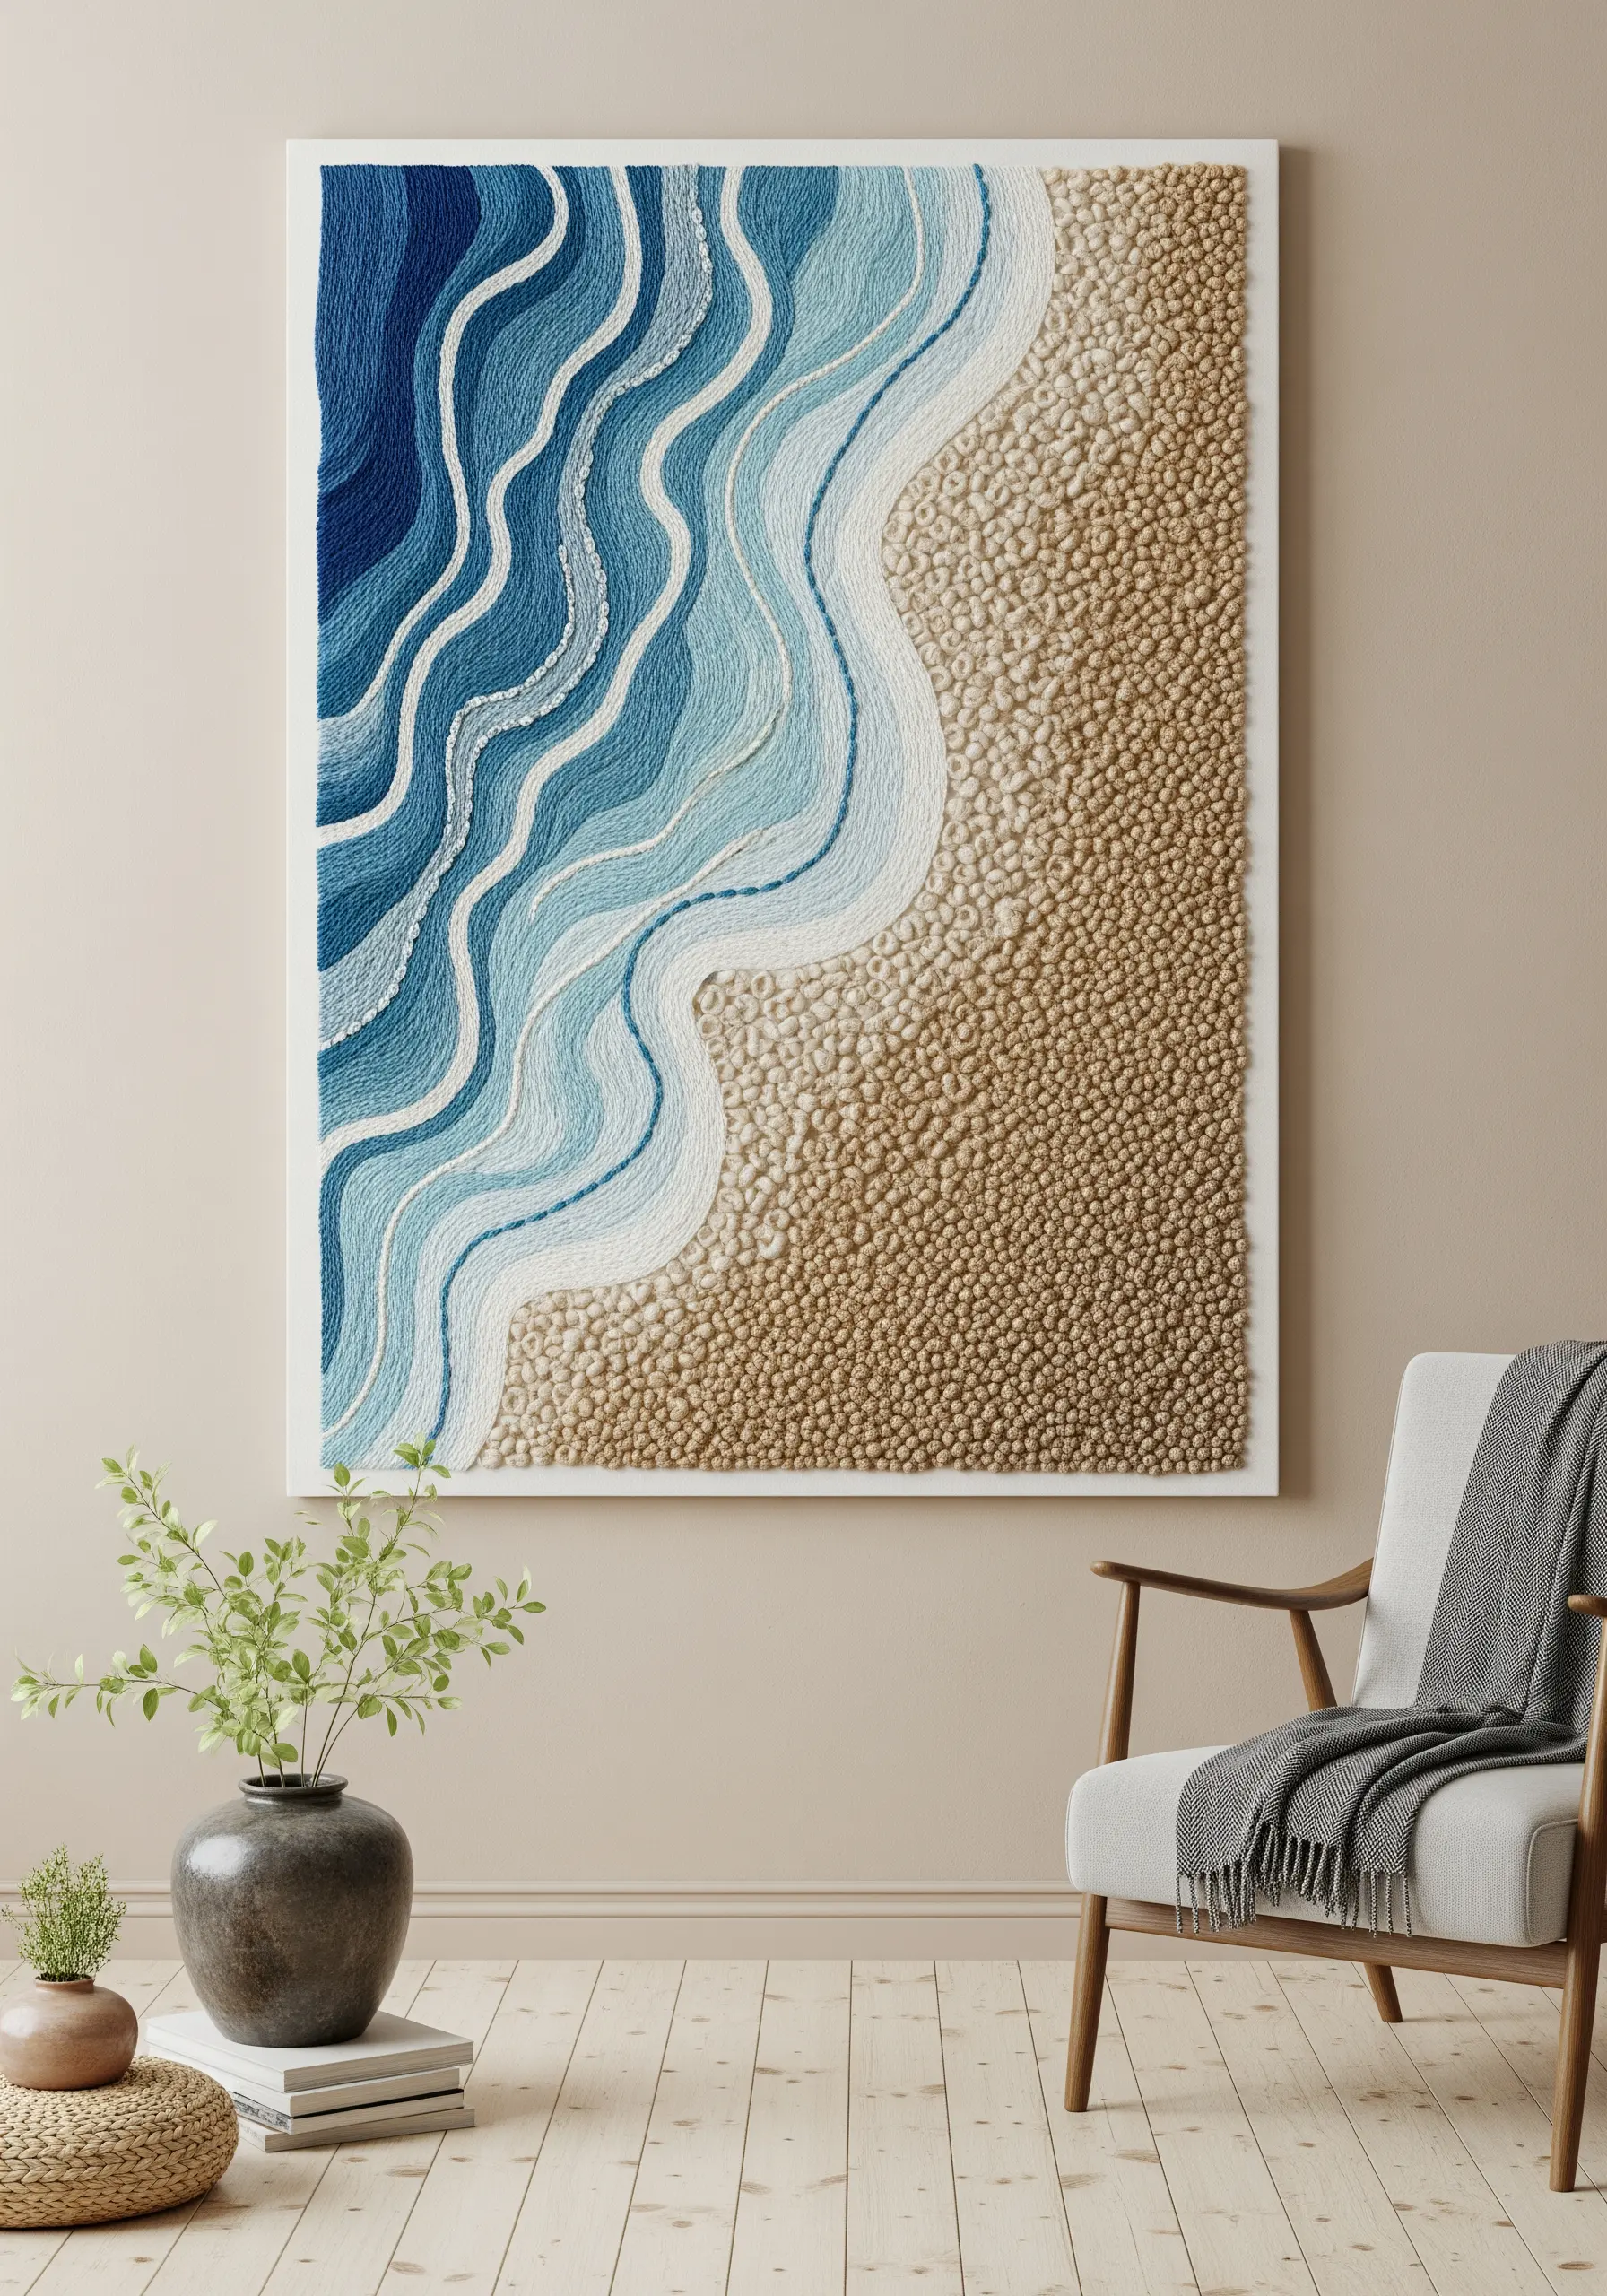
To capture an aerial beach scene, juxtapose two distinctly different textures.
Use dense French knots or turkey work with beige and sand-colored wool yarn to create the granular, three-dimensional texture of the shore.
For the water, use smooth, directional satin stitches or long-and-short stitches in shades of blue, laying them down to follow the movement of the waves.
This dramatic textural shift is what makes the composition so compelling and lifelike.
21. Add Dimension with Padded Stumpwork Forms
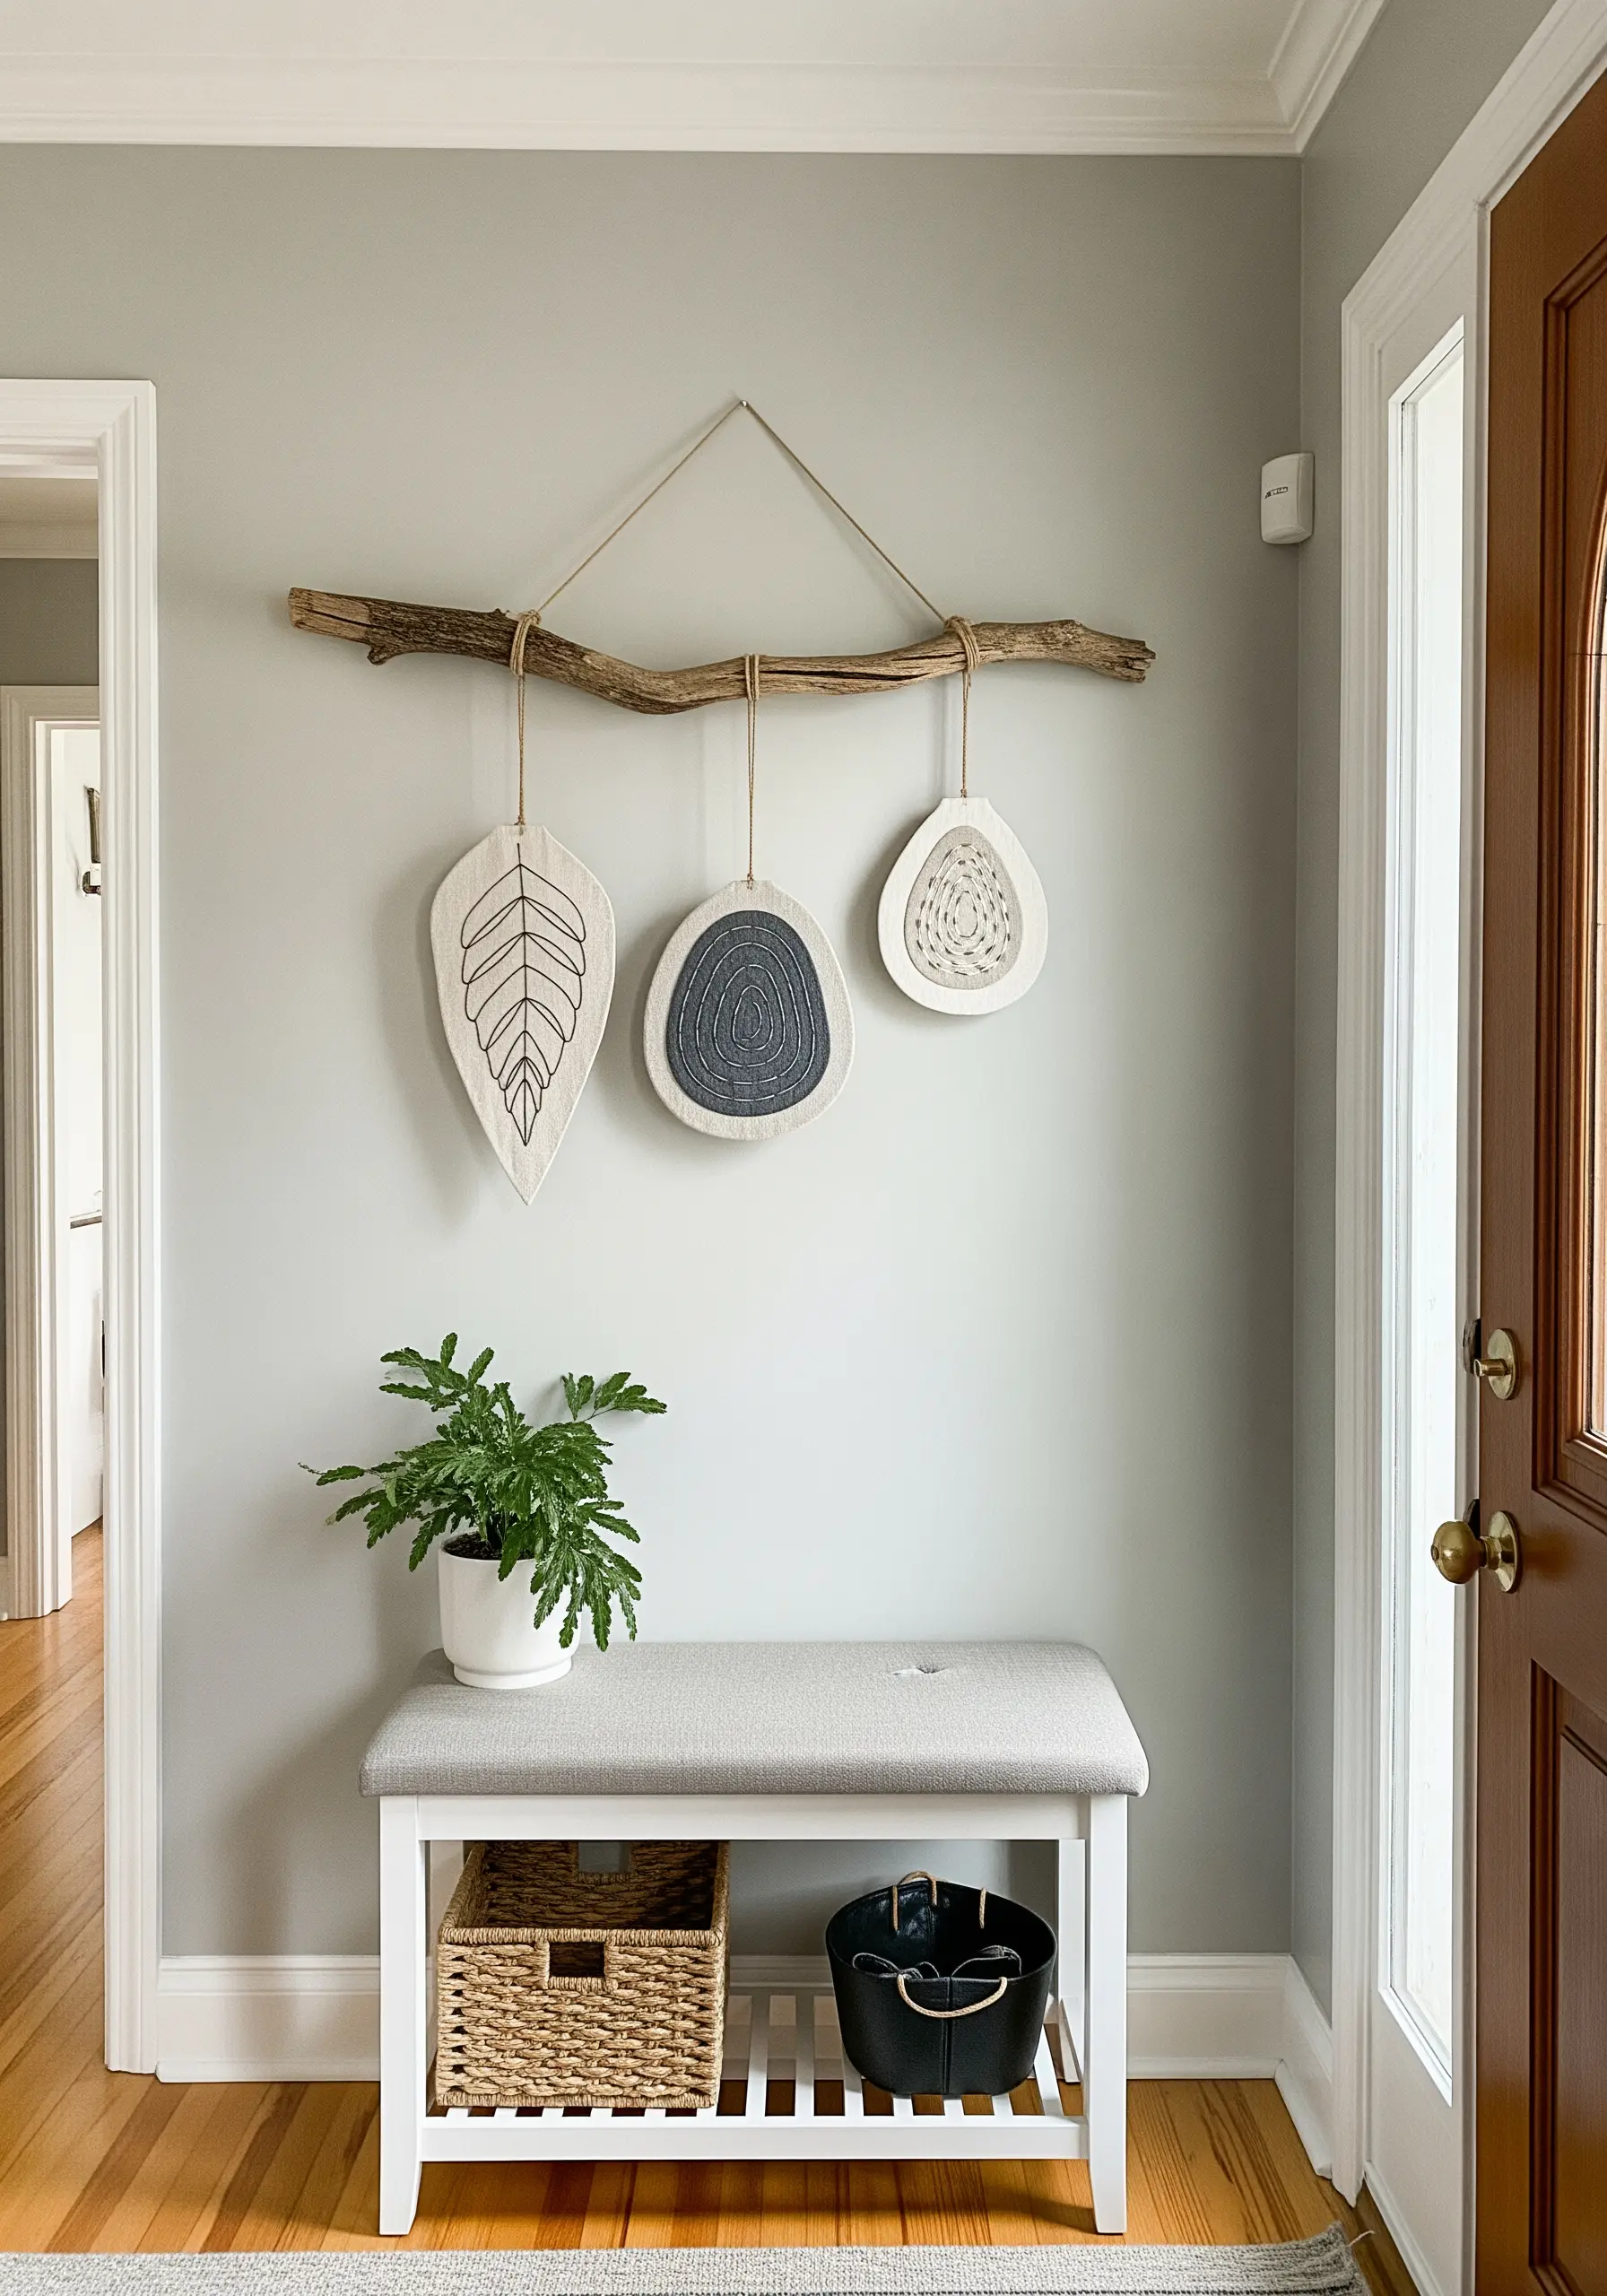
Move your embroidery off the flat surface by creating small, three-dimensional ornaments.
Stitch your designs onto a piece of fabric, then cut them out, leaving a small seam allowance.
Sew it to a backing fabric, stuff lightly with batting, and stitch closed to create a padded, sculptural element.
Hanging these handmade mini decor pieces from a natural branch creates a rustic and charming wall display.
22. Fill Large Areas with Controlled Texture

When filling a large monochromatic area, a flat satin stitch can look uneven and dull.
Instead, use a dense field of French knots or colonial knots to create a rich, stippled texture that catches the light beautifully.
This technique is more forgiving than satin stitch over large surfaces and adds a luxurious, tactile quality to the final piece.
It transforms a simple silhouette into a sophisticated work of stunning fiber art.
23. Design a Sampler of Organic Textures
Create a ‘stitch library’ on a single piece of fabric by filling various abstract shapes with different textures.
Dedicate one shape to satin stitch, another to French knots, a spiral to chain stitch, and so on.
This not only serves as a beautiful sampler of your skills but also creates a dynamic composition full of visual interest.
Stick to a cohesive, earthy color palette to ensure all the different elements feel unified.
24. Use Metallic Thread as a Graphic Accent
Incorporate a metallic thread not just for sparkle, but as a key design element.
In a concentric, agate-inspired design, use a single gold or silver thread to outline specific rings.
This strategic placement draws the eye, creates a sense of luxury, and breaks up the matte texture of the surrounding cotton or wool threads.
Place these metallic thread wall art projects on a dark, dramatic wall for maximum impact.
25. Add Whimsy with Embroidered Soft Sculptures
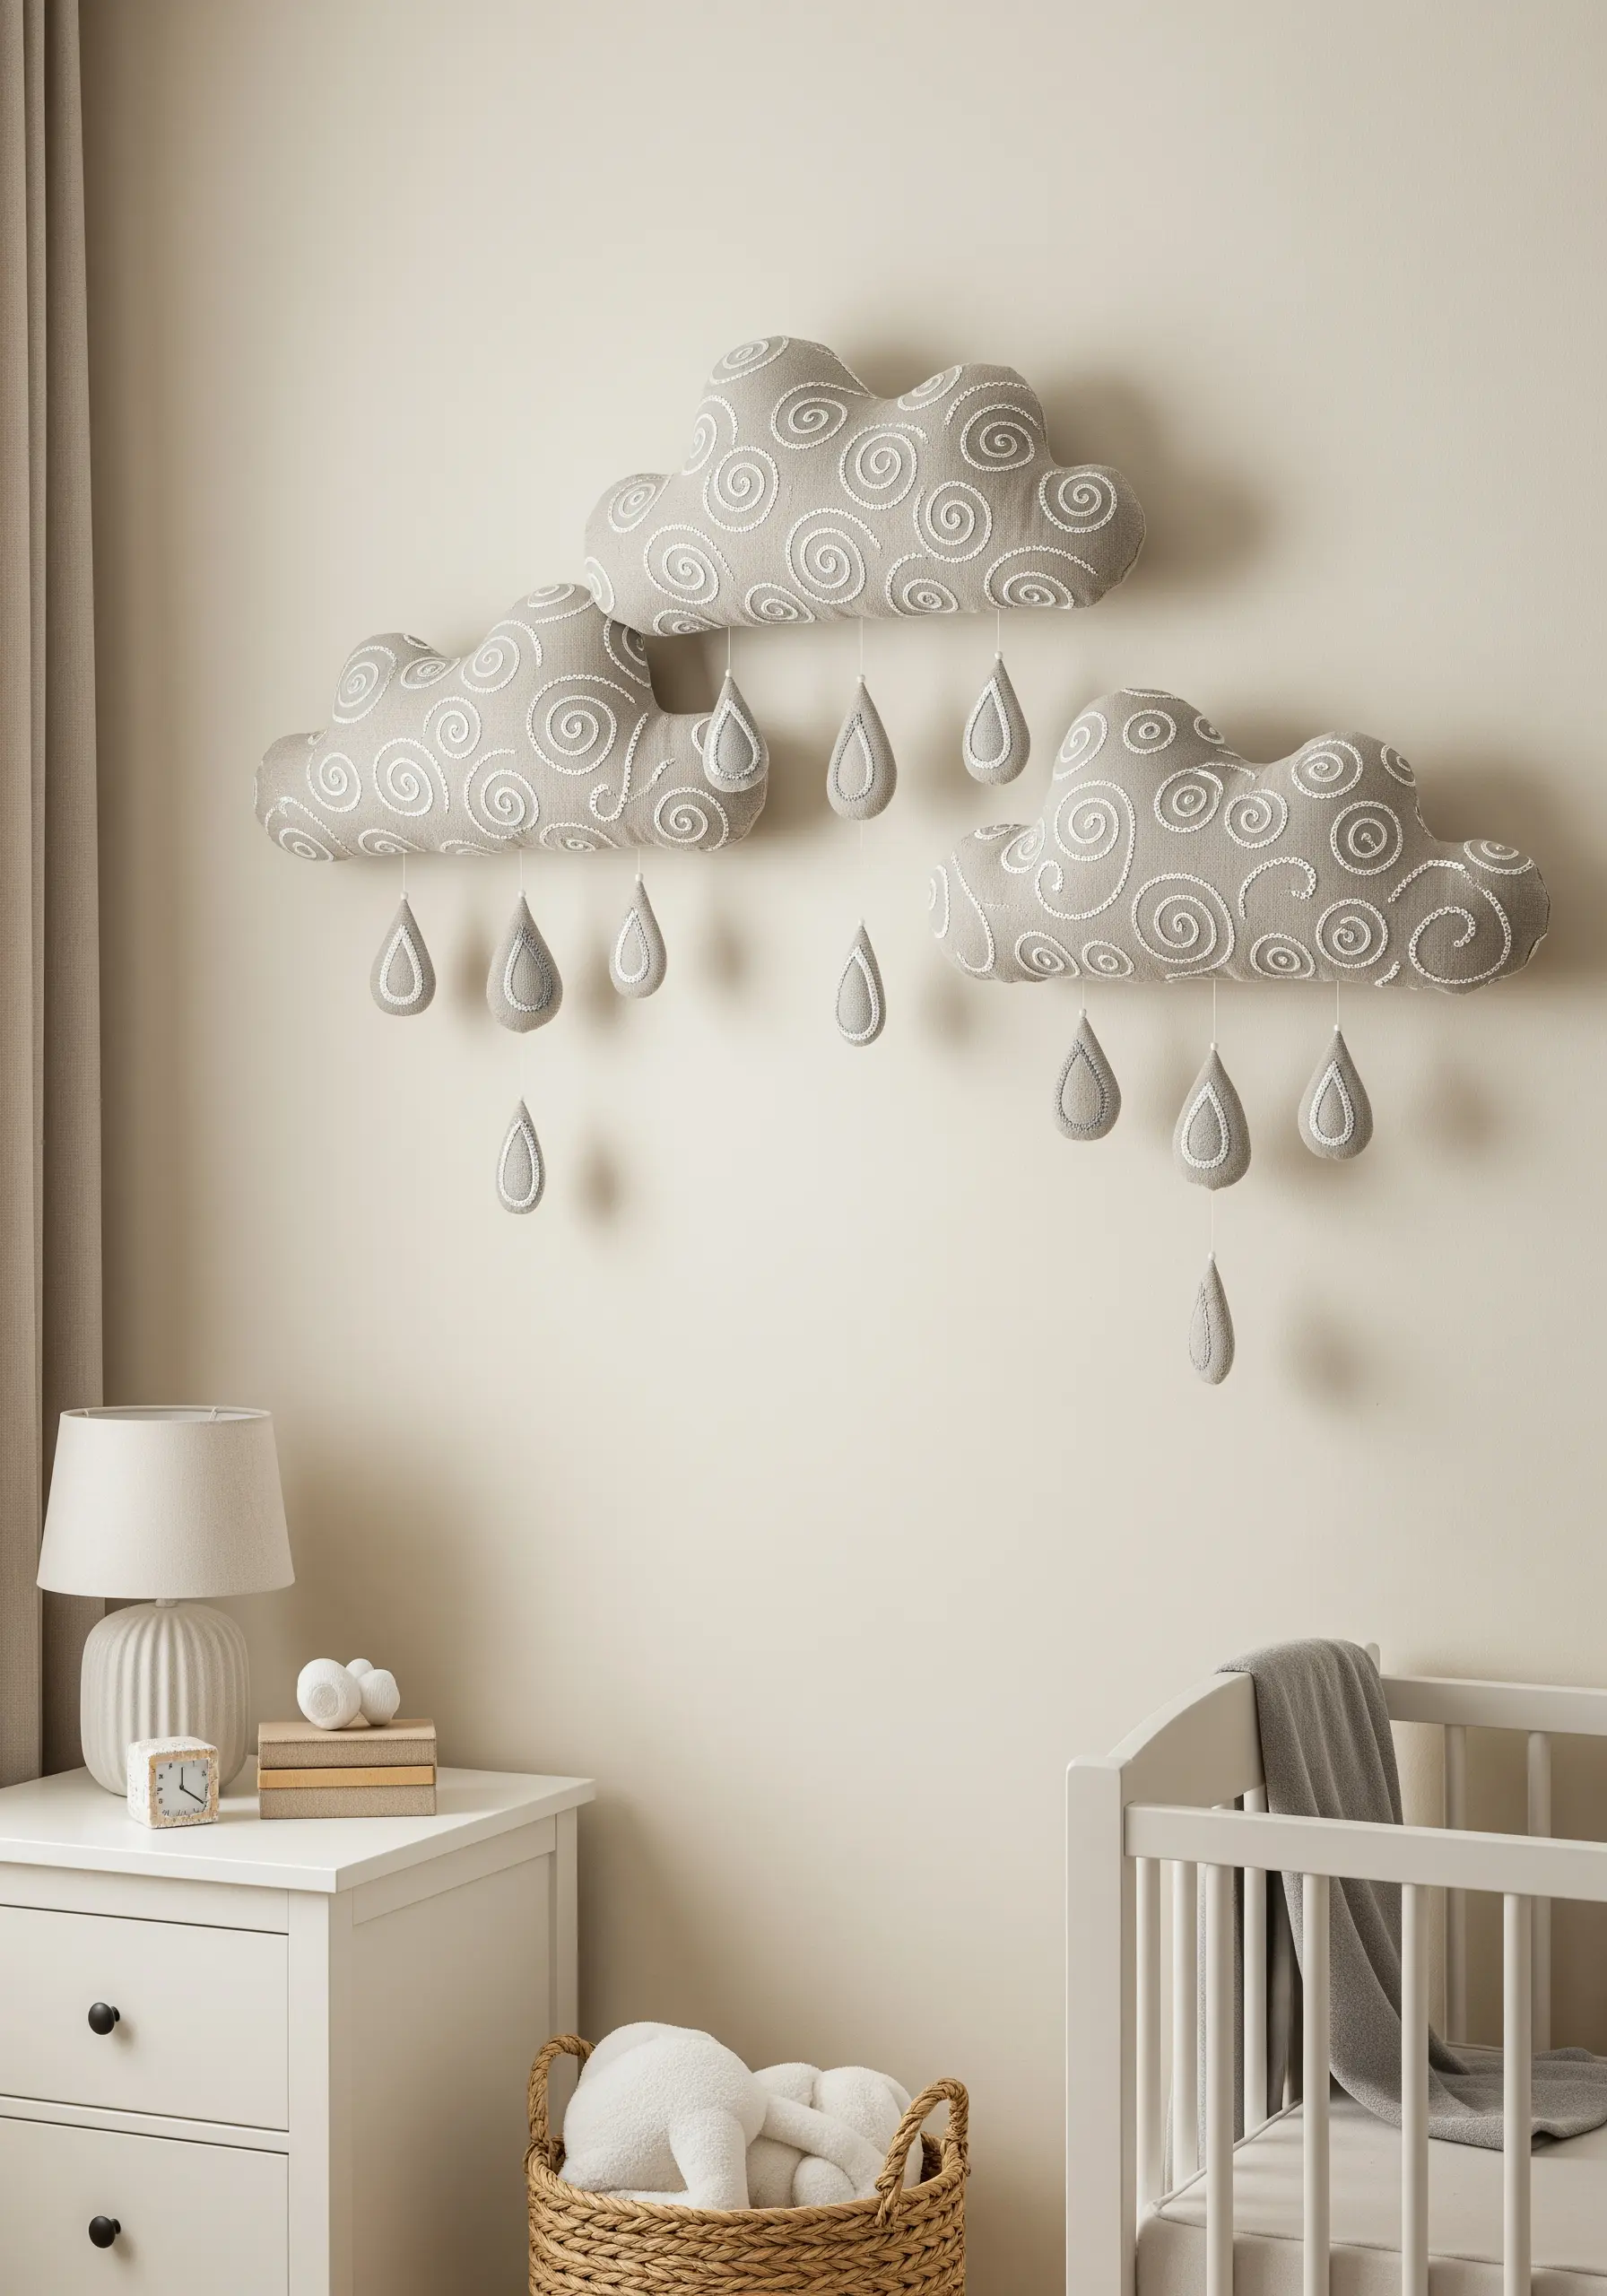
Create charming, three-dimensional decor by combining sewing with simple embroidery.
Cut cloud and raindrop shapes from soft felt or linen, and embroider them with simple patterns like swirls of running stitch before sewing and stuffing.
This technique turns basic stitches into delightful patterns on a sculptural form.
These embroidered nursery decor ideas are perfect for adding a soft, handmade touch to a child’s room.
26. Abstract Nature with Graphic Cross-Sections
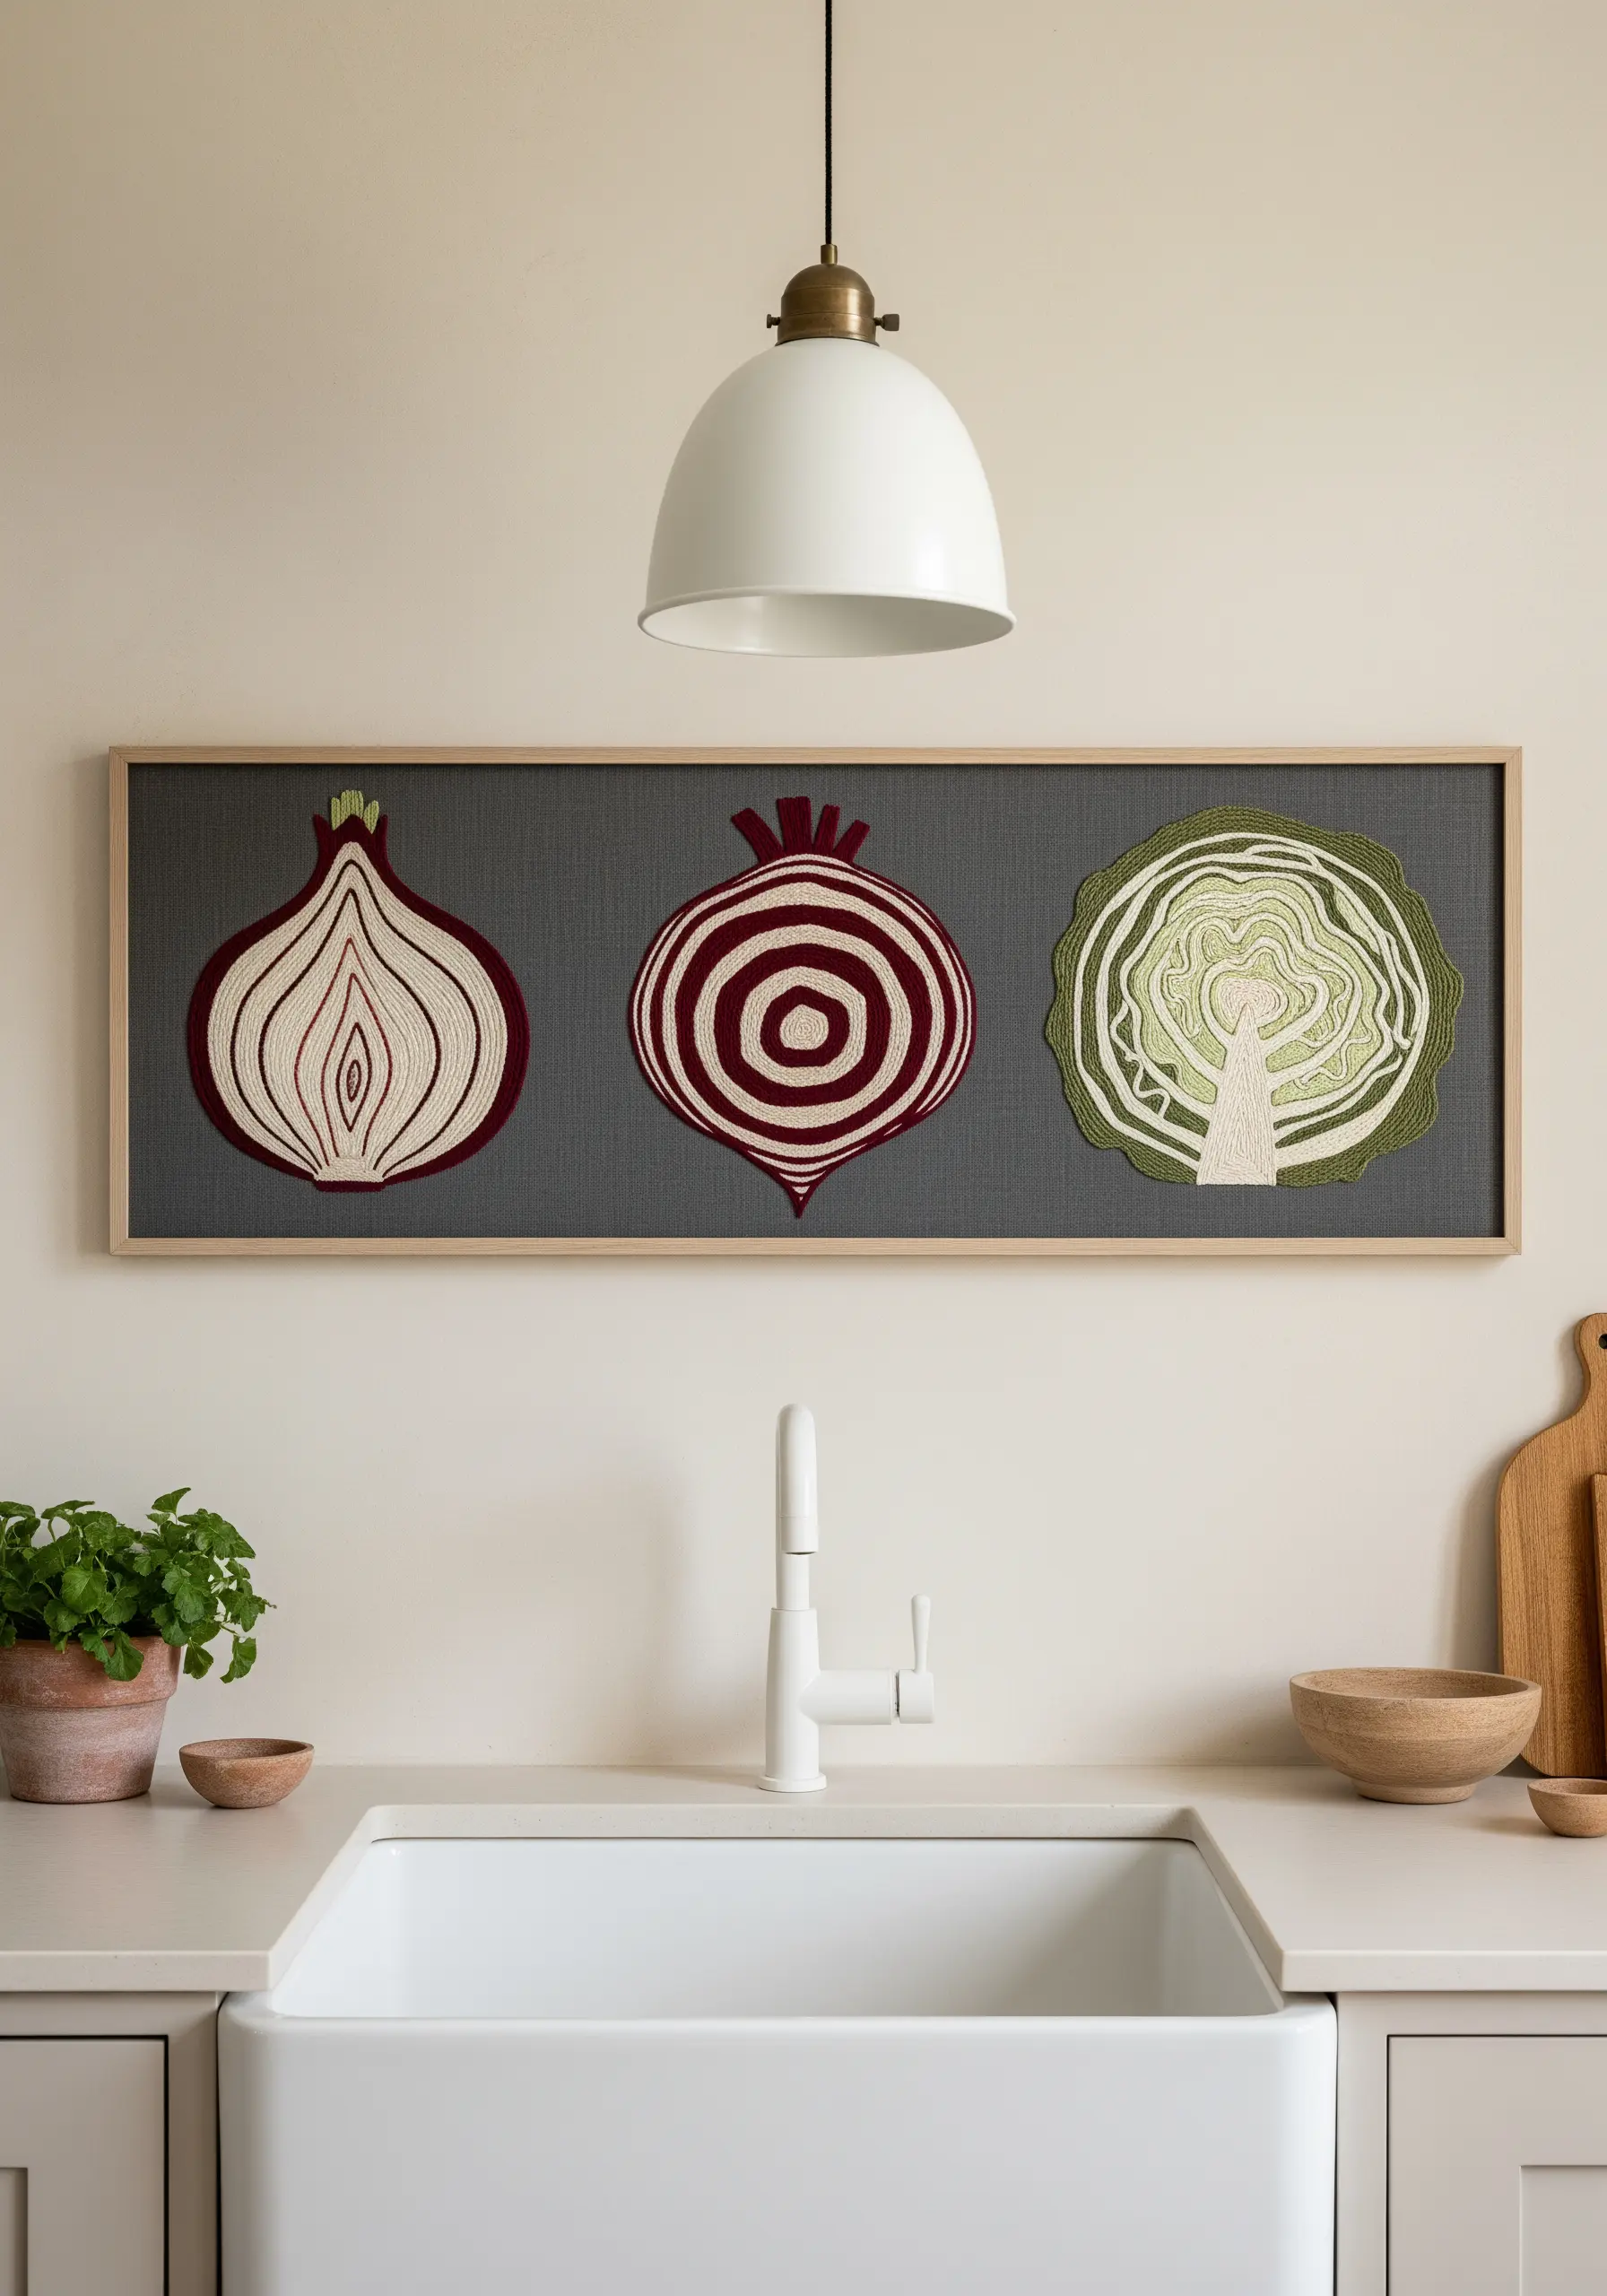
Find inspiration in the internal patterns of natural objects, like the rings of an onion or the structure of a cabbage.
Simplify these shapes into clean, graphic outlines and fill them with concentric rows of chain stitch or backstitch.
This approach transforms familiar vegetables into striking abstract art.
Framing them together as a triptych creates a cohesive and modern statement piece for a kitchen or dining area.
27. Stitch on Sheer Fabric for an Ethereal Effect
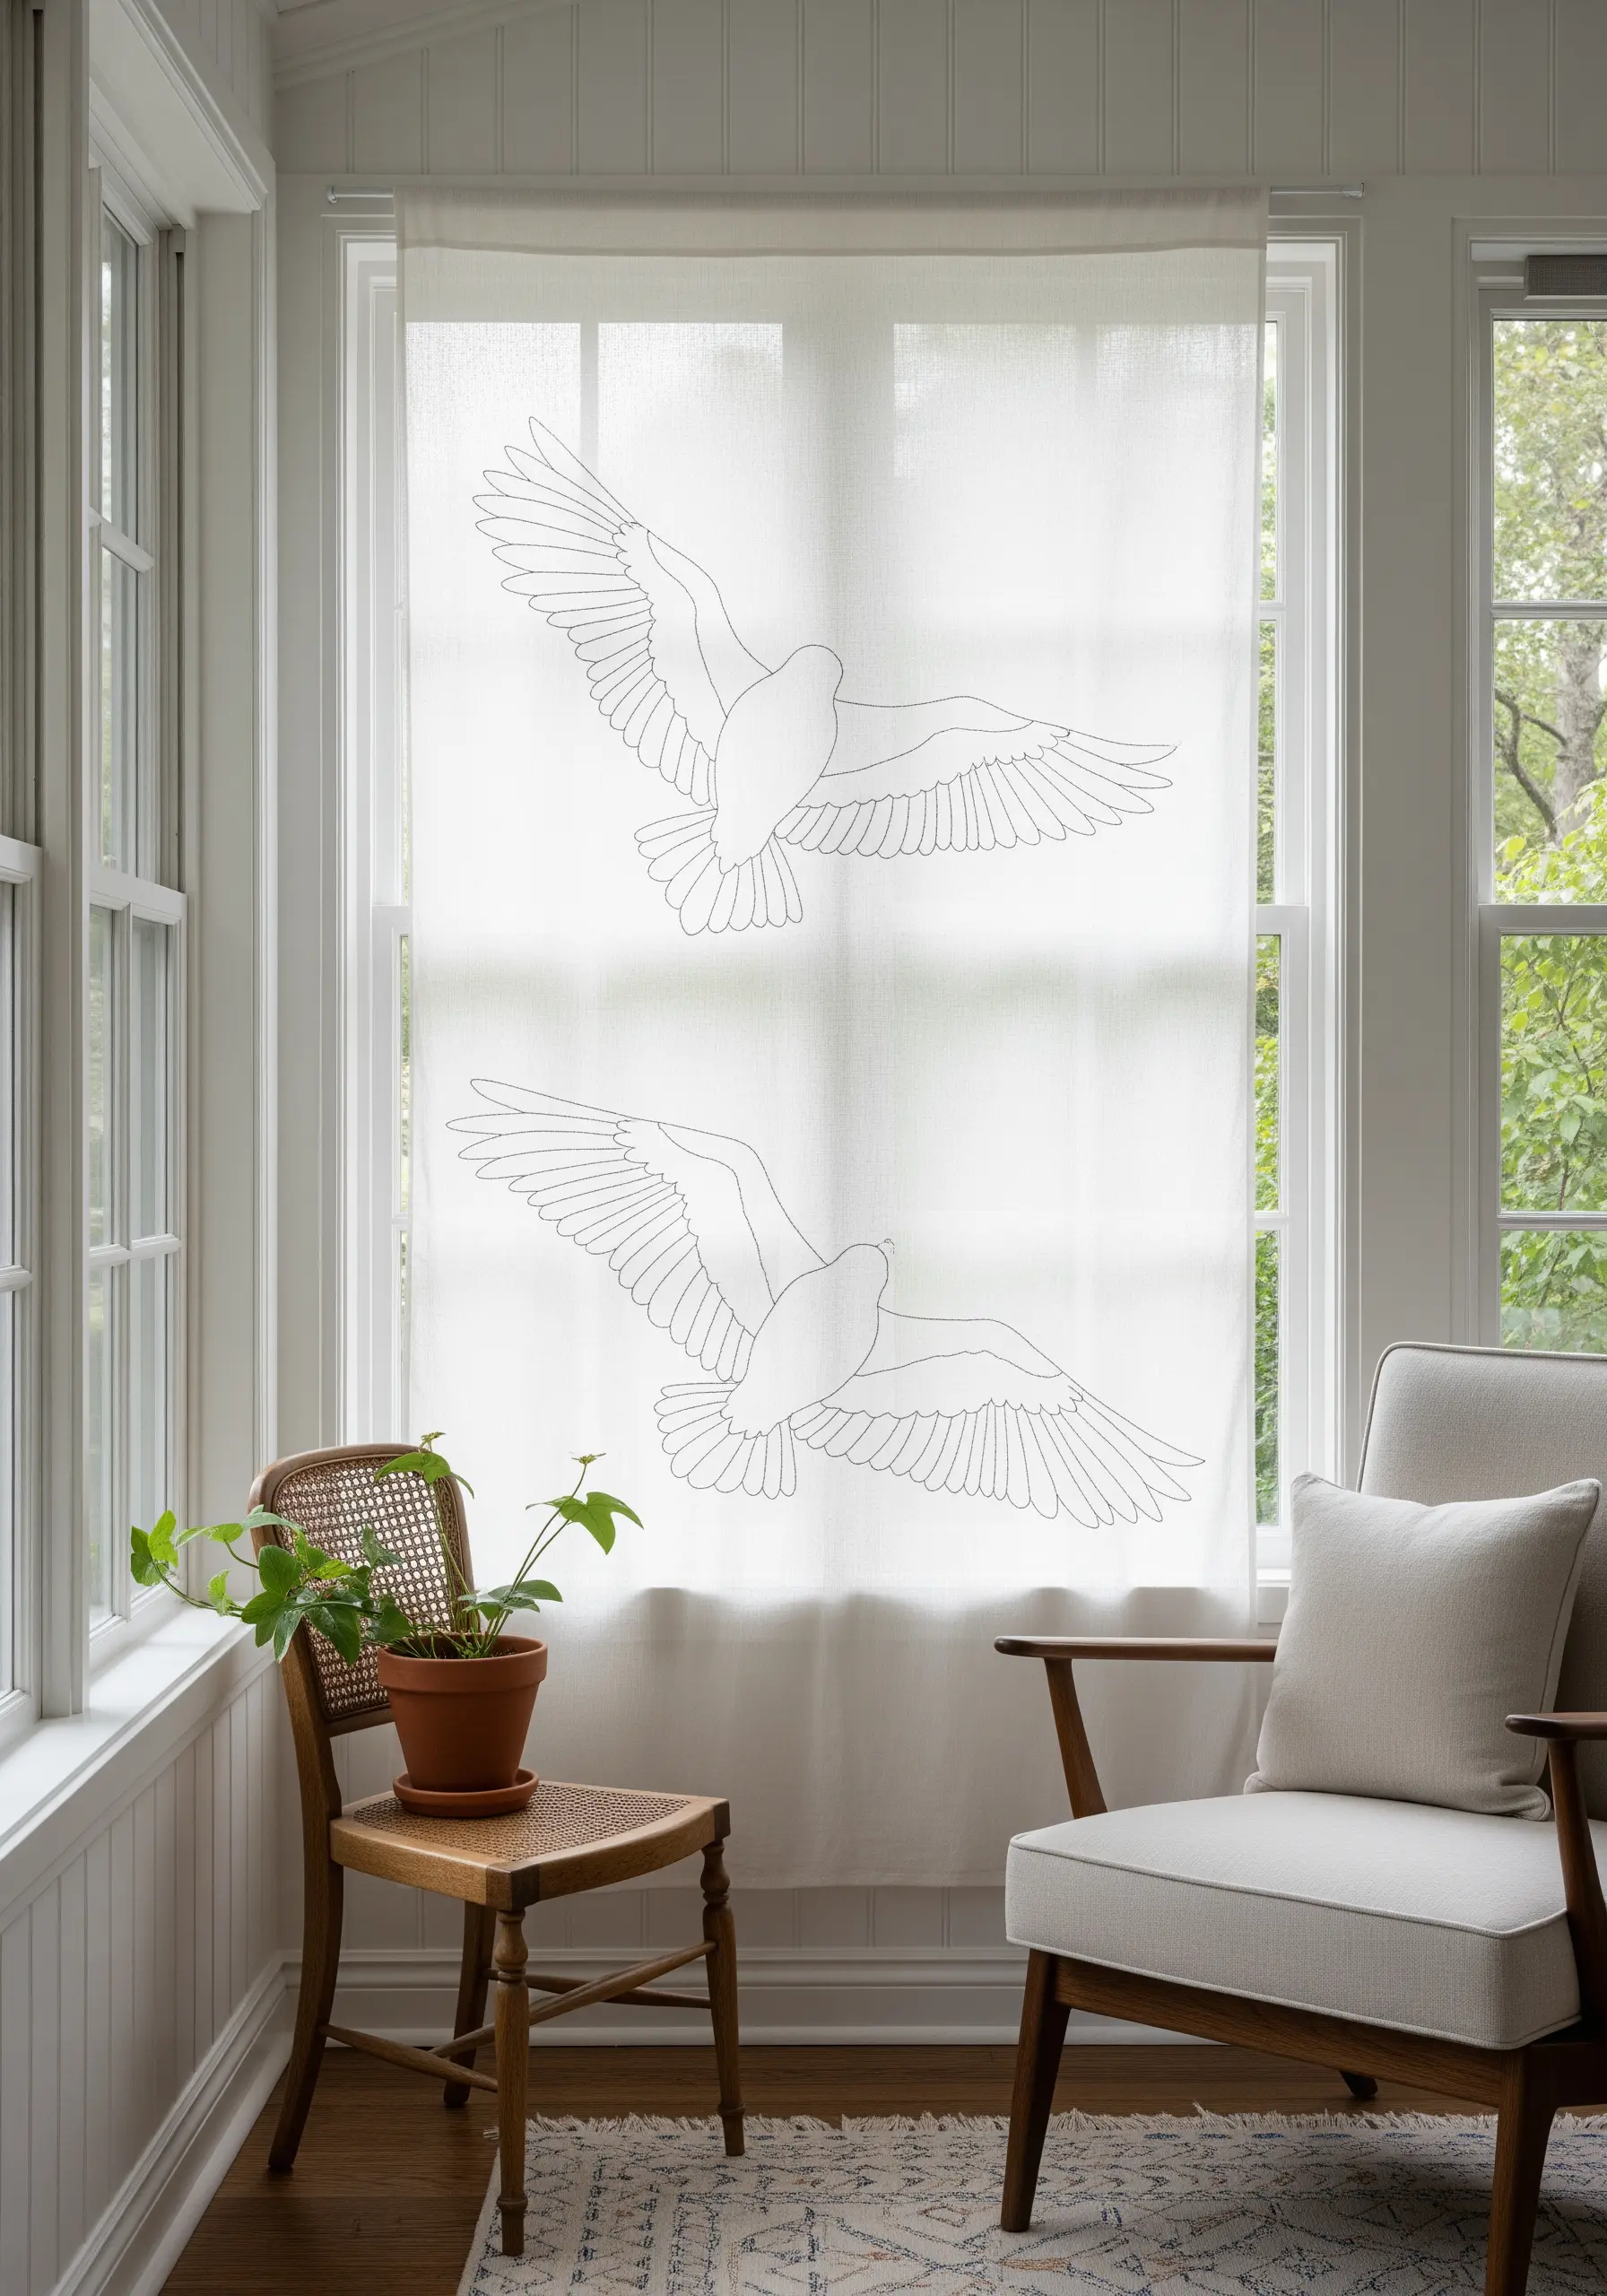
Create a delicate, light-filtering piece by embroidering on sheer fabric like organza or linen voile.
To prevent puckering, use a lightweight, tear-away or water-soluble stabilizer on the back while you stitch.
A simple backstitch using a dark thread is all you need to create a floating, drawing-like effect.
This technique turns a simple window covering into a subtle piece of art that interacts with the light.
28. Introduce Bold Texture with Chunky Yarn
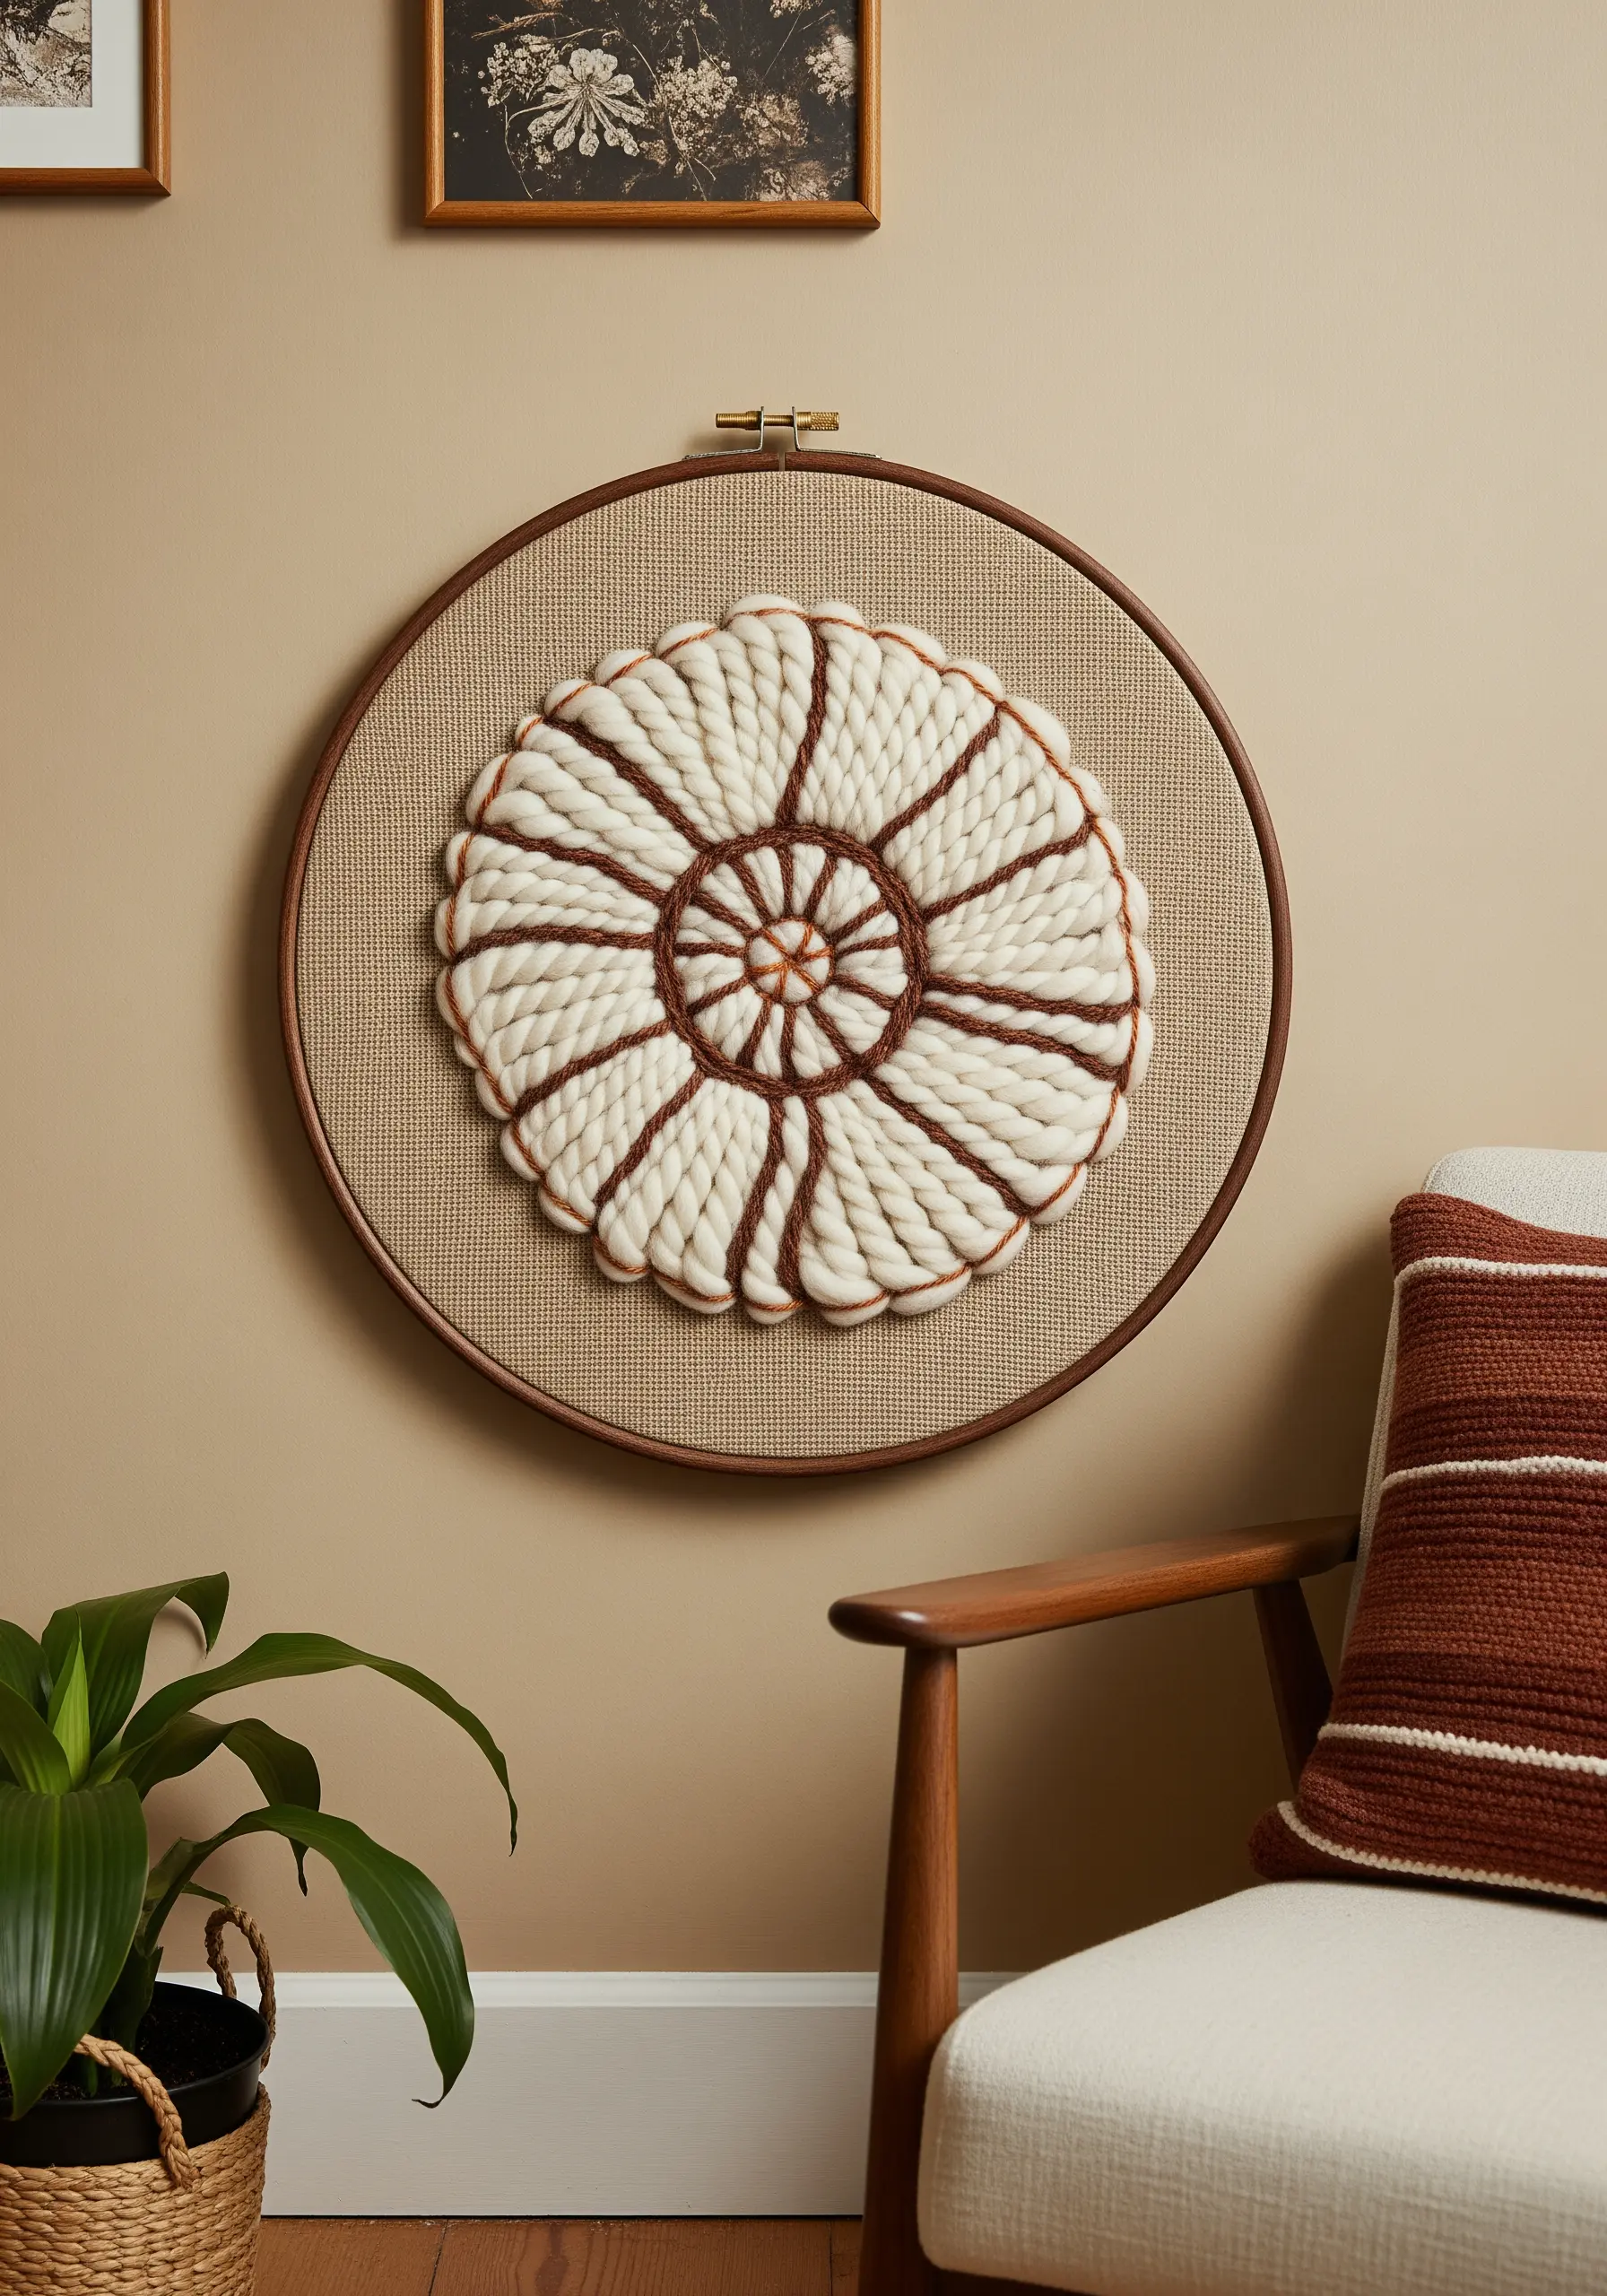
Incorporate thick fibers like wool roving or chunky yarn to add dramatic, sculptural texture to your hoop art.
Use a couching stitch—tacking the yarn down with a thinner, matching thread—to secure it to the fabric surface.
Alternatively, weave the yarn over and under foundational straight stitches to create woven sections.
These gorgeous mixed fiber textures add instant dimension and a cozy, tactile quality.
29. Depict Motion with Minimalist Ripple Lines

Capture the essence of a water ripple with nothing more than concentric, imperfect circles.
Use a single color thread, like white on a grey background, to keep the focus purely on the form.
Vary the thickness of your lines by using more or fewer strands of floss for certain rings.
Adding a few disconnected dots or short lines can suggest the initial splash, bringing the static image to life.
30. Blend Colors Subtly with Long-and-Short Stitch

To give bamboo leaves a realistic, painterly quality, use the long-and-short stitch to blend shades of green seamlessly.
Start with your darkest green at the base of the leaf, then work your way up with progressively lighter shades, interlocking the stitches from each row.
This technique eliminates harsh lines between colors, creating soft, natural gradients that mimic the way light hits foliage.
It’s the perfect way to master ways to embroider realistic shadows and add depth.
31. Build a Thematic Collection in Hoops
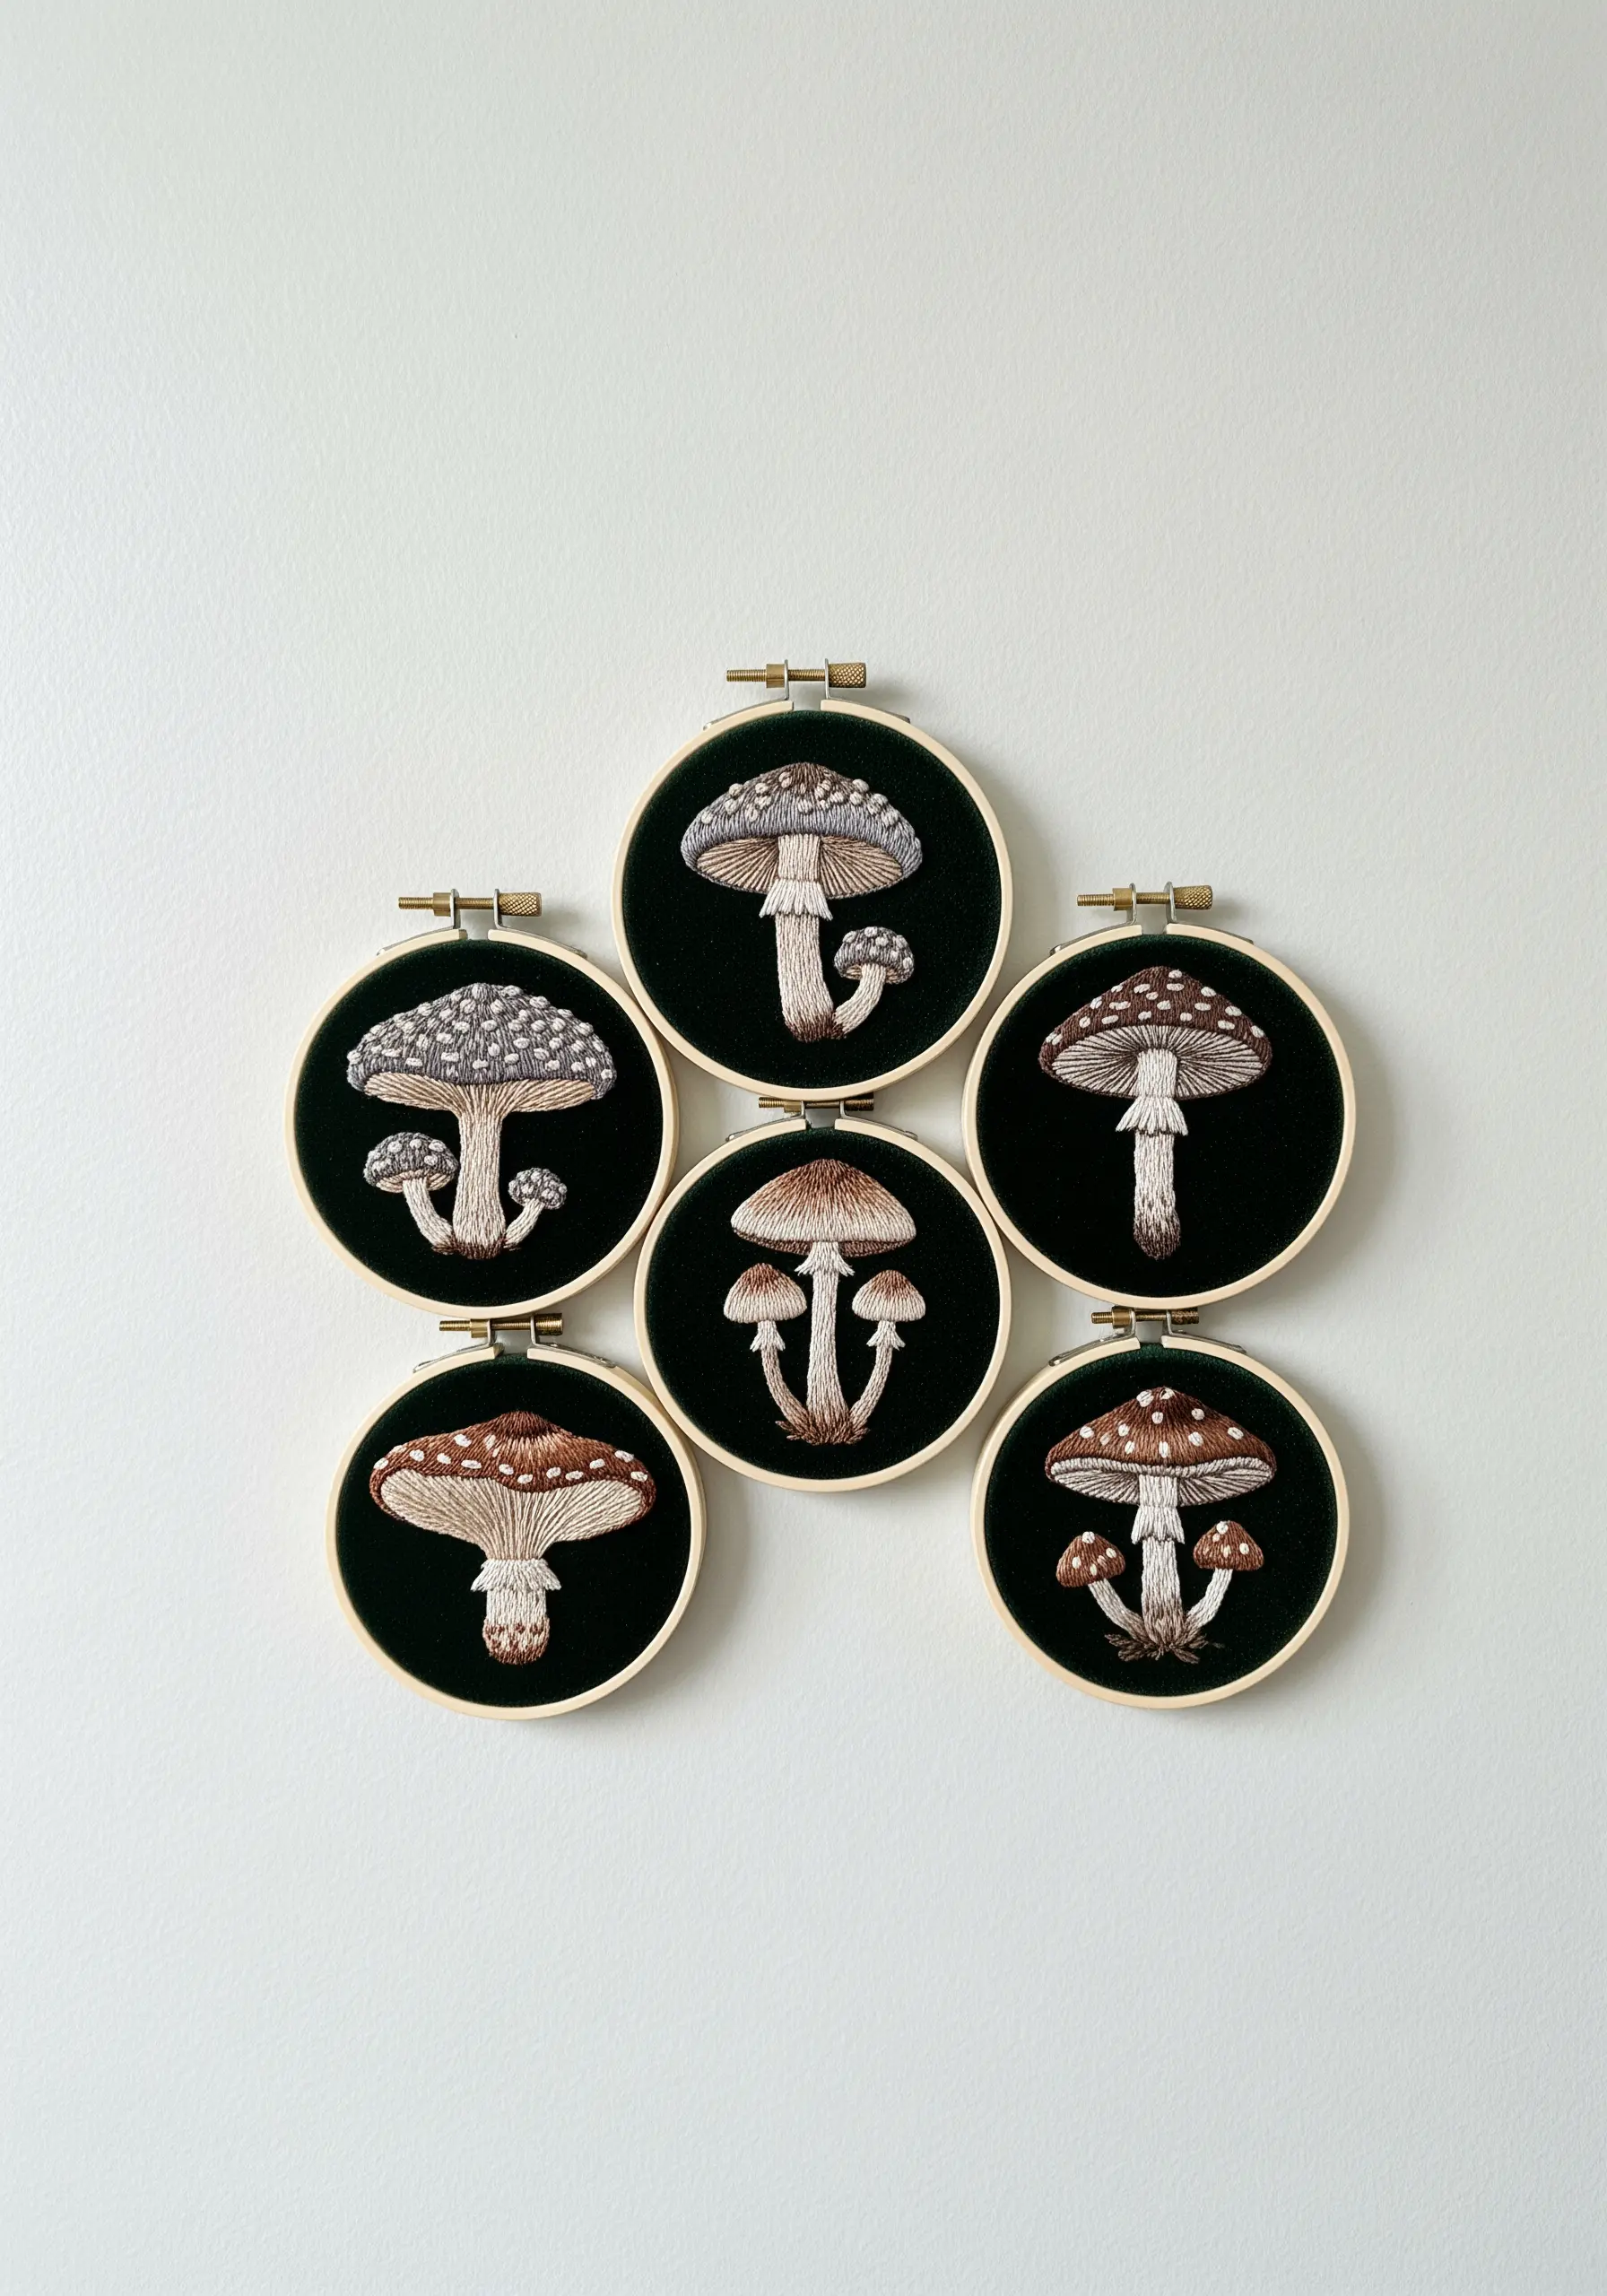
Create a compelling wall display by focusing on a single theme, like forest mushrooms, across multiple hoops.
Stitching each specimen on the same dark background fabric provides cohesion, even as the shapes and colors vary.
Use long-and-short stitch for shading on the caps and French knots or seed stitches for texture on the gills.
Arranging the hoops in a tight, organic cluster enhances the feeling of a naturalist’s collection and makes for compelling realistic mushroom forest floor embroidery projects.
32. Express Rhythm and Flow with Wavy Lines
Translate the feeling of sound waves, water currents, or geologic strata into abstract embroidery.
Use a simple backstitch or stem stitch to create flowing, parallel lines across your canvas.
Introduce rhythm by varying the colors in a repeating or random sequence.
Placing a pop of an unexpected color, like red among neutrals, creates a focal point and adds a layer of energy to the otherwise calm composition, making your embroidery decor ideas feel dynamic.


