
That plain T-shirt in your drawer holds more potential than you think. It’s not just an article of clothing; it’s a blank canvas waiting for a story, a mark, a touch of personality that is entirely yours.
Forget overwhelming, large-scale projects. The real magic often lies in the smallest, most intentional details—a single, perfectly stitched leaf on a collar, a tiny constellation over the heart, or a surprising burst of color peeking from a sleeve.
Here, you’ll find more than just ideas; you’ll find techniques. Discover how a simple change in stitch direction can create texture, how a padded underlayer can make a heart look full and smooth, and how a well-placed line can tell a story of movement. This is your invitation to transform the ordinary into something personal and quietly beautiful.
1. Botanical Gradients with Satin Stitch

To achieve this soft, painterly effect on leaves, blend two or three similar shades within each small shape using a satin stitch.
Work with just two strands of floss to keep the stitches smooth and angle them to follow the natural curve of the leaf.
On a stretchy T-shirt, always use a water-soluble stabilizer on the back; it prevents the fabric from puckering and provides a firm foundation for even stitches.
This is a perfect way to practice your shading on botanical line art embroidery patterns.
2. Layered Texture for Realistic Motifs
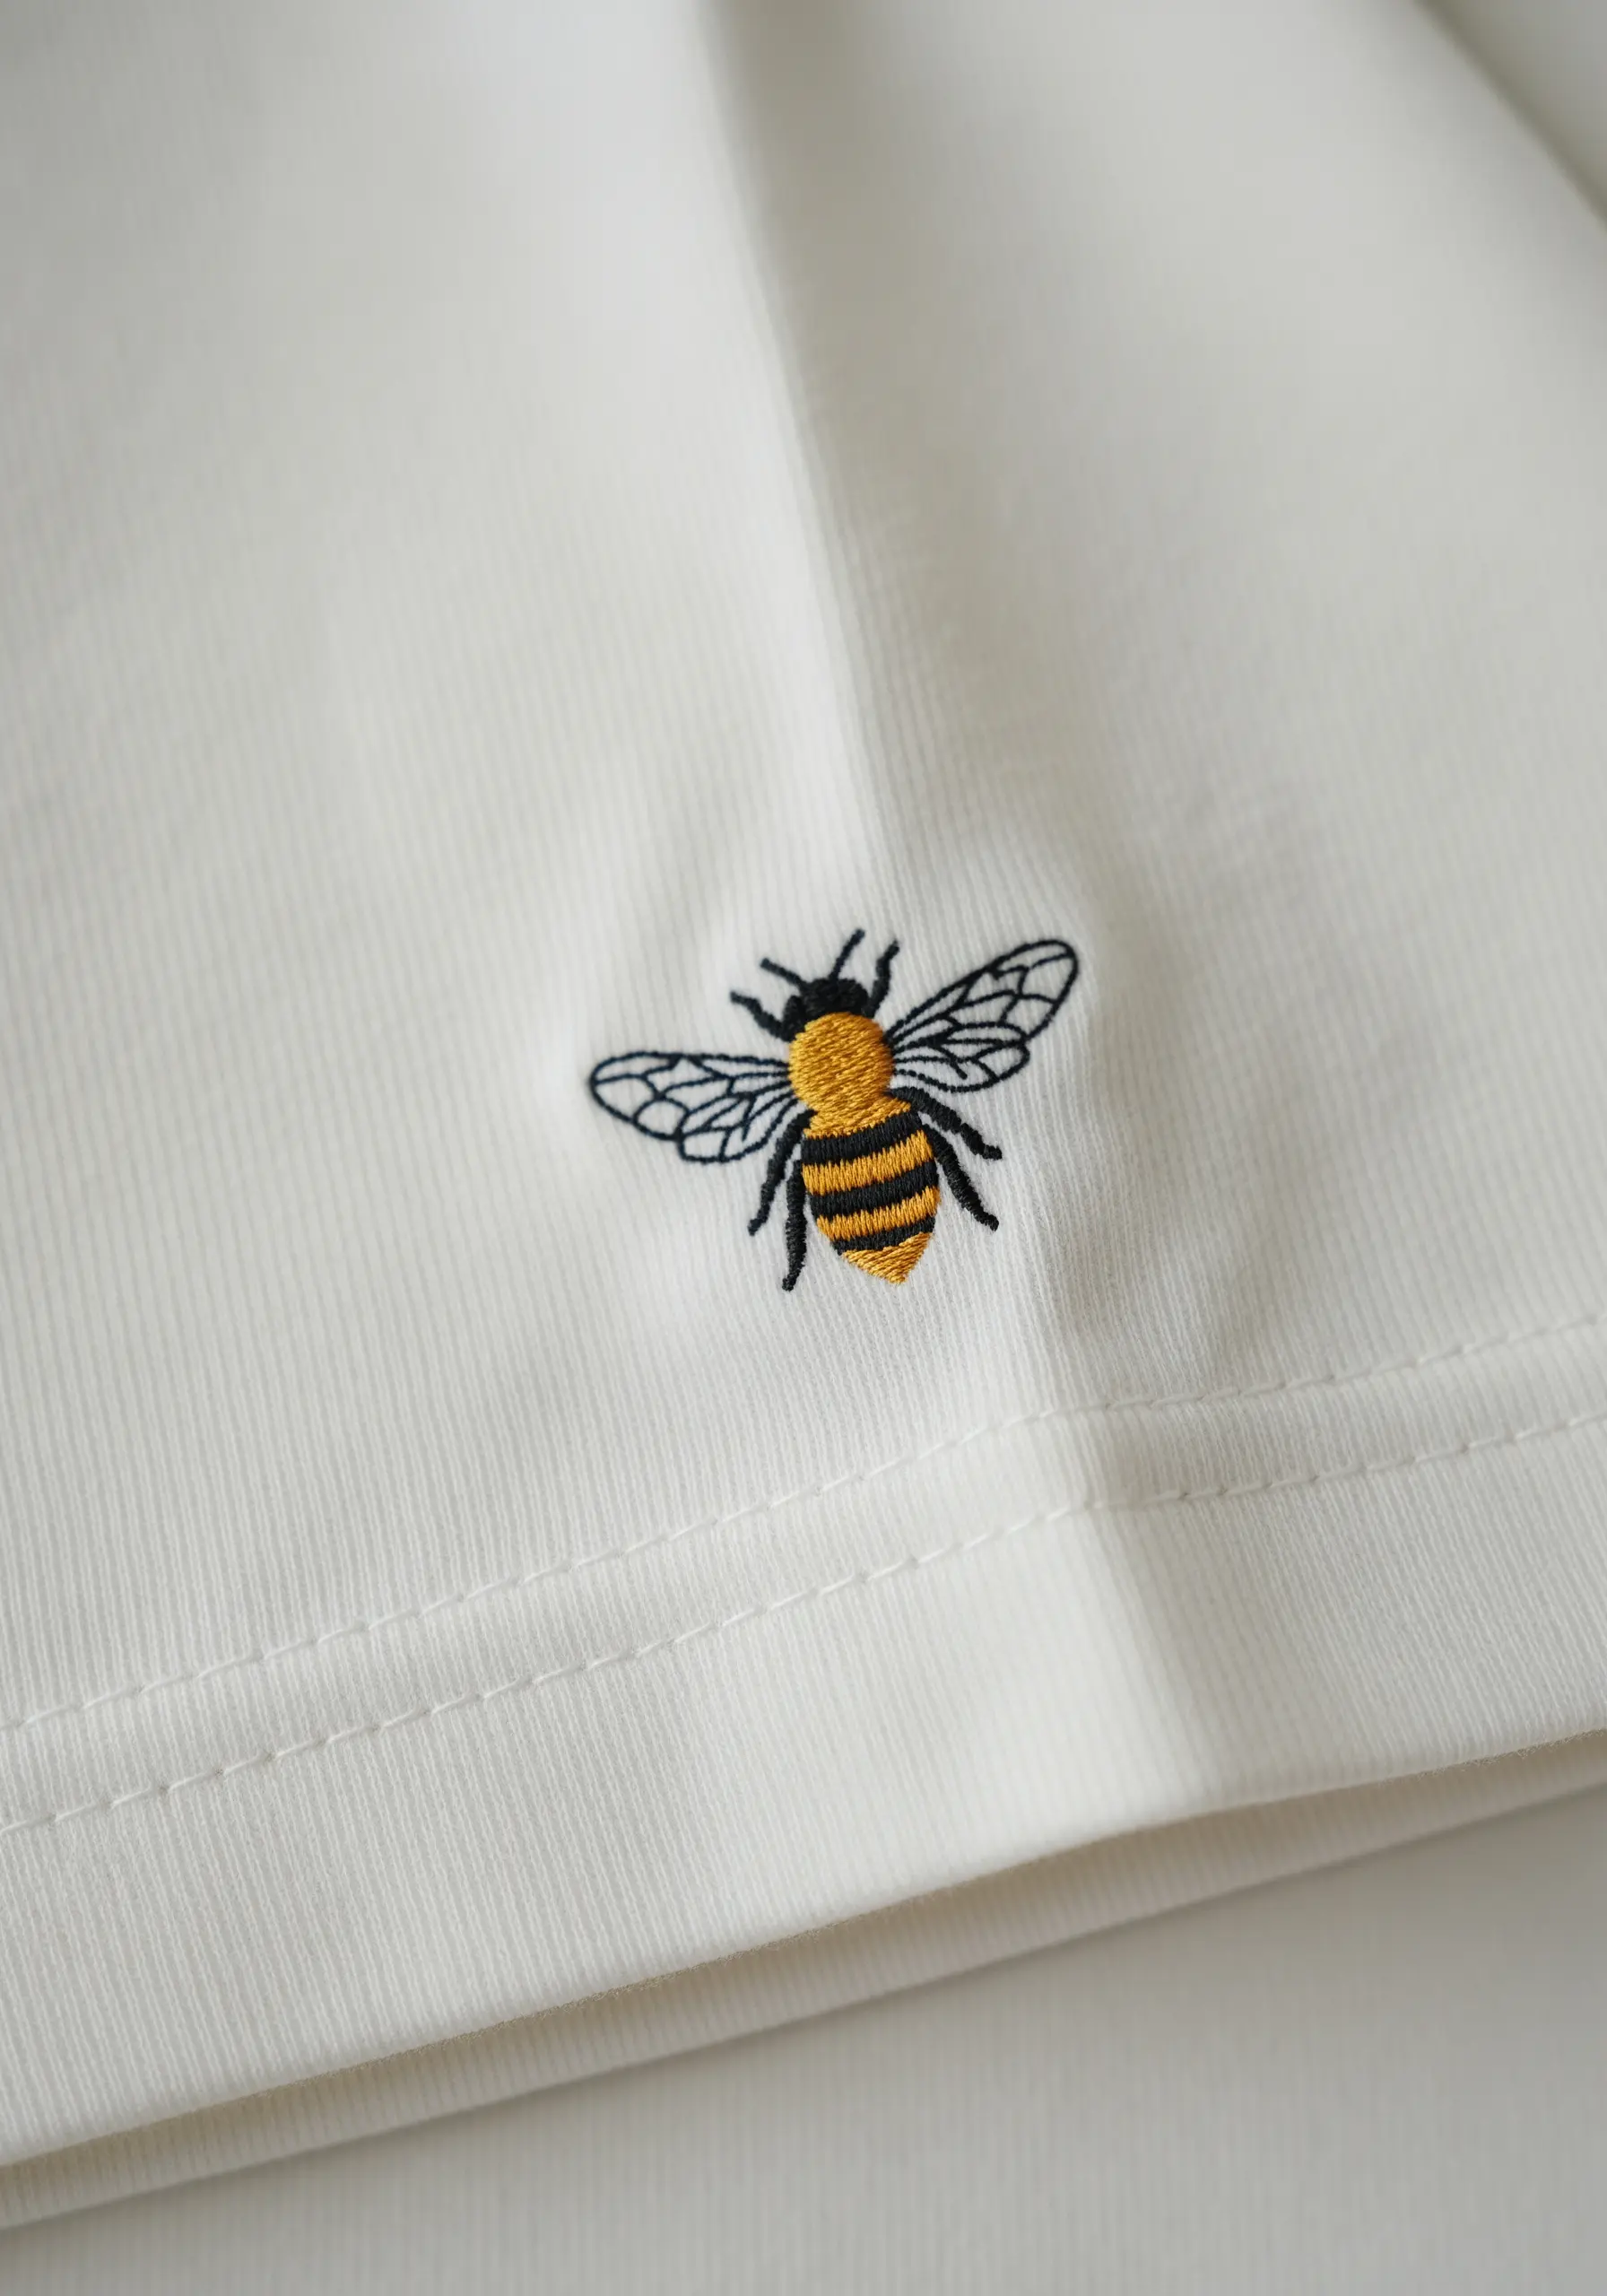
Bring a simple bee to life by focusing on texture.
Use a dense satin stitch for the black stripes and a slightly looser, fluffier satin stitch for the yellow sections to mimic a fuzzy body.
For the wings, create the illusion of transparency by using a single strand of light grey thread in an open fishbone stitch, leaving space between each stitch.
This contrast between the solid body and delicate wings is what makes the design feel dynamic and real.
3. Playful Motion with Line Art Stitches

You can create a sense of movement by combining two different types of line stitches in one design.
Use a crisp, solid backstitch for the paper airplane itself, giving it structure and form.
For the flight path, switch to a simple running stitch with evenly spaced gaps; this visual break implies motion and adds a light, whimsical touch.
Using just two strands of floss will keep these minimalist line art embroidery patterns feeling delicate and sharp.
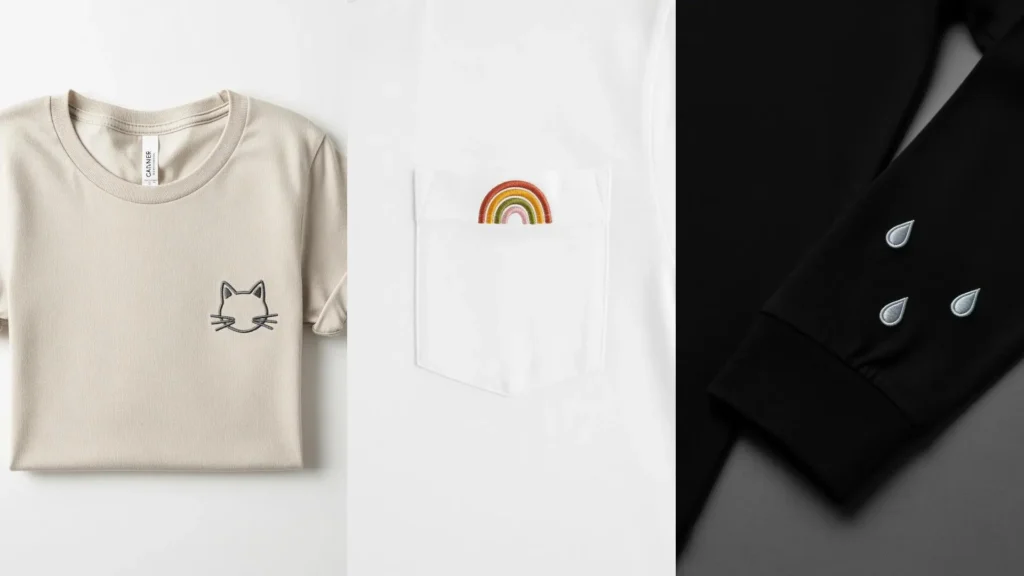
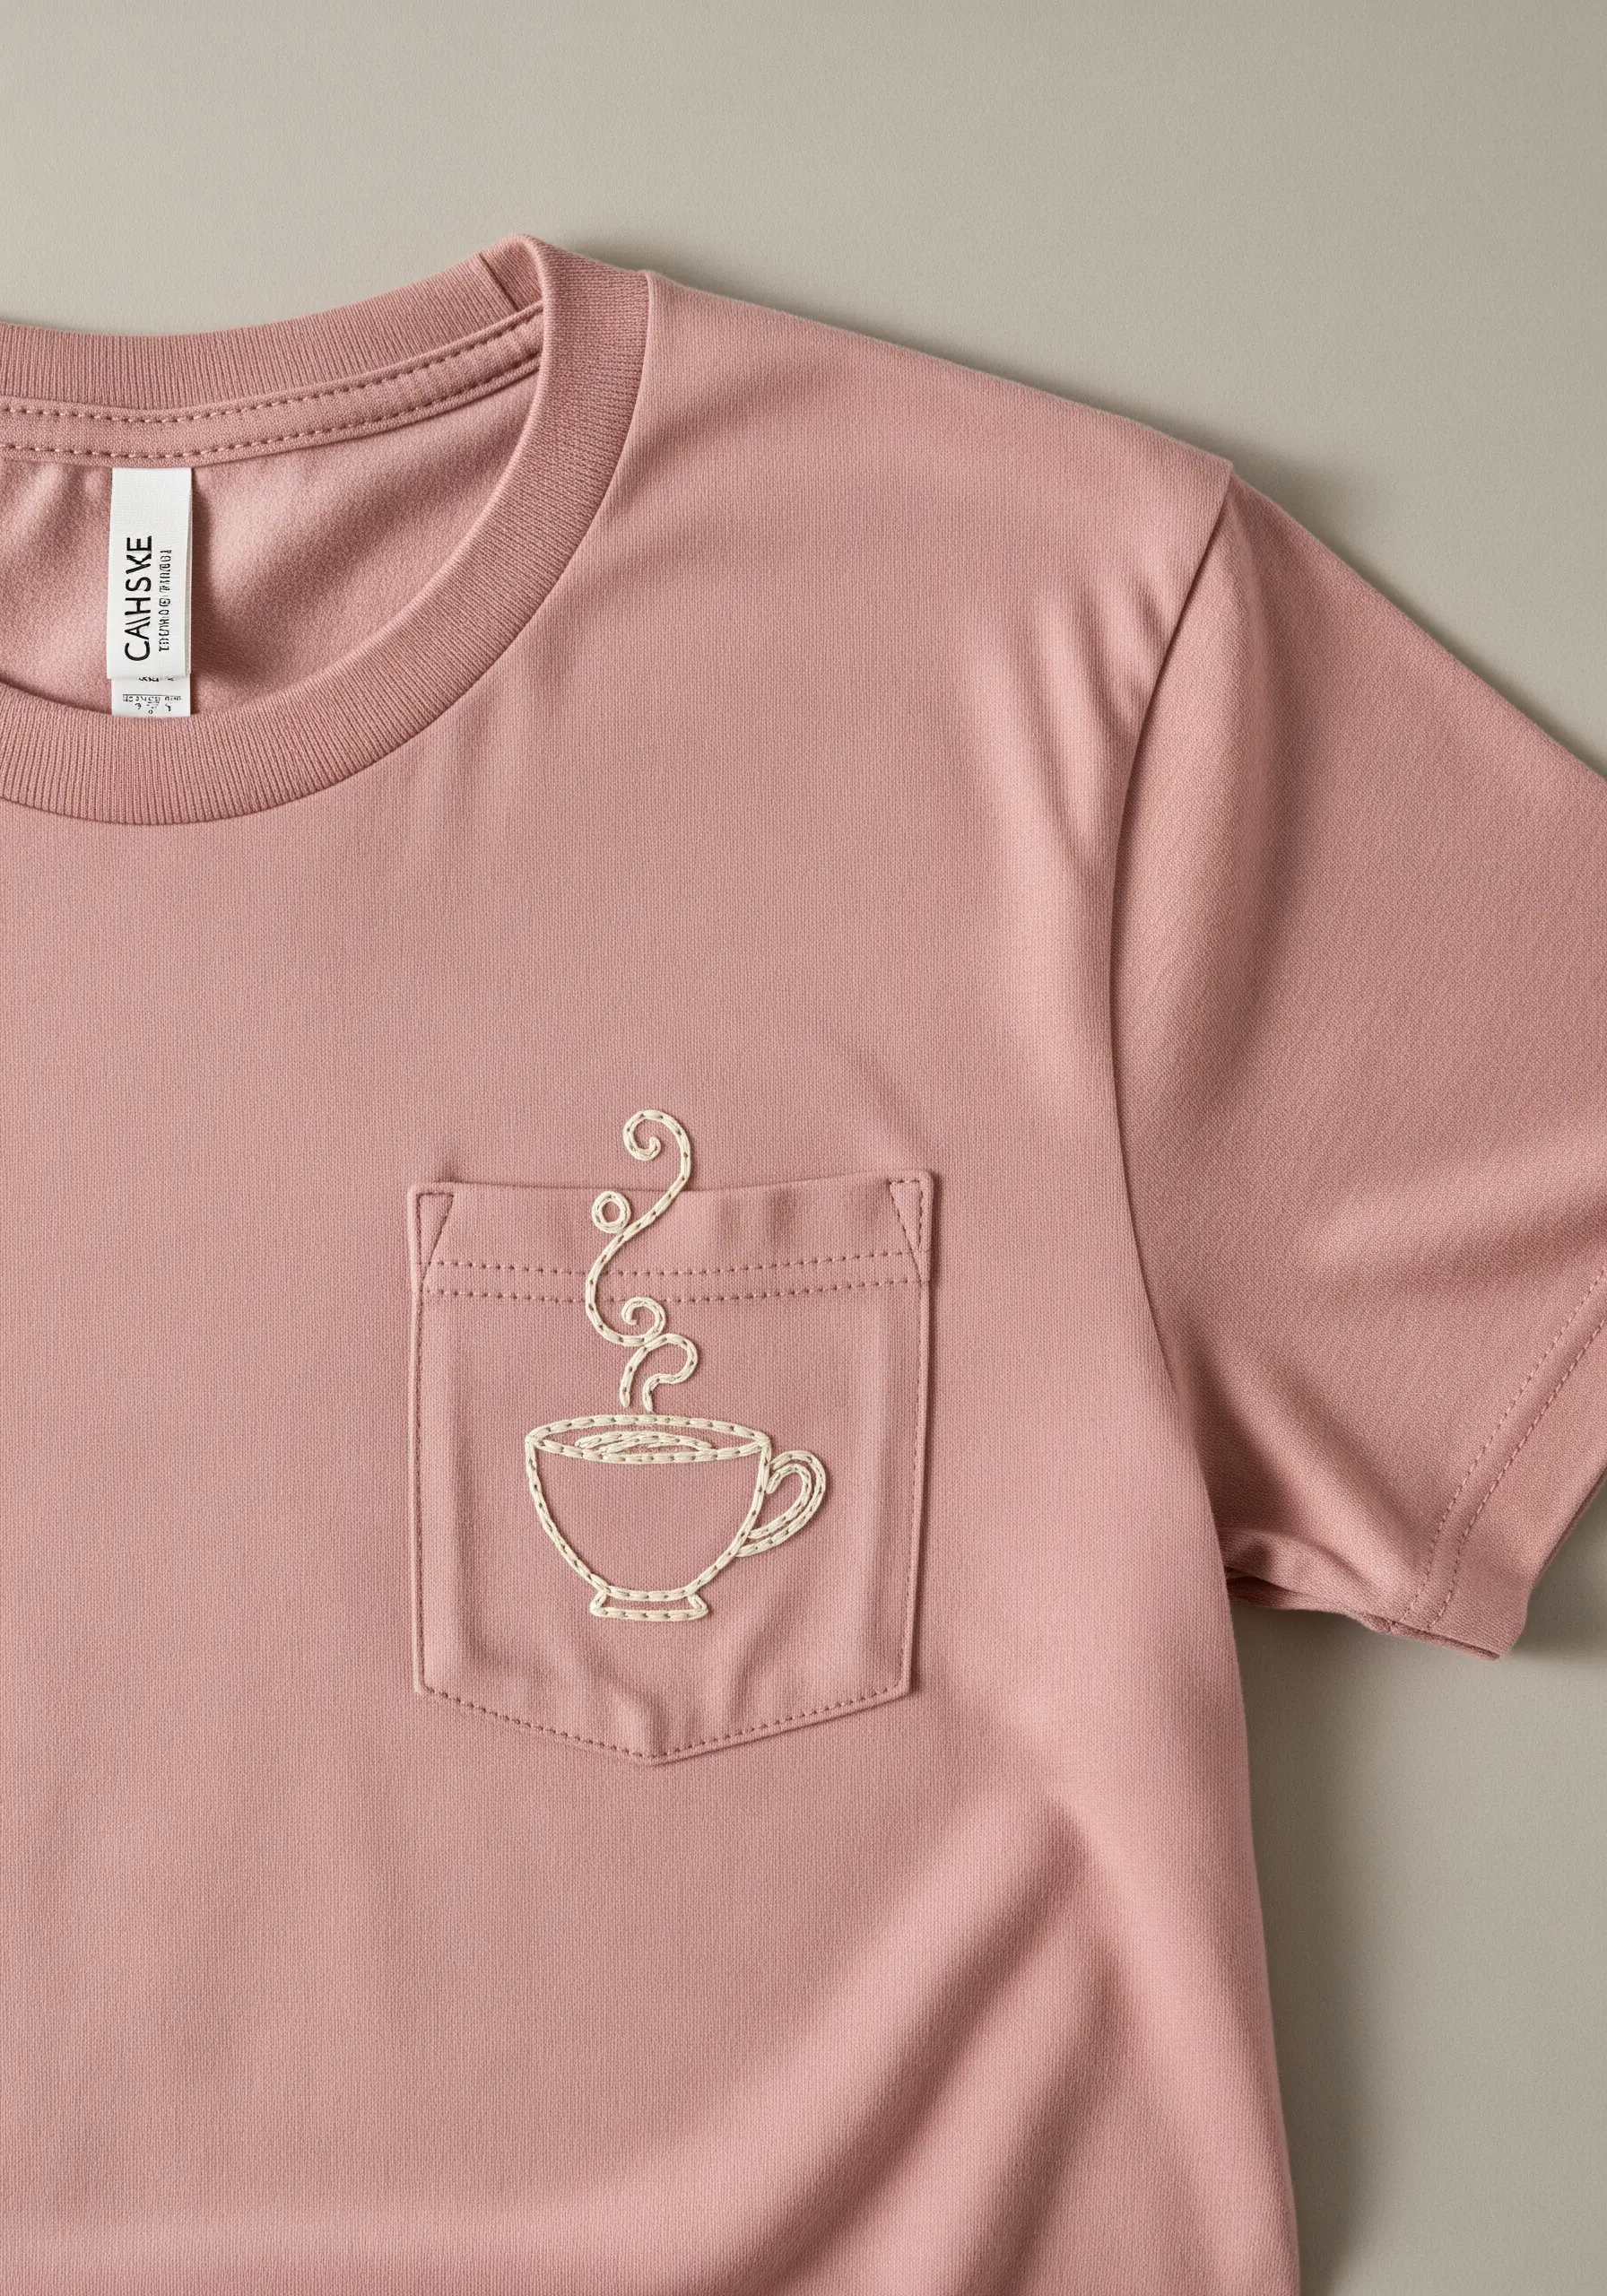
4. The Art of the Pocket Reveal

Transform a basic pocket into a framing device for a hidden detail.
By stitching your design directly onto the shirt so it just peeks over the pocket’s edge, you create an element of surprise and thoughtful placement.
For a modern rainbow, choose an earthy, muted palette instead of traditional brights.
A dense satin stitch ensures the colors are solid and impactful, turning a simple garment feature into an intentional design moment.
5. High-Contrast Texture with a Woven Fill
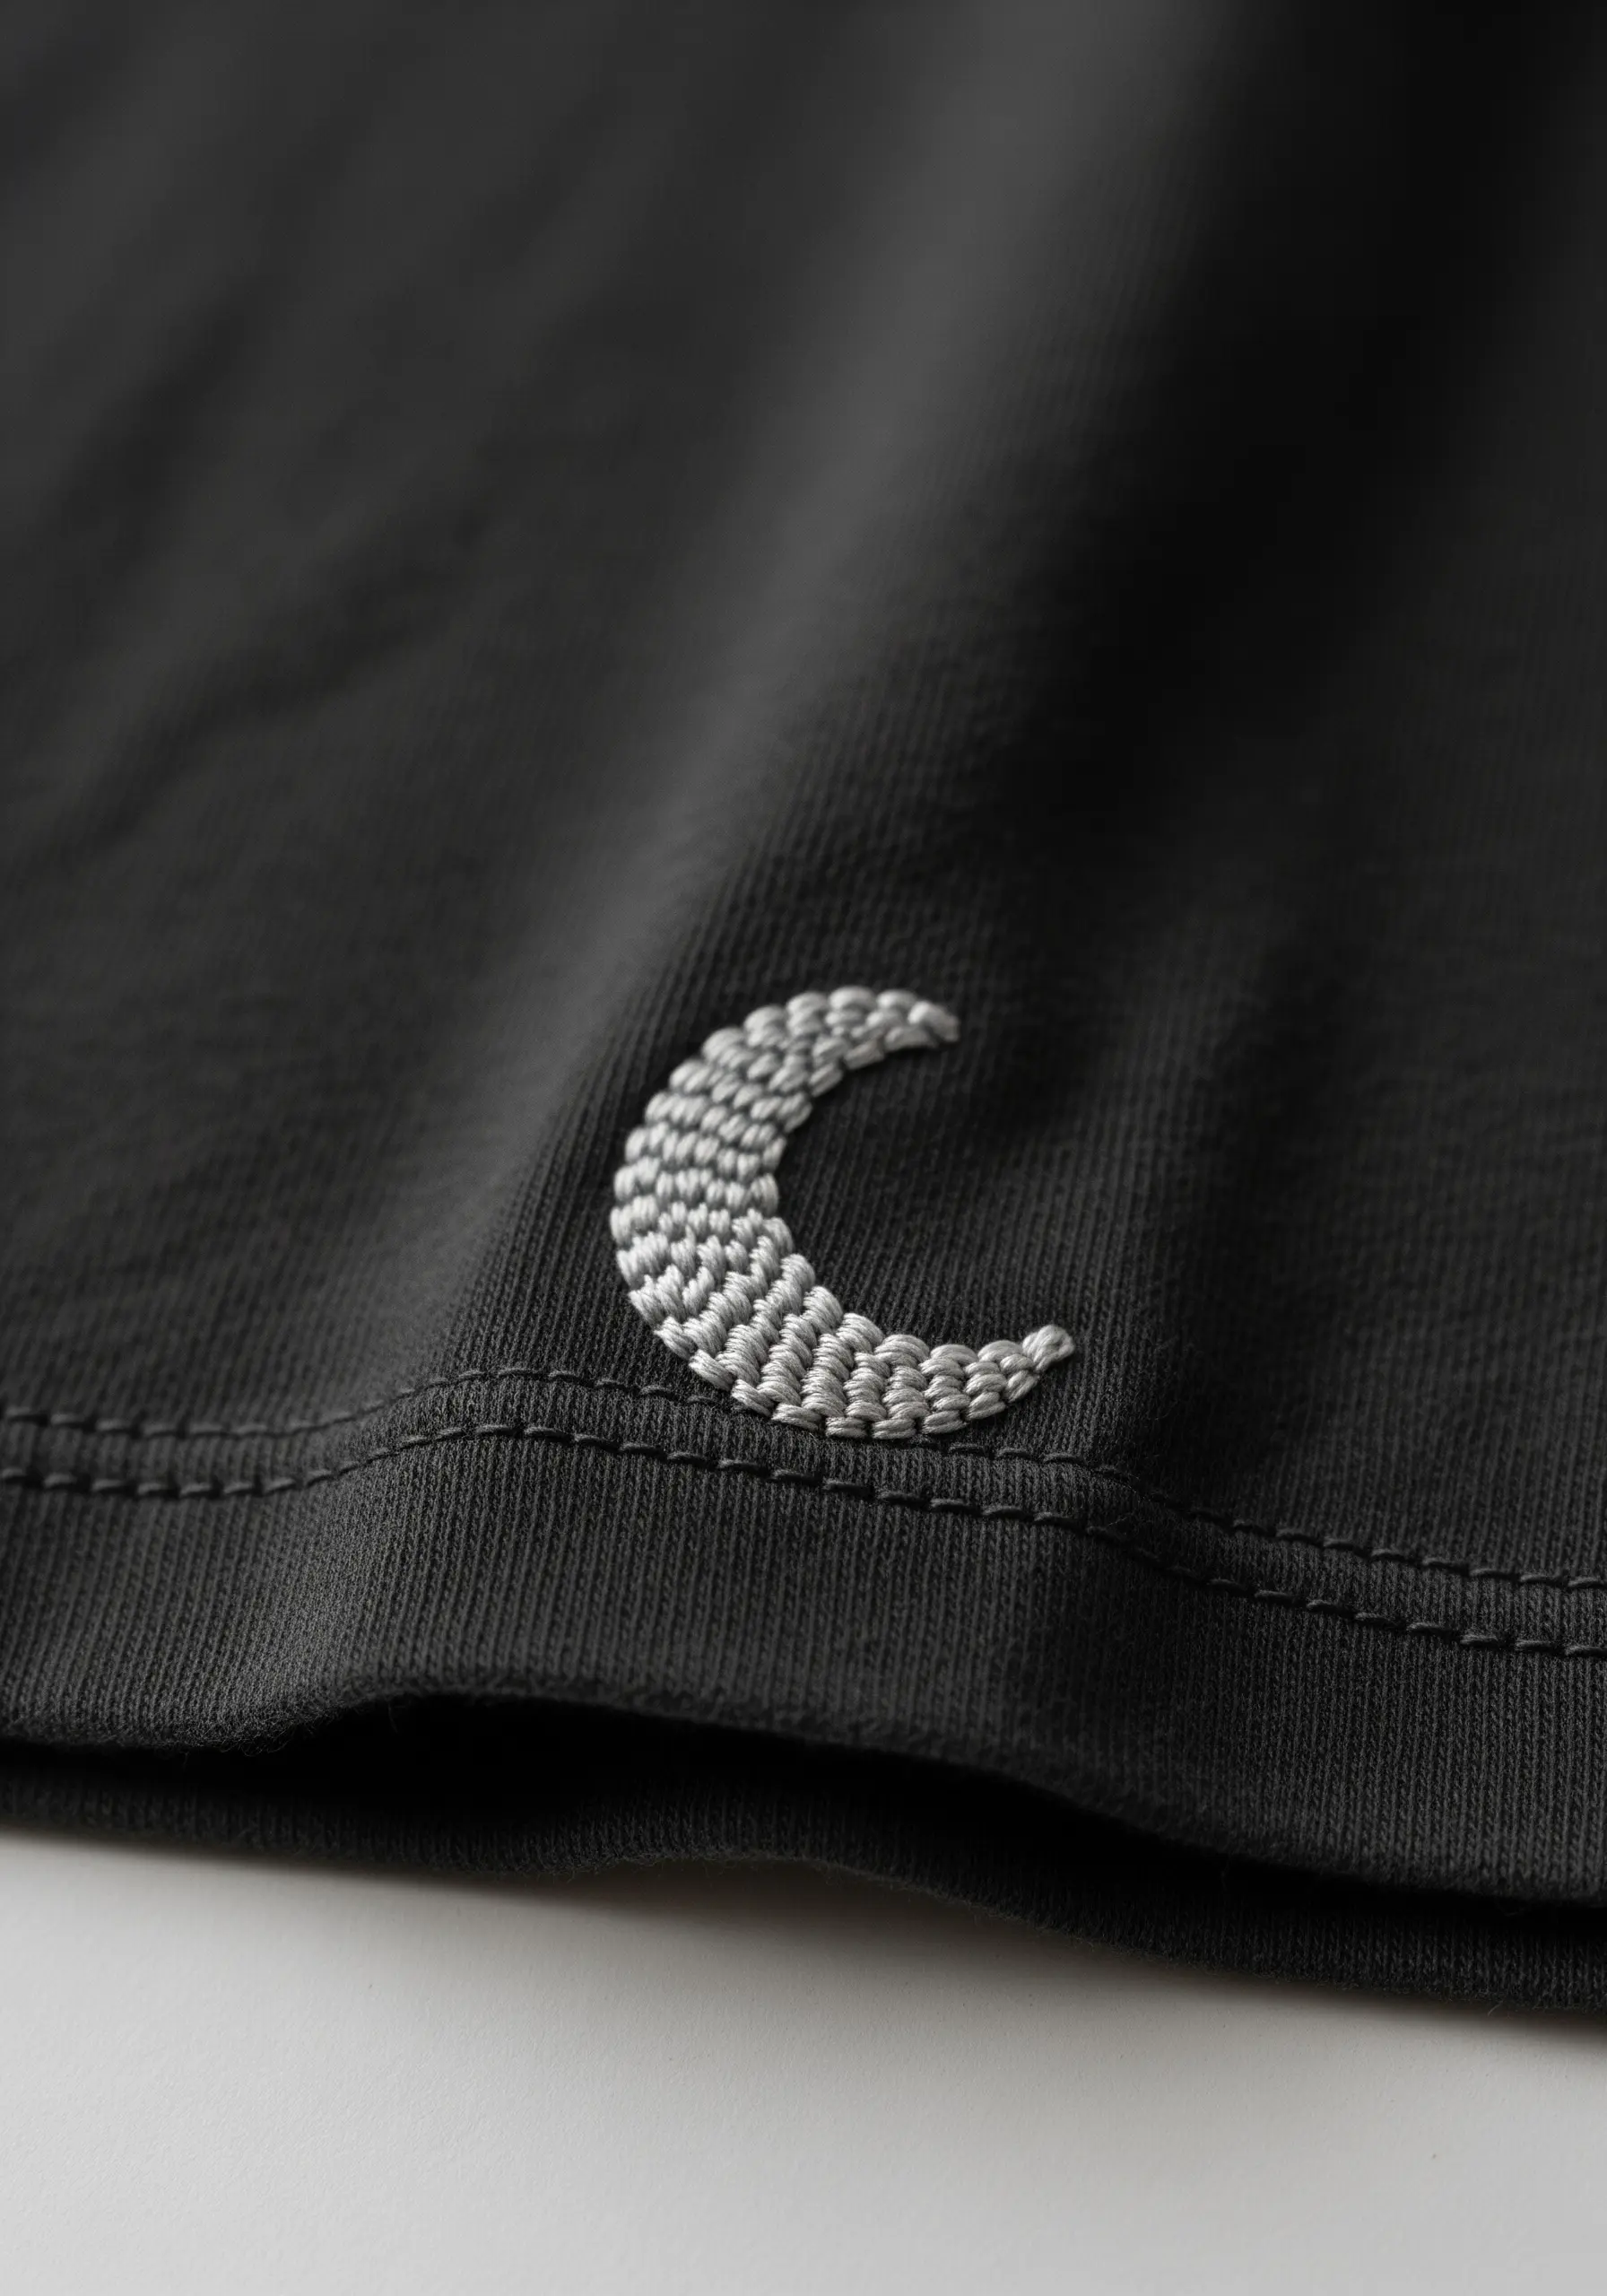
Give a simple shape like a crescent moon significant visual weight with a woven wheel stitch.
First, create a foundation of straight stitches like spokes in a wheel, then weave your thread over and under each spoke until the shape is filled.
This technique creates a raised, tactile surface that stands out beautifully, especially when using a light thread on dark fabric.
The texture, more than the shape itself, becomes the focal point.
6. Creating a Sense of Weightless Dispersal
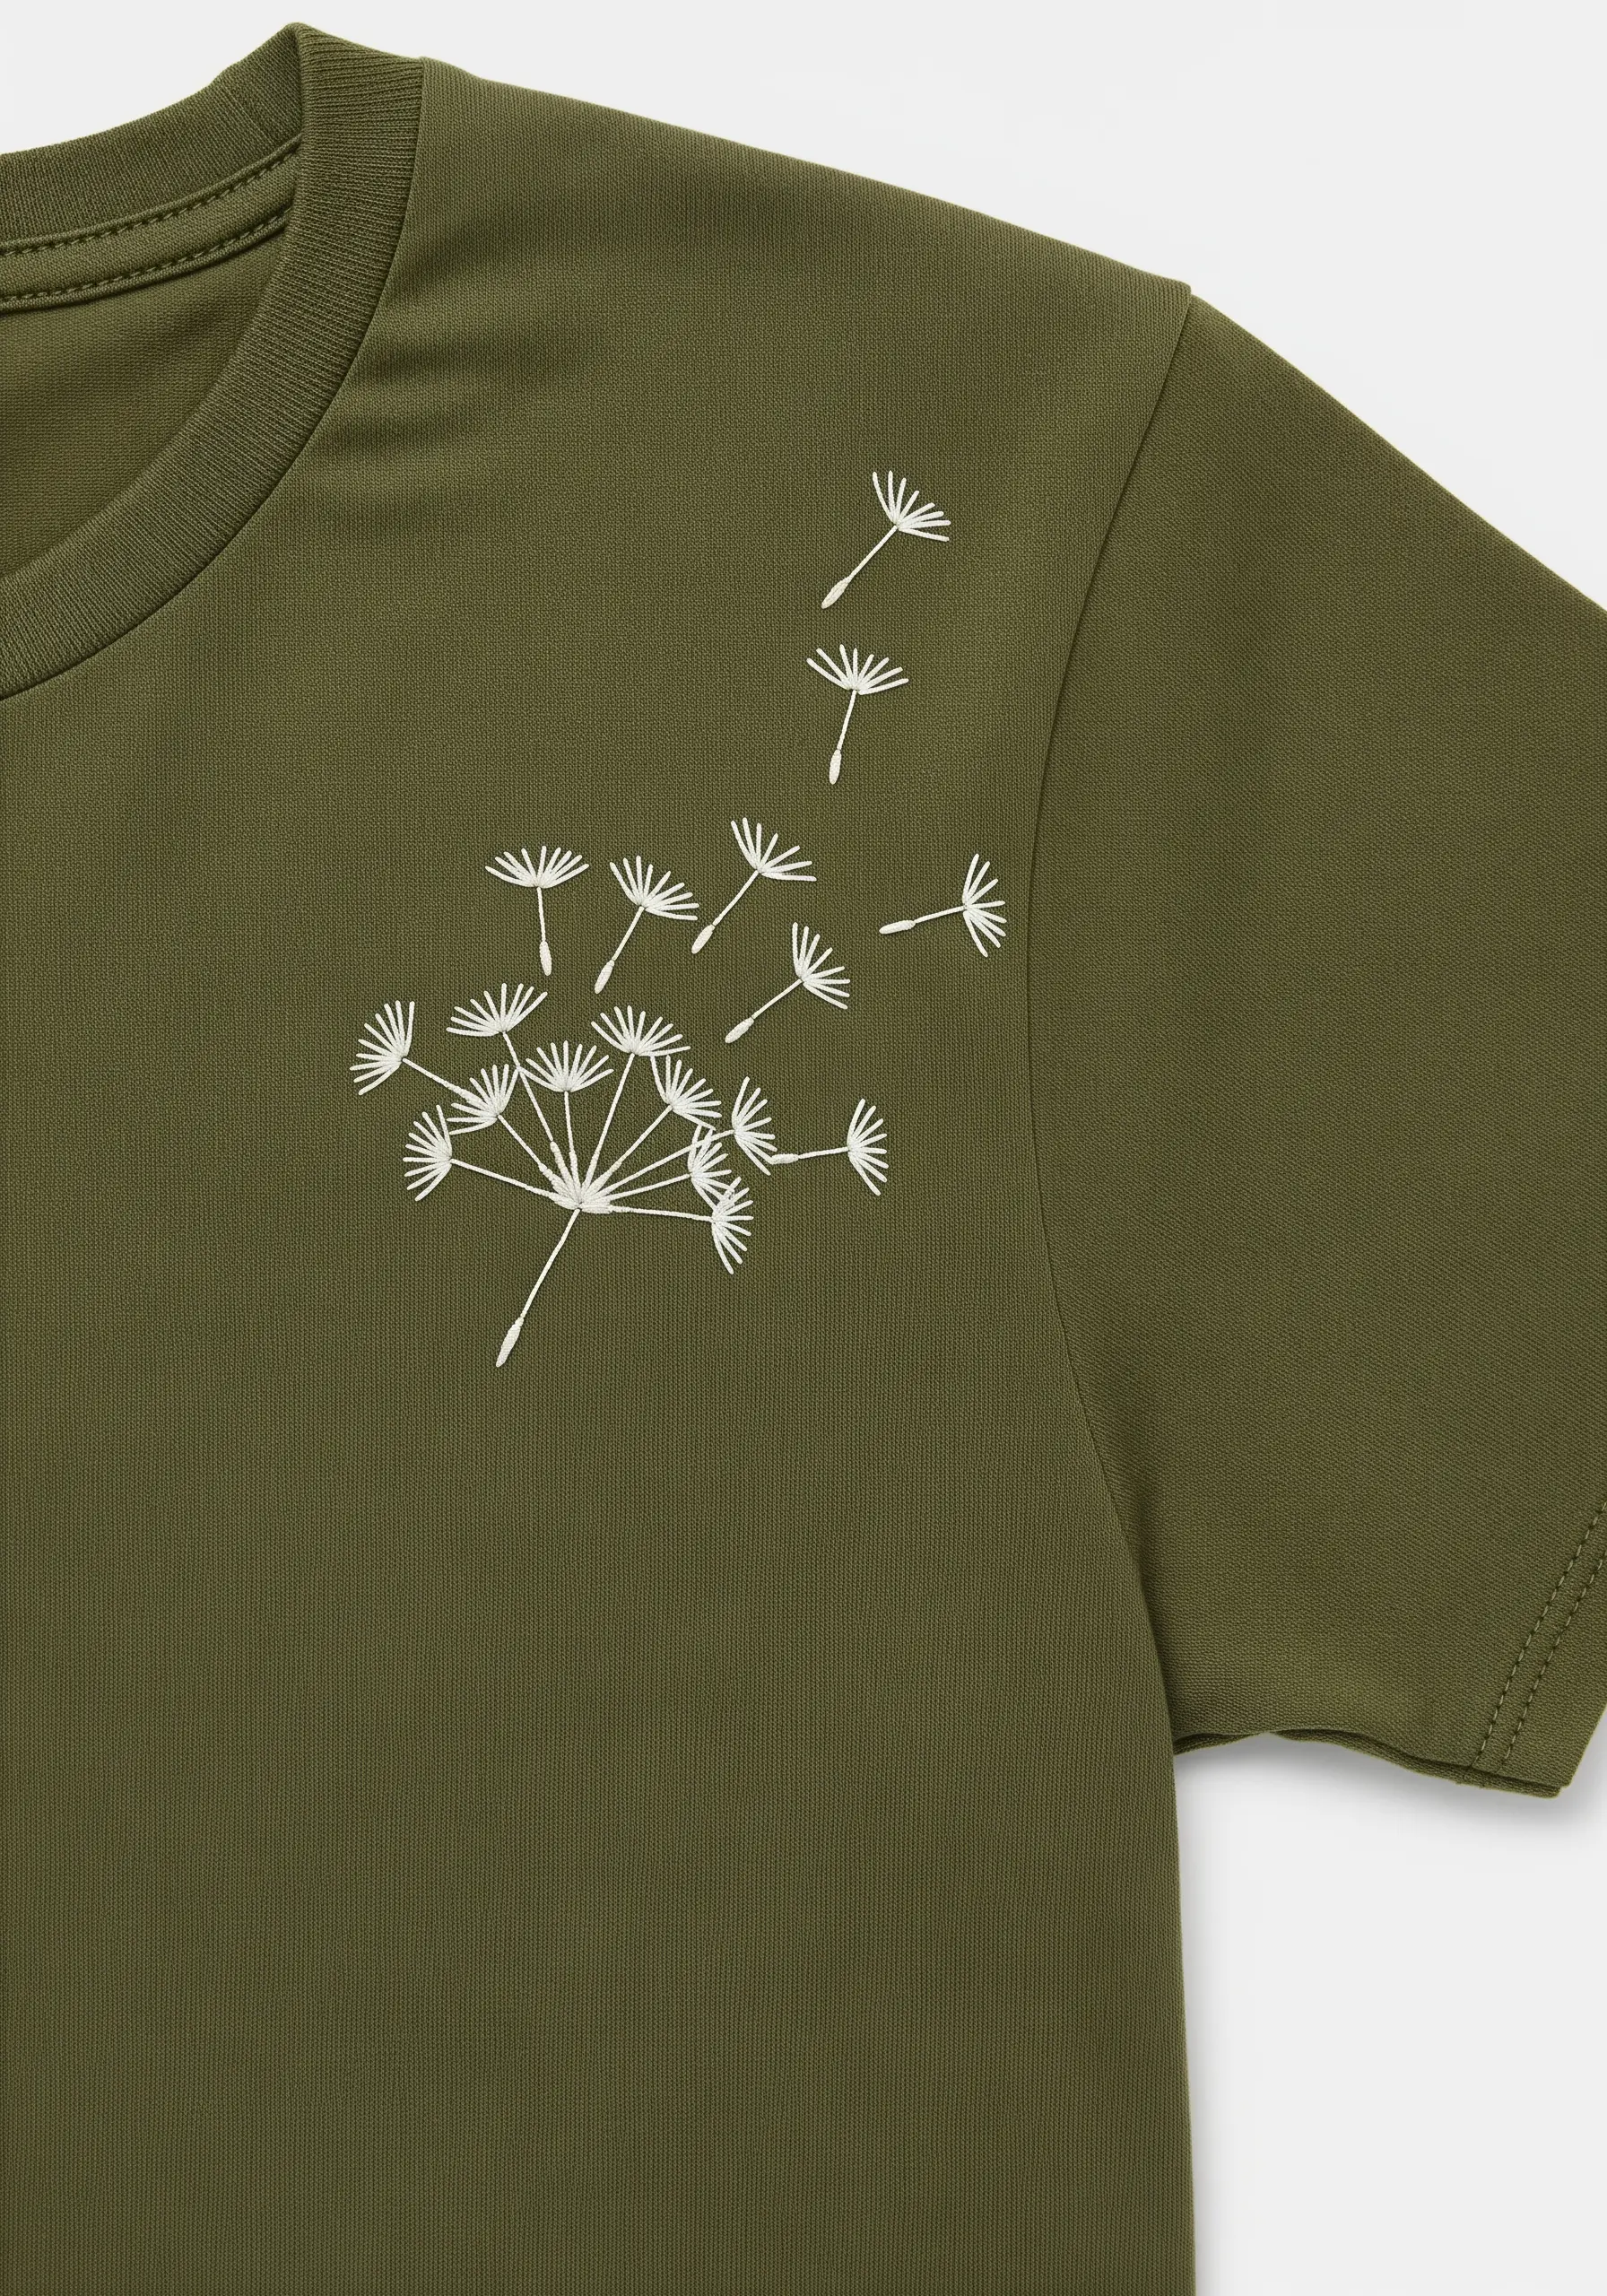
Capture the feeling of dandelion seeds floating on the wind by varying your stitch placement and type.
Use a combination of straight stitches and detached chain stitches for the seeds, keeping them small and delicate.
The key is to create an irregular, scattered pattern that spreads out across the fabric—this makes the movement feel natural and less static.
Using a single, high-contrast color ensures the delicate design remains visible and striking.
7. Geometric Color Blocking with Satin Stitch

For perfectly crisp geometric shapes, your secret weapon is a split-stitch outline.
Before filling any shape, outline it with a tight split stitch in the same color; this creates a raised edge that your satin stitch can neatly press against.
This simple preparation prevents uneven edges and makes your color blocking look incredibly sharp and professional.
Choose a cohesive palette with one bright accent for a balanced, modern feel, similar to these minimal embroidery designs that use only three colors.
8. The Minimalist Landscape Outline

You can suggest an entire landscape with a single, confident line.
To make that line bold and smooth on T-shirt fabric, use a whipped backstitch.
First, create a standard backstitch outline, then take a second strand of the same thread and wrap it around each stitch without piercing the fabric.
This technique thickens and smooths the line, giving your minimalist design the presence it deserves.
9. Perfecting the Classic Satin-Stitched Heart

The key to a flawlessly smooth, slightly puffed heart is a technique called padded satin stitch.
Before you begin your top layer, fill the shape with a foundation of small seed stitches or straight stitches.
Then, work your final satin stitches in the opposite direction over this padding.
This underlayer lifts the design, creates dimension, and ensures your stitches lie perfectly flat for a professional, almost machine-embroidered finish.
10. Dimensional Berries with French Knots
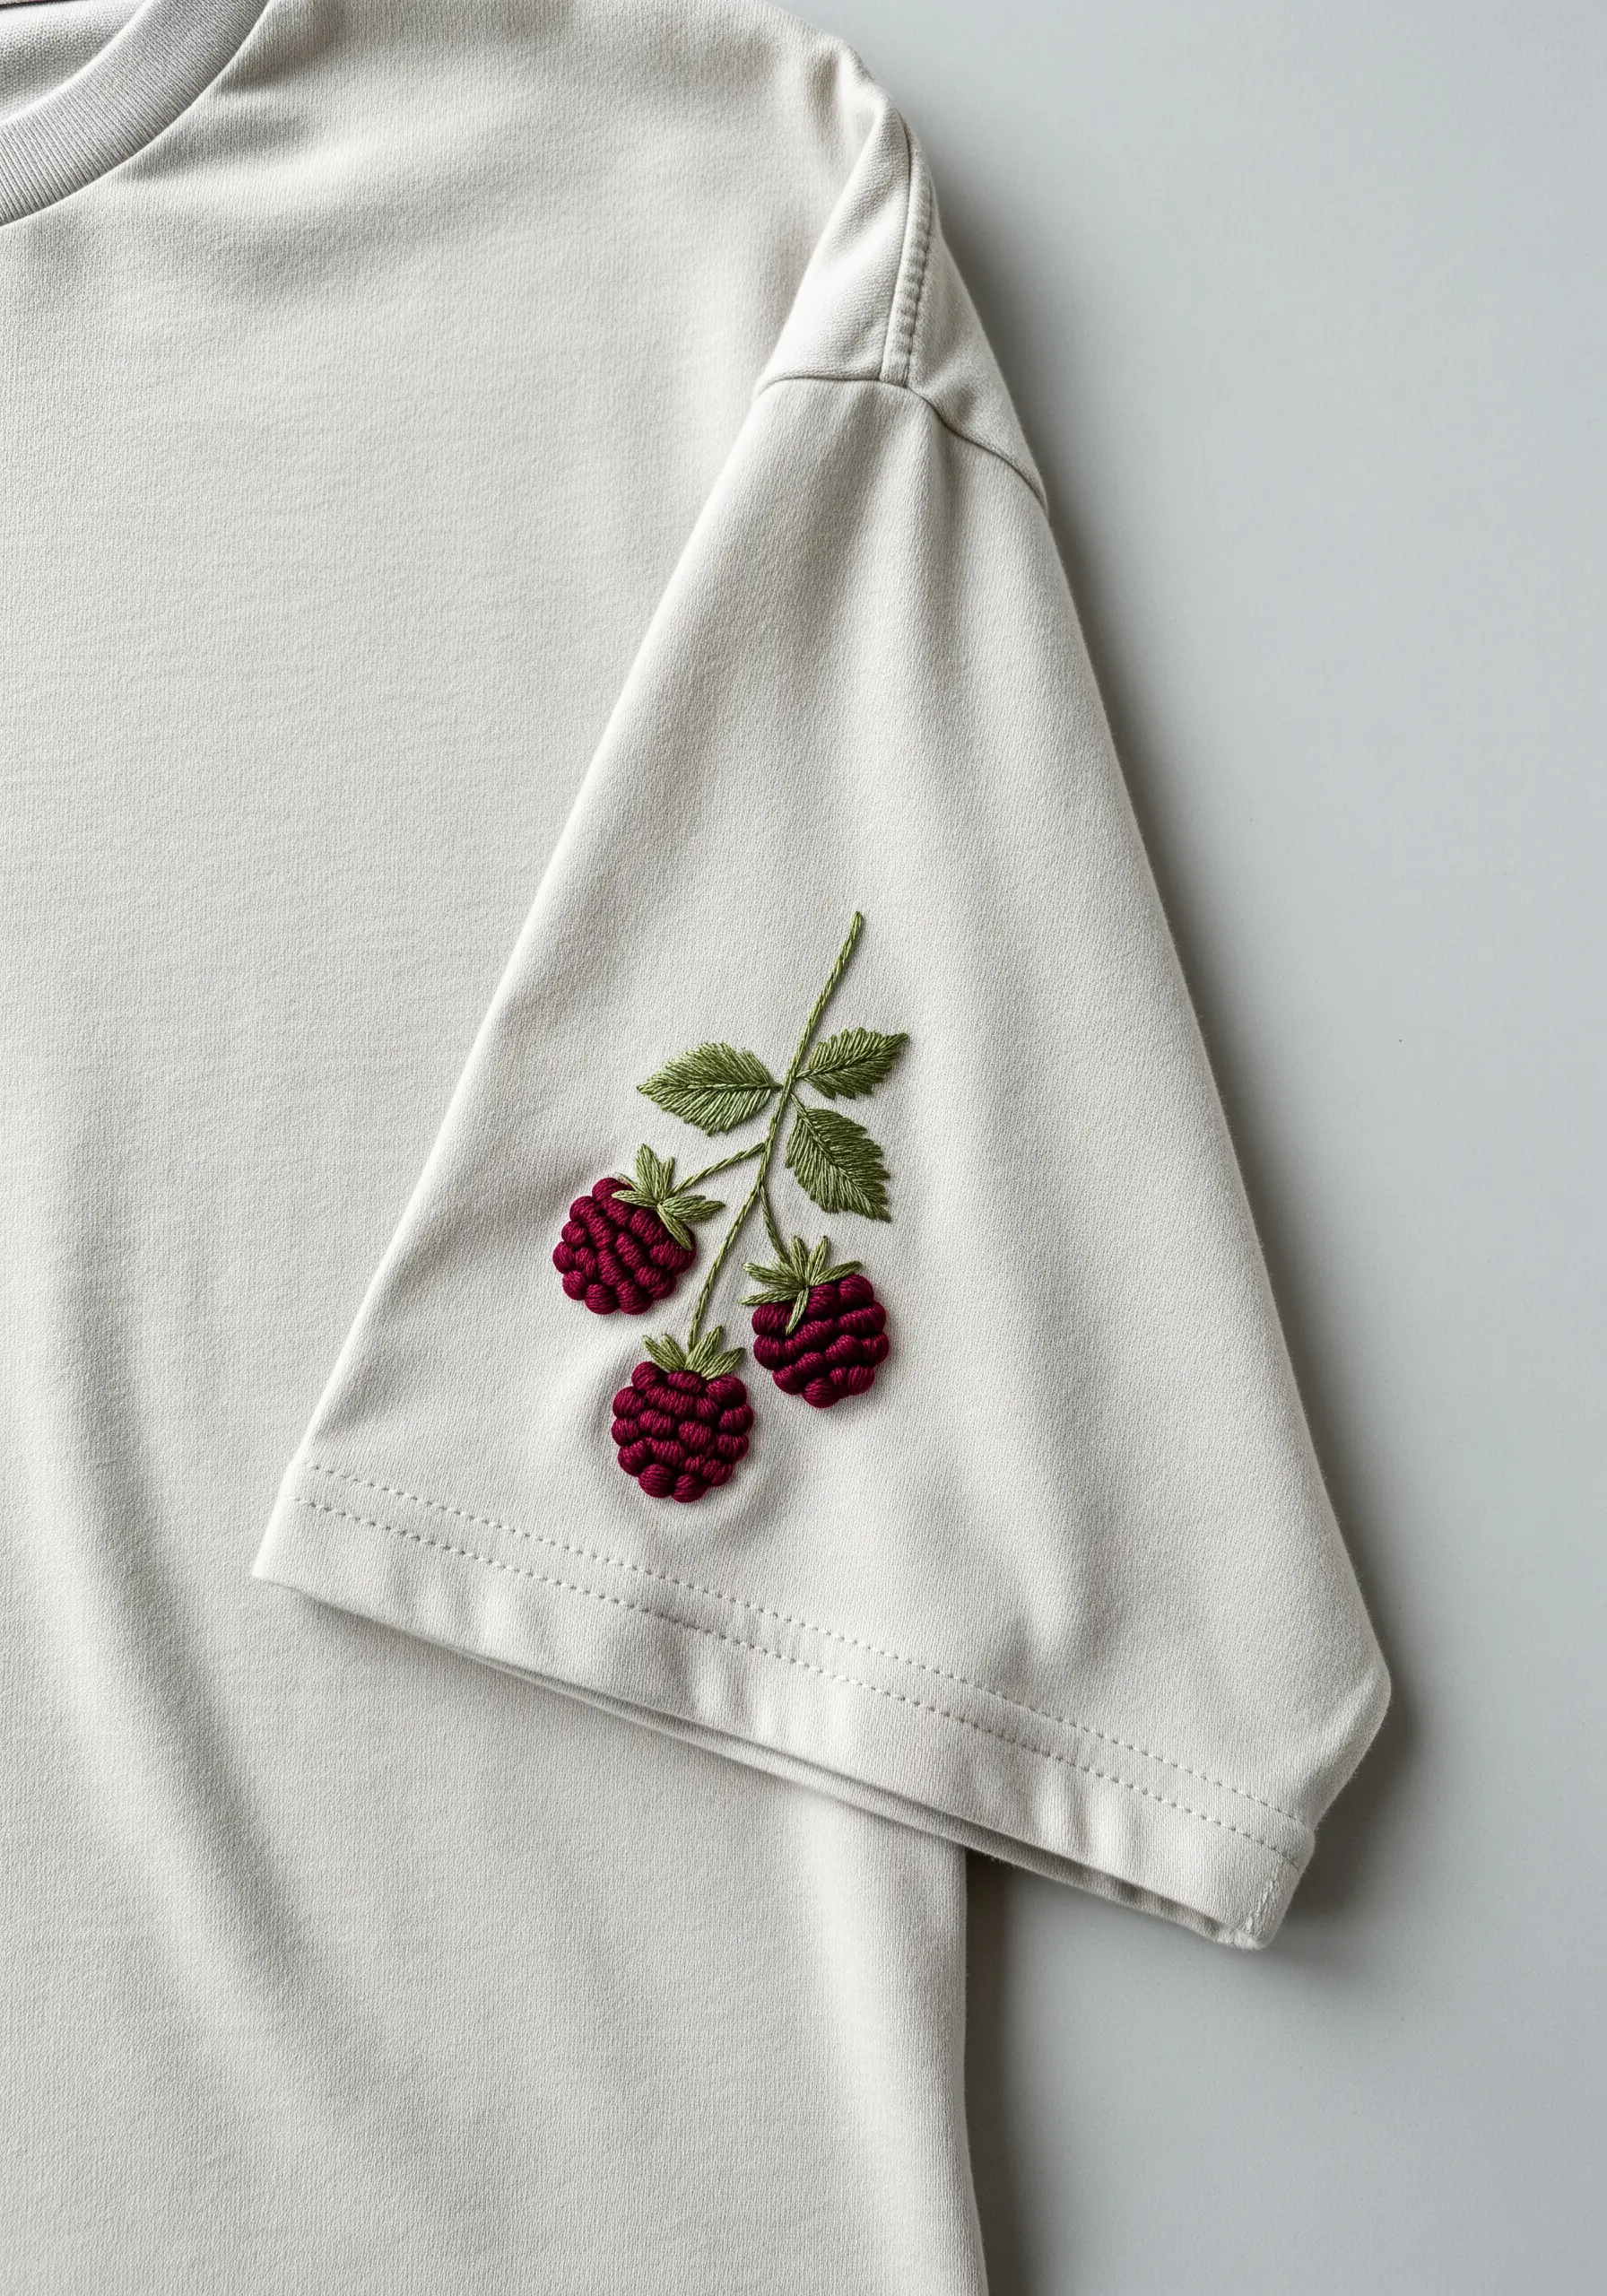
To create the bumpy, clustered texture of raspberries or blackberries, fill the shape with tightly packed French knots.
Use three to four strands of floss to make each knot substantial.
For added realism, use a slightly darker shade of thread for the knots at the base and a lighter shade at the top to mimic how light hits the fruit.
Placing your design on a sleeve instead of the chest is an unexpected touch that feels both modern and personal.
11. Dynamic Energy with Radiating Stitches
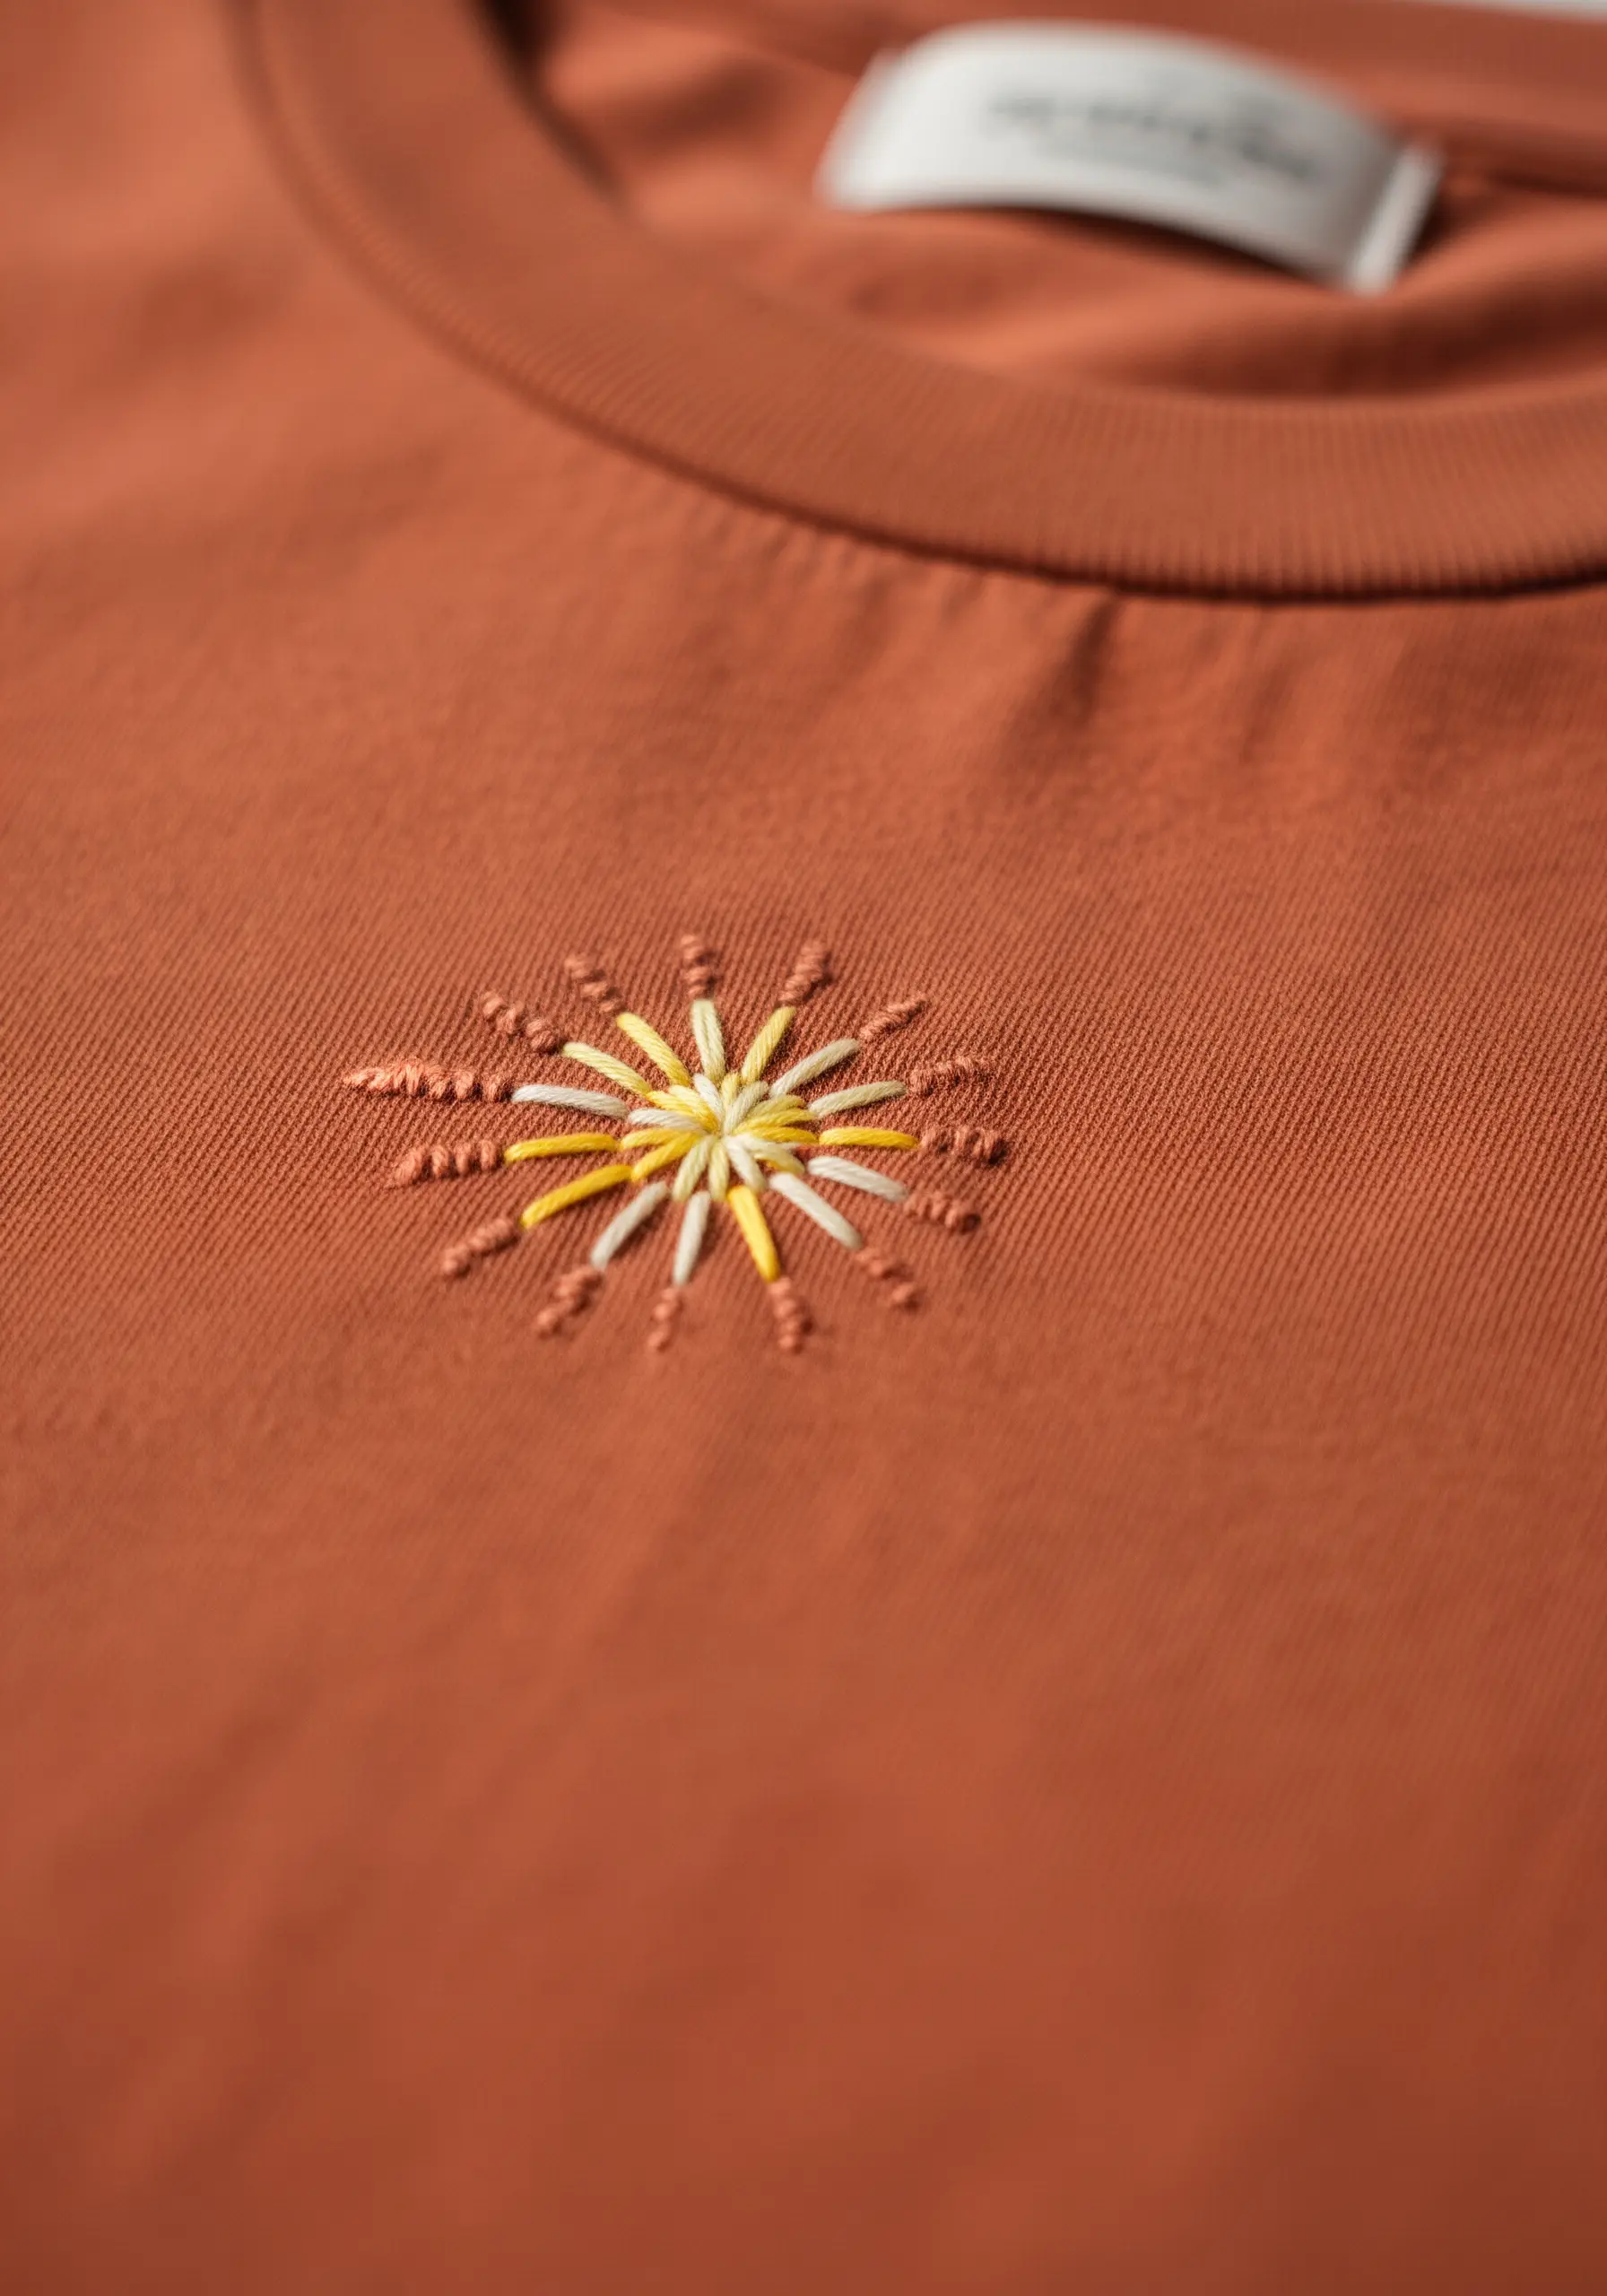
This vibrant sunburst proves that the simplest stitches can create the most dynamic effects.
Combine straight stitches of varying lengths with a few French knots at the tips or center.
By alternating two or three colors and radiating the stitches from a central point, you create an explosion of energy and texture.
This is one of the most effective cute and tiny embroidery ideas for a quick and impactful result.
12. Celestial Connection with Minimal Stitches
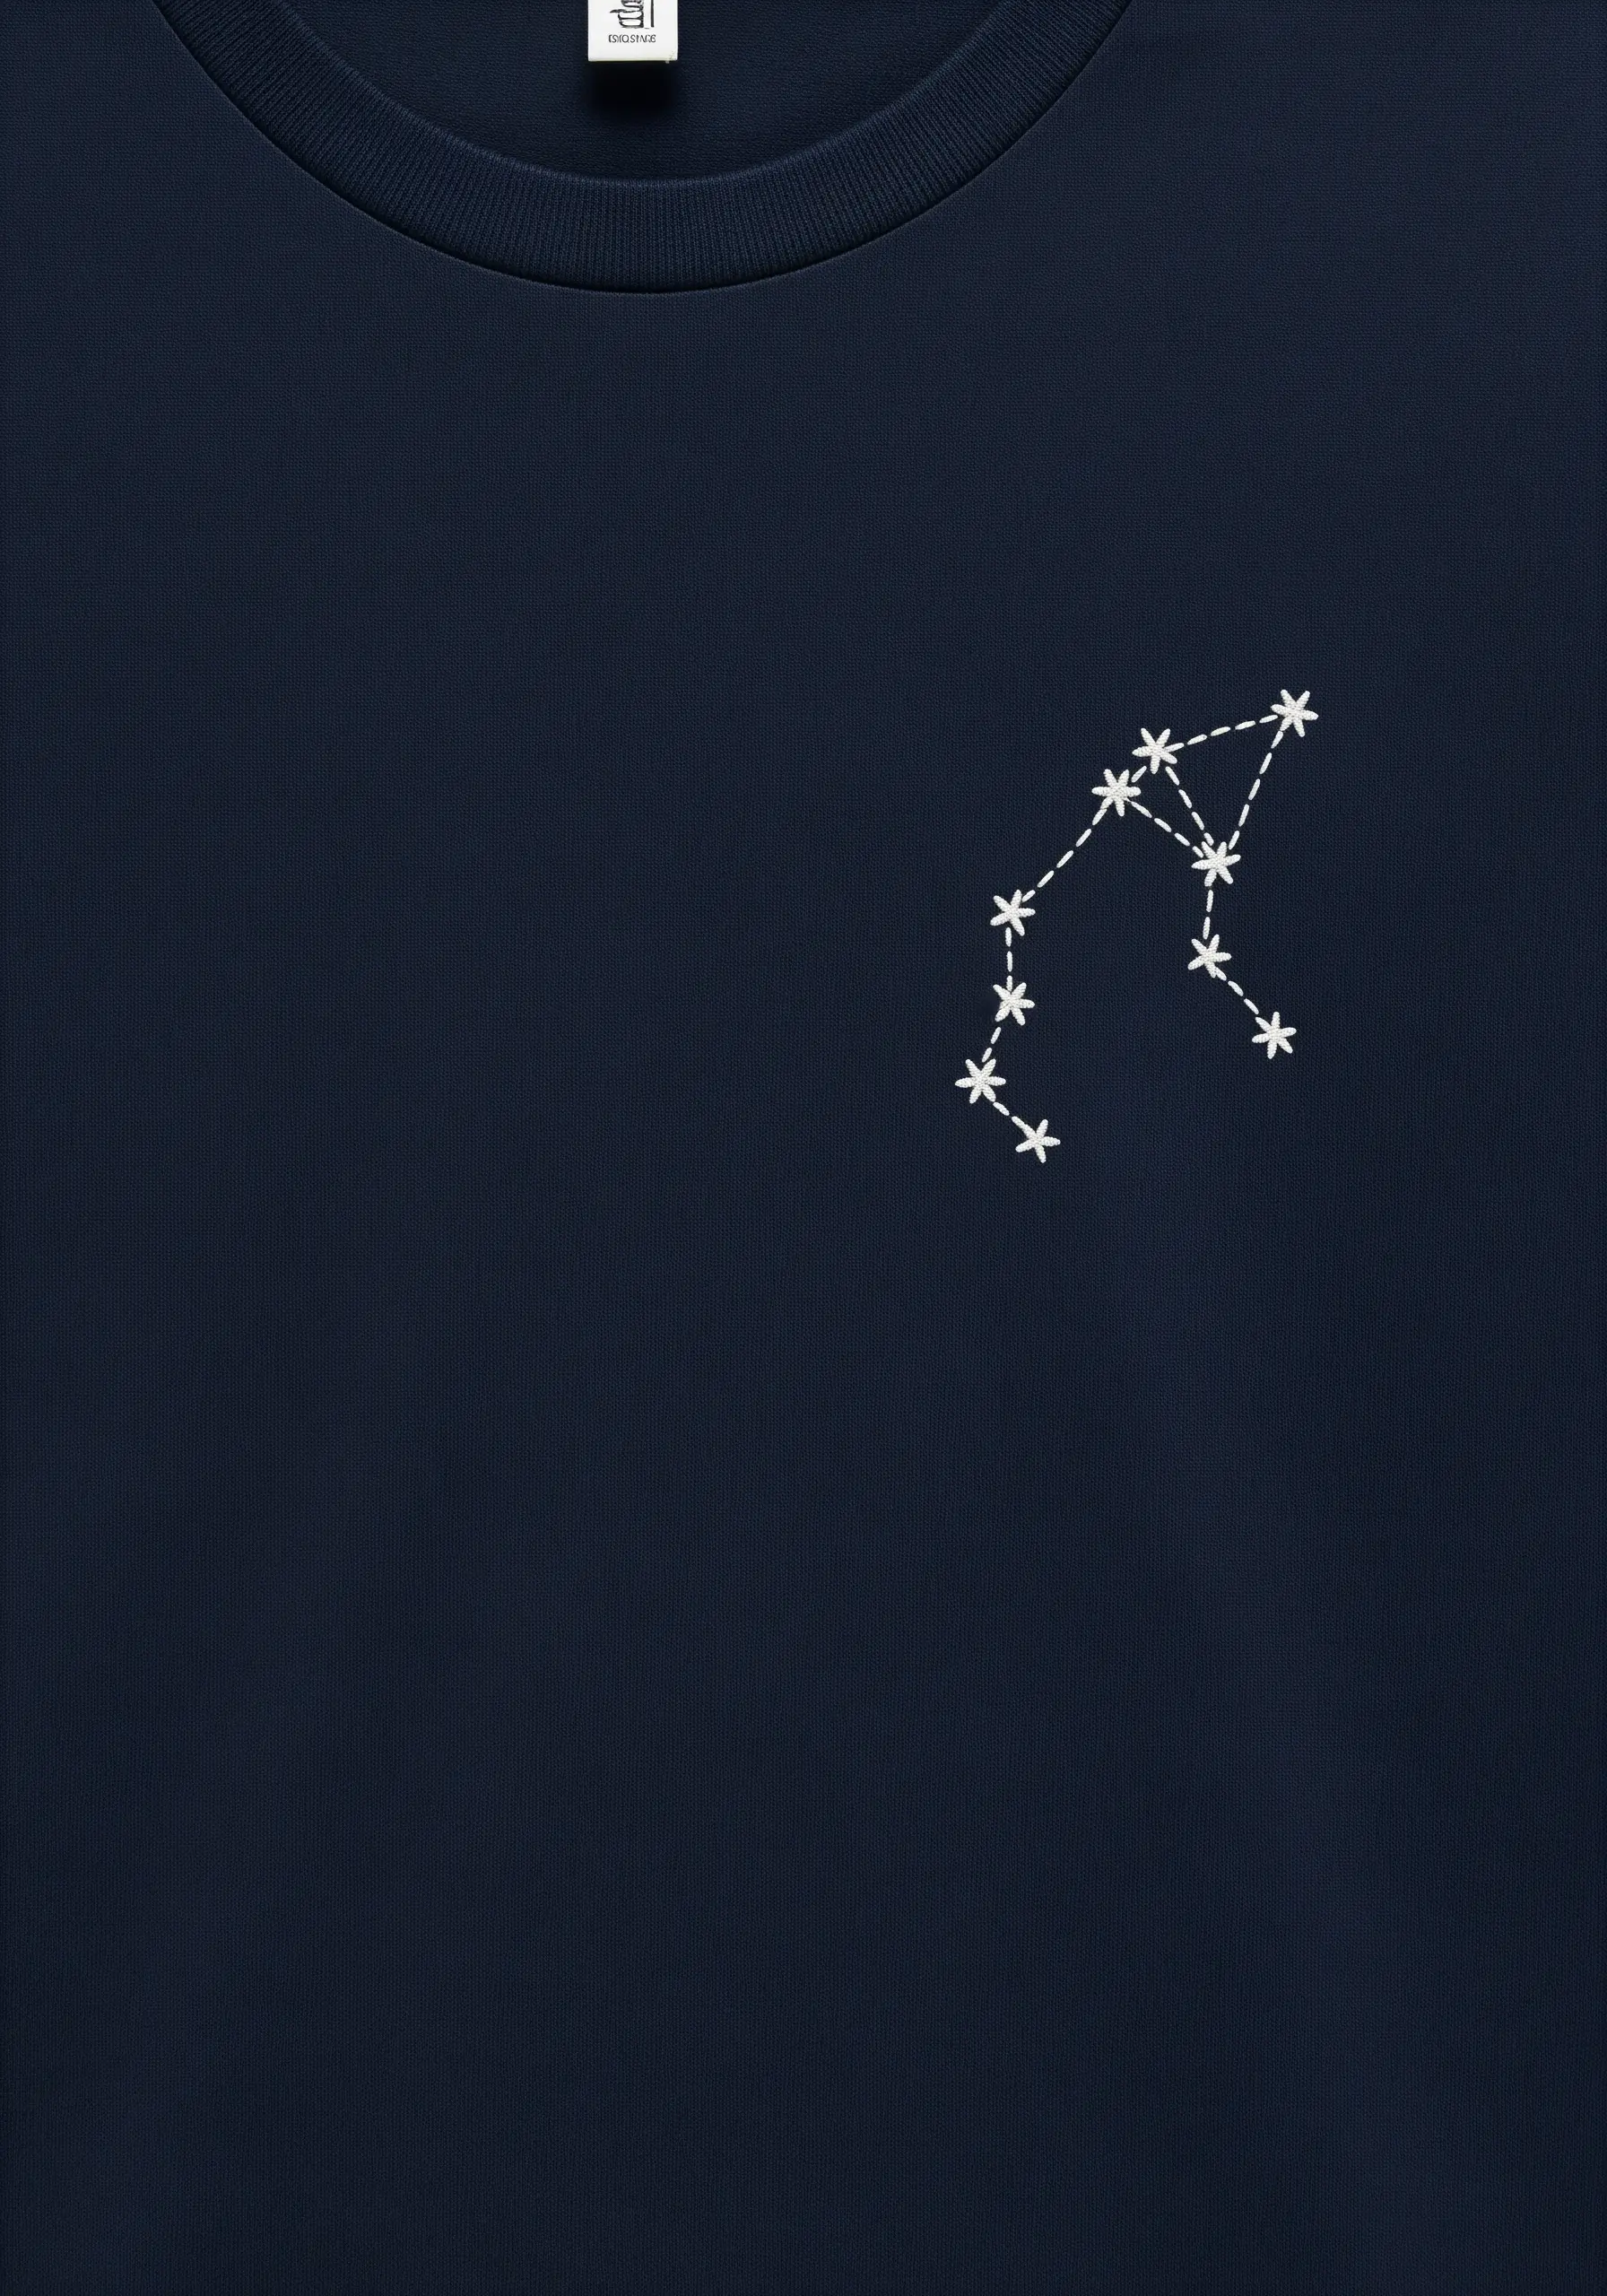
Map out your favorite constellation using nothing more than tiny star stitches and a connecting running stitch.
The key to making this design feel elegant is subtlety; use only one or two strands of white or metallic silver floss on a dark navy or black T-shirt.
This high-contrast, delicate approach feels less like a loud graphic and more like a personal, magical secret stitched onto your garment.
13. The Whipped Backstitch for Bold Outlines
When you want a line that’s both clean and substantial, a whipped backstitch is the perfect choice.
After completing a simple backstitch outline, take a second thread (in the same color) and weave it under each stitch without going through the fabric.
This action covers the gaps in the backstitch, creating a solid, rope-like line that gives your design a polished, graphic quality—perfect for modern thread art ideas.
14. Grounding Motifs with Hemline Placement

Break away from the expected chest placement and add a small, detailed motif to the hem of your T-shirt.
This unconventional choice draws the eye and feels like a hidden, intentional detail.
For the mushroom cap, use a brick stitch—staggering your short satin stitches like bricks in a wall—to create a seamless, curved fill.
A few tiny French knots add the final touch of realism.
15. Elegant Monograms with Gradient Satin Stitch

A single initial on a cuff adds an instant touch of bespoke luxury.
Elevate it further by creating a subtle ombré effect with a split satin stitch.
Choose two closely related shades of thread and blend them within the letterform—darker at the bottom, lighter at the top.
This small detail adds a layer of sophistication that makes these tiny embroidered accents feel incredibly refined.
16. Scattered Florals for a Playful Composition

Instead of centering a single floral motif, create a more dynamic and natural look by scattering three or five small daisies across the chest.
An odd number of elements is often more pleasing to the eye.
Use a simple lazy daisy stitch for the petals and fill the center with a tight cluster of French knots.
The simplicity of the stitch allows the thoughtful composition to become the main focus.
17. Graphic Marks with Contrasting Textures
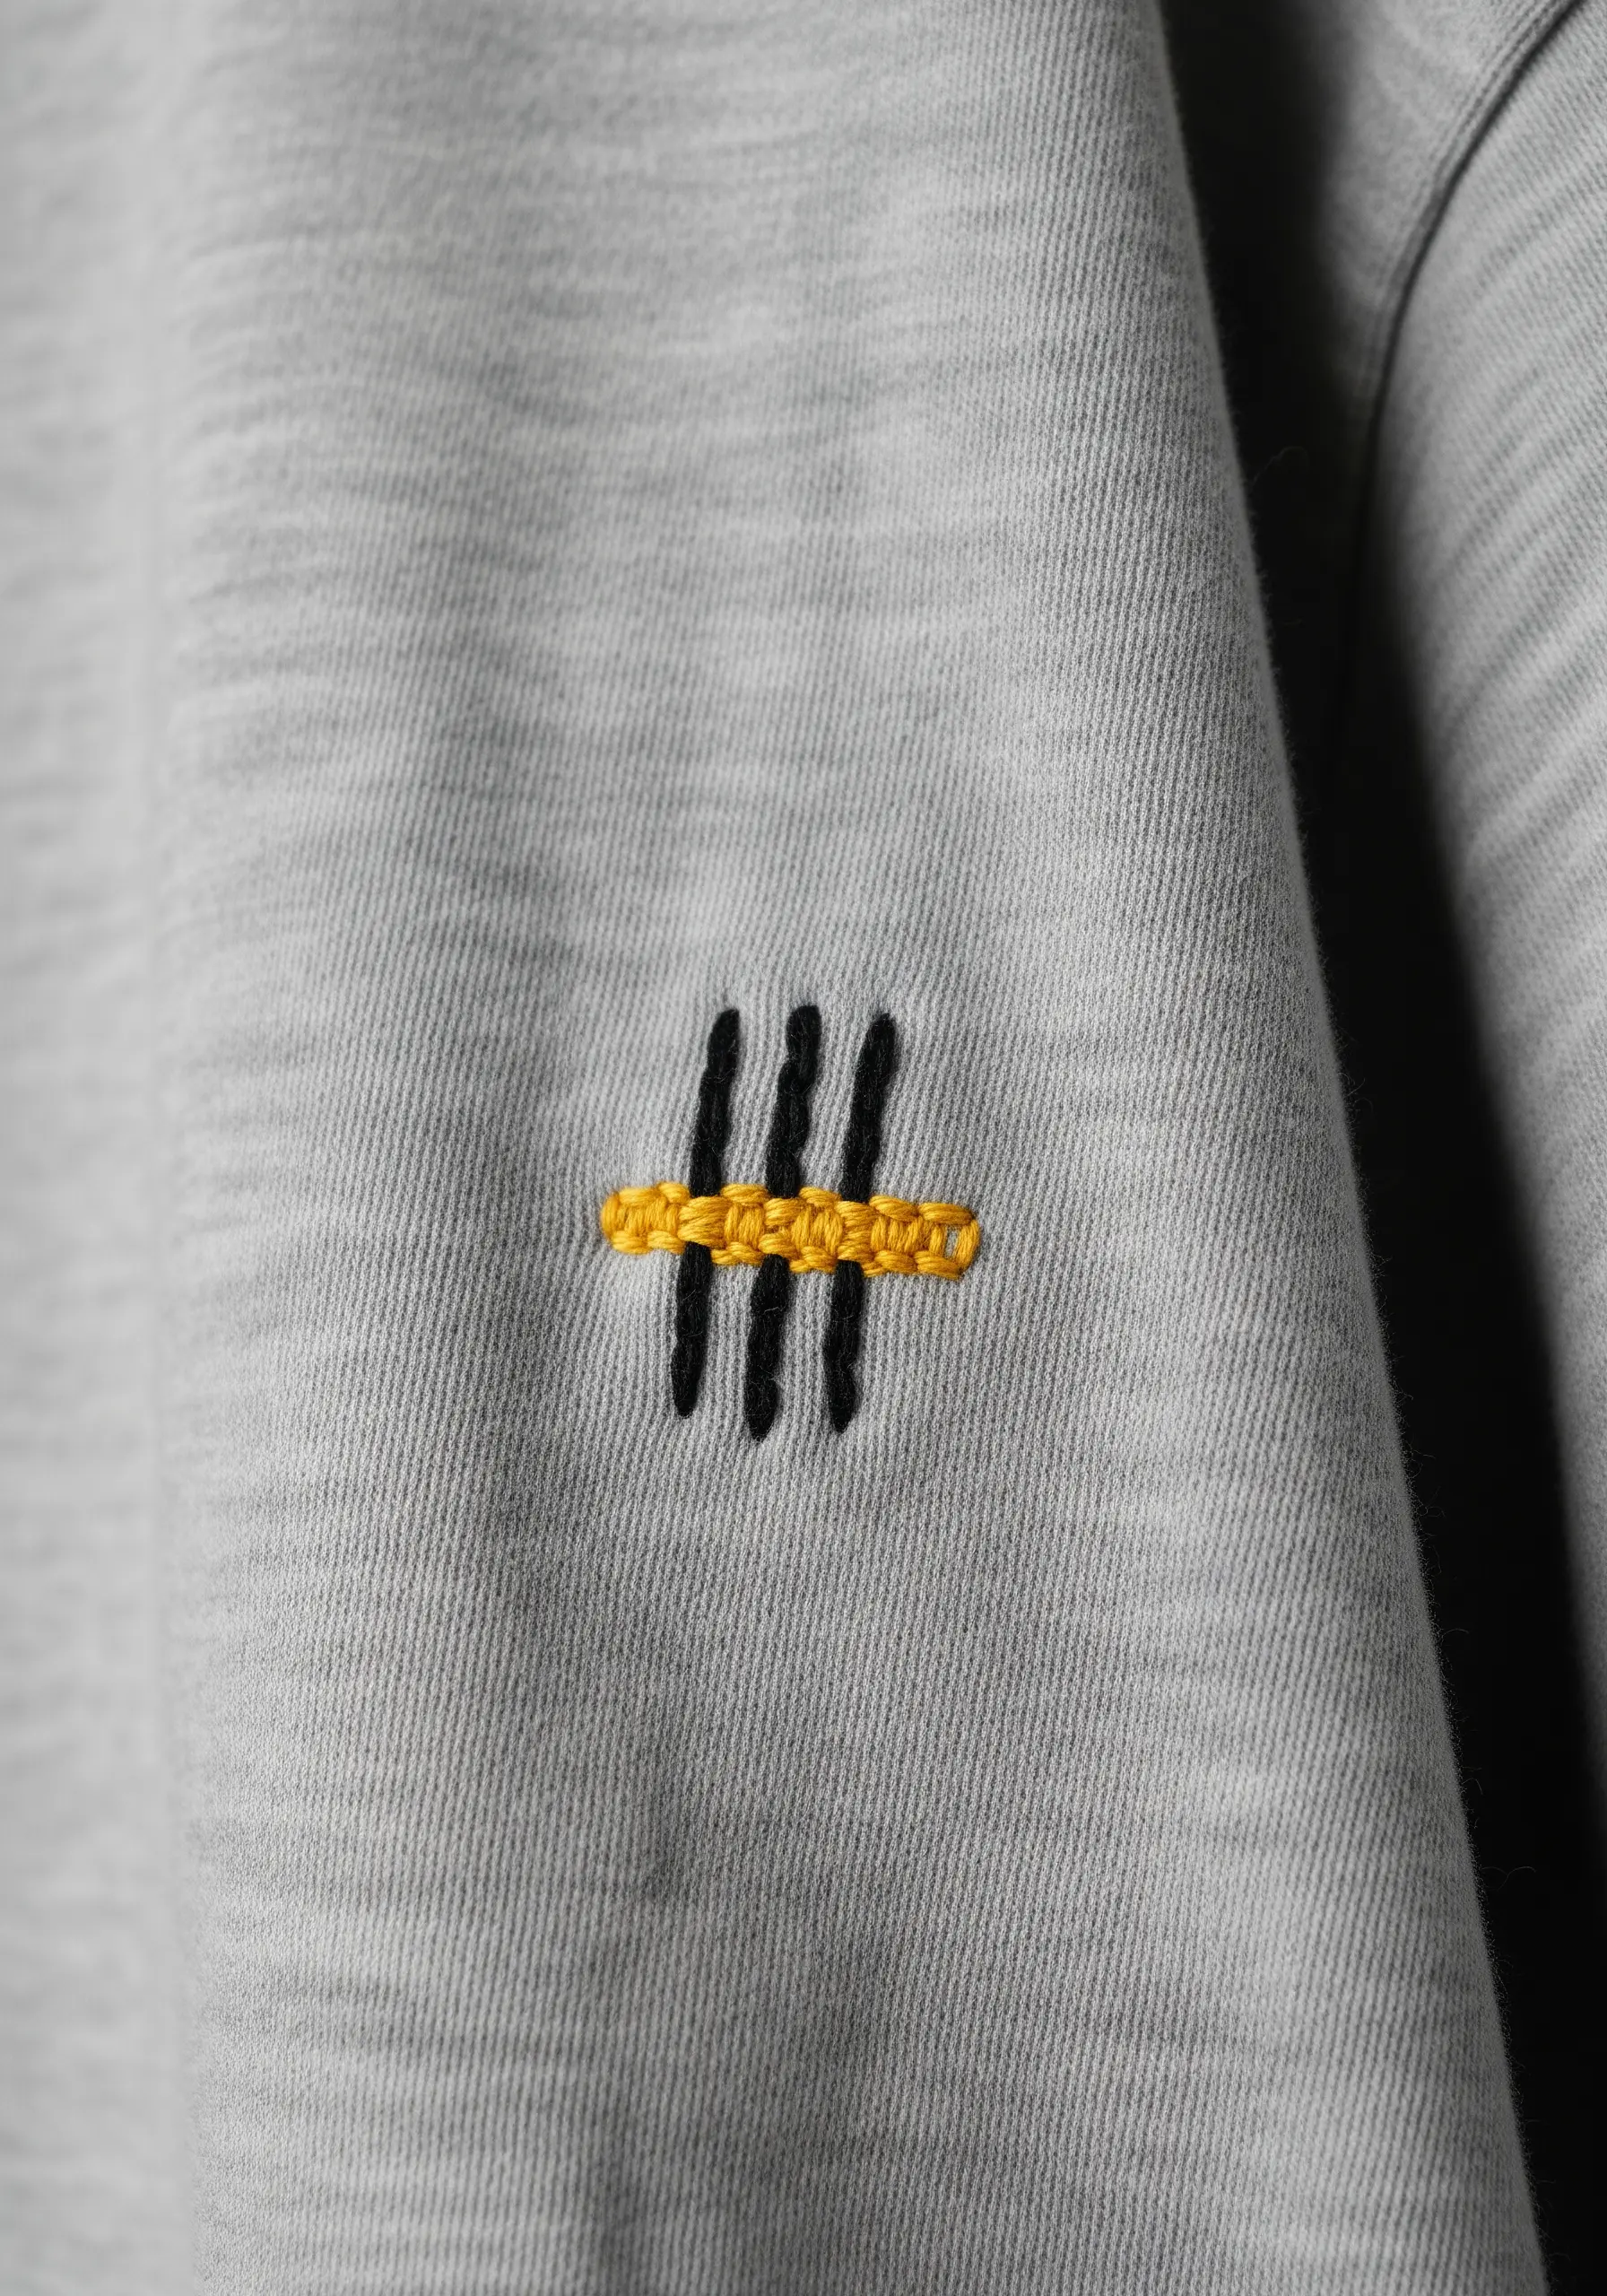
Even a tiny abstract design can have a huge impact when you play with texture.
Create the vertical lines with a flat, smooth satin stitch.
Then, add the horizontal bar using a contrasting technique, like a woven bar stitch, which wraps thread around the base stitches to create a raised, textured line.
This juxtaposition of smooth and ridged textures is what makes the simple mark so visually interesting.
18. Thread Painting in Miniature
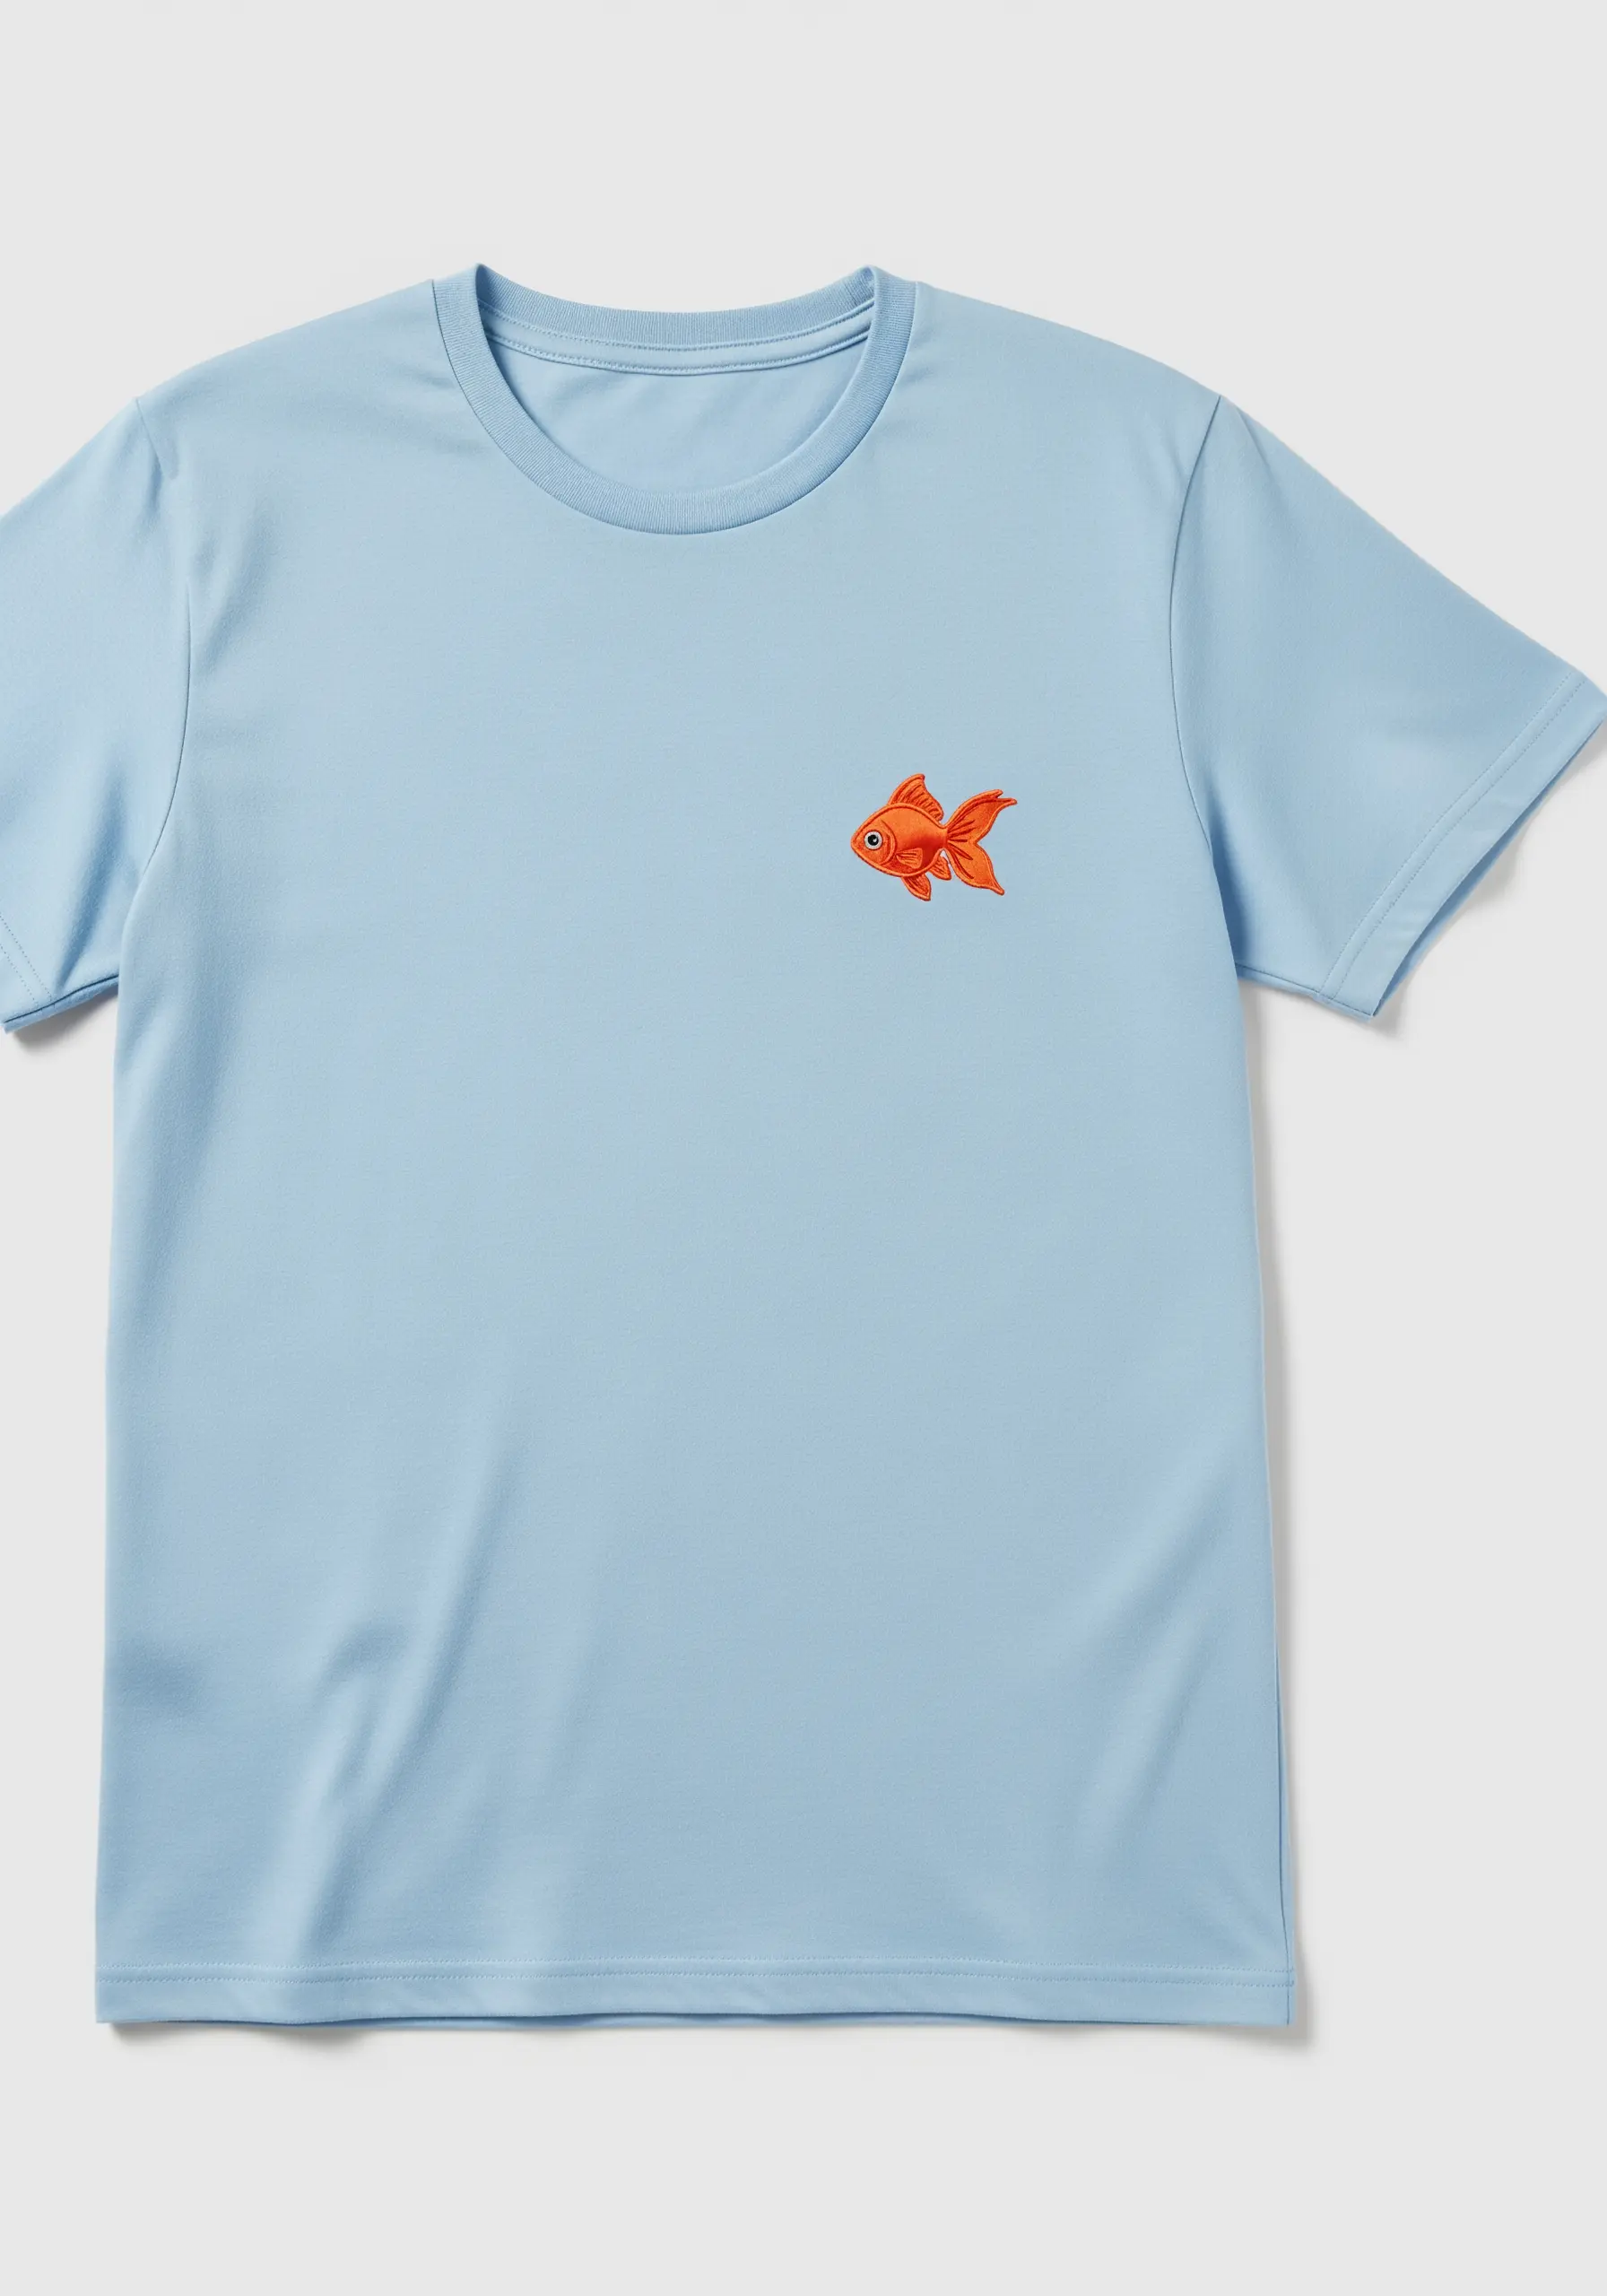
You don’t need a large canvas to practice thread painting; even a motif this small can benefit from subtle color blending.
Use a long-and-short stitch with three shades of orange to give the fish a rounded, 3D form.
Place the lightest shade along the top curve where light would hit, the medium shade in the middle, and the darkest shade on the underbelly.
This technique turns a flat shape into a lifelike creature.
19. The Power of an Outline and Highlight

To make simple shapes look incredibly clean and polished, focus on the finishing touches.
First, fill the raindrop with a light blue satin stitch.
Next, outline the entire shape with a crisp backstitch in a slightly darker thread to define the edge.
Finally, add a single white straight stitch as a highlight; this tiny detail instantly creates the illusion of a glossy, reflective surface.
20. The Elegance of Radiating Straight Stitches

Mimic the delicate, fanned-out veins of a ginkgo leaf by using strategically placed straight stitches.
First, outline the leaf shape with a split stitch to create a sharp border.
Then, fill each section with long straight stitches that radiate from the base of the stem.
This method is not only fast but also beautifully captures the leaf’s natural form and movement, making it one of the most graceful leaf embroidery stitches.
21. The Double Outline for Graphic Impact
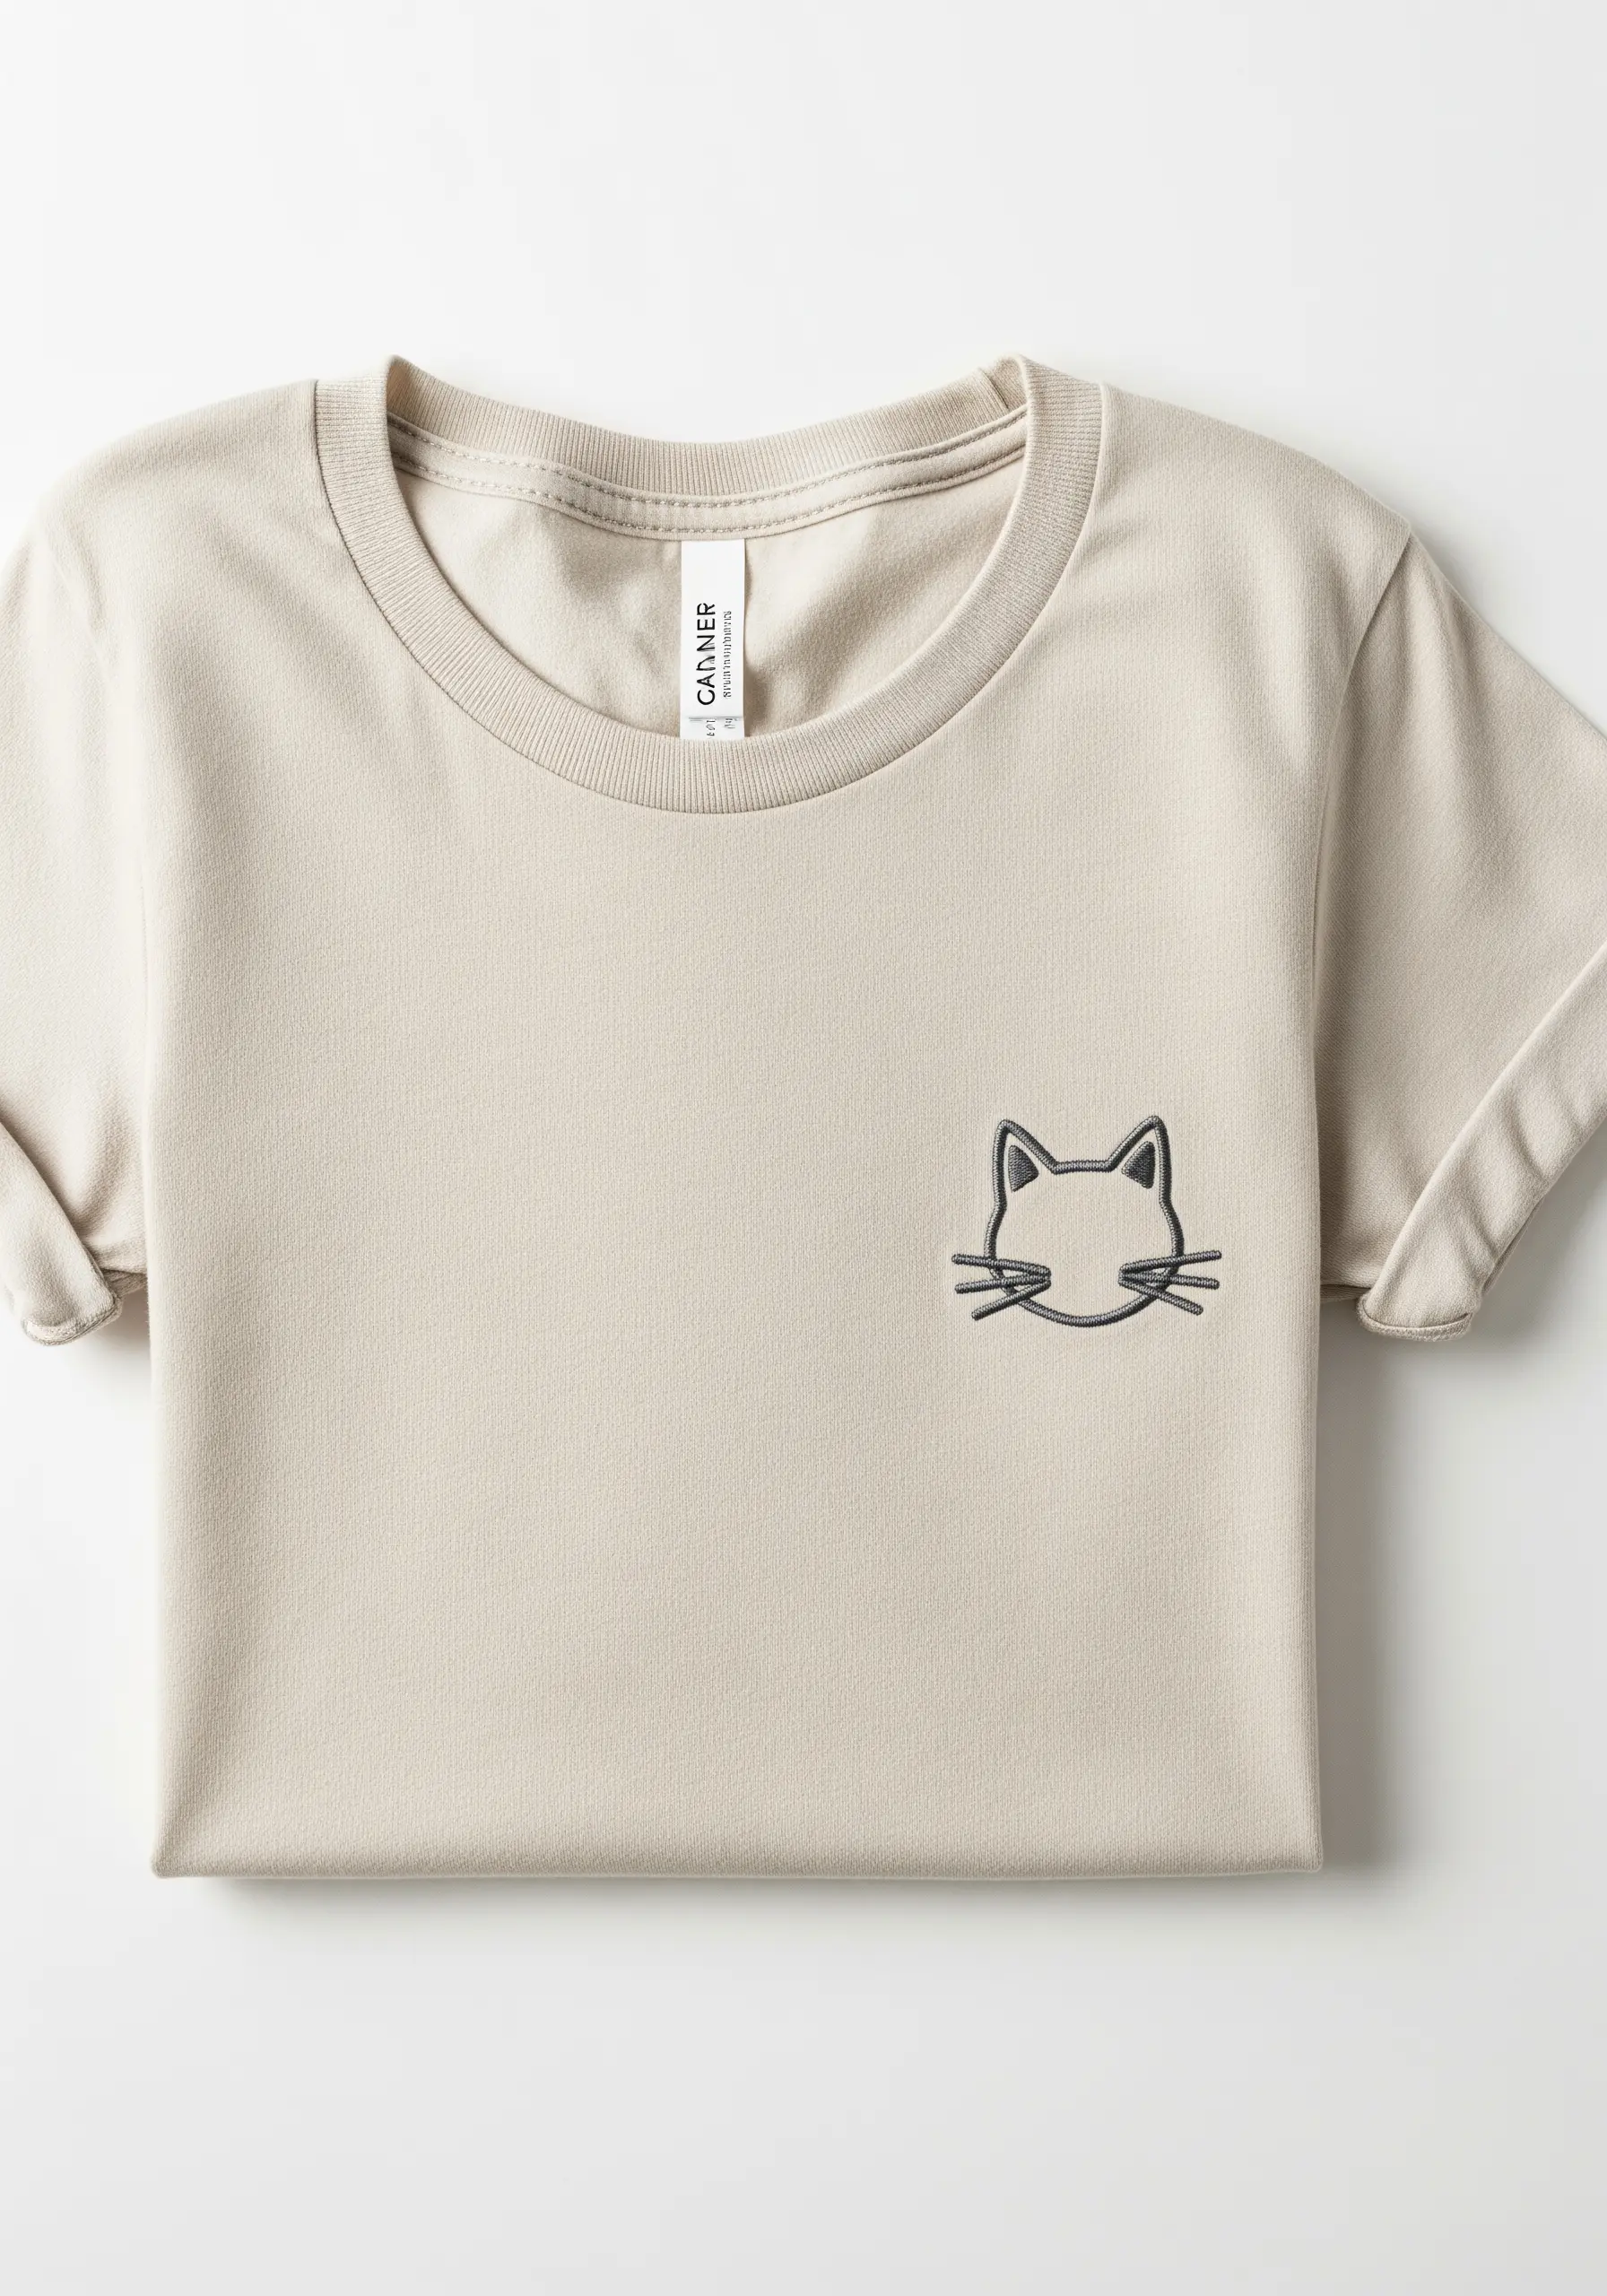
To make a simple line drawing pop off the fabric, give it a bold, sticker-like frame.
Stitch the inner details—the cat’s face and whiskers—with a thin, dark backstitch.
Then, trace the entire outer silhouette with a much thicker line using a satin stitch or a dense chain stitch in a contrasting, lighter color.
This double outline technique frames the design, adding weight and a clean, graphic finish that feels modern and intentional.


