

You have the threads, the fabric, and the desire to create something beautiful. But perhaps you feel your work is missing that final touch of polish—the kind that turns a simple project into a cherished piece.
The secret isn’t in complex patterns or expensive supplies. It’s in the small, intentional adjustments: changing the direction of a stitch to catch the light, choosing a thicker thread to make a line feel bold, or adding a single knot to create a point of texture.
These are the details that elevate your craft. Here, you’ll find simple motifs, yes, but more importantly, you’ll discover the techniques behind them. Consider this a quiet guide to helping you stitch with more confidence, precision, and artistry, starting right now.
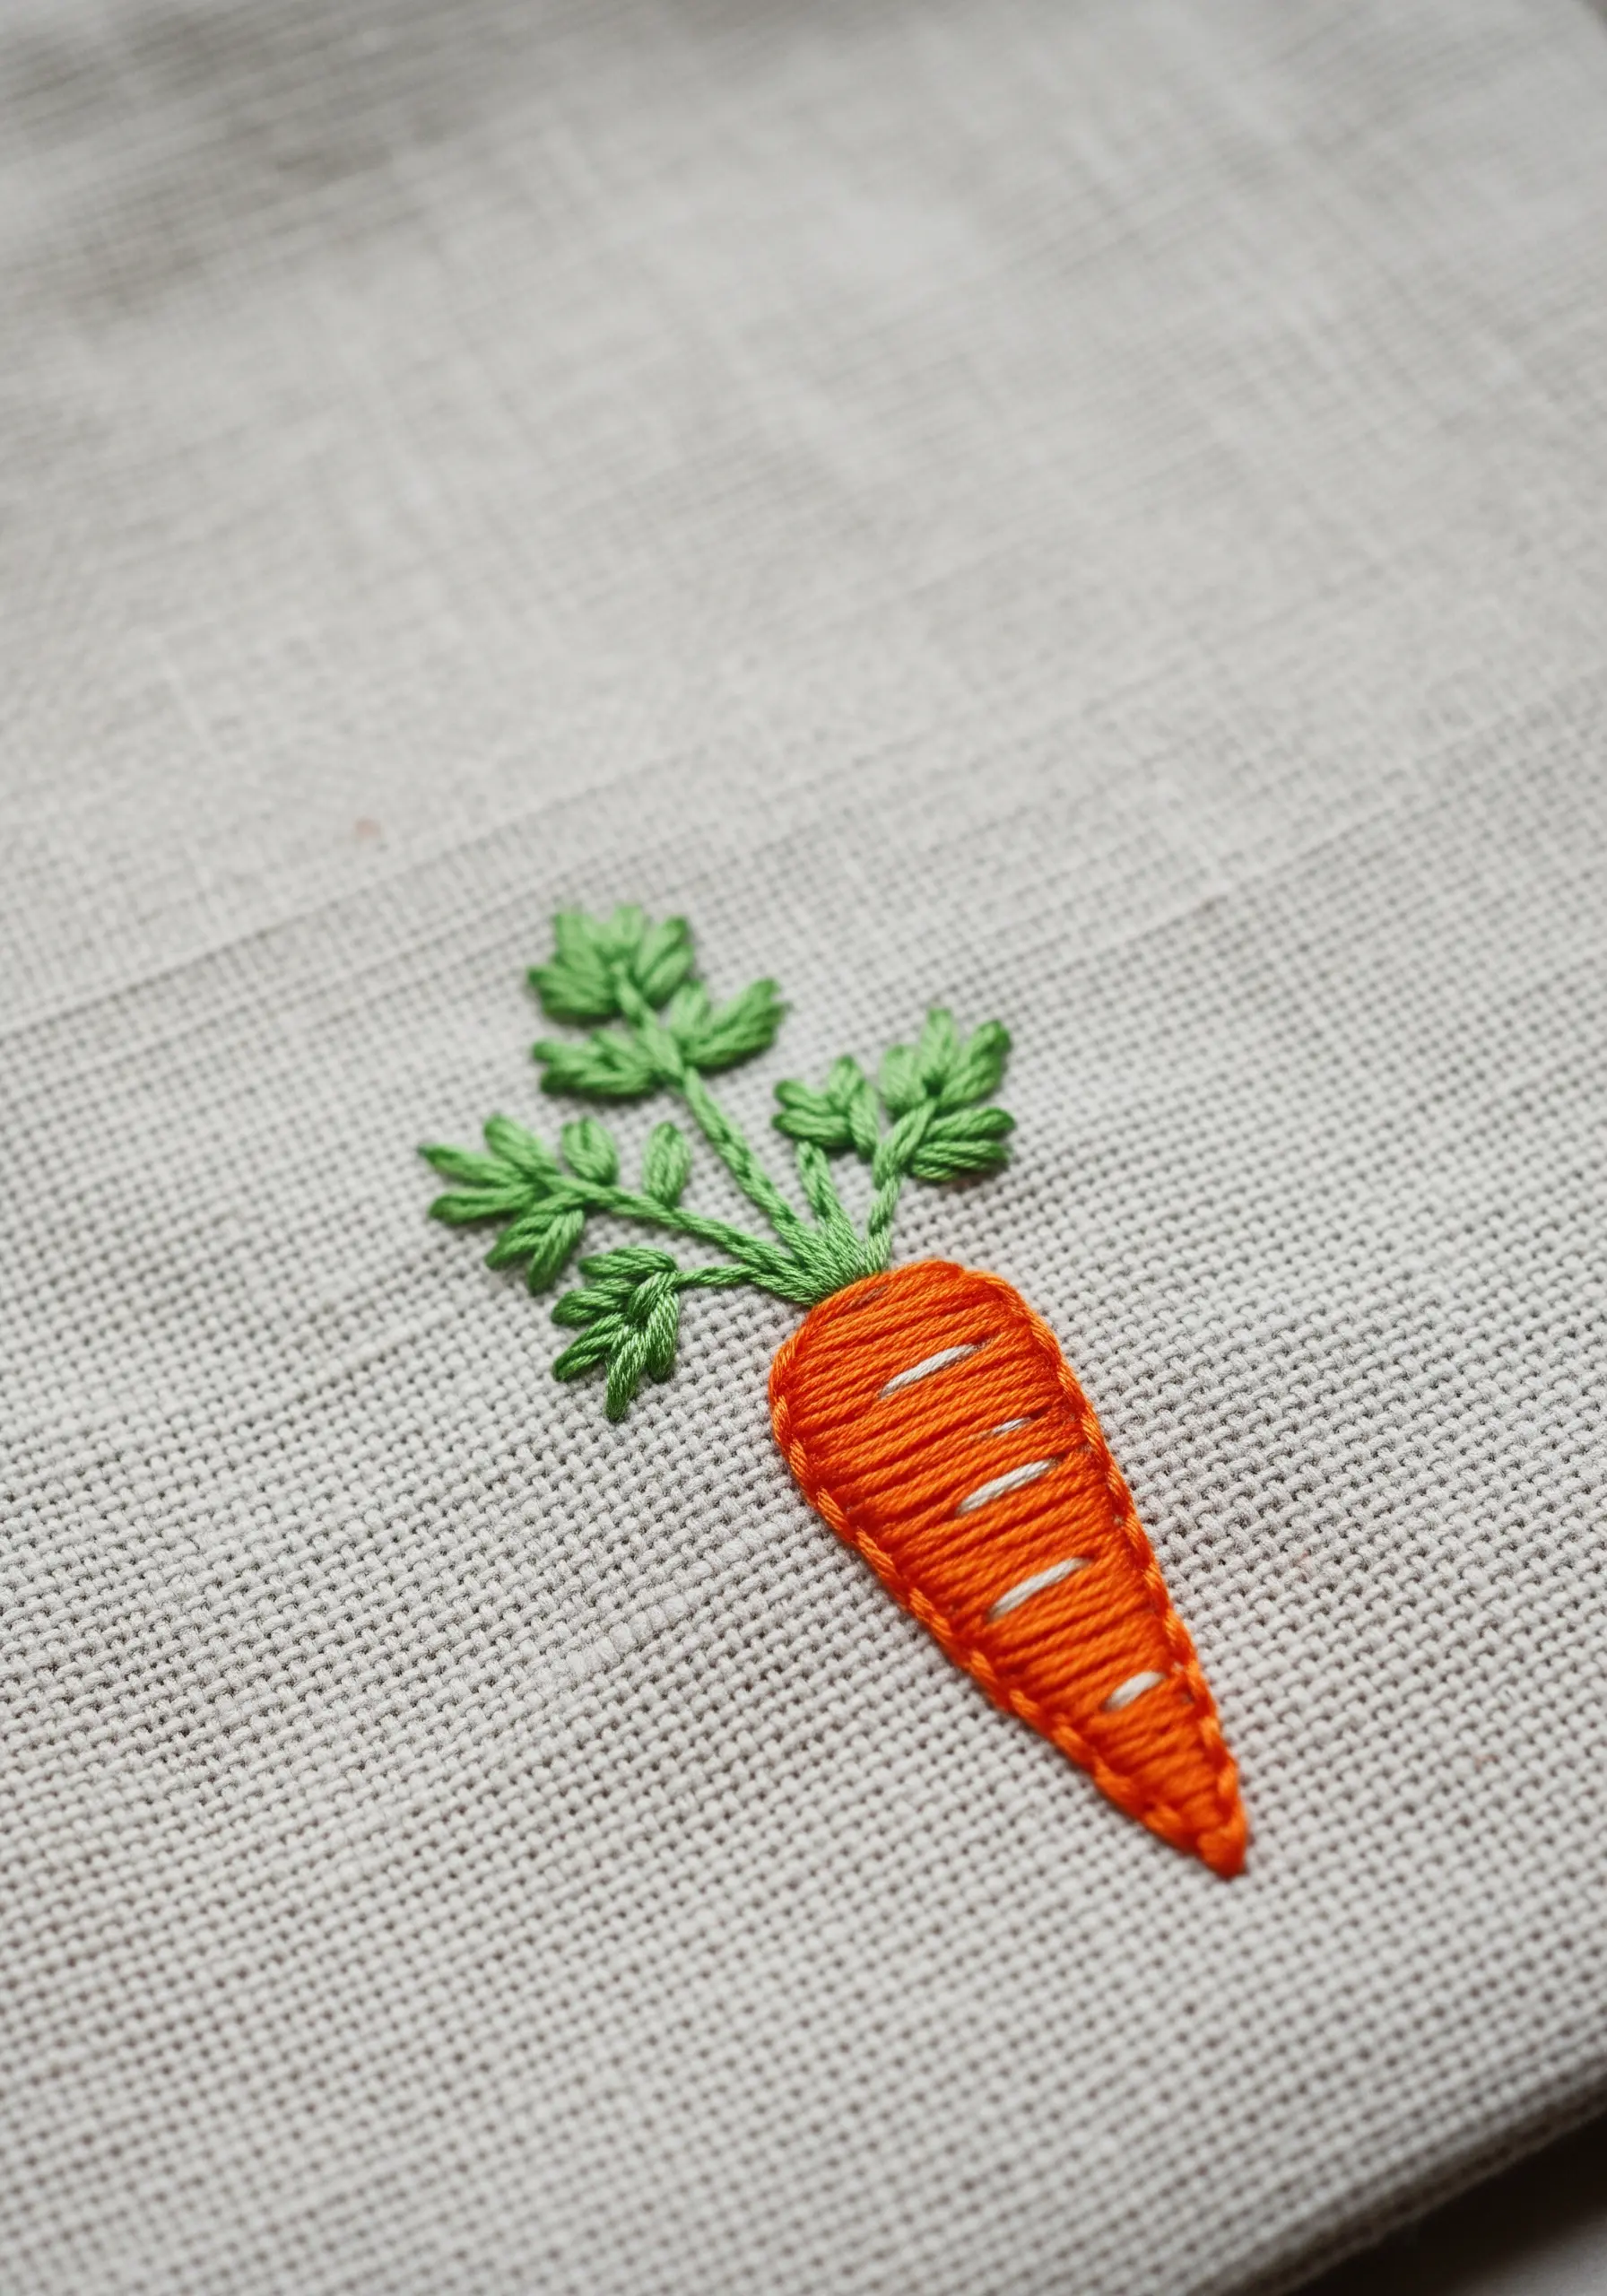
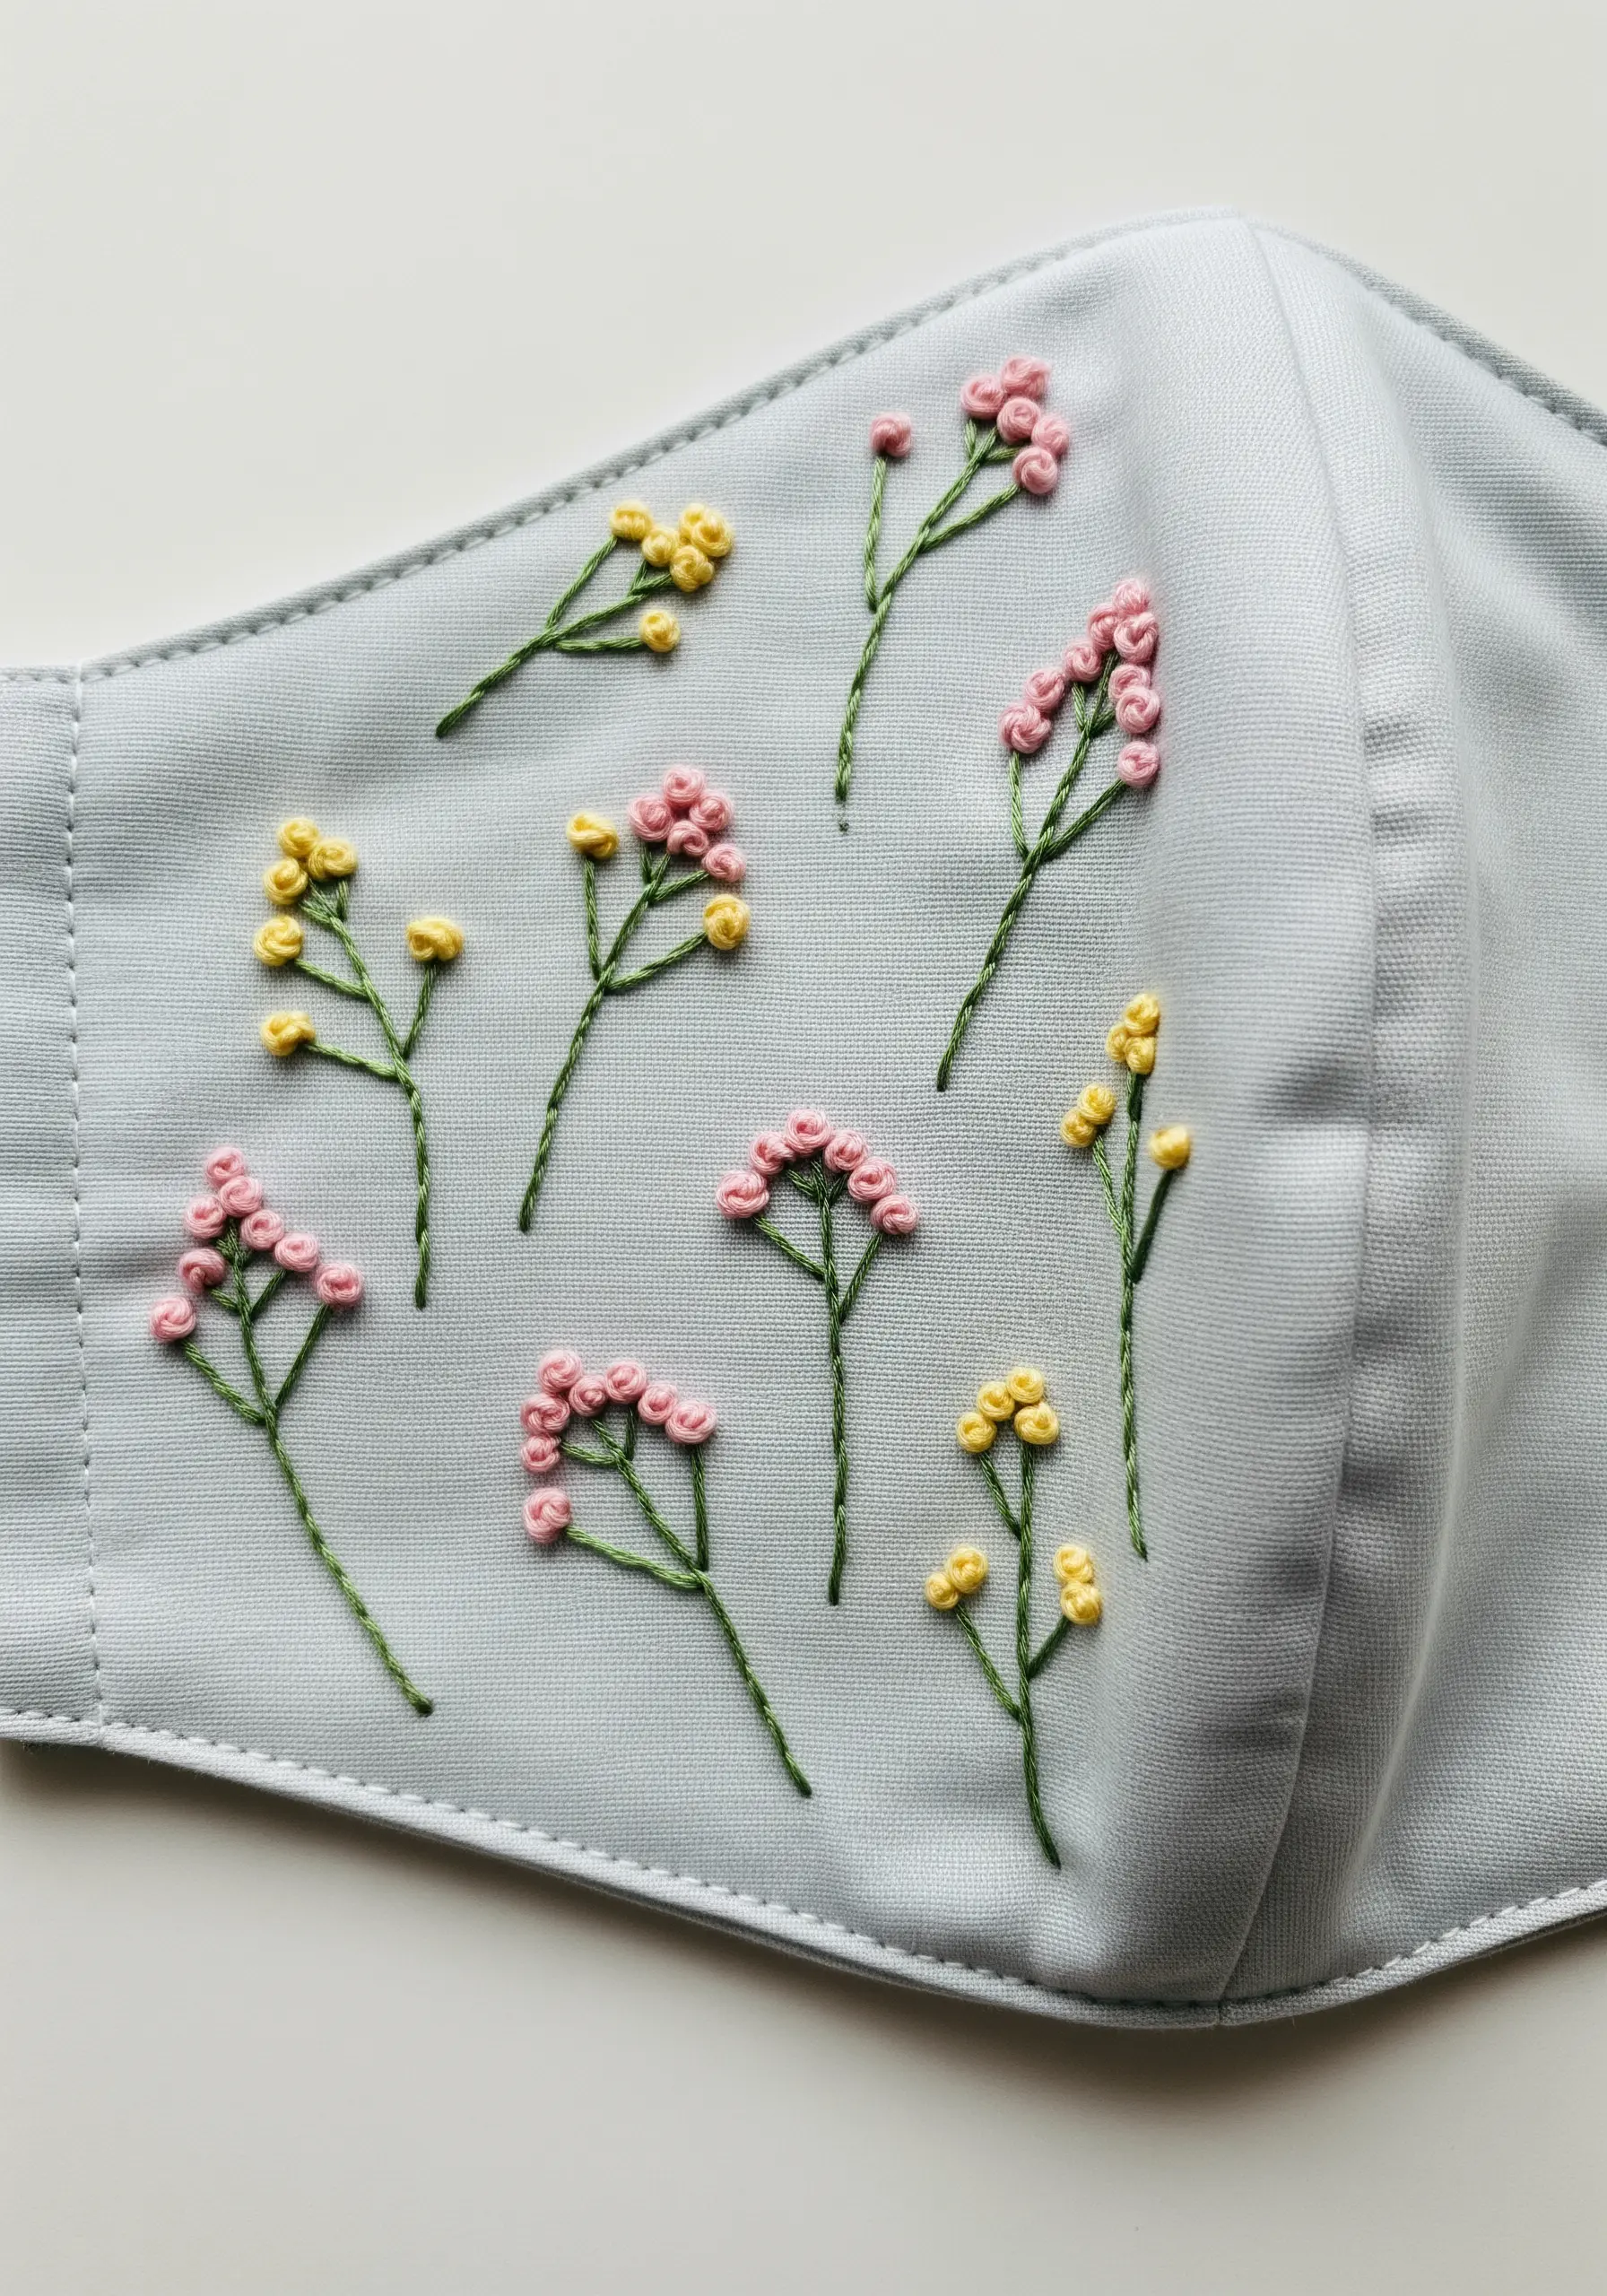
1. Render Lavender with Textural Stitches
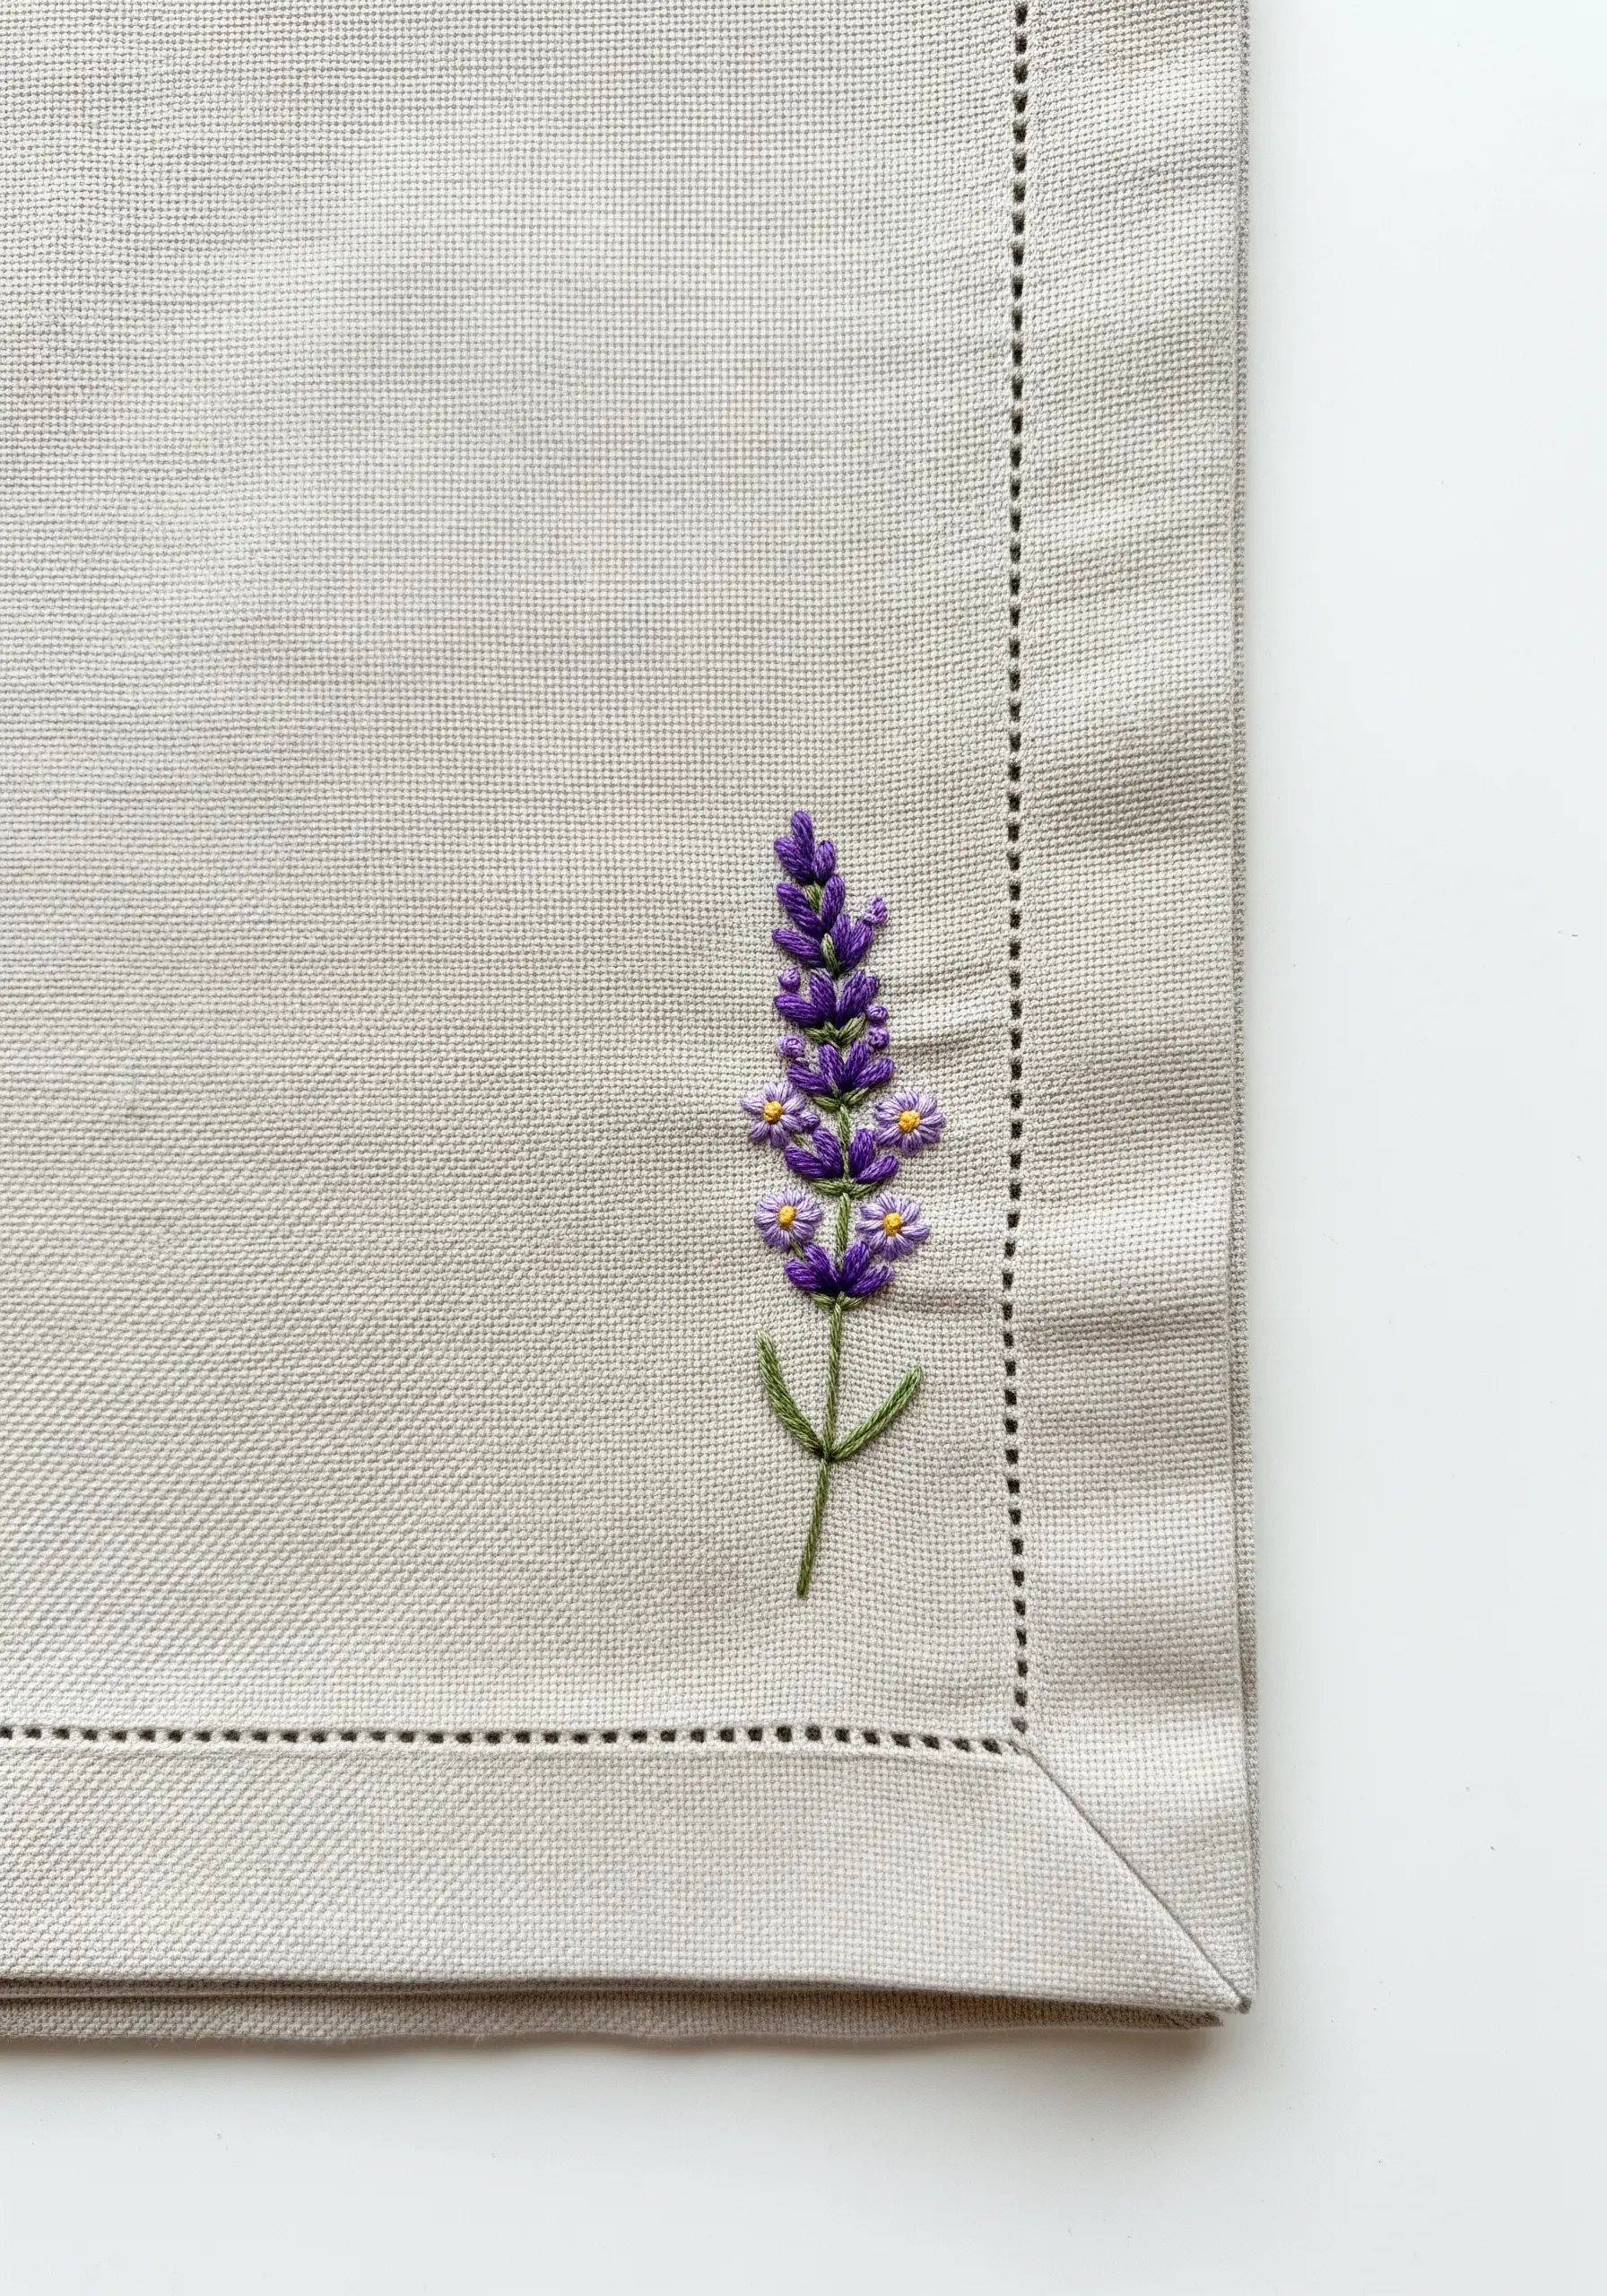
Create a realistic lavender sprig by combining three distinct stitches for texture.
Use a satin stitch for the fuller purple buds at the base, transitioning to tiny French knots for the delicate blossoms near the top.
This mimics the way lavender blooms, adding depth and realism to a simple motif.
For the stem, a fine backstitch or stem stitch with just two strands of floss will provide structure without overwhelming the delicate flowers.
2. Animate a Motif with a Flight Path
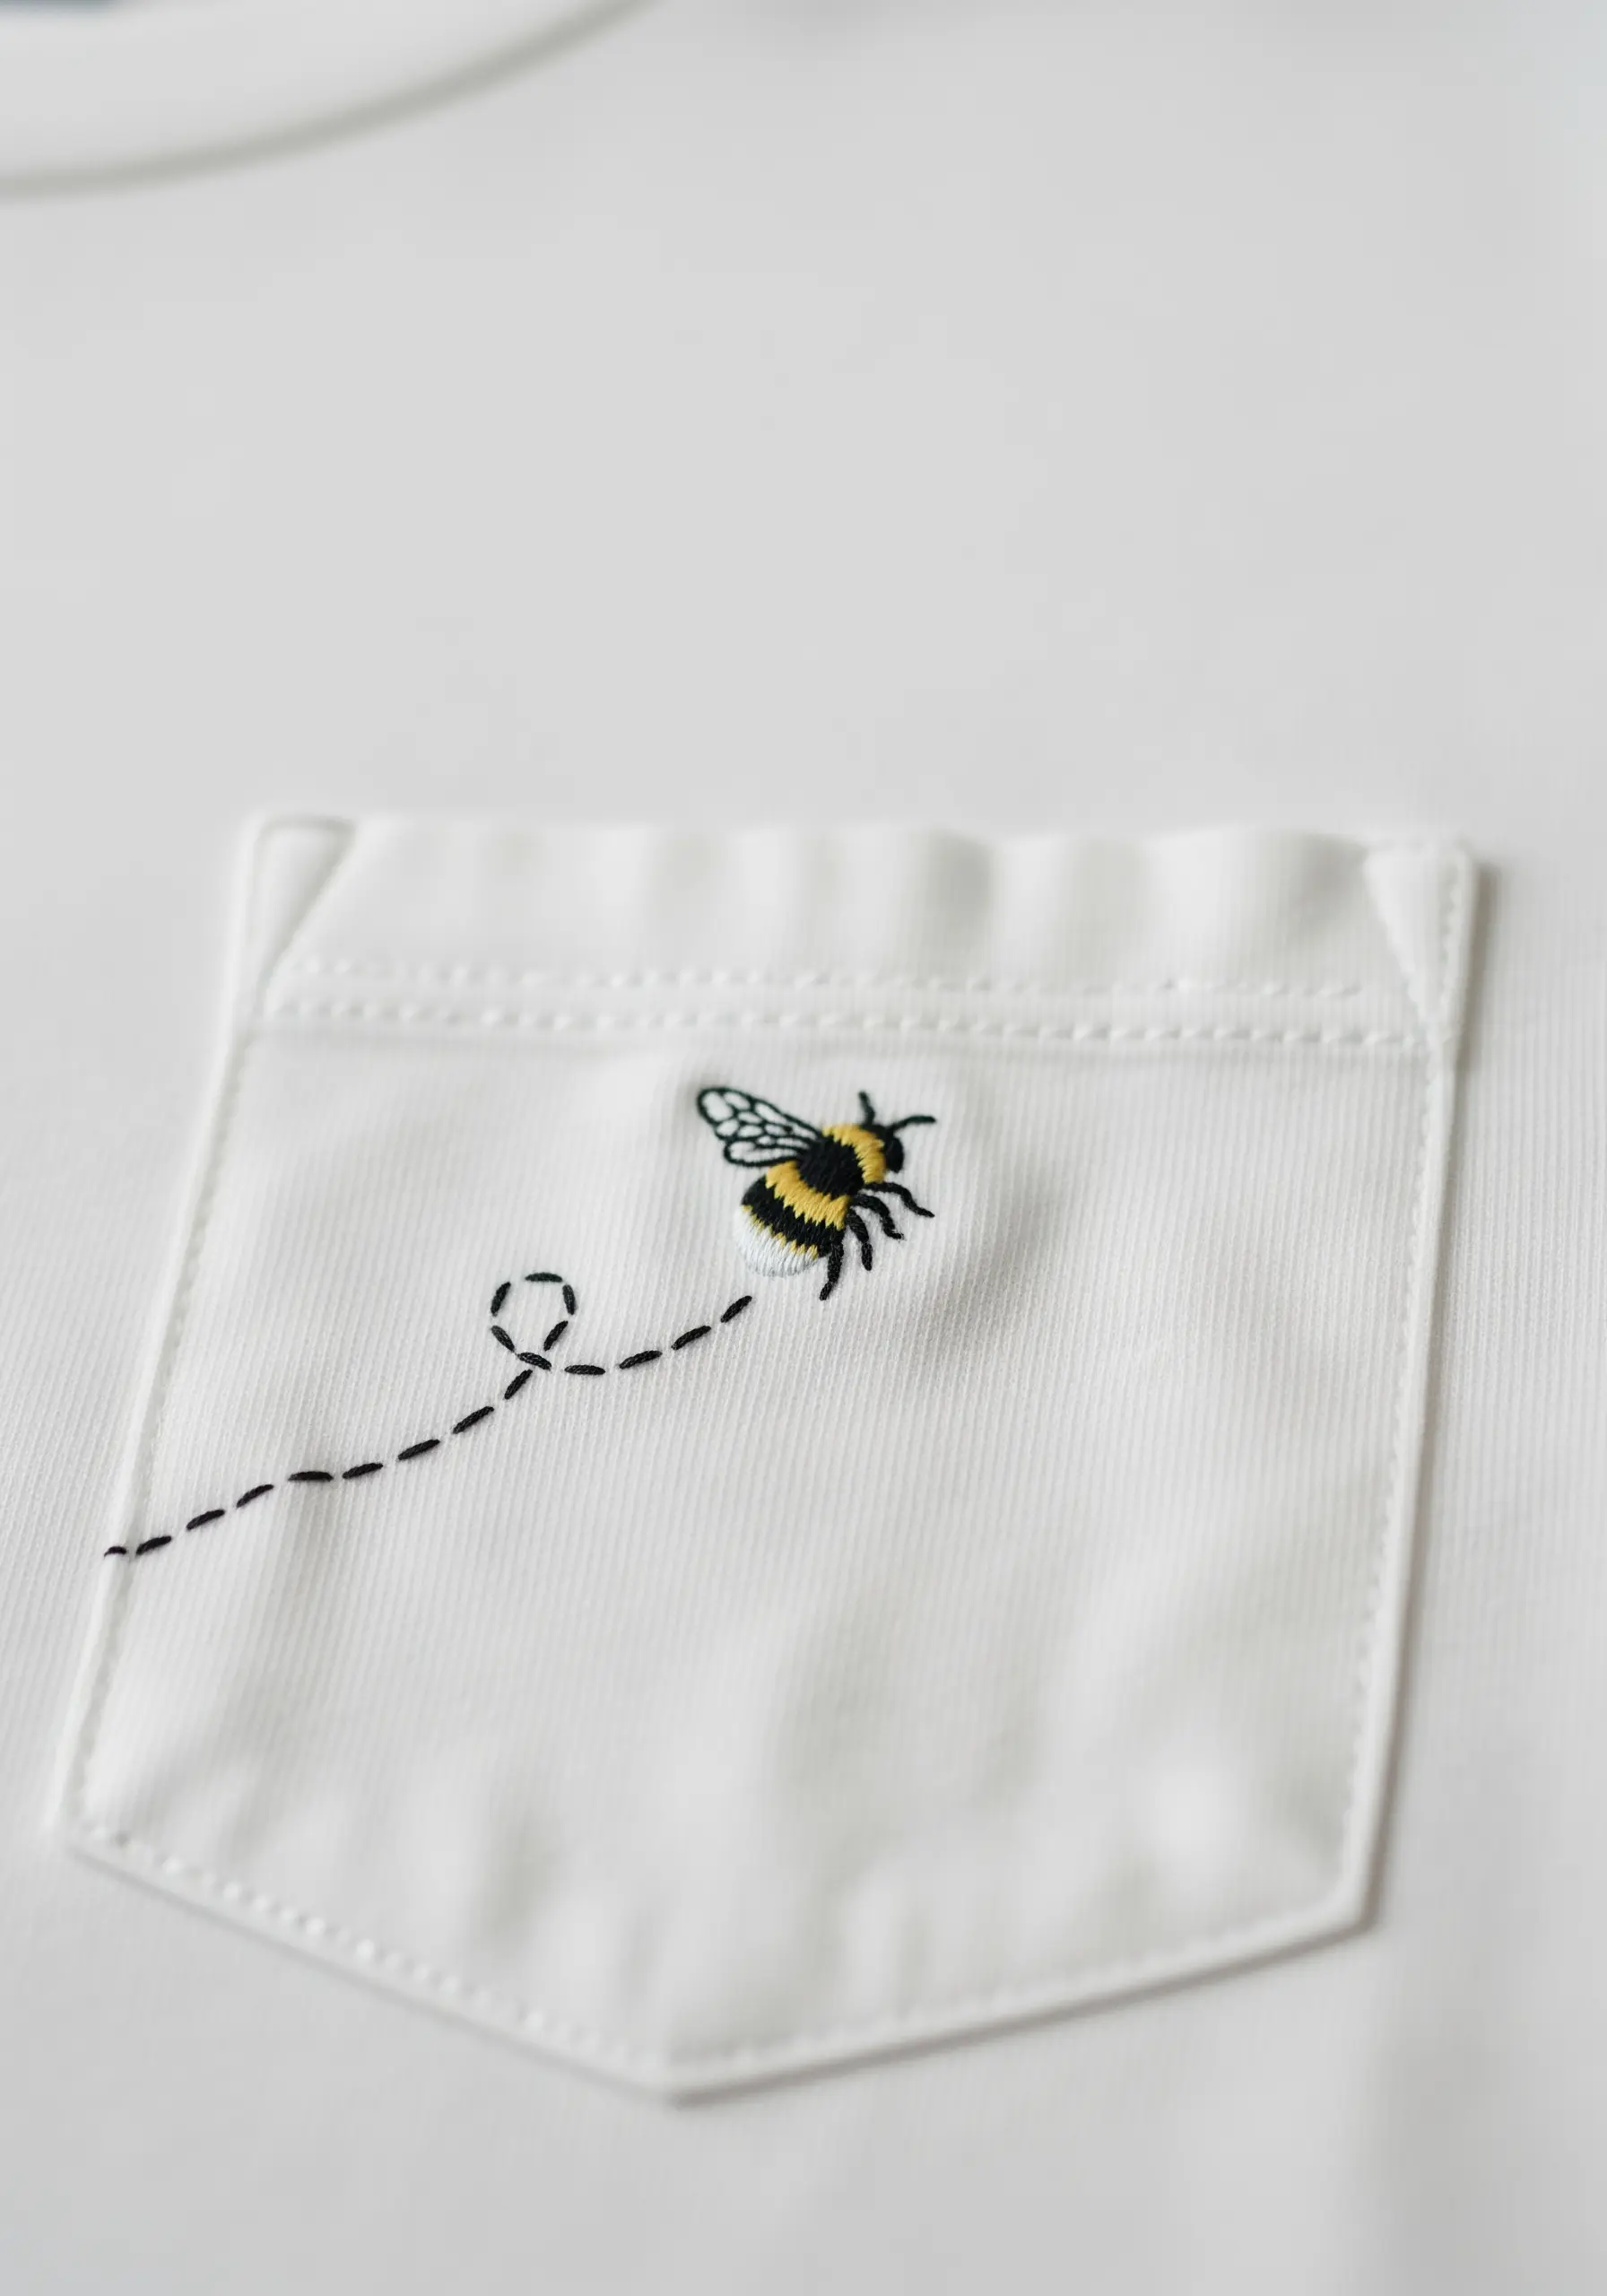
Give a static motif, like a bee, a sense of movement by adding a simple stitched trail.
Use a dashed backstitch or running stitch in a contrasting color to create a whimsical flight path, guiding the viewer’s eye across the fabric.
When embroidering on knit fabrics like a T-shirt, always use a stick-on, washable stabilizer to prevent the fabric from stretching and distorting your stitches.
The stabilizer provides a firm foundation, ensuring your lines are crisp and the motif remains flat after washing.
3. Create a Bold Sunburst with Straight Stitches
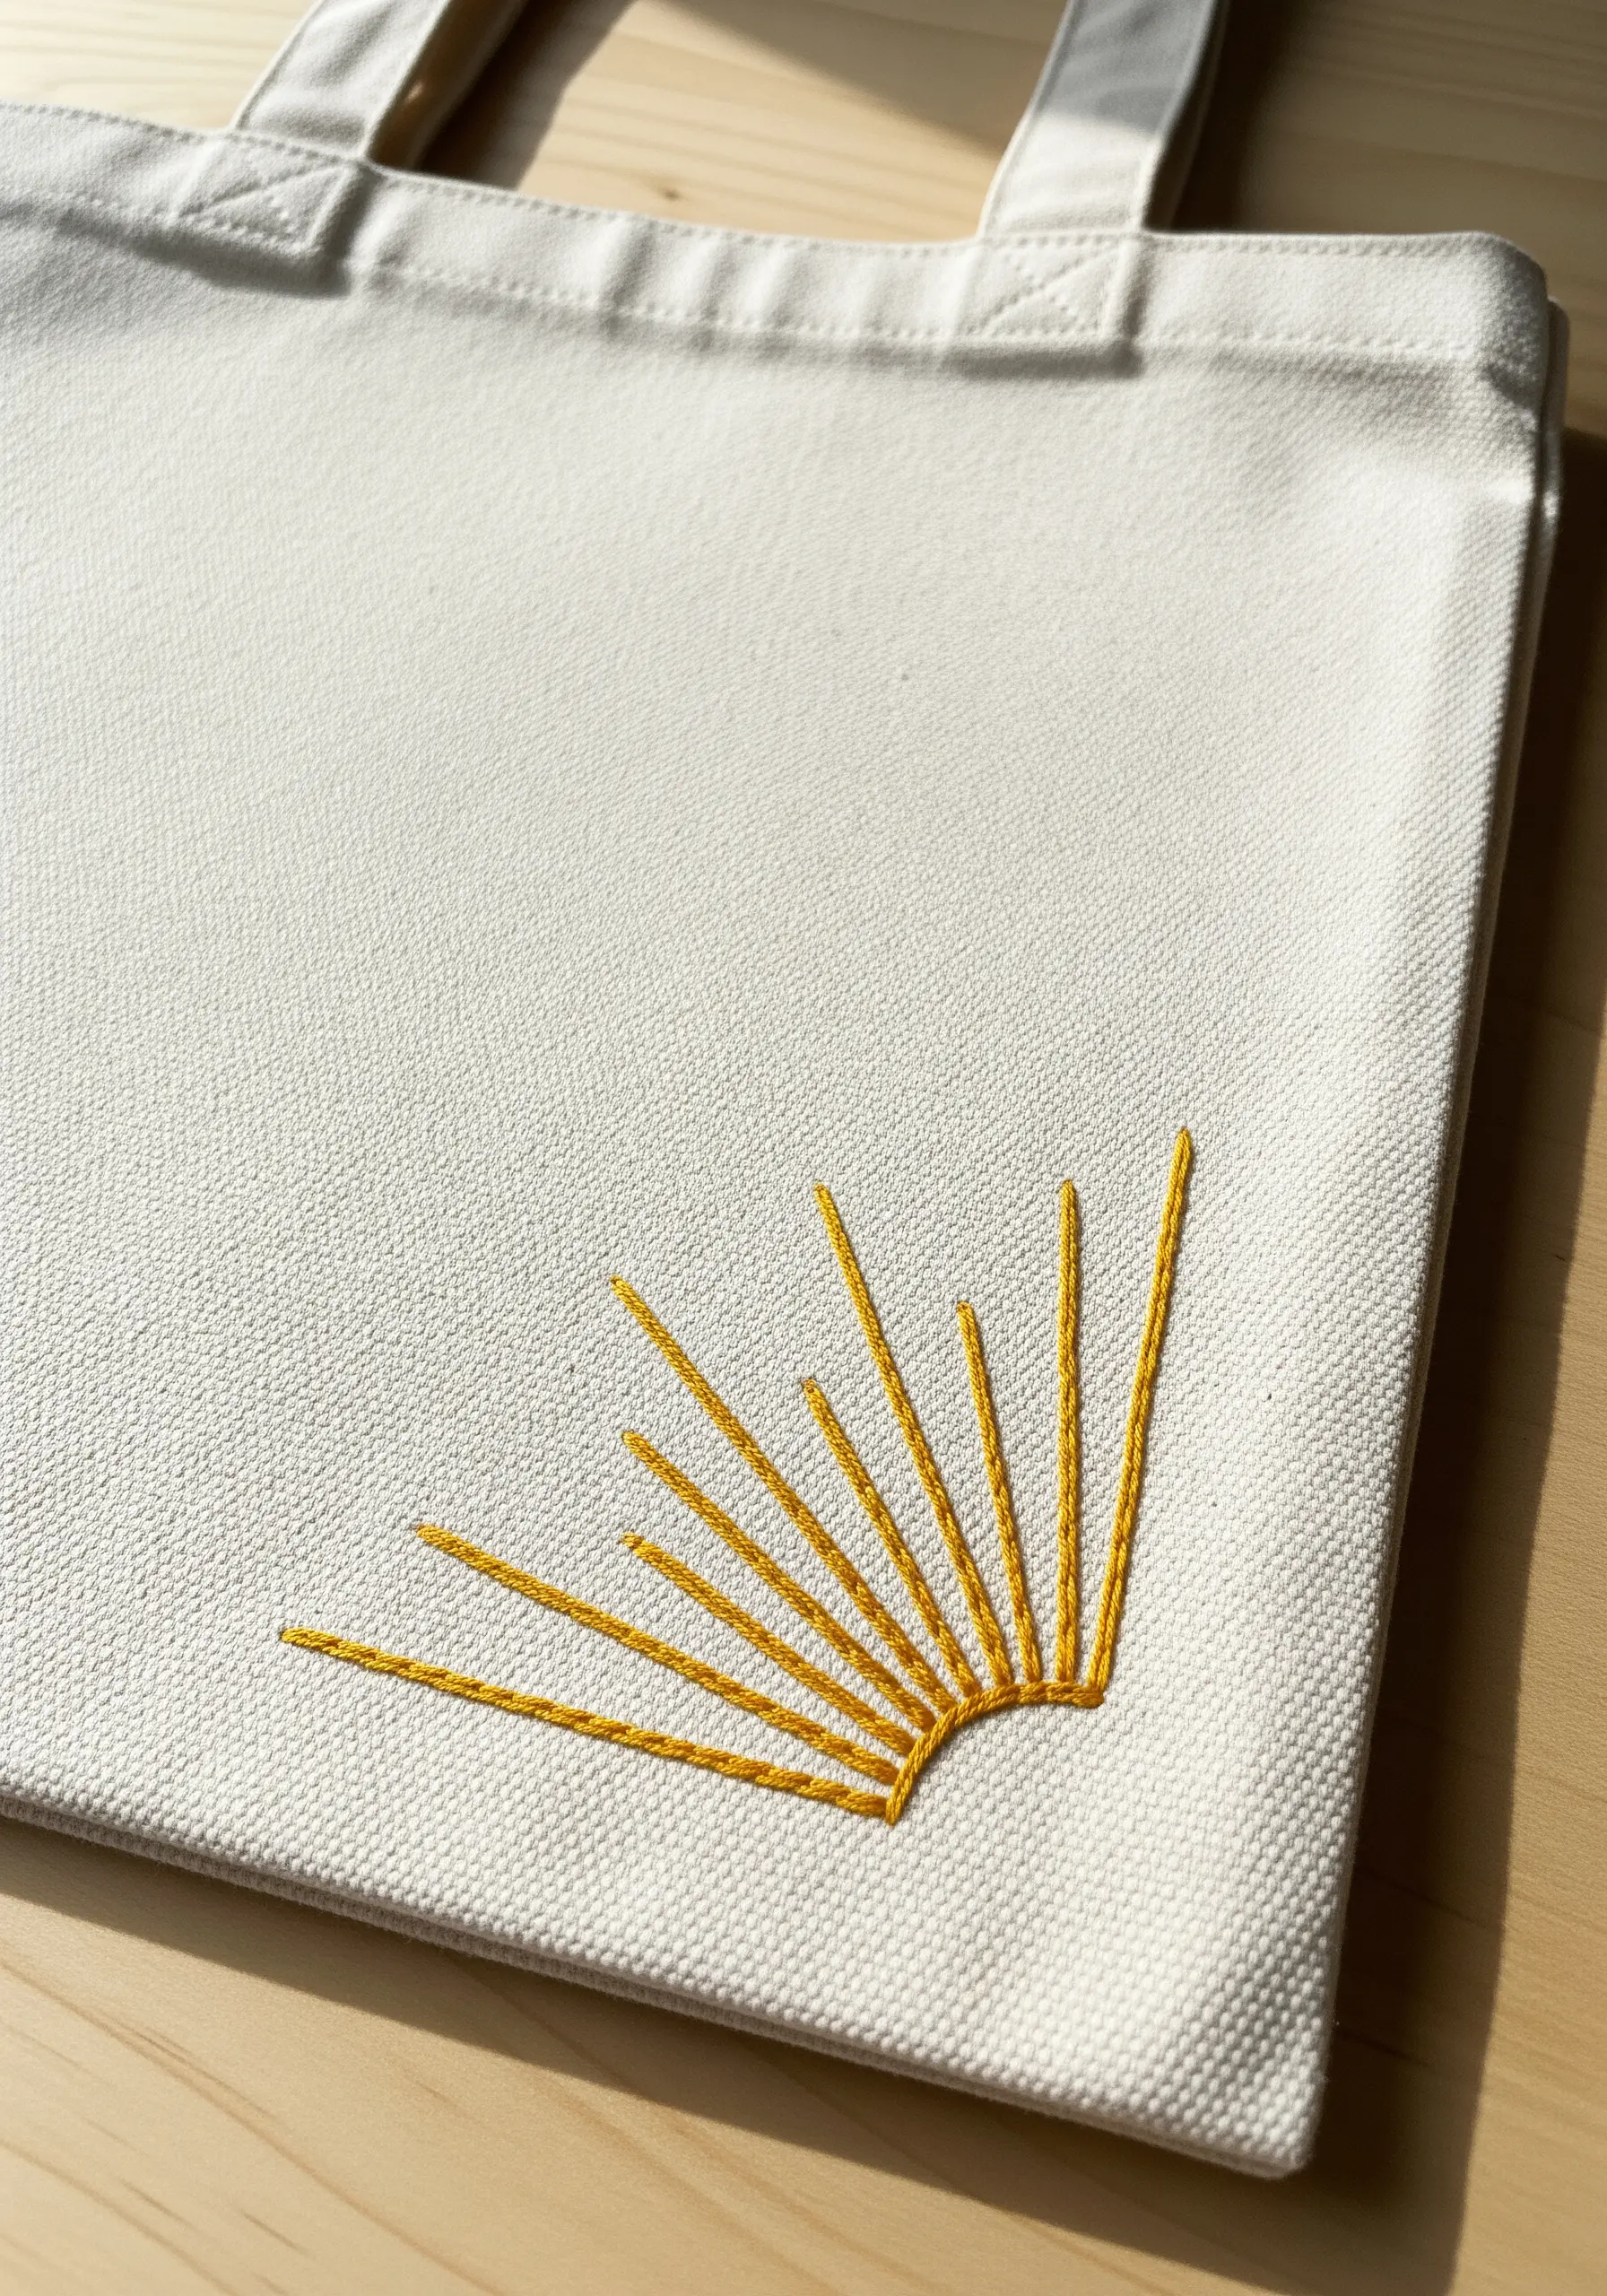
Achieve a striking, minimalist design using only the straight stitch.
Vary the length of each sun ray to create dynamic energy and visual interest.
For a design with this much graphic impact, use all six strands of your embroidery floss or switch to a thicker thread like pearl cotton.
This adds weight and presence, ensuring the simple motif stands out, especially on durable fabrics like canvas.
4. Add Dimension to a Crescent Moon

Elevate a simple crescent moon by giving it a raised, rope-like texture.
First, create the shape using a backstitch, then whip the stitches with the same color thread without piercing the fabric.
This technique, a whipped backstitch, creates a smooth, rounded line that catches the light beautifully, making it stand out against a dark background.
Keep the stars as simple single straight stitches to maintain focus on the moon’s texture.
5. Frame Apparel with a Bold Botanical Outline

Use an unexpected placement, like a collar point, to turn a simple motif into a custom design detail.
On heavy fabric like denim, a standard backstitch can get lost. Instead, use a chain stitch or a split stitch for your outline.
These stitches create a thicker, more substantial line that sits prominently on top of the fabric’s weave, resulting in a clean, bold finish that makes your clothes look custom-made.
Always use a stabilizer on the back of the denim to prevent puckering.
6. Stitch a Refined Leaf on a Crisp Cuff
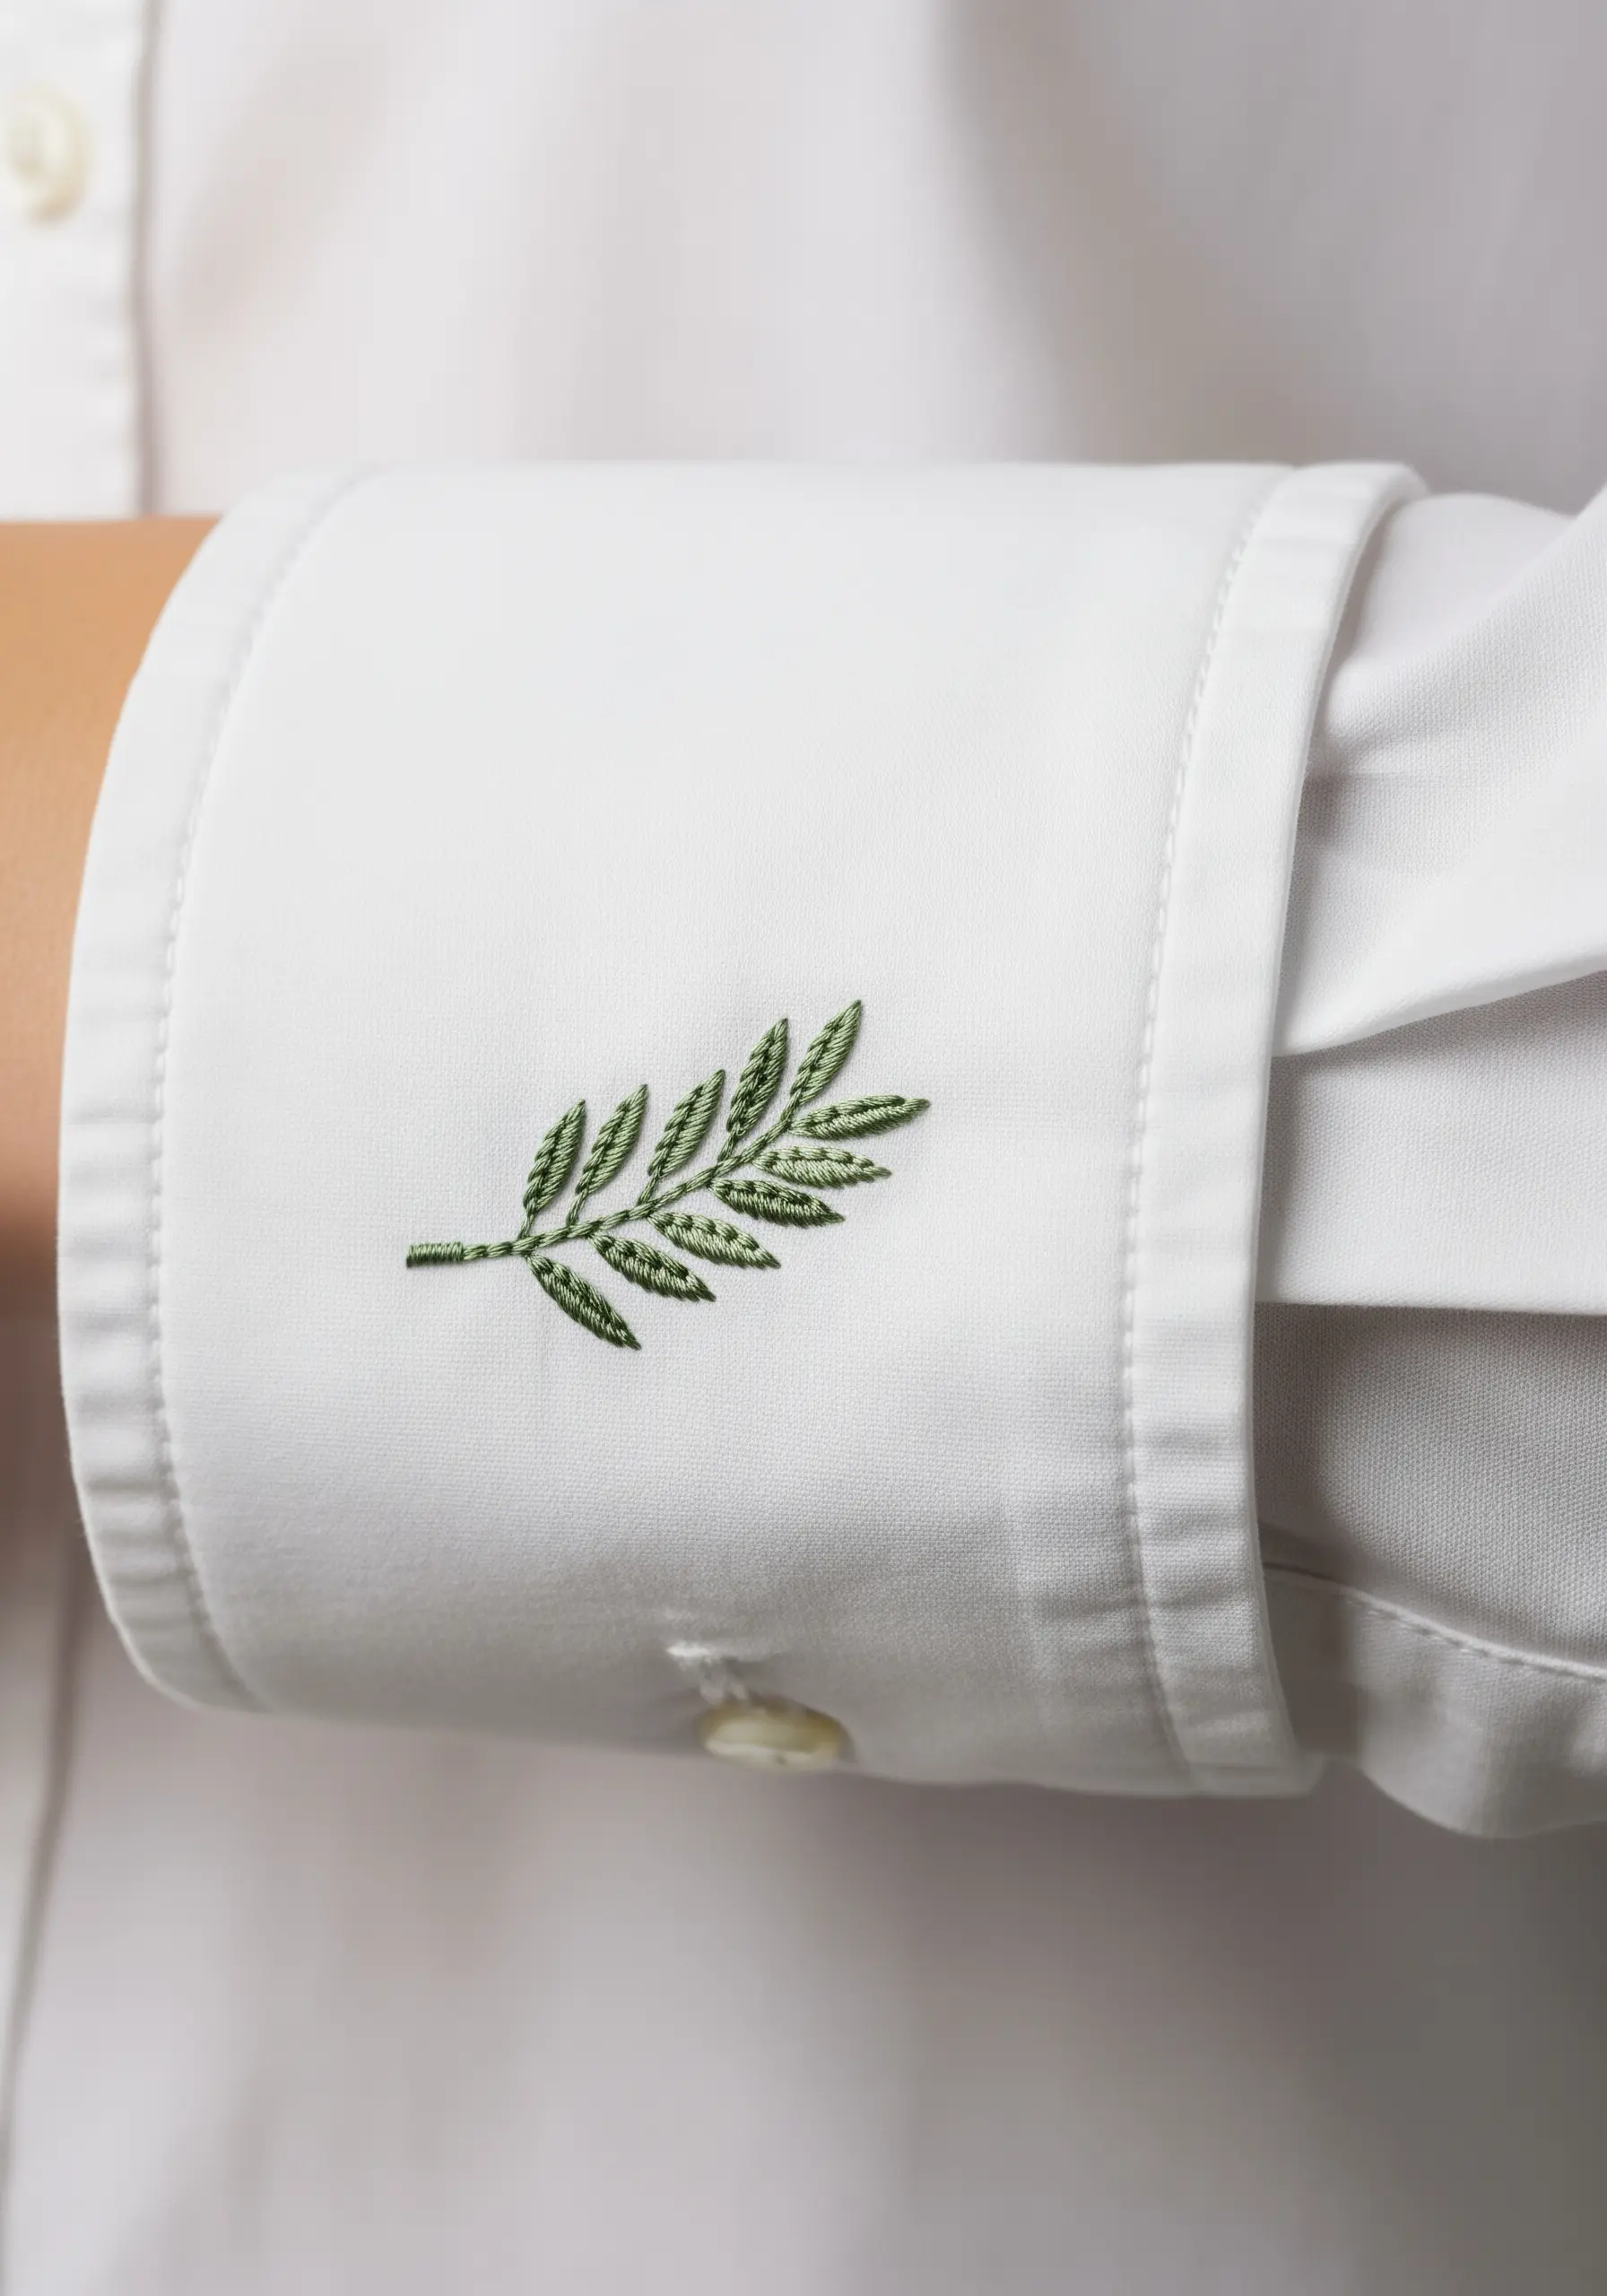
For an elegant, understated embellishment, place a delicate botanical on a shirt cuff.
Use the fishbone stitch for the leaves; this technique creates a central vein and angled sides in one fluid motion, giving the leaves a natural, realistic appearance.
To maintain a refined look on fine cotton, work with only two or three strands of floss. This ensures the detail remains crisp and doesn’t feel bulky.
7. Achieve a High-Gloss Satin Stitch

Make your satin-stitched motifs look polished and almost three-dimensional with a simple trick.
After filling the main shape with your satin stitches, add a highlight using a single strand of white or a much lighter color thread.
Lay just two or three long straight stitches over the top of your fill. This tiny detail mimics light reflection, instantly giving the motif a glossy, rounded appearance.
8. Master the Minimalist Landscape

Capture the essence of a landscape with a simple, continuous line.
For sweatshirts or other soft knits, use a split stitch instead of a backstitch. A split stitch creates a more solid, chain-like line that is less likely to sink into the fabric’s texture.
This ensures your line art remains sharp and defined, giving it a clean, modern aesthetic that feels intentional.
9. Define Outlines on Textured Fabric
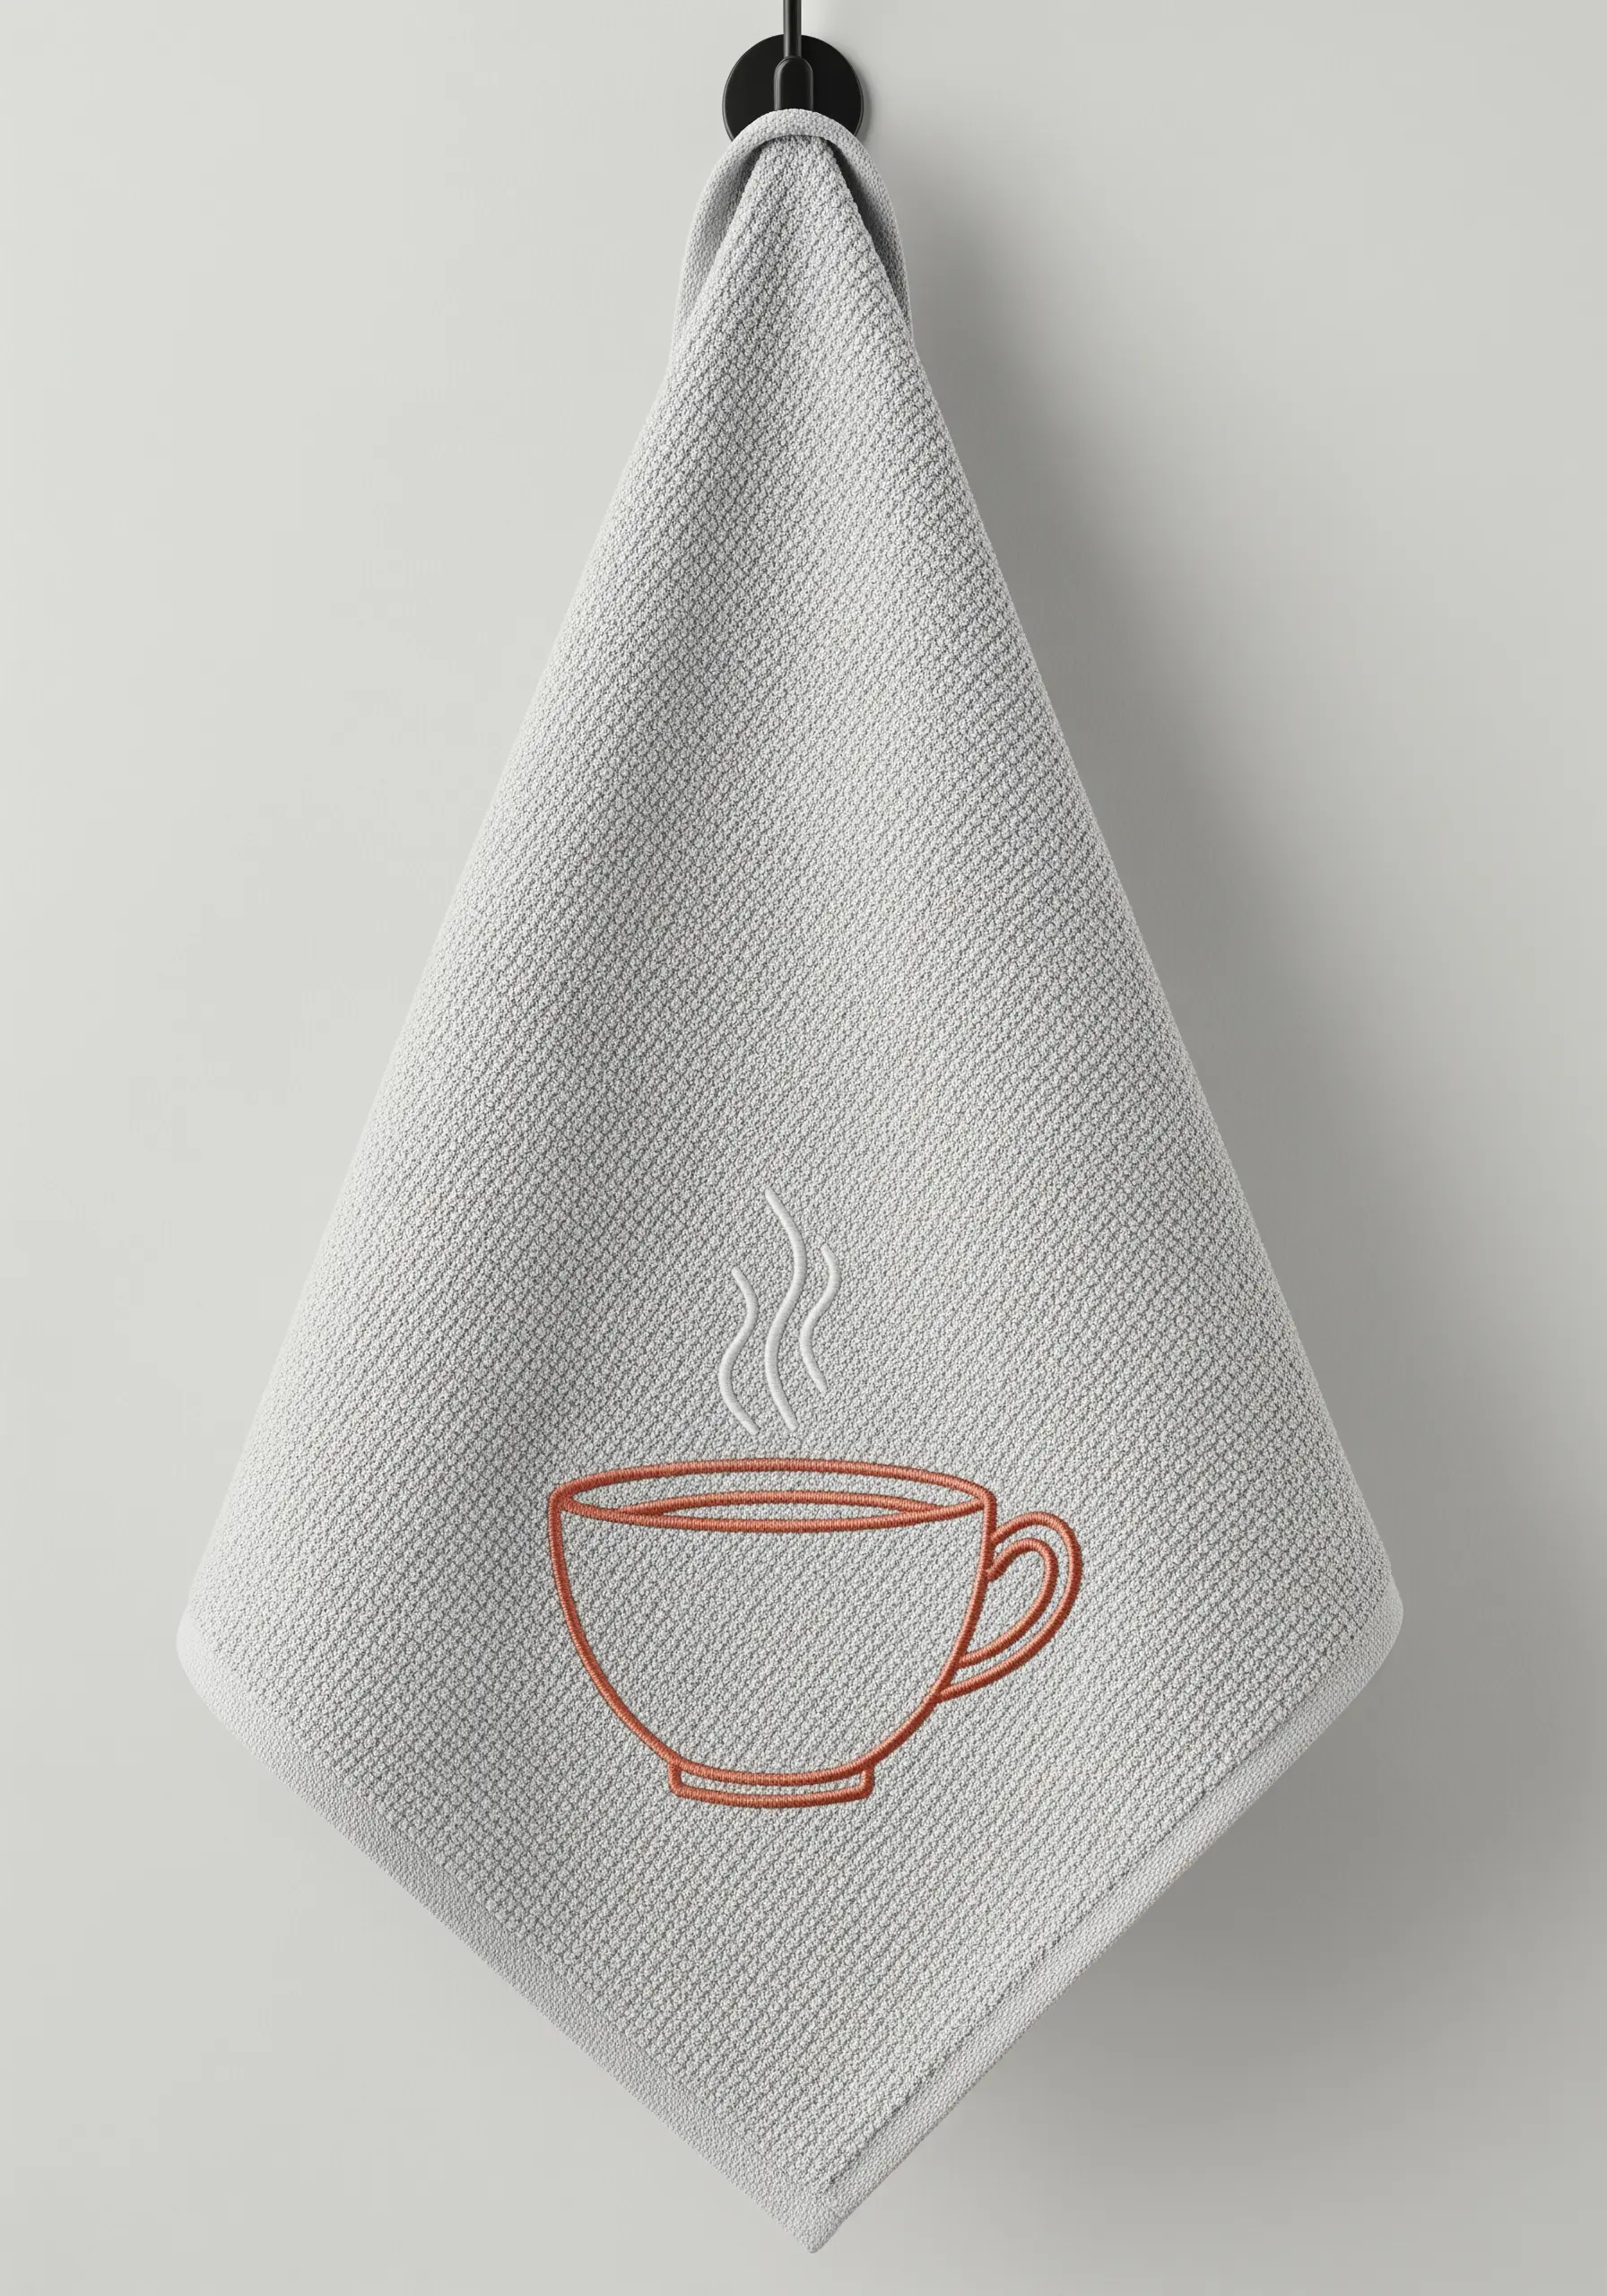
Stitching on textured fabrics like waffle-weave towels requires a technique that prevents your work from disappearing into the divots.
Use a water-soluble stabilizer on top of the fabric. This provides a smooth surface to stitch on, ensuring your lines are even.
Choose a heavier outline stitch, like a stem stitch or chain stitch, using four to six strands of floss. This gives the line enough body to sit proudly on the surface after the stabilizer is washed away.
10. Create a Sense of Whimsy and Movement

Bring a dandelion motif to life by stitching the seeds as if they are floating away.
Embroider the main flowerhead on one sock, then scatter a few detached seed stitches onto the matching sock.
This creates a playful, narrative connection between the two items, turning a simple pair of socks into a thoughtful, cohesive set.
Use detached chain stitches and straight stitches for a light, airy effect.
11. Perfect the Continuous Line Portrait
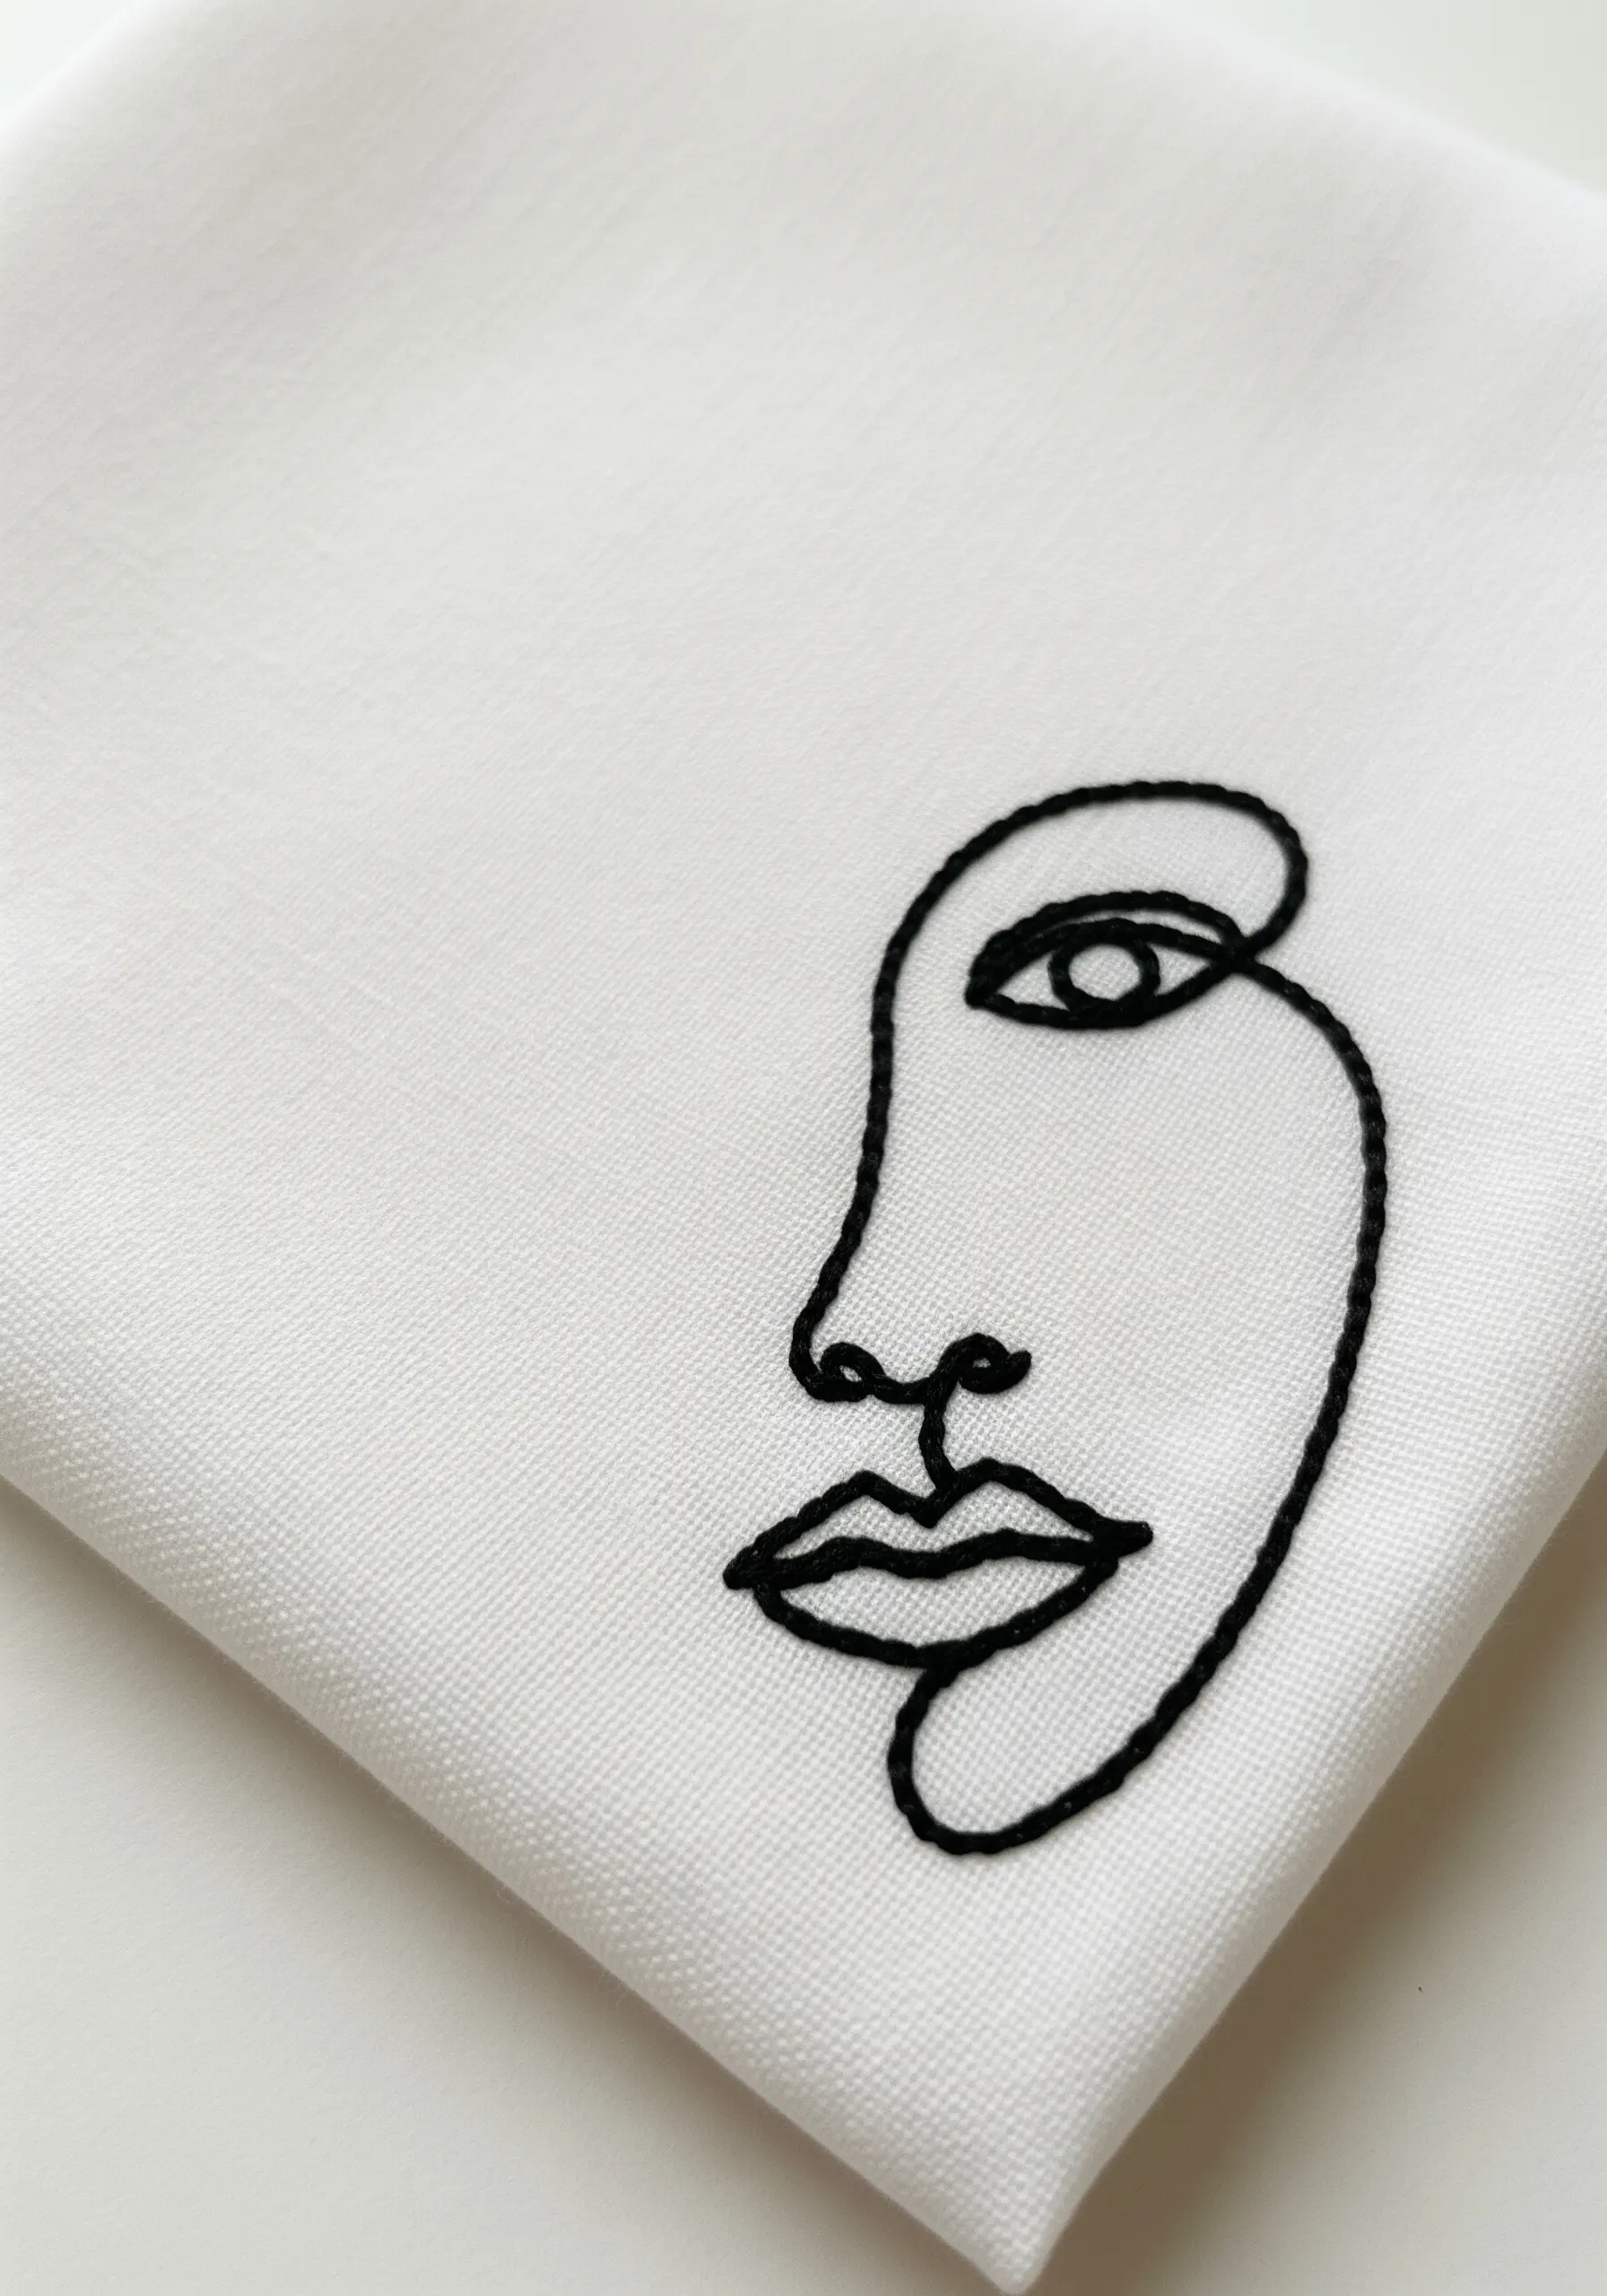
The power of a single-line design lies in its fluid, unbroken feel. To achieve this, your stitch choice is critical.
Use a whipped backstitch. First, lay down a standard backstitch along your design line. Then, without piercing the fabric again, weave your needle under each backstitch.
This covers the segmented look of a backstitch, creating a single, smooth, and continuous line that gives your artwork a polished, calligraphic quality.
12. Fill Geometric Shapes with Precision
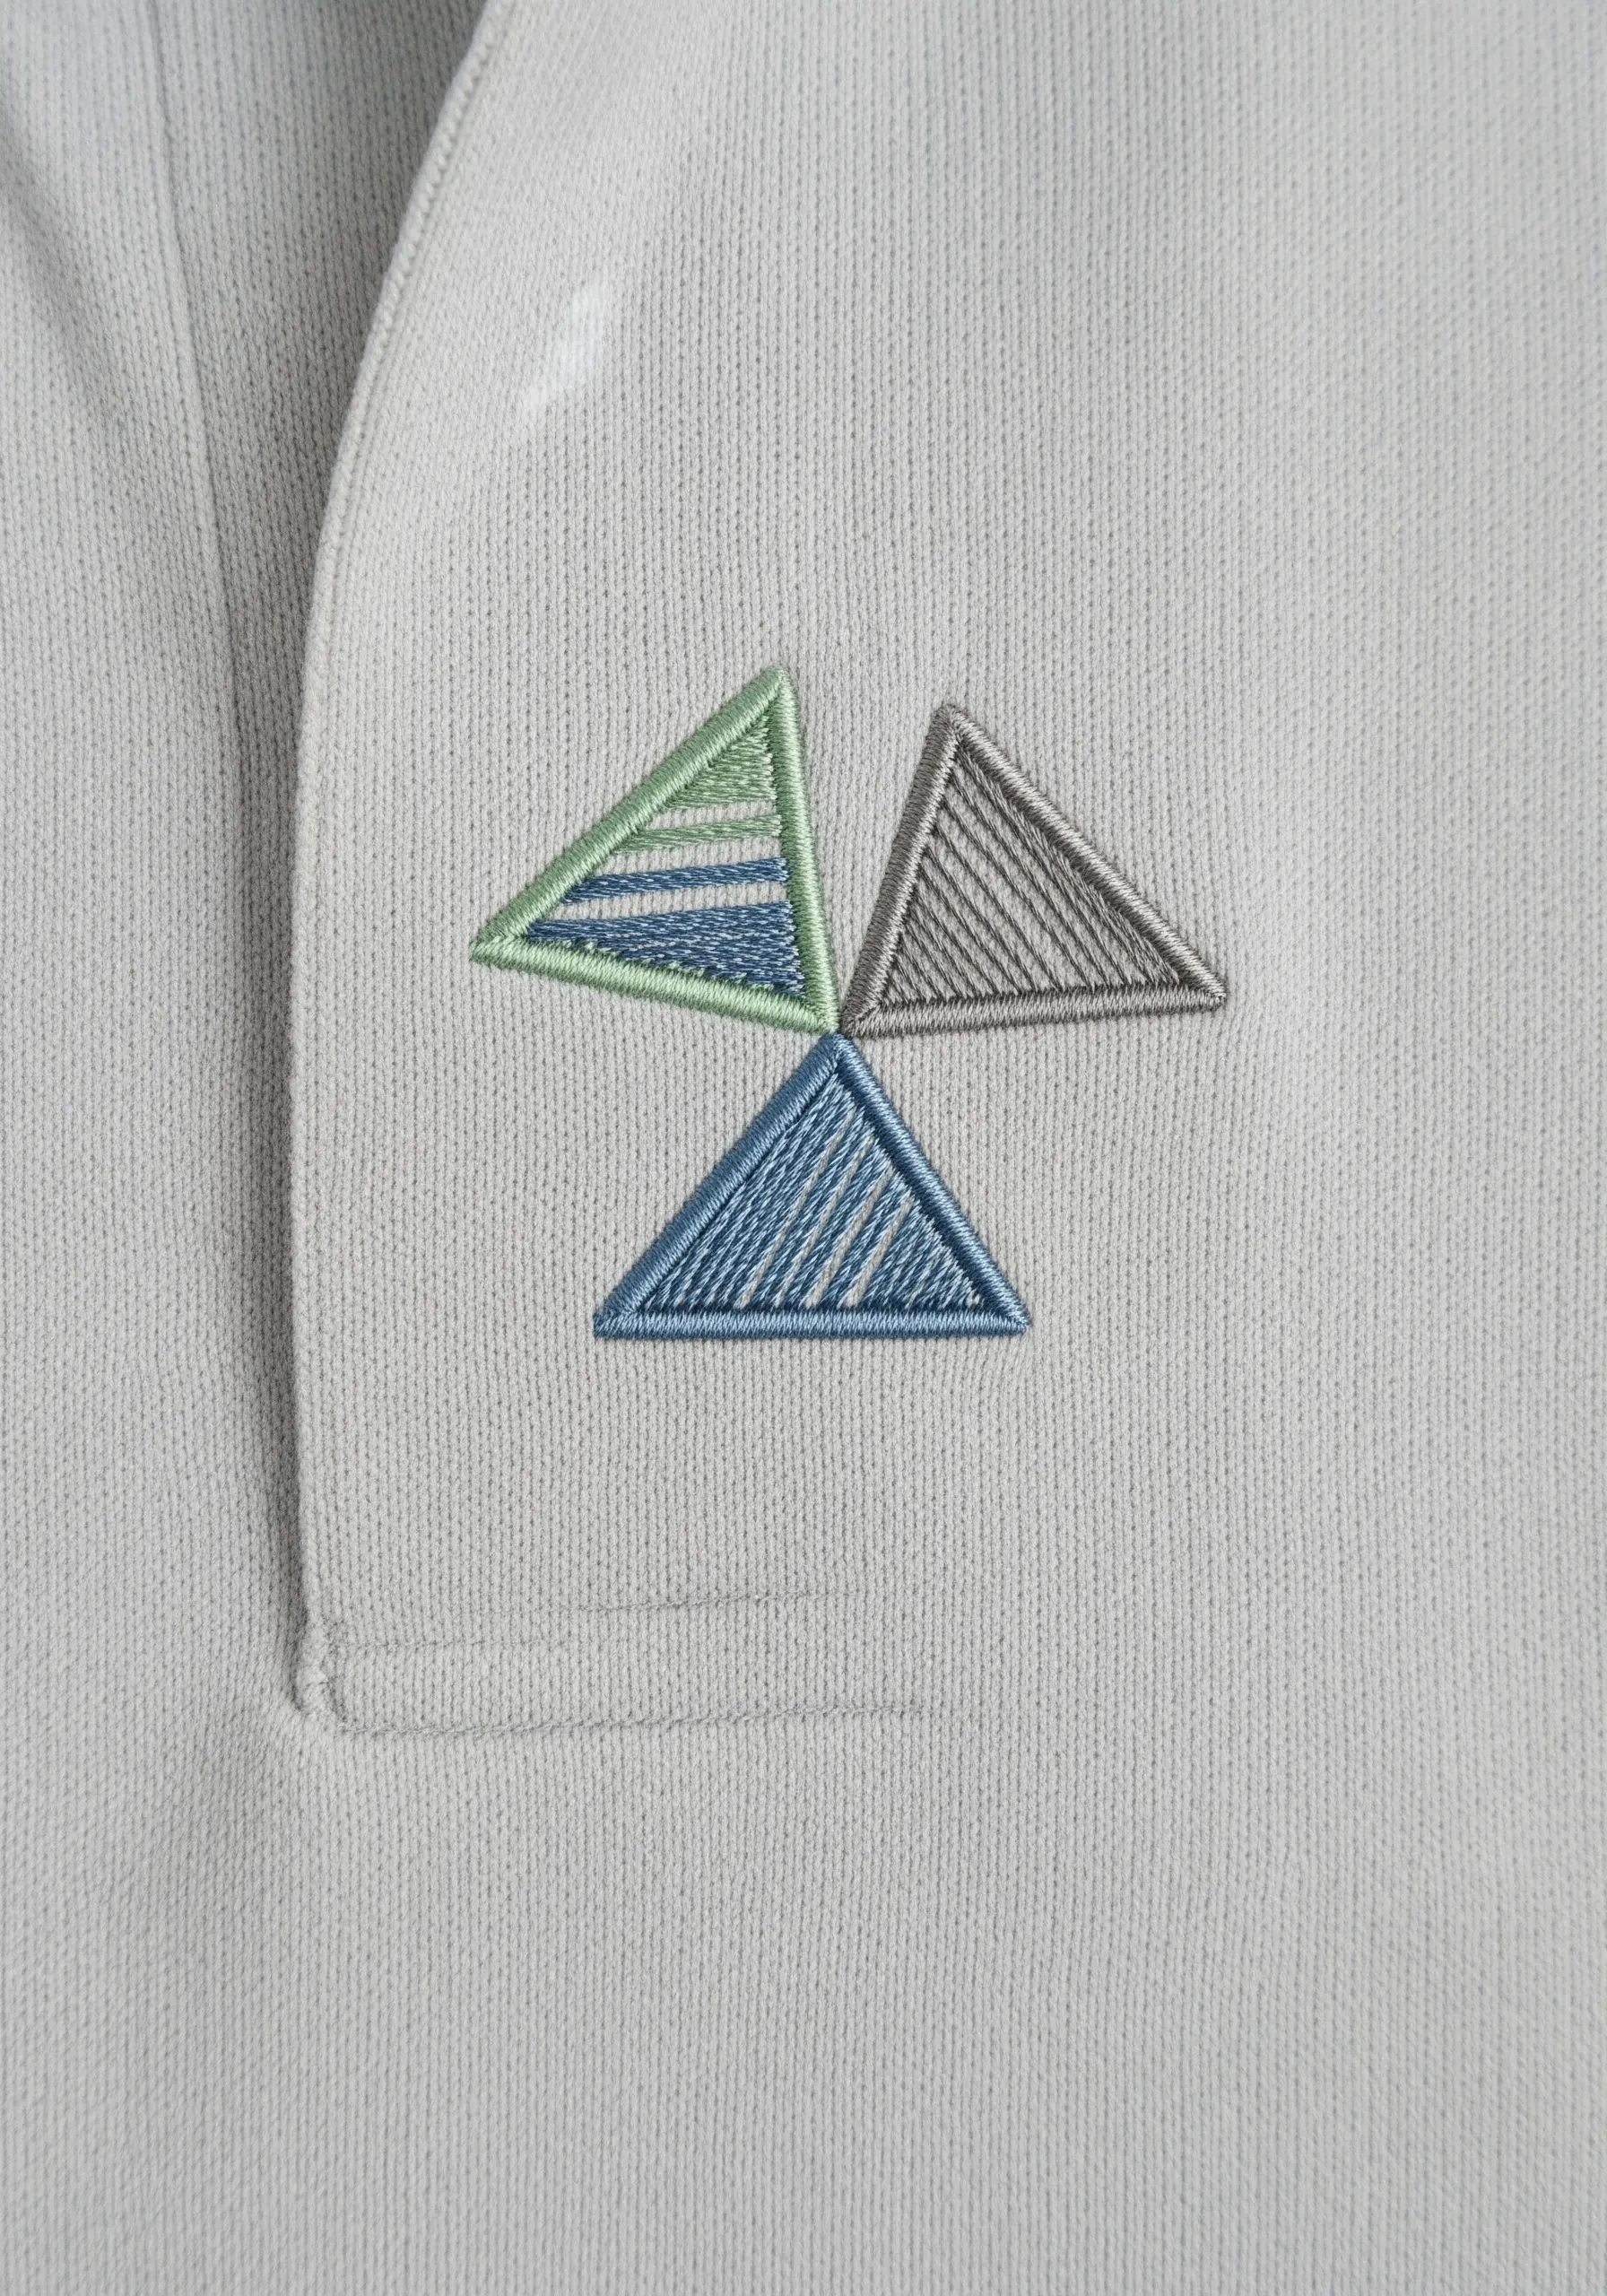
To achieve a clean, modern look with geometric fills, focus on stitch direction and tension.
Use a satin stitch or a long-and-short stitch to fill each shape. The key is to keep all stitches within a single triangle parallel to one of its sides.
Alternating the stitch direction in adjacent shapes creates a subtle light-shifting effect that adds depth and sophistication to the design.
Use a stabilizer on knit fabrics to prevent the fill stitches from pulling or warping the collar.
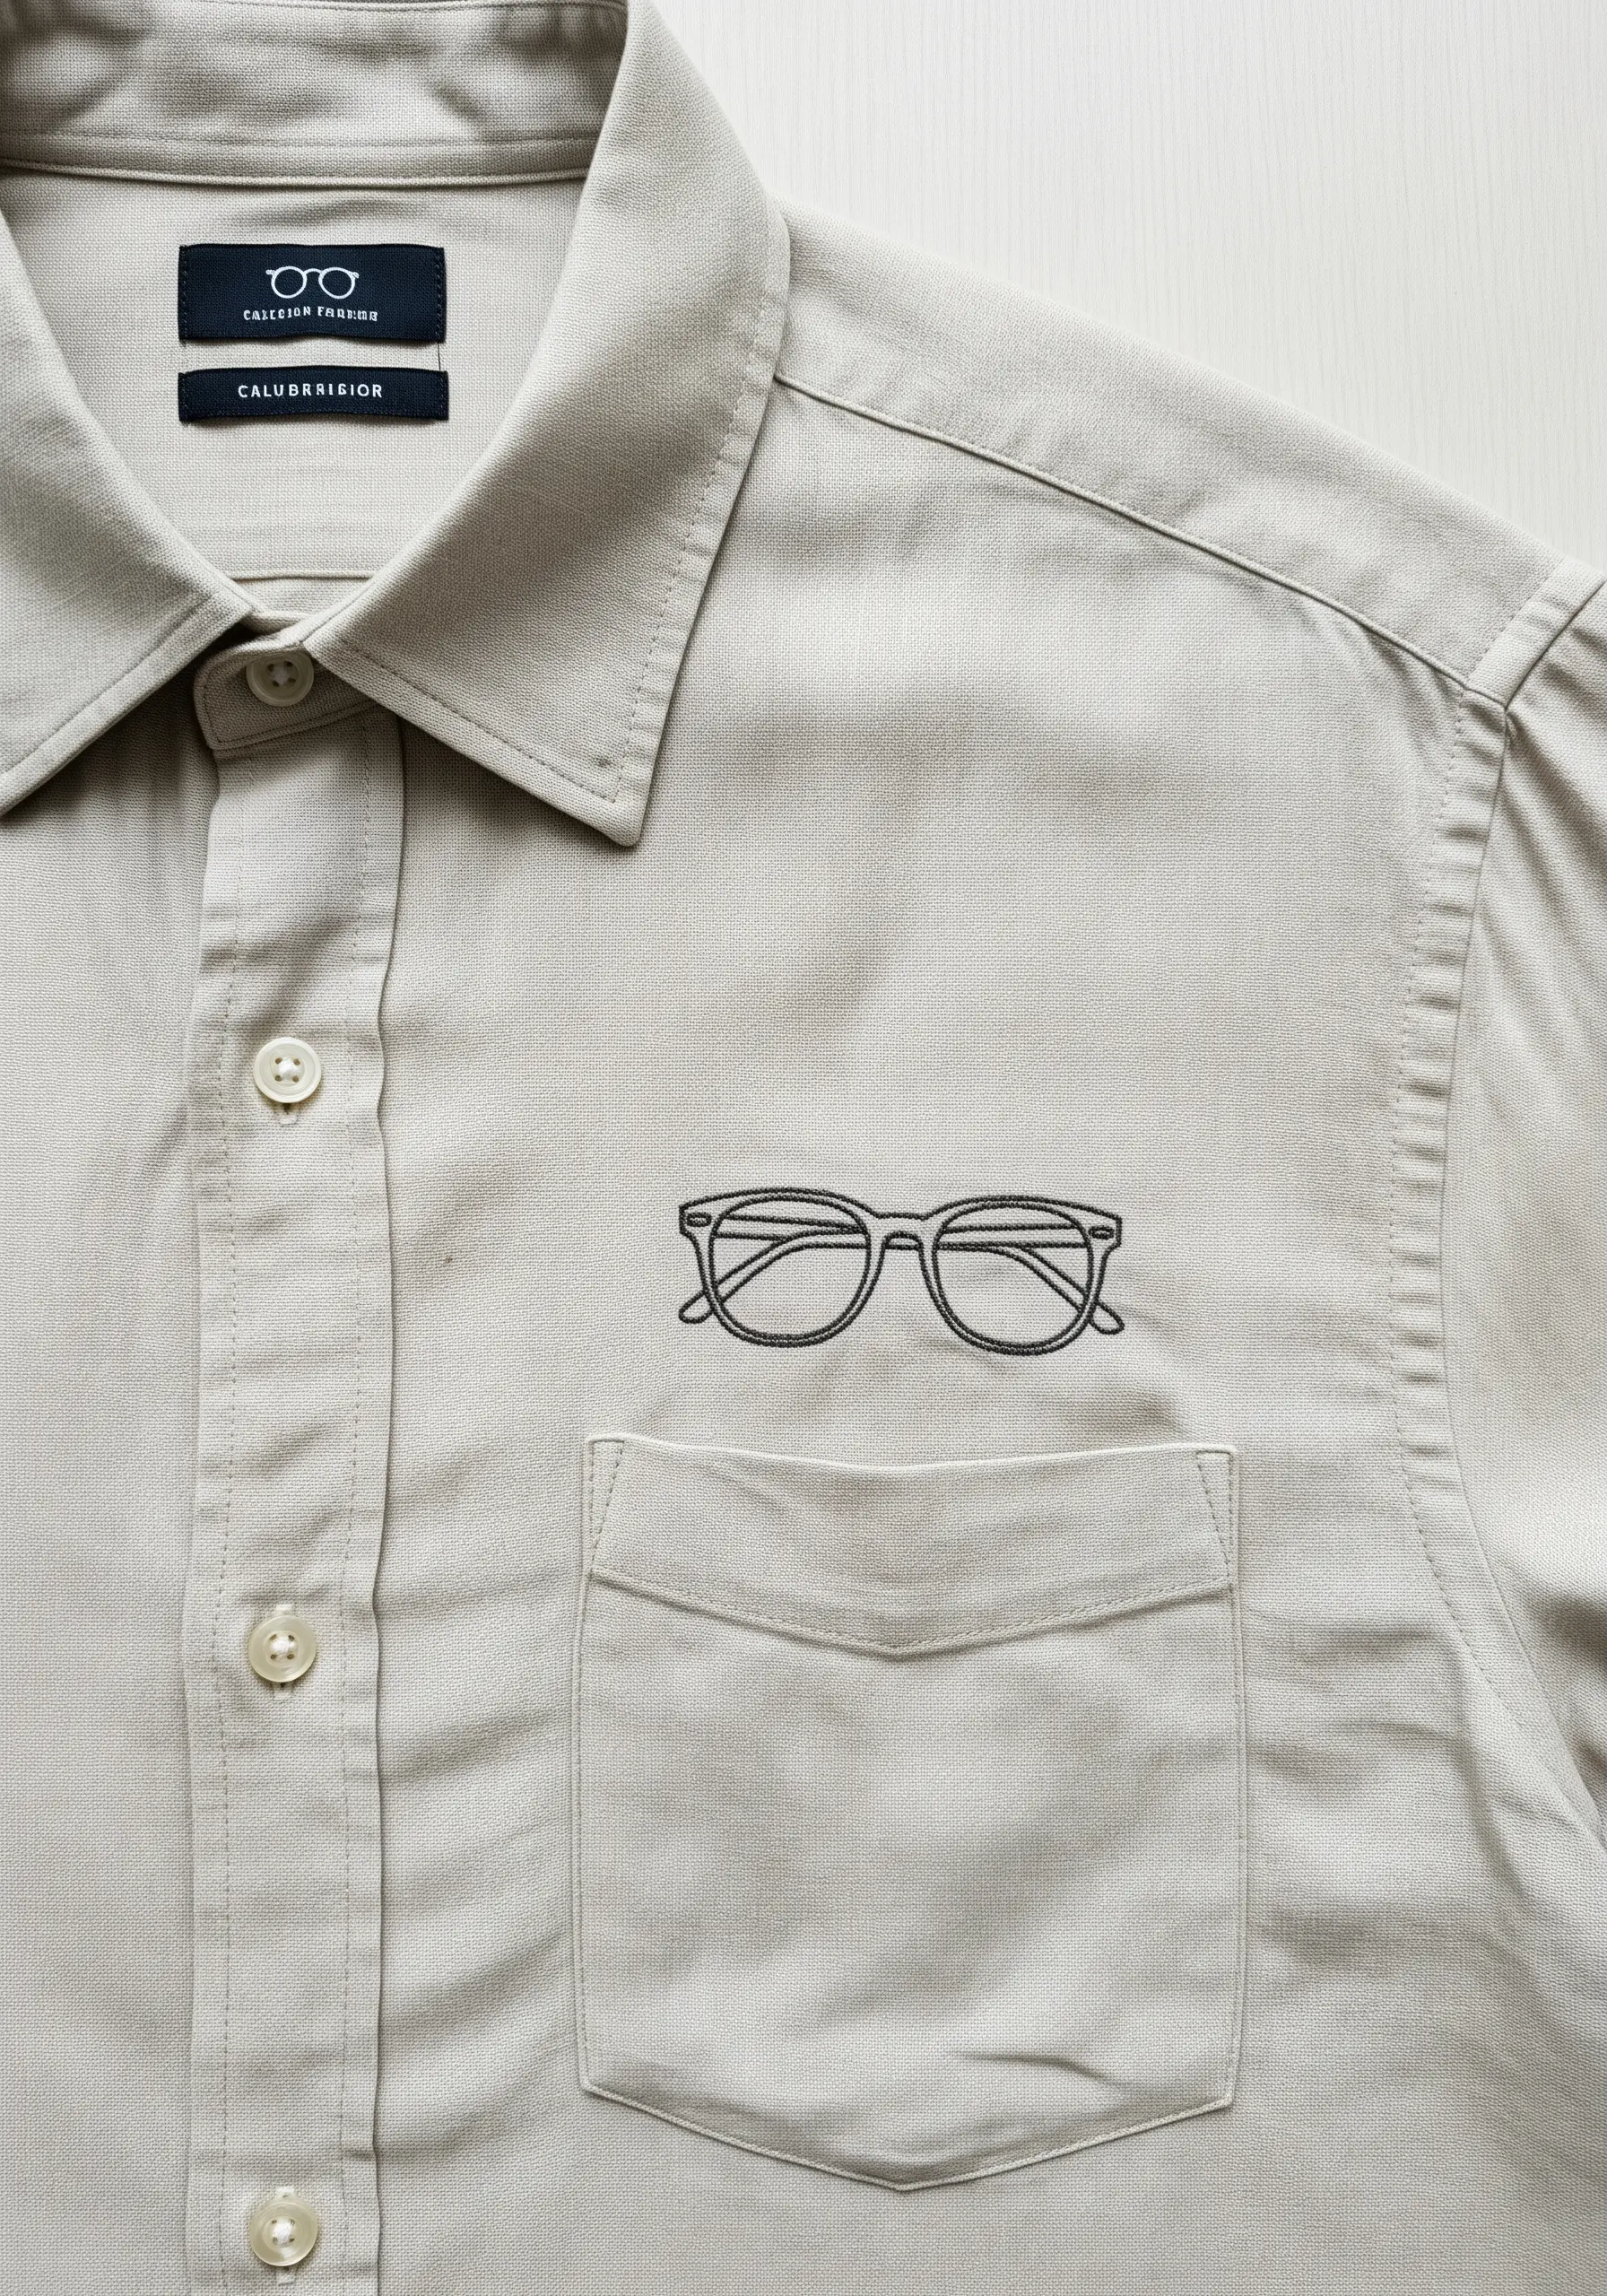
13. Create Crisp Lines on a Denim Pocket

Make a simple outline pop on a textured background like denim by focusing on thread choice and stitch execution.
Use a bright white thread to create high contrast against the blue fabric. A sharp needle is essential for piercing the dense weave cleanly.
Execute the design with a precise backstitch or split stitch, using three strands of floss. This gives the line enough weight to be seen without appearing bulky, resulting in a clean, graphic statement.
14. Achieve a Lush, Realistic Fern

Building a complex botanical like a fern is easier when you break it down into simple, repetitive stitches.
First, create the central stem using a stem stitch for a sturdy, rounded spine.
Then, work the individual fronds on either side with single, angled straight stitches or tiny fishbone stitches. Keep the stitches small and tightly packed to create a dense, lush texture.
This methodical approach transforms a series of simple stitches into a beautifully detailed piece of botanical art.
15. Master the Gradient Fill Stitch
For a smooth, professional-looking fill that mimics the sheen of silk, use a directional long-and-short stitch.
Instead of stitching in straight lines, angle your stitches to follow the natural curves of the leaf. Split your new stitches into the ones from the previous row to seamlessly blend them together.
This technique eliminates harsh lines and creates a subtle, elegant gradient, giving the object a lustrous, almost painted appearance.
16. Build Texture with a Modern Rainbow

Move beyond a simple satin stitch rainbow by assigning a different textural stitch to each colored arch.
Use a chunky chain stitch for the outer arch, a smooth stem stitch for the next, a knotted stitch like French knots for another, and so on.
This approach turns a simple shape into a tactile exploration of stitches and textures. Pairing it with a muted, earthy color palette gives the classic motif a contemporary, sophisticated feel.
These contemporary rainbow blend stitches offer a modern update to a classic design.
17. Create a Raised Appliqué Effect
Give your small motifs a clean, raised edge that makes them look like a polished patch.
First, outline the entire shape using a split stitch. Then, fill the interior with a dense satin stitch, ensuring your needle goes just over the outside of the split-stitch border.
This technique, called a padded satin stitch, contains the fill stitches for a perfectly sharp edge and gives the motif a subtle, three-dimensional lift from the fabric surface.
18. Craft a Simple, Personalized Bookmark
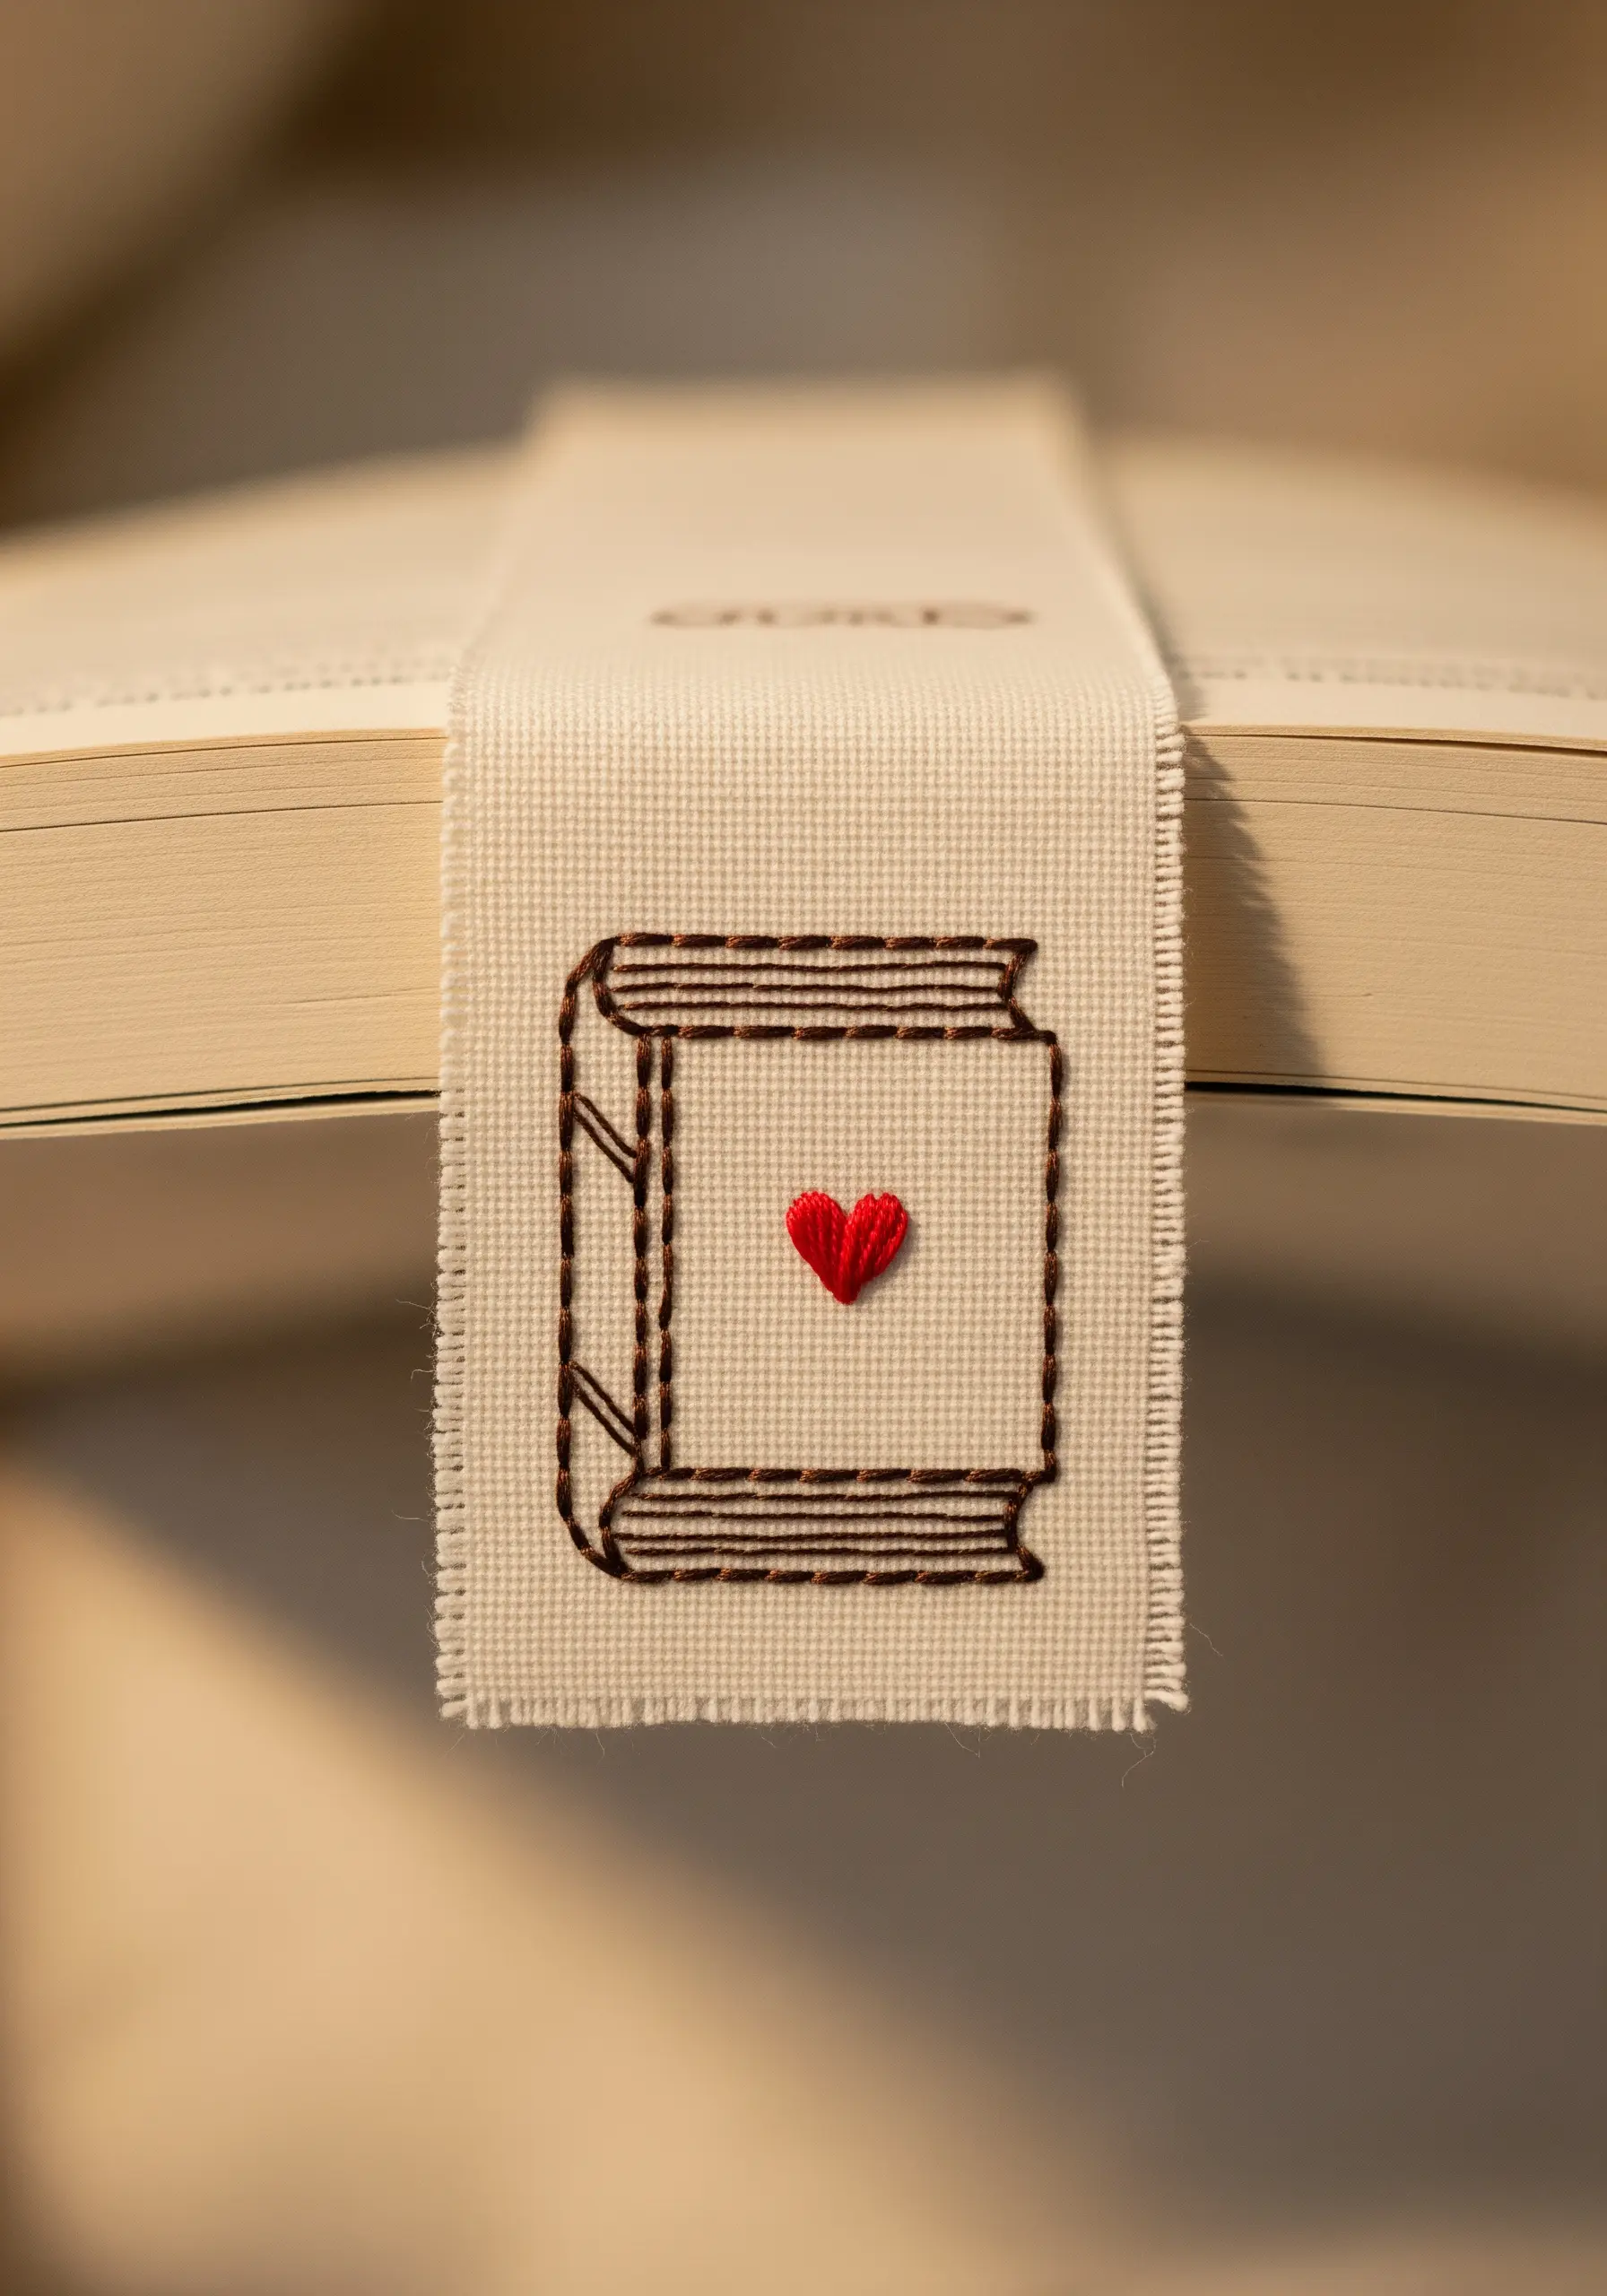
For a quick and meaningful project, embroider a simple motif onto a strip of Aida cloth or even-weave linen.
Use a basic backstitch for clean lines, and add a single pop of color with a small satin-stitched heart.
To finish, simply trim the fabric, leaving a small border, and use a fray-check solution on the edges to prevent unraveling. It’s a thoughtful gift that requires minimal finishing.
19. Map a Minimalist Constellation
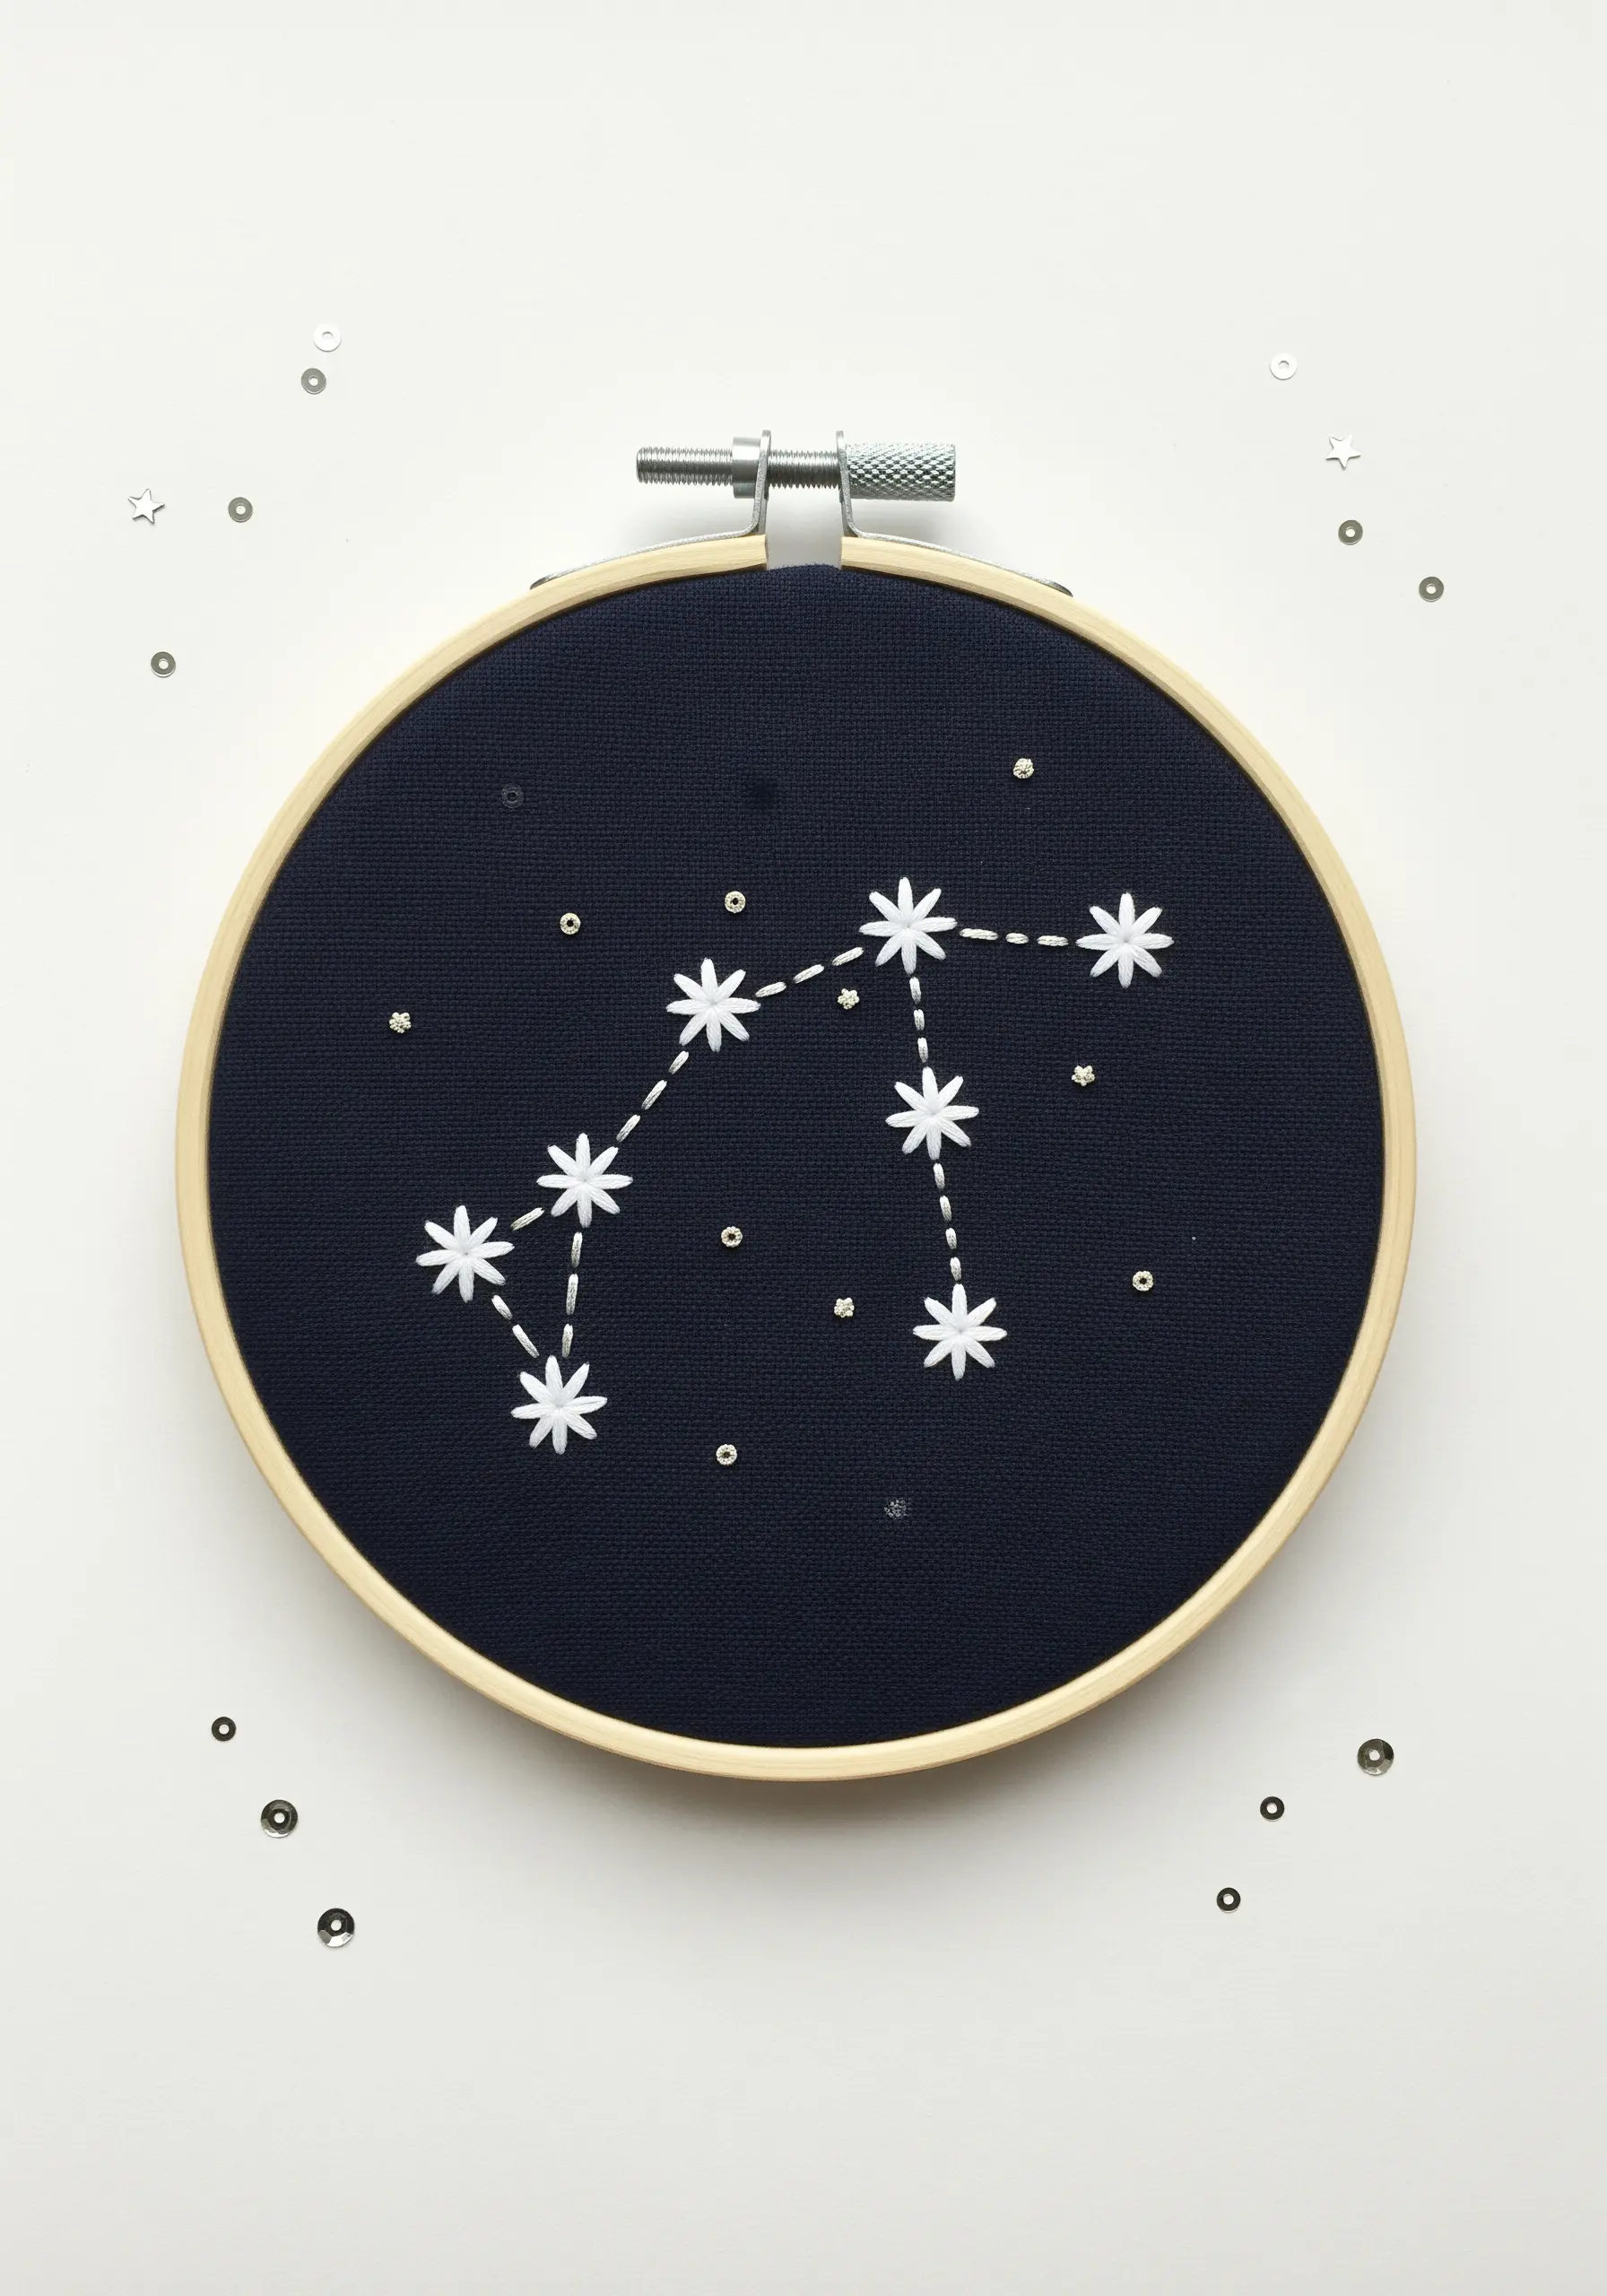
Create a sophisticated celestial design by focusing on clean lines and varied star sizes.
Use a fine metallic thread for the connecting lines to add a subtle shimmer, stitched with a simple backstitch.
For the stars, don’t just use one stitch. Vary their appearance by using a combination of small French knots and single straight stitches arranged in starburst shapes. This adds visual texture and makes the constellation feel more dynamic.
20. Integrate Embroidery on Patterned Fabric
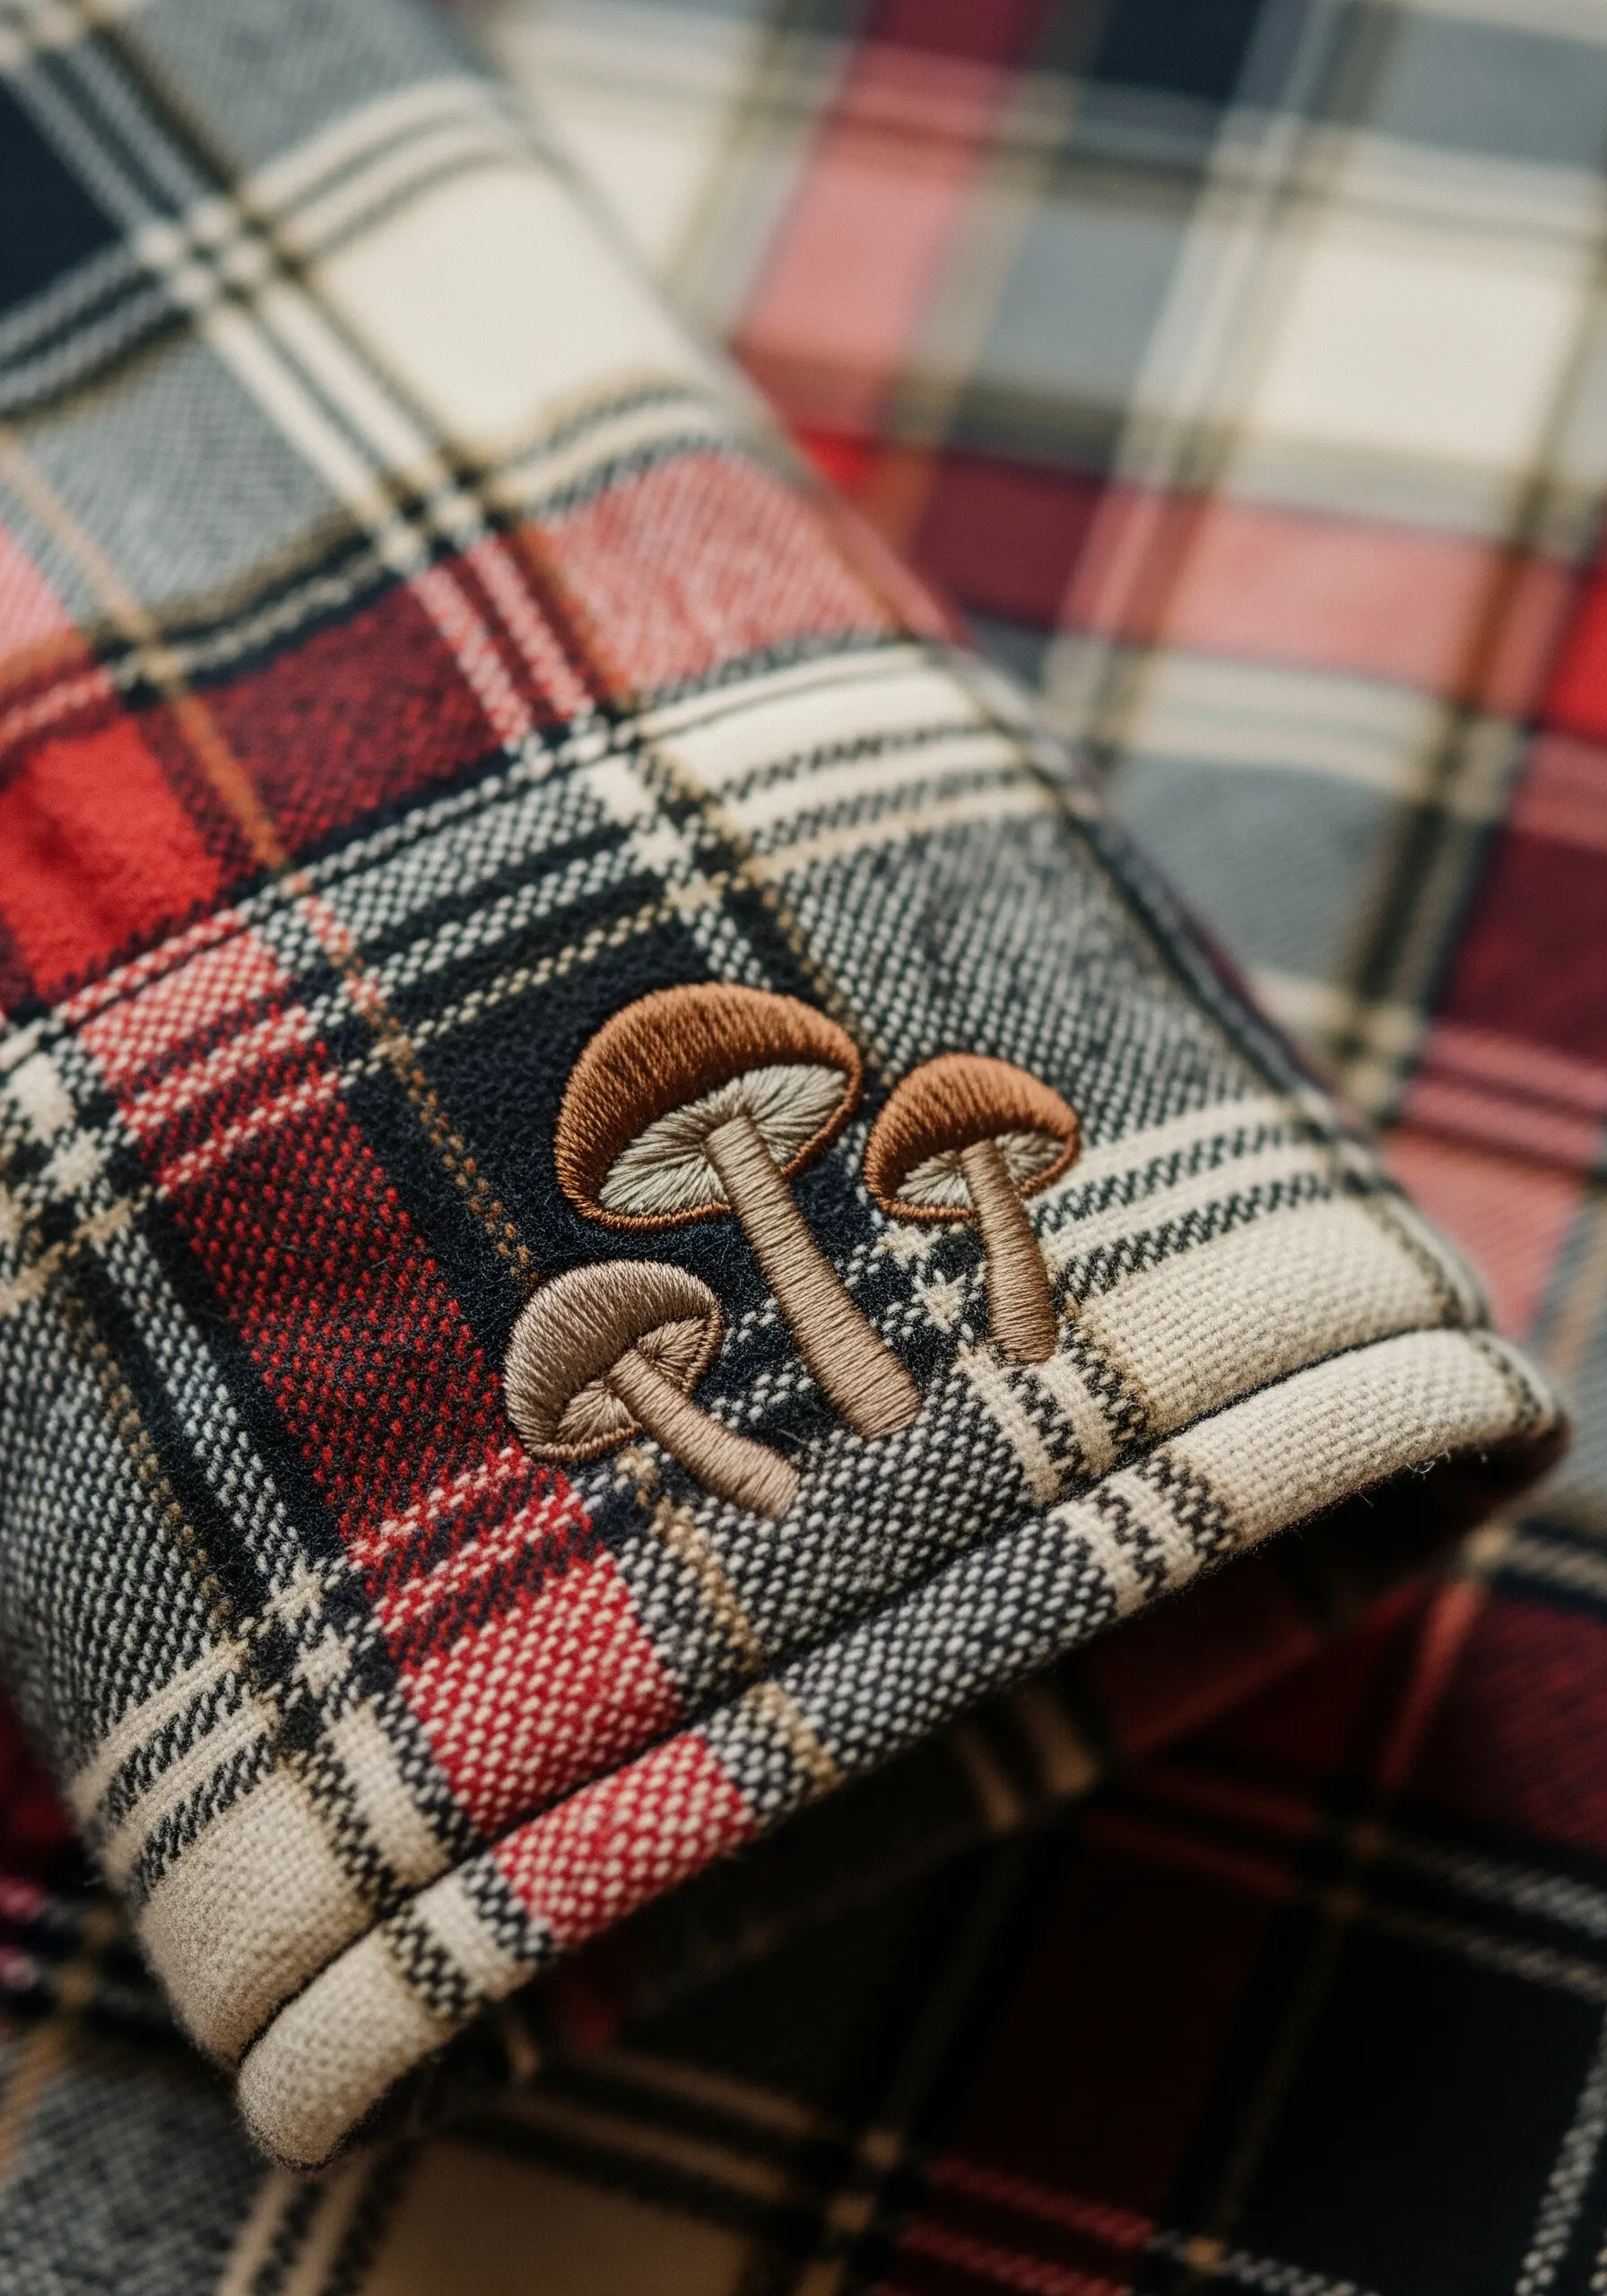
Stitching on a busy pattern like plaid can be challenging, but the key is to create contrast.
Choose a simple, solid motif like these mushrooms, and select thread colors that are either much lighter or much darker than the fabric’s dominant colors.
Use a padded satin stitch to give the motif dimension, helping it to visually separate from the background pattern. A stabilizer is essential to prevent the fabric’s weave from distorting your work.
21. Add Sparkle and Texture to a Fruit Slice
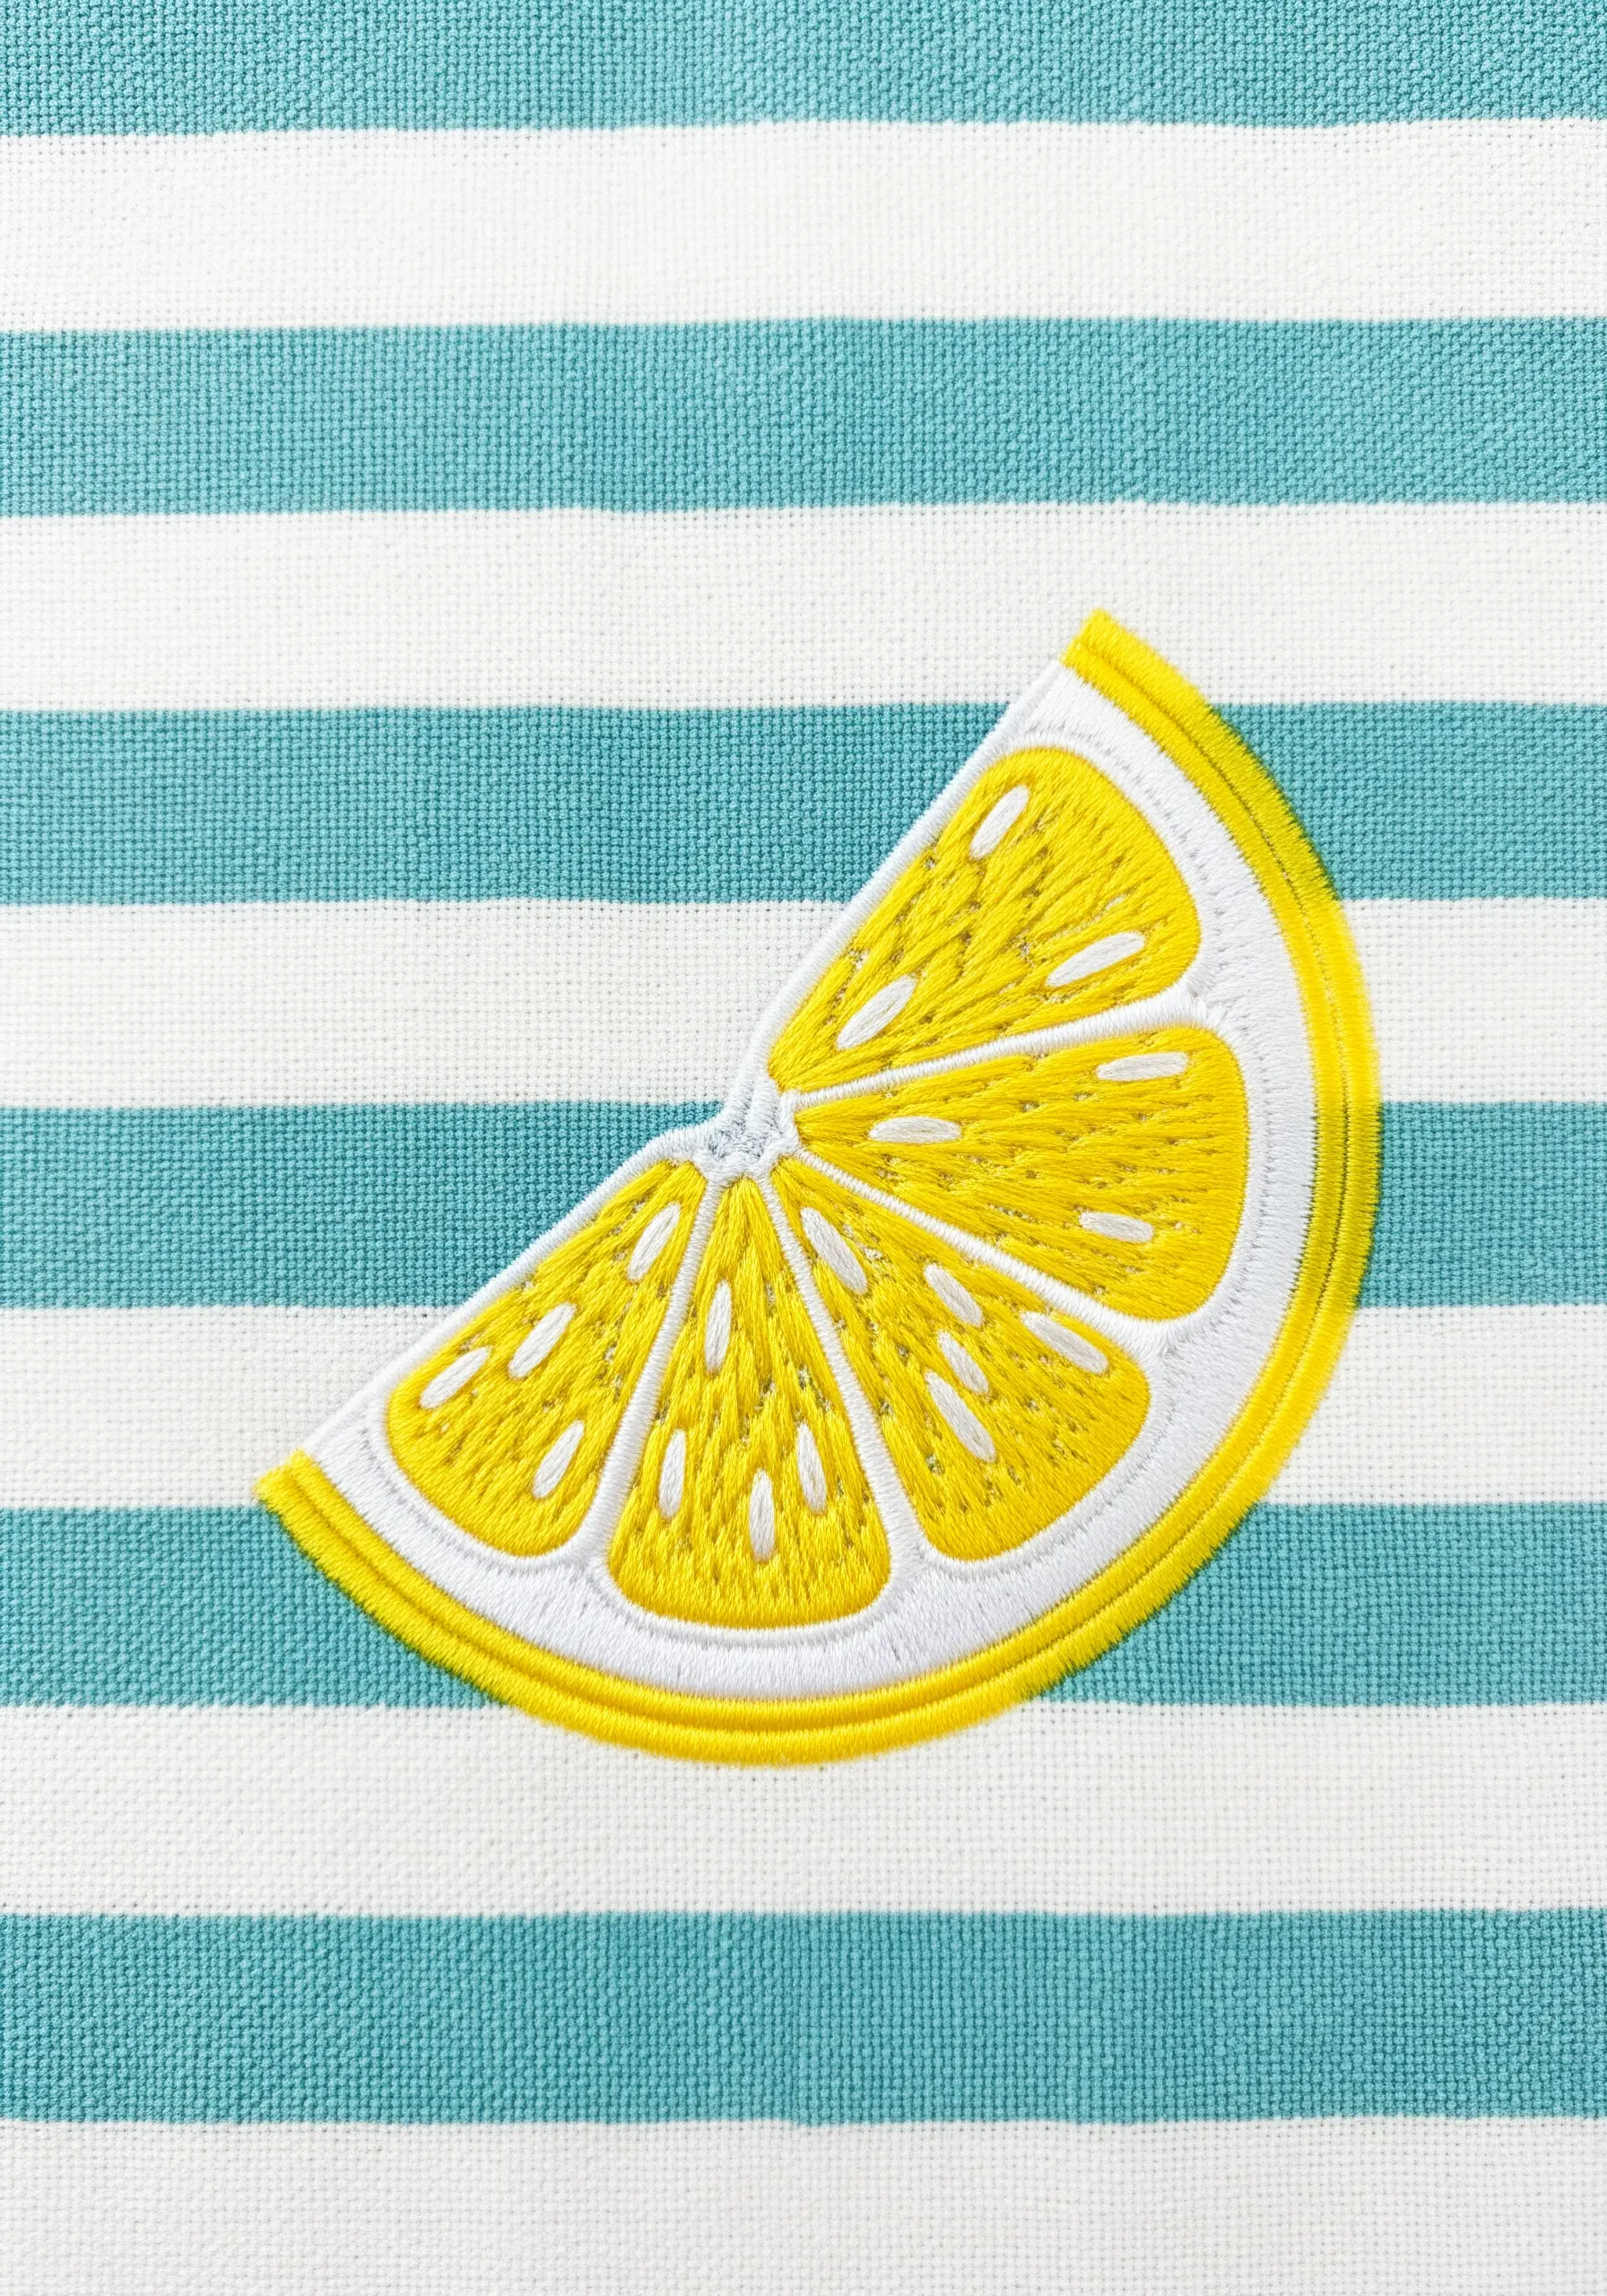
To make a fruit motif look fresh and juicy, incorporate subtle texture and light.
Fill the segments with a directional satin stitch, radiating from the center. Then, scatter tiny white seed stitches or French knots over the top.
This small addition breaks up the solid color, mimicking the texture of pulp and the way light reflects off a juicy surface. It’s a simple step that adds a surprising amount of realism.
22. Achieve a Flawless Graphic Silhouette

For a clean, bold silhouette on an item like a baseball cap, the goal is a smooth, uninterrupted line.
Use all six strands of your embroidery floss to give the design weight. Opt for a split stitch or a stem stitch instead of a backstitch.
These stitches create a more continuous, rope-like line that is perfect for graphic designs, ensuring the final result looks solid and intentional, not segmented.
23. Create a Raised Wave Motif
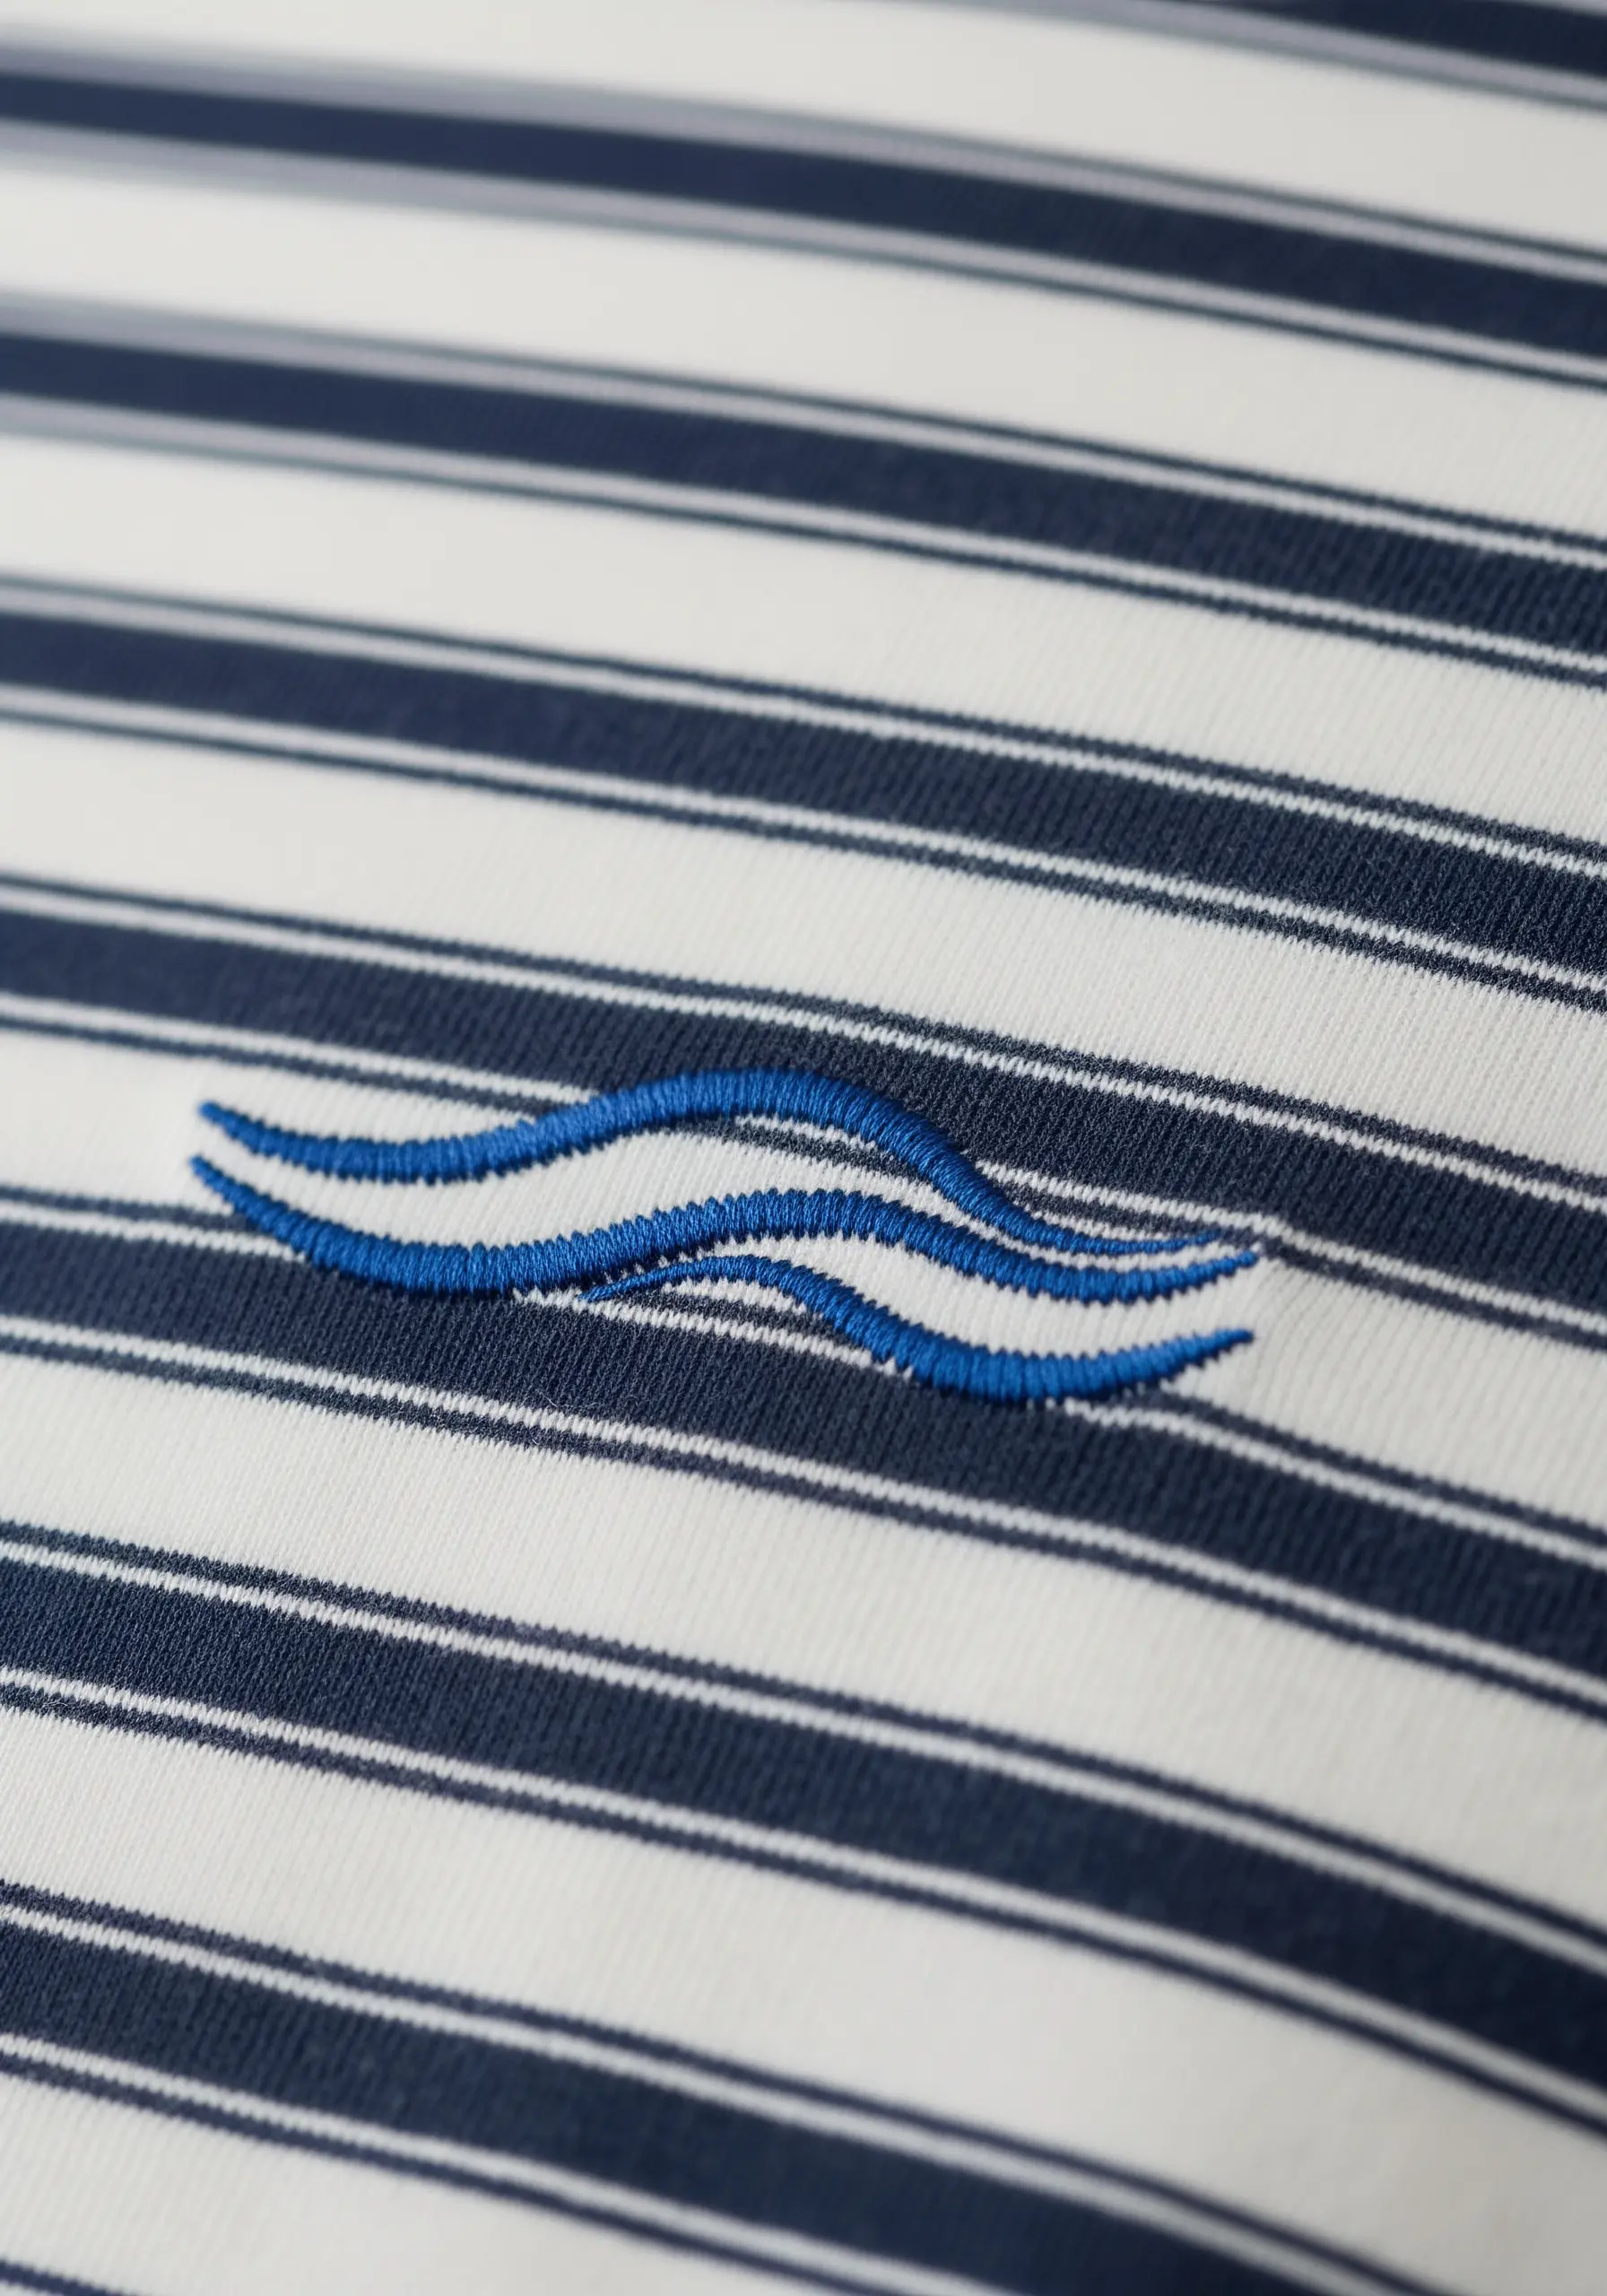
Make an embroidered element stand out on a patterned background by giving it physical dimension.
Use a padded satin stitch. First, fill the wave shapes with a foundation of horizontal straight stitches. Then, cover this padding with your final satin stitches, worked vertically.
This technique lifts the motif off the surface of the fabric, creating shadows and ensuring the blue waves don’t get visually lost in the navy stripes.
24. Stitch a Tiny, Tactile Cactus
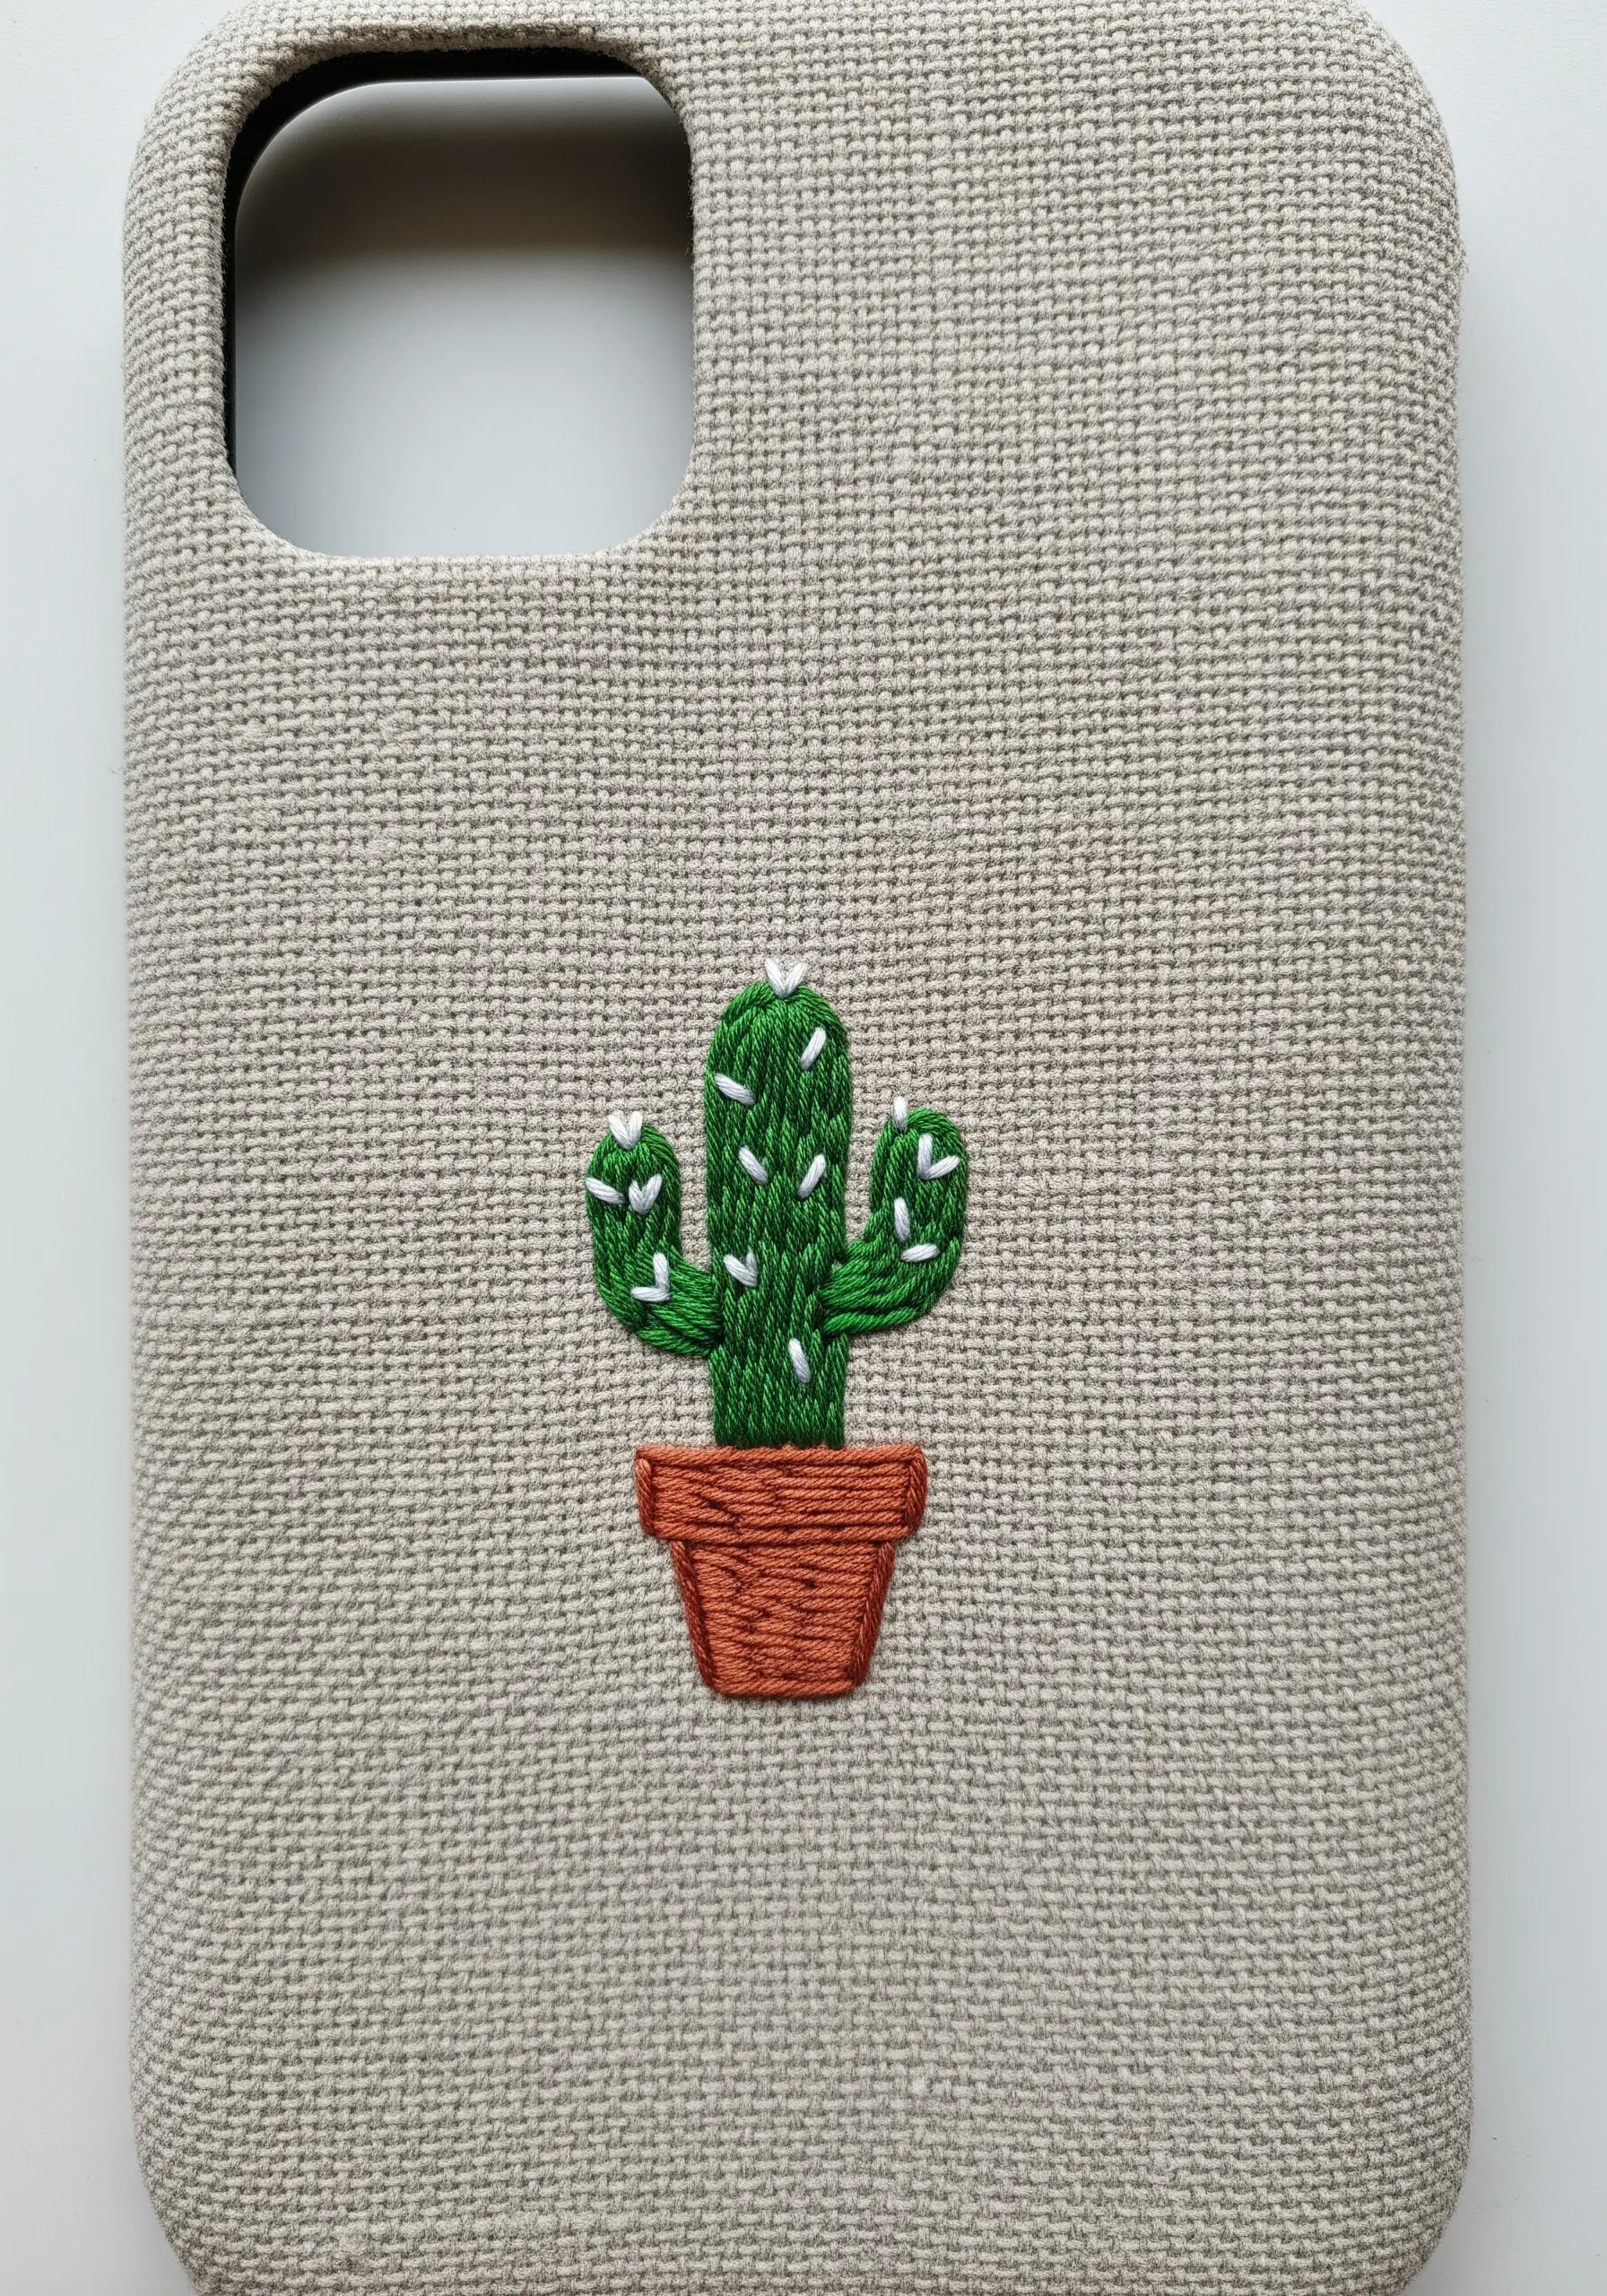
Even in a very small design, you can create a satisfying textural contrast.
Fill the pot with a horizontal satin stitch and the cactus body with a vertical satin stitch. This simple change in direction defines the two separate parts of the motif.
For the spines, use tiny, V-shaped straight stitches in a contrasting white thread. This adds a sharp, prickly texture that makes the simple design more engaging and tactile.
25. Embrace Simplicity on Felt
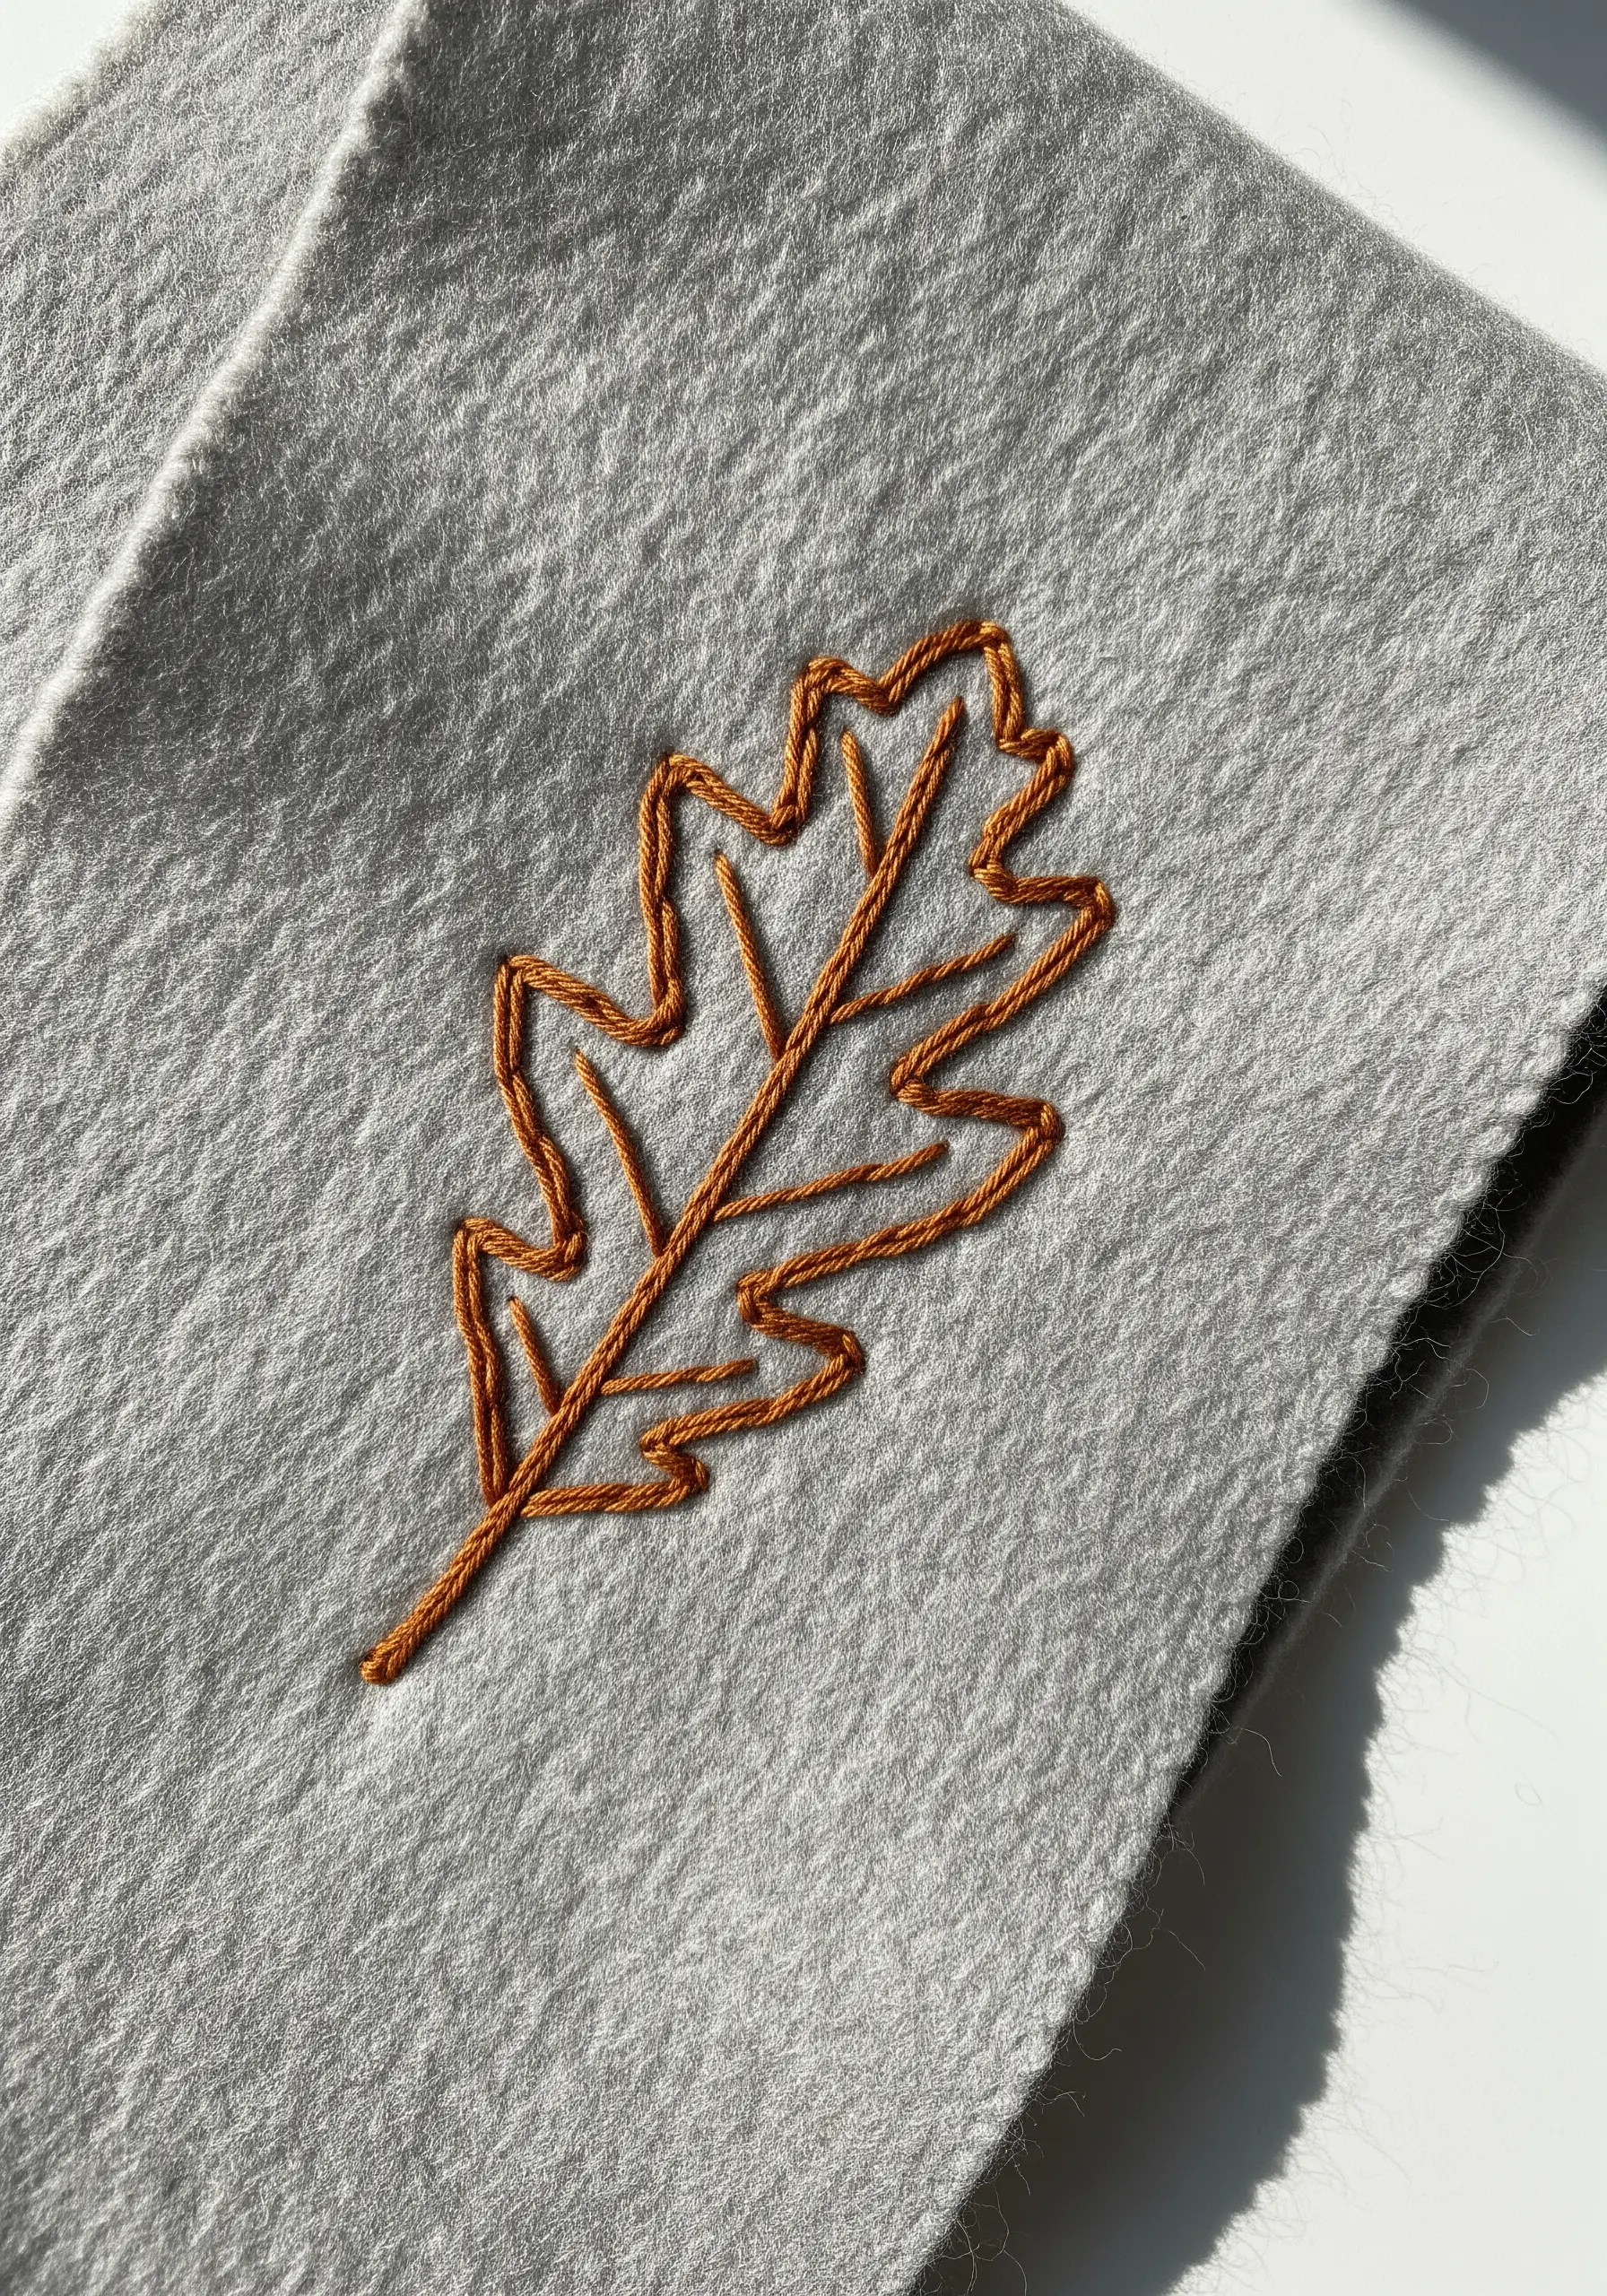
Felt is an ideal fabric for beginners because its matted fibers don’t fray and provide a stable, forgiving surface.
You don’t need complex stitches here. A simple backstitch or stem stitch is all that’s required to create a clean, elegant outline.
The beauty of this project comes from the contrast between the smooth, crisp lines of the thread and the soft, matte texture of the felt itself.
26. Perfect the Solid-Fill Silhouette

To achieve a perfectly crisp and opaque silhouette, preparation is everything.
Begin by outlining the entire shape with a neat split stitch. This creates a slightly raised ‘wall’ for your fill stitches.
Next, fill the shape with a dense satin stitch, ensuring your stitches are parallel and completely cover the fabric. The split stitch outline will contain your fill, resulting in a flawless edge that looks sharp and professional.
This creates a stunning effect for embroidery pillow ideas.
27. Design a Delicate Scattered Floral Pattern
Turn simple French knots into a sophisticated floral field with intentional placement.
Stitch tiny stems of varying heights and angles using a single backstitch. Then, top each stem with a cluster of two or three French knots in soft, complementary colors.
The key to a natural, balanced look is asymmetry. Avoid placing the flowers in straight lines or even clusters. This creates a gentle, organic rhythm across the fabric surface.
28. Execute a Precise Line-Art Illustration
For designs with fine, intricate details like these glasses, precision is paramount.
Switch to a smaller needle (size 9 or 10) and use only a single strand of embroidery floss. This allows you to create sharp corners and smooth curves without the thread appearing bulky.
Use a tiny backstitch, keeping your stitch length consistent. This meticulous approach is what gives delicate line art its crisp, professional, and almost-drawn appearance.
29. Create Sculptural Berries with Woven Wheels

For a highly textured, three-dimensional effect, build your shapes with woven wheel stitches (or bullion knots).
First, create a small star of five straight stitches. Then, weave your thread over and under these spokes until the shape is filled, creating a raised, round ‘berry’.
Clustering these stitches together produces a wonderfully tactile, almost sculptural bunch of grapes that invites touch. This is a perfect technique for adding focal texture to embroidery projects inspired by textures.
30. Add Texture with a Cross-Hatched Fill
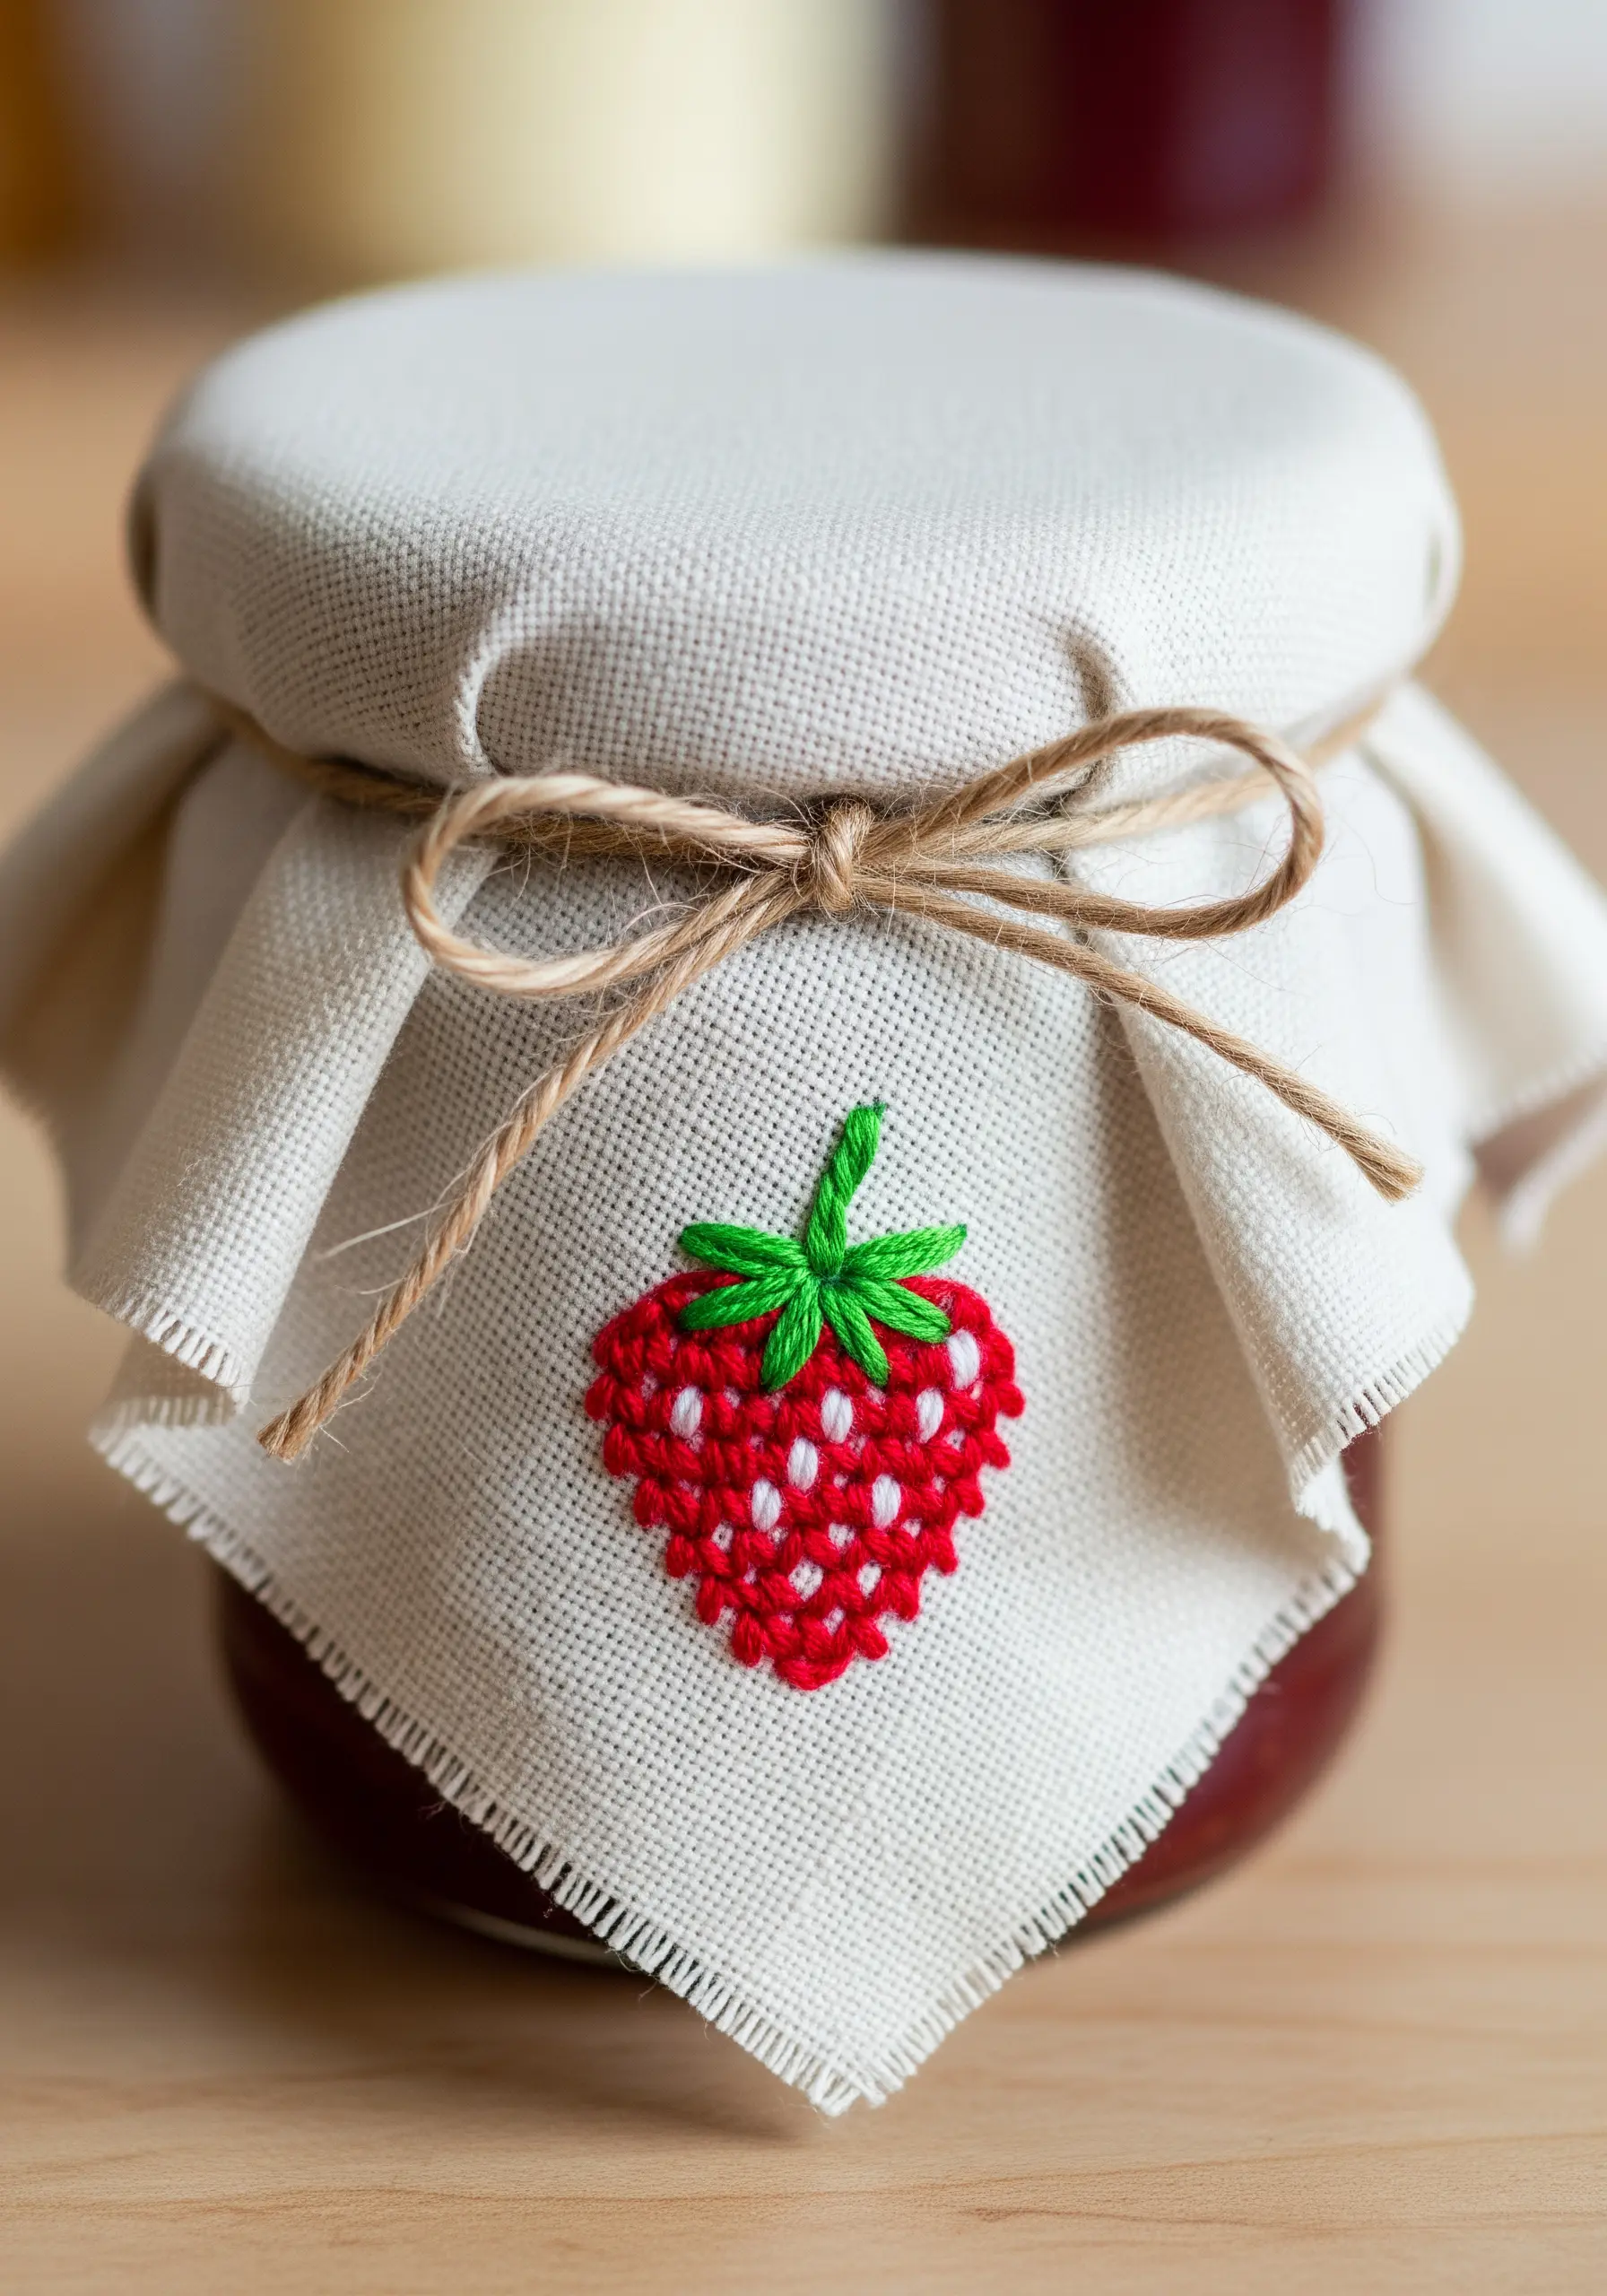
Instead of a standard satin stitch, give your fruit motifs a more rustic, graphic texture with a cross-hatched fill.
First, fill the strawberry shape with evenly spaced, diagonal straight stitches. Then, add another layer of diagonal stitches going in the opposite direction to create a grid.
This technique, often called trellis stitch, adds visual interest and texture, making the motif feel more hand-drawn and unique. Add white seed stitches on top to complete the effect.
31. Achieve an Elegant Monogram
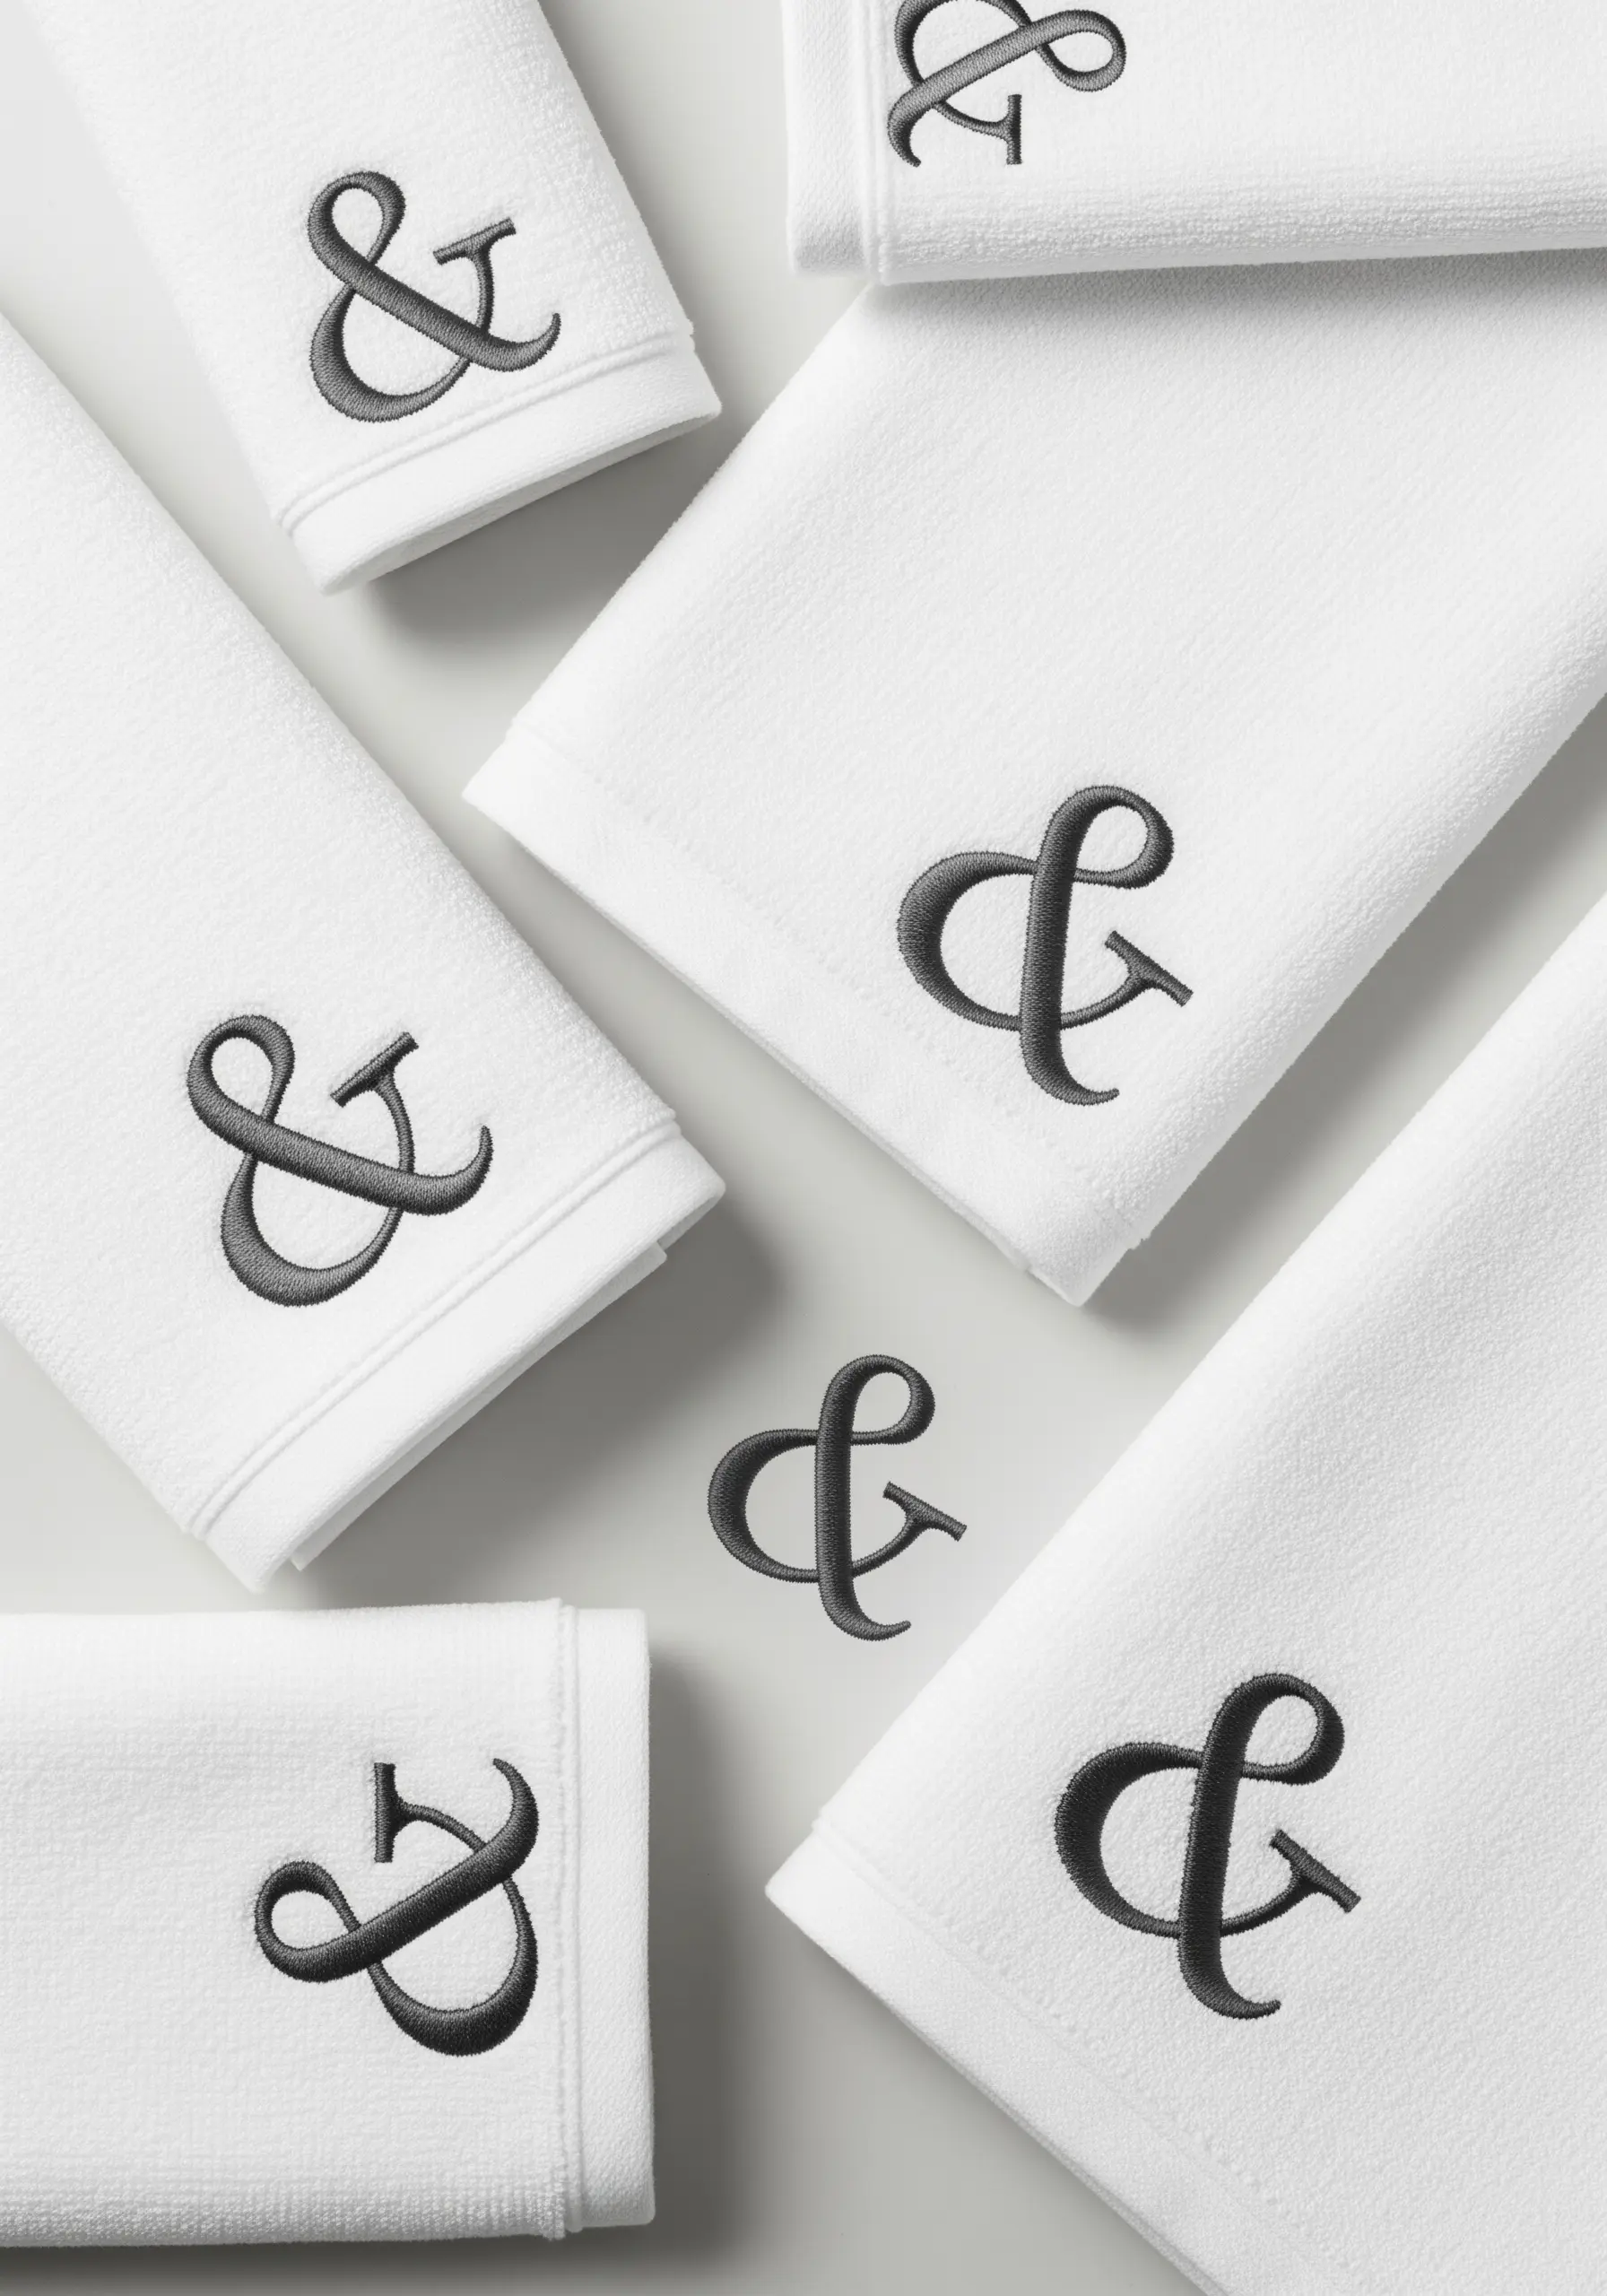
To create a monogram with a classic, high-end feel, focus on a smooth, raised surface.
For hand embroidery, you can replicate this machine-embroidered look with a padded satin stitch. Lay down a foundation of straight stitches within the letter’s shape, then cover it completely with tight, uniform satin stitches.
The padding raises the letter, while the smooth satin stitch gives it a professional sheen. Choose a classic serif or script font for a timeless, elegant finish on towels and linens.


