

Perhaps you see collage and embroidery as two separate worlds. One is about sharp edges, layered paper, and fixed compositions. The other is about soft thread, patient stitches, and flowing texture. But what happens when you invite them to speak to each other?
Think of your thread not just as decoration, but as a vital part of the composition. A simple backstitch becomes a line that connects two ideas. A cluster of French knots becomes a texture that begs to be touched. A long, loose thread becomes a whisper of movement in a static scene.
In these examples, you won’t just see finished projects. You’ll see the exact moment where thread transforms paper, where a stitch completes a story. Let this be your invitation to pick up a needle and stitch over everything—not to cover it up, but to bring it to life.
1. Sketch with Thread Over Vintage Illustrations
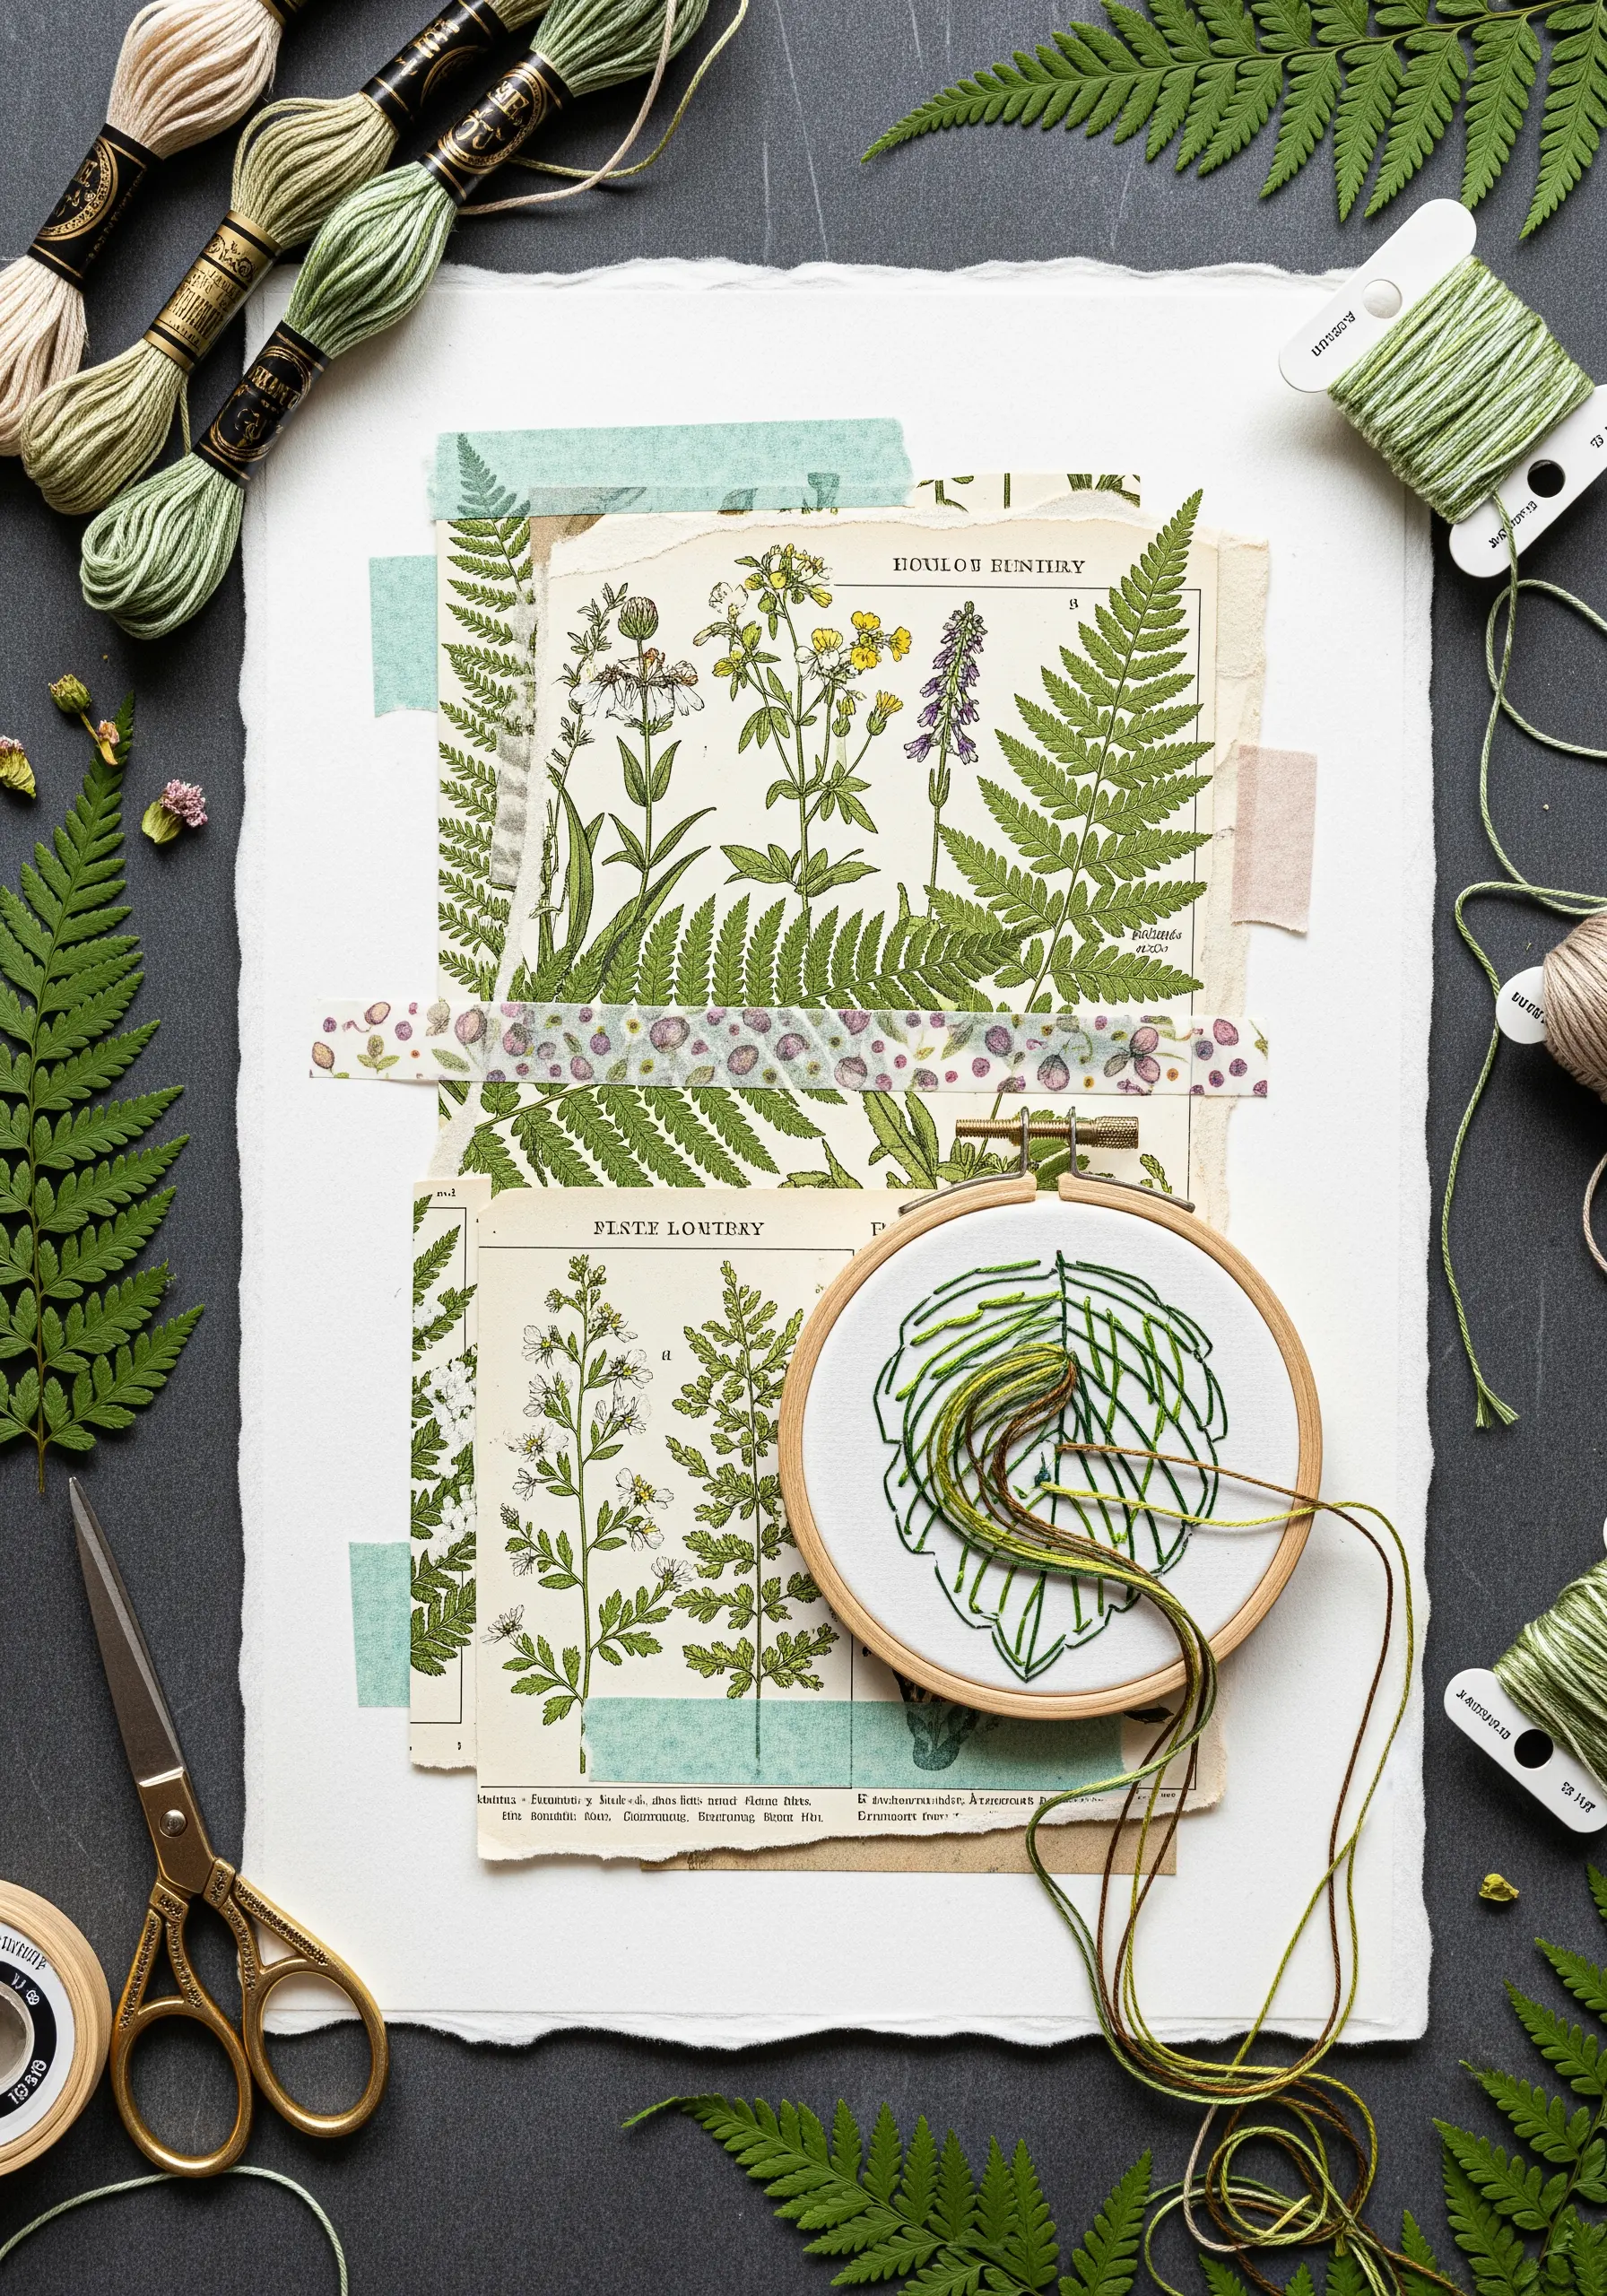
Select a single motif from a botanical print, like a leaf or flower, to serve as your guide.
Instead of tracing the illustration perfectly, use long and short stitches to create a loose, expressive interpretation directly on fabric.
This technique creates a beautiful dialogue between the precision of the vintage print and the organic freedom of your hand-stitching.
Use a variegated green thread to capture the subtle color shifts found in real foliage, adding depth with minimal effort.
2. Add Tactile Dimension to Cosmic Collages

Transform a flat, painted canvas by adding dimensional embroidery to celestial elements.
Use dense clusters of French knots made with metallic silver thread to represent starbursts or the textured surface of the moon.
Vary the size of your knots by changing how many times you wrap the thread around the needle—one wrap for small stars, two or three for larger ones.
This mixed-media approach turns a visual piece into a tactile one, inviting closer inspection and adding a sophisticated sparkle that paint alone cannot achieve.
3. Soften Geometric Lines with Couched Chains
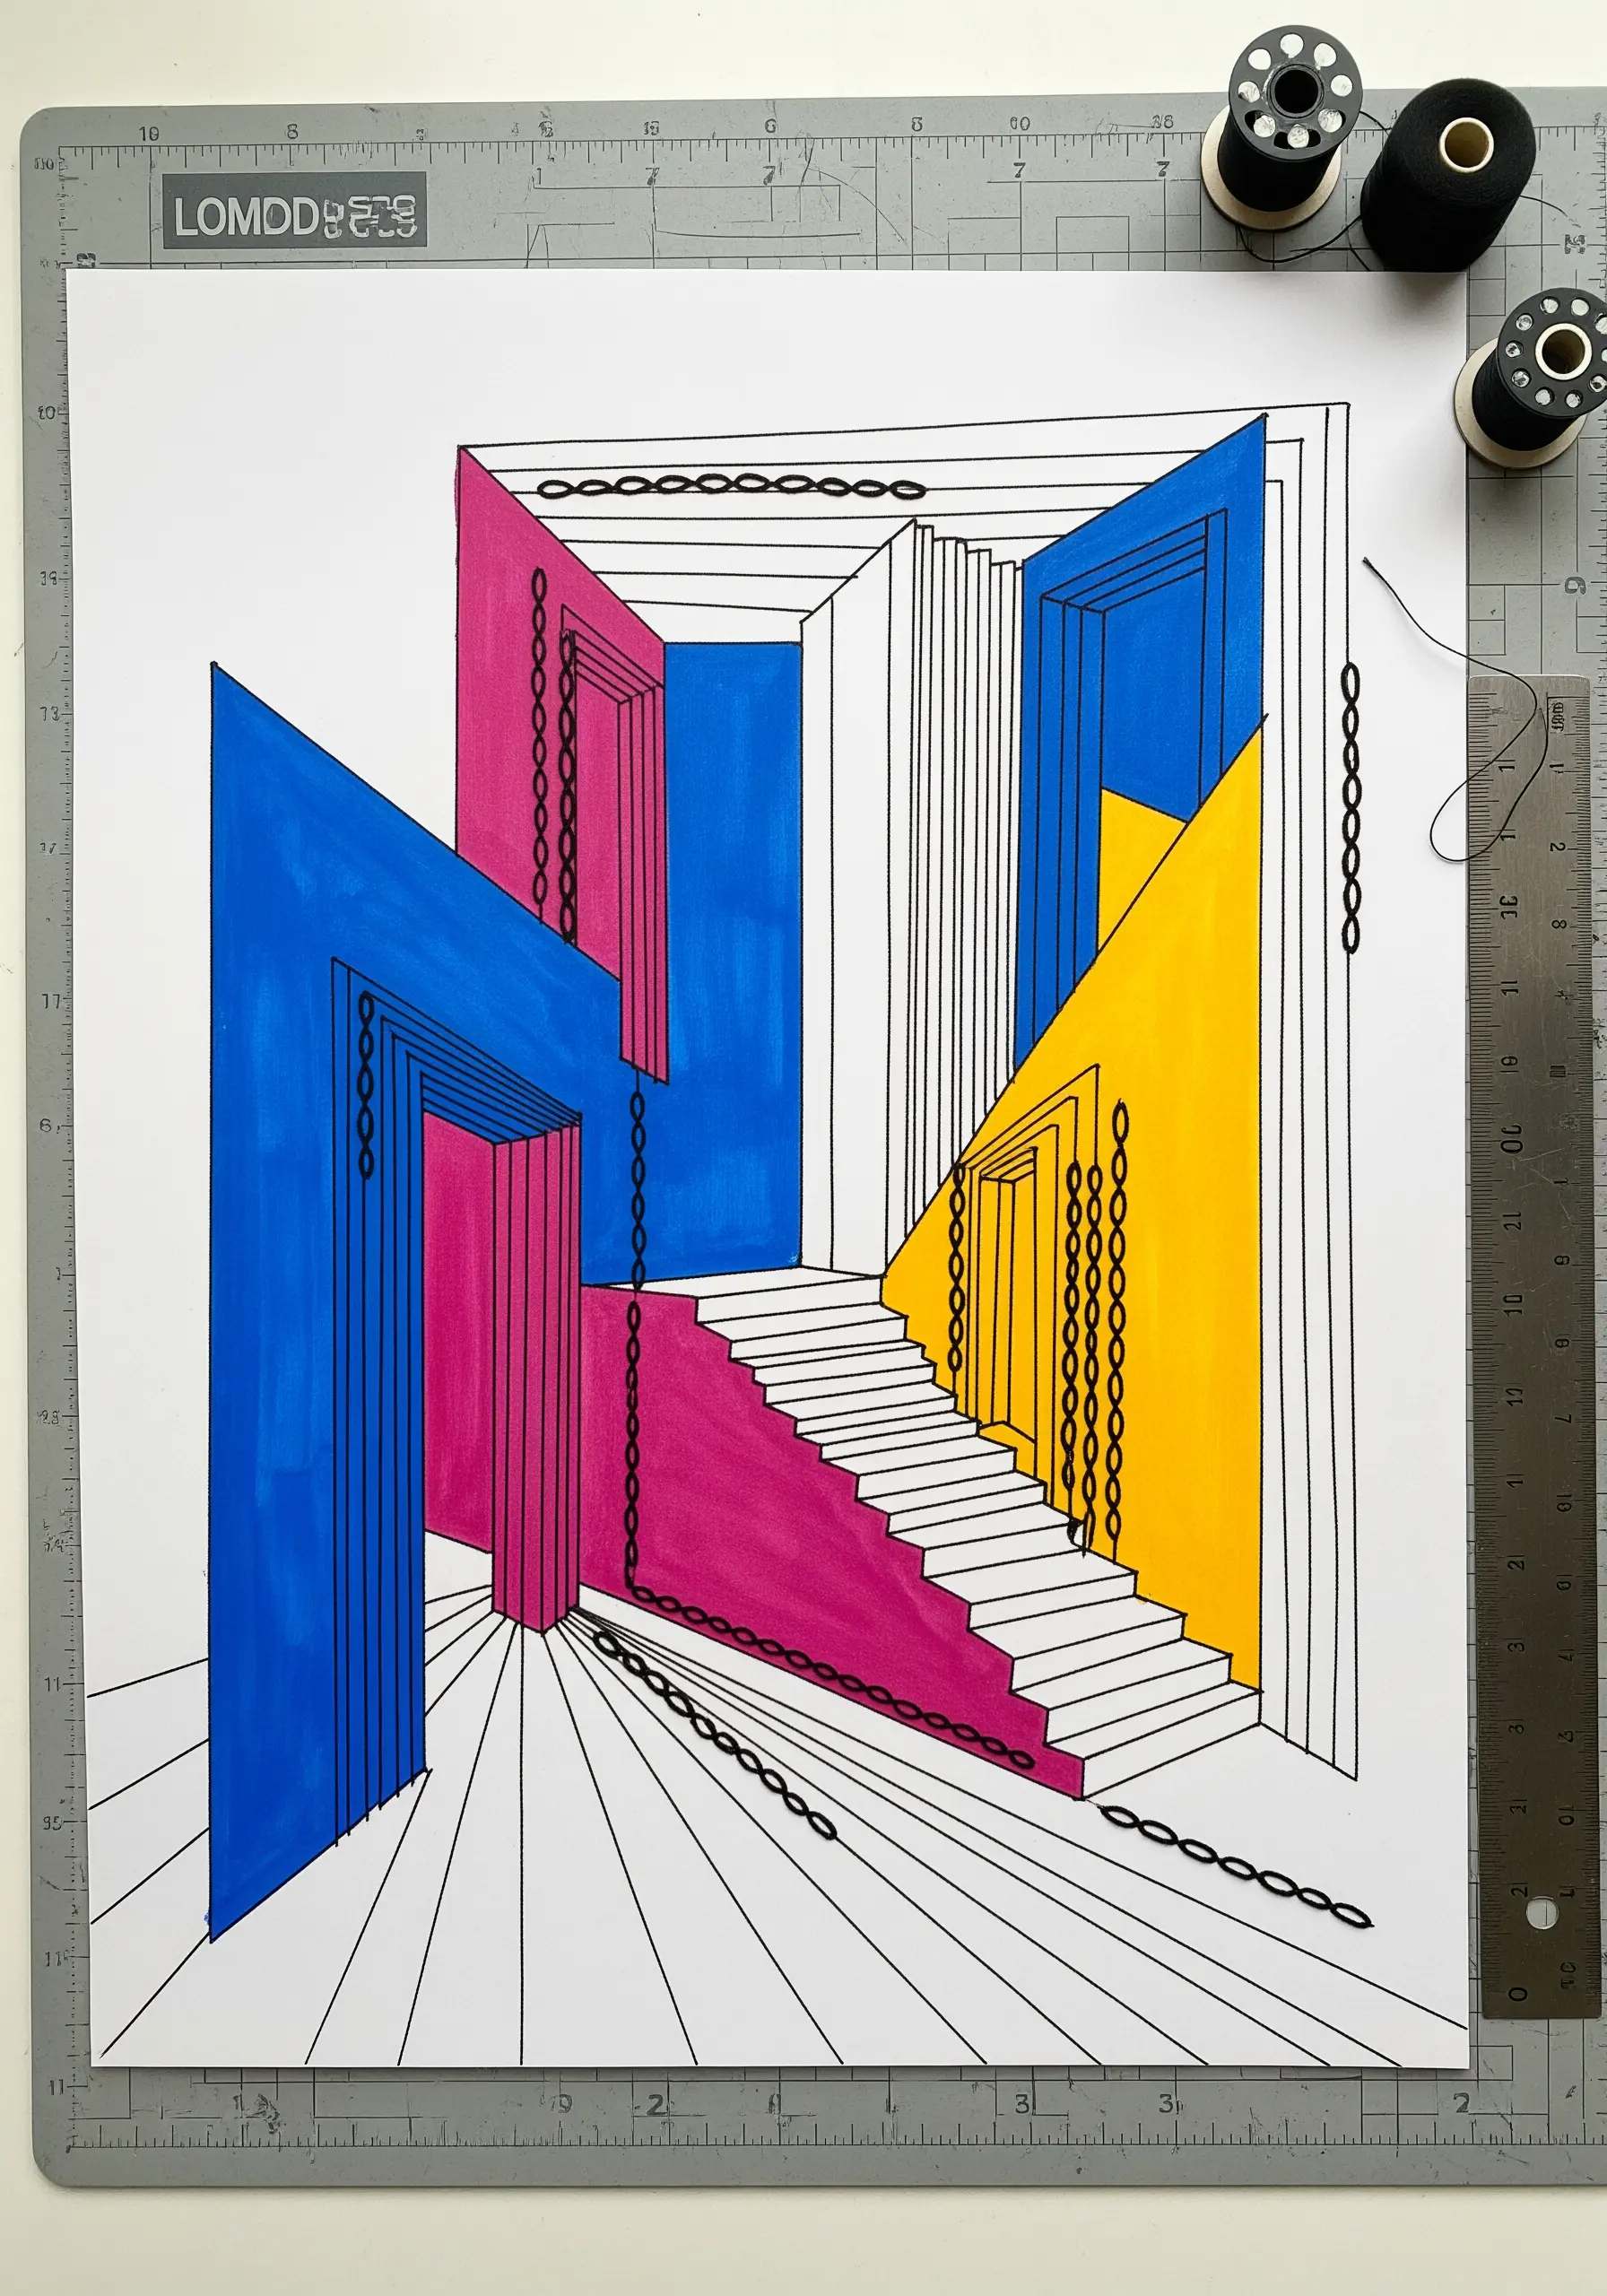
Contrast the sharp, graphic lines of an architectural drawing by adding the soft dimension of thread.
Use a heavy-weight thread or fine yarn to create draped lines that defy the rigid perspective of the artwork.
The chain stitch itself adds a beautiful, linked texture, but you can also couch down pre-made chains for a bolder effect.
This technique introduces an element of softness and gravity, creating a compelling visual tension between the flat, 2D illustration and the 3D thread work.
4. Embellish Portraits with Delicate Textural Details

Breathe new life into a printed portrait by focusing on one key area to embellish, such as the clothing or jewelry.
Use tiny French knots or bullion knots with a soft, single-strand floss to replicate the texture of lace or floral appliqué on a dress.
For jewelry, outline the shapes with a fine metallic thread and add tiny seed beads to represent pearls or gemstones.
This selective stitching adds a layer of handcrafted intimacy, transforming a simple print into a cherished, personal artifact.
5. Build an Underwater World with Dimensional Stitches
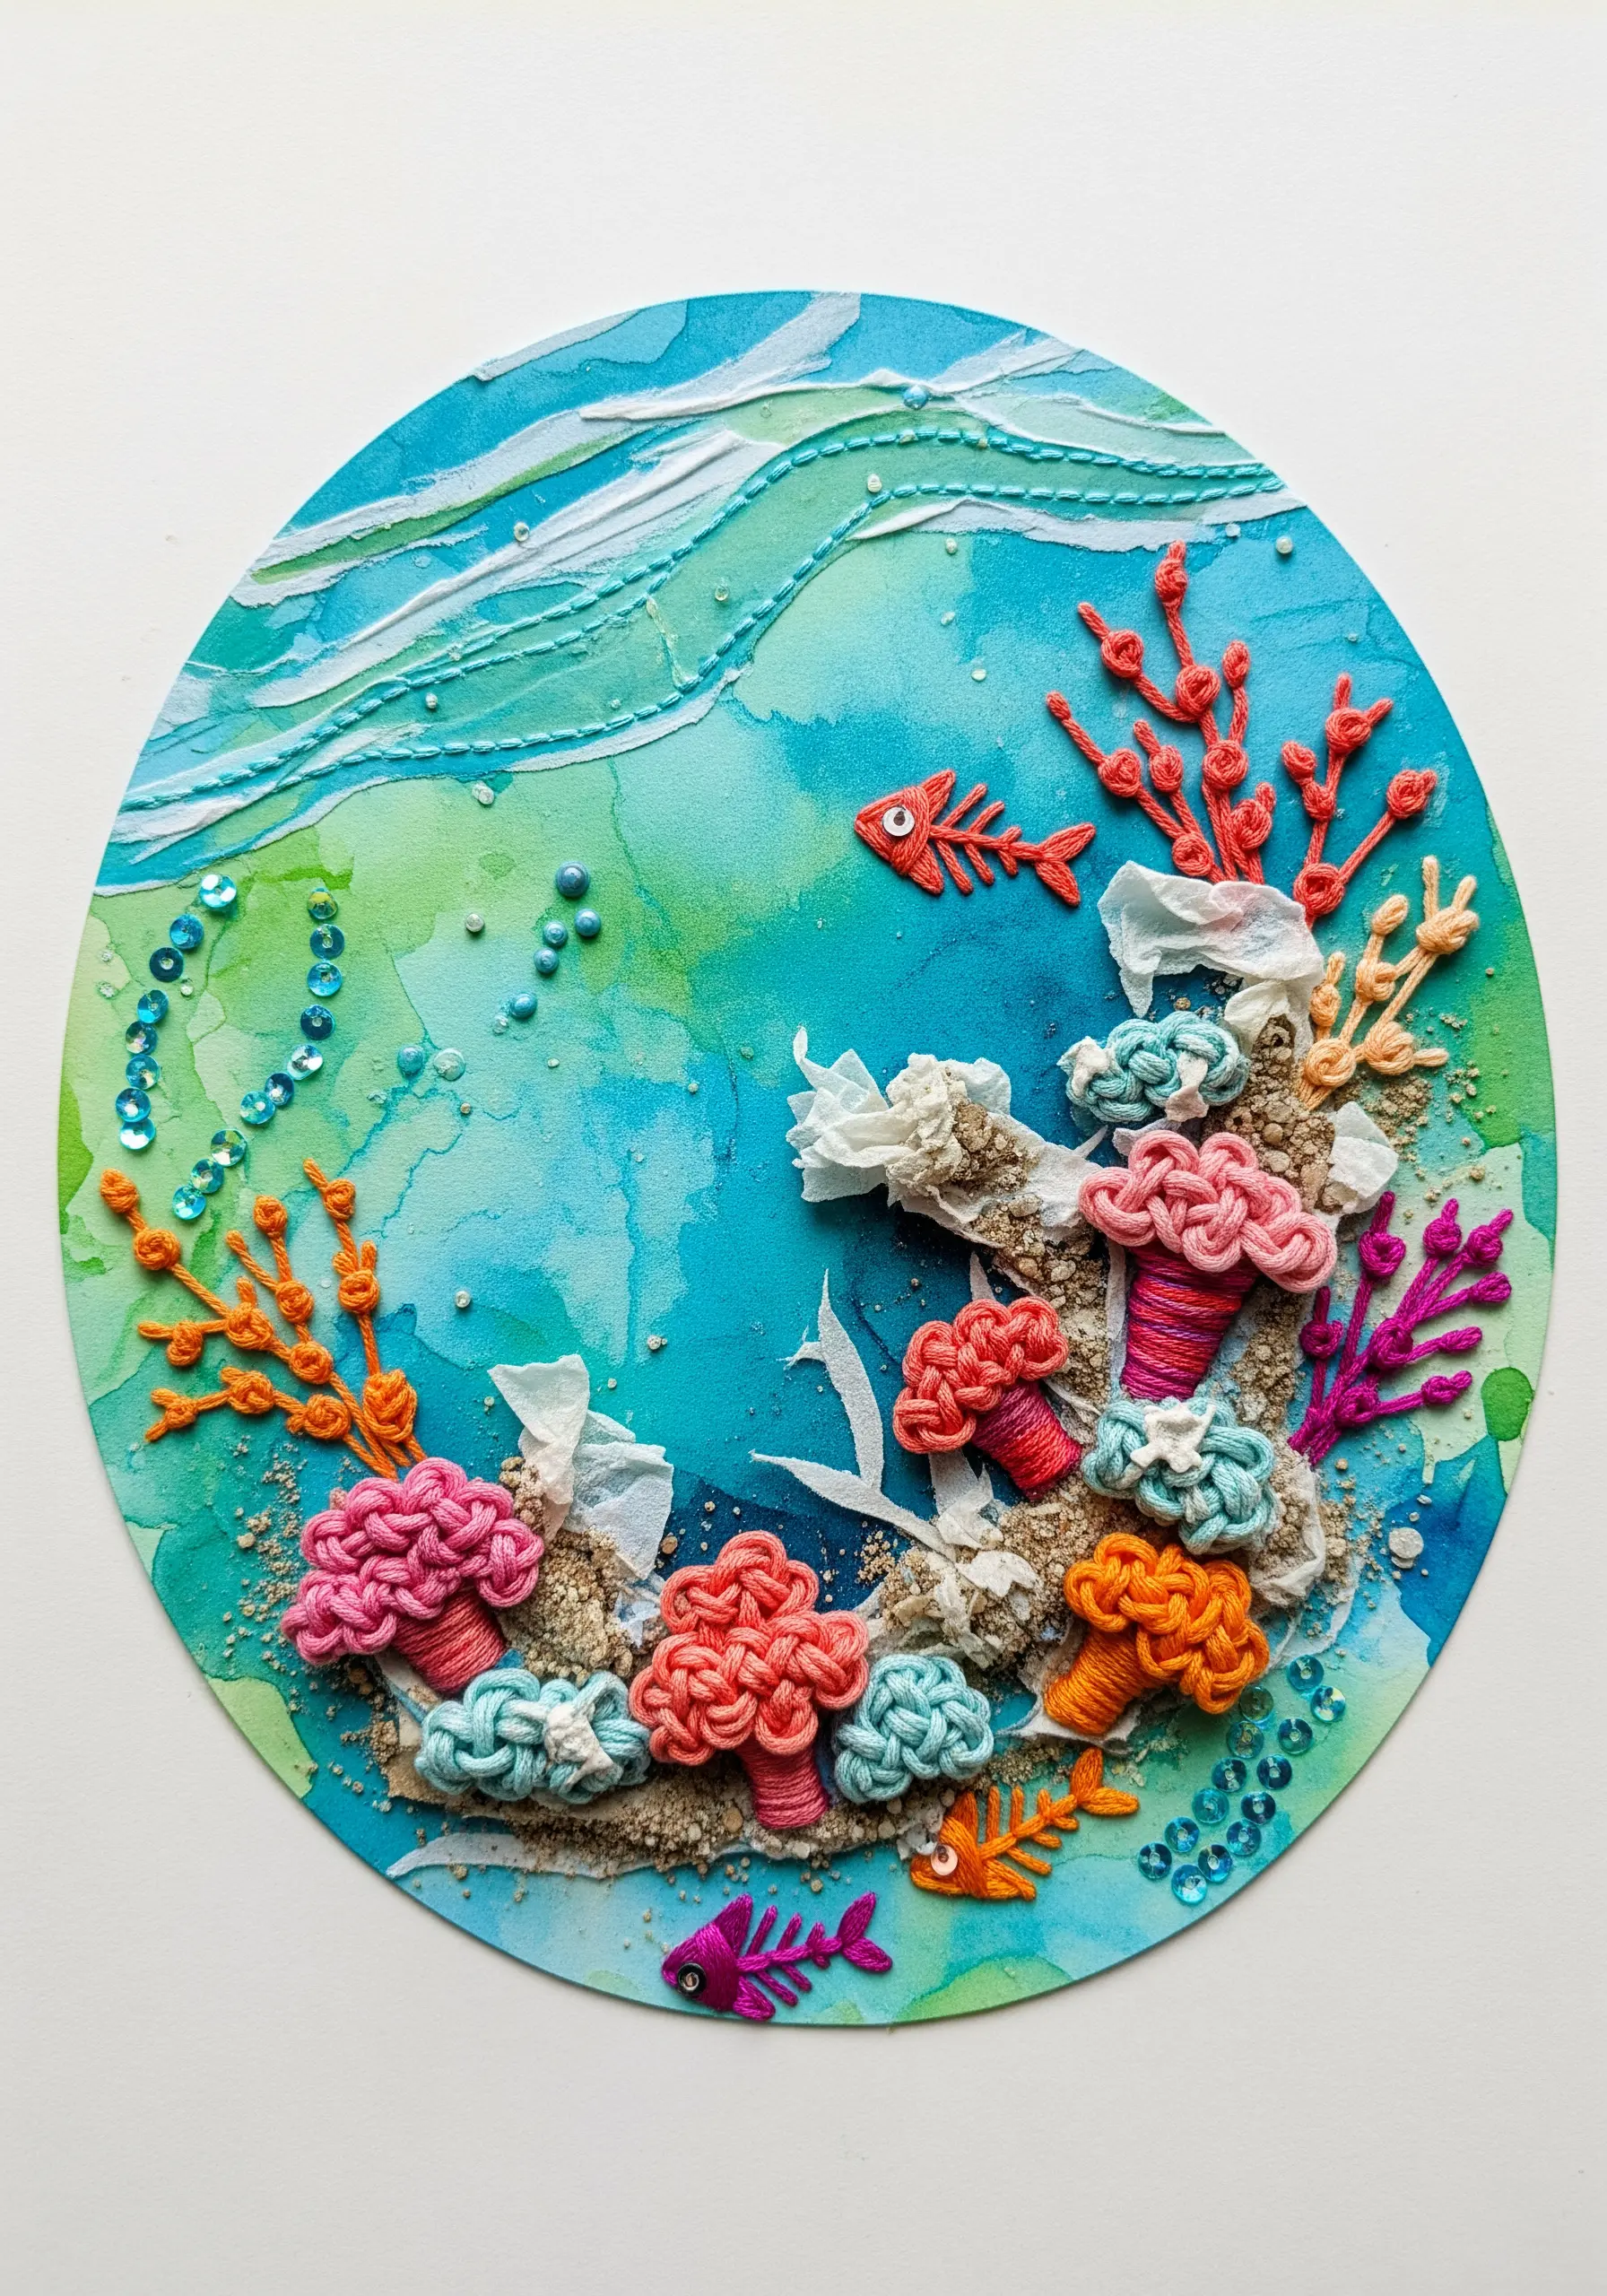
Create a vibrant coral reef by combining a watercolor background with high-texture embroidery stitches.
Use cast-on stitches or woven picot stitches to build 3D coral forms that rise from the surface.
Incorporate other materials like tiny sequins for shimmering water, sand for the ocean floor, and crinkled fabric scraps for sea anemones.
The variety of textures makes the scene incredibly dynamic and tactile, capturing the rich, diverse ecosystem of a reef.
6. Layer Natural Materials for Landscape Art
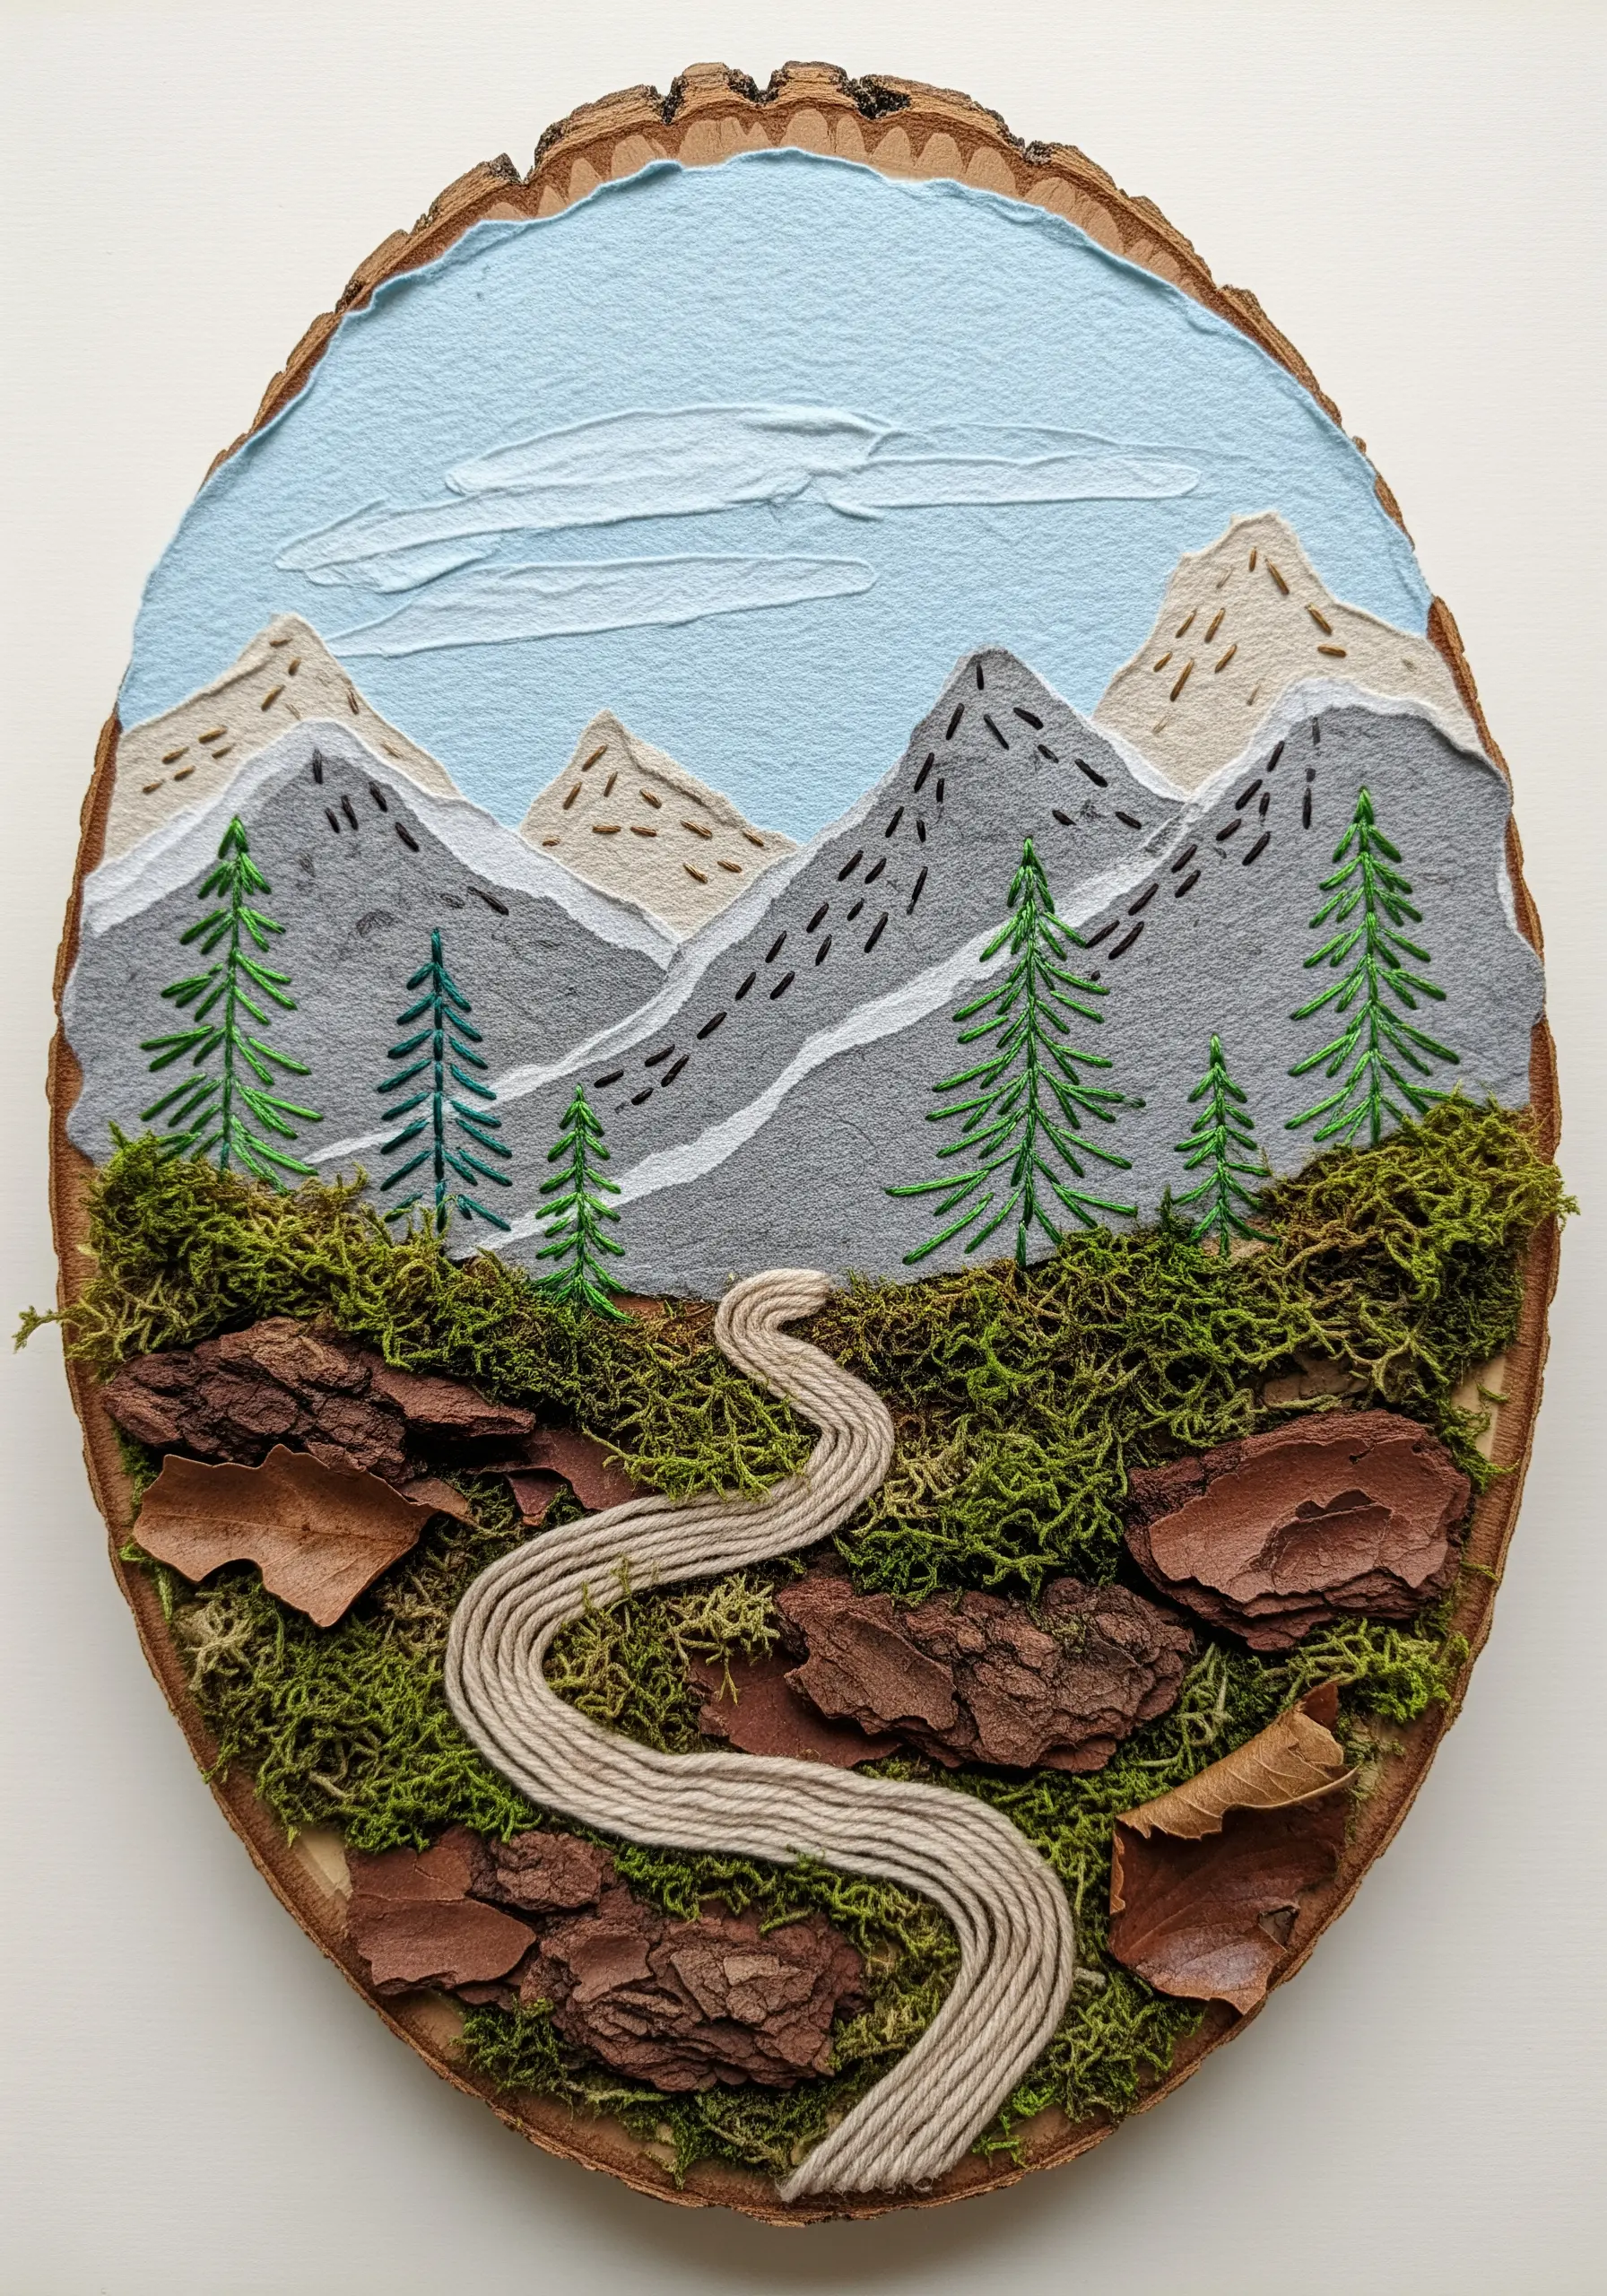
Create a rustic landscape by combining felt, thread, and found natural elements like moss and bark.
Cut mountains from felt and add simple backstitches or straight stitches to suggest rocky textures and shadows.
Couch down a thick cord or yarn to create a defined, winding path that draws the eye into the scene.
This mixed-media approach grounds your artwork in reality, blending the softness of fiber with the ruggedness of nature.
7. Create a Gradient of Woven Wheel Roses
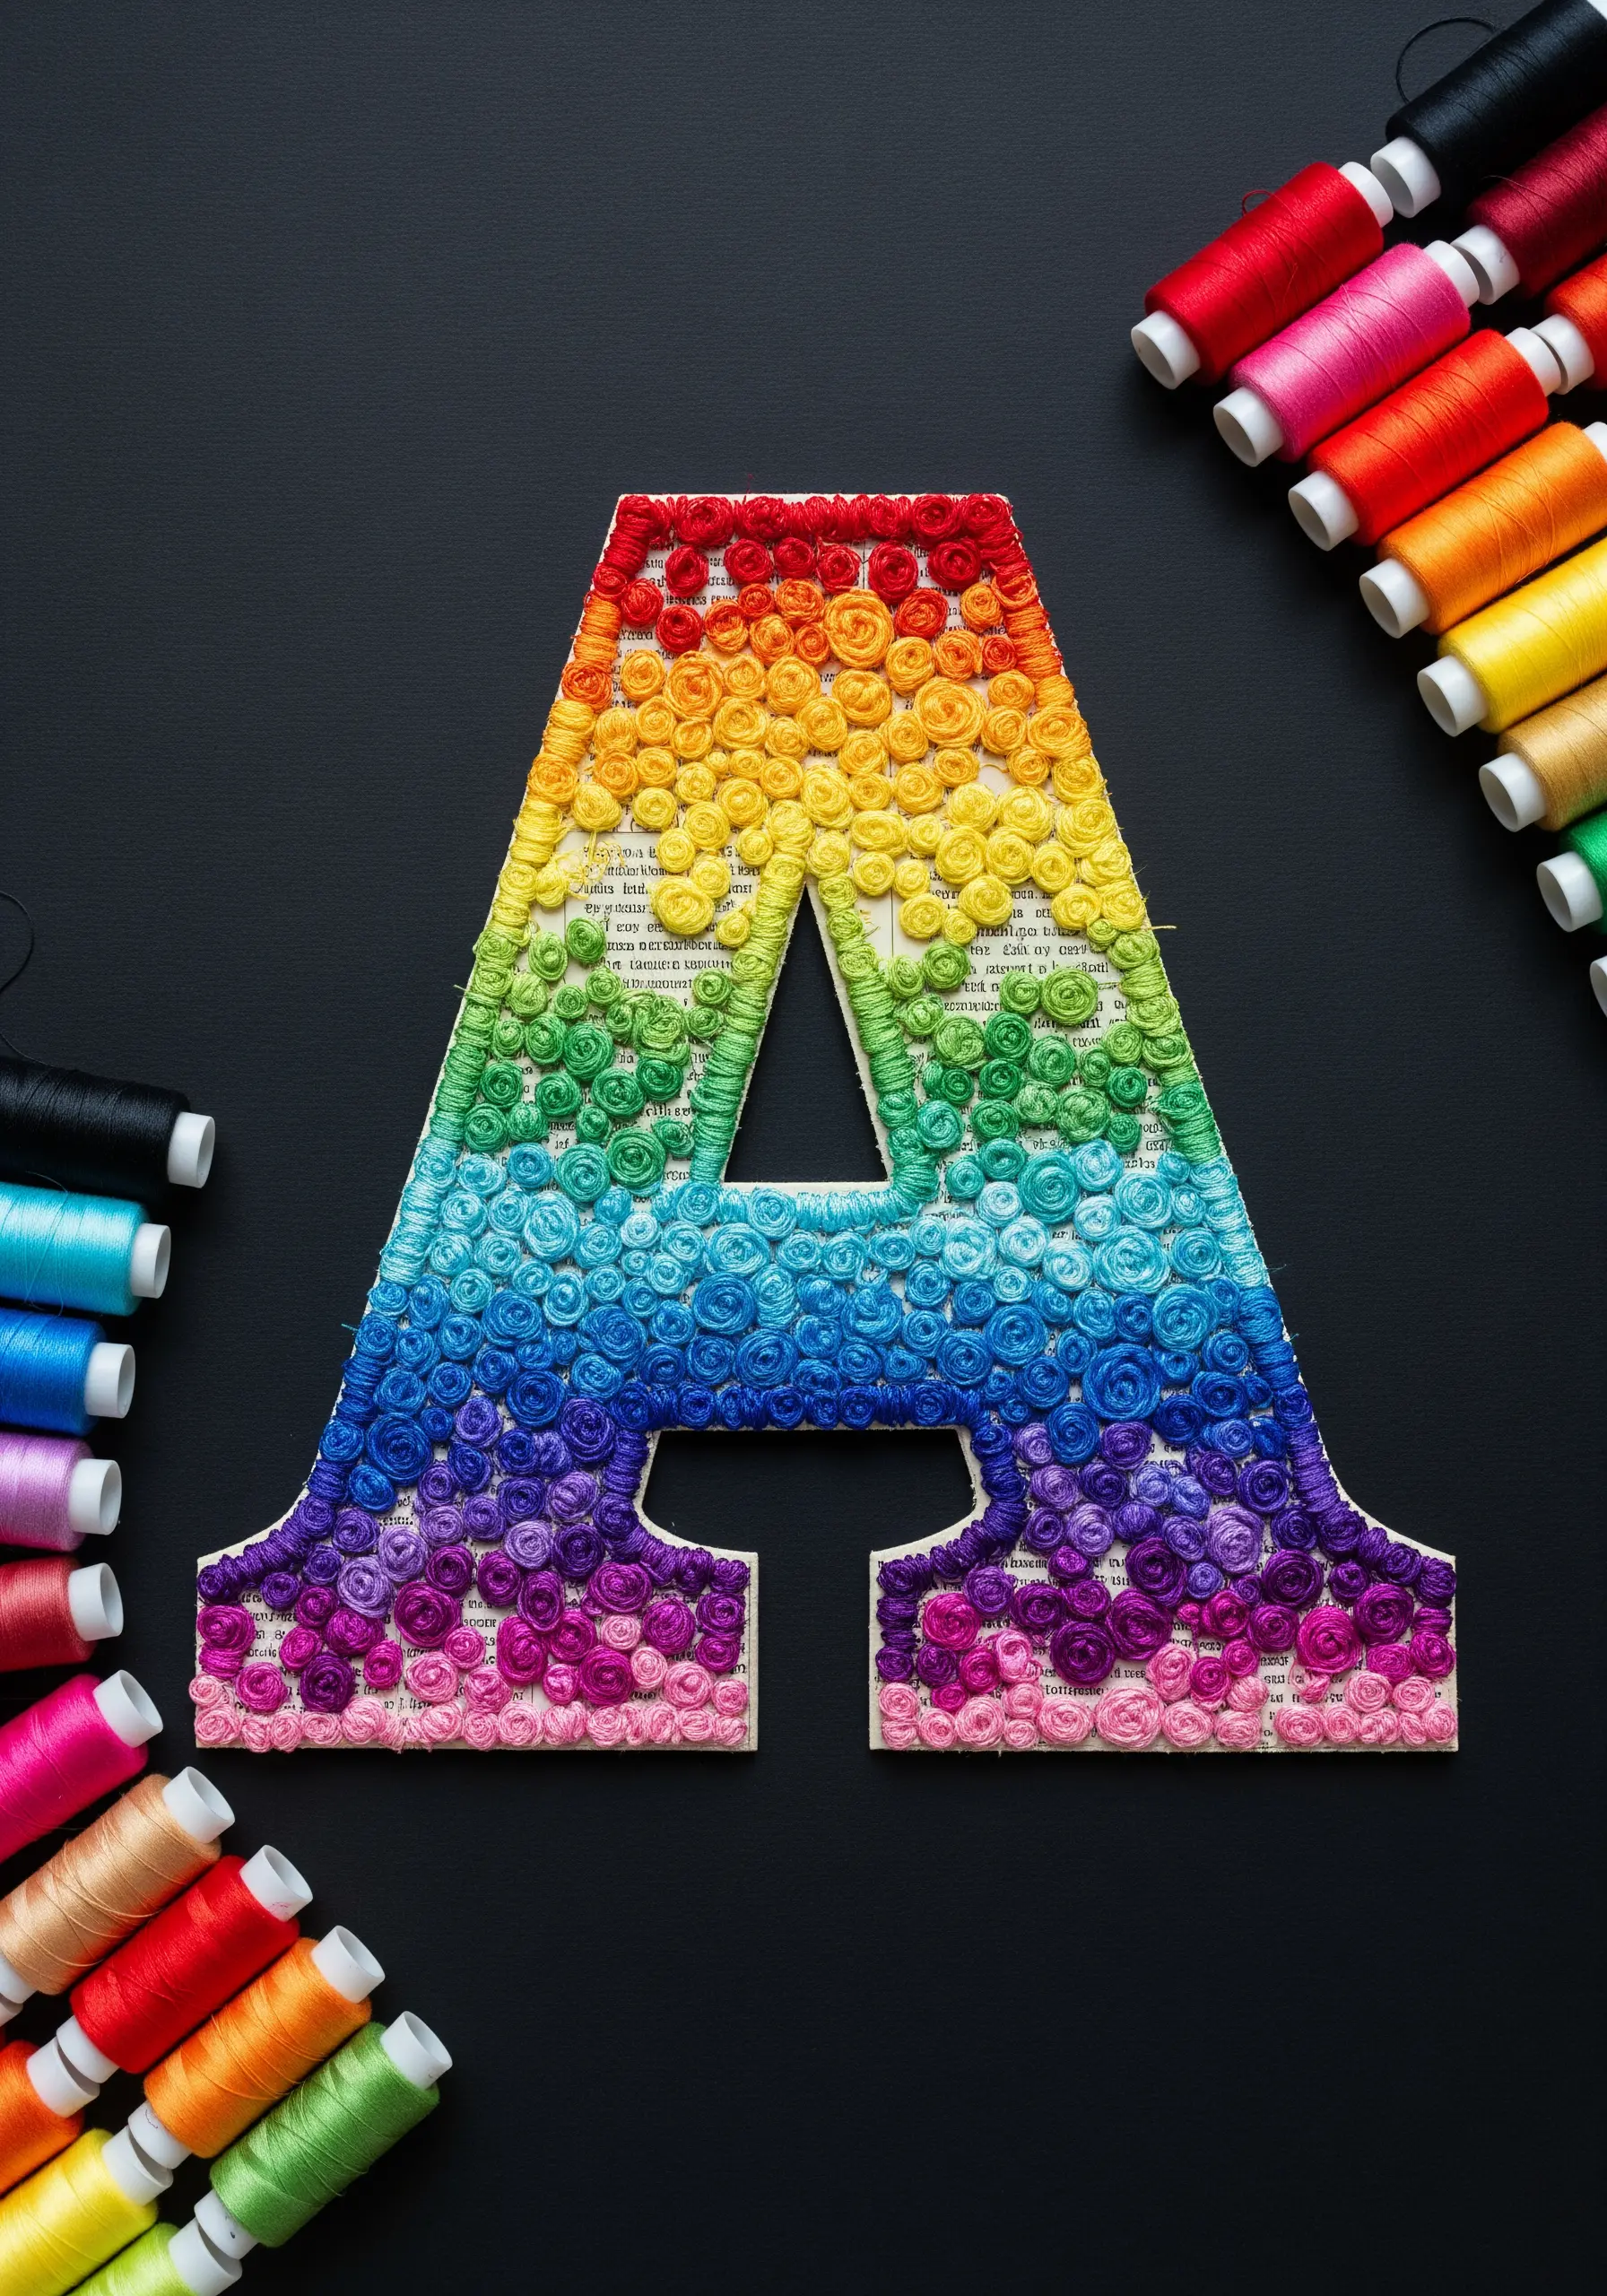
Fill a large shape with dense, touchable texture by mastering the woven wheel stitch, also known as a spider web rose.
To achieve a seamless color gradient, work in sections and slightly overlap the edges of your stitches where one color meets the next.
Use all six strands of embroidery floss or a thicker perle cotton to create plush, full roses that cover the background completely.
This technique transforms a simple stitch into a stunning, textural statement piece defined by its rich color flow.
8. Define Paper Collage with a Velvet Body
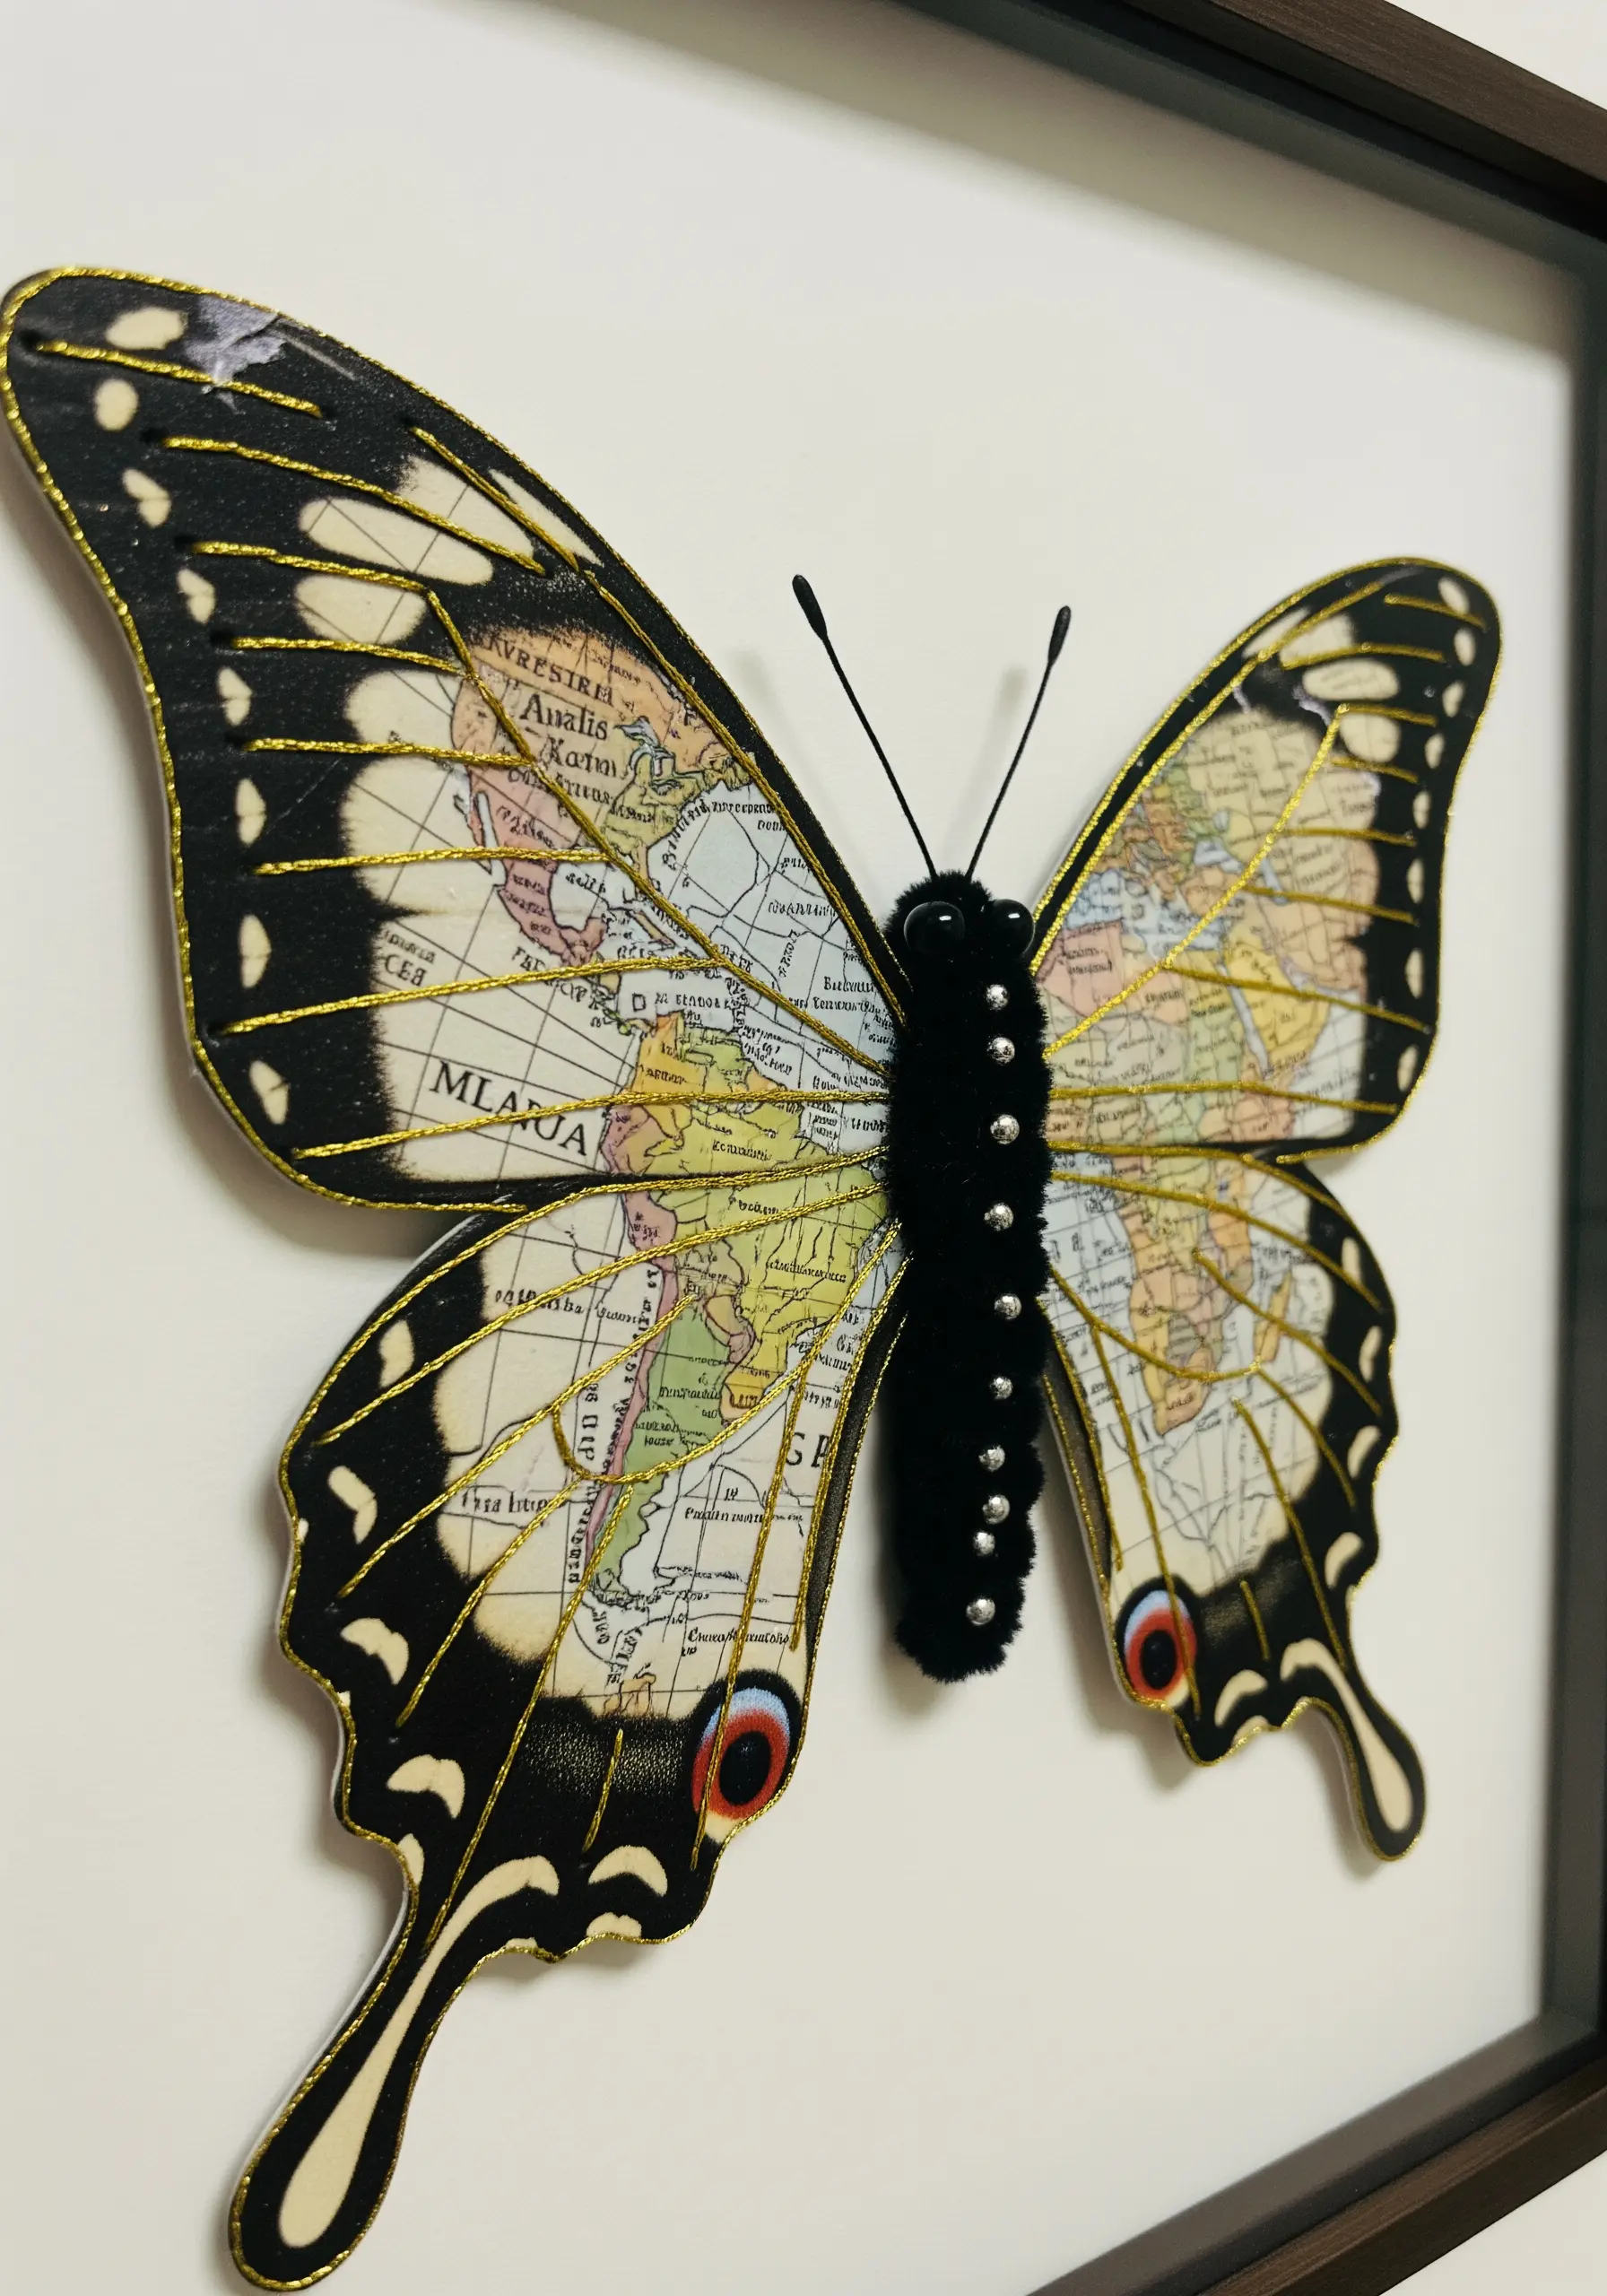
Elevate a paper butterfly by adding carefully chosen tactile elements that create contrast and realism.
Create a soft, velvety body using a chenille thread or by filling the shape with tightly packed black French knots.
Outline the delicate wing patterns with a fine metallic gold thread using a simple backstitch, which adds a touch of elegance and defines the paper edges.
This pairing of soft and sharp textures makes the creature feel more lifelike and transforms it into a sophisticated piece of art.
9. Stitch Beams of Light into a Cityscape
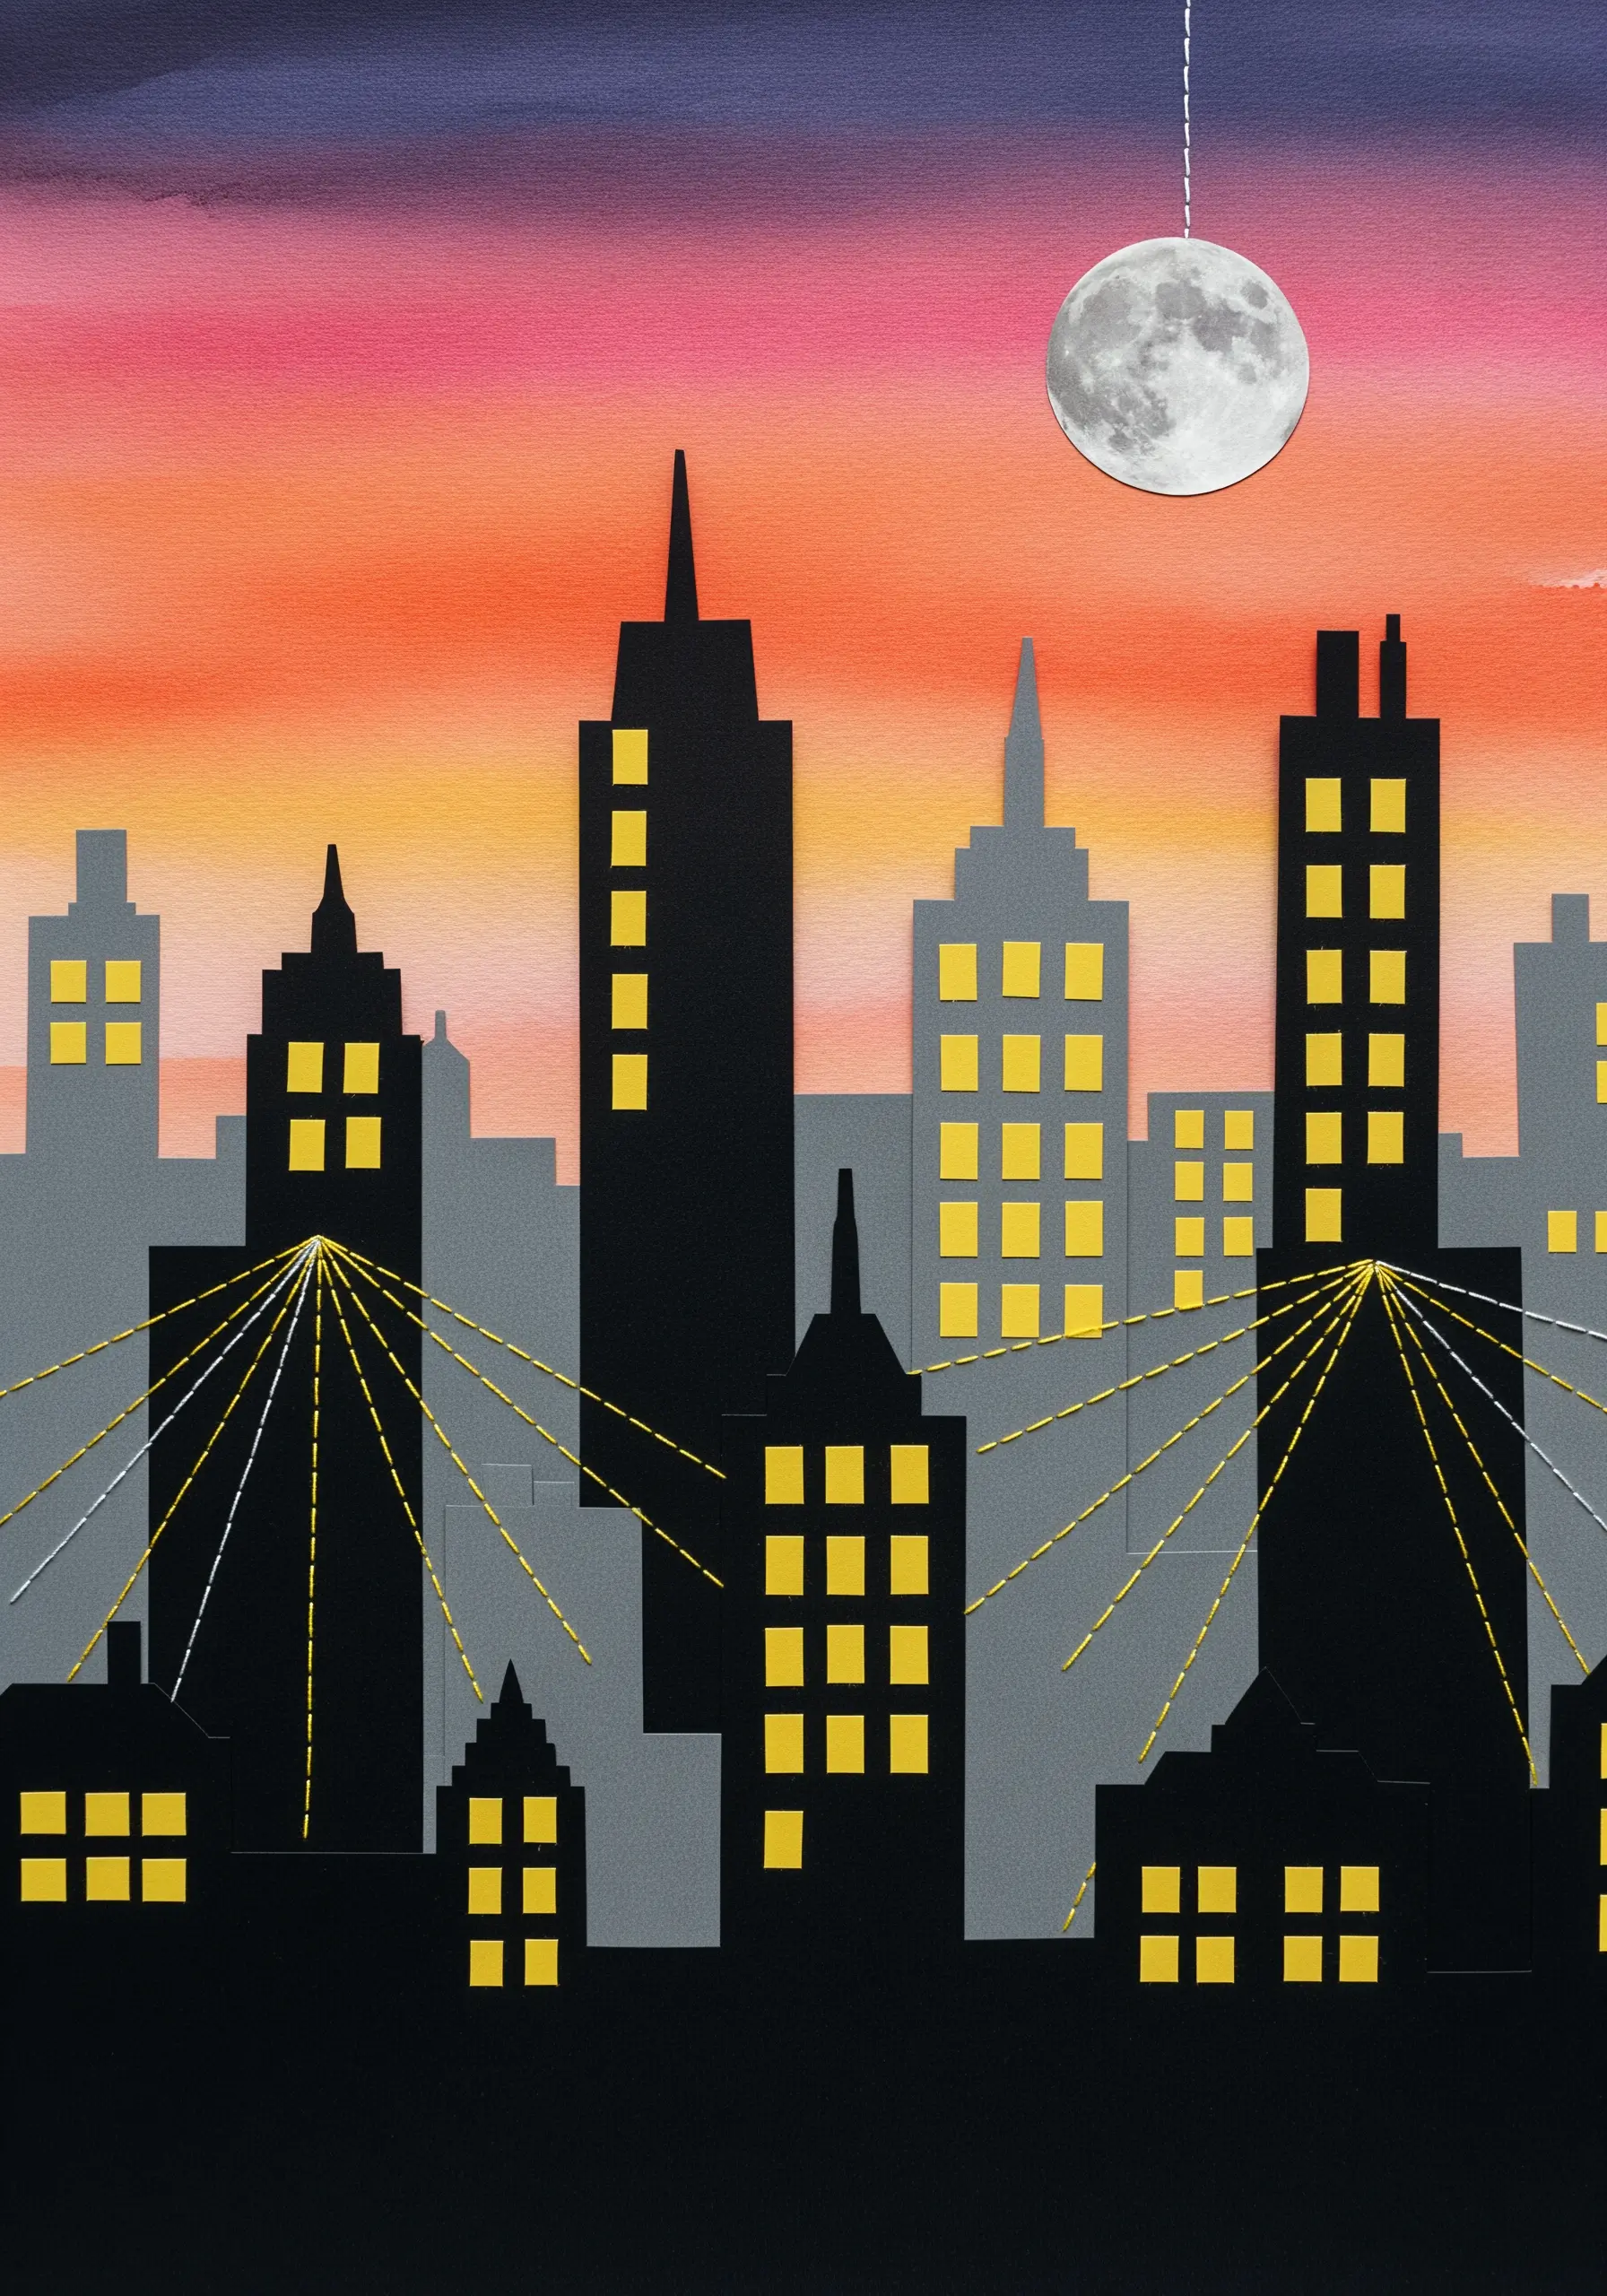
Add energy and life to a static paper cityscape by using thread to represent radiating light.
Use a bright yellow or metallic gold thread to stitch long, straight stitches emanating from the windows of the buildings.
Keep the stitches taut and vary their lengths and angles to create a dynamic, glowing effect that looks like light spilling into the night.
This simple technique beautifully captures an intangible element, turning your thread into a powerful tool for storytelling.
10. Unify a Composition with a Dotted Line
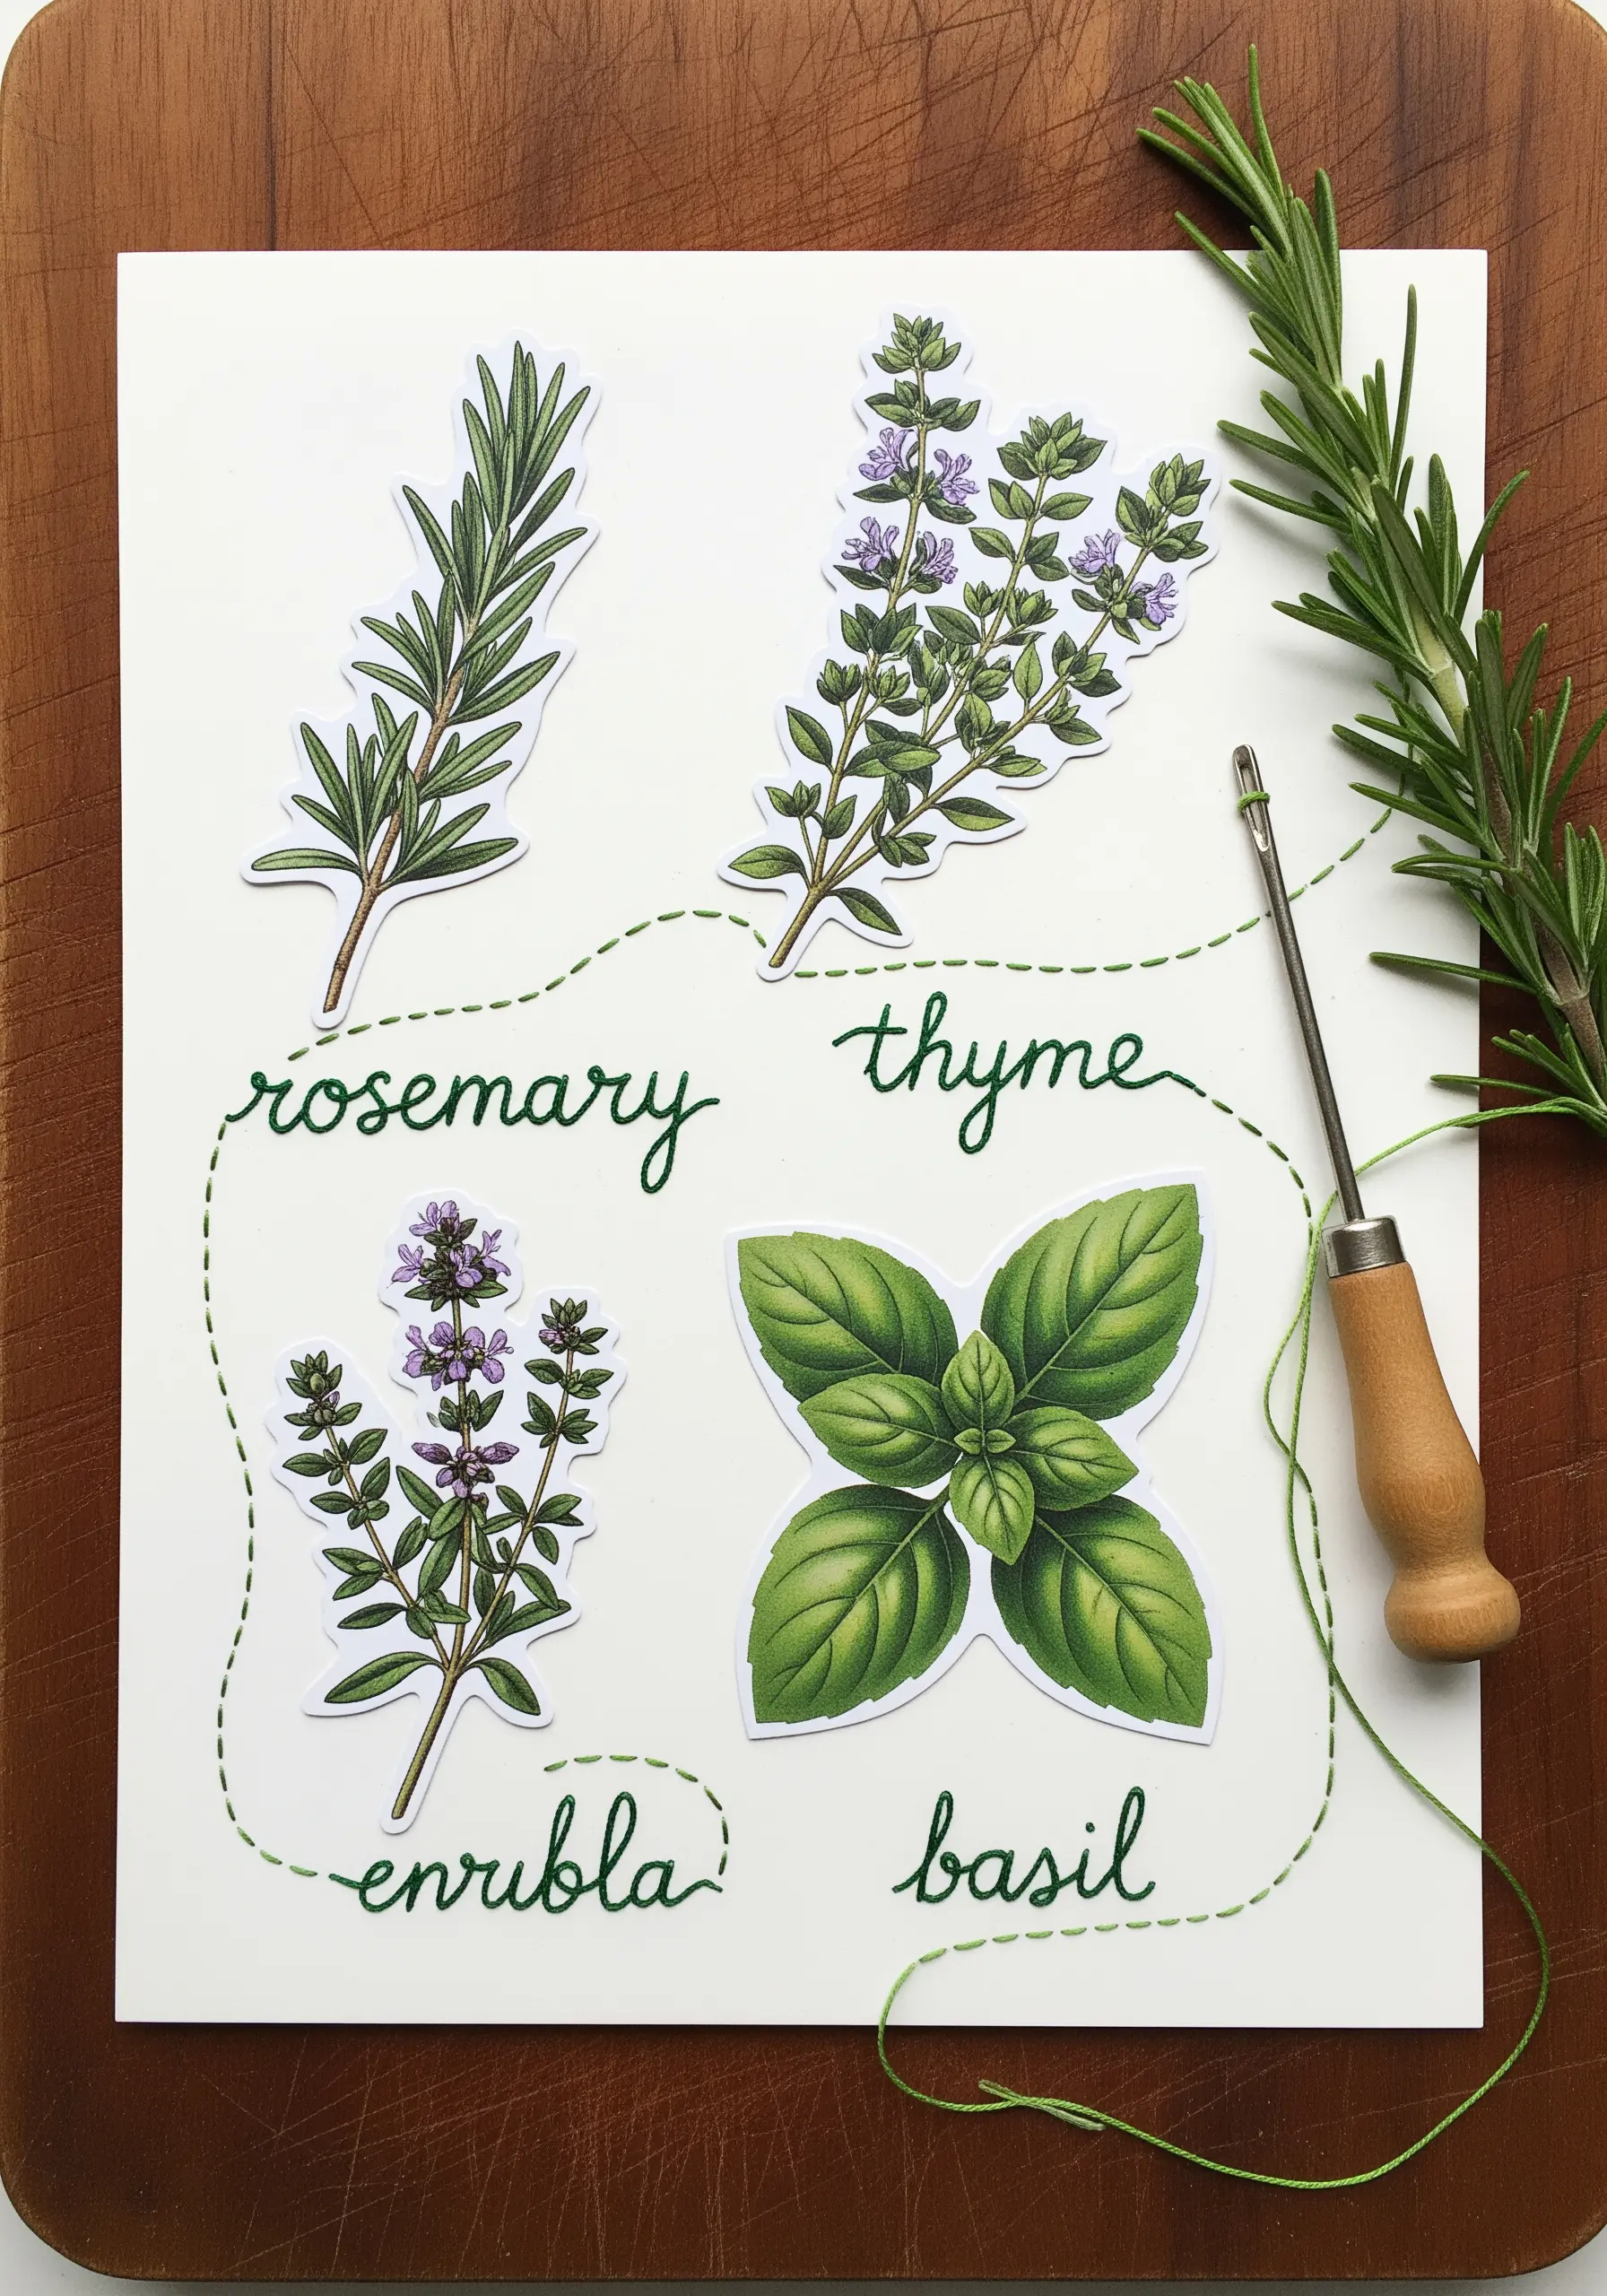
Connect disparate paper elements into a cohesive design using a simple, playful stitched line.
Arrange your botanical cutouts on a piece of cardstock, then use a punch tool or thick needle to pre-pierce holes for your stitching path.
A simple running stitch or backstitch in a contrasting color creates a charming ‘connect-the-dots’ effect that guides the viewer’s eye through the composition.
This technique is perfect for adding a touch of handmade whimsy to greeting cards or framed art.
11. Emphasize Movement with Directional Stitches
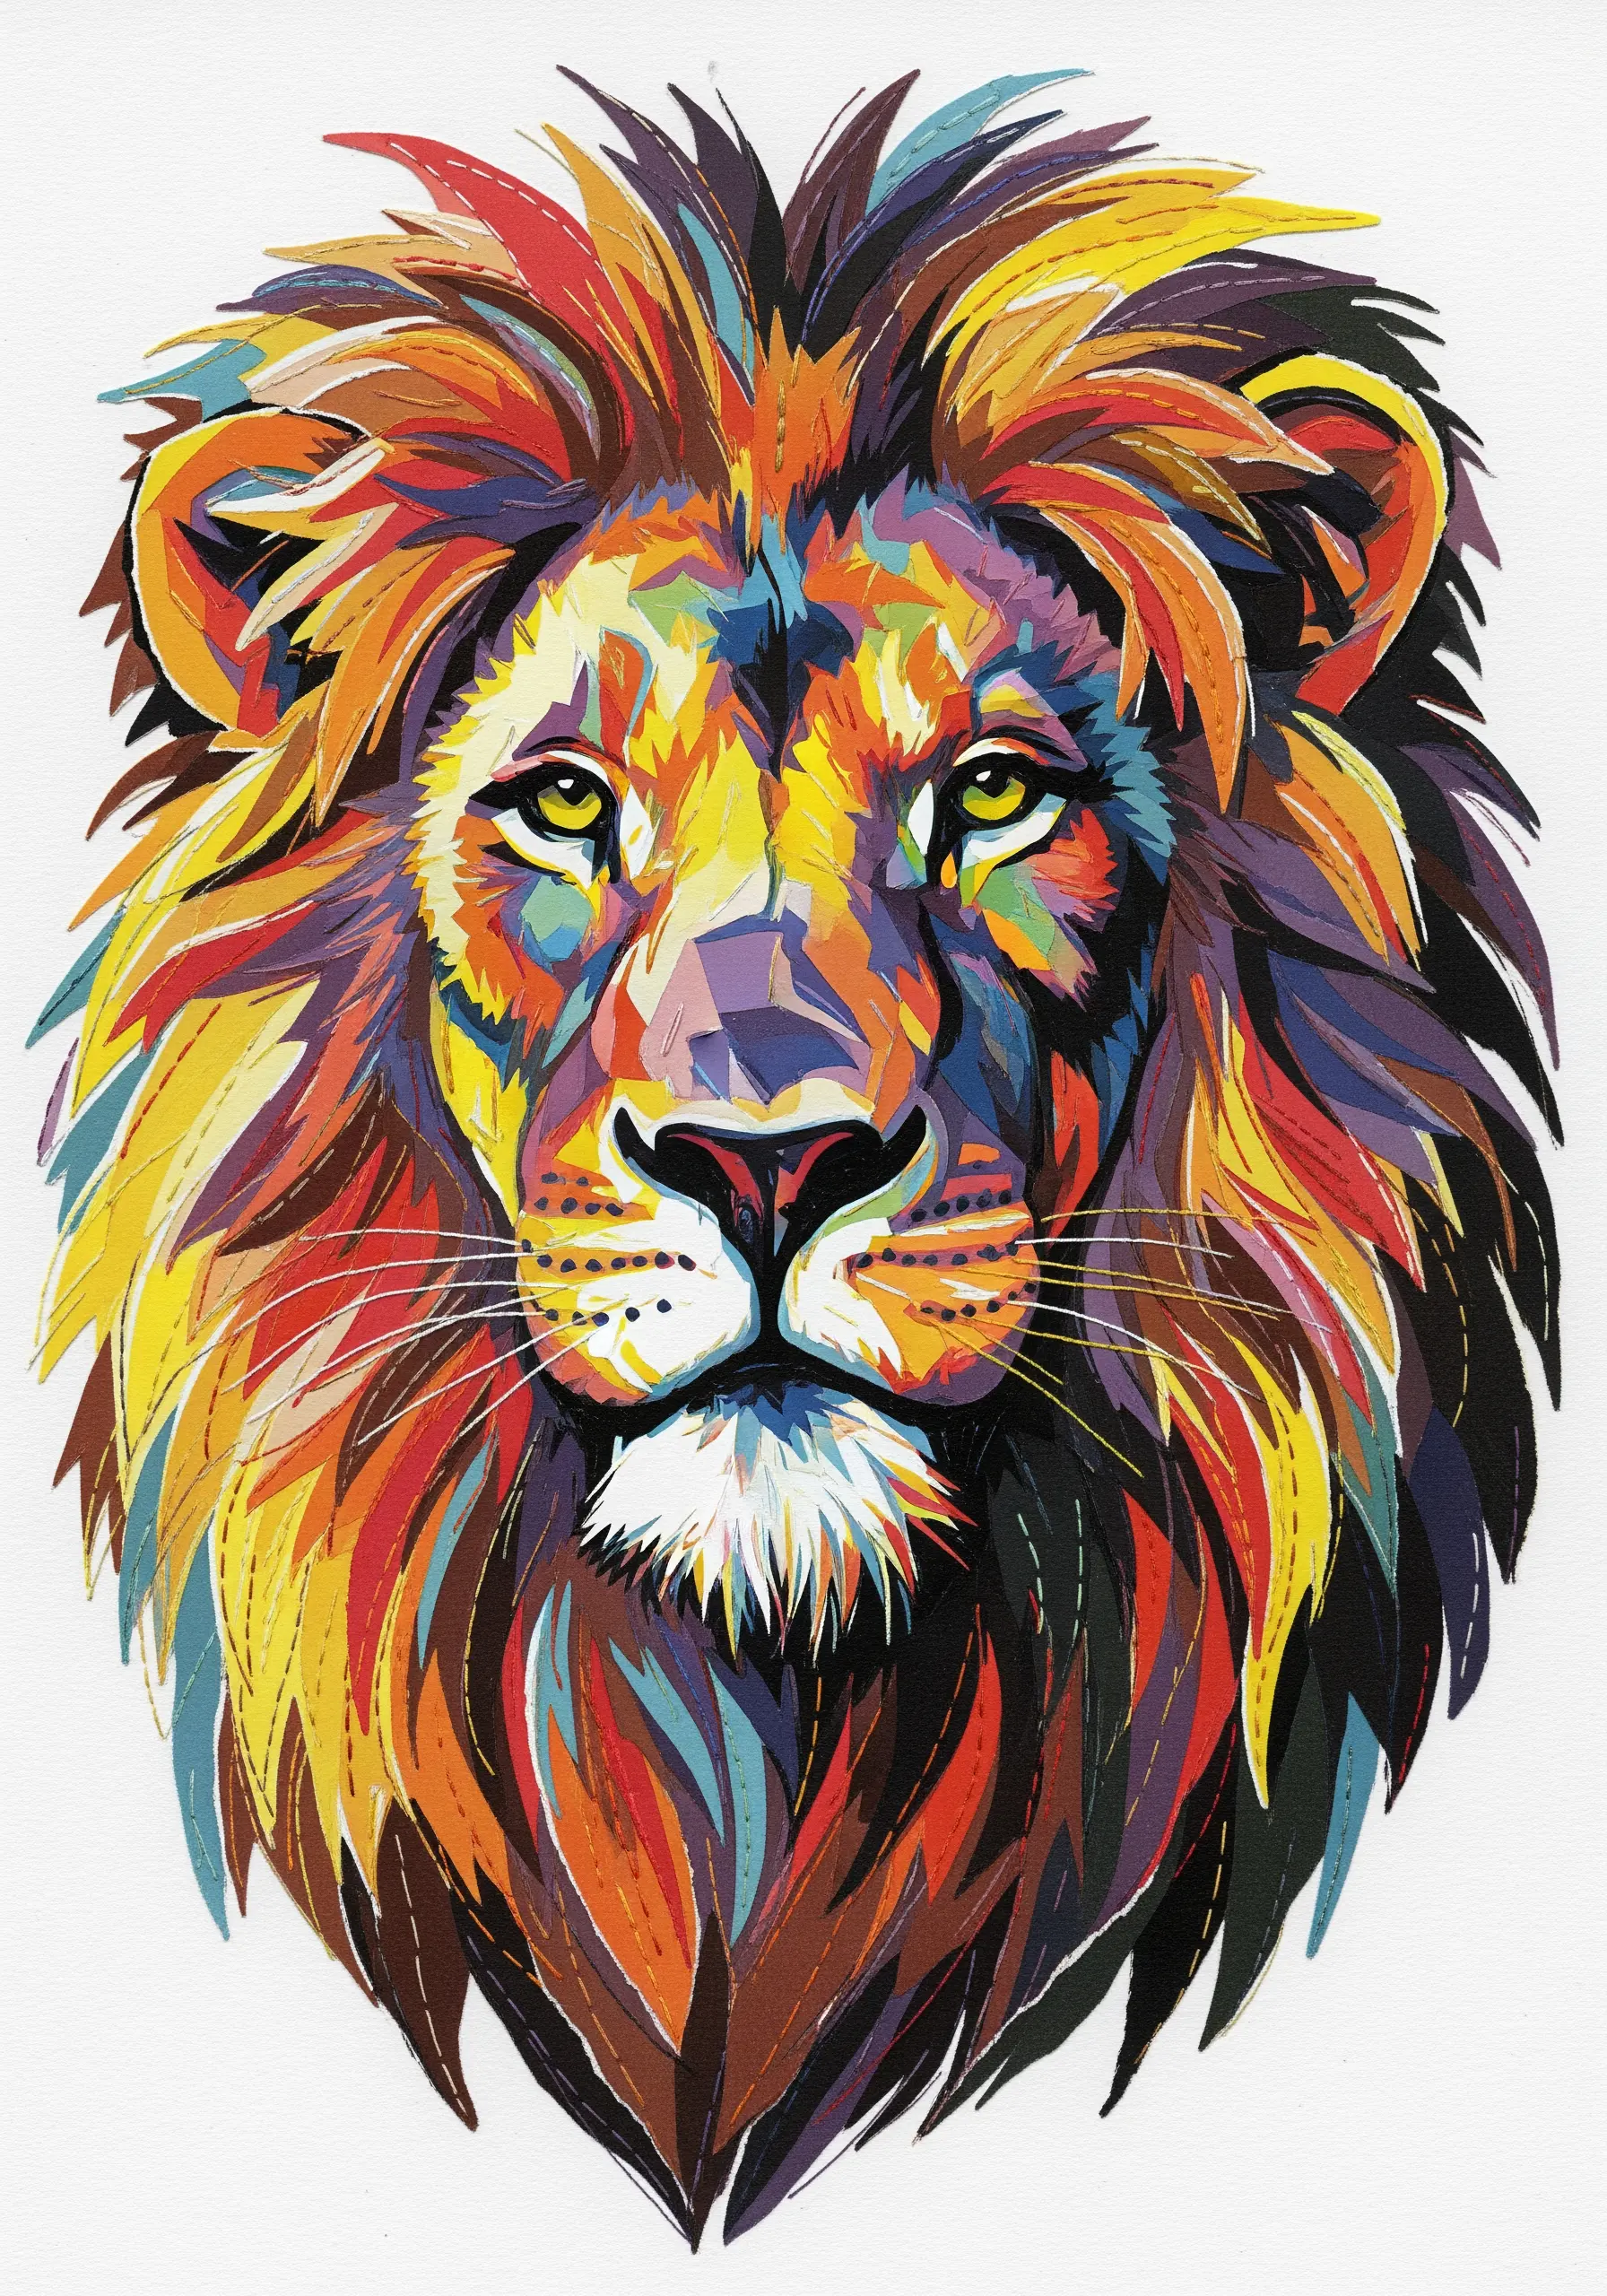
When working with a busy, colorful collage, use thread to enhance—not compete with—the existing design.
Instead of outlining every shape, add selective, directional straight stitches to an area of movement, like a lion’s mane.
Follow the lines and flow of the paper pieces, using your stitches to add a fine layer of texture that mimics hair or fur.
This subtle approach integrates the thread seamlessly, adding depth and dynamism without overwhelming the original artwork.
12. Frame Art Deco Designs with Beaded Outlines
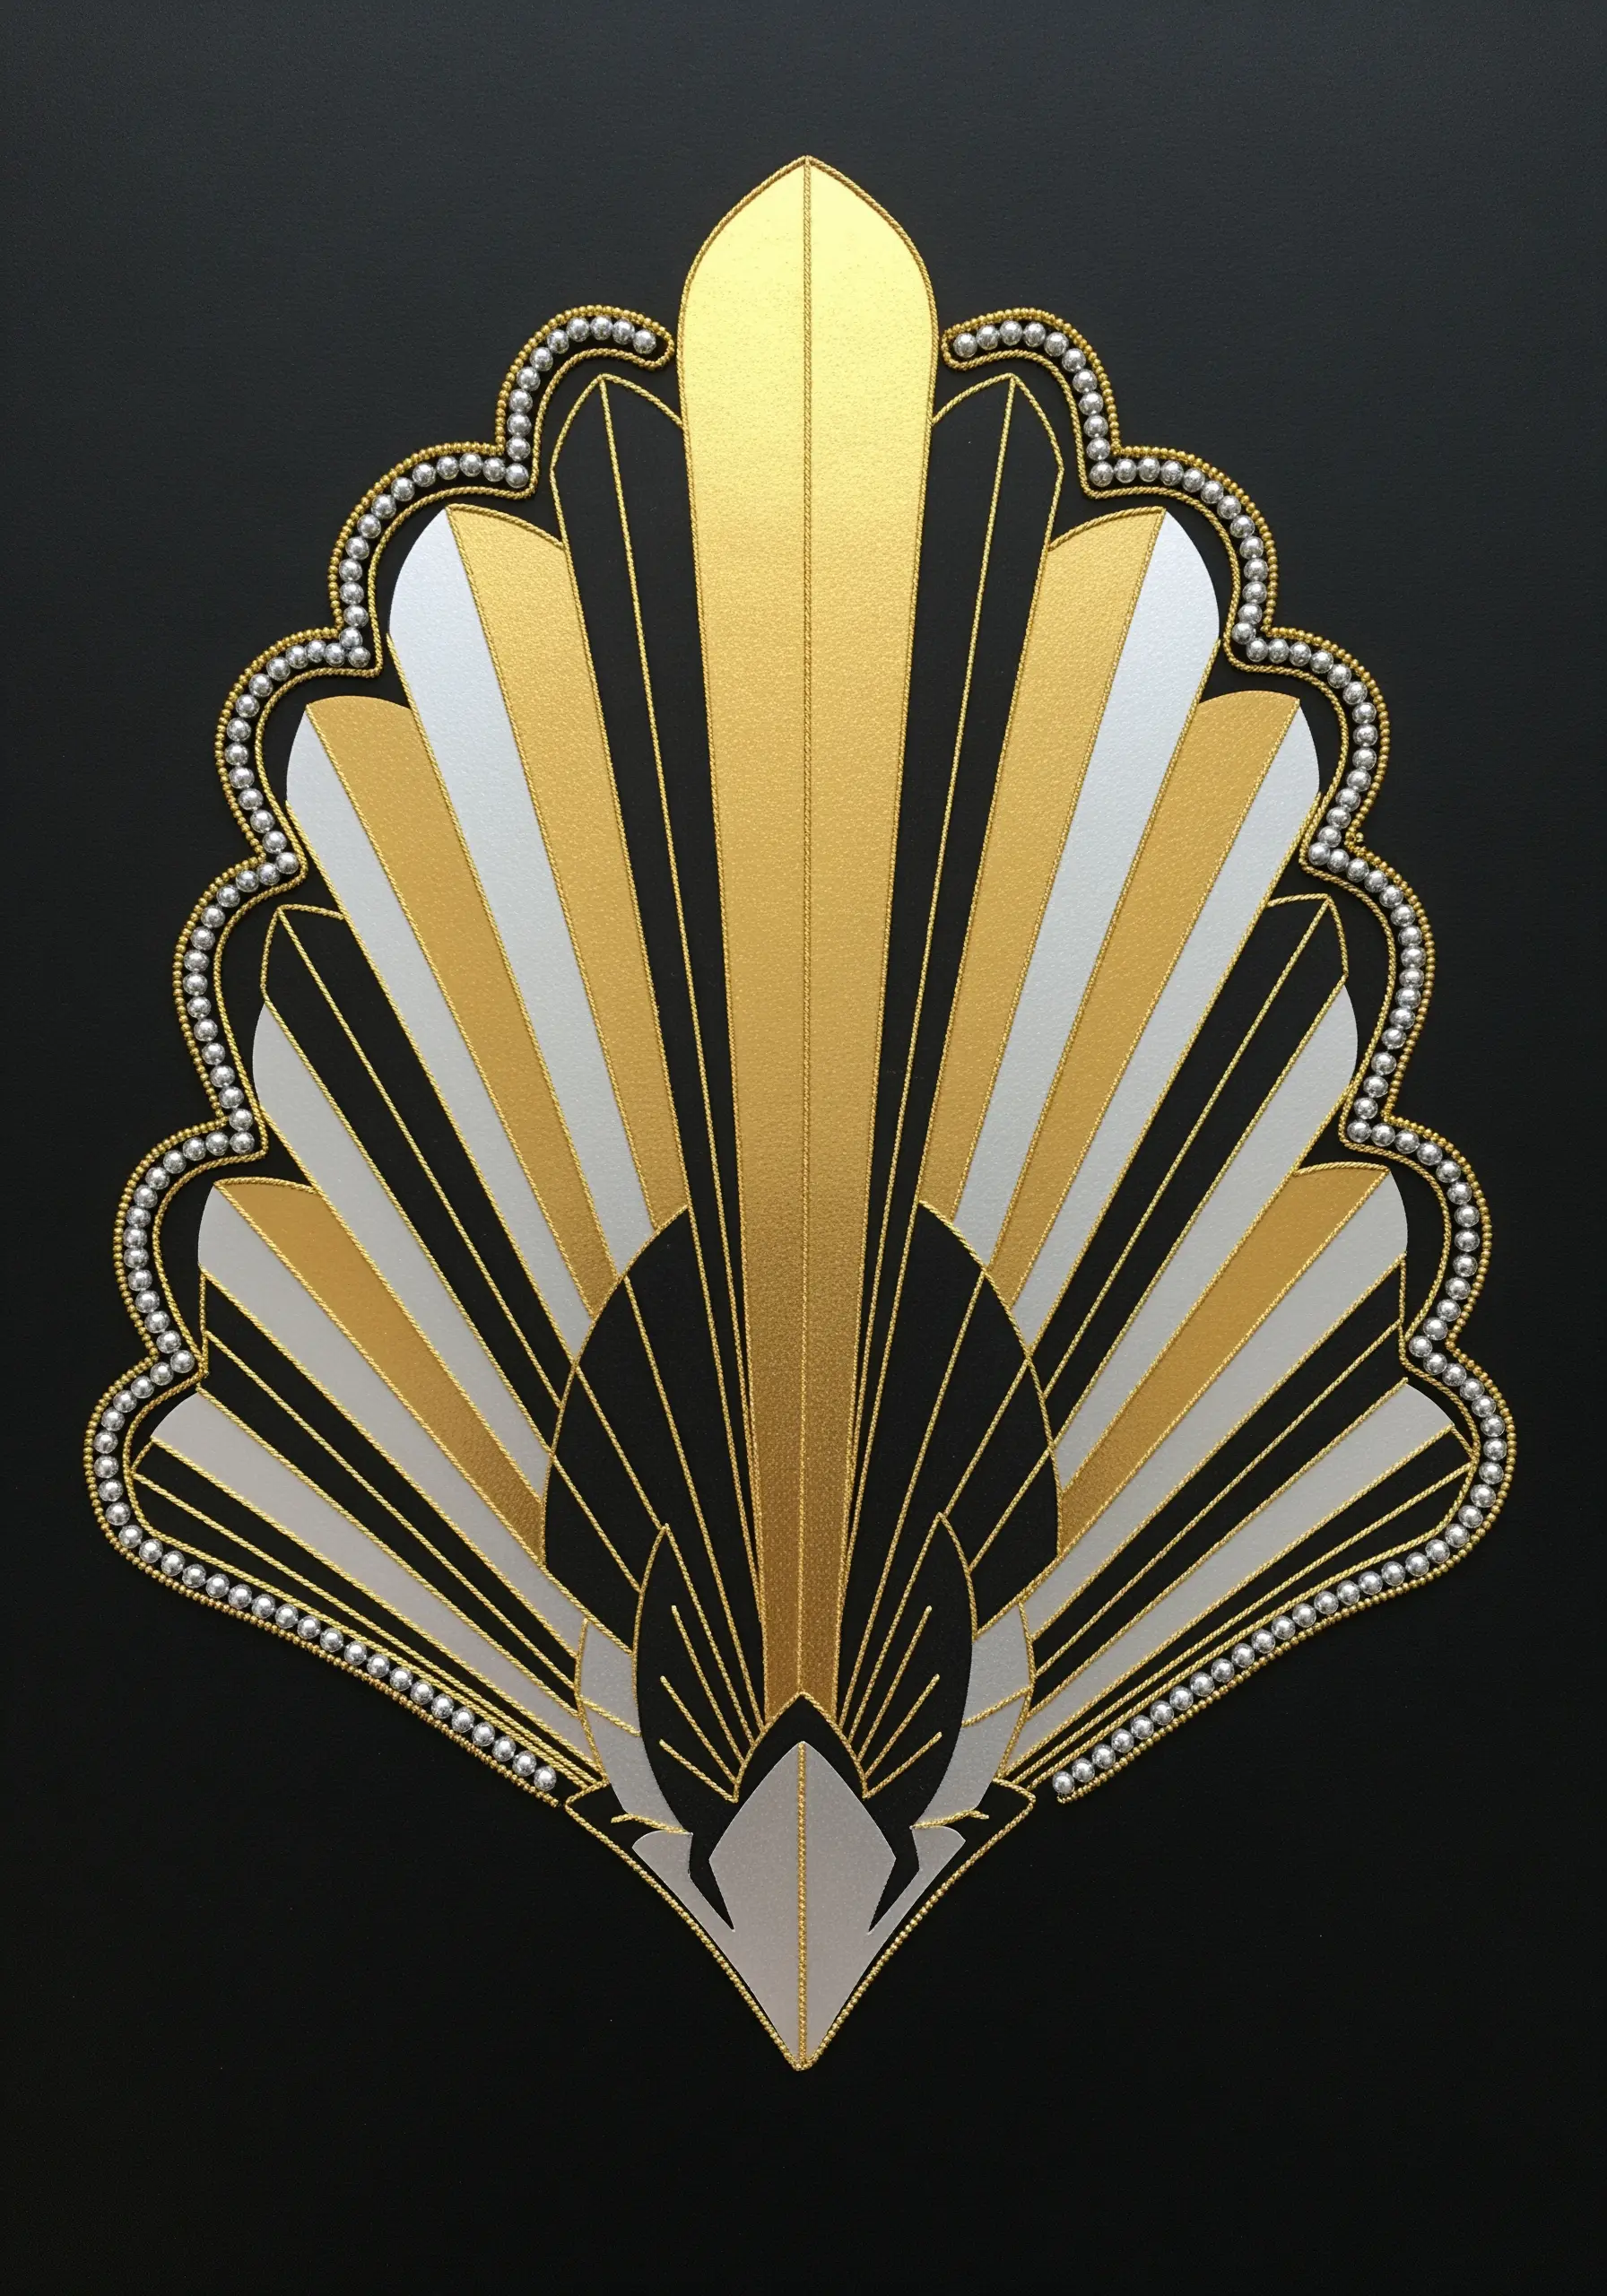
Capture the glamour of the Art Deco era by trading thread for beads to create your outlines.
Lay down a string of tiny seed beads along the edge of your design, and then use a separate, finer thread to tack it down between every two or three beads (a technique called couching).
This method creates a perfectly clean, raised line that catches the light beautifully.
The metallic or pearlescent finish of the beads adds a luxurious texture that is perfectly suited to the geometric elegance of the style.
13. Create Dimensional Eyelashes on a Paper Eye
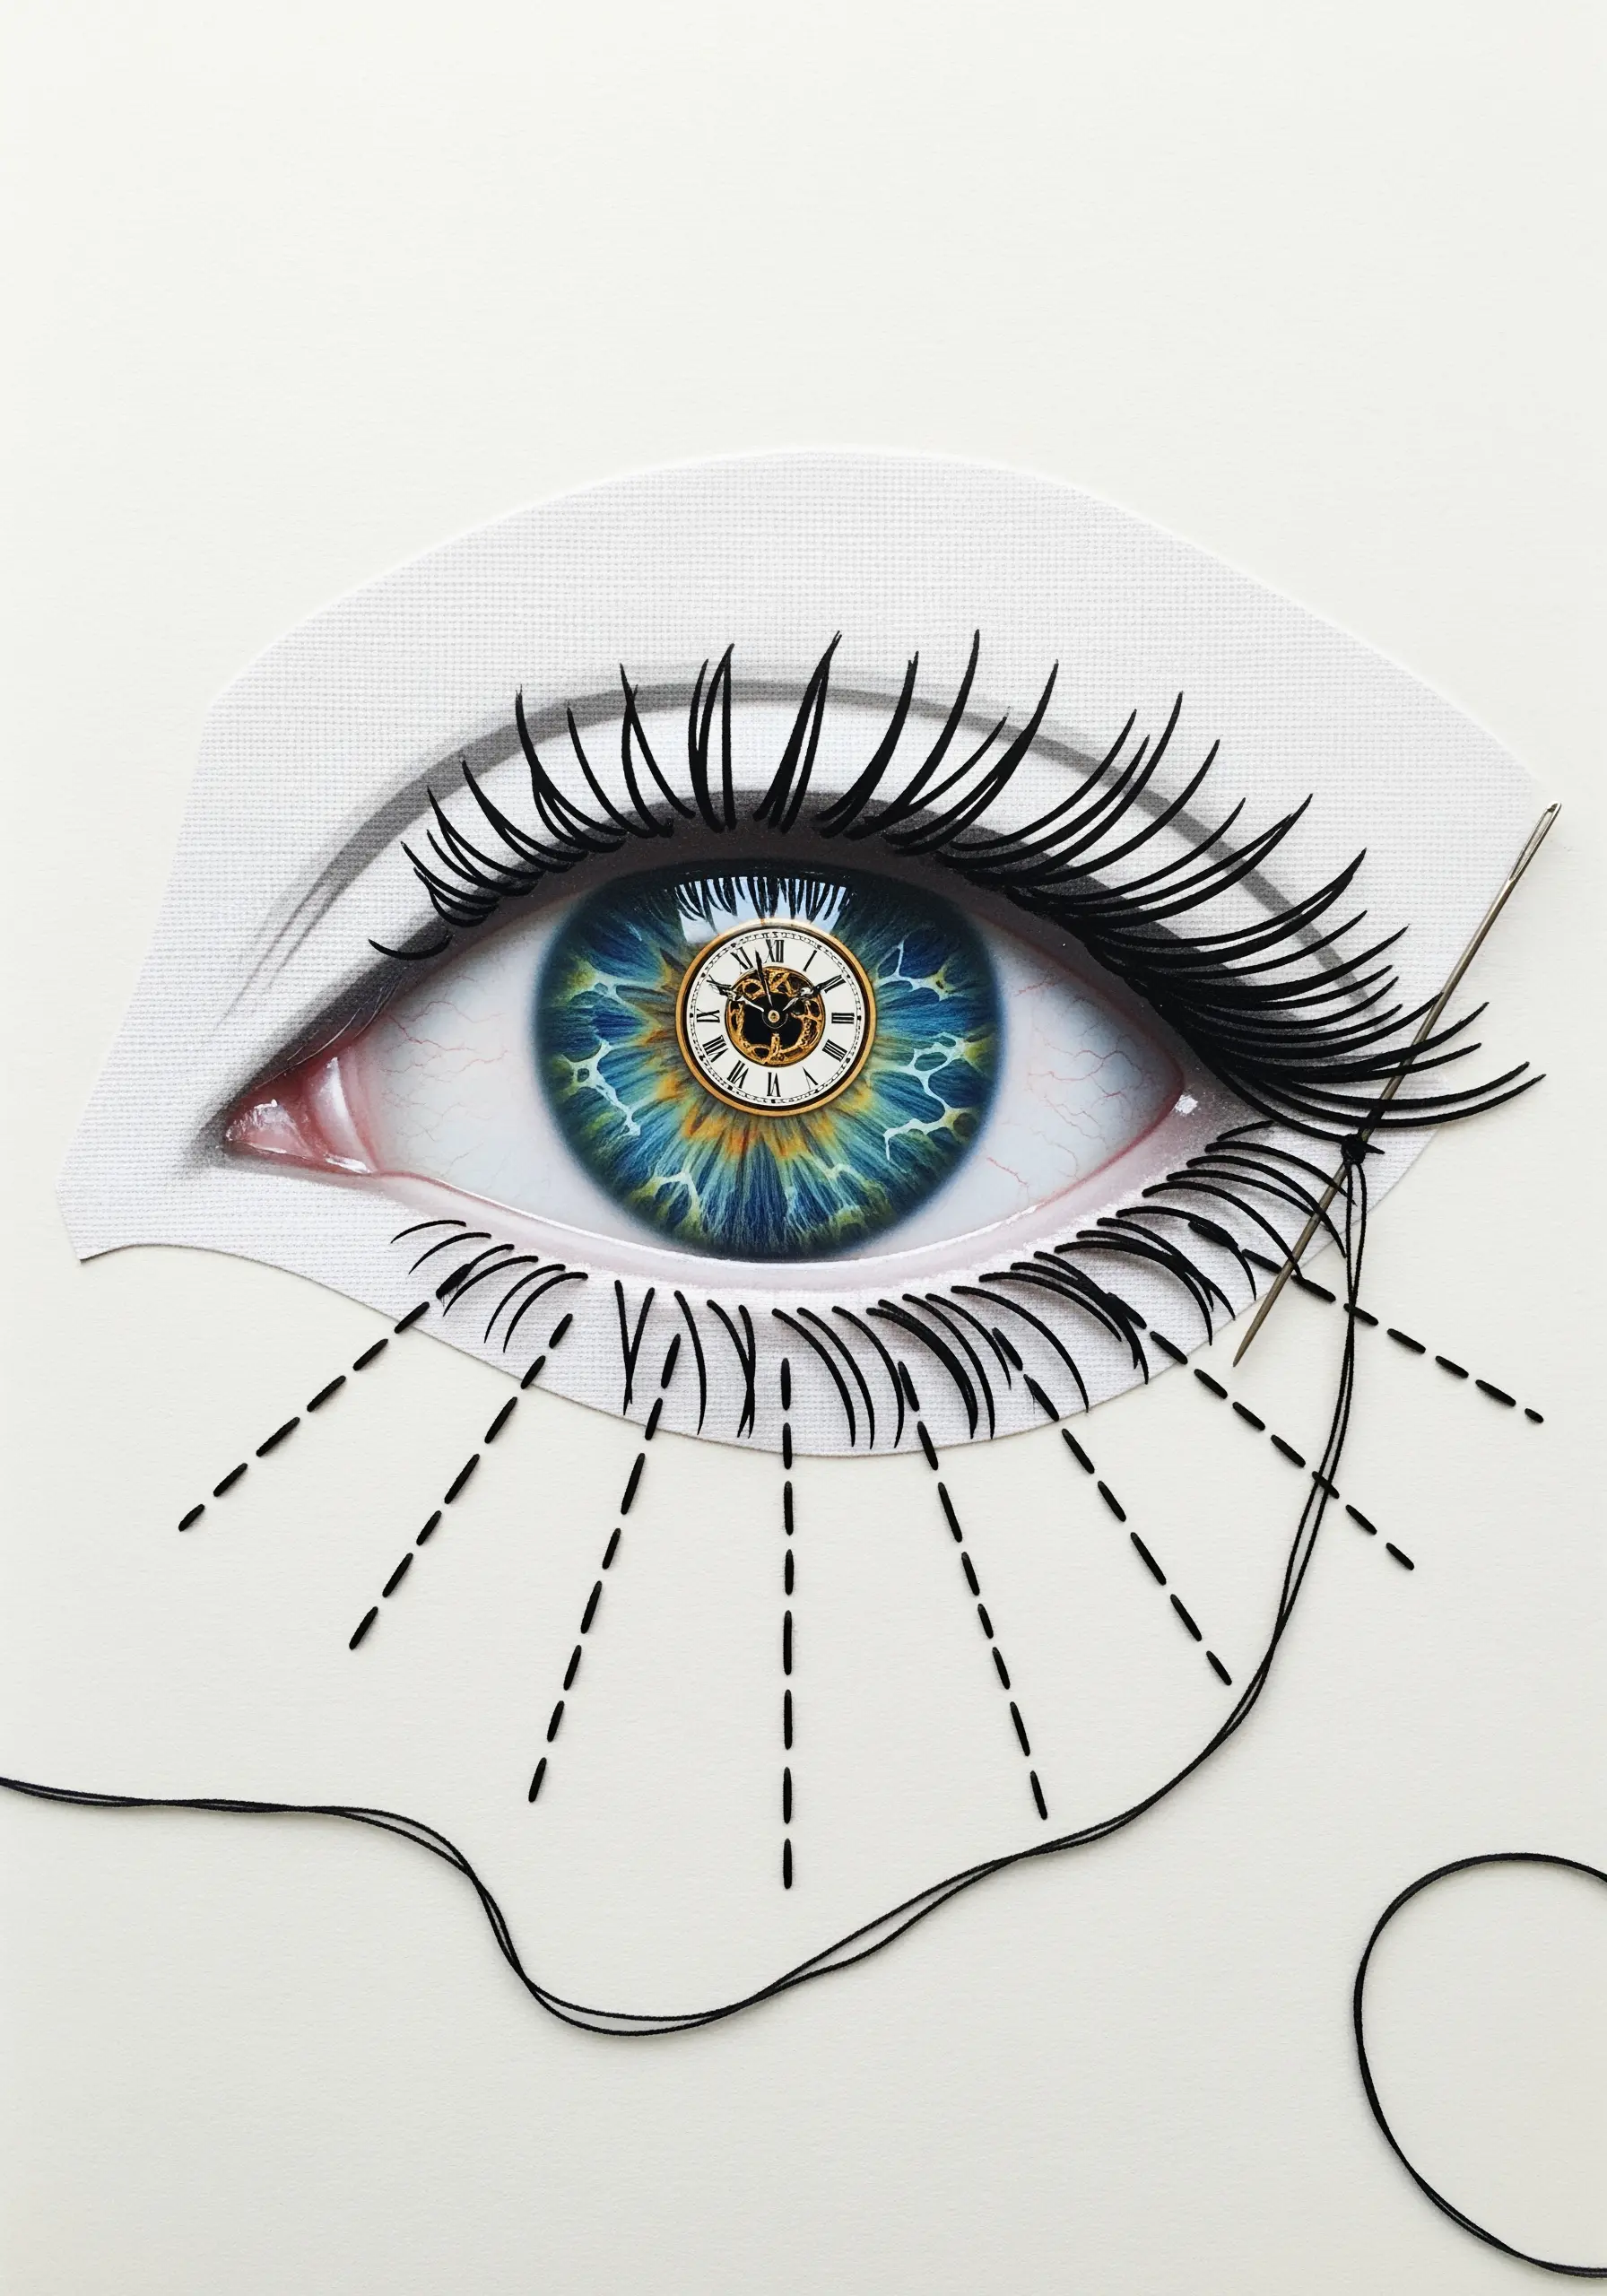
Give a surreal collage a startling touch of realism by stitching three-dimensional eyelashes directly onto the paper.
Use a thick black thread and a single, long detached chain stitch for each lash, which allows you to create a perfect curve.
Vary the length and angle of each stitch to mimic the natural flutter of real lashes.
The thread rising from the flat surface creates a captivating illusion, transforming a simple cutout into a piece of interactive, dimensional art.
14. Add Subtle Knots for Whimsical Mushroom Textures
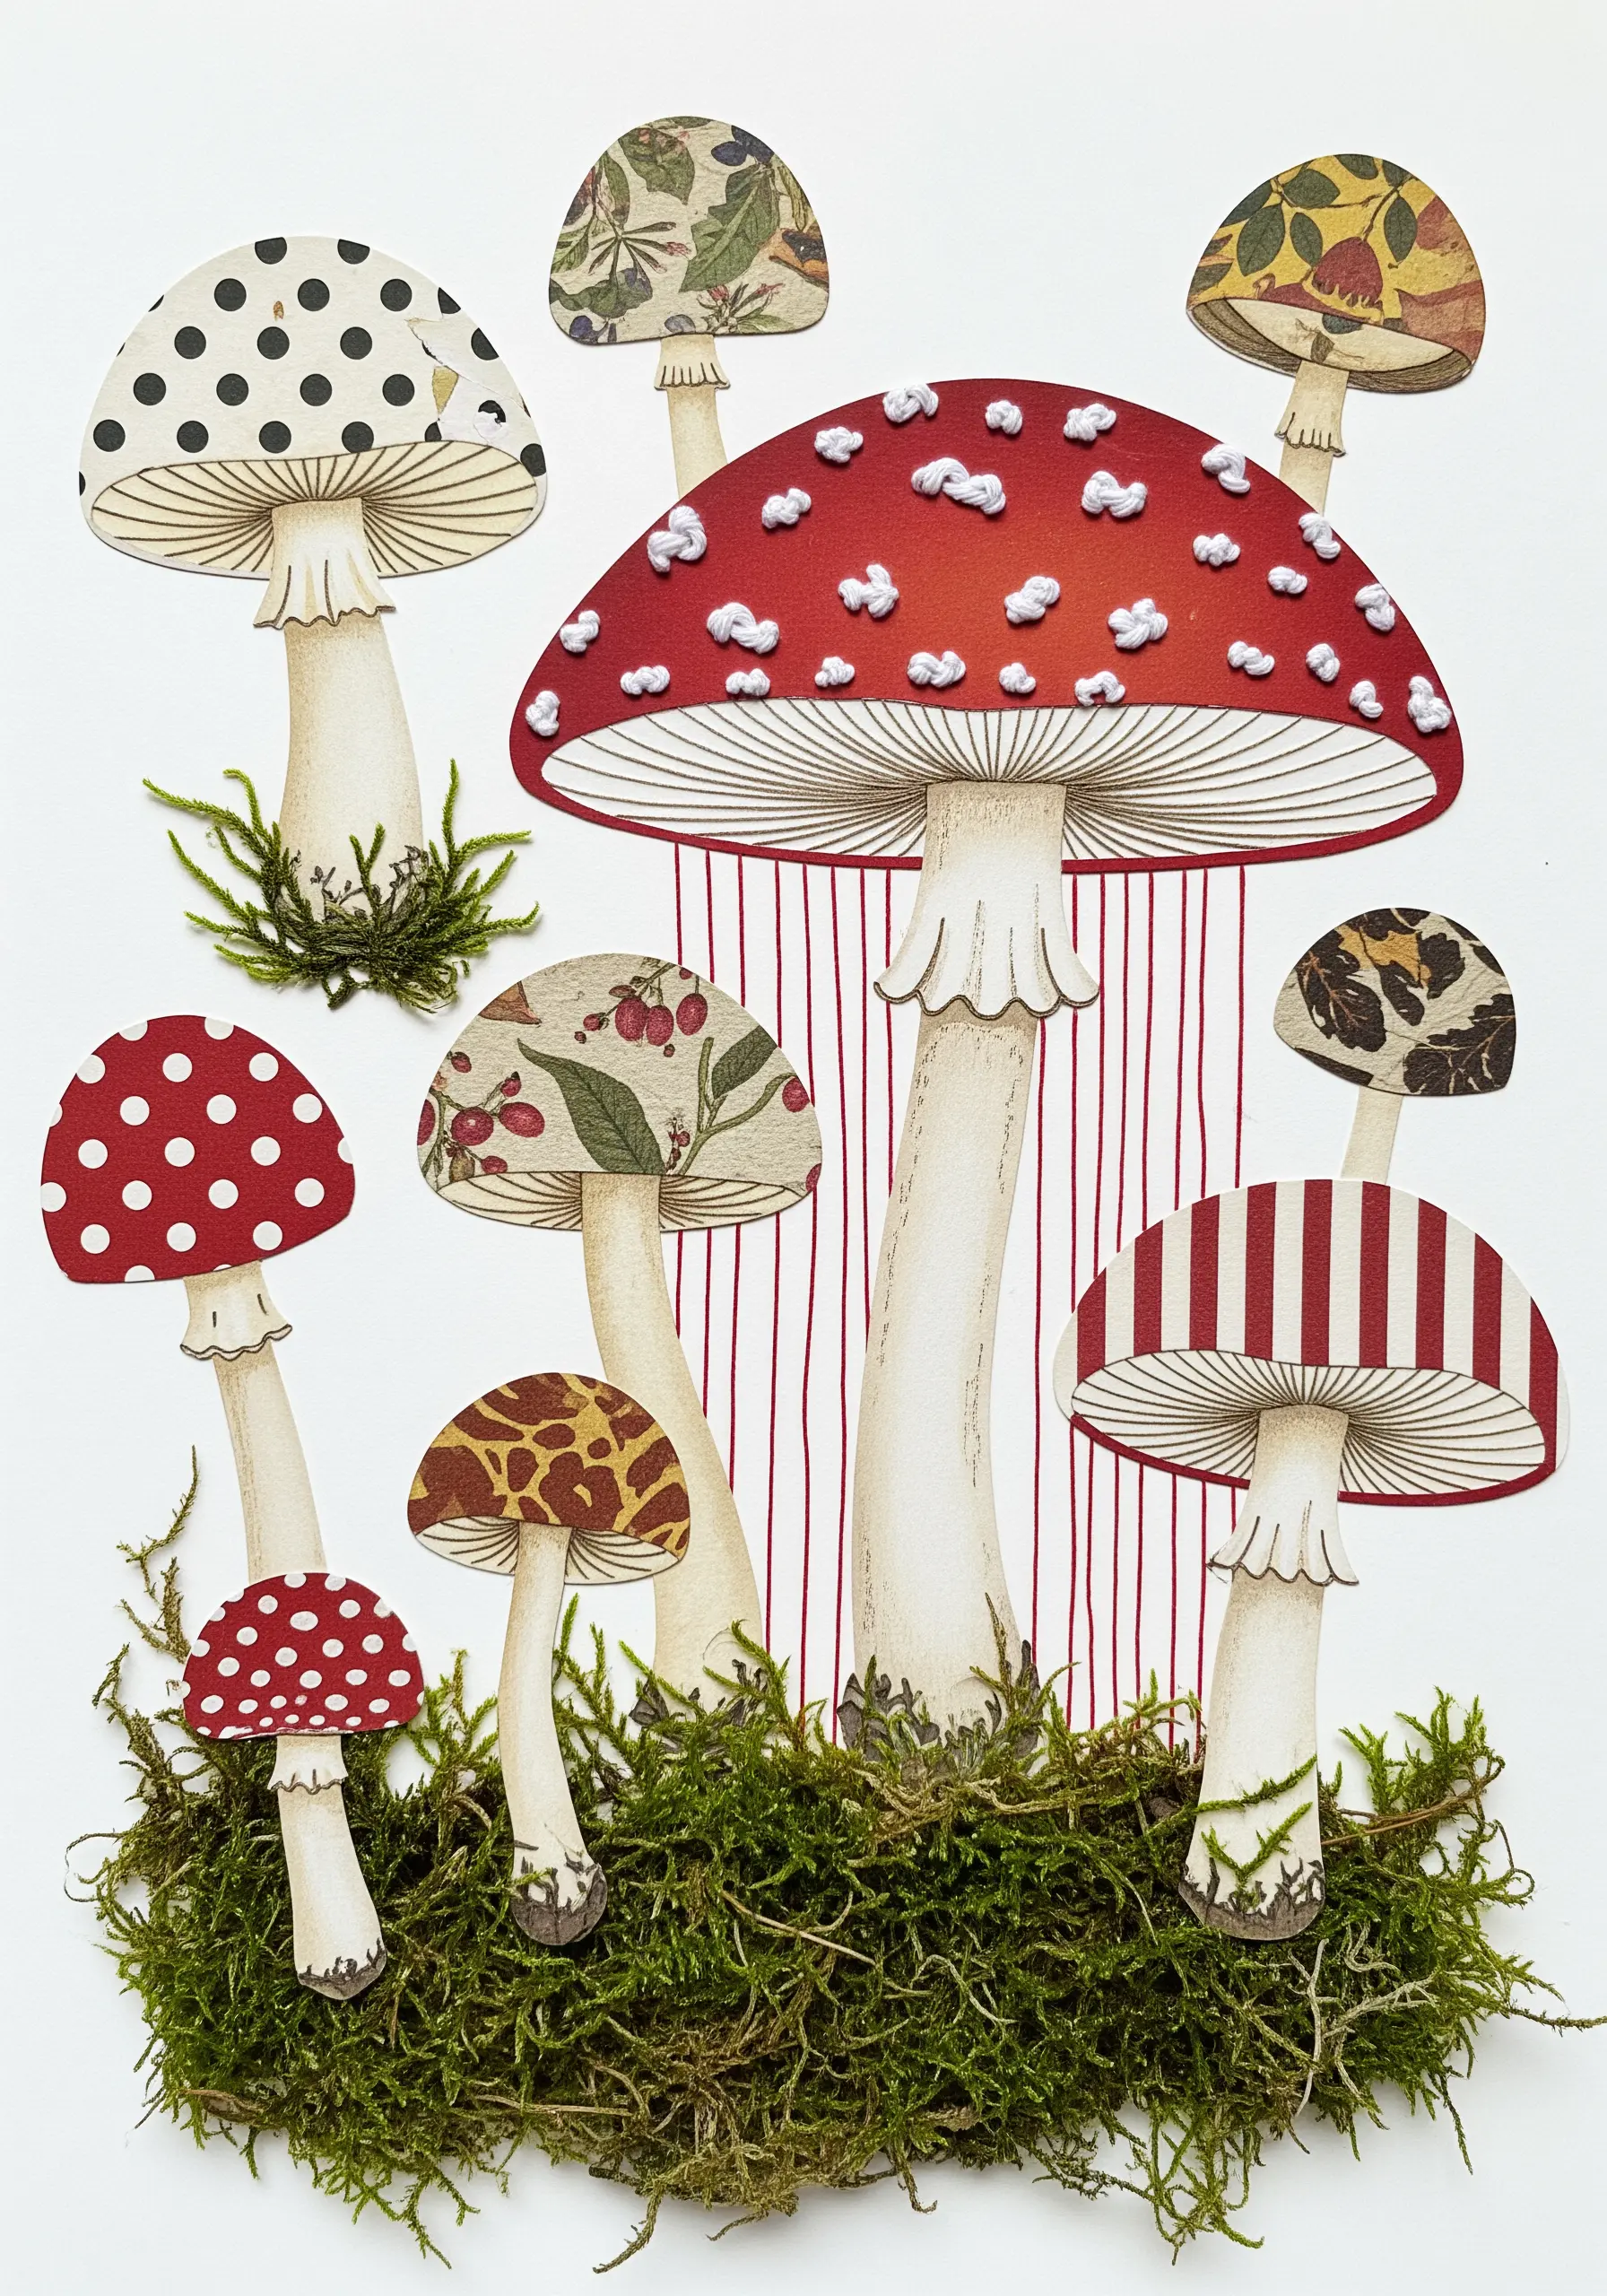
Enhance the charm of illustrated mushrooms by adding small, tactile details with just a few simple stitches.
Use white French knots on a red cap to create the iconic spots of a fly agaric mushroom, or add clusters of knots to suggest a rougher texture.
For the gills, use short, vertical straight stitches in a contrasting color to add depth and detail underneath the cap.
These small additions give the paper cutouts a delightful, handcrafted feel without overpowering their whimsical patterns.
15. Illustrate Light and Shadow with Stitch Density

Use thread to represent the phases of the moon by varying the density of your stitches.
On the illuminated portions of the moon, use a dense satin stitch or tightly packed seed stitches with a bright silver thread to create a full, reflective surface.
For the shadowed areas, use only a few sparse, scattered stitches or leave the surface bare to create a sense of darkness and depth.
This technique is a beautiful way to translate the concept of light into pure texture, making it one of the most effective celestial micro-embroidery ideas for modern projects.
16. Create a Raised Satin Stitch Emblem
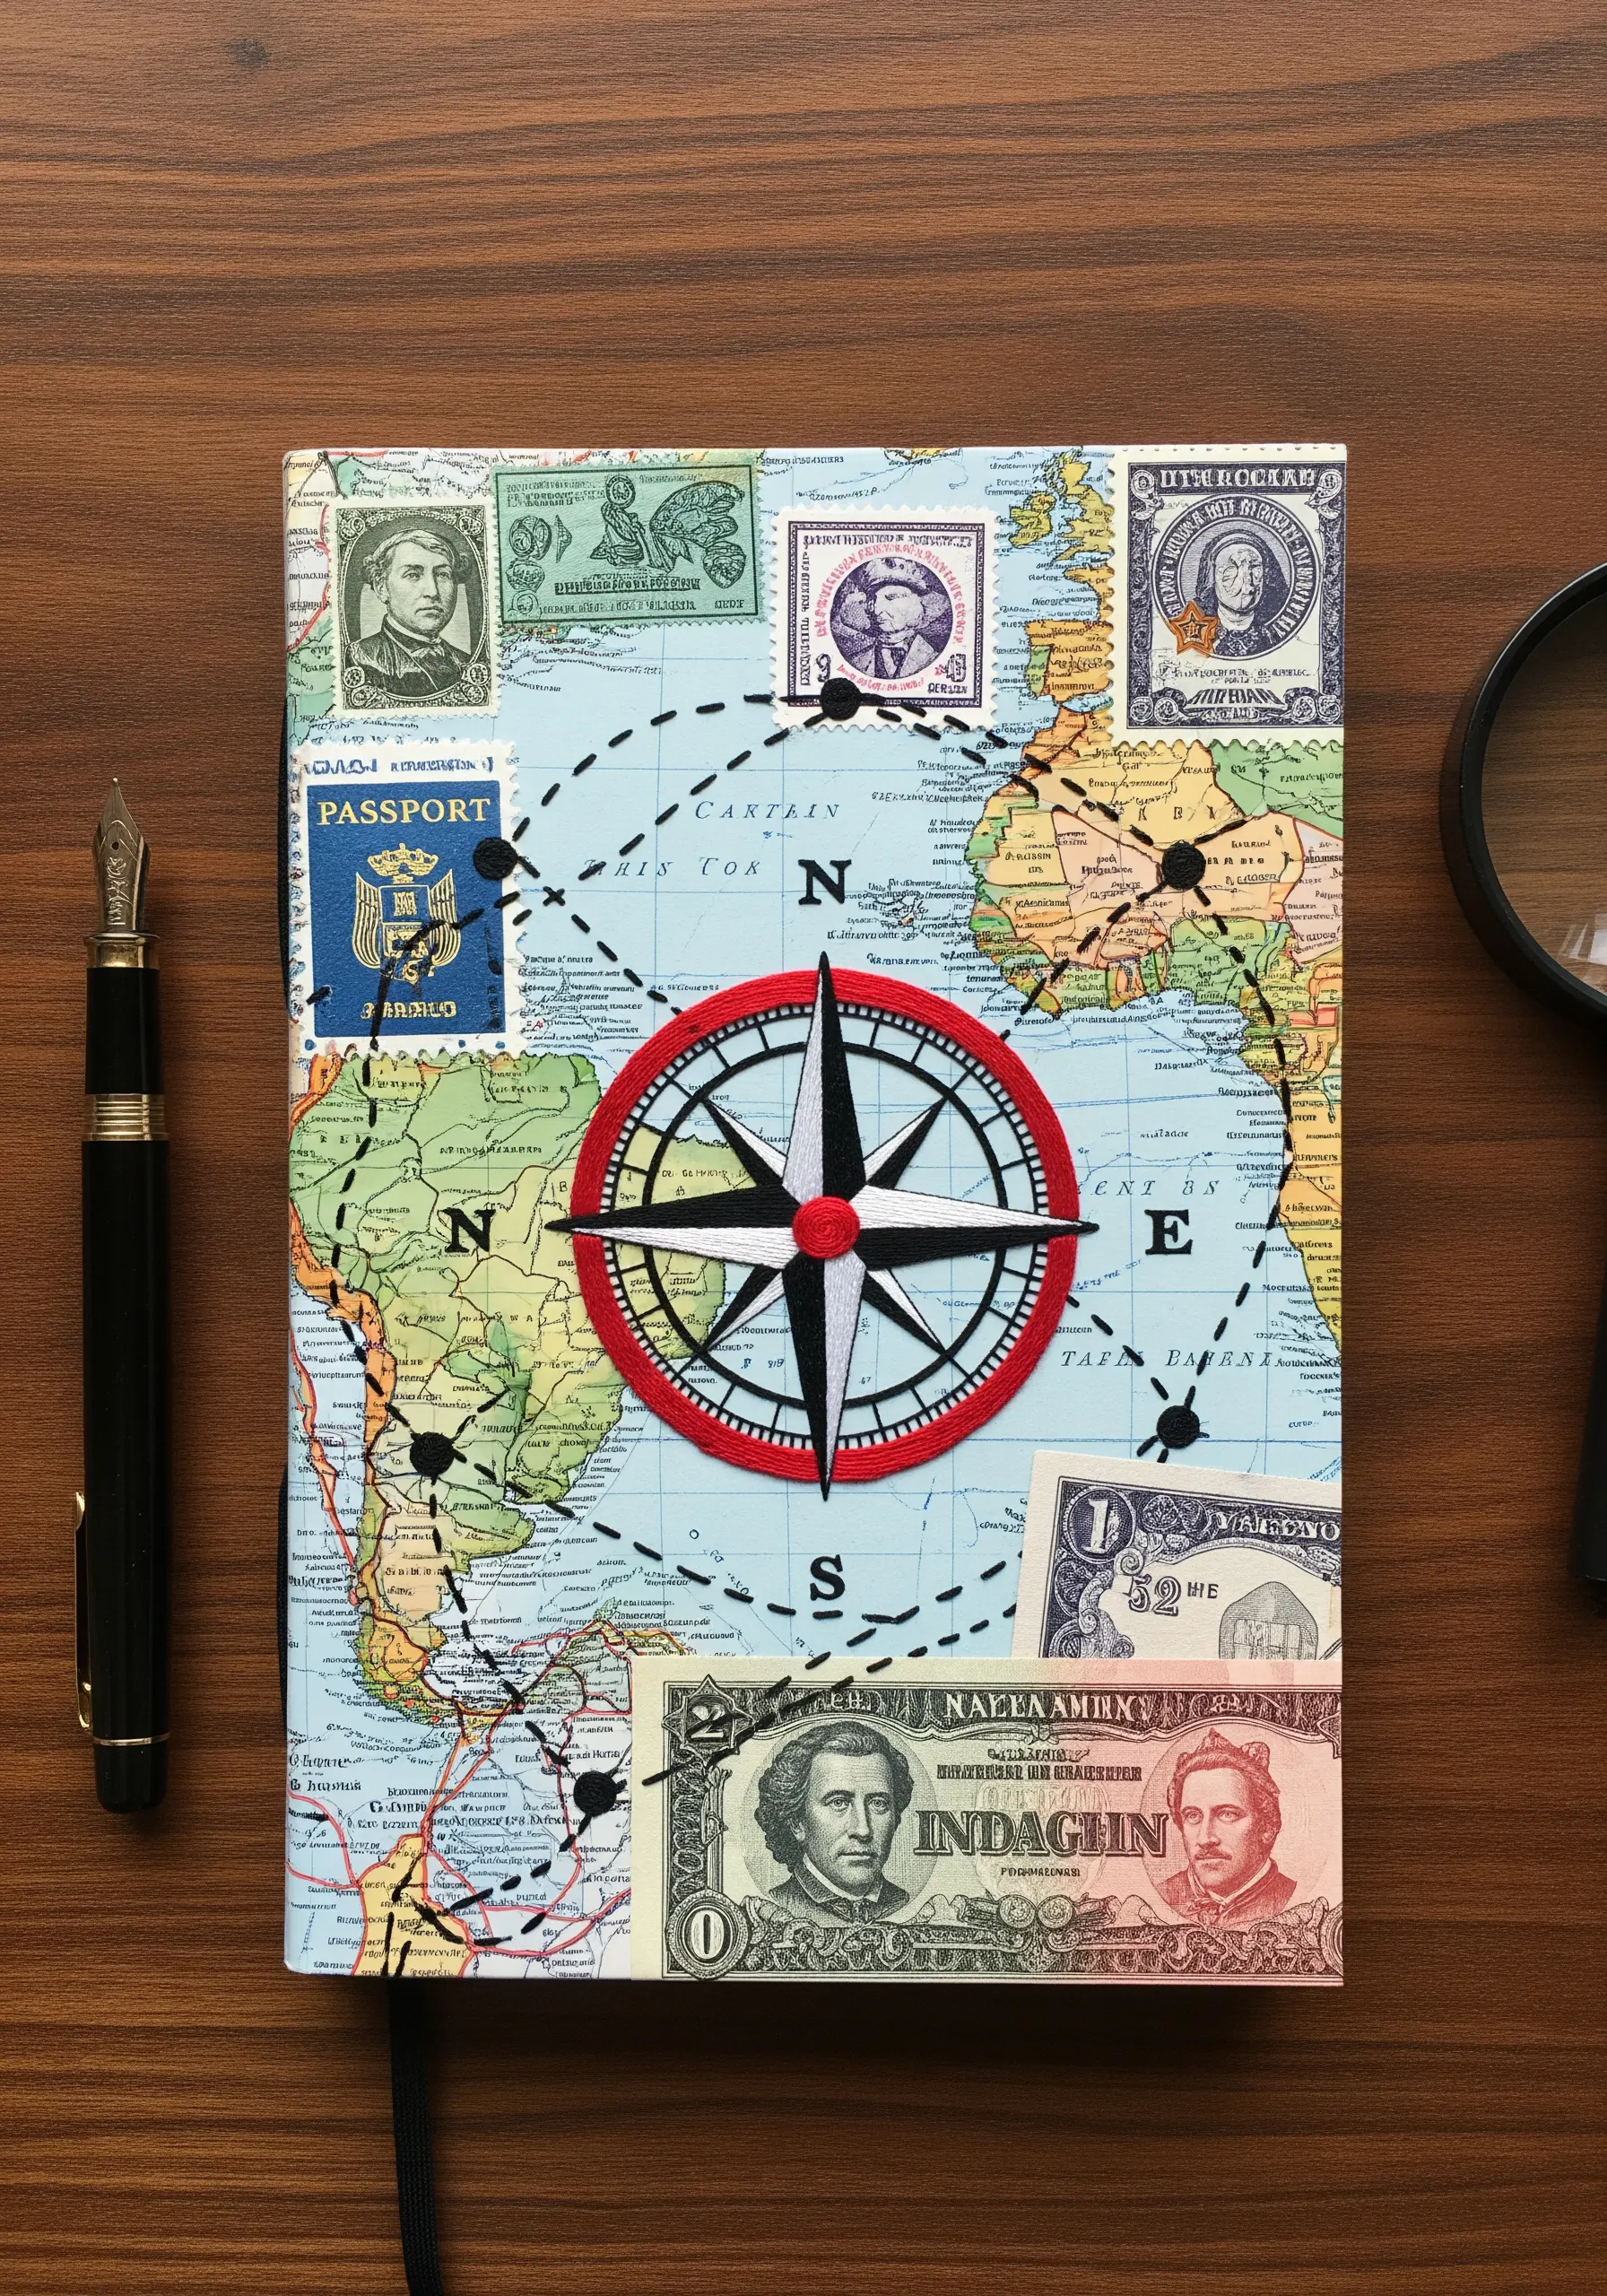
Make an embroidered element the undeniable focal point of your collage by giving it a raised, patch-like finish.
First, outline your shape—like this compass rose—with a split stitch. This creates a firm, raised border.
Then, fill the shape with satin stitches, making sure your needle goes over the split stitch outline on every pass.
This technique results in a perfectly smooth, dimensional emblem that stands out beautifully against a busy background like a map.
17. Simulate Fabric and Shine with Mixed Embellishments
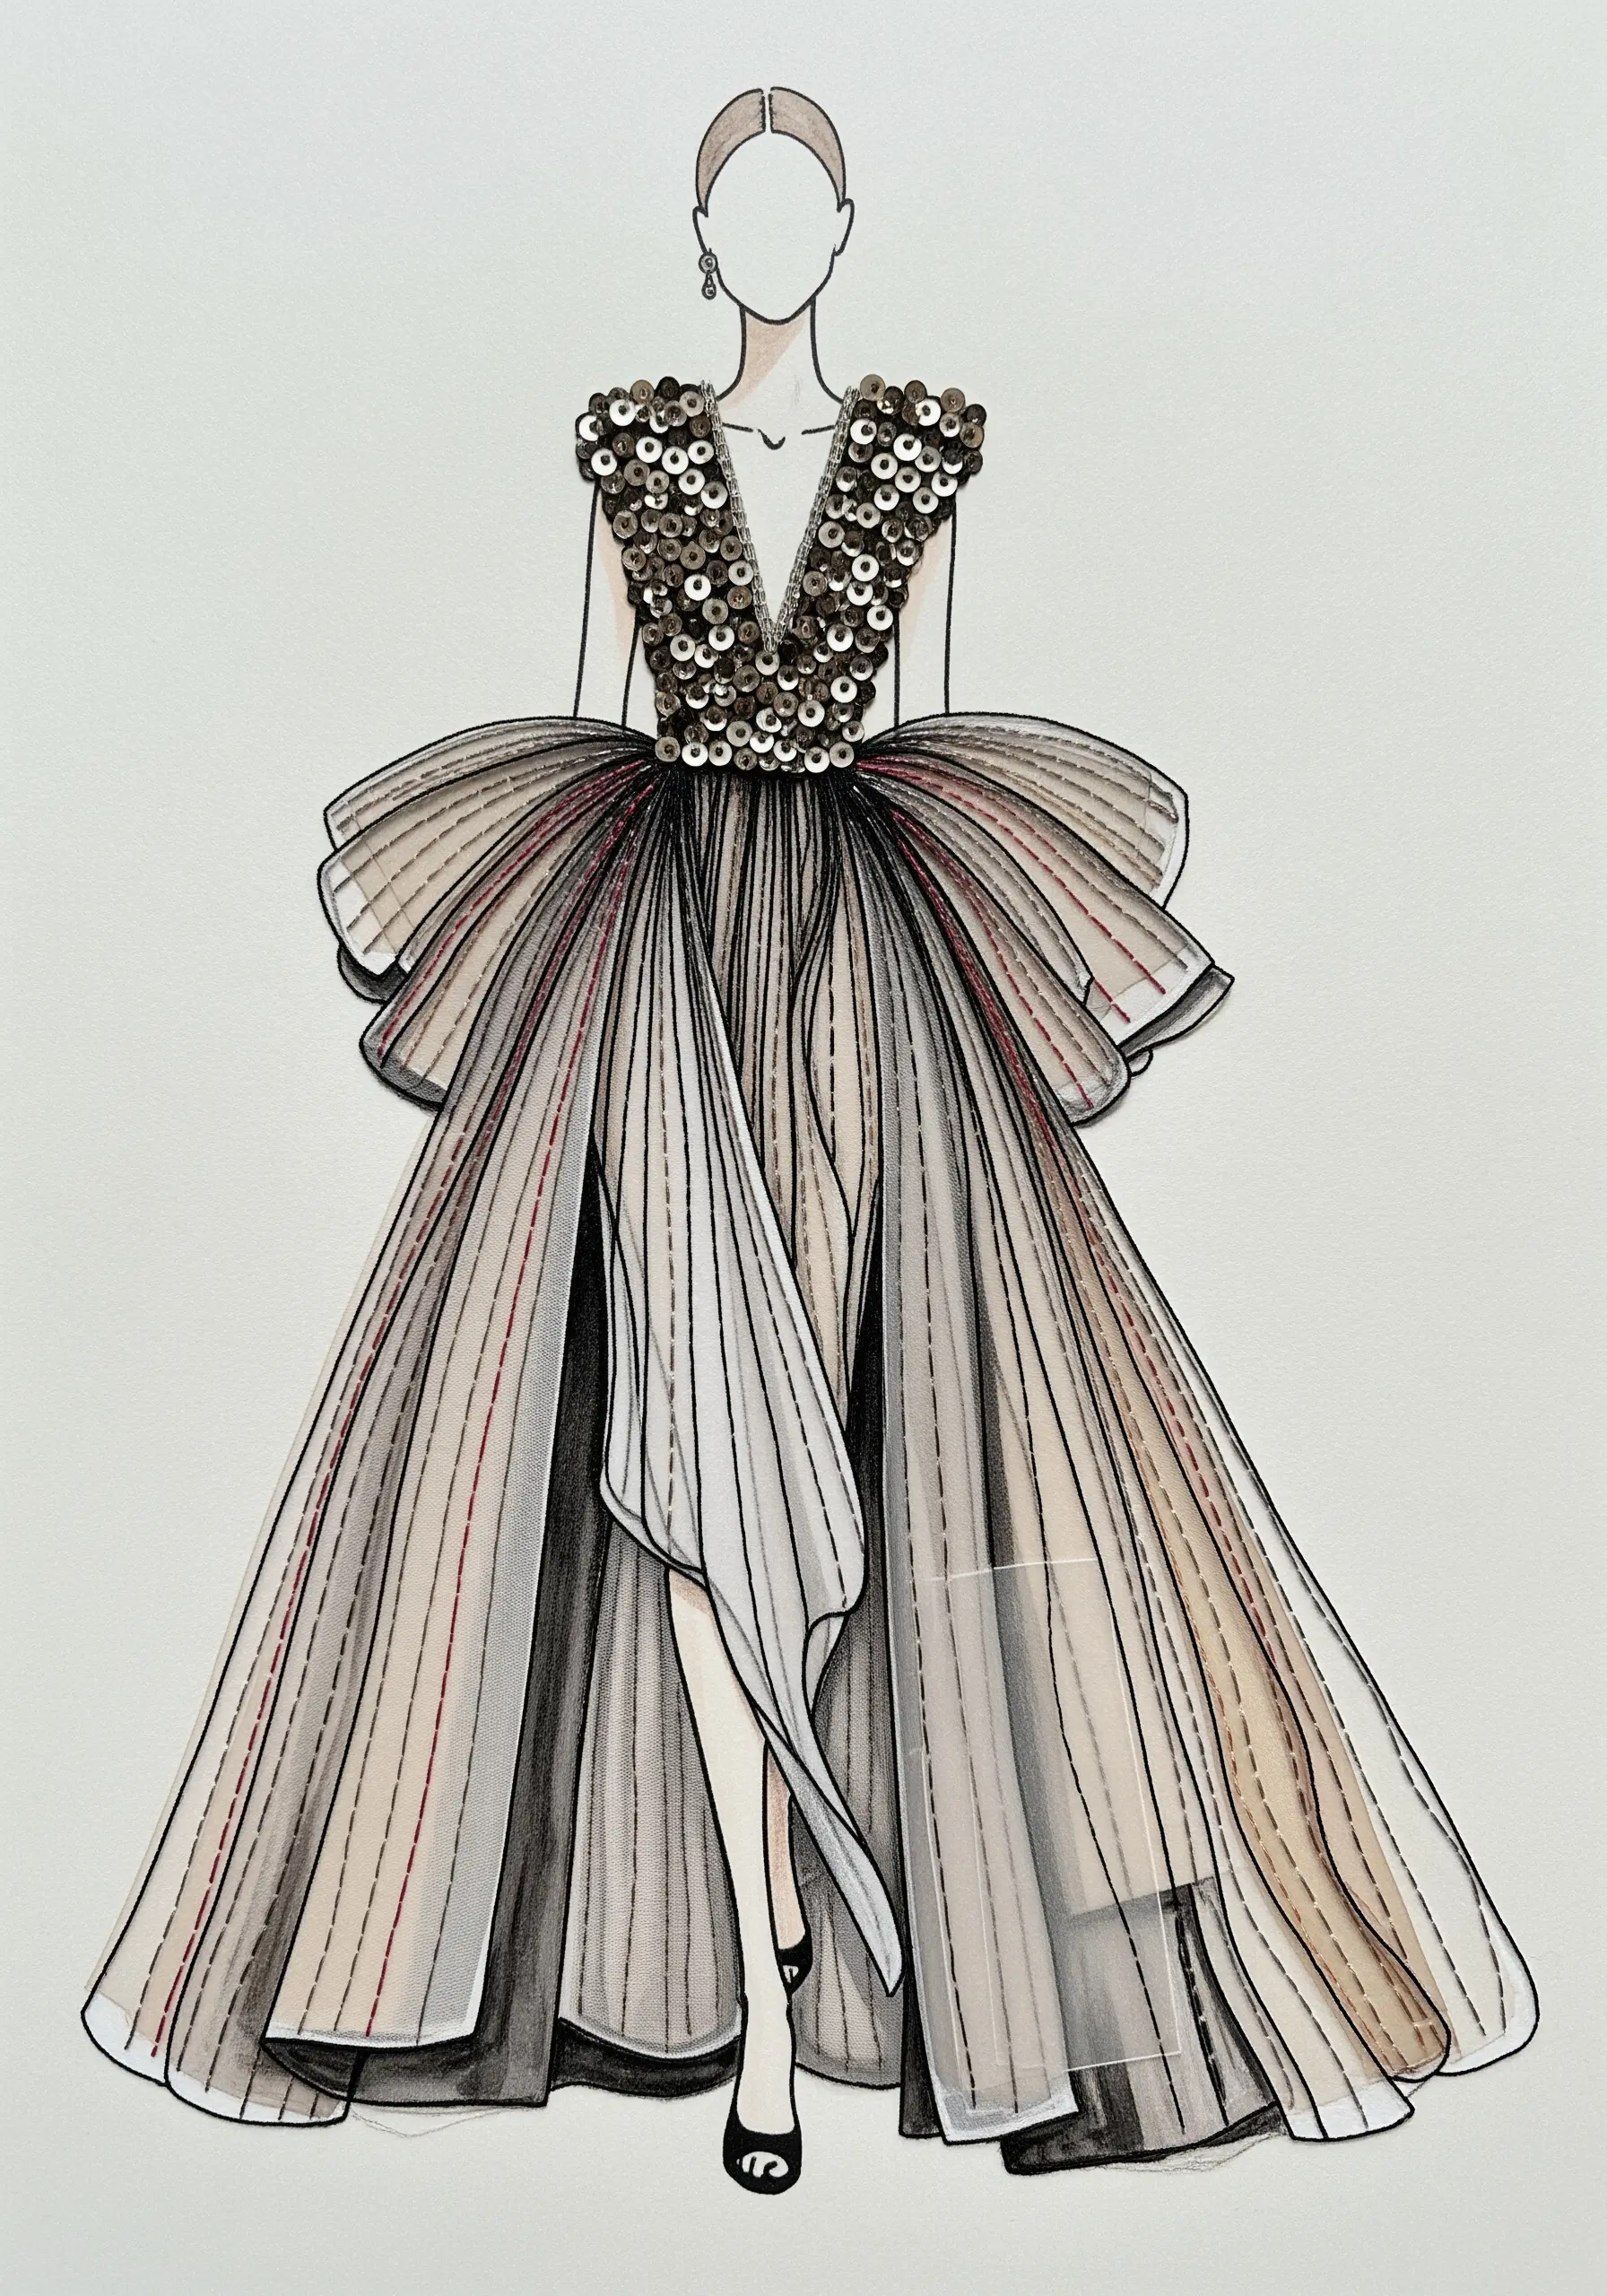
Recreate the luxury of a couture gown in your fashion illustrations by combining sequins and thread.
Apply flat sequins to the bodice with a single, tiny backstitch through each hole for a secure, shimmering surface that mimics beaded fabric.
For the skirt, use long, vertical straight stitches with a fine, silky thread to suggest the elegant drape and subtle sheen of tulle or silk.
This pairing of materials perfectly captures the different textures and light-play of a high-fashion garment.
18. Represent Sound with Loose, Vibrating Threads

Turn your thread into a metaphor for sound by allowing it to hang loose and free.
To create the strings of an instrument like a cello, couch down several strands of a lustrous, coppery thread only at the top and bottom of your collage.
Leaving the threads untethered in the middle allows them to move and catch the light, creating a visual representation of vibration and resonance.
This conceptual approach adds a layer of poetry and movement to an otherwise static piece.
19. Use Minimal Stitches on a Bold Color-Block Background
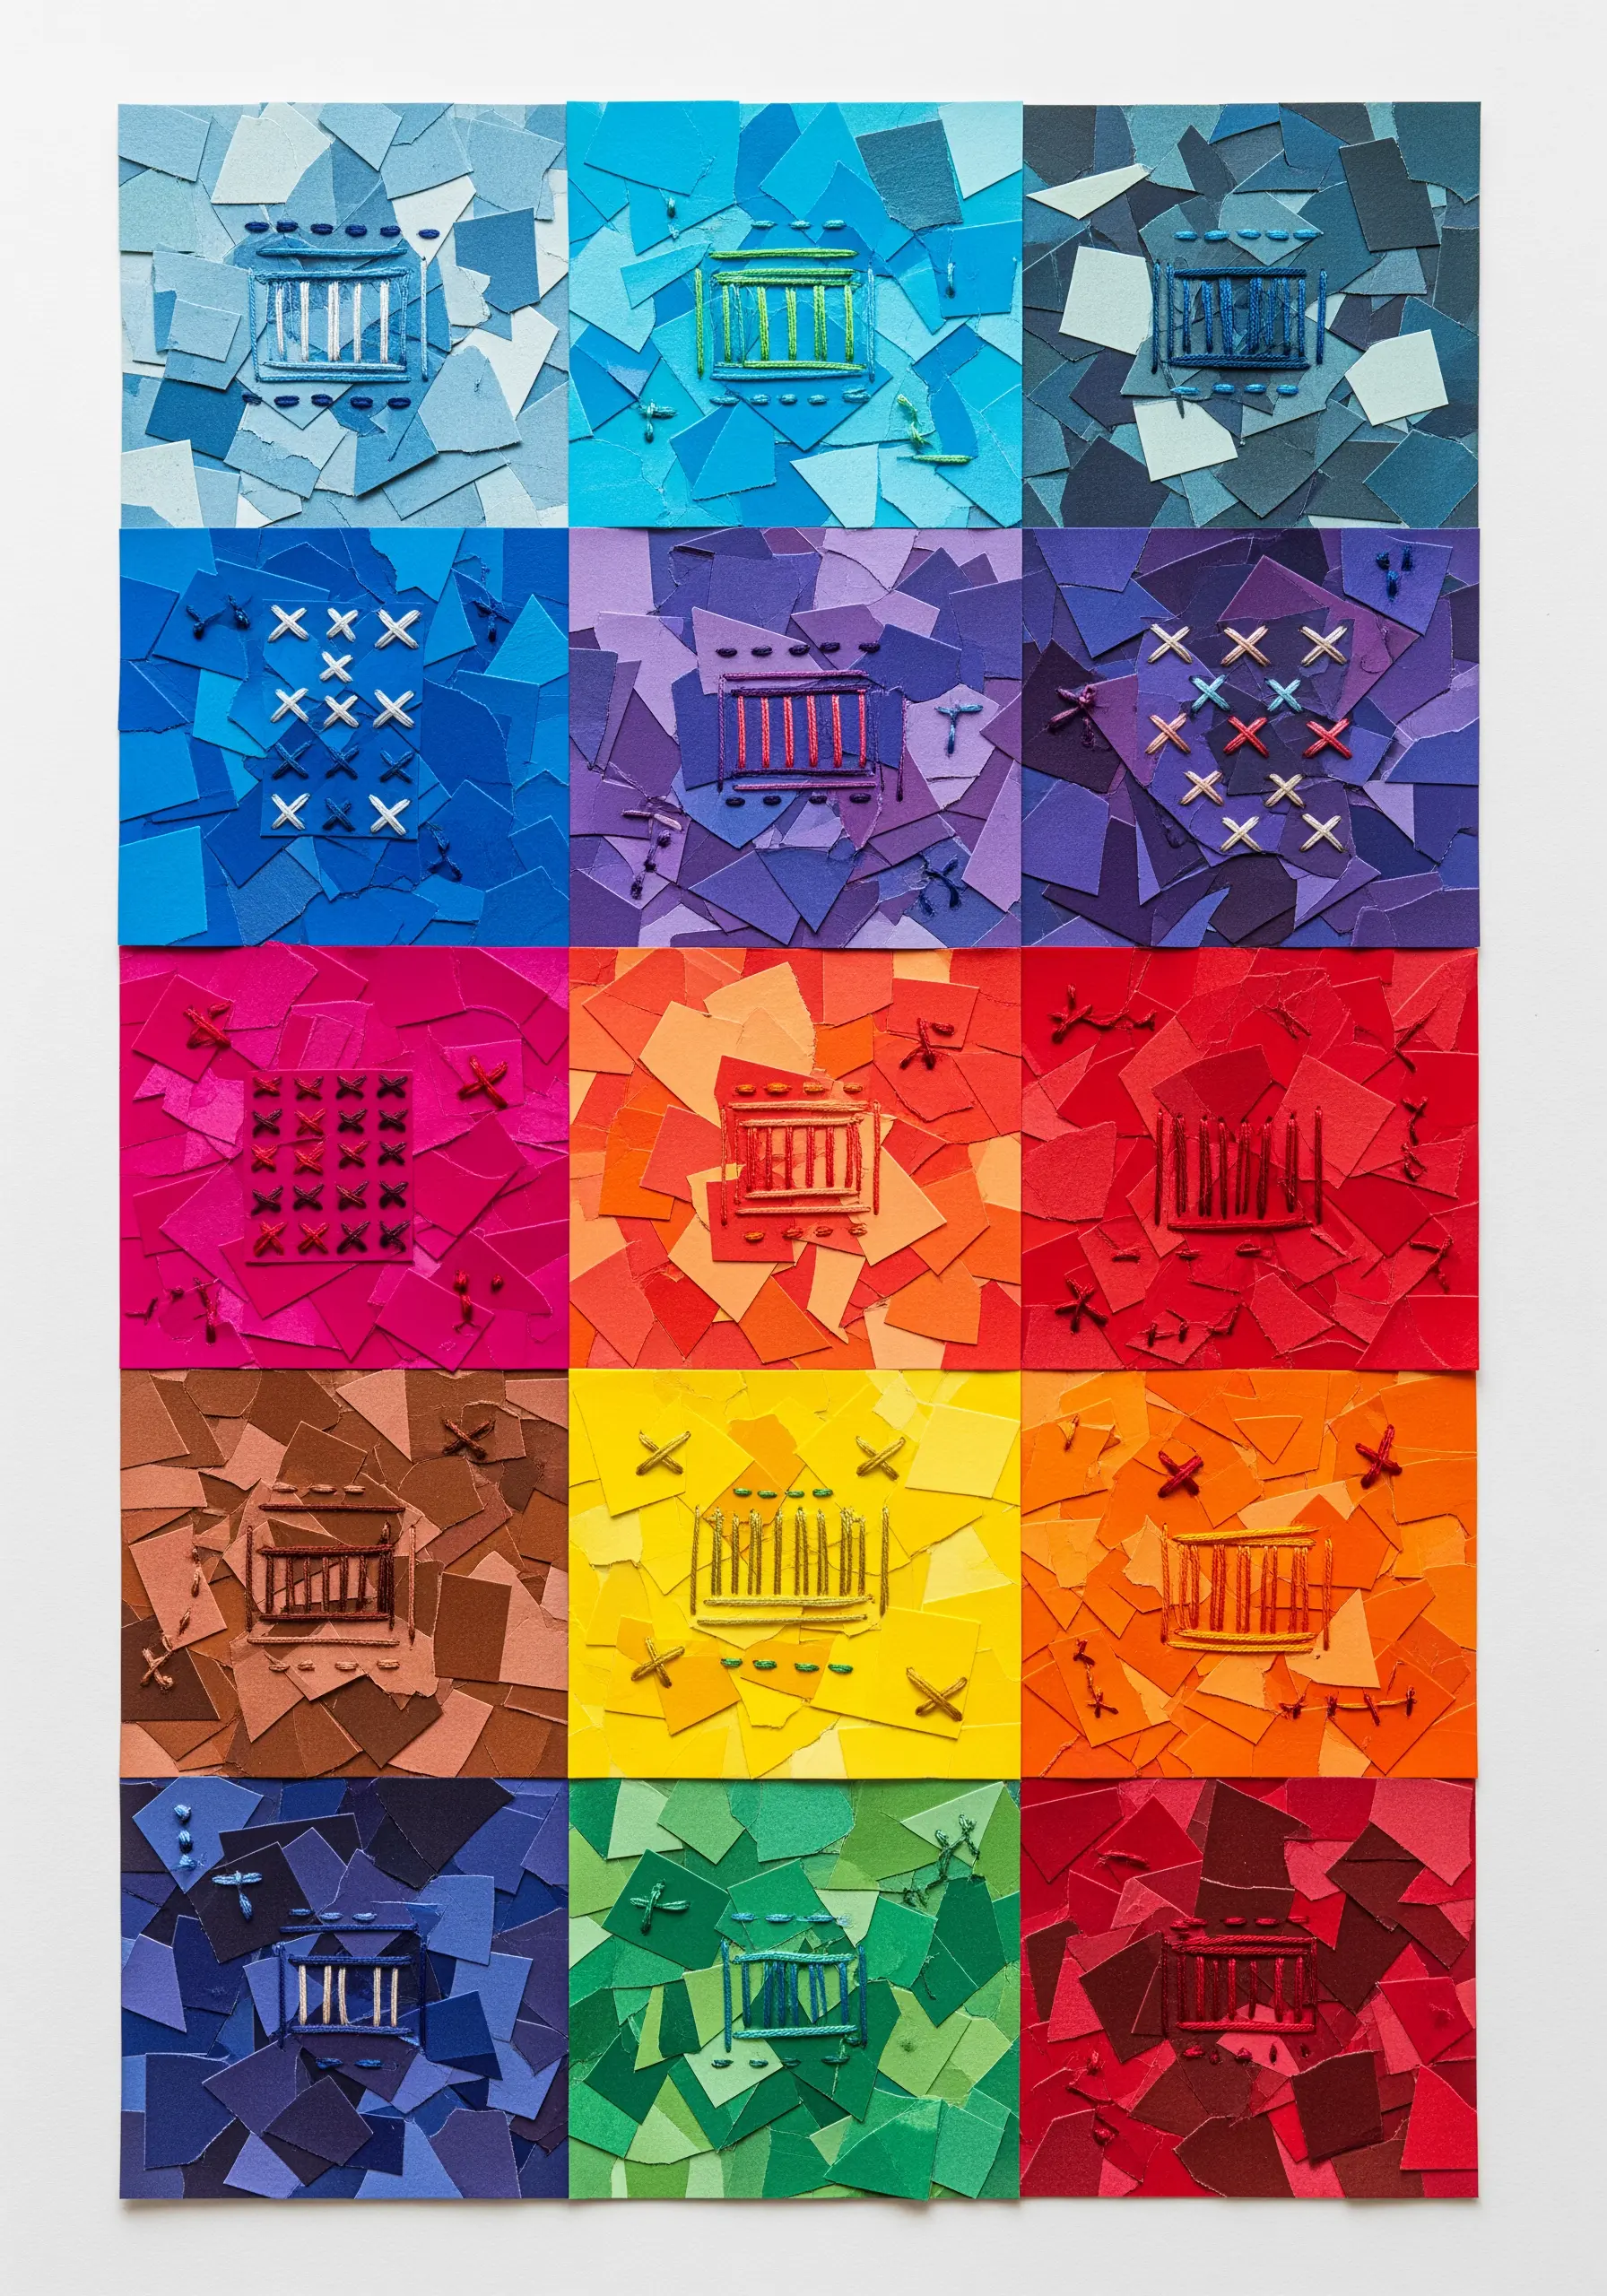
When your background is a vibrant collage of torn paper, simple, graphic stitches can make the biggest impact.
Create minimalist icons using fundamental stitches like the cross stitch, straight stitch, and seed stitch.
Use a single, contrasting color of thread within each color block to ensure your stitched motifs stand out clearly.
This approach creates a sophisticated balance between the chaotic texture of the paper and the clean, ordered geometry of the stitches.
20. Suggest Motion with Stitched Energy Lines
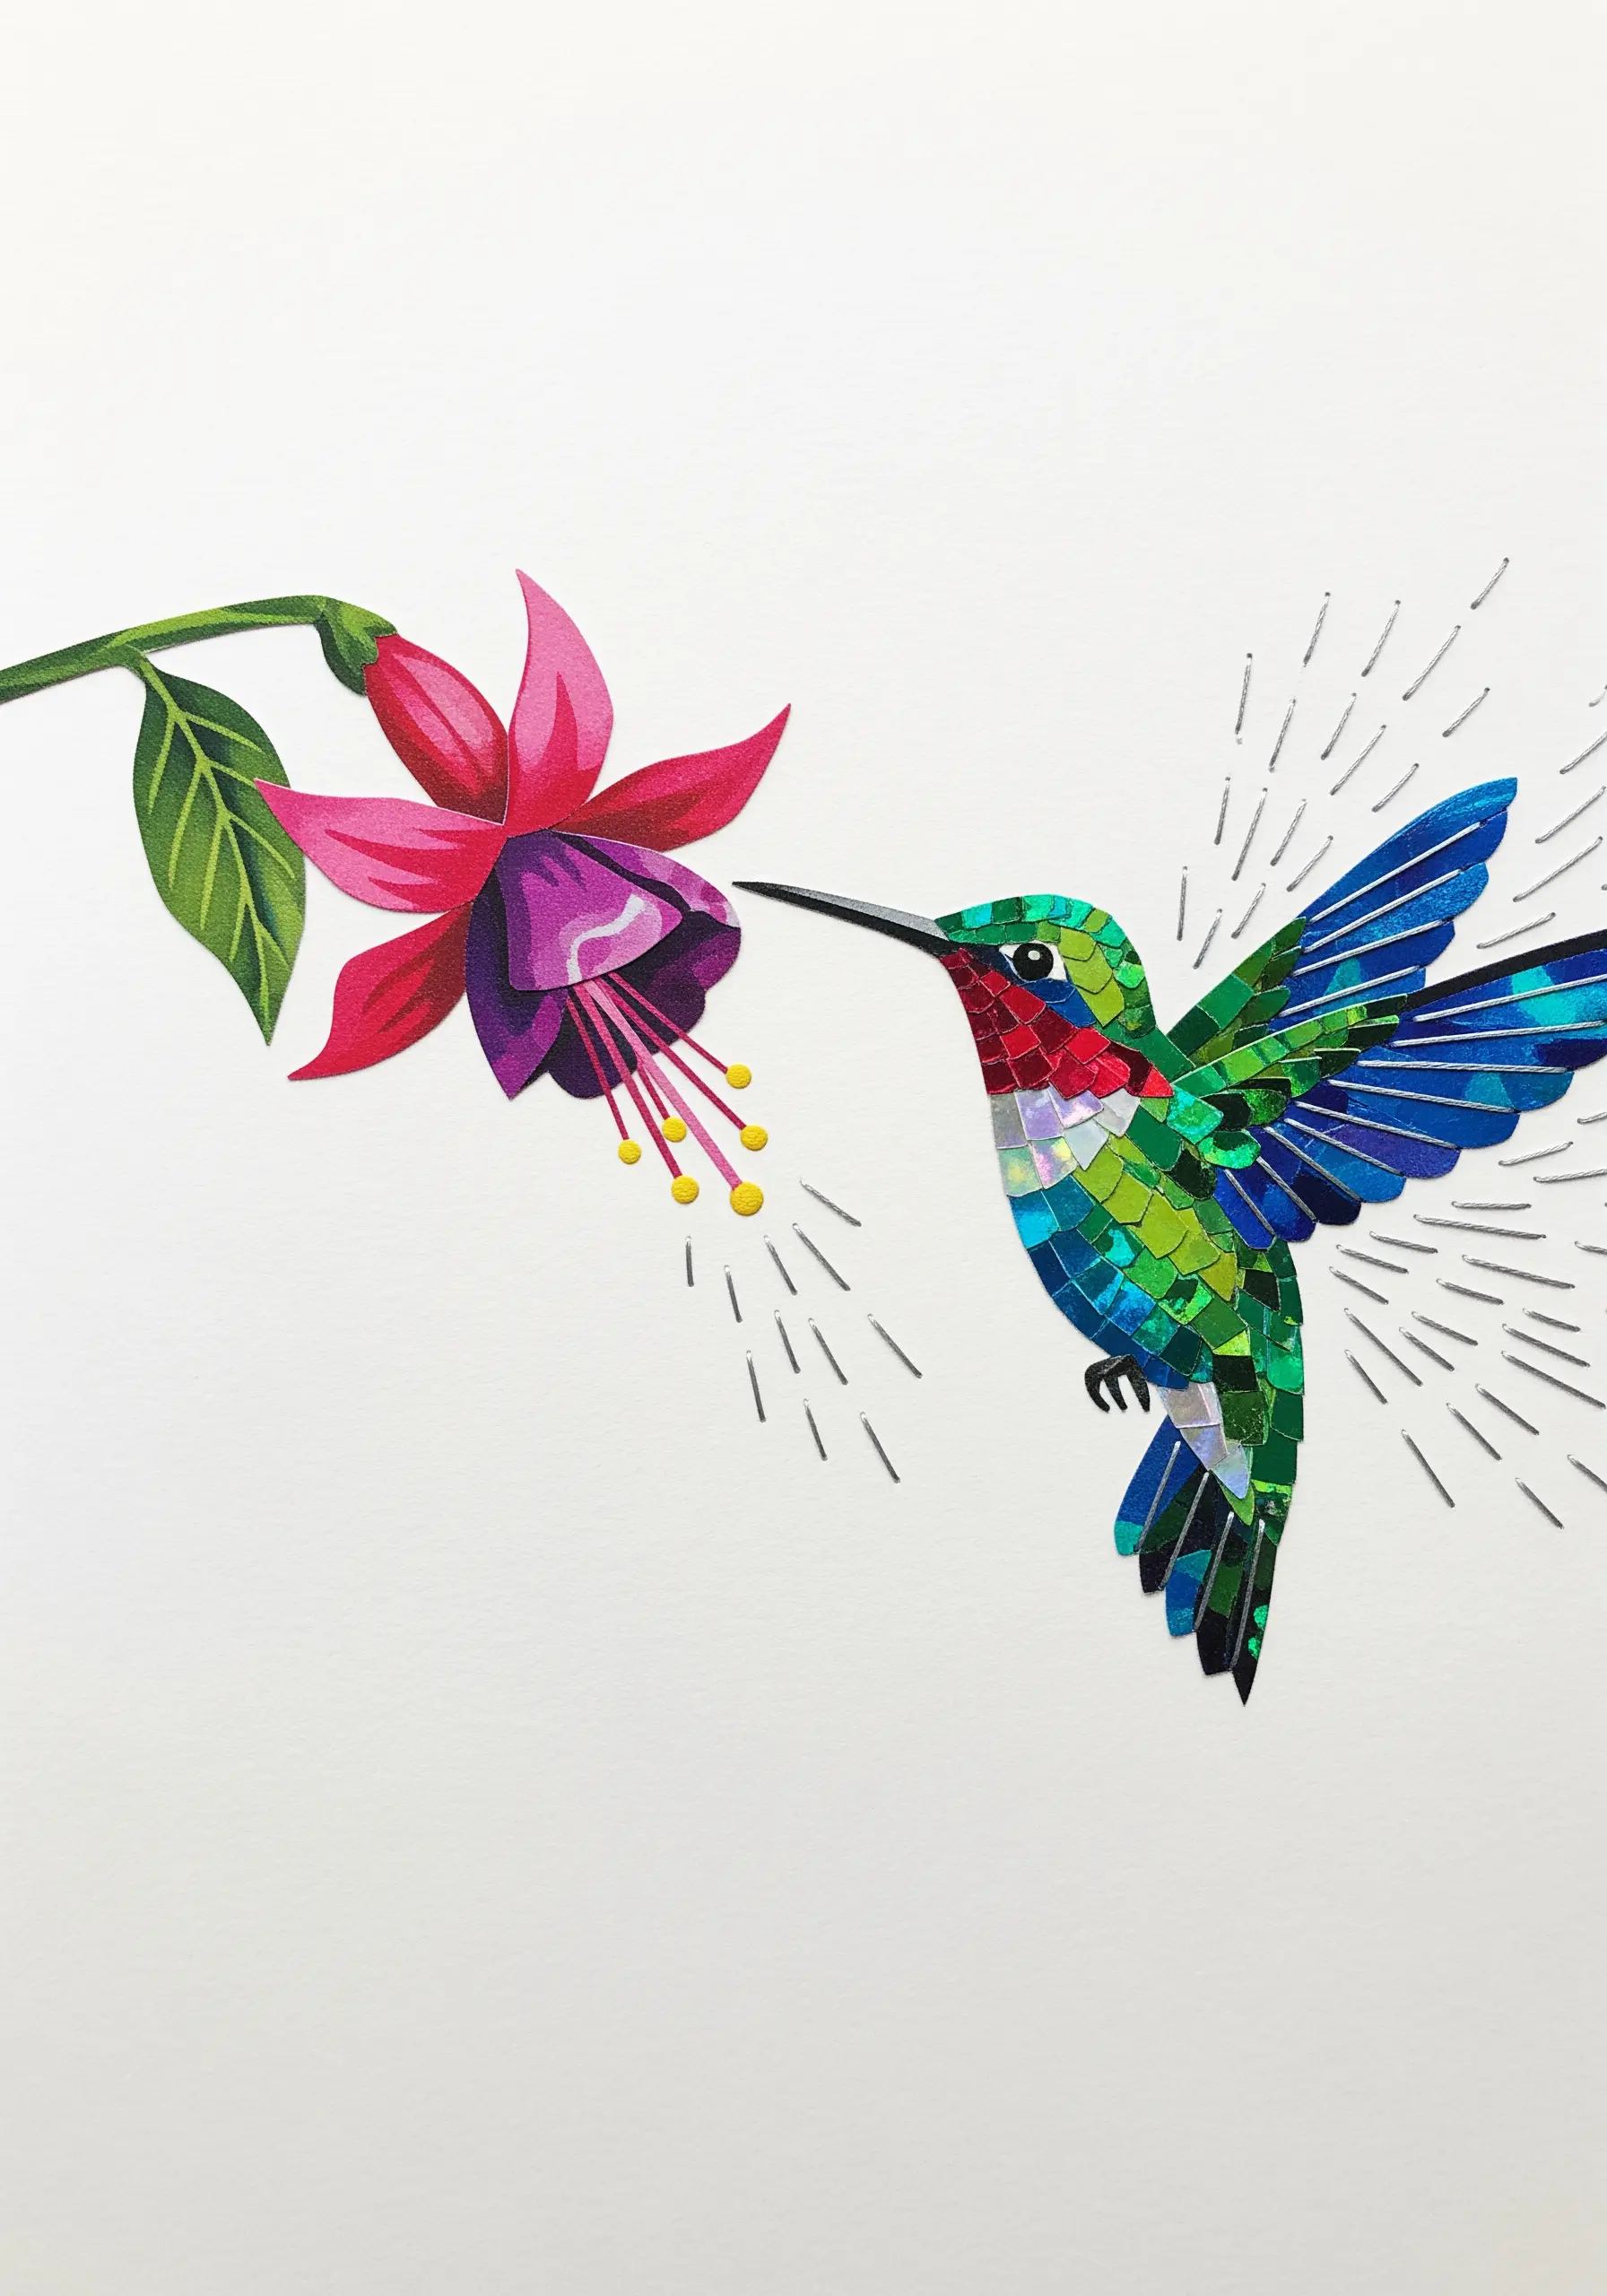
Capture the signature speed of a hummingbird by adding classic animation lines to your collage.
Use a bright silver or white thread to stitch a spray of short, sharp straight stitches behind the bird’s wings.
Vary the length, angle, and spacing of these seed stitches to create a dynamic sense of fluttering, rapid movement.
This technique instantly injects life and energy into a static image, telling a story of motion with just a few well-placed stitches.
21. Stitch Ethereal Steam with a Delicate Stem Stitch

Capture the light, airy quality of steam by using a fine thread and a simple, flowing stitch.
Use a light blue or pale gray thread with only two strands of floss to keep the effect delicate and subtle.
The stem stitch is perfect for creating smooth, elegant curves that swirl naturally, just like real steam rising from a cup.
This thoughtful detail adds a touch of cozy realism and charm to your paper collage creations.
22. Add Gilded Details to a Layered Paper Mandala
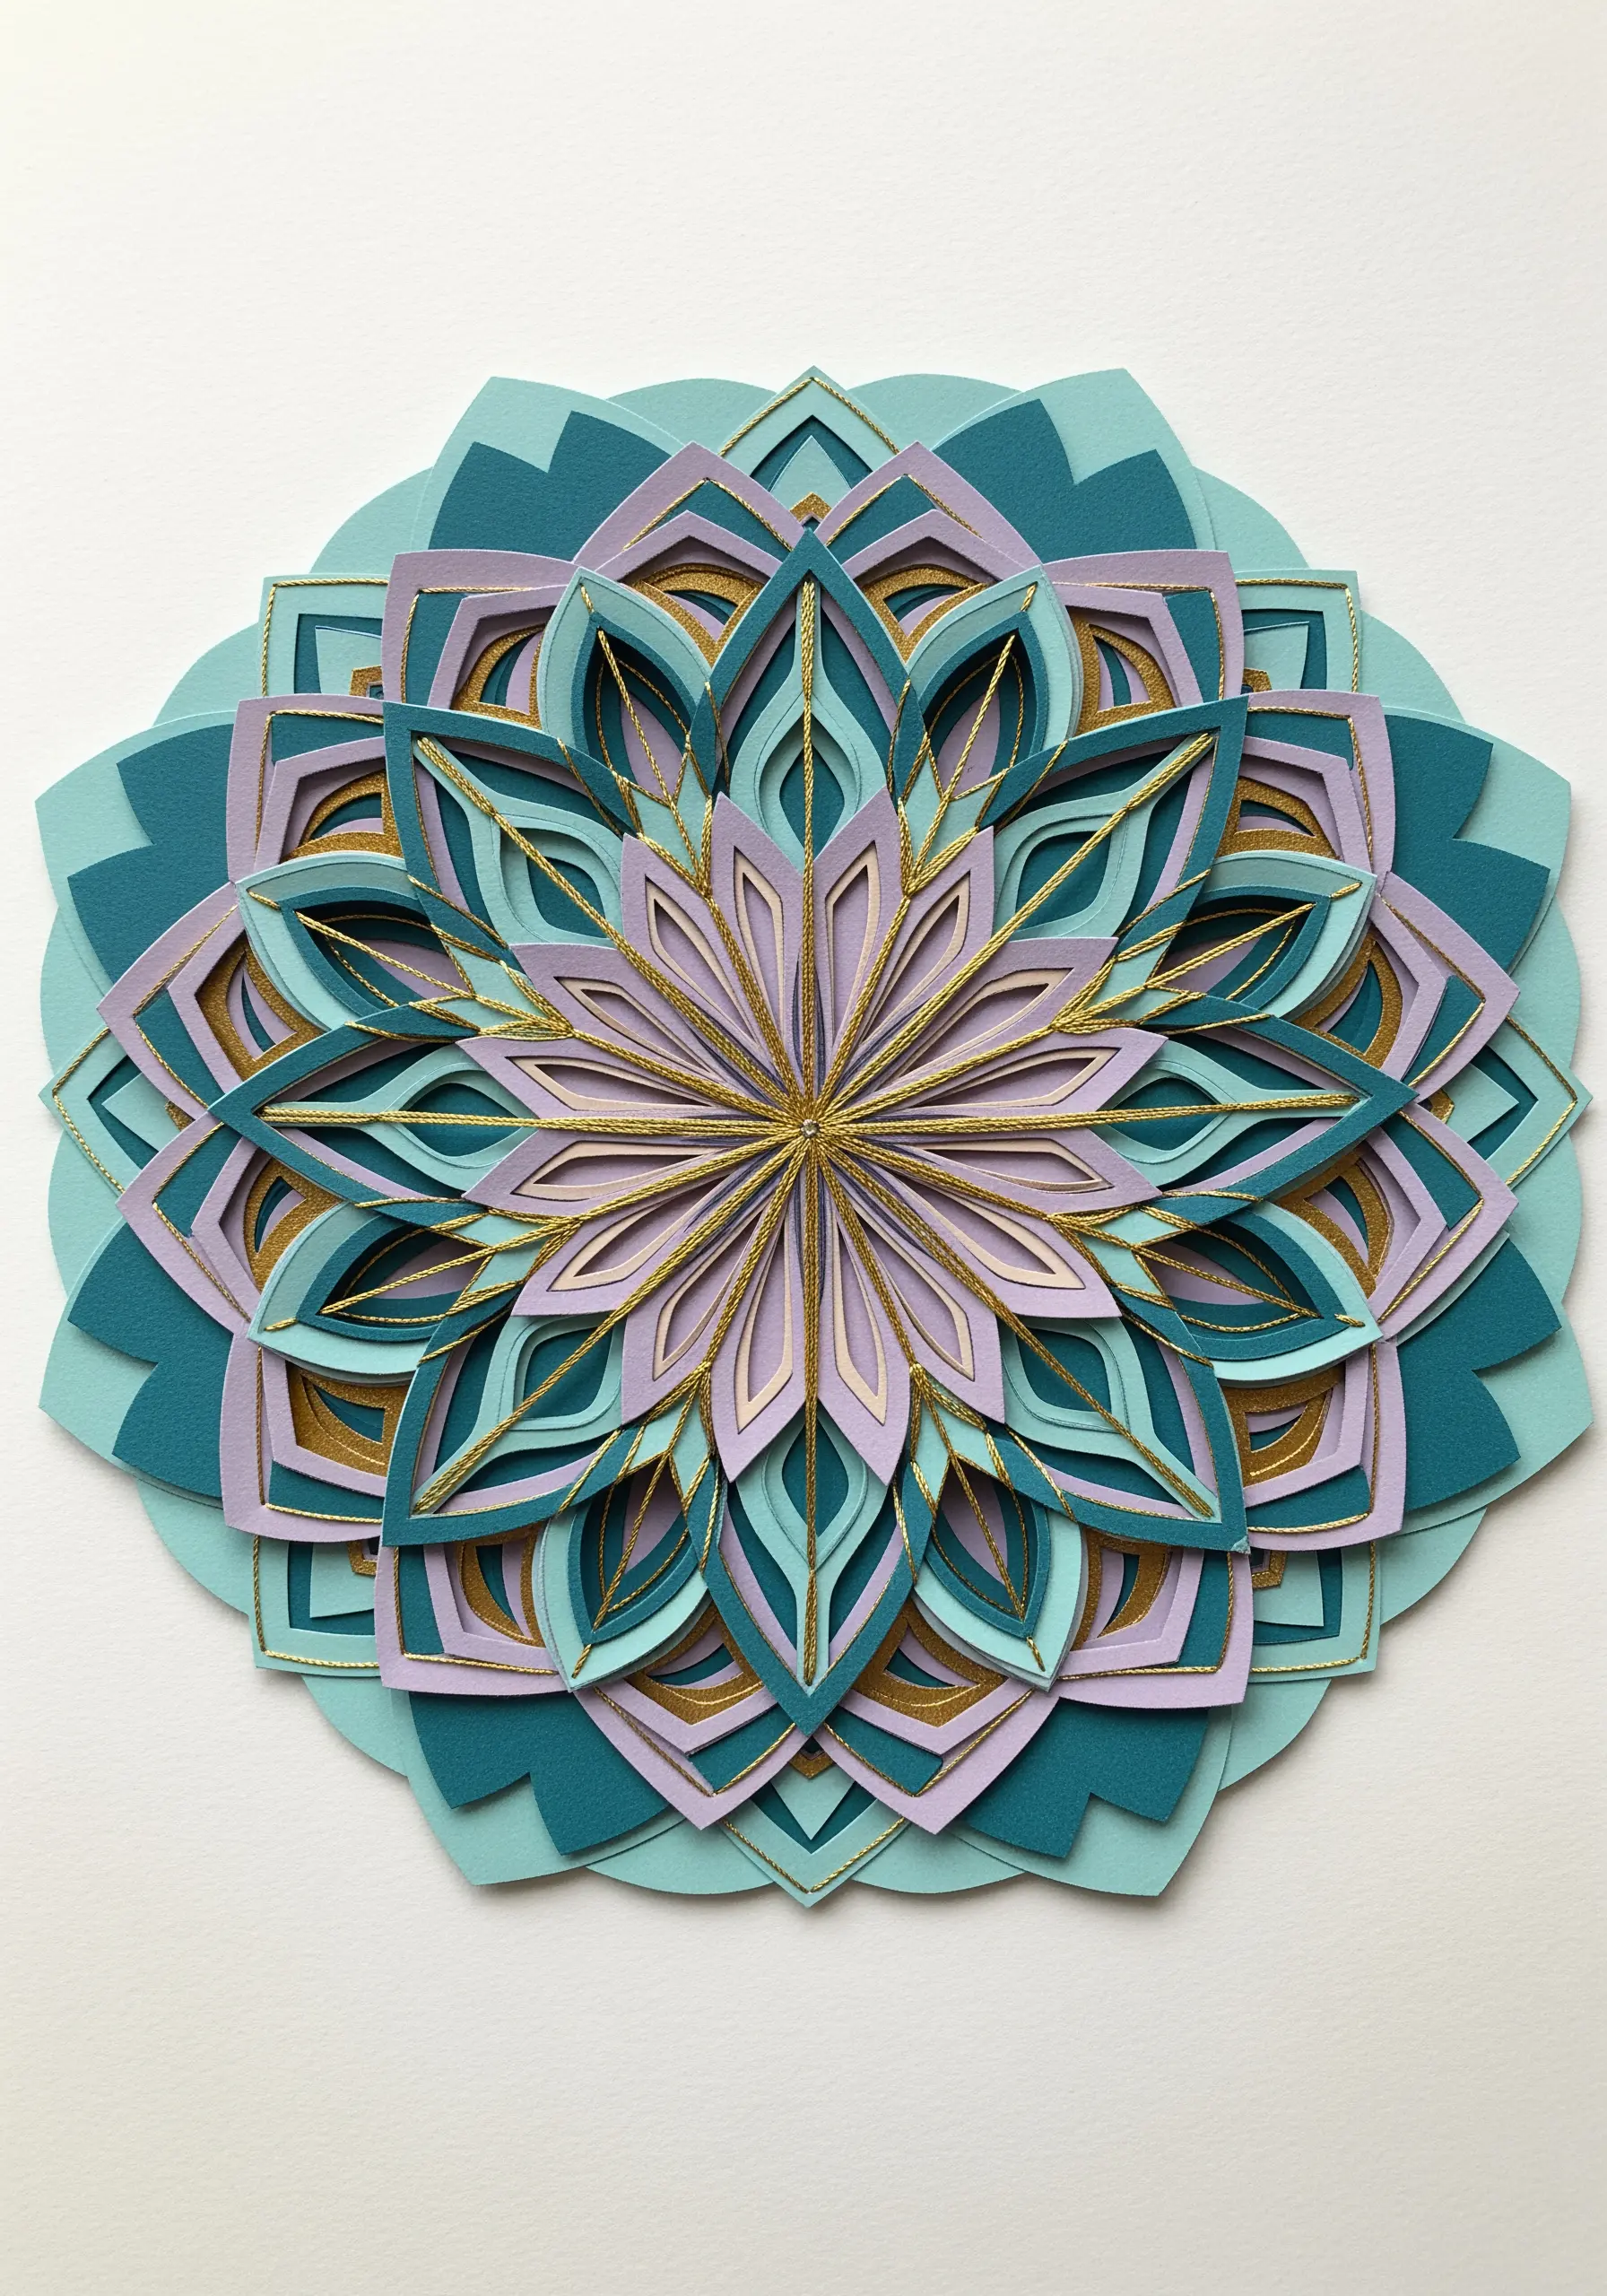
Elevate an intricate paper-cut mandala by adding fine lines of metallic thread as a finishing touch.
Use a single strand of gold thread and a simple backstitch to trace along the key curves and edges of the paper layers.
This doesn’t require stitching through all the layers; you can stitch on the top layer before assembling for a cleaner look.
The thread catches the light, adding a touch of luxury and defining the complex geometry without overwhelming the delicate papercraft.
23. Unify a Collage with a Strong Stem Stitch Outline
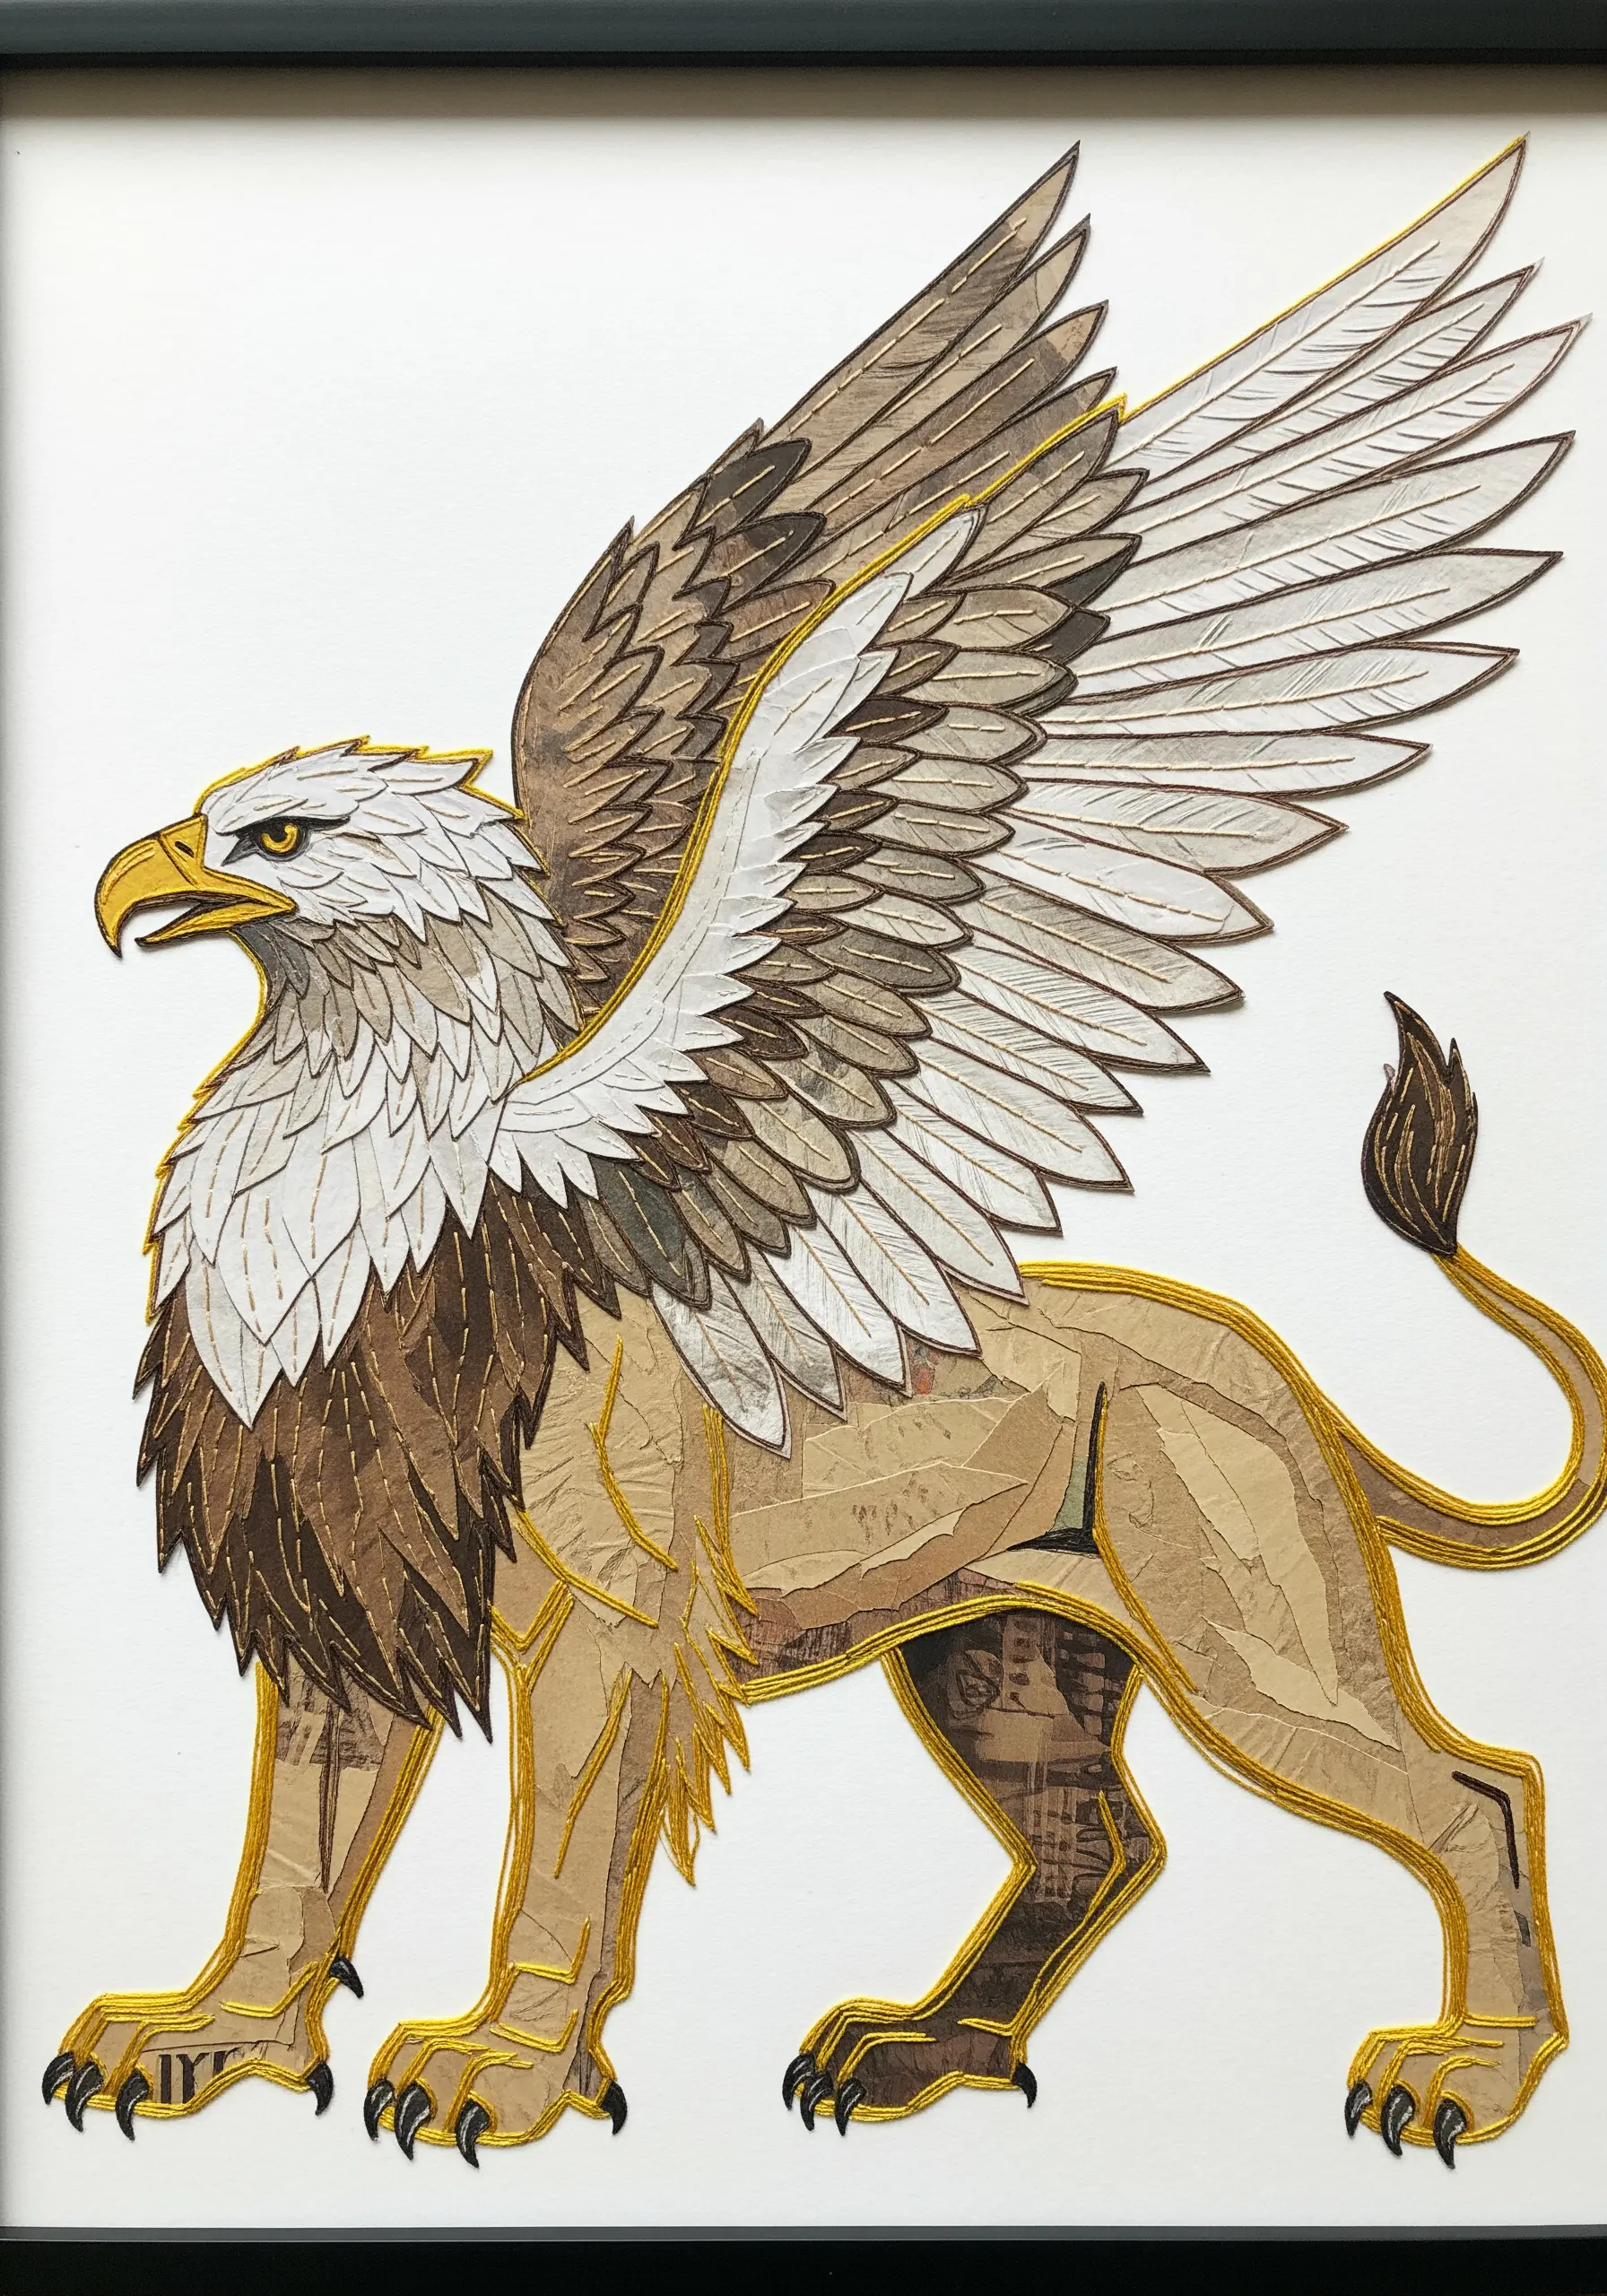
When you create a figure from multiple pieces of textured paper, a stitched outline can be the element that pulls it all together.
Use a bold thread, like a gold perle cotton, and a stem stitch or whipped backstitch to trace the entire silhouette of your creature.
This technique creates a clean, continuous line that acts as a container, transforming the disparate paper scraps into a single, cohesive form.
The raised texture of the stitch adds a final layer of dimension and polish.
24. Create Falling Rain with Hanging Threads
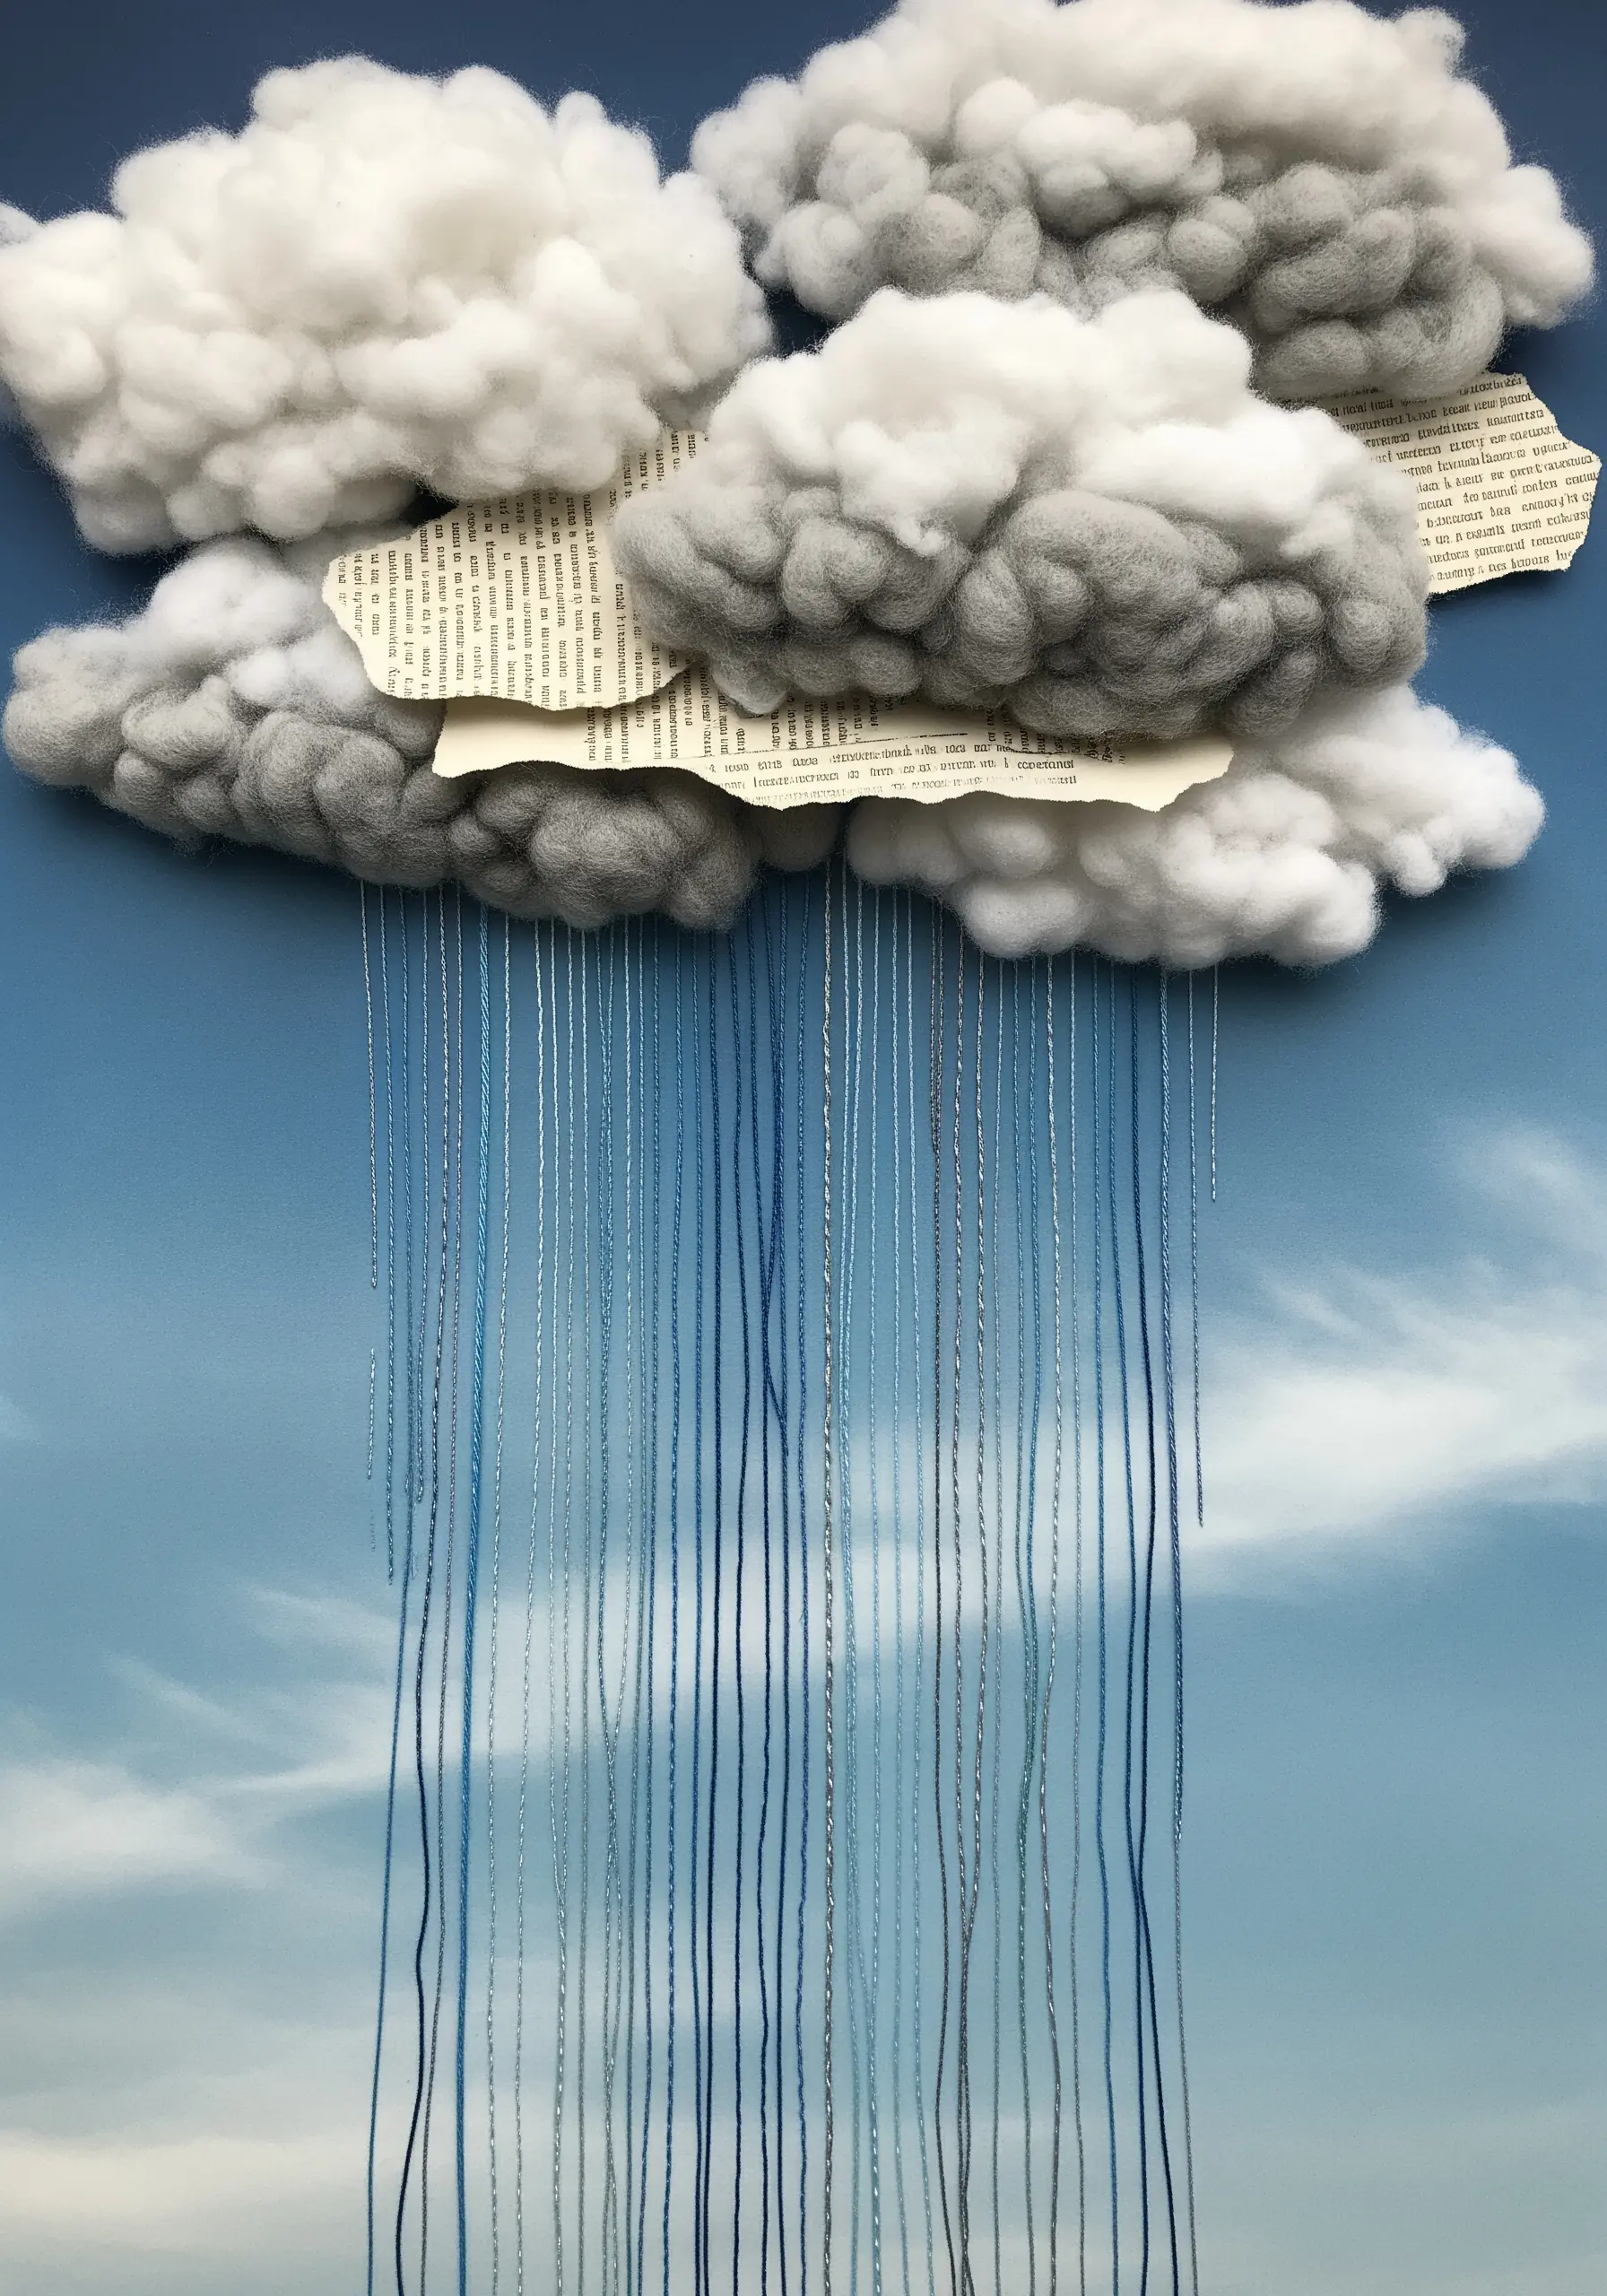
To create a convincing rain effect, let gravity do the work for you.
Select several shades of blue and gray thread to add depth and realism to your rain.
Secure long strands of thread only at the bottom edge of your cloud collage, then let them hang freely.
The natural weight of the thread will pull them into perfect, straight lines, creating a beautiful and dynamic illusion of a downpour.
25. Add Realistic Veins to Paper Autumn Leaves
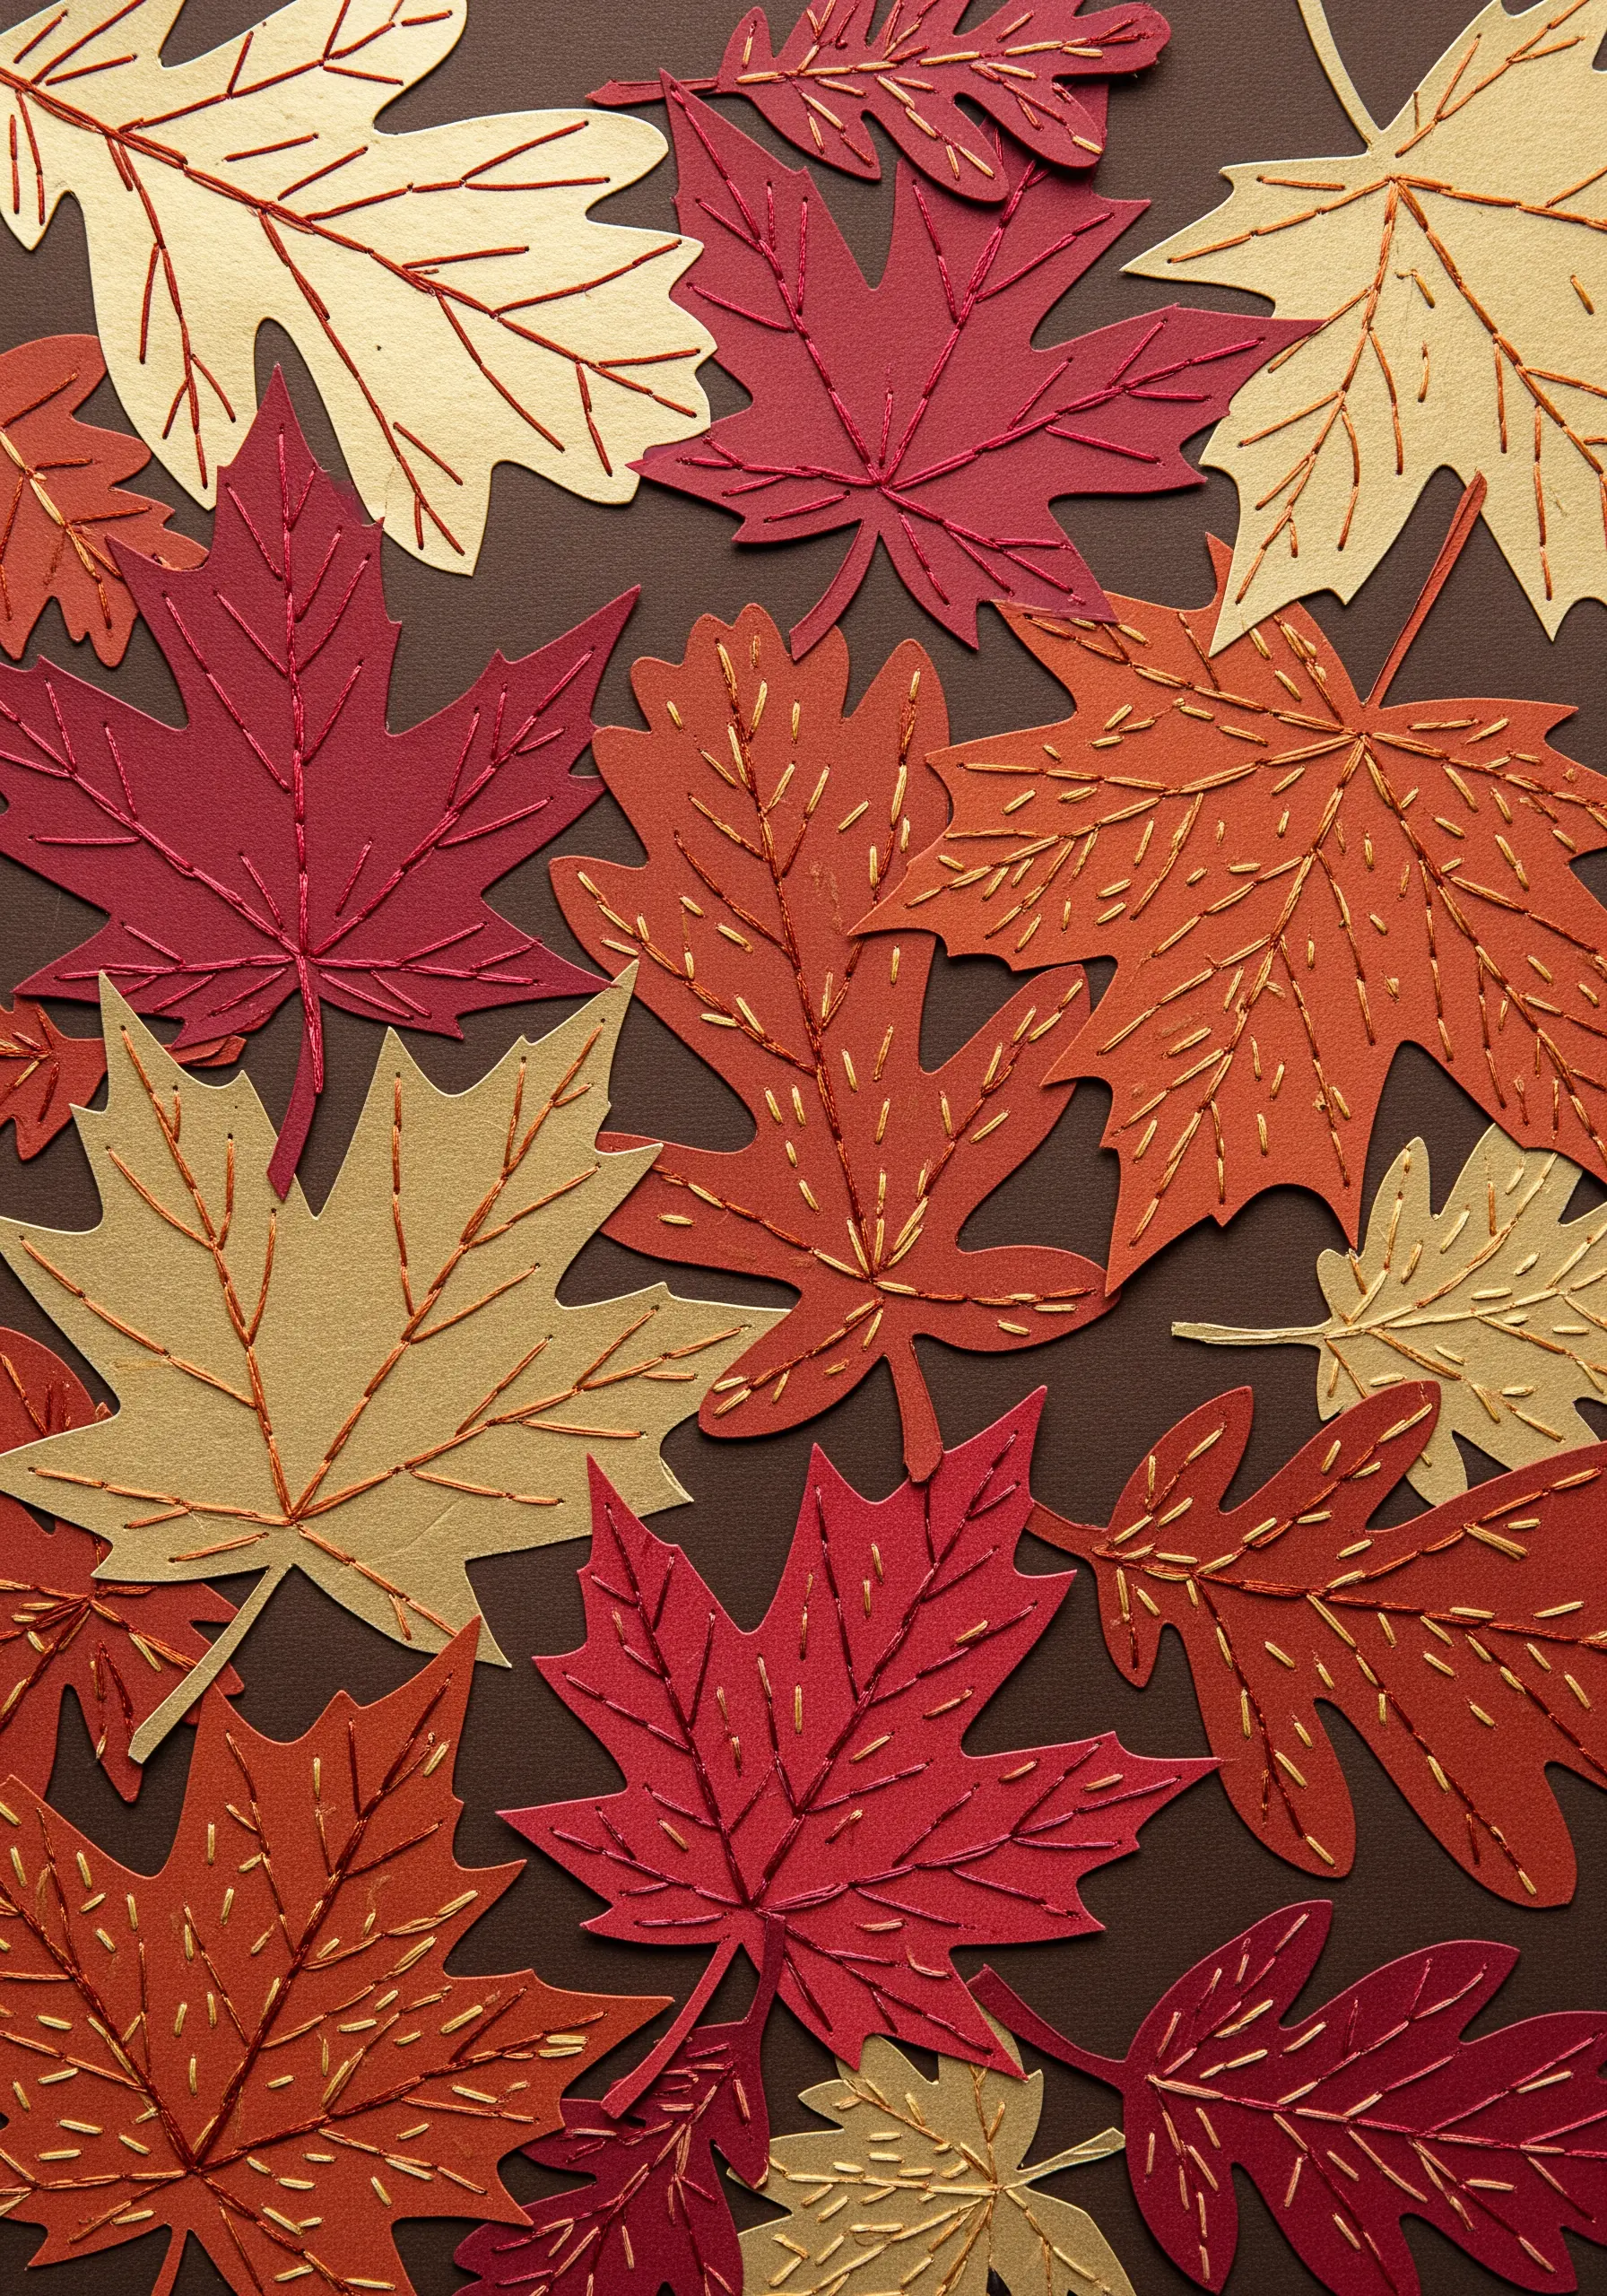
Give simple paper leaf cutouts a touch of botanical realism with elegantly stitched veins.
Use a backstitch in a contrasting metallic thread—like copper or gold—to create the central vein of each leaf.
From there, add smaller side veins using single, angled straight stitches.
This simple addition transforms the flat shapes into detailed, textured elements, making your entire composition feel more refined and lifelike. It’s a lovely touch for seasonal eco gift packaging.
26. Integrate 3D Stitched Florals into a Paper Jungle
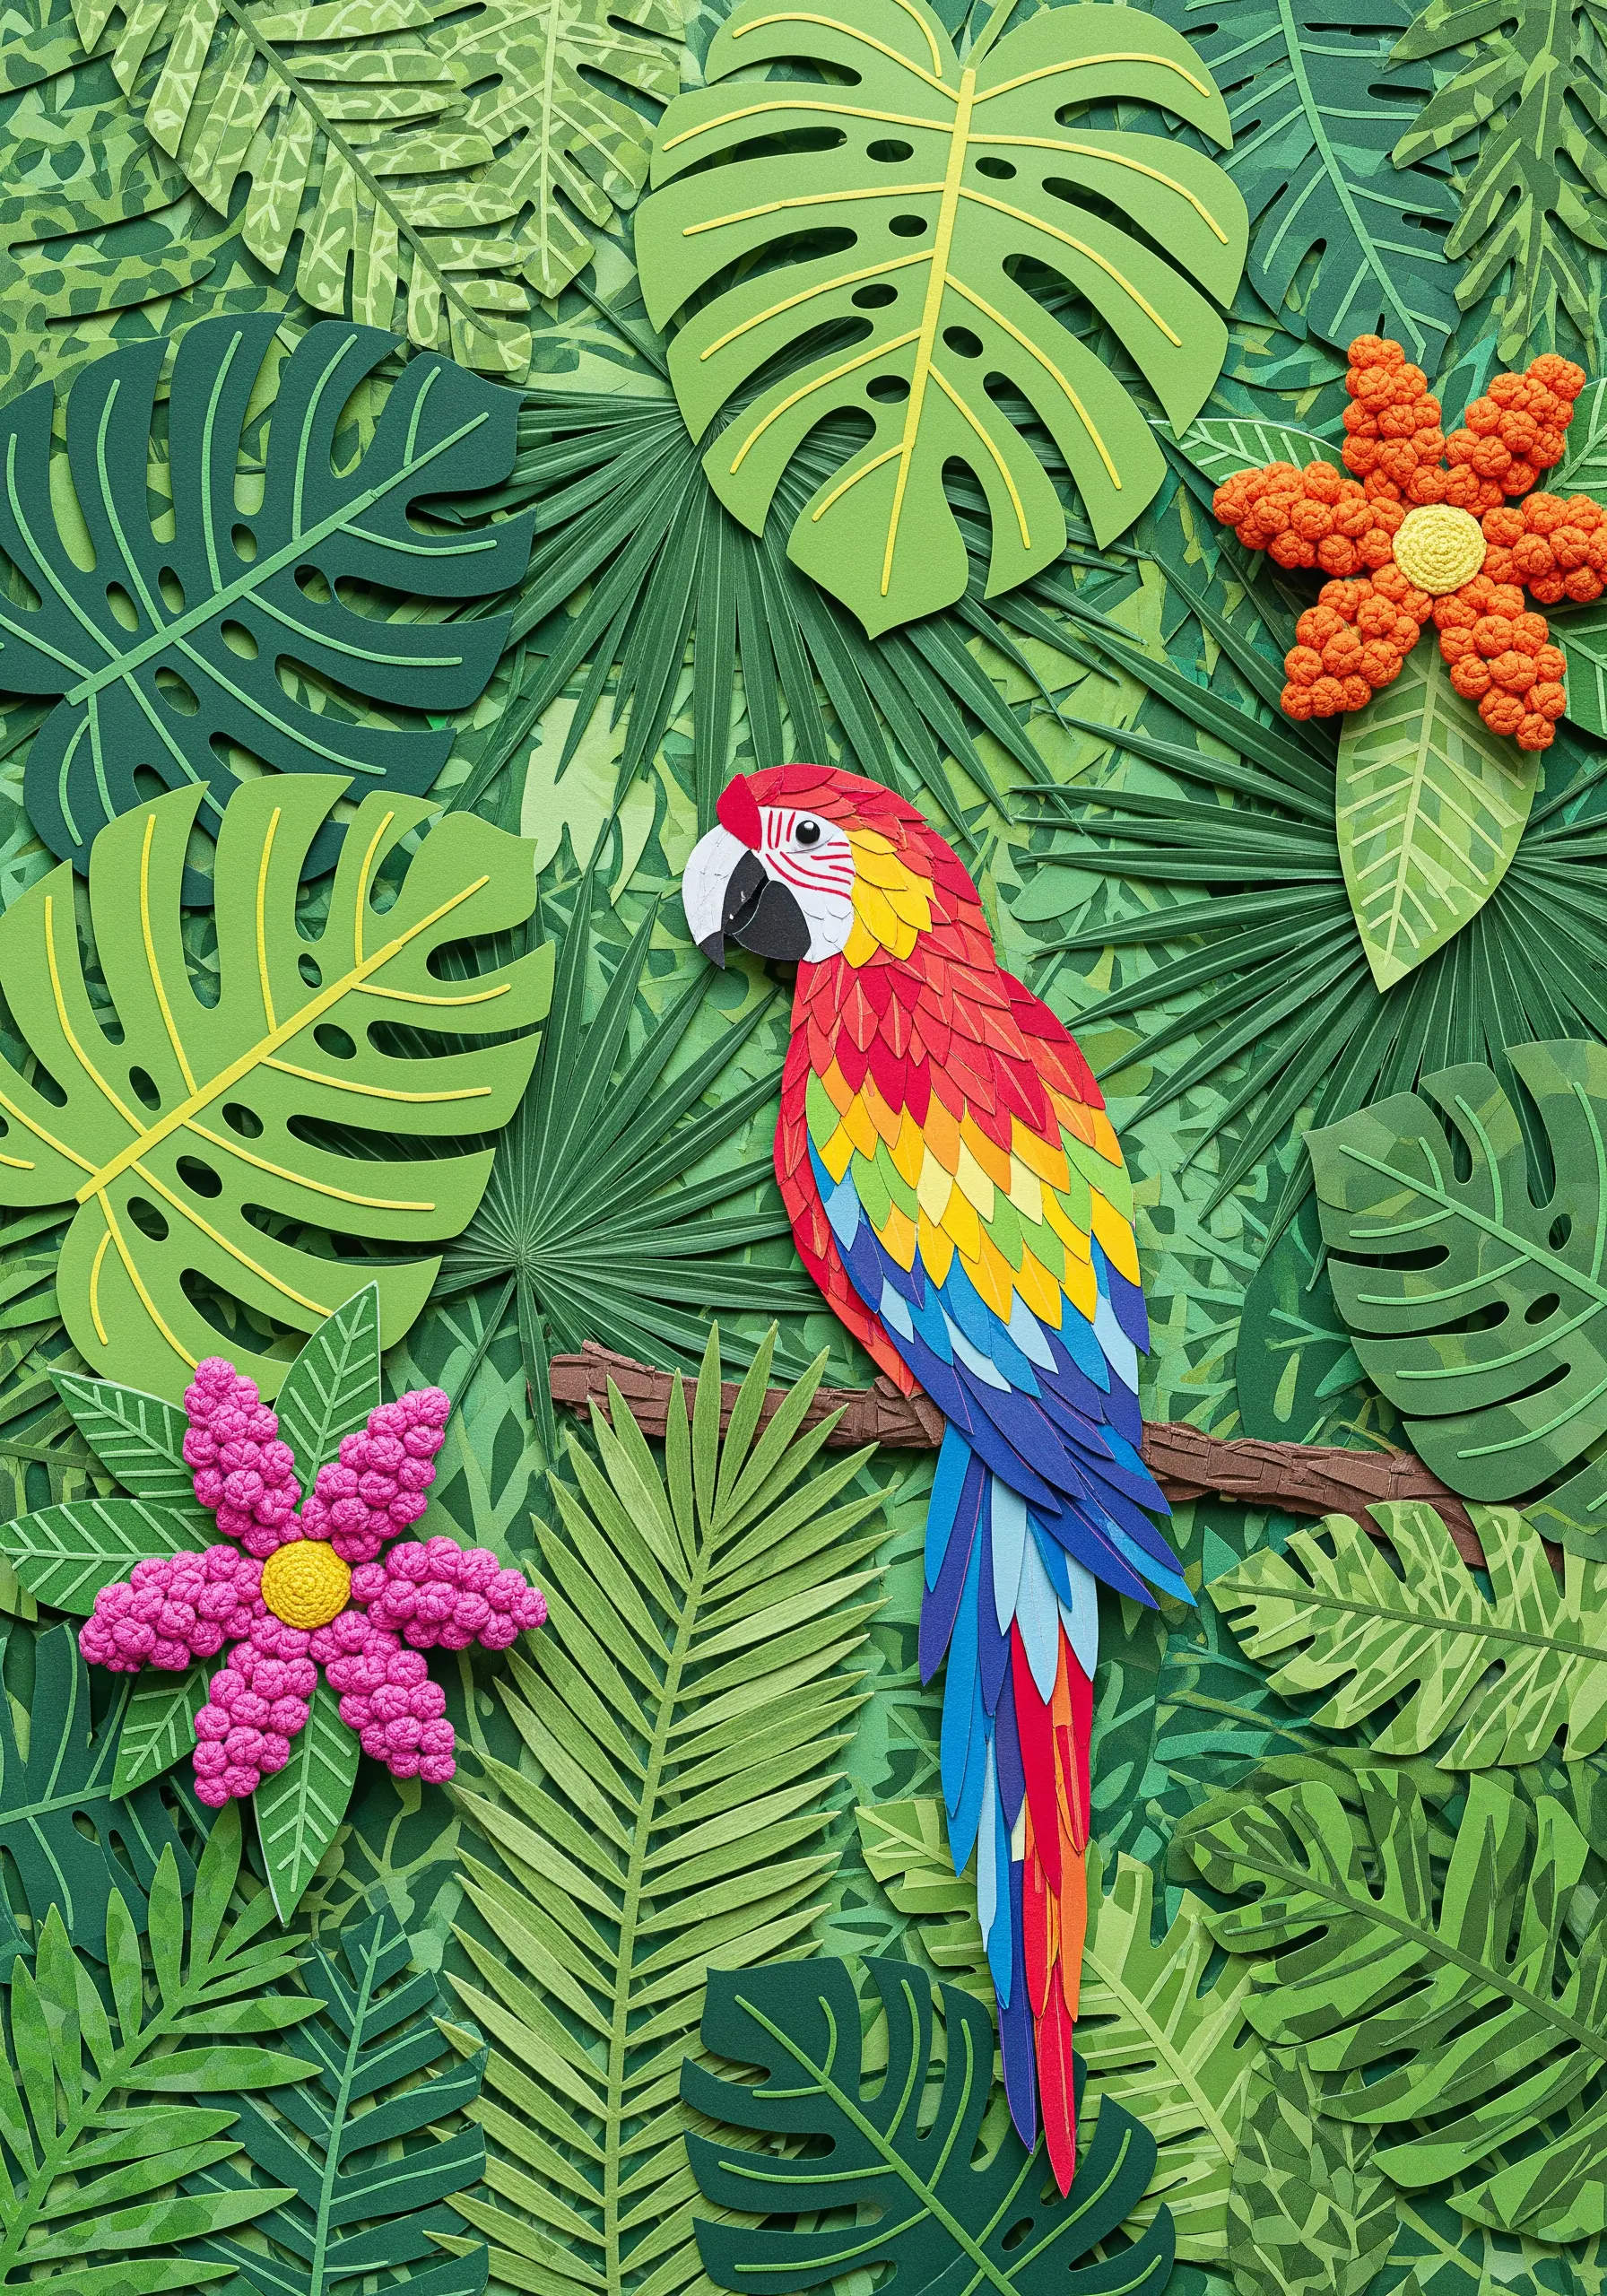
Create a lush, layered effect by adding dimensional embroidered flowers to a flat paper background.
Stitch your flowers—using high-texture stitches like woven wheels or dense French knots—on a separate piece of felt.
Once complete, carefully cut out the flower and attach it to your paper collage with a strong craft glue or a few discreet stitches.
This appliqué method allows you to build incredible dimension that makes your scene pop, inviting the viewer into your handcrafted world.
27. Define a Focal Point with Outline and Texture
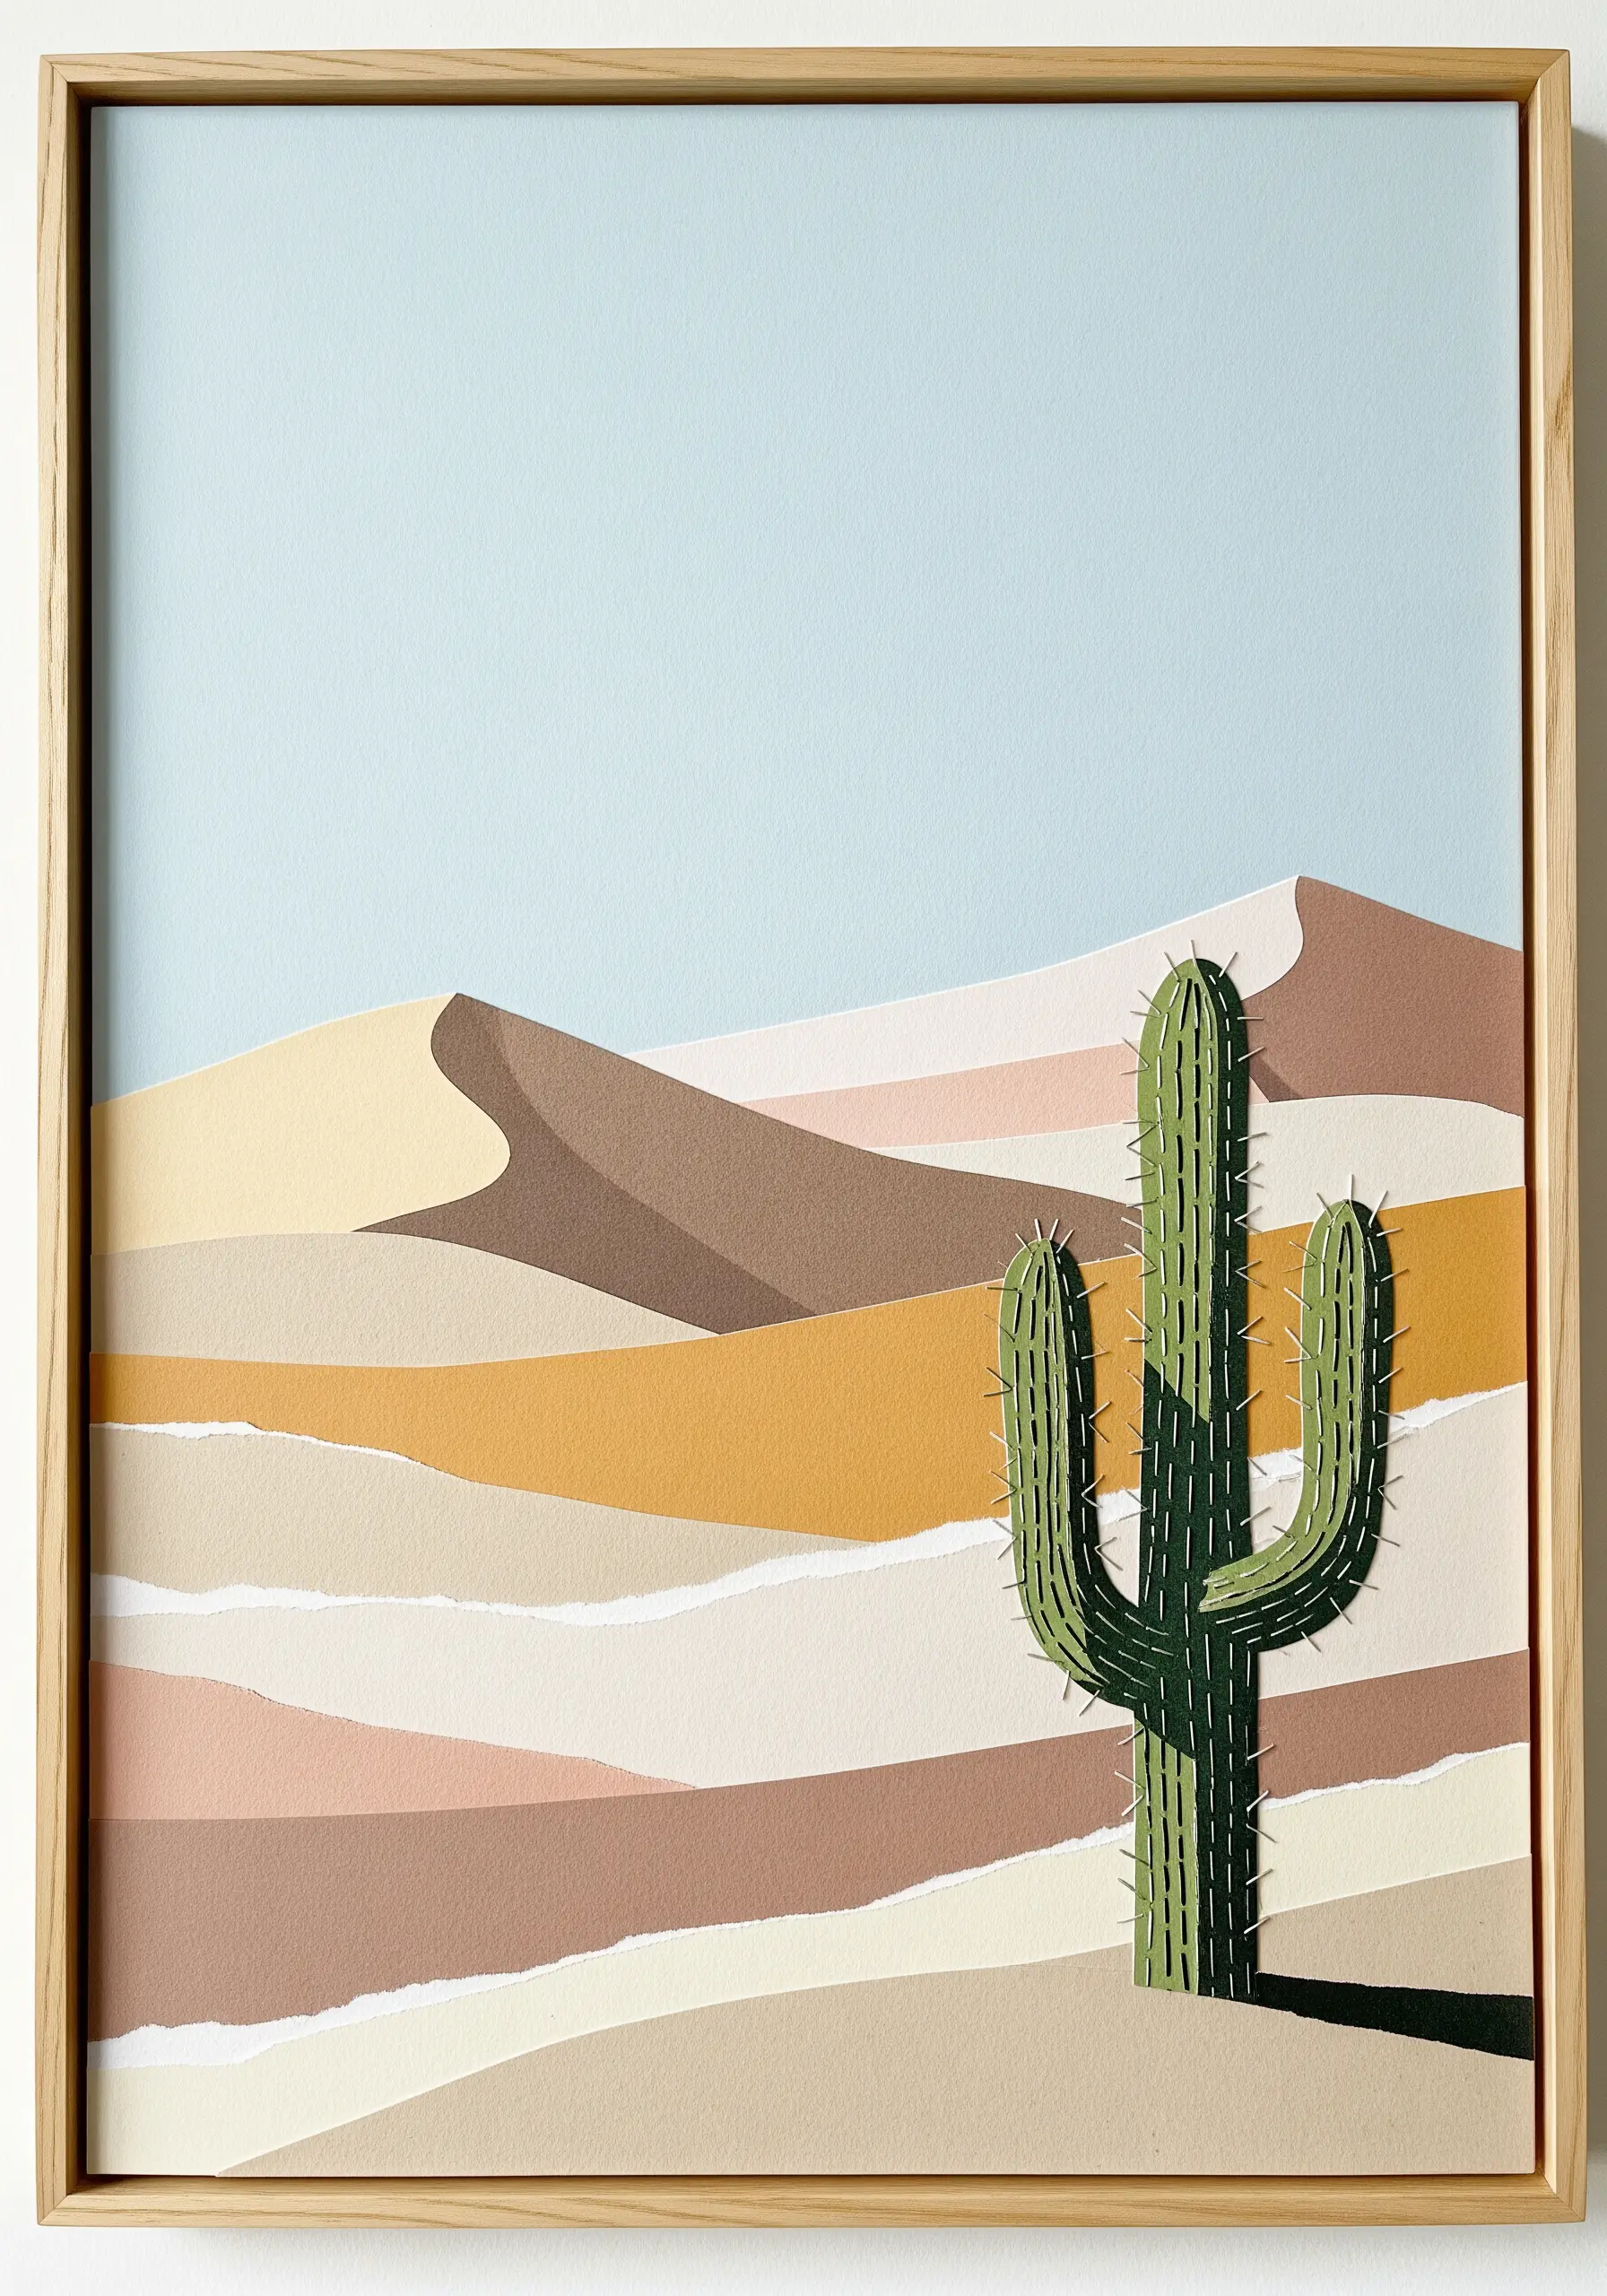
Make a central element stand out in a minimalist landscape by using thread to add both definition and texture.
First, outline your paper cactus with a split stitch. This creates a slightly raised, clean edge that separates it from the layered paper background.
Then, fill the interior with tiny V-shaped fly stitches or straight stitches to represent the sharp texture of cactus spines.
The embroidery transforms the simple cutout into the tactile, undeniable hero of the piece.
28. Mimic Stained Glass with a Heavy Chain Stitch
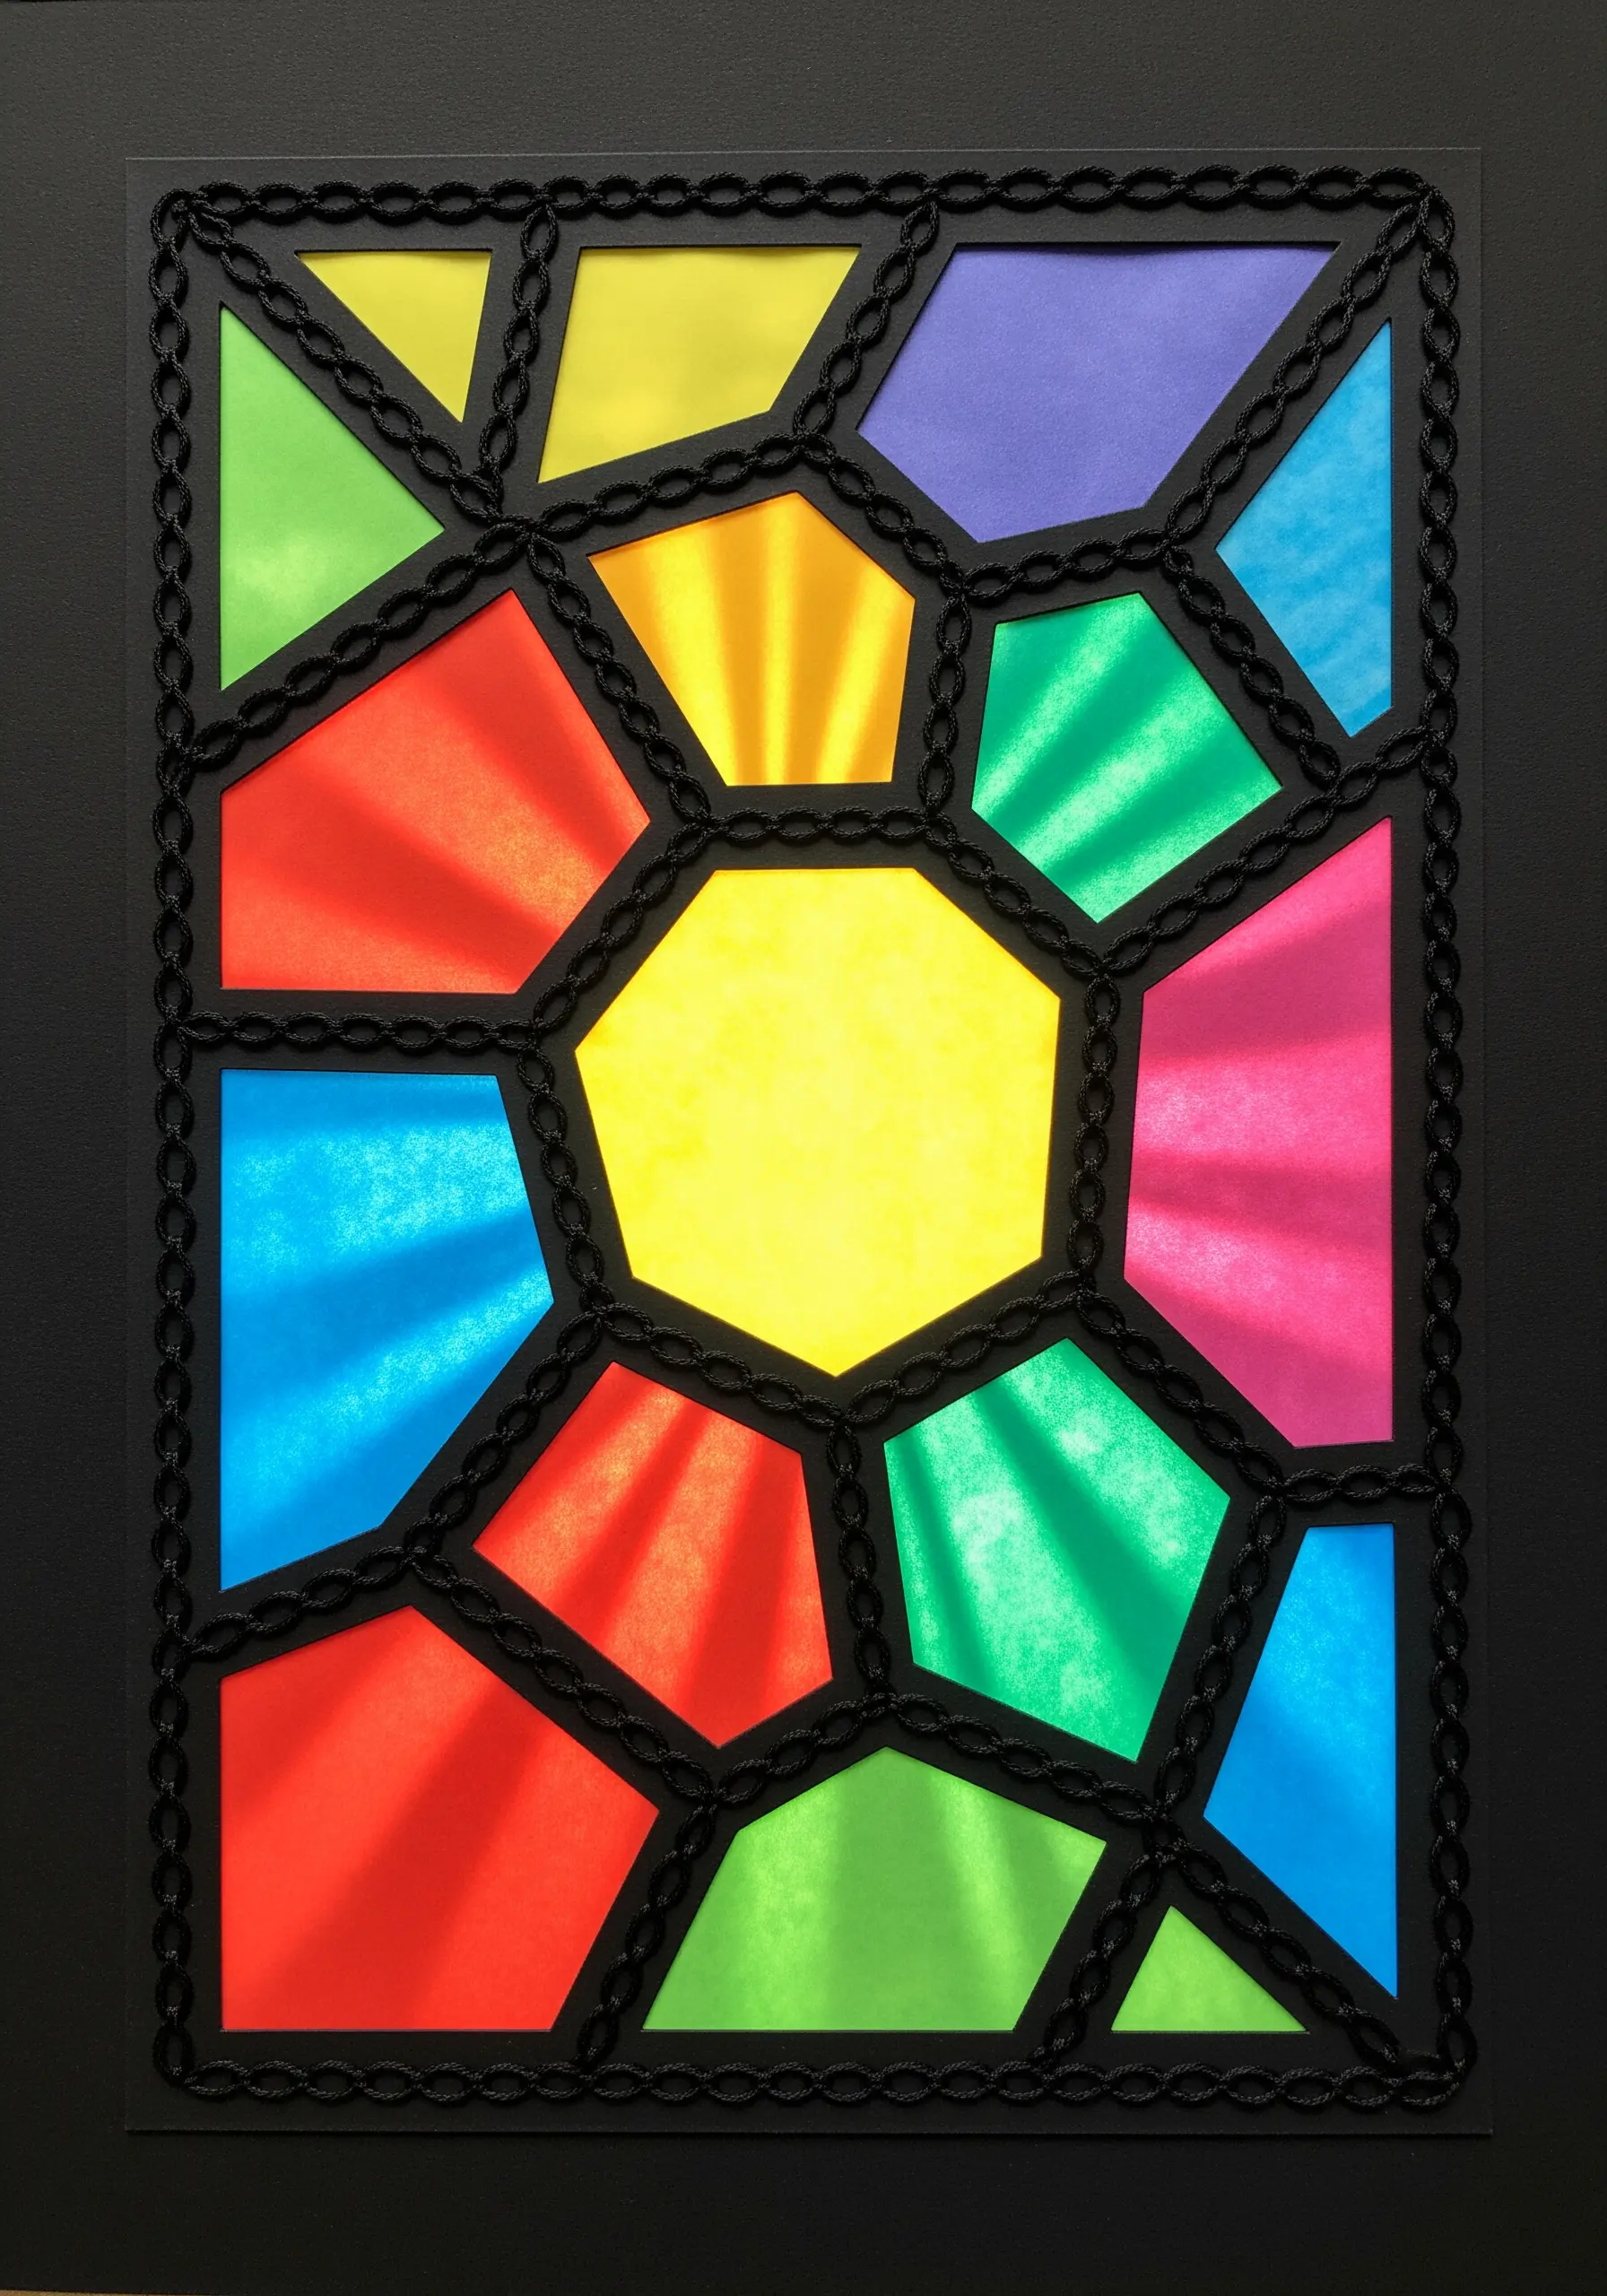
To recreate the bold, leaded lines of stained glass, you need a stitch that has weight and dimension.
The chain stitch, worked with a thick black thread like perle cotton, is the perfect choice.
It creates a raised, rounded line that convincingly simulates the soldered metal framework of a real stained glass window.
Keep your tension consistent to ensure the links in your chain are uniform, resulting in a clean and professional finish.
29. Trace Anatomical Lines with a Precise Stem Stitch

Complement a scientific illustration by using a stitch that provides a clean, continuous line.
The stem stitch is ideal for tracing the intricate pathways of veins and arteries on an anatomical heart collage.
Use just two or three strands of floss in contrasting reds and blues to maintain a delicate, illustrative quality.
This technique adds a layer of fine detail that honors the precision of the subject matter, blending art with anatomy beautifully.
30. Create a Flowing Mane with Loose Thread Bundles
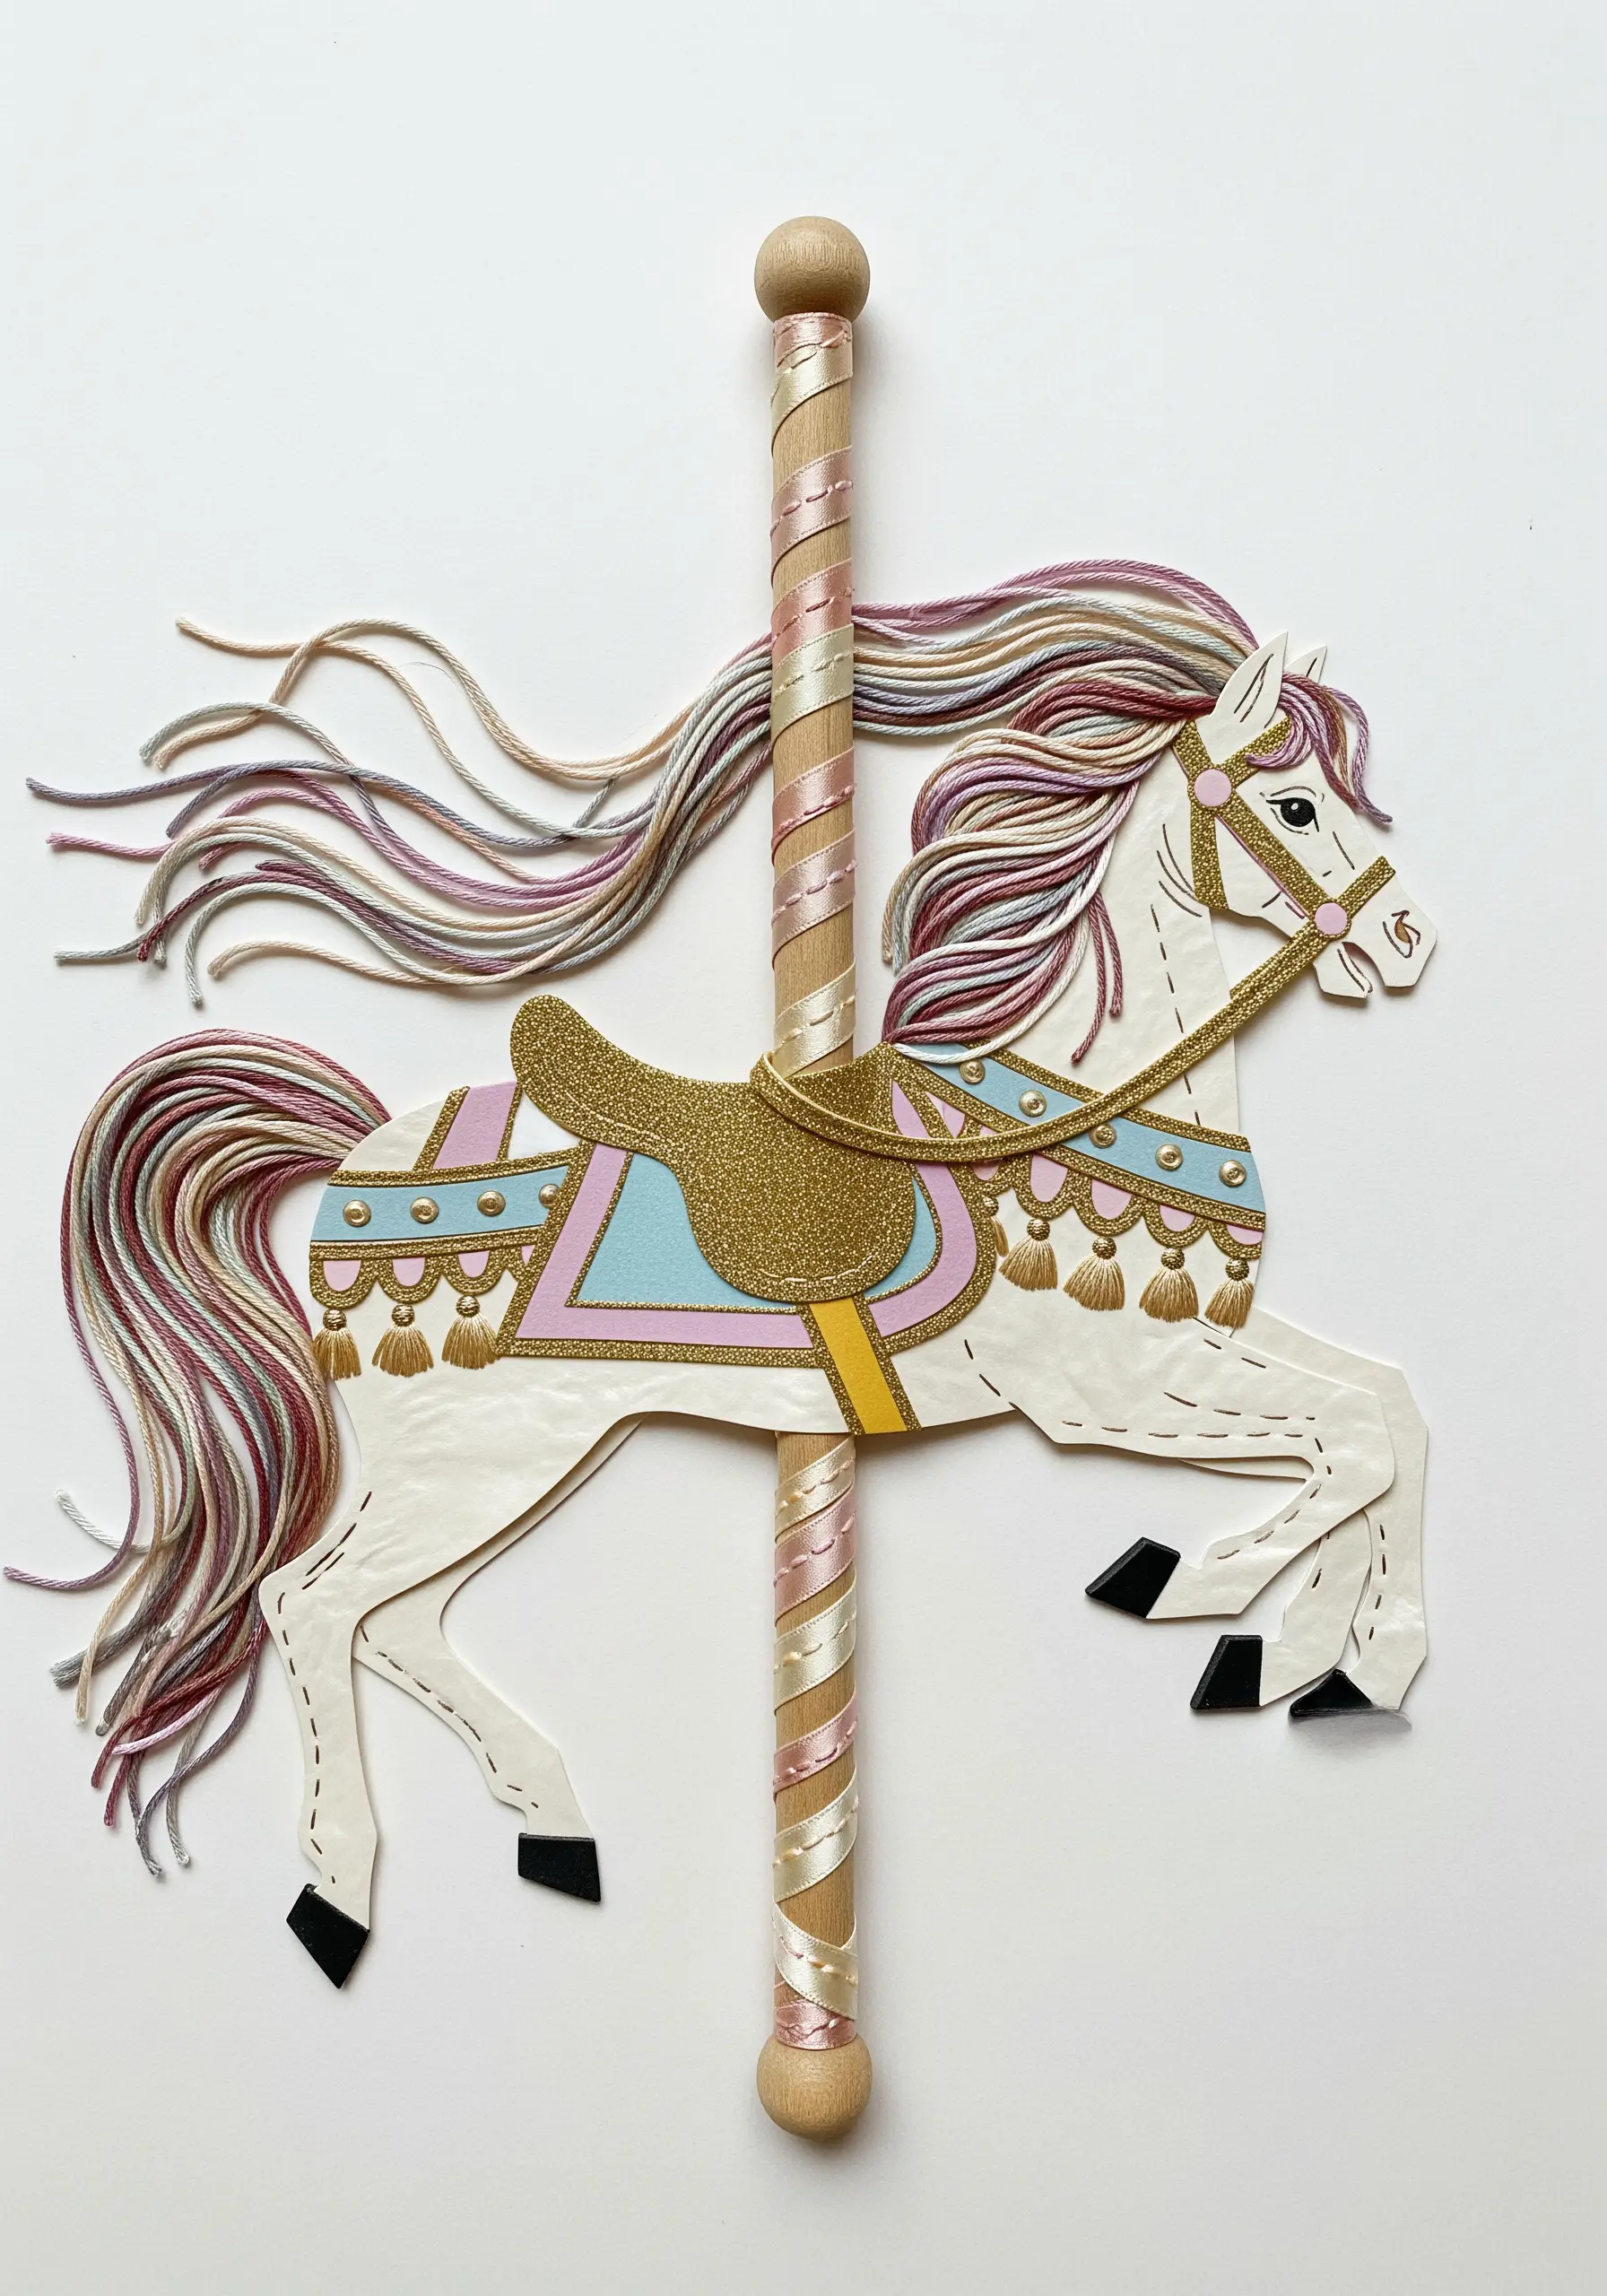
Bring a static carousel horse to life by giving it a mane and tail with real movement.
Bundle together long strands of multi-colored thread and secure them firmly at one end onto your paper collage.
Let the other ends hang loose and free, trimming them to the desired length and shape.
The untethered threads will shift and move, creating a soft, flowing texture that provides a stunning contrast to the crisp papercraft.
31. Add Personality with Minimal, Characterful Stitches
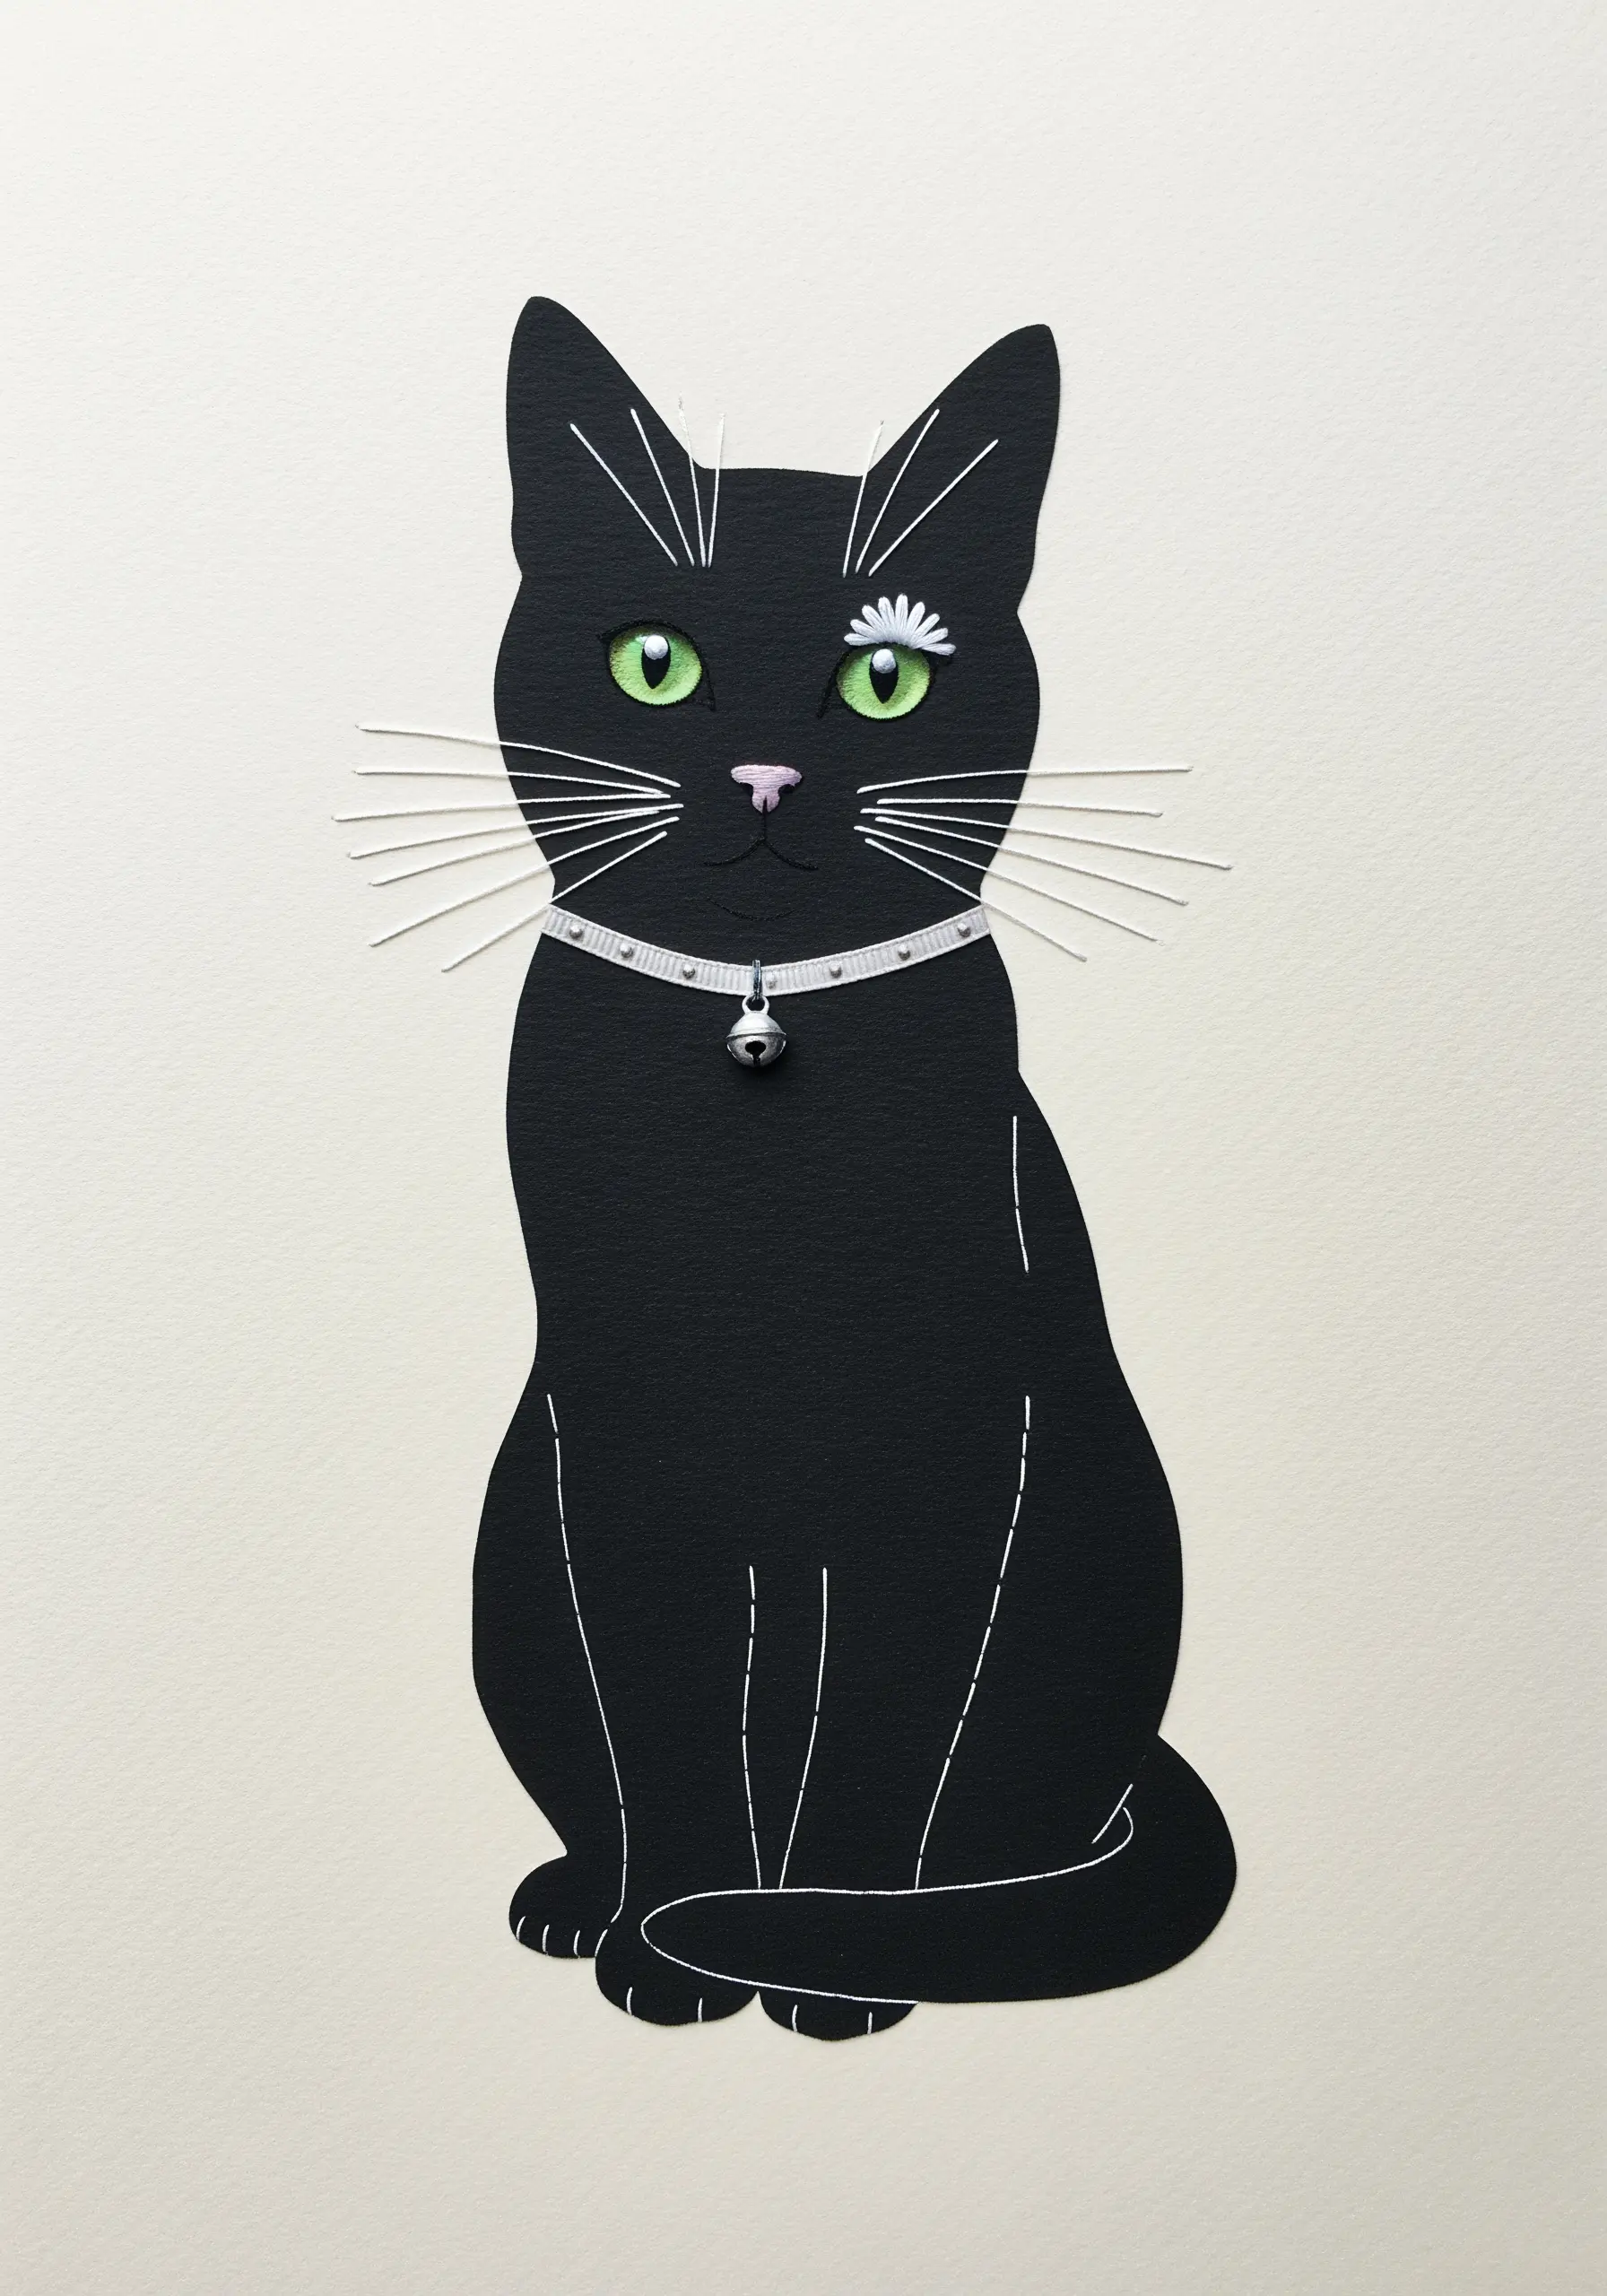
You don’t need to cover a surface in stitches to make an impact. Sometimes, less is more.
Give a simple black cat cutout instant charm by adding just a few key details.
Use single, taut straight stitches for crisp white whiskers, and create a tiny daisy on its ear using lazy daisy stitches and a single French knot.
These minimal, well-placed stitches are all it takes to give the silhouette a distinct and delightful personality.
32. Introduce an Organic Element into a Zen Garden

Create a beautiful point of contrast in a minimalist Zen garden composition by adding a touch of life.
Use a green stem stitch to create a delicate, climbing vine that seems to grow out of the sand.
Add small leaves along the stem using the lazy daisy stitch (detached chain stitch).
The embroidered vine introduces a welcome splash of color and an organic, growing form that provides a perfect counterpoint to the serene, raked lines of the sand, making it one of those minimalist embroidery ideas that feels rich with meaning.
33. Construct a Dimensional Fabric Flag
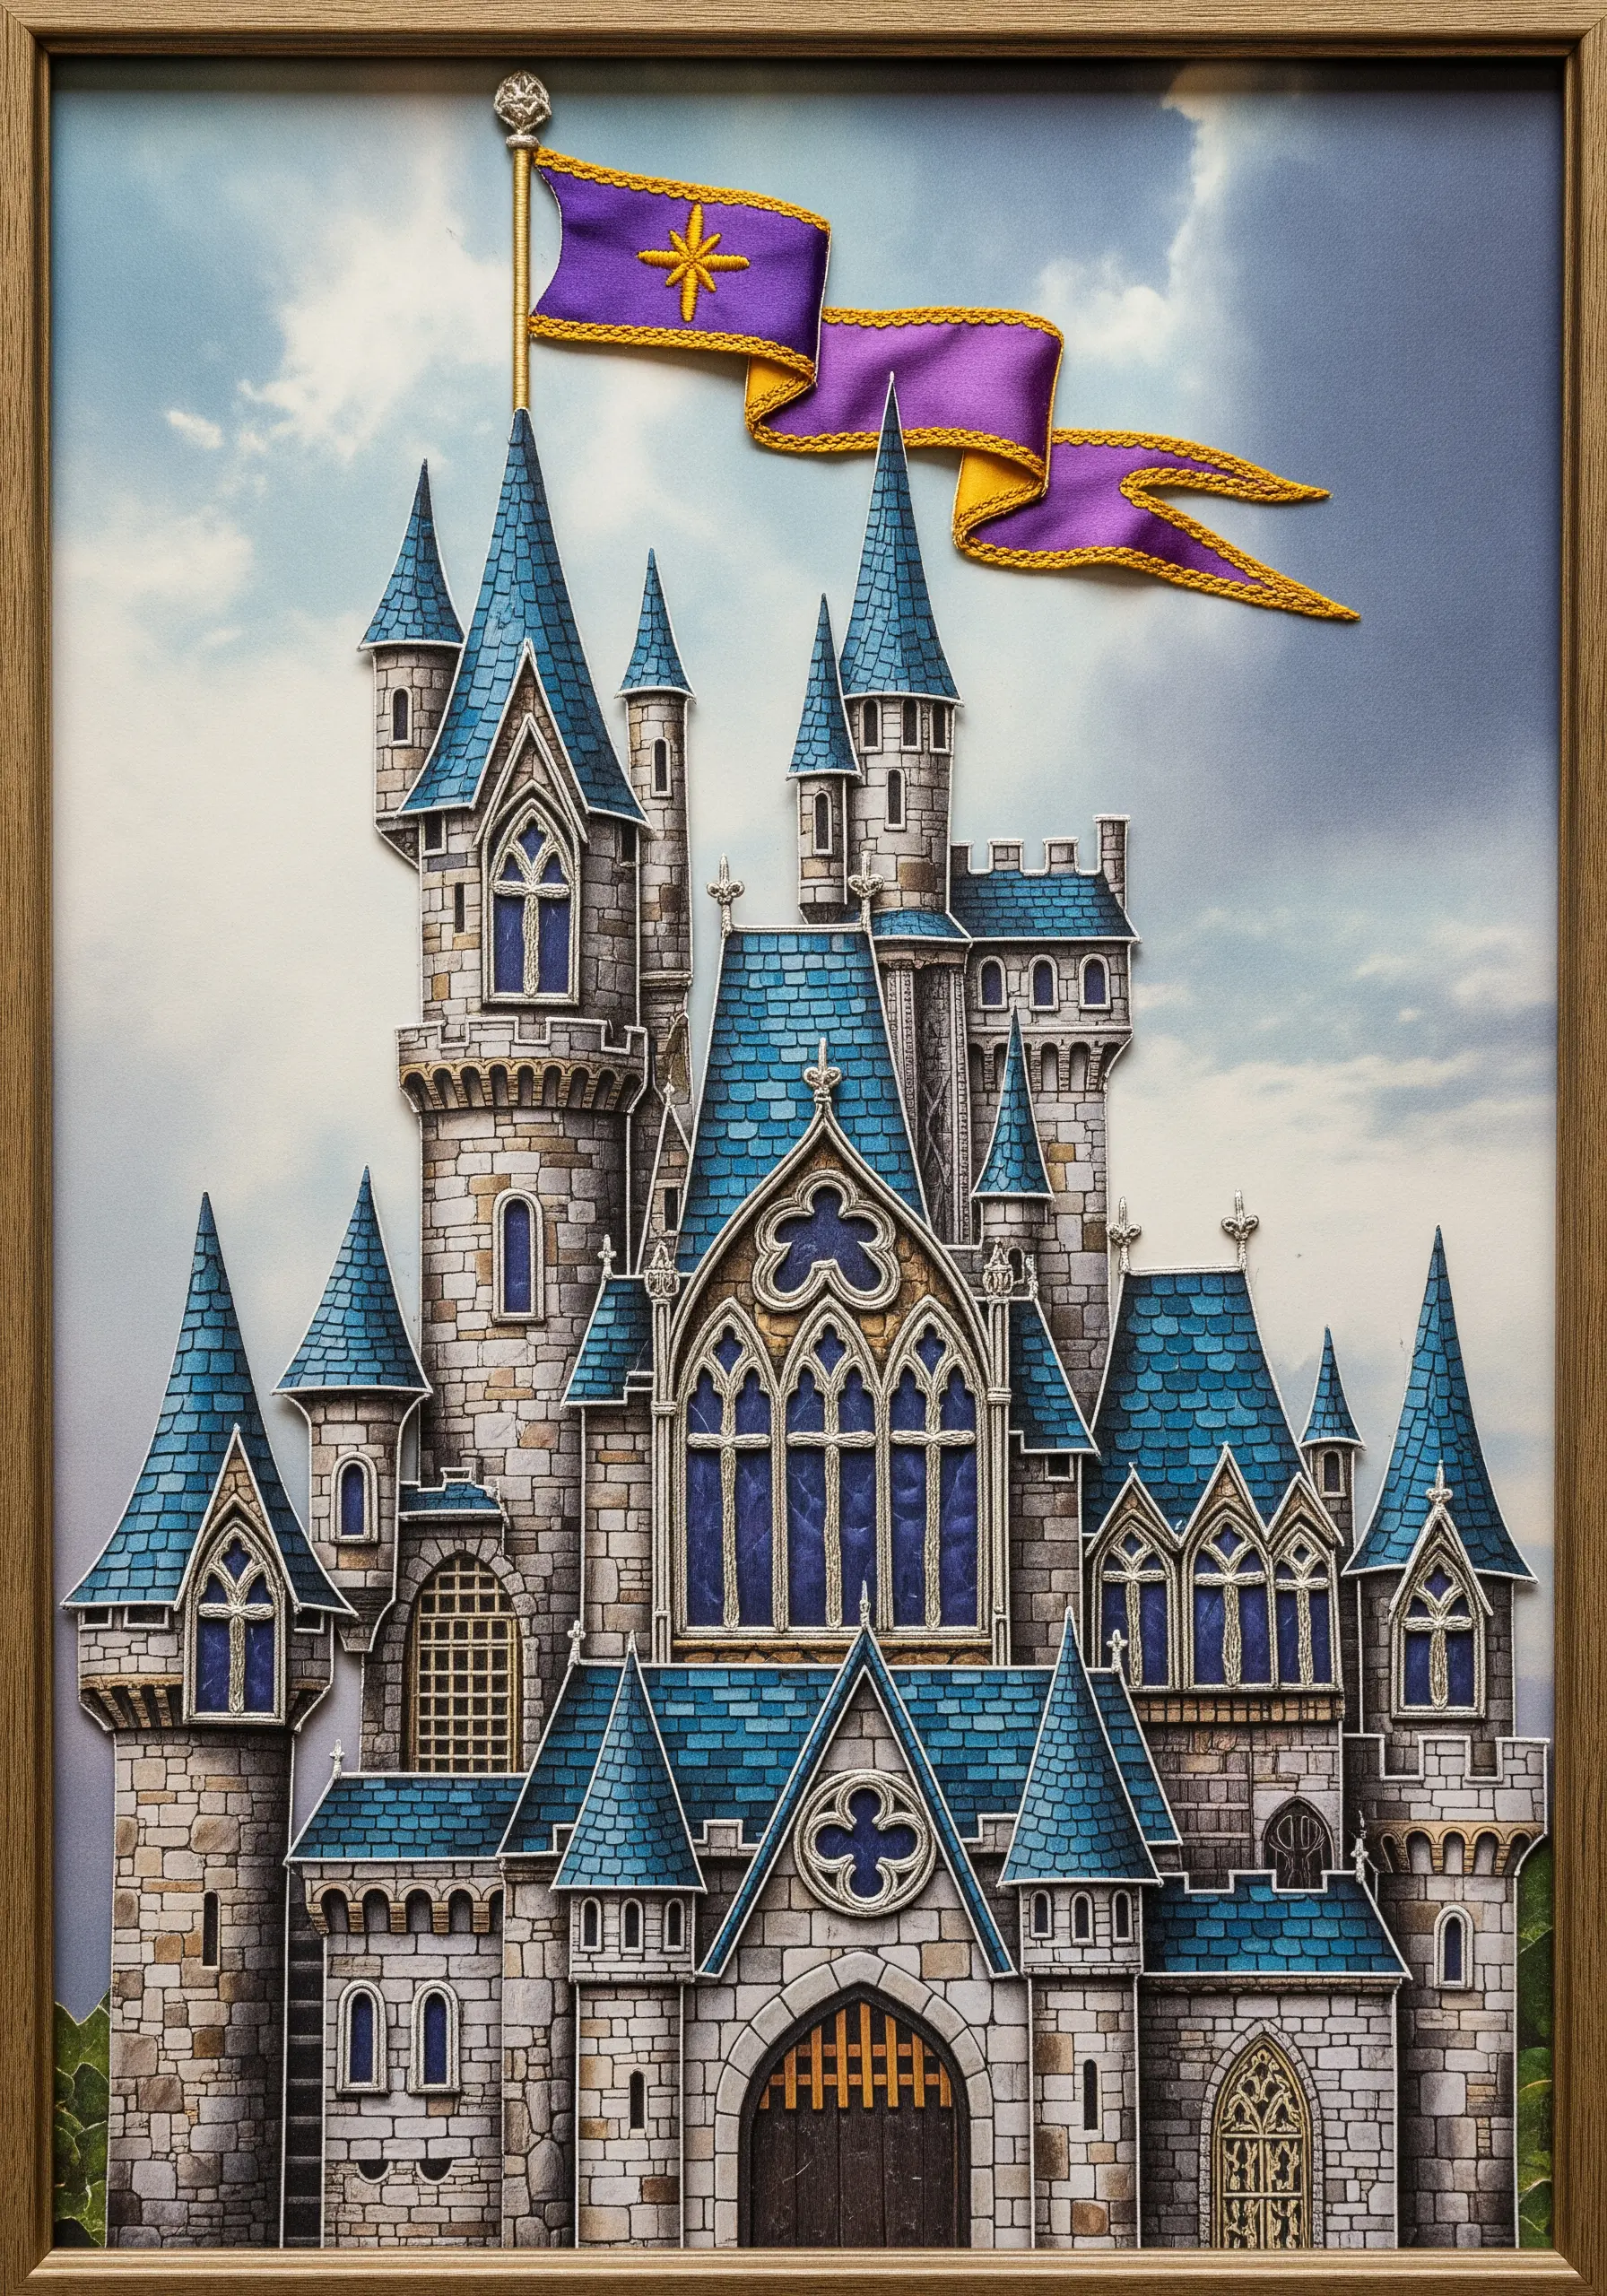
Give your collage a touch of regal realism by creating key elements with actual fabric.
Embroider the flag on a separate piece of fabric using satin stitch for the colored portions and metallic thread for details.
Attach the finished flag to your paper castle collage only along the edge of the flagpole.
This allows the flag to stand away from the surface, creating natural folds and shadows for a dynamic, 3D effect that captures the feeling of a banner waving in the wind.
34. Connect Steampunk Elements with Stitched Chains

Transform a static arrangement of gears into the impression of a working machine by adding stitched connections.
Use a heavy chain stitch with a metallic thread in a bronze or gunmetal shade to link the different gear components.
This creates a visual narrative, suggesting that the parts are all interconnected and functional.
The soft, looped texture of the thread also provides a compelling tactile contrast to the hard, metallic feel of the gears.
35. Create an Airy Framework with Trailing Stitches
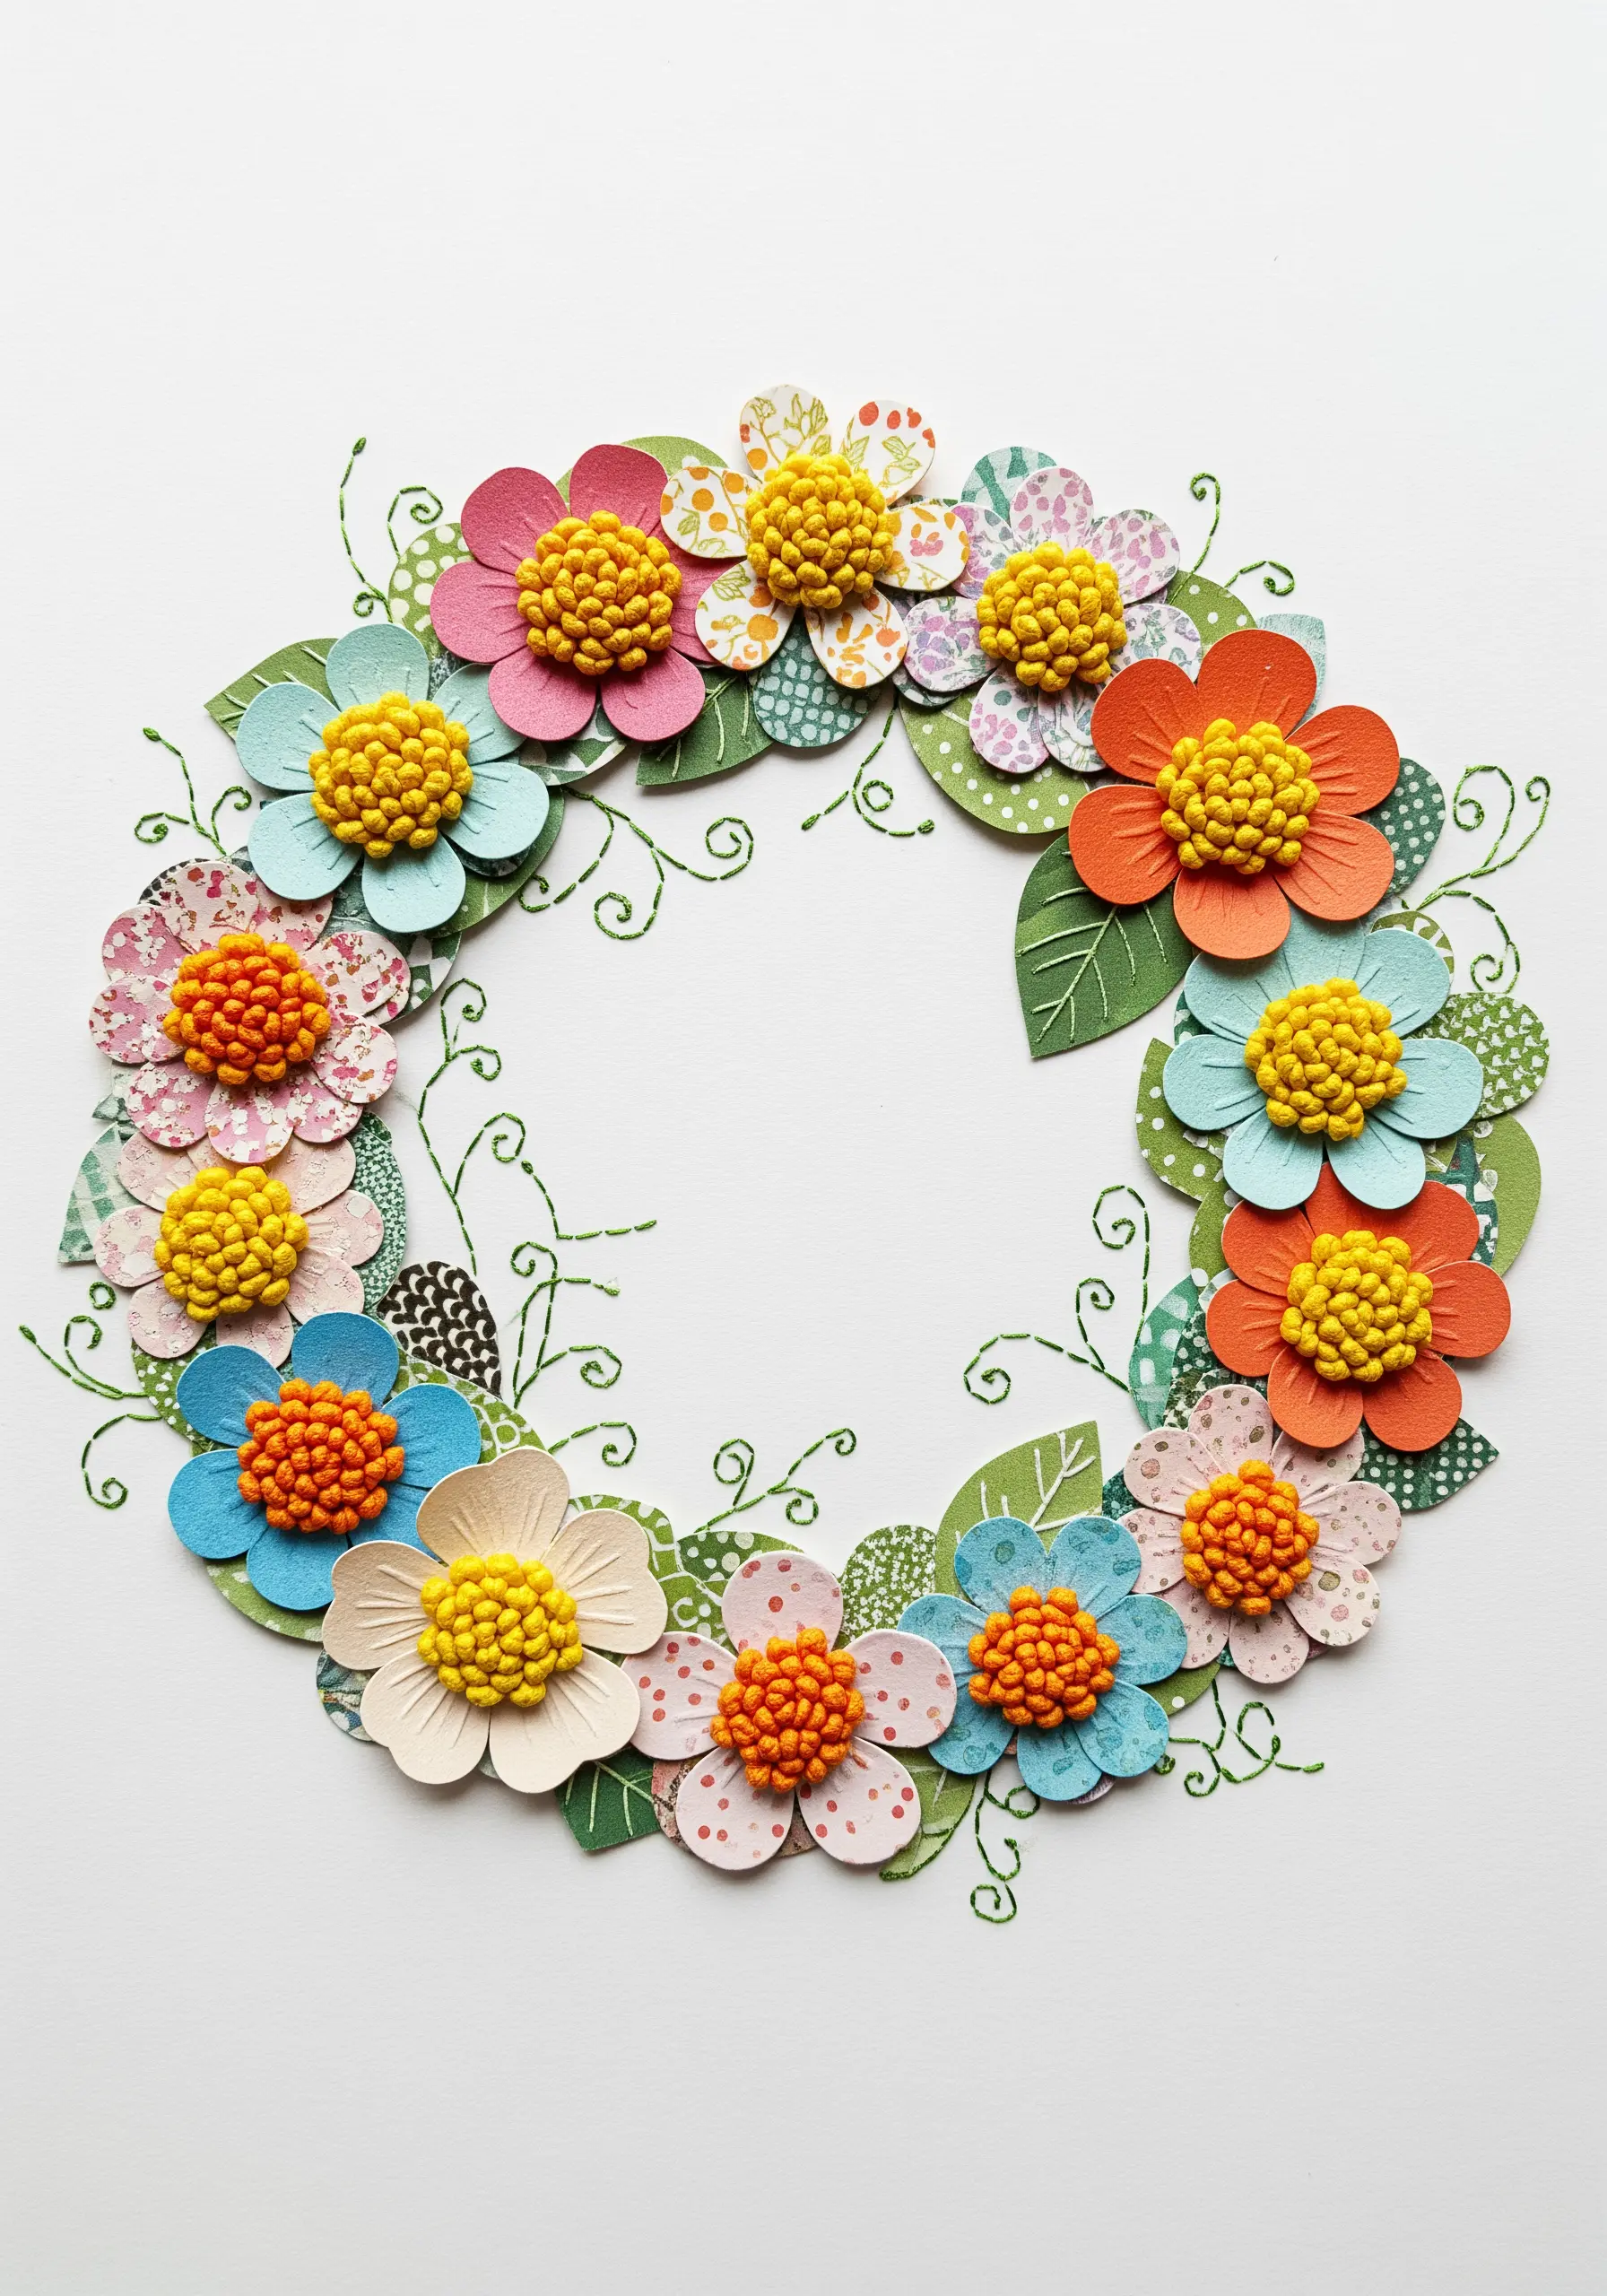
Unify a floral wreath made of paper cutouts by adding a delicate, stitched background that ties everything together.
Use a fine green thread and a simple running stitch or backstitch to create the impression of thin, trailing vines weaving between the flowers.
Scatter a few tiny leaves along the vines using single lazy daisy stitches.
This technique provides a light, airy structure that connects the individual elements without adding any visual weight, resulting in a perfectly balanced composition.
36. Add a Graphic Sunburst to a Minimalist Landscape
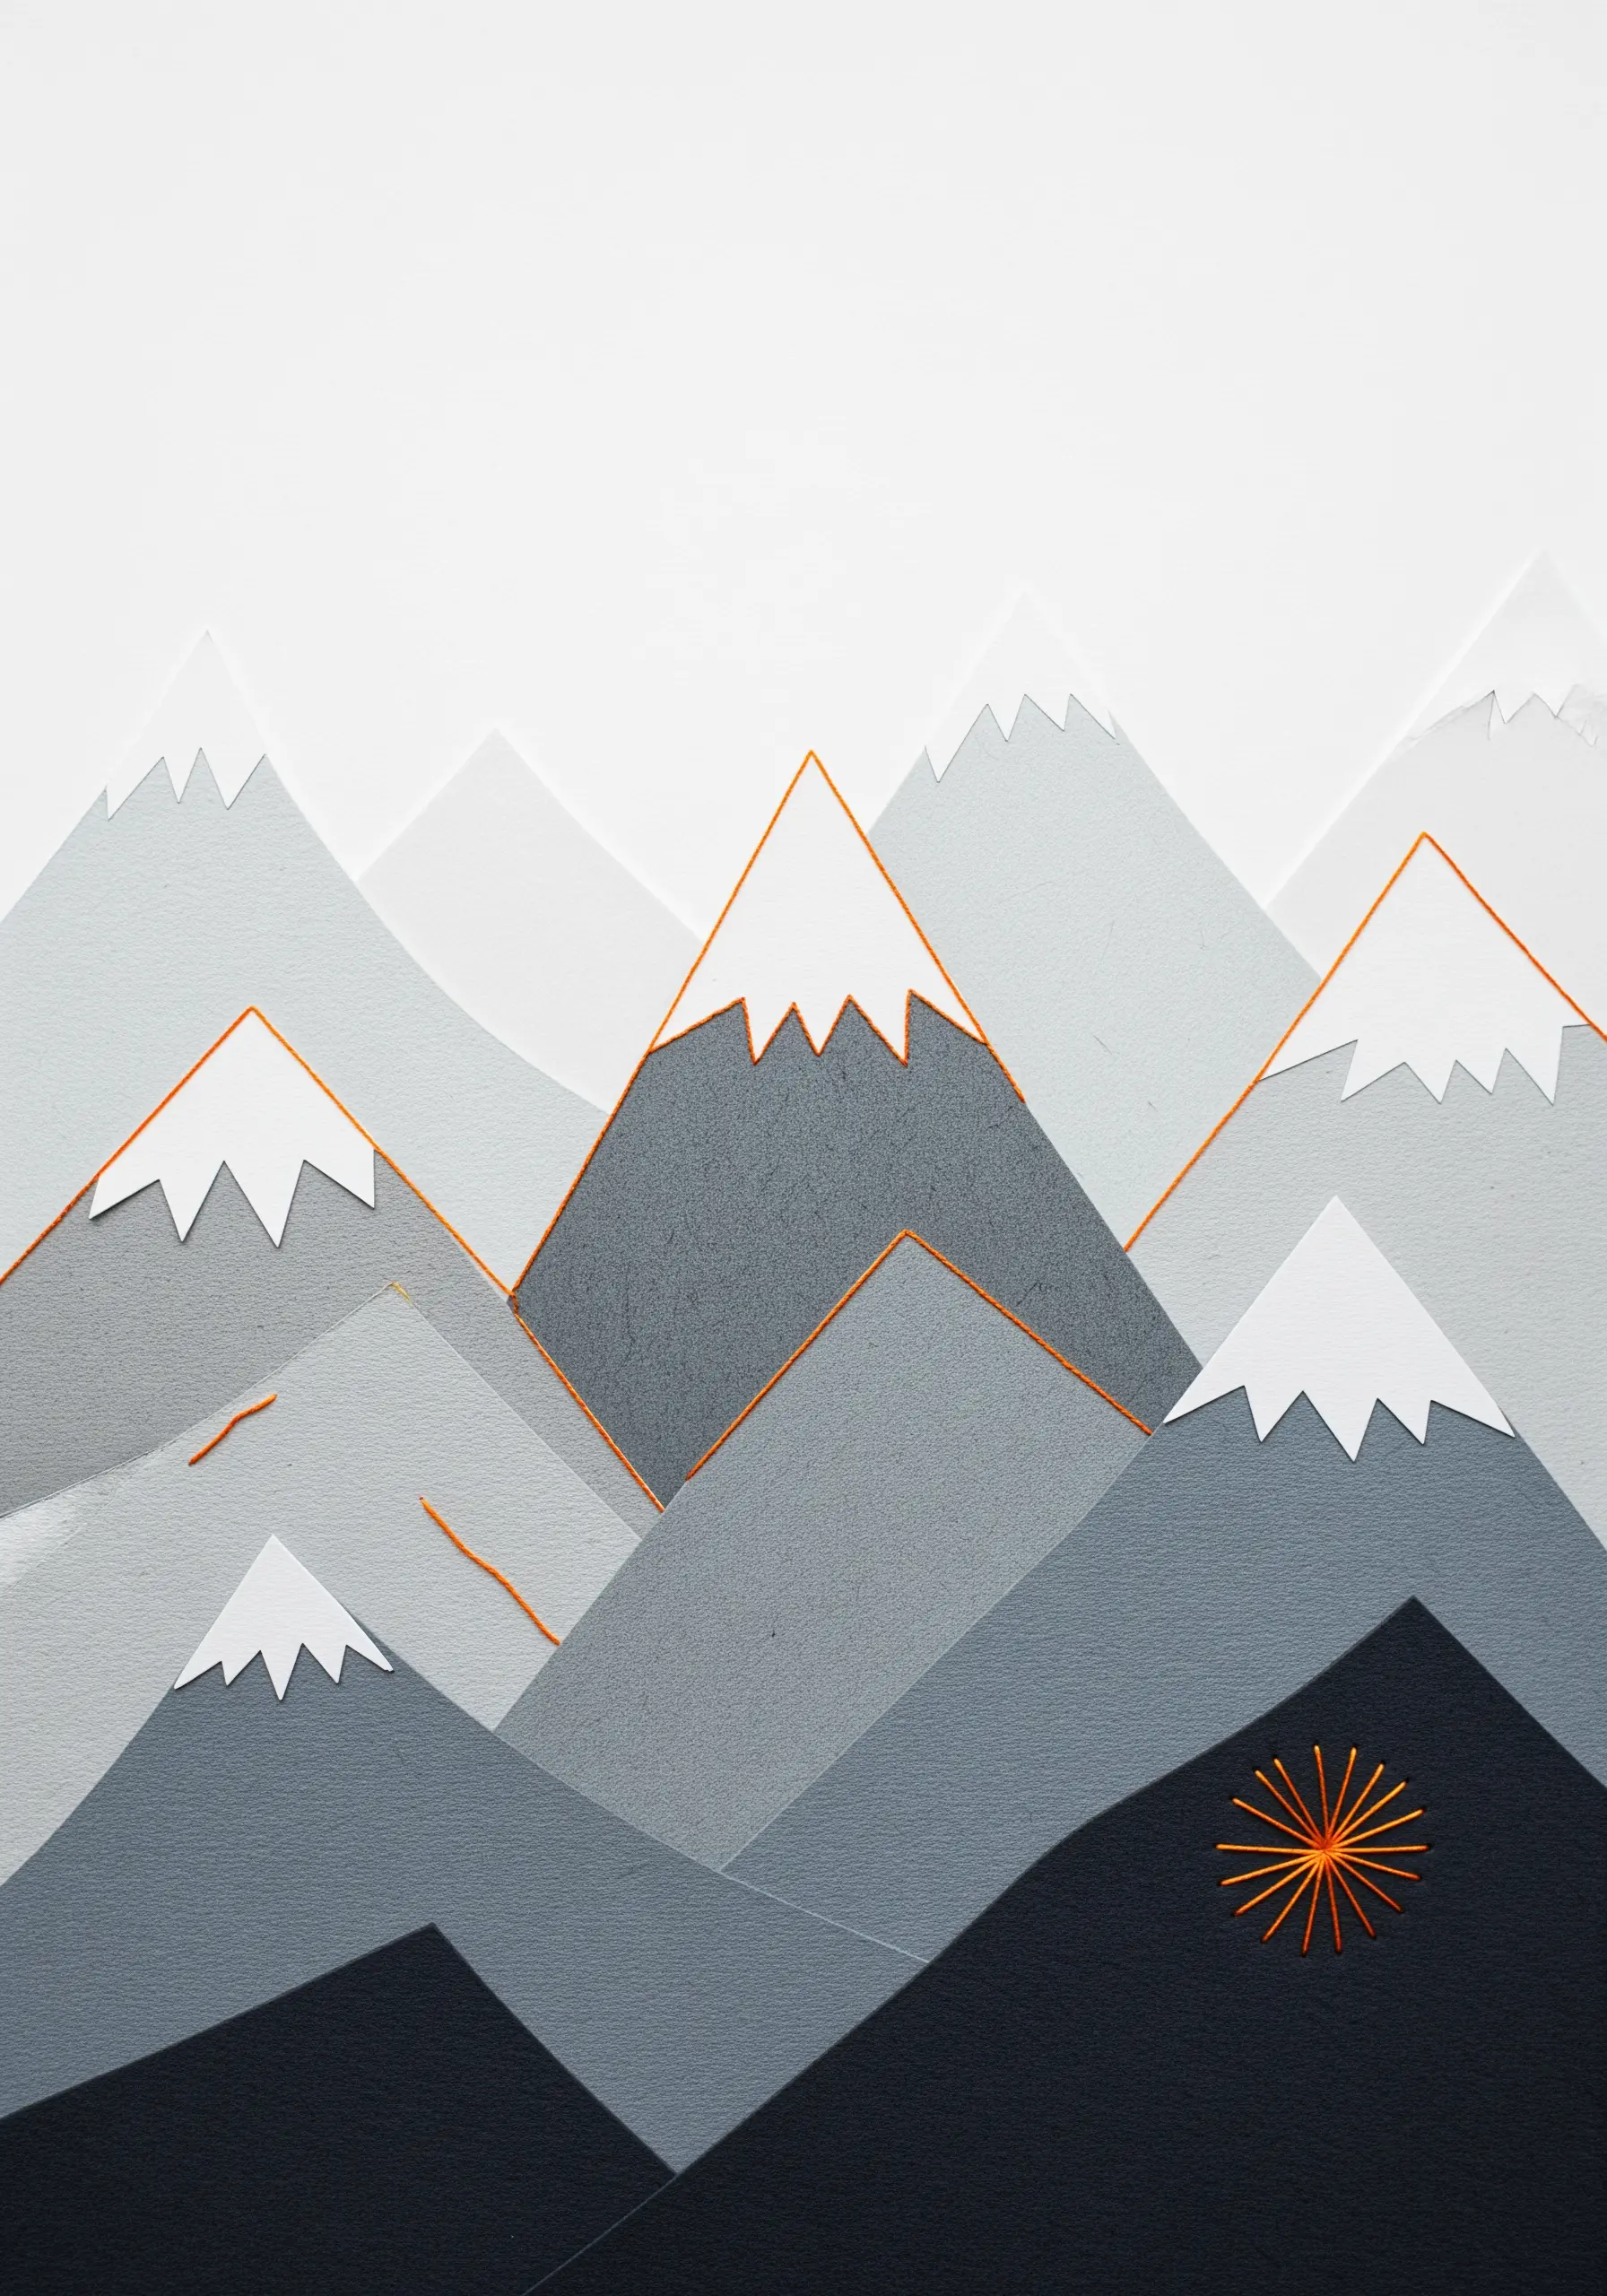
In a serene, layered-paper mountain scene, a single, sharp geometric detail can serve as a powerful focal point.
Use a bright, contrasting thread—like metallic copper or gold—to stitch a stylized sunburst or star.
Create the shape with a series of radiating straight stitches, working from a central point outwards for a clean, star-like effect.
This small touch of graphic energy provides a stunning counterpoint to the soft, muted tones and shapes of the mountains.


