

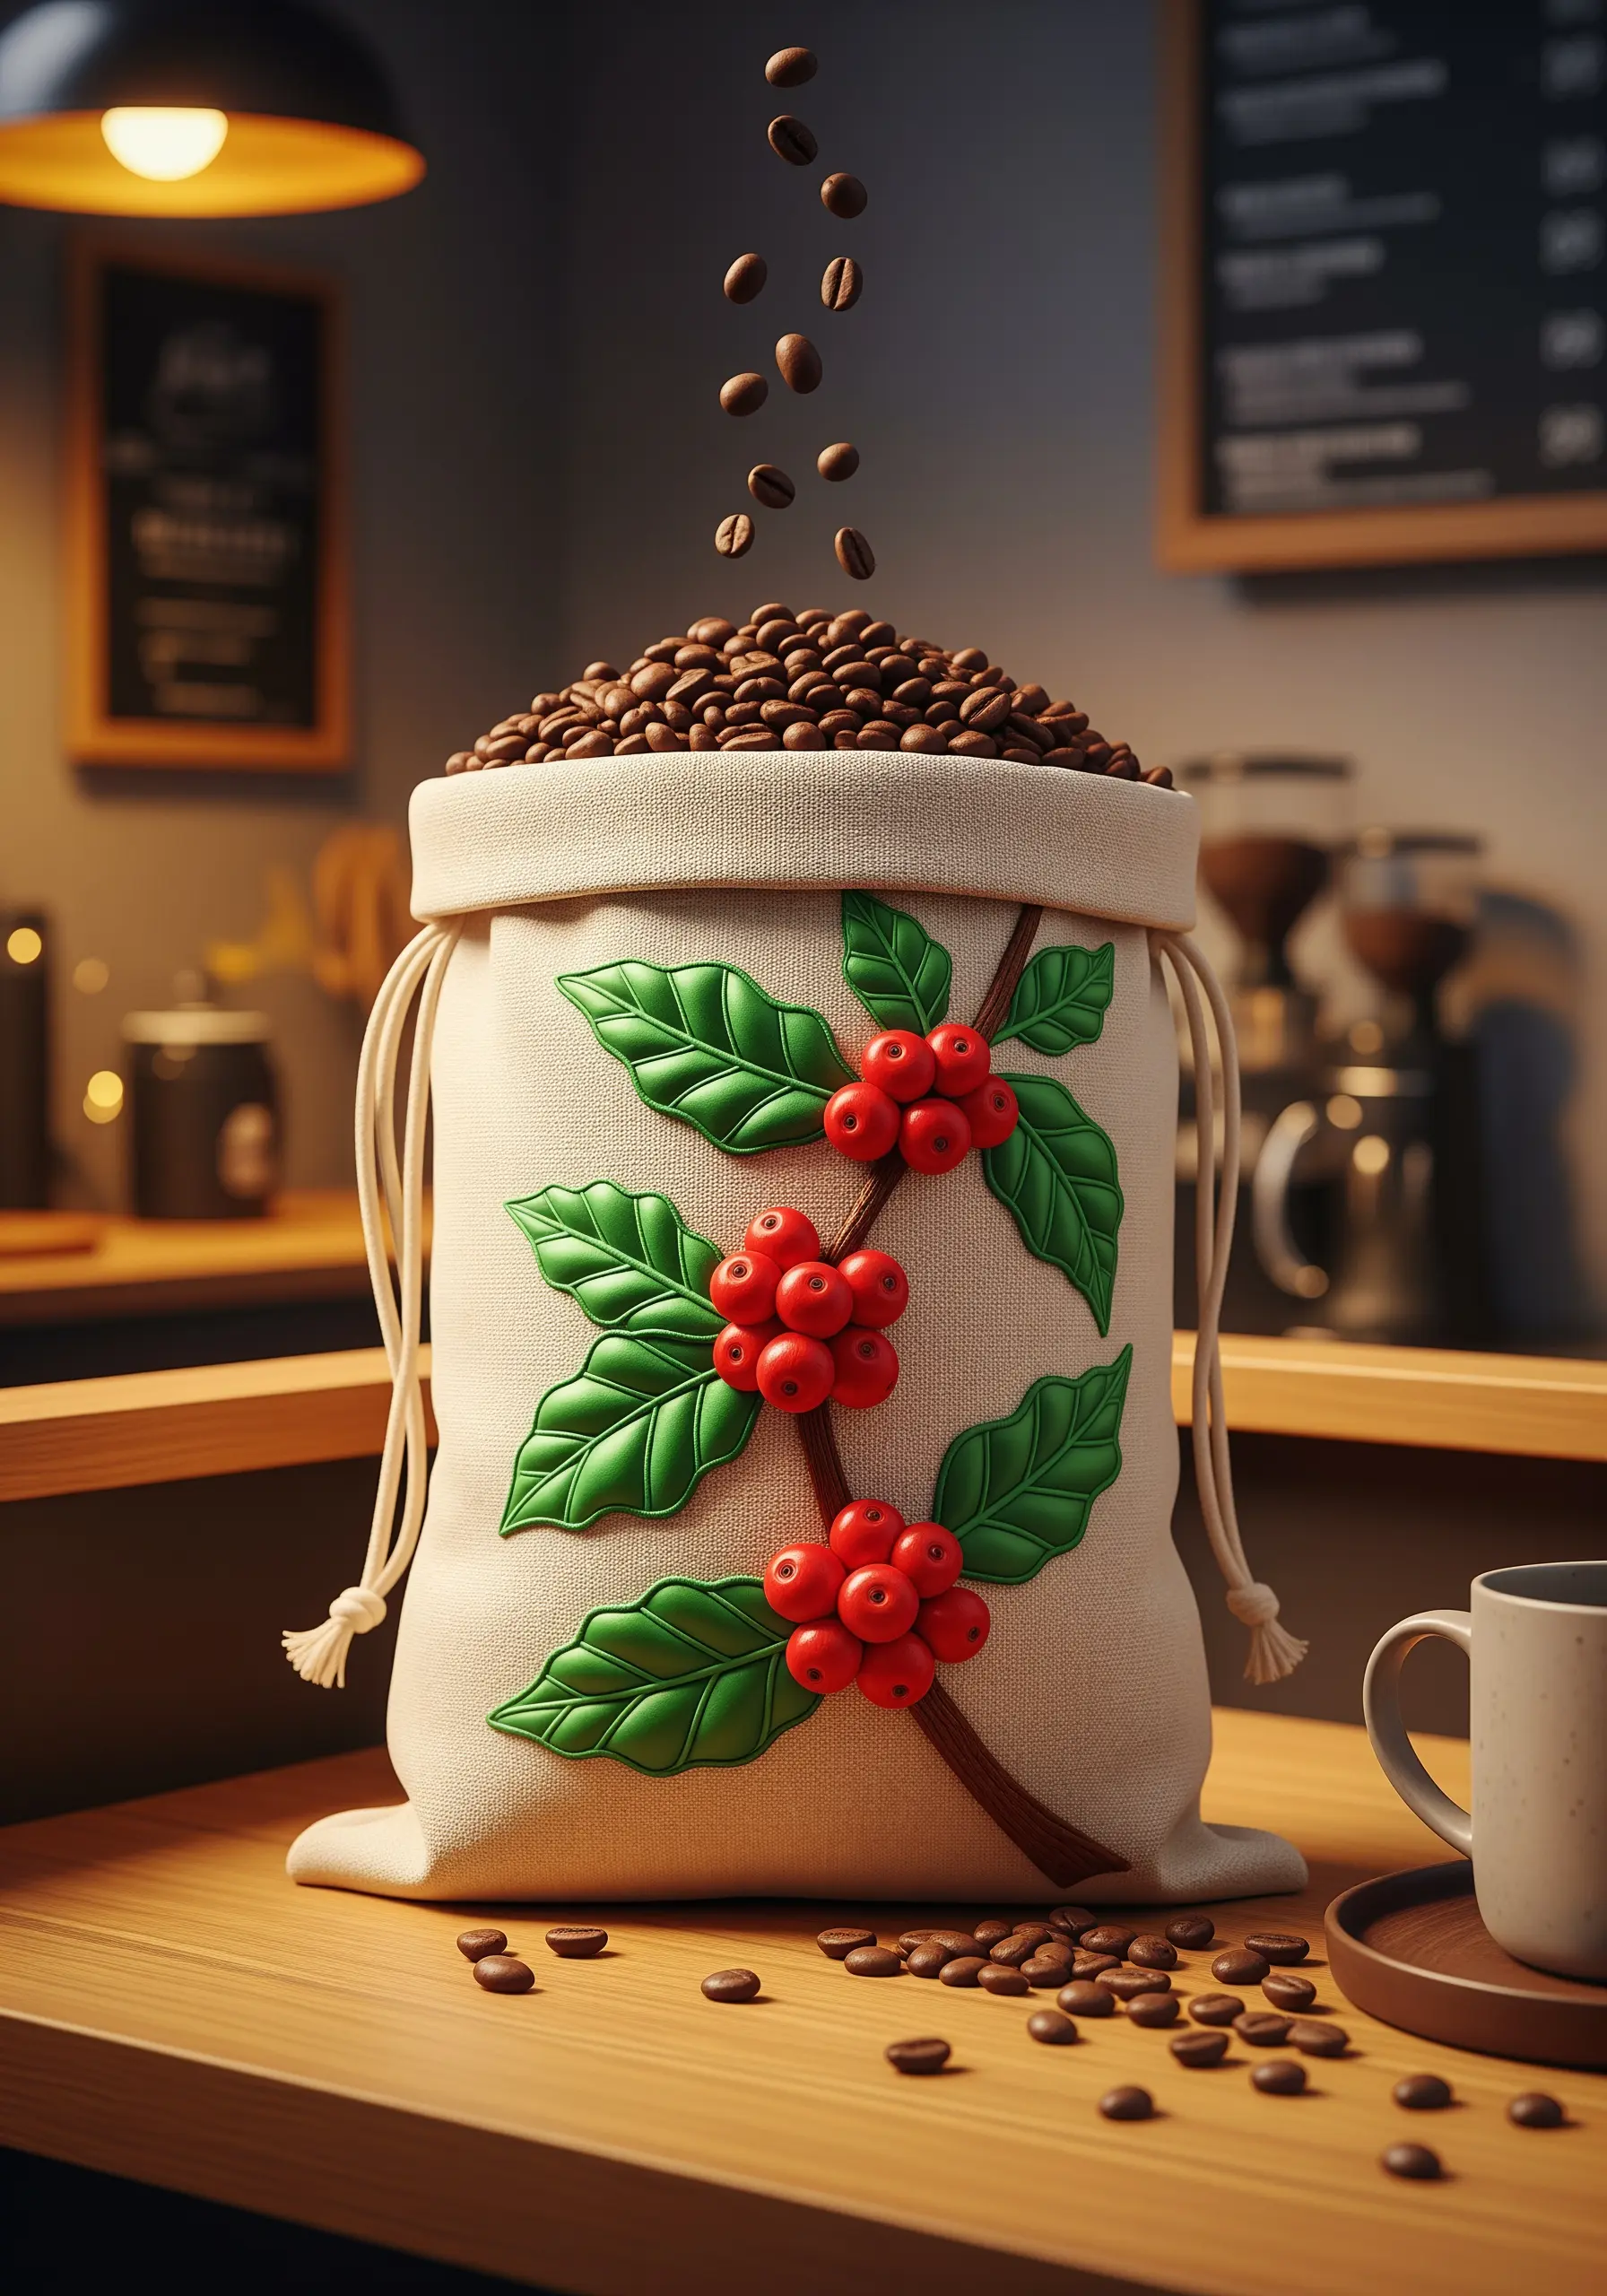
There is a special kind of magic in giving a gift that is thoughtfully wrapped. It’s the first thing someone sees, the first hint of the care you’ve put inside. But what if the wrapping itself could be part of the gift—something beautiful, reusable, and stitched with personal intention?
This is where fabric and thread come in. By transforming a simple cloth bag, a swatch of linen, or a Furoshiki wrap with botanical embroidery, you are creating more than just packaging. You are making an heirloom, a small piece of art that can be used and treasured long after the original gift is unwrapped.
Here, you’ll find ideas that go beyond simple decoration. We will explore how specific stitches create texture, how color choices evoke a mood, and how composition can turn a simple leaf into a statement. This is your guide to making every gift you give feel exceptionally personal and beautiful, right from the very first touch.
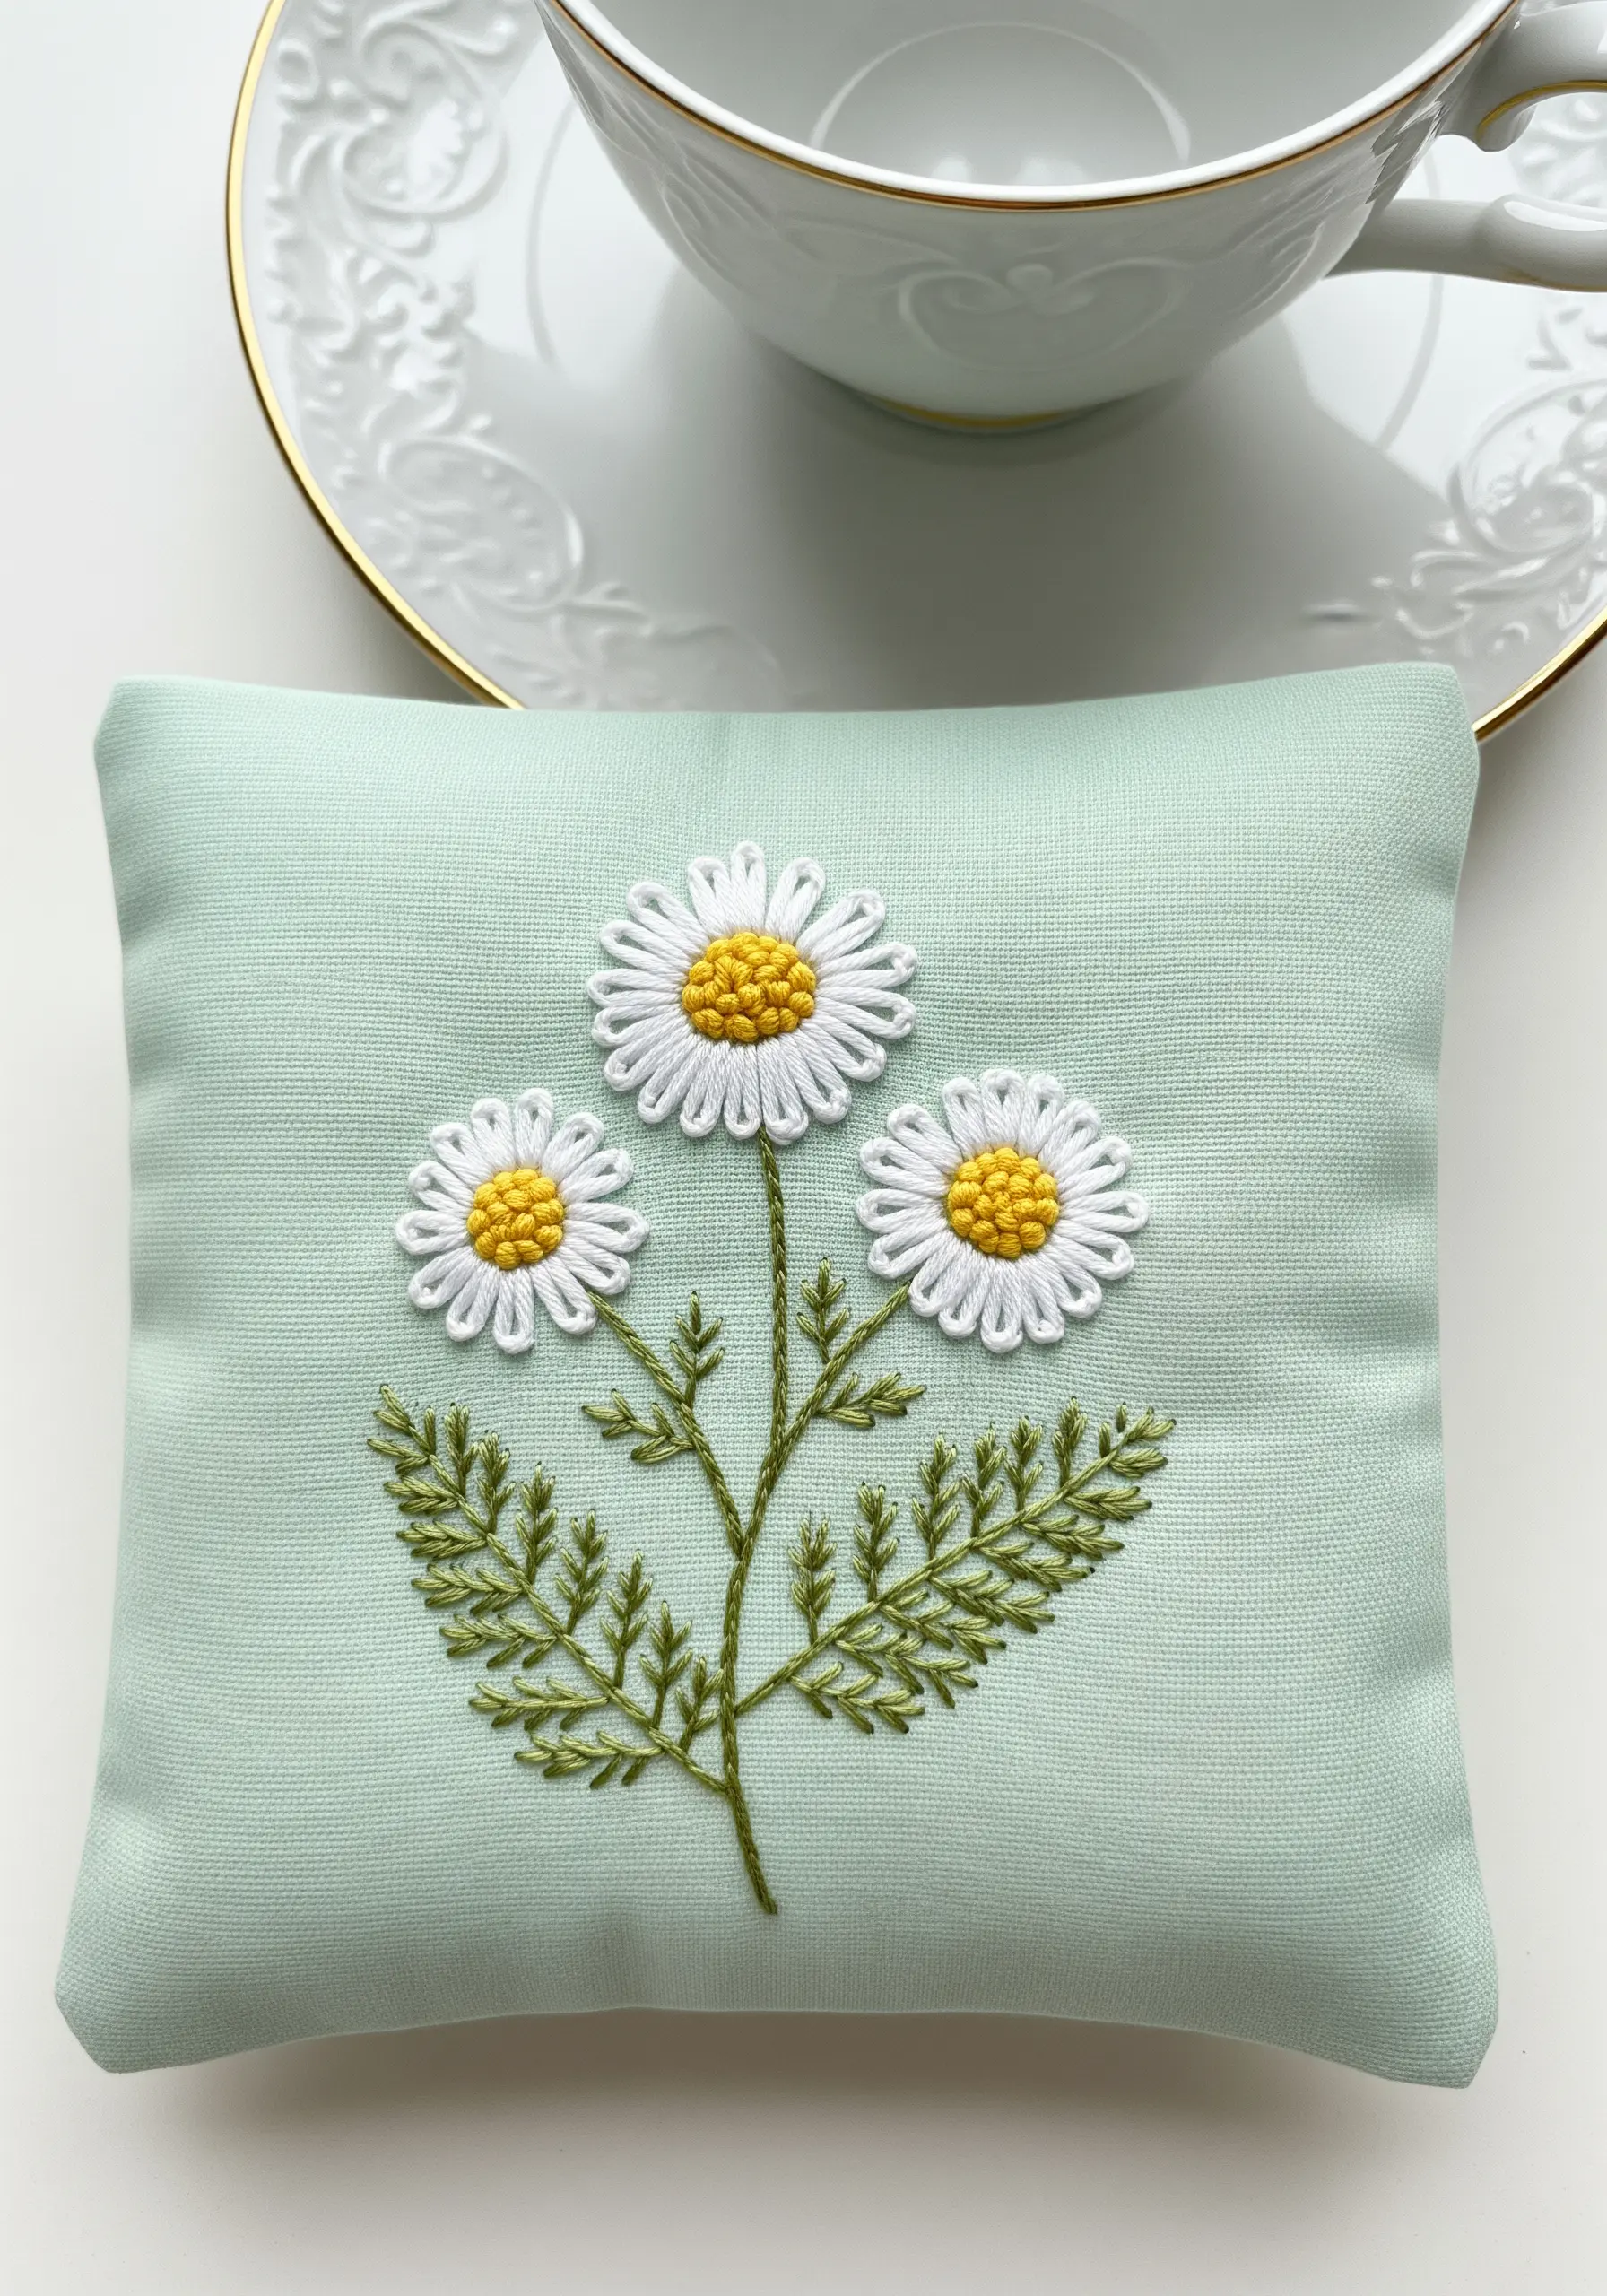
1. Achieve Depth with Thread-Painted Monstera
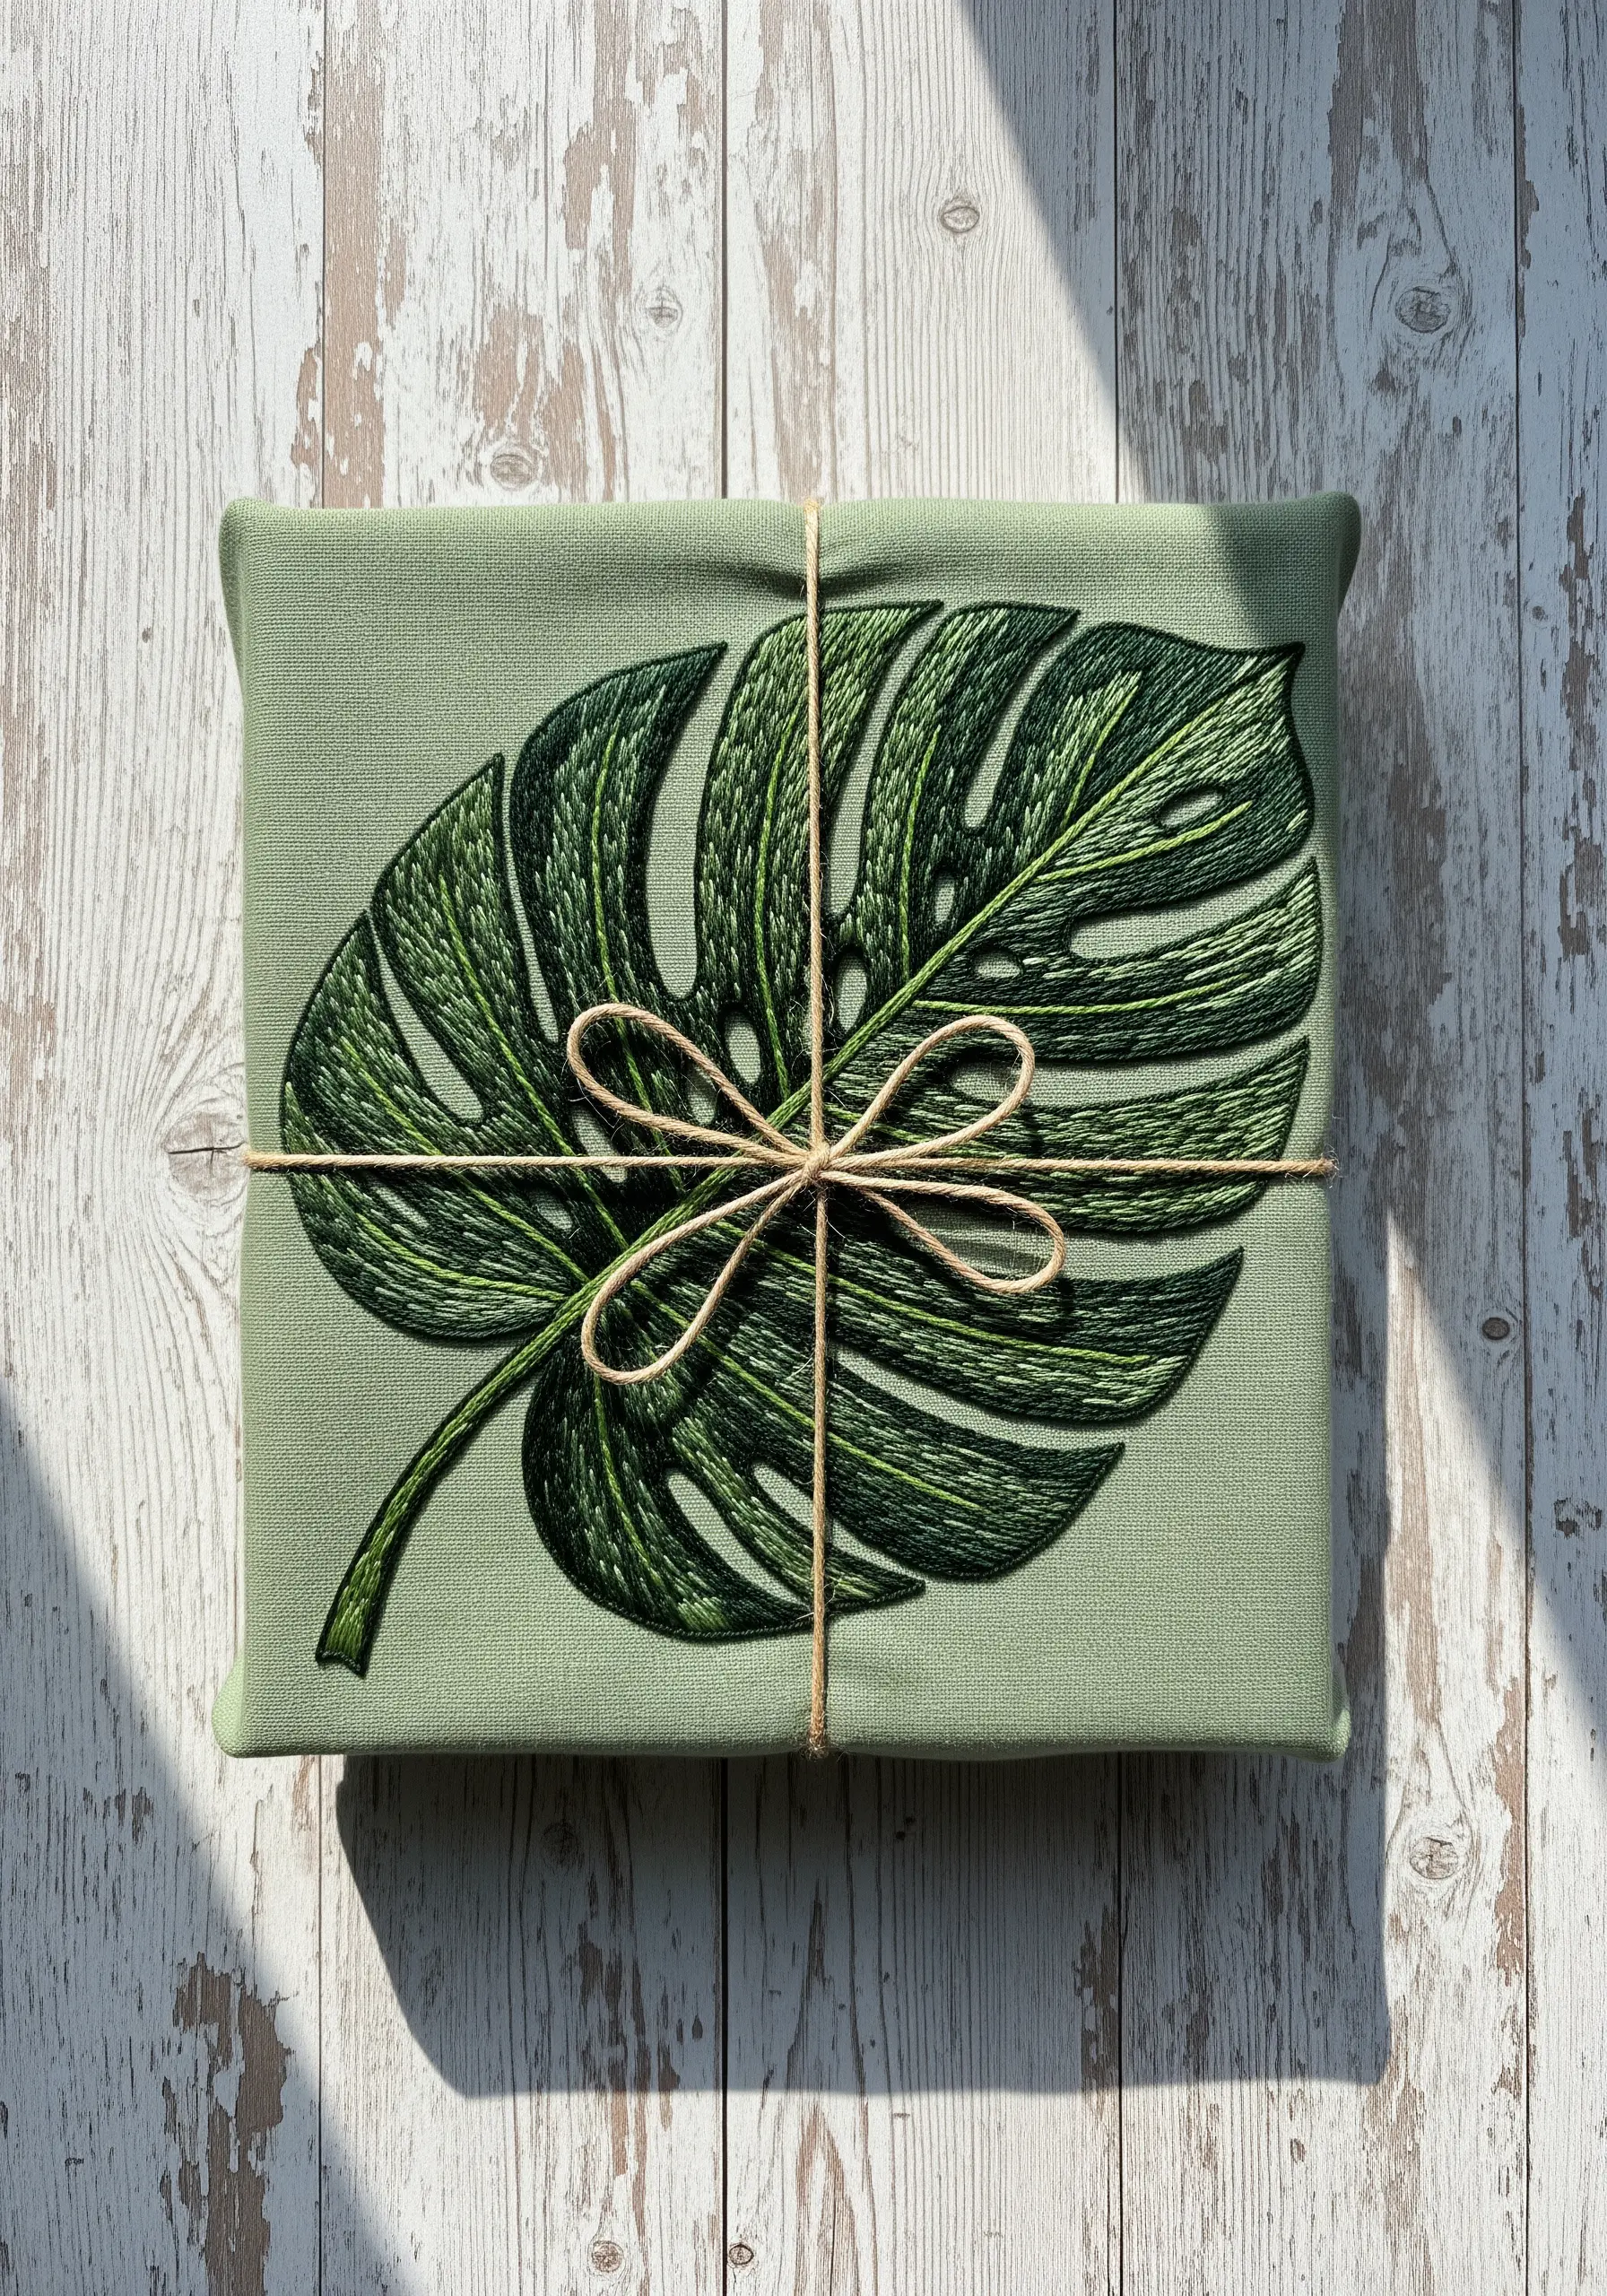
To create a leaf with realistic depth, use the long-and-short stitch technique, blending at least three shades of green from light to dark.
Work your stitches to follow the natural direction of the leaf’s growth, angling them away from the central stem.
For the delicate veins, use a single strand of your darkest thread in a simple backstitch, stitching it directly over your filled sections to create sharp, defined lines.
This approach transforms a flat shape into a dynamic, dimensional piece that feels alive.
2. Elevate a Small Bag with a Simple Ivy Vine
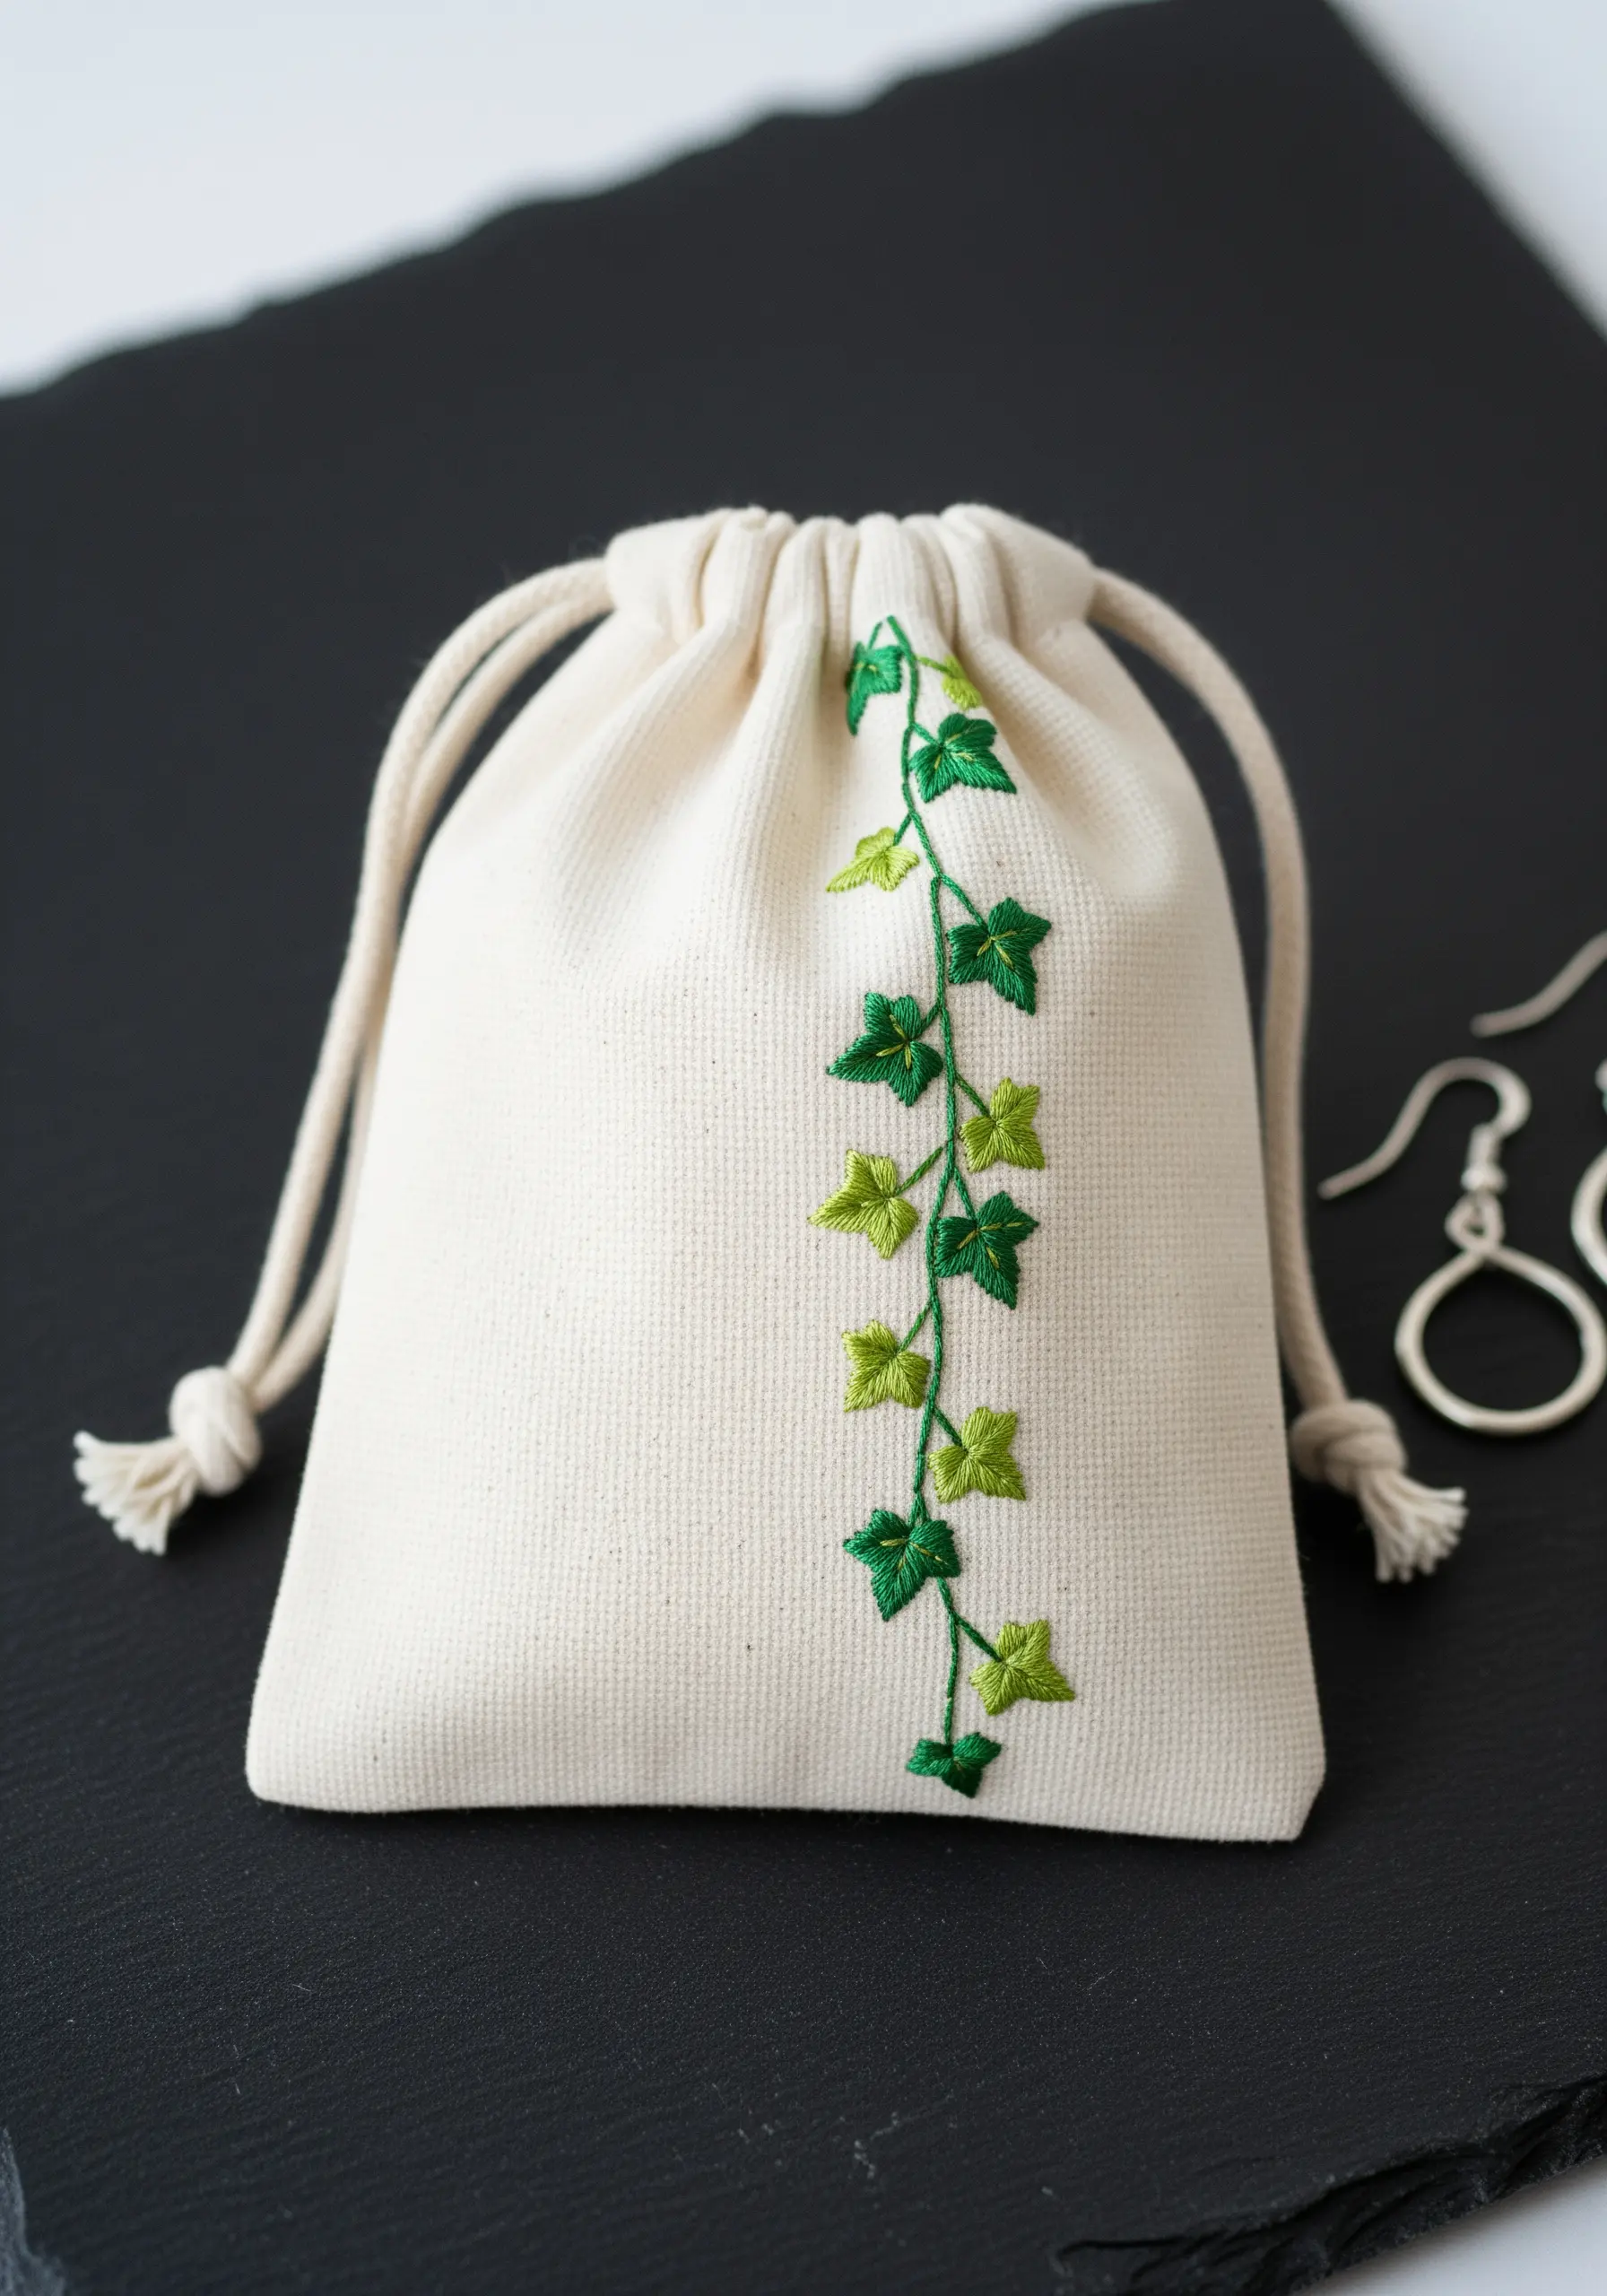
For a small drawstring pouch, a single vertical vine adds elegance without overwhelming the design.
Use a basic satin stitch for the ivy leaves, alternating between two shades of green to create subtle variation and visual interest.
Connect the leaves with a clean stem stitch in the darker green, ensuring your stitch length is consistent for a smooth, unbroken line.
This minimalist composition draws the eye upward, making the gift bag feel more refined.
3. Combine Stitches for a Textured Olive Branch
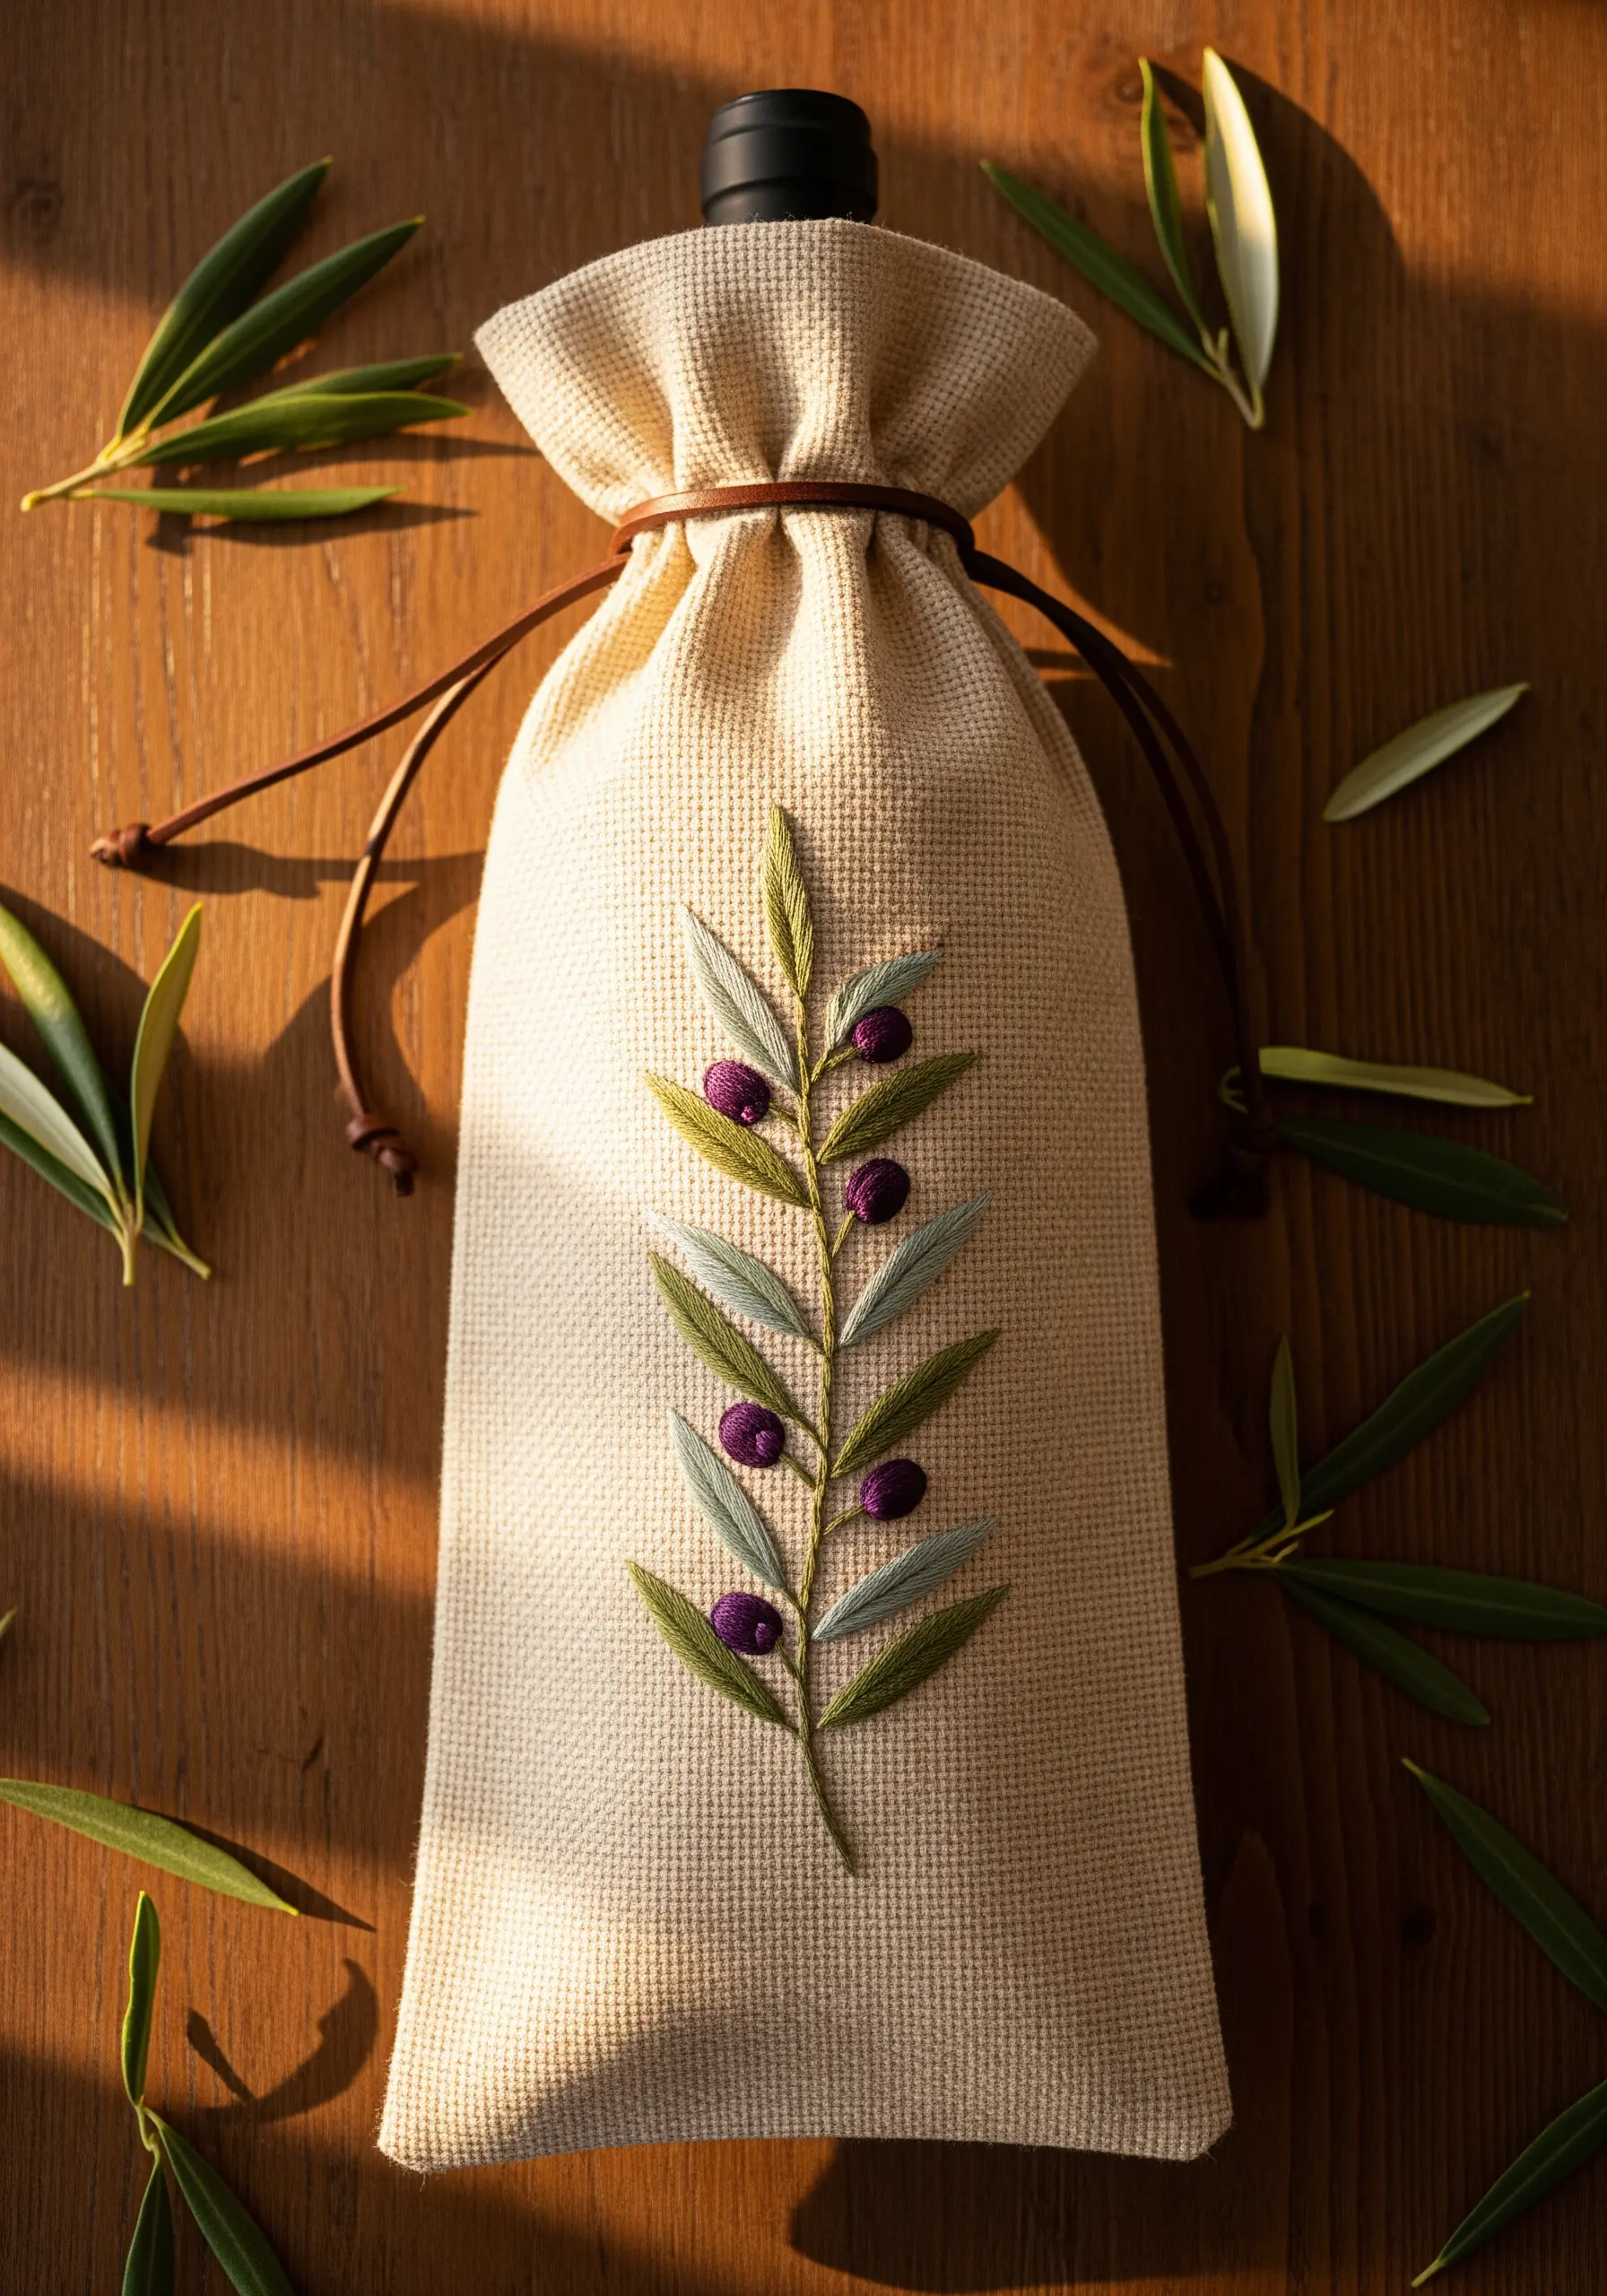
Create sophisticated texture by pairing different stitches within one motif.
Use the fishbone stitch for the olive leaves; this technique automatically creates the central vein for a more realistic look.
For the olives, use padded satin stitch—a base of small straight stitches covered by your final satin stitch—to give them a raised, three-dimensional quality.
This contrast between the flat, veined leaves and the plump berries makes the entire design more tactile and engaging.
4. Blend Colors for Vibrant Autumn Maple Leaves
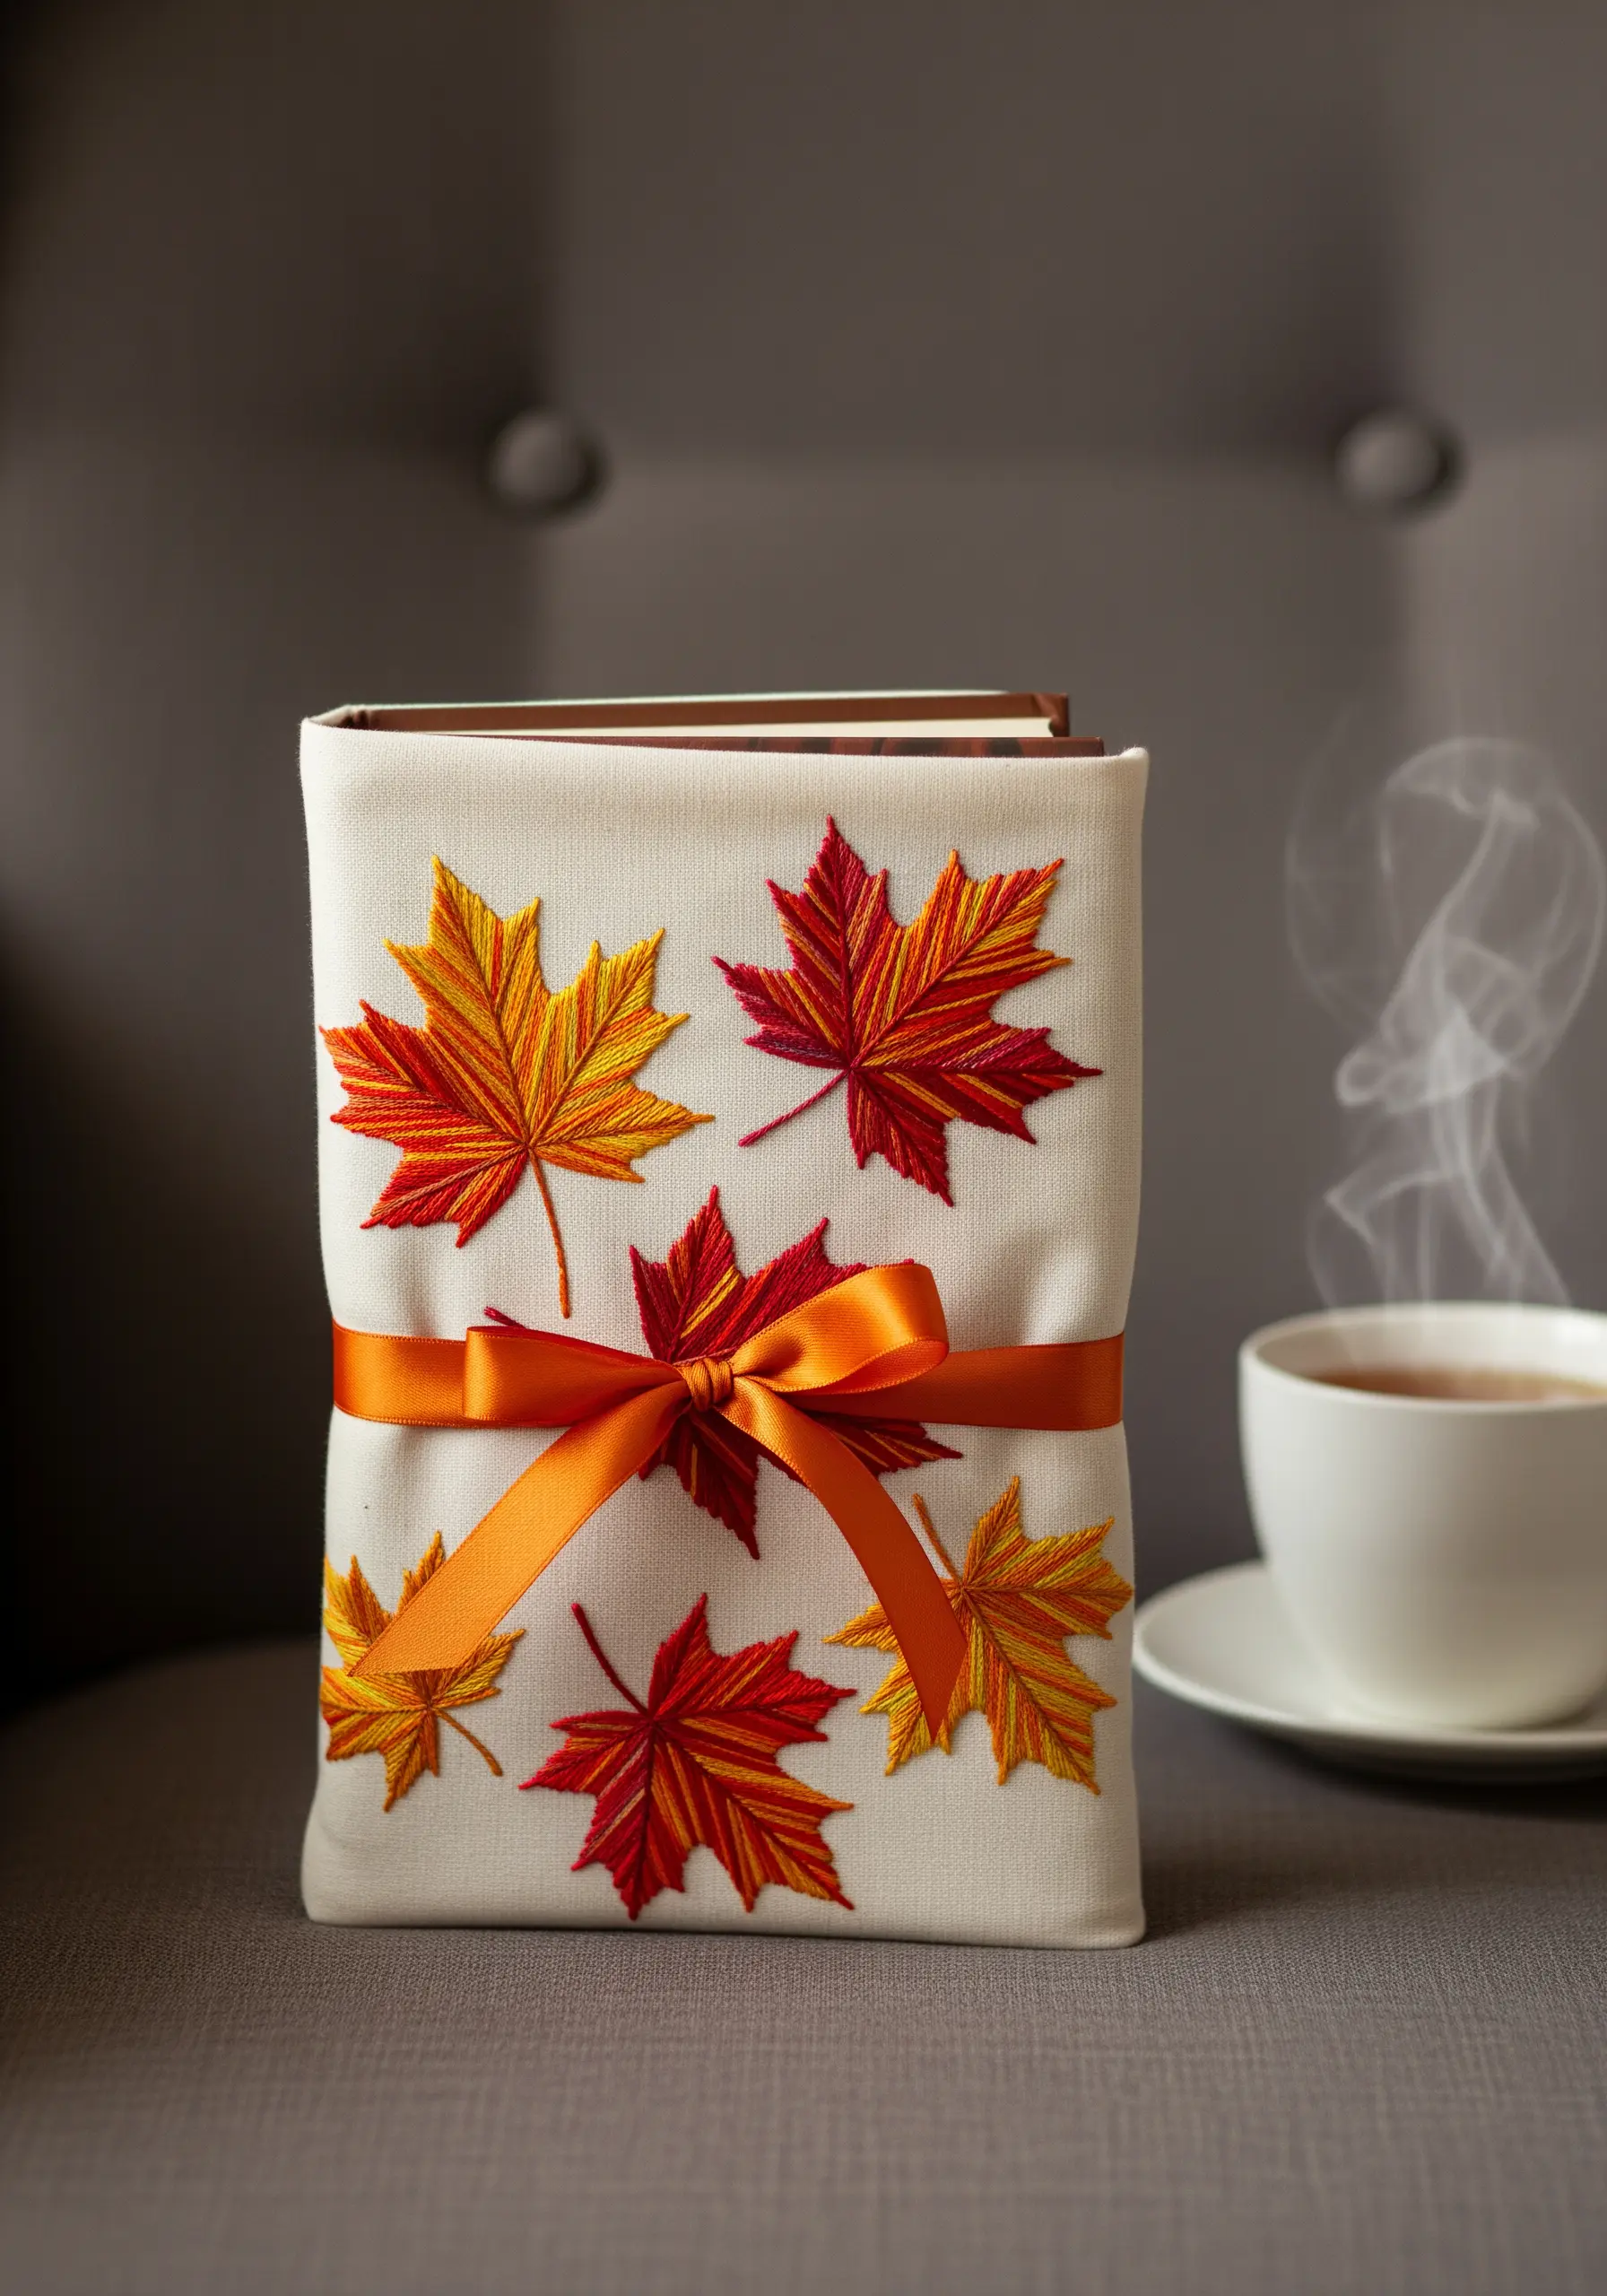
Capture the fiery look of autumn foliage by blending multiple colors within each leaf.
You can use a variegated thread for an effortless gradient, or manually blend two to three shades of red, orange, and yellow using the long-and-short stitch technique.
Ensure your stitches radiate outward from the center of each leaf lobe to mimic natural veining and create a sense of movement.
Finish with a simple stem stitch for the stalk in a contrasting dark red or brown.
5. Stitch a Muted Eucalyptus Wreath
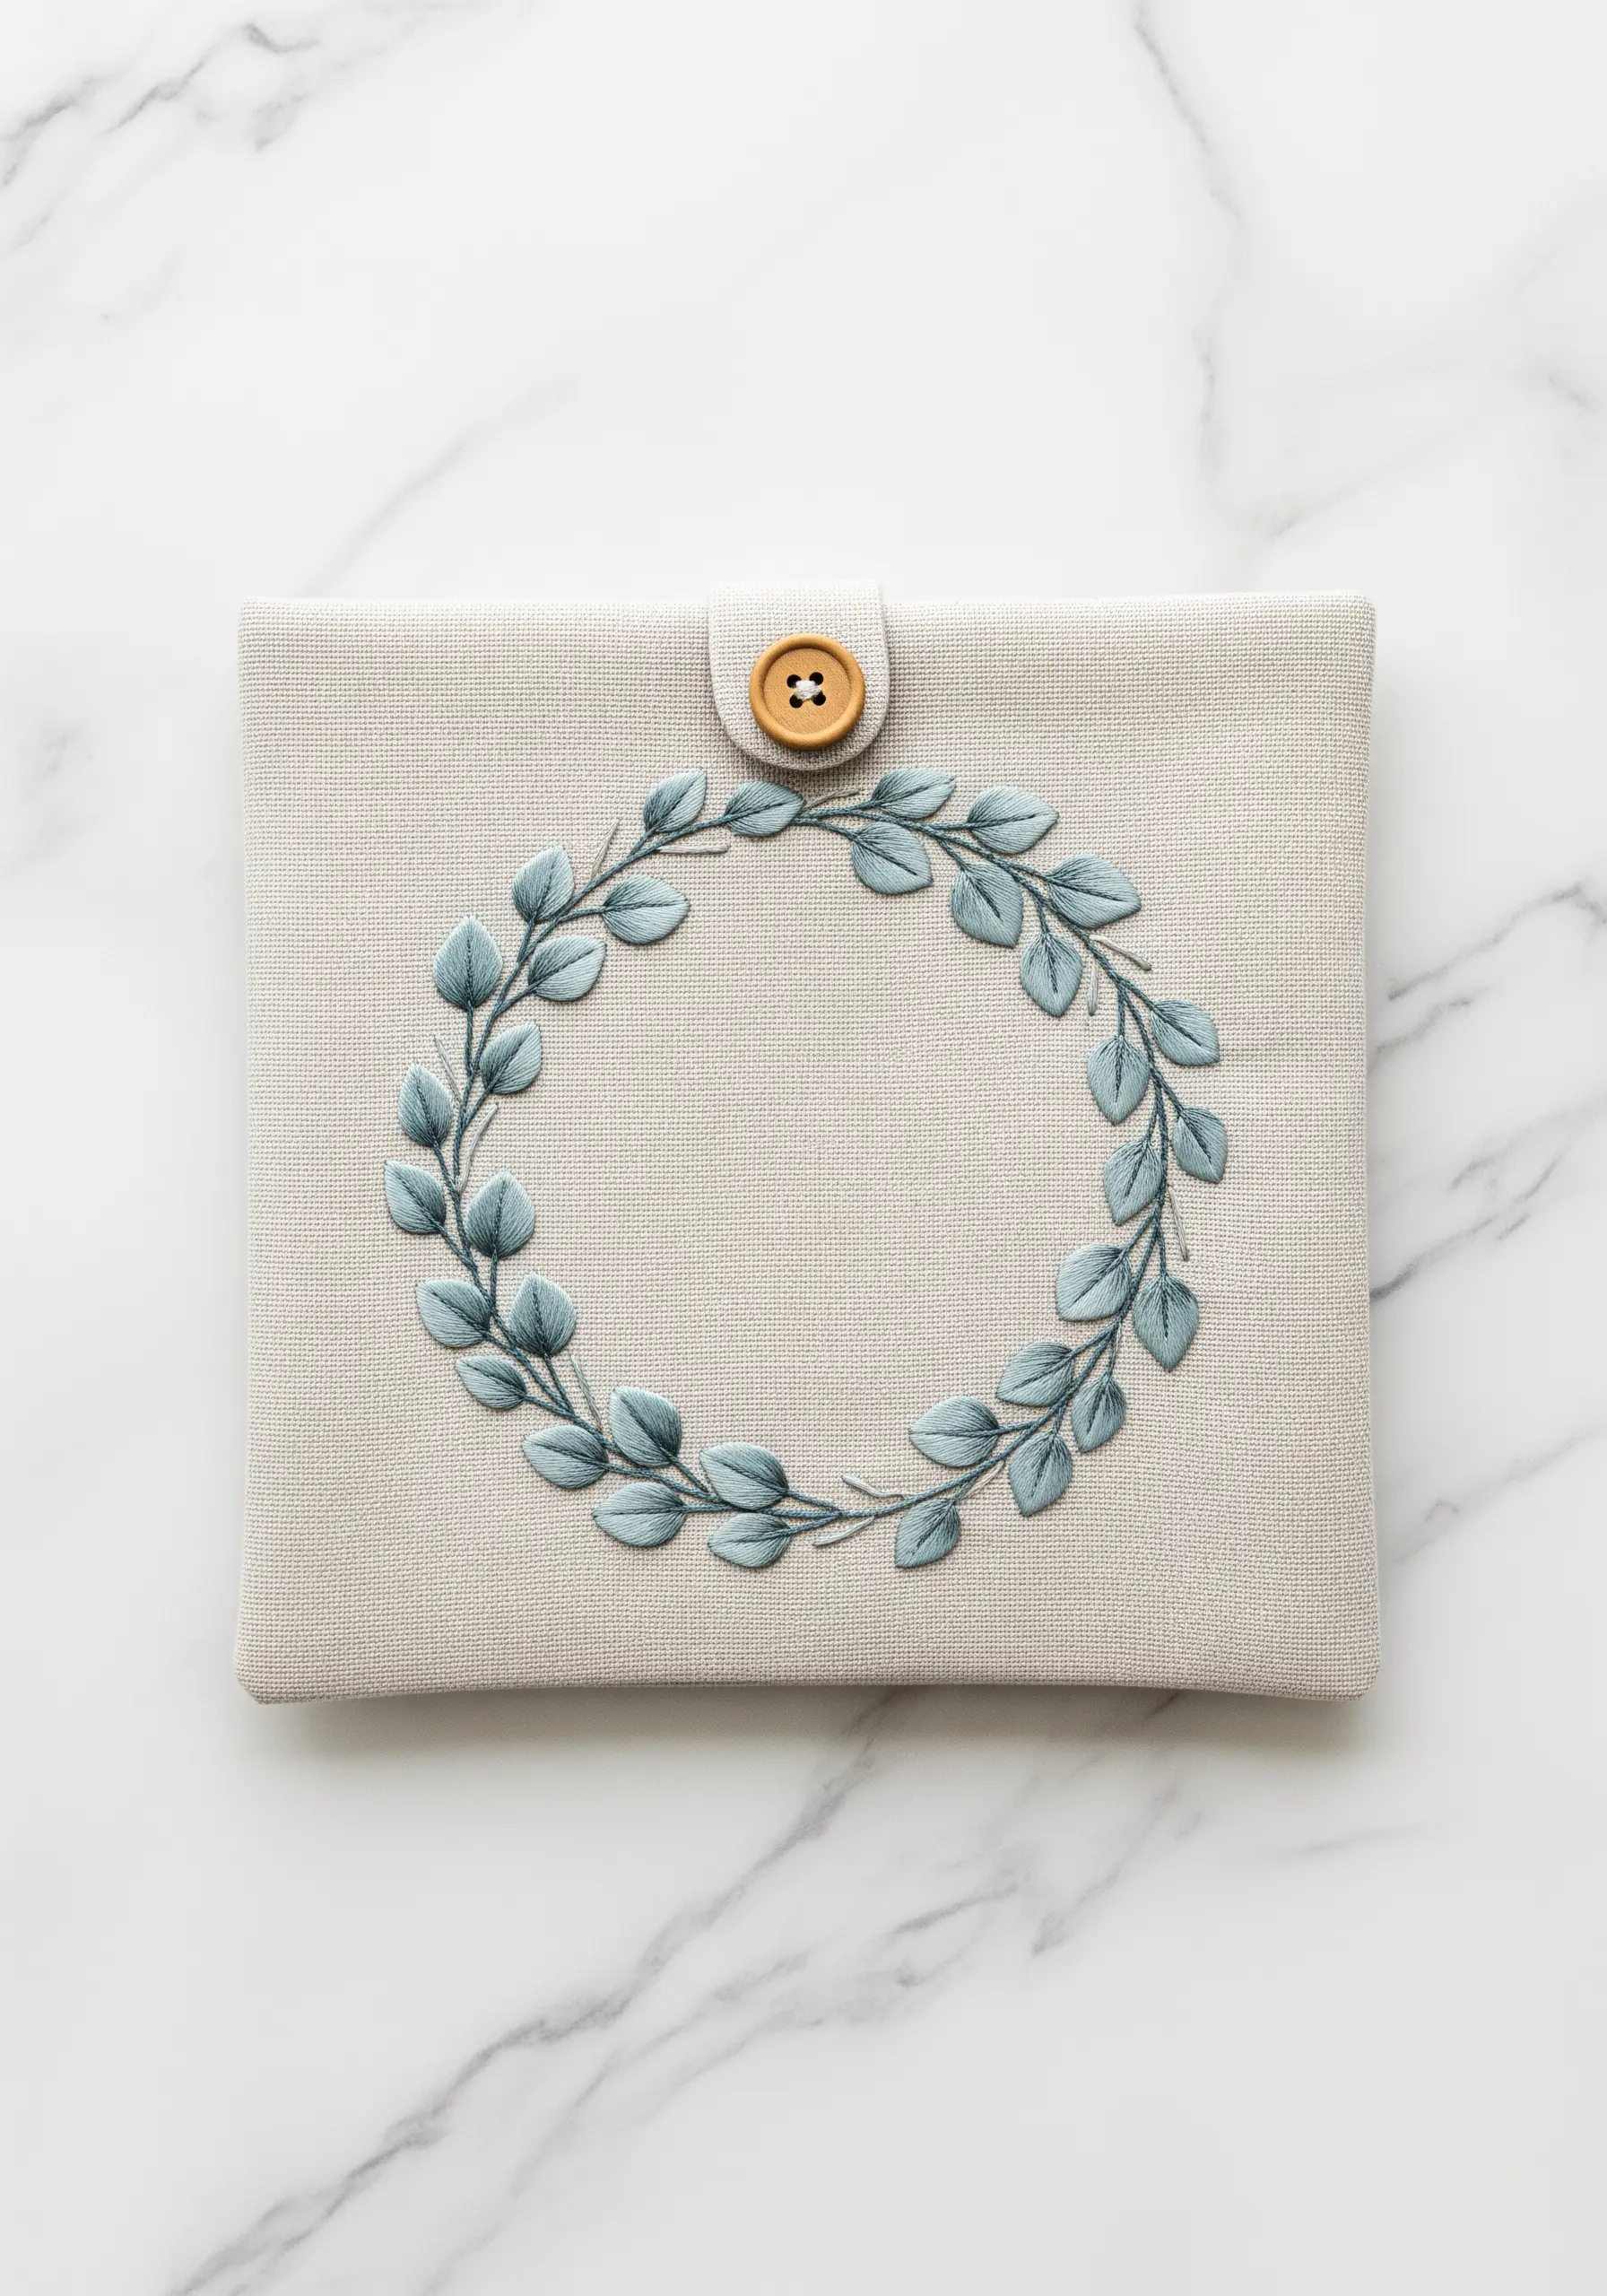
For an understated and modern look, choose a soft, muted color palette like dusty blue-green.
Use a simple satin stitch for the eucalyptus leaves, slightly overlapping them to build a full, lush wreath shape.
Keep the stitches for each leaf angled in the same direction for a smooth, cohesive finish.
A whipped backstitch for the connecting branches creates a perfectly smooth line that complements the soft foliage.
6. Create Impact with a High-Contrast Fern
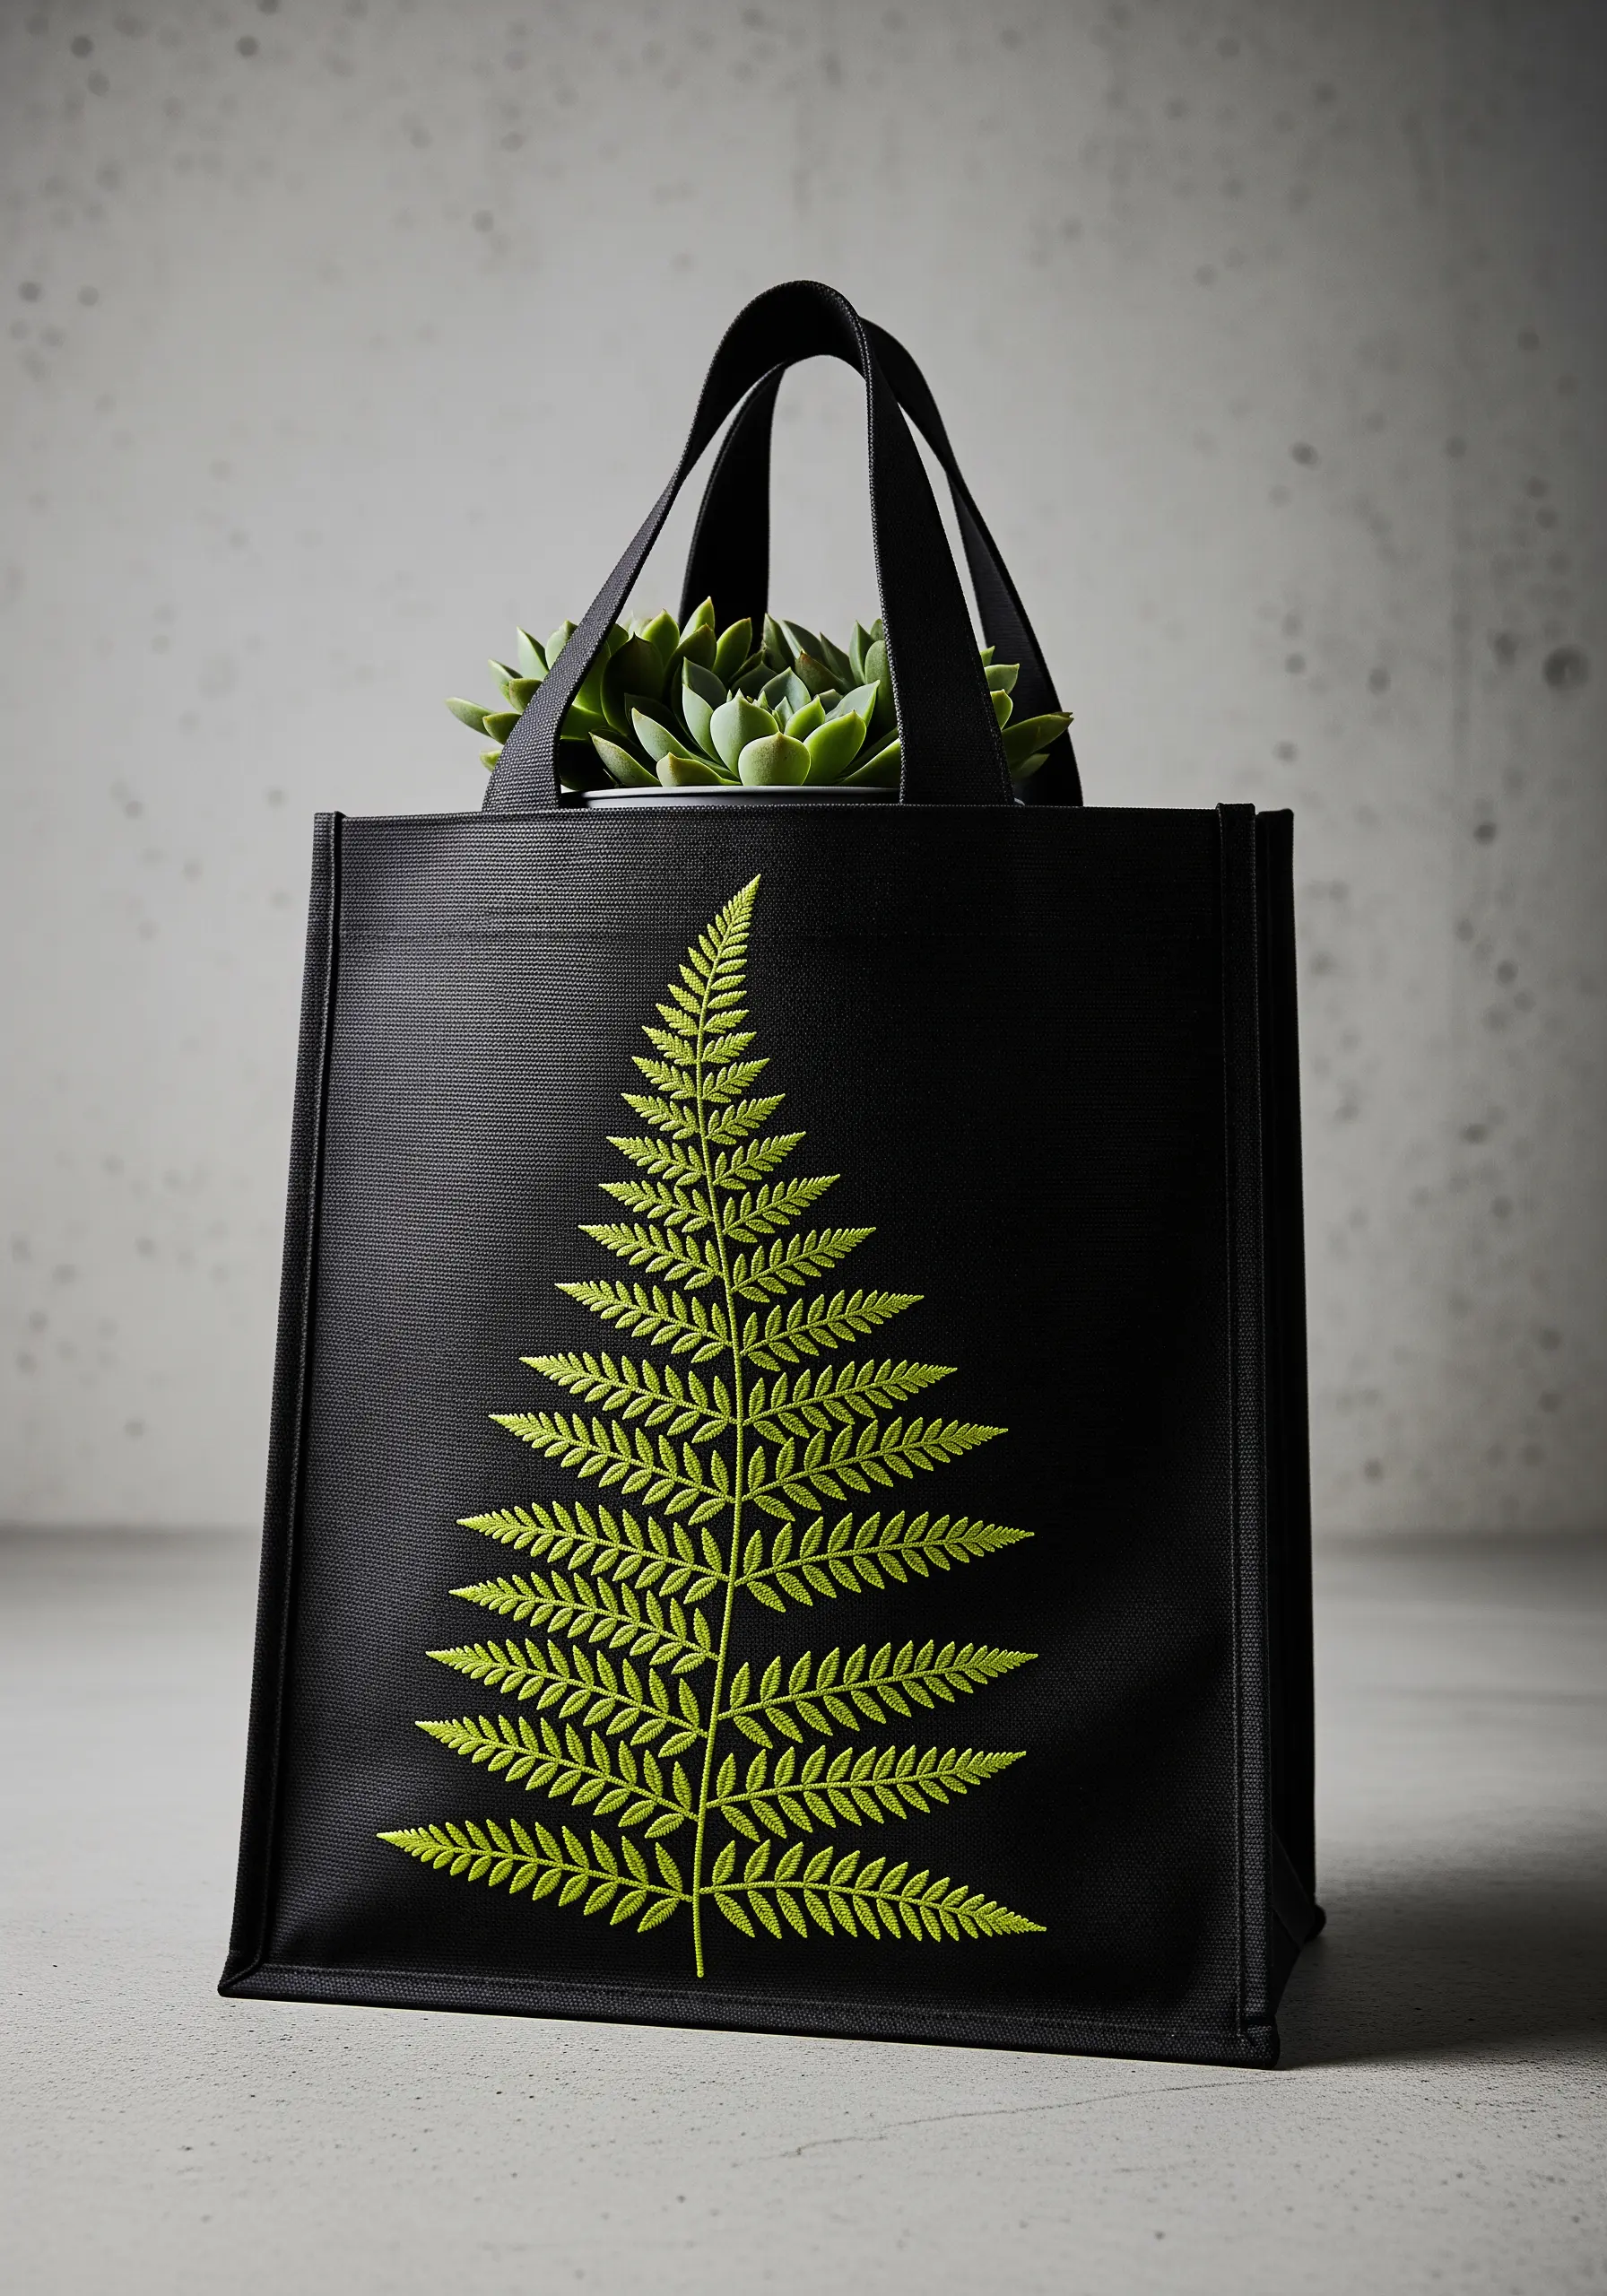
Make a bold statement by stitching a single botanical motif in a bright color on a dark fabric base, such as a black tote bag.
Use fishbone stitch for the individual fern fronds to create a beautiful, herringbone-like texture that adds detail without complexity.
Maintaining consistent stitch tension and angle is crucial here, as it ensures the overall shape is sharp, graphic, and intentional.
7. Design an Elegant Ginkgo Leaf Pattern
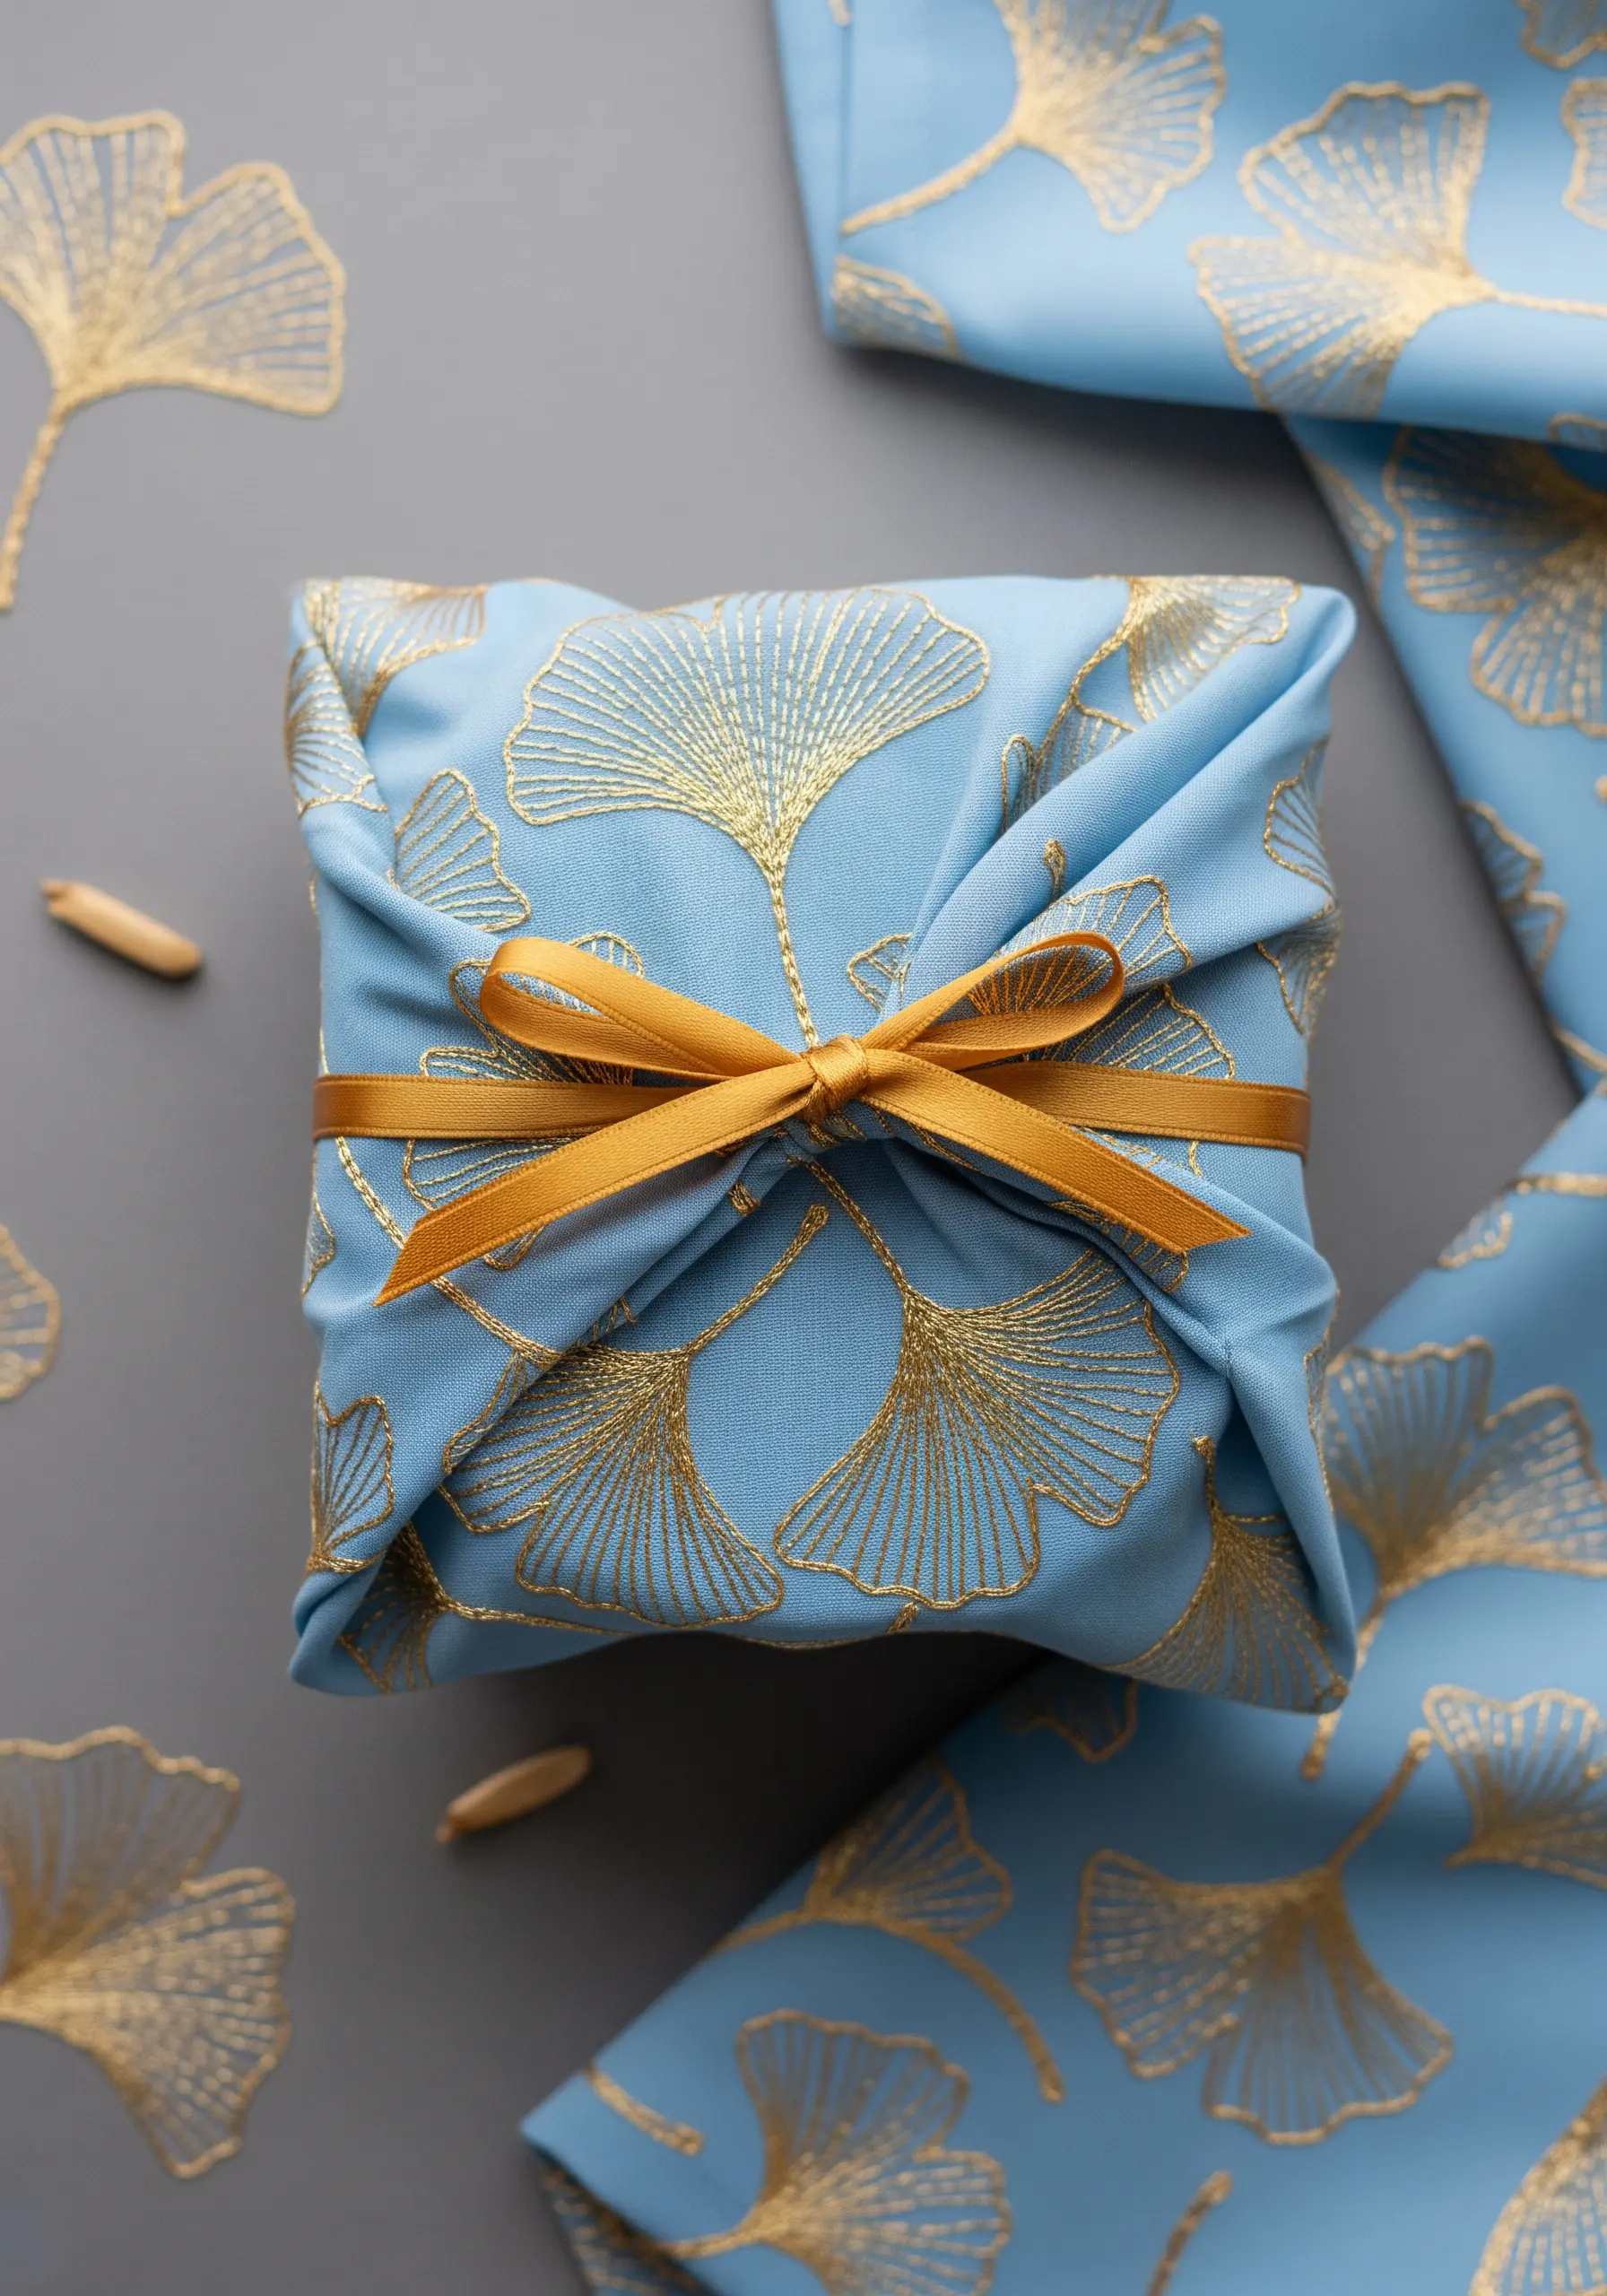
Transform a simple piece of fabric into luxurious wrapping with an all-over pattern.
Use a metallic gold thread for a touch of opulence that catches the light beautifully.
Create the iconic fan shape of the ginkgo leaf with a series of straight stitches radiating from a single point at the base.
Scatter the motifs randomly across the fabric, varying their orientation to create a dynamic and natural flow, perfect for Furoshiki-style wrapping.
8. Adapt Stitches for Rustic Burlap
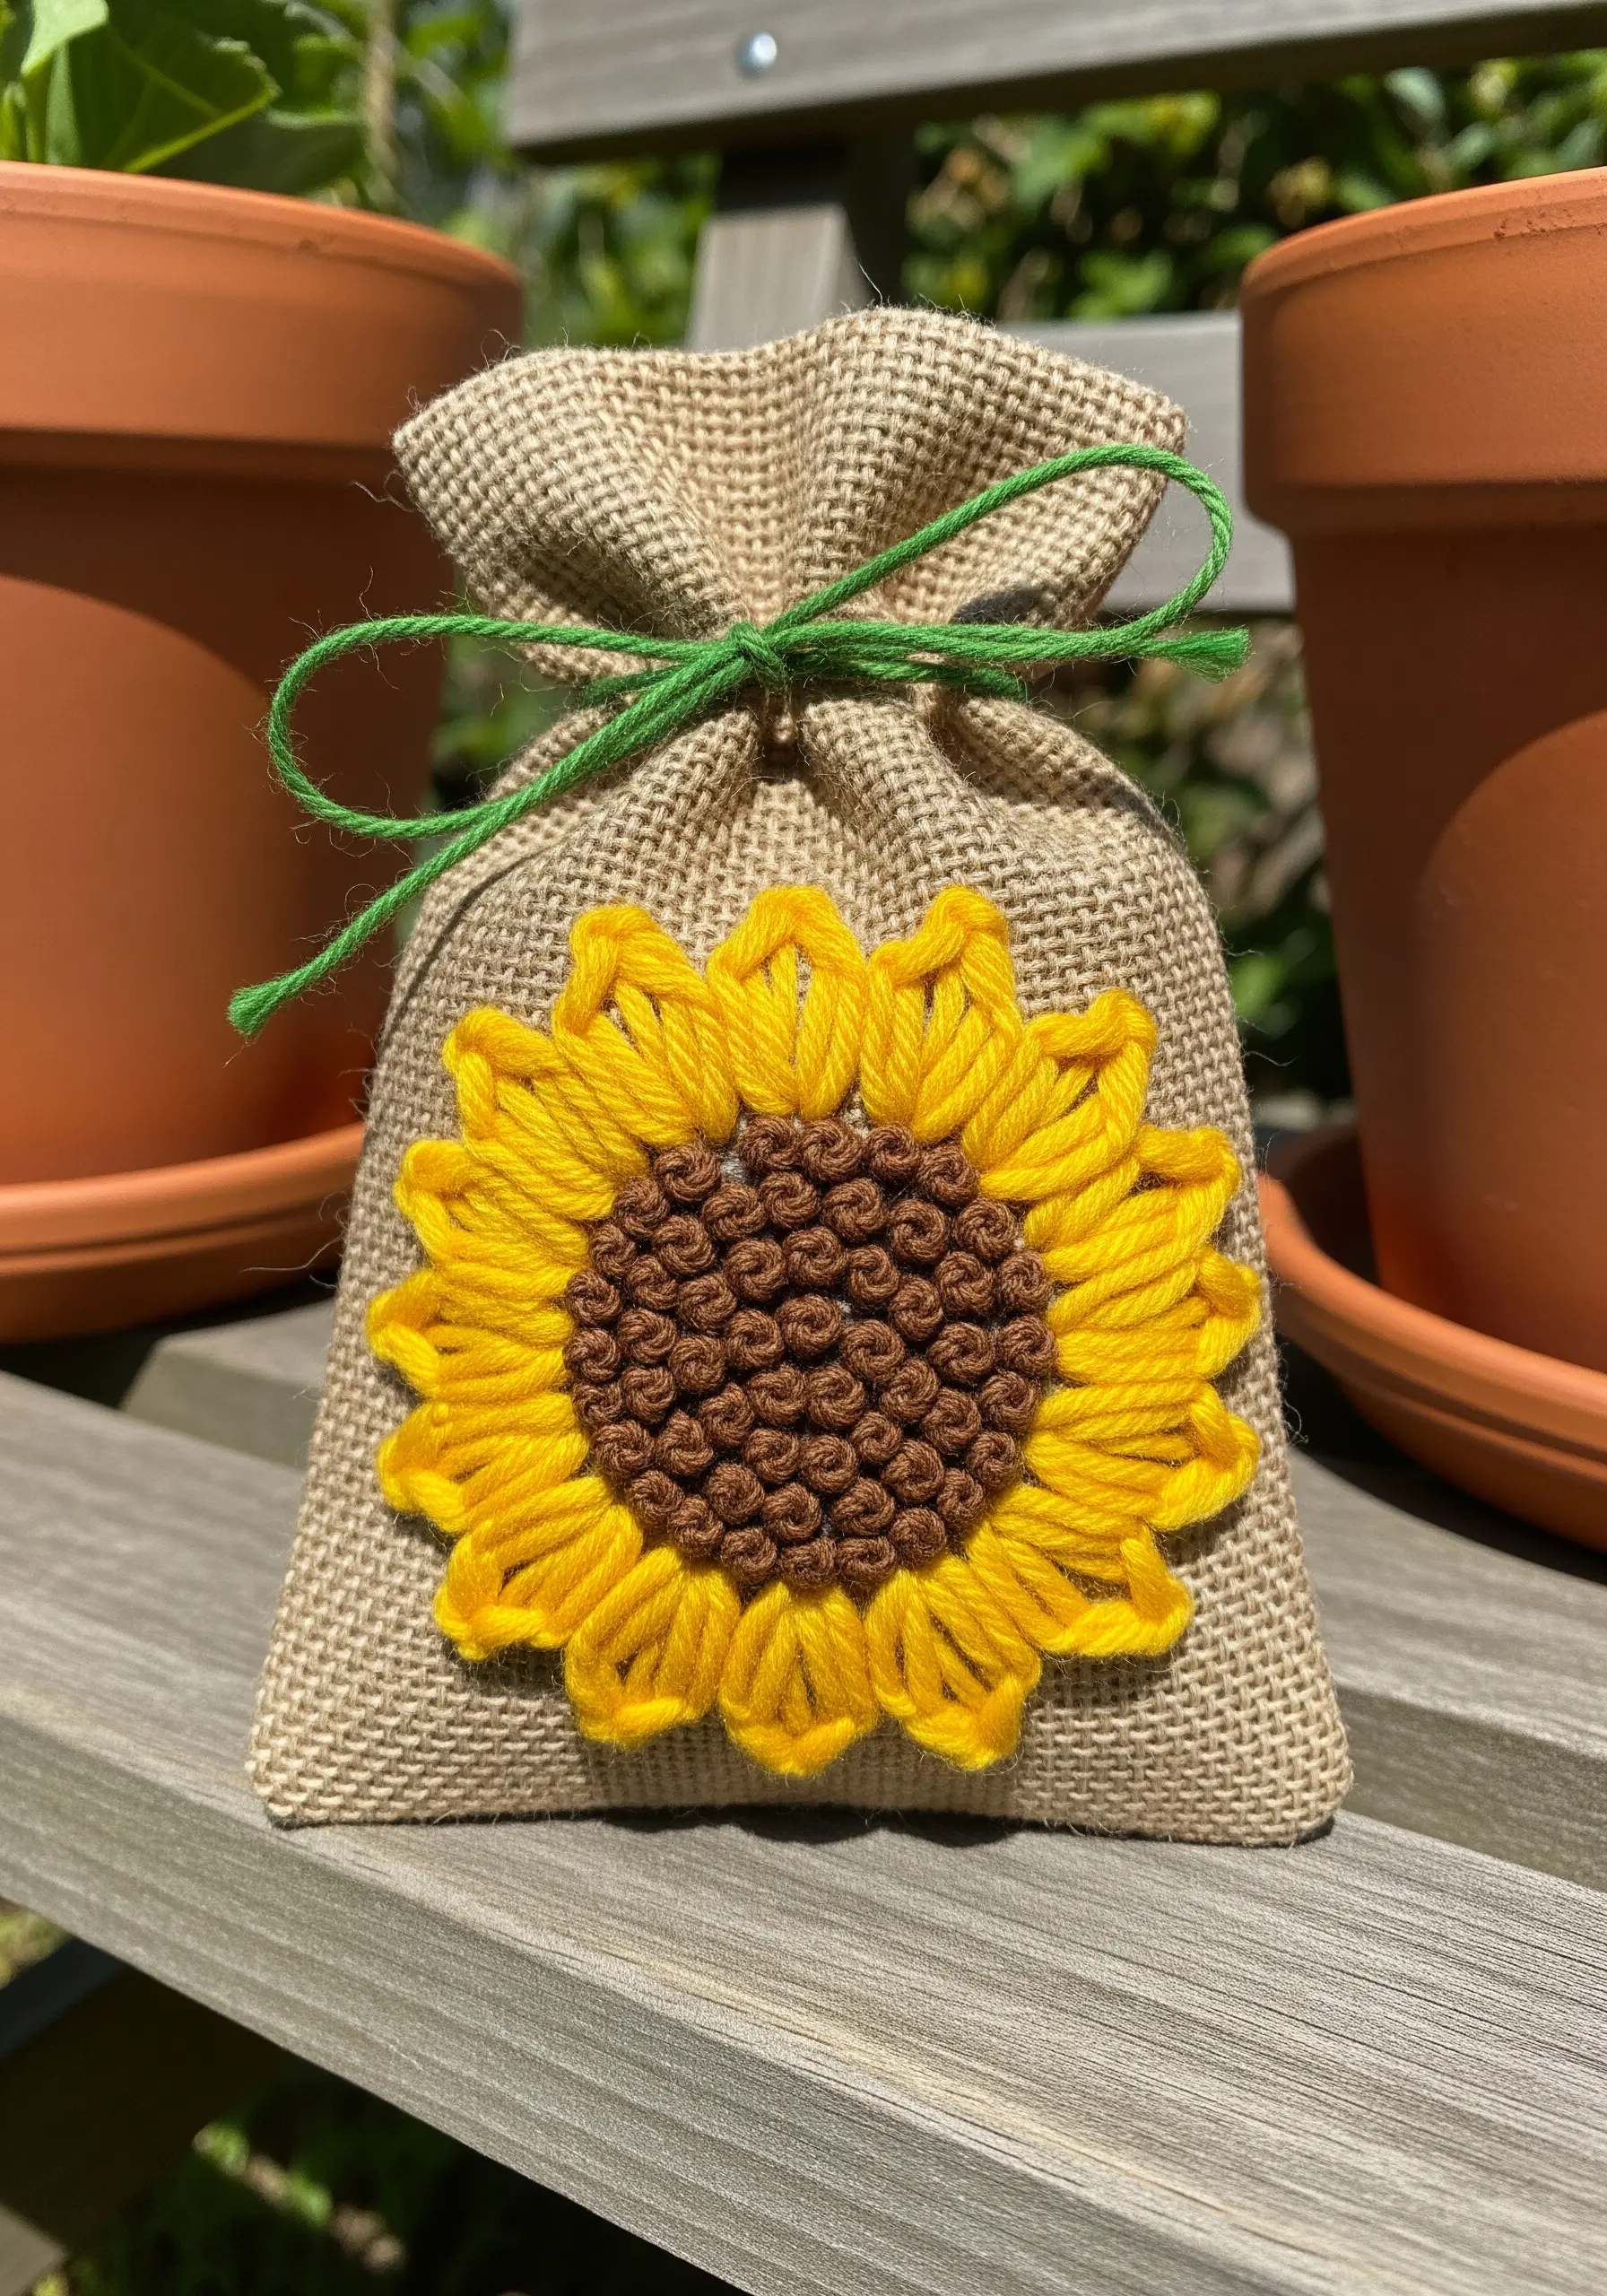
When working on a coarse fabric like burlap, adjust your materials and techniques for the best results.
Opt for thicker thread, such as tapestry wool or multiple strands of embroidery floss, which won’t get lost in the fabric’s open weave.
Use robust stitches like the detached chain stitch (lazy daisy) for the sunflower petals and dense French knots for the center.
This approach creates a bold, textural design that harmonizes perfectly with the rustic nature of the burlap.
9. Weave a Celestial Botanical Narrative

Combine botanical elements with celestial motifs for a design that tells a unique story.
Use a high-contrast thread, like silver or white on navy fabric, to create a look reminiscent of a starlit sky.
Stitch delicate leafy branches using fishbone or satin stitch, then connect them with straight lines to form constellations.
Add tiny French knots or star stitches to represent stars, turning your fabric wrap into a piece of celestial art.
10. Add Dimension with Padded Satin Stitch
To make elements like leaves and berries physically pop off the fabric, use a technique called padded satin stitch.
First, fill the shape with a base layer of small, dense straight stitches or seed stitches.
Then, cover this padding with your final satin stitch, working in the opposite direction. The underlying stitches will raise the surface, creating a subtle, sculpted 3D effect.
Add a final backstitch line down the center of the leaves for a crisp, defining vein.
11. Capture Succulent Textures with Mixed Media
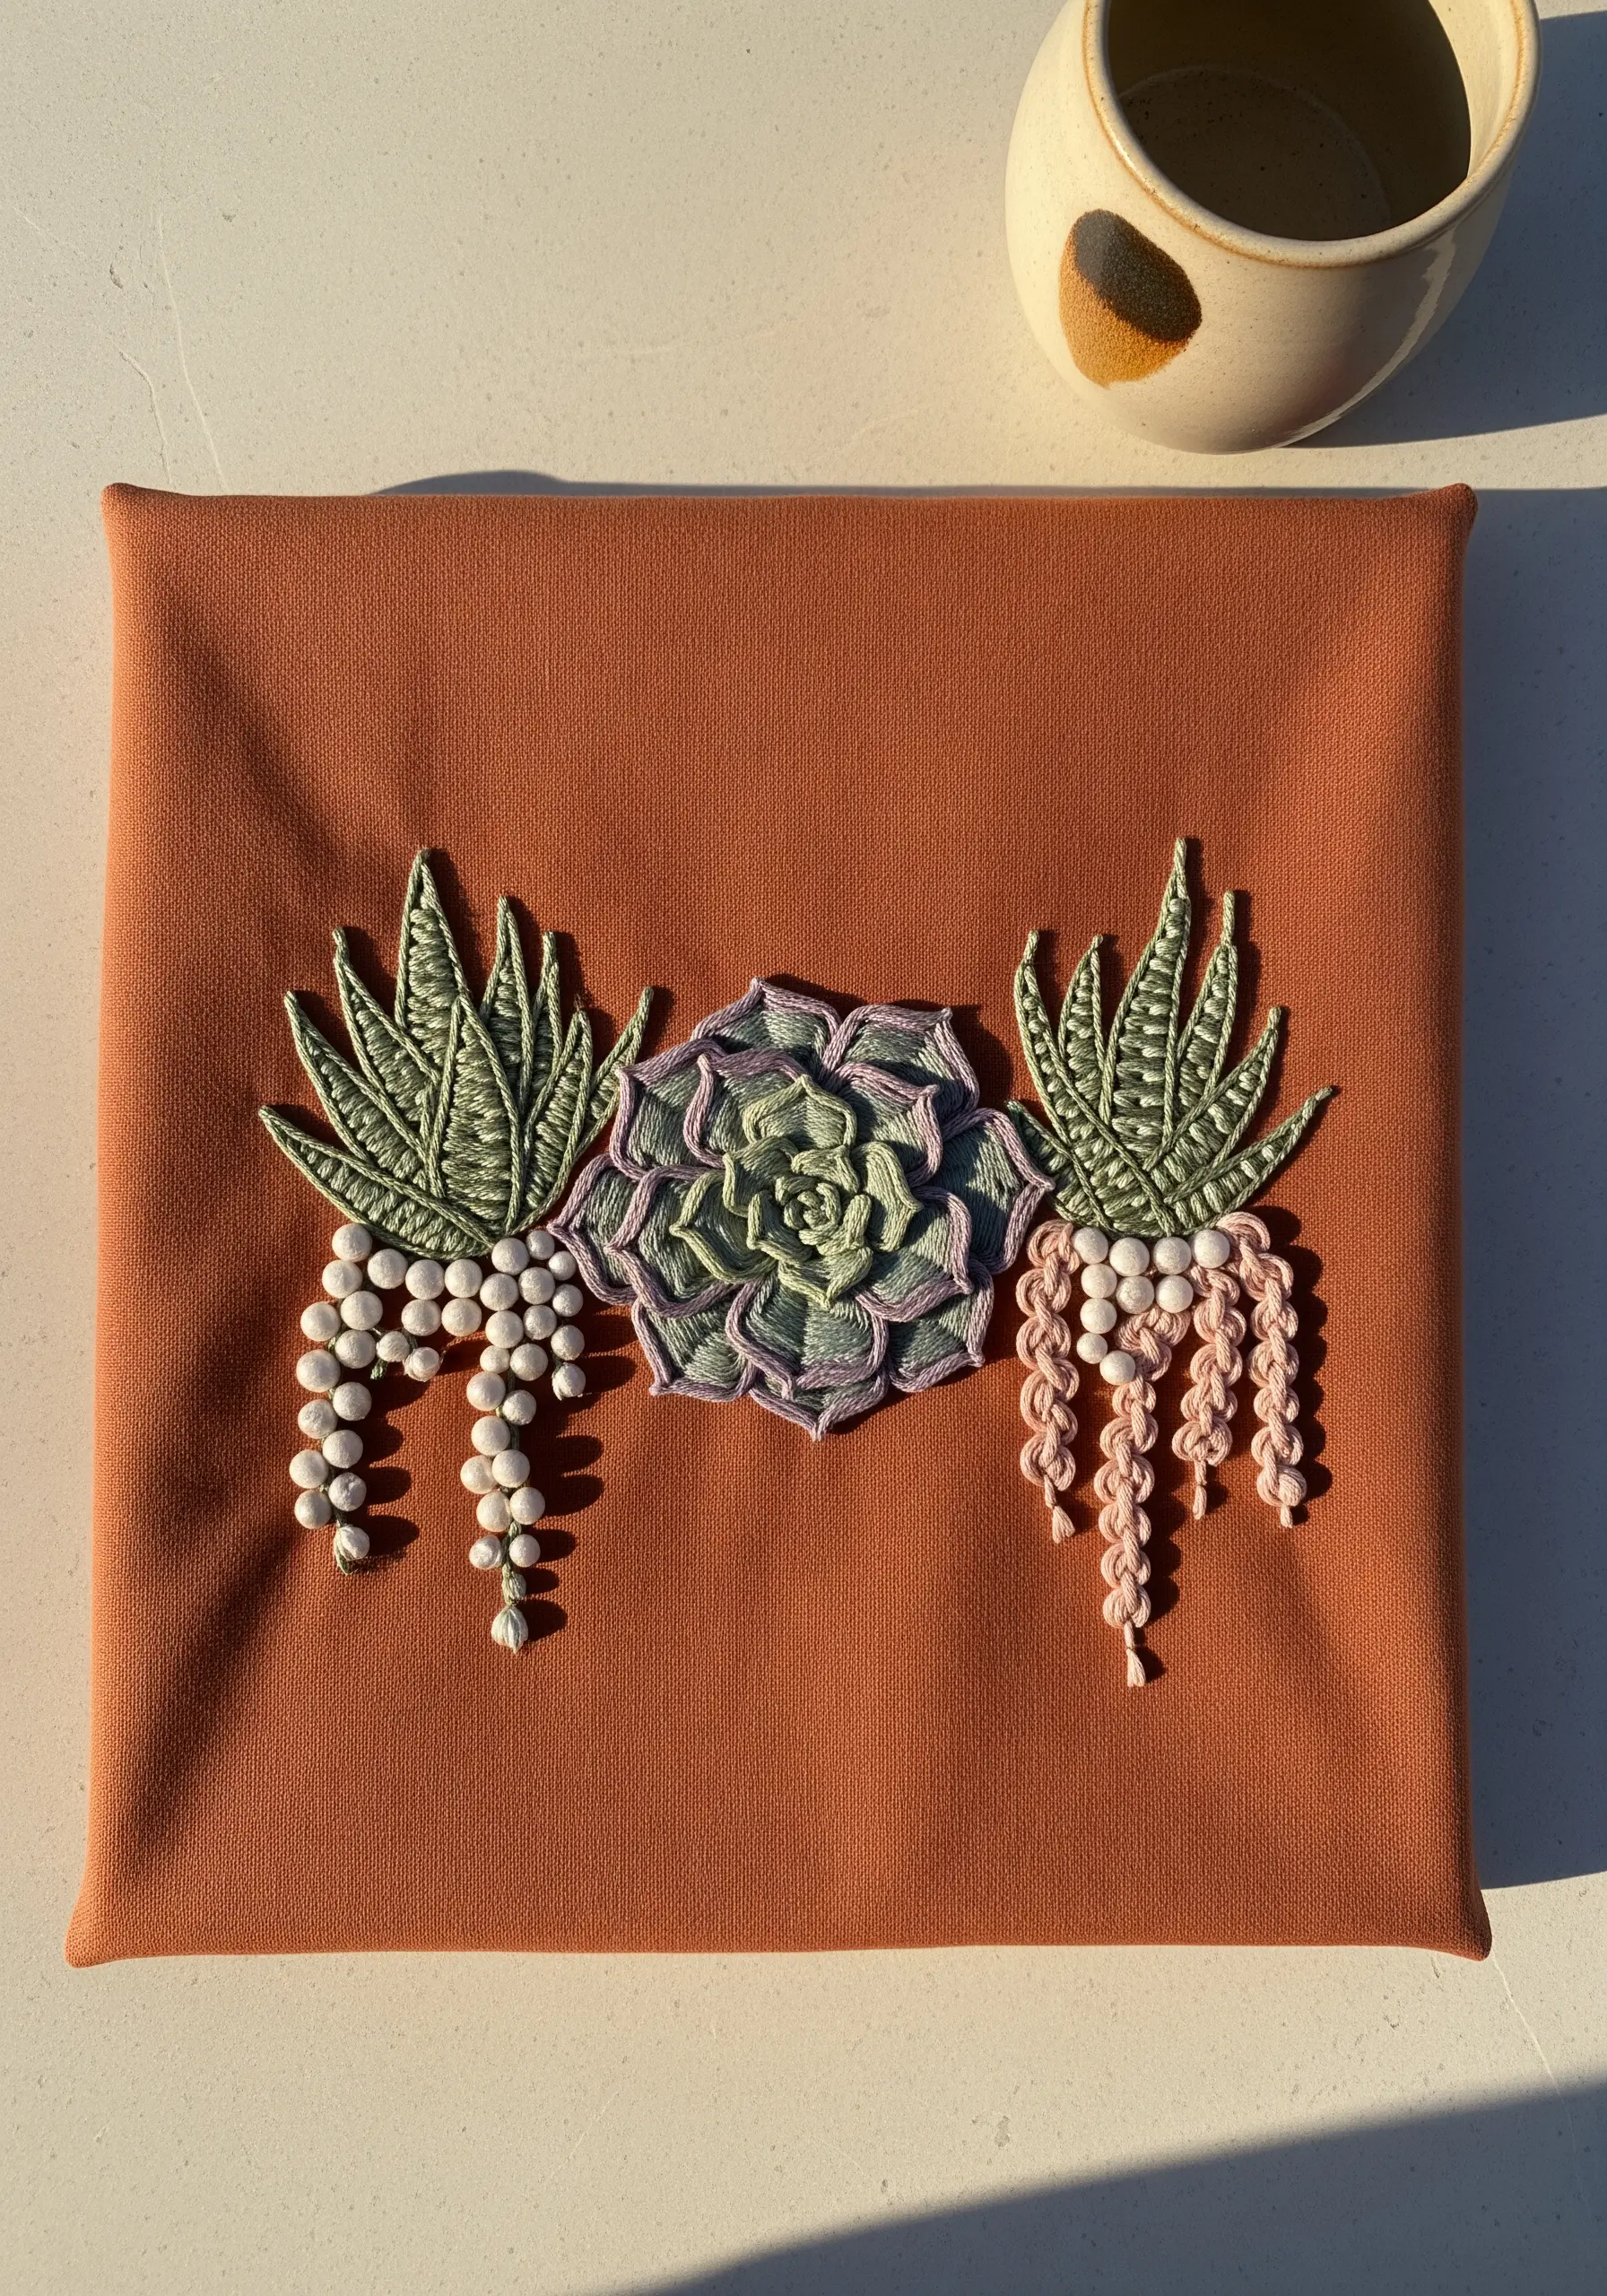
Succulents offer a wonderful opportunity to play with texture and dimension.
Recreate the rosette shape of an echeveria with a woven wheel stitch, and use satin stitch for the flatter, pointed leaves of an aloe.
For the cascading ‘string of pearls’ succulent, incorporate actual beads or a series of tightly packed French knots to mimic their spherical shape.
This mixed-media approach adds a delightful, tactile quality to your work.
12. Embrace Simplicity with a Rosemary Sprig
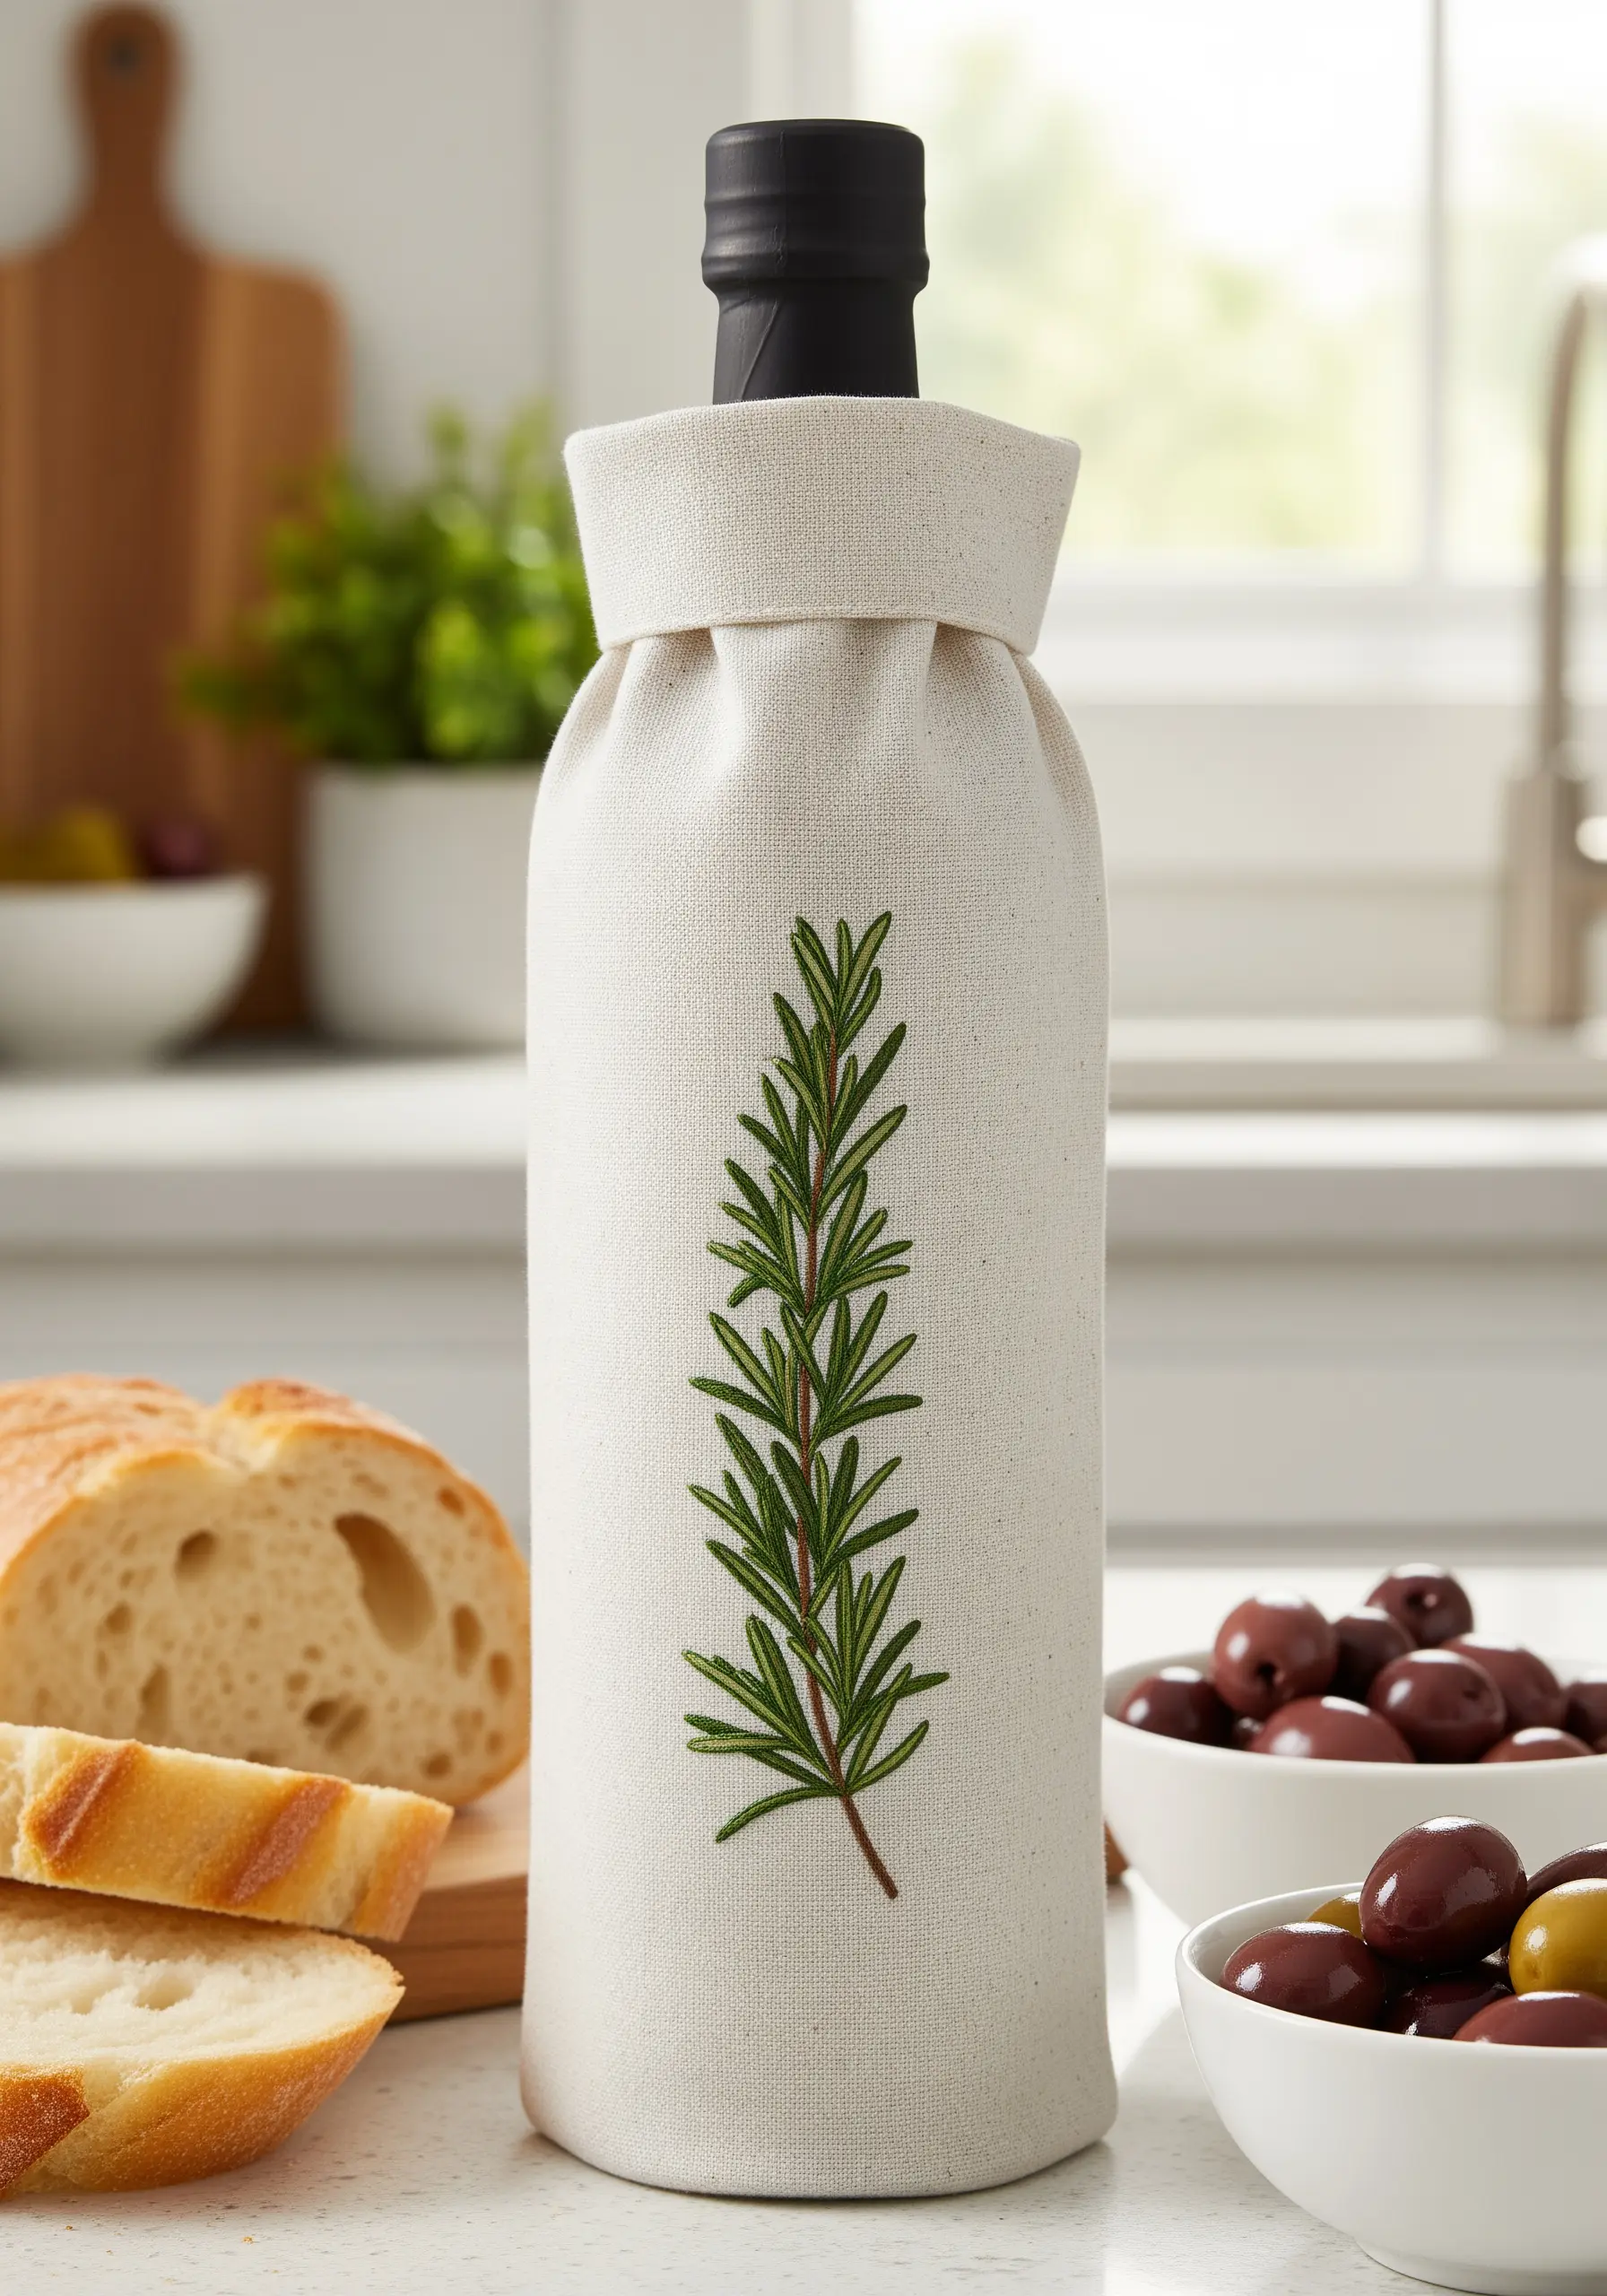
On a heavily textured fabric like linen, a simple, clean design can be incredibly impactful.
Use small, individual detached chain stitches for the rosemary needles, clustering them along the stem.
A single, clean line of stem stitch creates the woody stalk, providing a perfect anchor for the foliage.
This is a beautiful example of how minimal embroidery designs can convey elegance and charm with just a few well-placed stitches.
13. Recreate Lavender’s Texture with French Knots
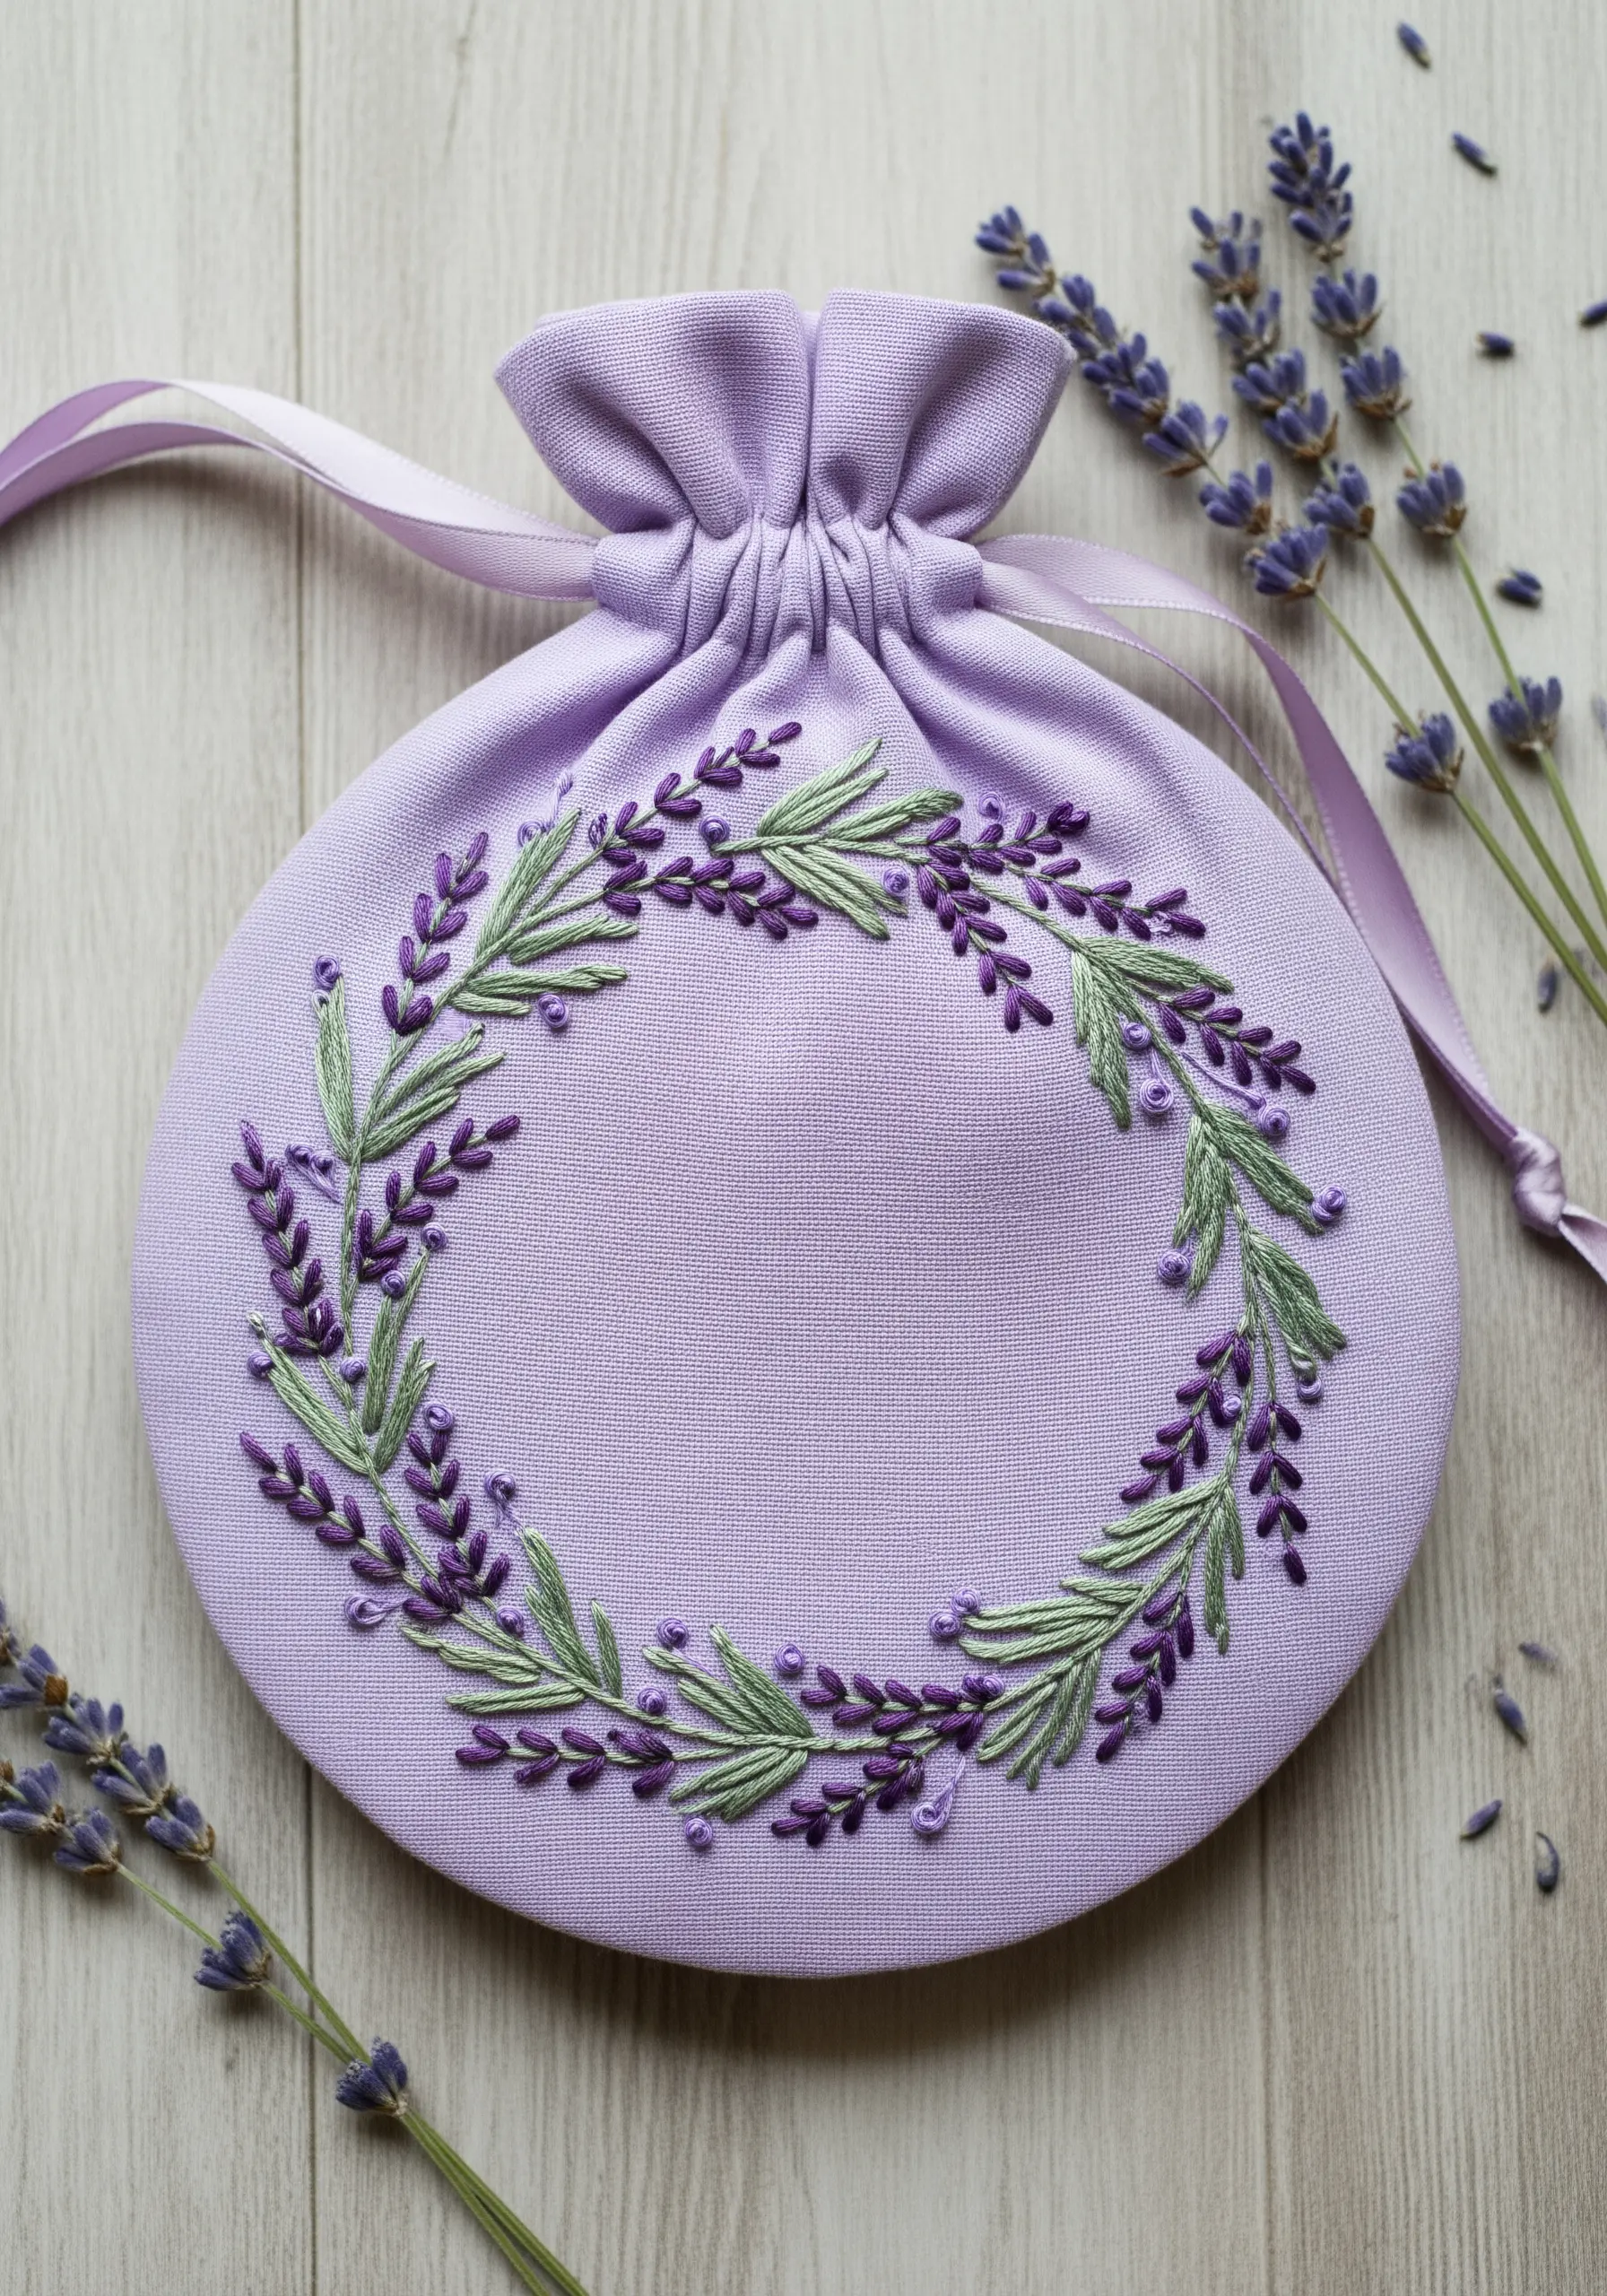
French knots are the ideal stitch for mimicking the dense, budded texture of a lavender flower.
Cluster them tightly at the top of each stalk, slightly varying their size and placement for a more organic feel.
For the slender stems and leaves, use a delicate straight stitch or fern stitch in a contrasting sage green, keeping the lines thin to balance the fullness of the blossoms.
The result is a design that is visually and texturally true to the plant itself.
14. Define Tropical Leaves with Bold Outlines
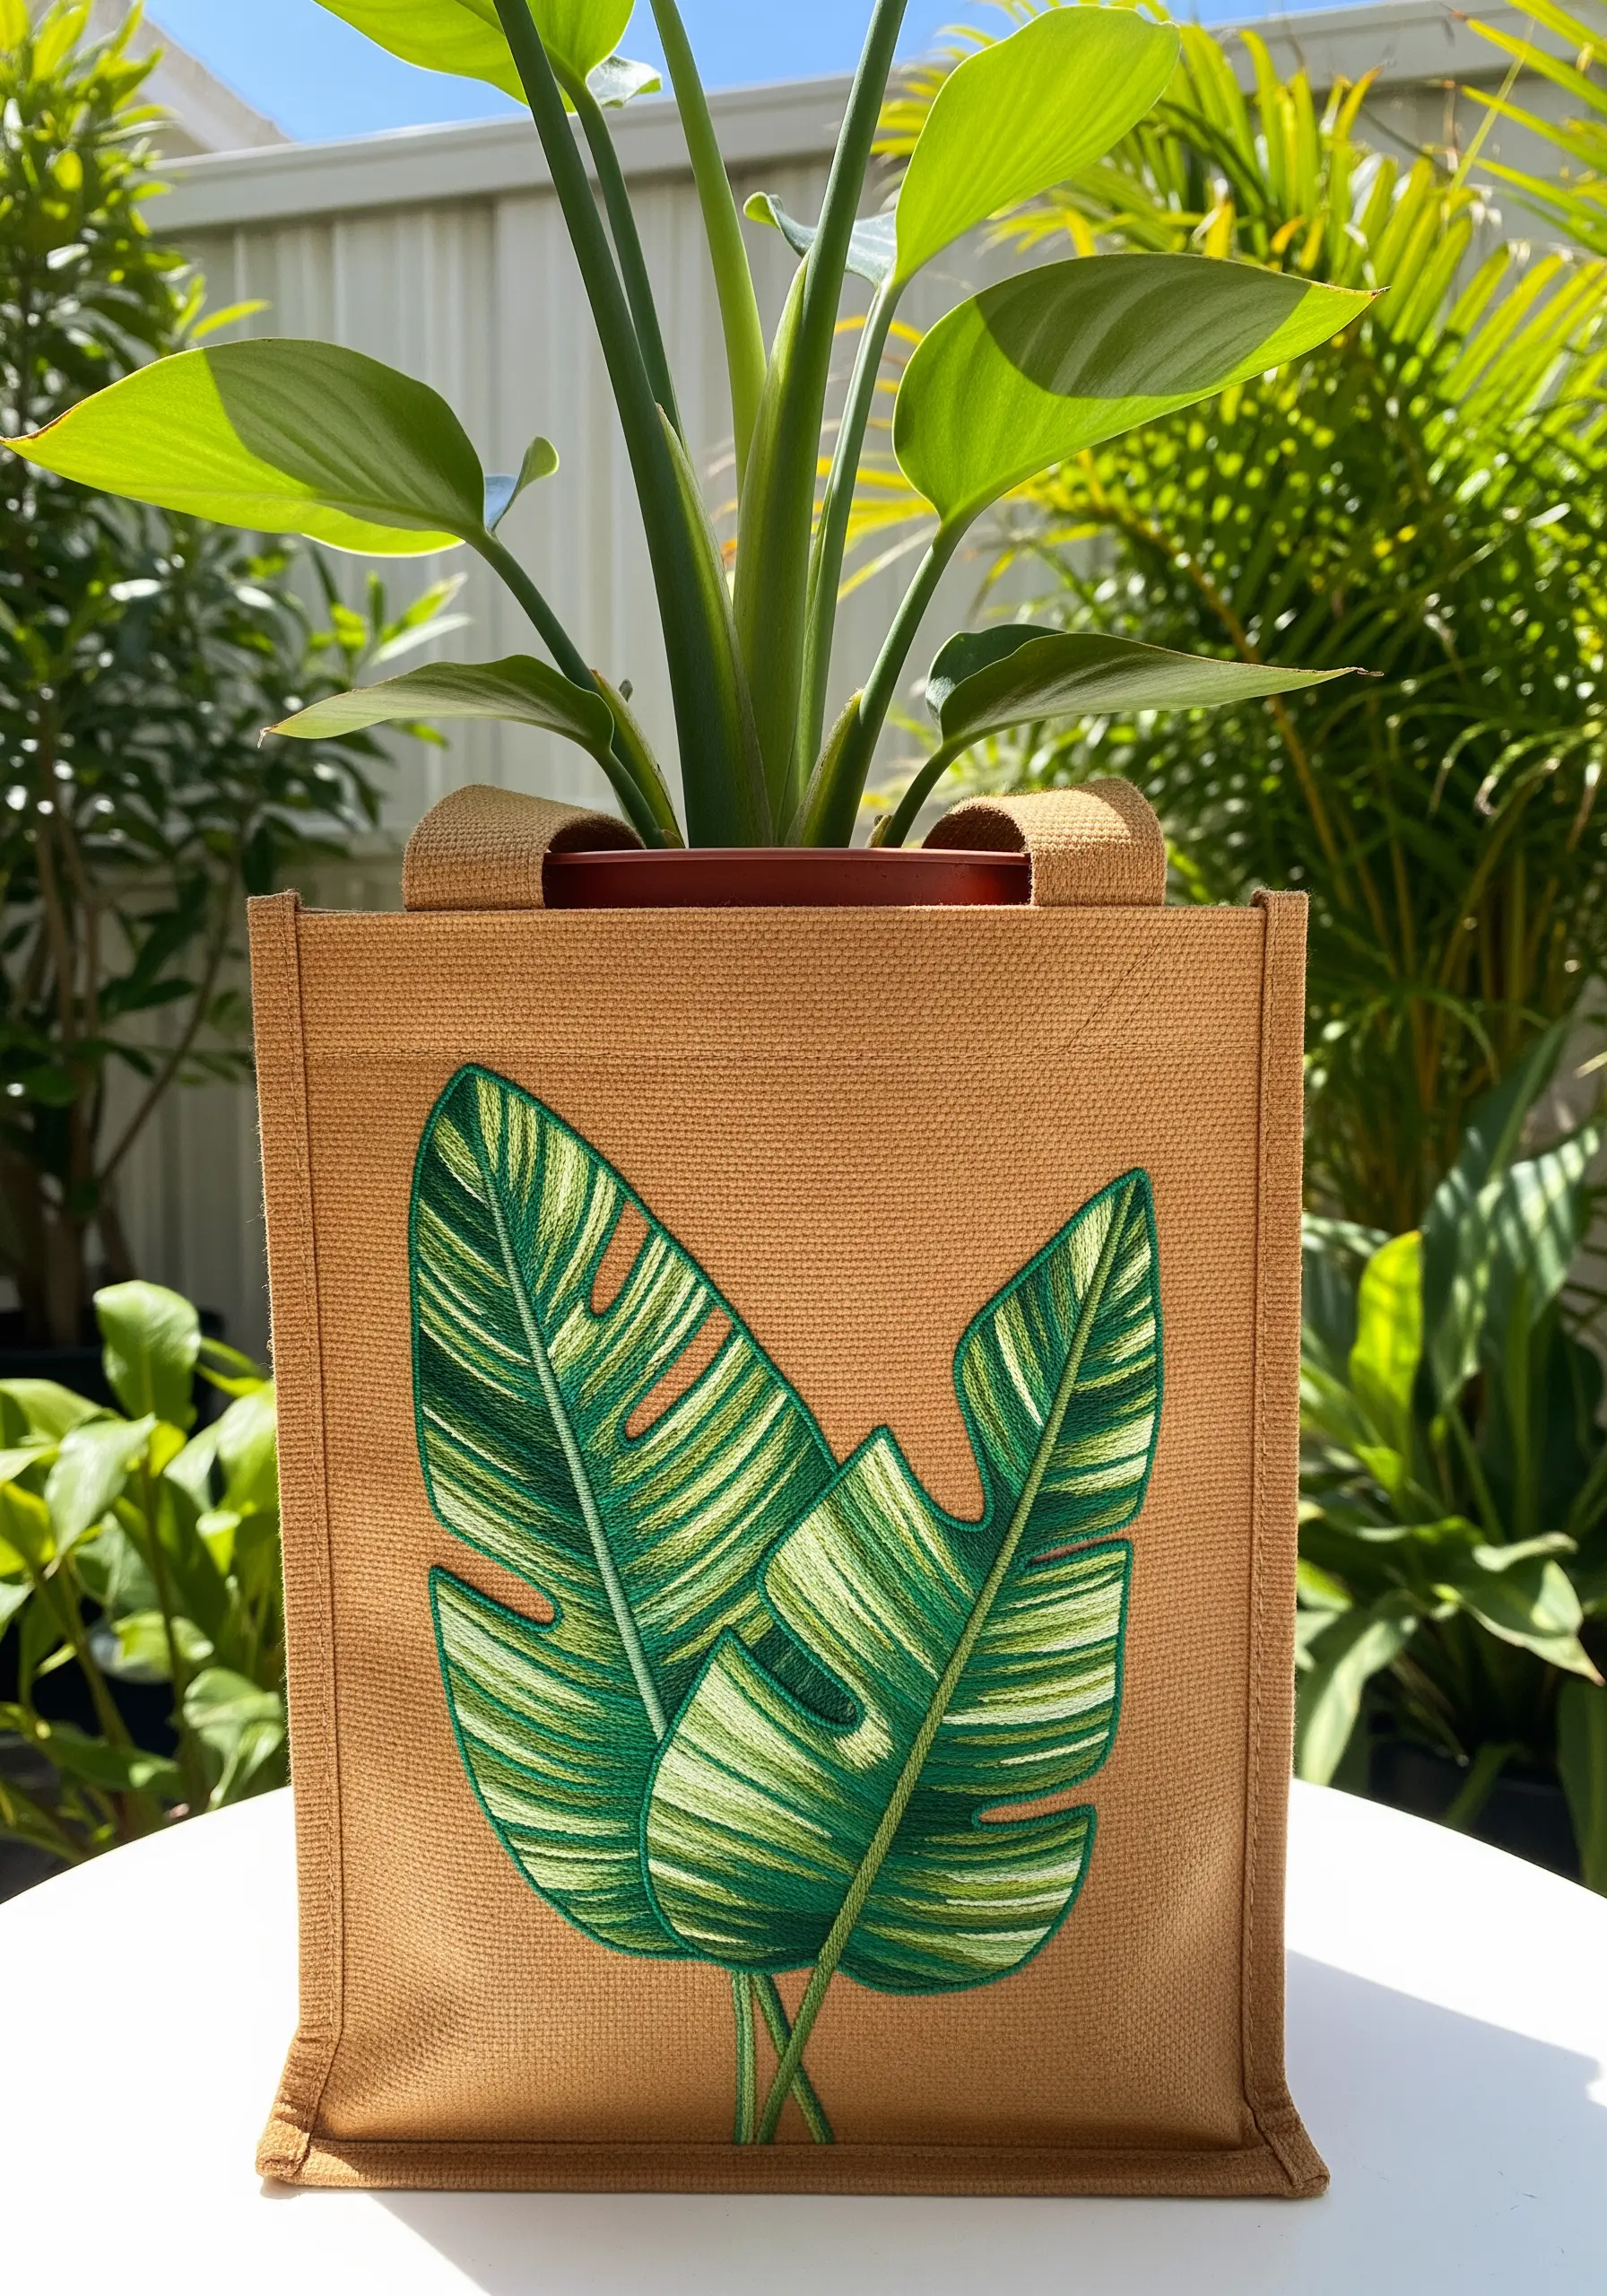
When stitching on a textured fabric like jute, crisp outlines are key to preventing the design from looking messy.
First, fill the leaf sections with long and short stitch to create the characteristic color variations.
Then, define the entire leaf and its inner sections with a clean split stitch or backstitch in your darkest thread color.
This outline acts as a visual container, making the design look sharp, graphic, and intentional against the rustic background.
15. Create a Geometric Bamboo Pattern
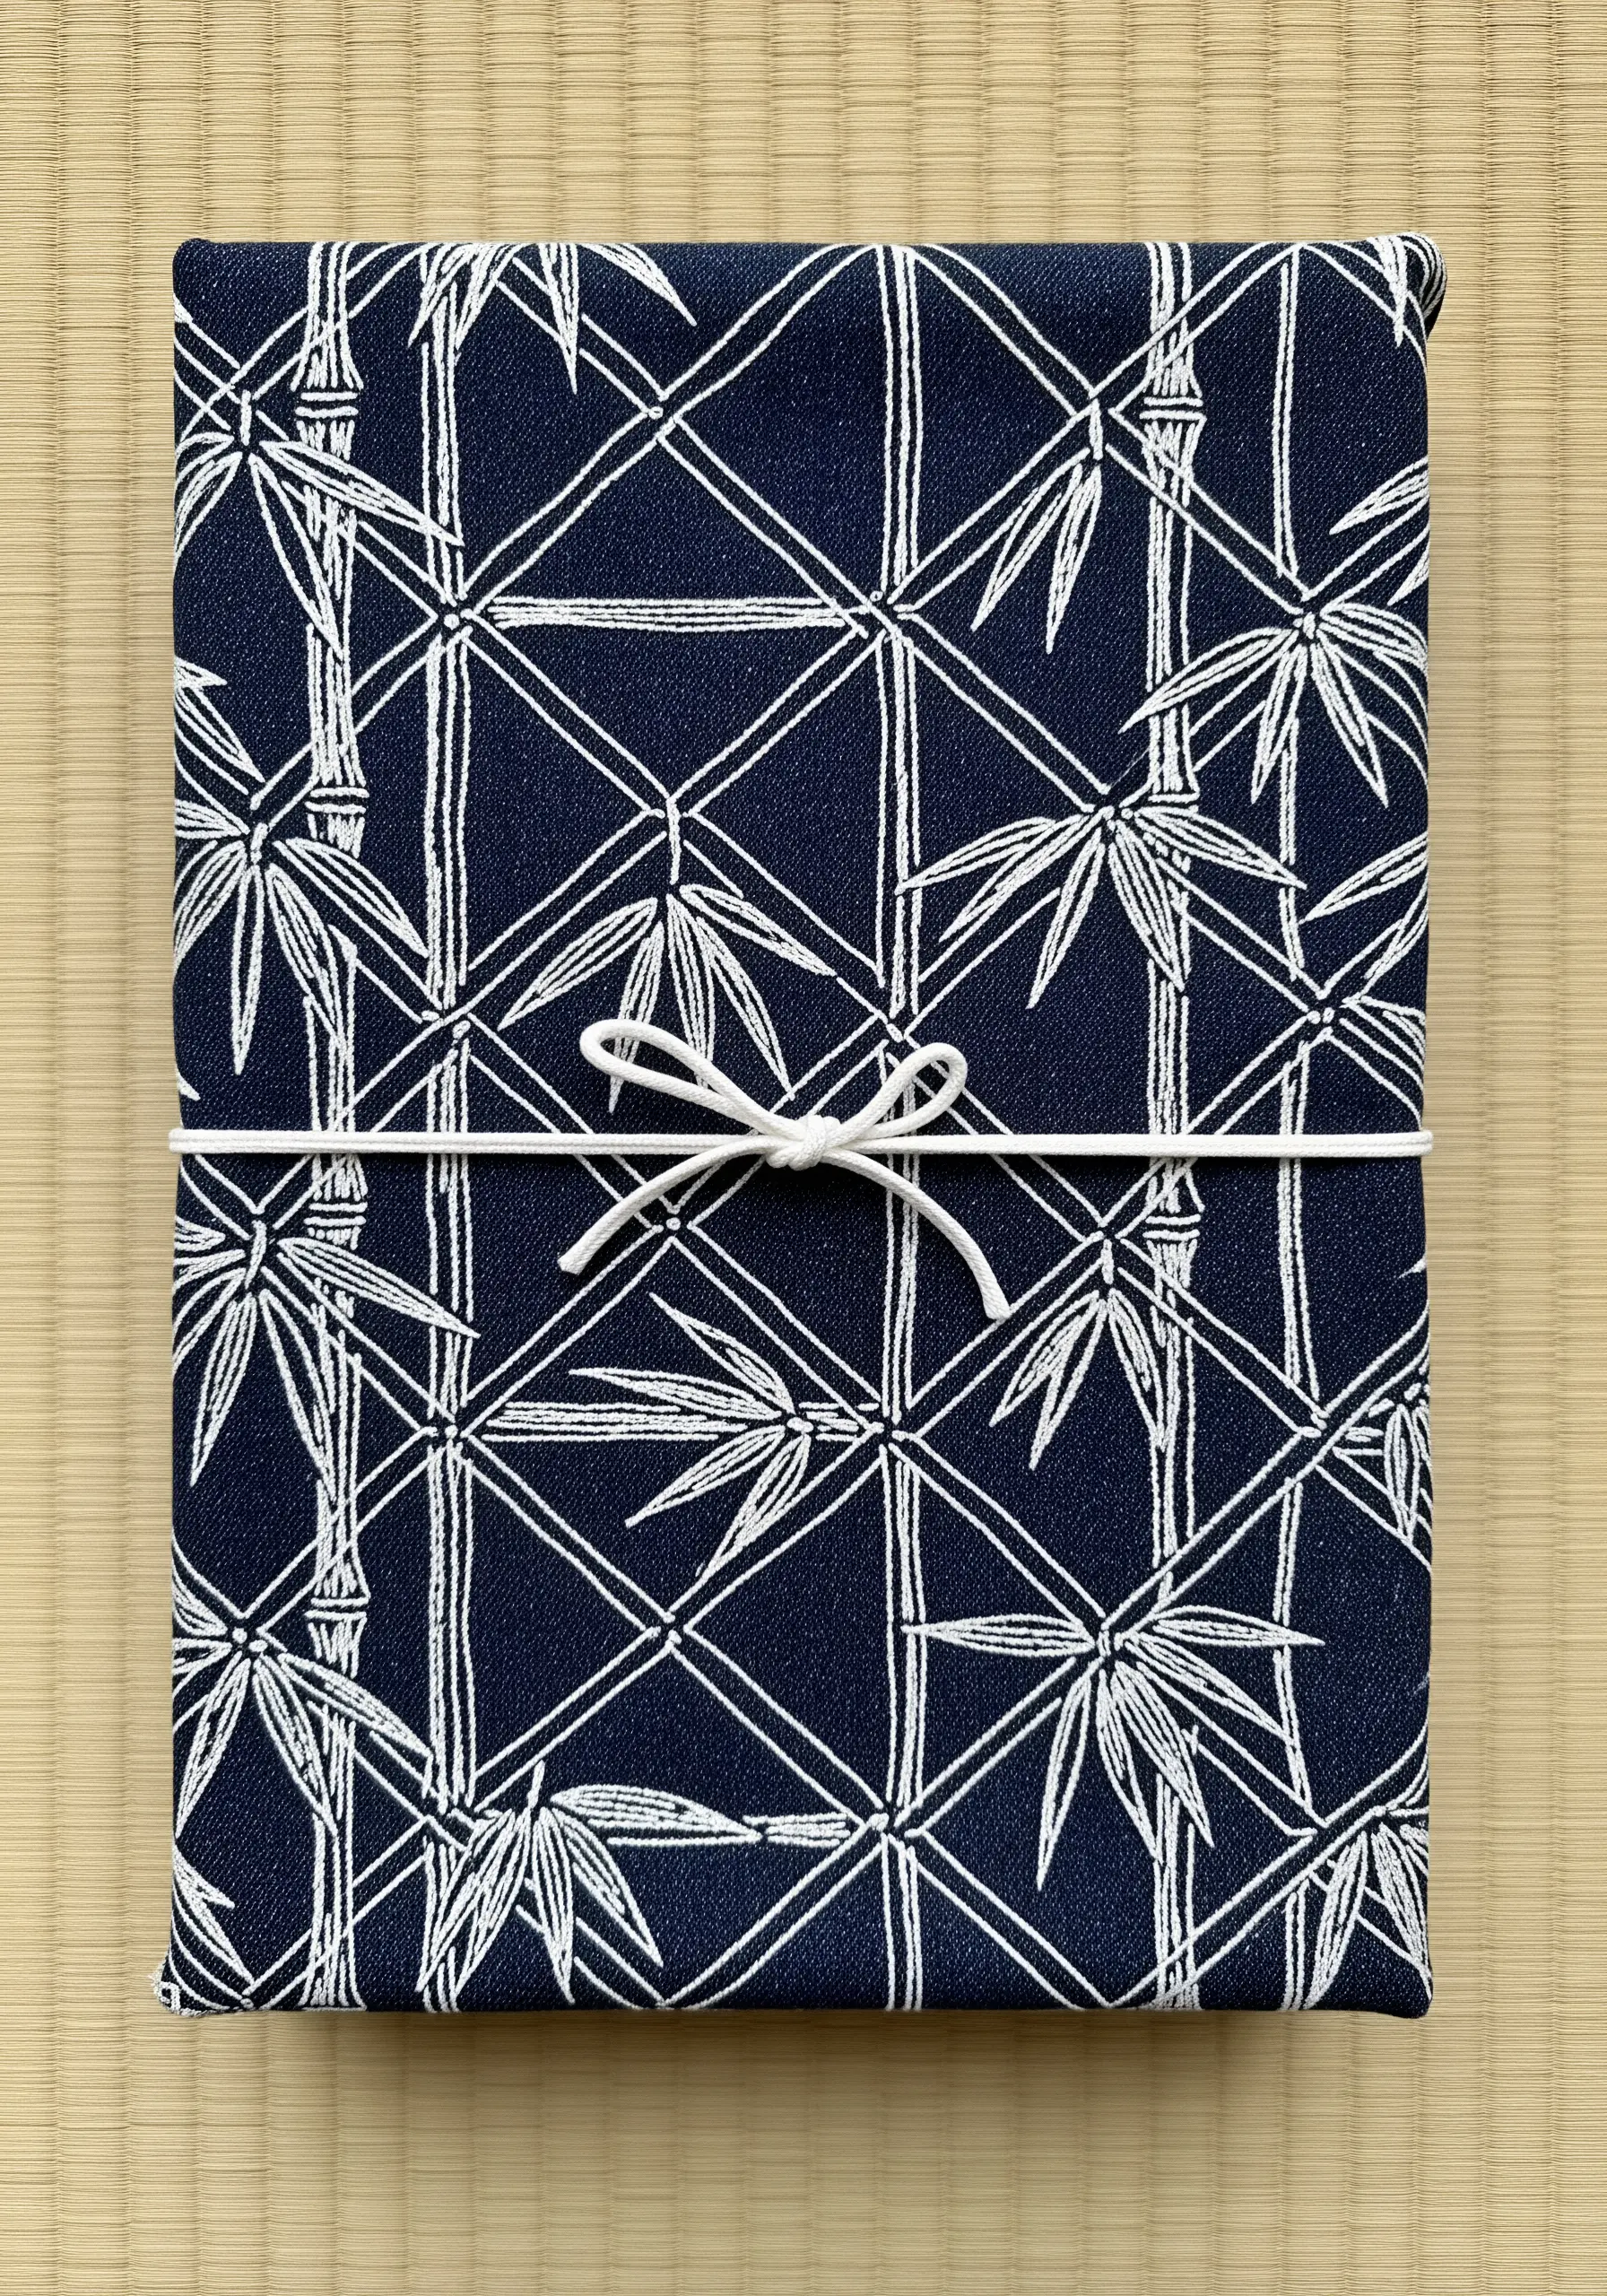
Translate the organic form of bamboo into a modern, geometric pattern using only straight stitches.
Use parallel lines for the stalks and small, angled stitches for the leaf clusters. Create a sense of structure by adding intersecting diagonal lines, forming a trellis-like grid.
Stitching this pattern in a single, high-contrast color—like white on navy—gives the fabric a sophisticated, graphic quality reminiscent of Japanese textiles.
16. Add Realism with Fishbone Stitch Mint Leaves
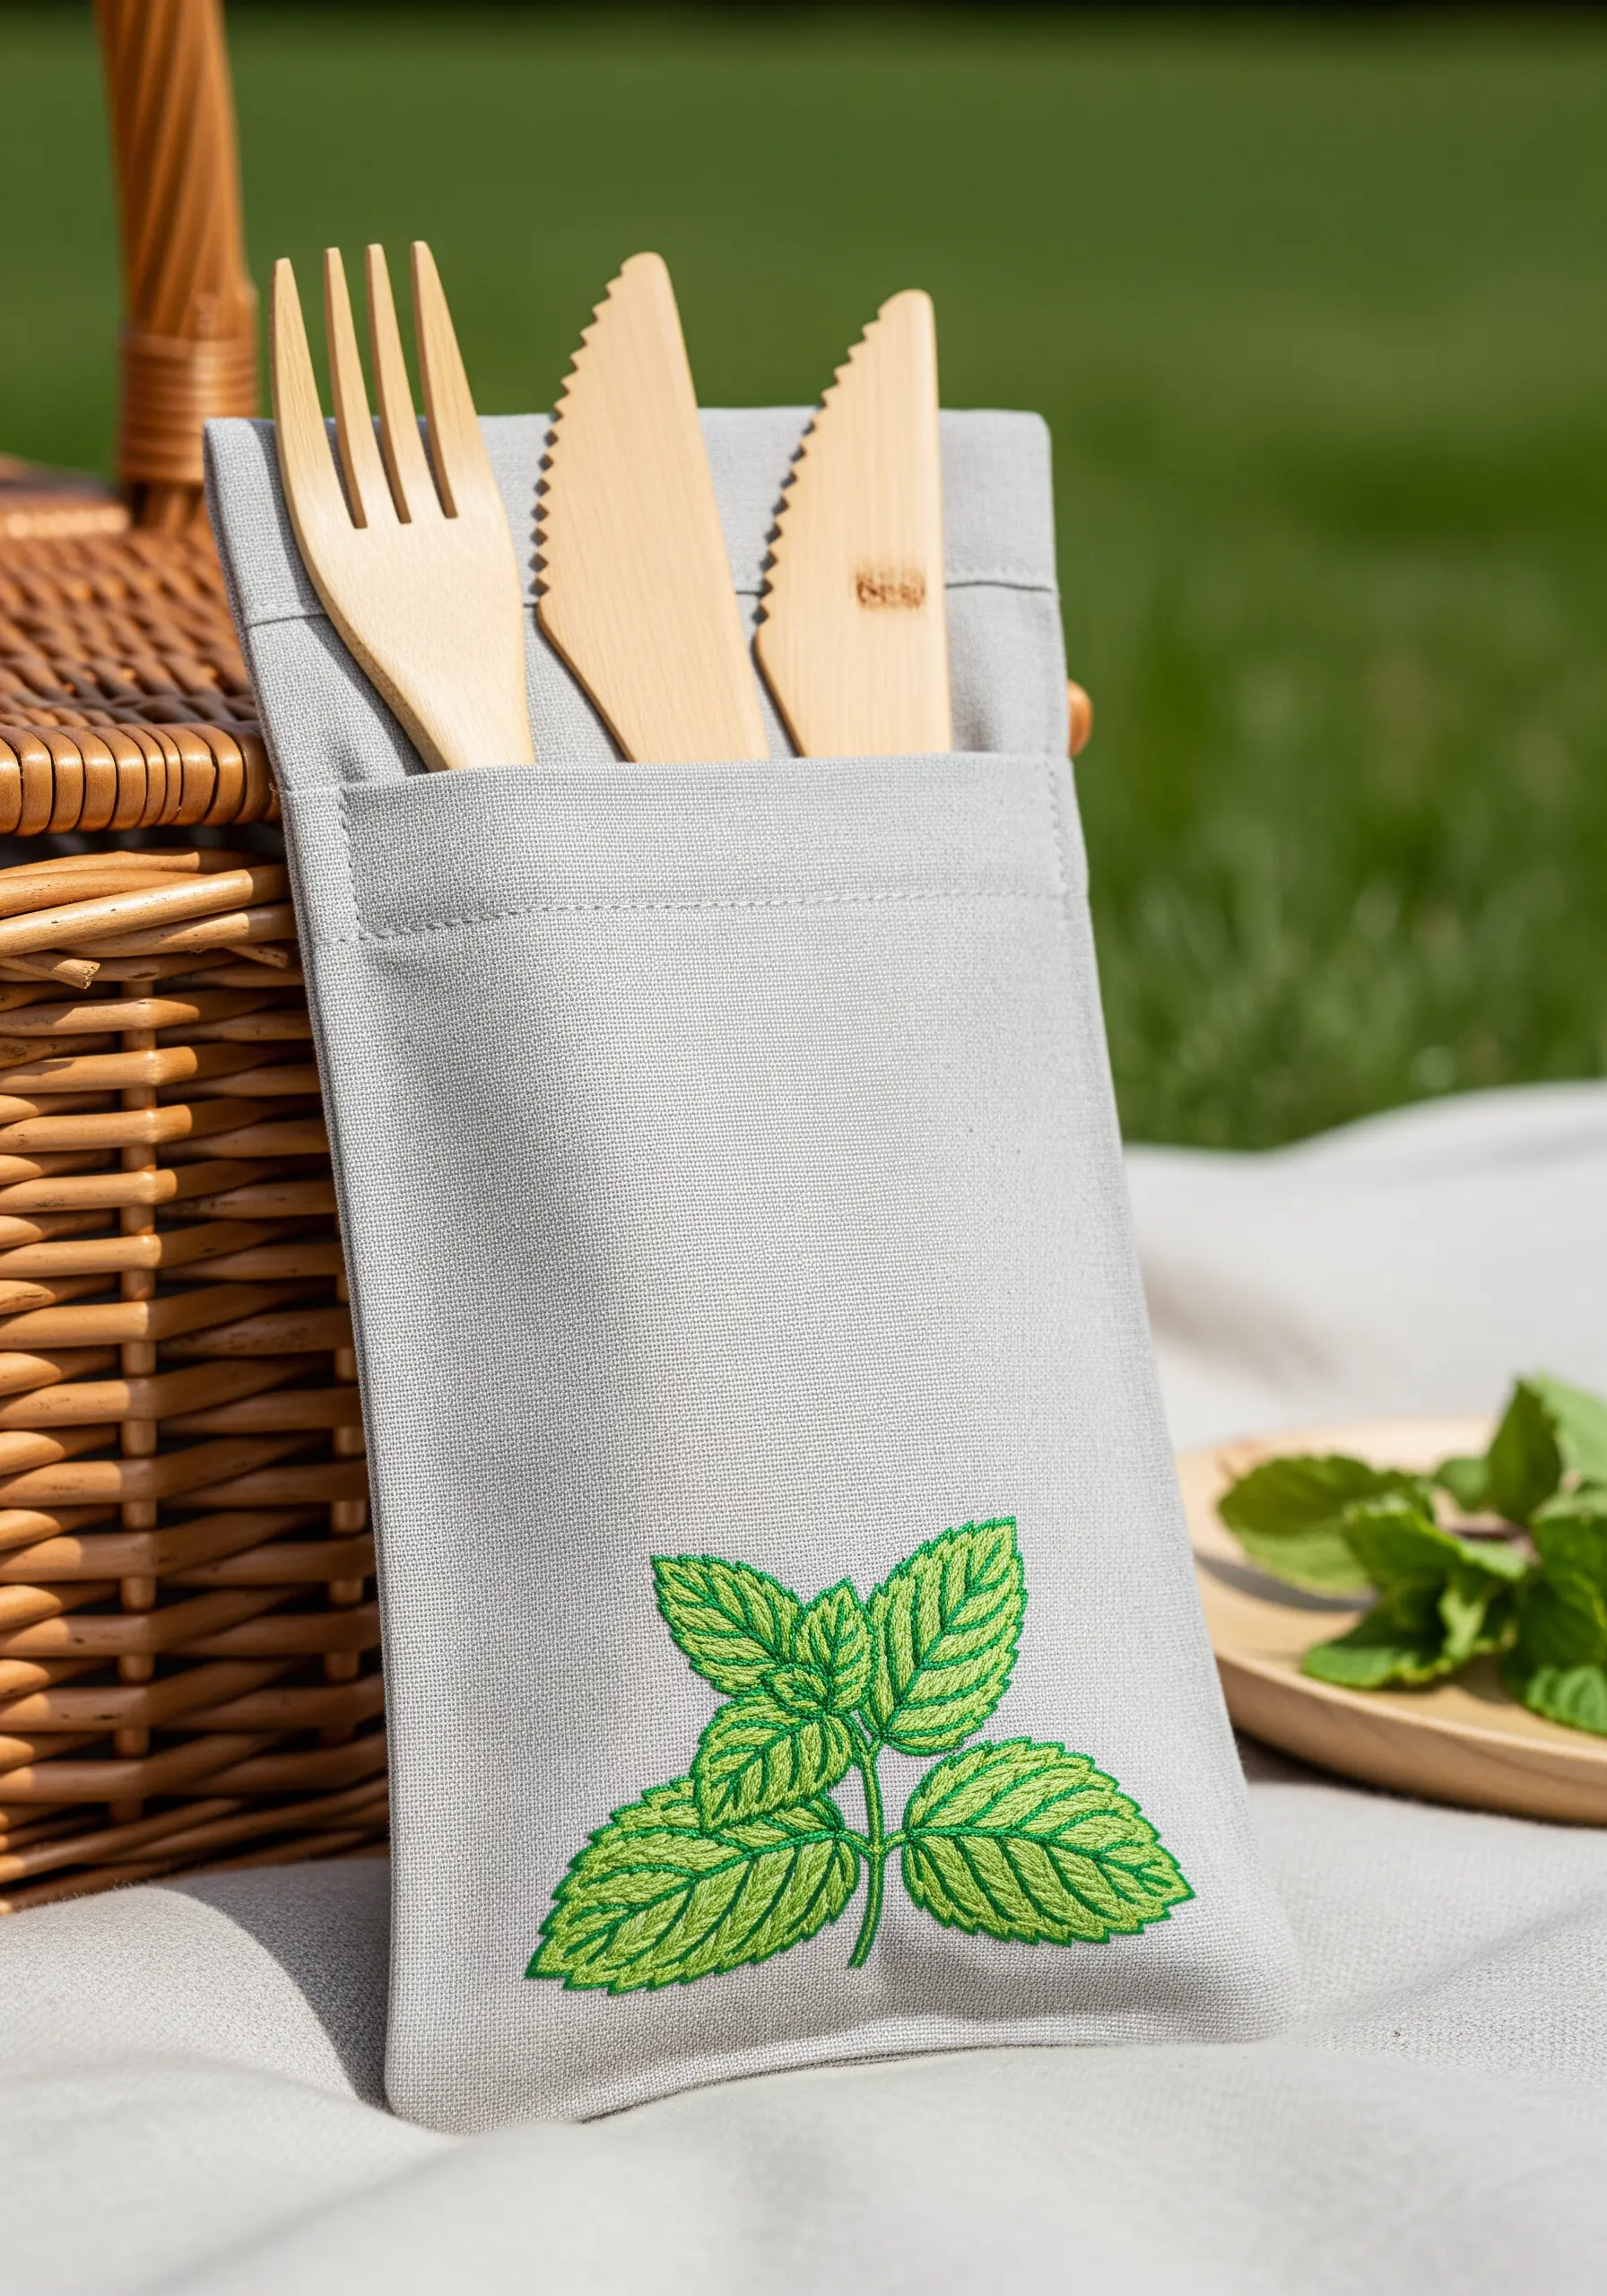
The fishbone stitch is perfect for leaves that have a prominent central vein, like mint.
This single stitch creates the vein and fills the leaf halves with angled stitches simultaneously, resulting in a beautifully textured and realistic look.
To define the characteristic serrated edges of the mint leaf, finish with a precise split stitch outline in a slightly darker shade of green.
17. Build a High-Texture Cotton Branch
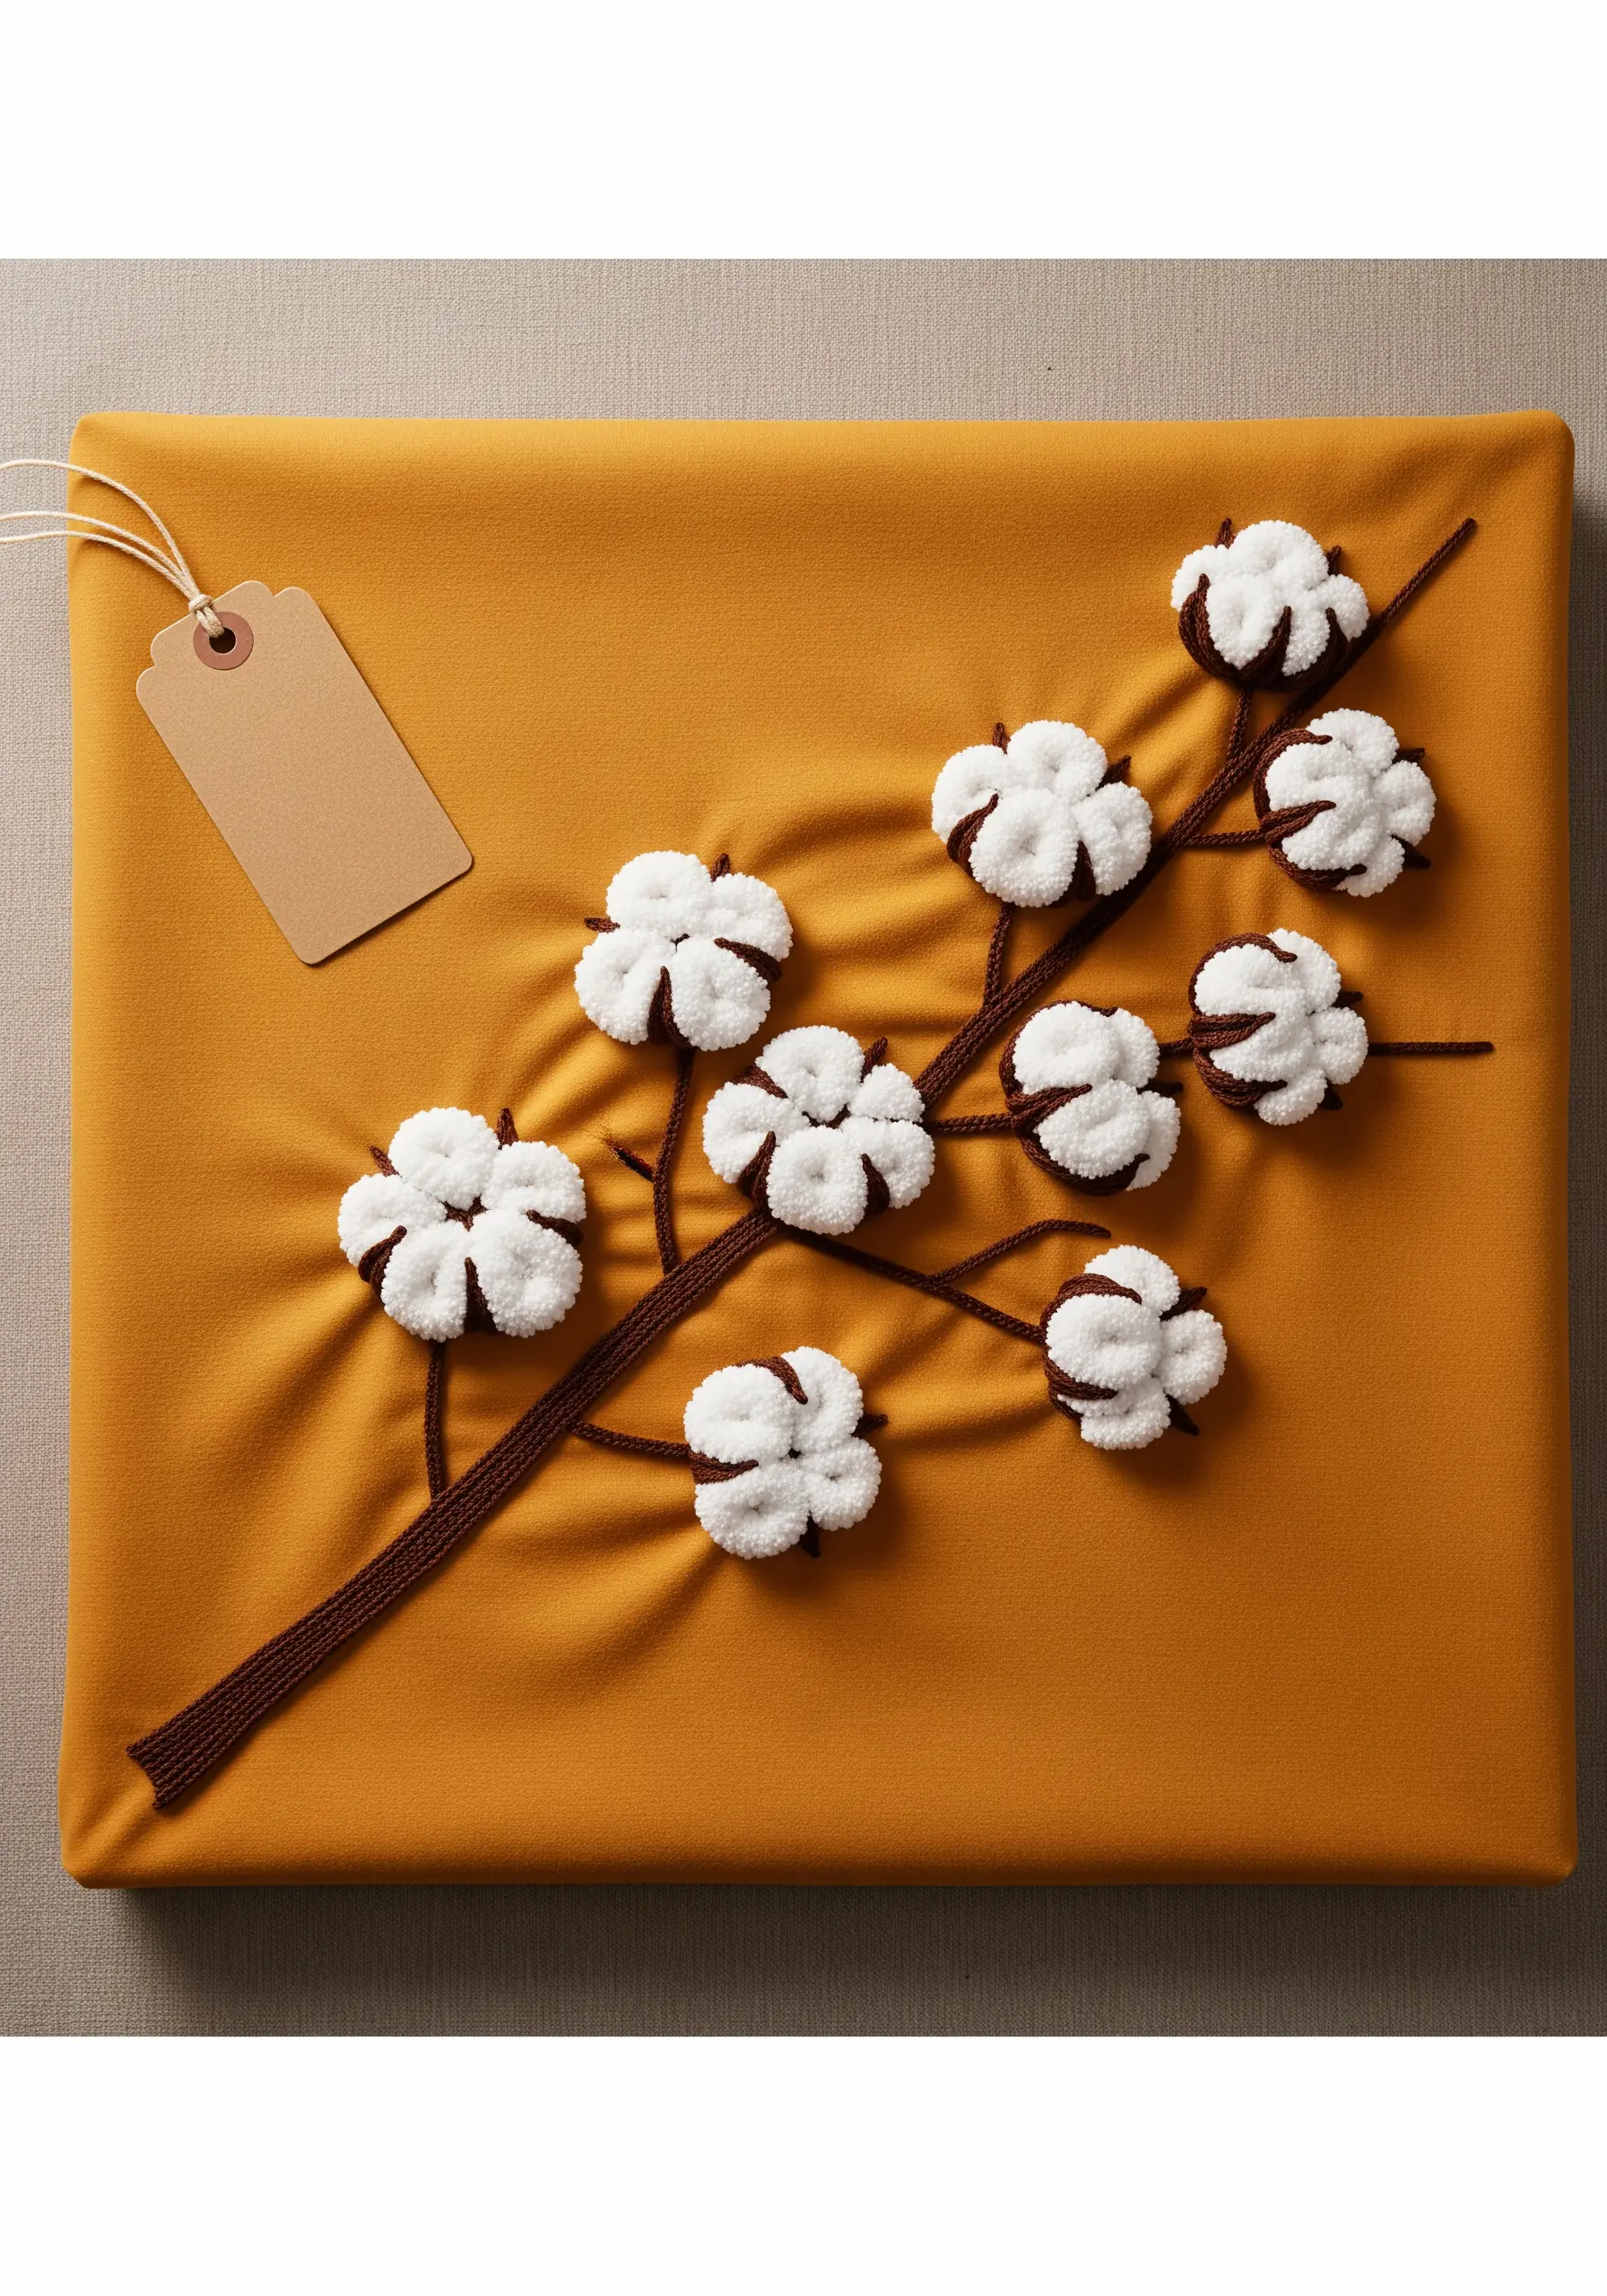
Create an incredibly tactile design by using techniques that add significant dimension.
For the branches, use a couching stitch: lay down a thick piece of brown yarn and tack it into place with a thinner, matching thread.
The fluffy cotton bolls can be made with the Turkey work stitch, which creates loops that you can trim to your desired fluffiness. This combination of textures is both visually and physically appealing.
18. Capture the Complexity of a Scottish Thistle

A complex botanical like the thistle requires a combination of different stitch techniques to do it justice.
Use long, fanned-out straight stitches for the vibrant purple flower head to mimic its spiky texture.
For the bulbous green base, use a dense satin stitch and add crisscrossing straight stitches over the top for definition.
The sharp, spiky leaves are best achieved with satin stitch, ensuring your points are clean and well-defined.
19. Use Line Art on Patterned Fabric
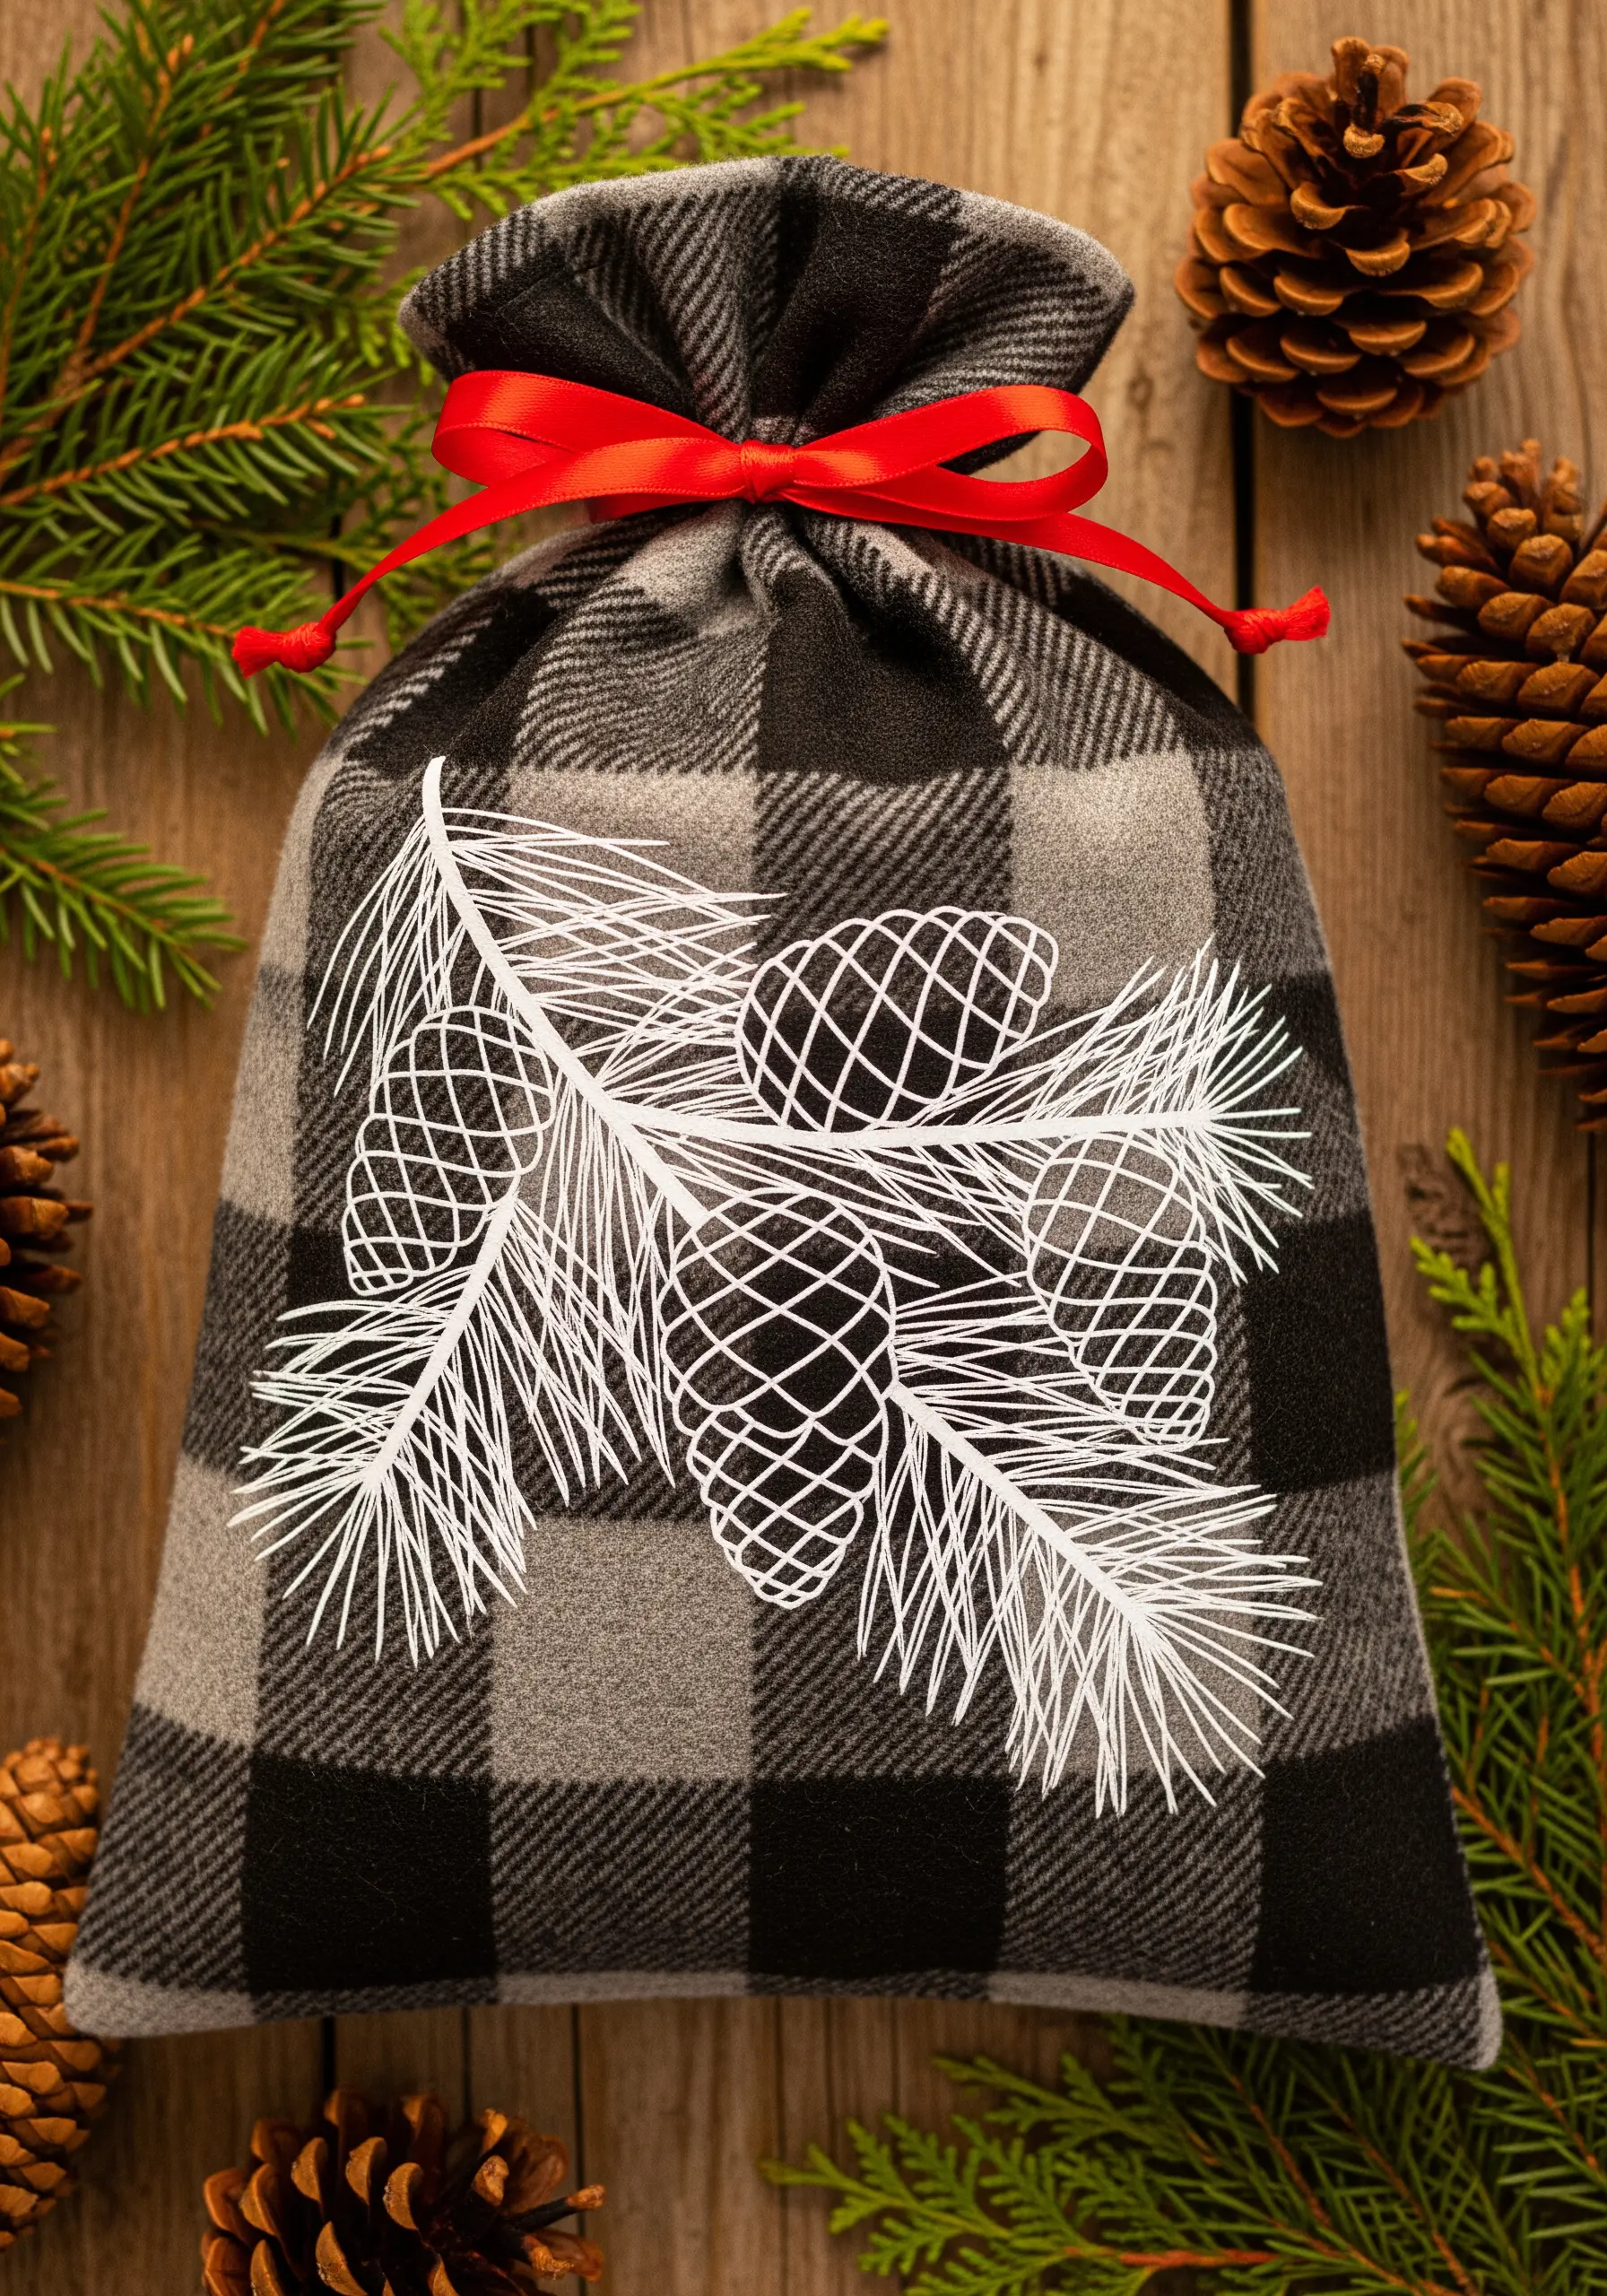
Don’t be afraid to embroider on patterned fabric; a simple, graphic design can create a stunning visual contrast.
Choose a thread color that stands out clearly against all the colors in the pattern—white on buffalo plaid is a classic choice.
Use a simple backstitch or stem stitch to create a clean, unbroken line. This technique allows the fabric pattern and the embroidery to enhance each other rather than compete.
20. Stitch Delicate Queen Anne’s Lace
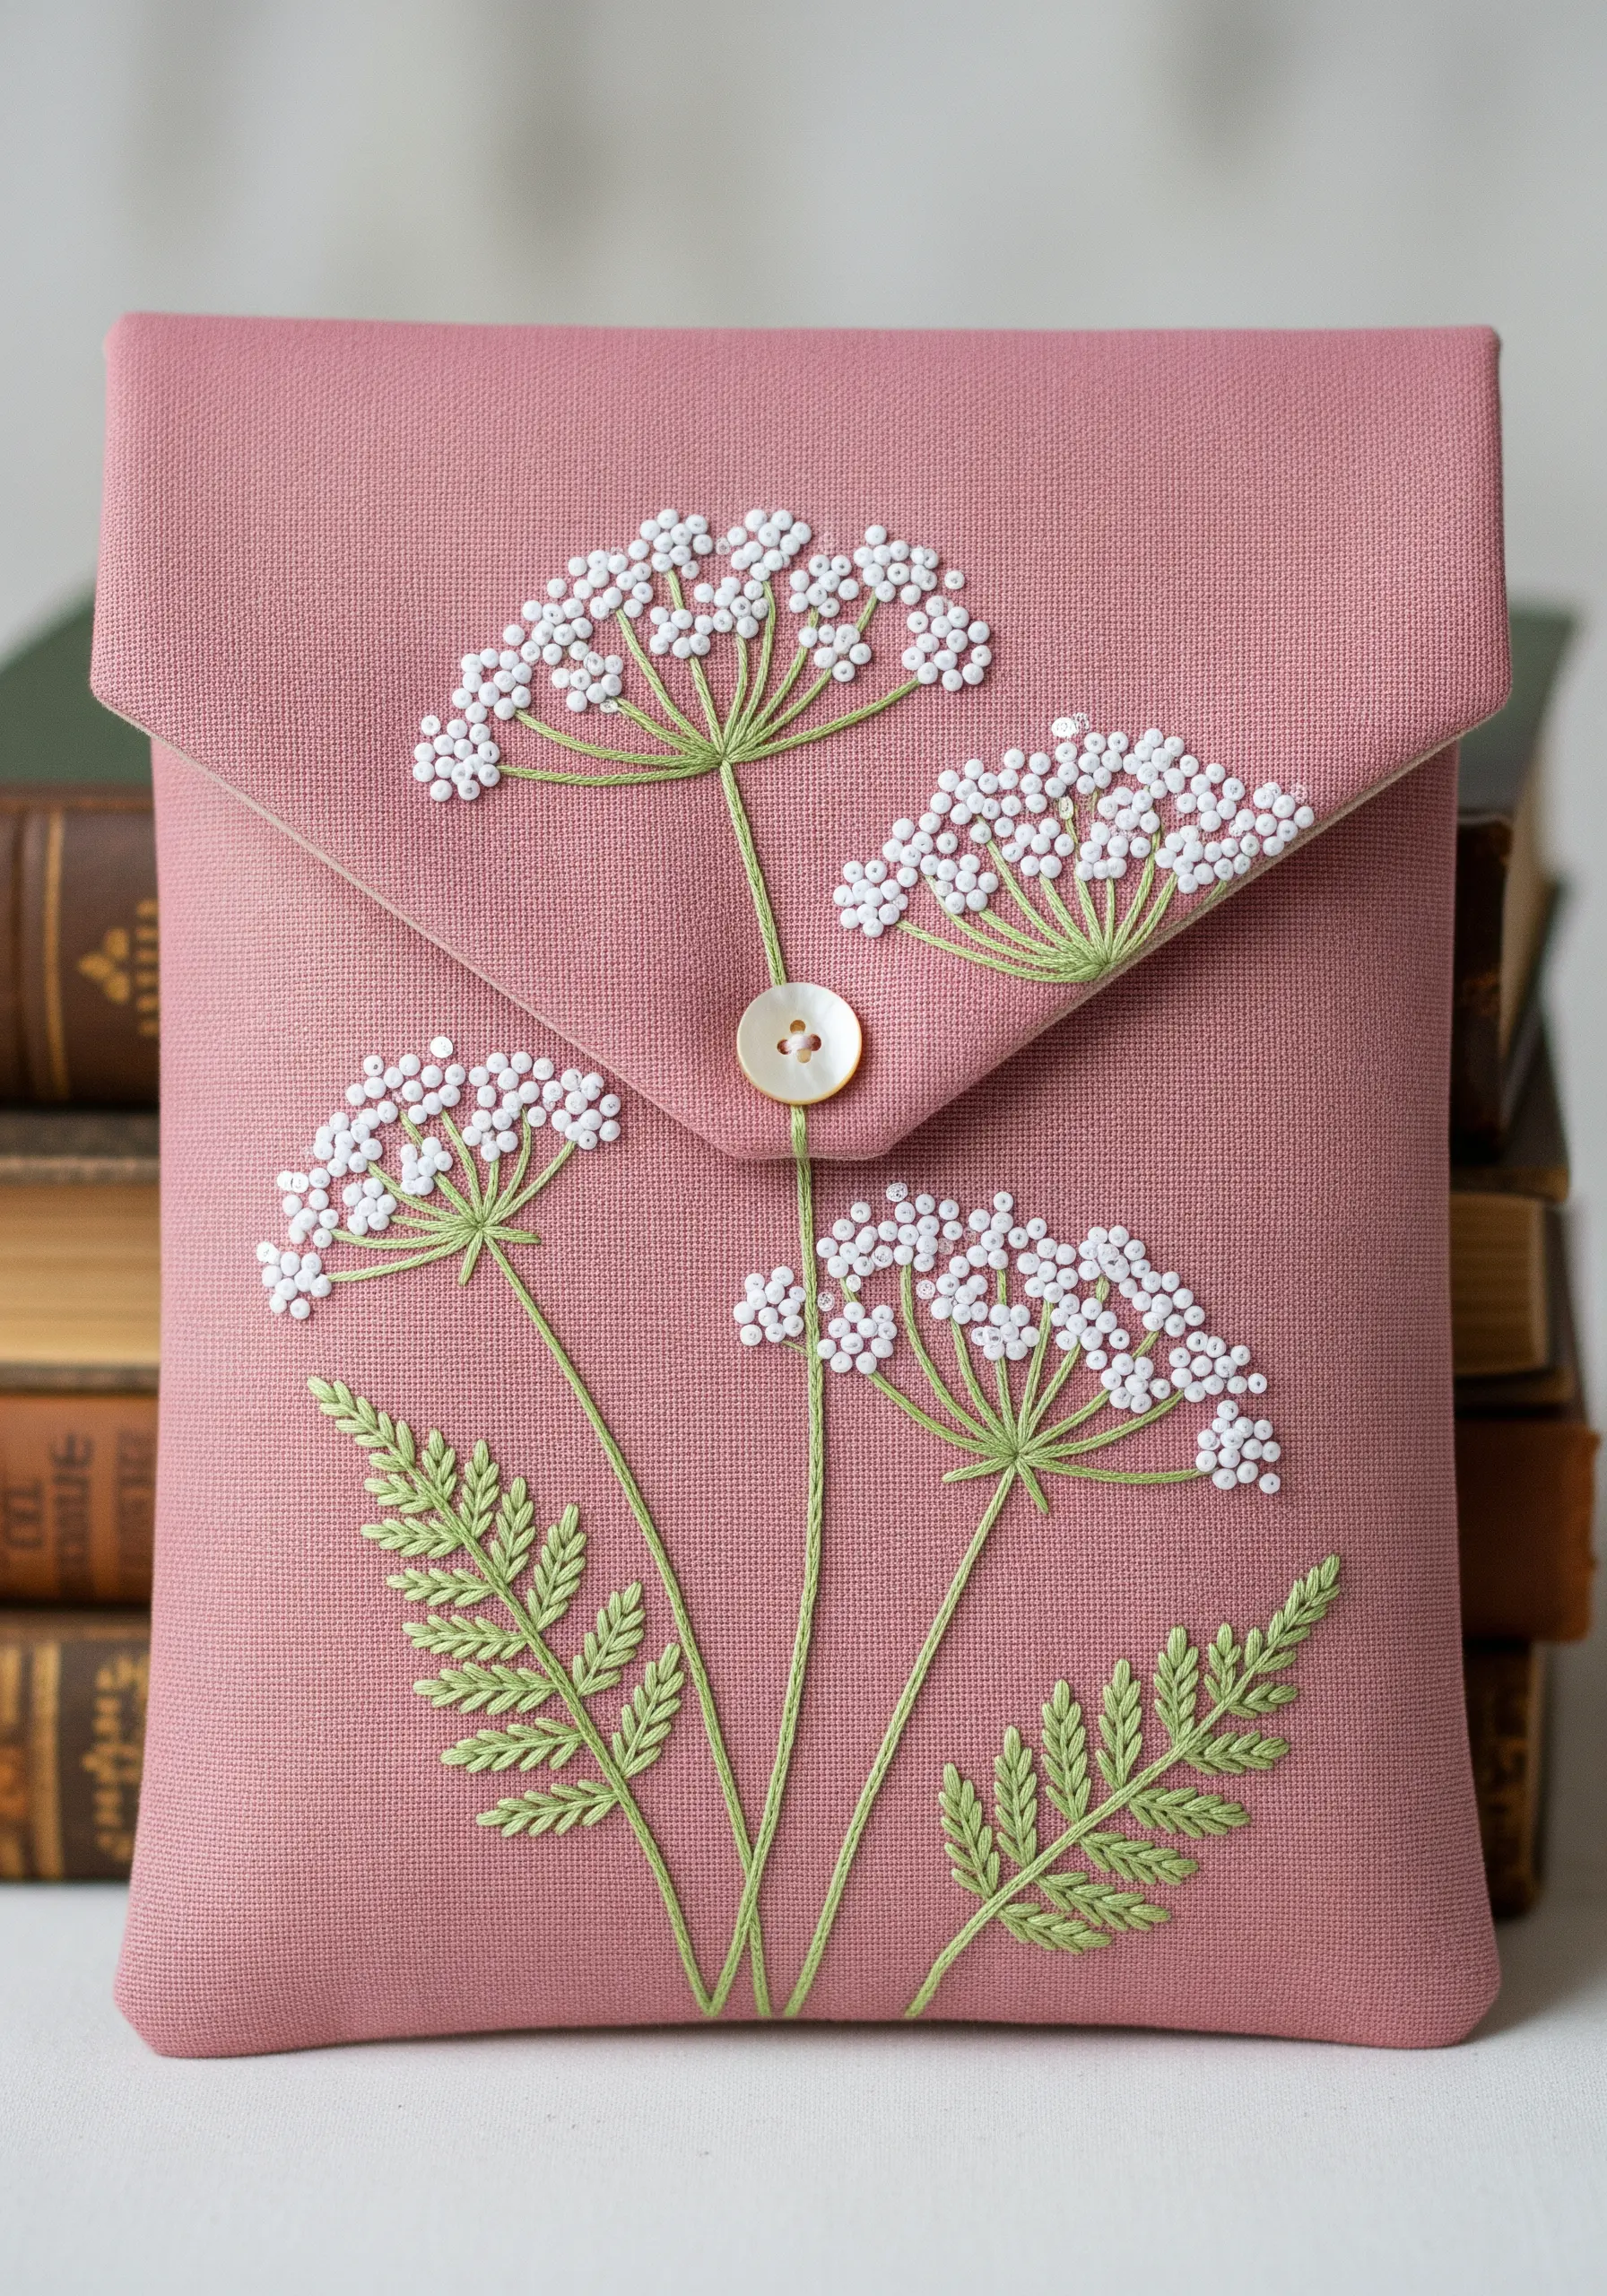
To capture the airy, delicate nature of Queen Anne’s Lace, focus on using fine details and lightweight stitches.
Create the flower clusters with tiny white French knots, which perfectly replicate the look of the minuscule blossoms.
Use only one or two strands of floss for the thin green stems, stitching them with a stem stitch.
The fern-like leaves can be rendered with small fly stitches, completing one of the most elegant botanical line art embroidery patterns.
21. Design a Dynamic Wildflower Meadow
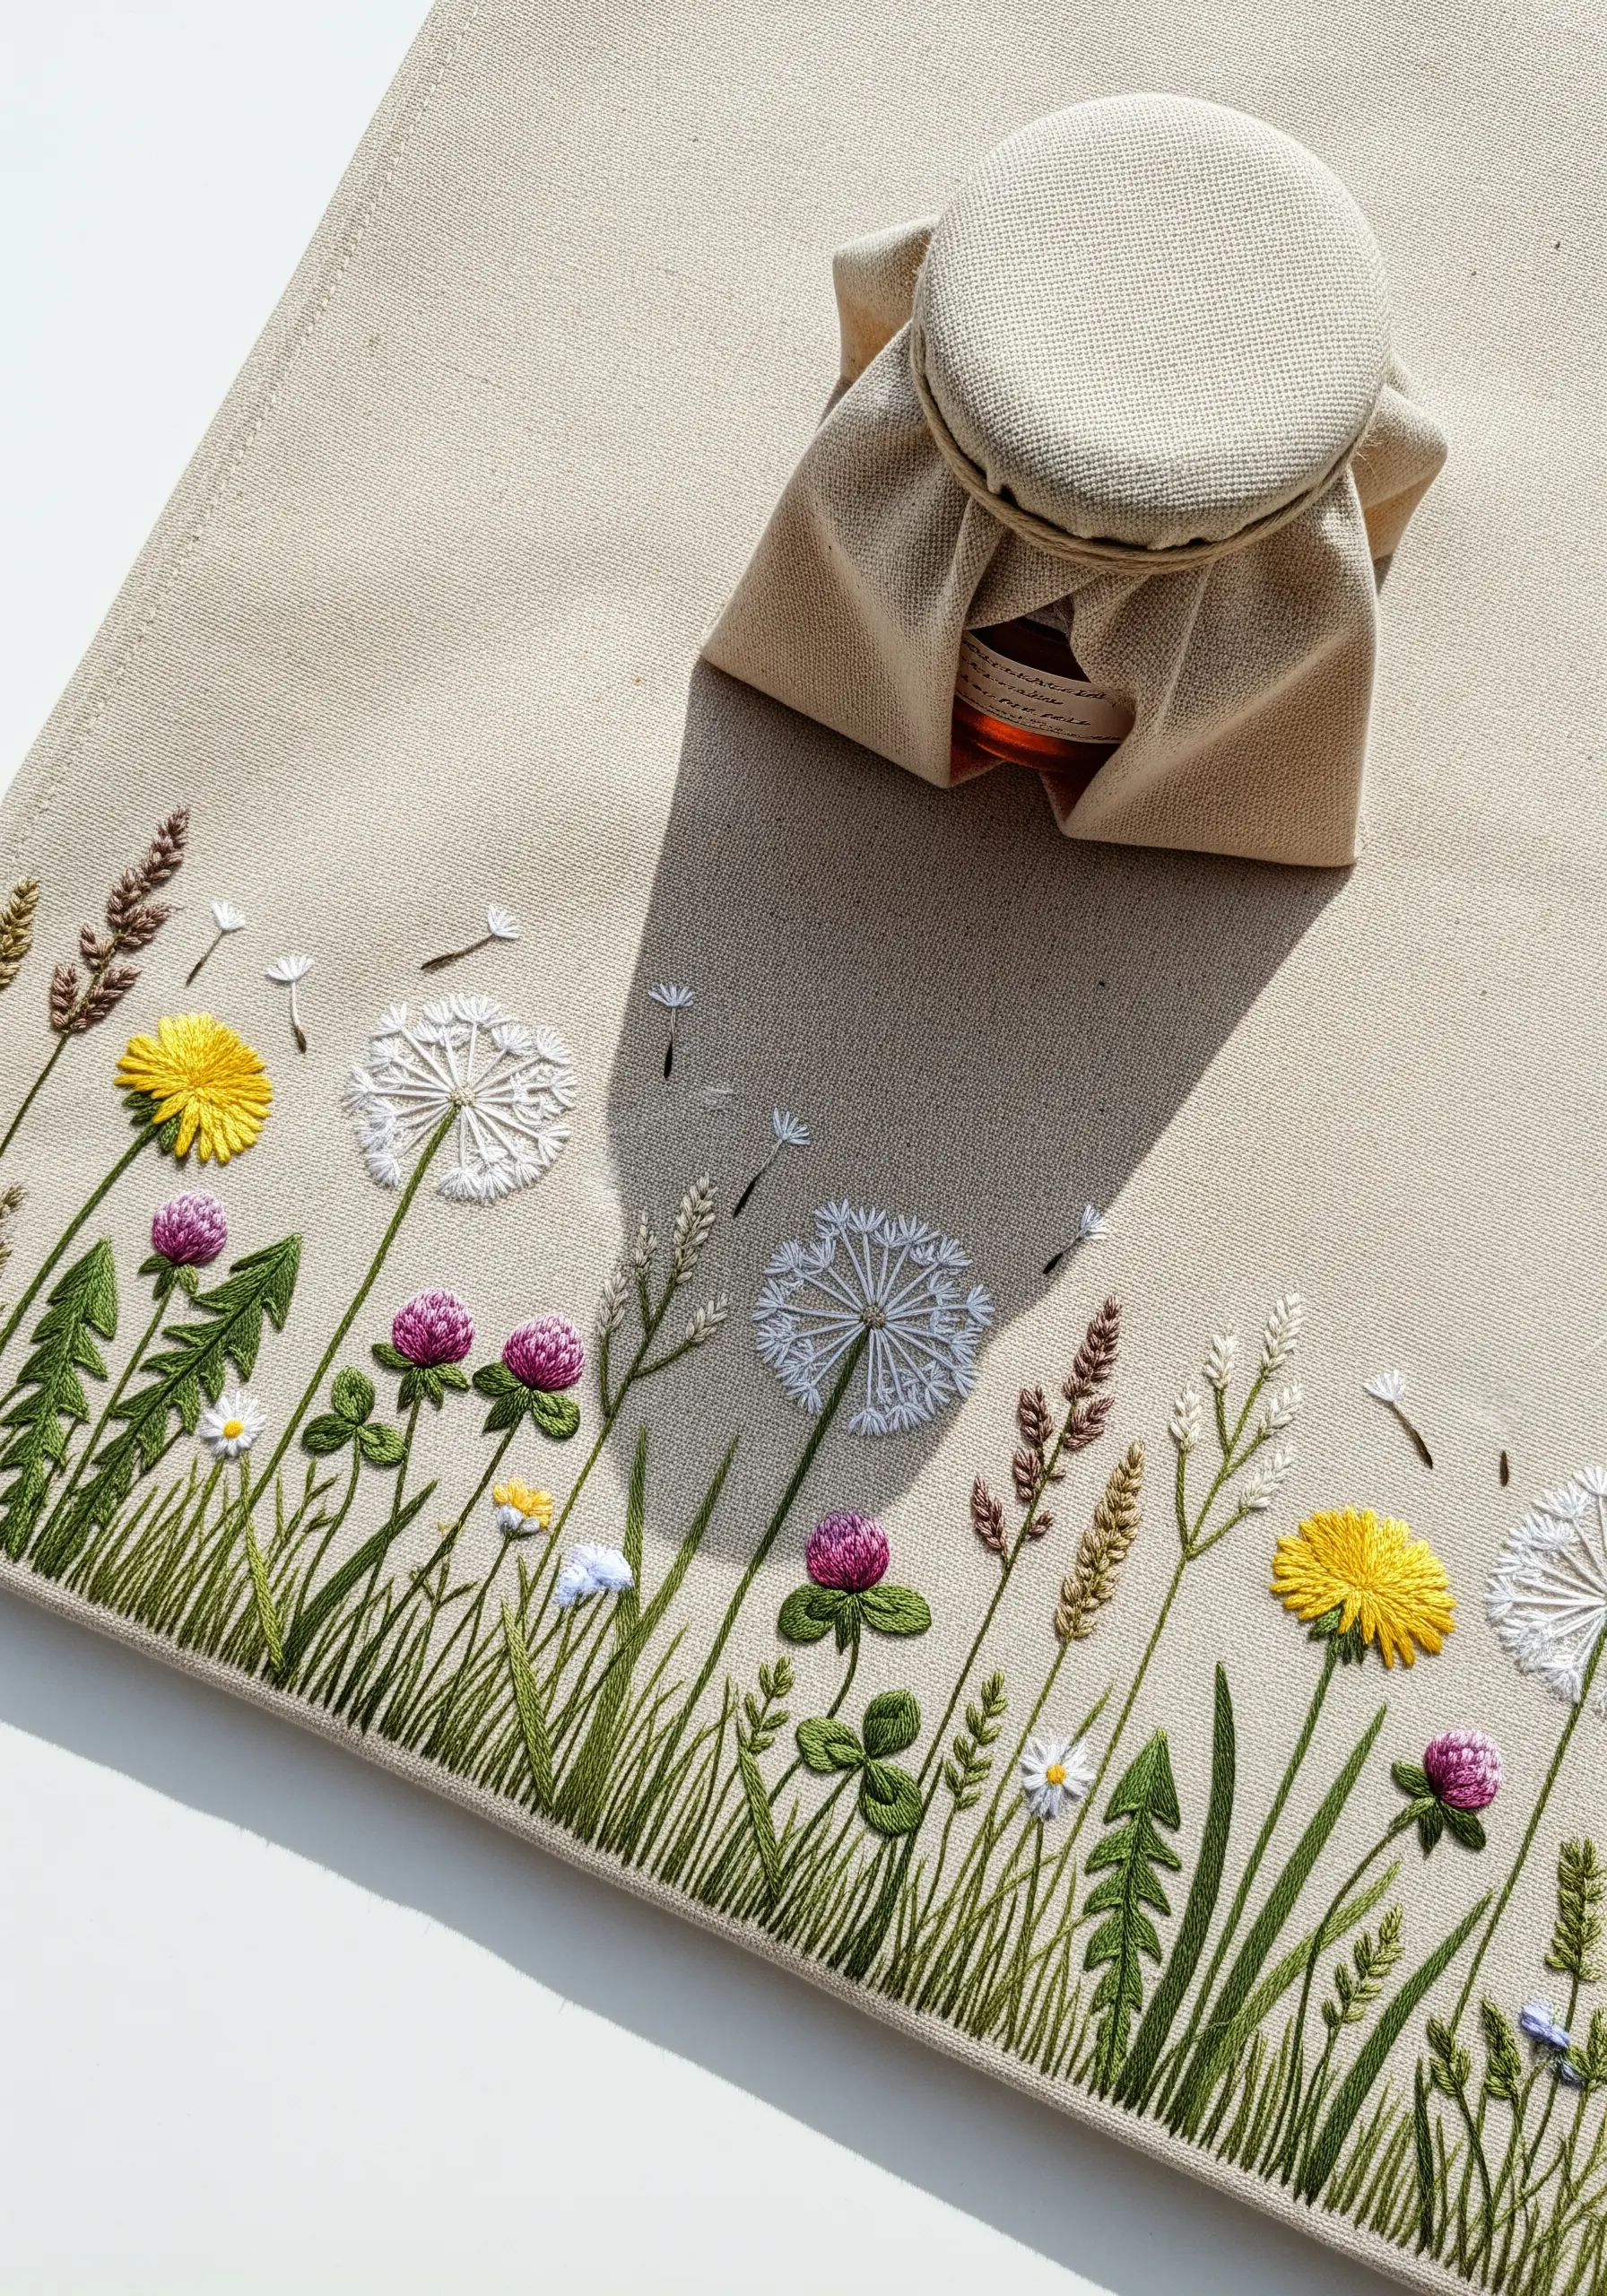
Create the feeling of a wildflower meadow by varying the stitches, colors, and heights of your botanicals.
Use a mix of stitches: lazy daisies for petals, French knots for flower centers, woven wheels for clover, and straight stitches for grasses.
Overlap some elements to create a sense of depth, and allow for some empty space to let the composition breathe.
This approach results in a design that is full of life, texture, and visual interest.
22. Recreate Skeleton Leaves with Fine Backstitch
Capture the intricate, lace-like structure of a skeleton leaf with precise stitching.
This design is all about fine lines, so use only a single strand of embroidery floss.
A simple backstitch is the perfect choice for creating the delicate network of veins. For even smoother curves, consider using a whipped backstitch.
Choose a high-contrast thread color to make the detailed linework stand out for a dramatic, graphic effect.
23. Frame a Gift with a Tropical Corner Motif
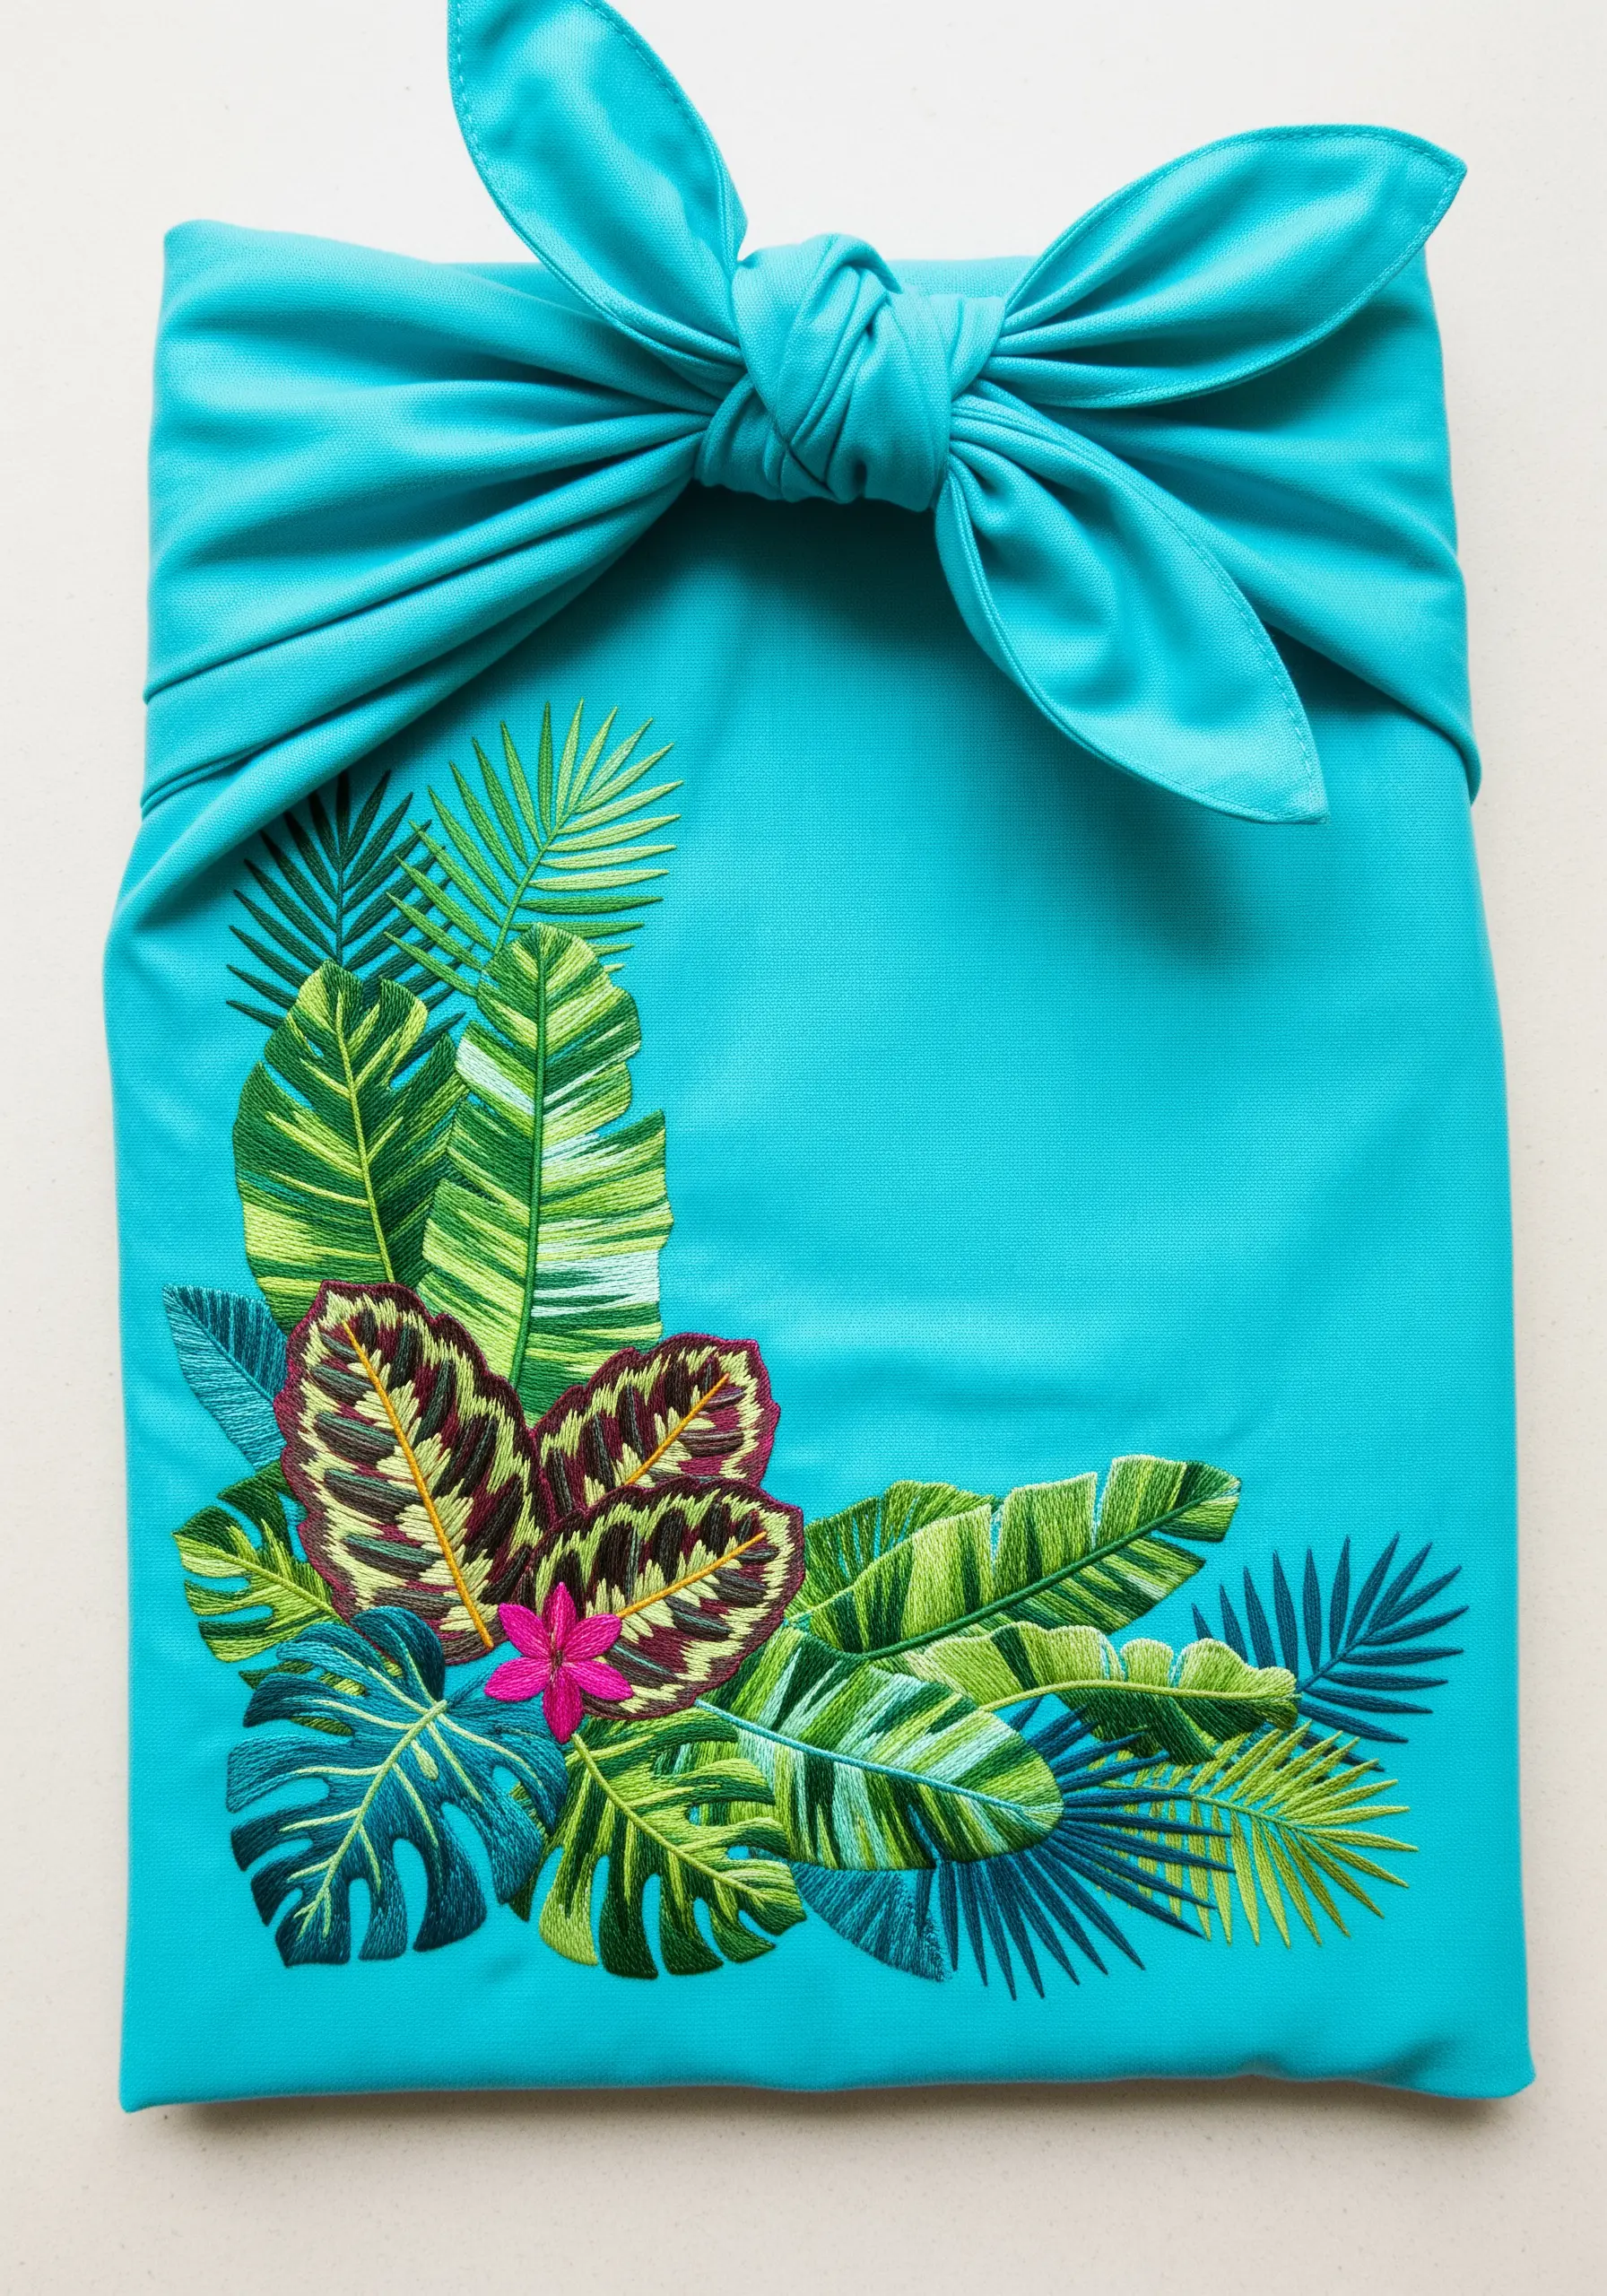
For Furoshiki-style fabric wraps, concentrating your embroidery in one corner creates a stunning focal point when the gift is tied.
Use the long-and-short stitch to blend vibrant greens, blues, and even pinks within the tropical leaves, giving them a lush, painterly feel.
Define the edges of each leaf with a crisp split stitch outline to ensure they stand out against the bright background and each other.
This placement makes the gift’s final presentation exceptionally beautiful.
24. Craft a Reusable Mushroom Forest Gift Band
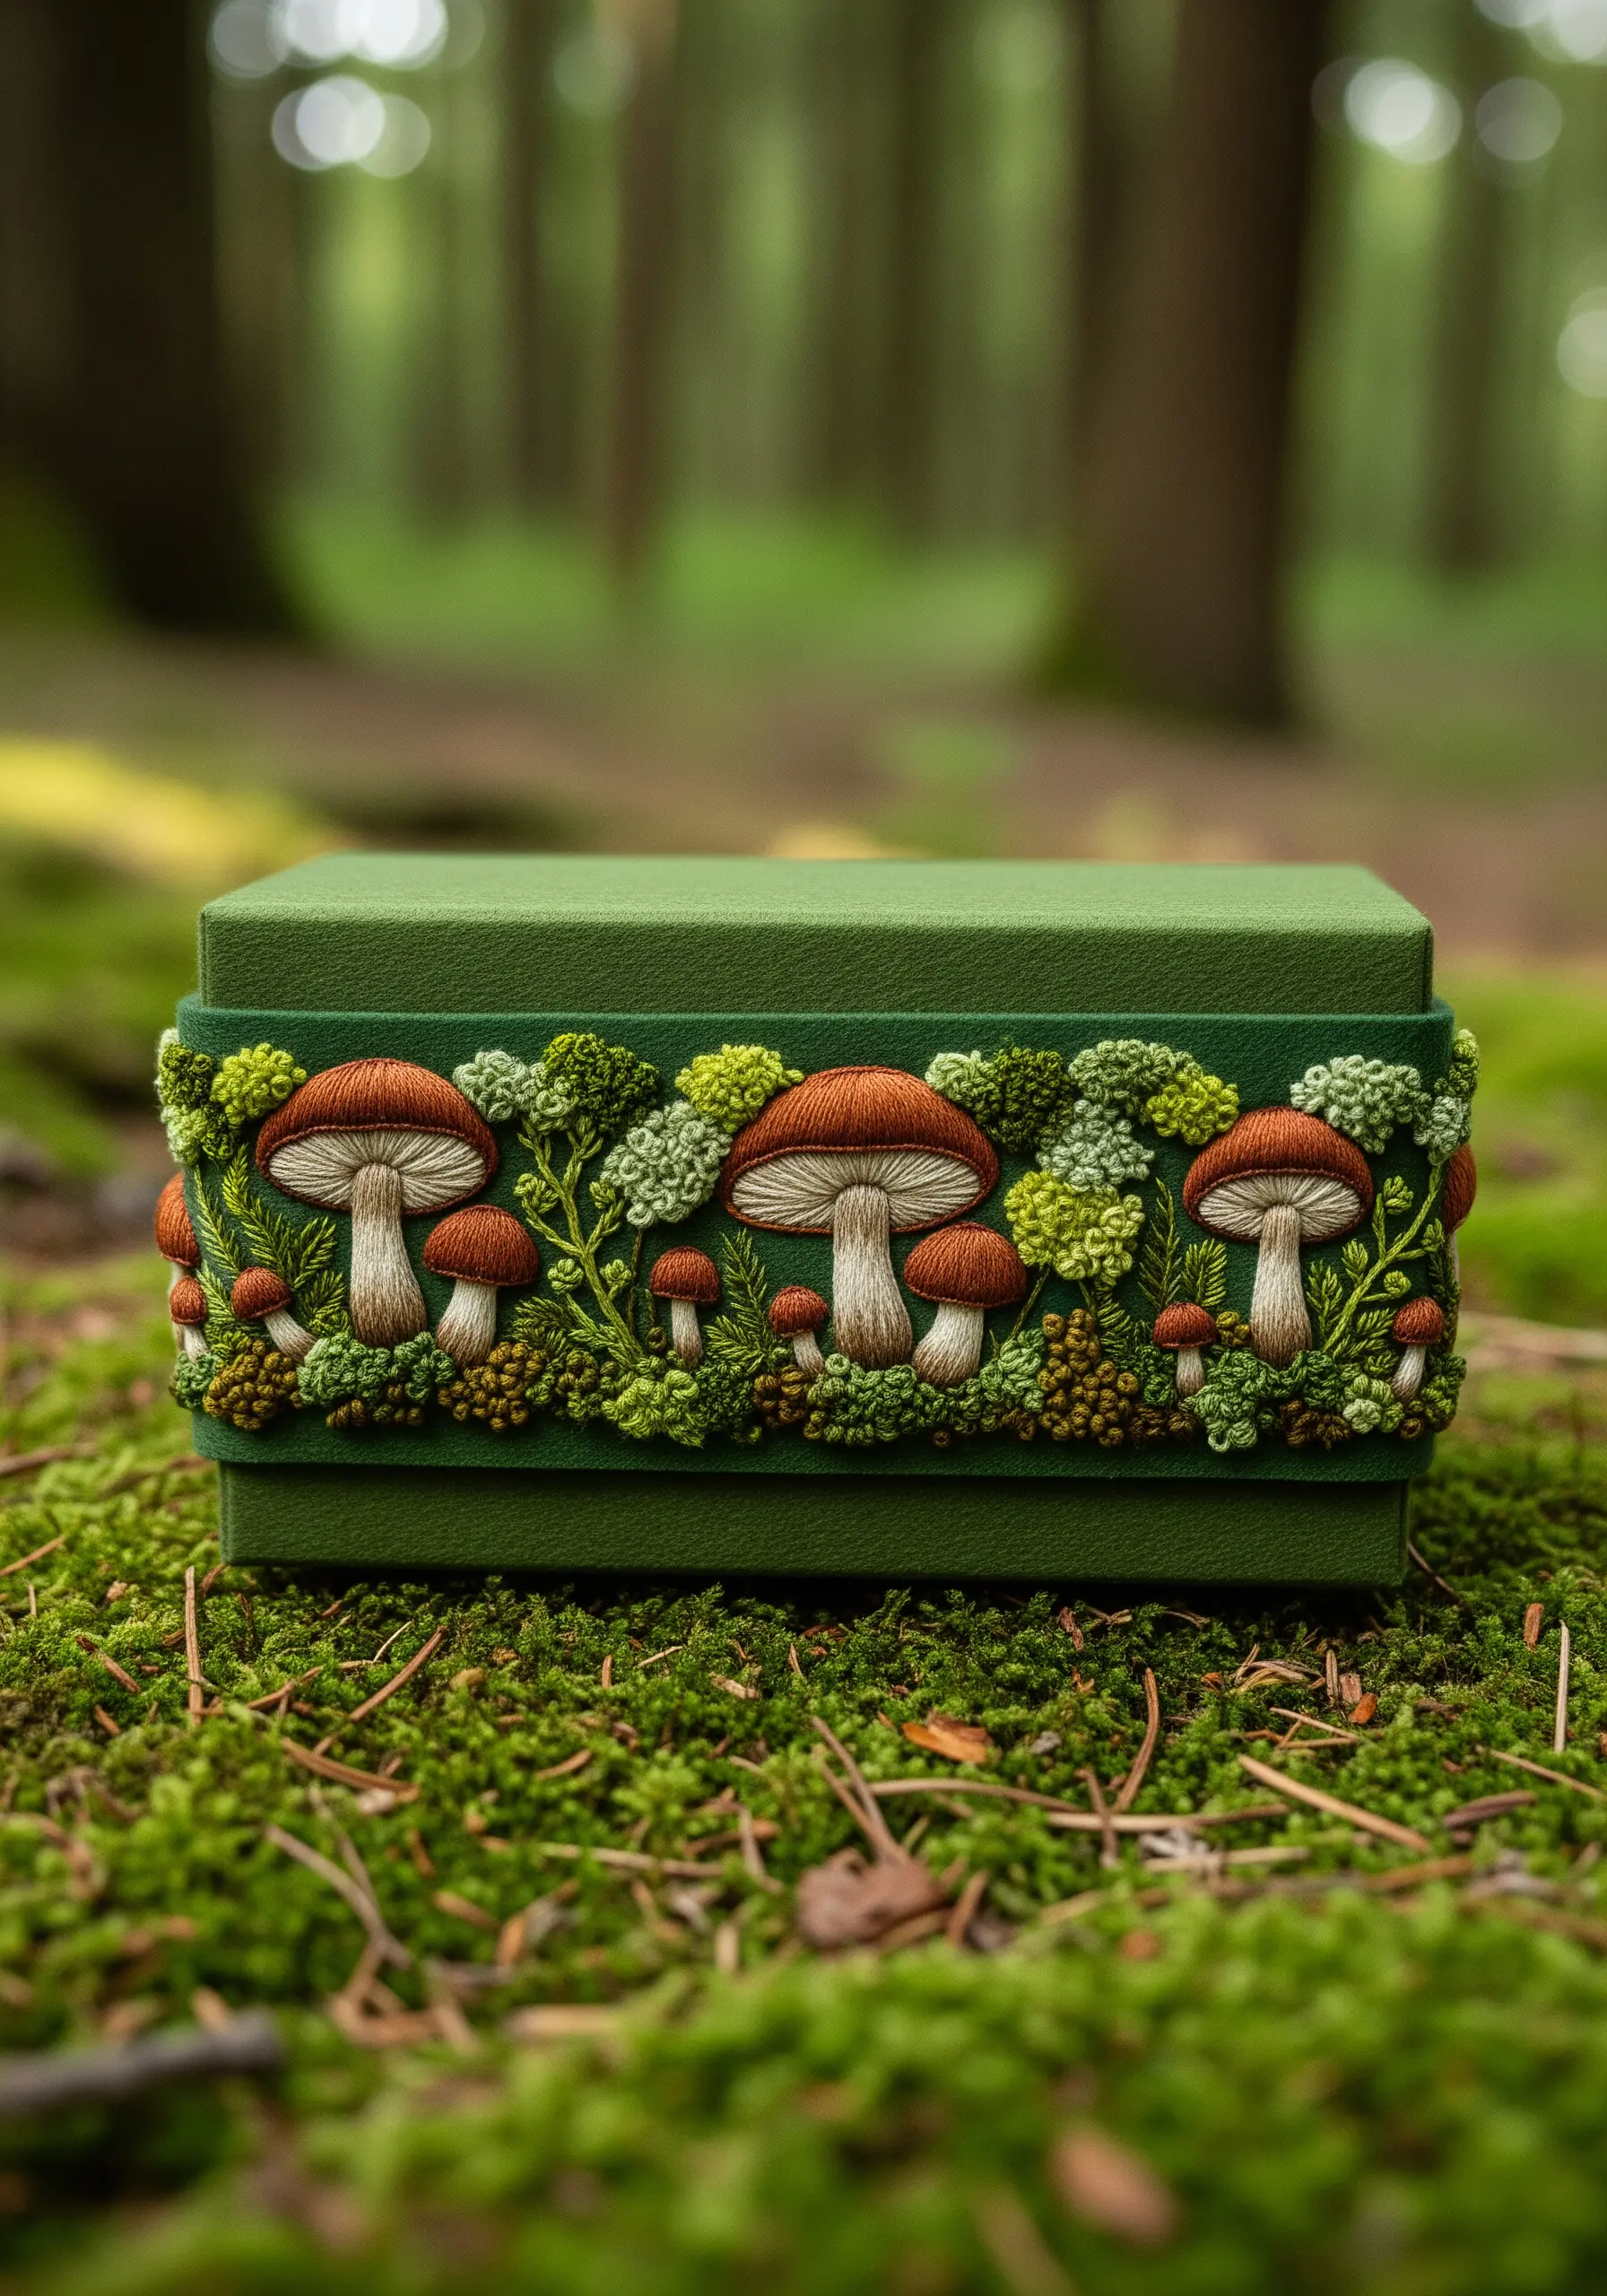
Instead of a disposable ribbon, create a reusable embroidered band to adorn a gift box.
Give the mushroom caps a satisfying, rounded shape by using padded satin stitch.
Create the mossy forest floor with a dense, textural cluster of French knots in various shades of green, brown, and ochre.
This texture-rich approach makes the band a beautiful, tactile gift in itself.
25. Make a Statement with Golden Wheat
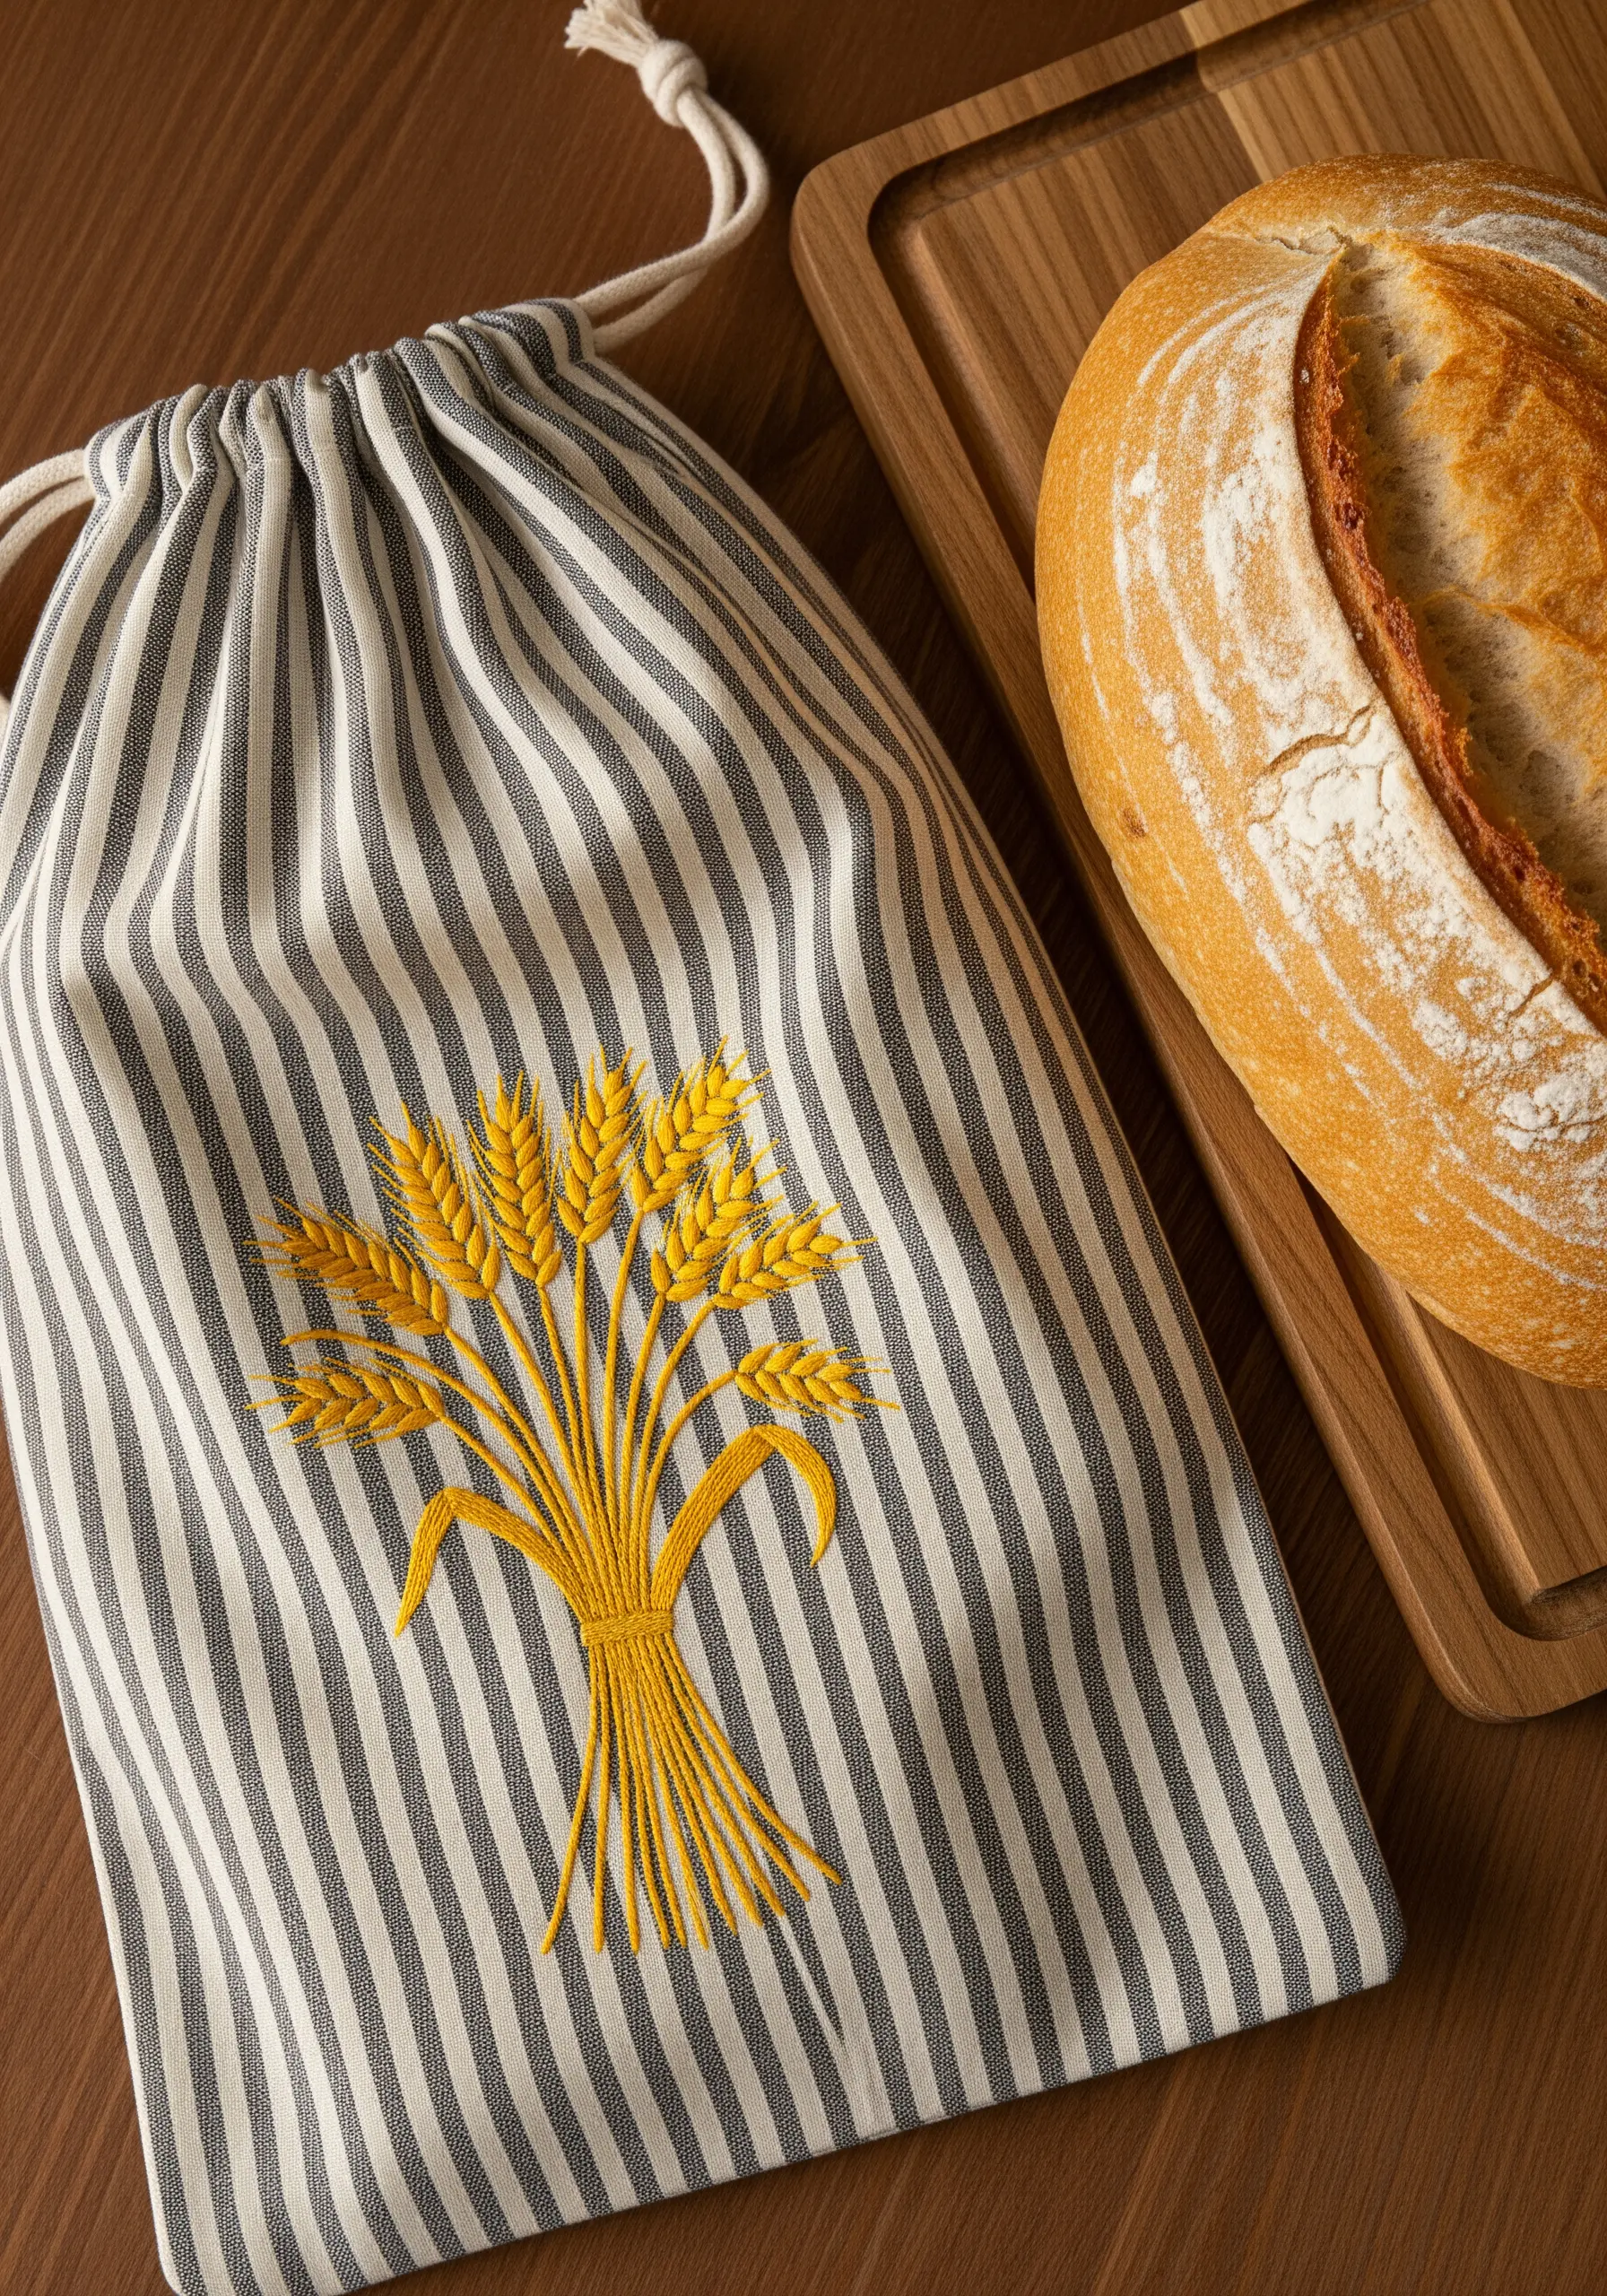
Embroidering on patterned fabric, like stripes, can create a wonderfully dynamic background for a simple, bold motif.
Choose a single, strong color that contrasts with the fabric—a golden yellow for a wheat sheaf is a perfect choice.
Use fishbone stitch for the individual wheat kernels, as it naturally creates the central line and texture.
The strong vertical lines of the wheat stalks against the stripes of the bag create a visually pleasing harmony.
26. Create an Illustrative Artichoke Design
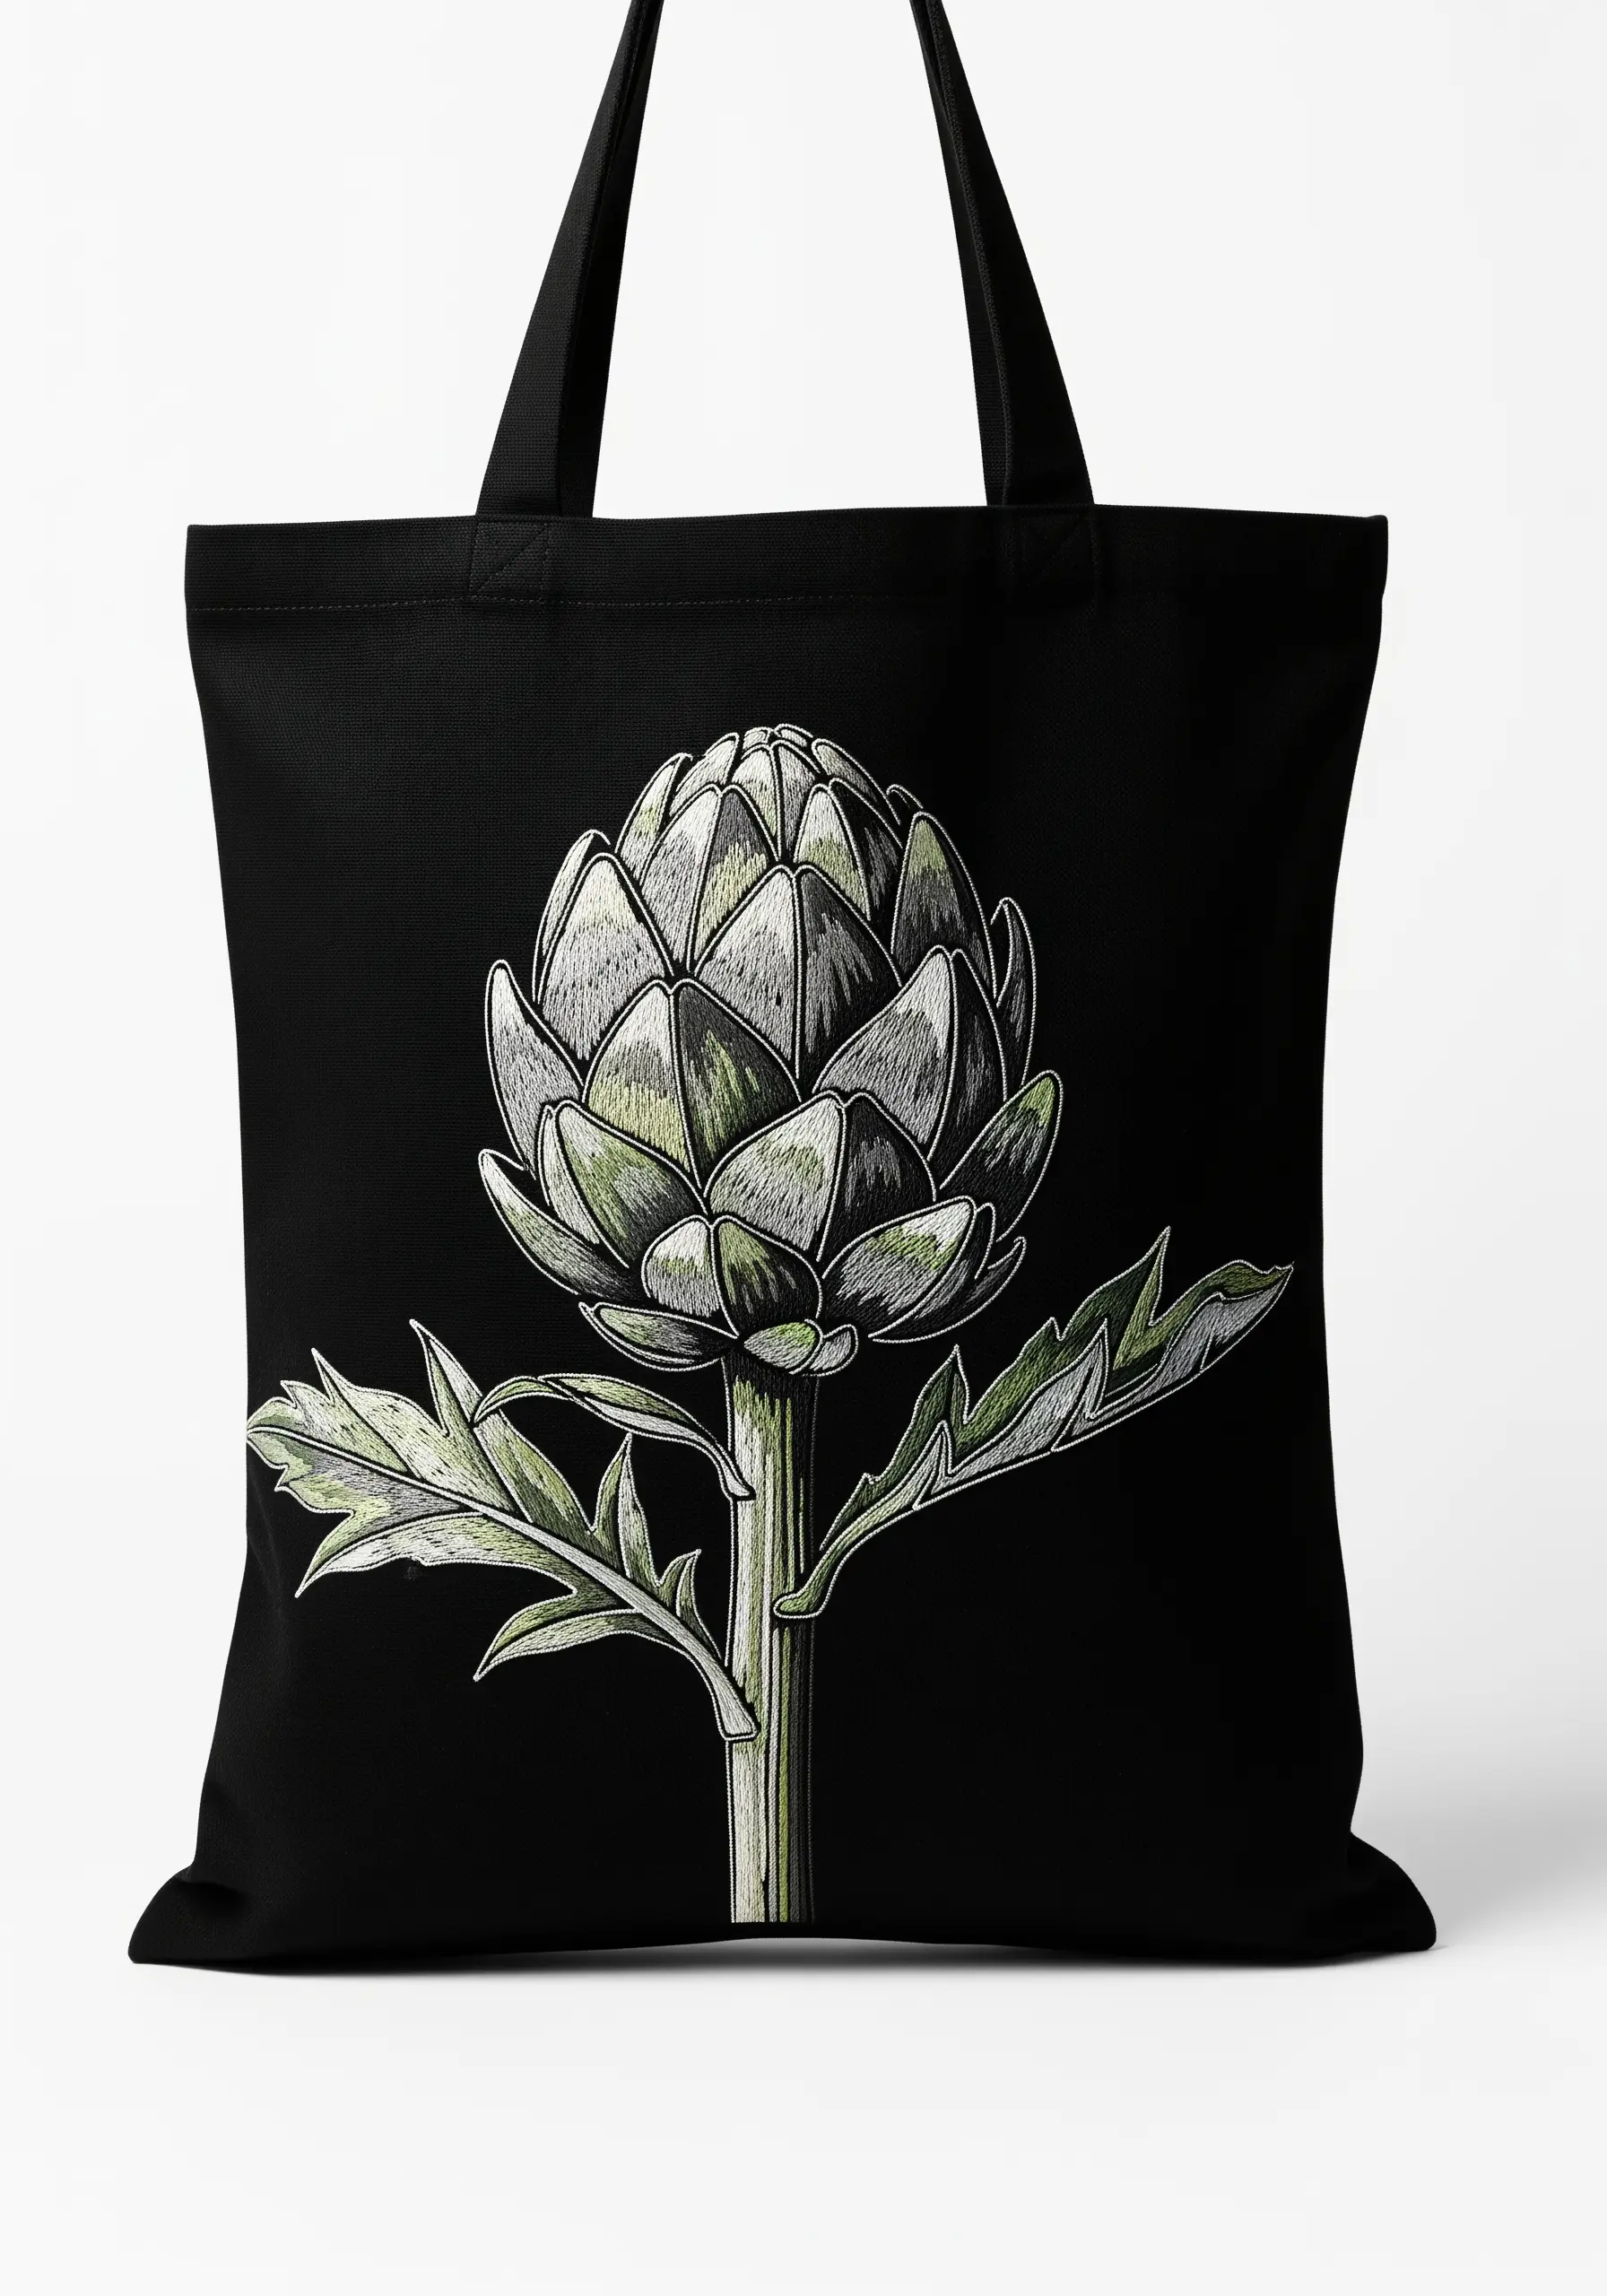
Emulate the look of a classic pen-and-ink botanical illustration using thread.
Use black backstitch for the main outlines to create a strong, graphic foundation.
For shading and texture, use short straight stitches arranged in hatching and cross-hatching patterns, just as you would with a pen.
Adding highlights with a lighter thread, like off-white or pale green, will give the artichoke form and dimension.
27. Stitch Dimensional Daisies with Woven Wheels
The woven wheel stitch is a fantastic way to create perfectly round, raised floral elements with beautiful texture.
Start with a star-shaped foundation of straight stitches, then weave your thread over and under these spokes until the shape is filled.
This creates the daisy petals in one simple, continuous process. Finish the flower with a cluster of yellow French knots in the center.
This technique adds impressive dimension much faster than traditional satin stitching.
28. Modernize Holiday Holly with Mixed Techniques
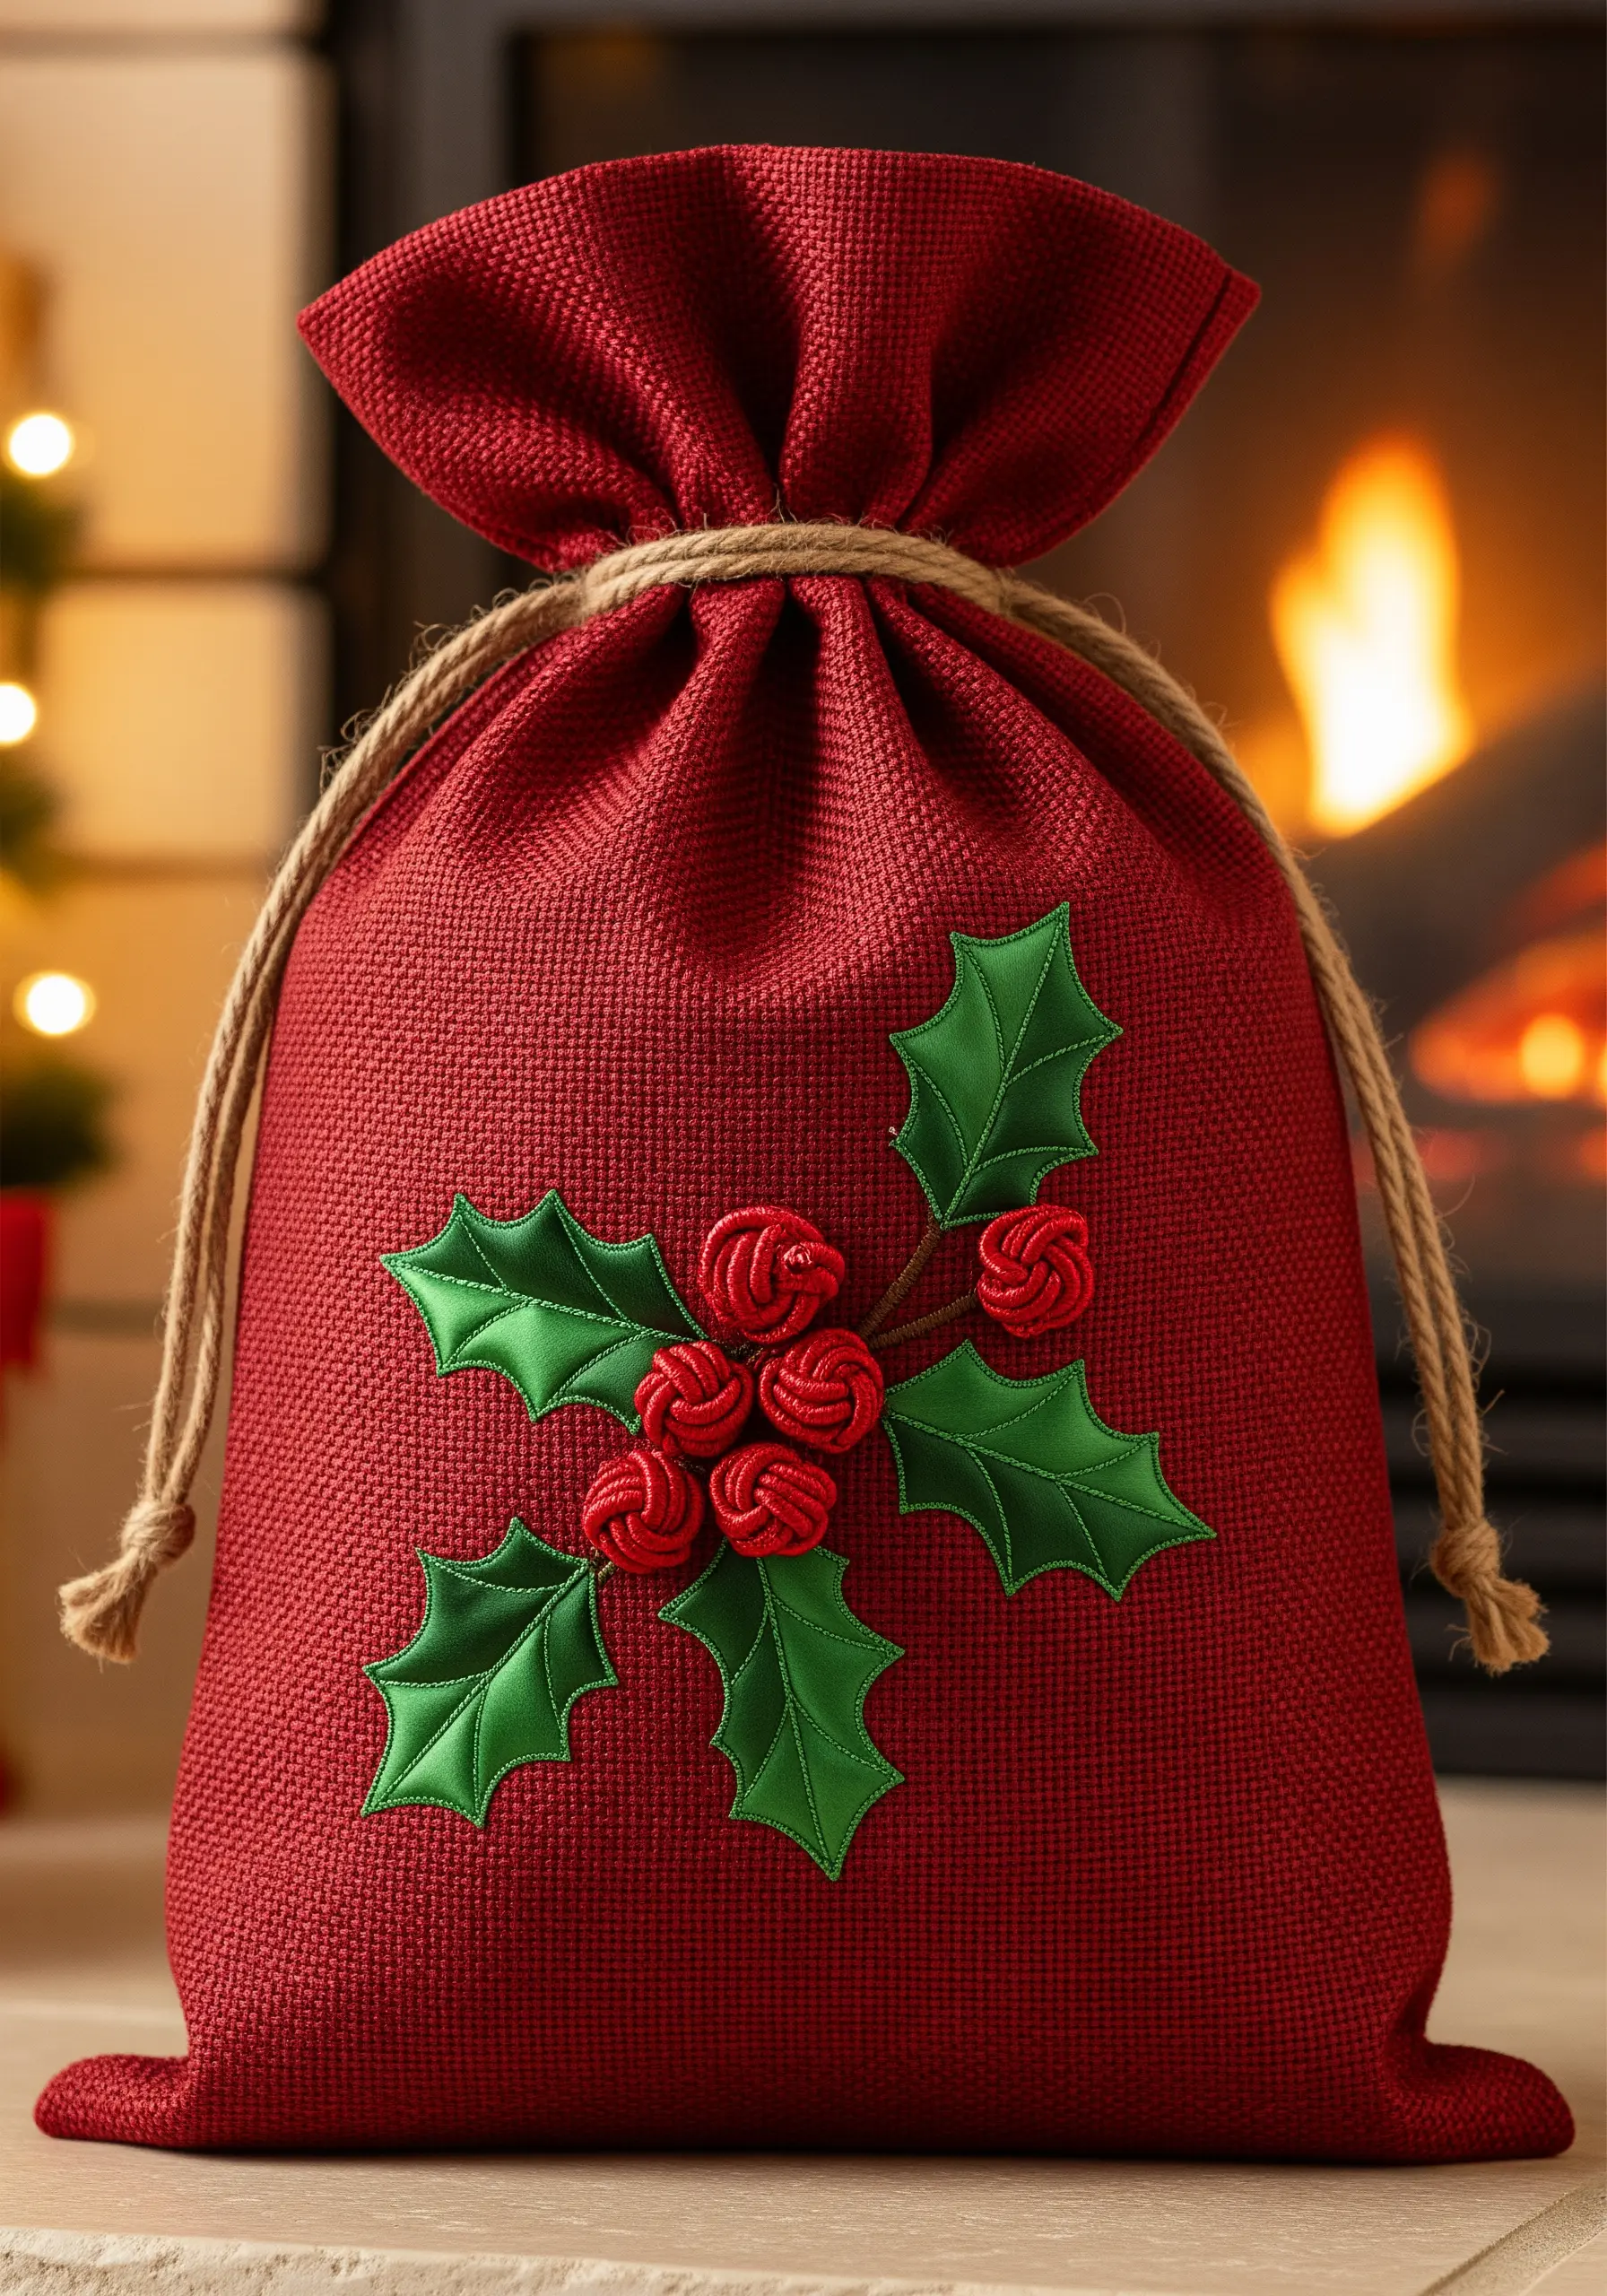
Give a classic holiday motif a contemporary update by combining different textile techniques.
For perfectly smooth leaves, use appliqué: cut the shapes from green felt or fabric and secure them with a neat backstitch outline.
Instead of simple French knots for the berries, stitch them as small woven wheels (or spider web roses) in a vibrant red. This gives them a gorgeous, rosette-like texture that feels special and elevated.
29. Craft a Serene Winter Birch Scene
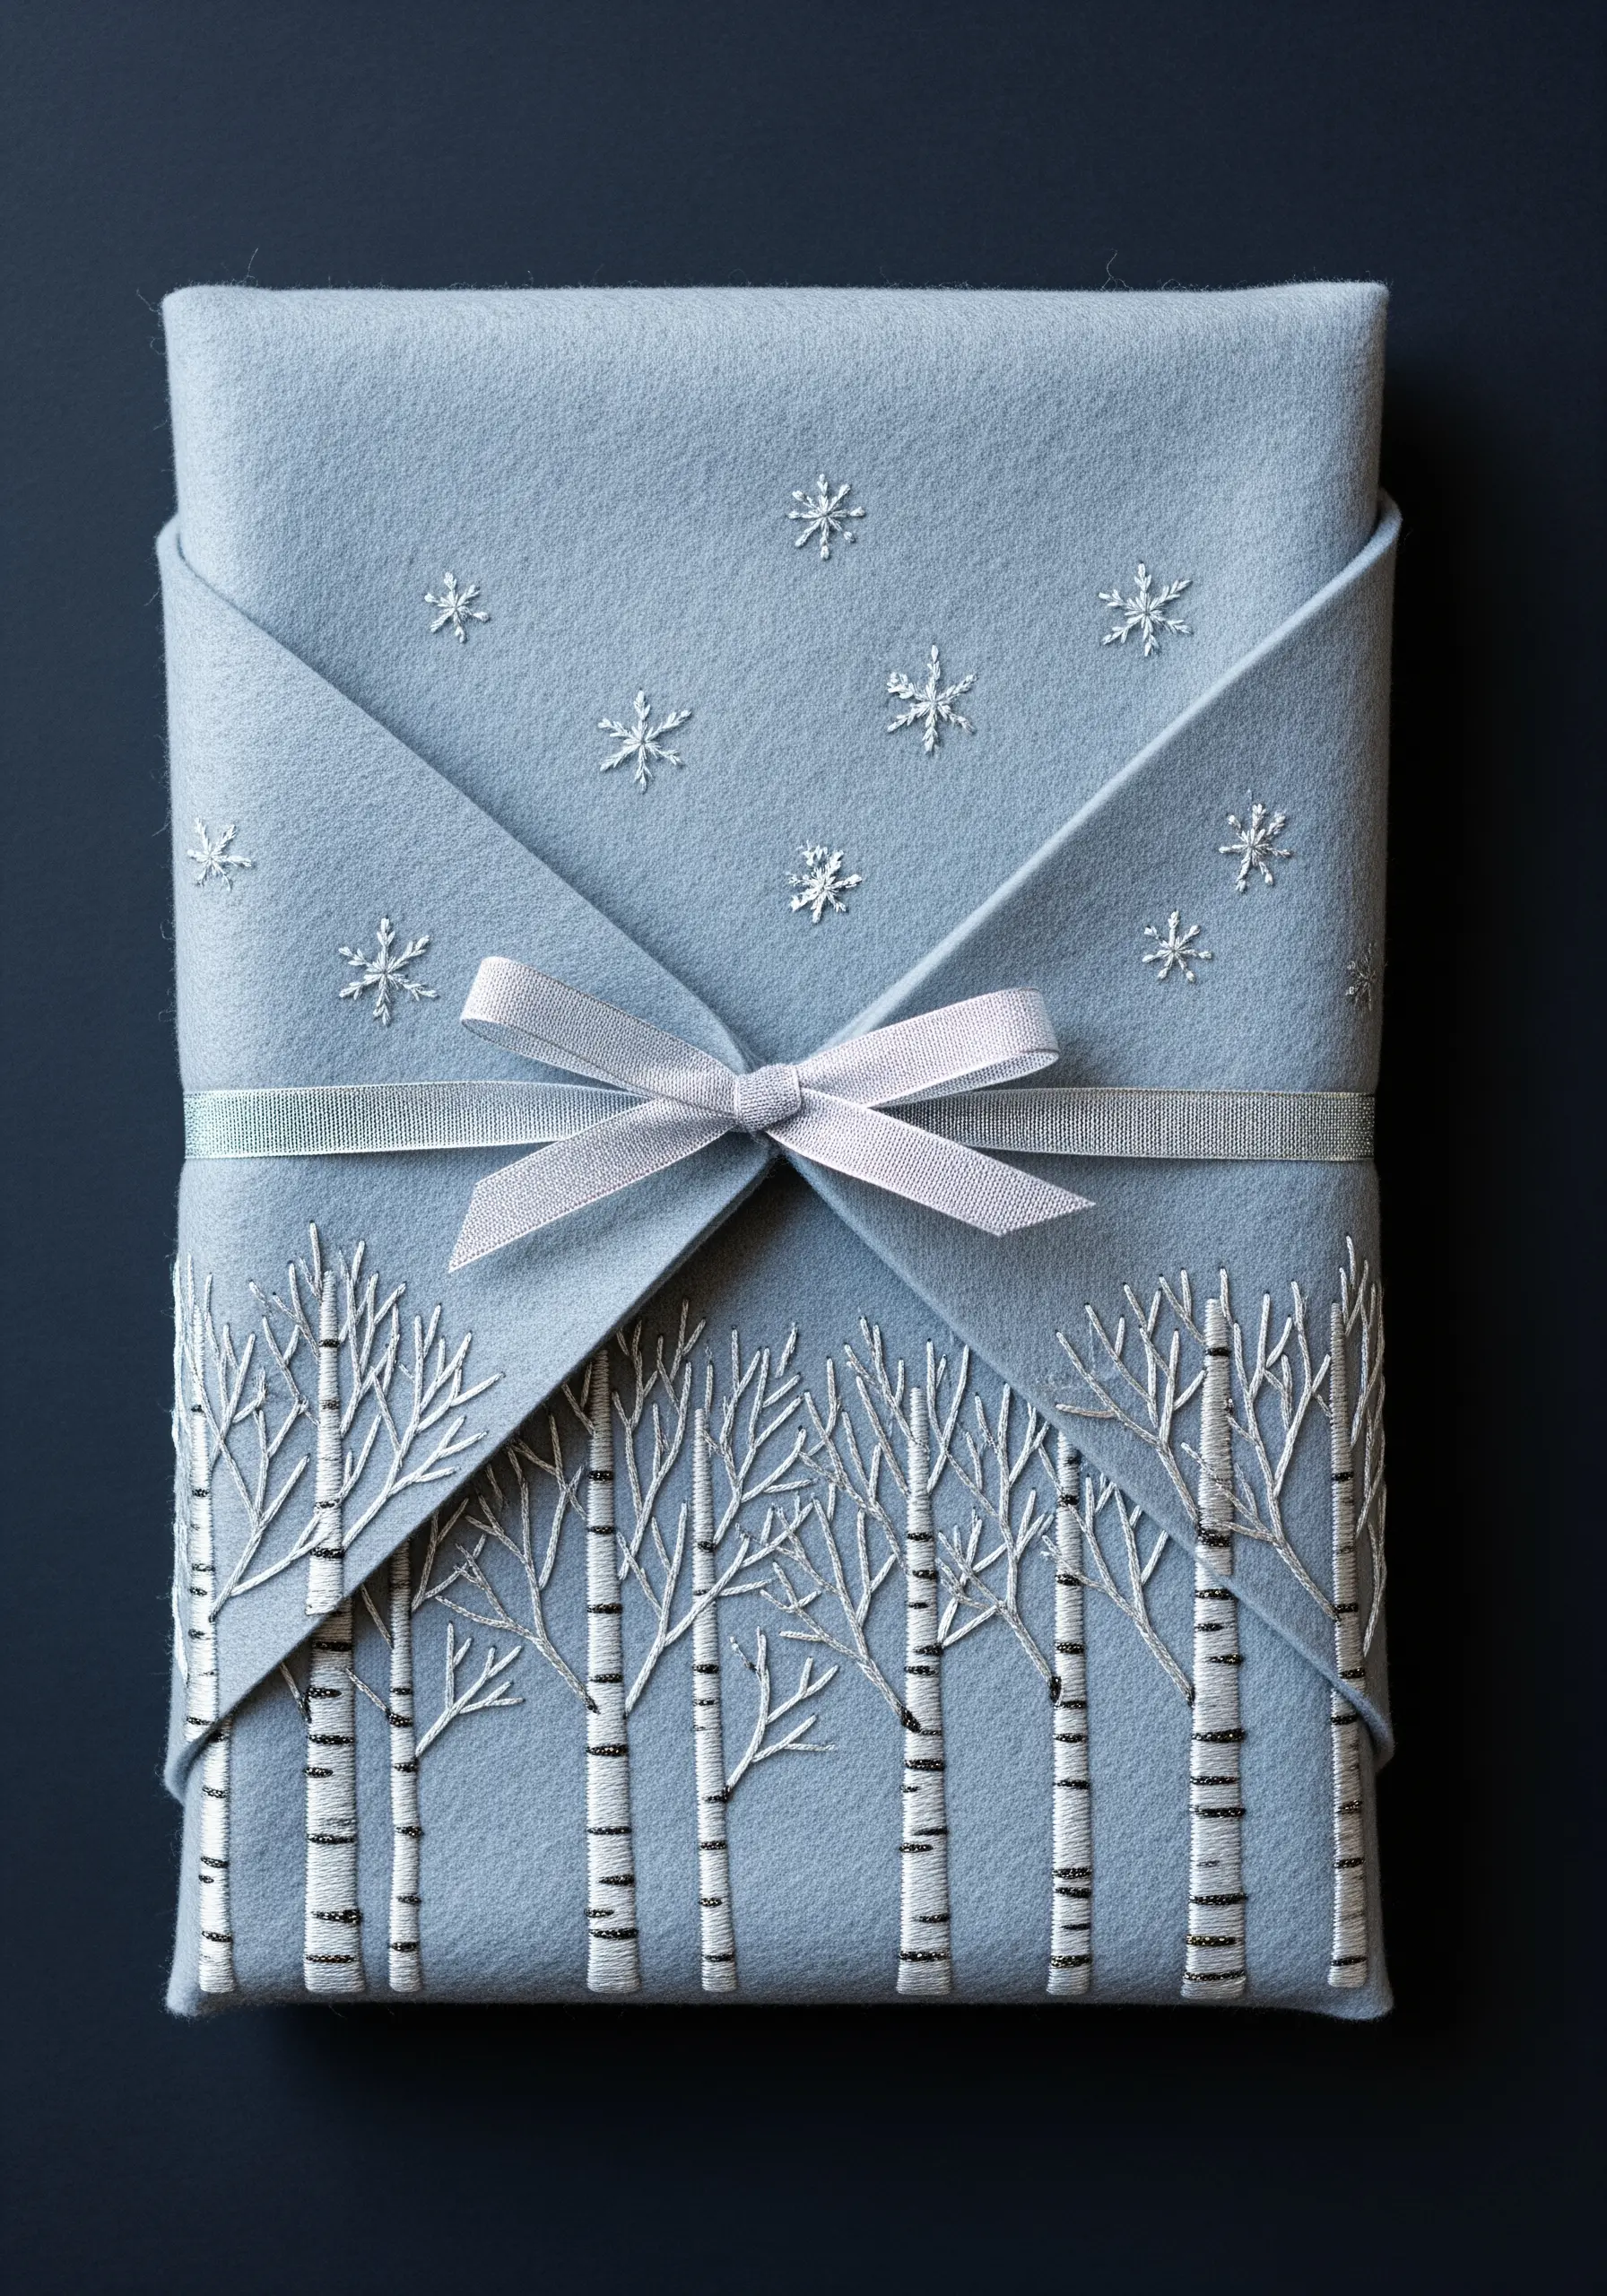
Felt provides a wonderful, non-fraying base for embroidery, creating a soft and cozy backdrop for a winter scene.
Stitch the birch trunks with white satin stitch, then add the characteristic dark marks with short, horizontal straight stitches in black or dark gray.
Use a fine backstitch or simple straight stitches with a single strand of thread to create the delicate, bare upper branches.
Scatter tiny star stitches or single cross stitches around the scene to represent falling snowflakes.
30. Blend a Realistic Sage Smudge Stick
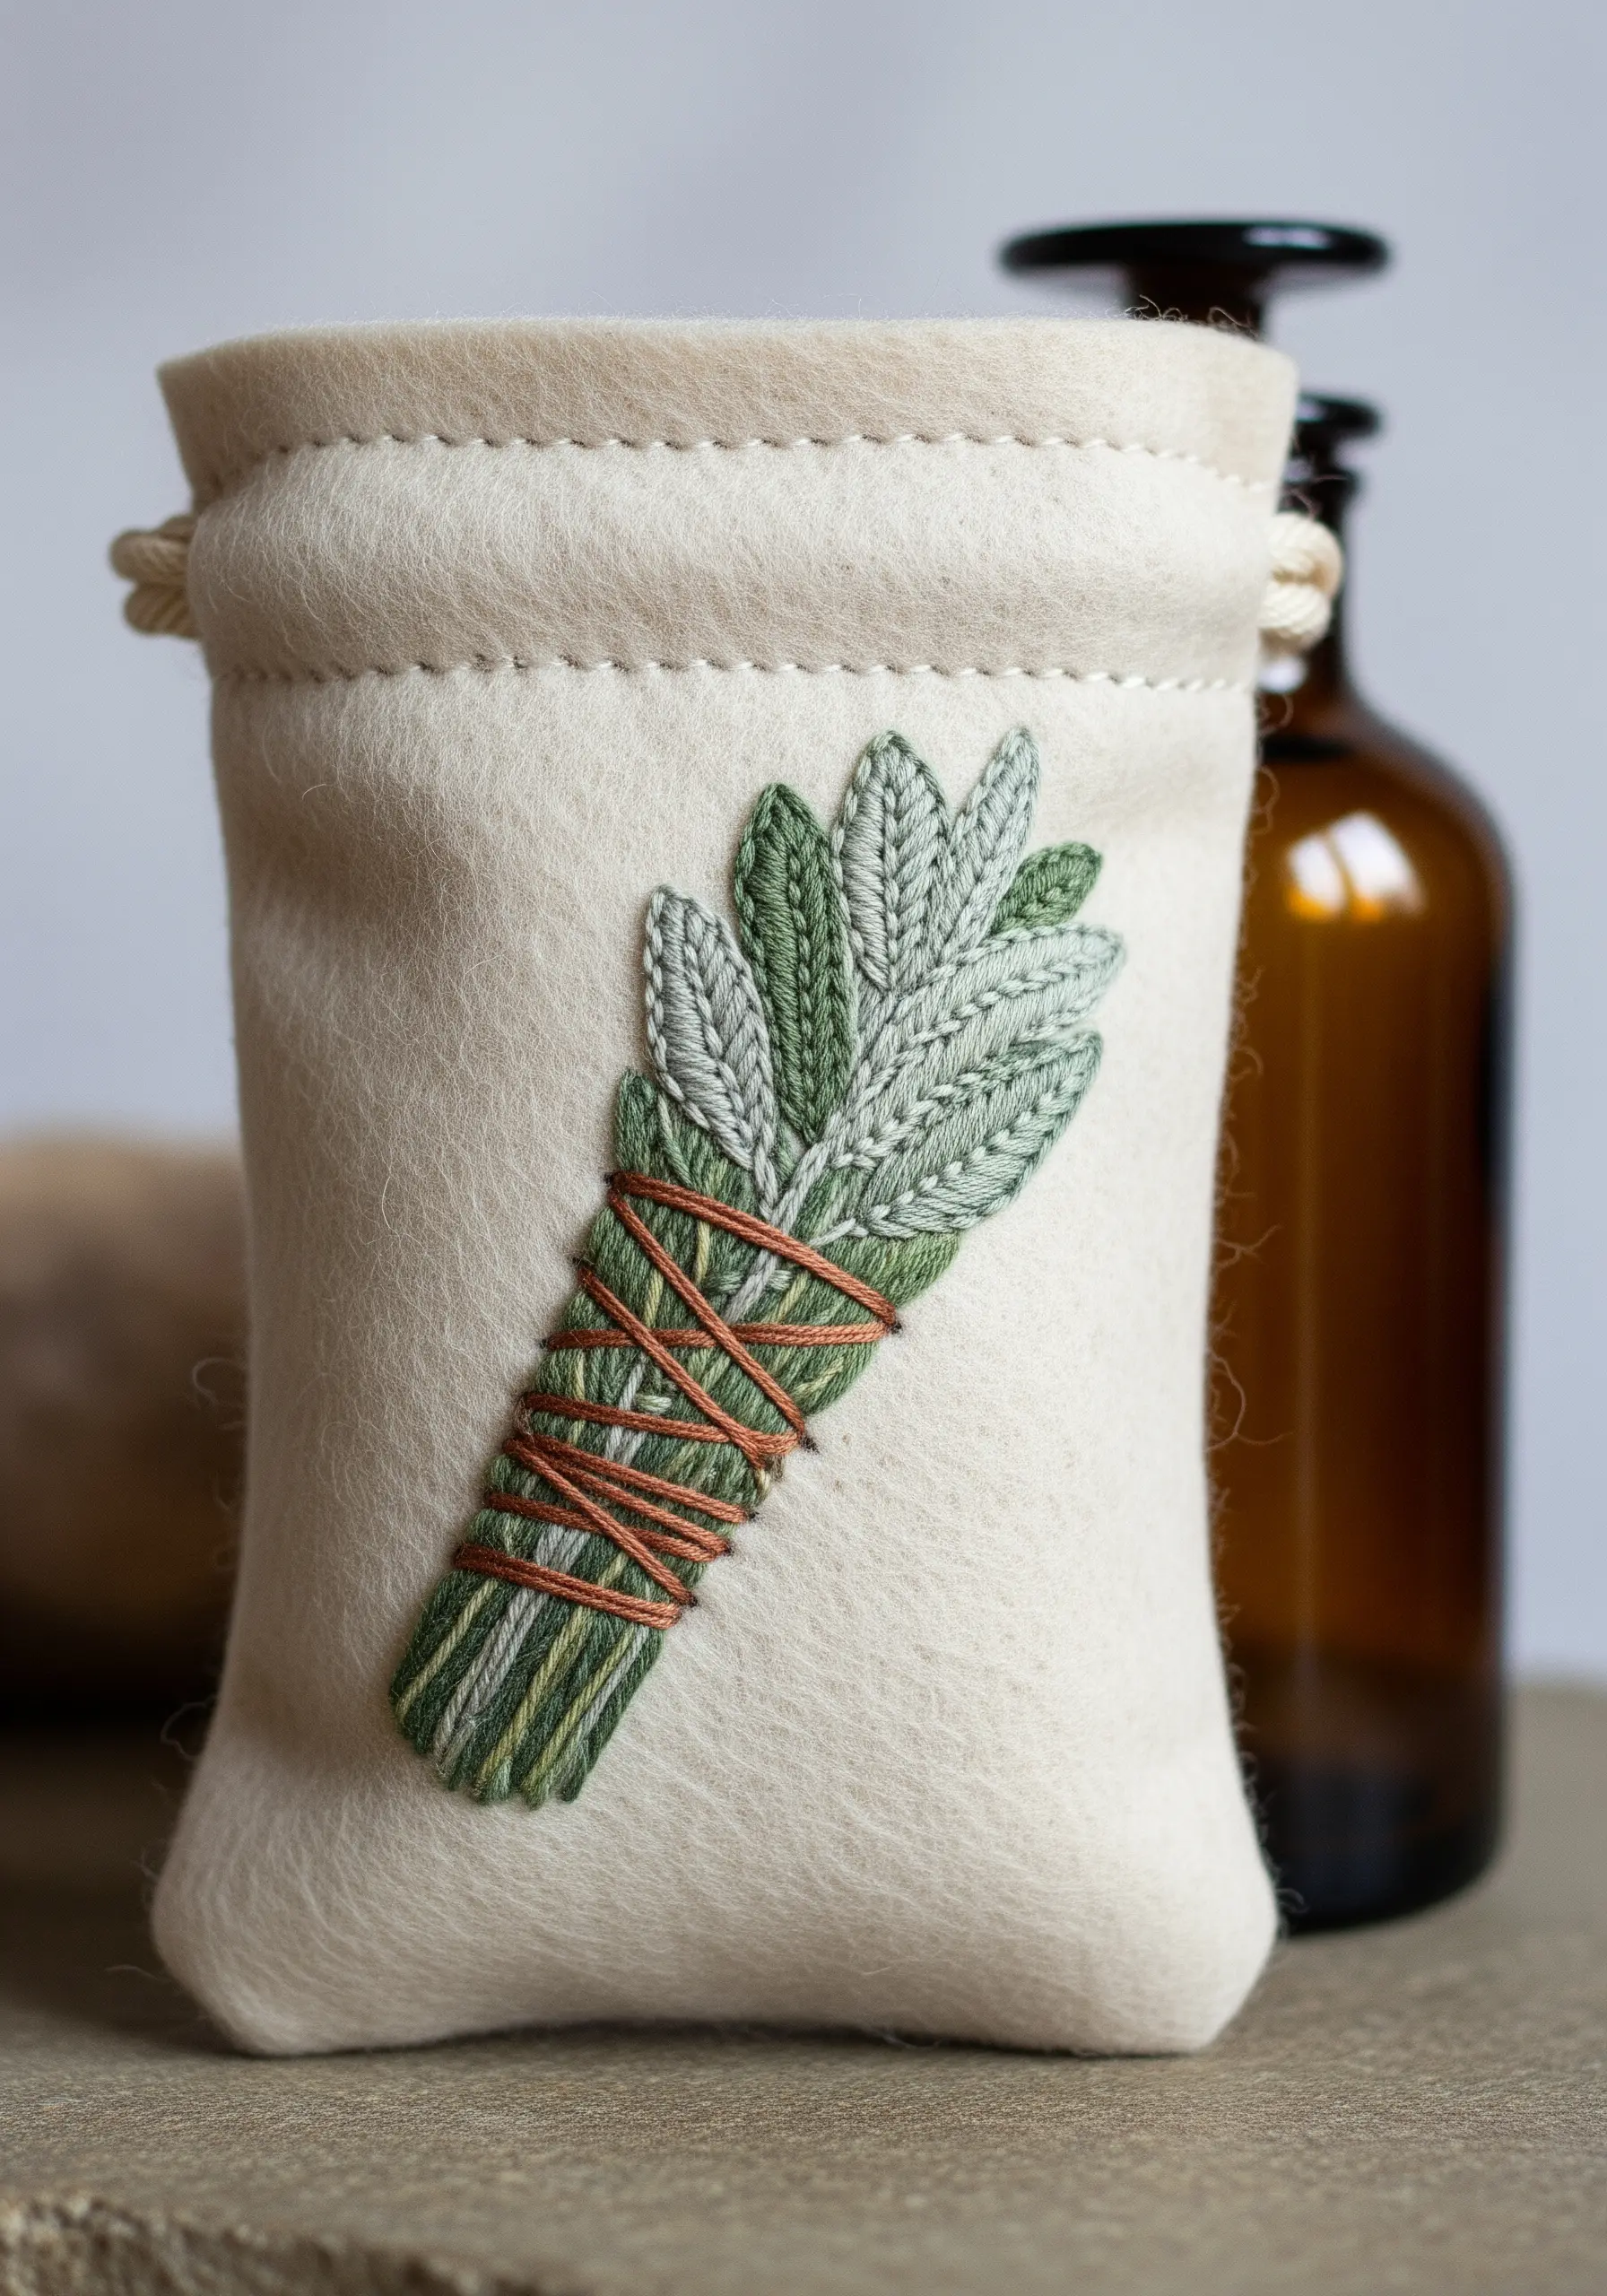
This design is an excellent exercise in subtle color blending and texture.
Use the long-and-short stitch for the sage leaves, blending multiple shades of silvery and muted greens to achieve a realistic, soft appearance.
For the string wrapped around the bundle, use couching: lay down a thicker copper or brown thread and tack it in place with small, inconspicuous stitches. This creates a clean, dimensional line that sits on top of the foliage.
31. Stitch a Cheerful Strawberry Wreath on Gingham
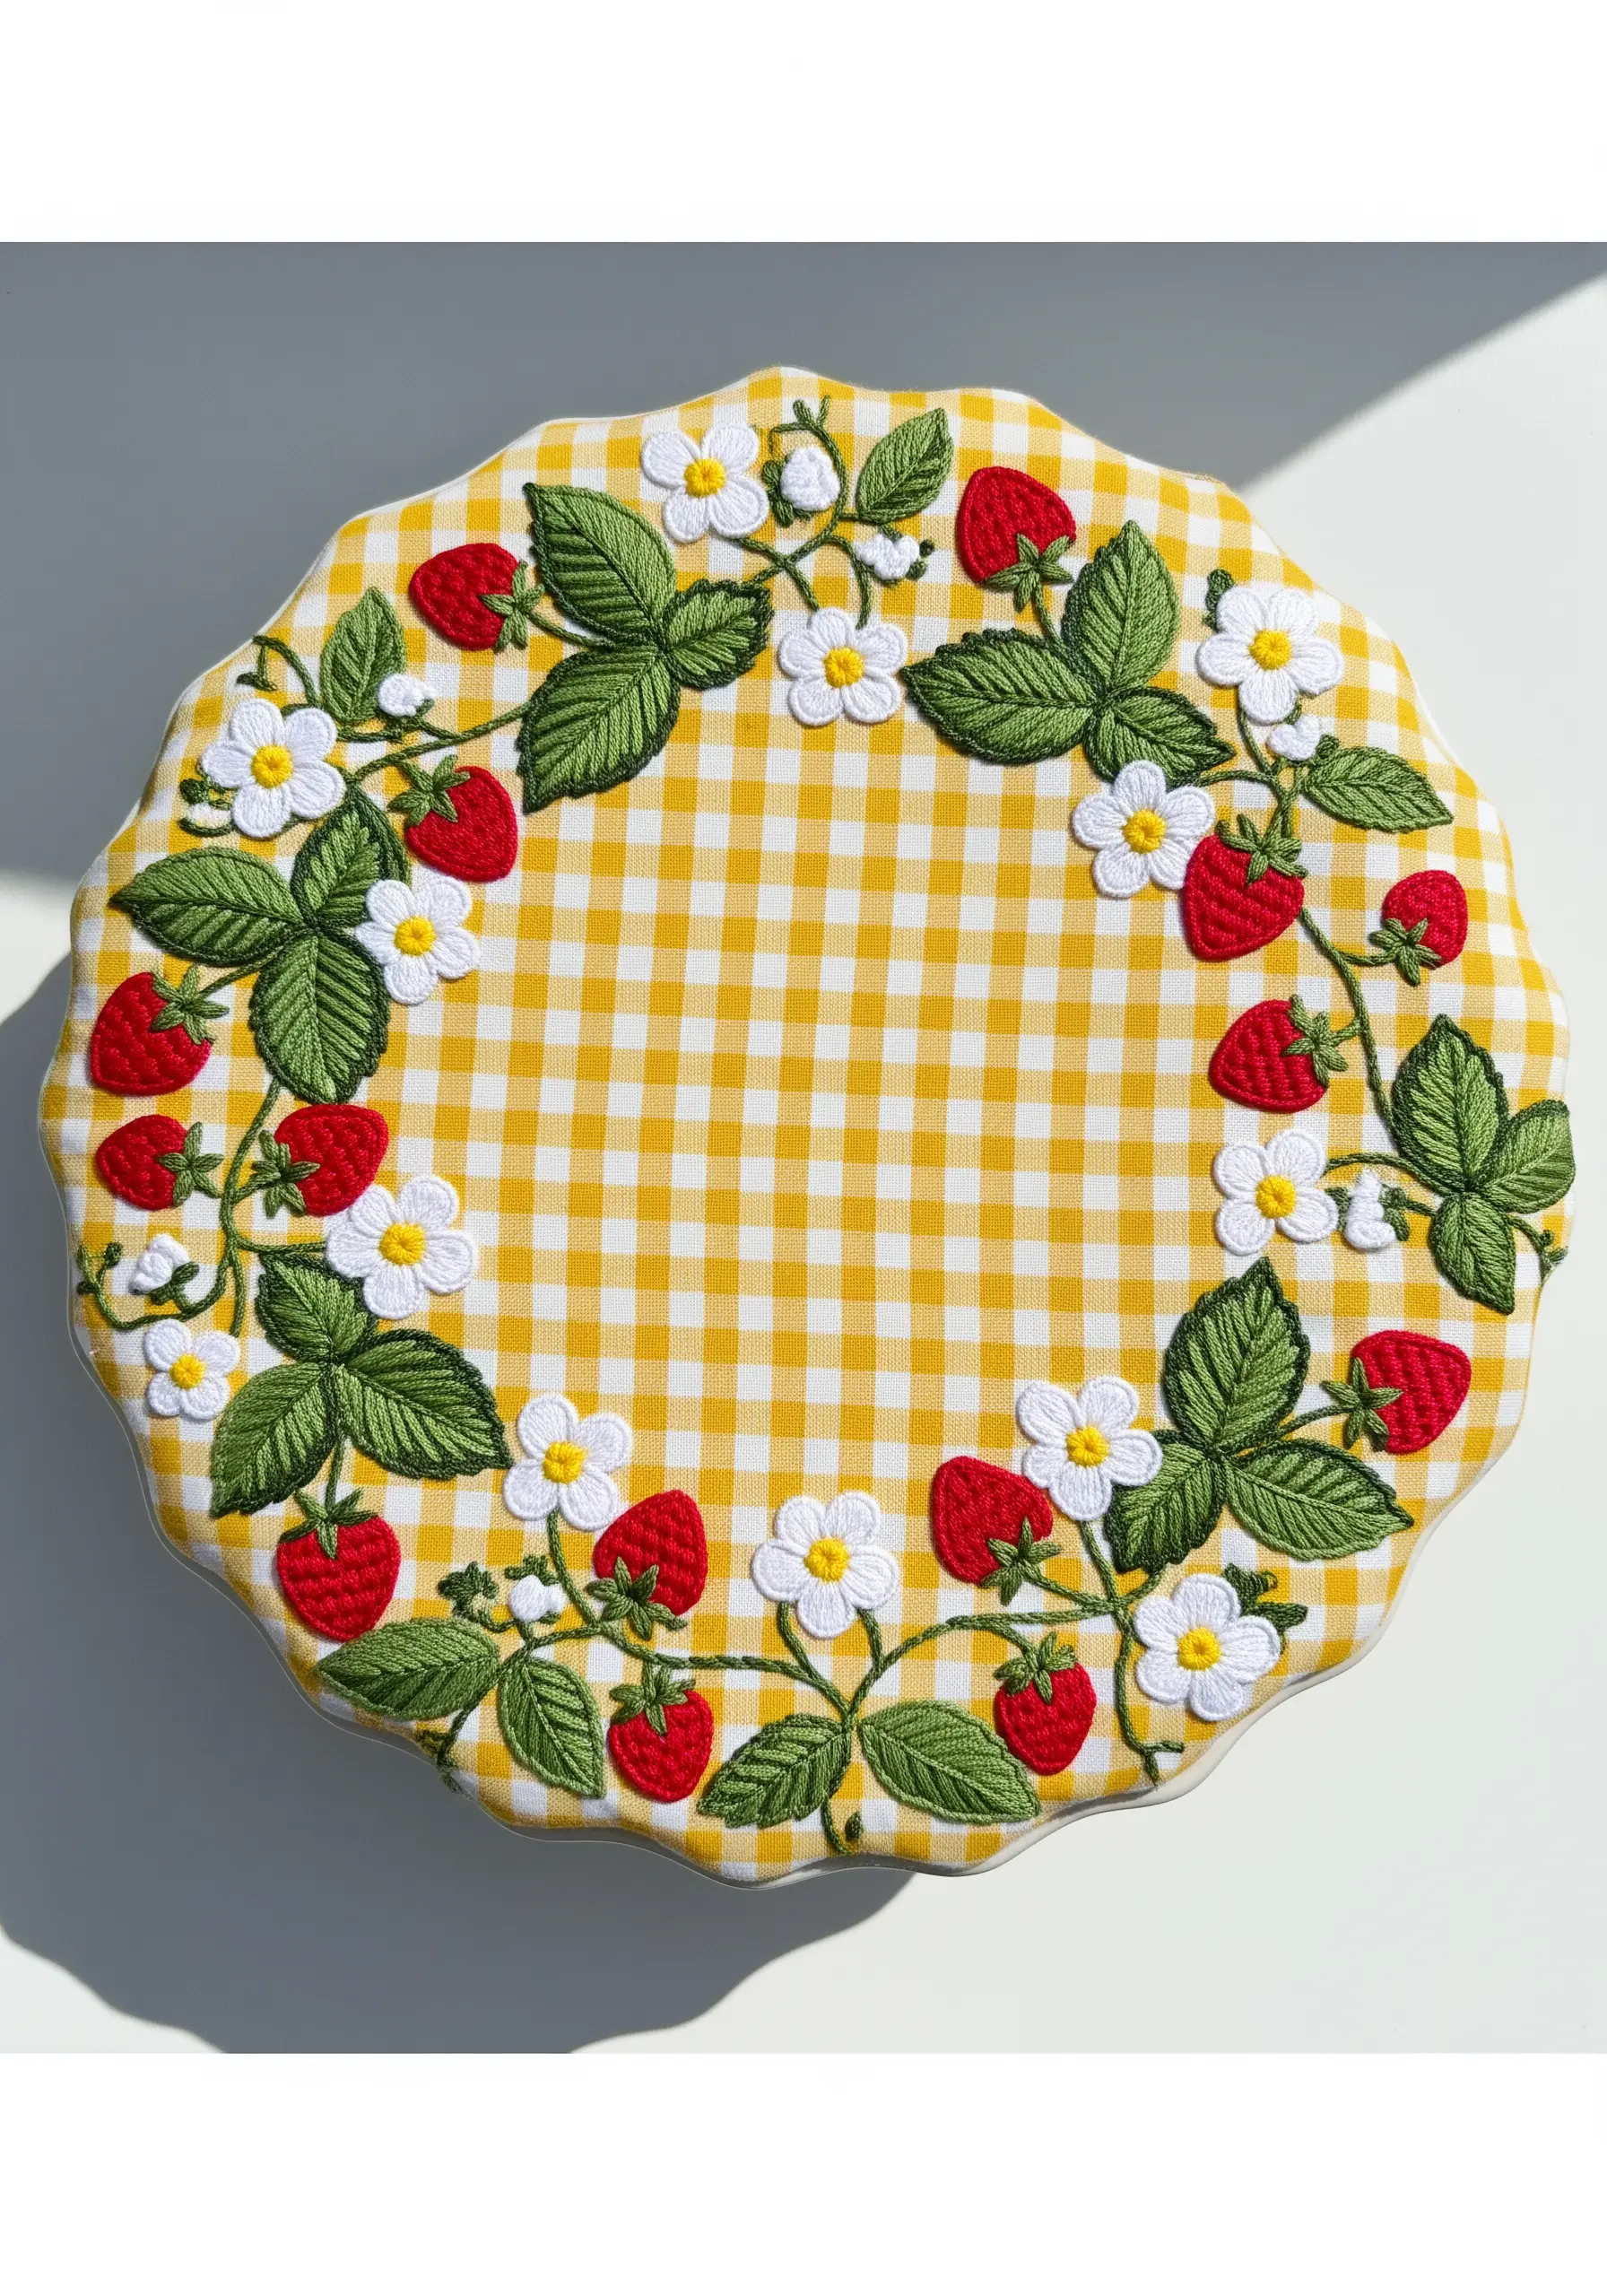
A gingham fabric offers a natural grid that makes spacing your embroidery elements incredibly easy.
Create plump strawberries with padded satin stitch, adding tiny white or yellow seed stitches on top for detail.
Use fishbone stitch for the leaves and simple lazy daisy stitches for the white flower petals, finishing each with a yellow French knot center.
The combination of the cheerful pattern and classic motifs creates a timeless, summery feel.
32. Enhance a Scene with Flowing Kelp
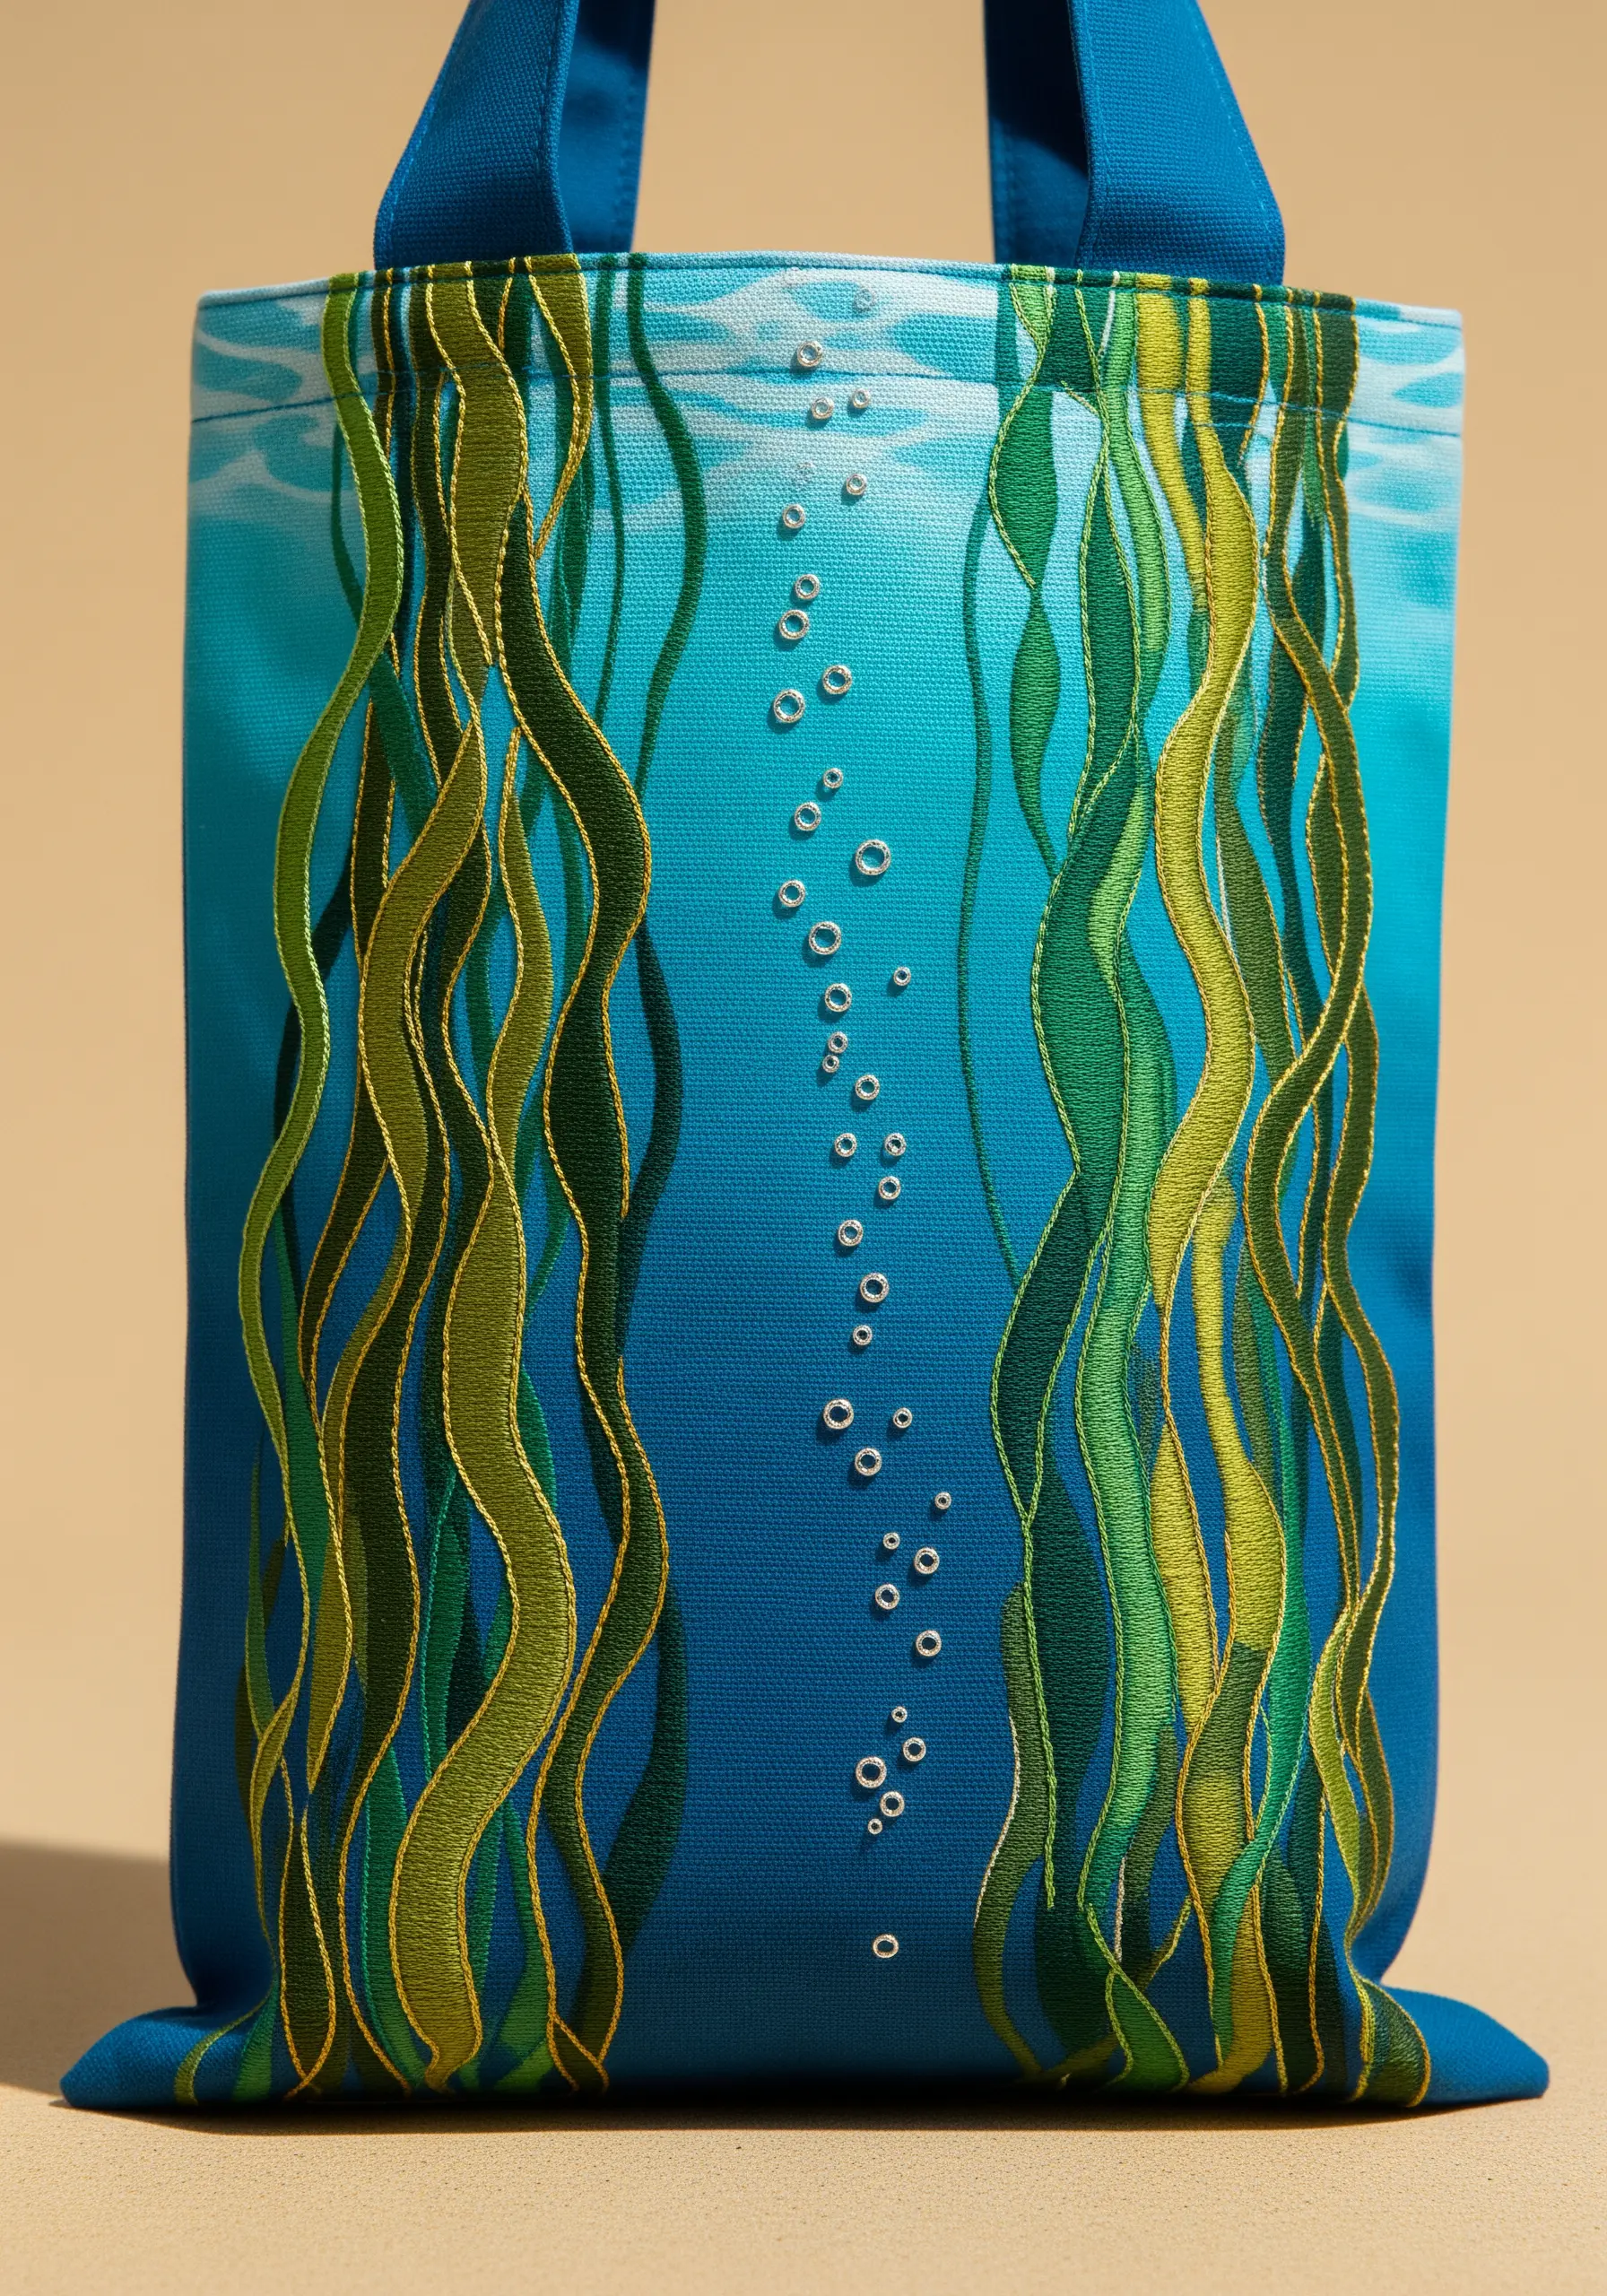
You don’t have to stitch the entire scene; start with a pre-printed or hand-dyed fabric background and add embroidery to create focus and texture.
Use a whipped backstitch or stem stitch with a high-sheen thread to outline the kelp fronds. This will catch the light and add a sense of fluid movement.
Add tiny, scattered white French knots or seed stitches to represent air bubbles, bringing the underwater scene to life.


