
When you decide to make a gift by hand, you’re offering more than just an object; you’re giving a piece of your time and attention. But how do you ensure your embroidery feels less like a simple craft and more like a piece of personal art? The answer isn’t in buying more supplies, but in refining your technique.
The difference between a nice piece and a truly stunning one often comes down to the small details. It’s about choosing to use two strands of thread instead of six for a delicate design, or adding a padded base to your satin stitch to make a monogram pop. It’s knowing how to blend colors to create a soft gradient, or how to layer stitches to give a floral arrangement realistic depth.
These are the ideas that will elevate your work. Each one is a small adjustment, a new way of thinking about thread and fabric that will give you a more polished, intentional result. Let this be your guide to transforming ordinary gifts into cherished keepsakes, stitched with skill, confidence, and heart.
1. Create a Meadowscape on a Canvas Tote
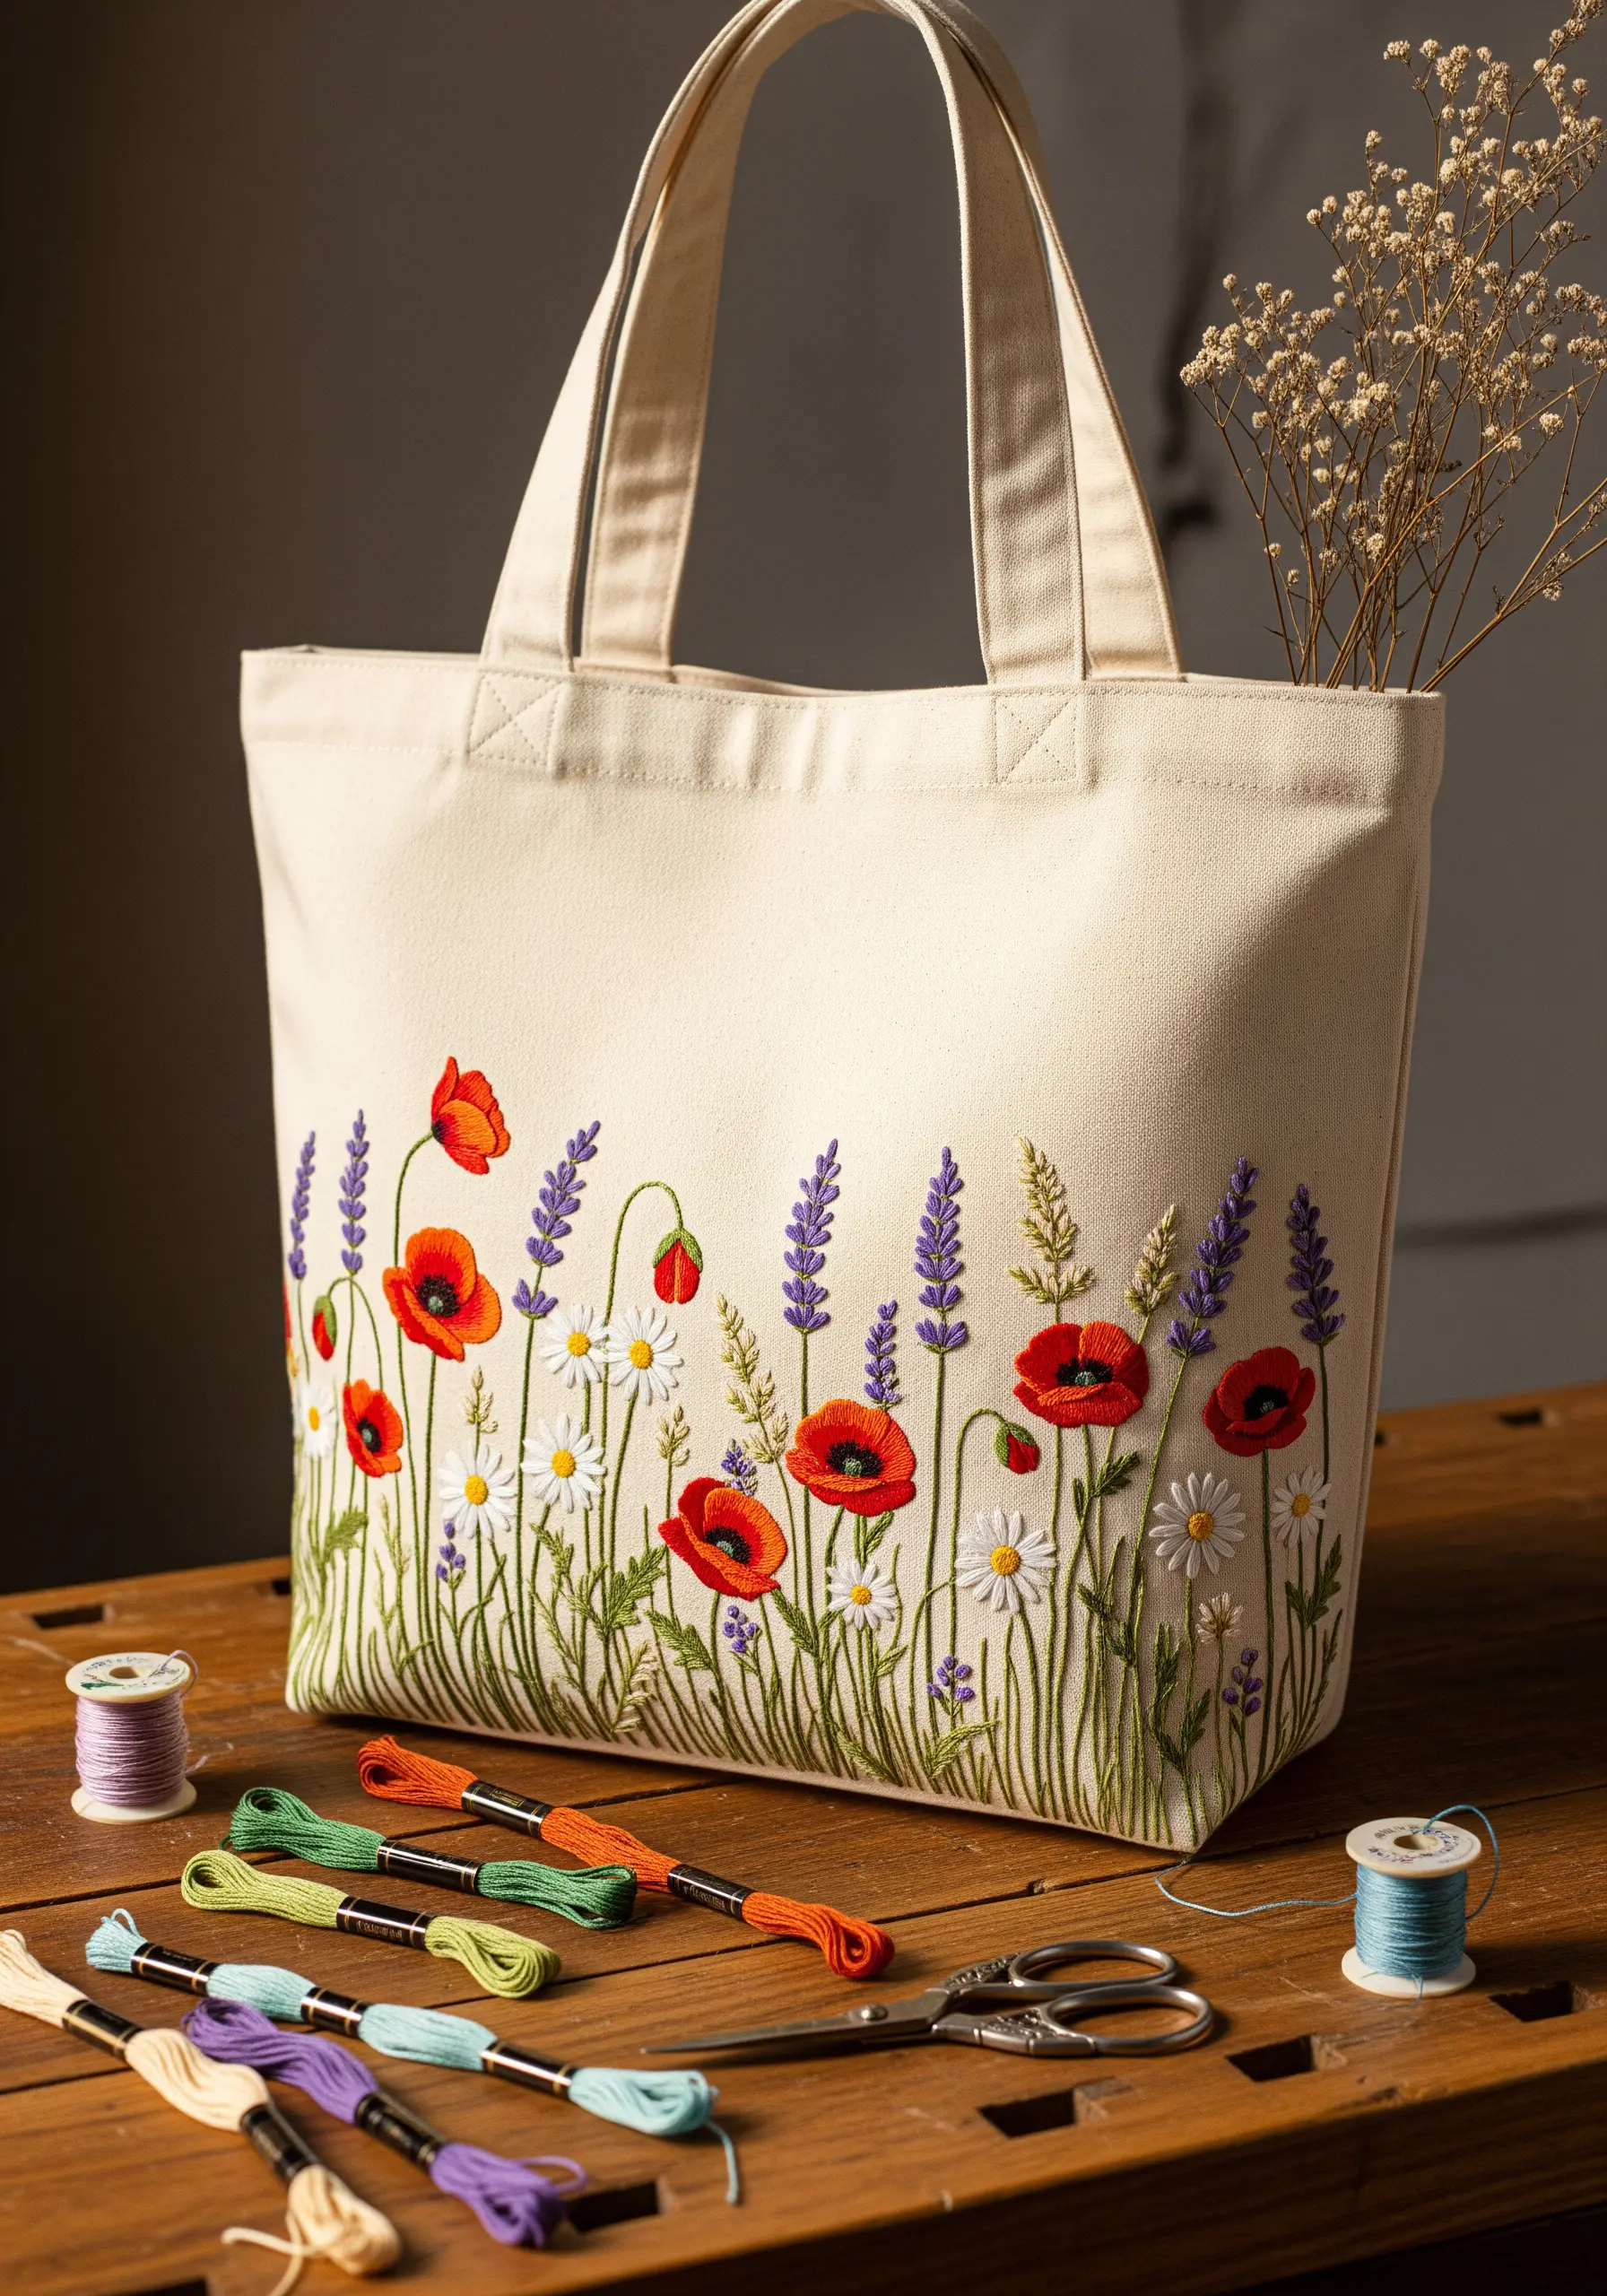
To give your floral arrangement depth, think in layers—foreground, middle ground, and background.
Use a full six strands for prominent flowers like poppies, stitching them with a satin stitch that follows the curve of the petals for a natural, plump look.
For mid-ground elements like lavender, switch to four strands and use detached chain stitches or French knots to suggest texture without overwhelming the composition.
Place delicate, single-strand stems and wheat ears in the background using a simple backstitch. This layering technique draws the eye and makes the entire design feel lush and dimensional.
2. Stitch a Celestial Scene on Denim
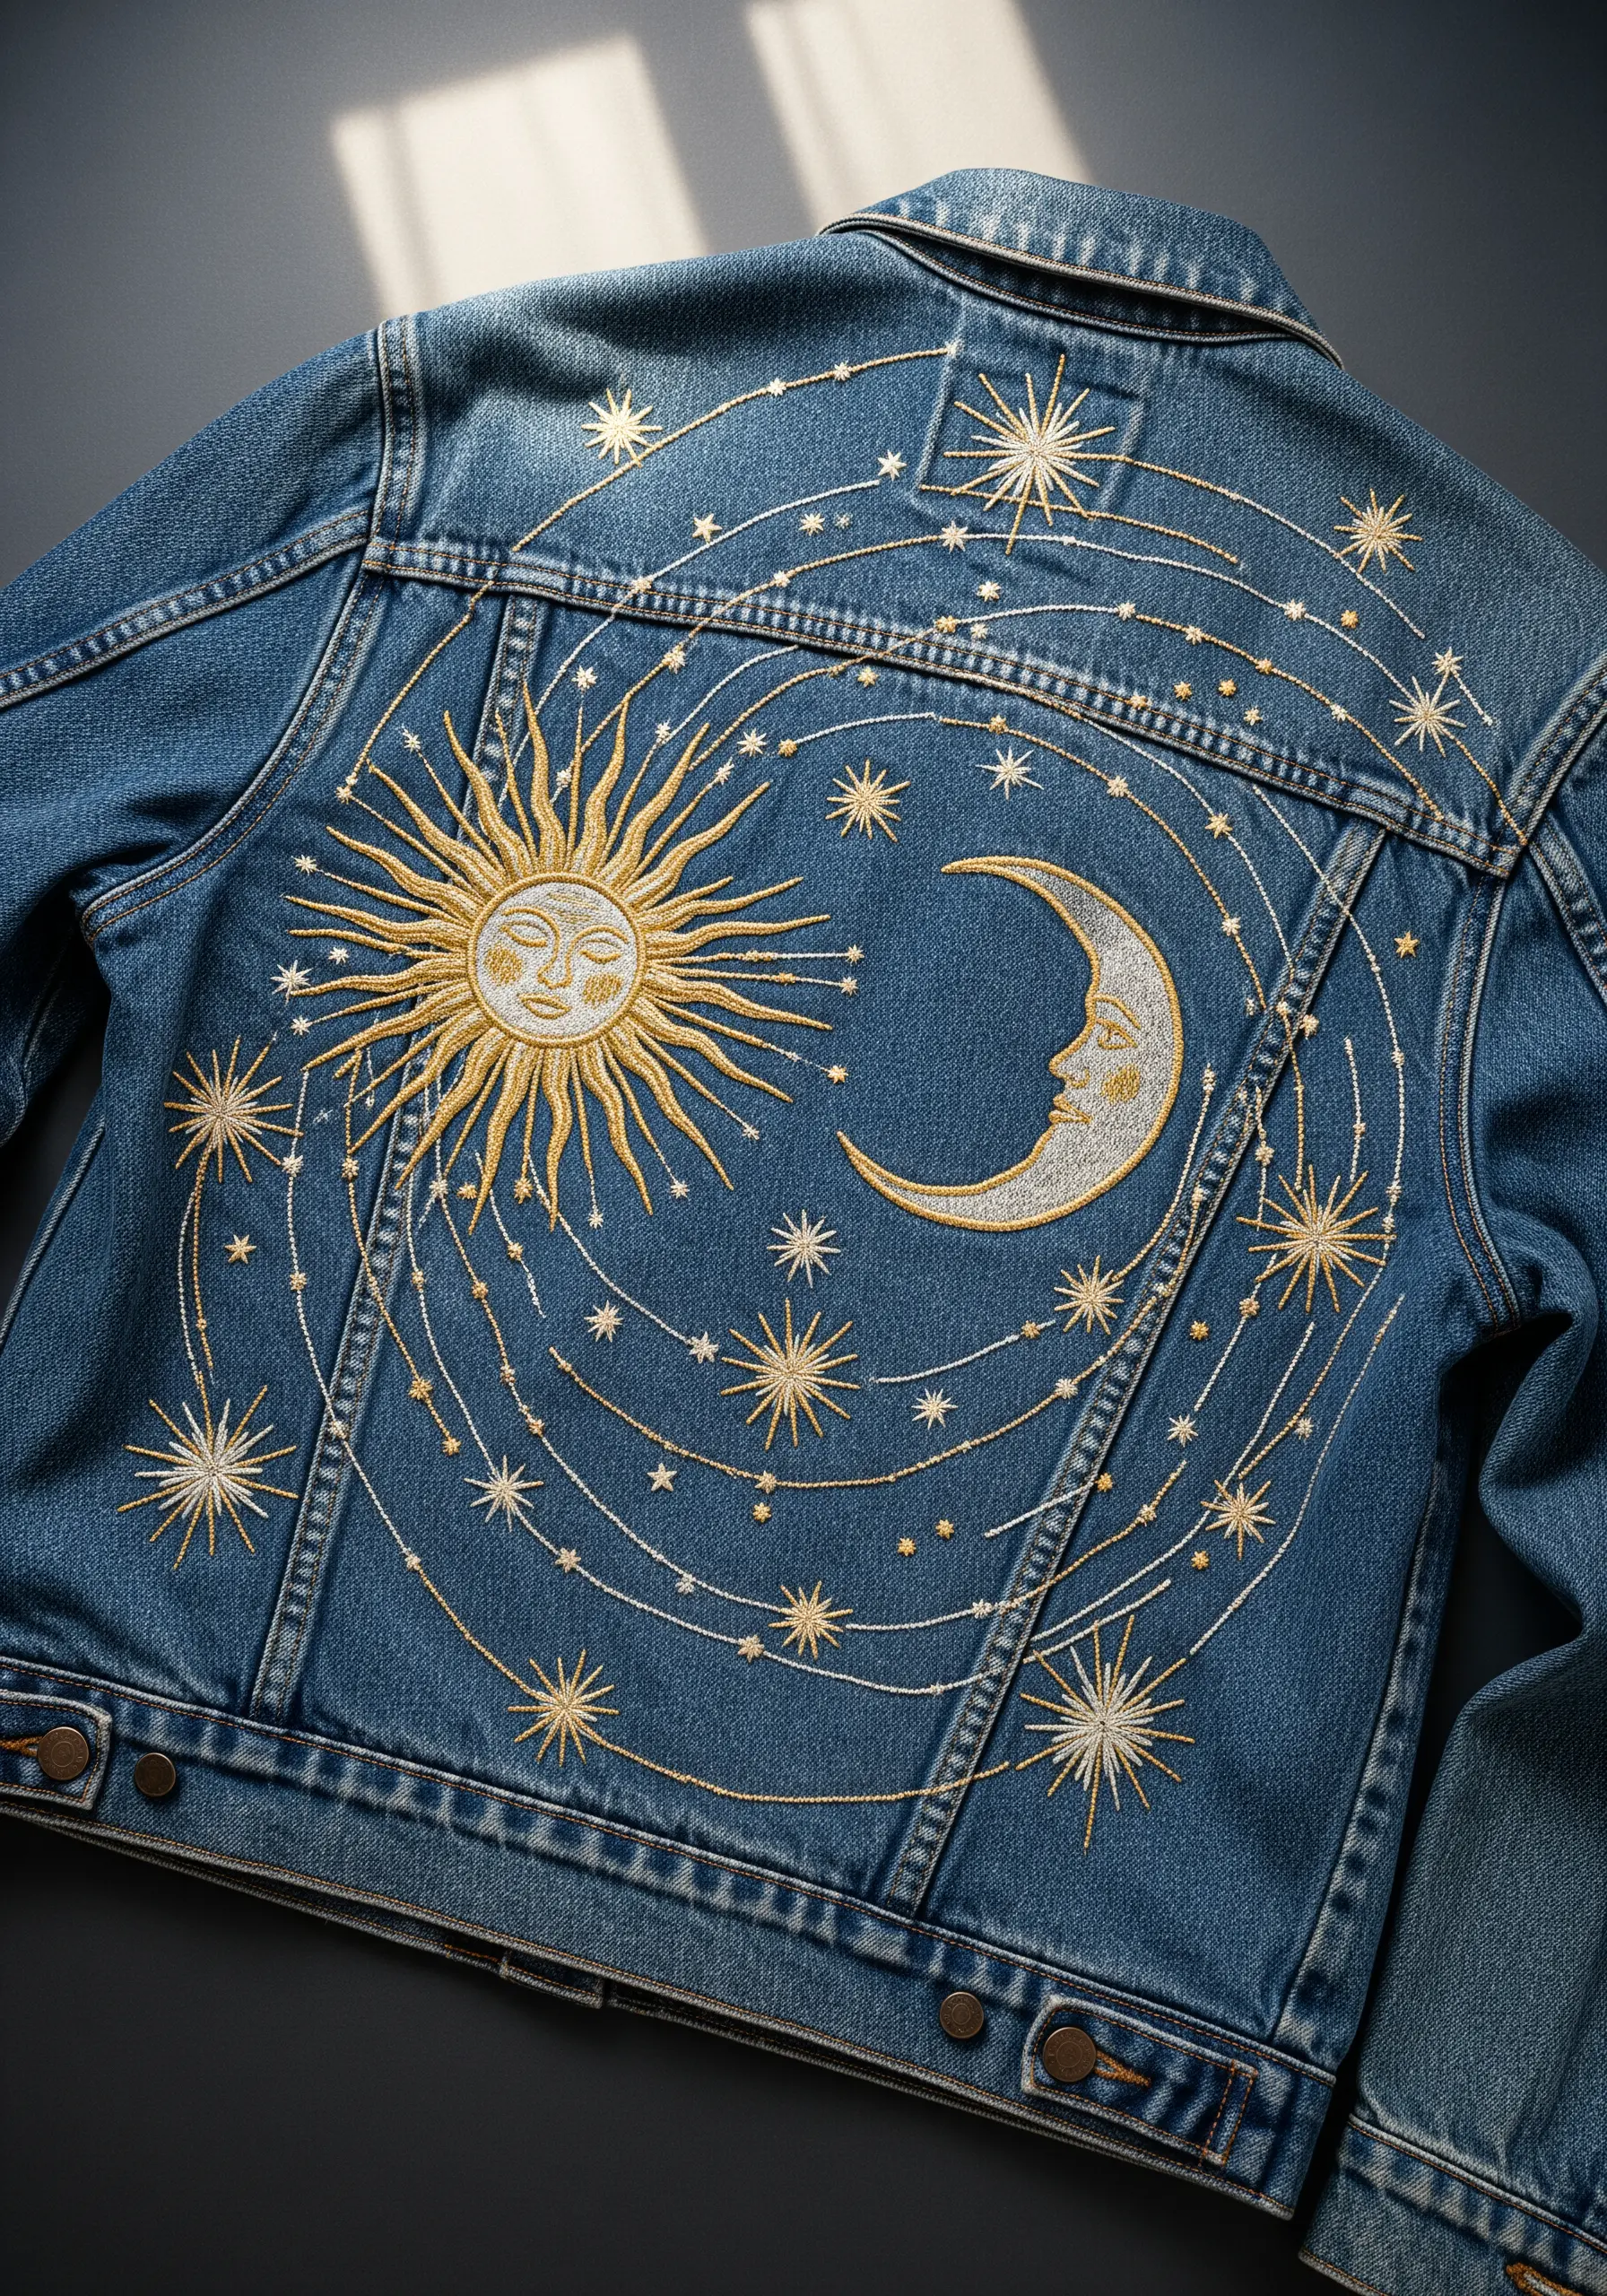
When embroidering on heavy fabric like denim, always use a tear-away stabilizer on the inside of the jacket to prevent the fabric from puckering under the tension of the stitches.
For a design with this much detail, vary your thread types. Use a matte cotton for the outlines and satin stitch fills, but introduce a metallic or silk thread for the starbursts to add a subtle, light-catching shimmer.
The key to successful metallic thread work is using shorter stitches and a thread conditioner like beeswax; this prevents snagging and preserves the shine.
This combination of texture and finish is what makes dramatic contrast look elegant and intentional.
3. Elevate Linens with Delicate Herbal Sprigs
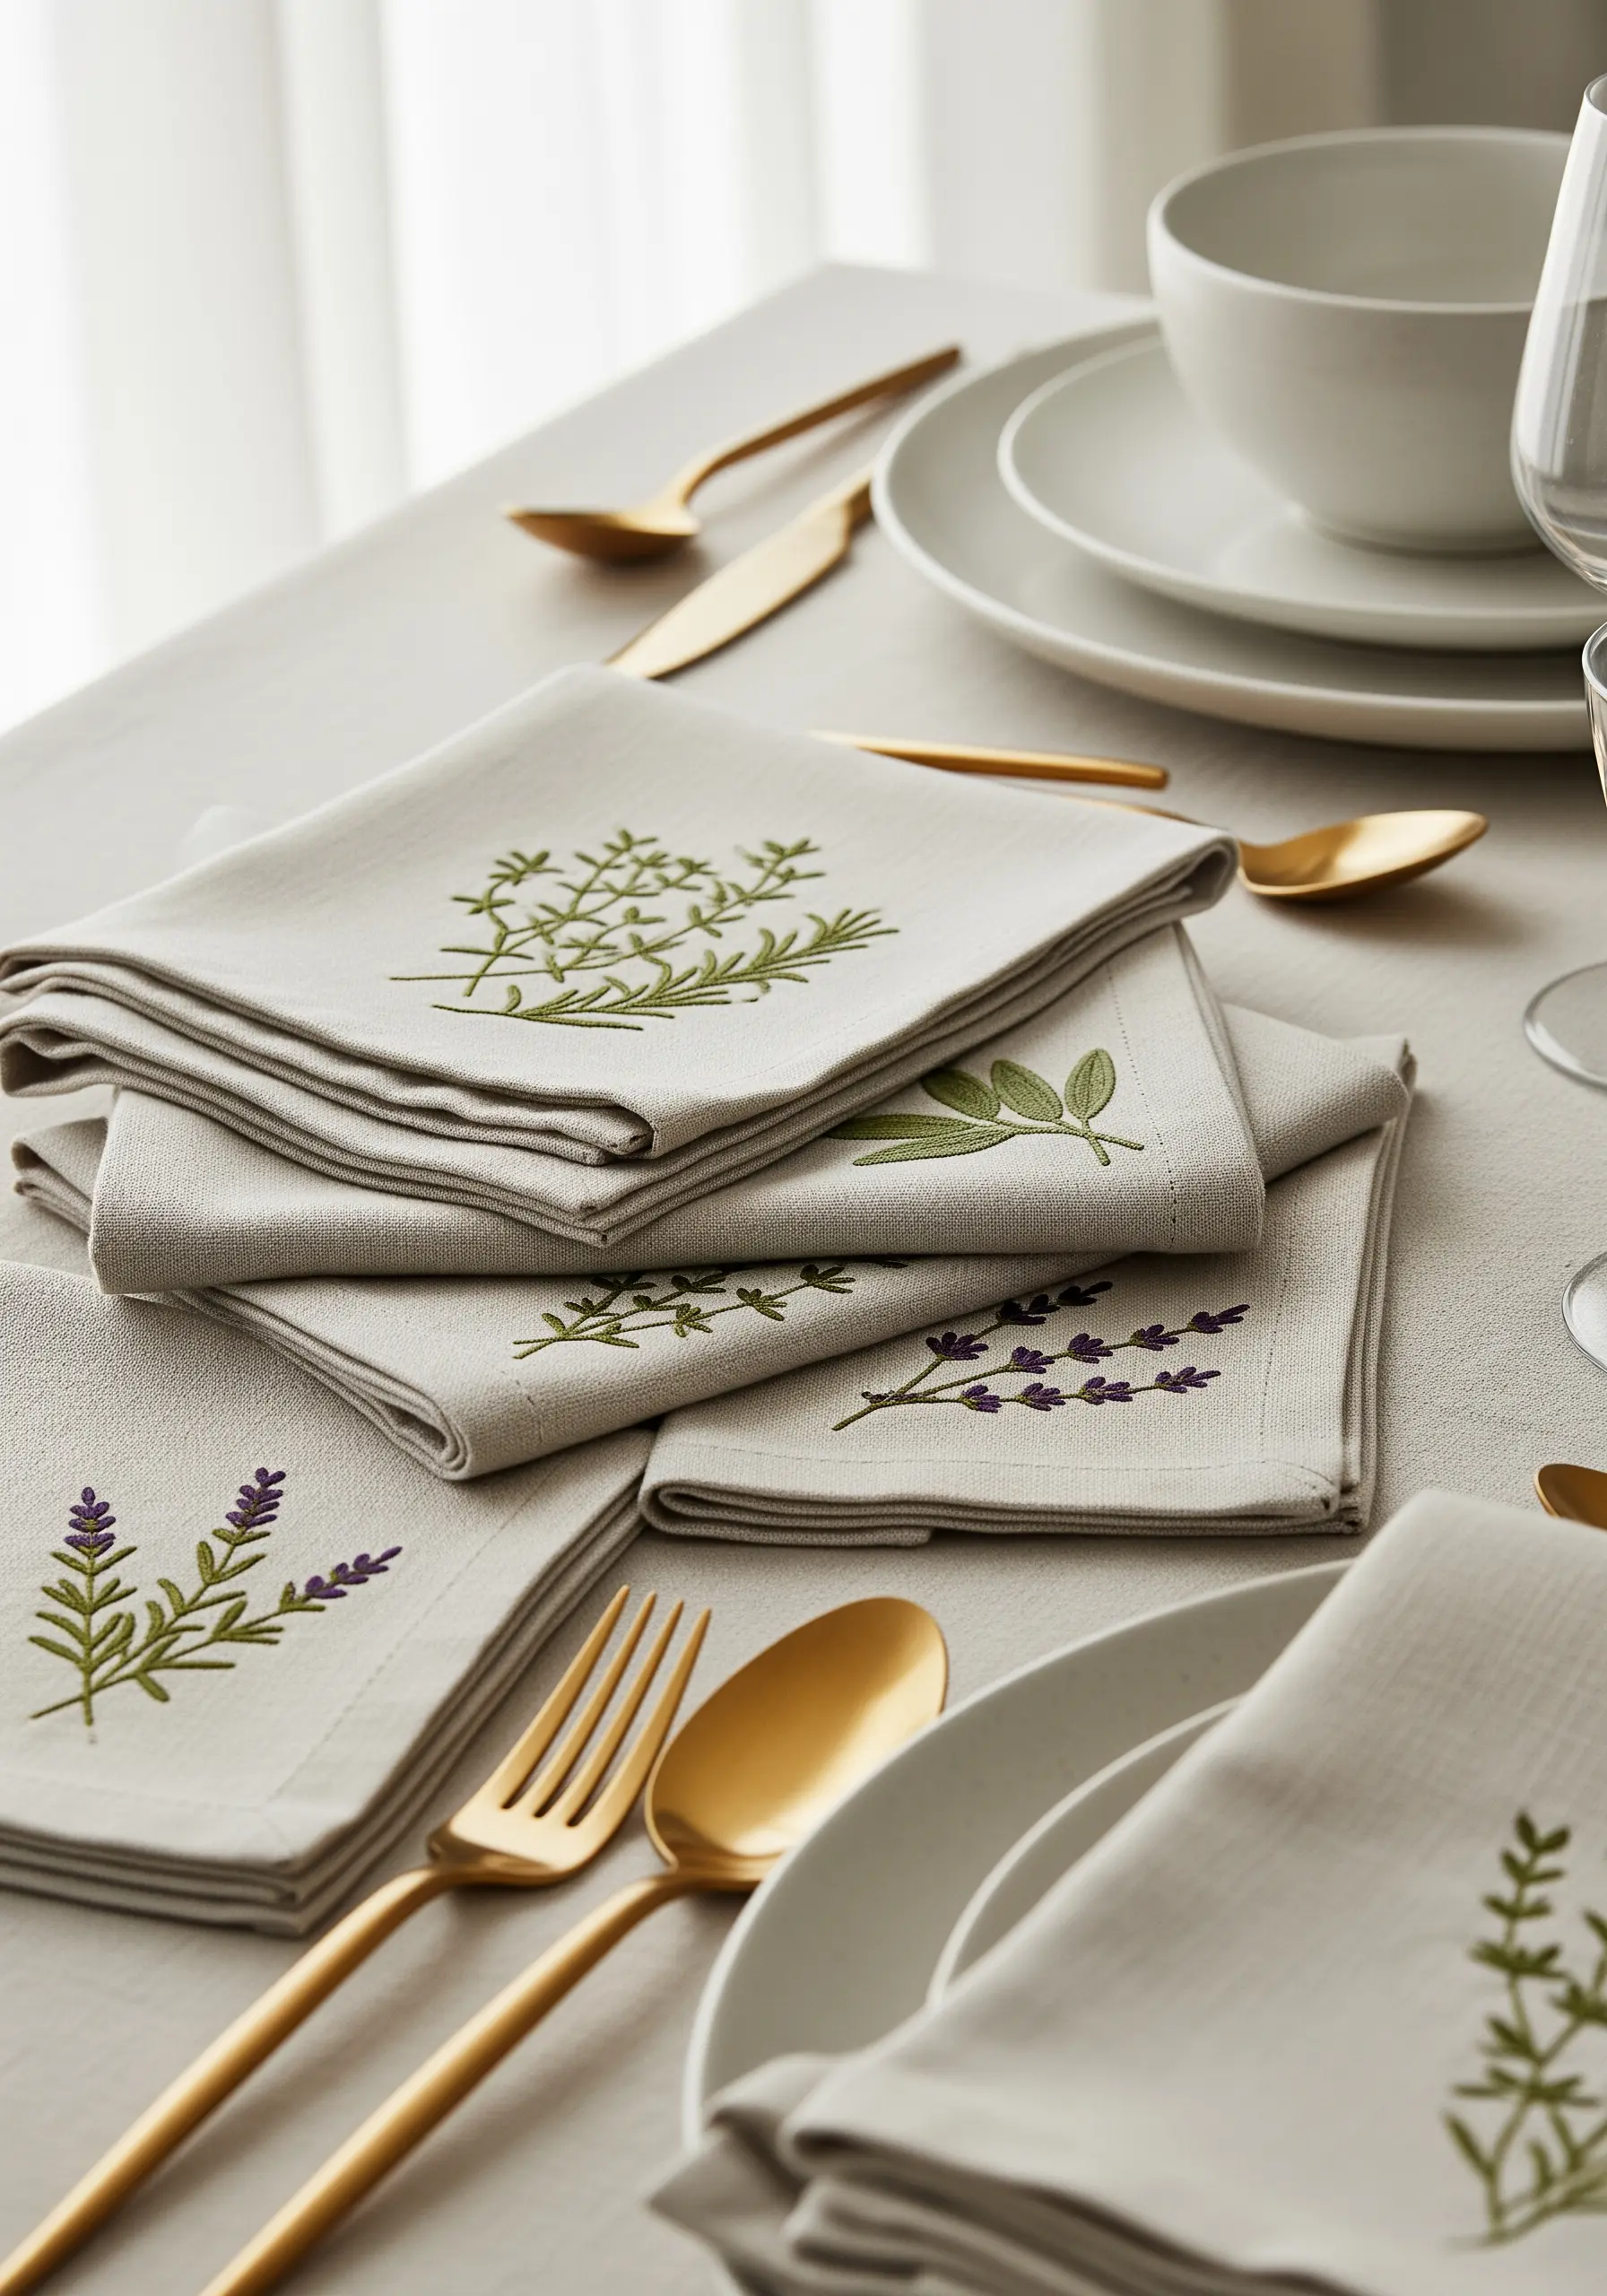
For fine textiles like linen napkins, subtlety is everything. Use just two strands of embroidery floss to keep the design from feeling heavy or stiff.
Focus on capturing the essence of each herb with a single stitch type. A simple stem stitch works perfectly for lavender stalks, while tiny detached chain stitches (lazy daisies) can form rosemary leaves.
The scattered, asymmetrical placement on each napkin makes the set feel cohesive yet unique. It’s a thoughtful detail that transforms everyday items into a coordinated, bespoke collection.
These modern minimalist table linen embroidery ideas are perfect for gifting.
4. Weave a Tapestry-Inspired Bookmark
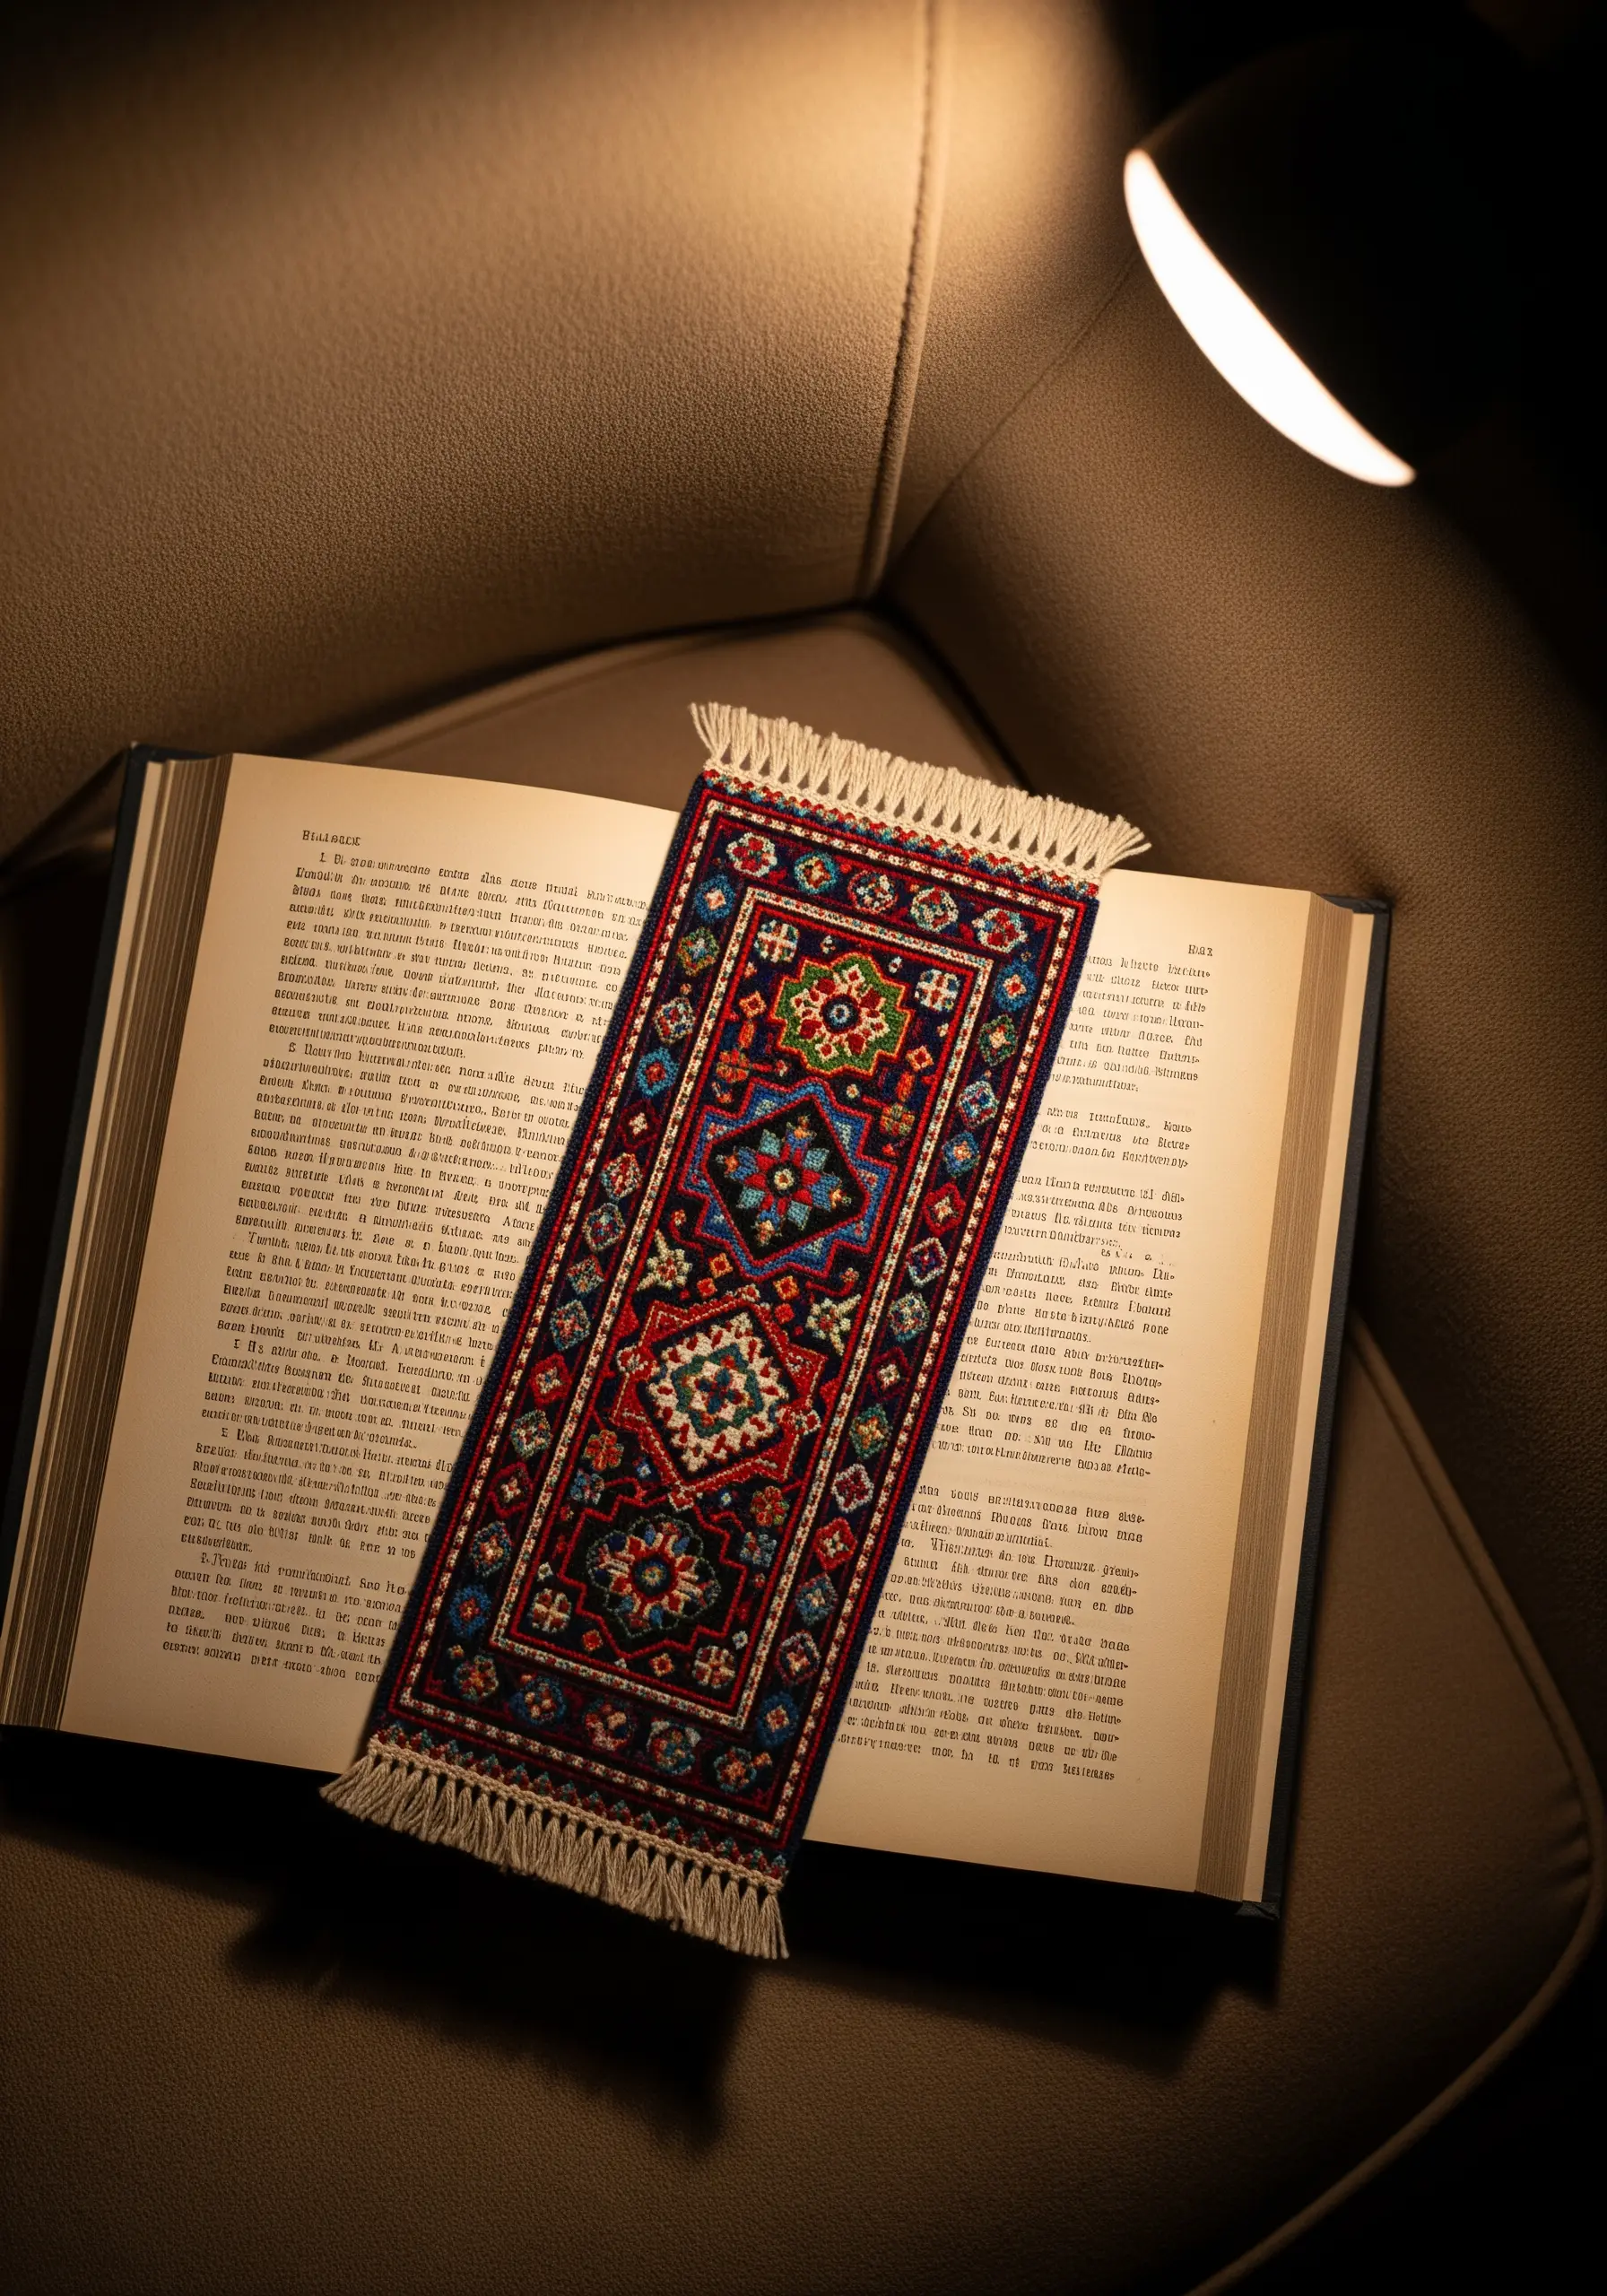
To create a bookmark with the rich, dense feel of a woven rug, use a high-count fabric like 28-count linen or evenweave. This allows for precise, tight stitches that won’t leave gaps.
Work your geometric pattern from the center medallion outwards to ensure perfect symmetry. Use a single strand of thread for cross-stitches or tent stitches to achieve the fine, pixelated detail of tapestry work.
A rich, jewel-toned color palette—deep reds, blues, and emeralds—grounded with black or navy outlines gives the design an authentic, heirloom quality.
Finish by creating a simple fringe with your warp threads for a truly polished look.
5. Craft a Vintage-Inspired Hot Air Balloon Bib
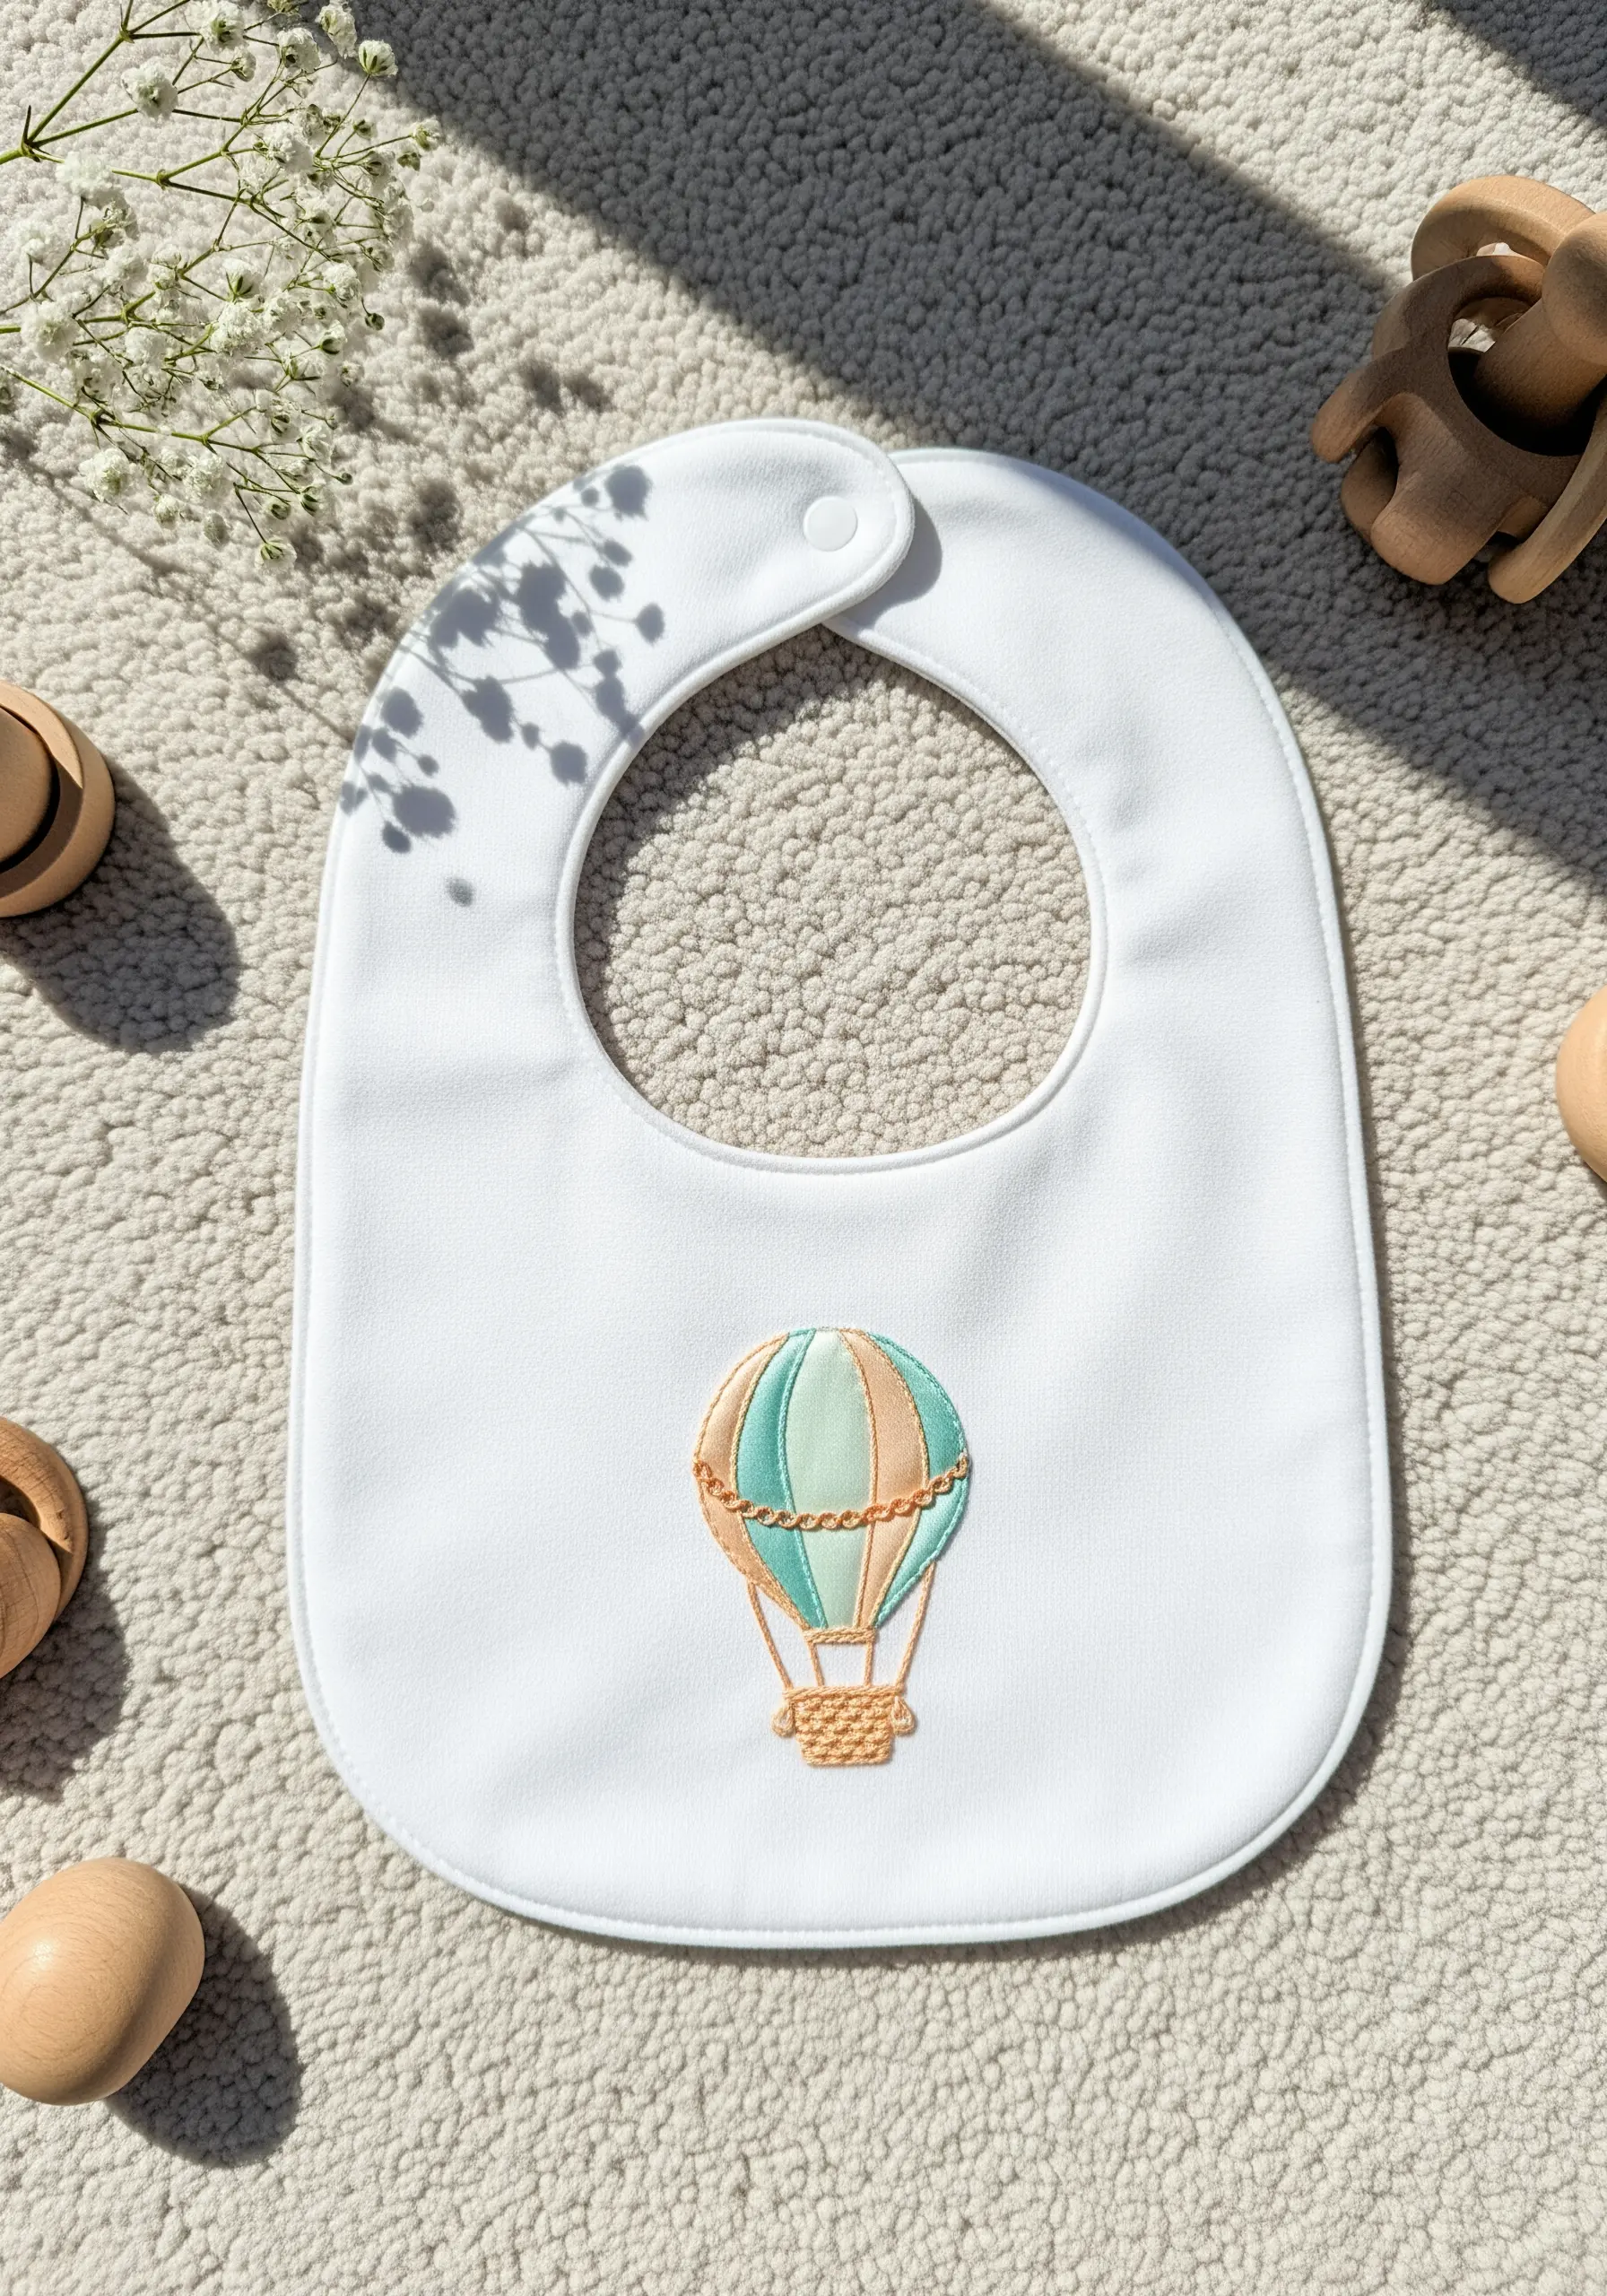
For baby items, choose soft, muted colors for a gentle, timeless aesthetic. A palette of mint, peach, and cream feels calming and sophisticated.
To achieve perfectly smooth satin stitches on the balloon panels, first outline each section with a tiny split stitch. This raised edge acts as a guide and helps your subsequent satin stitches lie flat and even.
Use a water-soluble stabilizer on the front of the bib to prevent the soft fabric from stretching, and a soft backing on the reverse side to protect delicate skin from scratchy threads.
6. Design an Art Deco Fan Cushion
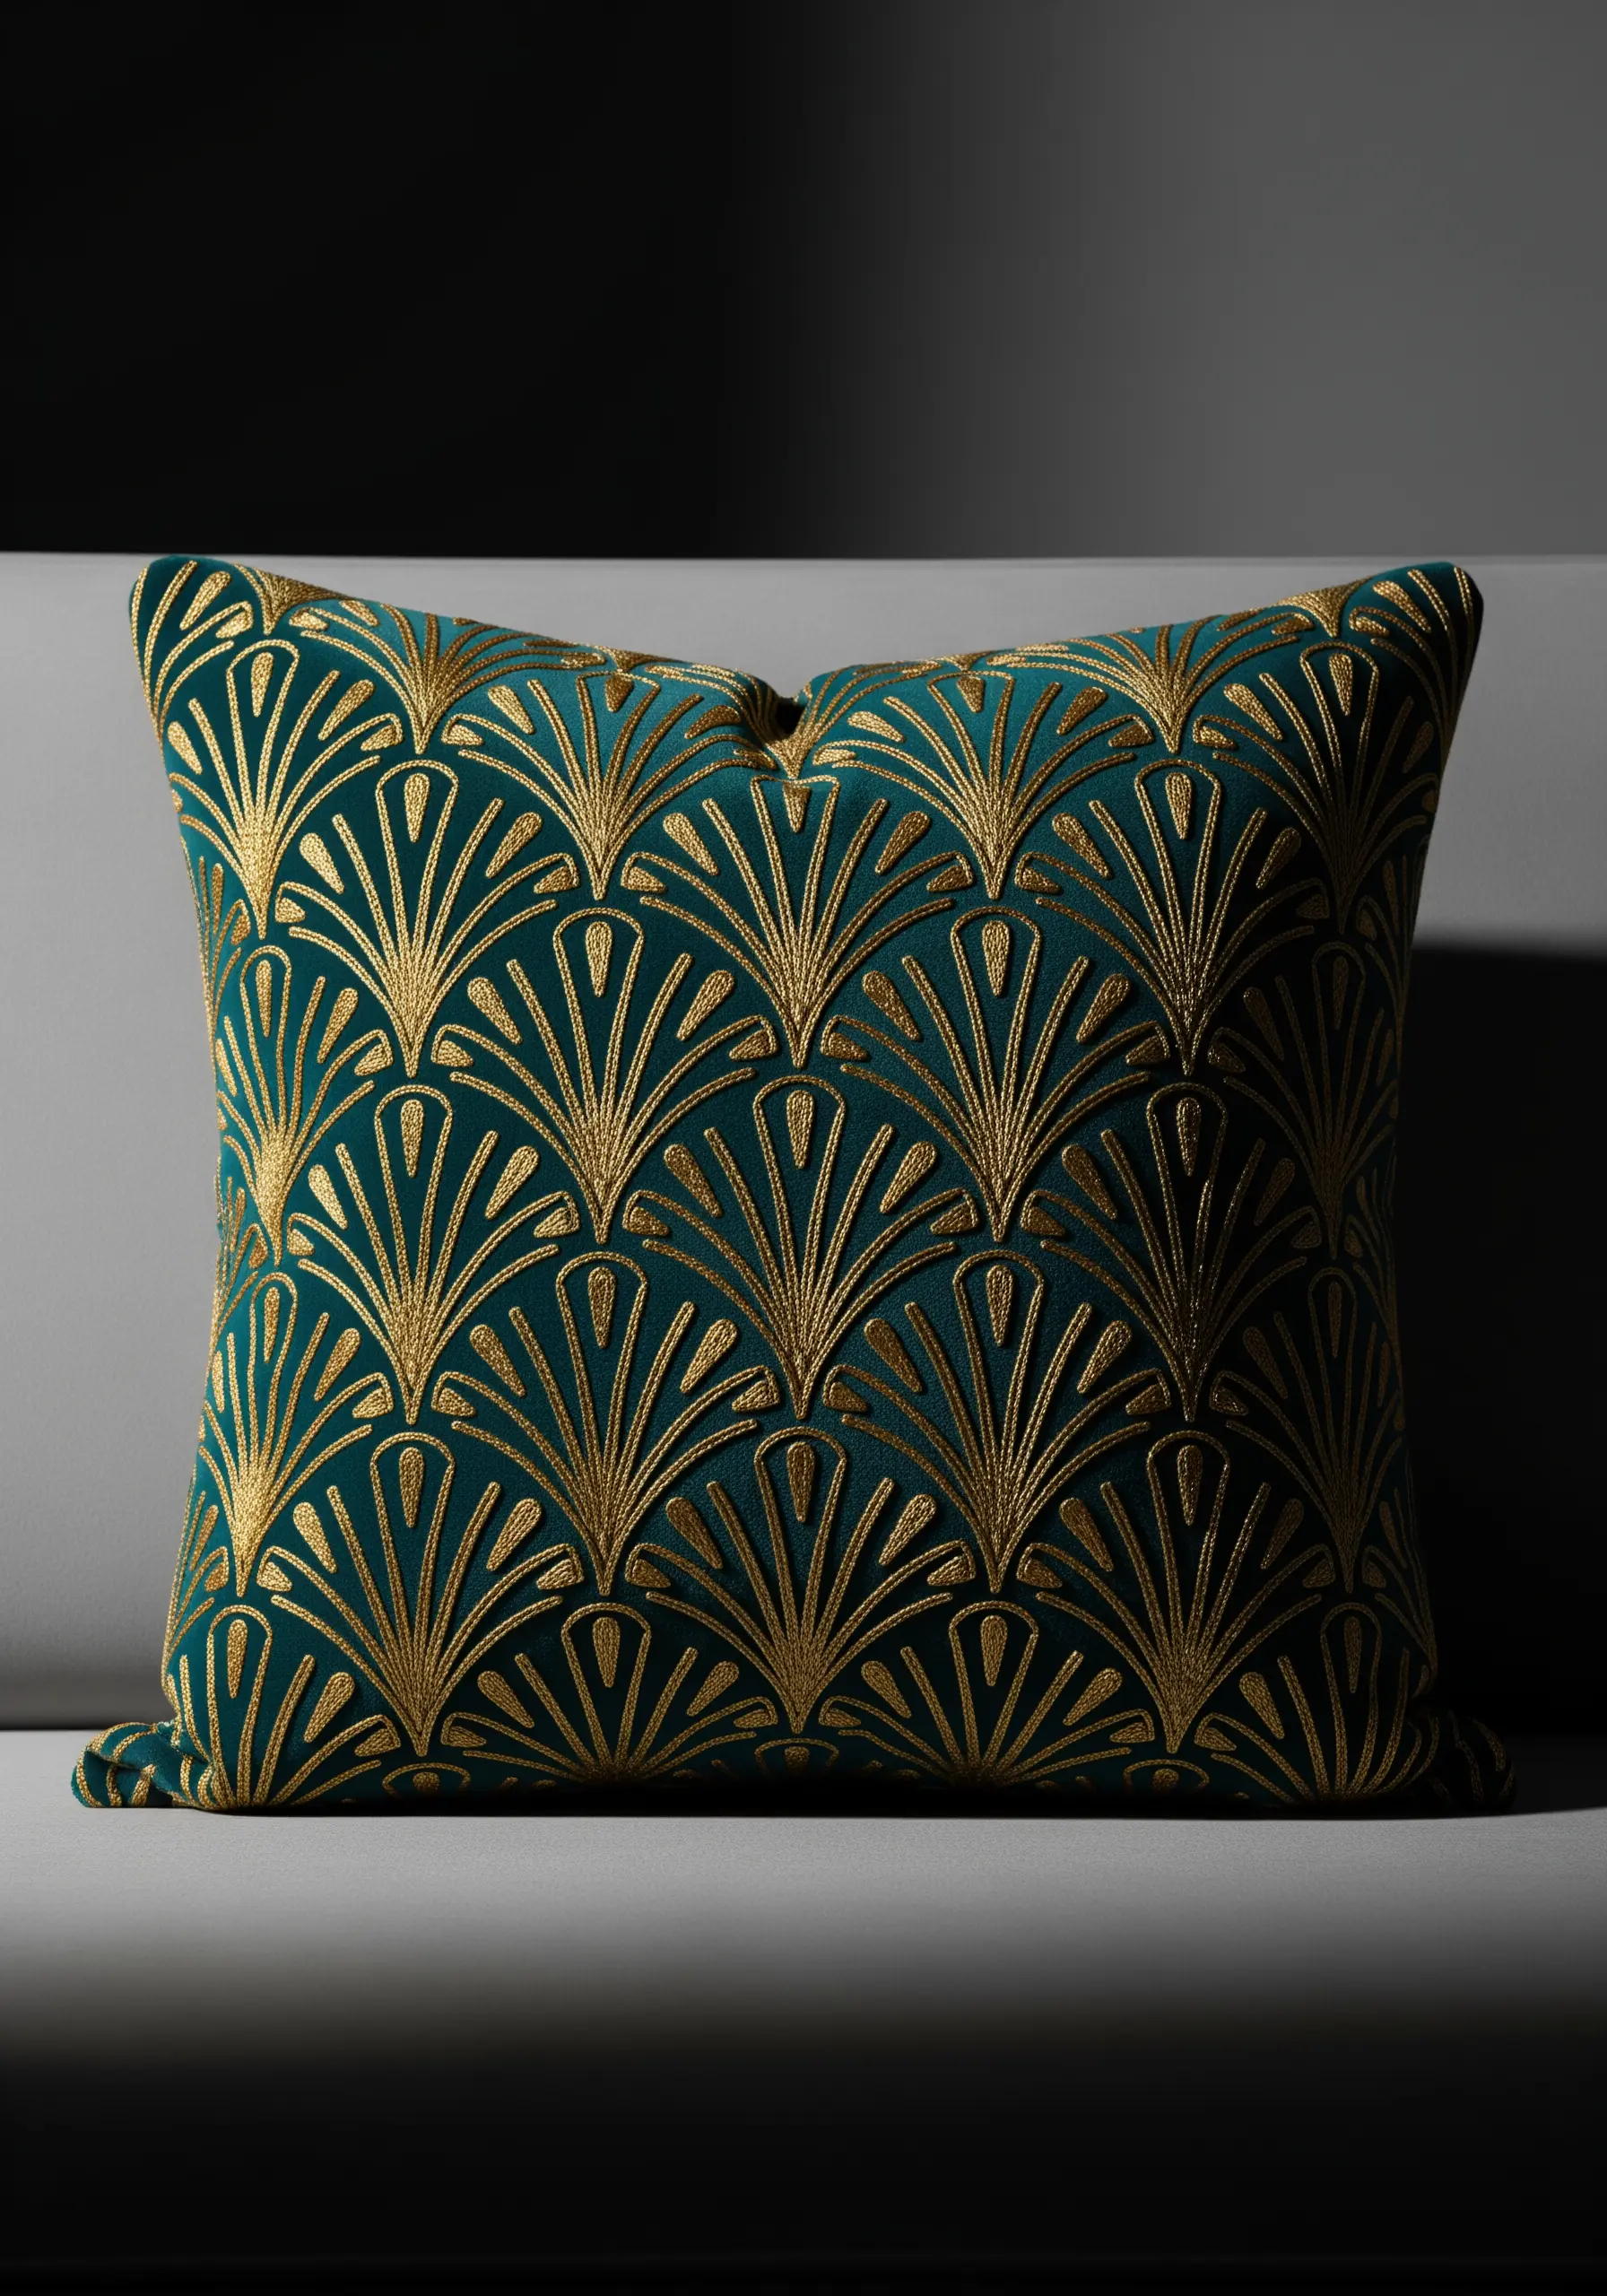
The power of this design lies in its high-contrast materials: lustrous gold thread against deep teal velvet. The velvet’s pile adds depth and absorbs light, making the metallic thread appear even brighter.
You don’t need complex stitches here. A simple, repeating chain stitch or a heavy backstitch using all six strands of metallic floss will create the bold, graphic lines needed for the Art Deco fan pattern.
Keep your stitch length consistent and focus on the radial symmetry of the design. This elegant repetition is what gives the cushion its luxurious, architectural feel.
7. Personalize a Kitchen Towel with a Playful Recipe
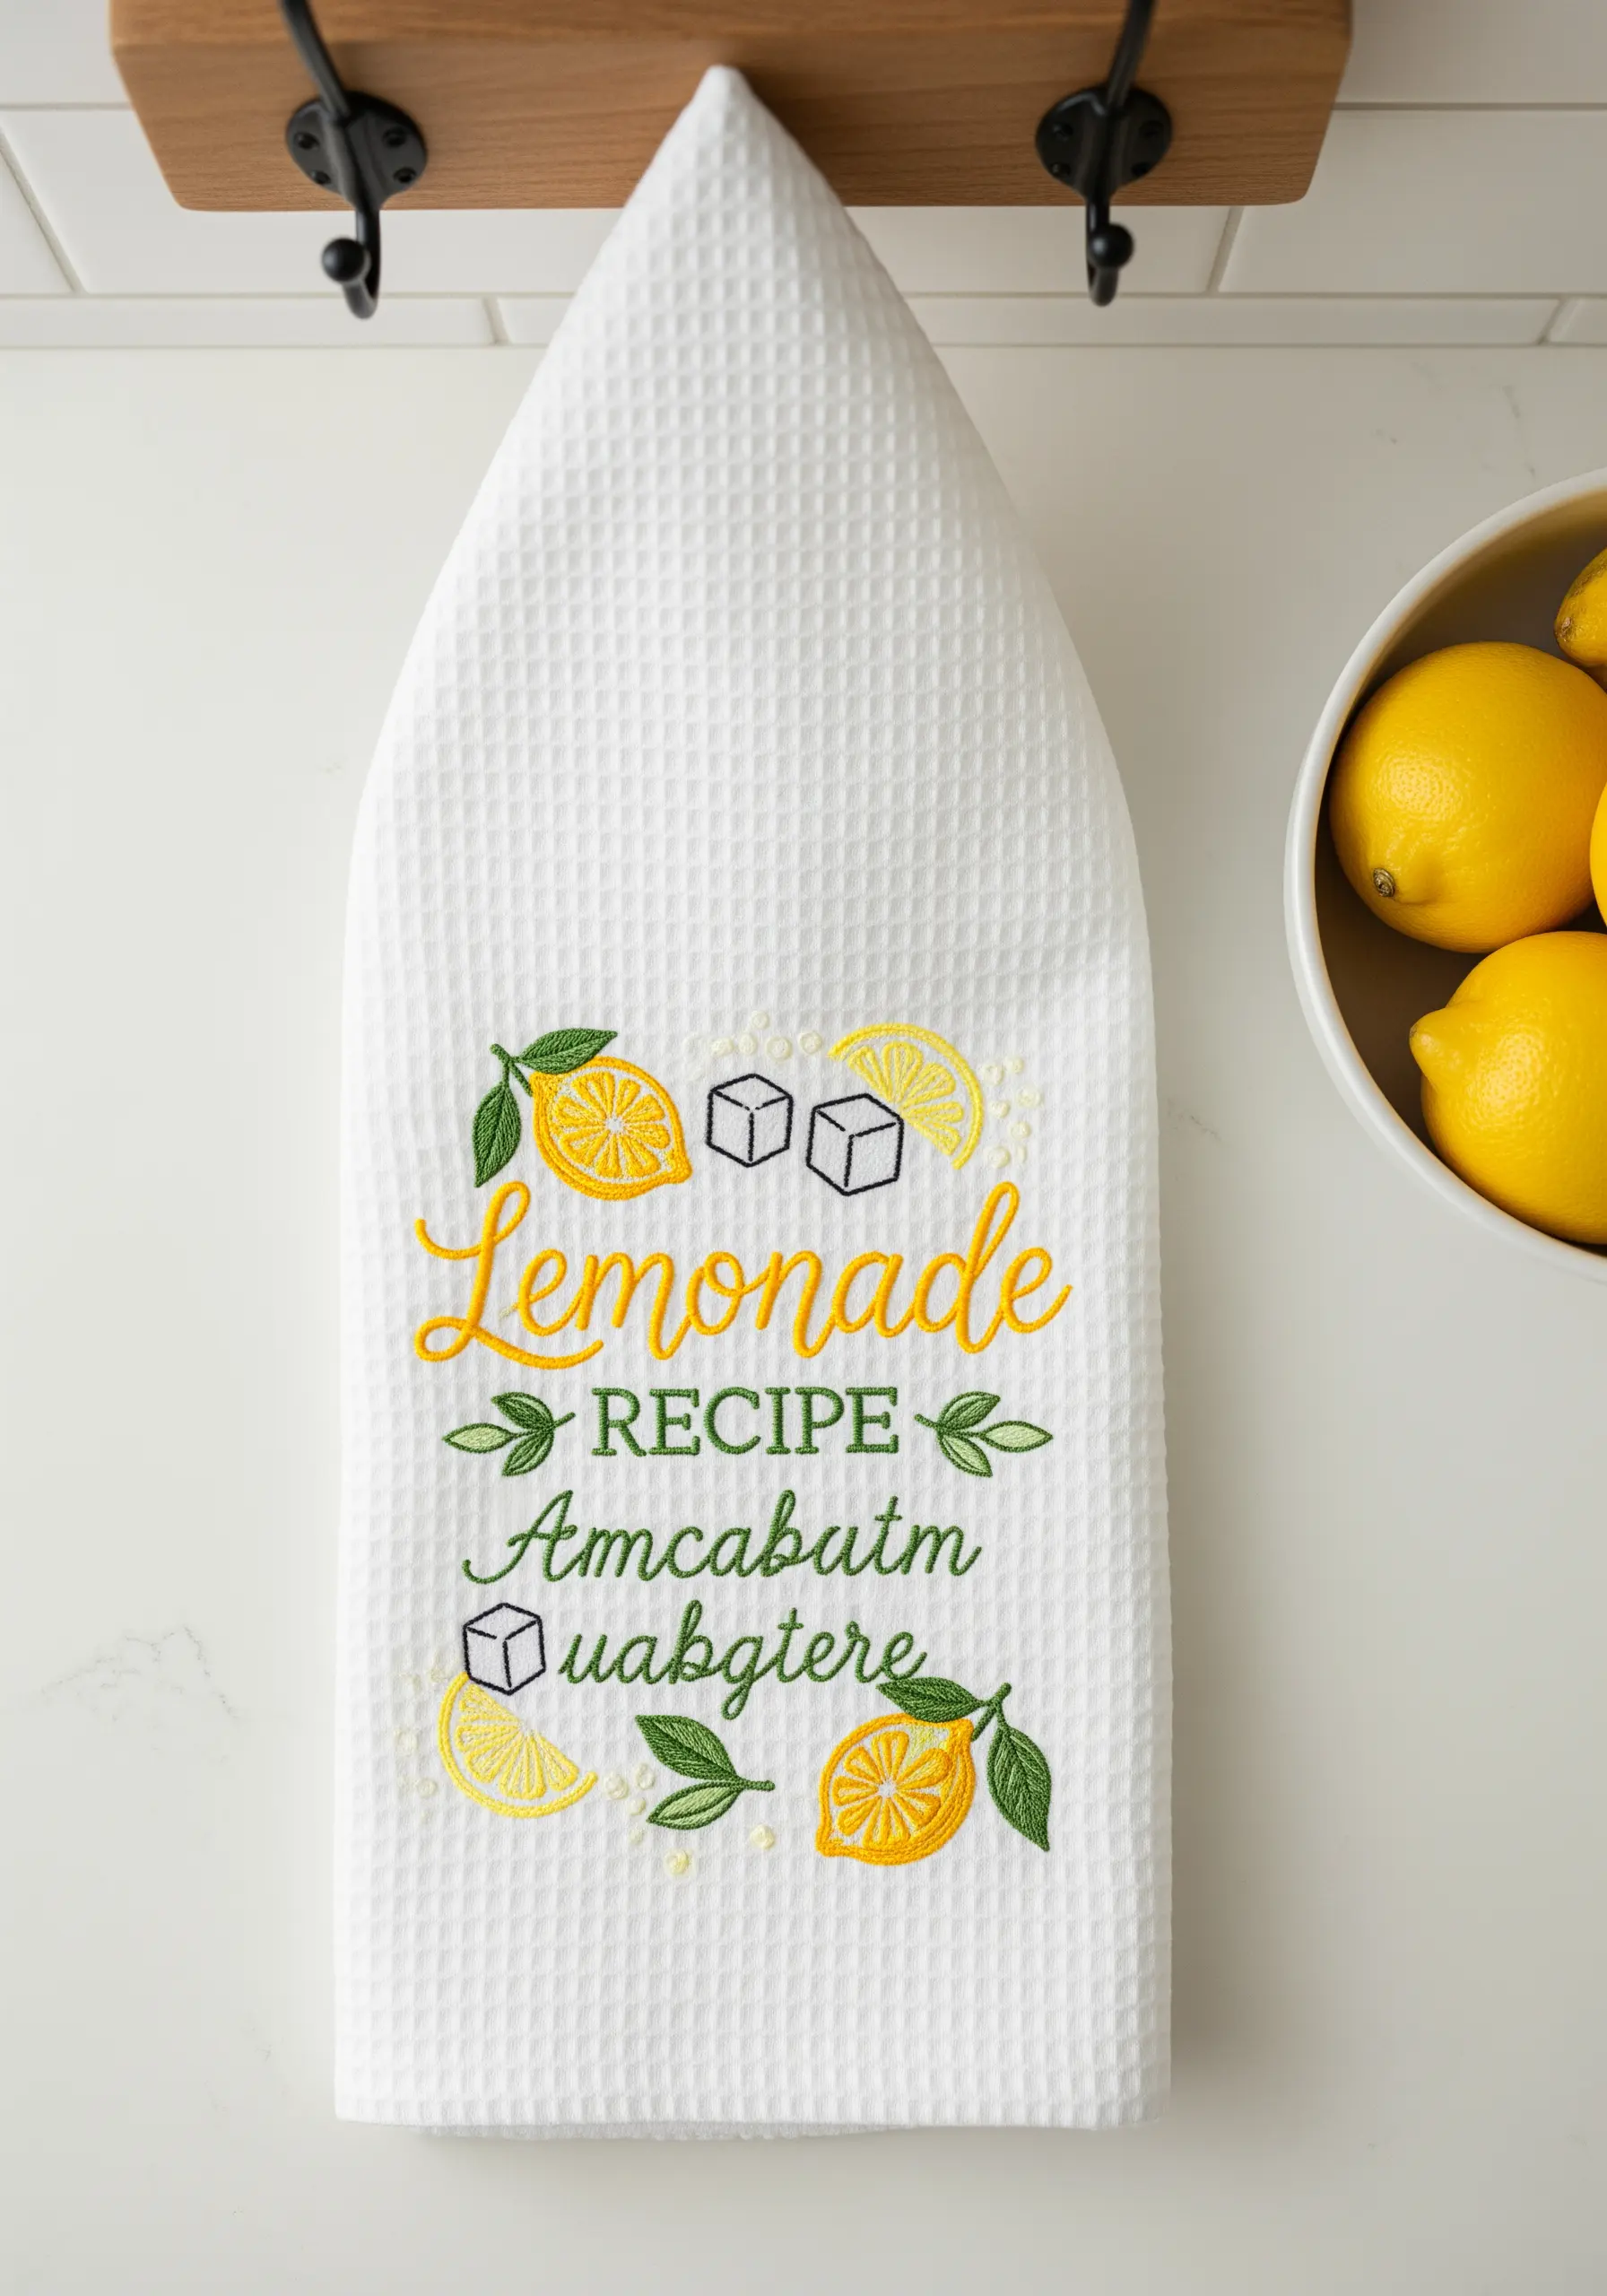
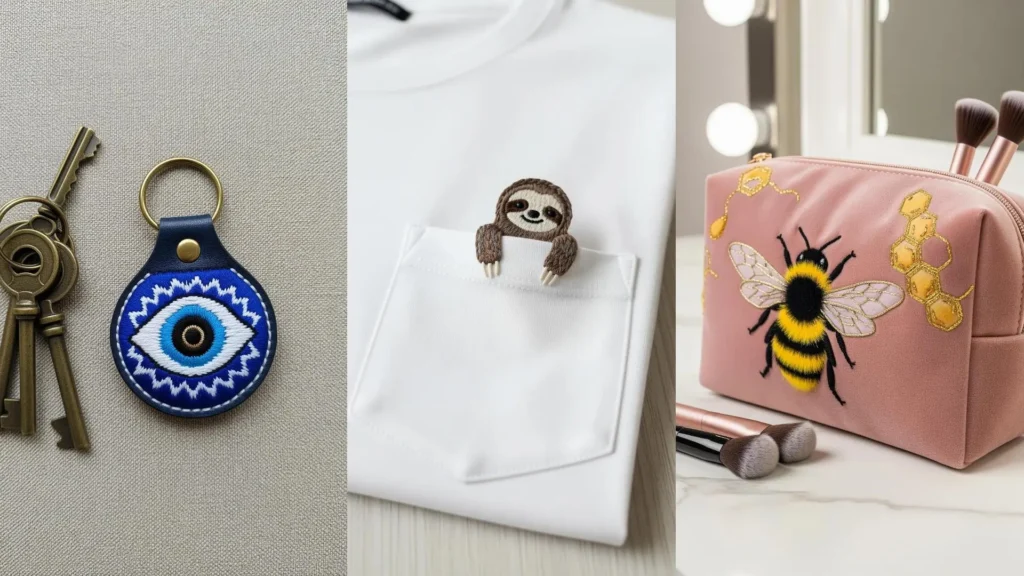
Embroidering on textured fabric like waffle-weave requires a stabilizer to prevent stitches from sinking and distorting. A water-soluble topper is perfect for this, as it dissolves away leaving crisp stitches behind.
Combine different lettering styles for visual interest. Use a clean, simple backstitch for the block letters and a more fluid whipped backstitch or stem stitch for the cursive script to make it flow beautifully.
Incorporate small, graphic motifs like the lemon slices and ice cubes to break up the text and add a touch of whimsy, turning a simple towel into a charming and functional piece of kitchen art.
8. Add Dimensional Florals to a Journal Cover
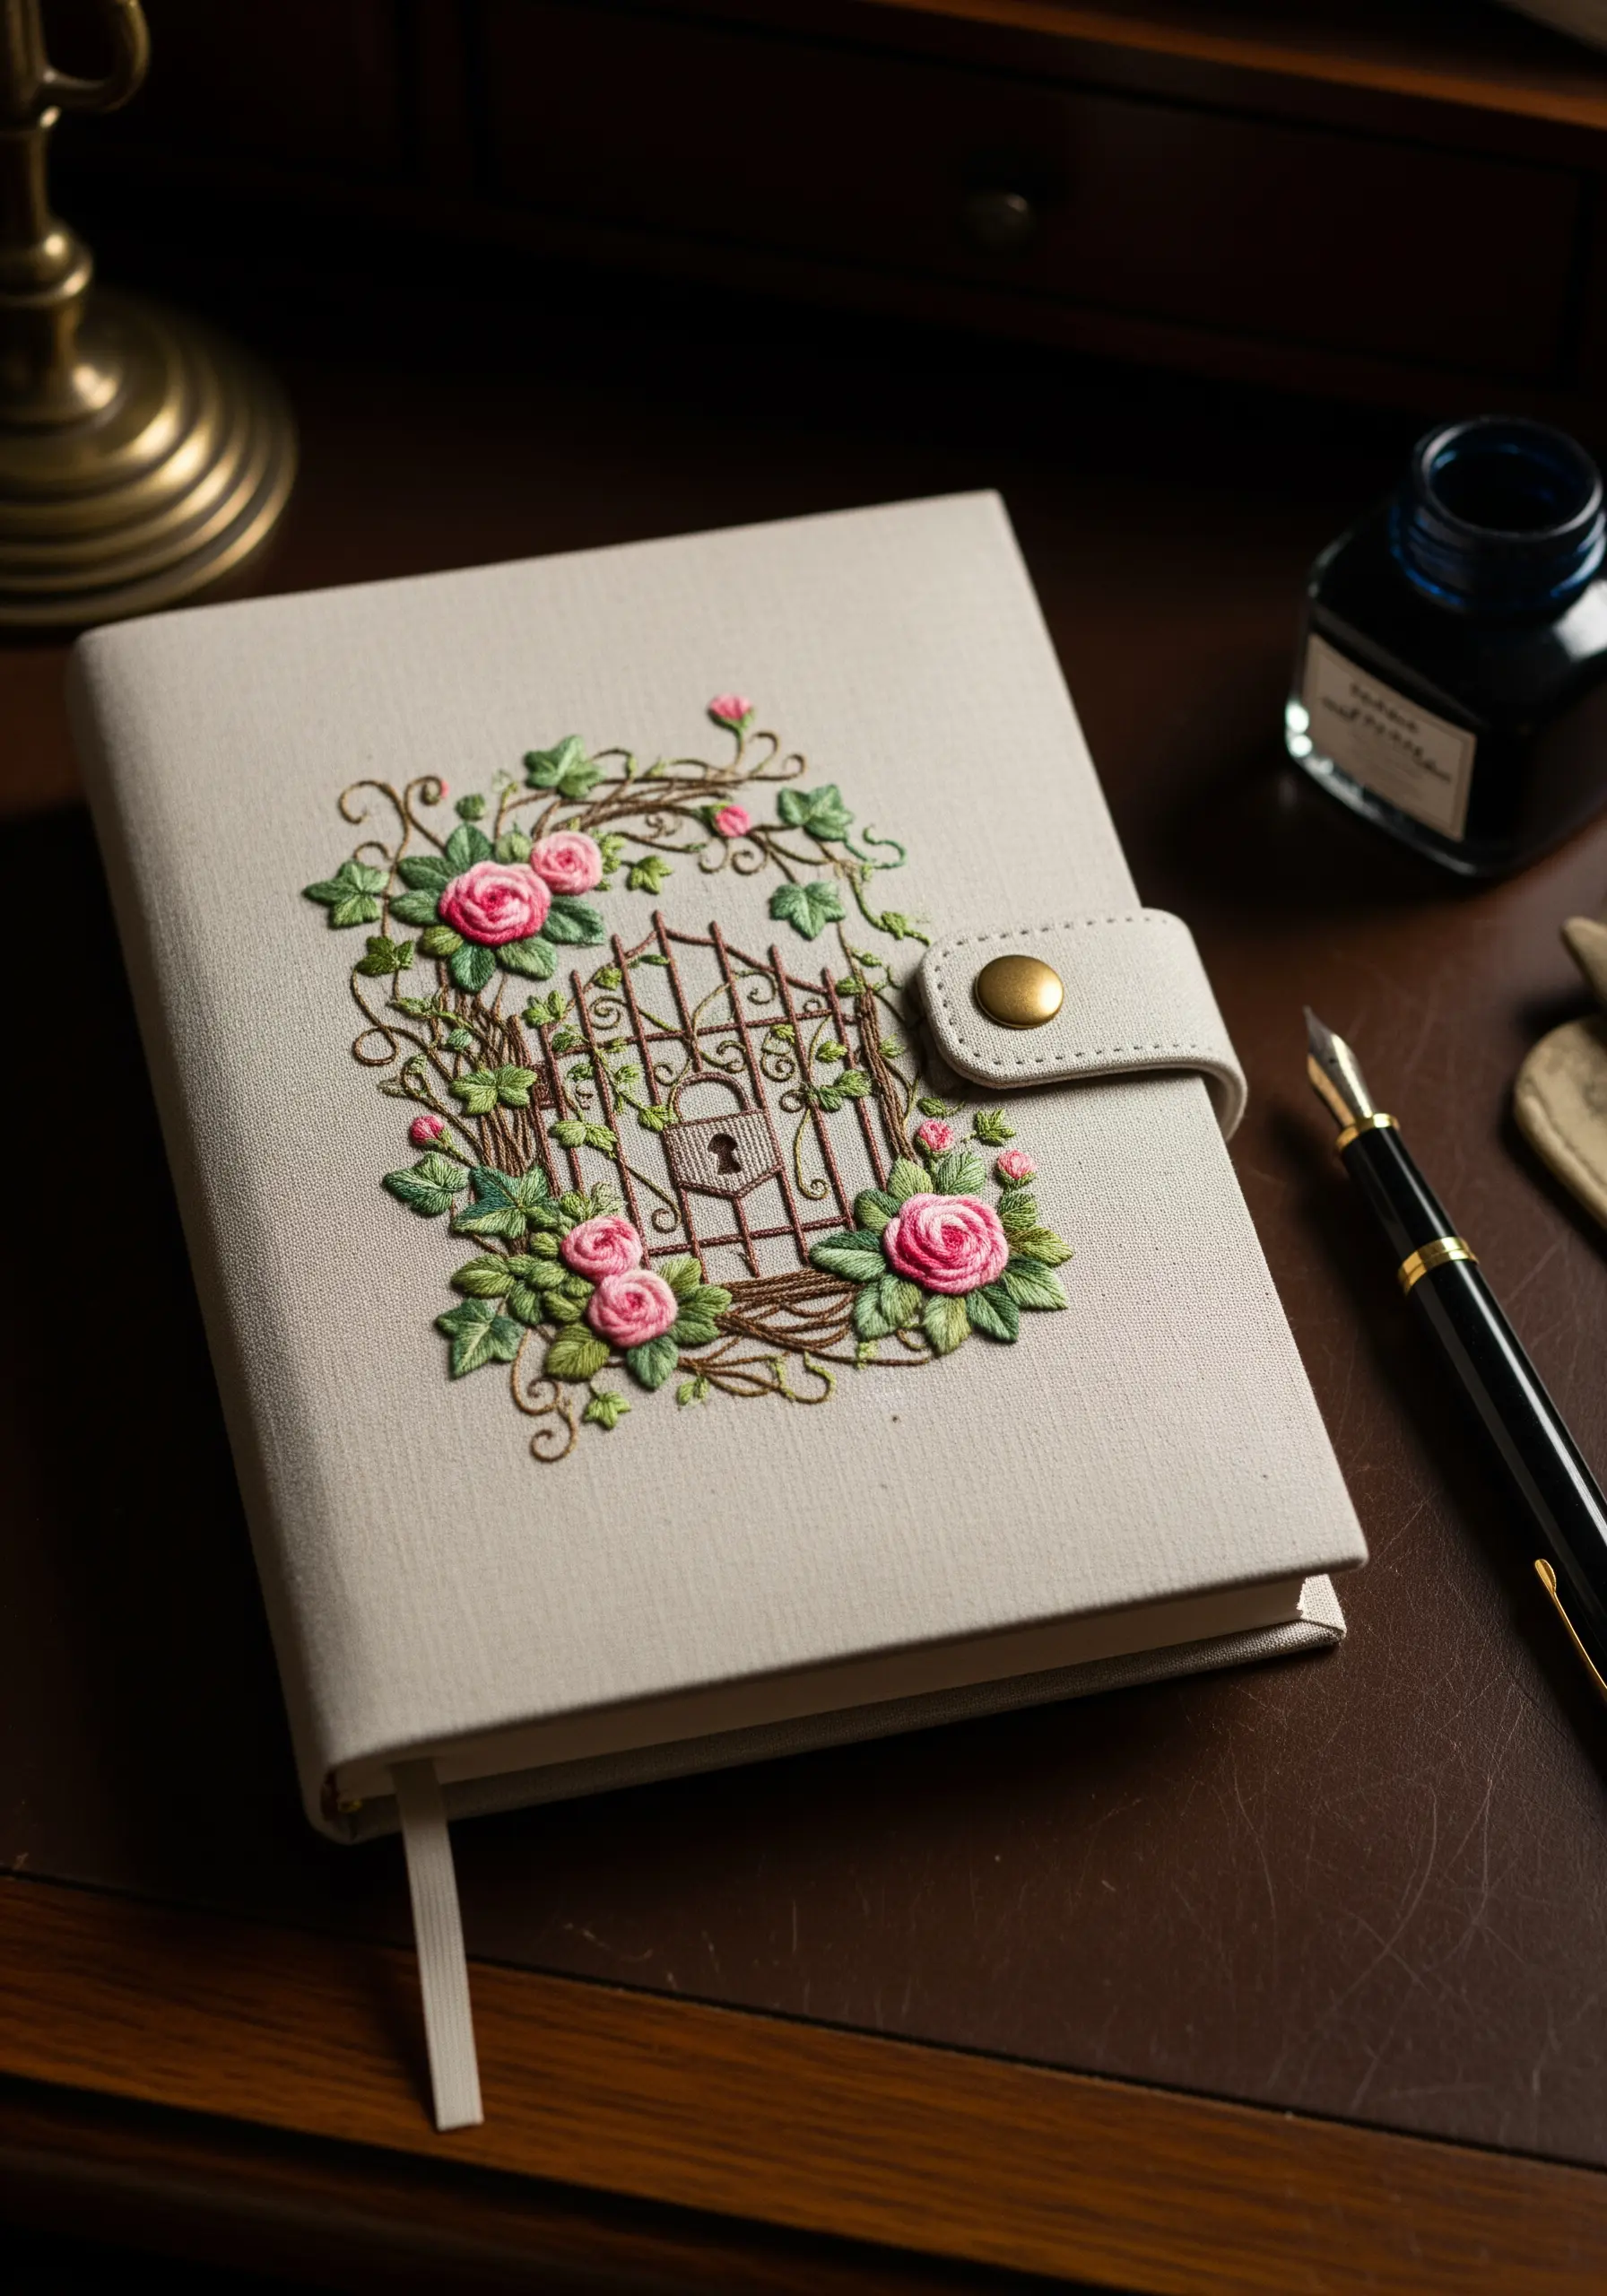
To make your embroidery physically lift off the fabric, incorporate 3D stitches. Create the roses using the woven wheel stitch (or spider web rose stitch), pulling the thread taut enough to be secure but loose enough to create high-profile petals.
For the leaves, use detached chain stitches (lazy daisies) but keep them slightly loose so they arch away from the surface. Small French knots clustered together will give the impression of baby’s breath.
This blend of flat and raised stitches, like the simple backstitch for the gate, creates a tactile, interactive design that invites touch and makes a simple journal feel like a secret garden.
9. Create a Full-Coverage Embroidered Cap
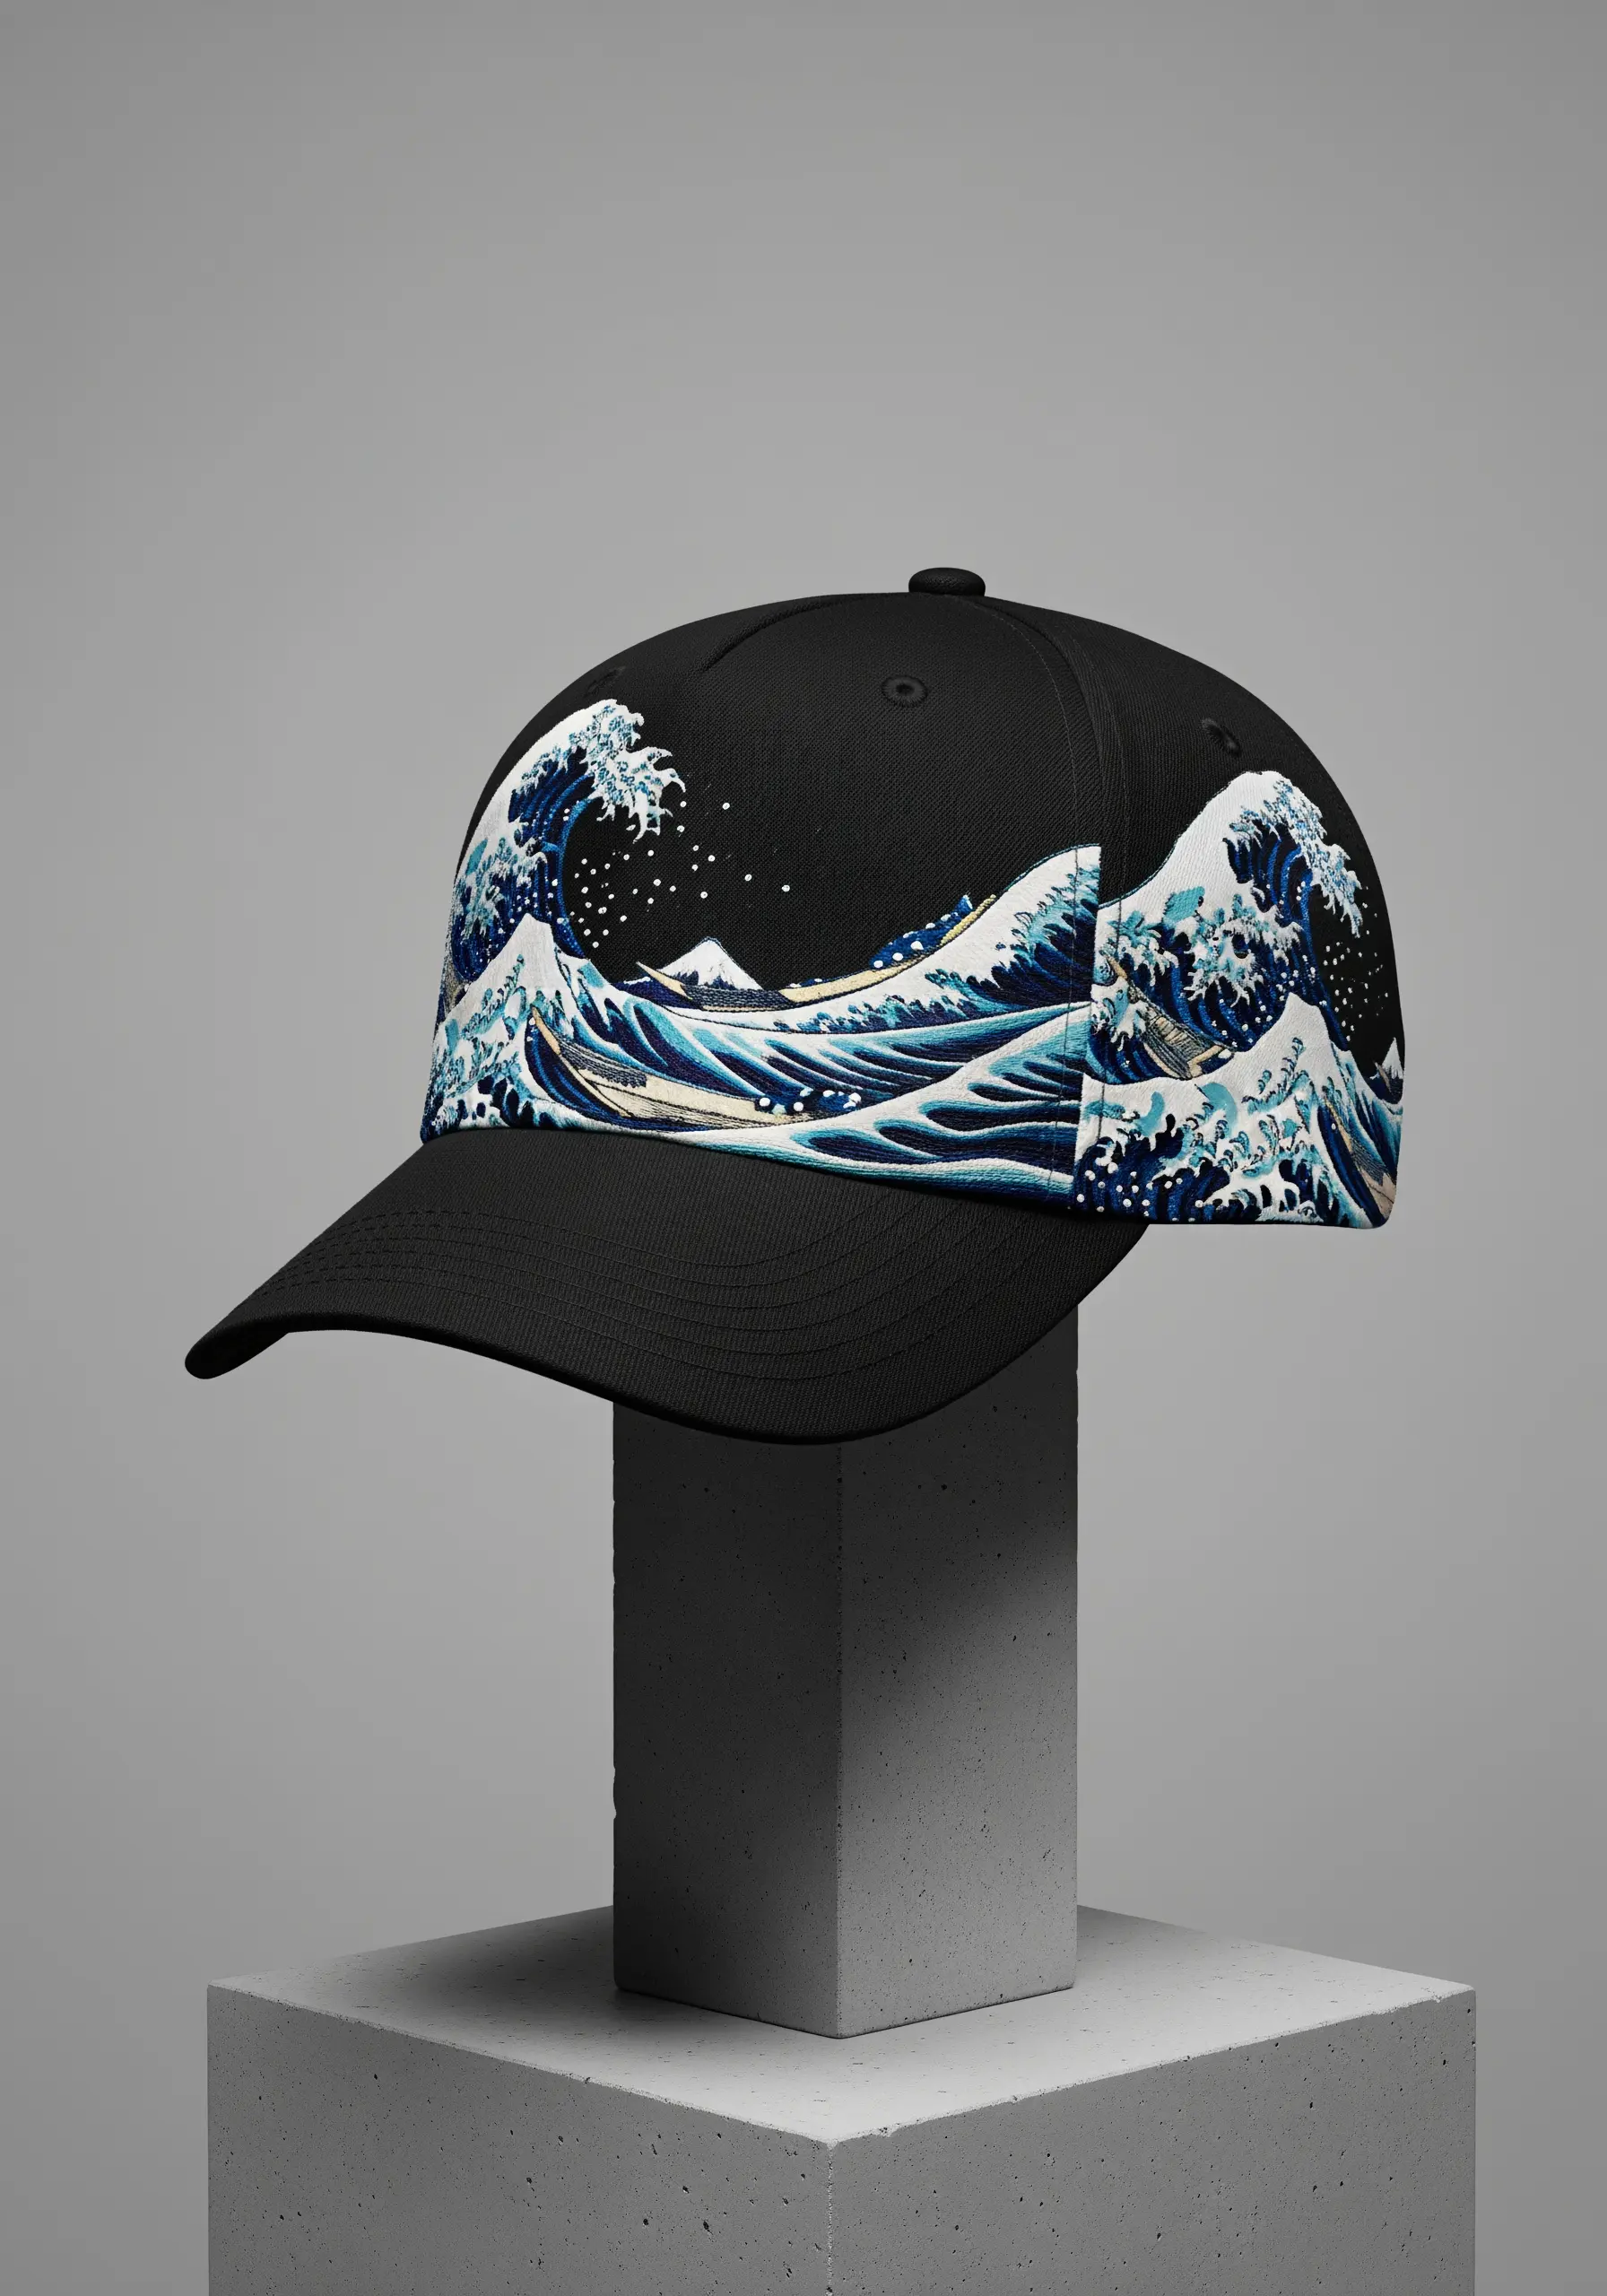
Applying a complex, full-coverage design to a curved surface like a cap is best achieved with a ‘patch’ technique. Embroider your design on a separate piece of sturdy fabric, using a hoop to keep it taut.
Once complete, trim the embroidered fabric, leaving a small margin. You can then carefully apply it to the cap using a strong fabric adhesive and finish the edges with a tight whipstitch for a seamless, integrated look.
This method allows you to execute intricate details, like the delicate foam of the waves, without battling the awkward shape of the hat itself.
10. Embellish Canvas Sneakers with Tropical Foliage
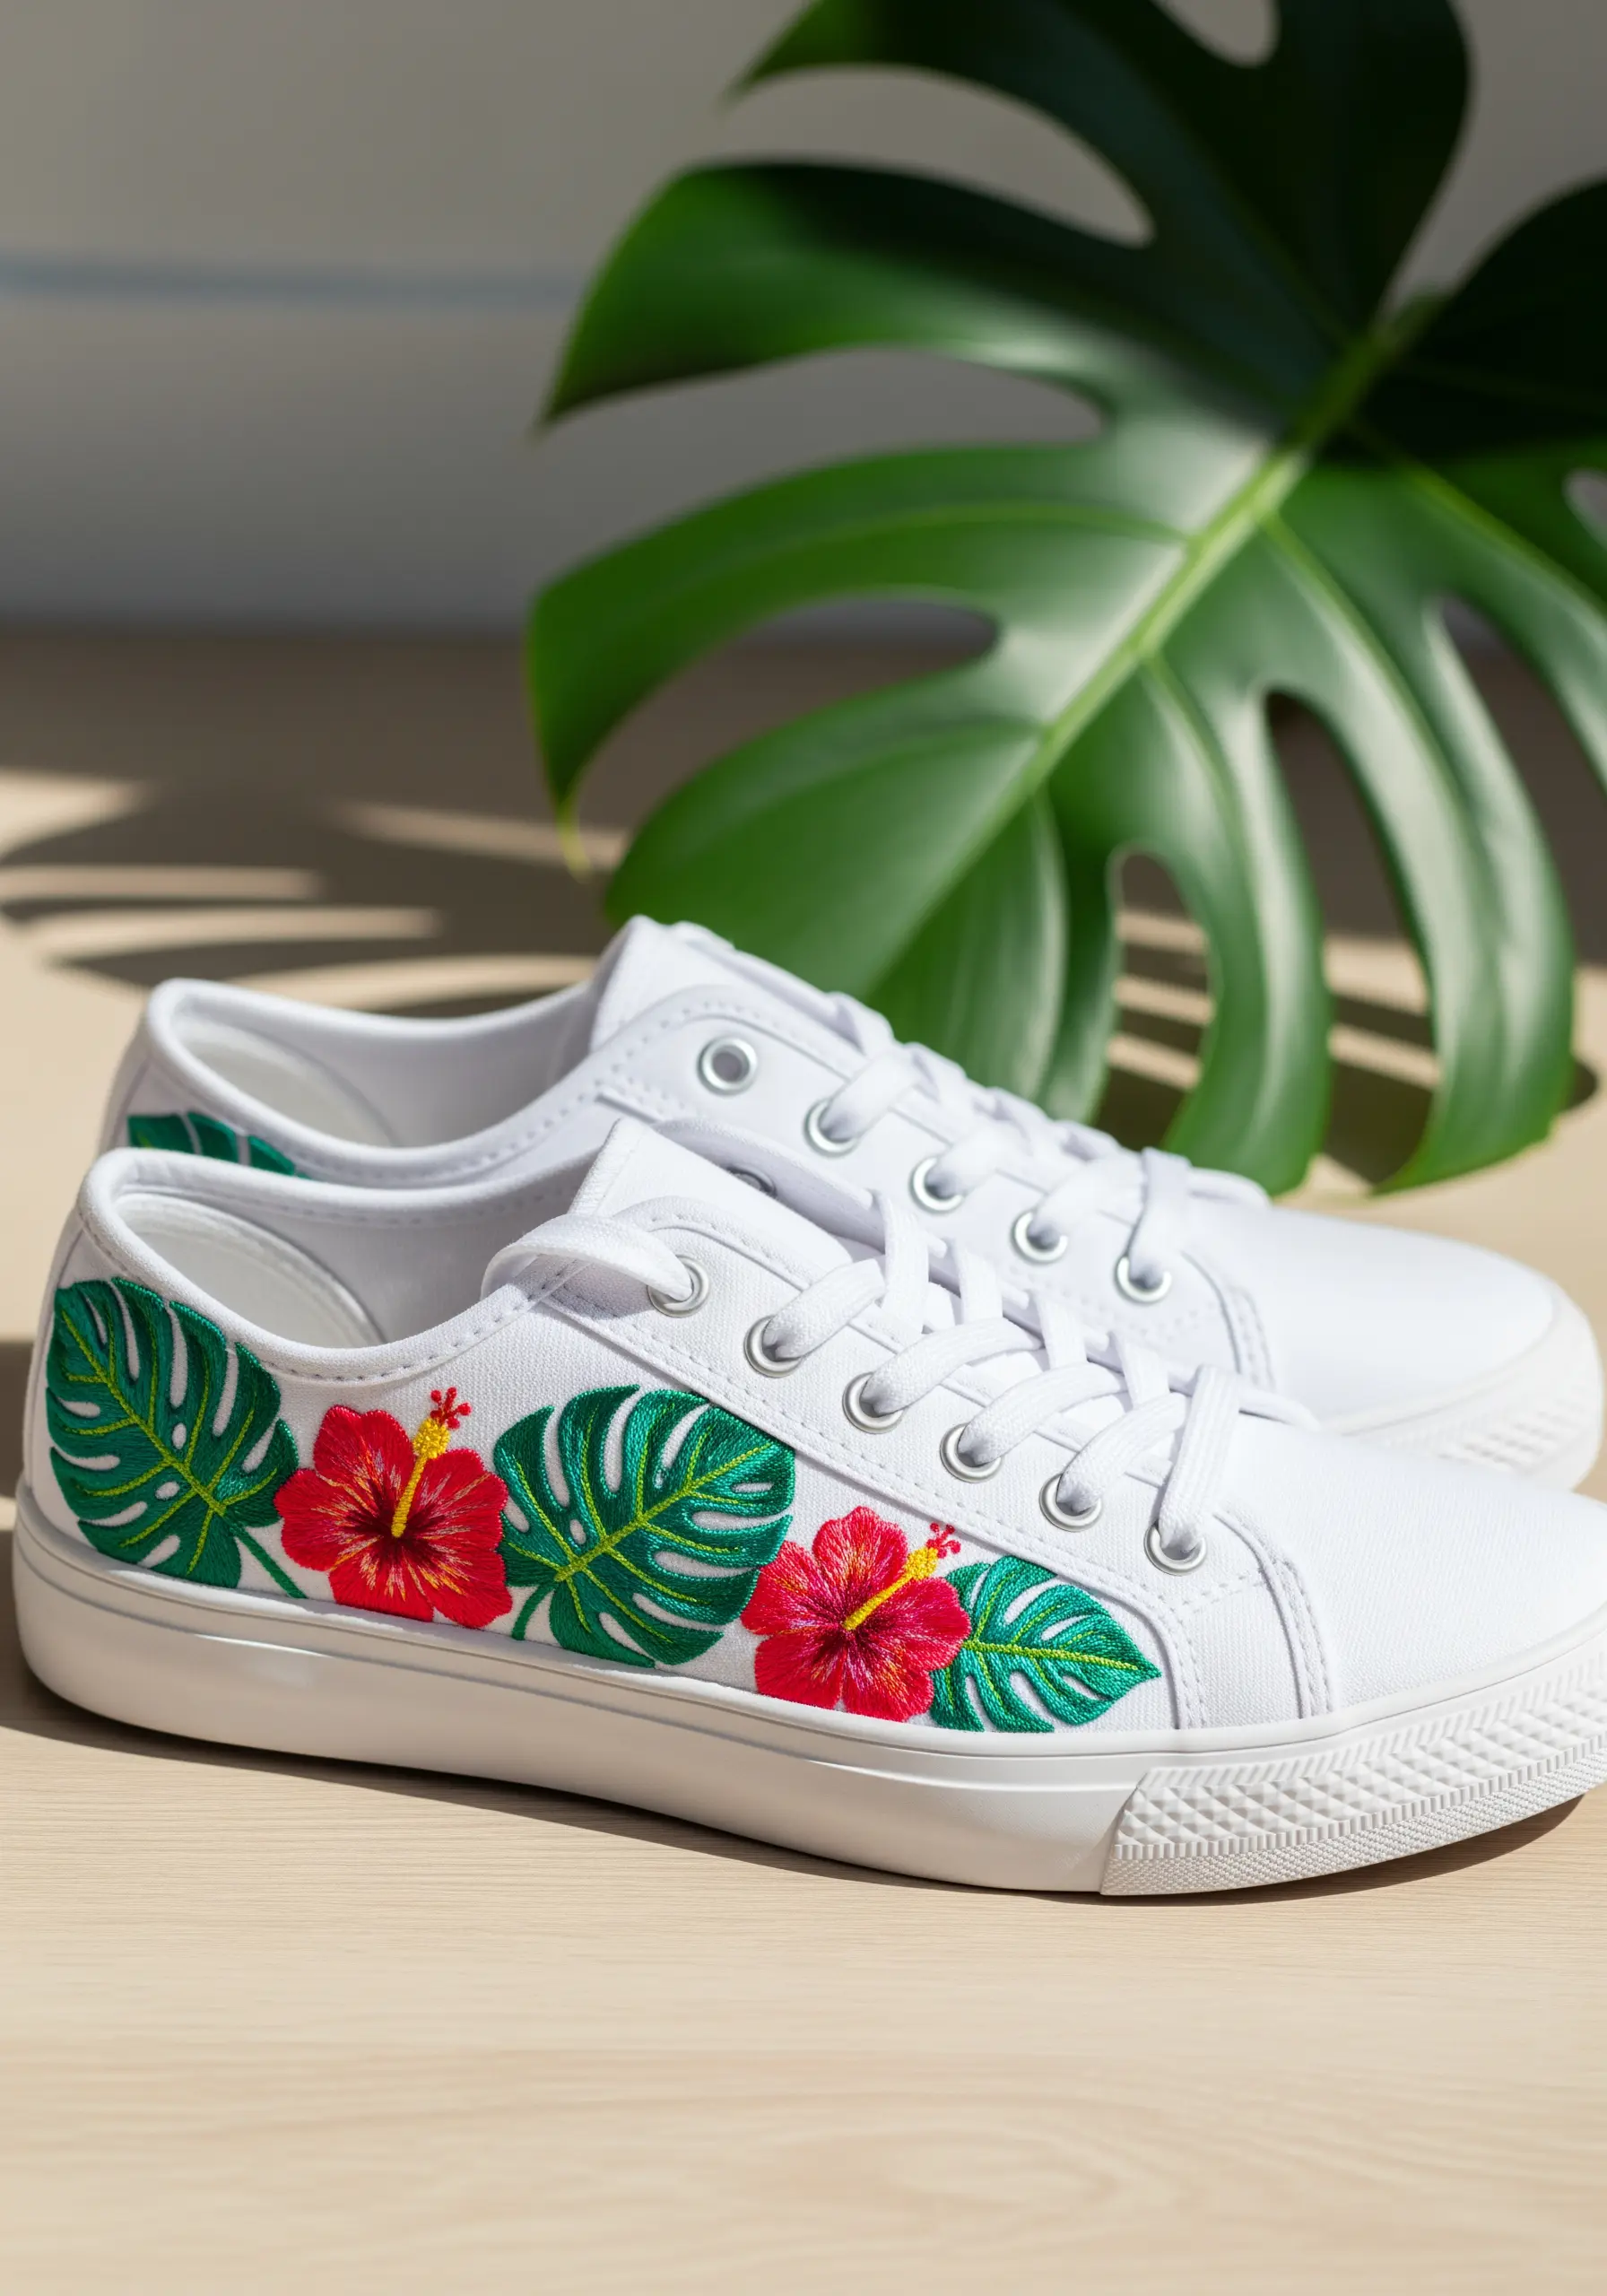
Before stitching on canvas shoes, use a friction-erasable pen to transfer your design. The ink vanishes with heat from a hairdryer, leaving no trace.
Use a sharp, sturdy needle and a thimble to protect your fingers, as pushing through the thick canvas can be tough. Stick to surface stitches like satin stitch and fishbone stitch that won’t create bulk on the inside of the shoe.
To create the vibrant hibiscus, blend two shades of red or pink using a long-and-short stitch. This adds realism and makes the flowers look more dynamic against the bold green leaves.
11. Stitch a Minimalist World Map on Leather

When embroidering on leather or faux leather, remember that every puncture is permanent. Plan your stitch placement carefully and use a leather needle, which has a special triangular point to pierce the material cleanly.
Use a simple backstitch for the entire design to create a clean, continuous line. A single, high-contrast thread color—like gold on brown leather—gives the piece a sophisticated, cartographic feel.
Do not use a traditional hoop, as it will permanently mark the leather. Instead, hold the material taut with your hands or use binder clips to secure it to a frame, protecting the leather surface with scrap fabric.
12. Create a Fuzzy Bumblebee with a Turkey Stitch
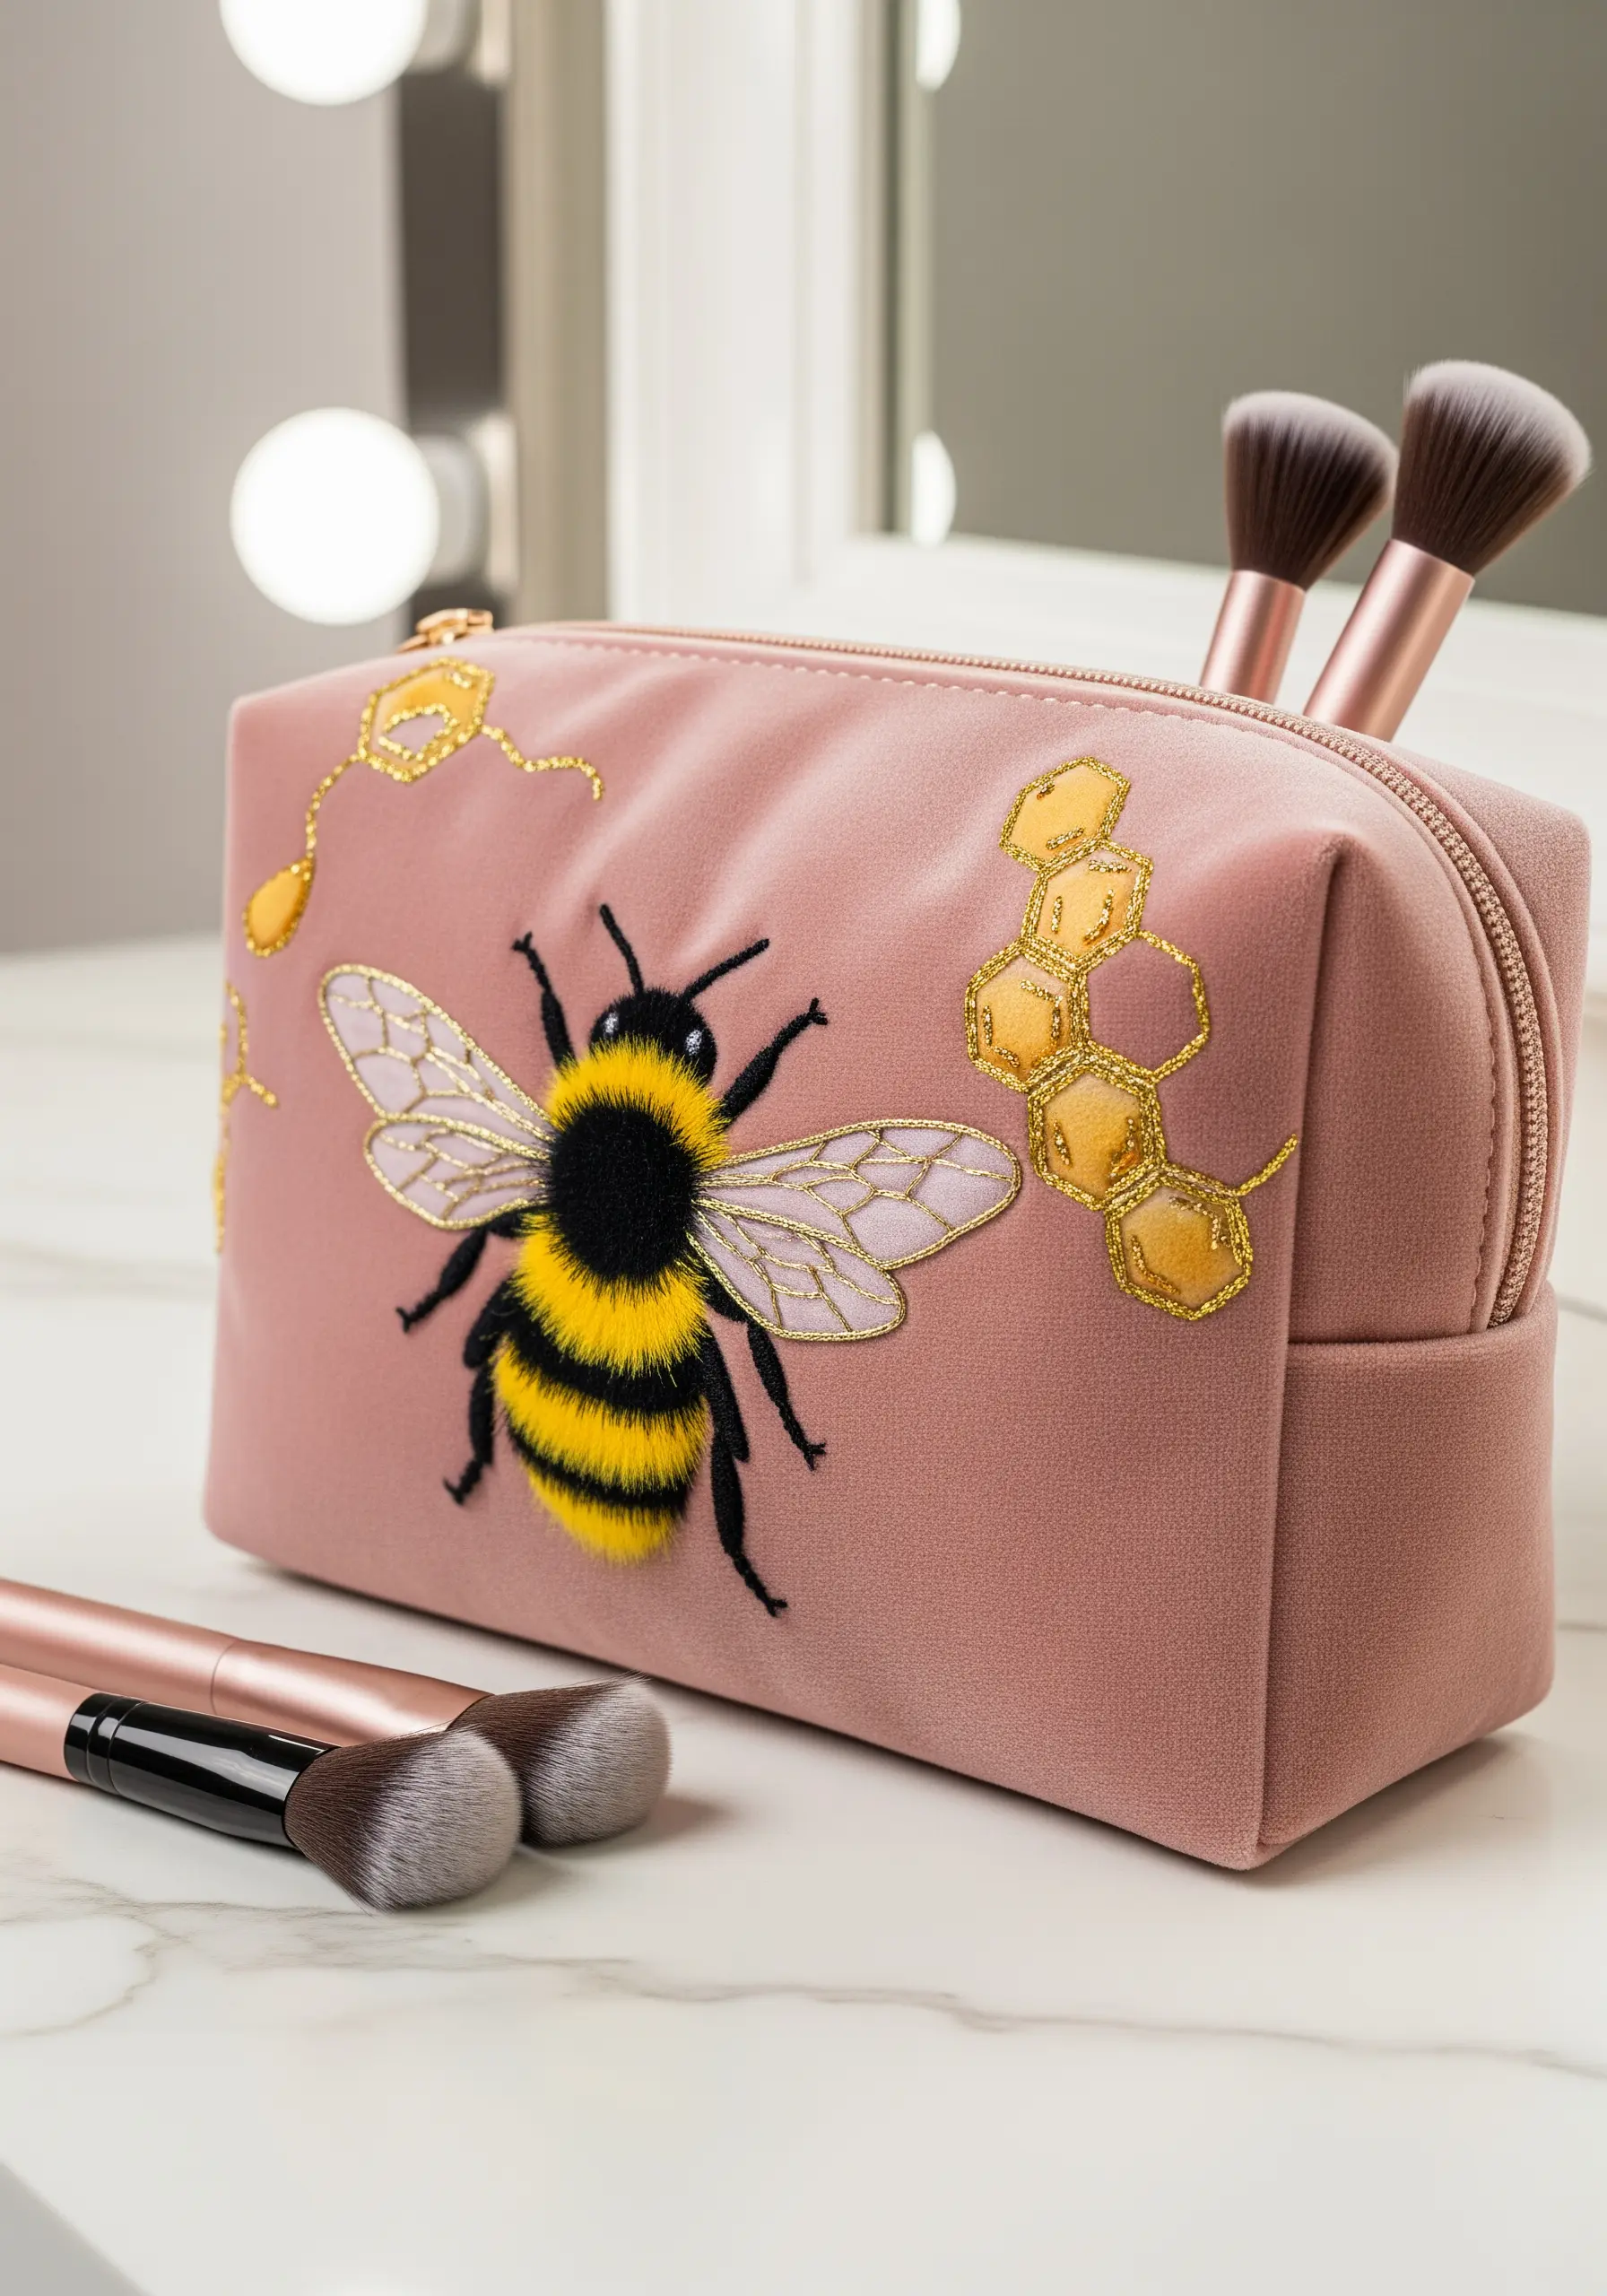
To achieve the fluffy, three-dimensional body of the bee, you’ll use the Turkey stitch. This technique creates loops of thread on the surface of the fabric, which you can then trim to your desired length to create a plush, velvety texture.
Alternate rows of yellow and black thread to create the stripes. After trimming the loops, fluff them up gently with the tip of your needle to blend the colors and enhance the fuzzy effect.
Contrast this high-texture element with flat stitches, like a satin stitch for the wings and a simple backstitch for the antennae, to make the bee’s body the star of the show.
13. Embellish Silk with Celestial Details
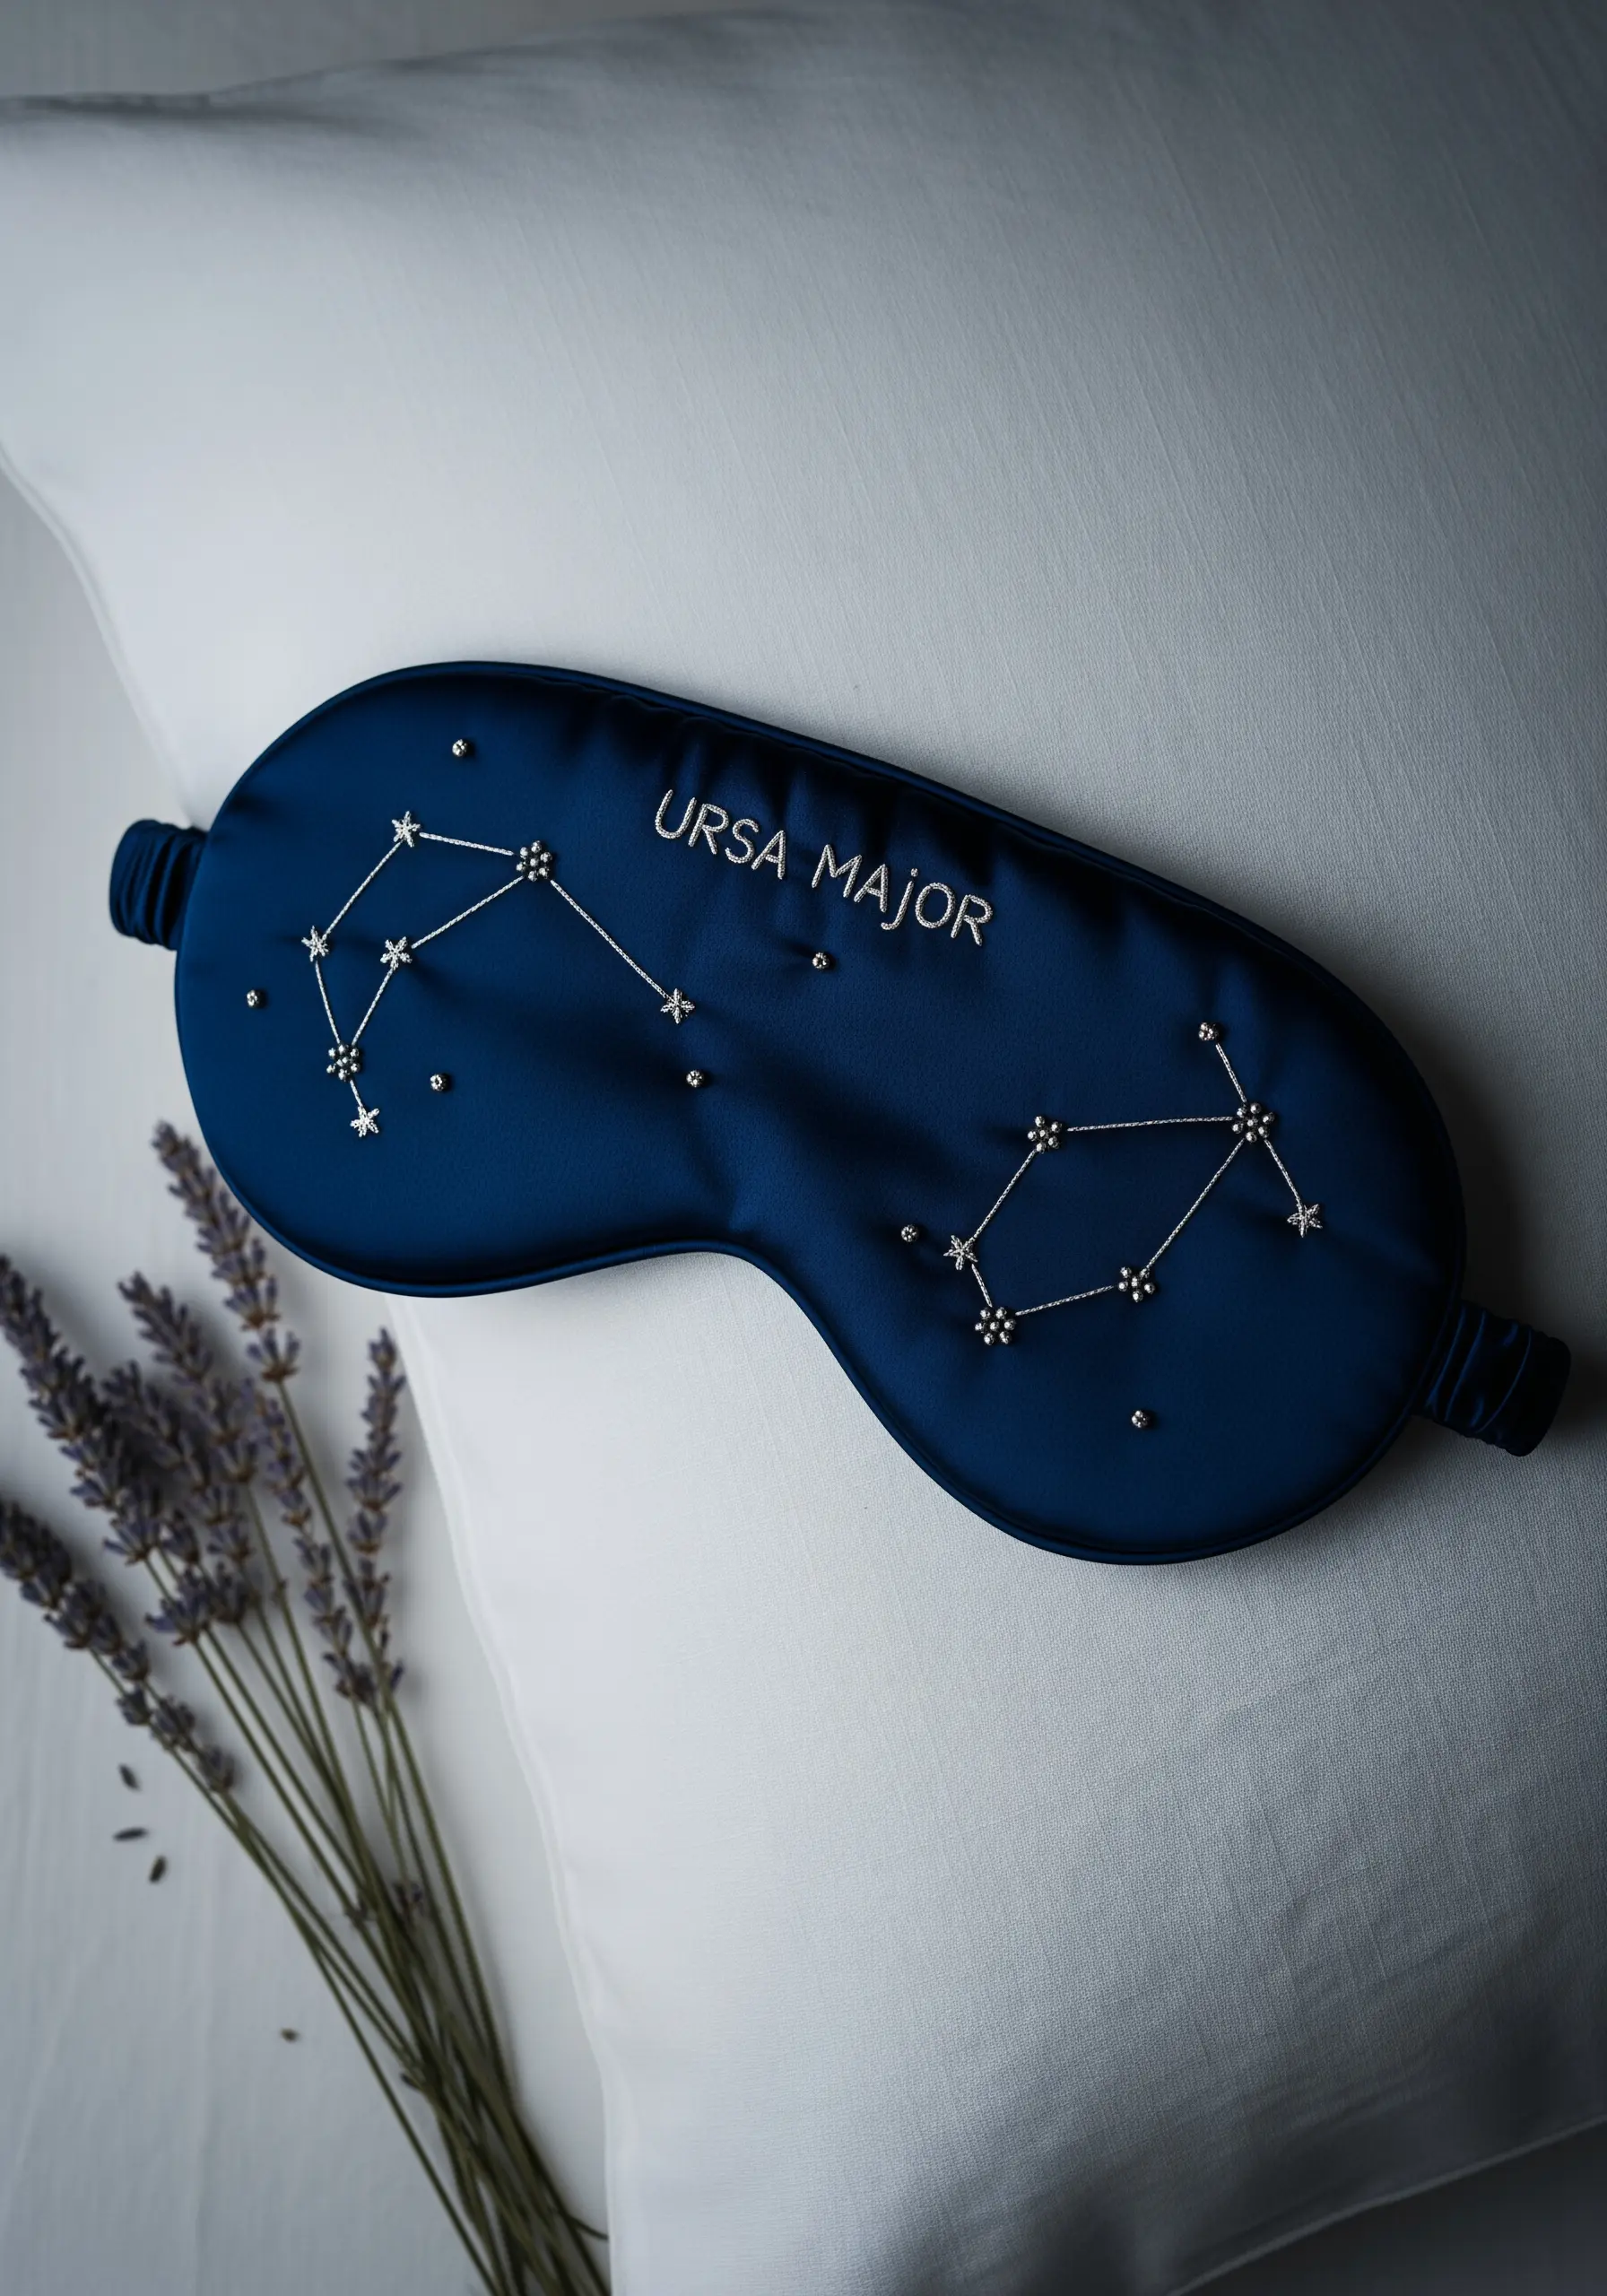
Working with delicate fabrics like silk requires a fine, sharp needle (a size 9 or 10 embroidery needle) to minimize holes and prevent snags. Always back the silk with a lightweight, iron-on stabilizer for support.
For the constellation lines, use a single strand of silver metallic thread in a simple backstitch. To represent the stars, secure tiny silver beads or seed pearls with a single, reinforcing stitch each. This adds a touch of glamour and dimension.
Keep the lettering delicate and airy by using a single strand of floss. This ensures the embroidery complements the luxurious fabric instead of weighing it down.
14. Design a Classic Monogrammed Handkerchief
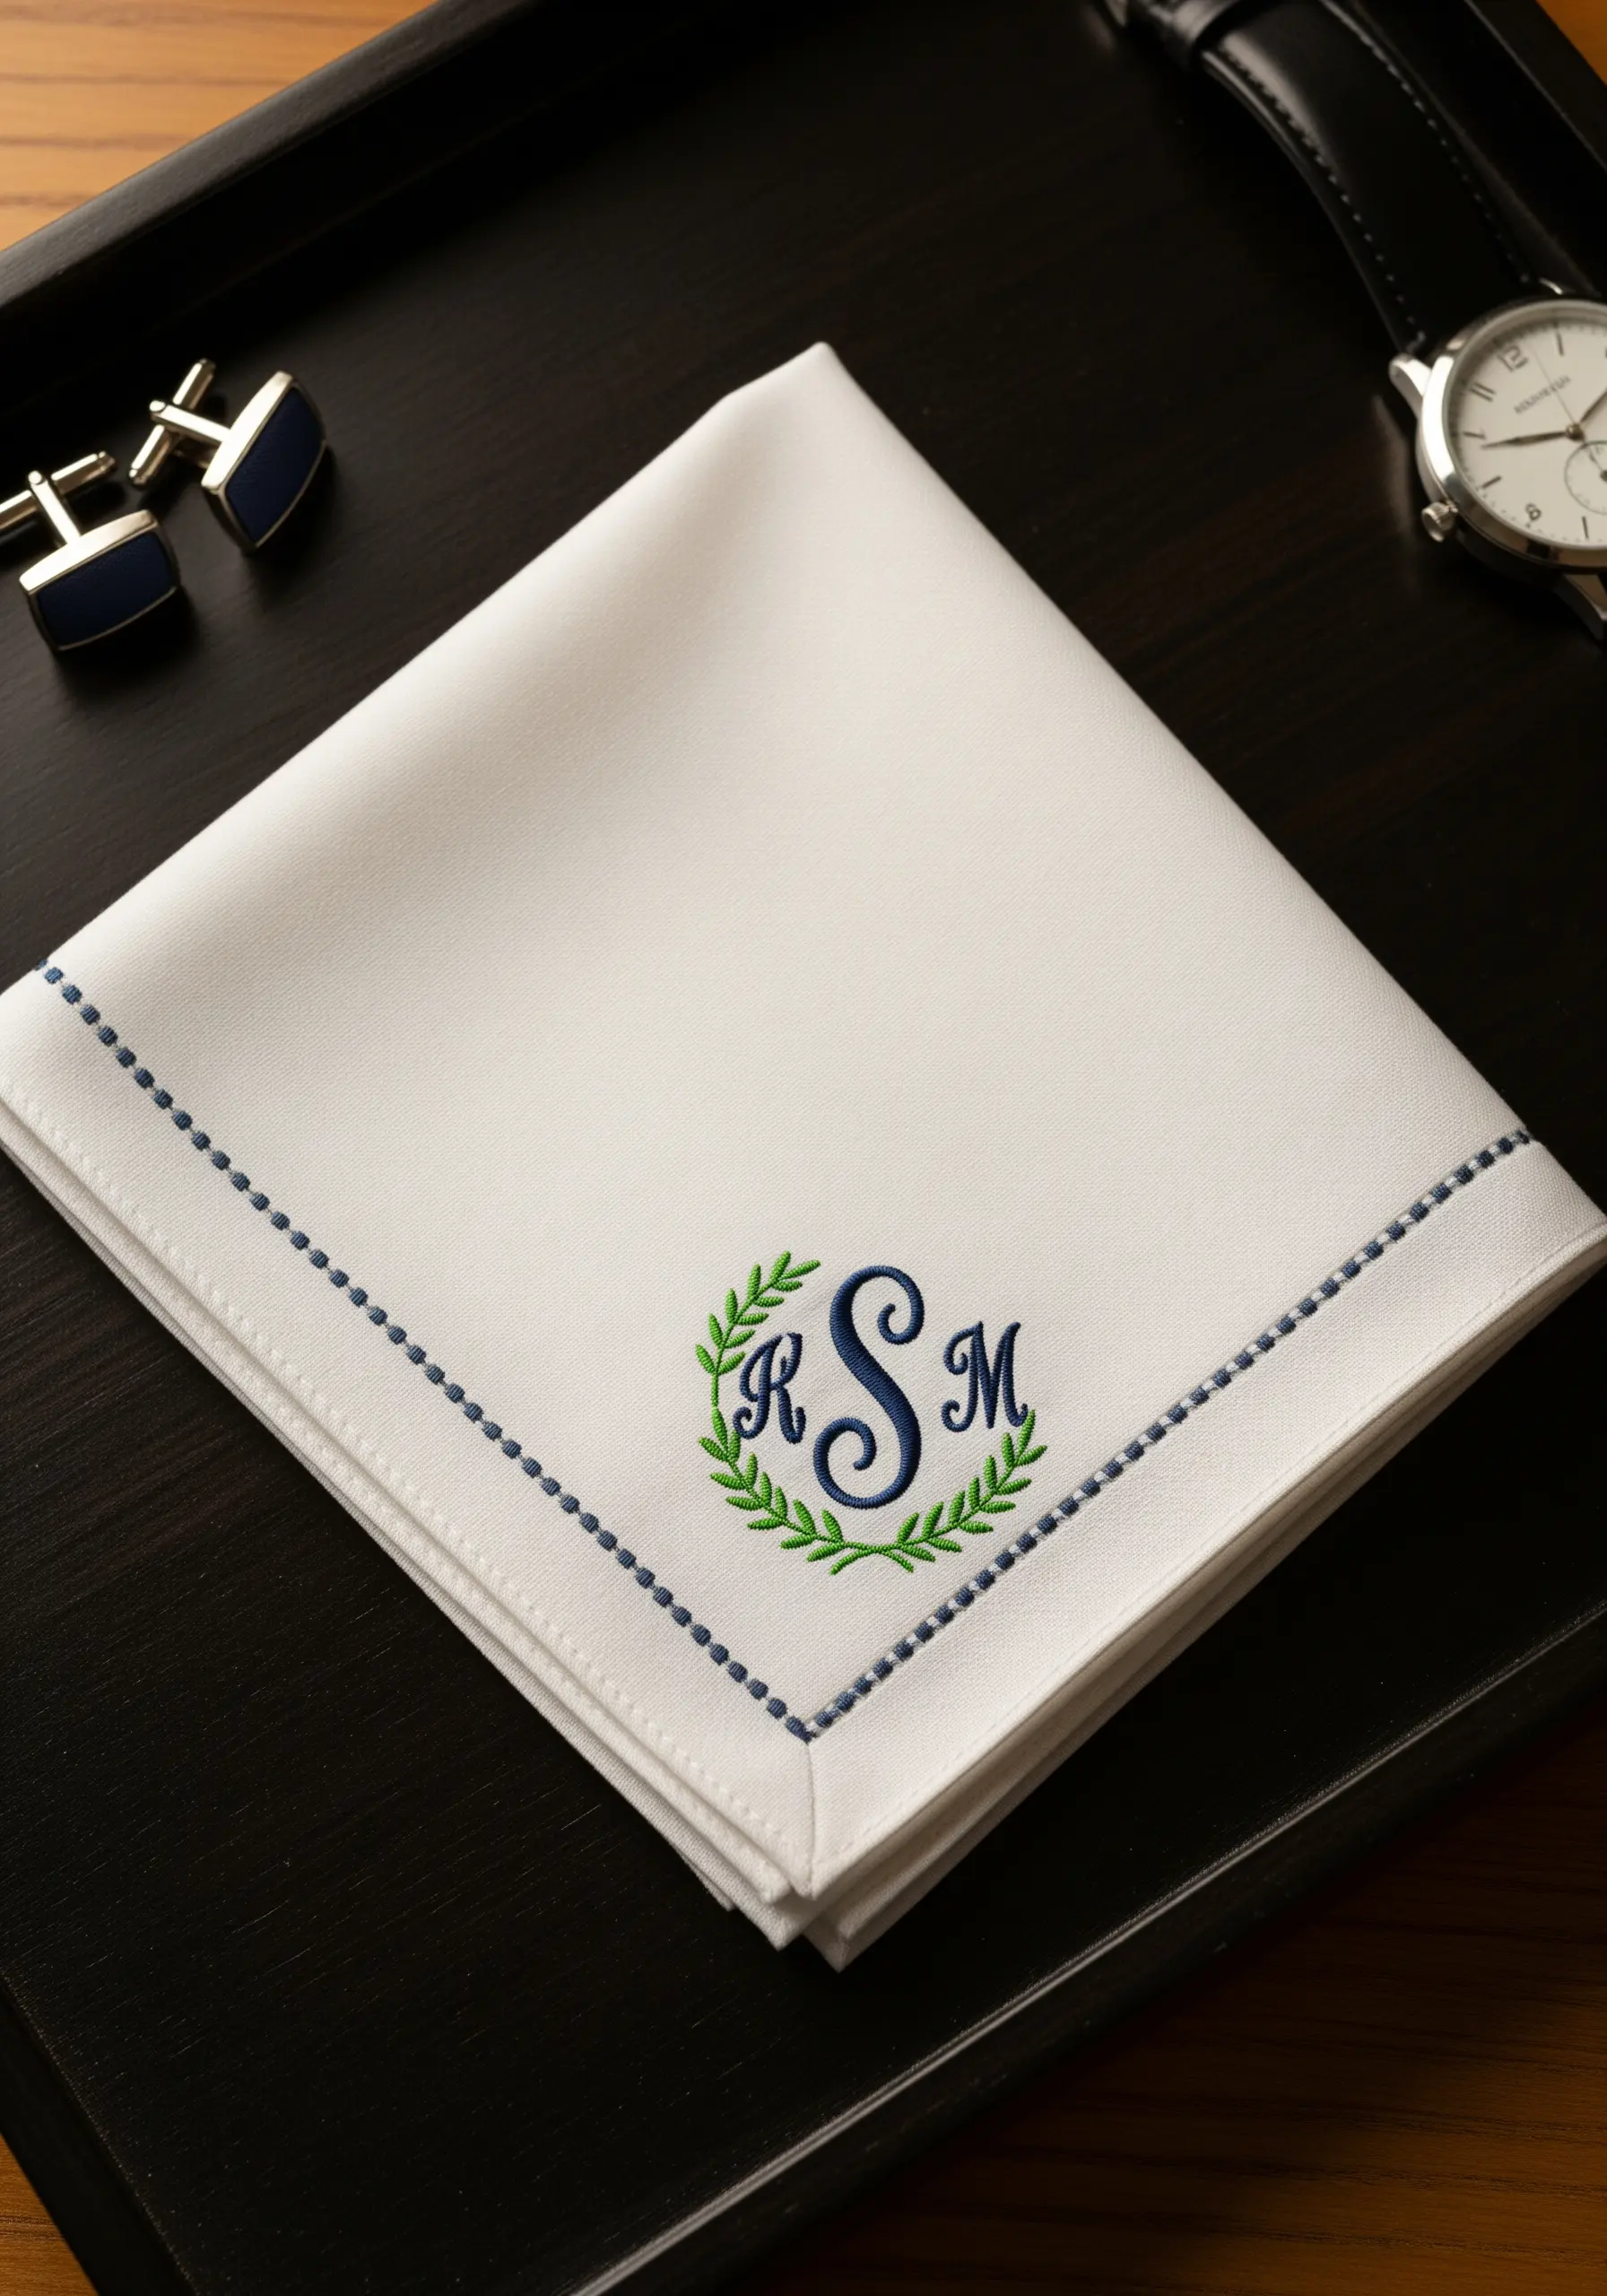
A timeless monogram combines different lettering styles for a dynamic look. Try a bold, satin-stitched serif font for the outer initials and a contrasting elegant script for the central letter.
Frame the monogram with a subtle wreath. Use a fishbone stitch for the leaves to give them a central vein and a natural, dimensional appearance. This is one of those minimal monogram styles that make personalized gifts look high-end.
For the border, a simple running stitch or a hemstitch provides a clean, tailored finish that complements the intricate central design without competing with it.
15. Outline Houseplant Leaves for a Graphic Look
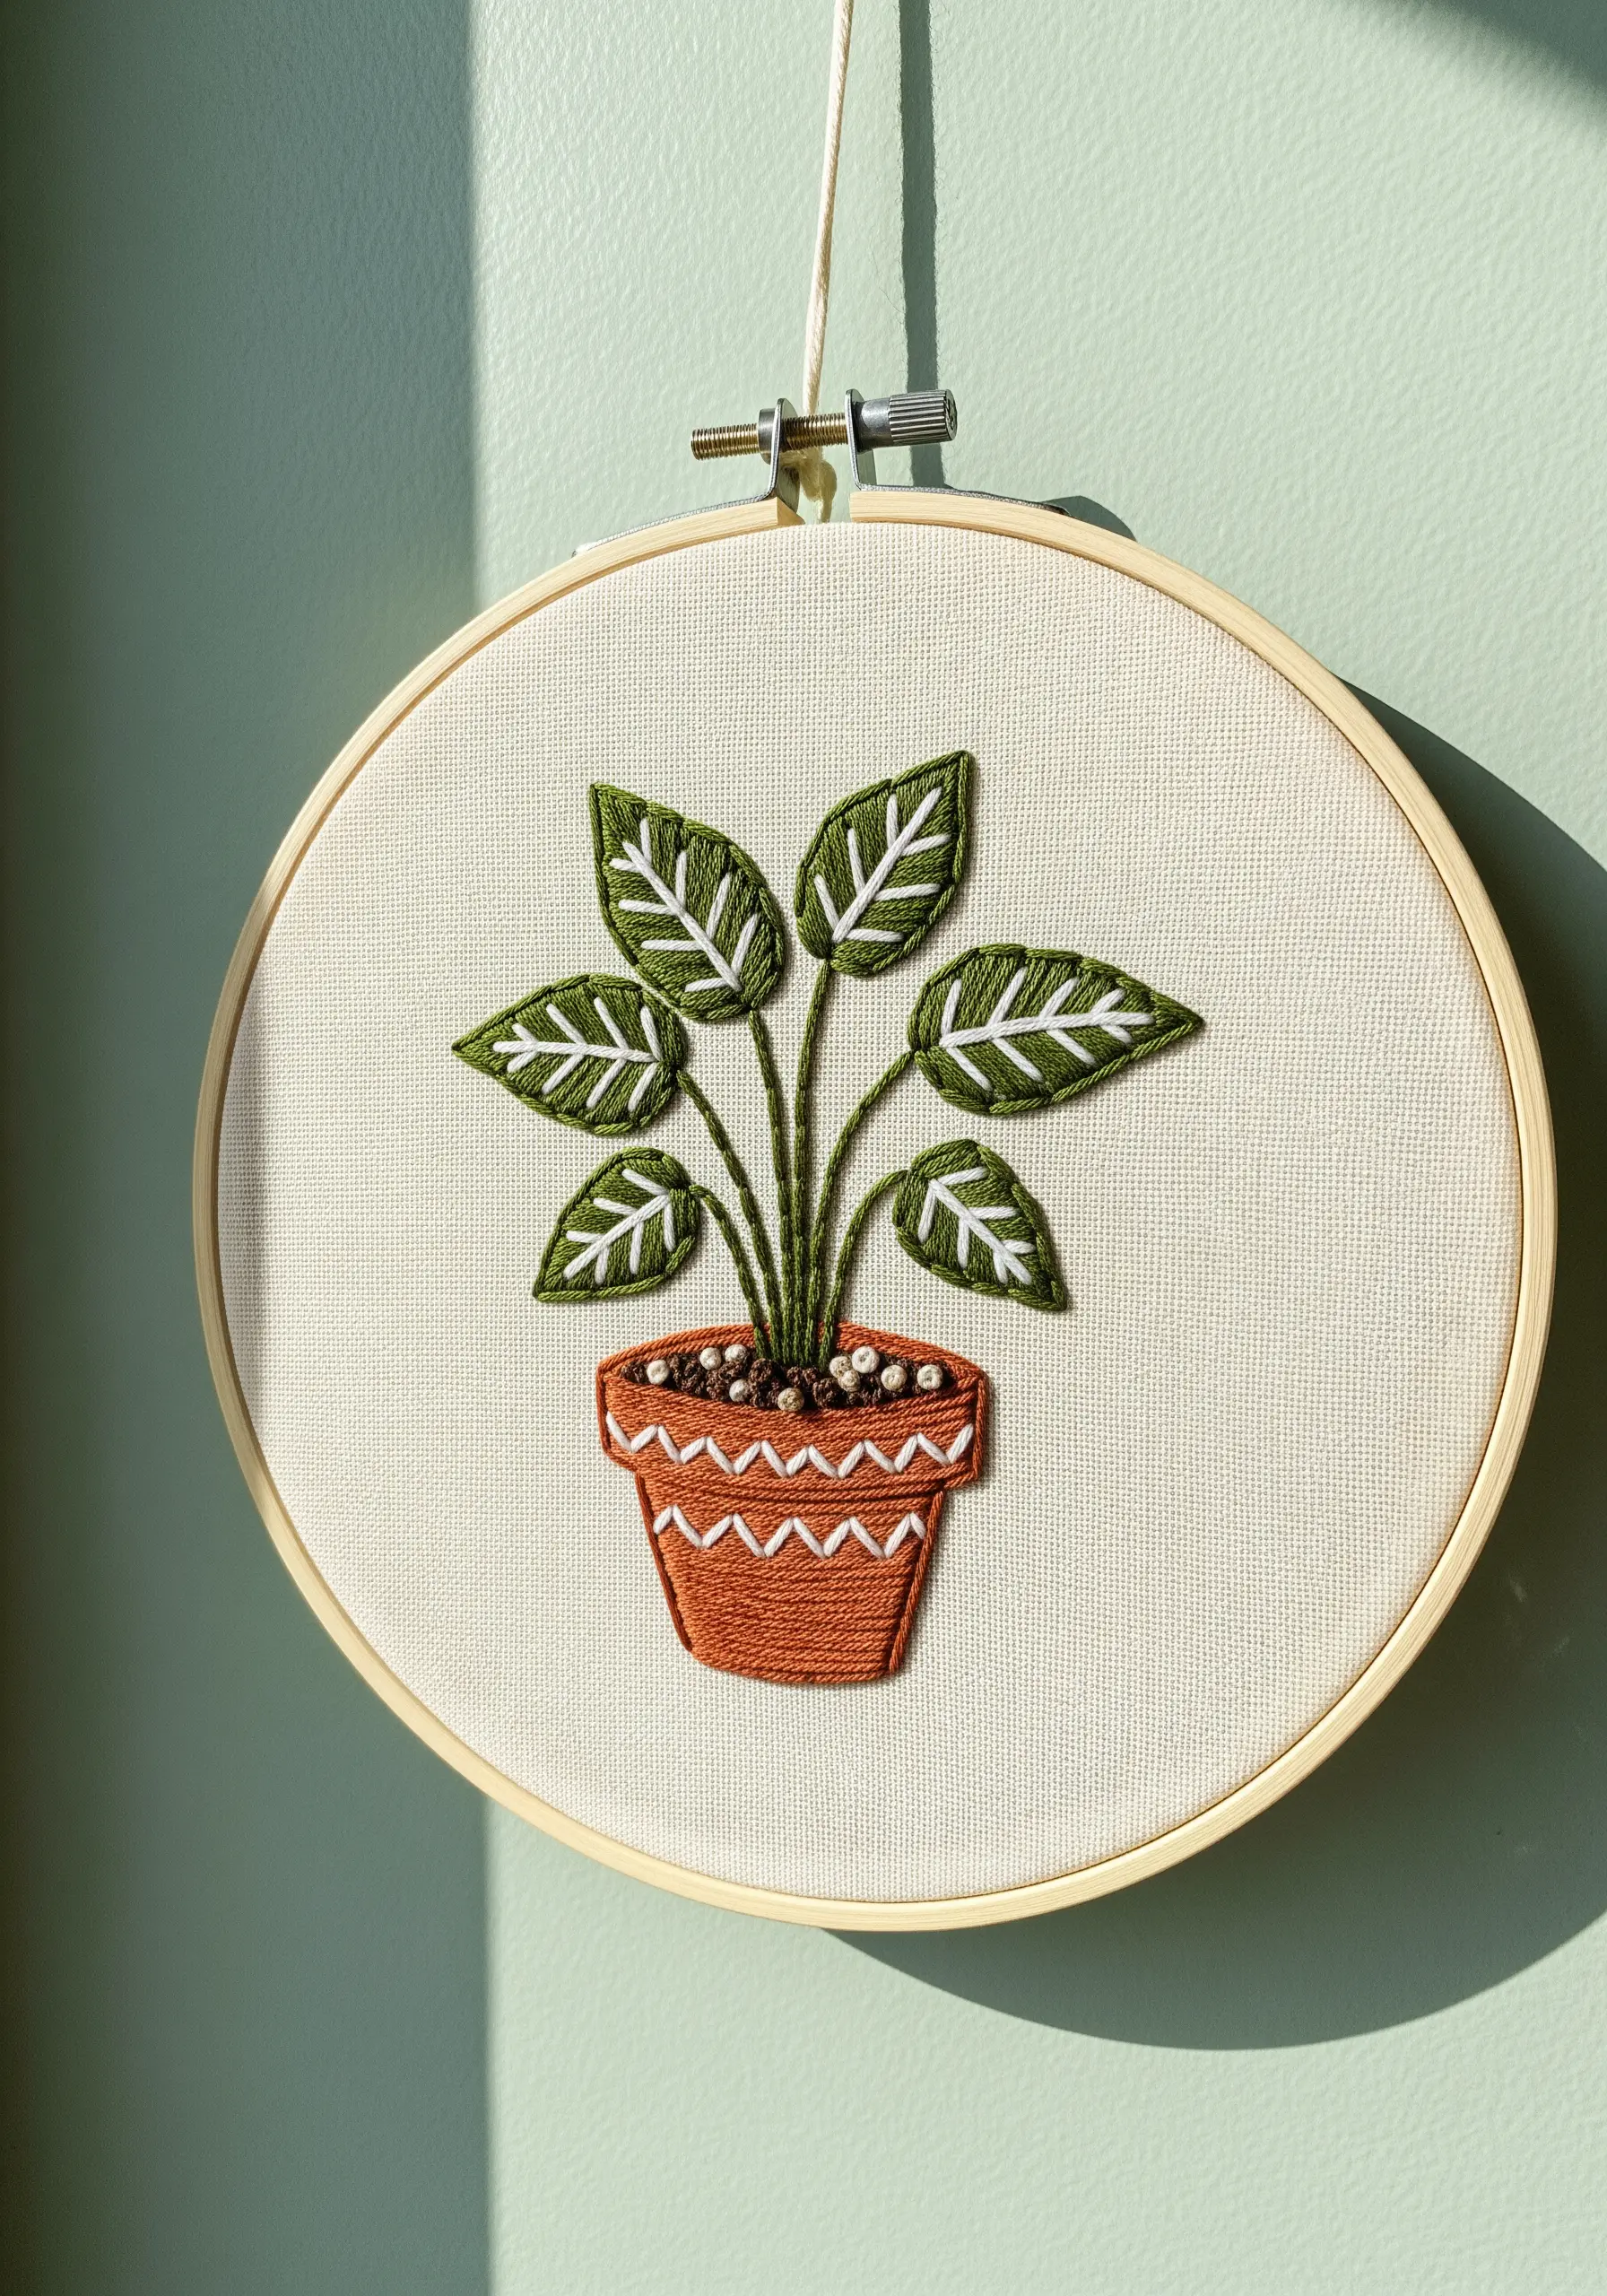
Instead of filling the leaves entirely, use a bold outline to create a modern, graphic effect. A thick chain stitch or a heavy backstitch using 4-6 strands of thread will give your lines definition and weight.
Fill the leaves with a contrasting split stitch, making sure your stitches follow the direction of the leaf’s veins. This subtle detail adds texture and the illusion of light hitting the surface.
To create the ‘soil’ in the pot, fill the area with a dense cluster of French knots using two different shades of brown. This technique provides a wonderful, nubby texture that contrasts beautifully with the smooth leaves.
16. Embroider a Geometric Camera Strap
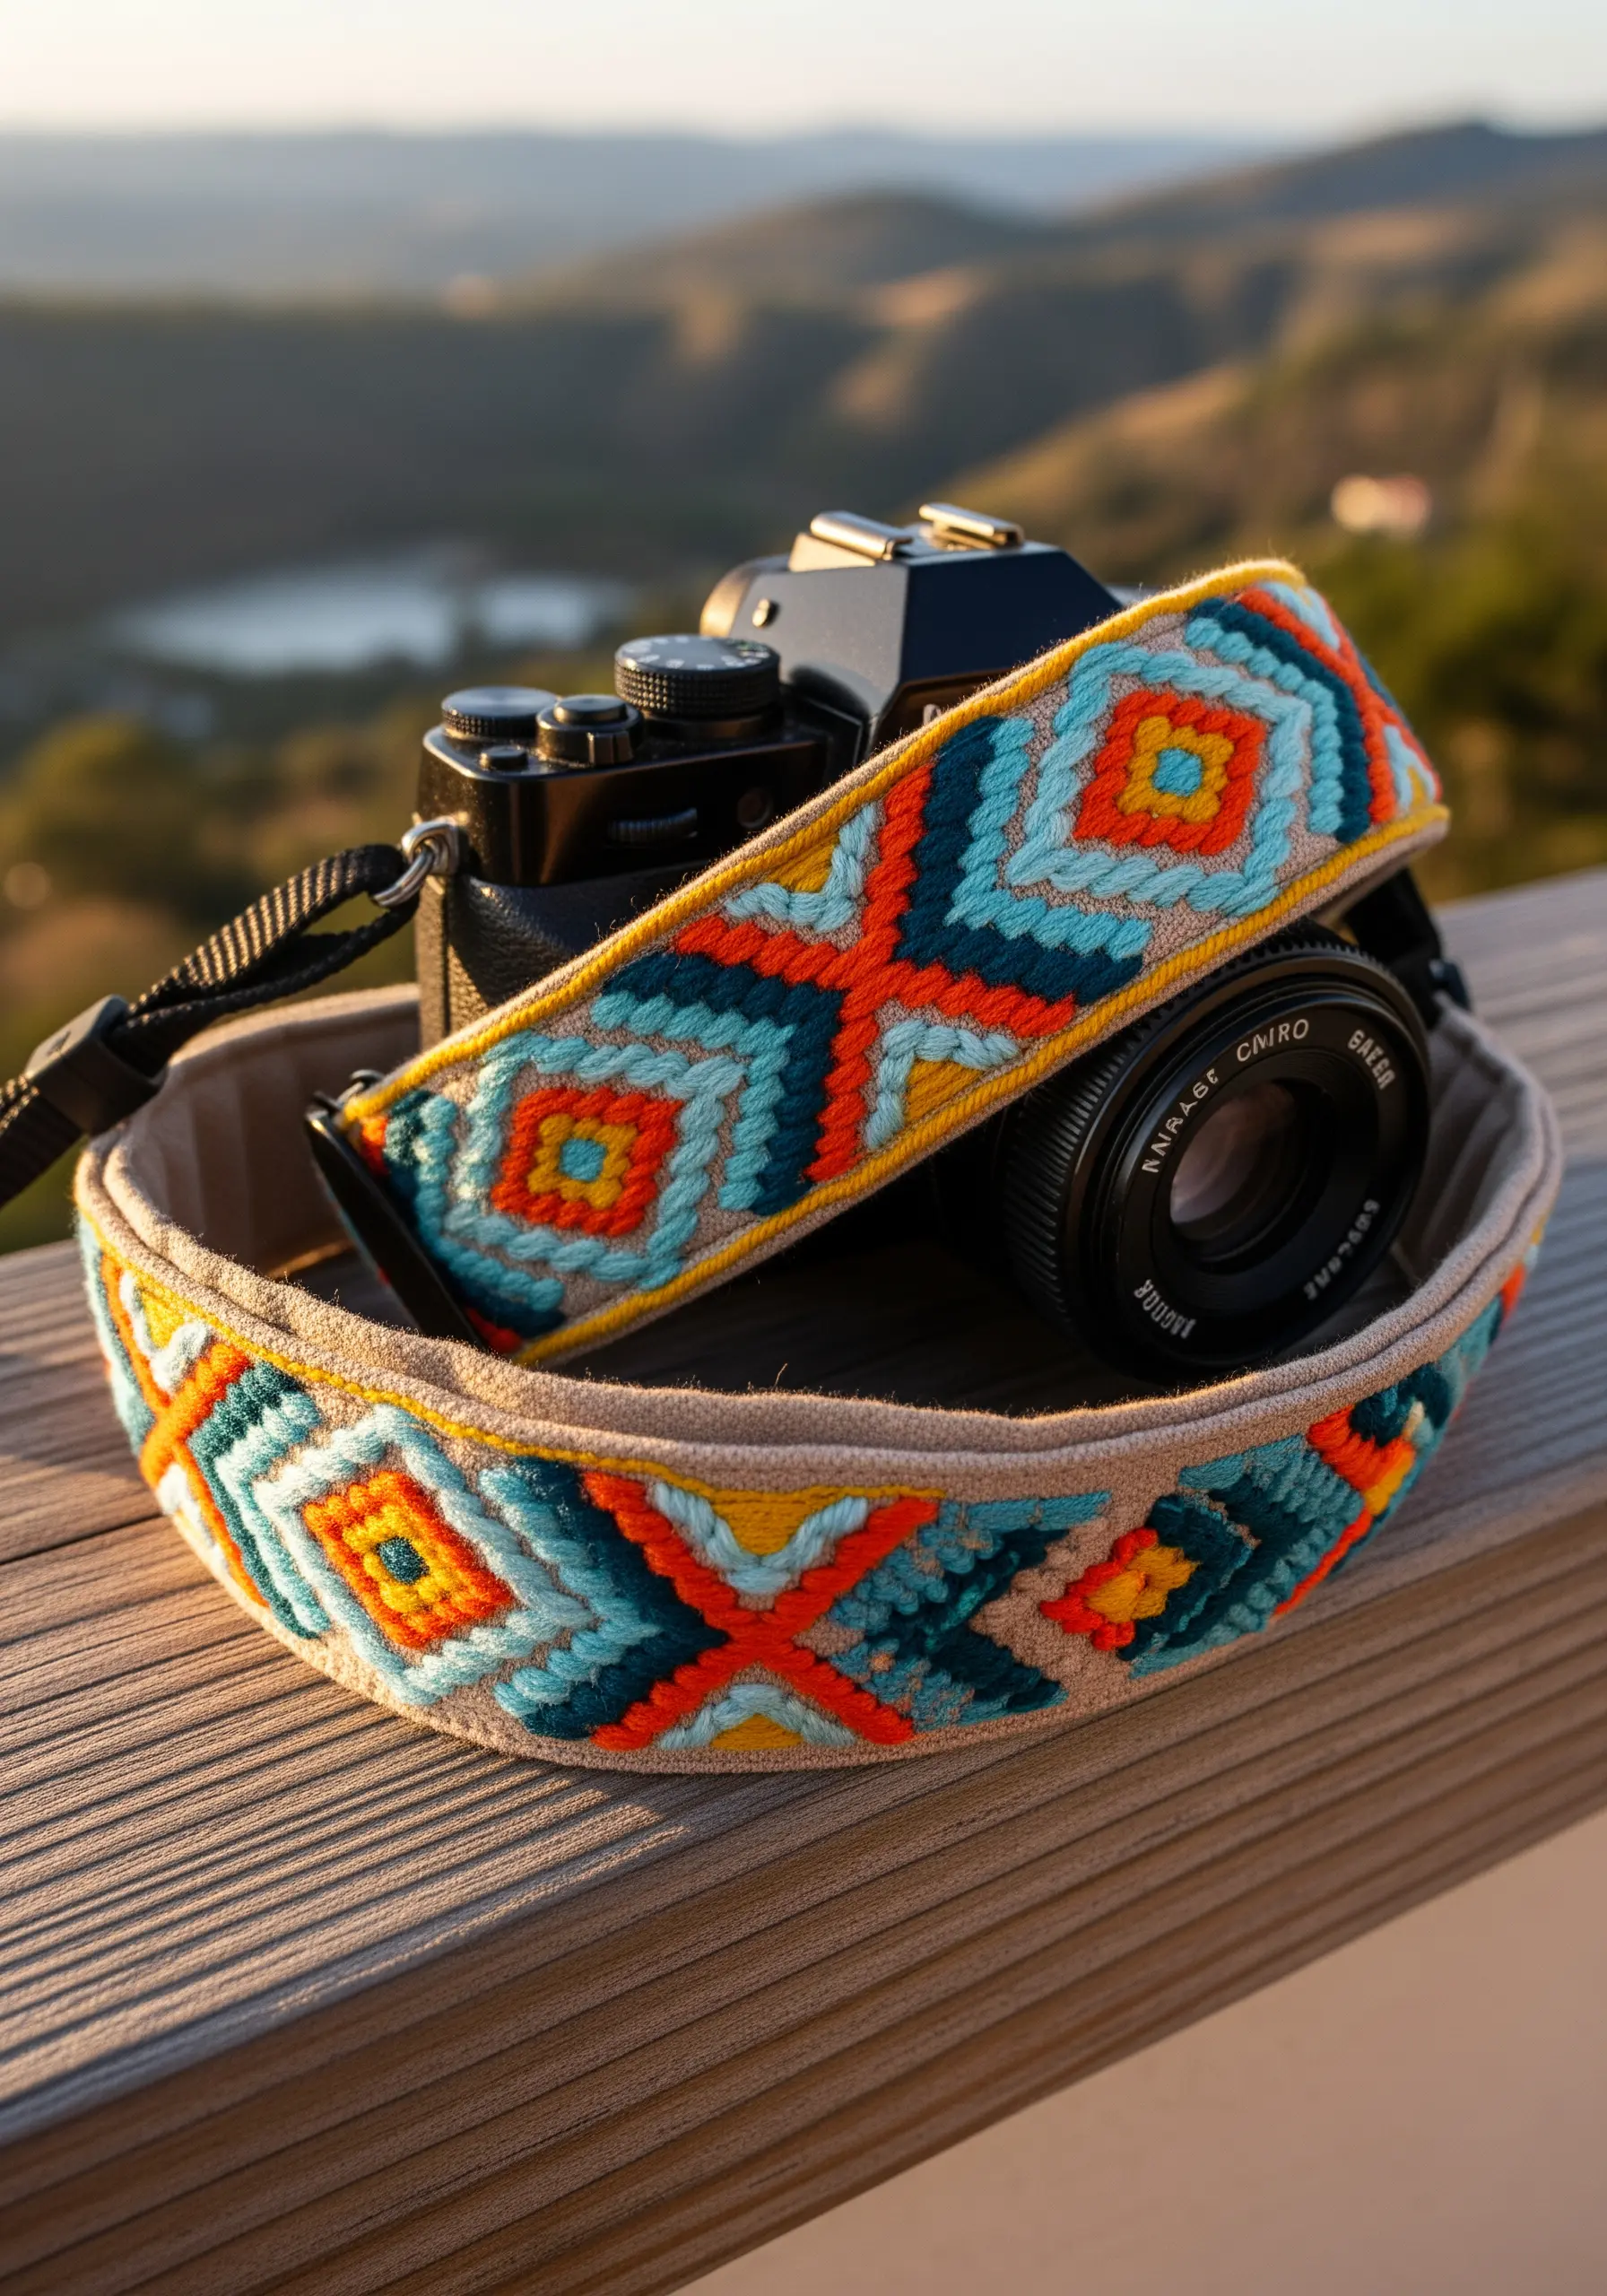
This style of embroidery, often called Bargello or Florentine stitch, uses straight, parallel stitches of varying lengths and colors to create geometric patterns. It’s perfect for functional items like straps because the stitches lie flat and are very durable.
To create this design, work in rows, using a single color to lay down a repeating pattern of vertical stitches over a set number of fabric threads (e.g., over four, then over two, then four again).
Use the first color row as a guide for the subsequent colors, echoing the pattern to create the wave or flame-like effect. A tapestry wool or six-strand cotton floss will provide excellent coverage and a soft, comfortable feel.
17. Add a Minimal Mandala to Felt Coasters

Felt is an ideal base for embroidery gifts because it’s stable, easy to stitch, and doesn’t fray. This means you don’t need a hoop and can cut it to any shape after stitching.
Use a simple backstitch with a contrasting, high-visibility thread (like white on colored felt) to create your mandala design. The beauty is in the clean, graphic lines, not complex stitches.
To assemble the coaster, stitch your design on one piece of felt, then place a second piece behind it and secure them together with a neat running stitch around the outer edge for a professional finish.
18. Craft a Forget-Me-Not Embroidered Gift Tag
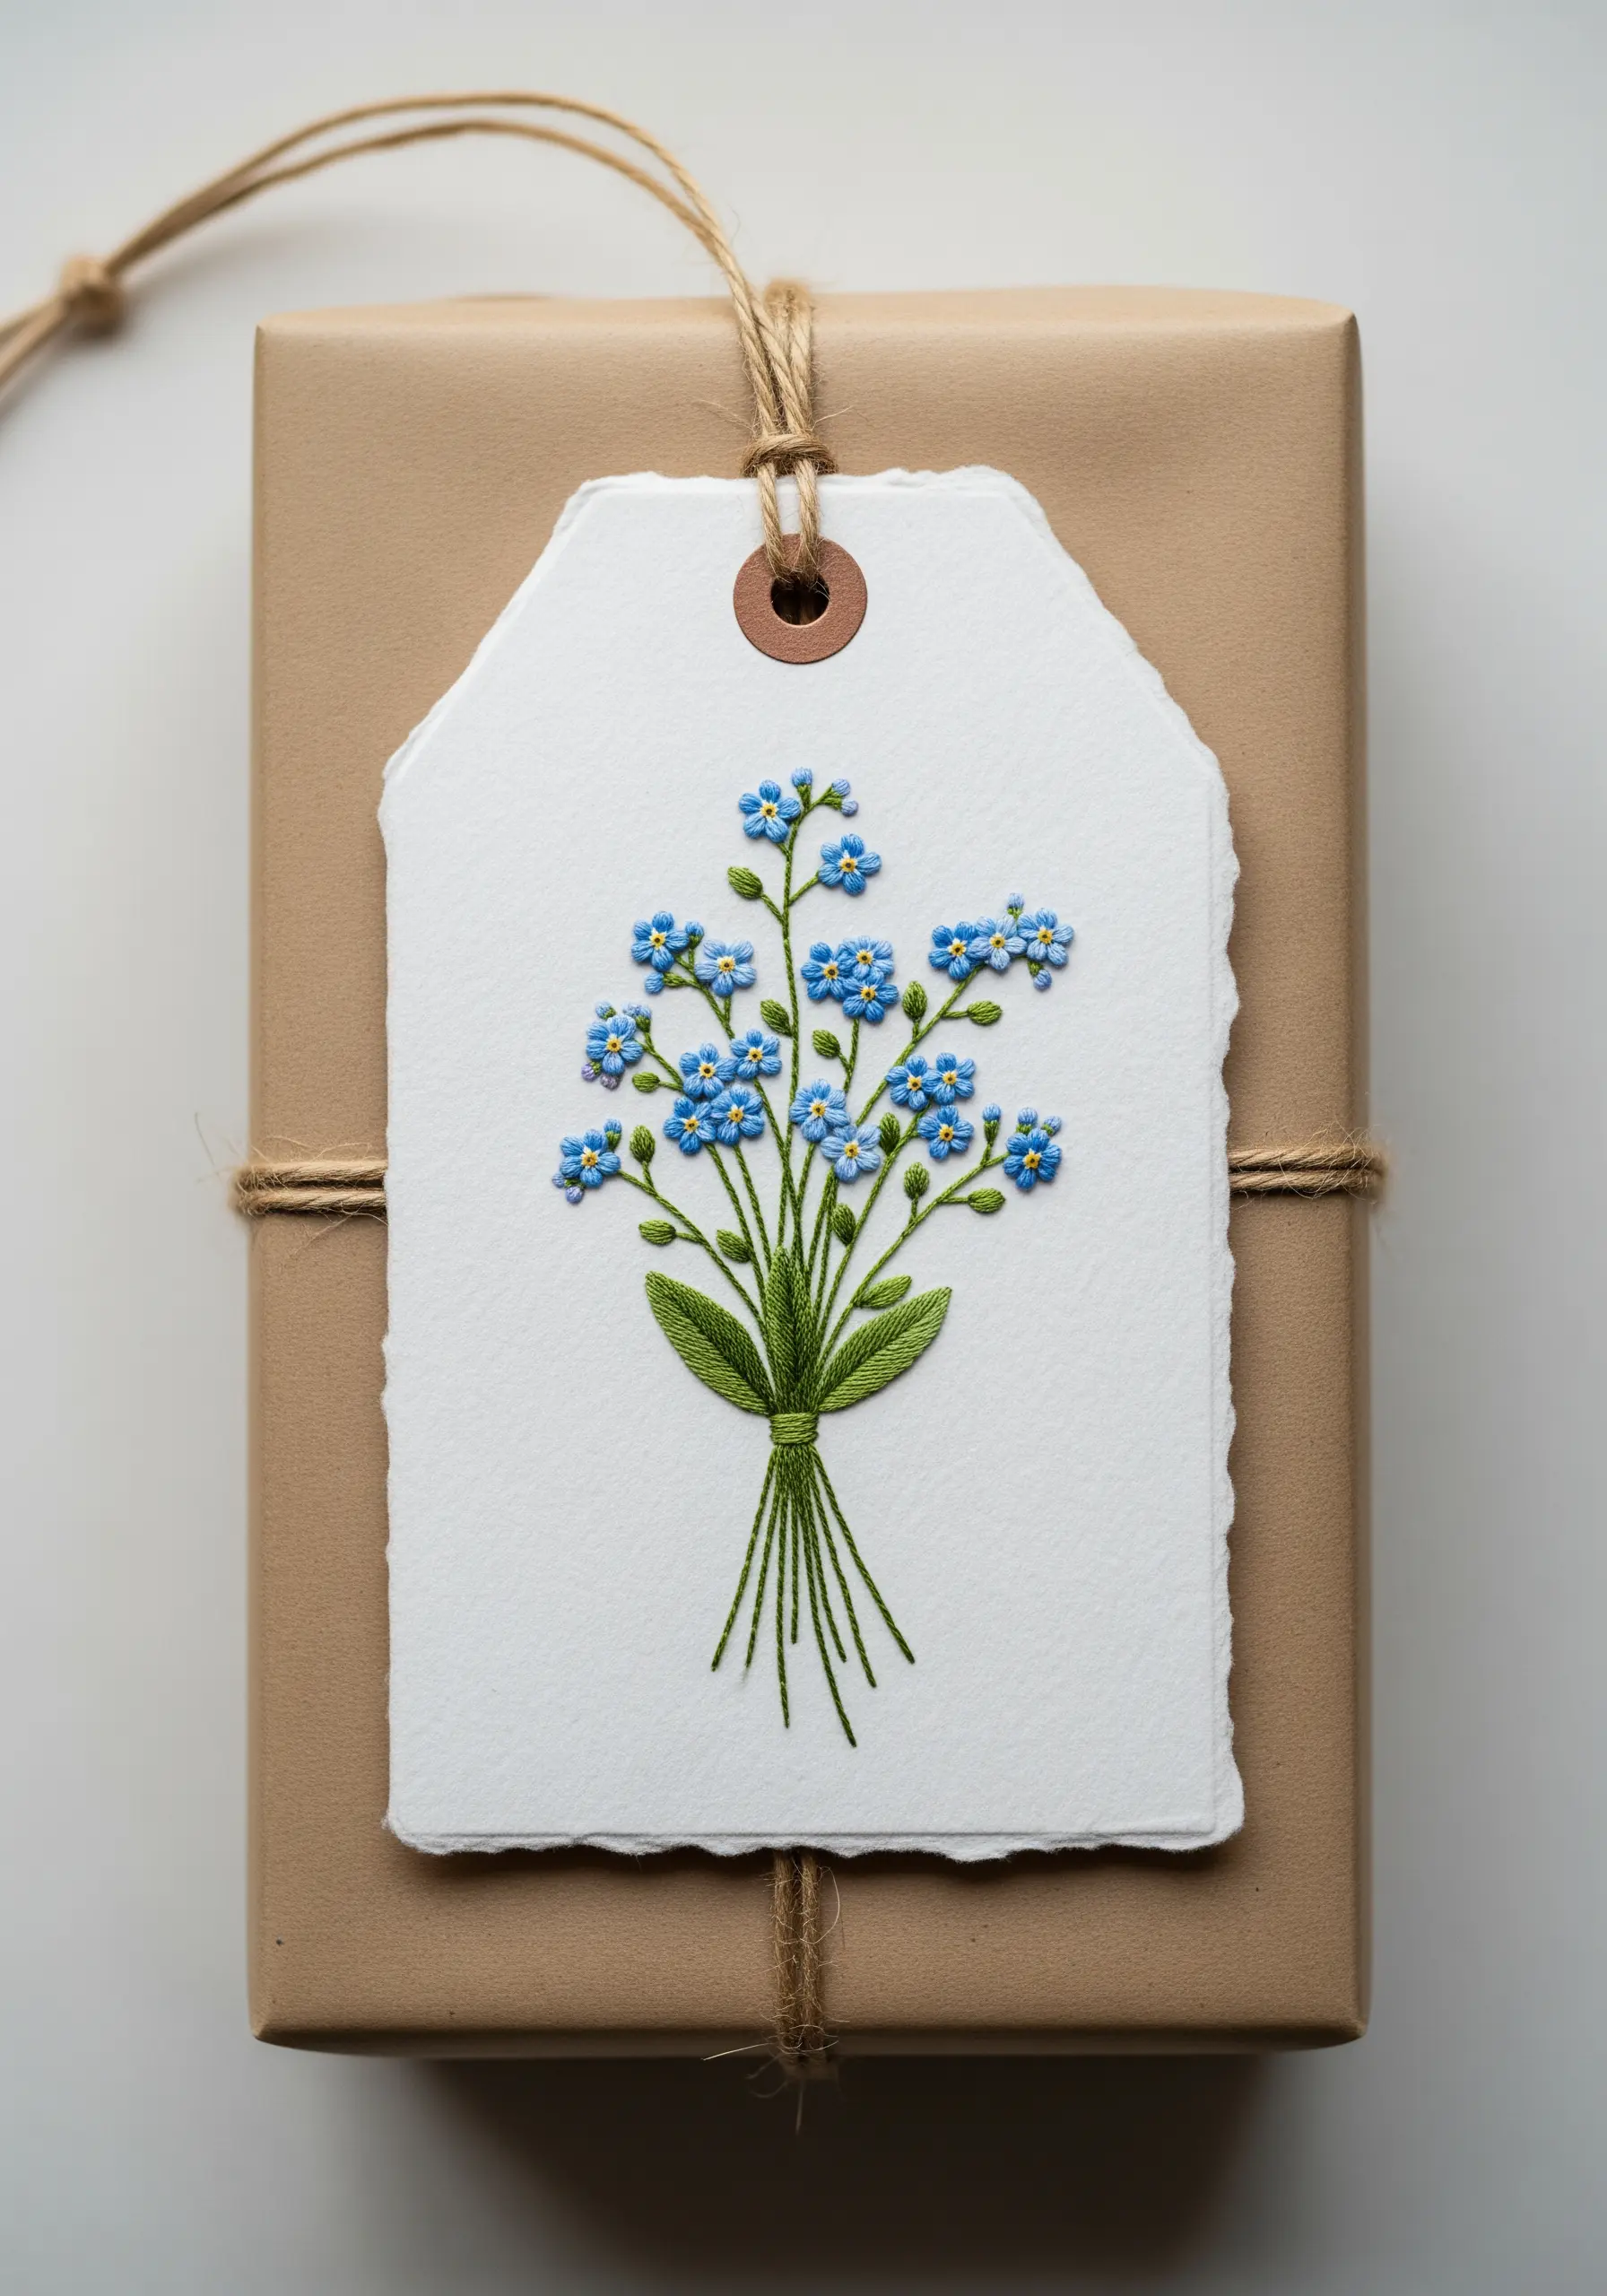
To embroider on paper or cardstock, you must first perforate your design. Lightly trace your pattern, then use a pin or a small awl to punch holes at regular intervals along the lines where your stitches will go.
Use a limited number of thread strands (1-2) and simple stitches. The forget-me-nots are perfect for this: use five individual lazy daisy stitches for the petals and a single French knot in the center.
A simple stem stitch for the stems is all you need to complete the bouquet. This technique turns a simple tag into a memorable keepsake.
Explore more paper art embroidery ideas to elevate your gift wrapping.
19. Personalize a Pet Bandana with a Playful Print
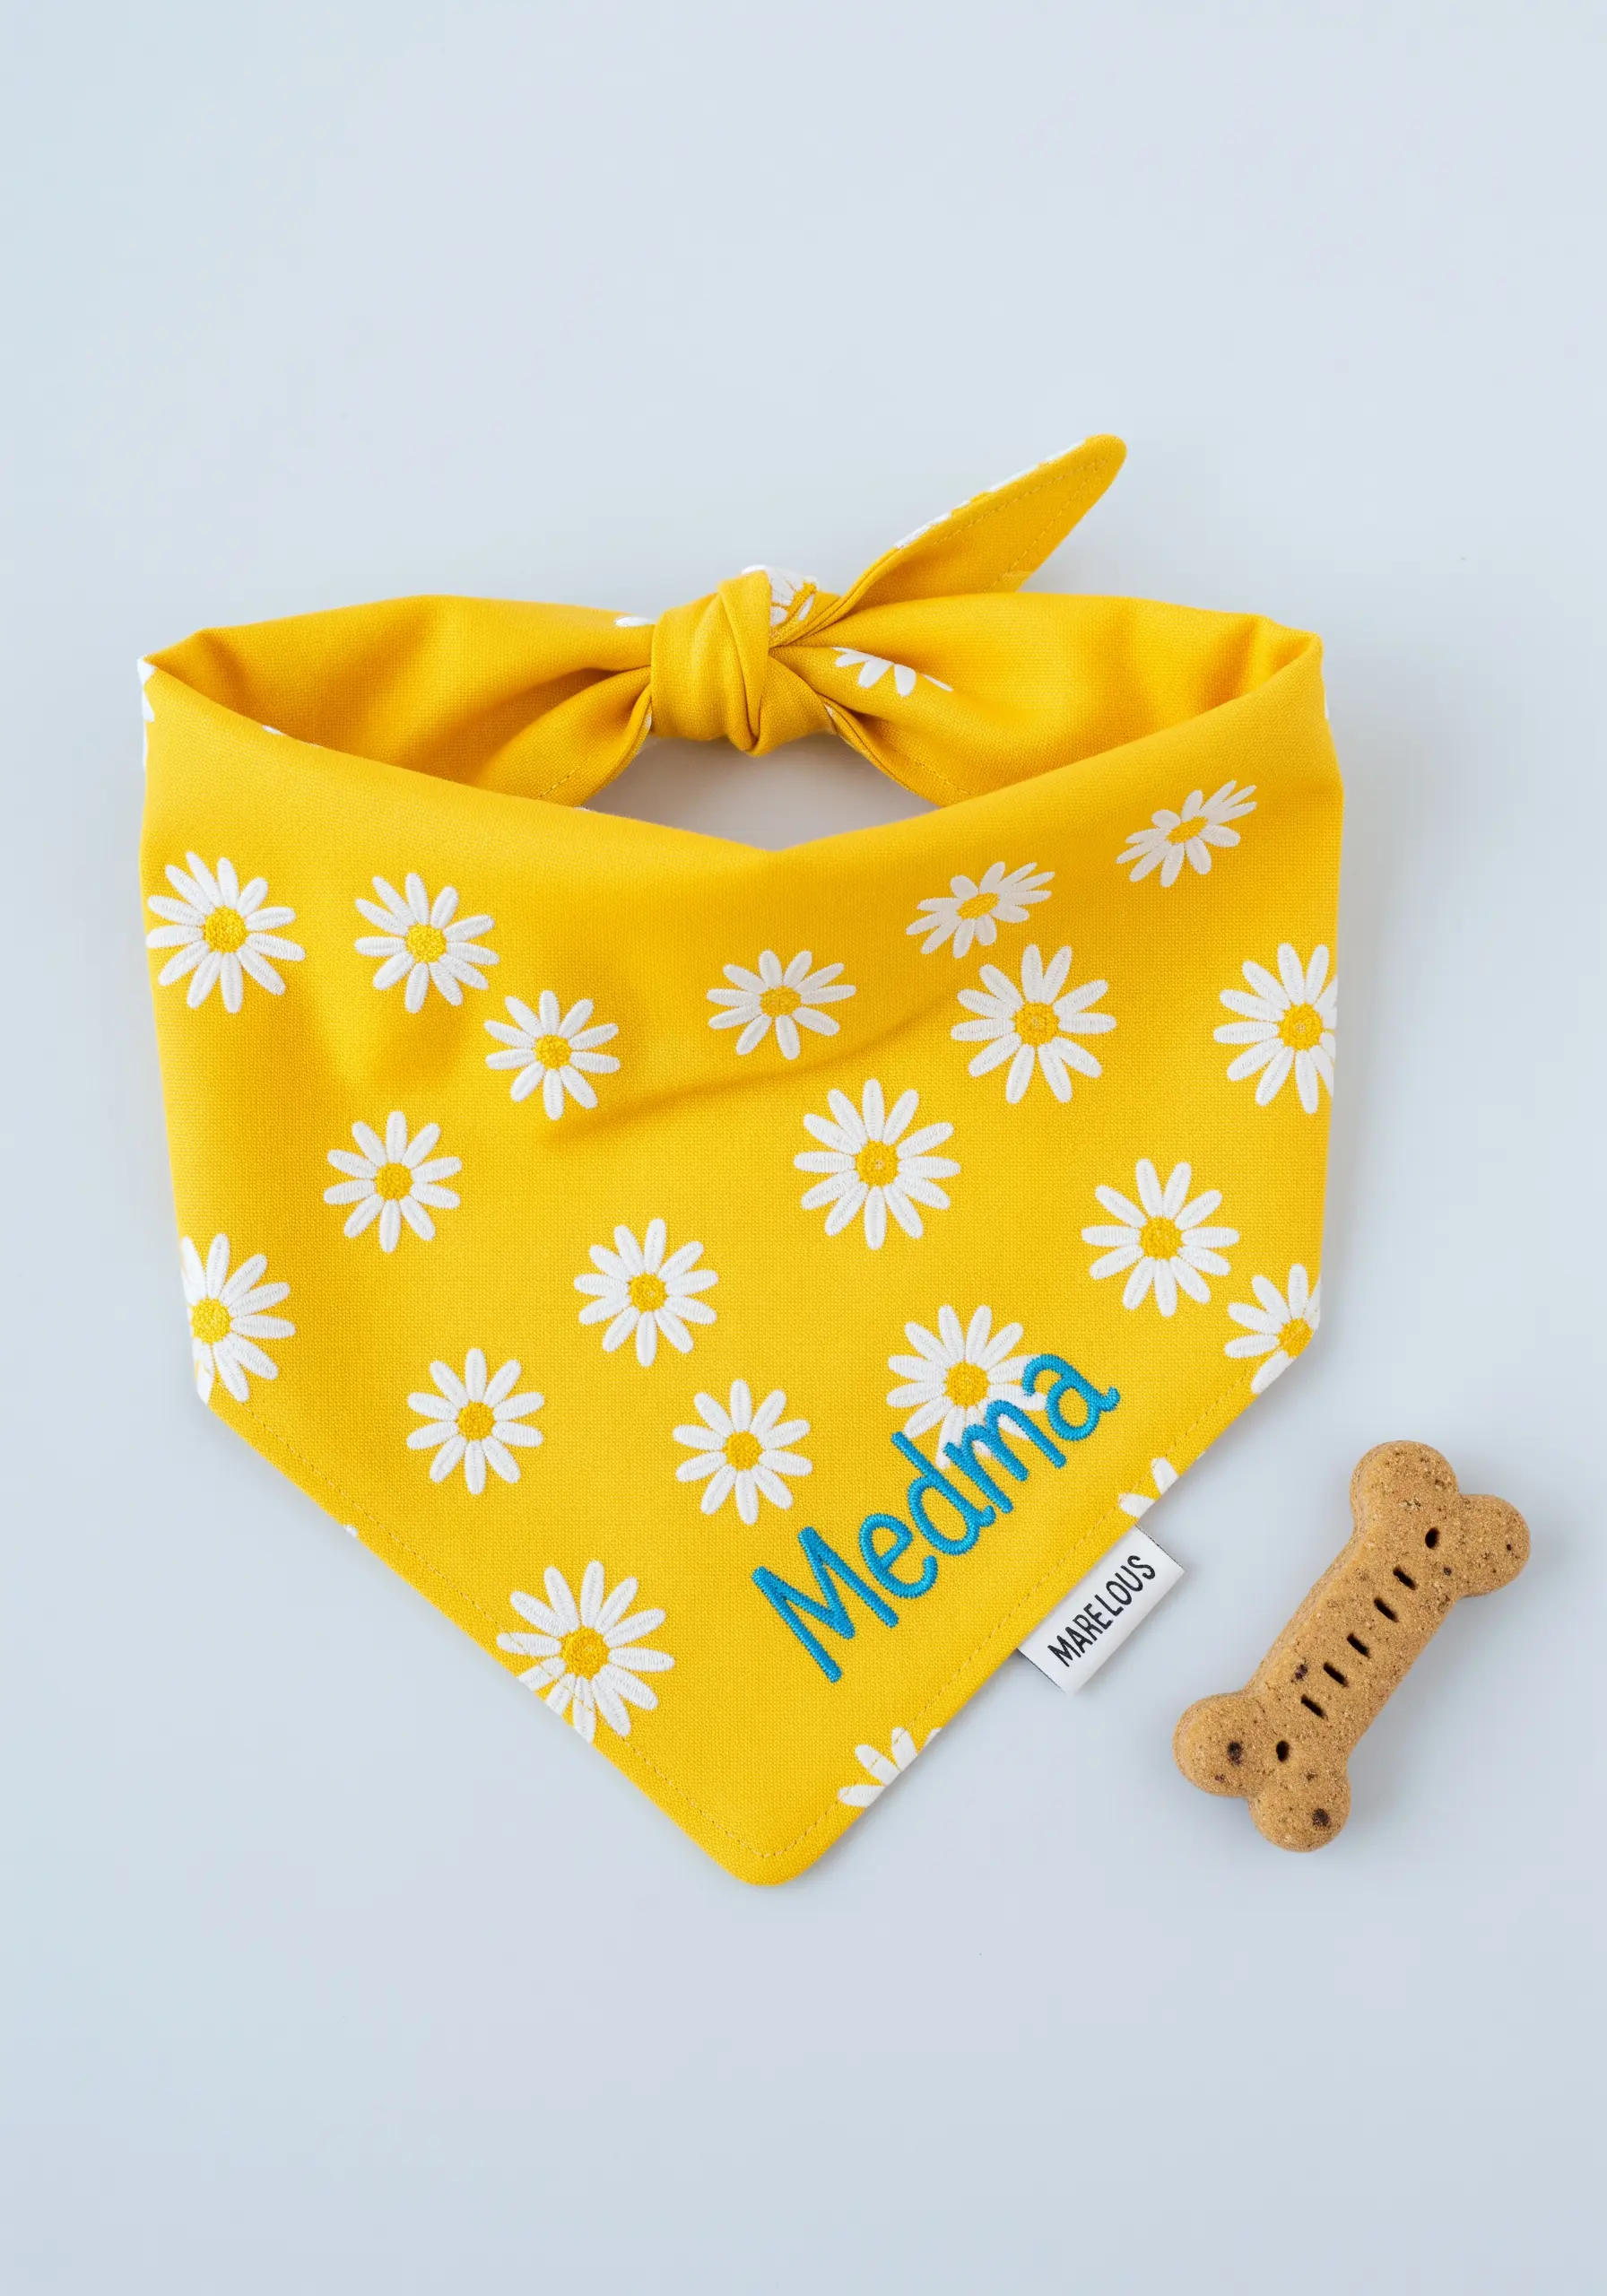
When adding a name to patterned fabric, choose a thread color that provides high contrast. A bright blue on a yellow background ensures the lettering stands out clearly.
To make the letters look full and professional, use a padded satin stitch. First, outline the letters with a split stitch, then fill the inside with small seed stitches. Finally, cover the entire area with satin stitches perpendicular to the padding. This creates a raised, embossed effect.
Always use a stabilizer on the back of thinner cotton fabrics to prevent the stitches from pulling and distorting the pattern.
20. Create a Protective Talisman Keychain
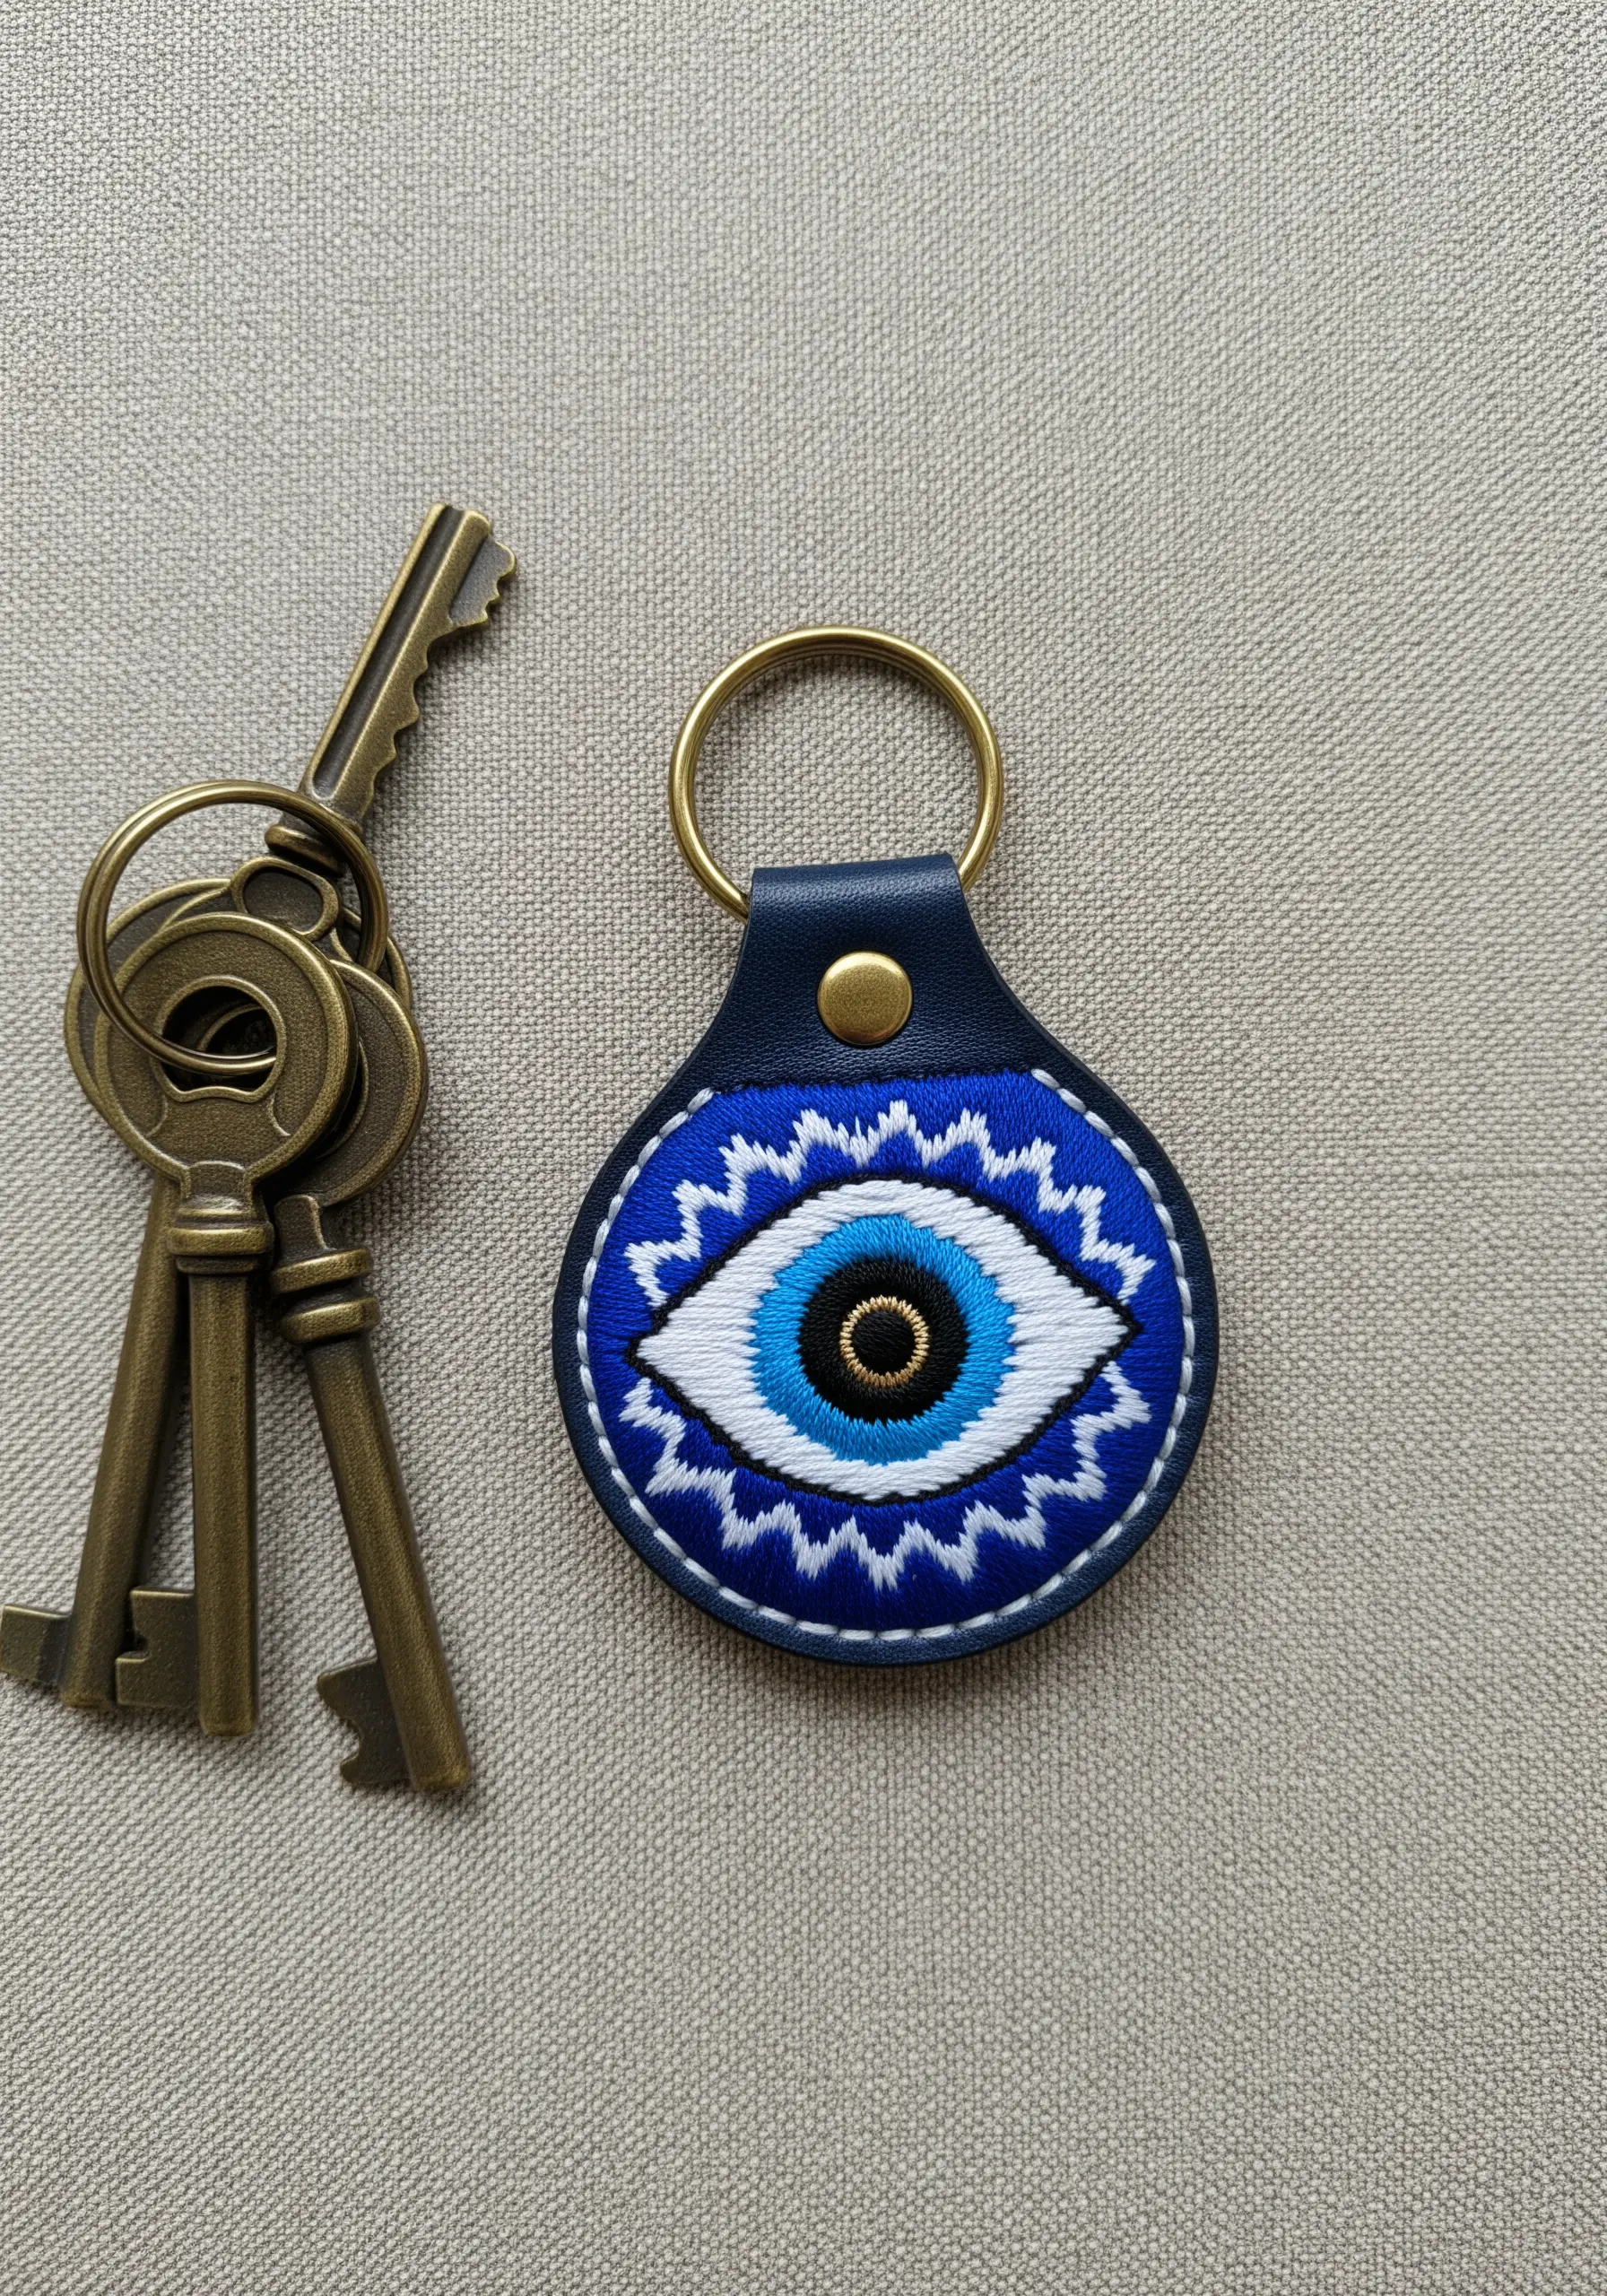
For a small, high-use item like a keychain, stitch density is key to durability. Use a tight, close satin stitch to fill in the colors of the evil eye motif, ensuring no fabric shows through.
Stitch the design on a sturdy, non-fraying material like faux leather or felt. This allows you to cut the shape out cleanly after embroidering without needing to finish the edges.
To add a final professional touch, use a contrasting backstitch to outline the entire shape. This not only defines the design but also helps to secure the satin stitches along the edge.
21. Stitch a Scribble-Art Glasses Case
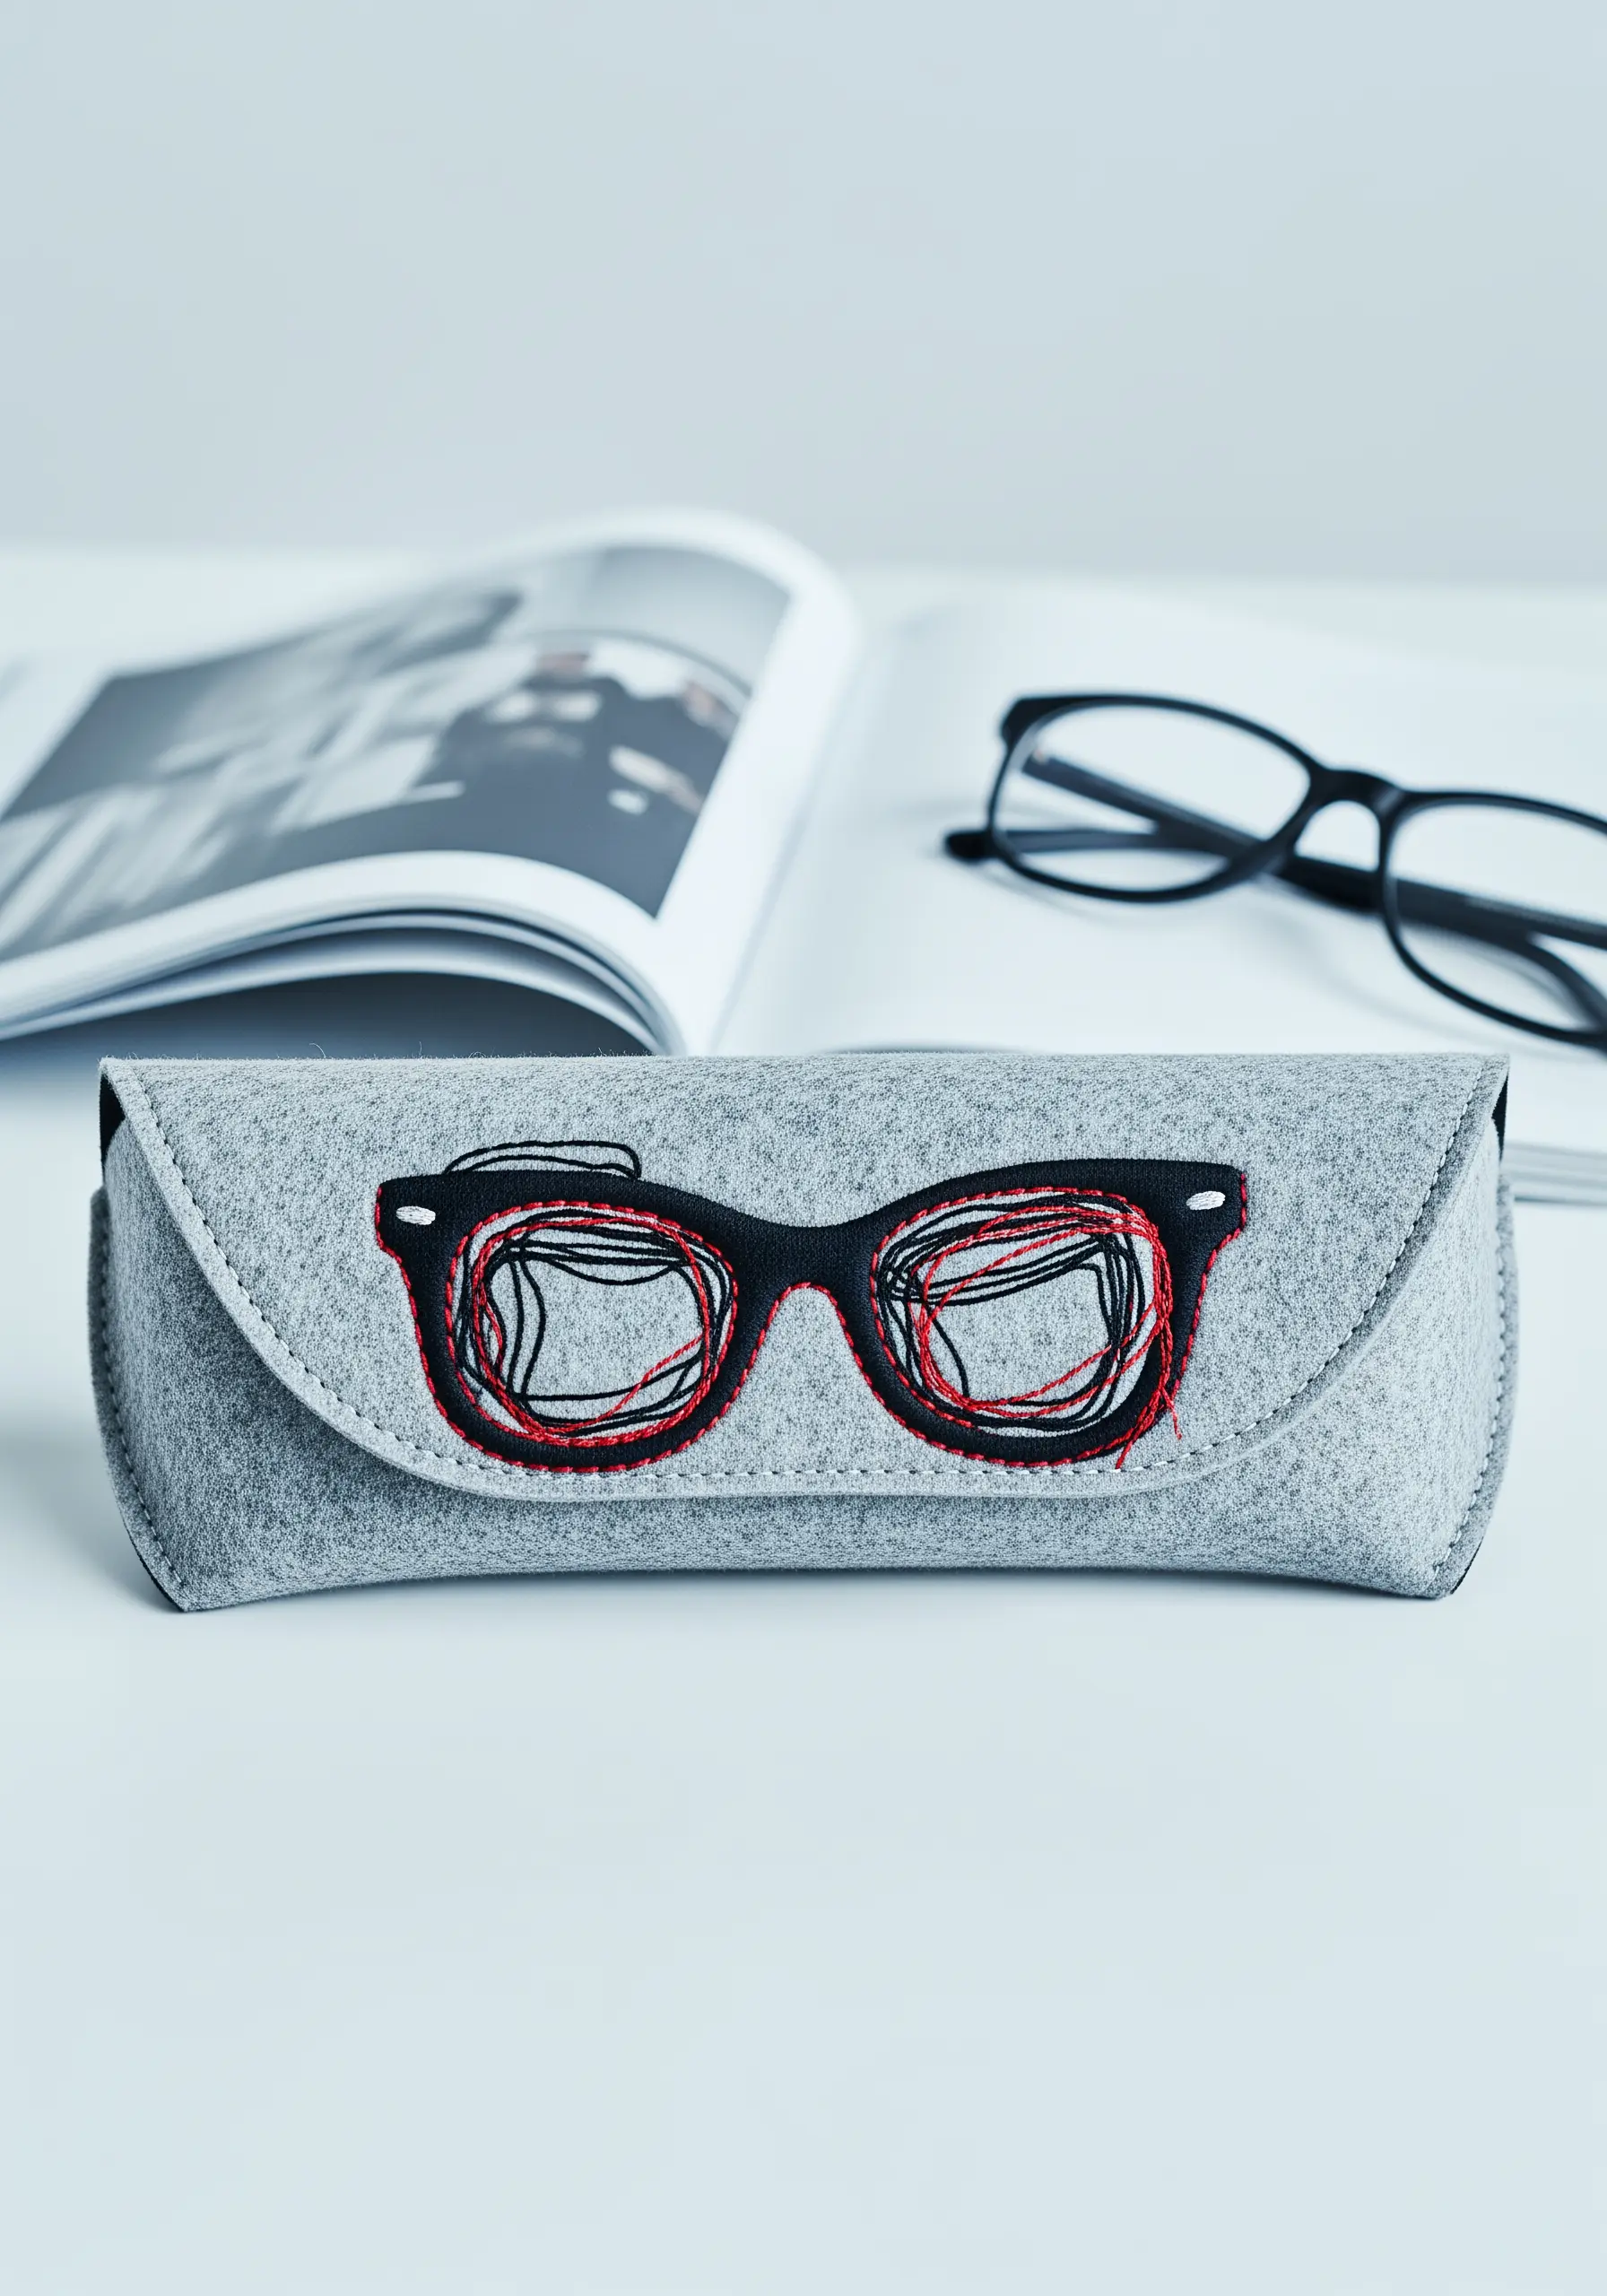
Embrace a free-form, expressive style by using thread to ‘scribble’ your design. Instead of precise outlines, use a long, looping running stitch in multiple layers to build up the shape of the glasses.
Use a primary color (black) for the main shape and an accent color (red) to add pops of energetic detail. Let the threads overlap and cross to create a sense of movement and spontaneity.
This technique is perfect for felt, as the soft, matte texture of the fabric provides a great canvas for the glossy thread, making the simple design visually interesting and tactile.
22. Achieve Realistic Shading on an Artichoke Apron
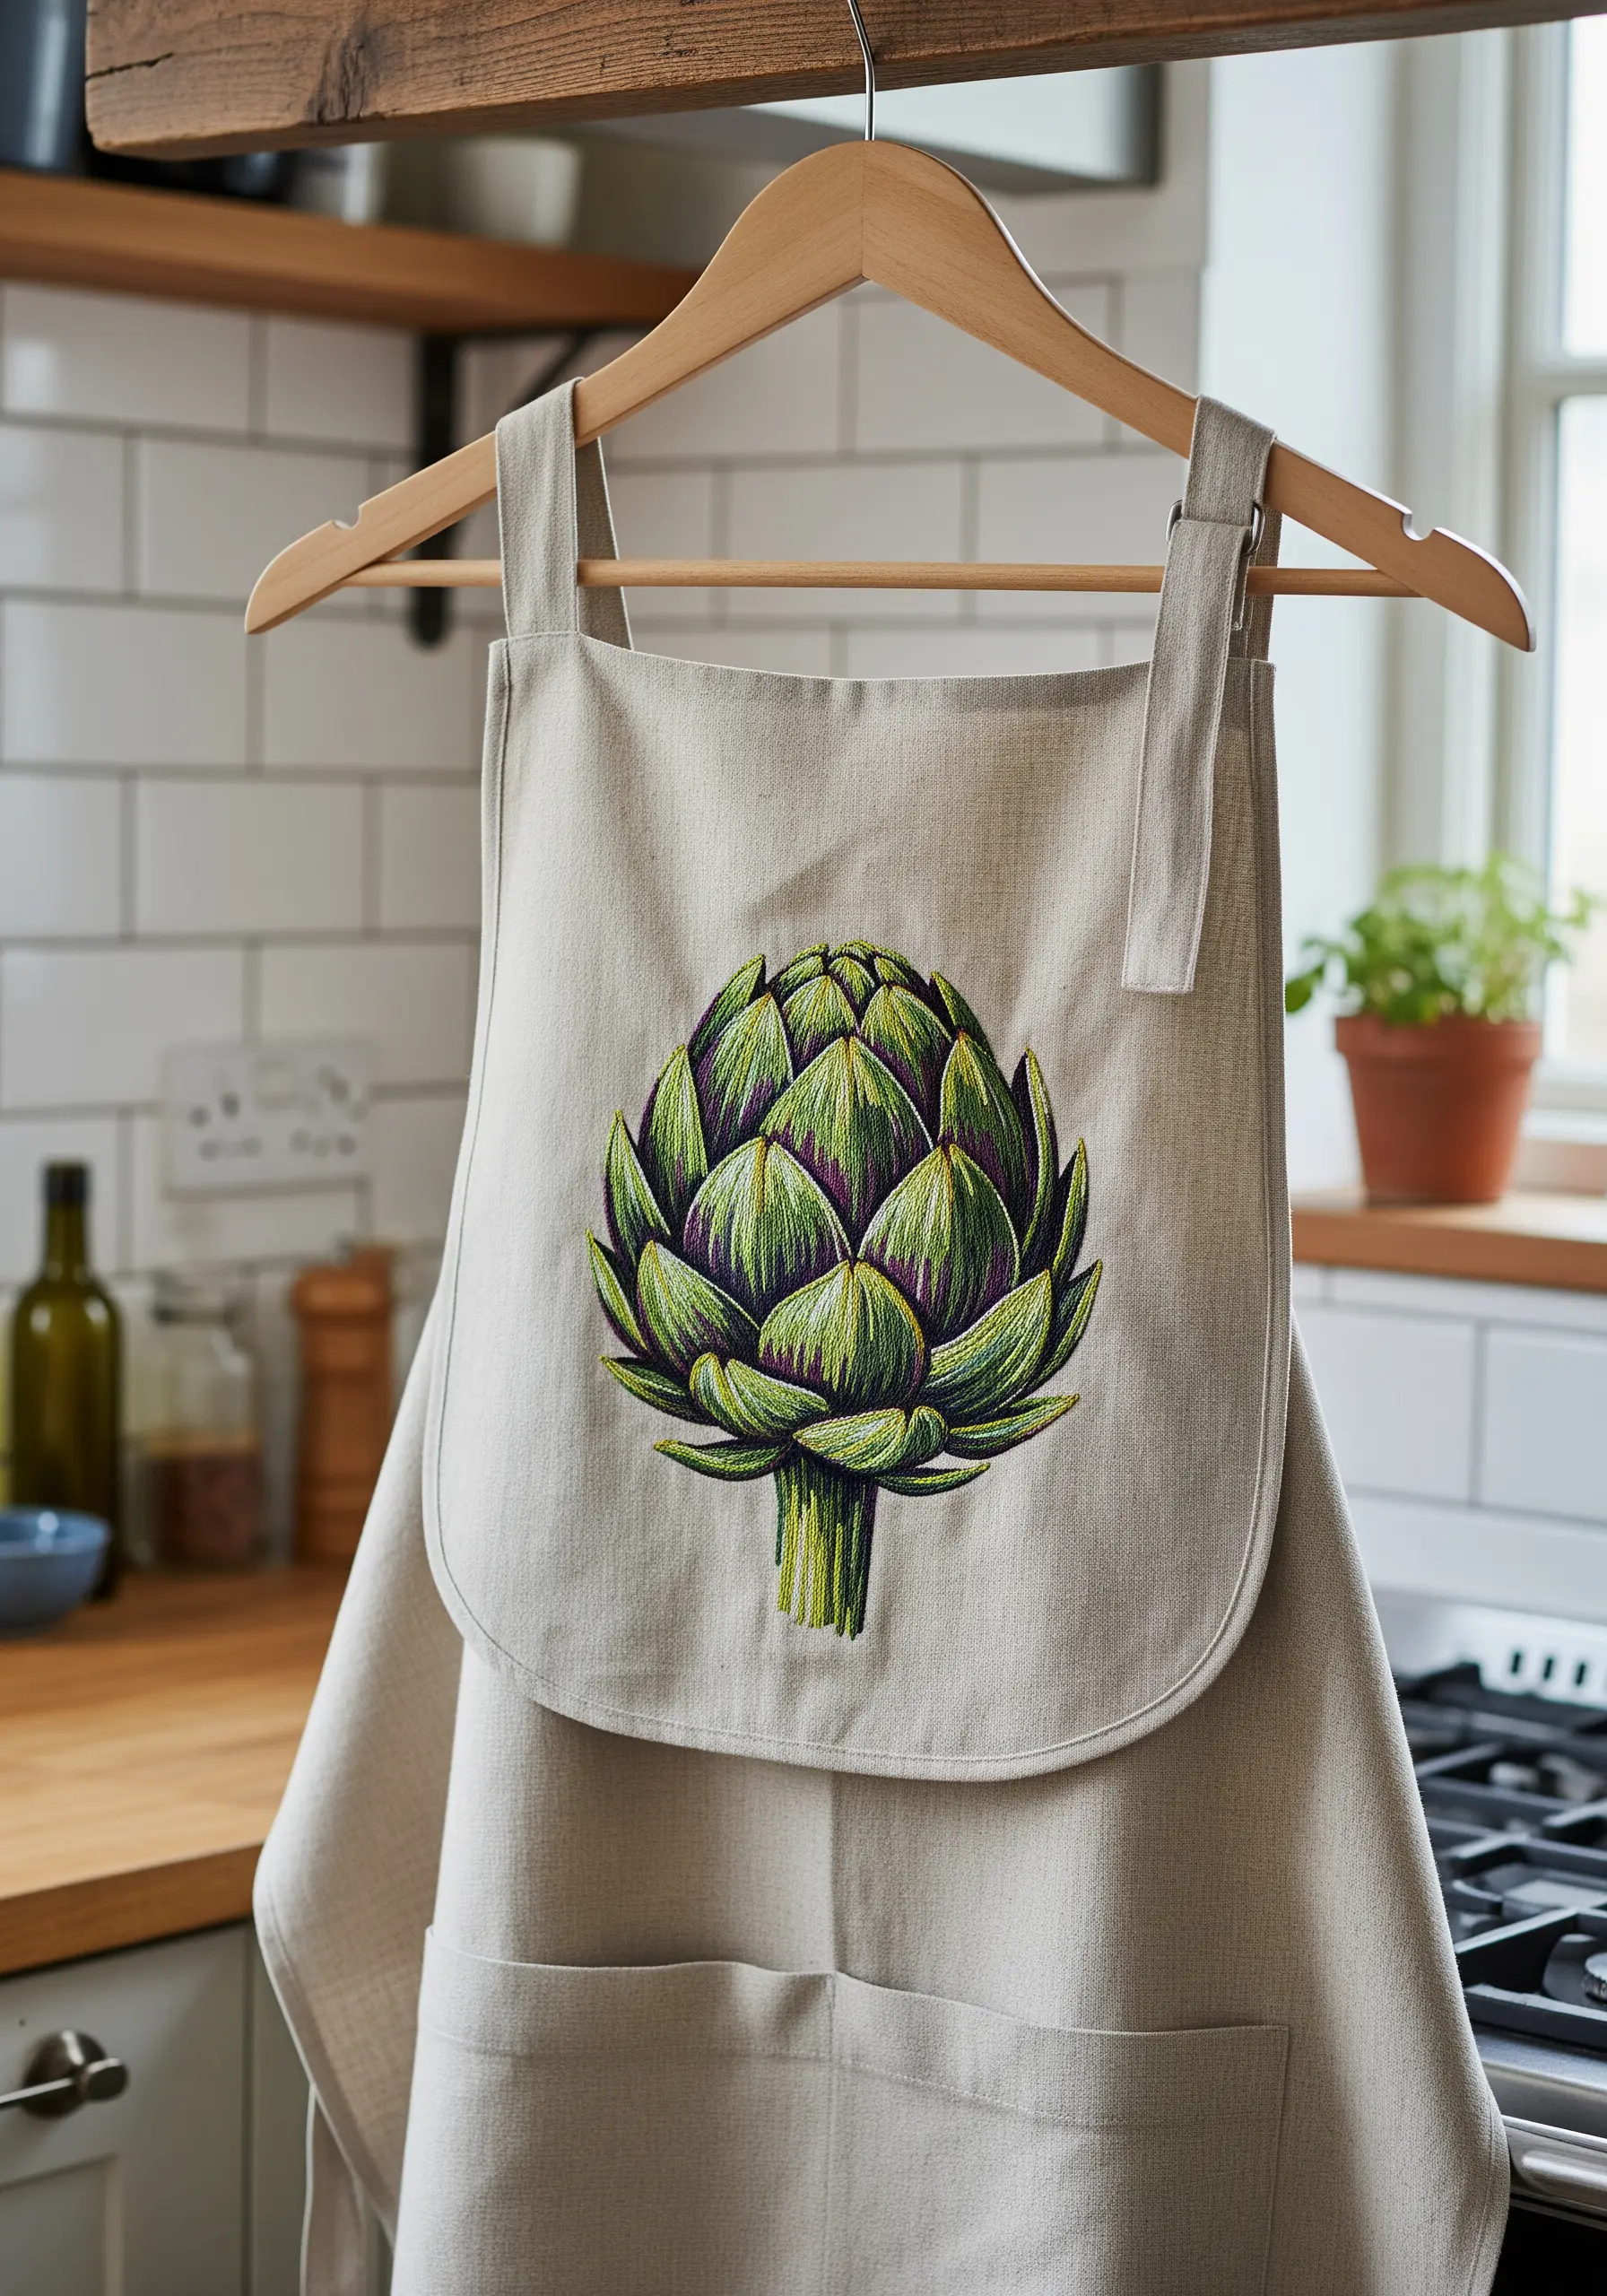
This stunning realism is achieved with thread painting, also known as long-and-short stitch. This technique allows you to blend colors seamlessly, just as you would with paint.
Work in small sections, one artichoke leaf at a time. Start with your darkest shade at the base, making a row of staggered long and short stitches. Then, bring your next lighter shade up through the fabric, splitting the stitches of the previous row to blend the colors.
Using multiple shades of green and purple is what creates the depth and realistic color variation. The key is to make your stitches follow the natural direction of the plant’s growth for a truly lifelike effect.
23. Craft a Minimalist Mountain Coffee Sleeve
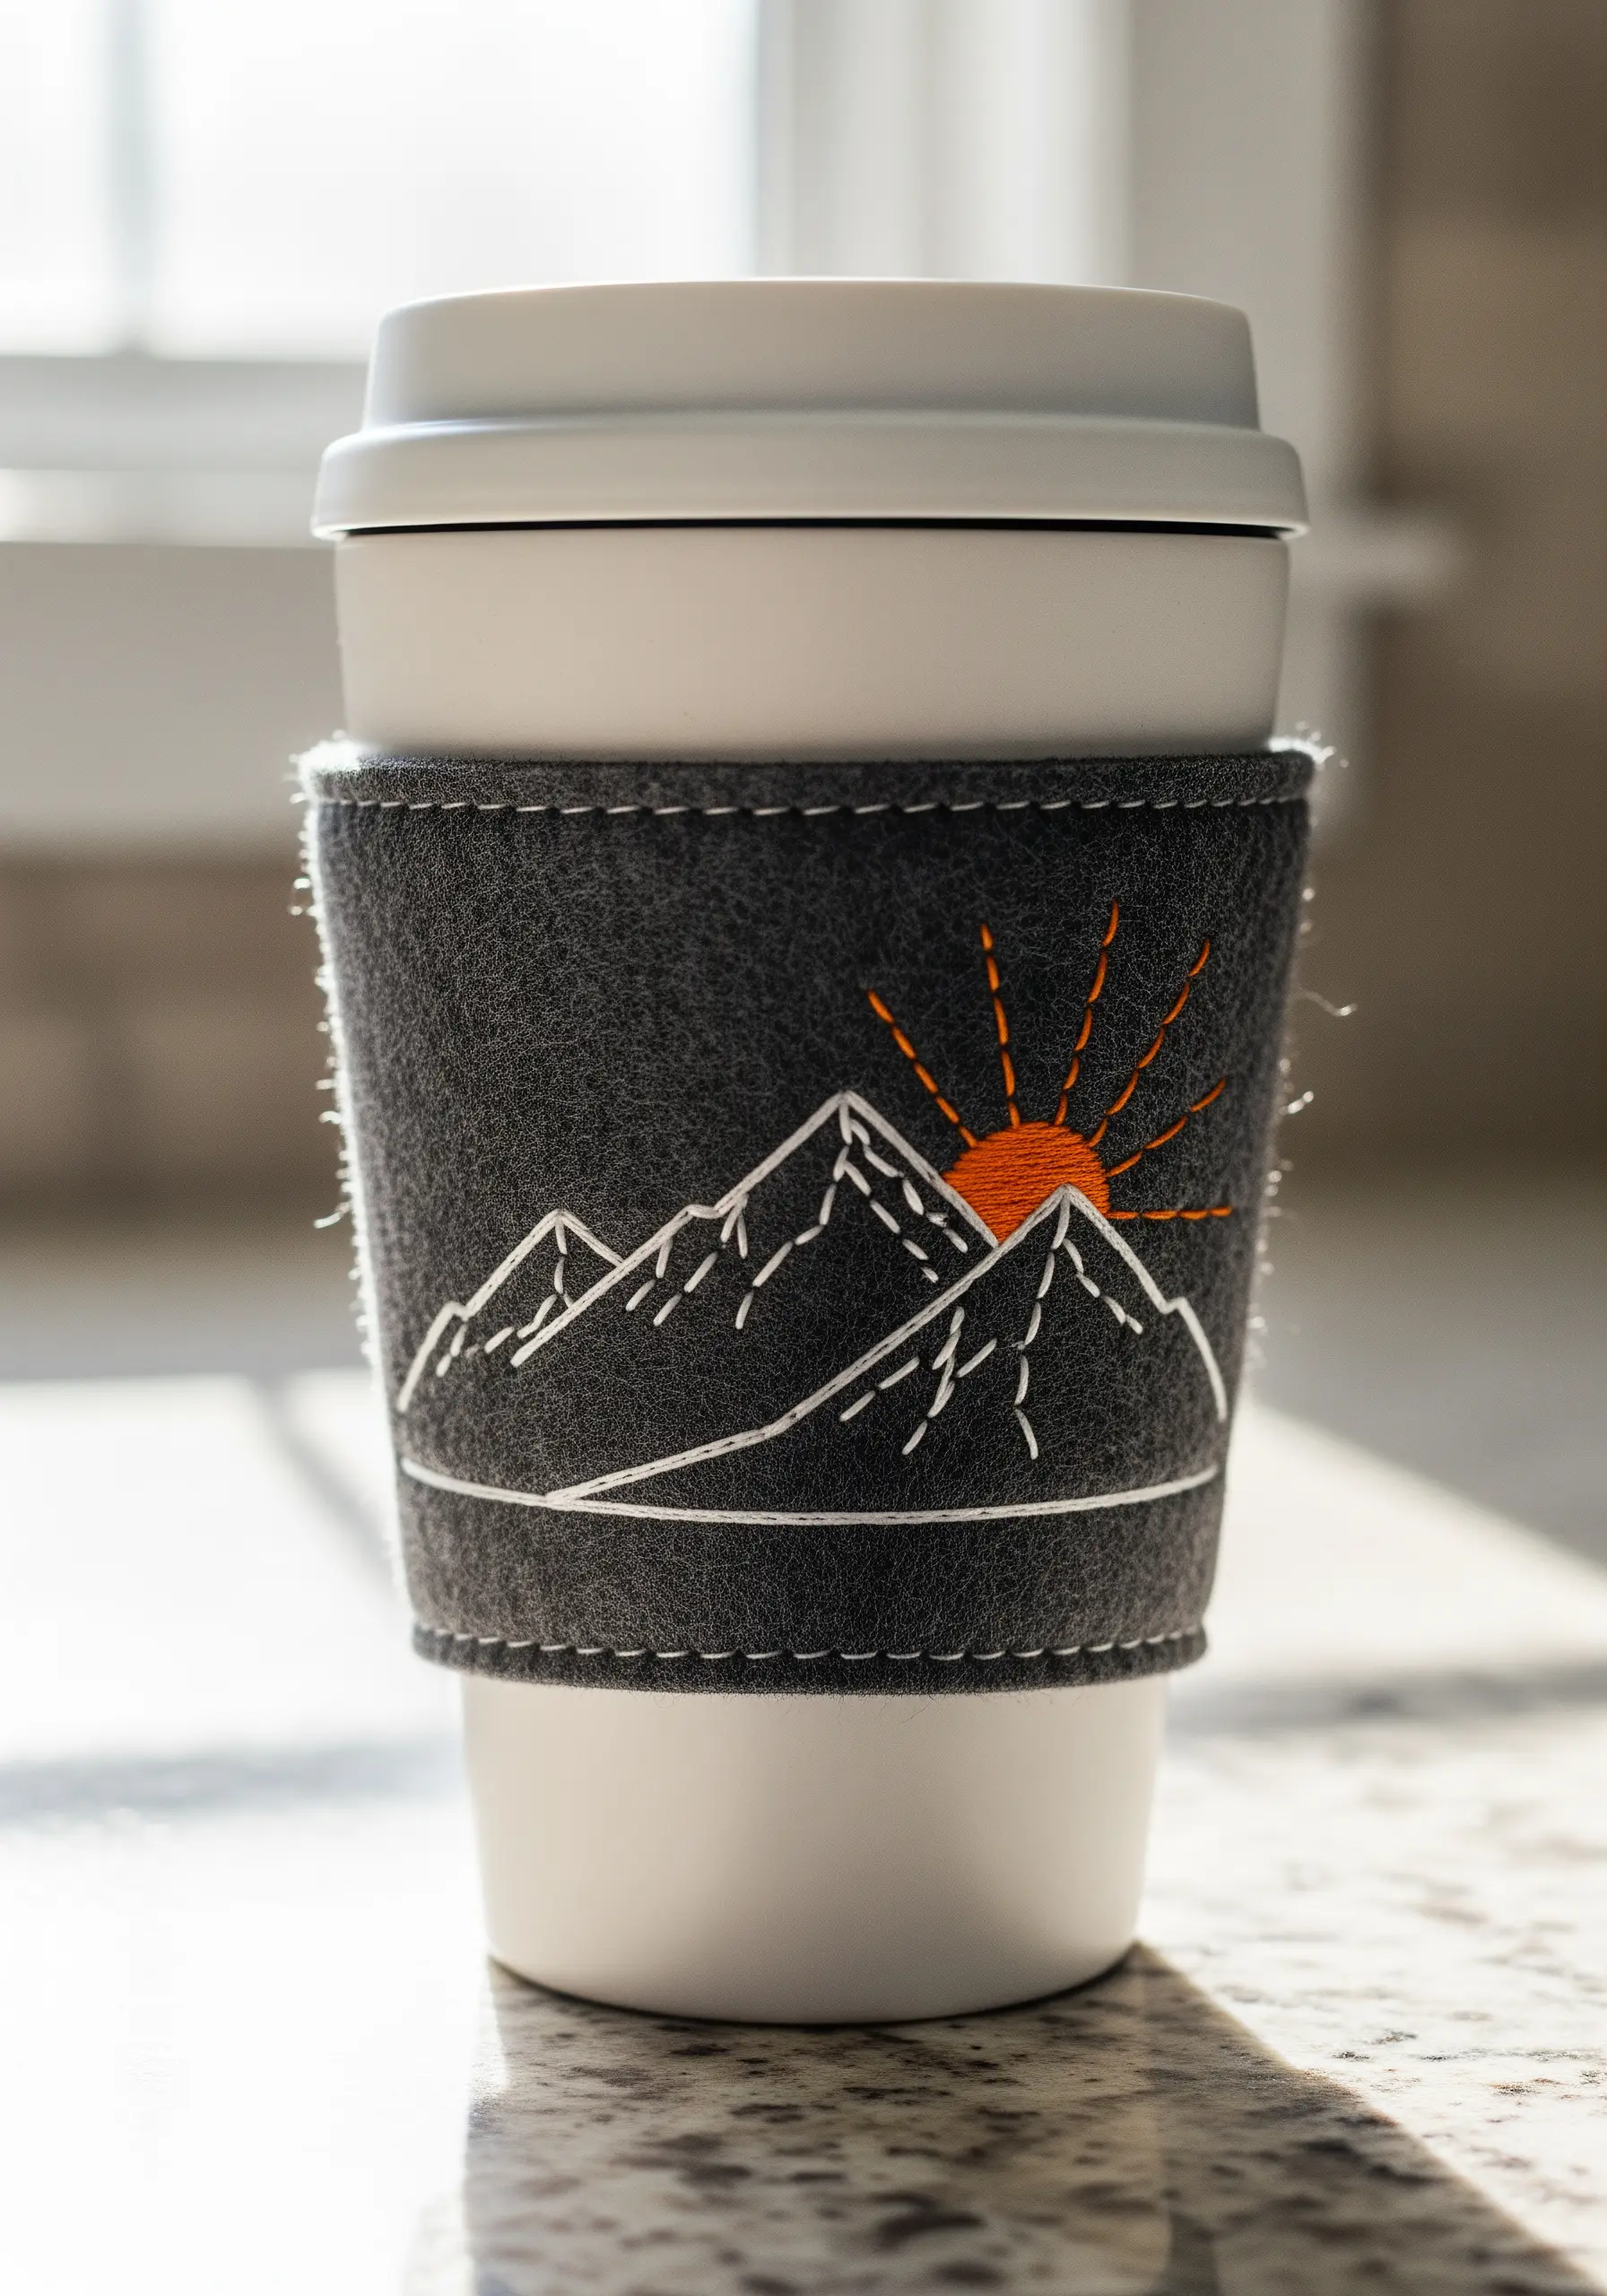
For a design that relies on clean lines, simplicity is paramount. Use a basic backstitch with three strands of white floss to create the crisp mountain range outline.
The felt material provides a sturdy, insulating base that is very forgiving to stitch on. The single pop of color in the sun, created with a simple satin stitch, draws the eye and balances the composition.
Finish the sleeve with a neat running stitch along the top and bottom edges. This not only adds a decorative detail but also reinforces the sleeve for daily use.
24. Design a Whimsical ‘Perfect Pair’ Sock Set
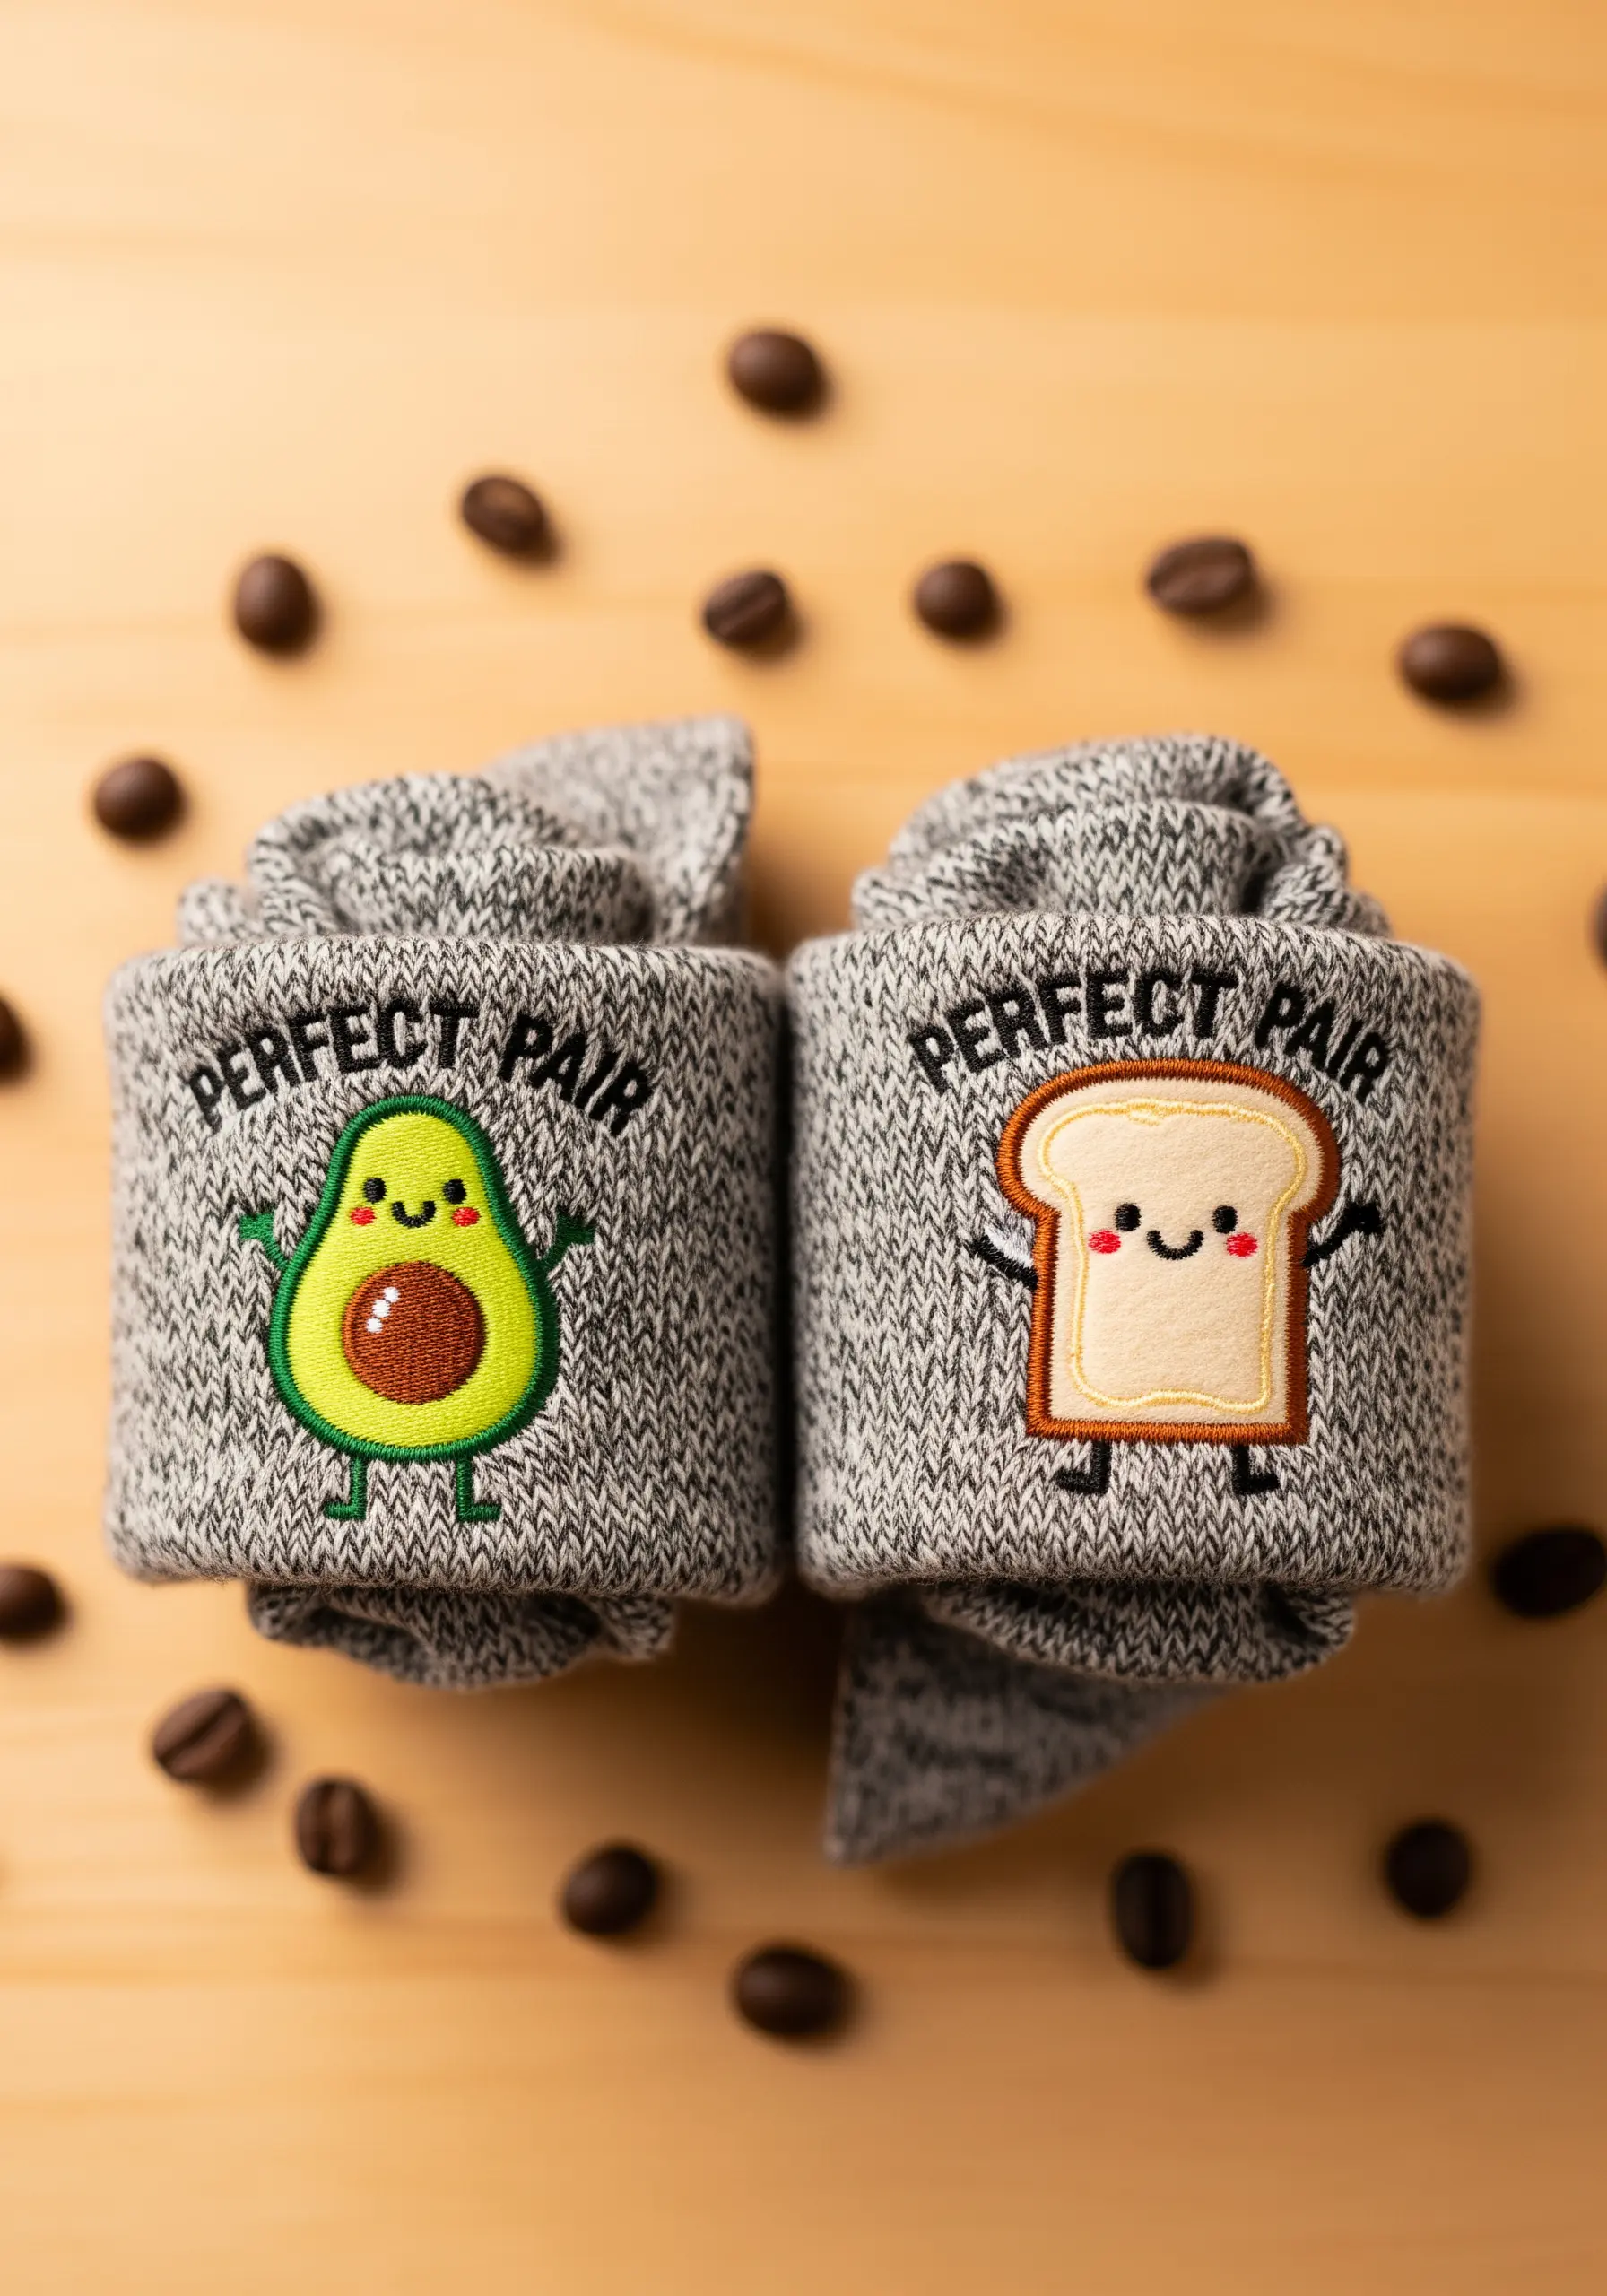
Embroidering on stretchy knit fabric like socks requires a soluble stabilizer on top to provide a smooth surface and prevent the stitches from disappearing into the knit.
To create the smooth, cartoon-like finish, outline each shape with a tight backstitch first. Then, fill the areas with a satin stitch, using the outline as a guide. This technique, known as raised satin stitch, gives the motifs a clean, patch-like appearance.
Keep the details simple and bold—French knots for eyes and a simple backstitch for mouths—to maintain the playful, graphic quality of the characters.
25. Add a Bold Monogram to a Chunky Knit Blanket
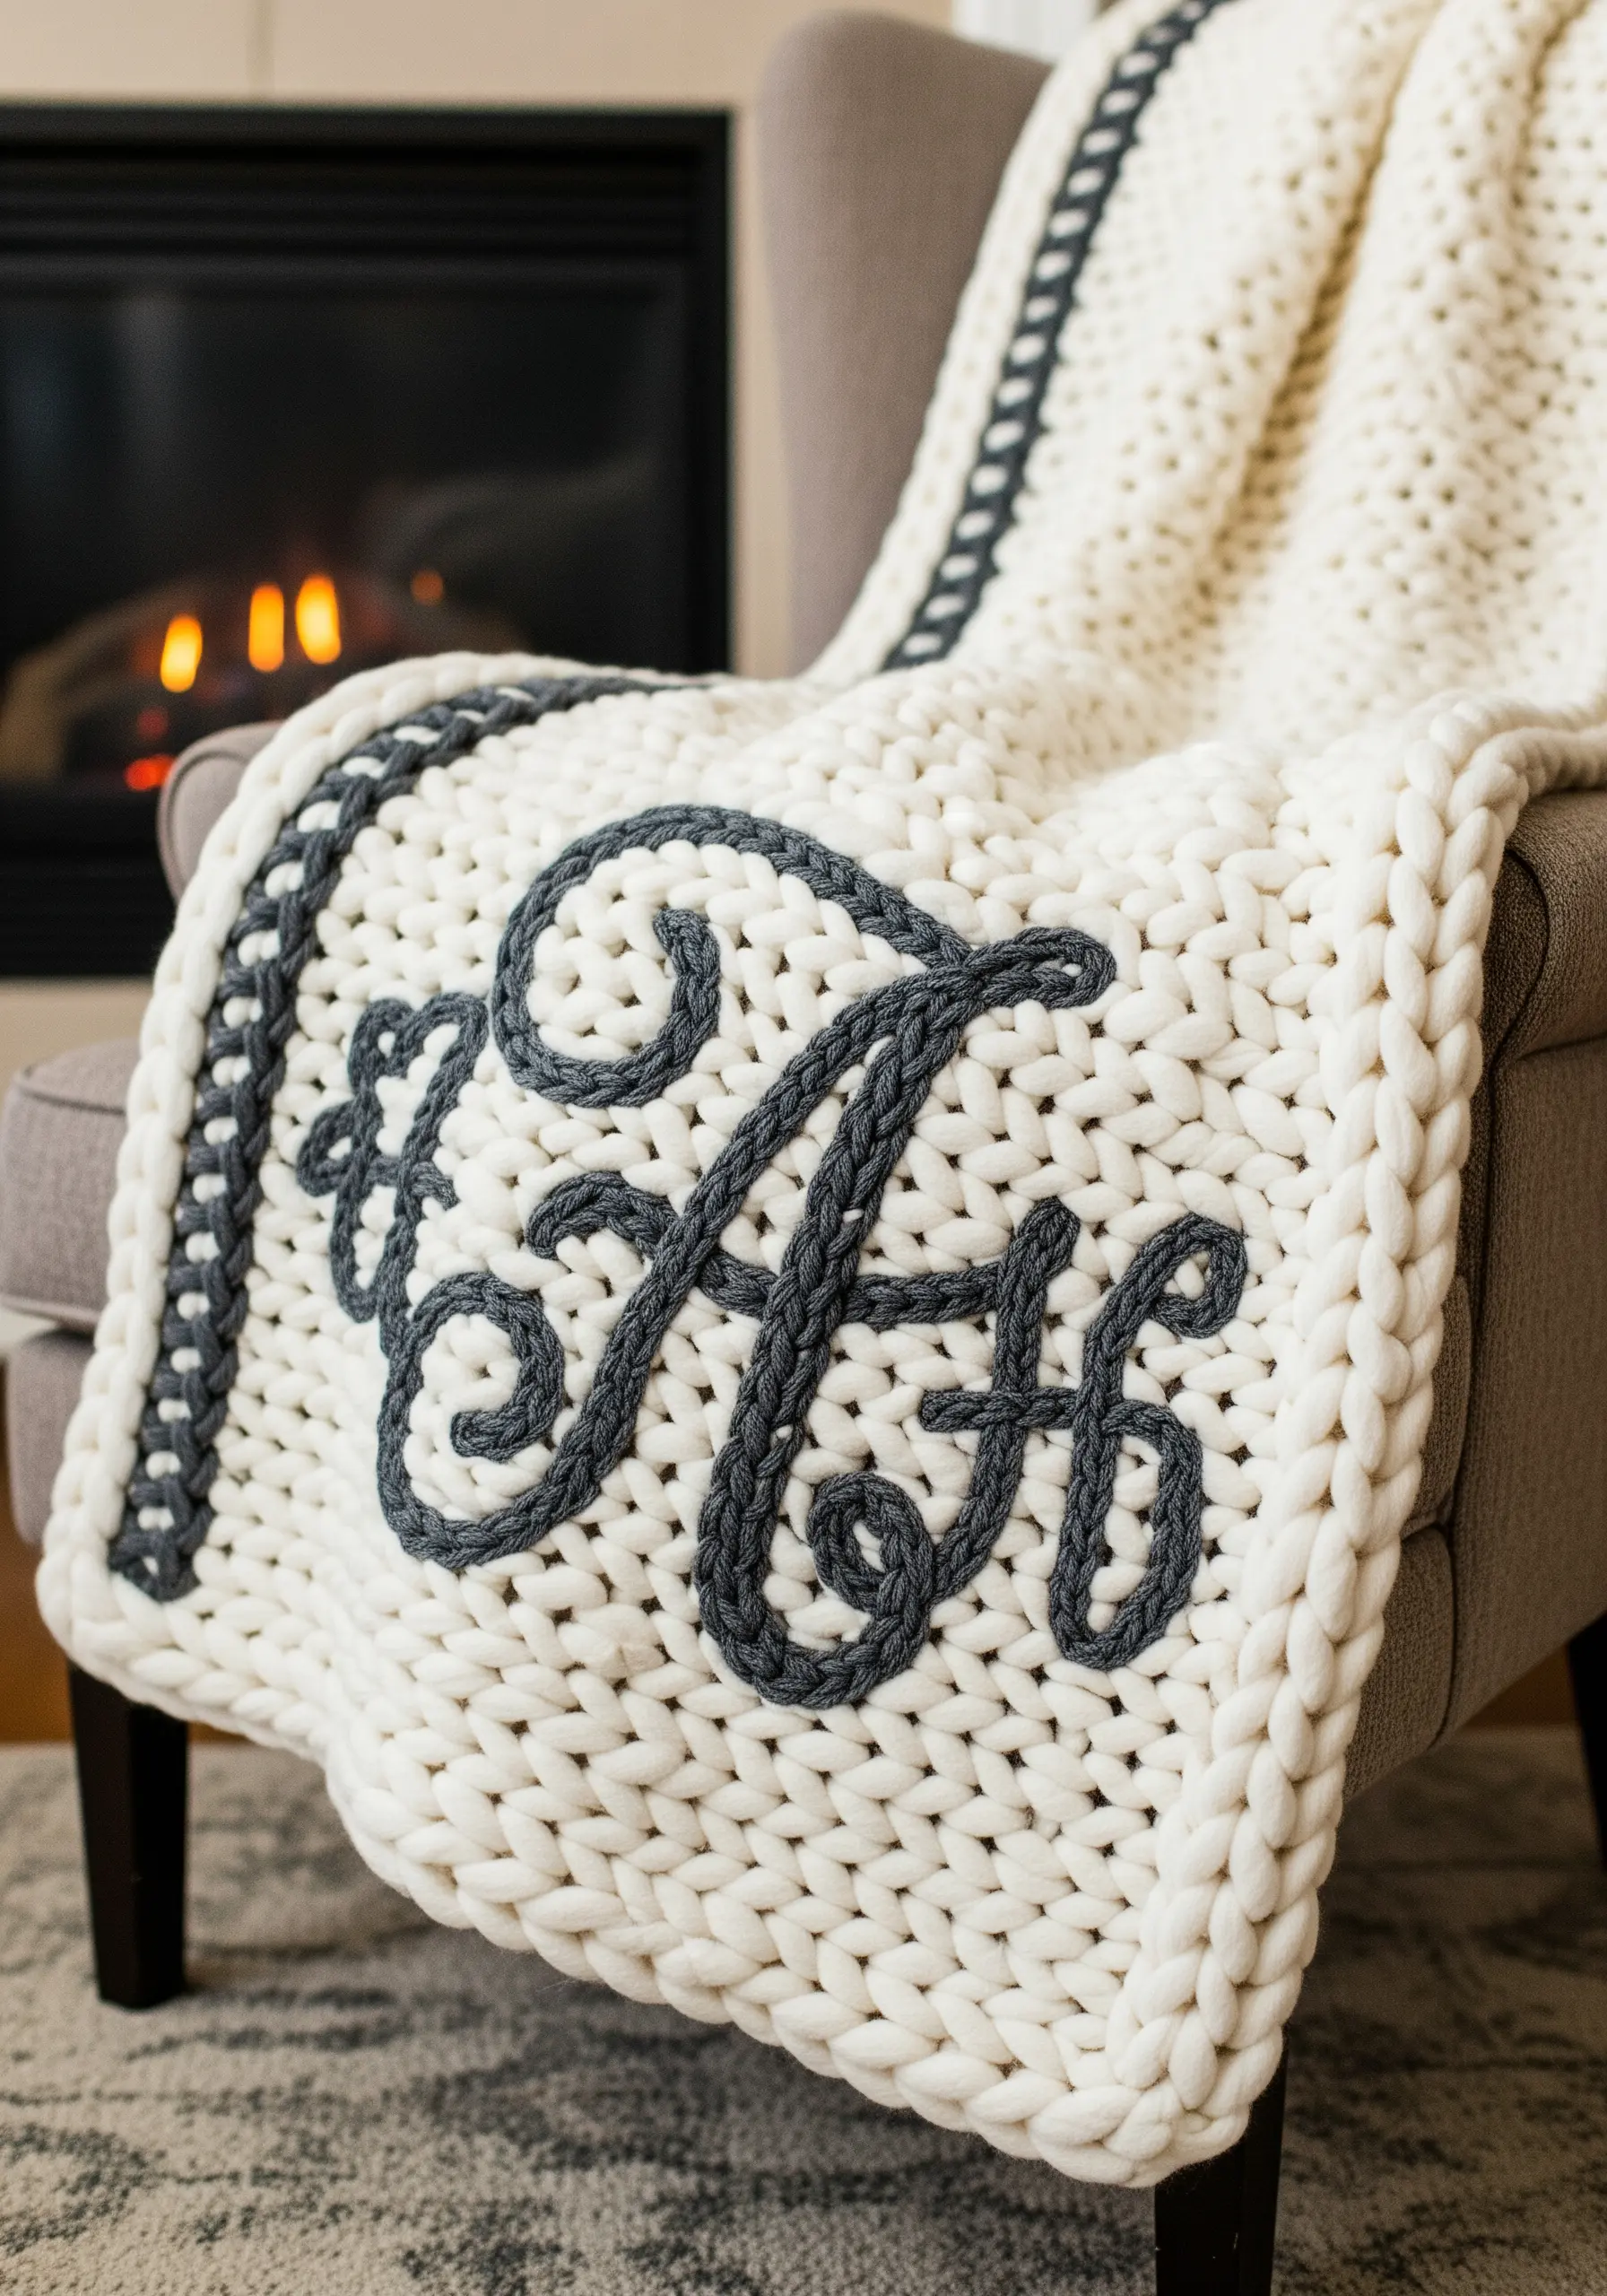
To embroider on a very open, chunky knit, you can’t use traditional stitches. Instead, use a technique called duplicate stitch or Swiss darning. This involves using a blunt tapestry needle and yarn to trace the path of the existing knit stitches.
This method allows you to add a design that flexes and stretches with the blanket, creating a seamless, integrated look rather than a stiff patch on top.
Choose a contrasting yarn color and a large, flowing script for the monogram. The scale of the design should match the scale of the knit for a balanced and impactful result.
26. Create a High-Tech Circuit Board Laptop Sleeve
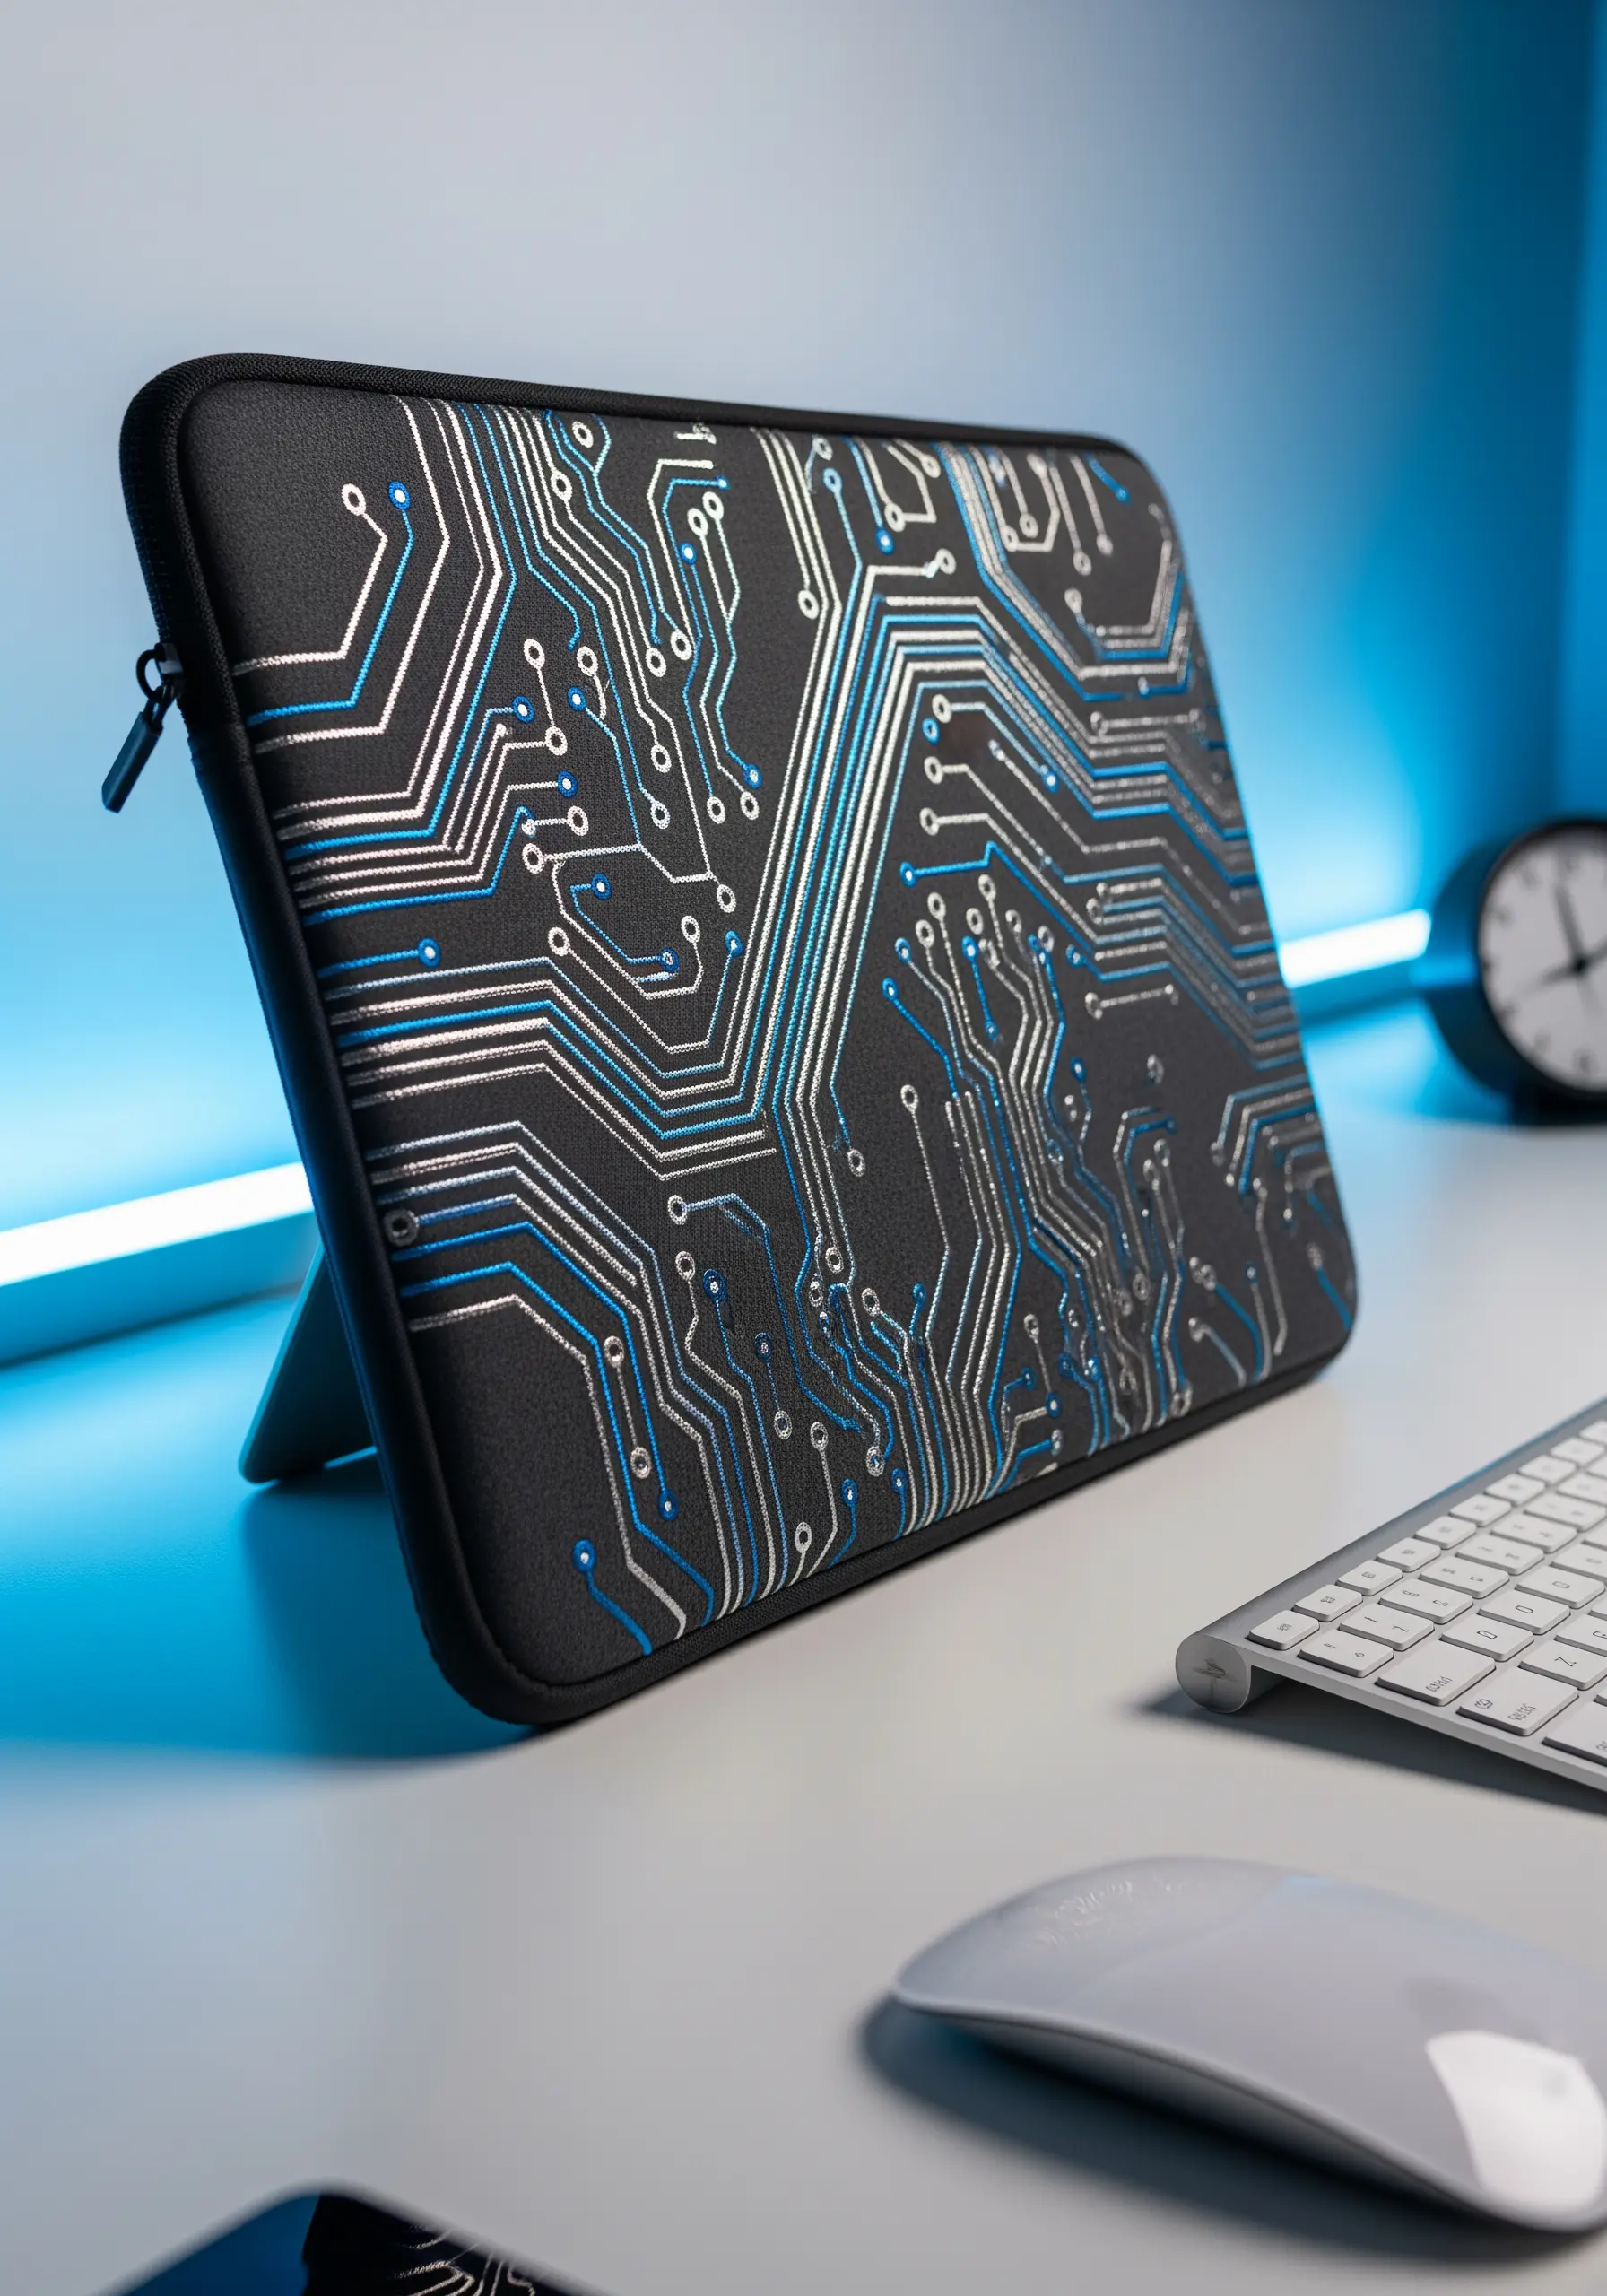
The key to this futuristic design is the choice of thread. Use a high-sheen silver or chrome-colored metallic thread for the main circuit lines to mimic solder.
A simple backstitch is all you need, but precision is crucial. Keep your stitch length incredibly consistent to create the clean, geometric lines of a circuit board. Use a single strand of a bright accent color, like electric blue, to add small details and guide the eye.
Stitching on neoprene or similar materials requires a sharp needle; the fabric is dense but the result is a padded, protective, and uniquely personalized tech accessory.
27. Embroider a Woven Fabric Plant Pot
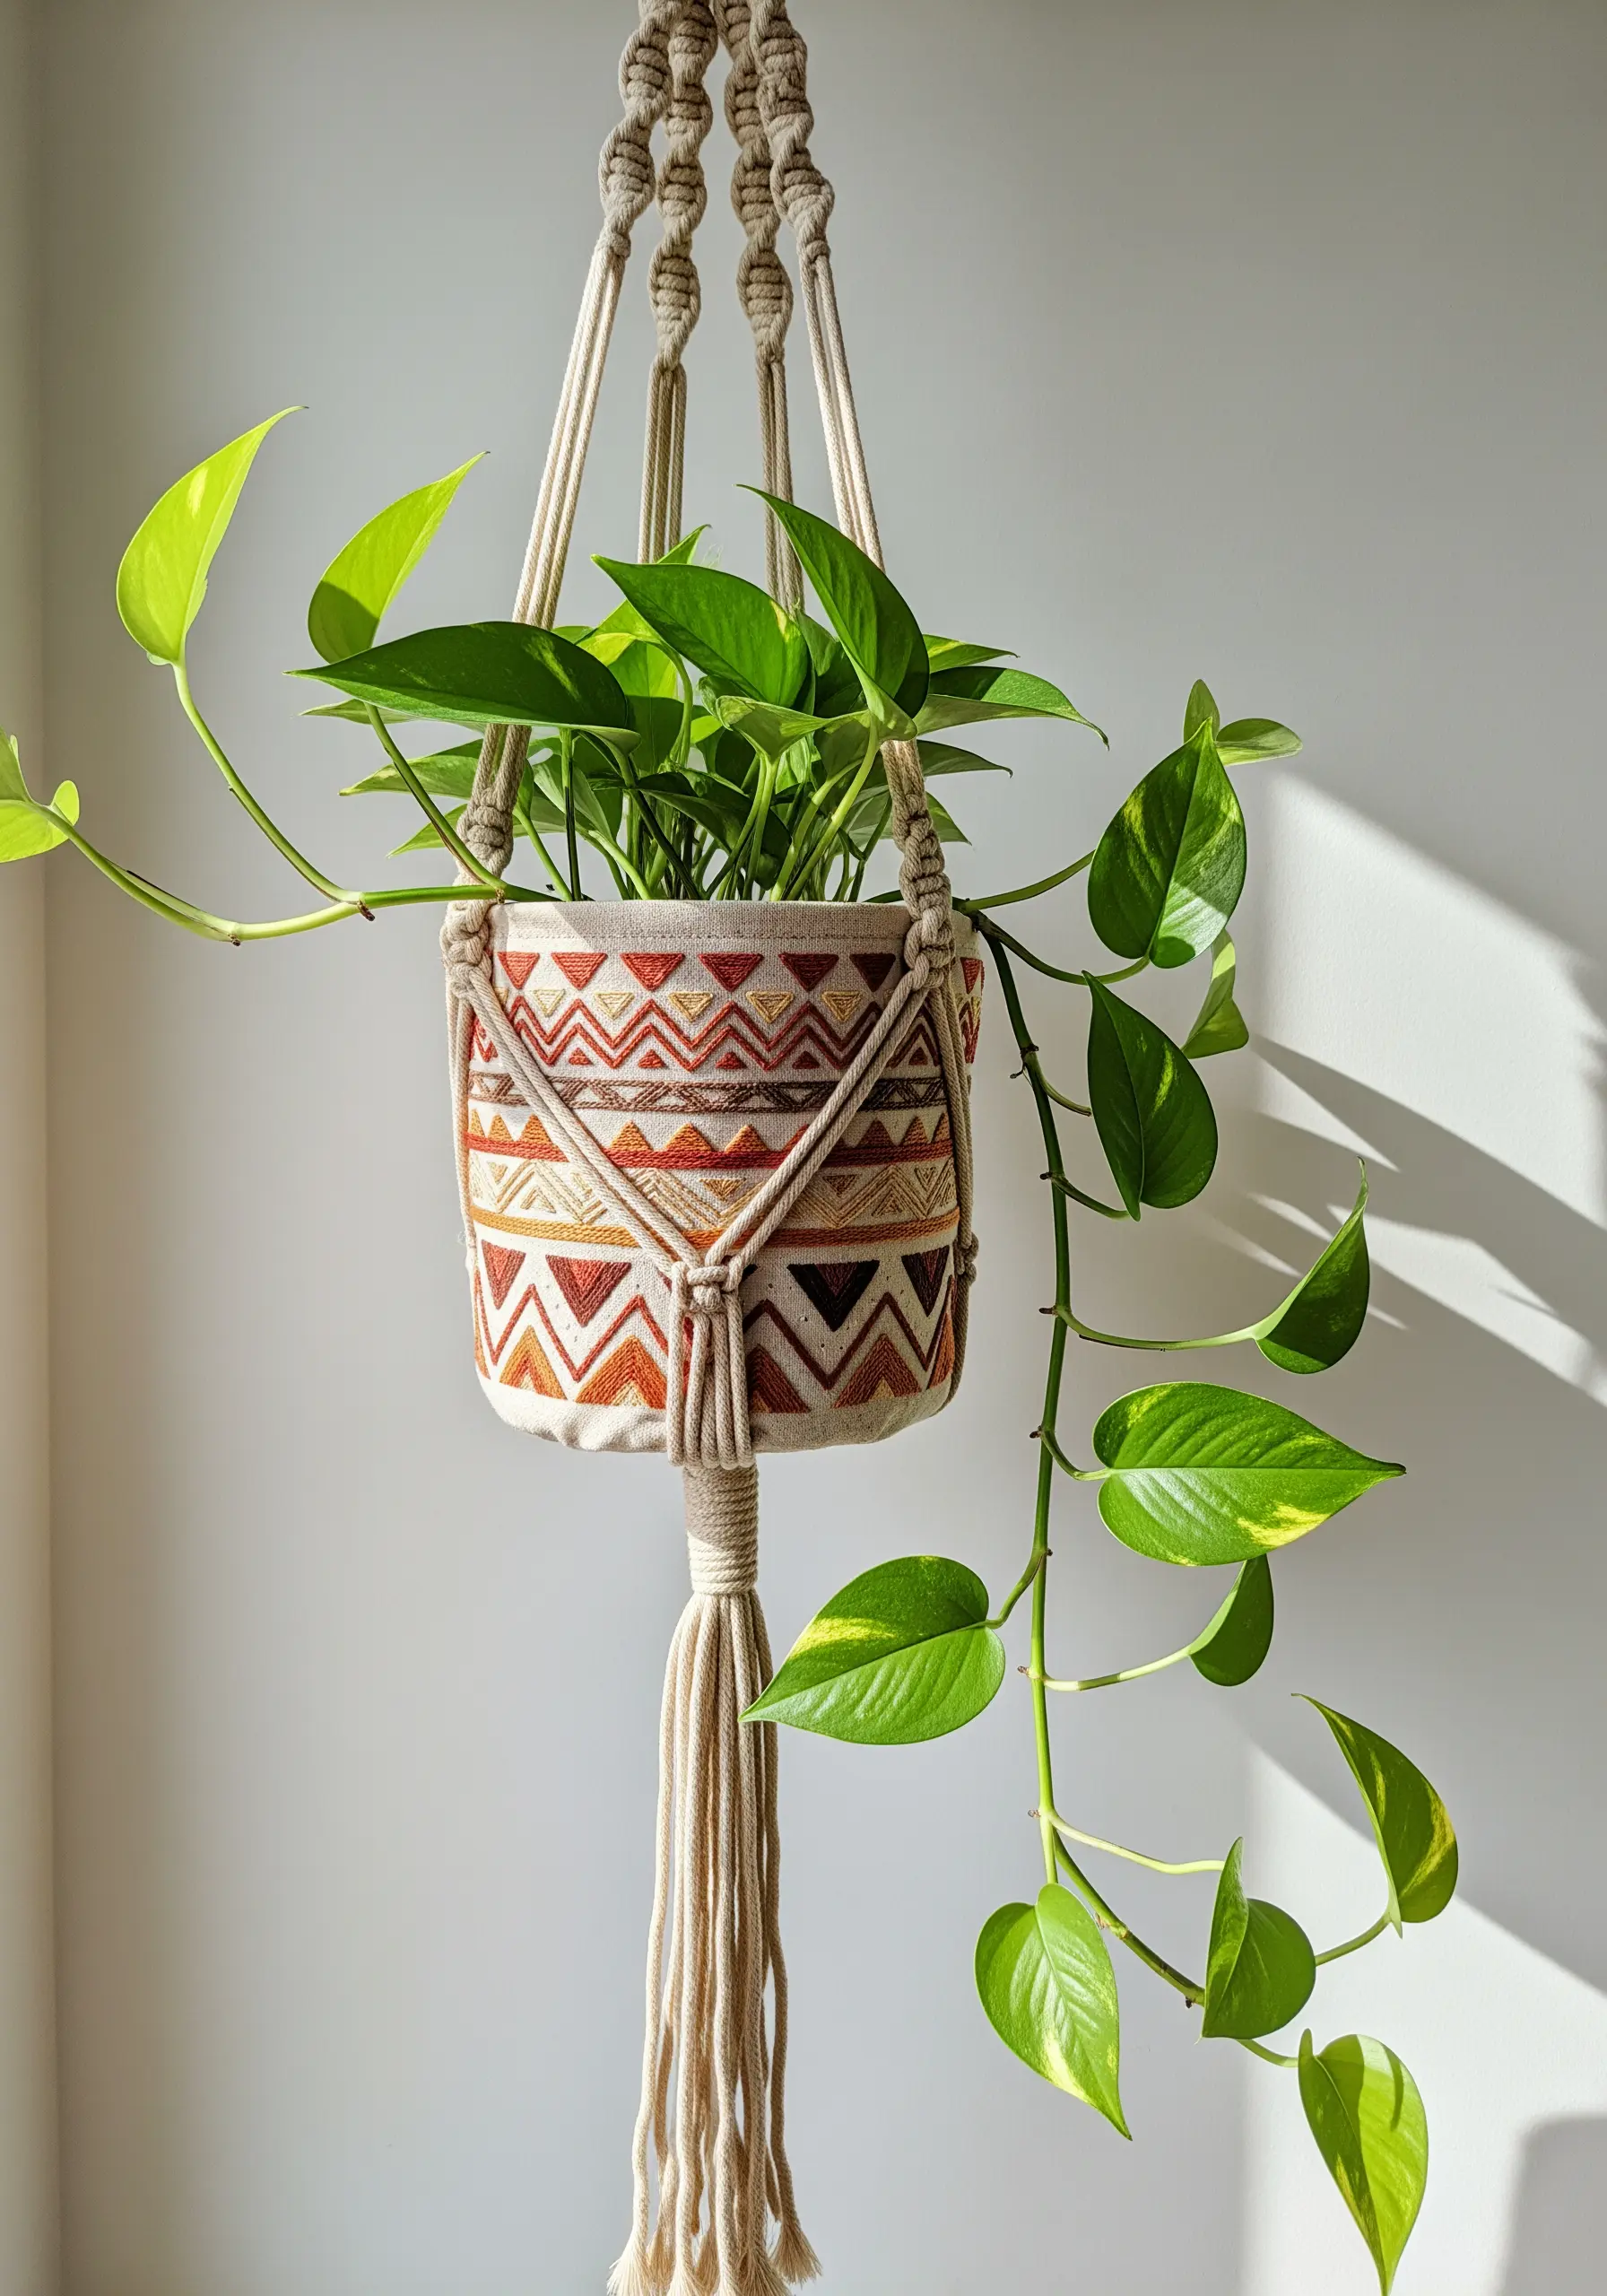
To add embroidery to an existing woven item like this pot holder, work directly with the fabric’s texture. Use the weave of the fabric as a natural grid to guide your stitches, much like you would with Aida cloth.
A simple running stitch or a backstitch is perfect for creating these geometric, Southwestern-inspired patterns. Let the design flow with the shape of the object.
Choose a color palette of warm earth tones—terracotta, sand, and brown—to complement the natural fibers of the macrame hanger and the green of the plant, creating a cohesive, bohemian look.
28. Embellish Woven Placemats with an Olive Branch Border
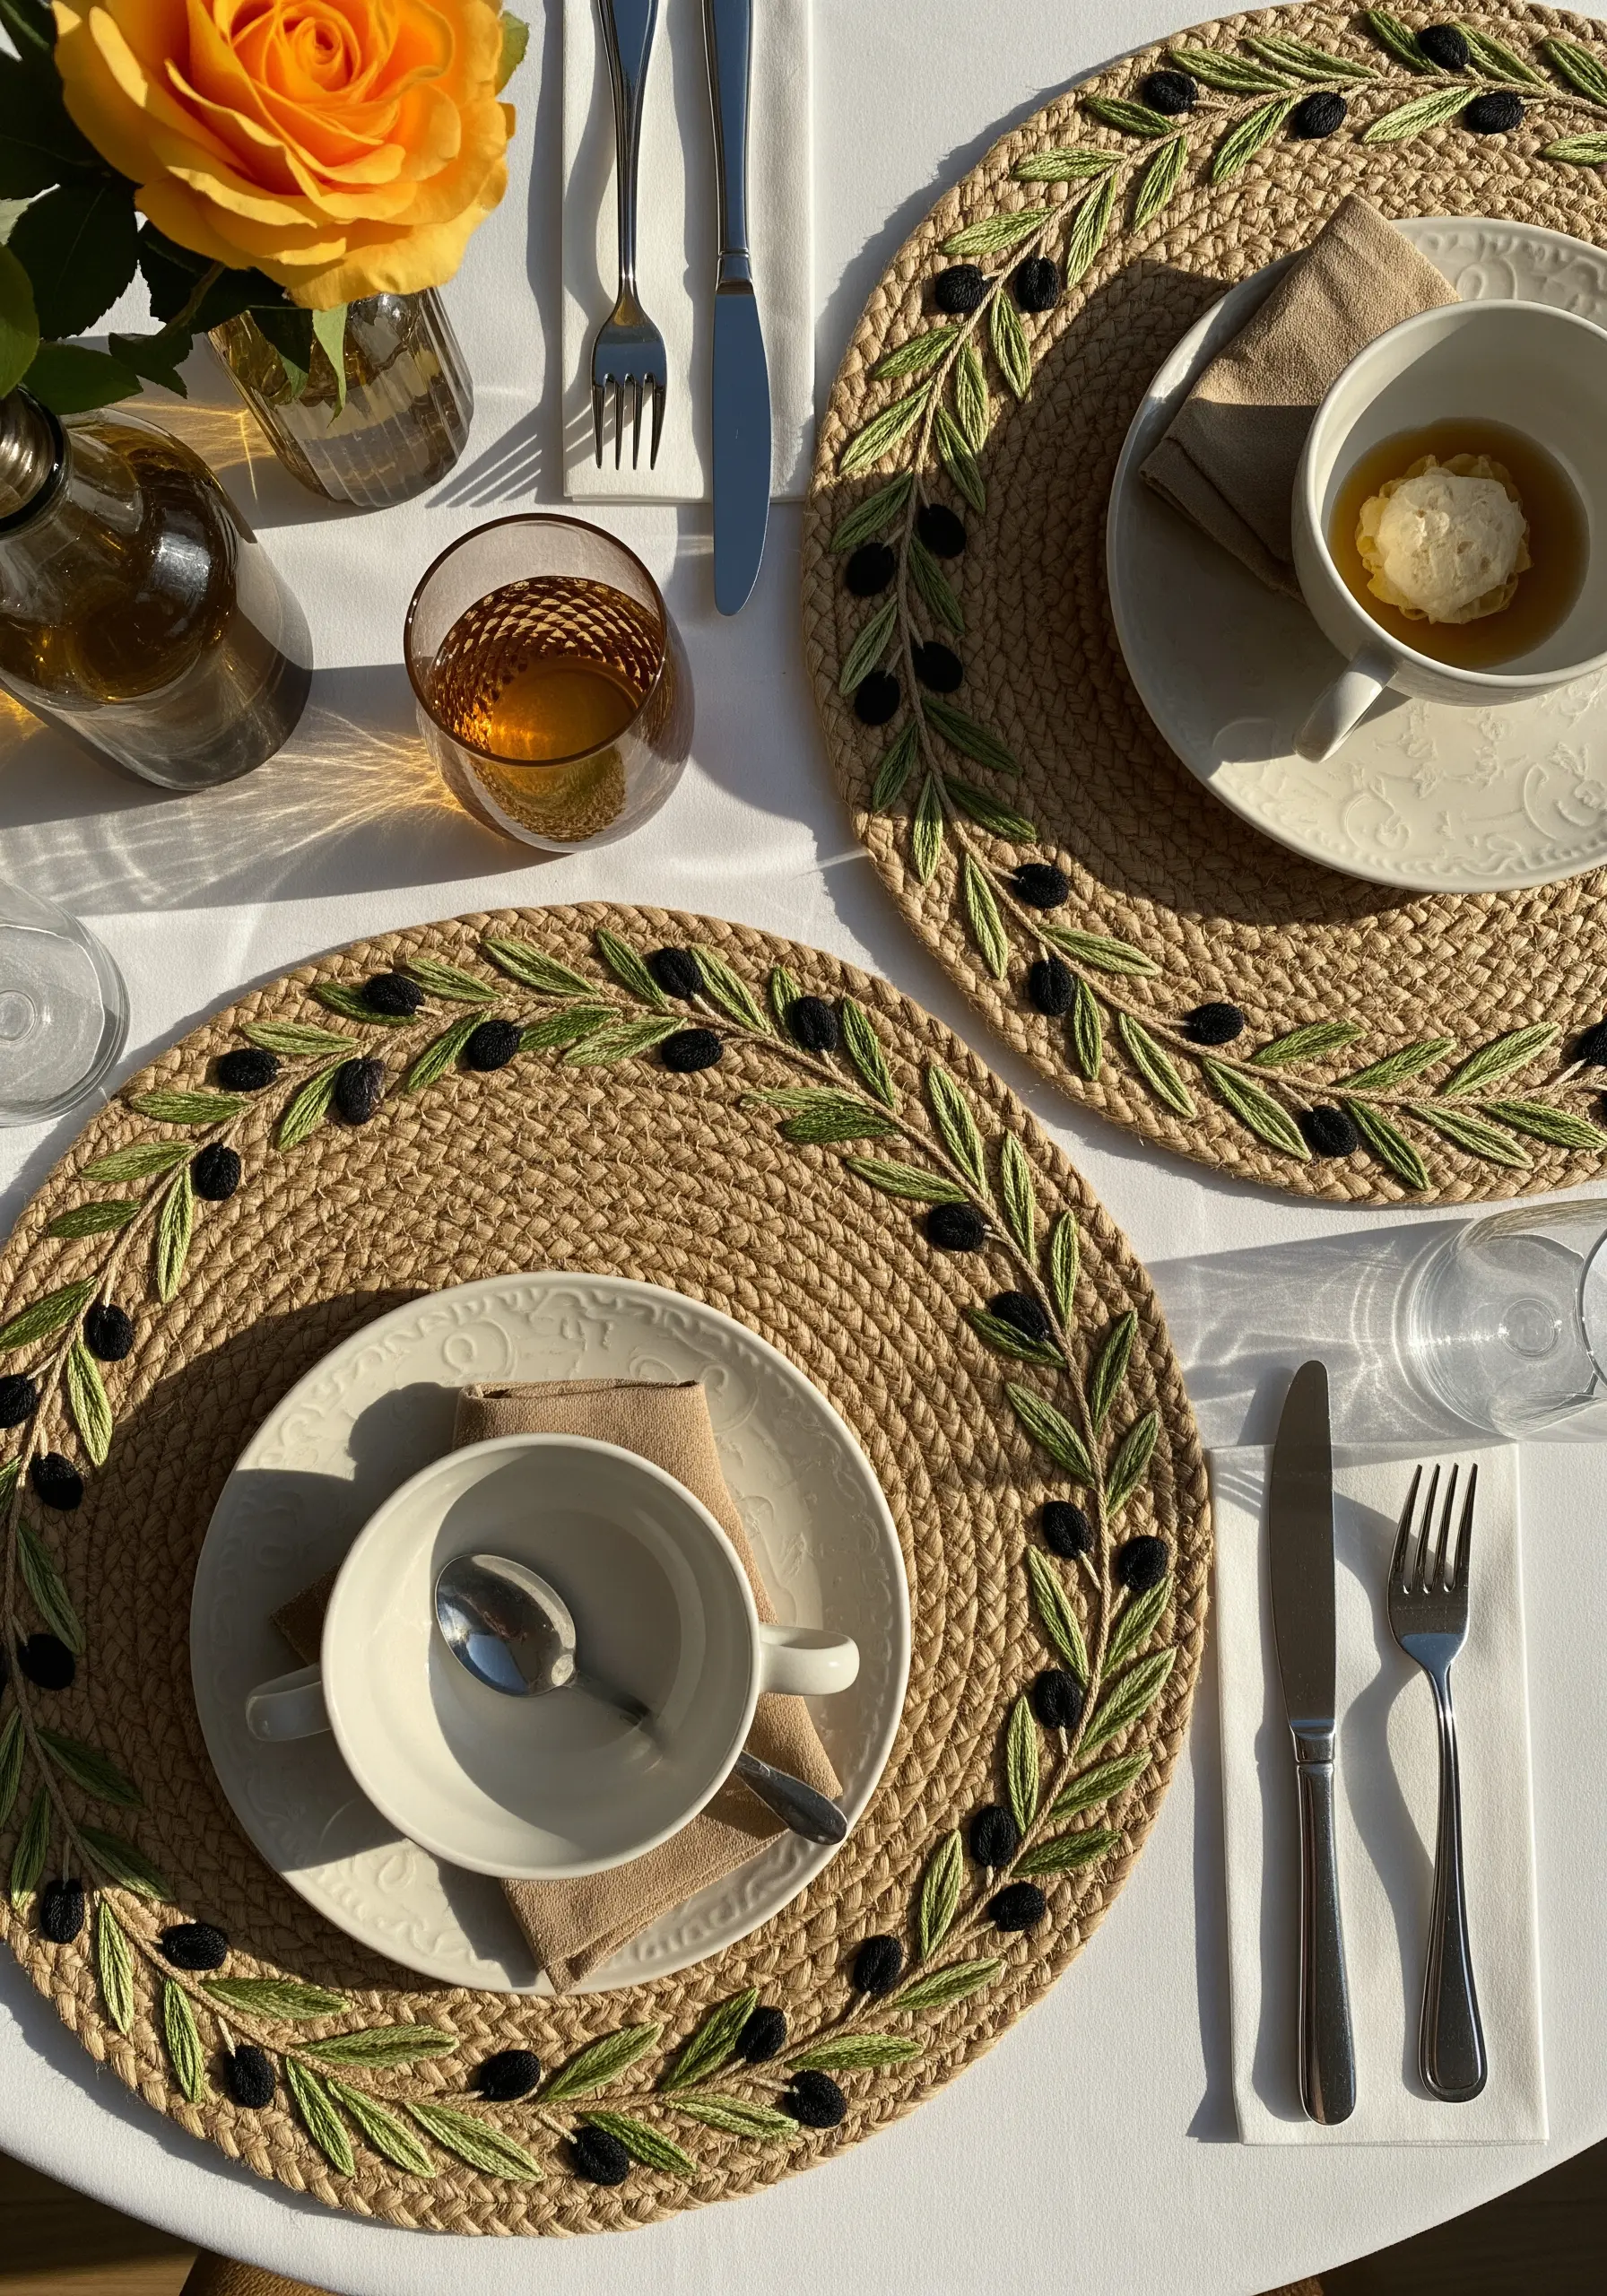
Stitching on a coarse, woven material like jute or seagrass requires a different approach. Use a thick, strong thread like tapestry wool or multiple strands of cotton floss, and a large-eyed, blunt tapestry needle that can slip between the weaves rather than piercing them.
Anchor your thread securely on the back, as knots can easily pull through. Weave the tail end through several stitches on the reverse side to lock it in place.
Use simple, bold stitches. A stem stitch for the branches and a satin stitch for the leaves and olives will stand out beautifully against the rustic texture of the placemat.
29. Add Garden Friends to Work Gloves
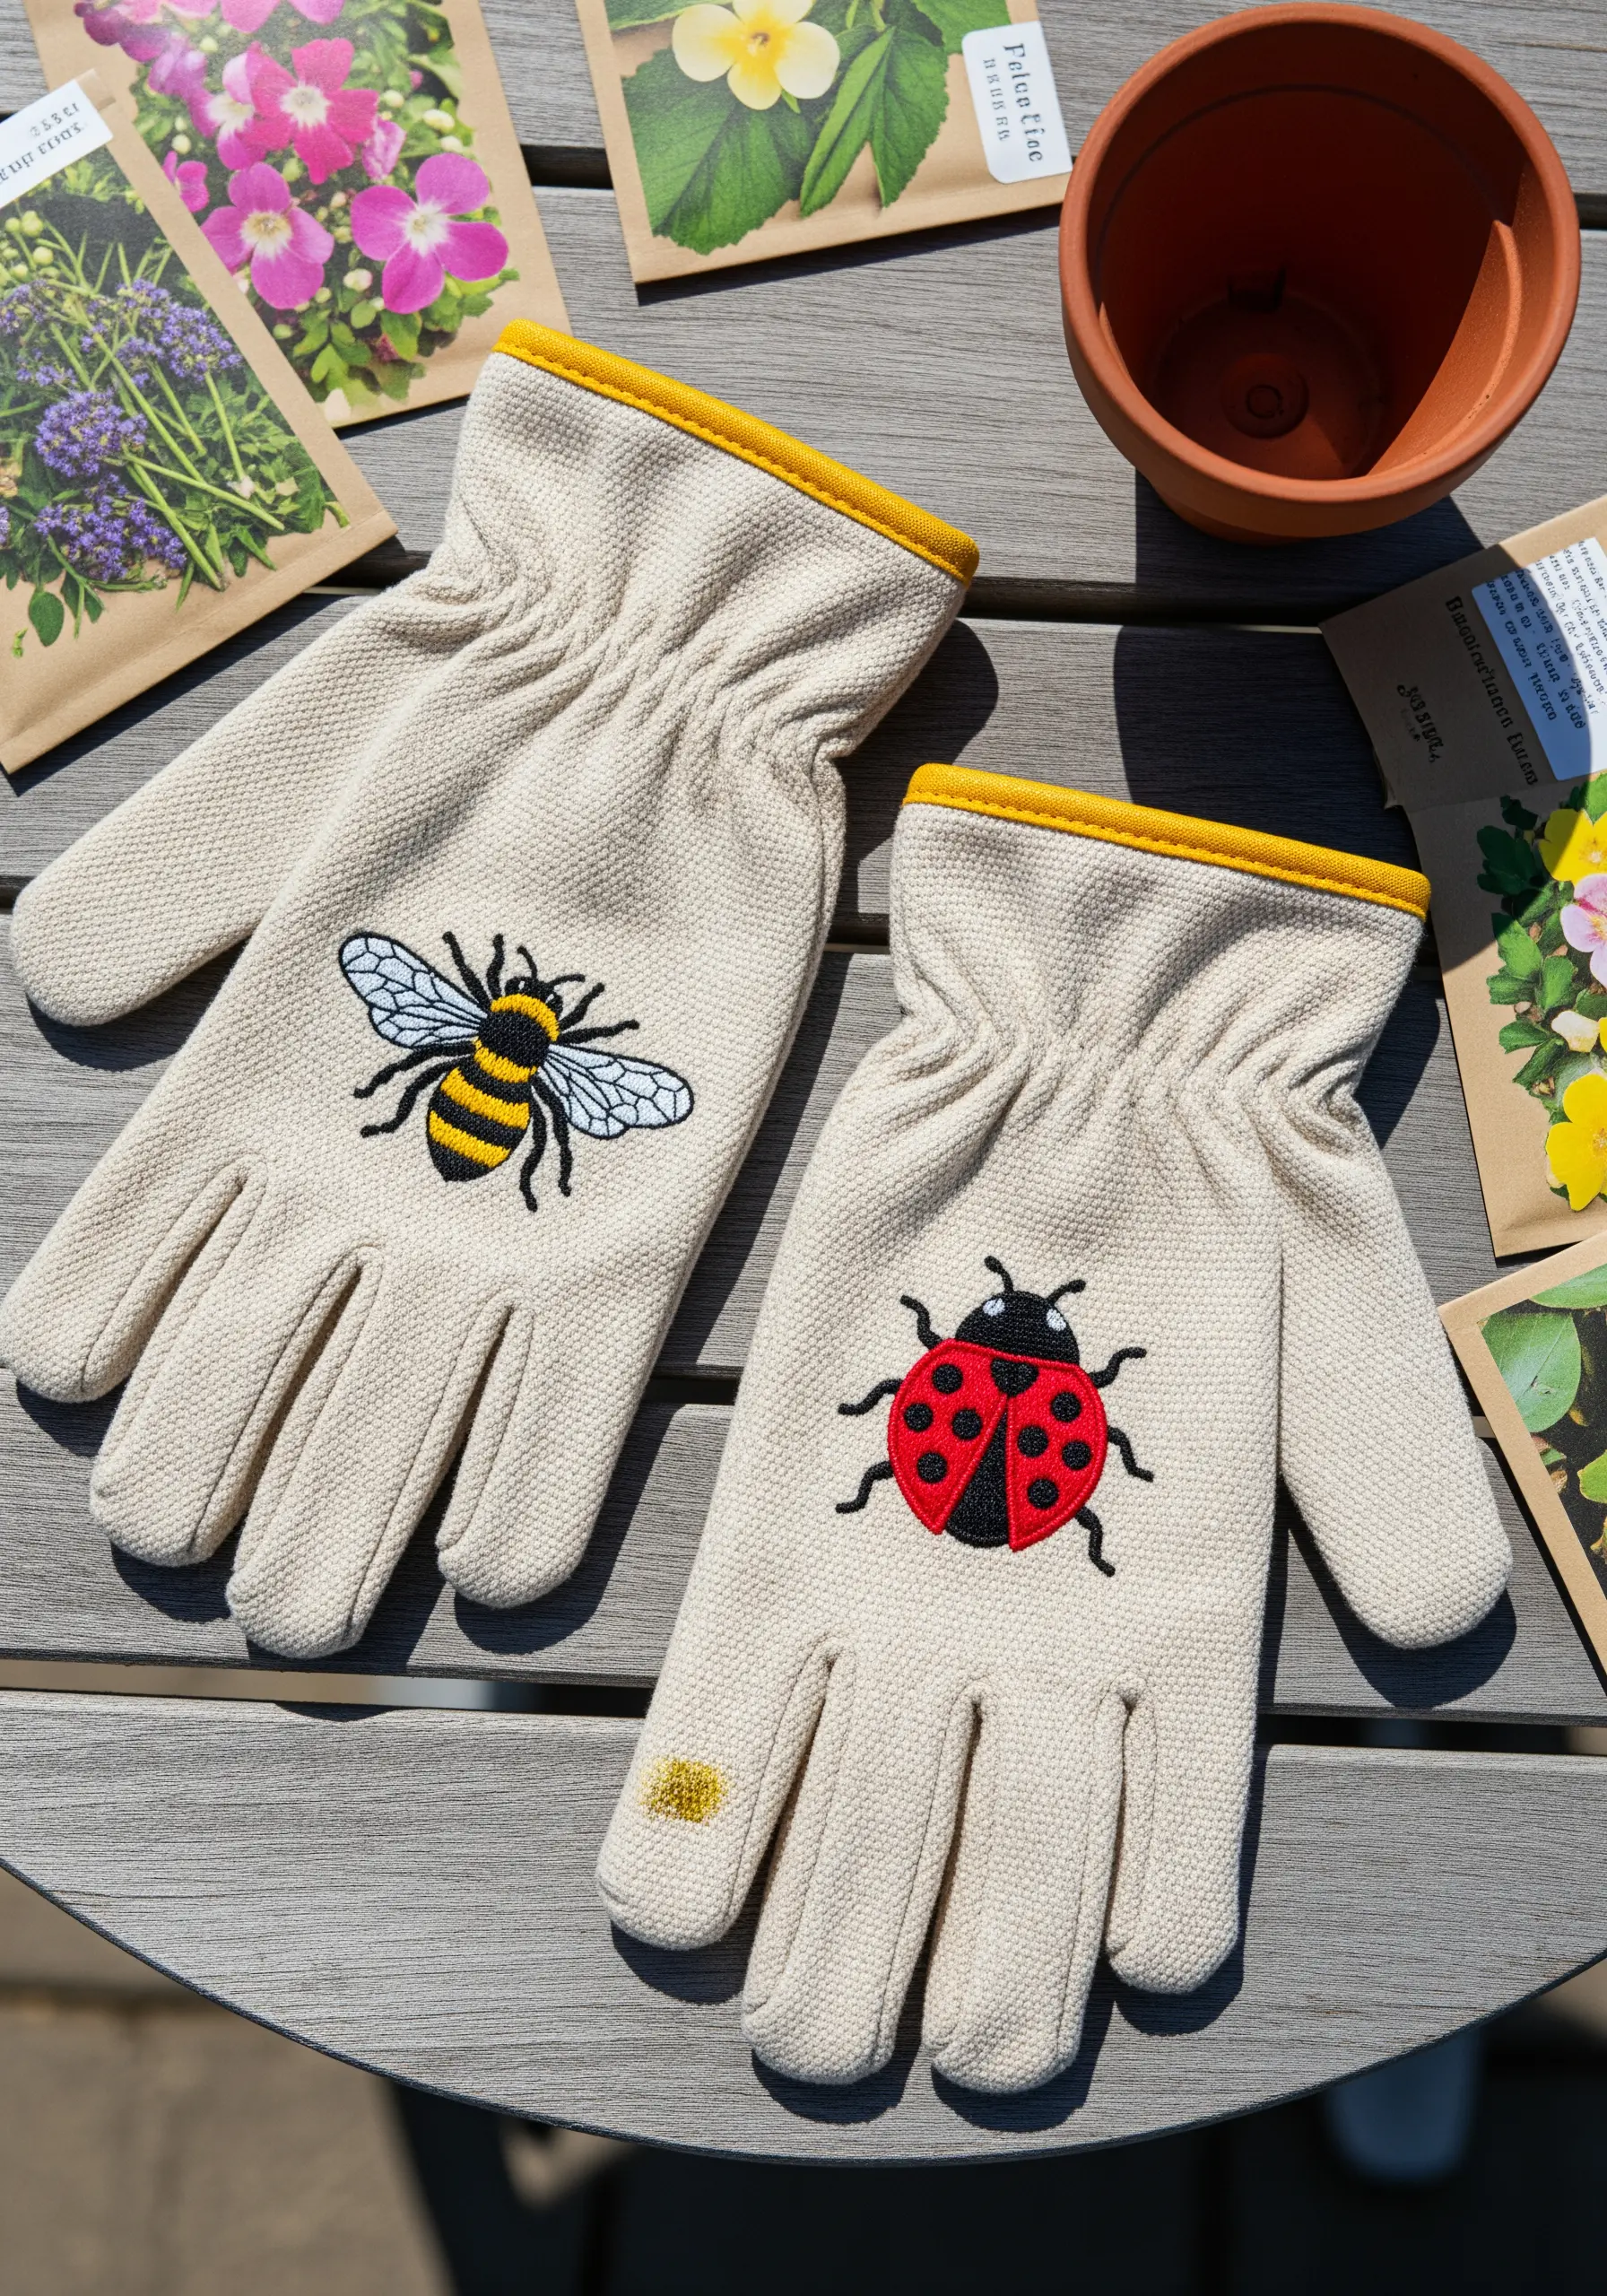
Personalizing a sturdy pair of gardening gloves makes for a delightful and practical gift. Choose simple, graphic motifs like a bee and a ladybug that are easily recognizable.
Use a heavy-duty needle and a thimble to stitch through the thick canvas. Keep your stitches bold and simple; a satin stitch for the filled areas and a backstitch for outlines and legs will be the most durable.
Use all six strands of cotton floss to ensure the design is robust and doesn’t get lost on the textured fabric. The bright colors add a touch of cheer to a hardworking accessory.
30. Craft an Iridescent Dragonfly Pouch
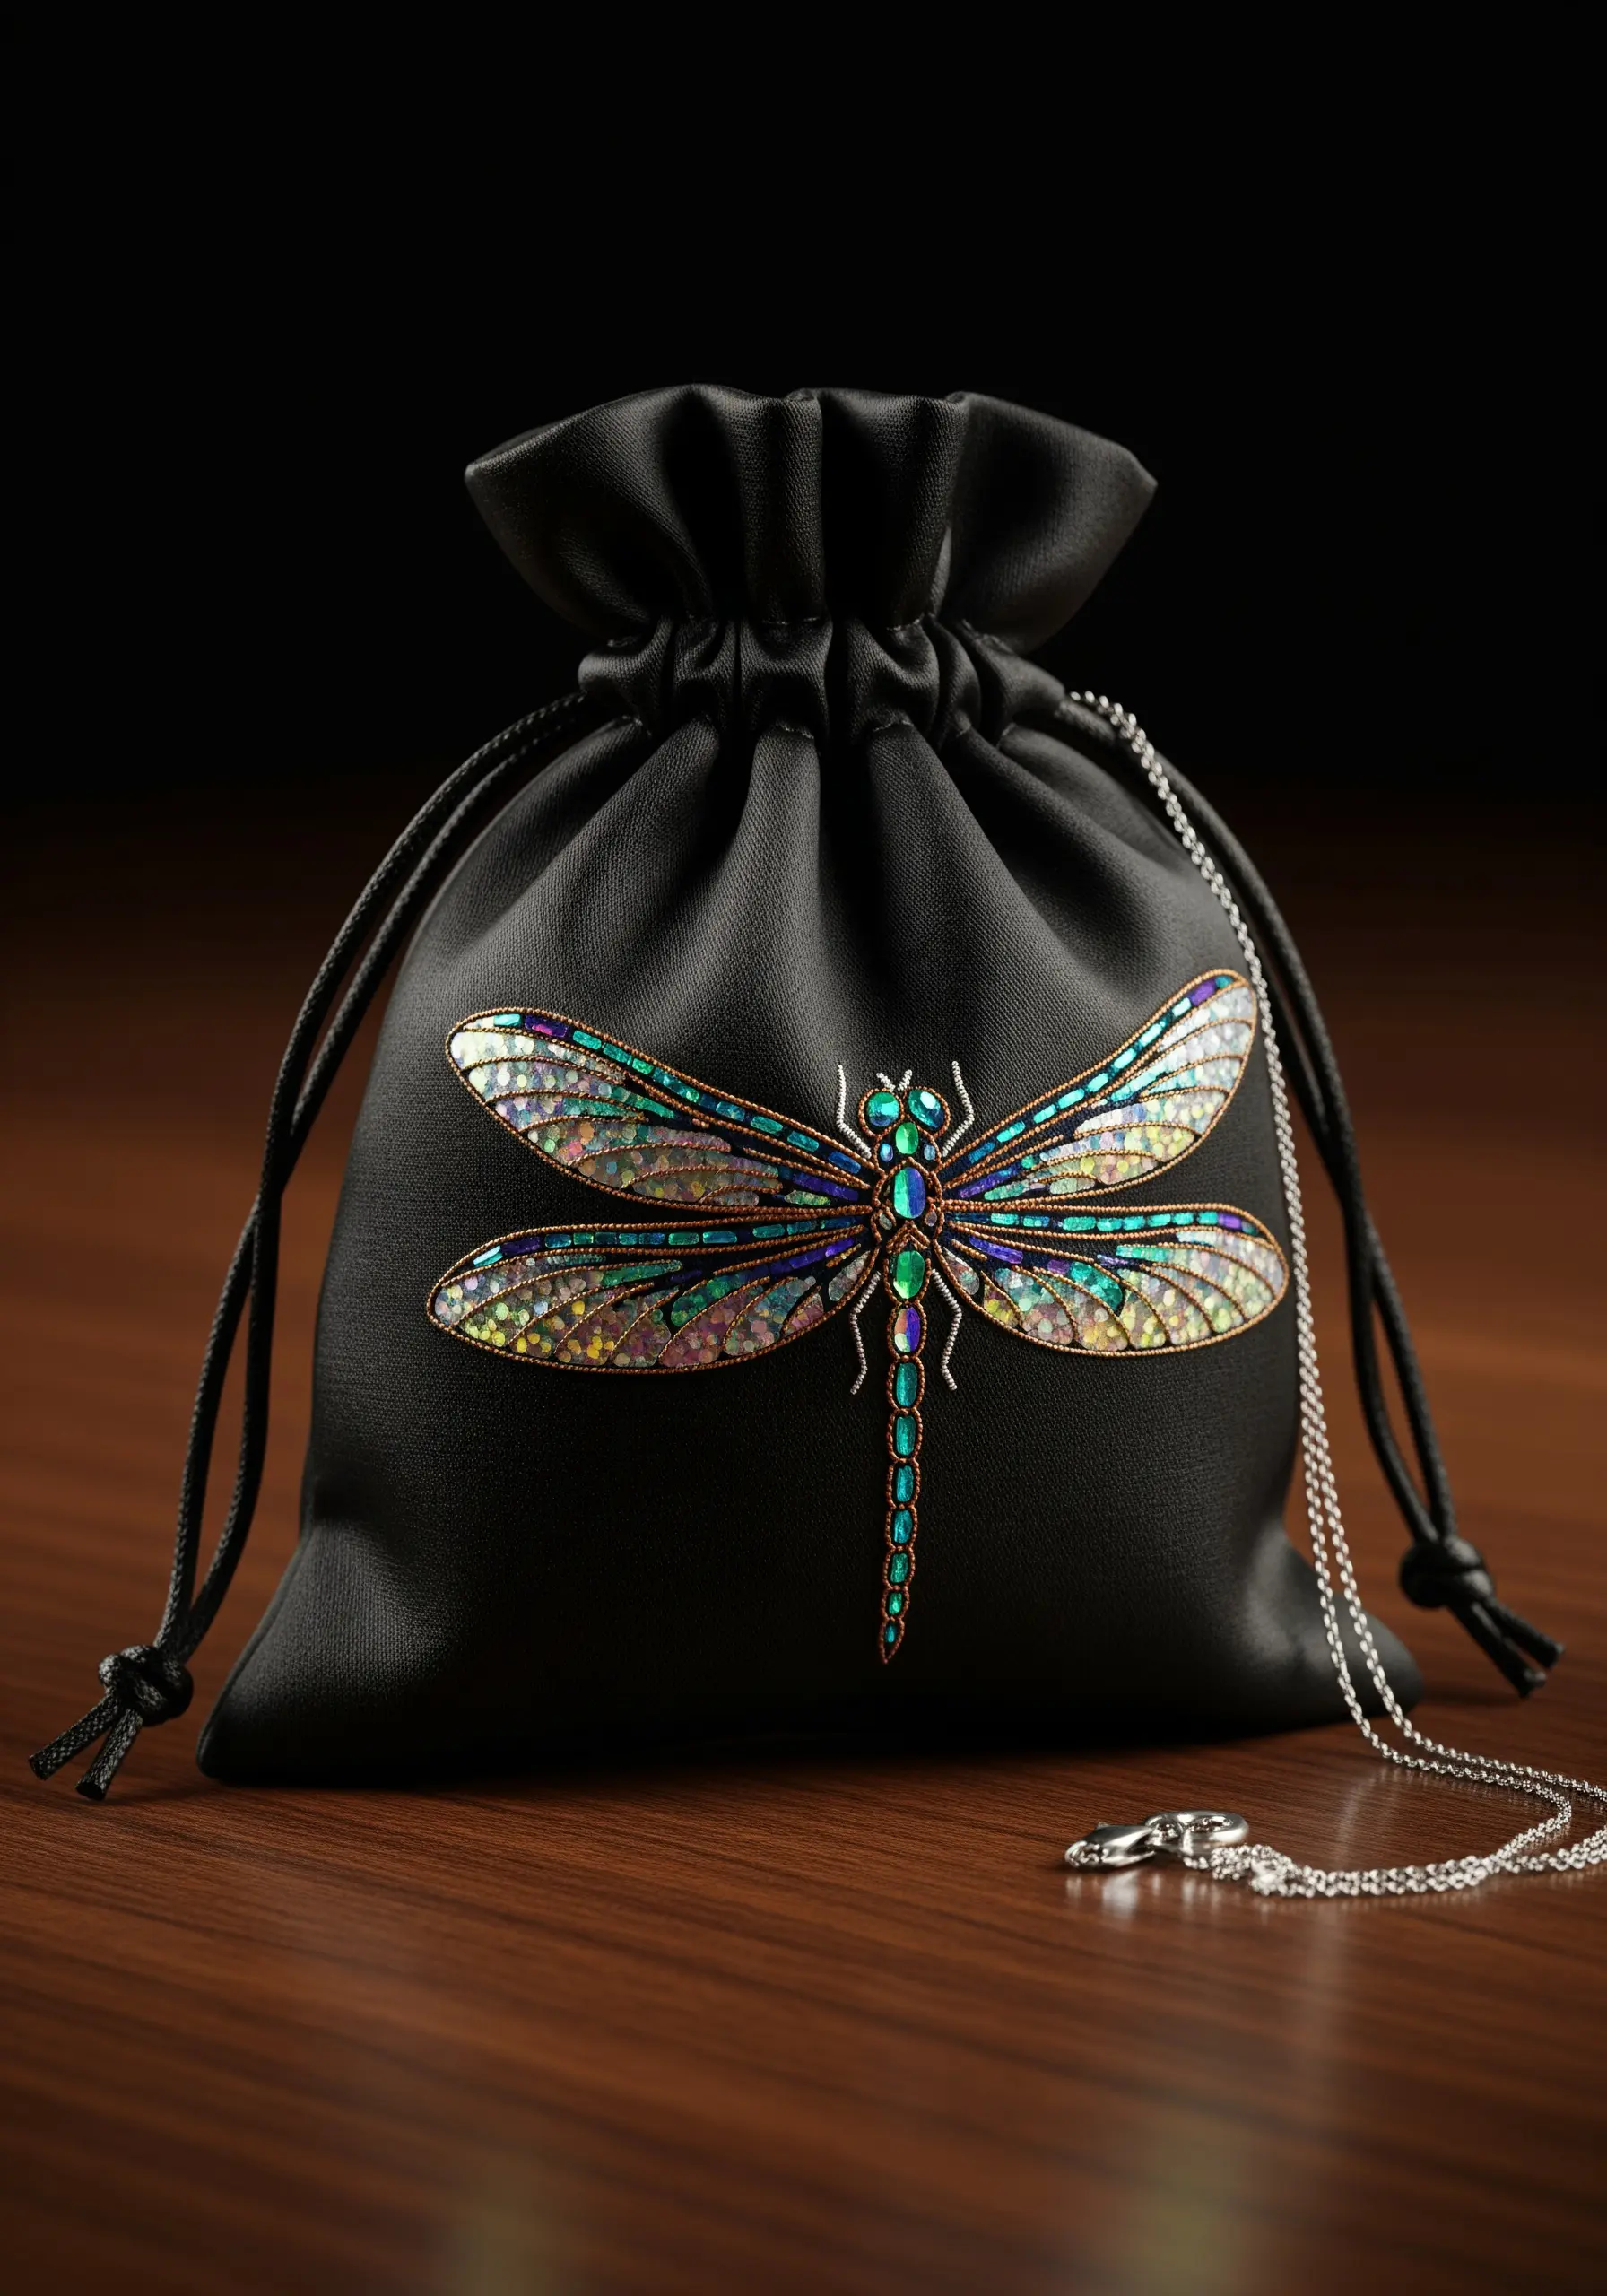
To capture the shimmering, multi-tonal quality of dragonfly wings, combine metallic threads with appliqué. Cut iridescent fabric or cellophane into the wing shapes and tack them down with a few small stitches.
Then, use a fine metallic or silk thread in a contrasting color to embroider the veins of the wings directly over the appliqué fabric. This secures the material and adds realistic detail.
For the body, use a padded satin stitch or couching—laying down a thicker cord and tacking it with a thinner thread—to create a raised, segmented effect. The combination of textures makes the dragonfly look truly magical.
31. Stitch a Retro-Style Atomic Cat Potholder

Capture the mid-century modern aesthetic with a combination of clean, graphic shapes and whimsical starbursts. Use appliqué for the large color blocks, like the cat’s body, for a crisp, clean edge.
Cut your felt or fabric shapes and secure them with a neat blanket stitch or whipstitch around the edges using a contrasting thread. This adds to the charming, handcrafted feel of the design.
For the finer details like the starbursts and whiskers, use a simple backstitch. The key to this style is its stylized simplicity and a playful, limited color palette.
32. Add a Peek-a-Boo Pocket Pal
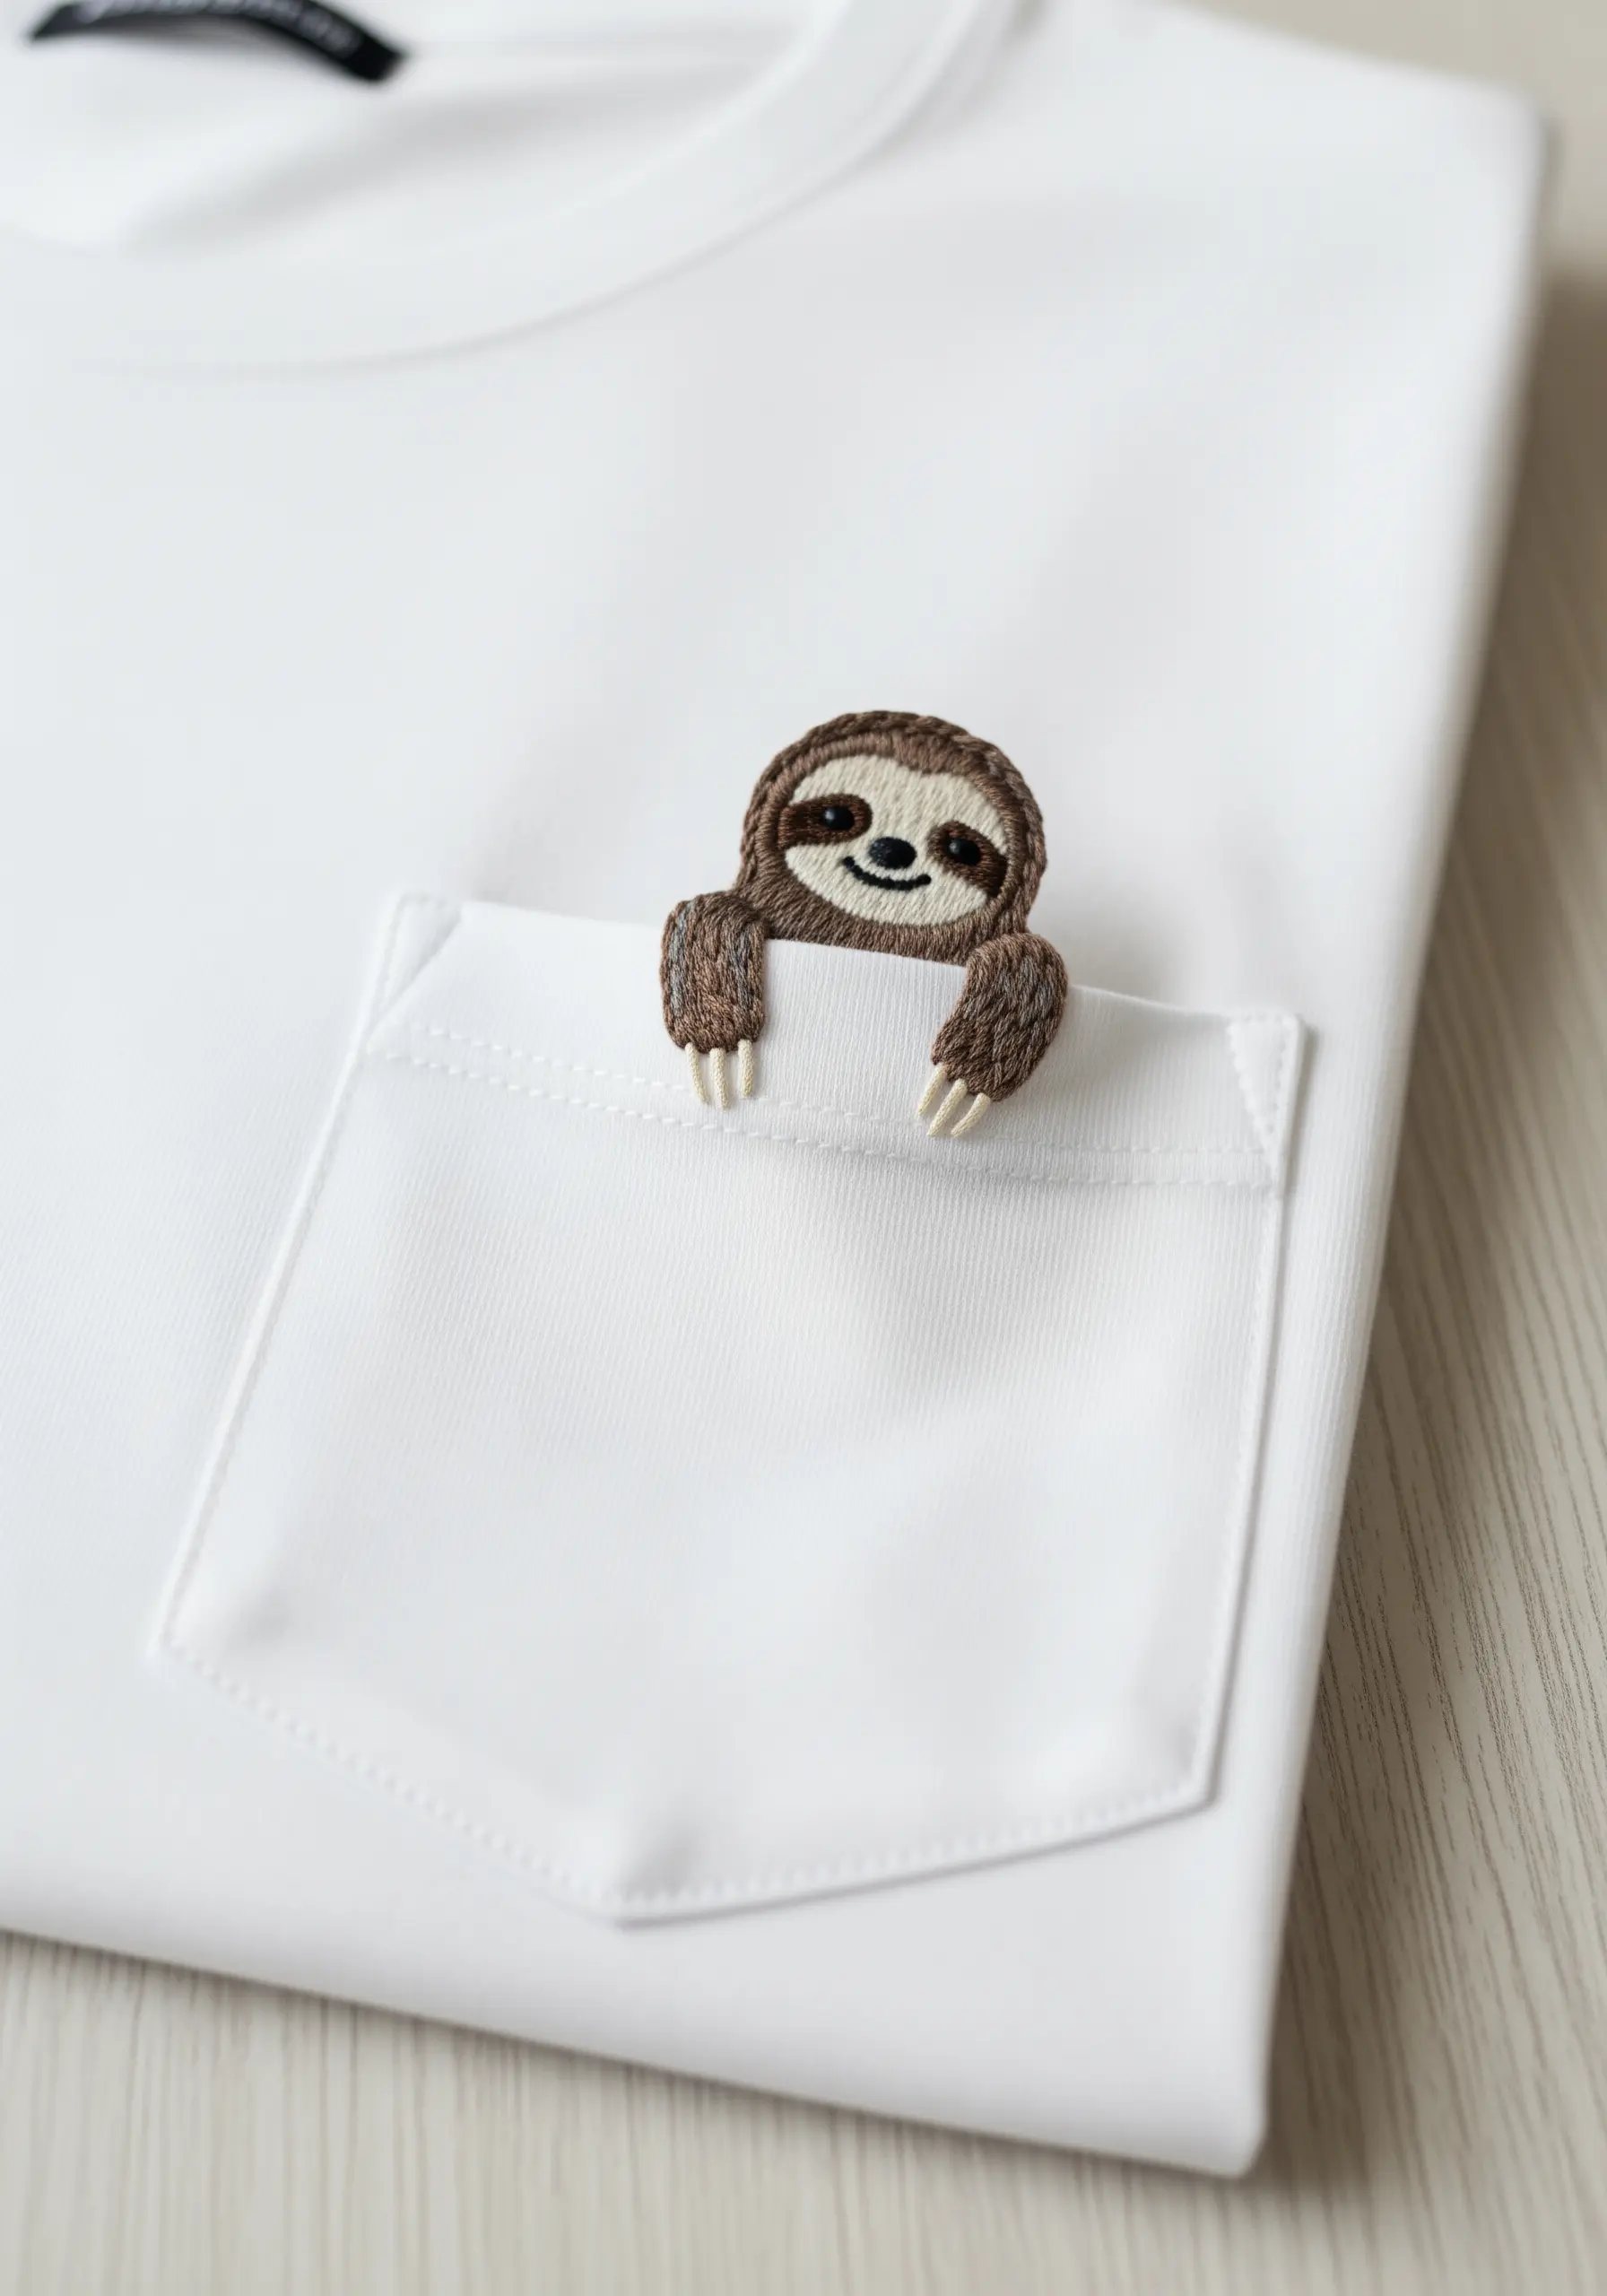
This charming effect is created by embroidering the main part of the animal on a separate piece of felt or sturdy fabric, and then stitching only the paws to the top edge of the pocket.
After embroidering your character, cut it out carefully, leaving a tiny margin or using a product like Fray Check on the edges if using woven fabric. Position it so it appears to be peeking out and securely stitch the paws in place from the inside of the shirt.
This creates a fun, interactive element that adds a secret bit of personality to a simple t-shirt. It’s one of those tiny secret embroidery ideas that feels incredibly special.
33. Create a Dimensional Grape Cluster Wine Bag
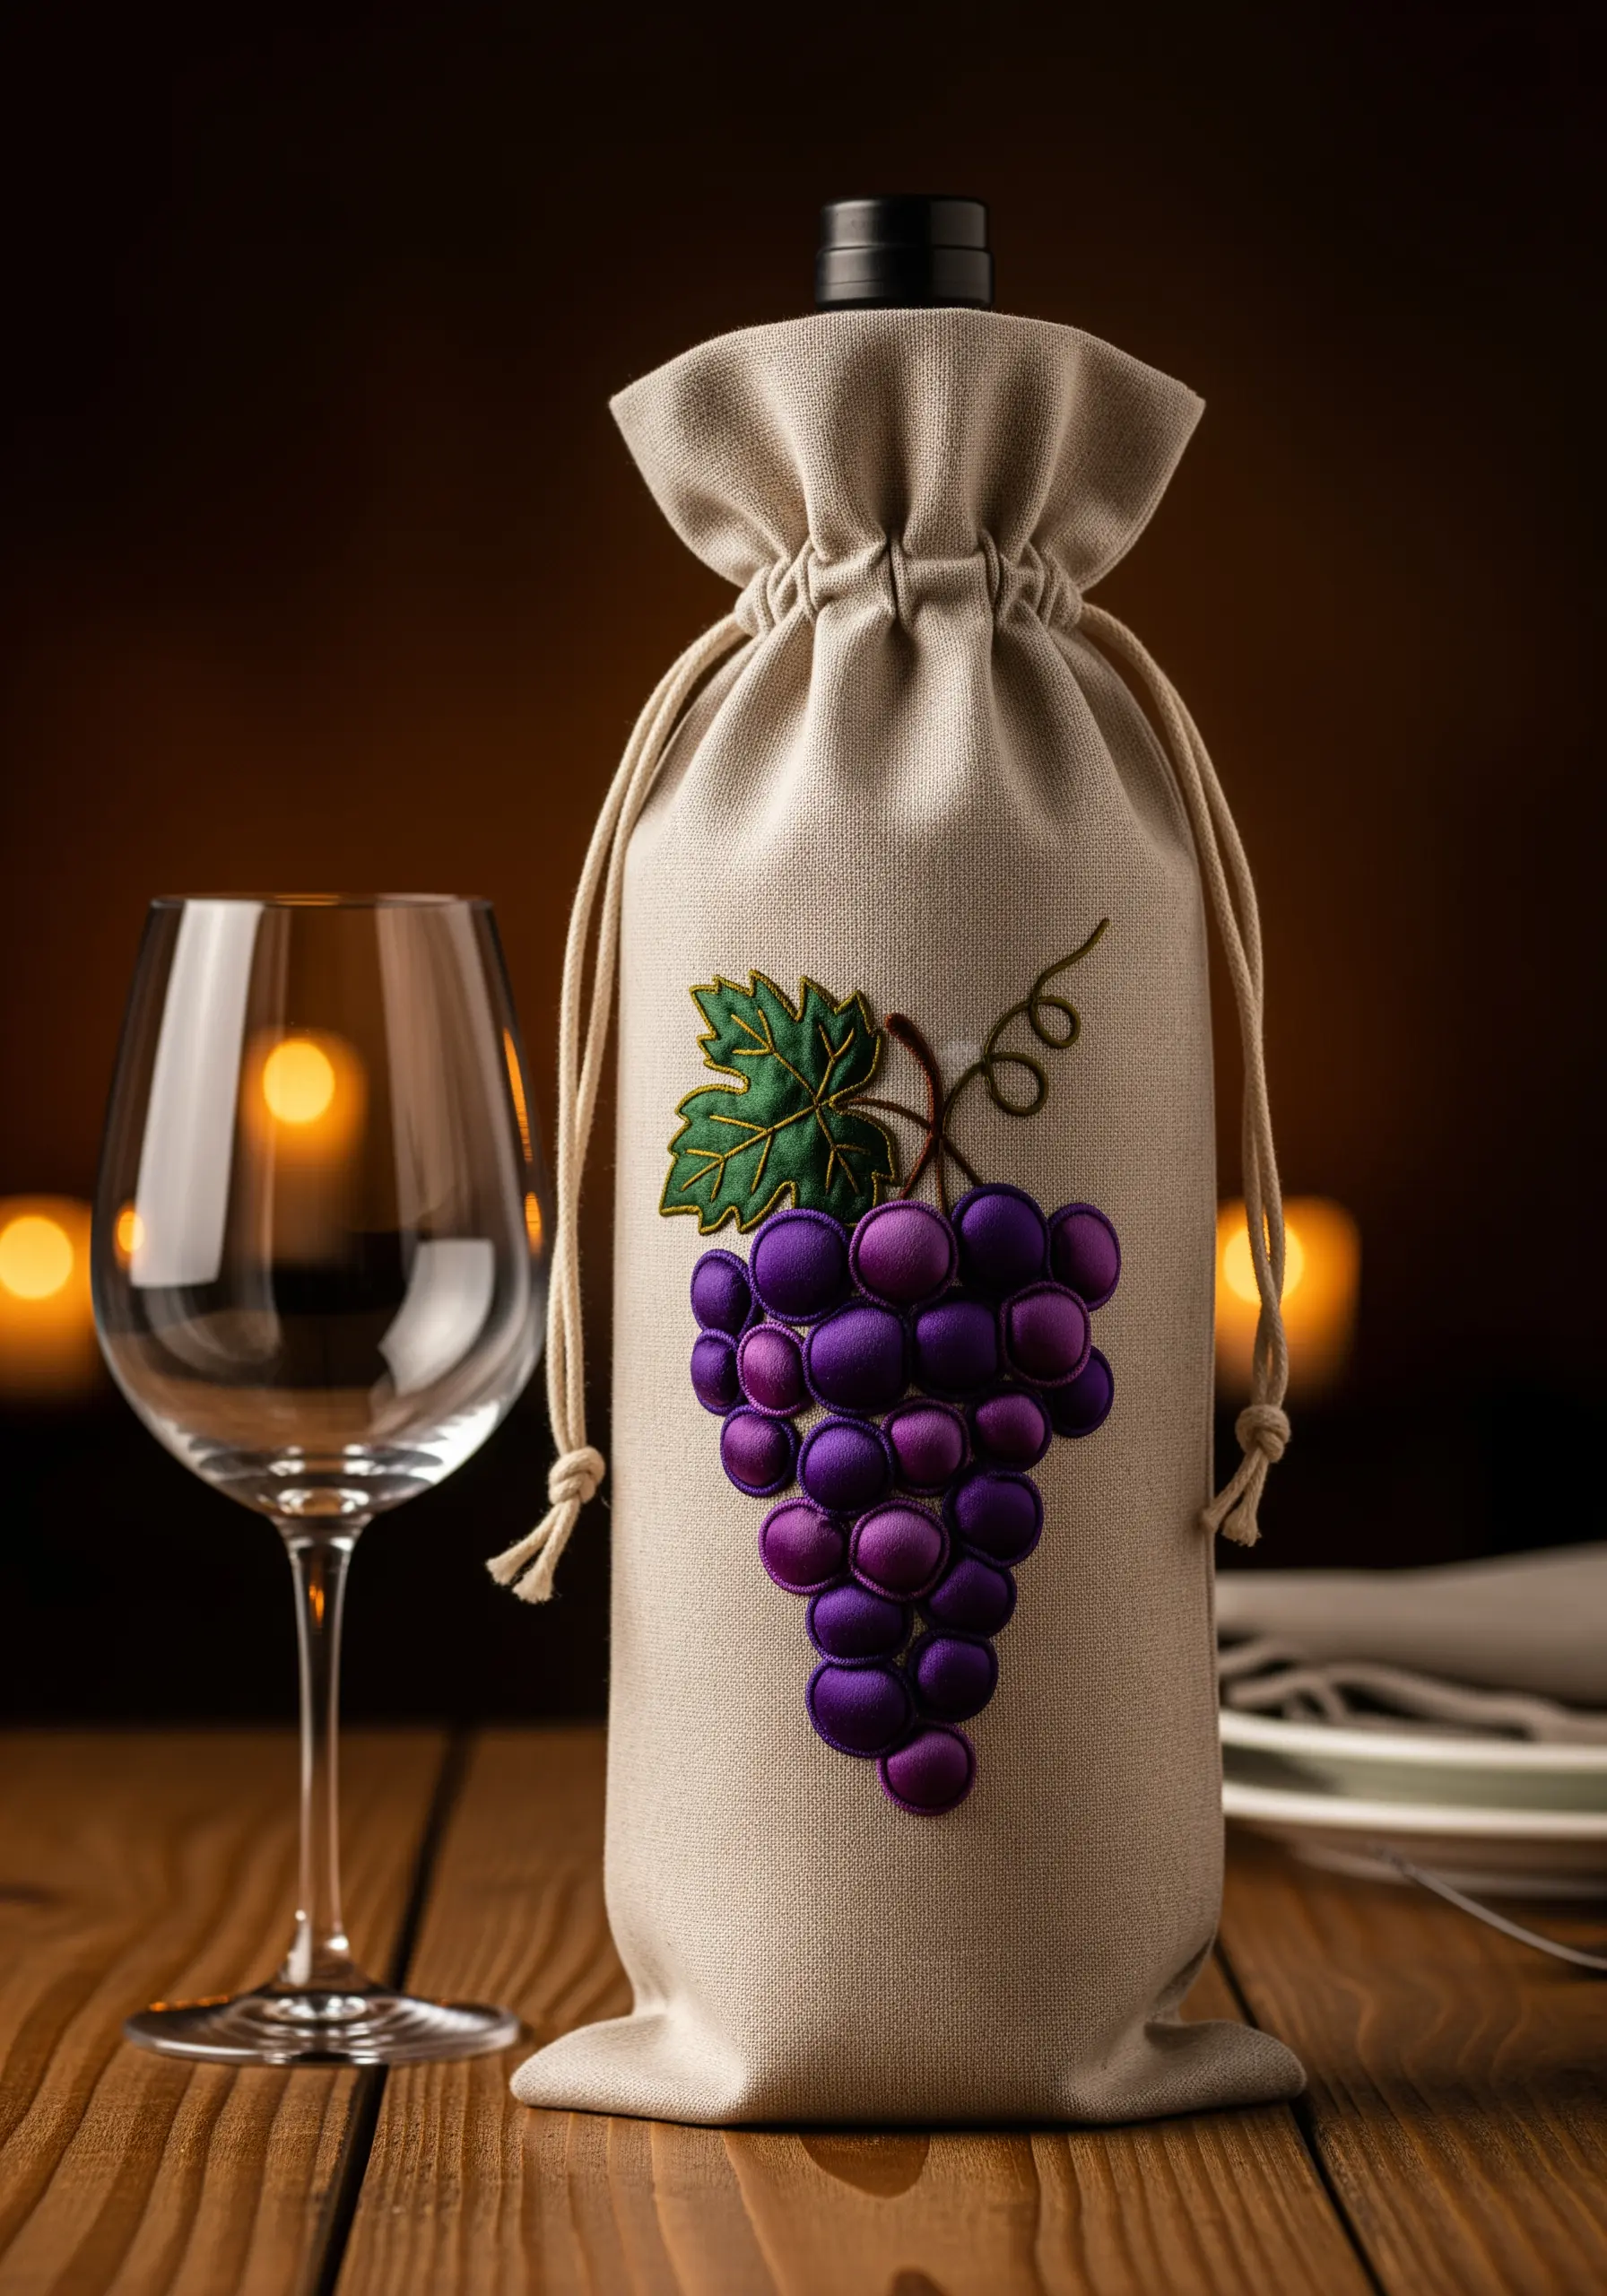
To give the grapes a realistic, rounded appearance, use a padded satin stitch. Create the padding by making several small straight stitches or a cluster of French knots in the center of each grape shape first.
Then, cover this padding with satin stitches, working from one side to the other. This underlying texture forces the top stitches to arch, creating a smooth, 3D effect.
Use two or three shades of purple and place them strategically—a slightly lighter shade on one side of each grape suggests a highlight, making the entire bunch look plump and lifelike. Leaf and plant embroidery ideas make gift packaging both beautiful and reusable.


