

That calm you feel when you stand by the shore doesn’t have to be a distant memory. With a needle and thread, you can bring that serene, coastal energy right into your home, one stitch at a time.
But this isn’t about simply stitching a seashell. It’s about capturing the texture of sun-bleached driftwood, the layered colors of a coral reef, or the rhythmic motion of waves against the sand. It’s about translating a feeling into fabric.
These ideas are designed to help you refine your technique and build your confidence. You’ll discover how a simple change in stitch direction can create dimension, how layering threads can build depth, and how a thoughtful composition can turn a simple pillow into a piece of art that feels both personal and polished.
1. Build an Underwater Scene with Layered Textures

Create a sense of depth in your coral reef by varying your stitch textures and thread weights.
Use a chunky chain stitch or French knots for the coral in the foreground to make it feel closer and more tactile.
For seaweed and coral in the background, switch to a finer, single-strand satin stitch or simple backstitch.
This technique tricks the eye into seeing distance and dimension, transforming a flat composition into a vibrant, layered world.
Place your brightest colors, like the vibrant reds and pinks, forward to draw attention, while muting the tones for elements further away.
2. Achieve Crisp Lines with a Whipped Backstitch

For a graphic design like a sand dollar, the clarity of your lines is everything.
Instead of a standard backstitch, use a whipped backstitch for a smoother, more pronounced outline.
First, complete your entire design with a simple backstitch, keeping your stitches small and even.
Then, using the same thread, slide your needle under each backstitch without piercing the fabric, creating a seamless, cord-like line.
This method eliminates the segmented look of a regular backstitch and gives your work a clean, polished finish, especially effective against a high-contrast fabric like navy blue.
3. Weave Oceanic Waves with Thick Yarn

Capture the rhythmic texture of ocean waves by moving beyond floss and incorporating thick yarn or roving.
This technique, known as couching, involves laying down thick fibers on the surface of your fabric and securing them with small, discreet tacking stitches using a matching thin thread.
Arrange different weights and shades of blue yarn in undulating lines to mimic the swell of the sea.
The result is a highly tactile, sculptural piece that adds dramatic texture and movement, making it one of those stunning mixed-fiber projects that feels as good as it looks.
4. Create a Sense of Motion with Scattered Motifs
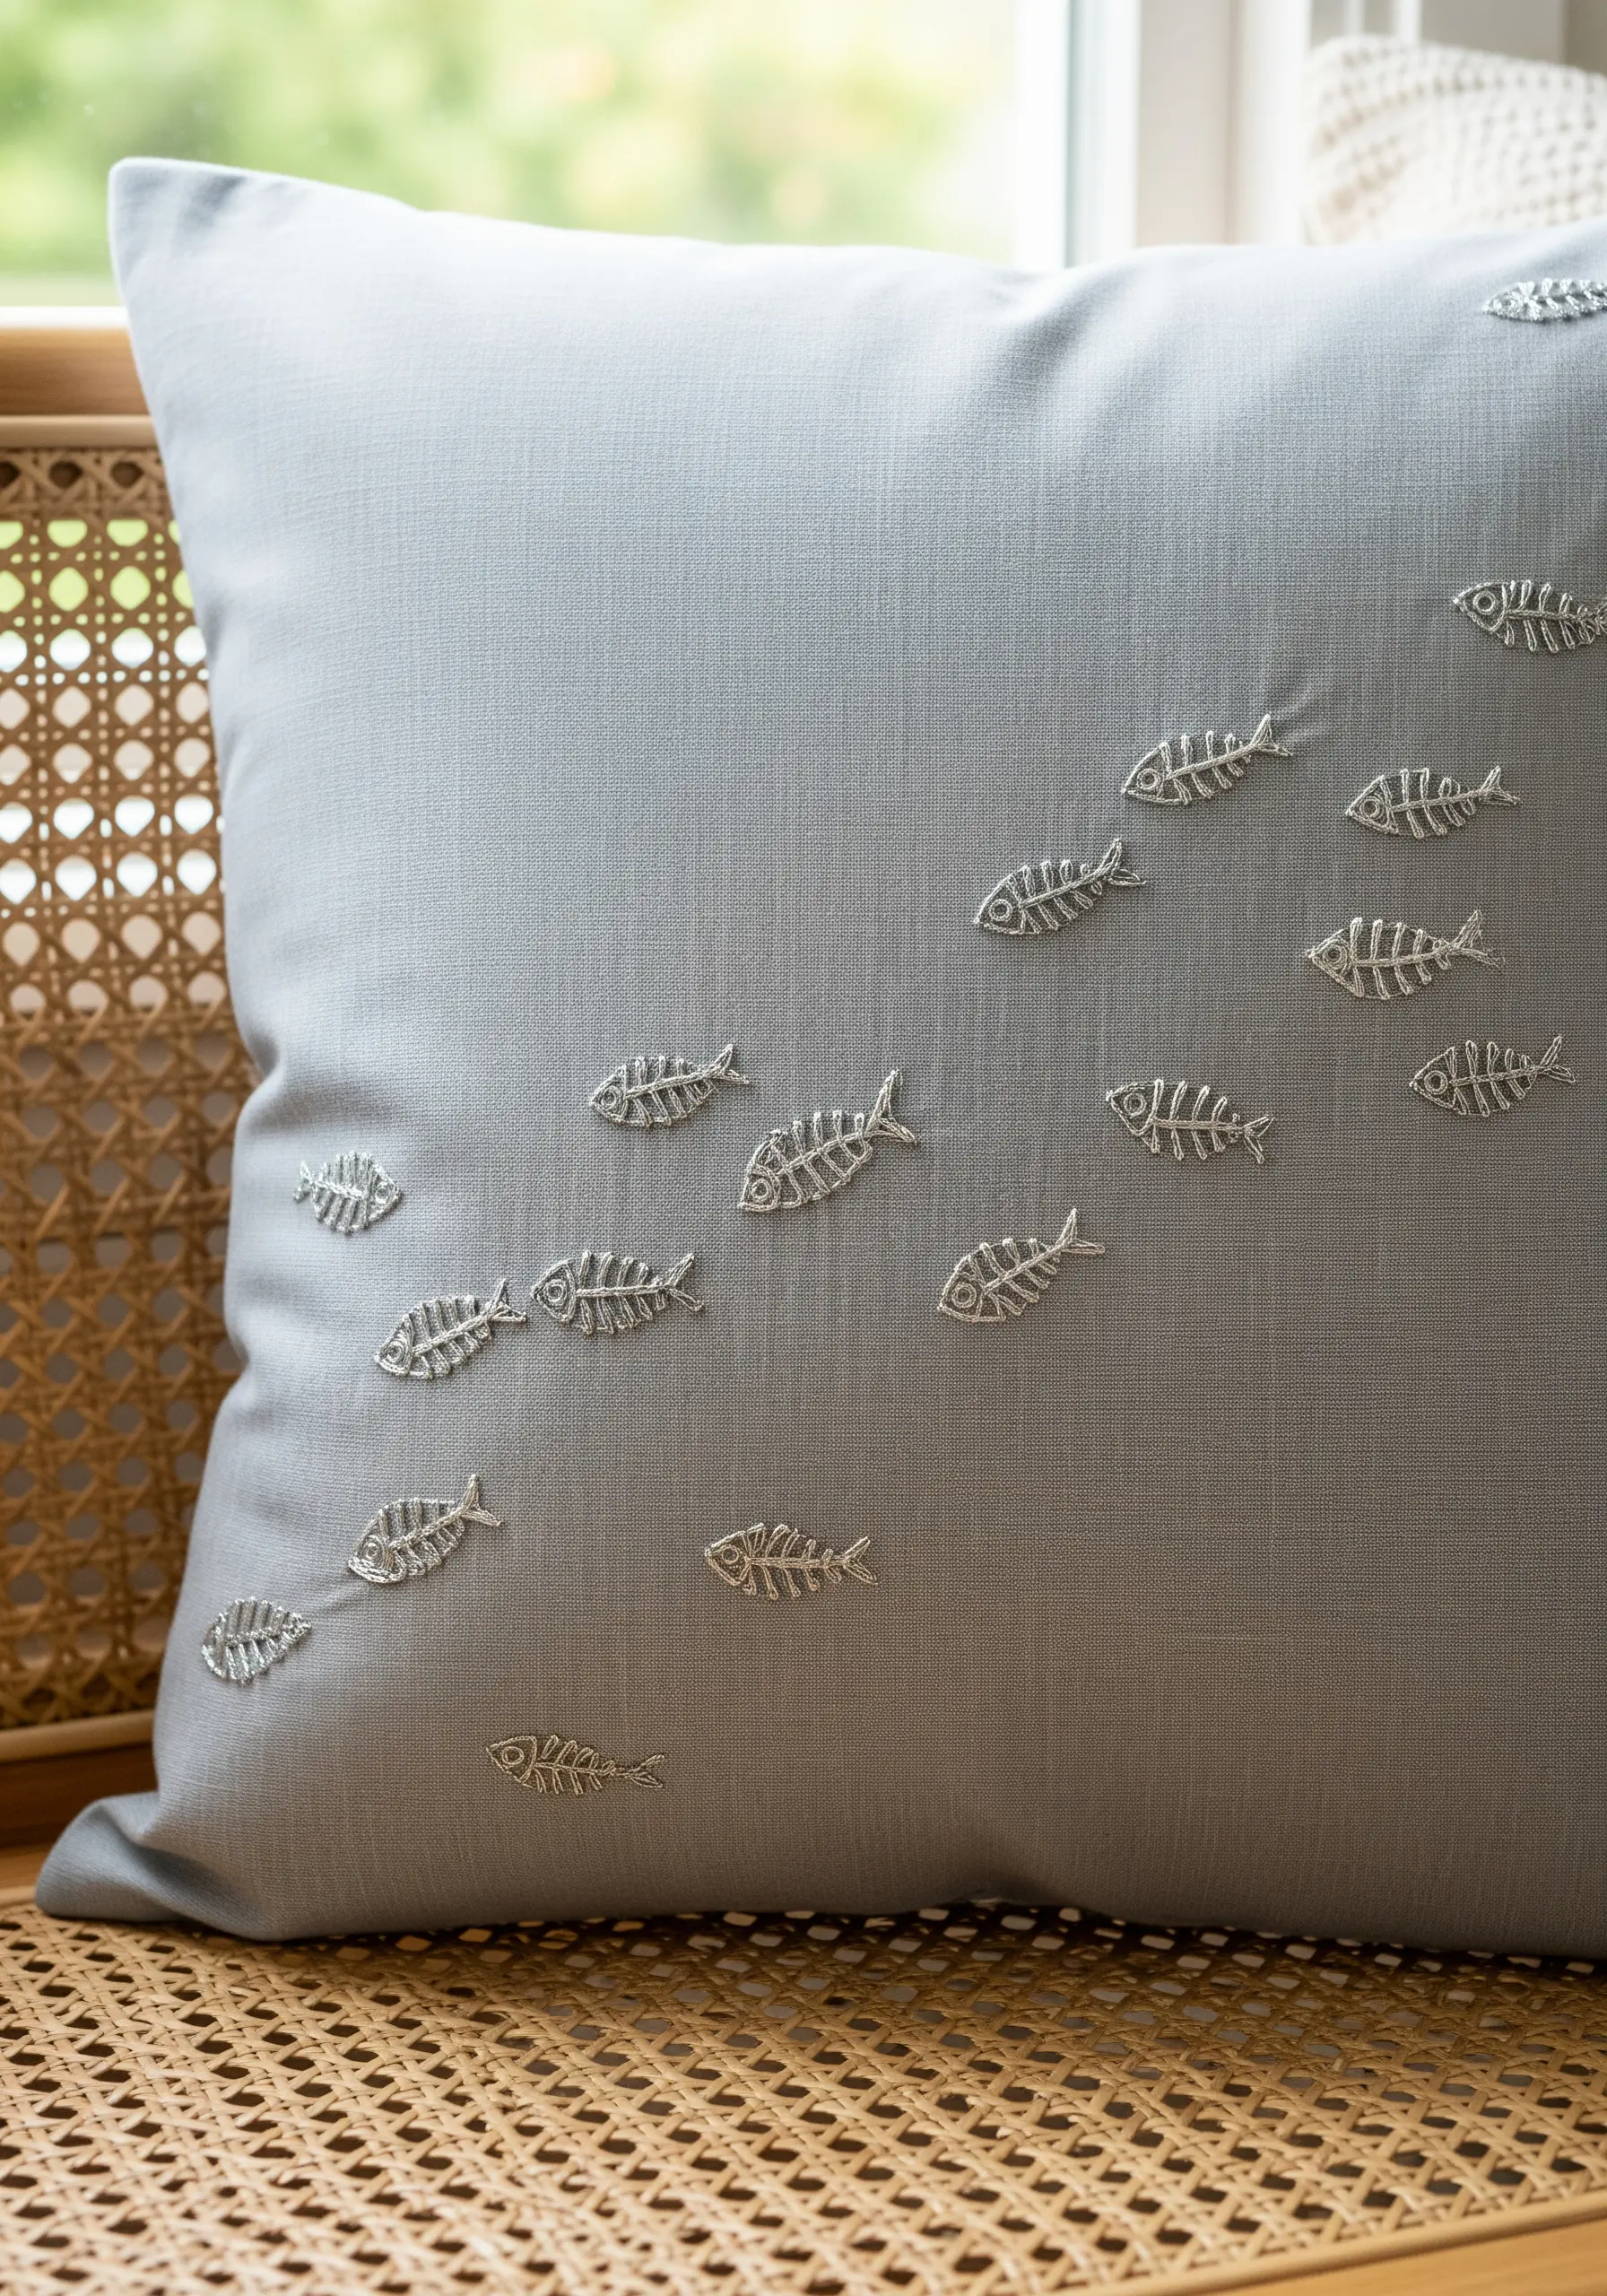
A simple motif can gain immense visual power through thoughtful placement.
Arrange these delicate fish skeletons in a gentle, sweeping curve across the pillow to create a feeling of movement, as if a school of fish is swimming by.
Vary the spacing and orientation of each fish slightly to make the pattern feel more organic and less rigid.
Using a single color of metallic thread against the soft grey linen adds a touch of quiet elegance, proving that you don’t need complexity to make a sophisticated statement.
5. Frame Your Scene with a Dimensional Border

Elevate a detailed landscape by enclosing it within a defined, textural border.
After completing your thread-painted lighthouse scene, couch a piece of natural jute or thick rope around the circle.
Lay the rope along your guideline and use a strong, matching thread to stitch it down with small, evenly spaced tacking stitches.
This porthole effect not only adds a nautical touch but also cleanly frames your artwork, giving it a professional, finished look that separates it from the background fabric.
6. Use Negative Space for a Crisp, Modern Design

When working with simple, graphic shapes like these sailboats, the empty space around them is as important as the stitches themselves.
Resist the urge to add more elements. Instead, focus on perfecting the execution of each boat.
Use a split stitch for the outlines to ensure they are sharp and unwavering. Then, fill the shapes with a dense, smooth satin stitch.
The clean white fabric acts as a perfect canvas, allowing the repeating motifs to feel intentional, balanced, and modern.
7. Give Minimalist Stitches a Subtle 3D Lift
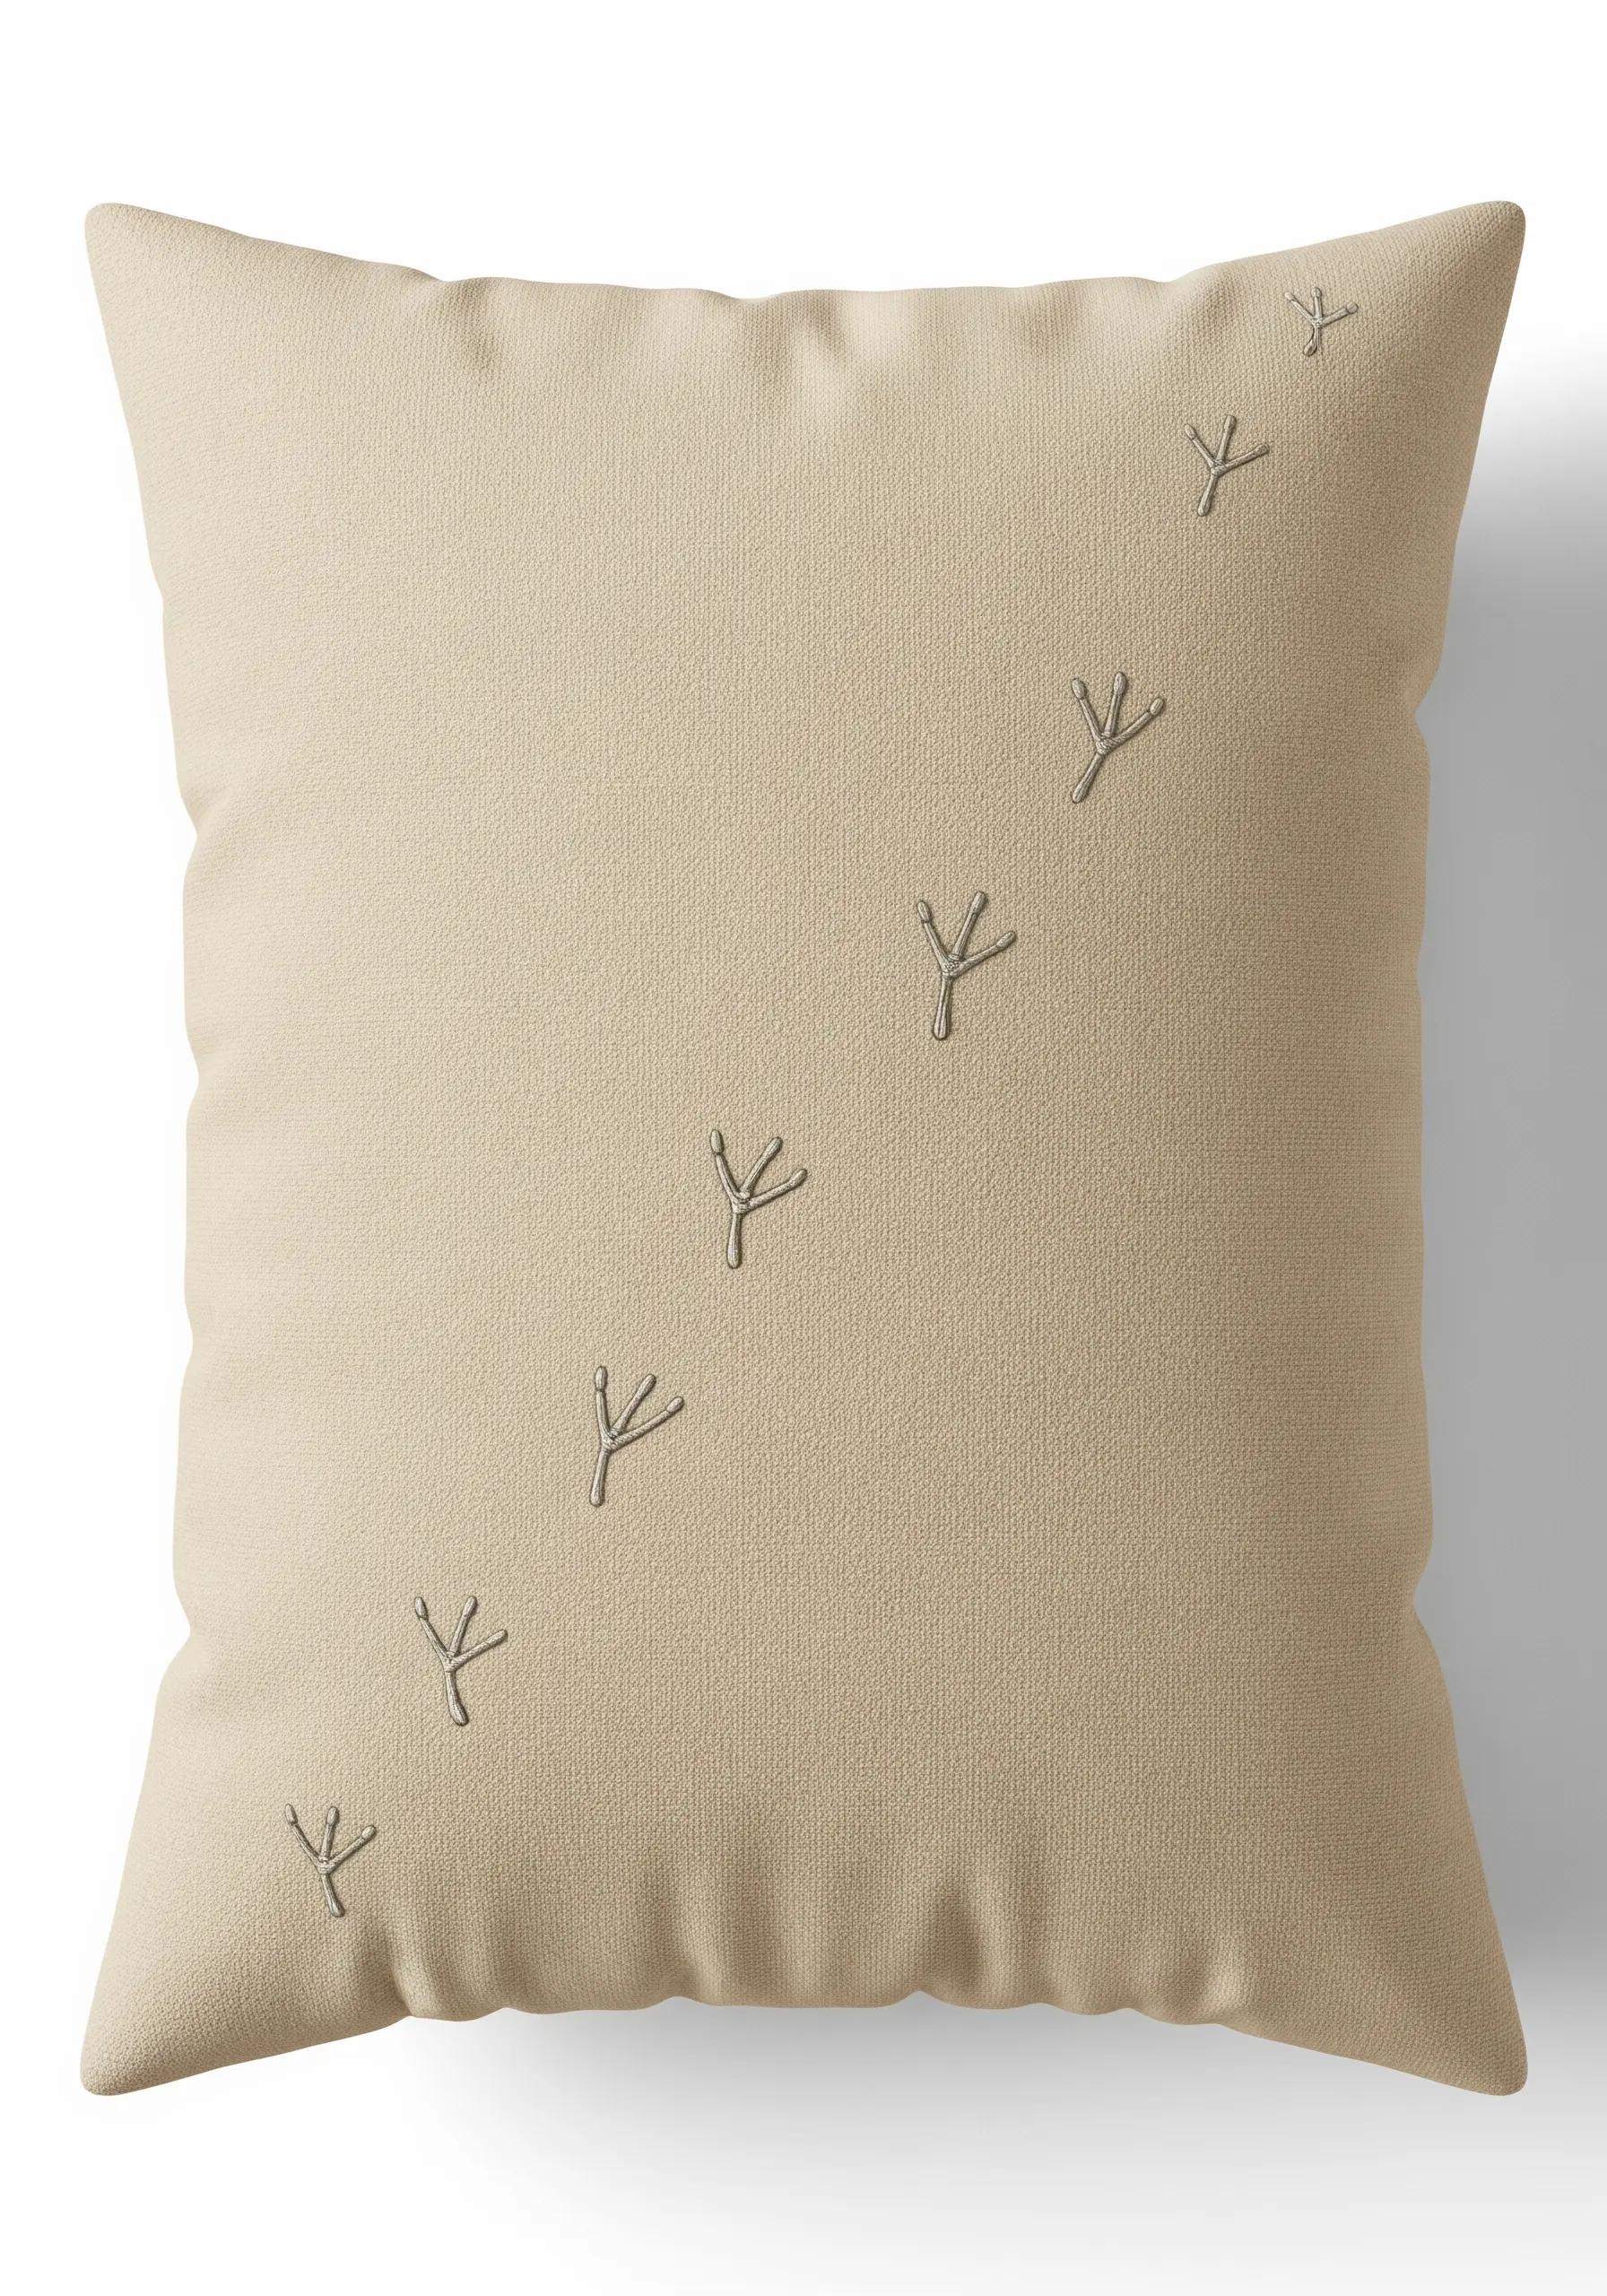
Even the most minimal design, like these delicate bird tracks, can be enhanced with a touch of dimension.
Before stitching the final motif, create a base of small, straight stitches within the shape.
Then, work your final satin stitches over this padding. This technique, called padded satin stitch, raises the embroidery slightly from the fabric surface.
It catches the light beautifully and gives a simple design a subtle, tactile quality that invites a closer look.
8. Master Realism with Single-Strand Blending
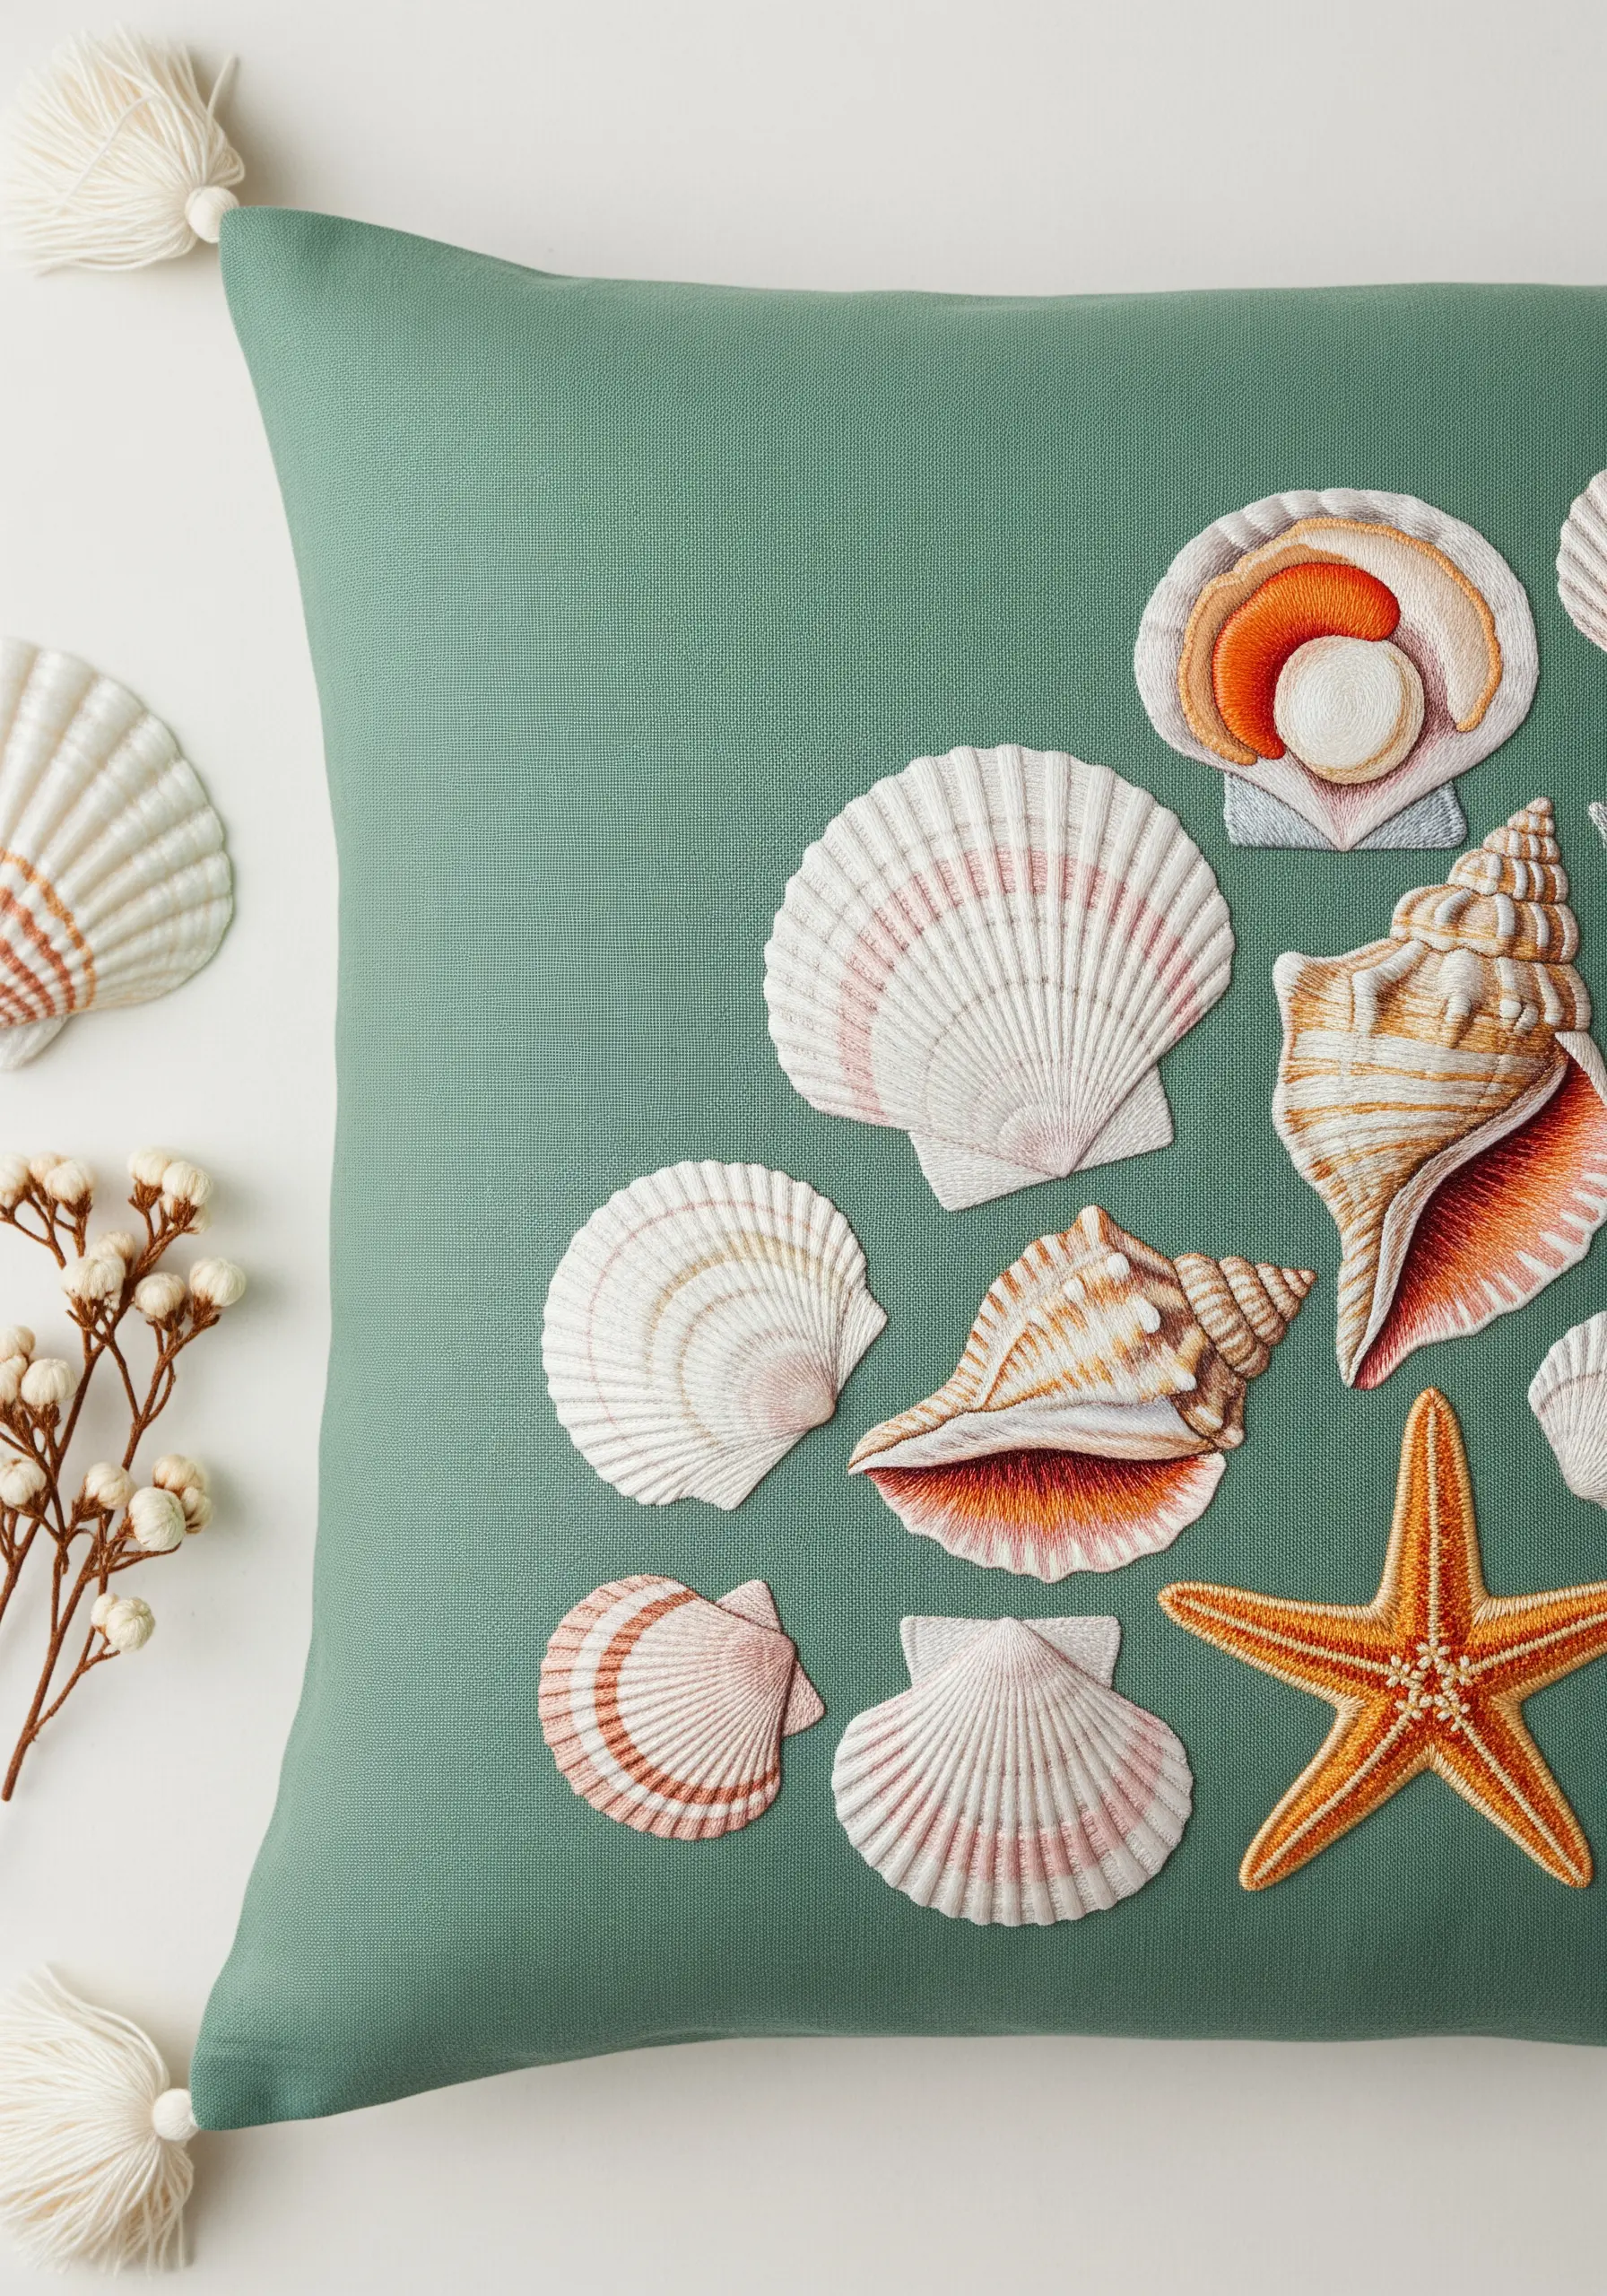
To make seashells look truly realistic, you need to capture their delicate color transitions.
Work with a single strand of embroidery floss to achieve the smoothest gradients with long-and-short stitch.
Study a real shell and notice how the colors shift—don’t just place stripes of color next to each other.
Instead, blend them by staggering your stitches and introducing new shades gradually. This meticulous technique is the key to turning a simple shape into a piece of contemporary thread painting.
9. Define Form with Directional Stitching
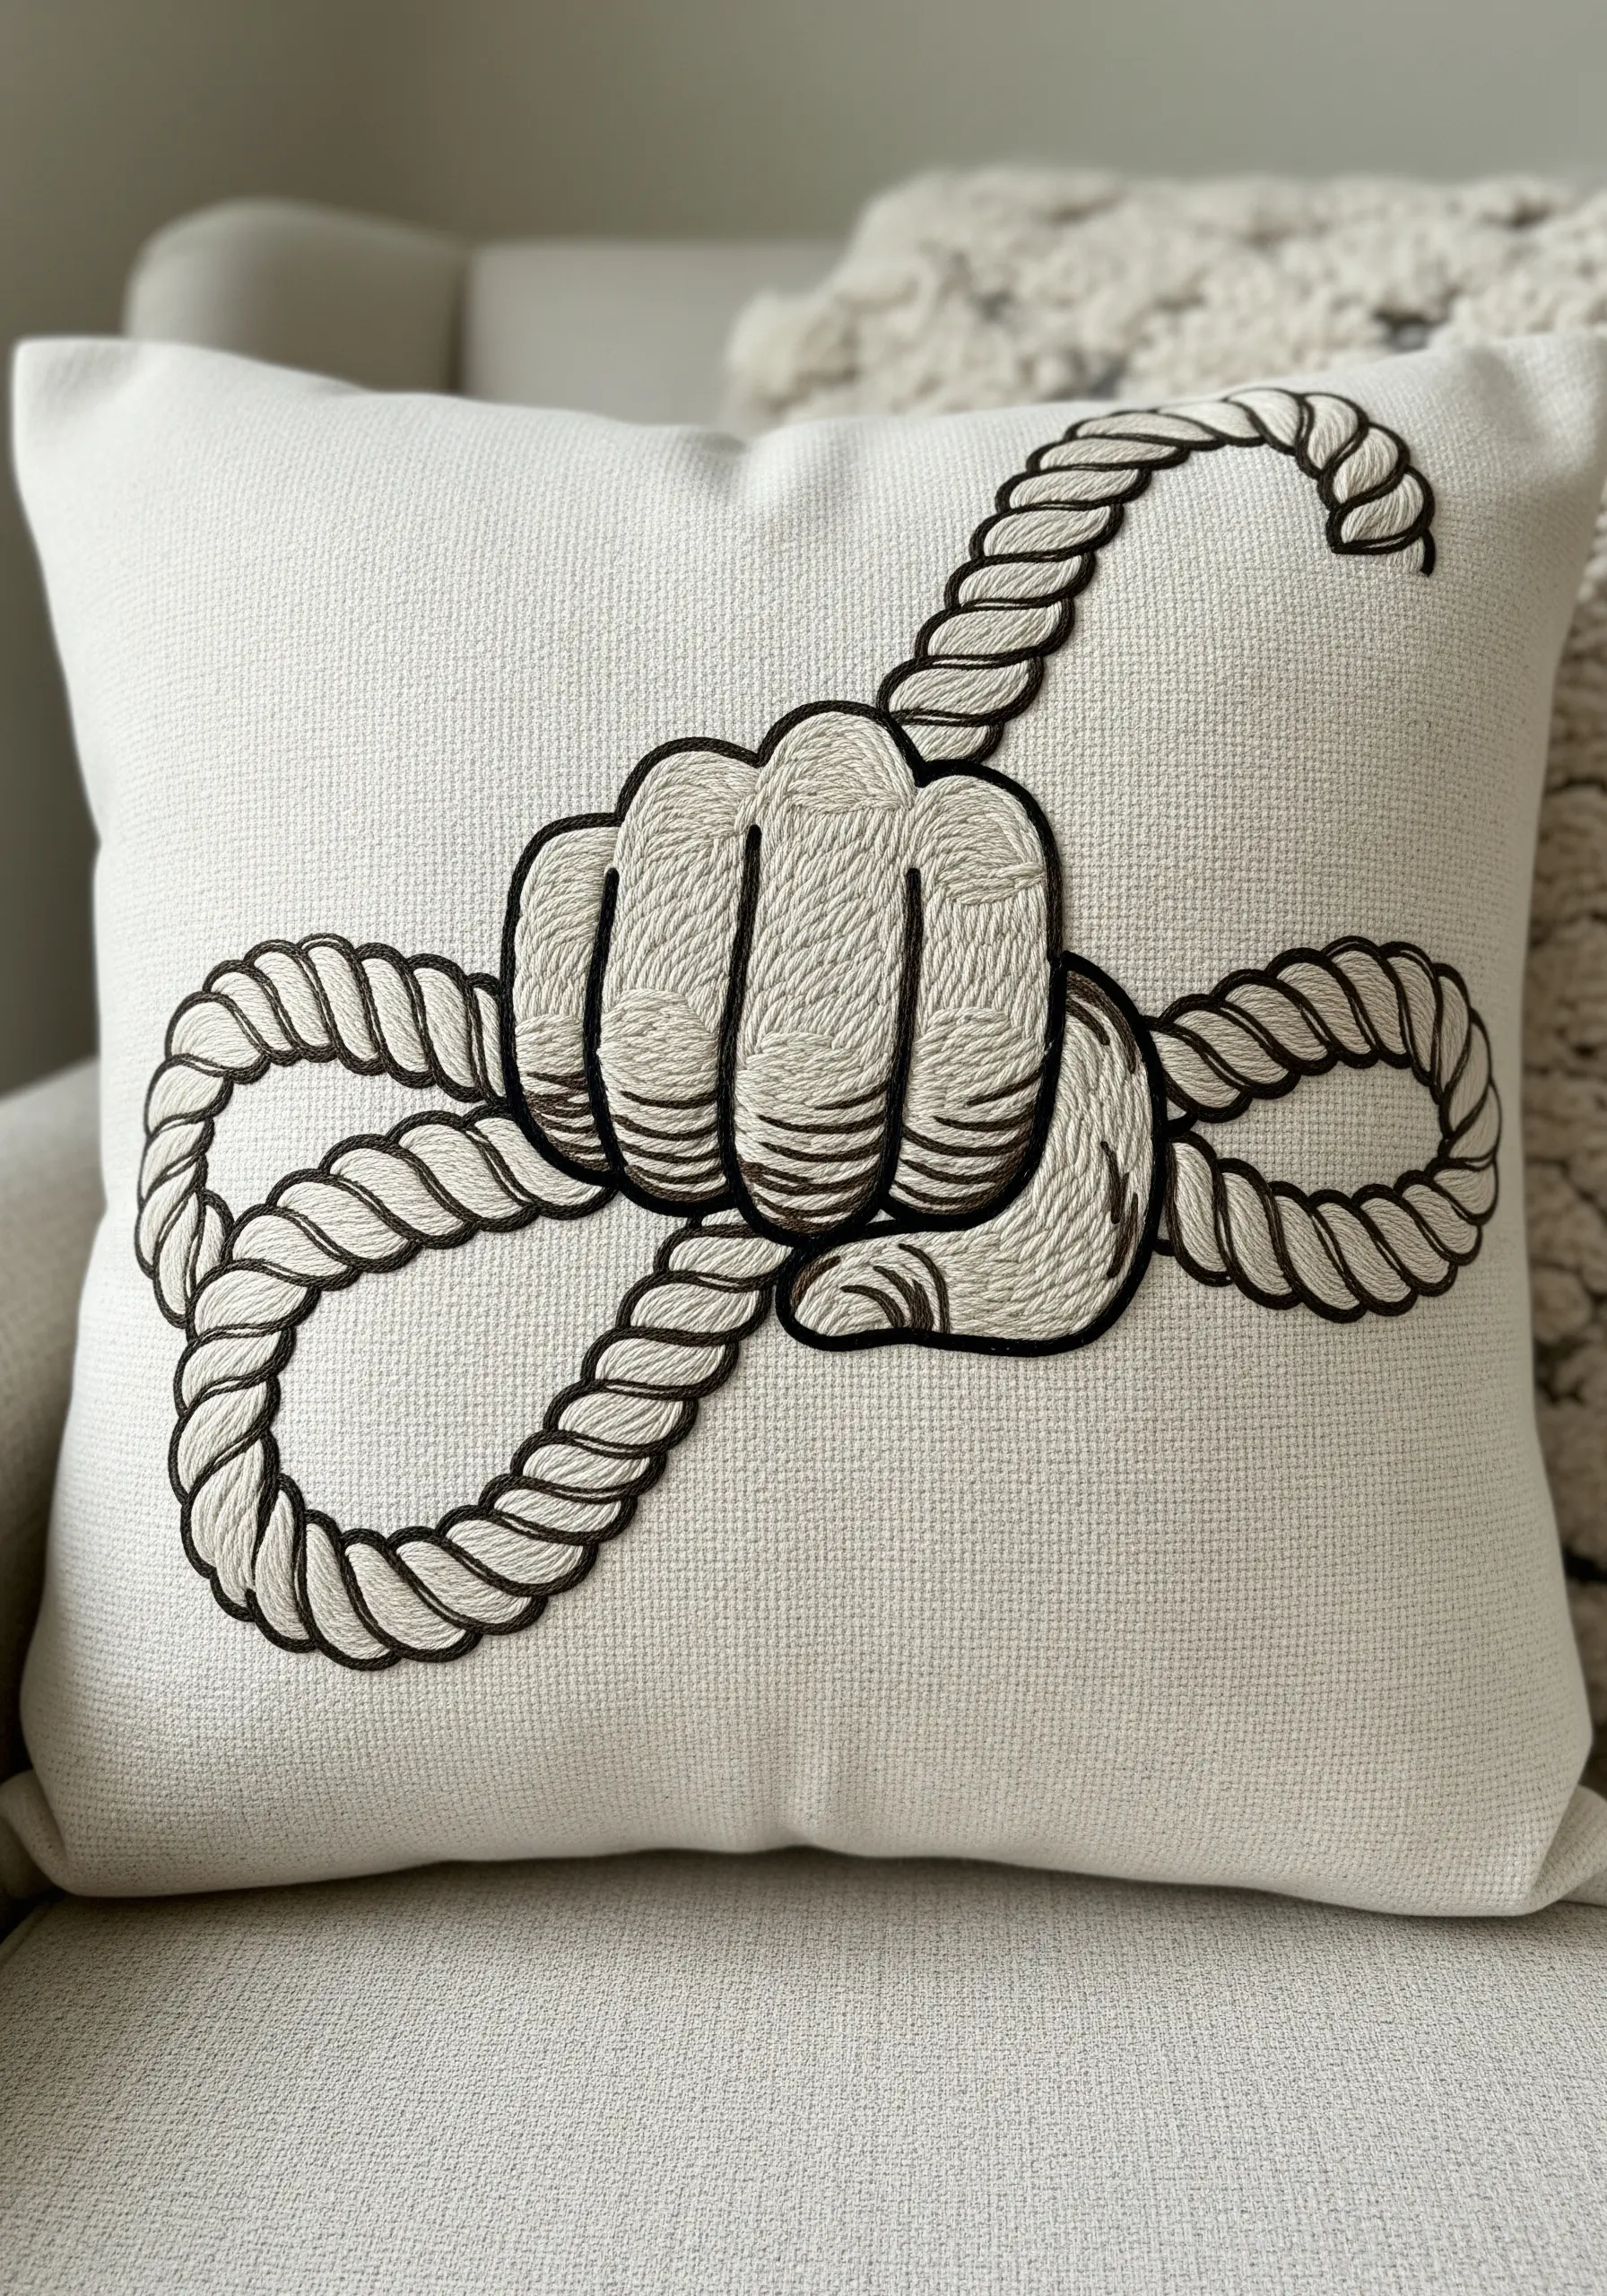
To create the illusion of a three-dimensional object like a fist or a rope, the direction of your stitches is critical.
For the rope, use a heavy chain stitch or a whipped backstitch to mimic a twisted texture. Notice how the dark outline thread adds definition.
For the fist, align your fill stitches to follow the natural contours of the hand and knuckles.
Stitching in the direction a muscle would curve, rather than just filling the shape, instantly creates shadow and form, giving the design volume and strength.
10. Create a Mosaic Effect with Satin Stitch Blocks

For a geometric design like this sea turtle’s shell, treat each colored section as its own miniature project.
First, secure the entire design with a sharp backstitch outline in a dark, defining color.
Then, fill each small polygon with a perfectly smooth satin stitch, ensuring all stitches lie parallel to one another within that block.
This methodical approach creates a clean, mosaic-like effect where each color is vibrant and distinct, resulting in a stunning, graphic finish.
11. Add Sophistication with Mixed Metallic Threads

When working with a classic motif like a compass rose, elevate it by using two different metallic threads—a warm gold and a cool silver.
Assign one metal to the primary directional points and the other to the secondary points to create visual hierarchy and depth.
Keep your satin stitches neat and directional to maximize the light-reflecting properties of the thread.
This simple color strategy transforms the design from a flat graphic into a sophisticated, shimmering emblem perfect for a dark, moody fabric.
12. Capture Underwater Motion with Variegated Thread

To give your seaweed a natural, flowing appearance, use variegated floss in shades of green and olive.
A single strand of this thread will change color as you stitch, creating subtle, organic shifts in tone without you having to switch needles.
Use a curved stem stitch or twisted chain stitch to suggest the gentle sway of the plants in the water.
Scatter tiny French knots in white or iridescent thread throughout the scene to represent air bubbles, completing the serene underwater illusion.
13. Create Landscape Depth Through Layering
To build a convincing dune scene, you must stitch it as if you were building it in real life: from back to front.
Begin with the farthest elements, like the sky or distant grasses, using lighter threads and sparser stitches.
Next, add the fence posts with a vertical satin stitch. Finally, stitch the foreground grasses using bolder colors and longer, more dynamic stitches that overlap the fence.
This layering technique is fundamental for creating a believable sense of perspective and distance in any landscape embroidery.
14. Make Single-Color Designs Pop with a Bold Outline
When your design is composed entirely of intricate line work in a single color, its impact comes from the weight and texture of the line itself.
Use a chain stitch or a four-strand backstitch to create a bold, substantial outline for this seahorse.
This choice creates a line that is visually stronger than a simple backstitch, making the design stand out dramatically against the bright coral fabric.
The uniform thickness gives the complex inner swirls and patterns a cohesive, graphic quality.
15. Use Shading to Give Spirals a 3D Effect
To prevent a spiral, like this tentacle, from looking flat, you must use color and shading to suggest volume.
Use long-and-short stitch to blend at least three shades of a color—a highlight, a mid-tone, and a shadow.
Concentrate the lightest shade along the center of the tentacle’s arm and the darkest shades along the edges.
This gradient creates a convincing illusion of a rounded surface, making the spiral appear to recede and twist in space.
16. Embellish Printed Fabric with Strategic Stitches

You don’t always have to start with a blank canvas. Elevate a pillow made from printed fabric with a few thoughtful stitches.
On this vintage map, tiny red star stitches or cross stitches have been added to mark specific locations.
This simple act of embellishment personalizes the object and adds a layer of handmade texture and storytelling.
It’s an incredibly effective way to create a custom piece without the time commitment of a full embroidery project.
17. Recreate Sea Foam with French Knot Clusters

The key to capturing the energy of a crashing wave is mastering the texture of its foam.
Instead of trying to stitch the foam with flat stitches, create dense clusters of French knots using white, off-white, and pale blue threads.
Vary the size of the knots by wrapping the thread around your needle once, twice, or three times.
This variation, combined with the dense clustering, creates a highly tactile and realistic sea spray effect that brings the entire iconic image to life.
18. Mimic Woodgrain with Directional Straight Stitches
To capture the organic texture of driftwood, think less about traditional fill stitches and more about drawing with thread.
Use a palette of neutral threads—greys, beiges, and blacks—and lay down long straight stitches that follow the lines and contours of the wood.
Vary the number of strands you use, from a single strand for fine cracks to four or five strands for thicker grain lines.
This layering of directional stitches builds a rich, linear texture that perfectly mimics the weathered surface of real wood.
19. Combine Stitches for a Dimensional Wildflower Bouquet
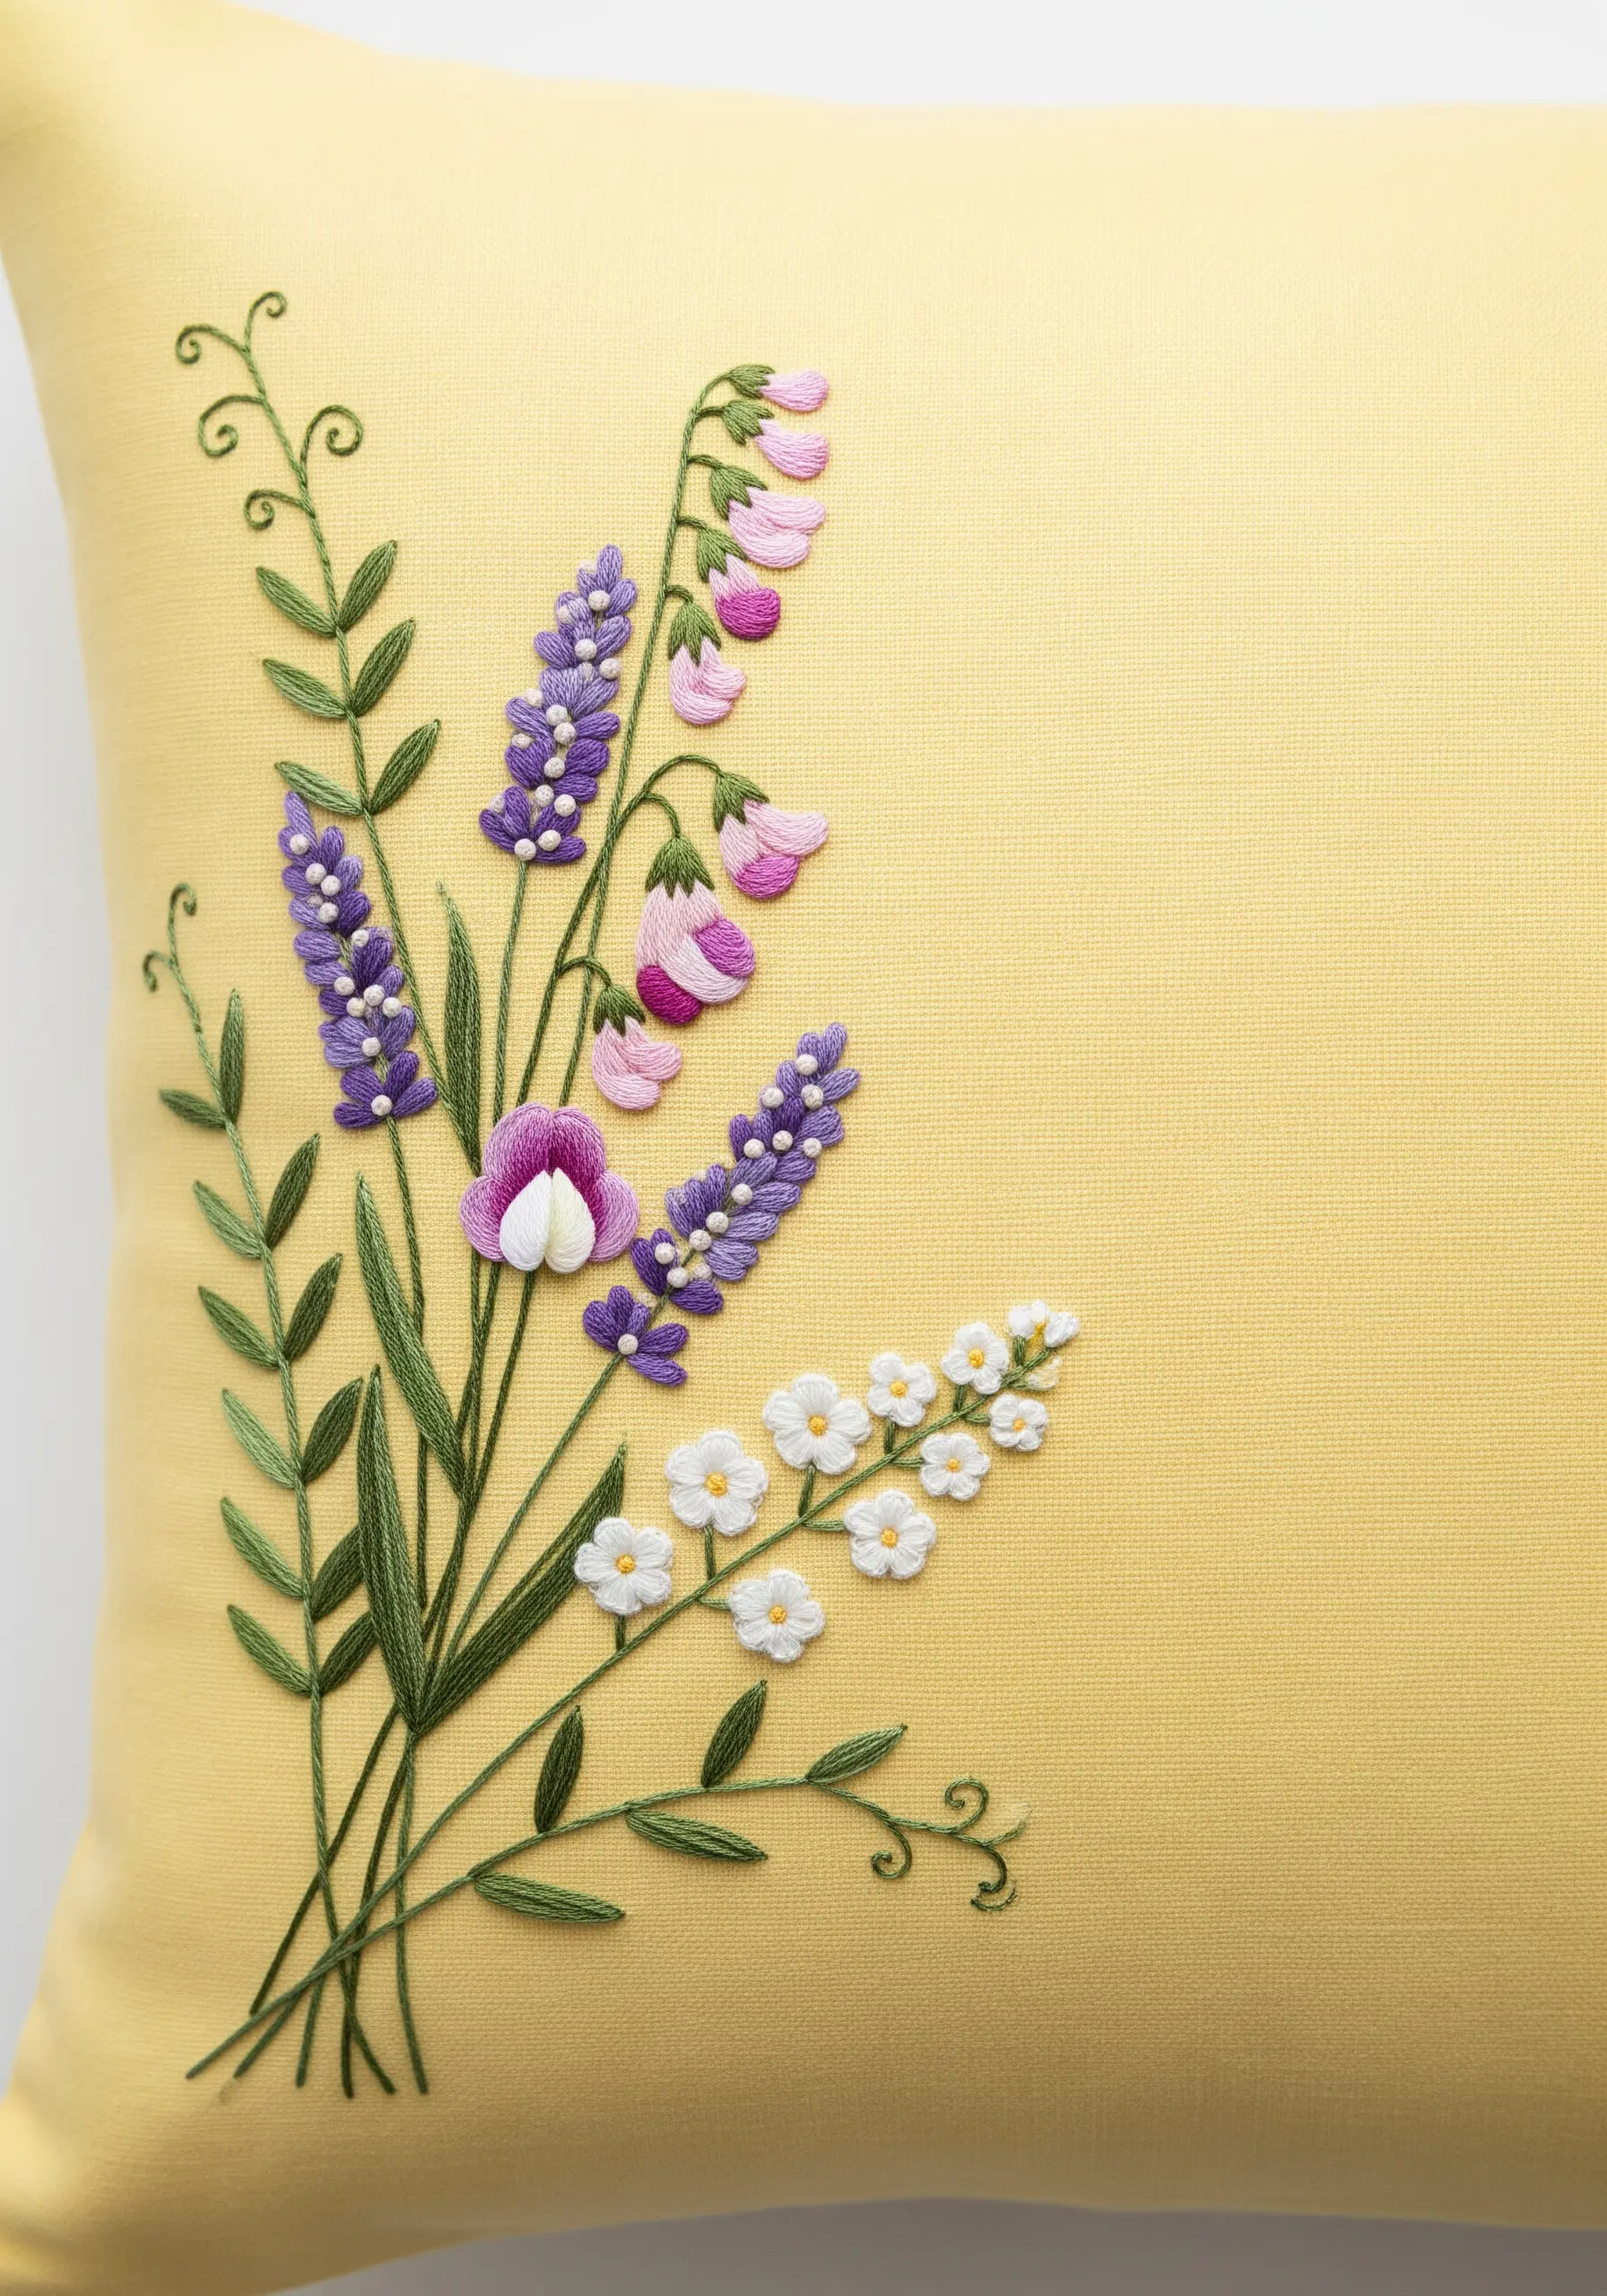
Bring a coastal meadow to life by assigning a different, textural stitch to each type of flower.
Use padded satin stitch for the bell-shaped sweet peas to make them plump and rounded. Create the purple lupines with a series of stacked, short satin stitches or French knots.
For the small white flowers, a simple detached chain stitch (lazy daisy) for each petal gives them a delicate, open look.
Combining these techniques in one bouquet results in a texture-rich embroidery that is far more engaging than one stitched with a single method.
20. Ensure Crisp Edges with a Split-Stitch Outline

For a bold, graphic motif like this anchor, a perfectly clean edge is non-negotiable.
Before you begin your satin stitch fill, outline the entire shape with a precise split stitch.
This creates a slightly raised, firm boundary for your satin stitches to tuck up against.
It prevents the edges from looking fuzzy and ensures your fill is contained, resulting in a shape that looks exceptionally sharp, professional, and intentional, even against a busy striped background.
21. Choose a Chain Stitch for Playful Line Art

When your design has a charming, hand-drawn quality, a simple backstitch can sometimes feel too thin or severe.
Opt for a chain stitch instead. It creates a line with the texture of a tiny rope or braid, which adds a bit of weight and character.
This stitch is perfect for illustrative designs like this message in a bottle, enhancing its playful, storybook feel while remaining clean and easy to read.
22. Integrate Beads for an Elegant Finishing Touch
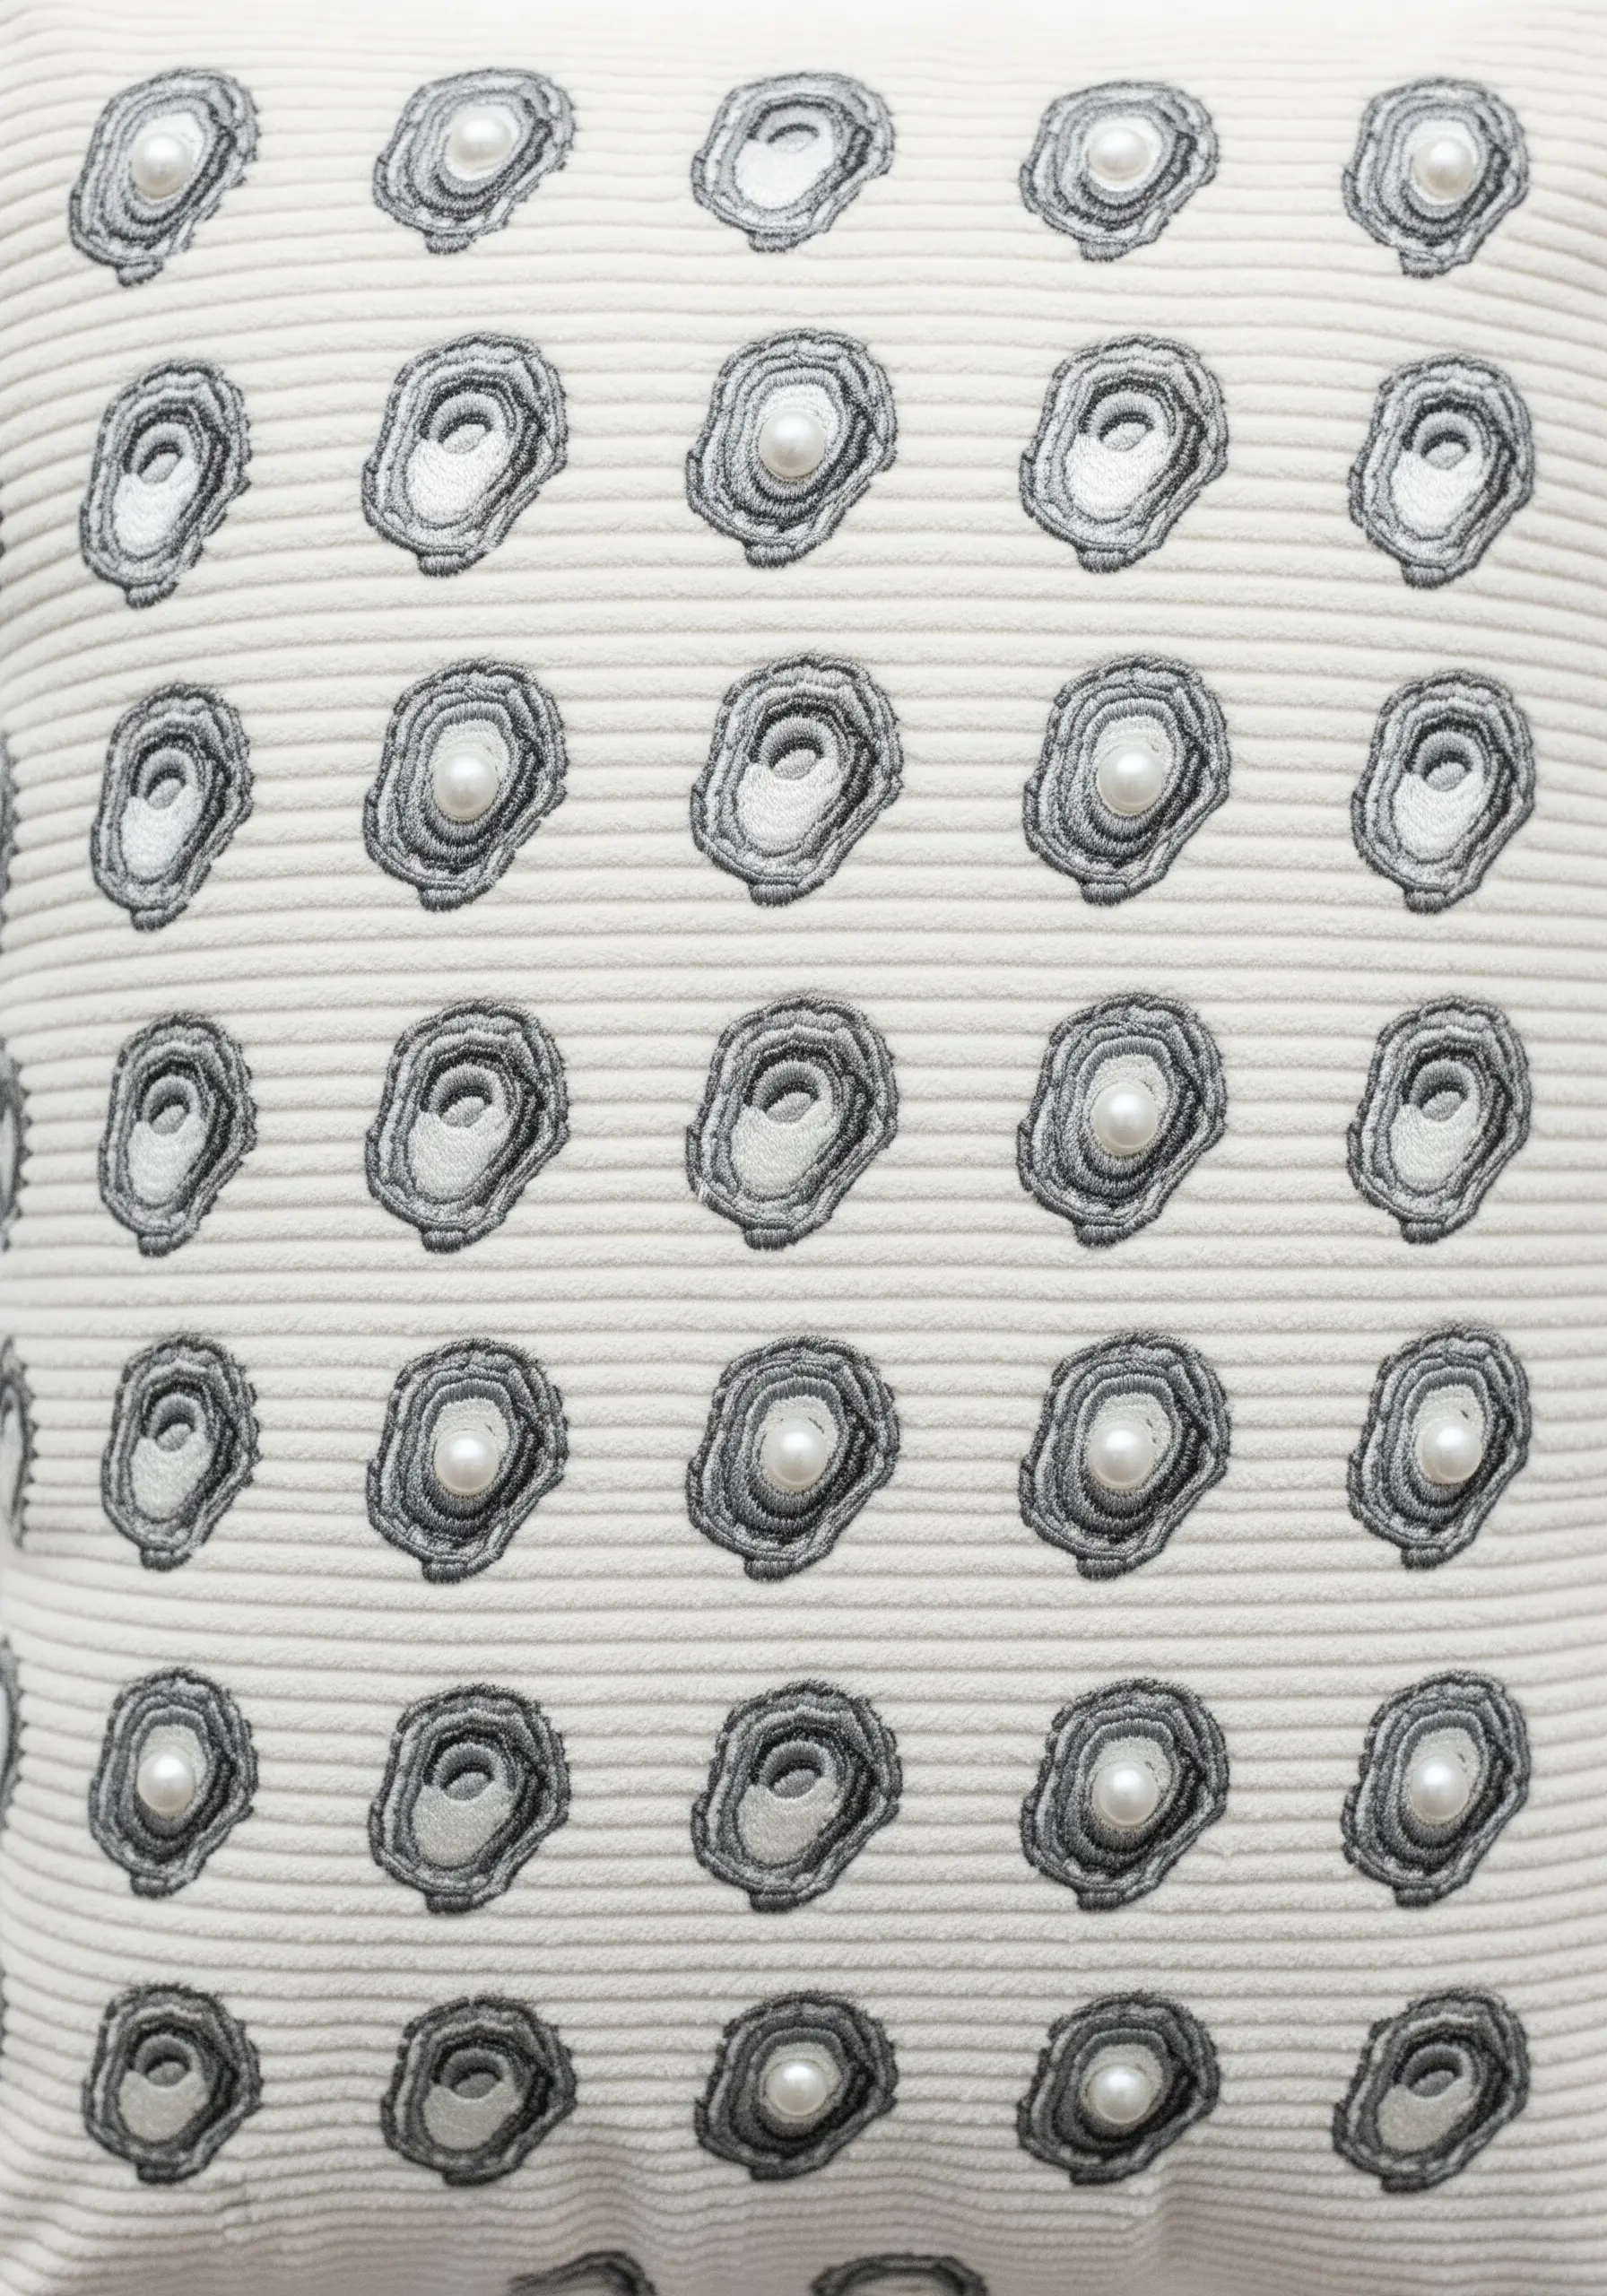
Combine thread with three-dimensional elements for a touch of unexpected luxury.
After embroidering the layered, organic shapes of the oyster shells, securely sew a small pearl bead into the center of each one.
The smooth, iridescent surface of the pearl provides a beautiful textural contrast to the matte finish of the cotton floss.
This is a simple way to add a focal point and an element of surprise, making it a perfect example of abstract mixed-media embroidery.


