
Have you ever looked at a painting and wished you could capture that same fluid color and texture with a needle and thread? You can. The secret isn’t in mastering dozens of complex stitches, but in learning to see thread as a painter sees pigment.
It’s about letting go of rigid lines and allowing colors to meet, mingle, and blur into one another. It’s about understanding that the direction of a single stitch can create shadow, and a cluster of knots can build a highlight.
In these examples, you’ll discover how to use color, texture, and composition to create embroidery that feels less like a craft and more like a painting. This is your invitation to pick up a hoop and think not just about the pattern, but about the atmosphere you want to create—one stitch at a time.
1. Render Luminous Landscapes with Directional Satin Stitch
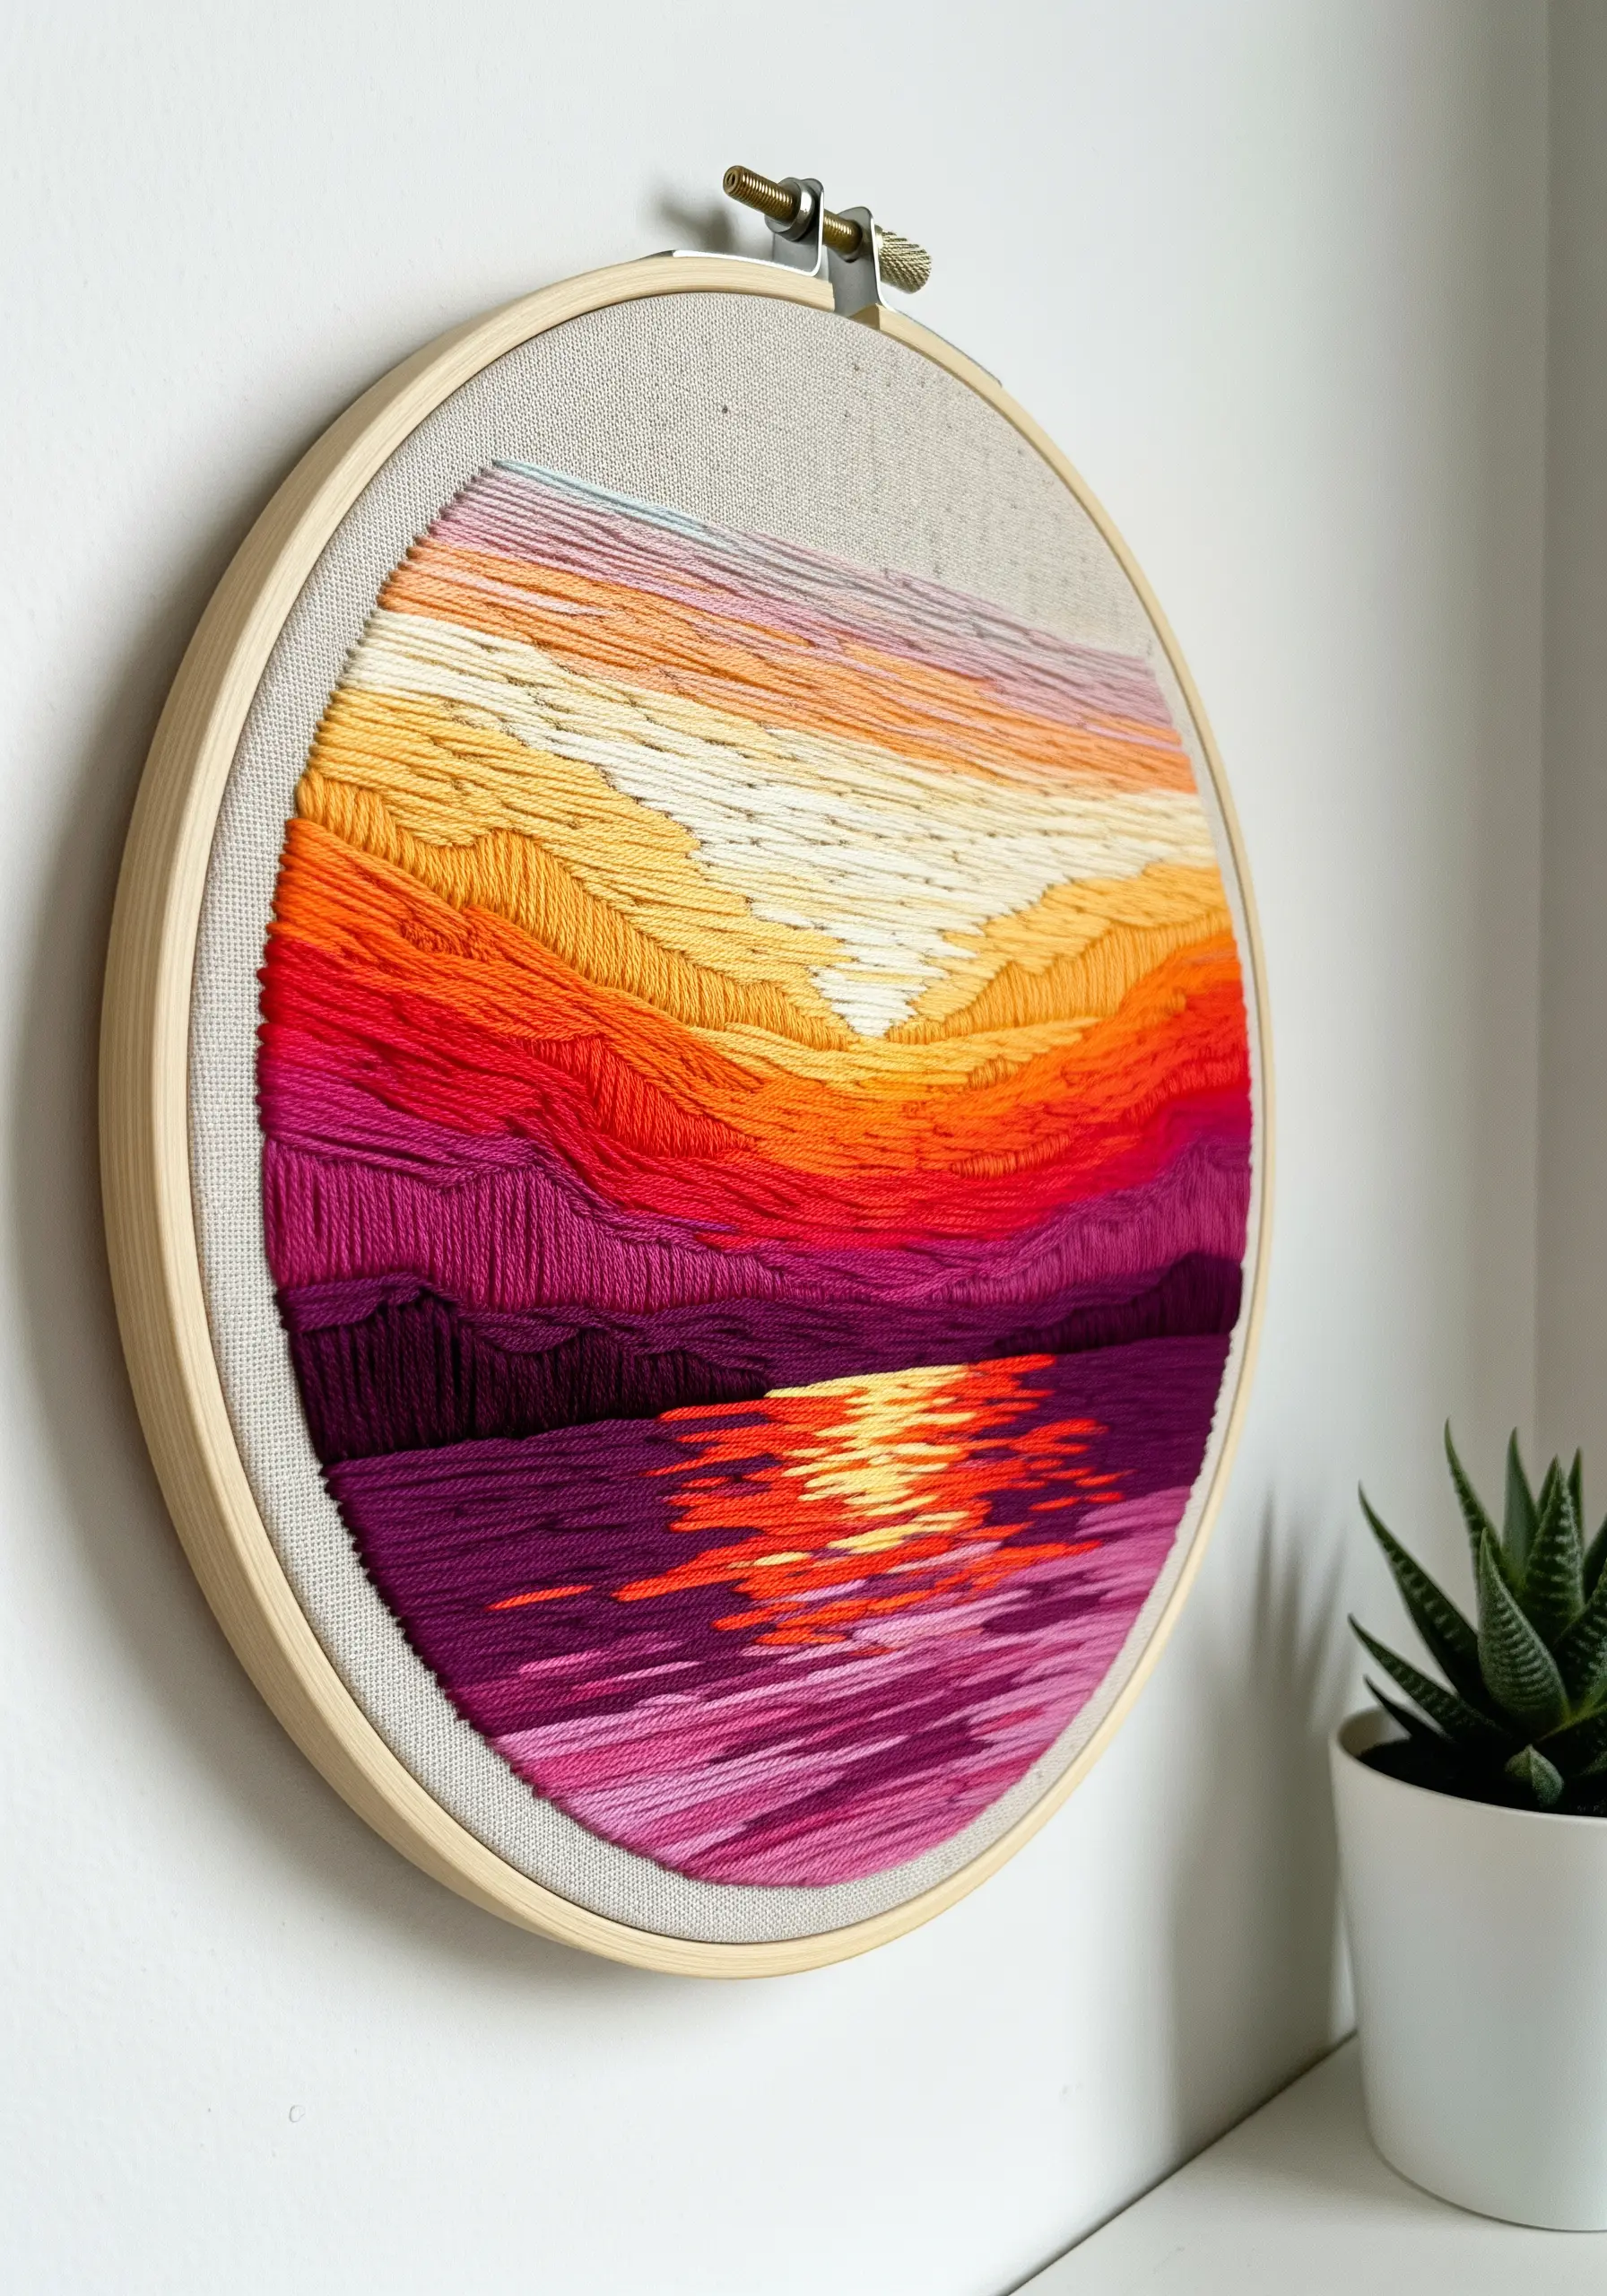
Create the illusion of a painted sunset by laying long satin stitches horizontally across your fabric.
Vary the length and angle of your stitches slightly where colors meet to soften the transition, mimicking how light blends in the sky.
For the water’s reflection, use shorter, vertical satin stitches in the same sunset palette.
Stagger these stitches to create a broken, shimmering effect that captures the movement of light on water, transforming a simple technique into vibrant hoop art.
2. Sculpt Oceanic Motion with Ribbon and Beads
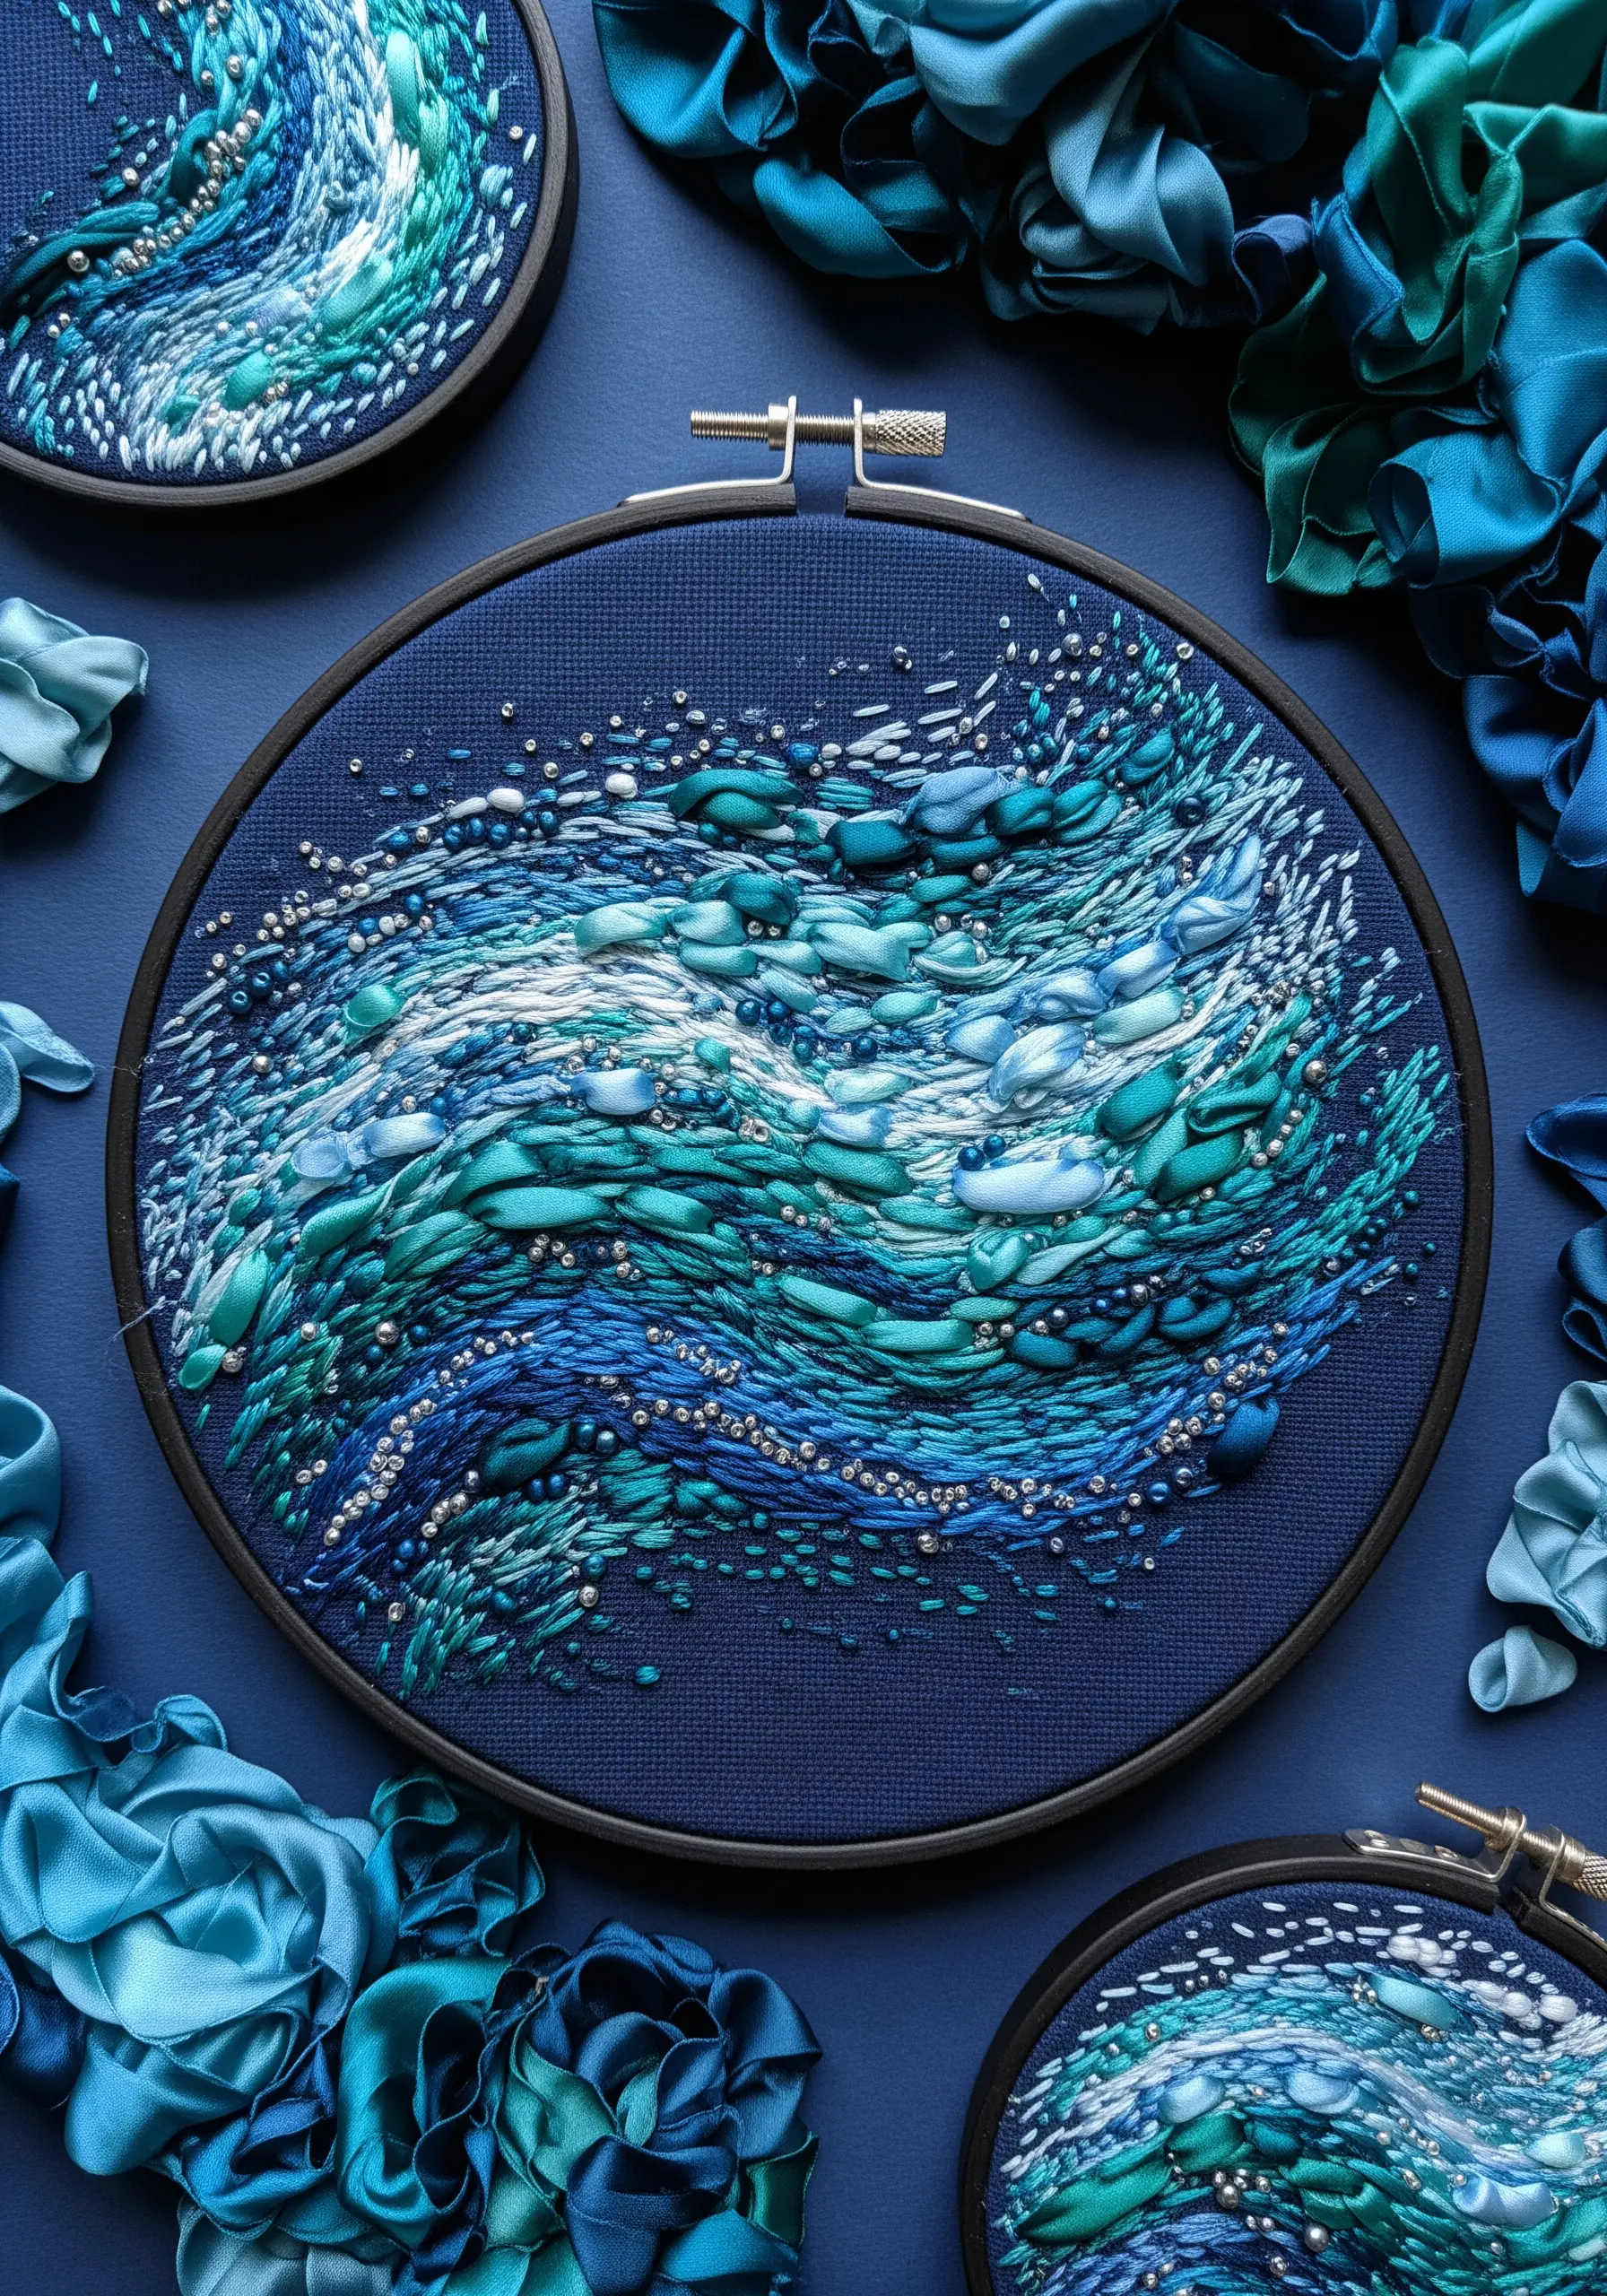
Combine standard embroidery floss with silk ribbons to introduce dramatic texture and light reflection.
Instead of stitching with the ribbon, lay it on your fabric in flowing wave-like shapes and tack it down with small, coordinating stitches—a technique called couching.
This method preserves the ribbon’s natural volume and sheen.
Scatter silver or transparent seed beads throughout the design to simulate sea spray and add a final layer of dimension and sparkle to your fiber art installations.
3. Paint Nebulas with Wool Roving and Seed Beads
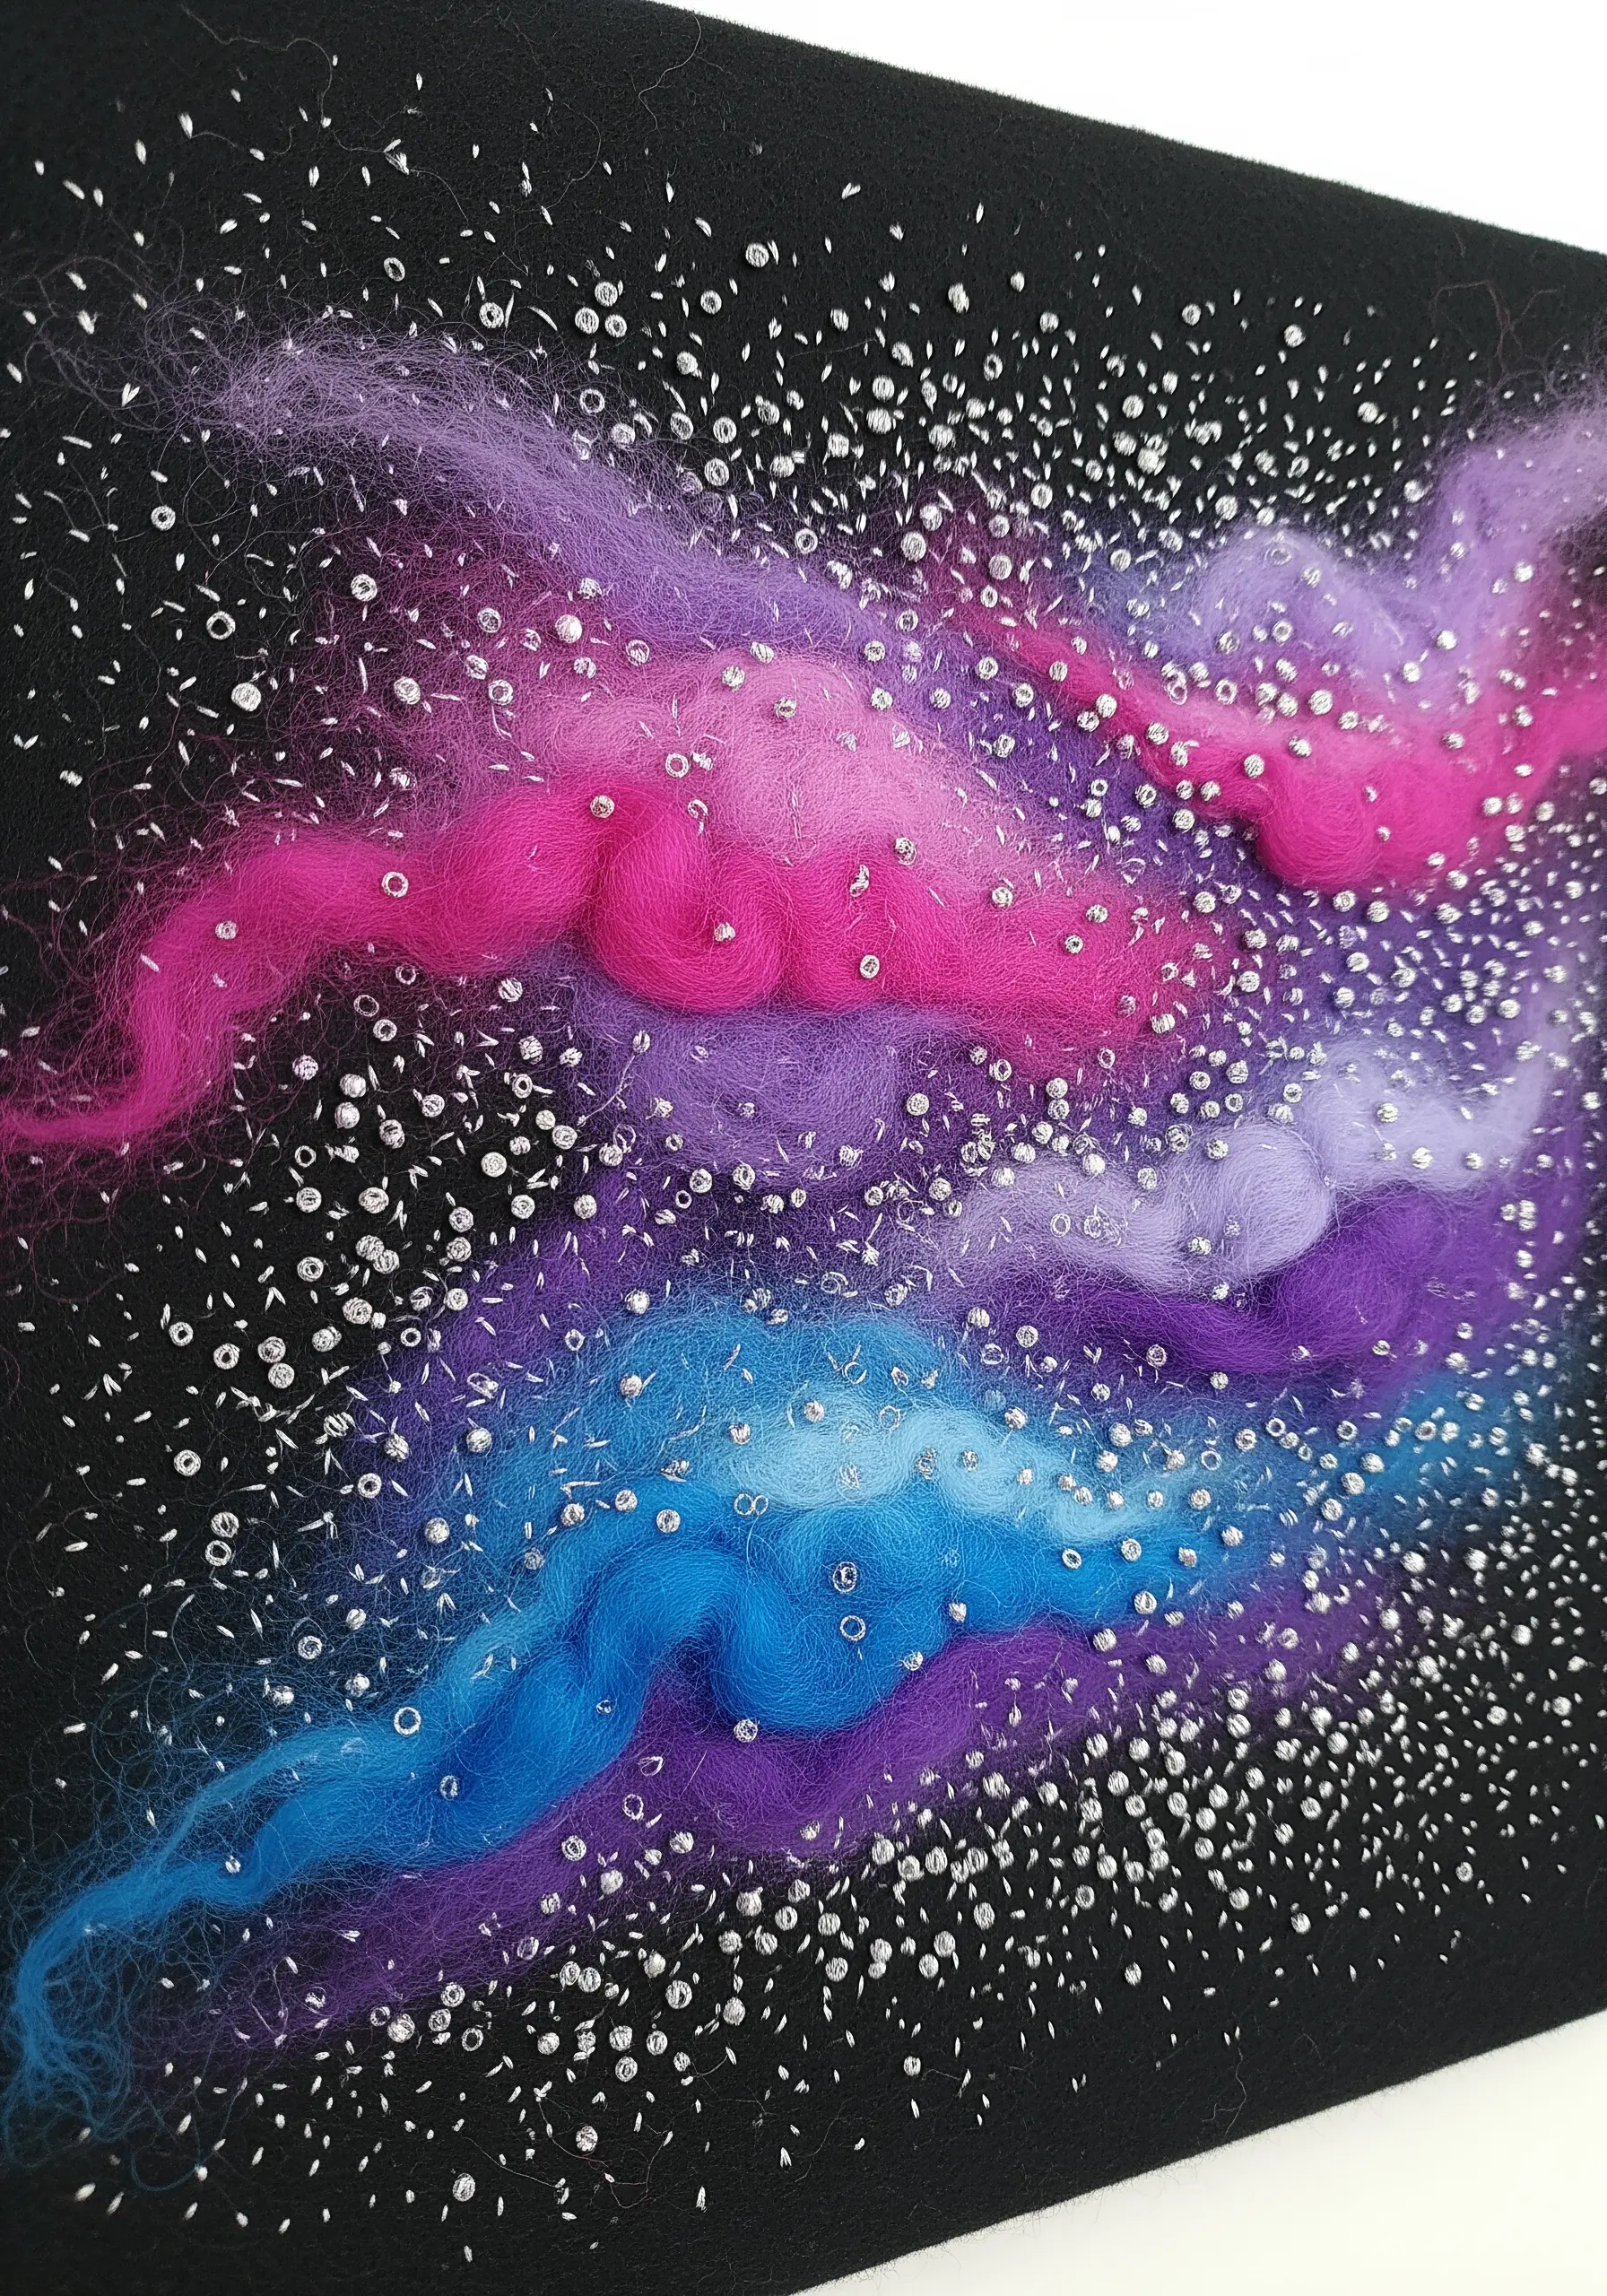
For a soft, cloud-like effect, use wool roving as your base instead of thread.
Gently pull apart wisps of colored wool and lay them on your dark fabric, then use a felting needle to tack them loosely in place.
Once your nebula shape is formed, secure it further with scattered seed beads and sequins, using a single strand of matching thread.
This mixed-media approach builds ethereal depth that thread alone cannot achieve, turning your hoop into one of those unexpected fiber art installations.
4. Stitch Ethereal Blends on Transparent Fabric
Create a delicate, floating effect by stitching on a sheer fabric like tulle or organza.
Use a water-soluble stabilizer to support the fabric while you work, which you’ll wash away later.
Work with just one or two strands of floss and use light, airy stitches like the seed stitch or detached chain stitch.
By painting a soft watercolor wash onto the fabric before you begin stitching, you create a dreamy, blended background that enhances the subtlety of your thread work.
5. Build Sculptural Forms with Chunky Yarn Couching
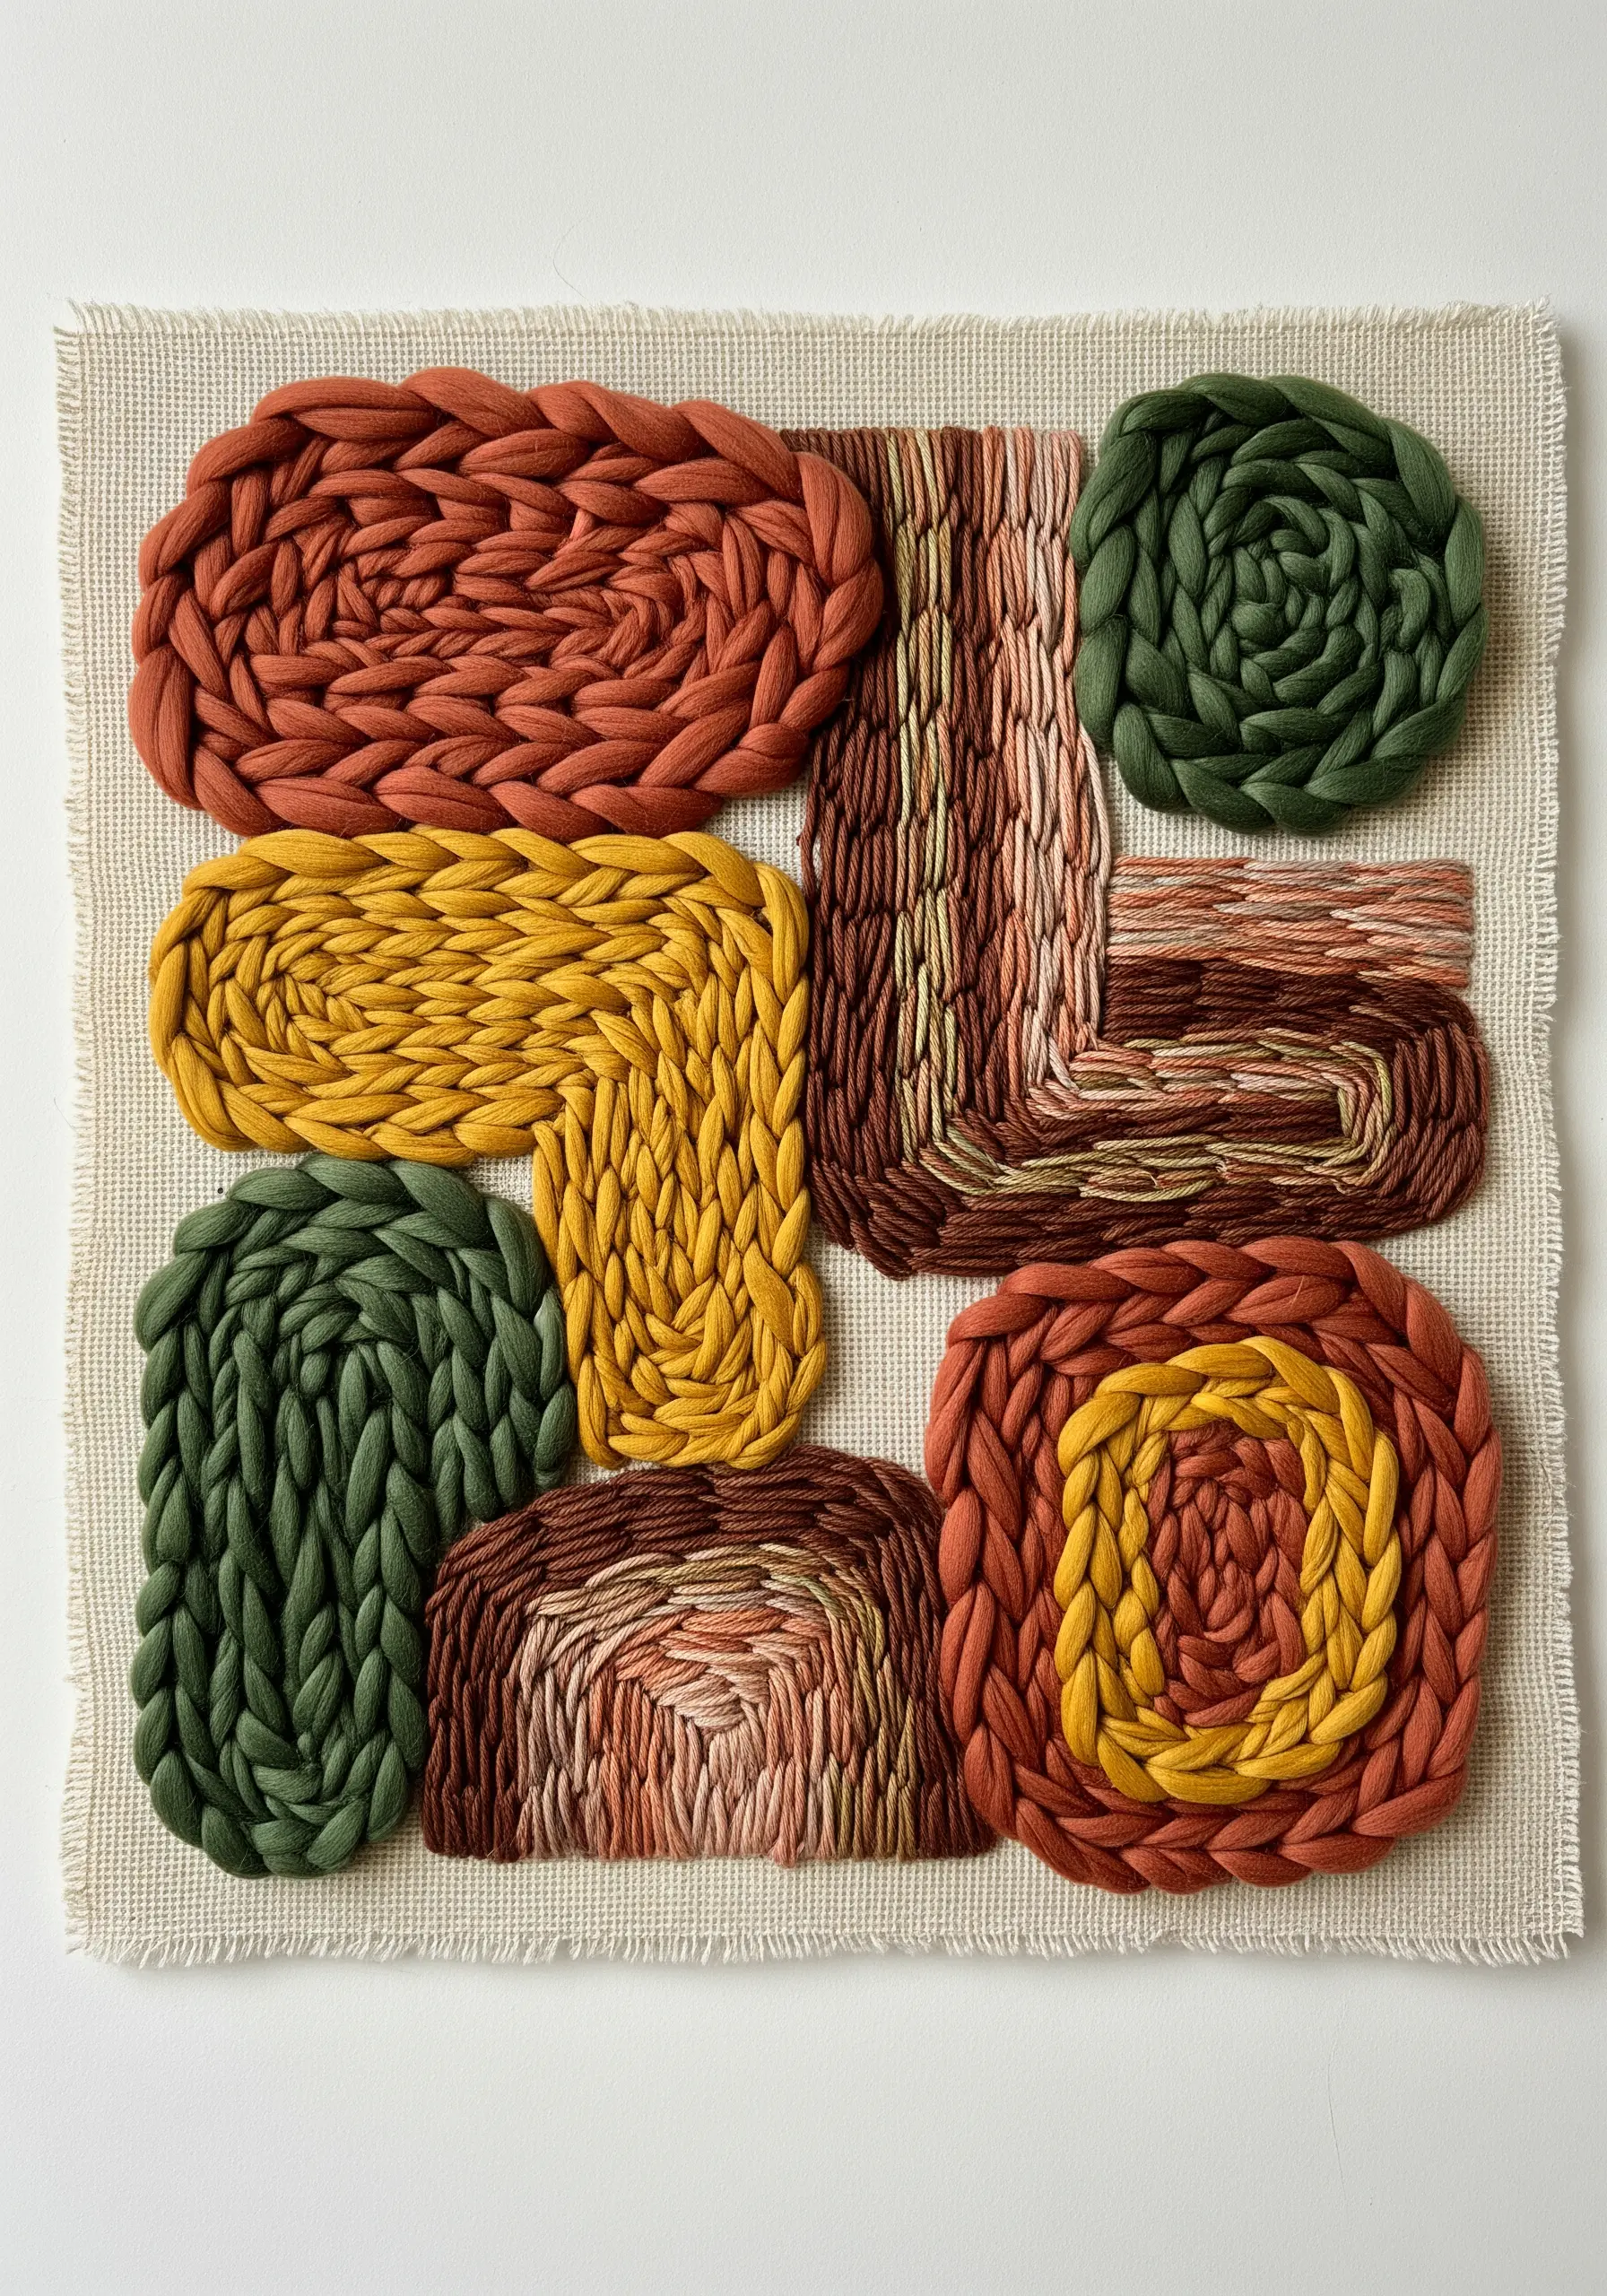
Achieve bold, graphic texture by couching thick, braided yarn onto a sturdy canvas backing.
Instead of pulling the yarn through the fabric, lay it on the surface and use a matching, standard-weight thread to tack it down with small, almost invisible stitches.
Plan your composition by lightly sketching abstract shapes first, then fill them by coiling or layering the yarn.
This technique creates a high-relief, sculptural piece that bridges the gap between embroidery and layered yarn wall art.
6. Master the Monochrome Gradient
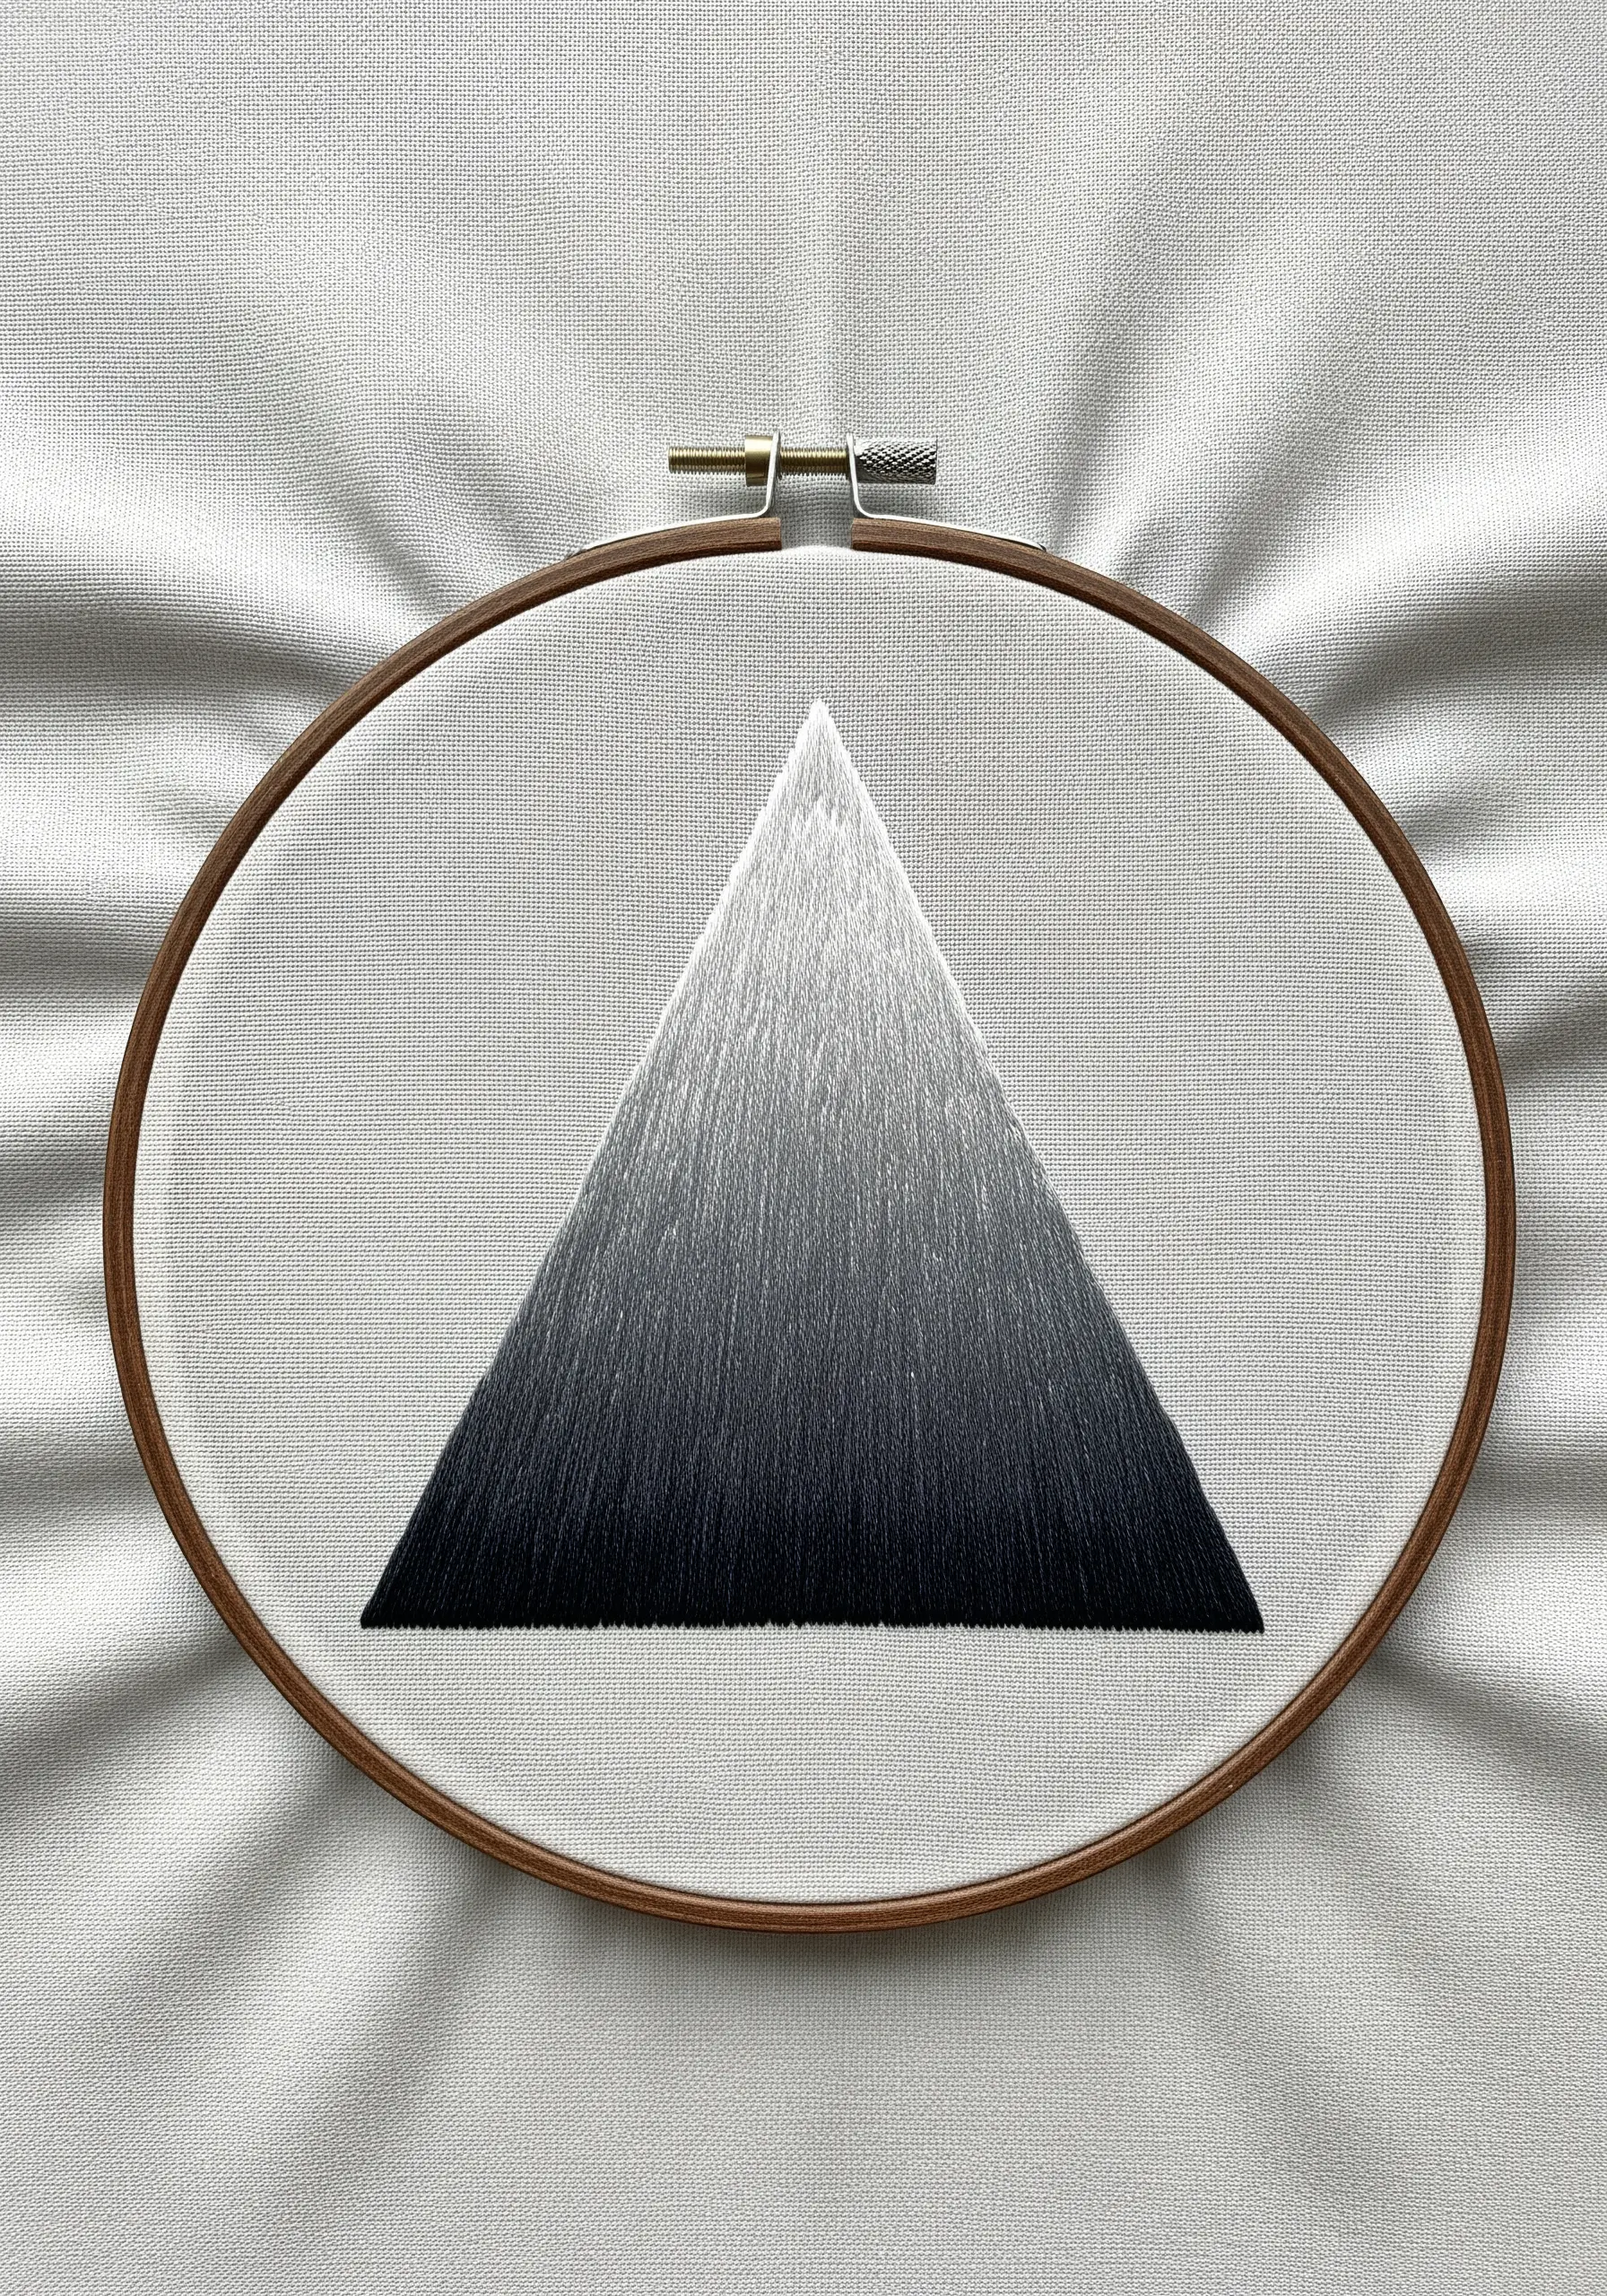
Create a flawless monochrome gradient using the long-and-short stitch, often called thread painting.
To achieve this seamless blend, select at least five shades of a single color, from the lightest to the darkest.
Work in vertical rows, ensuring your stitches penetrate the previous row of stitches, interlocking the colors for a smooth transition.
The precision required by a geometric shape makes this an excellent exercise for mastering one of the most essential modern thread art techniques.
7. Depict Molten Flow with Color Blocking and Texture
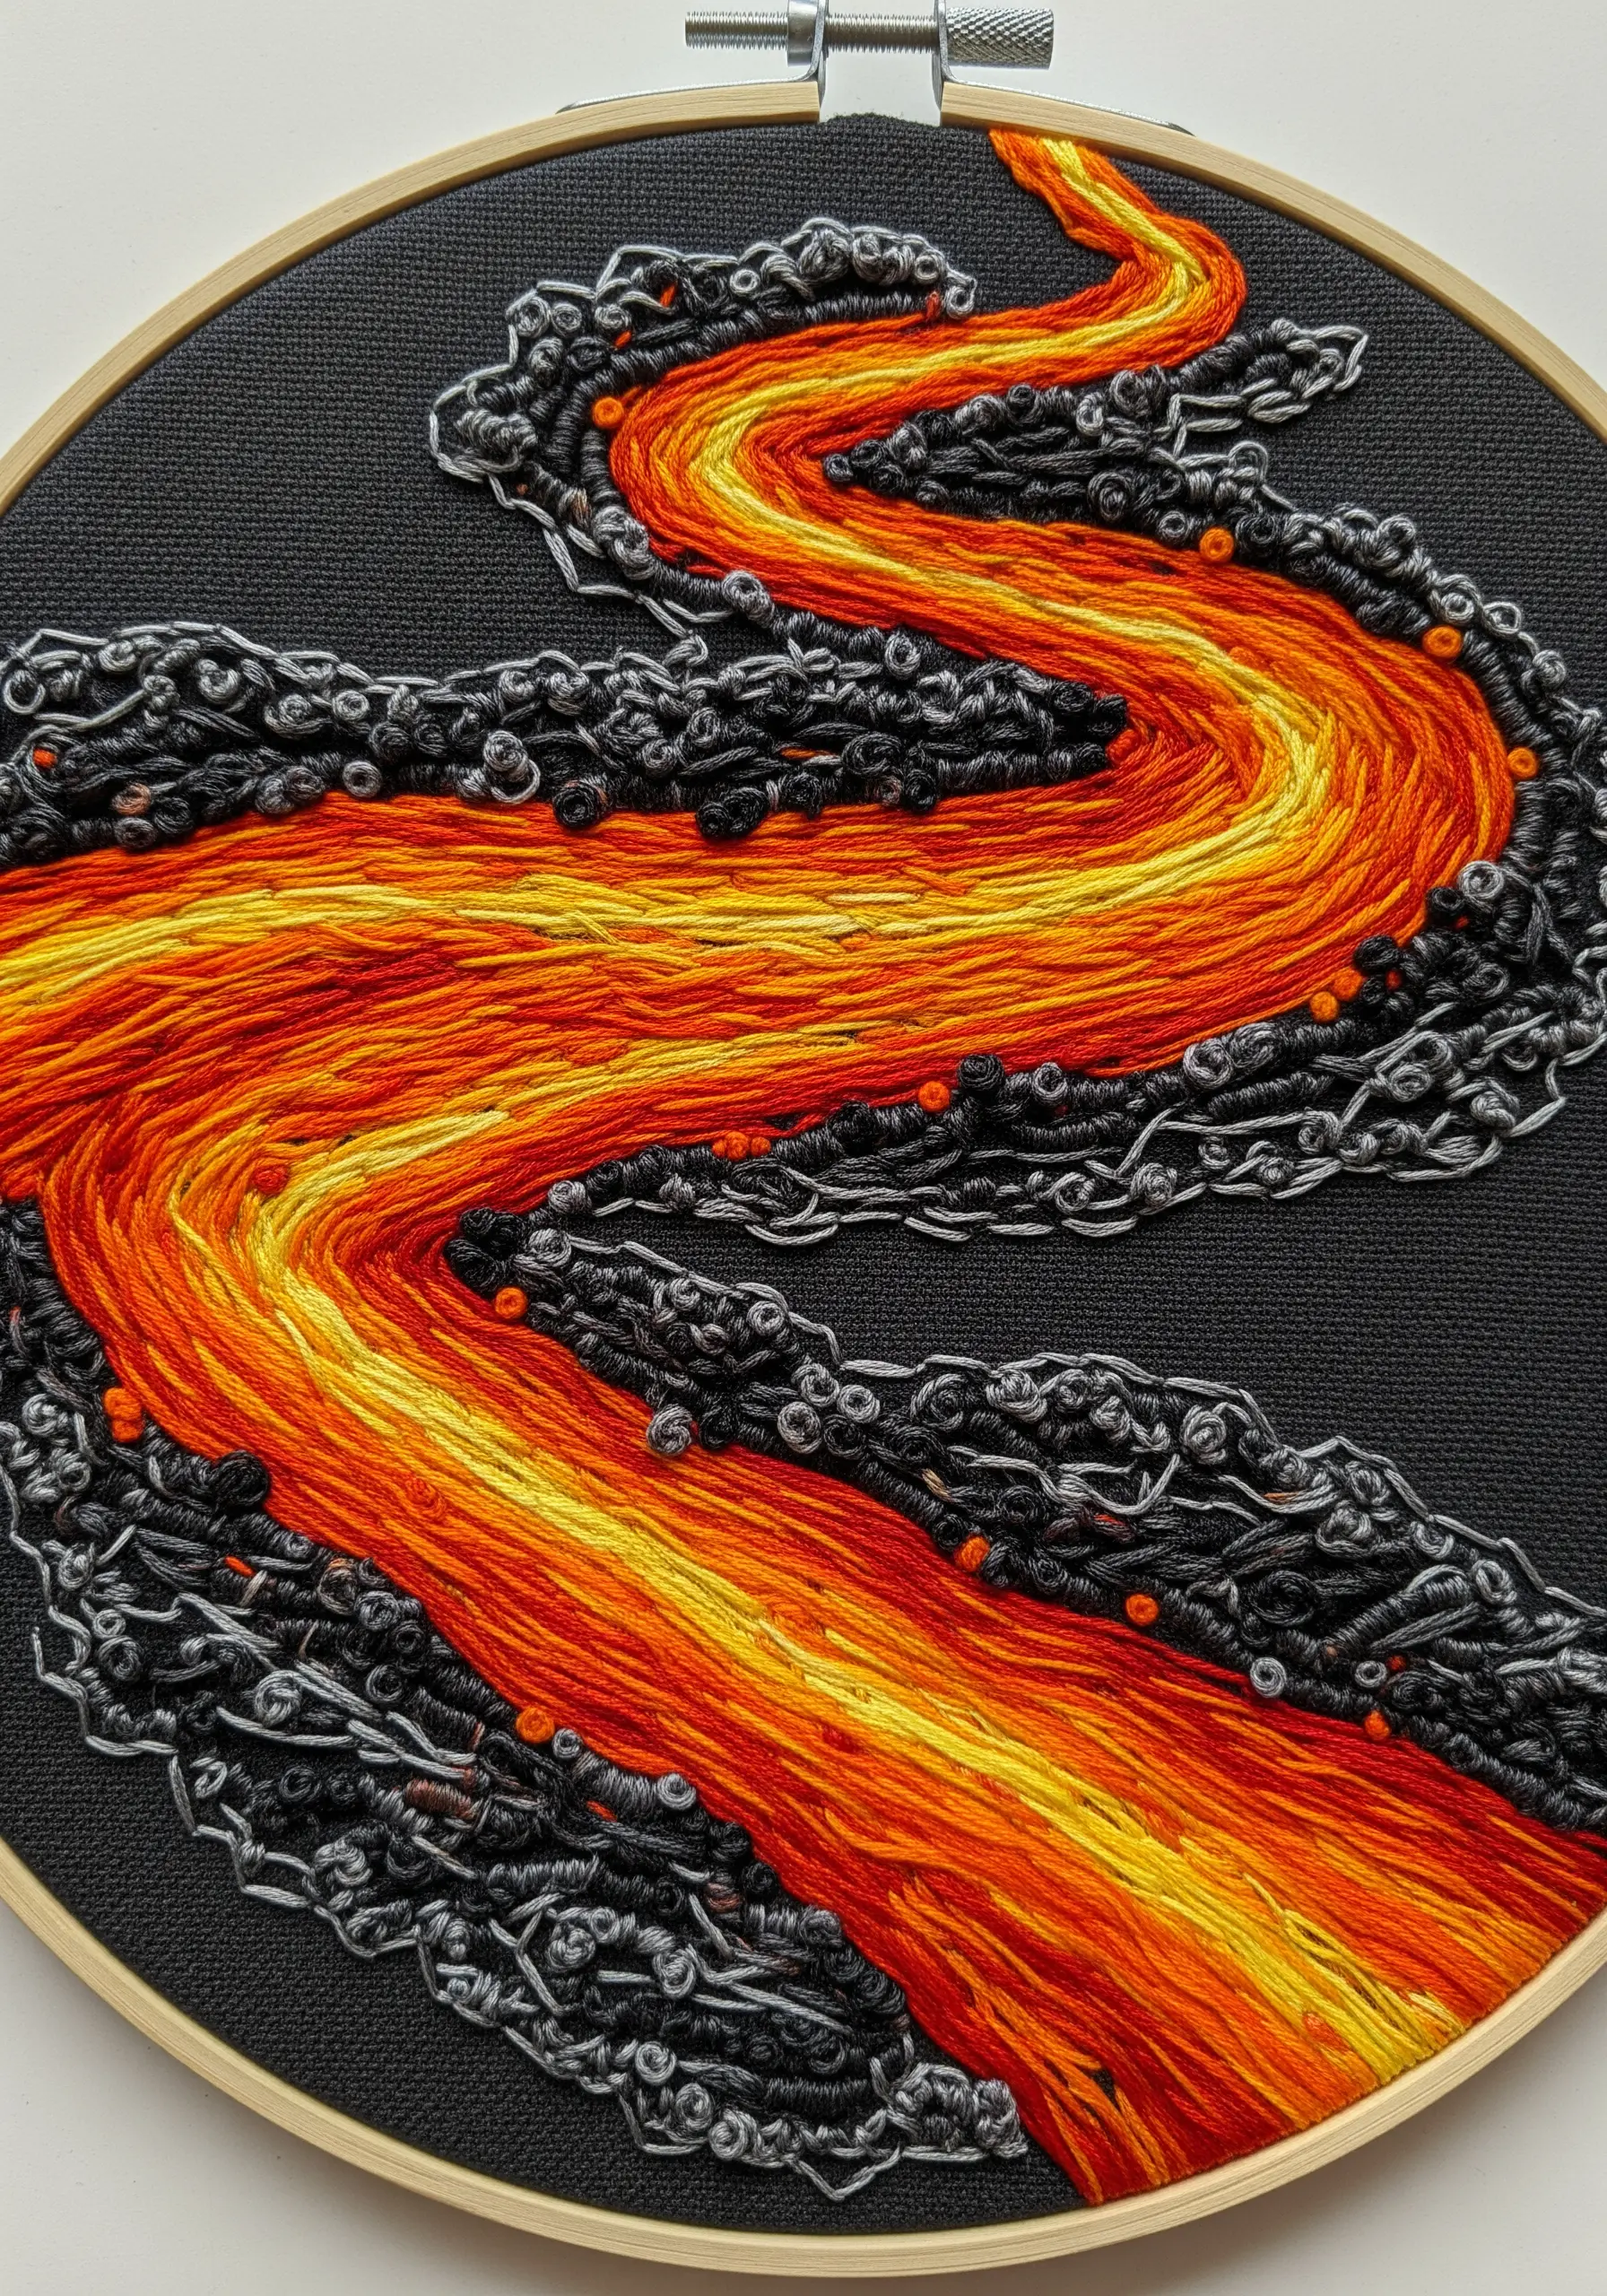
Capture the intense energy of lava by using distinct color blocks of red, orange, and yellow satin stitches.
To create the flow, ensure all your stitches follow the curve of the river, which sells the illusion of movement.
For the cooling volcanic rock, switch to textural stitches like French knots and bullion knots in shades of grey and black.
This contrast between the smooth, flowing ‘lava’ and the rough, clustered ‘rock’ creates a dynamic and tactile piece of abstract thread embroidery.
8. Weave Geological Layers with Varied Stitches
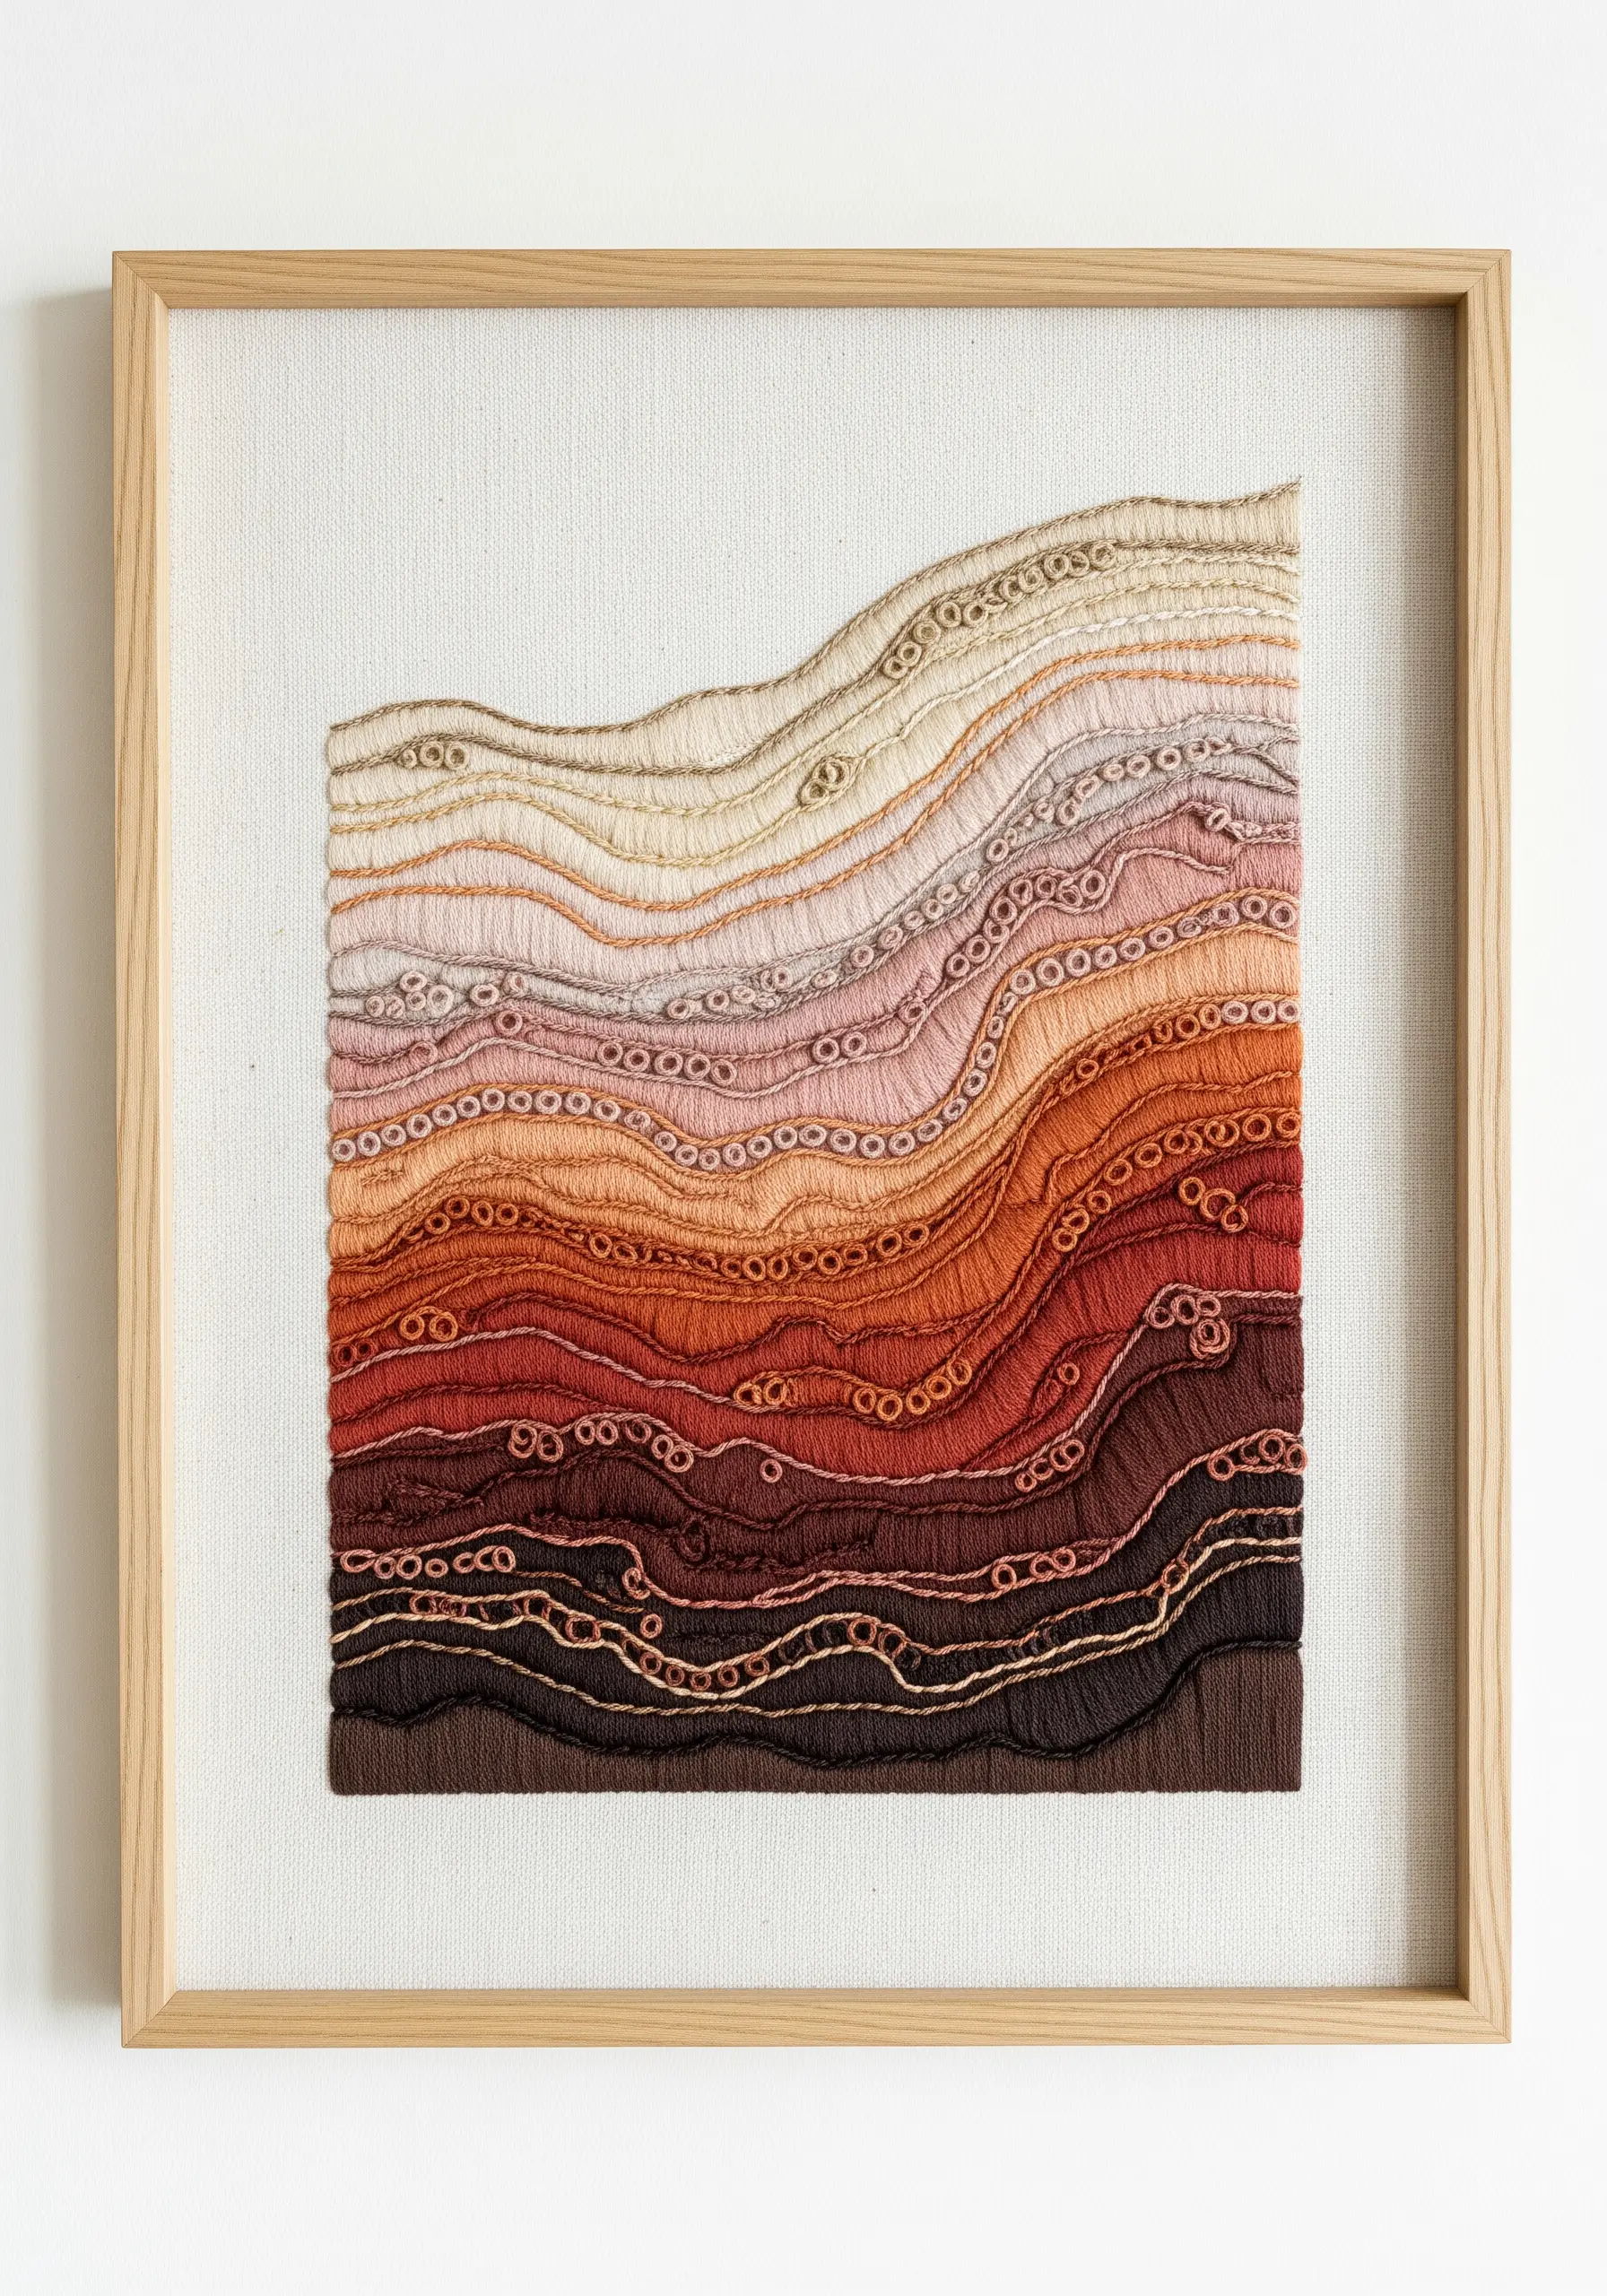
Emulate the texture of sedimentary rock by assigning a different stitch to each color layer in your design.
Use smooth satin stitch for one layer, follow with a row of French knots, then a band of chain stitch, and perhaps some delicate seed stitches.
By varying both color and stitch type, you create a composition that is rich in tactile detail.
This approach transforms a simple striped pattern into a compelling piece of framed embroidery that invites closer inspection.
9. Create Rhythm with Undulating Color Groups
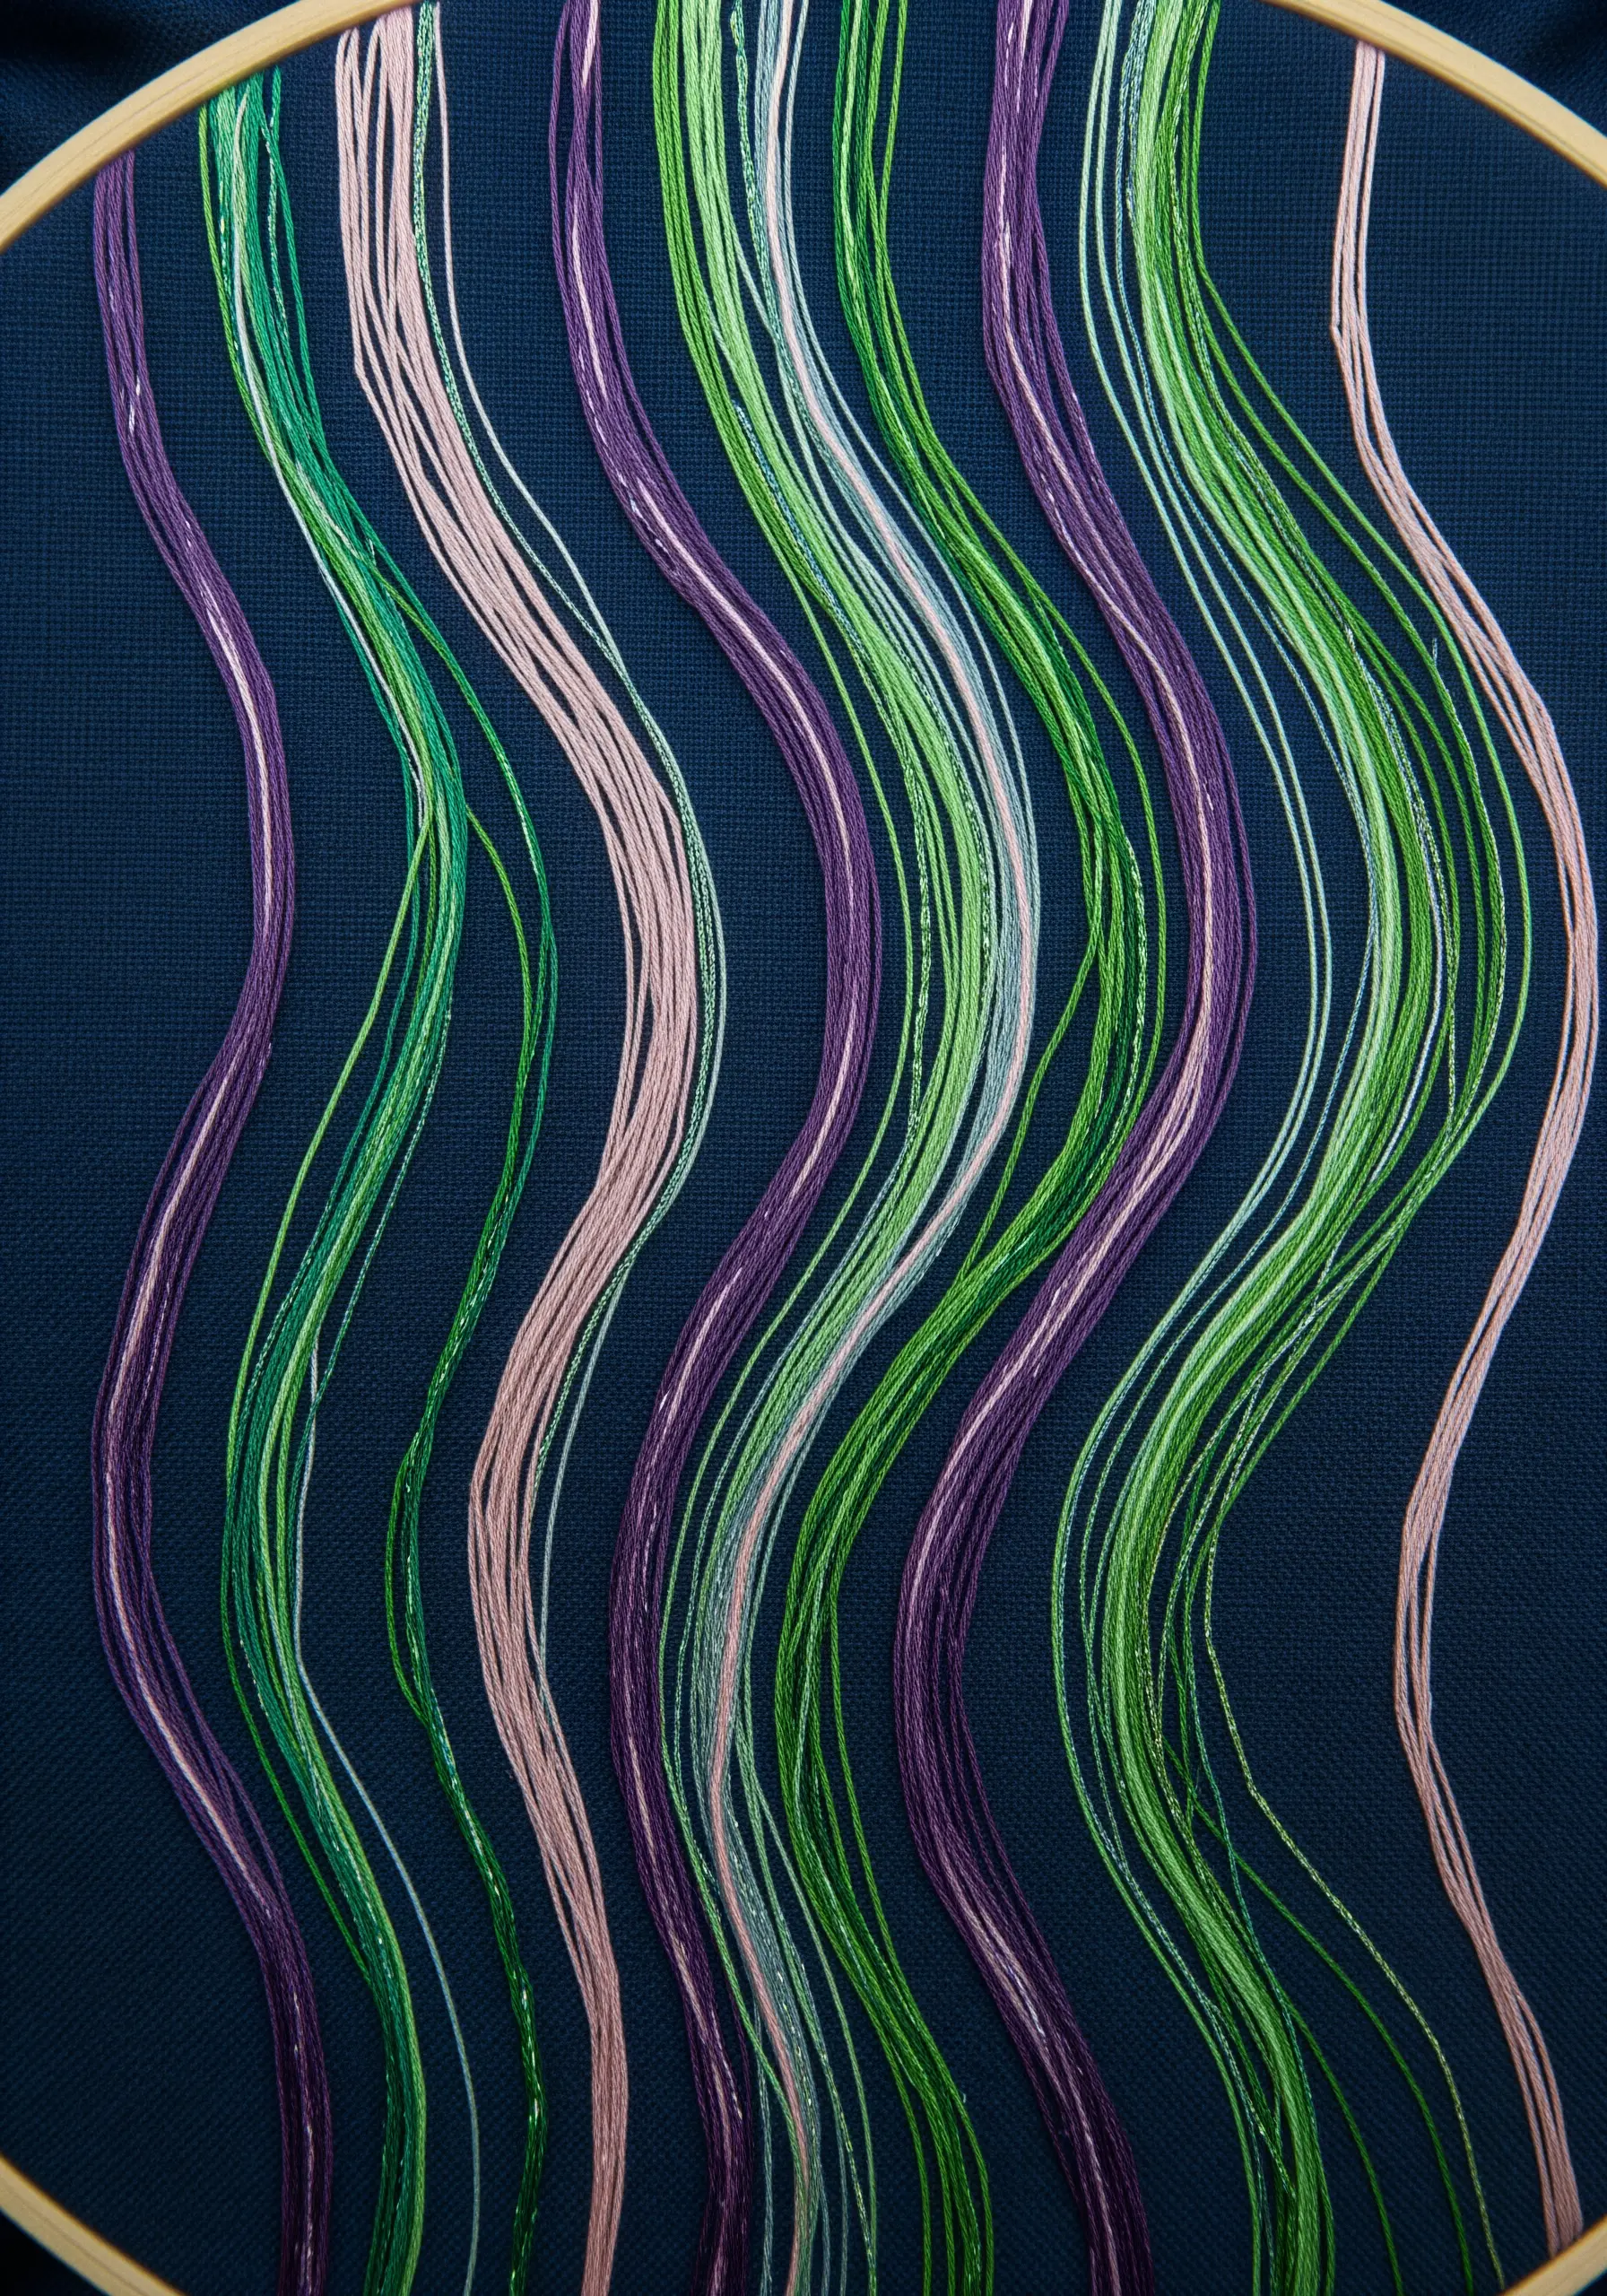
Instead of blending colors within a single stitch, explore how colors interact when laid side-by-side.
Choose a limited palette and thread multiple needles, one for each color.
Work across the fabric with long, flowing stitches that curve and wave, alternating colors to create a sense of rhythm and vibration.
This technique is less about realism and more about exploring the pure relationship between color and line, resulting in striking abstract hoop art.
10. Blend Light and Shadow with Textural Whirlpools
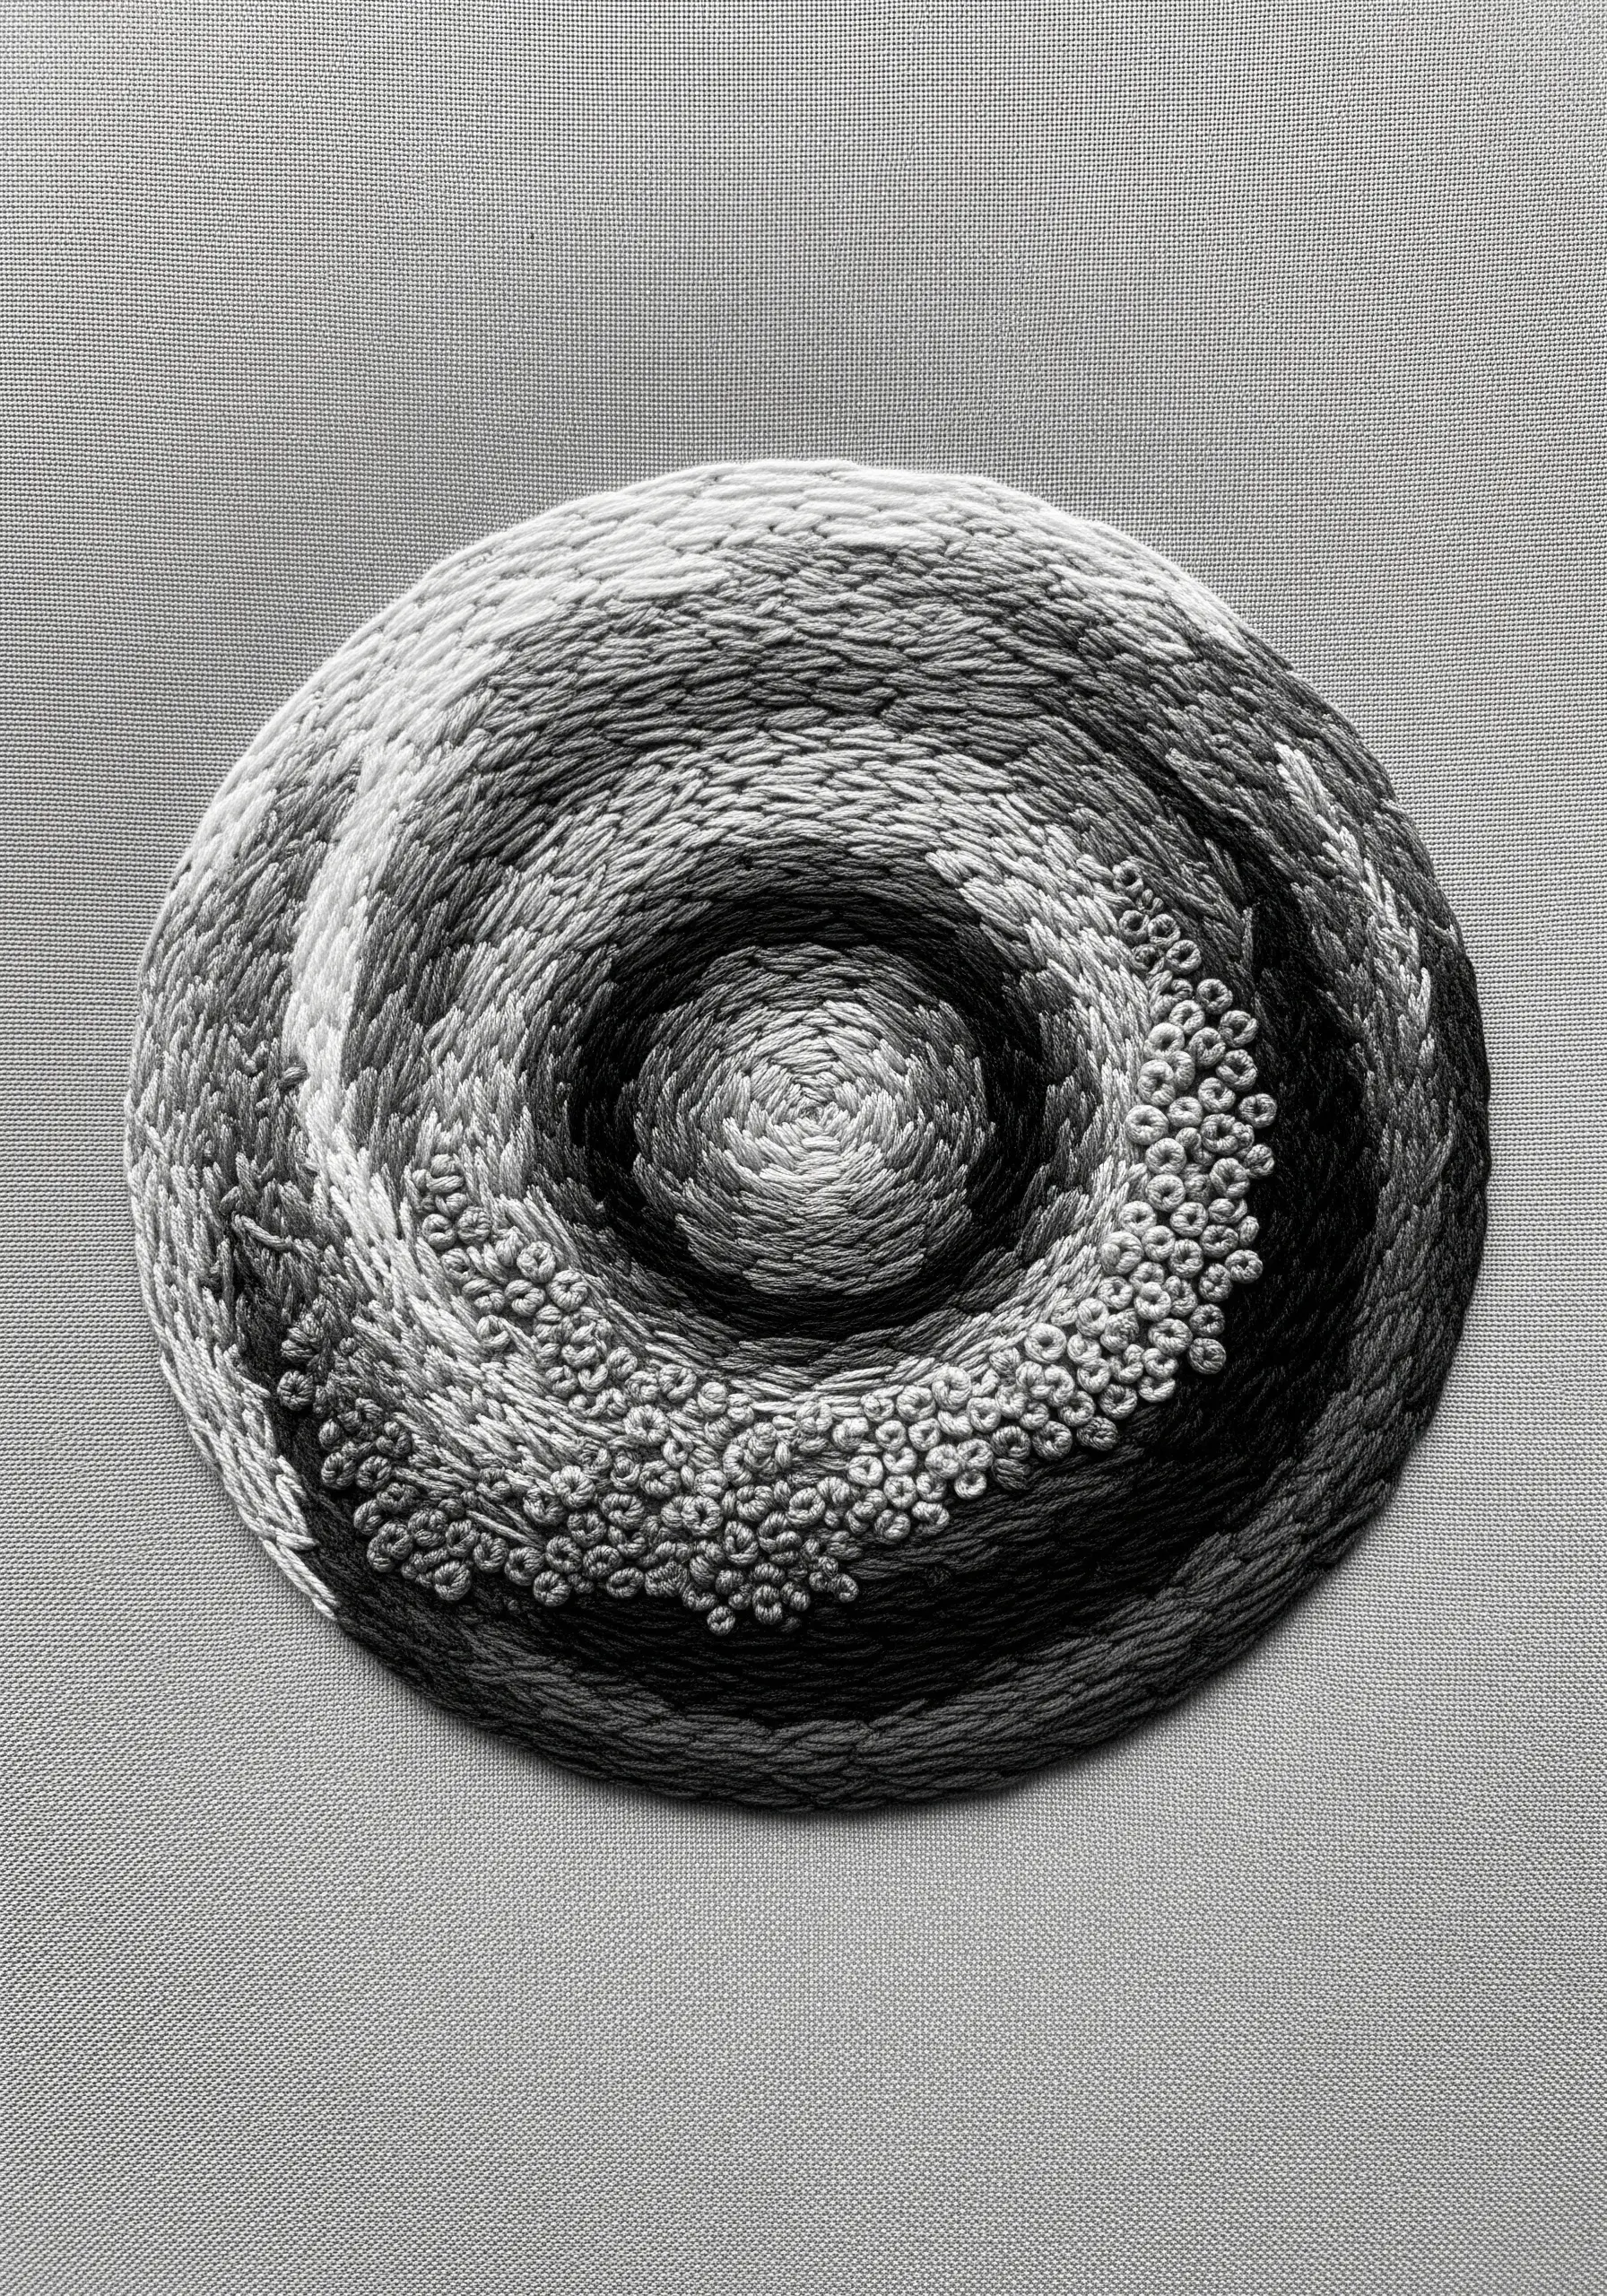
Create a powerful sense of depth by combining circular satin stitch with dense clusters of French knots.
Stitch a spiral starting from the center, gradually blending shades from light to dark to create a vortex effect.
Then, interrupt the smooth flow with sections of tightly packed French knots in contrasting tones.
This juxtaposition of smooth and rough textures is what gives the piece its dramatic, swirling energy, making it a perfect example of texture-rich thread art.
11. Achieve Radiant Blends with Segmented Satin Stitch
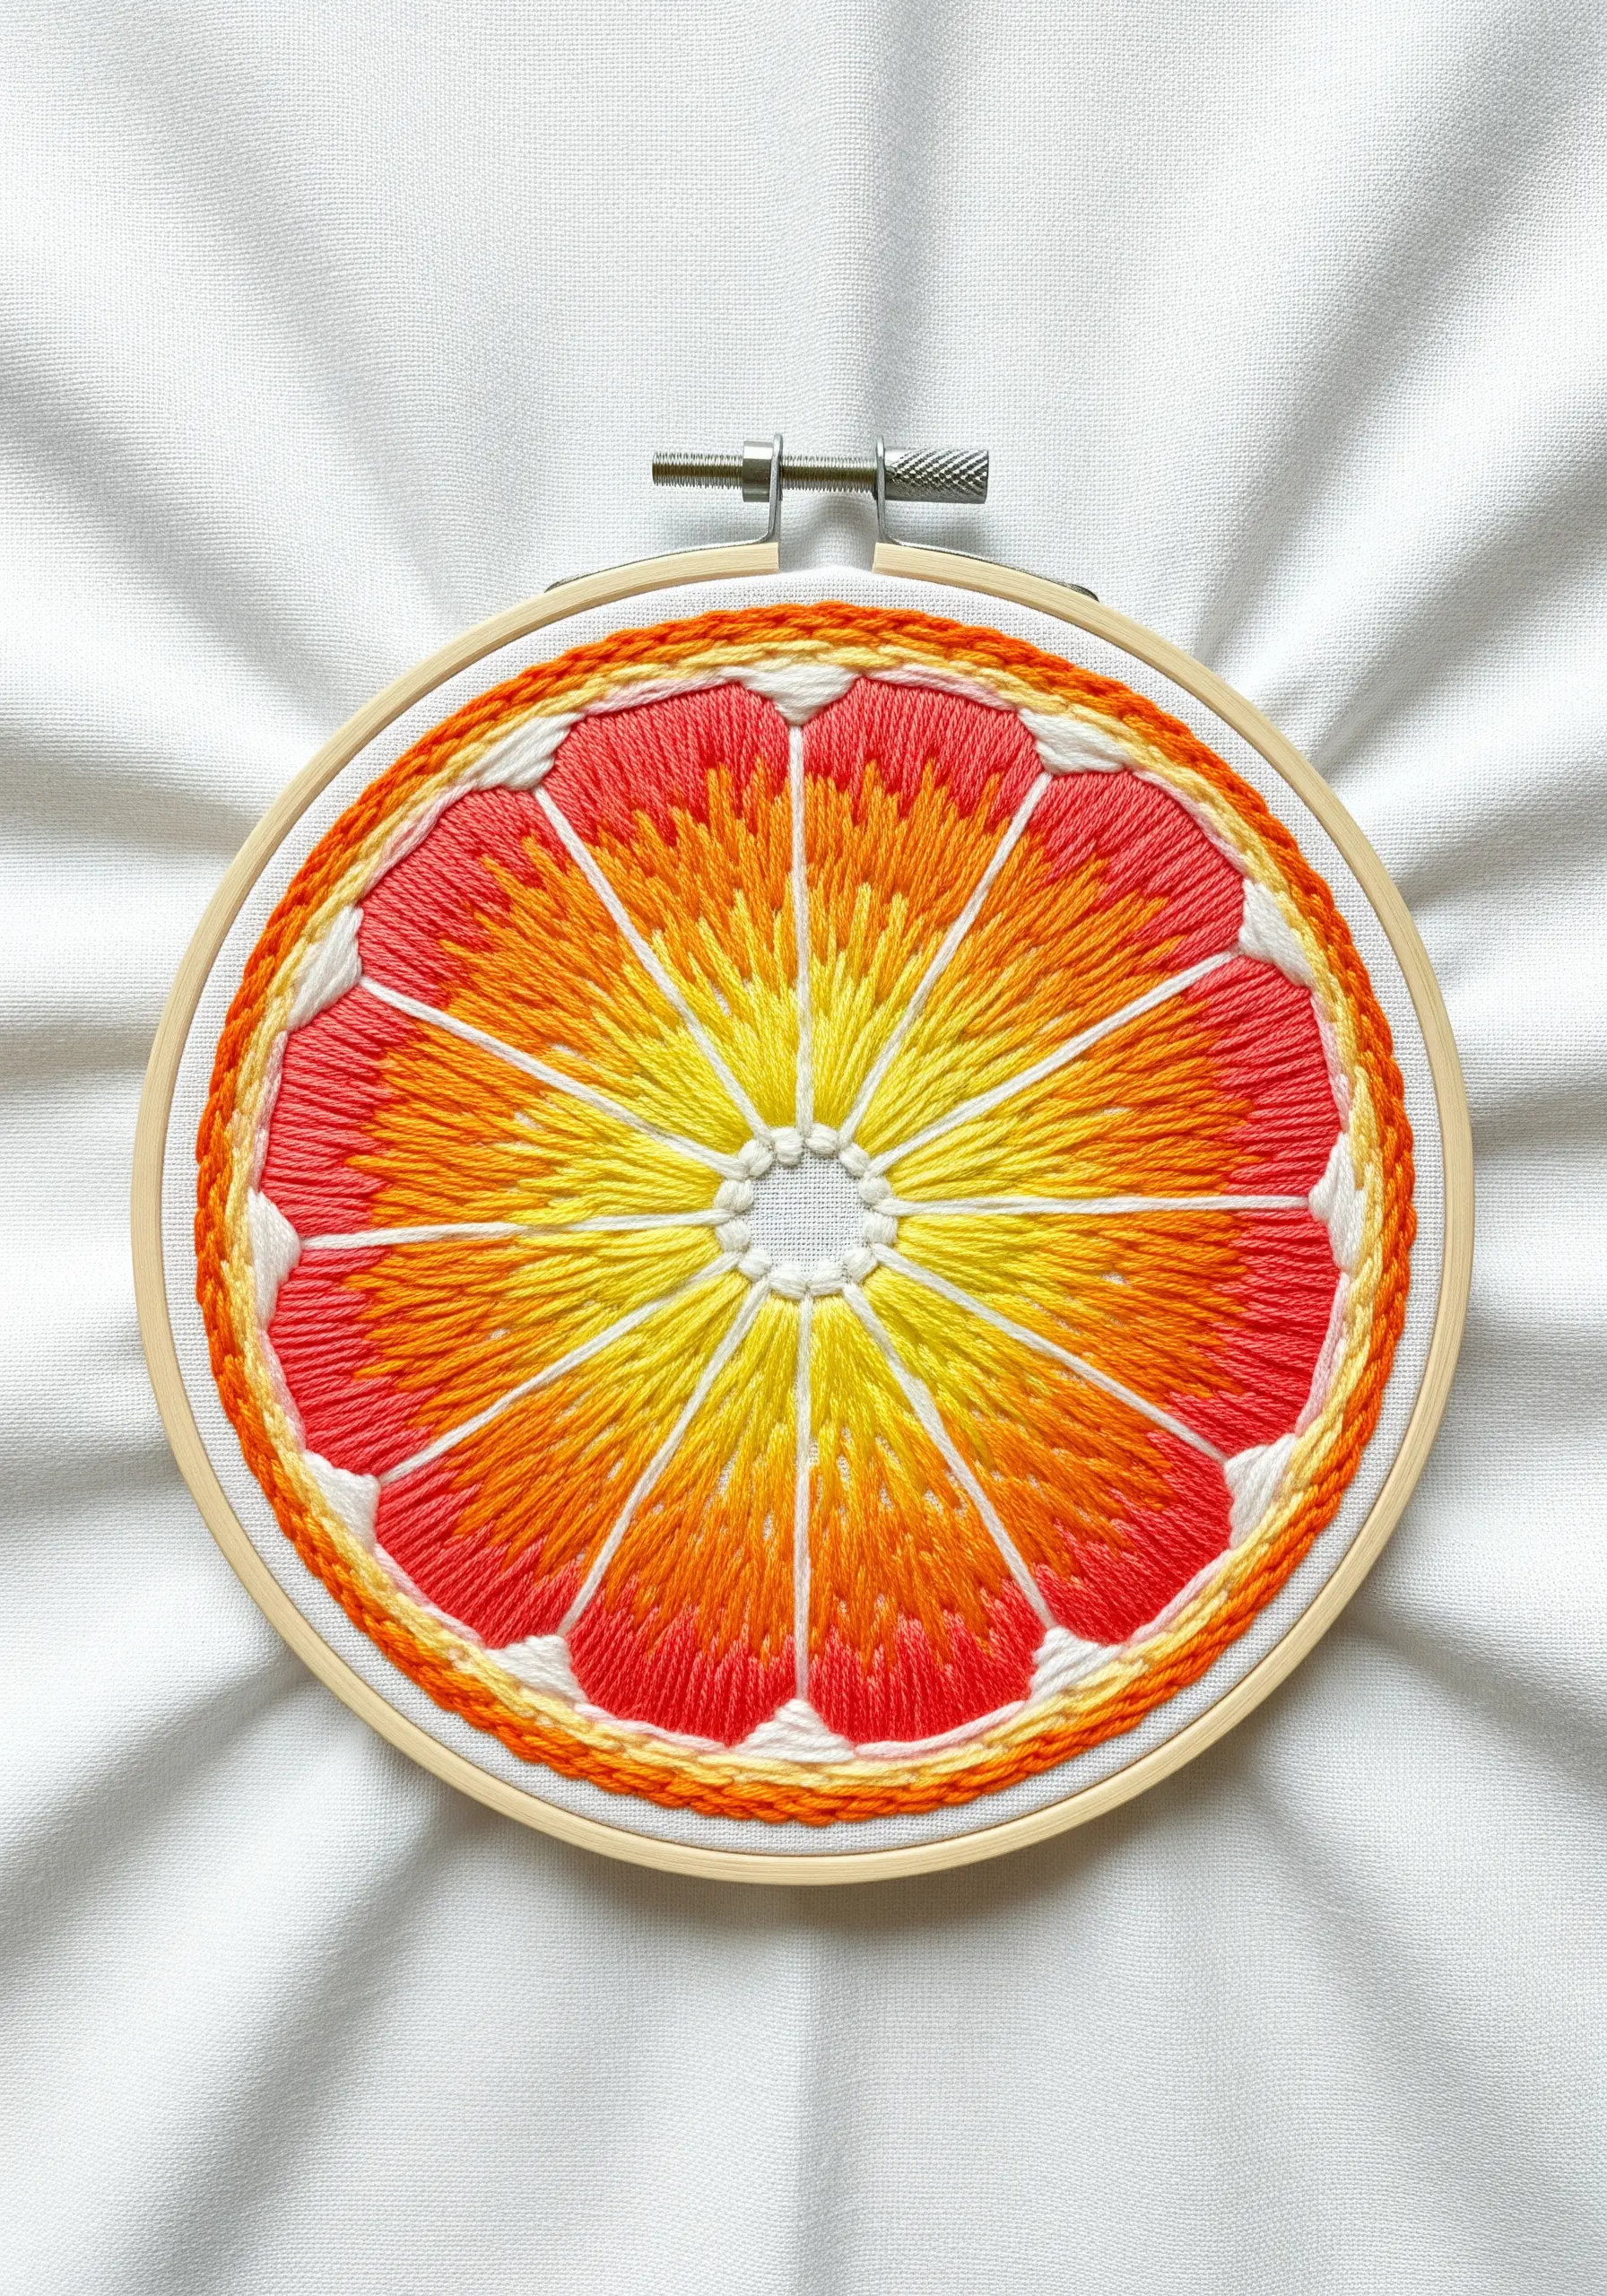
To create a vibrant citrus slice, divide the shape into segments and work each one individually with satin stitch.
Use a long-and-short stitch technique within each segment to blend two or three analogous colors, like yellow into orange, to create a juicy, radiant effect.
Outline each segment with a clean backstitch or split stitch to define the shape and make the colors pop.
This methodical approach gives you maximum control over your color transitions for a clean, graphic finish.
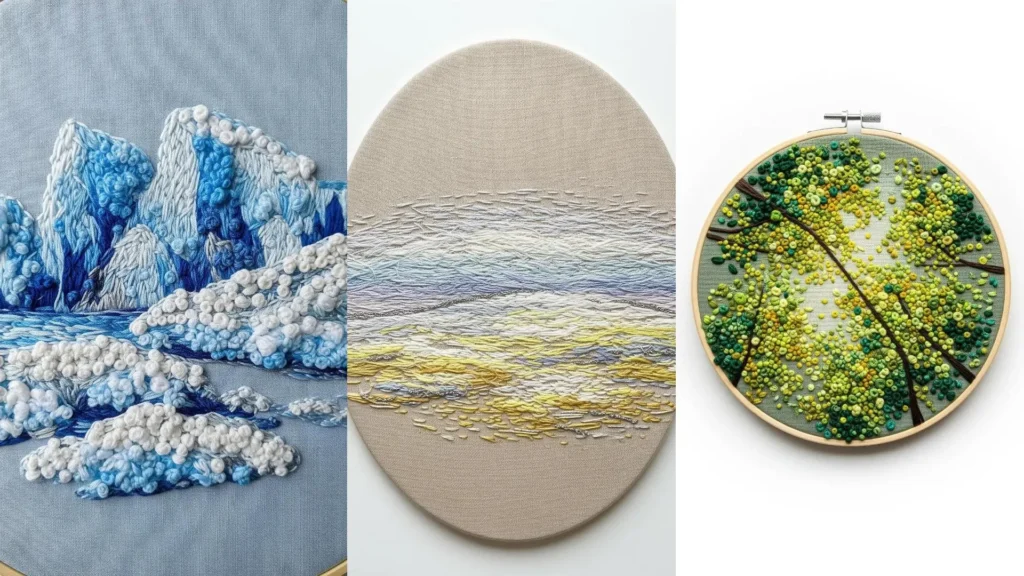
12. Build an Impressionistic Canopy with French Knots
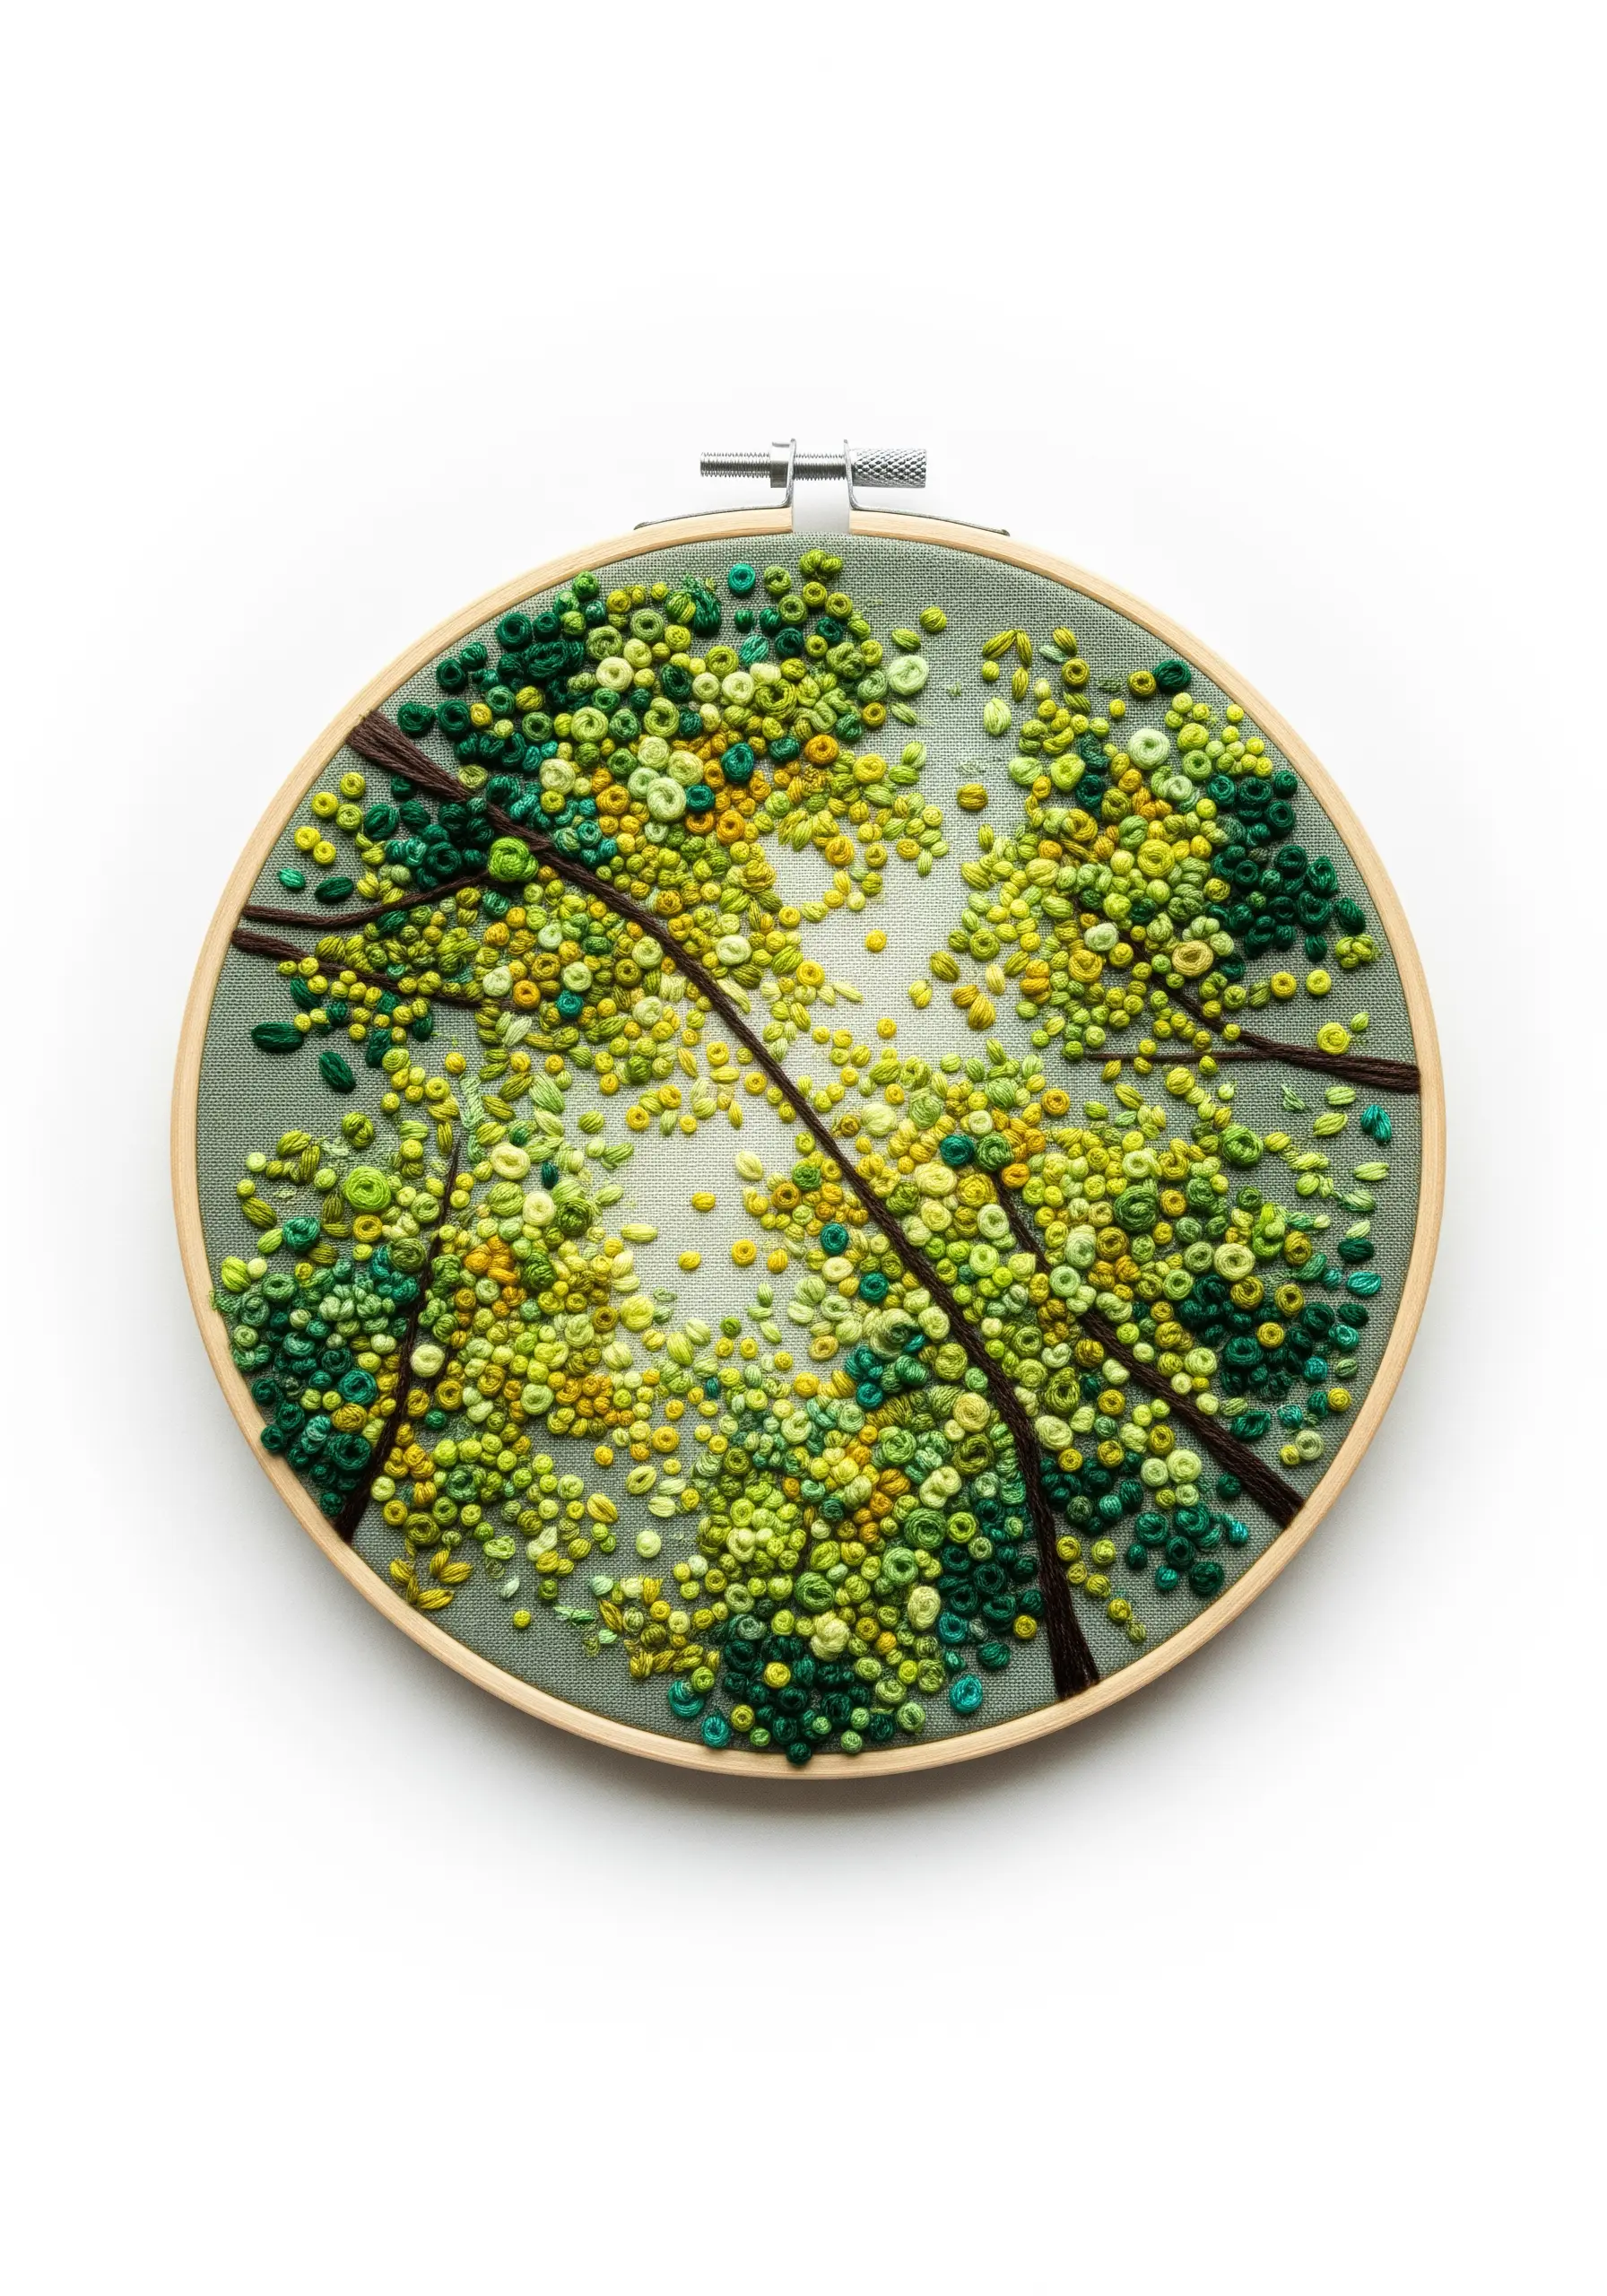
Suggest the effect of sunlight filtering through leaves by using clusters of French knots in various shades of green and yellow.
Use darker greens for the lower layers and sprinkle brighter yellow and lime green knots on top, especially in the center, to create points of light.
Vary the size of your knots by changing the number of times you wrap the thread around the needle.
This pointillist technique allows you to blend colors optically, creating a beautifully textured and dreamy botanical effect.
13. Diffuse Colors for a Soft-Focus Effect
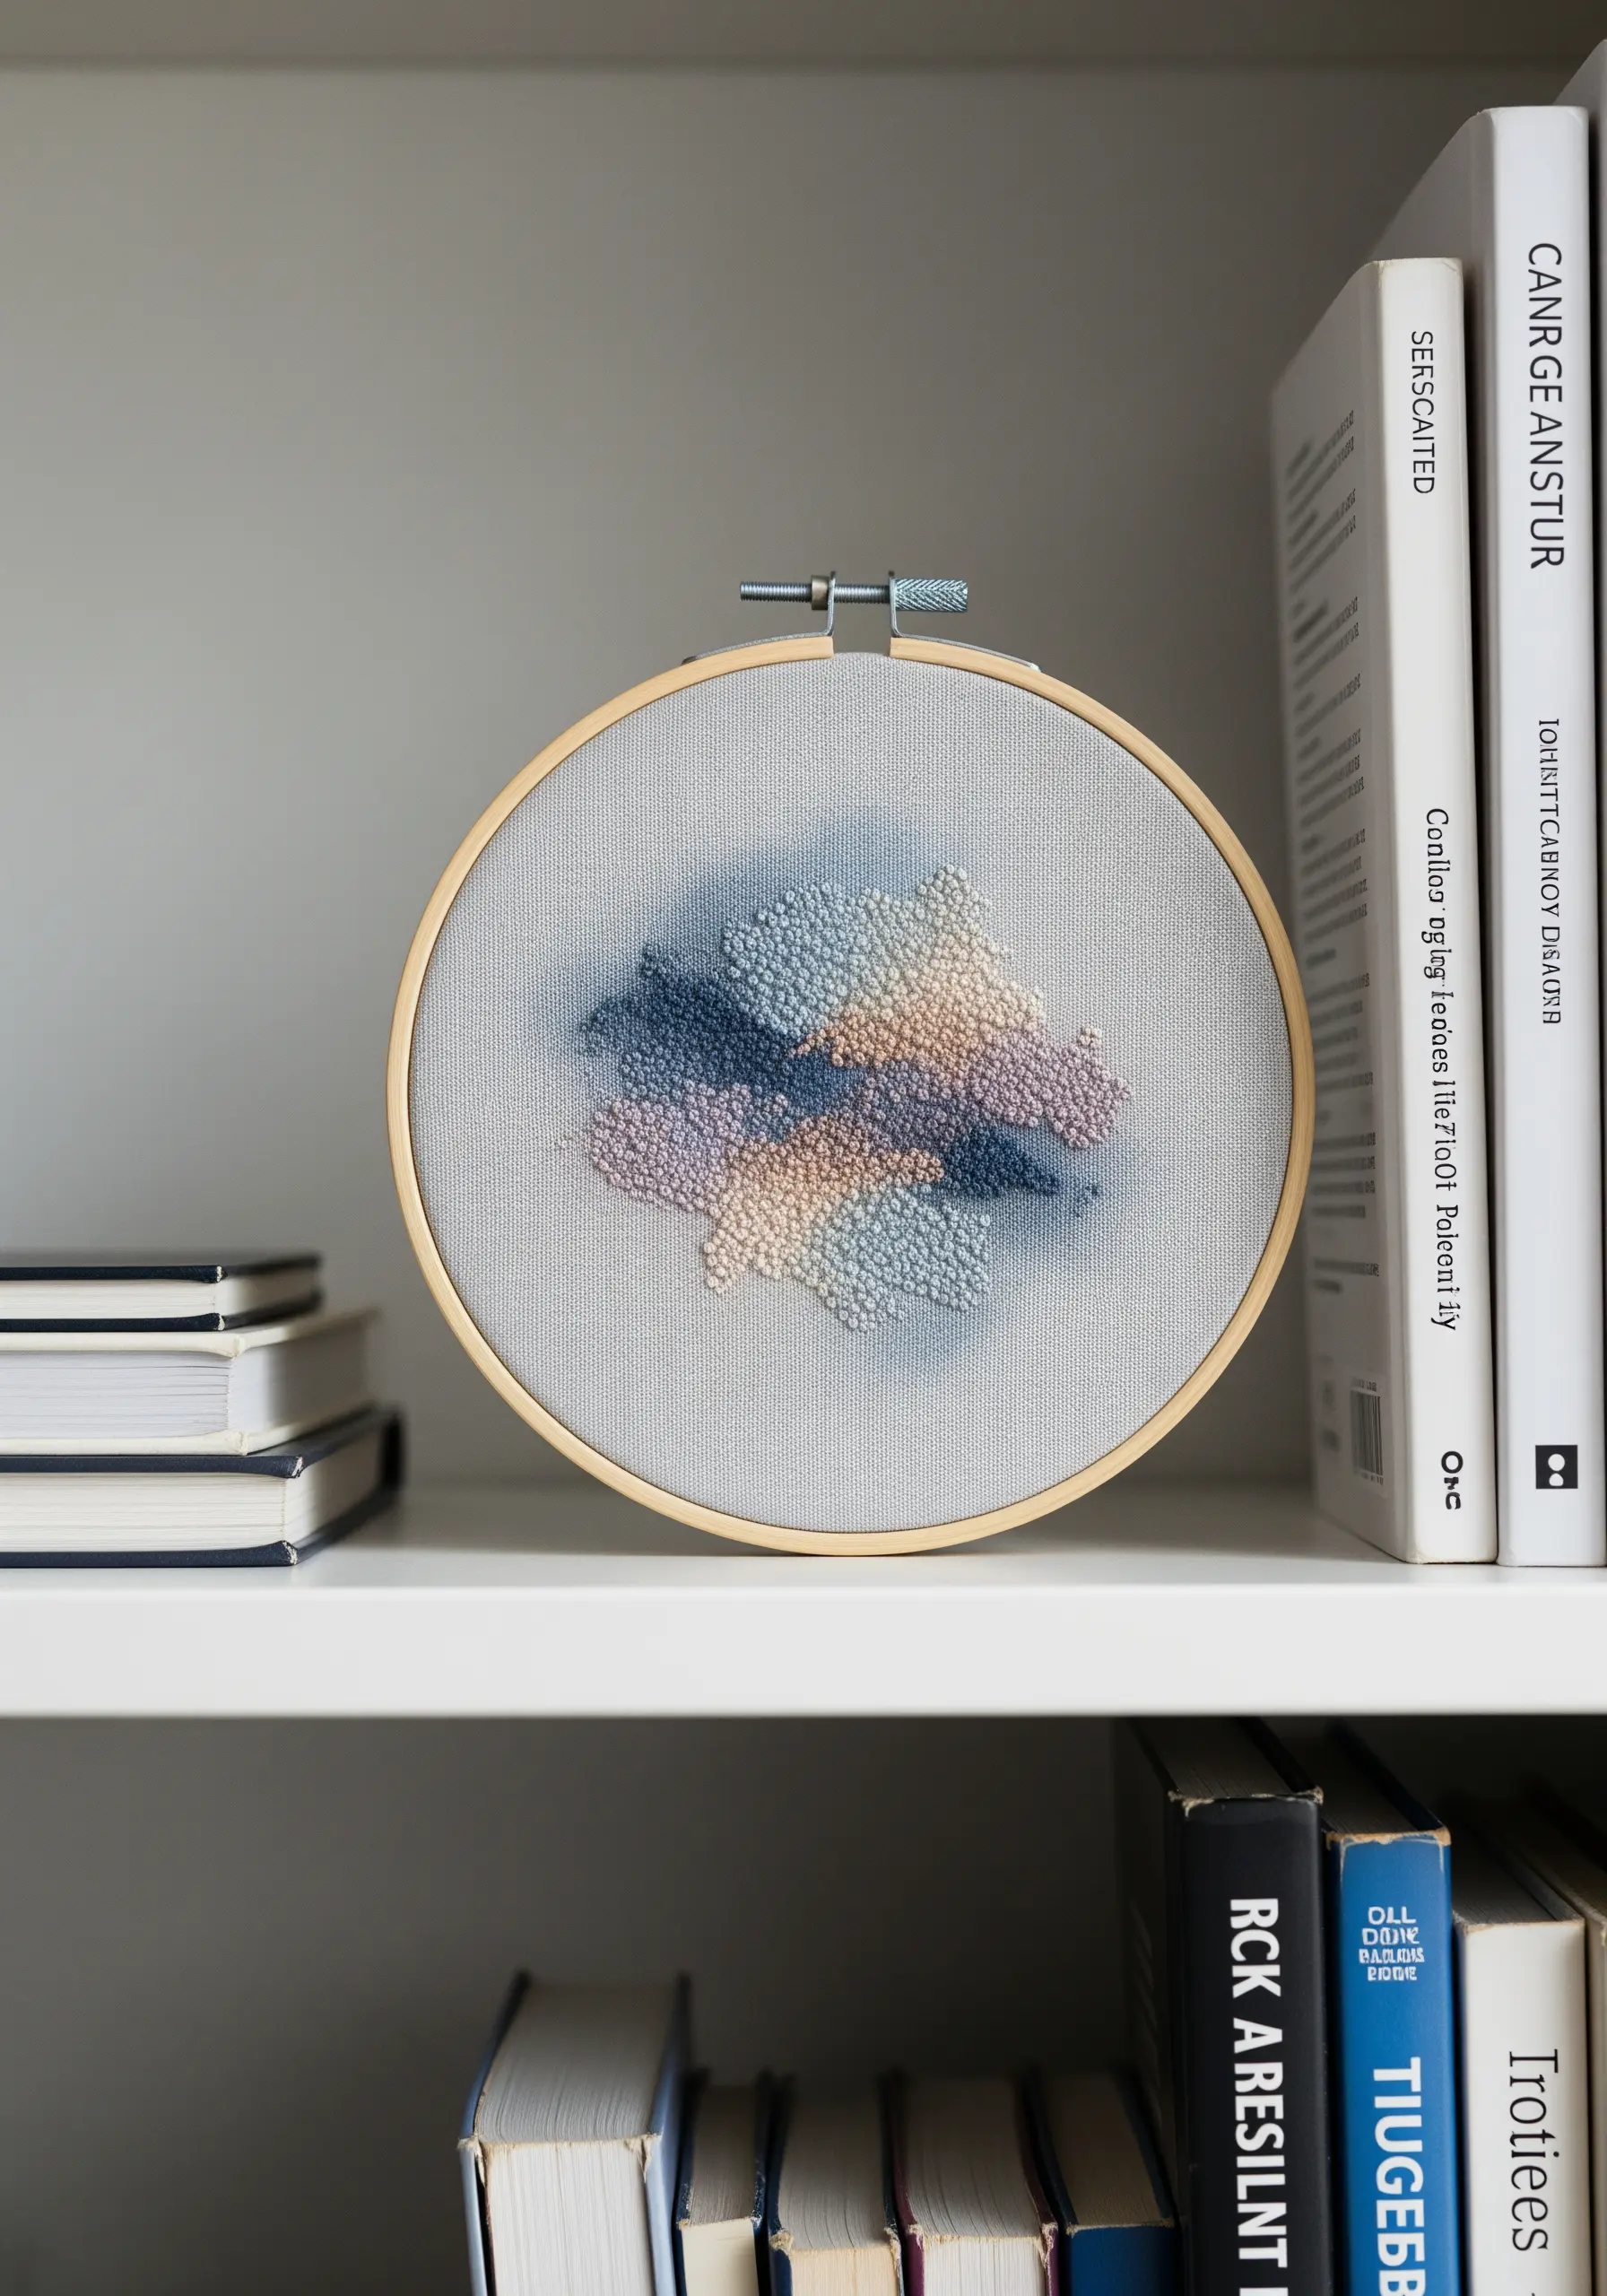
Create a hazy, atmospheric blend using dense fields of French knots and seed stitches.
Instead of creating hard edges, allow your color fields to intermingle by scattering stitches from one color area into the next.
To enhance the soft-focus feel, lightly brush the surrounding fabric with powdered pastels or chalk before you begin stitching, then seal it.
This mixed-media approach results in a dreamy, out-of-focus quality perfect for watercolor-style embroidery patterns.
14. Weave Miniature Rainbow Gradients
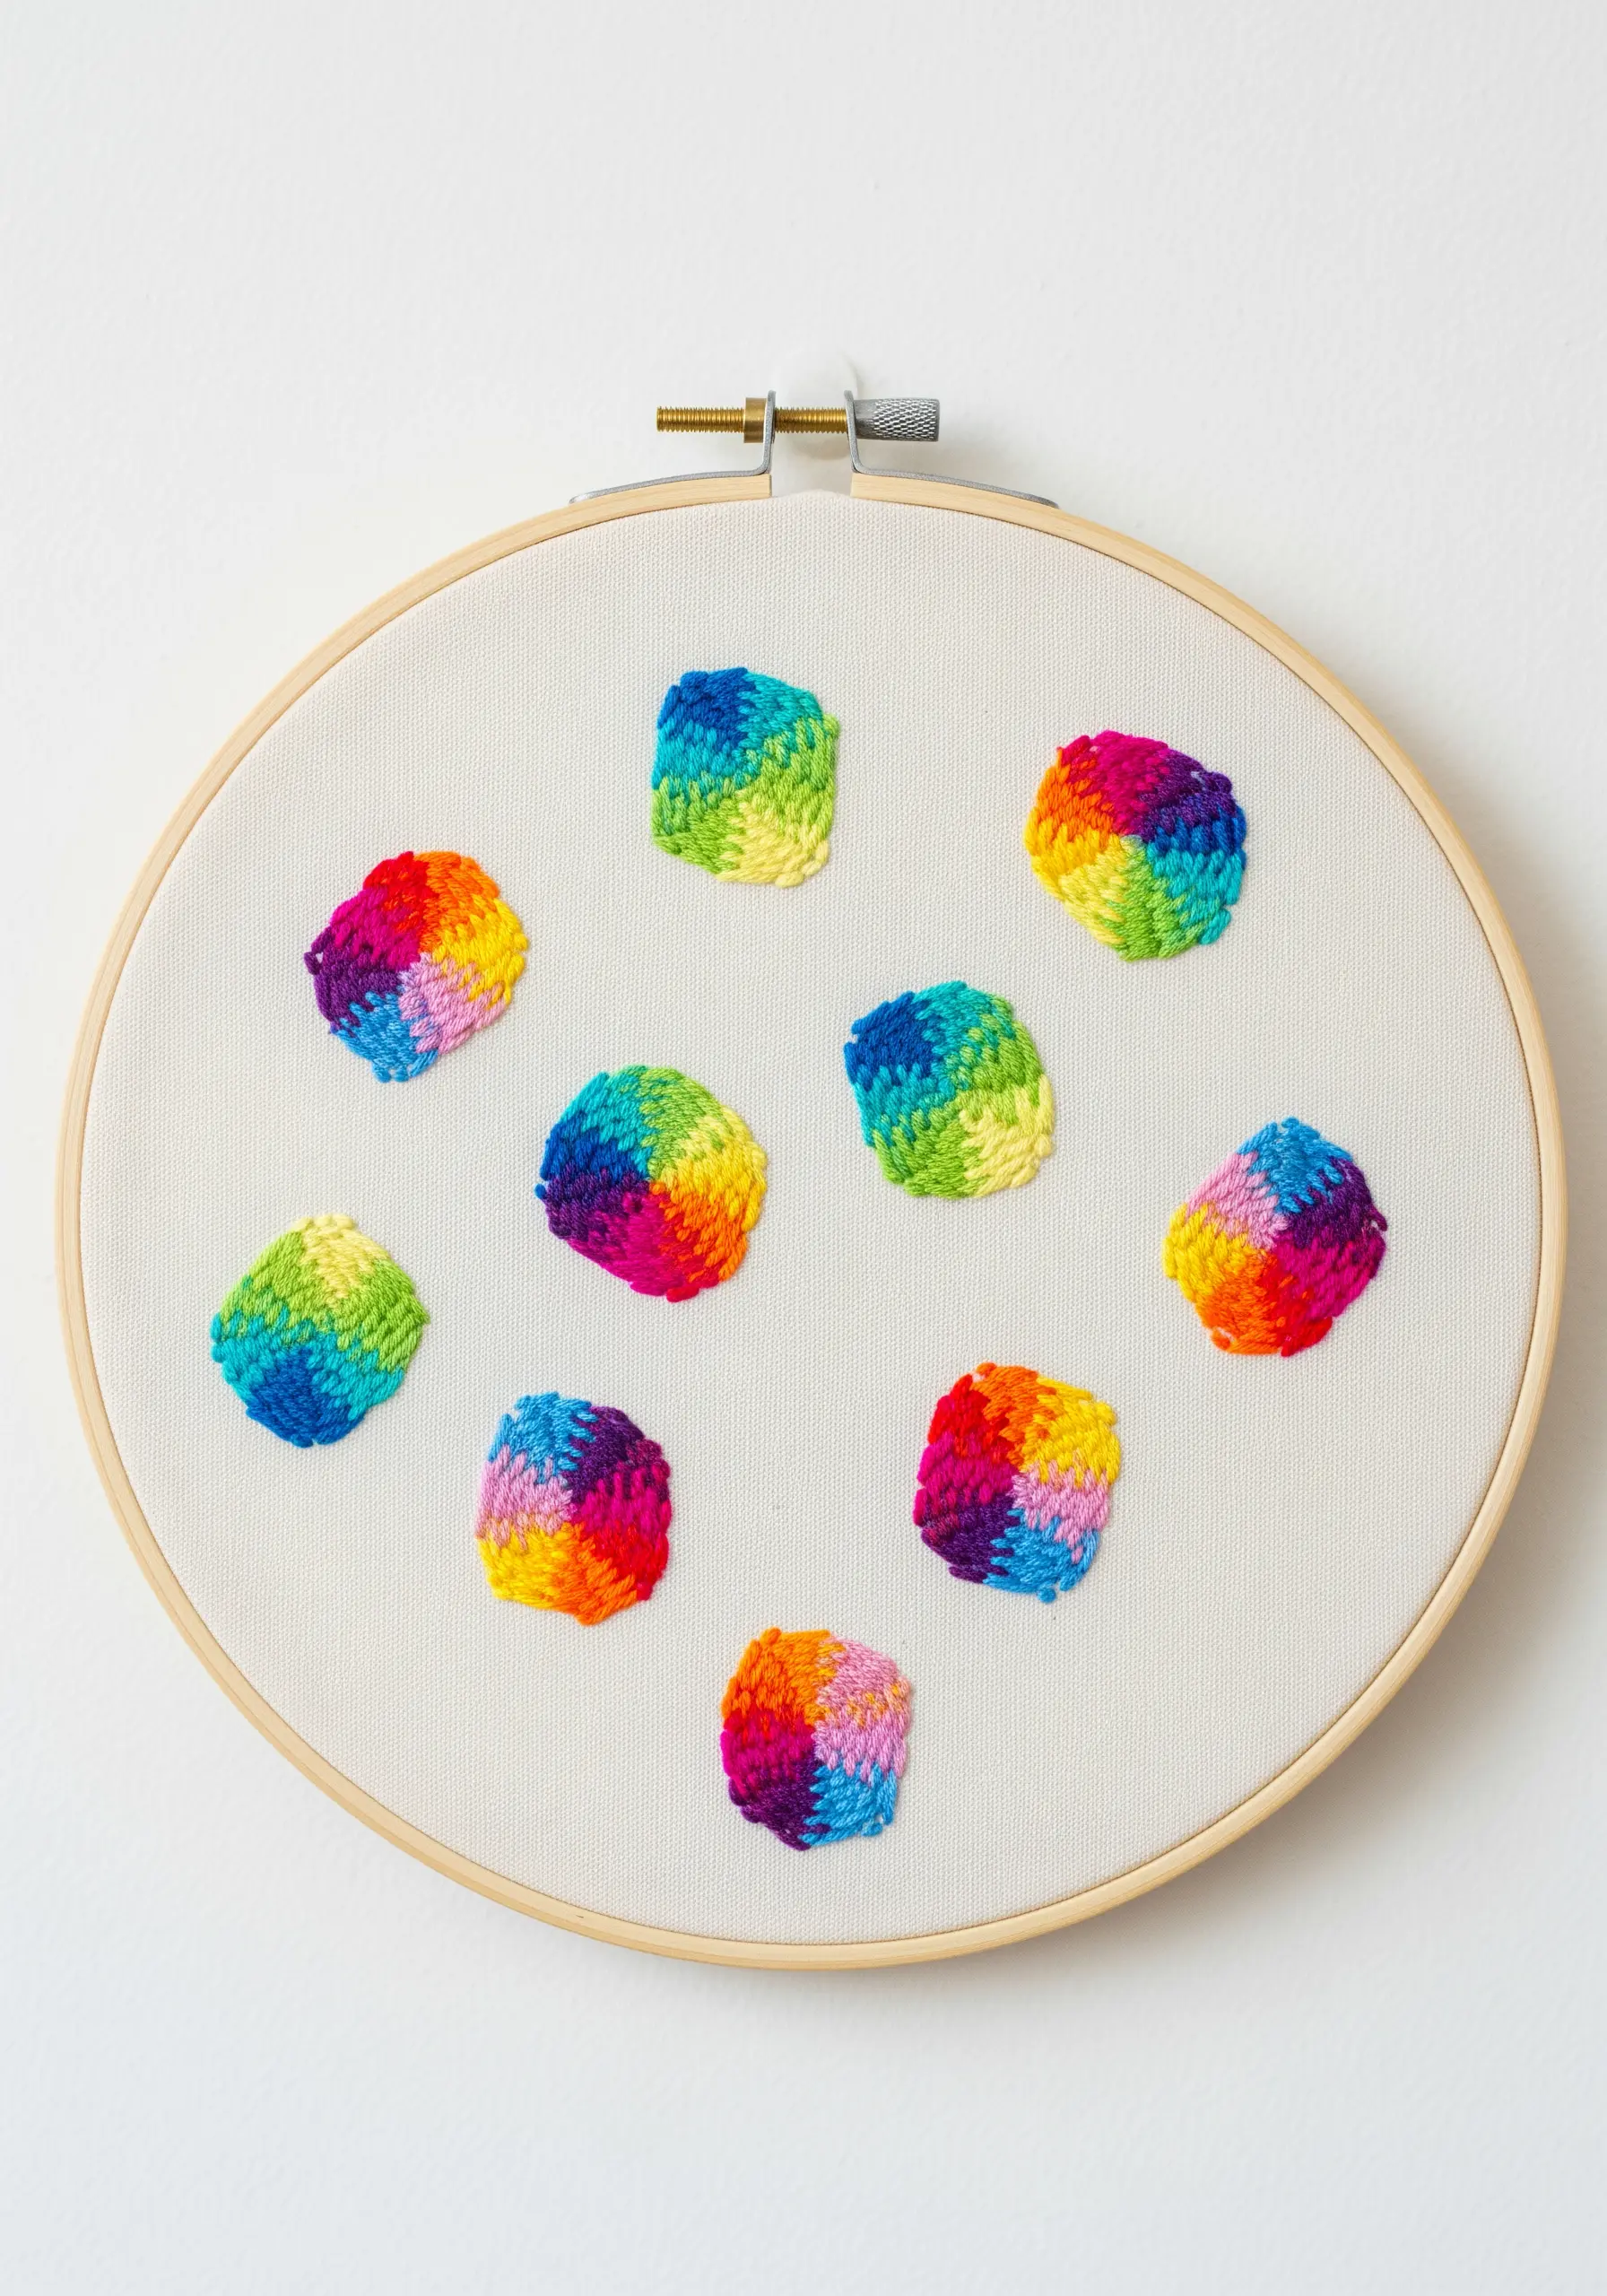
Create these vibrant, woven-looking squares using a series of straight stitches layered over one another.
Start by filling a small square with vertical satin stitches in a rainbow sequence.
Then, use the same colors to weave horizontal stitches over and under your base layer, creating a tiny, textured checkerboard.
This technique turns simple straight stitches into complex-looking motifs, ideal for creating magical ombre effects on a small scale.
15. Imply Landscapes with Minimalist Stitching
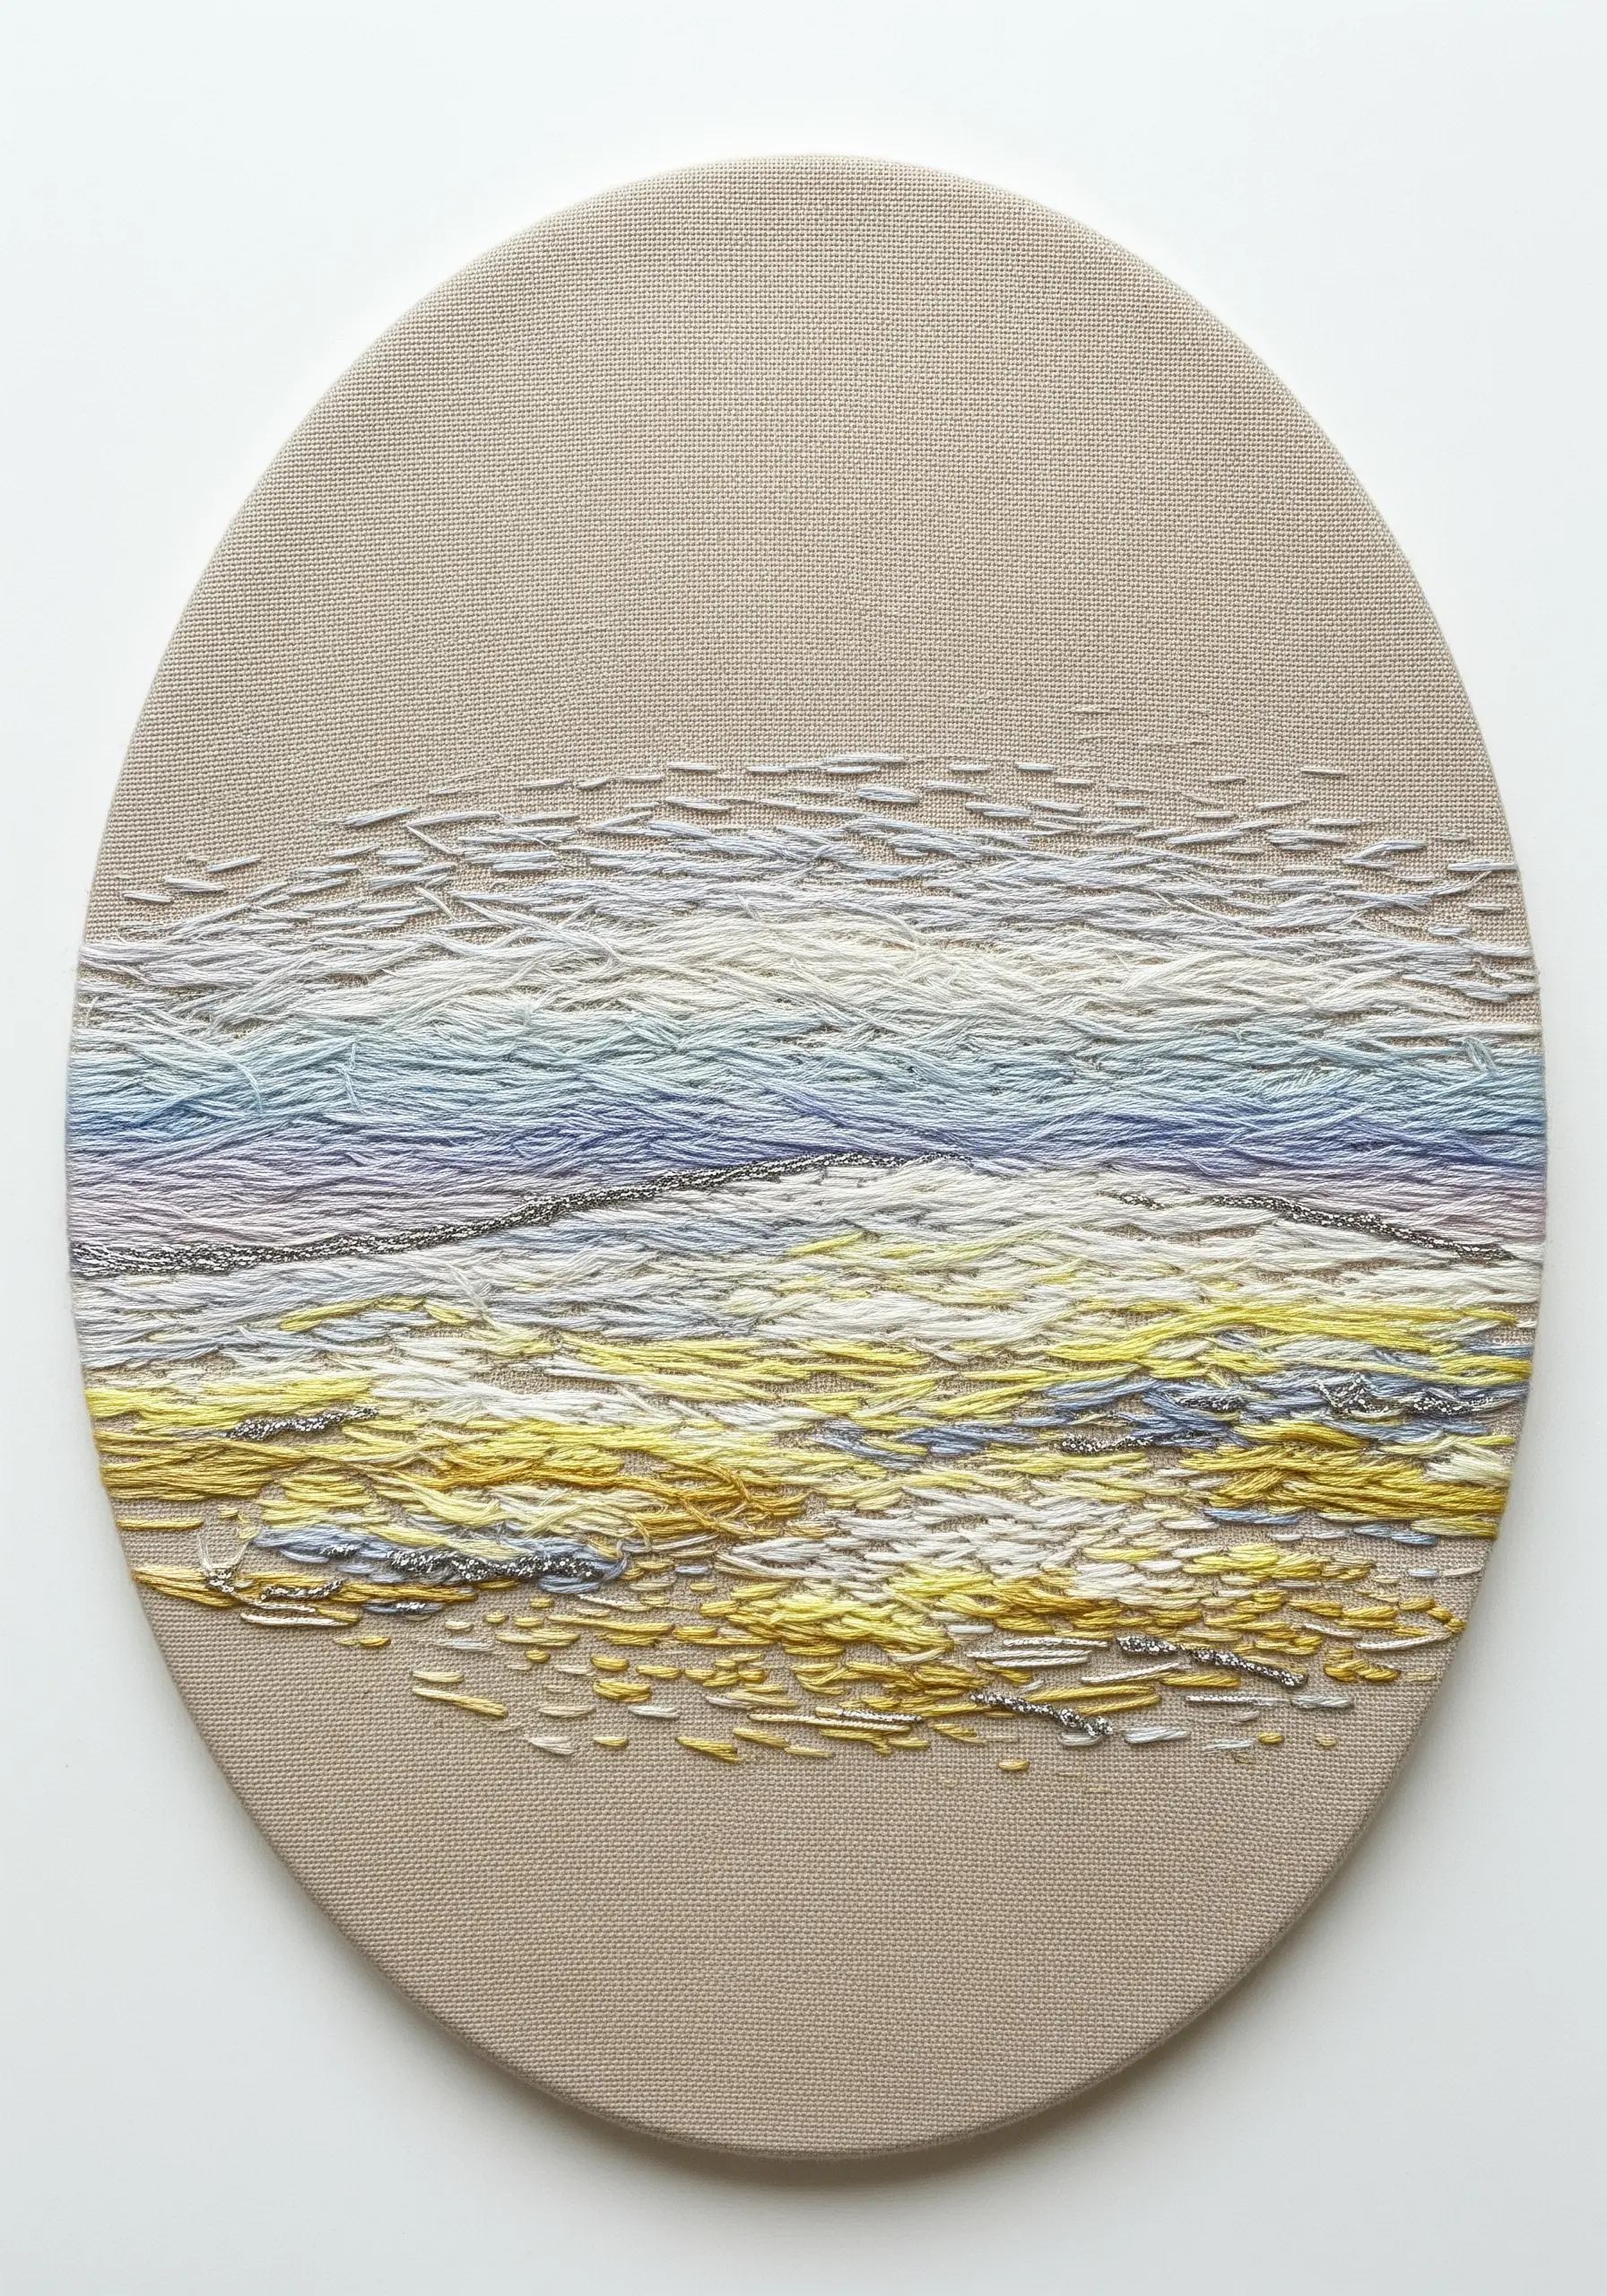
Suggest a serene beach or desert landscape with sparse, thoughtful stitches rather than dense fills.
Use single strands of floss in soft, muted colors and lay them down as long, horizontal straight stitches.
Vary the stitch length and spacing to create a sense of texture and distance.
Introduce a single strand of metallic thread to catch the light, suggesting a glint of sun on water or sand. This restraint is key to minimalist embroidery decor.
16. Sculpt Icy Peaks with Layered Knots and Stitches
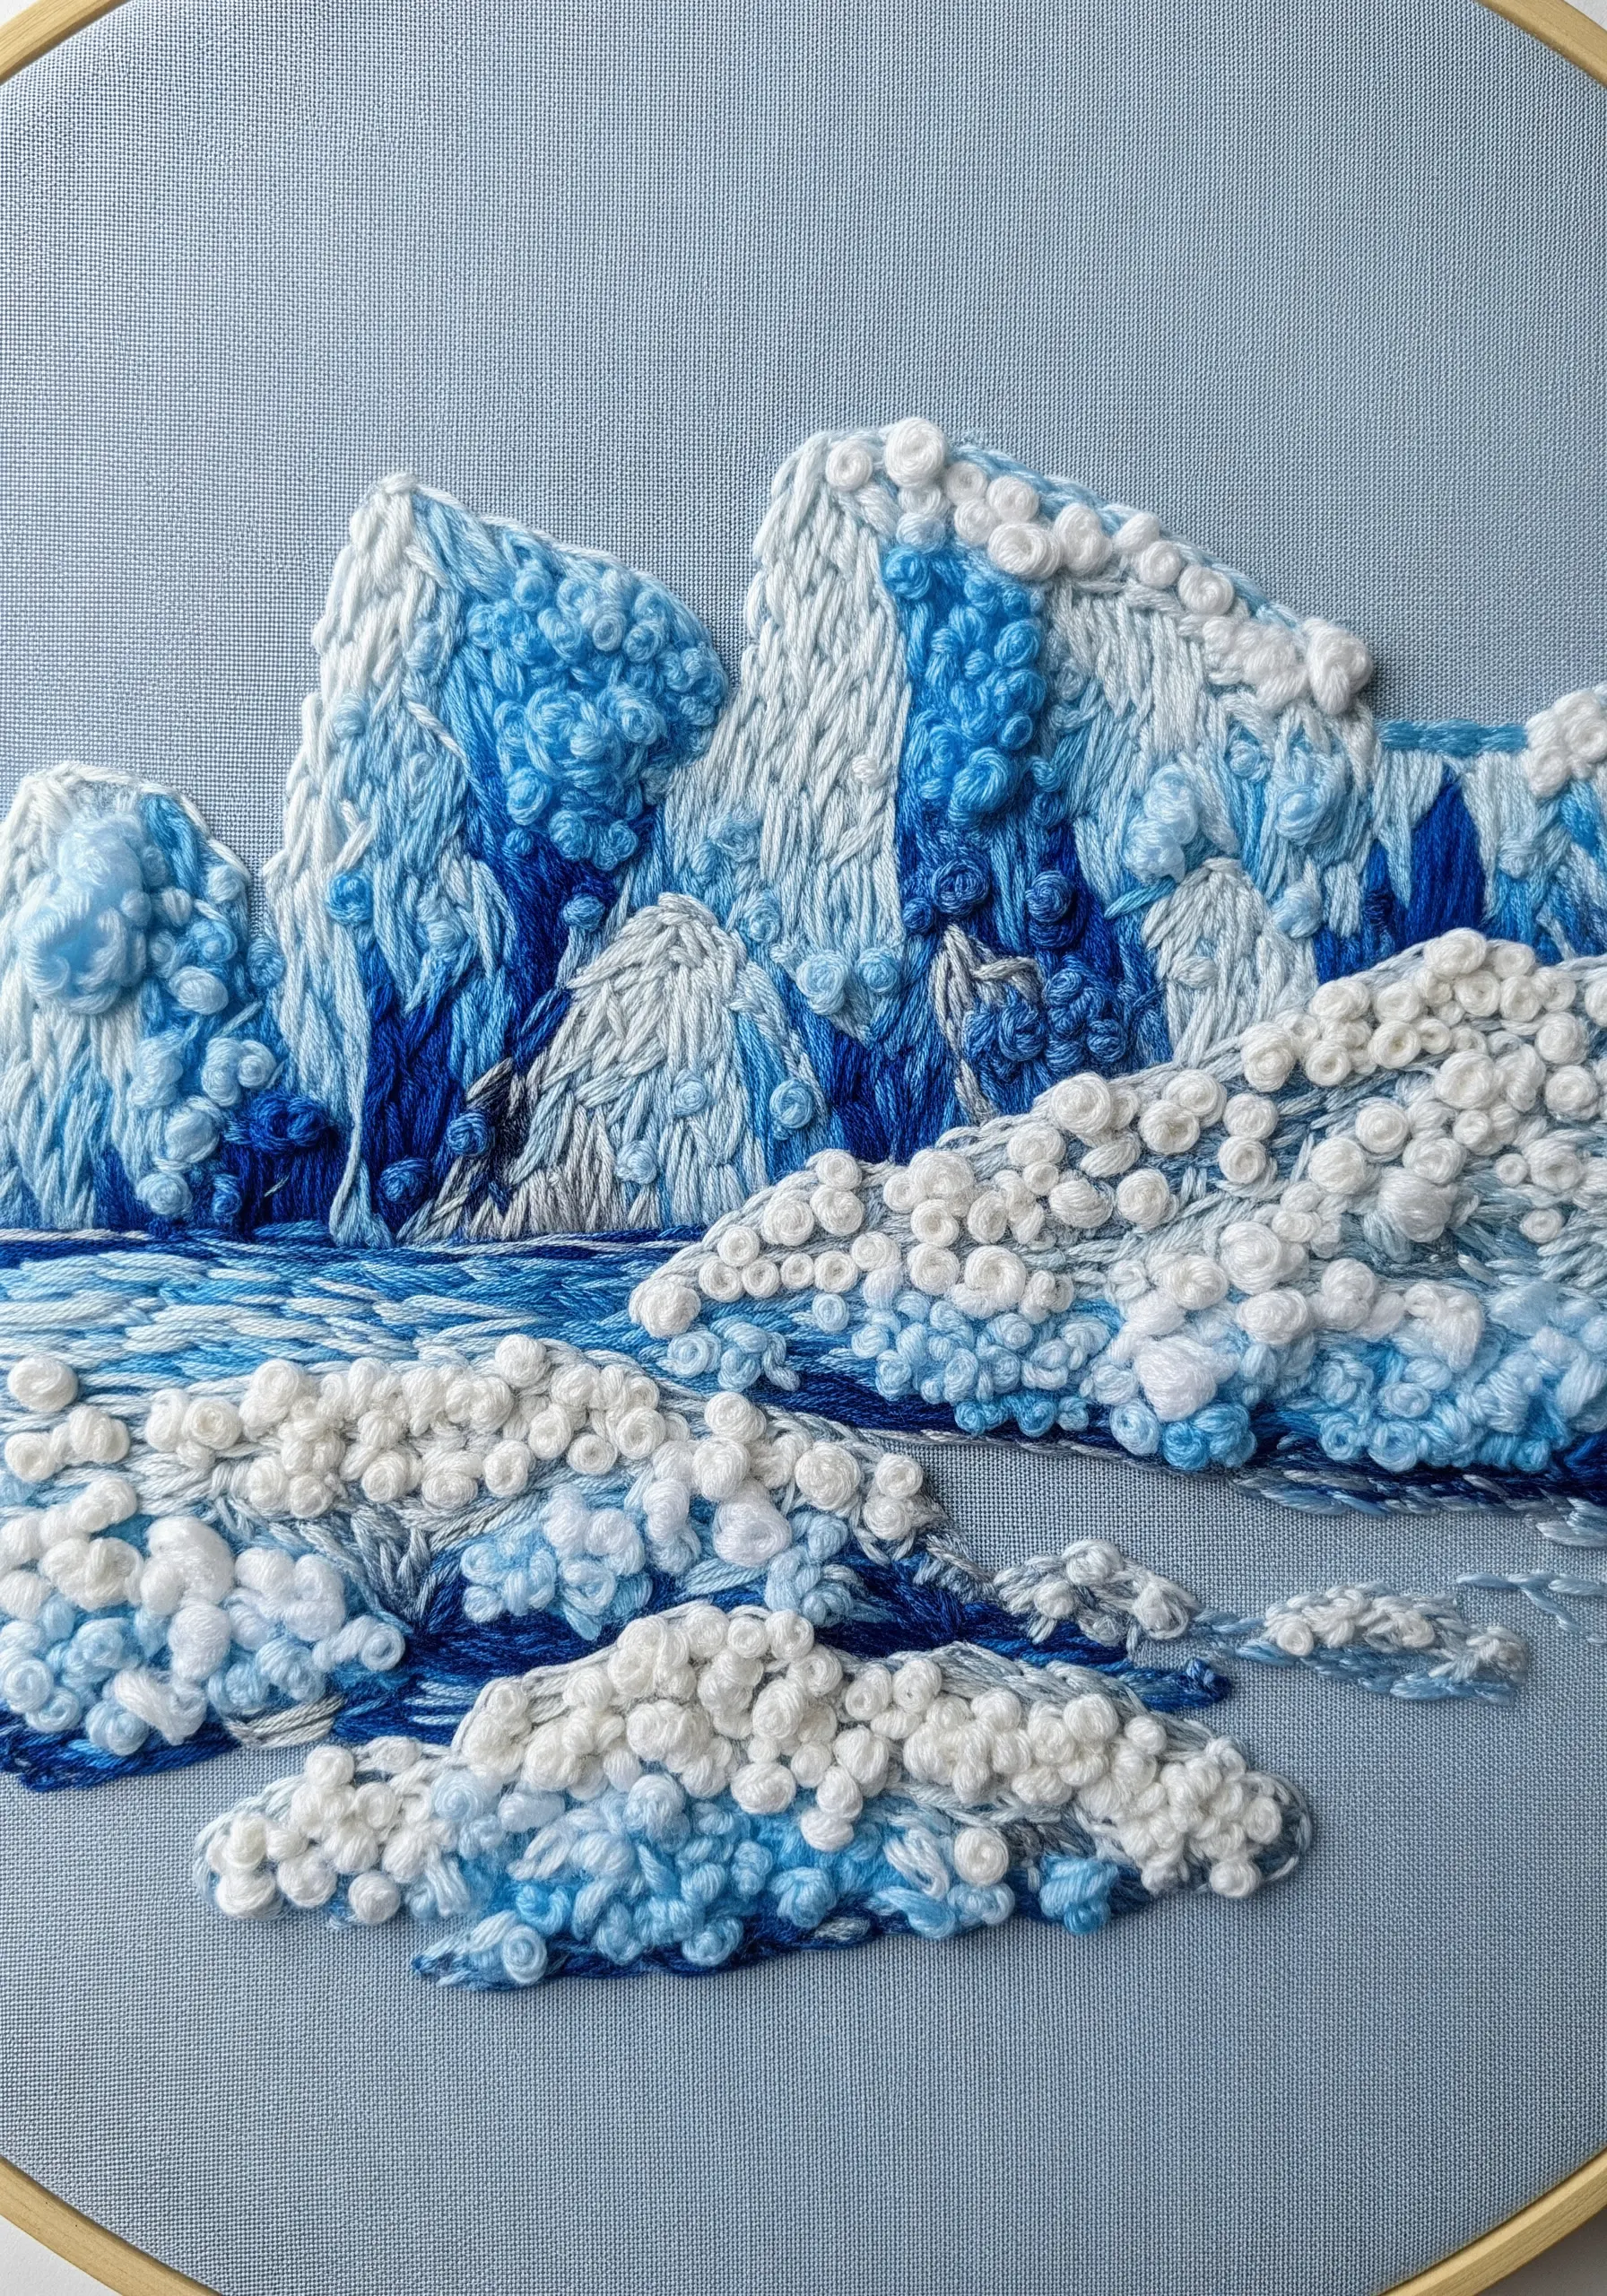
Build dimension and texture in a monochrome palette by layering different types of stitches.
Use directional satin stitches to form the underlying shape and shadows of the mountains.
Then, build up areas of highlight and texture with dense clusters of French knots, colonial knots, and bullion stitches.
Packing these knots tightly creates a high-relief surface that mimics the texture of snow and ice, adding incredible depth to your work.
17. Map Abstract Terrains with Organized Chaos

Create the feeling of an aerial map or intricate landscape through a playful mix of stitch styles.
Define a primary path with a smooth, flowing stitch like a split stitch or whipped backstitch.
Then, fill the surrounding areas with clusters of seemingly random stitches: short straight stitches, seed stitches, and French knots.
By sticking to a cohesive color palette, the ‘chaos’ becomes an intentional texture that creates a dynamic and fascinating composition.
18. Create Organic Forms with Concentric Color Blending
To embroider these smooth, stone-like shapes, use a single, continuous line of split stitch that spirals from the center outwards.
Change your thread color every few rows to create soft, concentric rings of color.
This technique is meditative and creates a wonderfully smooth and solid texture without using satin stitch.
The key is keeping your stitches small and consistent to maintain a perfect curve, resulting in beautiful organic shape embroidery patterns.
19. Build a Coral Reef with a Vocabulary of Knots
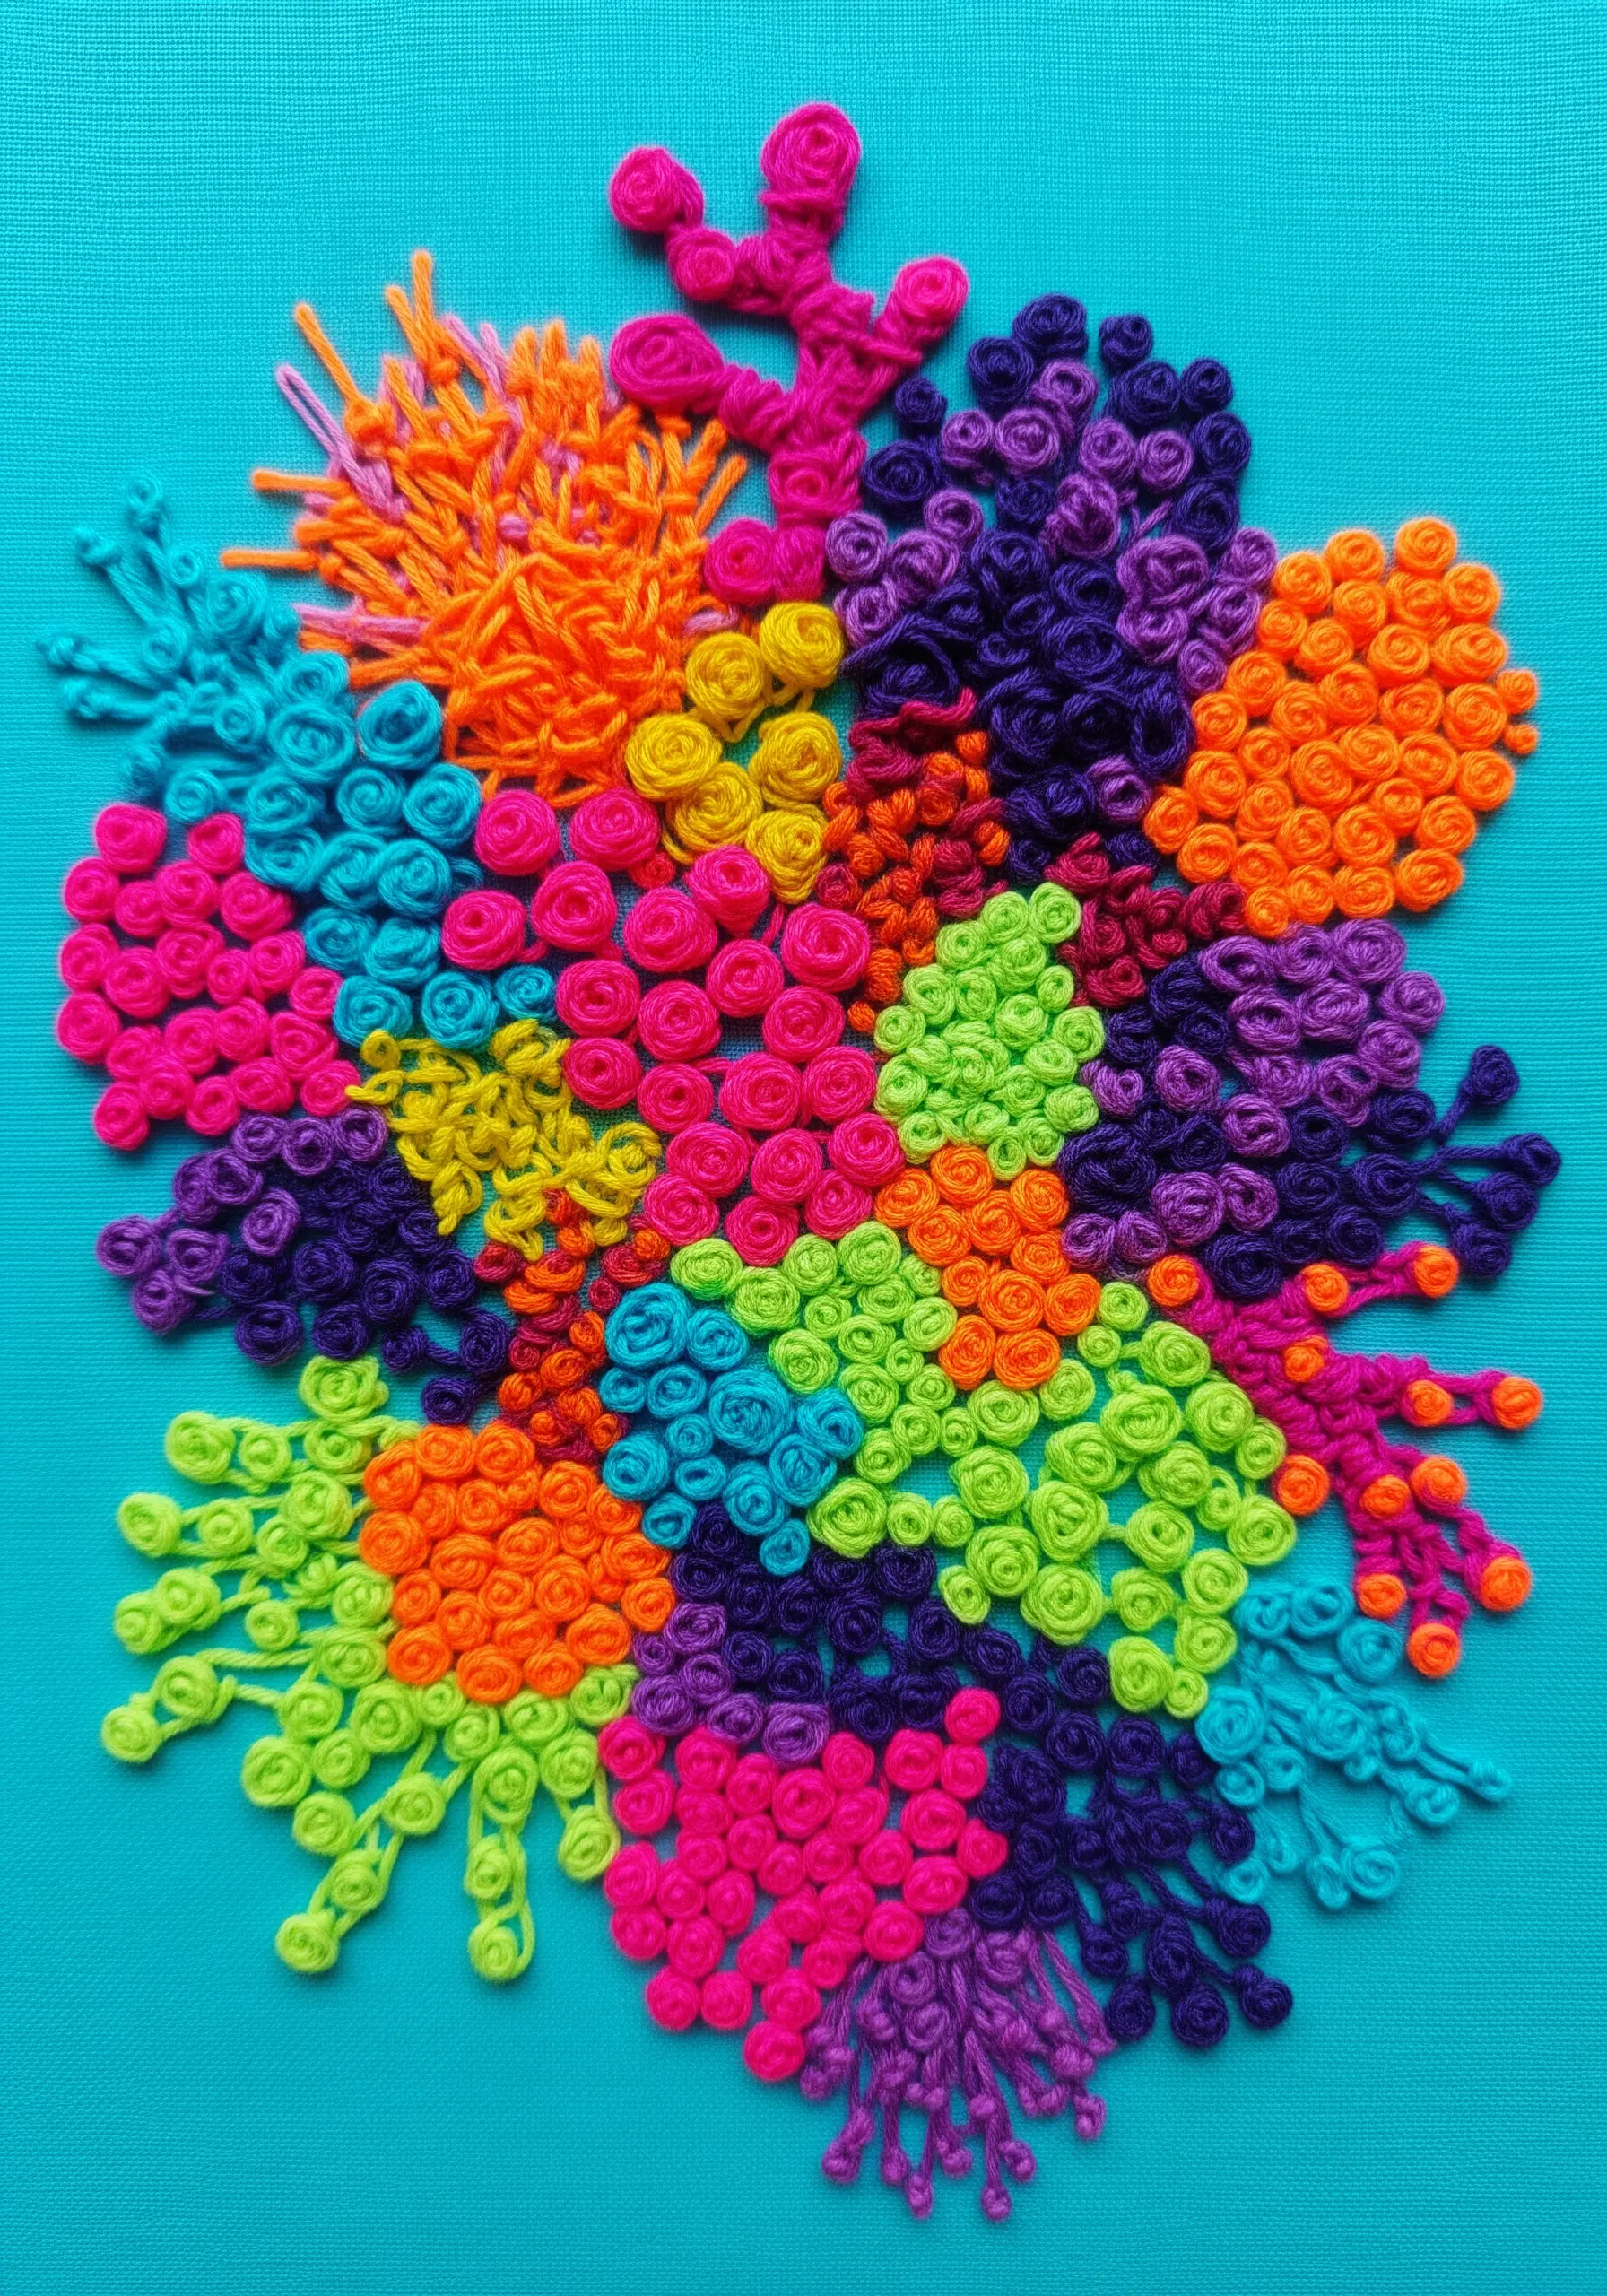
Recreate the vibrant, complex texture of a coral reef using a dense collage of knotted and woven stitches.
Use French knots and colonial knots for rounded shapes, bullion knots for tube-like structures, and woven wheel stitches (or rose stitches) for flower-like corals.
Group stitches of the same type and color together to form distinct ‘colonies’.
The sheer density and variety of stitches against a bright background fabric is what makes this piece so visually exciting.
20. Suggest Form with Tone-on-Tone Textures
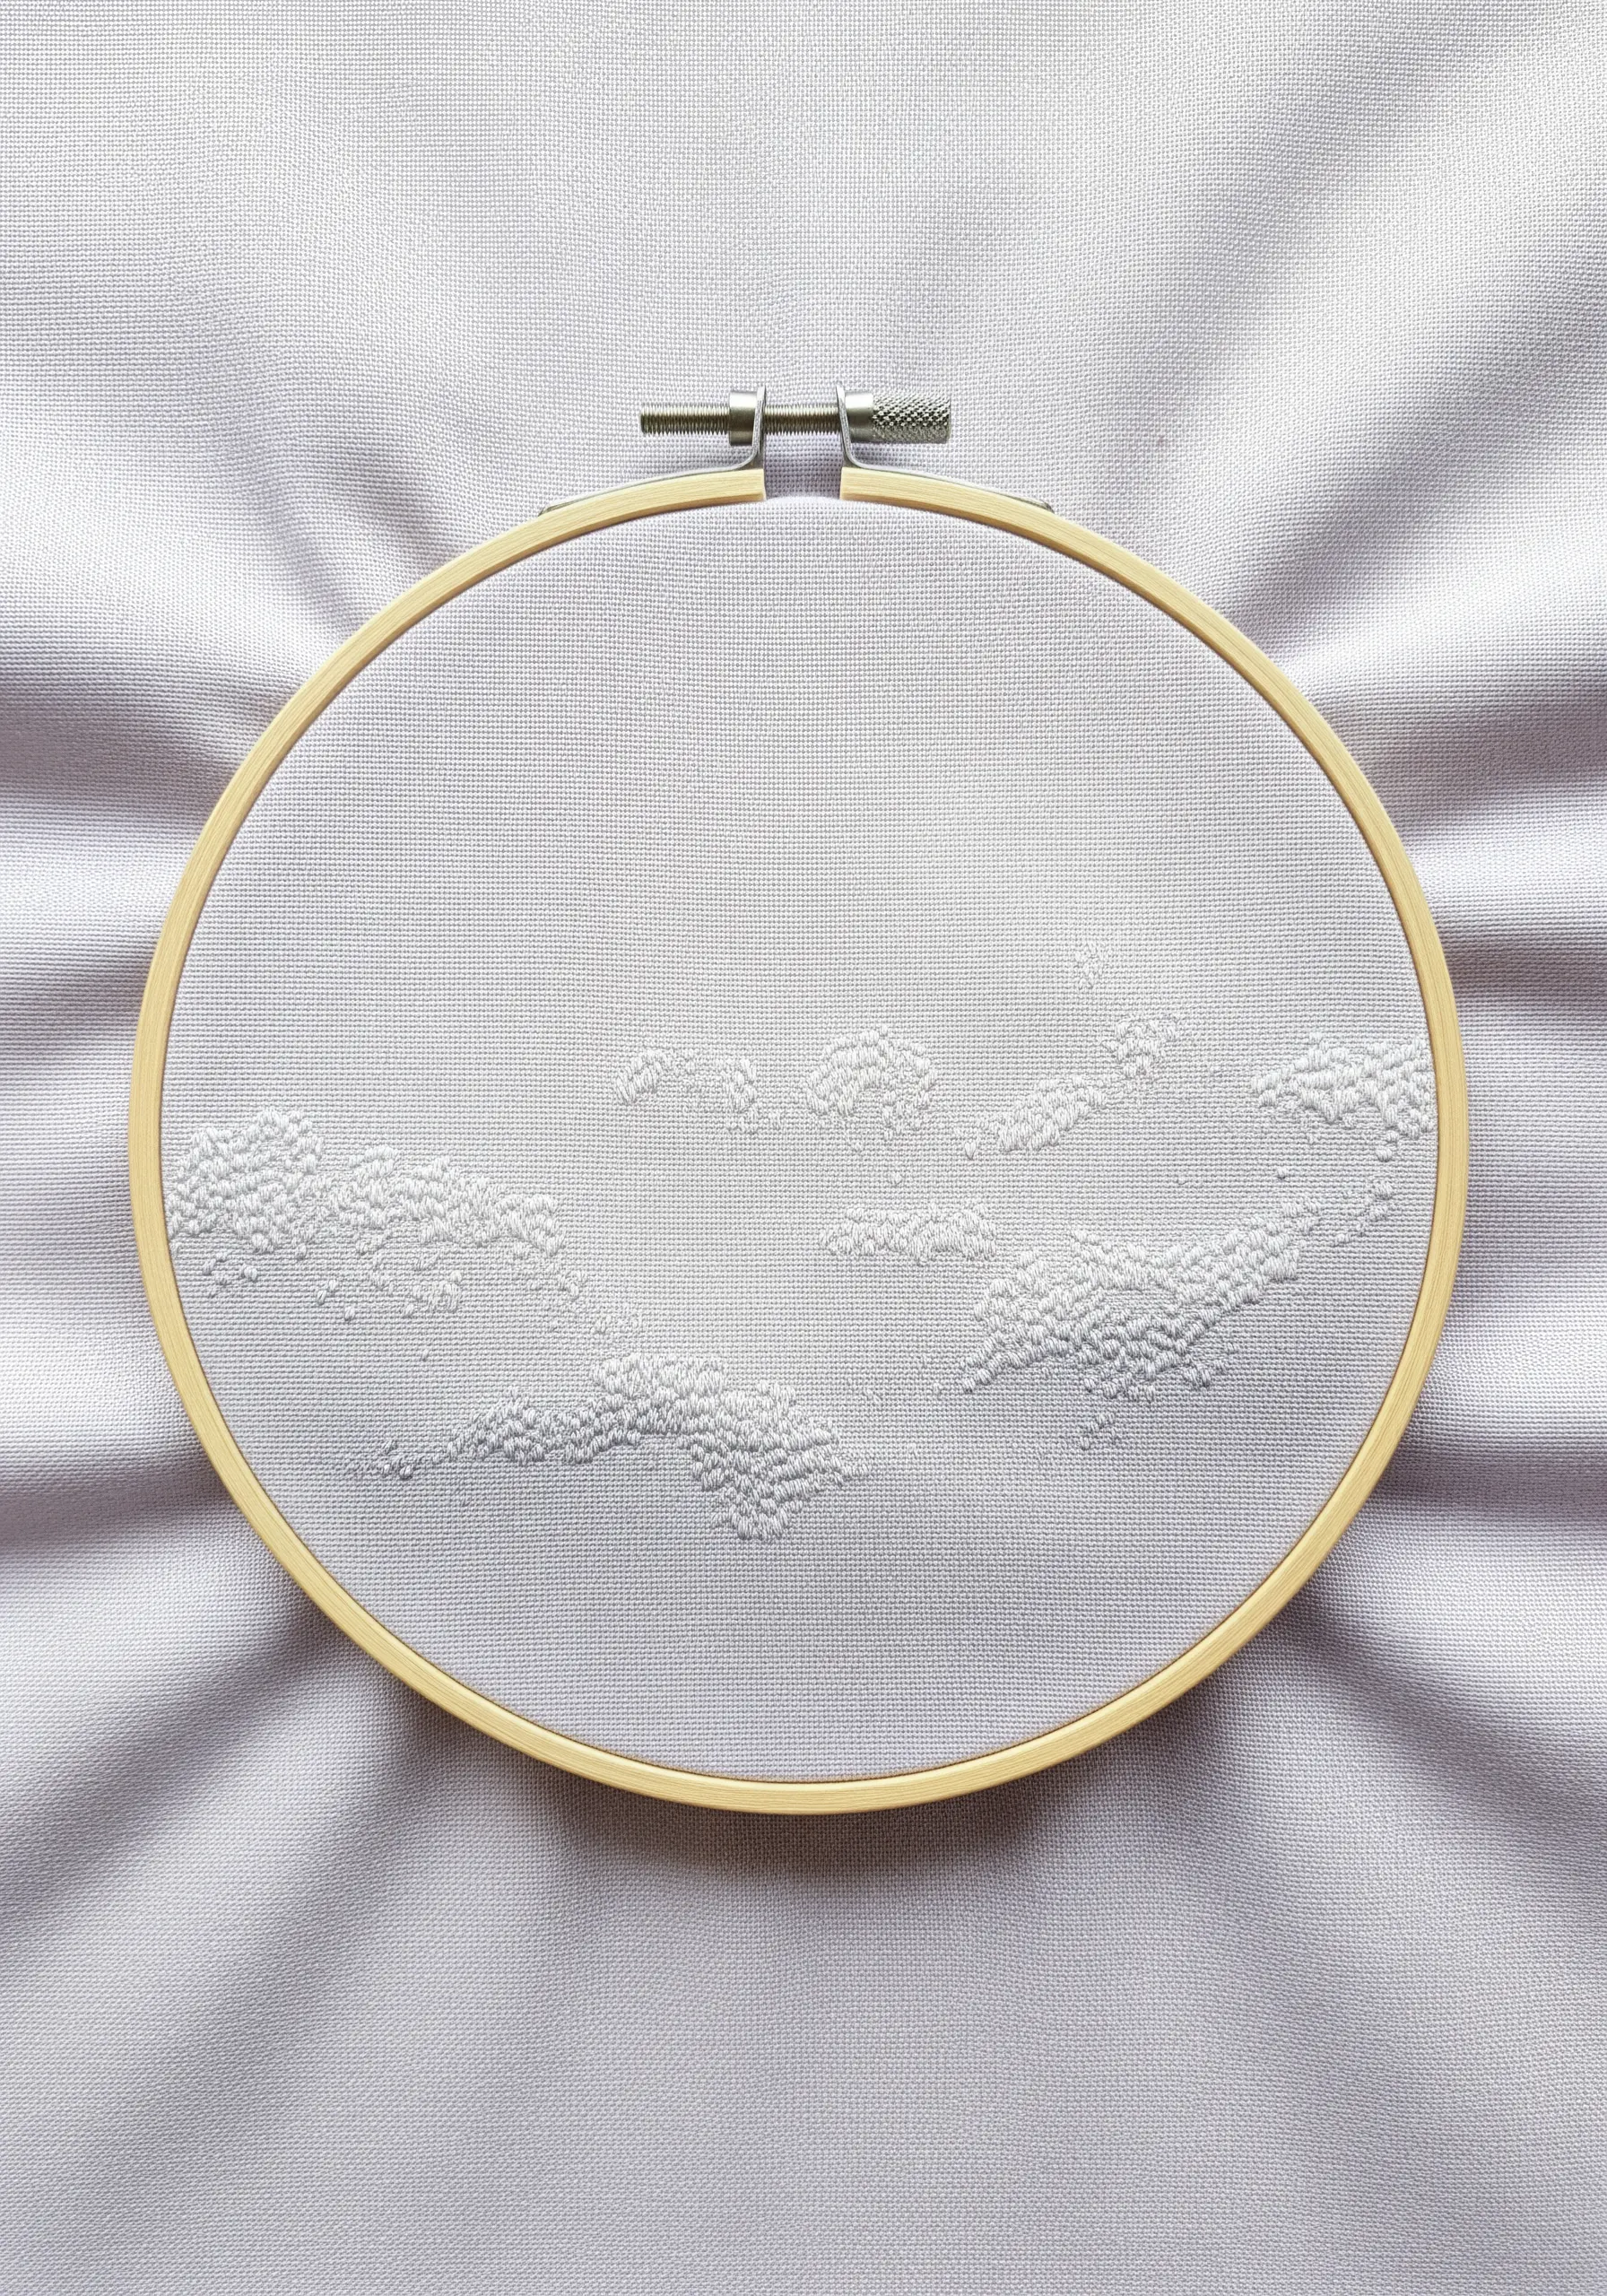
Explore the power of subtlety by using a single color of thread on a matching fabric.
In this style, the entire visual effect is created by the texture of your stitches and the way they catch the light.
Use dense French knots or seed stitches to build up shapes, like clouds against a sky.
This is a sophisticated approach that focuses on pure texture, creating monochrome embroidery ideas that feel both modern and timeless.
21. Create Digital Glitches with Thread
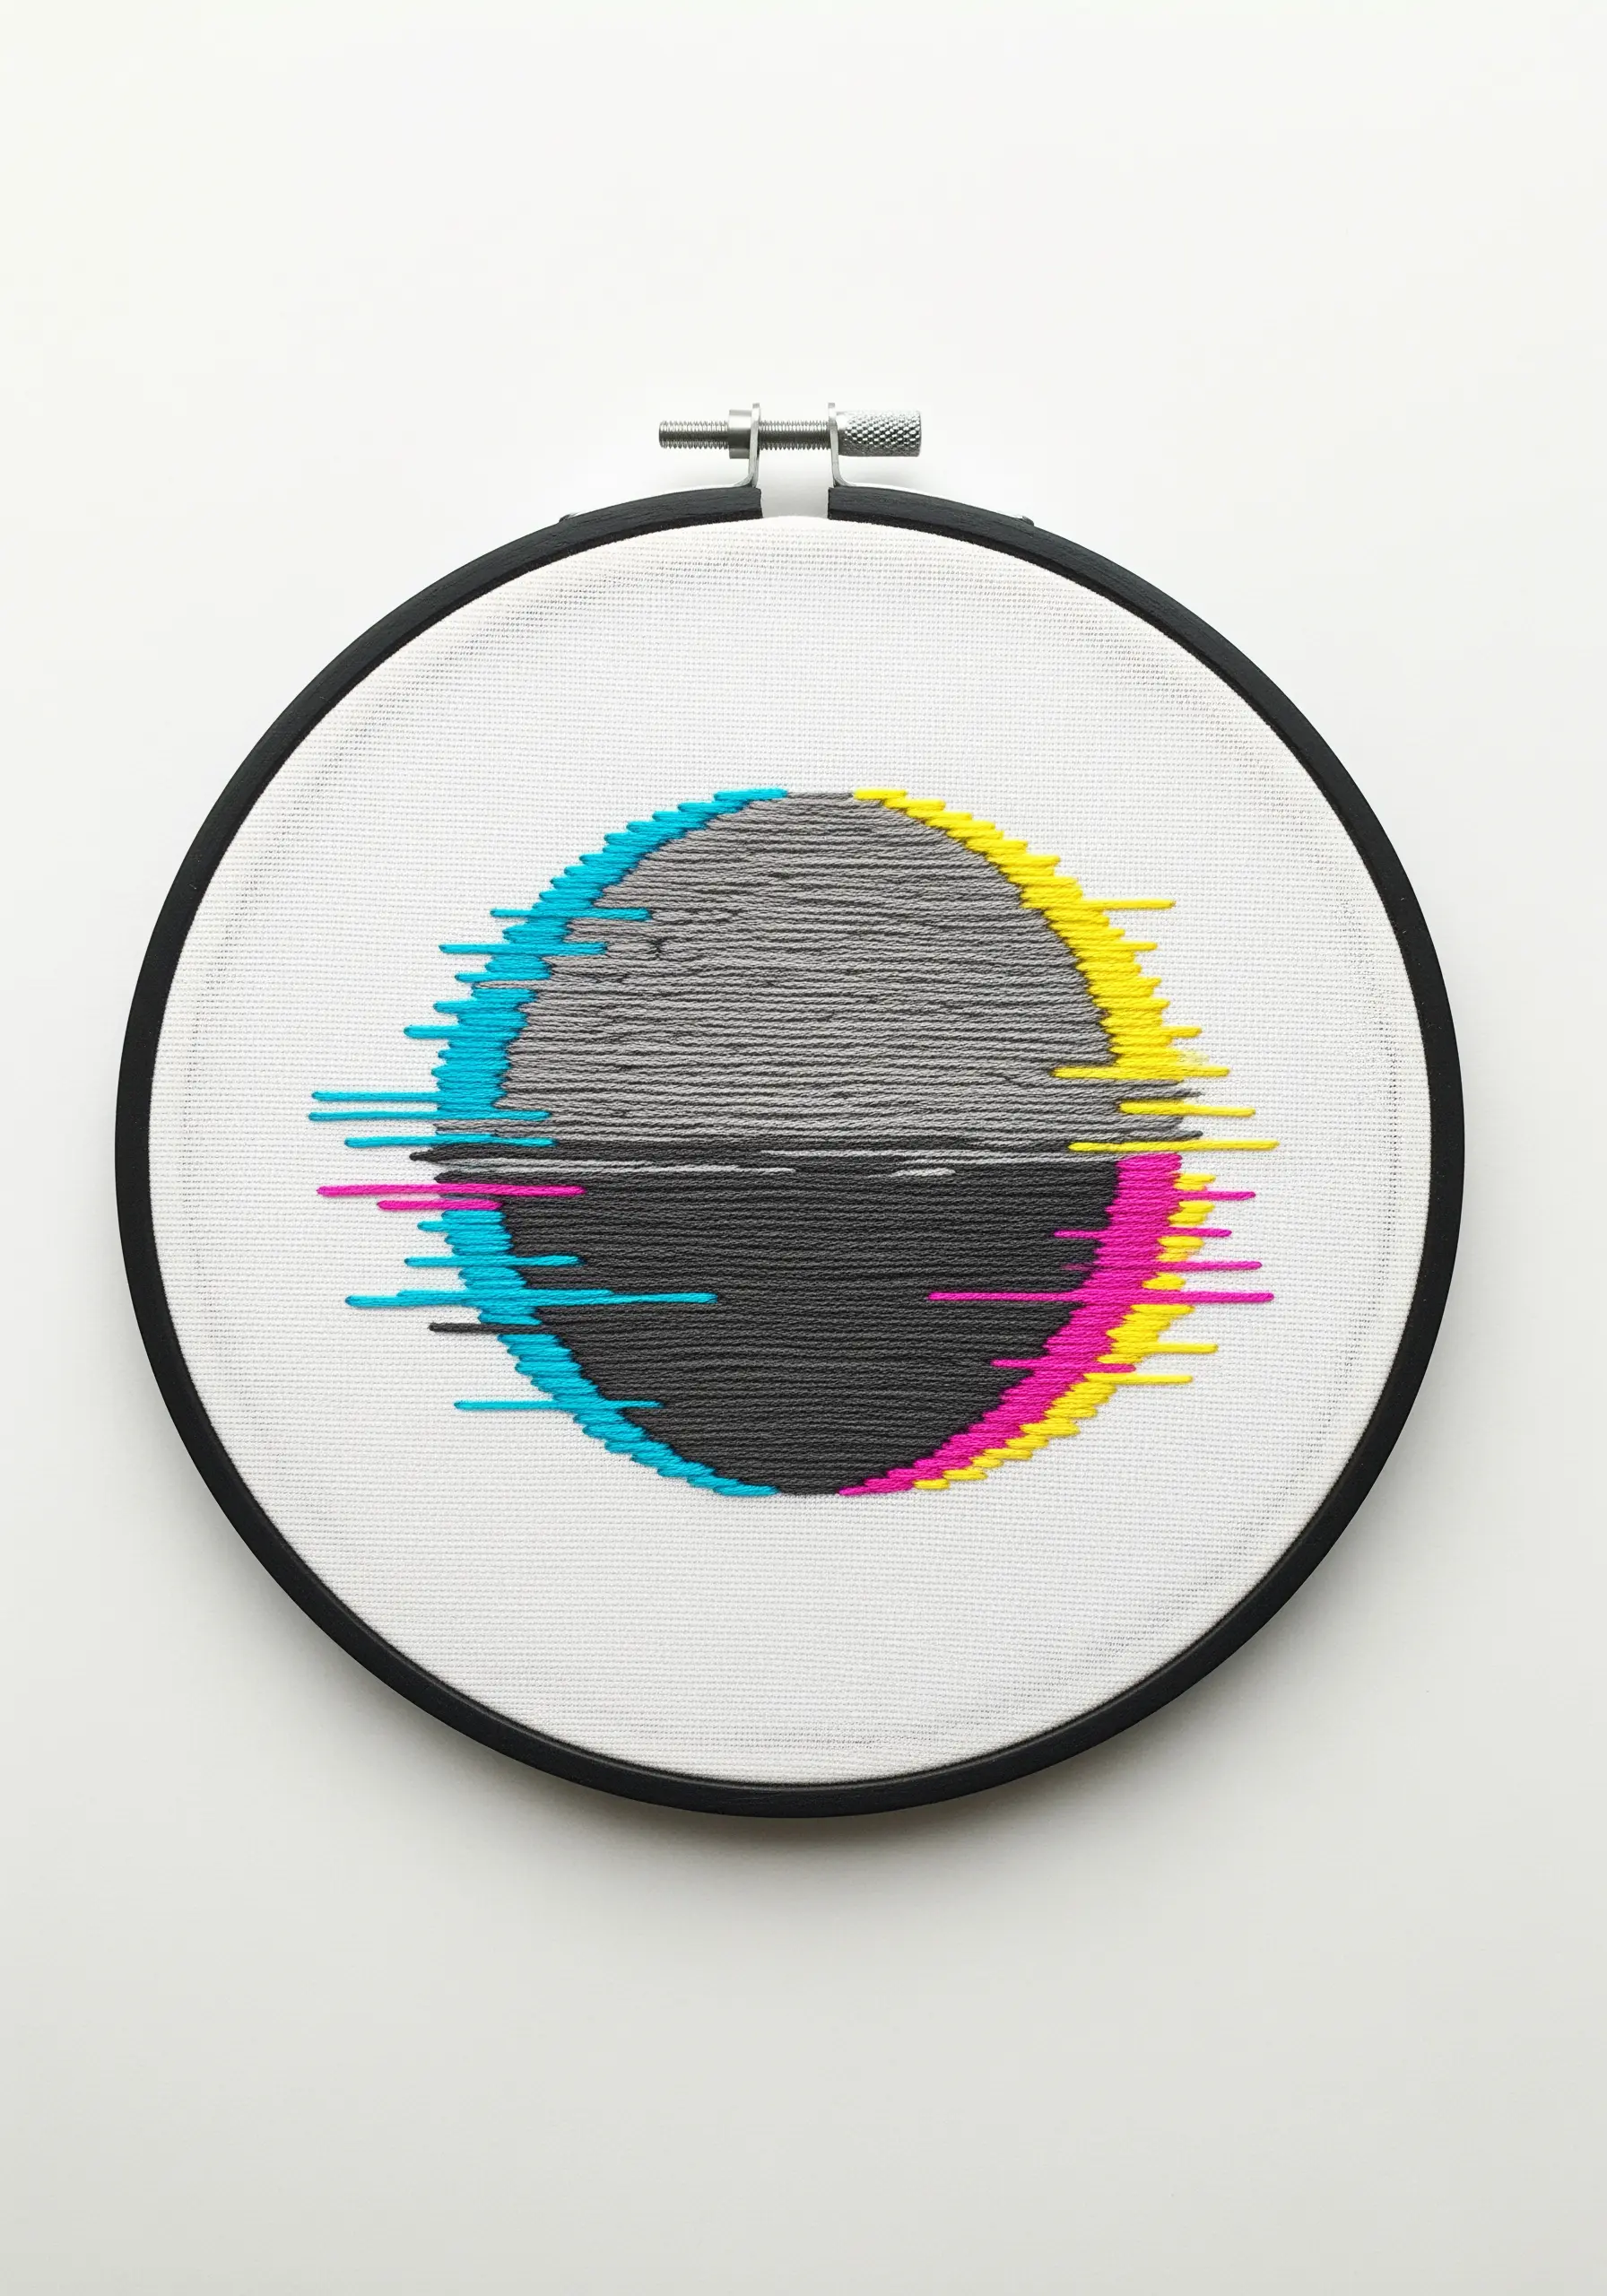
Mimic a CMYK color glitch by layering bands of satin stitch.
Start with a solid shape in grey or black, using horizontal satin stitches.
Then, introduce sections of cyan, magenta, and yellow with stitches that are intentionally offset and ‘broken’.
Let some stitches extend beyond the boundary of the original shape to enhance the glitch effect.
This technique cleverly uses traditional stitches to explore a modern, digital aesthetic, resulting in clever abstract optical illusion stitches.
22. Capture Volcanic Plumes with Looped Stitches
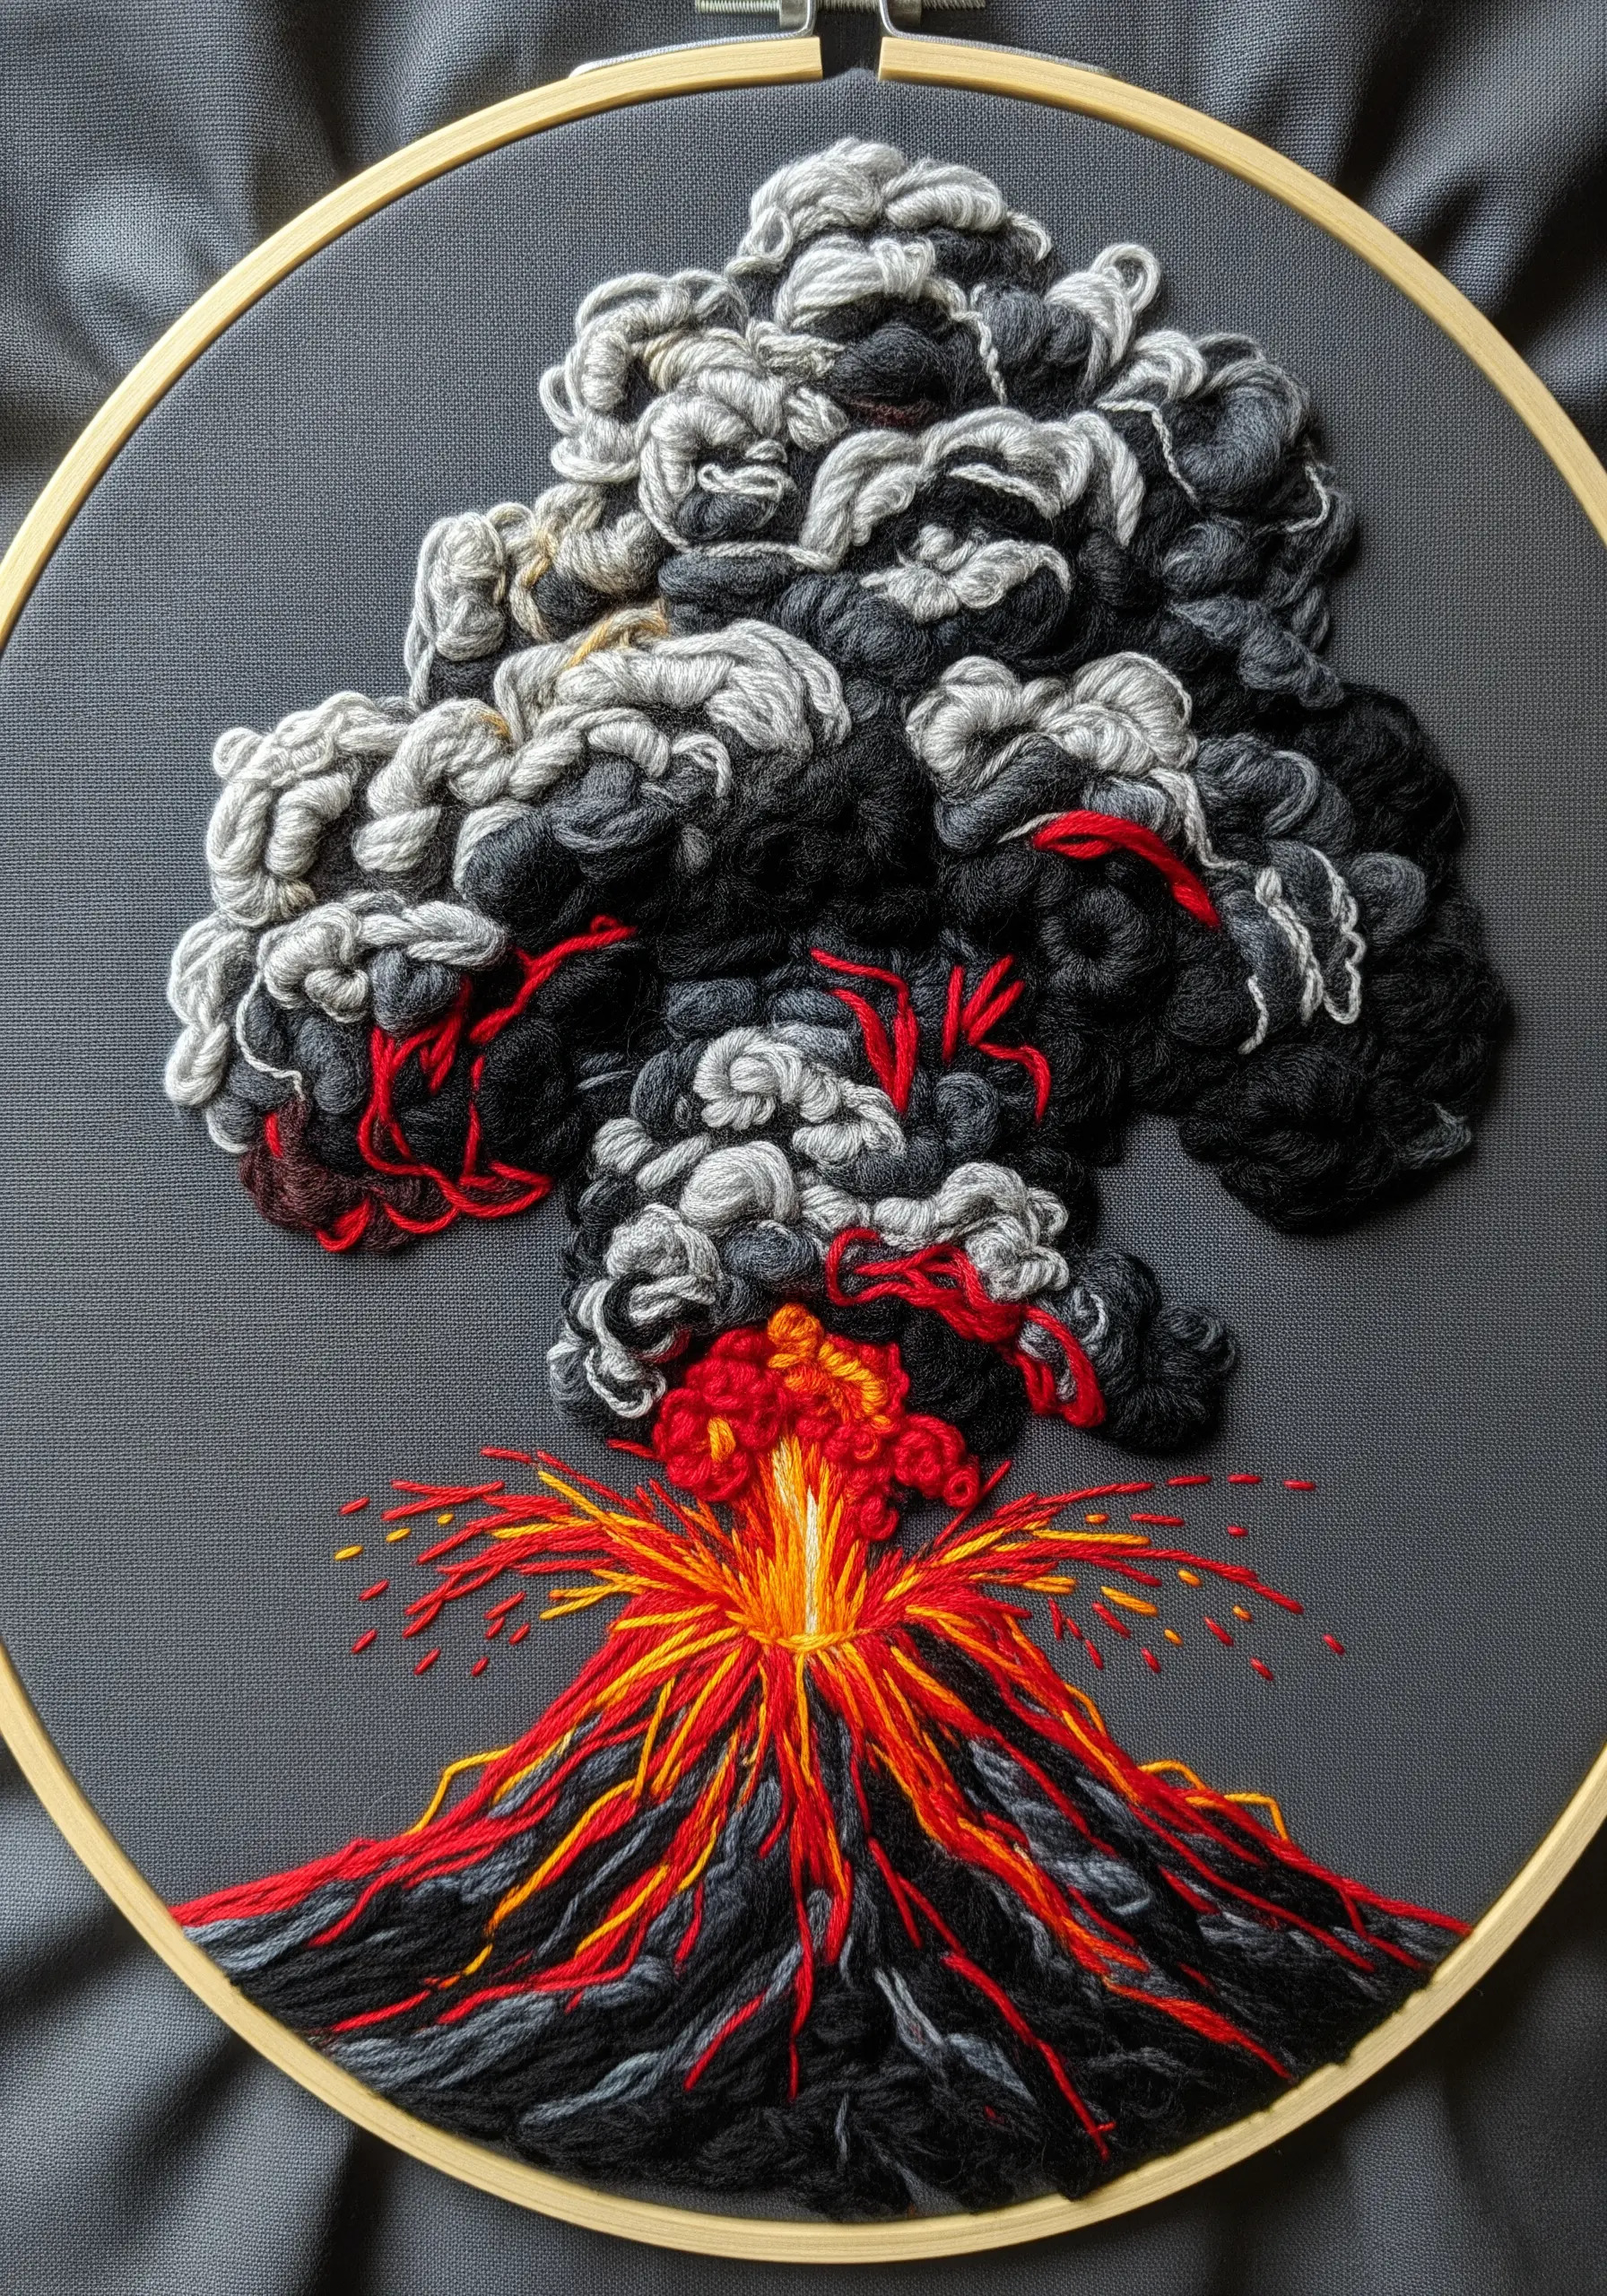
To create the billowing, three-dimensional effect of smoke, use the turkey stitch or looped stitch.
Work in concentric circles, leaving the loops of thread uncut to create a dense, puffy texture.
Use multiple shades of grey, black, and white to give the smoke cloud depth and movement.
Contrast this soft, high-relief texture with sharp, fiery straight stitches for the eruption below, creating a powerful visual and tactile experience.
23. Achieve Graphic Blends with Fabric Appliqué

For a perfectly clean and graphic color blend, try appliqué with felt or non-fraying fabric instead of thread.
Cut out your wavy landscape layers from different colors of felt.
Arrange them on a stretched canvas, using a thin layer of fabric glue to secure them.
The negative space between the shapes becomes a crisp design element.
This method offers a bold, minimalist alternative to thread painting for large-scale embroidery on canvas.
24. Create an Ink Splatter with Controlled Stitching

Recreate the spontaneous energy of an ink splatter using a dense center and radiating straight stitches.
Fill the core of the design with tightly packed French knots or satin stitches in your darkest color.
From this center, work outwards with straight stitches and French knots in lighter, analogous colors.
Vary the length and angle of your stitches, and leave intentional gaps to mimic the organic way ink splashes and dries, creating a beautiful abstract thread splatter.
25. Blend Thread and Fiber for Hazy Florals
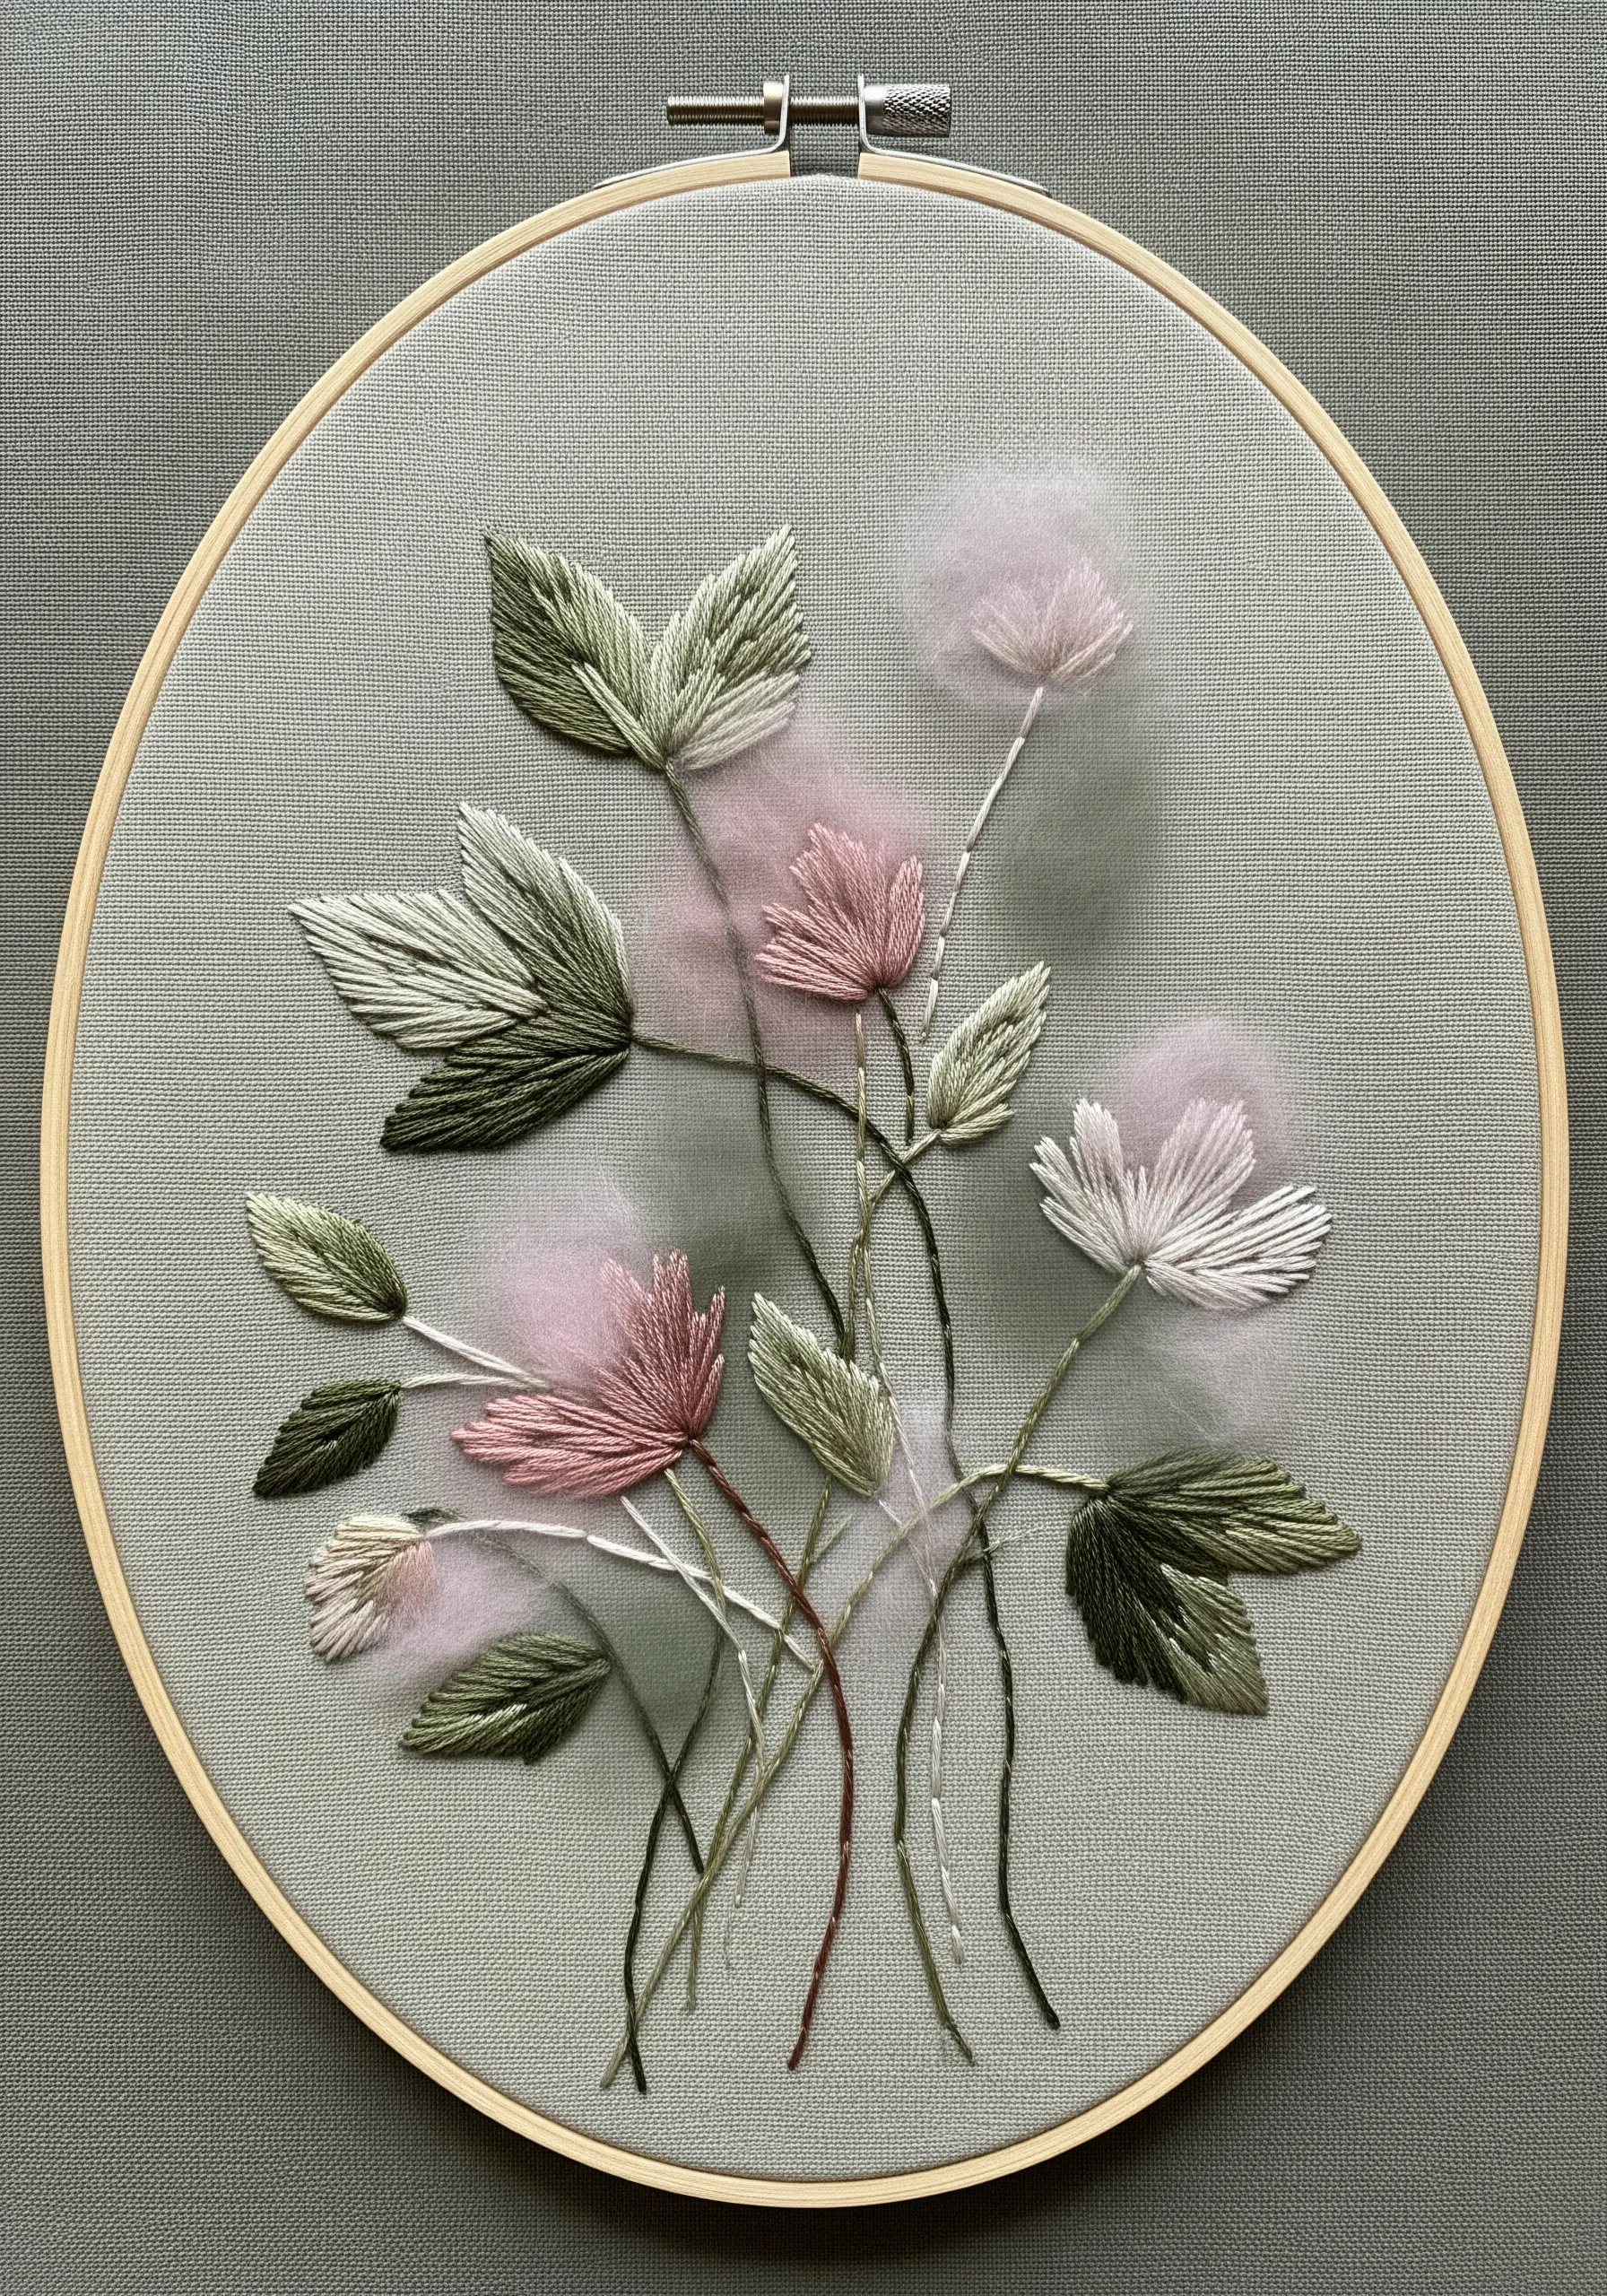
Combine sharp satin stitch with soft, ethereal wool roving to create a unique floral composition.
Embroider the leaves and stems with traditional satin stitch for crisp definition.
For the flower blossoms, tack down small tufts of unspun wool or roving with a few hidden stitches.
Gently tease the fibers with your needle to create a soft, hazy bloom. This beautiful mixed-media technique adds a dreamy, painterly quality to abstract botanical silhouettes.
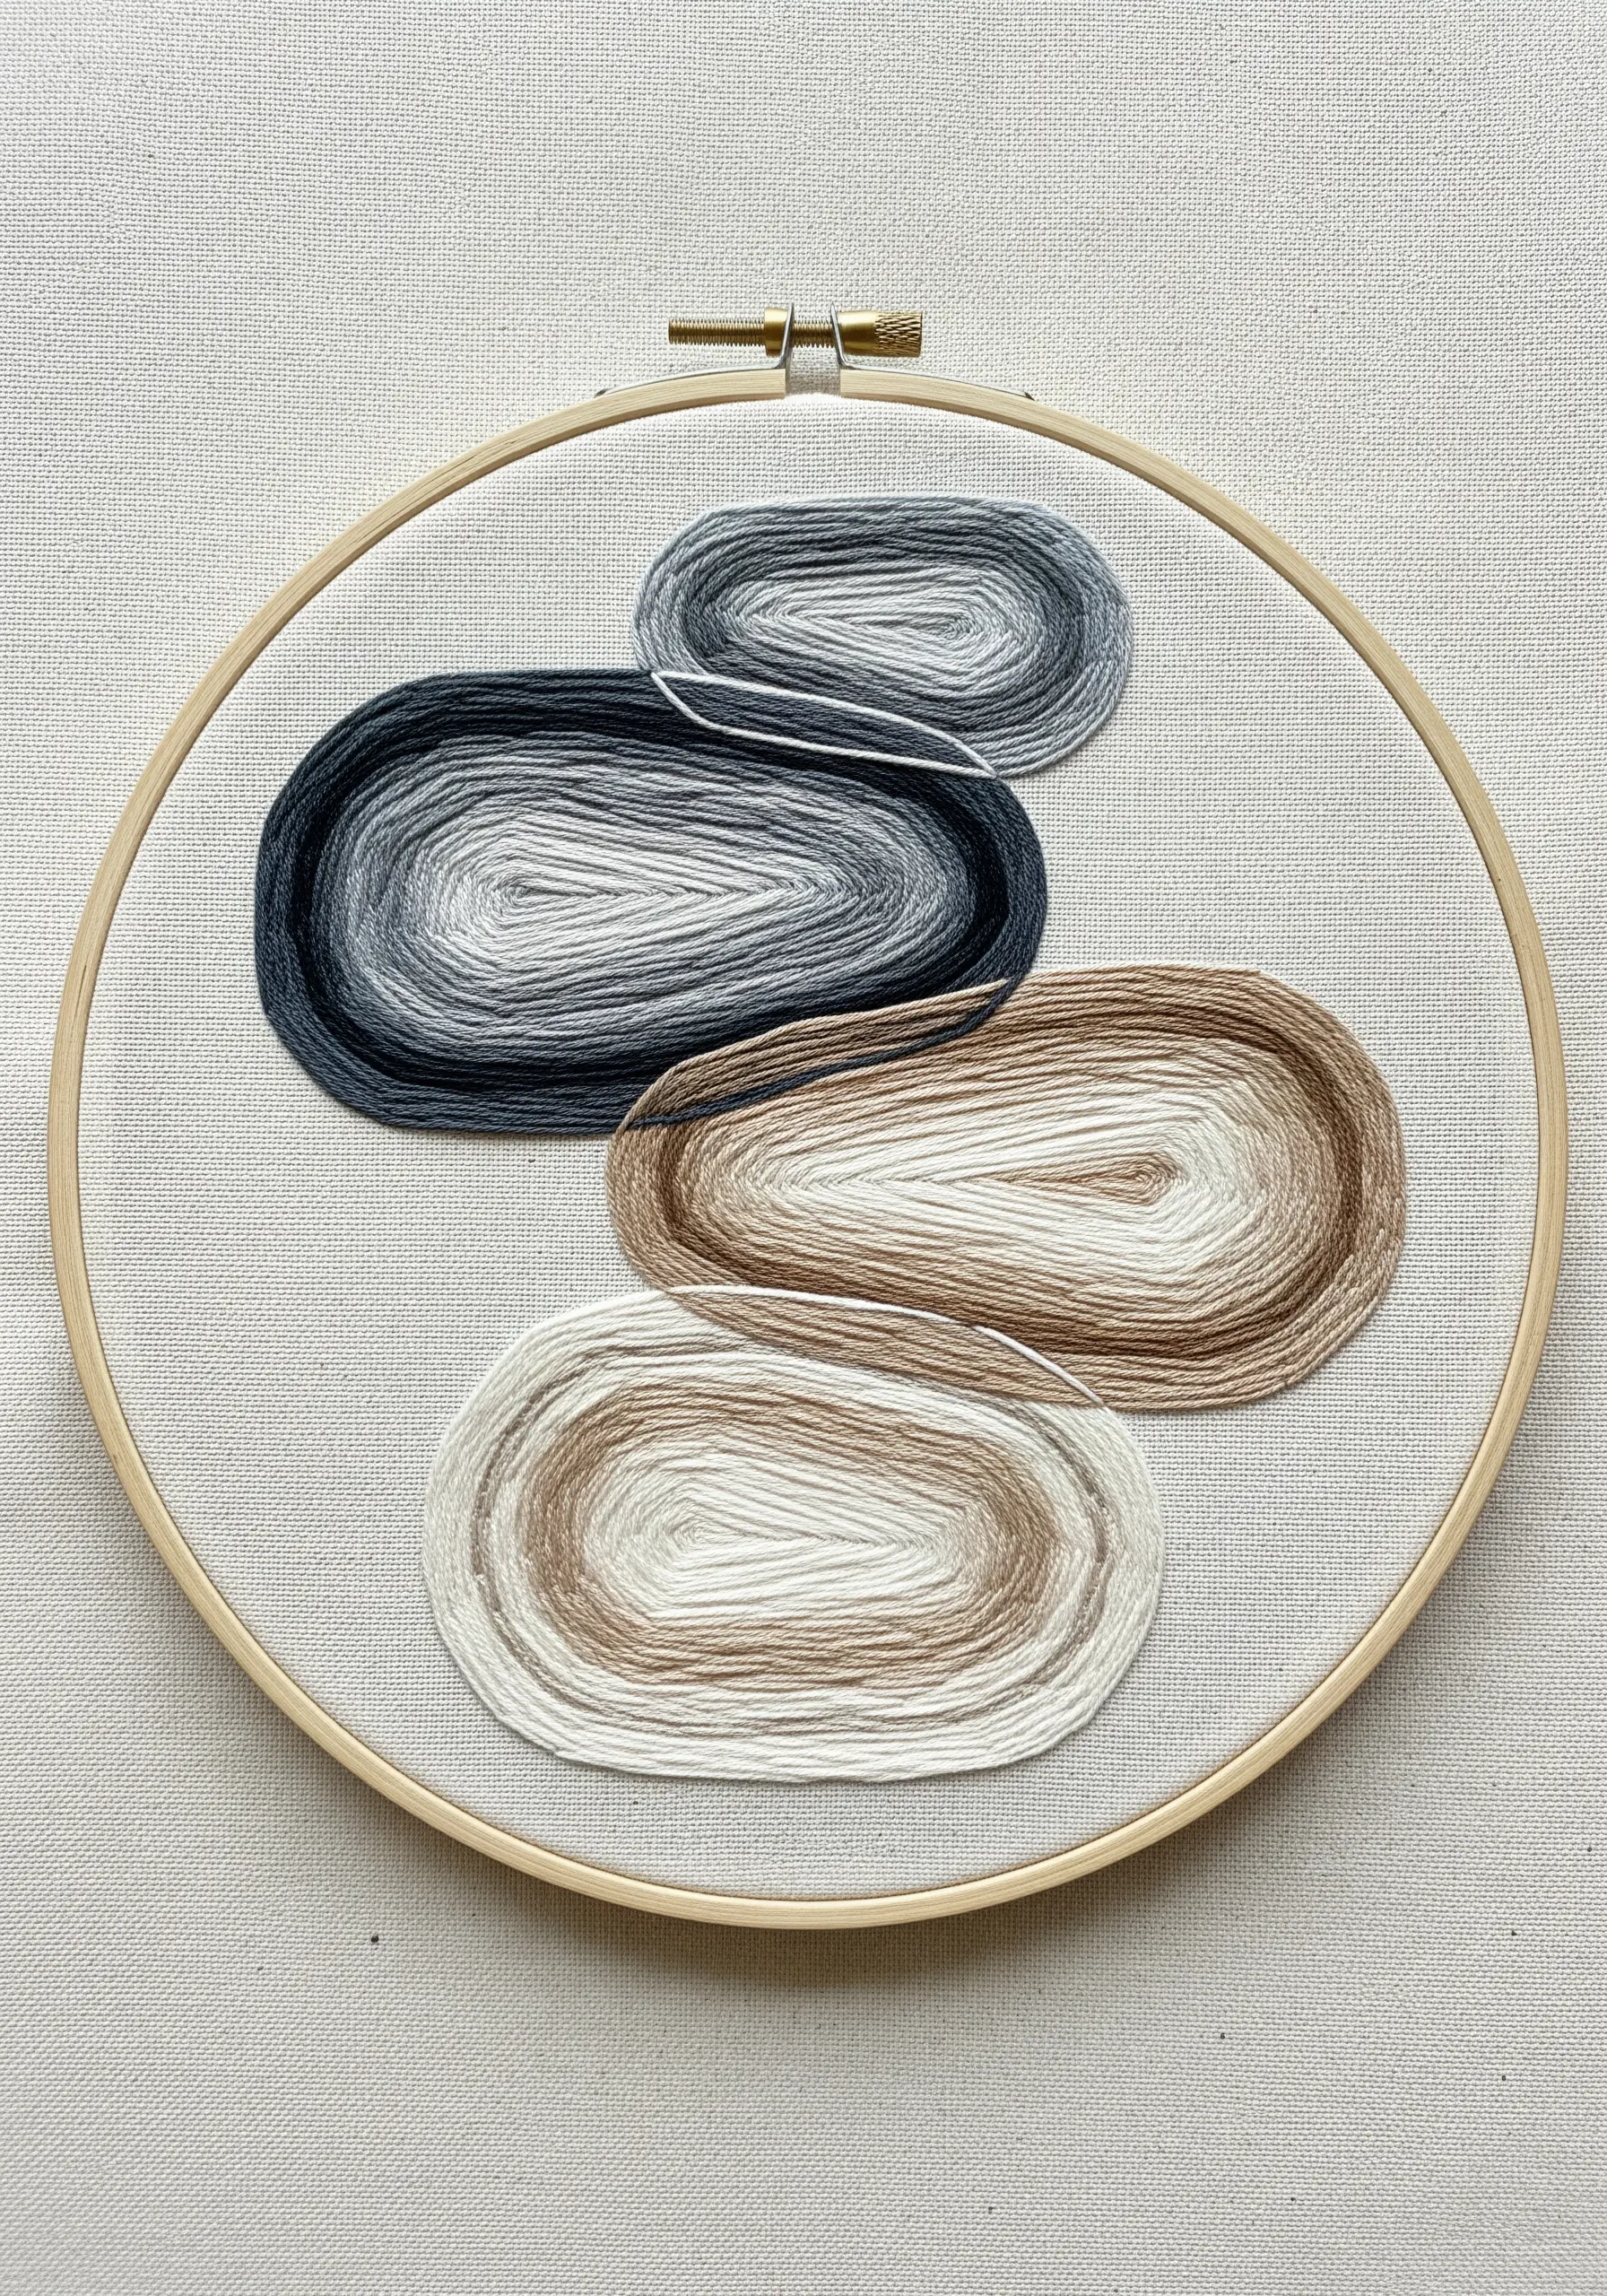
26. Isolate Gradients for a Modern Color Study
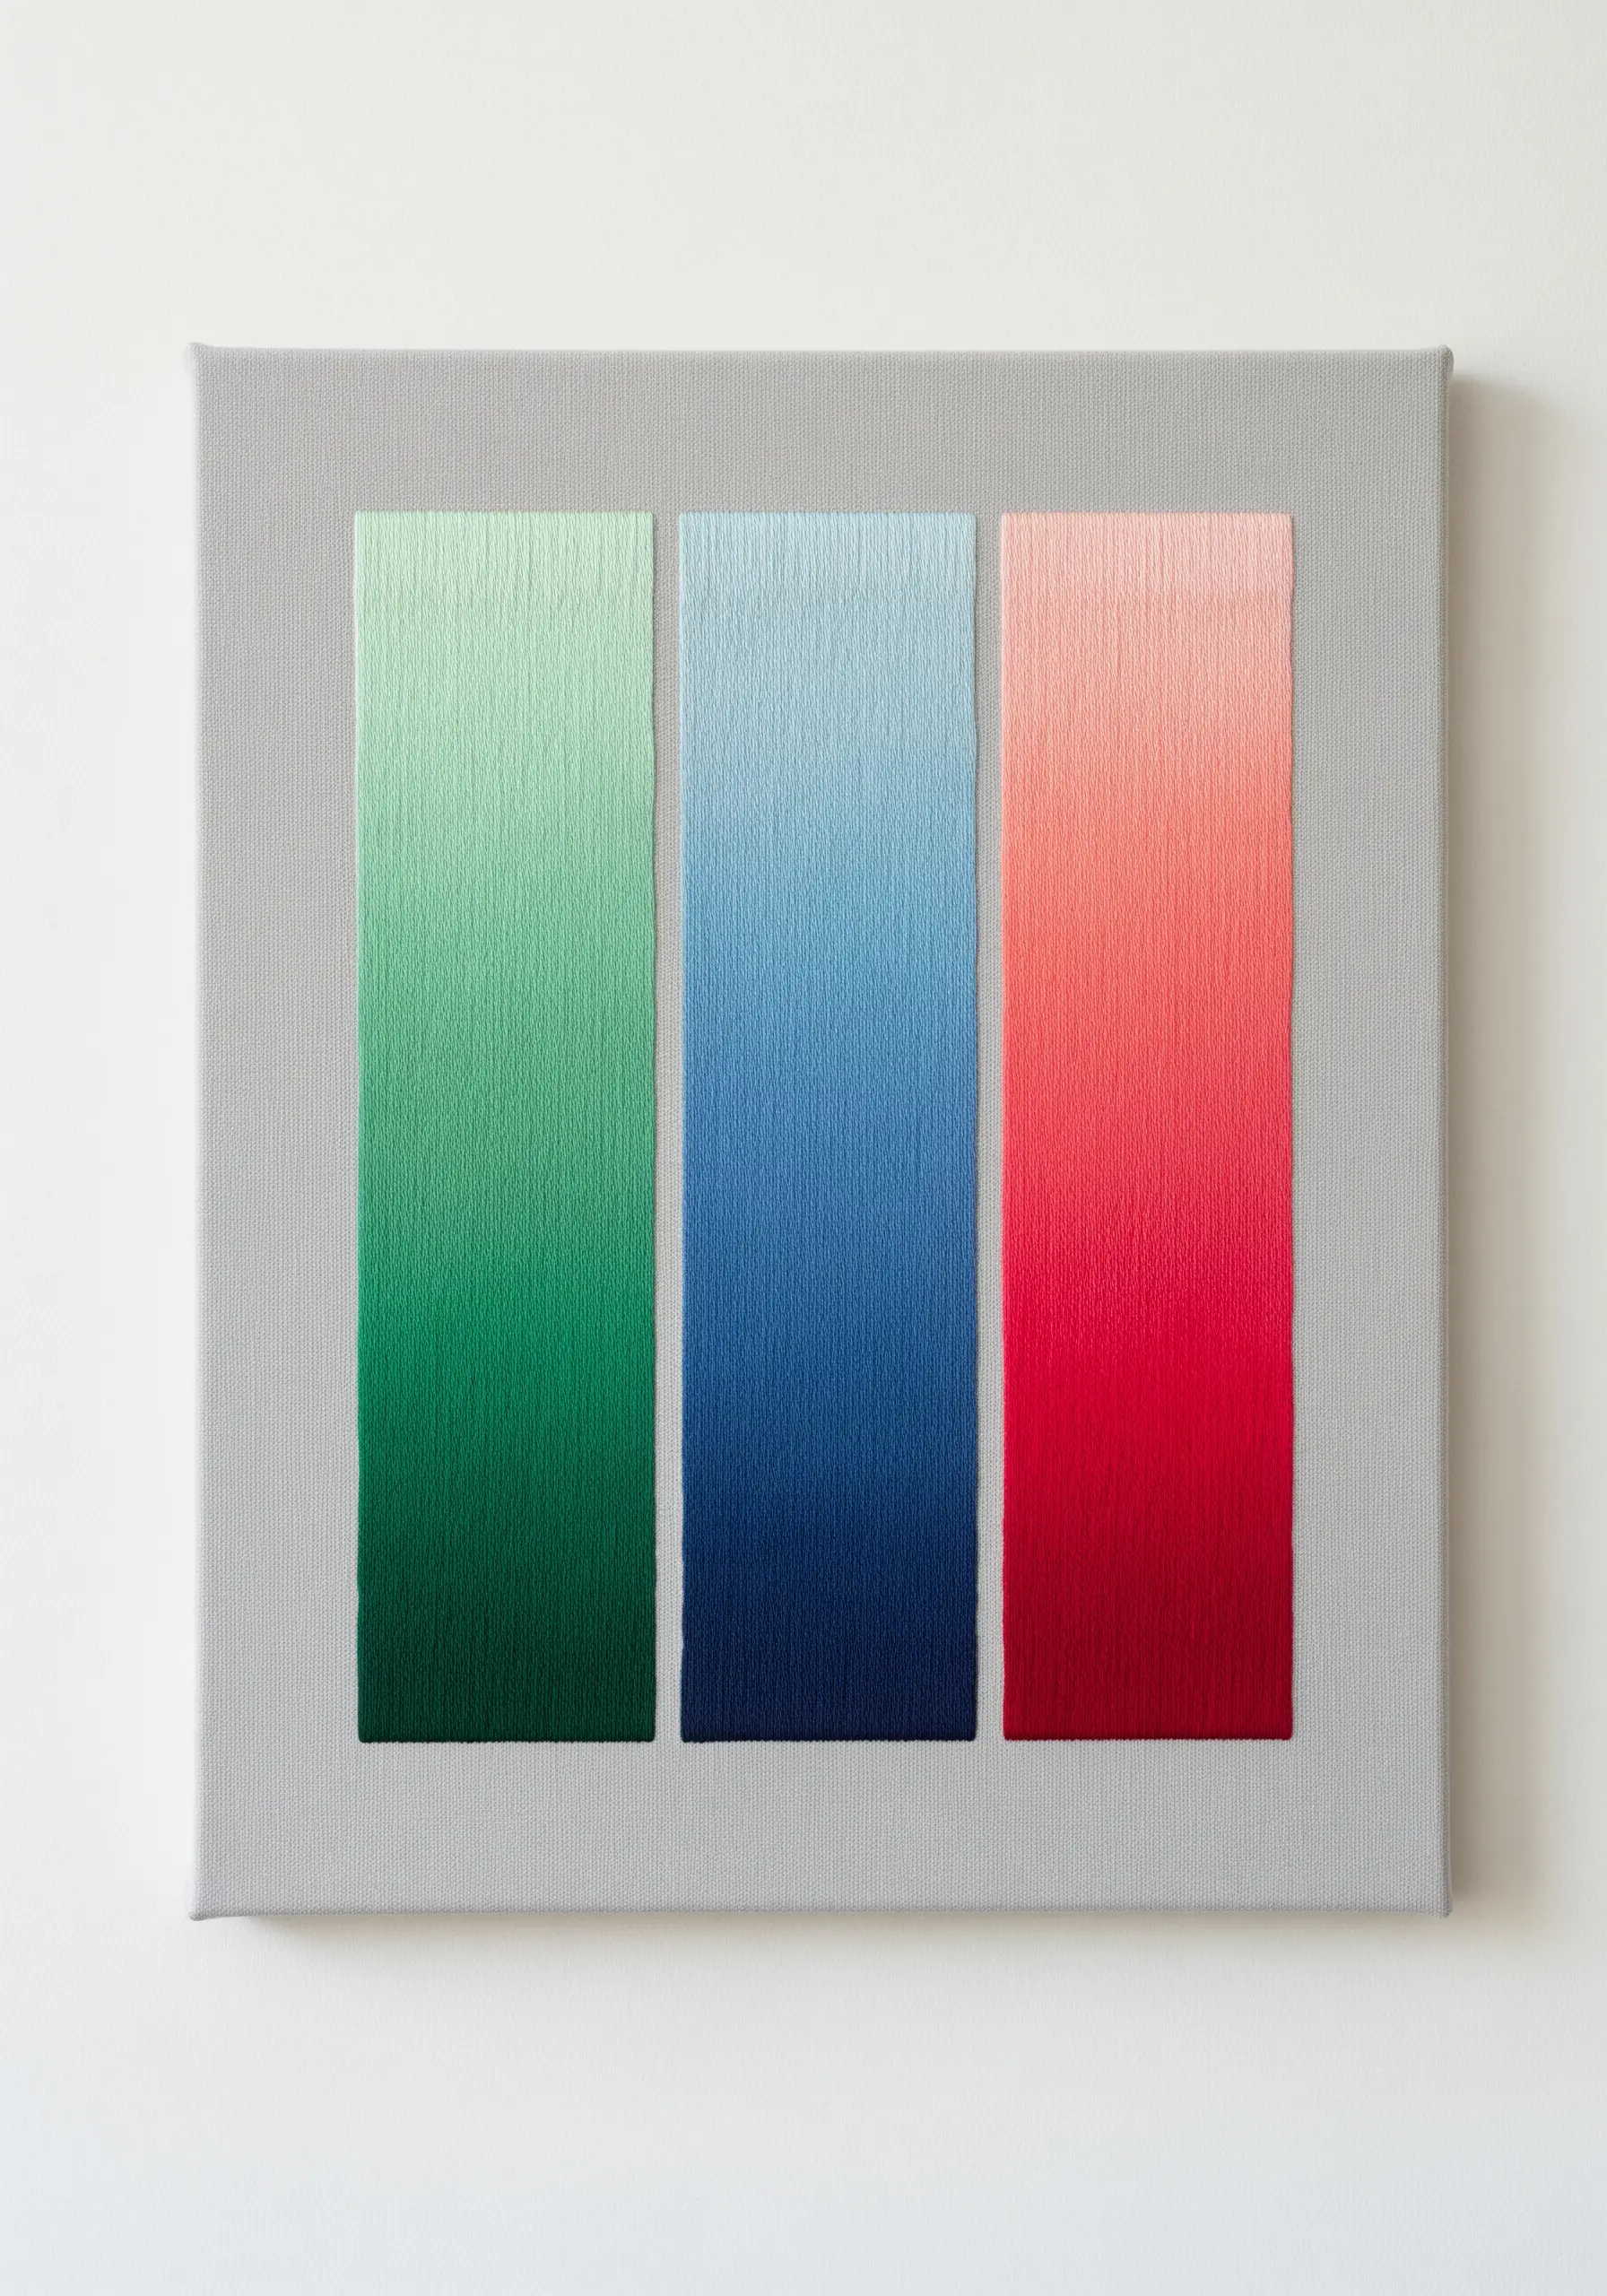
Turn a technical exercise into a striking piece of modern art by isolating your gradients.
Create distinct rectangular blocks and fill each one with a seamless long-and-short stitch gradient.
By presenting them as separate swatches on a neutral background, you draw attention to the technical skill and the pure beauty of the color transition.
This is an excellent way to practice your blending and creates sophisticated, minimal DIY embroidery pieces.
27. Deconstruct a Gradient with Floating Threads
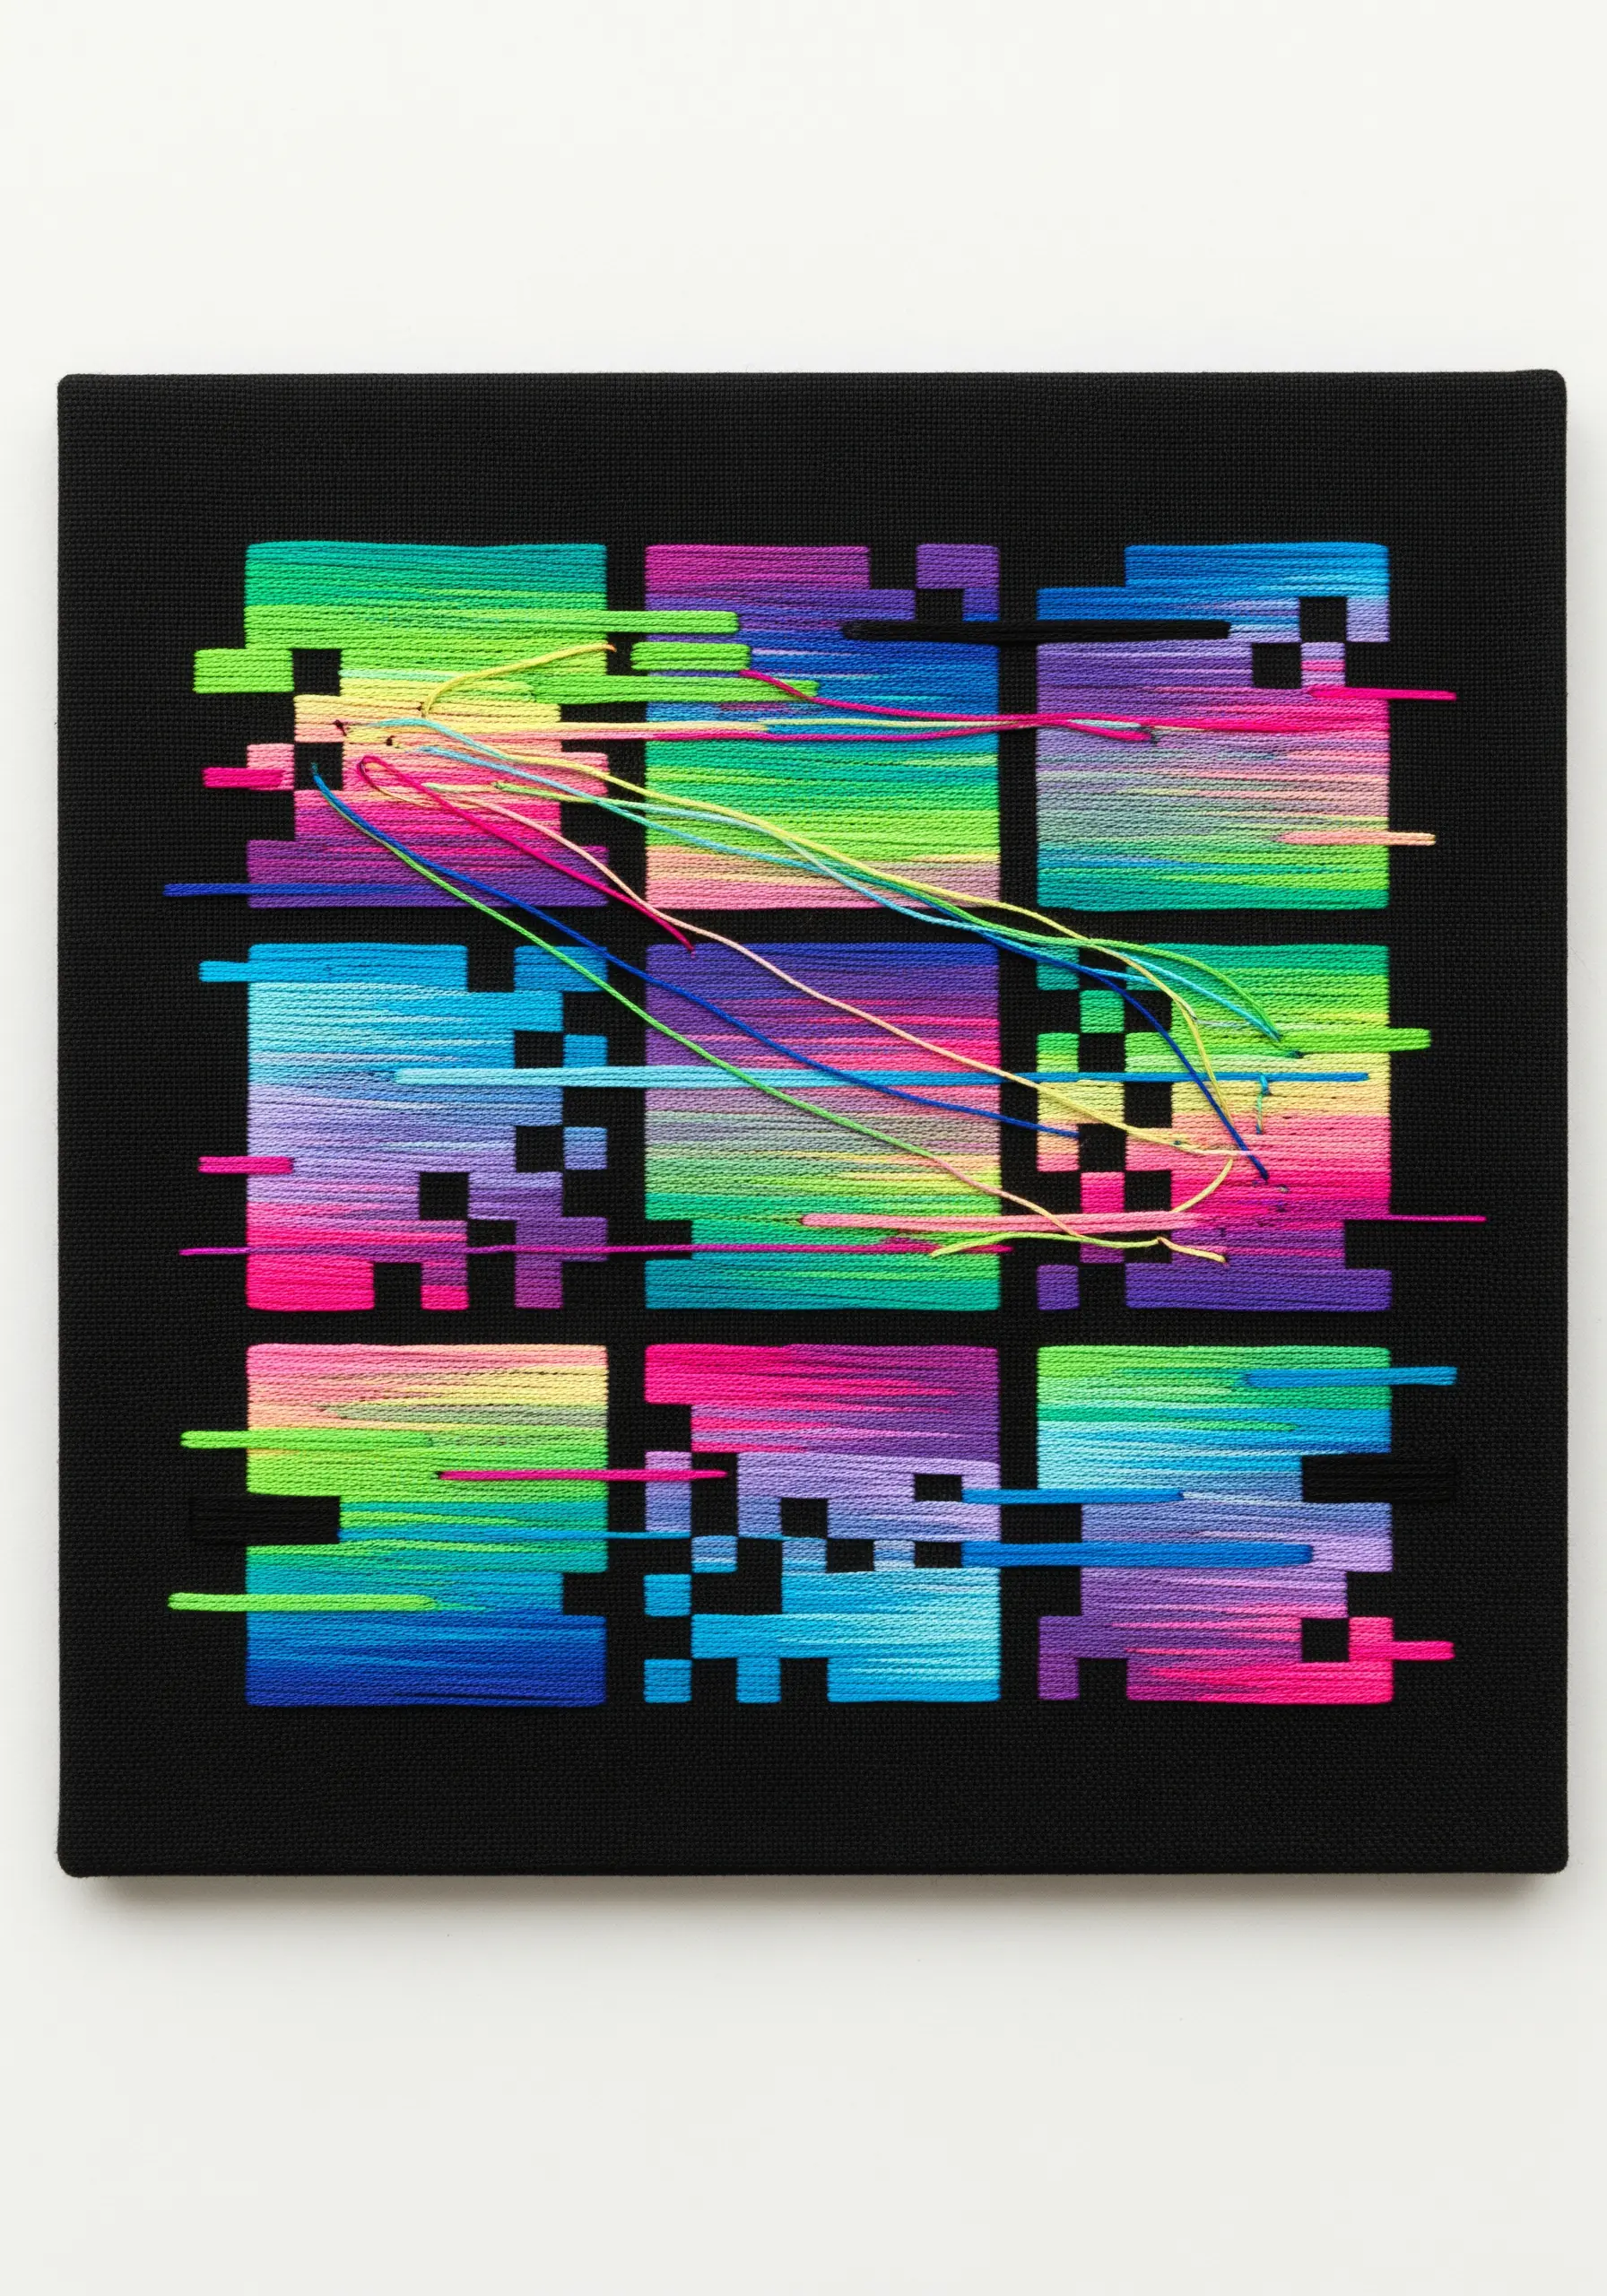
Create a pixelated, deconstructed effect by combining satin stitch blocks with long, loose threads.
First, embroider a grid of squares, filling each with a color gradient using horizontal satin stitches.
Then, carry long strands of thread across the surface, tacking them down only at the beginning and end.
This layering of tight stitches and loose threads creates a dynamic sense of movement and digital decay, perfect for contemporary stitch designs.
28. Stitch a Sunburst of Pure Color
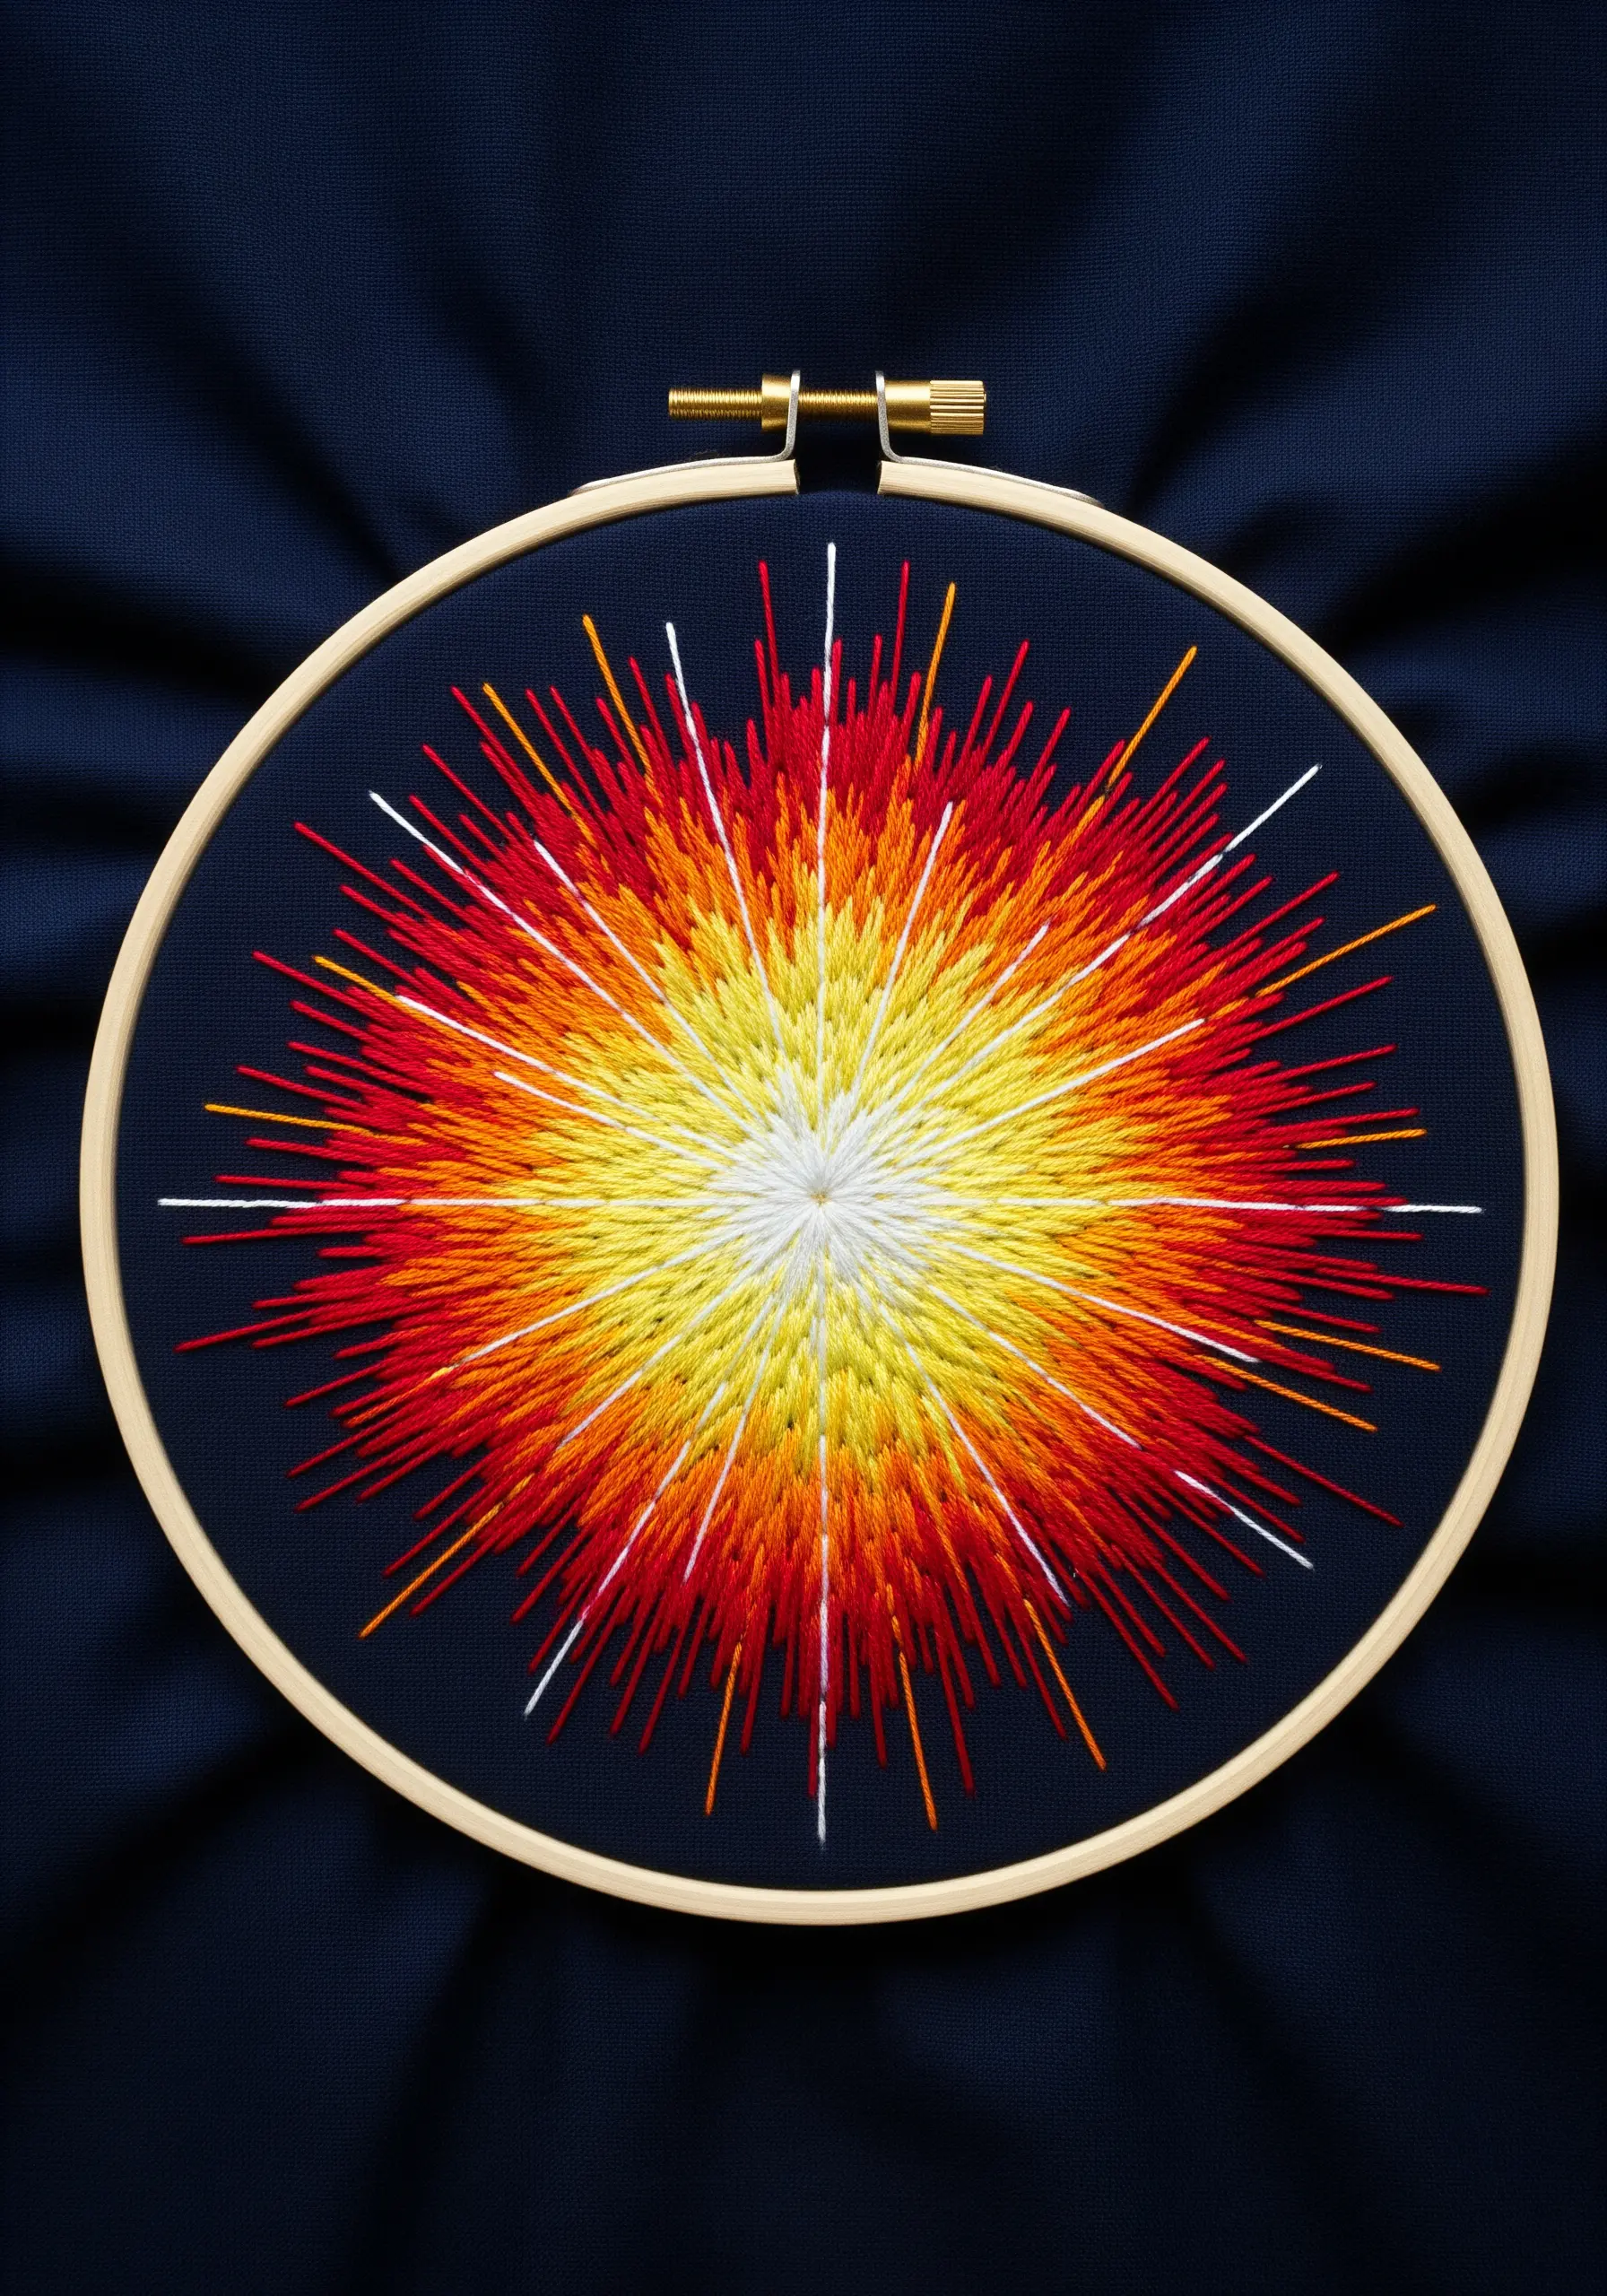
Capture the explosive energy of a starburst with radiating straight stitches.
Start with a small, dense center of white or yellow satin stitch.
Working your way out, use concentric rings of color—from yellow to orange to red—stitching long, straight lines that emanate from the center.
Vary the length of the stitches in the outermost layer to create an uneven, explosive edge. This technique transforms a simple stitch into a dramatic abstract thread burst.
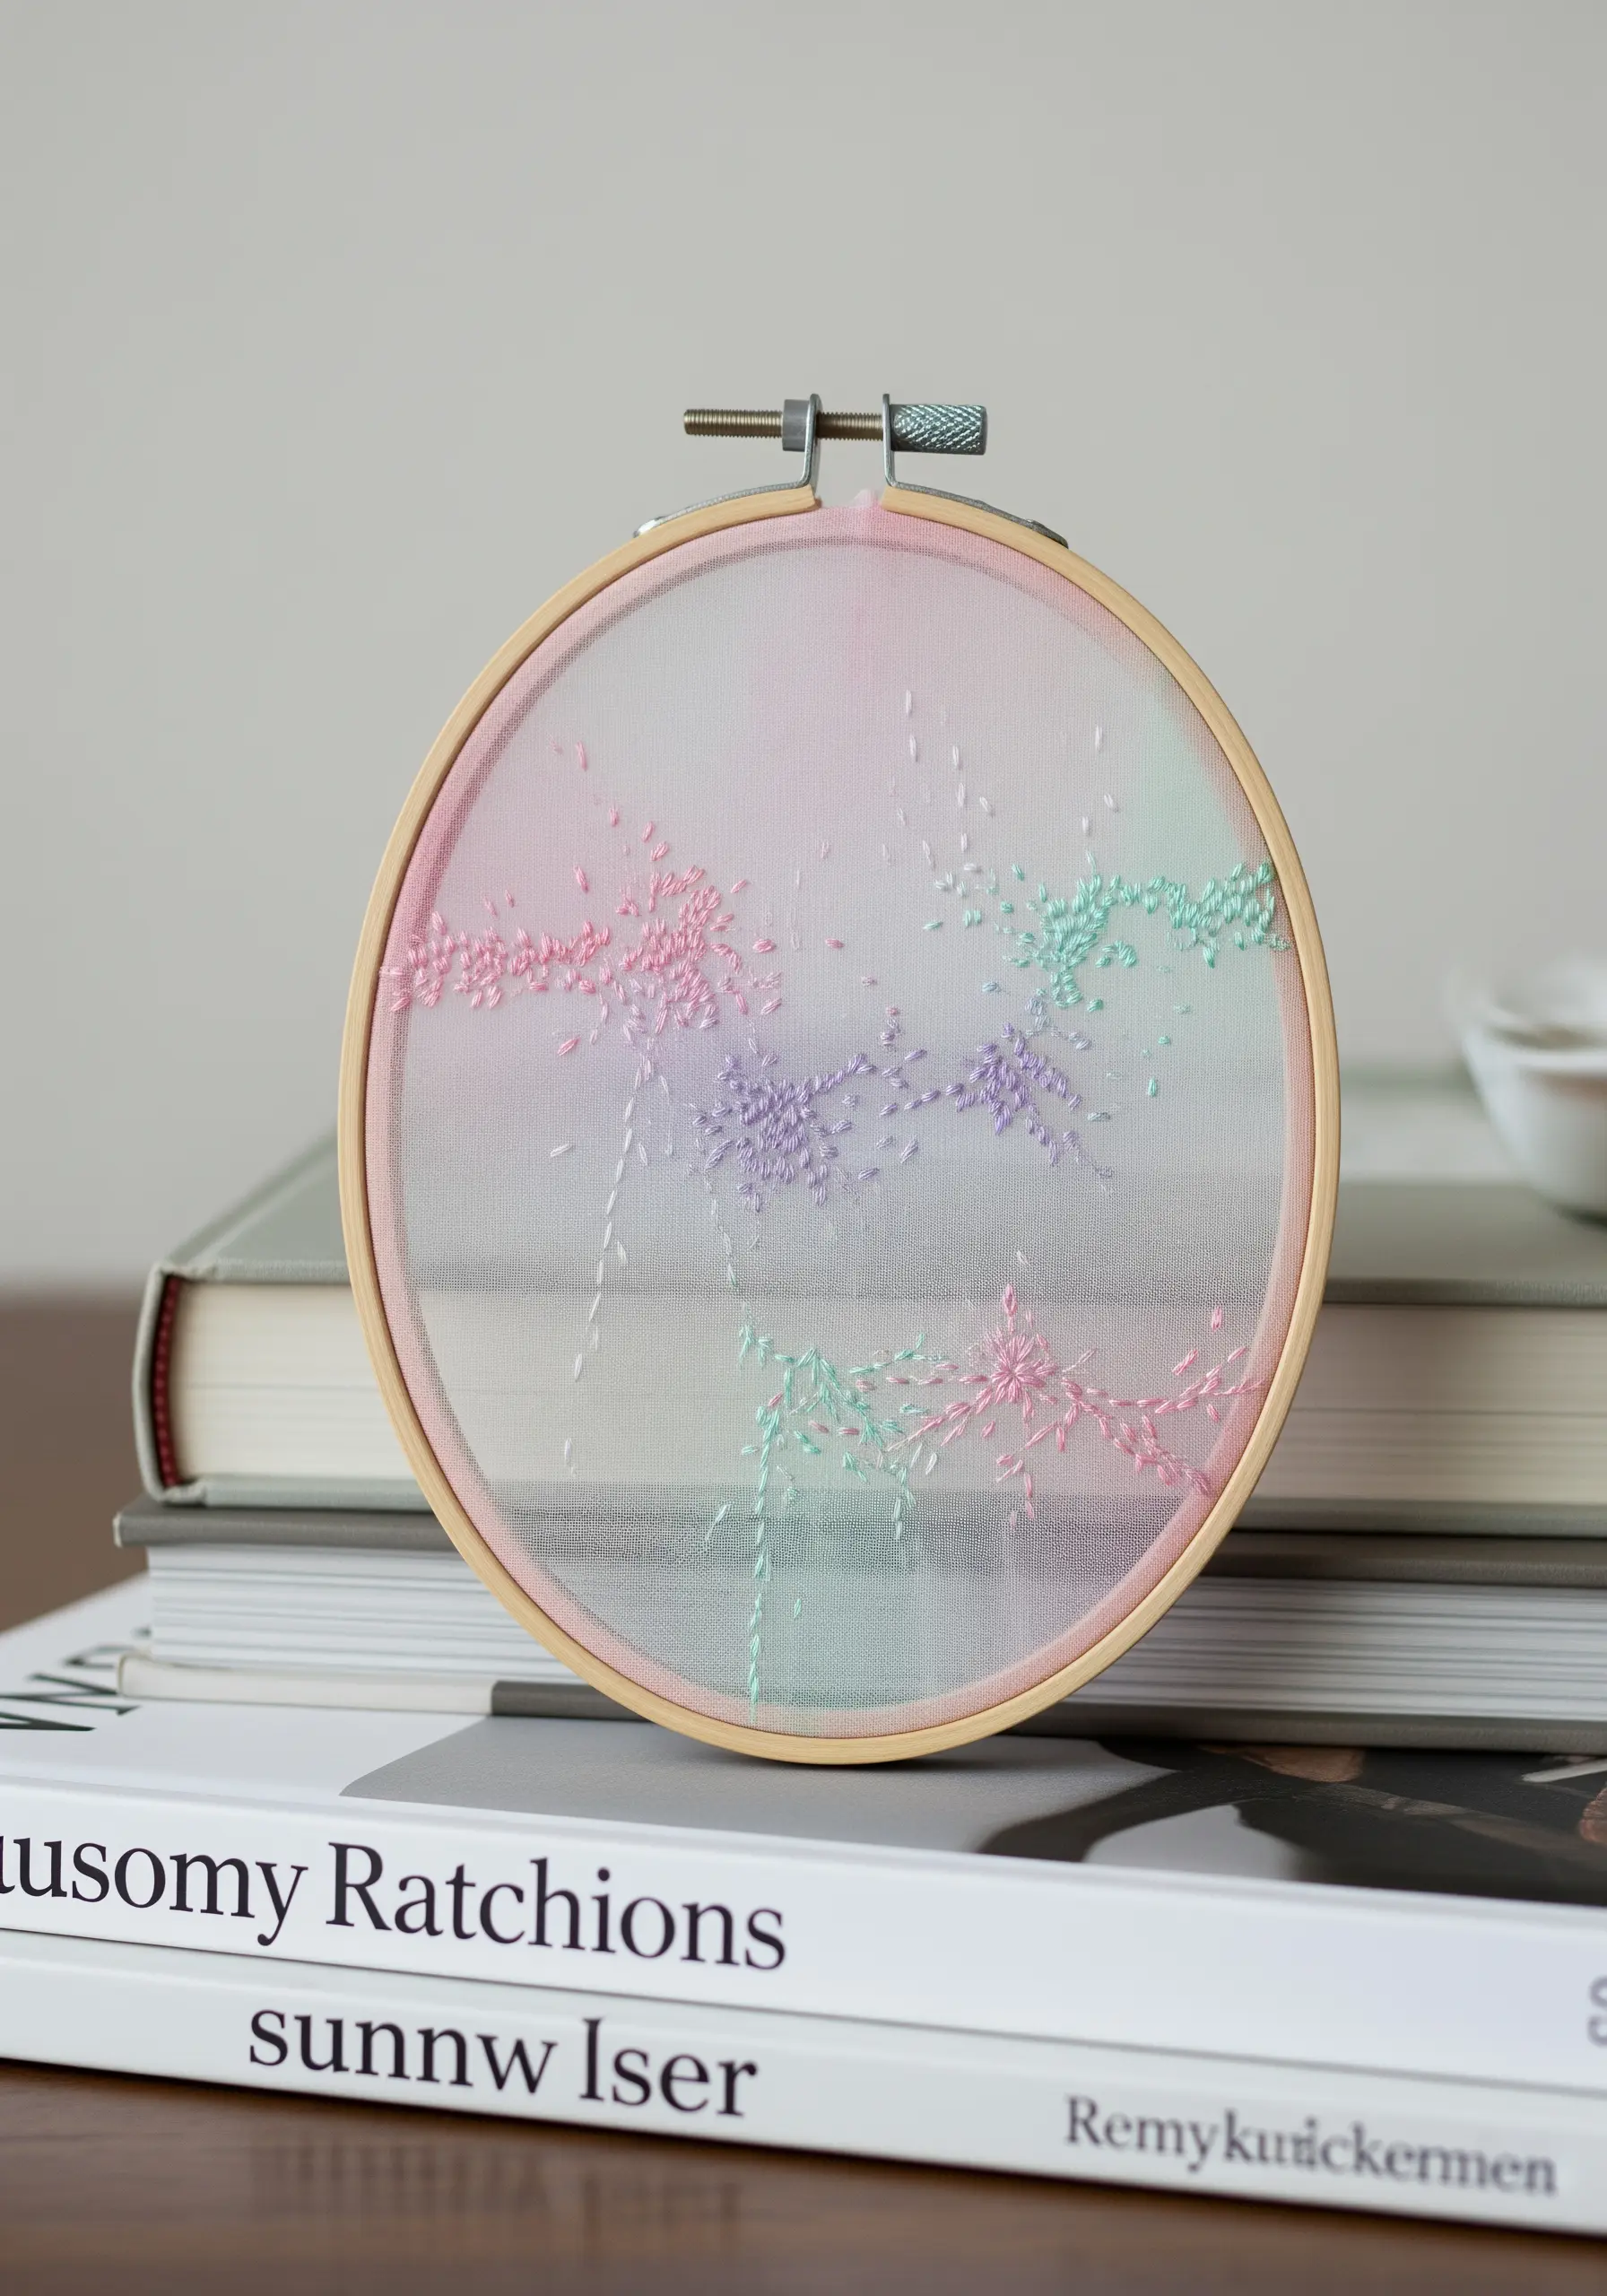
29. Visualize Sound with Color-Blend Stitches
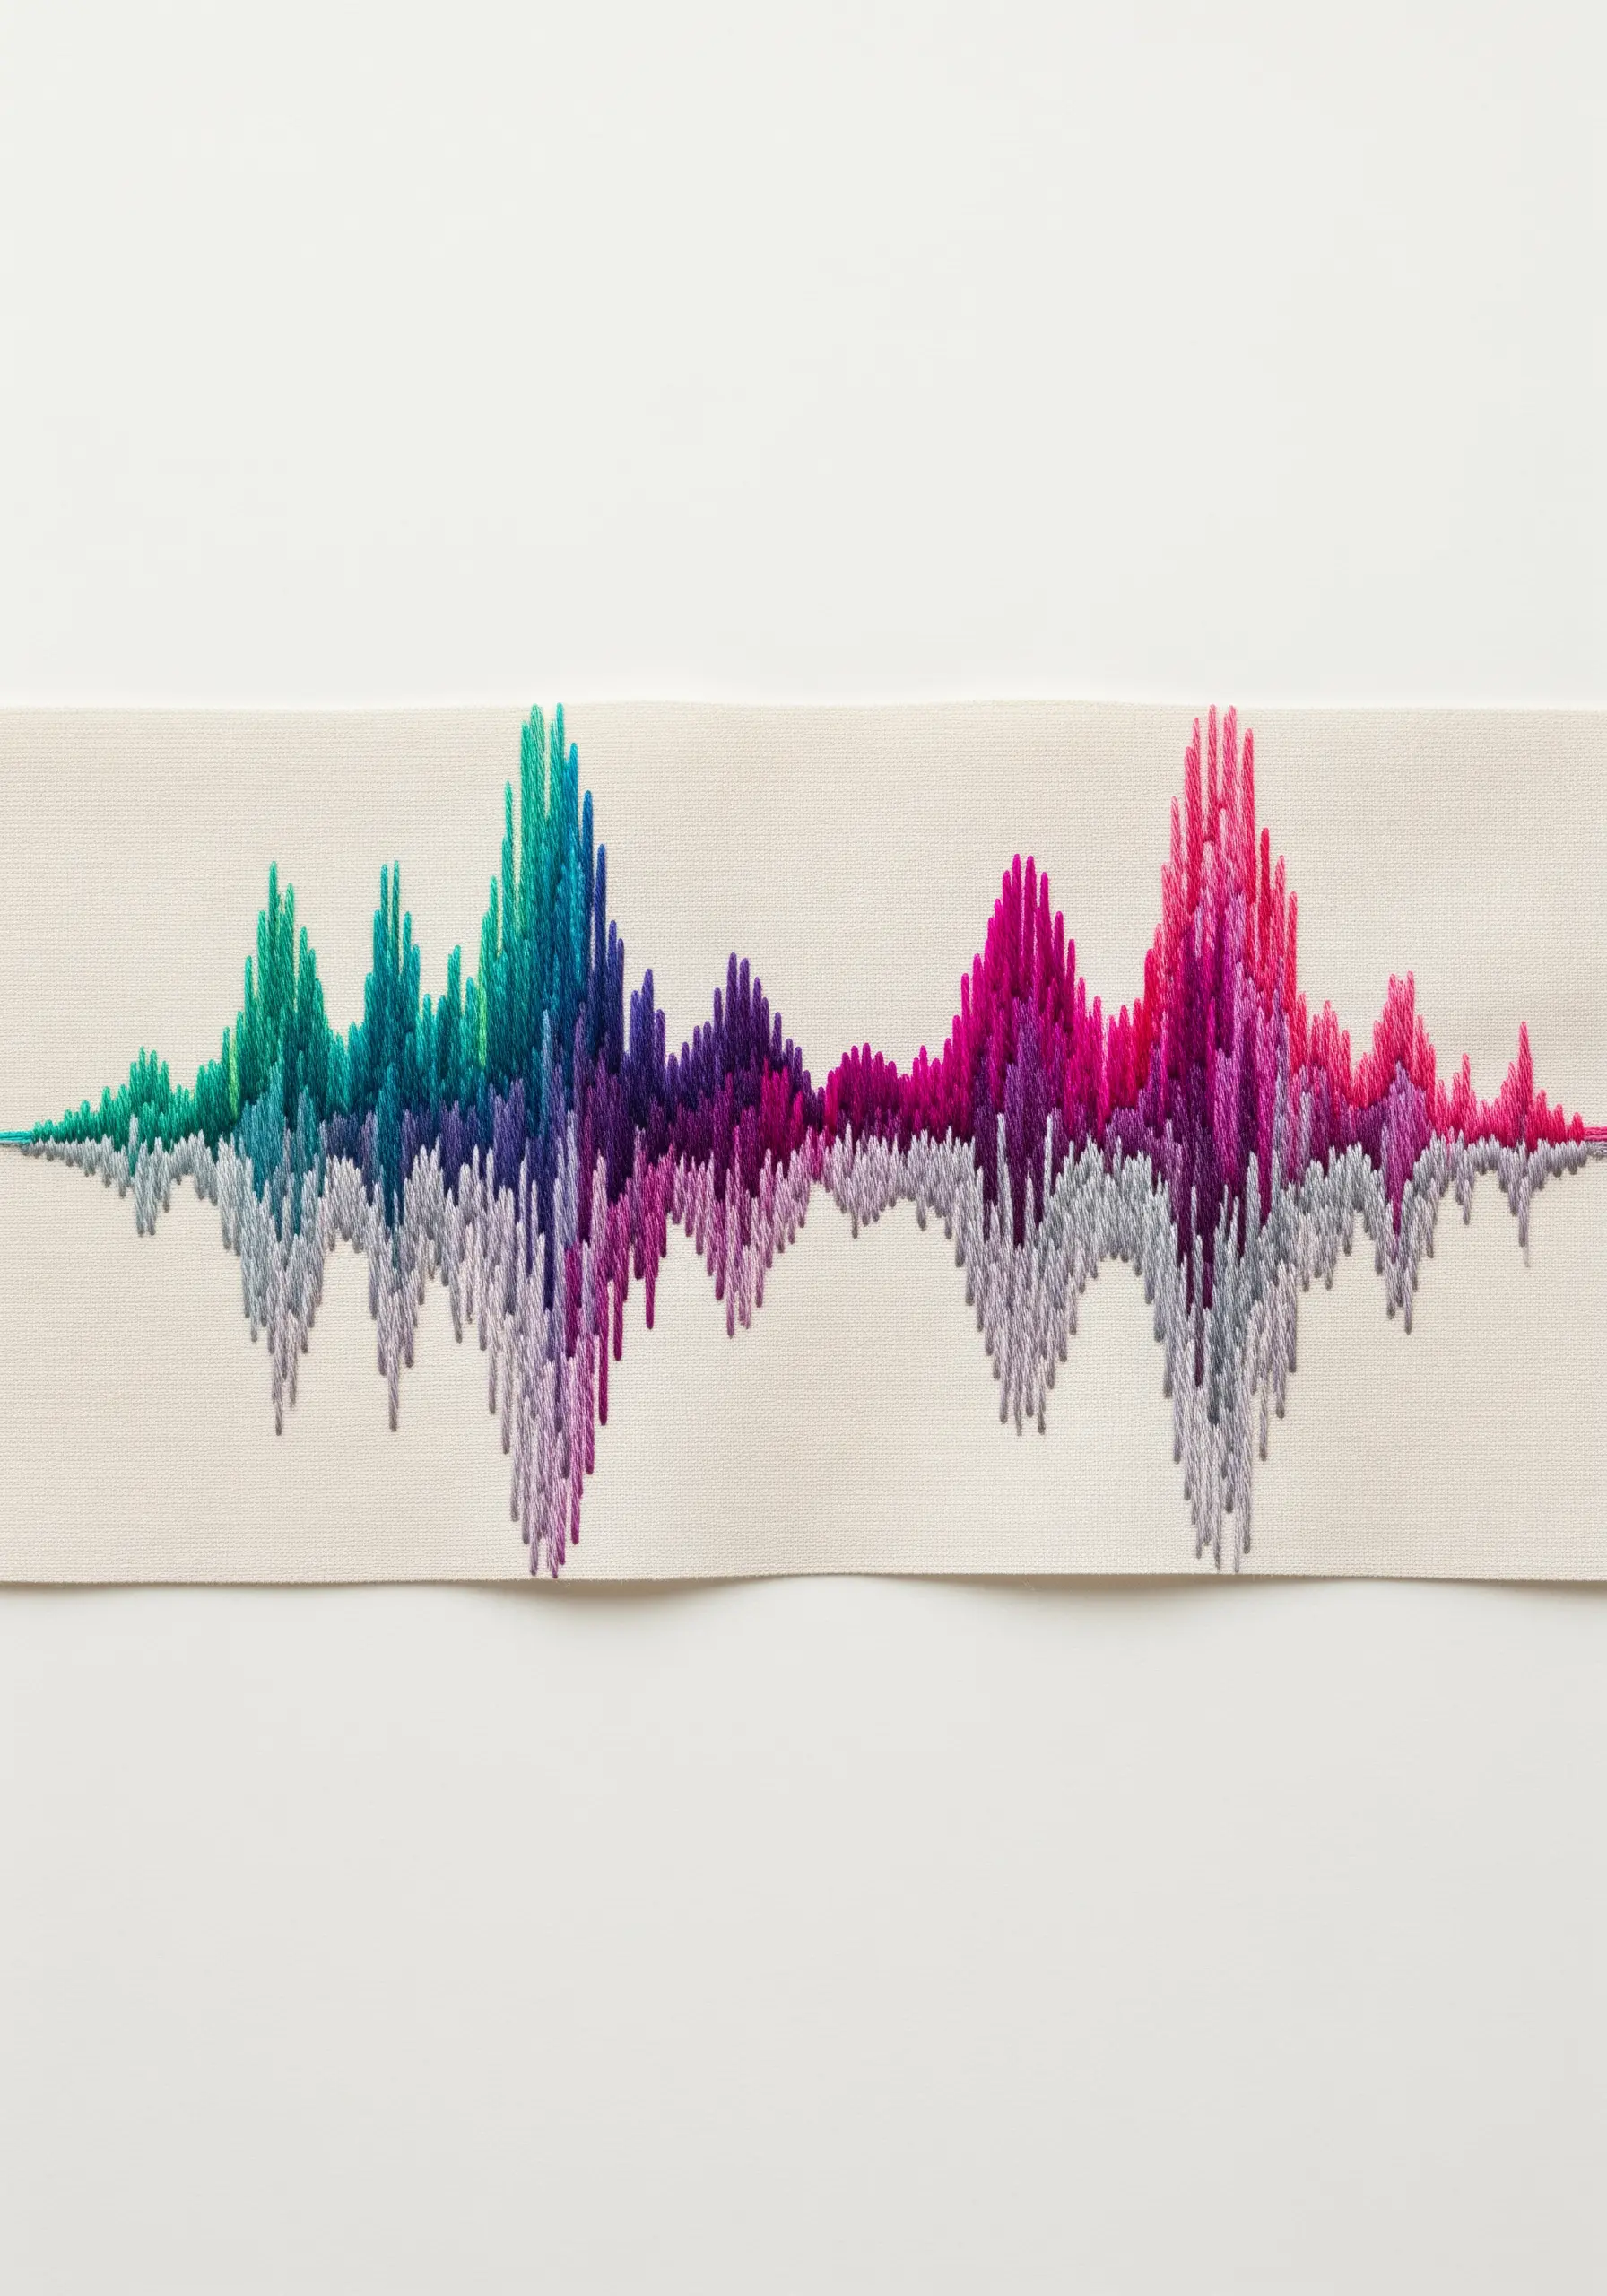
Translate a soundwave into a tactile piece of art by varying the height and color of your vertical satin stitches.
Lightly draw the soundwave pattern onto your fabric as a guide.
Use a thread painting technique, blending different colors along the length of the wave to represent shifts in tone or mood.
This is a deeply personal way to visualize a favorite song, a voice, or a memory, turning abstract data into meaningful abstract concept art.


