

You have the threads, the fabric, and the desire to create something beautiful, but perhaps you feel stuck in a cycle of familiar patterns. You know your work could be more, but you’re not sure how to bridge the gap between a simple craft and a piece of art that truly speaks.
The secret isn’t about learning hundreds of new, complicated stitches. It’s about learning to see with an artist’s eye—to understand how texture, color, and composition can transform a simple line of thread into a powerful statement.
This is your guide to making that shift. Here, we move beyond just following instructions. We explore the ‘why’ behind each design choice, giving you the confidence to experiment, to combine techniques, and to develop an abstract style that is entirely your own. It’s time to turn that empty wall into a testament to your creativity.
1. Juxtapose Soft Texture and Rigid Form

Combine the plushness of thick wool roving with the clean geometry of metallic lines to create a dramatic focal point.
First, couch the wool roving onto a sturdy canvas backing, arranging it in a soft, organic curve.
Then, use fine copper wire or a heavy metallic thread, pulling it taut across the frame to intersect the soft wool.
This contrast between textures—soft versus hard, matte versus reflective—is what gives the piece its modern, architectural power.
These statement-size wall art ideas work best on a large scale where the material contrast can truly command a room.
2. Sculpt an Abstract Landscape with Stitch Density
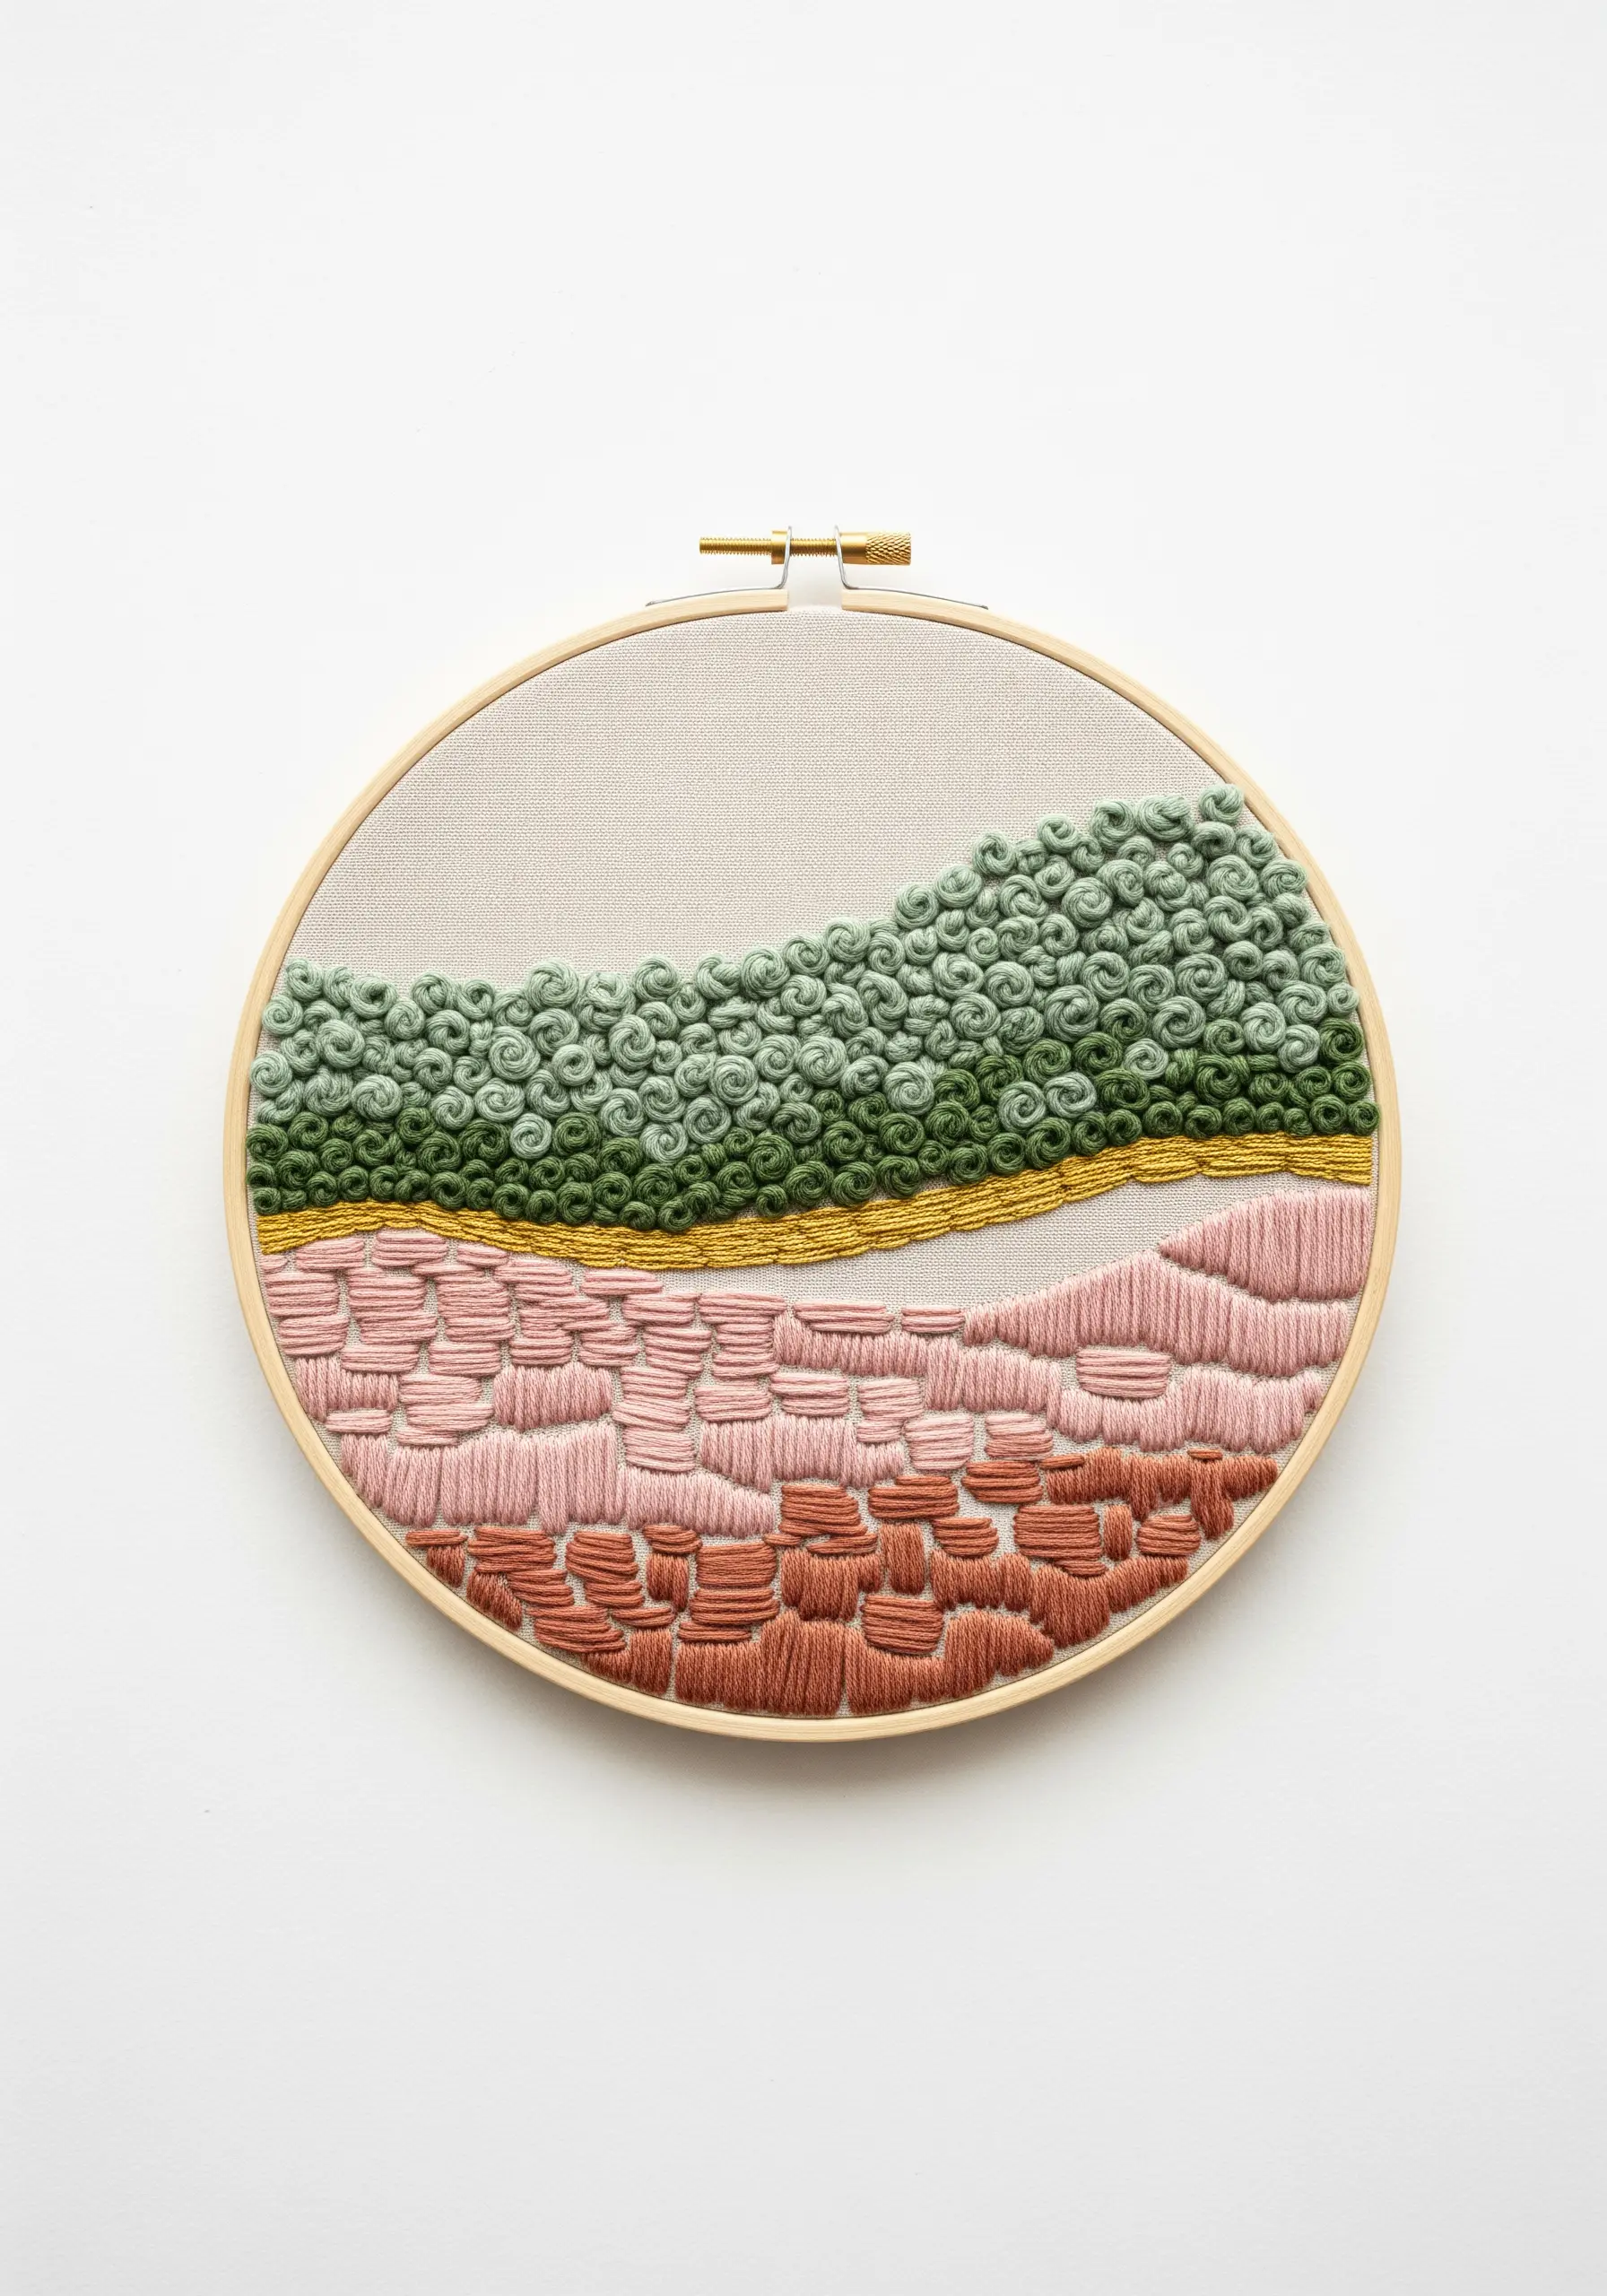
Create the illusion of rolling hills and textured earth by varying your stitch choices and their density.
For the upper green section, use tightly packed French knots with six-strand floss to build a lush, mossy surface.
Transition to a smooth, linear element with a band of satin stitch or chain stitch in a contrasting color like mustard yellow.
For the lower sections, use chunky satin stitches or woven bars in earthy pinks and terracotta, leaving small gaps to suggest layers of sediment.
The key is to let each stitched zone have its own distinct textural character, which helps capture nature’s textures in an abstract way.
3. Curate a Cohesive Triptych with a Monochromatic Palette

To create a polished gallery wall, stitch three separate pieces using a single color family but with varied patterns.
Select shades of one core color—like indigo, navy, and grey-blue—to ensure the set feels unified.
Dedicate each canvas to a different textural pattern: one with flowing satin-stitched waves, another with dotted seed stitches, and a third with sharp geometric lines.
Framing them identically and hanging them in a simple grid transforms individual embroideries into a single, intentional art installation.
This approach allows you to explore monochrome embroidery ideas without sacrificing visual interest.
4. Embrace Maximalism with High-Relief Fiber Art
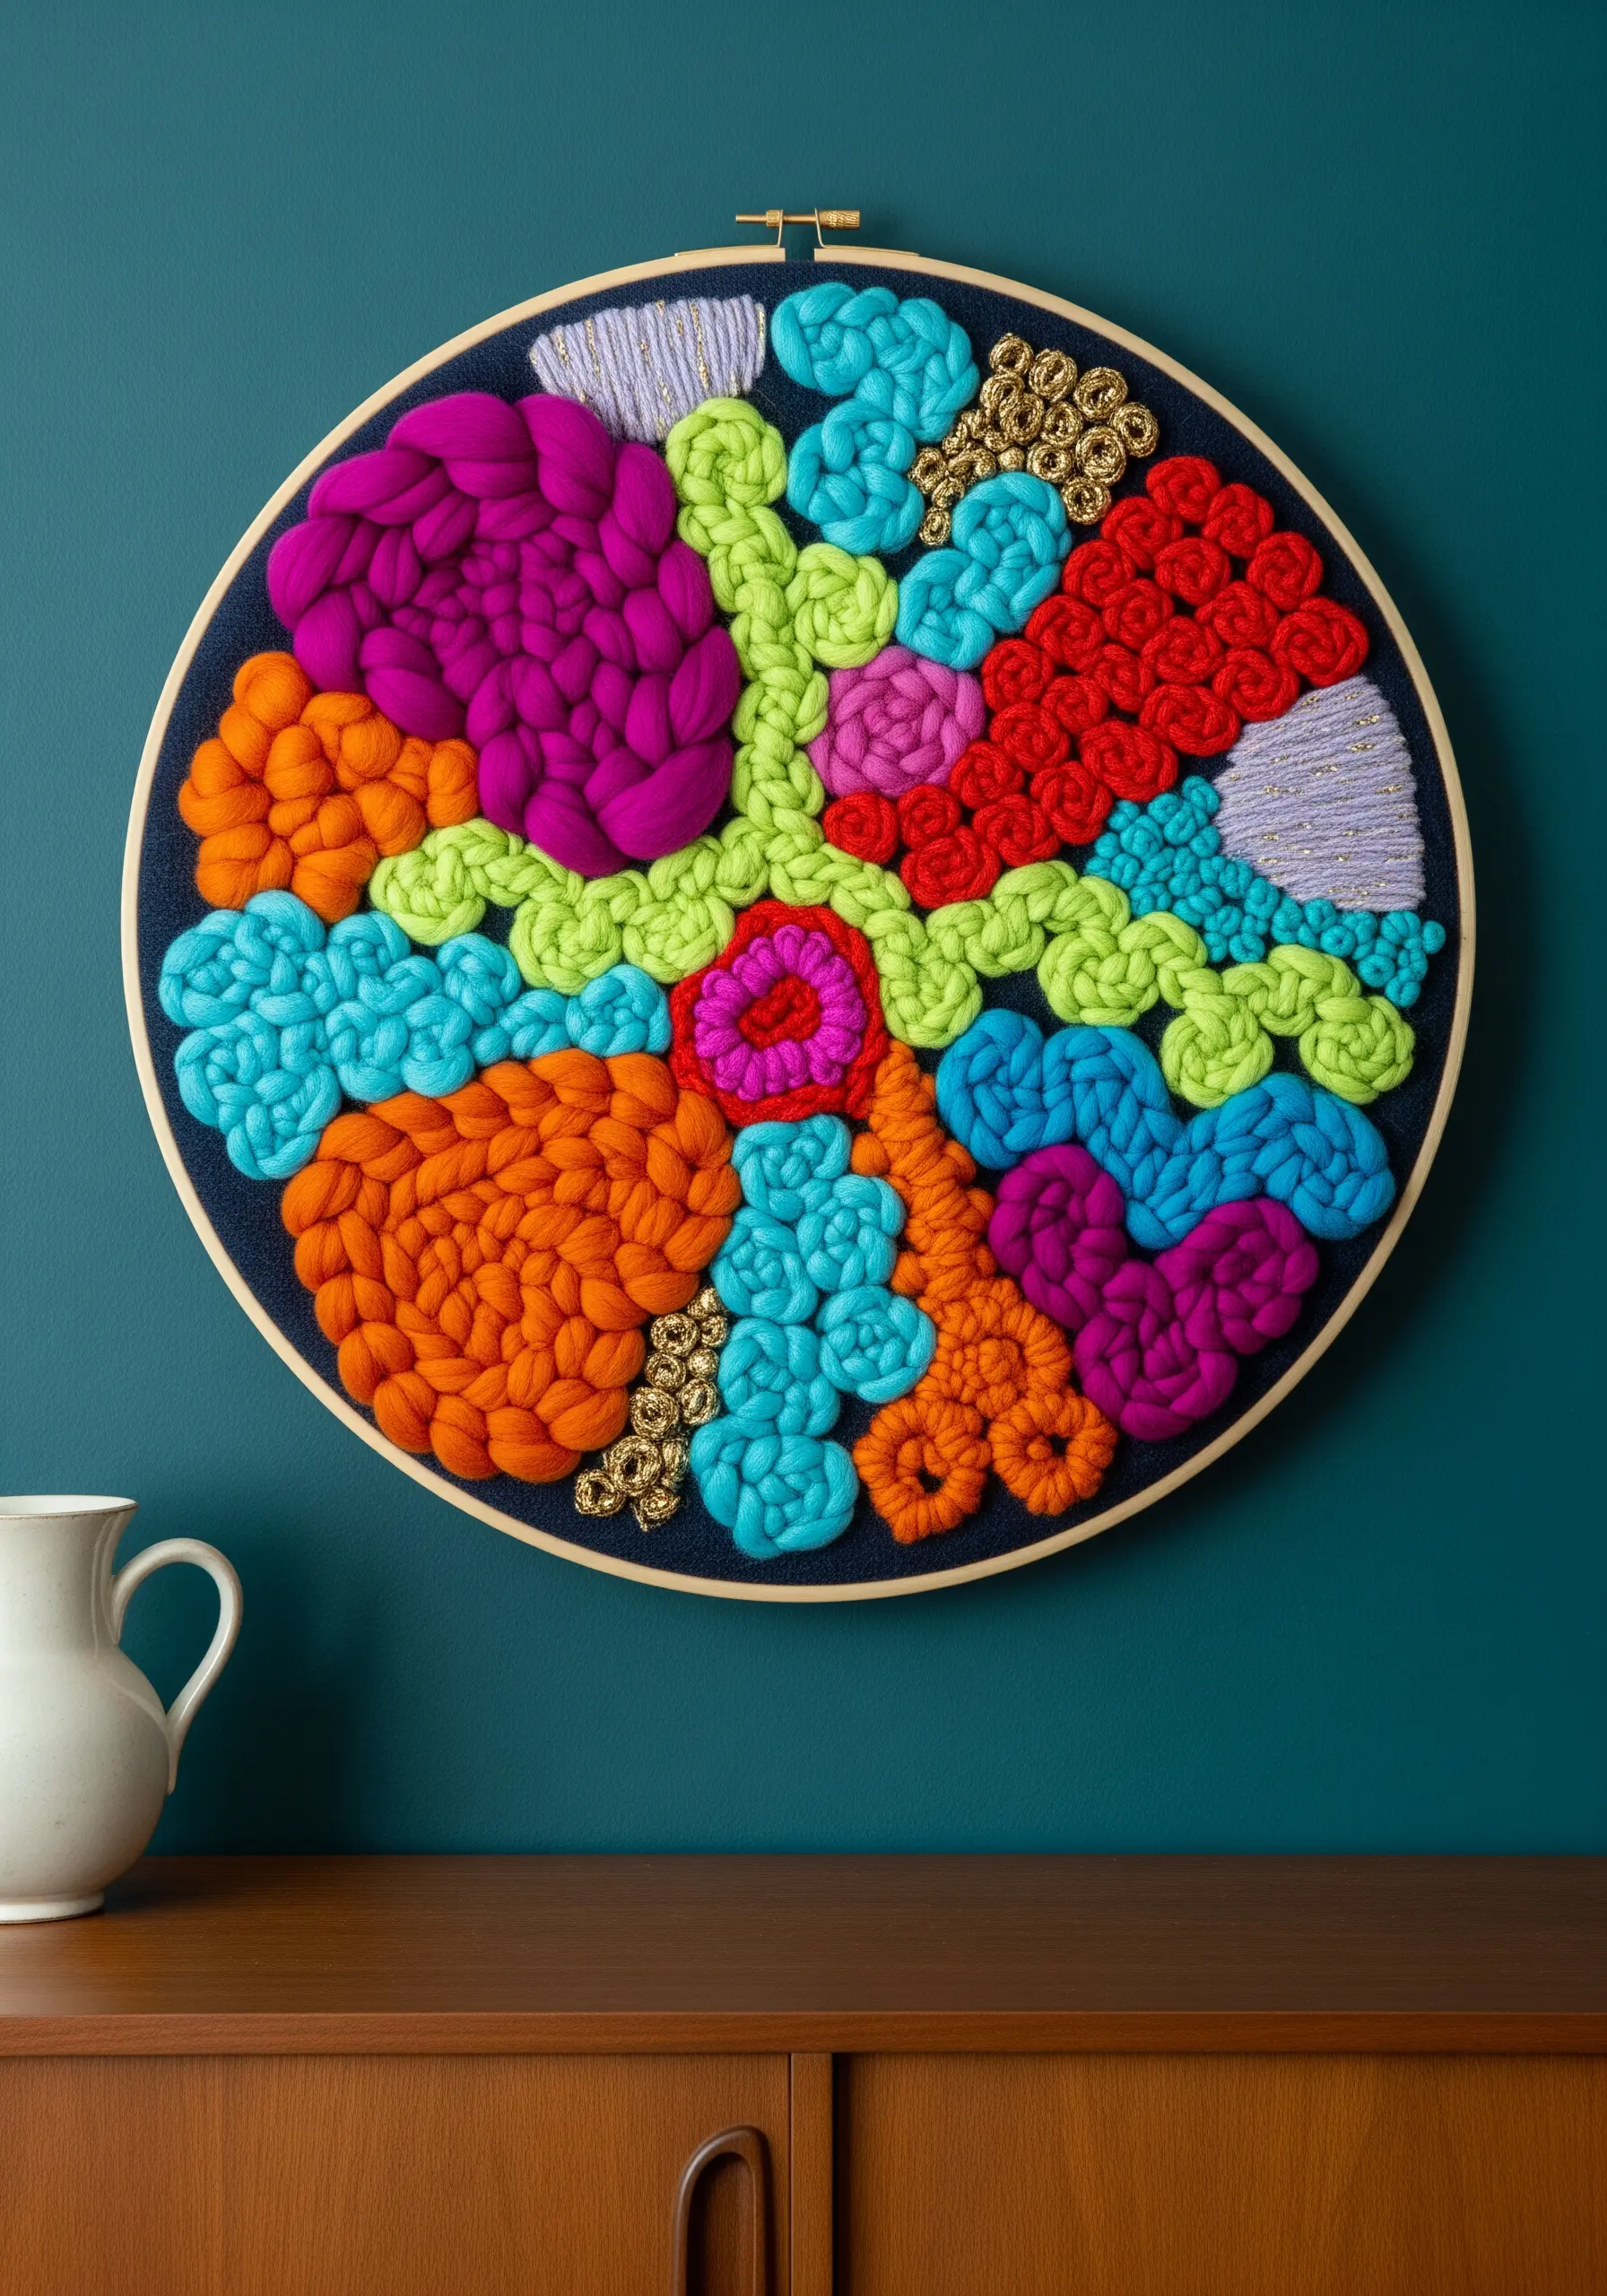
Achieve this vibrant, sculptural look by moving beyond standard floss and embracing chunky yarn and punch needle techniques.
Outline organic, cell-like shapes on your fabric and fill each one with a different texture or bold color.
Use a punch needle for plush loop sections, try weaving thick yarn directly into the fabric, or couch braided yarn for a raised, coiled effect.
The goal is to pack these textures so densely that they push against each other, creating a piece that is bursting with energy and tactility.
Don’t be afraid to experiment with gorgeous mixed-fiber textures for an even more dynamic result.
5. Master the Art of Restraint with Negative Space

Luxury in abstract art often comes from what you choose to leave out.
Create a composition of floating, pebble-like shapes on a high-quality neutral linen or cotton fabric.
Fill each shape with meticulously straight satin stitches, varying the angle of the stitches in each shape to catch the light differently.
This subtle shift in direction creates a quiet sense of movement and depth.
The generous use of empty fabric around the motifs gives the piece a serene, uncluttered feel, perfect for minimal embroidery wall designs that calm a space.
6. Energize Your Art with 3D Stumpwork and Neon

Combine flat stitches with raised, three-dimensional elements to create a piece that feels dynamic and alive.
Start by laying down energetic lines of color using a whipped backstitch or chain stitch for a smooth, raised effect.
To create the ‘shattered’ metallic pieces, use stumpwork techniques: embroider small, geometric shapes onto a separate piece of fabric with silver thread, cut them out, and stitch them onto your main piece so the edges lift away from the surface.
The contrast between the flat grey background, the vibrant neon, and the raised silver elements gives the work an edgy, graphic quality.
7. Build a Nebula with French Knots and Seed Beads

Create the swirling depths of a galaxy by layering thousands of French knots on a black or dark navy fabric.
Use a variegated thread or multiple shades of purple, pink, and blue, clustering them to form cosmic clouds and blending them at the edges.
Vary the number of wraps on your French knots—one wrap for distant stars, three for closer, denser areas—to build depth.
Finally, scatter tiny silver seed beads or add a few stitched starbursts with metallic floss to mimic twinkling stars.
This technique is perfect for creating celestial micro-embroidery ideas that feel infinite.
8. Paint with Yarn Using a Couching Technique

Create broad, sweeping waves of color by ‘painting’ with yarn instead of floss.
This technique, called couching, involves laying down strands of yarn on your fabric and securing them with small, perpendicular stitches using a thinner matching or contrasting thread.
Plan your color gradient in advance, arranging yarns from dark to light to create flowing, topographical lines.
This method allows you to cover large areas with rich color and texture much faster than traditional satin stitch, making it ideal for large-scale tapestries and earthy texture embroidery patterns.
9. Explore Texture in a Pure Monochrome Palette

Challenge yourself to create a visually rich piece using only one color, forcing you to focus entirely on texture and form.
Divide your hoop into curved sections and fill each one with a different high-texture stitch.
Combine chunky chain stitches, raised satin stitch bars, dense French knots, and woven picot stitches.
Even without color variation, the way light hits the different stitch directions and heights will create a stunning landscape of shadow and relief.
These tone-on-tone embroidery techniques result in an incredibly sophisticated and timeless work of art.
10. Weave Geometric Shapes for a Bauhaus-Inspired Look

Combine bold, woven color blocks with sharp, intersecting lines for a composition inspired by modern art.
Create your primary shapes—a circle, square, or triangle—using a darning stitch or needle weaving technique.
Warp your shape by creating long, parallel foundation stitches, then weave your thread over and under them until the shape is filled with solid, textured color.
Contrast these filled shapes with stark, black backstitched lines that run across the canvas, grounding the composition with a graphic, architectural feel.
This is one of the most effective modern geometric thread art ideas for a contemporary interior.
11. Achieve Flawless Fills with Thread Painting
For perfectly smooth, dense color blocks, master the long-and-short stitch, often called thread painting.
Fill each geometric section with stitches of varying lengths, layering new stitches into the previous row to eliminate harsh lines and create a seamless, satin-like finish.
To make the shapes pop, outline them with a fine, metallic thread using a couching or backstitch technique.
The contrast between the matte, smooth color fills and the sharp, reflective outline gives the piece a clean, graphic, and incredibly polished look.
These abstract thread embroidery ideas rely on precision for their impact.
12. Create a Gradient ‘Waterfall’ with Loose Threads

This large-scale piece is less about individual stitches and more about harnessing the collective power of thread itself.
To create this ombré effect, start by attaching dense bunches of dark blue thread or yarn to the top of a canvas or dowel.
Gradually introduce lighter shades of blue, then turquoise, and finally cream, reducing the density of the threads as you move across.
Let the threads hang loose, trimming them at different lengths to create an organic, flowing edge.
This is how fiber art installations can use color and texture to evoke the feeling of a cascading waterfall.
13. Channel Art Deco Style with Symmetrical Satin Stitch

Capture the elegance of the Art Deco era with a symmetrical design that emphasizes clean lines and bold shapes.
On a dark fabric for high contrast, sketch out a mirrored, fan-like pattern.
Use satin stitch to fill each segment, paying close attention to the direction of your stitches.
Make the stitches radiate from a central point within each ‘fan’ to create a beautiful, light-catching sheen.
Incorporate fine, radiating lines with a single strand of metallic thread to mimic sunbursts, a classic Art Deco motif perfect for vibrant hoop art designs.
14. Build Sculptural Forms with Knitted I-Cords
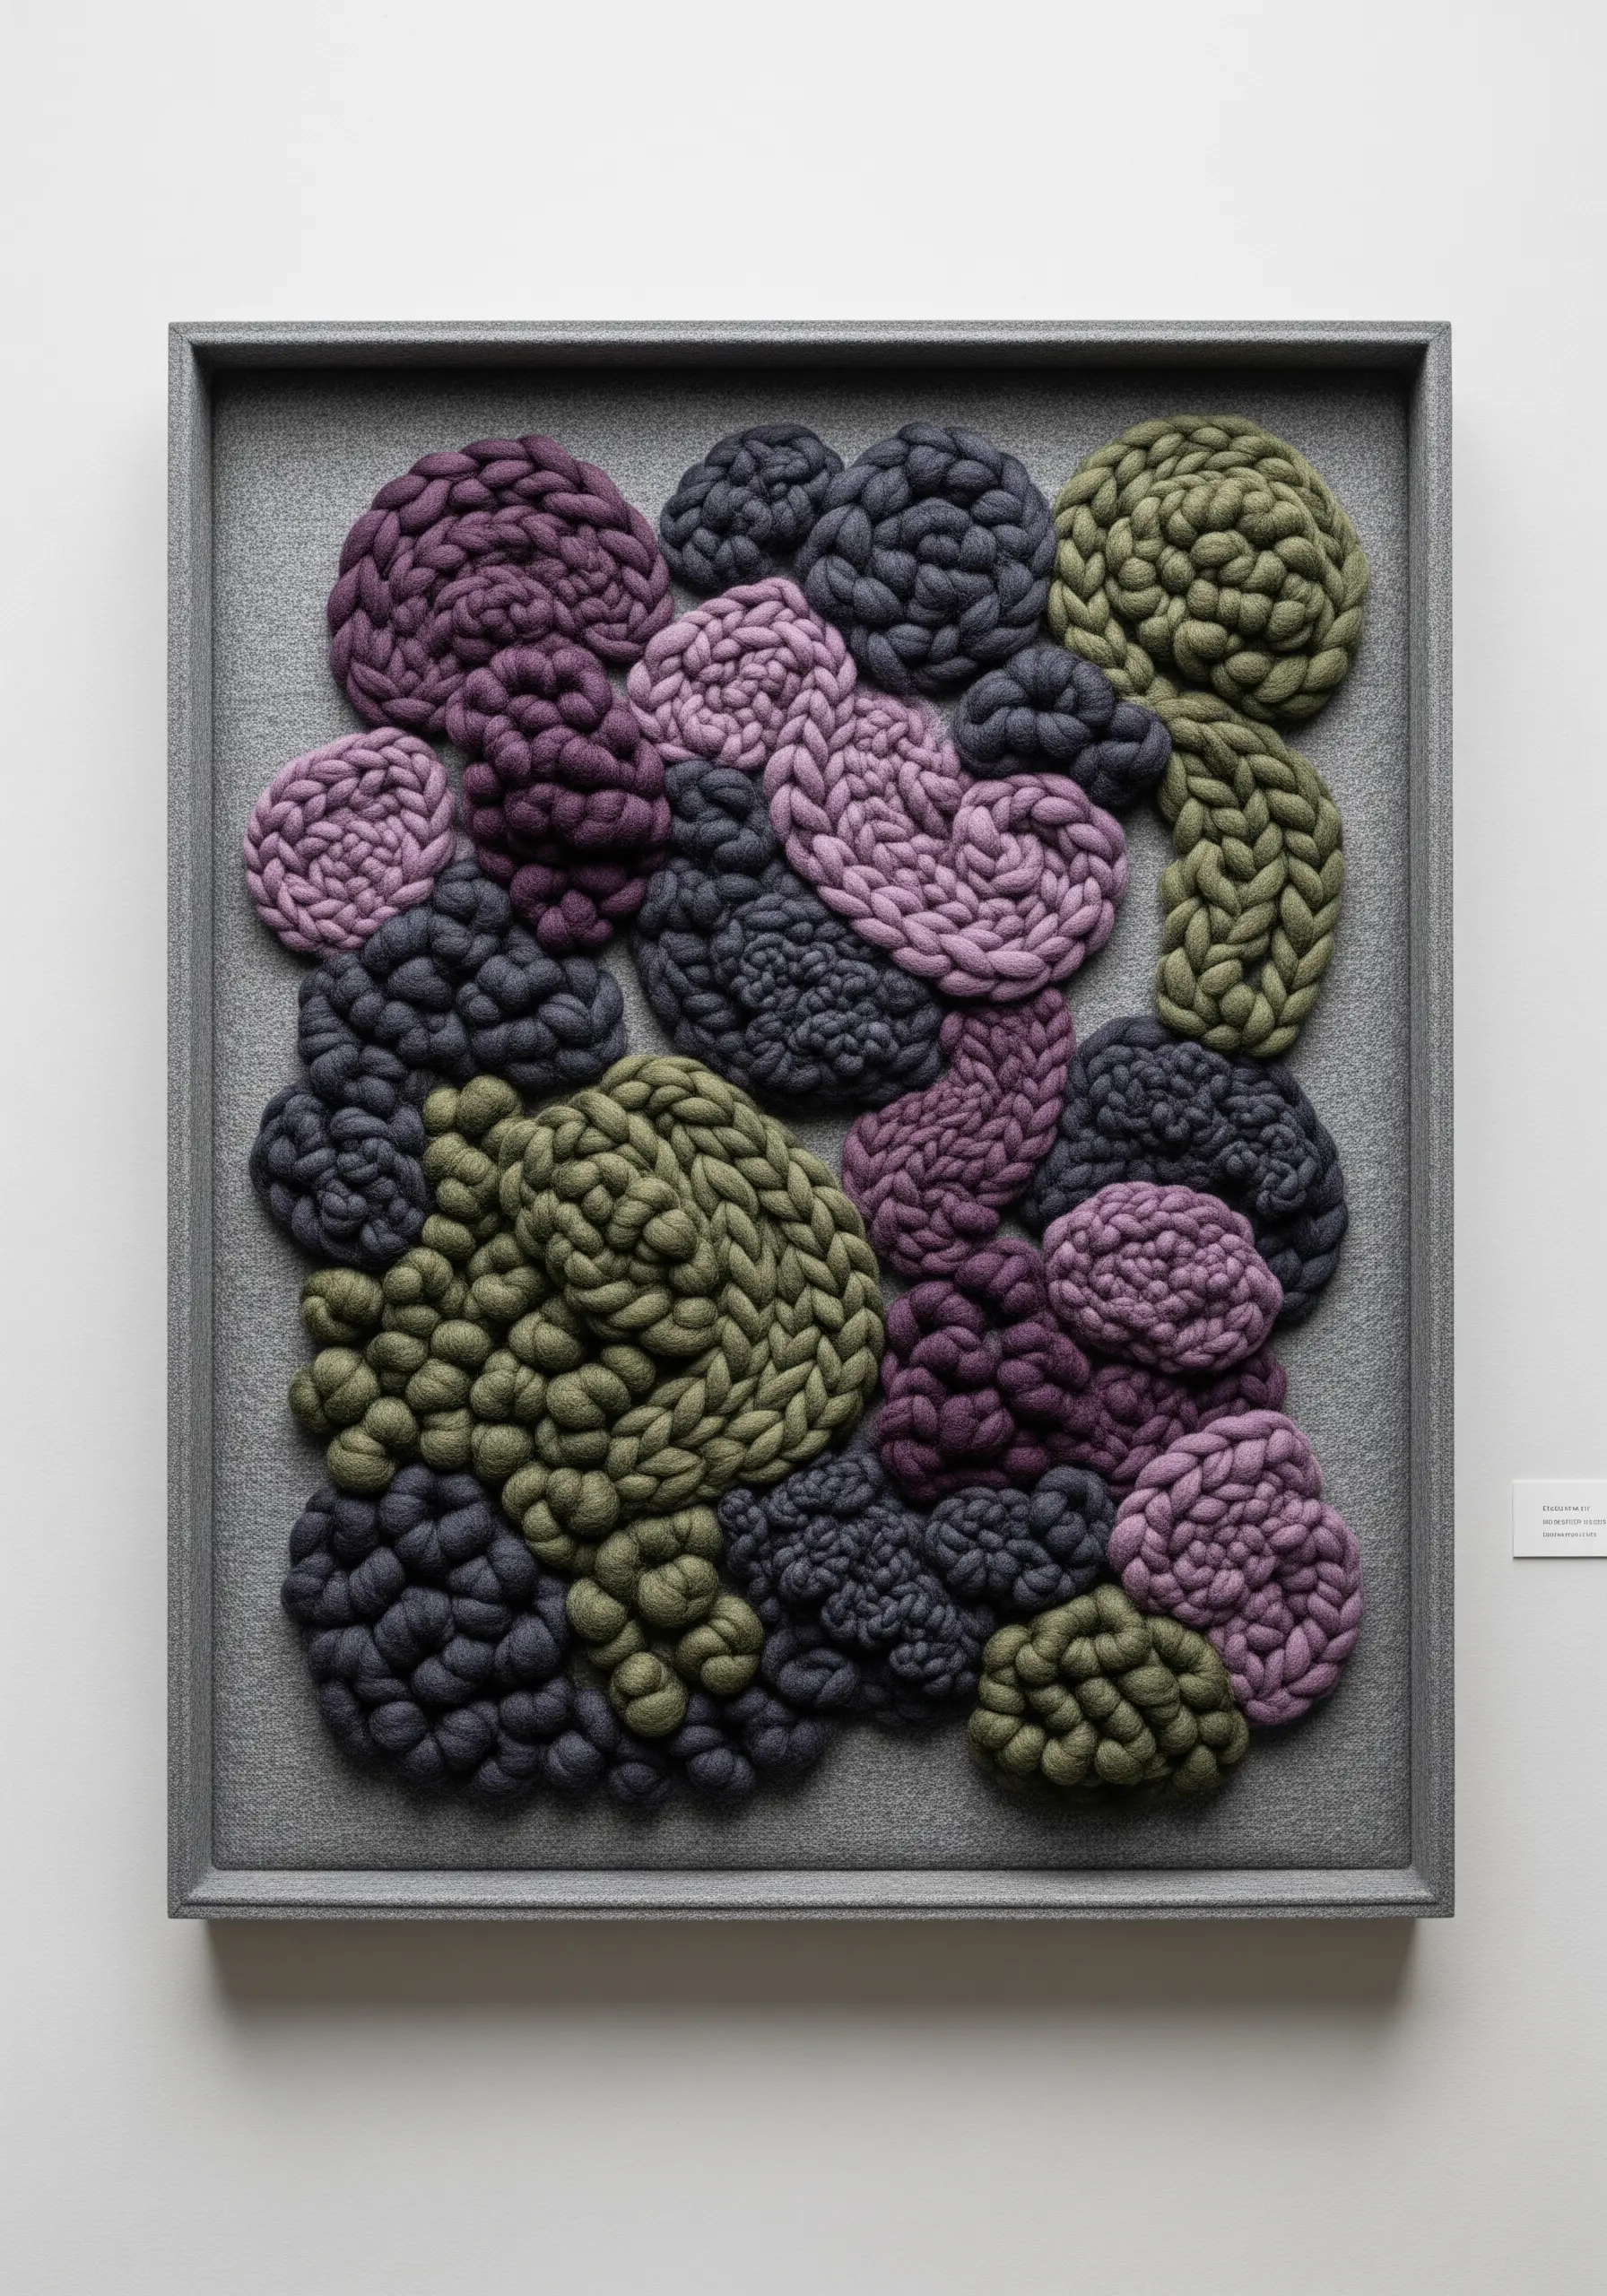
To achieve these highly dimensional, organic shapes, you’ll need to work off the hoop before you work on it.
Use chunky yarn to knit or crochet tubes, braids, or flat shapes—these are often called I-cords in knitting.
Create a variety of these textured forms in a cohesive color palette, like these muted purples and greens.
Then, arrange and stitch them onto a fabric-covered canvas or board, clustering them together to create a composition that resembles moss, coral, or other natural formations.
These unexpected fiber art installations blend needlework crafts to create something entirely new.
15. Embrace Imperfection with an Embroidered Kintsugi
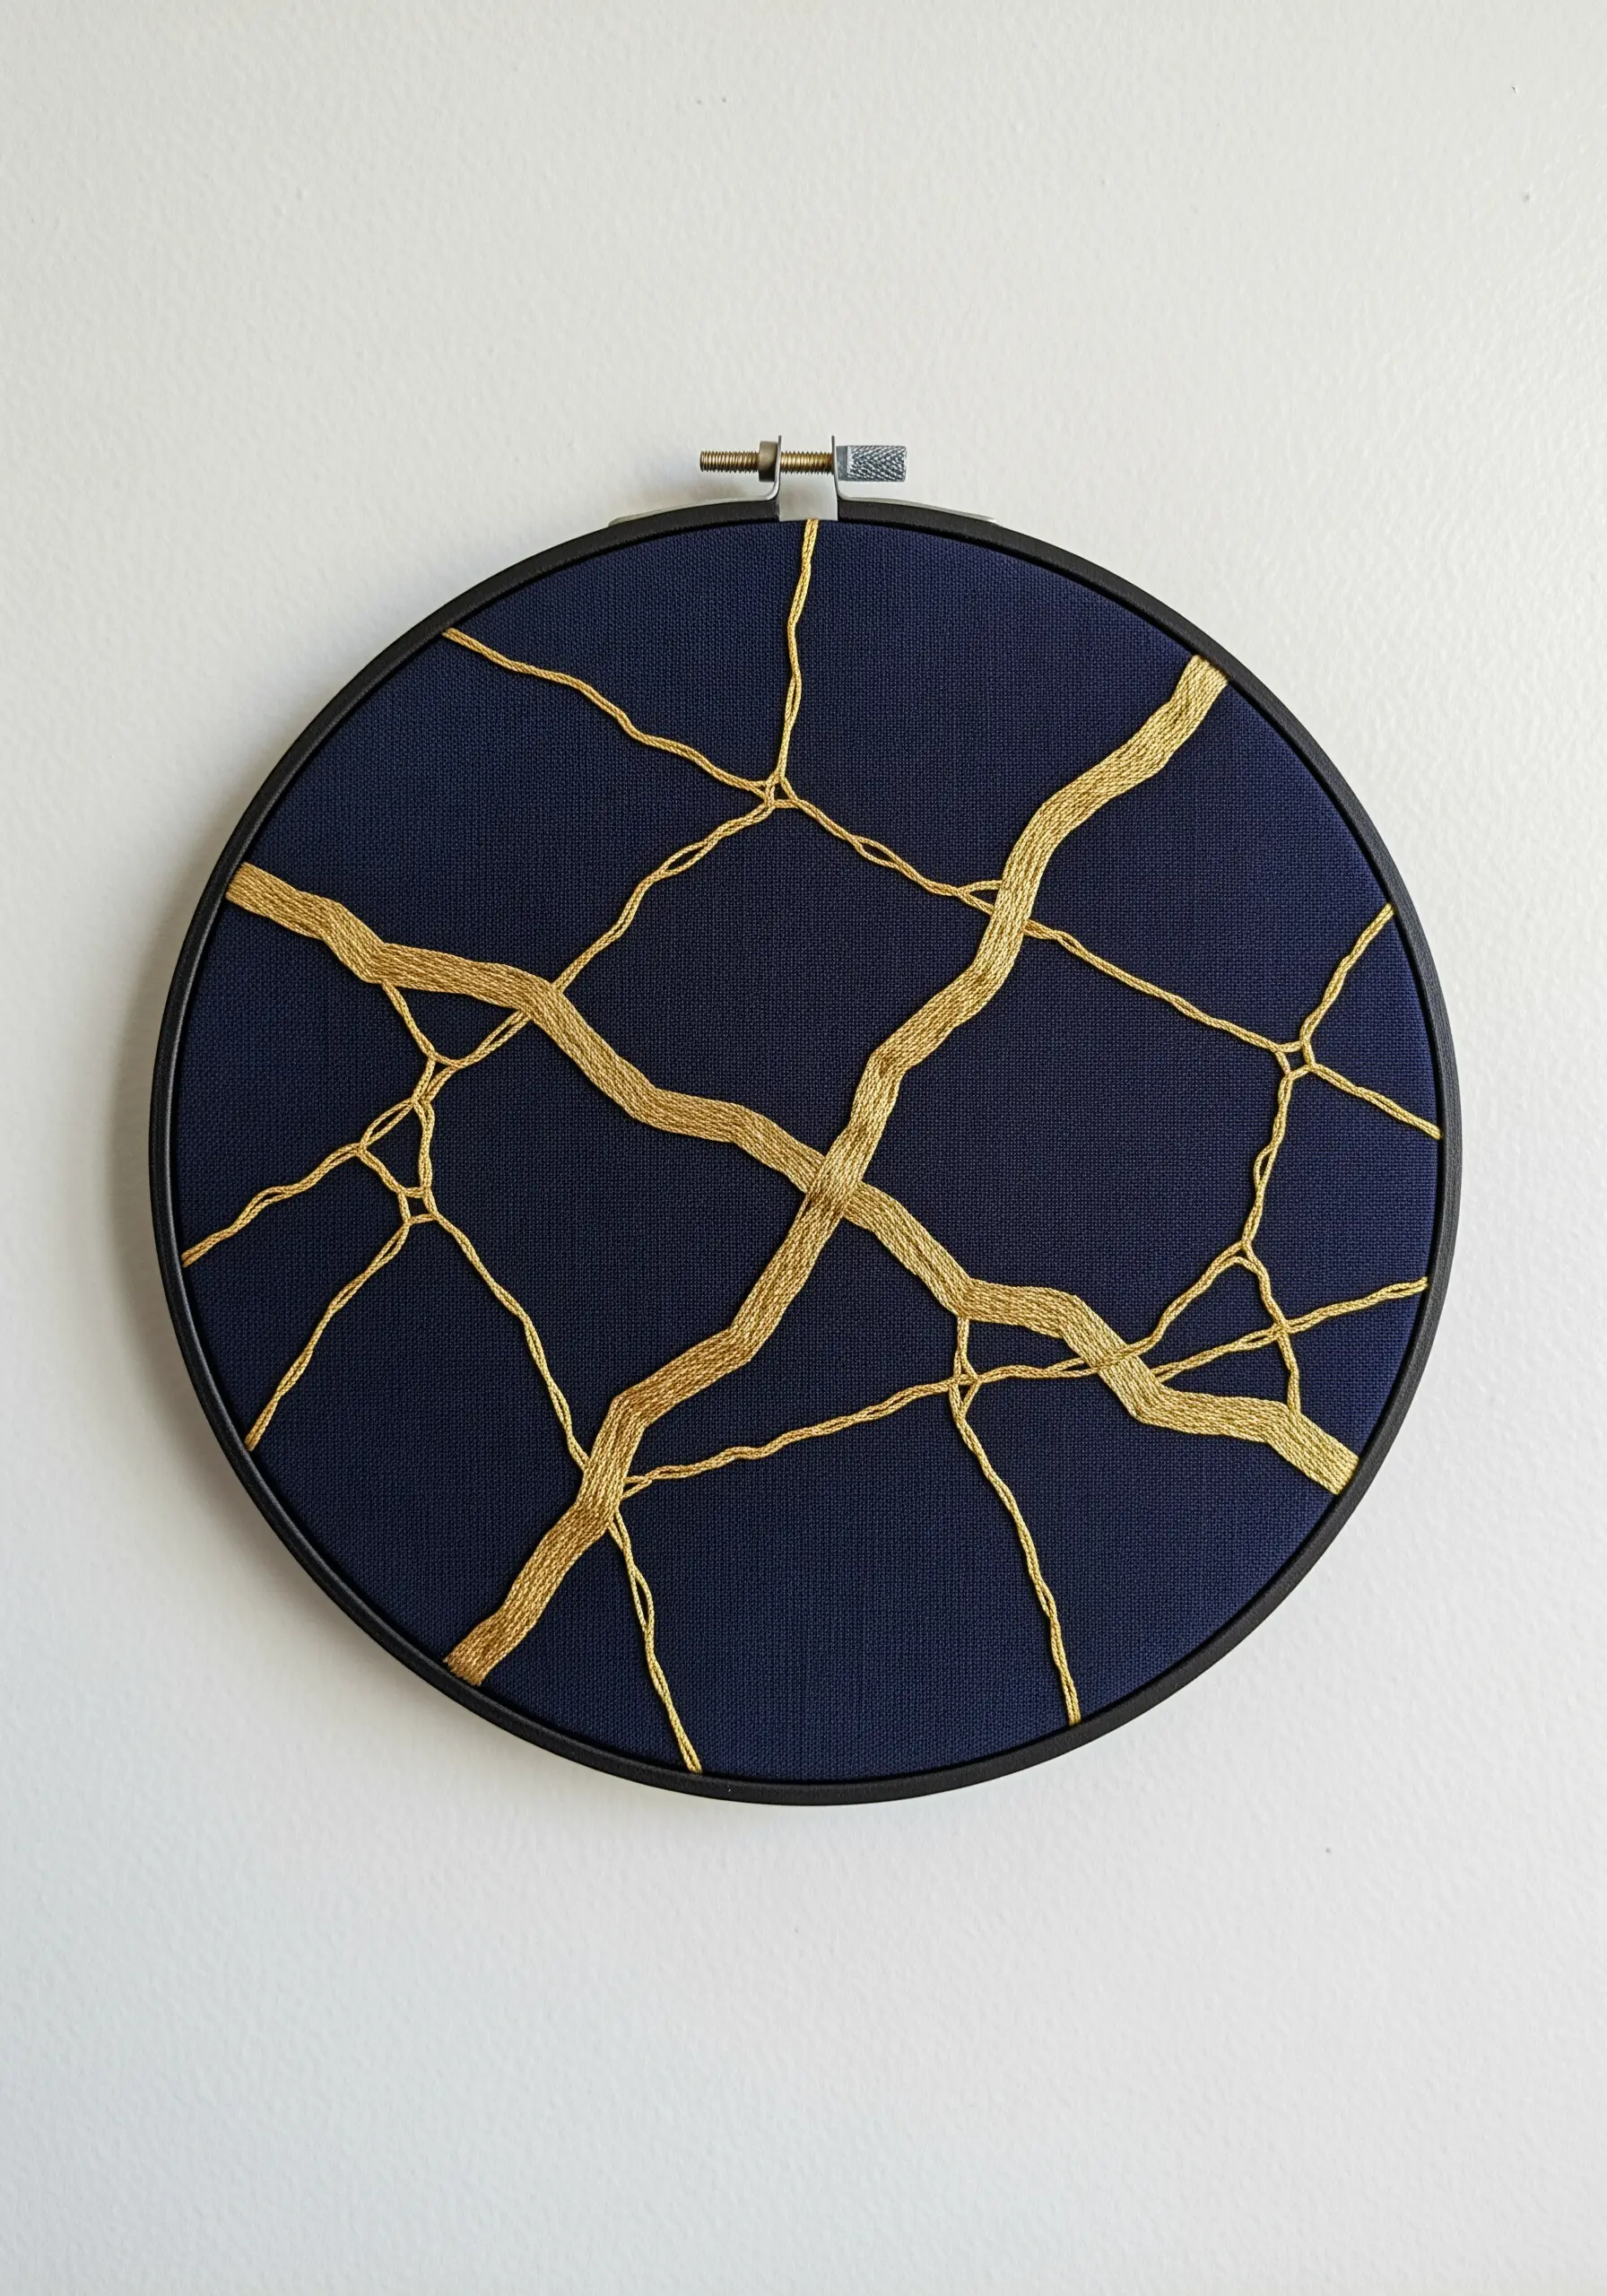
Inspired by the Japanese art of repairing broken pottery with gold, this design finds beauty in flaws.
Start with a dark, solid-colored fabric like navy or black linen to make the metallic thread stand out.
Using a high-shine gold metallic thread, couch it onto the fabric to create a network of organic, intersecting ‘cracks’.
Vary the thickness of the lines by using one, two, or even three strands of thread laid side-by-side.
The philosophy behind this design is as beautiful as the result, and metallic thread wall art projects like this add both elegance and meaning to a space.
16. Design a Digital ‘Glitch’ with Color Blocking

This style mimics the effect of a digital glitch or pixelated image, creating a dynamic burst of color.
Achieve this by using blocky satin stitches or even traditional cross-stitches on Aida cloth or canvas.
Sketch a grid and plan your color transitions, clustering blocks of cyan, magenta, and yellow to create an abstract shape.
Allow the edges to be uneven and fragmented, as if the image is breaking apart.
This modern, graphic style is a fantastic way to play with bold color theory in a structured yet chaotic composition.
17. Layer Sheer Fabrics for a Watercolor Effect
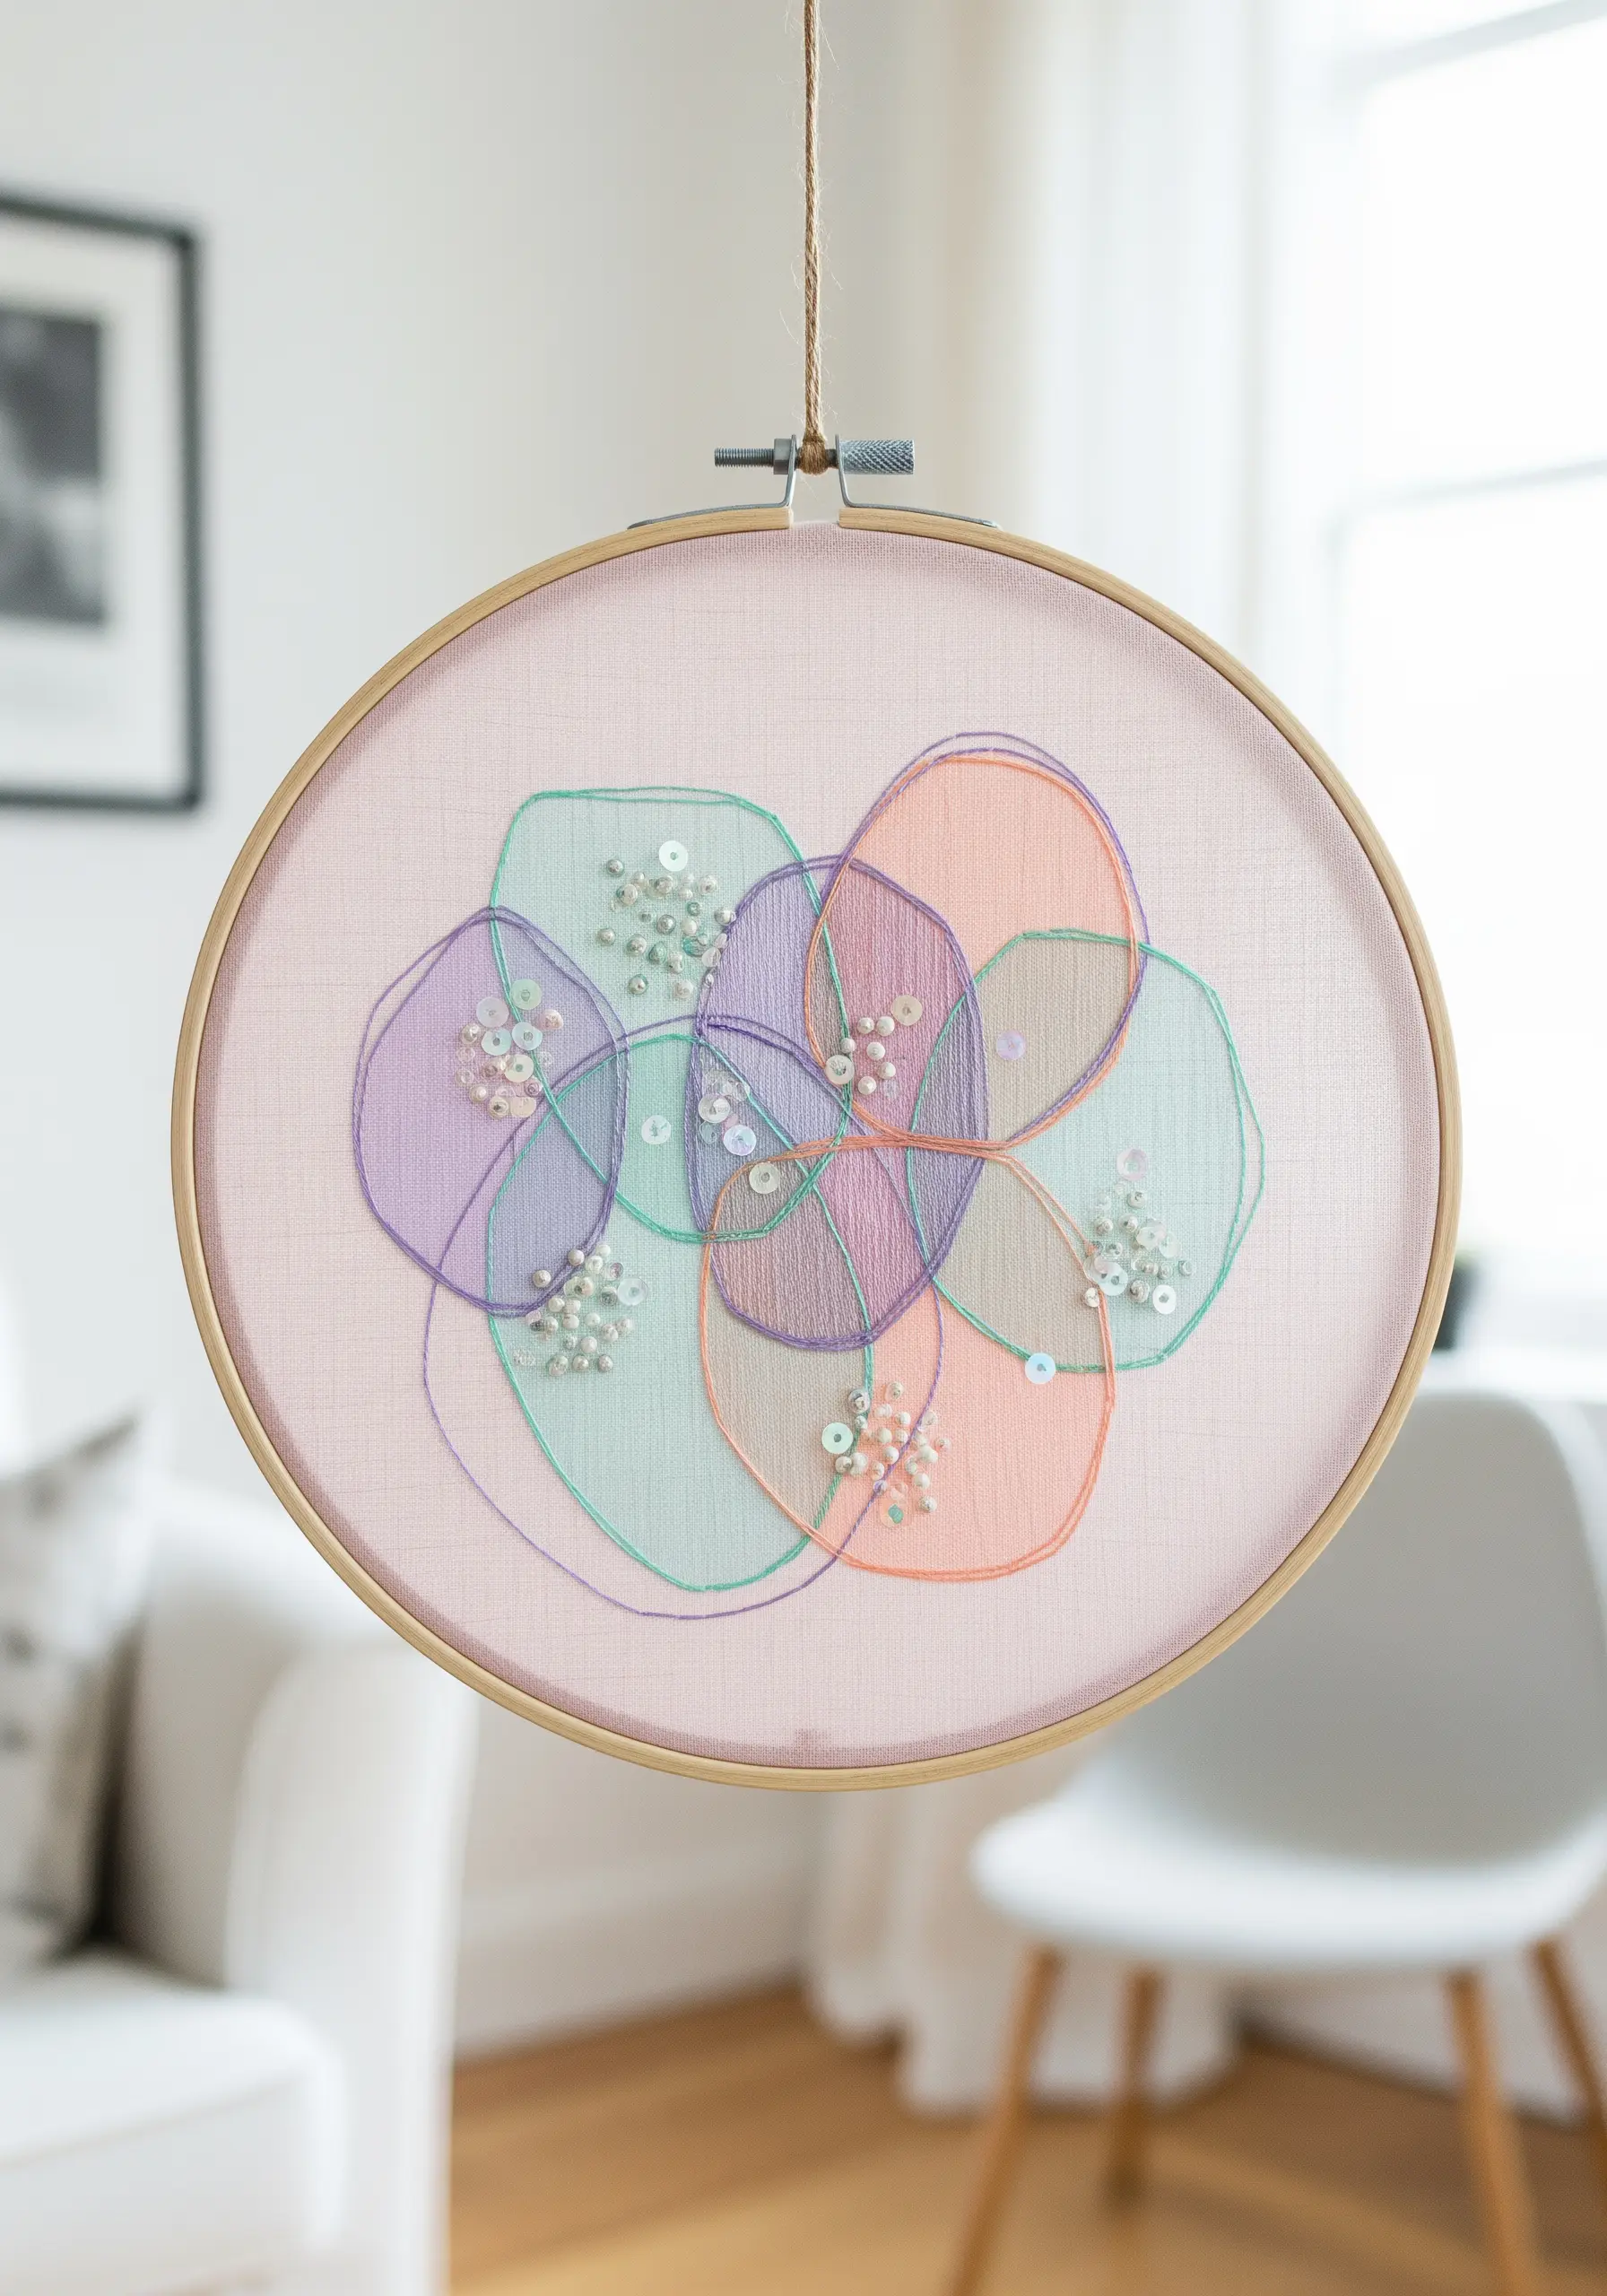
Create ethereal, overlapping colors by using sheer organza as both your base and your appliqué material.
Cut abstract shapes from different colors of organza and arrange them on your main fabric, allowing them to overlap.
Where the fabrics overlap, new, muted colors will emerge, mimicking the effect of watercolor paint.
Secure each shape with a delicate backstitch around the edge using a single strand of floss.
Embellish with scattered beads or sequins for a touch of sparkle, enhancing the dreamy quality of these fabric collage embroidery projects.
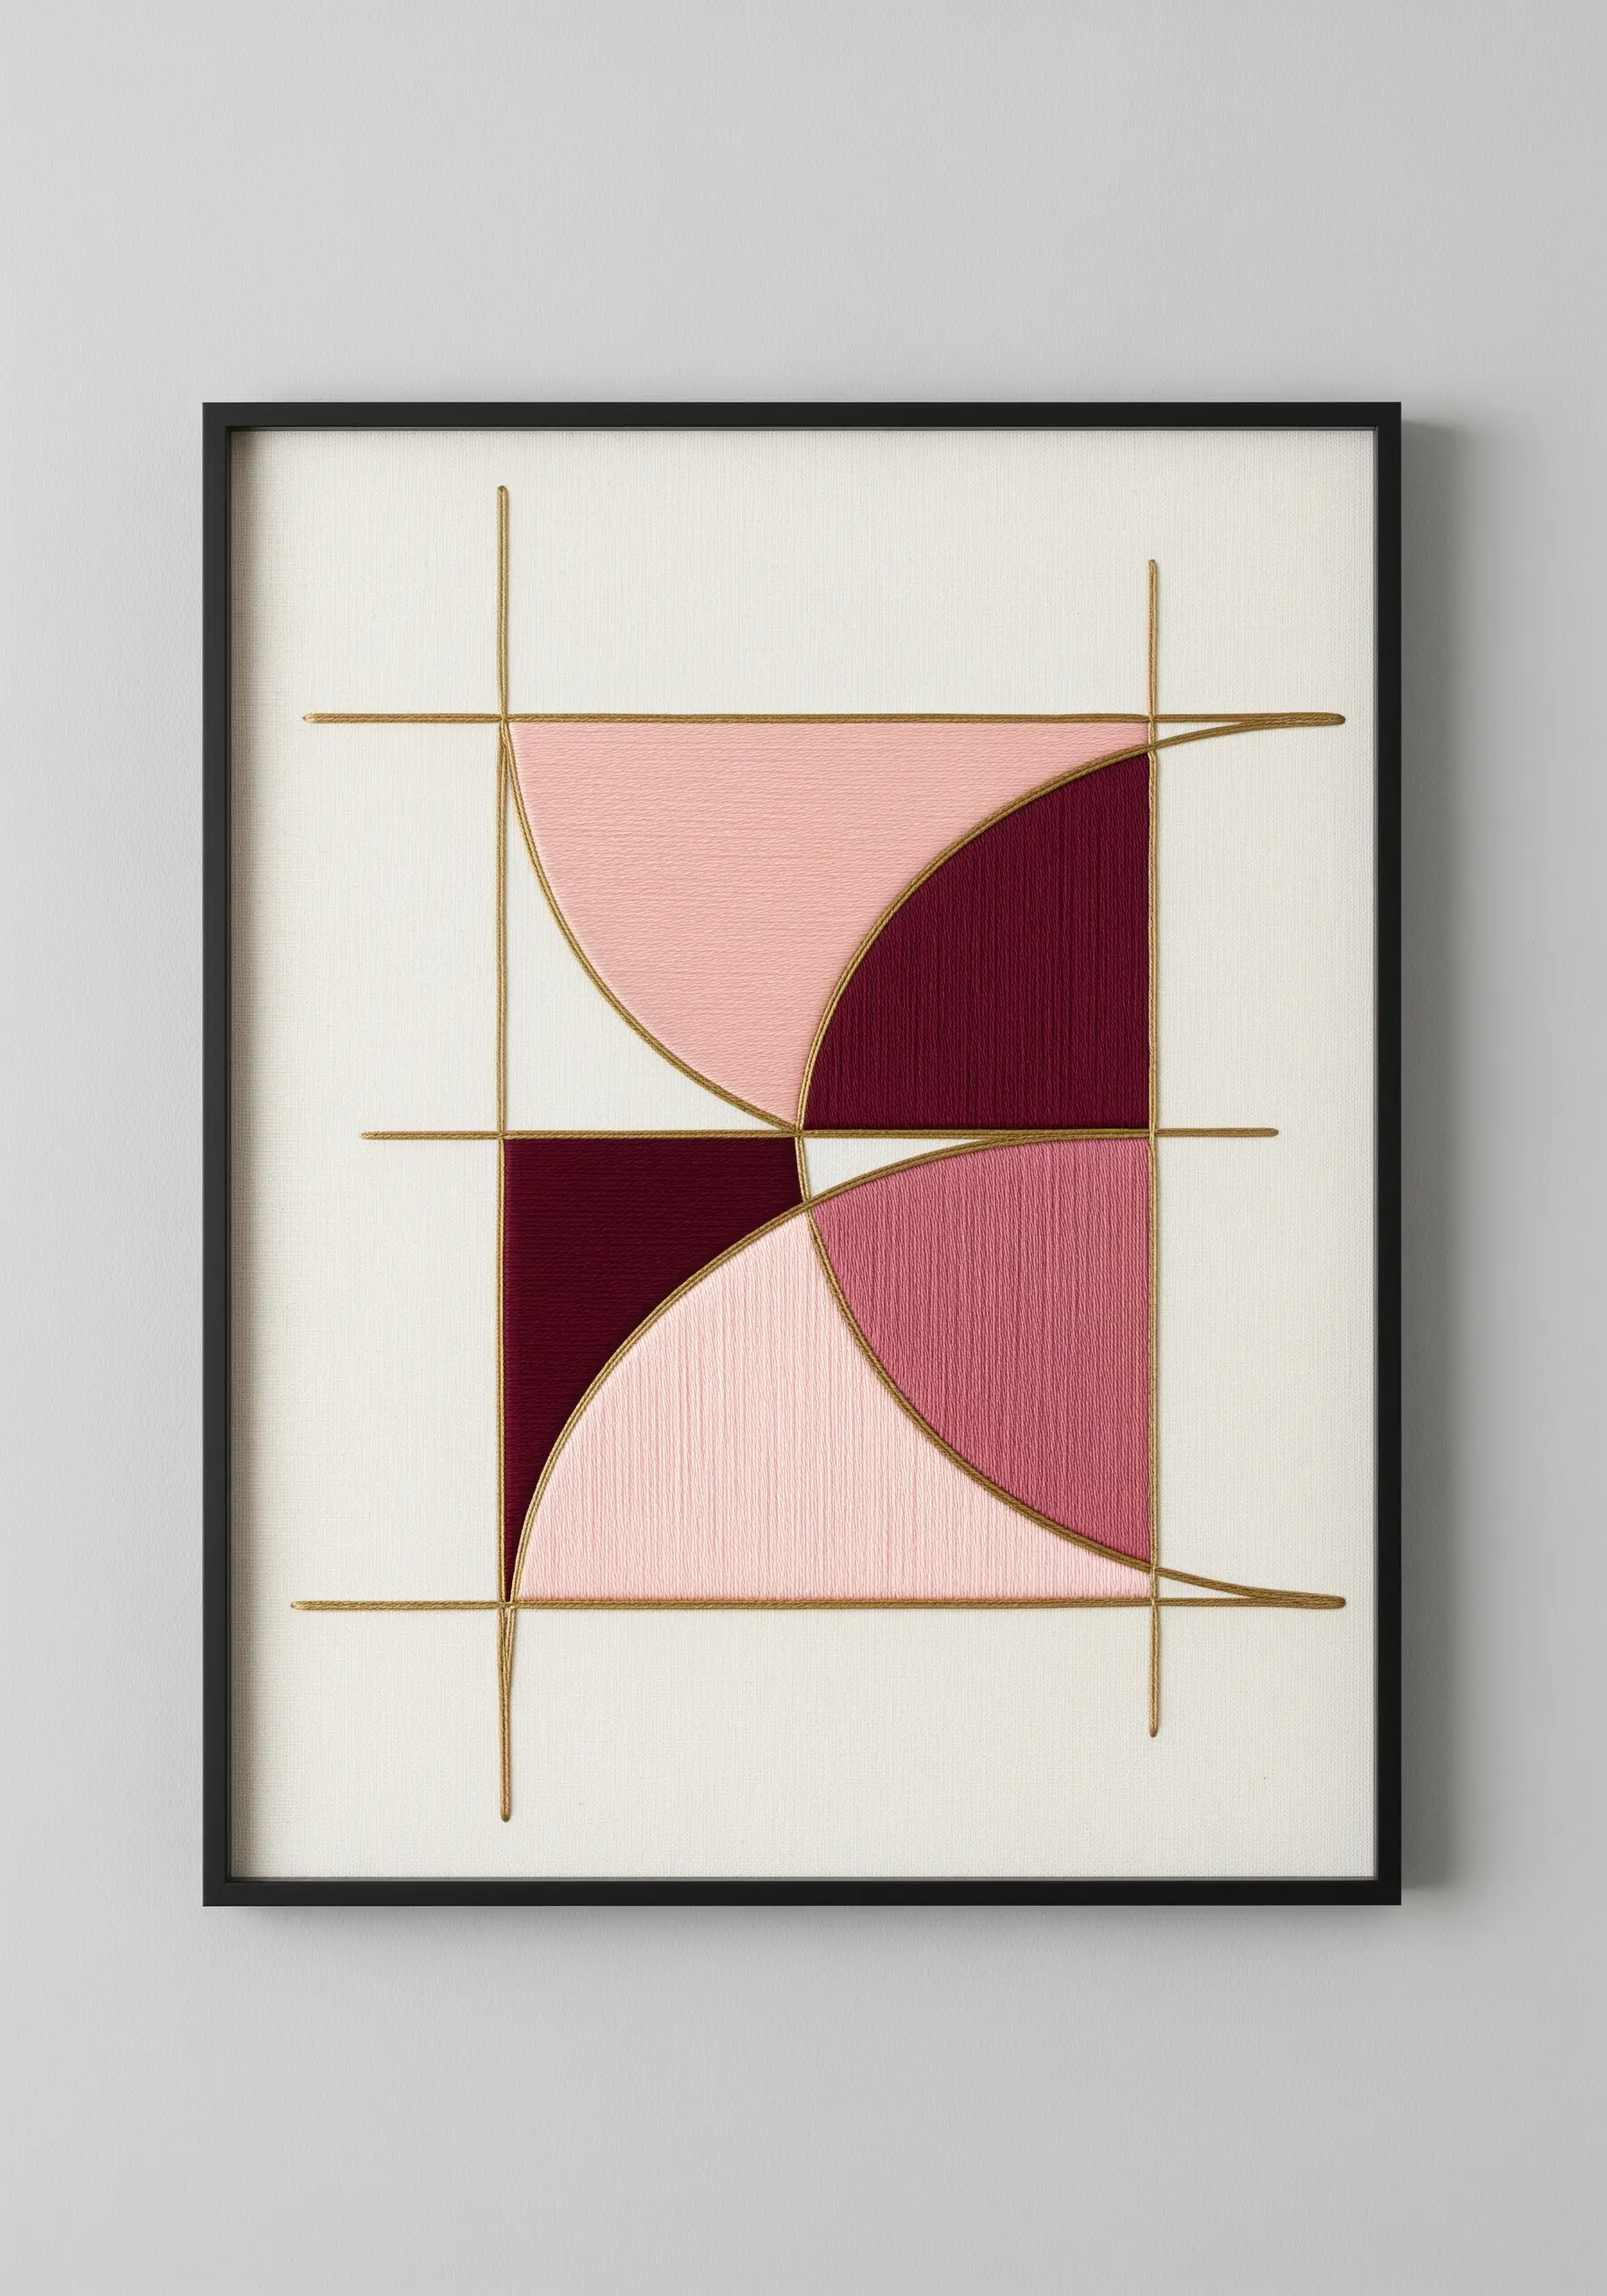
18. Create Illusions with Geometric String Art

This technique uses straight stitches to create the illusion of elegant curves, a hallmark of string art.
Start with a sheer or solid background and mark out points for your geometric shapes.
Using a single, continuous strand of thread for each shape, stitch from one point to another across the open space, systematically moving along the perimeter.
The overlapping straight lines will naturally form parabolic curves, creating intricate, web-like patterns.
Displaying it in a clear acrylic frame enhances the floating, delicate quality of these modern thread art techniques.
19. Capture a Painterly Gesture with Thread

Recreate the energy and movement of a single, bold brushstroke using thousands of tiny stitches.
To achieve this look on a large scale, use a thick black yarn or multiple strands of embroidery floss.
Fill the shape with a dense, chaotic seed stitch or a directional long-and-short stitch, ensuring your stitches follow the flow and energy of the ‘stroke’.
Let the edges be slightly uneven and tapered, just like a real brushstroke.
This is how large-scale embroidery tapestries can capture a moment of raw, artistic energy.
20. Compose a Landscape with Fabric Appliqué
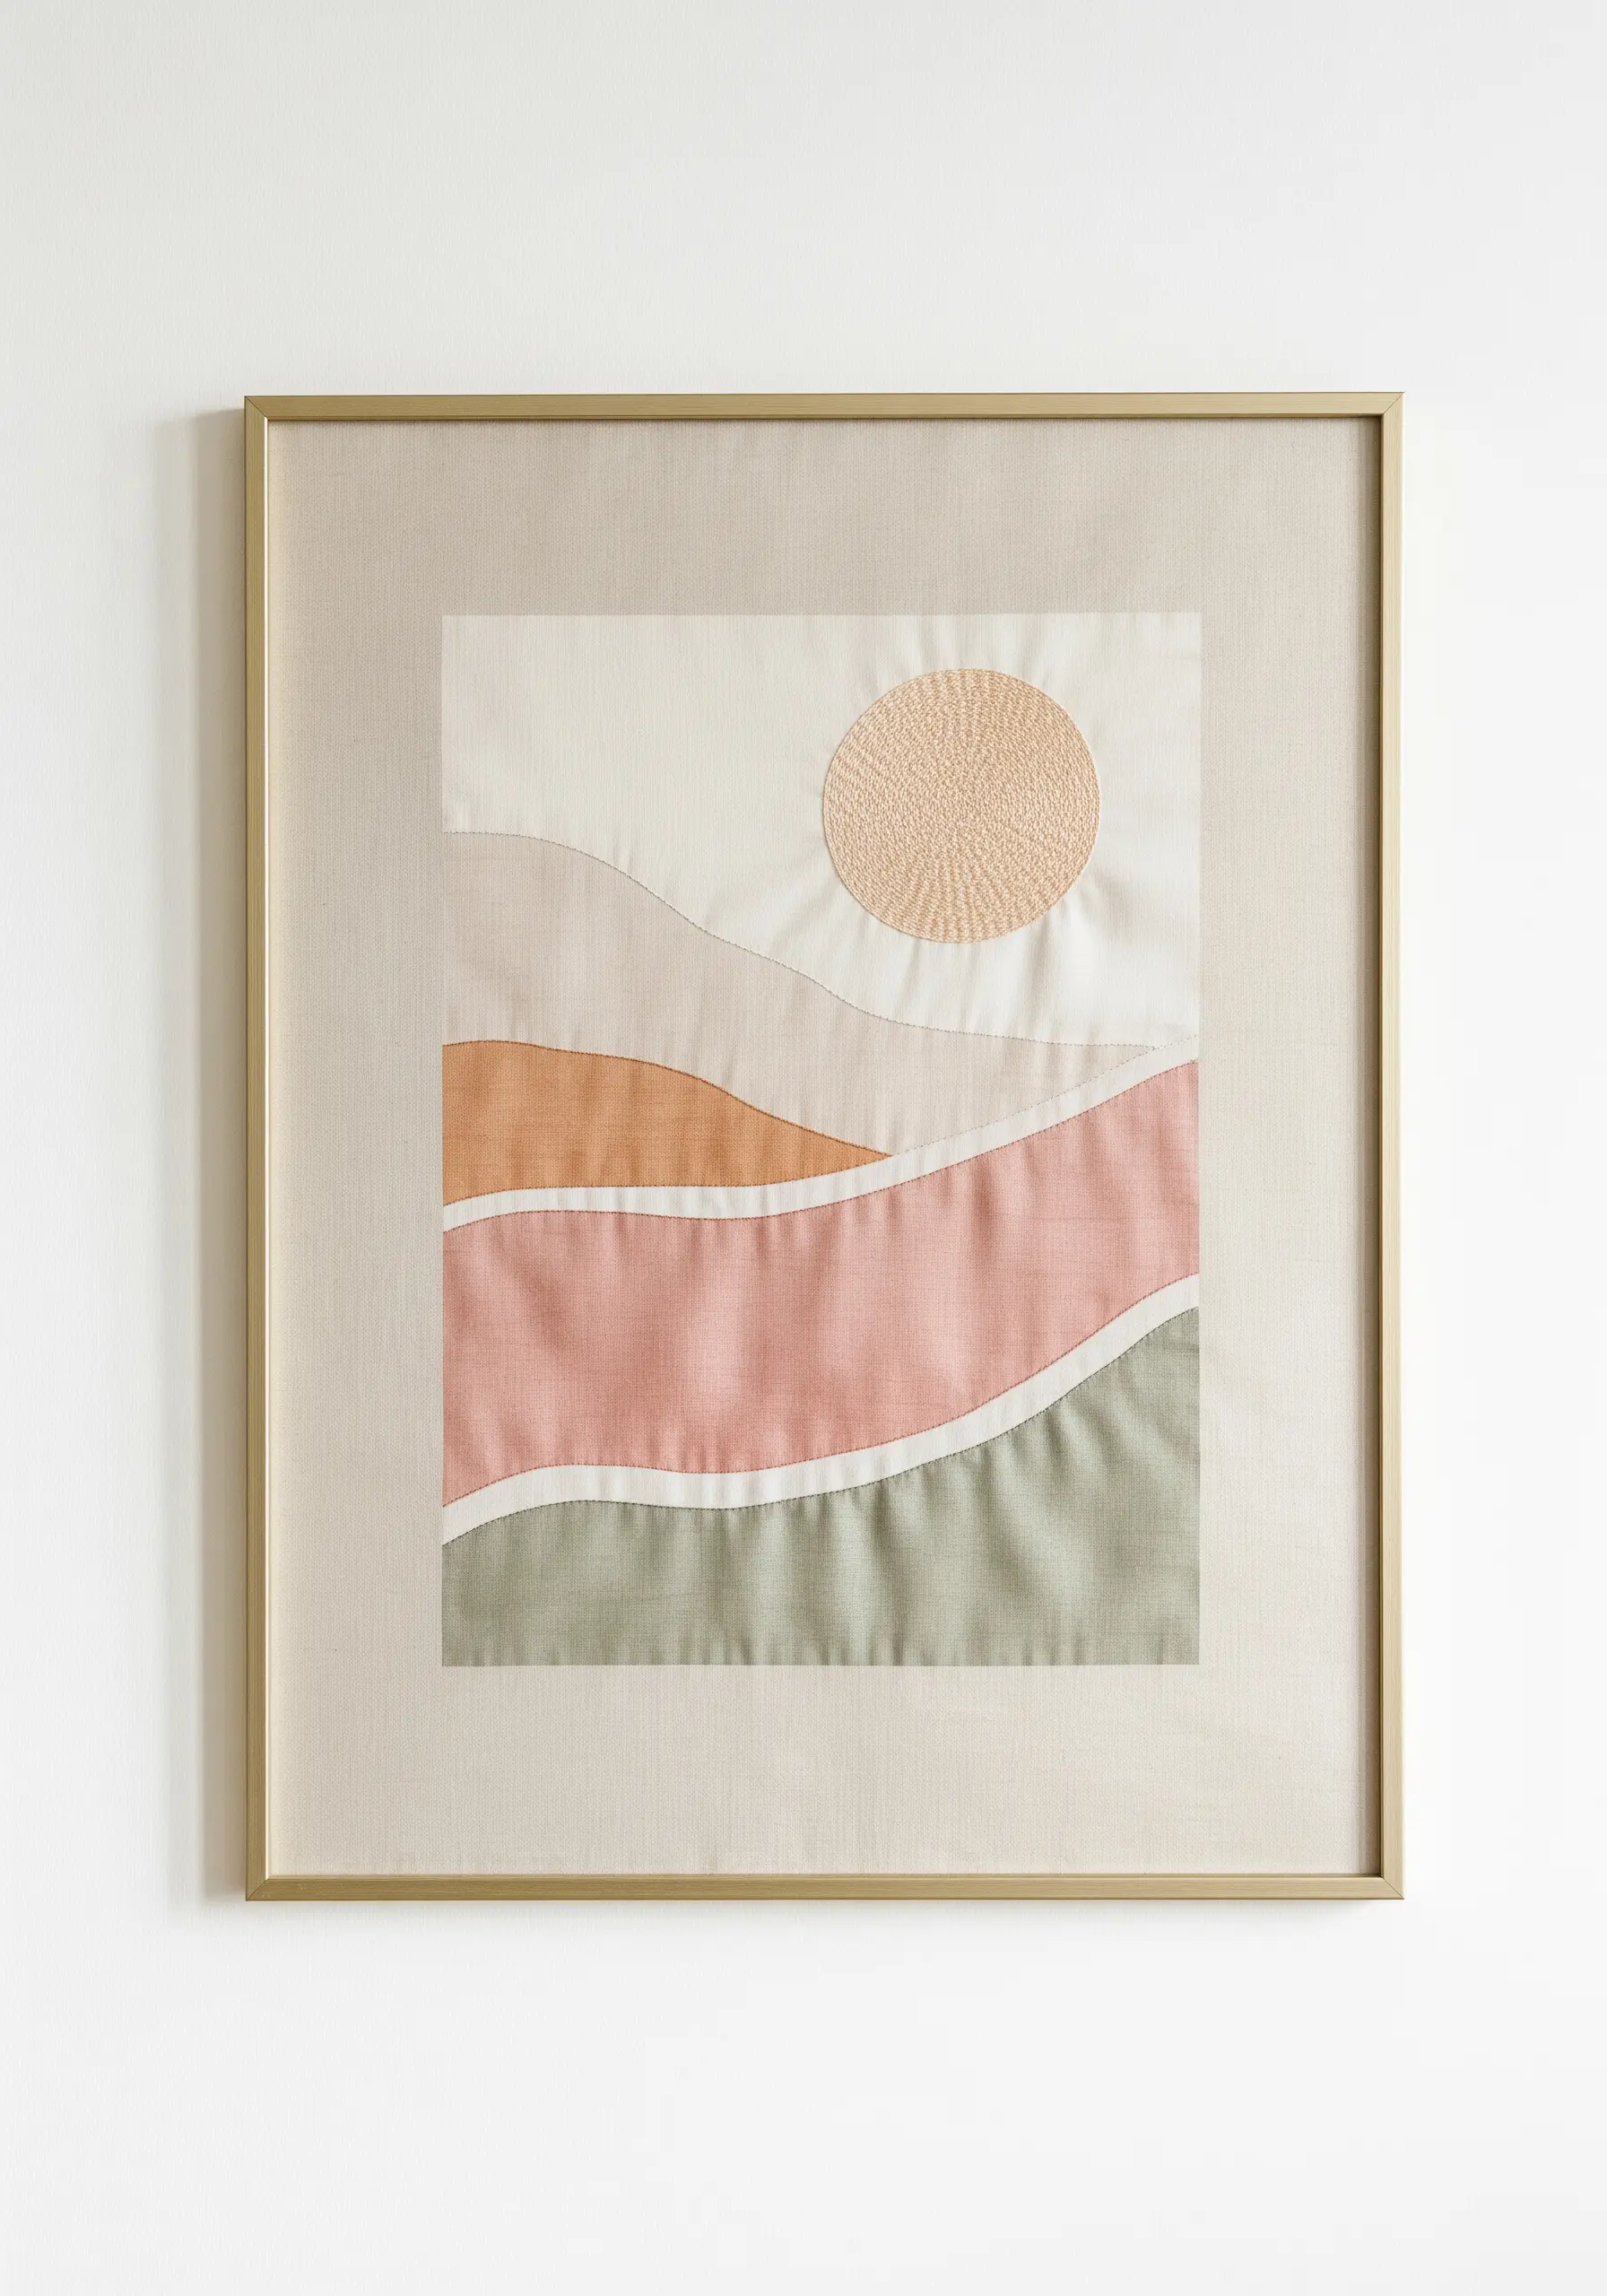
Instead of filling large areas with stitch, use fabric itself to block in color for a soft, quilted look.
Cut gentle, rolling curves from fabrics in a muted, harmonious palette of sand, blush, and sage green.
Arrange the pieces on a neutral background fabric, layering them to create a sense of depth.
Secure each piece with a neat, simple backstitch or running stitch along the edges, using a thread that either matches or provides a subtle contrast.
This method of fabric collage embroidery is perfect for creating serene, abstract landscapes.
21. Blend Weaving and Stitching in One Hoop

Combine two distinct fiber arts within a single frame for a piece rich in contrasting textures.
On one side of the hoop, create a small loom by warping threads vertically across the hoop. Weave different yarns through this warp to create a textured, woven section.
On the other side, use traditional embroidery techniques—like satin stitch for color blocking and chain stitch for outlines—to create abstract shapes.
This fusion of techniques allows you to explore stunning mixed-fiber projects and push the boundaries of what hoop art can be.
22. Depict Underwater Light with French Knots and Beads

Suggest the feeling of being underwater by building up layers of texture and a deep color gradient.
Create layered, organic ridges using a whipped backstitch or chain stitch in deep blues and teals.
Fill the spaces between with dense clusters of French knots in varying shades to mimic effervescence and marine life.
Use a gradient from dark navy at the bottom to a lighter turquoise at the top to suggest light filtering down from the surface.
Finally, add scattered iridescent beads to catch the light like tiny air bubbles, perfect for detailed ocean-inspired hoop embroidery ideas.
23. Frame Negative Space with a Dimensional Border
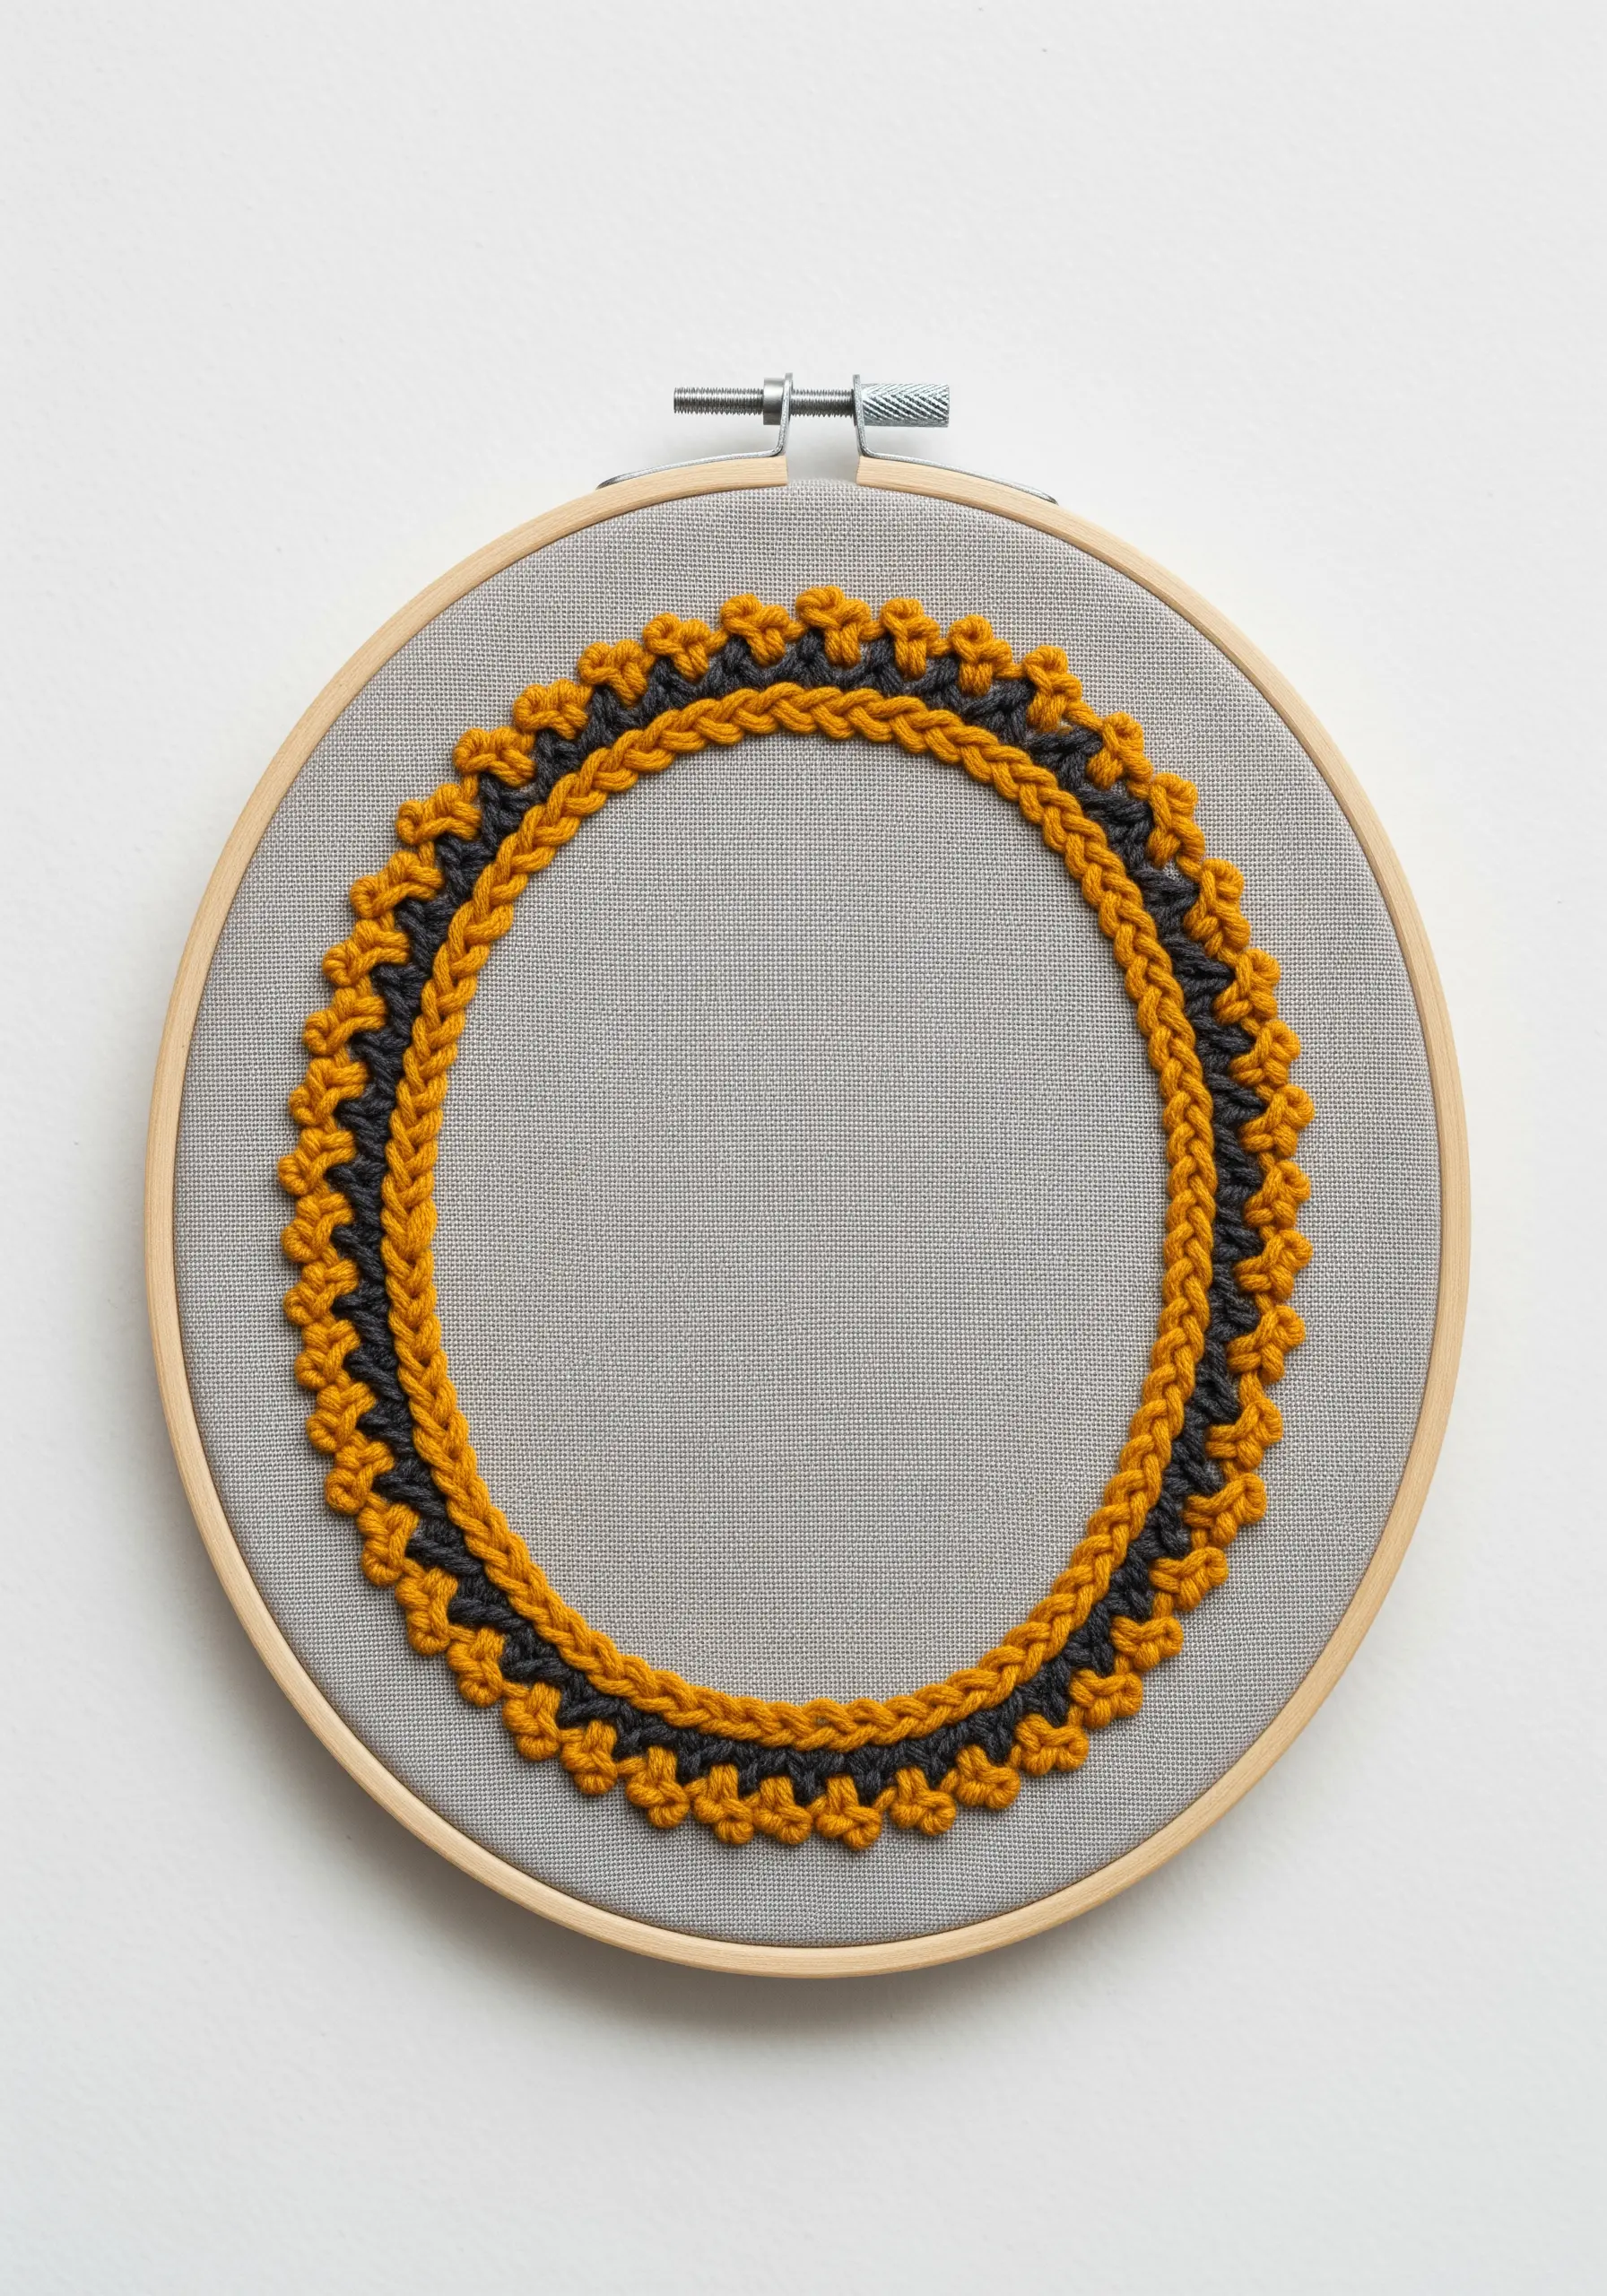
Turn a simple border into the main event by using a highly textured, three-dimensional stitch.
The stitch used here is a variation of a cast-on or drizzle stitch, which creates raised, looped shapes.
Work this stitch in a circle using two contrasting colors, like charcoal and mustard, to create a layered, intricate pattern.
By leaving the center of the hoop completely empty, the ornate border becomes the focal point.
This technique is a sophisticated way to create modern, minimal border designs that feel both classic and contemporary.


