
When you work with a single color, you invite a different kind of creativity to the foreground. Without the distraction of choosing a palette, you can finally focus on the one thing that gives embroidery its soul: texture.
Think of your thread not just as a line of color, but as a sculptural material. How does it catch the light? What shadow does it cast? How does a smooth satin stitch feel next to a bumpy French knot, or a thick, couched cord next to a delicate seed stitch?
In this collection, you’ll discover how to make monochrome feel multi-dimensional. You’ll learn to build depth, evoke emotion, and create stunning visual interest using nothing more than the interplay of stitch, thread, and fabric. It’s time to let texture tell the story.
1. Layer Sculptural Forms with Appliqué and Couching
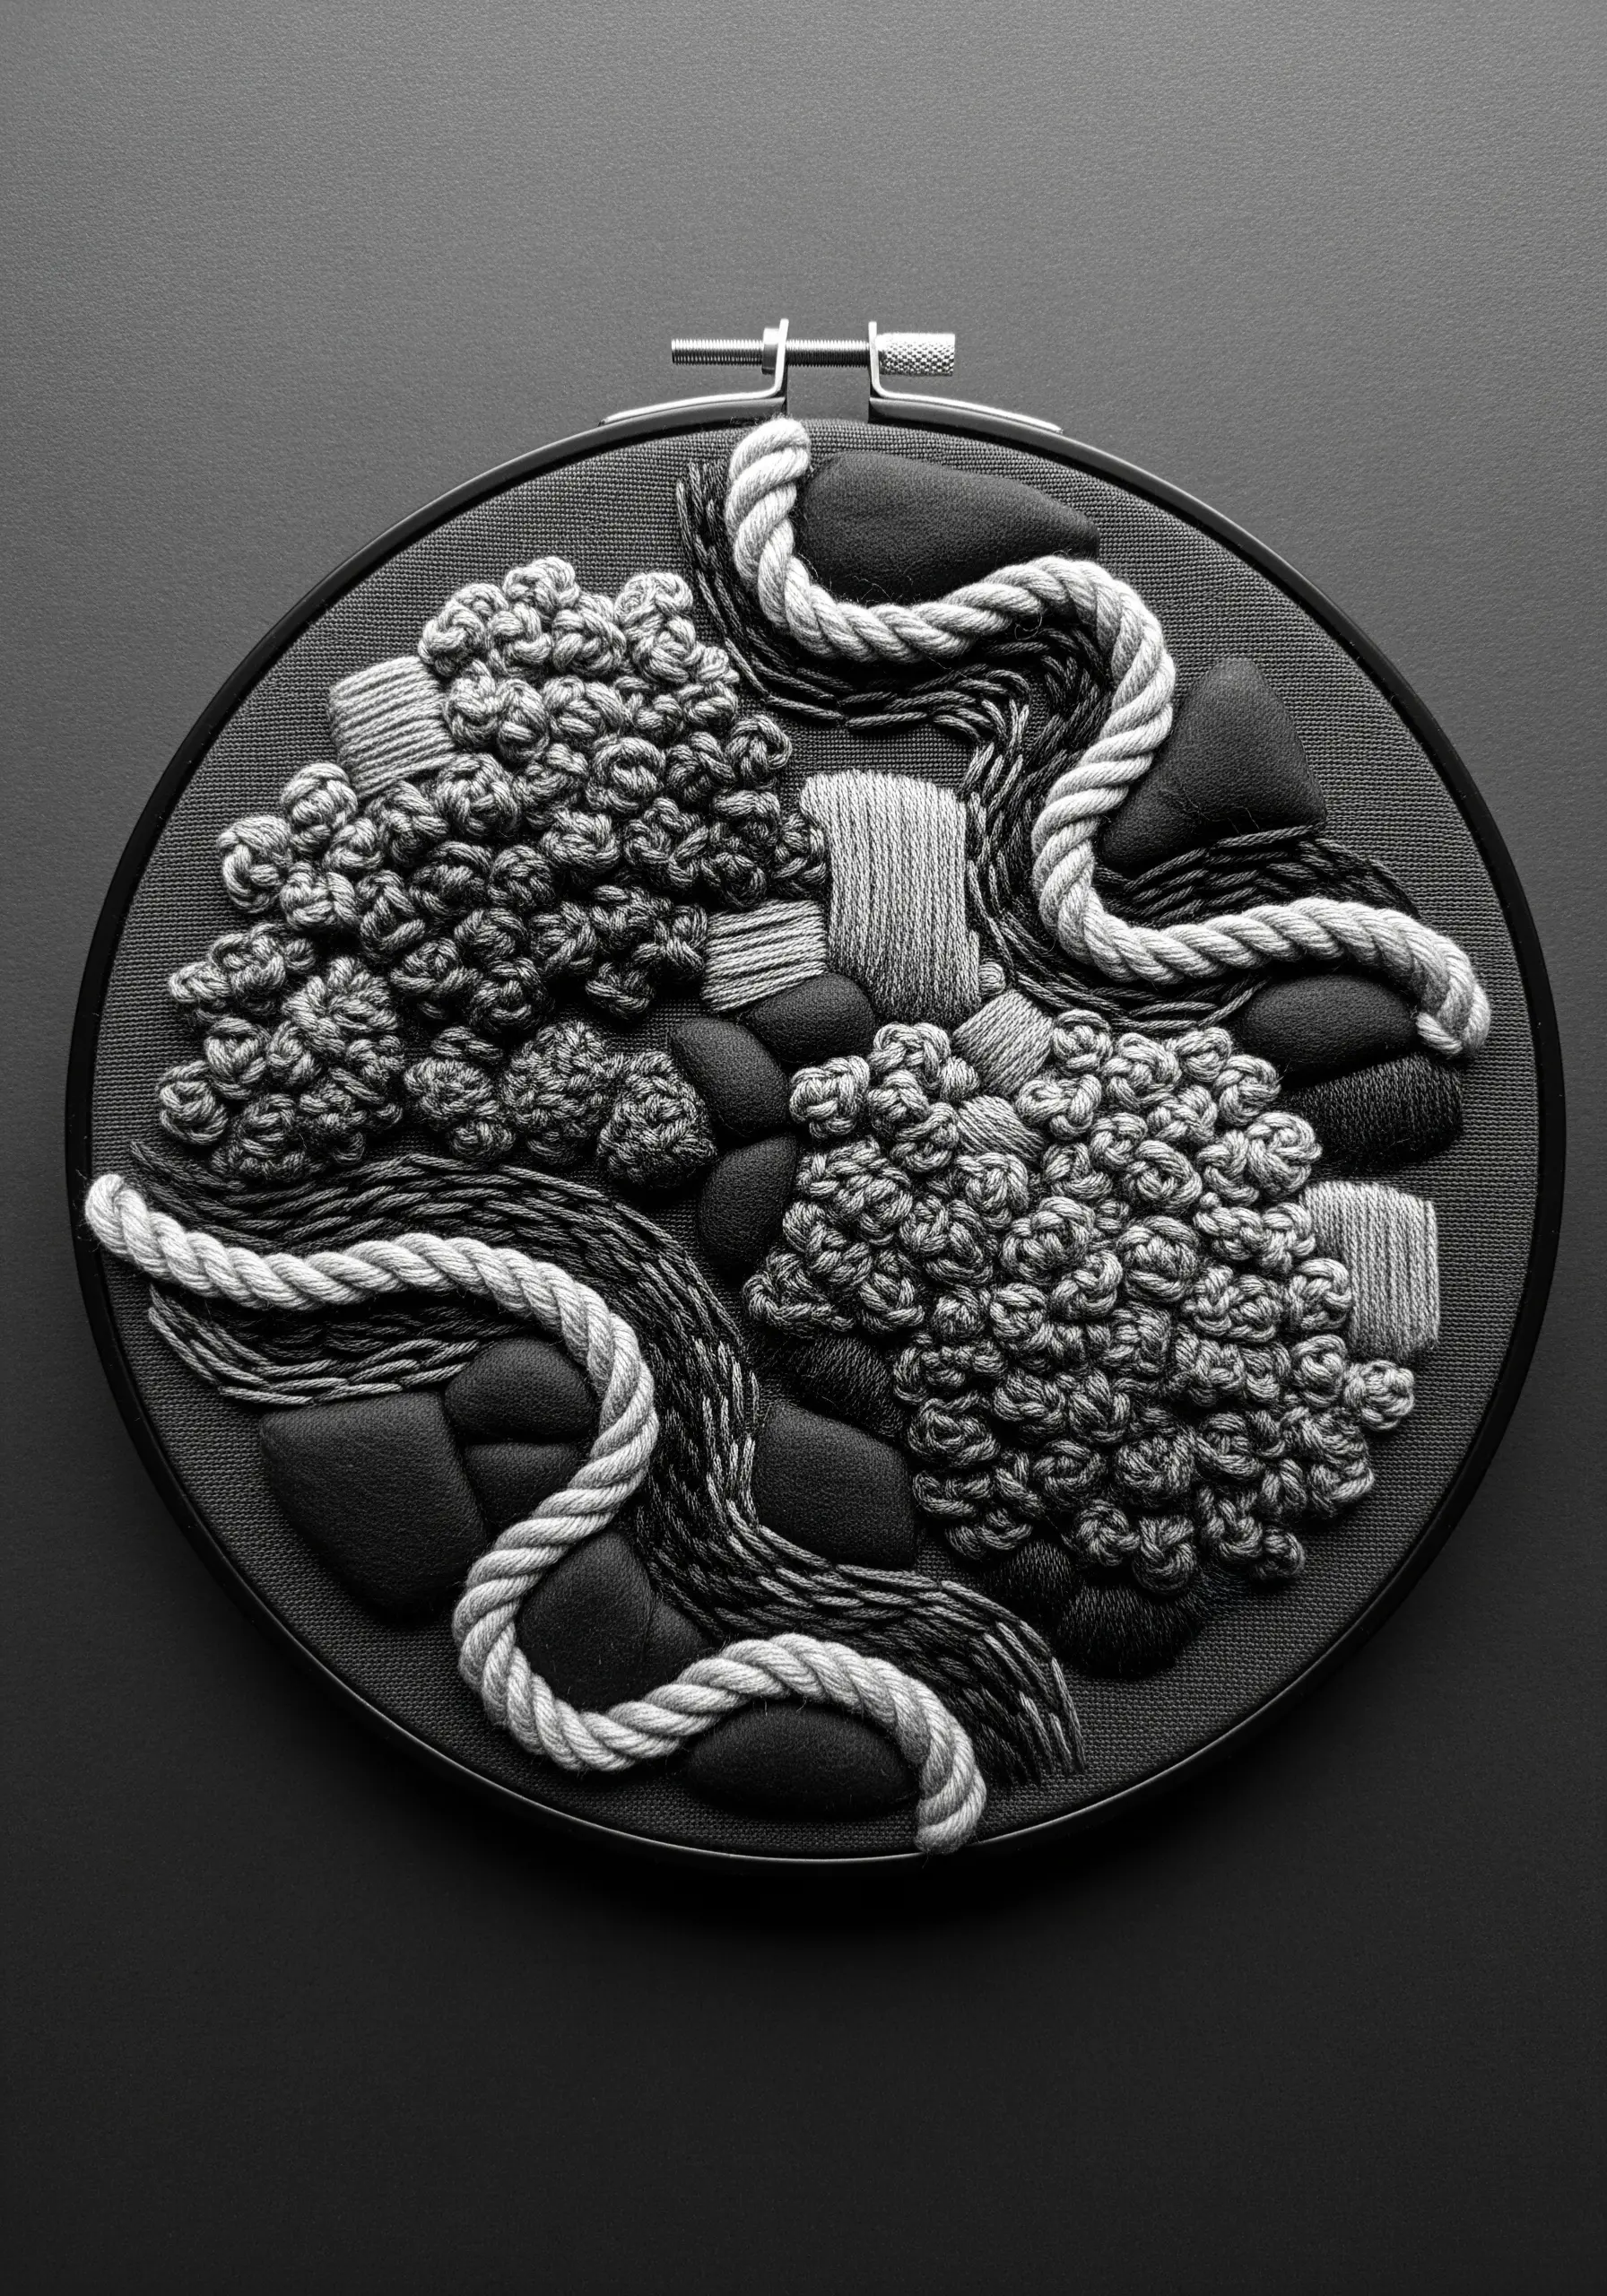
Create dramatic depth by combining different materials in a single monochrome palette.
Start by cutting organic shapes from a thick, non-fraying fabric like felt or faux suede and attach them to your base fabric using a few holding stitches.
Then, introduce thick, twisted cord or yarn, securing it with a couching stitch to create flowing, rope-like lines that travel over and around your appliqué pieces.
Finally, fill negative spaces with dense clusters of French knots, contrasting the smooth appliqué and linear cords with a rich, bumpy texture that invites touch.
This method builds a truly three-dimensional surface, where light creates shadows that enhance the piece’s sculptural quality.
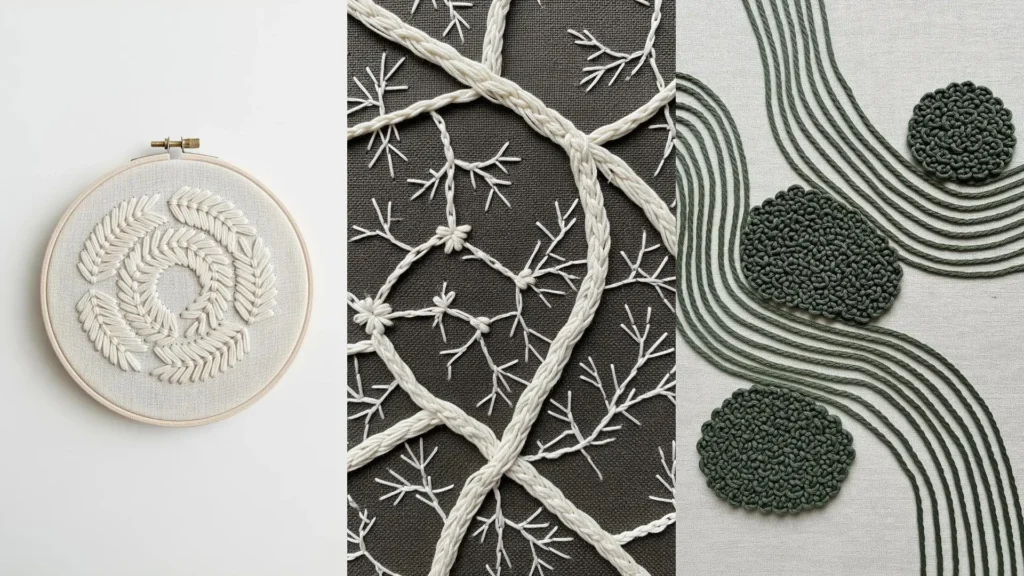
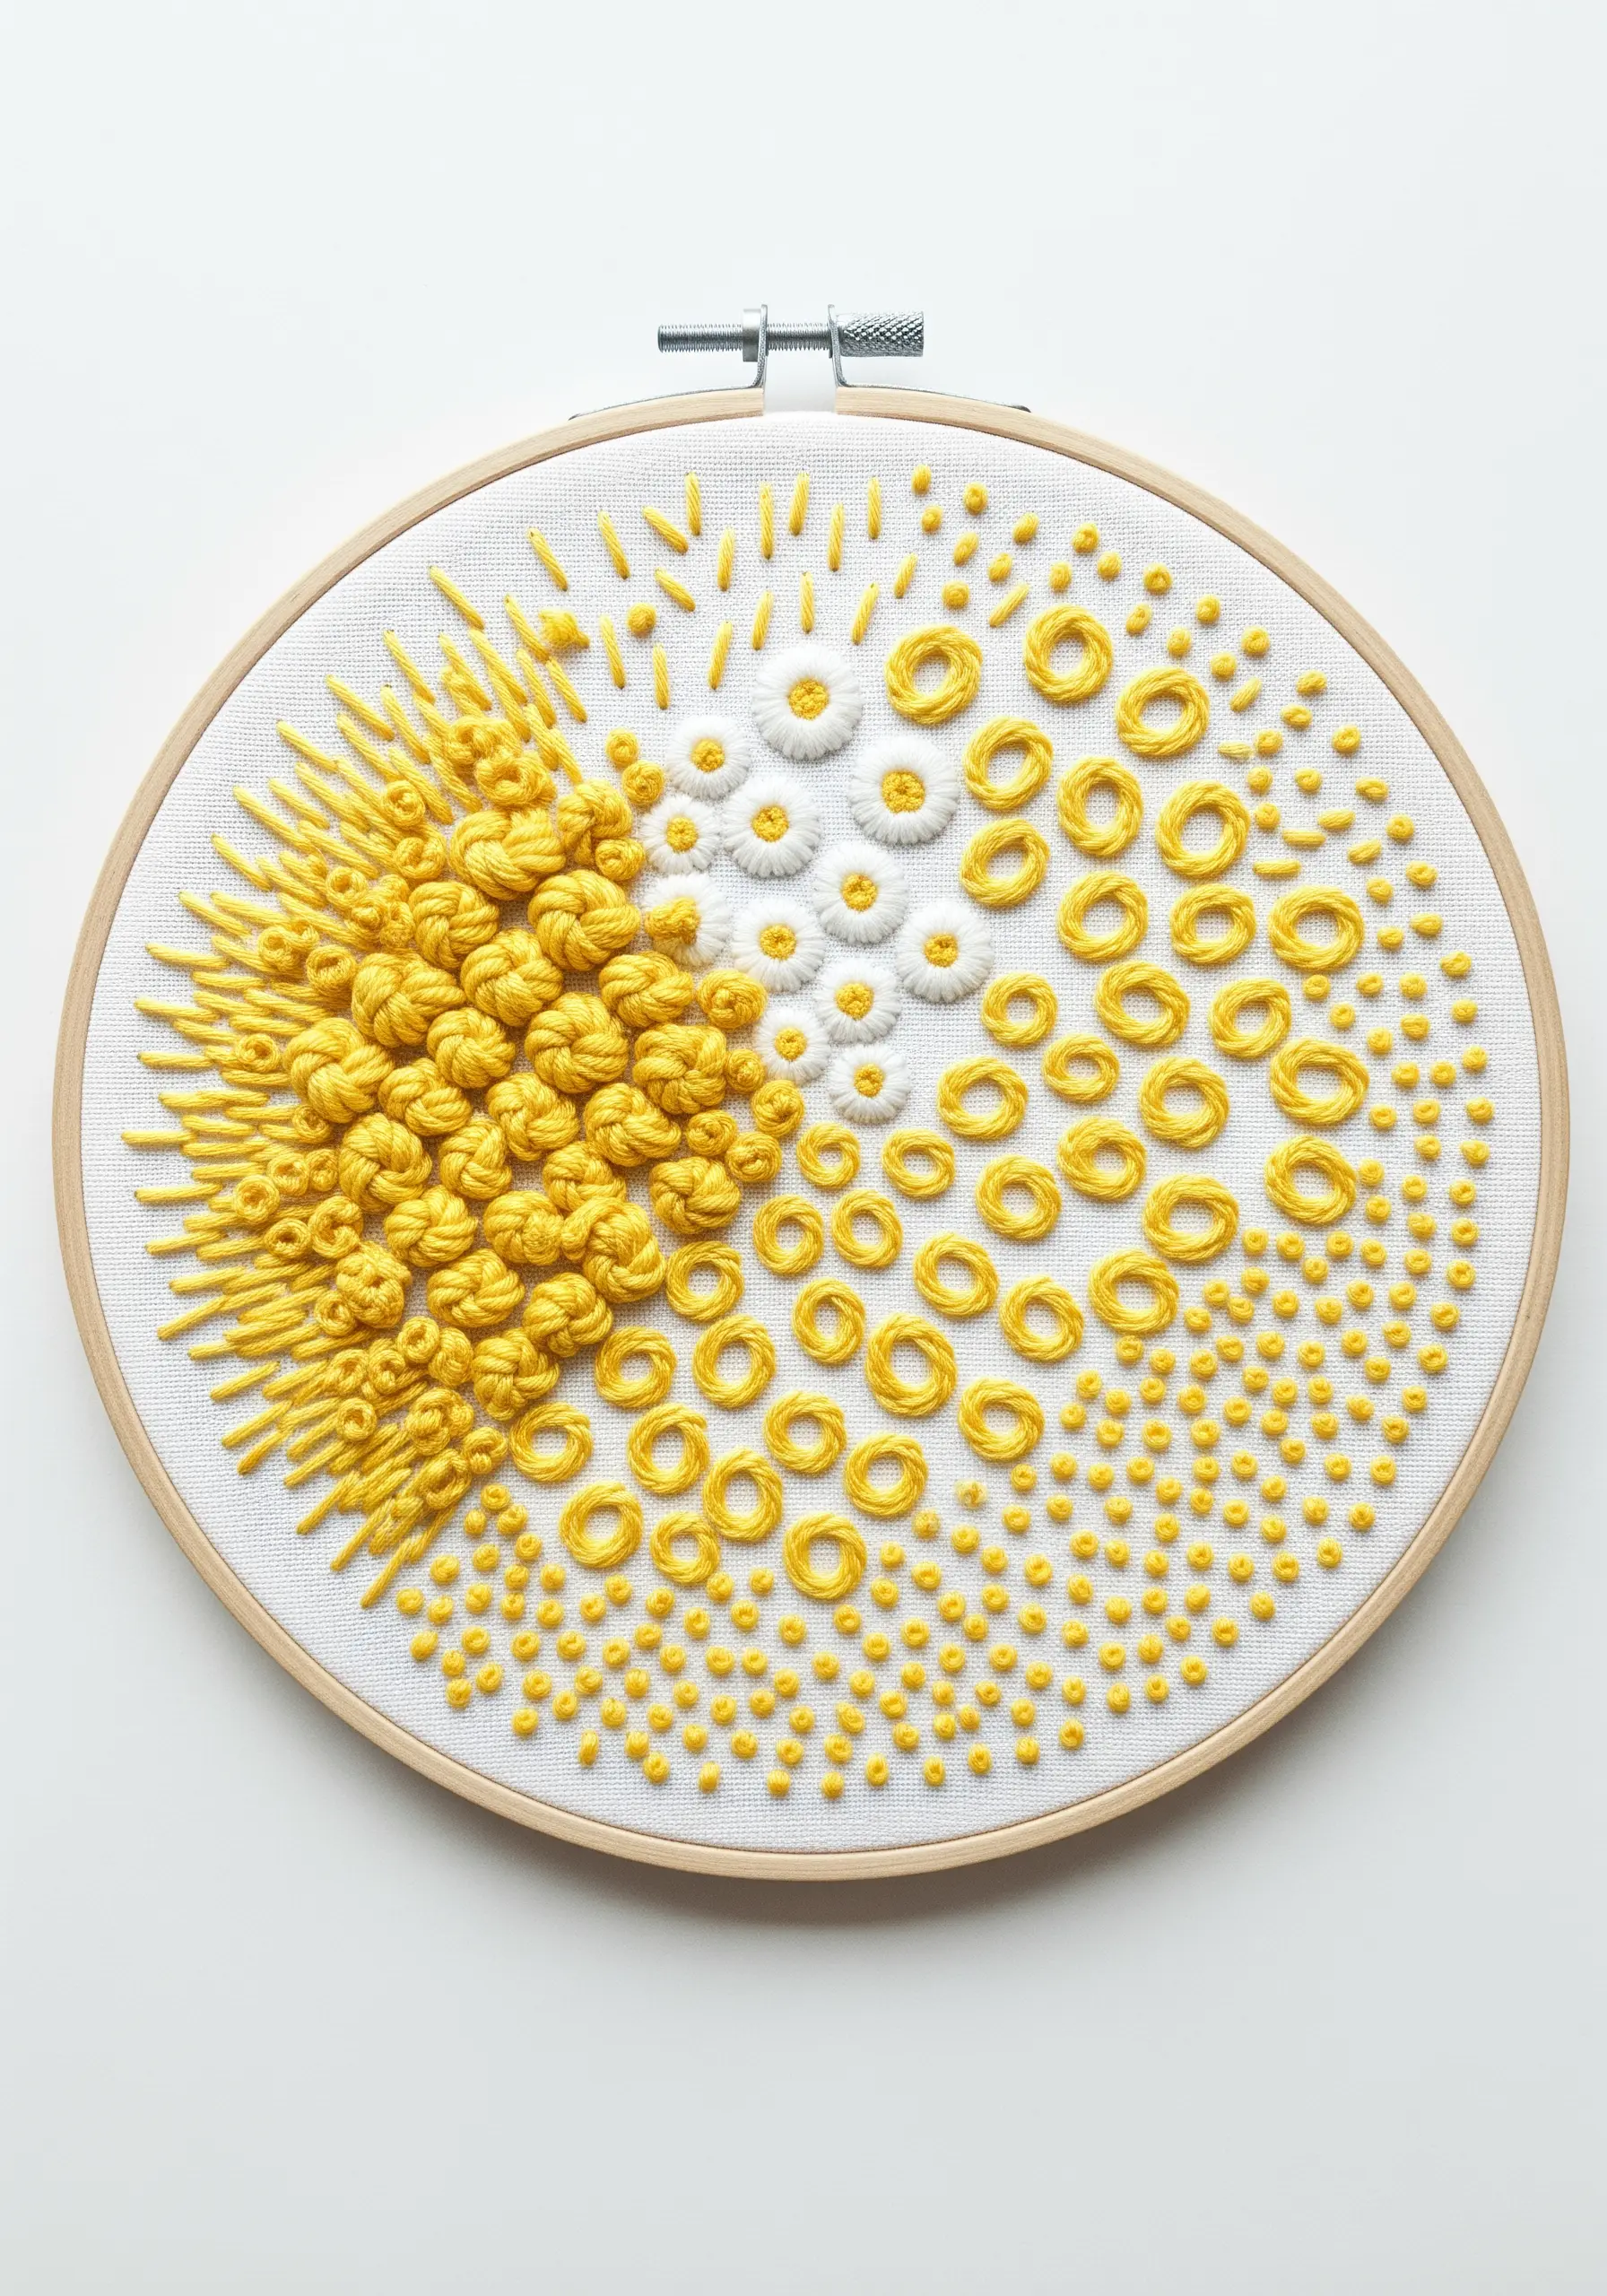
2. Explore Radial Stitches within Circular Motifs

Turn simple circles into intricate medallions by exploring different radial and circular fill stitches, all in a single thread color.
For a smooth, woven look, try a whipped spider web stitch, where threads radiate from a central point and are then woven over and under.
To create a ribbed texture, fill a circle with concentric rings of chain stitch or split stitch.
For a lacy, open effect, use buttonhole stitch worked in a circle to create rings and eyelets.
By varying the stitch within each circle, you create a dynamic composition where texture, not color, directs the eye.
3. Capture Motion with Directional Satin Stitch
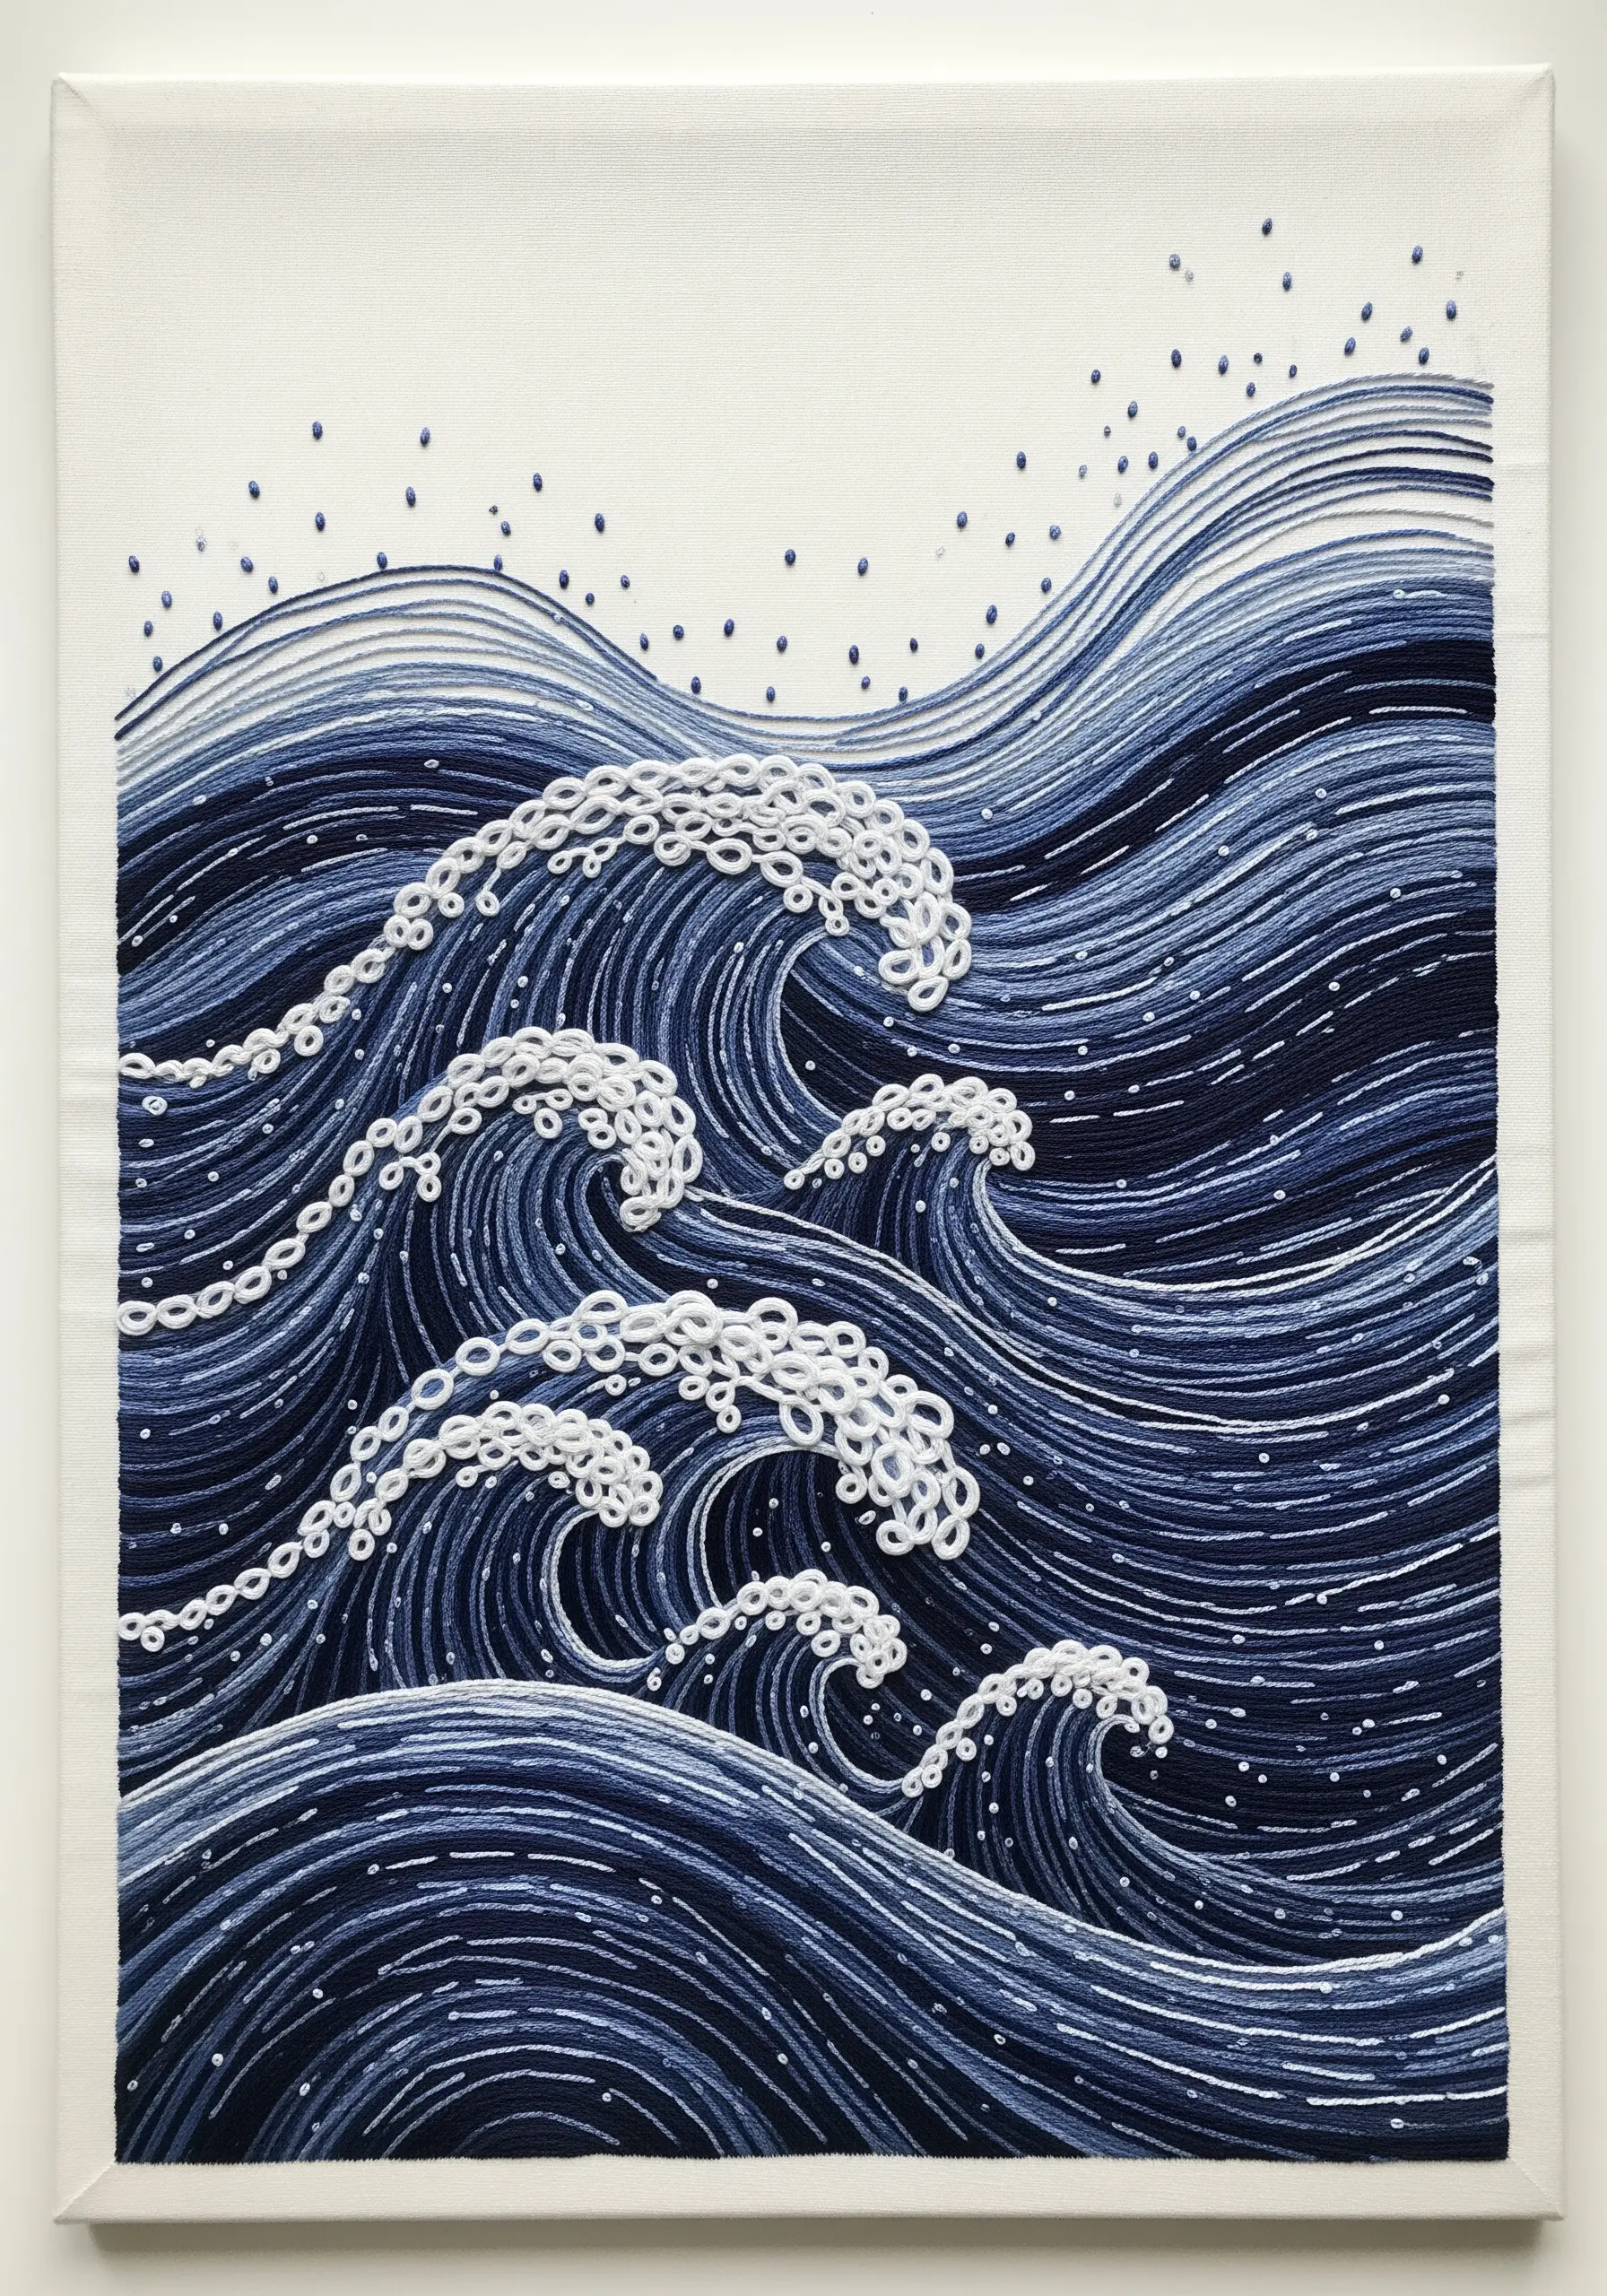
Evoke the flow of water or wind by using the direction of your stitches to guide the viewer’s eye.
Map out the curves of your waves first, then fill them with long, dense satin stitches that precisely follow these lines.
To create depth, use a thicker thread (more strands of floss) for the waves in the foreground and a thinner thread for those in the background.
Accent the crests of the waves with a line of bubbly French knots or colonial knots to simulate sea foam, adding a point of high texture against the smooth flow of the satin stitch.
This technique turns a flat surface into a dynamic scene purely through stitch placement and thread weight.
4. Introduce Architectural Dimension with Stumpwork
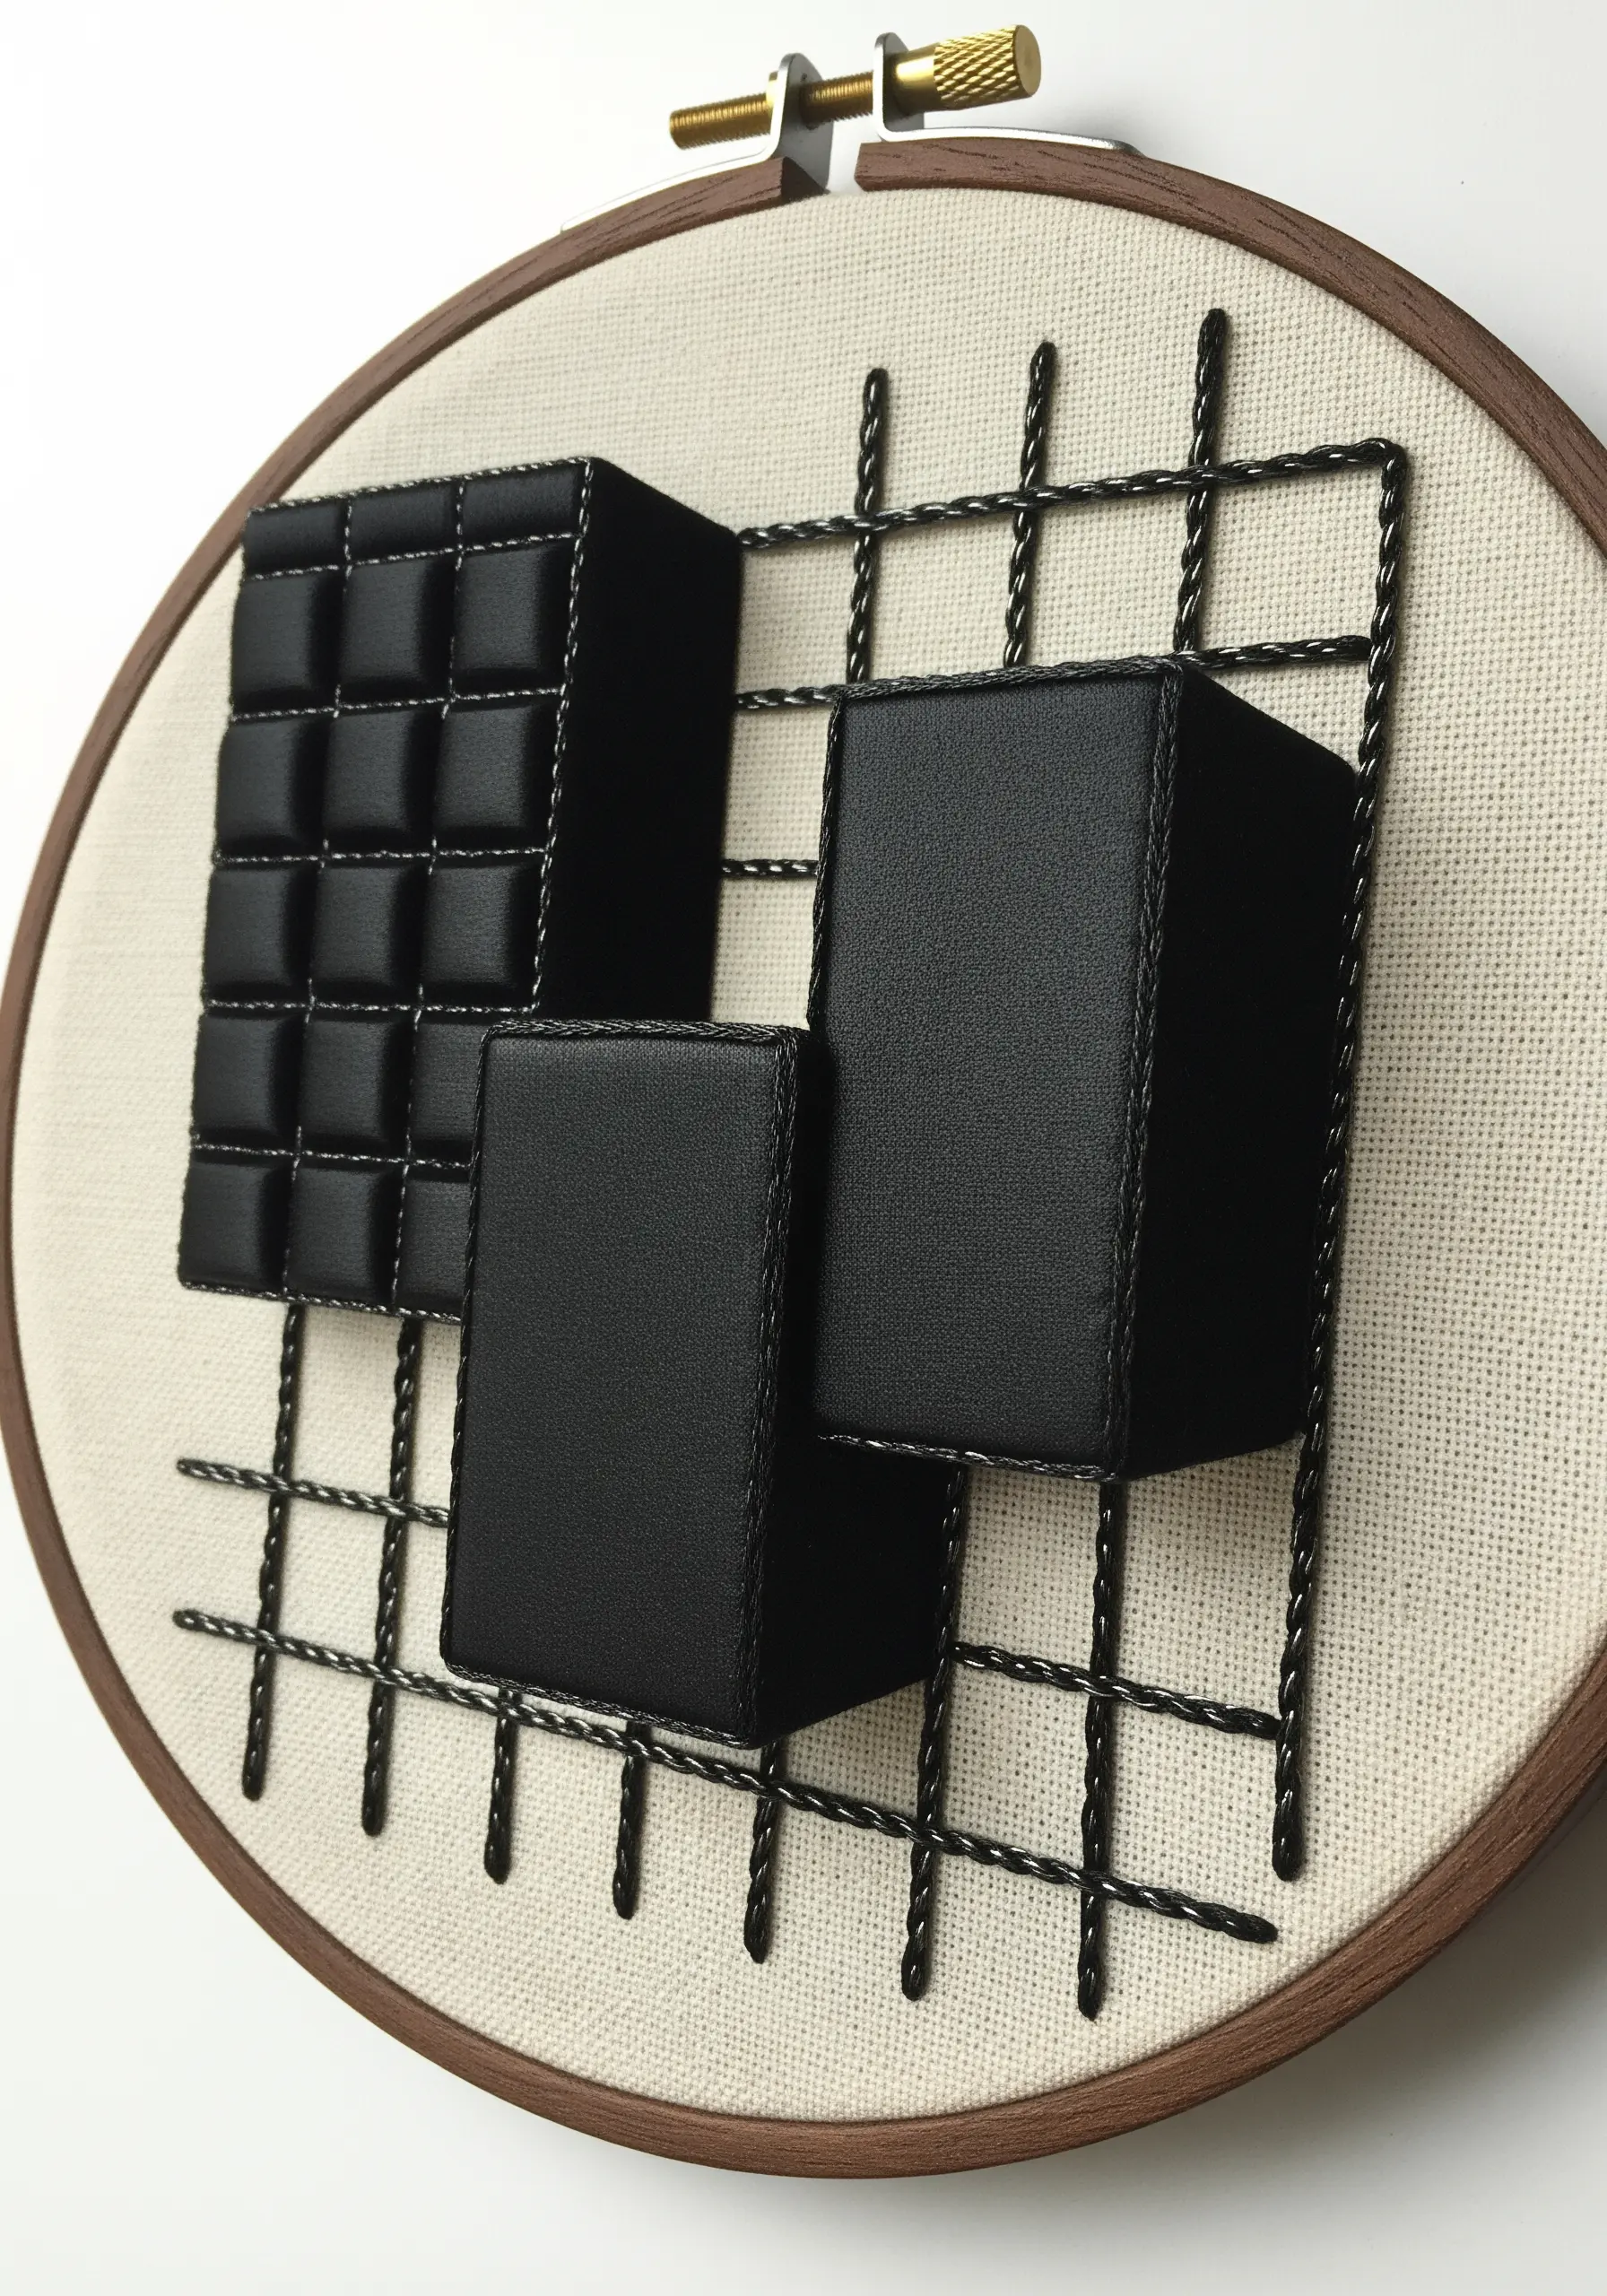
Elevate your embroidery from two to three dimensions using basic stumpwork techniques.
Create padded geometric shapes by covering small pieces of foam or felt with fabric, like faux leather, and stitching the edges neatly.
Attach these 3D elements to your main fabric, positioning them to create a sense of architectural perspective.
Contrast these solid, modern forms with a simple, open grid made from couched thread, which provides a visual anchor without adding bulk.
This approach transforms the embroidery hoop into a small-scale sculptural installation.
5. Juxtapose Geometric Grids and Organic Fills
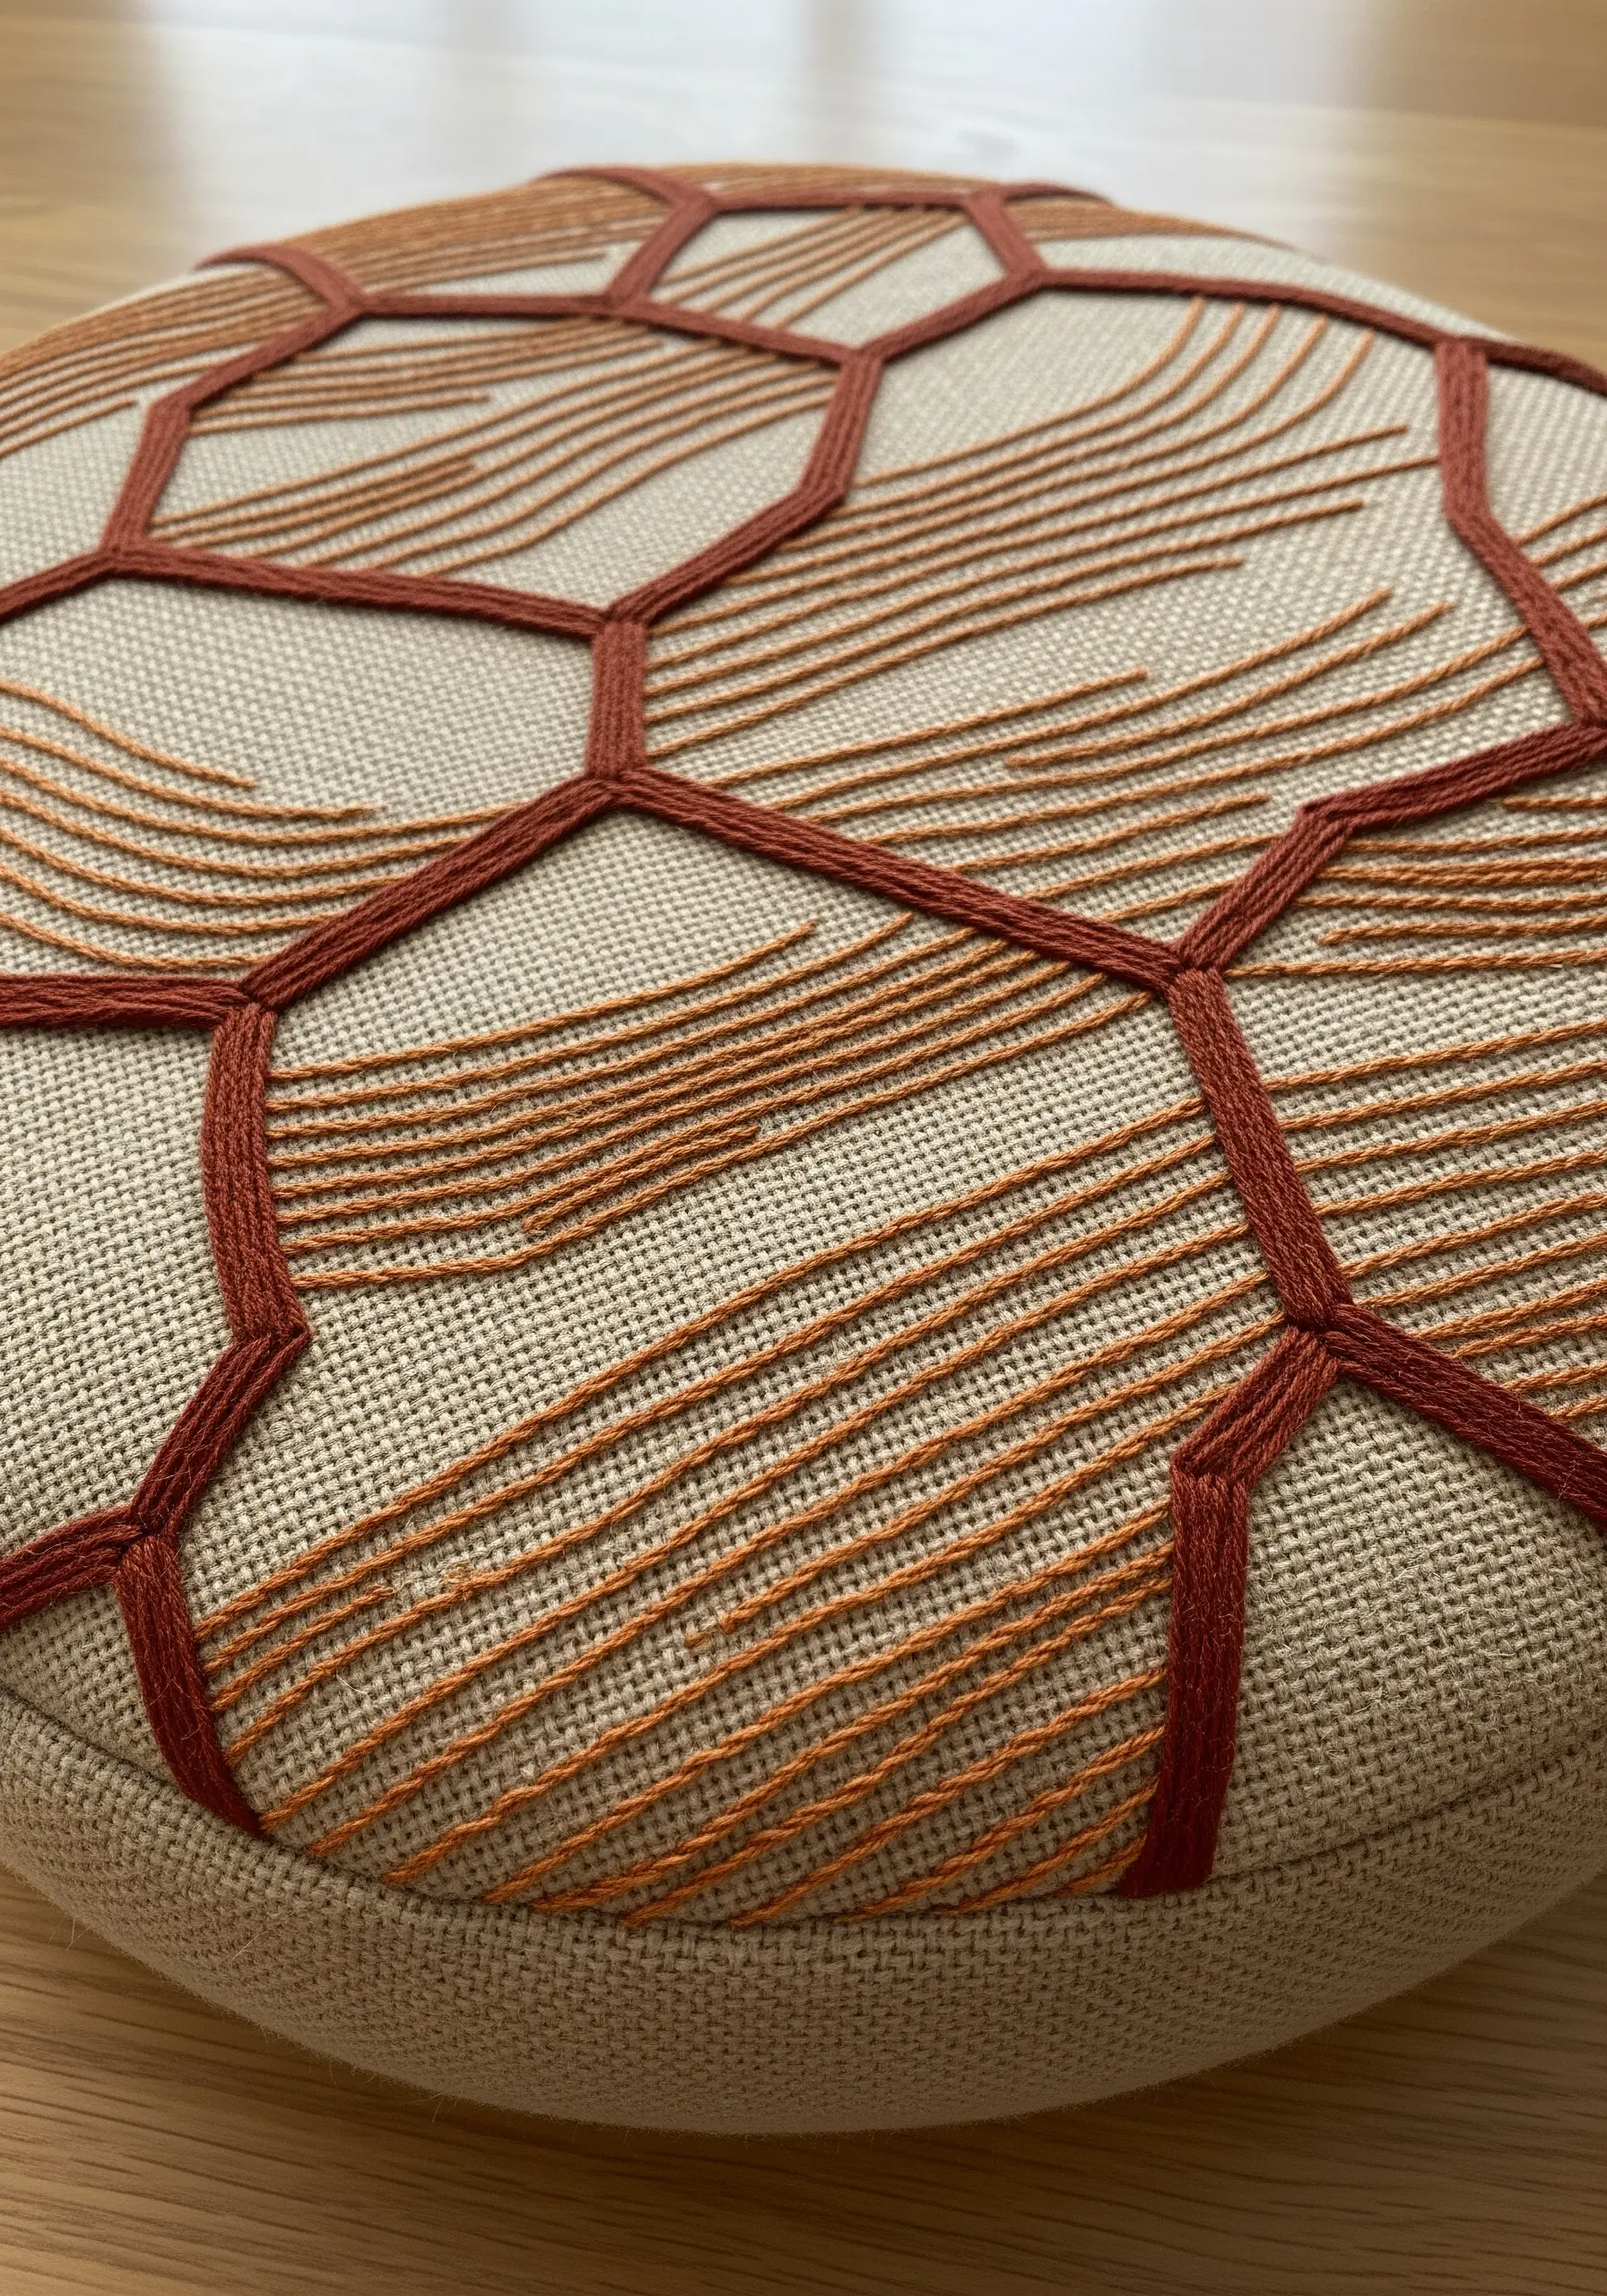
Create visual tension by combining a rigid structure with a free-flowing fill.
First, establish a strong geometric framework, like a honeycomb pattern, using a bold outline stitch such as a whipped backstitch or a couched cord.
Instead of a traditional fill, work rows of simple running stitches inside each shape, gently curving them to suggest movement or rolling hills.
This contrast between the sharp, angular frame and the soft, organic interior texture makes the overall design feel both controlled and alive.
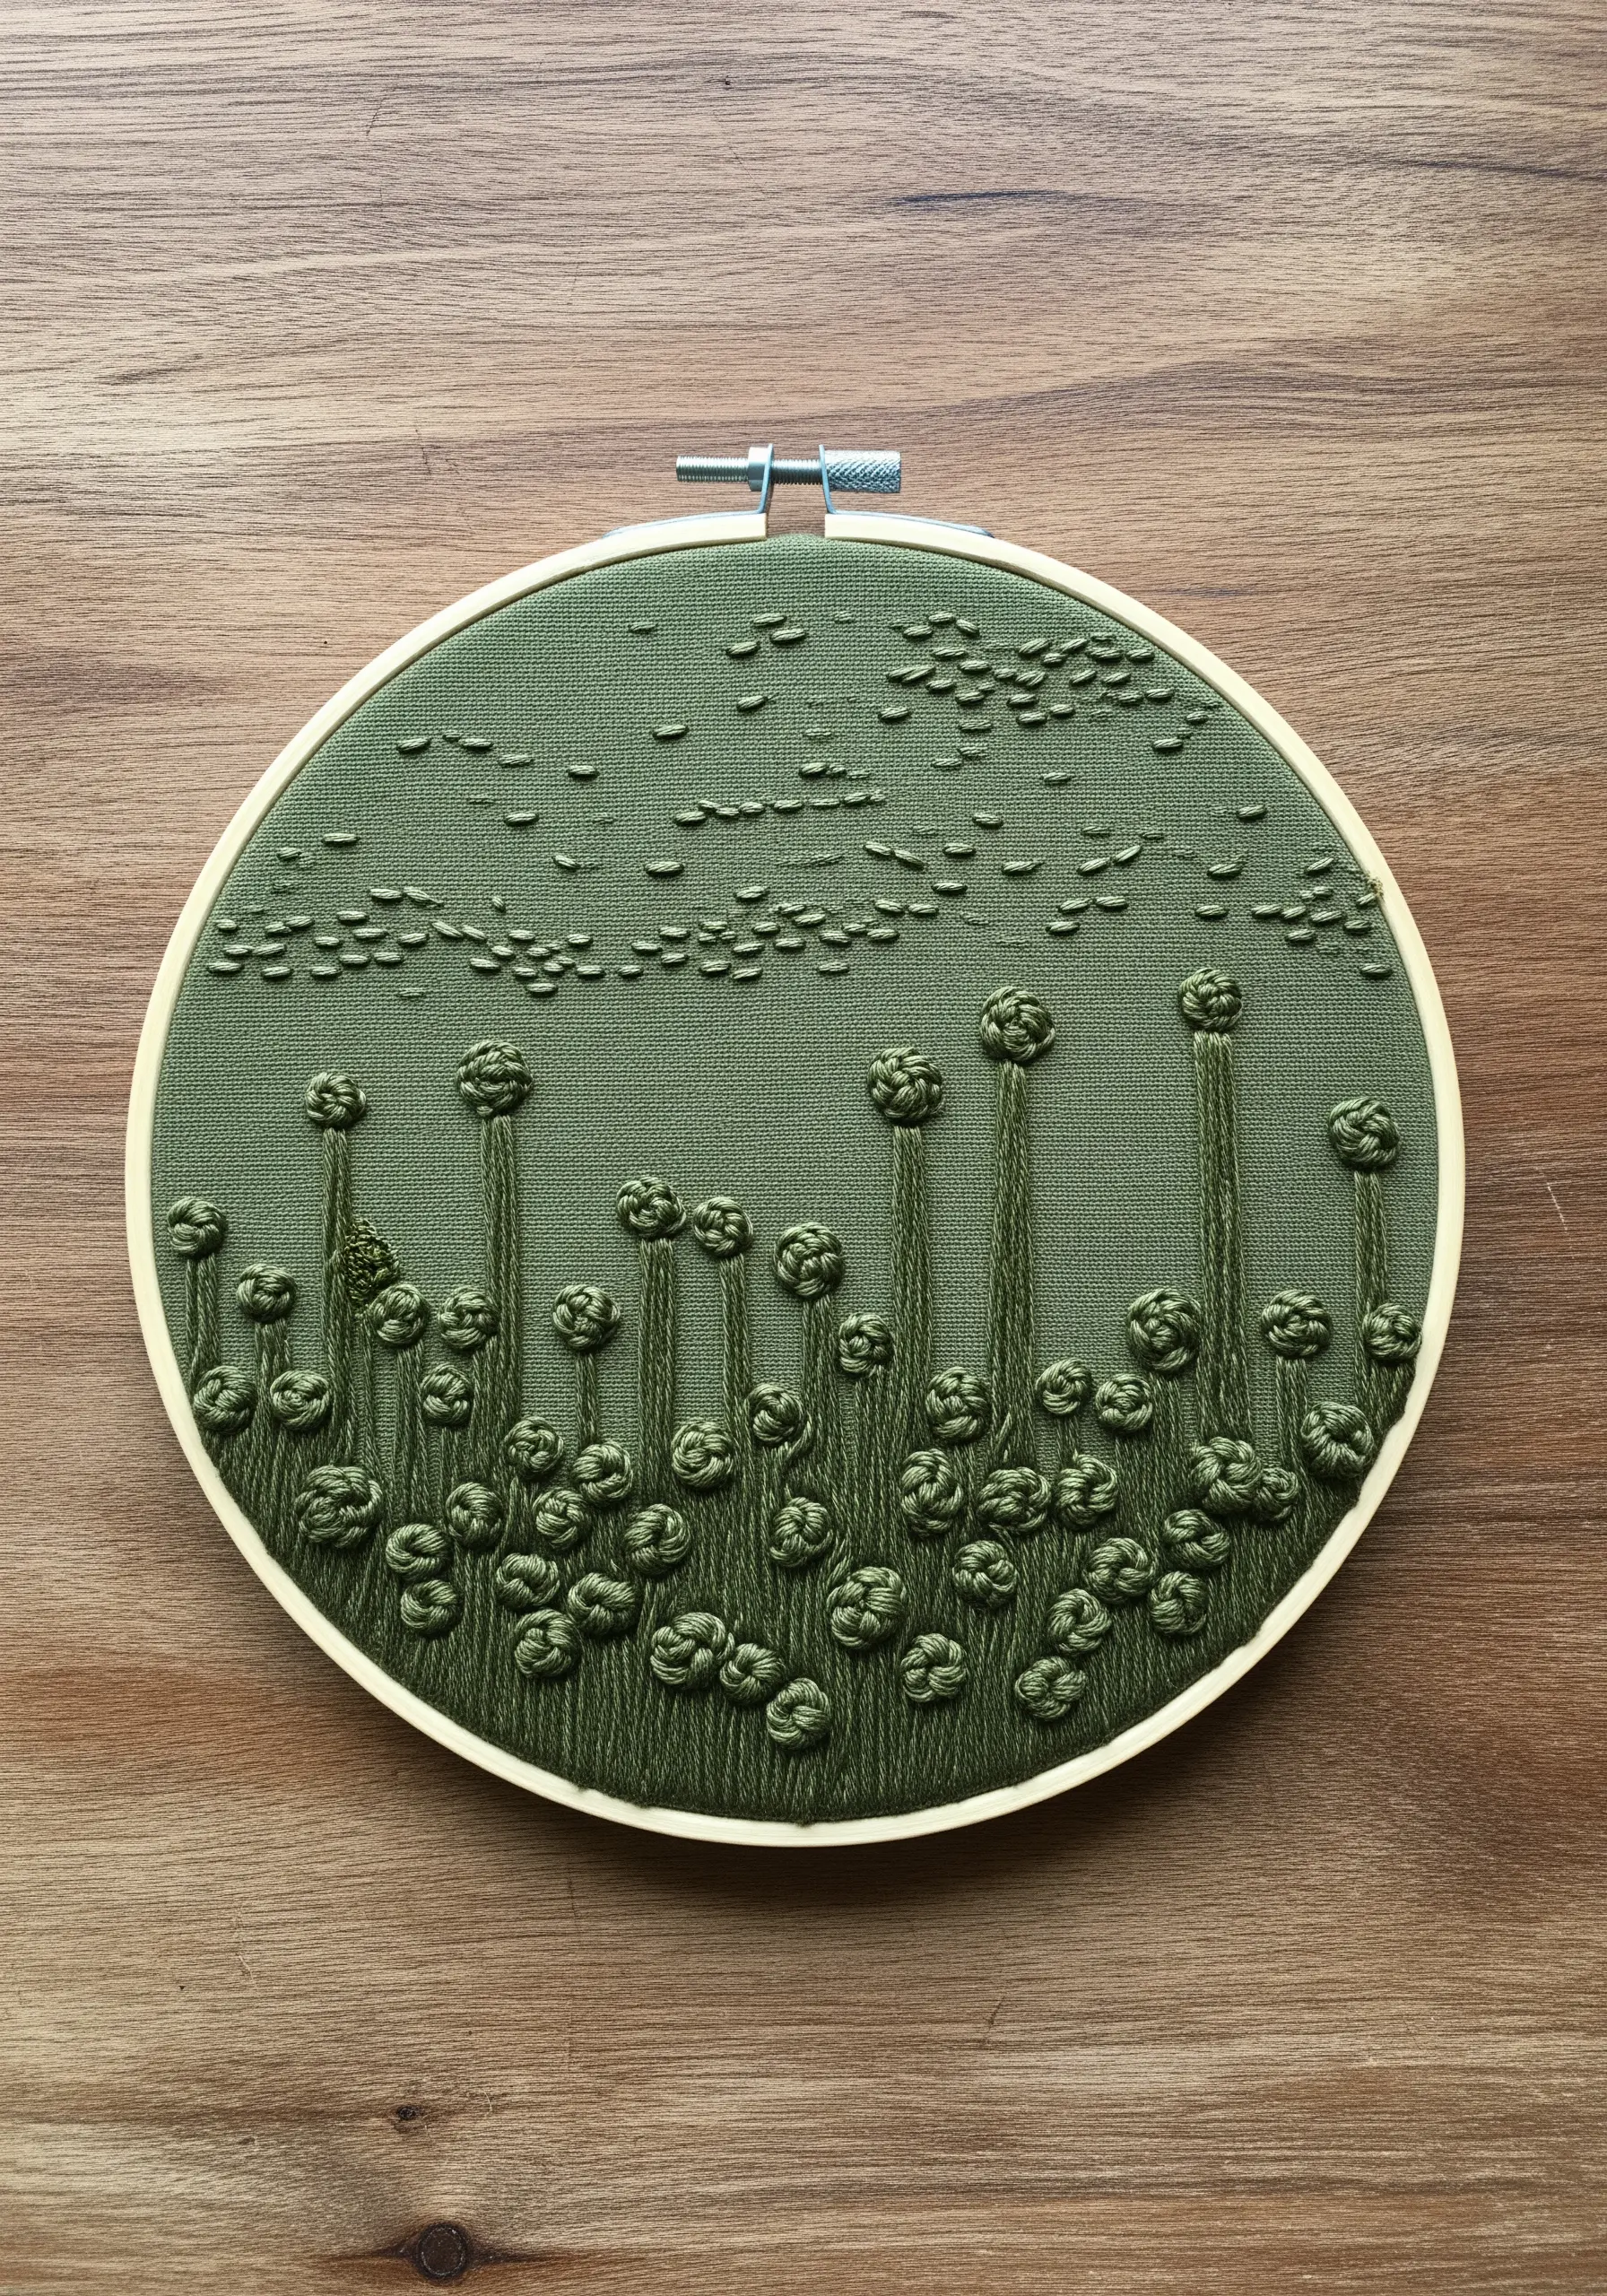
6. Build Sculptural Flora with Woven Knots
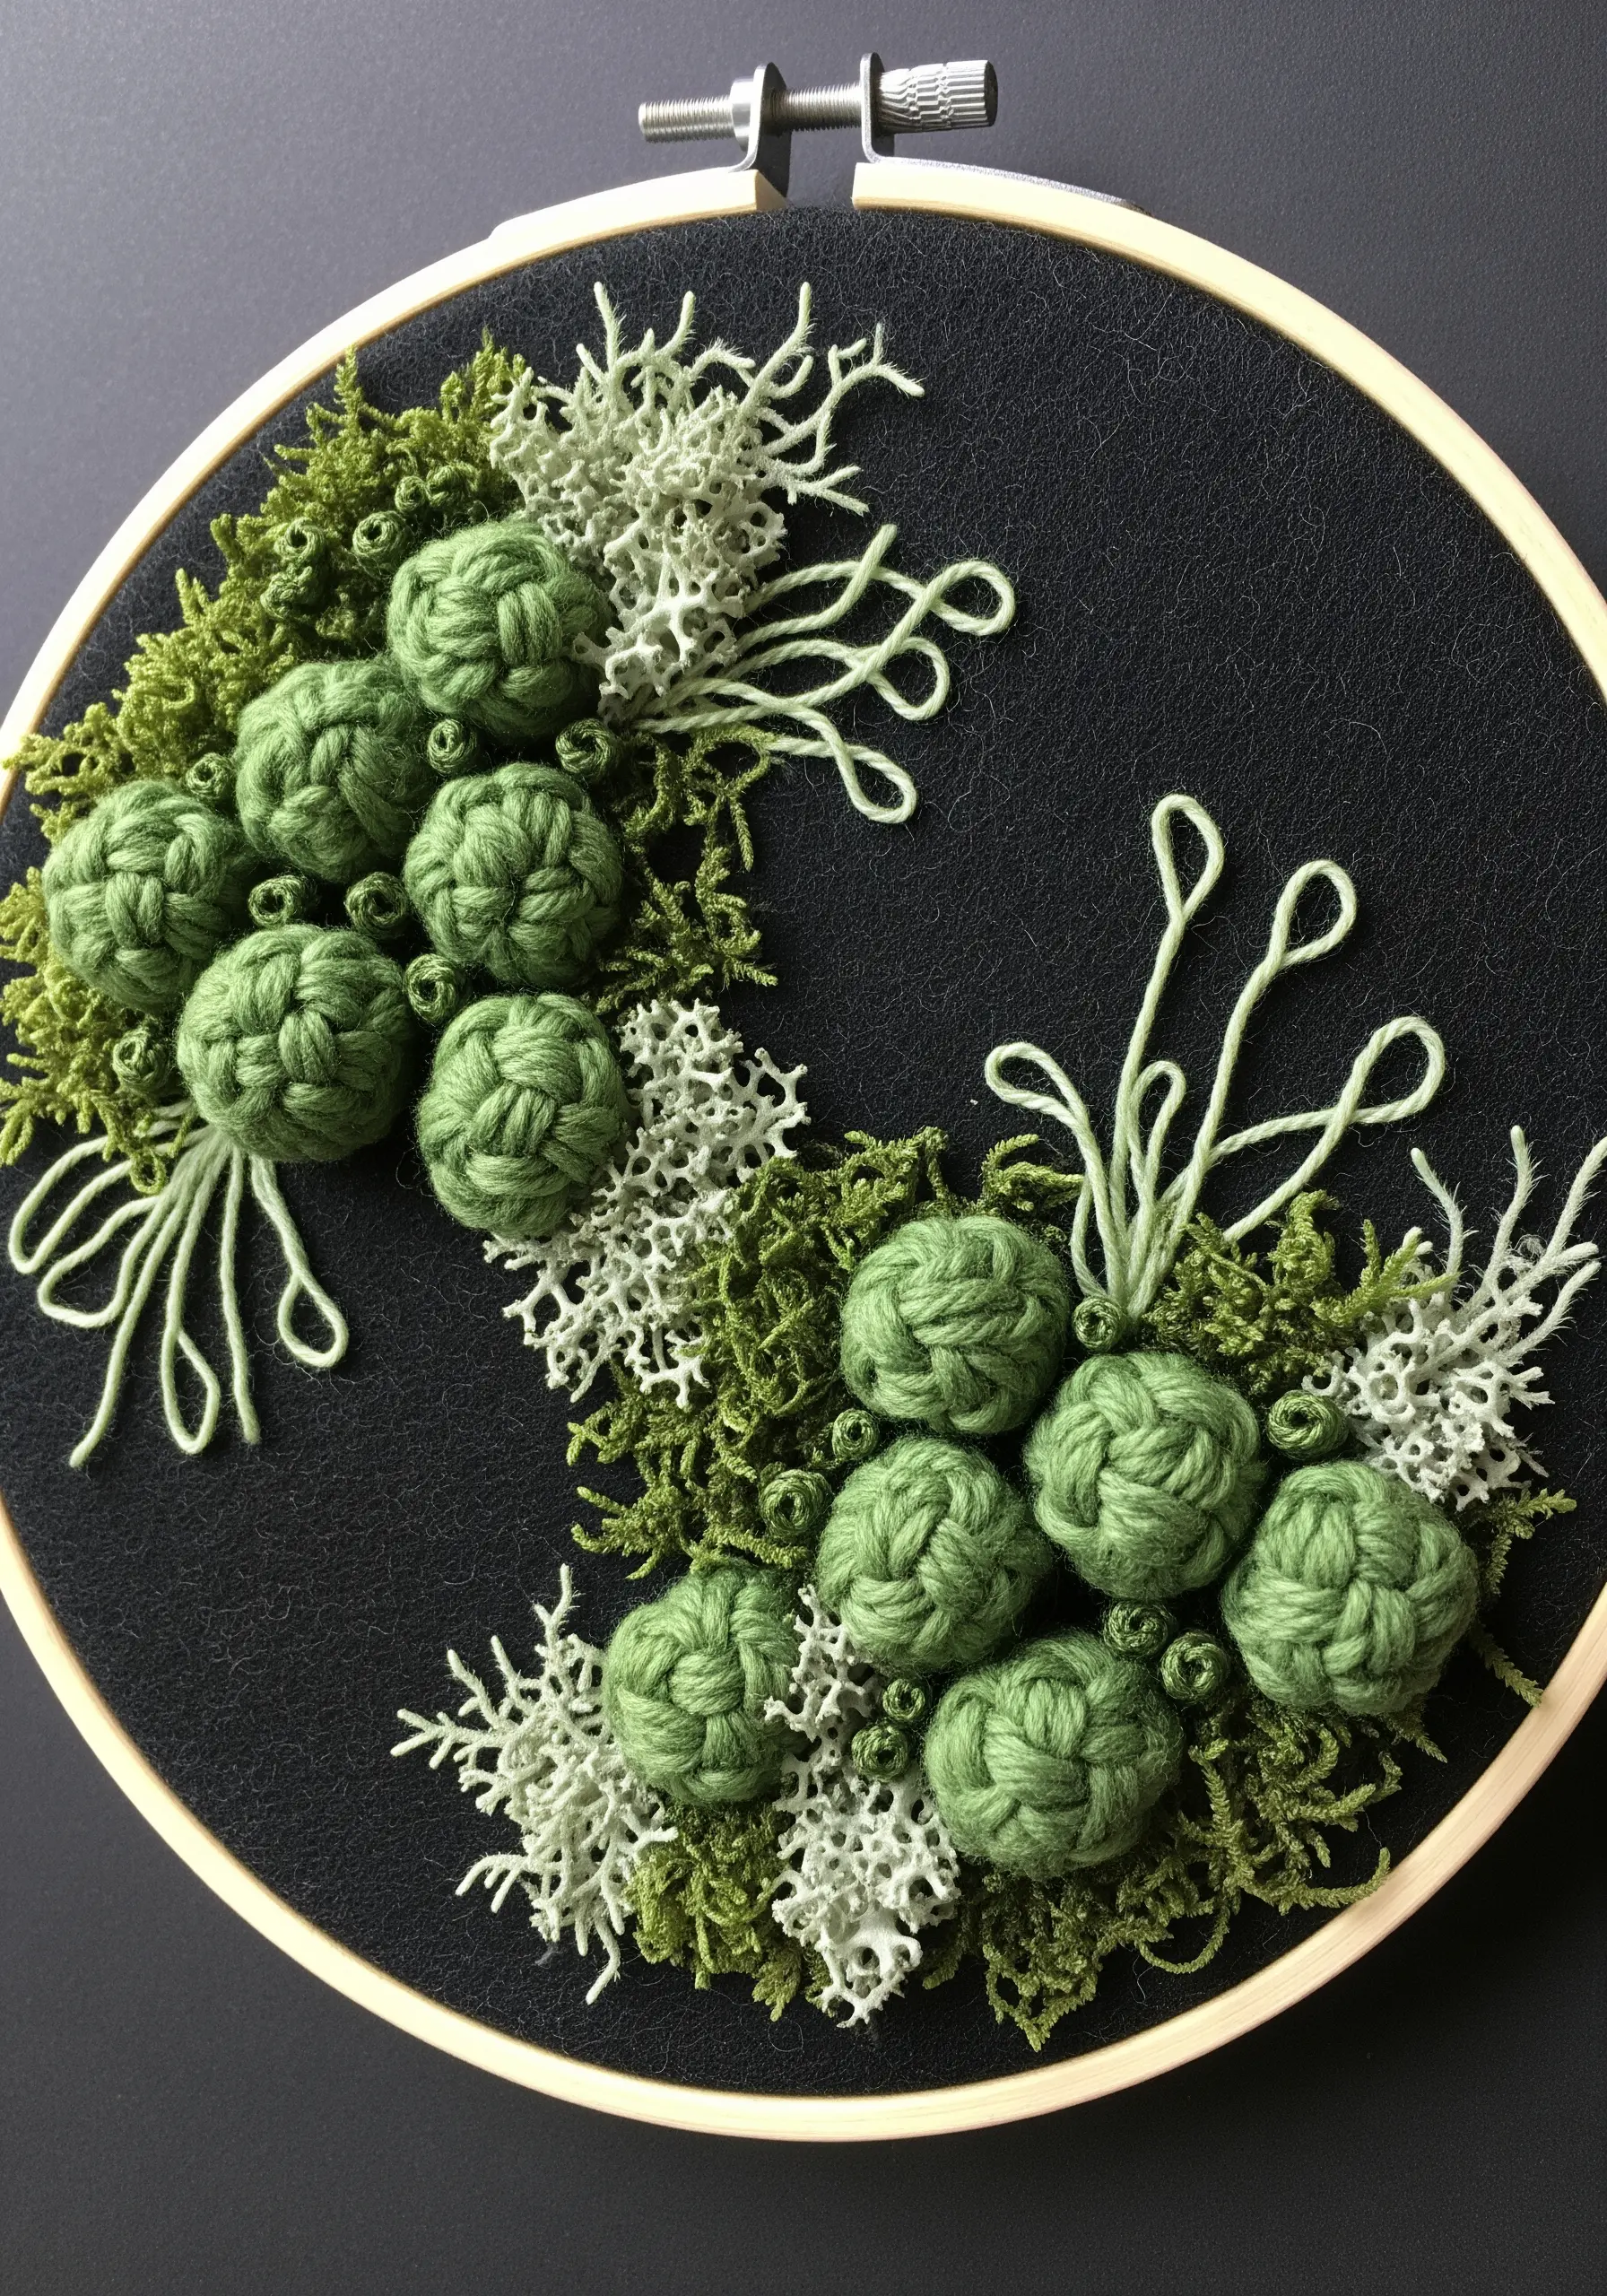
Mimic the dense, clustered forms of moss or lichen by using highly dimensional stitches.
Create the larger spherical shapes with woven picot stitch or by making large, multi-wrap bullion knots that you coil into balls.
For the finer, branching textures, use turkey work (looped stitches) and then trim the loops to varying lengths to create a fuzzy, organic feel.
Placing these high-relief stitches on a dark, plain-weave fabric like black linen makes the texture pop, turning the thread into a small sculptural element.
7. Create Soft Volume with Padded Satin Stitch
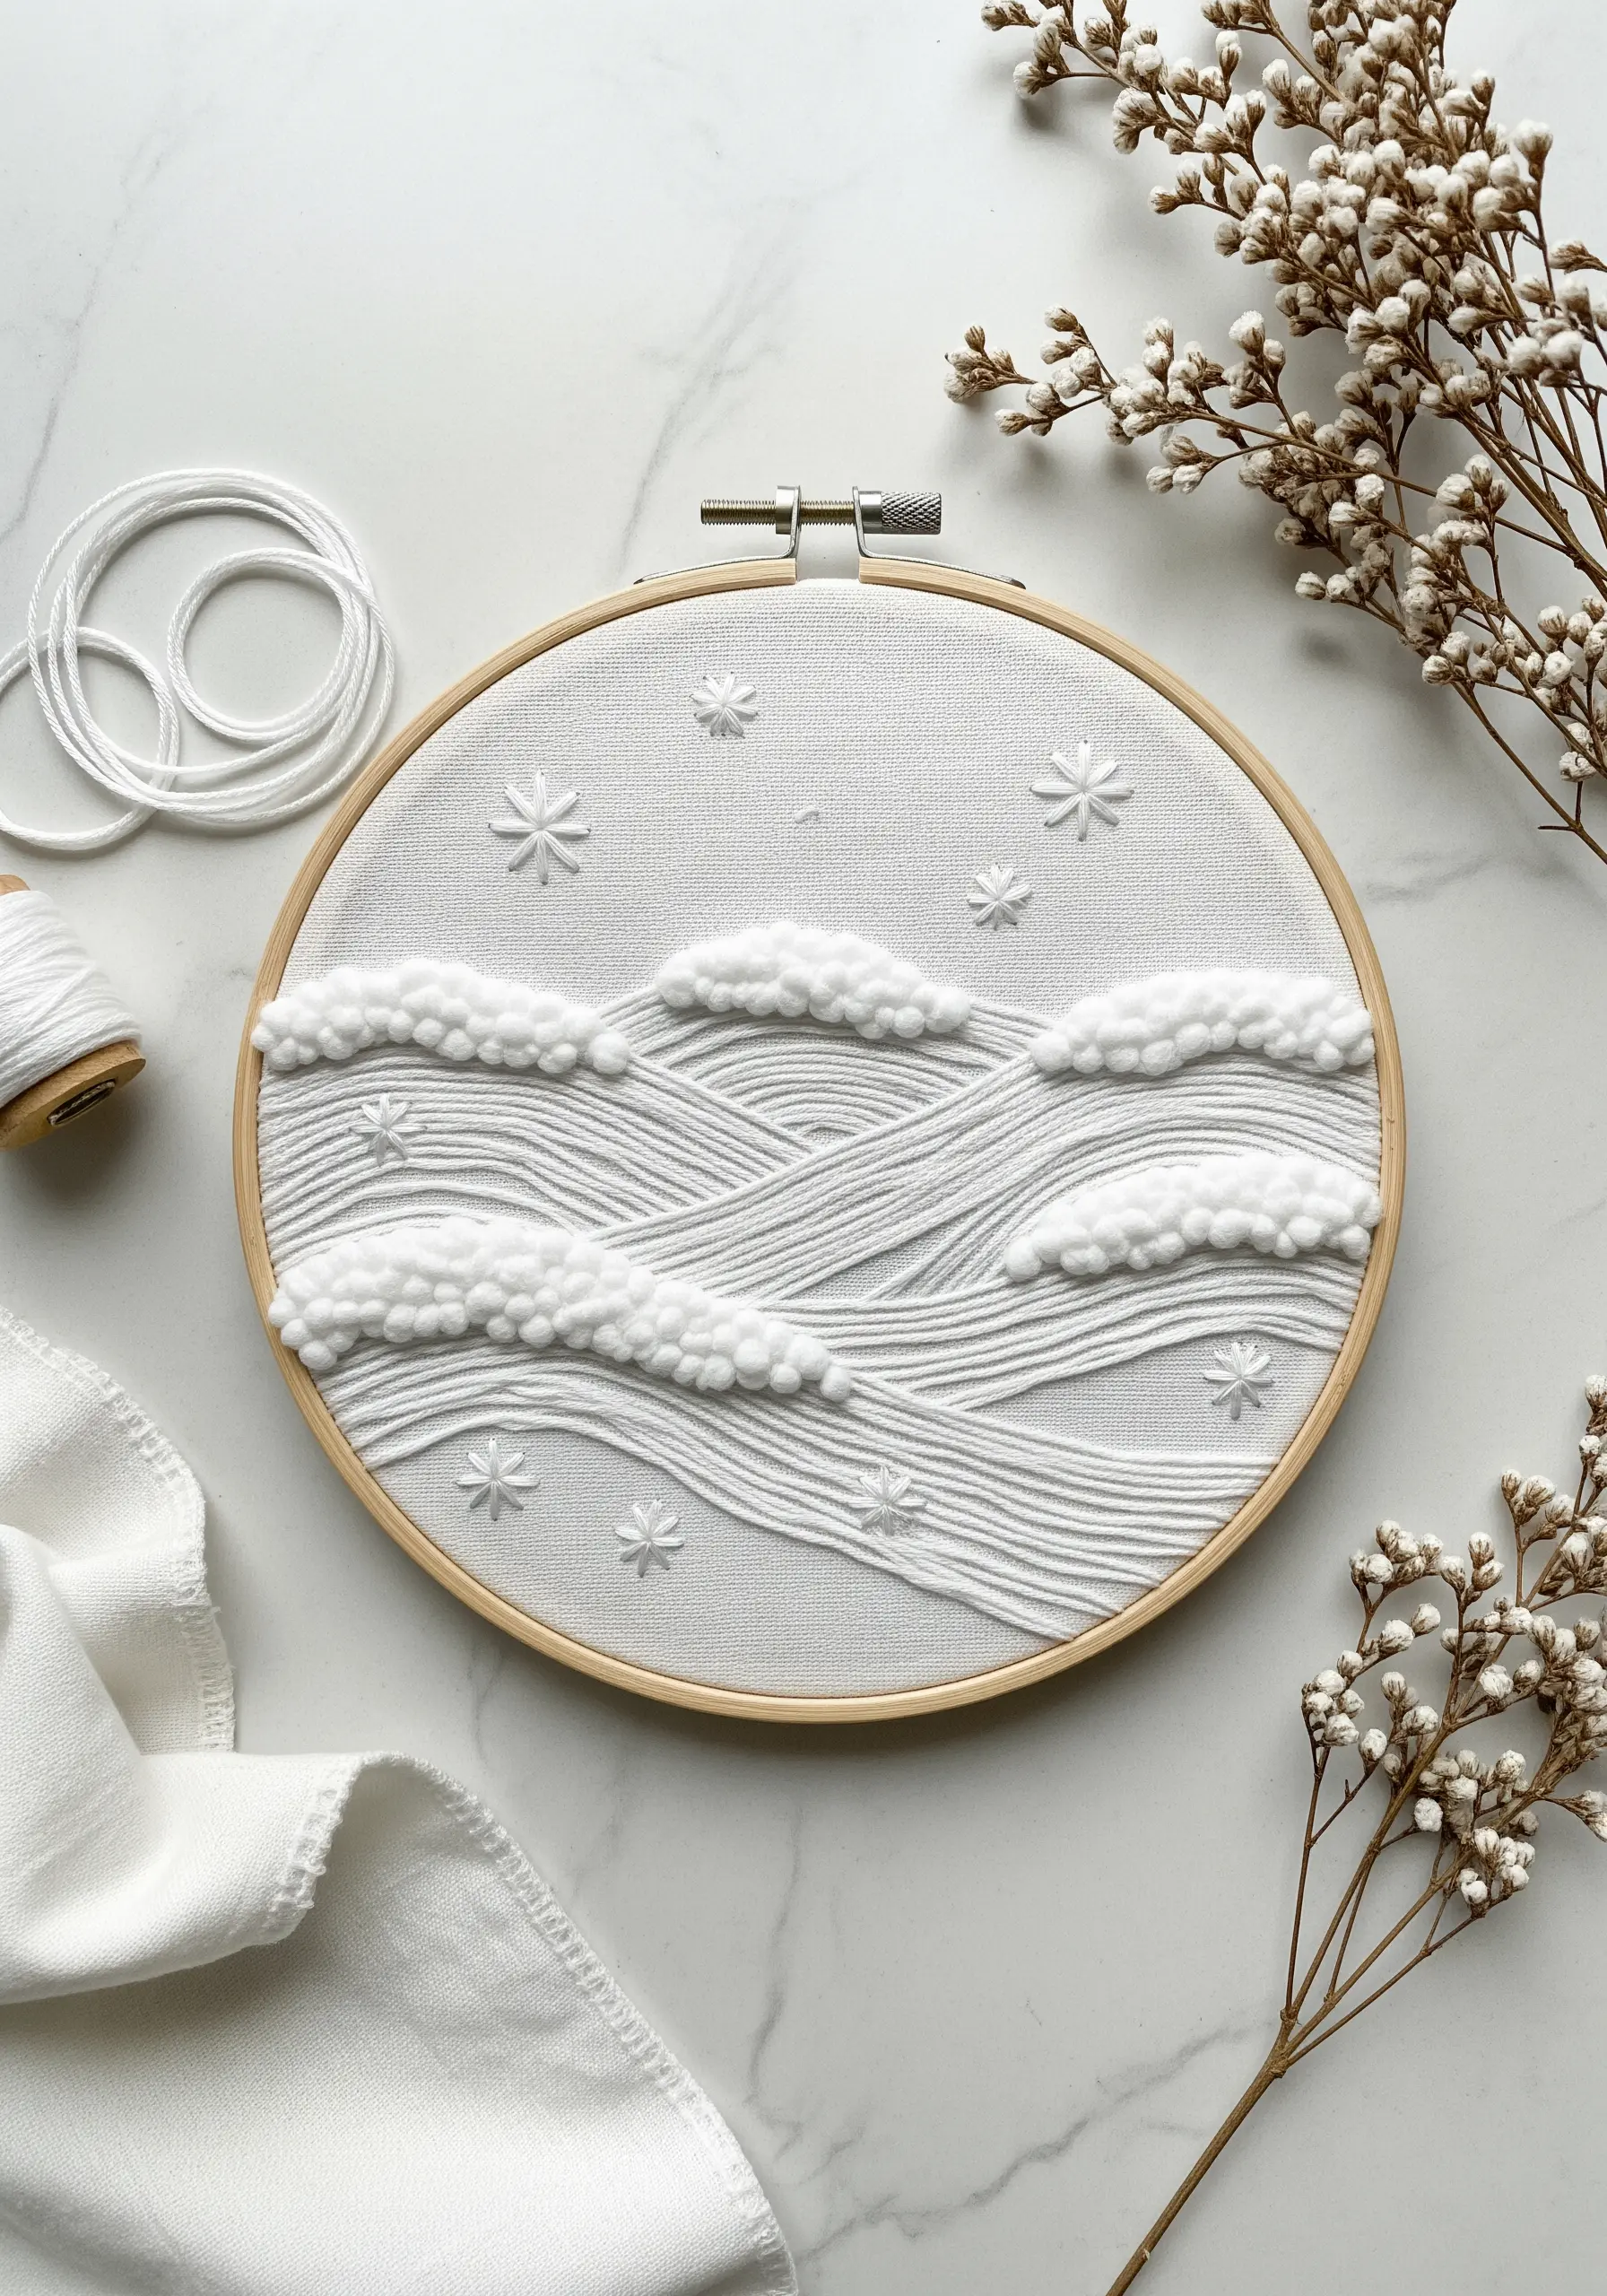
Give clouds or other soft elements a pillowy, three-dimensional quality using padding.
First, stitch a layer of felt or several layers of running stitch within your shape’s outline.
Then, work your satin stitches over this padding, pulling the thread just tight enough to curve smoothly over the raised surface.
Contrast these plush, voluminous clouds with delicate, flat elements like tiny star stitches or thin, clean lines of stem stitch to represent wind—the difference in height makes the padded areas seem even softer.
8. Embellish Apparel with a Mixed-Media Approach
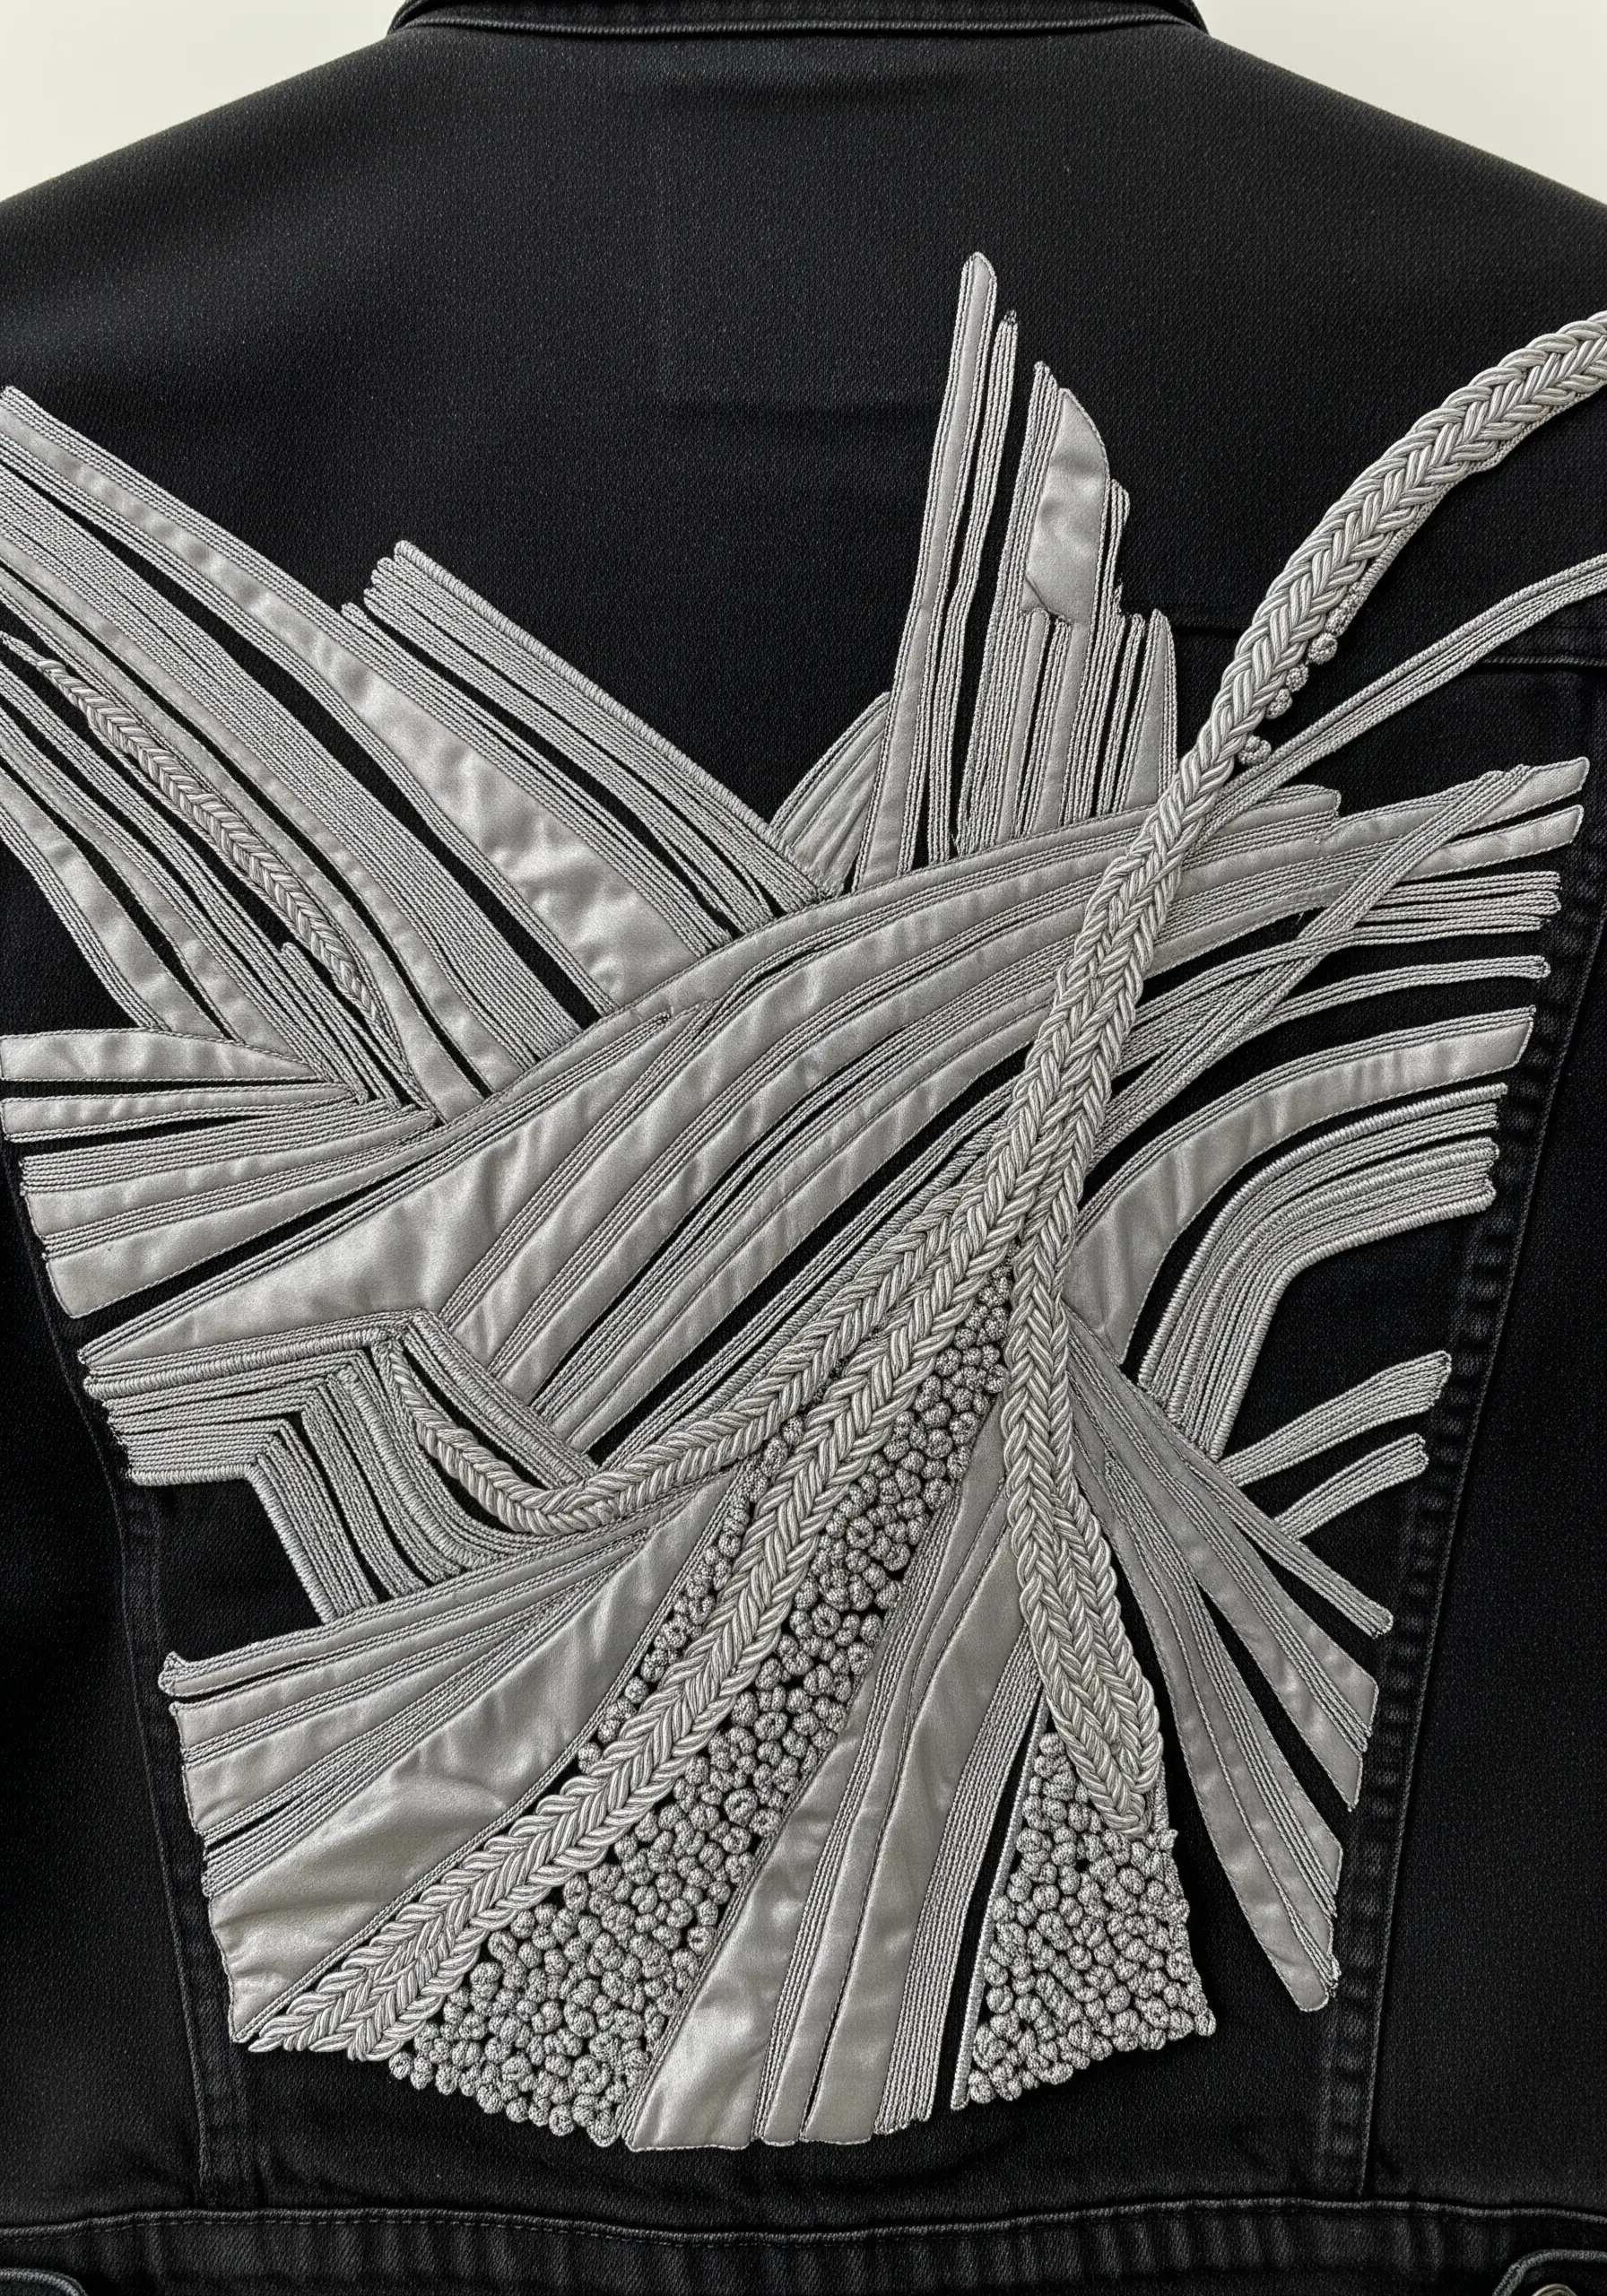
Transform a plain garment by layering different materials and textures in a single color.
Cut bold, graphic shapes from a fabric with a high sheen, like satin or sateen, and use them as appliqué bases.
Outline and accent these shapes with a variety of textural elements: couch down thick, braided cord for strong lines, fill areas with dense seed stitching for a matte finish, and add rows of smooth satin stitch for linear shine.
This vintage-inspired denim jacket embroidery technique works because the single color unifies the diverse textures, making the design feel cohesive and intentionally luxurious.
9. Radiate Energy with Taut Lines and Dense Knots
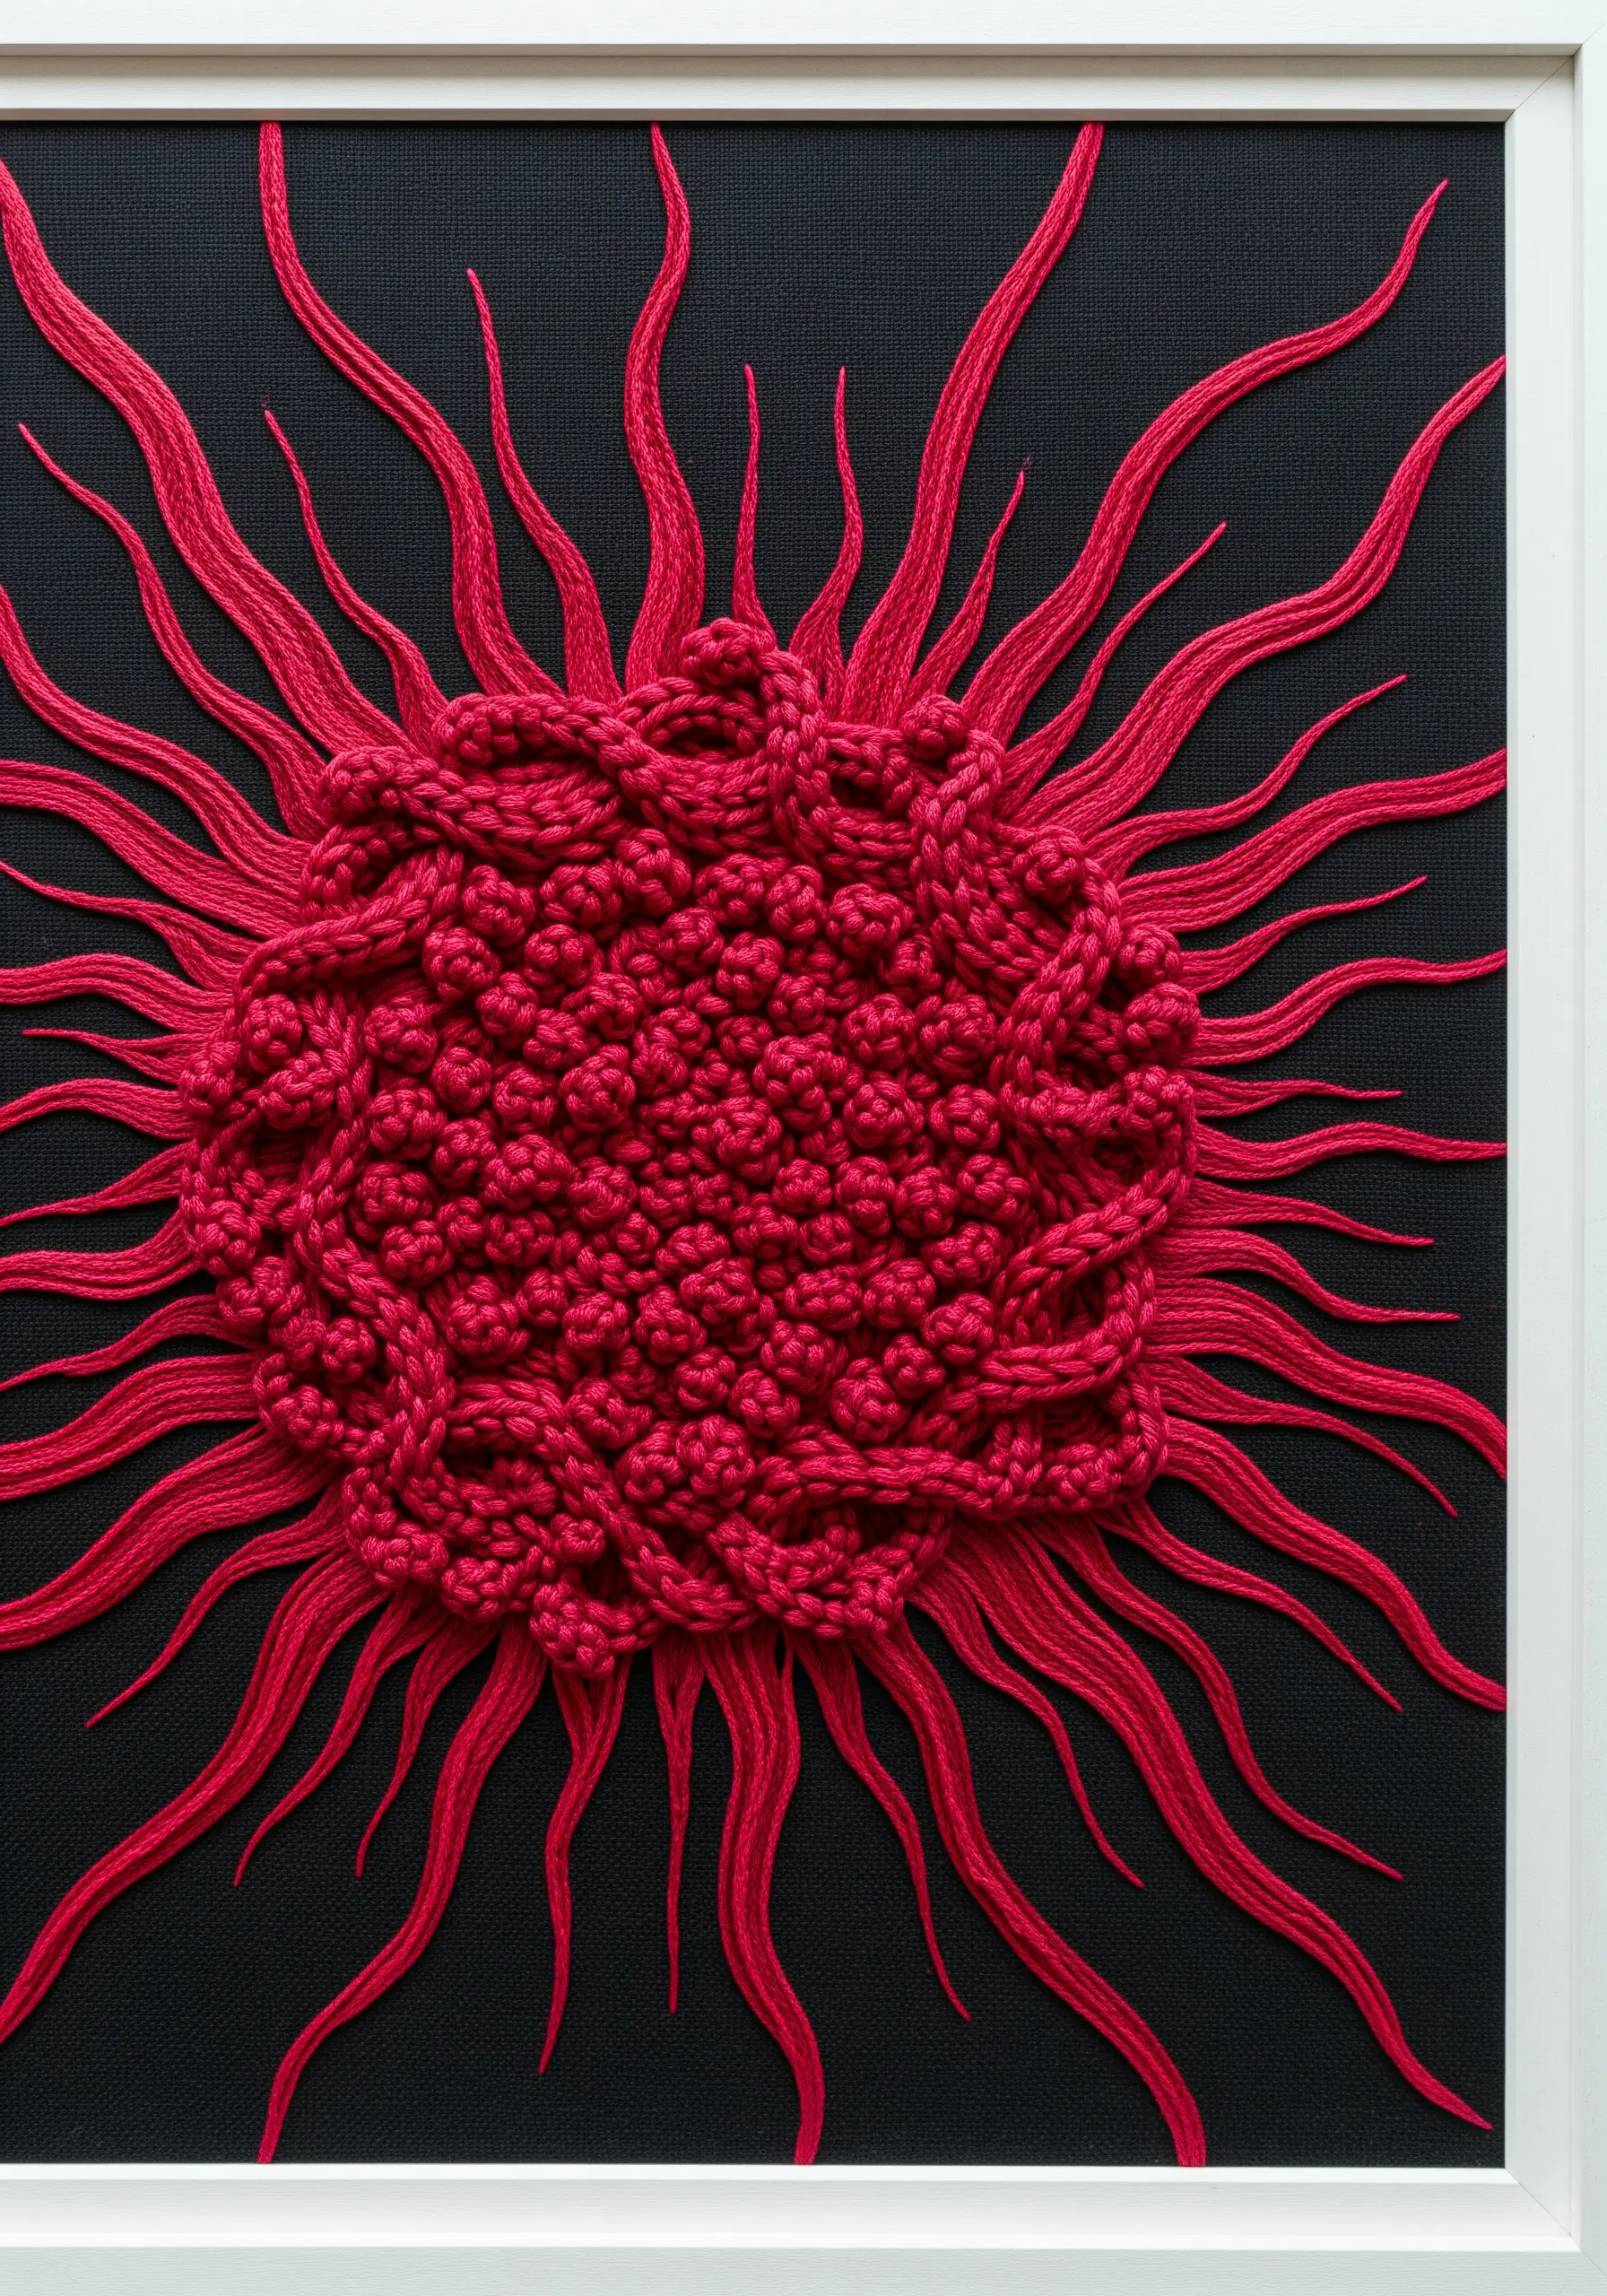
Capture a sense of explosive energy by combining a chaotic, textured center with sharp, controlled lines.
Create a central mass of high-relief texture using tightly packed cast-on stitches or bullion knots, varying their direction and length for an organic feel.
From this core, extend long, straight stitches or couched threads that radiate outwards, pulling them taut before securing them to create tension.
The contrast between the tangled, raised center and the sleek, straight rays gives the piece a powerful sense of outward motion.
10. Compose with Geometric Stitch Blocks

Treat your embroidery hoop like a canvas for abstract composition by blocking out shapes with distinct textural stitches.
Fill one area with a woven stitch, like a basket or weaving stitch, to create a solid, fabric-like texture.
In another section, use a knotted grid stitch, like trellis work, for an open, net-like effect that reveals the fabric beneath.
For a third element, use clean, parallel lines of satin stitch or couched thread for a smooth, graphic counterpoint.
This method allows you to explore the interplay of shape and texture in a clean, modern way.
11. Build an Underwater World with Stacked Stitches
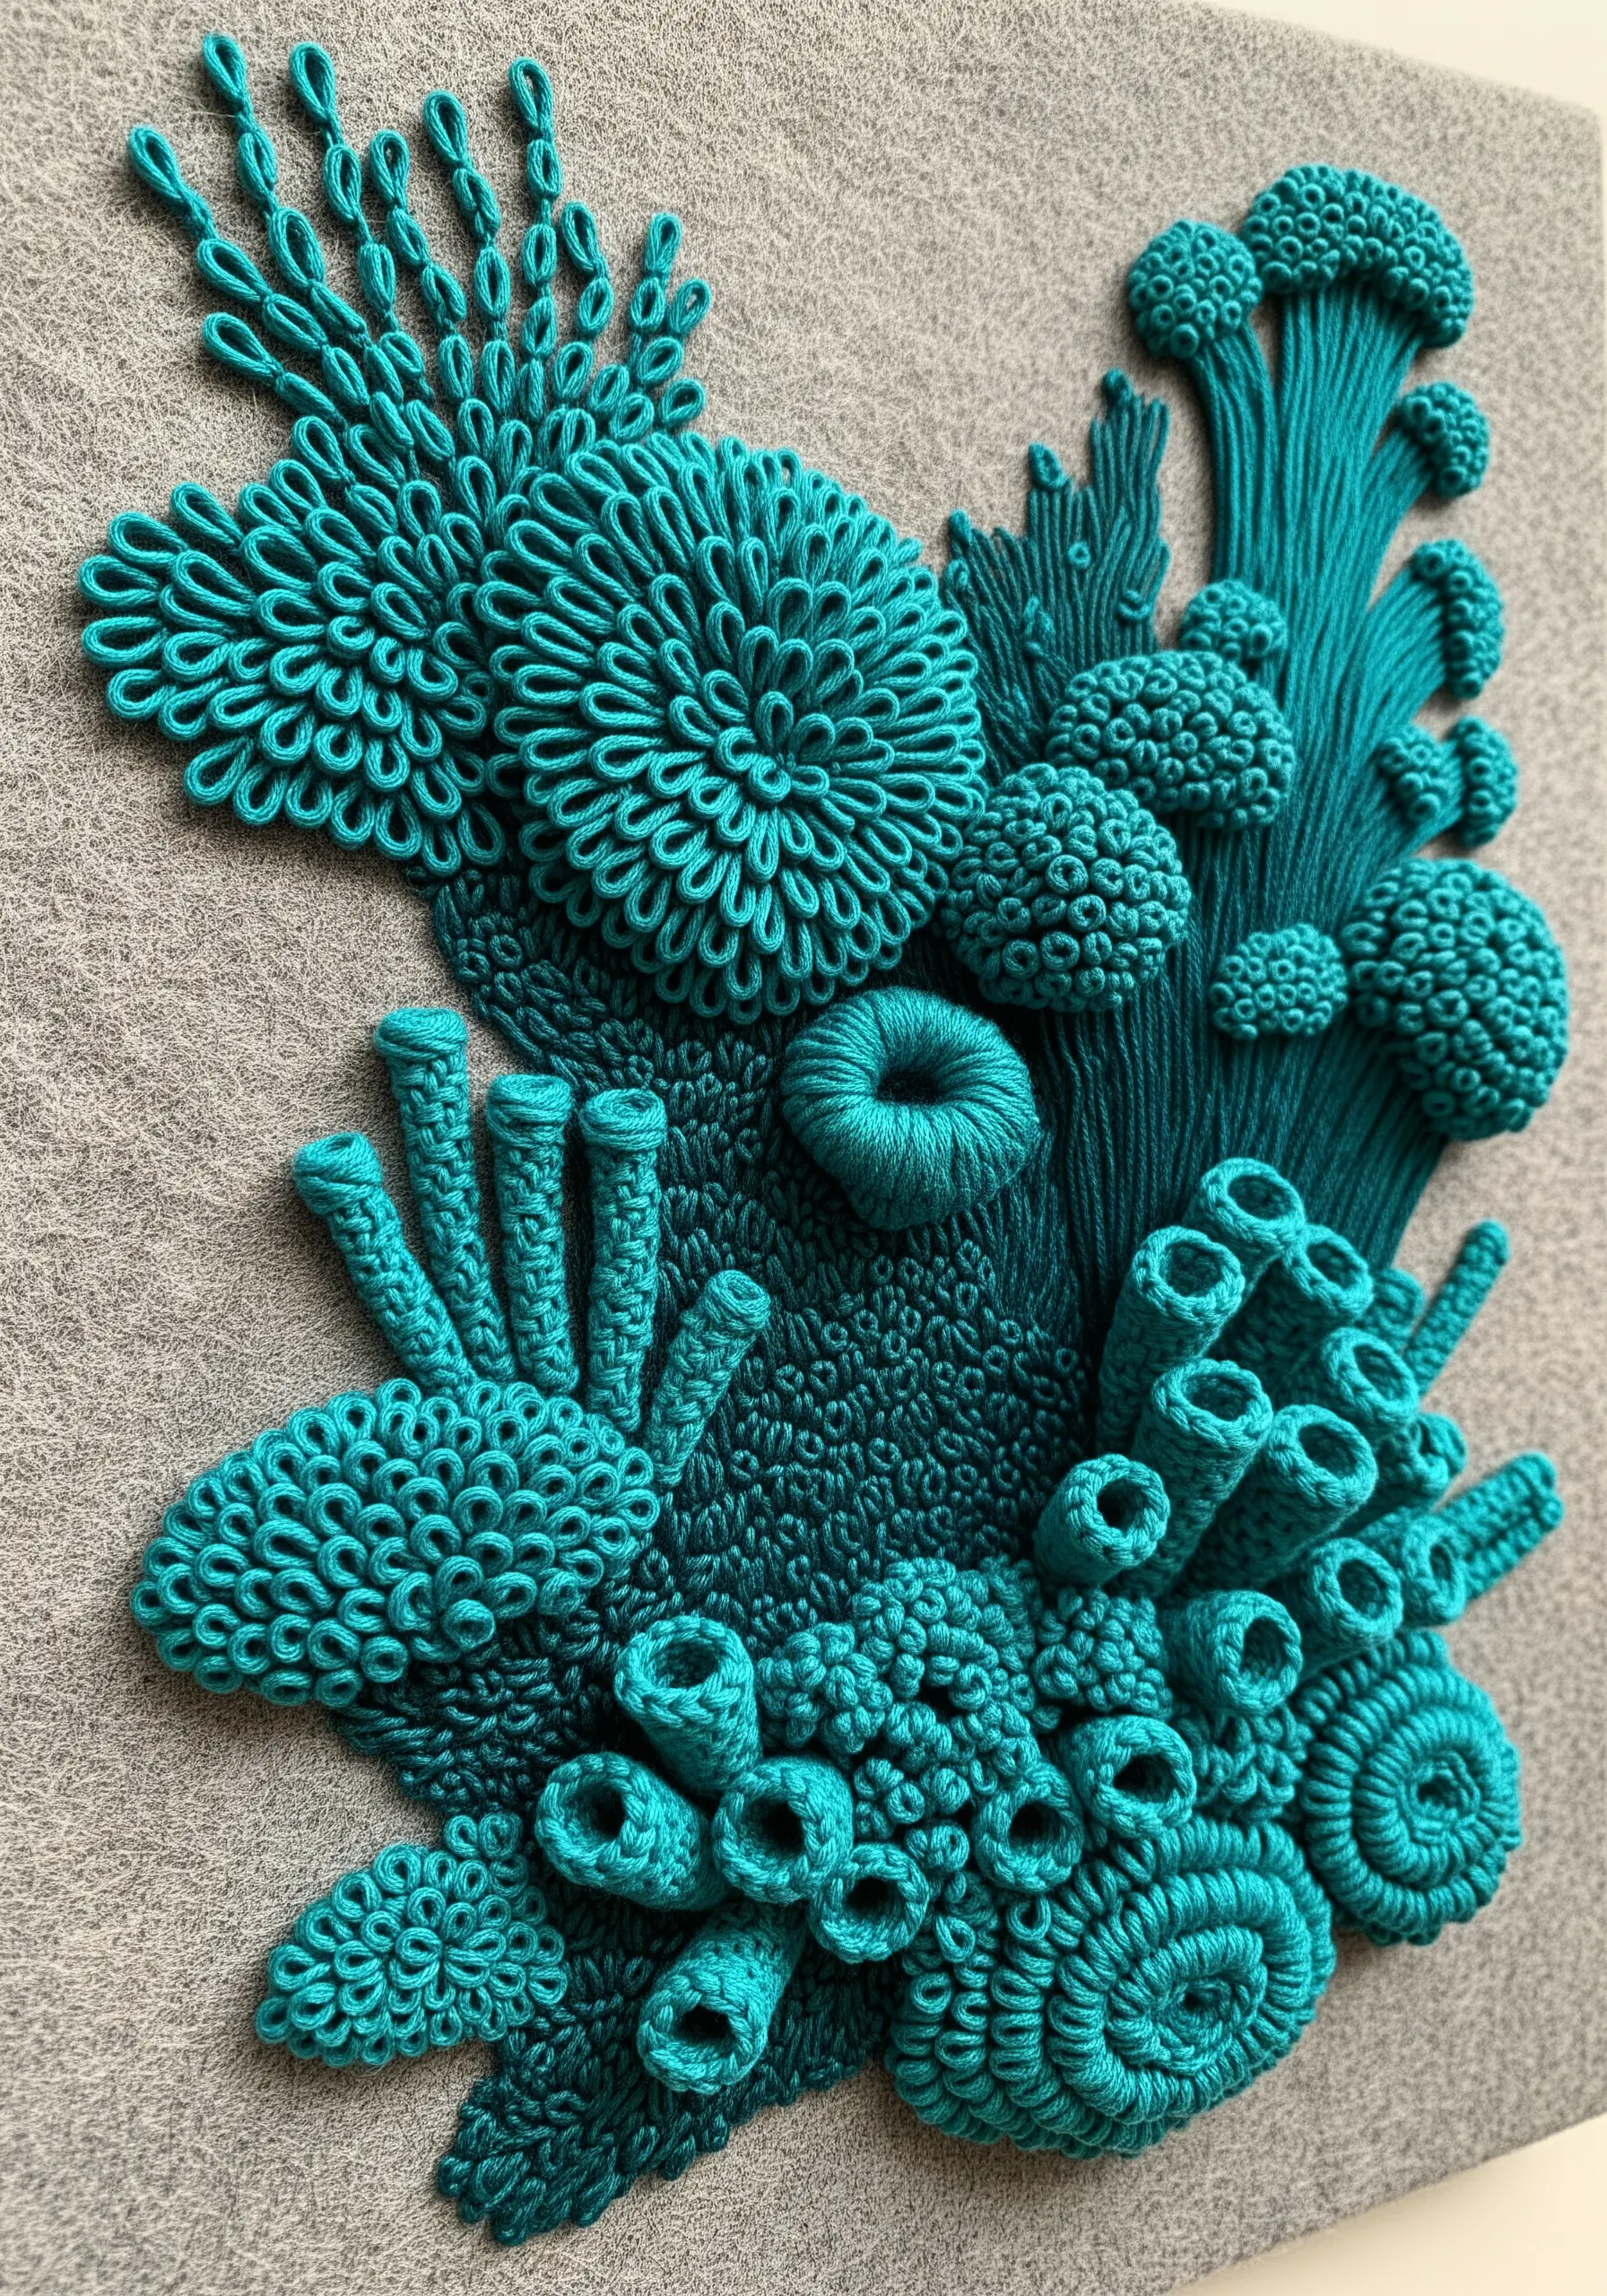
Create a vibrant, monochrome coral reef by building stitches upon one another to form sculptural shapes.
Use buttonhole stitch worked in the round to create hollow, tube-like coral forms.
Make dense, brain-like coral textures with tightly packed French knots or bullion knots stitched closely together.
For branching forms, use detached chain stitches stacked at the ends of one another or create padded satin stitch columns.
Working on a felt or other thick fabric provides a stable base for these high-relief, sculptural stitches.
12. Create Rhythm by Varying Linear Stitches
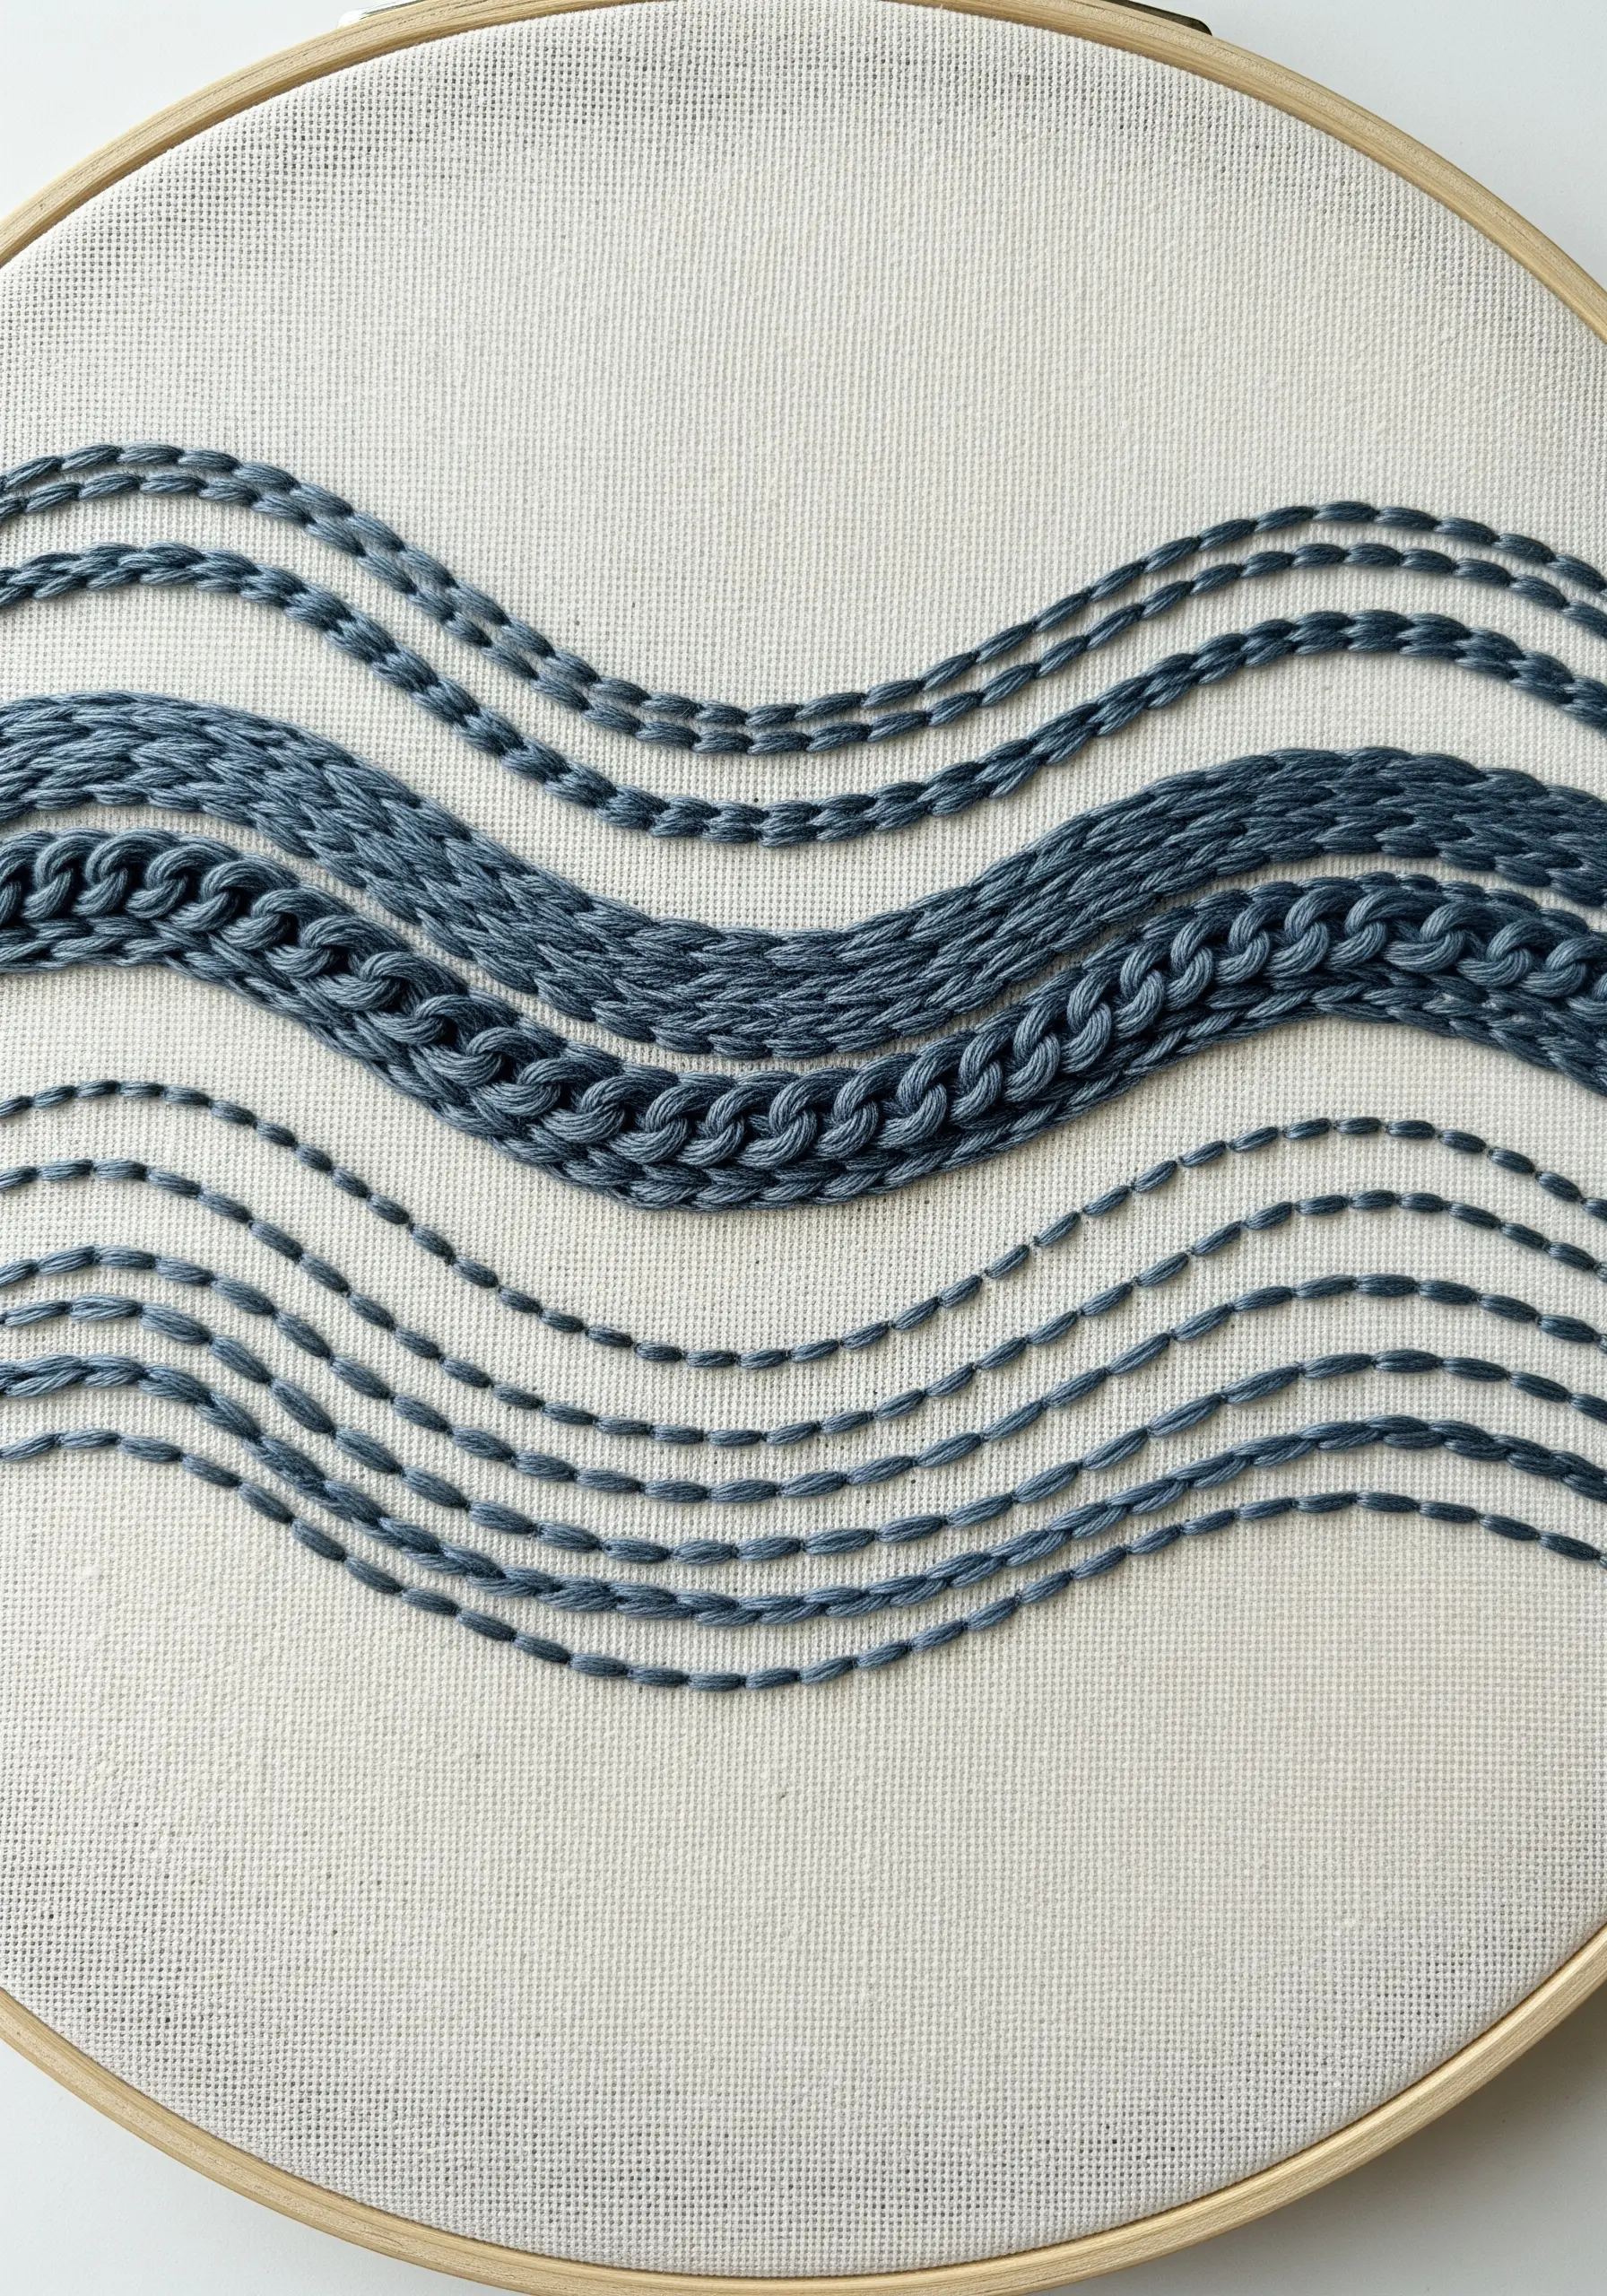
Even a simple wavy line can become visually complex by changing the stitch you use to create it.
Stitch several parallel, undulating lines, but assign a different stitch to each one: a smooth split stitch, a hefty chain stitch, a delicate running stitch, and a textured whipped backstitch.
Though the color and path are the same, the way each stitch reflects light and creates shadows will be unique.
This technique is a powerful way to add subtle variety and rhythm to your work, turning a simple design into a sophisticated study of texture.
13. Define Form with Negative Space and Appliqué
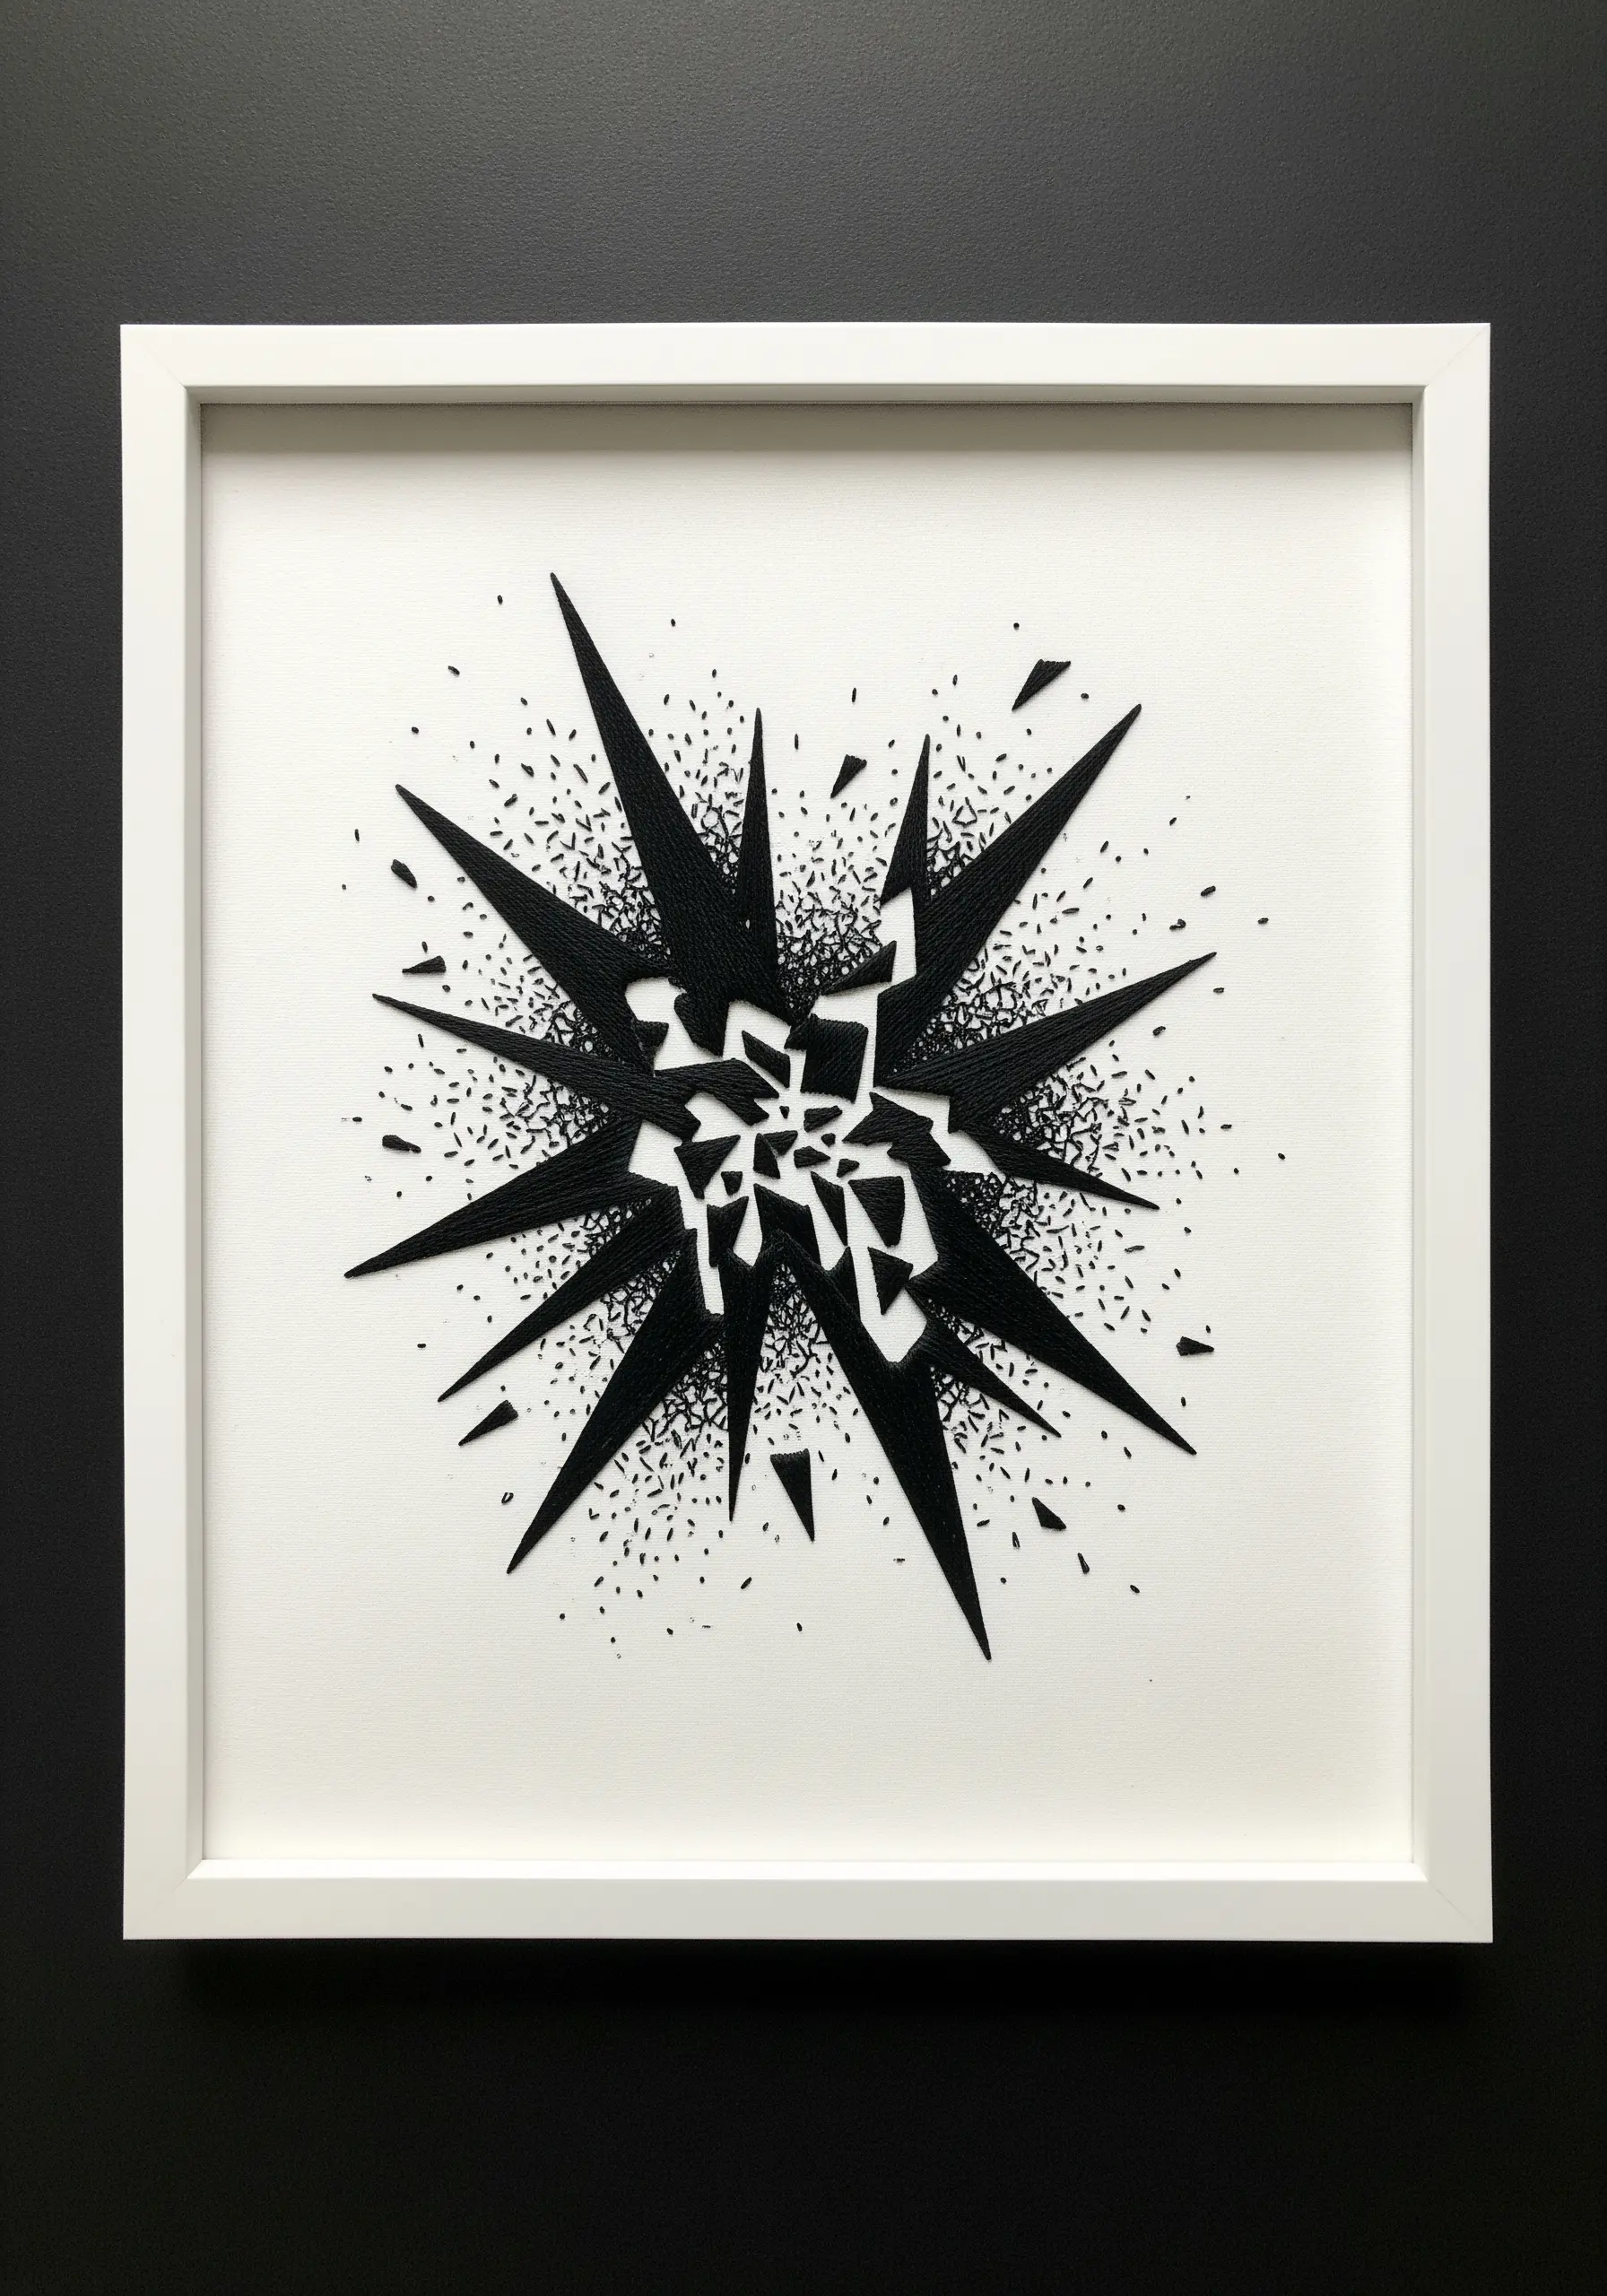
Create a powerful graphic impact by focusing on the space around your subject.
Cut a sharp, explosive shape from a piece of black felt or non-woven interfacing and appliqué it to a white fabric background.
Instead of embellishing the shape itself, scatter tiny seed stitches or straight stitches in the negative space around it, creating a field of texture that makes the central black form appear even more solid and stark.
This reversal—texturing the background instead of the subject—is an effective way to play with visual weight and focus.
14. Balance Order and Complexity in Composition
Create a visually satisfying design by balancing areas of dense, complex texture with sections of clean, simple order.
Fill several organic, cloud-like shapes with tightly packed French or colonial knots, making them feel heavy and intricate.
Connect or frame these textured masses with long, parallel lines of couched thread that flow smoothly across the fabric.
This juxtaposition gives the eye a place to rest, making the knotted sections appear even more wonderfully complex by comparison.
15. Blend Sheen and Matte Textures with Mixed Fibers
Achieve subtle dimension in a monochrome piece by using different types of thread and ribbon in the same color.
For the smooth, light-catching petals of a flower, use silk or satin ribbon to create wide, elegant stitches.
In contrast, fill the surrounding areas with French knots made from standard cotton floss, which has a softer, more matte finish.
The single color ensures the design is cohesive, but the difference in how the materials reflect light creates a sophisticated, two-tone effect that adds depth and luxury.
16. Design a Textural Sampler Grid

Turn your hoop into a reference library of texture by dividing it into a grid and dedicating each section to a different fill stitch.
This is an excellent way to master new techniques while creating a beautiful piece of abstract framed embroidery.
Explore stitches like the basket weave stitch, diagonal satin stitch, seed stitch, and woven filling stitches.
You can even leave some sections of the grid empty, allowing the fabric’s natural texture to become part of the design and create negative space.
17. Weave a Dimensional Centerpiece Knot

Create a powerful focal point with a single, complex woven knot that serves as the heart of your design.
Learn a dimensional knotting technique like the Turk’s Head knot or a plaited braid stitch, using a thick yarn or multiple strands of floss for high relief.
From this intricate center, radiate lines of simpler stitches—such as couched cords or straight stitches—to draw the eye outwards.
Adding tiny, scattered seed stitches at the ends of the rays gives the piece a sense of dissipating energy and adds a final layer of delicate texture.
18. Create Raised Lines with Trapunto Quilting
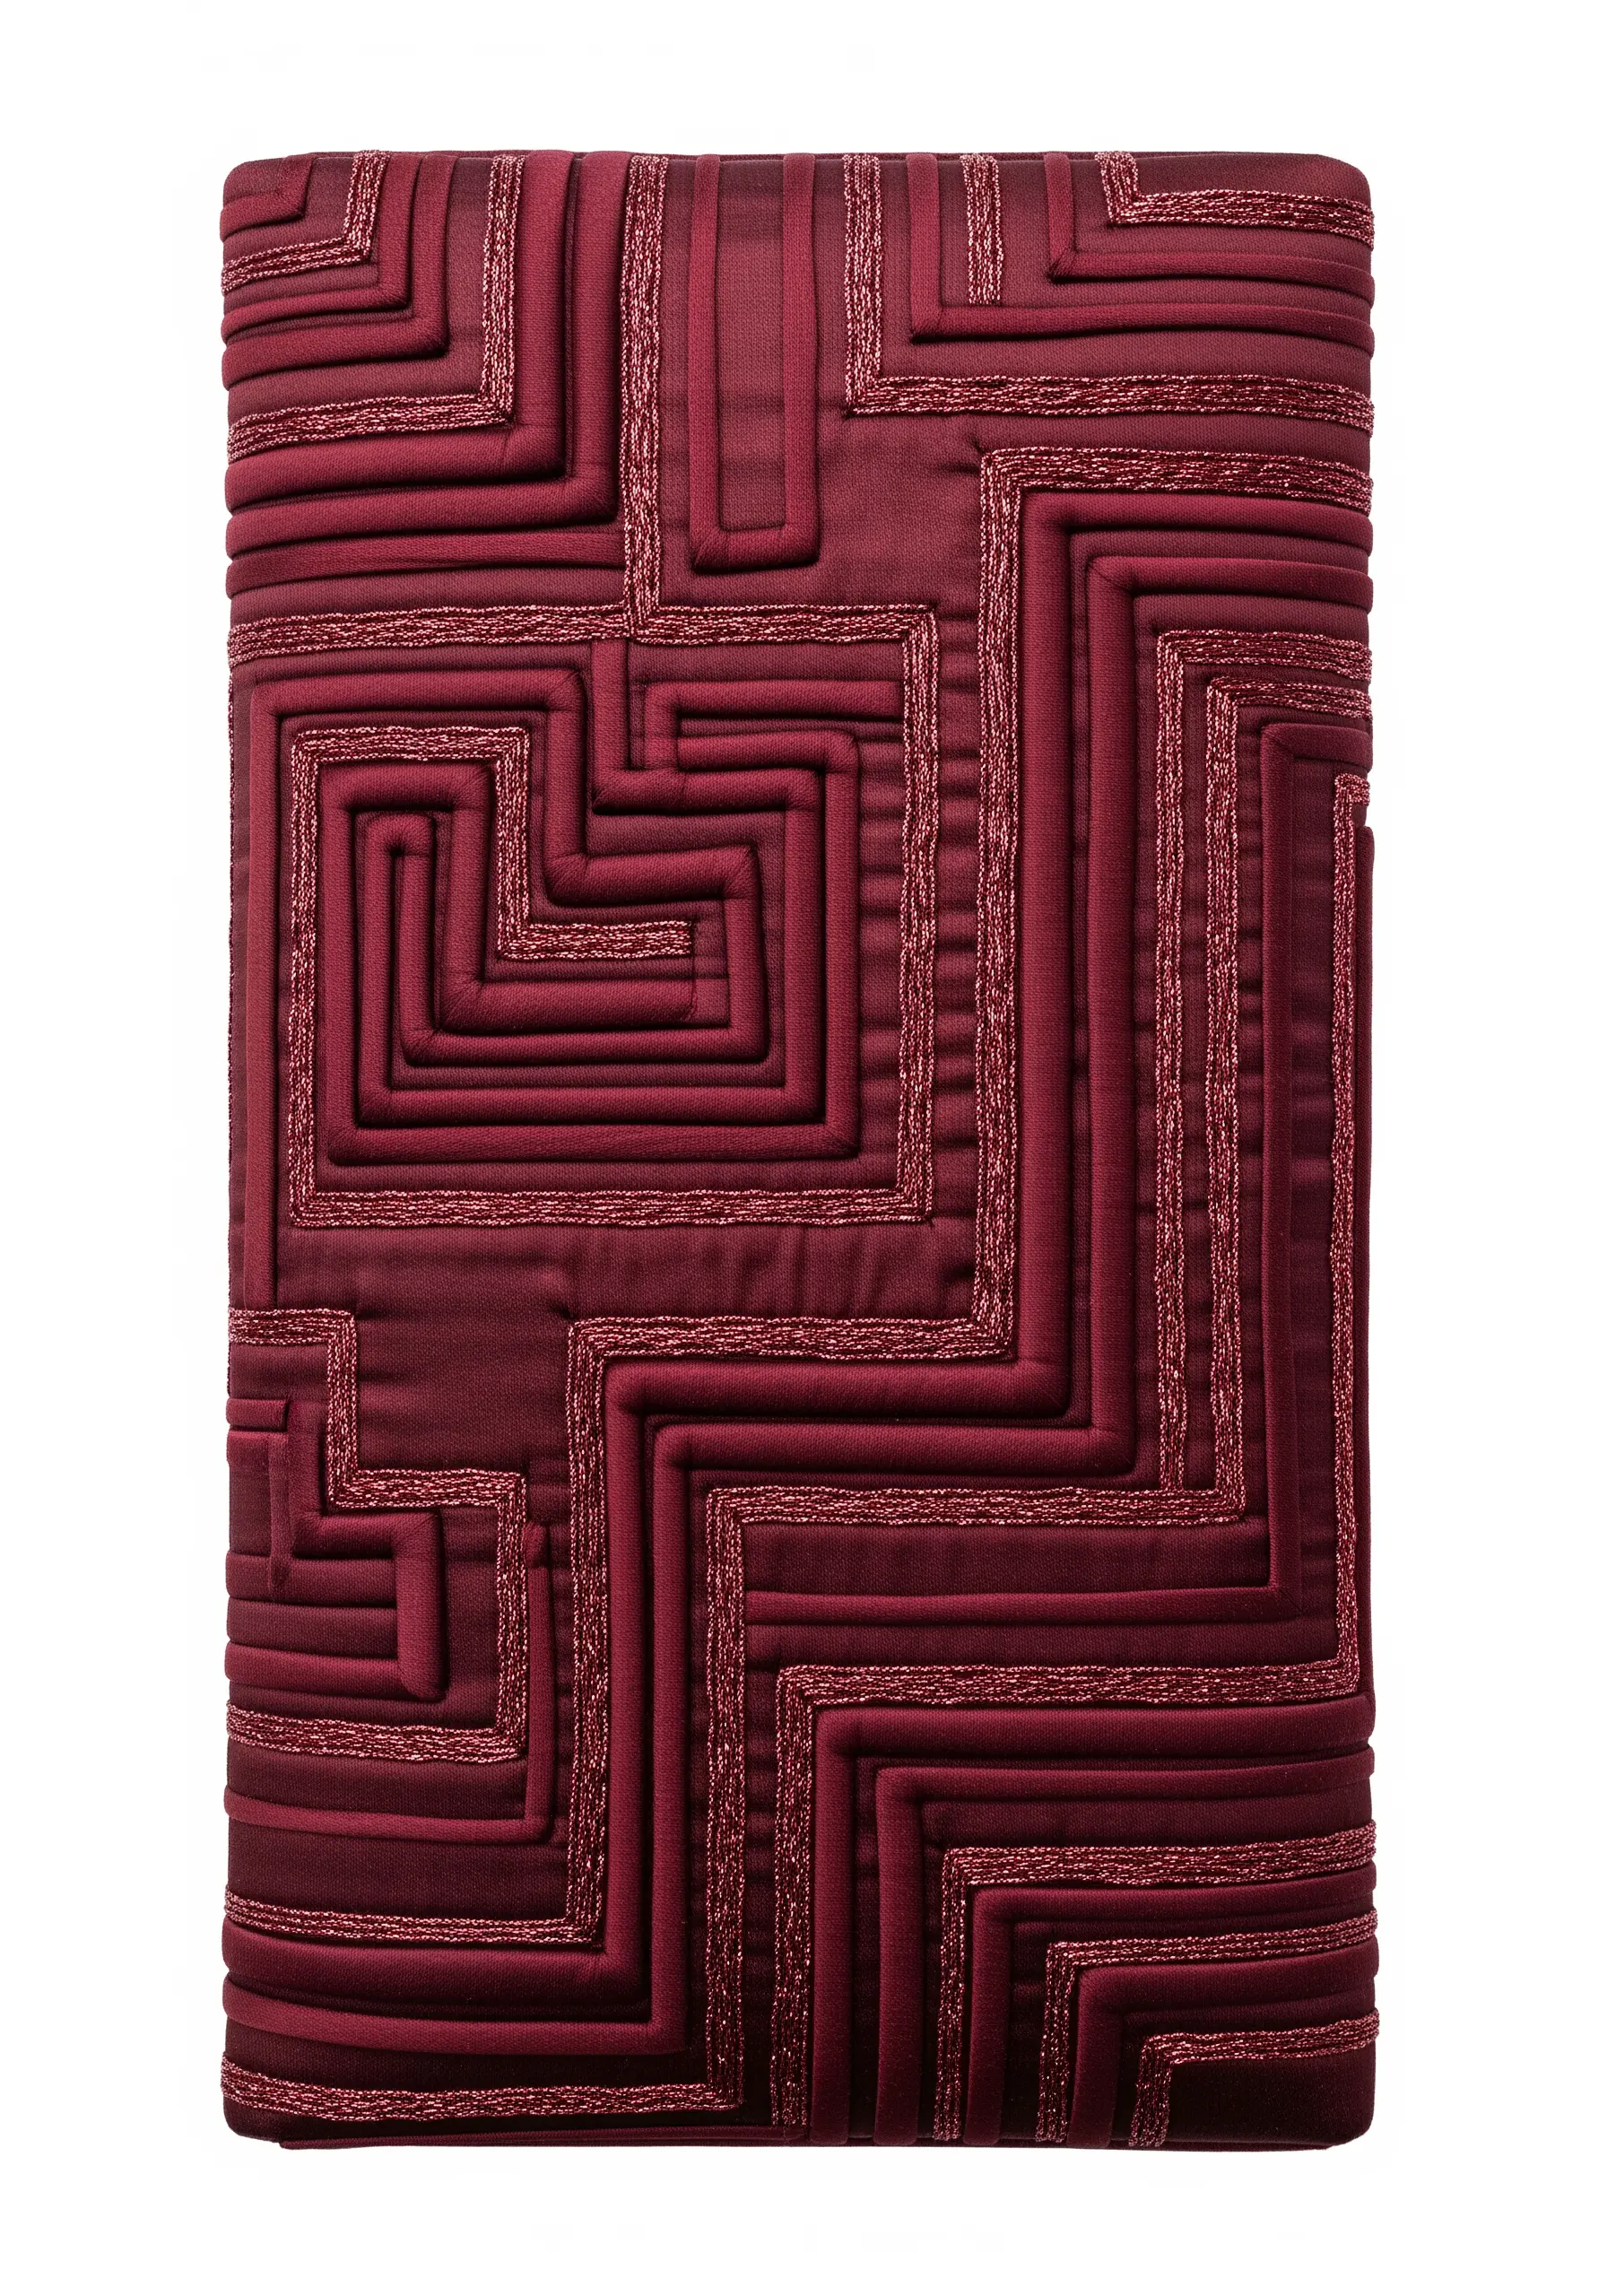
Give your embroidered lines a soft, pillowy dimension using the trapunto technique.
First, stitch your geometric design onto your main fabric with a backing layer behind it, using two parallel lines of backstitch for each path.
From the back, carefully make a small slit in the backing fabric only, and use a blunt tool to gently push stuffing (like cotton roving) into the channels you’ve created.
To further define these raised lines, you can couch a decorative thread, like a metallic or gimp thread, along the stitch lines on the front.
19. Form a Wreath with Directional Fishbone Stitch
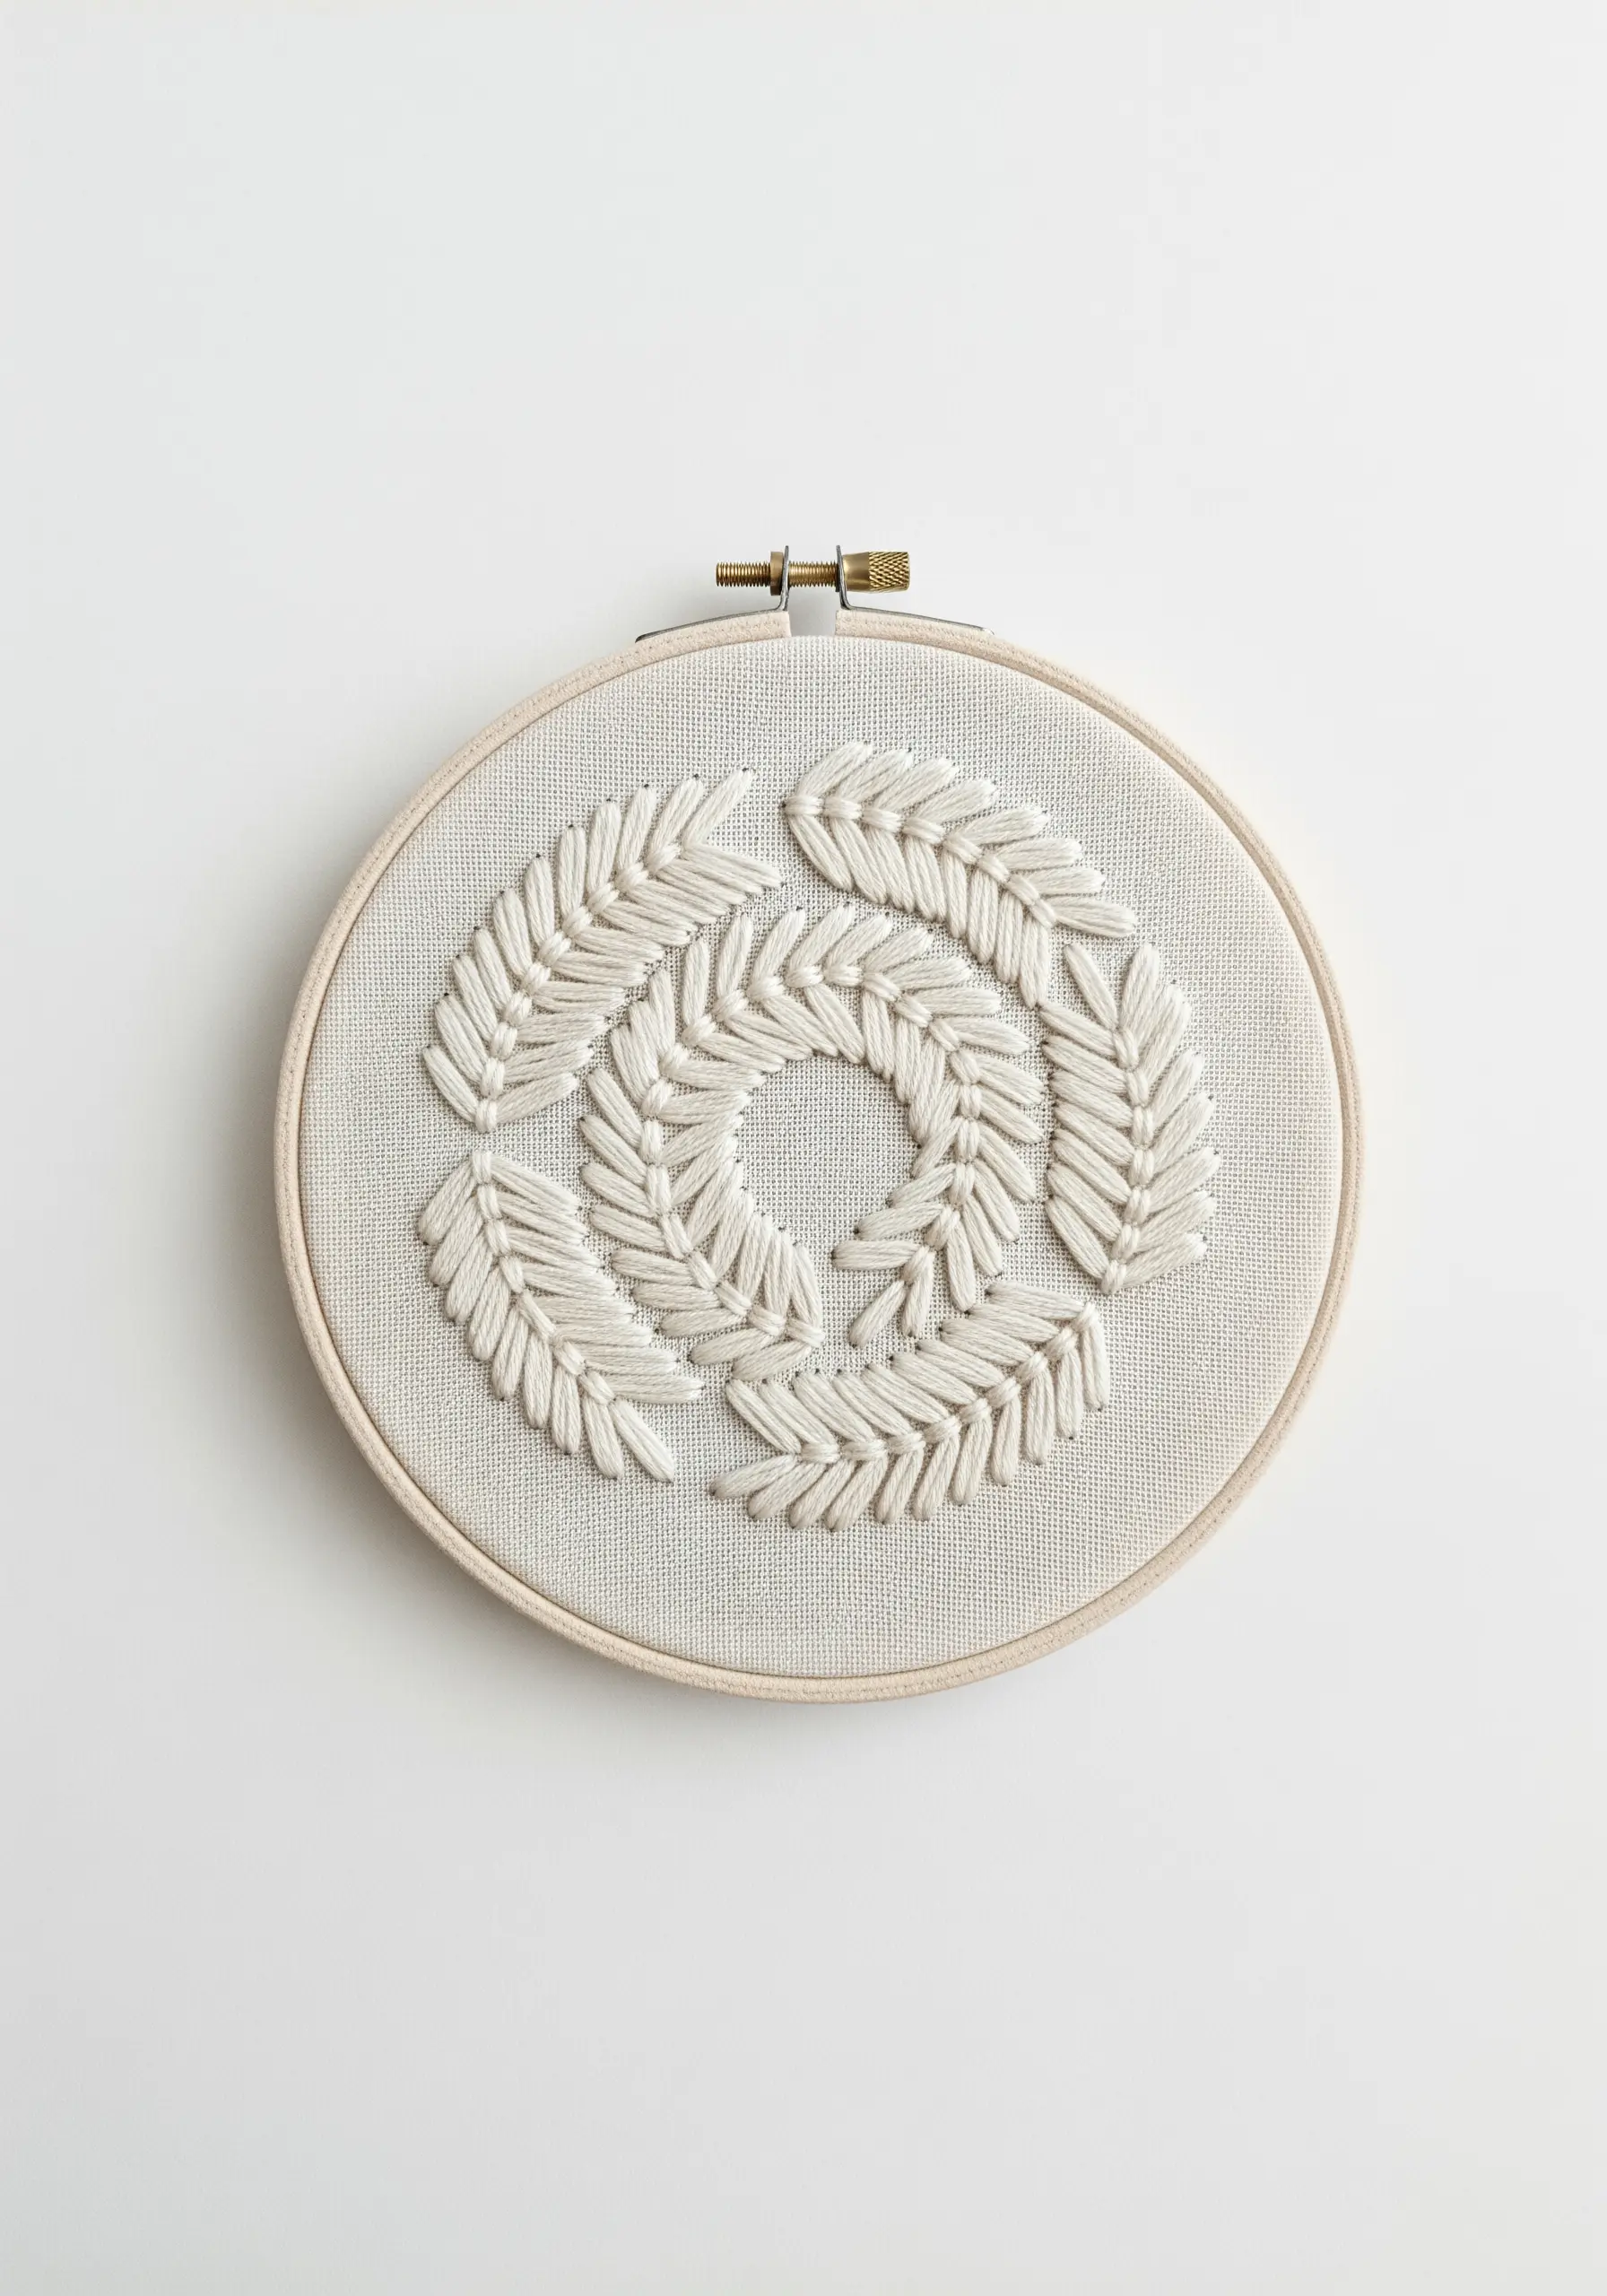
Create the illusion of layered leaves or feathers using a single, versatile stitch.
Work the fishbone stitch in short, curved segments, overlapping them slightly as you move around in a circle to form a wreath.
By angling the central ‘spine’ of each stitch, you control the direction and flow of the entire piece, giving it a natural, swirling movement.
This technique is incredibly efficient, as the fill and outline are created simultaneously, resulting in a clean and elegant motif that is rich with implied texture.
20. Visualize Sound with Varied Stitch Heights

Translate abstract data, like a soundwave, into a tactile masterpiece by varying stitch type and height.
Use vertical satin stitches or dense straight stitches for the sharp peaks and valleys, varying their height according to the soundwave’s form.
For the fuller, curved sections, switch to padded satin stitch to create a soft, undulating volume that rises from the fabric.
Incorporate clusters of French knots to represent staccato notes or textured noise, adding another layer of tactile information to your visual design.
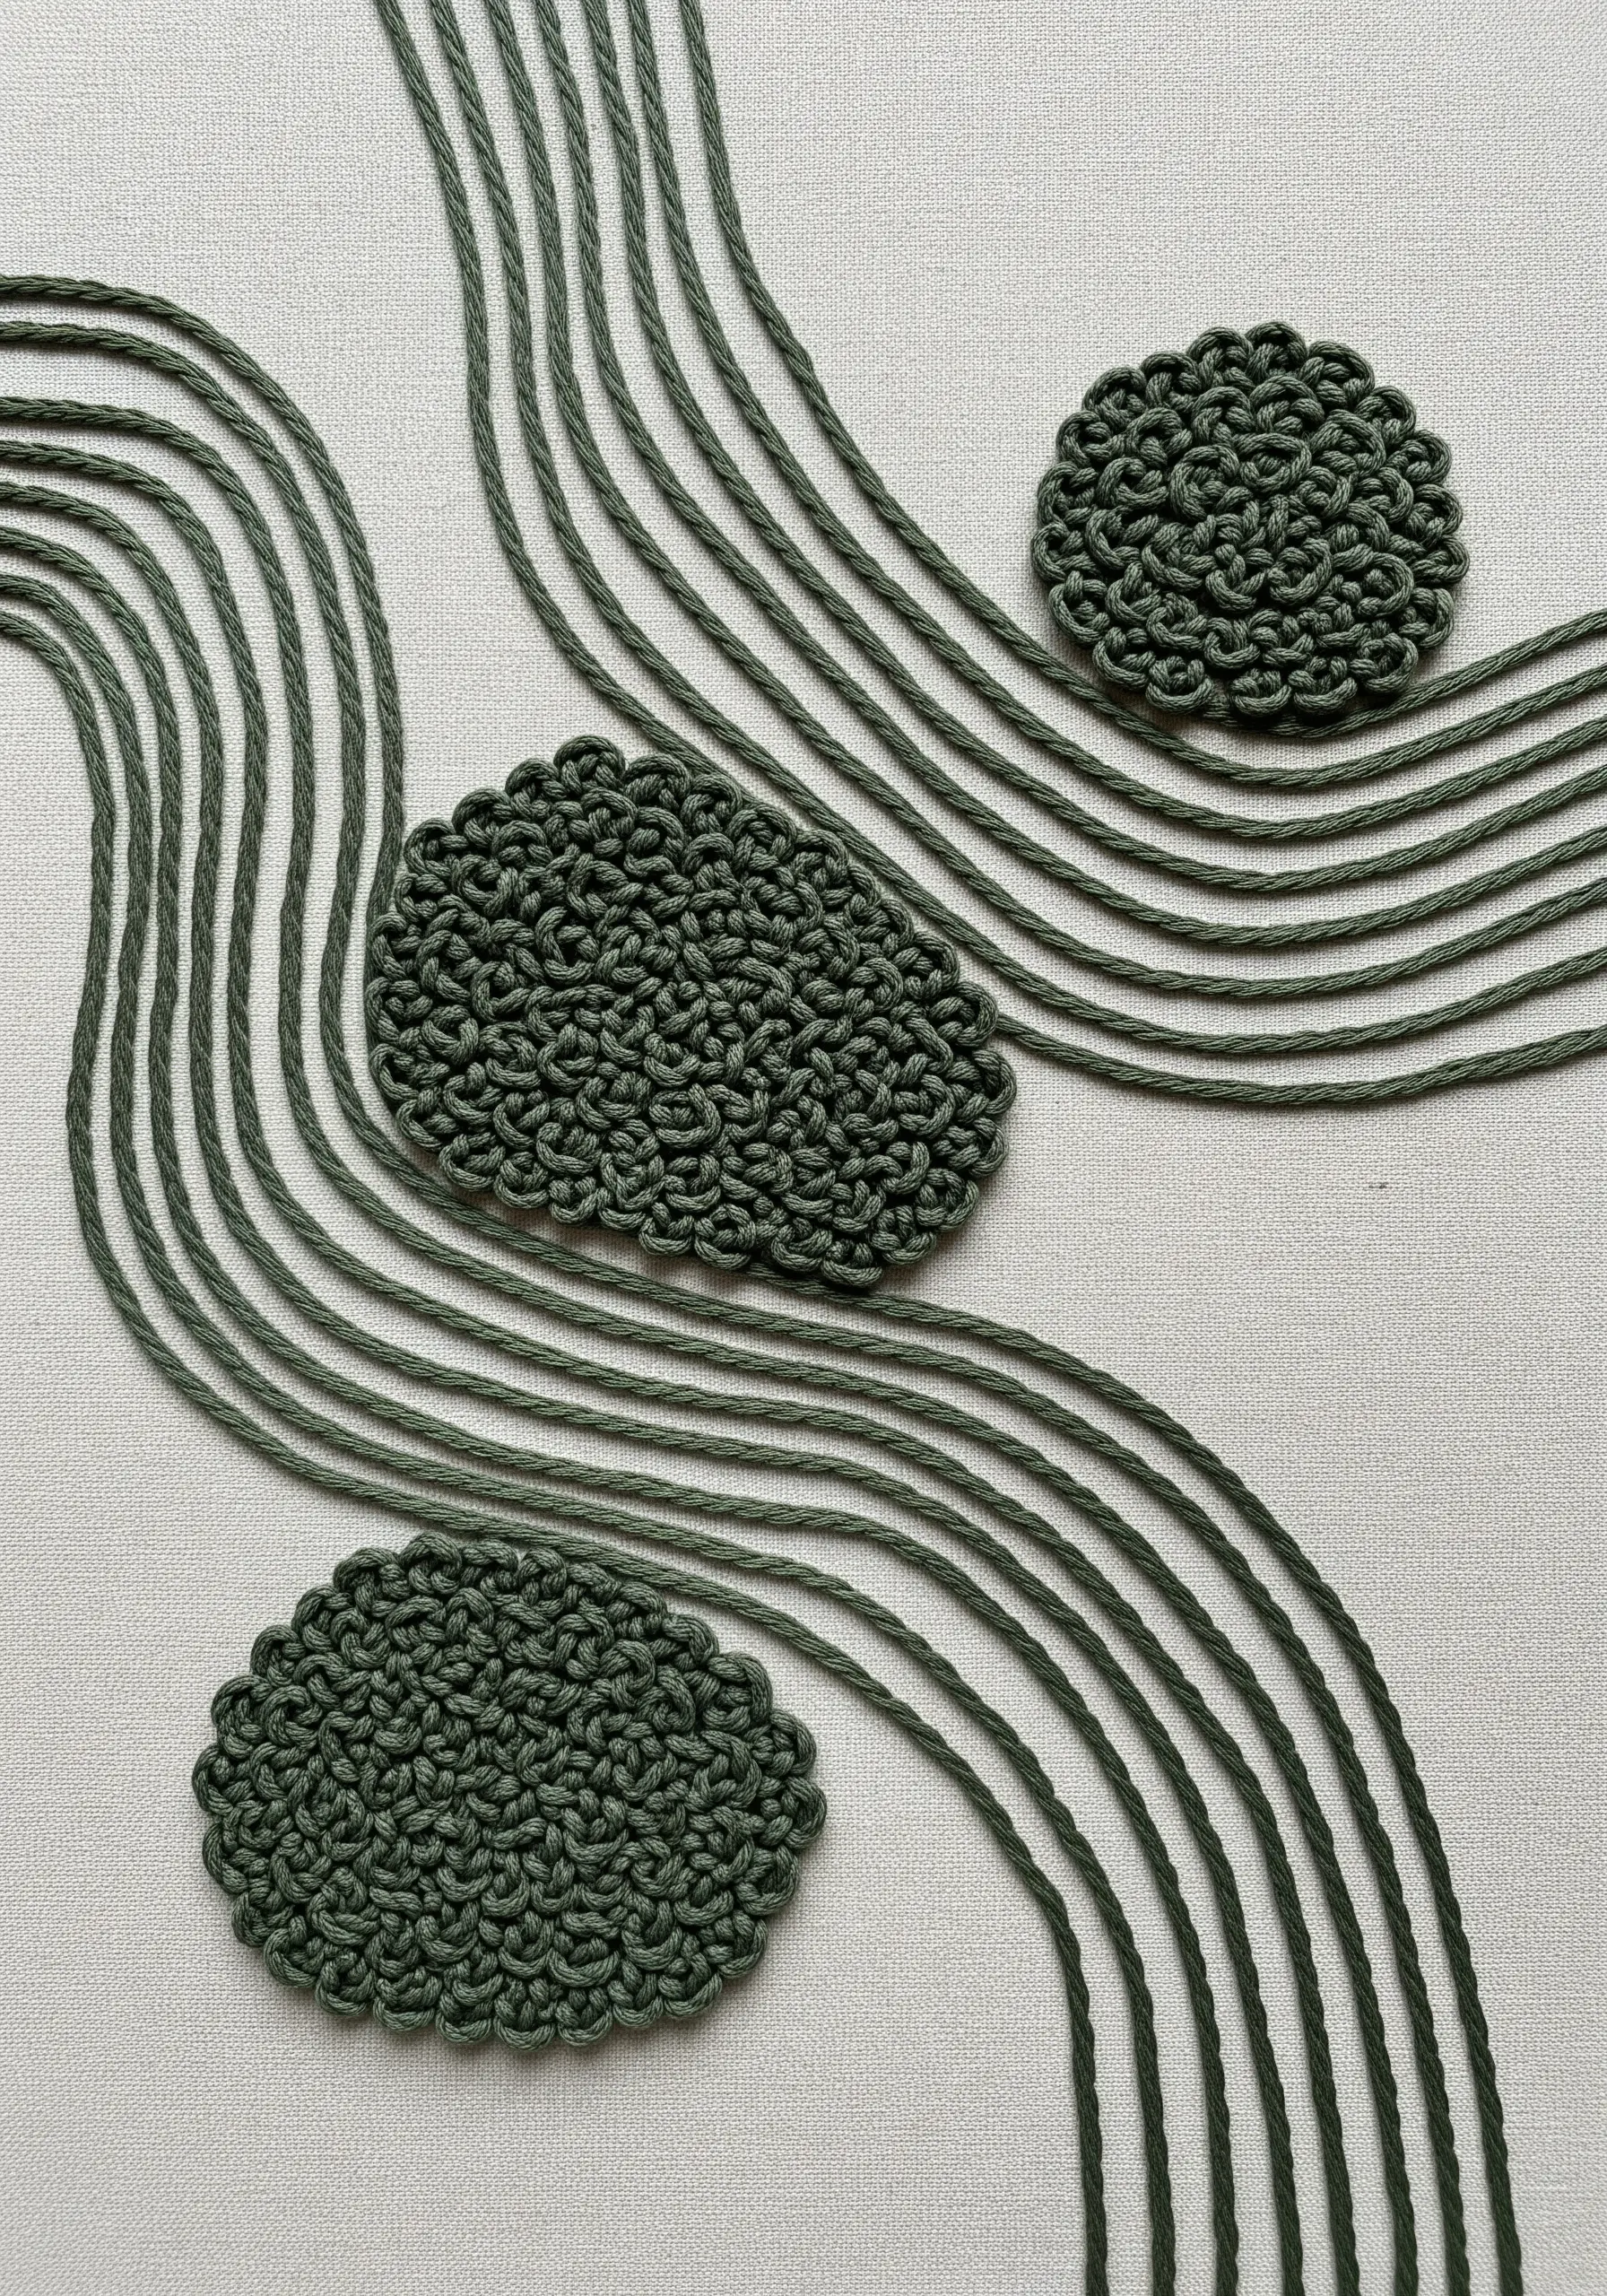
21. Apply Thick Cords for Bold, Graphic Shapes

When you want to make a bold statement, embroider *with* a material rather than just a thread.
Instead of trying to stitch with a very thick yarn or rope, use the couching technique: lay the cord on the surface of your fabric and use a thinner, matching thread to tack it down with small, evenly spaced stitches.
This method allows you to create clean, graphic spirals, circles, and lines while preserving the full texture and dimension of the cord itself.
It’s an ideal way to add texture to functional items like lampshades or cushions.
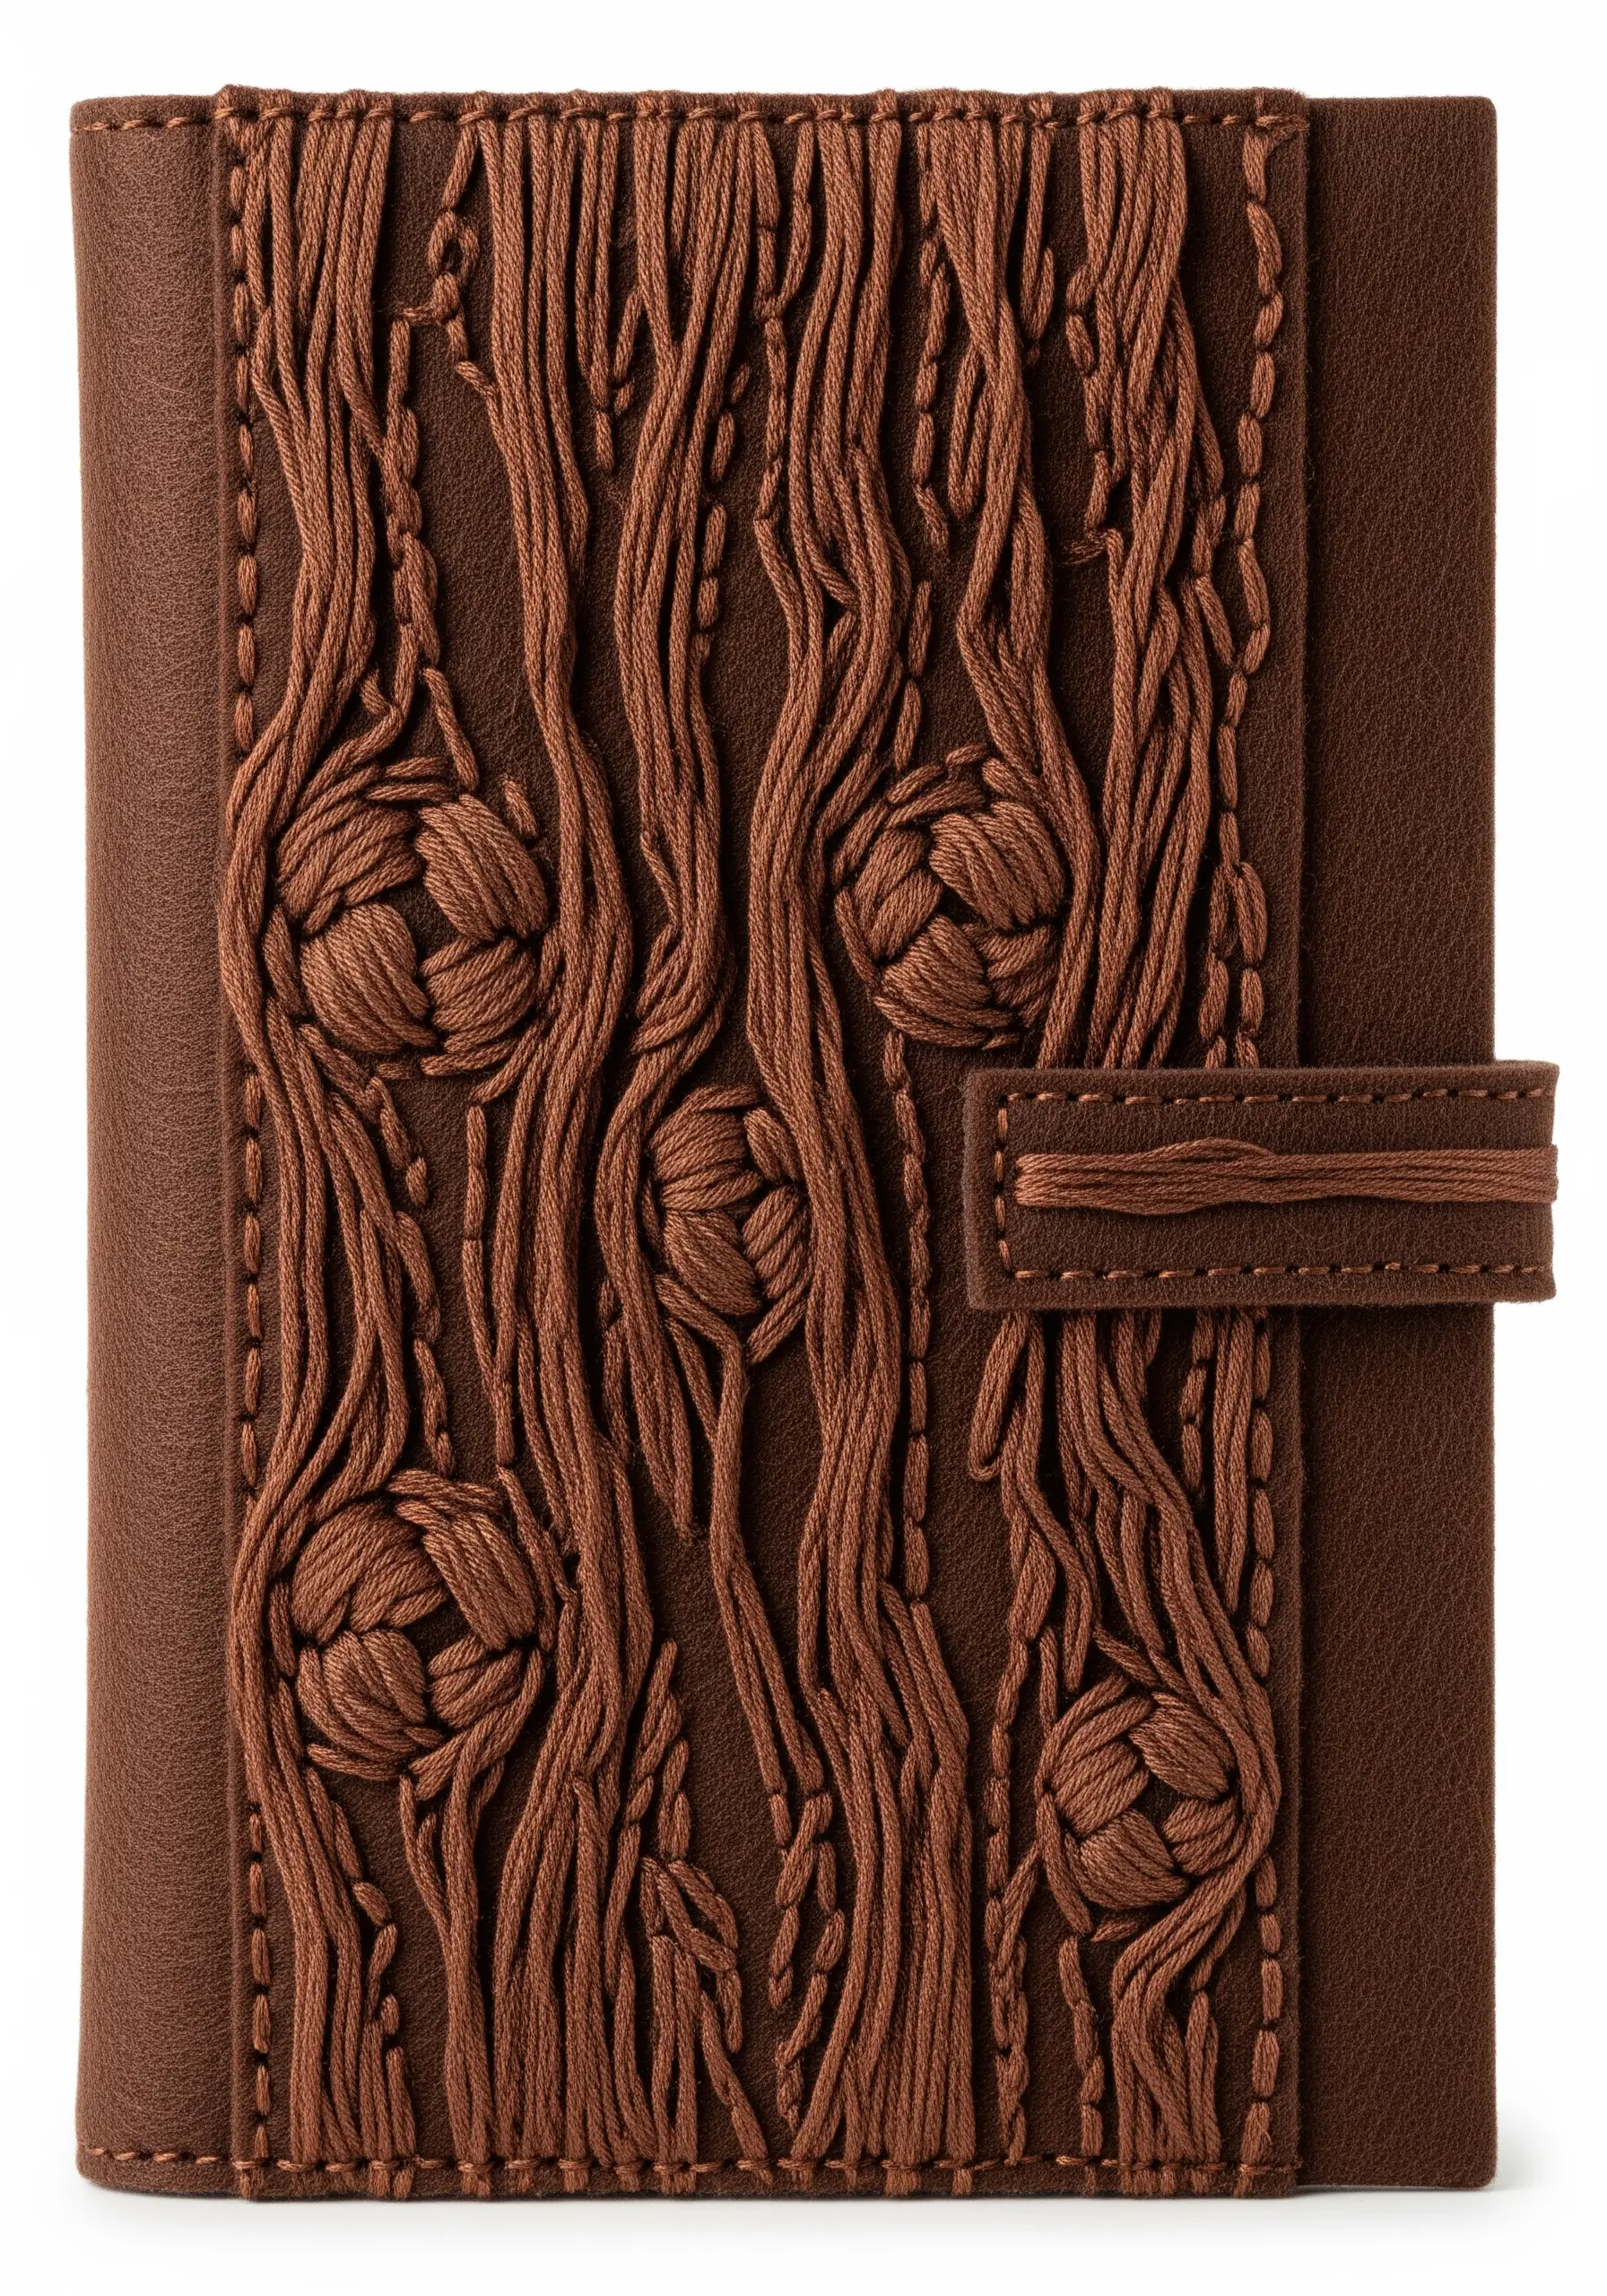
22. Master Tone-on-Tone Botanical Relief
Create a sophisticated, nature-inspired piece by stitching with thread that exactly matches your fabric color.
With color removed from the equation, the focus shifts entirely to the texture and the shadows cast by your stitches.
Use high-relief stitches like bullion knots, cast-on stitches, or French knots to represent flower heads or seed pods.
For stems and leaves, use simpler, flatter stitches like stem stitch or split stitch.
This tone-on-tone embroidery creates an elegant, embossed effect that is subtle from a distance but reveals intricate detail up close.
23. Weave an Architectural Grid with Varied Line Weights
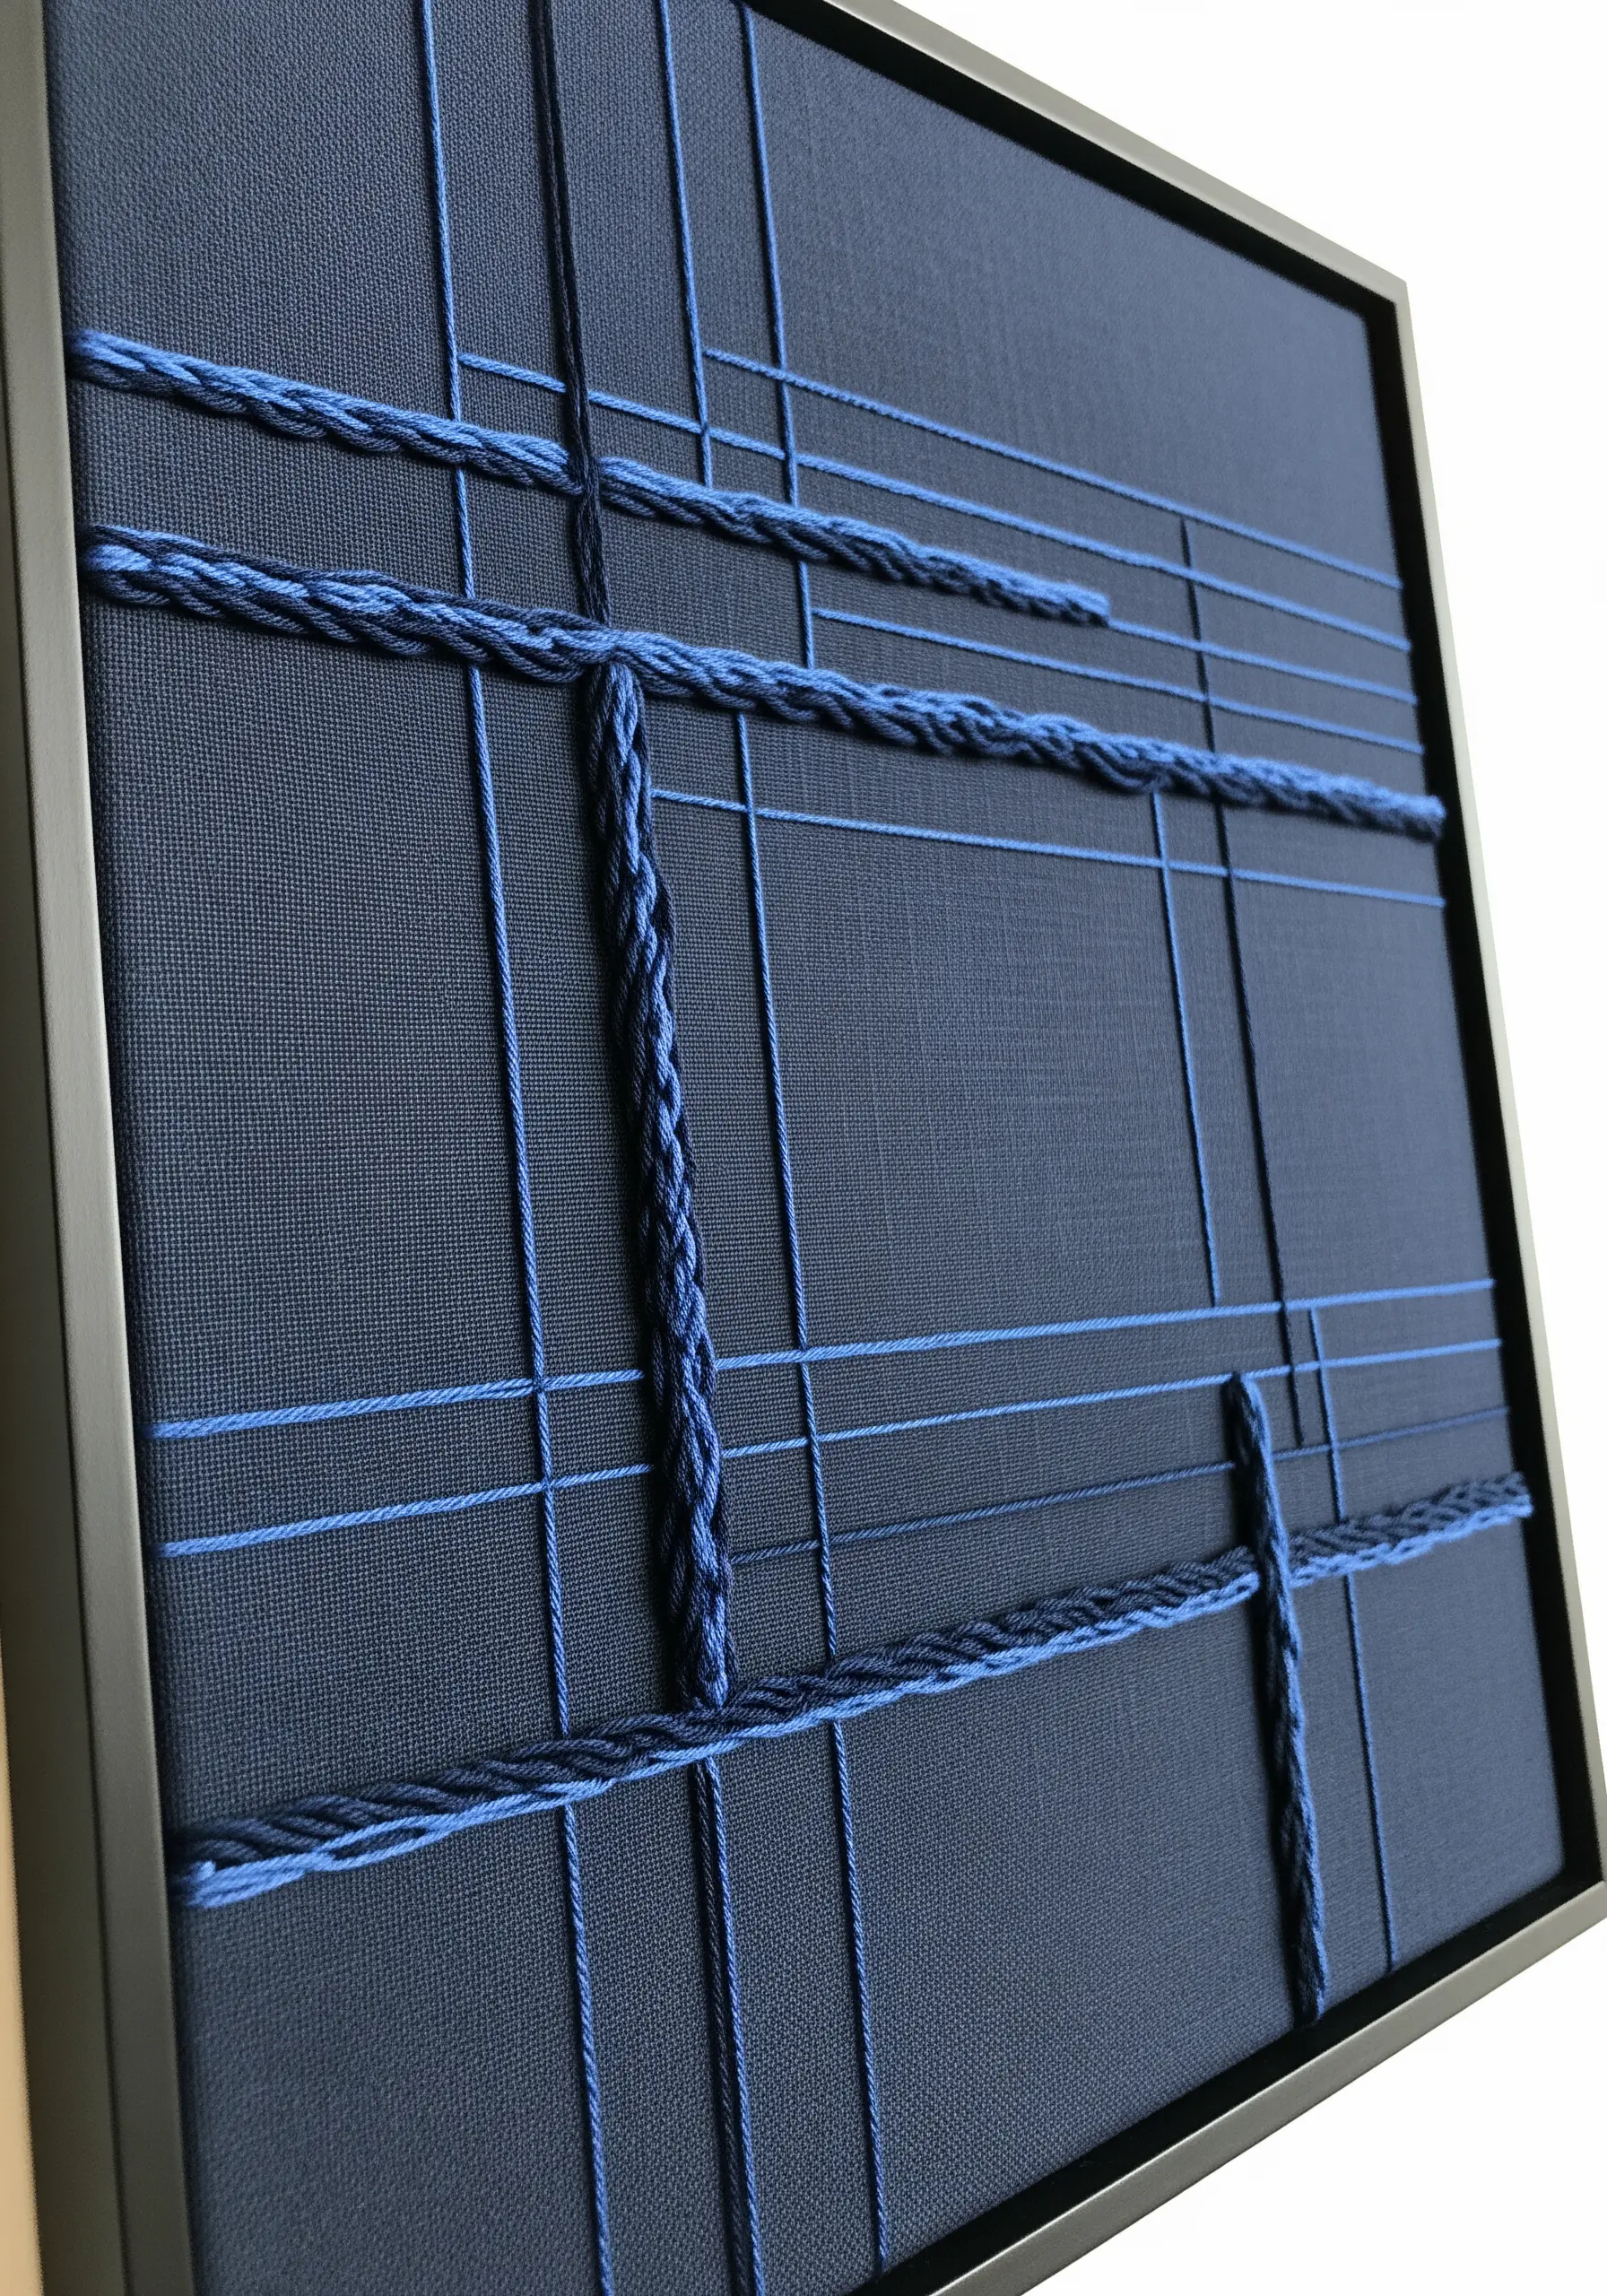
Construct a modern, grid-based composition by playing with the thickness and texture of your lines.
Establish a primary grid using a thick, braided cord secured with couching stitches. This creates a strong, dominant structure.
Then, intersect this grid with a secondary set of lines using a much thinner thread, perhaps just a single strand of floss.
The contrast between the heavy, textured braid and the delicate, fine lines creates a visual hierarchy and architectural depth, turning a simple grid into a complex statement piece.
24. Turn a Simple Motif into a Stitch Encyclopedia

Elevate a basic shape, like a leaf, by treating each one as a canvas for a different textural fill stitch.
Outline a series of hanging leaves, then fill each one with a unique pattern: one with clean vertical satin stitches, another with a woven lattice or trellis stitch, a third with dense seed stitch, and a fourth with an open Cretan stitch.
This approach not only makes the design incredibly engaging to look at but also serves as a brilliant way to practice and perfect a wide range of stitches within a single, cohesive project.
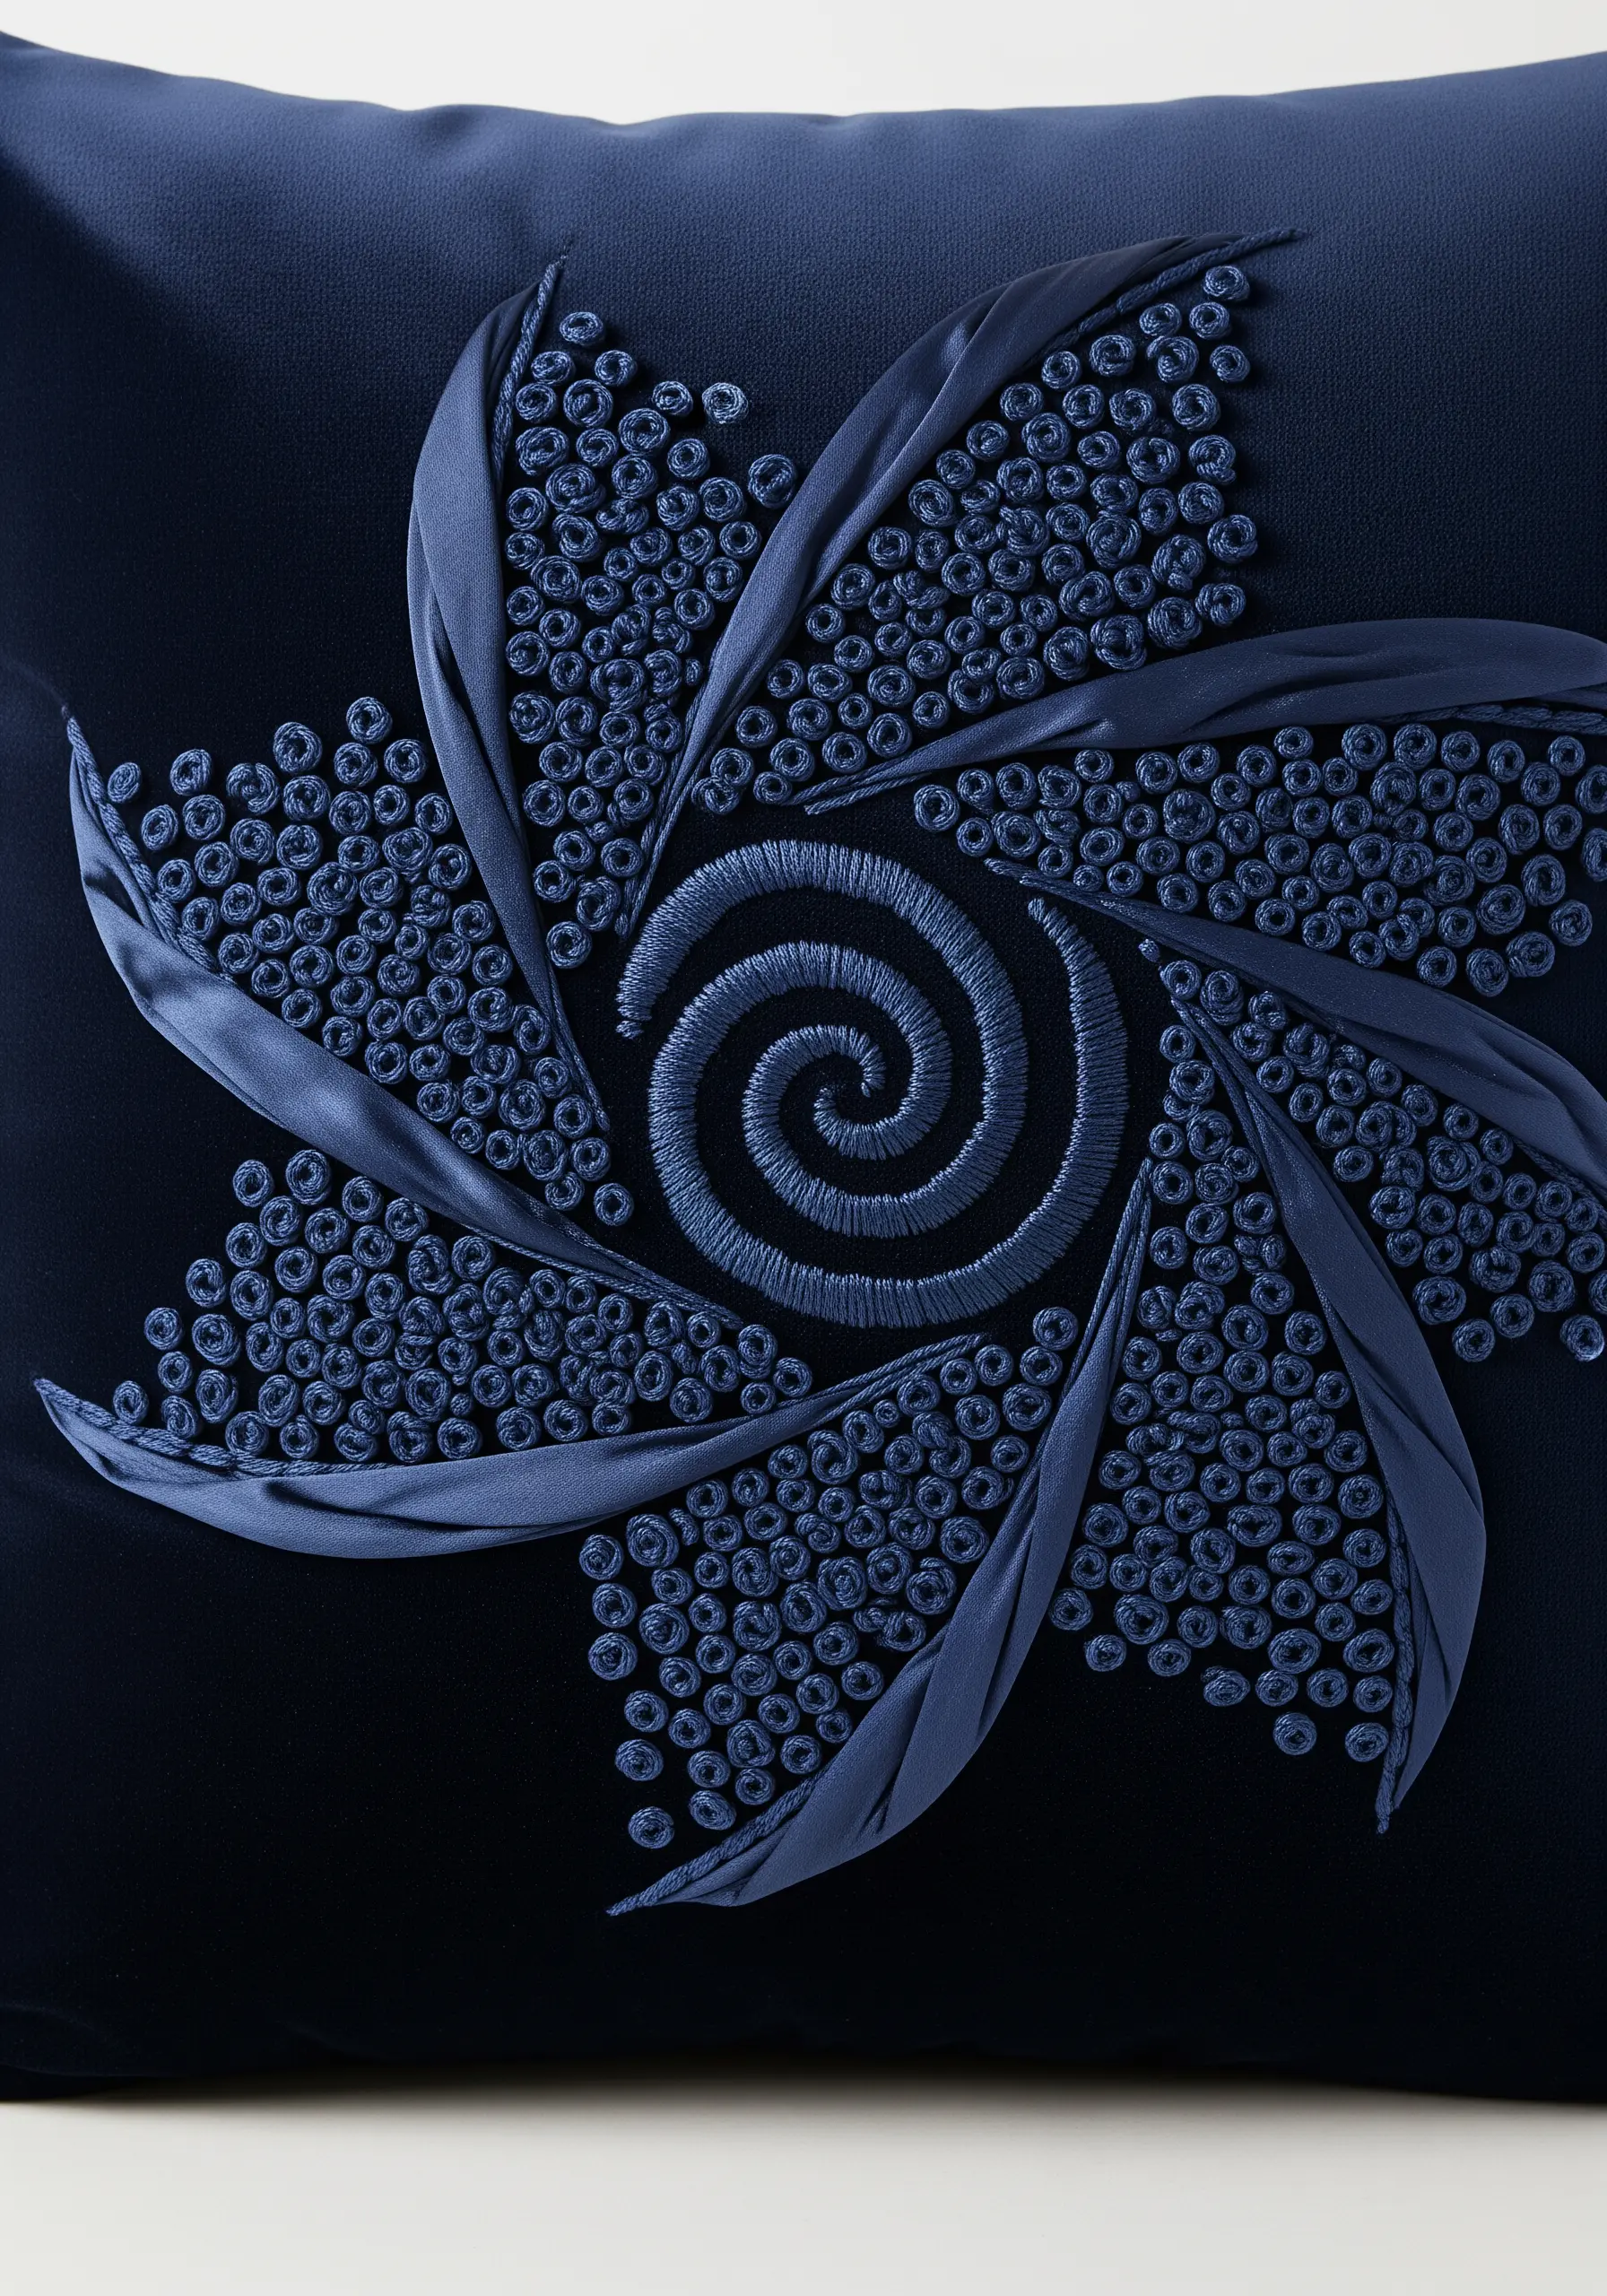
25. Sculpt with Ribbon for Light-Catching Texture
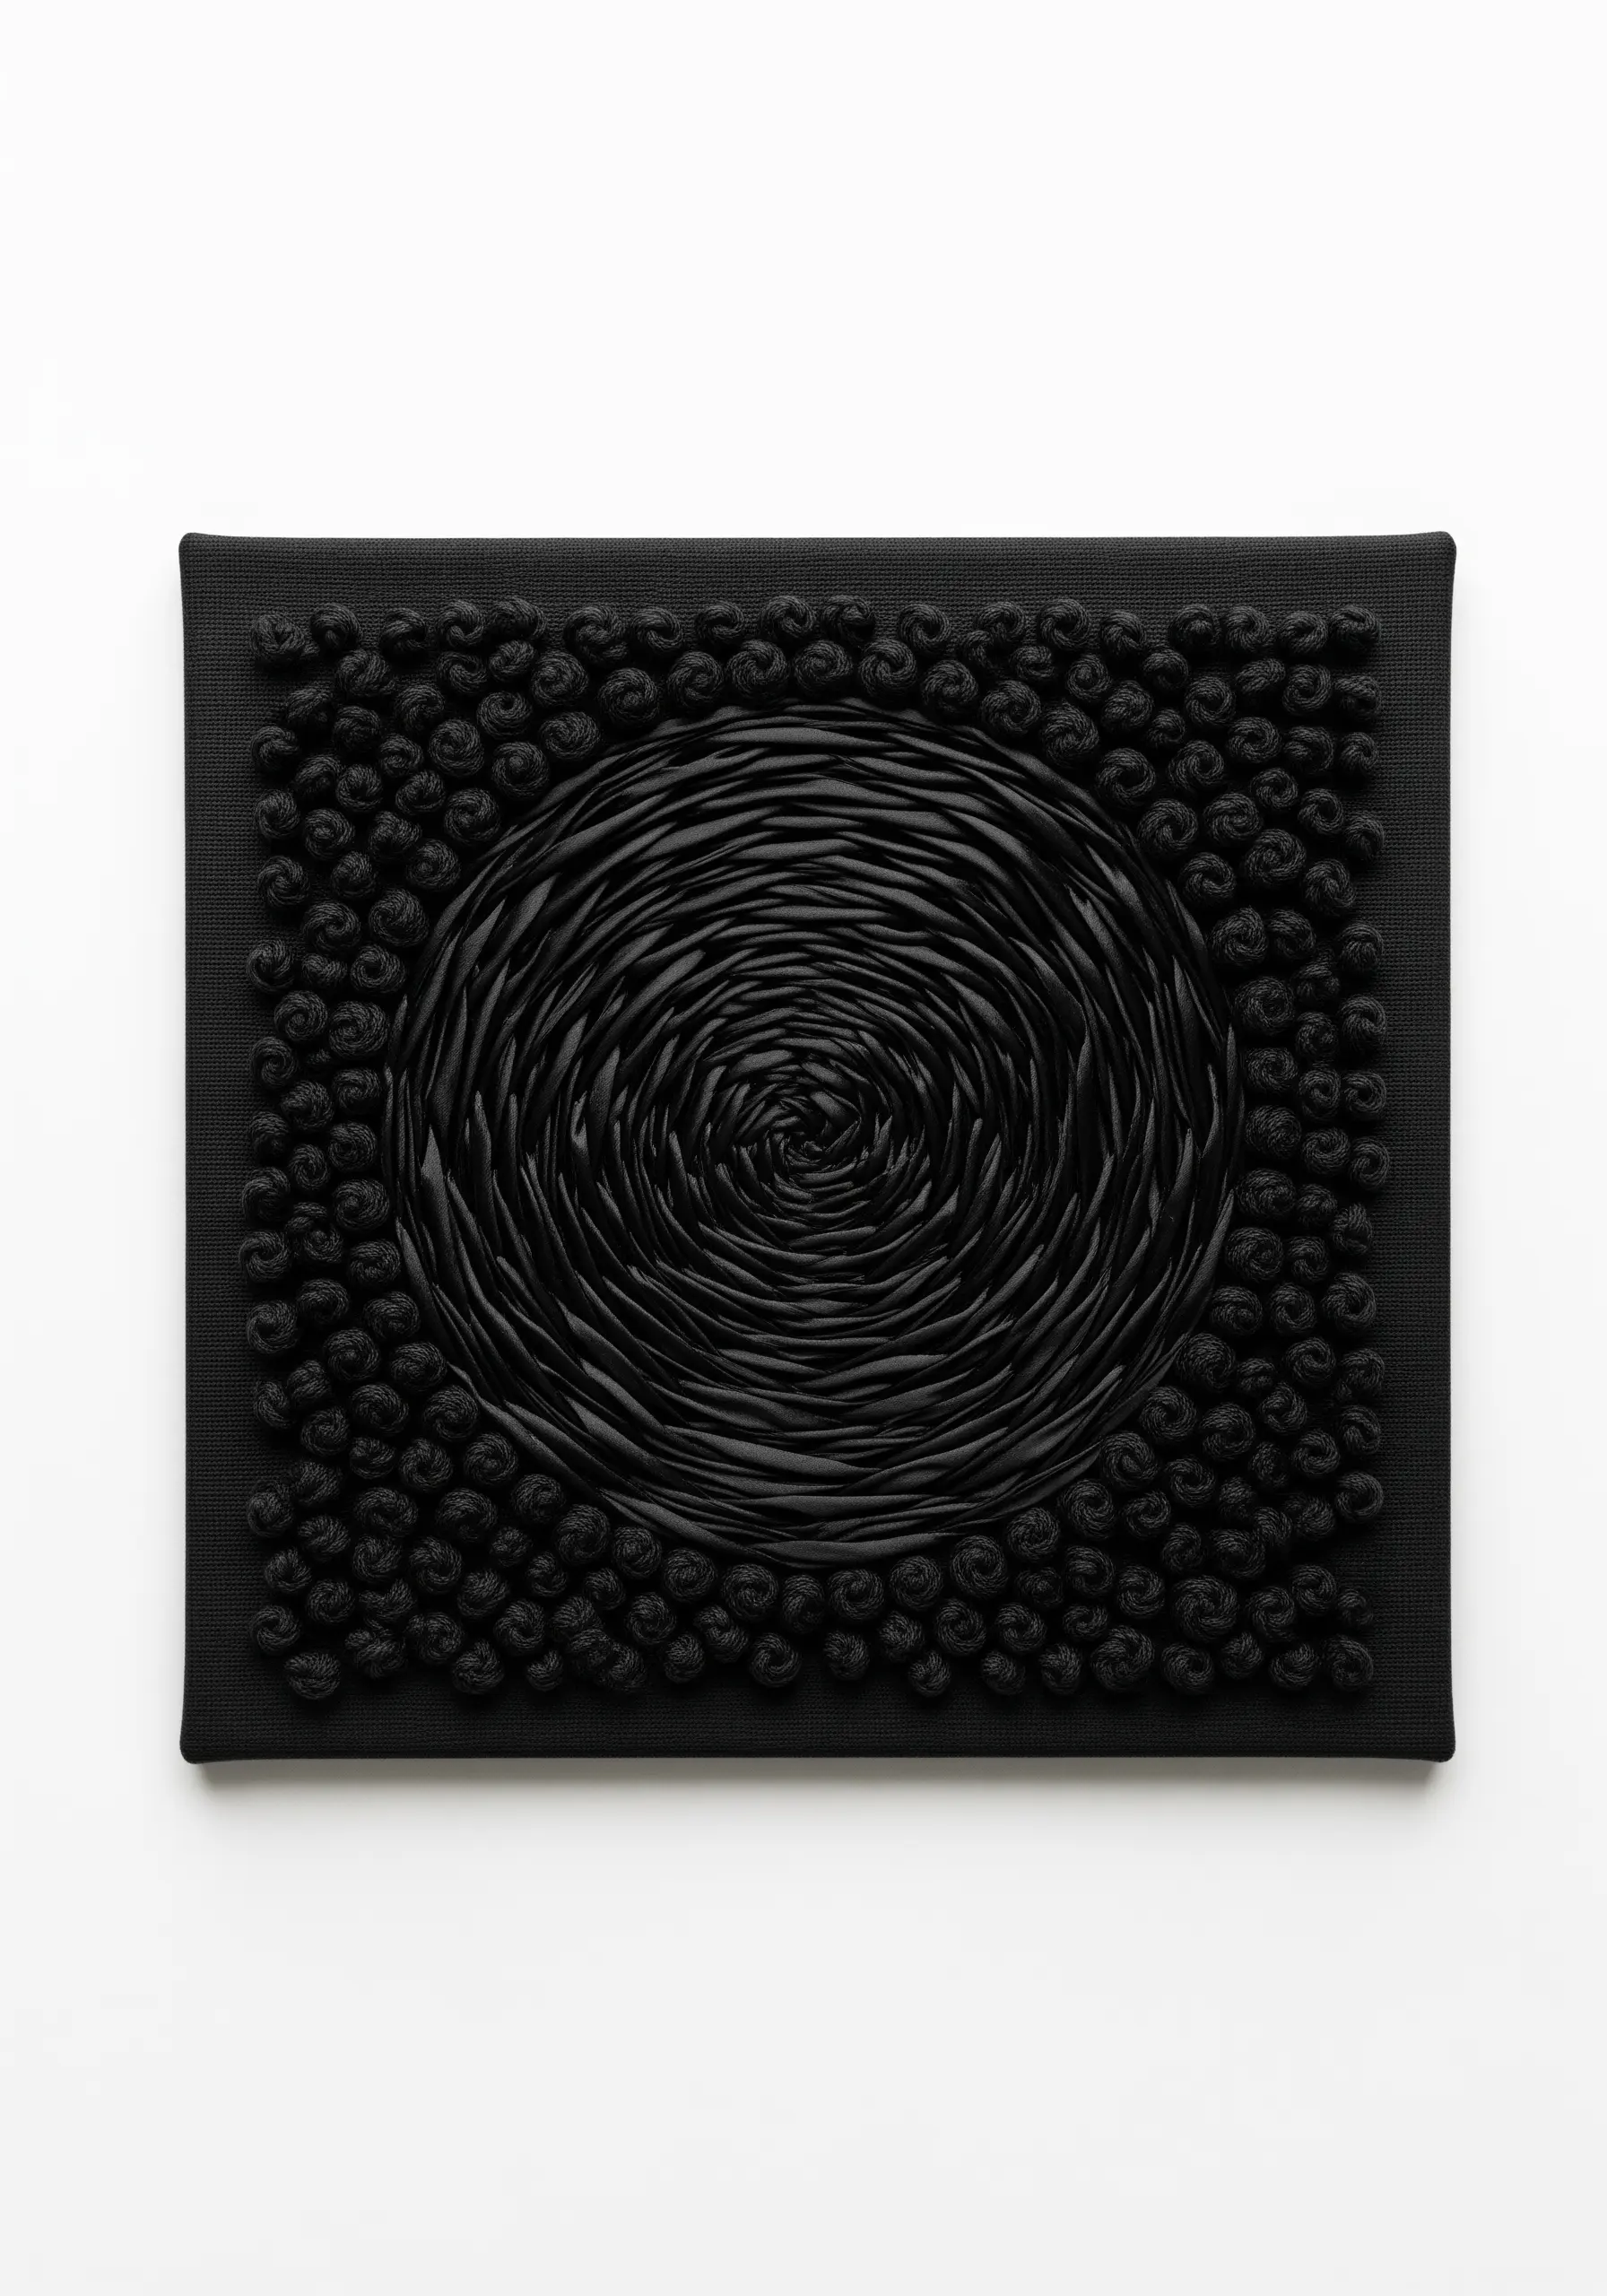
Use silk or satin ribbon instead of thread to create textures with a unique, luxurious sheen.
In the center of your design, create a swirling vortex using a ribbon stitch, intentionally twisting the ribbon as you pull it through the fabric. This creates facets that catch and reflect light in different ways.
Frame this high-sheen area with a border of dense, matte French knots made from cotton floss. The contrast makes the ribbon’s luster even more dramatic, creating a focal point of pure texture and light.
26. Craft Delicate Forms with Fanned Stitches
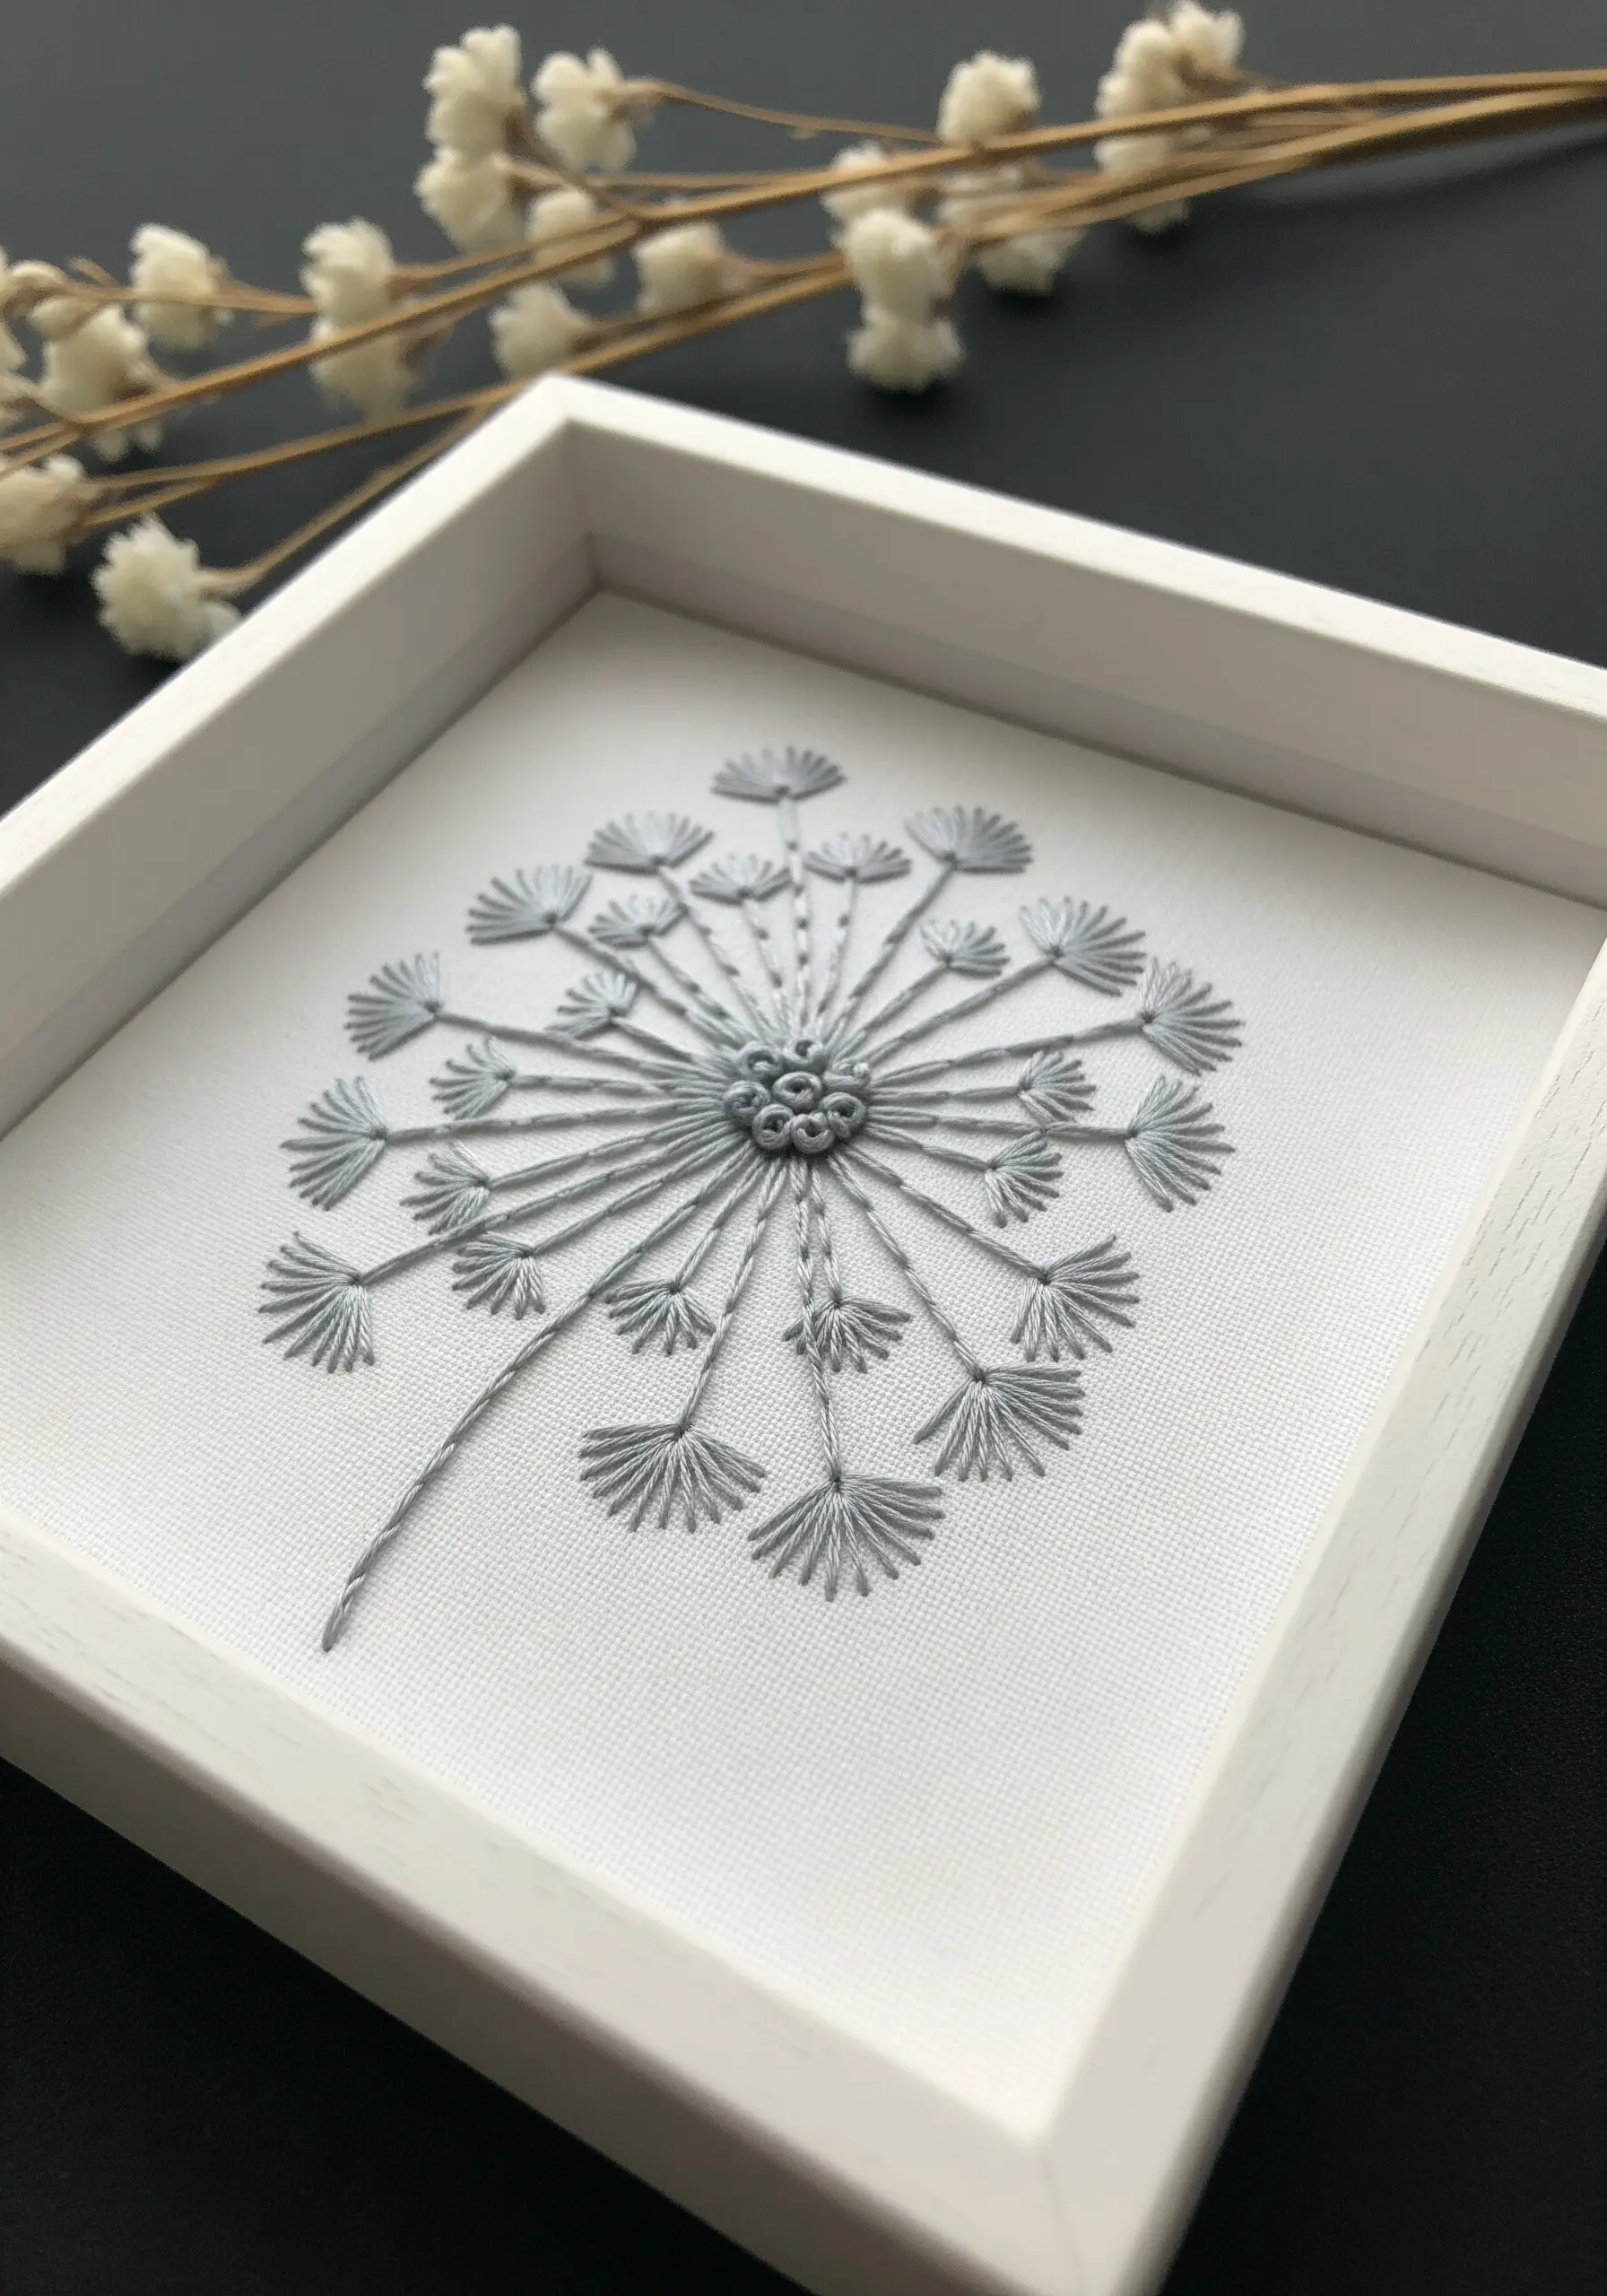
Recreate the fragile structure of a dandelion seed head or delicate flora using precise stitch placement.
The center can be a small cluster of French knots or a single woven wheel.
For the radiating seed pods, create small fans of detached chain stitches (lazy daisies) or straight stitches, ensuring they are evenly spaced around the center.
Using a fine thread (two or three strands) on a plain-weave linen or cotton allows the delicacy of the stitchwork to stand out, resulting in an elegant and airy design.
27. Create Visual Flow with a Gradient of Textures
Instead of a color gradient, create a textural one that transitions from dense and complex to light and open.
Begin in one corner with a tightly packed cluster of a high-relief stitch, like bullion knots.
Gradually transition to a slightly less dense stitch, like French knots, and then to a more open one, such as detached chain stitches.
Finally, fade into an area of sparse, simple seed stitches or tiny straight stitches. This gradual shift in stitch density and type creates a beautiful sense of movement and visual flow across the hoop.
28. Incorporate Weaving and Macrame on Fabric
Bring the tactile world of weaving and knotting directly onto your fabric surface.
To create a woven section, first lay down a series of parallel vertical threads (the warp). Then, use a blunt tapestry needle to weave another thread horizontally (the weft) over and under the warp threads.
For knotted elements, you can adapt simple macrame knots, like the square knot, by anchoring them to the fabric at the top and bottom.
This technique adds an unexpected and wonderfully chunky texture, perfect for embellishing journal covers, bags, or wall hangings.
29. Design Optical Illusions with Warped Lines
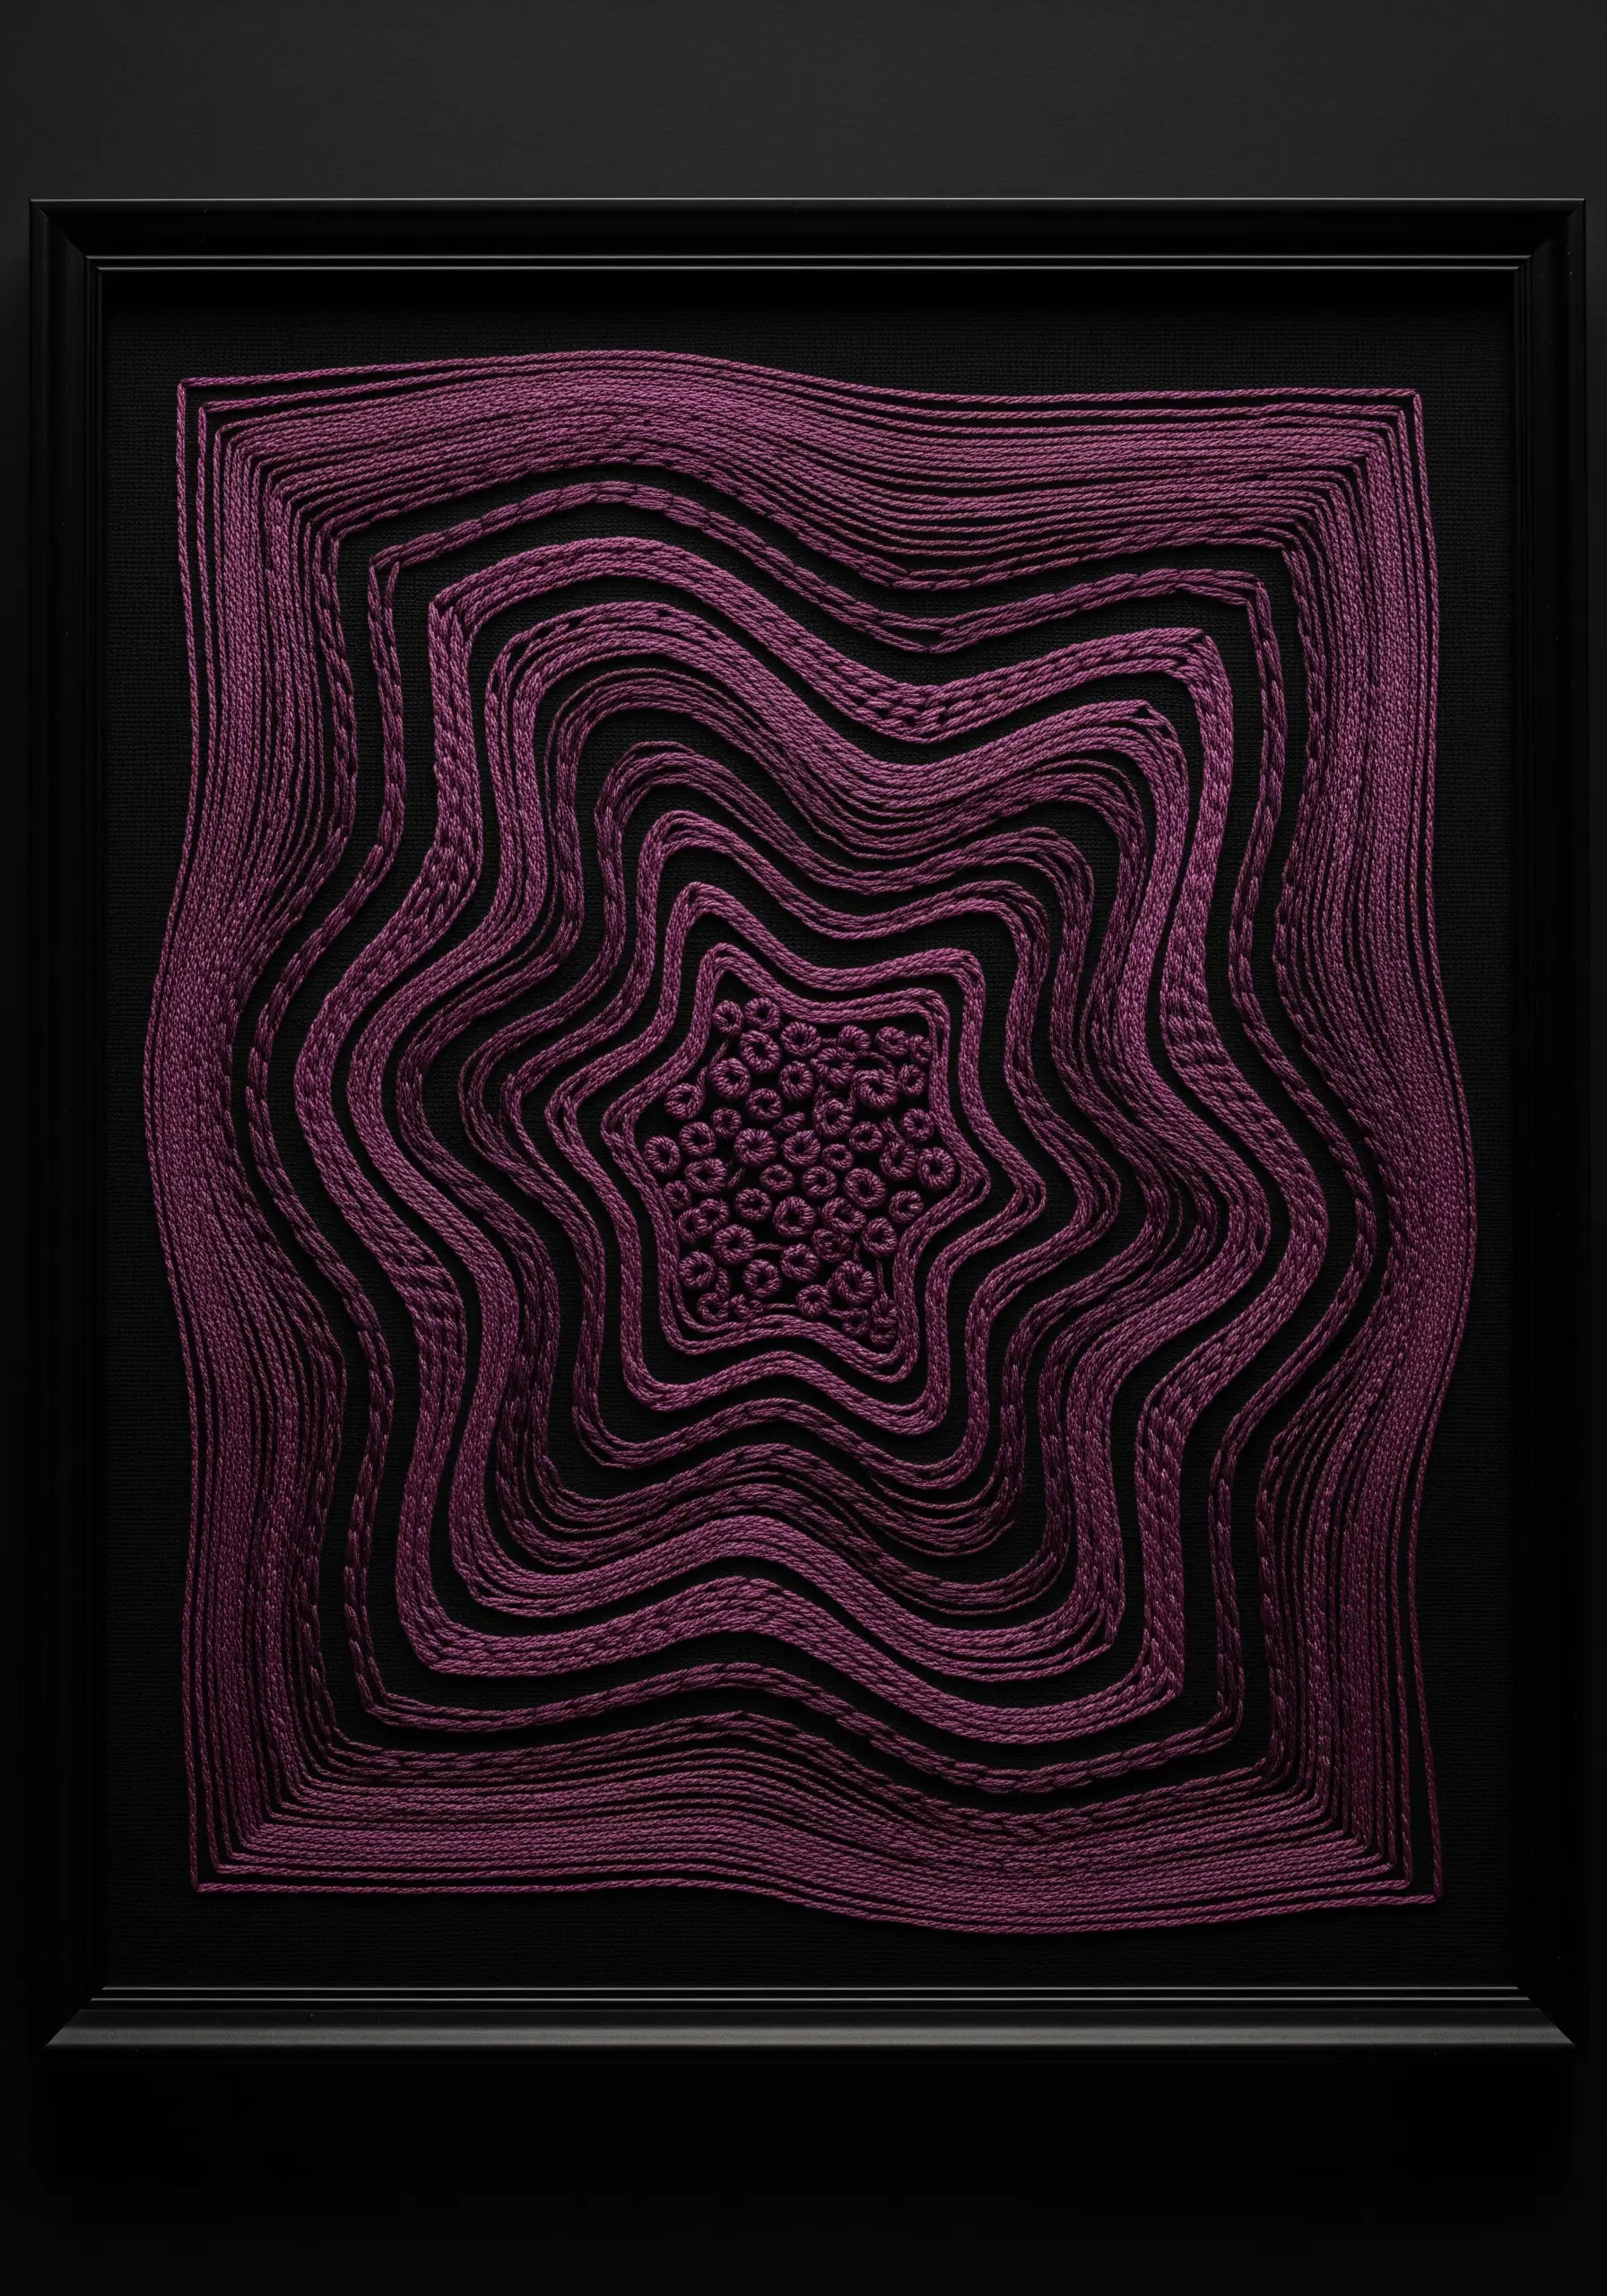
Trick the eye and create a sense of three-dimensional space using precisely placed couched threads.
Draw a series of concentric, wavy shapes on your fabric. Then, lay long strands of thread along these lines and tack them down with a couching stitch.
The illusion of depth and movement comes from the perfectly parallel spacing and the fluid curves of the lines.
Placing a small, textured element like a cluster of French knots in the center can anchor the design and enhance the sense that the surrounding lines are vibrating or receding.
30. Go Bold with Chunky Yarn on Canvas
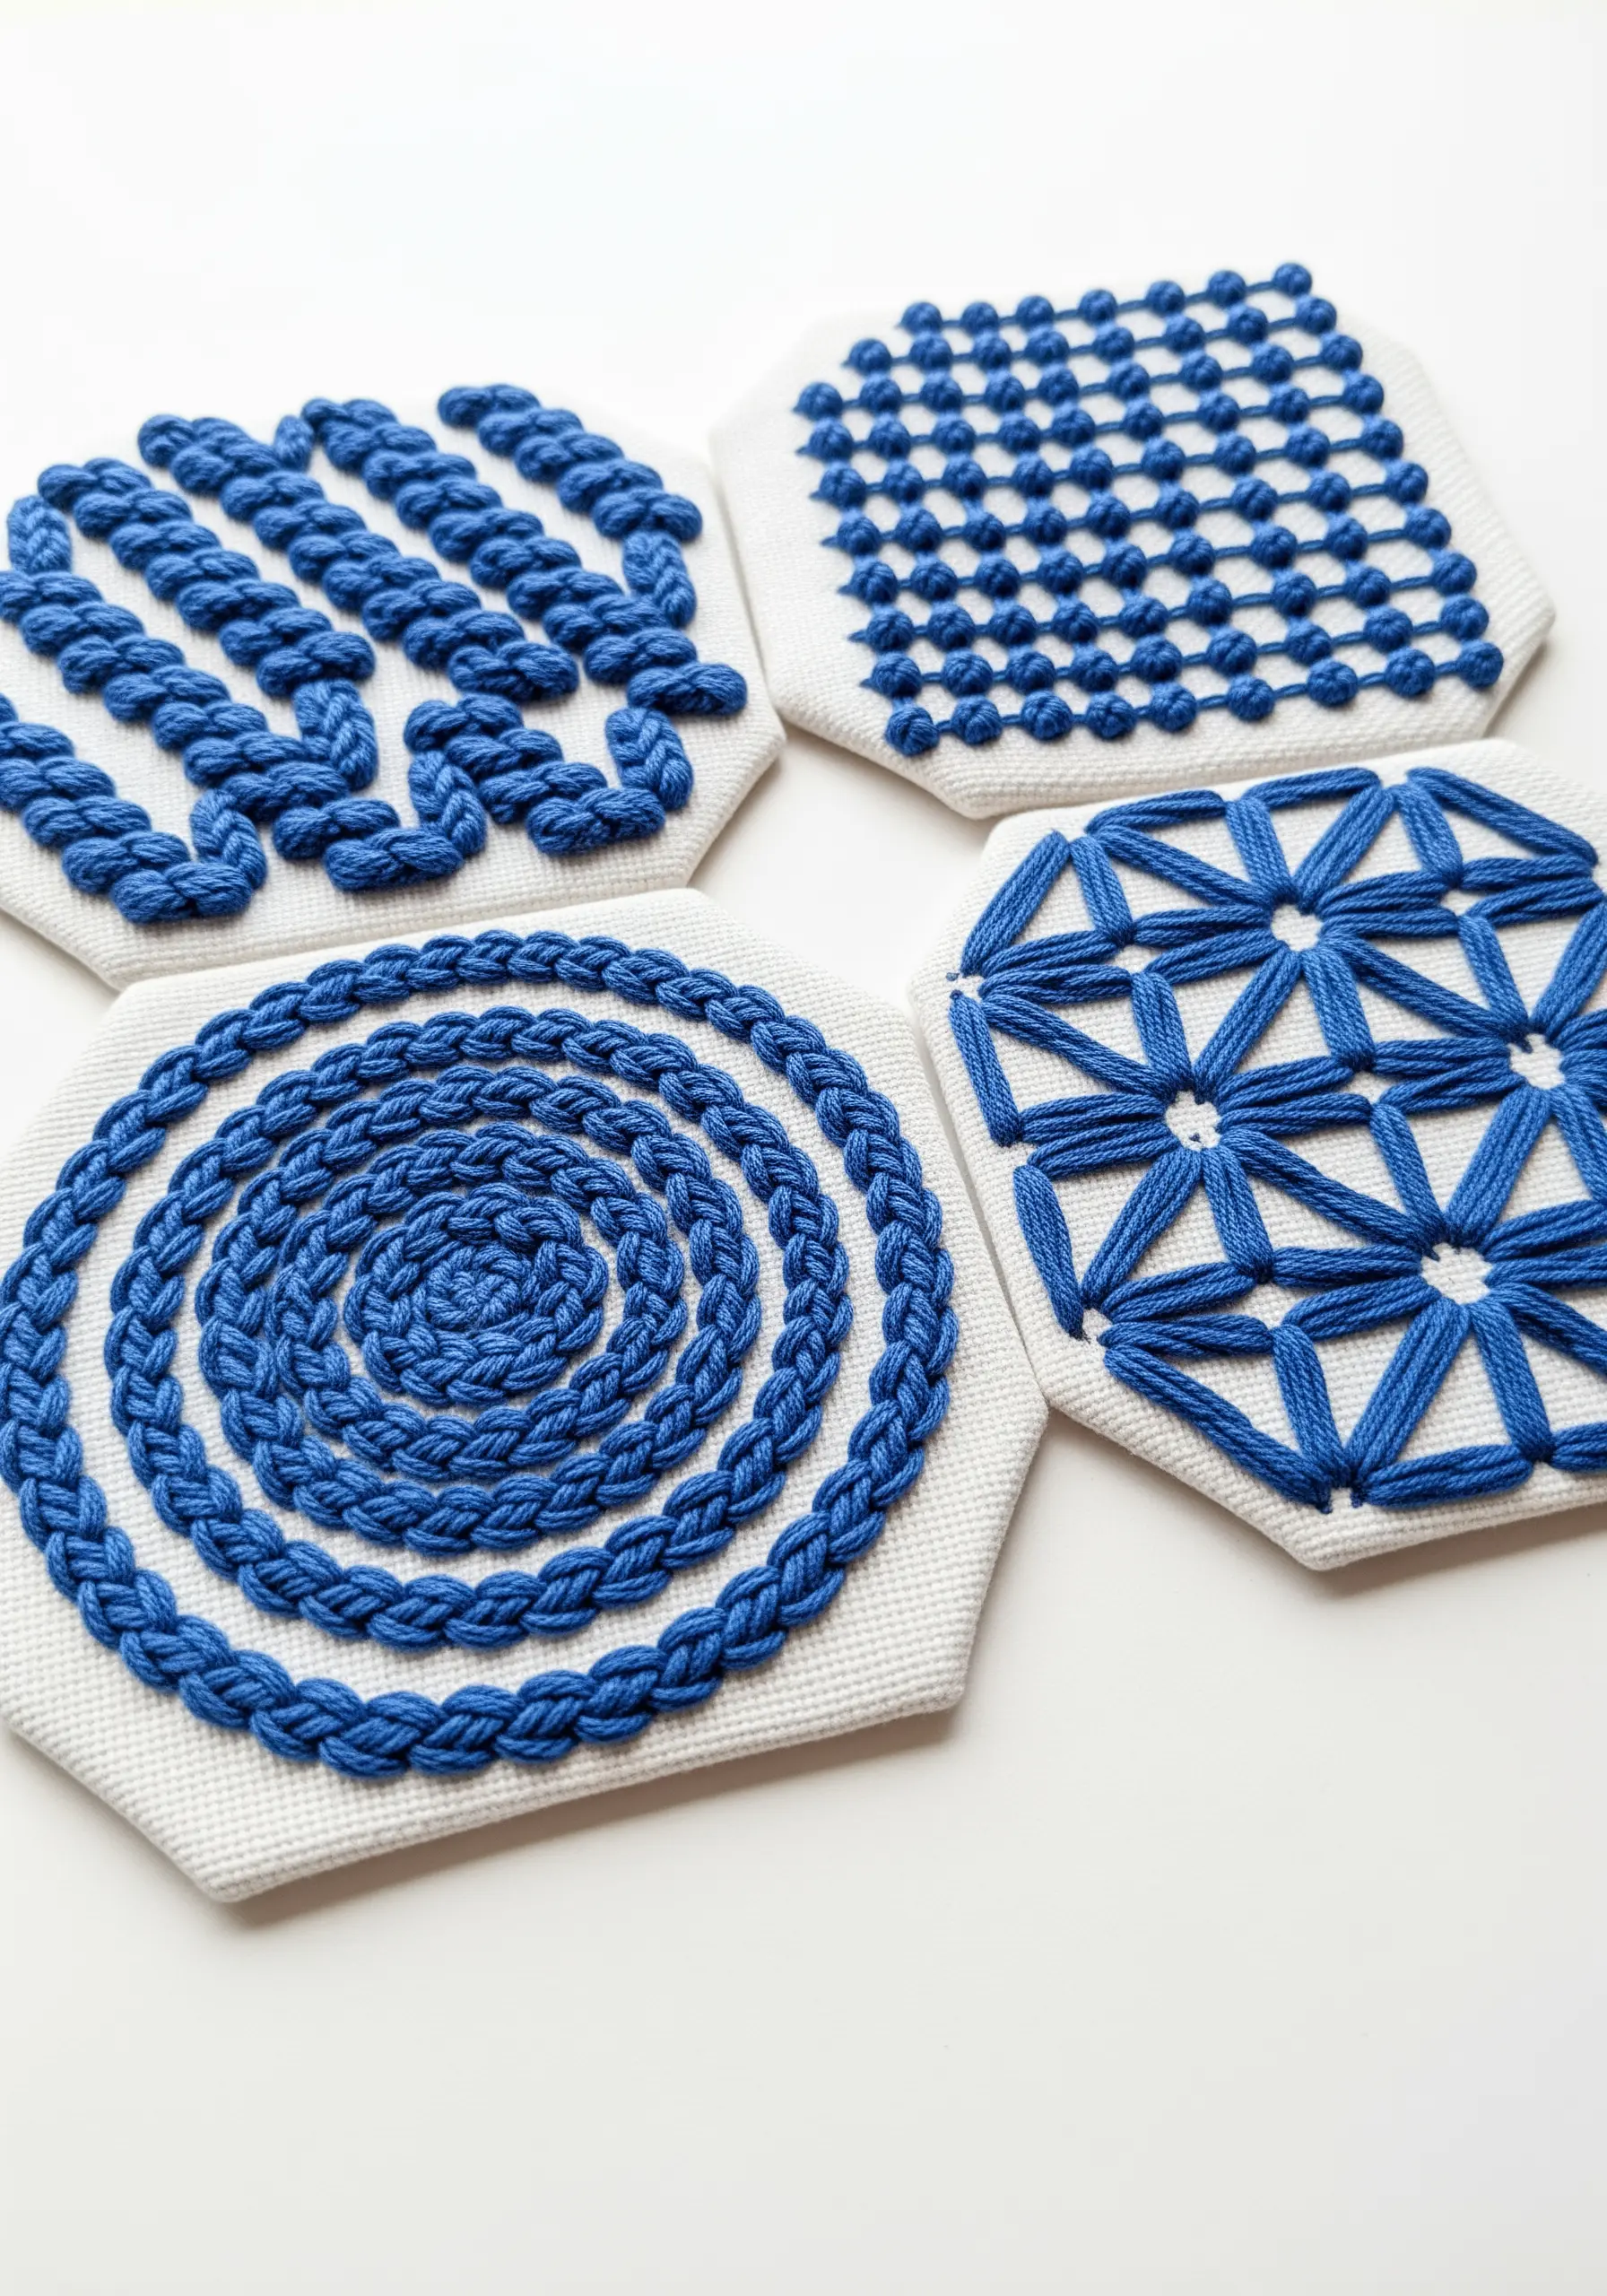
For a fast, high-impact project, swap fine floss for chunky yarn and a sturdy canvas fabric.
Because of the yarn’s thickness, simple stitches create incredible texture. A basic chain stitch becomes a hefty braid, couching creates bold outlines, and woven bar stitches produce a satisfyingly chunky fill.
This is a great approach for creating functional, durable items like coasters, placemats, or trivets, as the resulting embroidery is both visually striking and robust.
31. Define Organic Shapes with Contour Stitching

Create a sense of volume and form in abstract shapes by stitching in contours, like a topographic map.
Instead of filling a shape with a traditional satin stitch, use a simple backstitch or stem stitch to trace the shape’s outline, then stitch another line just inside that one, and so on, until you reach the center.
This technique creates a subtle, swirling texture that emphasizes the organic form of the shape and gives it a hand-carved, three-dimensional appearance. It is one of the best ways to turn natural textures into stunning embroidery art.
32. Craft Micro-Jewelry with Metallic Threads
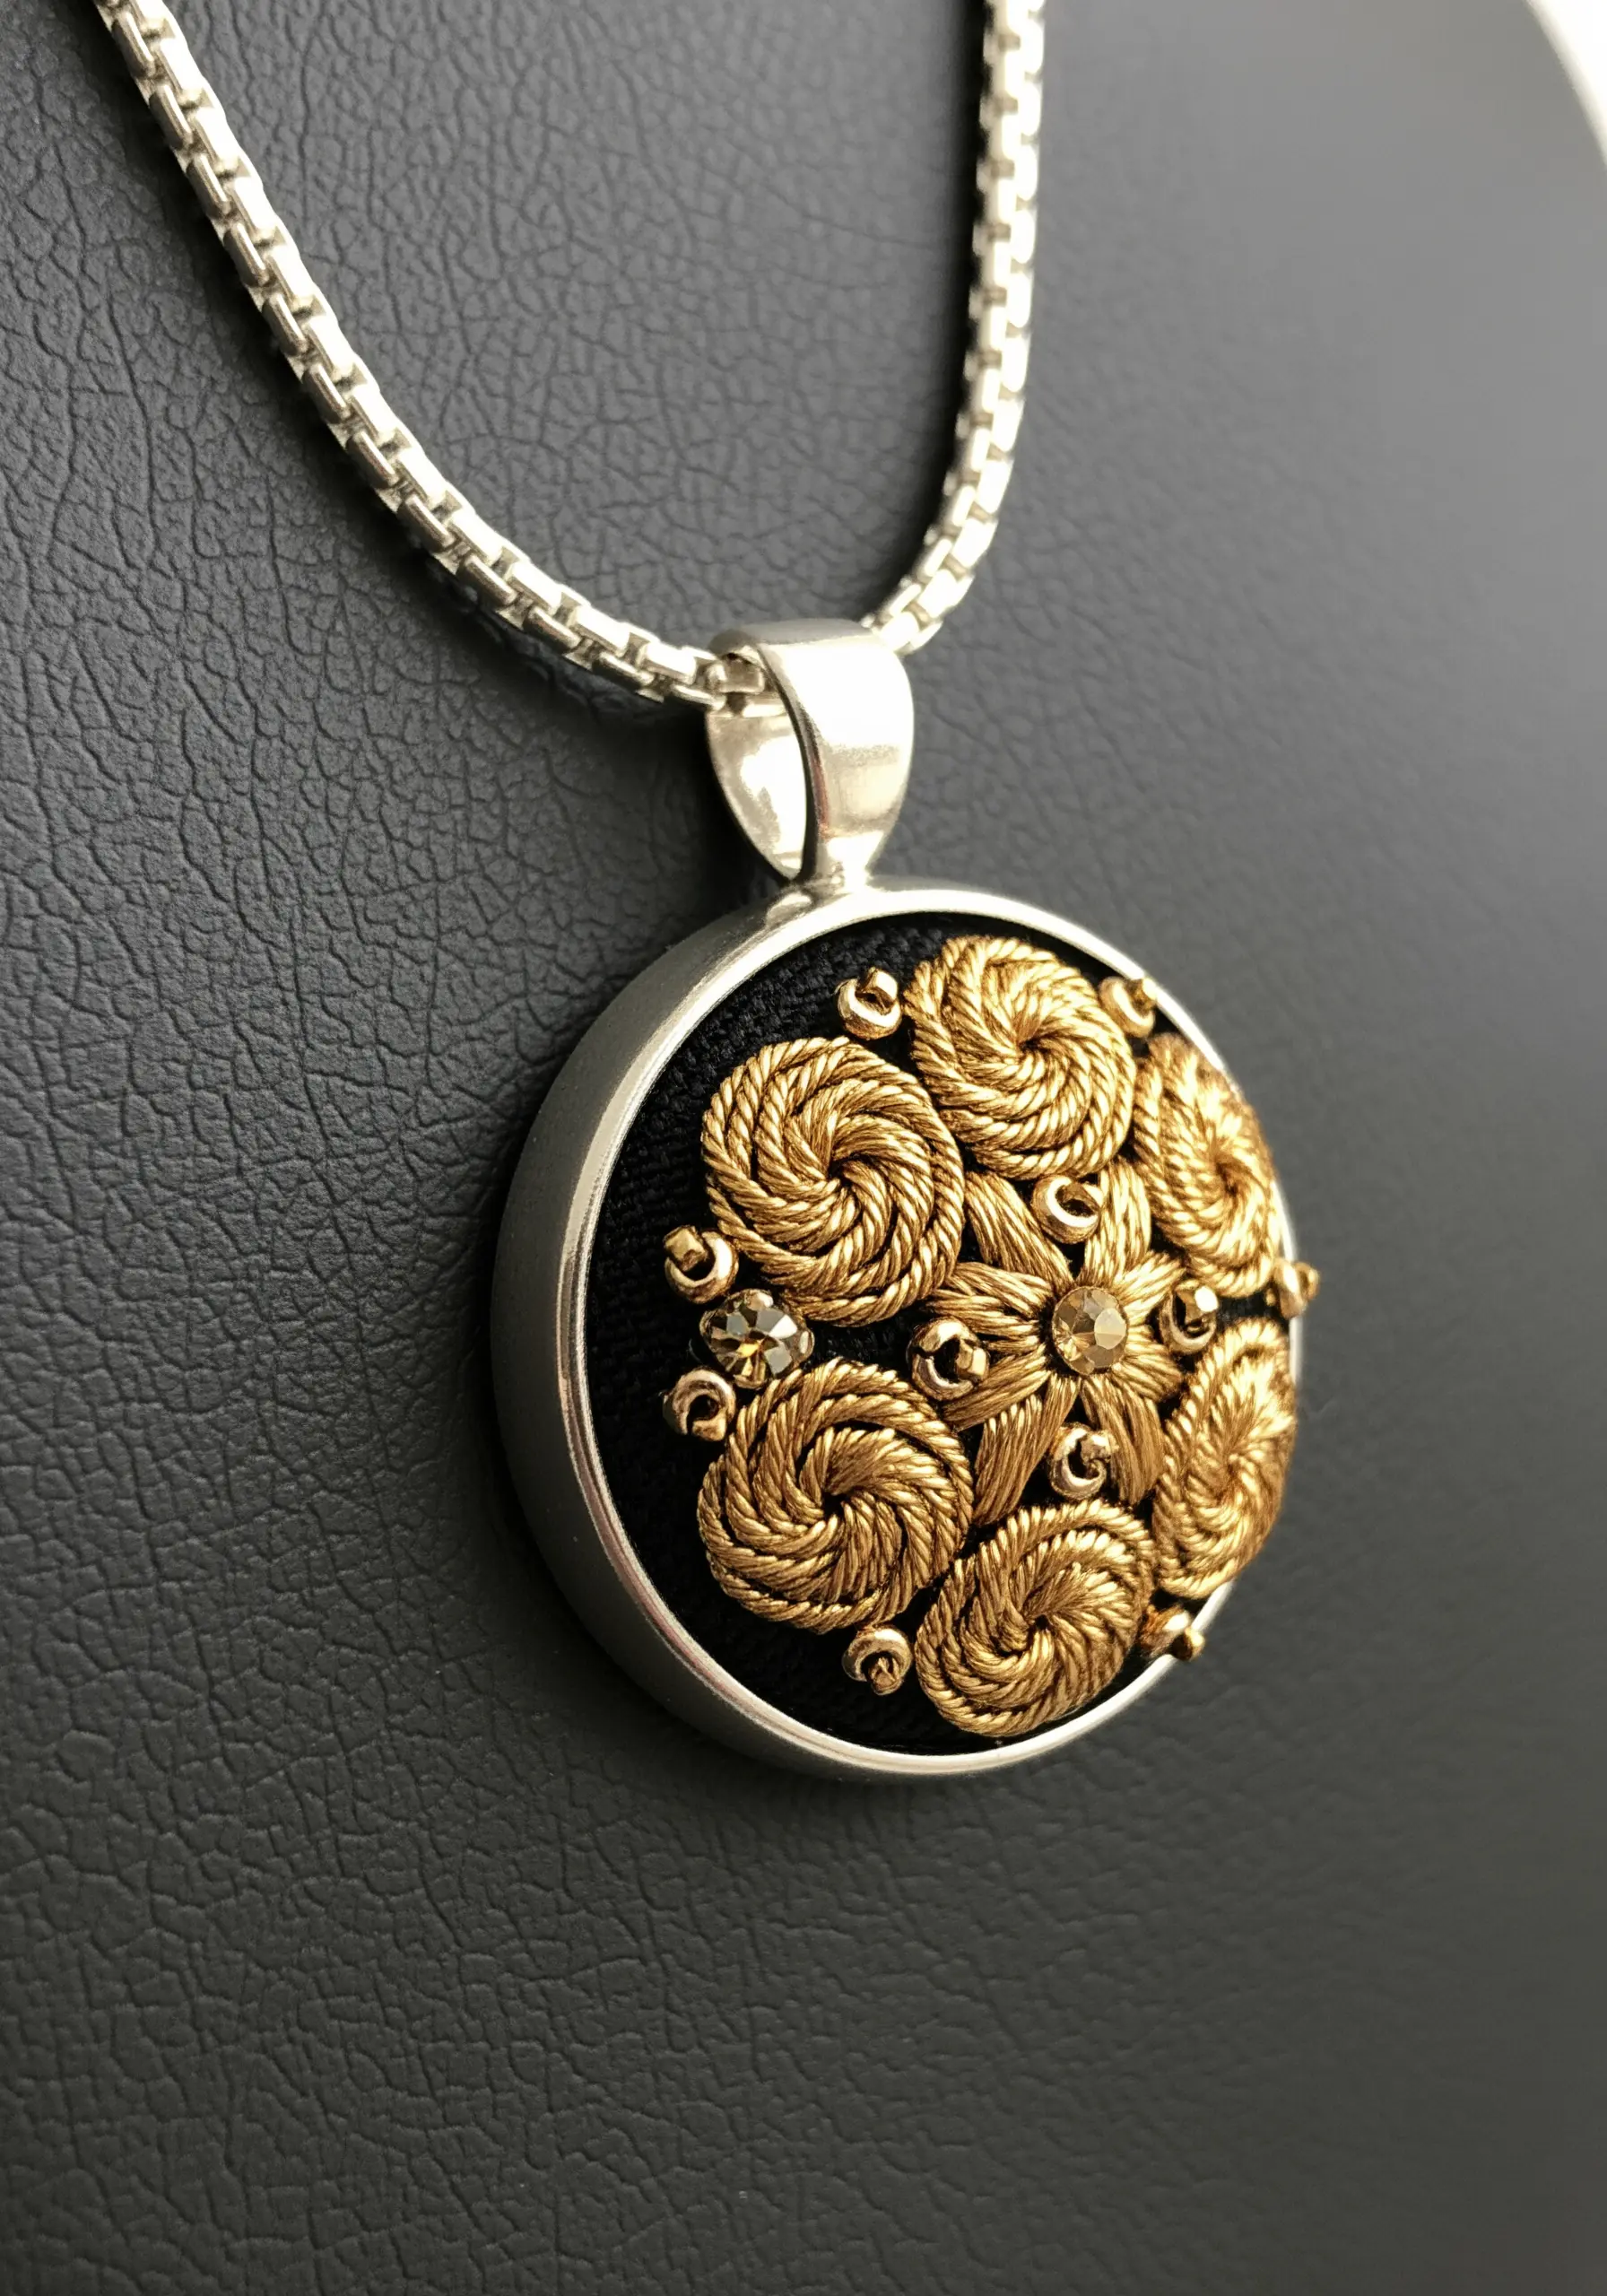
Monochrome texture can be powerful even on a tiny scale, making it perfect for creating unique jewelry.
Use a single strand of metallic thread to work a dense composition of small-scale stitches like French knots, whipped spider wheels, and tiny couched spirals inside a small pendant bezel.
To make working with metallic thread easier, use a thread conditioner (like beeswax) and a needle with a slightly larger eye to reduce friction and fraying.
The final piece will catch the light beautifully, showcasing a wealth of texture in a compact space.
33. Achieve Ultimate Softness with Punch Needle
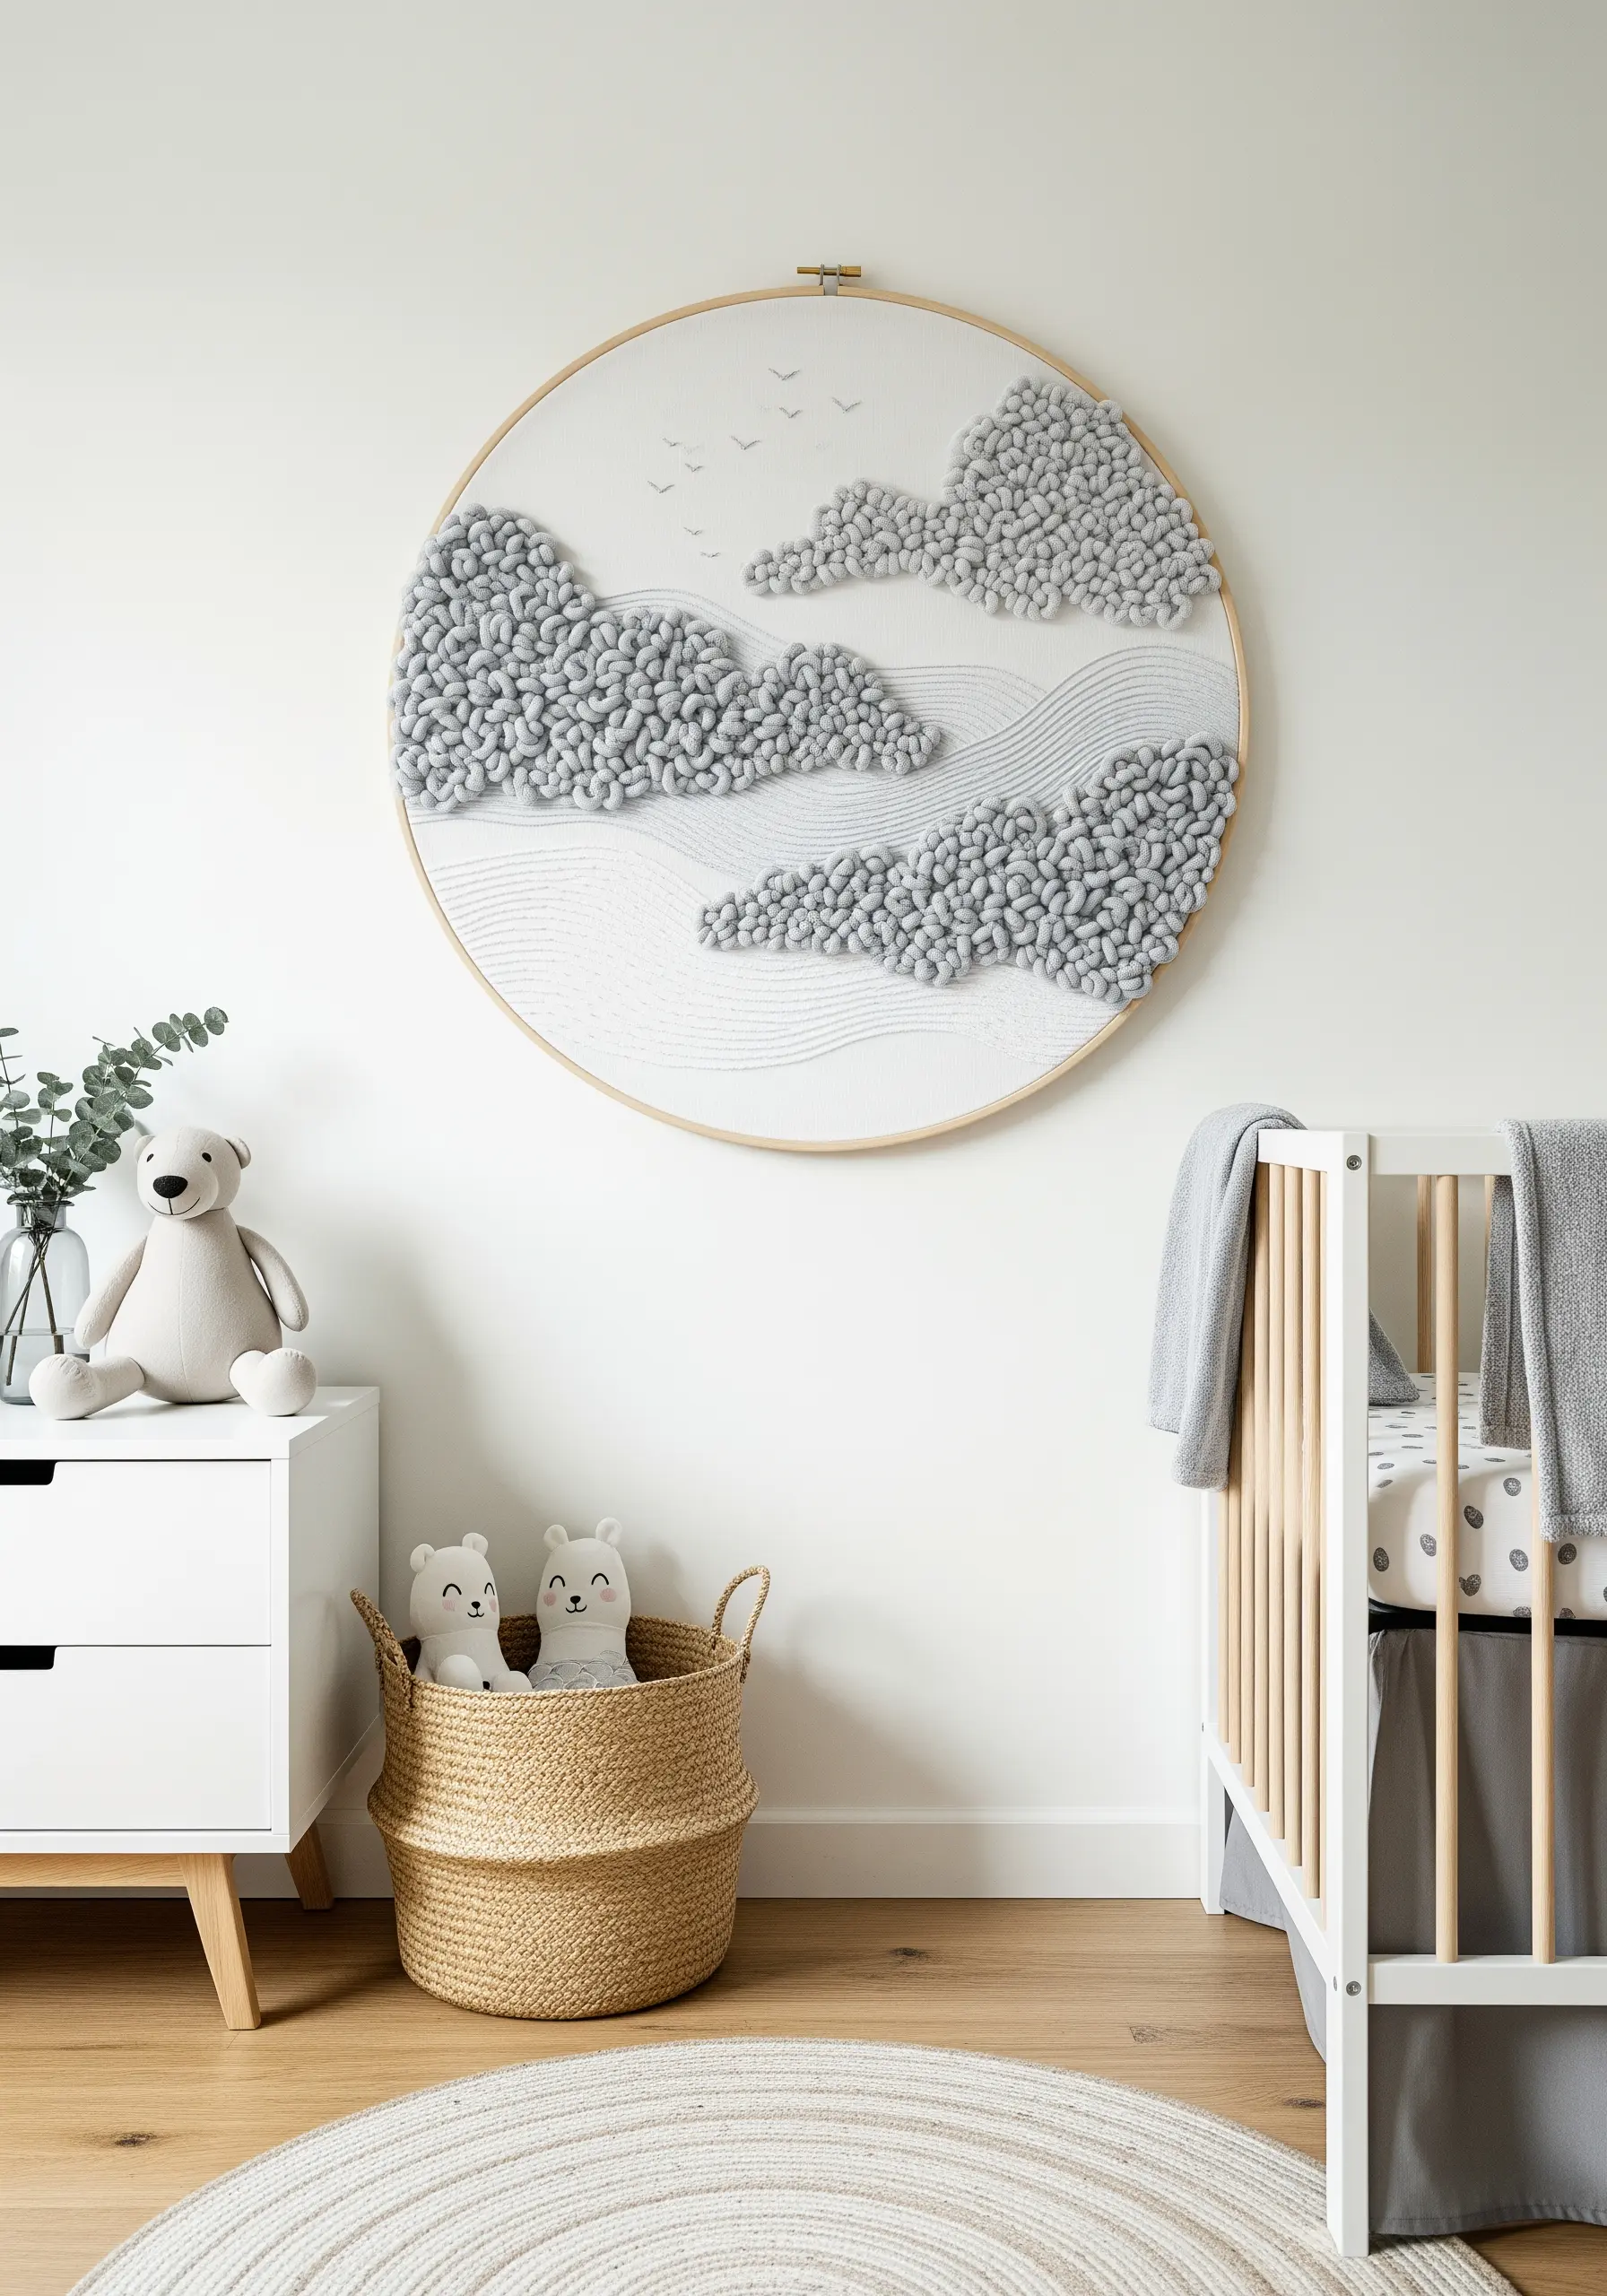
For a plush, velvety texture that you can’t achieve with traditional needlepoint, turn to punch needle embroidery.
Working from the back of the fabric, the punch needle creates a series of dense loops on the front surface. By packing these loops tightly together, you can create soft, sculptural shapes like clouds or rolling hills.
This technique is ideal for larger-scale pieces like nursery wall art or cushions, where a soft, tactile quality is desired. Contrast the looped areas with flat, simple line embroidery for balance.
34. Create Visual Hierarchy with Contrasting Cords
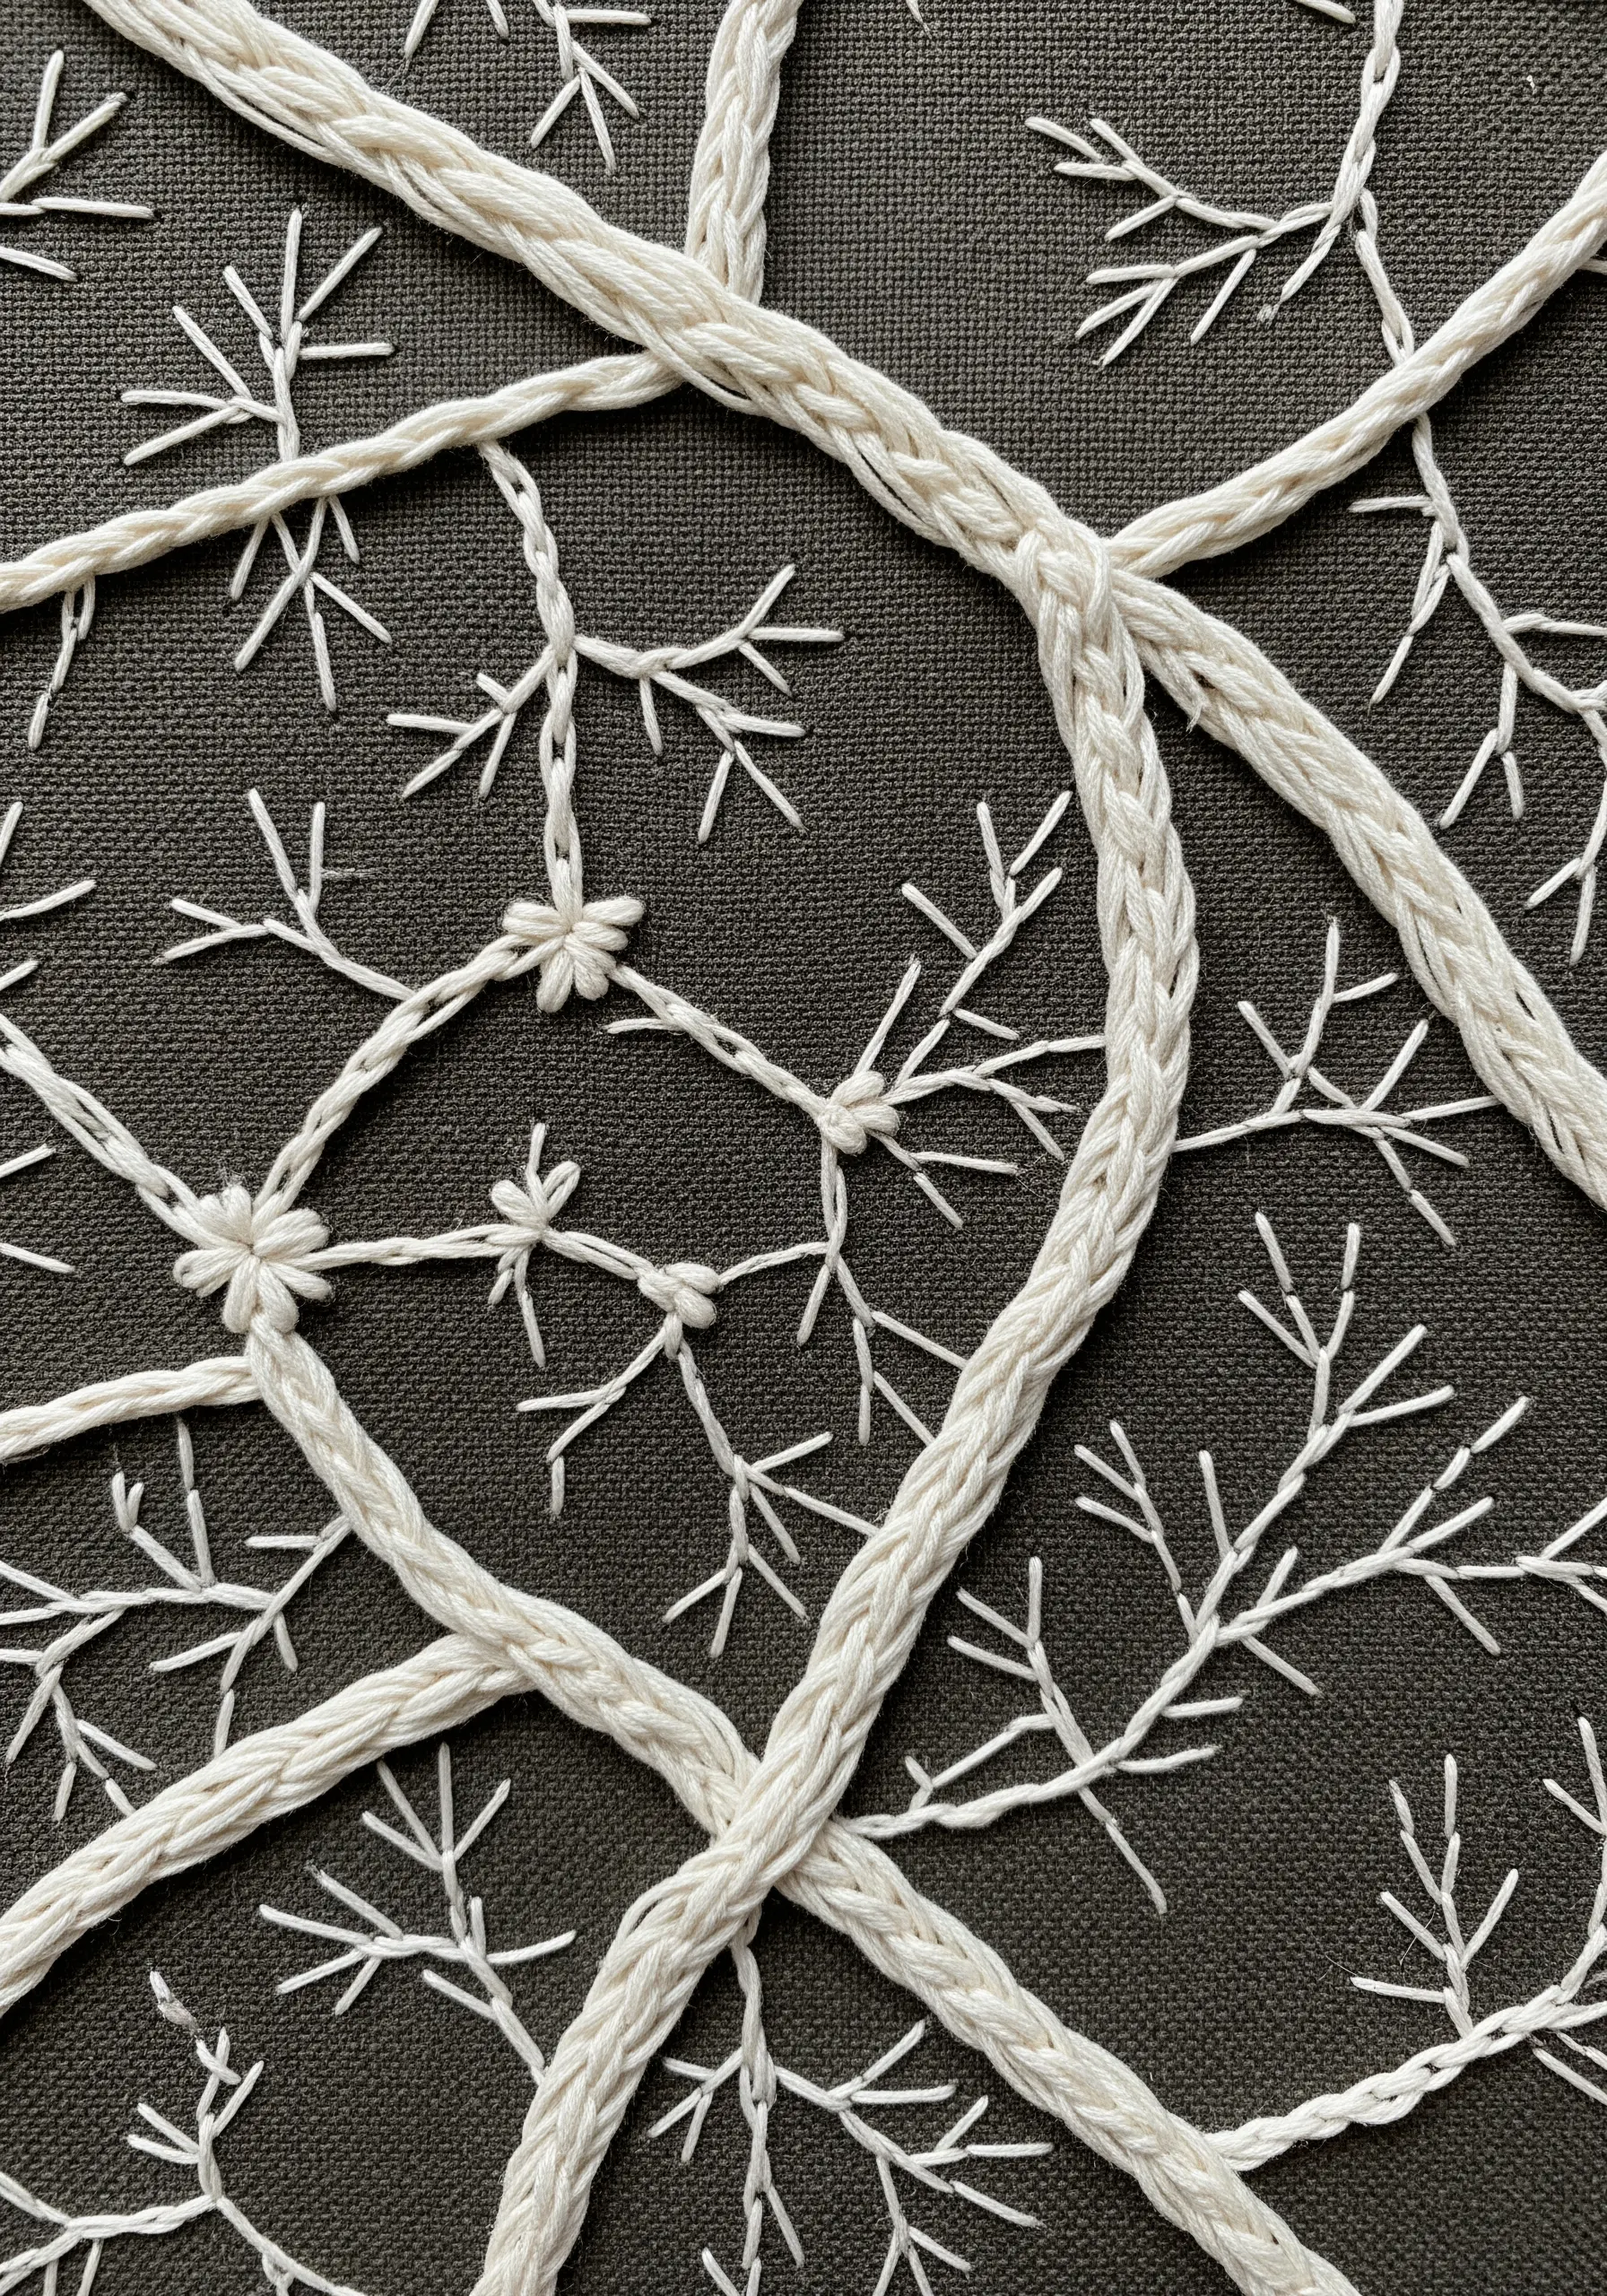
Mimic the way tree branches grow by using different thread thicknesses to establish a clear visual hierarchy.
For the main, structural branches, couch down a thick, braided or twisted cord. This creates a strong foundation for your design.
For the secondary branches and tiny twigs, switch to a much finer thread—perhaps just two strands of floss—and use simple straight stitches or backstitch.
This dramatic contrast in line weight is a fundamental principle of design, and it instantly makes your composition feel more natural, intentional, and visually sophisticated.


