
Before you pick up another needle, I want you to set aside the idea that embroidery is just about following a pattern. Think of it, instead, as a way to paint with thread, to sculpt with fiber, and to bring an intentional, quiet beauty to the walls you see every day.
Your space deserves more than generic prints. It deserves something with texture, story, and the unmistakable warmth of the human hand. The projects that follow aren’t just ideas; they are invitations to elevate your technique, to see fabric and floss with an artist’s eye.
Whether you’re exploring the bold impact of a single line or the subtle gradient of a thread-painted scene, you have the ability to transform a blank wall into a personal gallery. Let’s begin.
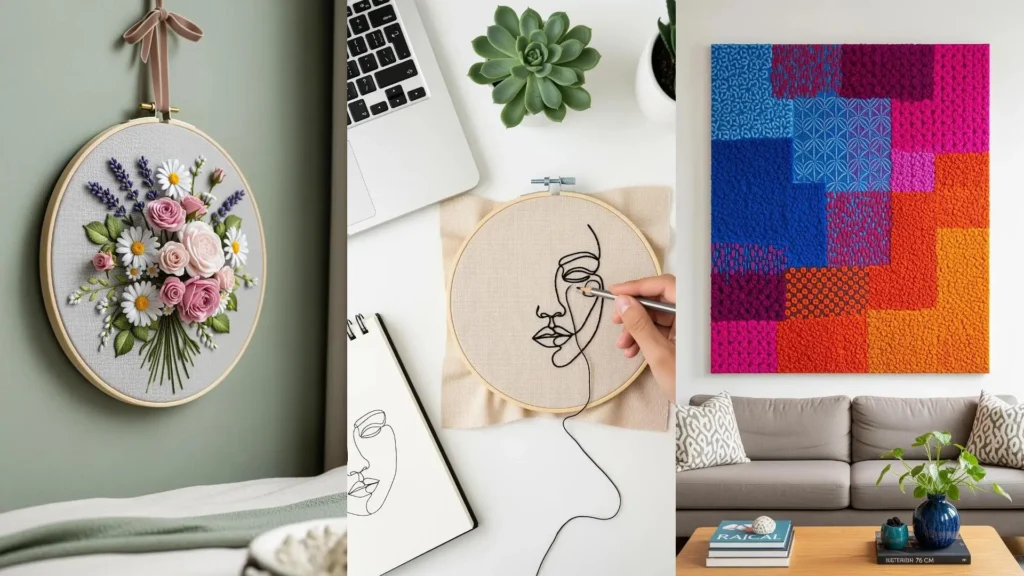
1. Create a Statement Piece with Oversized Botanicals
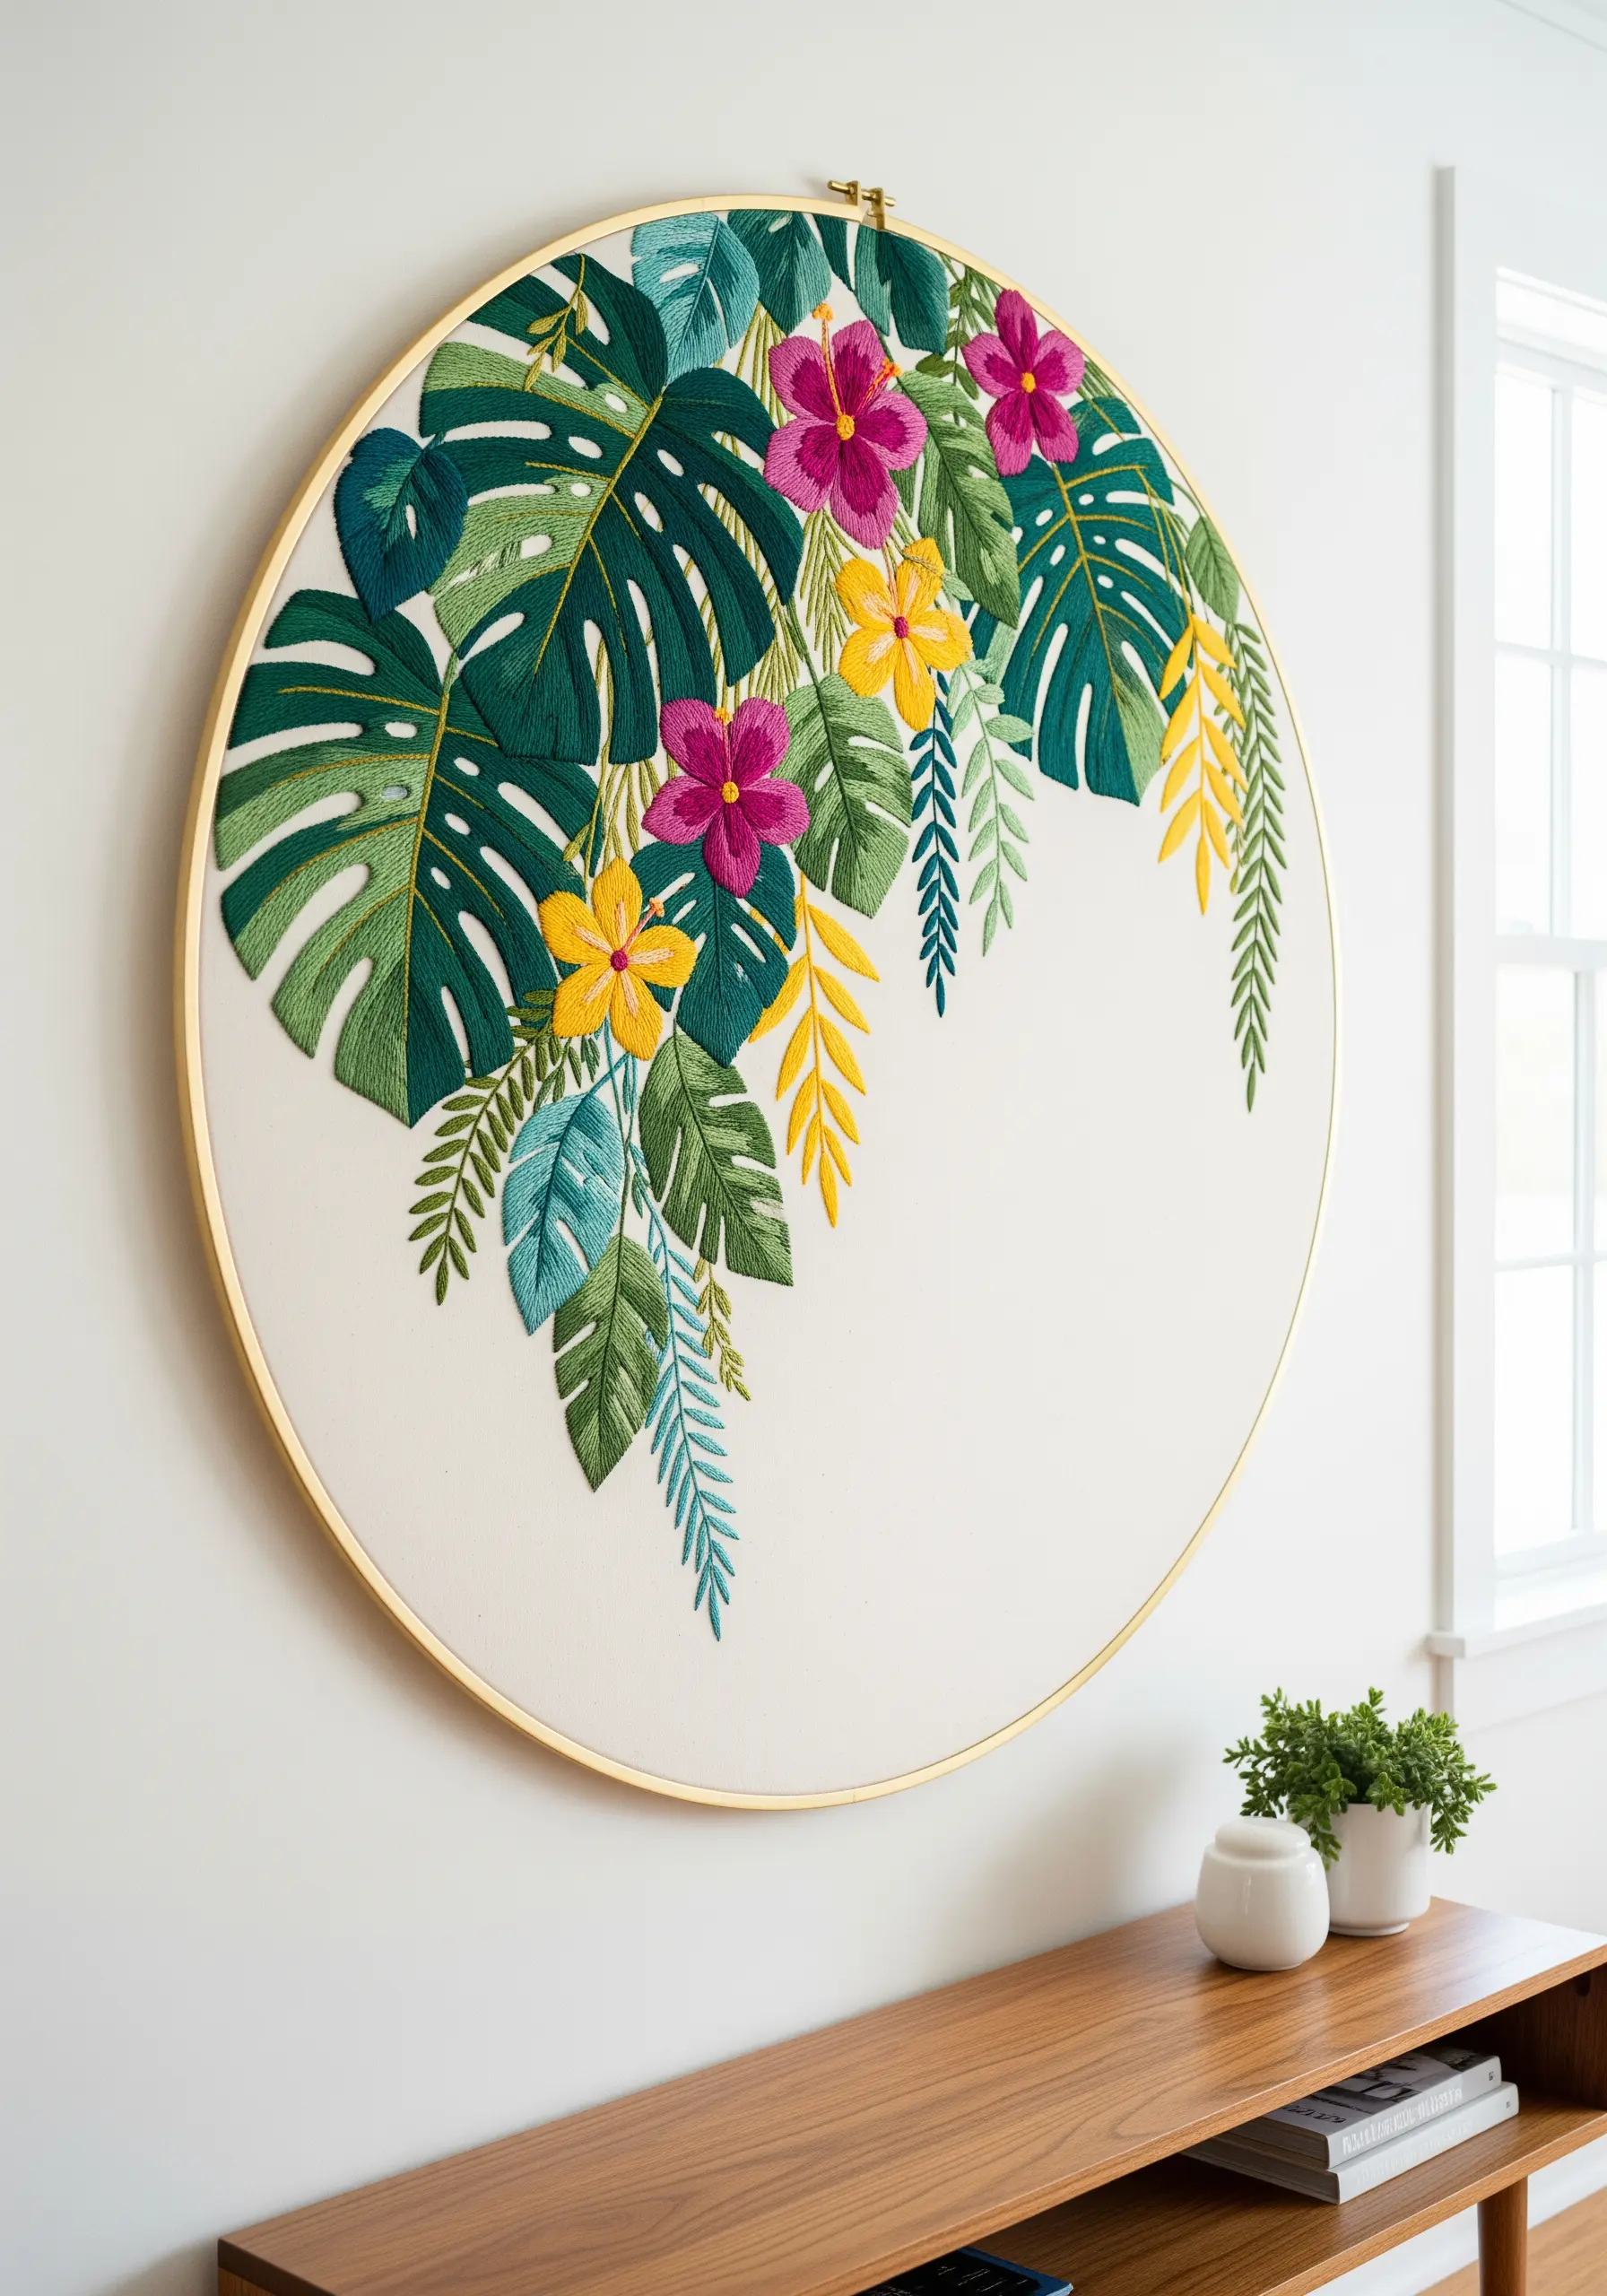
Move beyond small hoops and dedicate a large-scale piece to a single, dramatic composition.
Use an oversized quilting hoop (18 inches or larger) and a neutral, heavyweight cotton or linen blend that can support the thread without puckering.
To create depth, layer your satin-stitched leaves, stitching the foremost elements last.
Vary the direction of your satin stitches on each leaf to mimic natural light reflection, which adds realism and visual movement.
The strategic use of negative space is key; it allows the vibrant botanicals to breathe and prevents the design from feeling cluttered, turning it into true oversized hoop wall displays.
2. Master Celestial Details on Dark Fabric
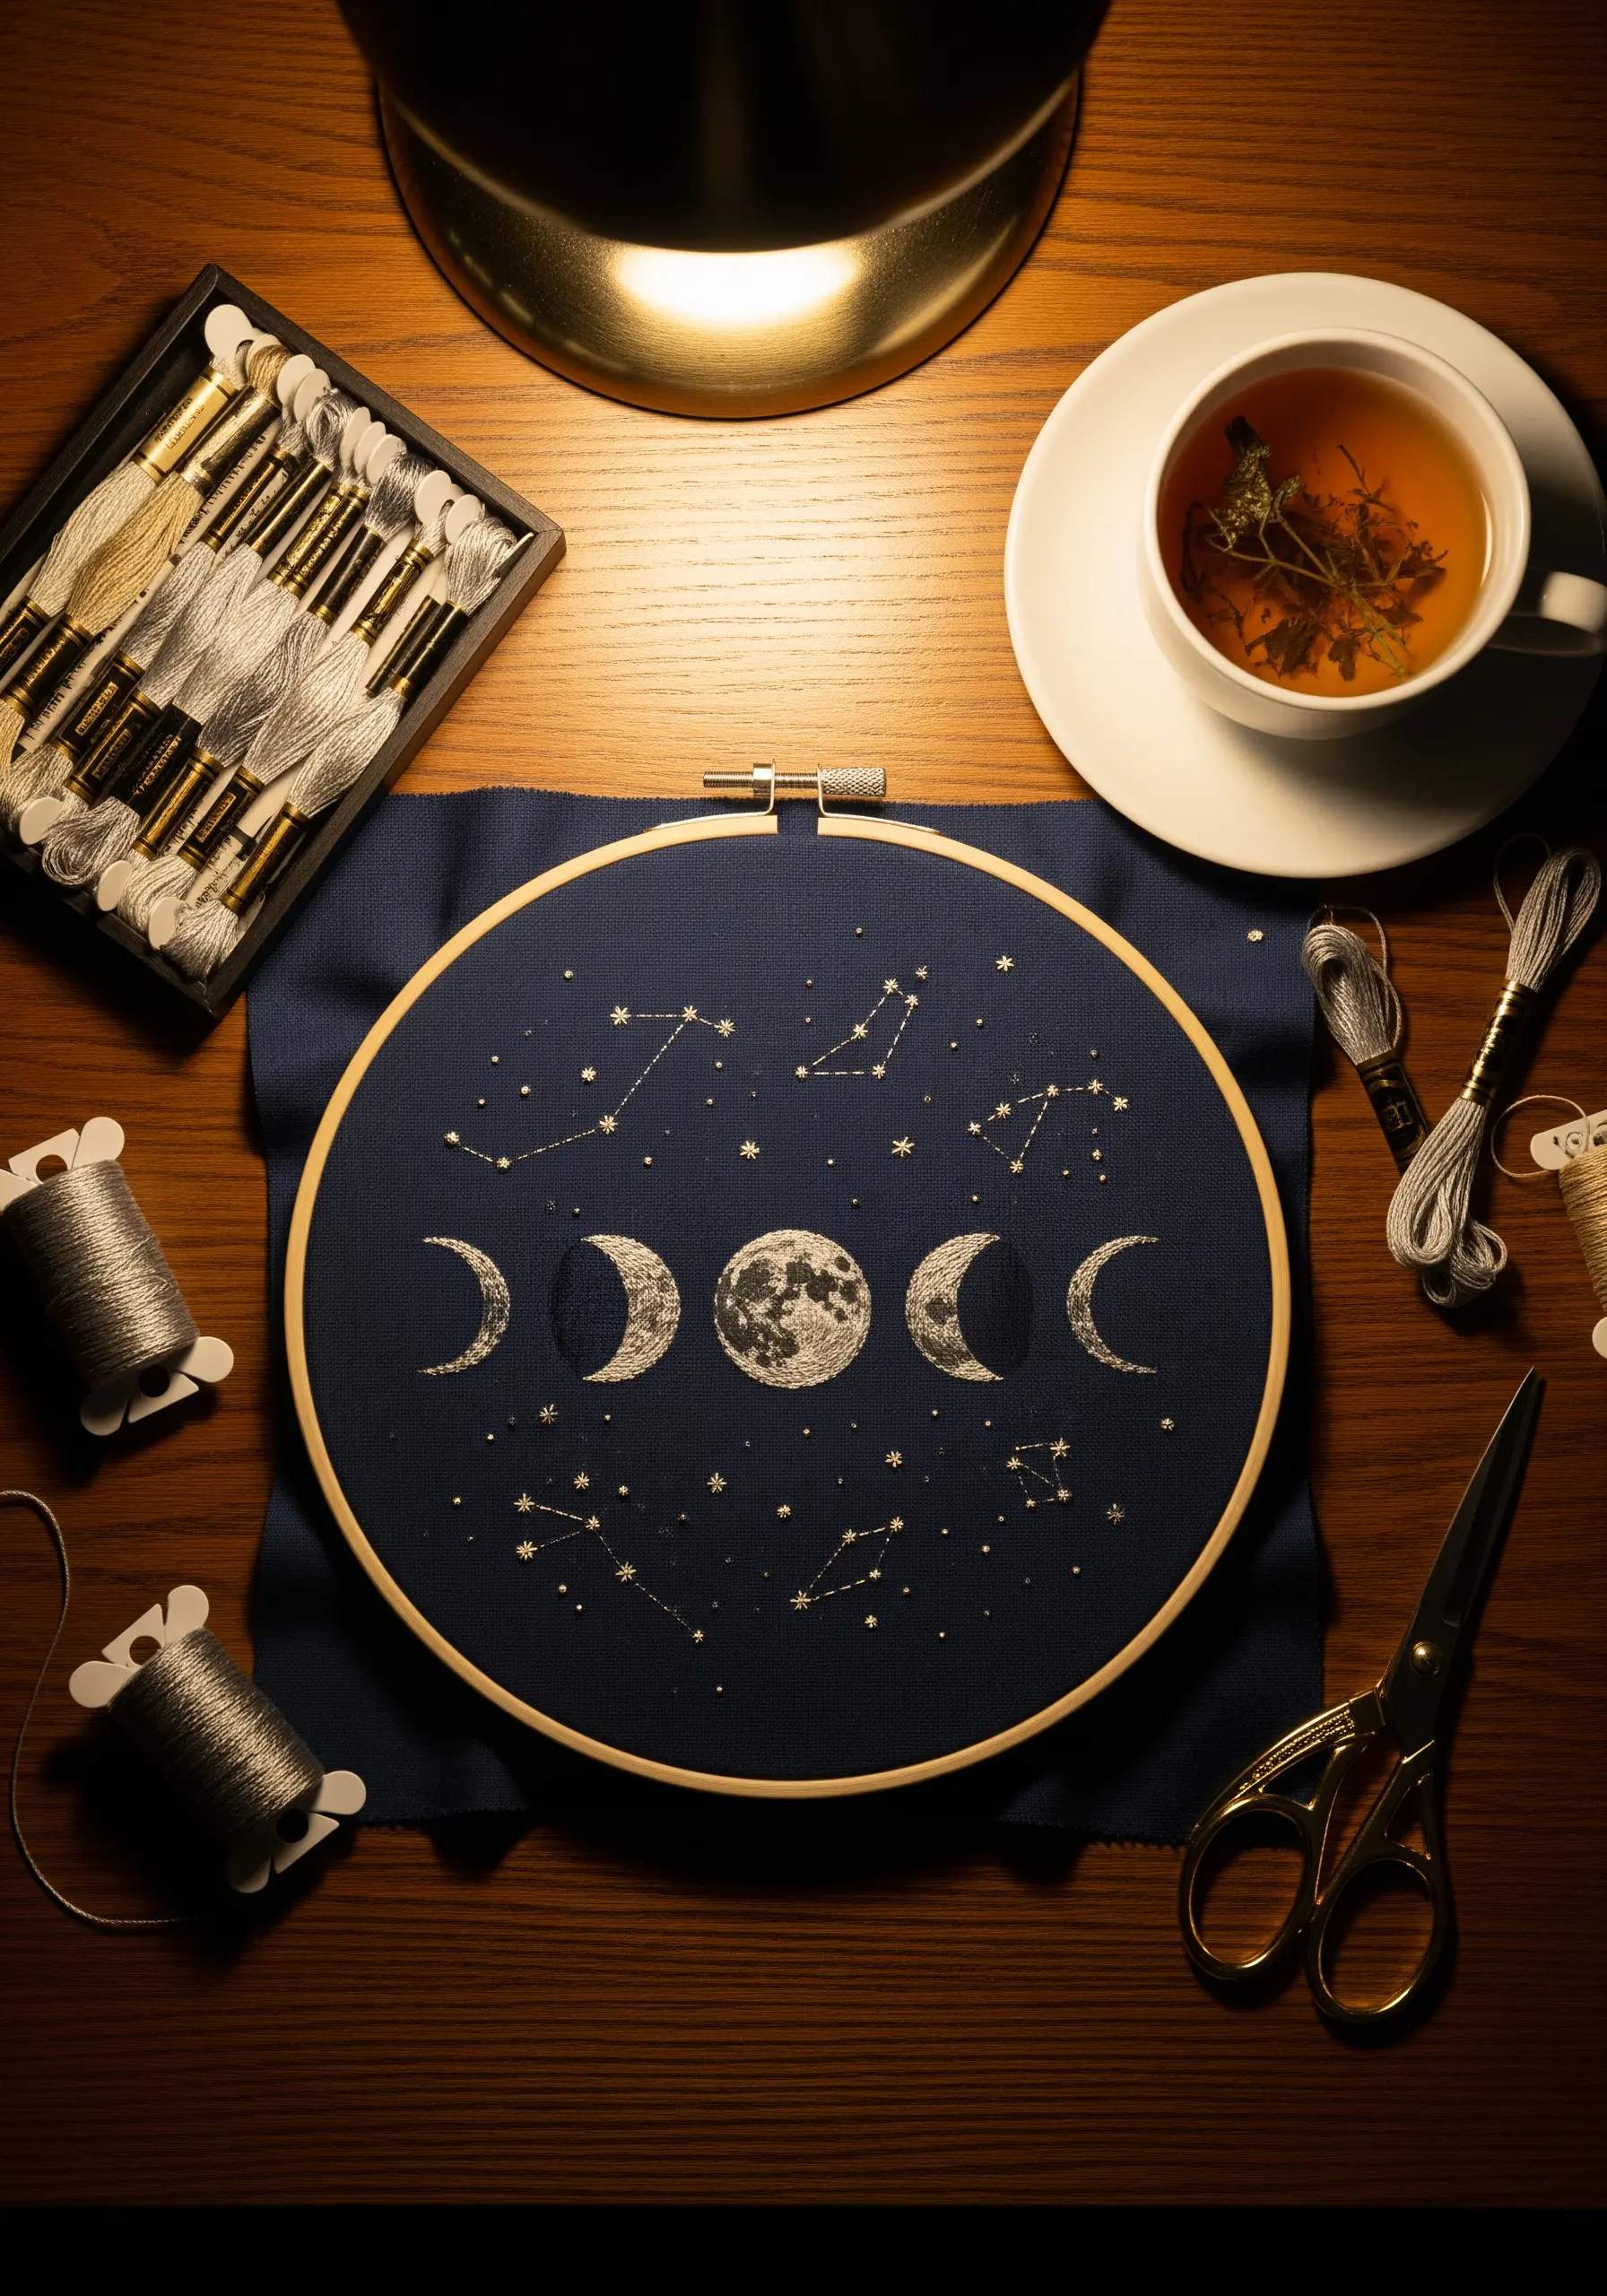
Stitching on dark fabric creates immediate visual drama and makes light or metallic threads pop.
For the full moon, use a dense circular satin stitch or thousands of tiny French knots in variegated grey and white thread to build texture.
Use a single strand of metallic silver or pearlescent white floss for the constellations and stars to ensure they look delicate and sharp, not bulky.
This contrast between the textured moon and the fine star lines creates a sophisticated focal point for tiny night sky embroidery designs.
3. Explore Abstract Art with Dimensional Thread
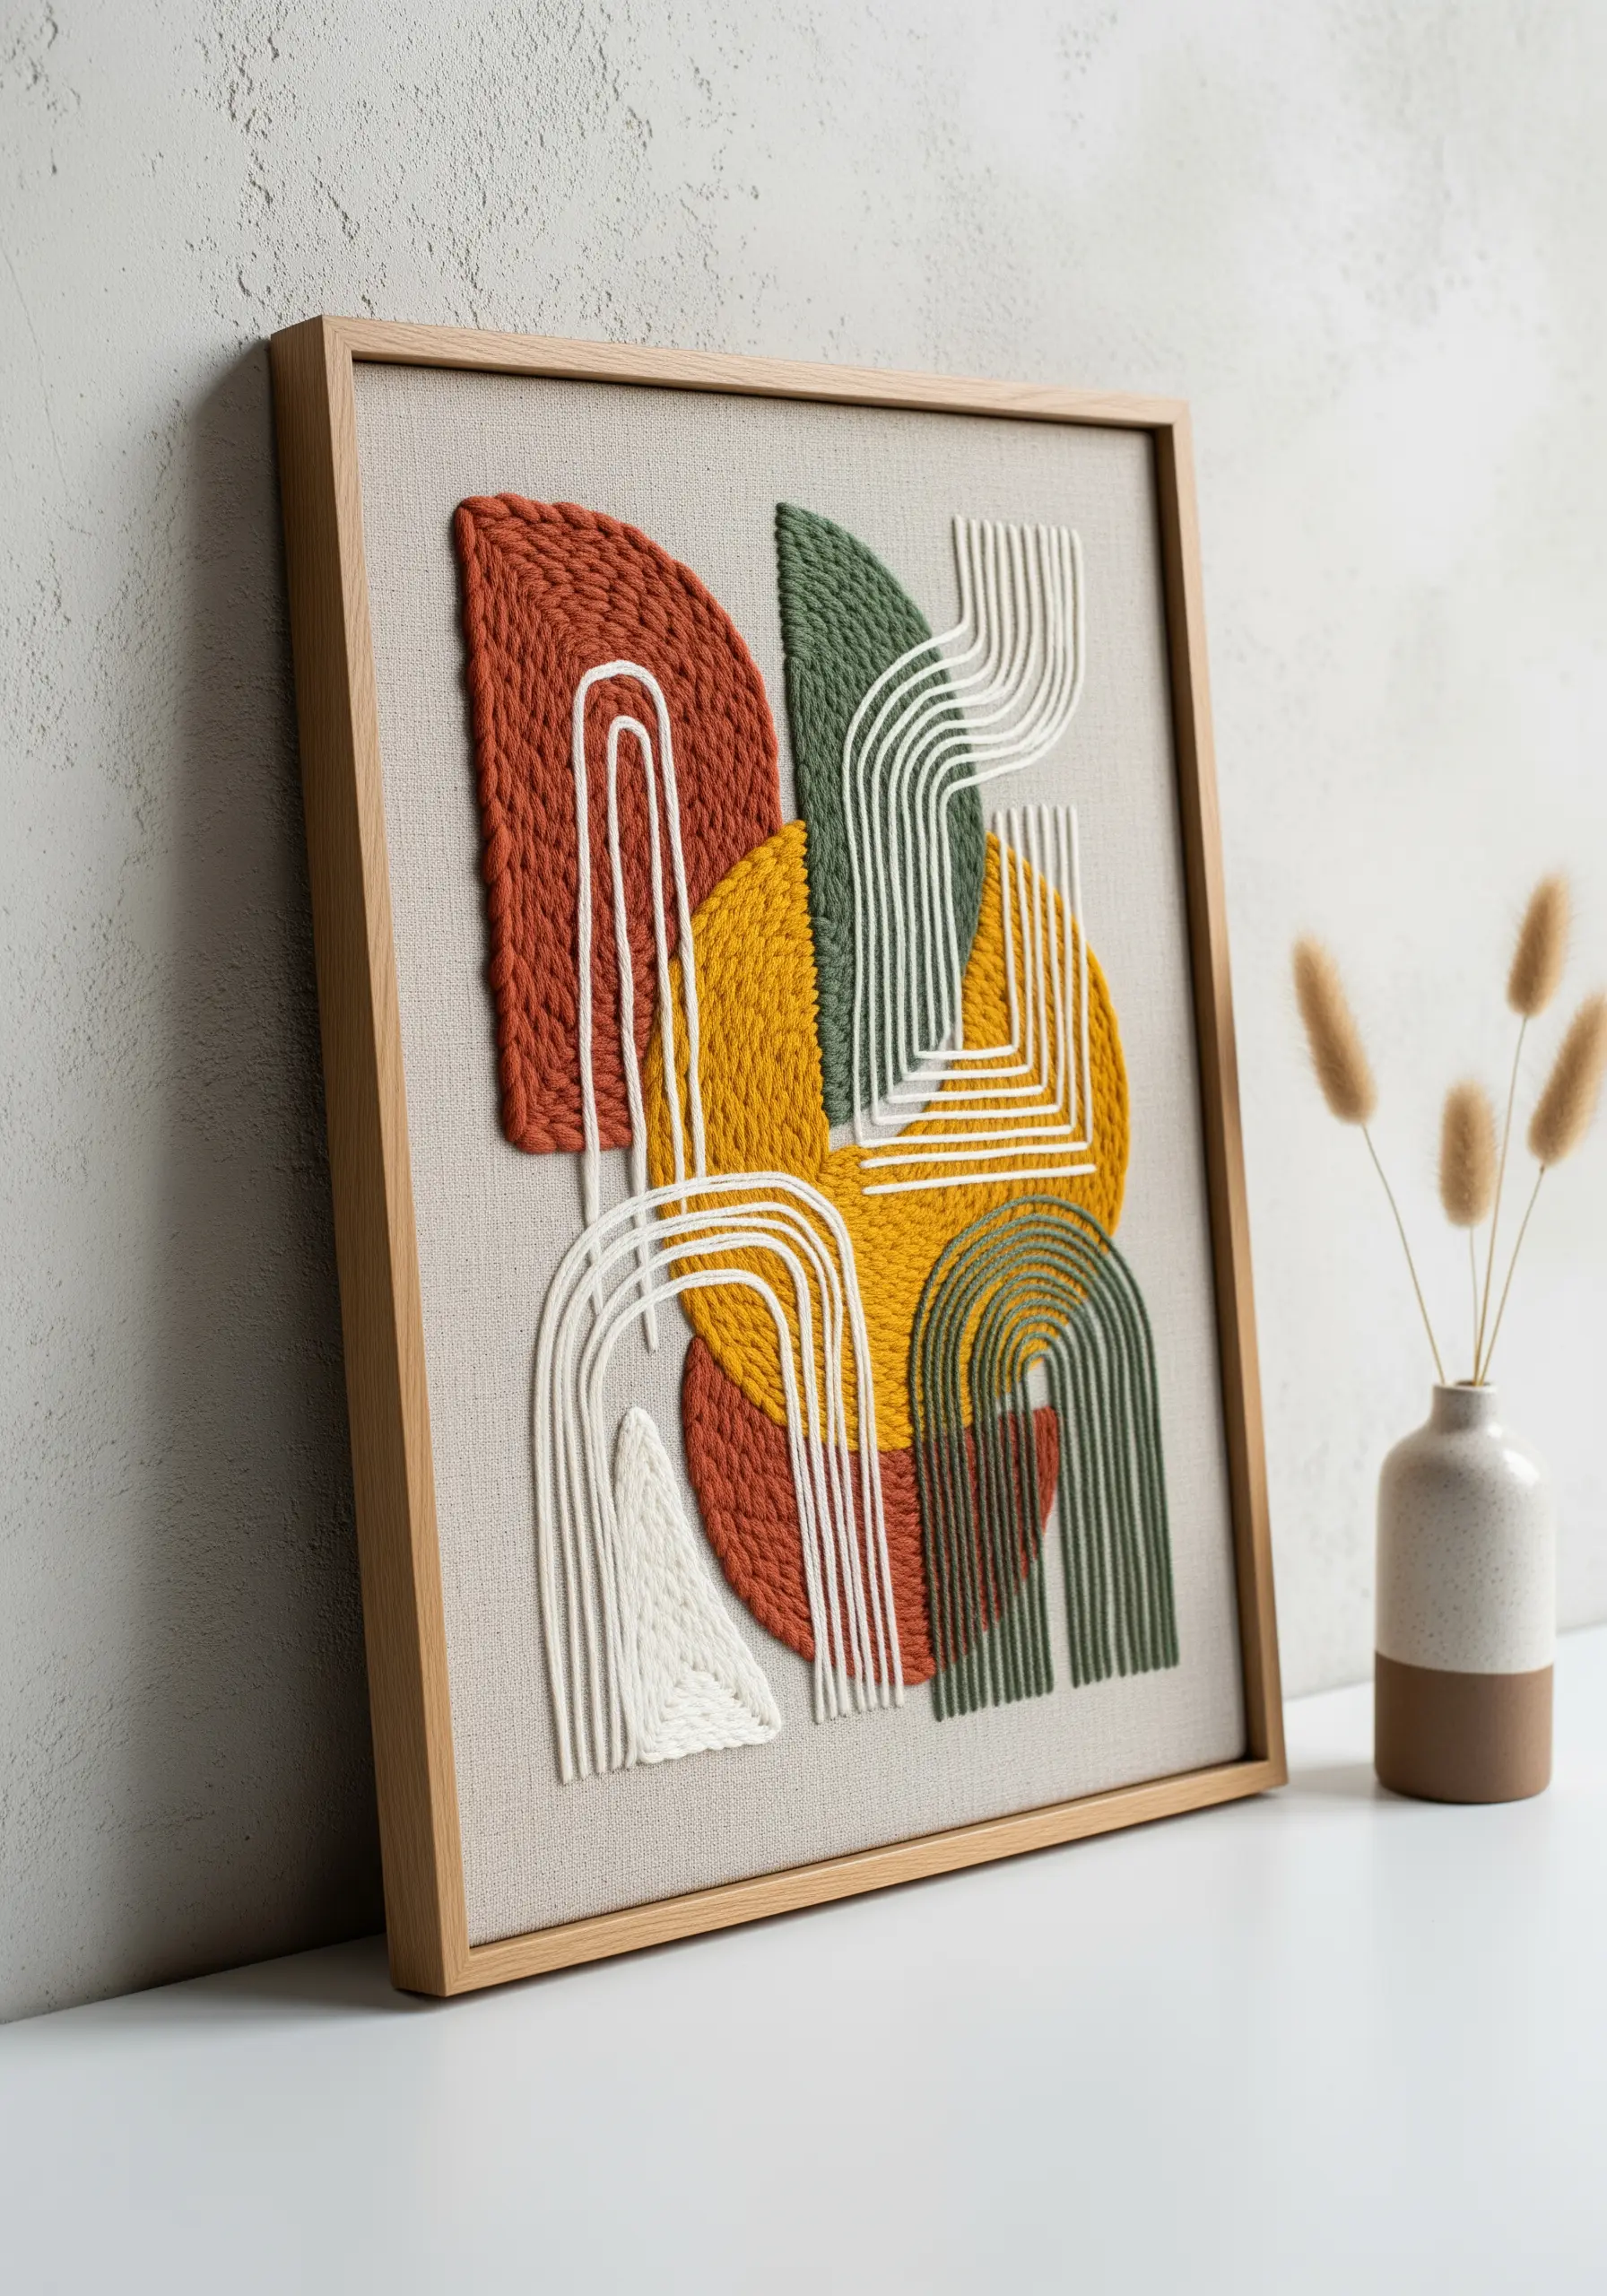
Combine fine embroidery floss with chunky yarn or roving to create a powerful textural contrast.
Use a couching stitch to tack down thick fibers, allowing you to create clean, curved lines that would be impossible with traditional stitches.
Plan your composition with bold, overlapping color blocks filled with satin stitch or chain stitch for a dense, woven appearance.
The interplay between the smooth, flat stitches and the raised, couched lines turns a simple abstract design into a tactile, sculptural piece of abstract thread embroidery.
4. Tell a Story with an Embroidered Triptych
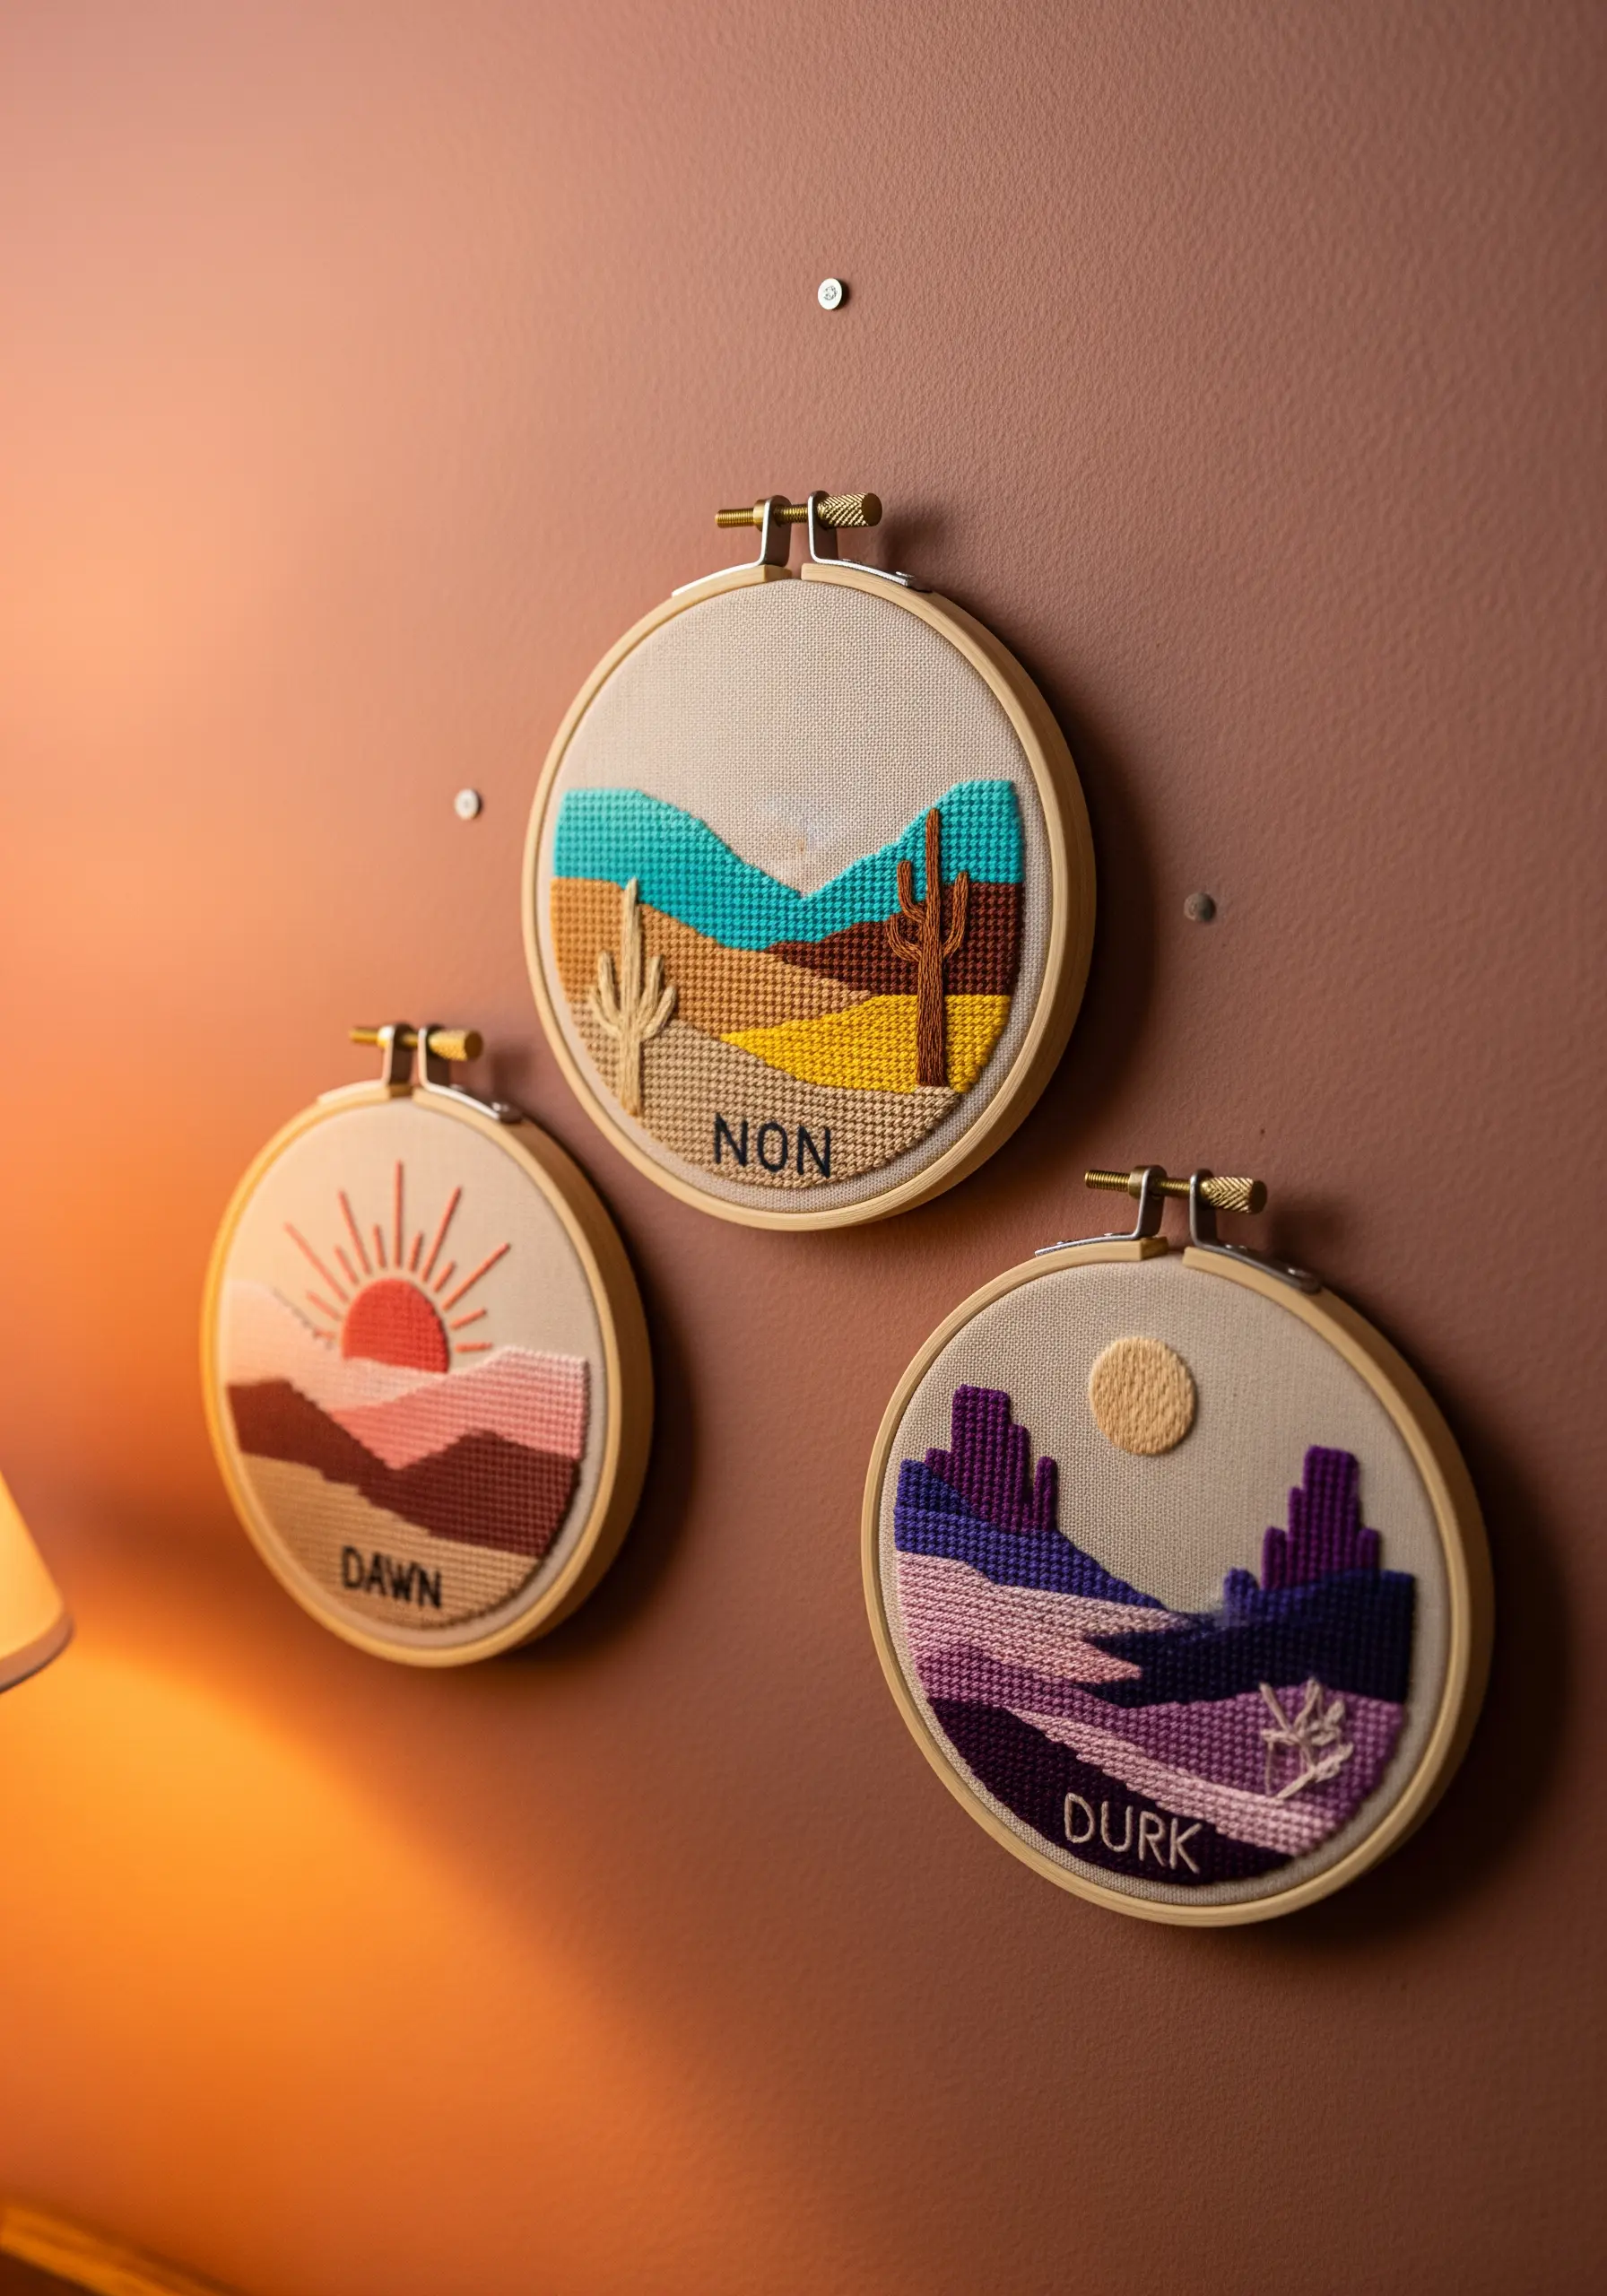
Group multiple small hoops to create a larger narrative, like the progression of a day from dawn to dusk.
Use a consistent color palette across all three hoops to ensure they feel cohesive, even as the light and mood shift.
Fill the landscapes with solid blocks of satin stitch or needlepoint tent stitch for a clean, graphic look that feels modern and intentional.
This approach transforms simple motifs into travel-inspired embroidery hoops that tell a story on your wall, making the collection more impactful than a single piece.
5. Elevate Lettering with Padded Satin Stitch
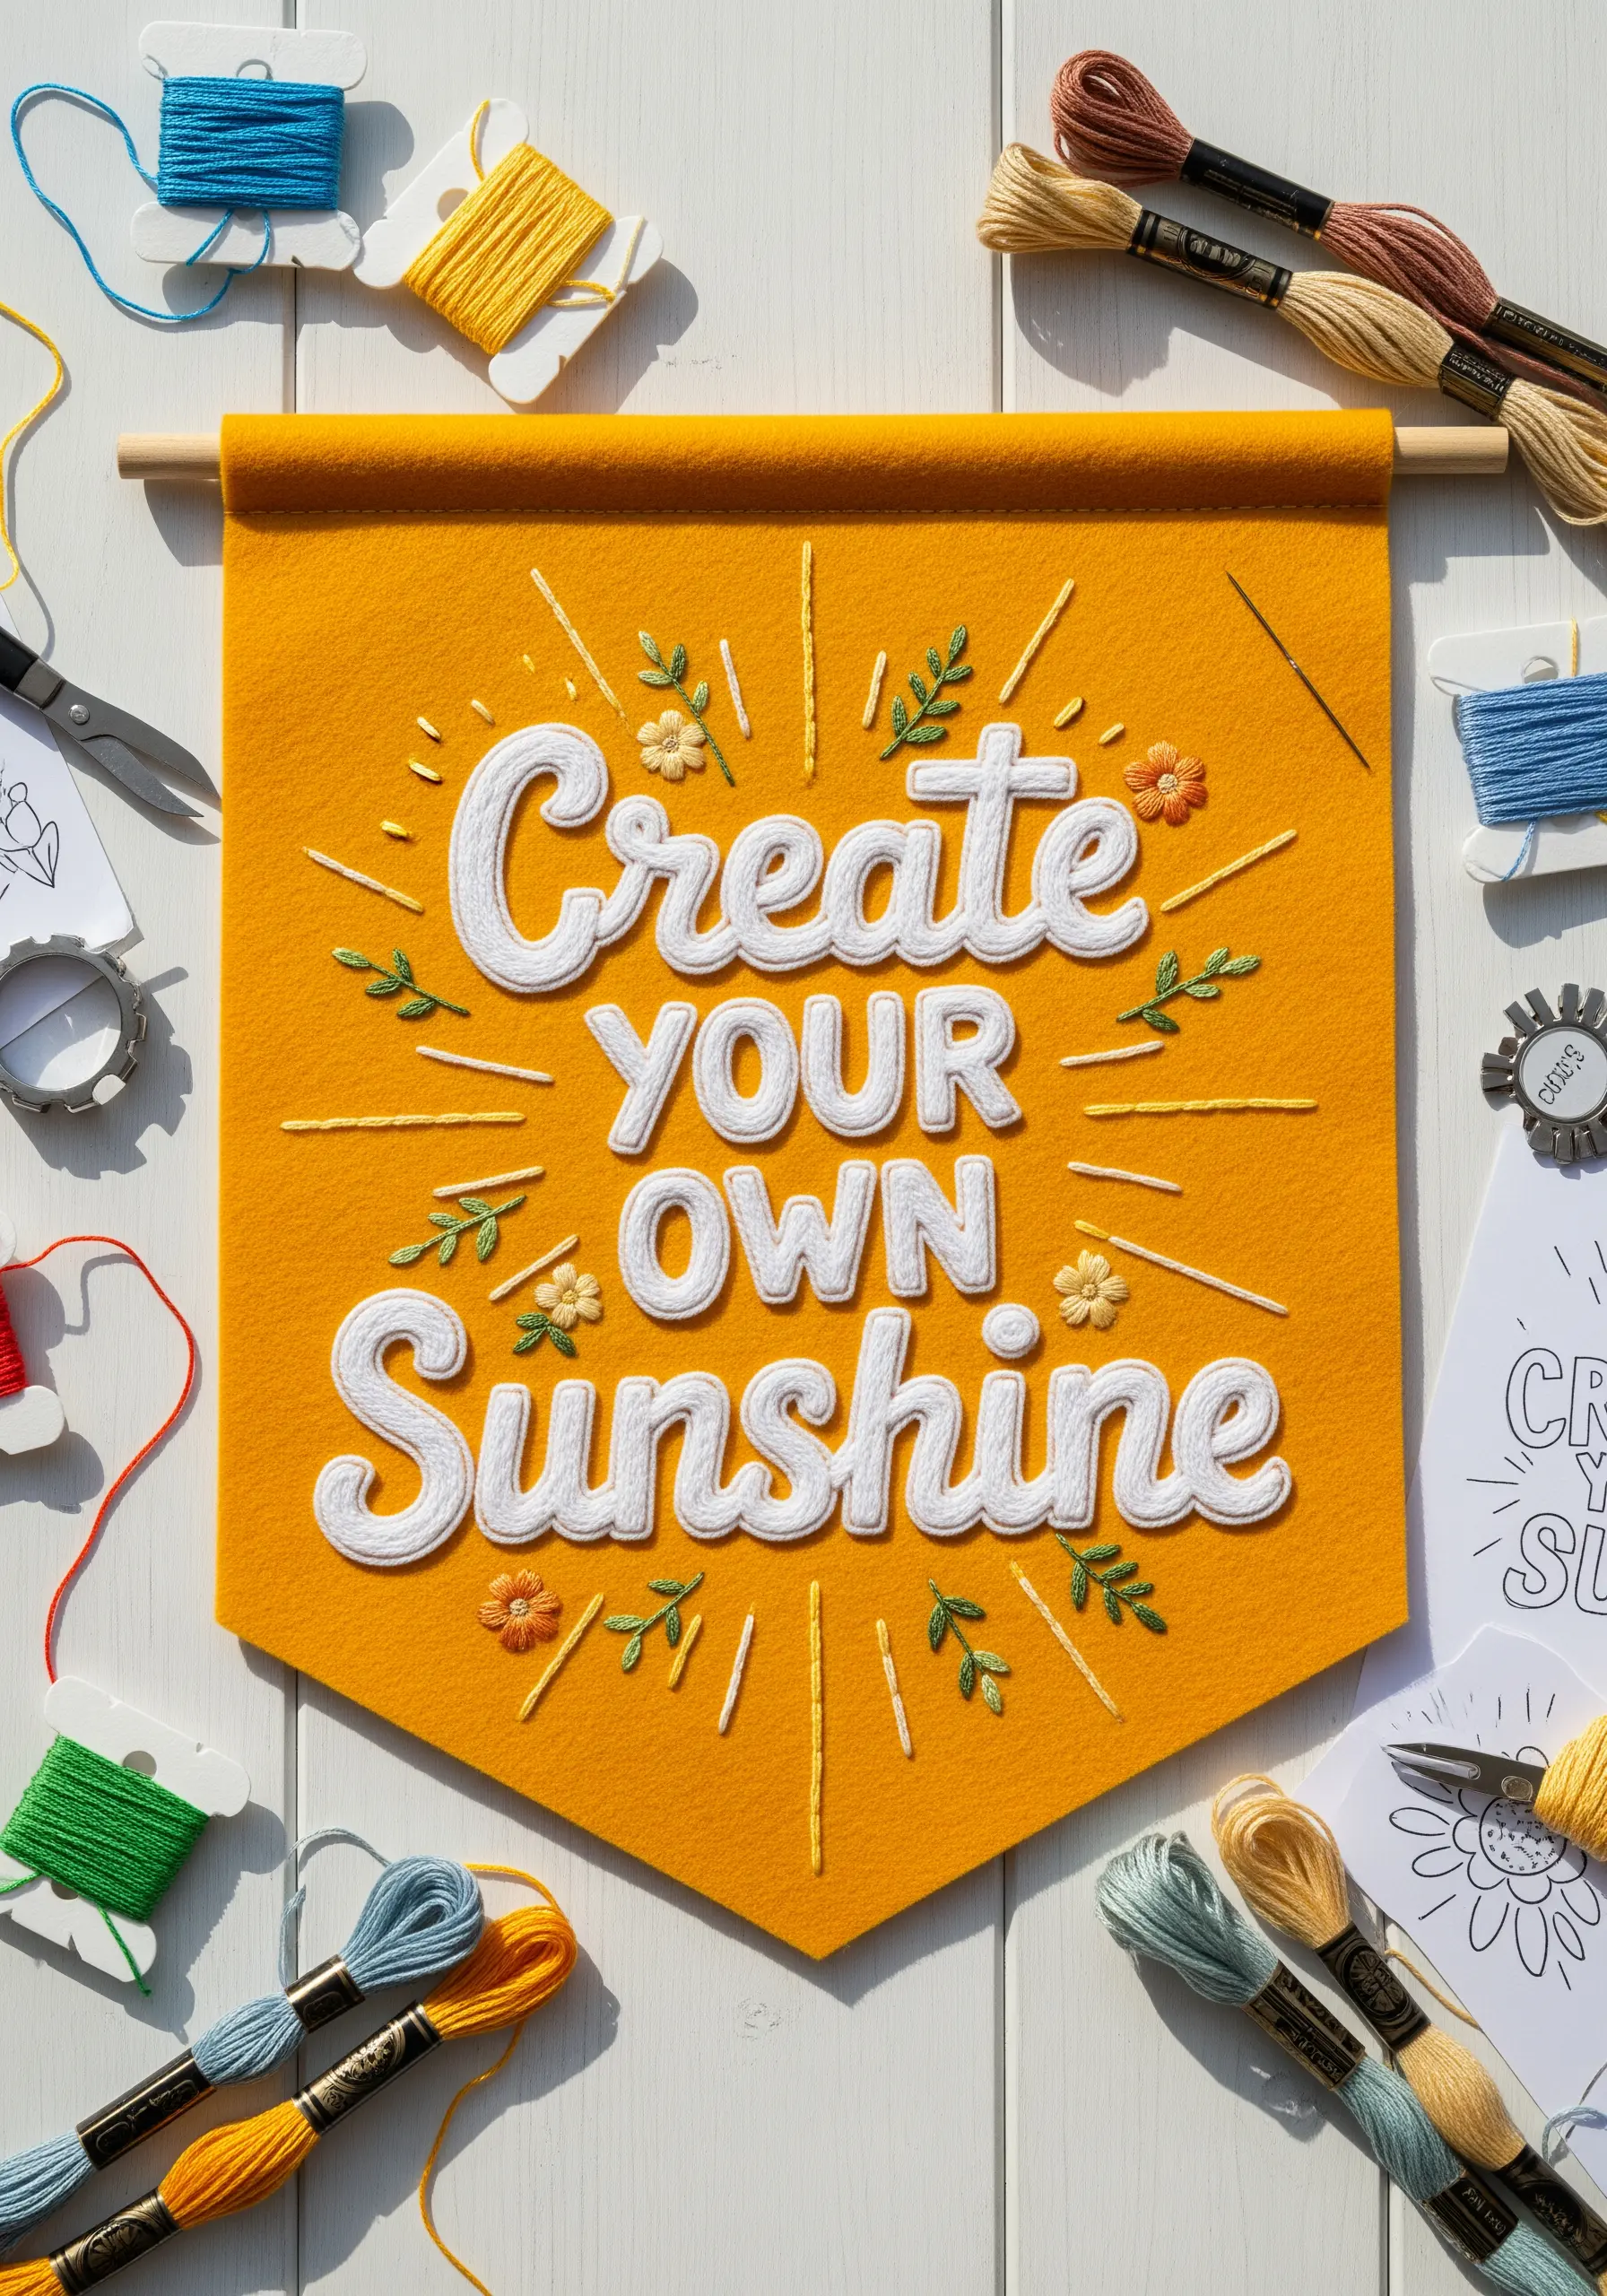
Stitching on a felt banner provides a stable, non-fraying background that’s perfect for dense embroidery.
To make your lettering three-dimensional, first outline the letters with a split stitch, then fill the interior with seed stitches before covering it all with a final layer of smooth satin stitch.
This technique, known as padded satin stitch, lifts the letters off the fabric surface, creating shadow and definition.
Surround your raised text with delicate, single-strand floral details to soften the bold typography in your inspirational quote embroidery hoops.
6. Capture Architecture with Thread Painting
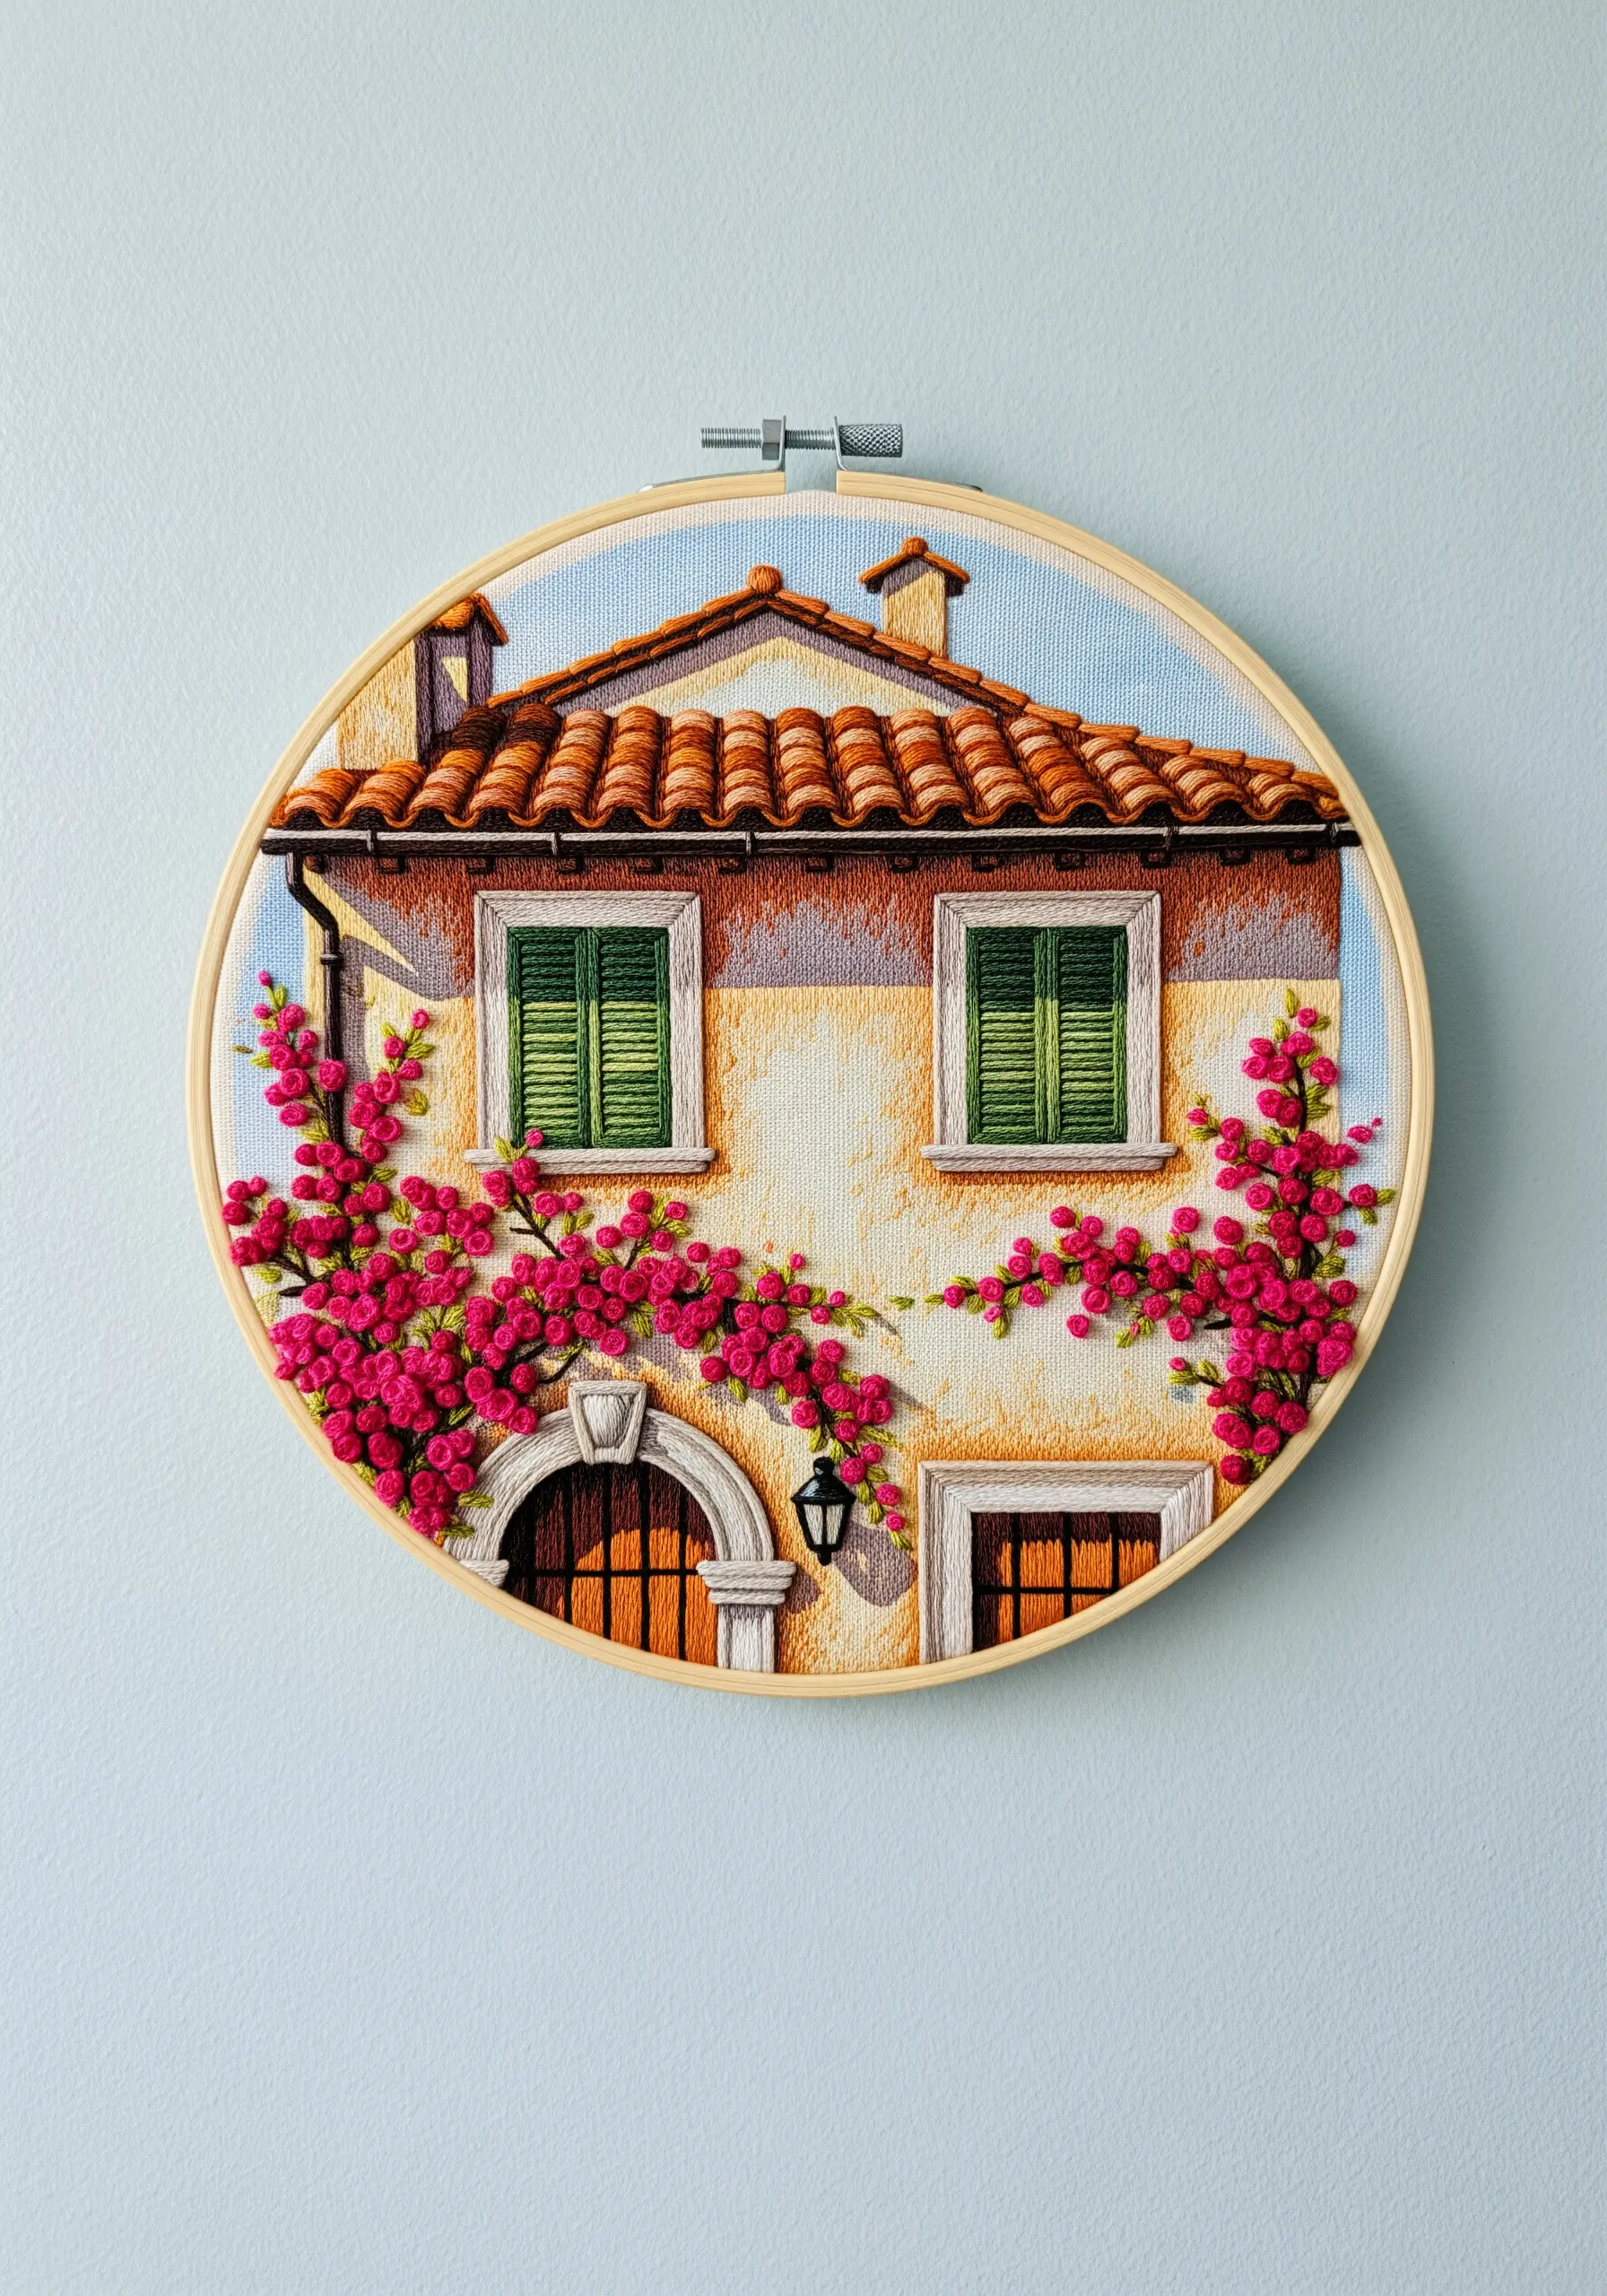
Translate a photograph of a beloved place into a detailed thread painting by focusing on light and shadow.
Use long-and-short stitch with single strands of floss to blend colors smoothly on walls and roofs, mimicking the way sunlight hits surfaces.
For sharp details like window shutters or roof tiles, use straight stitches layered directionally to create texture and precise lines.
The key to realism lies in observing how colors shift in shadows—use cooler blues and purples instead of just darker shades of the base color. This elevates your work to contemporary thread painting techniques.
7. Build a Bouquet with 3D Floral Stitches
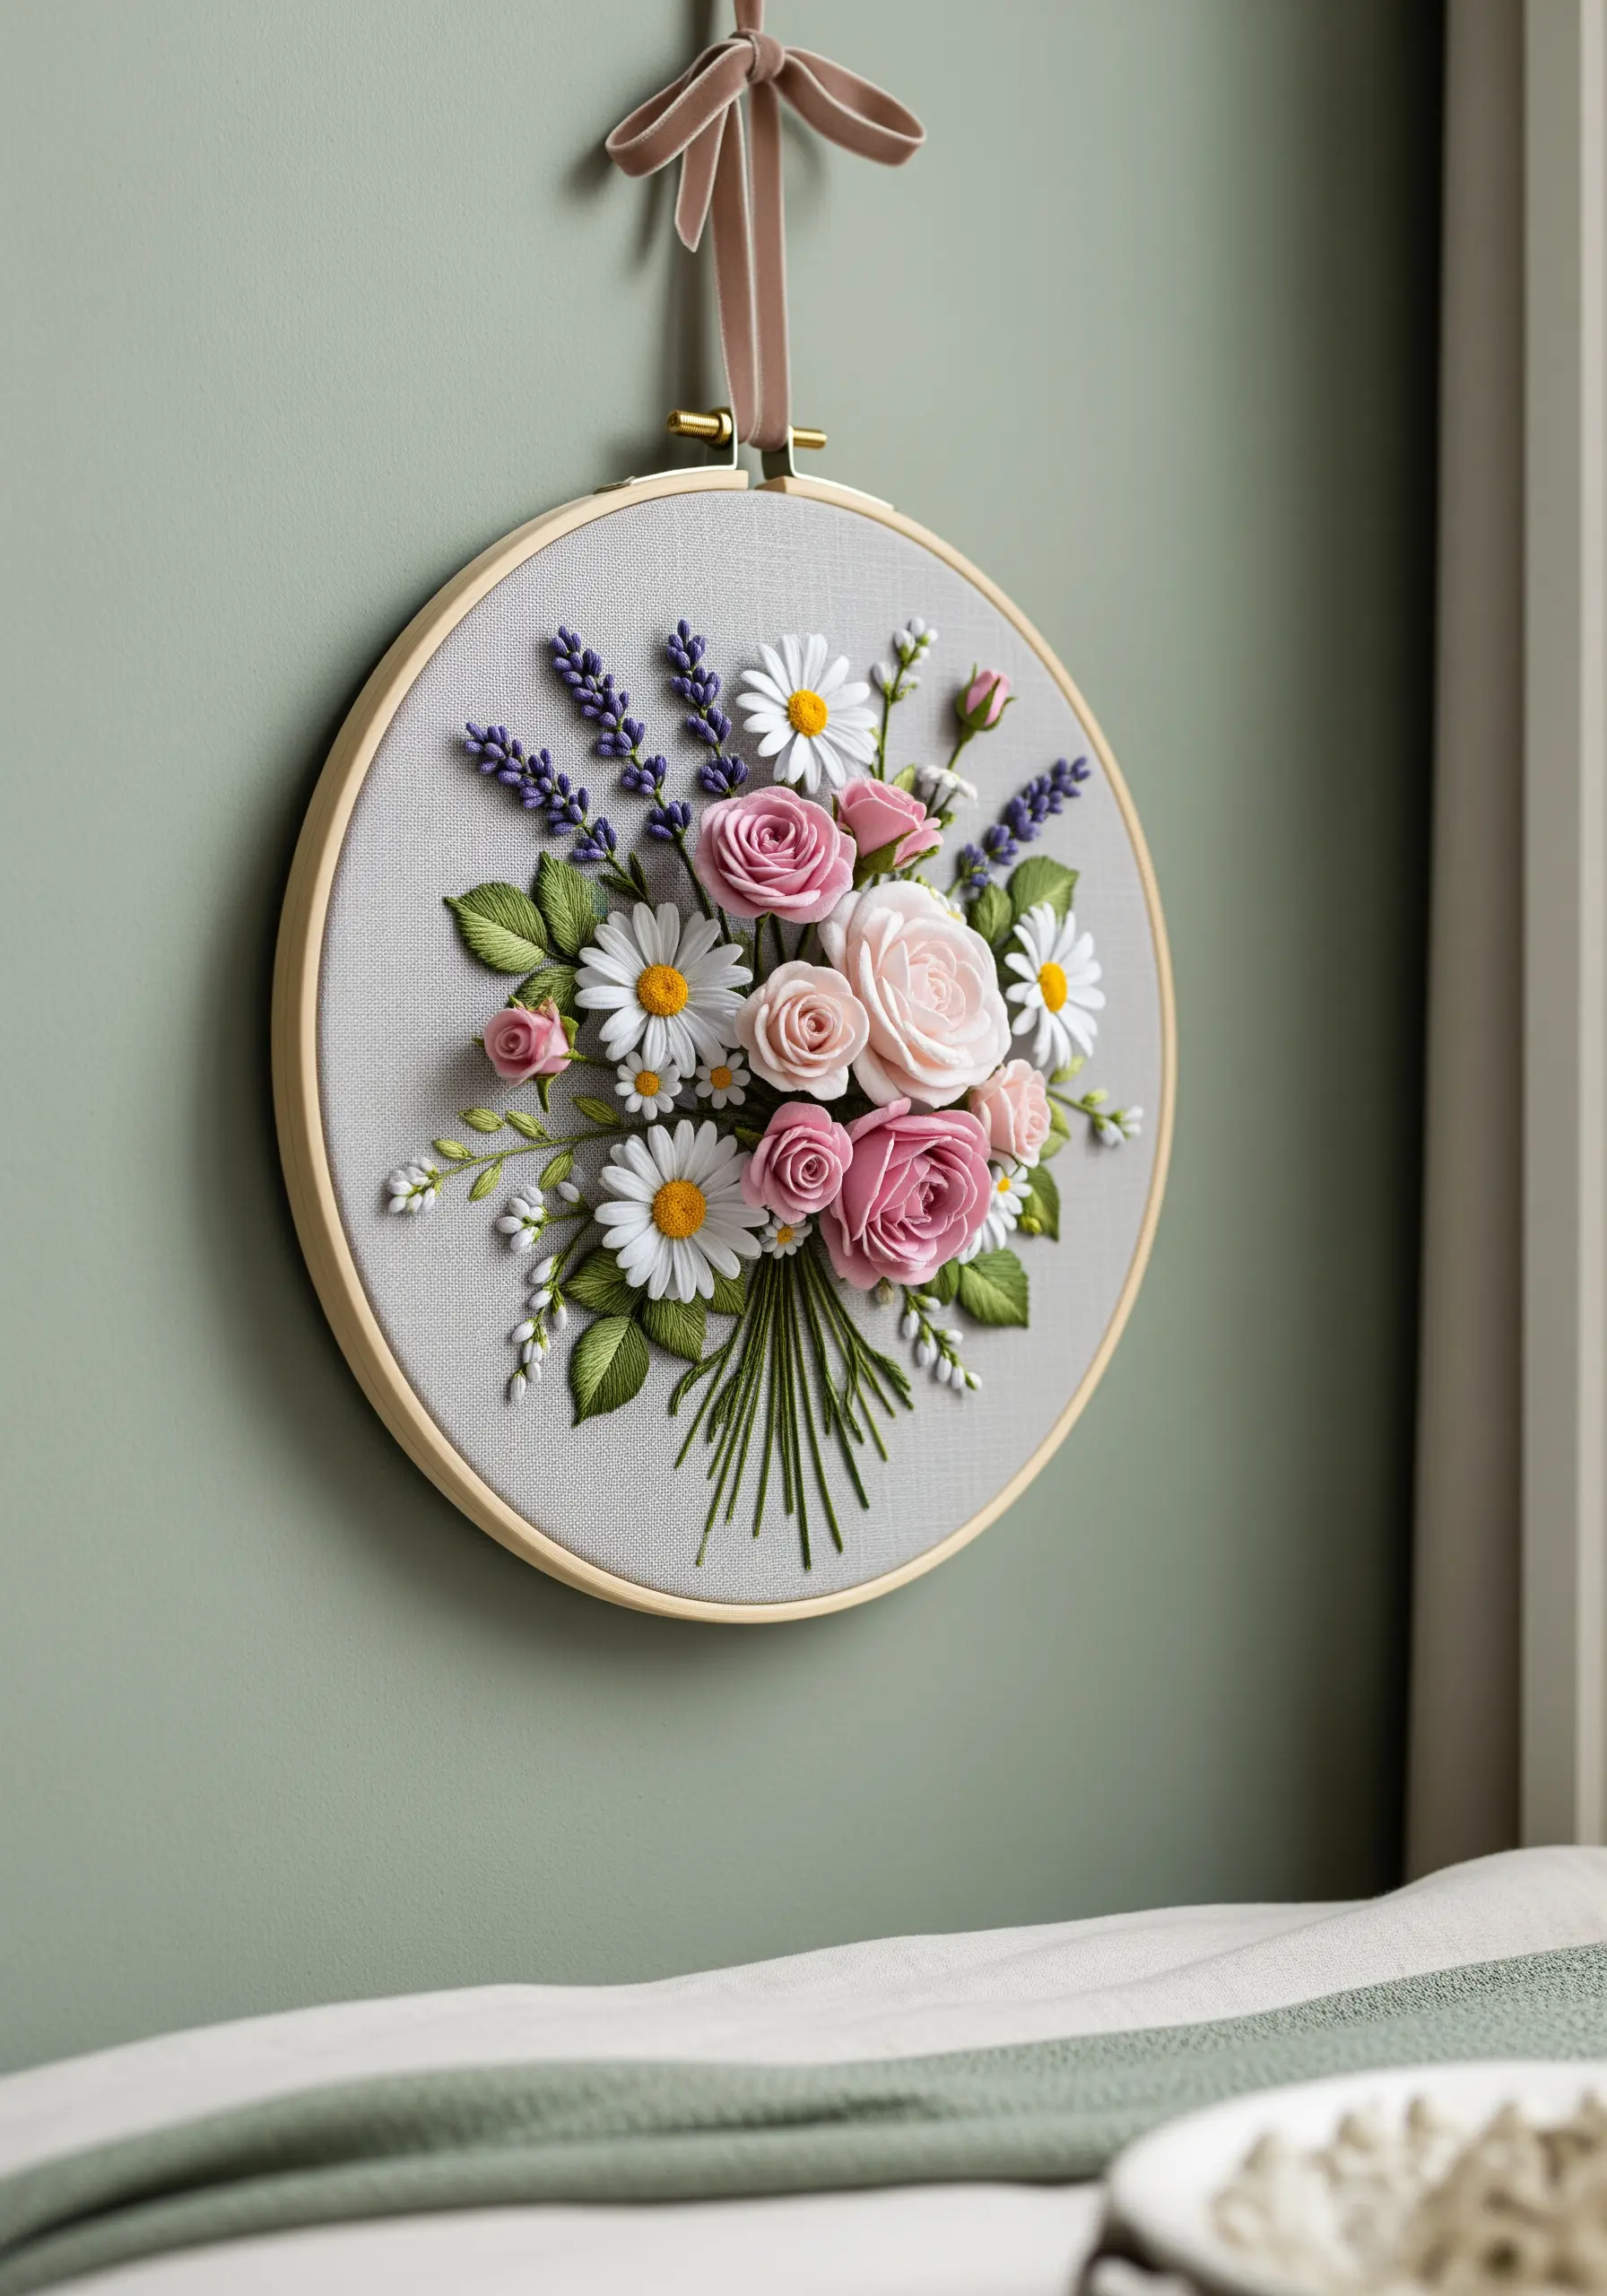
Create a lush, sculptural bouquet by incorporating dimensional stitches that lift off the fabric.
Use the woven wheel stitch for roses, adjusting the tension to make them tight buds or full blooms.
For smaller, delicate flowers and leaves, try stumpwork techniques by stitching detached elements over a wire frame and attaching them to the main piece.
Combining these raised elements with flatter satin-stitched leaves creates a stunning sense of depth, turning a simple floral arrangement into one of those 3D floral embroidery techniques that feels truly alive.
8. Embrace Minimalism with Single-Line Art
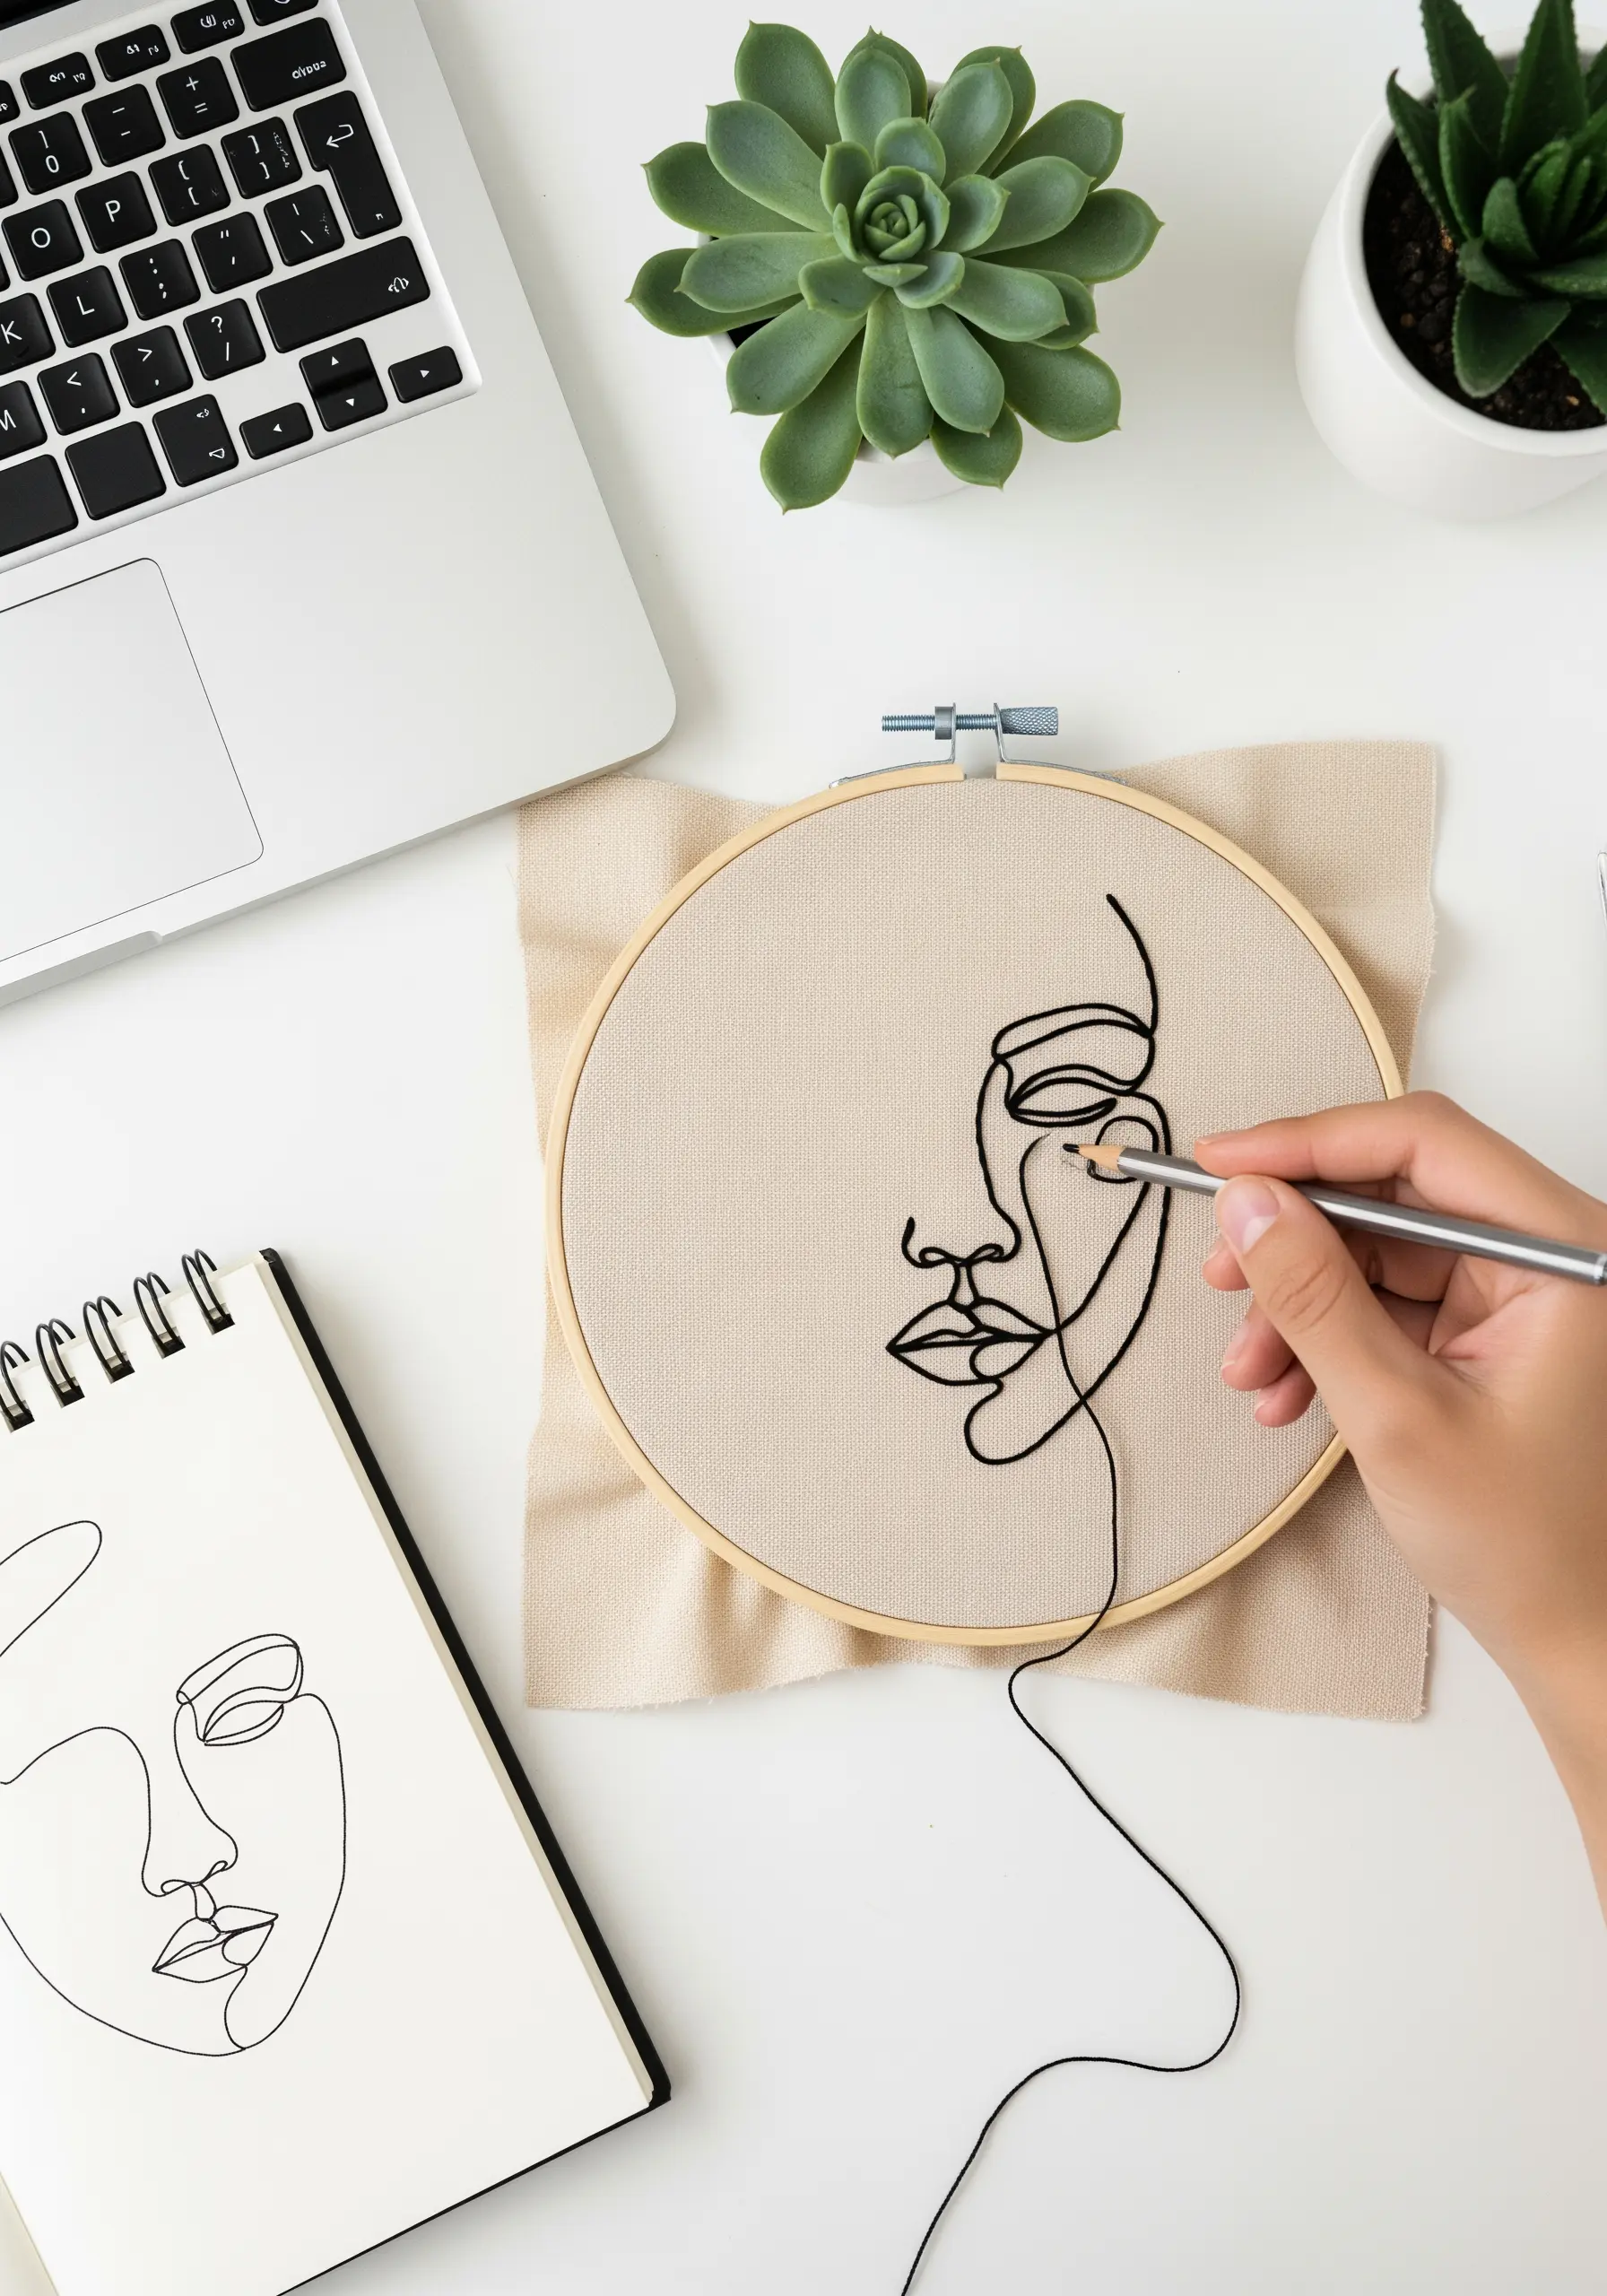
Translate the elegance of contour drawing into embroidery for a modern, gallery-worthy piece.
Use a single, continuous strand of thick thread, like a #8 pearl cotton or even fine yarn, to create your design.
Couch the thread onto the fabric with a thinner, matching floss, which allows you to create fluid curves and sharp angles without distorting the fabric.
The beauty of this technique is its simplicity; the focus on negative space makes these single-line face profiles incredibly impactful.
9. Weave Narrative with Mixed Media Elements
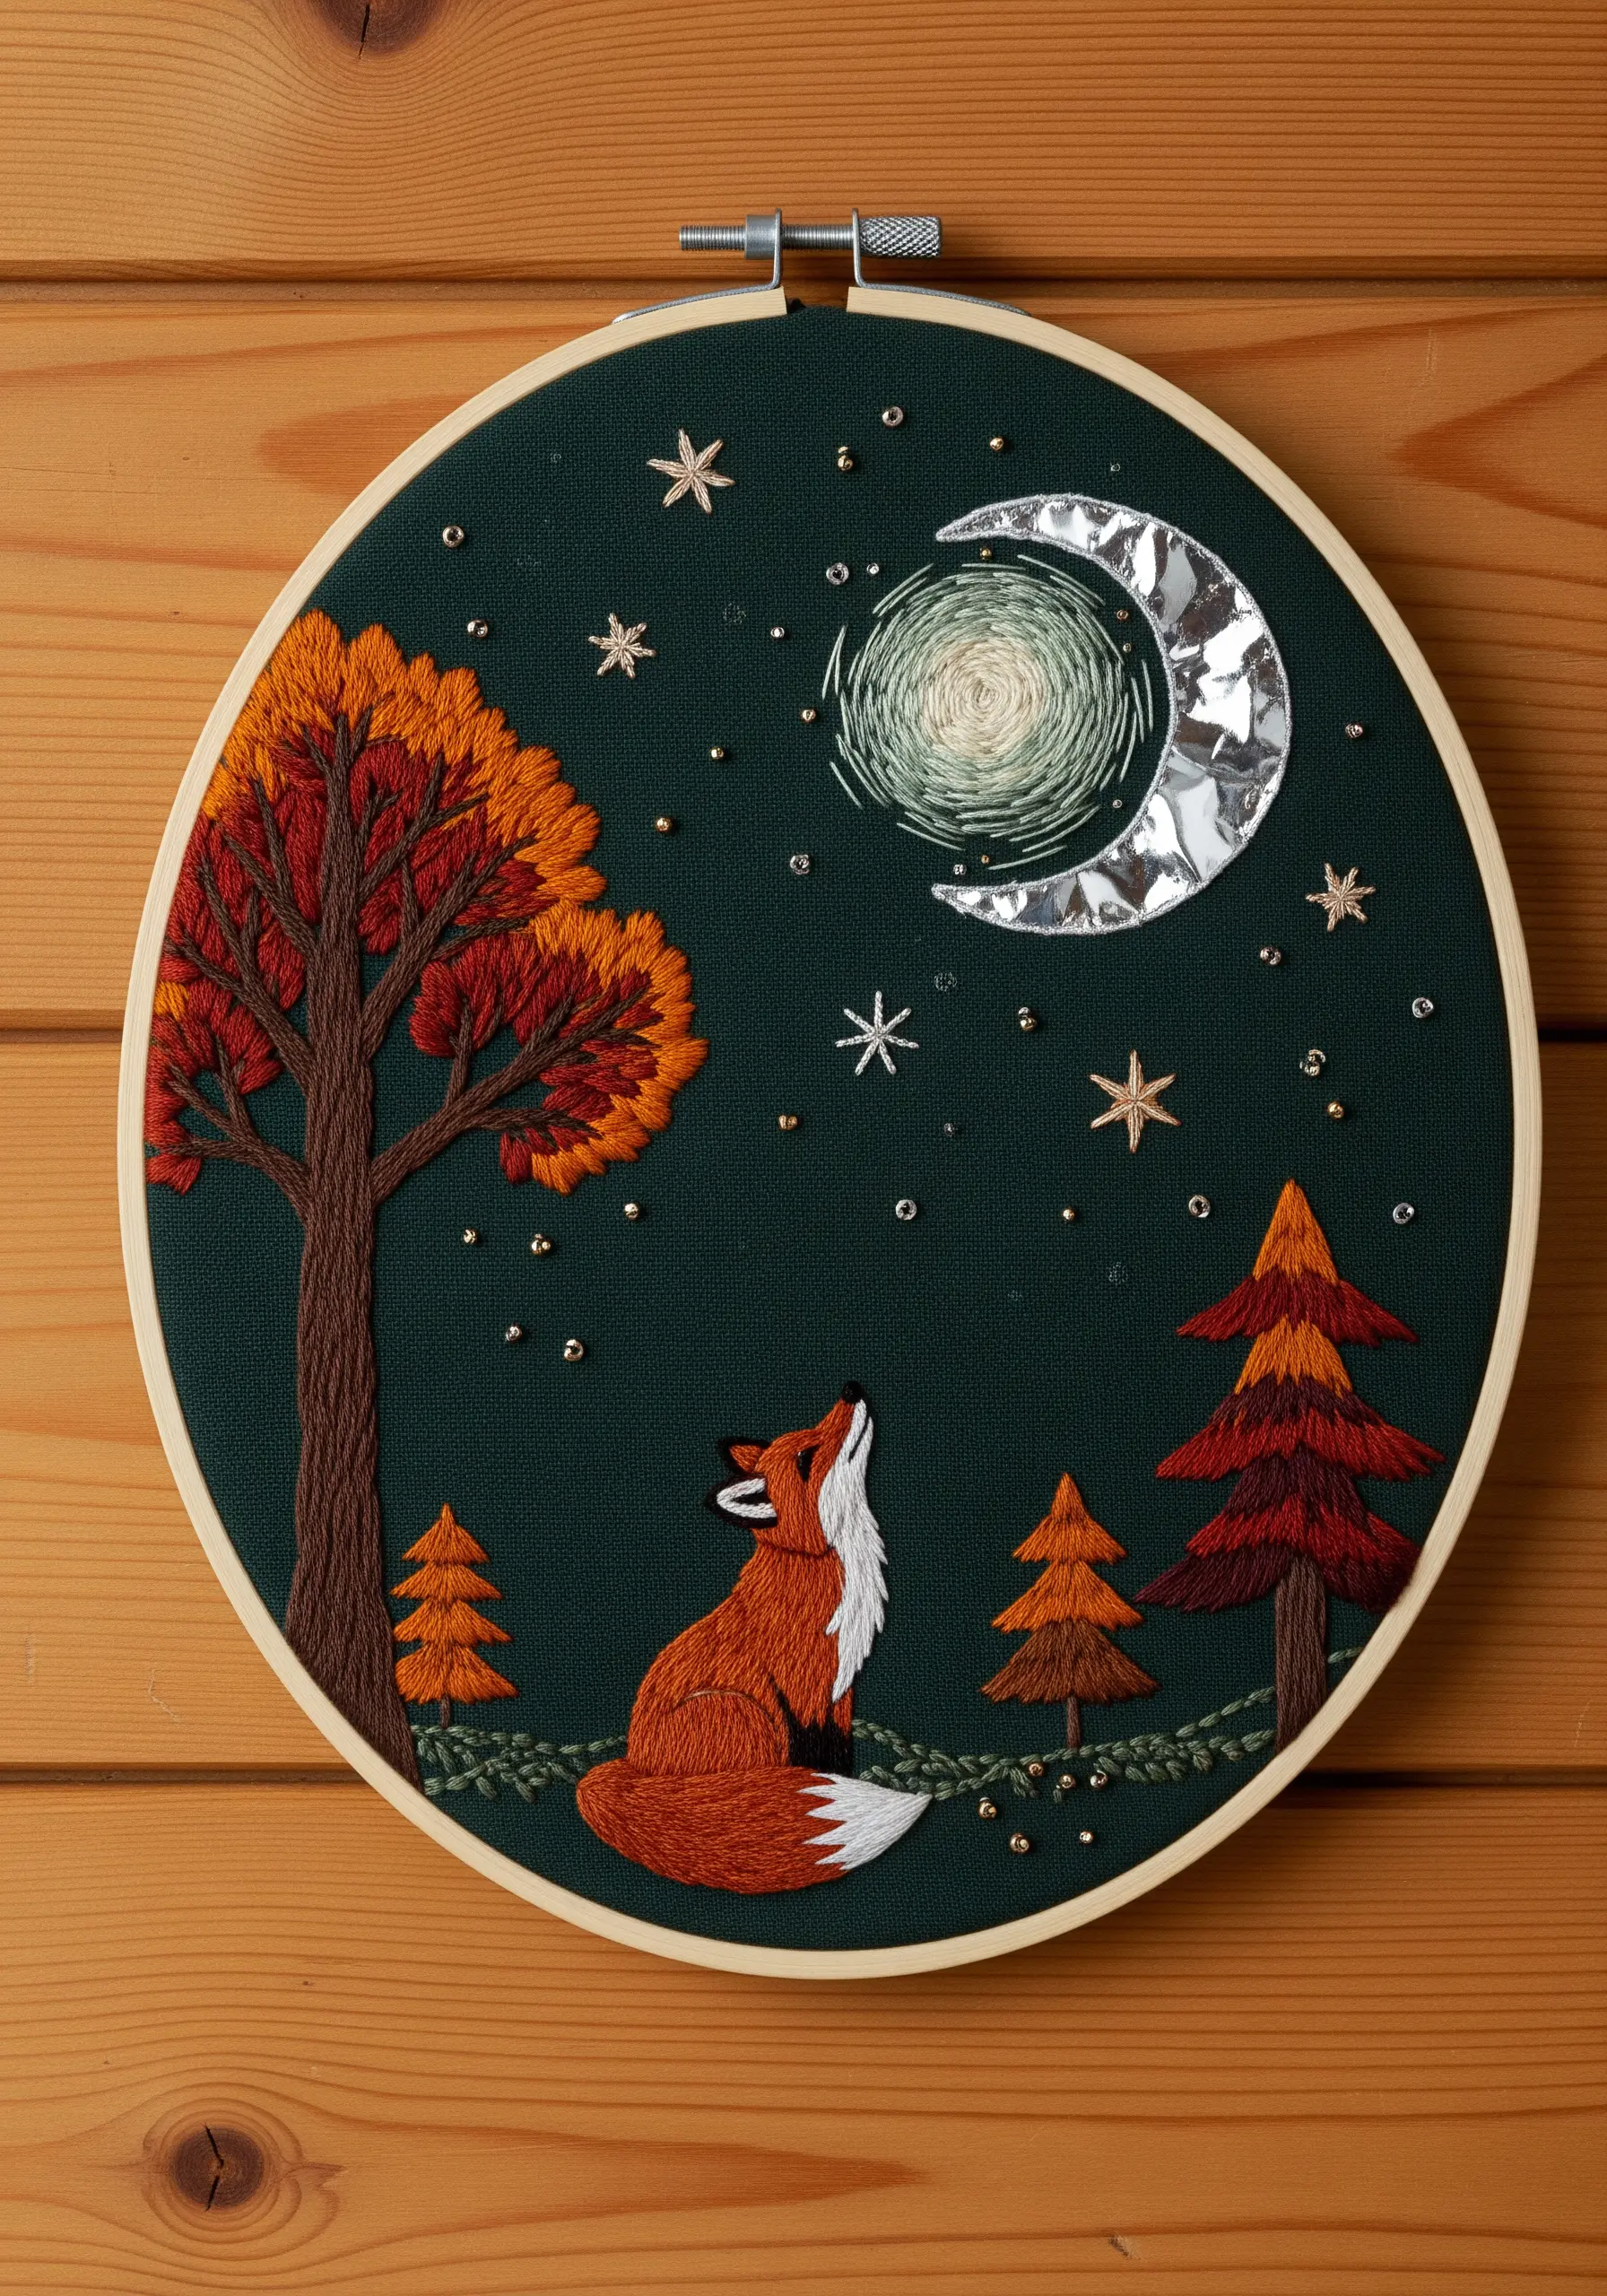
Incorporate unexpected materials to add texture and light to your embroidered scenes.
Create a luminous moon by appliquéing a piece of silver lamé fabric and stitching over it with concentric circles of iridescent thread.
Build fur texture on the fox using directional long-and-short stitch in shades of orange, rust, and white to suggest dimension and softness.
Adding tiny metallic seed beads as distant stars catches the light differently than thread, adding a final layer of magic to your narrative, much like you see in realistic wolf embroidery motifs.
10. Create an Interactive Embroidered Map
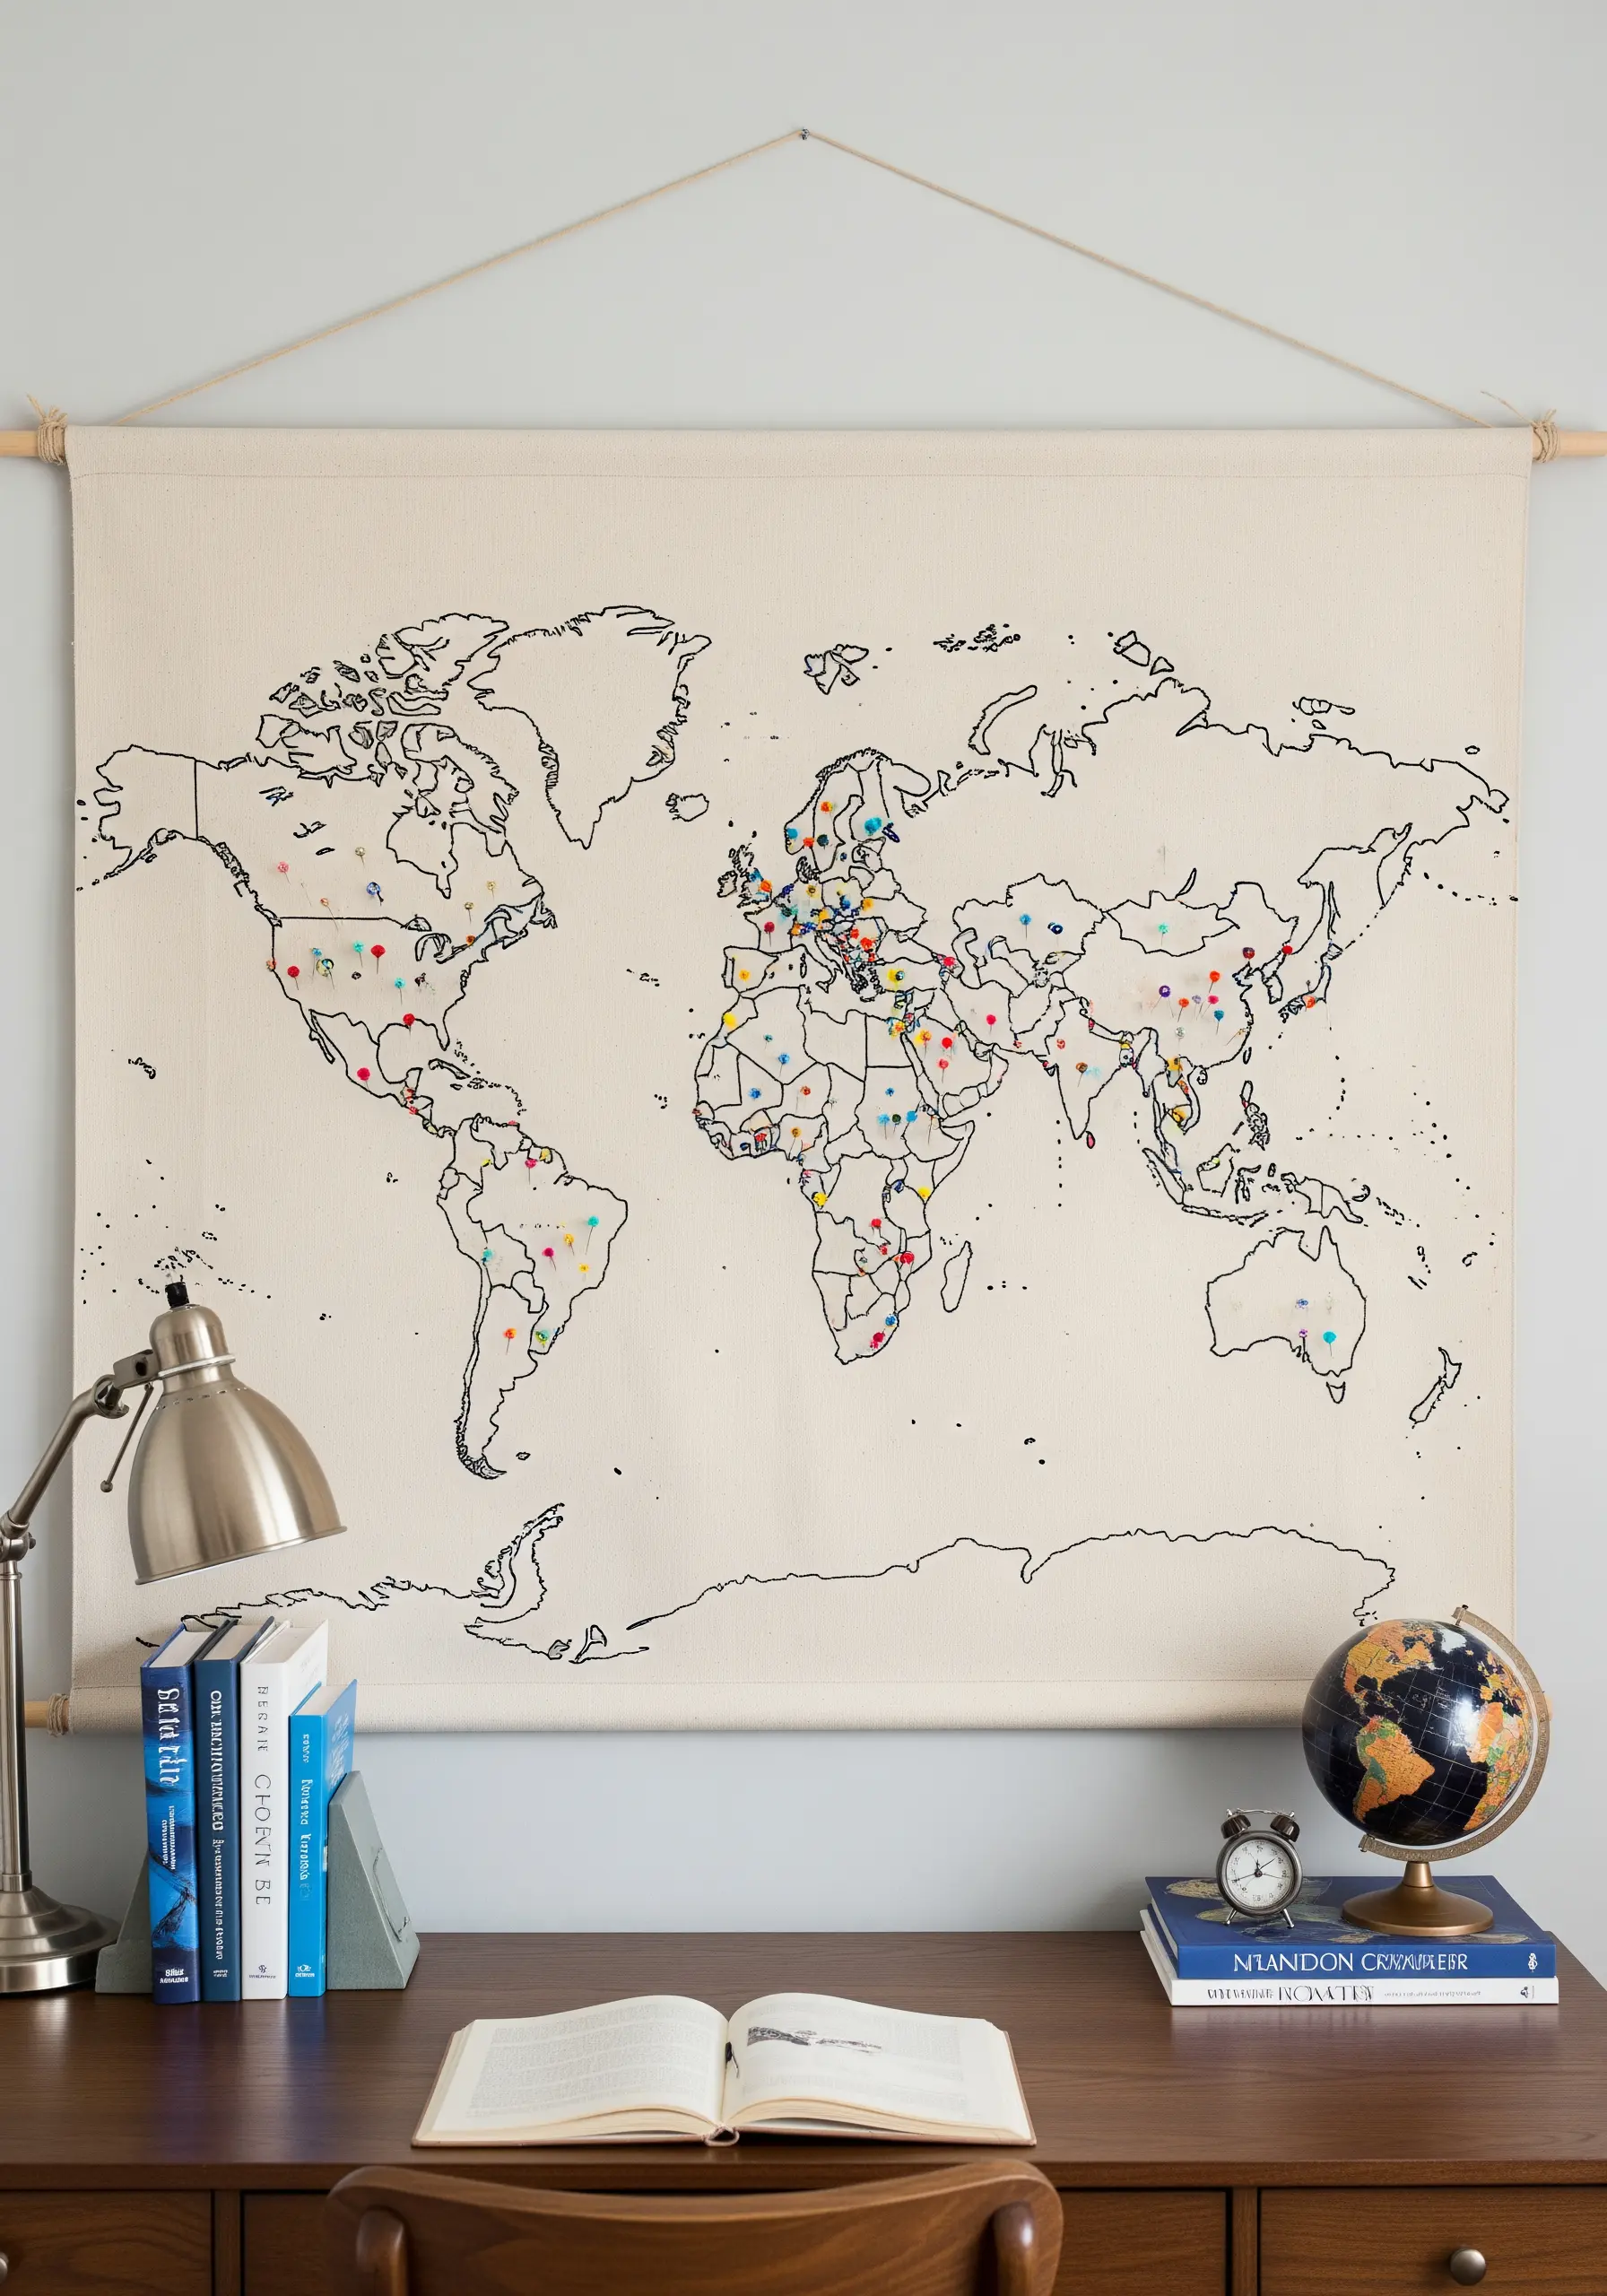
Transform a simple wall hanging into a personal story of your travels.
Start with a large piece of canvas and transfer a world map outline using a water-soluble pen or heat-erasable marker.
Stitch the continents with a simple backstitch or stem stitch for a clean, graphic look.
Instead of just stitching locations, use different colored French knots or even small, custom-made map pins to mark places you’ve been, want to visit, or hold special meaning. This turns your wall art into one of those living large-scale embroidery tapestries.
11. Replicate Gem-Like Textures with Thread
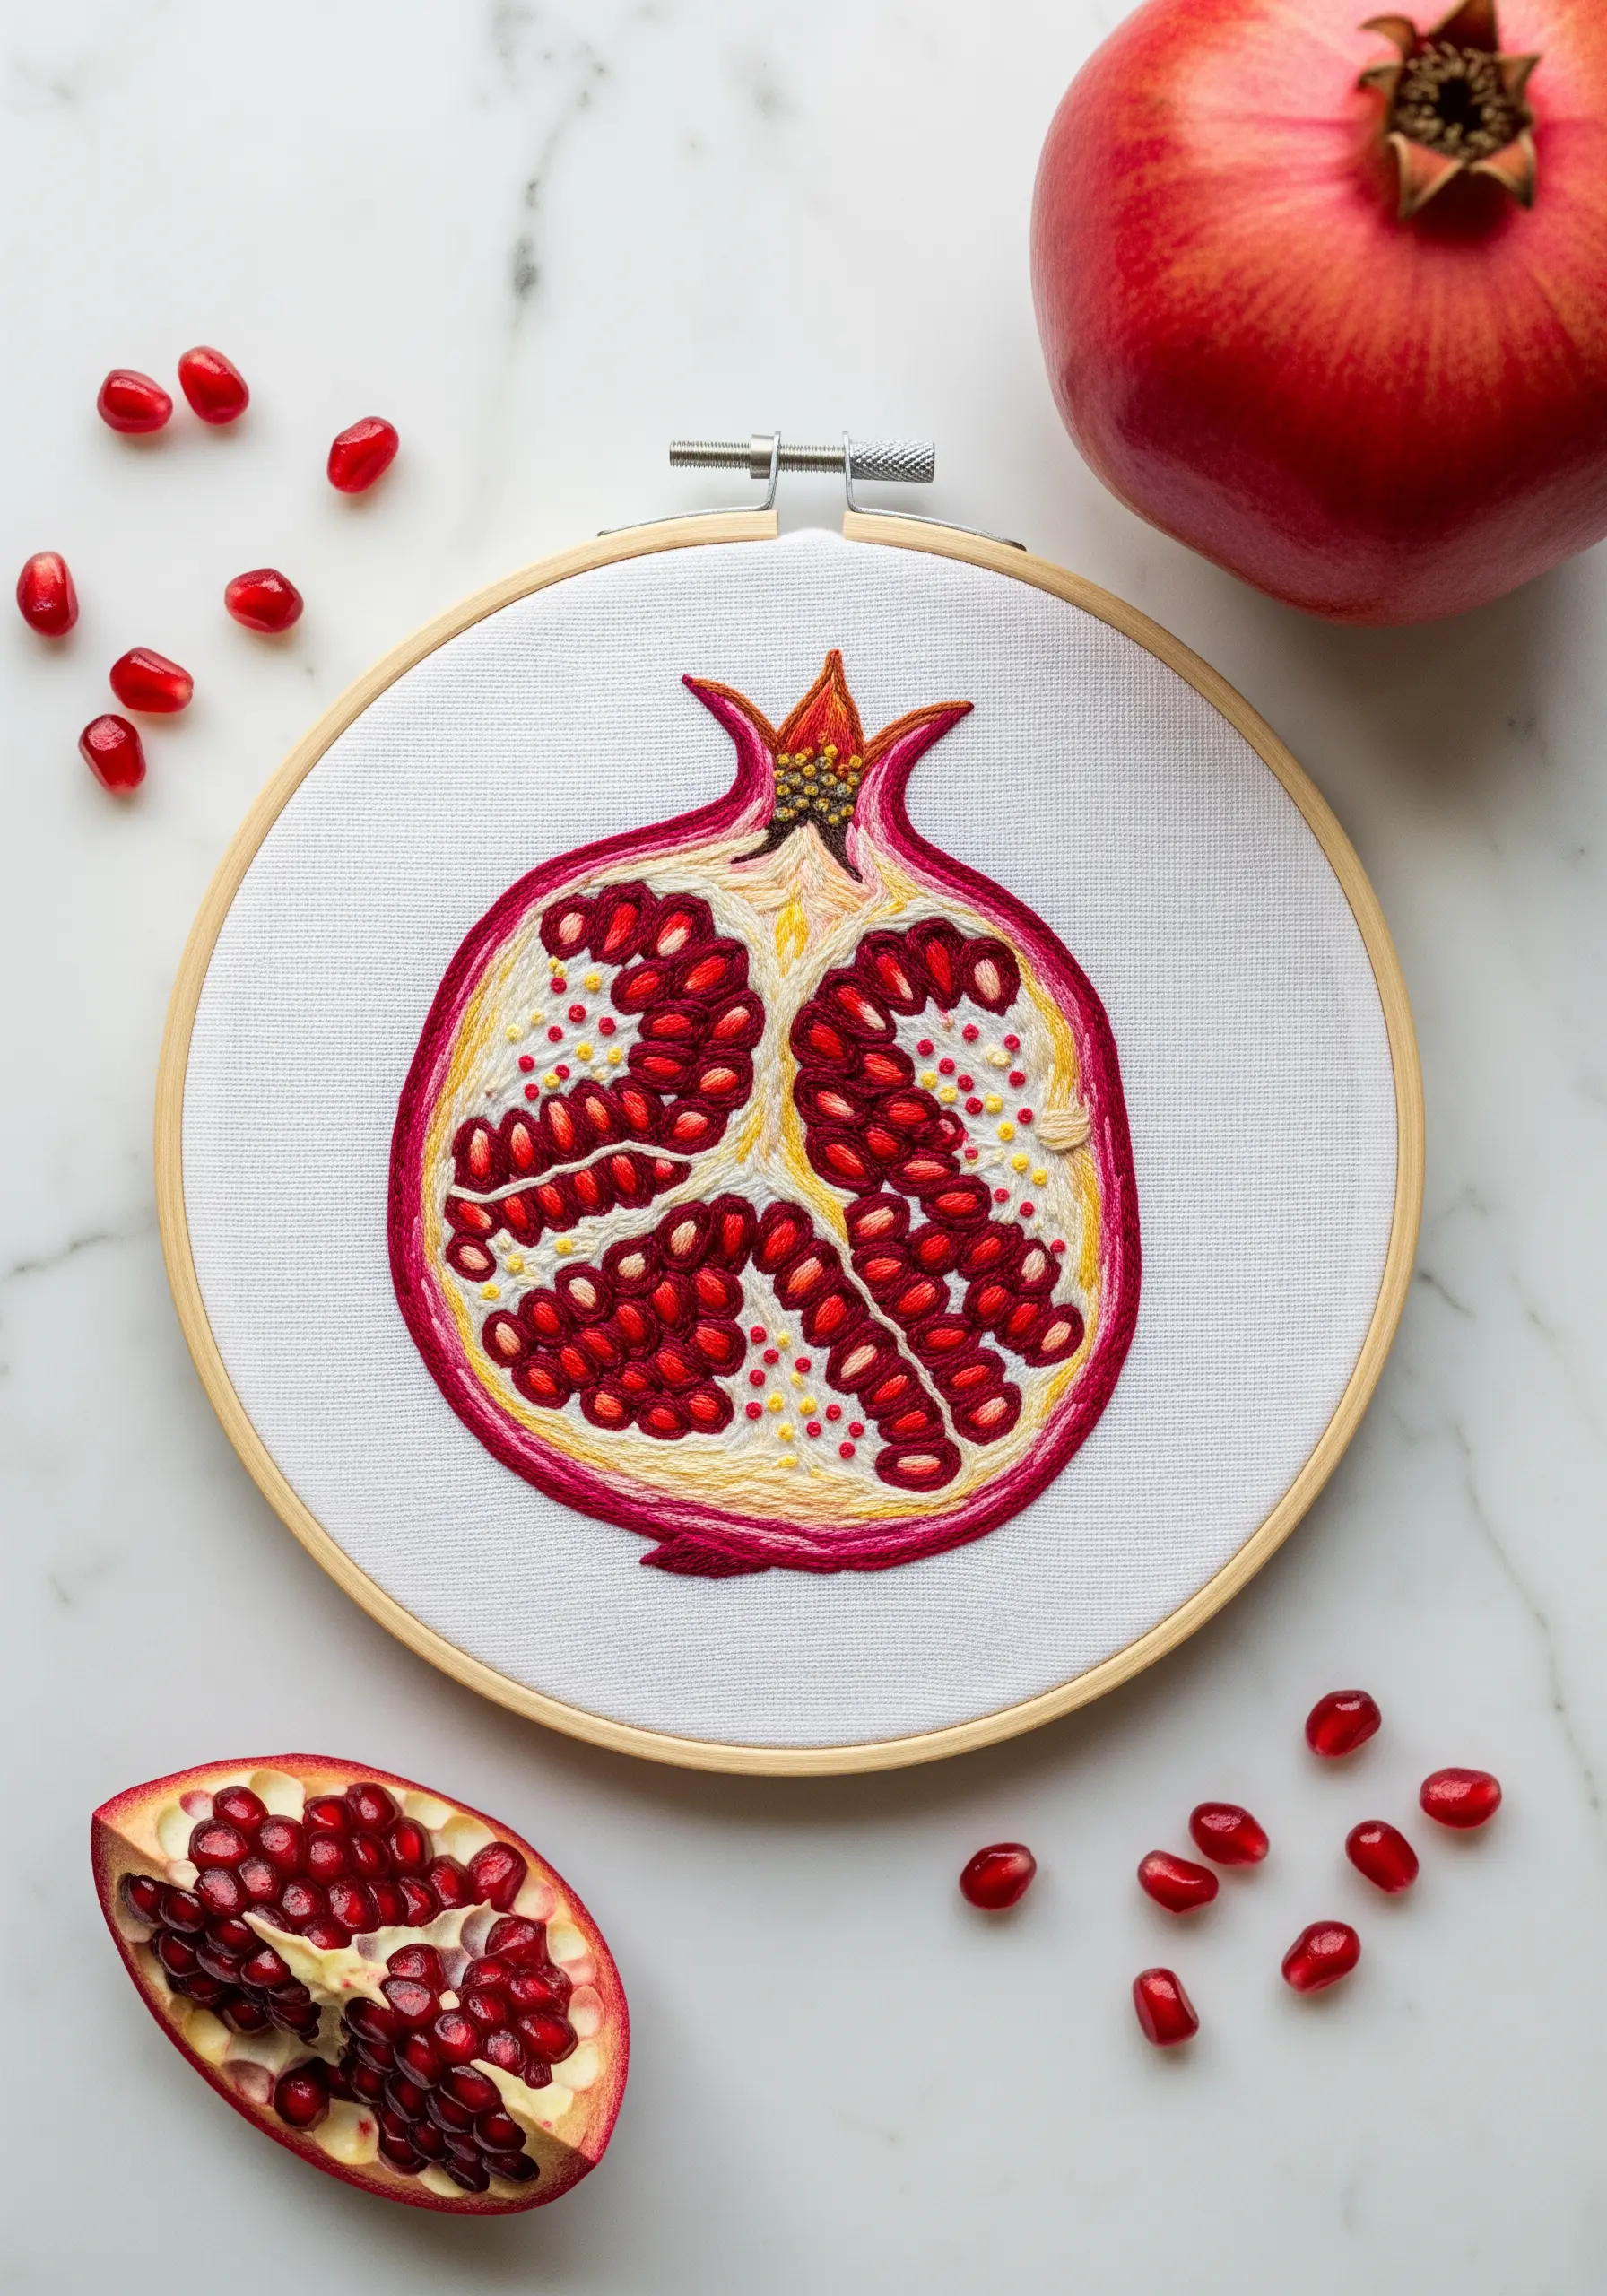
Capture the juicy, translucent quality of pomegranate seeds by using specific threads and stitches.
Use a glossy rayon or silk floss for the seeds, as its high sheen mimics the reflection of light on a wet surface.
Create each seed with a cluster of two or three tightly packed French knots, which gives them a rounded, dimensional shape.
Contrast this glossy texture with matte cotton floss for the pith, using variegated yellow and cream thread to add realism. It’s a perfect way to practice simple line art fruit & food motifs with a textural twist.
12. Translate Iconic Art into Stitched Form
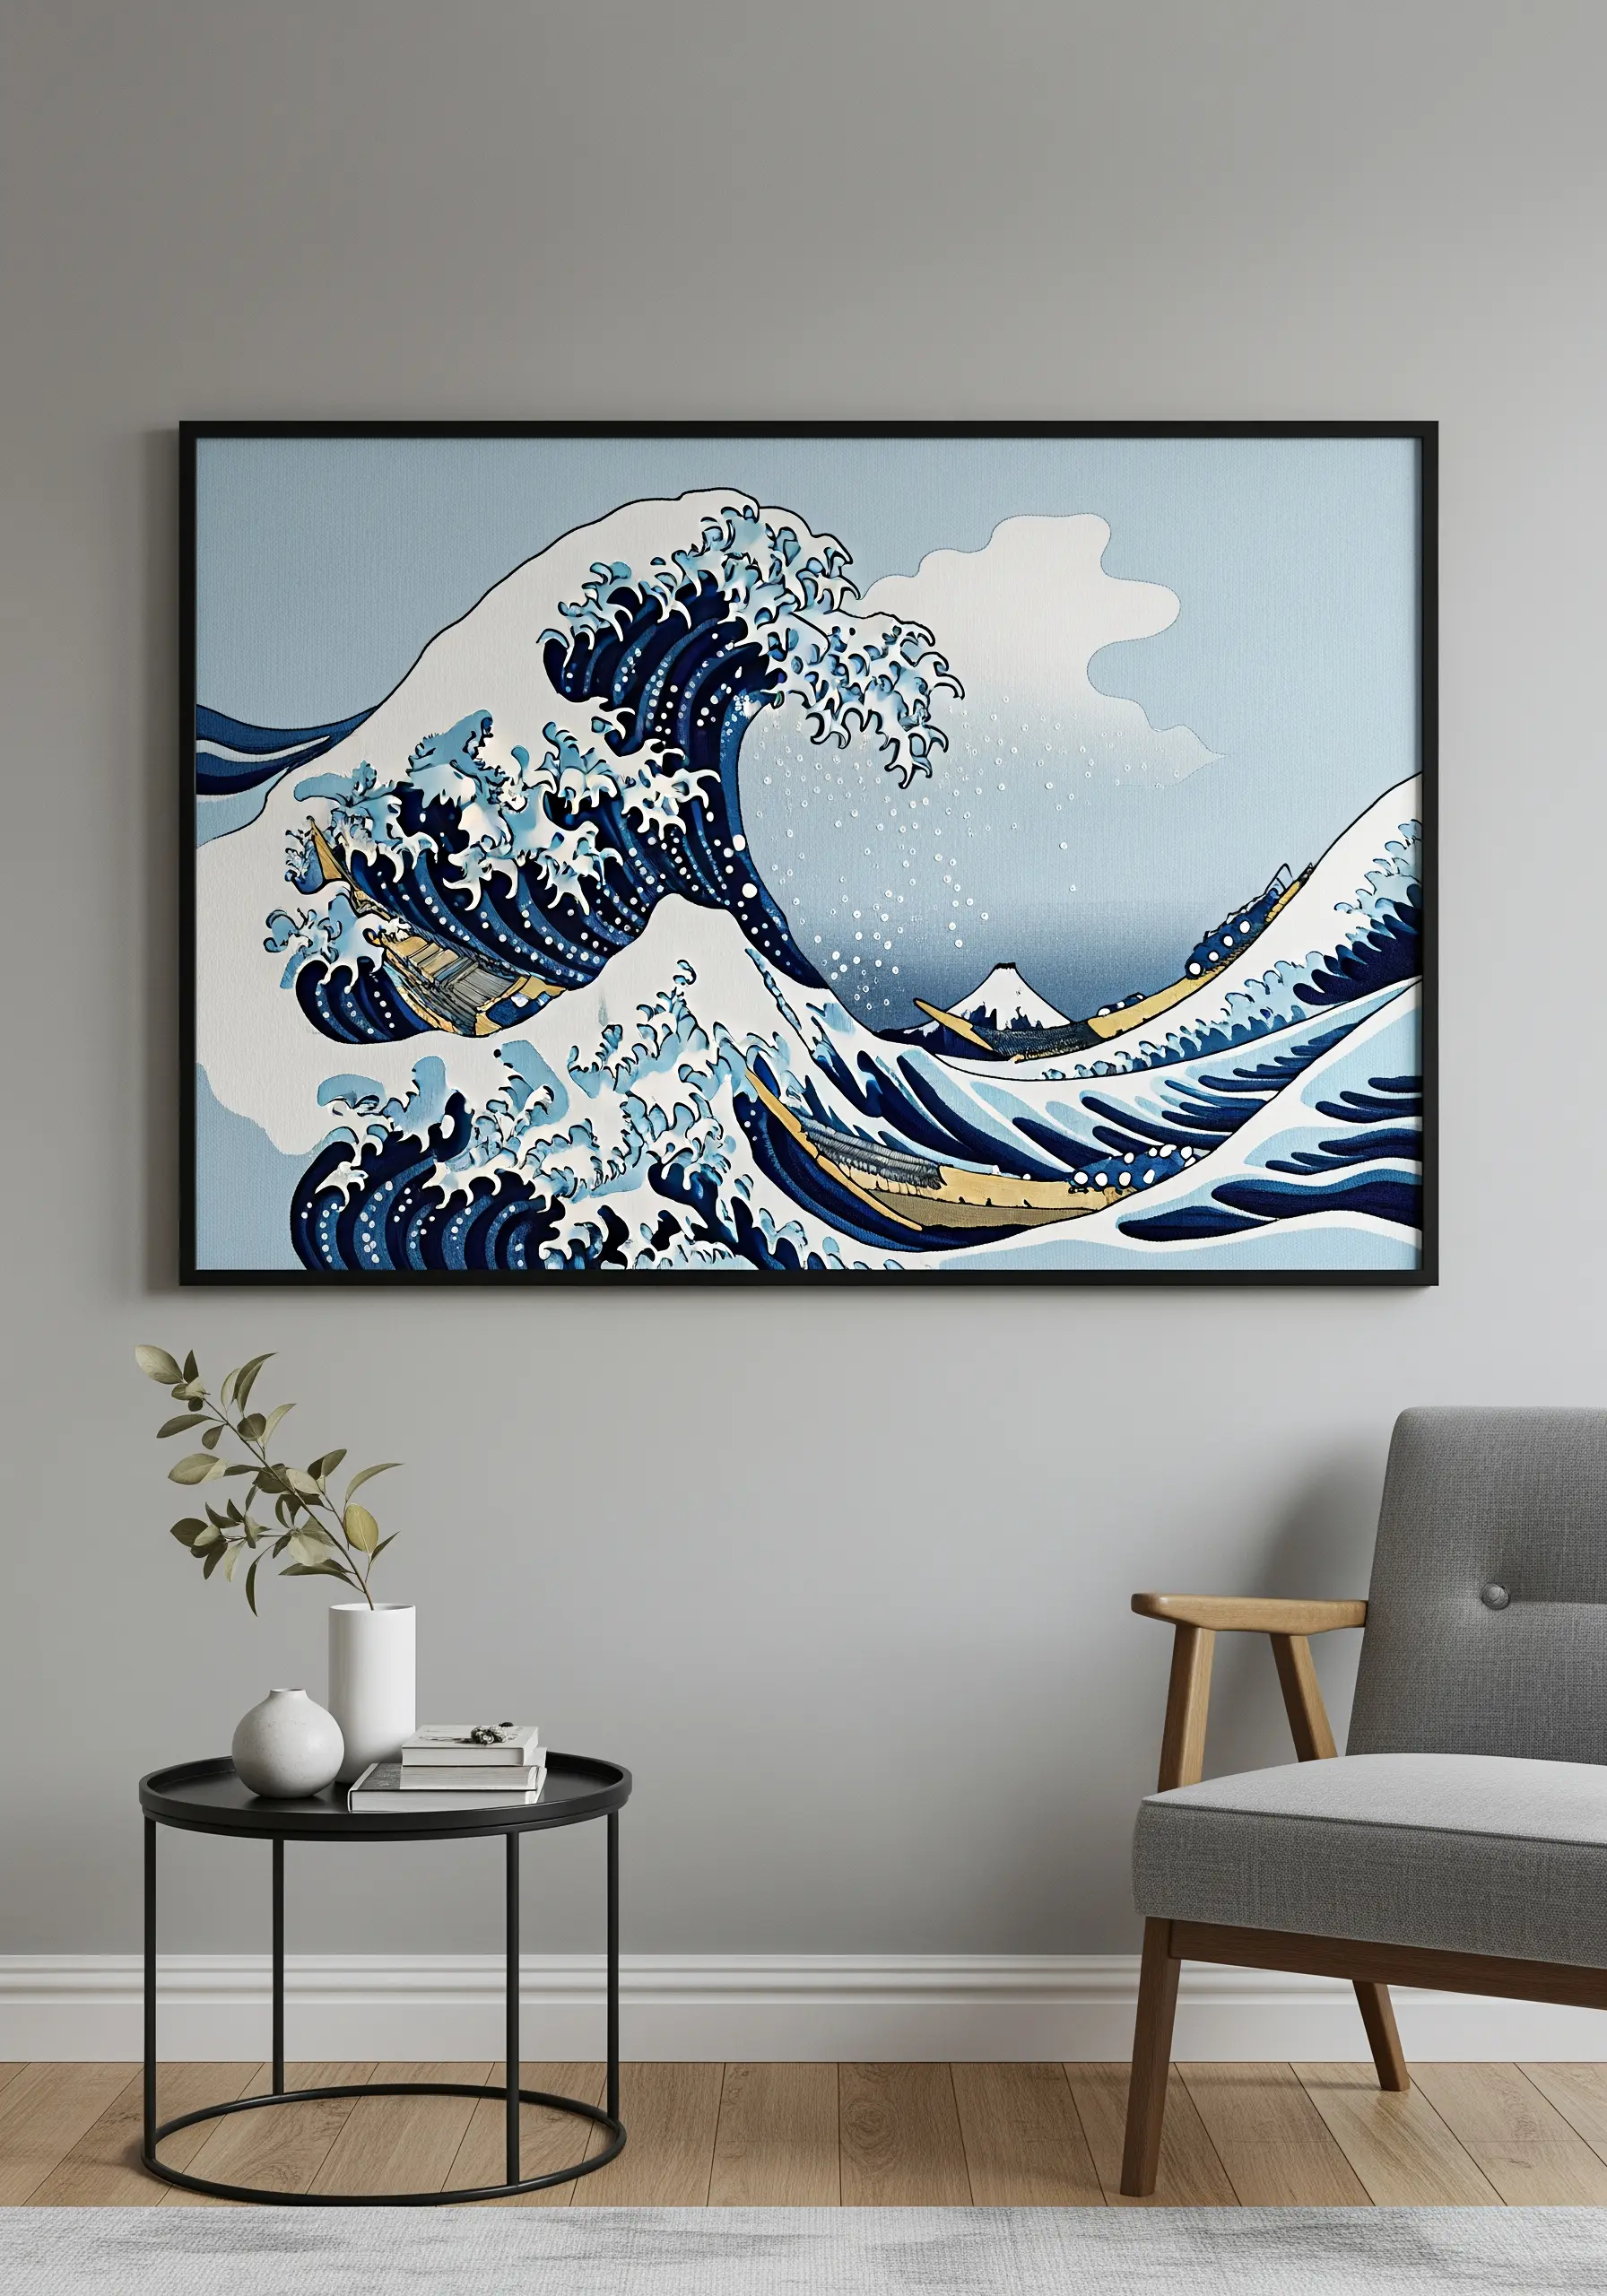
Reinterpreting a masterpiece like ‘The Great Wave’ in thread challenges you to think like a painter.
Focus on stitch direction to convey movement; use long, flowing straight stitches for the main body of the waves and chaotic seed stitches or French knots for the sea spray.
Simplify the complex color palette of the original into five or six key shades to maintain clarity and impact.
The result is not just a copy, but an interpretation that honors the original through texture, making for stunning framed embroidery patterns.
13. Design Personalized Pennants with Appliqué

Combine fabric appliqué with embroidery for crisp, bold lettering on children’s decor.
Cut the letters from a contrasting color of felt and use a neat whip stitch or a tight machine zigzag to secure them to the banner. This gives a cleaner edge than satin stitch alone.
Frame the name with whimsical, lightly stitched motifs like planets and stars to add personality without overwhelming the central design.
This mixed-media approach allows you to create professional-looking personalized name & monogram wall embroidery gifts quickly and effectively.
14. Stitch a Mandala with a Gradient Palette
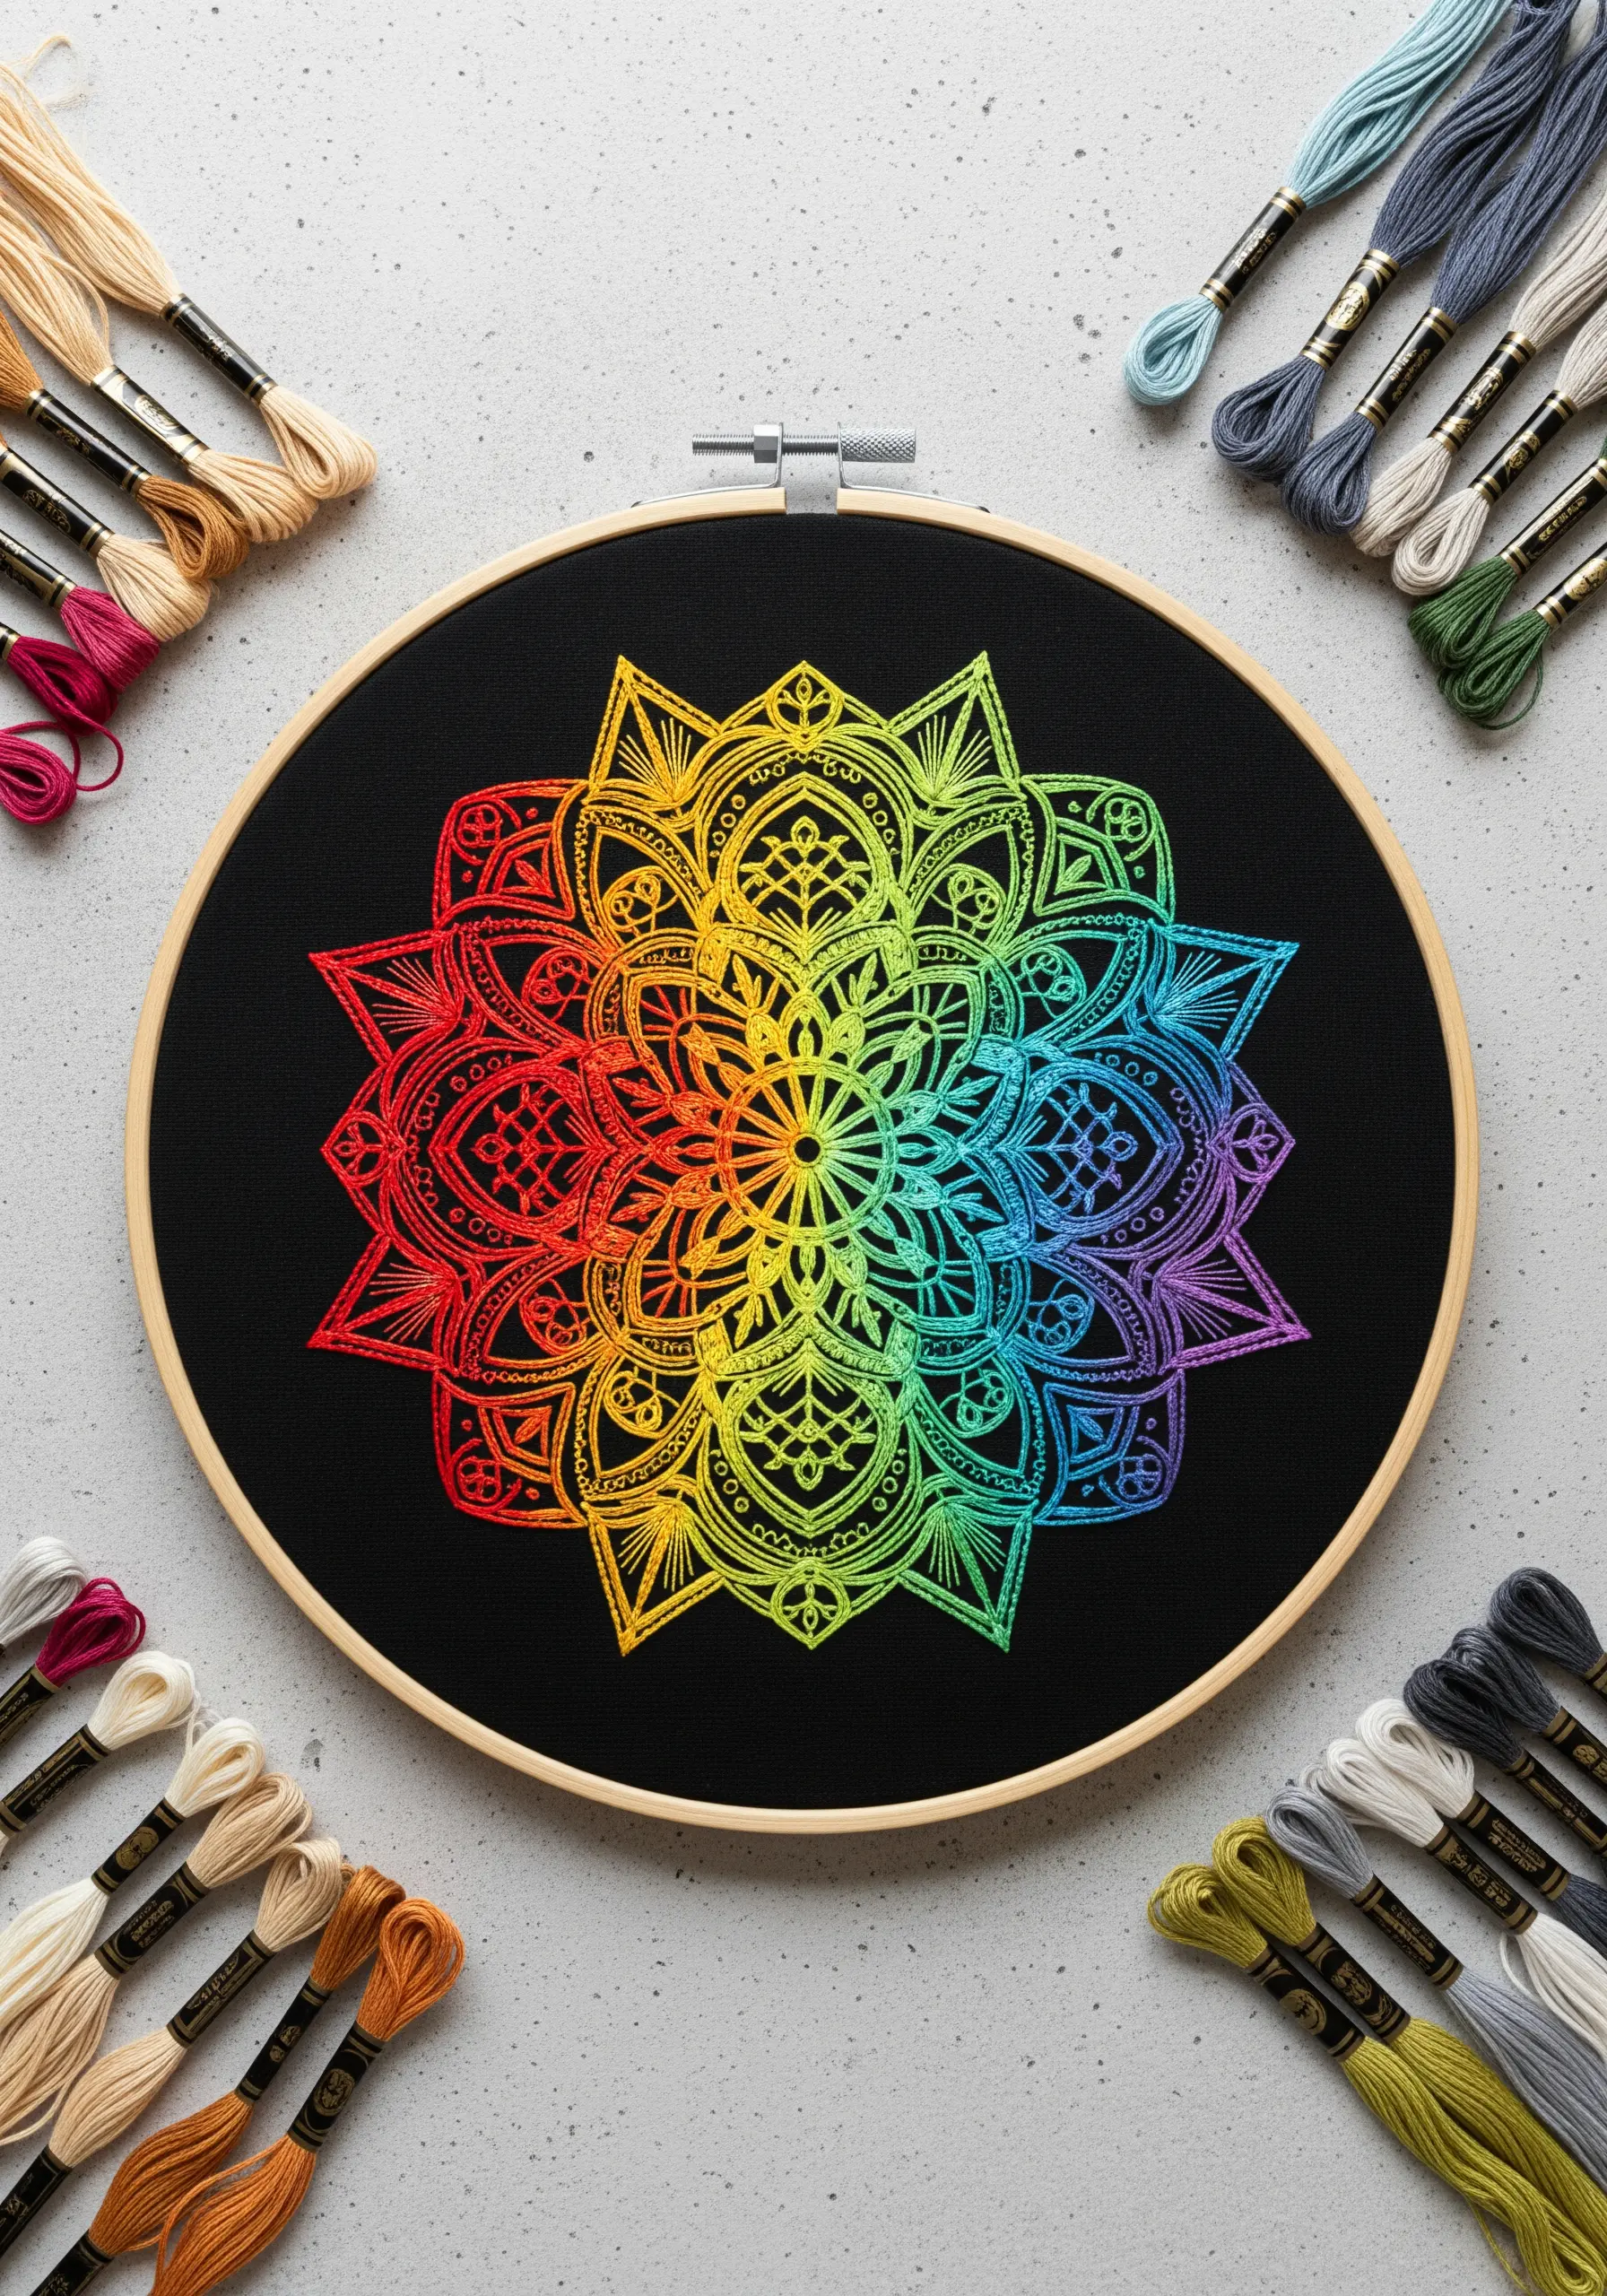
Achieve a seamless rainbow effect in a complex mandala by carefully planning your color transitions.
Divide the design into sections and assign a specific color family to each, blending them where they meet.
Alternatively, use a high-quality variegated thread that cycles through the rainbow for an effortlessly smooth gradient.
Stitching this vibrant design on black fabric makes the colors appear exceptionally luminous, resulting in contemporary rainbow blend stitches that are meditative to create and mesmerizing to view.
15. Create a Refined Botanical Gallery Wall
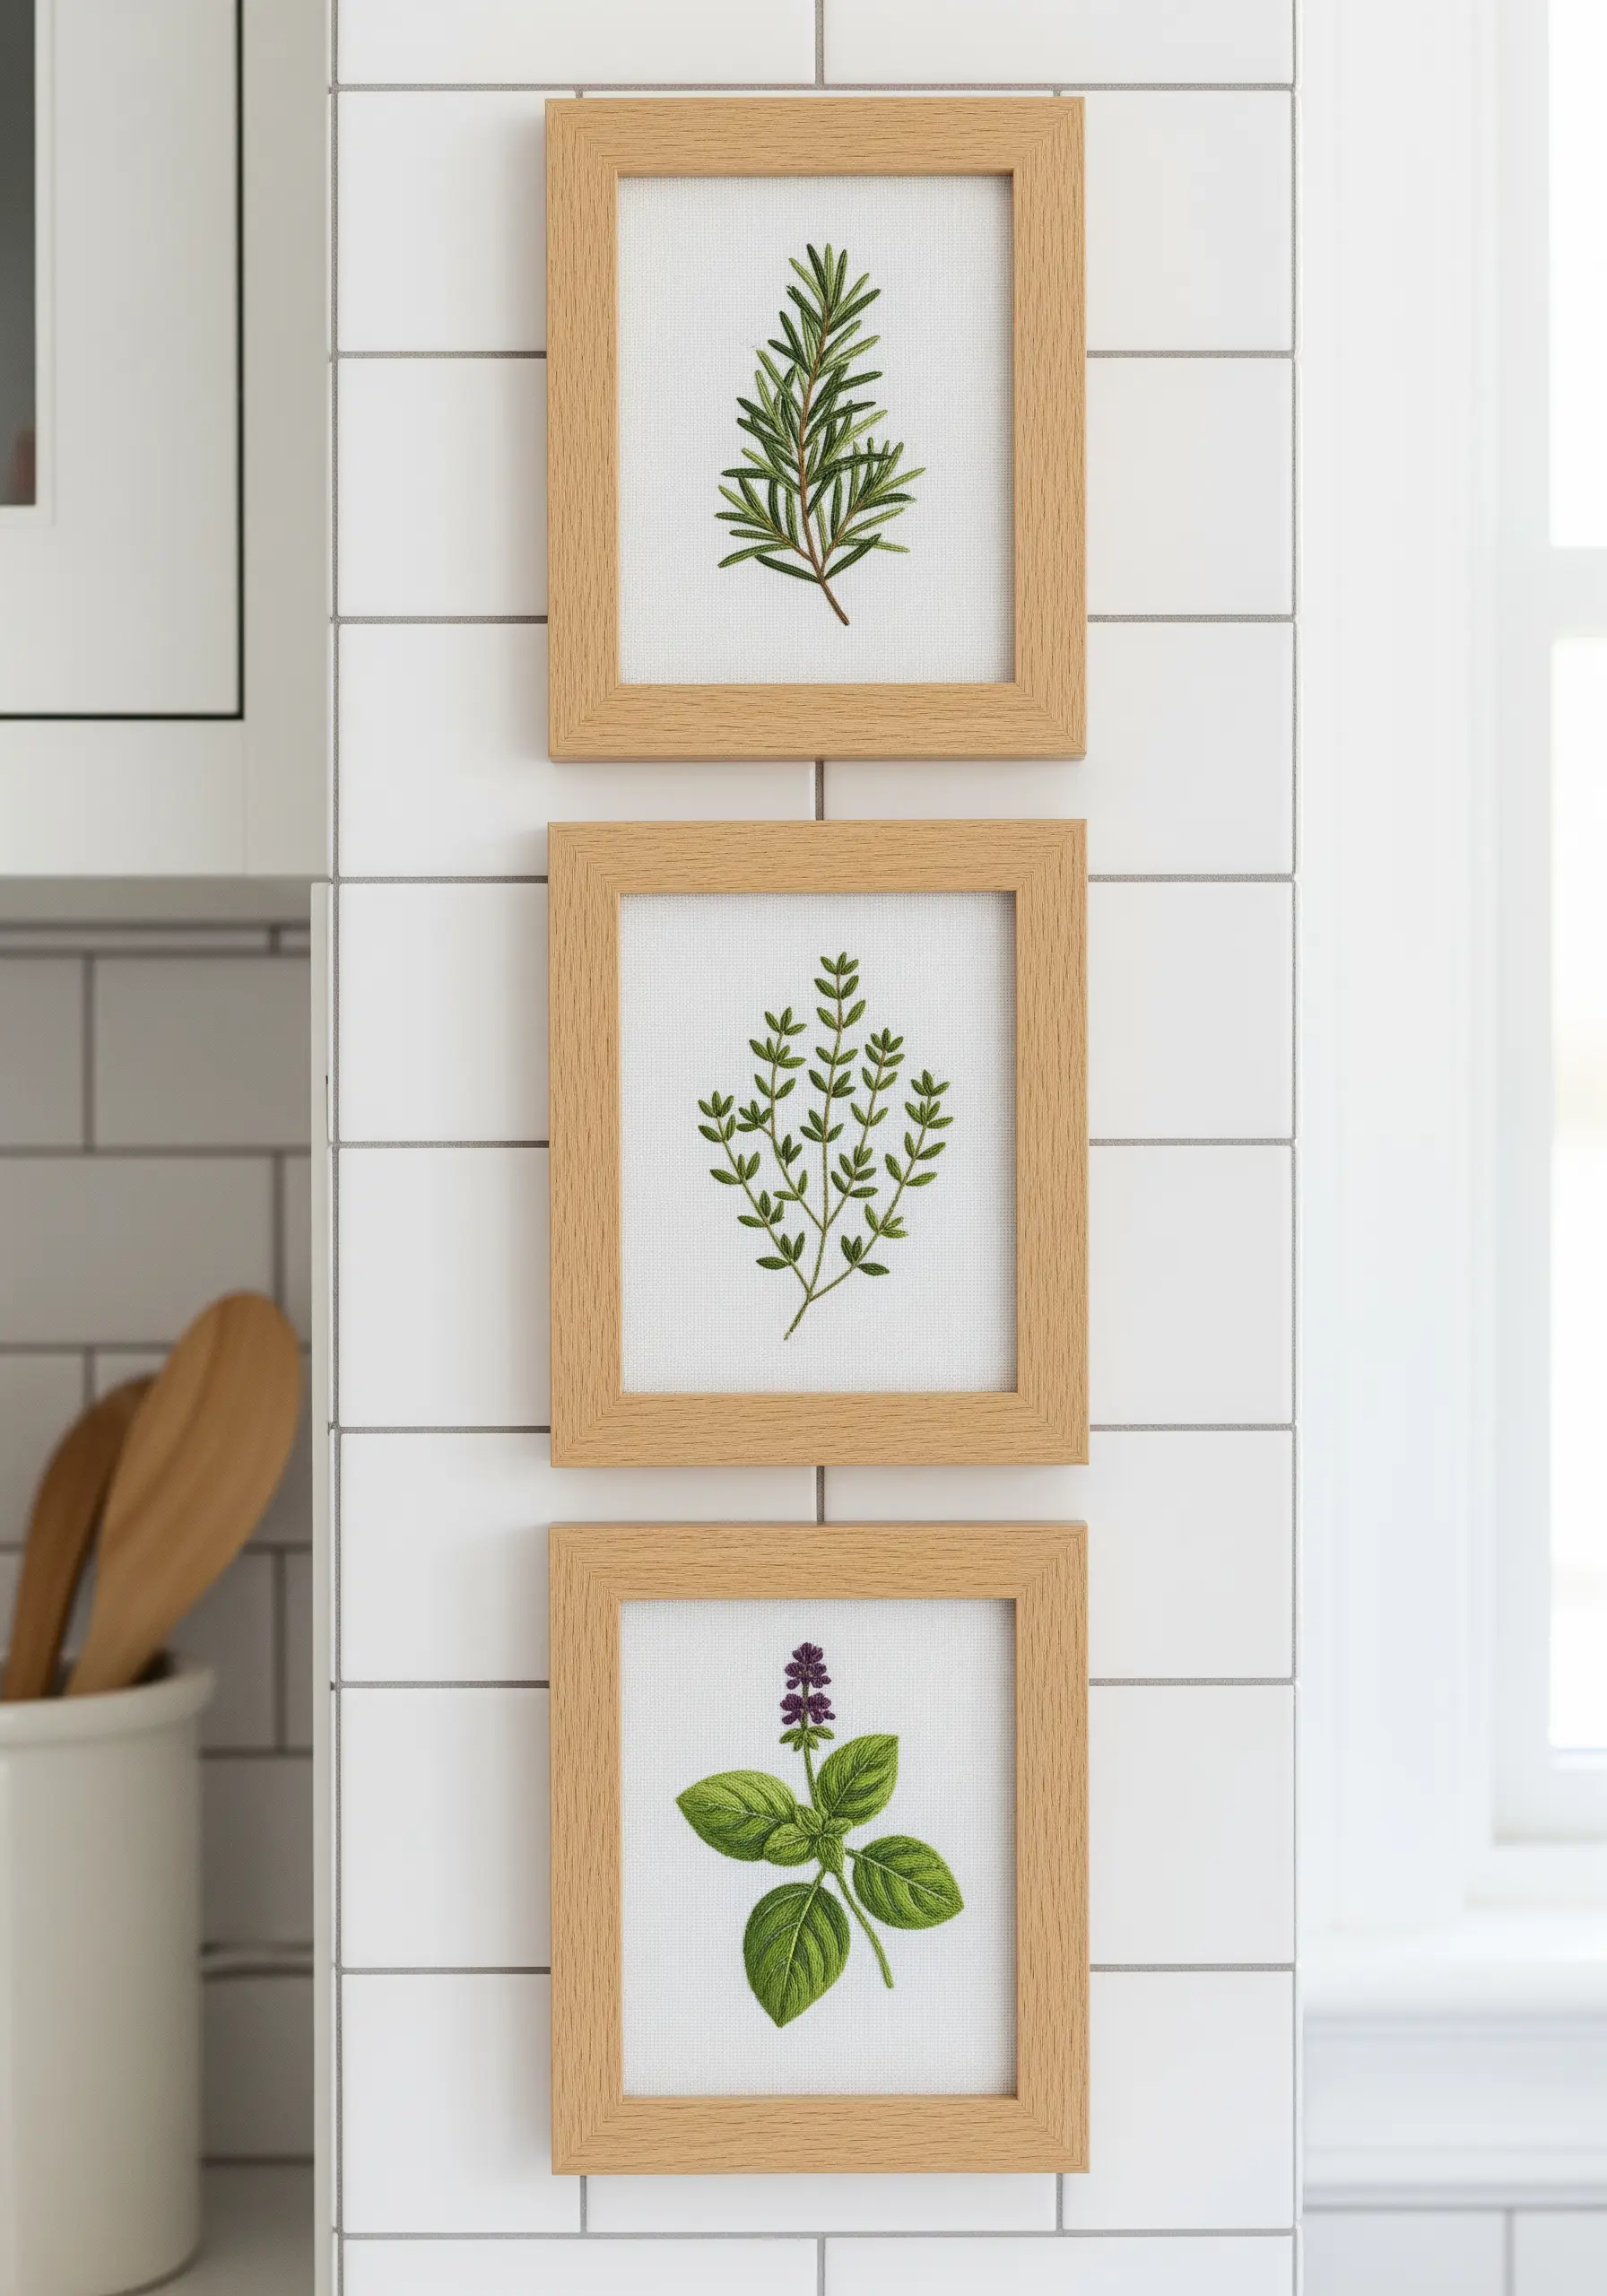
Elevate simple herb motifs by focusing on delicate detail and sophisticated presentation.
Use just one or two strands of floss to stitch each plant, relying on stem stitch for woody stems and detached chain stitch or single straight stitches for leaves.
Stitch each herb on a piece of high-quality linen or even-weave fabric for a classic, textured background.
Framing them individually in identical, simple wooden frames transforms them from simple stitches into a coordinated set of botanical stitch ideas, perfect for a kitchen or dining area.
16. Sculpt a Coral Reef with High-Texture Stitches
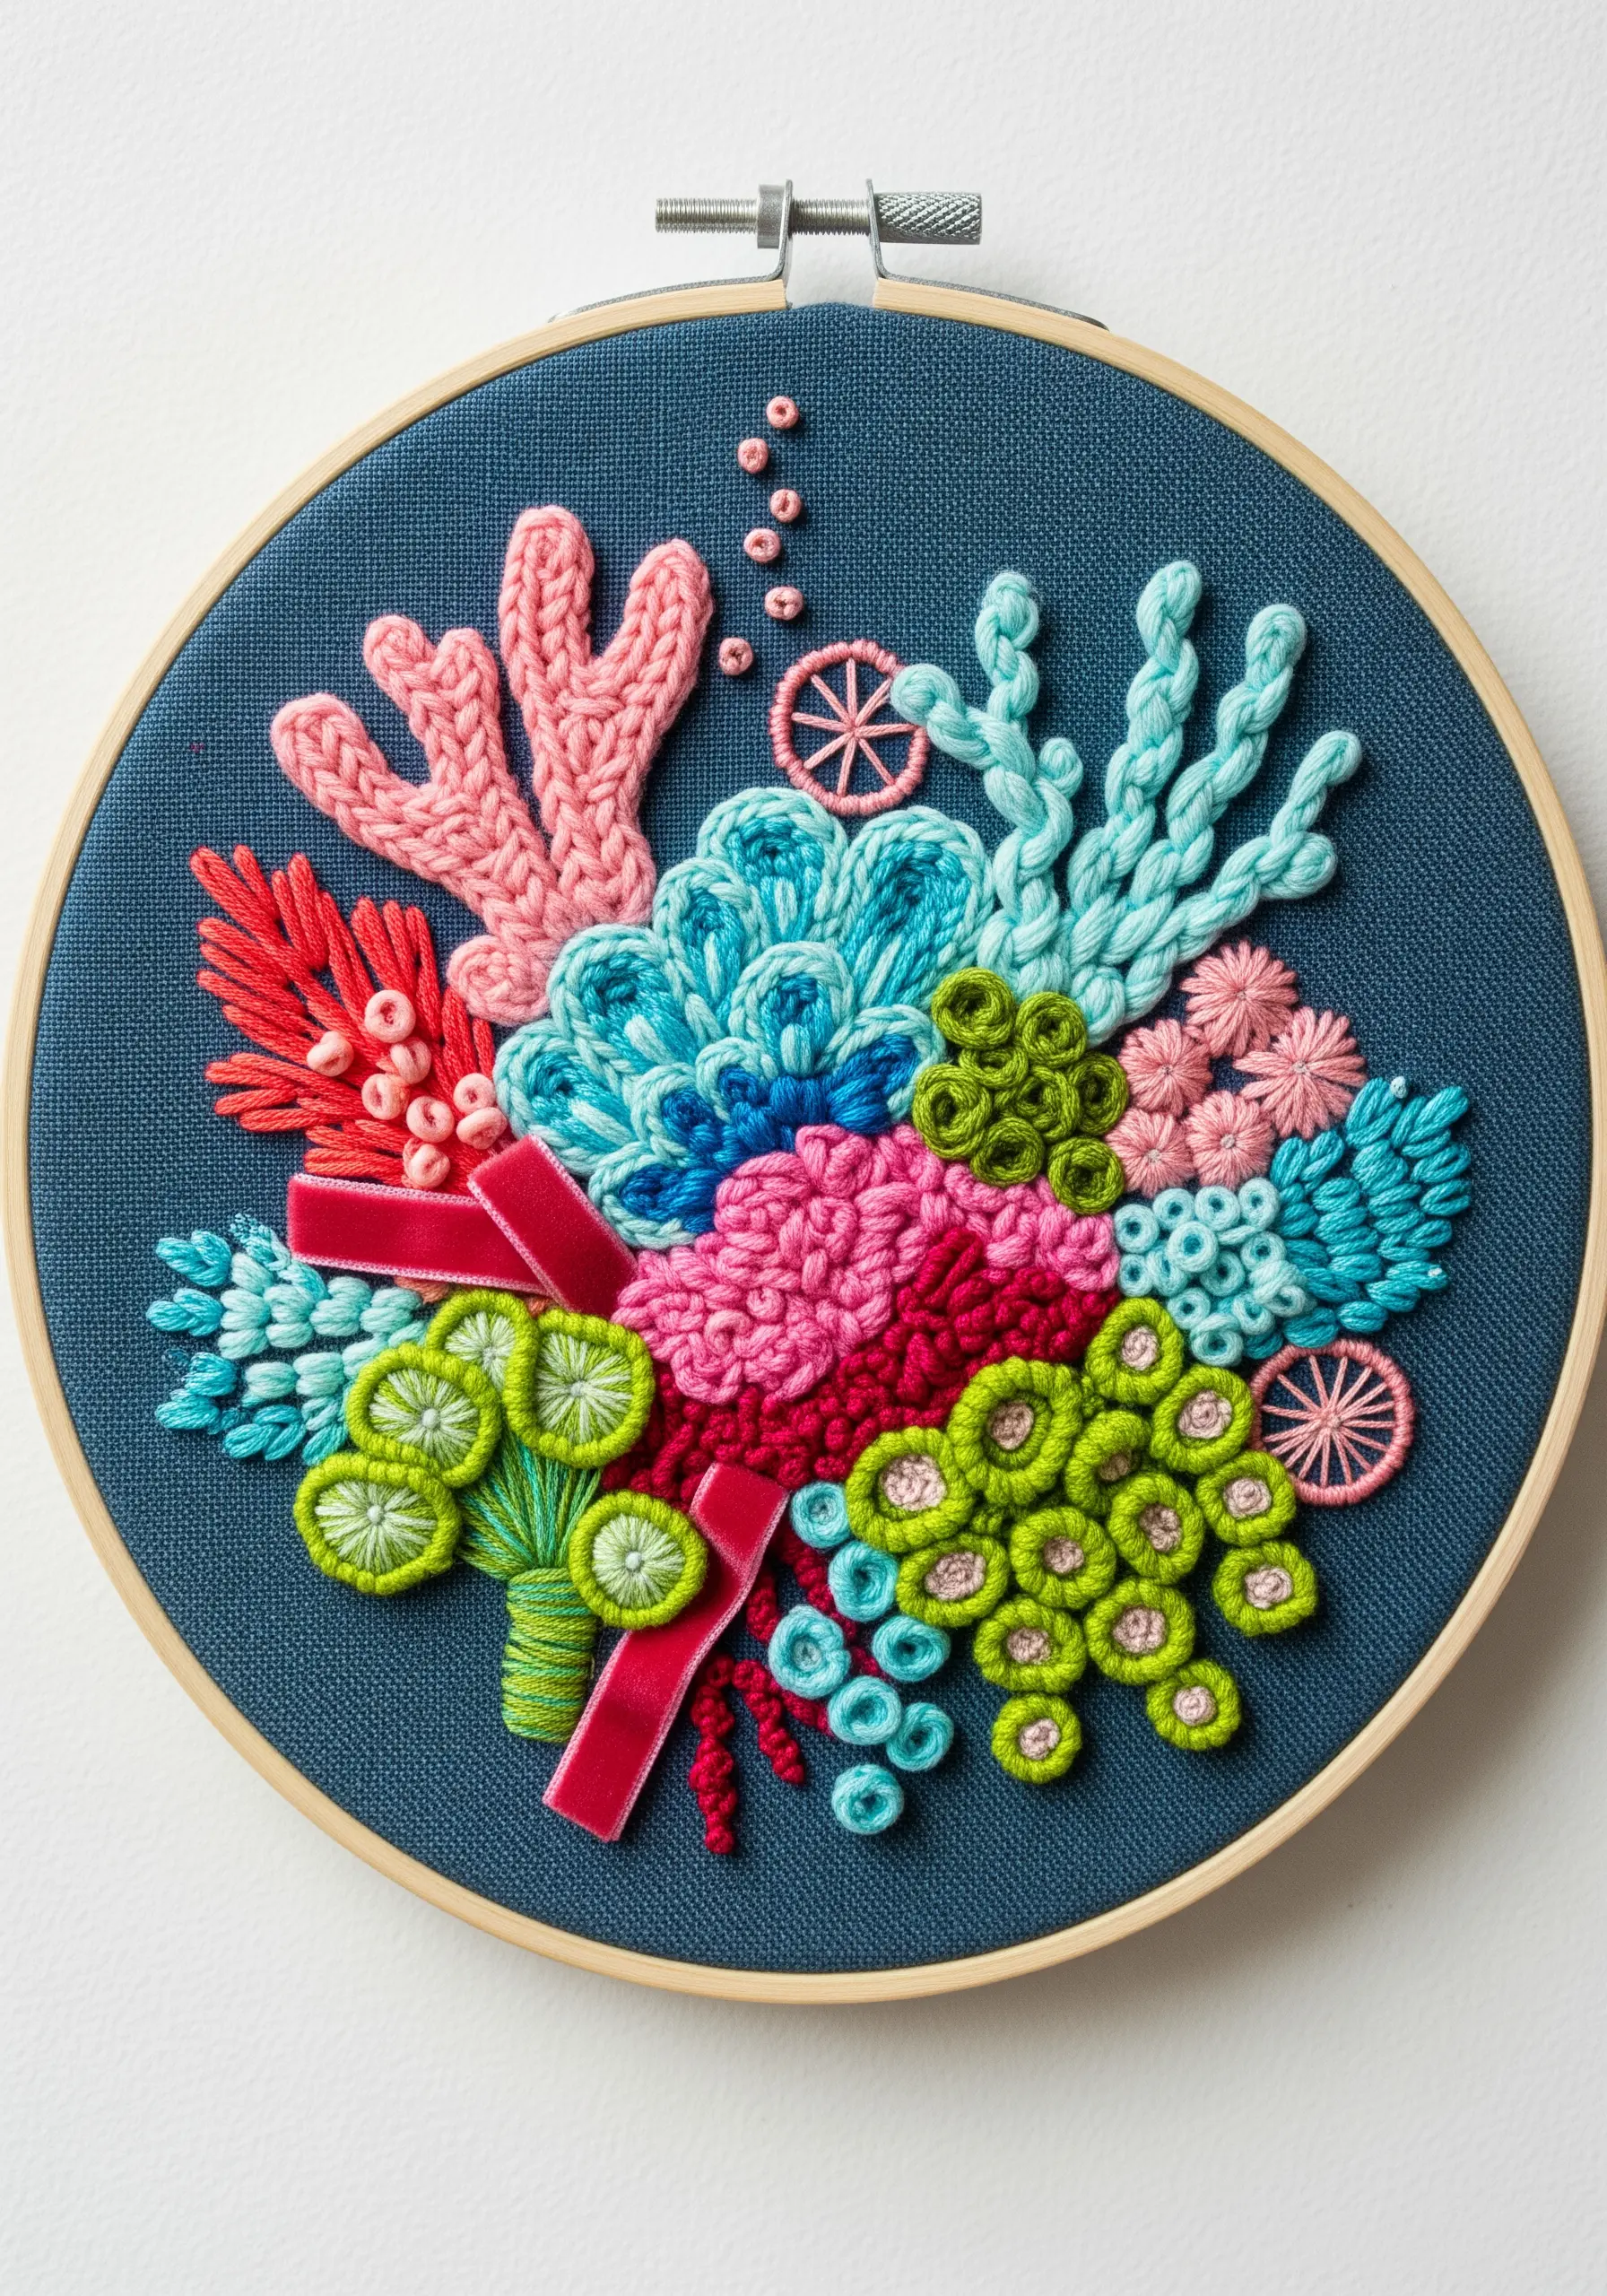
Go beyond flat embroidery and build a tactile, three-dimensional underwater world.
Use heavily textured stitches like the cast-on stitch and bullion knot to create coral shapes that rise significantly from the fabric surface.
Incorporate different materials, like velvet ribbon for sea anemones and chunky yarn for brain coral, to add varied textures and sheens.
This project is an excellent sampler for exploring how different stitches and fibers can mimic organic forms, pushing your skills in nature texture embroidery.
17. Achieve Realism in Pet Portraits
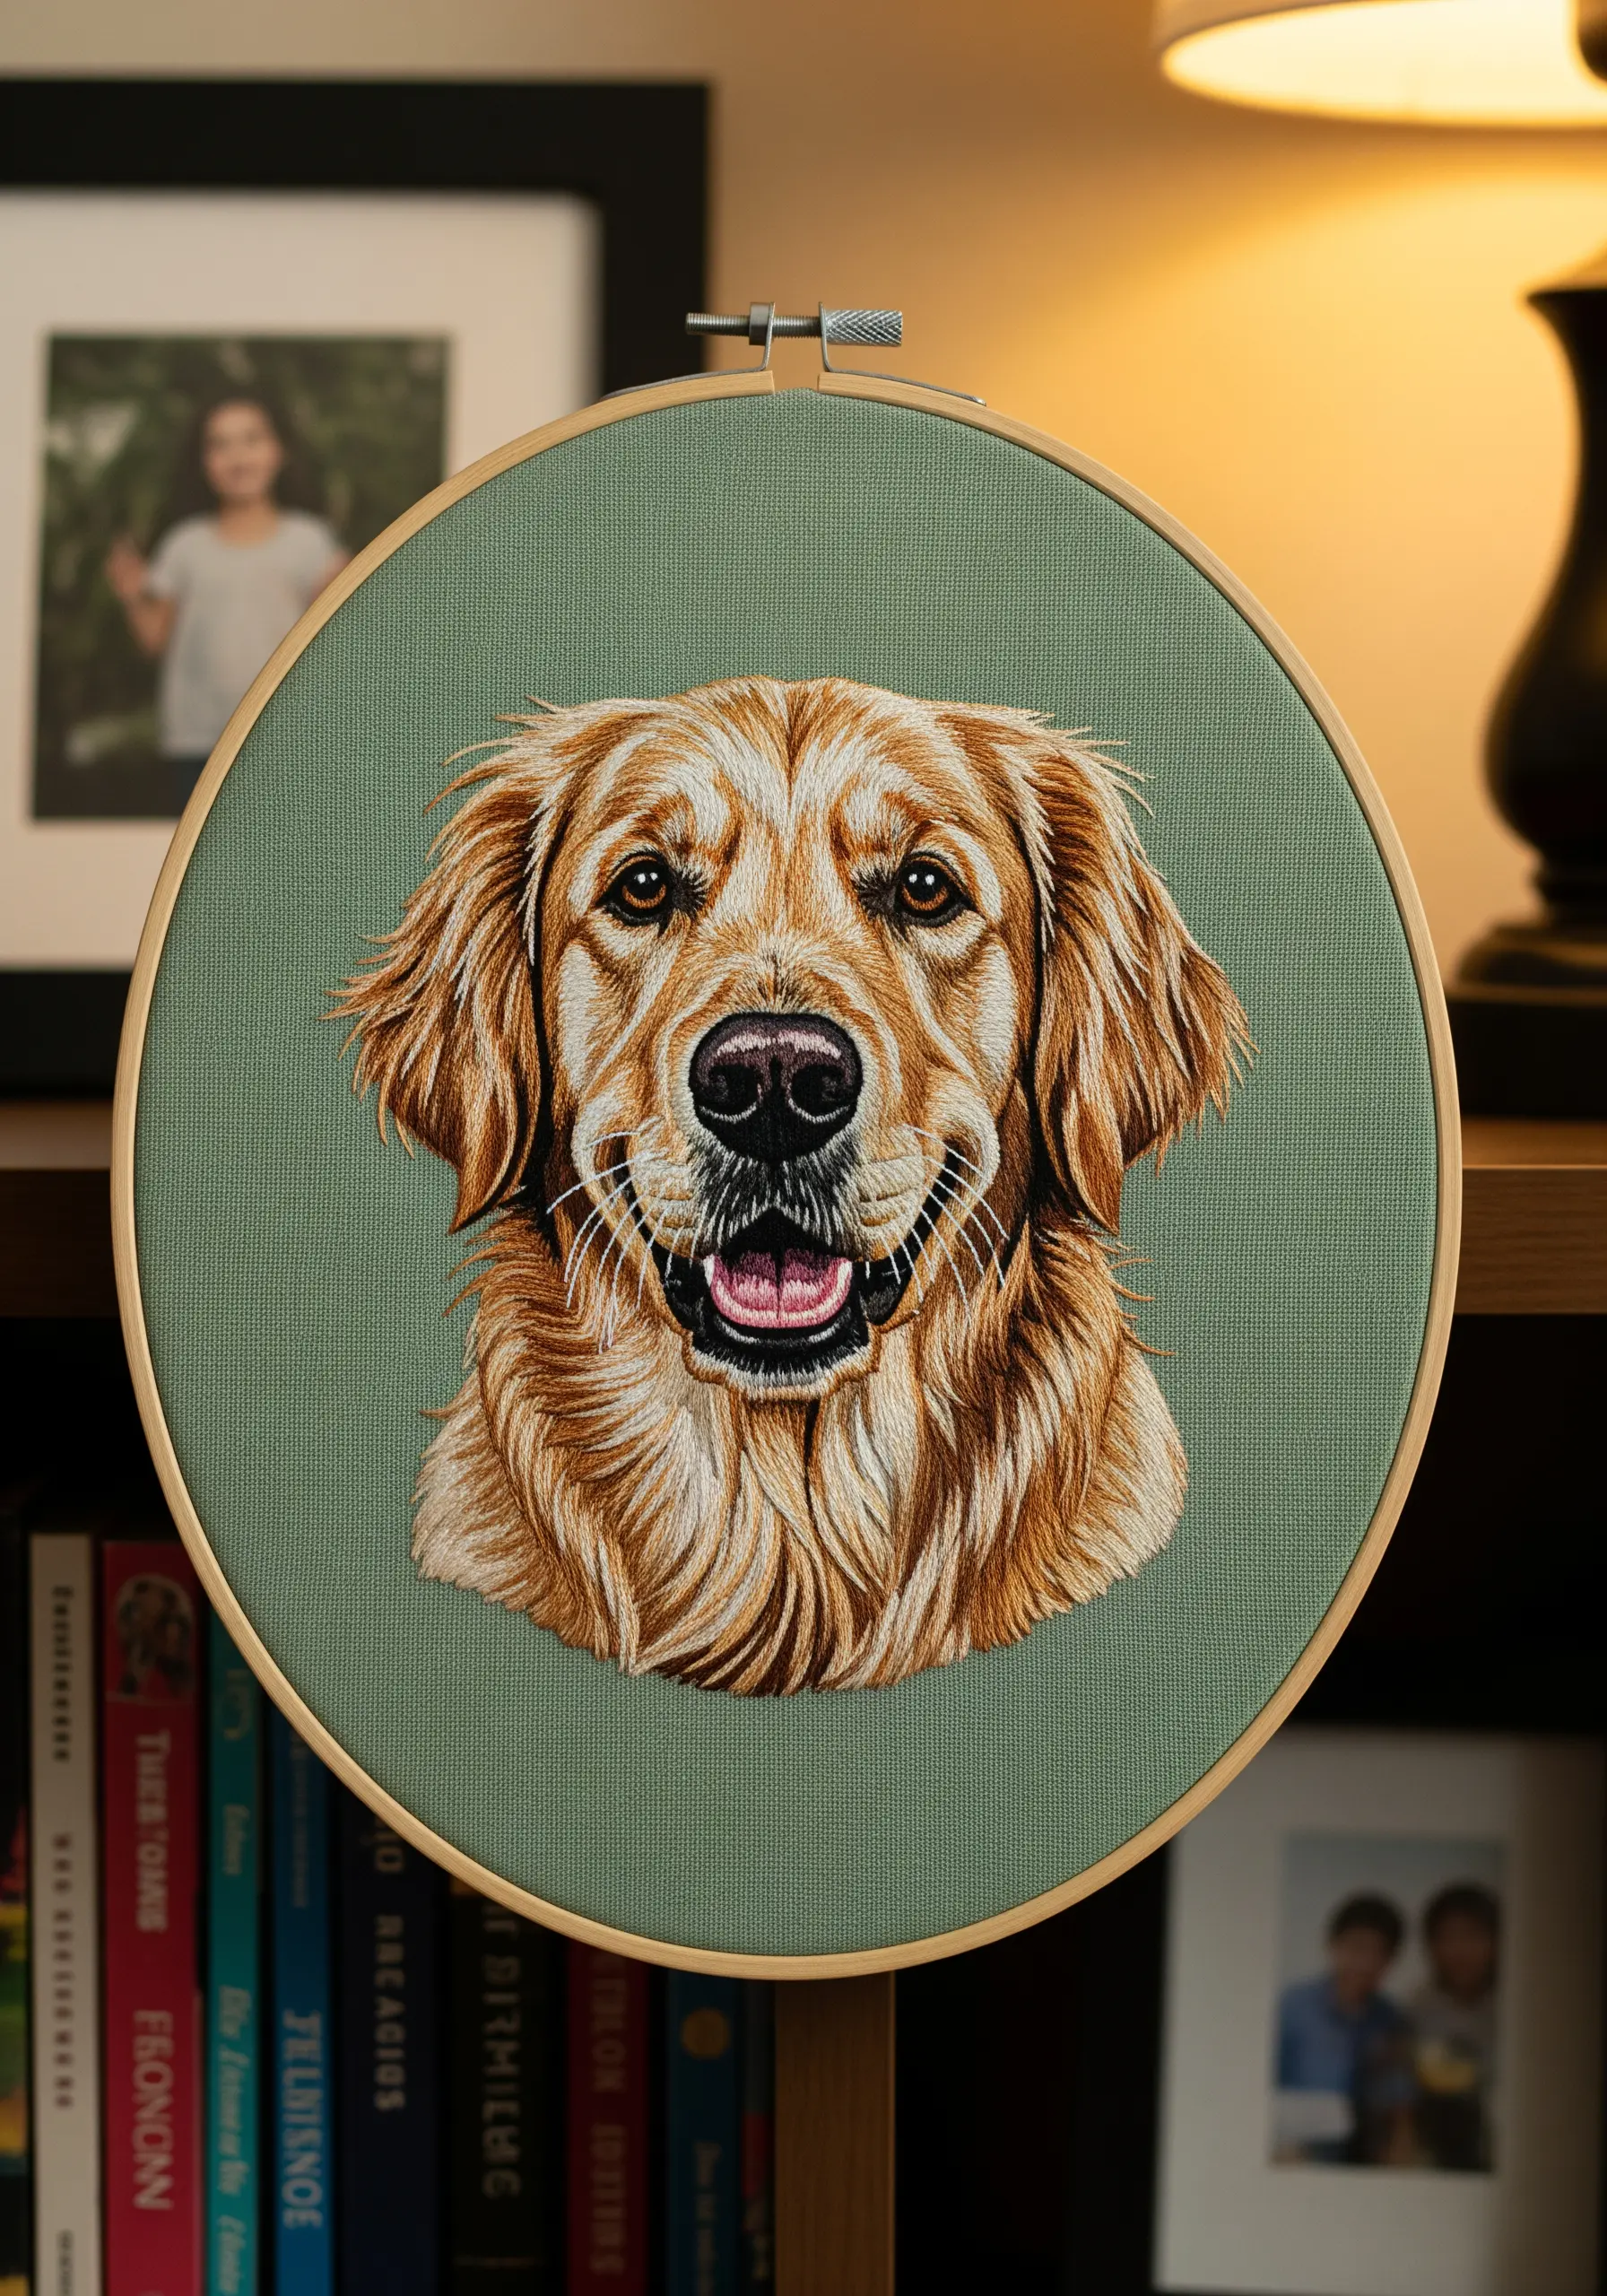
Capturing the essence of a pet in thread is all about understanding the direction of fur growth.
Work from a clear photograph and map out the direction of the fur with a disappearing ink pen before you begin.
Use single strands of floss and the long-and-short stitch, layering your stitches just as fur grows. This creates a soft, blended effect without harsh lines.
Pay special attention to the eyes and nose; use a satin stitch with a glossy black or dark brown thread to give them a lifelike wetness. This is the secret behind minimal pet-themed line art stitches and realistic portraits alike.
18. Embroider a Skyline at Sunset
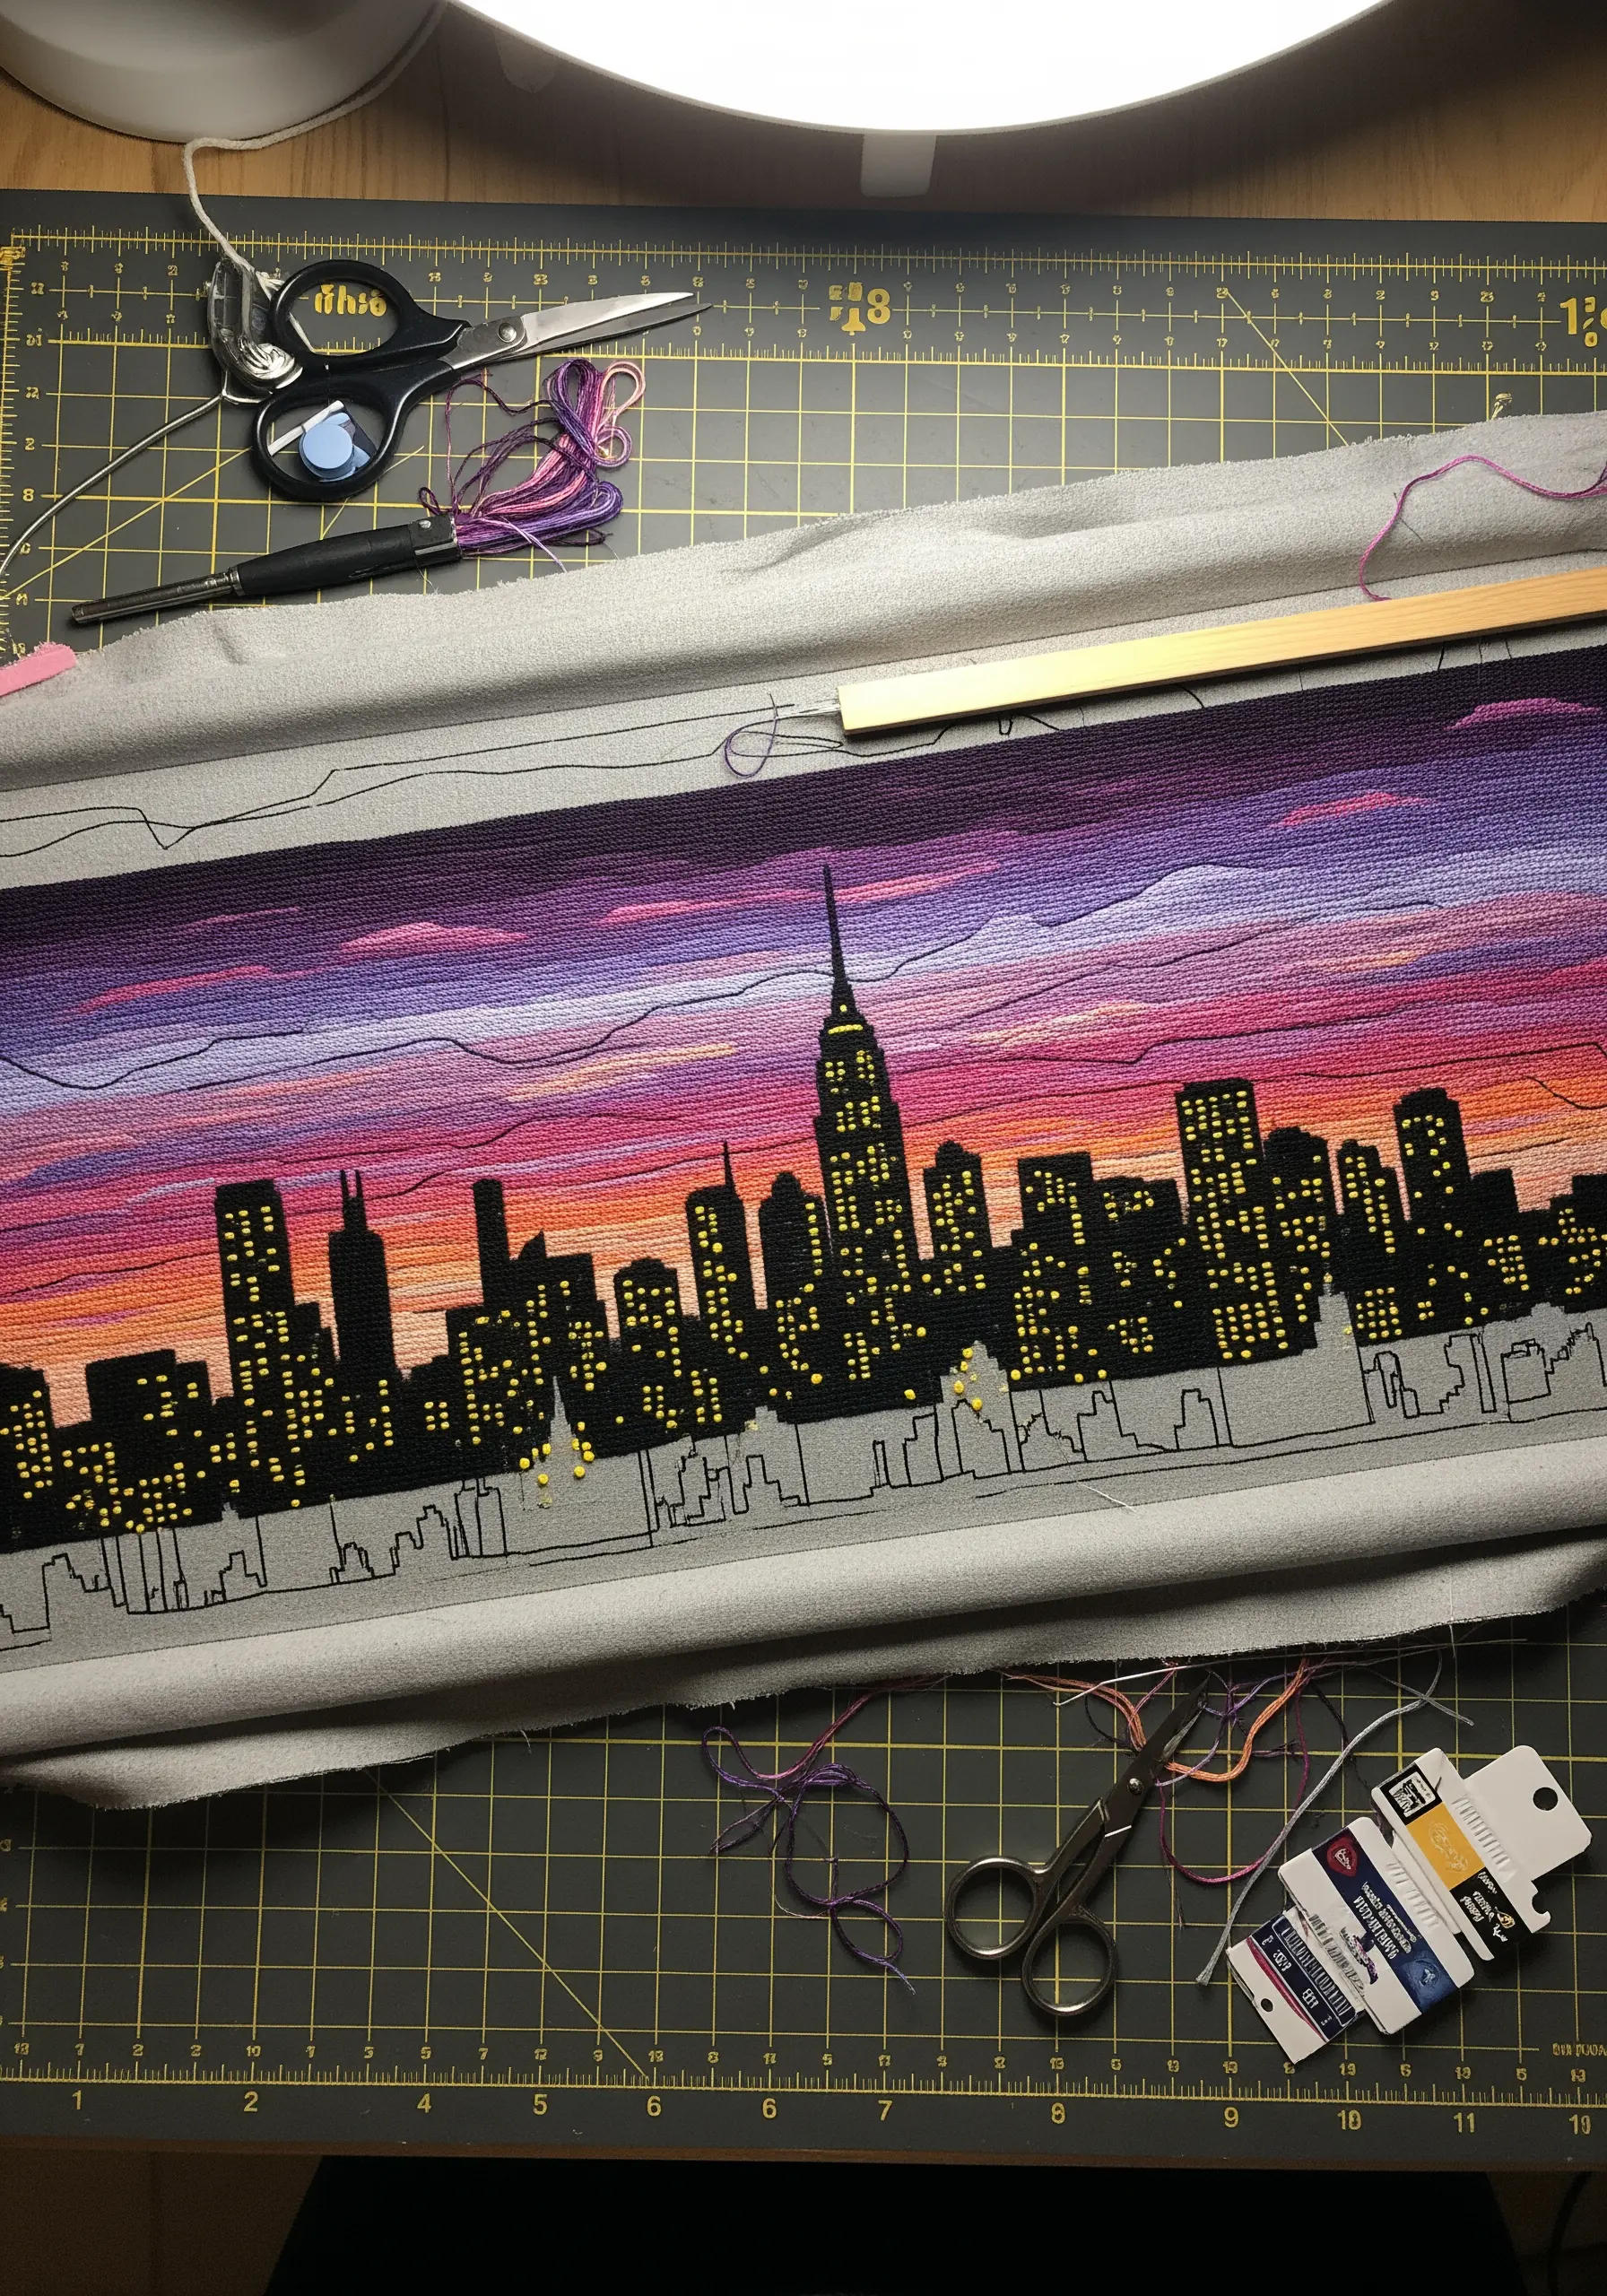
Recreate the beauty of a city sunset by blending a gradient sky and using negative space for light.
Use horizontal long-and-short stitches to blend shades of pink, purple, and orange for a smooth, painterly sky.
Fill in the building silhouettes with a solid, dark satin stitch for a stark contrast.
The most crucial detail is leaving small squares of the base fabric unstitched to represent illuminated windows. This simple technique brings the entire embroidered city skyline to life.
19. Design a Large-Scale Abstract Textile
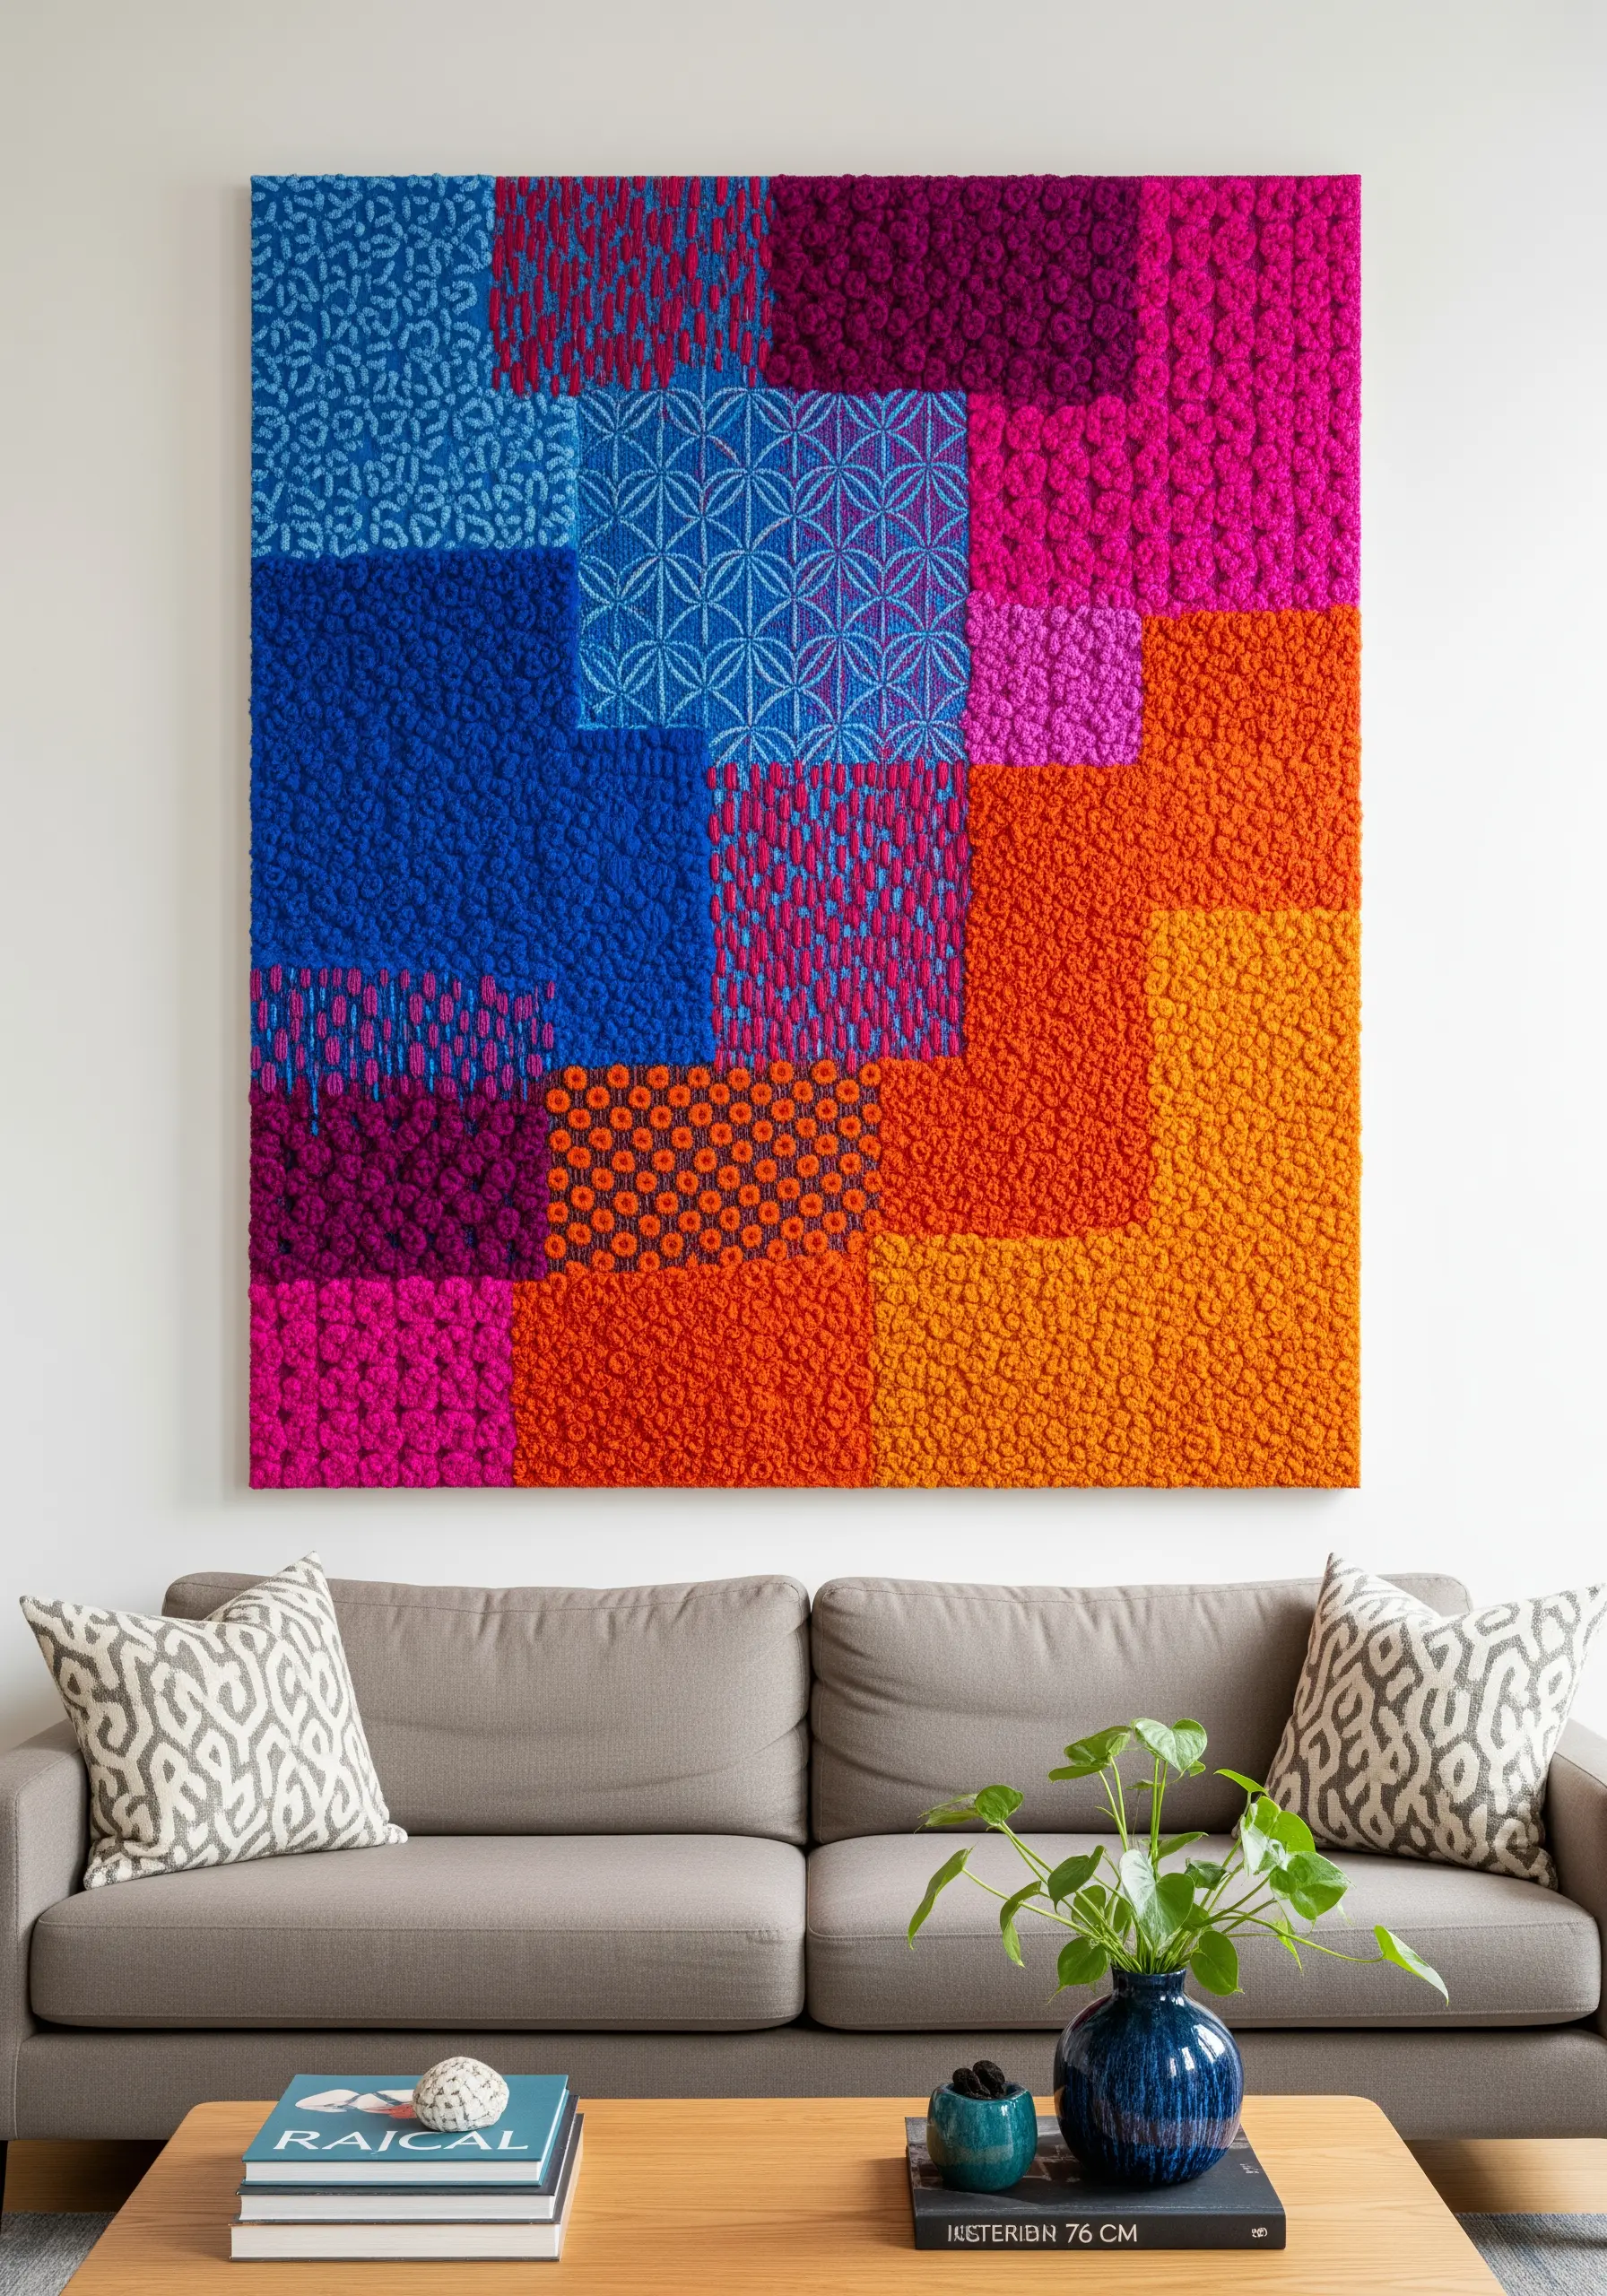
Create a major piece of wall art by treating fabric like a canvas for textural exploration.
Divide a large, stretched canvas or frame into a grid and fill each square with a different color and stitch.
Experiment with dense French knots, punch needle loops, turkey work, and woven patterns to build a highly tactile, dimensional surface.
This approach allows you to play with color theory and texture on a grand scale, resulting in fiber art installations that have the presence of a modern painting.


