

A simple tote bag holds more than just your daily essentials—it holds the potential to be a walking canvas, a small garden you can carry with you. Before you thread your needle, I want you to reconsider the fabric not as a surface to be covered, but as a space to cultivate intention and beauty.
Each idea that follows is more than a pattern; it’s a lesson in technique. It’s about understanding why a padded satin stitch gives a petal life, or how the direction of a single line can create the illusion of movement. It’s about making choices that elevate your work from a craft project to a piece of personal art.
You don’t need dozens of complicated stitches or a massive collection of threads. You only need to learn how to use a few simple techniques with purpose. Let’s transform that plain canvas, stitch by intentional stitch.
1. Render Delicate Lavender with Textured Stitches
Instead of simple satin stitches for lavender buds, use the granitos stitch or tiny, detached chain stitches to create a plump, three-dimensional effect.
Work with two or three closely related shades of purple, alternating them randomly to give the flowers natural depth and variation.
For the stems, a fine whipped backstitch using a single strand of green floss will provide a smooth, clean line that contrasts beautifully with the textured buds.
This combination of textures makes the simple motif look instantly more refined and lifelike.
2. Paint with Thread for a Hyper-Realistic Sunflower
Achieve a painterly effect on sunflower petals by mastering the long-and-short stitch.
Use at least three shades of yellow and one of red-orange, blending them seamlessly to create highlights and shadows.
Direct your stitches to follow the natural curve of each petal, converging toward the center to enhance the illusion of form.
For the sunflower’s center, build layers of French knots and seed stitches in dark brown, black, and deep green to create a dense, seed-like texture.
This gradient color technique transforms a flat design into a vibrant, dimensional statement piece.
3. Elevate Motifs with Padded Satin Stitch
To make the mushroom caps pop from the burlap surface, first create a padded base using layers of seed stitch or running stitch within the outline.
Cover this padding with smooth, vertical satin stitches, ensuring your thread tension is even to avoid puckering the coarse fabric.
The white spots are more effective as raised French knots rather than flat stitches, adding to the dimensionality.
Contrast the solid mushrooms with delicate, open-work fern stitches for the foliage, creating a dynamic play between dense and airy textures.
4. Define Shapes with Graphic Color Blocking
Create a bold, modern Monstera leaf by dividing it into sections and filling each with a different shade of green.
Use a split stitch to create a sharp, clean outline for each color-blocked section before filling it with satin stitch.
This outlining technique prevents colors from bleeding into one another and gives the design a crisp, graphic quality.
The high contrast between the vibrant greens and the black tote makes this design impactful, proving that you don’t always need complex shading for a stunning result.
5. Build Harmony with Symmetrical Floral Arrangements
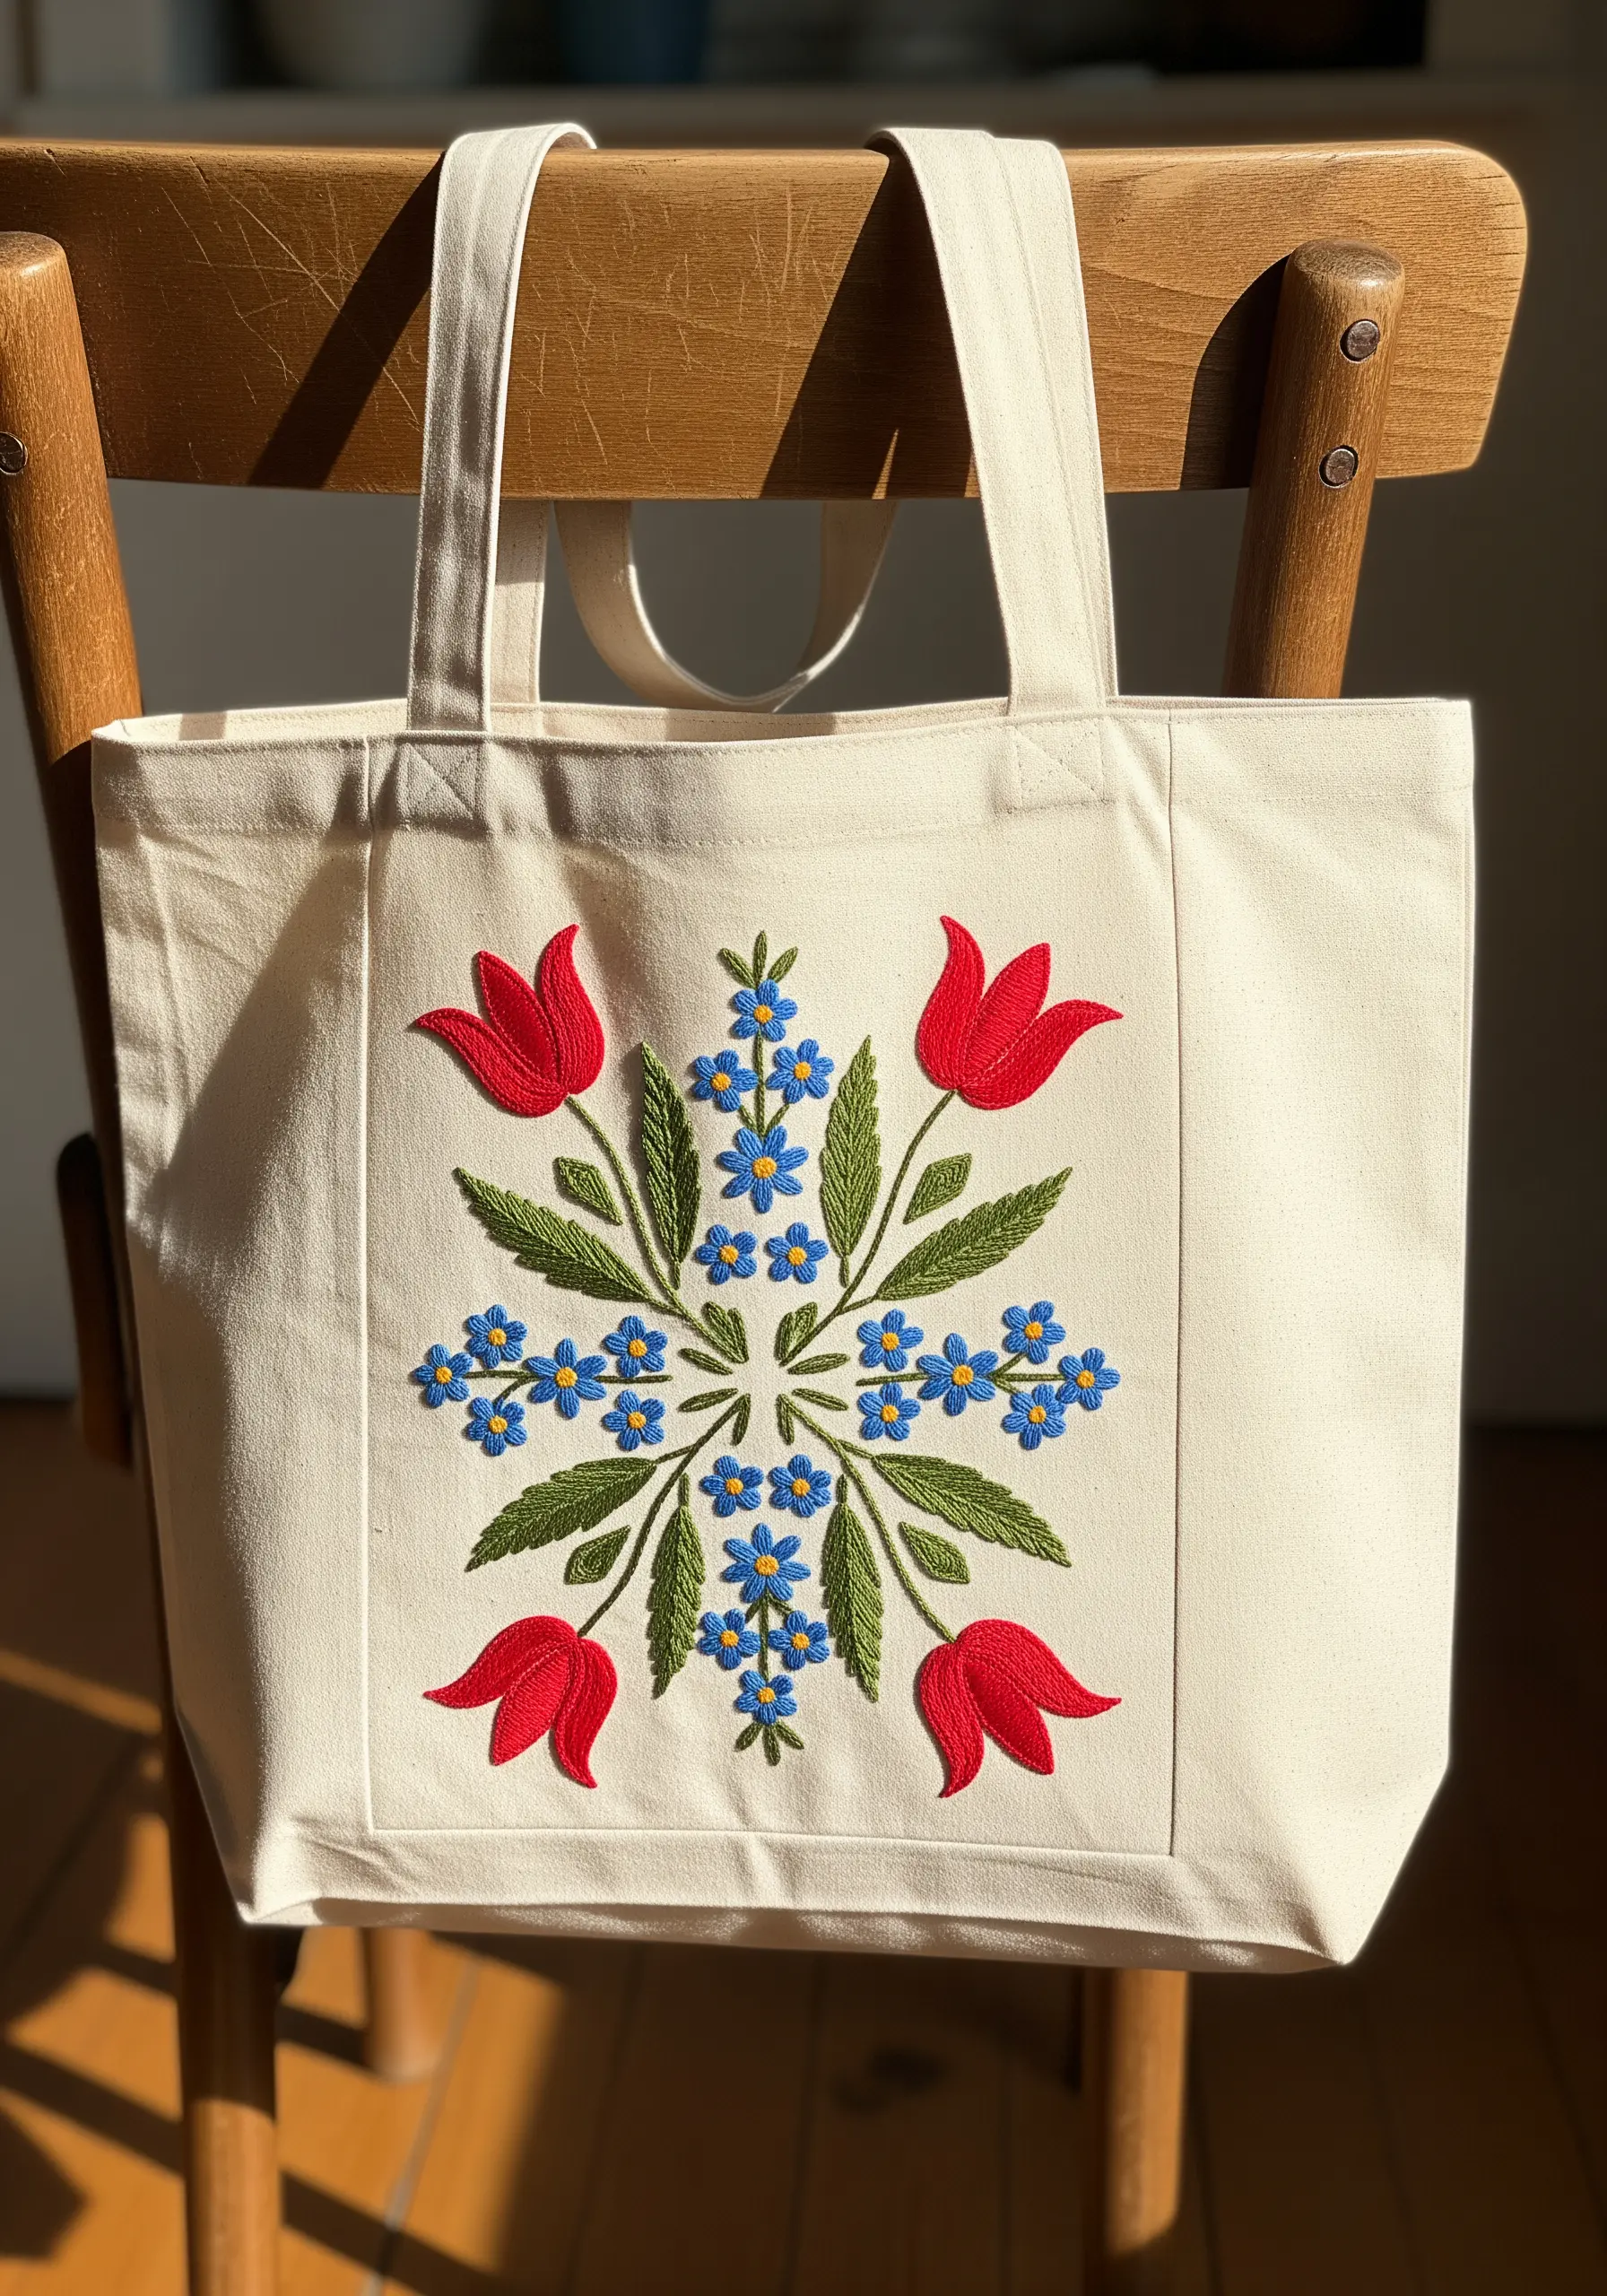
When composing a symmetrical design, anchor it with a central axis to ensure balance. Here, the central stem acts as the mirror line.
Use a consistent stitch for each type of flower—like satin stitch for the tulips and French knots for the forget-me-nots—to create a readable, cohesive pattern.
The repetition of shapes and colors on either side of the central axis is visually calming and gives the tote a classic, polished look.
This approach to composition turns a simple bouquet into an elegant, folk-art-inspired medallion.
6. Extend Embroidery Beyond the Expected Surface
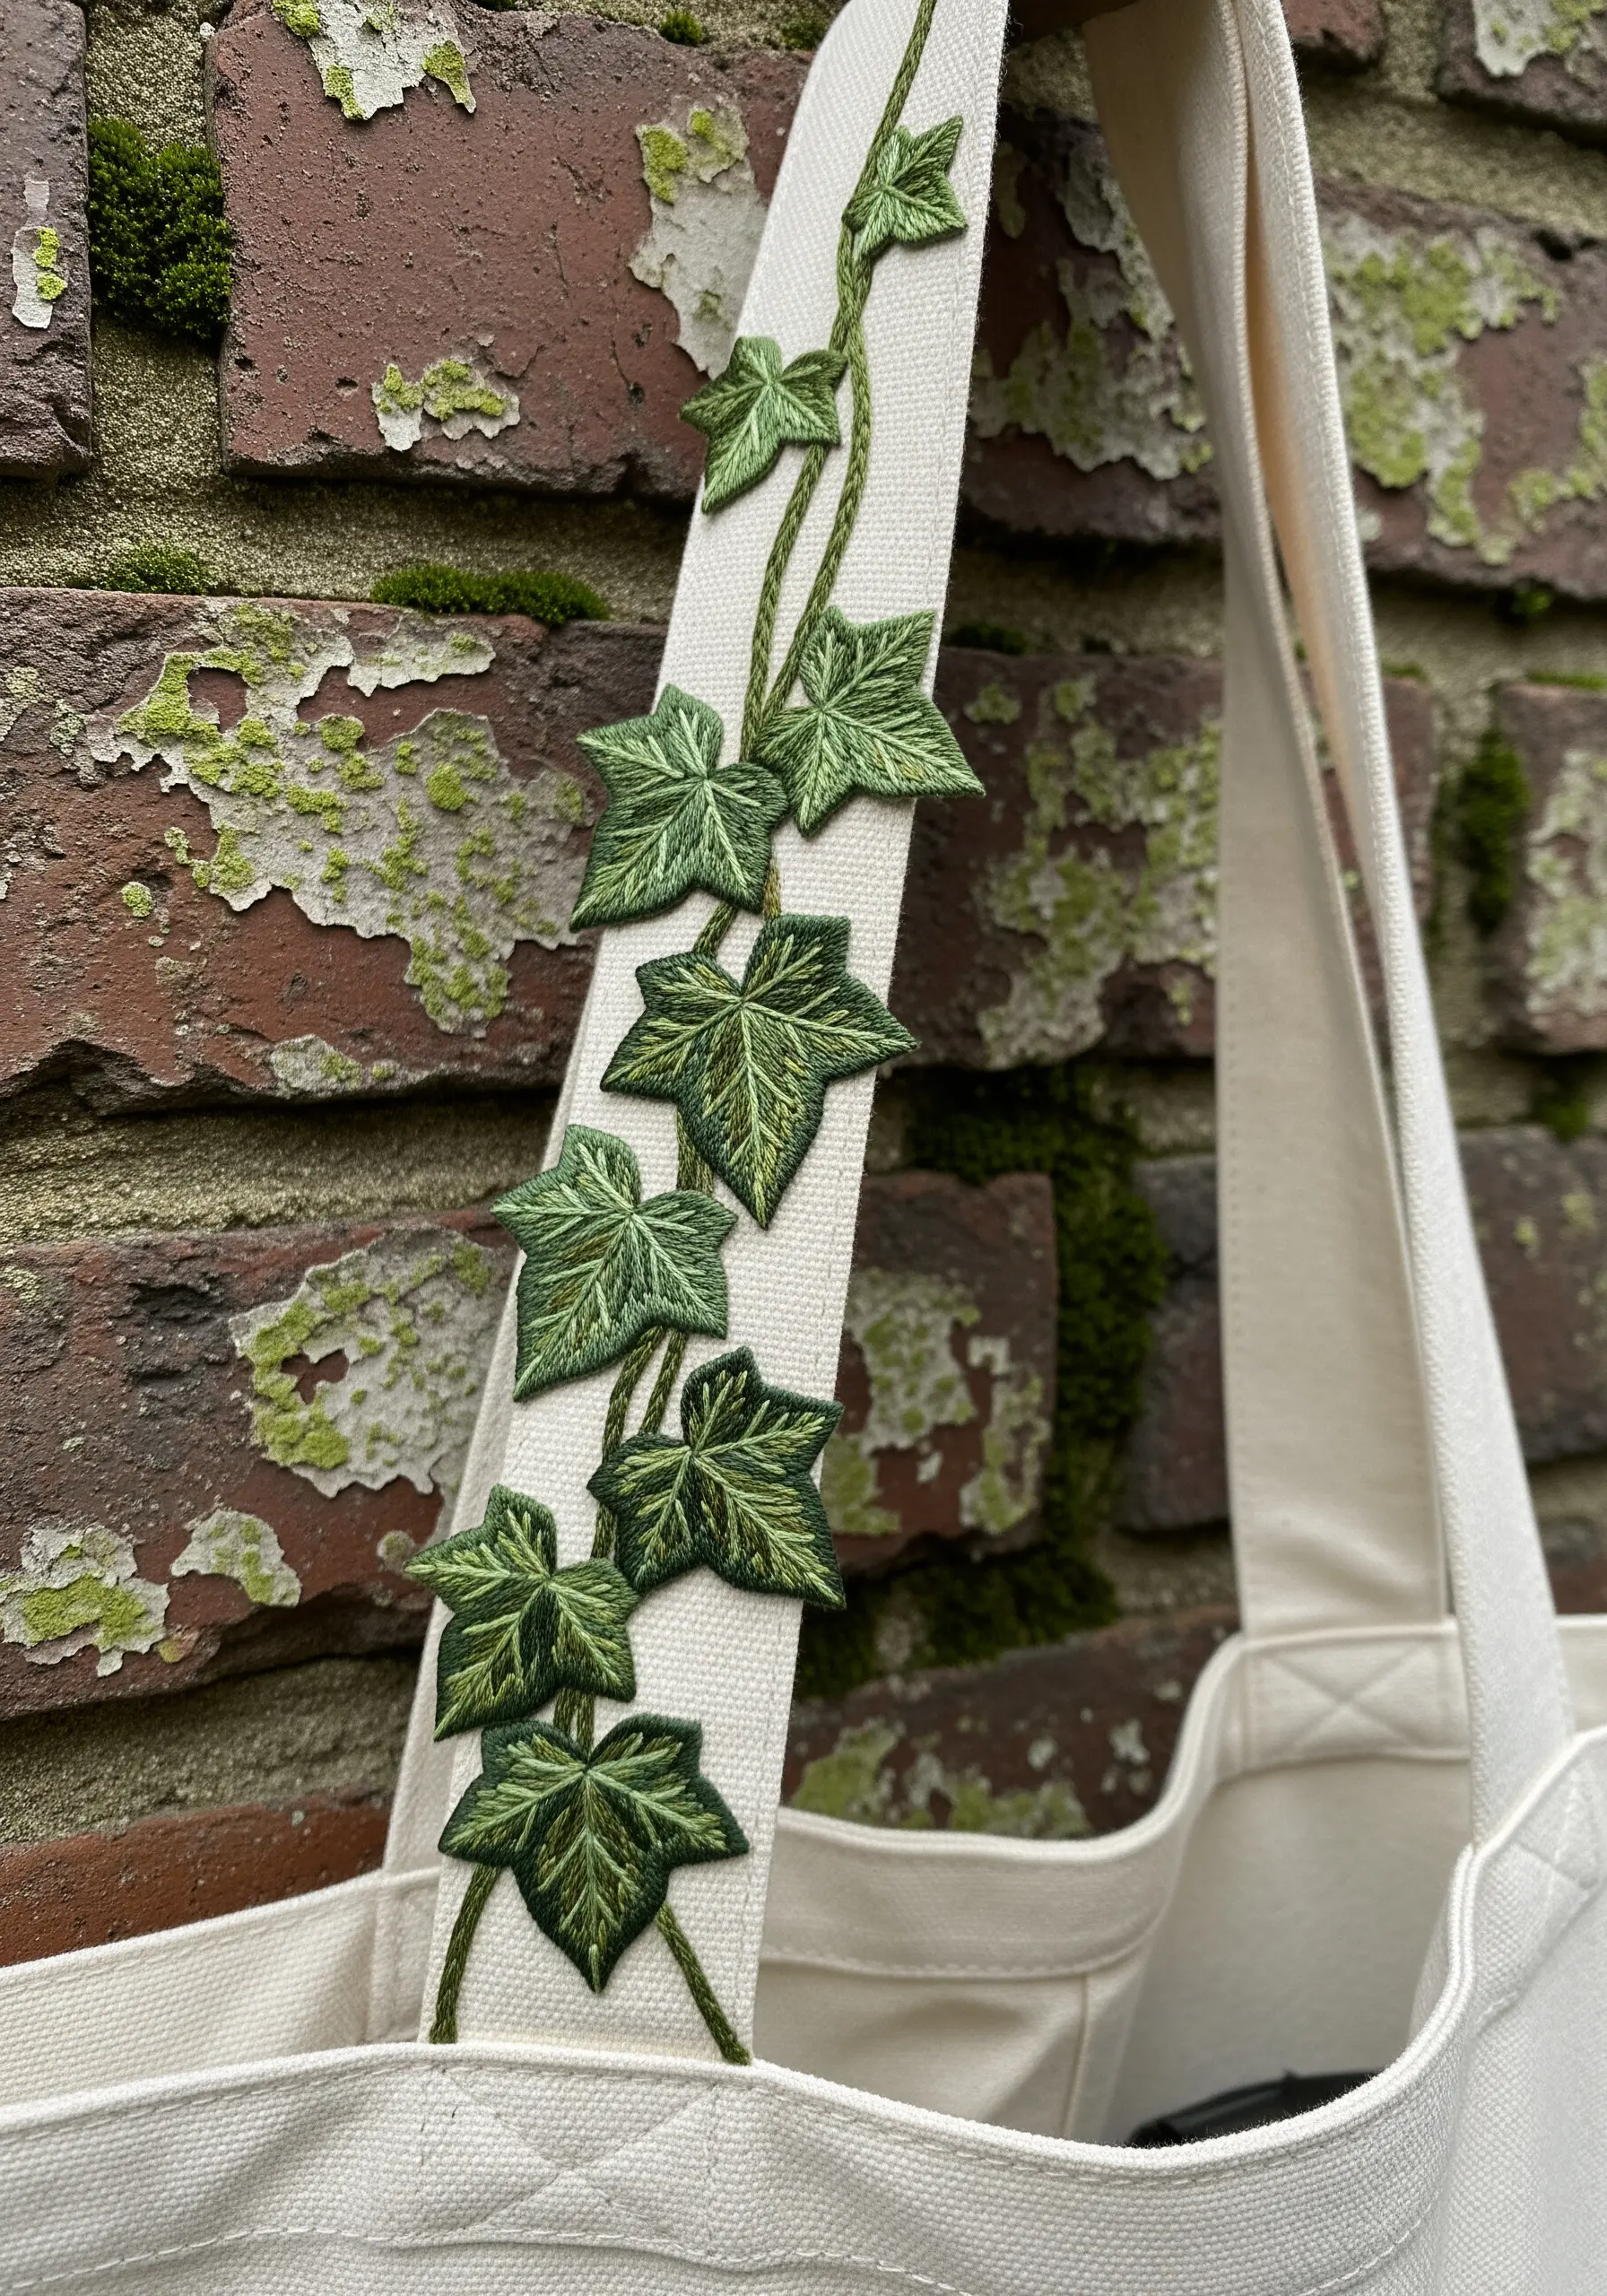
Carry your botanical design onto the tote bag’s handle for an unexpected, custom detail that elevates the entire piece.
Create individual ivy leaves using a stumpwork technique: stitch them on a separate piece of fabric with a stabilizer, then cut them out and applique them onto the handle.
Connect the leaves with a couched vine made from thicker green yarn or multiple strands of floss. Couching—tacking down a thicker thread with smaller stitches—is perfect for creating smooth, curved lines on uneven surfaces like a strap.
7. Capture Delicacy and Movement with Open Stitches

To create the ethereal quality of a dandelion seed head, use straight stitches radiating from a central point, but leave plenty of negative space.
The key is varying the length and density of the stitches; shorter, denser stitches near the core suggest fullness, while longer, sparser stitches create a fluffy edge.
For the floating seeds, a single lazy daisy stitch for the parachute and a straight stitch for the stem is all you need to convey lightness and motion.
Using a fine, single-strand thread enhances this delicate effect.
8. Use Variegated Thread for Effortless Color Blending
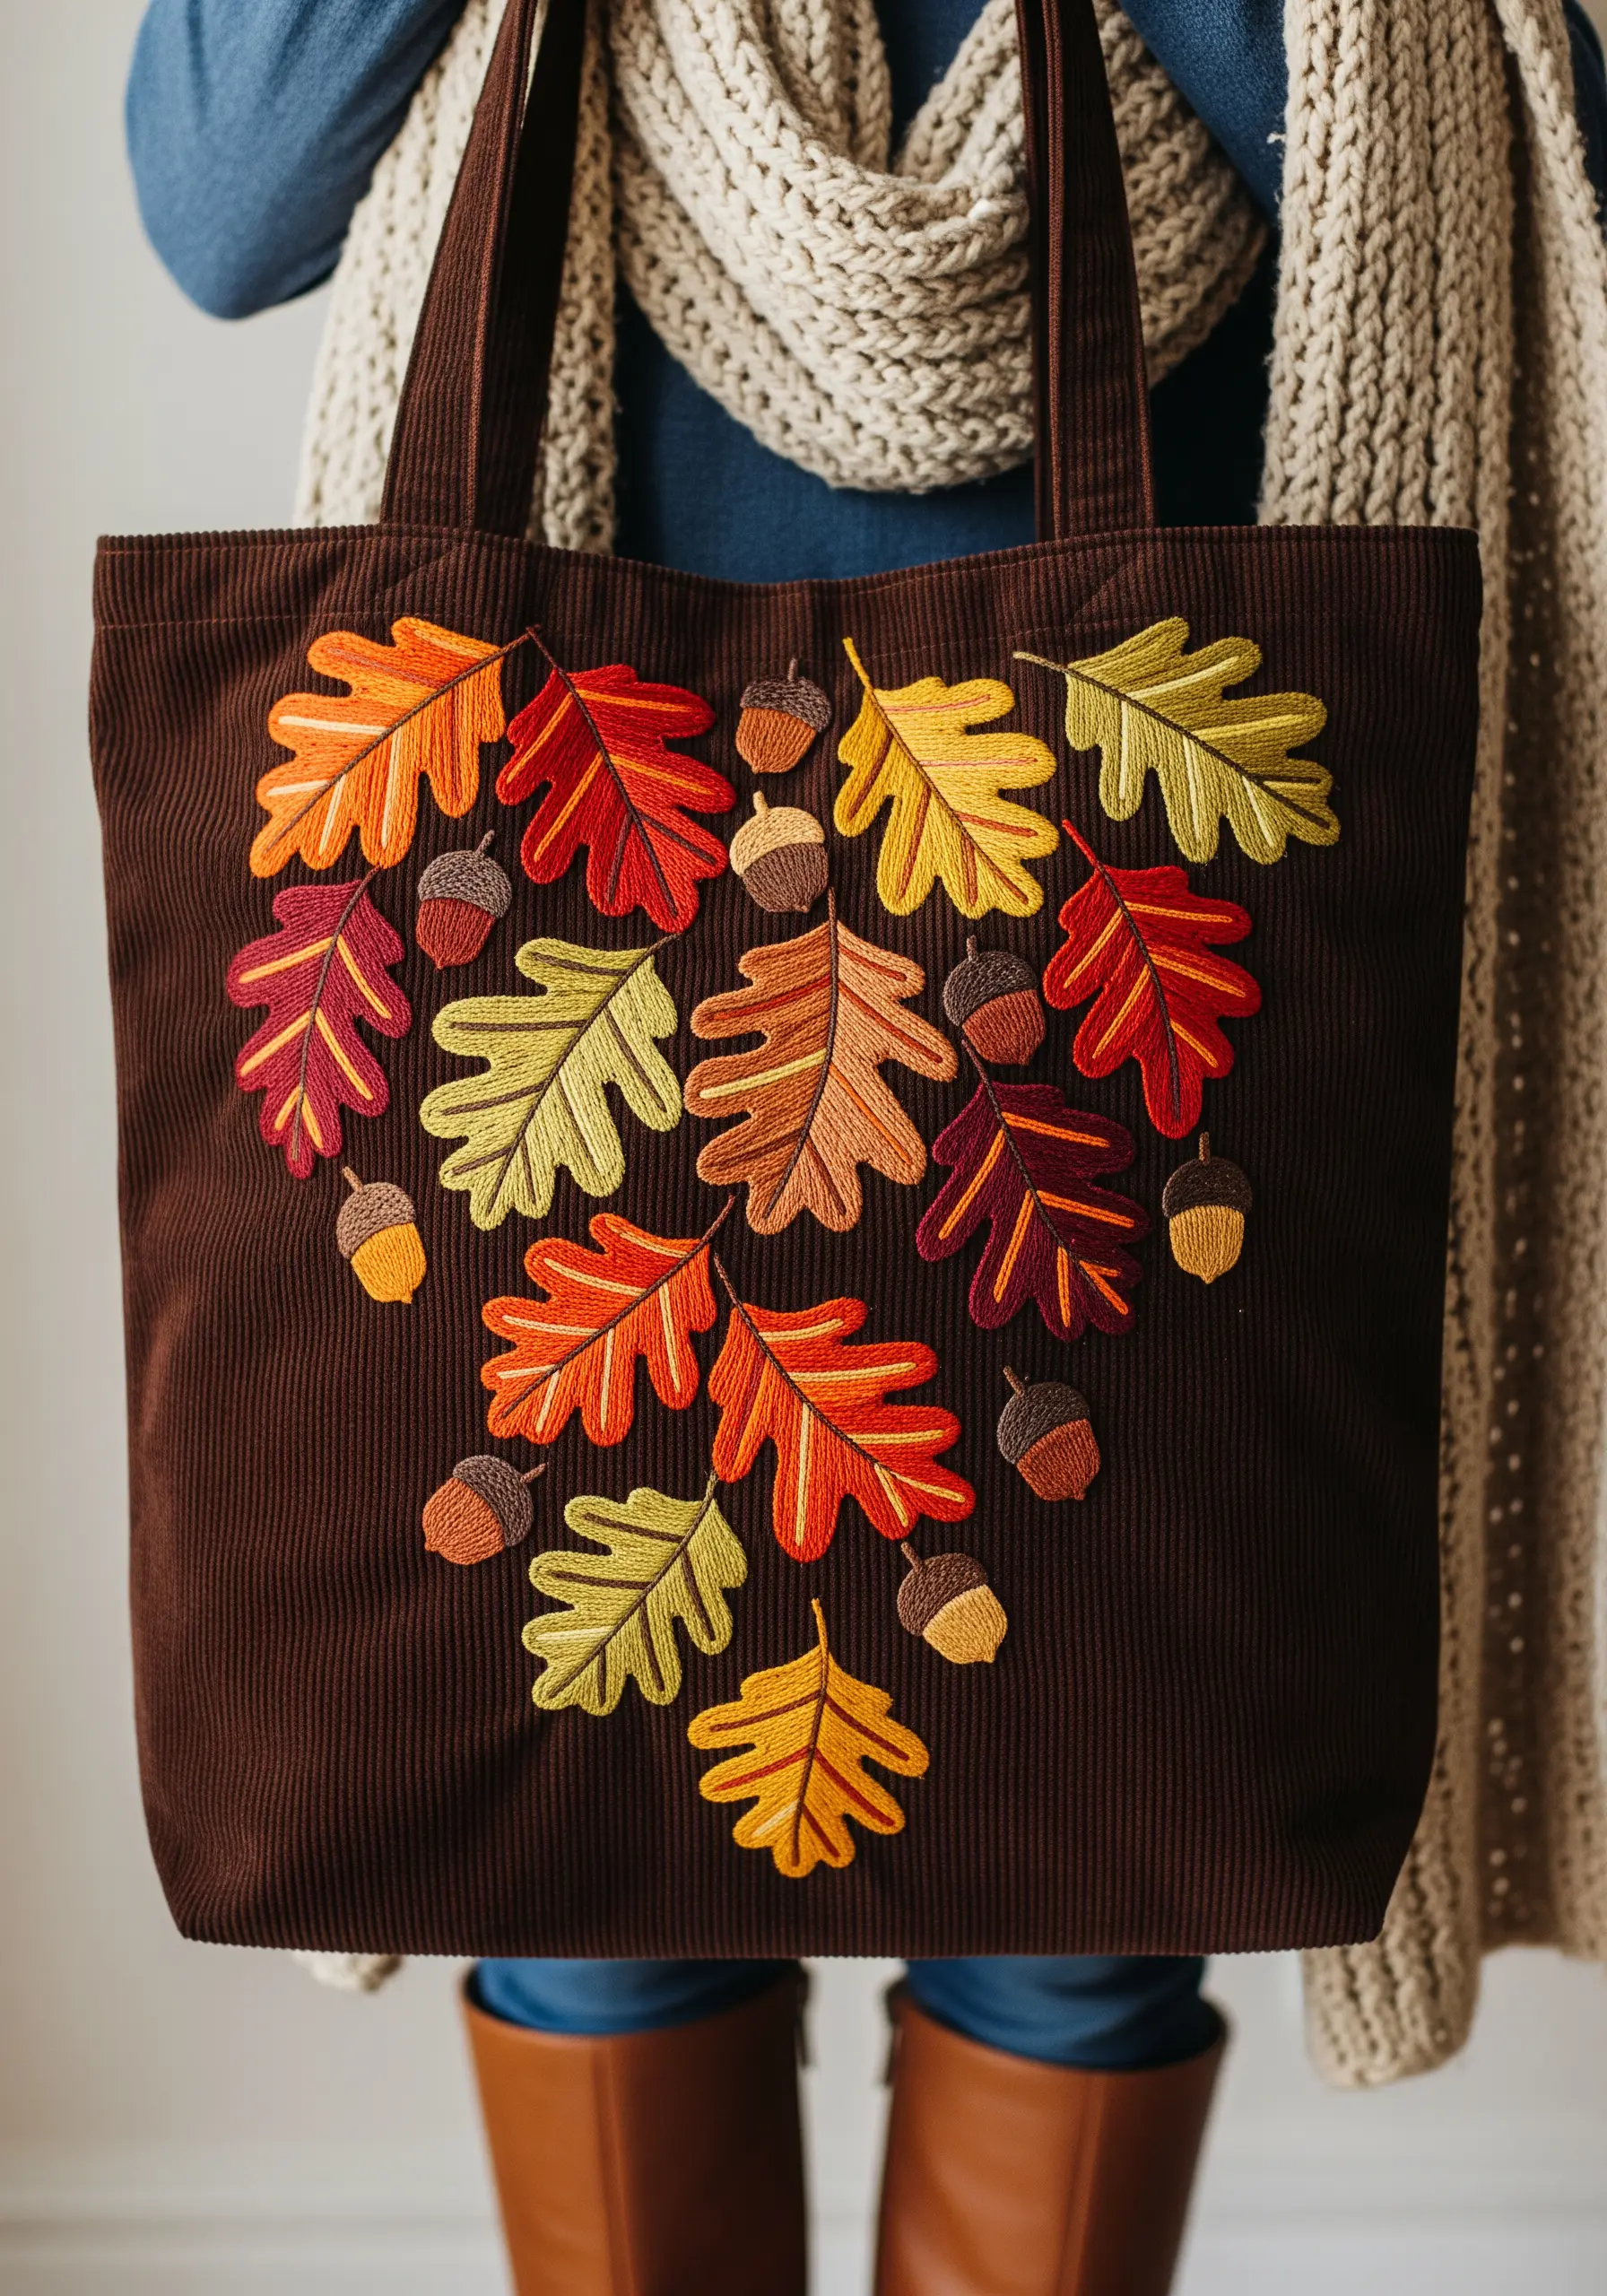
For motifs like autumn leaves, variegated floss is a brilliant shortcut to achieving natural color transitions without changing your thread.
Fill each leaf with a simple fishbone stitch. This stitch creates a central vein and angled sides, and it allows the thread’s color changes to flow organically across the leaf.
Arrange the leaves in a scattered, overlapping pattern to enhance the feeling of a crisp autumn day.
Pairing these multi-tonal leaves with solid-colored acorns, stitched in satin stitch, provides a point of visual rest and contrast.
9. Combine Celestial and Botanical Themes
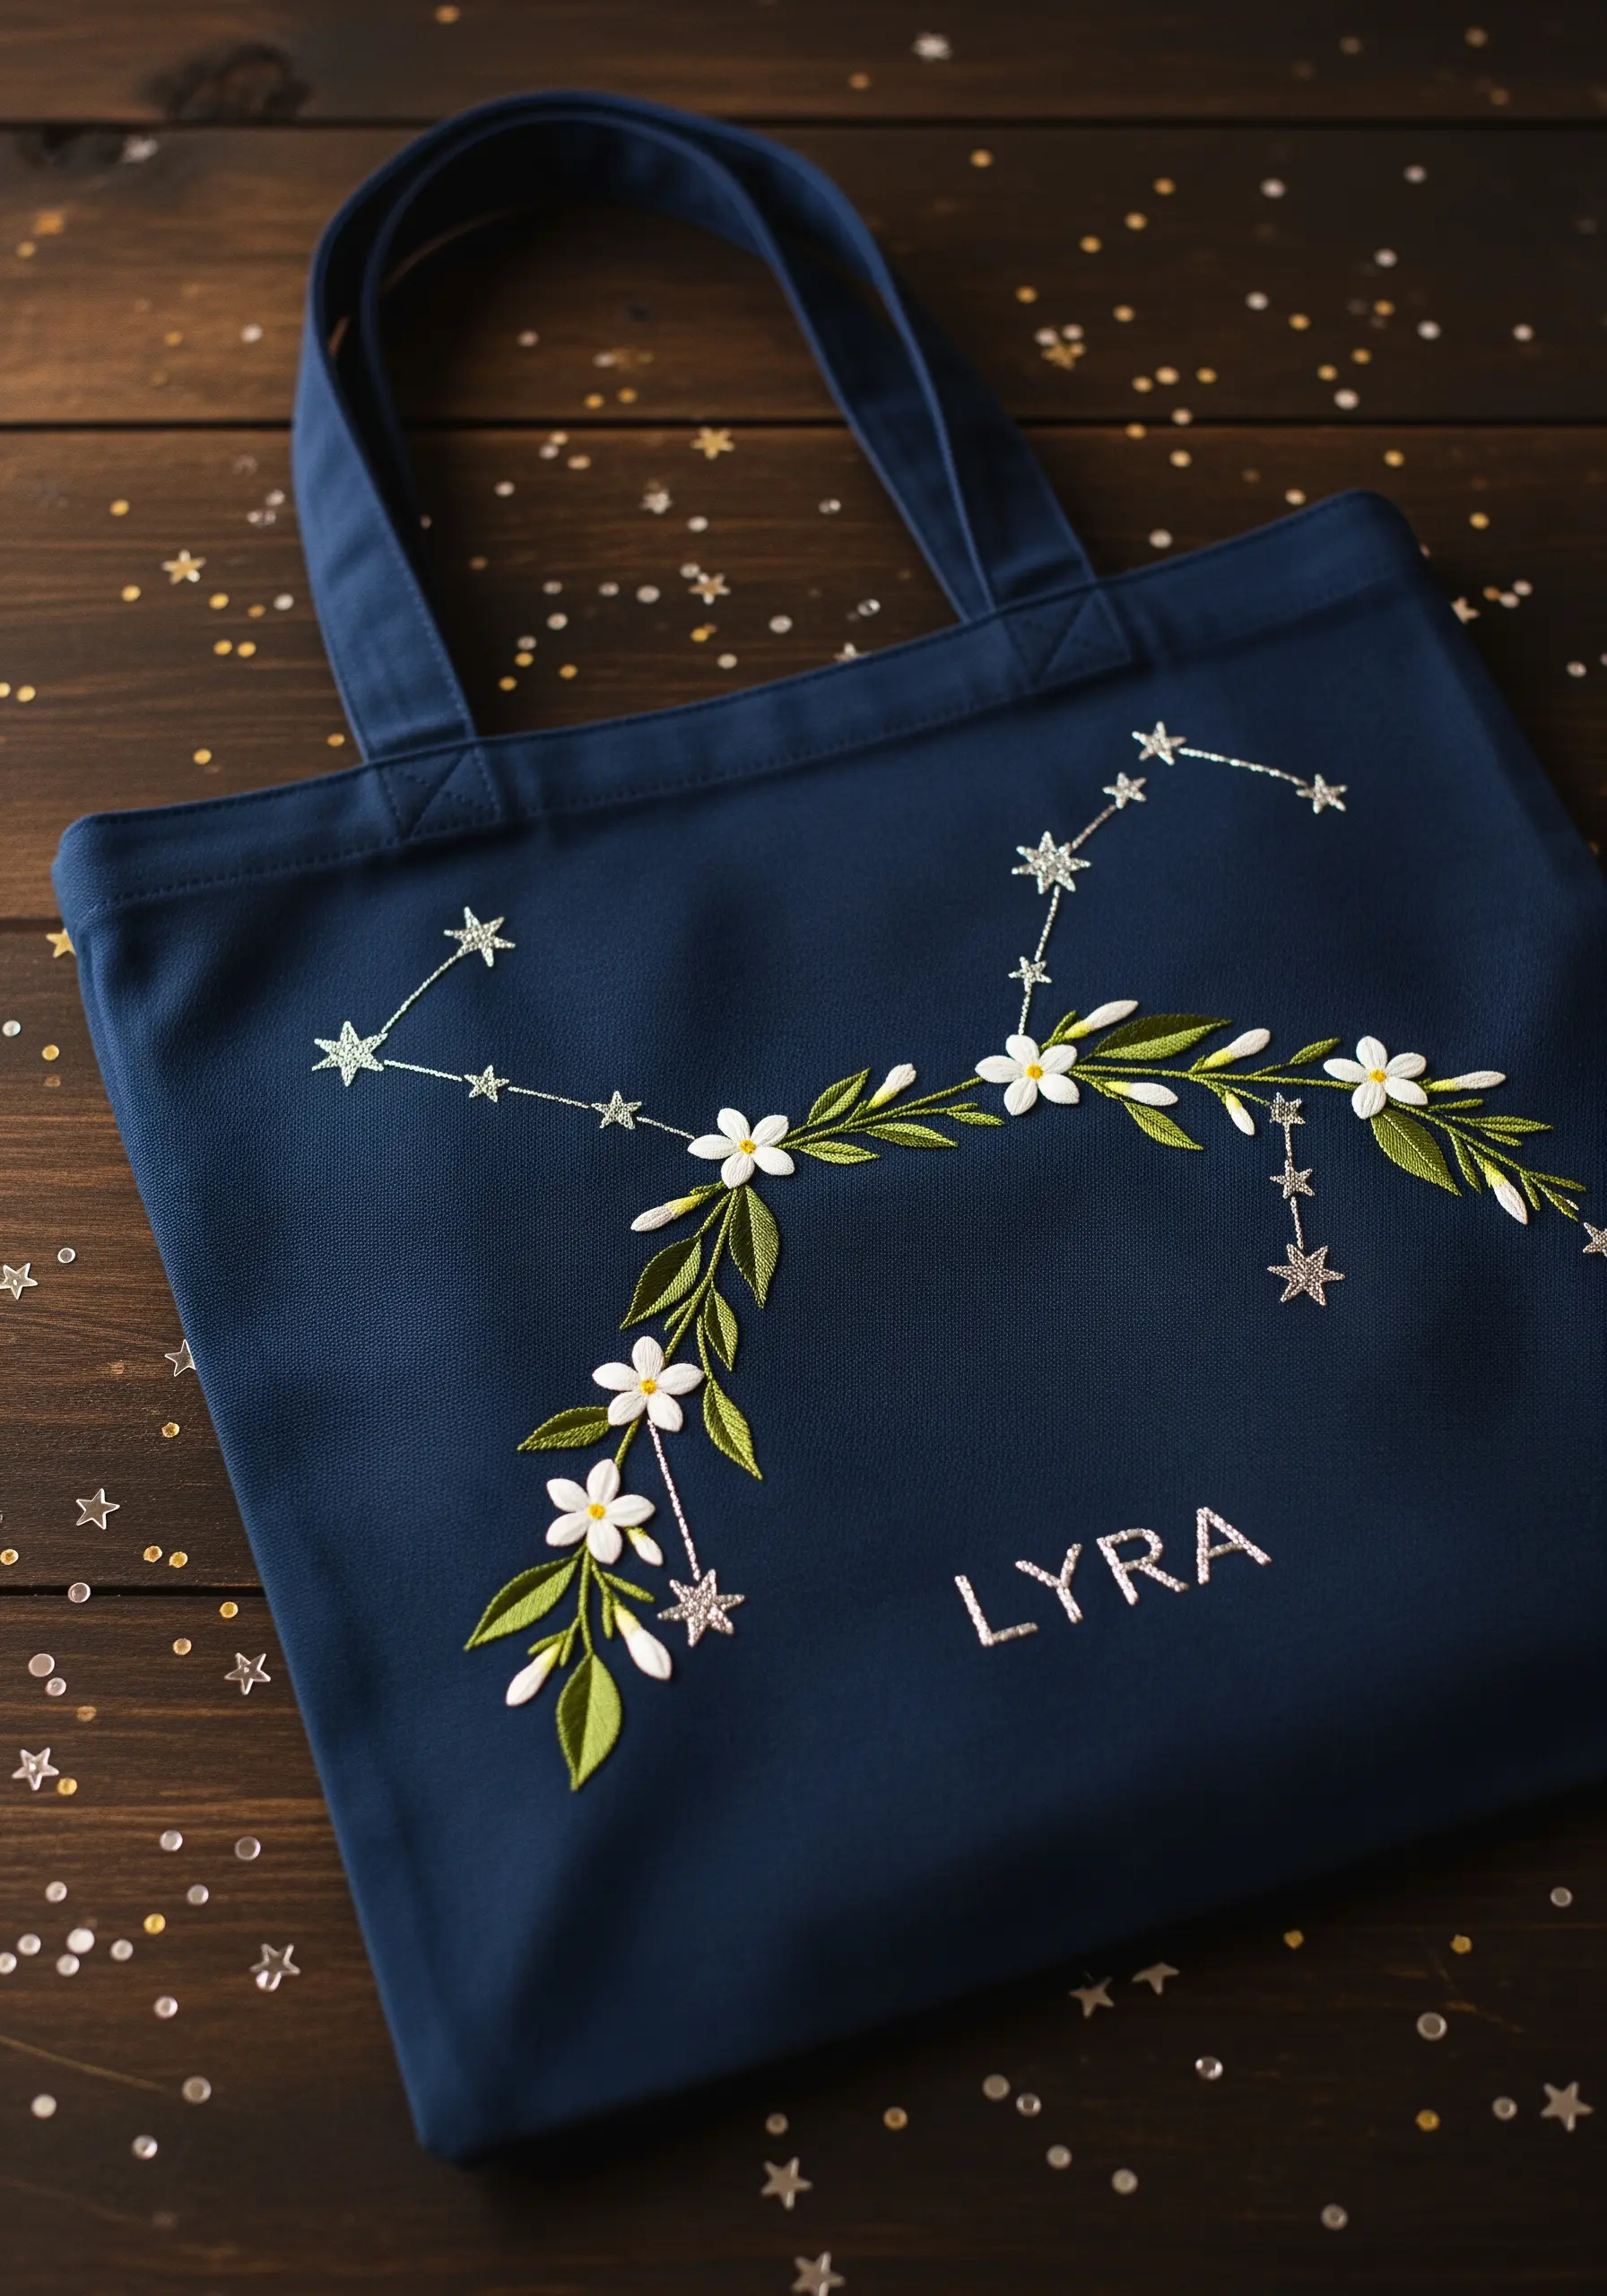
Merge the night sky with earthly florals by weaving a constellation pattern through a garland of leaves and flowers.
Use a metallic silver thread for the stars and connecting lines to make them stand out against the dark fabric. A simple star stitch or a tiny French knot works perfectly.
For the foliage, choose ribbon stitch for the leaves to create soft, dimensional forms that contrast with the sharp, graphic lines of the constellation.
Adding a personalized name or word in a clean, simple font grounds the celestial design and makes it uniquely yours.
10. Create a Minimalist Herb Garden with Line Work
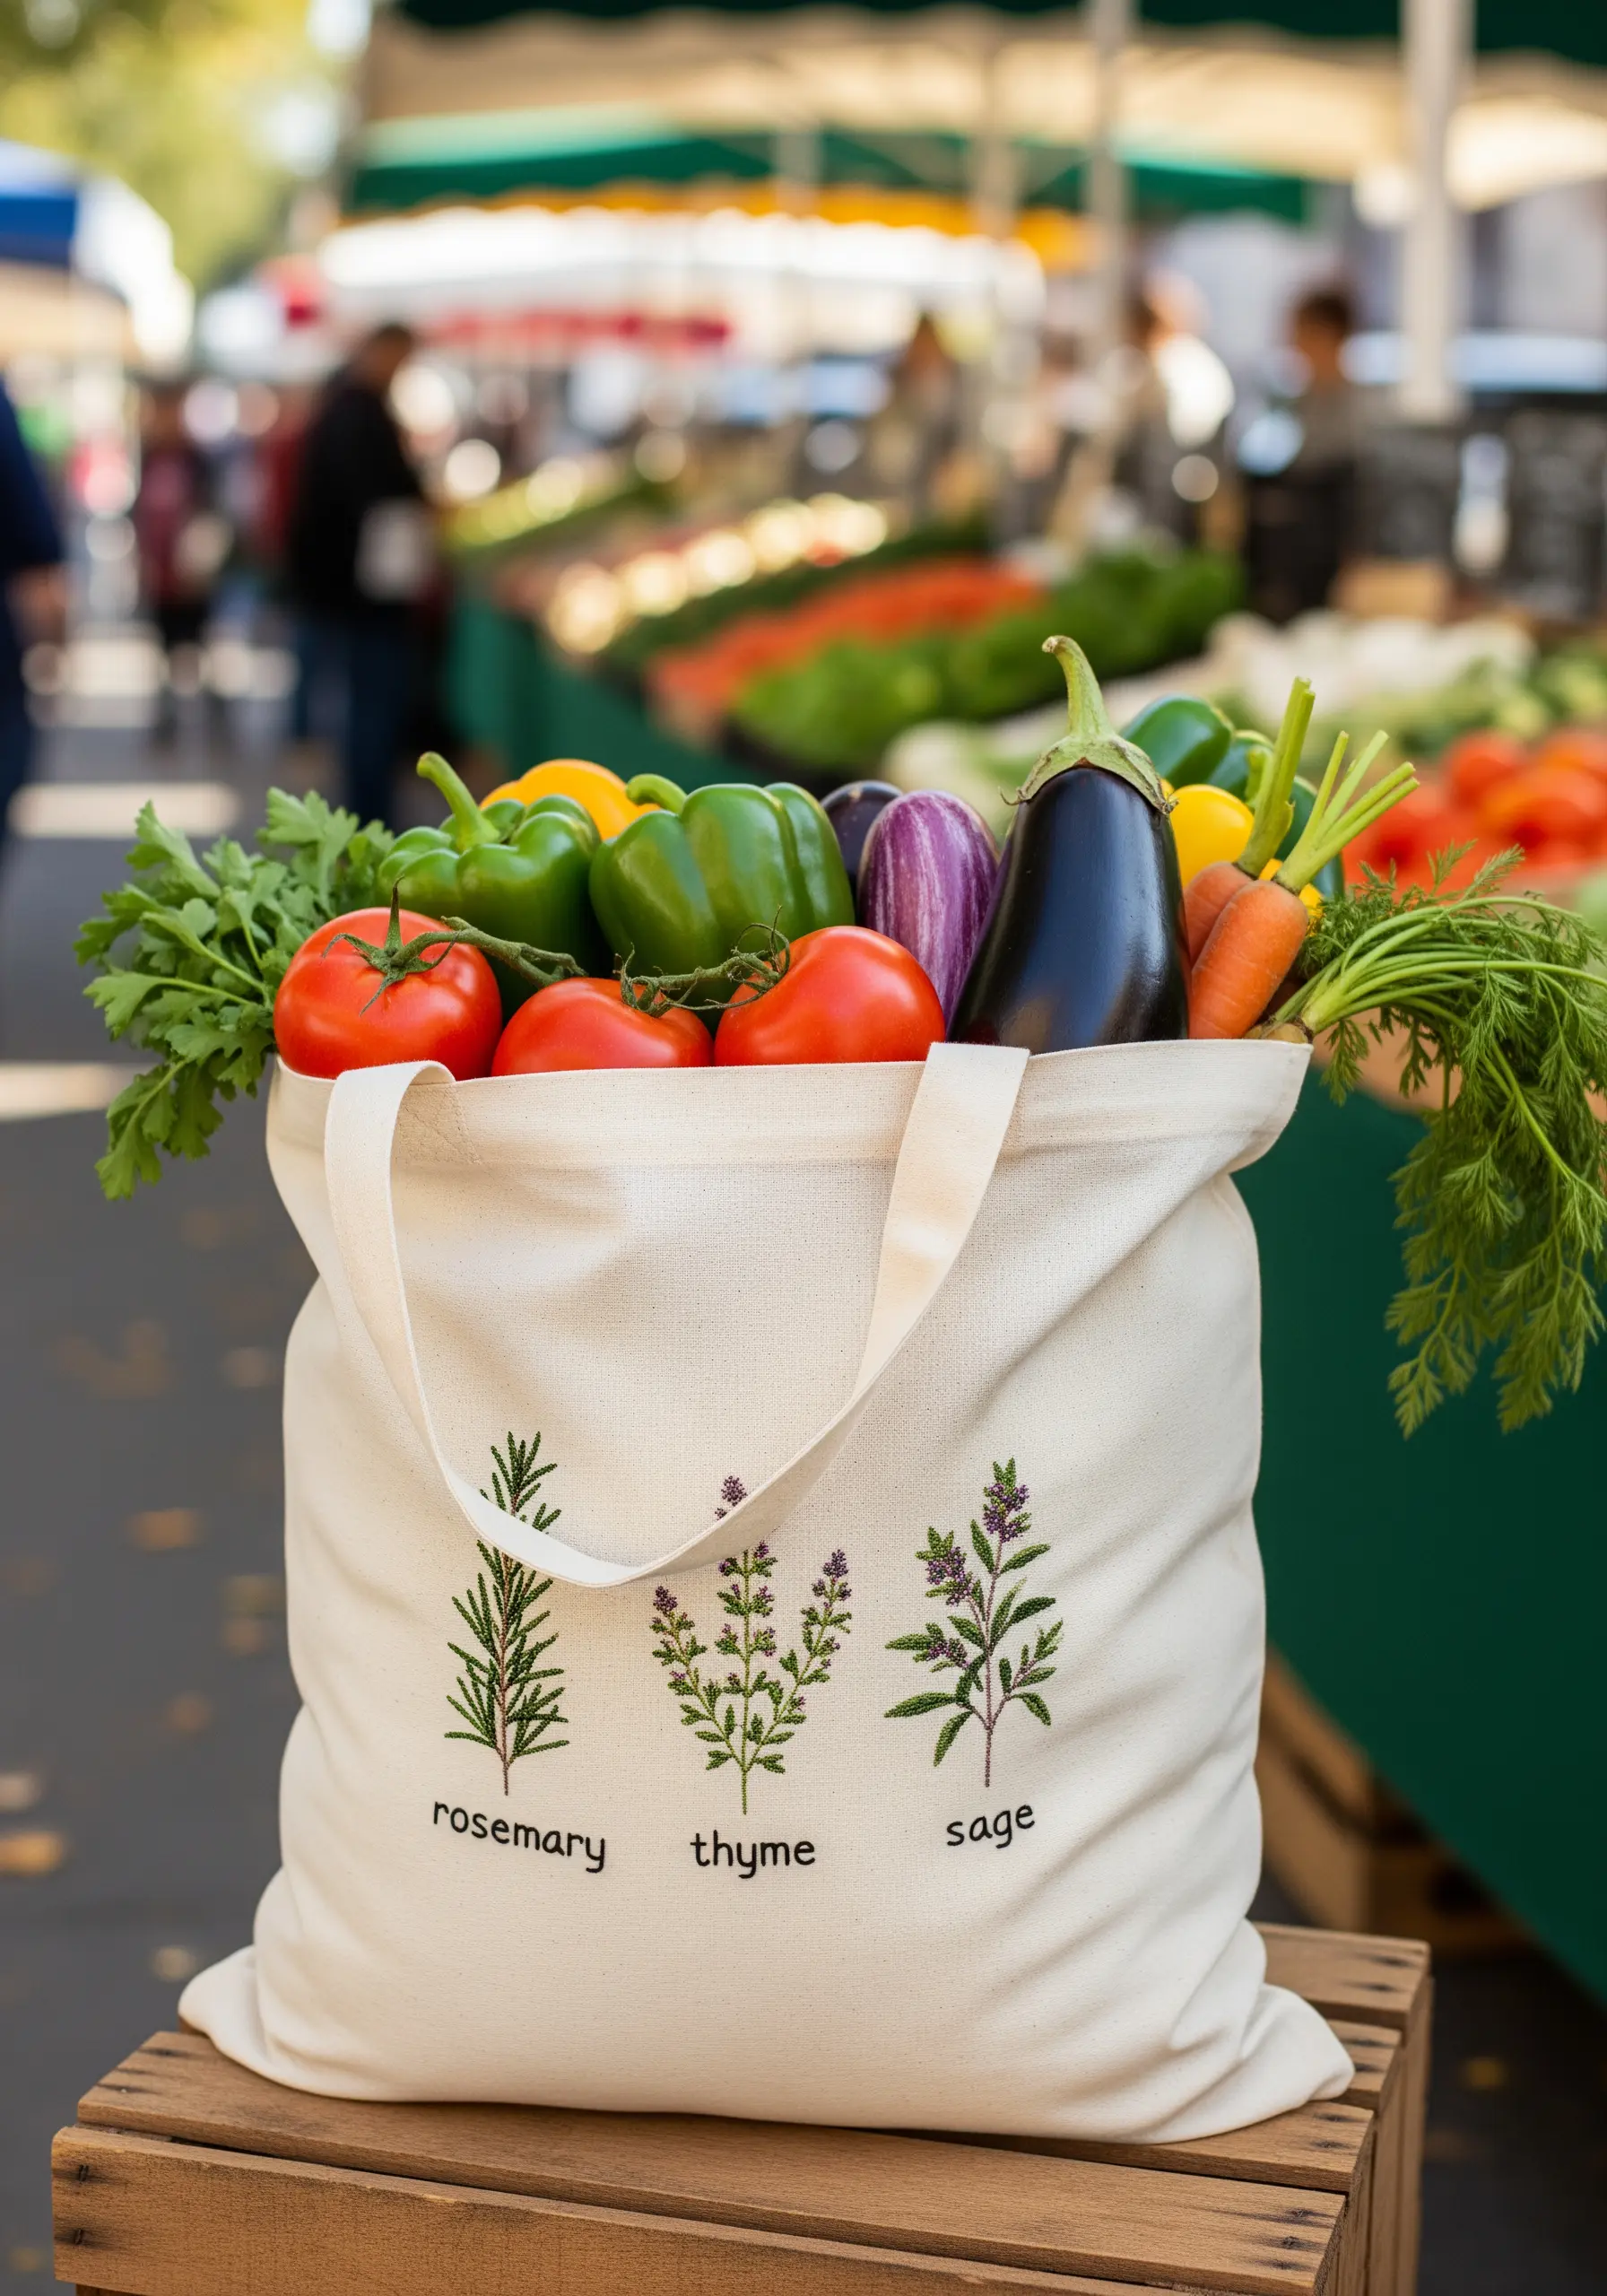
Embrace a clean, scientific illustration style by stitching herbs with simple, descriptive line stitches.
Use stem stitch for the main stalks and detached chain stitches or single straight stitches for the leaves of rosemary, thyme, and sage.
Keep the color palette limited and natural. Using only one or two shades of green per herb maintains the minimalist aesthetic.
Adding a simple, sans-serif text label beneath each plant completes the field-guide look, turning your market tote into a charming and practical piece of art.
11. Build a 3D Terrarium with High-Texture Stitches
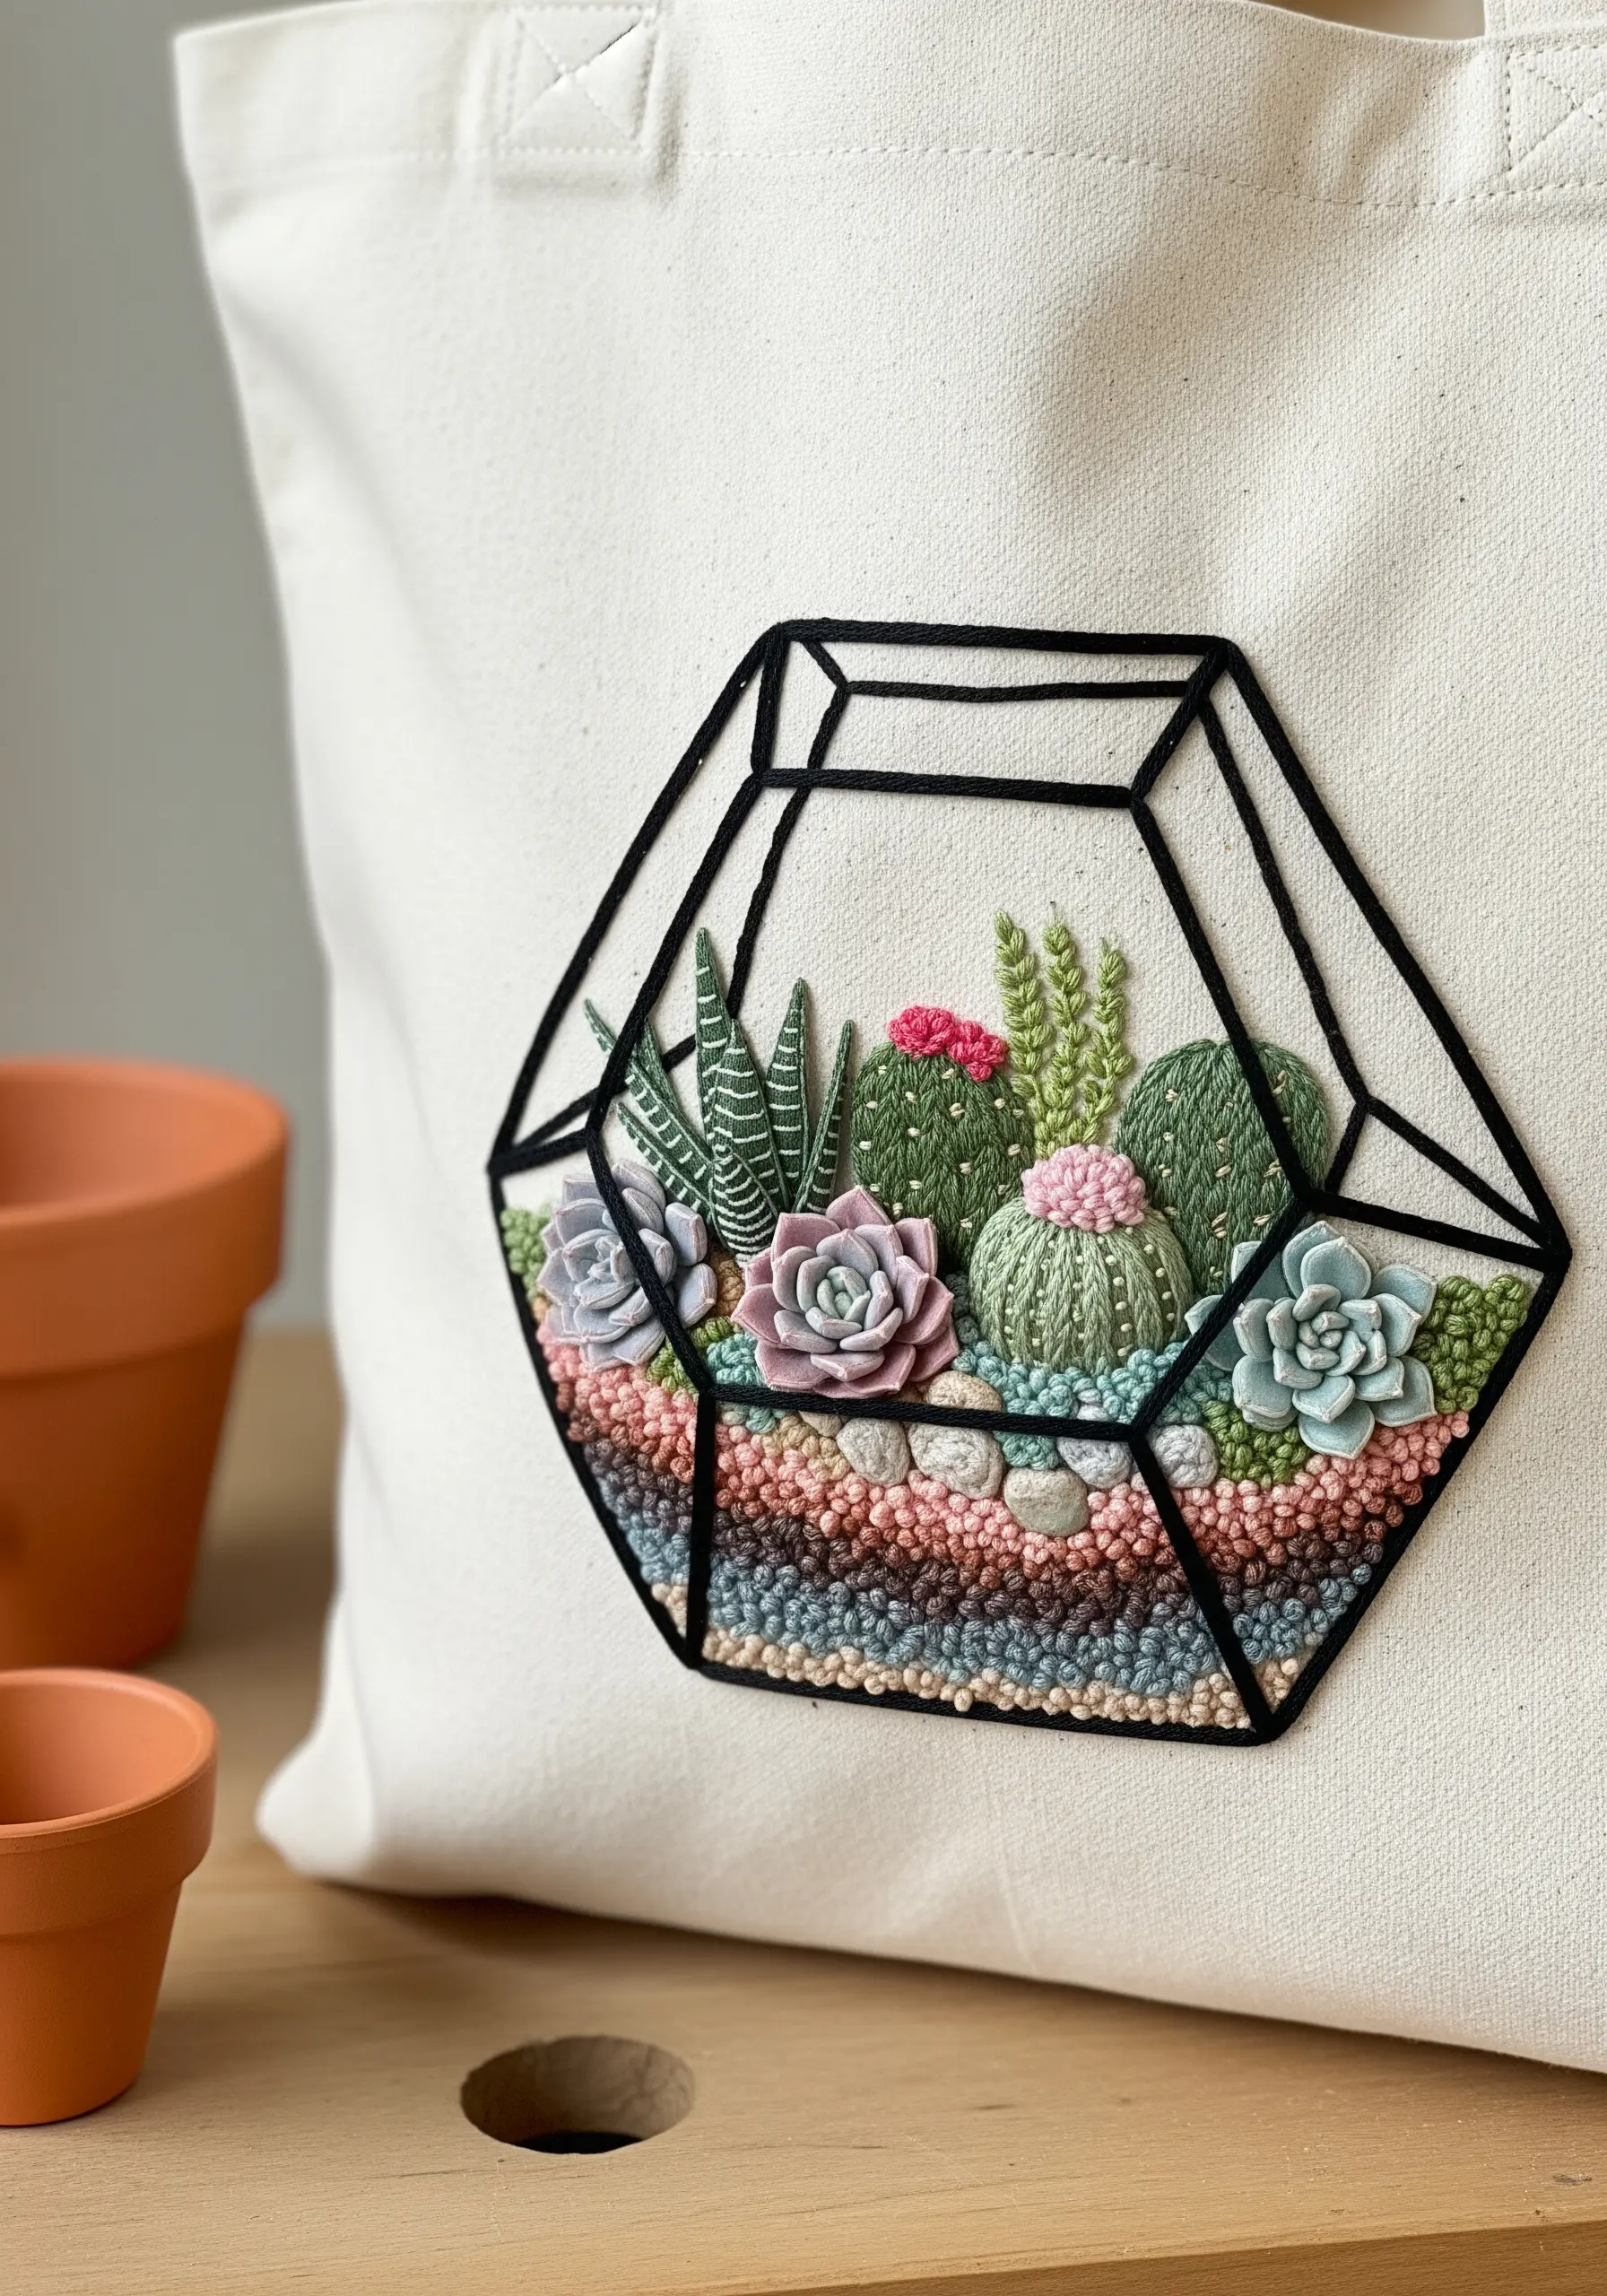
Create a stunning, tactile terrarium by assigning a different textural stitch to each element.
Use rows of dense French knots in earthy tones for the soil and pebbles, creating a wonderfully bumpy surface.
For the succulents, try a woven picot stitch for spiky leaves, cast-on stitches for dimensional petals, and bullion knots for plump cacti.
Frame the entire scene with a bold, black outline using a heavy chain stitch or couched yarn to define the geometric glass shape. This contrast in texture is key to making the design come alive.
12. Give Petals Dimension with a Padded Base
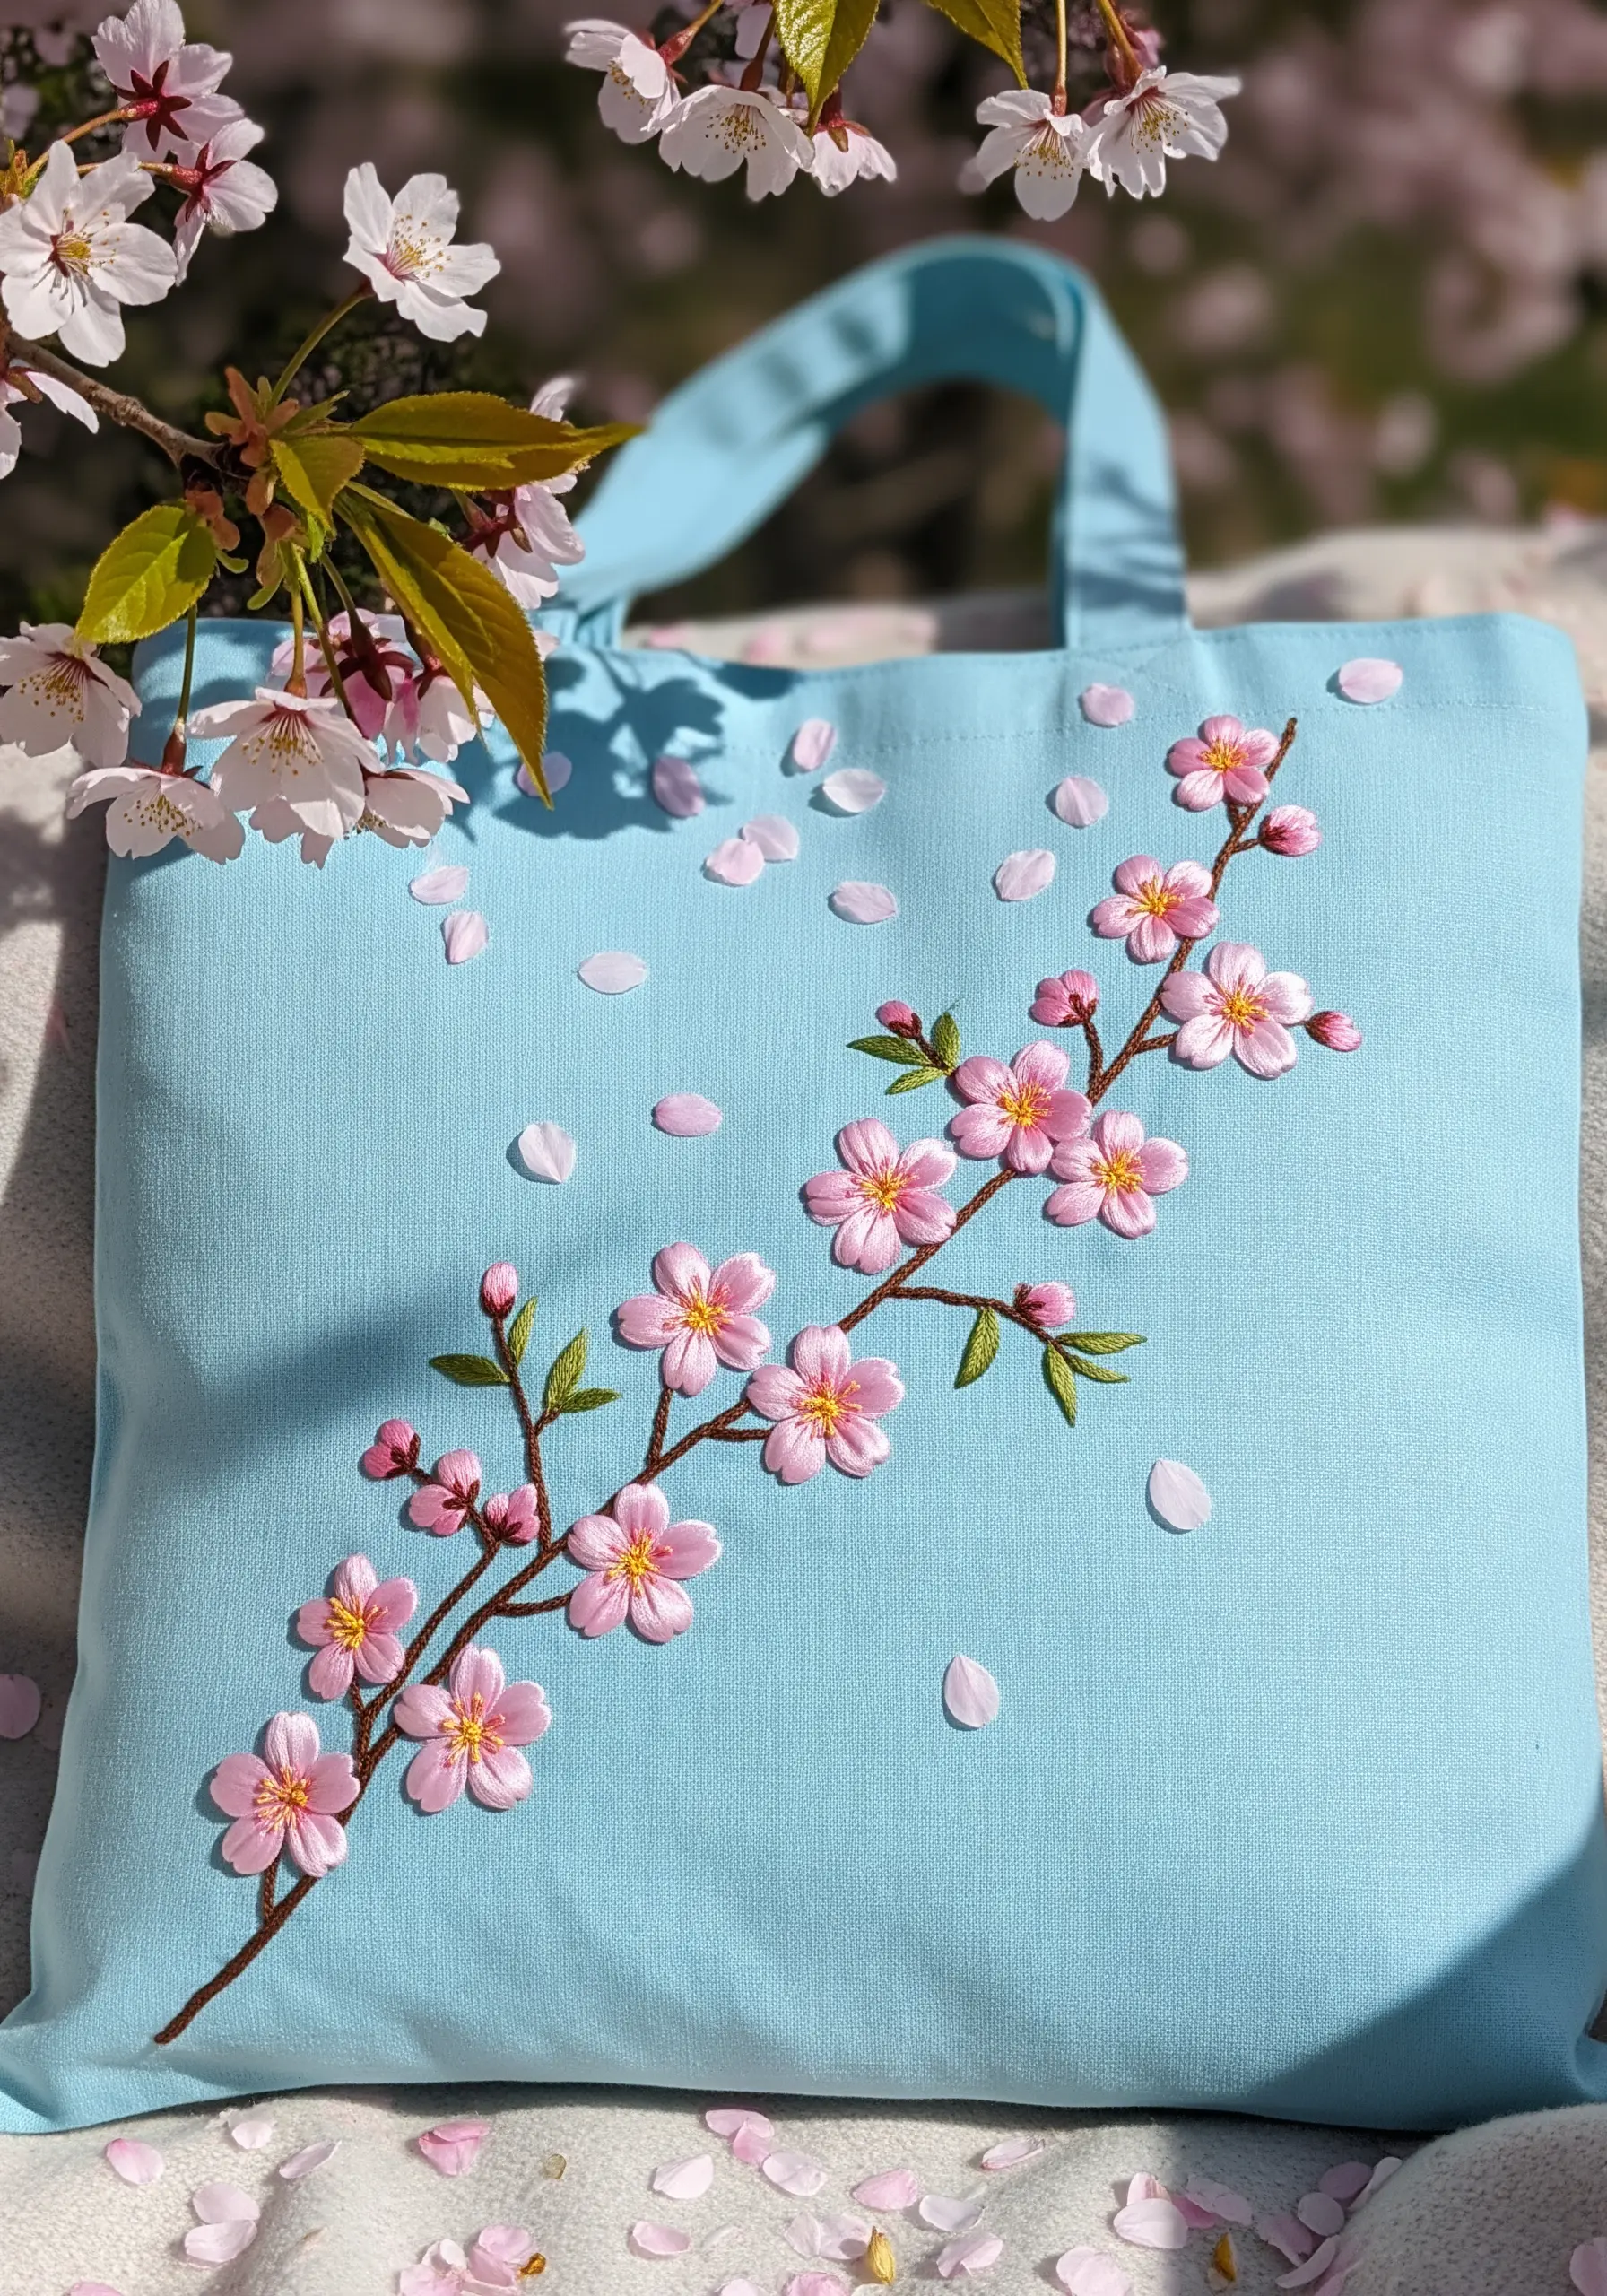
To make your cherry blossoms feel soft and three-dimensional, use a padded satin stitch technique.
First, stitch a small, five-pointed star in the center of each flower using a contrasting thread. Then, work your pink satin stitches over this star base.
The underlying stitches physically lift the satin stitch, creating gently rounded petals that catch the light beautifully.
Finish with a cluster of yellow French knots in the center to complete the blossom. This simple preparation step adds a professional-looking dimension to your work.
13. Embrace the Simplicity of Botanical Line Art
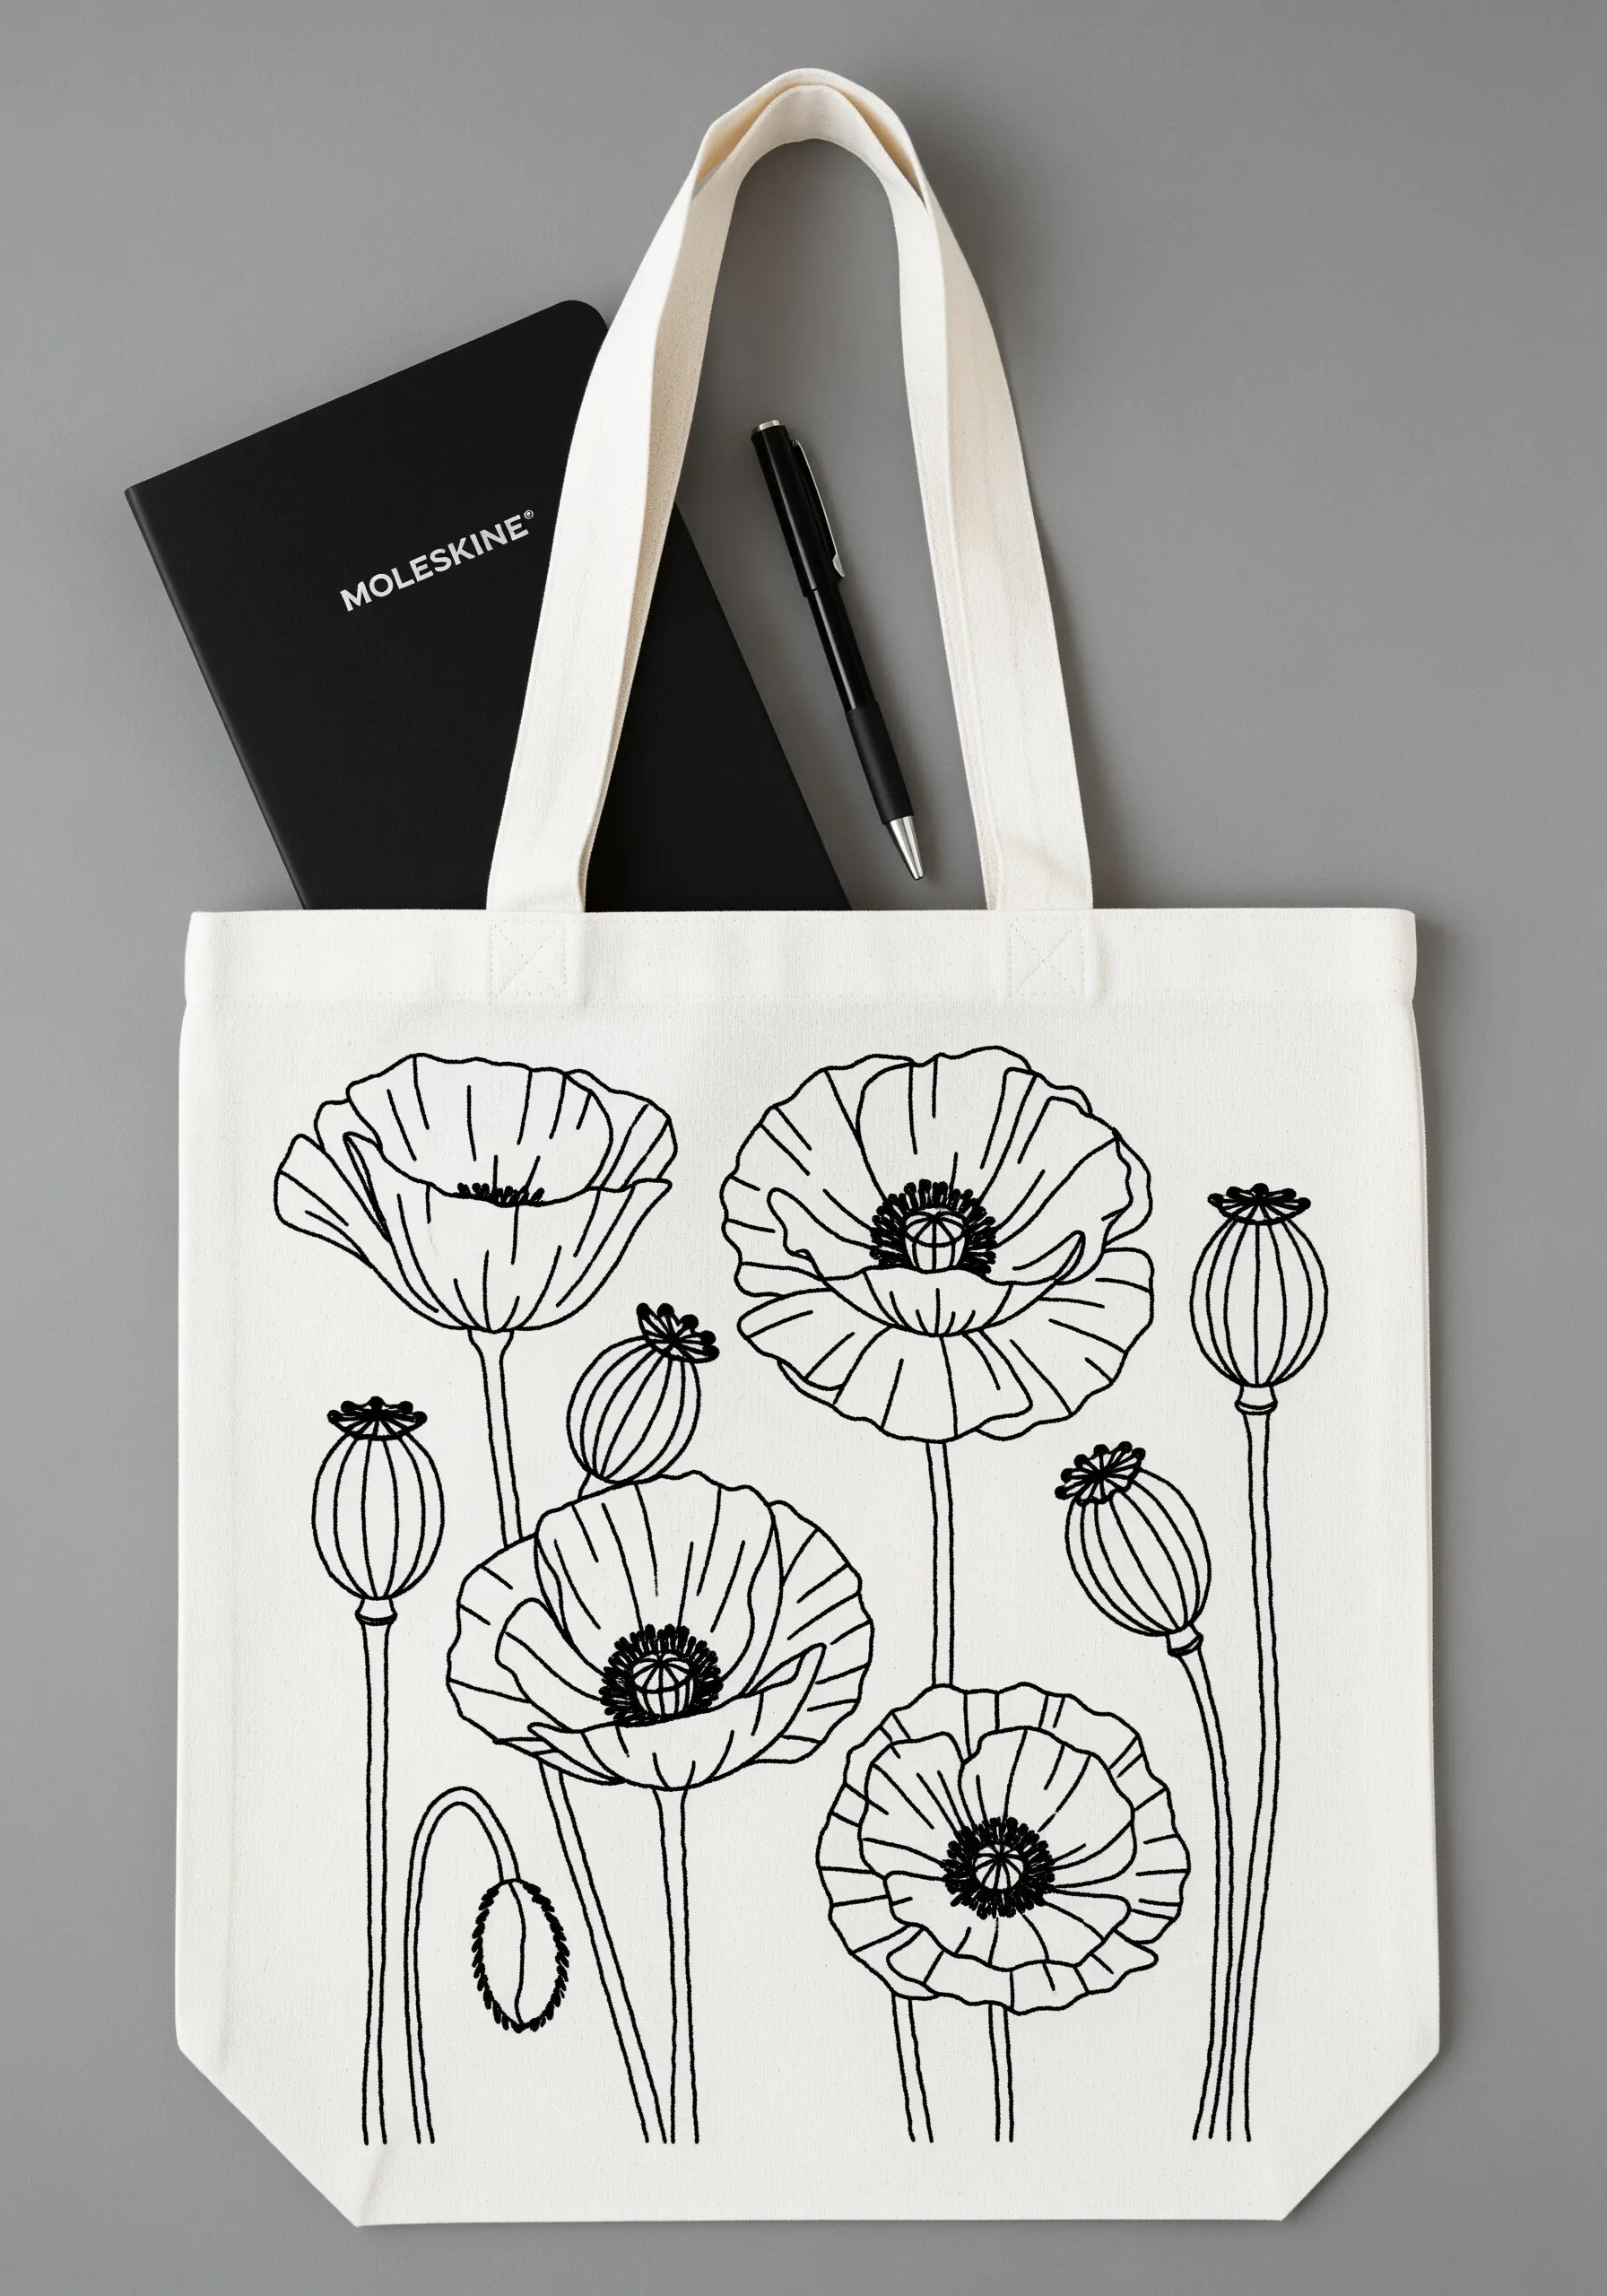
Sometimes, the most striking design is the simplest. Recreate the elegance of a pen-and-ink drawing using a single color of thread.
A whipped backstitch is ideal for this, as it creates a solid, smooth line that mimics a confident brushstroke. Use two strands of black floss for a bold look.
Focus on clean lines and negative space. The beauty of this style lies in what you choose to leave out.
These botanical line art embroidery patterns work exceptionally well on light-colored canvas, where the contrast is sharp and modern.
14. Add Subtle Sparkle with Metallic Chain Accents
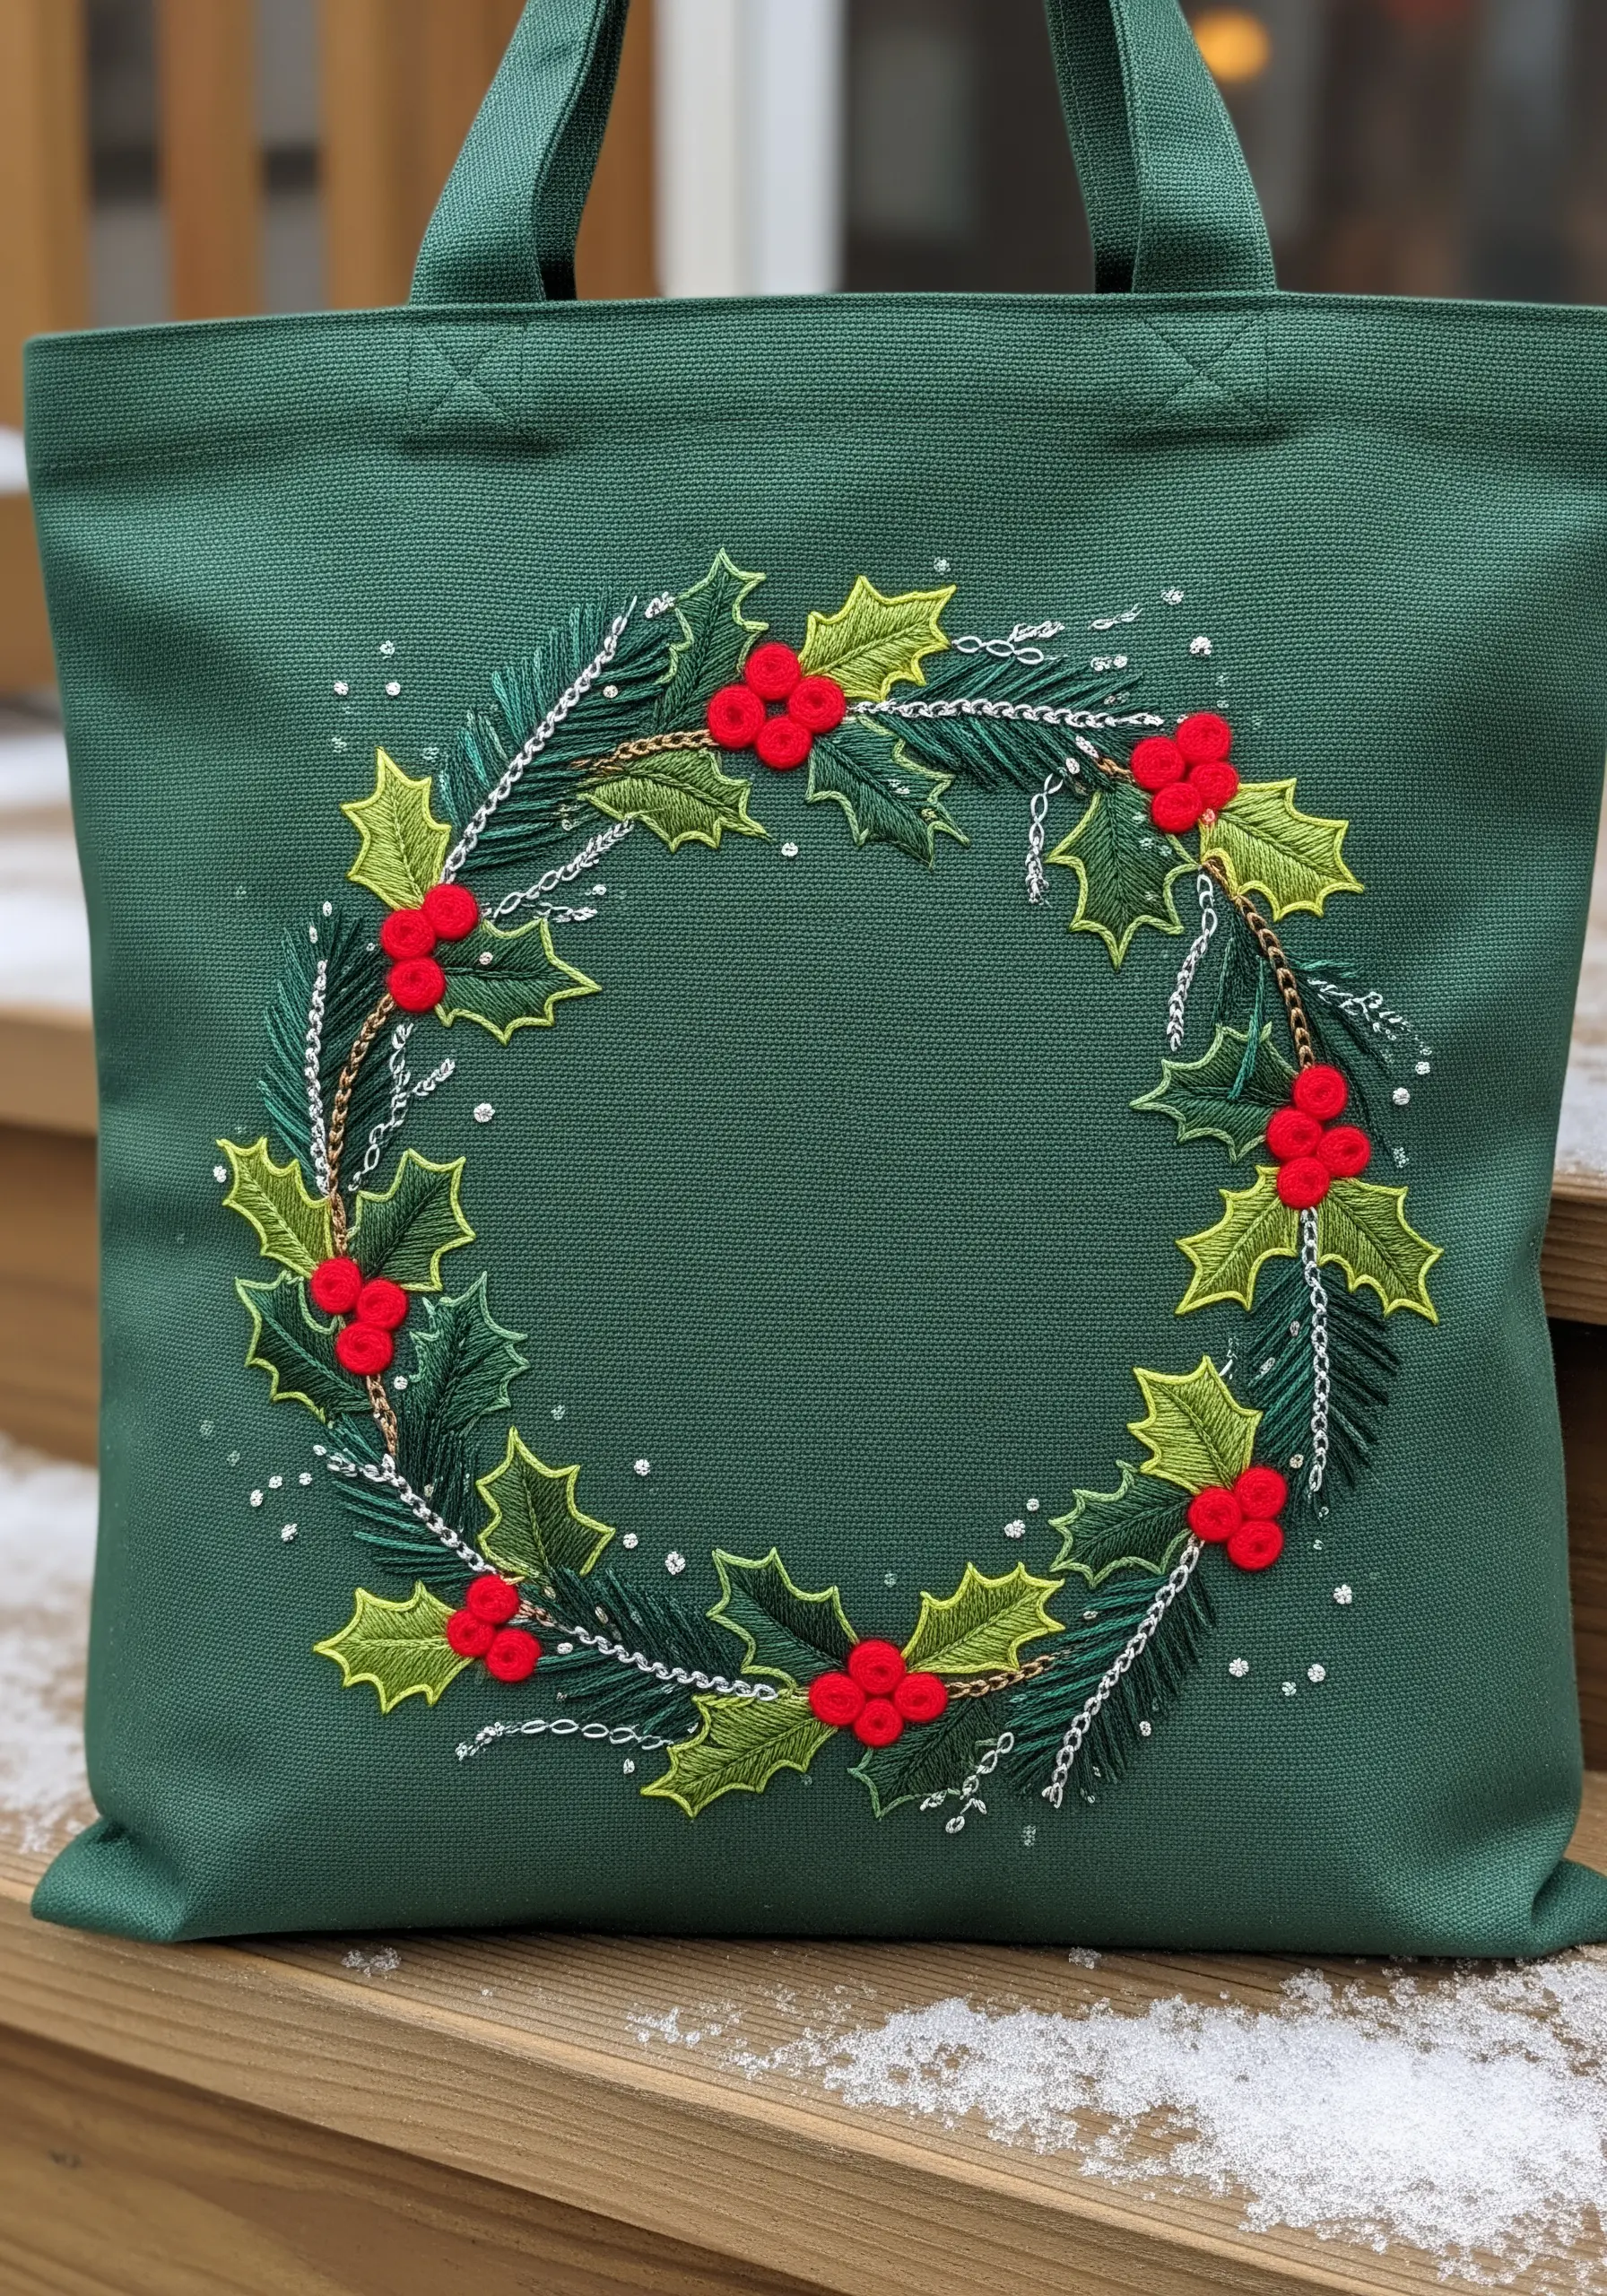
Incorporate a fine metallic chain into your embroidery for a touch of unexpected elegance.
Lay the chain along your design line and couch it onto the fabric, using a matching metallic thread and small, discreet stitches placed in between the links.
Pair the metallic element with traditional stitches like fishbone for leaves and French knots for berries. The mix of matte floss and gleaming metal creates a sophisticated textural contrast.
Scatter tiny white straight stitches or French knots like snowflakes to complete the festive, wintry feel.
15. Master Thread Painting for Photorealistic Florals

For lush, complex flowers like peonies, thread painting (or needle painting) is the ultimate technique for realism.
Work with a single strand of floss and use long-and-short stitch to blend multiple shades of pink, peach, and white seamlessly across each petal.
Pay close attention to the direction of your stitches, following the natural, ruffled curves of the peony petals to create shape and movement.
This is a slow, meditative process, but the results are breathtakingly realistic, turning your tote into a wearable masterpiece.
16. Create Bold Shapes with Yarn Couching
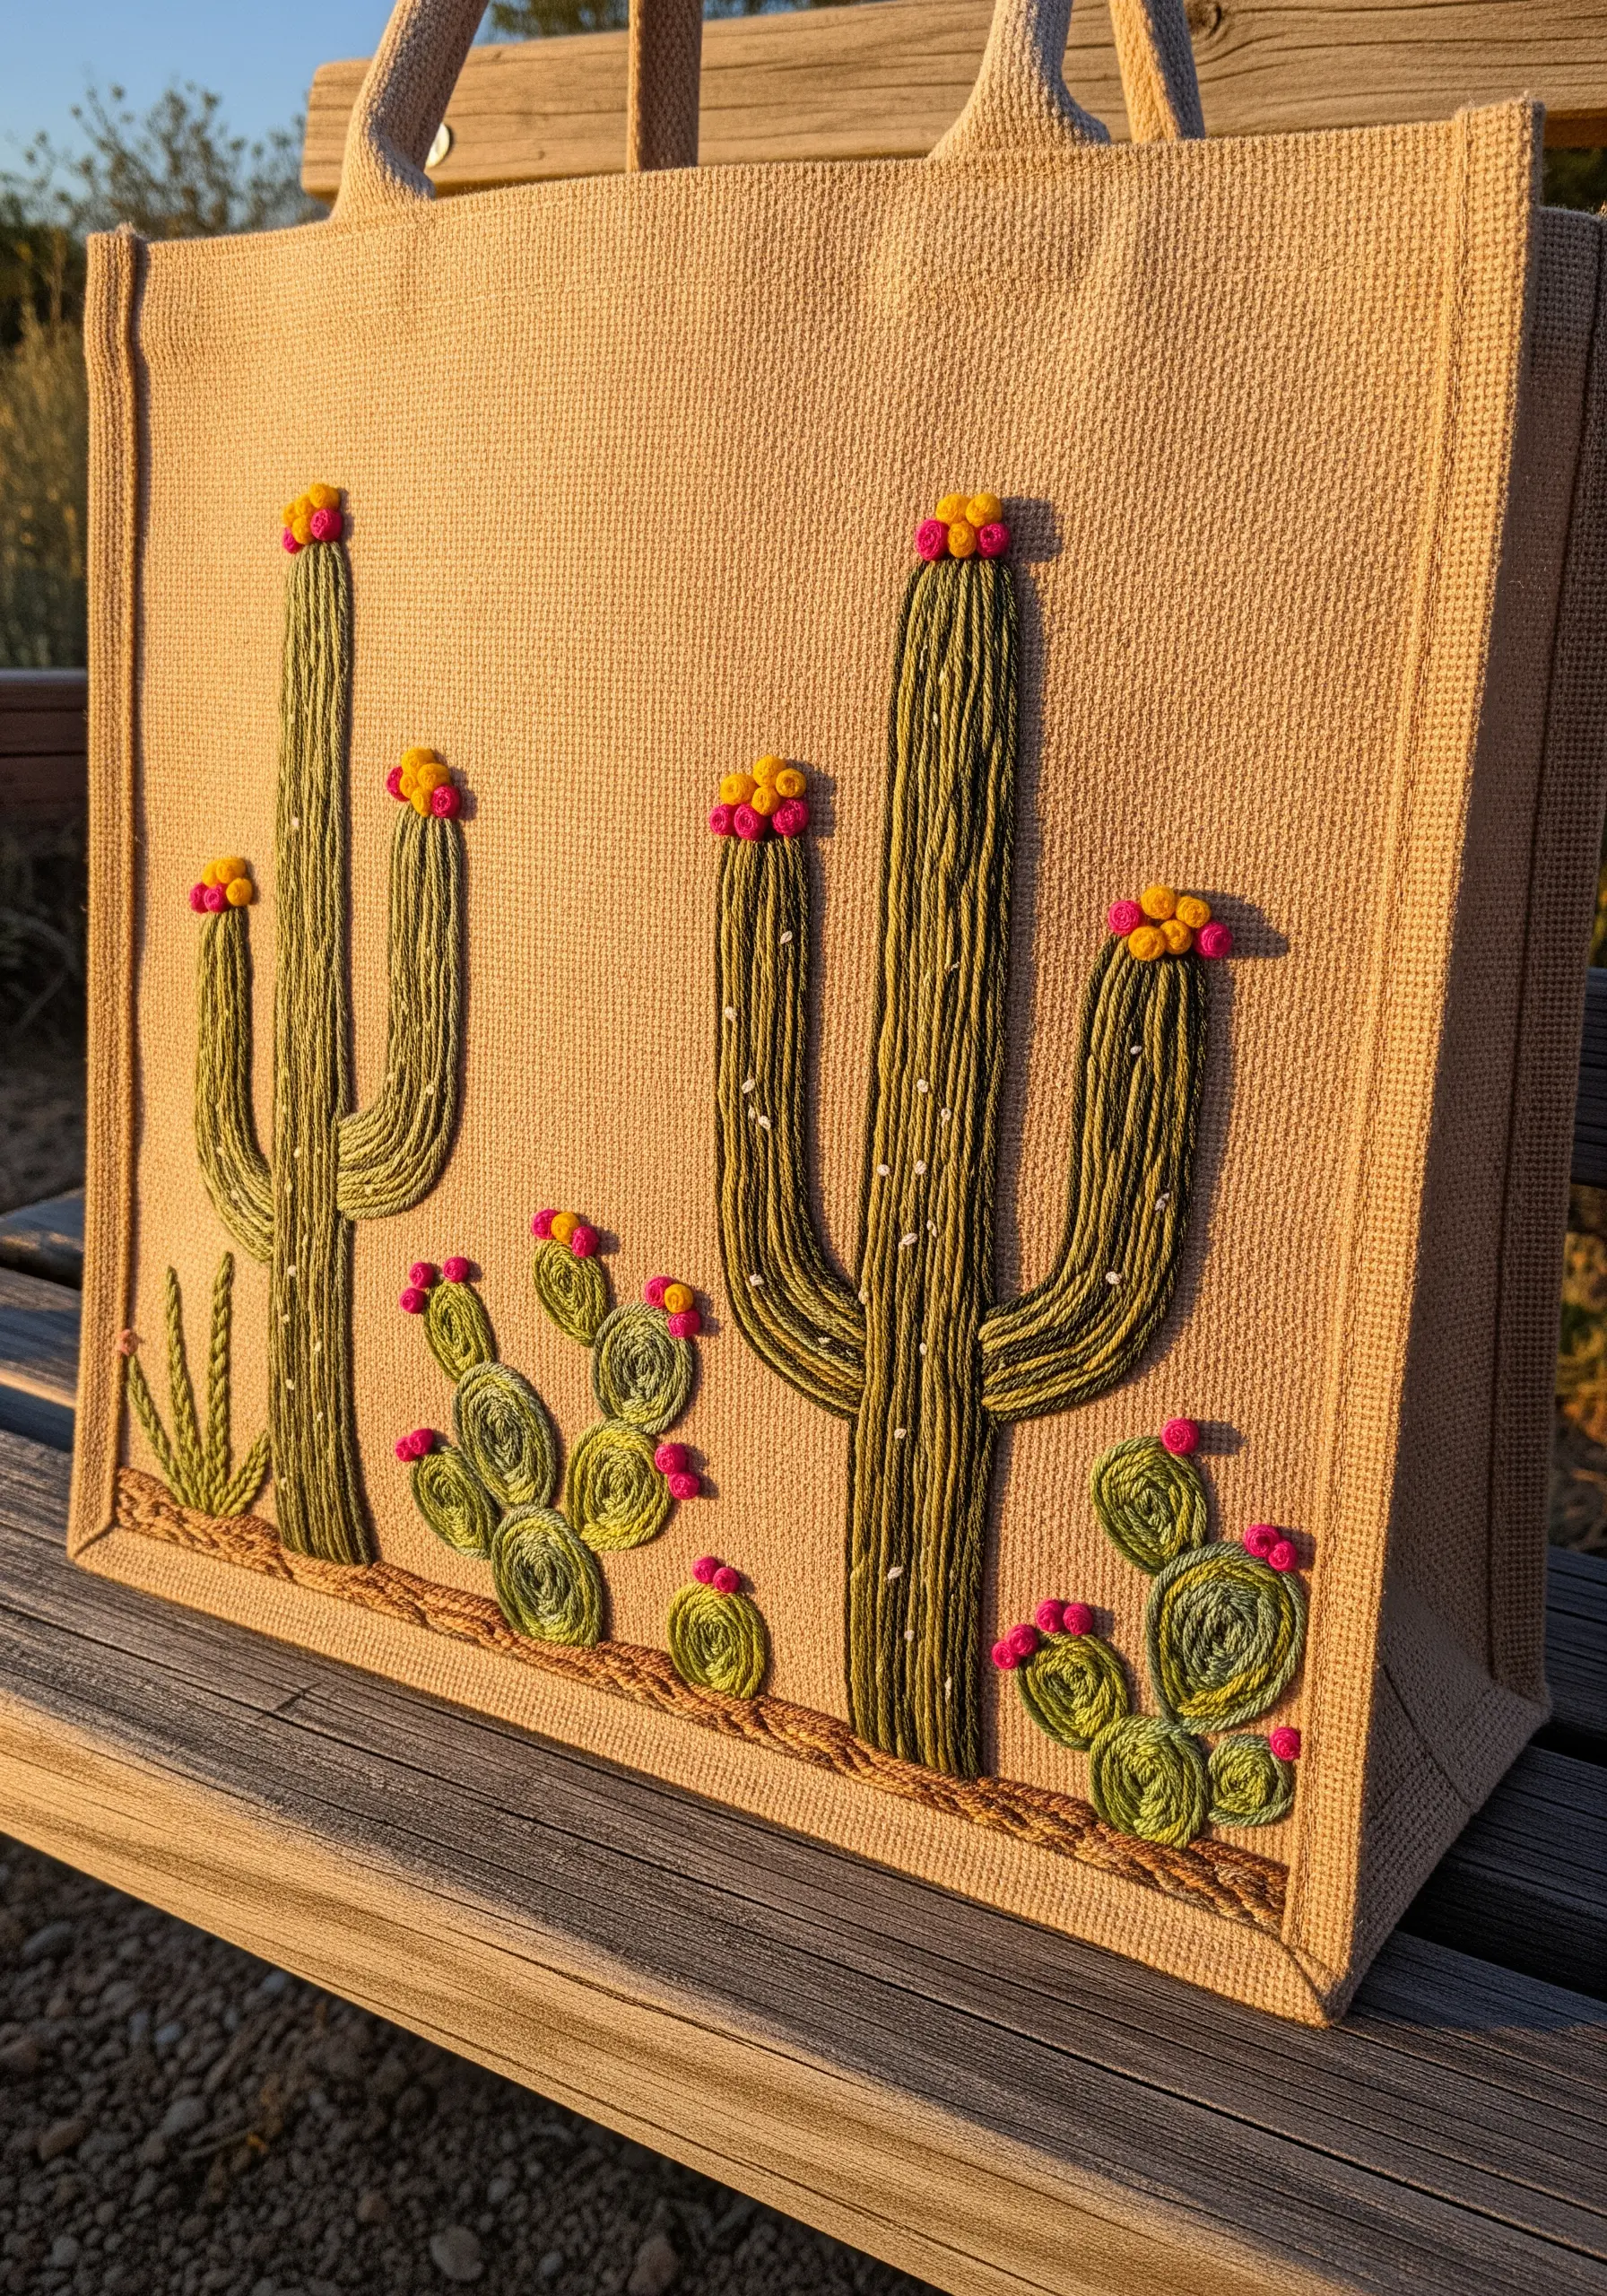
For a bold, graphic cactus design on a coarse fabric like burlap, switch from floss to yarn.
Lay down your main cactus shape using a thick, variegated green yarn. Then, use a single strand of matching embroidery floss to tack the yarn in place with small, evenly spaced stitches (couching).
This technique is fast, covers a large area efficiently, and creates a wonderfully rustic, textured outline.
Add details like pink French knot flowers and straight-stitch spines to complete the playful desert scene.
17. Design a Playful Pattern with Scattered Motifs

Instead of a single focal point, create a dynamic surface by scattering small, repeating motifs across the tote bag.
To prevent the pattern from looking too rigid, vary the orientation of the strawberries and place the tiny daisy fillers irregularly.
Use a padded satin stitch for the strawberries to make them look plump and juicy, and add tiny white seed stitches for the seeds before you stitch the red.
This appliqué-like style creates a cheerful, all-over print that feels both whimsical and modern.
18. Capture Elegance with a Single, Delicate Motif
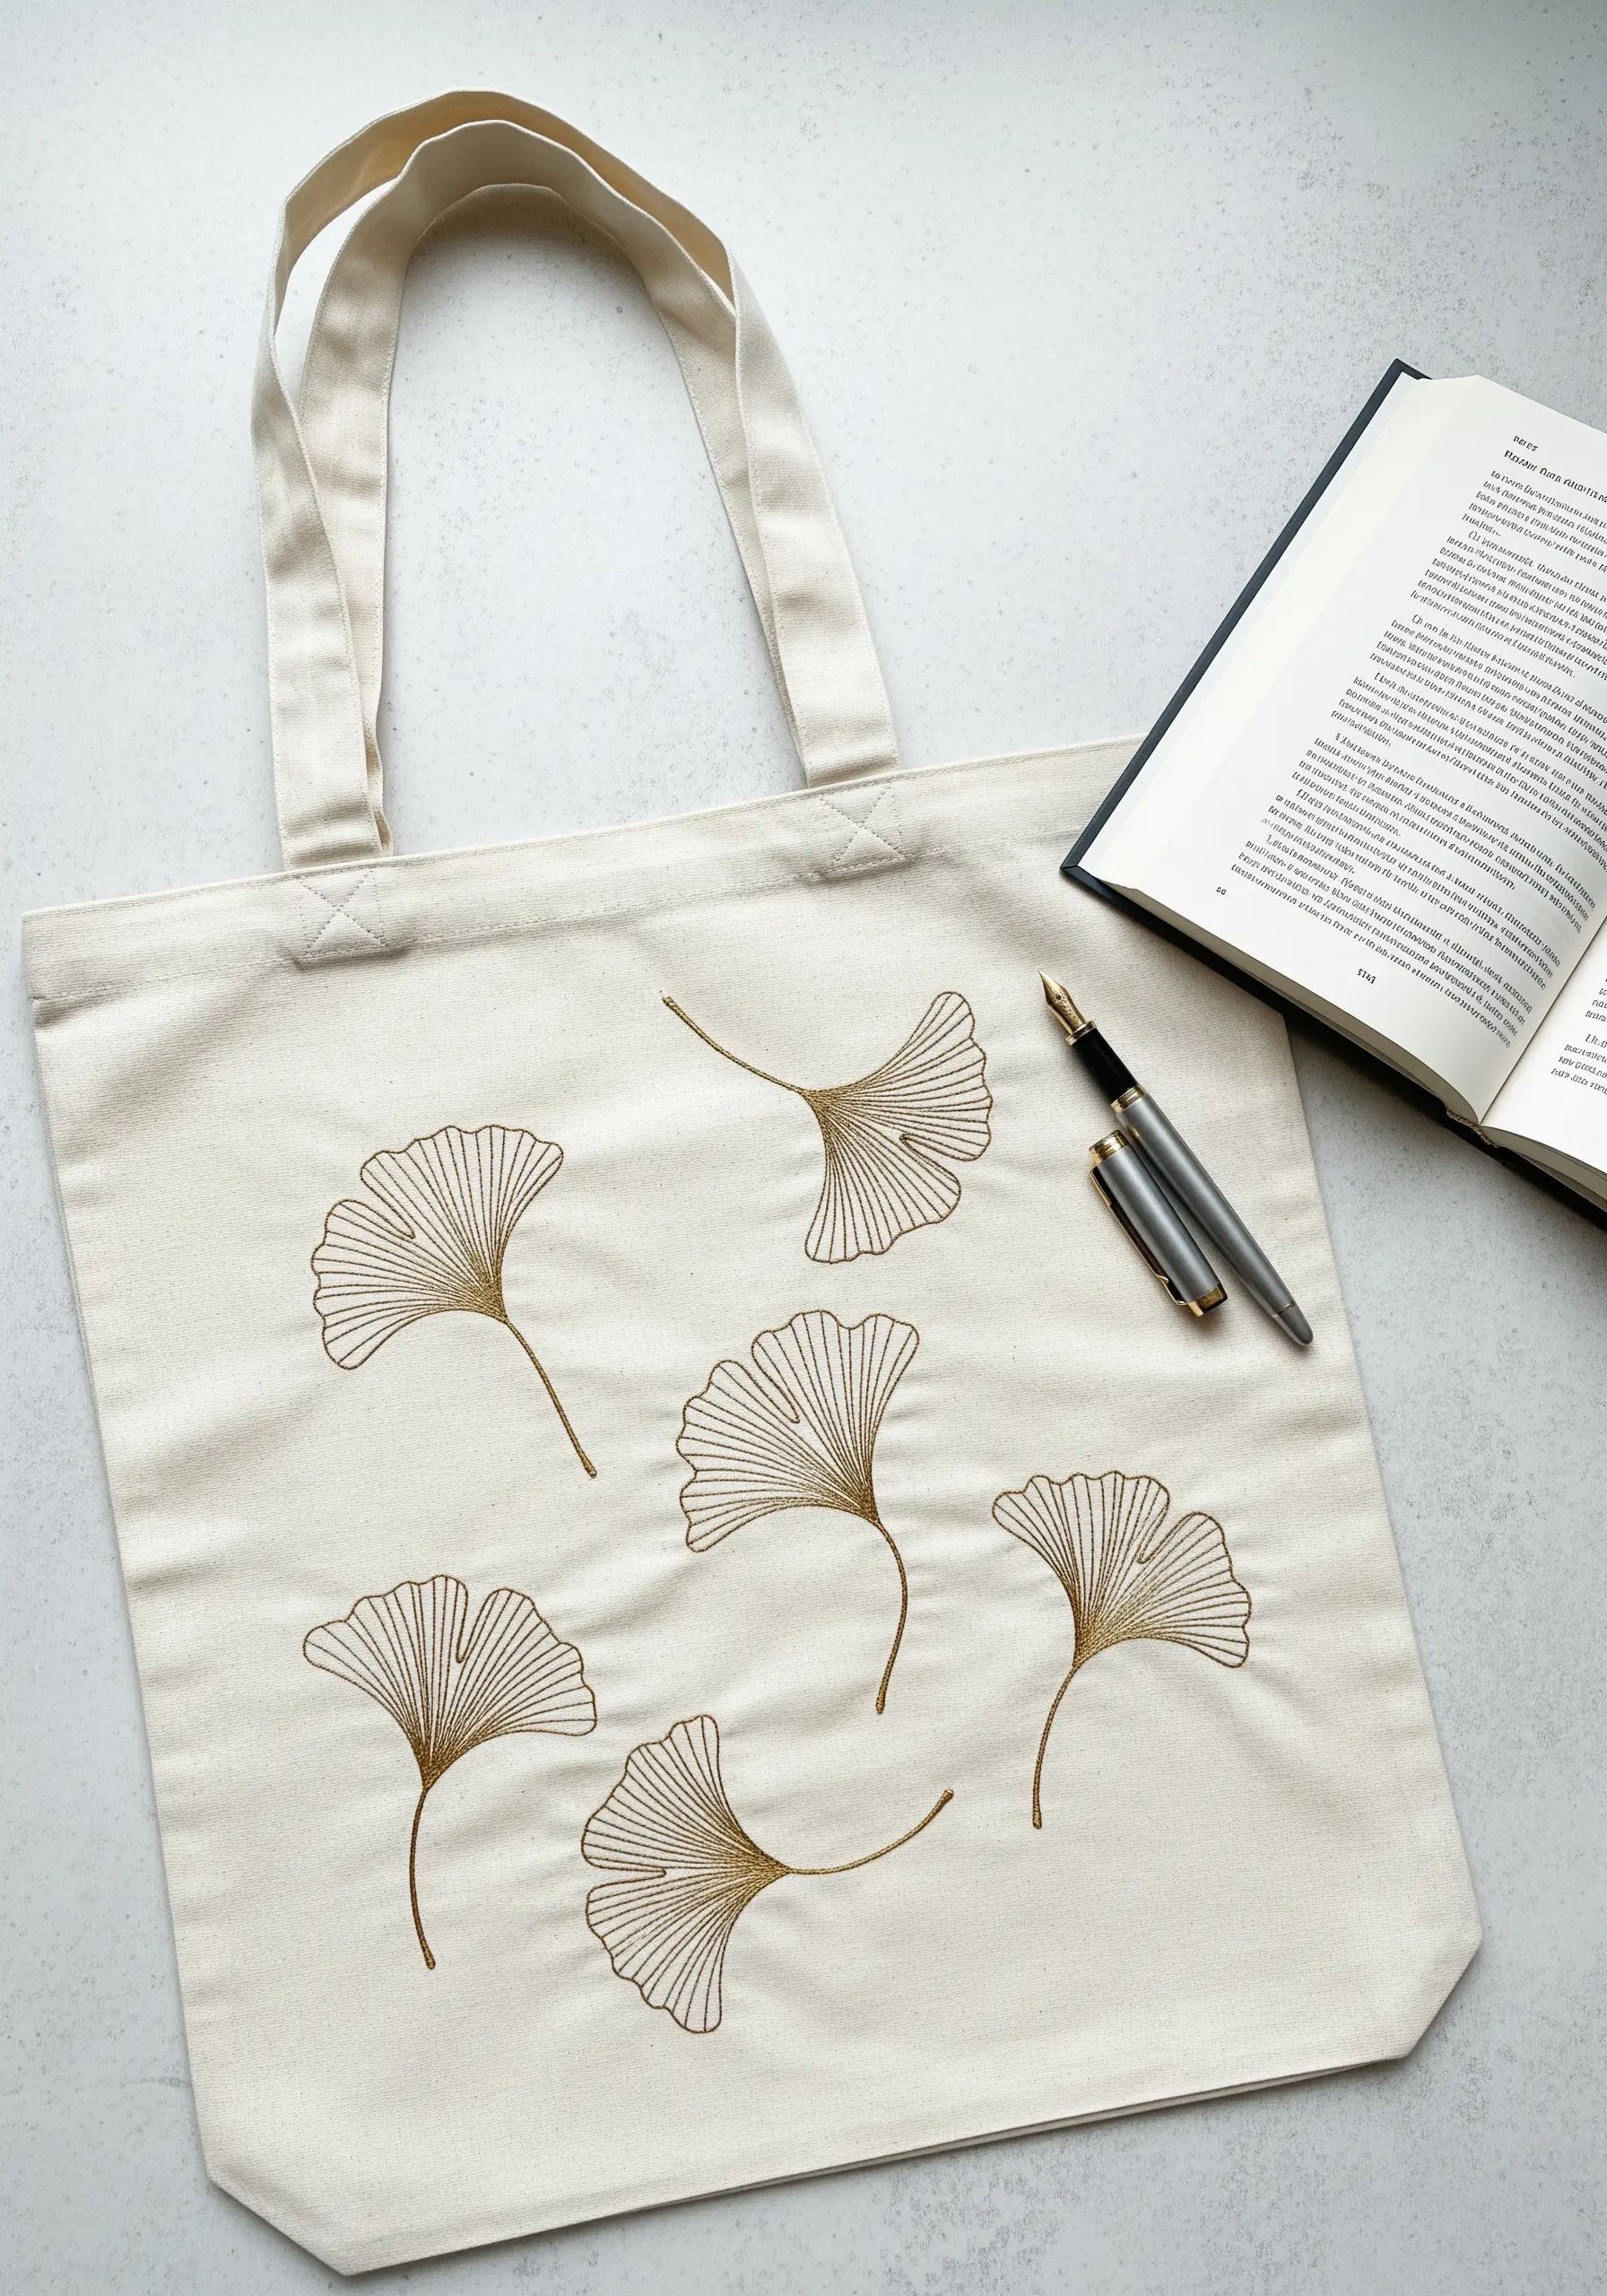
Showcase the beauty of a single color and stitch by repeating a delicate motif like the ginkgo leaf.
Use a stem stitch for the stalk and radiating straight stitches for the leaf’s veins. This creates a fan-like effect that is both simple and incredibly graceful.
Choosing a metallic or silk thread in a single shade—like gold or bronze—elevates the design from simple to luxurious.
The key to this minimalist look is flawless stitch execution and thoughtful placement, allowing each leaf to feel like it’s gently floating on the fabric.
19. Bring Insects to Life with Layered Stitches
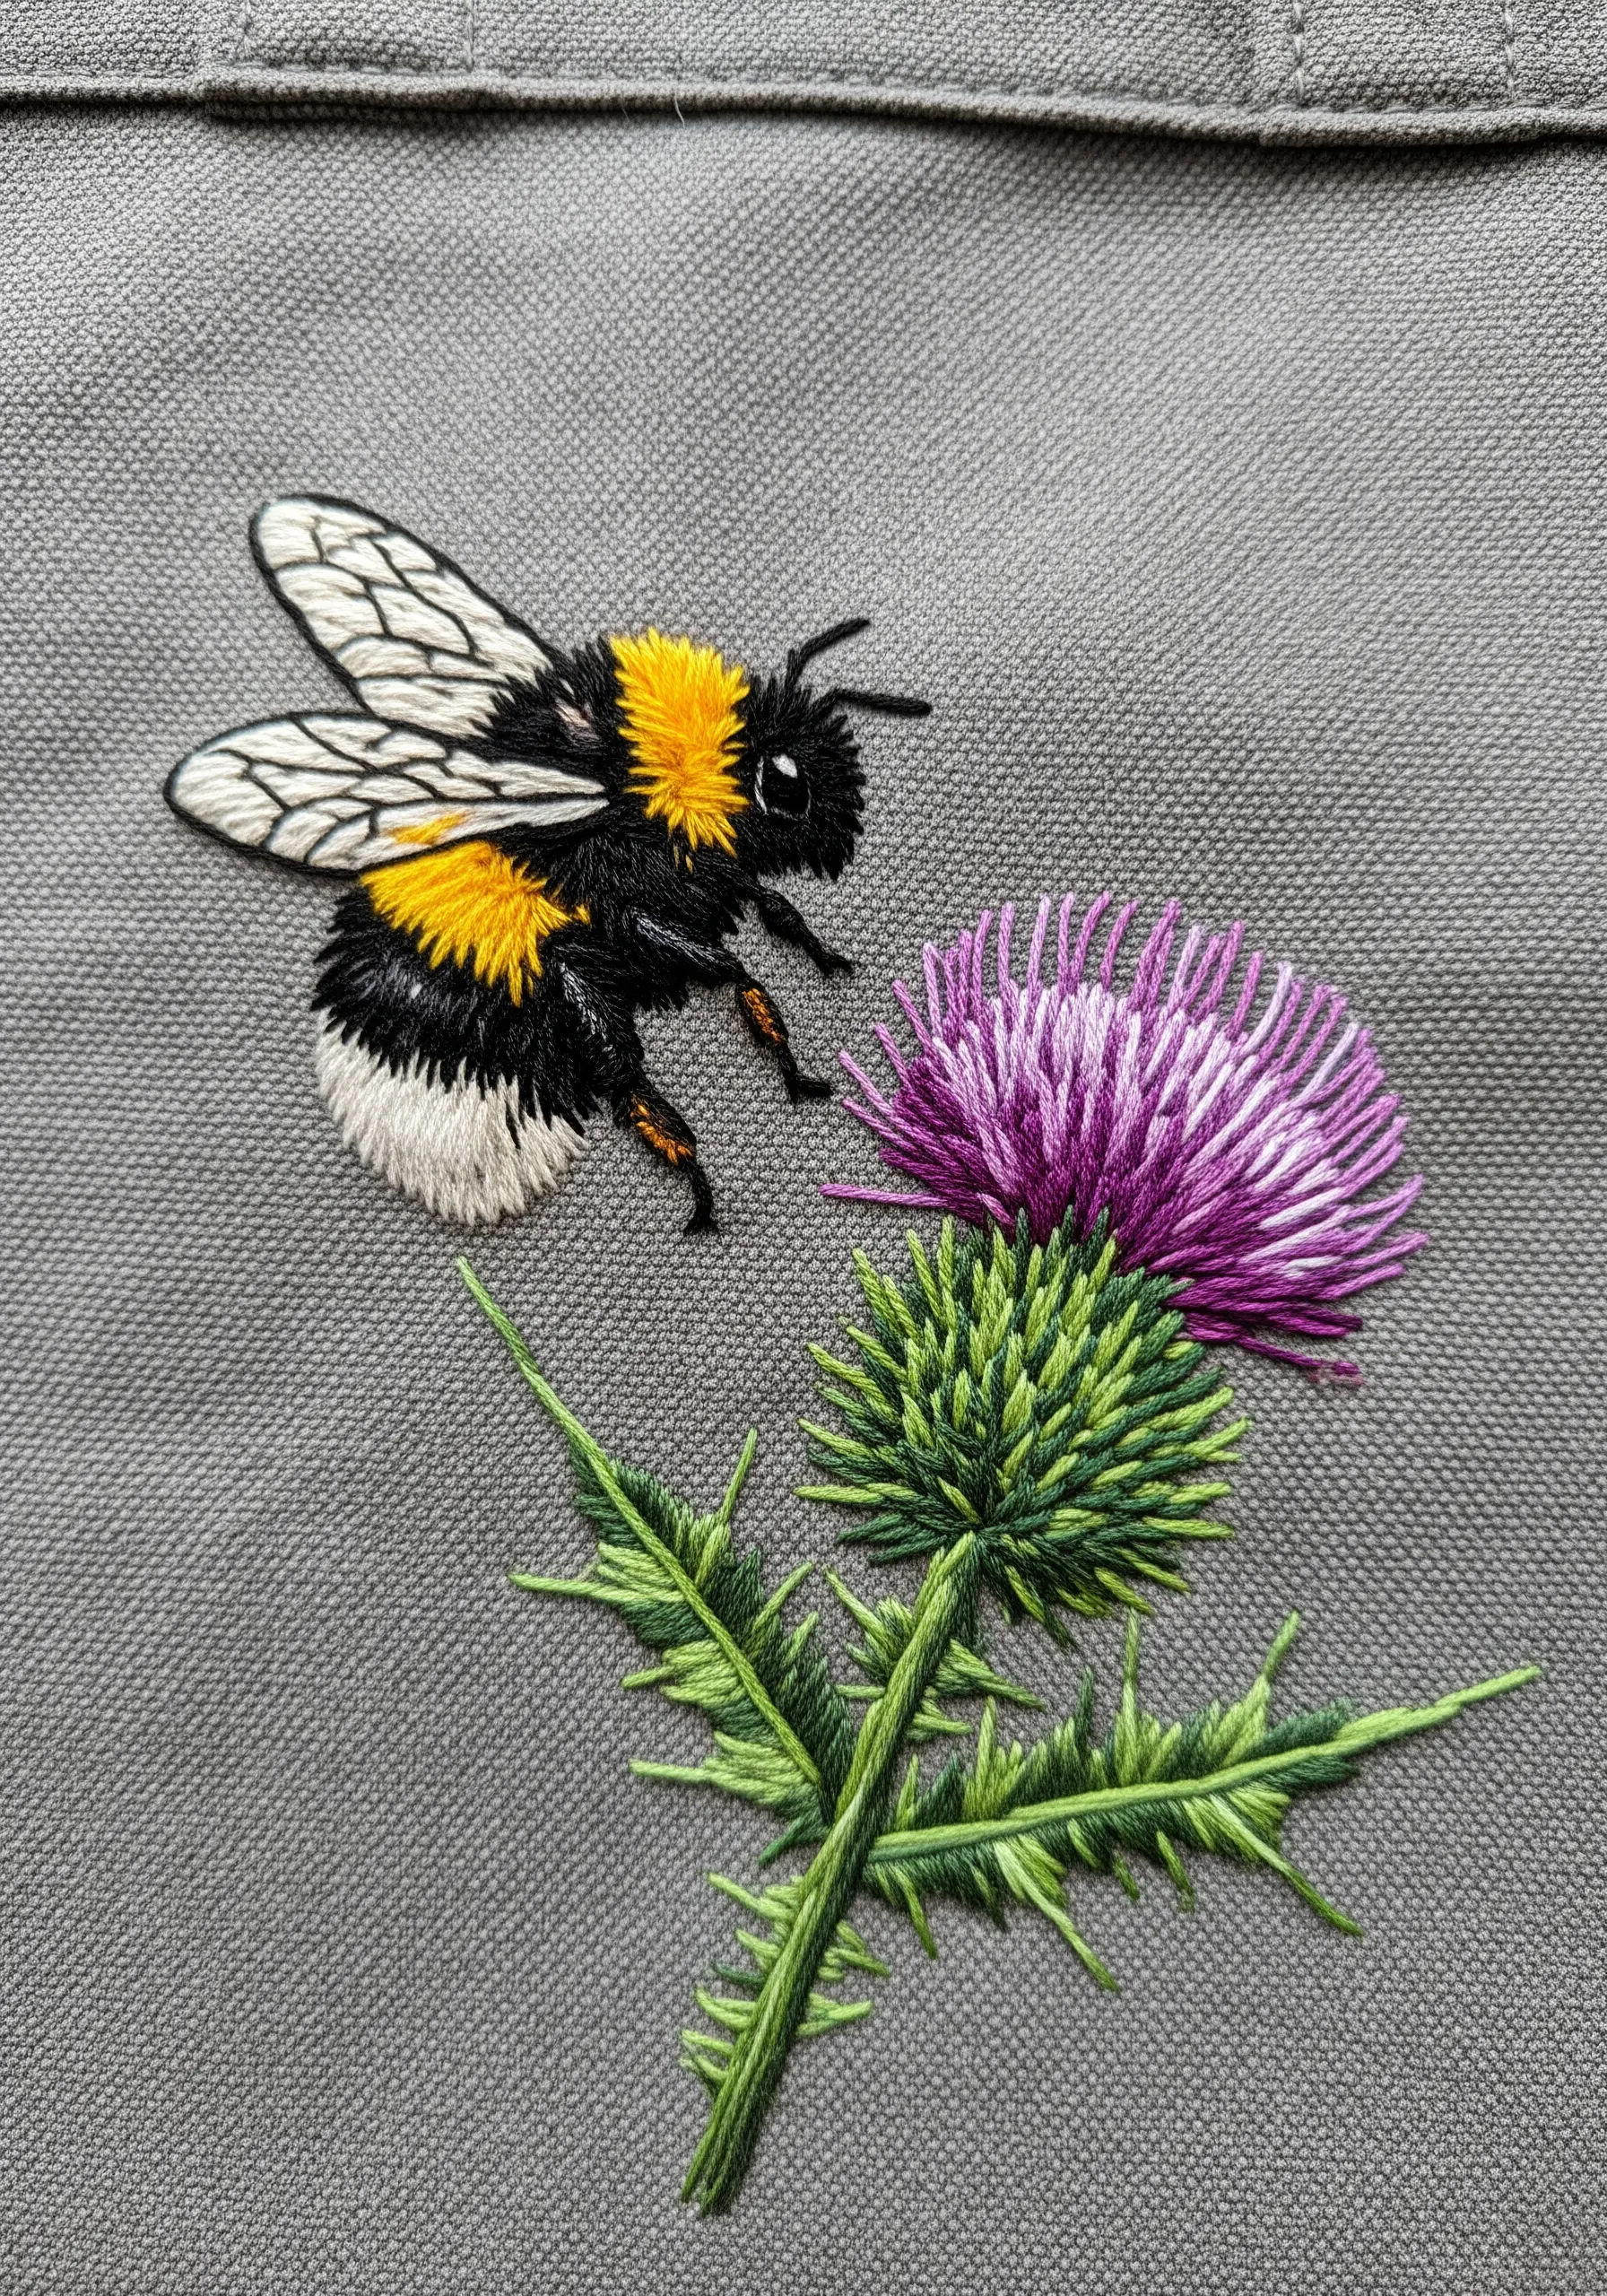
To create the fuzzy texture of a bumblebee, use a turkey stitch (or Ghiordes knot) and trim the loops to create a short, dense pile.
For the smooth, translucent wings, outline the shape with a split stitch and then fill with an open brick stitch or lattice work using a fine, off-white thread.
Contrast these textures with the sharp, spiky thistle. Use straight stitches of varying lengths and directions for the flower and sharp, detached chain stitches for the thorny leaves.
20. Create Depth by Overlapping Leaves and Fruit

To make your botanical arrangements look lush and natural, strategically overlap the elements.
Always stitch the object that is furthest away first. In this case, embroider the leaves in the background, then stitch the stems, and finally add the oranges on top.
Use a directional satin stitch on the oranges, slightly curving your stitches to suggest their roundness.
This simple layering of real plant shapes is a fundamental principle of composition that instantly adds depth and realism to your work.
21. Stitch a Wildflower Meadow with Varied Heights
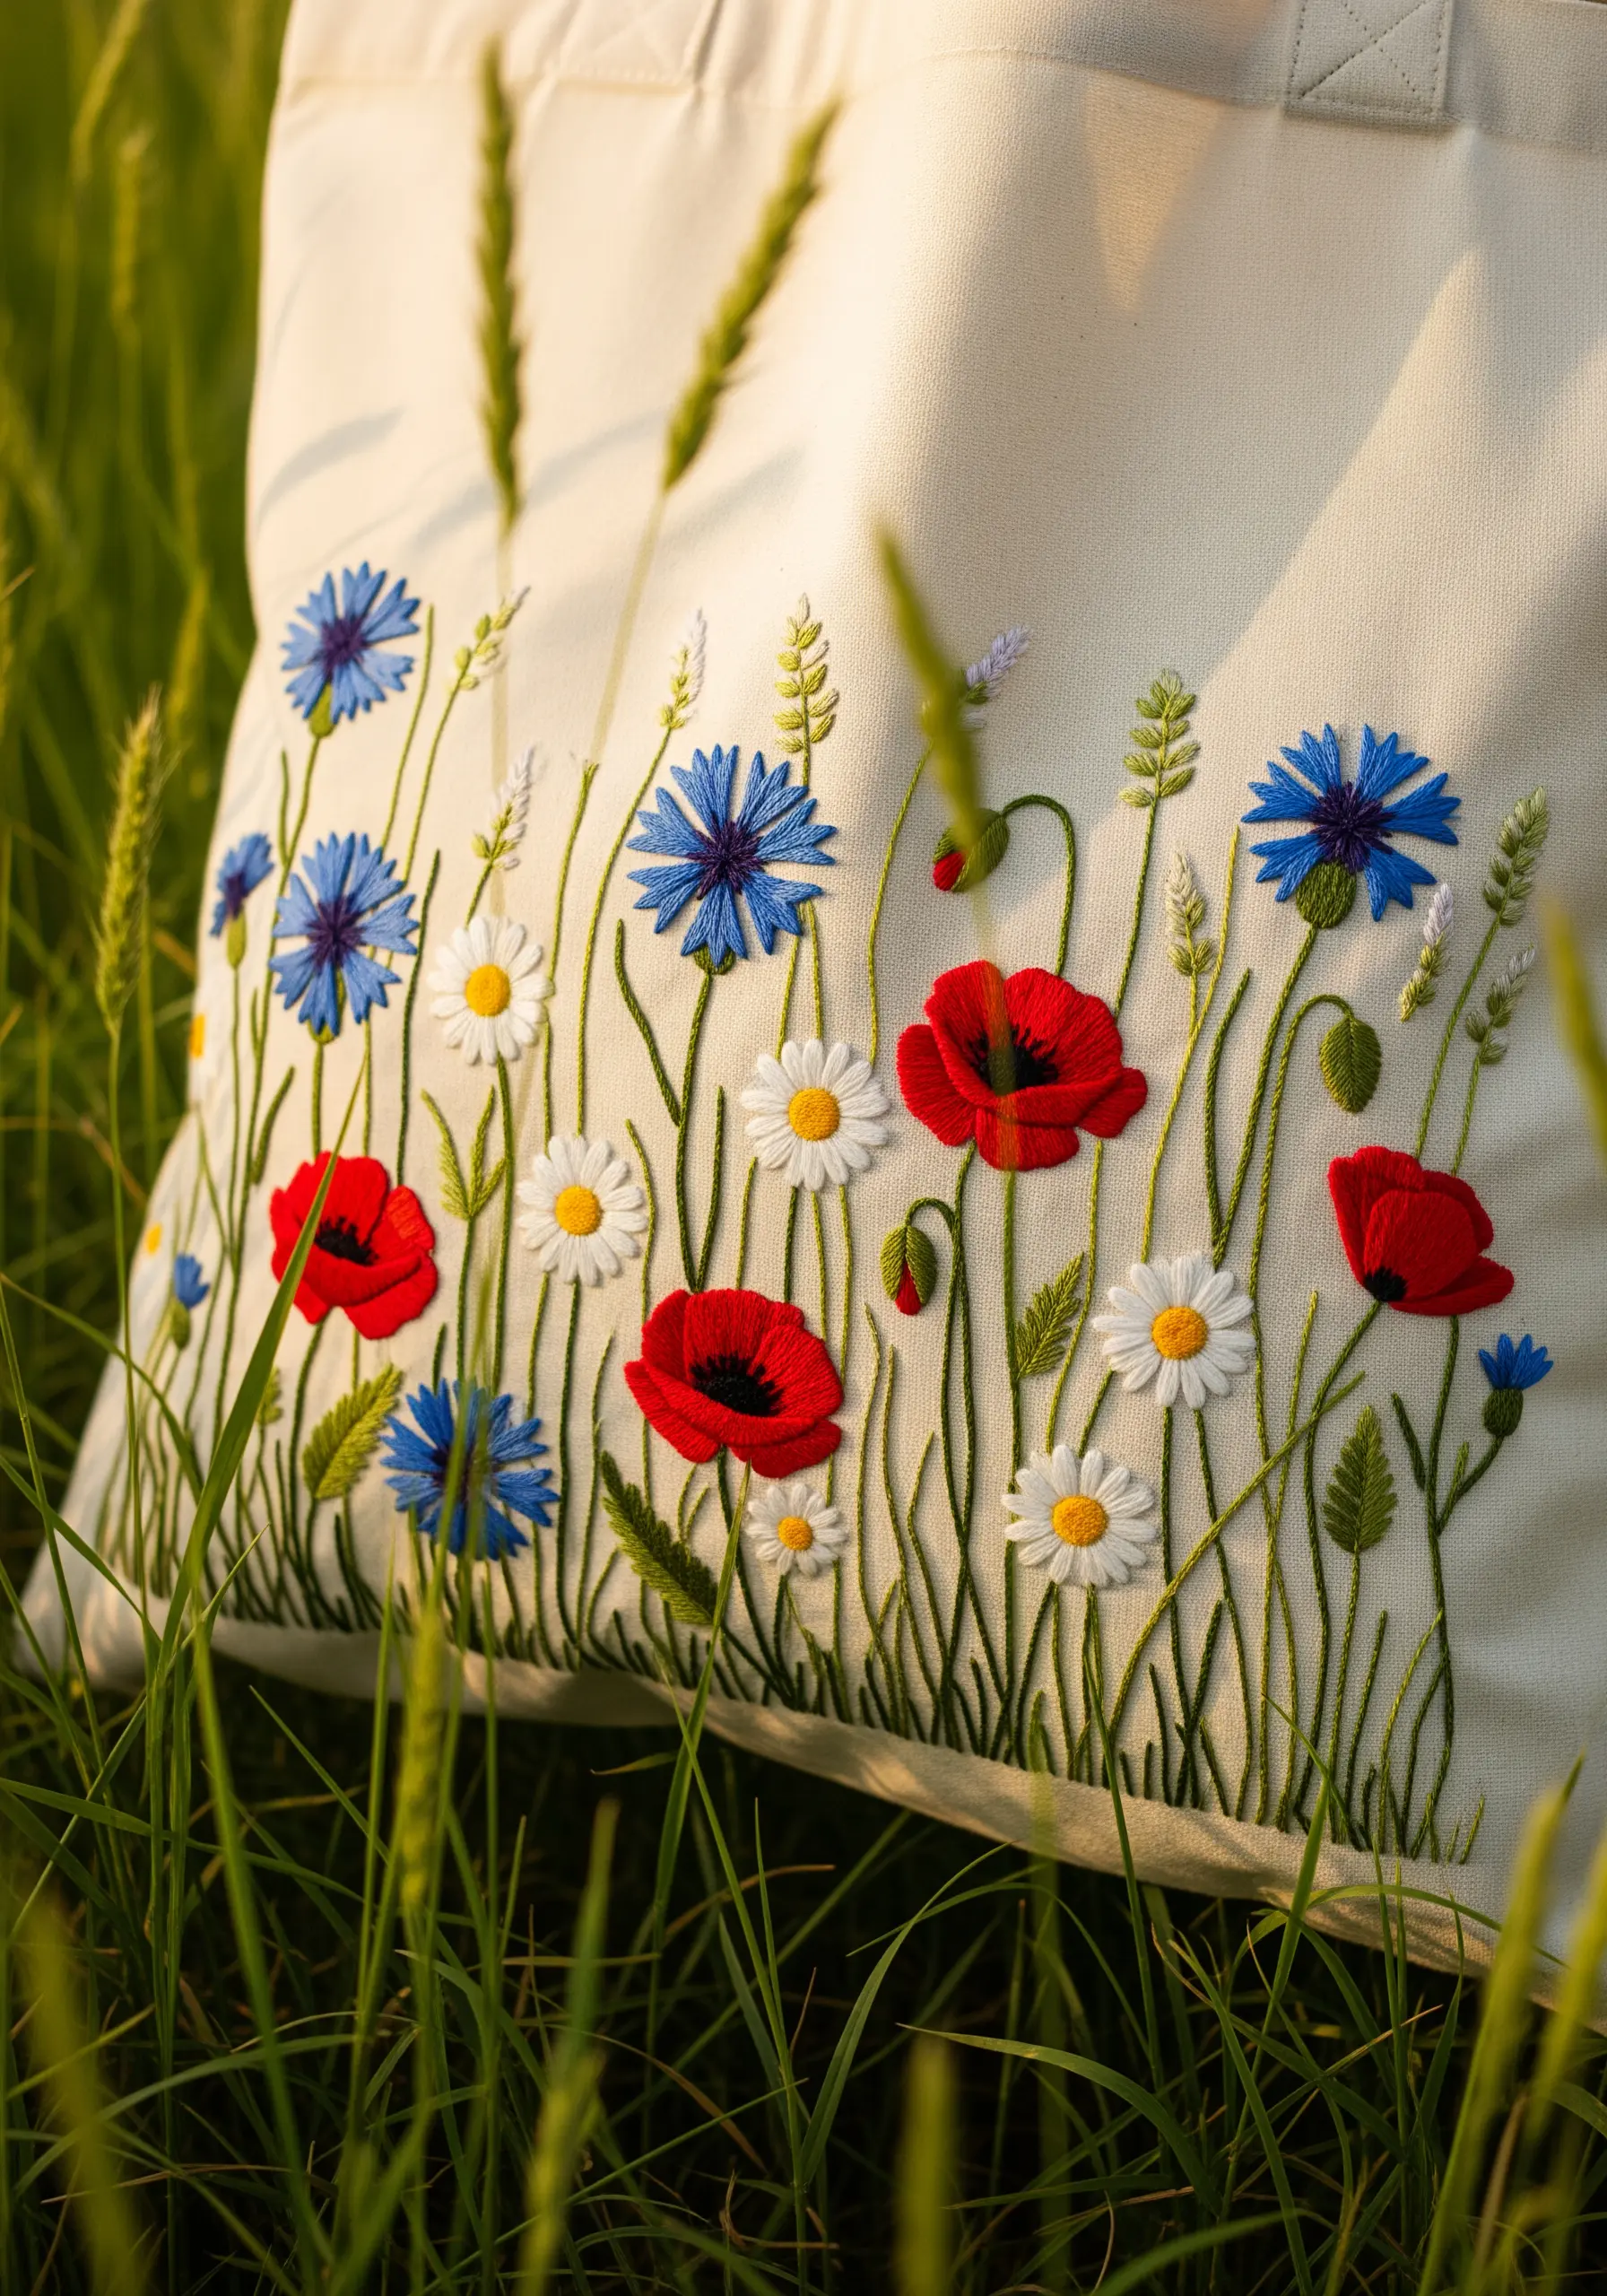
Capture the feeling of a natural meadow by varying the heights and types of your flowers.
Use simple, classic stitches that are easy to master: lazy daisy for the white petals, satin stitch for the red poppies, and straight stitches for the blue cornflowers.
Create a sense of depth by stitching some stems with a lighter green and making them thinner, suggesting they are further in the background.
Don’t strive for perfect symmetry; the slight randomness of a wildflower field is what makes it so charming.
22. Use Glow-in-the-Dark Thread for a Magical Touch
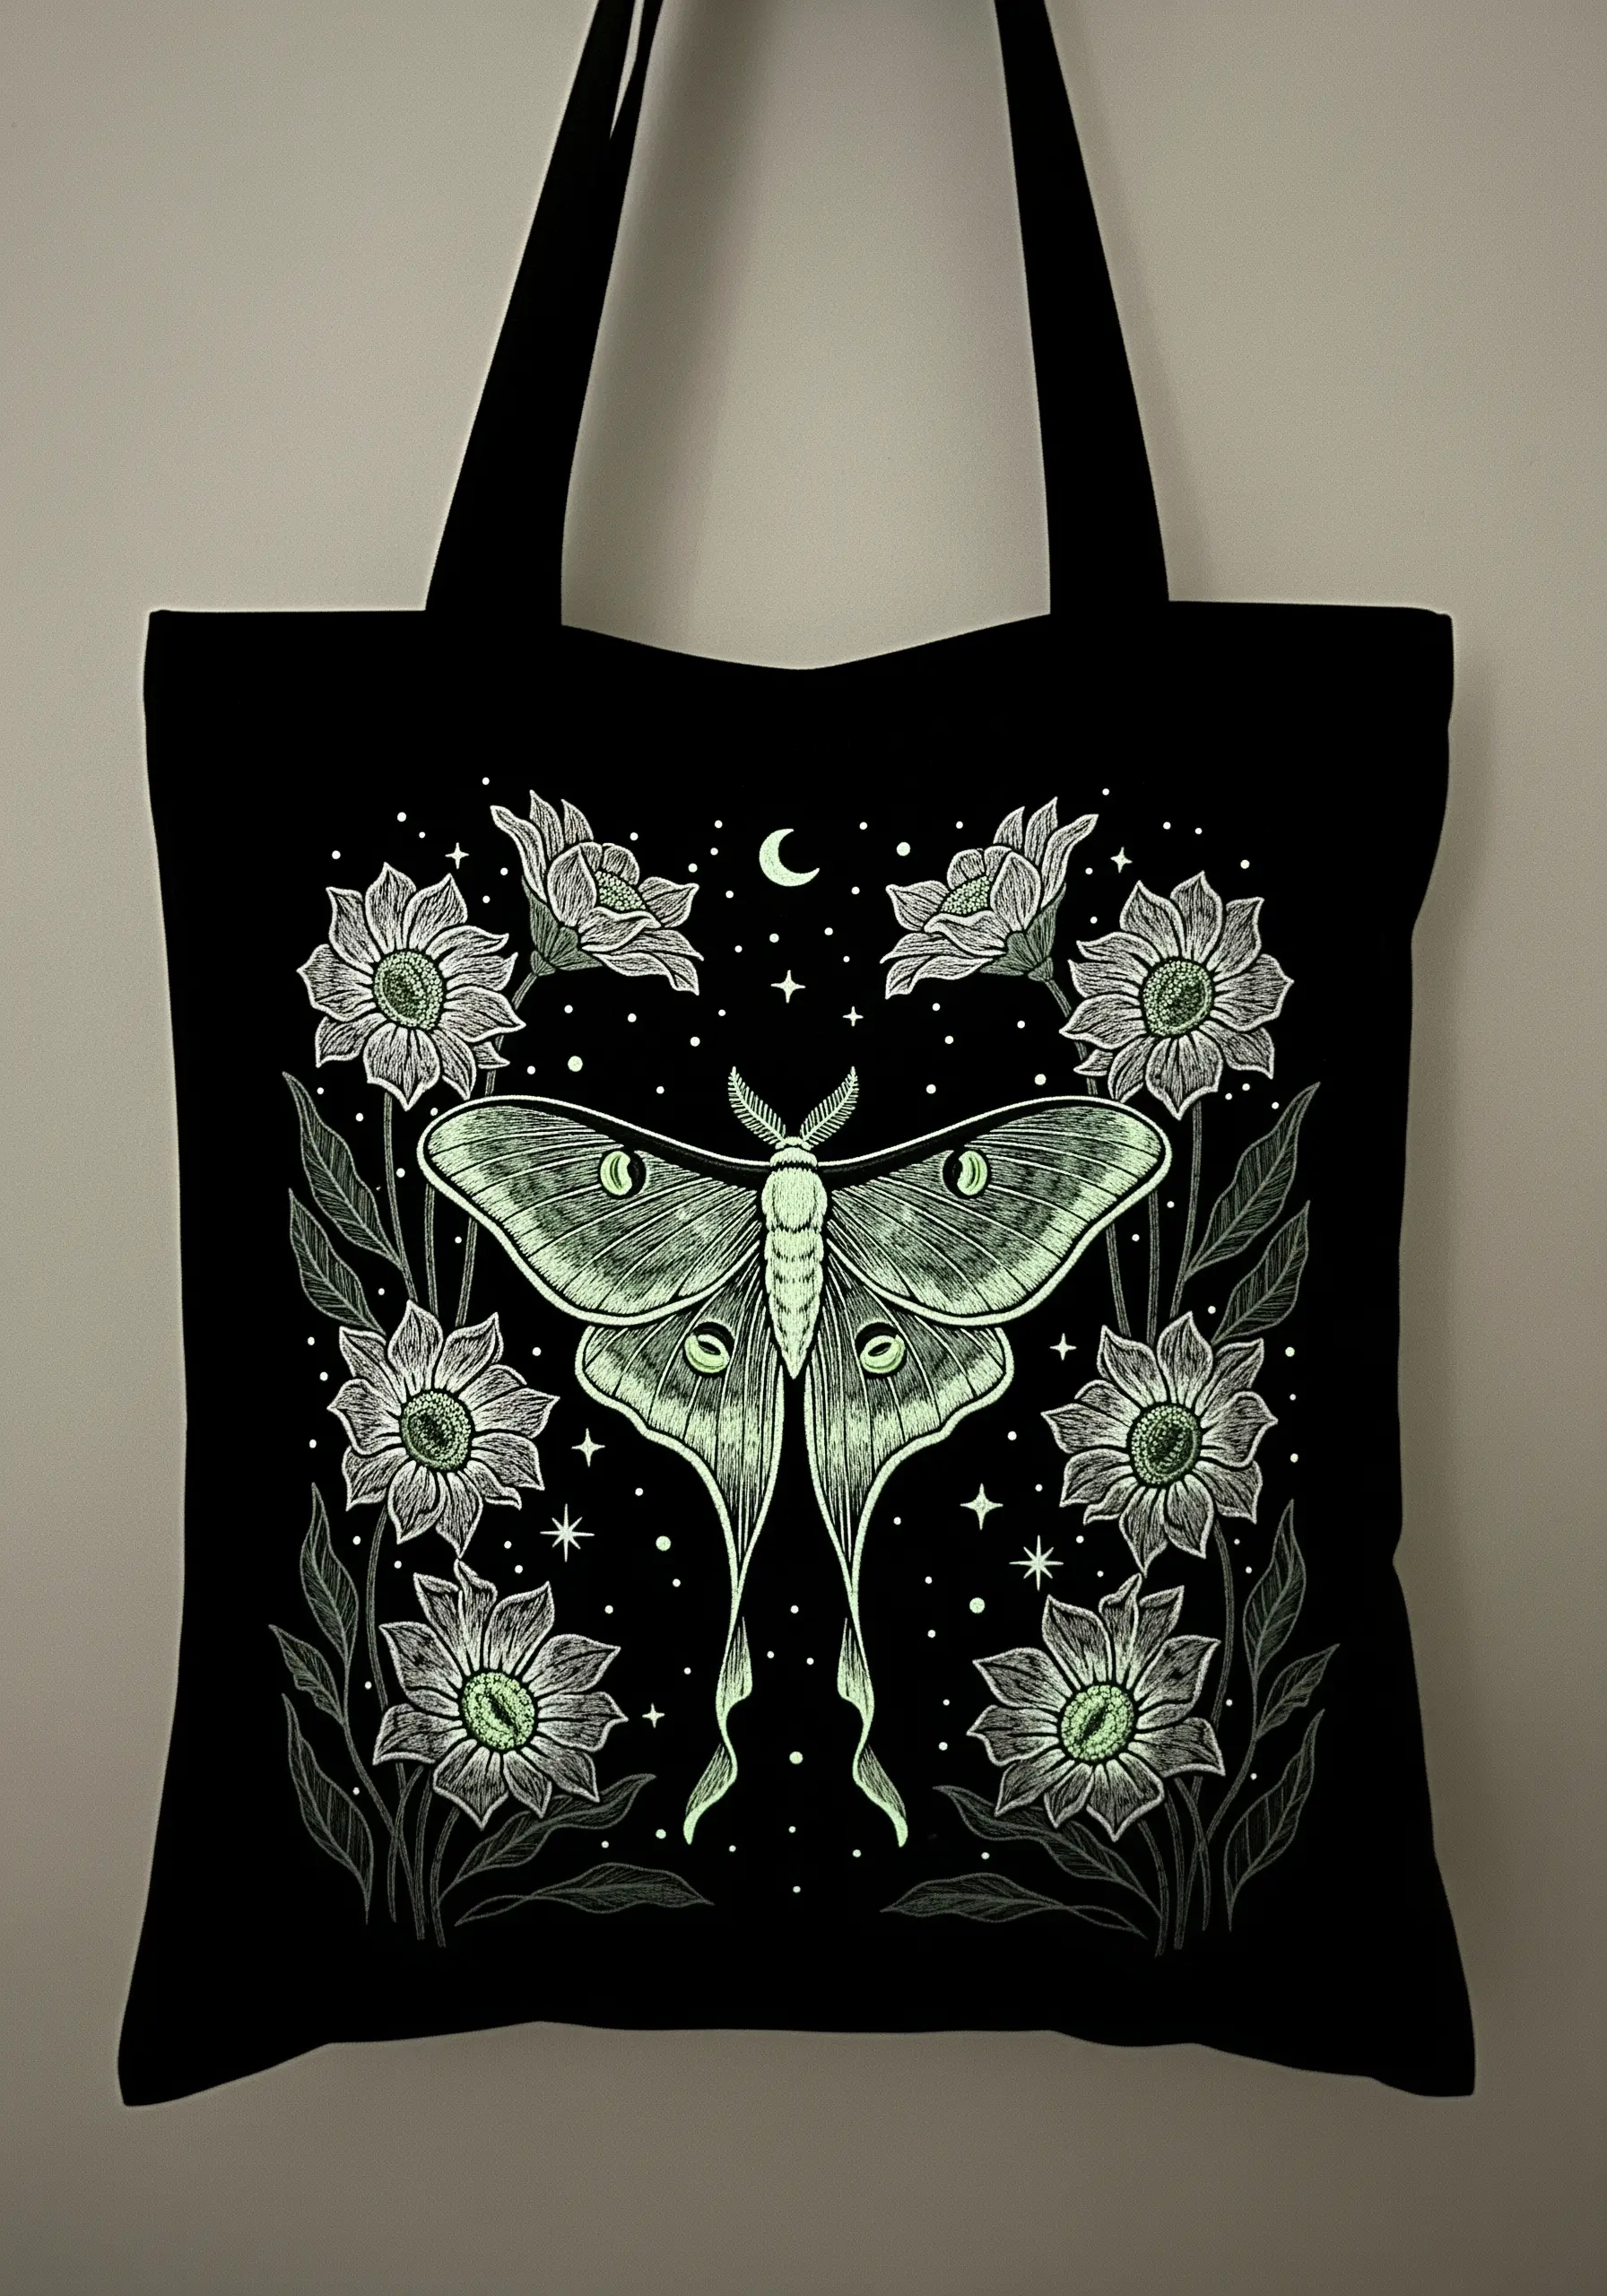
For a design that transforms after dark, substitute standard white or pale green floss with a specialty glow-in-the-dark thread.
This thread works best with simple line work and fill stitches, like the satin stitch used on the moth’s wings and the outline stitch on the flowers.
Before stitching, make sure the thread is compatible with your fabric and test its glow intensity. ‘Charge’ it under a bright light for the best effect.
This unexpected detail adds a layer of magic to your botanical tote, revealing a secret design in the dark.
23. Create a Modern Mosaic with Embroidered Patches

For a clean, graphic look, embroider your succulents on individual felt patches first, then applique them onto the tote.
Cut hexagon shapes from dark felt to act as your frames. This provides a stable base for stitching and creates a crisp edge.
After embroidering each plant with delicate long-and-short stitches, neatly trim the felt and attach the patches to the bag with a small, tidy whipstitch around the border.
This modular approach allows for perfect placement and creates a striking, honeycomb-inspired design.
24. Capture Iridescence with Silk Floss
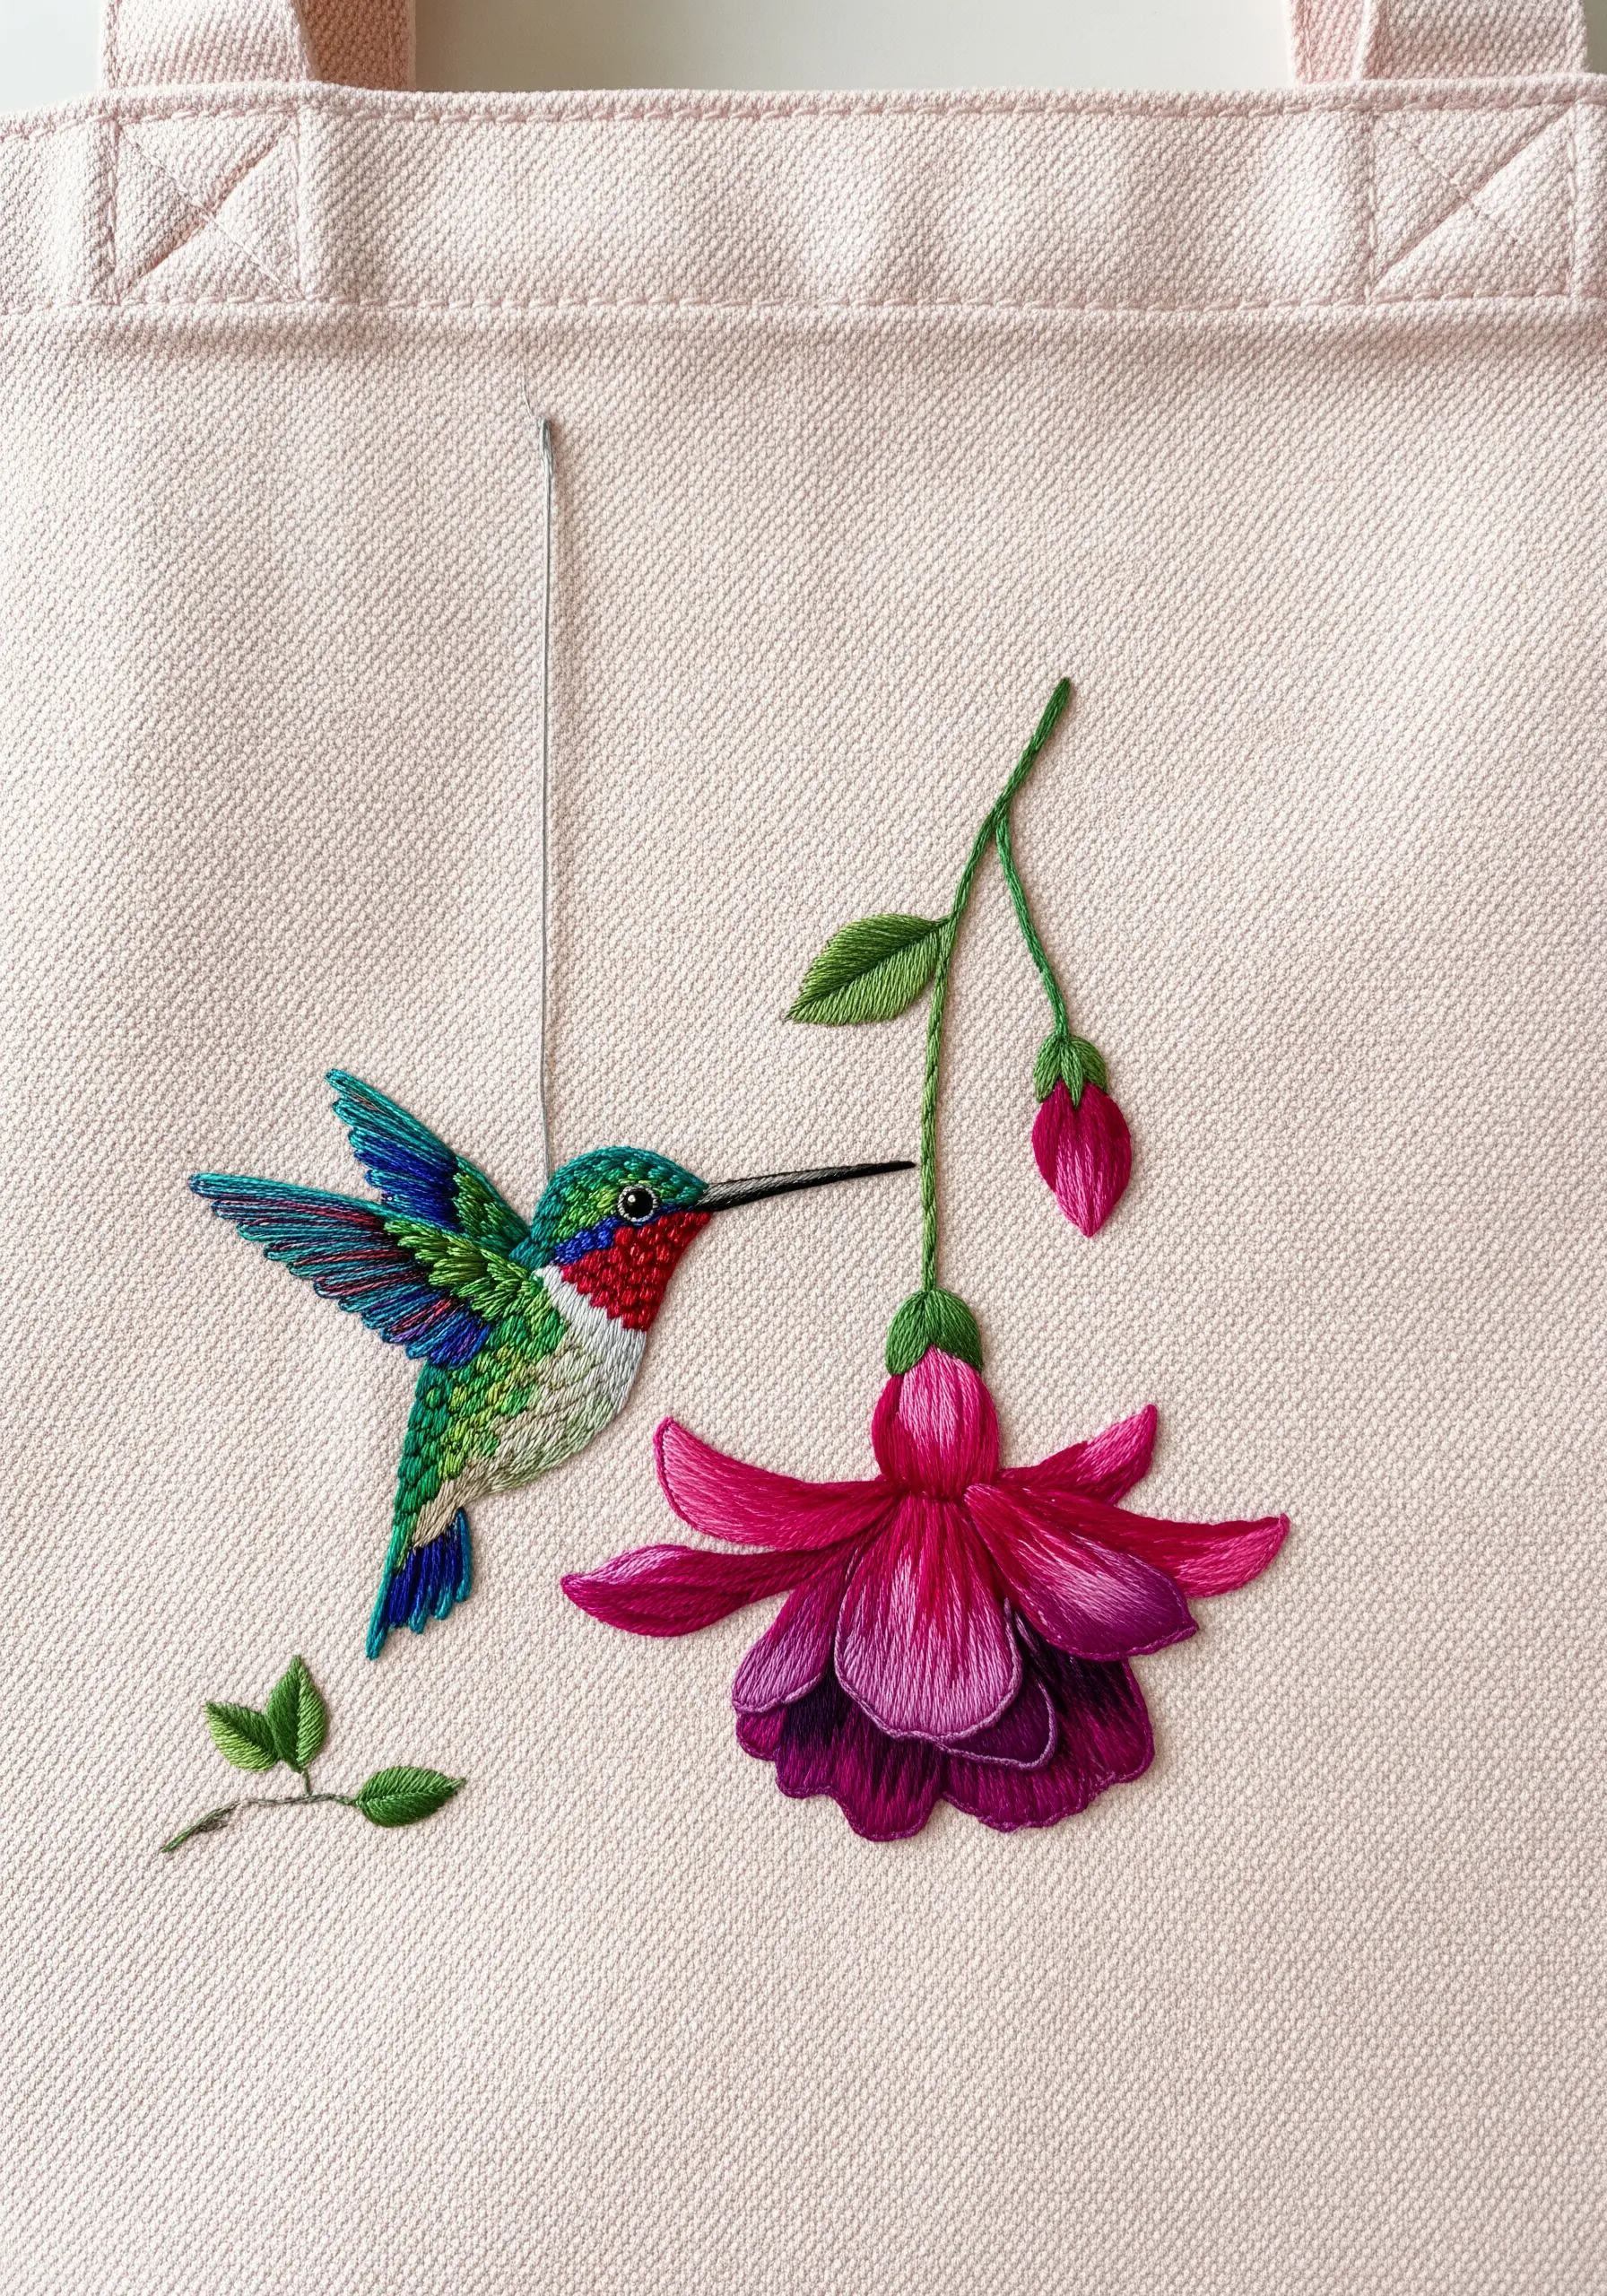
To mimic the iridescent sheen of a hummingbird’s feathers, choose silk or rayon floss instead of standard cotton.
These threads have a natural luster that catches the light, creating subtle shifts in color that are perfect for capturing the bird’s plumage.
Use very short, directional satin stitches, packing them tightly together and changing the angle slightly to reflect light differently across the body and wings.
For the fuchsia flower, the bold, solid colors of cotton floss provide a matte contrast that makes the hummingbird’s sheen even more noticeable.
25. Frame Your Design with a Stitched Border
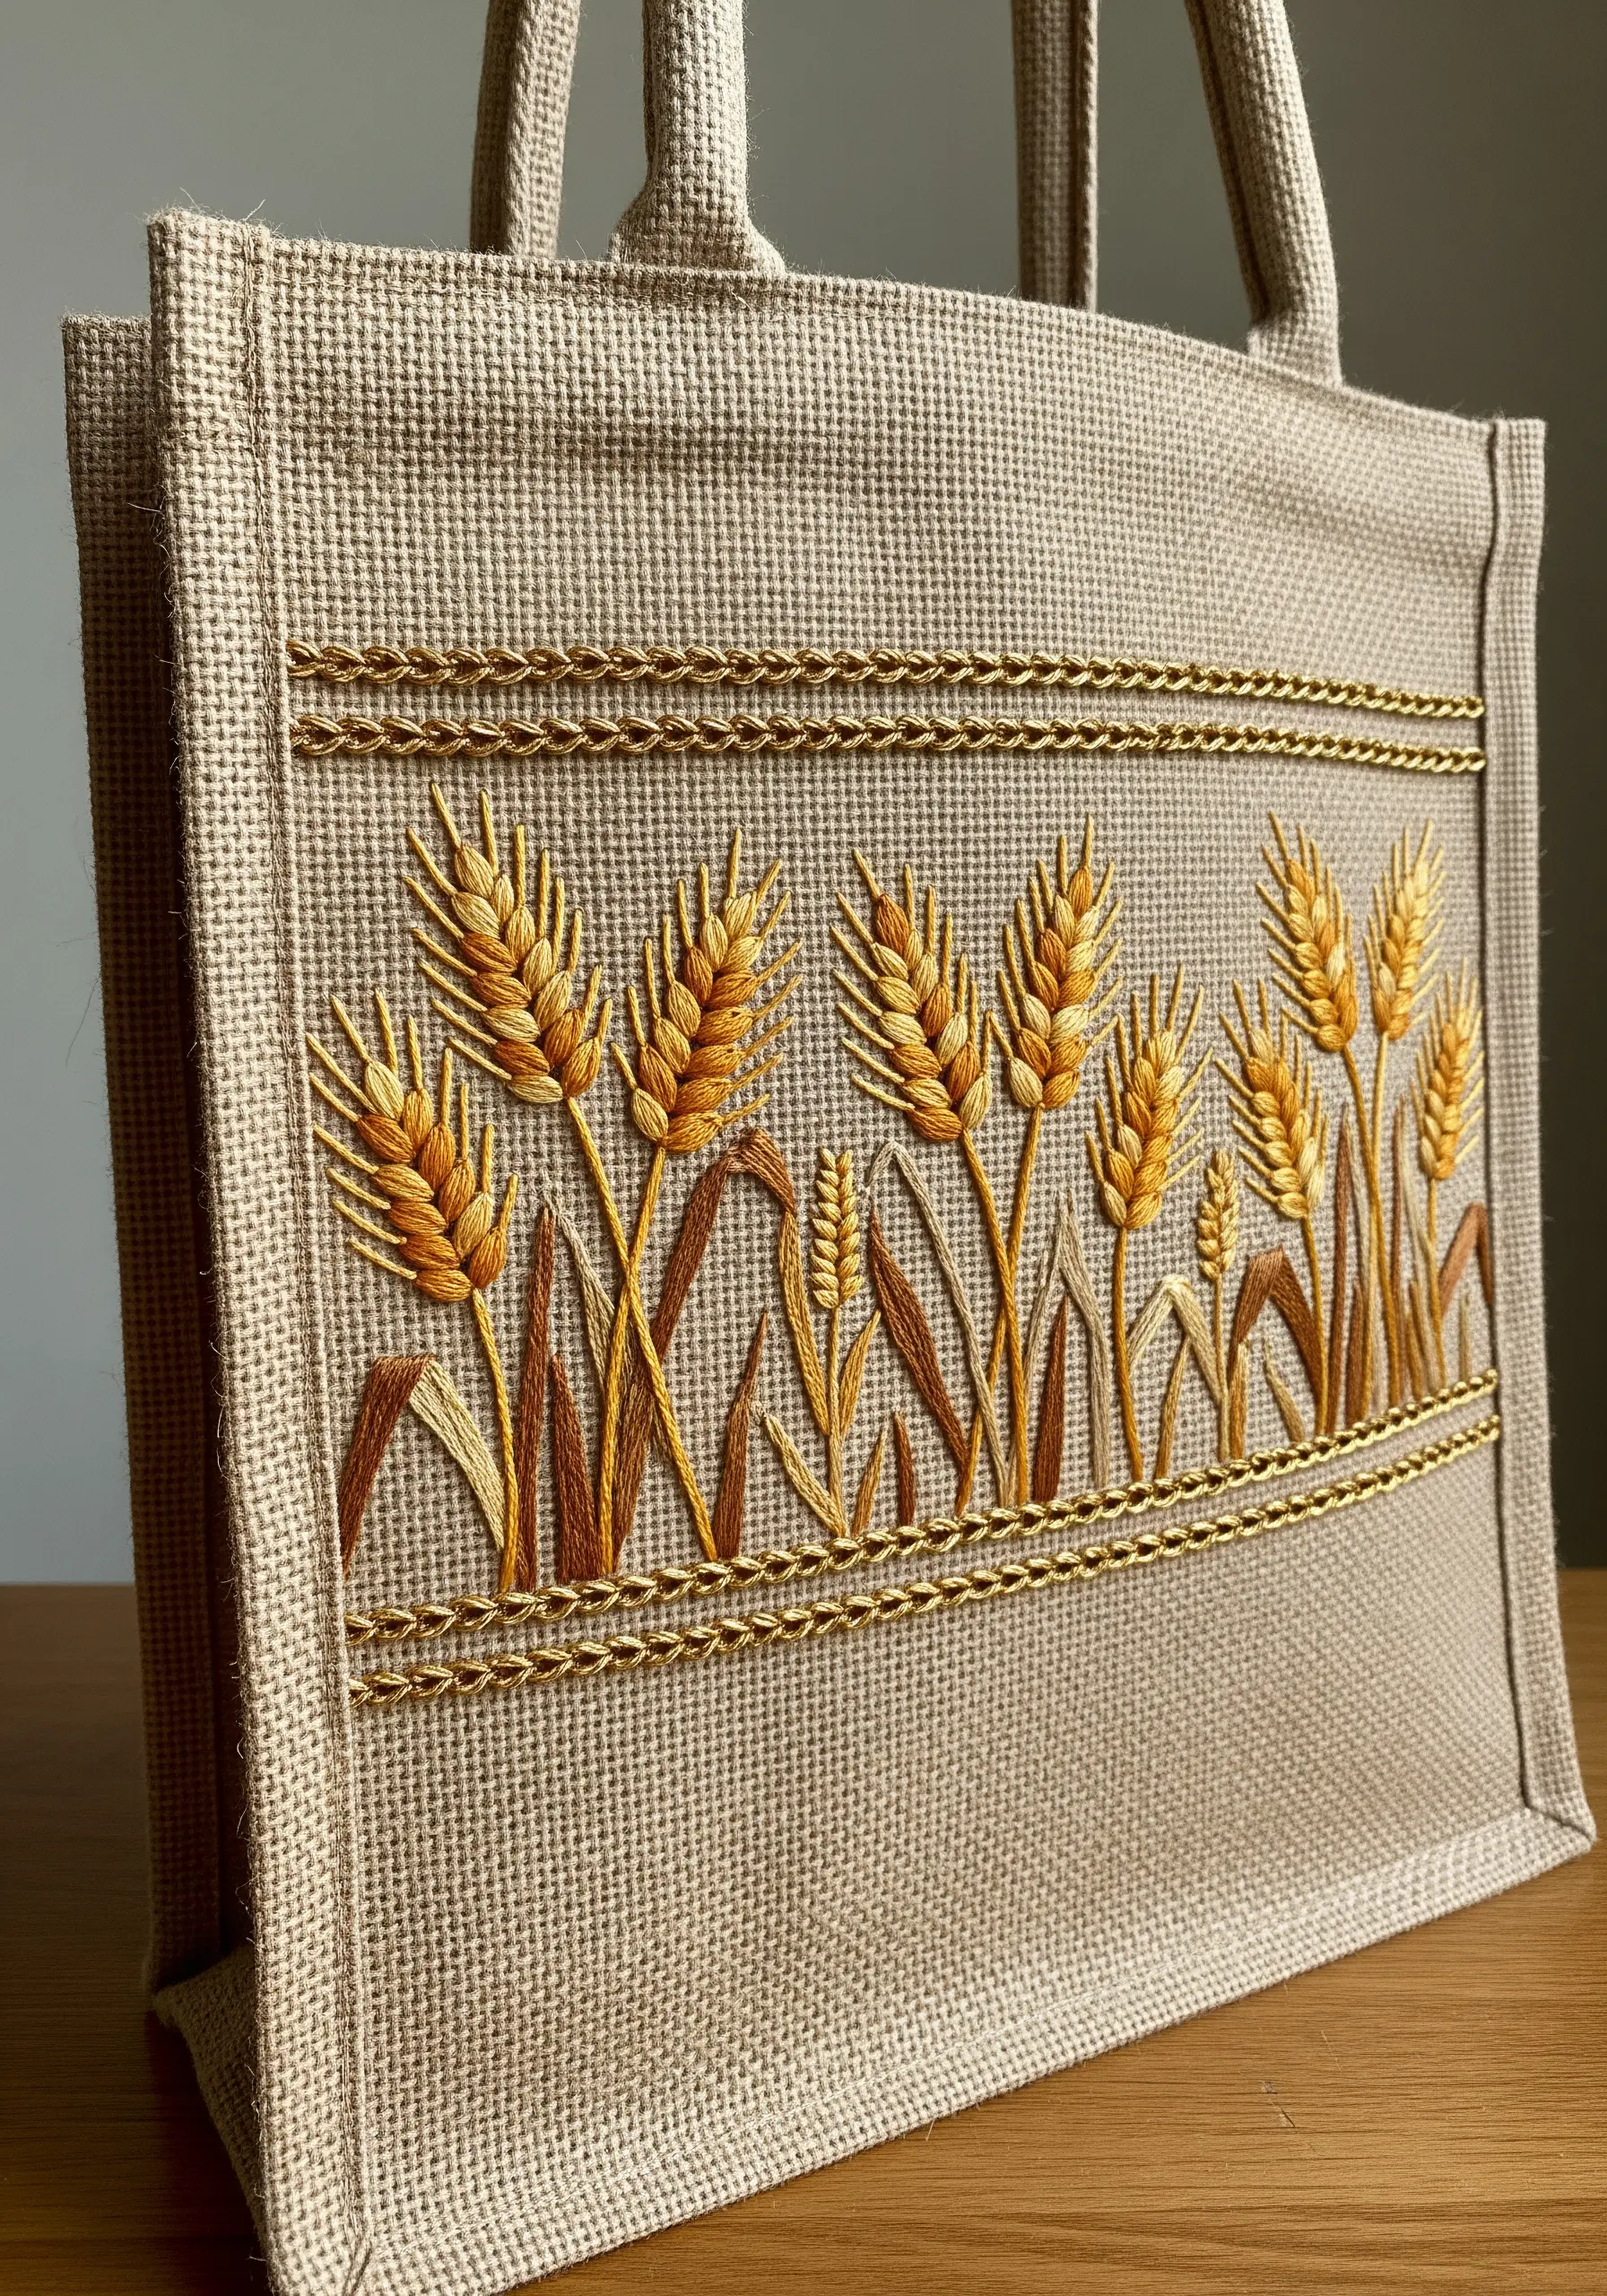
Elevate a simple botanical motif by enclosing it within an elegant, stitched border.
A braided chain stitch or a heavy chain stitch in a contrasting metallic thread adds a touch of sophistication and defines the design area.
For the wheat stalks, use a fishbone stitch for the grains, which naturally creates the herringbone pattern of a wheat ear.
This combination of rustic subject matter with a formal, almost regal border creates a beautiful juxtaposition on a simple burlap bag.
26. Convey Underwater Motion with Flowing Stitches
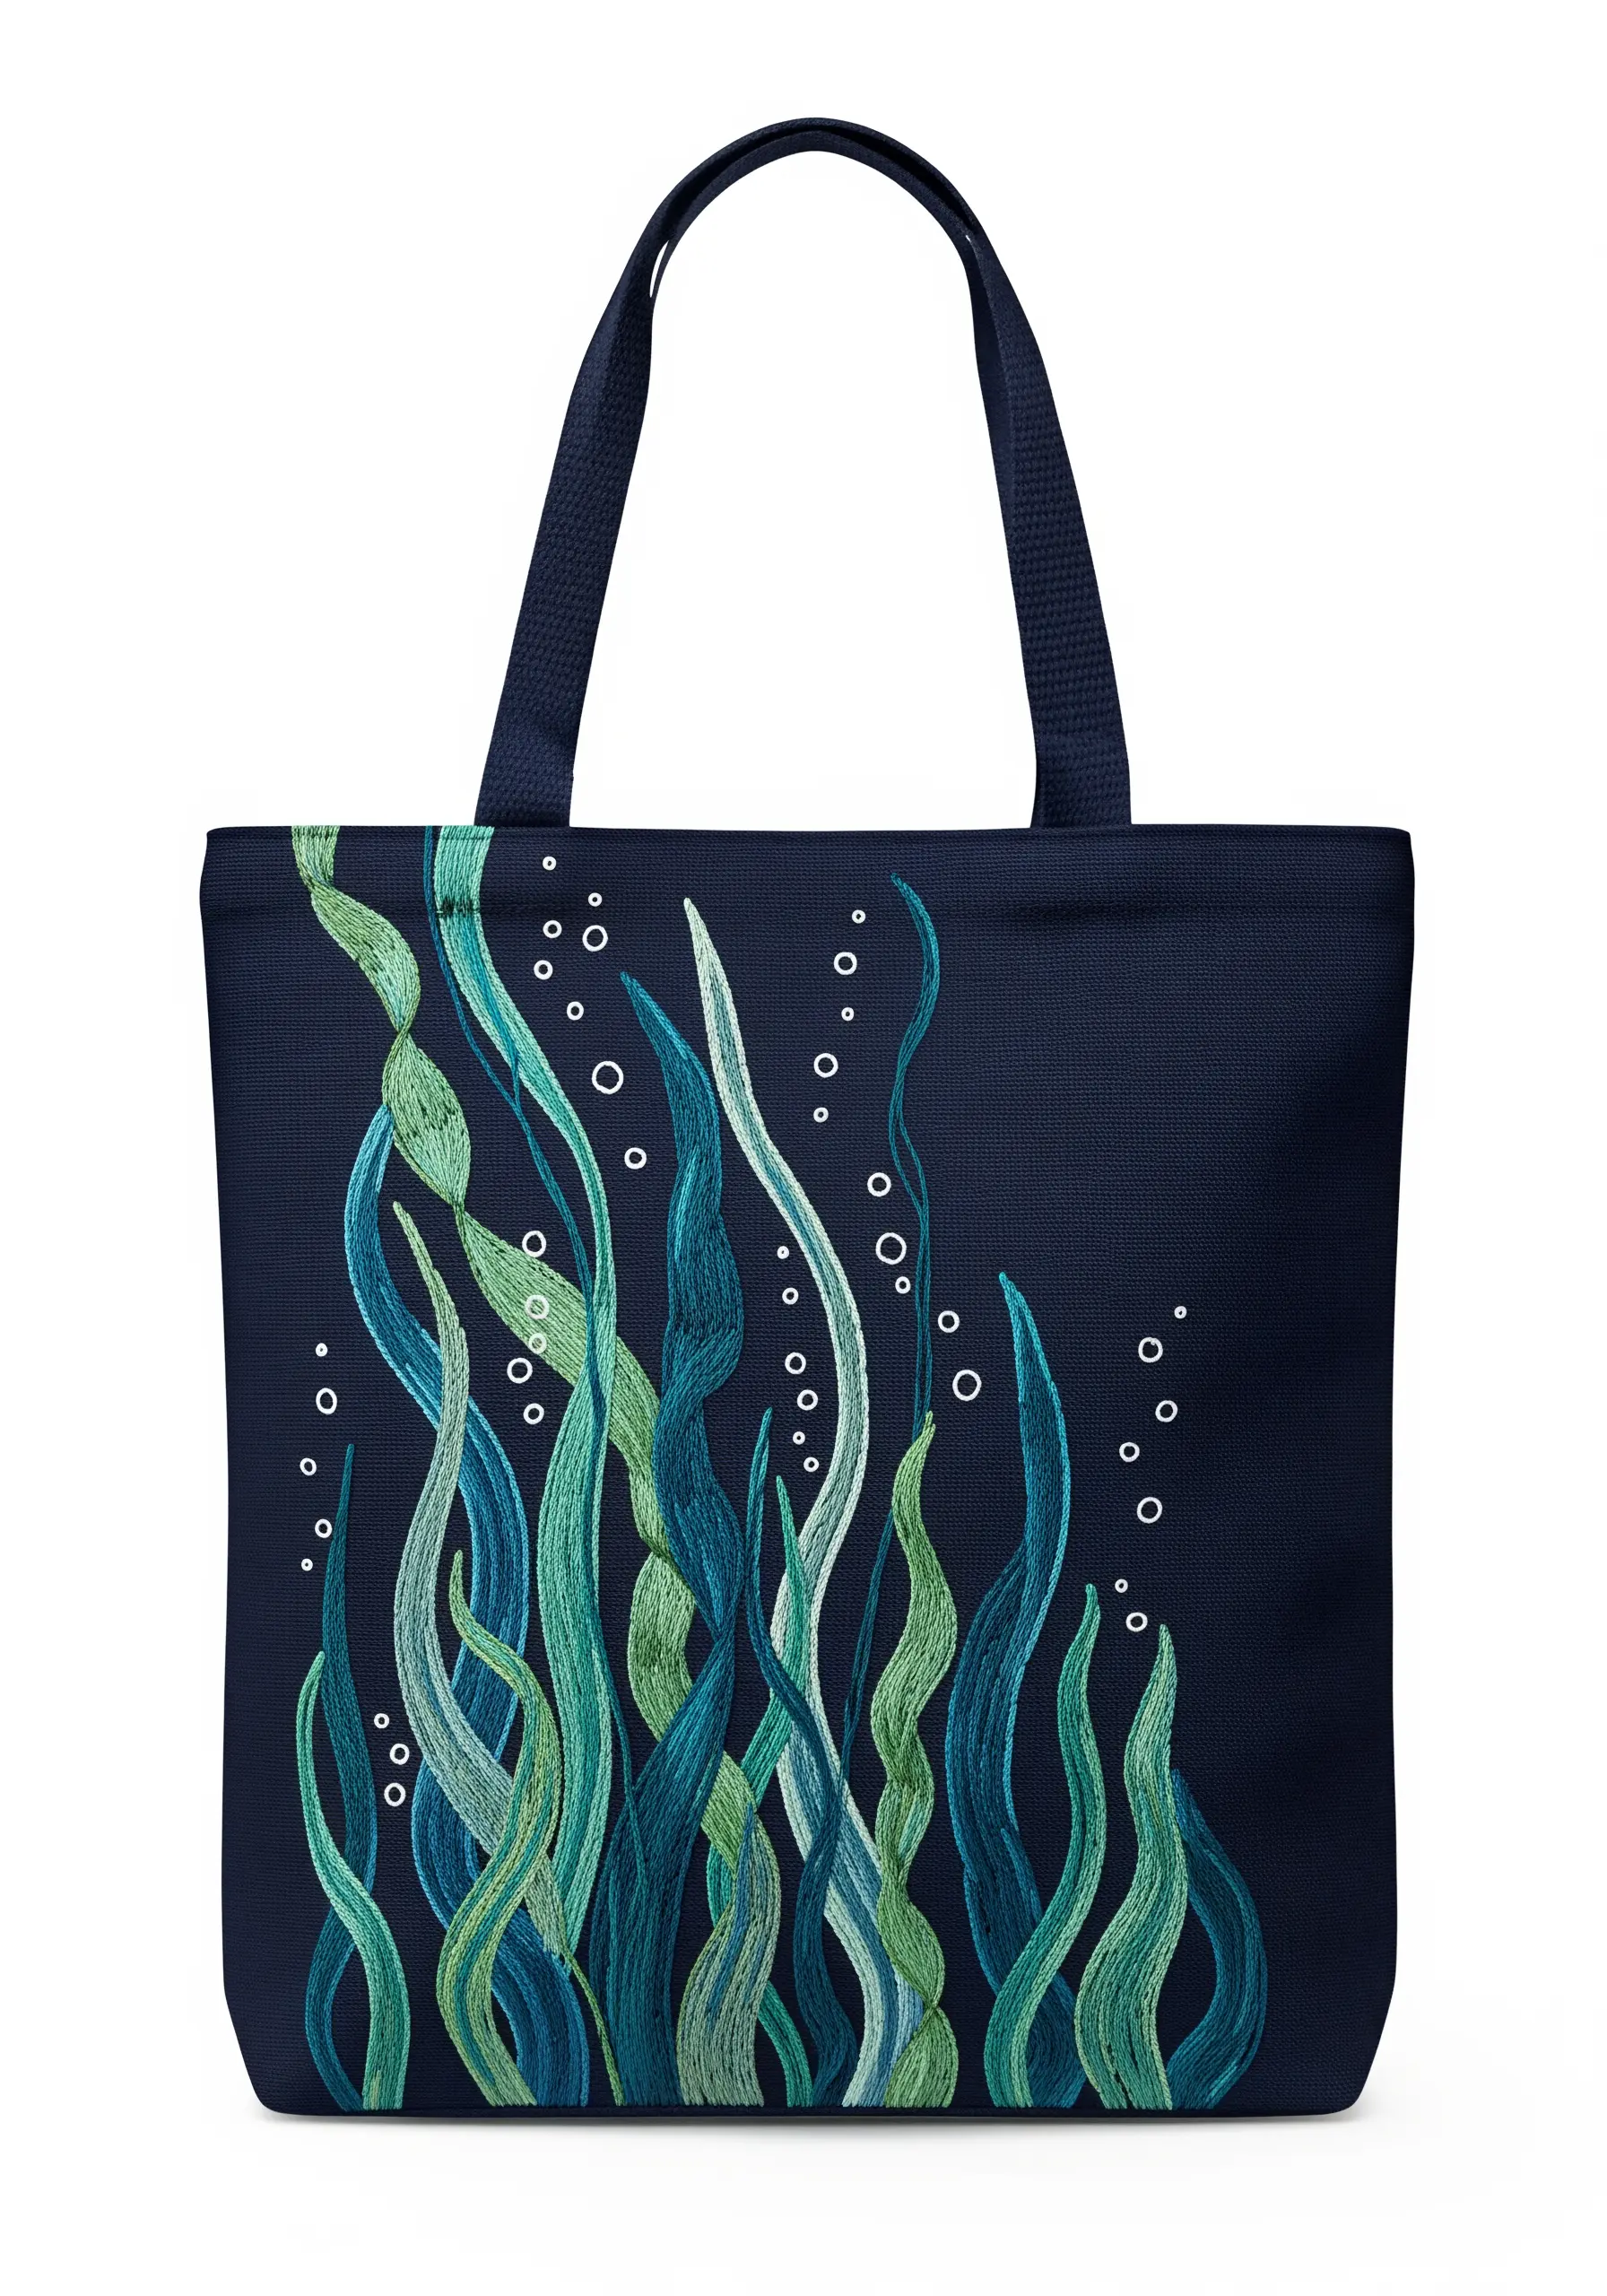
To suggest the gentle sway of seaweed, use stitch direction to your advantage.
Fill each blade of seaweed with long, vertical stitches that follow its curve, like a split stitch or stem stitch. Avoid horizontal fill stitches, which would break the illusion of movement.
Use a palette of analogous colors—blues, teals, and sea greens—to create a harmonious underwater scene. A variegated thread can be very effective here.
A few scattered French knots or tiny circles in white create the effect of air bubbles rising to the surface, completing the aquatic feel.
27. Combine Realism and Artistry with Pressed Flowers

For a delicate, hyper-realistic effect, incorporate actual pressed flowers into your embroidery.
Carefully arrange your pressed pansies and forget-me-nots on the fabric and secure them with a light layer of fabric-safe glue or fusible webbing.
Then, use fine, single-strand embroidery to add stems, leaves, and subtle details, seamlessly blending the pressed botanicals with your stitch work.
This mixed-media technique from inspiring pressed flower art projects creates a piece with incredible texture and a unique, ethereal quality, but remember it will be more fragile than thread alone.
28. Create a Lush Fern Border with Fishbone Stitch
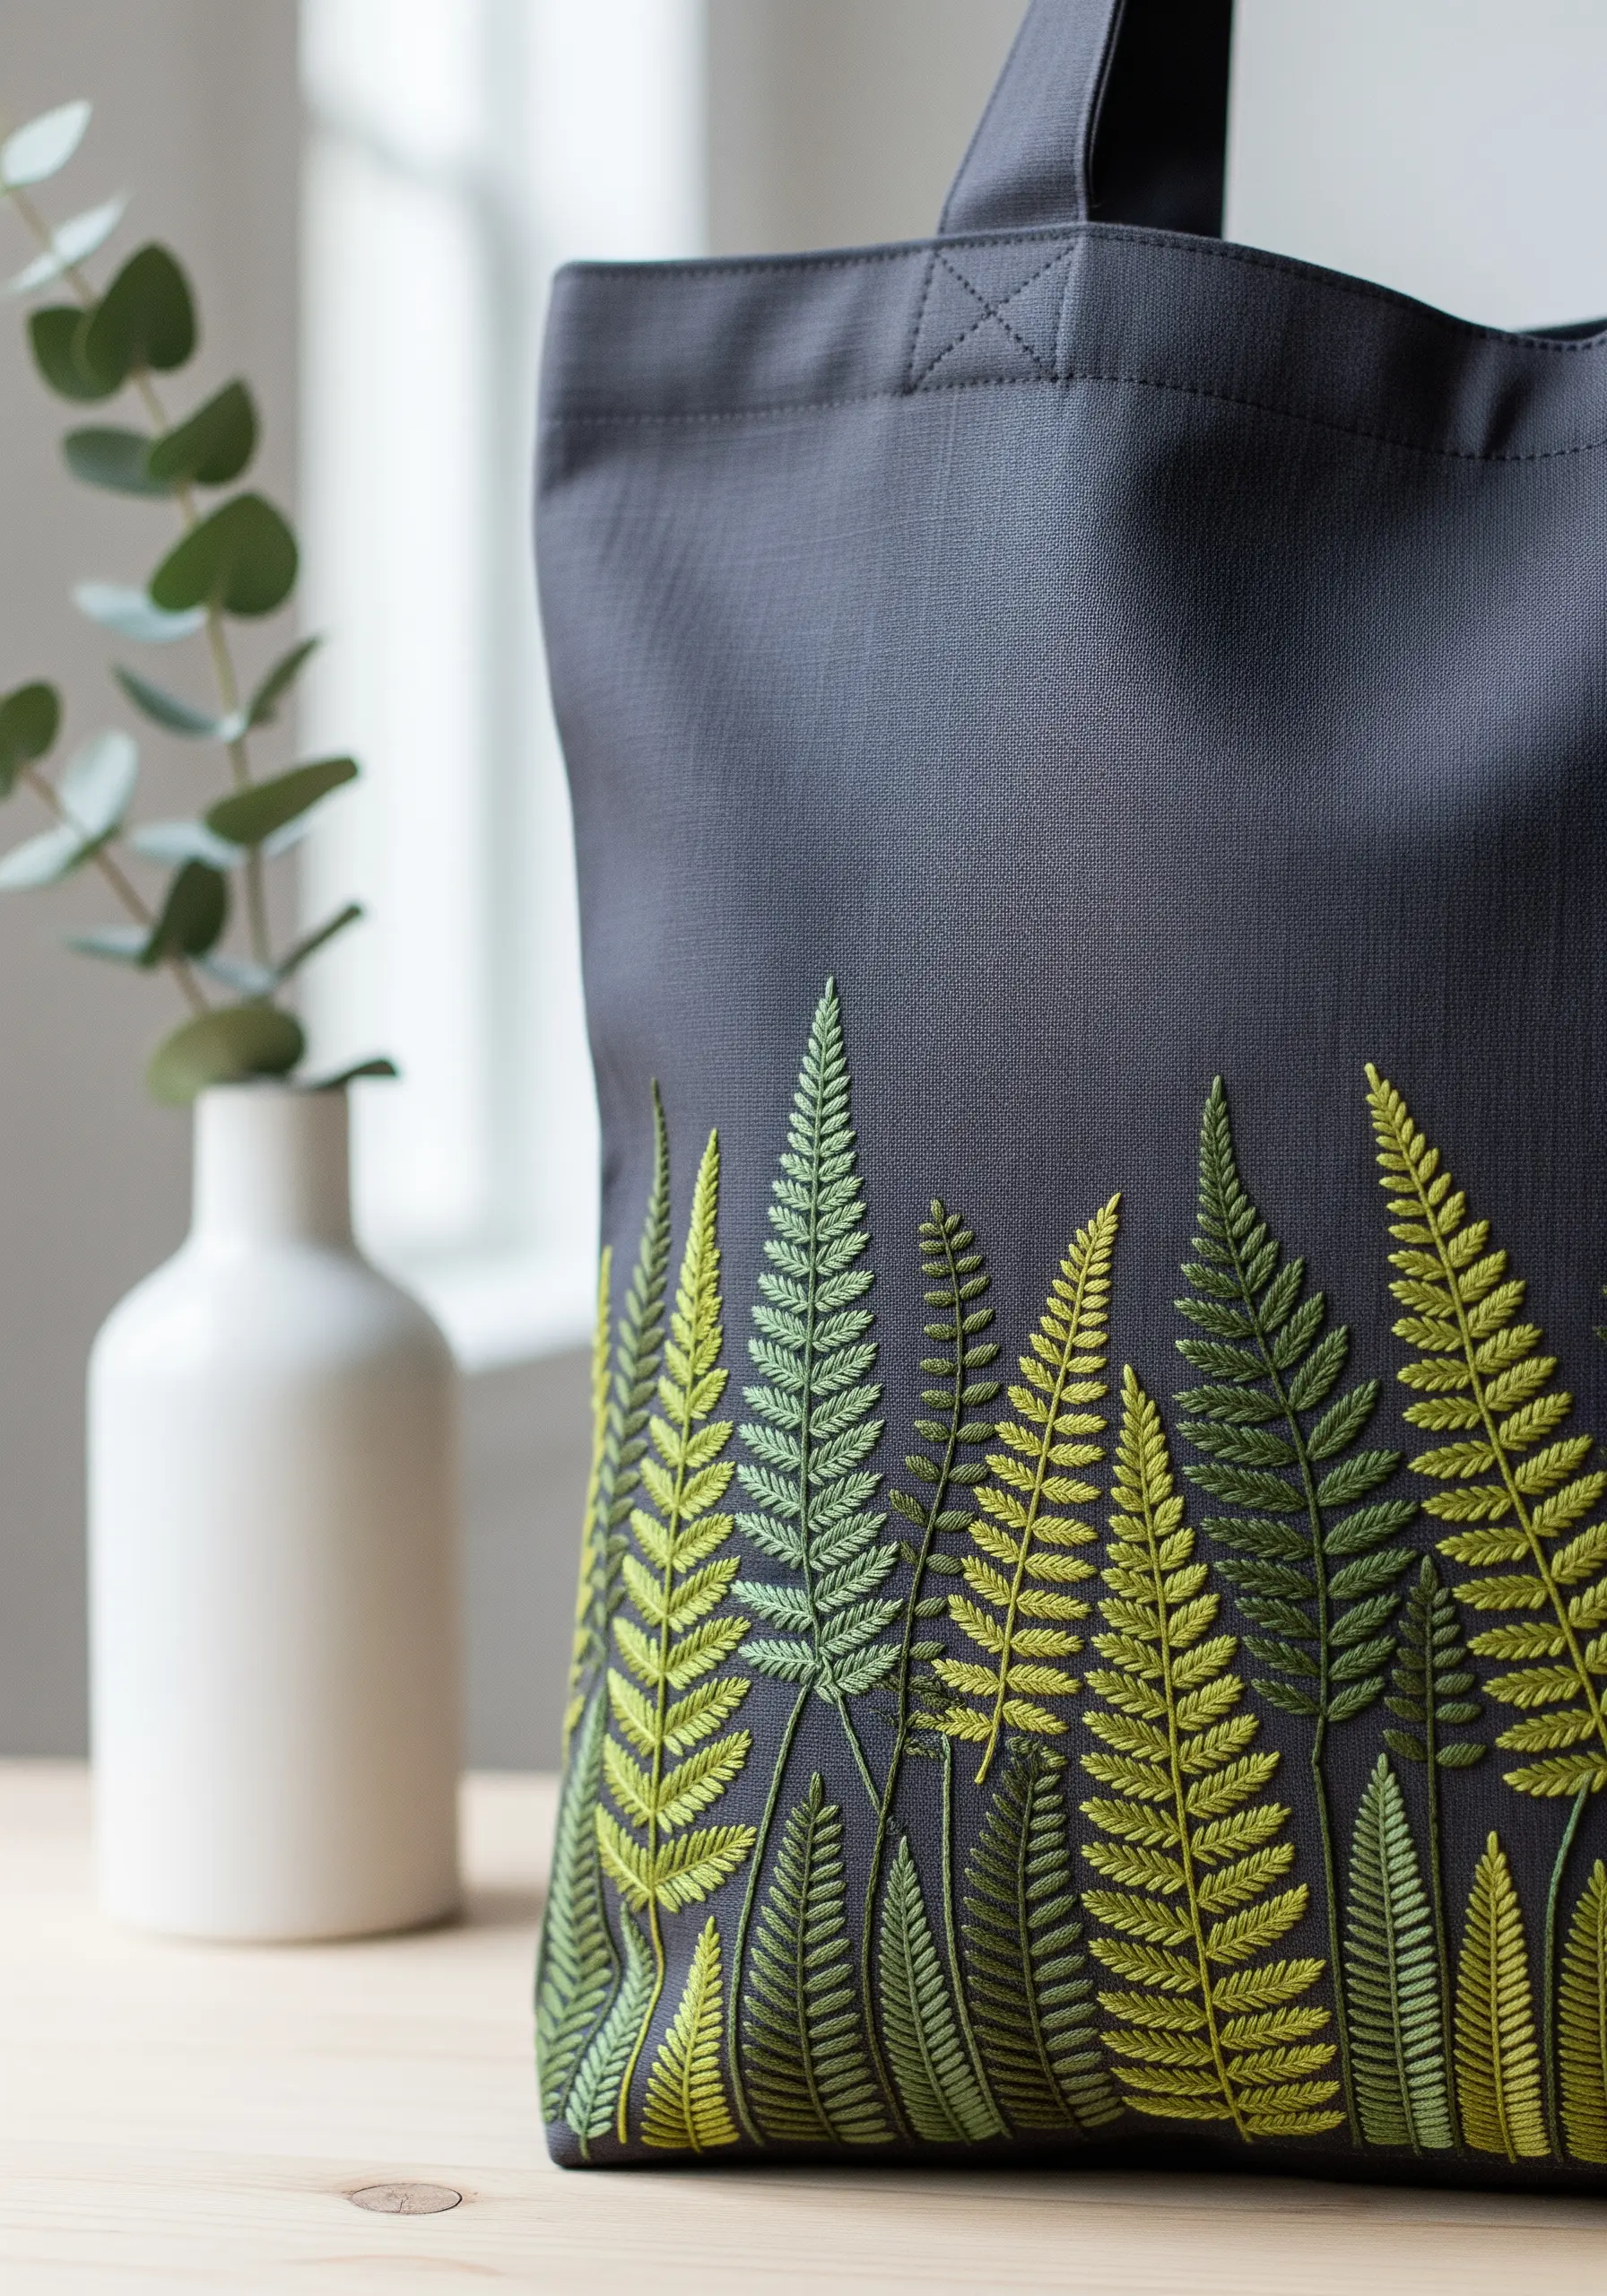
A simple border of ferns at the base of your tote bag can create a powerful graphic statement.
The fishbone stitch is perfect for fern fronds, as it creates both the central stem and the angled leaves in one continuous motion.
Create depth and interest by varying the height of the ferns and using a gradient of greens, from bright chartreuse to deep forest green.
This design is particularly effective on a dark tote, where the vibrant greens will stand out, creating a miniature forest floor along the bottom edge.
29. Tell a Story with a Full Embroidered Scene
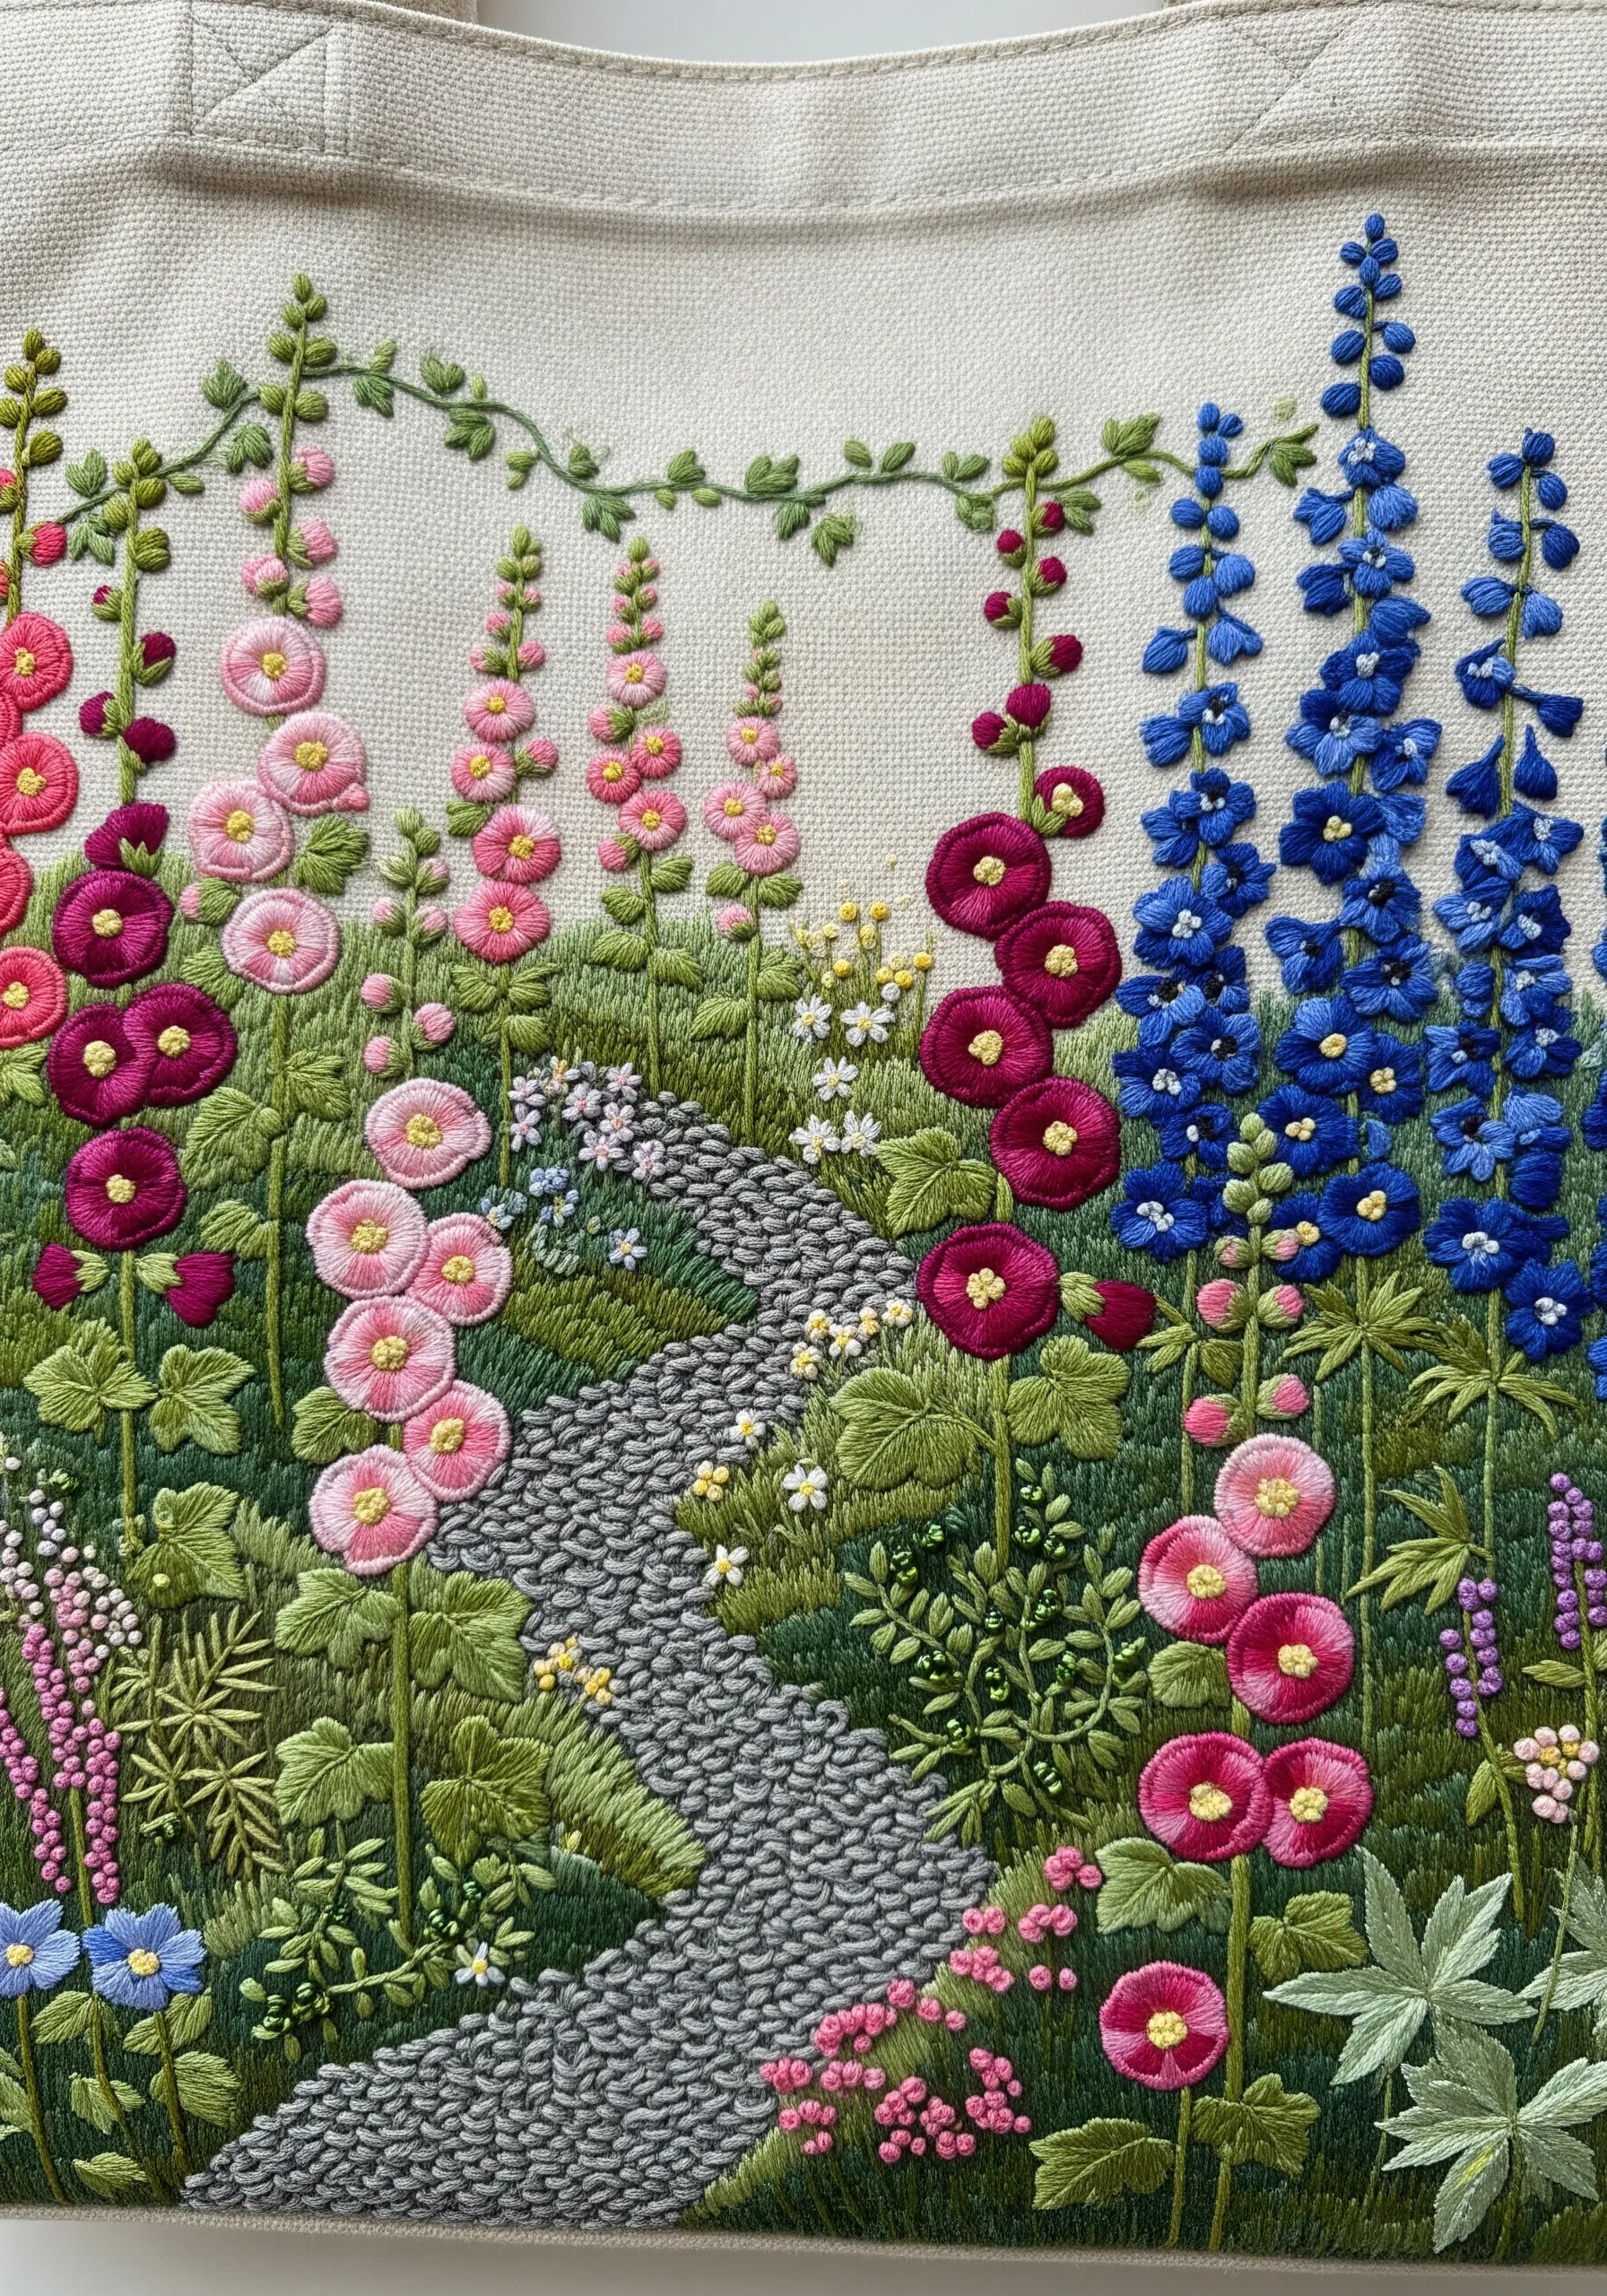
Go beyond single motifs and stitch an entire, immersive garden scene on your tote.
Use a variety of stitches to create different textures: French knots for the cobblestone path, bullion knots for rosebuds, and lazy daisy stitches for hollyhock blossoms.
Establish a sense of perspective by making flowers in the foreground larger and more detailed, while those in the background are smaller and simpler.
This ambitious project turns your tote bag into a lush, detailed landscape you can get lost in, showcasing a true mastery of texture and composition.


