
A tote bag isn’t just for carrying things—it’s a canvas waiting for your story. Before you start another project, I want you to think about texture and dimension. How can you make the waves feel like they’re actually cresting, or a sunset feel as warm and blended as the real thing?
The secret isn’t in complex patterns, but in choosing the right stitch for the job. A simple switch from satin stitch to French knots can turn a flat surface into a tactile landscape. Using a thicker thread or a padded stitch can make your lettering pop, transforming a simple quote into a bold statement.
Here, you’ll find ideas that focus on technique over complexity. Each one is a small lesson in how to think like a textile artist—how to build layers, blend colors with intention, and choose stitches that don’t just fill a space, but give it life. Your next tote bag can be more than just beautiful; it can be an experience.
1. Surreal Coral Reef Texture
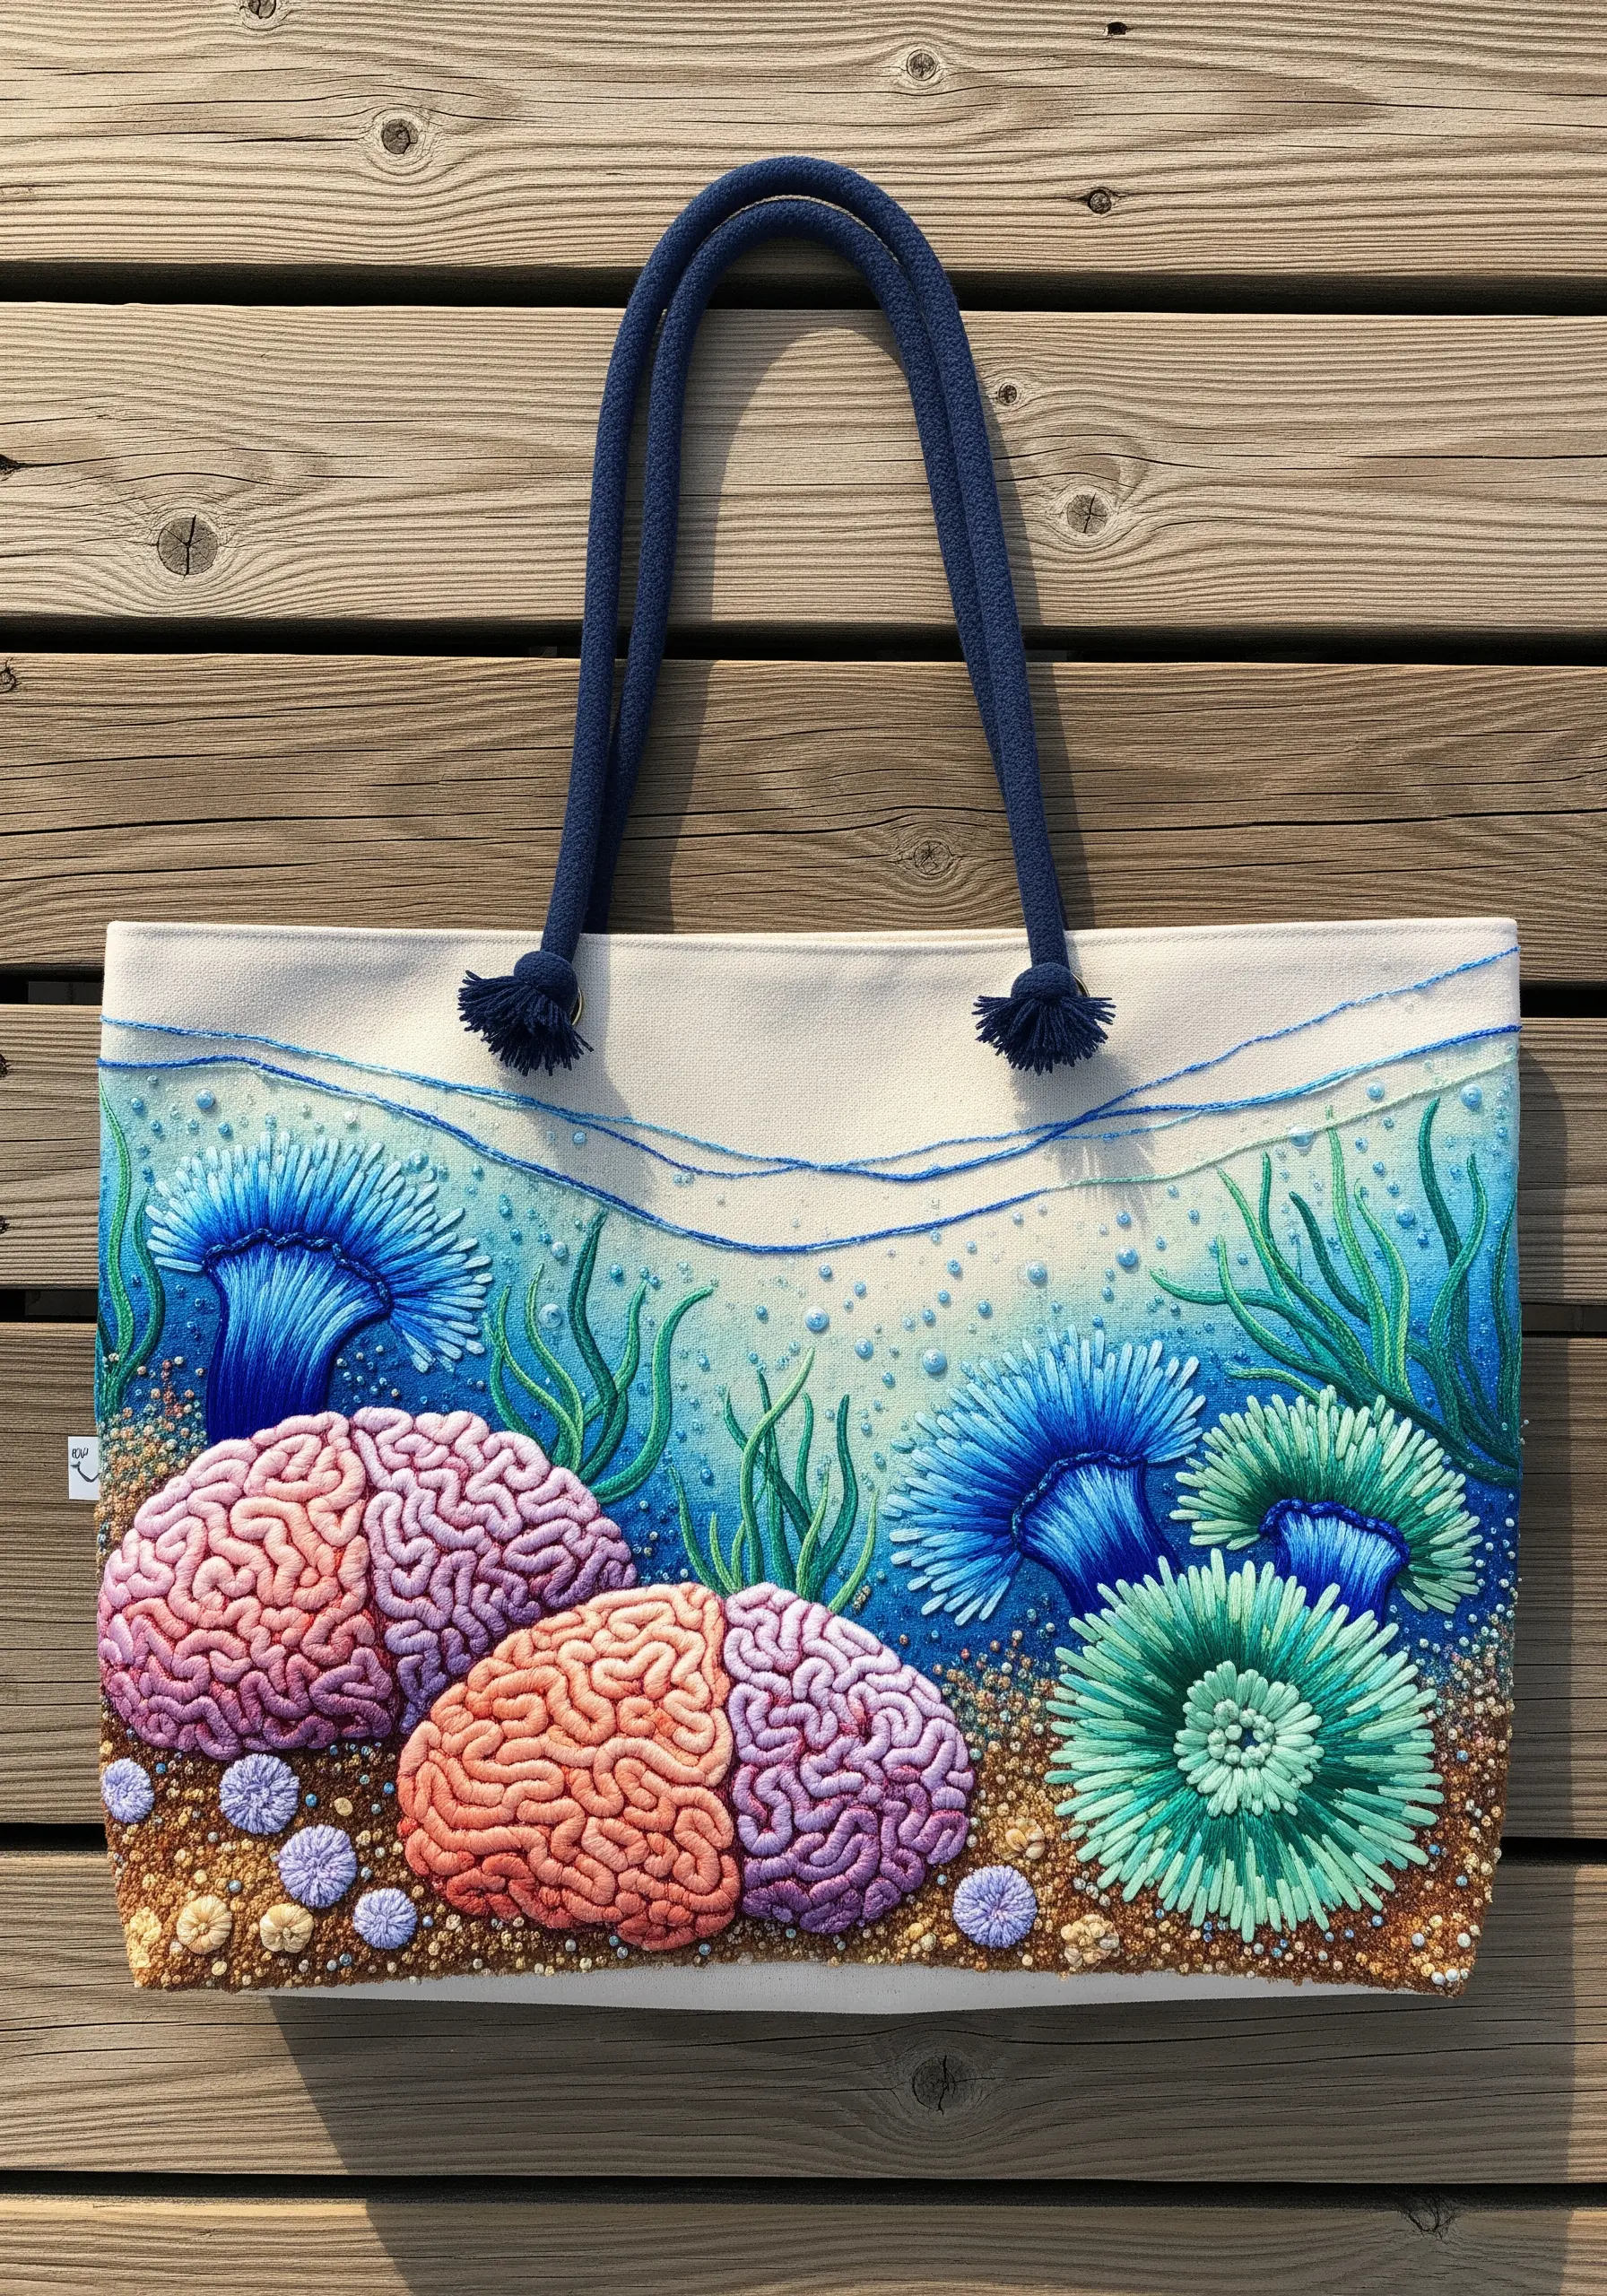
Create a tactile underwater world by combining distinct textures for each element.
For the brain coral, use densely packed French knots or bullion knots in variegated pink and orange floss to mimic its complex folds.
For the sea anemones, build layers of long straight stitches radiating from a central point, or try turkey work for a plush, 3D effect that moves.
The sandy bottom comes alive with scattered seed stitches and tiny beads, giving it a gritty, realistic feel against the smoother coral.
Blend the water in the background using a thread painting technique with light and dark blues to create a sense of depth and movement.
2. The Minimalist Rope Wave
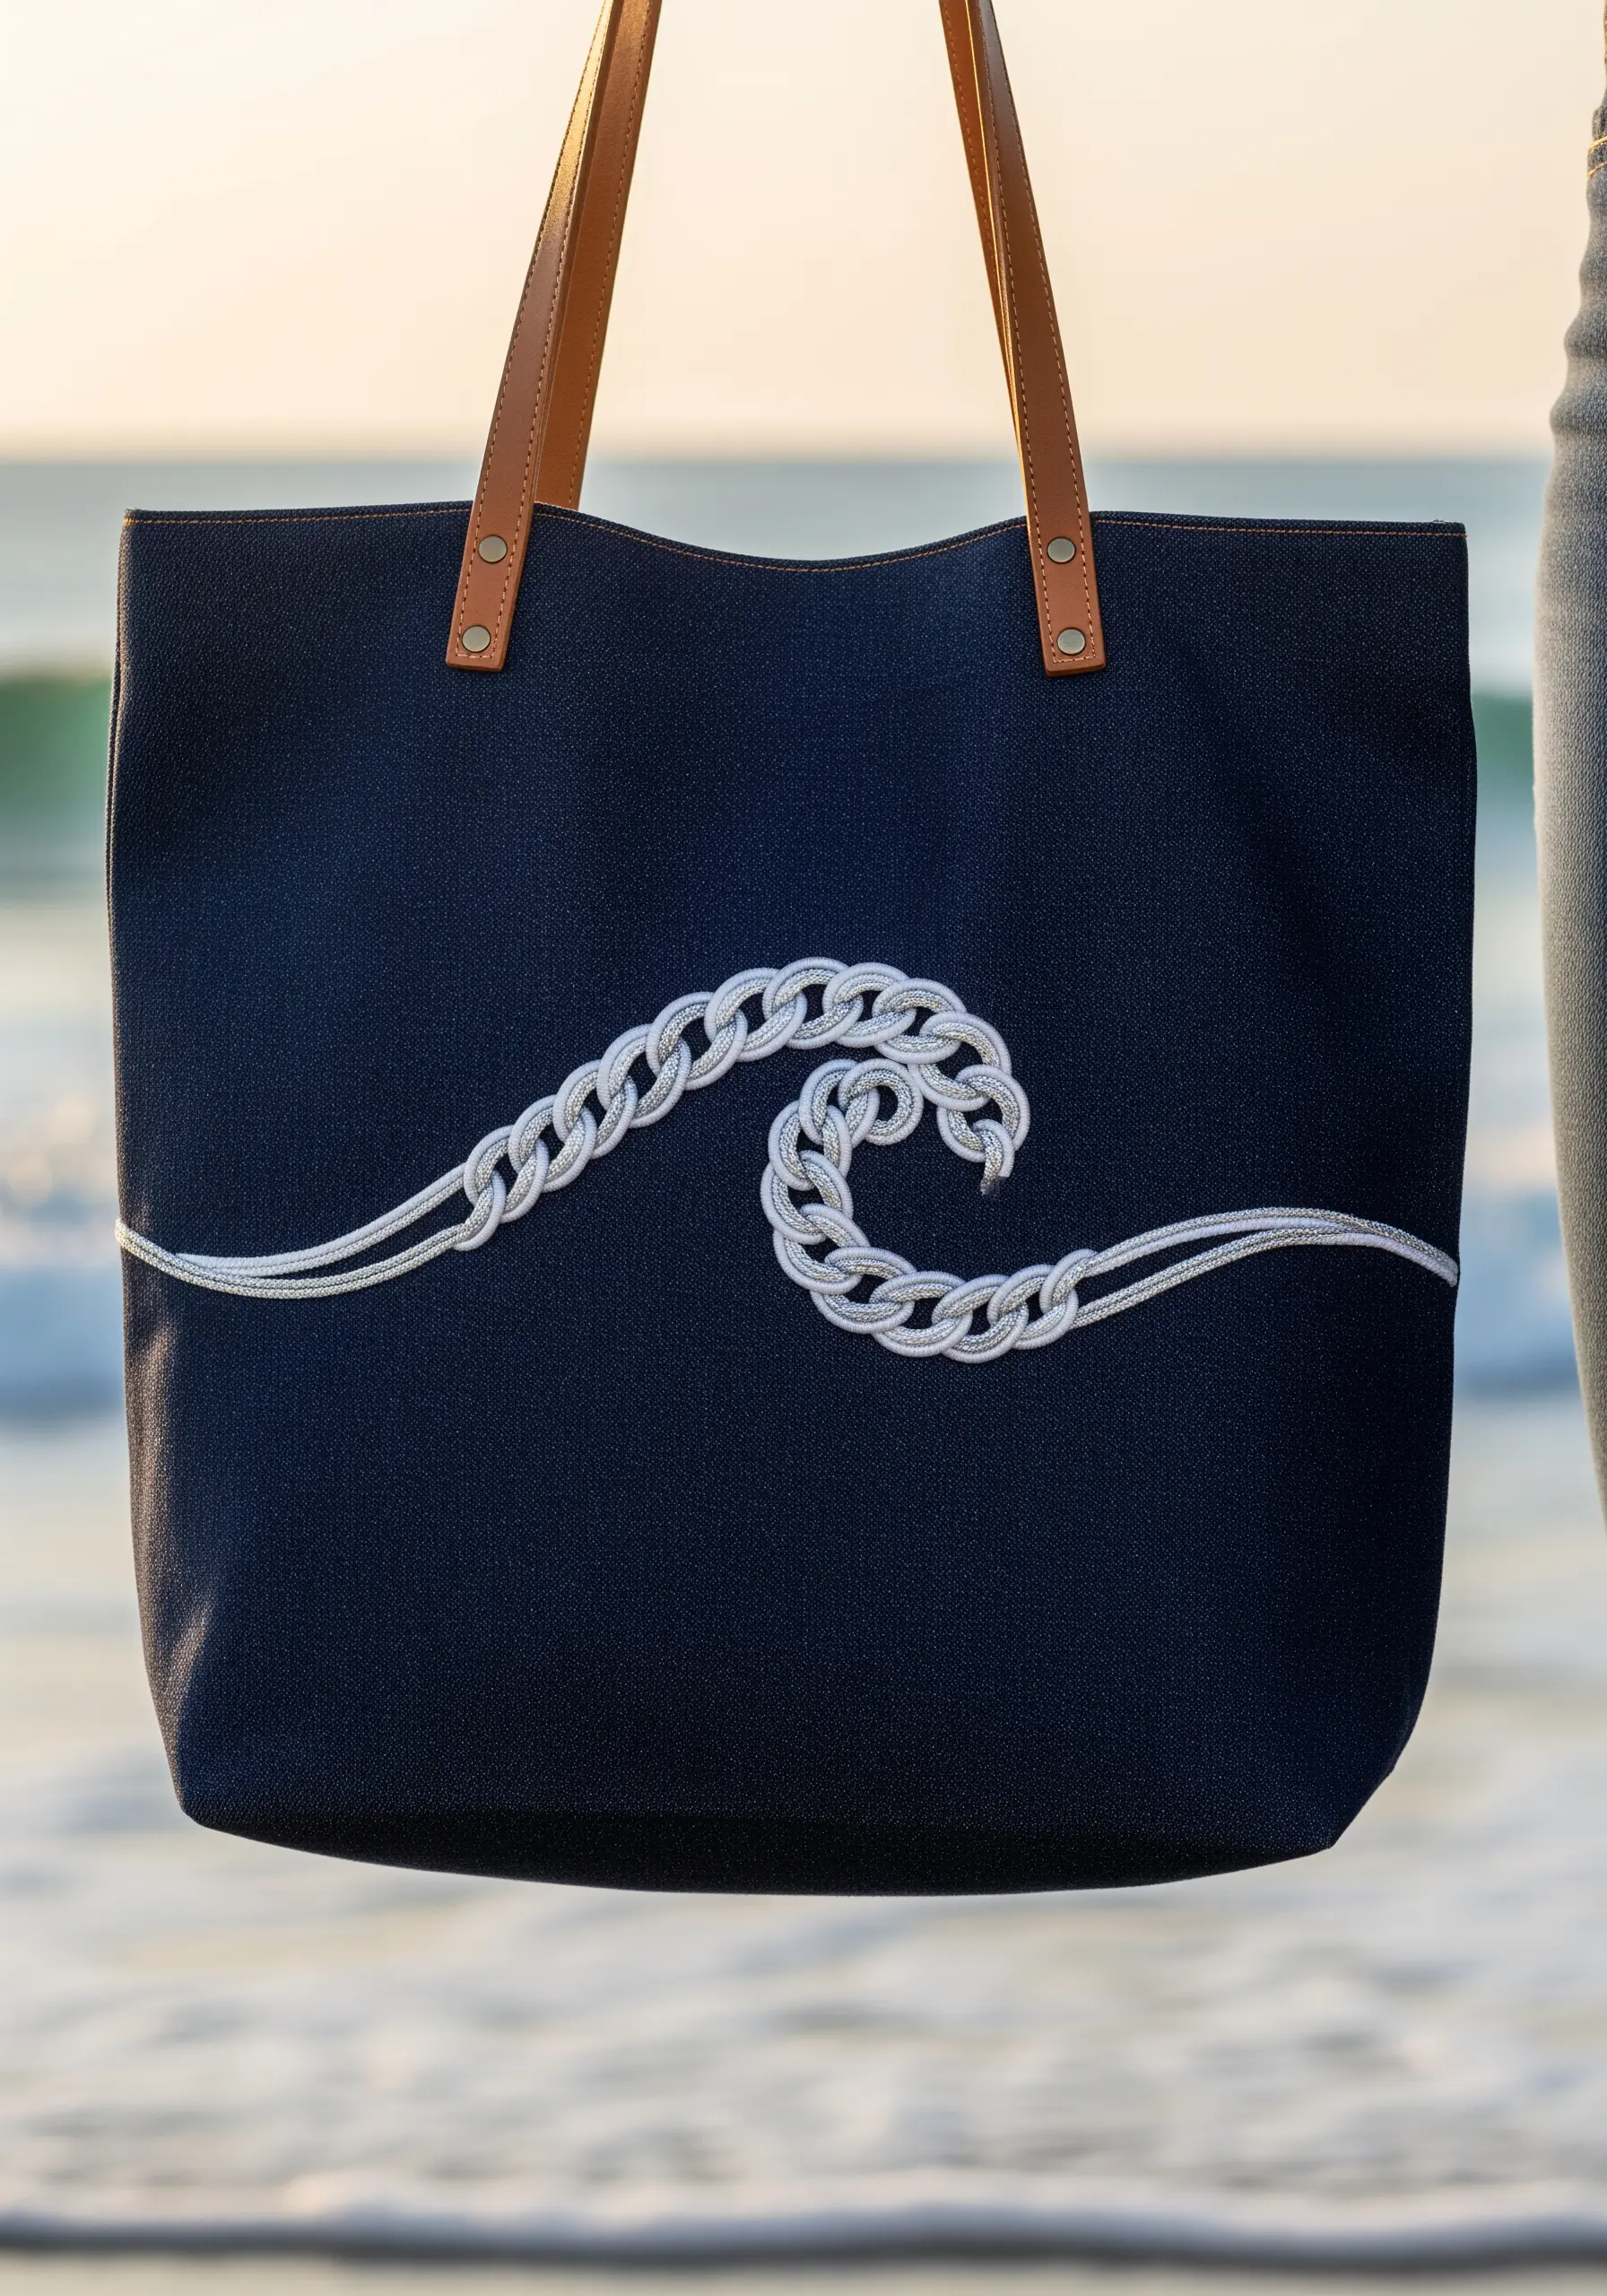
Achieve a bold, sculptural effect by couching a thick cord onto your tote bag.
First, lay down your cord or a bundle of thick yarn in the desired wave shape.
Then, using a single strand of matching or contrasting embroidery floss, secure the cord to the fabric with small, evenly spaced tacking stitches.
For a refined finish, use a metallic silver thread for your couching stitches; this adds a subtle glint that catches the light like sea spray and elevates the minimalist design.
3. The Saturated Sunset
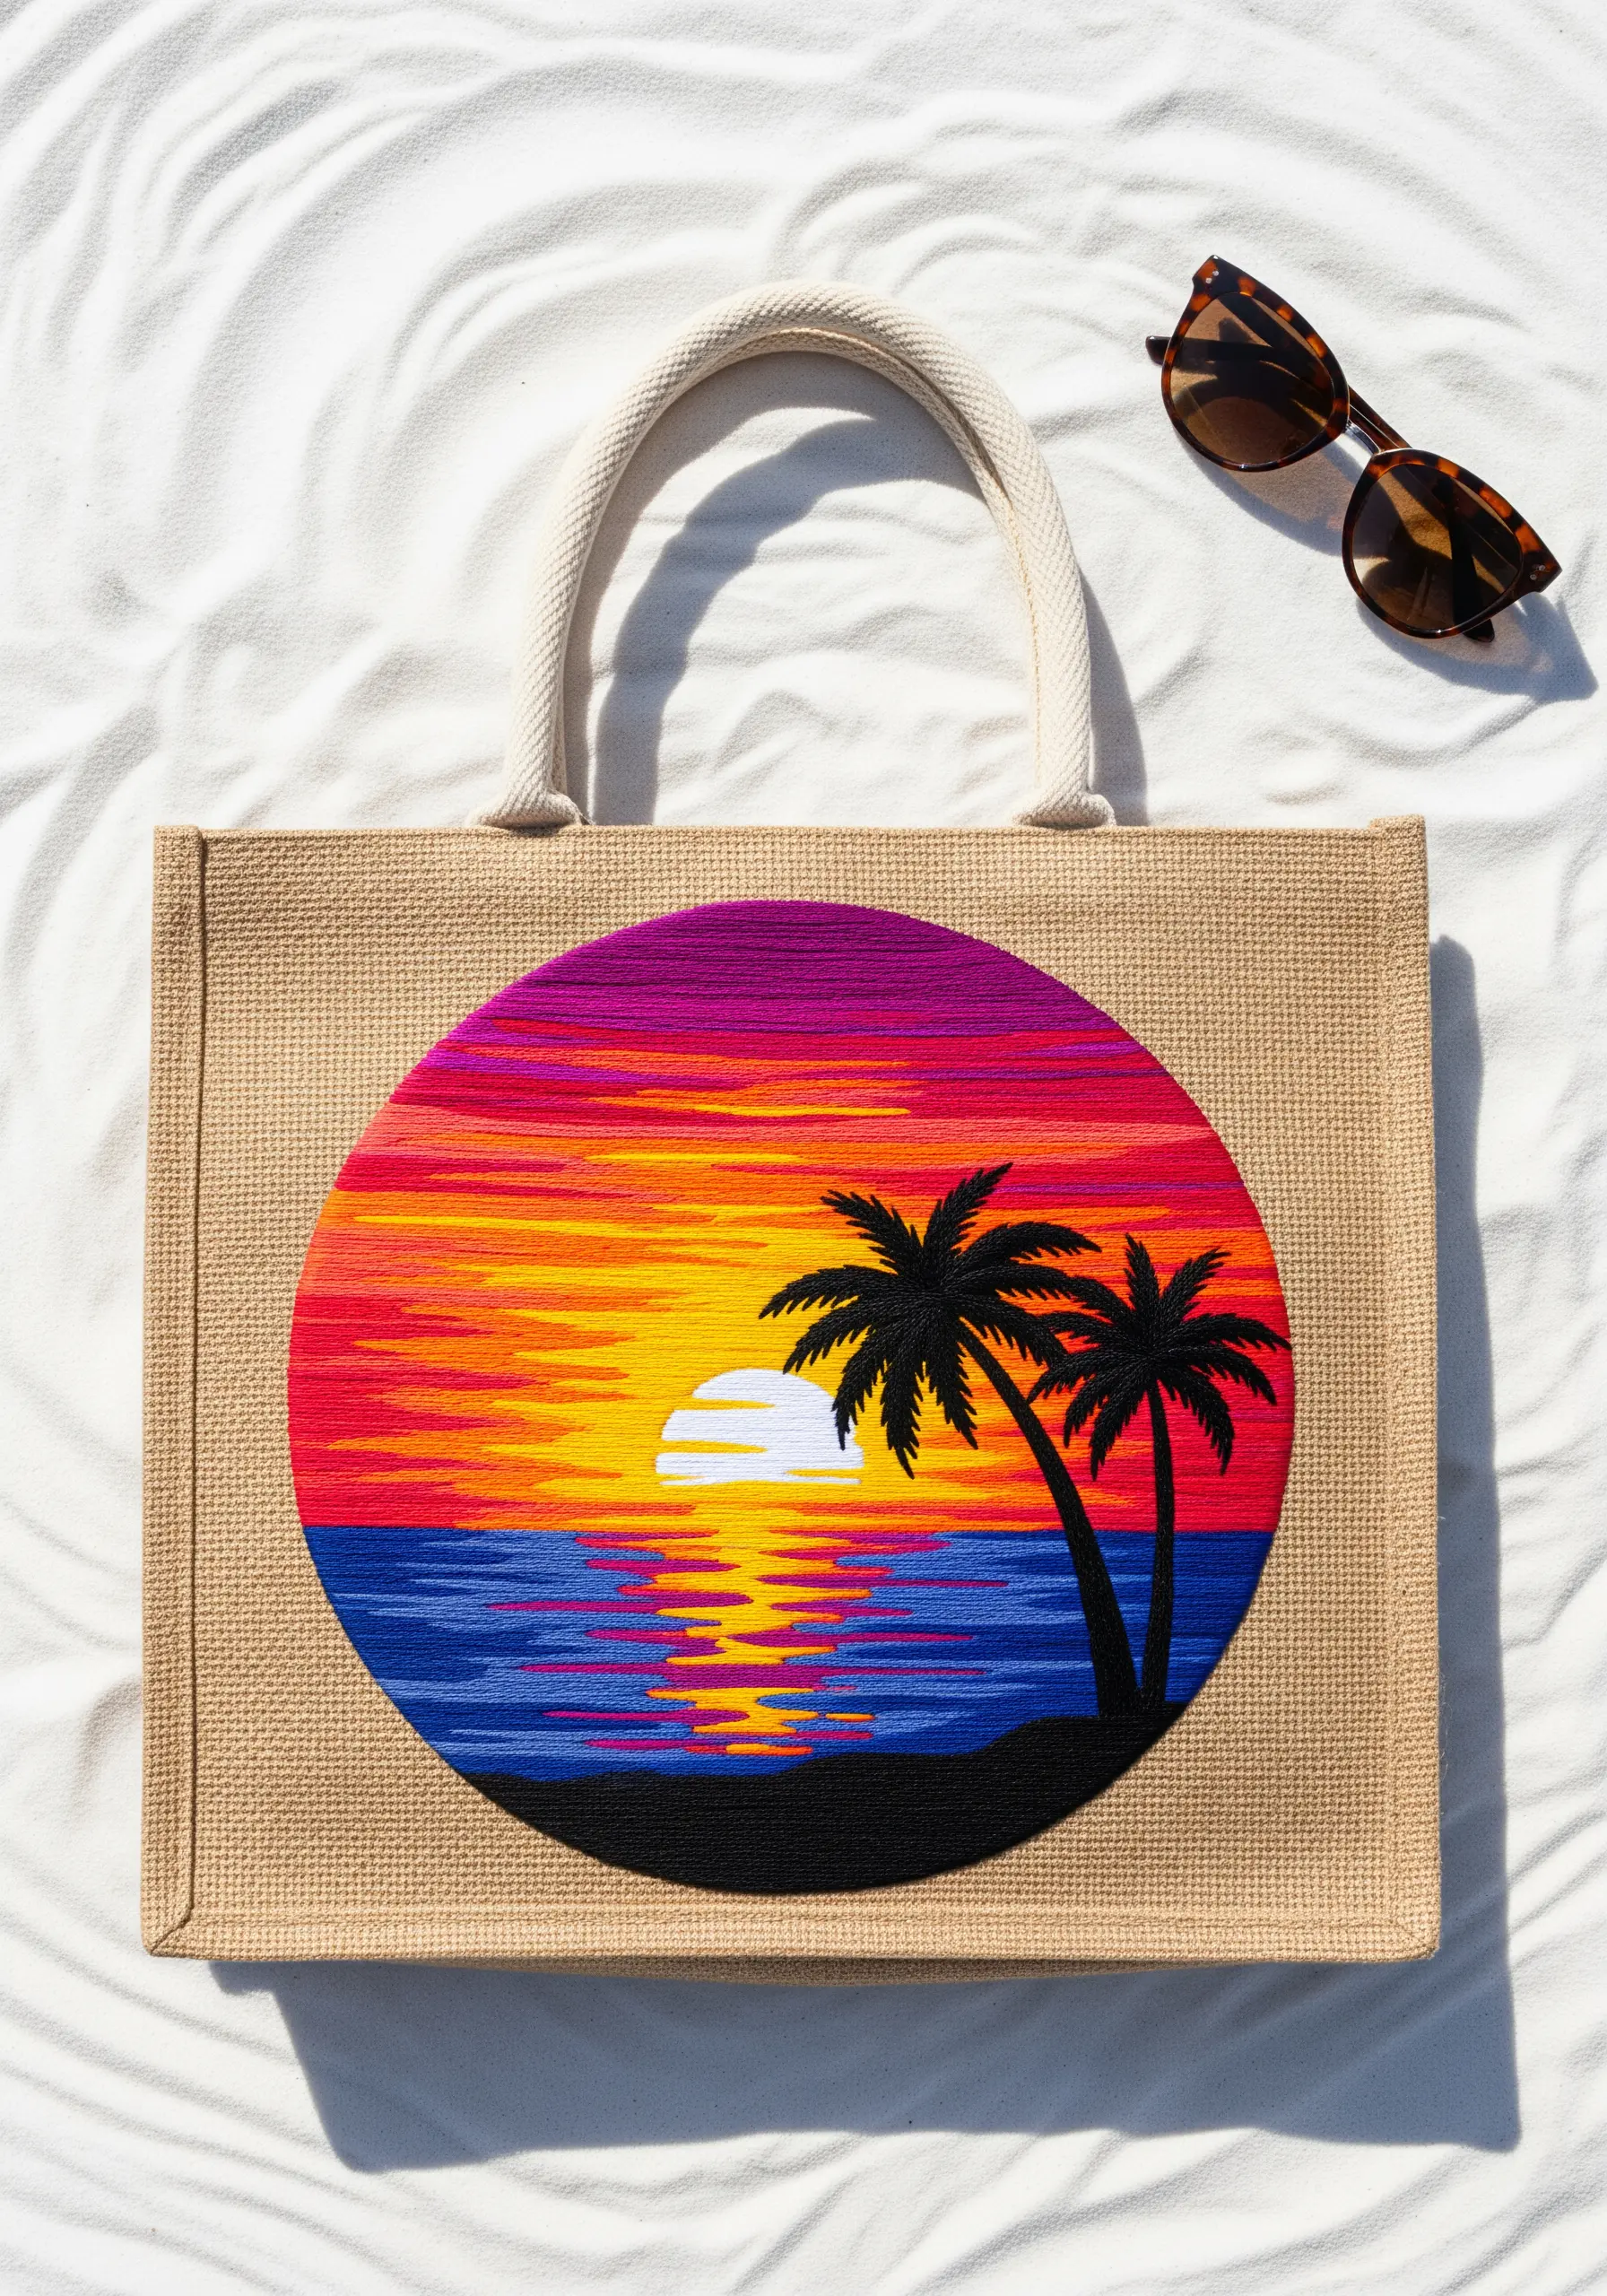
Capture the intense color of a tropical sunset with horizontal thread painting.
Work in horizontal bands, using long and short stitch to seamlessly blend vibrant shades of purple, magenta, orange, and yellow.
To create the water’s reflection, mirror the sky’s colors in shorter, denser satin stitches, breaking them up with lines of dark blue.
Keep the palm trees as simple silhouettes; a crisp backstitch or stem stitch in black will make them stand out dramatically against the fiery sky without competing for attention.
4. Bejeweled Seahorse Appliqués
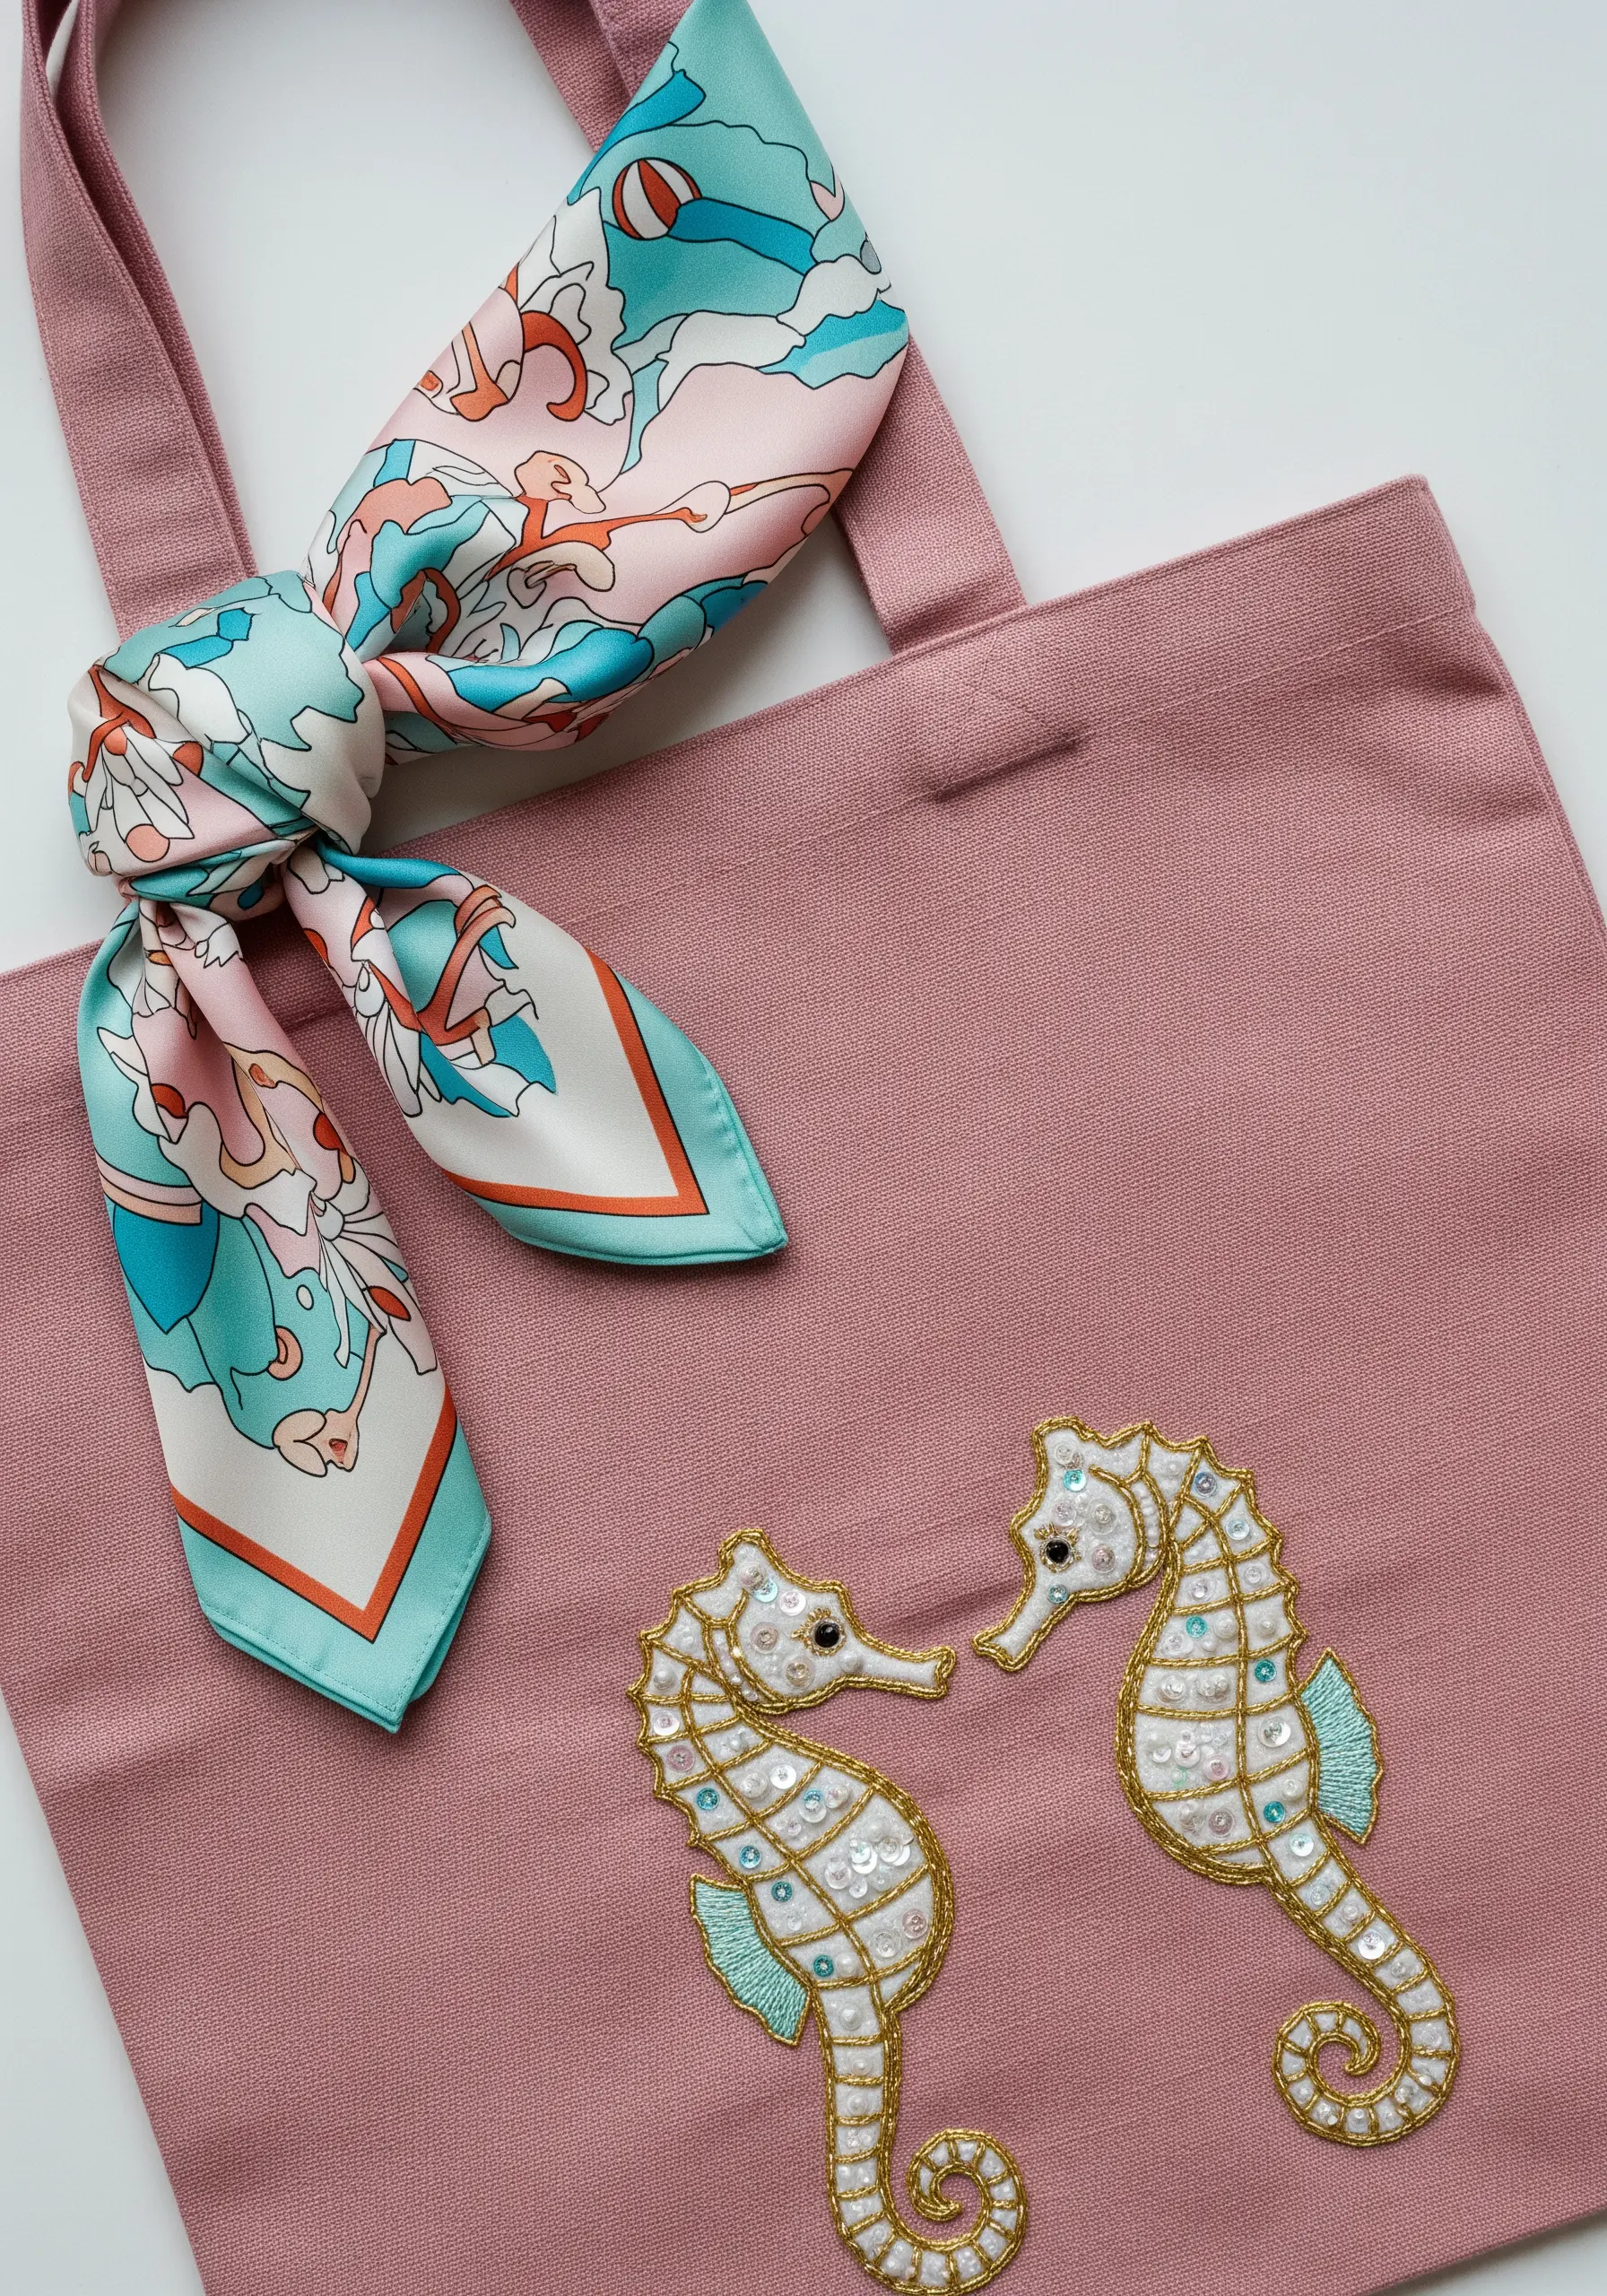
Elevate simple outlines by combining metallic thread with sparkling sequins.
First, outline your seahorse shape using a whipped backstitch with a gold metallic thread—the whipping smooths the stitch and gives it a solid, cord-like appearance.
Fill the body segments with a single, strategically placed sequin, stitched down with a tiny coordinating bead in the center.
For the fins, use a light satin stitch in a contrasting color like aqua, which adds a soft texture against the hard sparkle of the sequins.
5. Transparent Glass Effect
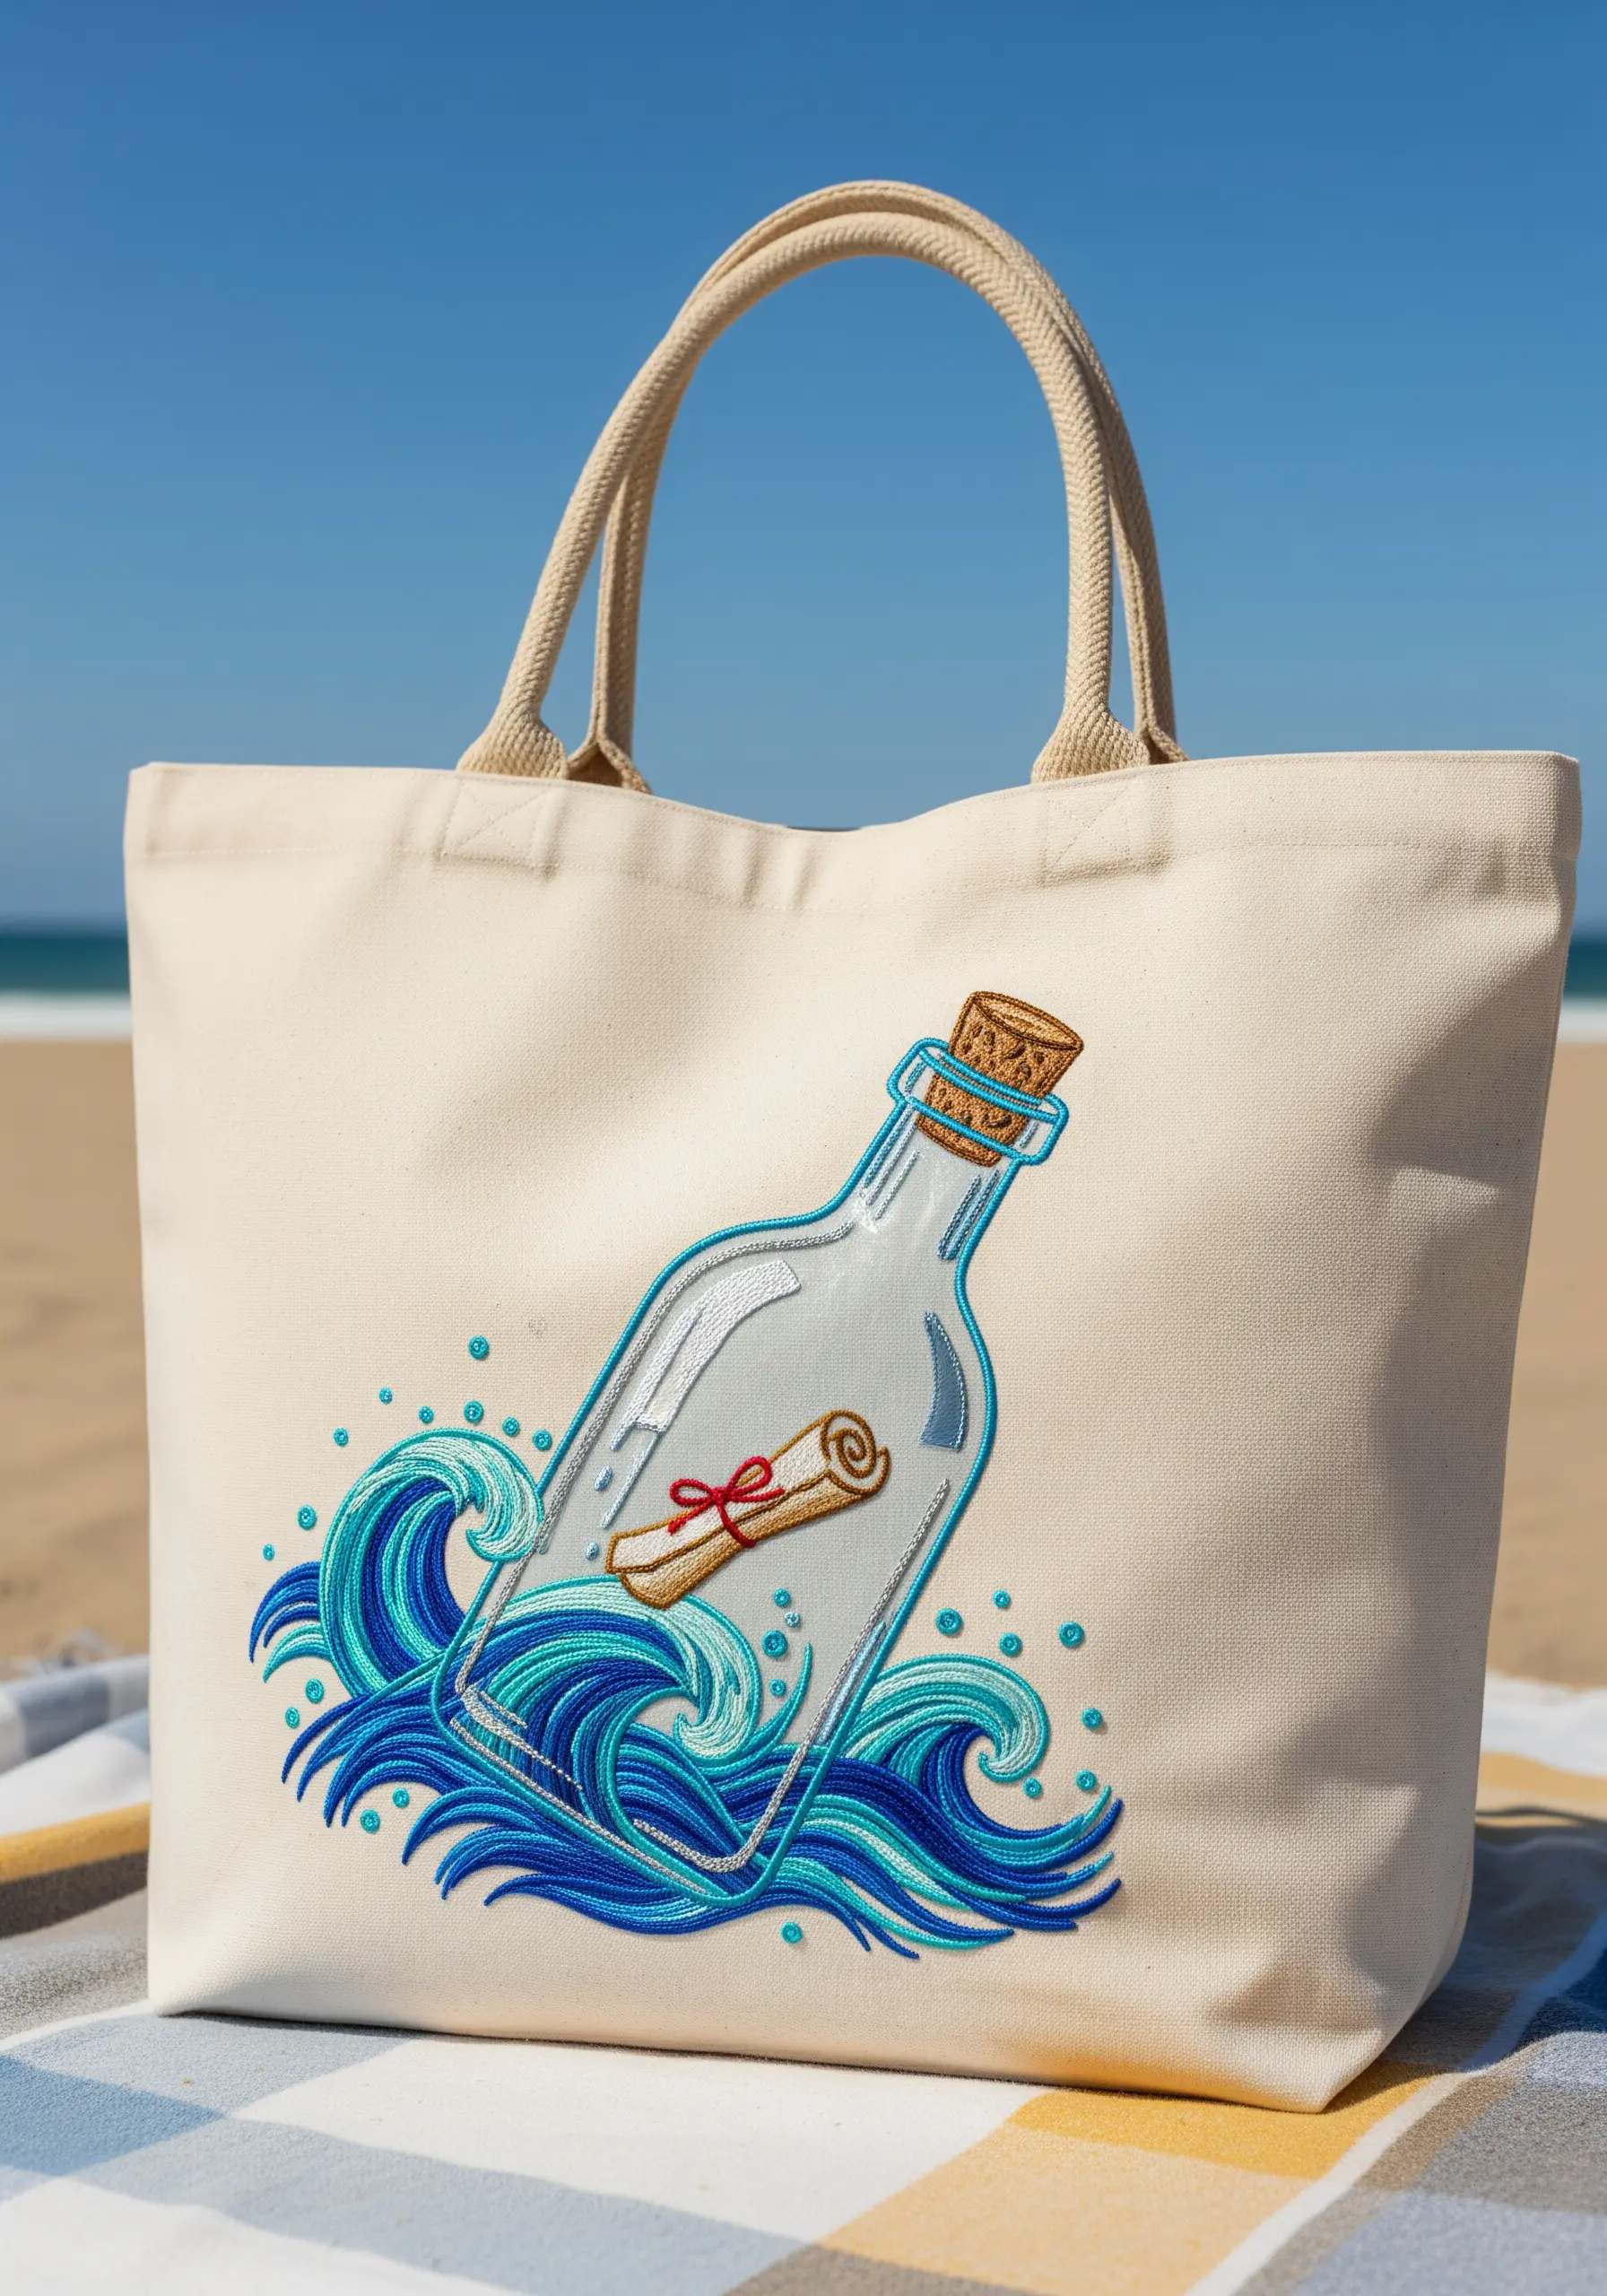
Create the illusion of glass by using your thread sparsely and strategically.
Use a single strand of light blue or white floss to stitch long, vertical straight stitches inside the bottle outline, leaving plenty of fabric showing through.
Add a few curved white stitches near the edges to suggest reflection and dimension.
Contrast this delicate fill with bold, dense satin stitch for the surrounding waves, making the bottle appear even more transparent and fragile.
6. Geometric Turtle Shell
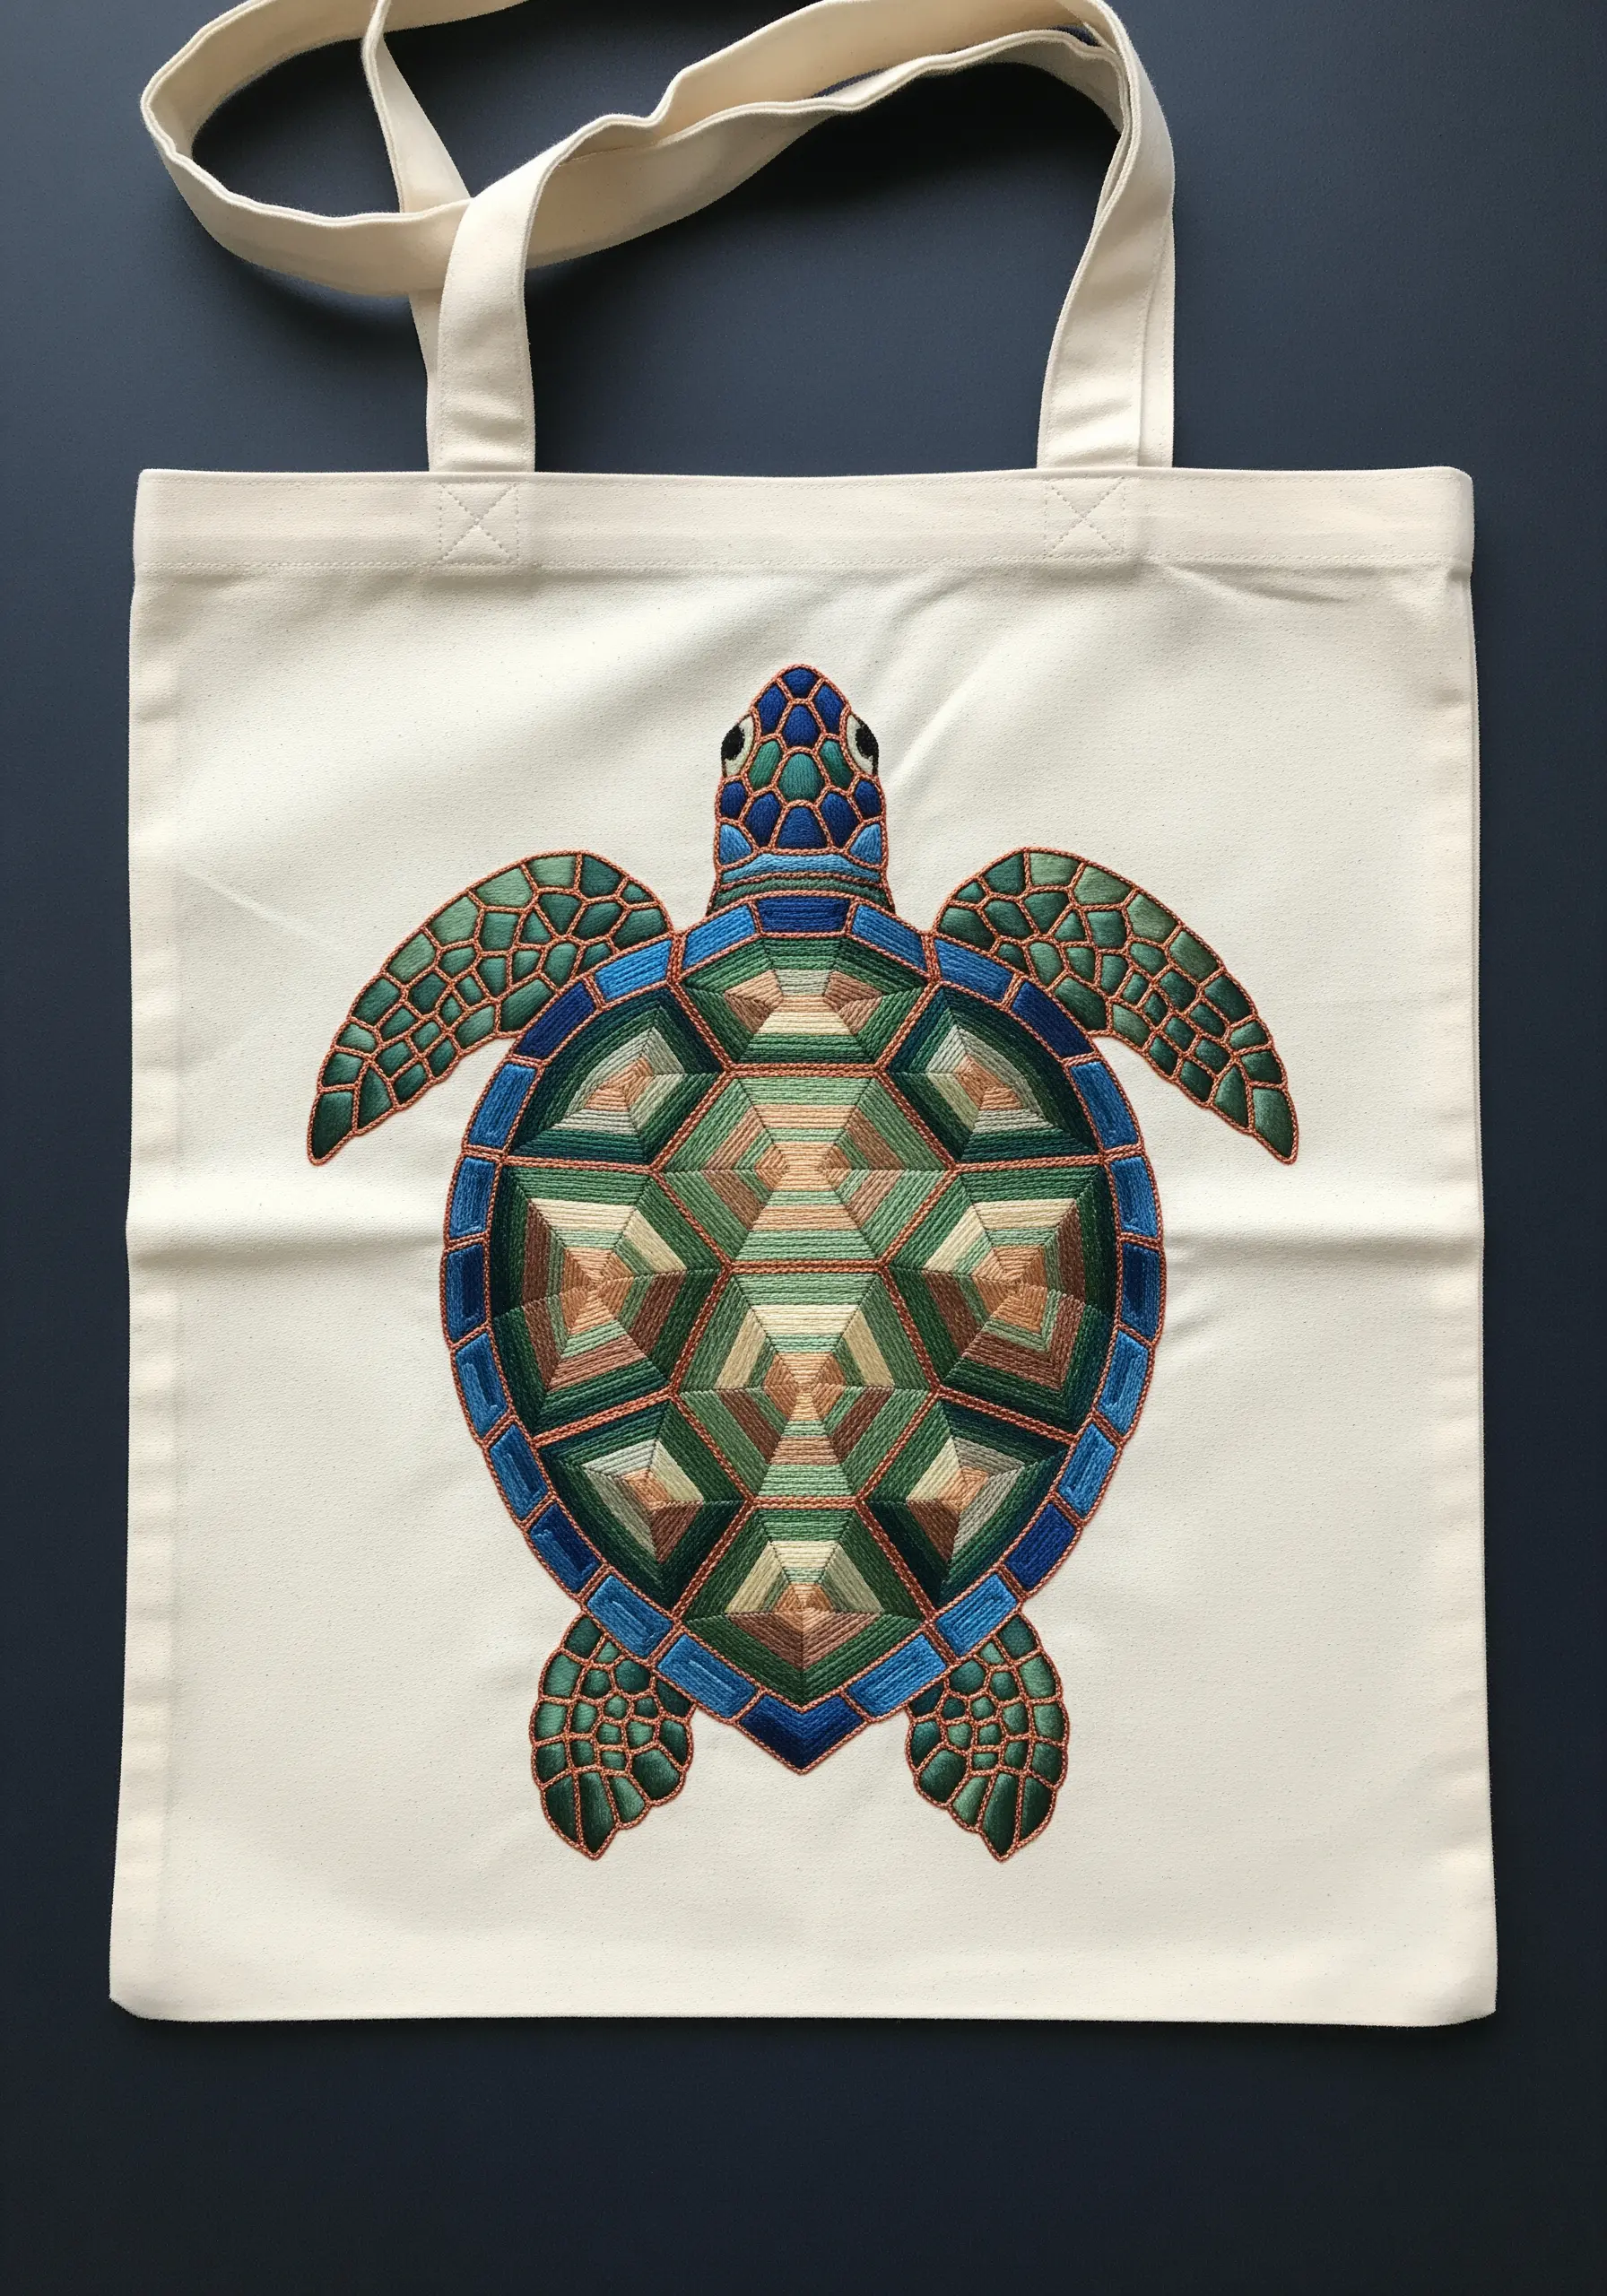
Turn a familiar motif into a modern art piece with geometric precision.
To ensure perfectly sharp edges for each segment of the shell, outline the entire design with a split stitch first.
Fill each polygon with a dense satin stitch, paying close attention to the stitch direction—angling them differently in adjacent shapes creates a subtle light-shifting effect.
Using an earthy, tonal color palette keeps the complex geometry from feeling overwhelming, resulting in a sophisticated, mosaic-like finish.
7. High-Relief Pineapple Texture
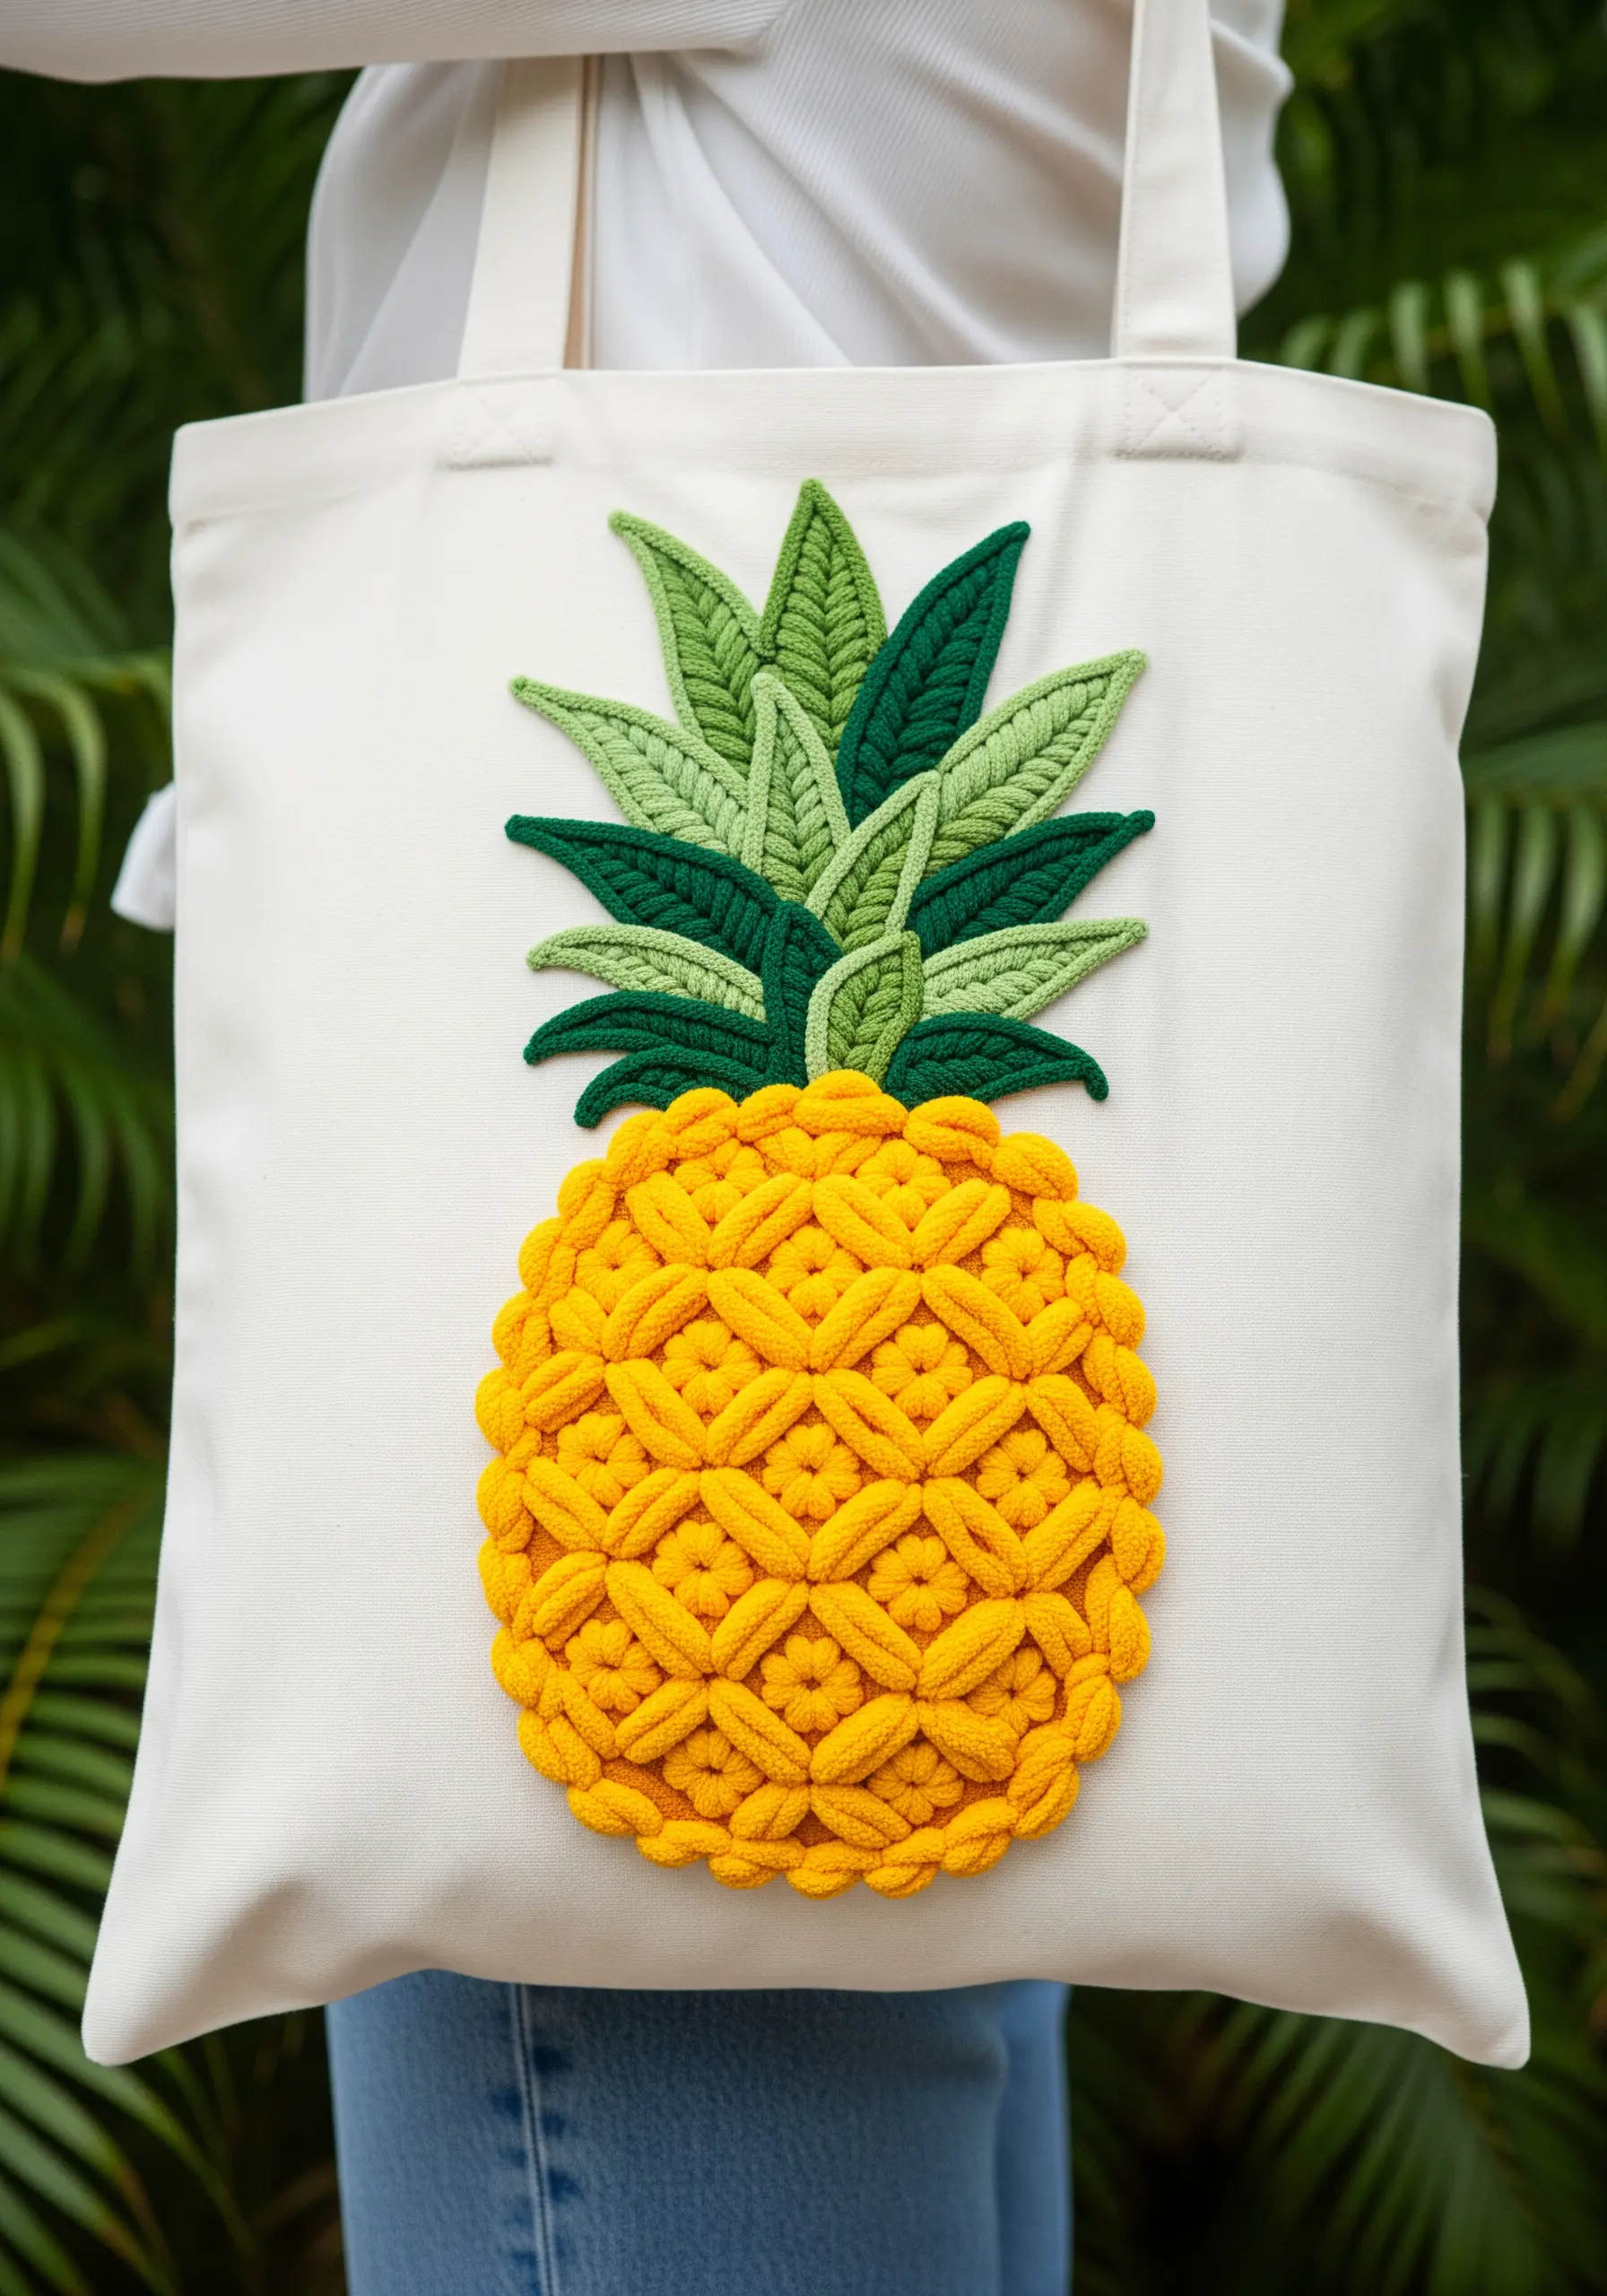
Give your design a stunning 3D quality by using dimensional stitches and thicker fibers.
For the pineapple’s body, use a thick yarn or cotton cord to create a raised lattice or woven stitch—this immediately lifts the design off the fabric.
Construct the leaves using a layered fishbone stitch, working from the top down and overlapping each leaf slightly to build realistic dimension.
The textural contrast between the chunky, woven fruit and the smoother, pointed leaves is what makes this design so visually compelling.
8. Art Deco Shell Pattern
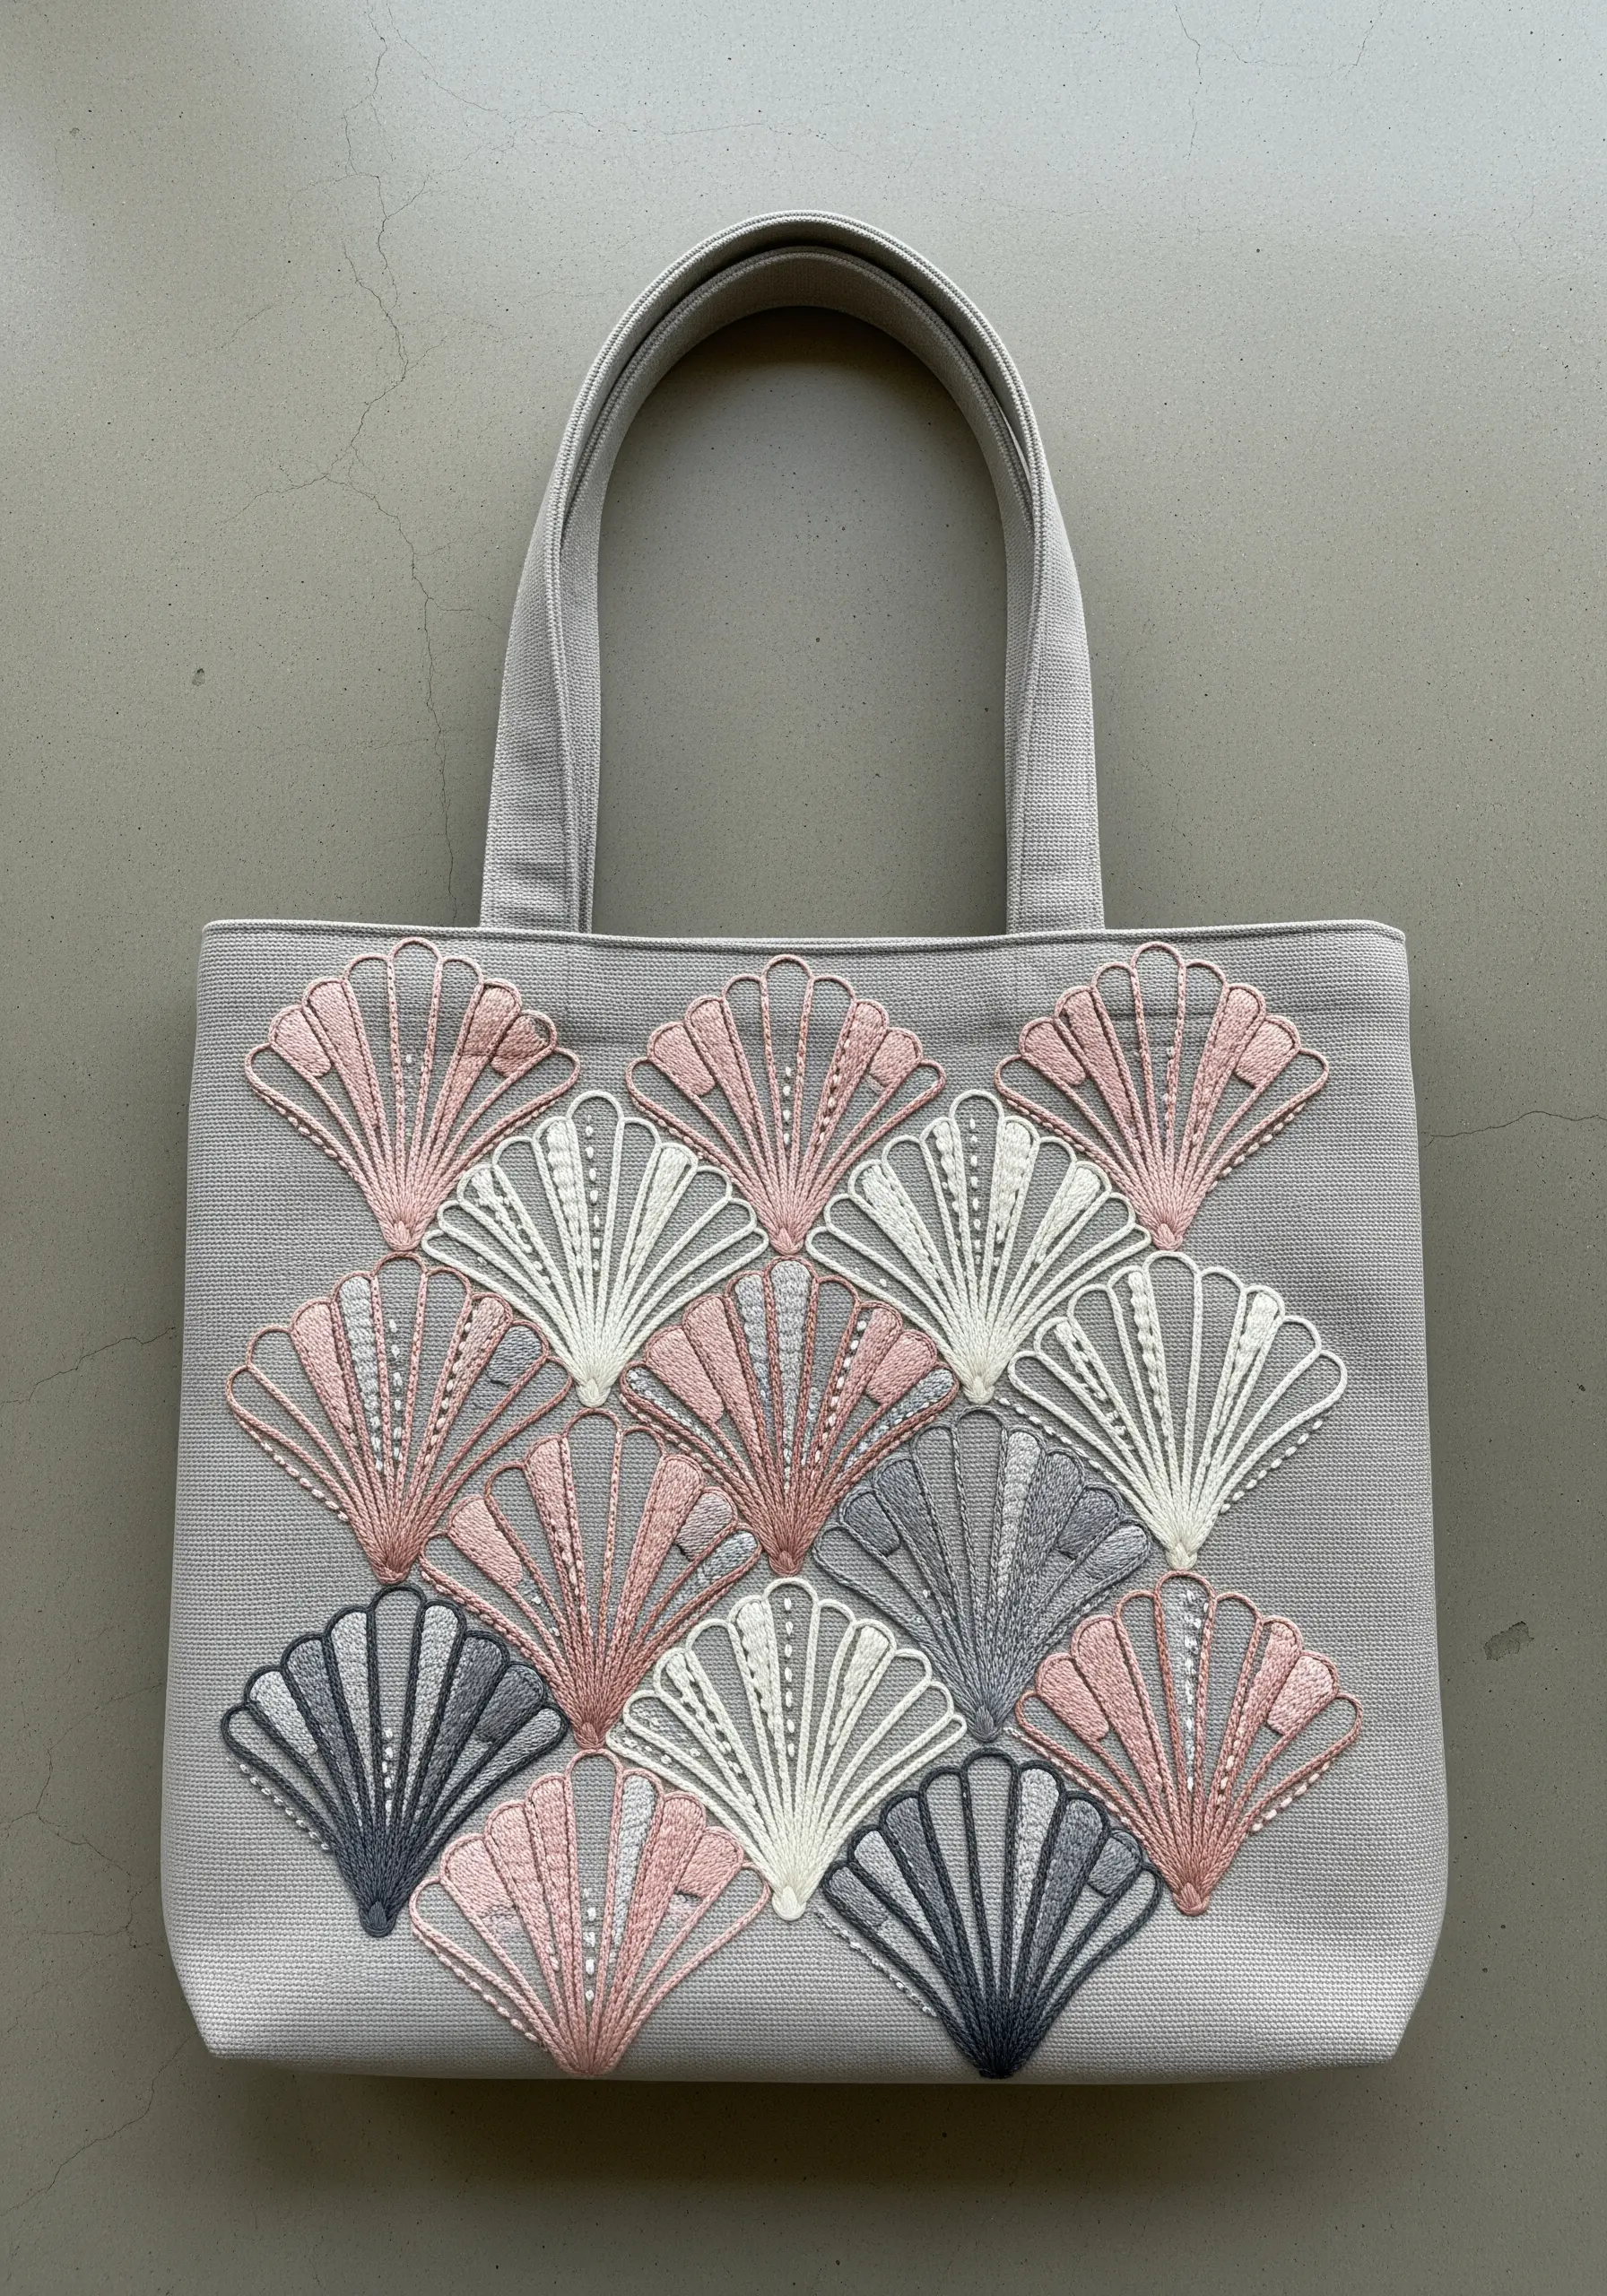
Create a sophisticated, repeating pattern with controlled color and clean lines.
This design relies on a simple fan-shaped satin stitch, but the elegance comes from the execution.
Use a limited, modern palette like dusty rose, charcoal, and cream to keep the pattern feeling chic, not busy.
Ensure your stitches are perfectly parallel within each shell. A light tracing of the stitch direction with a water-soluble pen can help guide you to a flawless, uniform finish.
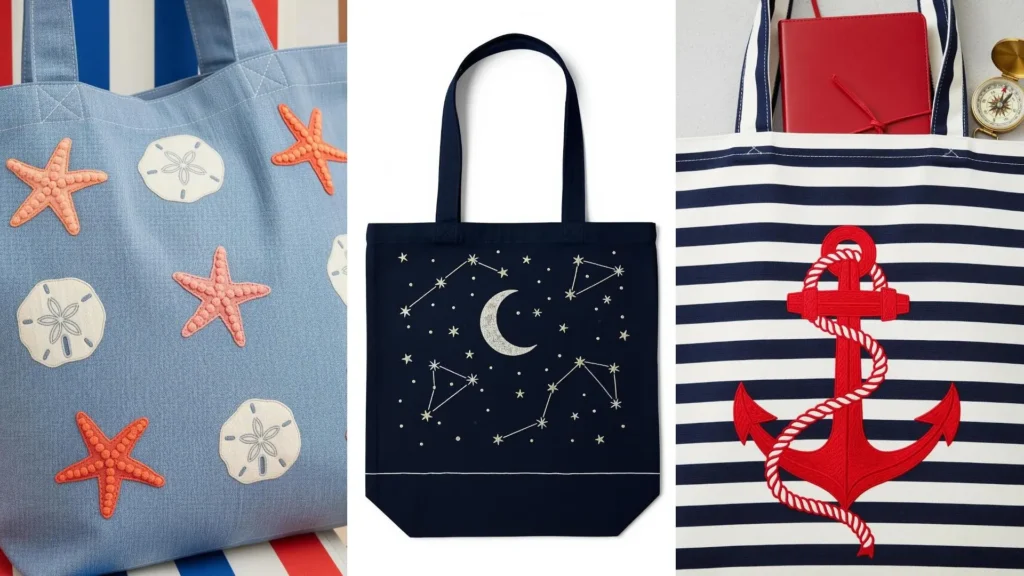
9. Bold Anchor with a Twisted Rope
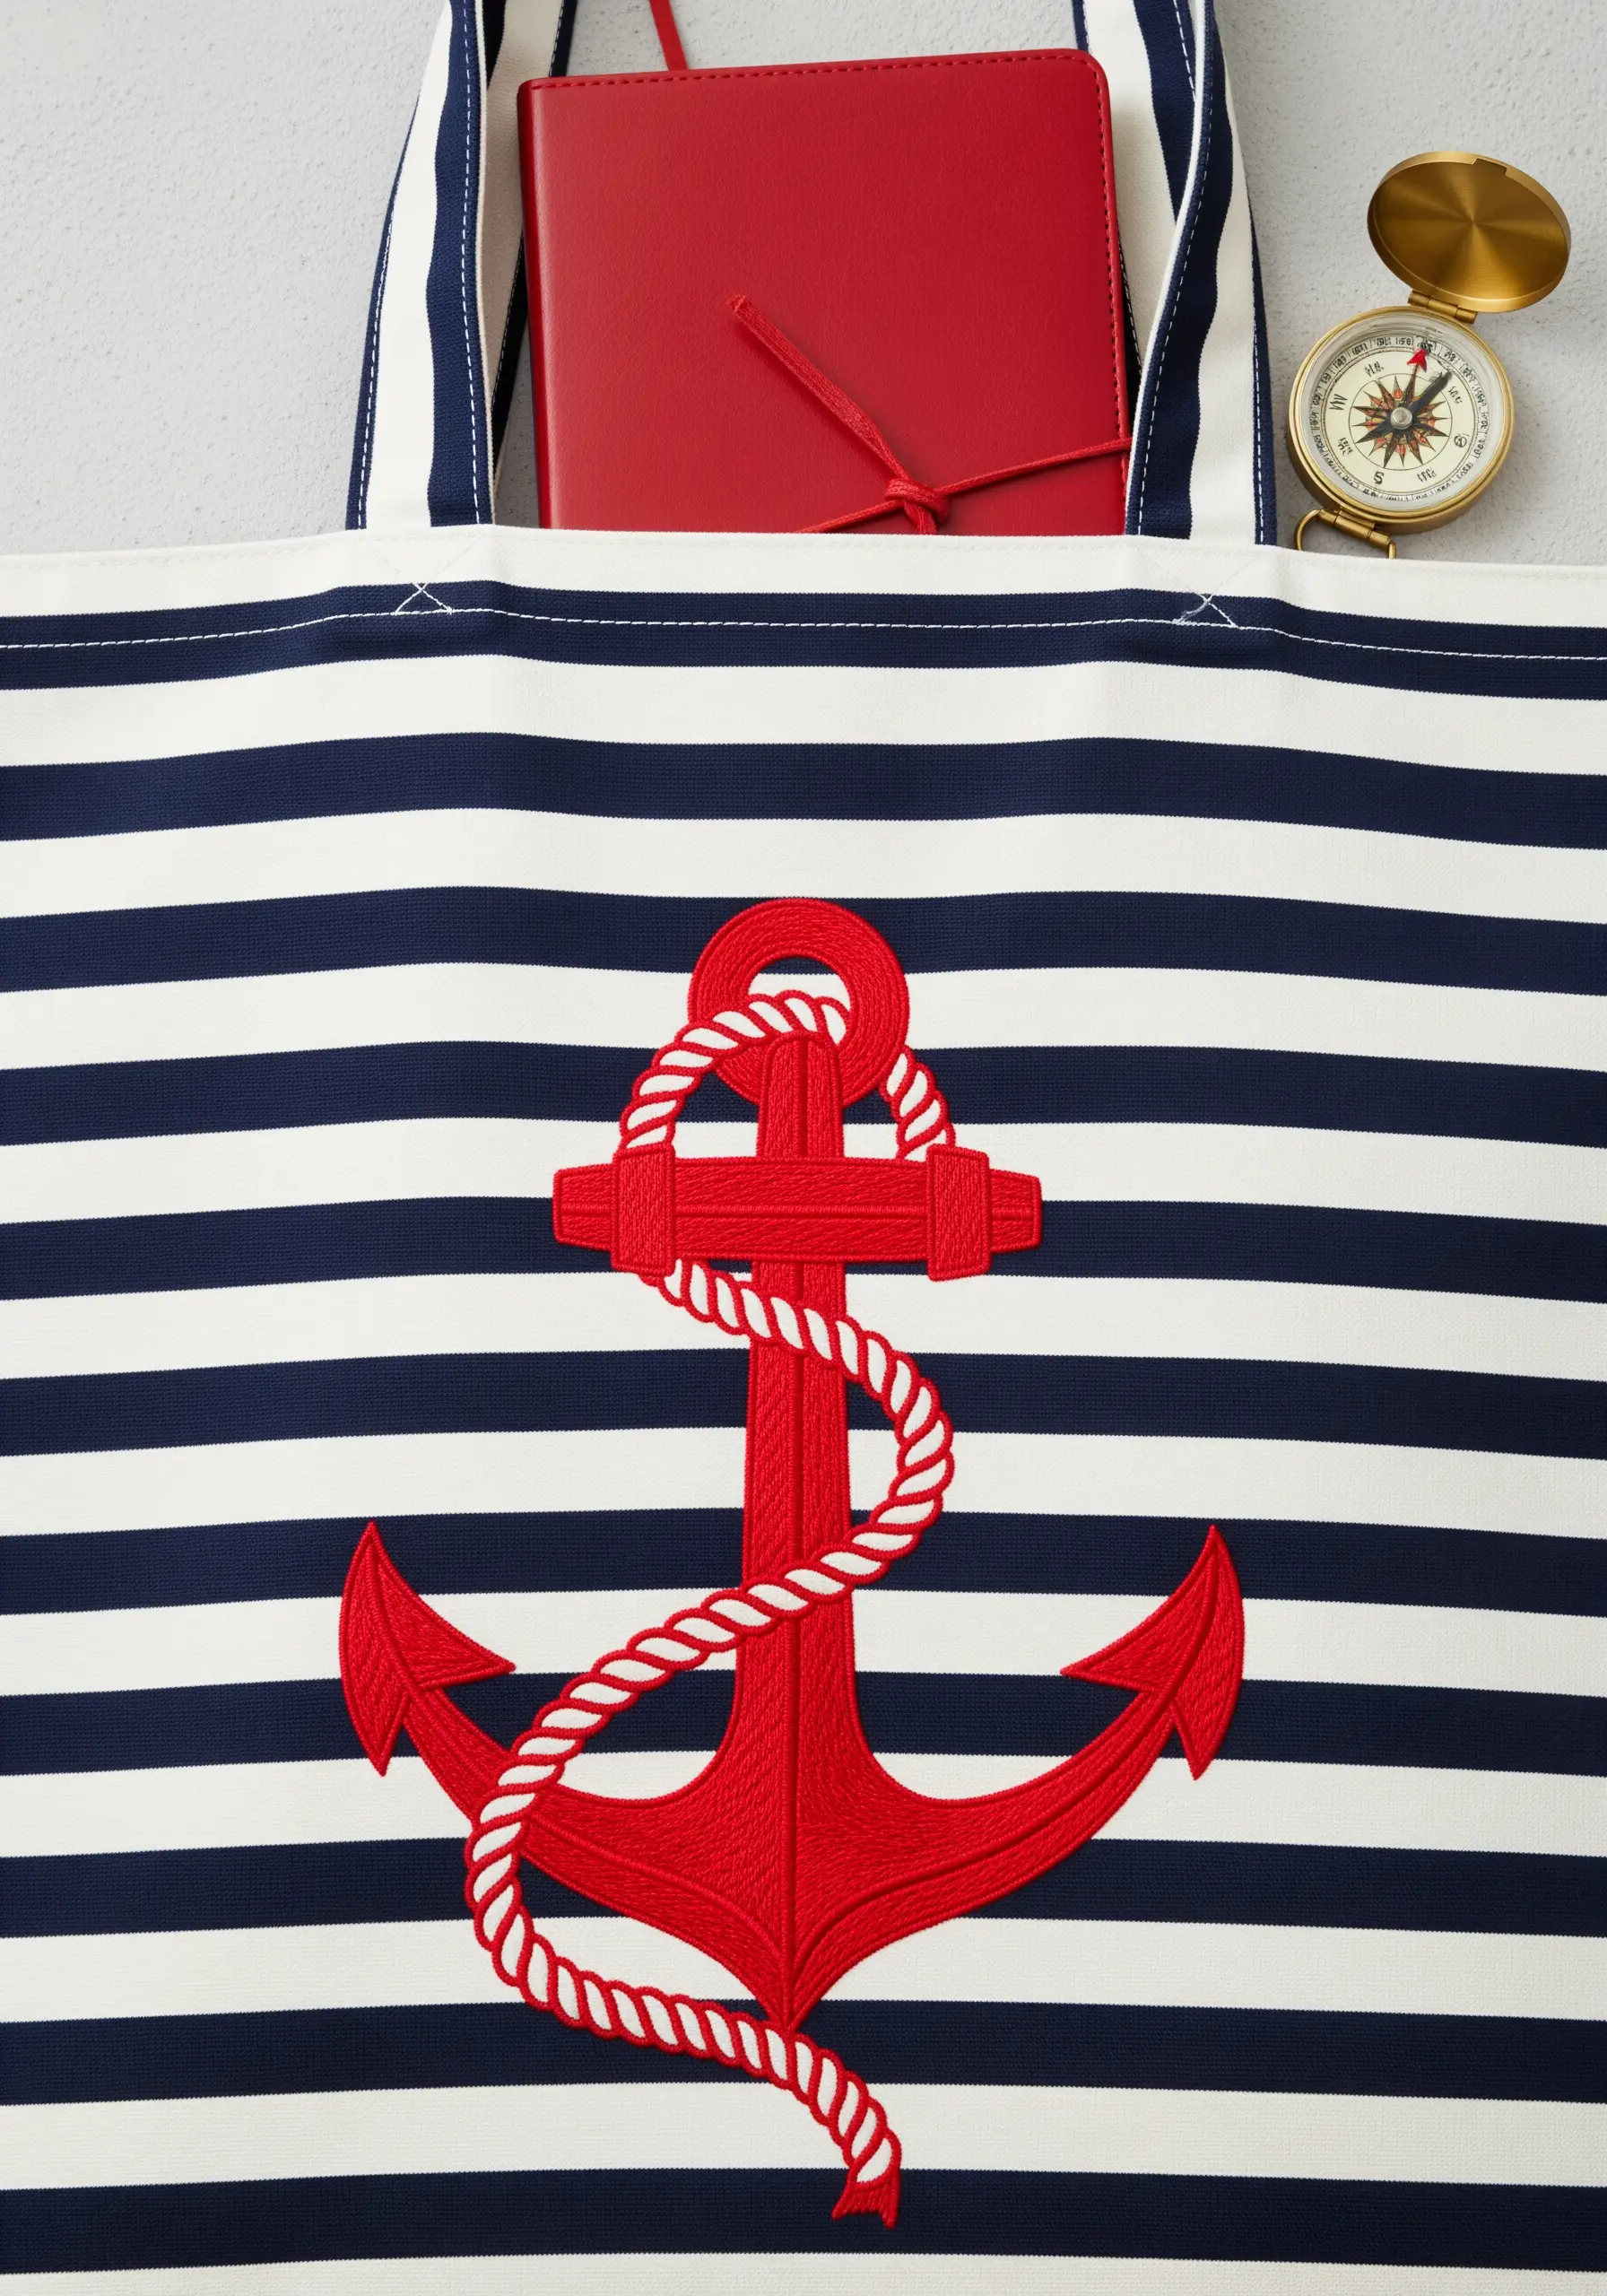
Make a classic nautical symbol pop by focusing on clean fills and textural accents.
Fill the anchor shape with a dense, smooth satin stitch. To prevent puckering on a large fill area like this, use a stabilizer behind your fabric.
For the rope, create a realistic twist by using a raised chain band stitch or by couching a pre-twisted cord directly onto the anchor.
The white rope against the red anchor provides a sharp, graphic contrast that defines the entire piece.
10. Realistic Dolphin Shading
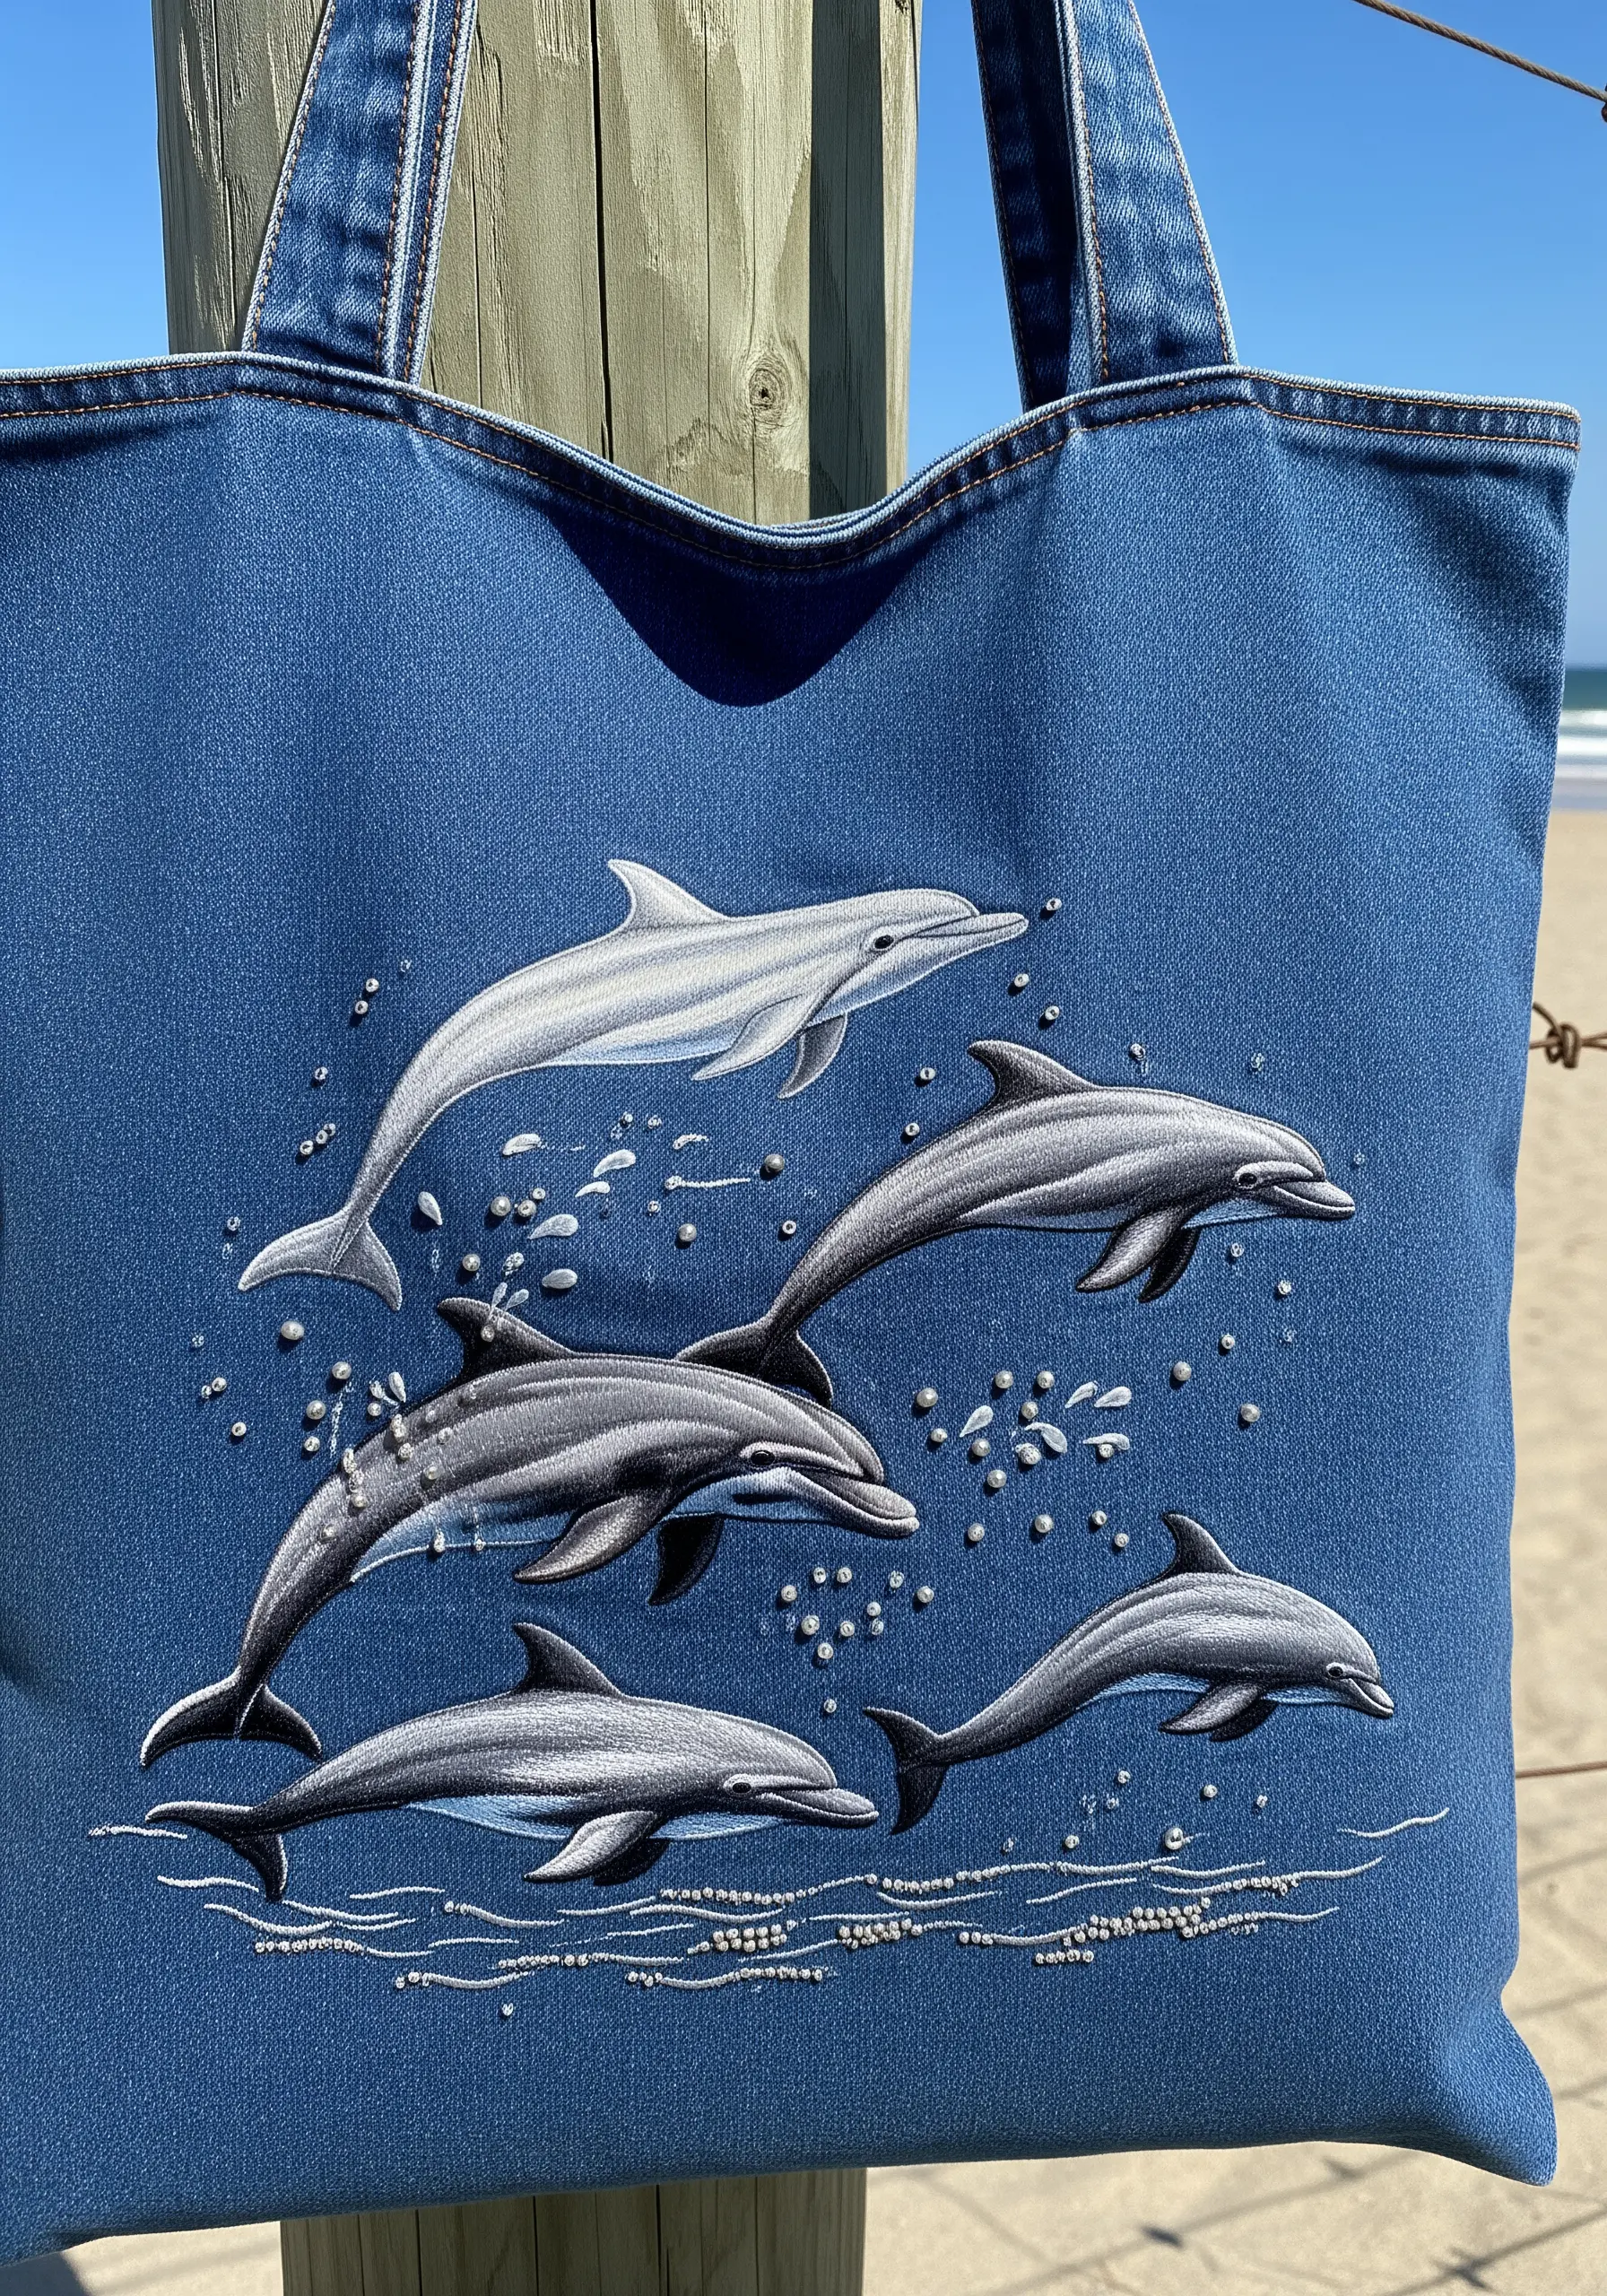
Bring marine life to life by using thread painting to create smooth, realistic gradients.
On a dark fabric like denim, start with your lightest grey tones and work towards the darker ones using the long and short stitch.
Use a single strand of floss for the most delicate blending, allowing you to capture the subtle curves and highlights on the dolphins’ bodies.
Add a few scattered French knots or silver beads to represent sea spray, giving the scene a dynamic sense of movement.
11. Blended Monstera Leaf
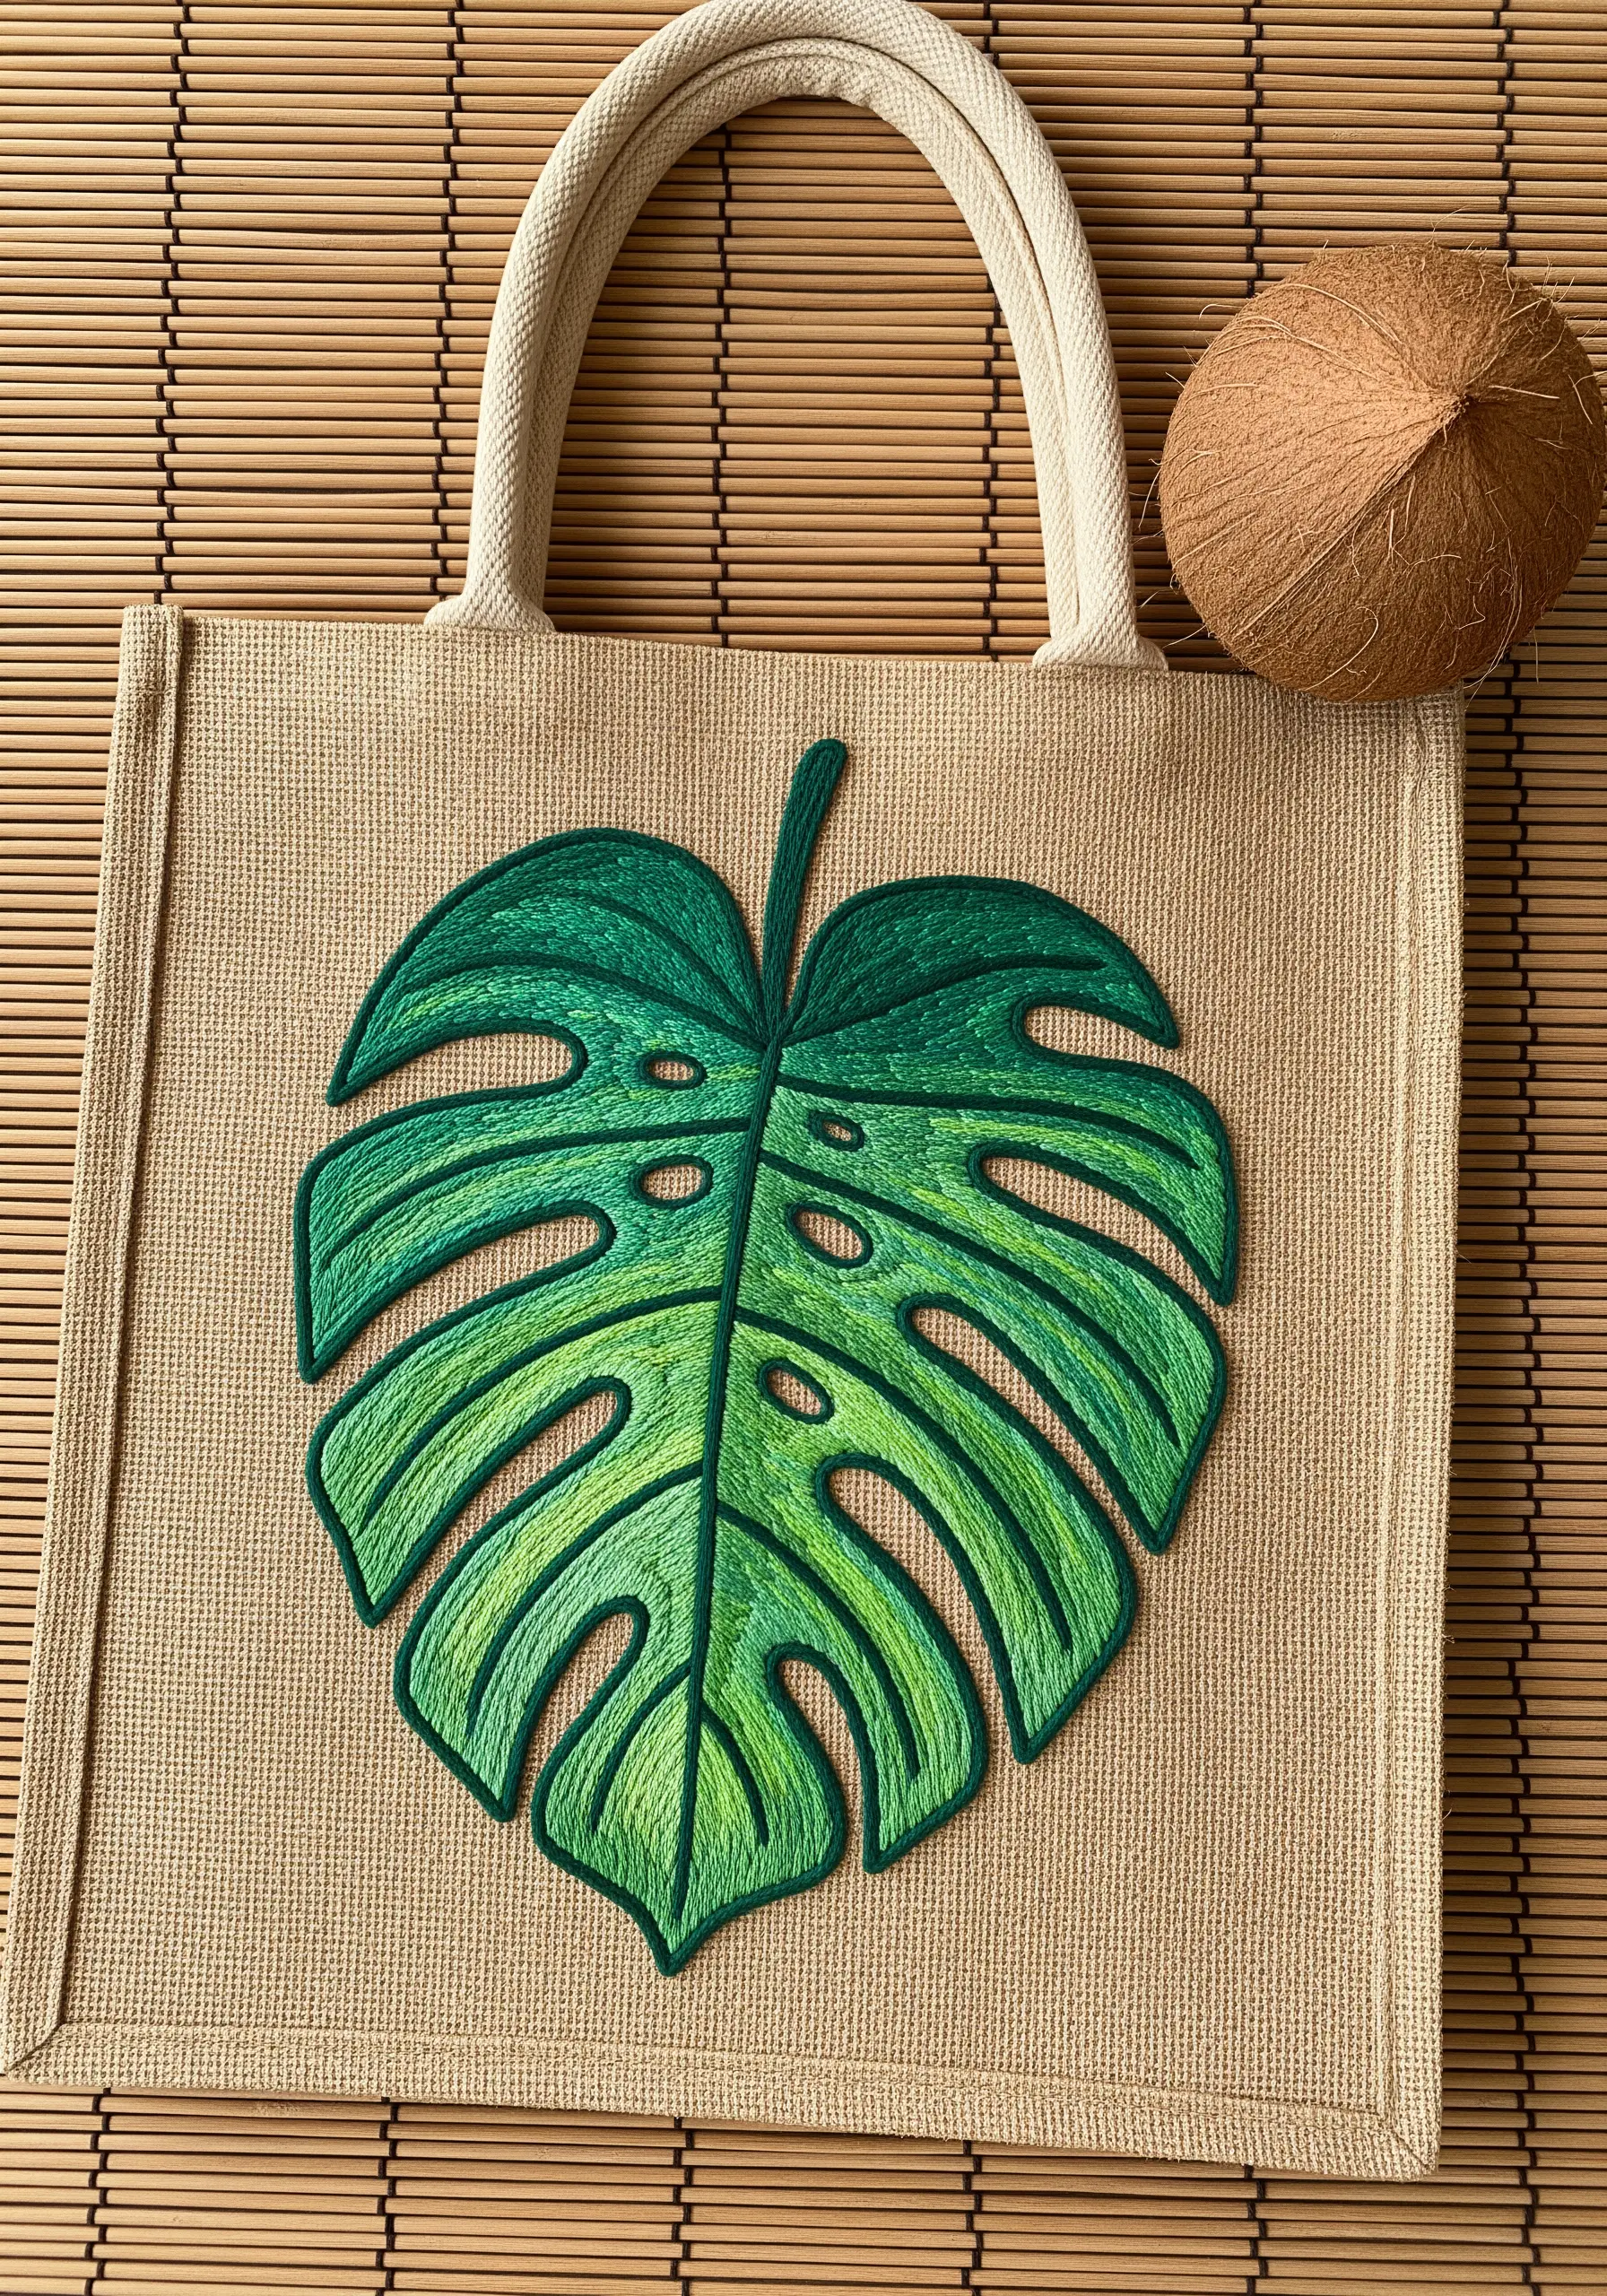
Achieve a natural, variegated look within a single leaf by mastering color blending.
Divide the leaf into sections based on your chosen color palette.
Fill each section with long and short stitch, using two or three shades of green to create a soft gradient from light to dark.
A bold outline in a dark green split stitch will unify the sections and give your leaf a clean, defined edge that stands out against the natural jute fabric of the bag.
This is one of the best tropical leaf embroidery designs for practicing your blending skills.
12. Iridescent Jellyfish
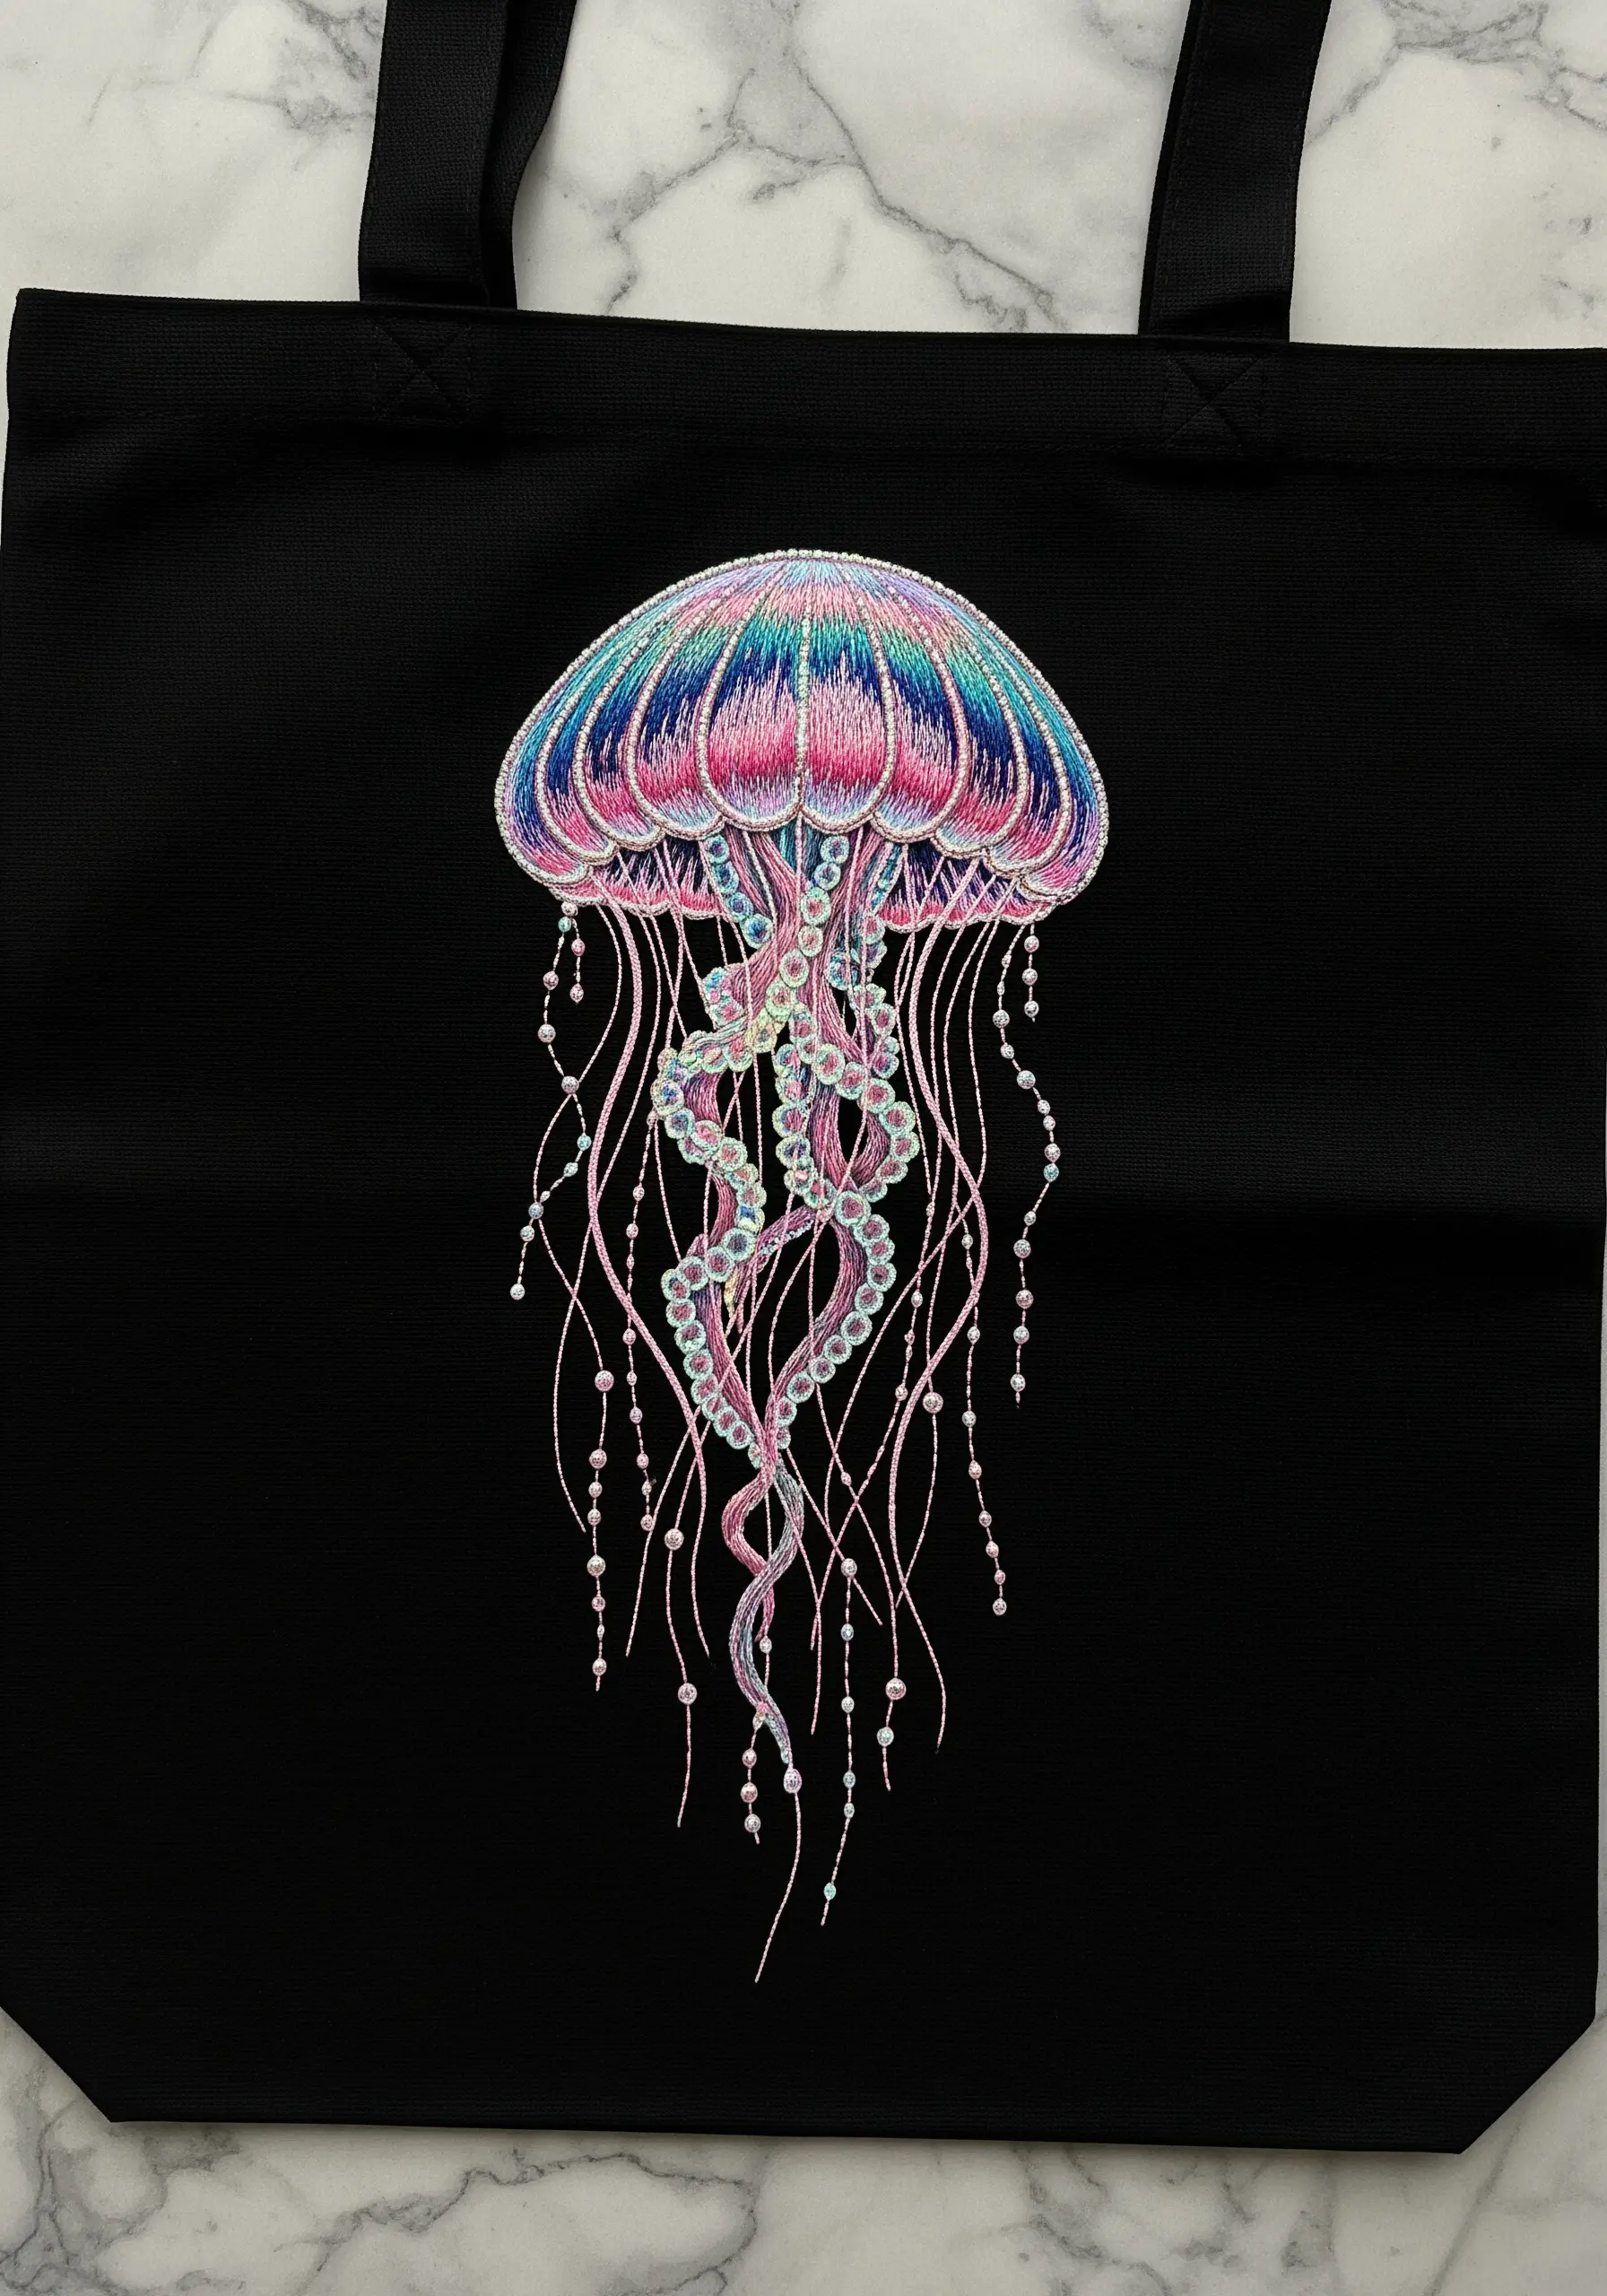
Capture the ethereal glow of a jellyfish using specialty threads and delicate embellishments.
For the bell, blend satin stitches using iridescent and metallic floss to create a shimmering, otherworldly effect against the black fabric.
The tentacles are an opportunity for mixed-media magic: use a mix of fine chain stitches, couched curly threads, and strands of tiny seed beads.
This combination of textures and light-reflecting materials is what will make your jellyfish look like it’s floating in the deep sea.
13. Textured Appliqué Starfish
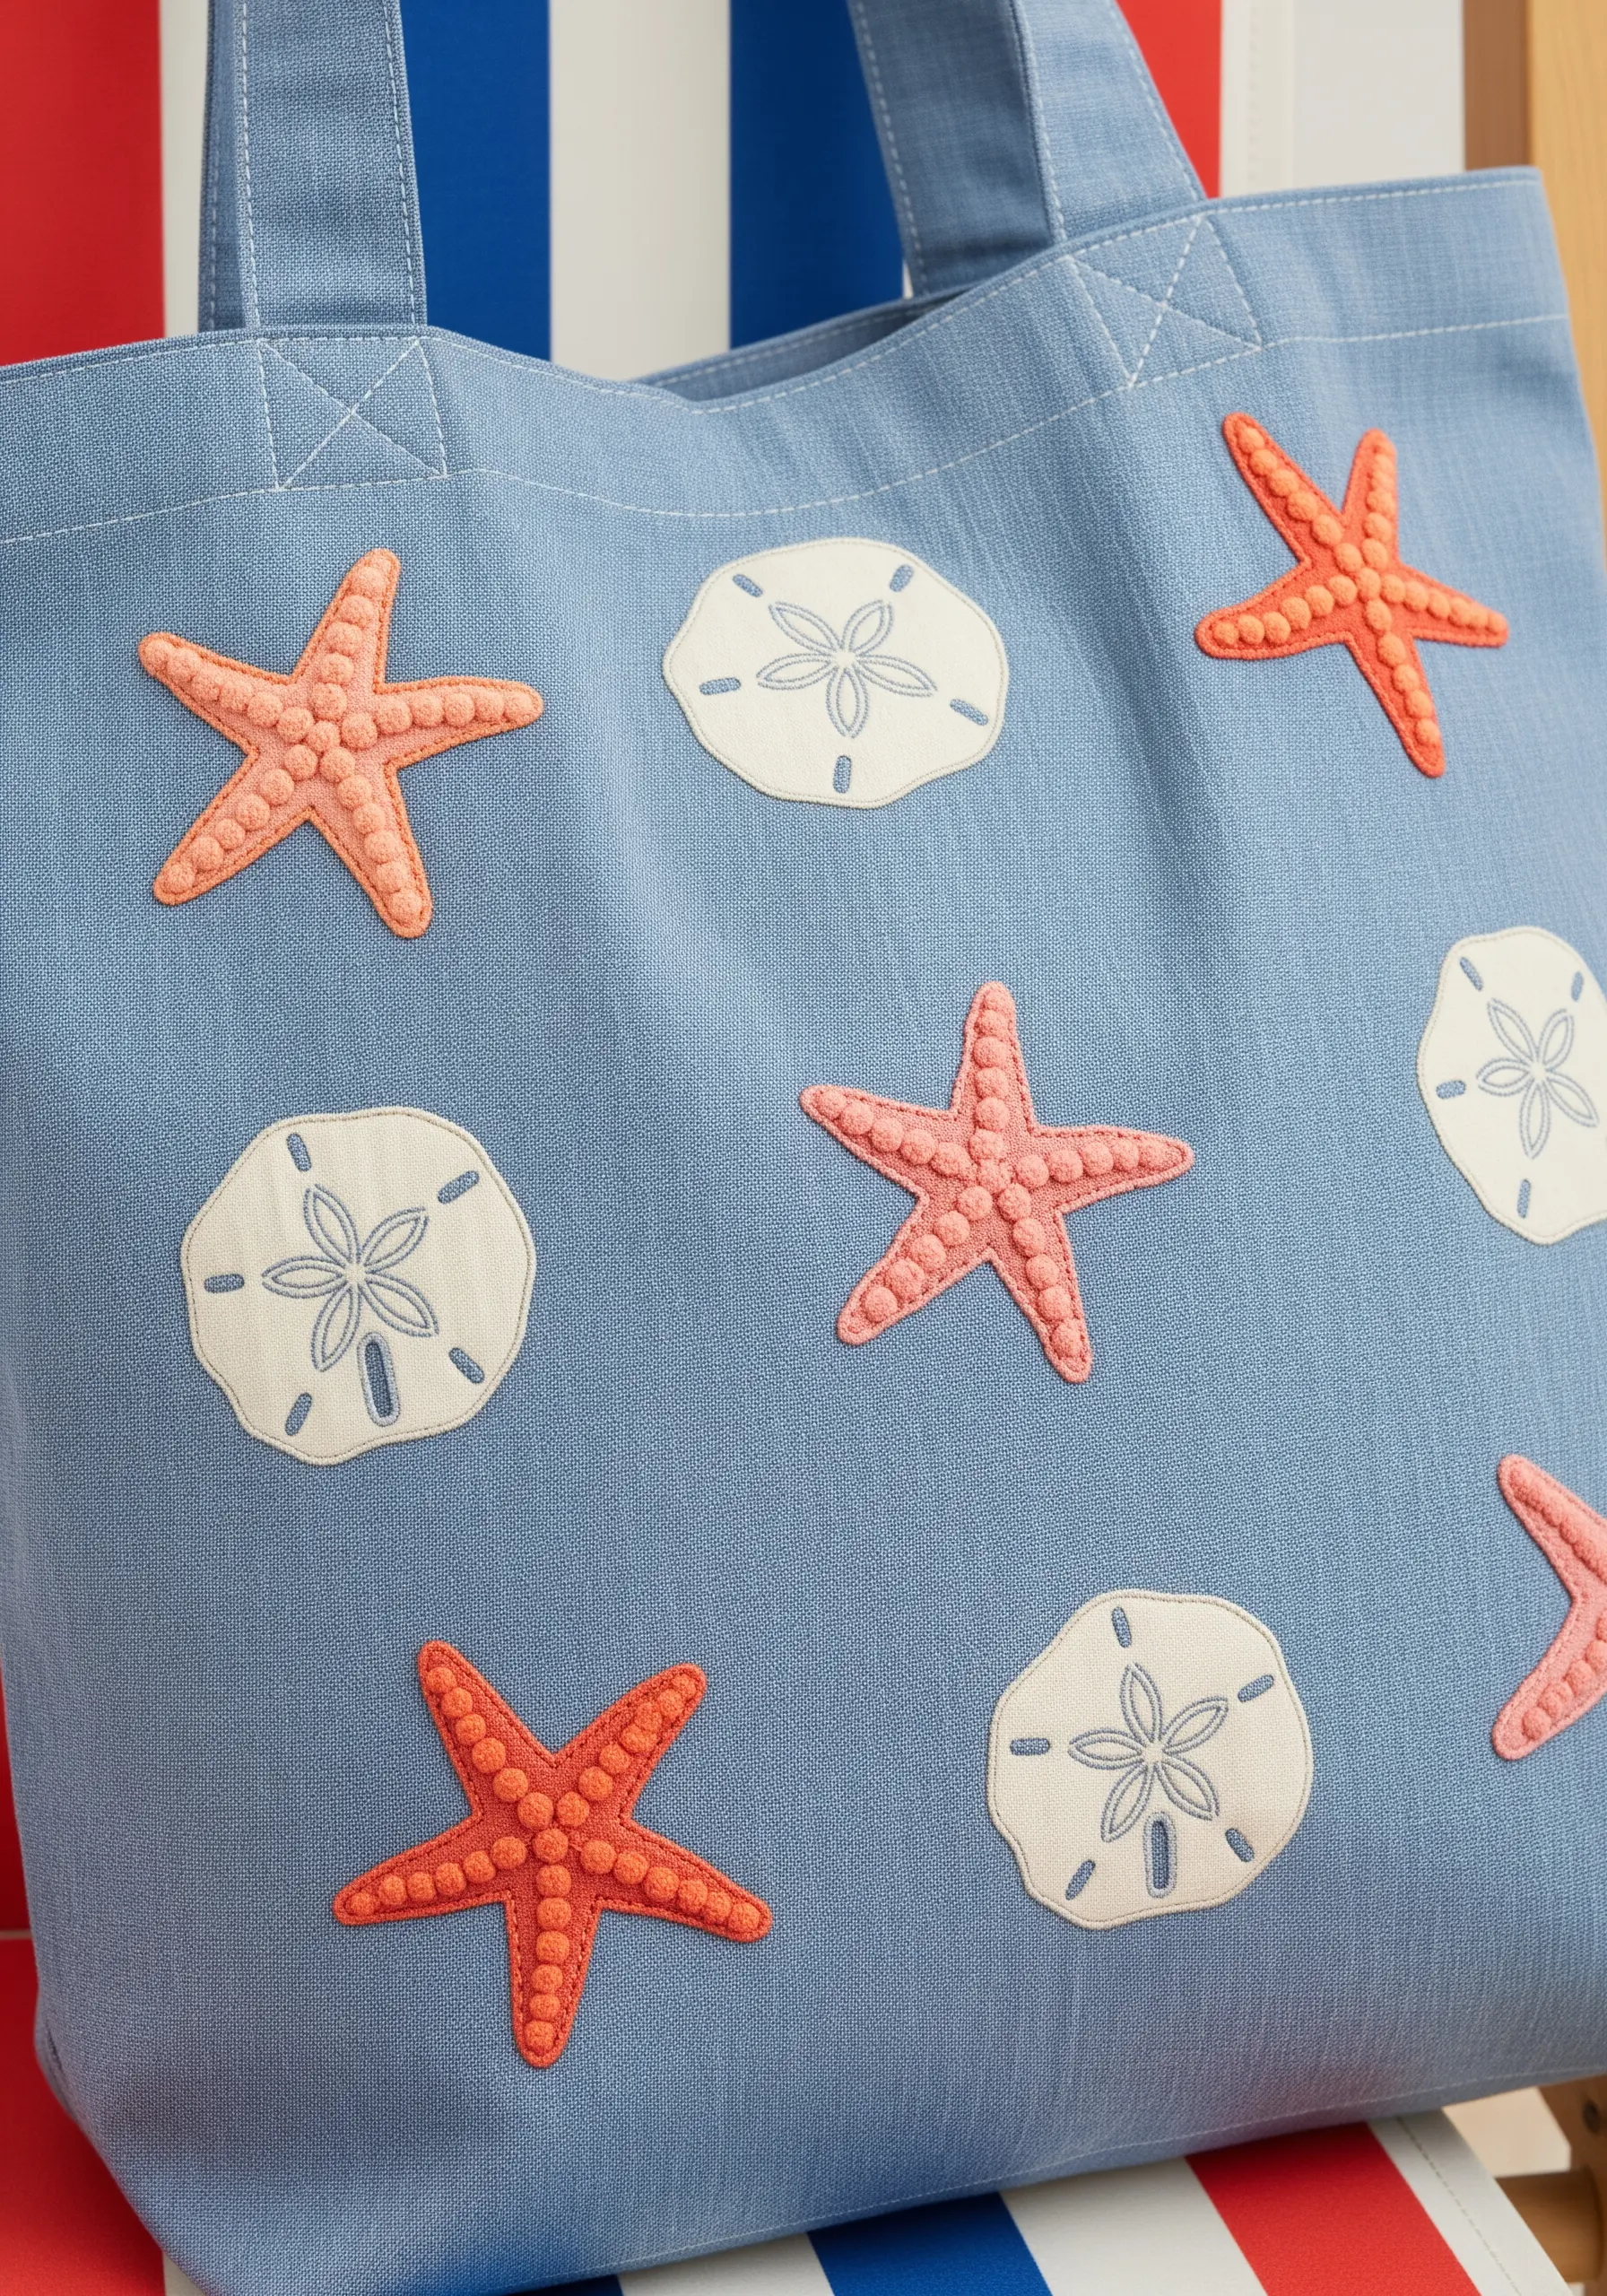
Add instant dimension and texture by using fabric appliqué for your main motifs.
Cut your starfish shapes from felt or a textured fabric and secure them to the bag with a neat blanket stitch around the edge.
Fill the starfish surface with a scatter of French knots for a bumpy, realistic texture.
For the sand dollars, use a smooth white cotton fabric and add the central design with a simple, delicate backstitch in a contrasting thread.
14. The Classic Compass Rose
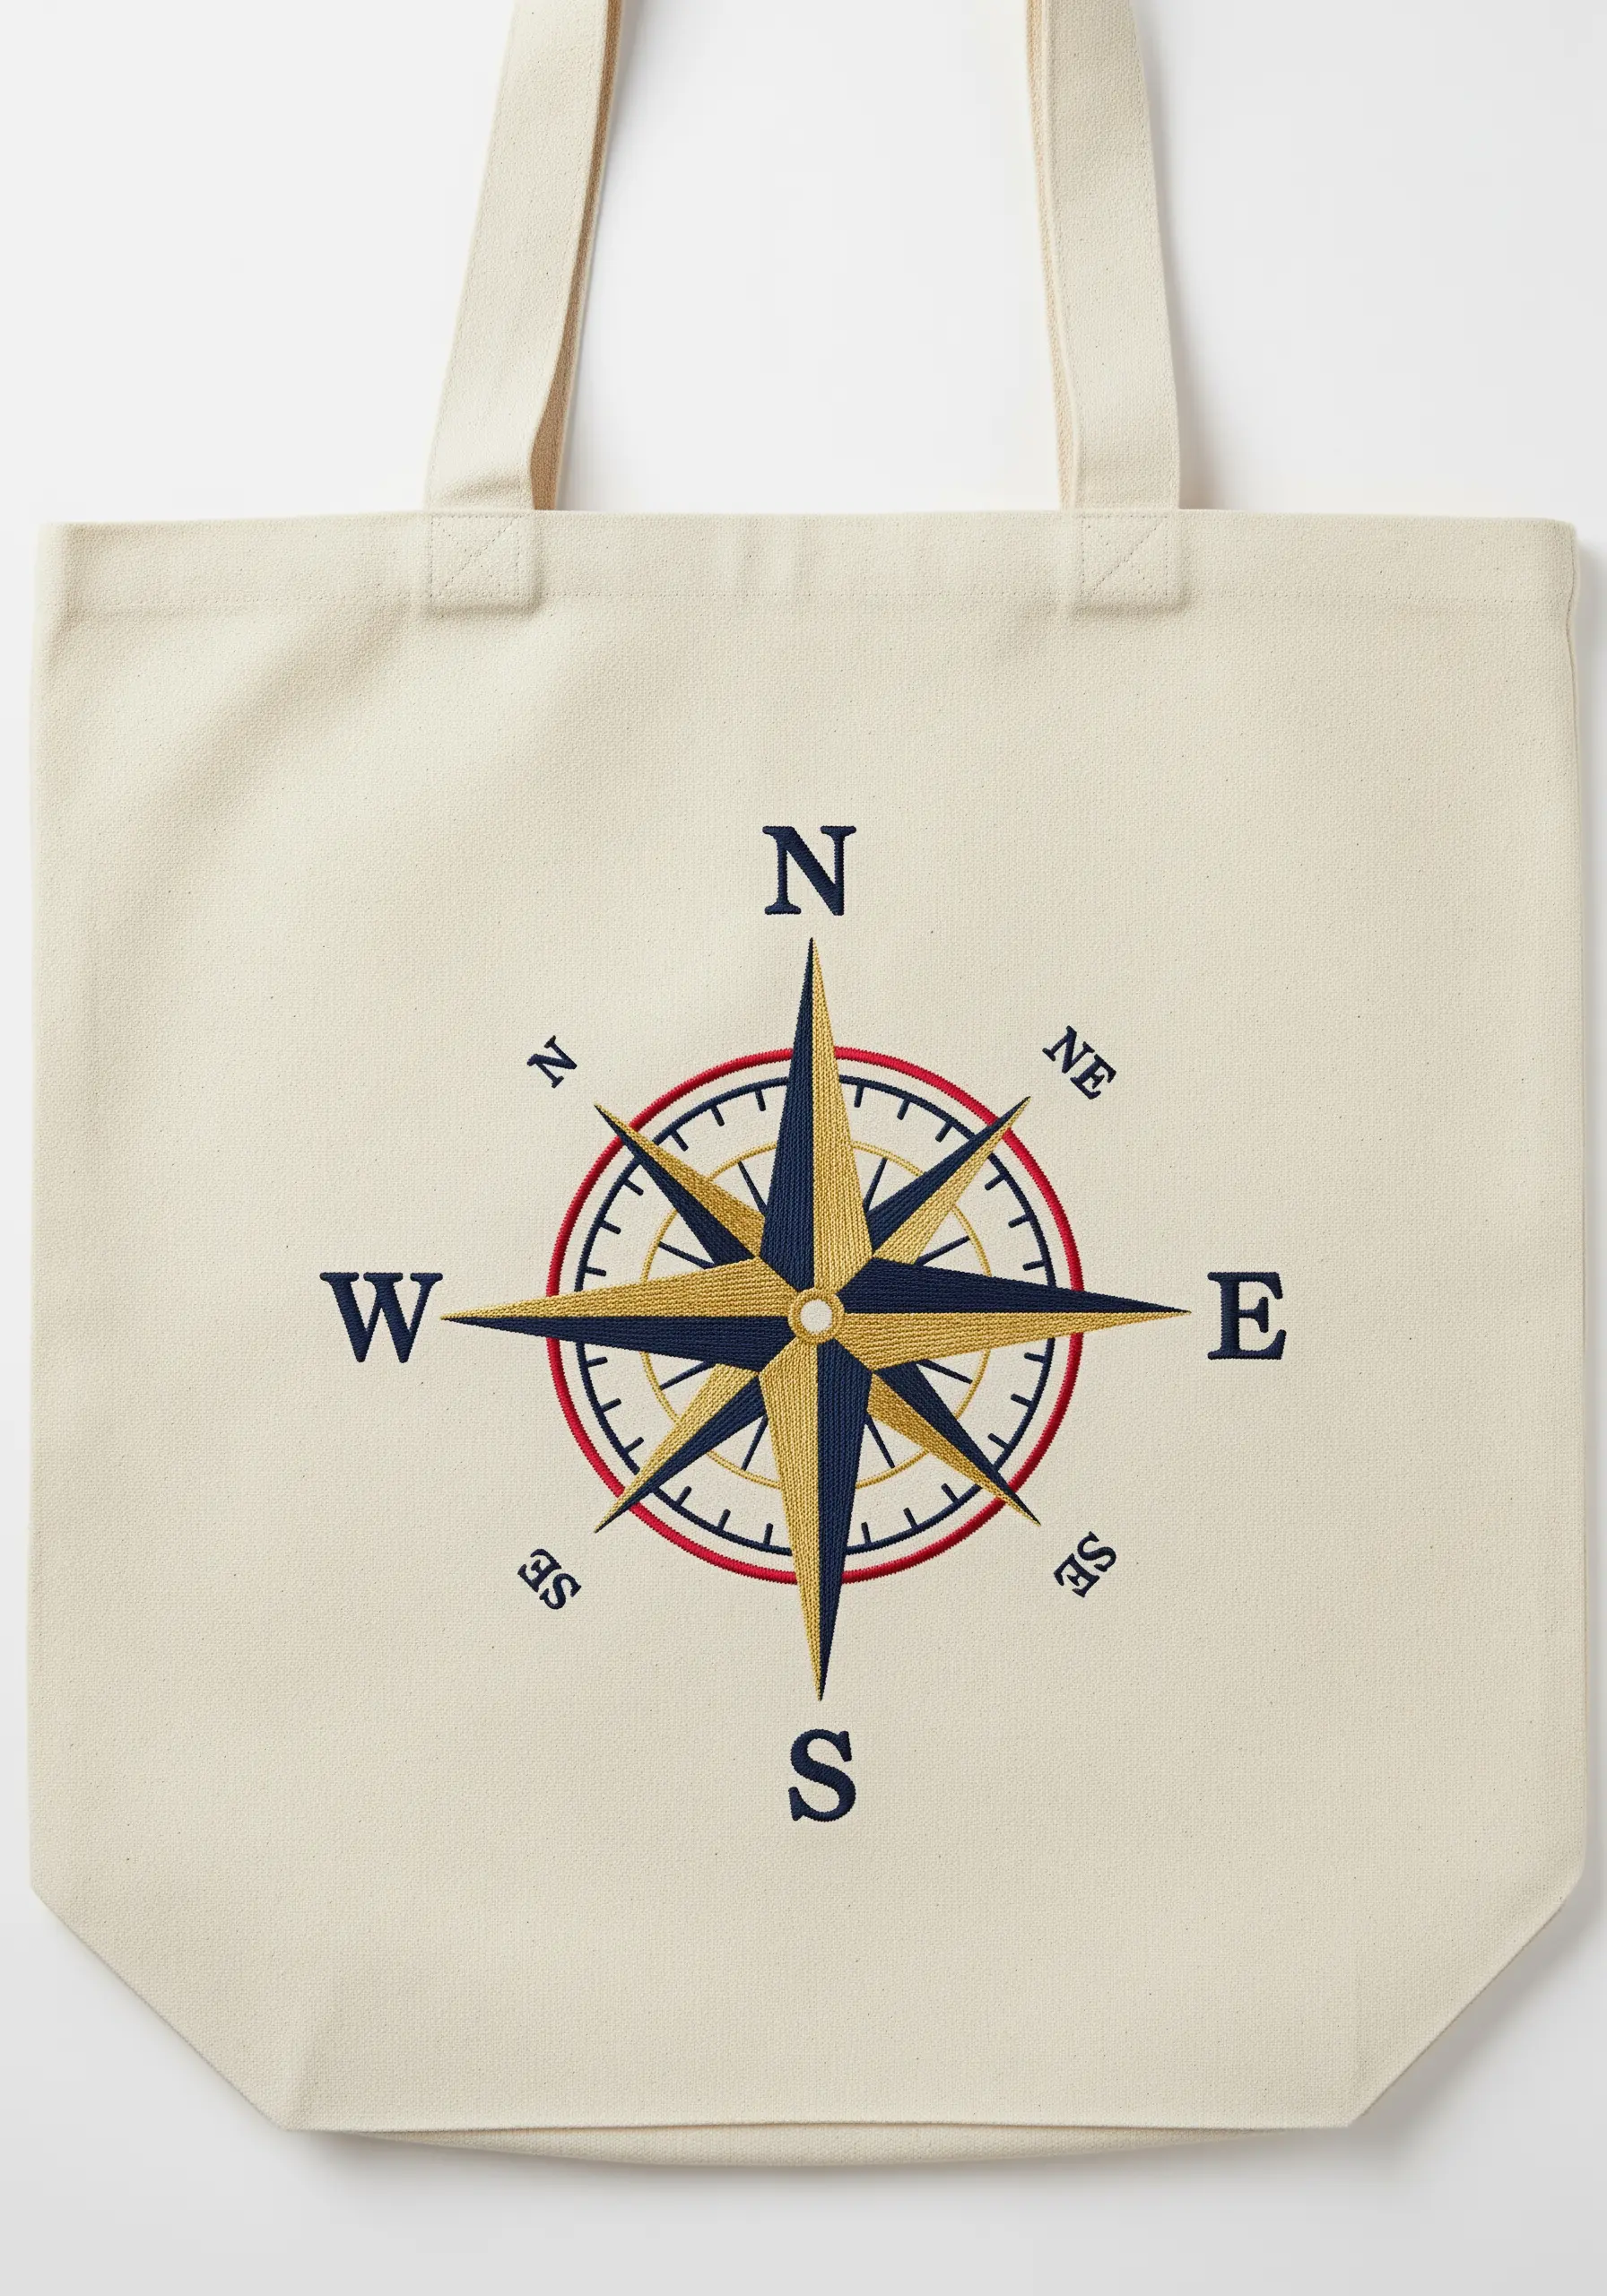
Execute a classic design with flawless precision by focusing on stitch consistency.
Use a high-quality stabilizer to prevent any distortion of the fabric while you stitch the clean lines and symmetrical shapes.
Fill the triangular points with satin stitch, alternating colors for a sharp, graphic look. For an even smoother finish, outline each shape with a split stitch before filling.
A touch of metallic gold thread in the center adds a hint of luxury and draws the eye to the heart of the design.
15. A School of Whimsical Fish
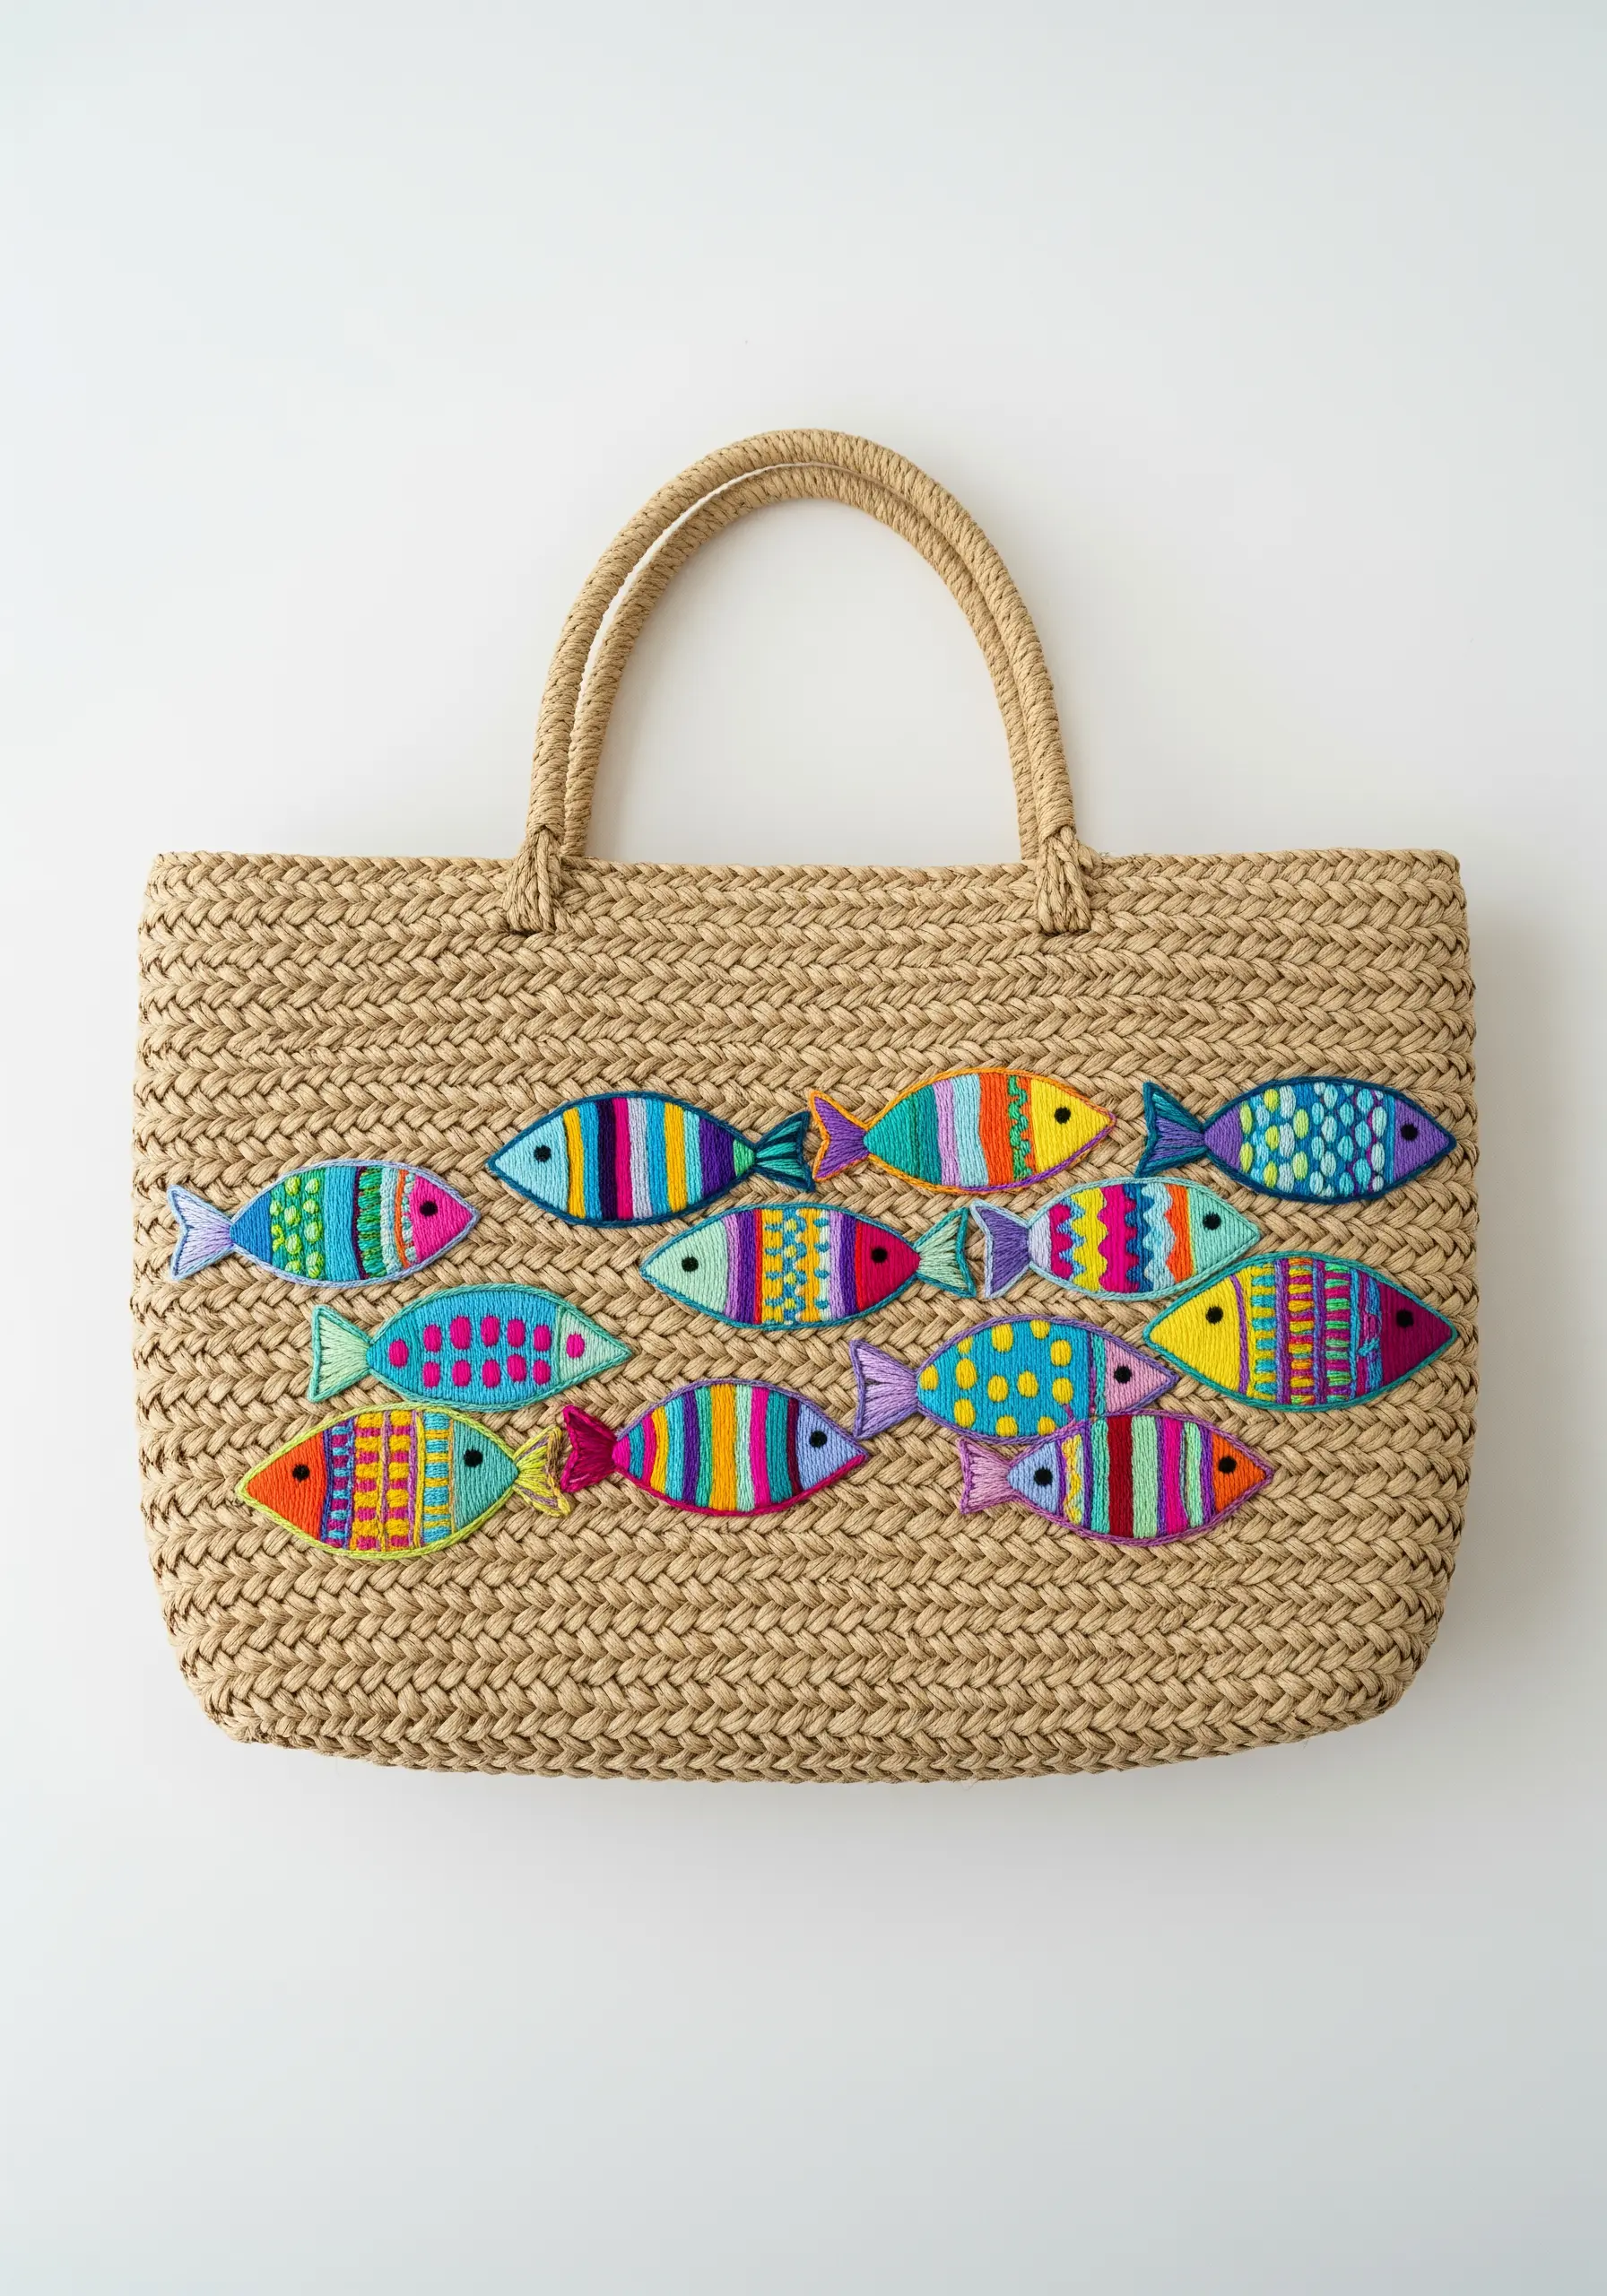
Create a playful, vibrant scene that’s perfect for using up your leftover thread.
There’s no need for perfect realism here; the charm comes from the variety of patterns and colors.
Fill each fish with a different combination of simple stitches: horizontal satin stitch for stripes, seed stitch for spots, and checkerboard patterns using vertical and horizontal bars.
Outline each fish in a contrasting color to make it pop from the woven straw background.
16. Soft and Tactile Cattails
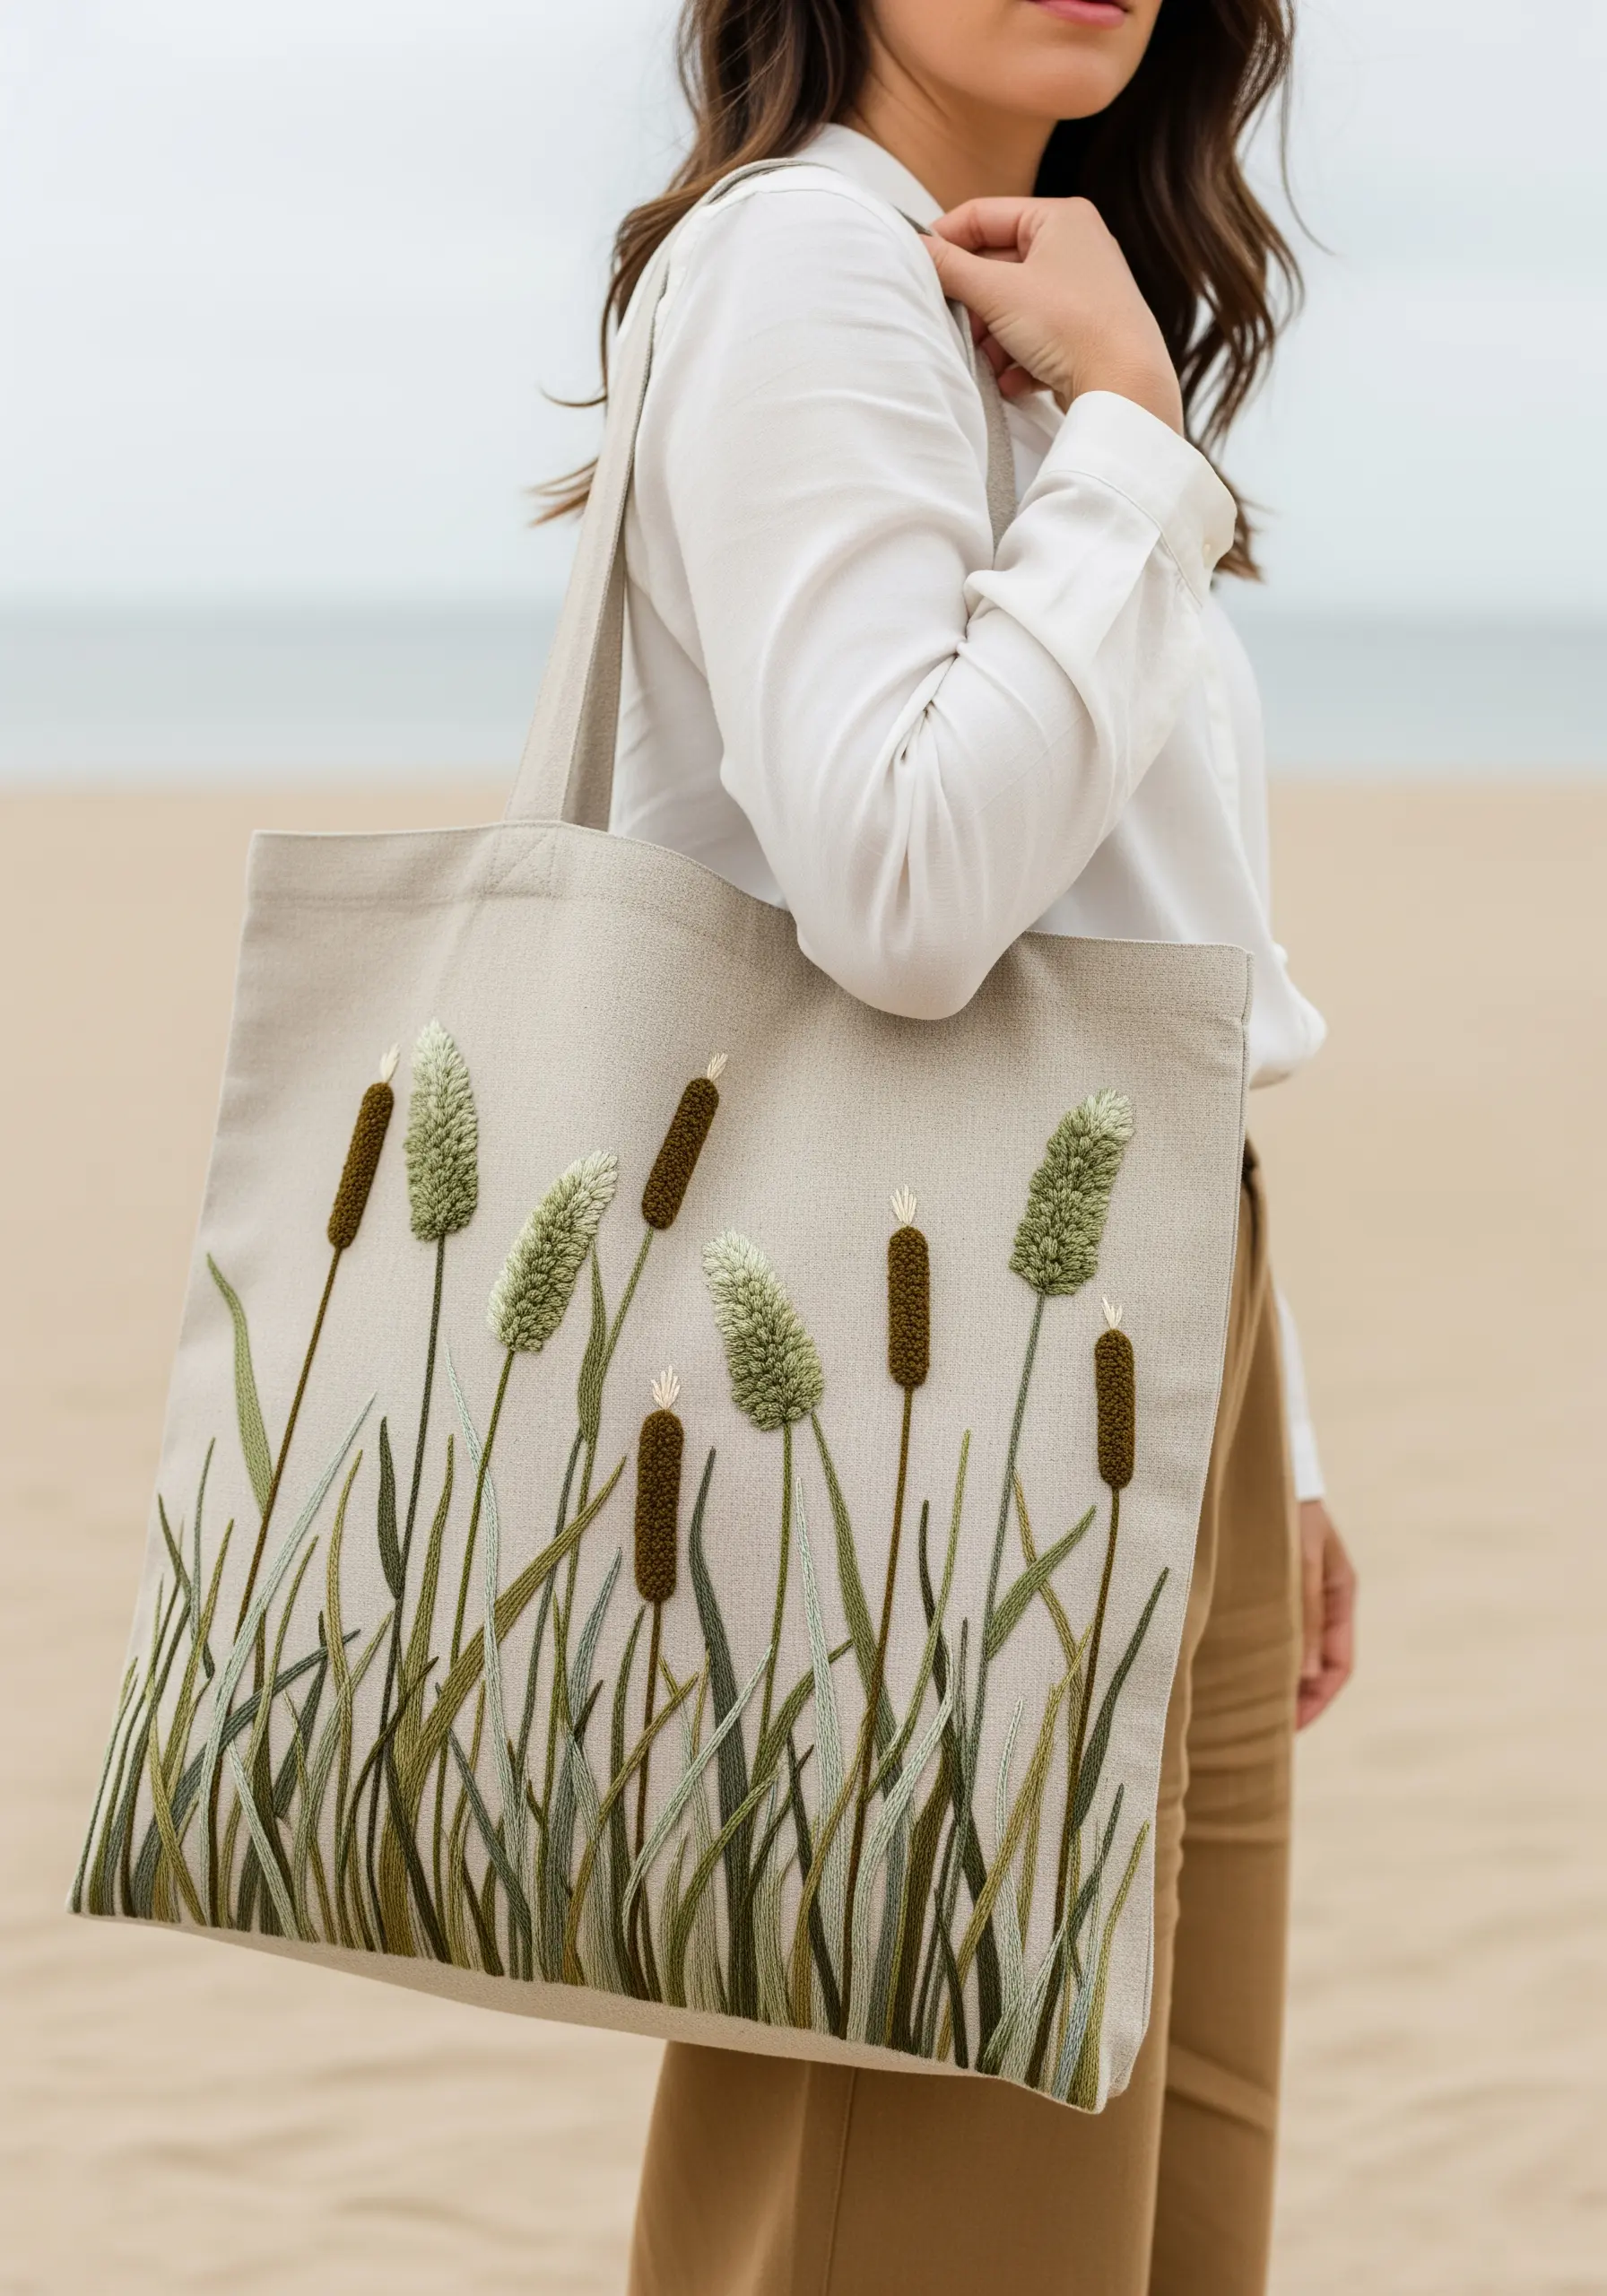
Recreate the textures of marshland grasses with dimensional stitches that invite touch.
For the fluffy, light green heads, use bullion knots or a series of small loop stitches (turkey work) and trim them for a soft, fuzzy texture.
The dense brown cattails are best rendered with tightly packed French knots in a rich, chocolatey brown.
Use a simple stem stitch for the reeds and blades of grass, varying the length and angle to create a natural, breezy composition.
17. Raised Script Lettering
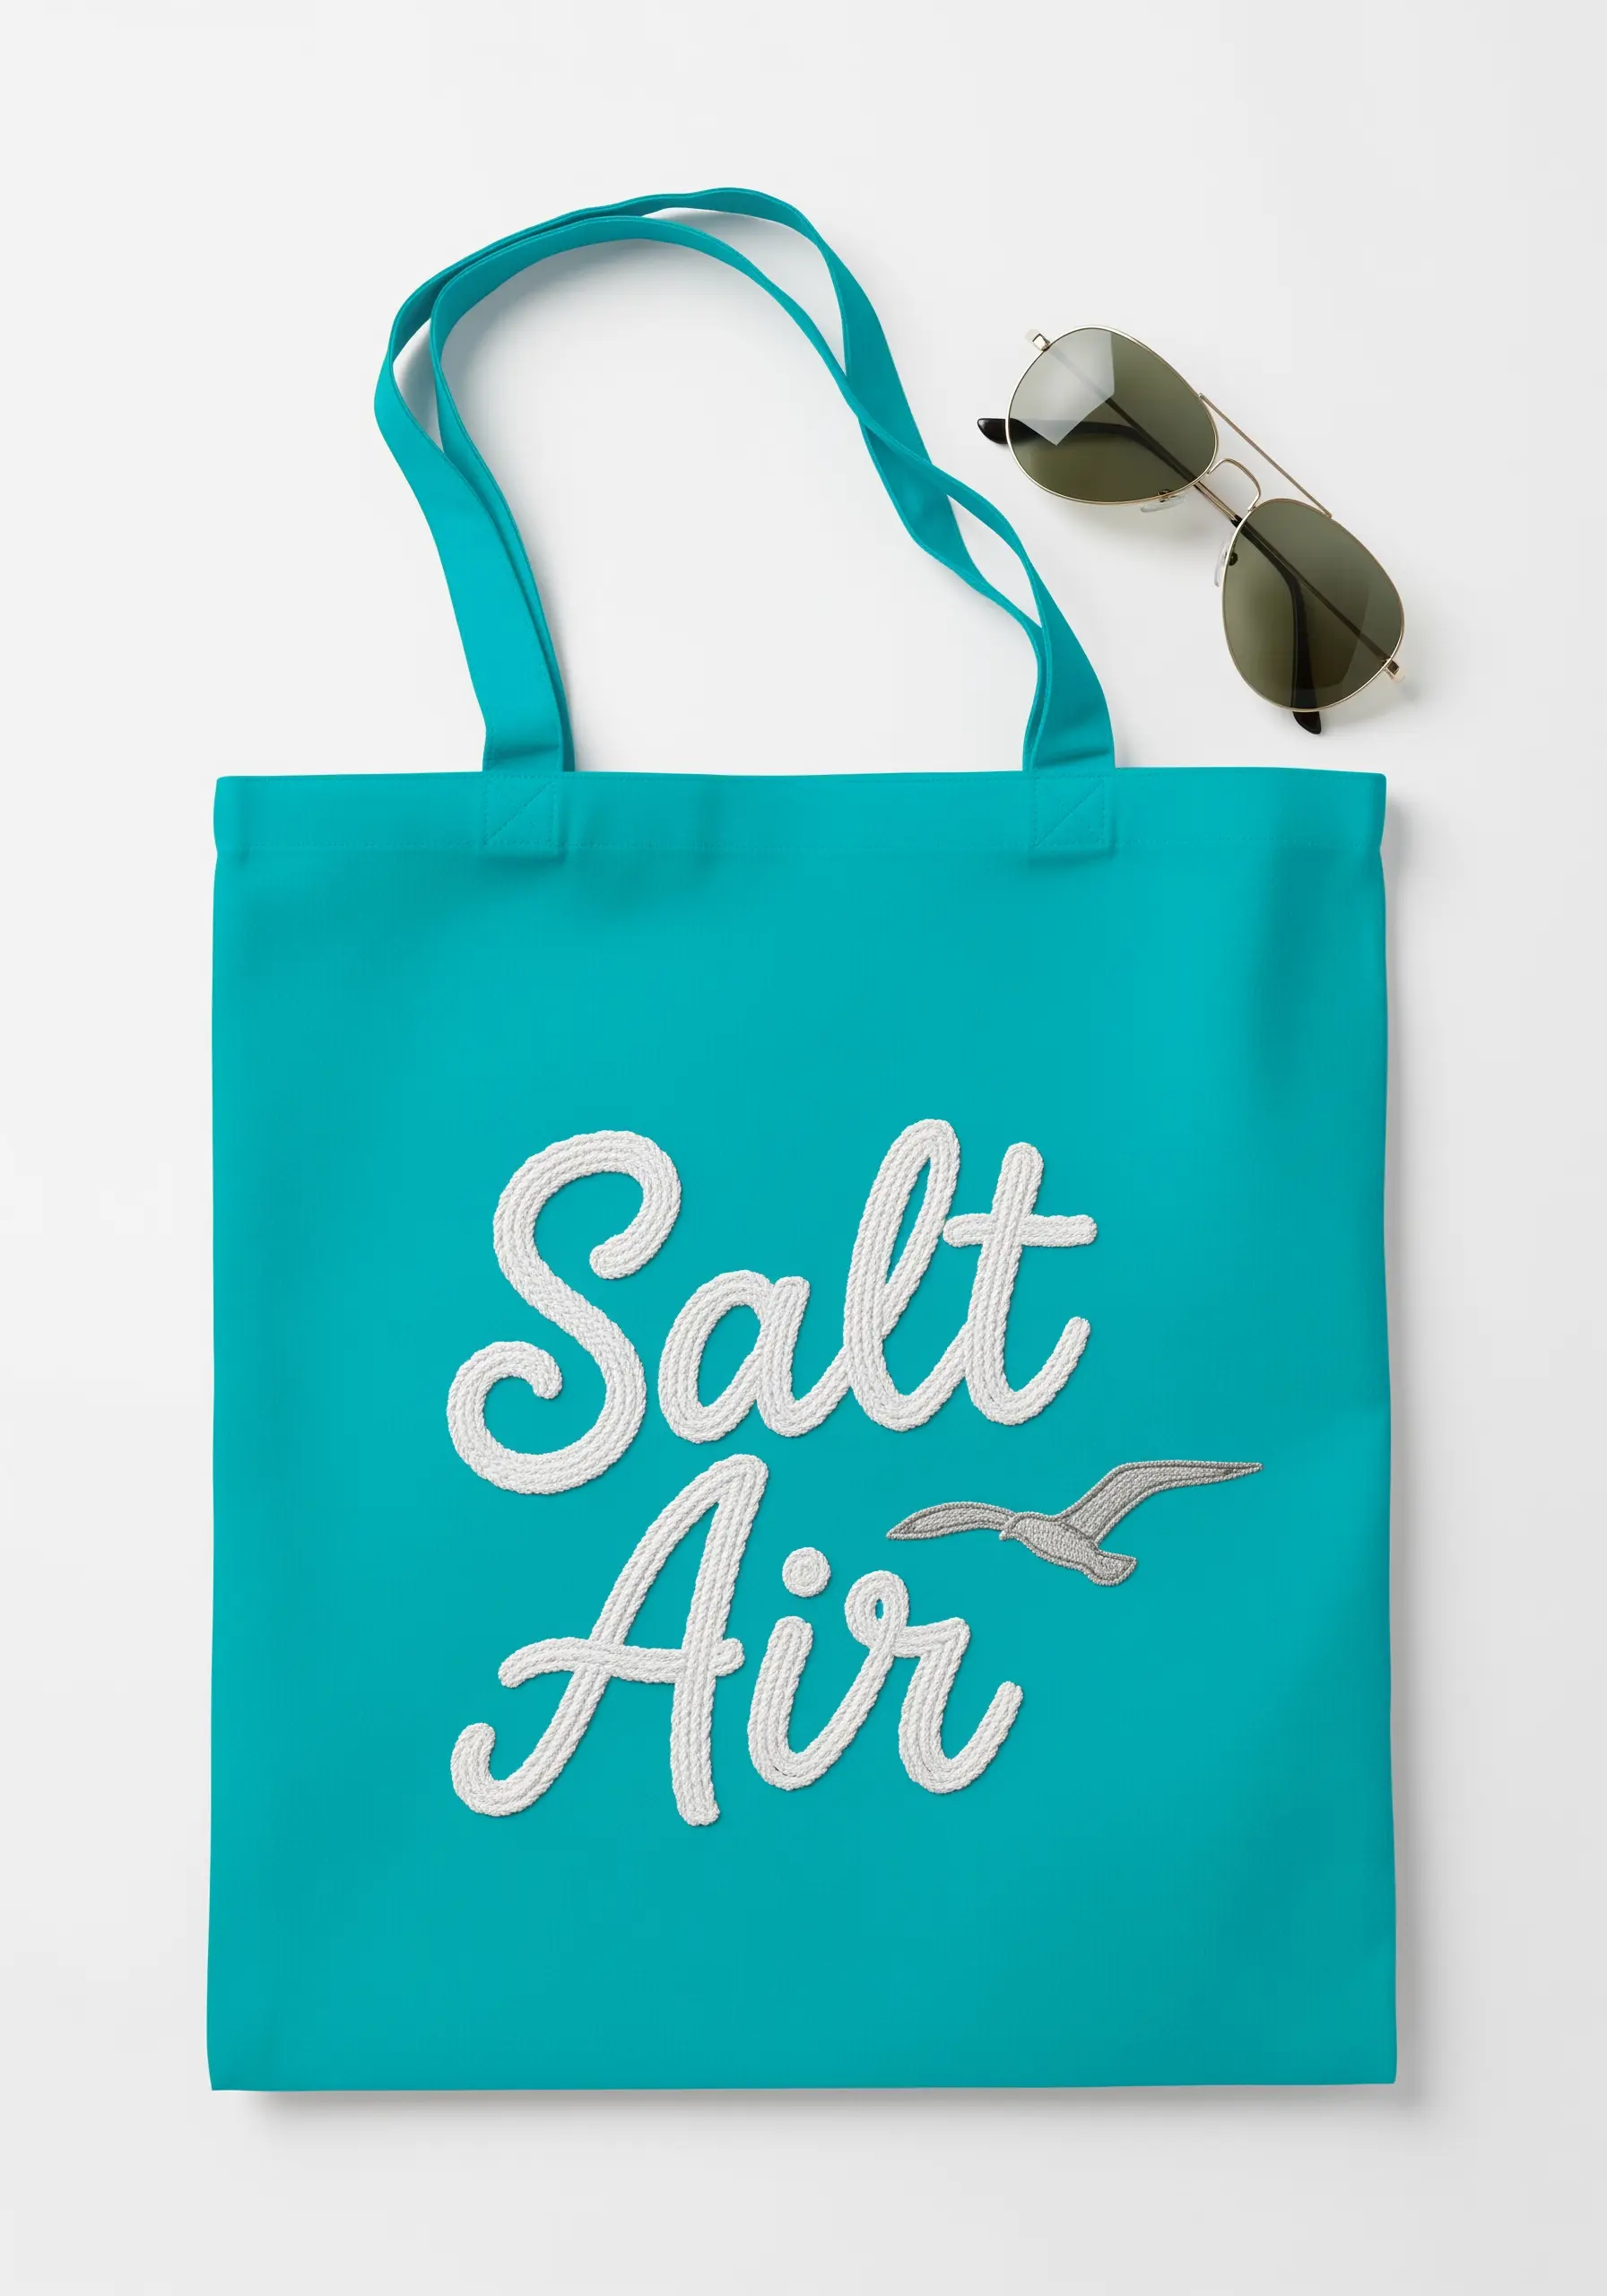
Make typography the star of your design by giving it dimension and texture.
To create this raised, rope-like text, use a padded satin stitch: first, create a base of small horizontal stitches, then cover them with your final vertical satin stitches.
Alternatively, a raised stem stitch band or a simple whipped backstitch using a thicker, 6-ply floss will also achieve this embossed look.
The clean, high-contrast effect of white on turquoise makes the lettering crisp and easy to read from a distance.
18. Lighthouse with Appliqué and Knots
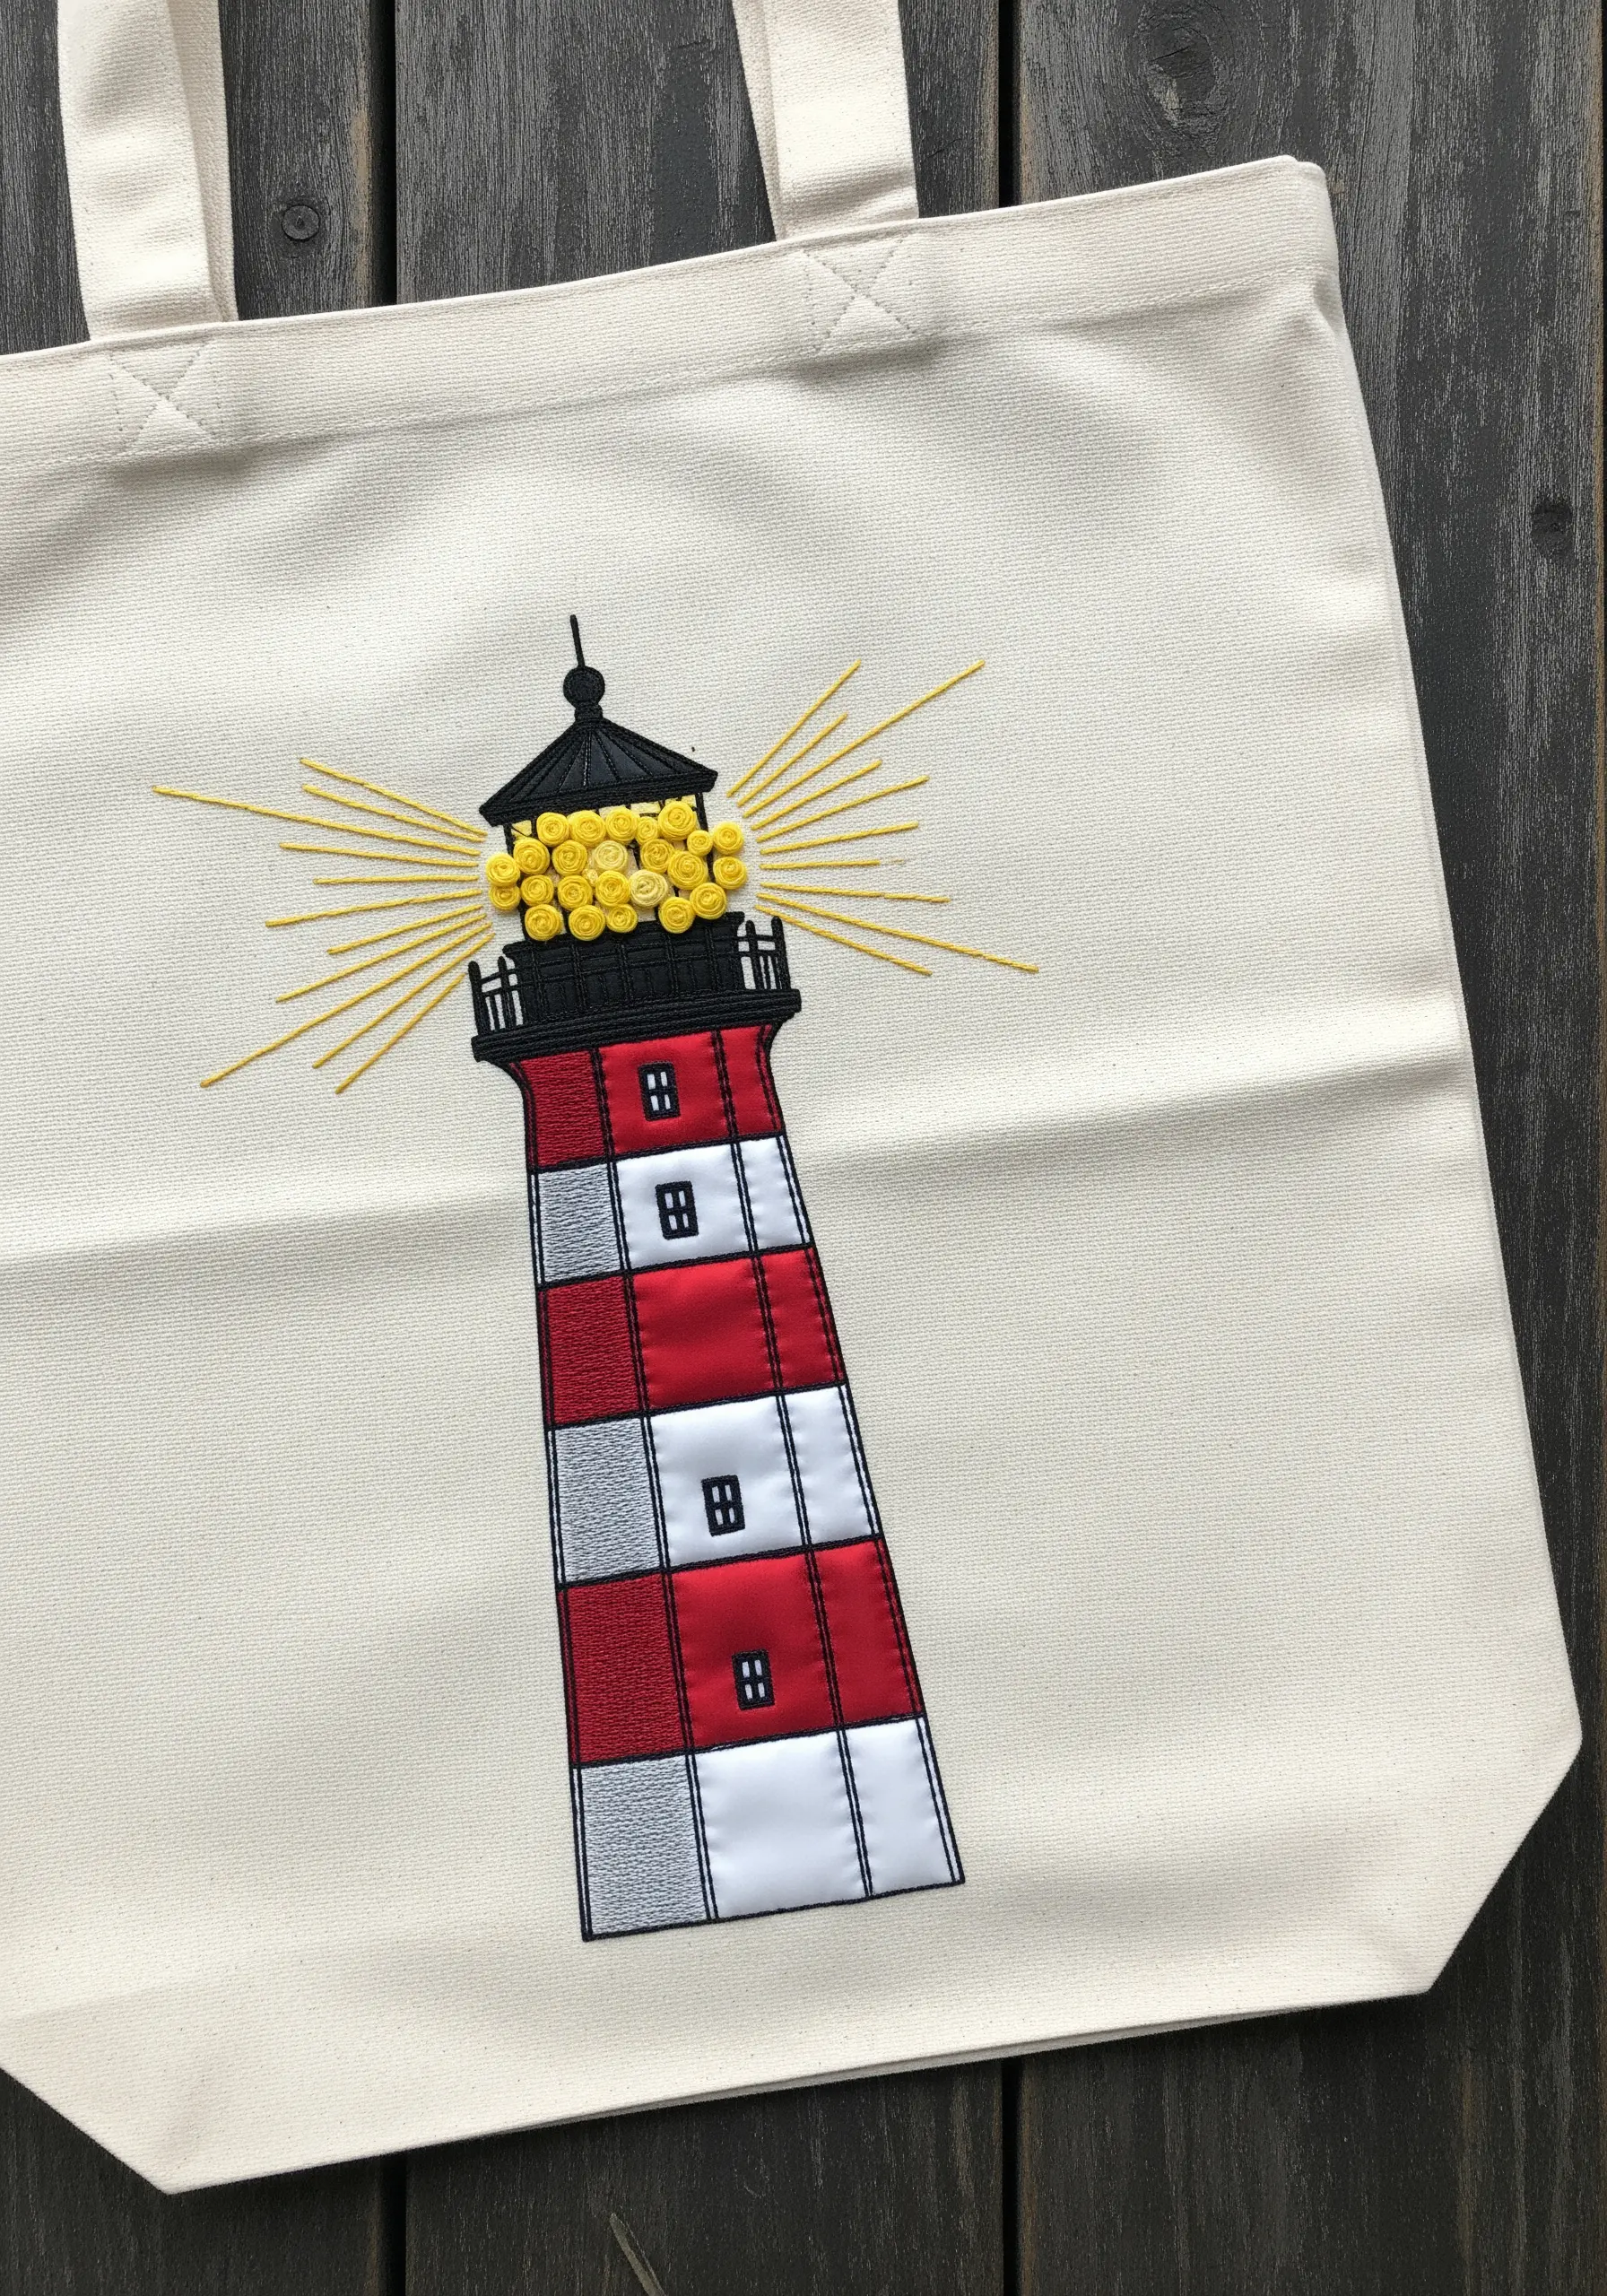
Combine fabric appliqué with dense stitch work for a clean, graphic design with a touch of texture.
Use pieces of red, white, and black fabric for the lighthouse stripes and top, securing them with a neat satin stitch border.
The light is the focal point: create a glowing, 3D effect by filling the lamp area with a dense cluster of bright yellow French knots.
Radiating straight stitches in a lighter yellow suggest rays of light, completing the charming scene.
19. Layered Fabric Waves
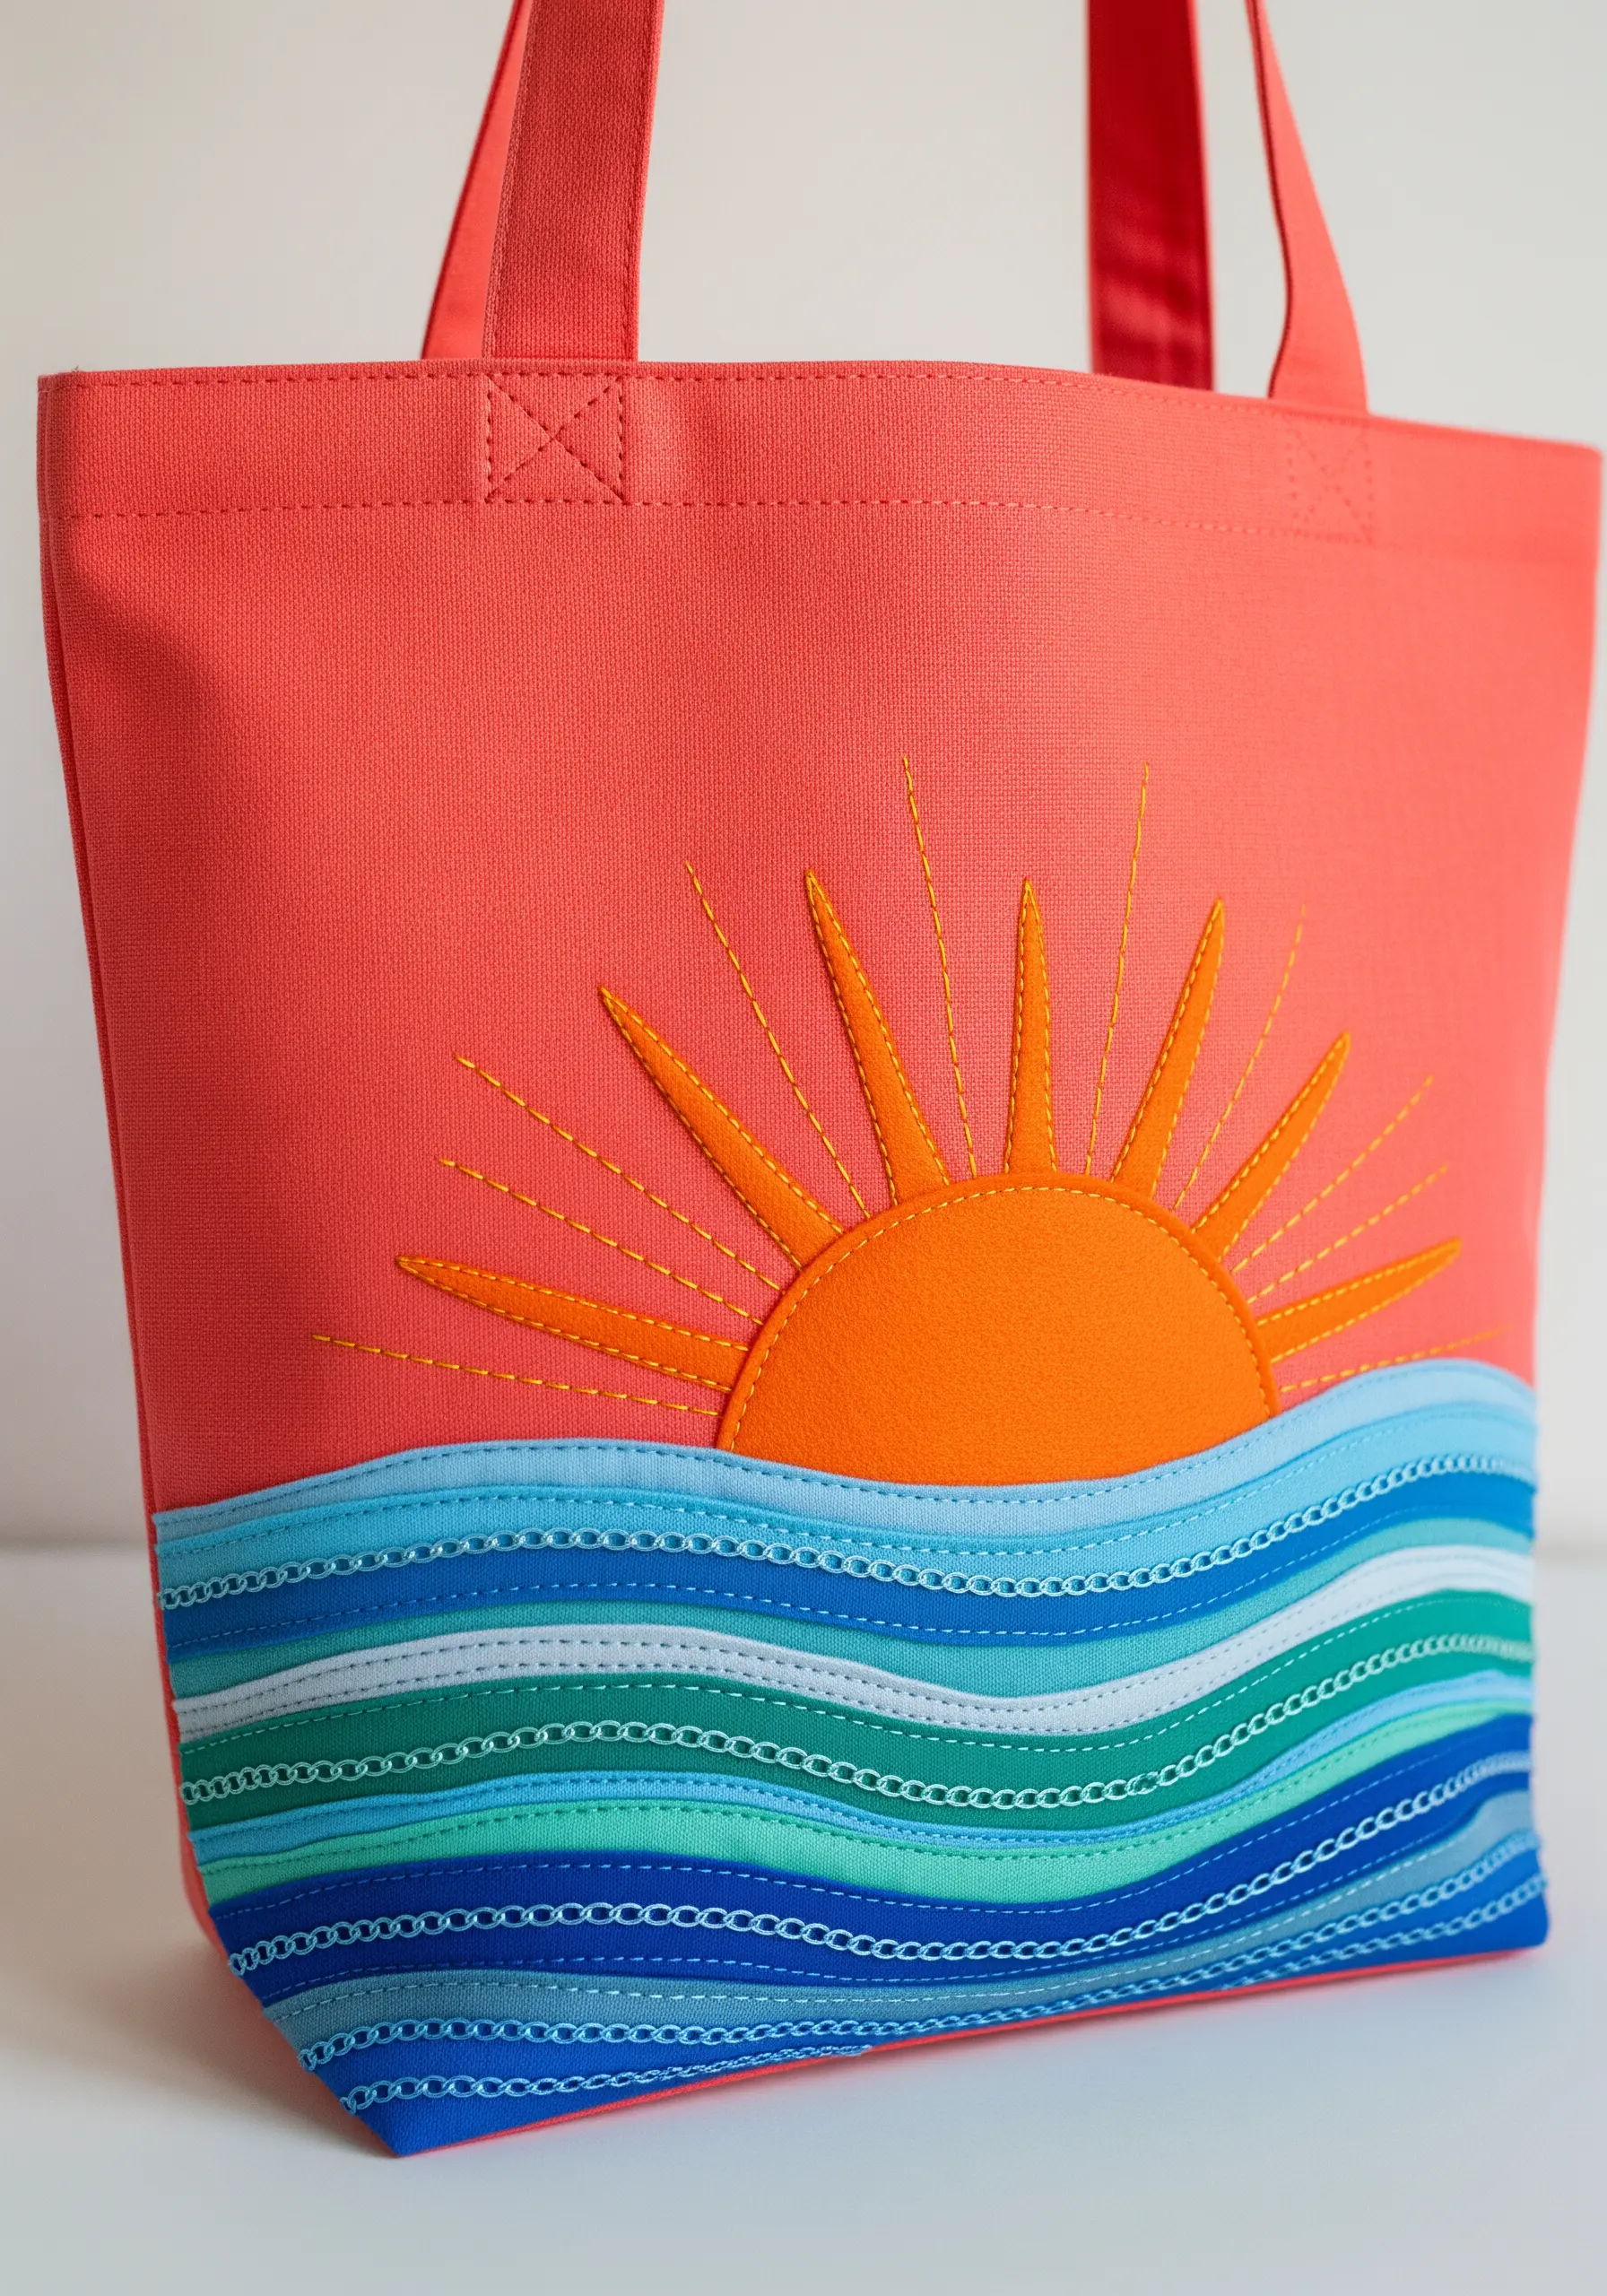
Build a dynamic ocean scene by layering fabric strips instead of stitching a large fill area.
Cut wavy strips of different blue and green cotton fabrics and arrange them to create your ocean.
Secure each layer with a decorative machine stitch or a simple hand-stitched running stitch in a contrasting color for added visual interest.
This appliqué technique is much faster than thread painting and creates a bold, graphic style that’s perfect for a playful beach bag.
20. Majestic Humpback Whale
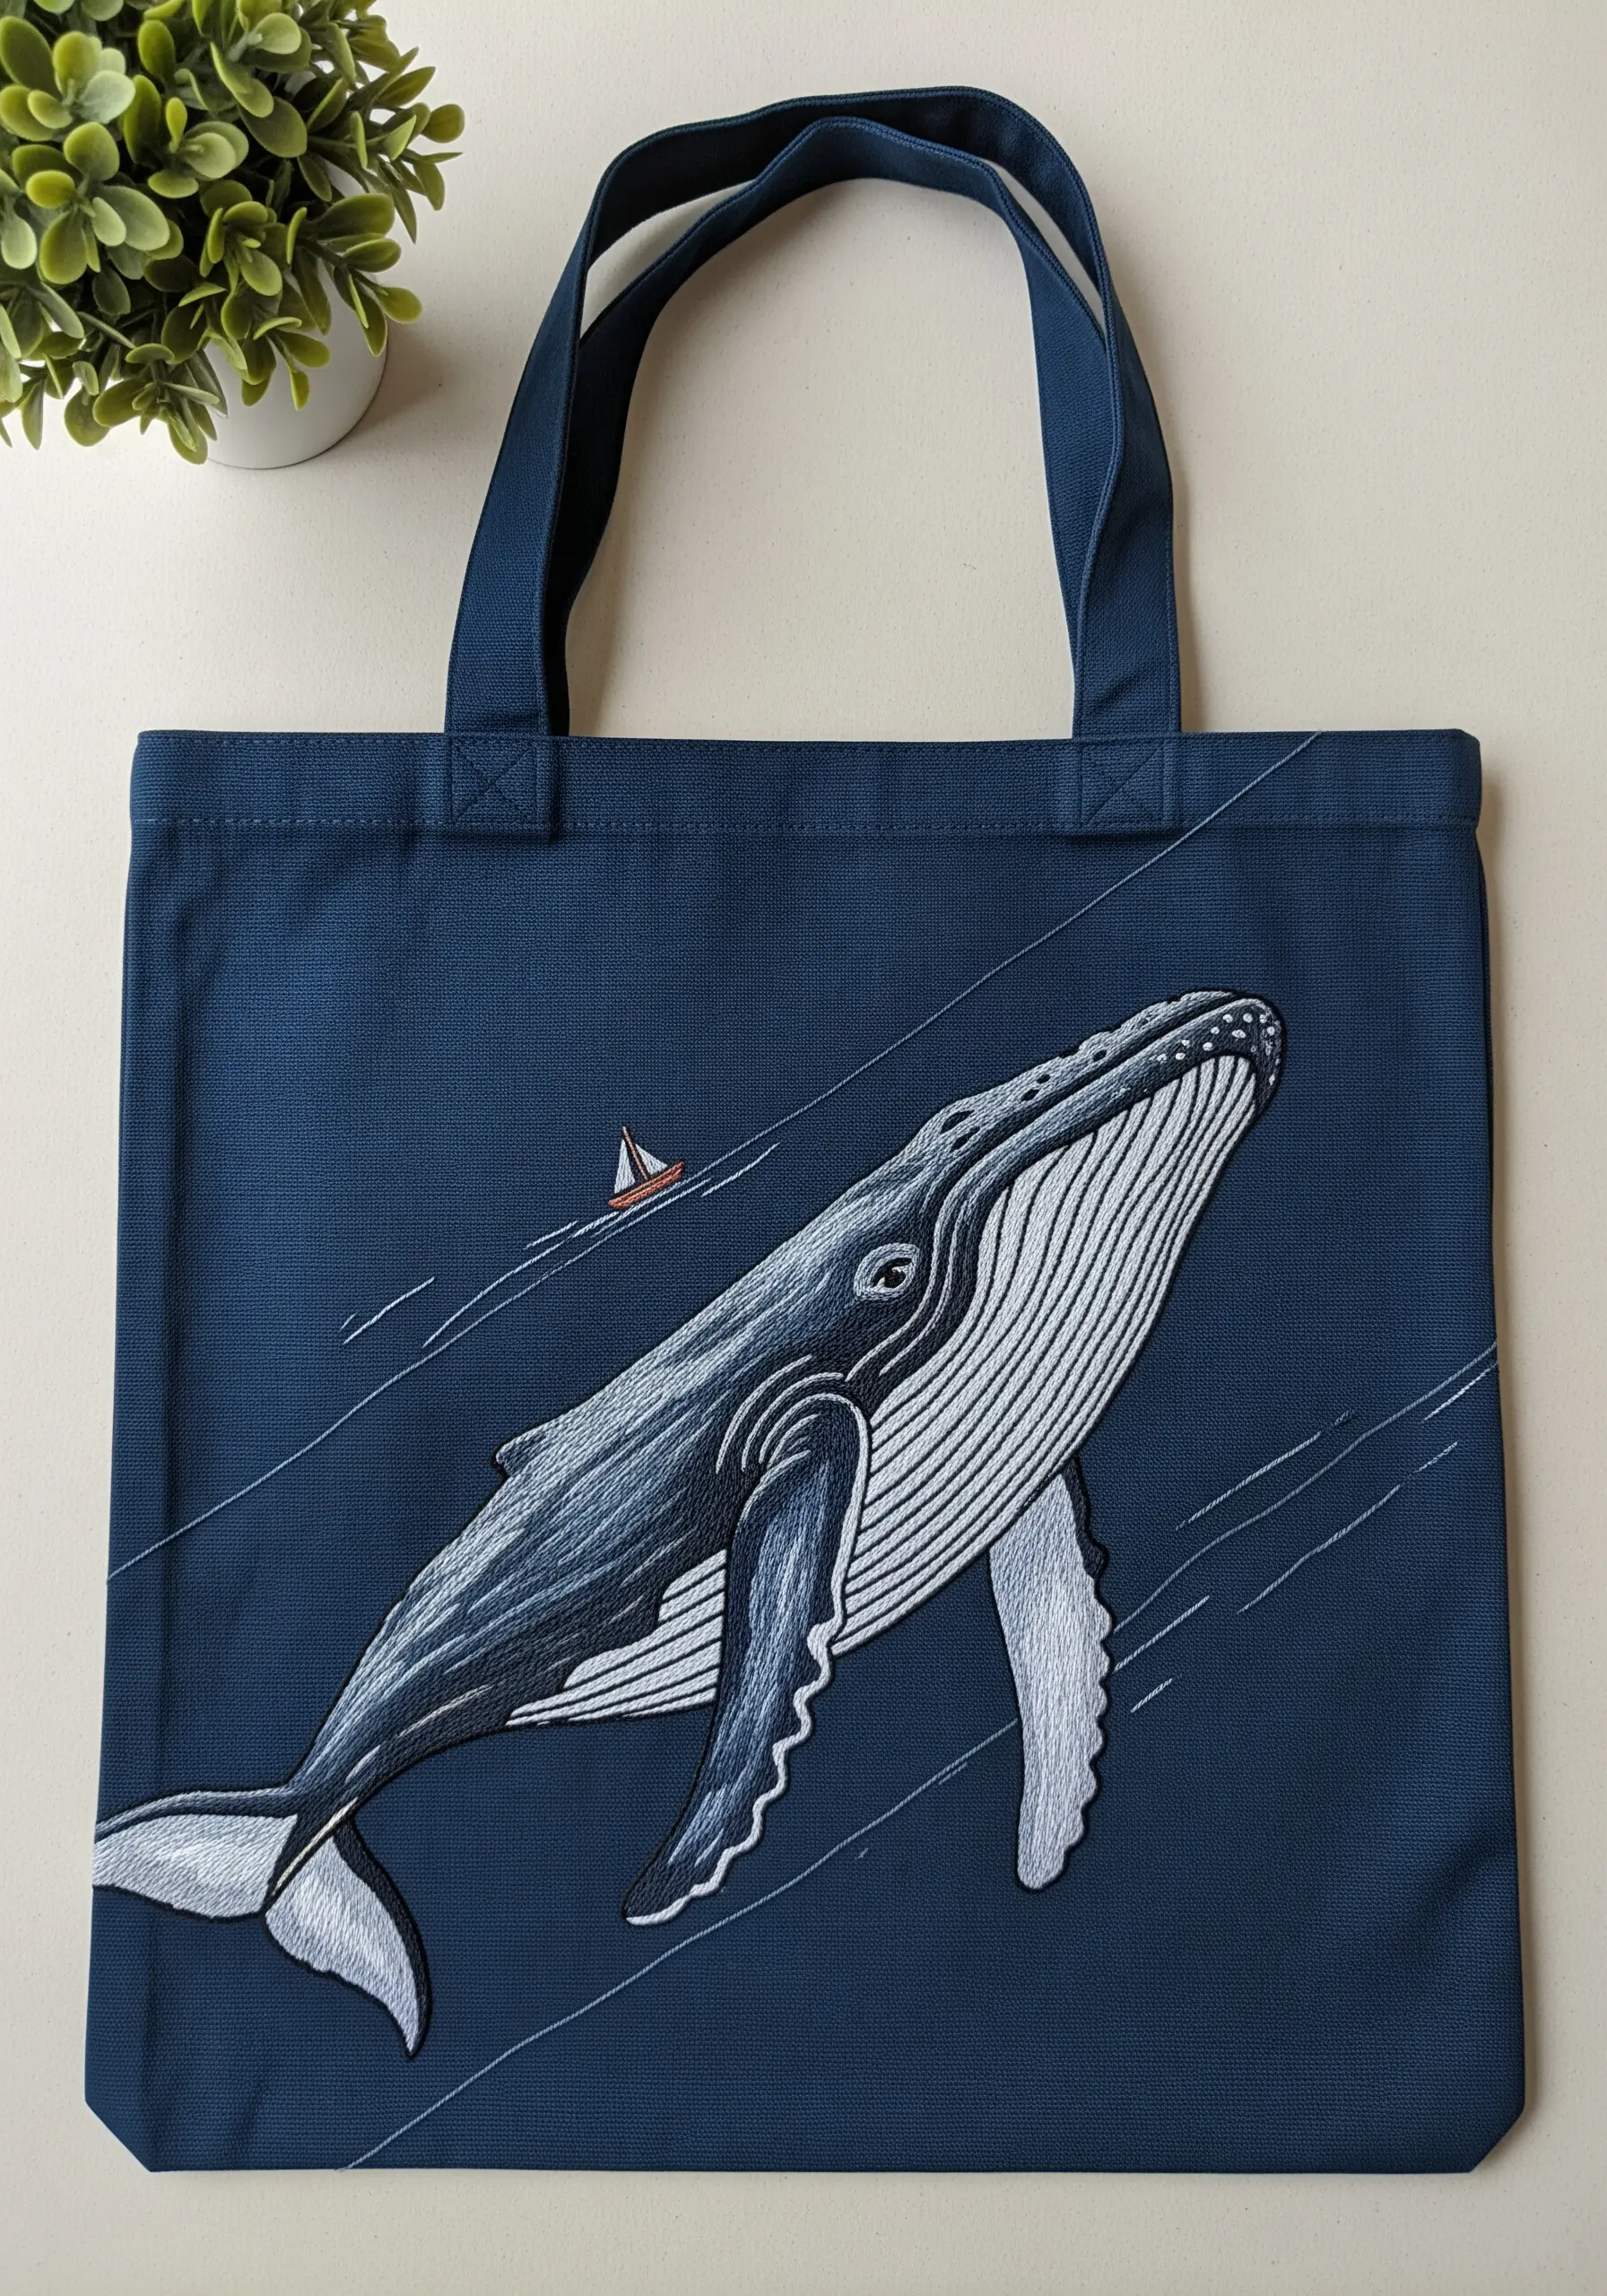
Capture the gentle power of a whale with careful shading and precise line work.
Use long and short stitch with just a few shades of grey and white to create the smooth, rounded form of the whale’s body.
The most critical detail is the series of long, parallel pleats on its underside. Stitch these with a single, continuous split stitch for each line to ensure they are perfectly clean and unbroken.
This precision against the softly blended body gives the whale a sense of realism and scale.
21. Hyper-Realistic Hibiscus Blooms
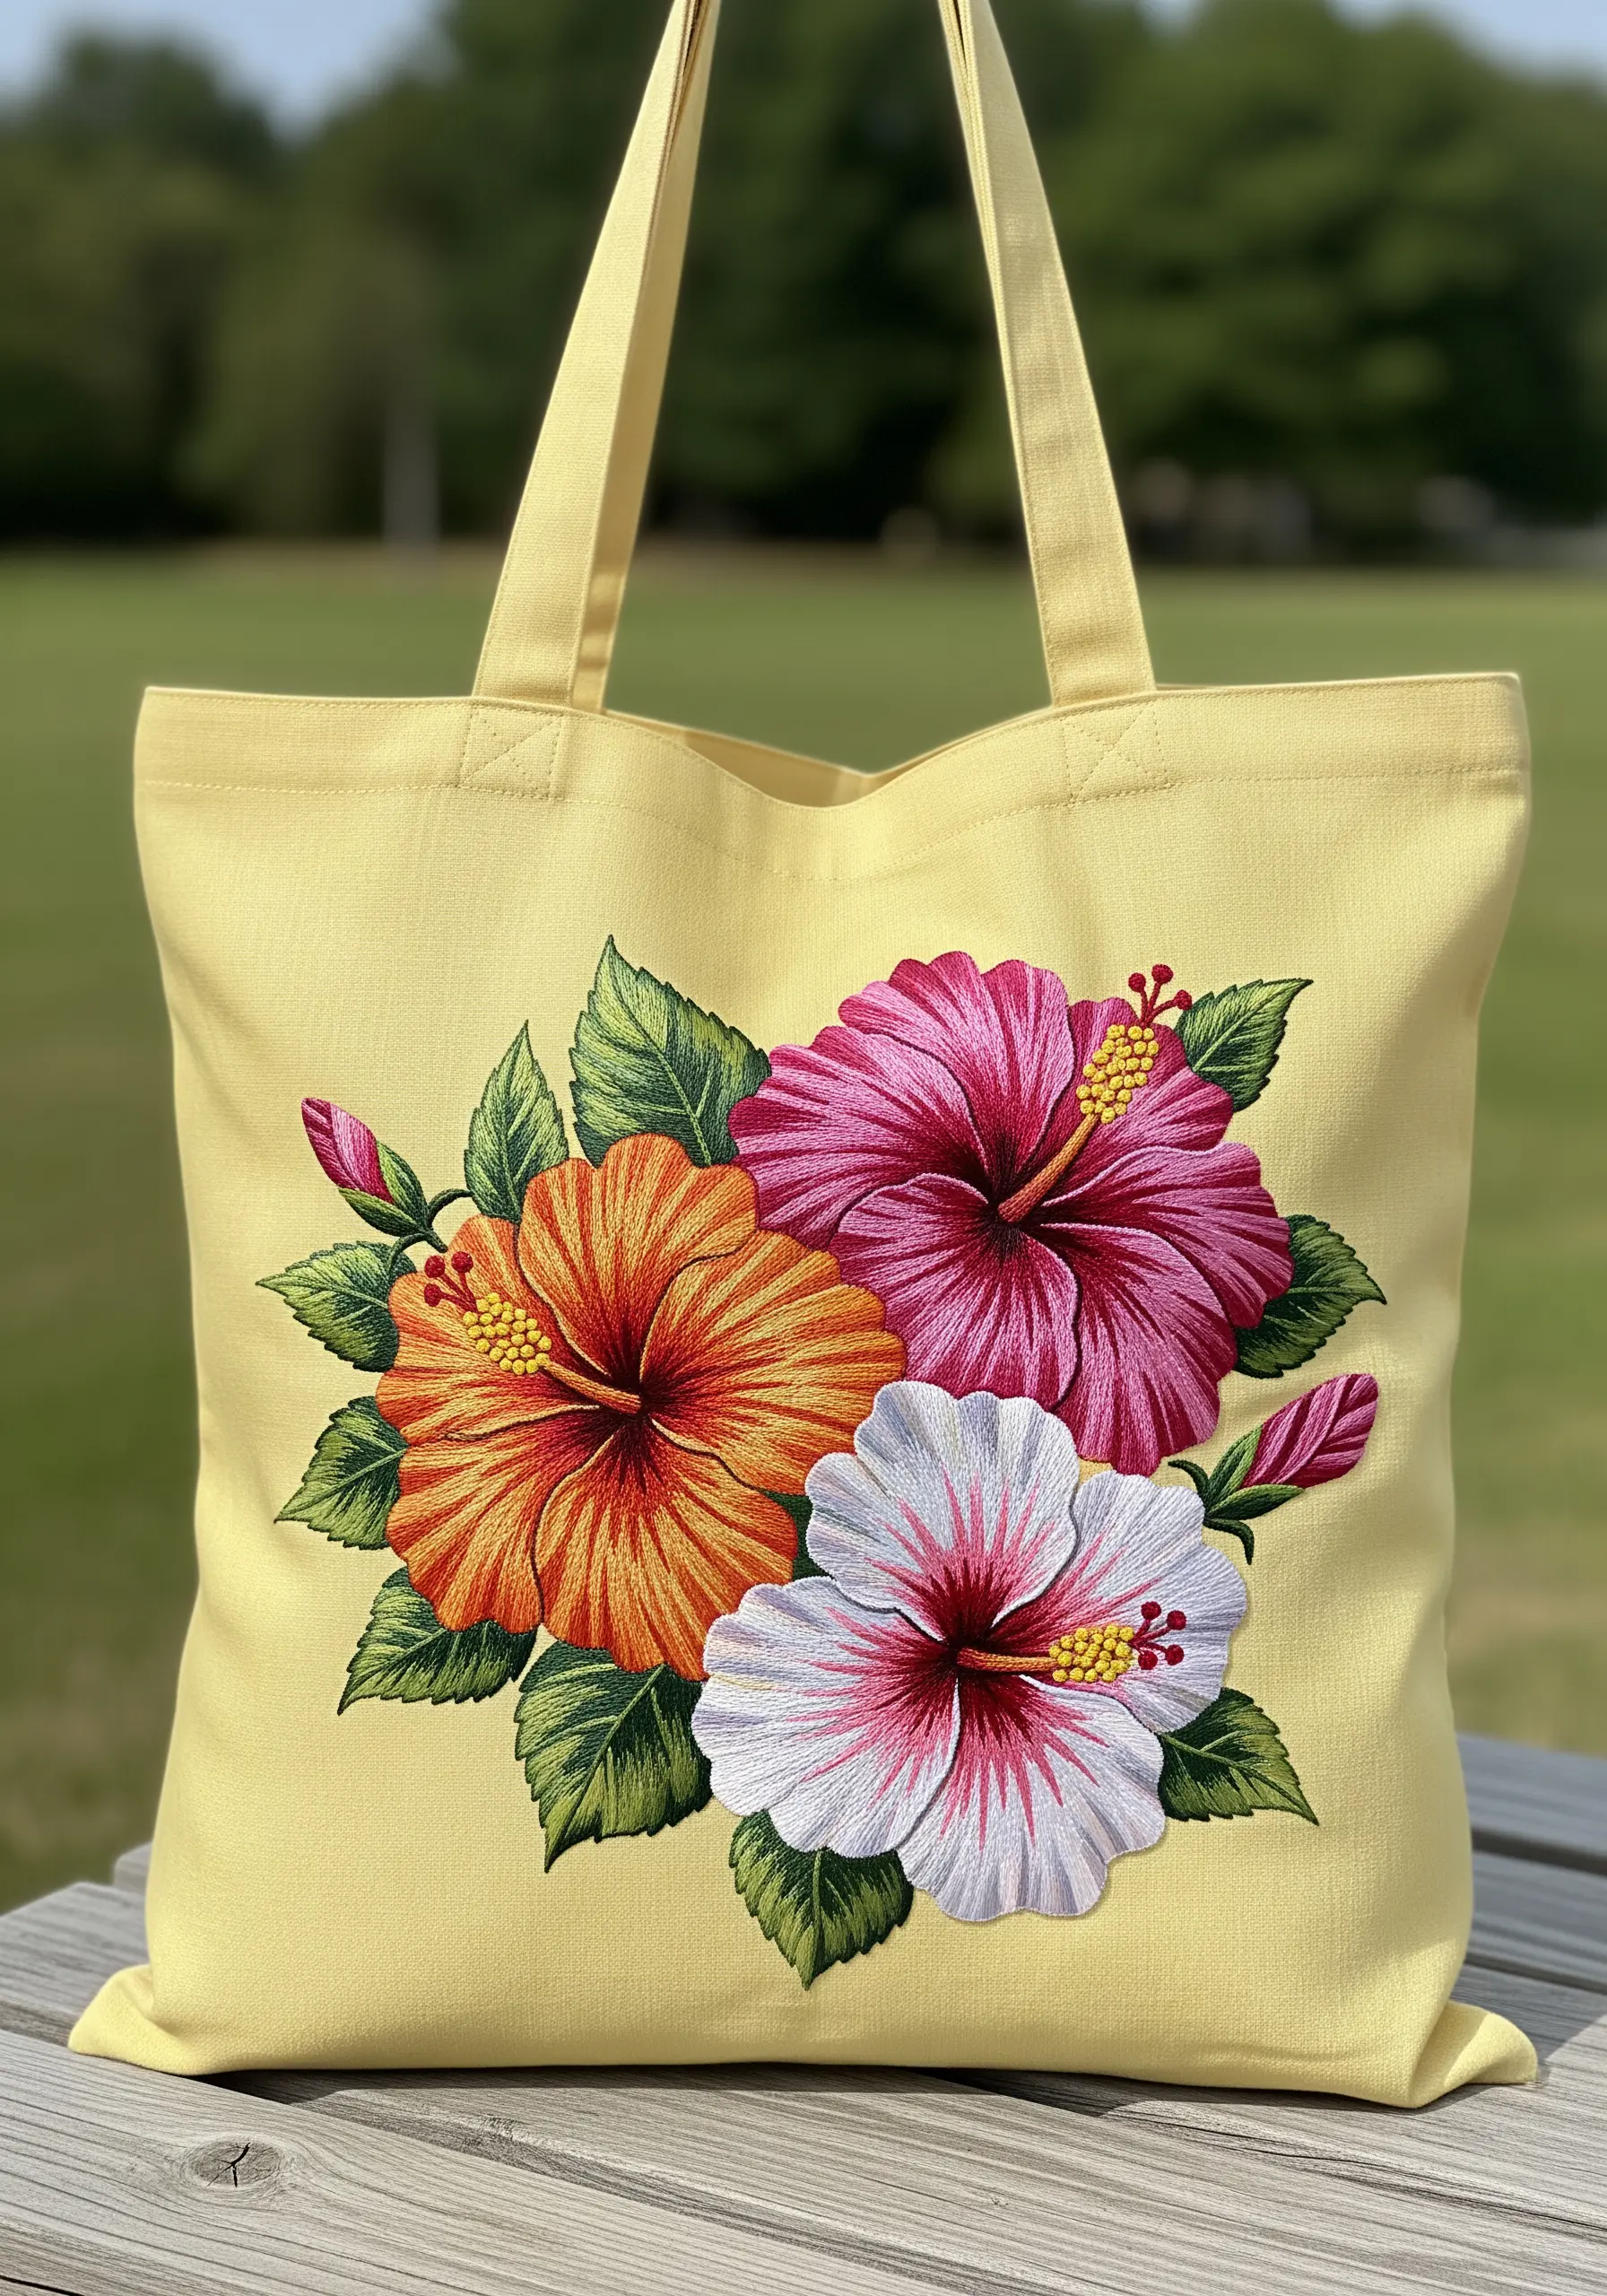
Achieve a painterly, realistic floral effect through advanced thread painting techniques.
For each petal, use a single strand of floss and angle your long and short stitches to follow its natural curve, blending from dark to light as you move outward.
Don’t be afraid to use 4-5 different shades within a single petal; this is what creates true depth and realism.
For the delicate stamen, use a long straight stitch topped with a tiny French knot in a contrasting color like bright yellow. These tropical flower embroidery ideas are perfect for summer.
22. Frosted Sea Glass
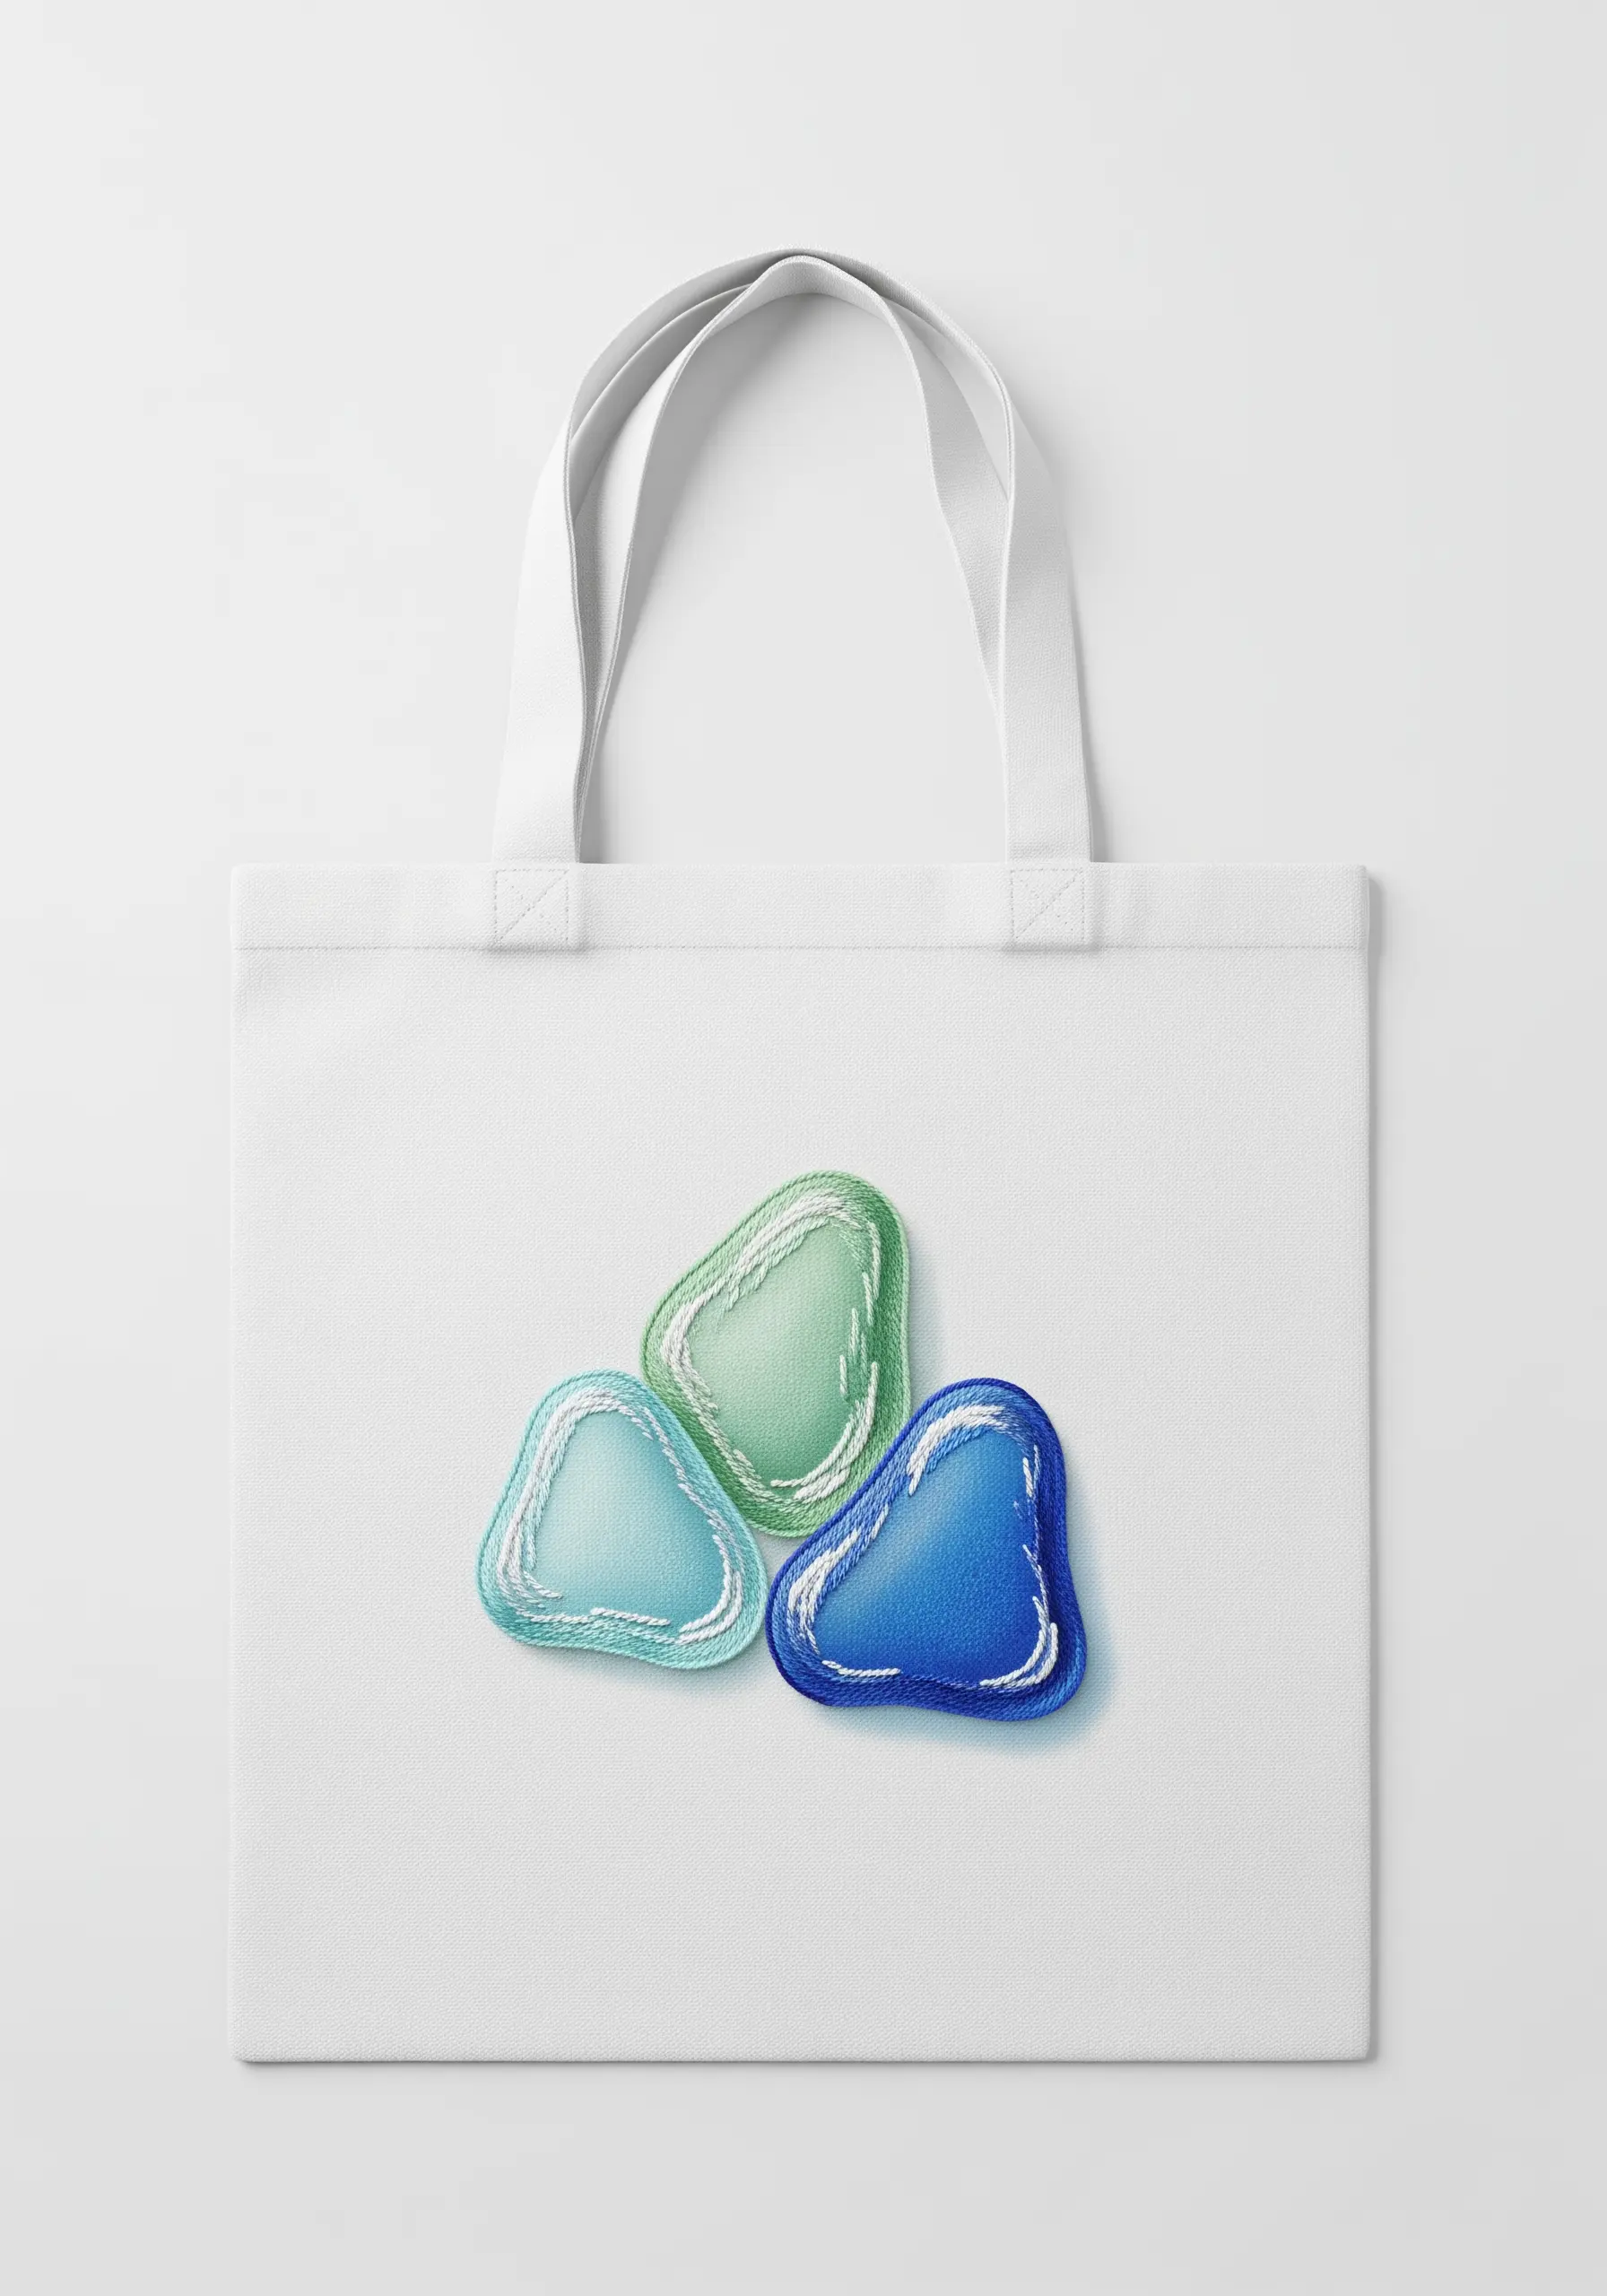
Mimic the soft, matte finish of tumbled sea glass with a delicate stitching approach.
Fill the center of each shape with a sparse layer of seed stitch or short, scattered straight stitches, allowing the white fabric to show through.
This negative space is key to creating a translucent, frosted look.
Define the edges with an outline of whipped backstitch in a slightly shinier thread, which gives the impression of a wet, smooth edge against the matte surface.
23. Intricate Oceanic Mandala
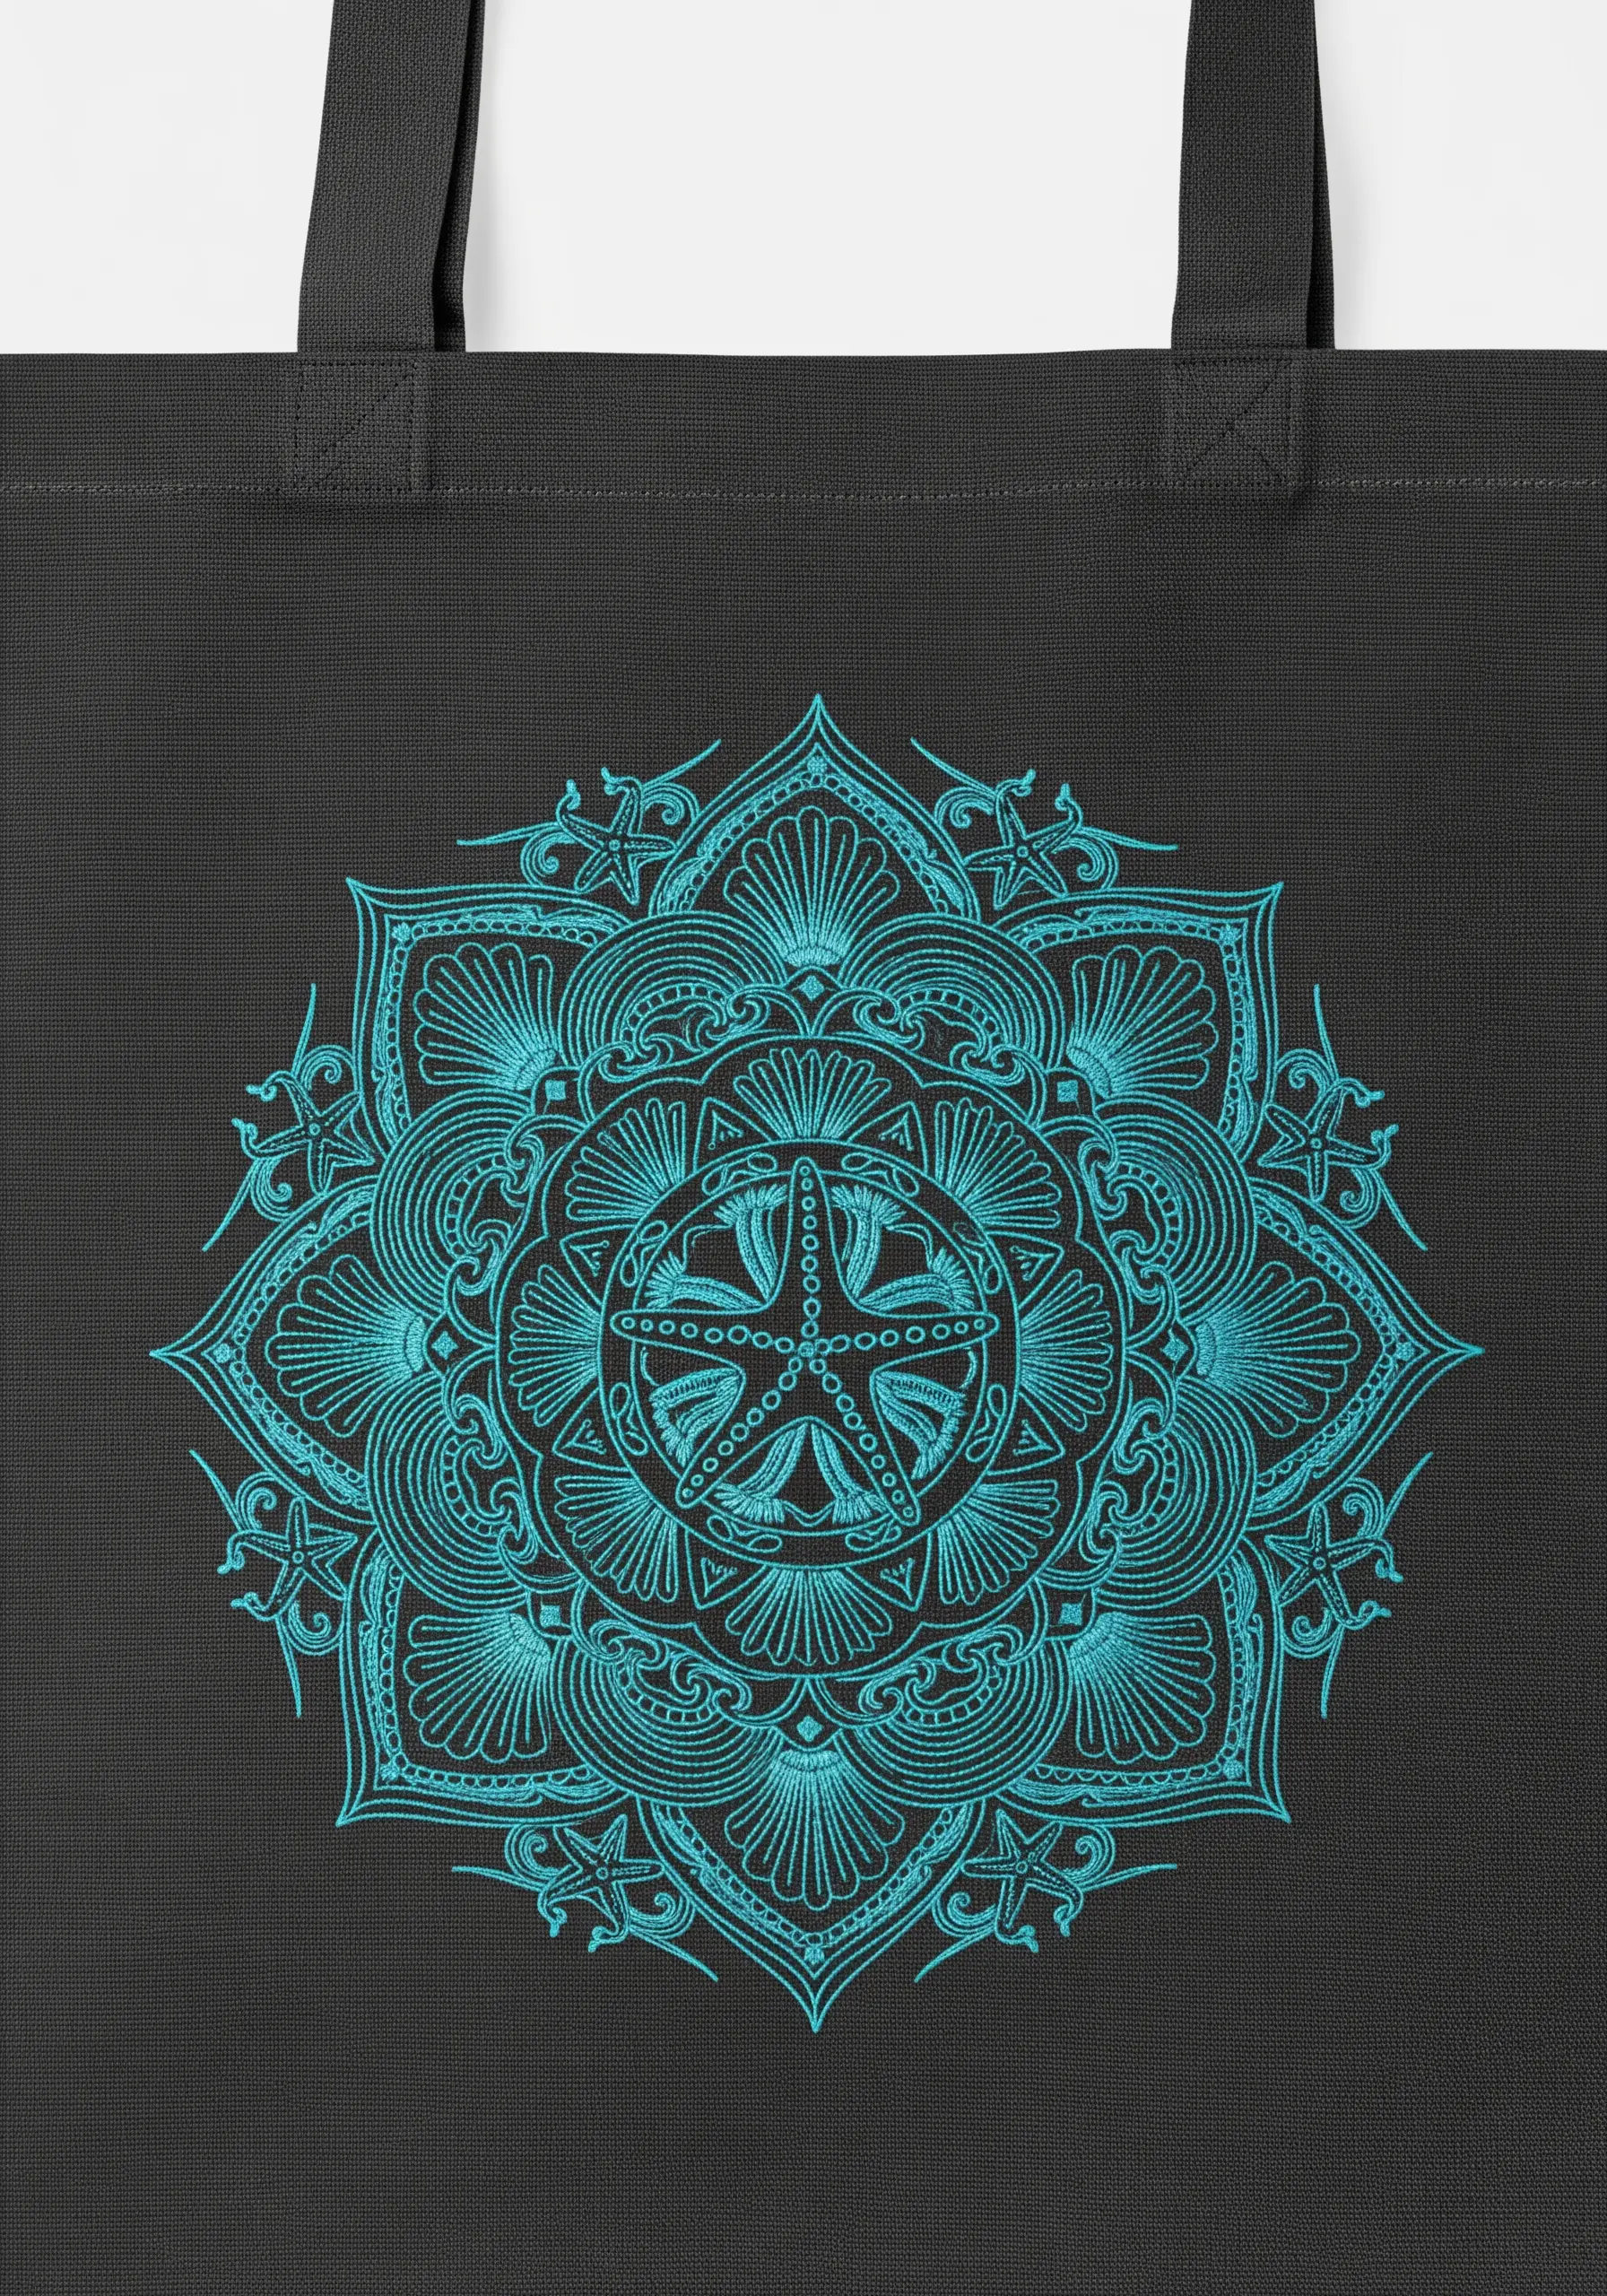
Create a mesmerizing design where the focus is on pure, intricate line work.
Using a single, high-contrast color like turquoise on a black bag makes every detail stand out.
Stick to one or two basic stitches, like a backstitch or stem stitch, and concentrate on keeping your stitch length perfectly consistent throughout the entire piece.
A fine-tipped, water-soluble transfer pen is your best tool here to ensure the complex pattern is perfectly symmetrical before you begin stitching.
24. Playful Flip Flop Appliqué
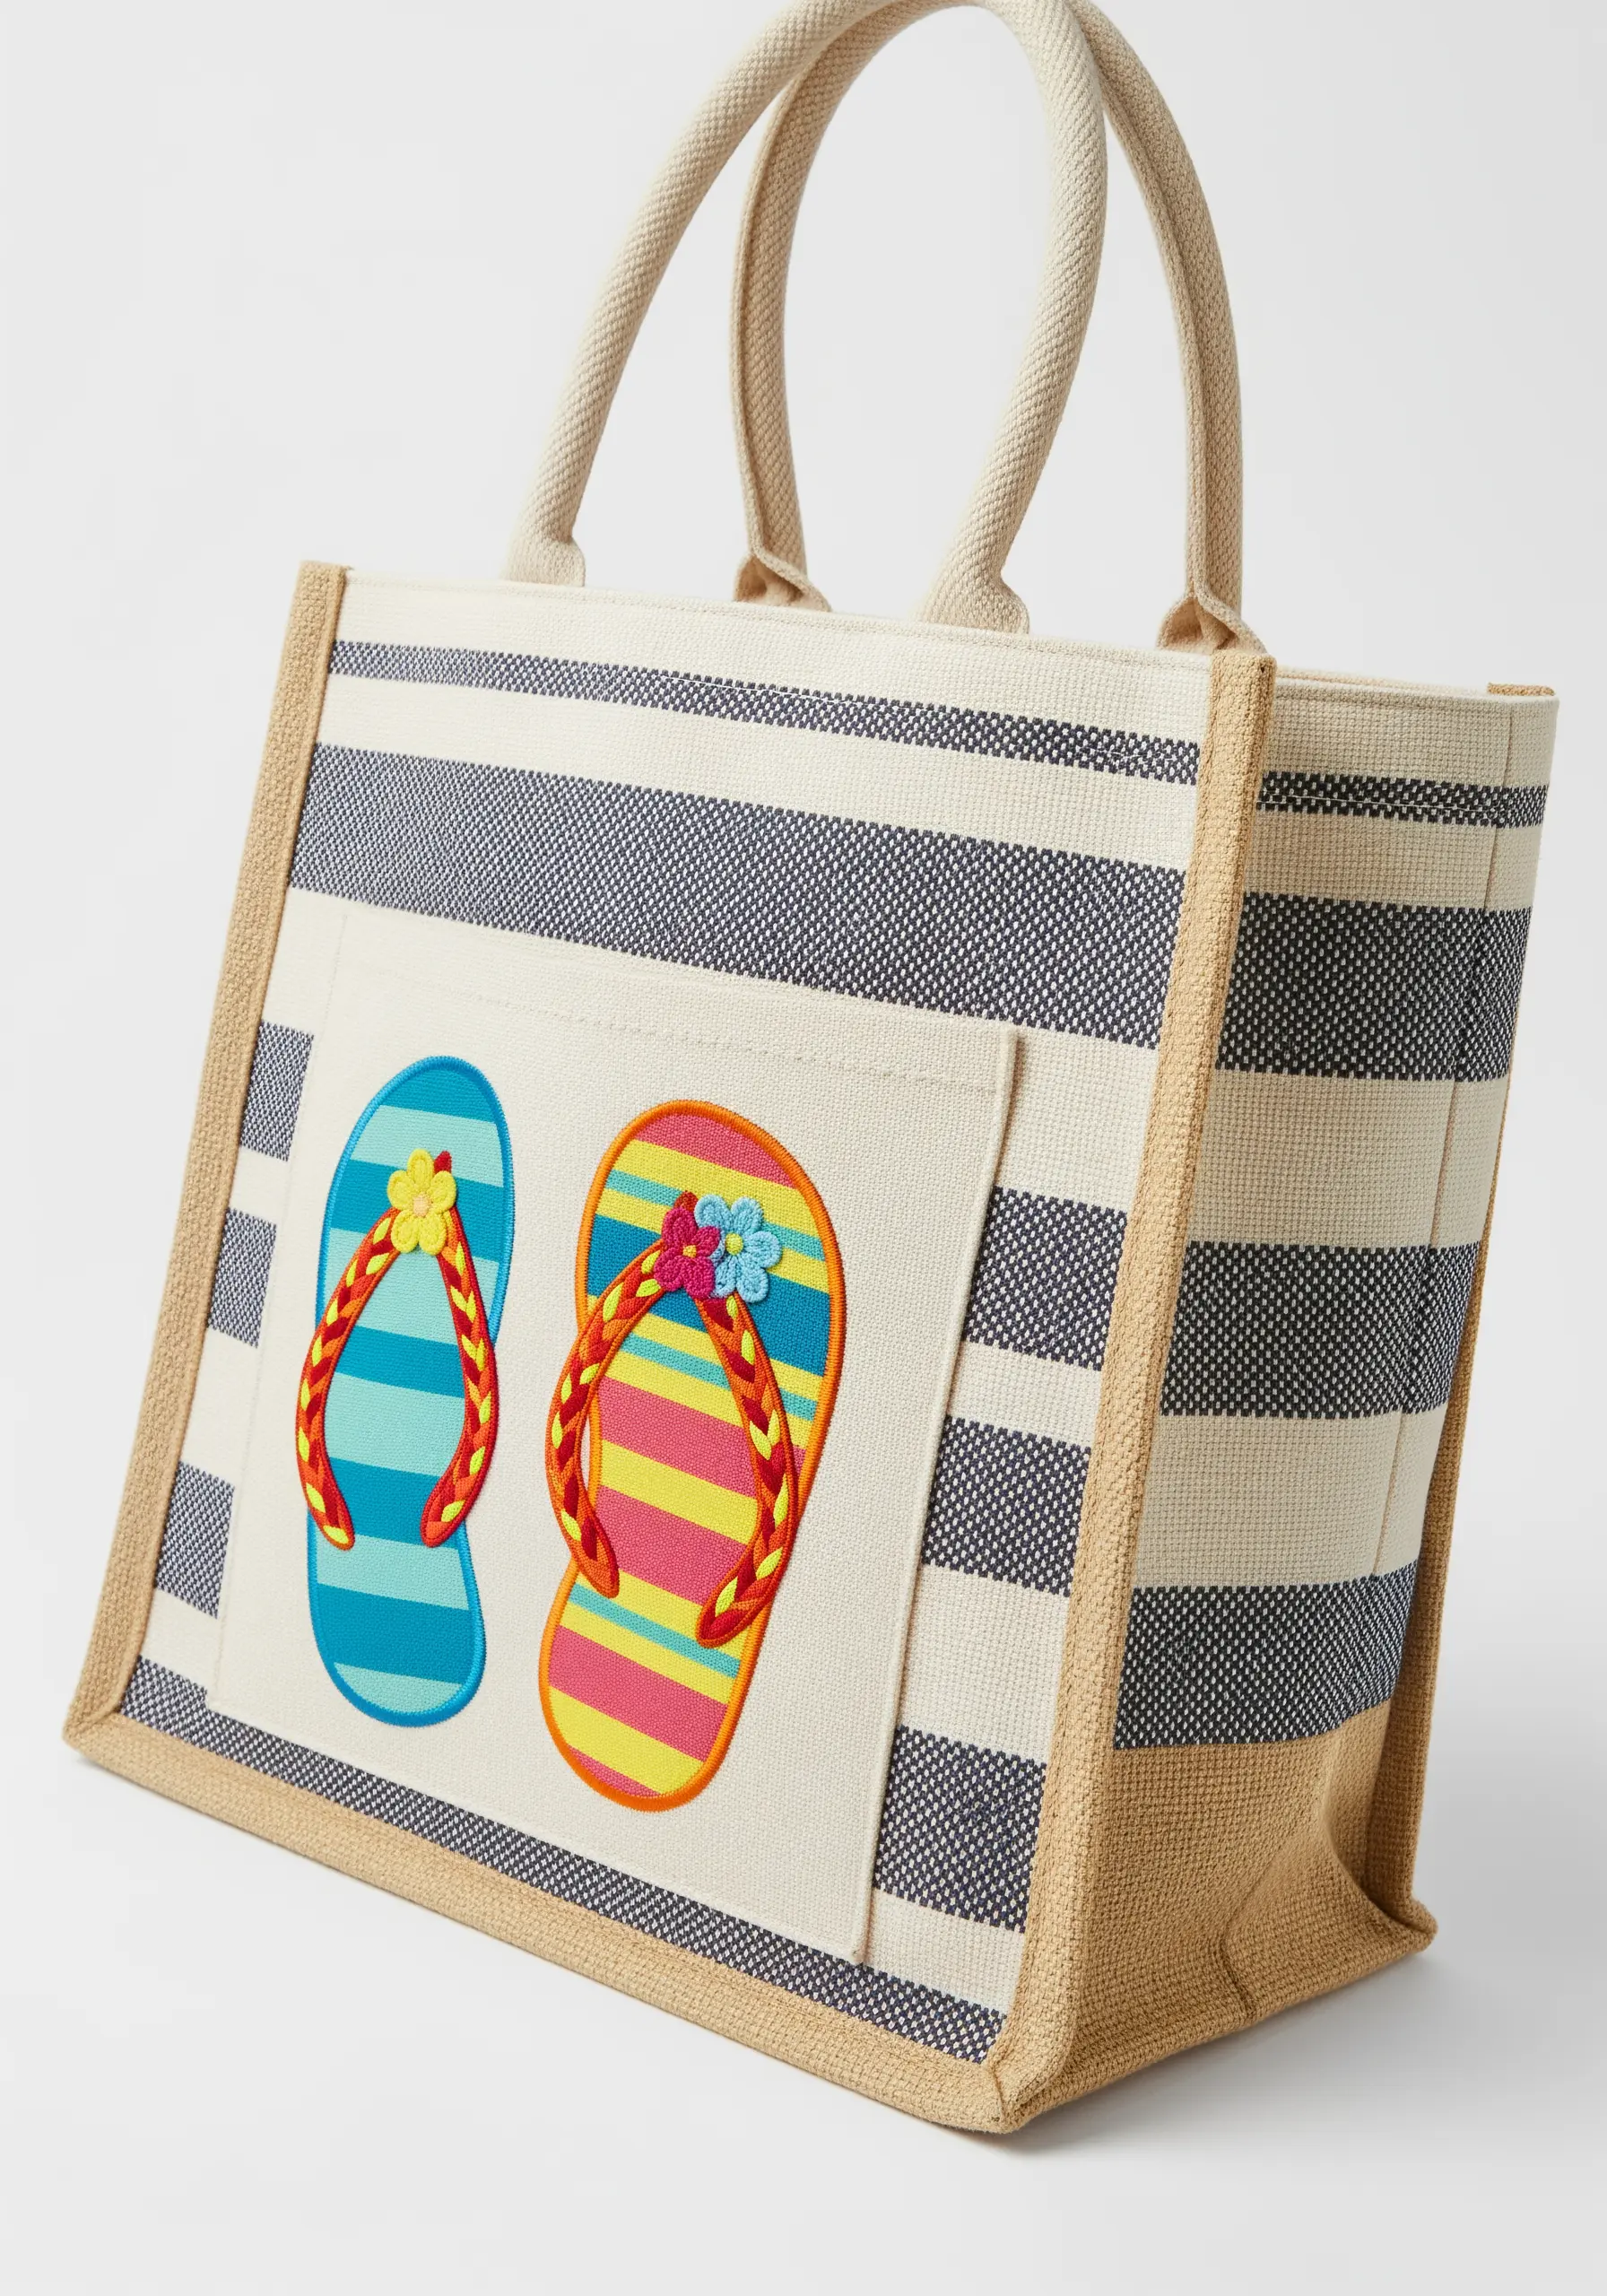
Create a fun, summery motif with the bold and simple technique of fabric appliqué.
Choose brightly colored felt for the flip flop bases; its non-fraying edge is perfect for this kind of work.
Secure the felt with a simple running stitch or a neat blanket stitch around the perimeter.
For the straps, use a dimensional stitch like a braided chain stitch or couch down a piece of twisted cord to make them stand out from the surface.
25. Embellished Shell and Pearl Crescent
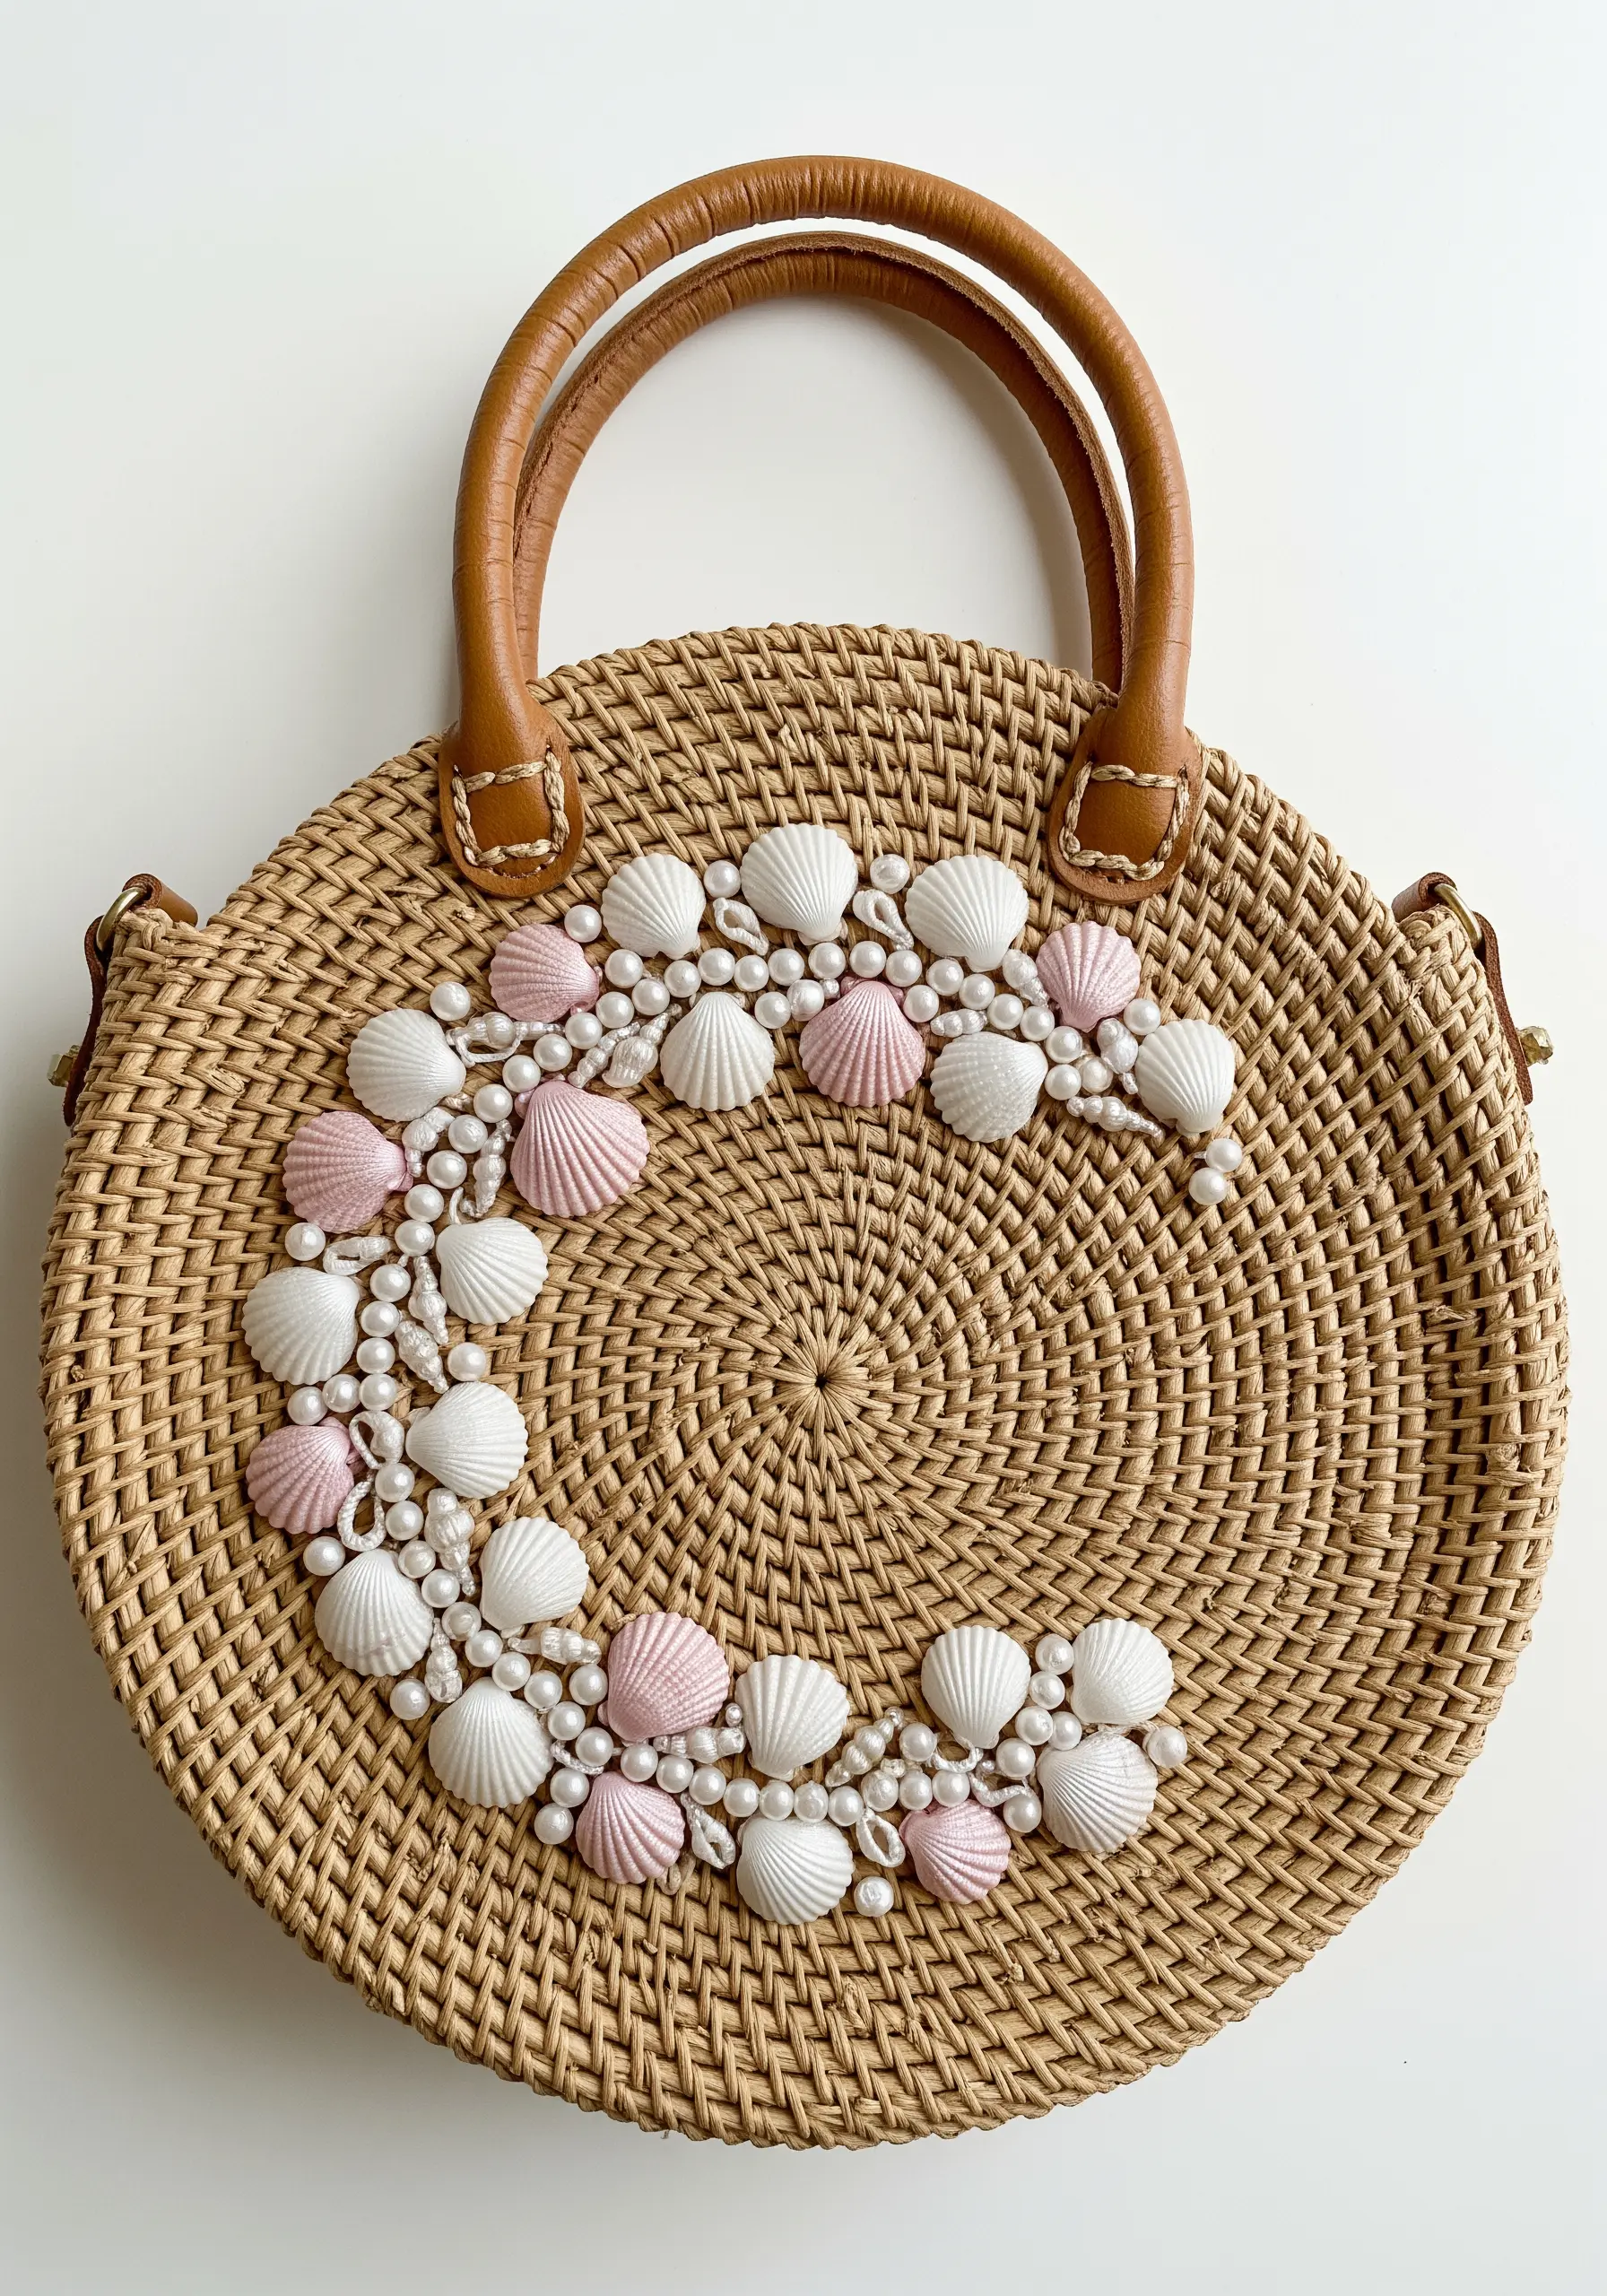
Move beyond thread and incorporate natural elements for a truly unique beach bag.
Arrange real miniature shells and faux pearls into a graceful crescent shape on your woven bag.
Secure each element individually using a strong thread, passing through the piece two or three times for maximum durability.
Group smaller pearls between the larger shells to fill gaps and create a sense of balance and flow, turning your bag into a piece of wearable art.
26. Celestial Night Sky
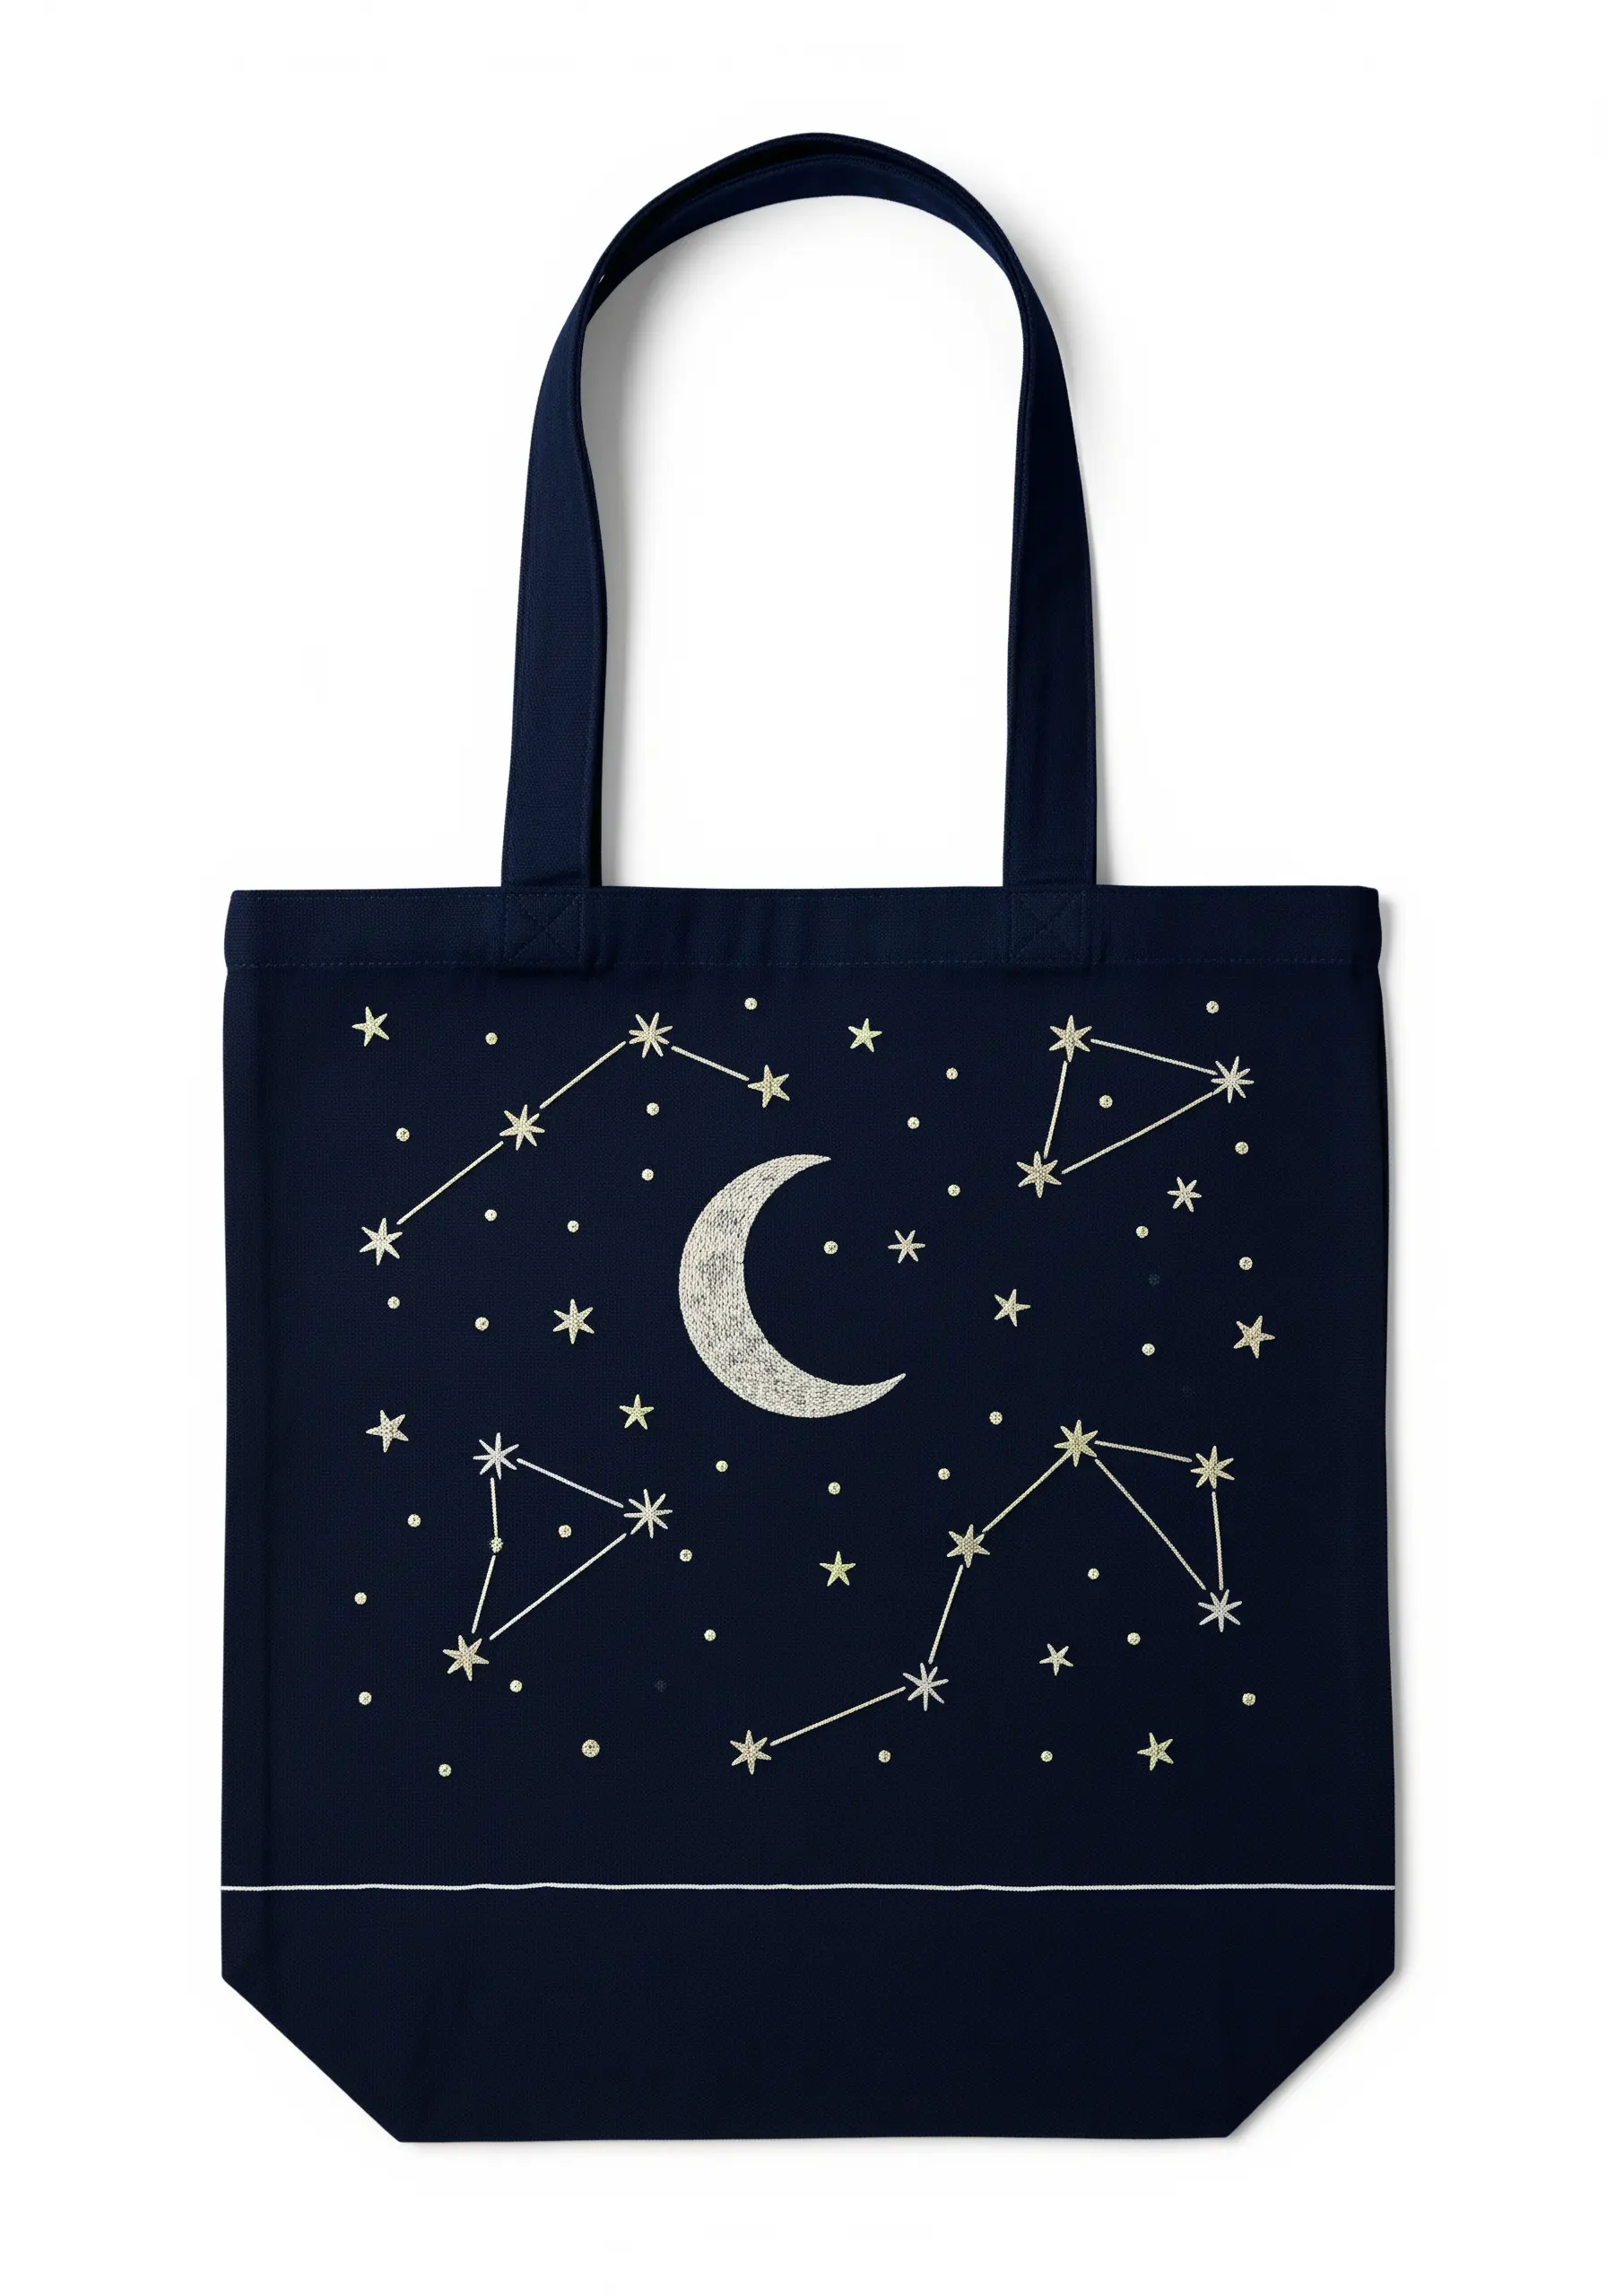
Capture the magic of a beach night sky with a minimalist, high-contrast design.
Use a silvery-white or glow-in-the-dark thread against a deep navy fabric for a striking effect.
Create the stars with simple French knots or tiny seed stitches, varying the size slightly for a more natural look.
For the moon, fill the crescent shape with a dense seed stitch or a light satin stitch; this textural difference will make it the focal point of your cosmic scene.
27. Graphic Blue Crab
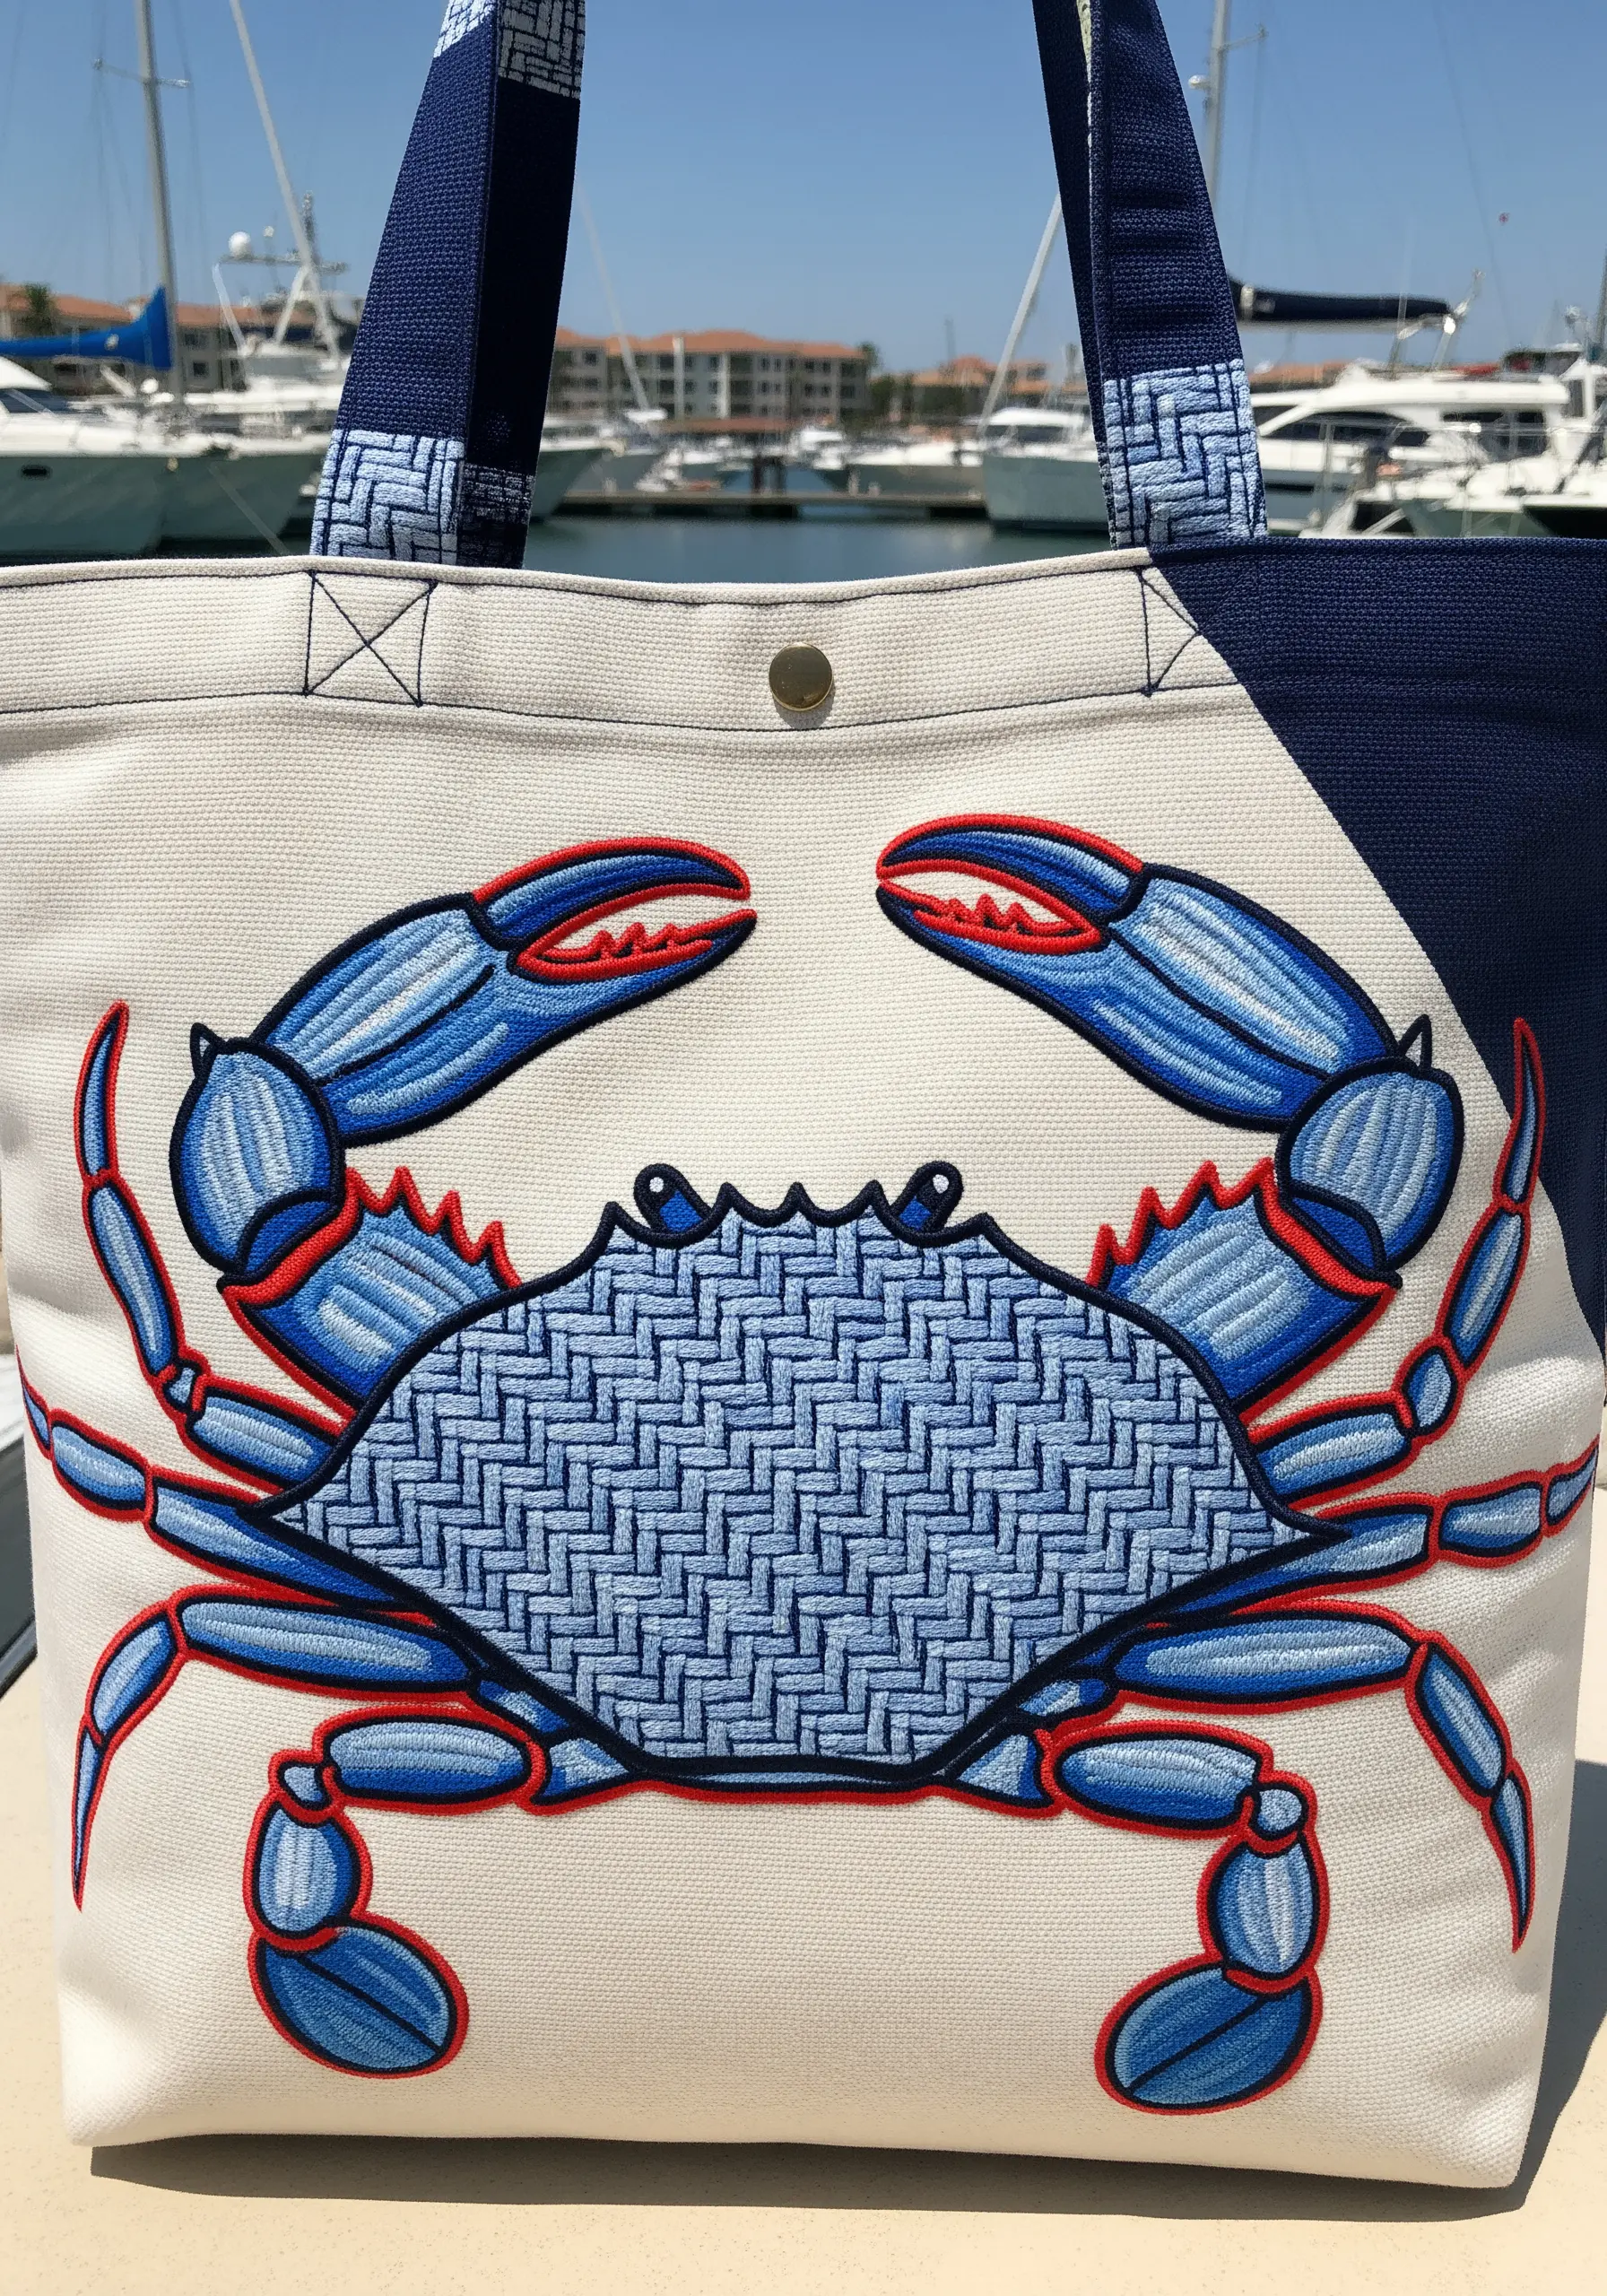
Go beyond a standard fill stitch and use a geometric pattern to add modern flair.
Instead of a simple satin stitch, fill the crab’s shell with a basketweave or bargello stitch. This creates an unexpected and highly textural focal point.
Use a bold, thick satin stitch in a vibrant red or orange for the outlines. This sharp contrast defines the crab’s shape and makes the intricate fill pattern pop even more.
28. Vibrant Campfire
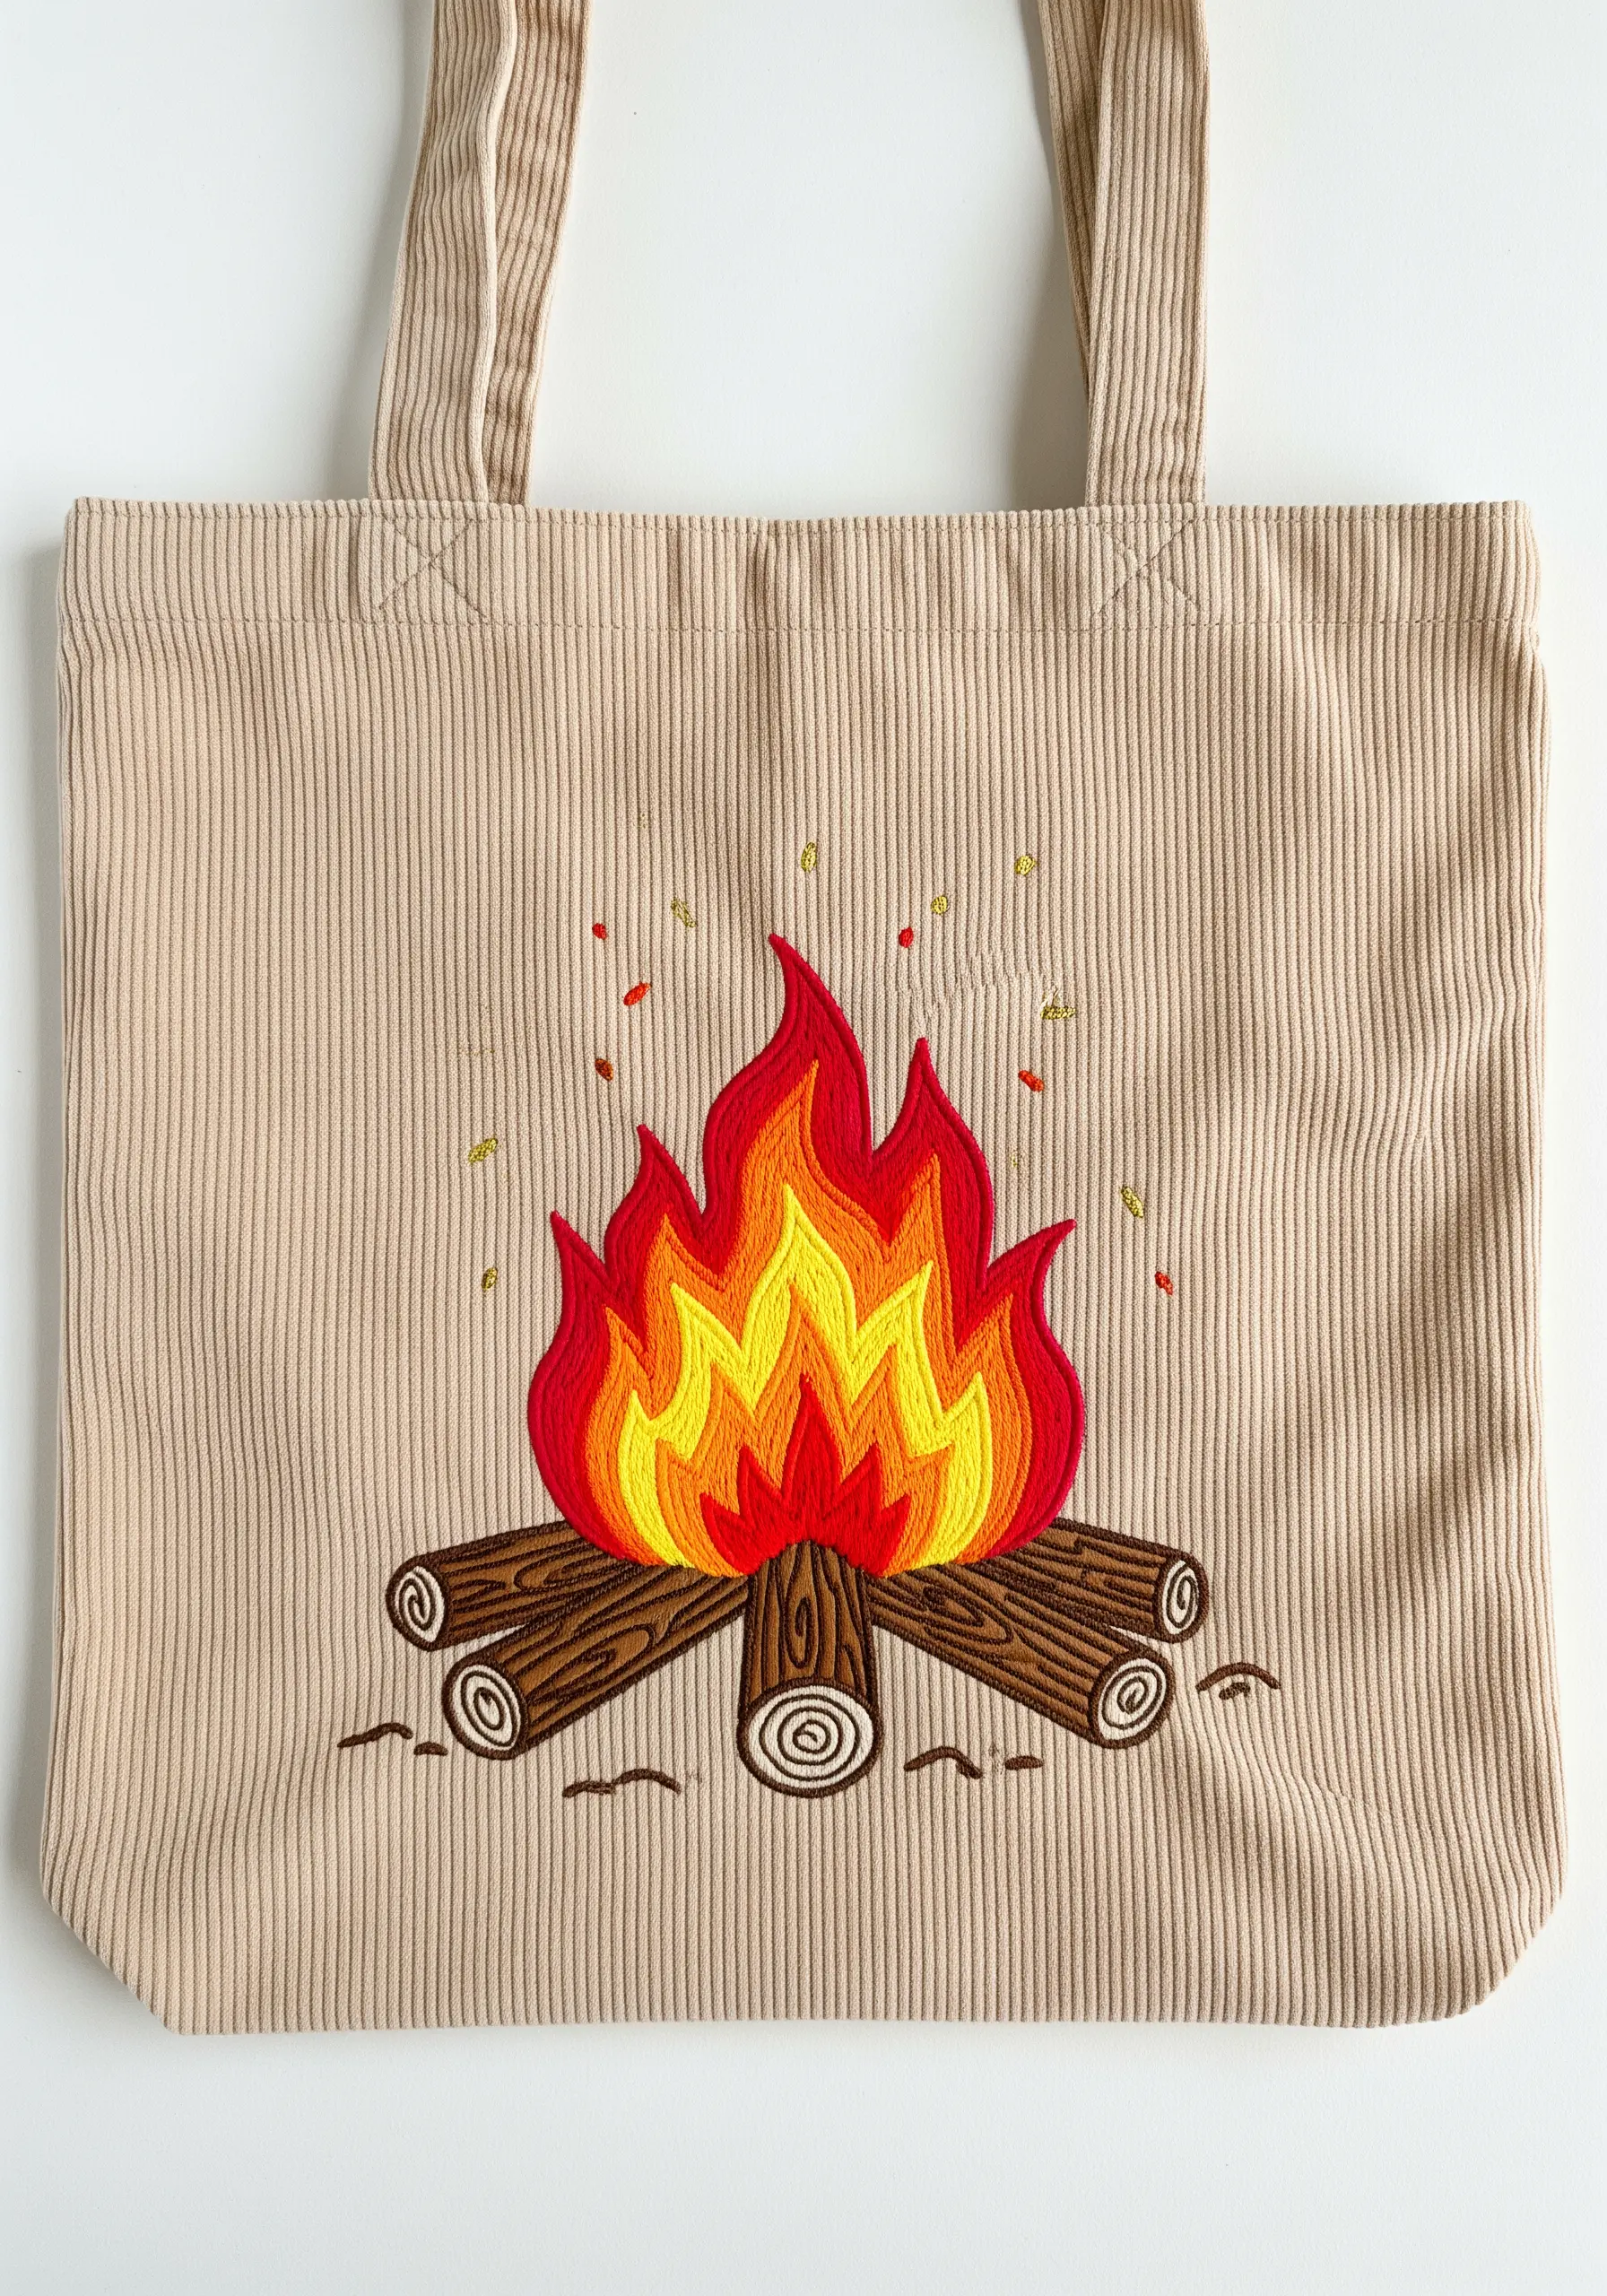
Stitch the warmth and movement of a campfire by blending colors within the flames.
Start with yellow satin stitches at the core of the fire, then blend in orange and finally red as you move to the outer edges.
Keep your satin stitches long and slightly curved to mimic the flickering motion of the flames.
For the logs, use a simple backstitch to create concentric circles for the ends, and long straight stitches in varying shades of brown for a wood grain effect.
29. Elegant Palm Frond Silhouette
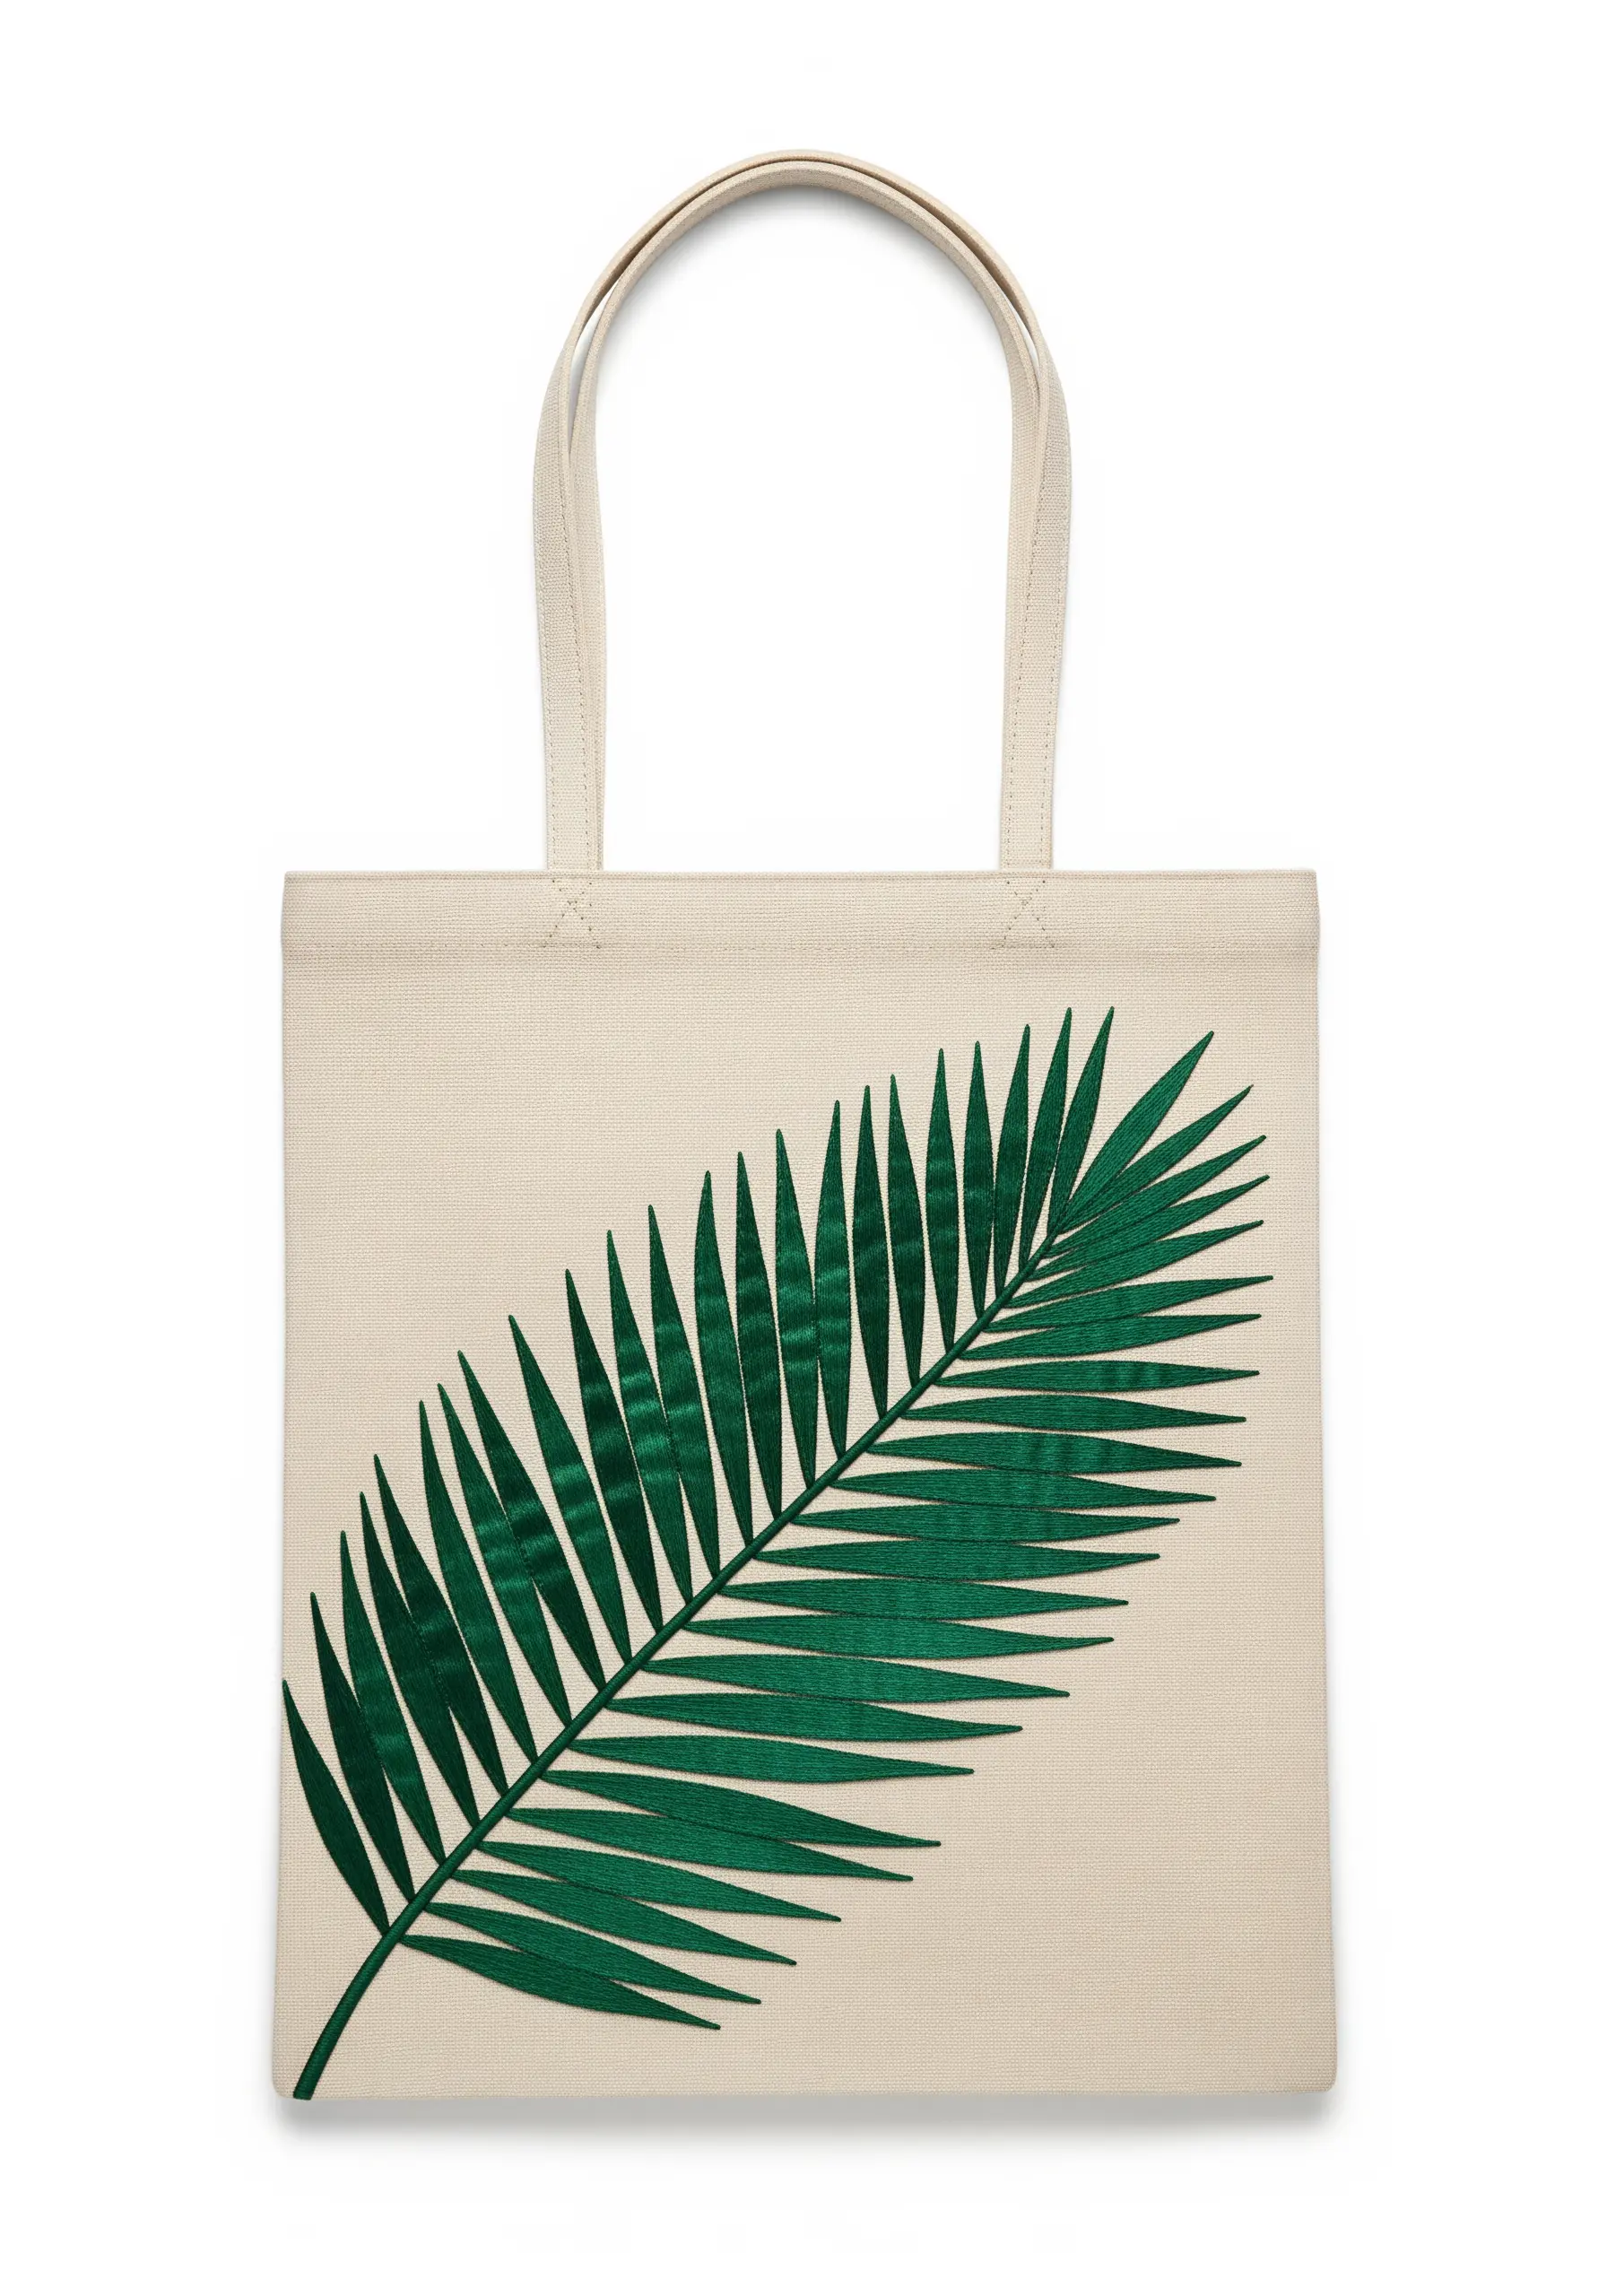
Achieve a look of effortless elegance by focusing on the power of a single, well-executed motif.
The success of this design lies entirely in the direction of your satin stitches.
For each individual leaf, angle your stitches outward and downward from the central stem. This simple technique creates the graceful, fanned-out shape of a real palm frond.
Using a single, rich green thread on a neutral canvas background makes this design feel both modern and timeless.
30. A Pattern of Sunshine
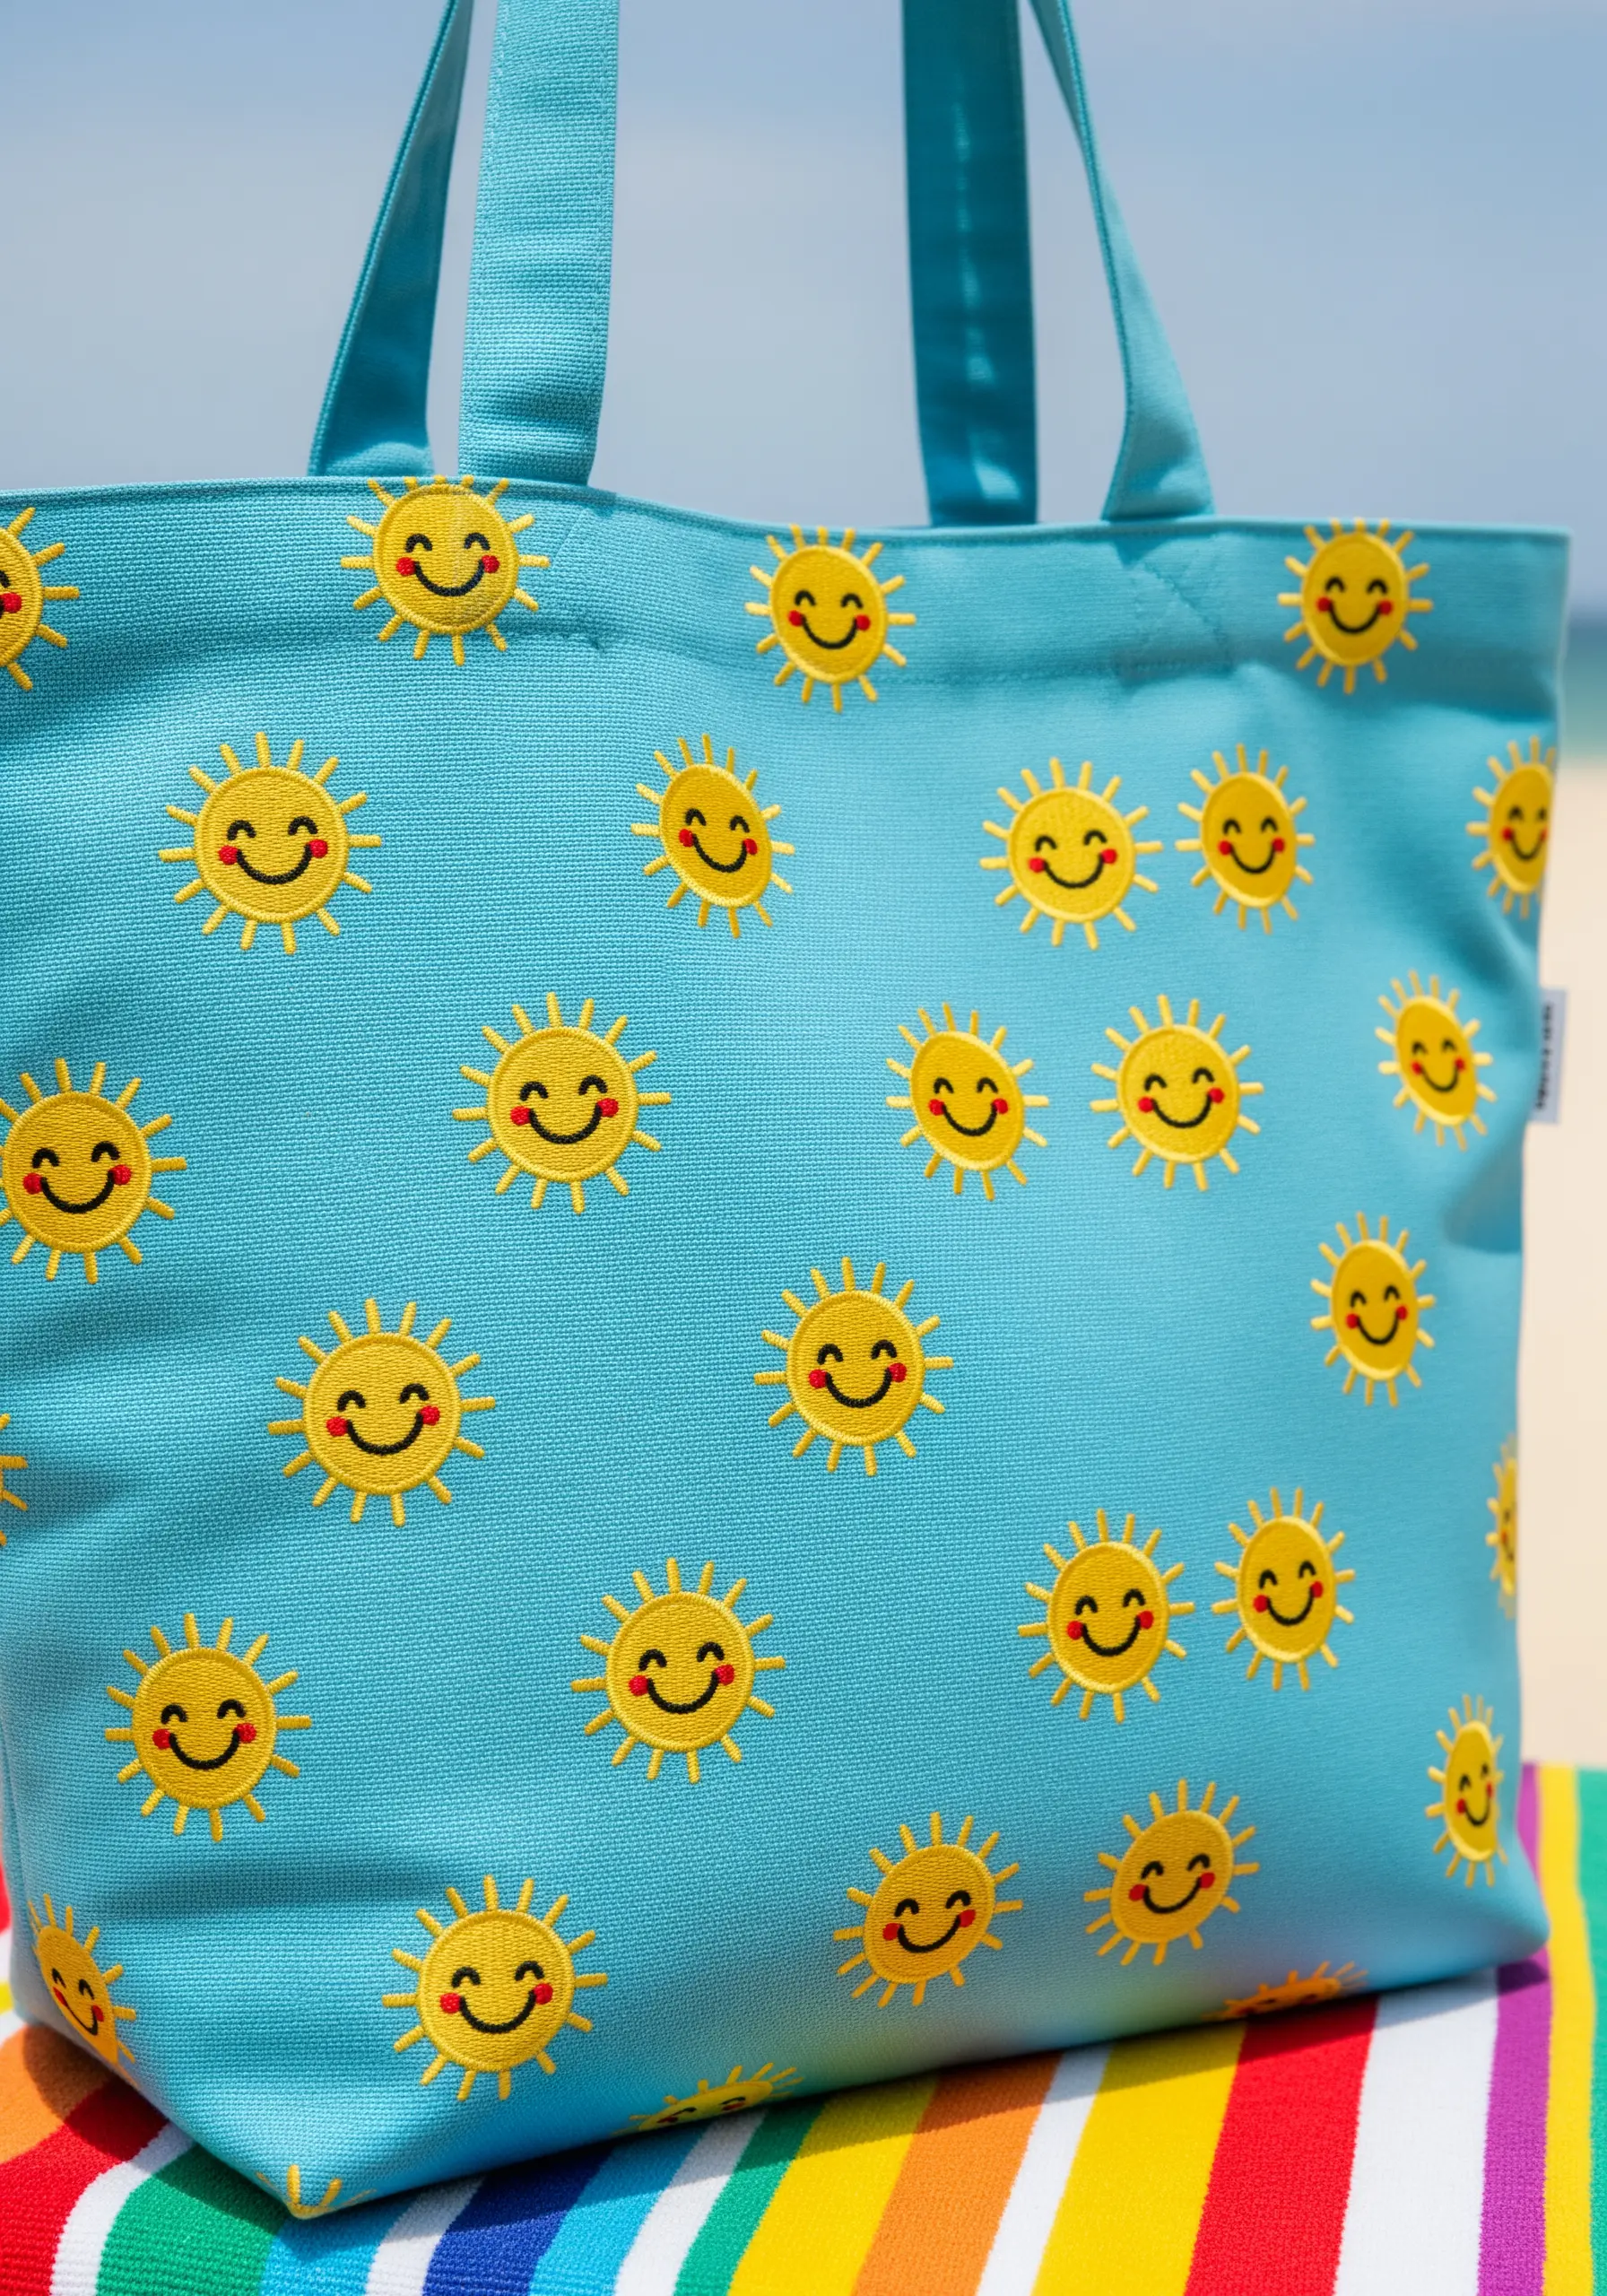
Turn a simple motif into a cheerful, engaging pattern through thoughtful repetition.
The key to a successful repeat pattern is consistency. Use a template or a water-soluble marker to ensure each sun is the same size and evenly spaced.
Keep the embroidery simple: a yellow satin stitch for the circle, short straight stitches for the rays, and two tiny stitches for a smiling face.
This design proves that you don’t need complex stitches to create a bag that radiates pure joy.
31. The Intricate Conch Shell
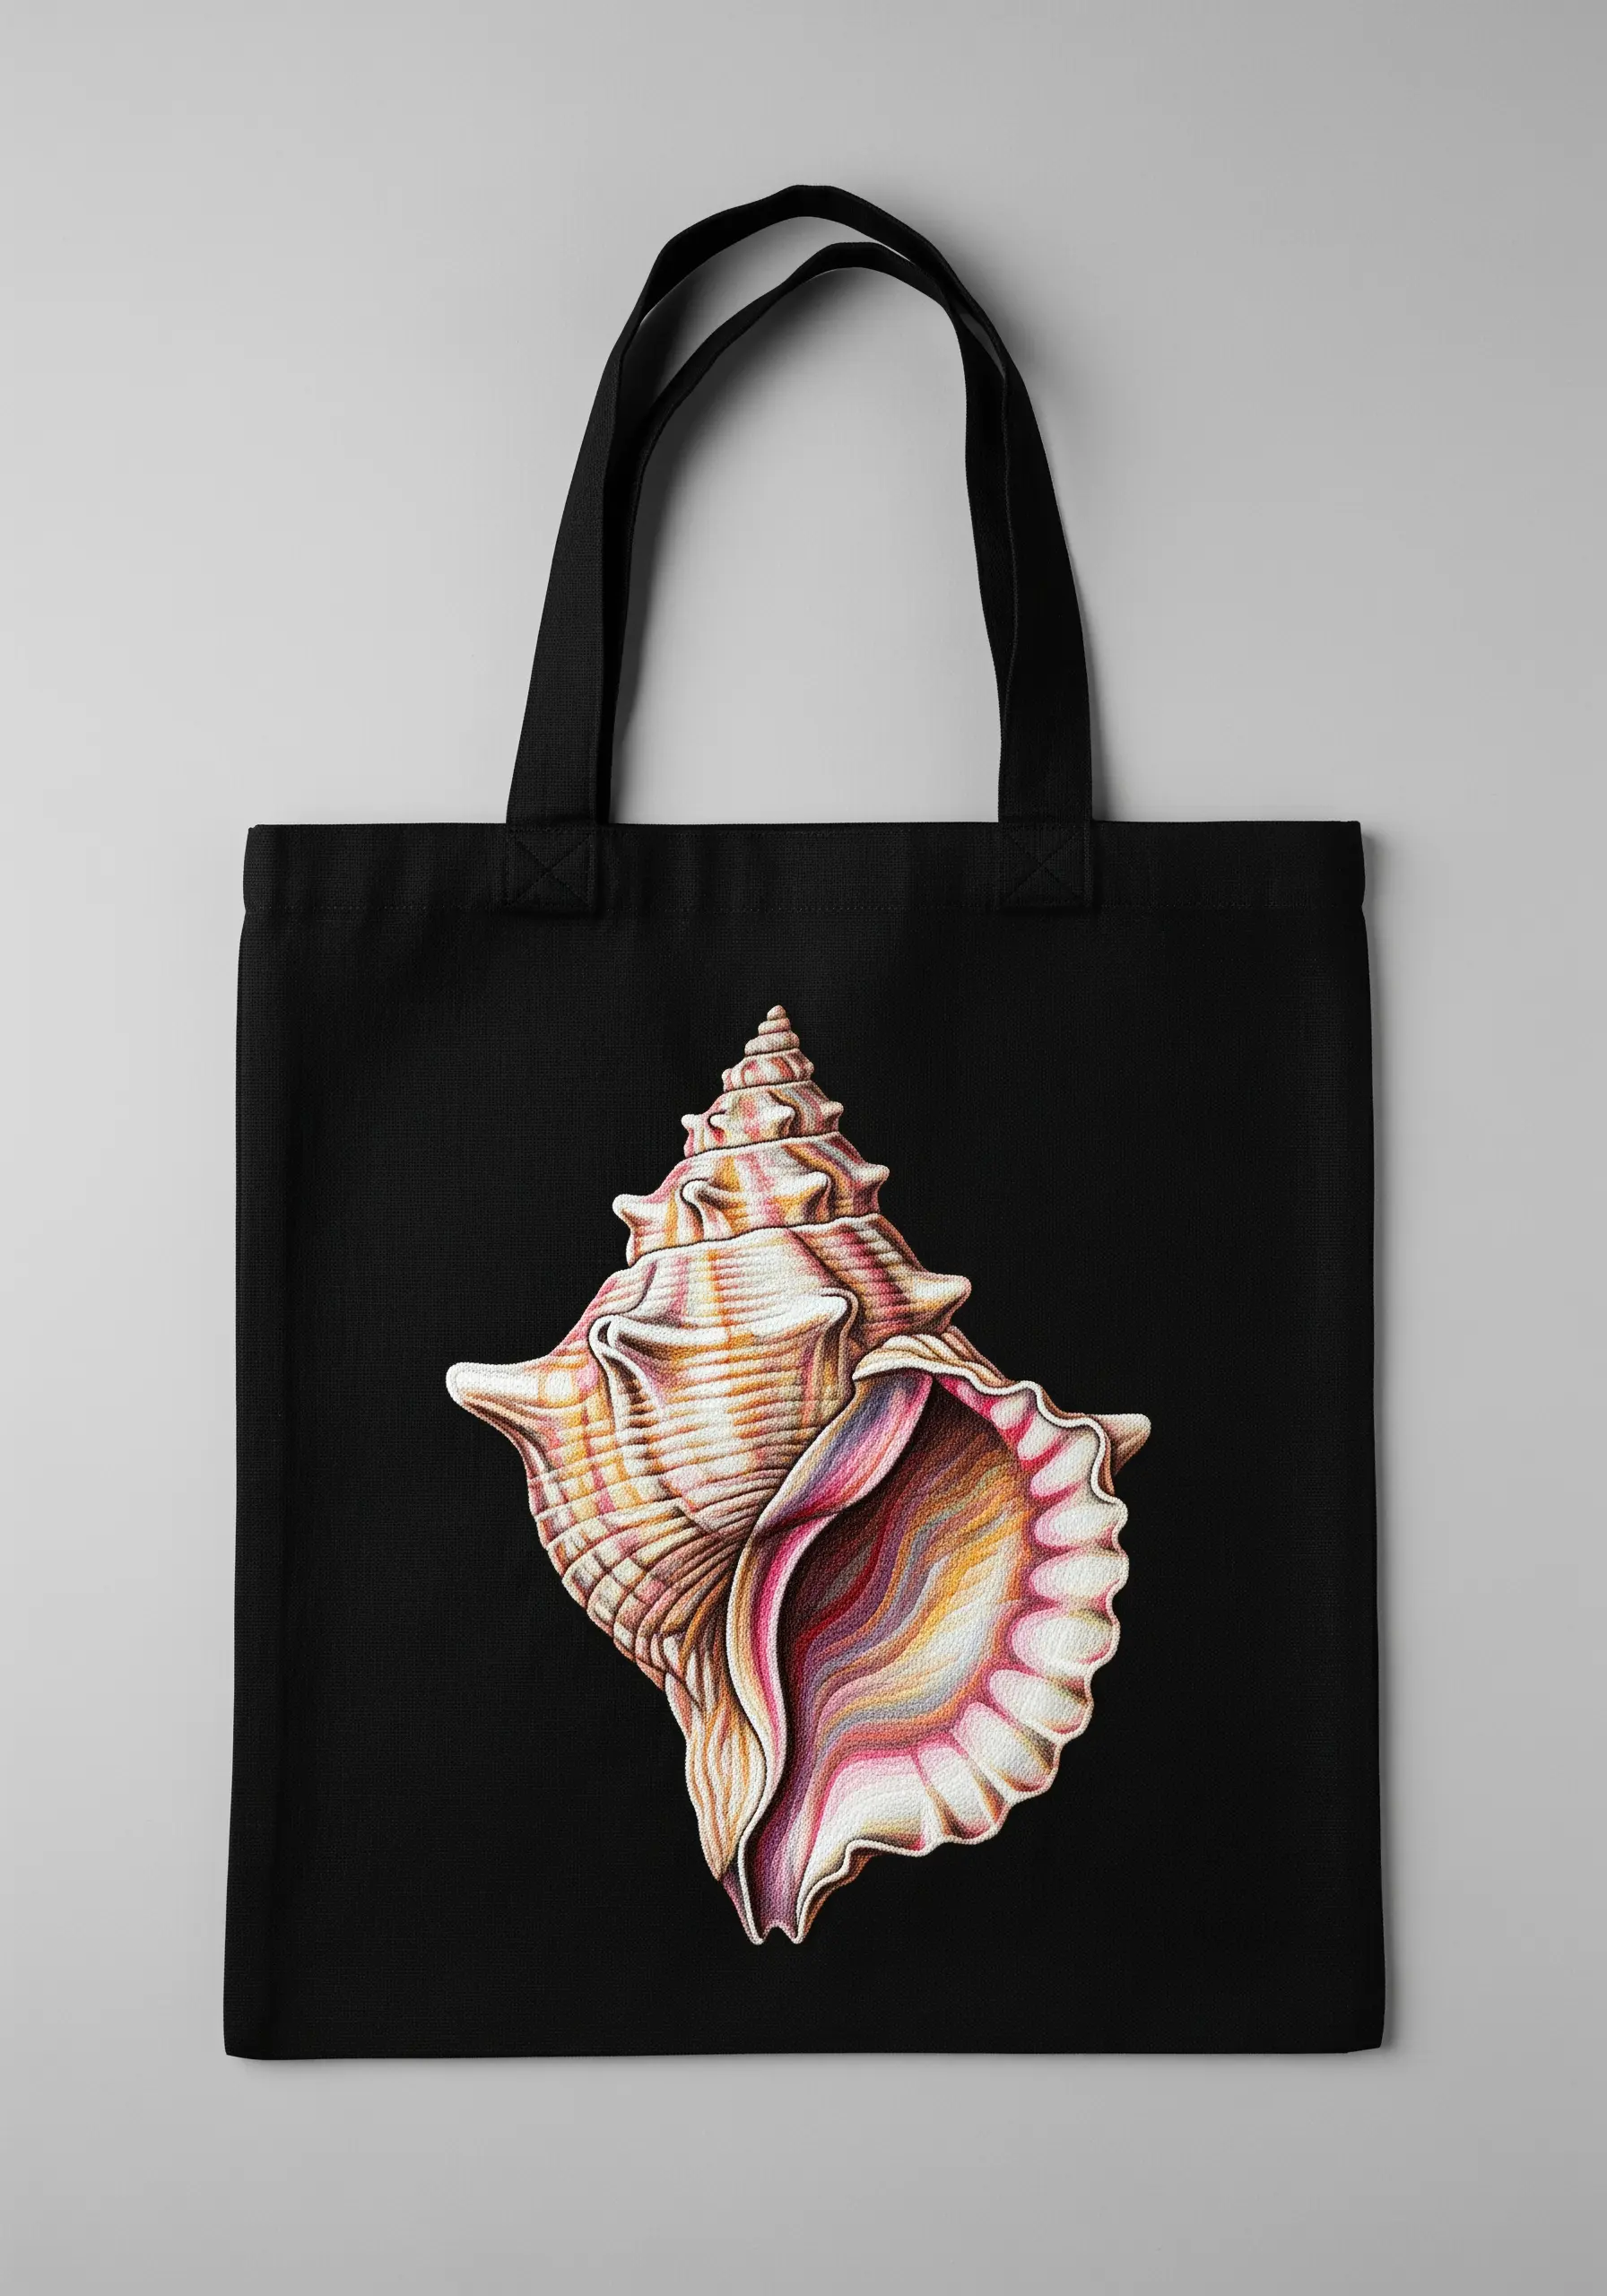
Tackle a master-level project by treating your thread like paint.
This hyper-realistic effect is achieved with single-strand thread painting. Use dozens of closely related shades of pink, cream, and orange to create flawless gradients.
The stitch direction is everything. Follow the natural curves and whorls of the shell with your long and short stitches to build its three-dimensional form.
This is a testament to how patience and a careful eye for color can turn simple thread into breathtaking art.
32. Appliqué Surfboards
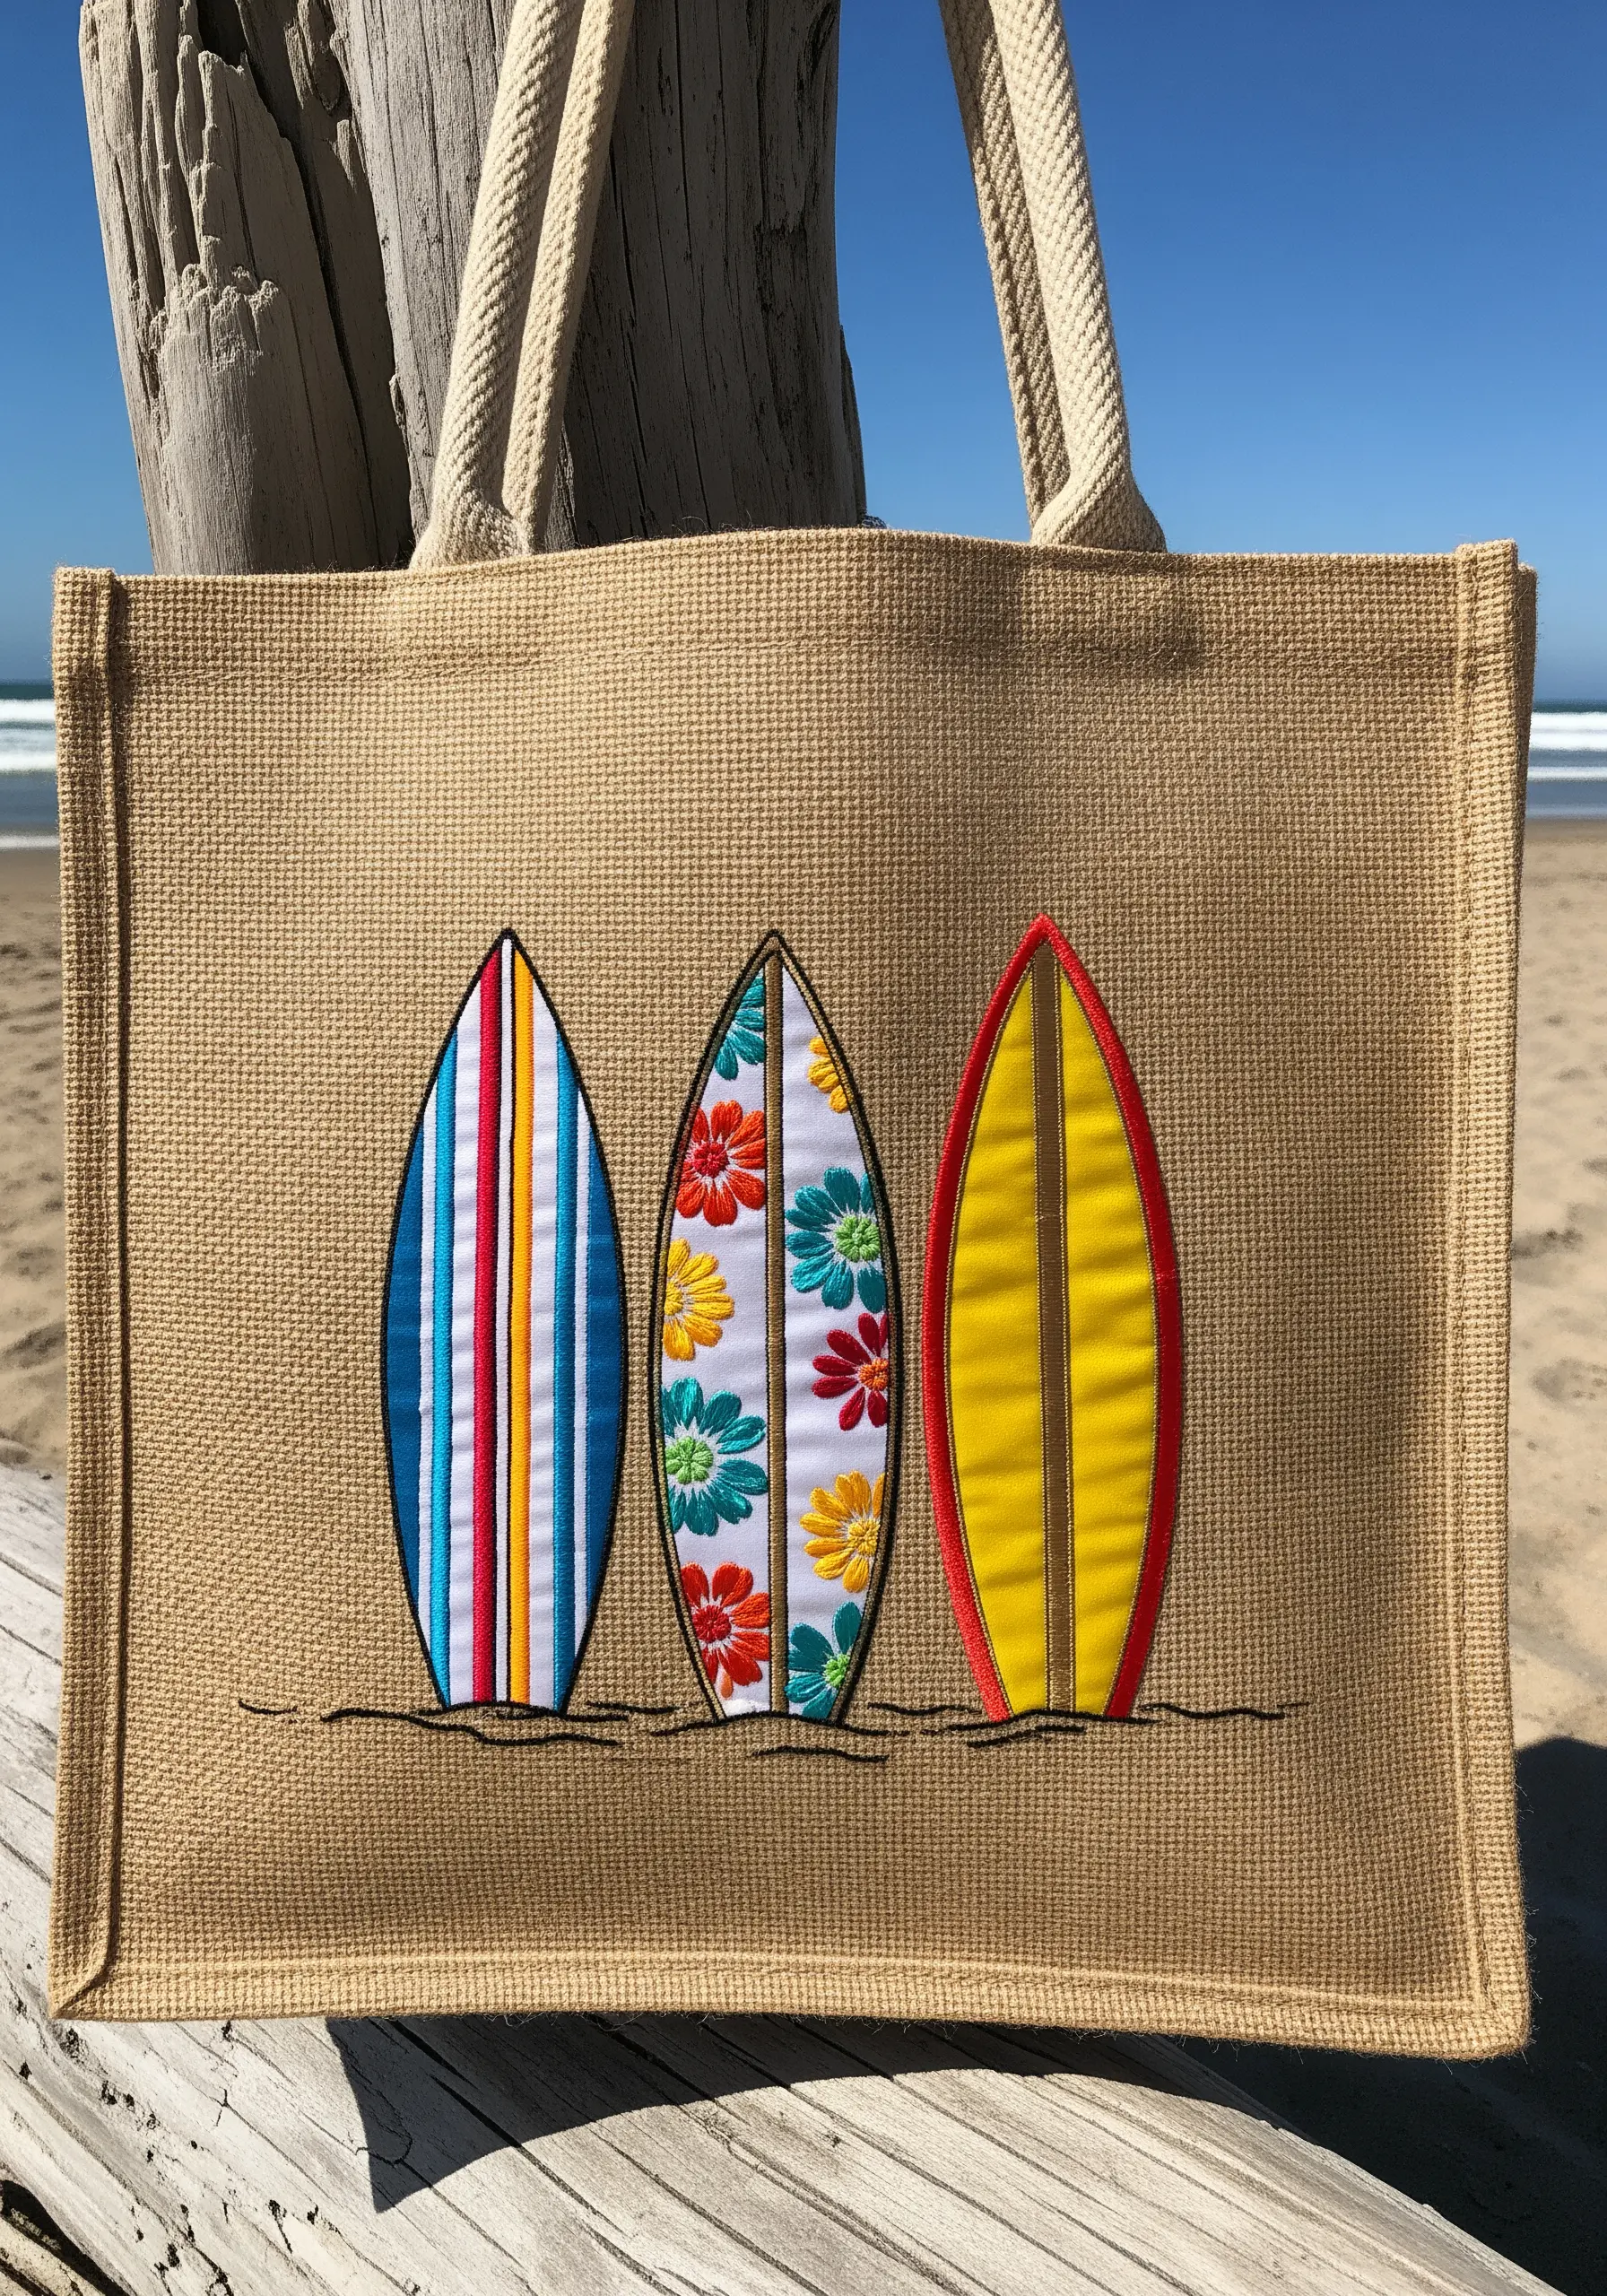
Incorporate complex patterns easily by letting patterned fabric do the work for you.
Cut your surfboard shapes from different scraps of vibrant, patterned fabric—florals, stripes, or geometrics all work well.
Tuck the raw edges under or use an iron-on adhesive for a clean edge, then secure each board to the jute bag with a tight, neat satin stitch border in a complementary color.
This technique allows for endless customization and is a fantastic way to use up beloved fabric scraps.
33. Refined Typography
Embroider text that looks clean, classic, and professionally designed.
For a crisp sans-serif font like this, precision is key. Outline each letter with a tiny split stitch first to create a sharp edge.
Then, fill the letters with a smooth, horizontal satin stitch. Using a single direction for your fill stitch ensures a uniform, light-reflecting surface.
A single, fine line stitched below the text helps to ground the composition and adds a touch of modern, minimalist elegance.
34. The Textured Tiki Cocktail
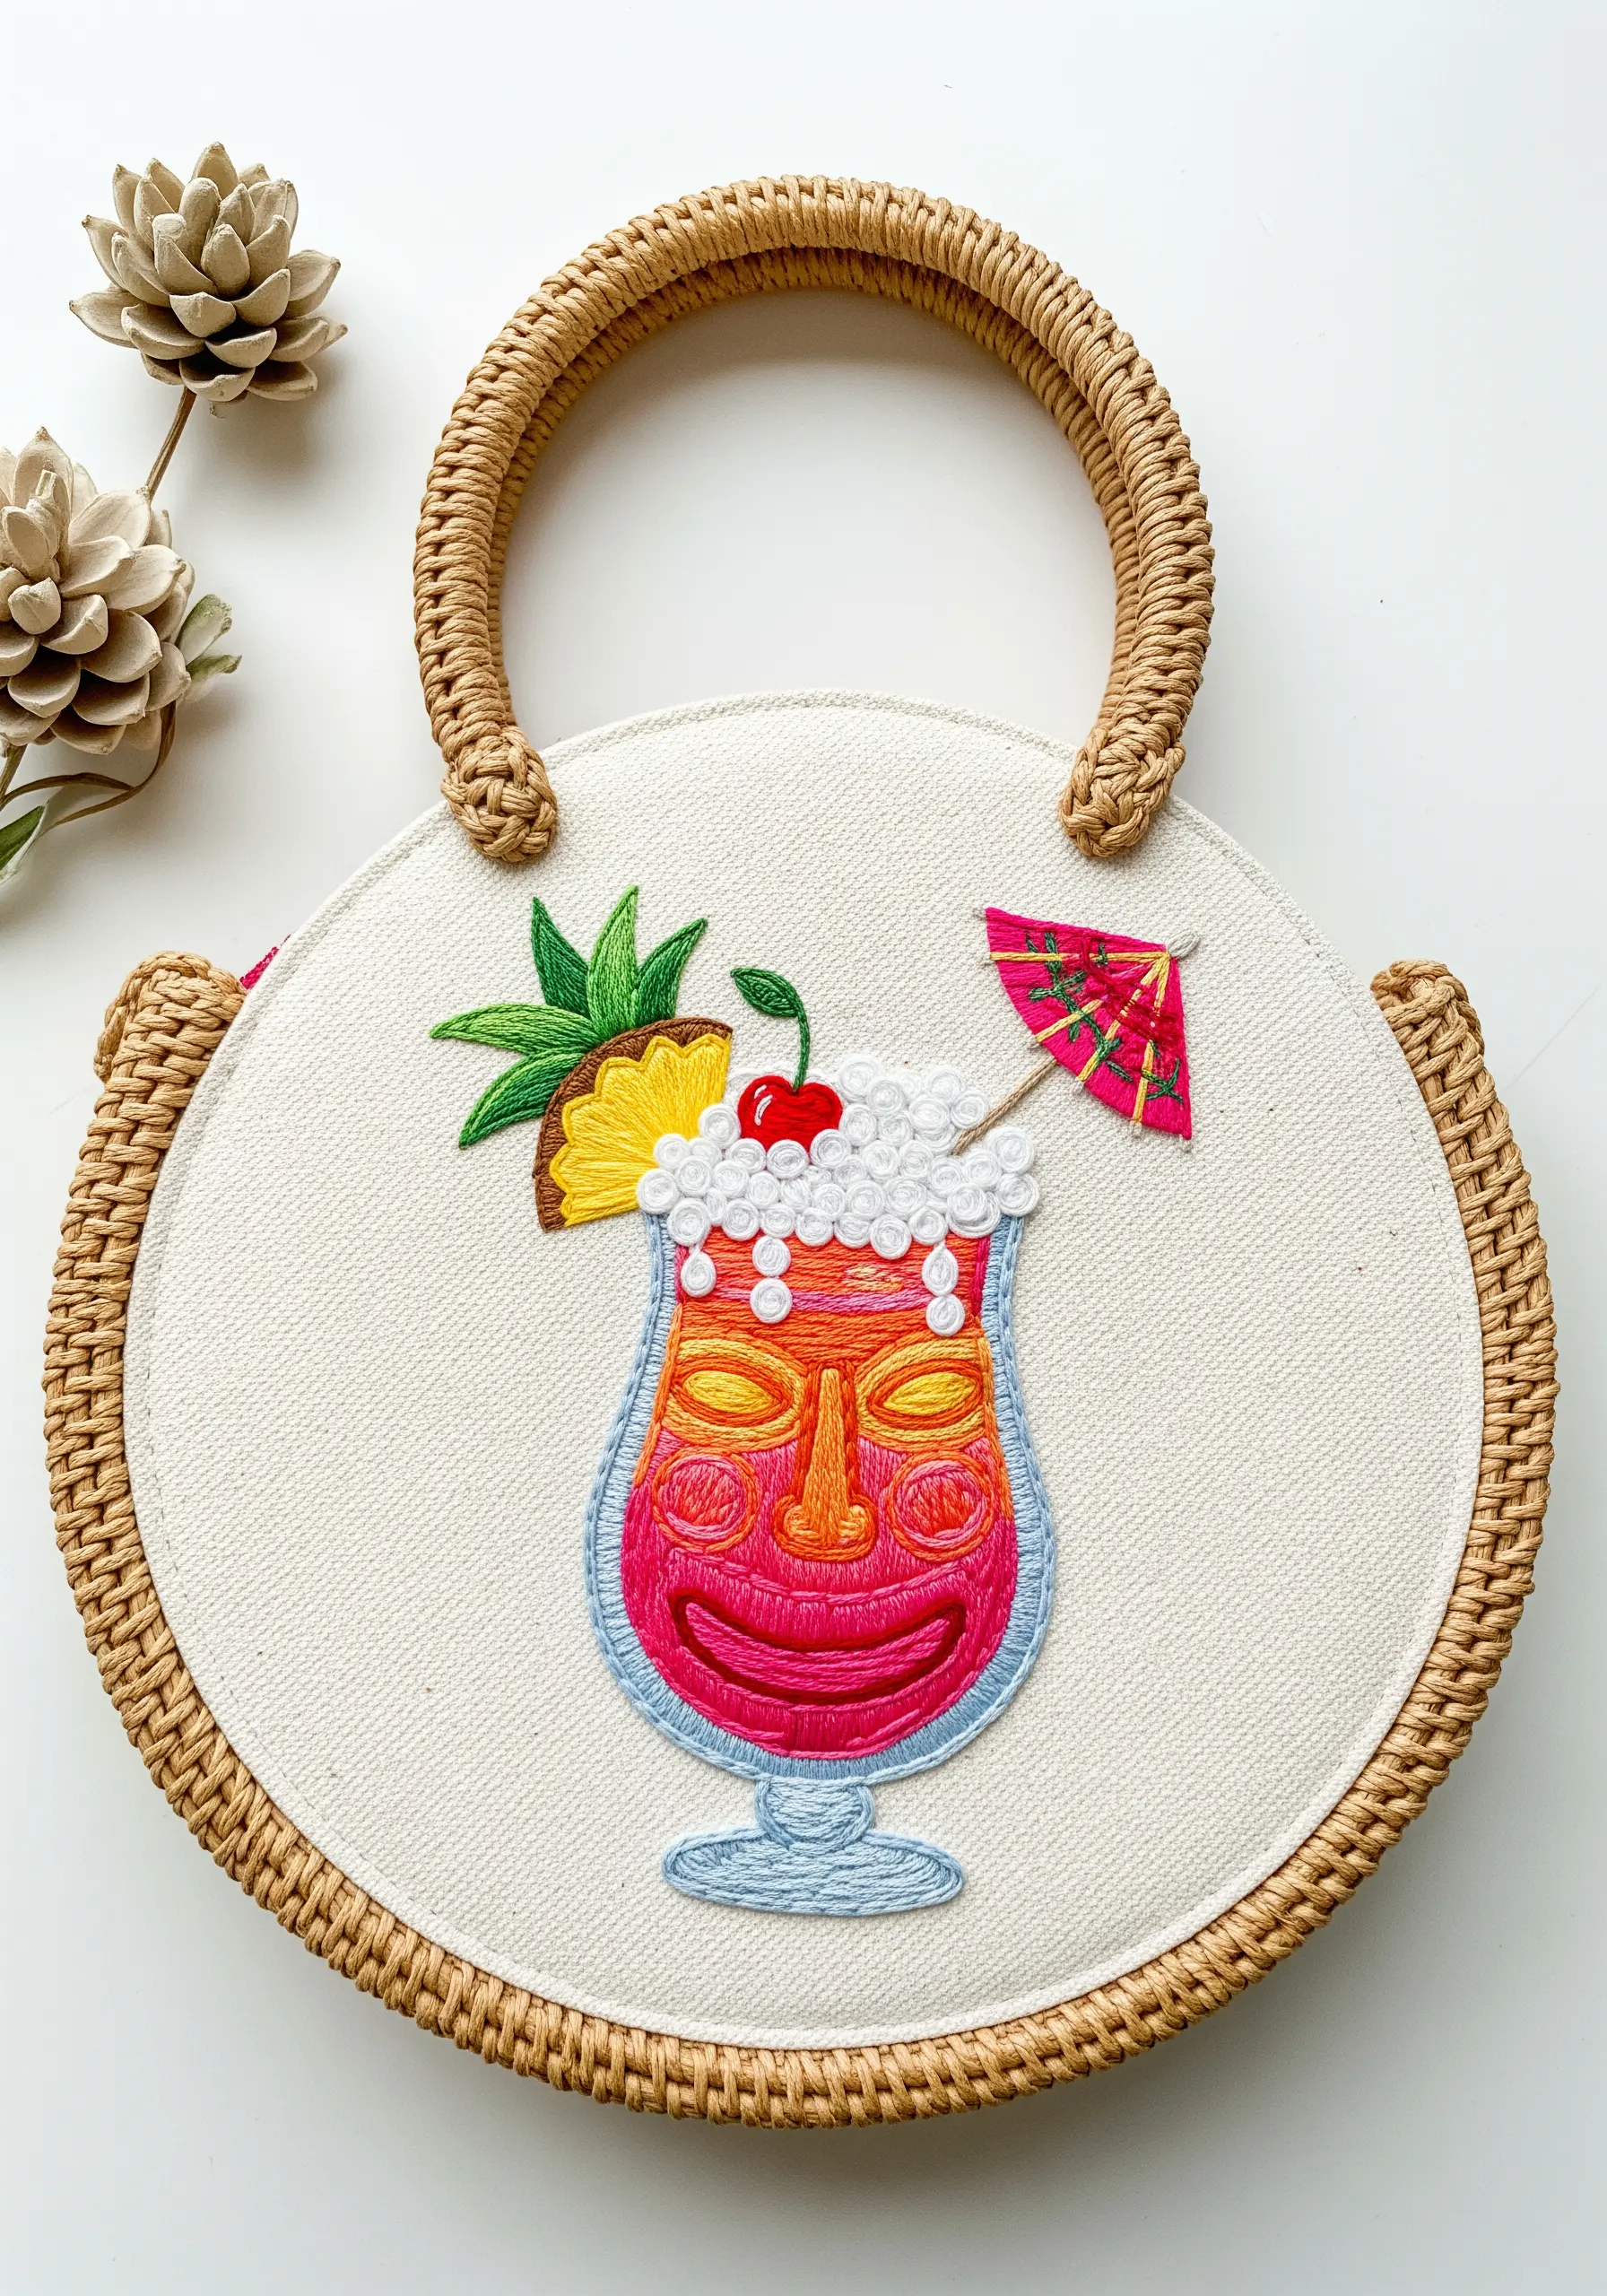
Bring a playful illustration to life by assigning a different texture to each element.
Use satin stitch for the smooth glass, but change the stitch direction for each color section to create subtle dimension.
The foam on top is a perfect place for a cluster of white French knots, which gives it a bubbly, three-dimensional quality.
Don’t forget the details: a woven wheel stitch for the pineapple slice and a few straight stitches for the paper umbrella add the final touches of tropical fun.


