

On a quiet, rainy afternoon, there’s a unique comfort in the simple rhythm of needle and thread. It’s more than just a way to pass the time; it’s an opportunity to create something calm and beautiful with your own hands.
But sometimes, you might feel that your projects, while enjoyable, are missing a certain polish. You want to move beyond just following a pattern and start making deliberate choices that elevate your work from a simple craft to a small piece of art.
Here, you won’t find complicated instructions or a long list of supplies. Instead, you’ll discover thoughtful techniques and subtle adjustments you can try right now—from choosing the right stitch for a specific texture to understanding how a single strand of thread can change everything. Let’s make something that feels as peaceful to create as it looks.
1. Render Lavender with Tactile Detail
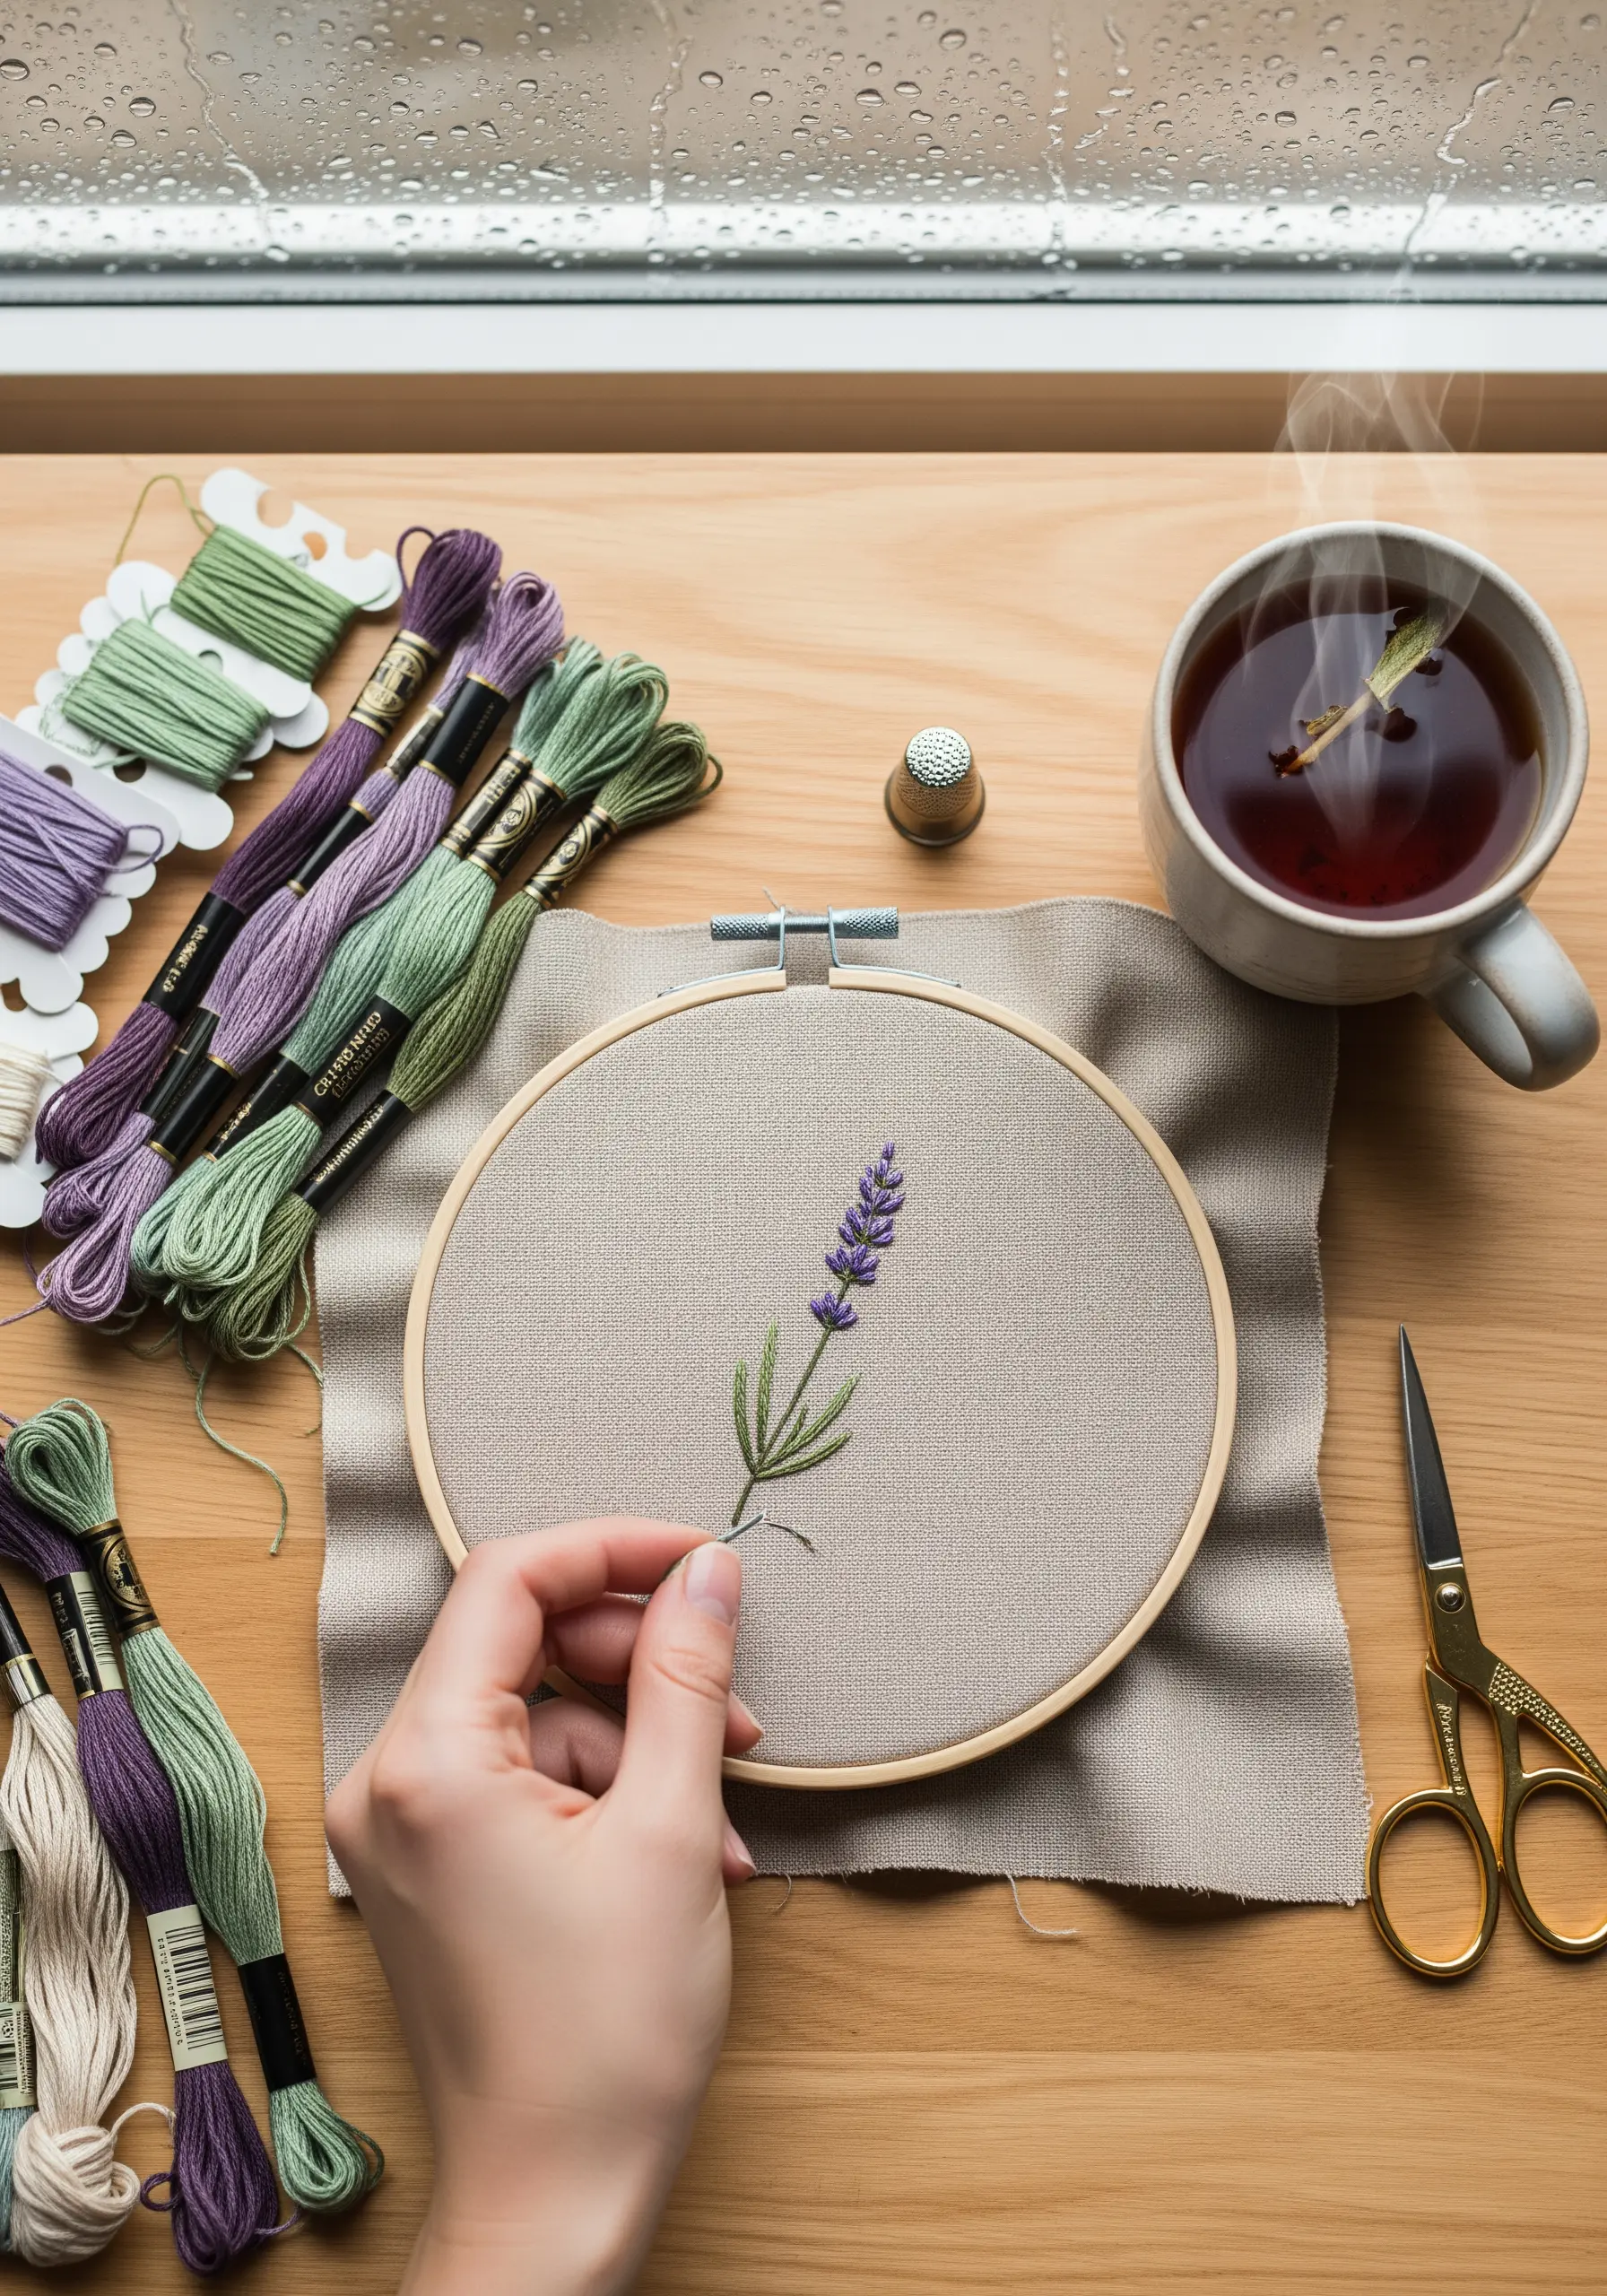
Instead of flat satin stitches, give your lavender buds realistic texture by using French knots or tiny bullion knots.
Vary the size and placement of each knot, and blend two or three shades of purple and mauve floss to create natural depth.
For the stem, use a whipped backstitch with two strands of green floss; this creates a smoother, more rounded line than a standard backstitch, mimicking a real stalk.
Stitching on a neutral, textured fabric like linen or Osnaburg lets the botanical details stand out with quiet elegance.
2. Create a Botanical Stitch Sampler

Dedicate a single hoop to practicing different leaf textures, turning a practice session into a piece of art.
Assign a specific stitch to each leaf type: use fishbone stitch for defined central veins, long-and-short stitch for smooth gradients on larger leaves, and detached chain stitches (lazy daisies) for small sprigs.
This method builds your visual dictionary of textures, helping you understand how a stitch choice can define a plant’s character.
Organize your hoop into quadrants to create a structured composition, transforming your nature-themed embroidery samplers into a beautiful reference guide.
3. Master the Shimmer of Metallic Threads
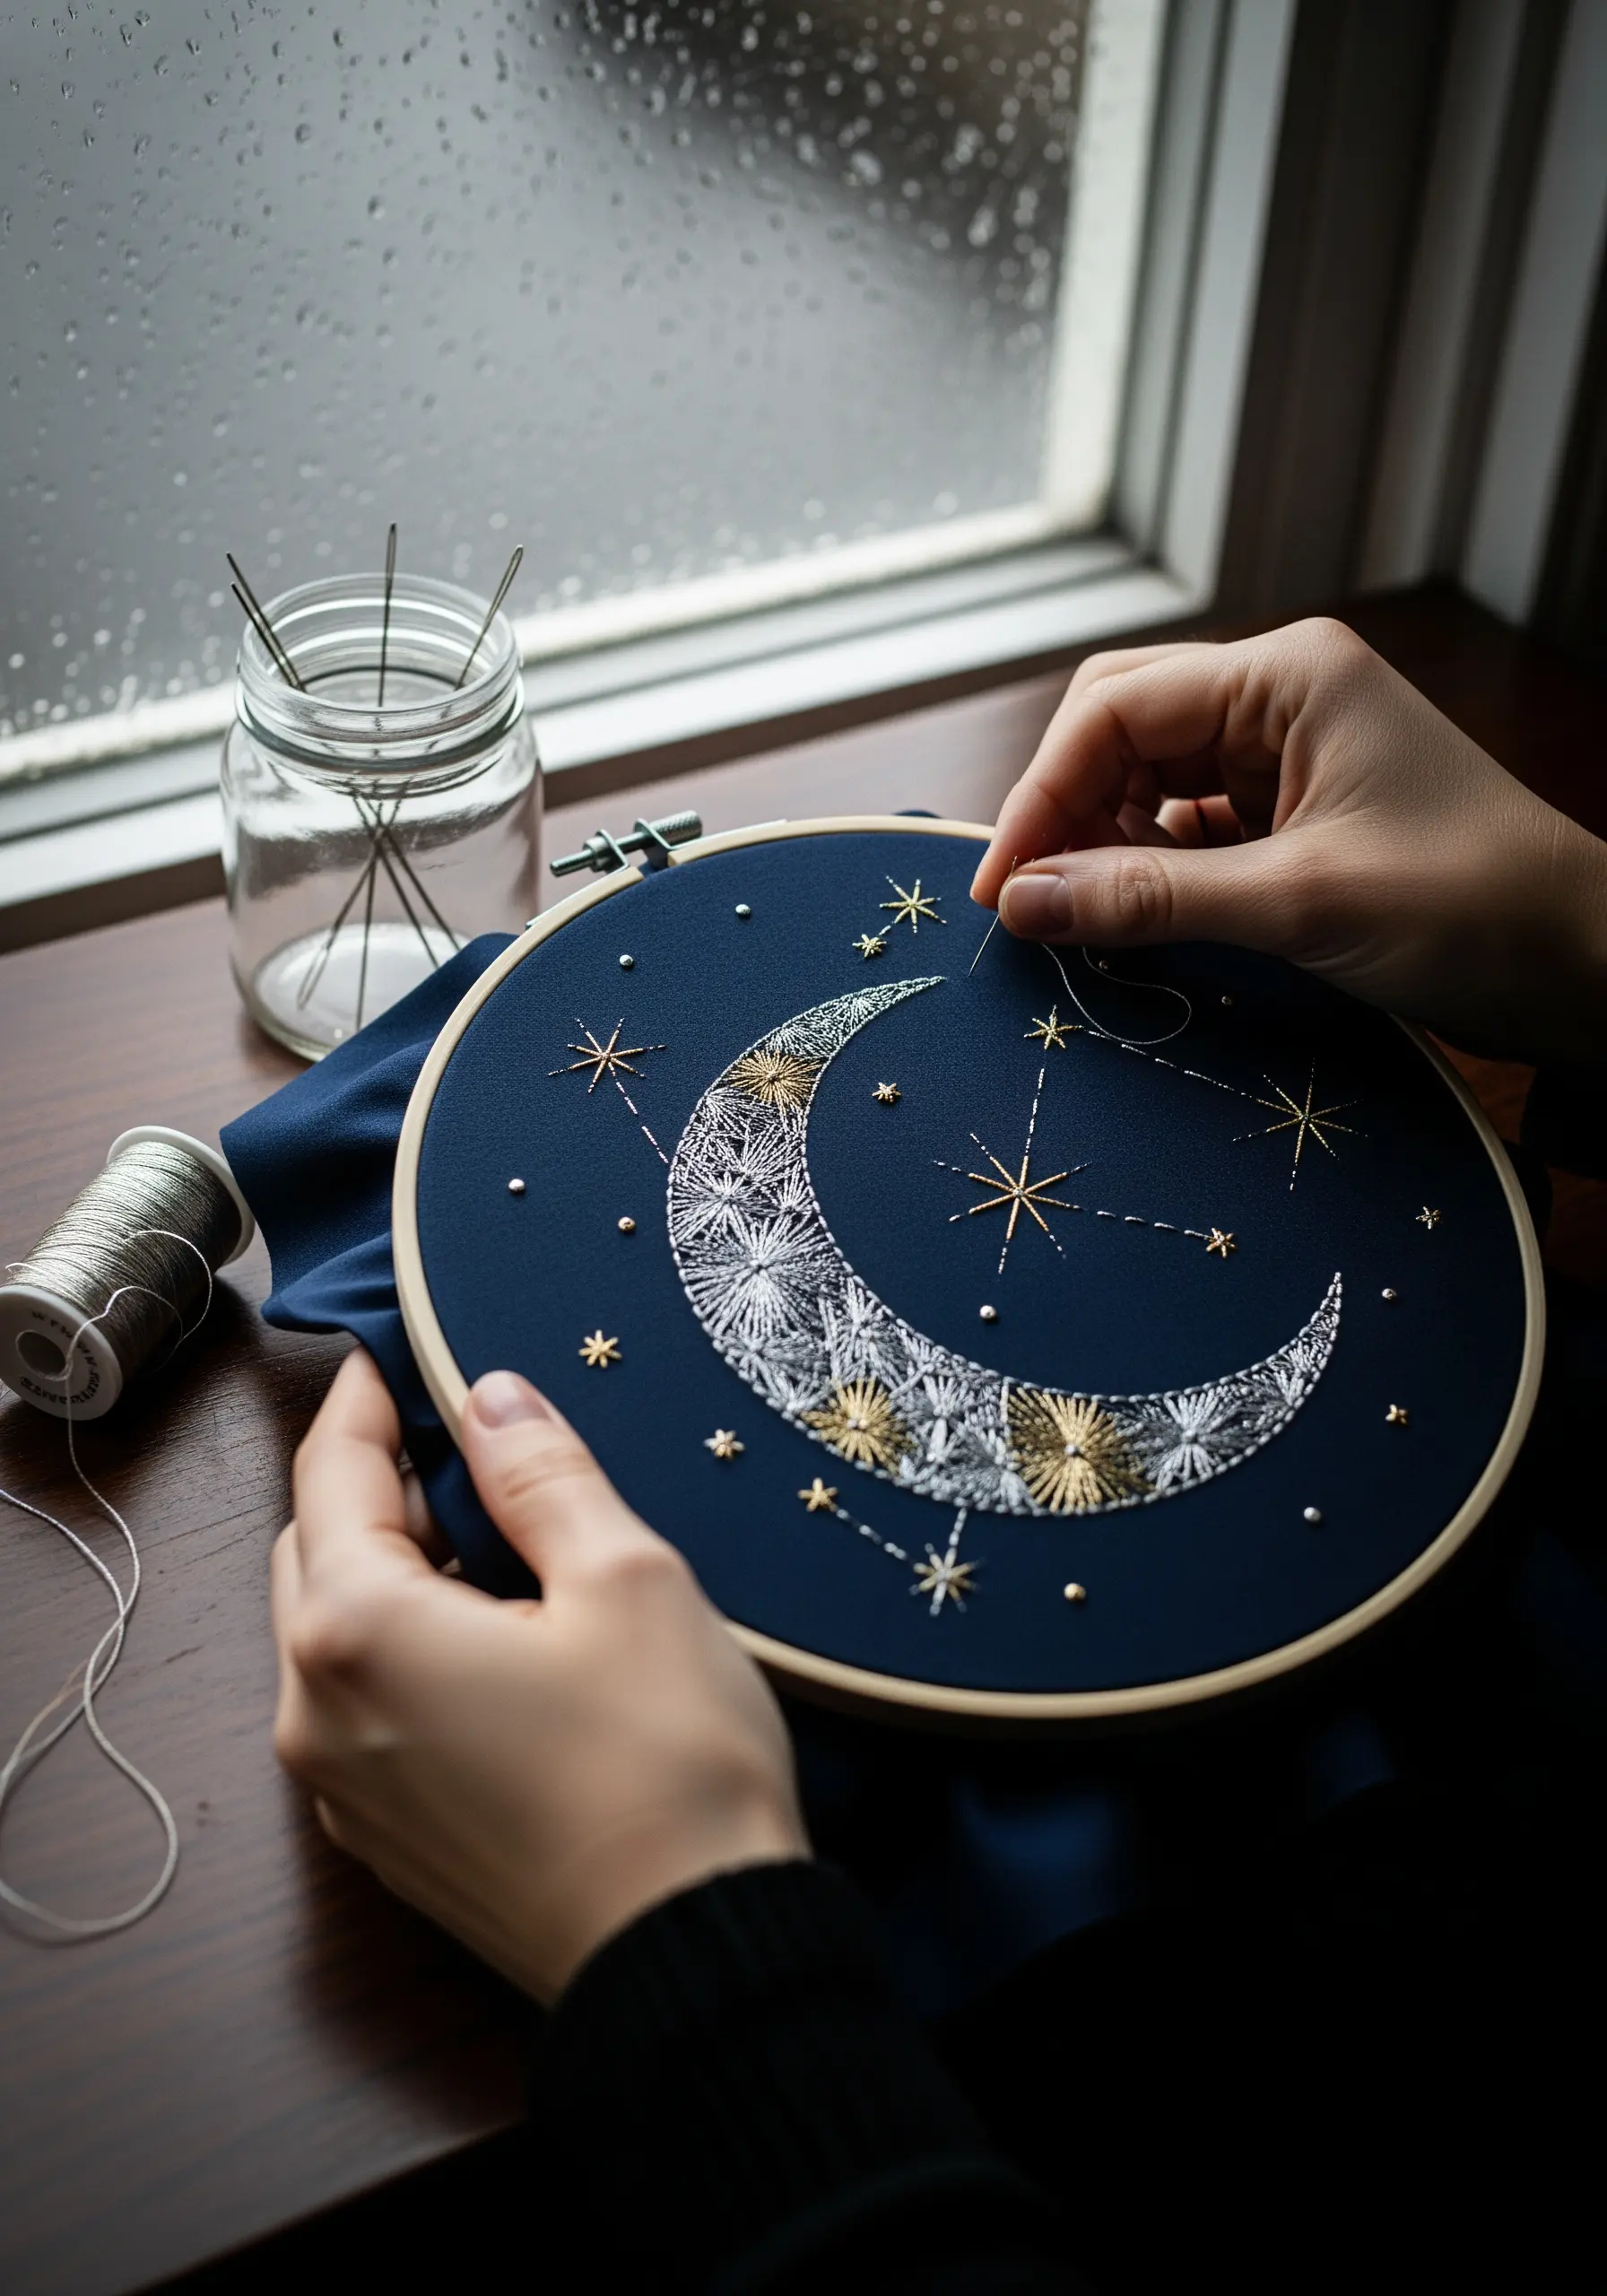
To create celestial designs that genuinely sparkle, combine metallic thread with standard cotton floss.
Work with shorter lengths of metallic thread (no more than 12 inches) to prevent tangling and fraying, and use a needle with a slightly larger eye.
For the moon’s texture, fill the shape with a dense pattern of straight stitches using silver metallic thread, then add accents with white cotton floss for contrast.
Use single straight stitches for radiating stars and tiny French knots for distant constellations, letting the metallic thread catch the light against a dark navy fabric.
4. Embroider on Paper for Graphic Precision
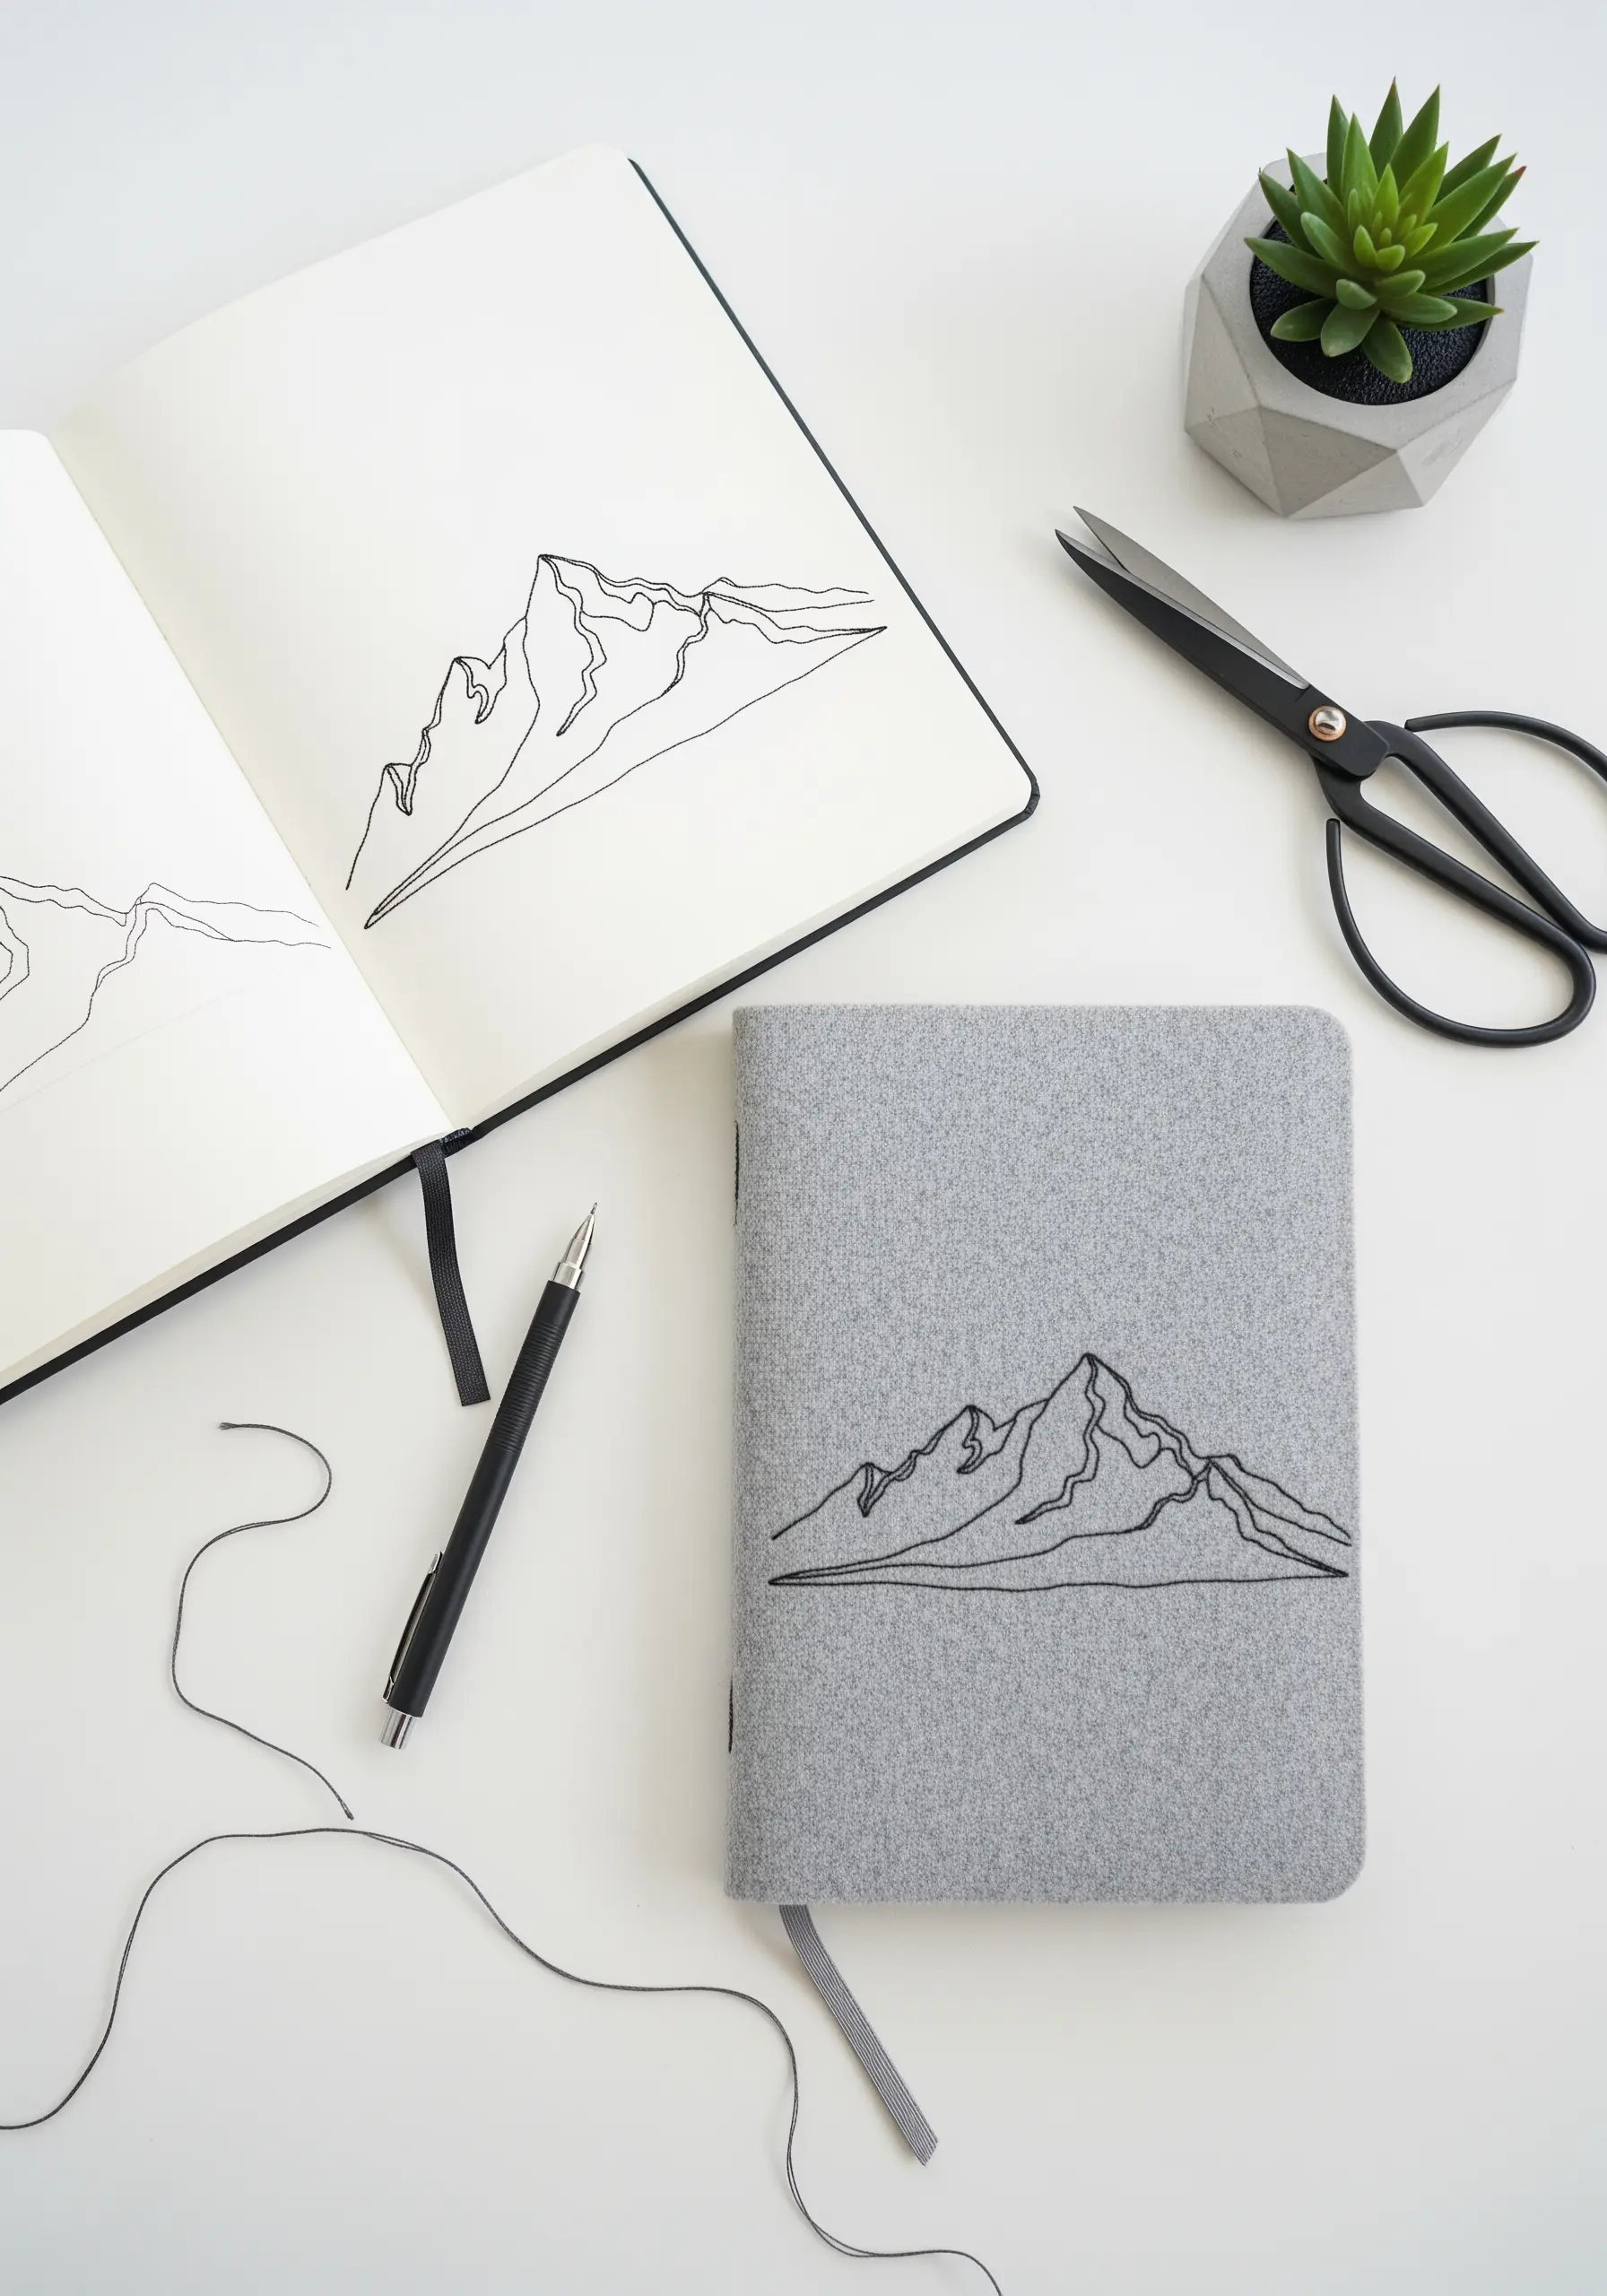
Stitching on a fabric-covered journal creates a beautifully crisp, graphic effect that feels both personal and modern.
Before you begin, lightly trace your design onto the cover and use a sharp awl or a thick needle to pre-punch holes along the lines, about 2-3mm apart.
This prevents the paper and fabric from tearing and ensures perfectly even stitches.
A simple backstitch using three strands of black floss is all you need to achieve this clean, illustrative look, transforming an ordinary object into a custom keepsake.
These paper art designs that pair beautifully with nature-inspired embroidery offer a calm, focused stitching experience.
5. Add Delicate Motifs to Kitchen Linens
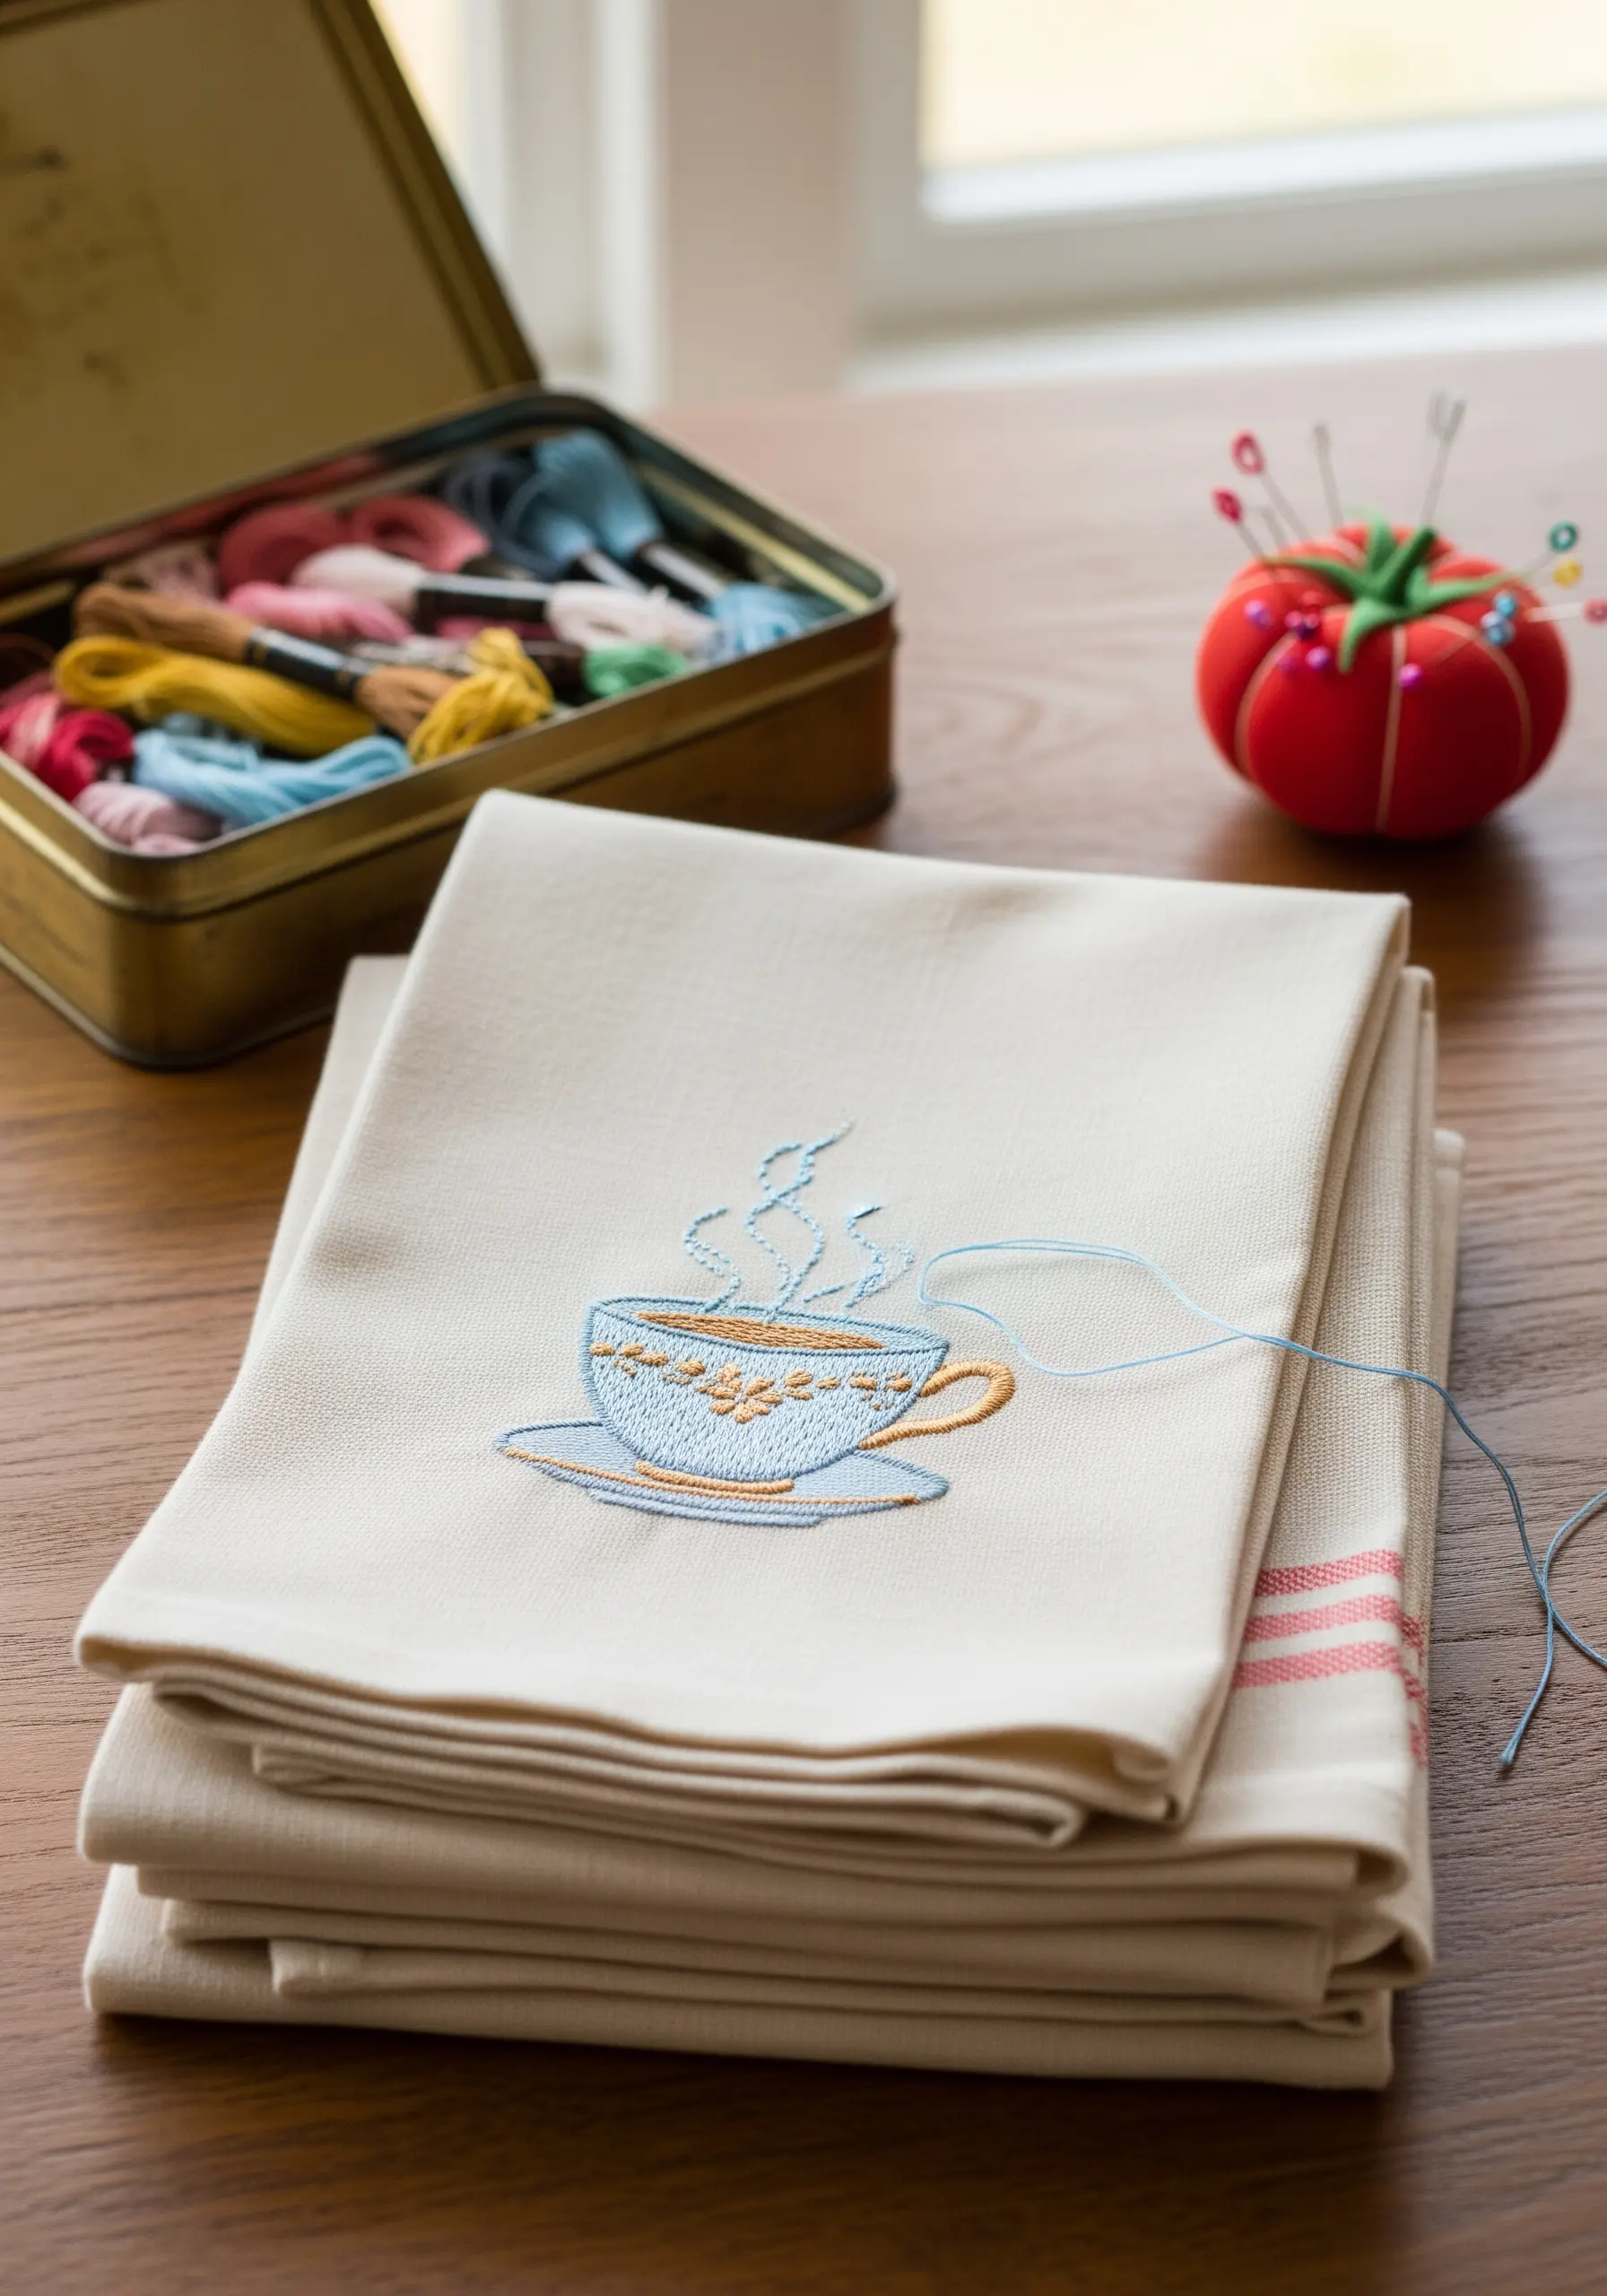
Elevate simple tea towels or napkins with a single, charming motif that speaks to their use.
To avoid puckering on lightweight cotton or linen, use only one or two strands of embroidery floss and a fine, sharp needle.
Trace your design with a water-soluble pen and use a combination of simple stitches: a backstitch for the cup’s outline, a satin stitch for the coffee, and a delicate whipped backstitch for the steam.
These refined details ensure your embroidery complements the fabric rather than overwhelming it. Explore more simple embroidery designs that make your old linen look brand new.
6. Embellish Denim with High-Texture Florals
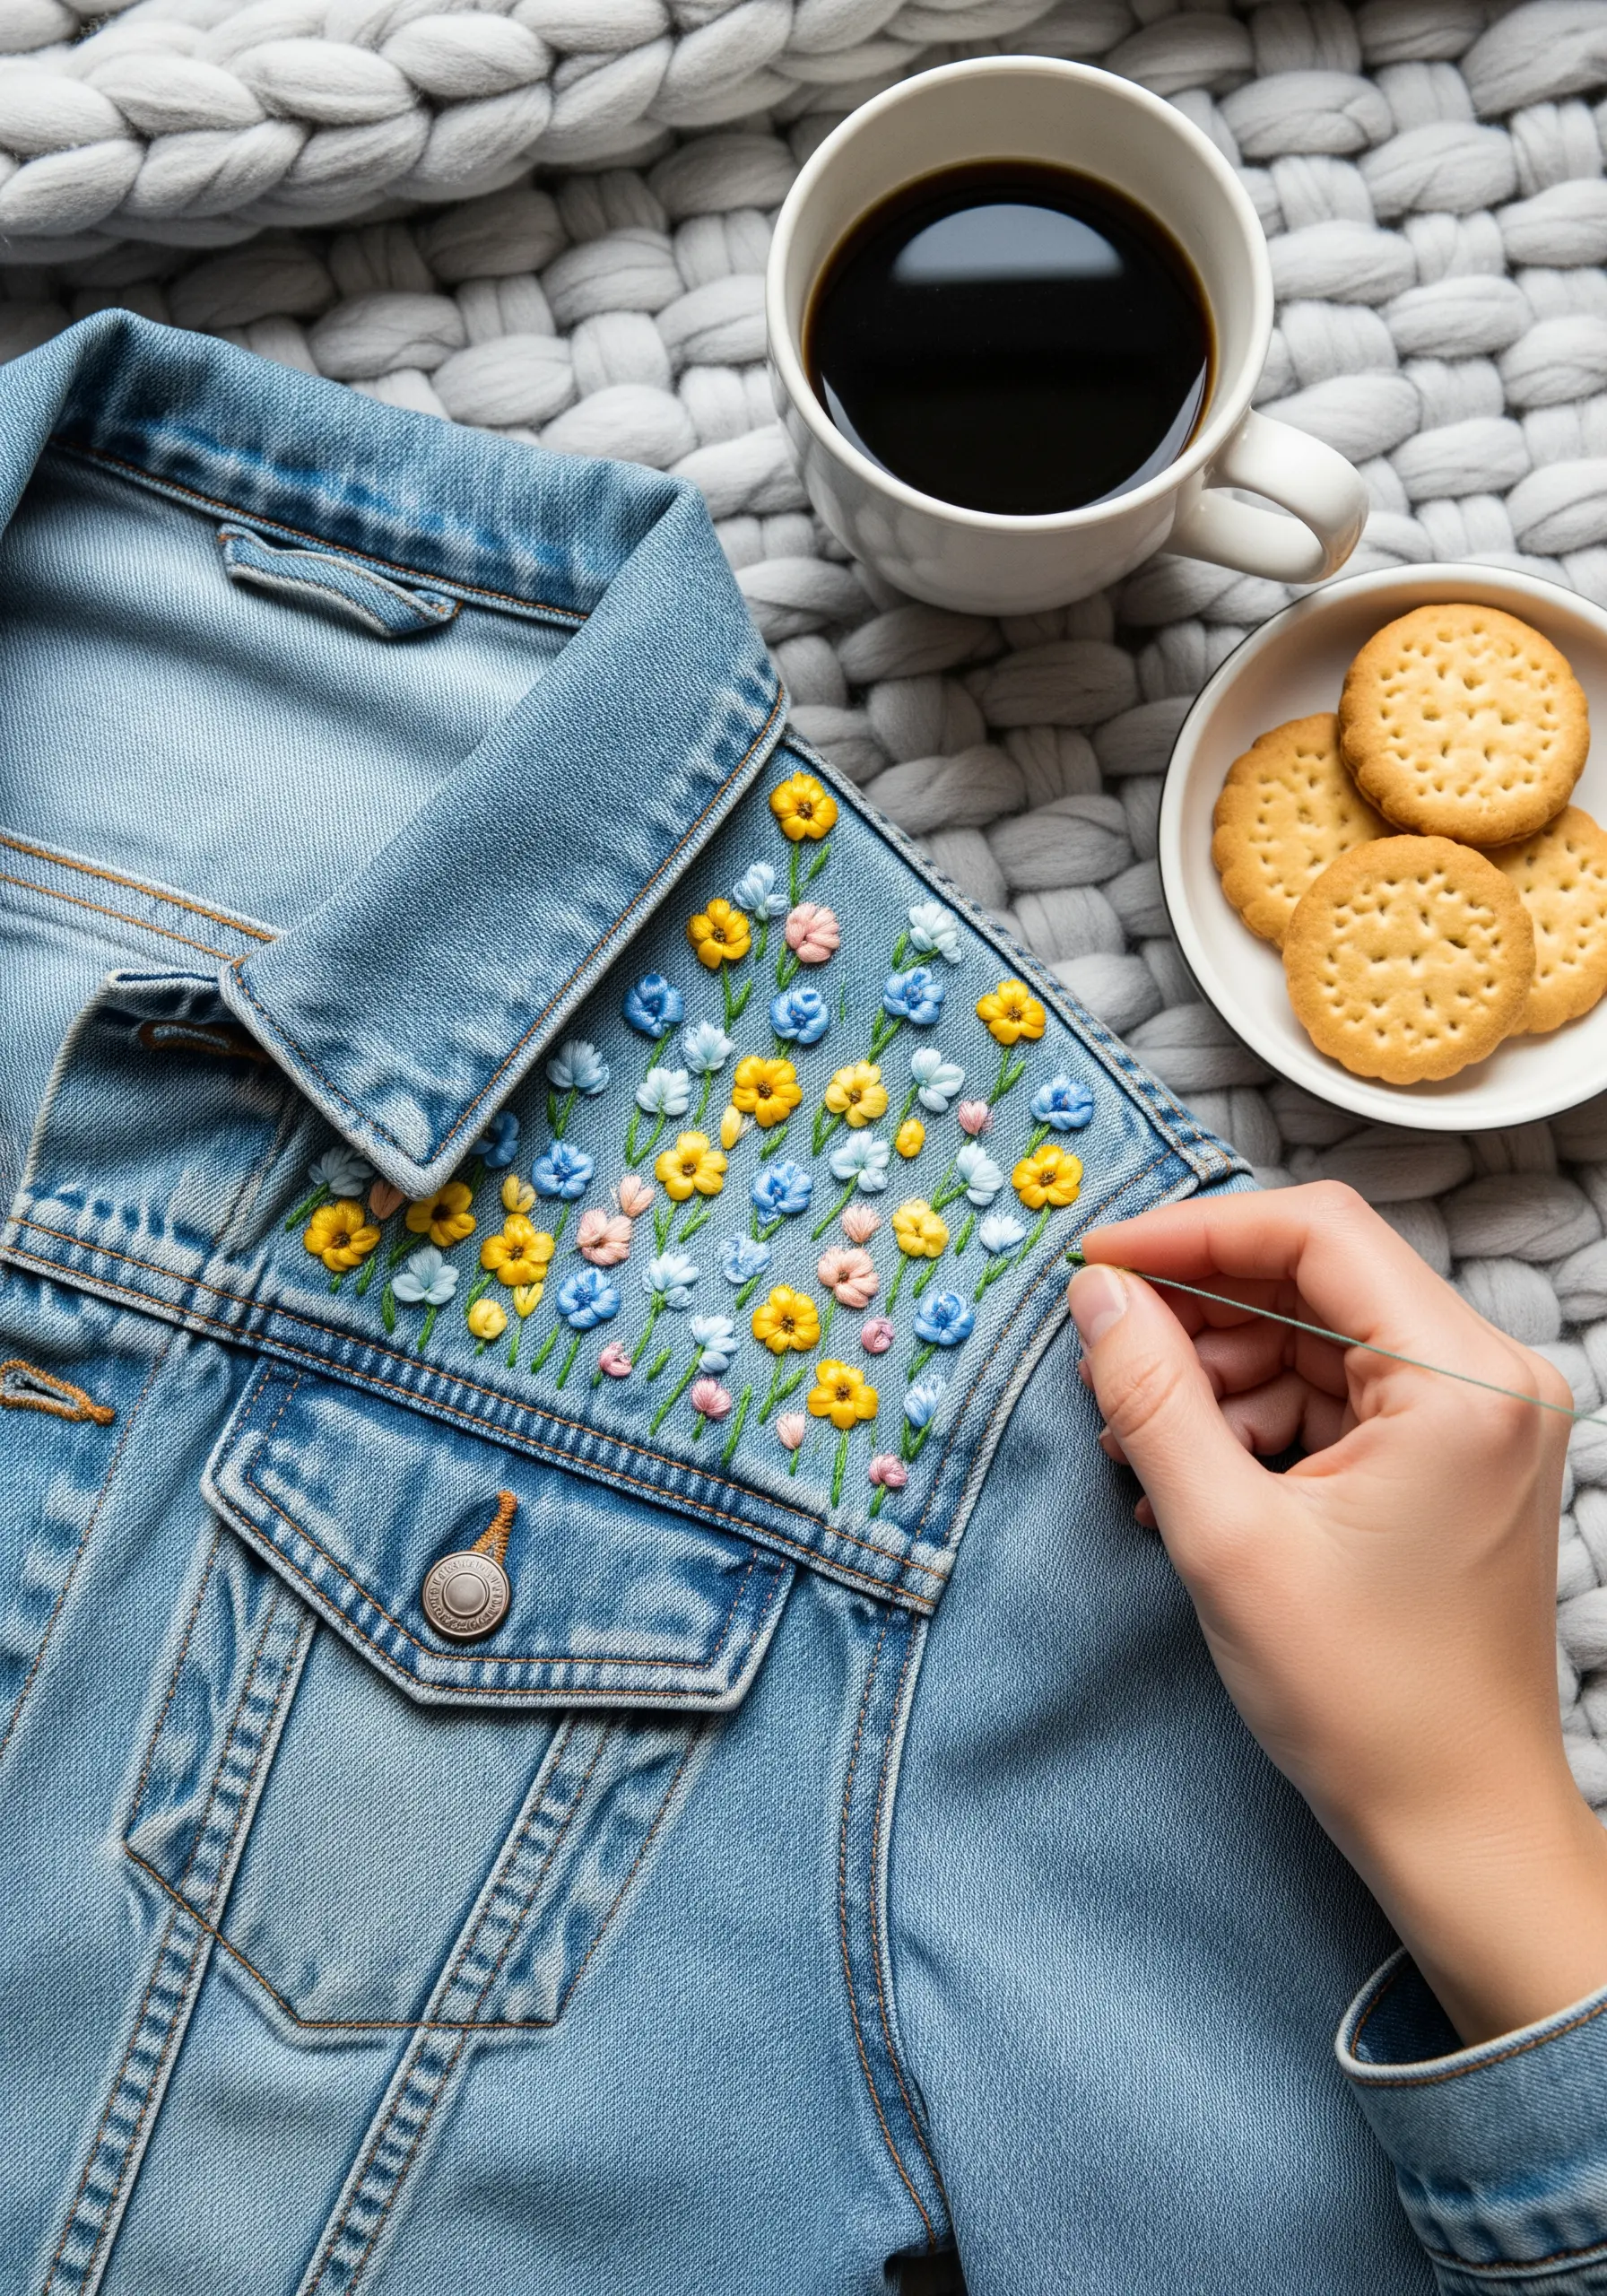
Denim is a sturdy canvas that calls for bold, dimensional stitches that won’t get lost in the fabric’s texture.
Use woven wheel stitches (rose stitches) for the larger flowers, pulling the thread taut to create a dense, raised bloom that stands up to wear.
Complement them with clusters of French knots for smaller blossoms and detached chain stitches for leaves.
Use all six strands of cotton floss to ensure your colors are saturated and the texture is prominent, transforming a plain jacket yoke into a wearable garden.
7. Capture Realism with Thread Painting
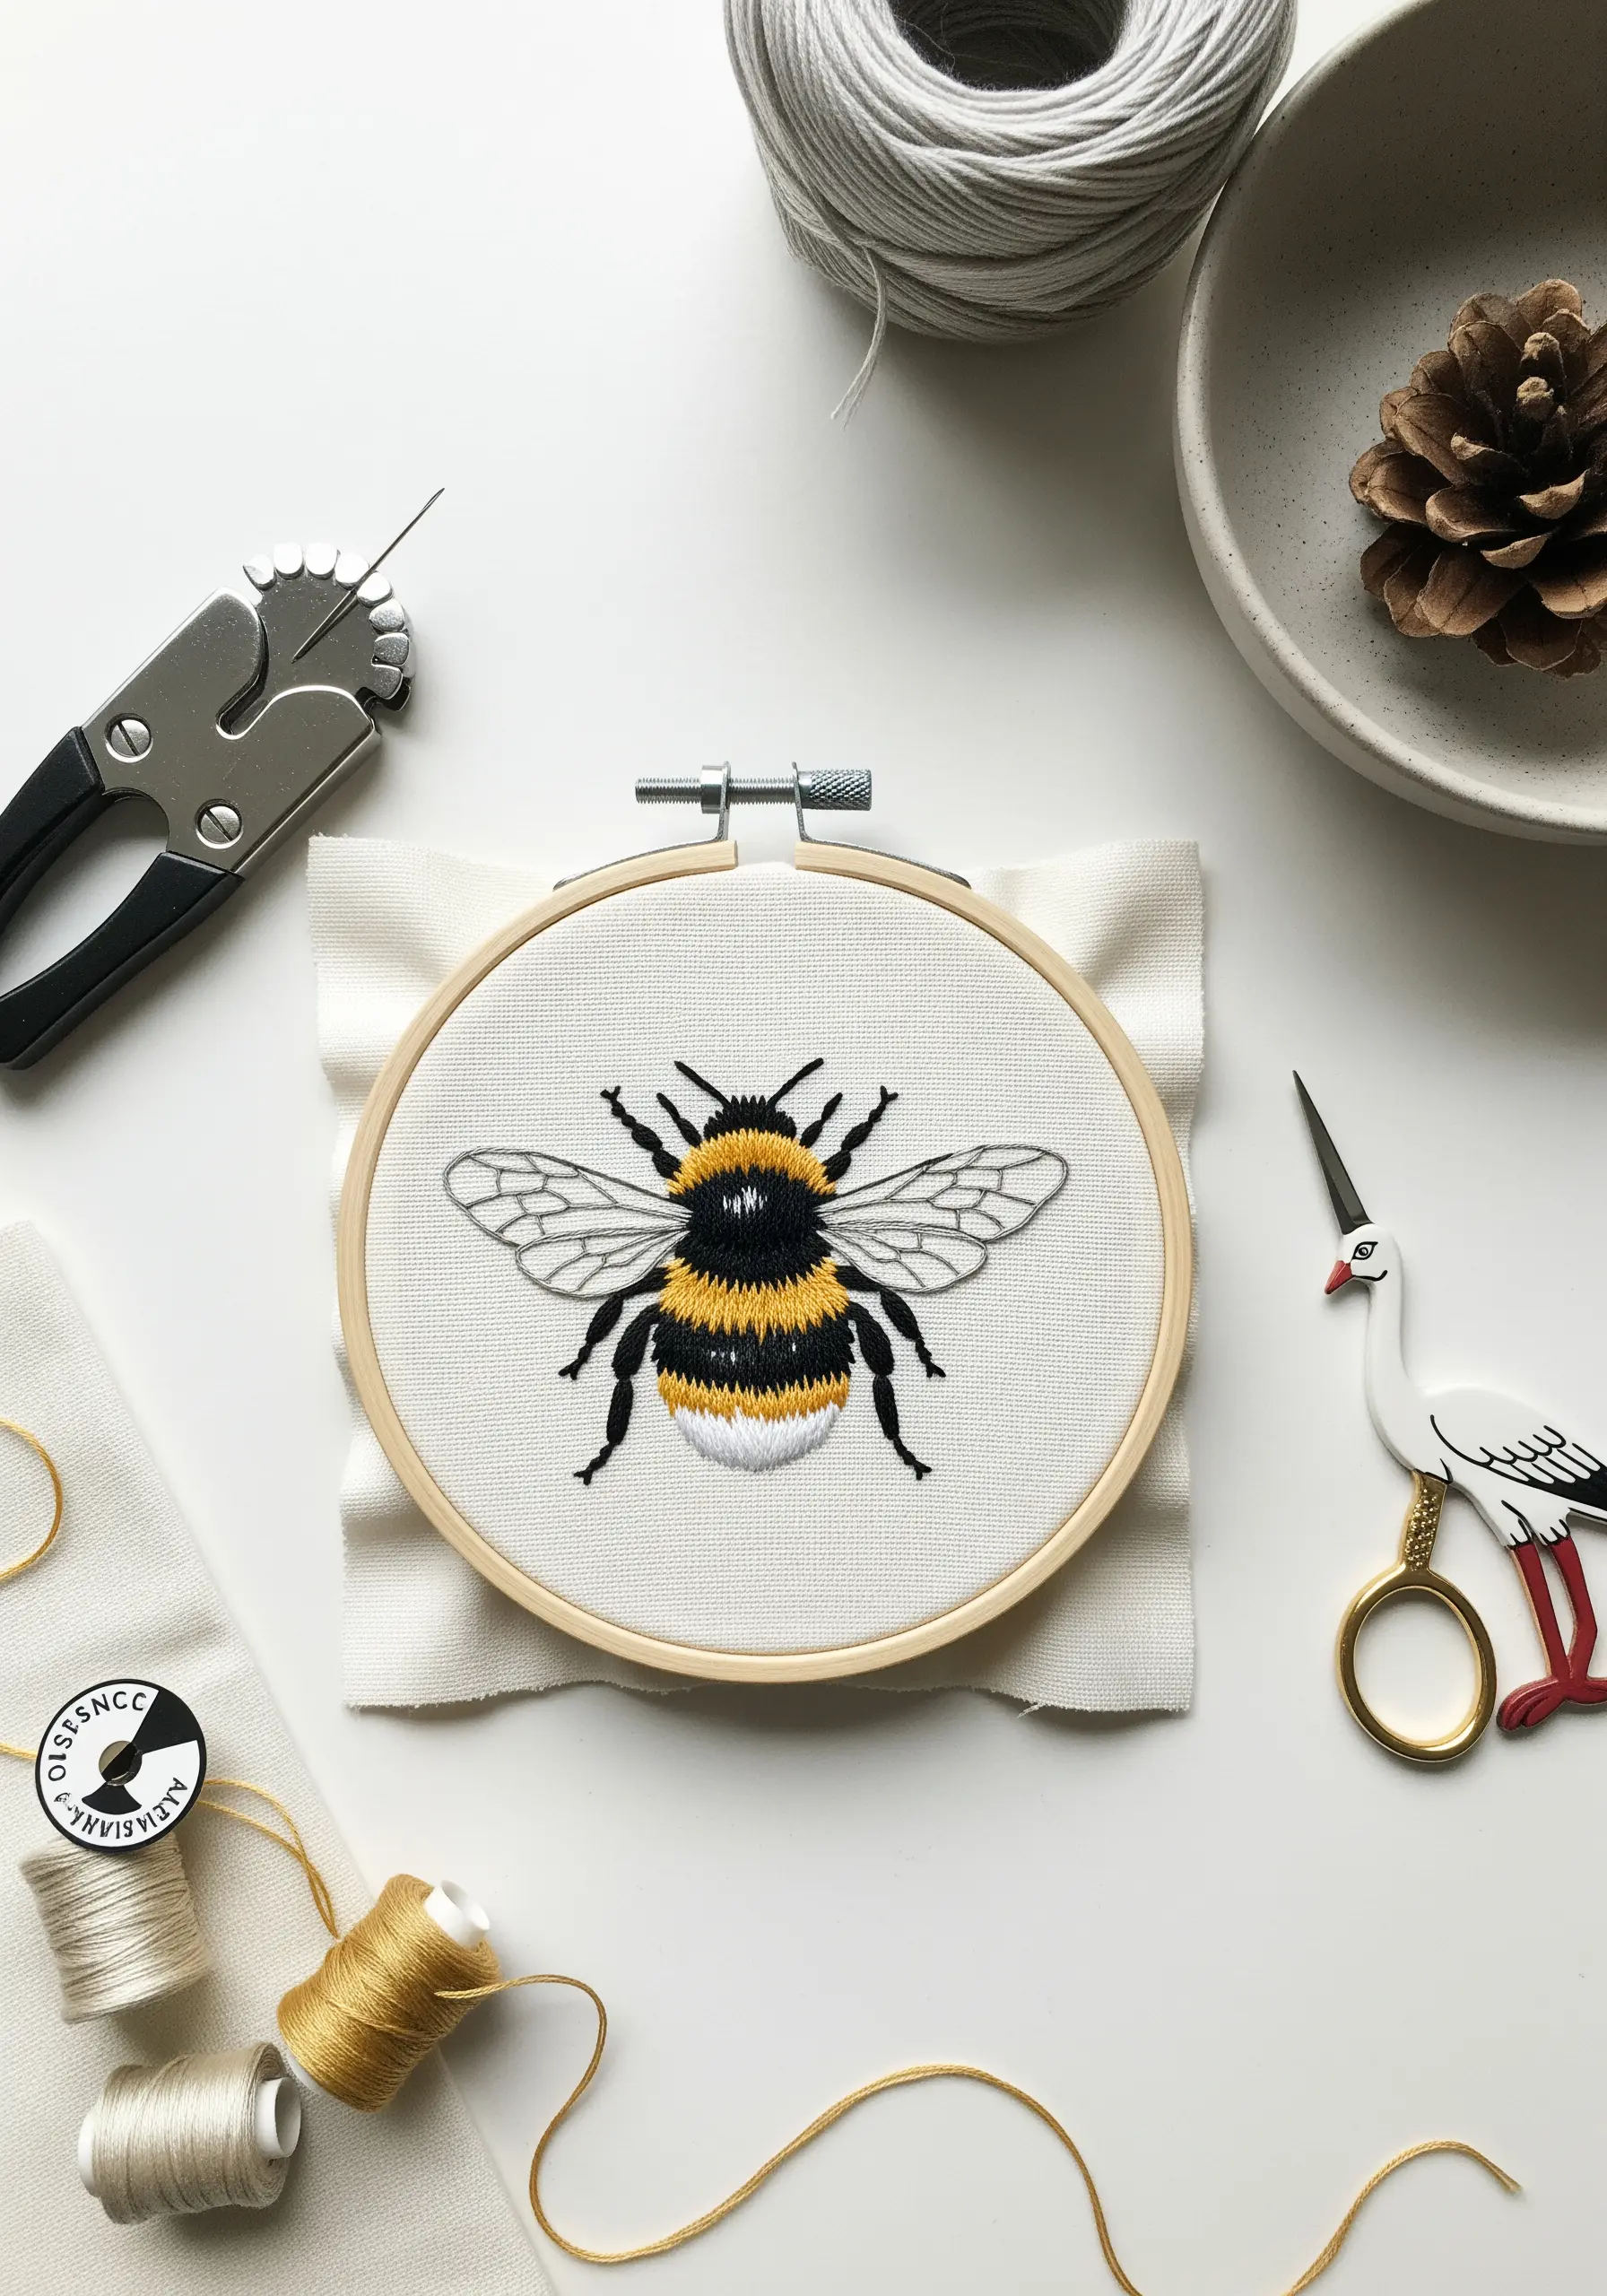
To create a lifelike bumblebee, use the long-and-short stitch to blend colors seamlessly, mimicking the soft, fuzzy texture of its body.
Work in small sections, using two or three shades of yellow and black floss to create subtle gradients where the stripes meet.
For the wings, use a single strand of light grey or translucent filament thread. Outline the shape with a delicate split stitch, then add a few sparse straight stitches inside to suggest veining and transparency.
This thoughtful approach to detail is what makes realistic animal insect embroidery patterns come to life.
8. Add Dimensional Accents to Printed Fabric
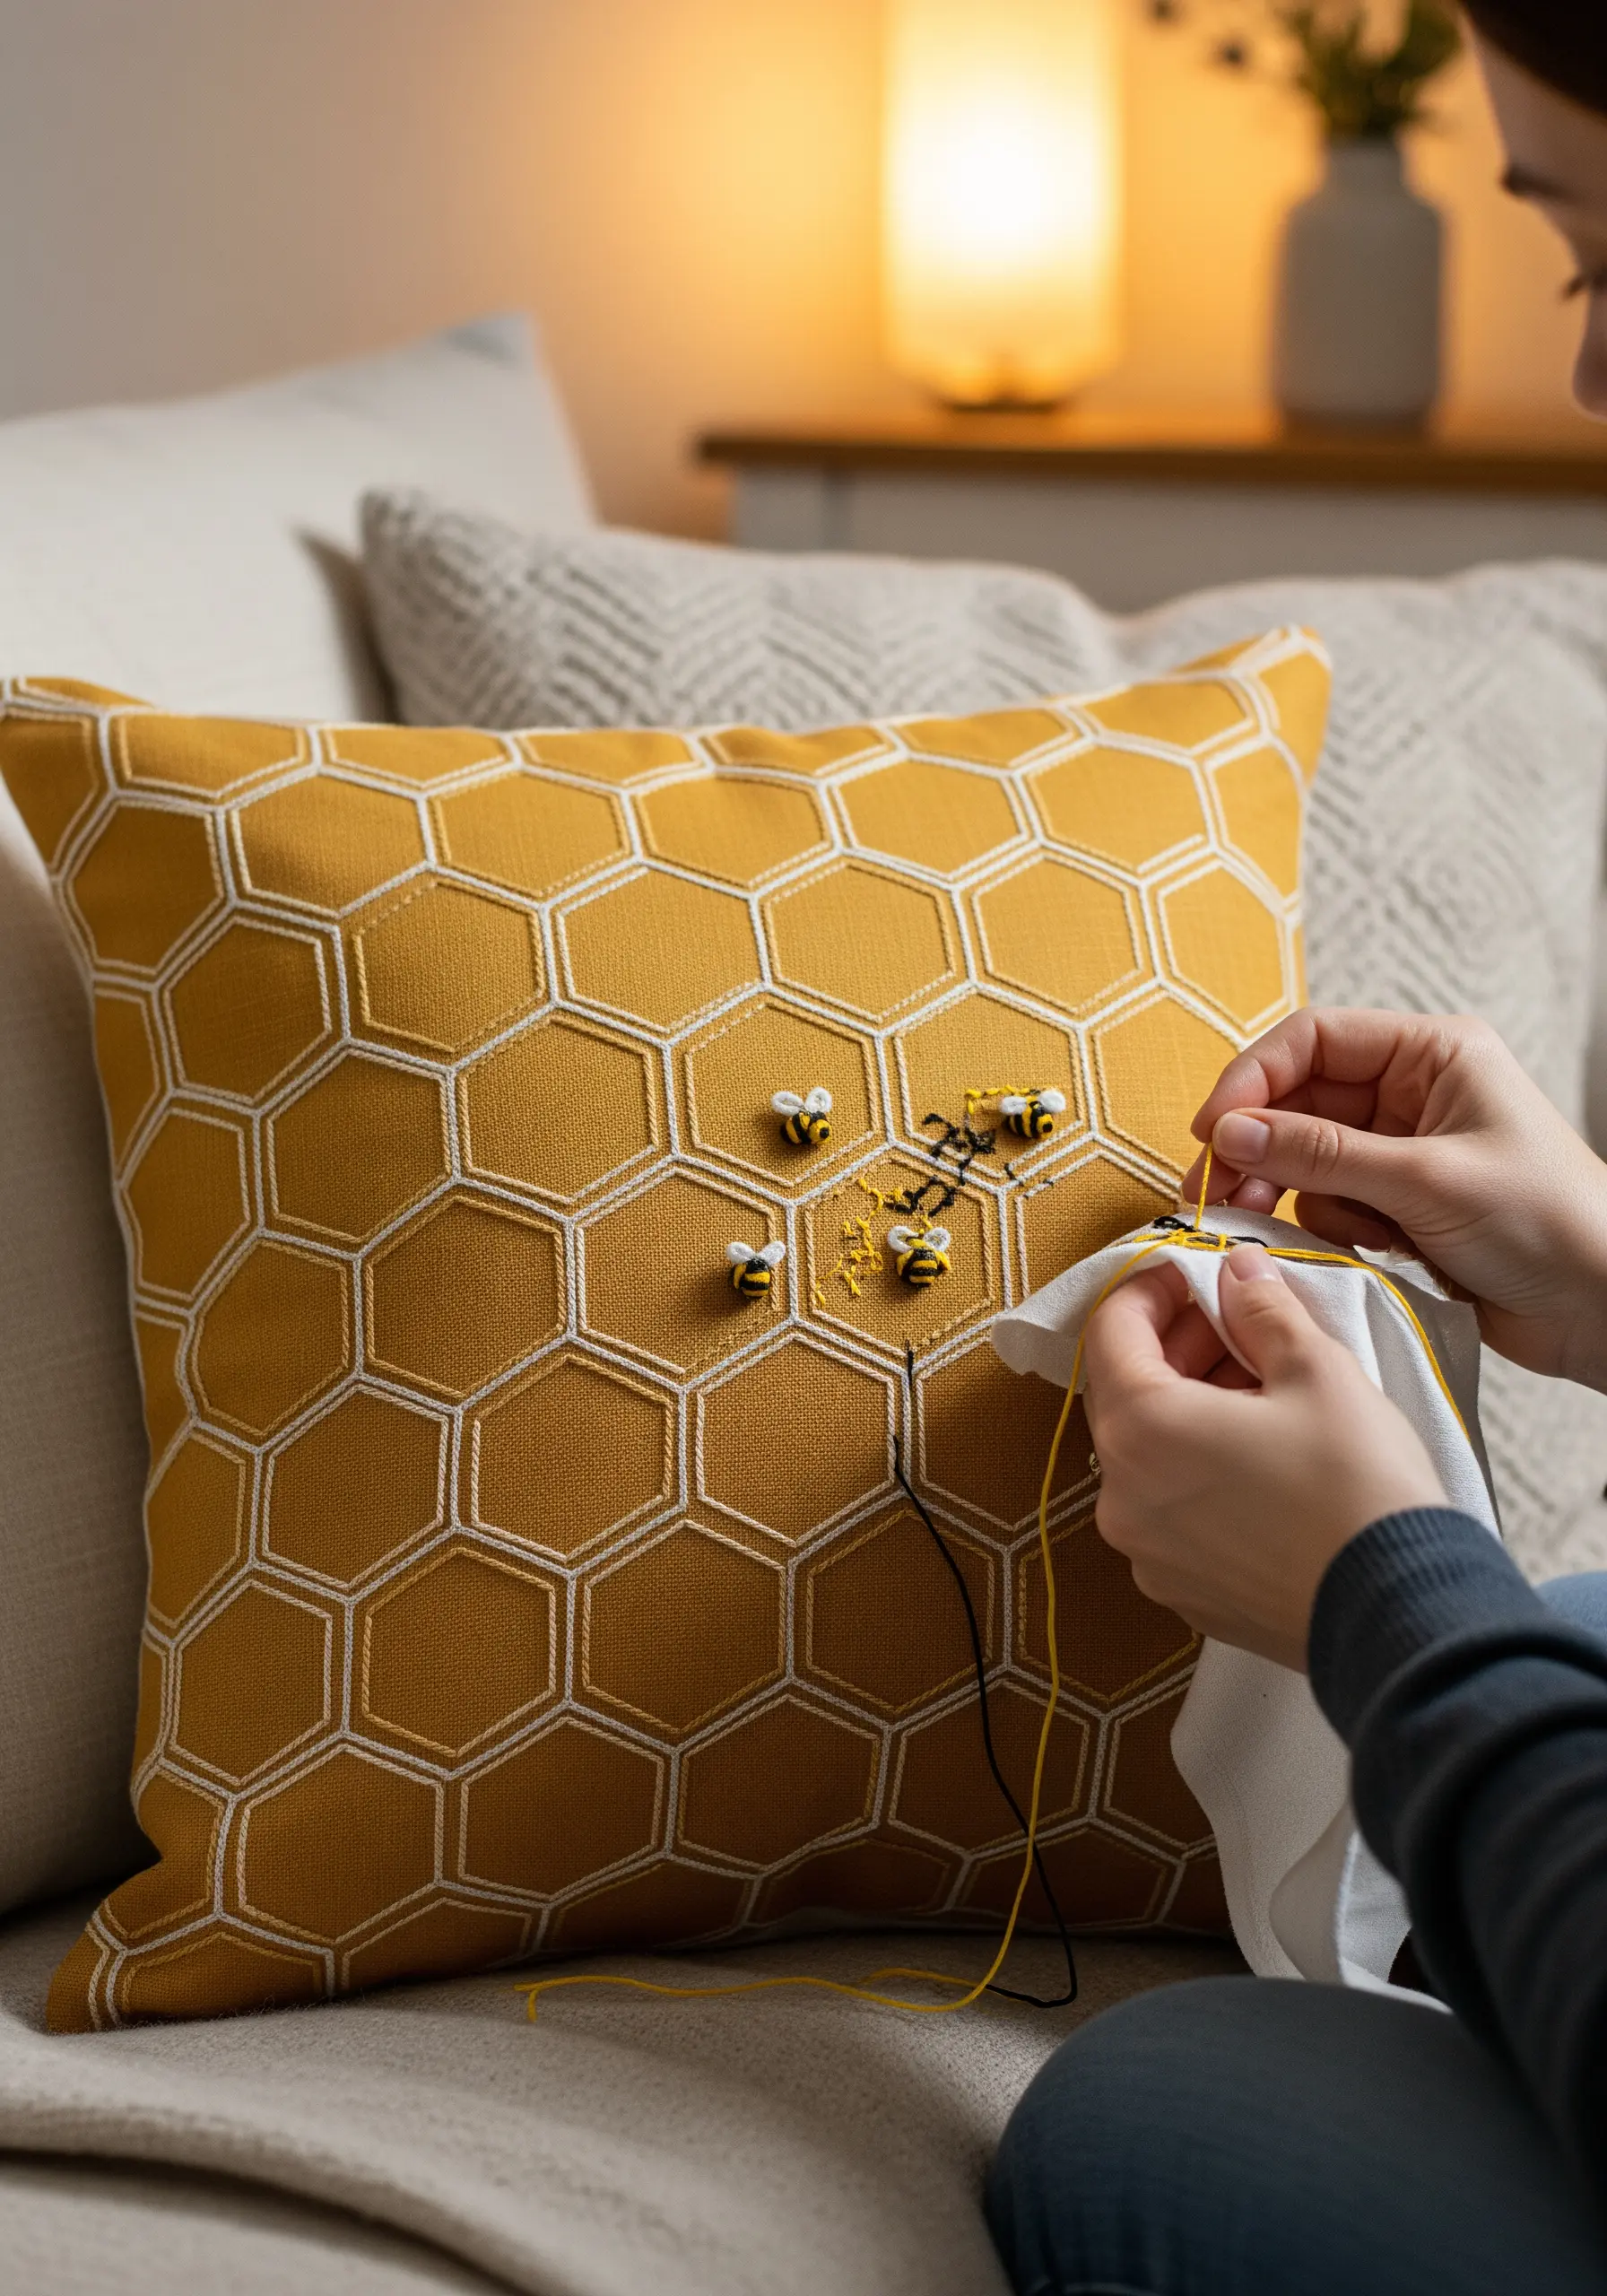
Enhance a pre-printed pillowcase or fabric by adding selective, three-dimensional embroidery that makes the design pop.
Instead of just outlining the pattern, create small, sculptural bees using padded satin stitch—place a few foundation stitches in the center of the bee’s body before covering it with your final satin stitches.
This simple technique lifts the motif off the surface, creating a playful, tactile interaction between the print and the thread.
It’s a quick way to customize home decor and add a handmade touch to a store-bought item.
9. Craft a Durable and Elegant Bookmark
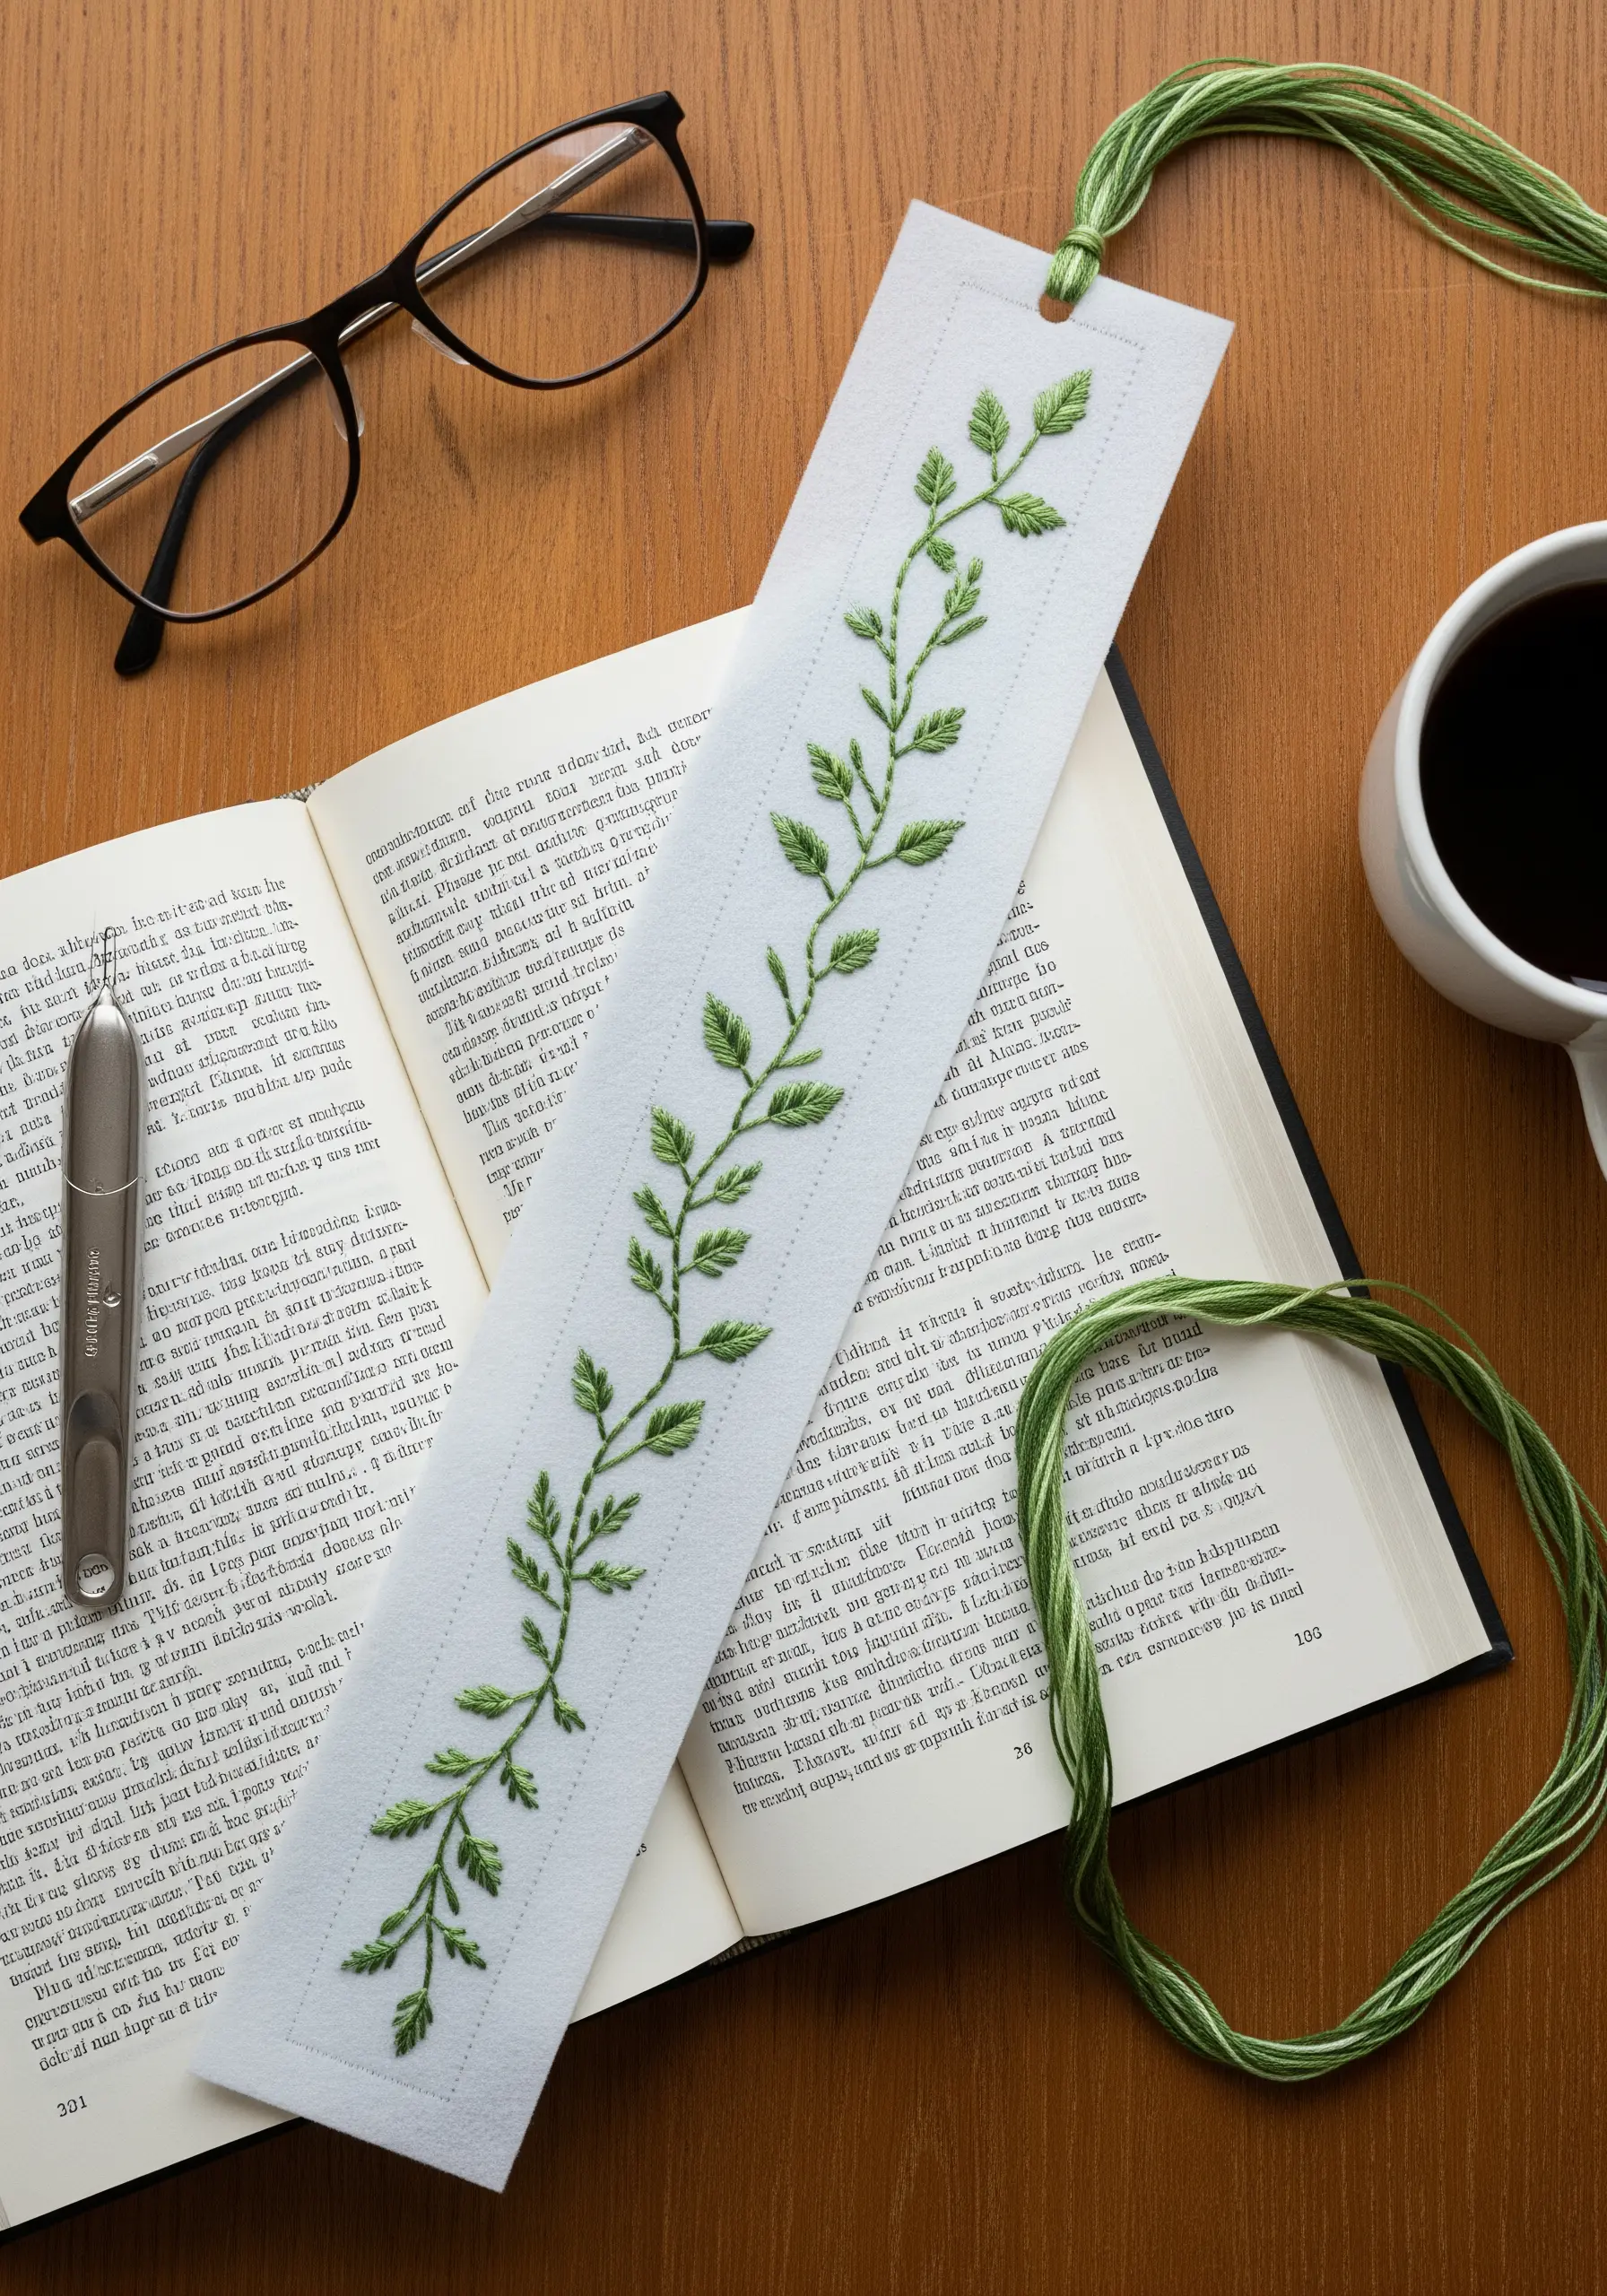
When embroidering a functional item like a bookmark, choose your materials for longevity.
Select a high-count linen or stiff felt that won’t easily fray. To add structure, iron a lightweight fusible interfacing to the back of your fabric before you start stitching.
Use a simple stem stitch for the flowing vine and fly stitches for the individual leaves, as these stitches are both beautiful and durable.
Finish the edges with a neat blanket stitch to prevent wear and tear, ensuring your work remains pristine through countless pages.
10. Blend Embroidery and Paint for Atmospheric Landscapes
Create an expressive, painterly landscape by combining watercolor with thread in what are often called abstract mixed-media embroidery ideas.
First, apply light washes of fabric paint or watercolor to your canvas to establish the sky and water, letting it dry completely.
Then, use embroidery to add texture and define the horizon. Use loose, clustered French knots for distant foliage and long, horizontal straight stitches for light reflecting on the water.
The thread doesn’t need to cover the paint entirely; instead, let the two mediums work together to create layers of color, light, and texture.
11. Personalize Linens with Botanical Line Art
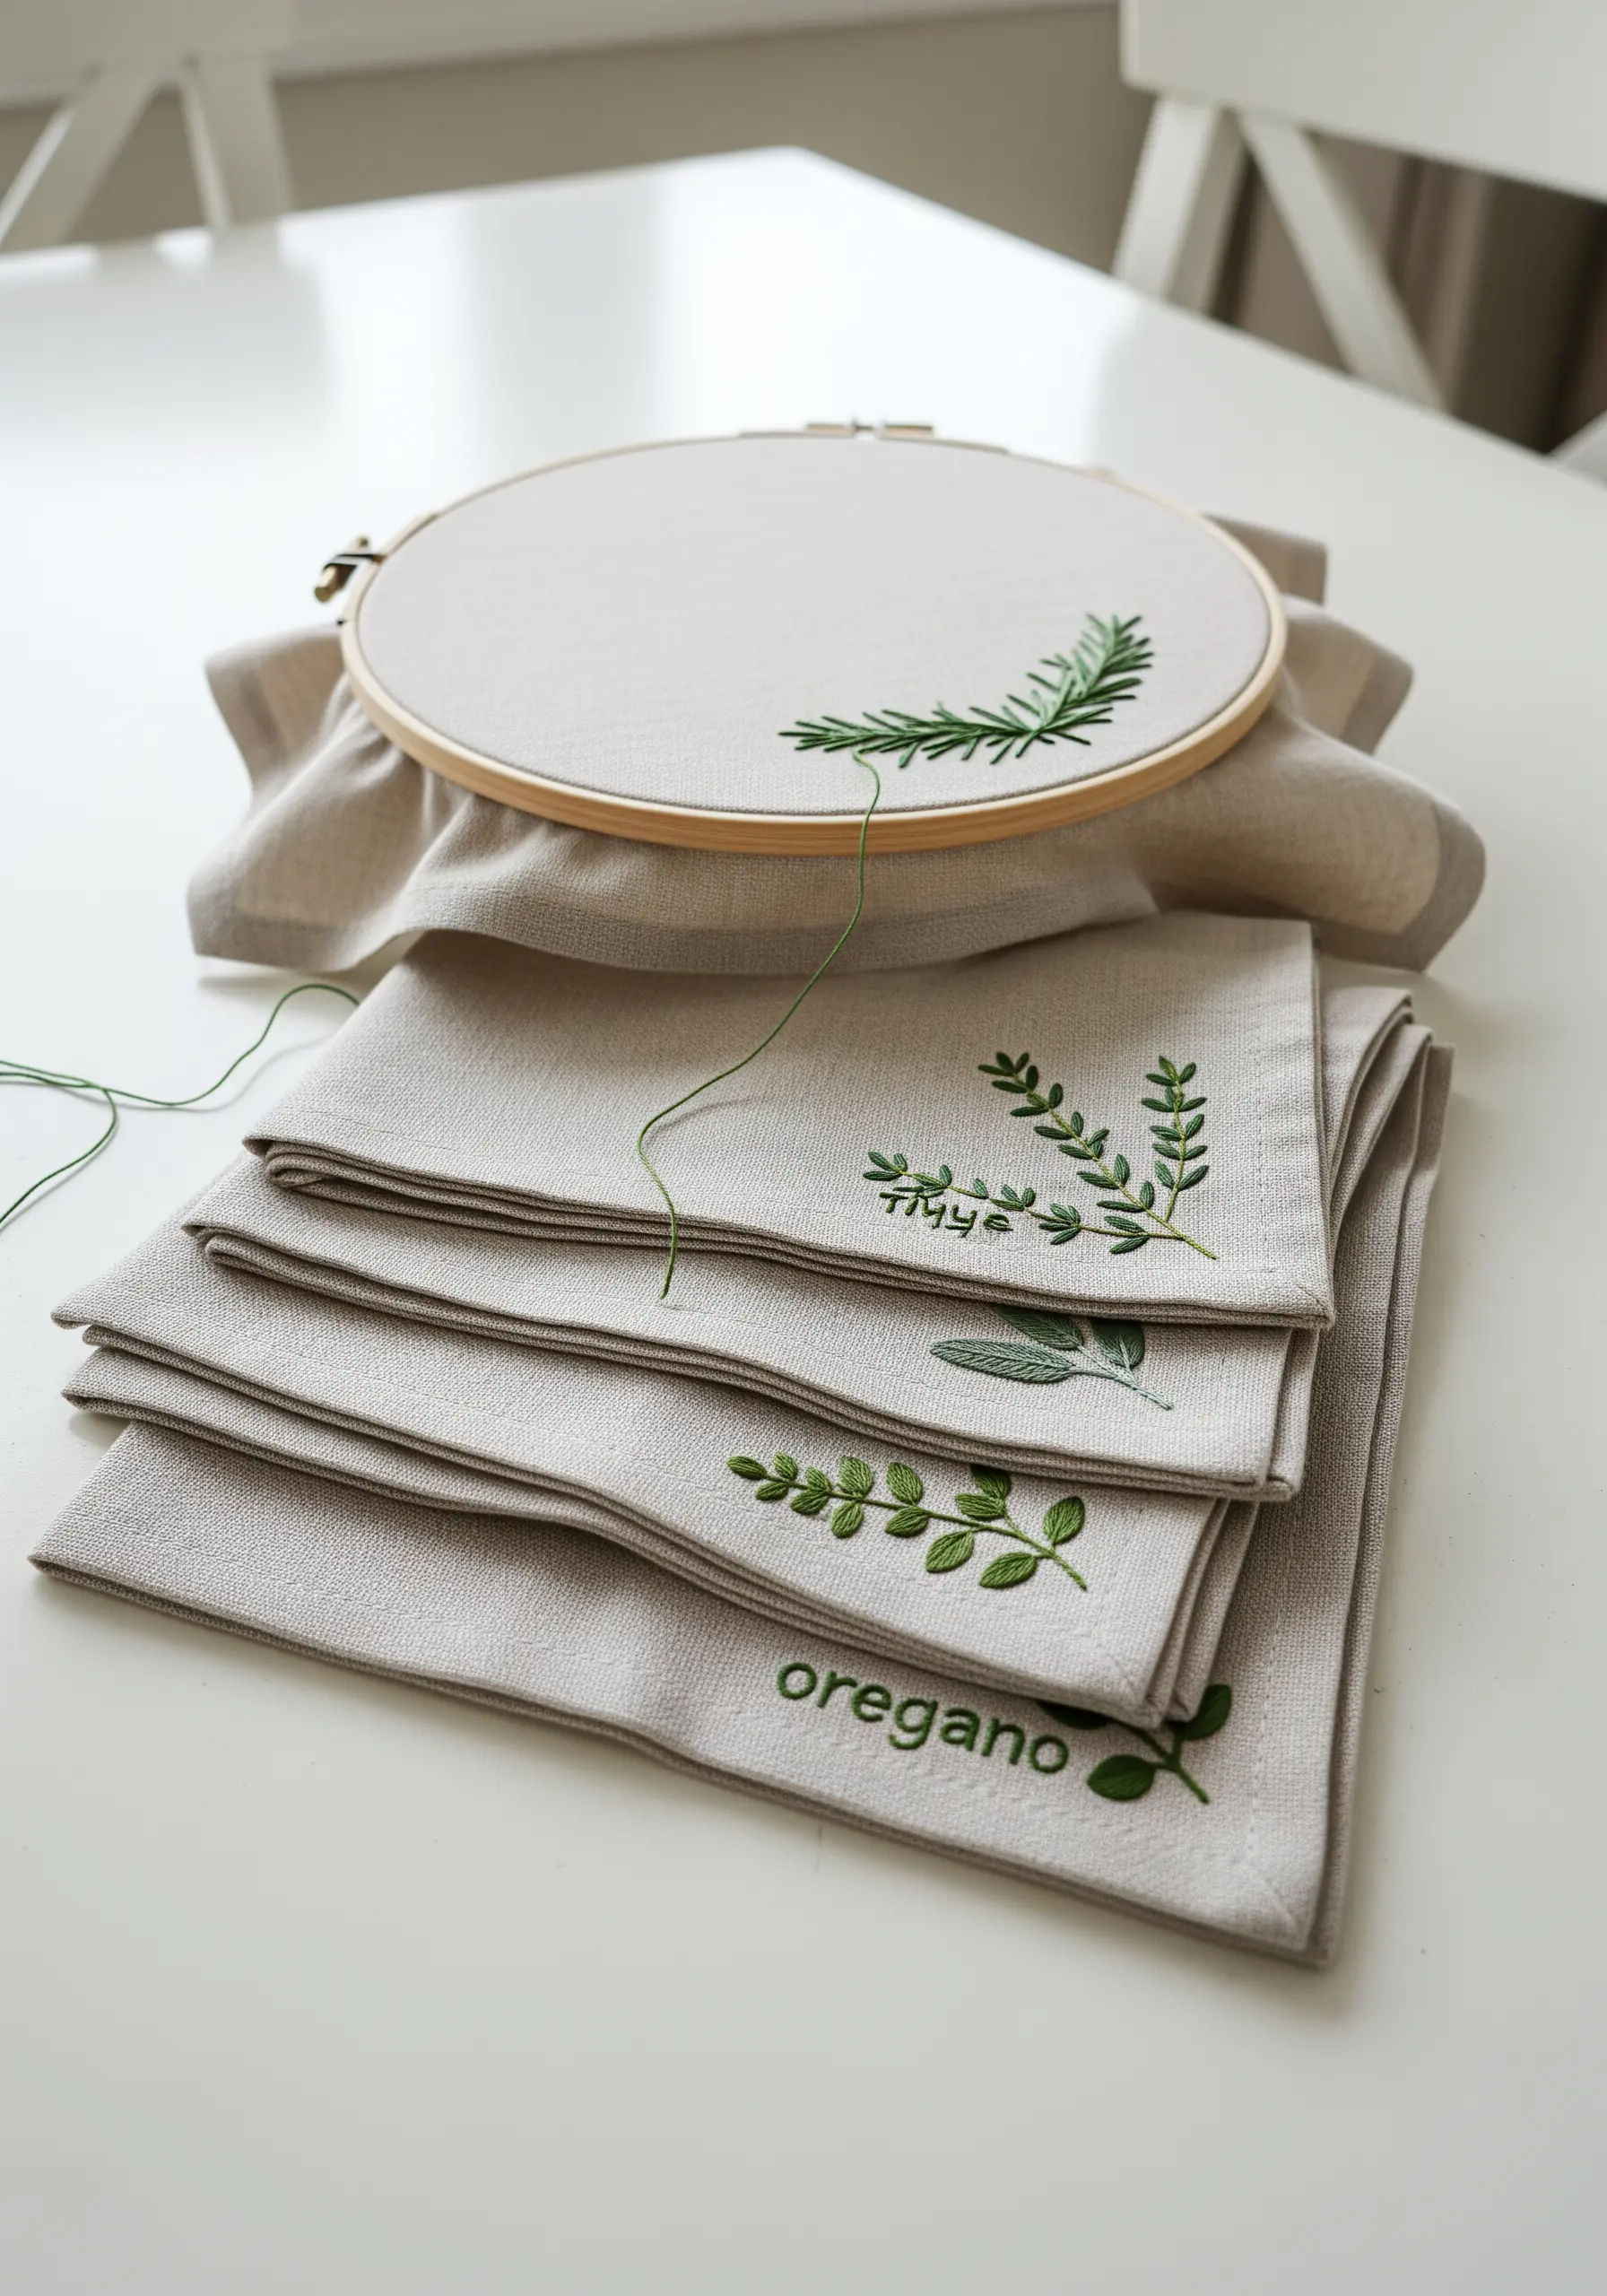
Transform a simple set of napkins into a personalized herb collection with clean, minimalist botanical motifs.
Choose classic herbs like rosemary, thyme, or oregano and stitch them using a simple stem stitch or split stitch for a refined, illustrative look.
Using just two strands of a high-quality cotton floss in a classic shade of green ensures the design remains delicate and doesn’t interfere with the napkin’s drape.
Adding the herb’s name in a simple script turns them into beautiful, functional labels for your dining table.
12. Stitch Uplifting Words on Felt Banners

Felt is an ideal fabric for beginners—it’s stable, doesn’t fray, and its soft texture pairs beautifully with embroidery floss.
To make the lettering stand out, use a chain stitch with all six strands of floss. This creates a bold, rope-like line that has more presence than a simple backstitch.
Scatter a mix of French knots and seed beads around the word to add a touch of sparkle and visual interest.
This project is not only calming to stitch but also creates a gentle, encouraging piece of decor.
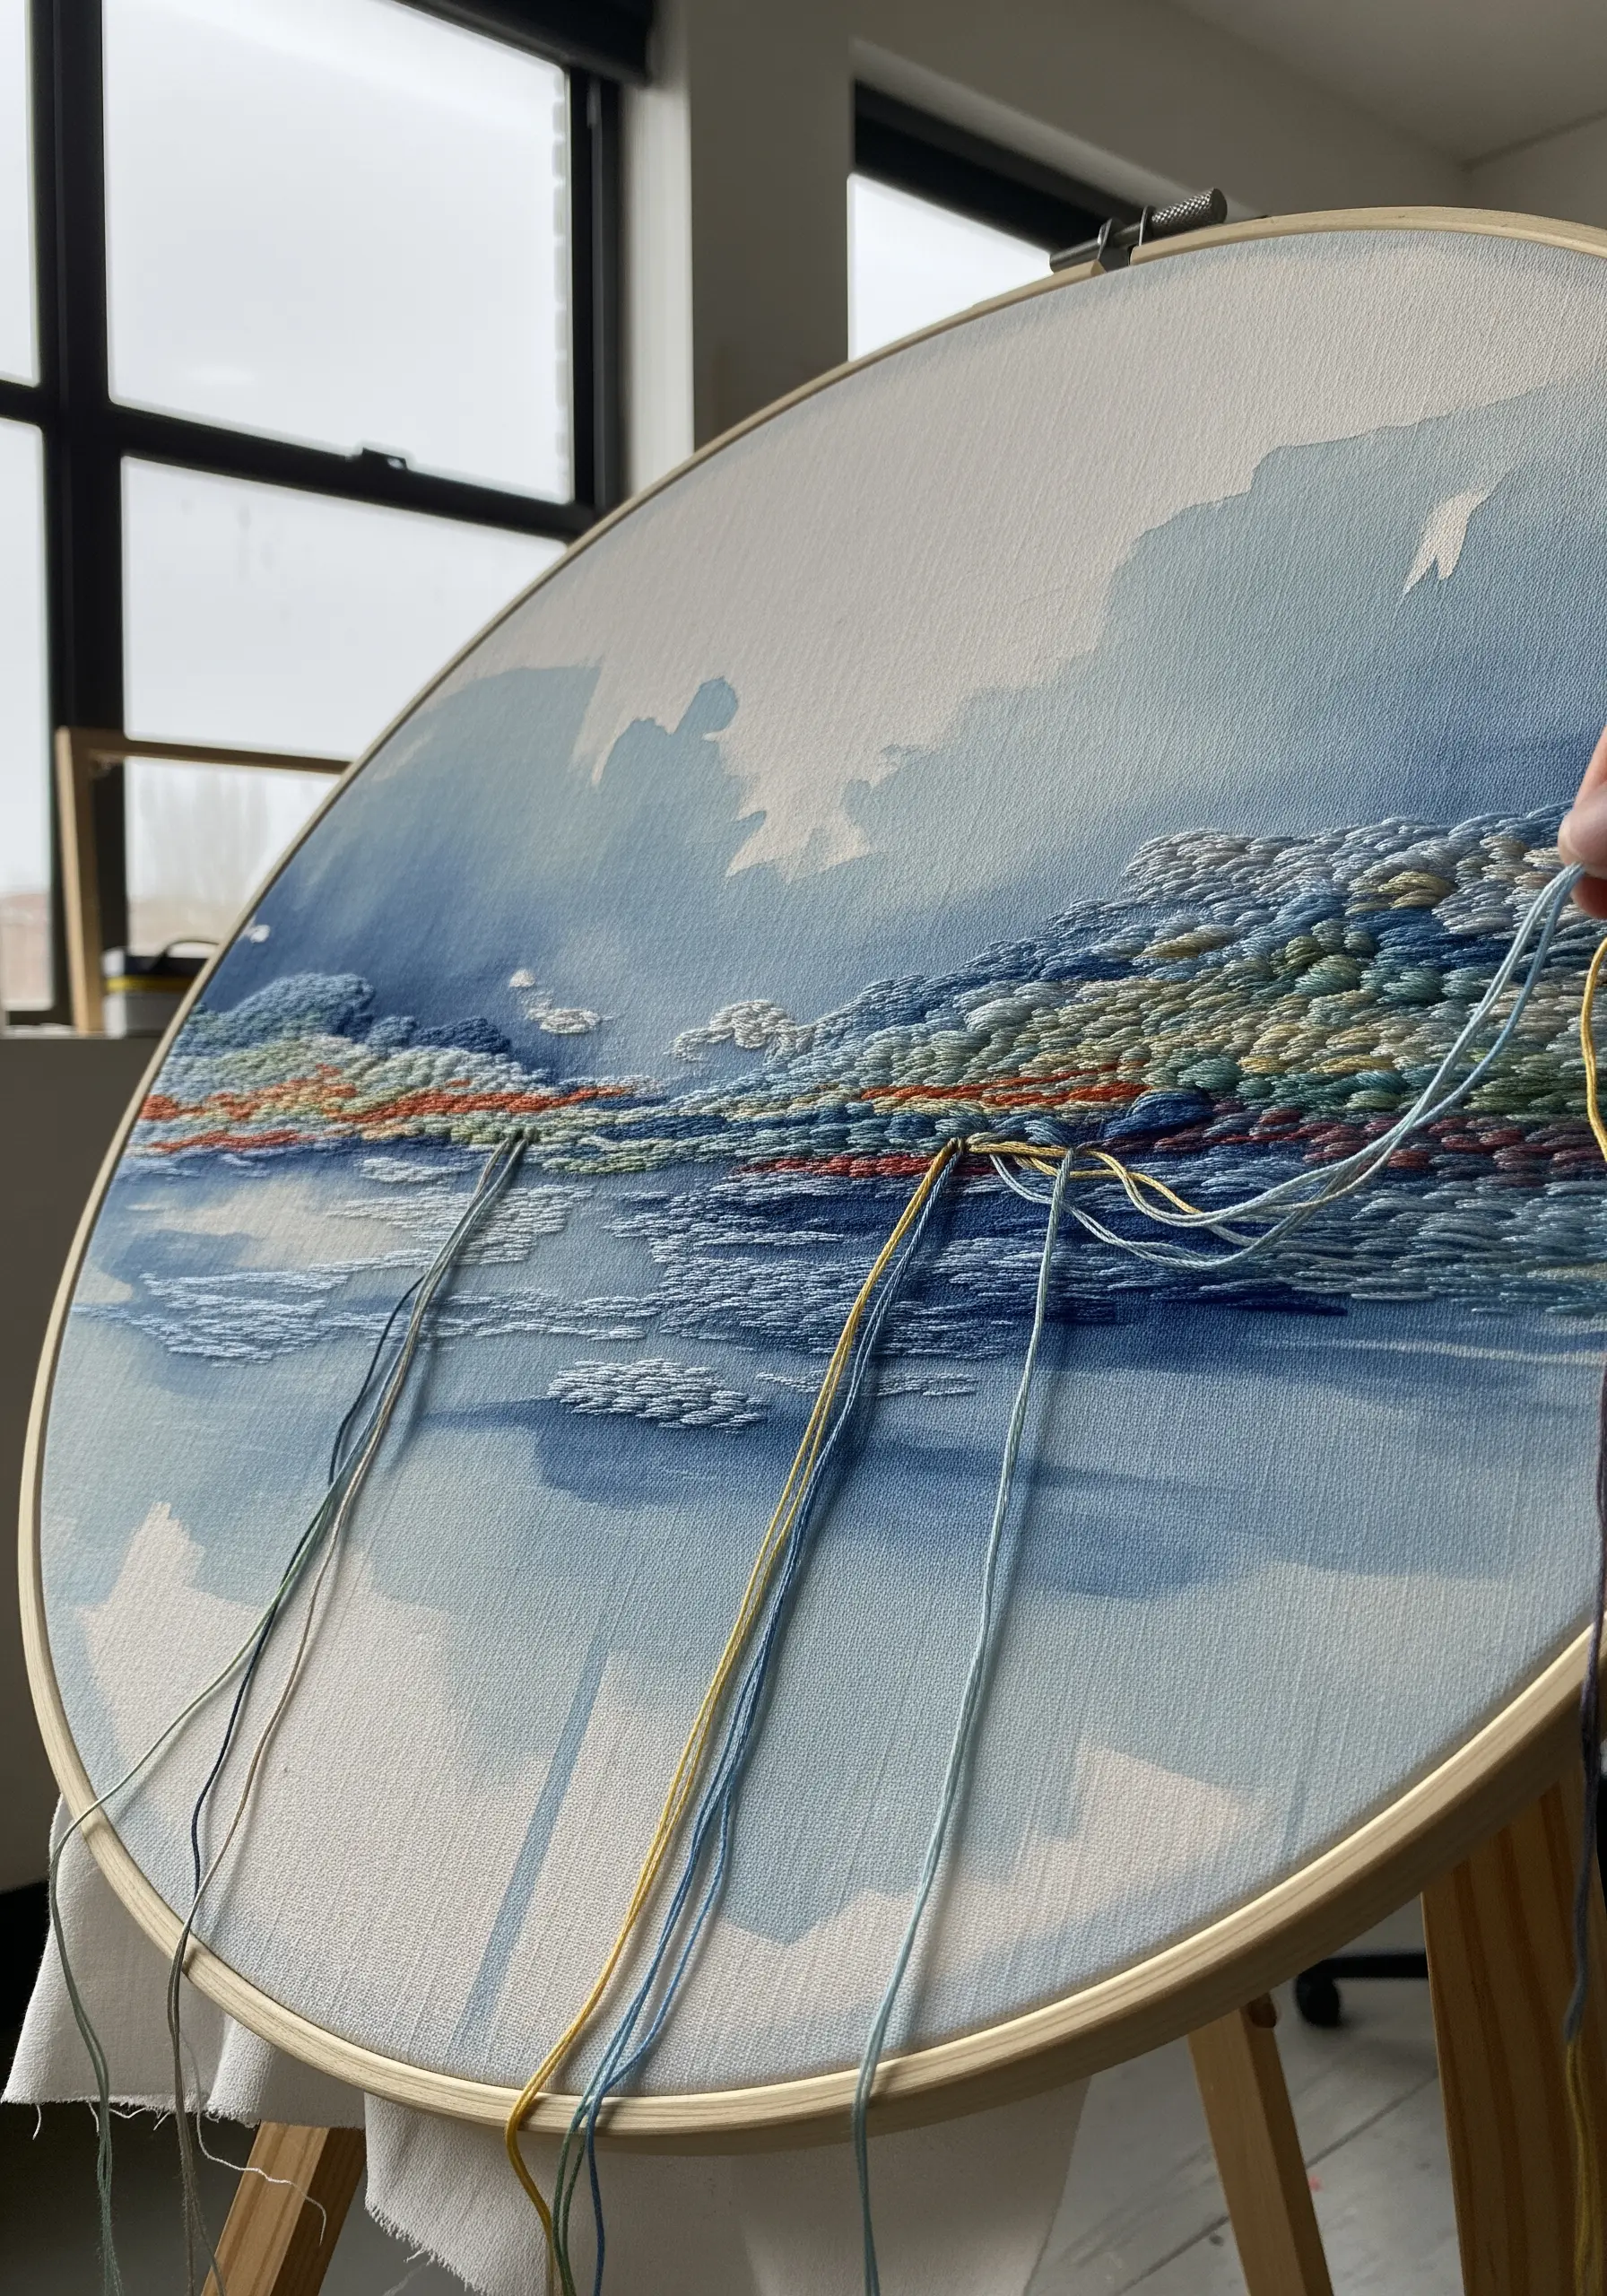
13. Create Depth with Atmospheric Perspective
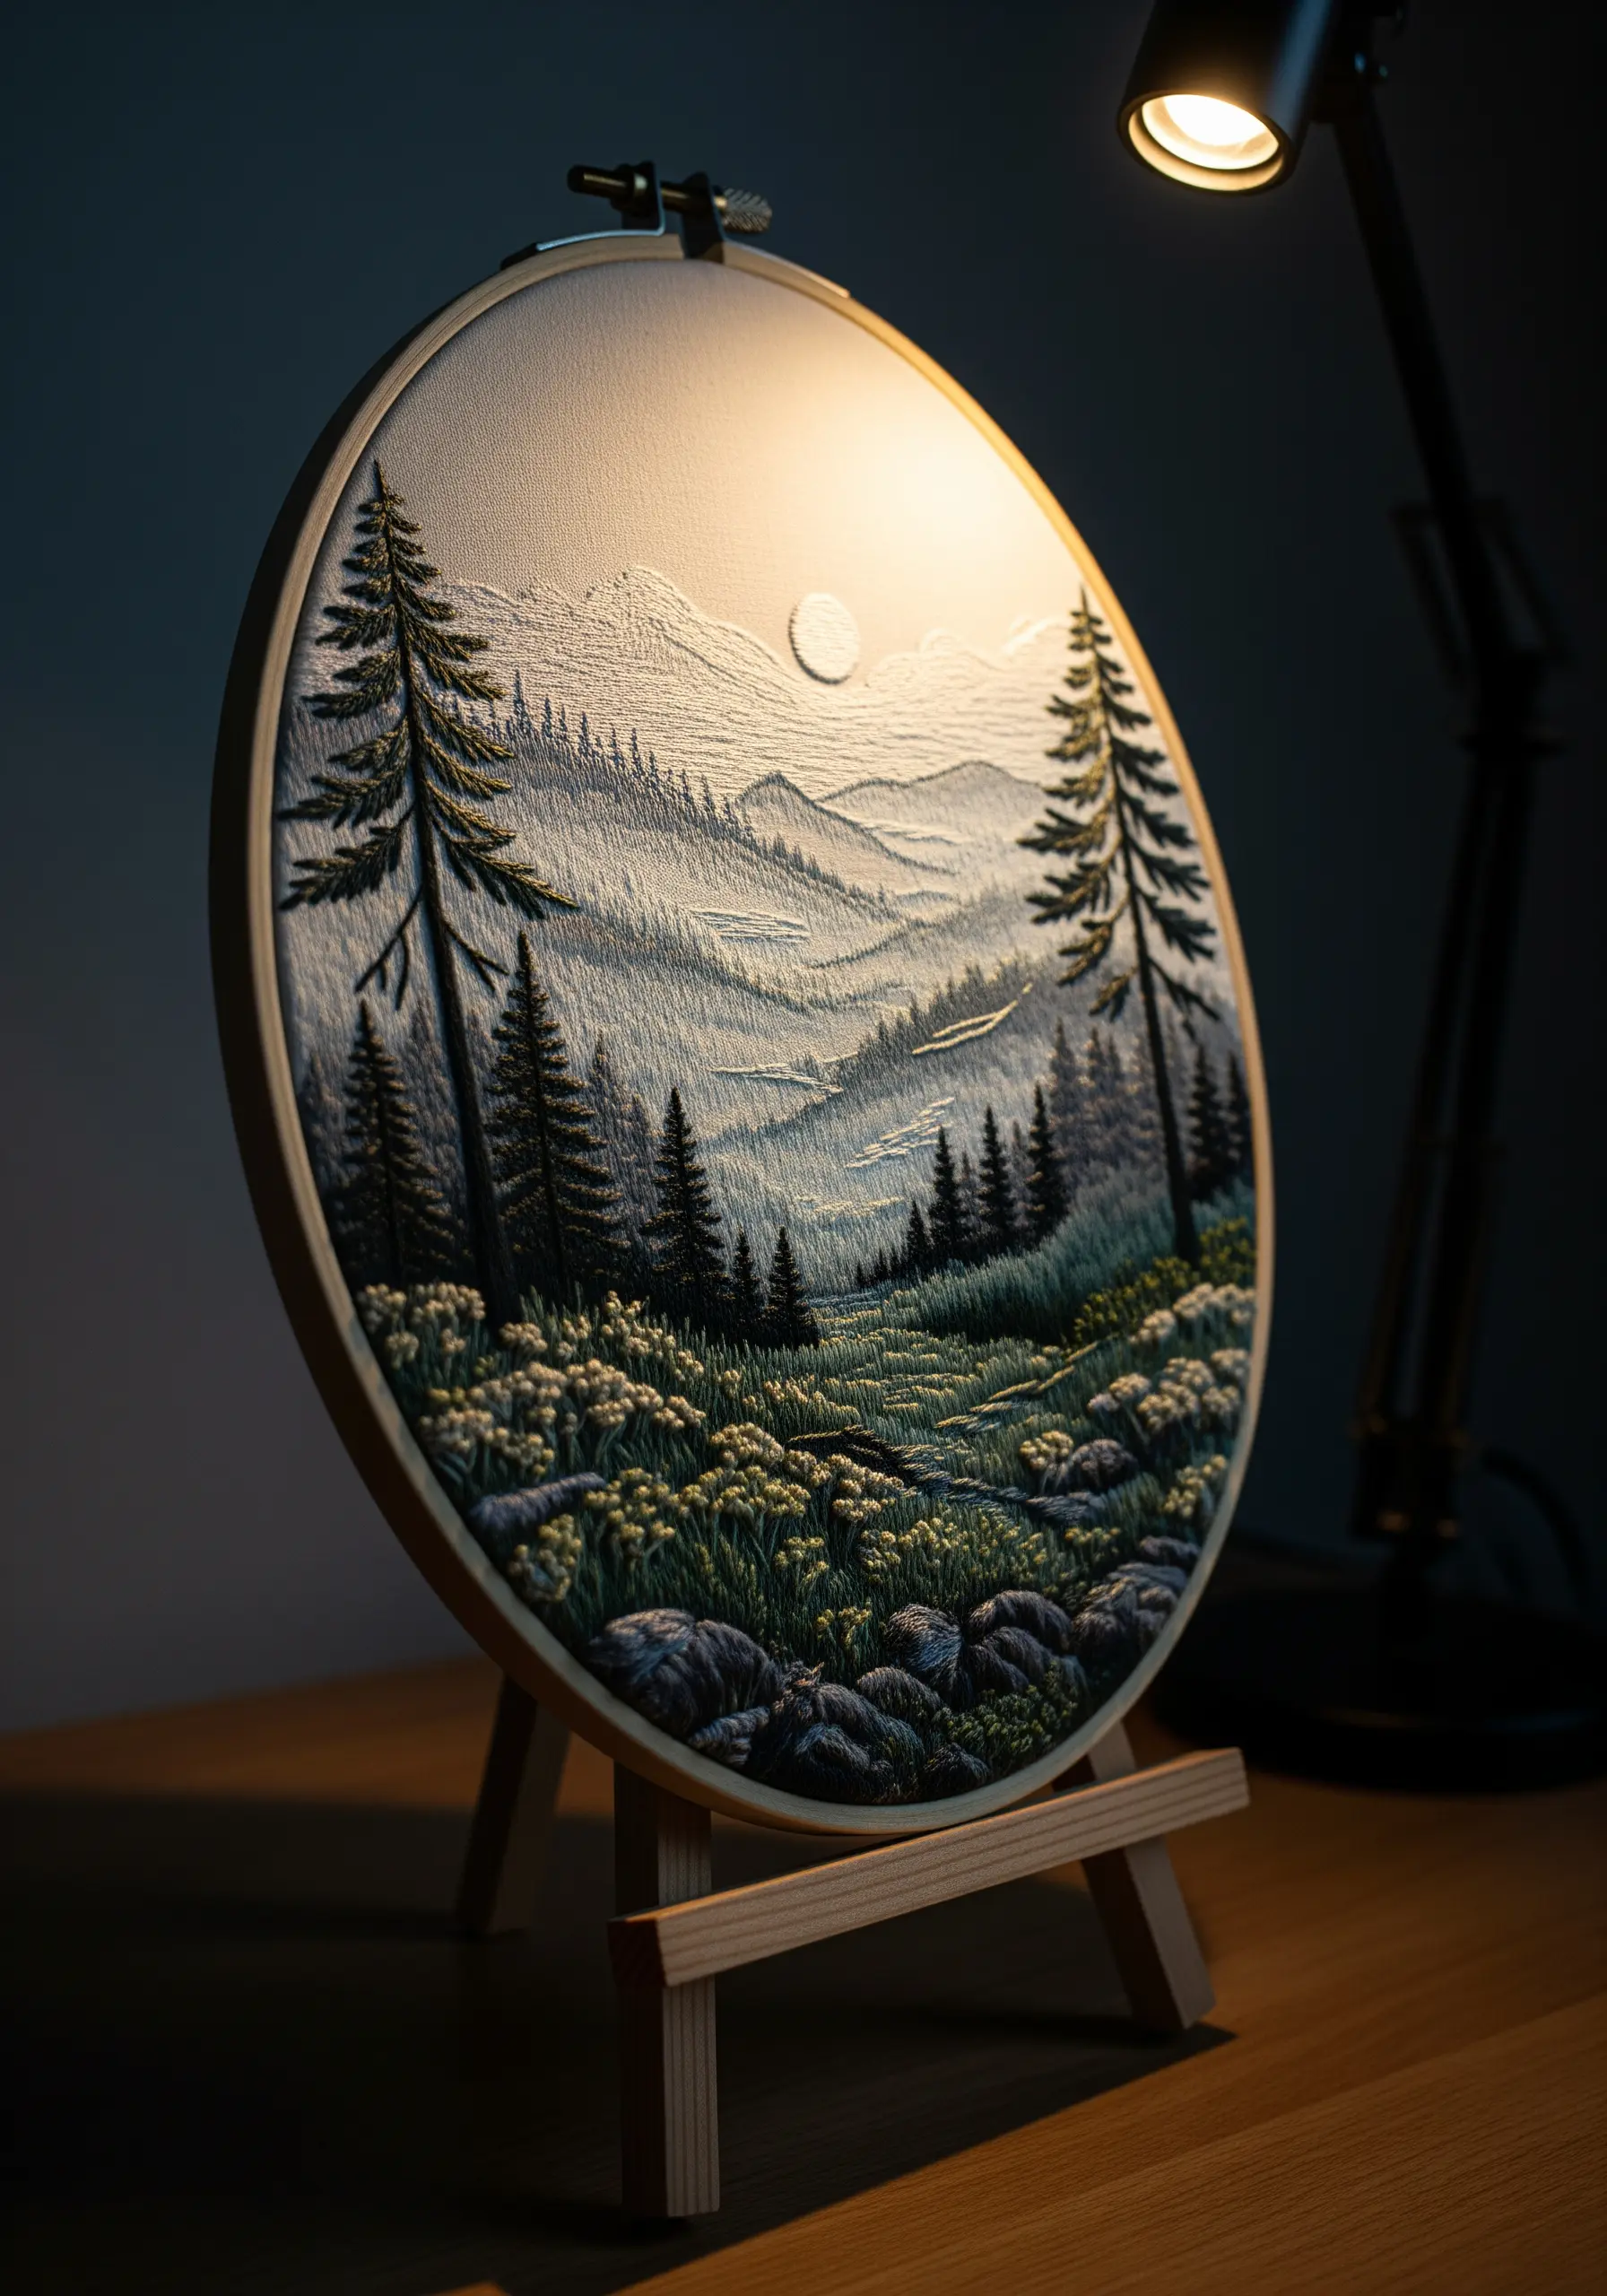
To give your landscape embroidery a convincing sense of distance, use thread and stitch density to create atmospheric perspective.
For the mountains in the background, use fewer strands of floss (one or two) in lighter, cooler tones like pale blue and grey. Keep your stitches sparse and flat.
As you move to the foreground, switch to more strands (three to six) and warmer, more saturated colors.
Use high-texture stitches like French knots and bullion knots for the foreground flowers and rocks to make them advance visually, creating a rich, layered scene.
14. Transform Mending into a Design Element
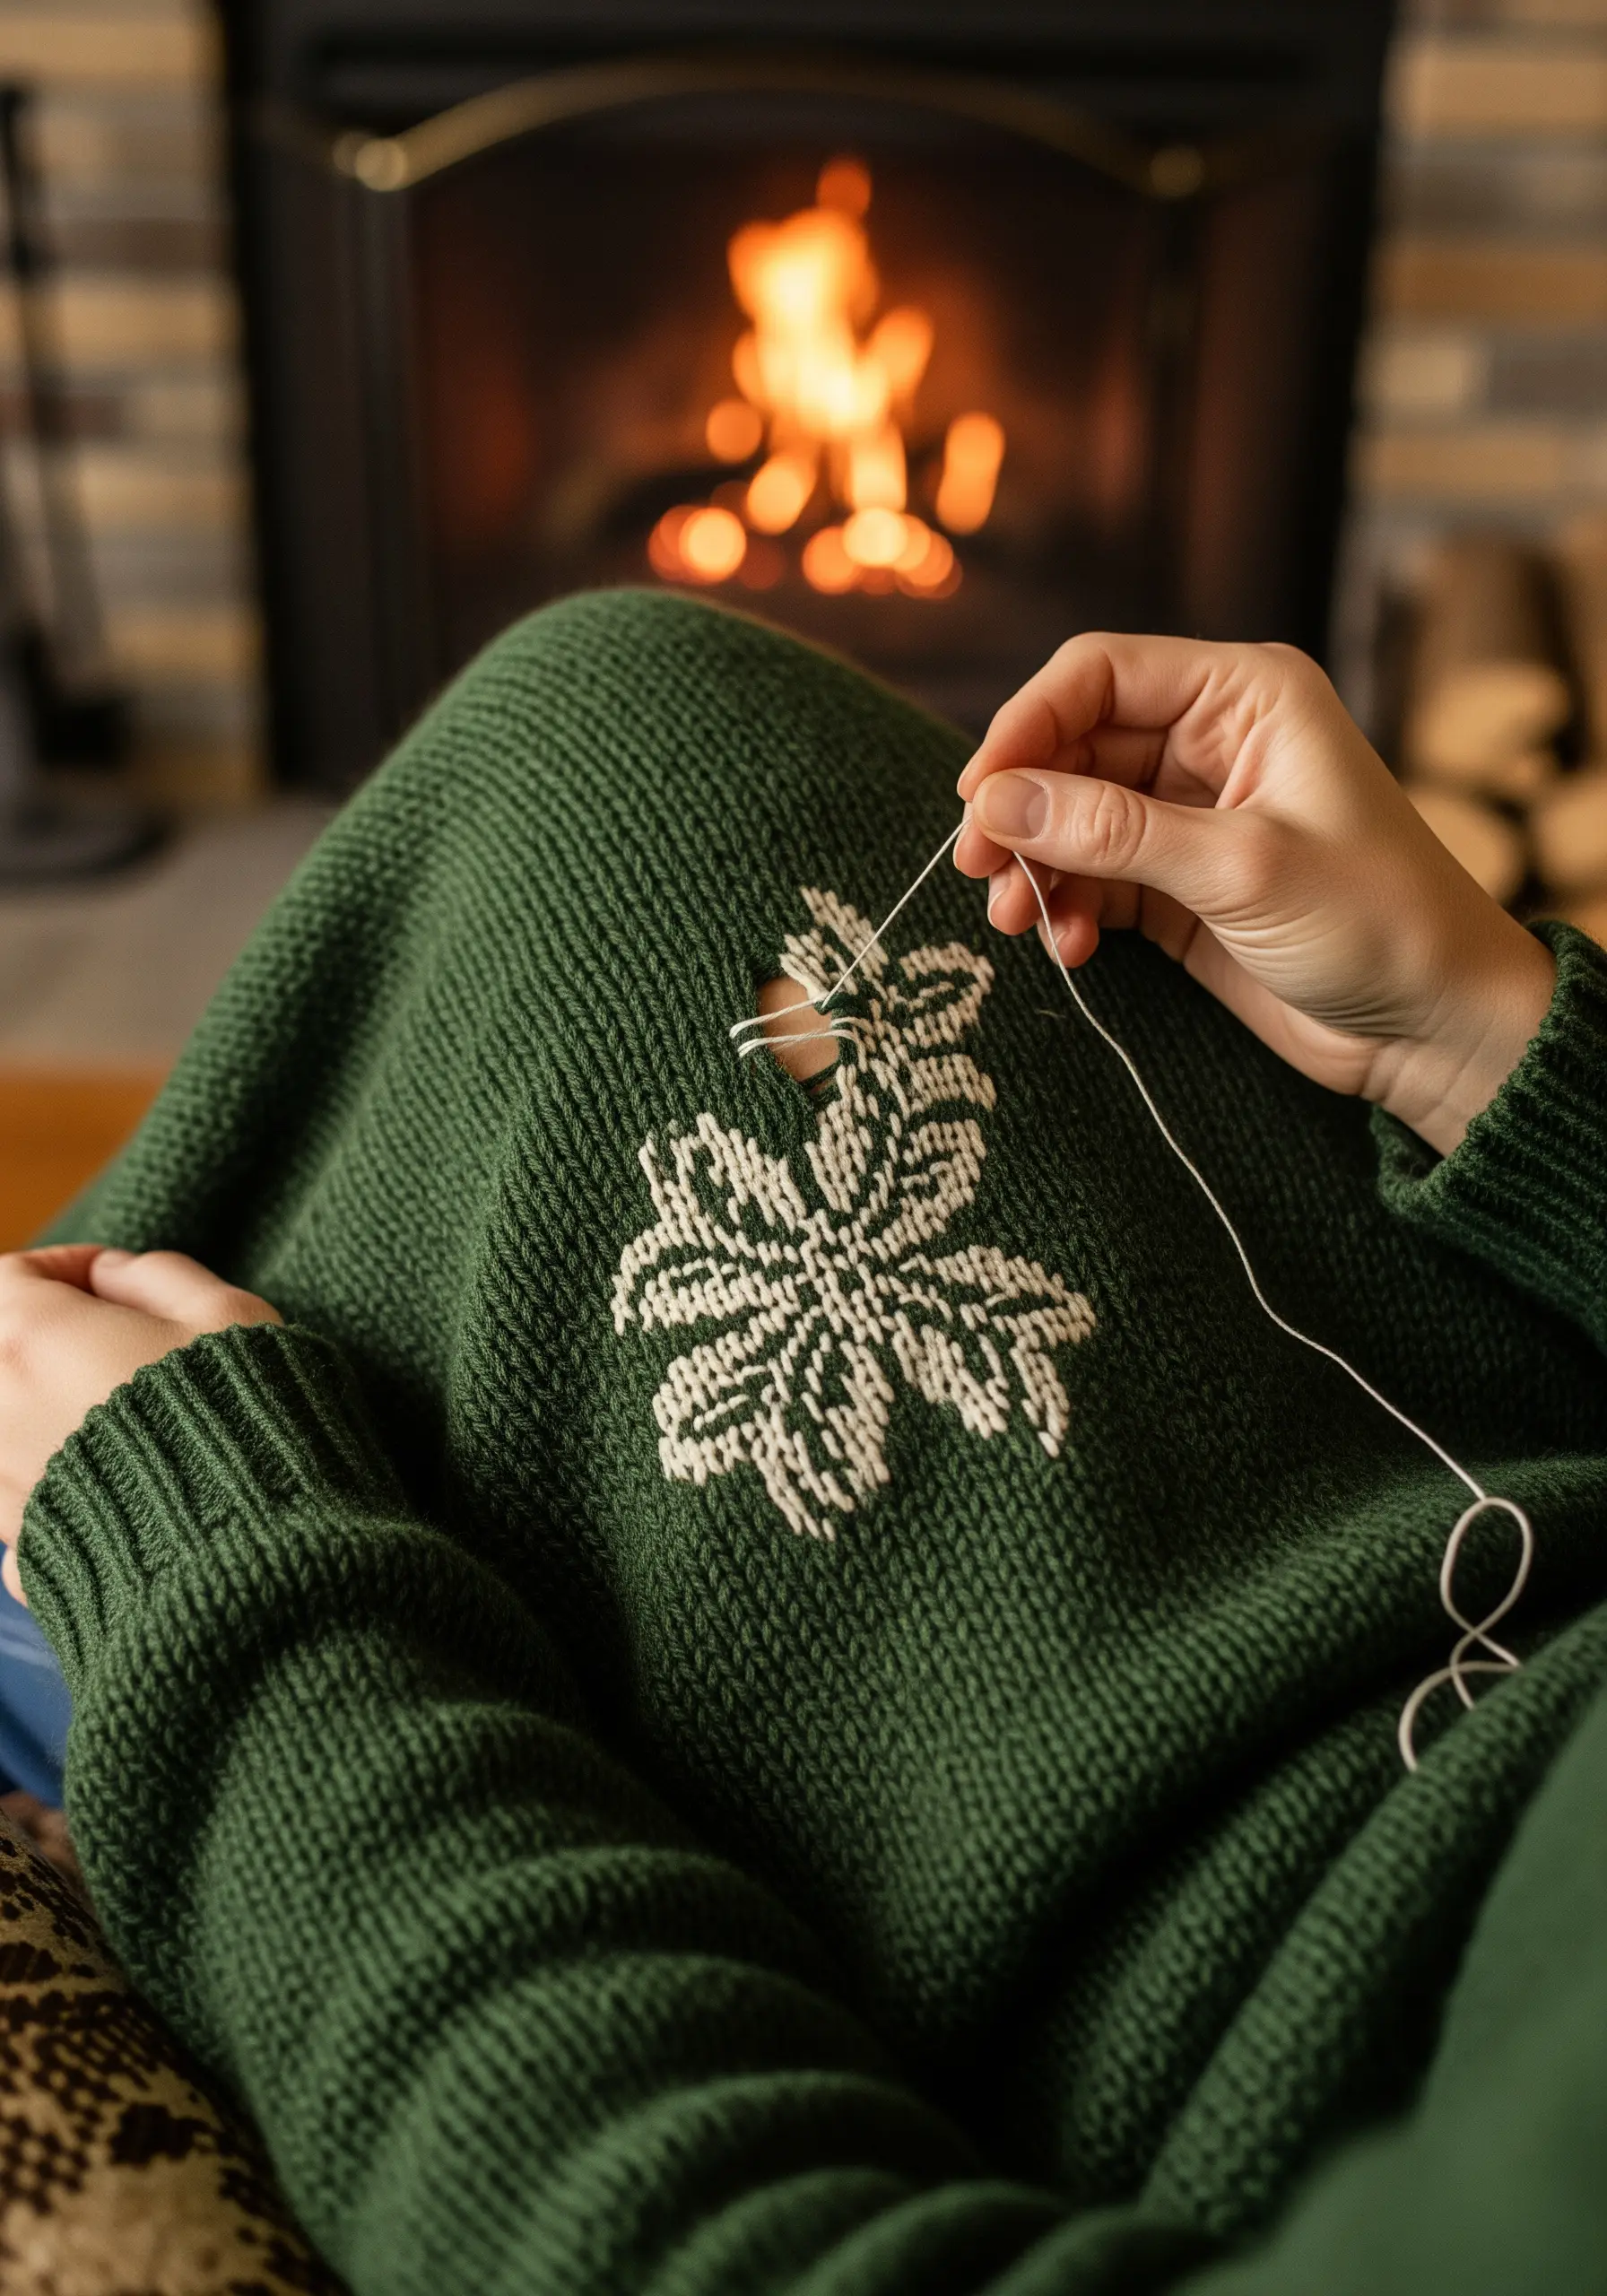
Embrace visible mending to turn a flaw in a favorite sweater into a beautiful, intentional feature.
First, stabilize the area around the hole with a few subtle stitches on the inside of the garment.
Then, on the outside, use a darning technique or a pattern of dense satin stitches to cover the hole completely. A simple geometric or floral motif works beautifully.
Choosing a high-contrast thread color, like ivory on dark green, celebrates the act of repair and adds a unique, personal story to your clothing.
15. Design a Modern Alphabet Sampler
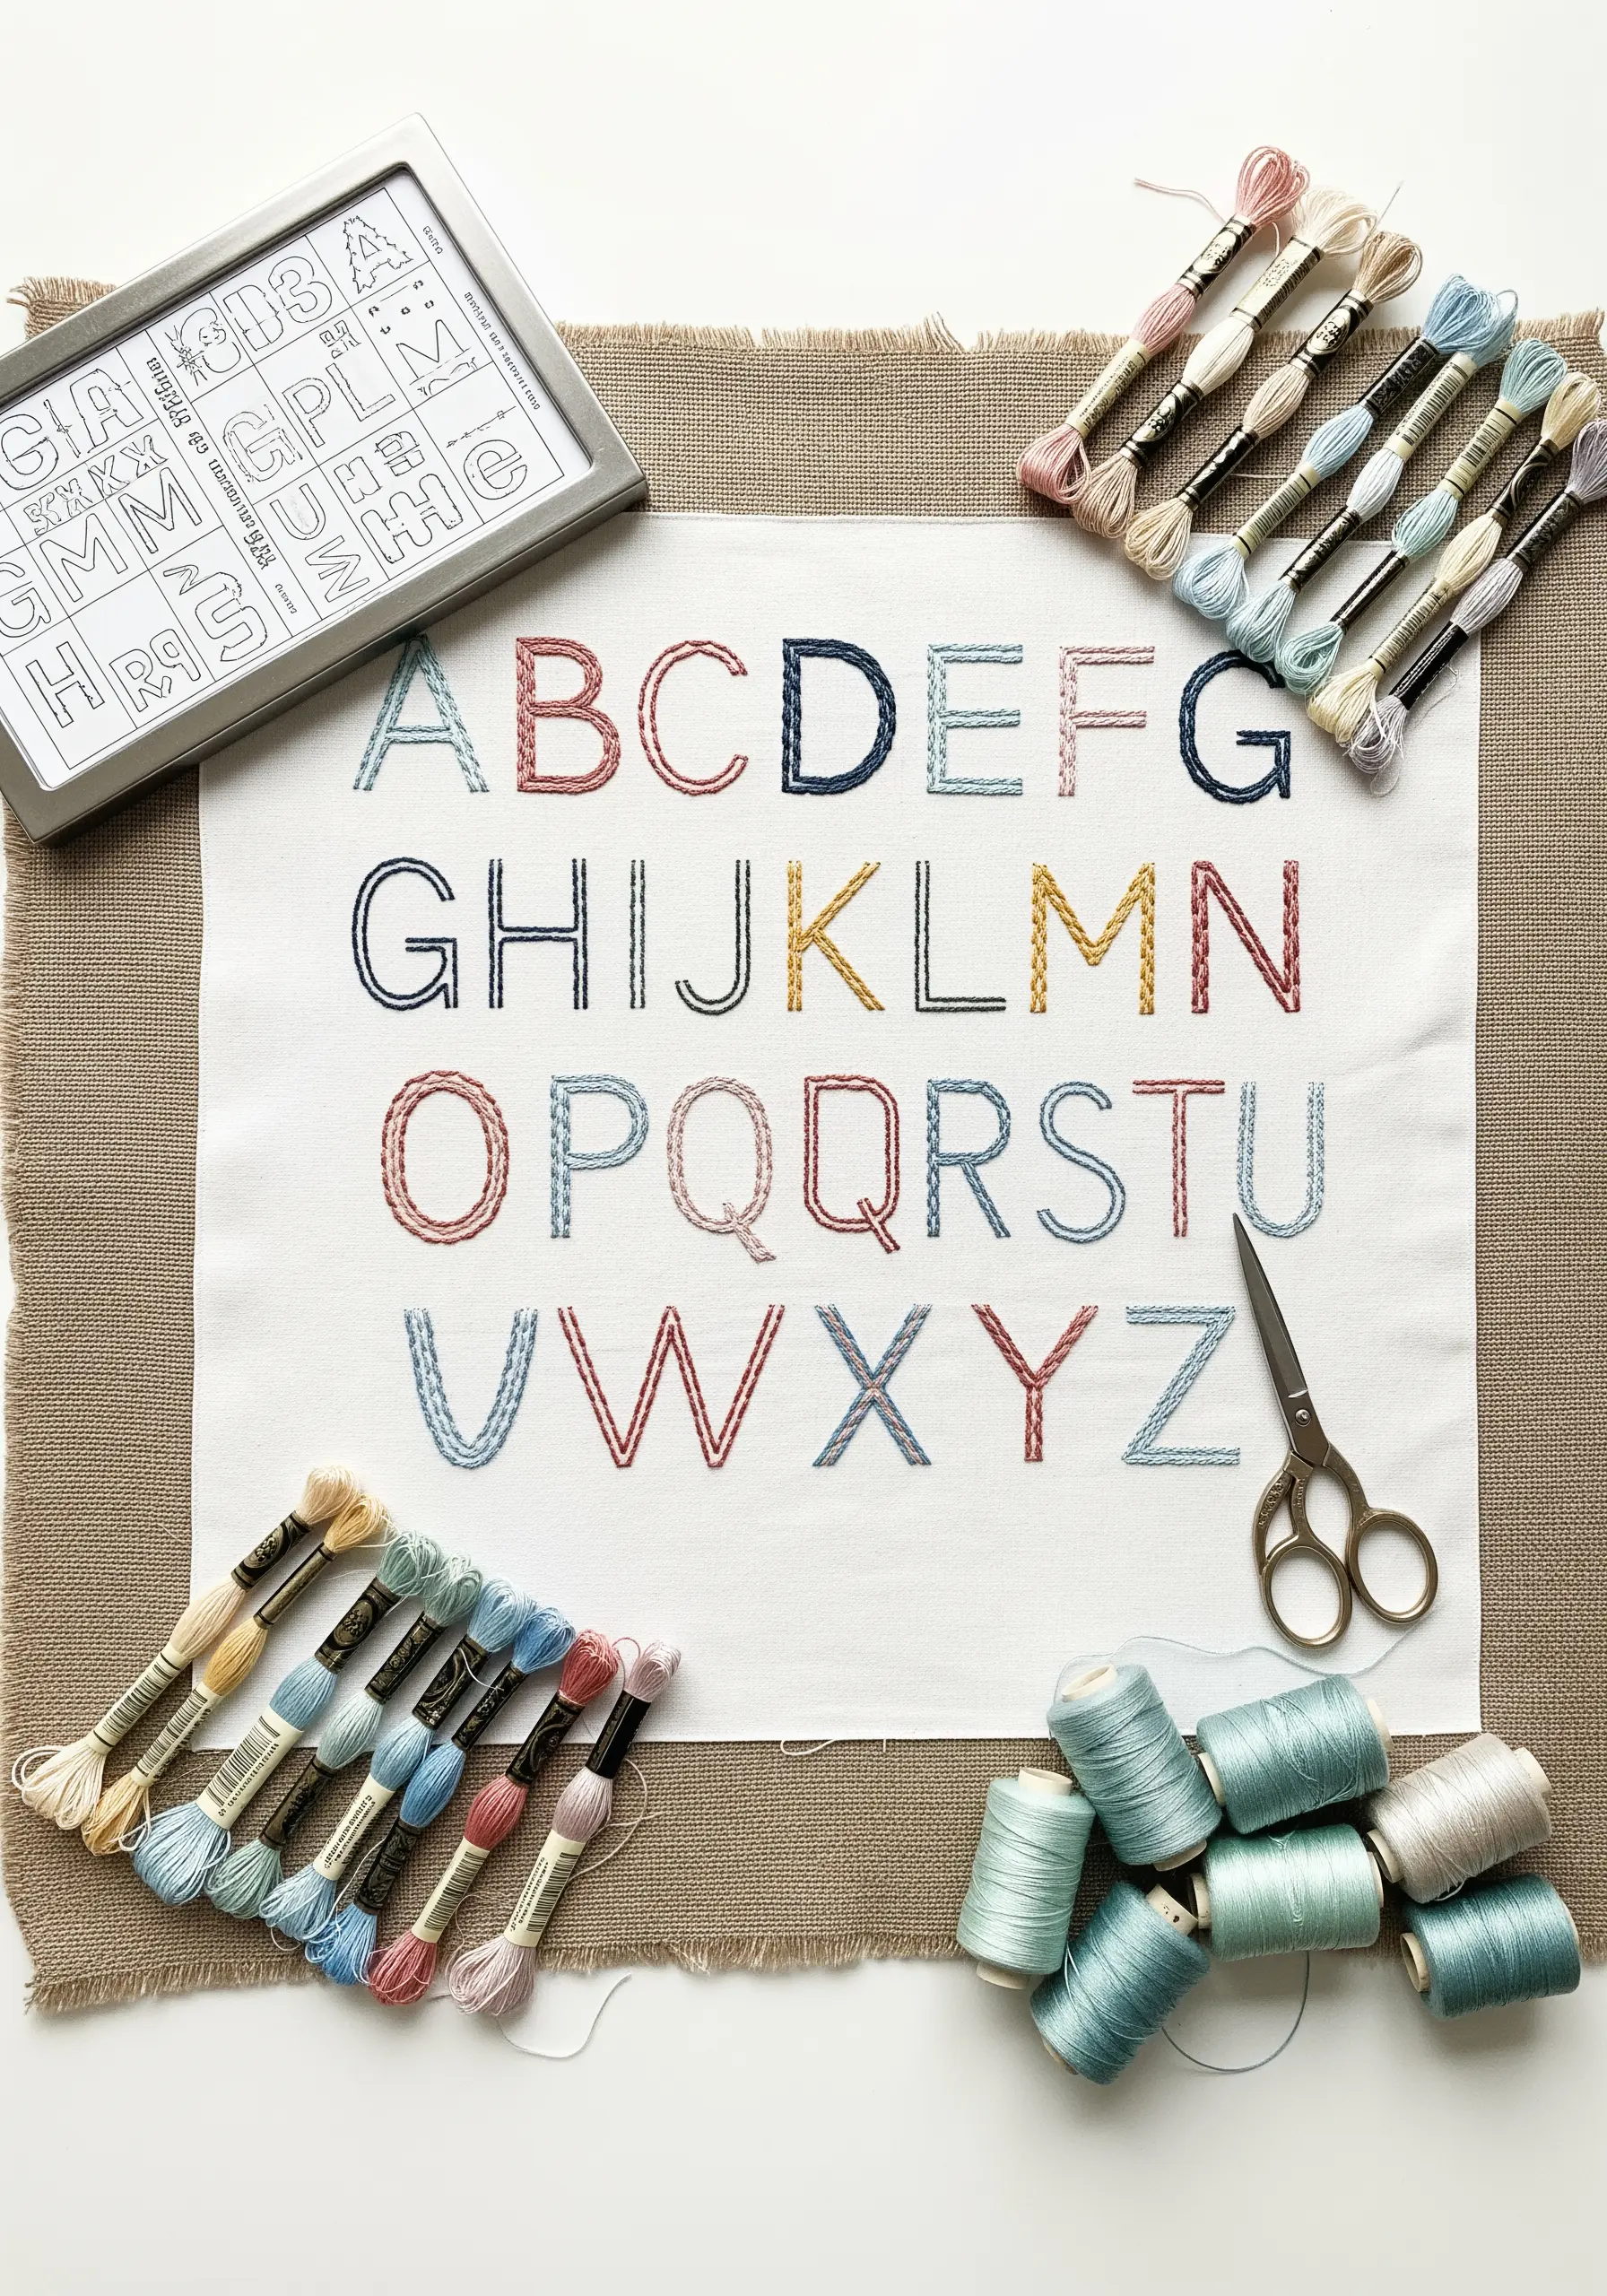
Reimagine the traditional sampler by focusing on typography and stitch variation for a clean, modern aesthetic.
Assign a different line stitch to each letter to build your muscle memory: use a whipped backstitch for smooth curves, a chain stitch for bold lines, and a stem stitch for elegant stems.
Choose a contemporary color palette—like muted blues, ochre, and blush—to keep the design fresh and stylish.
This project is a meditative way to master foundational stitches while creating a piece of personalized art you’ll be proud to display.
16. Explore 3D Embroidery with a Sculptural Cactus
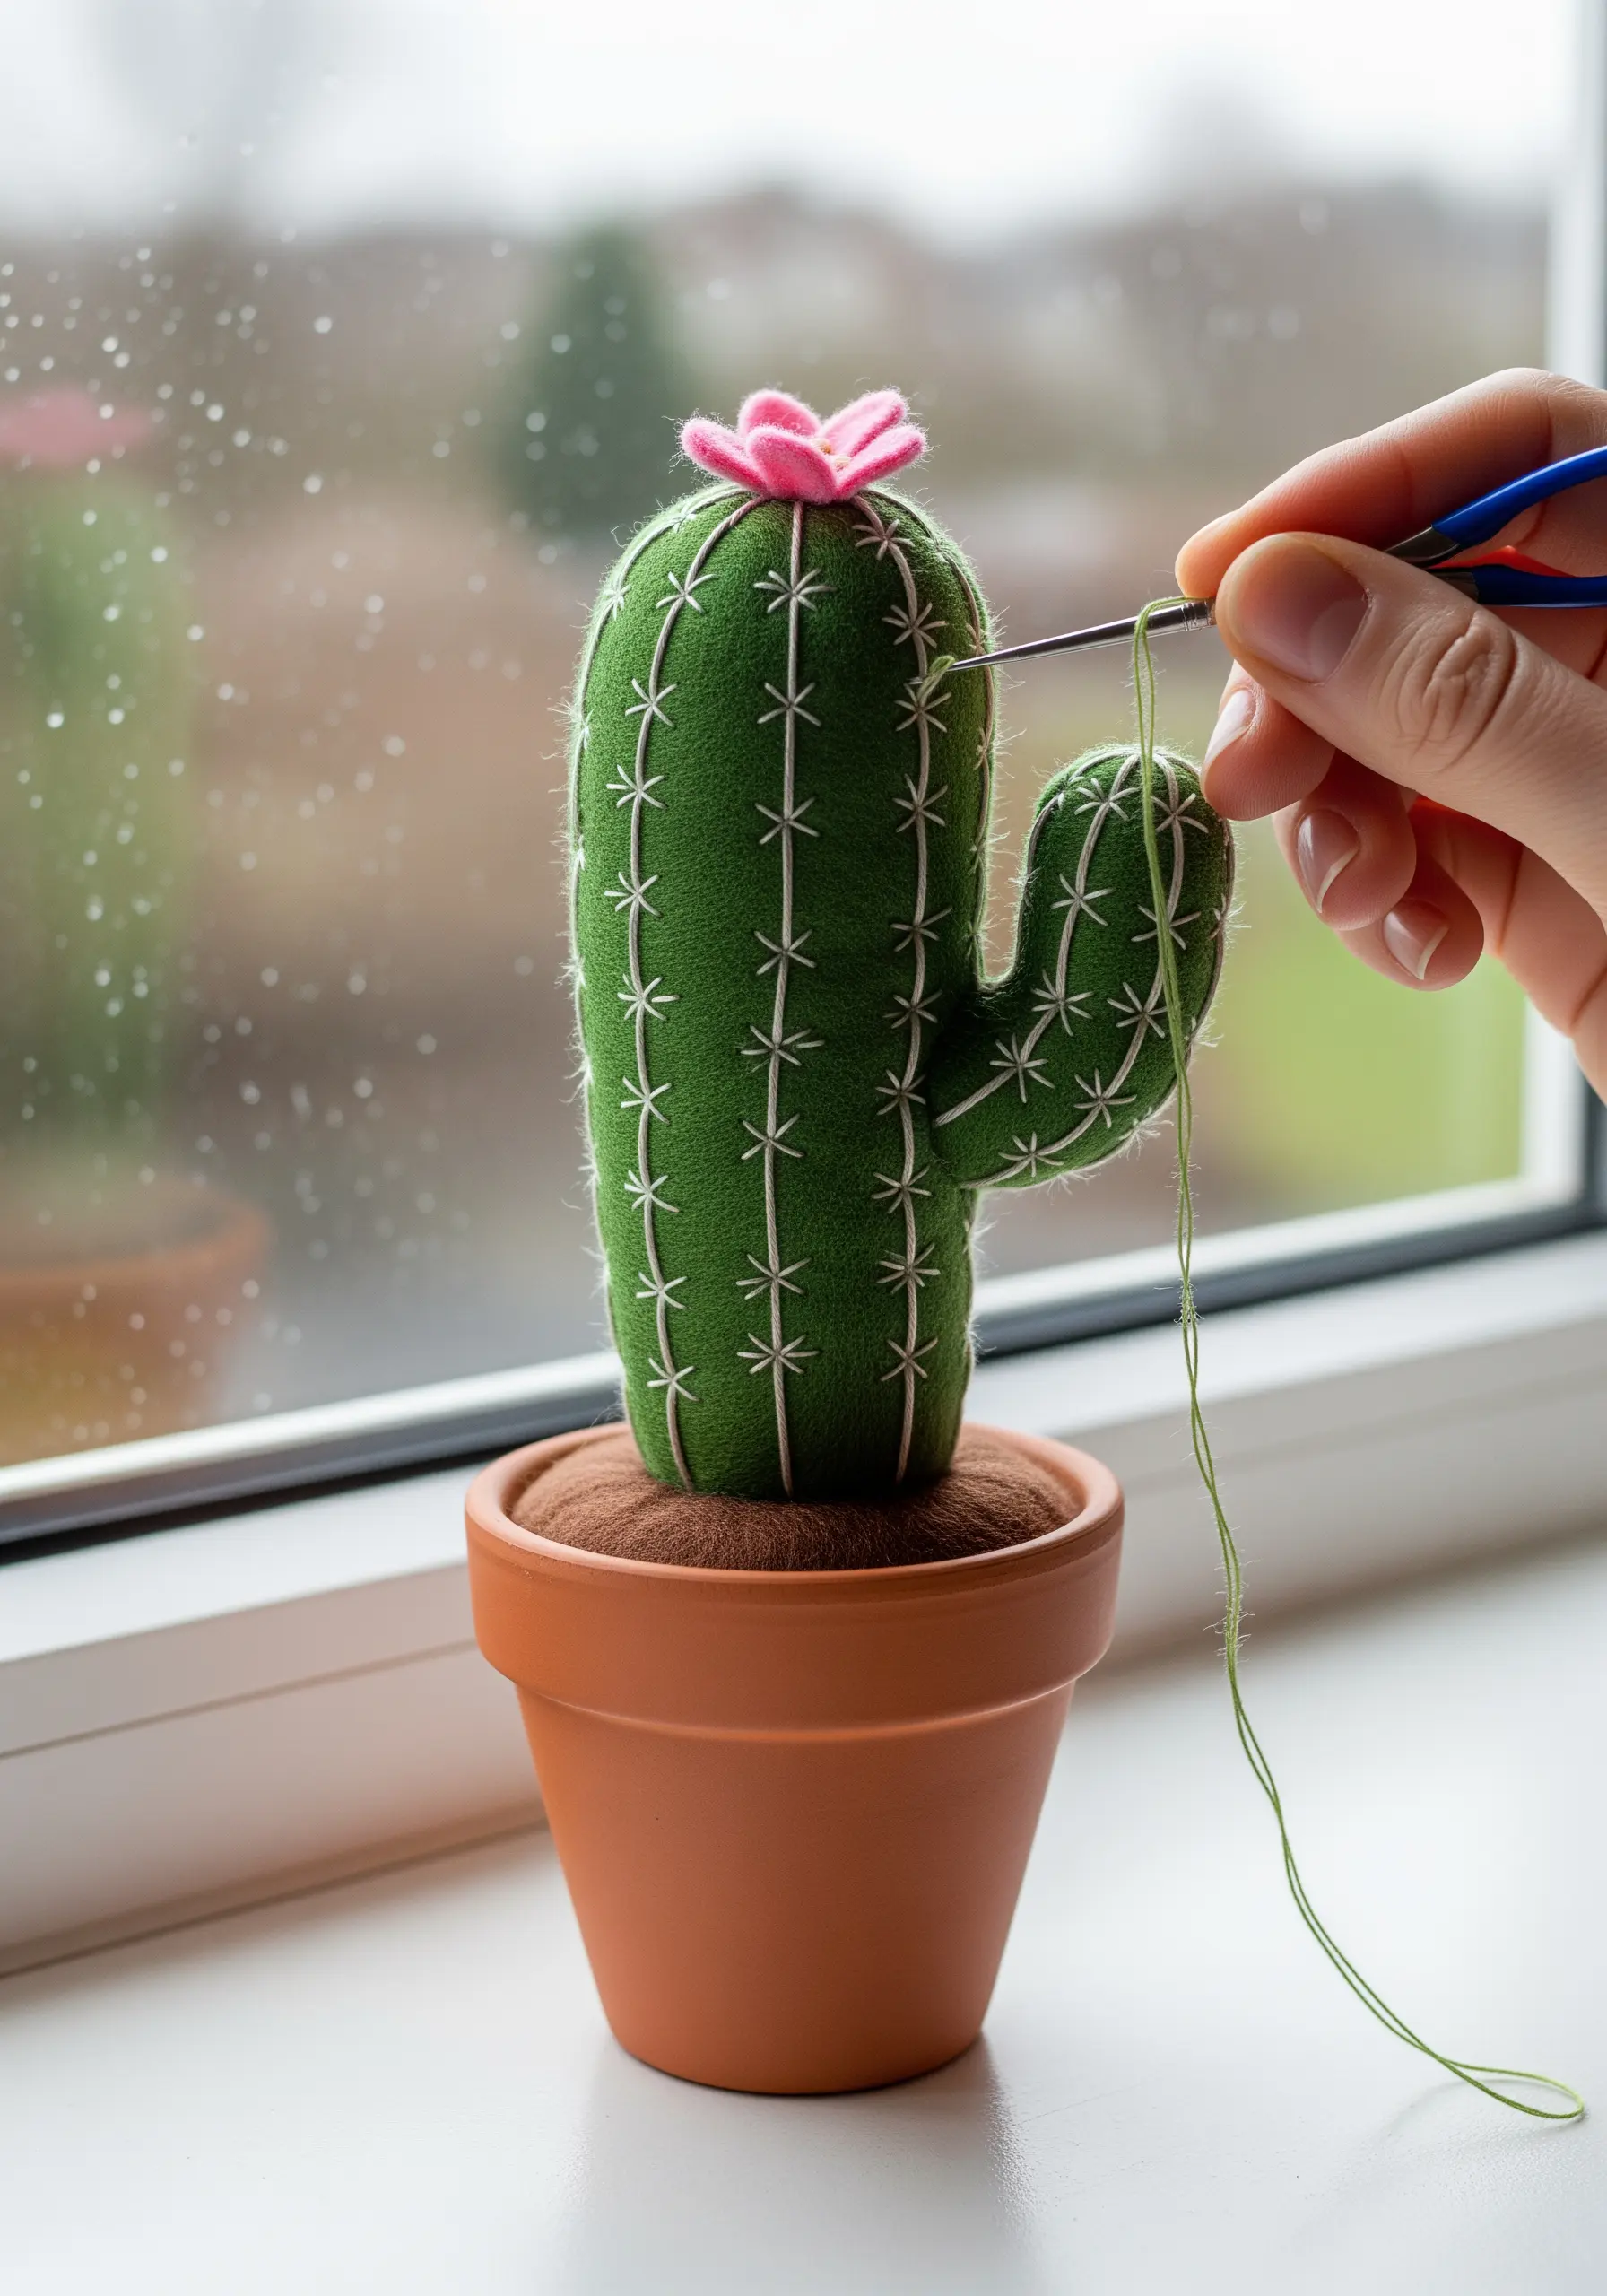
Move beyond the hoop with a simple stumpwork project that adds a playful, three-dimensional element to your craft.
Cut your cactus shape from two pieces of felt and stitch them together around the edges, leaving a small opening. Stuff it with polyester fiberfill before stitching it closed.
Use simple straight stitches in a contrasting color to add the characteristic lines and spines of the cactus.
This technique introduces you to the basics of sculptural embroidery and results in charming mini handmade objects that bring life to any tabletop.
17. Illuminate Your Stitches on a Lampshade
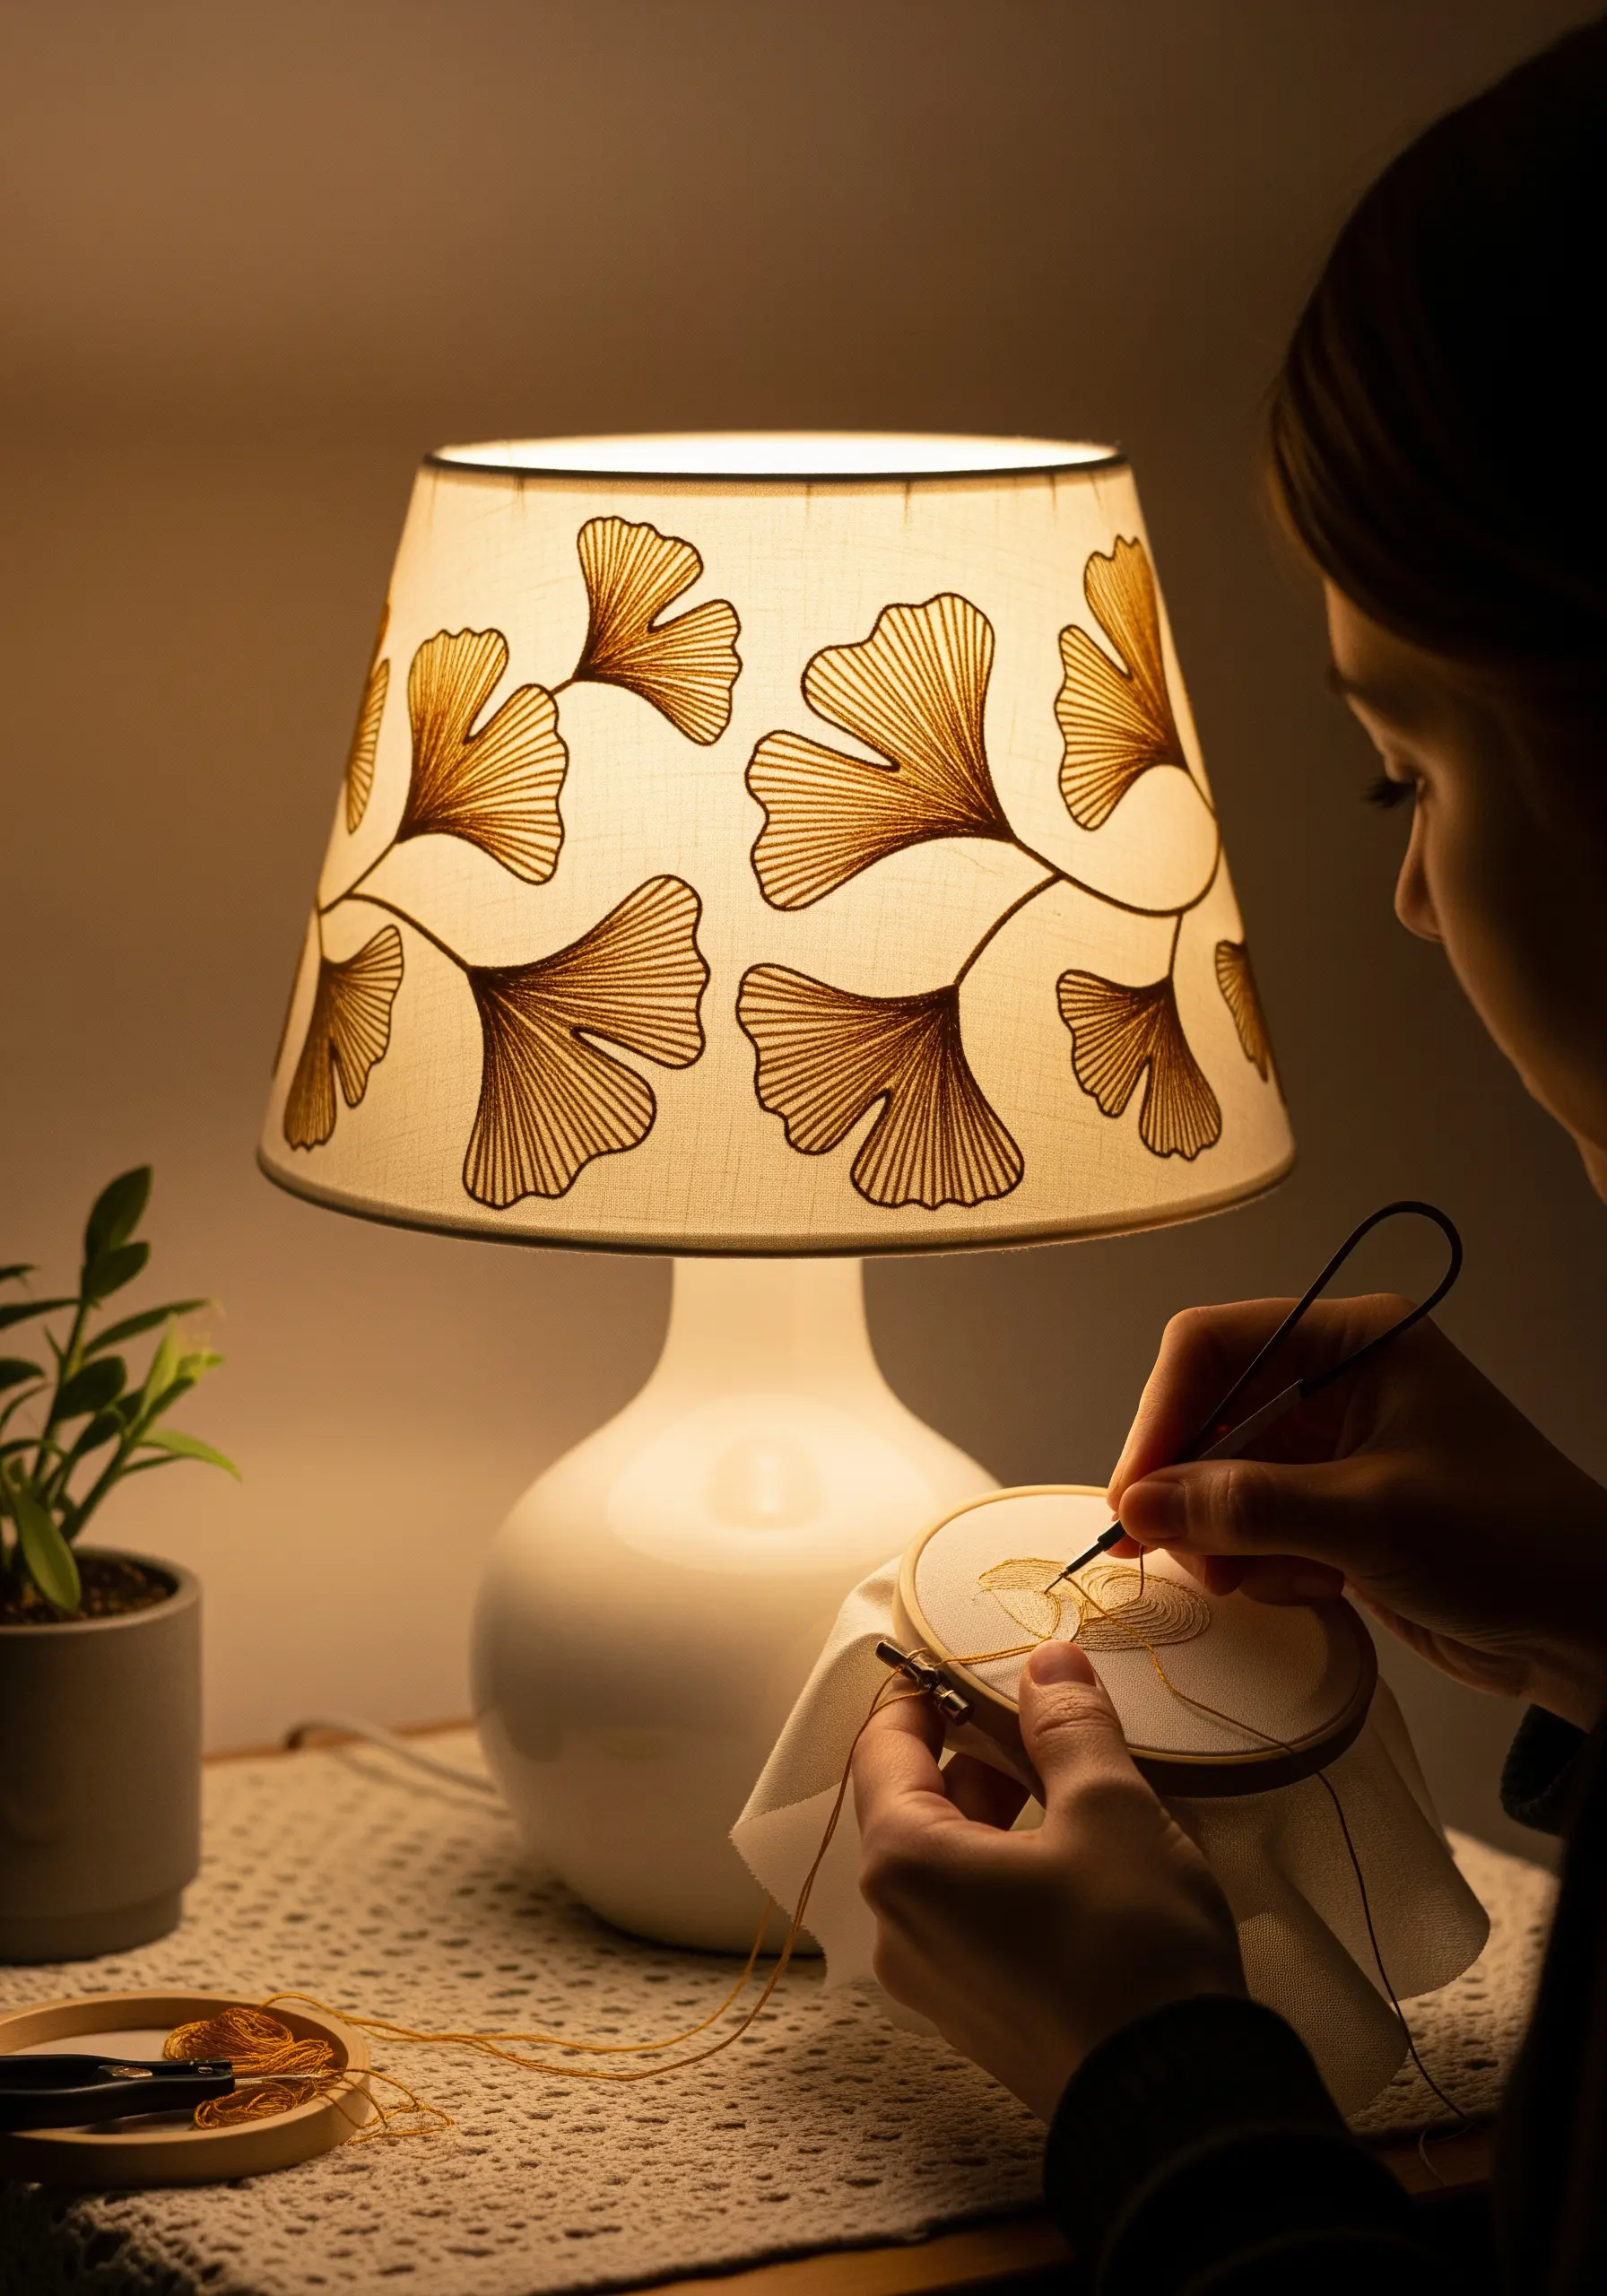
Turn a plain lampshade into a piece of functional art by embroidering a design that interacts with light.
Choose a lampshade made from a stitchable fabric like linen or cotton, and use a simple, open design like these ginkgo leaves.
Use a backstitch or split stitch for the outlines and a satin stitch for the fill, ensuring your stitches are neat on both the inside and outside.
When the lamp is turned on, your embroidery will be beautifully silhouetted, creating a warm, ambient glow and casting delicate shadows.
18. Capture the Motion of Water with Thread
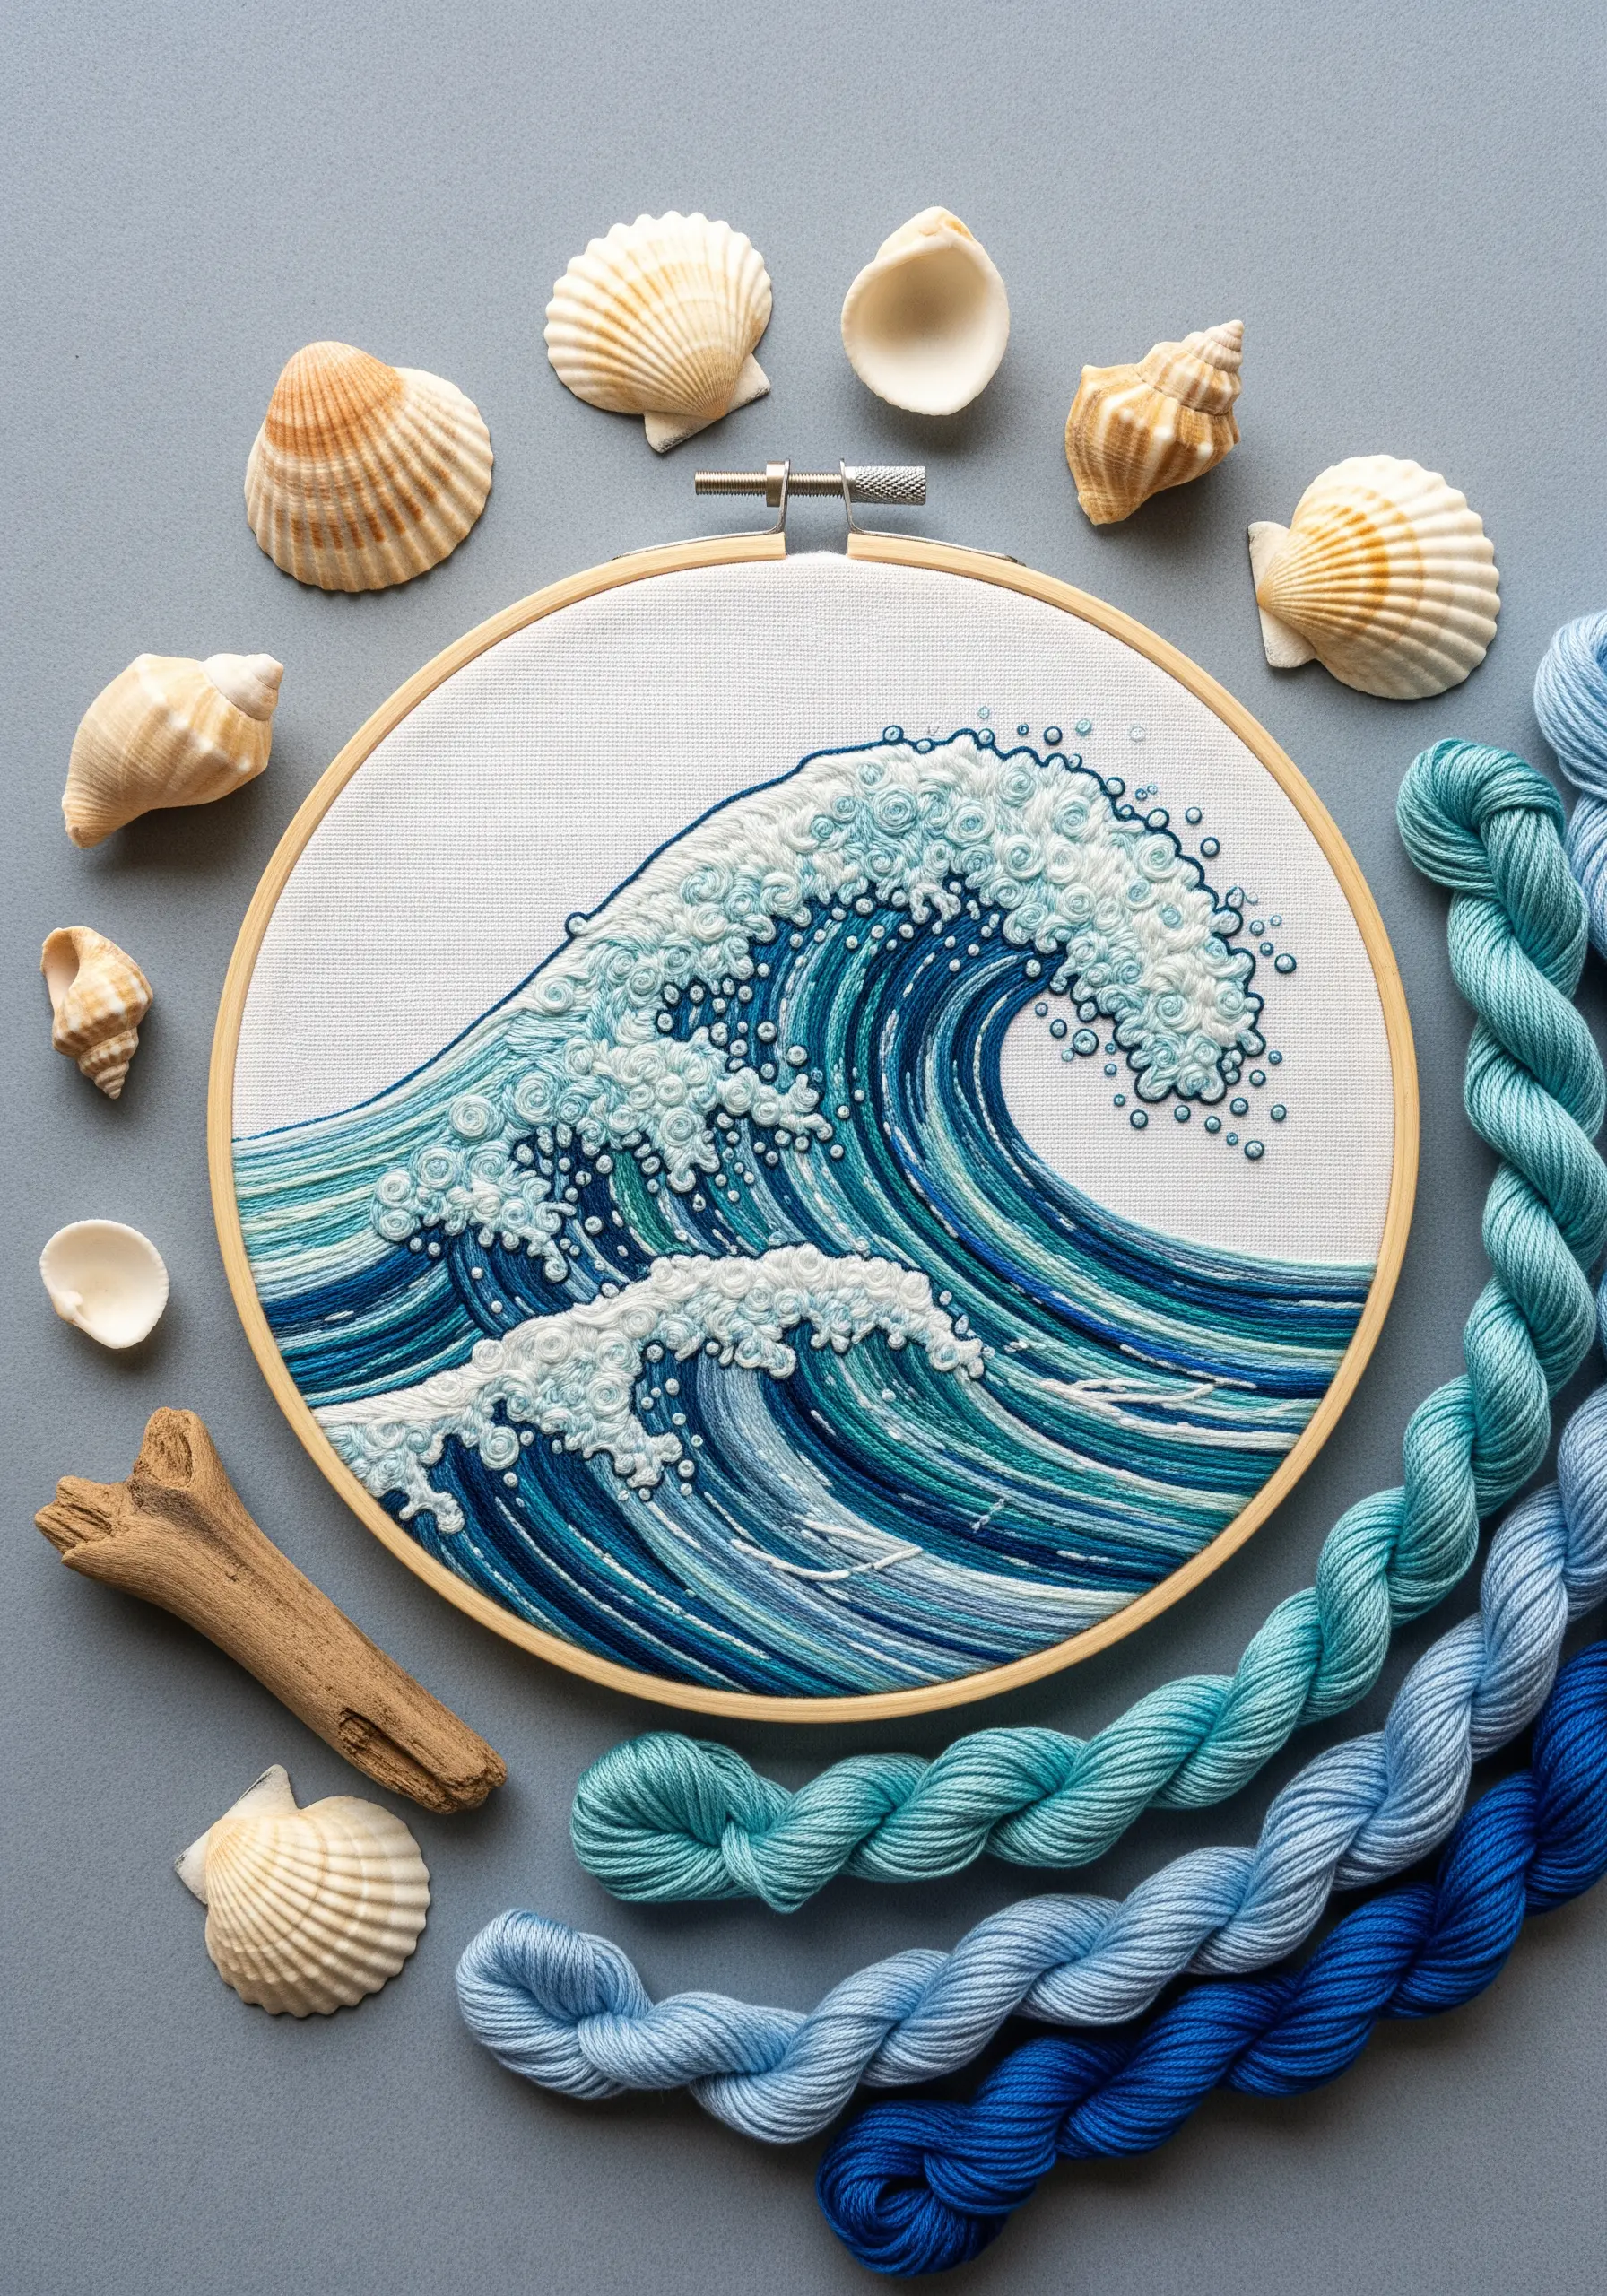
To embroider a dynamic ocean wave, use the direction of your stitches to convey movement and energy.
Fill the body of the wave with long, flowing satin stitches that follow its curve. Use a spectrum of blue threads, from deep navy to light aqua, to create highlights and shadows.
For the sea foam, use a dense application of French knots in white and off-white. Vary the size and tightness of the knots to create a churning, bubbling texture that contrasts with the smooth water.
19. Stitch Meditative Spirals on Felt Coasters
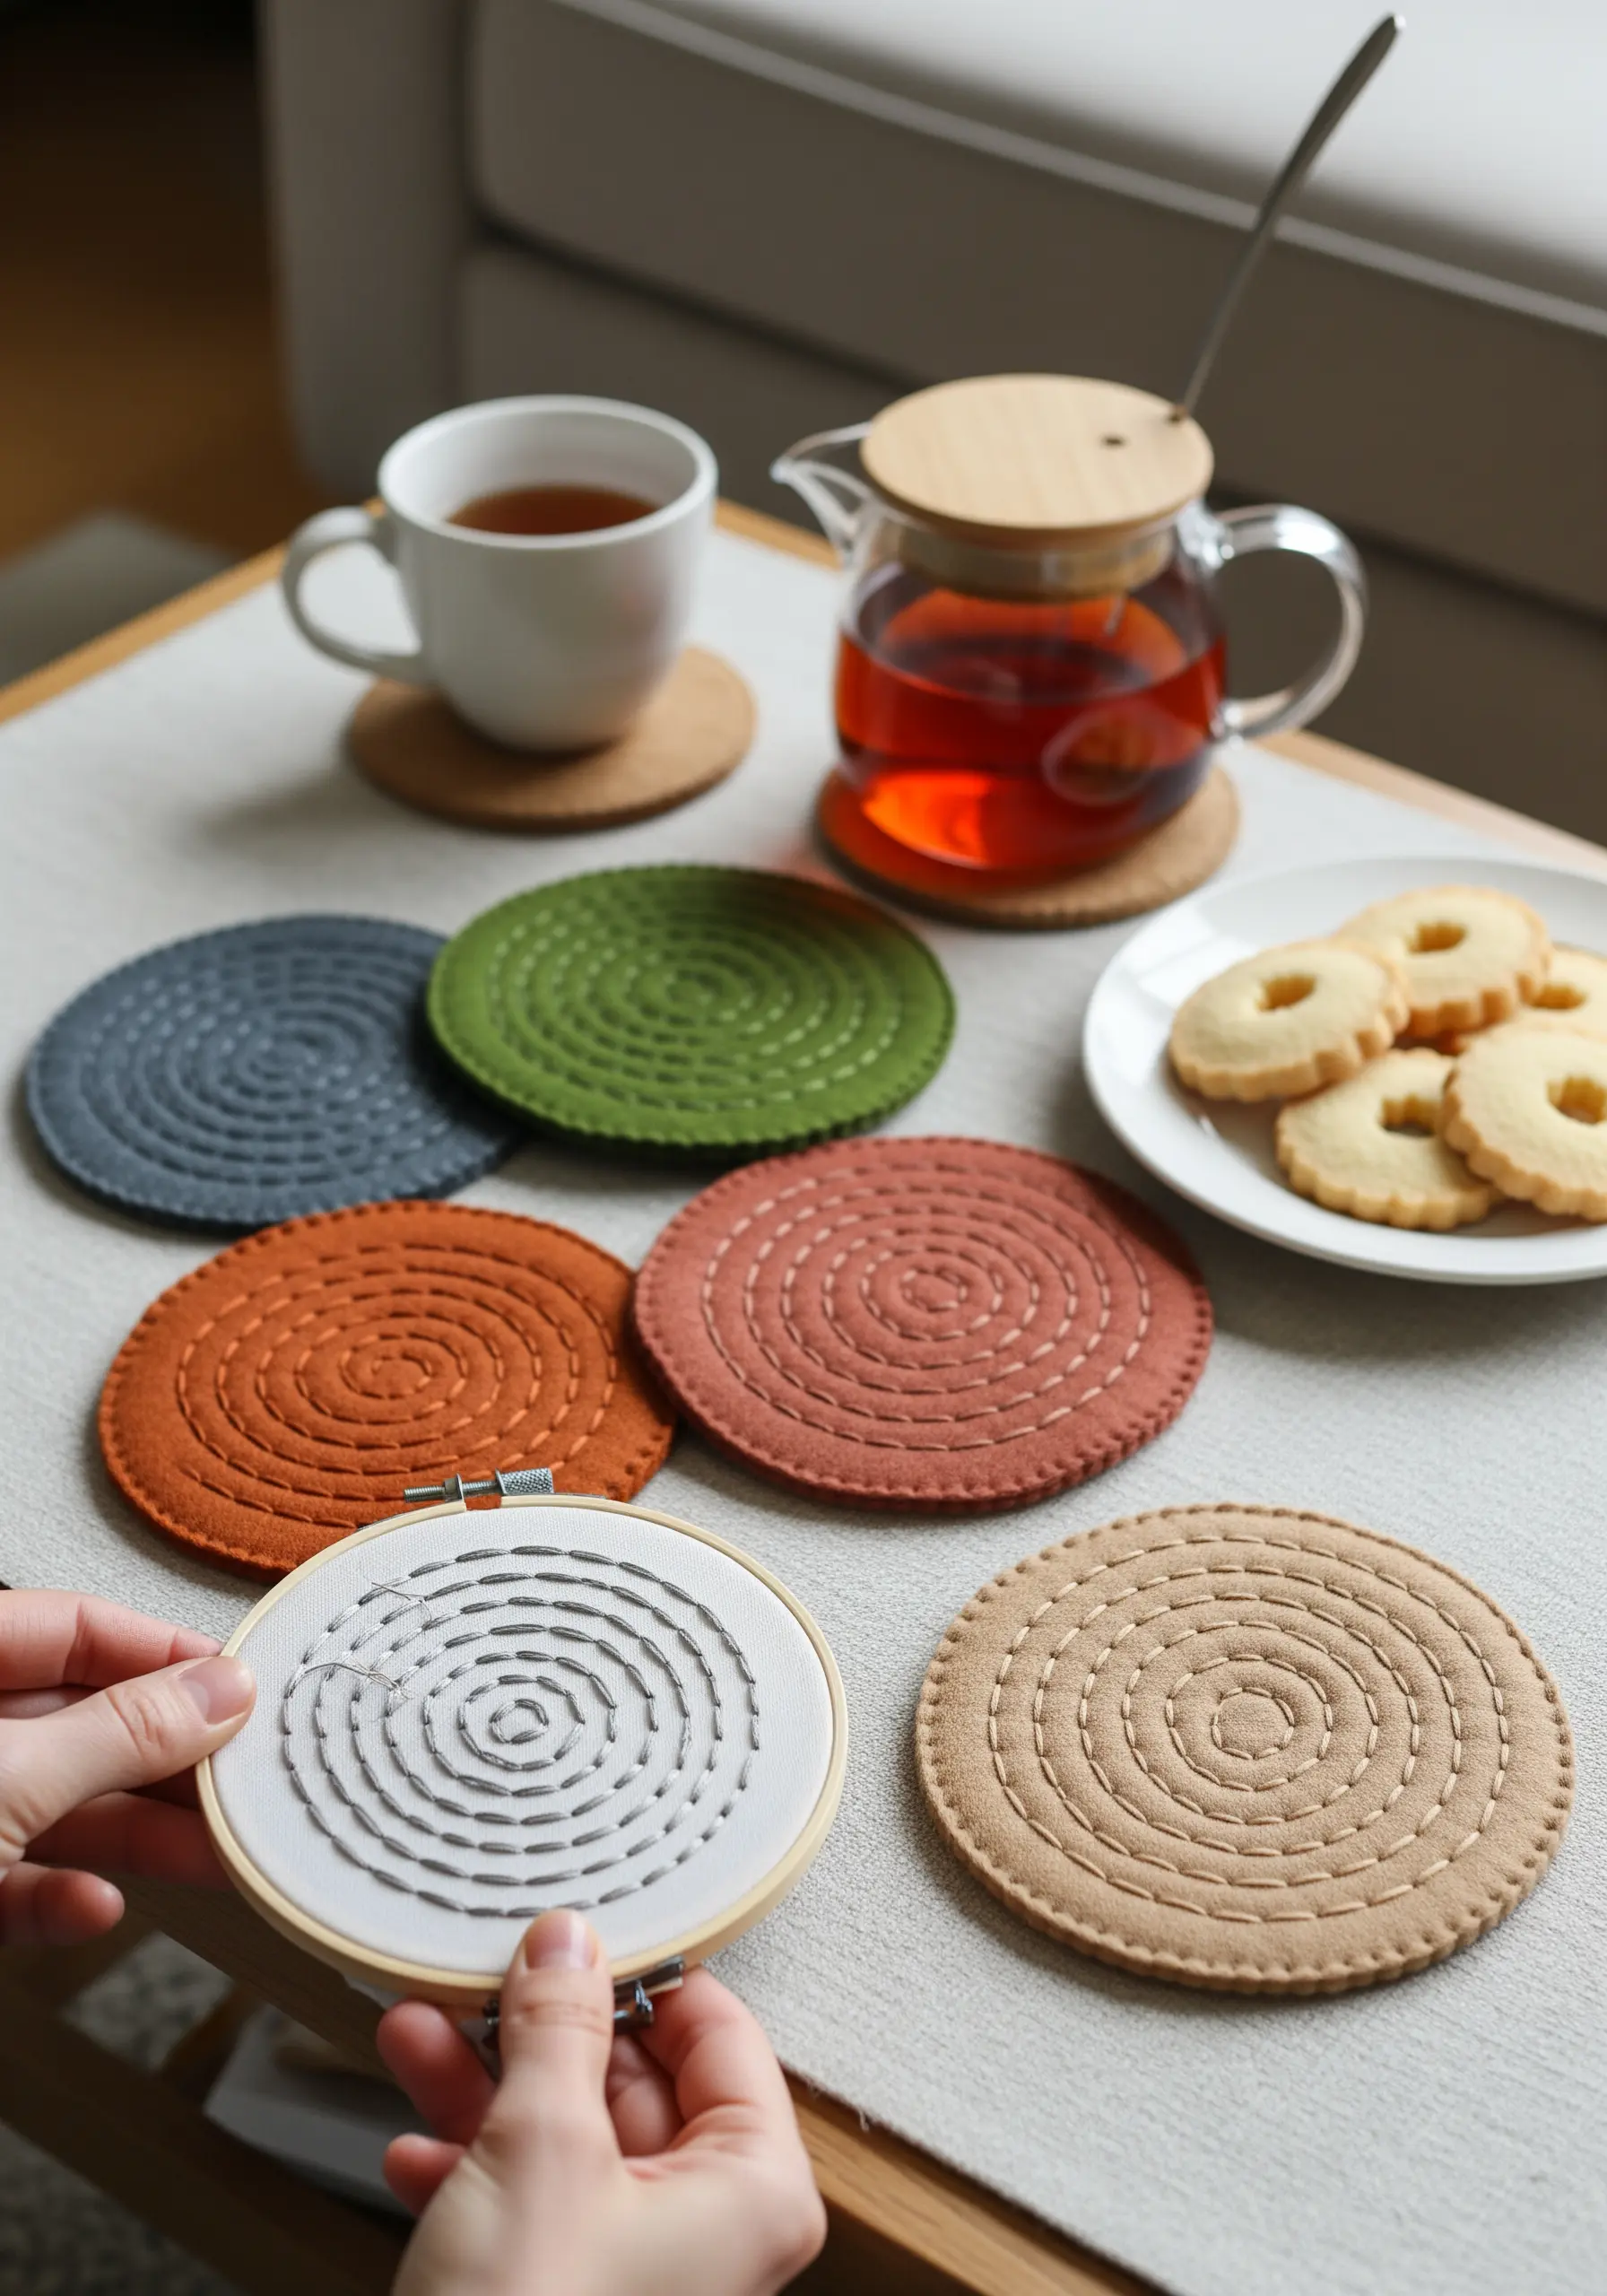
Create a set of modern, functional coasters with this simple and calming stitching project.
Cut circles from thick wool-blend felt, which is durable and absorbent. Using all six strands of cotton floss for a bold effect, stitch a simple running stitch in a continuous spiral from the center outwards.
Focus on keeping your stitch length and spacing consistent to create a pleasing, rhythmic pattern.
This project is a perfect exercise in mindfulness, and the finished coasters are beautiful small handmade projects that double as thoughtful gifts.
20. Build a Textured Woodland Scene
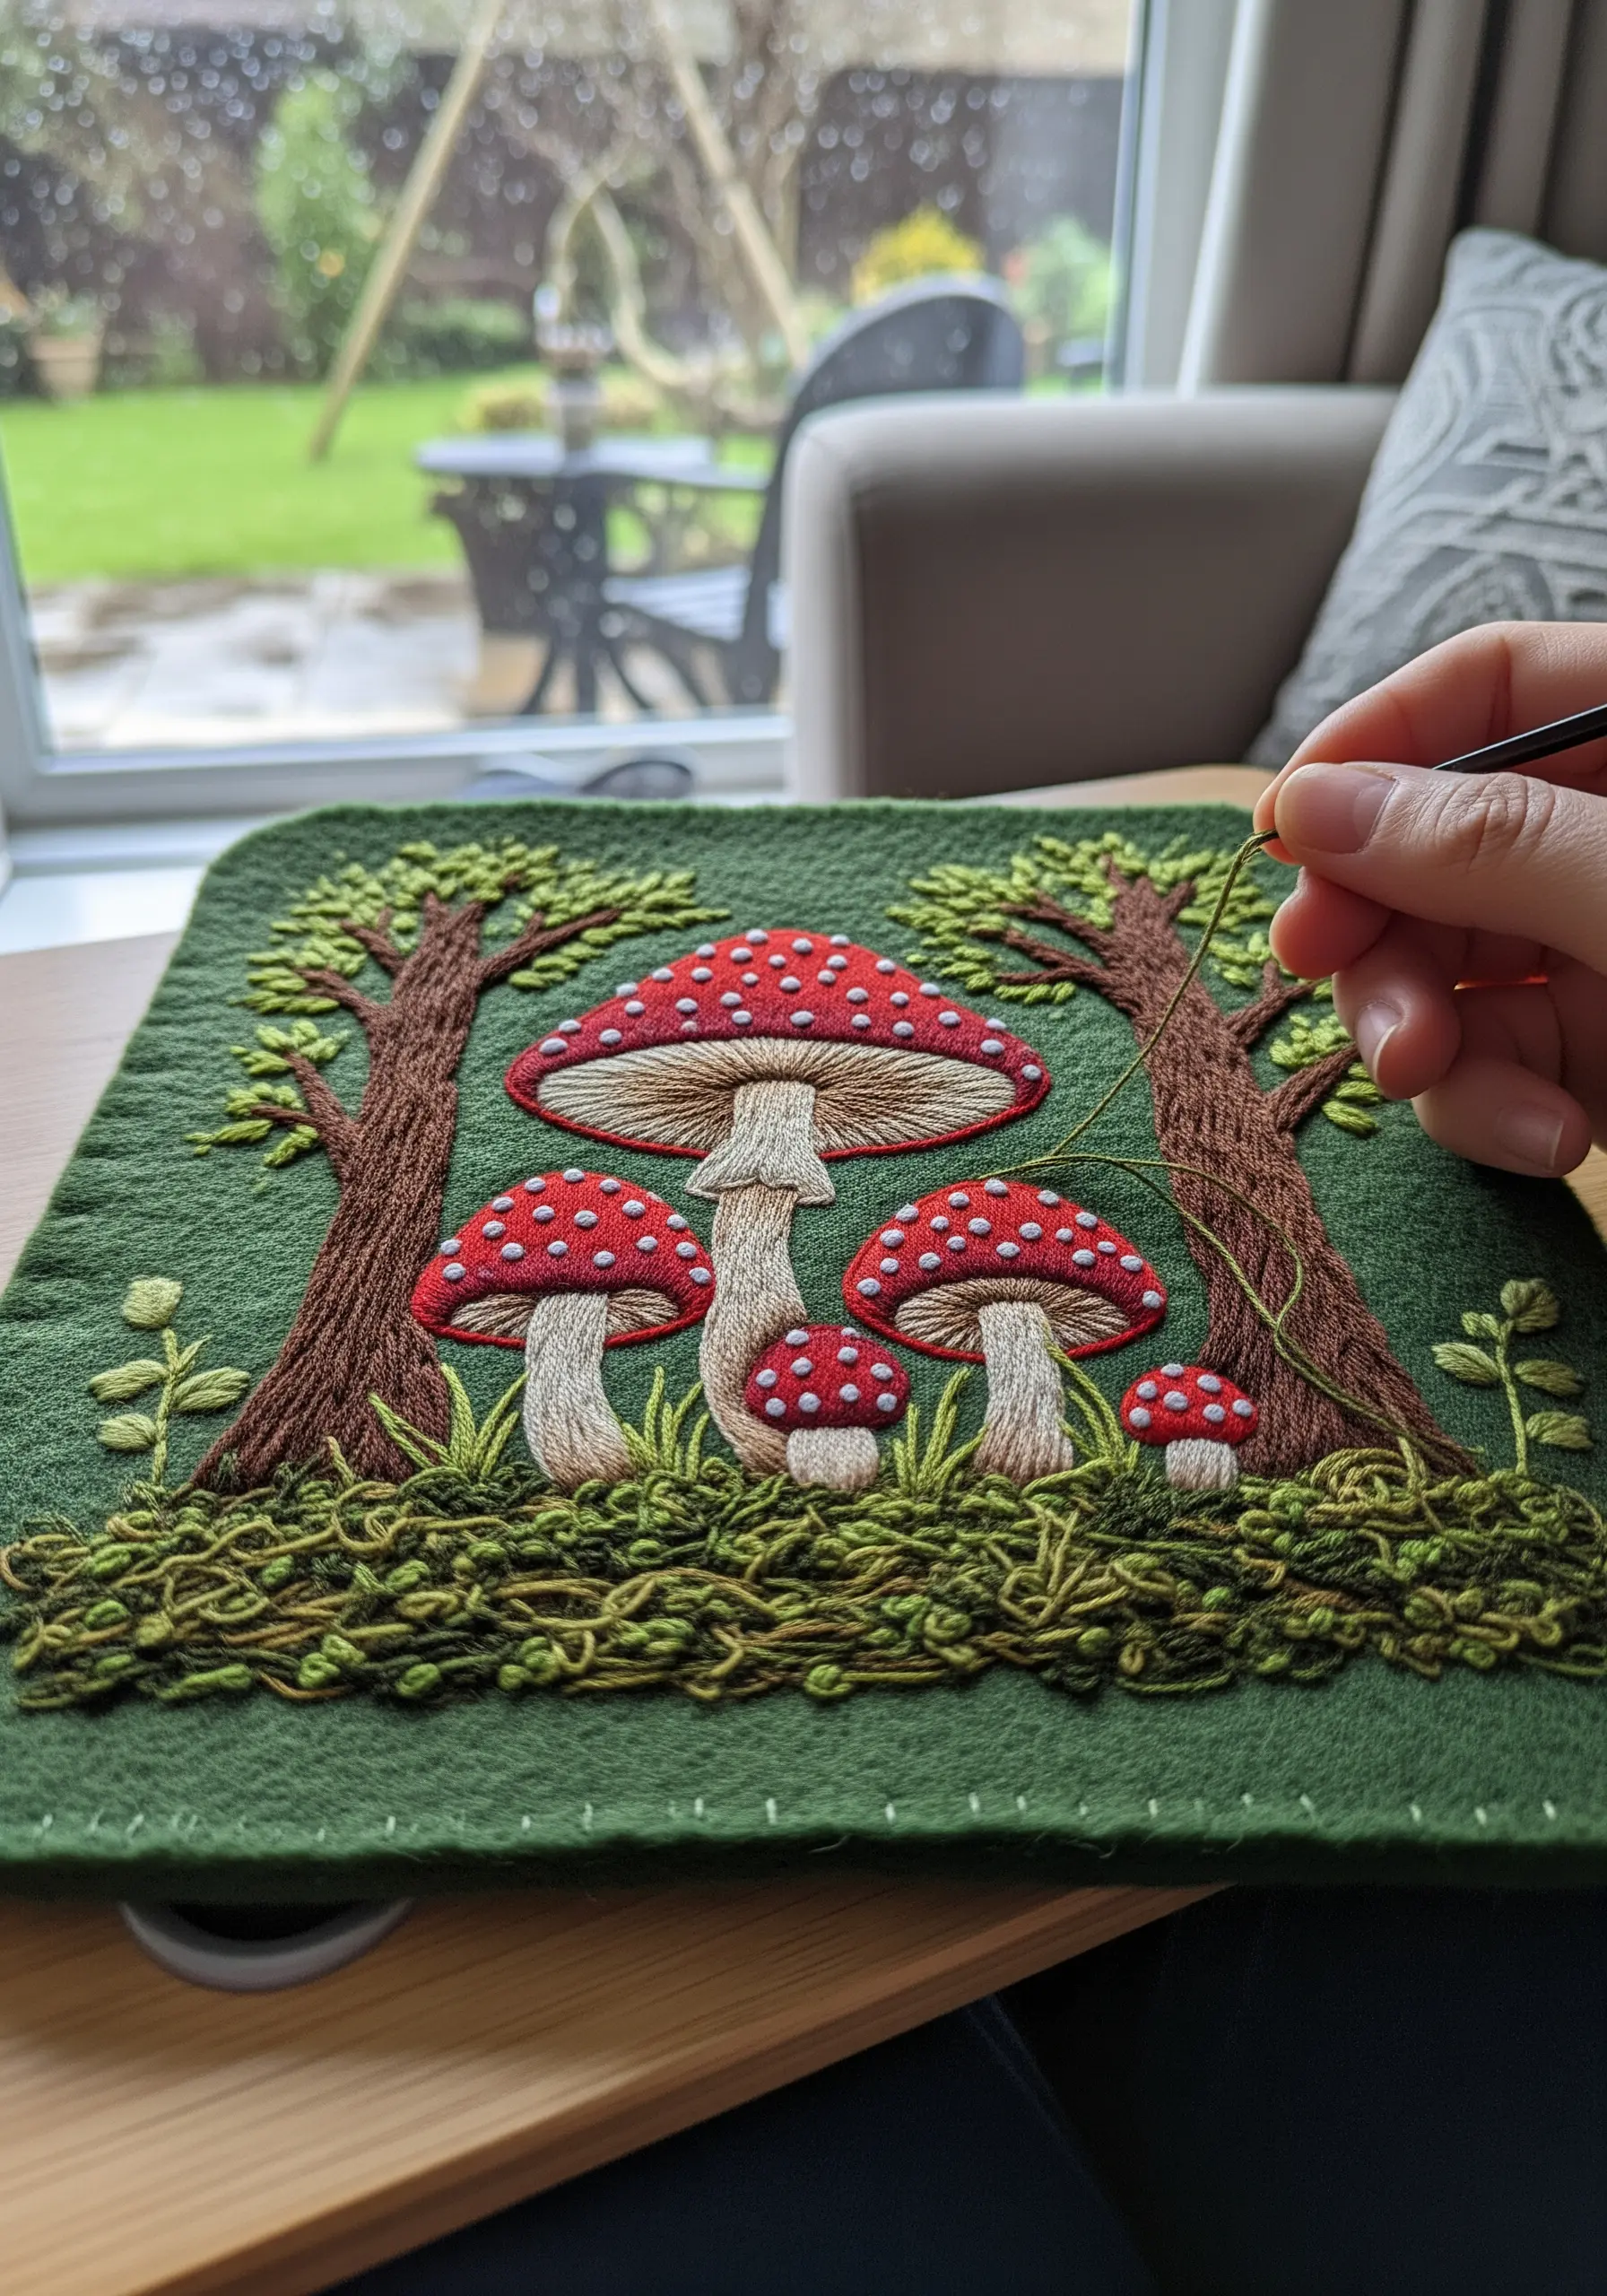
Create a rich, tactile forest floor by layering different stitches and thread weights.
For the mushroom caps, use a padded satin stitch to give them a rounded, three-dimensional form. Add French knots for the spots.
Create the mossy ground using turkey work (ghiordes knot) or layered straight stitches with variegated green thread for a wild, untamed look.
Stitching on a felt base adds an extra layer of softness and depth to your realistic mushroom forest floor embroidery projects, making the textures even more inviting.
21. Achieve Delicate Gradients in Floral Petals
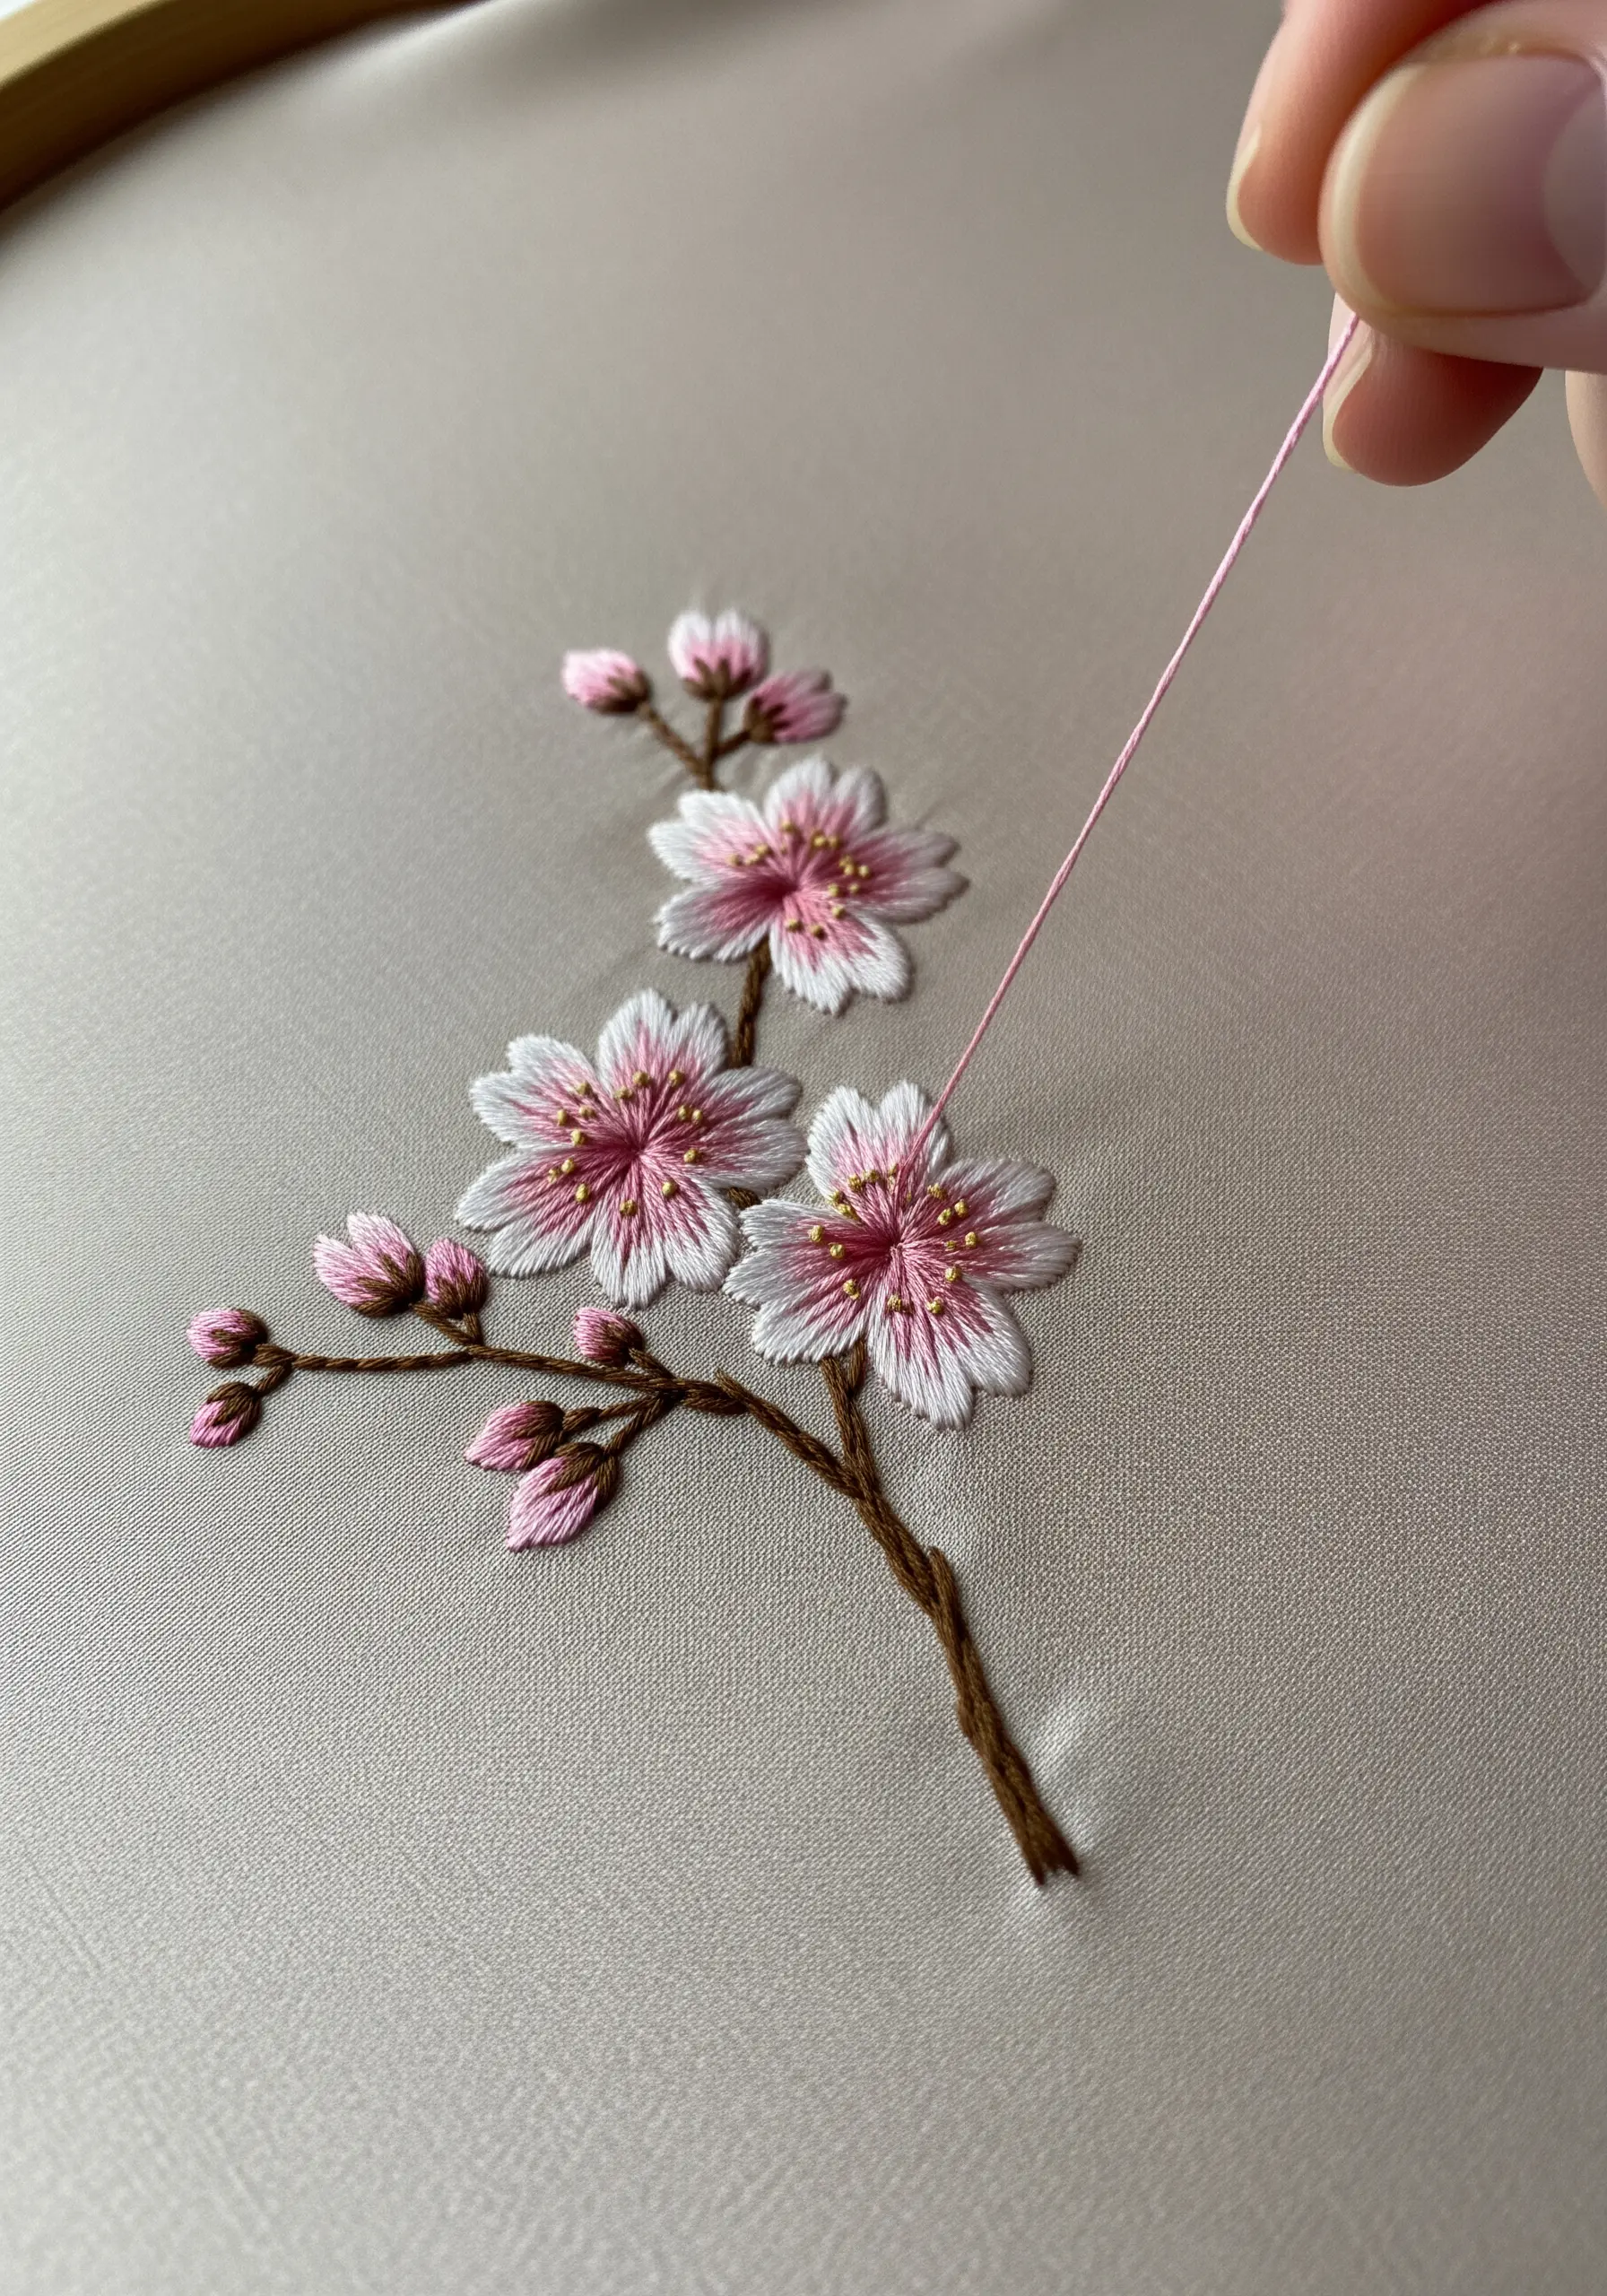
For realistic cherry blossoms, use the long-and-short stitch to blend colors softly from the center of the petal outwards.
Start with a darker pink at the base of the petal, using two strands of floss. As you work towards the edge, gradually introduce a lighter pink and then an off-white, allowing your stitches to overlap slightly for a seamless gradient.
This needle-painting technique eliminates harsh lines and gives the petals a soft, ethereal quality.
A few tiny French knots in yellow or gold at the center provide the perfect finishing touch.
22. Combine Paint and Thread for Lunar Textures
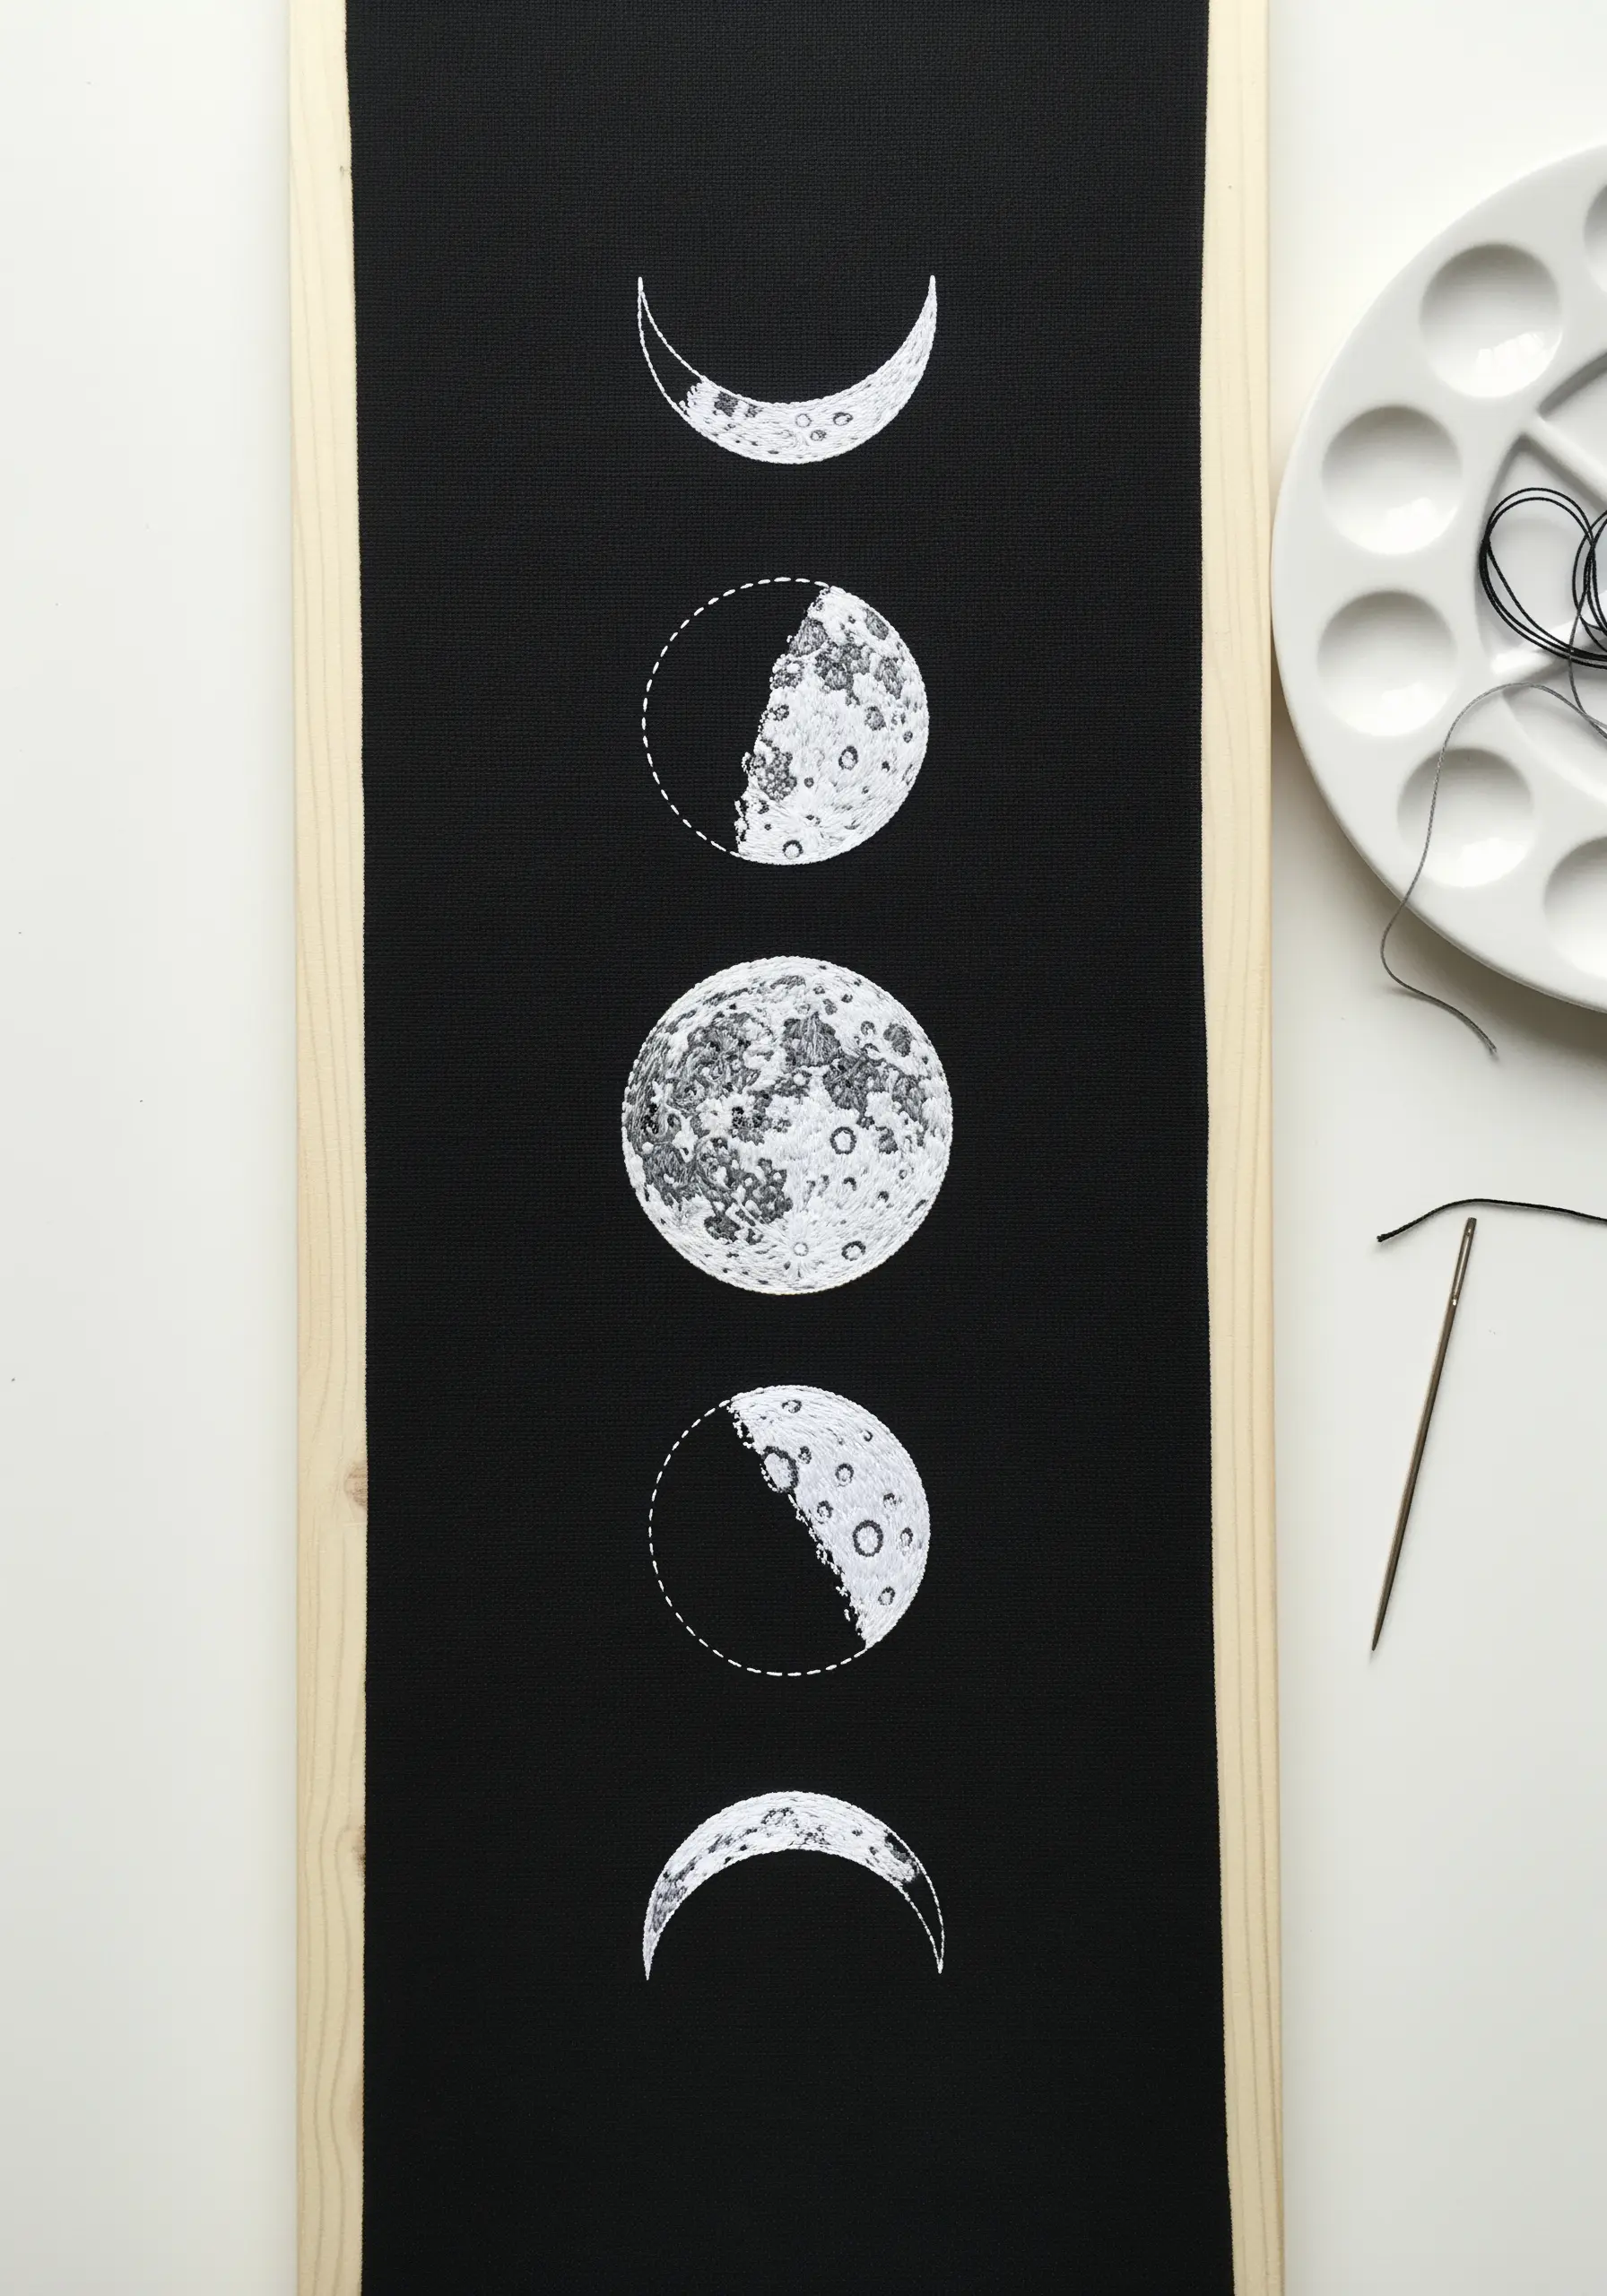
Create a stunningly realistic moon phase series by using fabric paint as a base for your embroidery.
On black fabric, lightly sponge or paint white fabric paint to map out the illuminated parts of the moon, creating a soft, textured surface.
Once the paint is completely dry, use a single strand of white or light grey thread to add details. Use tiny seed stitches and French knots to represent craters and a fine backstitch for the crisp outer edge.
This is one of the most effective mixed-media crafts with embroidery that are surprisingly relaxing and visually impactful.
23. Create a Minimalist House Portrait

Capture the charm of a home with a clean, architectural embroidery that focuses on line and selective color.
Trace the main structural lines onto your fabric and use a crisp backstitch or split stitch with three strands of black floss to create a strong, graphic outline.
Keep the majority of the design in monochrome to maintain a modern aesthetic.
Then, add small, vibrant pops of color for details like flower boxes or a front door, using tiny French knots and satin stitches. This contrast makes the entire piece feel thoughtful and alive.


