

There comes a moment in every stitcher’s journey when you want to move beyond simply following a pattern. You want your work to feel less like a craft and more like art—intentional, polished, and uniquely yours.
That transition doesn’t require complex new skills or expensive materials. It begins with small, deliberate choices: selecting the right stitch for a curve, understanding how thread weight changes a design’s mood, or knowing when a single line speaks louder than a thousand stitches.
Here, you’ll find ideas built on that philosophy. Each project is an invitation to refine your technique, to see fabric and thread with a calmer, more confident eye, and to create pieces that bring a quiet, modern beauty into your home and life.
1. The Art of the Single, Expressive Line

Create a powerful landscape with nothing more than a single line.
Use a whipped backstitch or a stem stitch to create a smooth, uninterrupted outline that gives your work a polished, graphic quality.
Vary your stitch length—longer on straight sections and shorter on curves—to maintain a fluid, natural-looking line without any awkward angles.
Stitching with 3-4 strands of floss on a neutral linen fabric provides enough weight to make the design feel intentional and bold, rather than sparse.
2. Layered Satin Stitch for Botanical Realism
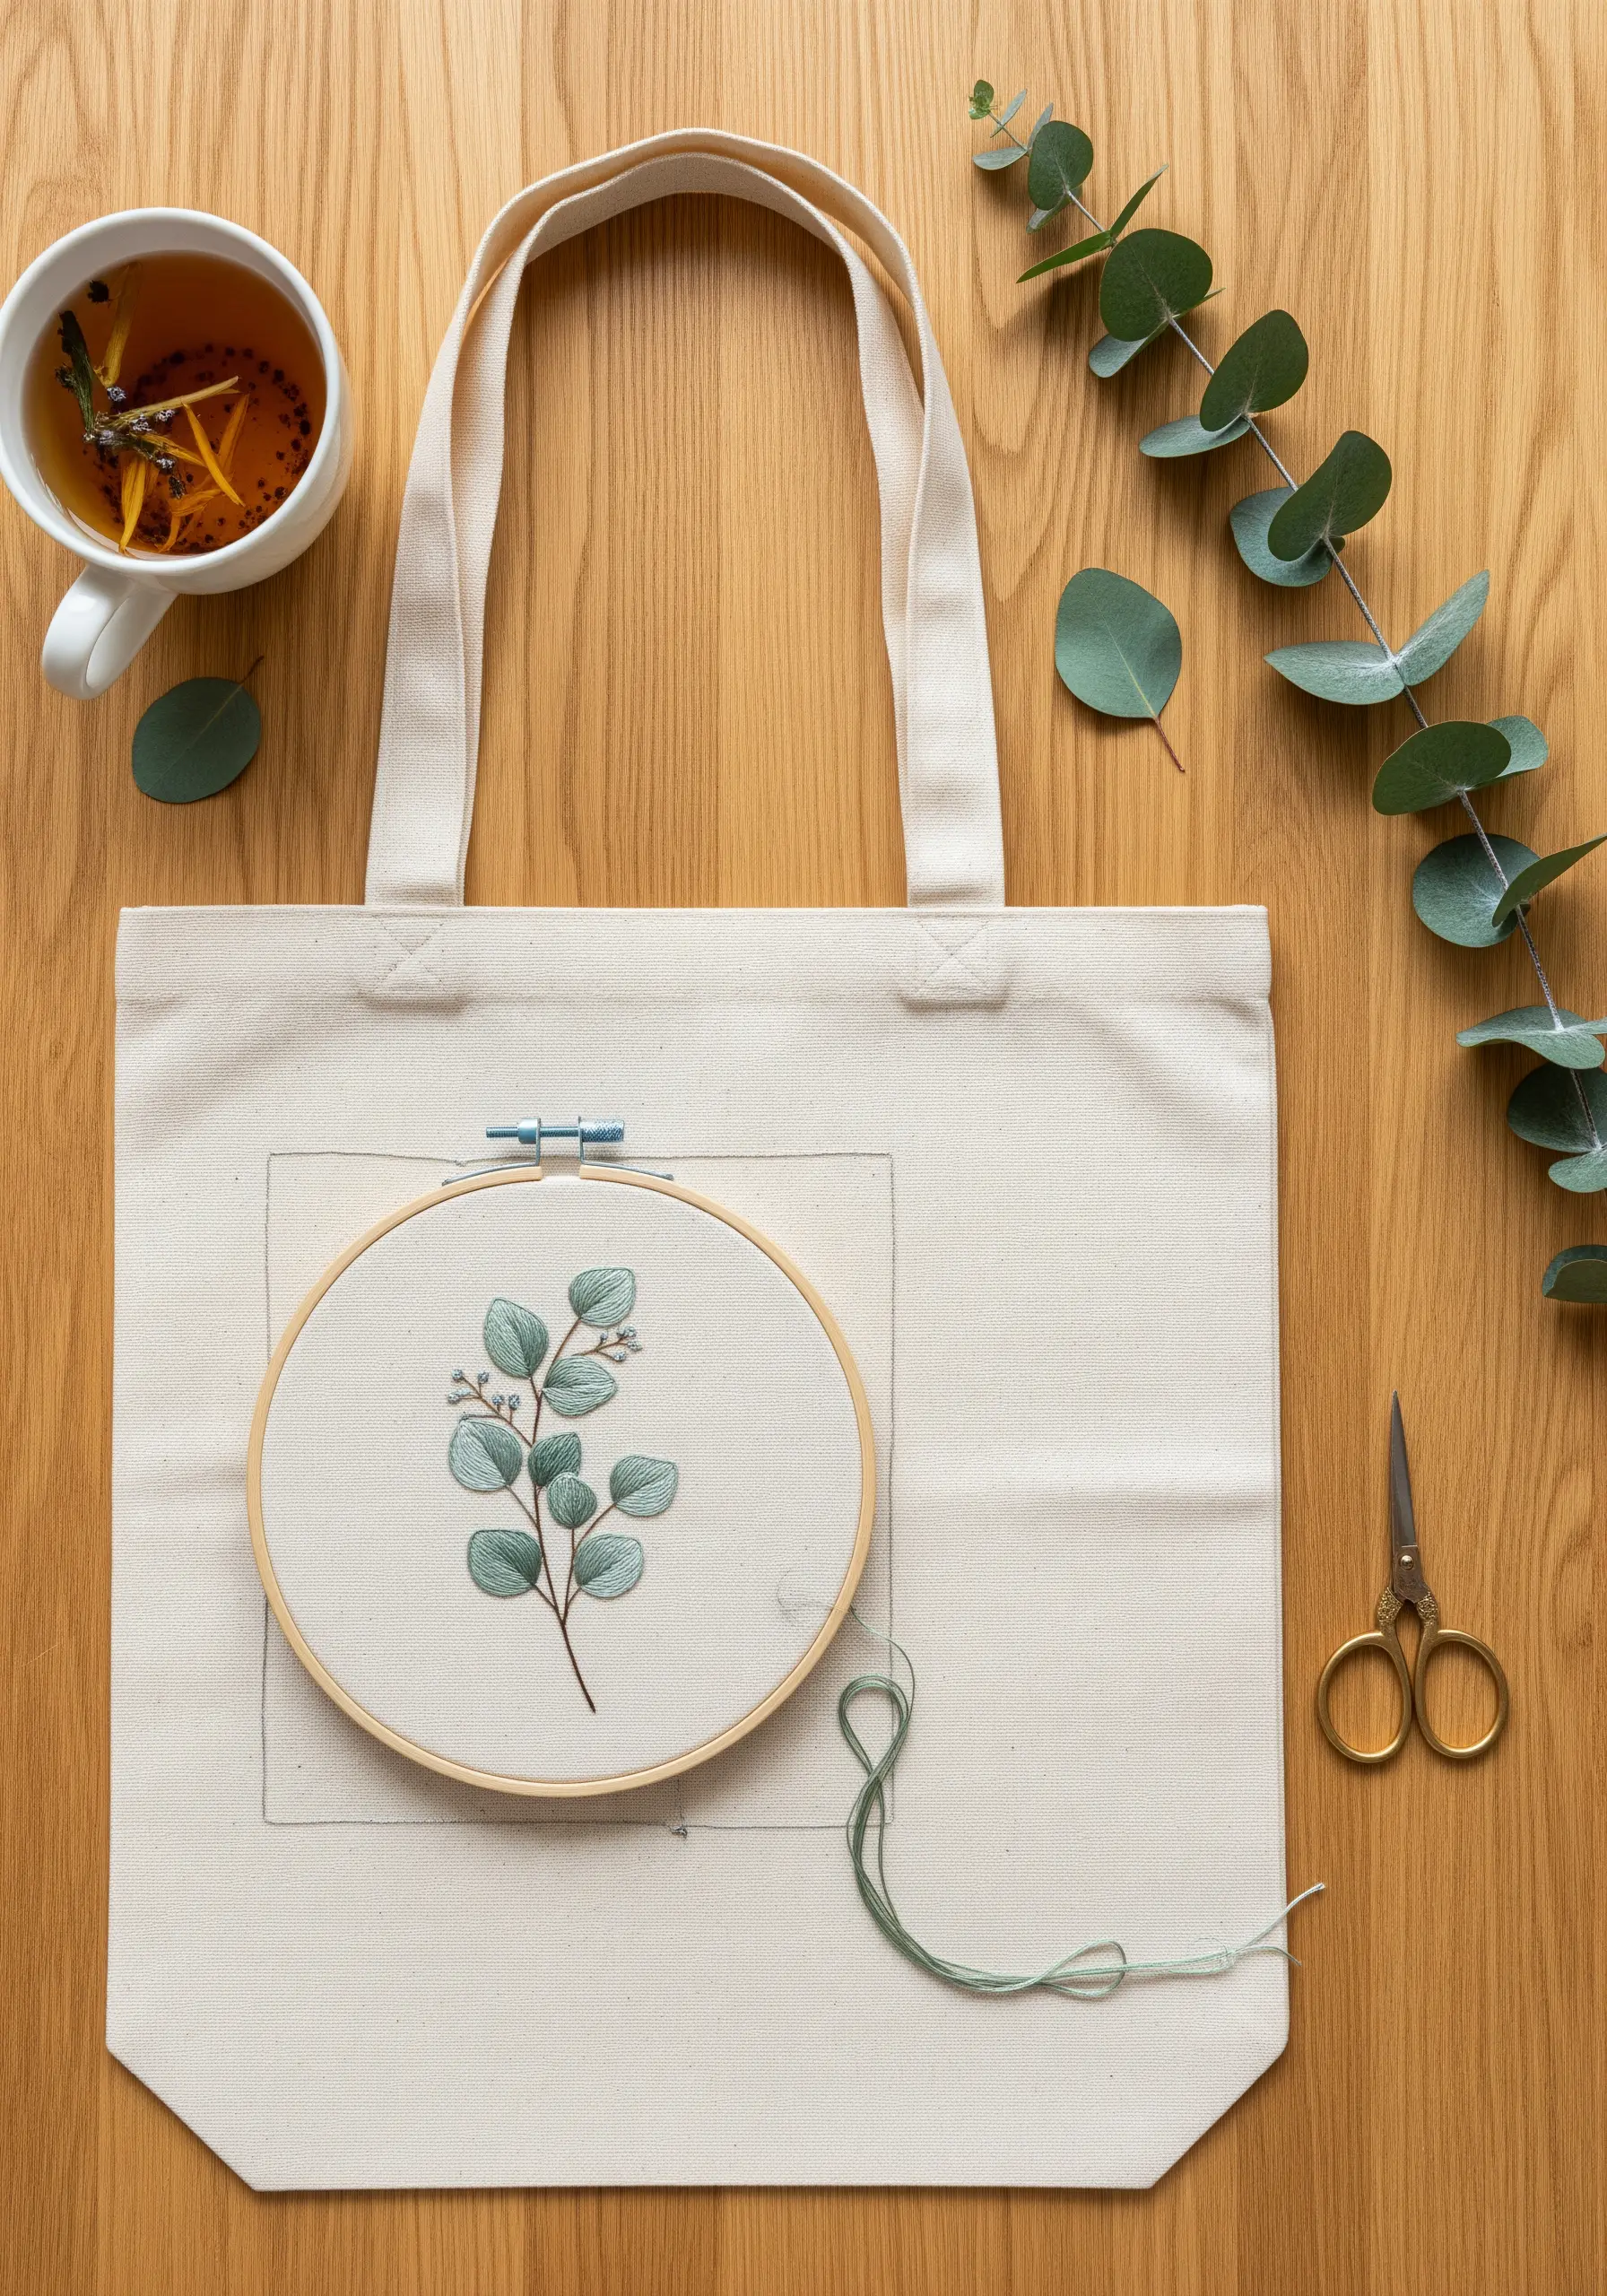
Instead of filling leaves with a single flat color, you can build subtle, painterly depth with layered satin stitches.
Begin with a base layer in a lighter shade, then add a slightly darker shade on top, ensuring your stitches follow the natural direction of the leaf’s veins.
This simple gradient technique creates a soft, realistic shadow effect that instantly elevates your botanical work.
Use only two strands of floss to keep the details delicate and prevent the fabric from puckering, especially on a lighter canvas tote.
3. Creating Dynamic Texture with Seed Stitch Fills
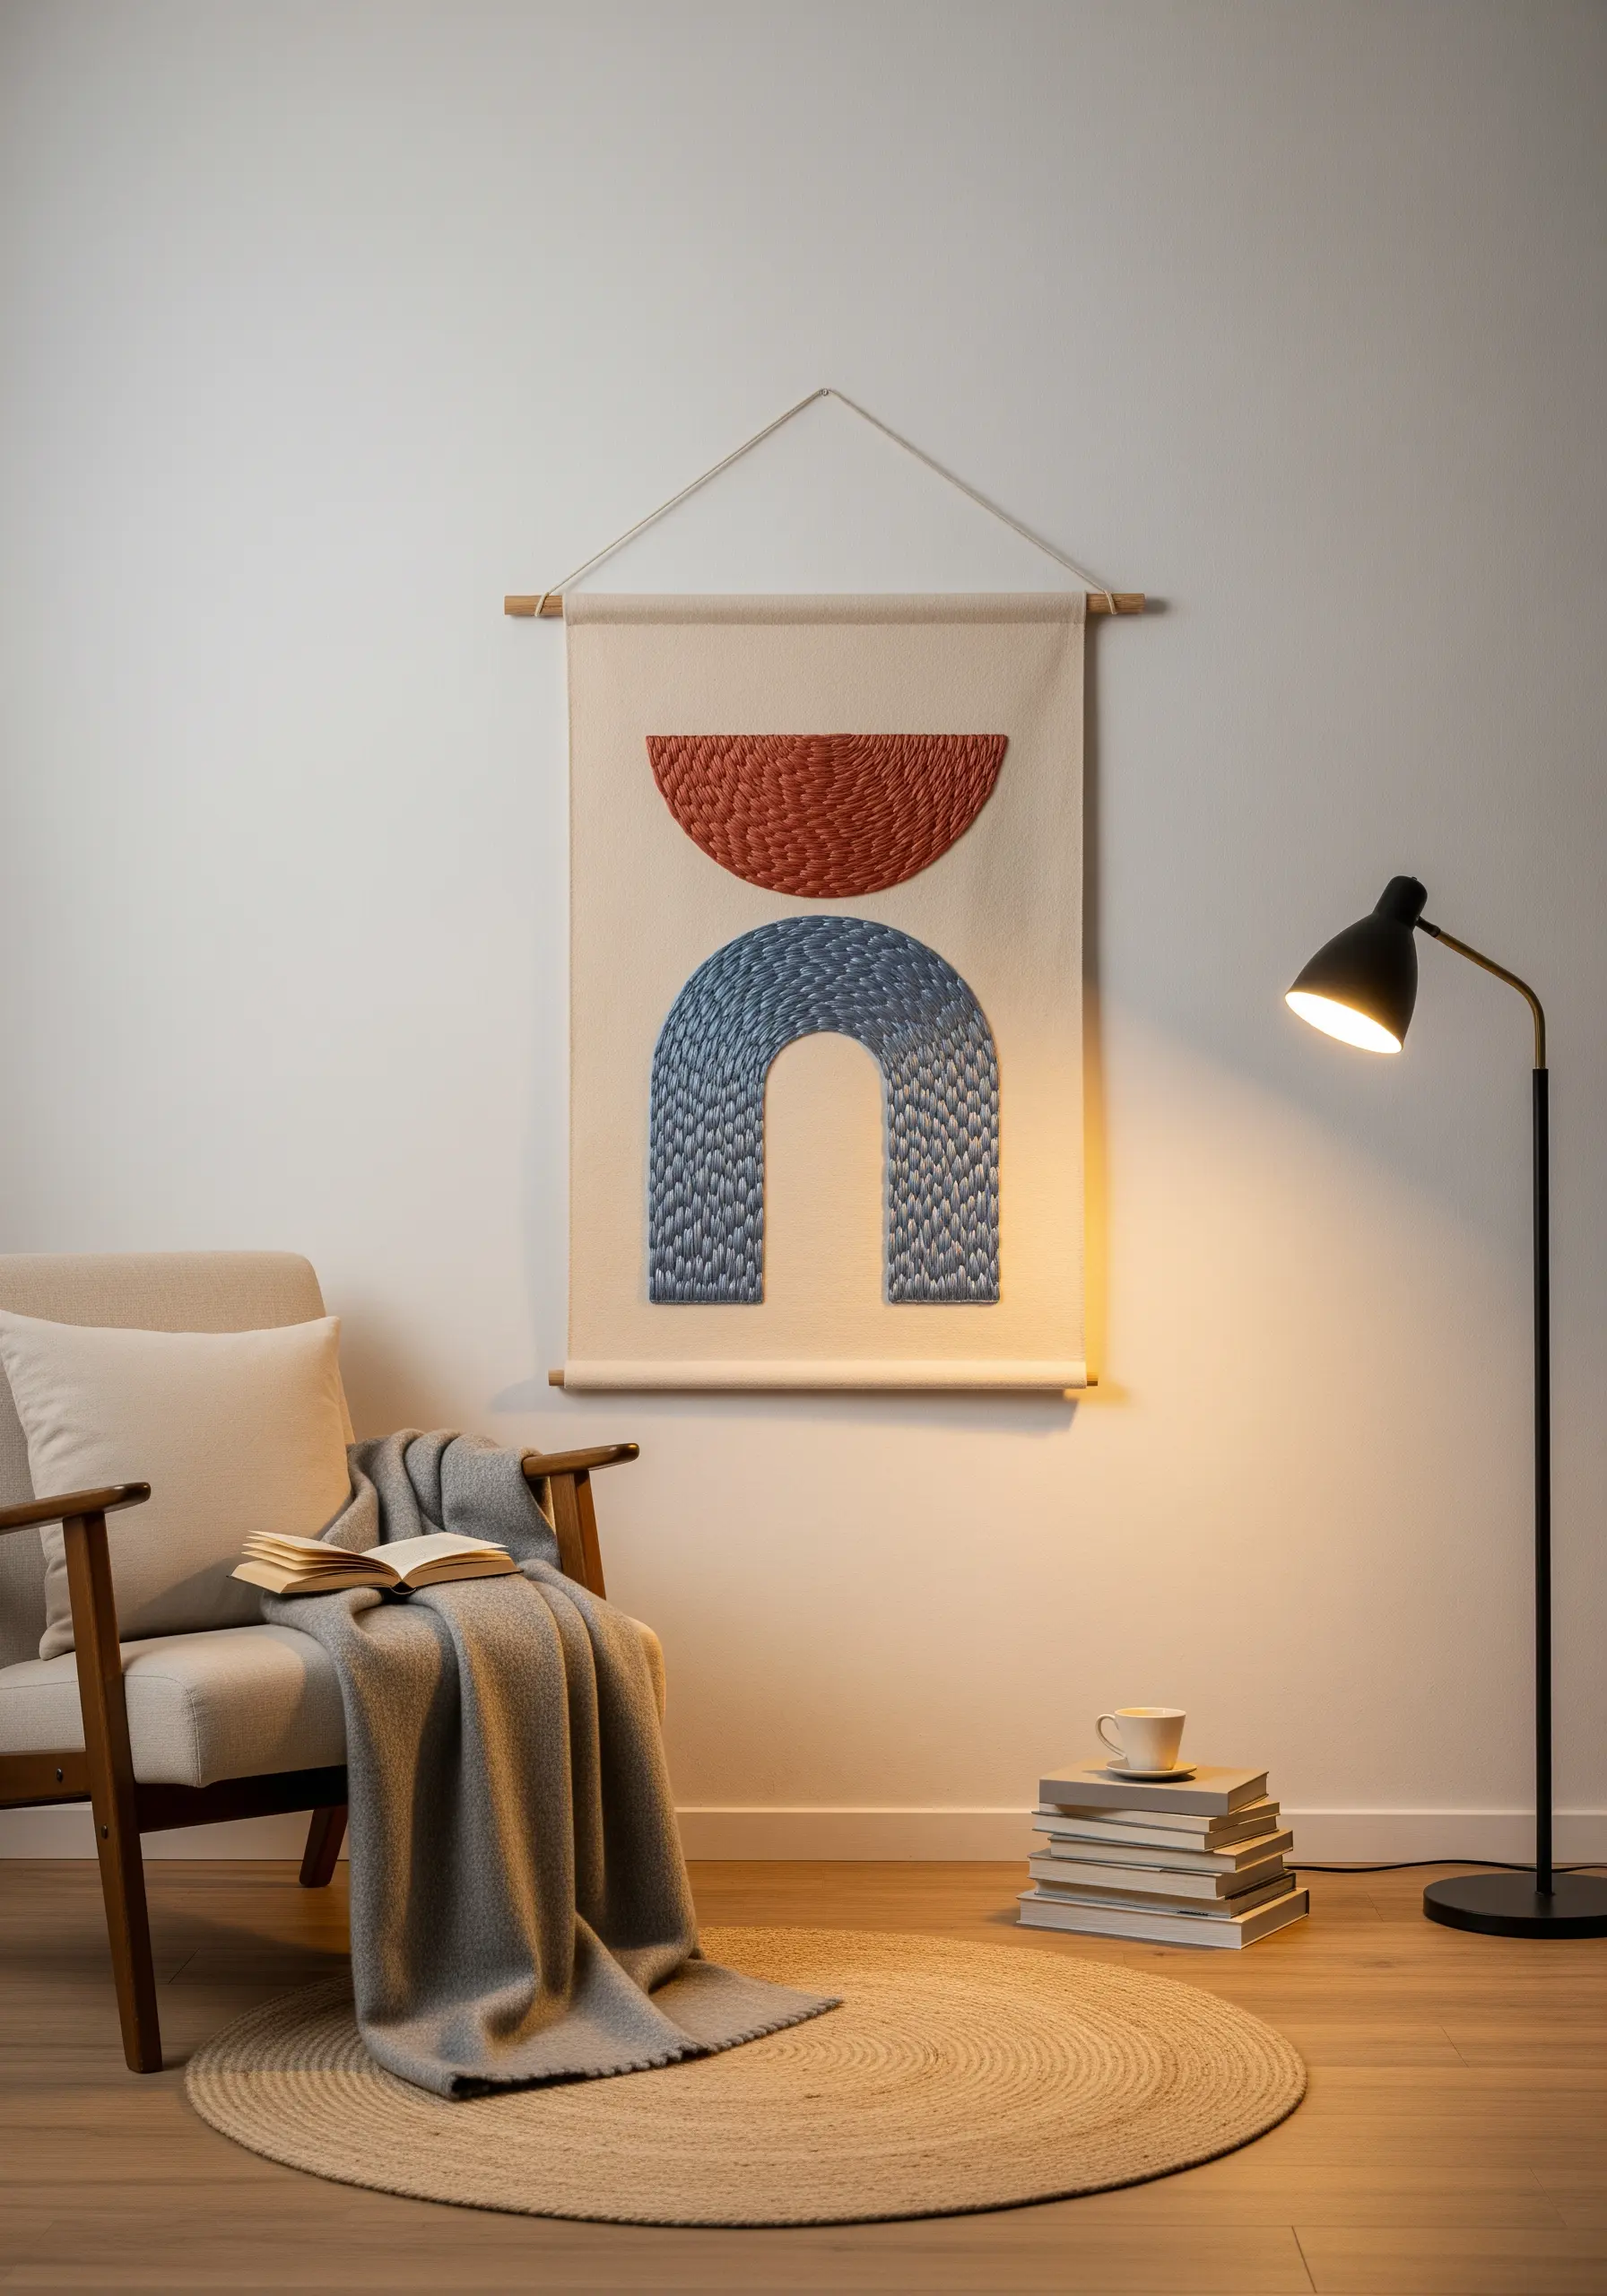
To fill large geometric areas without the perfect uniformity of satin stitch, use the seed stitch for an organic, woven-like texture.
Scatter small, individual straight stitches randomly within the shape, constantly changing their direction and spacing to create movement.
This technique is not only meditative but also catches the light in a way that adds dimension and tactile interest to your wall hangings.
For a bold composition, use a consistent thread weight across all shapes but vary the colors to build contrast and definition. This is a great example of abstract wall hoop designs.
4. Perfecting the Satin Stitch Arc on Denim

For a flawless rainbow arch on a sturdy fabric like denim, your preparation is everything.
First, outline each color band with a split stitch. This raised edge provides a perfect guide, allowing you to tuck your satin stitches underneath it for a crisp, clean finish.
Always work your satin stitches from the outside edge toward the center of each band to maintain consistent tension and avoid gaps.
This method prevents the slightly uneven look that can happen with freehand satin stitch, giving your work a truly professional feel.
5. High-Contrast Motifs on Dark Fabric
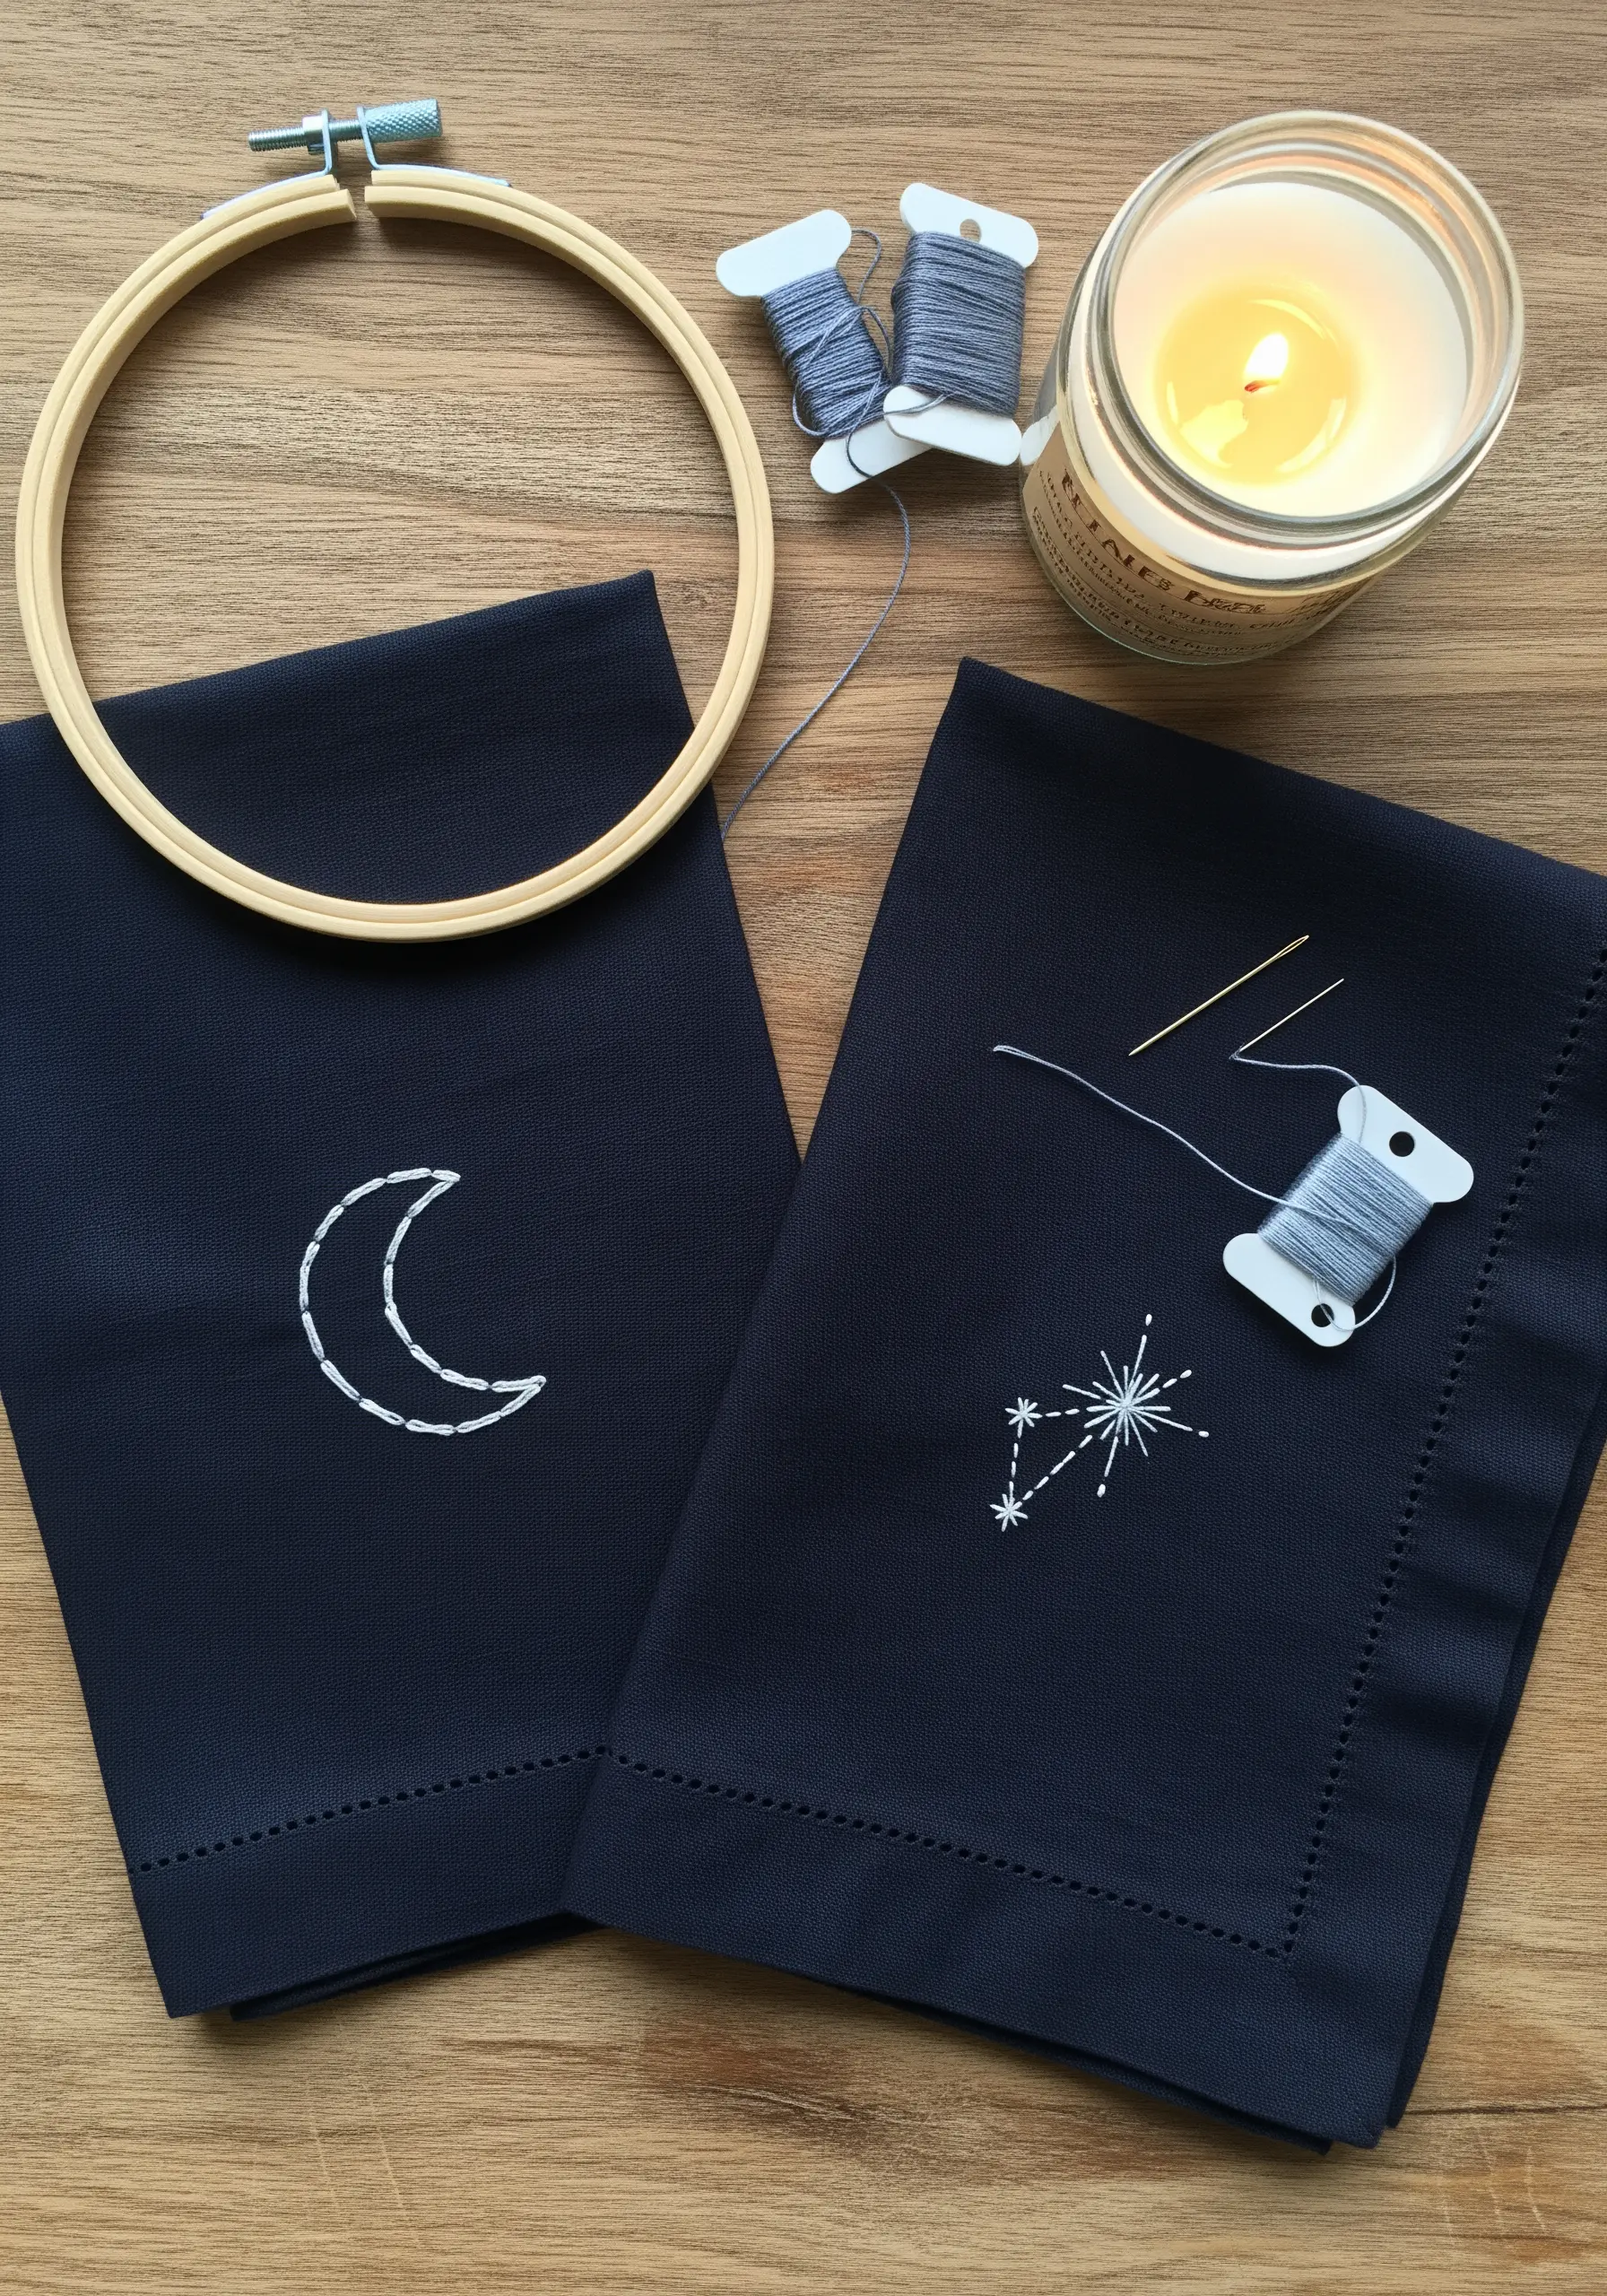
When stitching light thread onto a dark background, every stitch stands out, so precision is your most valuable tool.
Use a chain stitch to outline the crescent moon; it creates a delicate, rope-like texture that gives the simple shape more substance.
For the star, use straight stitches of varying lengths radiating from a central point to create a twinkling effect.
This high-contrast approach on dark linen turns even the simplest motifs into elegant, striking statements.
6. The Secret to Flawless Script on Stretchy Fabric

To embroider clean, beautiful lettering on knit fabric like a t-shirt, you must use a stabilizer—it’s non-negotiable.
Iron a cut-away stabilizer onto the back of the collar area before you begin stitching. This simple step prevents the fabric from stretching and distorting your letters as you work.
Use a classic backstitch or a smooth stem stitch with 3 strands of floss for a clear, readable script that moves with the garment without puckering.
7. Appliqué and Outline for 3D Felt Designs
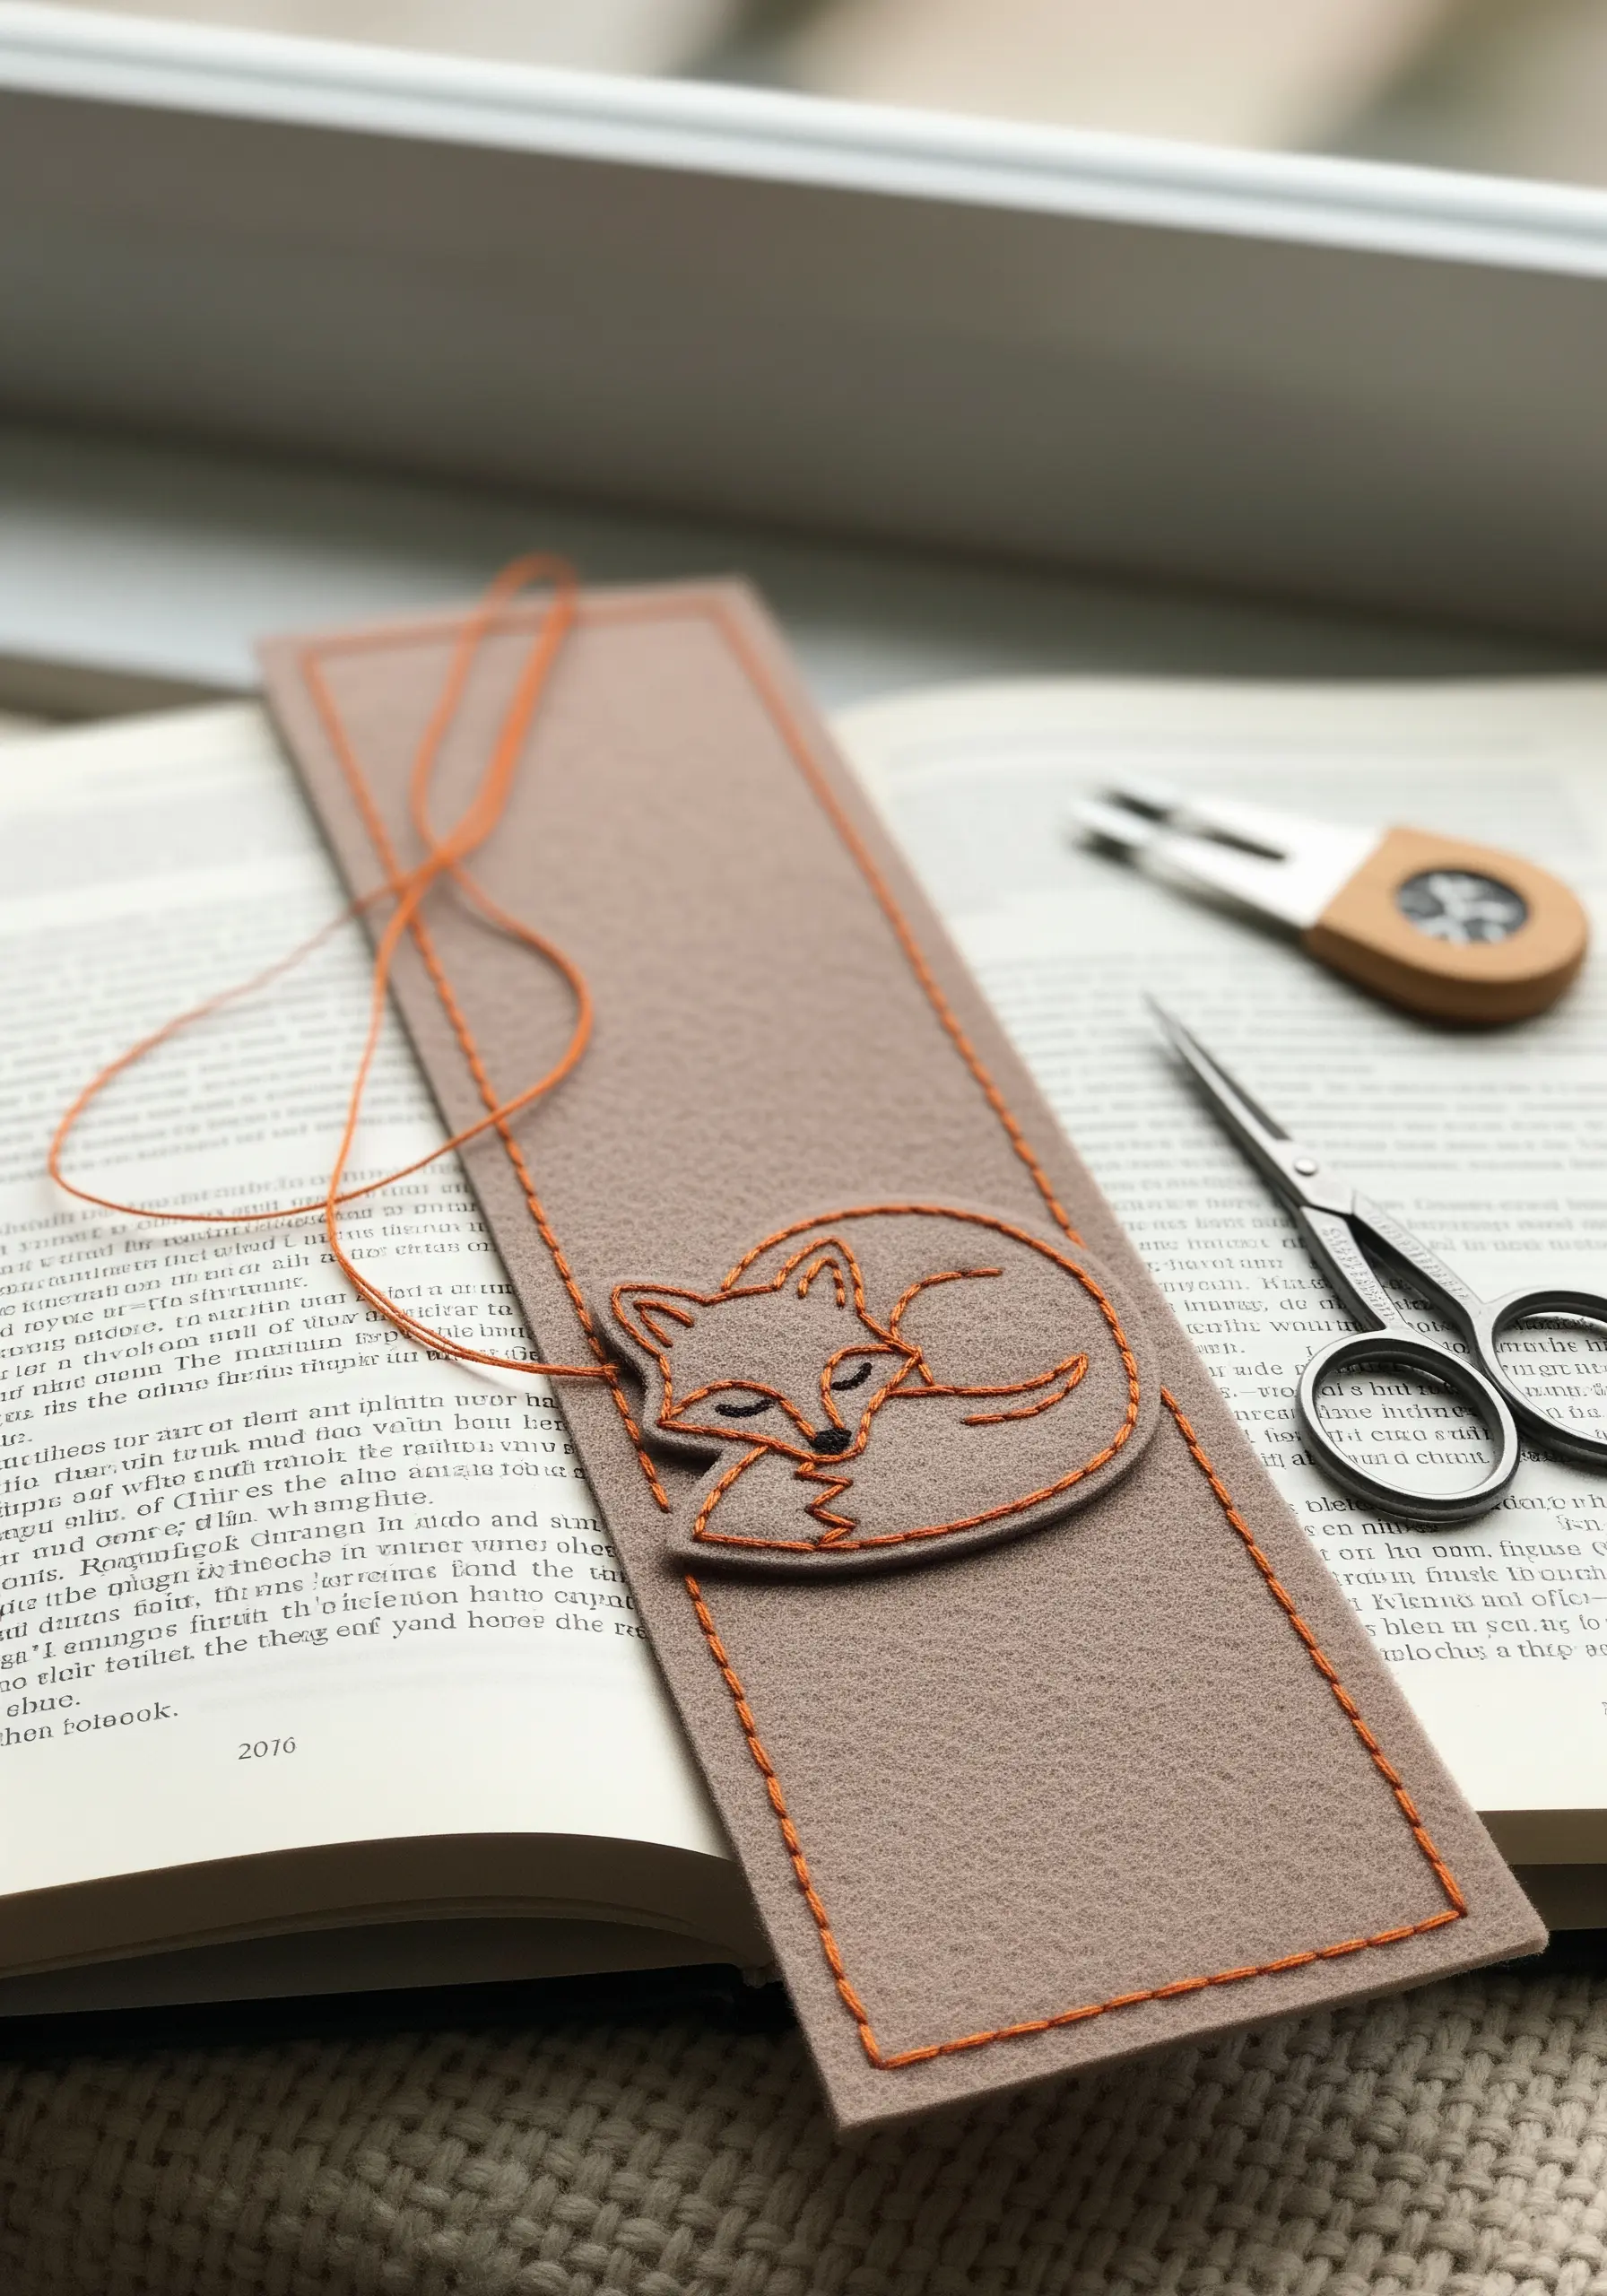
Combine appliqué with embroidery to create charming, dimensional projects with minimal effort.
Cut your main motif from a contrasting piece of felt and secure it with a few small, hidden stitches.
Then, use a simple backstitch to add the finer details, bringing the character to life.
Finish the piece with a blanket stitch around the outer edge—it not only looks beautiful but also reinforces the felt and prevents it from fraying over time.
8. Mapping Memories with Abstract Running Stitch

Transform a plain, fabric-covered journal into a personal artifact by creating an abstract map with running stitch.
Use a single color of thread for a sophisticated, minimalist aesthetic, focusing on varying your stitch length and direction to create pathways and intersections.
A few strategically placed cross stitches can represent meaningful locations or moments.
This thoughtful approach turns a simple notebook into one of those minimalist embroidery projects that double as gifts, either for yourself or someone else.
9. Stitching Through Paper for a Lantern Effect
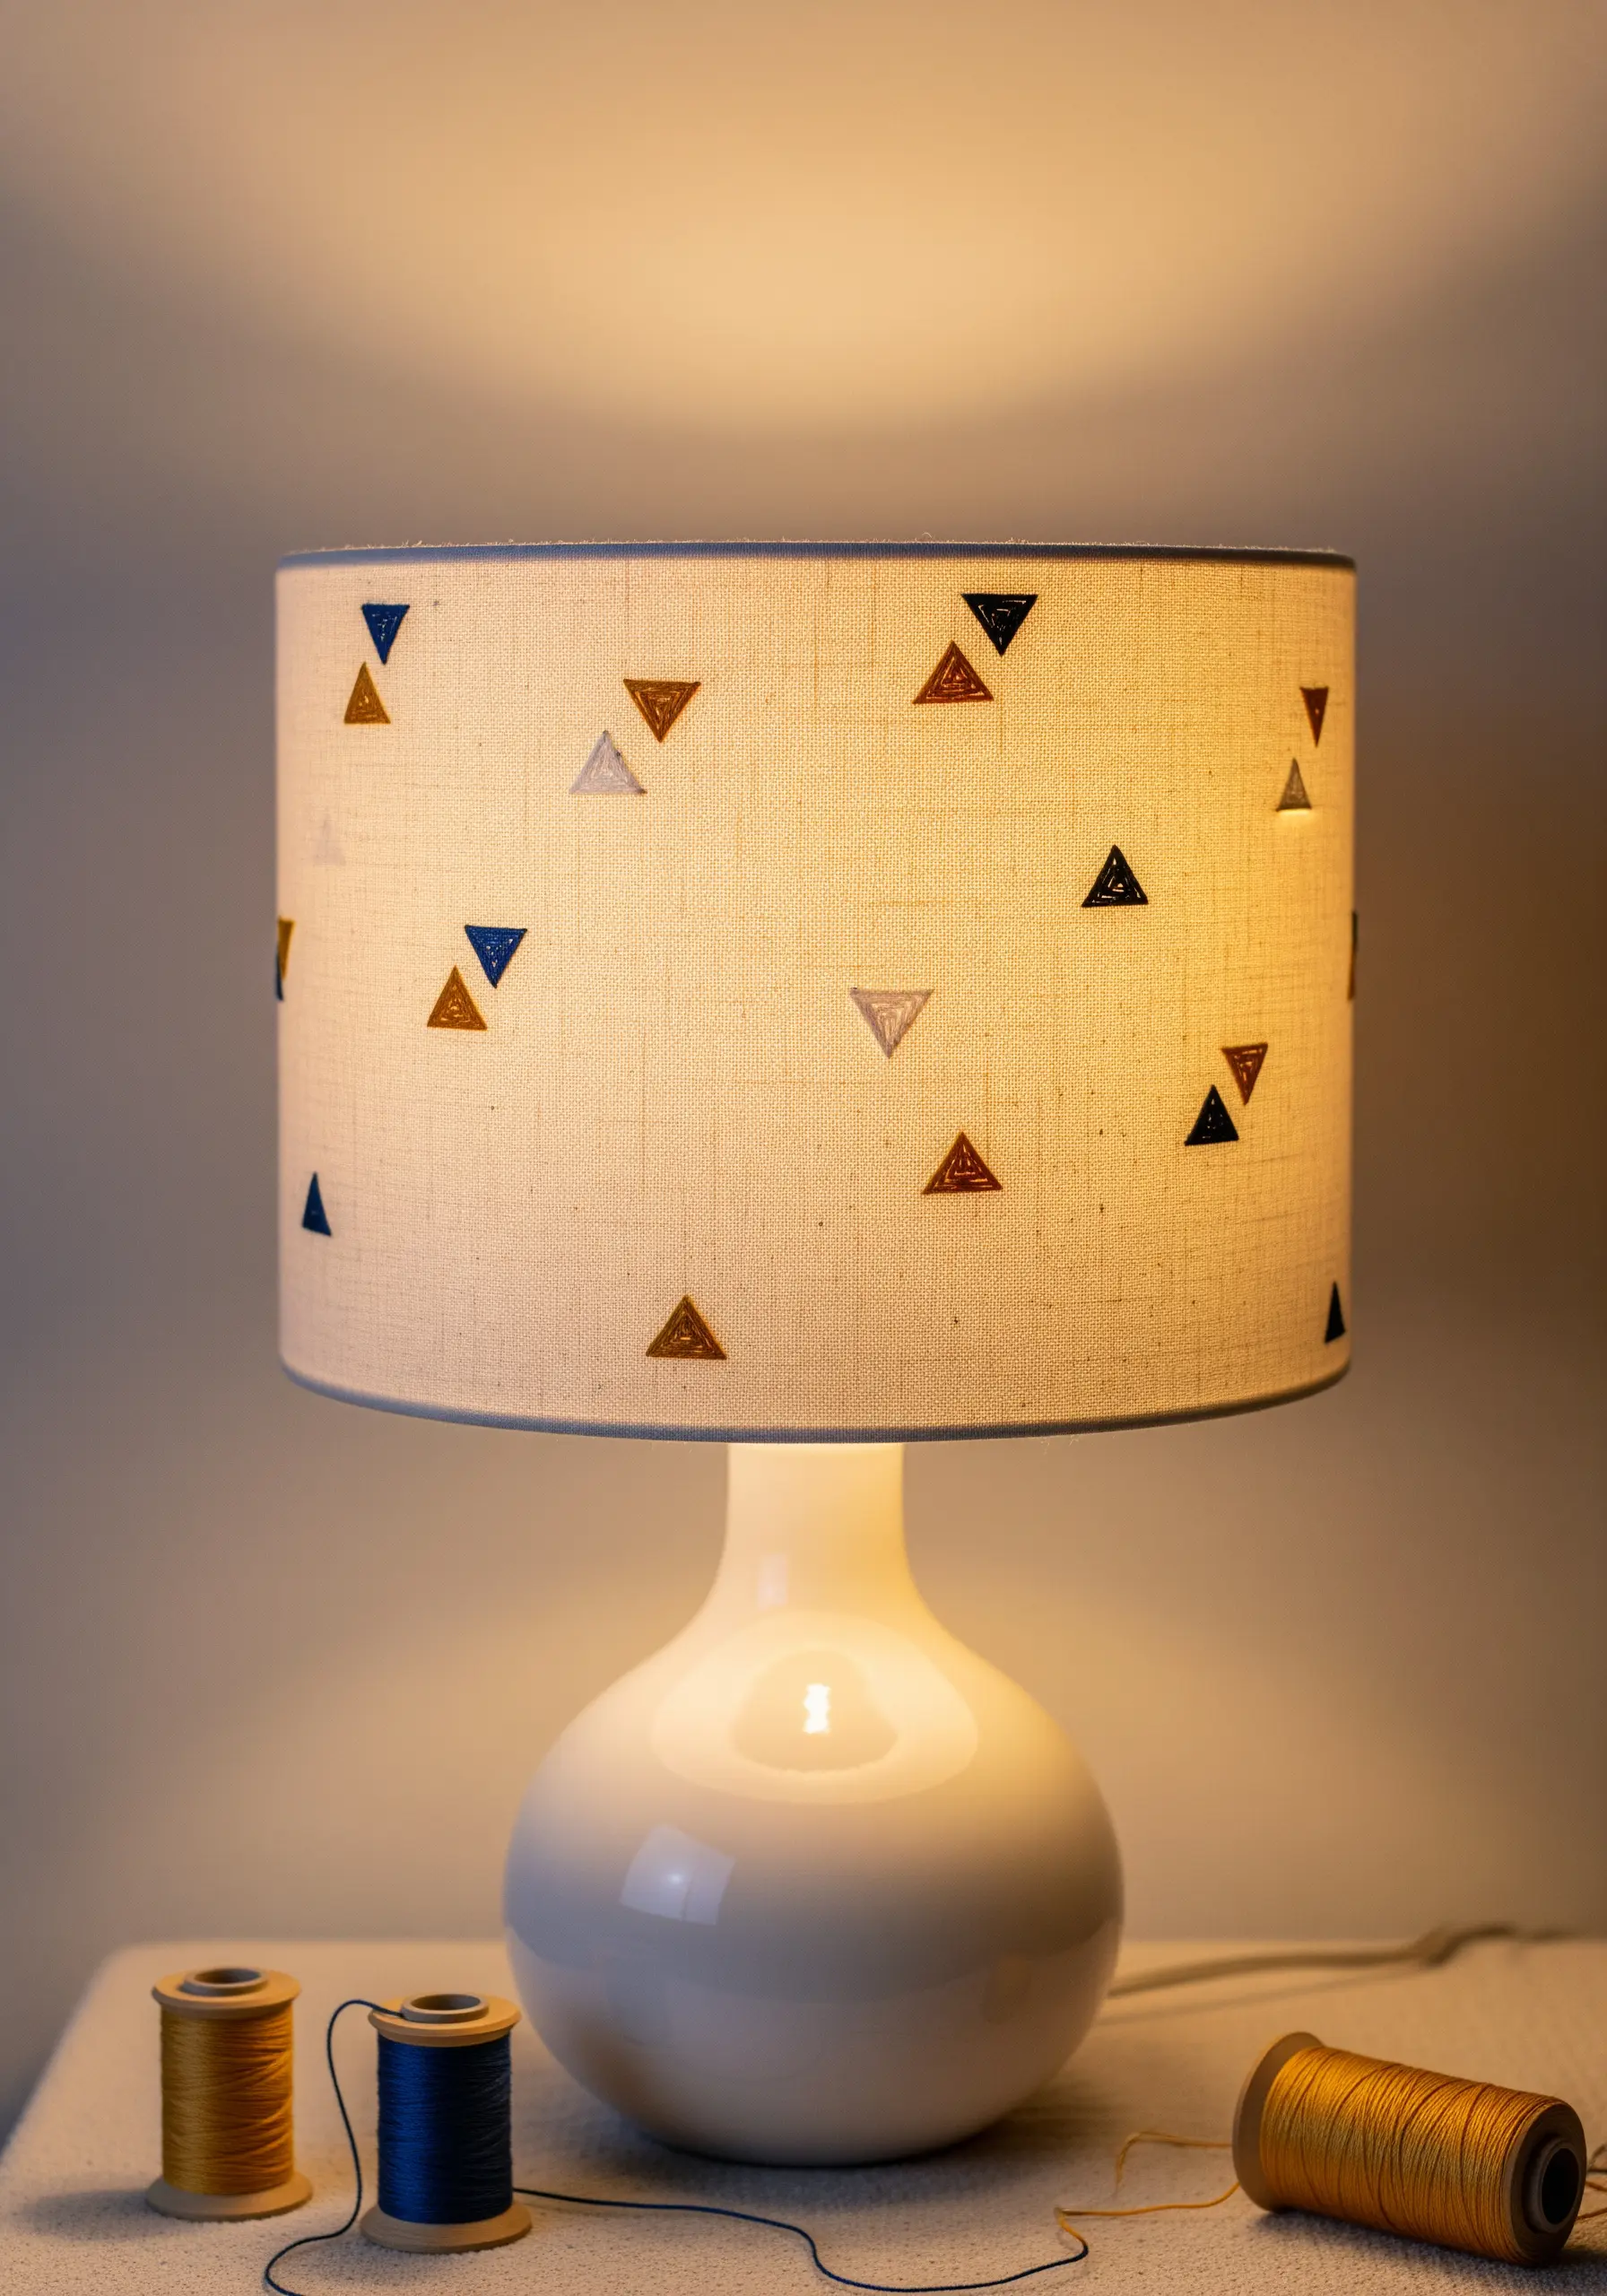
Embroidering on a paper or fabric lampshade creates a stunning effect when the light is turned on.
To avoid tearing the material, first pierce the holes for your design with a pin or a fine awl. This prepares the surface for stitching without causing damage.
Use a simple satin stitch to fill in small geometric shapes; the light will shine through the thread itself, creating a warm, textured glow.
Choose a thread with a slight sheen, like rayon, to enhance this beautiful, luminous effect.
10. Dimensional Monograms Using the Couching Technique

Create a bold, highly textured monogram by couching thick yarn, rope, or a handmade cord onto your fabric.
First, arrange the thick fiber into the shape of your letter. Then, using a standard six-strand floss in a matching color, tack it down with small, evenly spaced stitches that are perpendicular to the cord.
This technique adds impressive dimension that stands out beautifully on simple linen or cotton, turning a pillowcase into a piece of personalized decor.
11. Minimalist Detail on Functional Felt Coasters
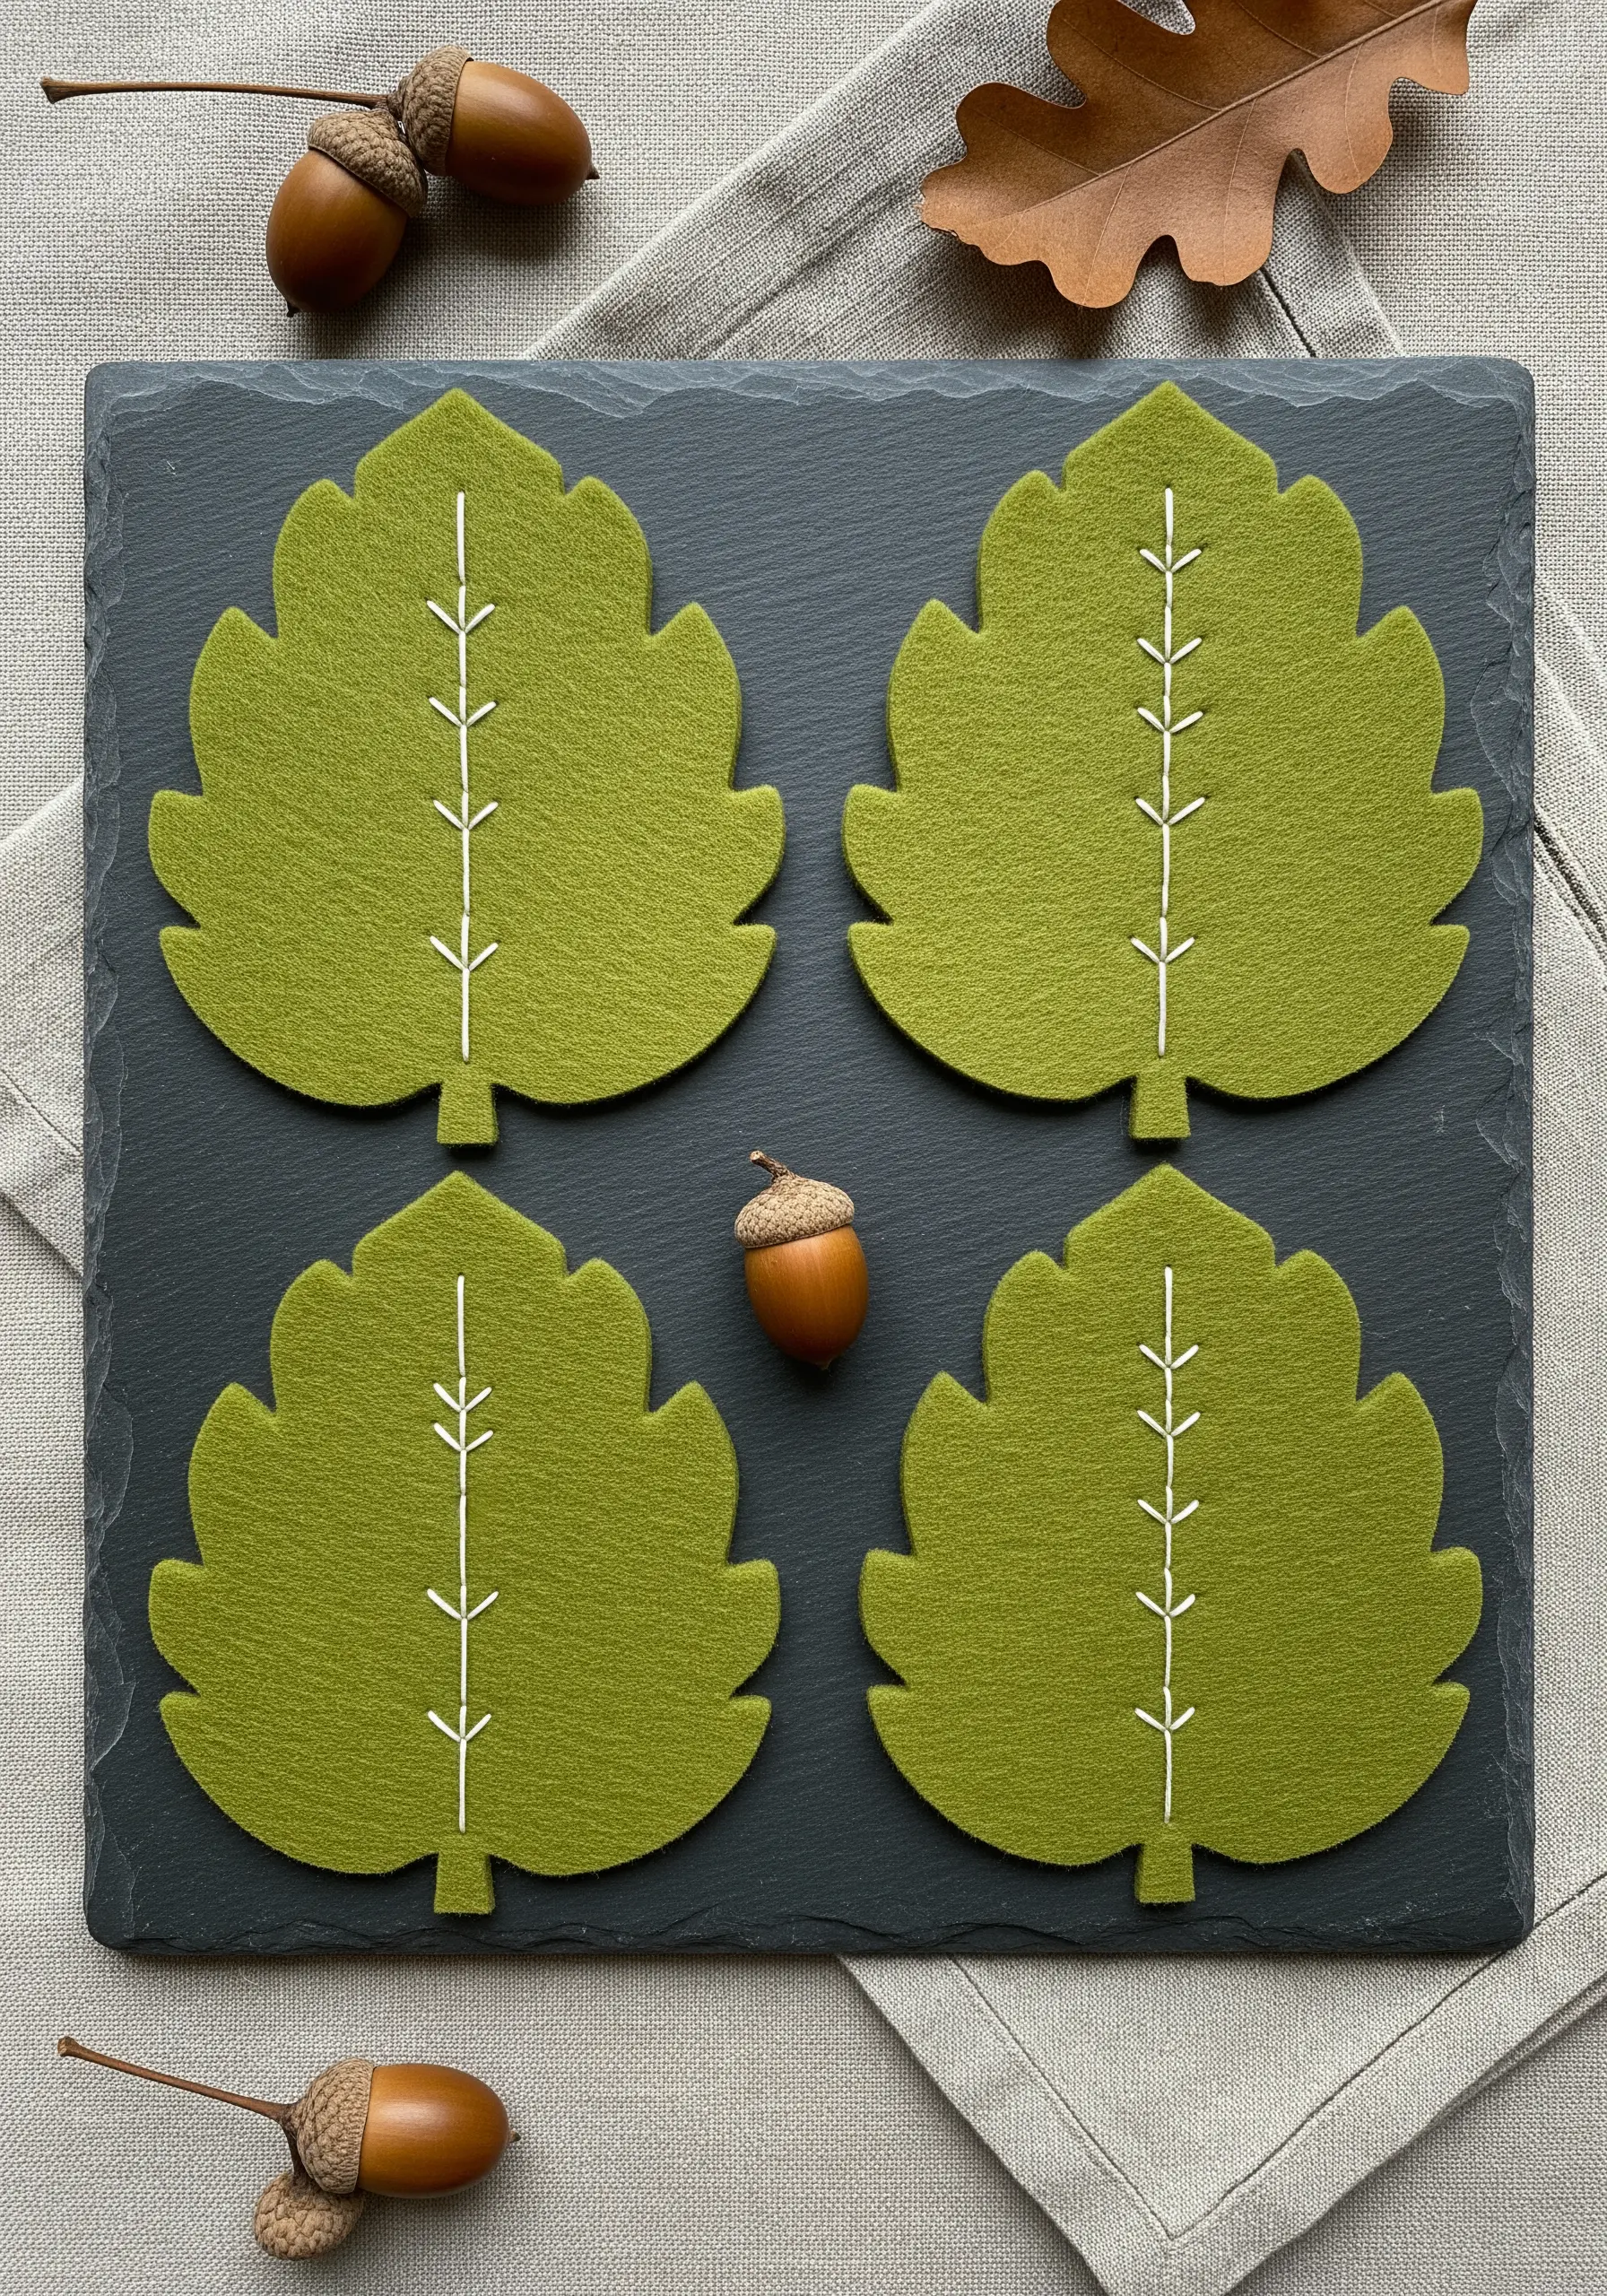
For a project that is both functional and beautifully understated, add simple veining to felt leaf shapes with a basic backstitch.
The key to a modern, sophisticated look is restraint. A single central vein with a few angled offshoots is all you need to suggest the form of a leaf.
Use a high-contrast thread, like white on olive green, to make the minimal design feel intentional and graphic rather than unfinished.
12. Micro-Embroidery with Delicate Thread Painting

To create a detailed miniature motif, such as a bee, use the long-and-short stitch—often called thread painting.
Work with only a single strand of floss to achieve the finest possible detail and control.
Blend the colors—like the yellow and black stripes—by slightly overlapping your stitches, which creates a soft, realistic transition instead of a hard line.
This careful technique turns a simple embellishment on an apron or collar into a tiny, treasured work of art.
13. The Fluidity of a Continuous Line Portrait
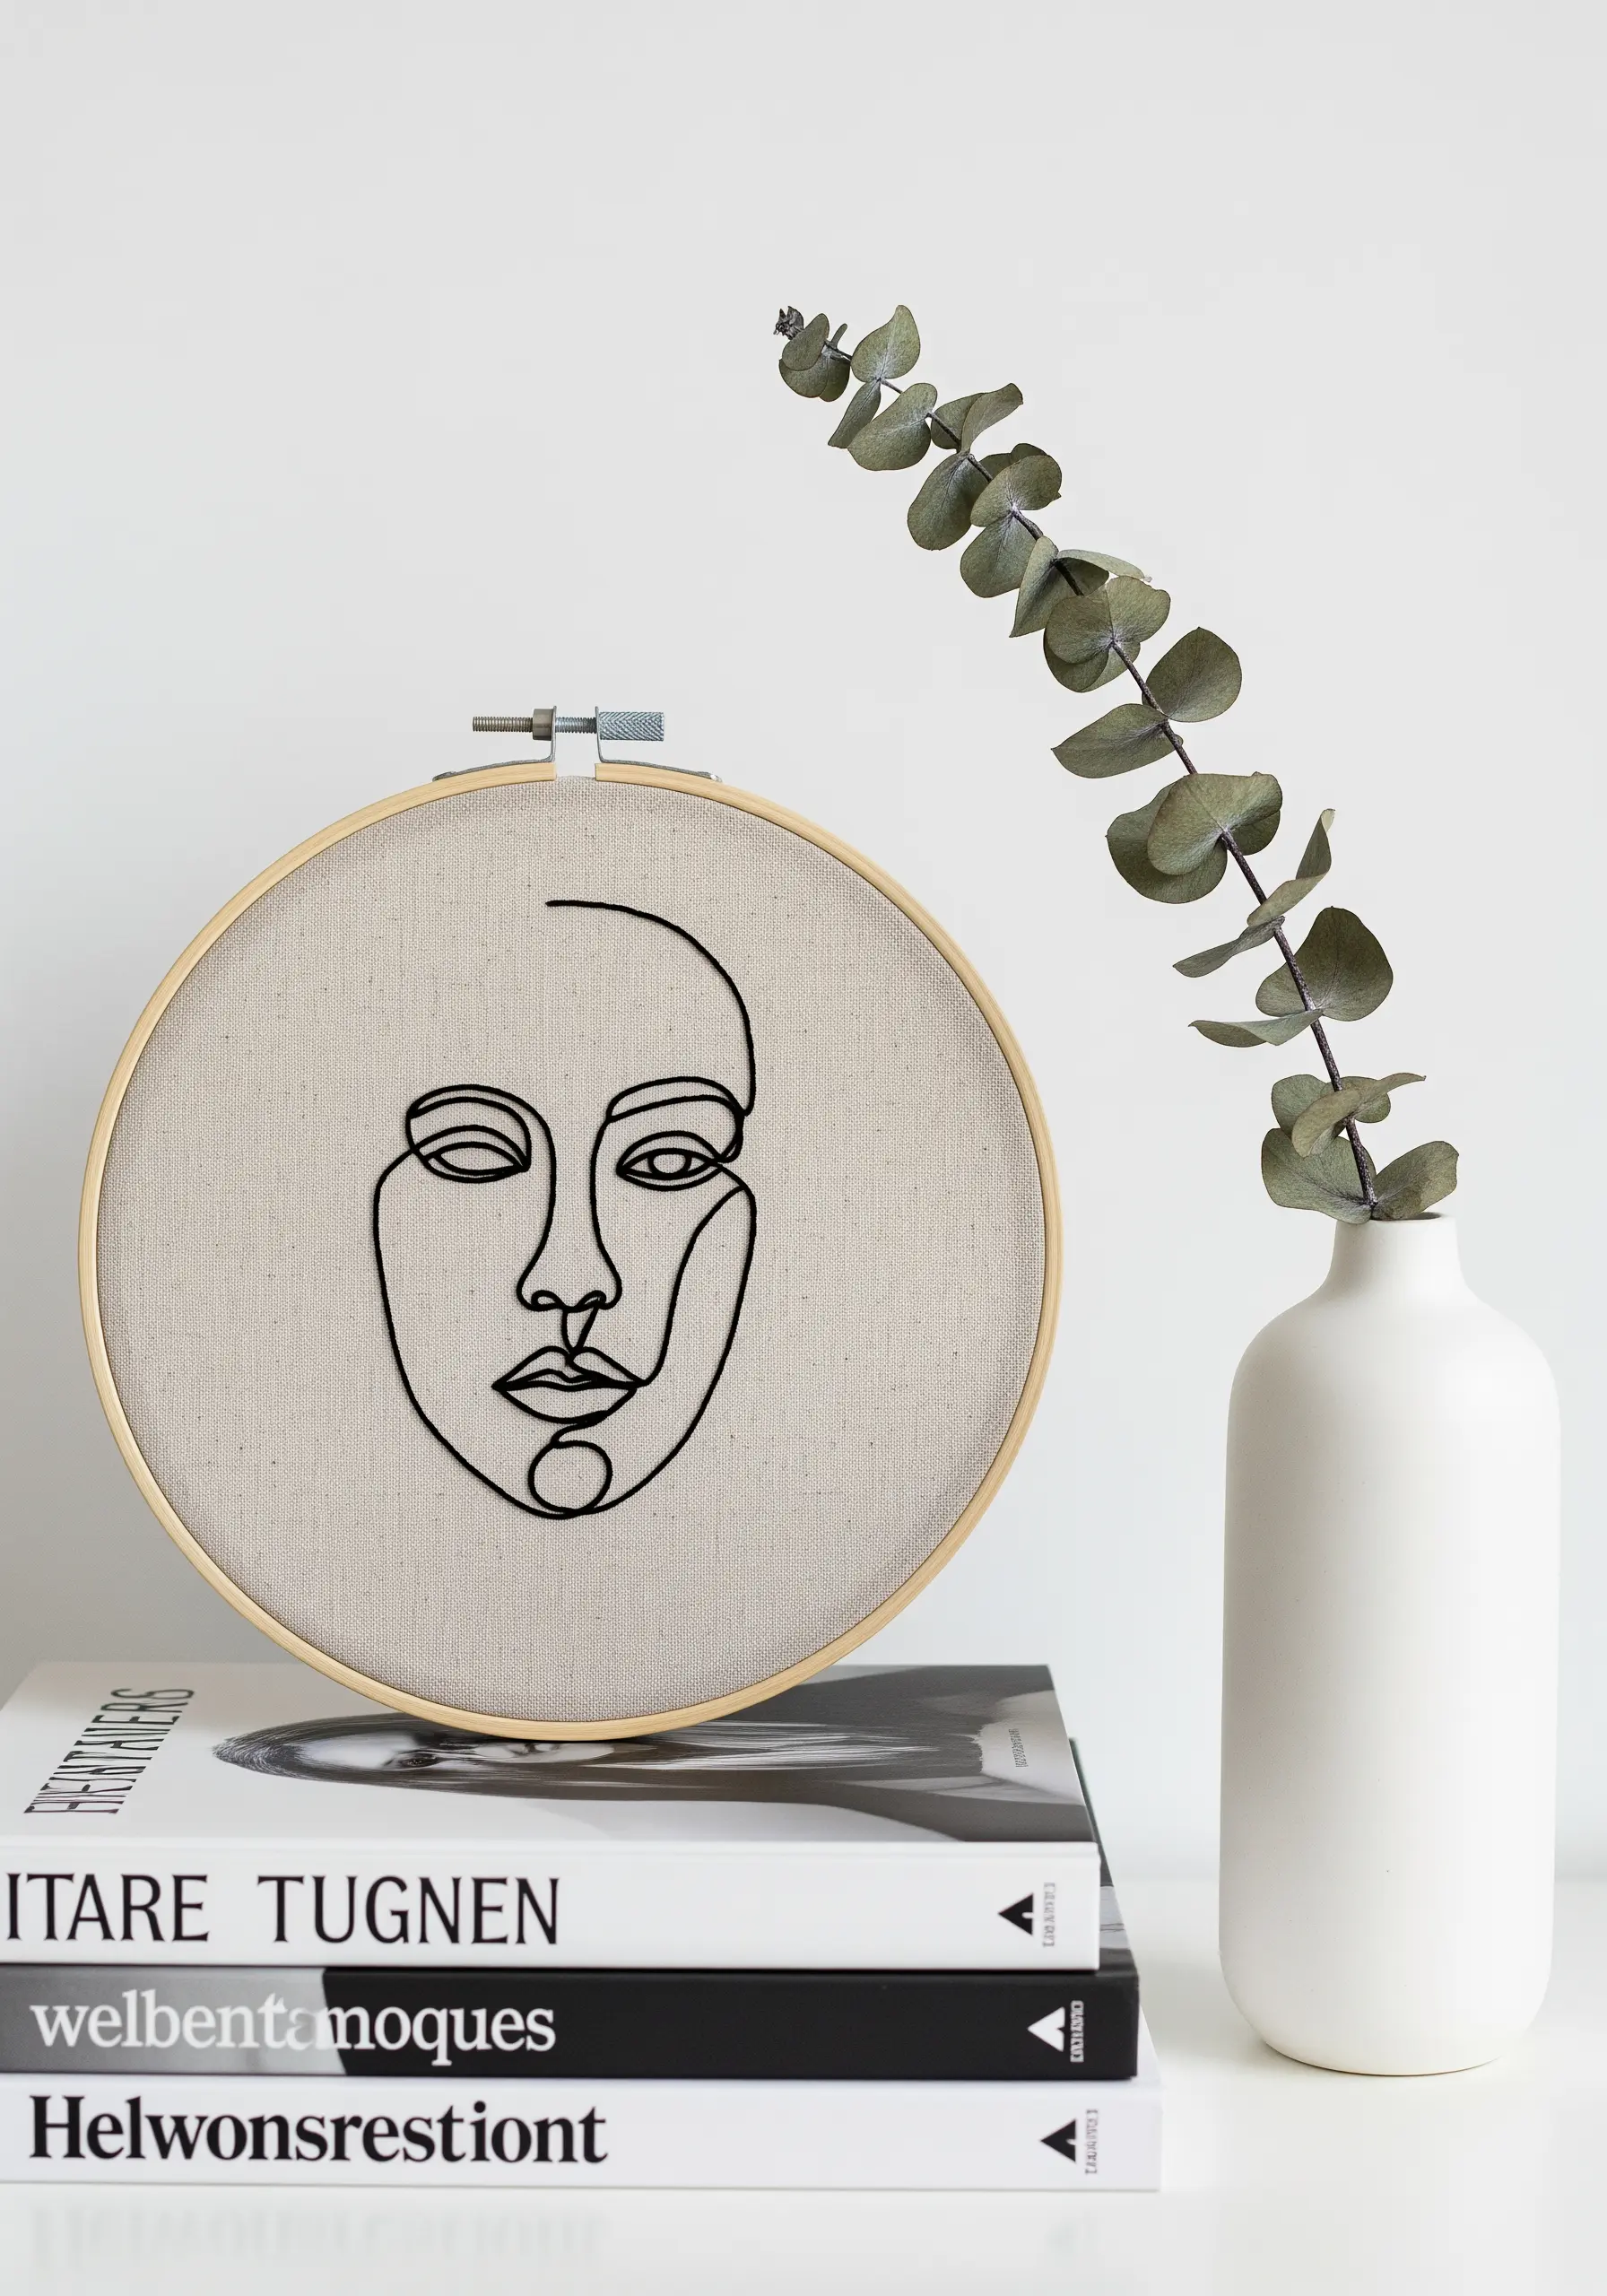
The power of a single-line drawing lies in its uninterrupted flow. You can replicate this effect perfectly using a whipped backstitch.
First, stitch the entire outline with a standard backstitch. Then, without piercing the fabric again, take a second length of thread and weave it around the existing stitches to conceal the gaps.
This creates a perfectly smooth, solid line that honors the original artwork’s intention.
These one-line embroidery wall arts look stunning when stitched with three strands of black floss on natural linen for a classic, graphic statement.
14. Embellishing Knits with a Flexible Cable Stitch

To add a decorative band to knitted items like socks or sweaters, choose a stitch that mimics the texture of knitting itself.
The Pekinese stitch or a plaited braid stitch are excellent choices because they sit on the surface of the knit fabric without pulling or causing distortion.
This creates a beautiful, flexible embellishment that stretches naturally with the garment, ensuring your hard work doesn’t restrict the item’s fit or function.
15. Combining Stitches for an Elegant Wheat Stalk

For a graceful botanical like a wheat stalk, the right combination of stitches makes all the difference.
Use a stem stitch for the main stalk to give it a strong, rope-like structure.
For the individual grains, use a satin stitch, angling your stitches slightly outward from the central stem. This simple directional change creates a sense of fullness and organic shape.
Using a thread with a subtle sheen, such as a gold-toned cotton or a single strand of metallic floss, adds a touch of warmth and sophistication.
16. Creating a Delicate Floral Border with Texture

To stitch a balanced and delicate floral border, rely on a few simple, textured stitches used in combination.
Use lazy daisy stitches for the white petals, which are quick and create perfect teardrop shapes.
Add French knots for the flower centers in both blue and yellow to provide a pop of color and a raised, tactile element.
By keeping the motifs small and spacing them rhythmically, you can create one of those intricate-looking handmade embroidery projects for last-minute gift inspiration that feels both classic and fresh.
17. An Abstract Pattern with Satin Stitch Pebbles

Create a playful, modern pattern by filling a space with irregularly shaped satin stitches.
Instead of stitching perfect circles, create small, organic “pebble” shapes, varying their size, color, and orientation to build a dynamic composition.
To ensure each shape looks smooth and intentional, keep your stitches short and parallel within each individual pebble.
This technique is a fast and effective way to add a pop of personality and texture to a simple canvas pouch or pillow cover.
18. Finishing a Tiny Hoop as a Keychain

To turn a small embroidery project into a functional and durable keychain, the final finishing steps are crucial.
After stitching your design, trim the excess fabric, leaving about a half-inch border around the hoop.
Secure the edges to the inside of the hoop with a strong adhesive like hot glue or fabric glue.
For a professional look, cut a piece of felt to the exact size of the hoop’s back and glue it in place to conceal the messy stitches. Finally, attach the keychain hardware to the hoop’s tightening screw.
19. Achieving Crisp Lines on Chunky Knits

Embroidering on a ribbed or chunky knit requires a gentle approach to avoid damaging the yarn.
Instead of piercing the yarn fibers, which can cause them to snag or split, guide your needle *between* the existing knit stitches.
Using a tapestry needle with a blunt tip makes this much easier and protects the integrity of the garment.
A simple backstitch using all six strands of floss will create a bold, clean outline that sits neatly on top of the knit texture without getting lost.
20. Replicating Line Art on Rustic Burlap

Burlap’s loose, open weave provides a wonderful rustic texture, but it can swallow fine lines.
To ensure your design remains clear and bold, use a stitch that creates a solid, rope-like line, such as a stem stitch or a whipped backstitch.
These stitches build upon themselves, creating a raised line that won’t get lost in the fabric’s coarse texture.
Use all six strands of floss to give your line art the necessary weight to stand out—this technique is perfect for tote bag embroidery designs for coffee lovers, too.
21. Combining Stamped Text with a Stitched Accent
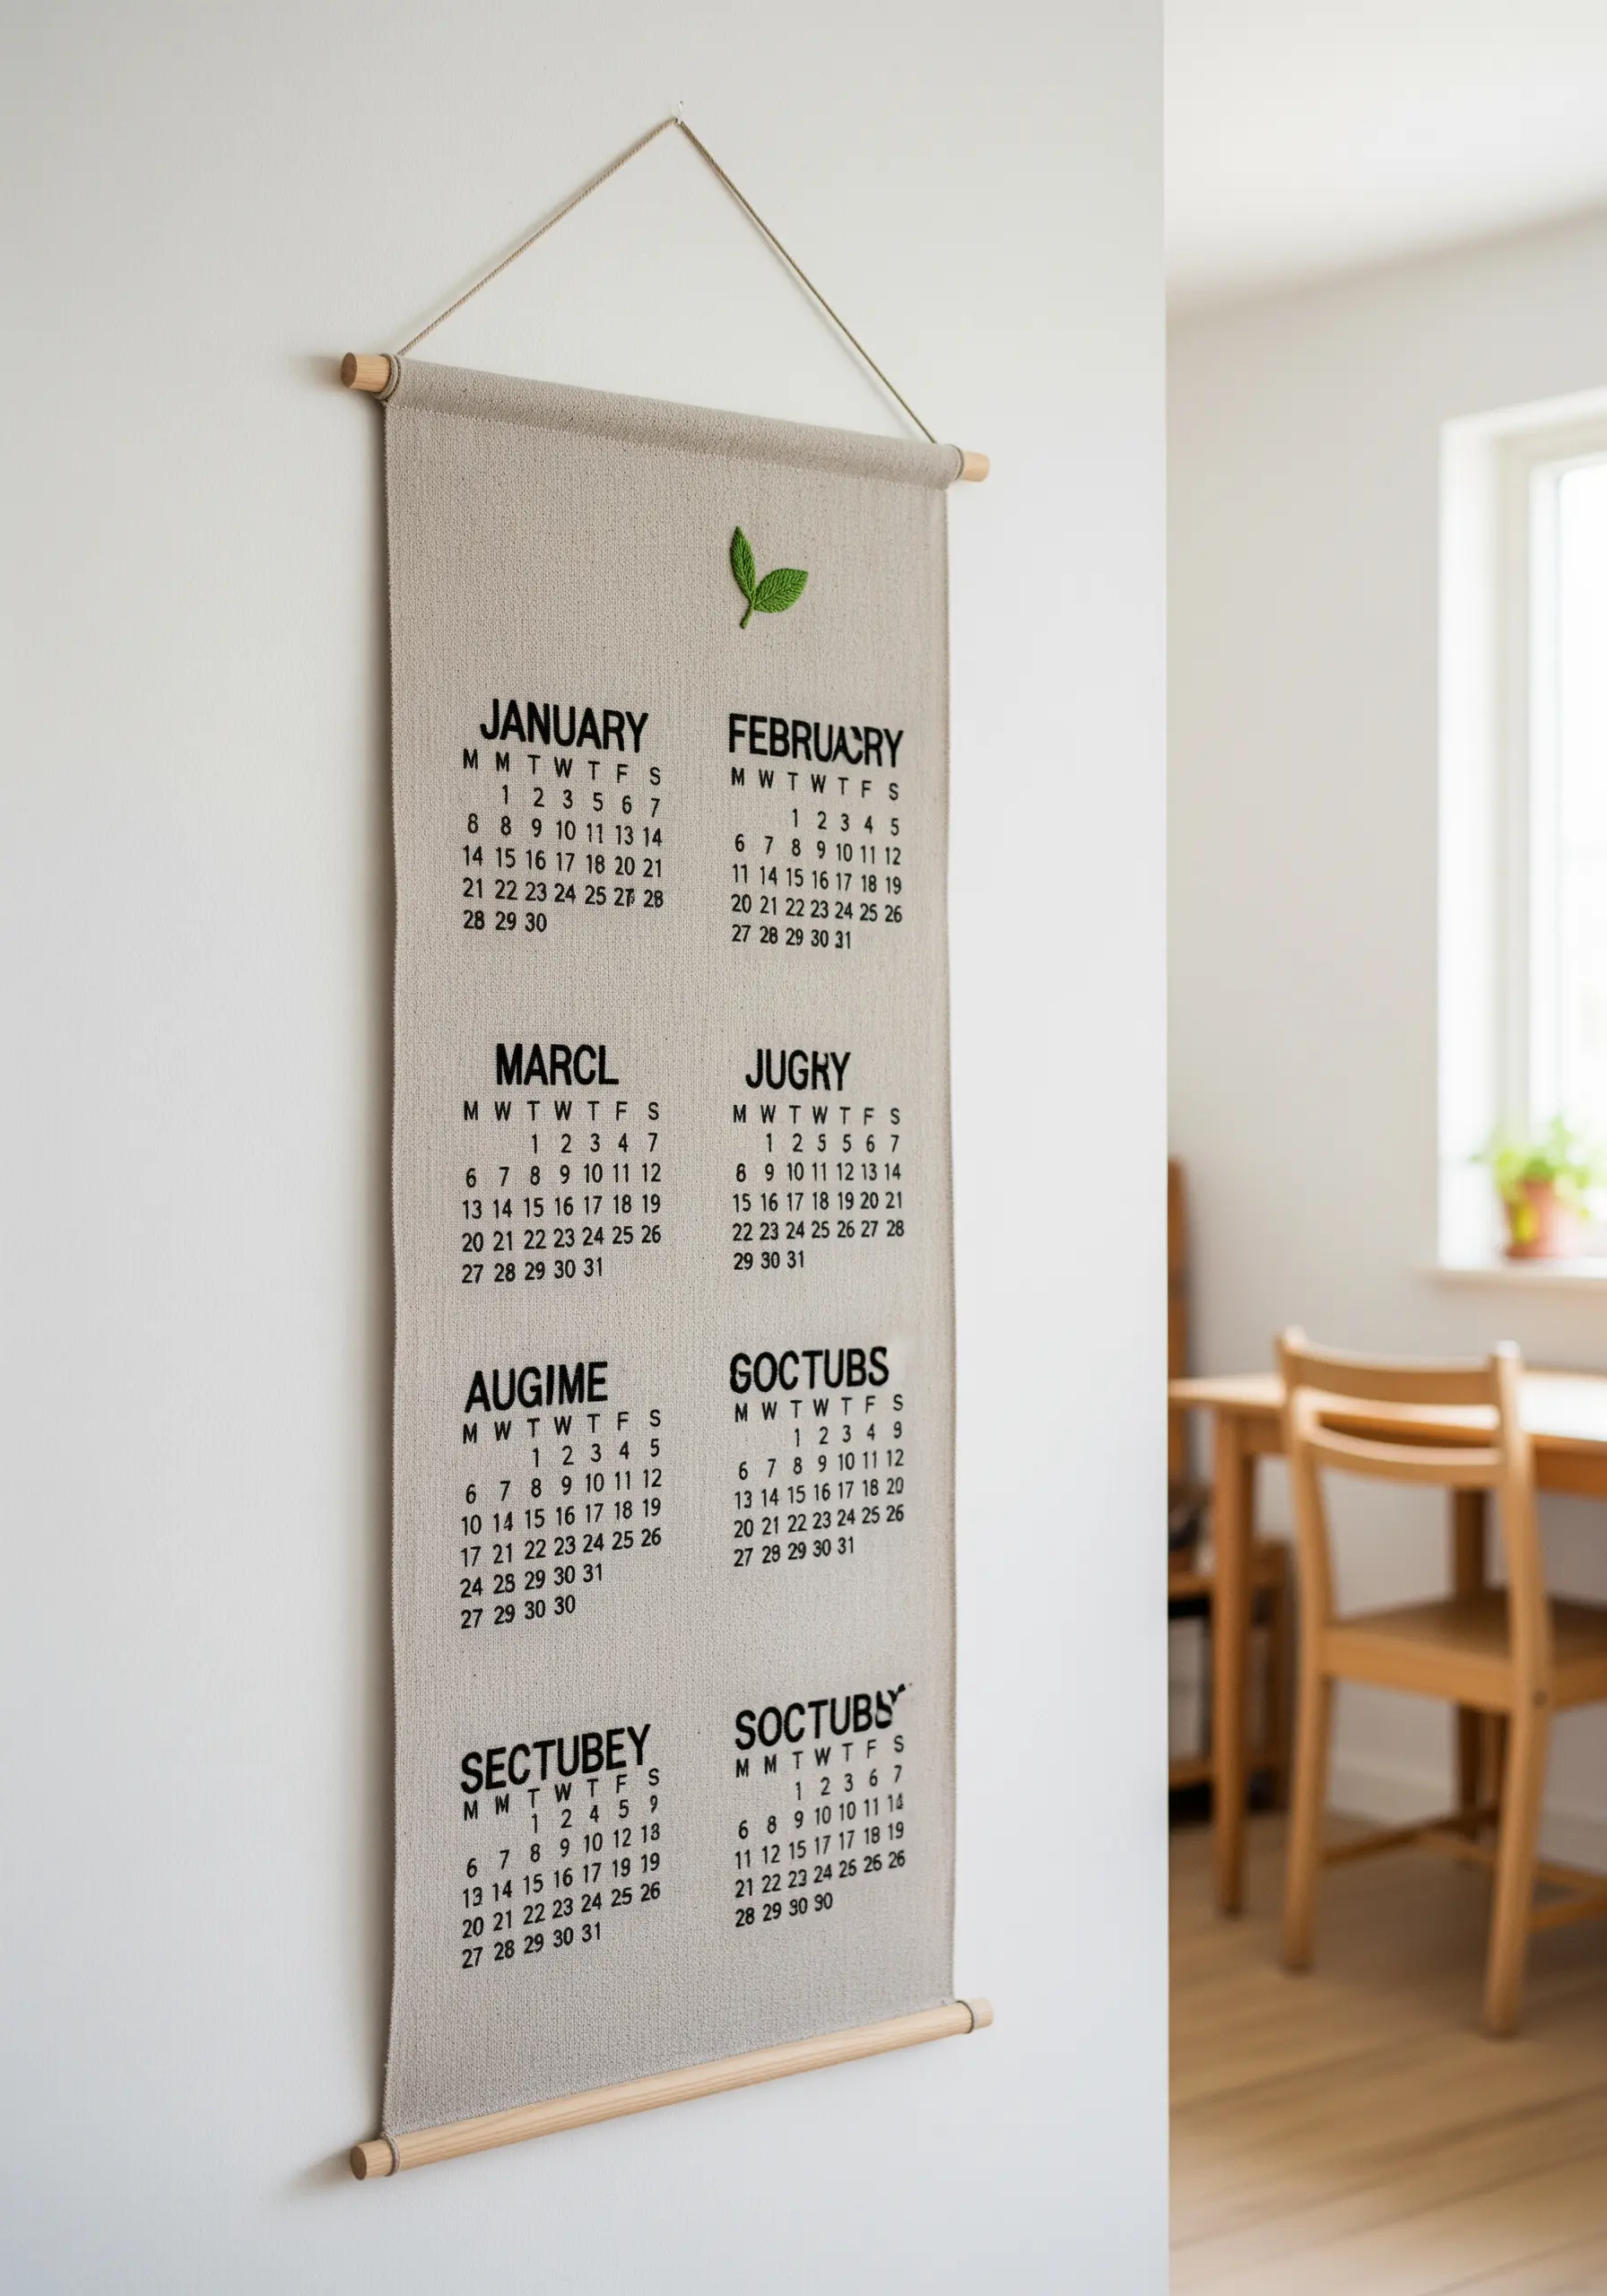
For projects that require a lot of text, such as a calendar, combining fabric stamping with embroidery is an elegant and time-saving solution.
Use permanent fabric ink and letter stamps for the main grid to ensure clean, uniform text that would be tedious to stitch by hand.
Then, add a small, personal touch with a single embroidered element—like a leaf motif, a star, or a simple border.
This mixed-media approach gives you a beautiful, handmade result without the immense time commitment of stitching every single letter.
22. Clean Outlines on Textured Waffle Weave
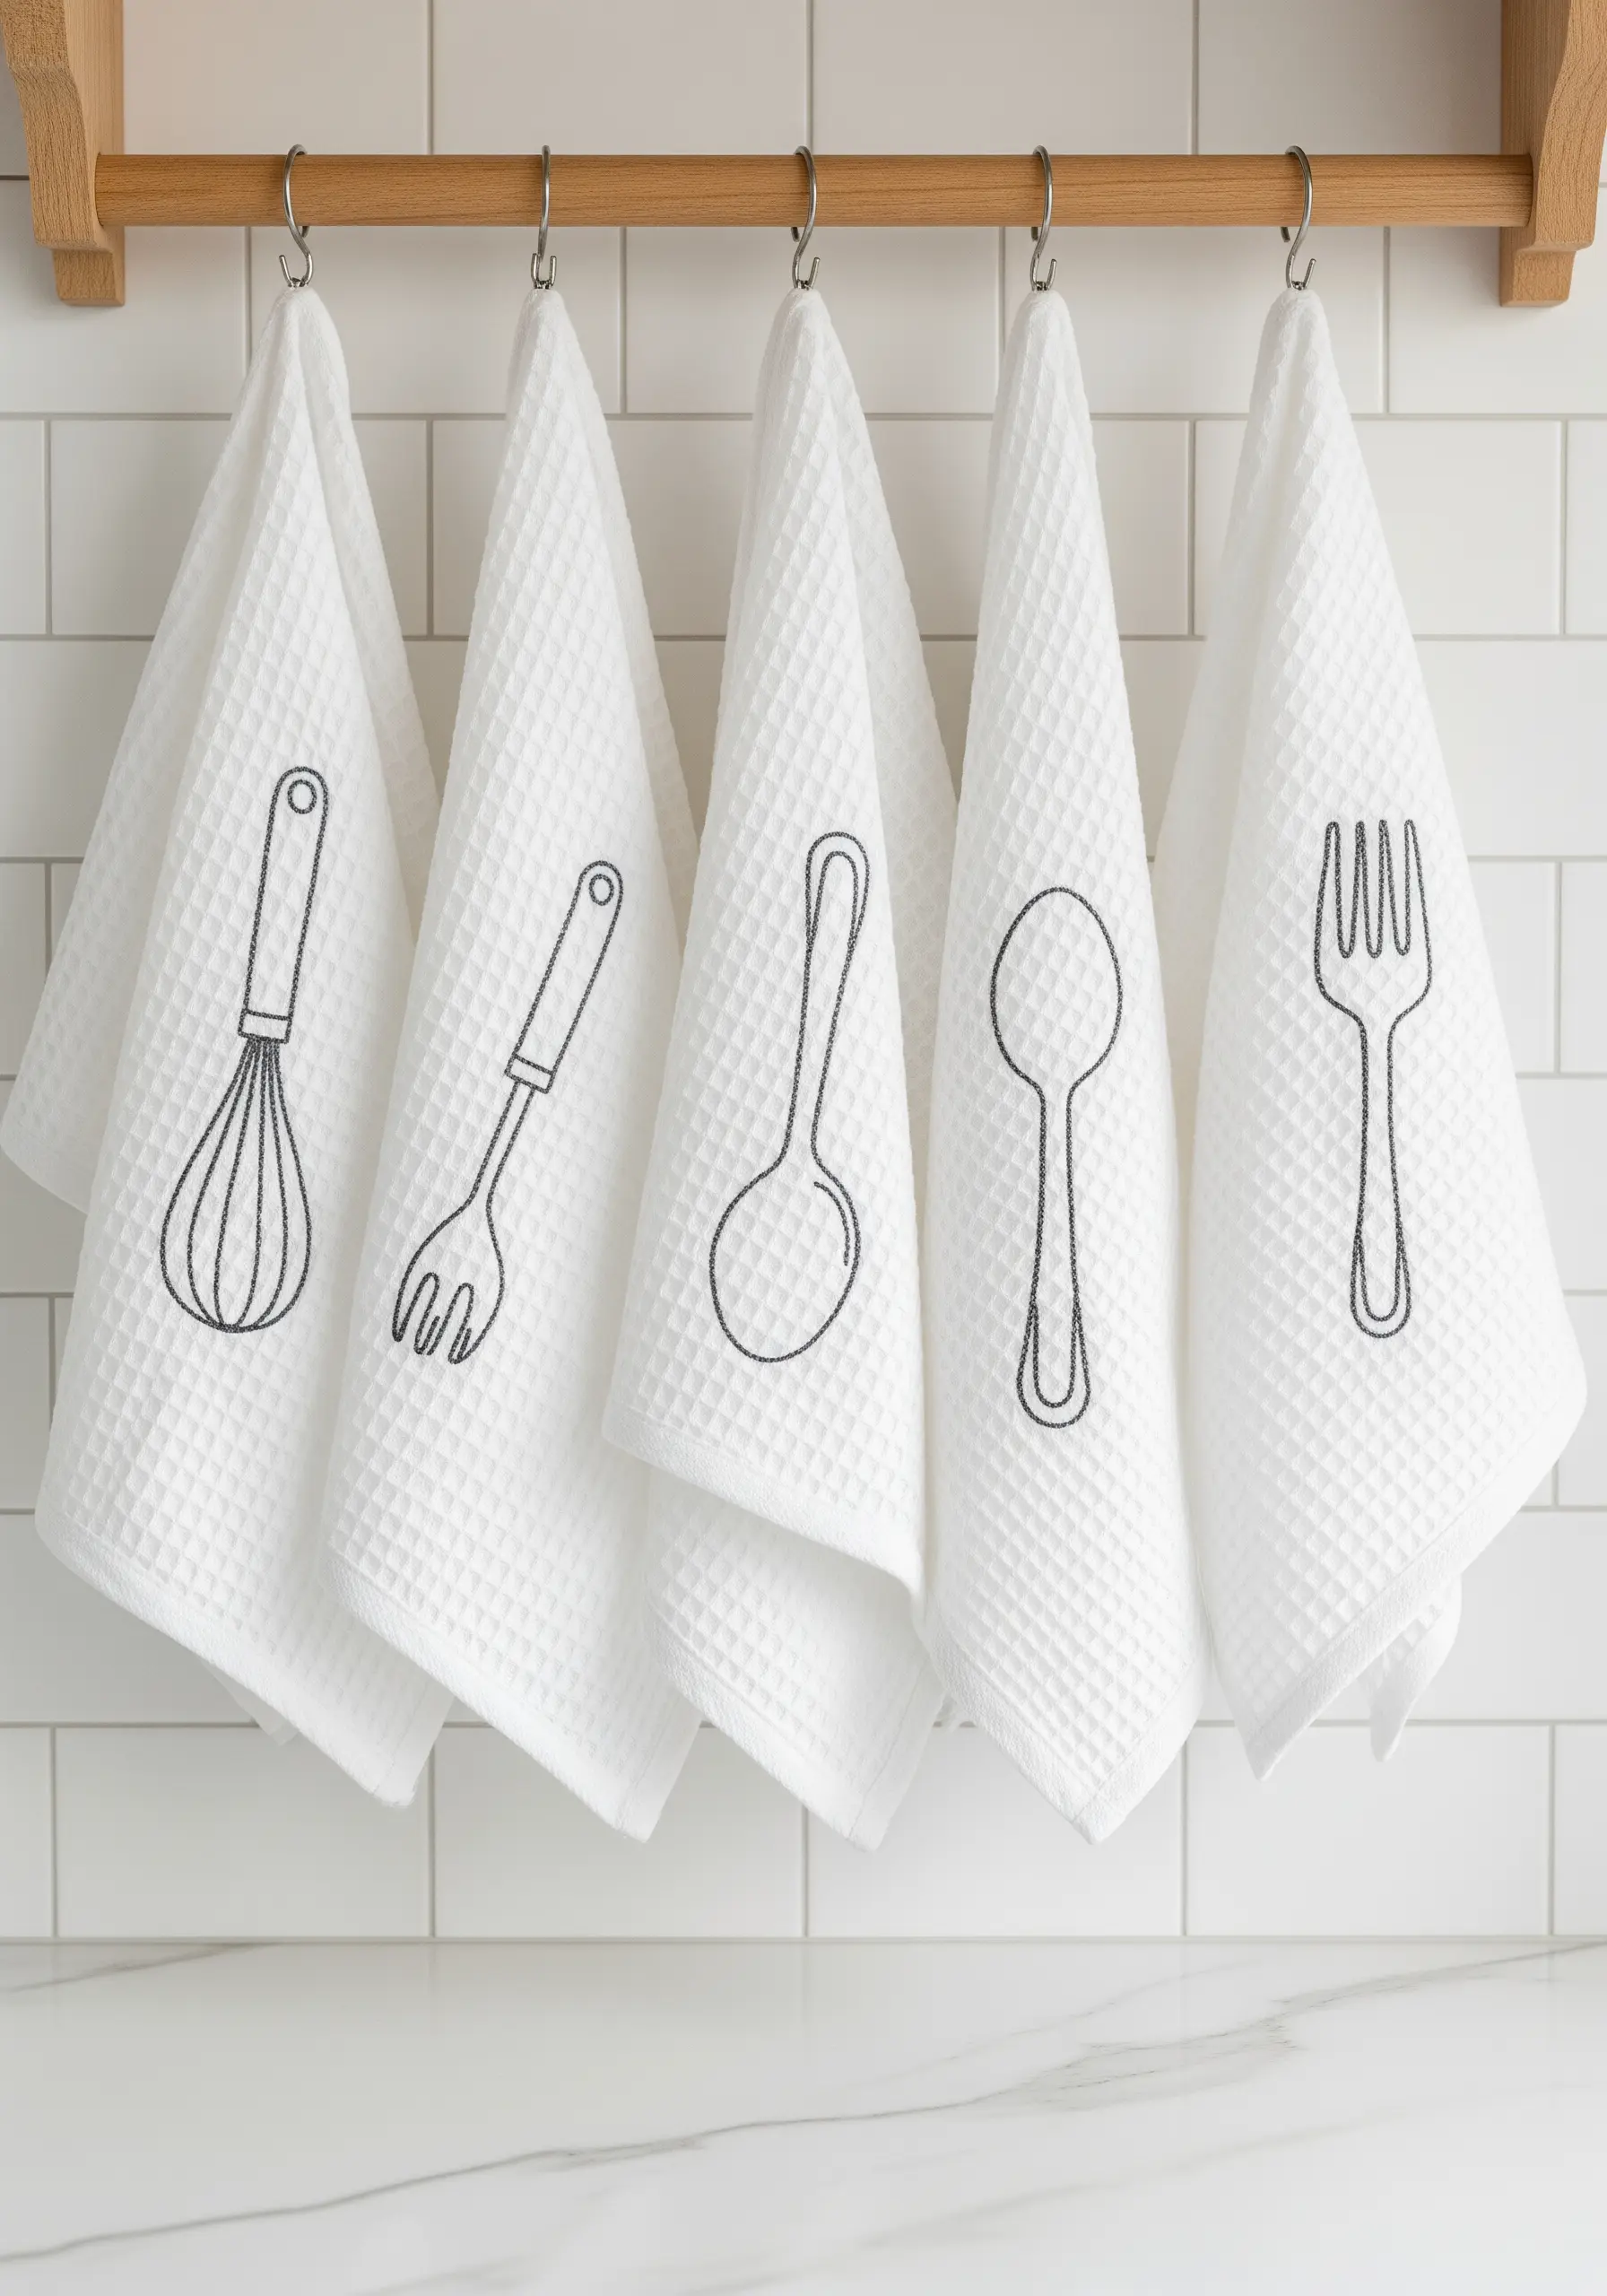
Waffle weave towels have a deep, grid-like texture that can easily hide fine stitches, making outlines look broken or messy.
To counteract this, use a thicker, raised stitch like a stem stitch or a split stitch with at least 3-4 strands of floss.
These stitches create a solid, dimensional line that sits proudly on top of the fabric’s grid, ensuring your design is clear, crisp, and intentional.
This simple adjustment is the key to creating beautiful embroidered kitchen towel designs.


