
You’ve mastered the stitches and filled countless hoops, but you feel a pull toward something more. Something dimensional. You’re ready to take your threads off the flat surface and into the open air, but it can feel intimidating to leap from a pattern to a sculpture.
Let’s reframe the idea. Think of sculpture not as a complex new skill, but as a change in perspective. It’s about seeing the world around you—a plastic bottle, a broken plate, a bundle of old magazines—as a new kind of canvas, one that has its own form and story before you even make the first stitch.
These ideas are your permission slip to experiment. They show you how your existing embroidery skills—stitching, wrapping, knotting, and connecting—are the perfect tools for building three-dimensional art. It’s time to let your needle lead you off the fabric and into a world of unexpected, touchable beauty.
1. Define Form with Couching on Paper
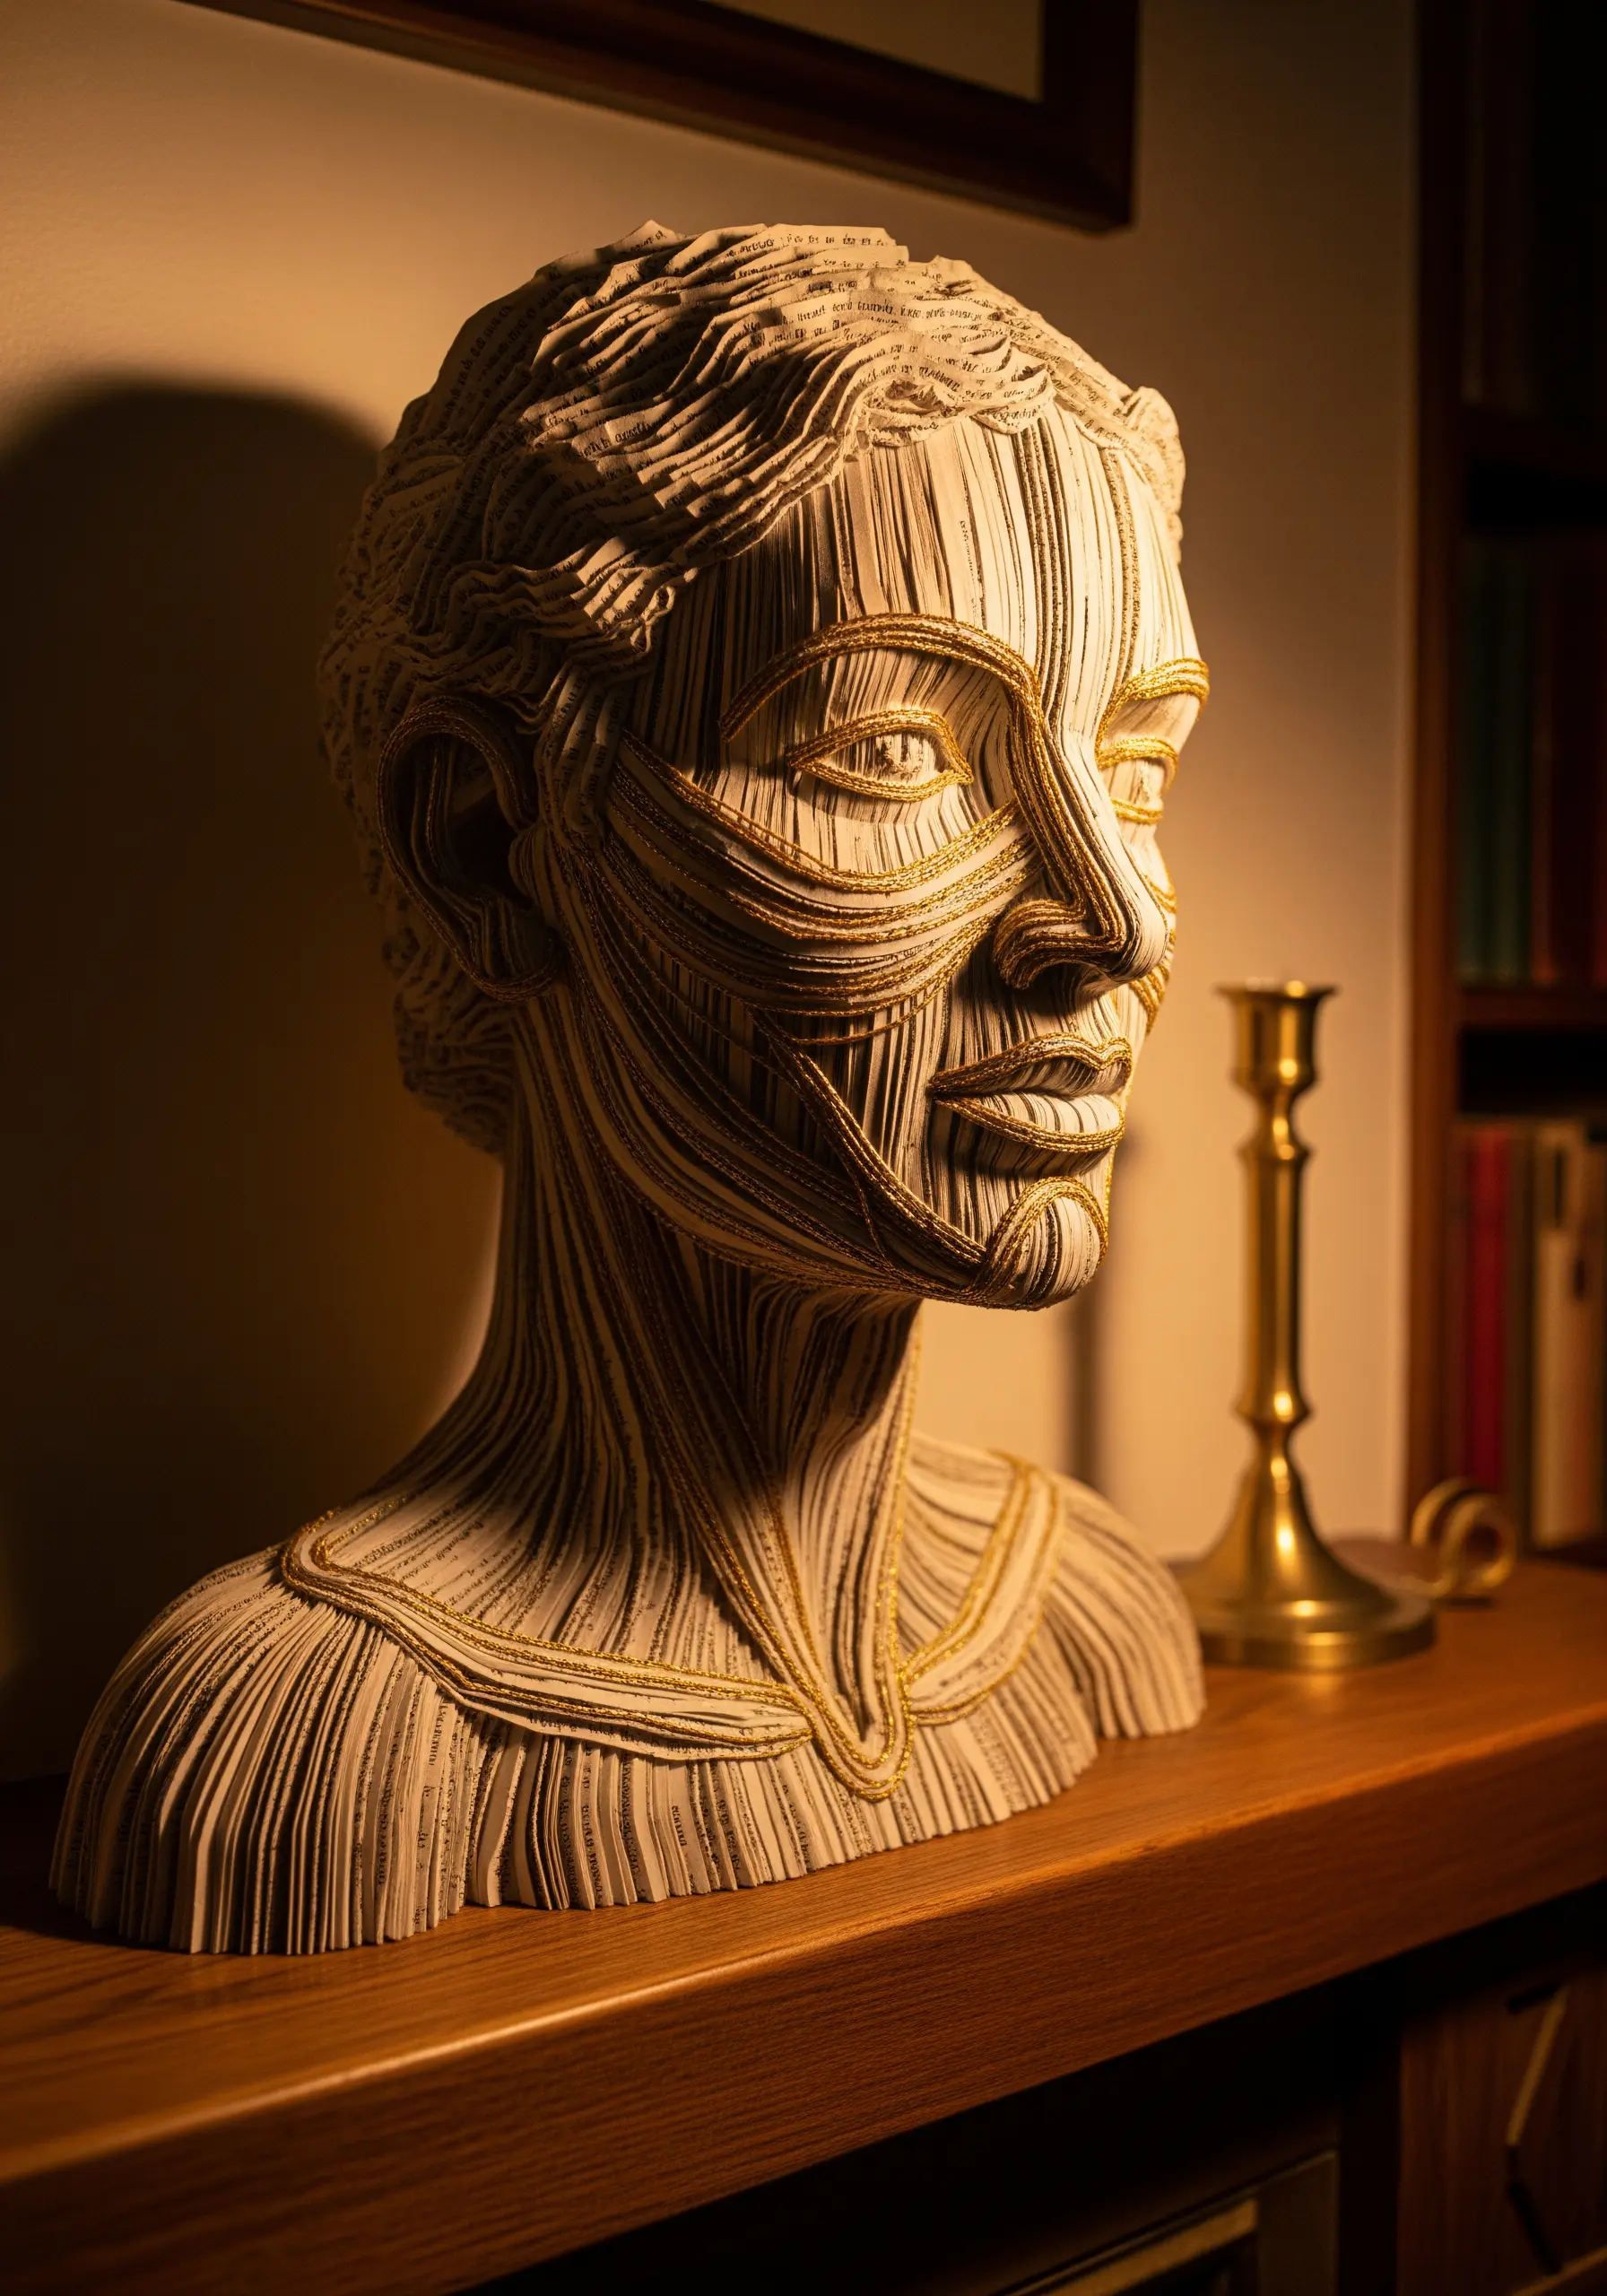
Give layered paper sculptures a voice by using thread to trace their contours.
Instead of merely gluing paper layers, use a couching stitch with a fine metallic thread to outline key features like facial lines or anatomical structures.
Lay your metallic thread along the desired line and use a second, finer thread (in a matching or invisible color) to tack it down with tiny stitches from the back.
This technique adds a subtle, light-catching definition that elevates the paper from a simple craft material into something refined and intentional.
The metallic gleam contrasts beautifully with the matte paper, creating visual depth and a touch of luxury.
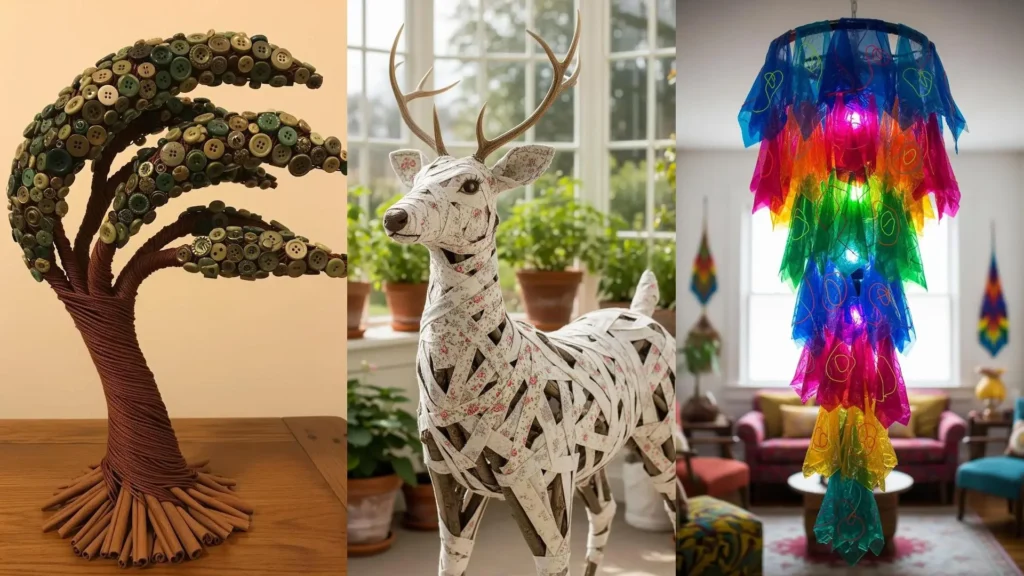
2. Stitch Organic Edges onto Upcycled Plastic
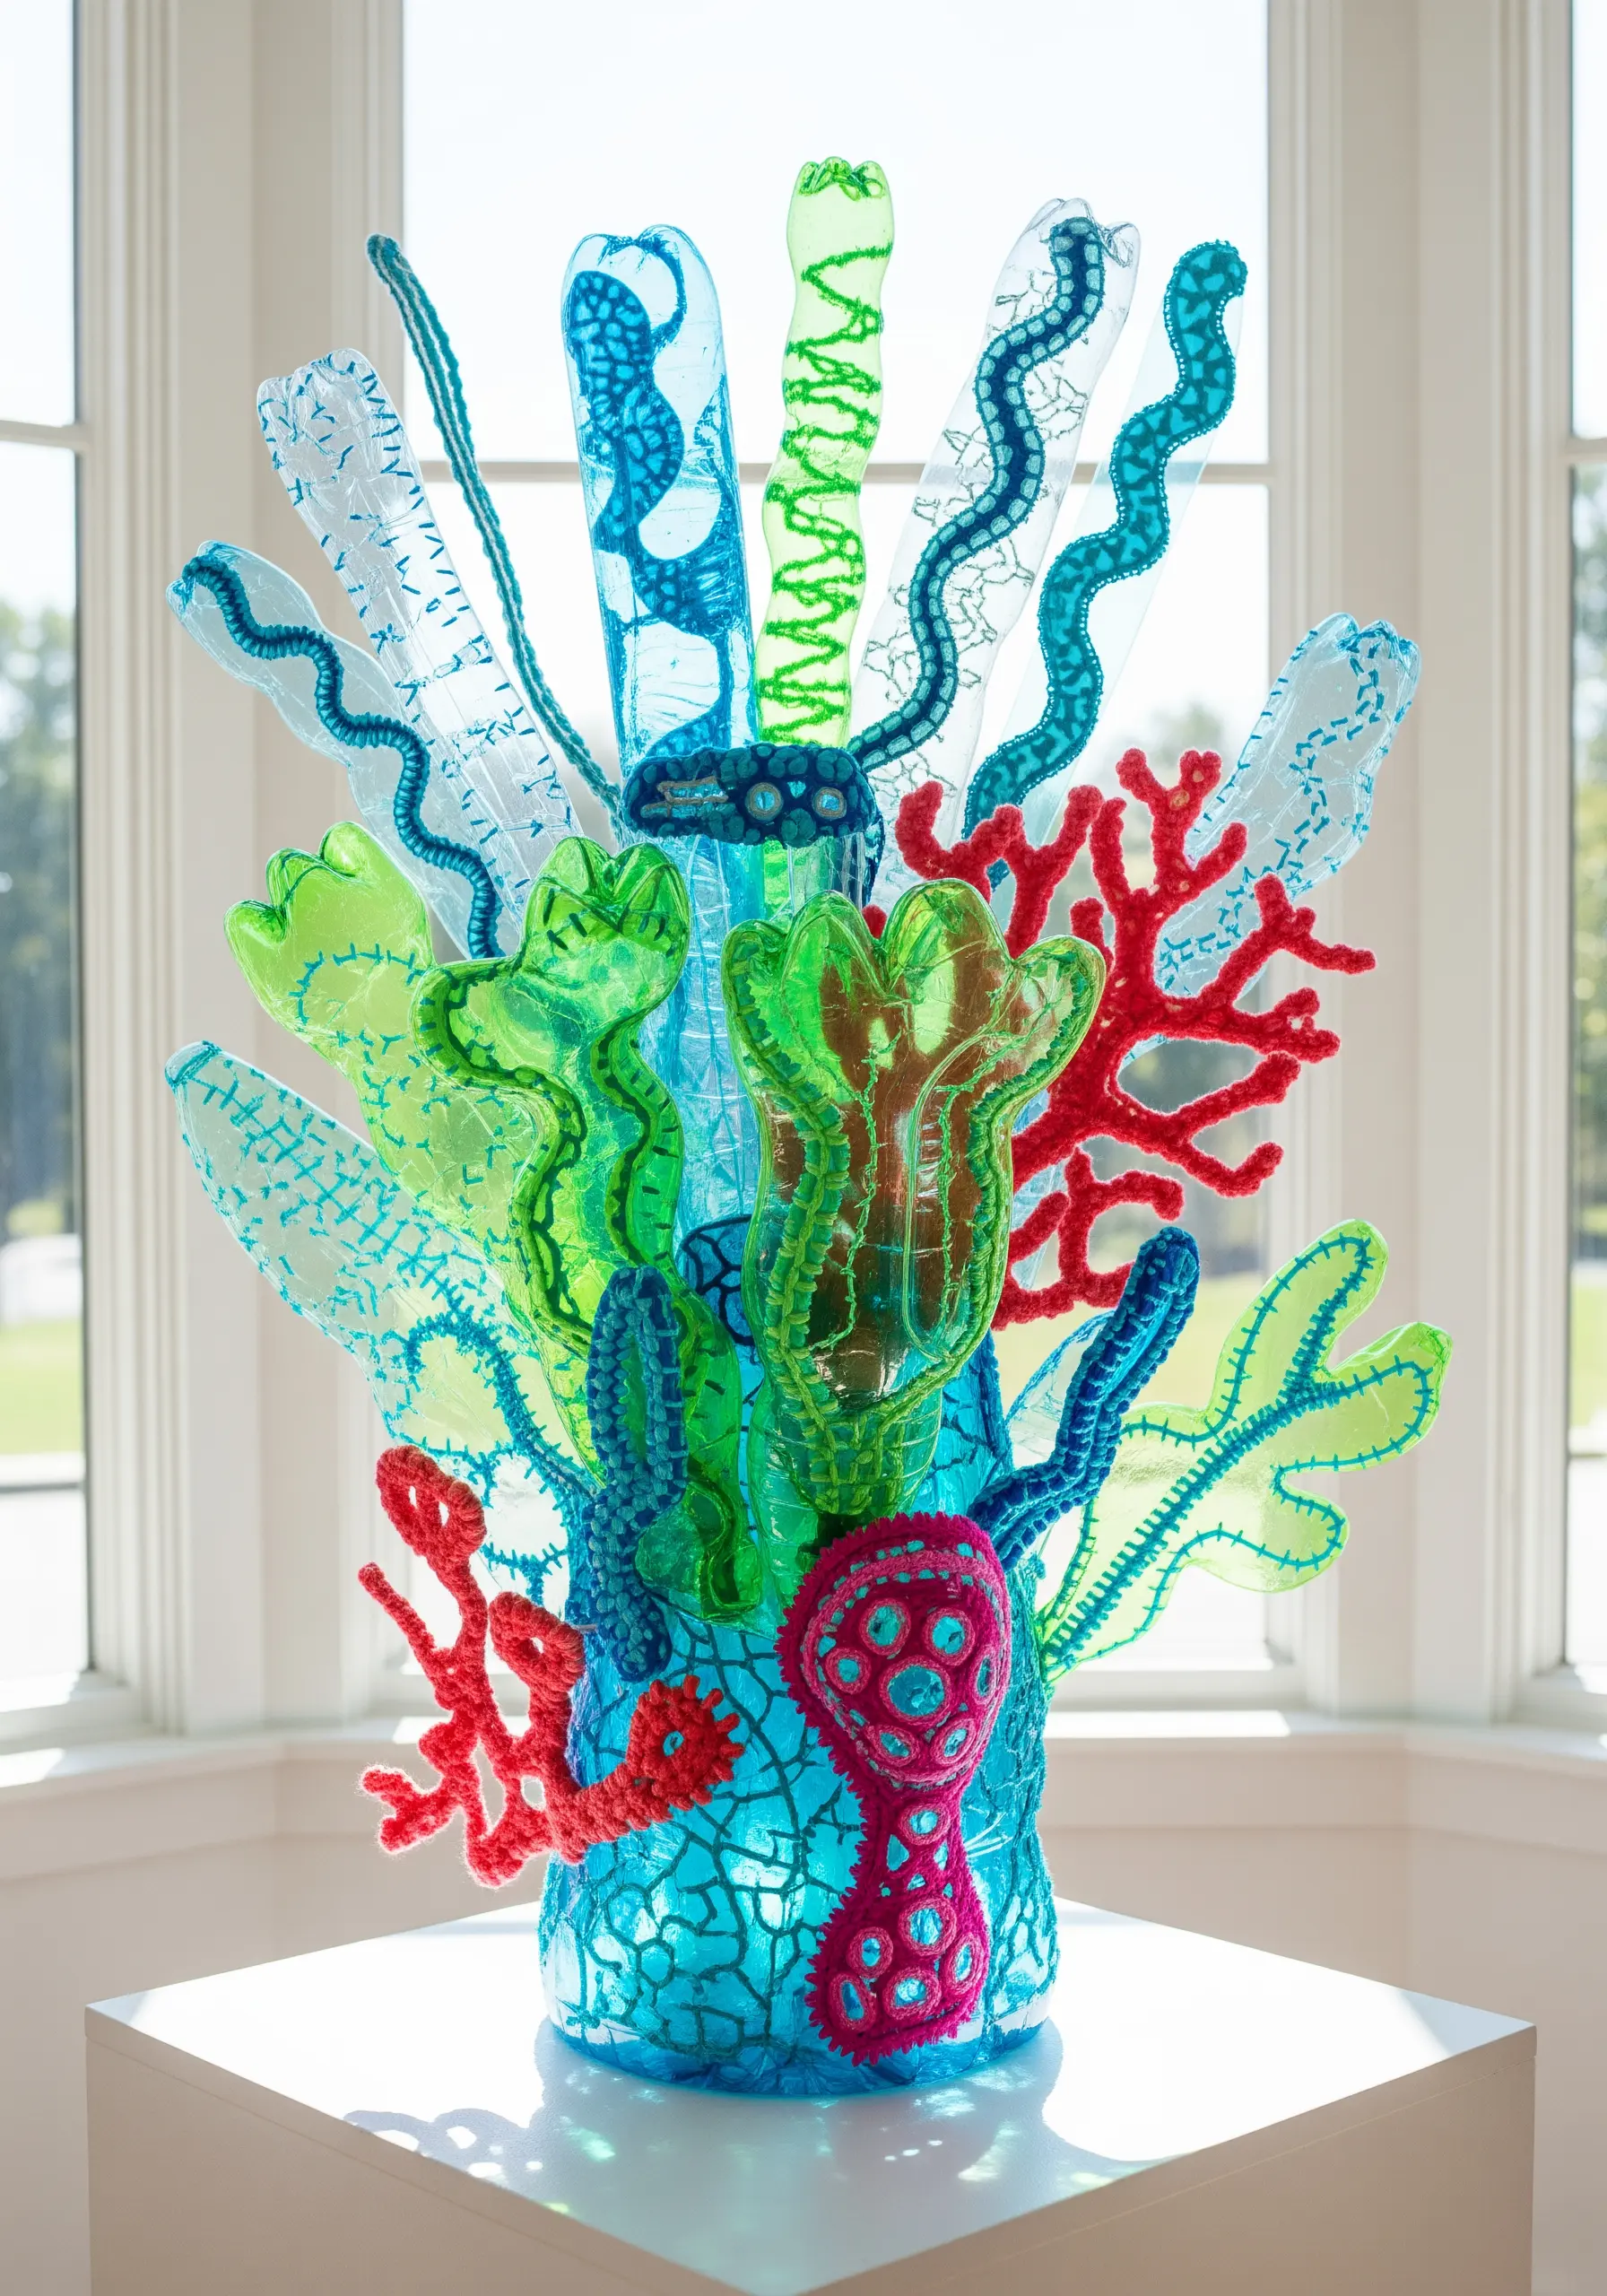
Transform rigid plastic waste into a vibrant, coral-like sculpture by softening its edges with thread.
First, carefully cut recycled plastic bottles into organic, flowing shapes.
Use a sharp awl or a gently heated needle (with proper ventilation and caution) to pierce a series of holes along the cut edges.
Then, use a blanket stitch or chain stitch with colorful yarn or embroidery floss to ‘bind’ the sharp edges.
This not only adds a pop of color but also introduces a soft, tactile texture that contrasts powerfully with the slick, hard plastic, making it a perfect example of creative mixed-media embroidery projects.
3. Frame Found Objects with Wire and Thread

Integrate non-traditional materials like circuit boards or old CDs into your work by using thread as a structural and decorative frame.
Use fine-gauge copper or brass wire to create a basic armature for your sculpture, wrapping it around objects to hold them in place.
Then, embellish the wire itself by wrapping it tightly with embroidery floss, adding beads or pearls as you go.
This technique allows you to connect disparate, hard-surfaced objects into a cohesive whole, with the thread-wrapped wire acting as a unifying visual line.
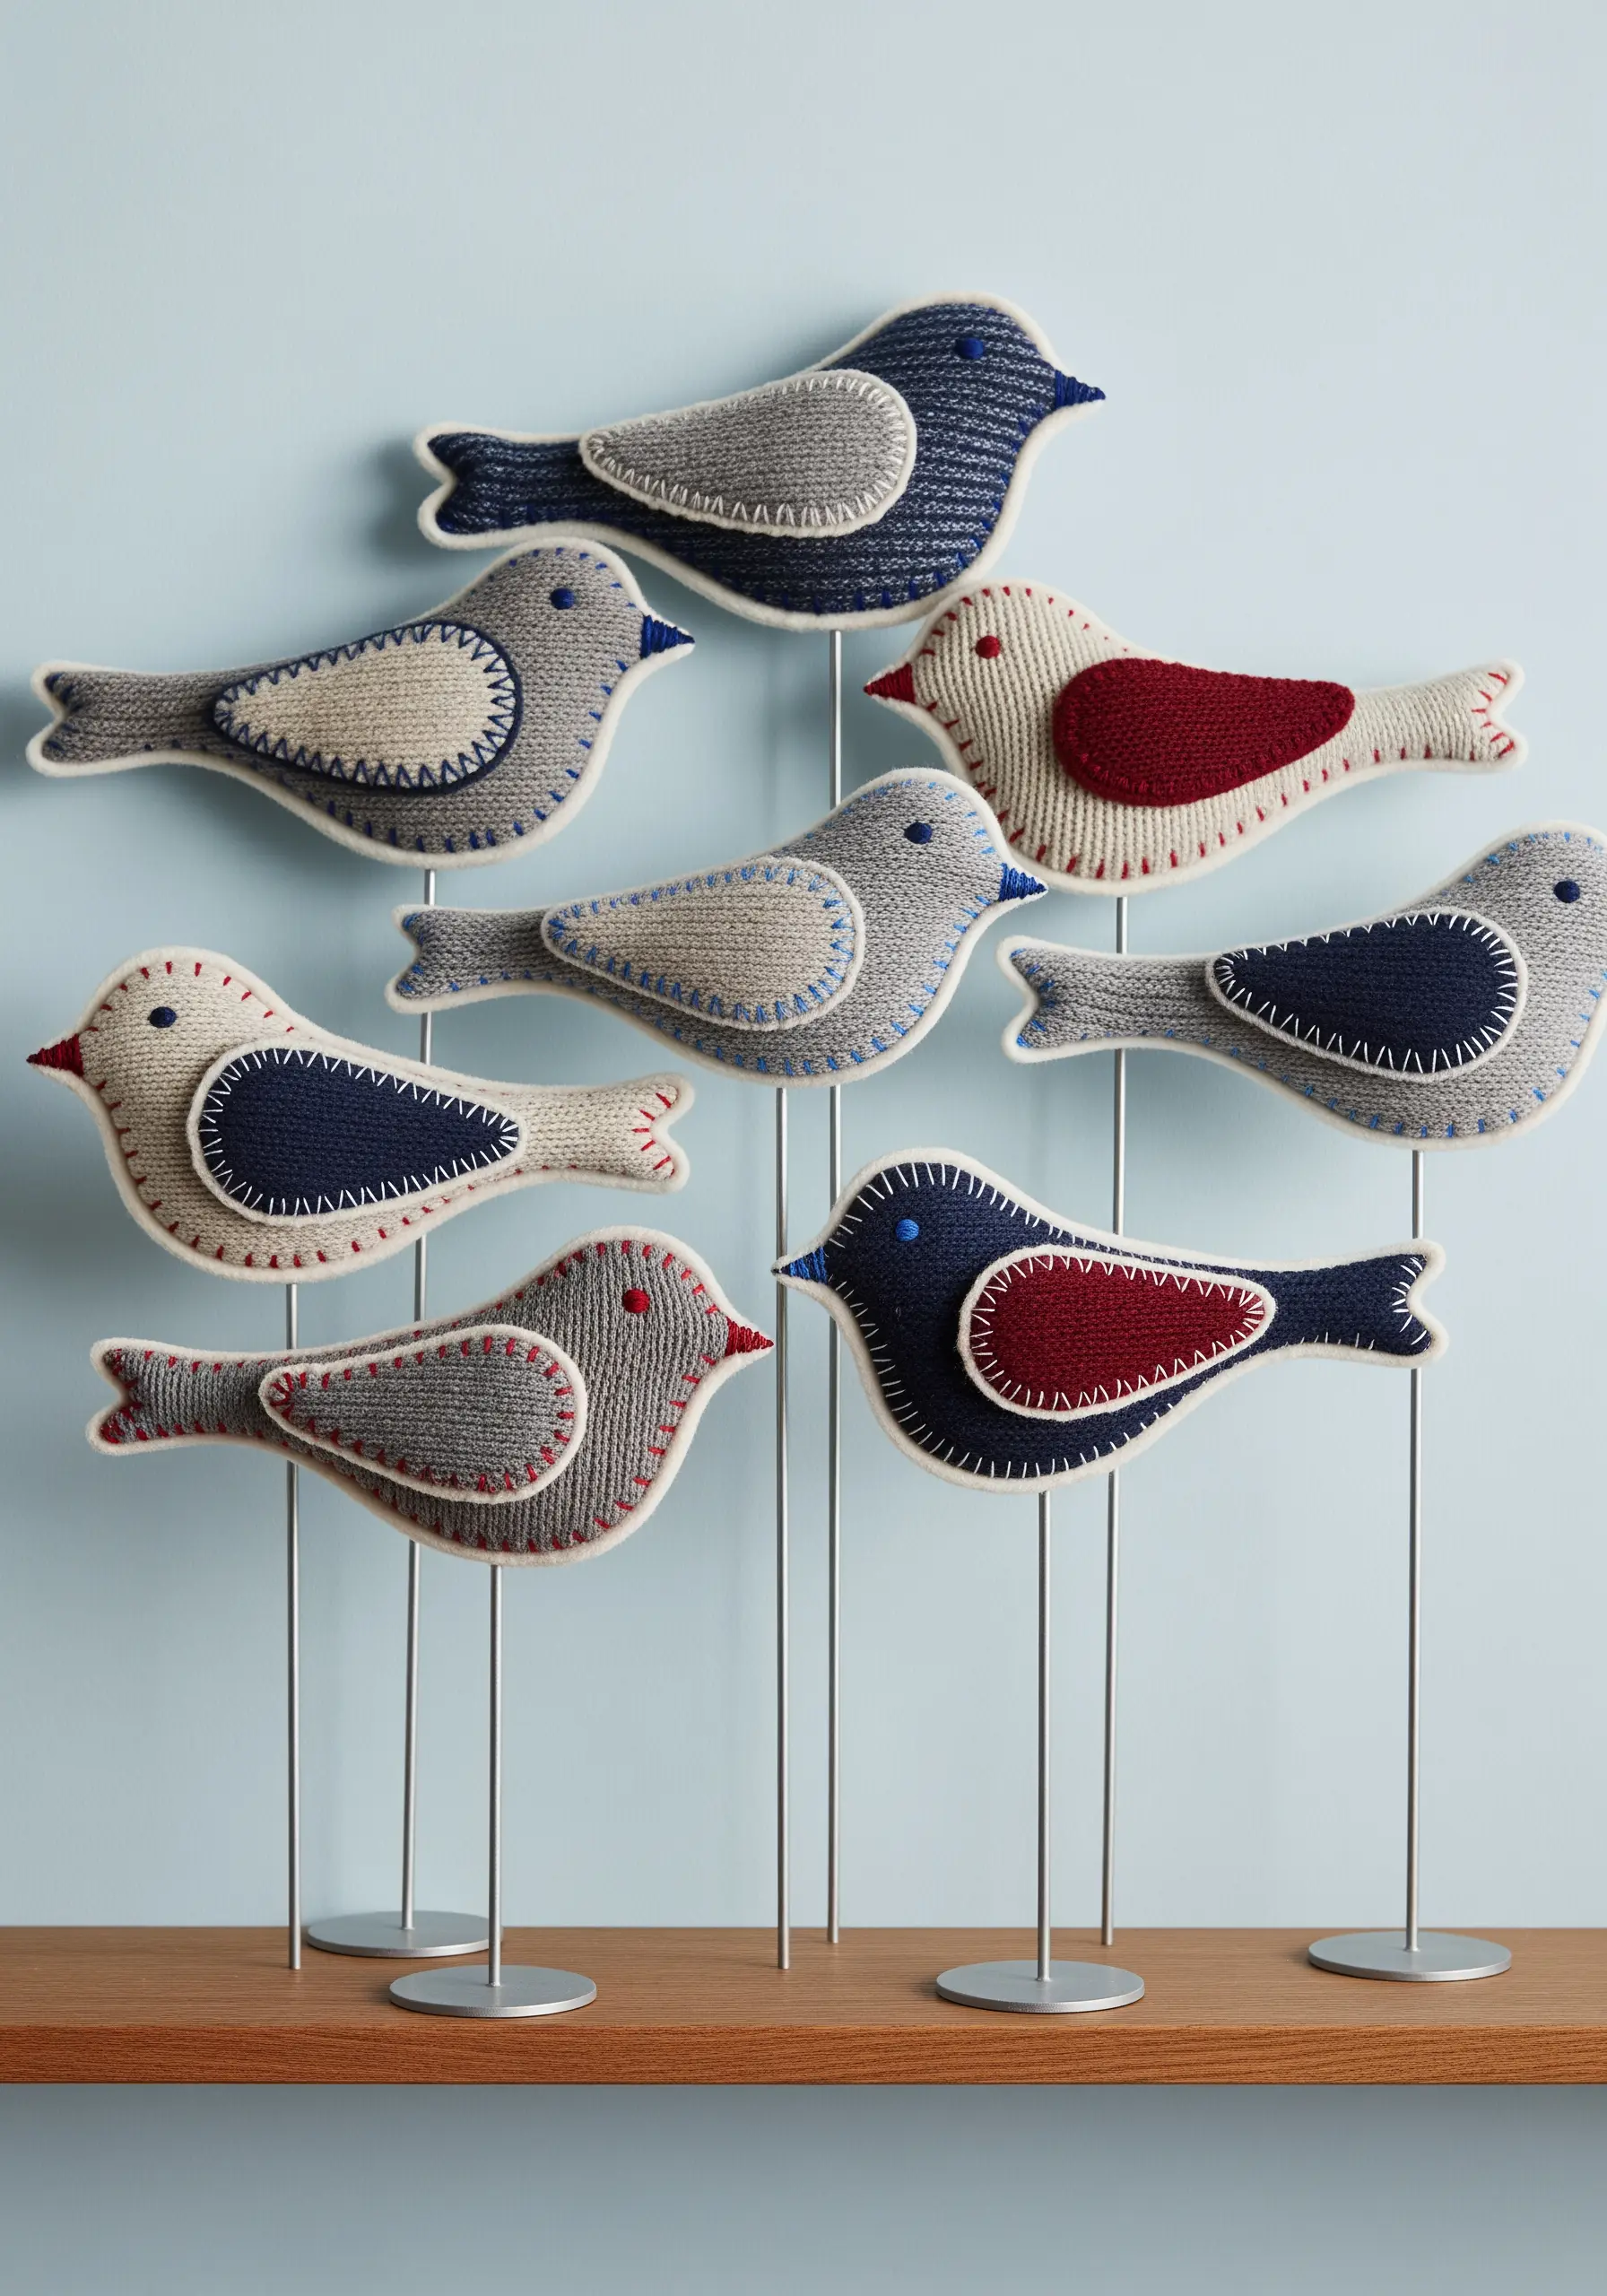
4. Create Sculptural Forms with Binding Knots
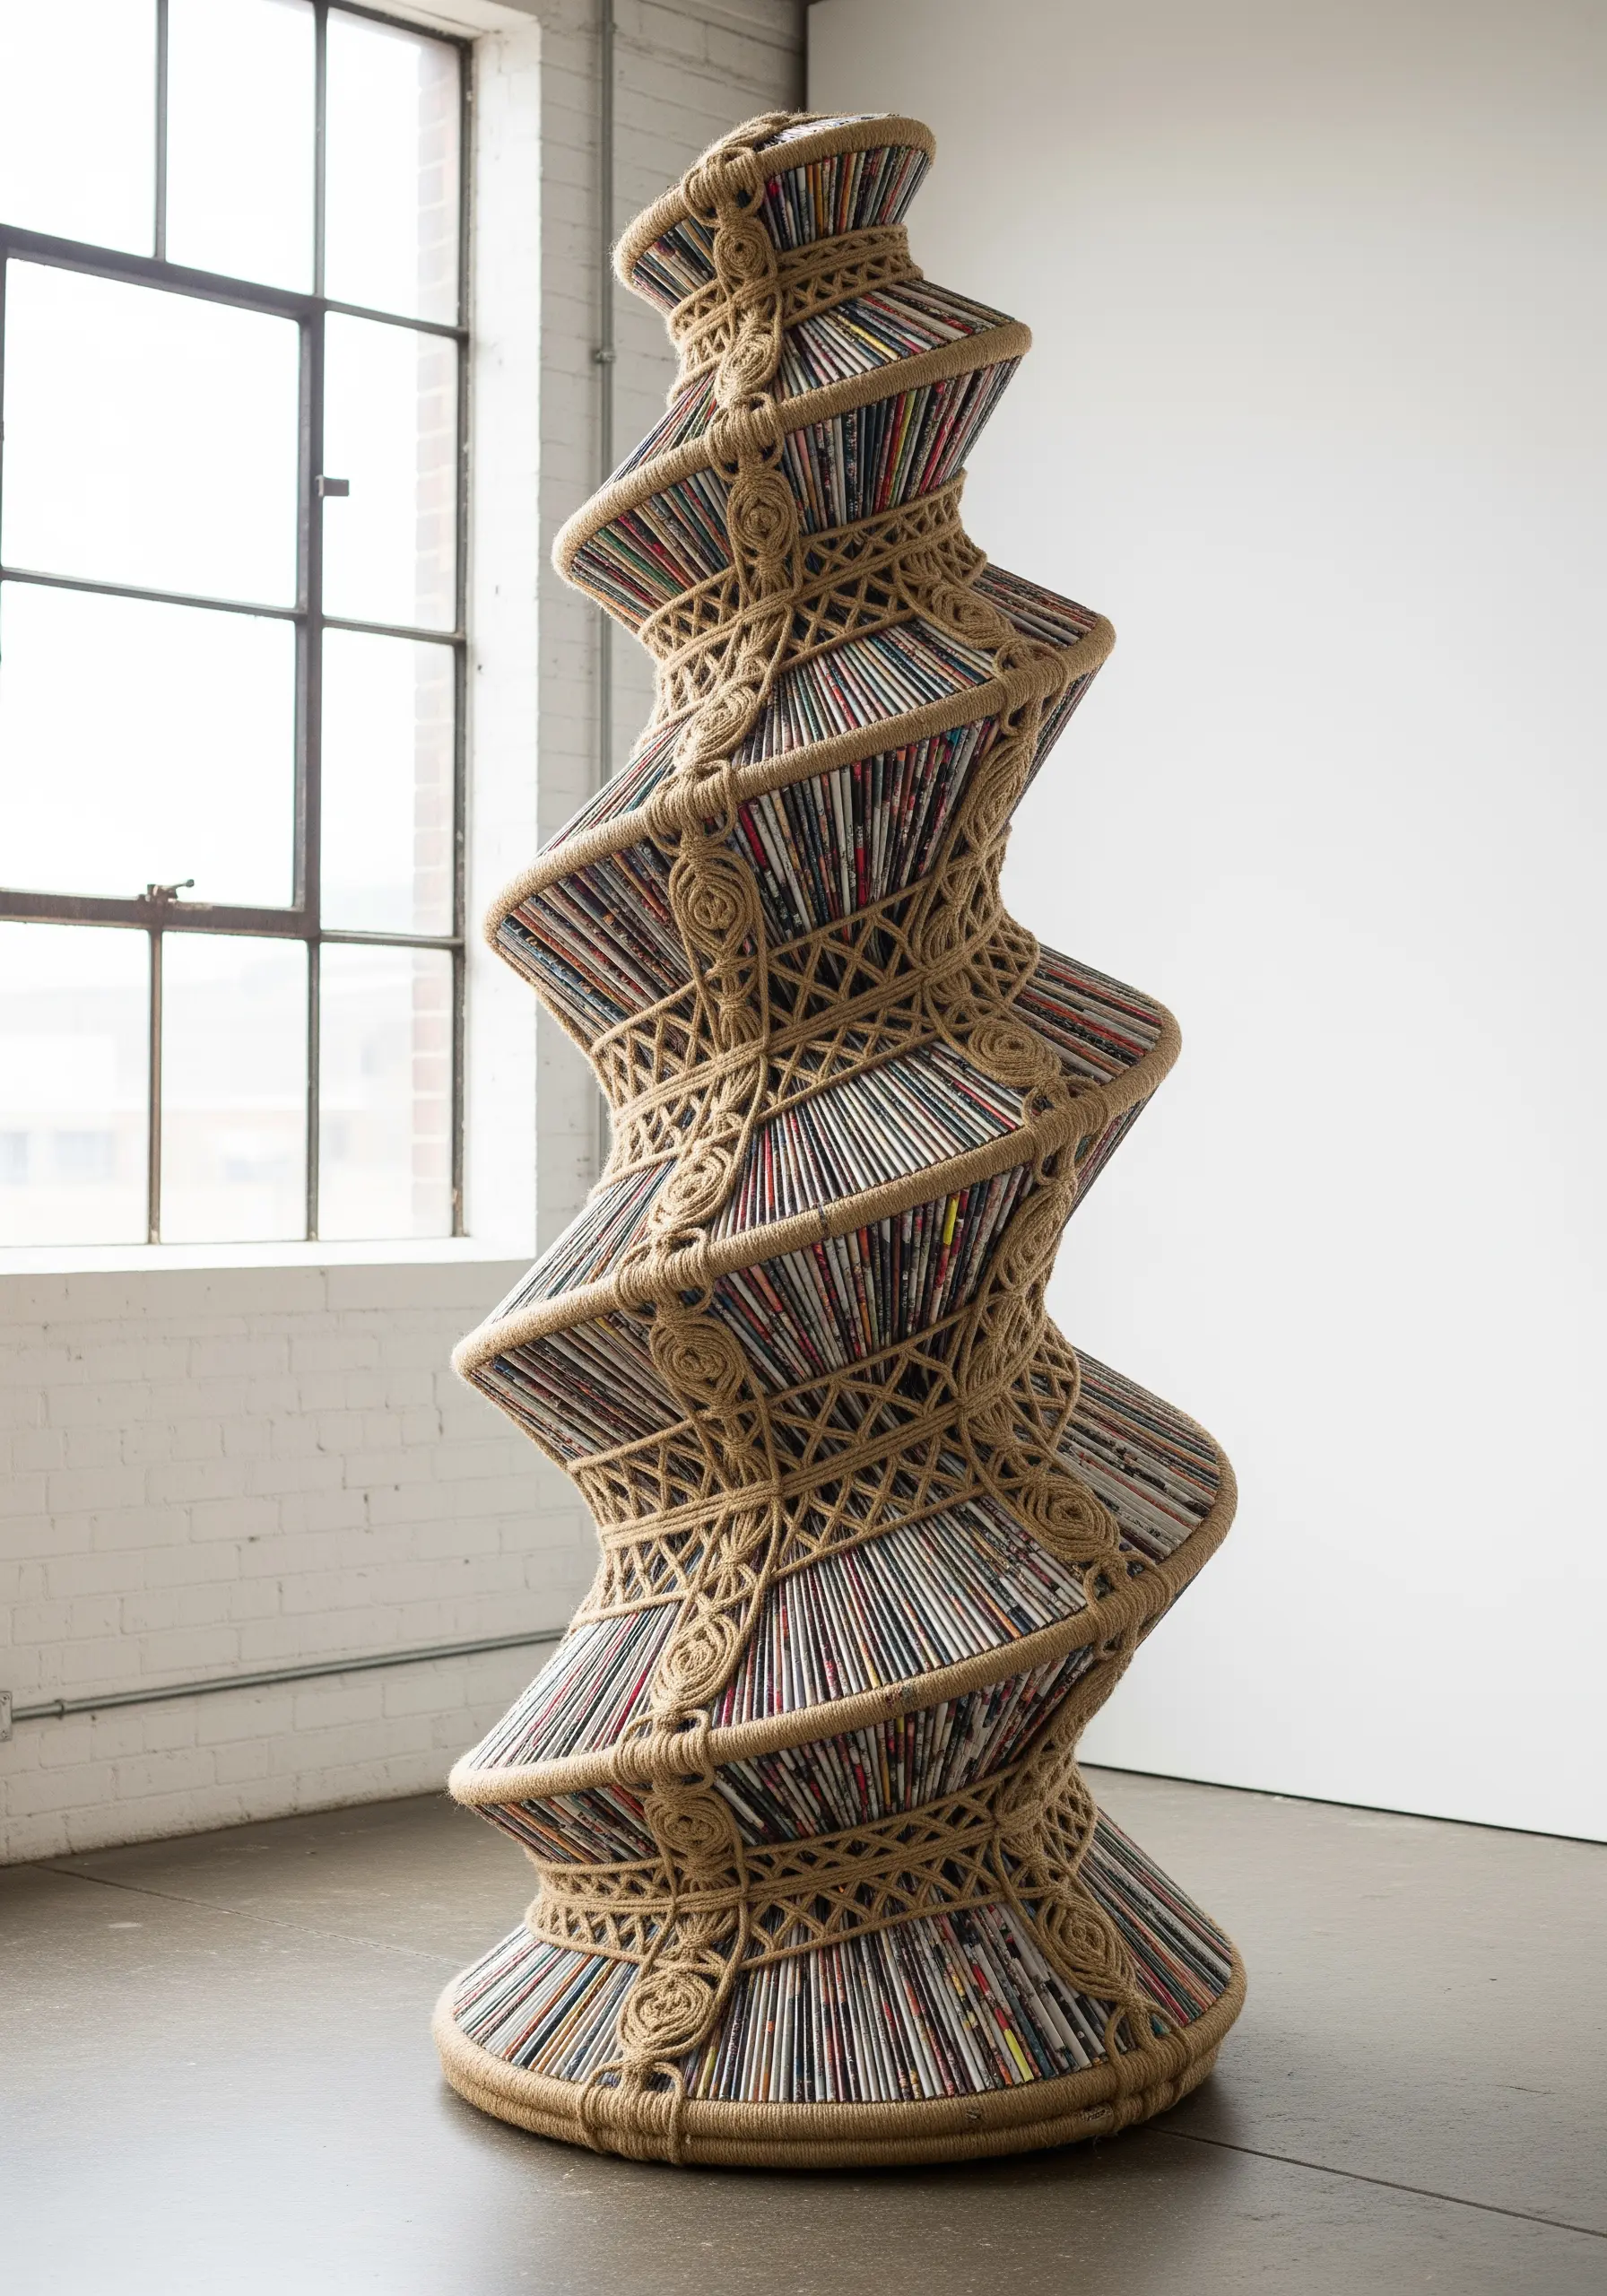
Use the tension and texture of knots to build large-scale sculptures from rolled paper or magazines.
Stack your rolled materials and use a strong, natural fiber cord like jute or thick cotton to bind them together.
Instead of simple wrapping, use macrame techniques like the square knot or lark’s head knot to create a decorative, net-like structure around the form.
The key is maintaining consistent tension in your knots to ensure the sculpture is stable and the pattern is uniform, turning simple binding into a form of stunning yarn wall art.
5. Trace Delicate Veins on Skeleton Leaves
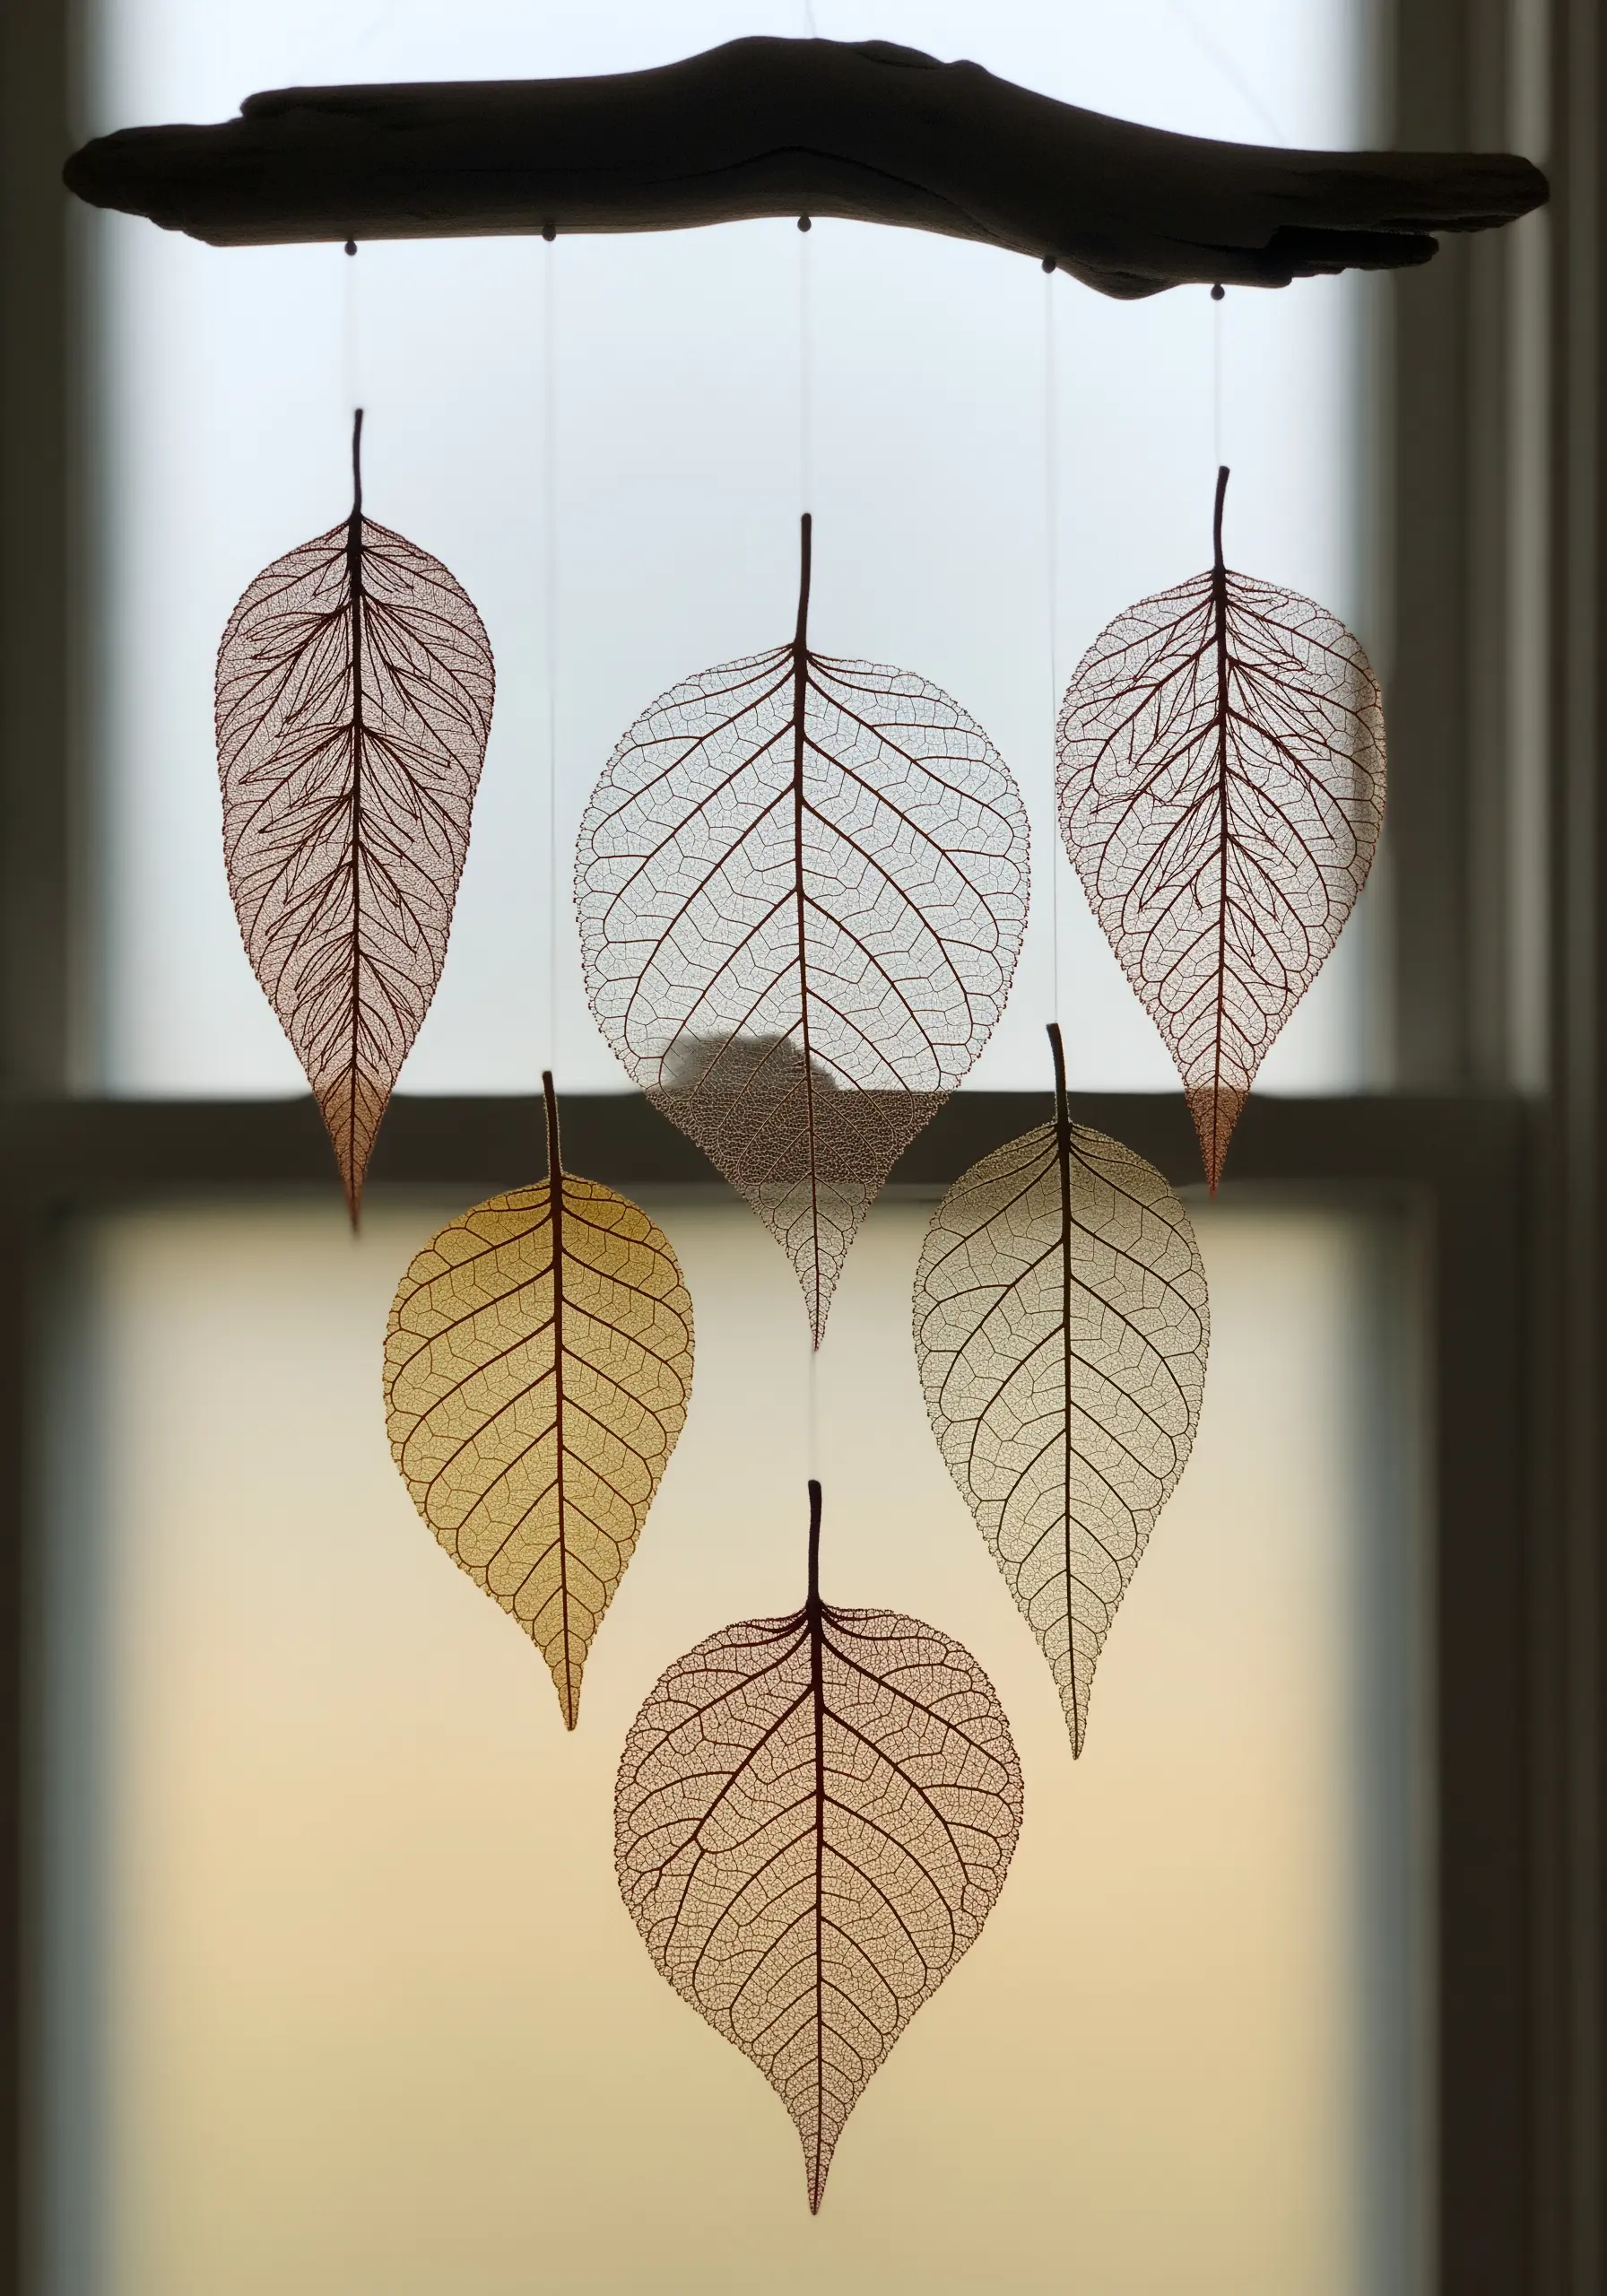
Emphasize the natural beauty of skeleton leaves by stitching directly onto their fragile surfaces.
Use a single strand of fine silk thread and a sharp, slender needle (like a beading or milliner’s needle) to minimize the risk of tearing.
Rather than creating a new design, use a simple running stitch or backstitch to trace the existing veins of the leaf.
This subtle embellishment catches the light and adds a hint of color, enhancing the leaf’s intricate structure without overpowering it.
Hang them as a mobile to appreciate how the light filters through the delicate stitch work.
6. Blend Hard and Soft Textures in Assemblage
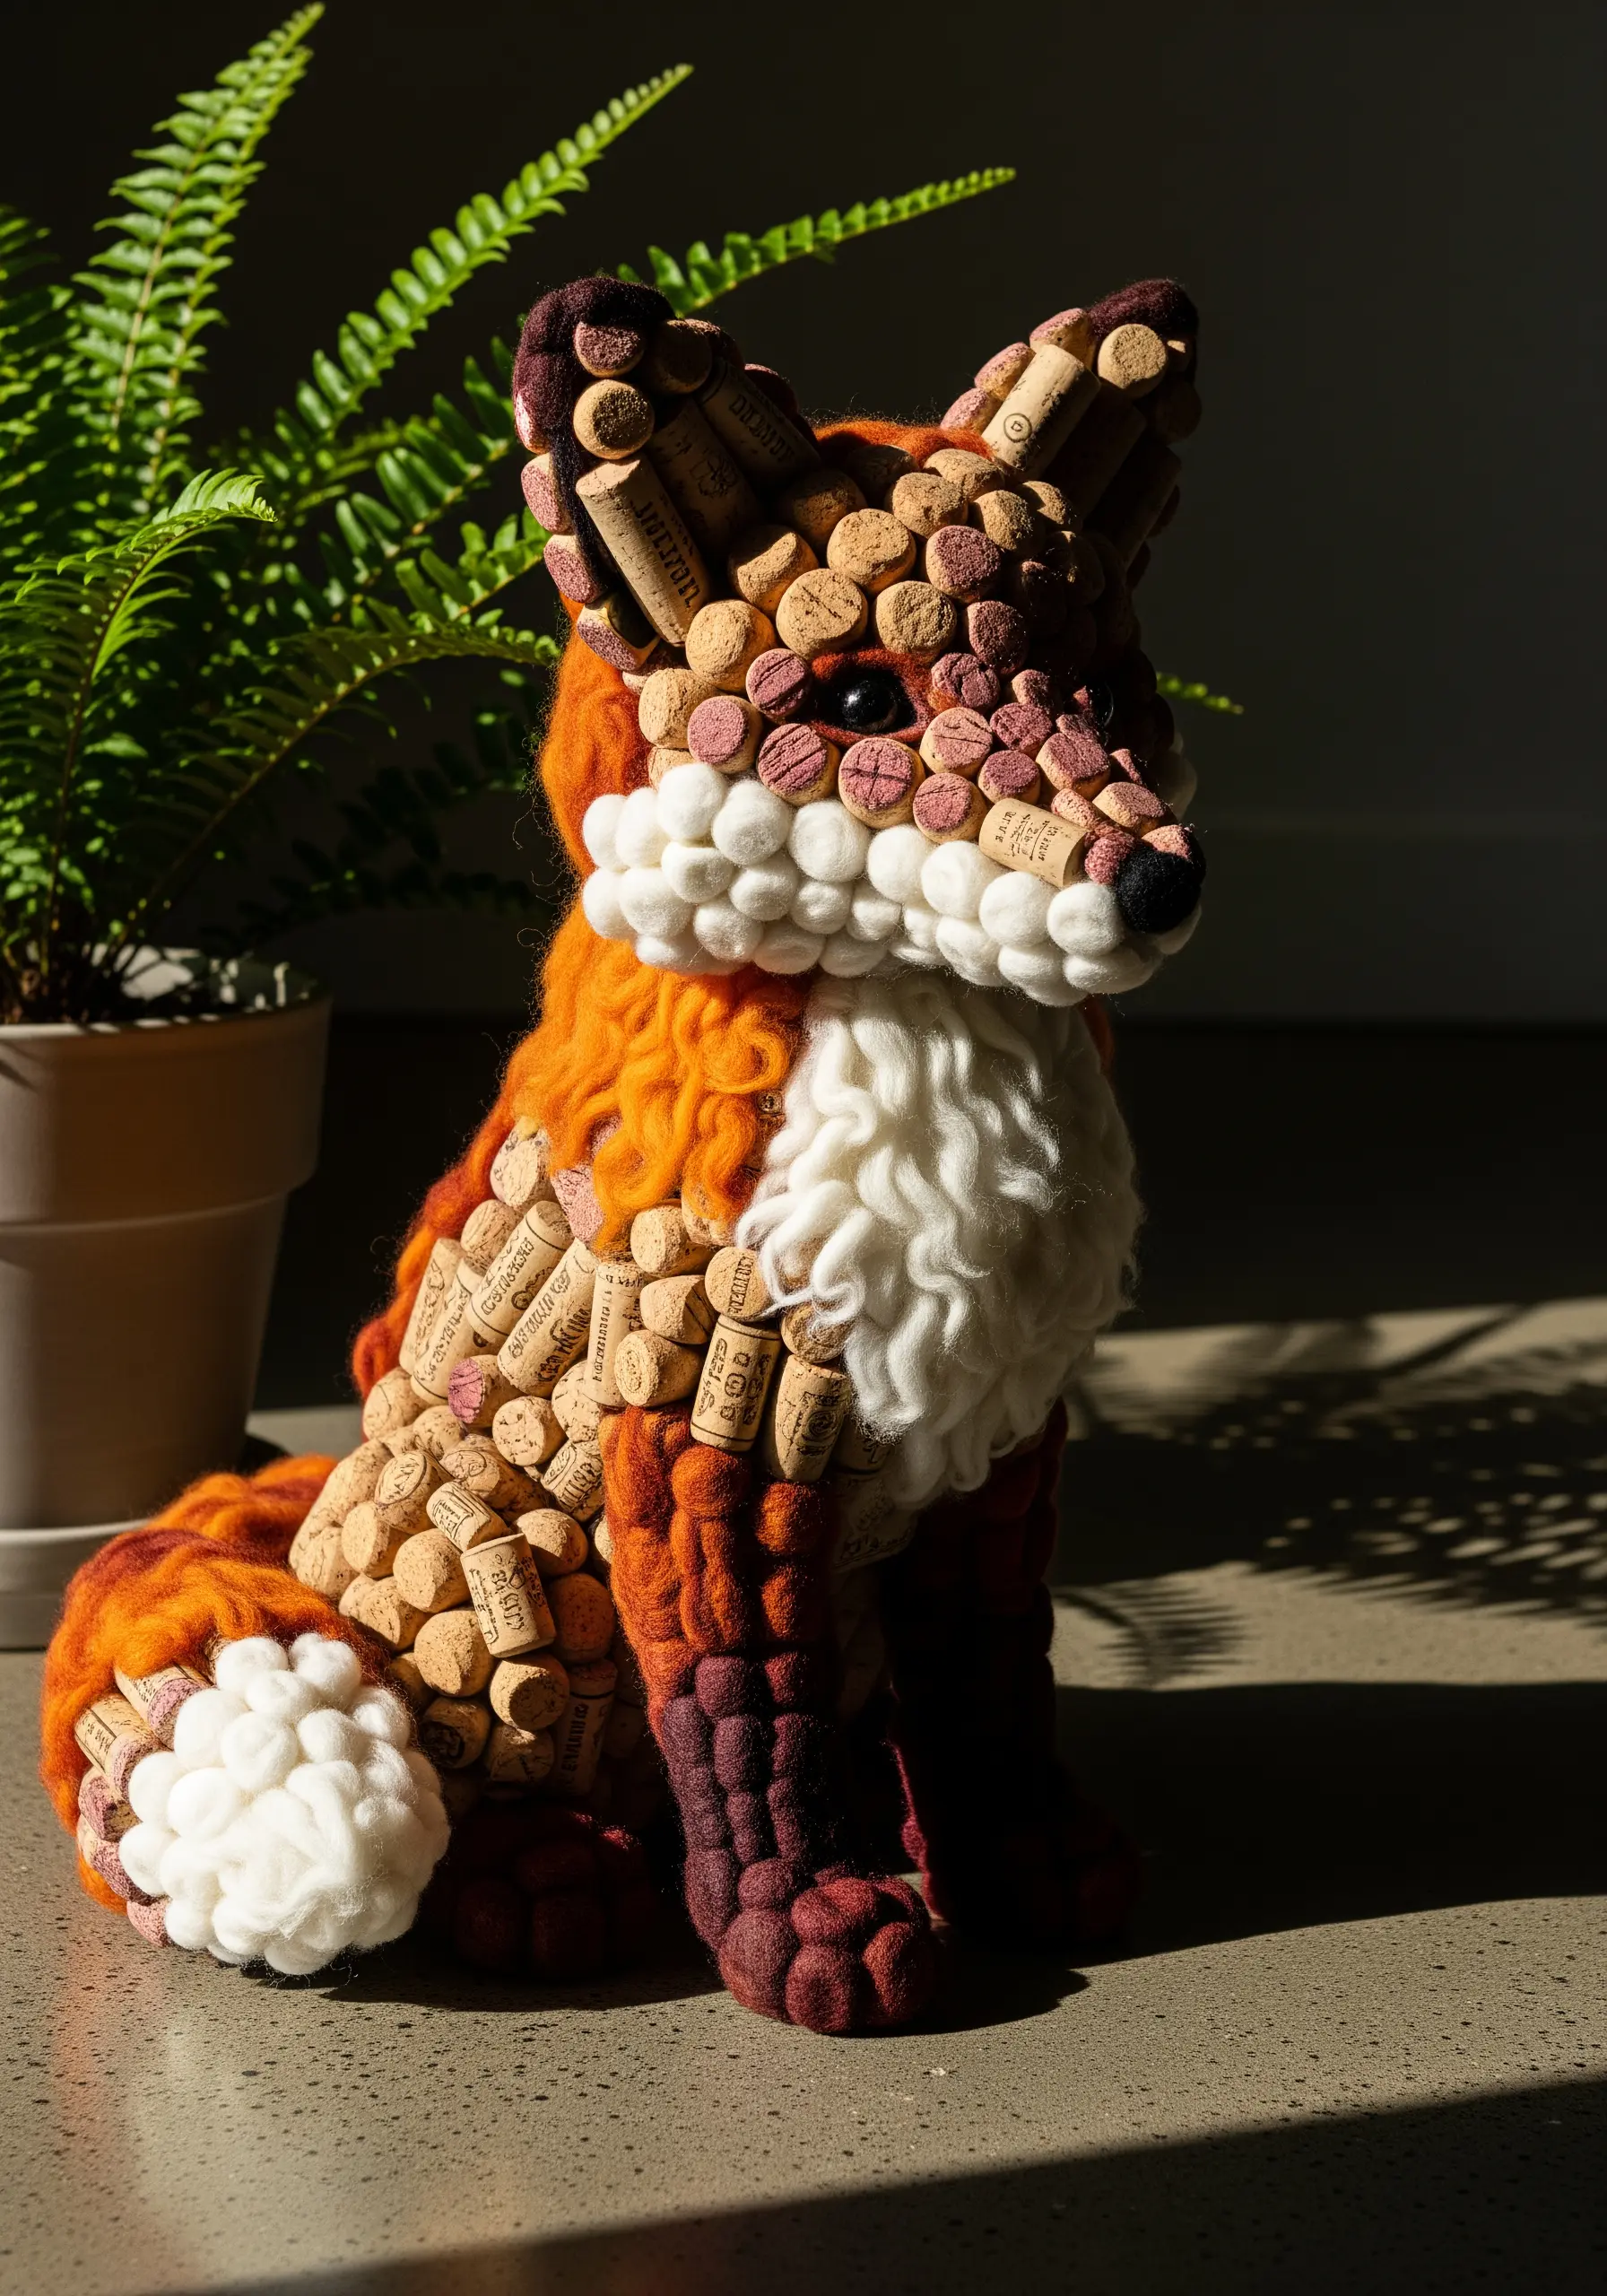
Create dynamic sculptures by combining hard, found objects with soft, plush fiber techniques.
Build a base form using wine corks, pebbles, or wood pieces, secured with a strong adhesive.
For the softer sections, use yarn wrapping, needle felting, or dense clusters of French knots to mimic fur or moss.
The contrast is everything: the smooth, solid texture of the corks makes the yarn sections appear even softer and more inviting.
This technique allows you to build complex forms and textures that engage the senses of both sight and touch.
7. Couch Heavy Objects onto a Fabric Canvas
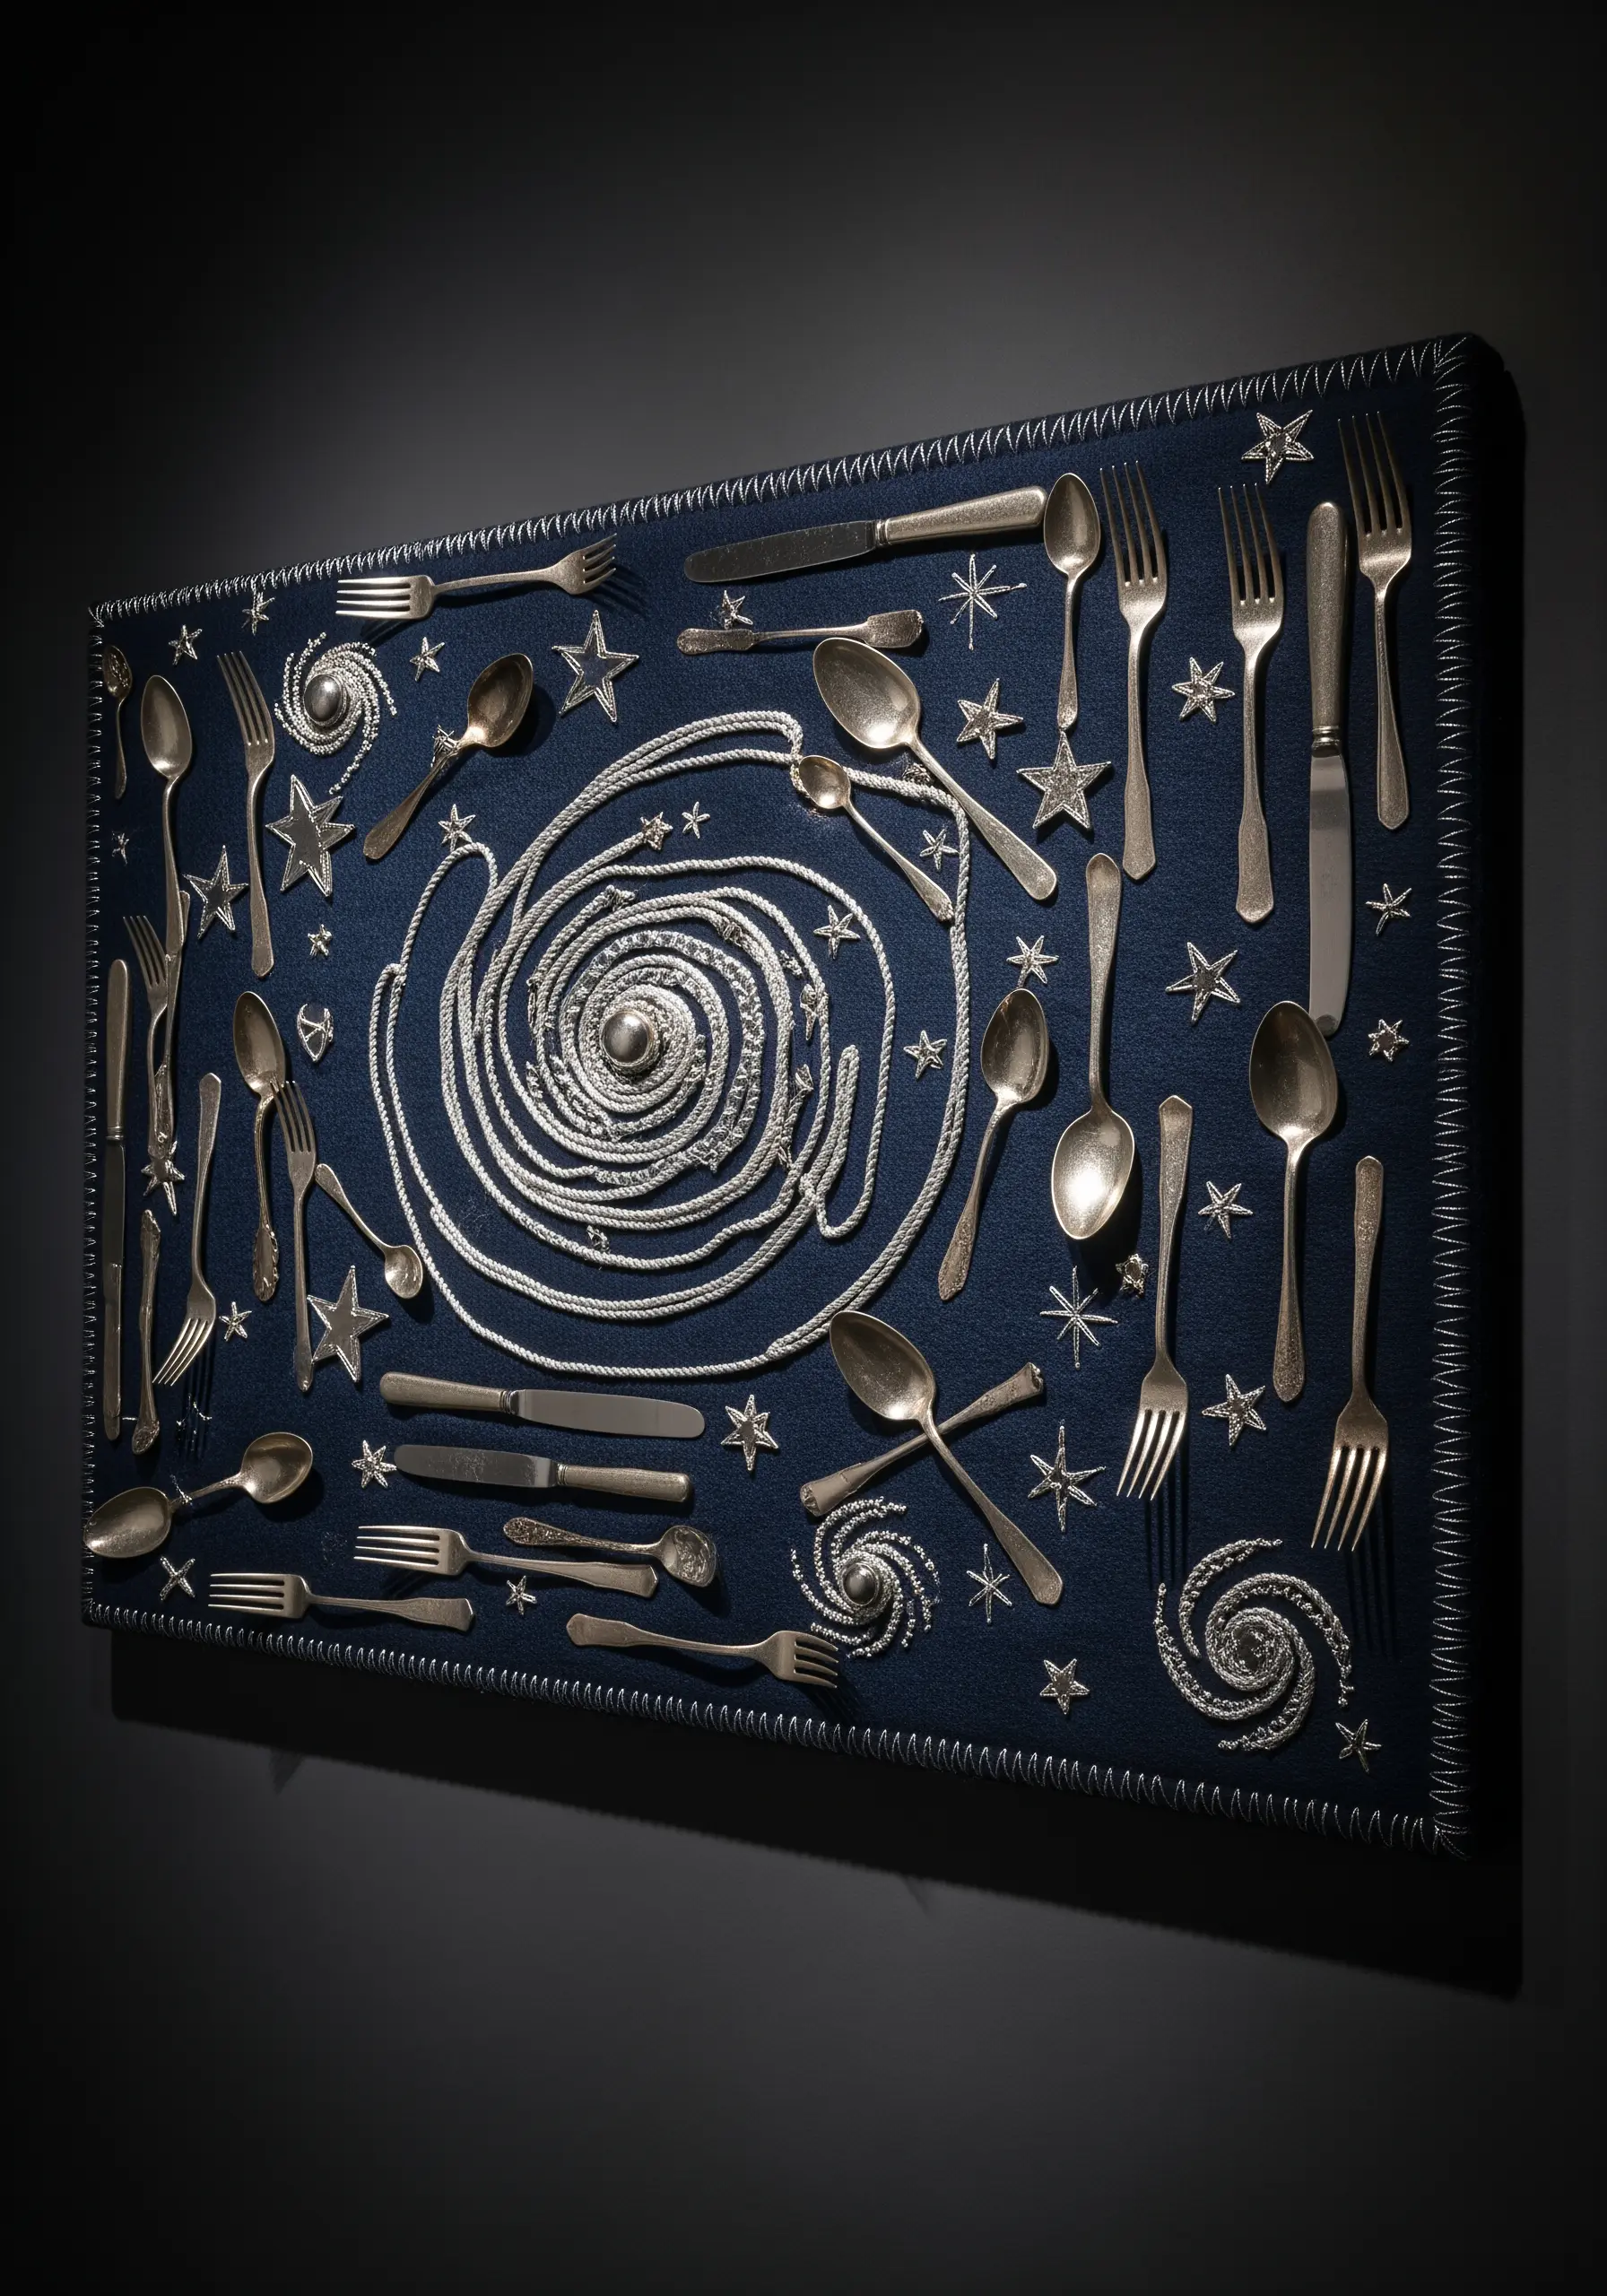
Create a stunning wall piece by anchoring unexpected items, like cutlery, onto a fabric background.
Arrange your objects on a tightly stretched canvas of heavy-duty fabric like denim or felt.
Use a strong thread, such as perle cotton or even fine wire, to couch the items in place.
Lay the couching thread over the object and use a second thread to make small, tight anchoring stitches into the fabric on either side.
Add embroidered elements, like simple metallic stars, to integrate the objects into a cohesive, narrative scene.
8. Draw with Thread on Transparent Surfaces

Use embroidery to add graphic, linear details to sculptures made from transparent or translucent materials.
On a surface like colored plastic bags or sheets of acetate, thread acts like a drawn line with added texture.
Use a needle to pierce the material and stitch a simple design using a backstitch or stem stitch in a high-contrast color.
The thread creates a playful, floating line that interacts with the light filtering through the colored plastic, adding another layer of visual interest.
9. Weave Geometric Patterns with Tension
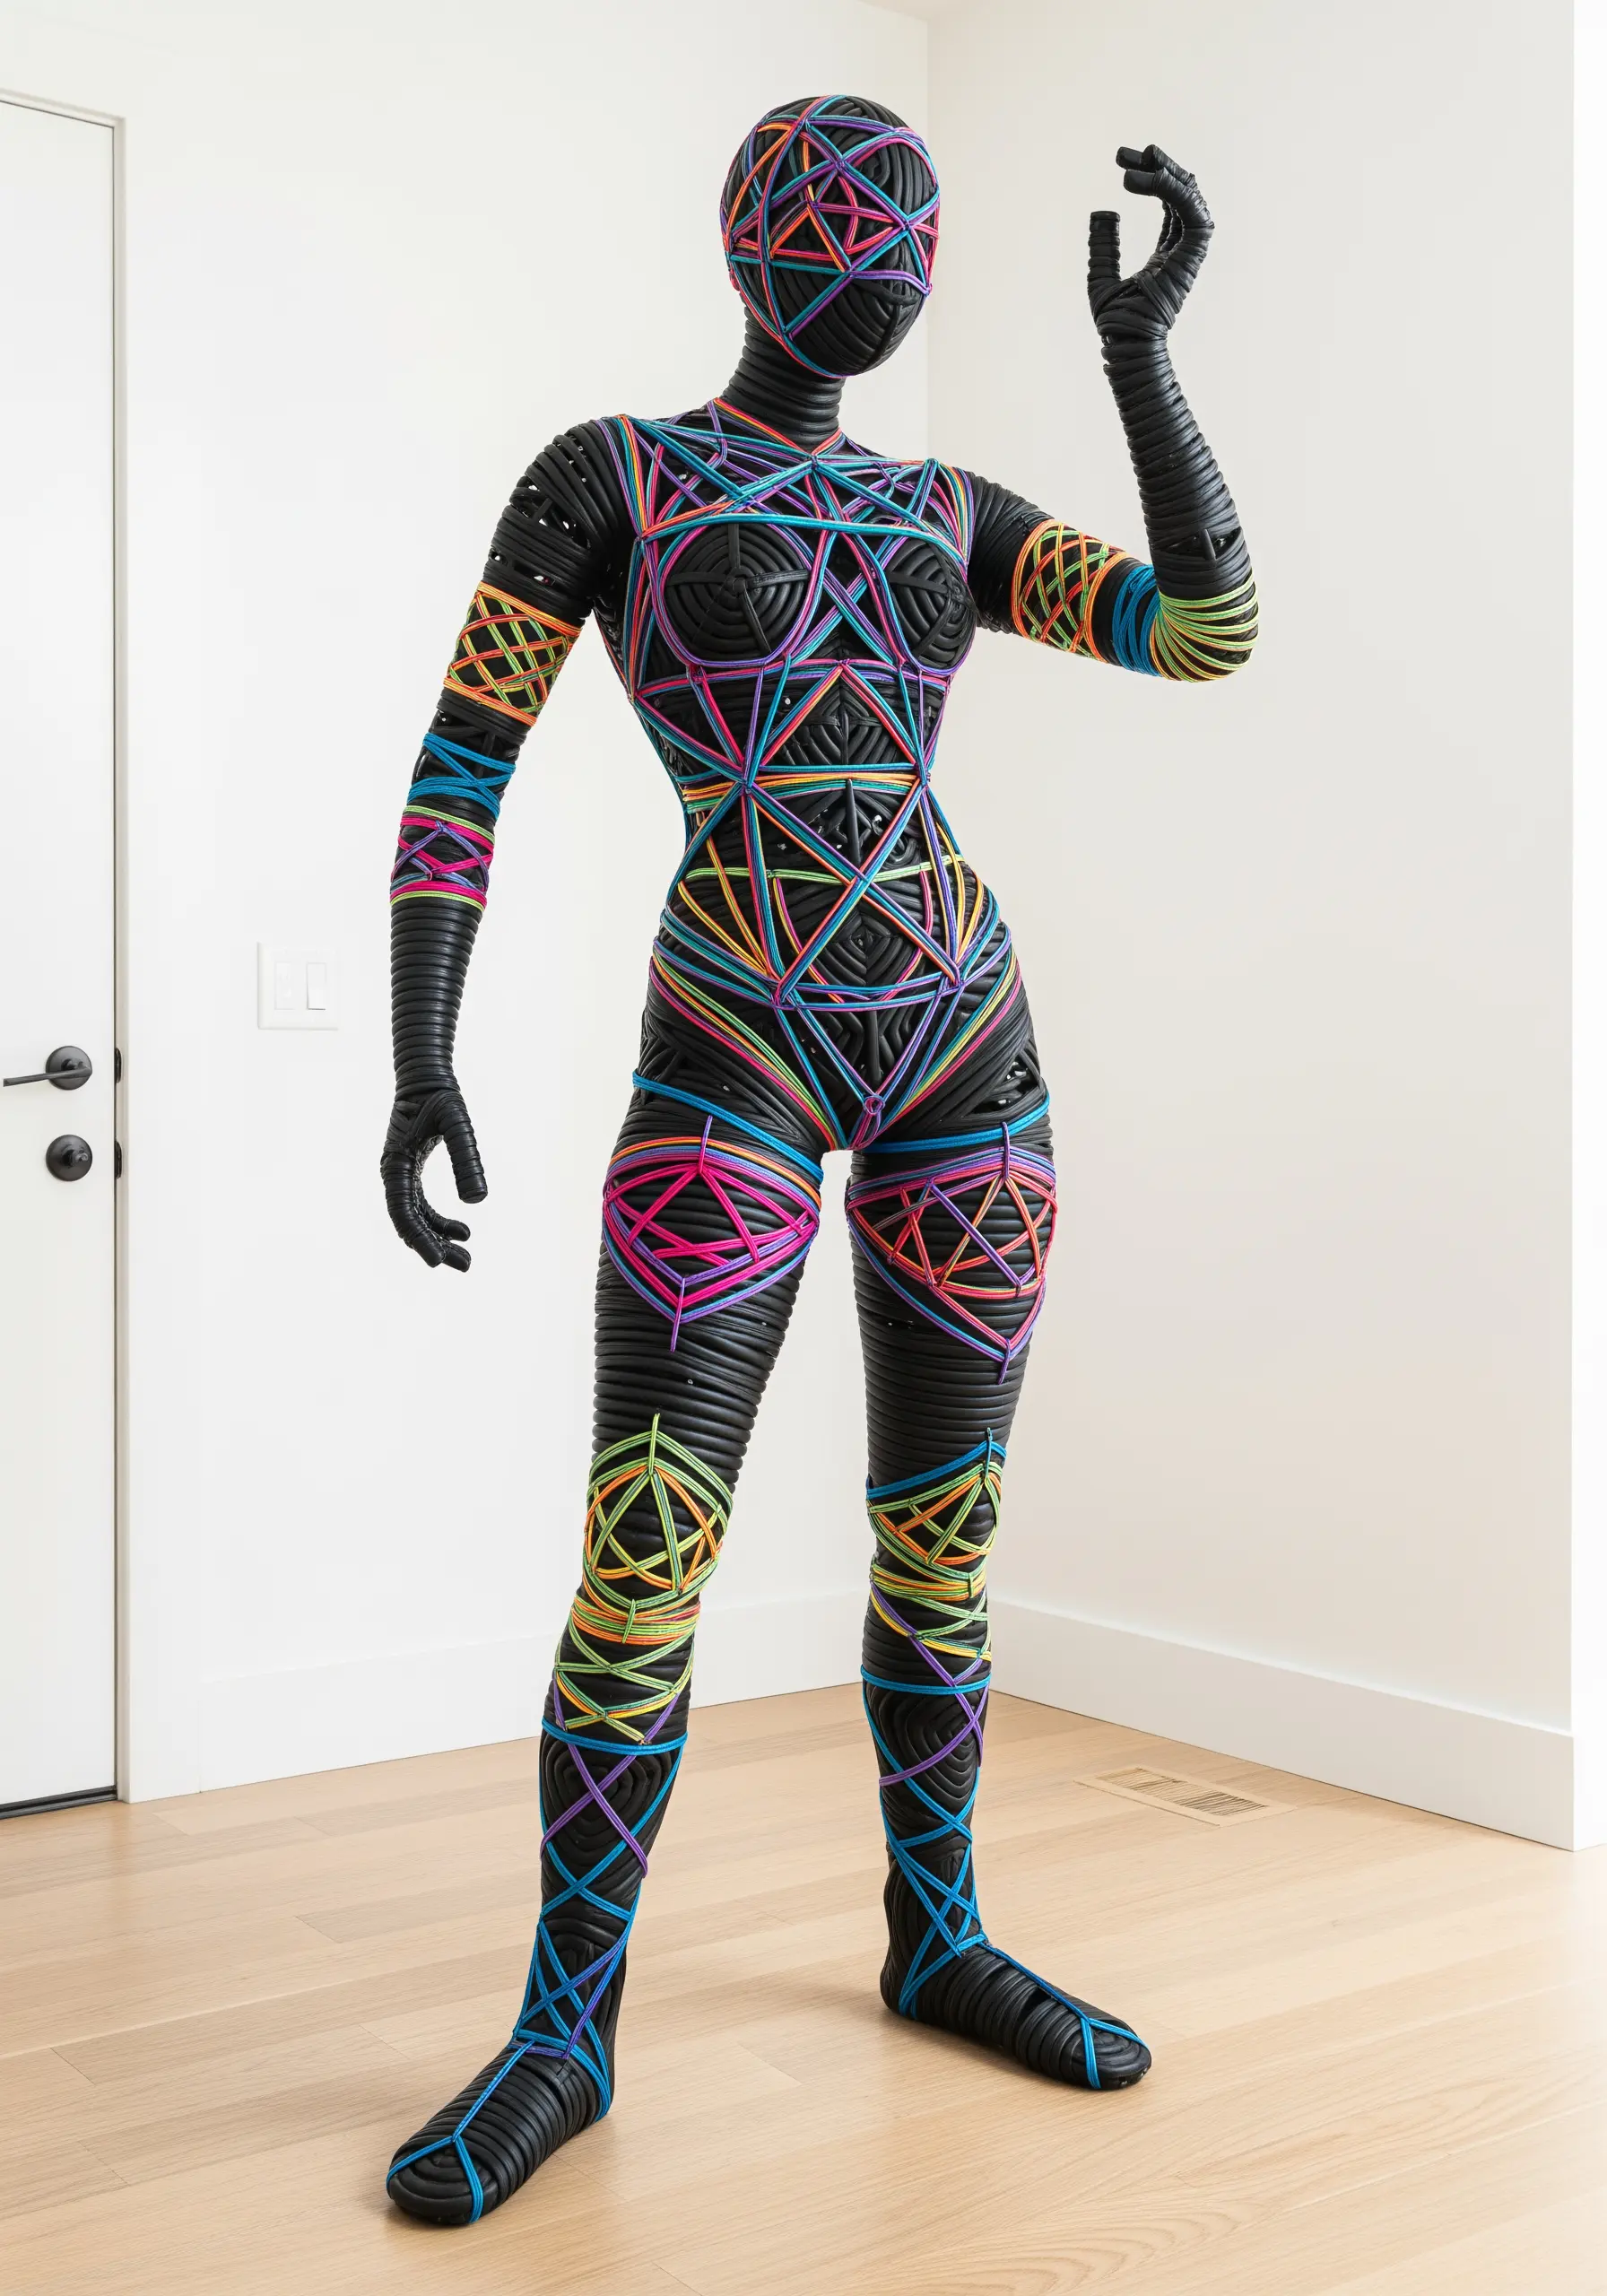
Transform a simple form by wrapping it with colorful thread to create intricate geometric patterns.
Start with a base structure, whether it’s a mannequin, a vase, or a wire frame.
Use vibrant embroidery floss or thin yarn to wrap the object, crisscrossing the threads to build up geometric shapes like triangles, diamonds, and stars.
The key to achieving sharp, clean lines is maintaining consistent, tight tension as you wrap.
This technique turns a solid form into a canvas for stunning, three-dimensional line work.
10. Reinvent Kintsugi with Thread
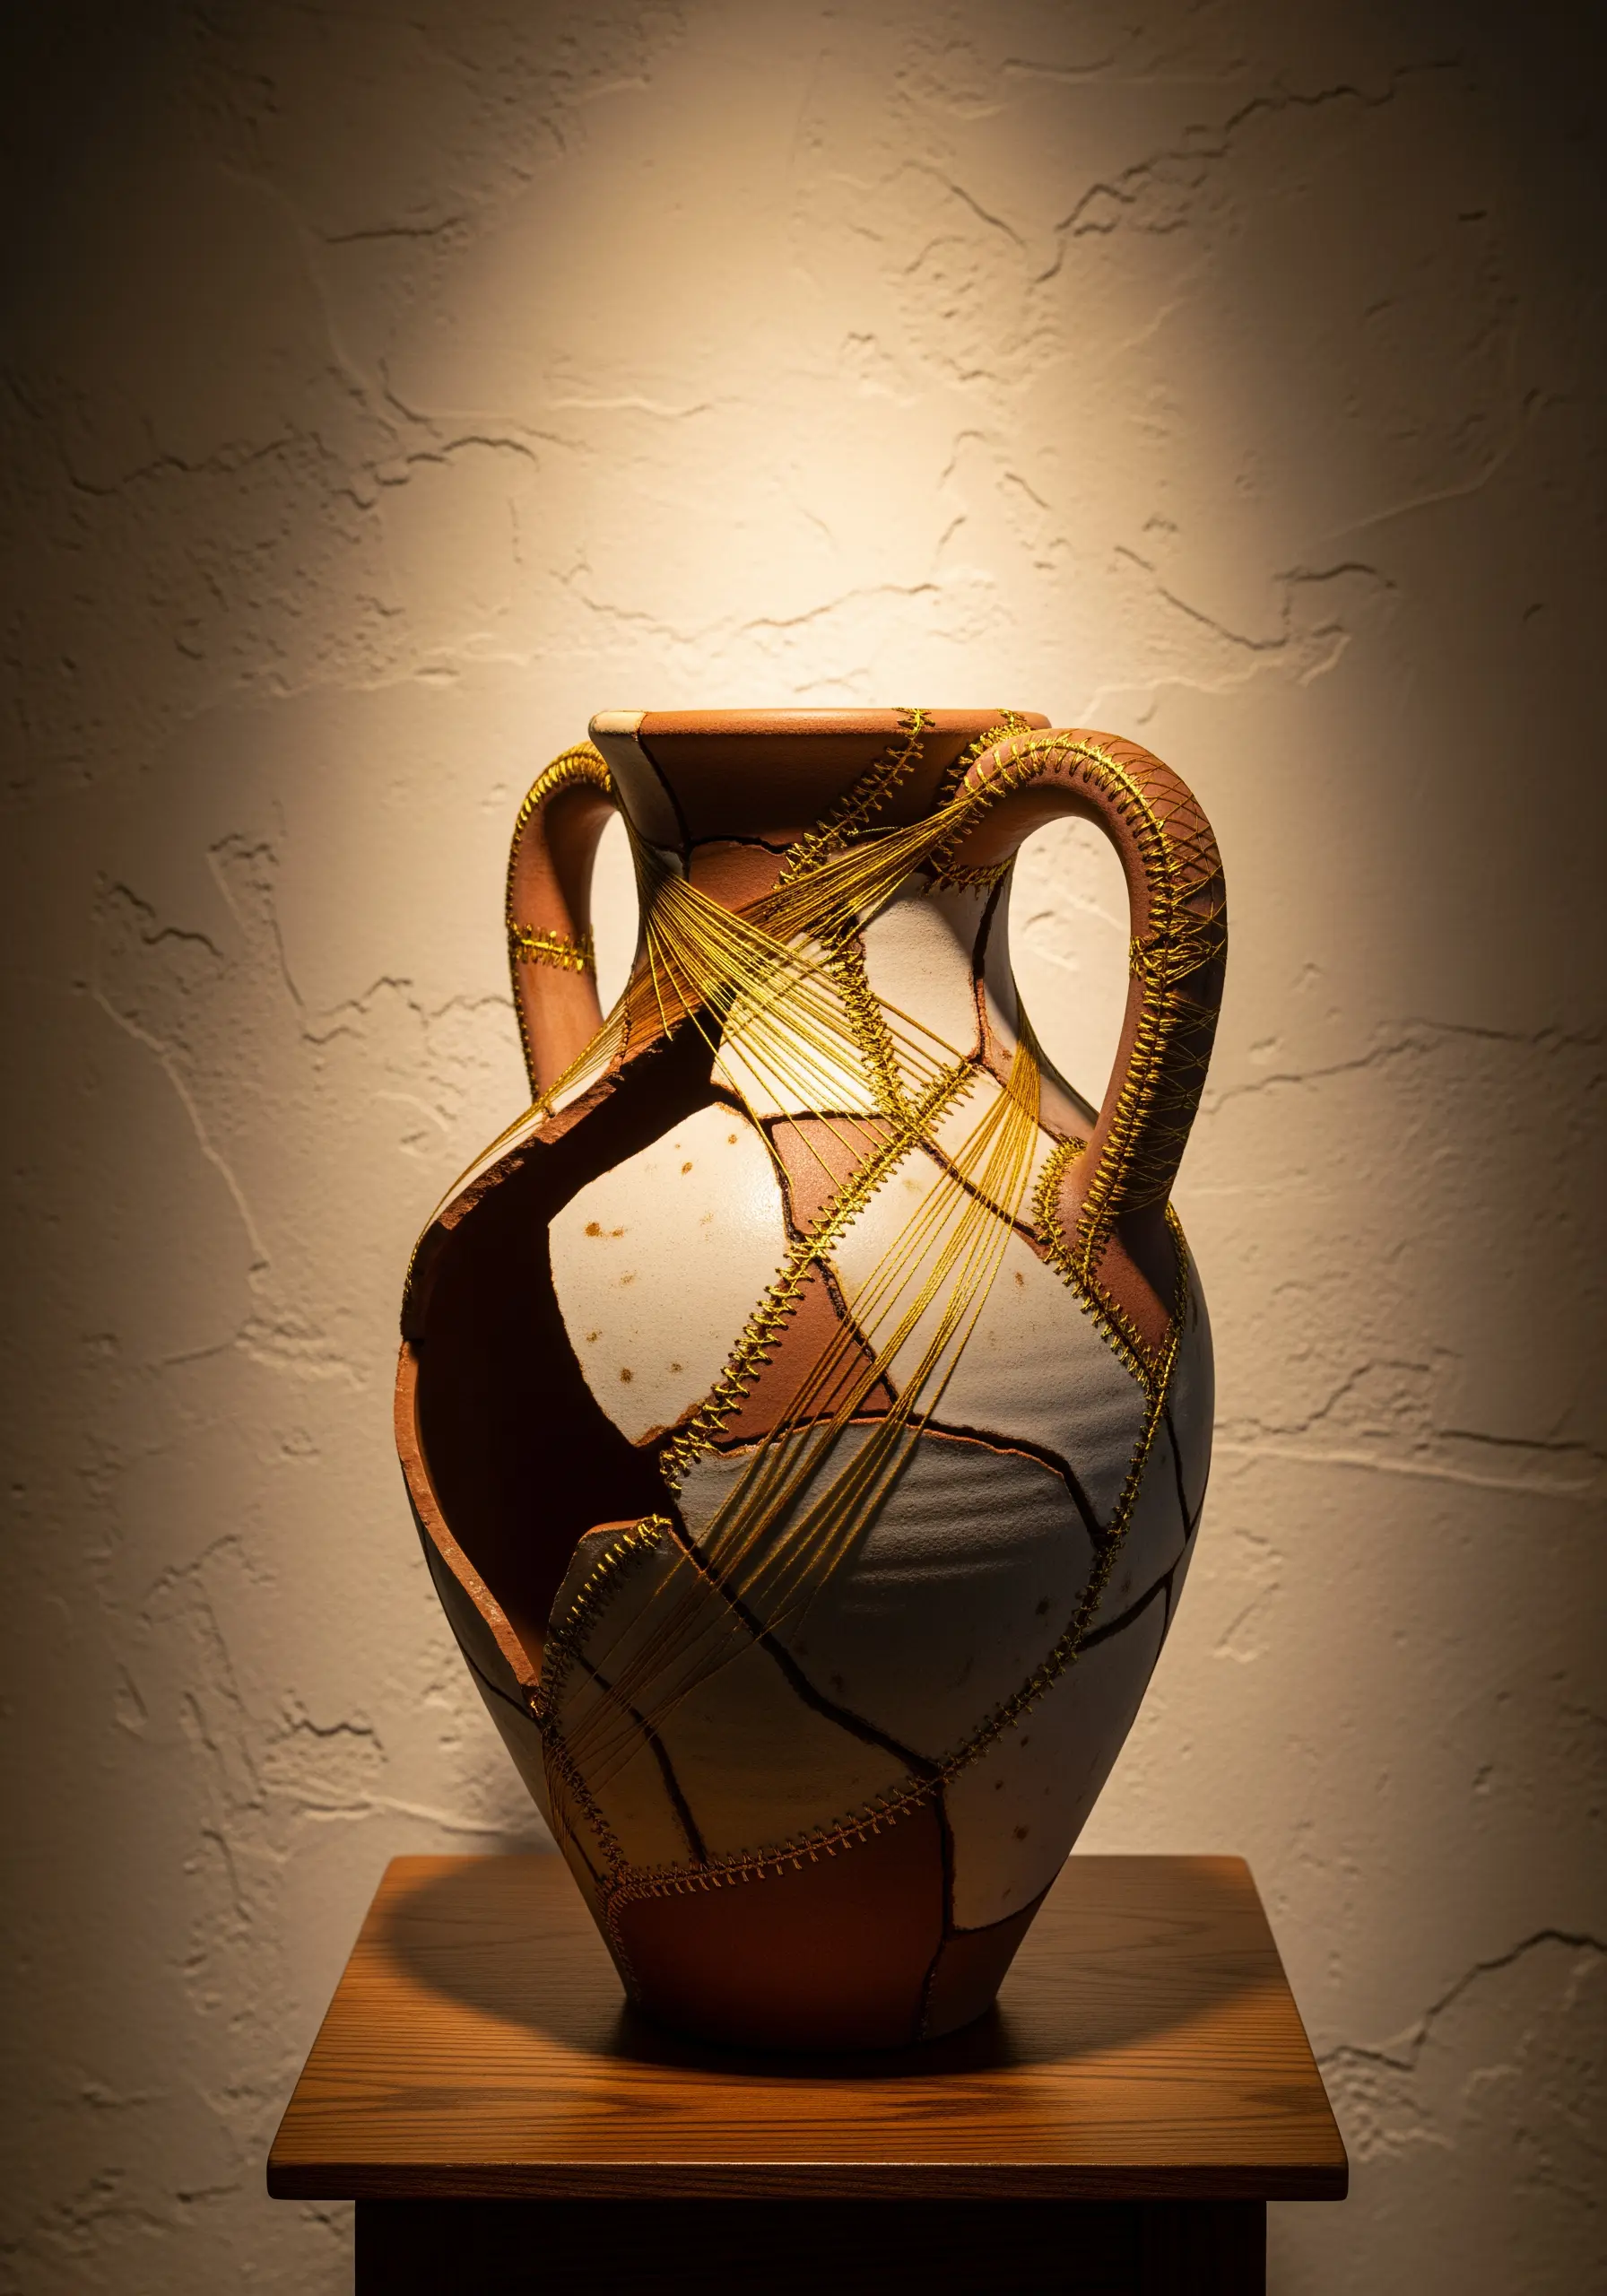
Apply the philosophy of Kintsugi—the Japanese art of repairing broken pottery—using thread instead of gold lacquer.
Carefully drill tiny, evenly spaced holes along the broken edges of ceramic fragments using a fine-bit Dremel tool.
Then, use a strong metallic gold thread to ‘stitch’ the pieces back together, creating visible, decorative seams.
You can use lacing techniques, cross-stitches, or even span the gaps with woven thread ‘patches’.
This method doesn’t just repair the object; it celebrates its history and transforms the breaks into beautiful features.
11. Lace Industrial Materials Together
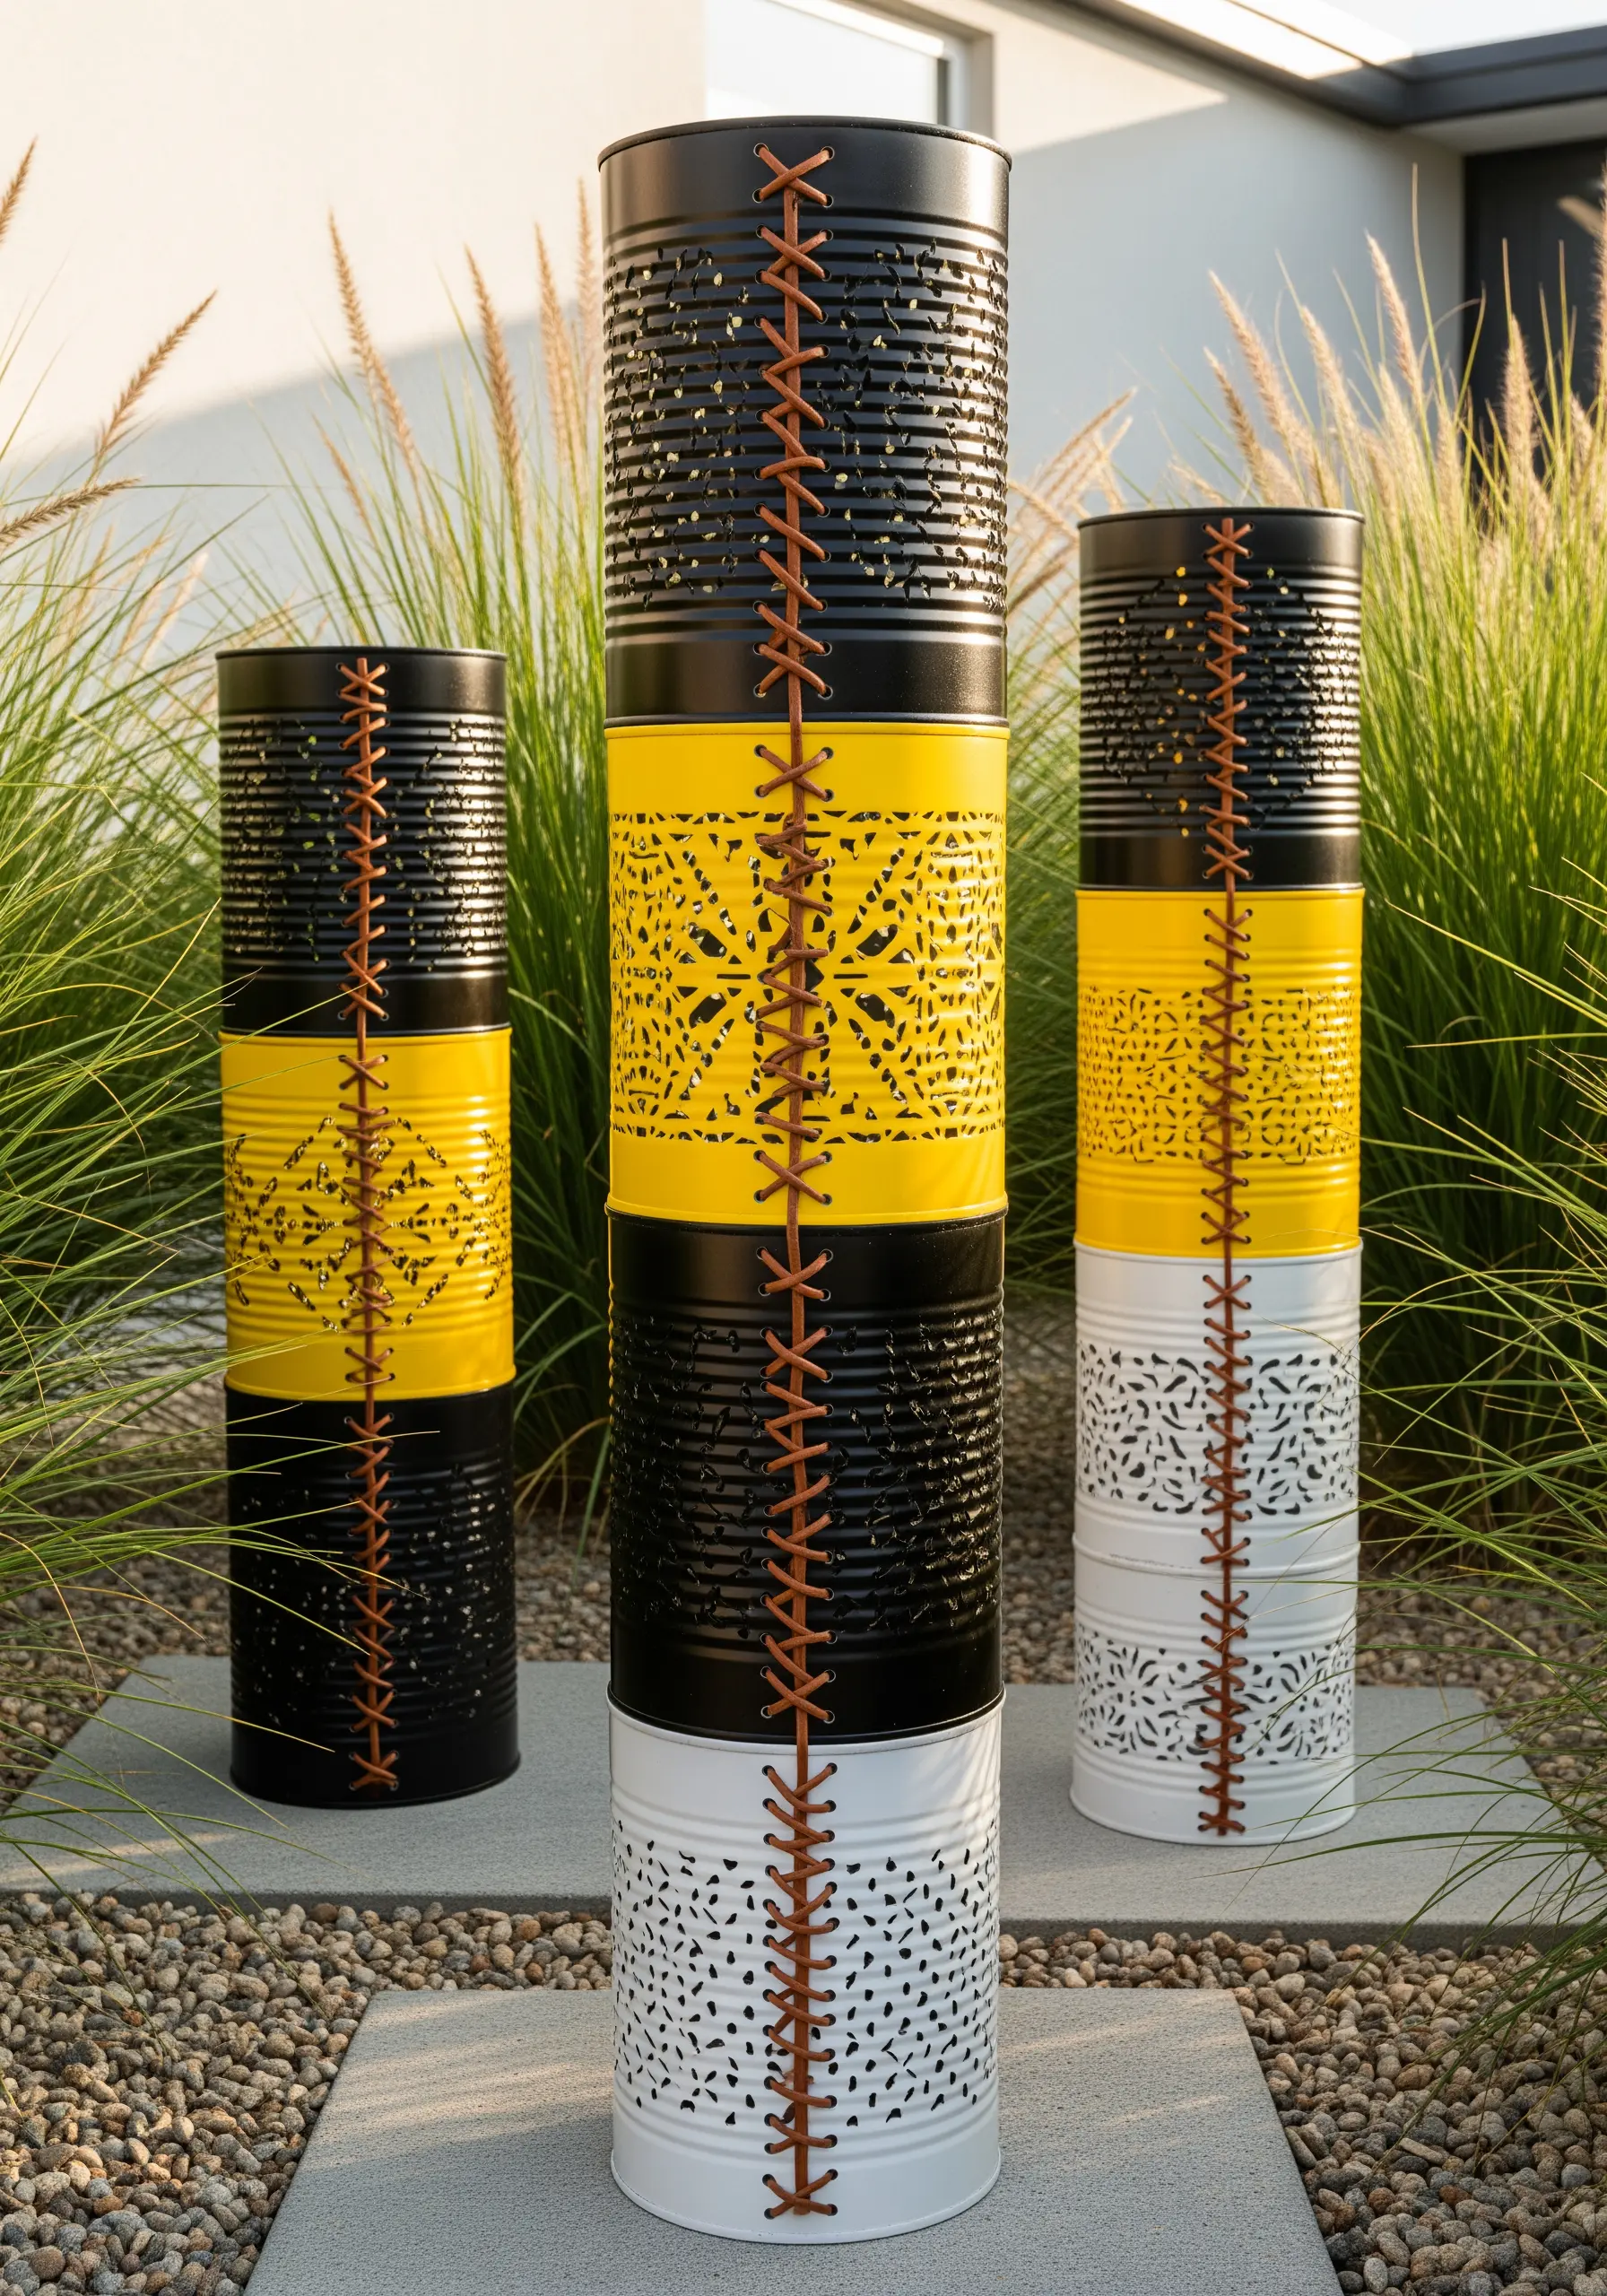
Juxtapose the cold, hard nature of metal with the warmth of rustic stitching to create striking outdoor or indoor sculptures.
Drill or punch holes in upcycled materials like tin cans or pieces of sheet metal.
Use a thick, durable material like leather cord or waxed linen thread to lace the components together.
A simple, bold cross-stitch or baseball stitch not only provides a strong structural connection but also creates a powerful visual contrast that draws the eye.
12. Adapt Traditional Stitching for 3D Forms
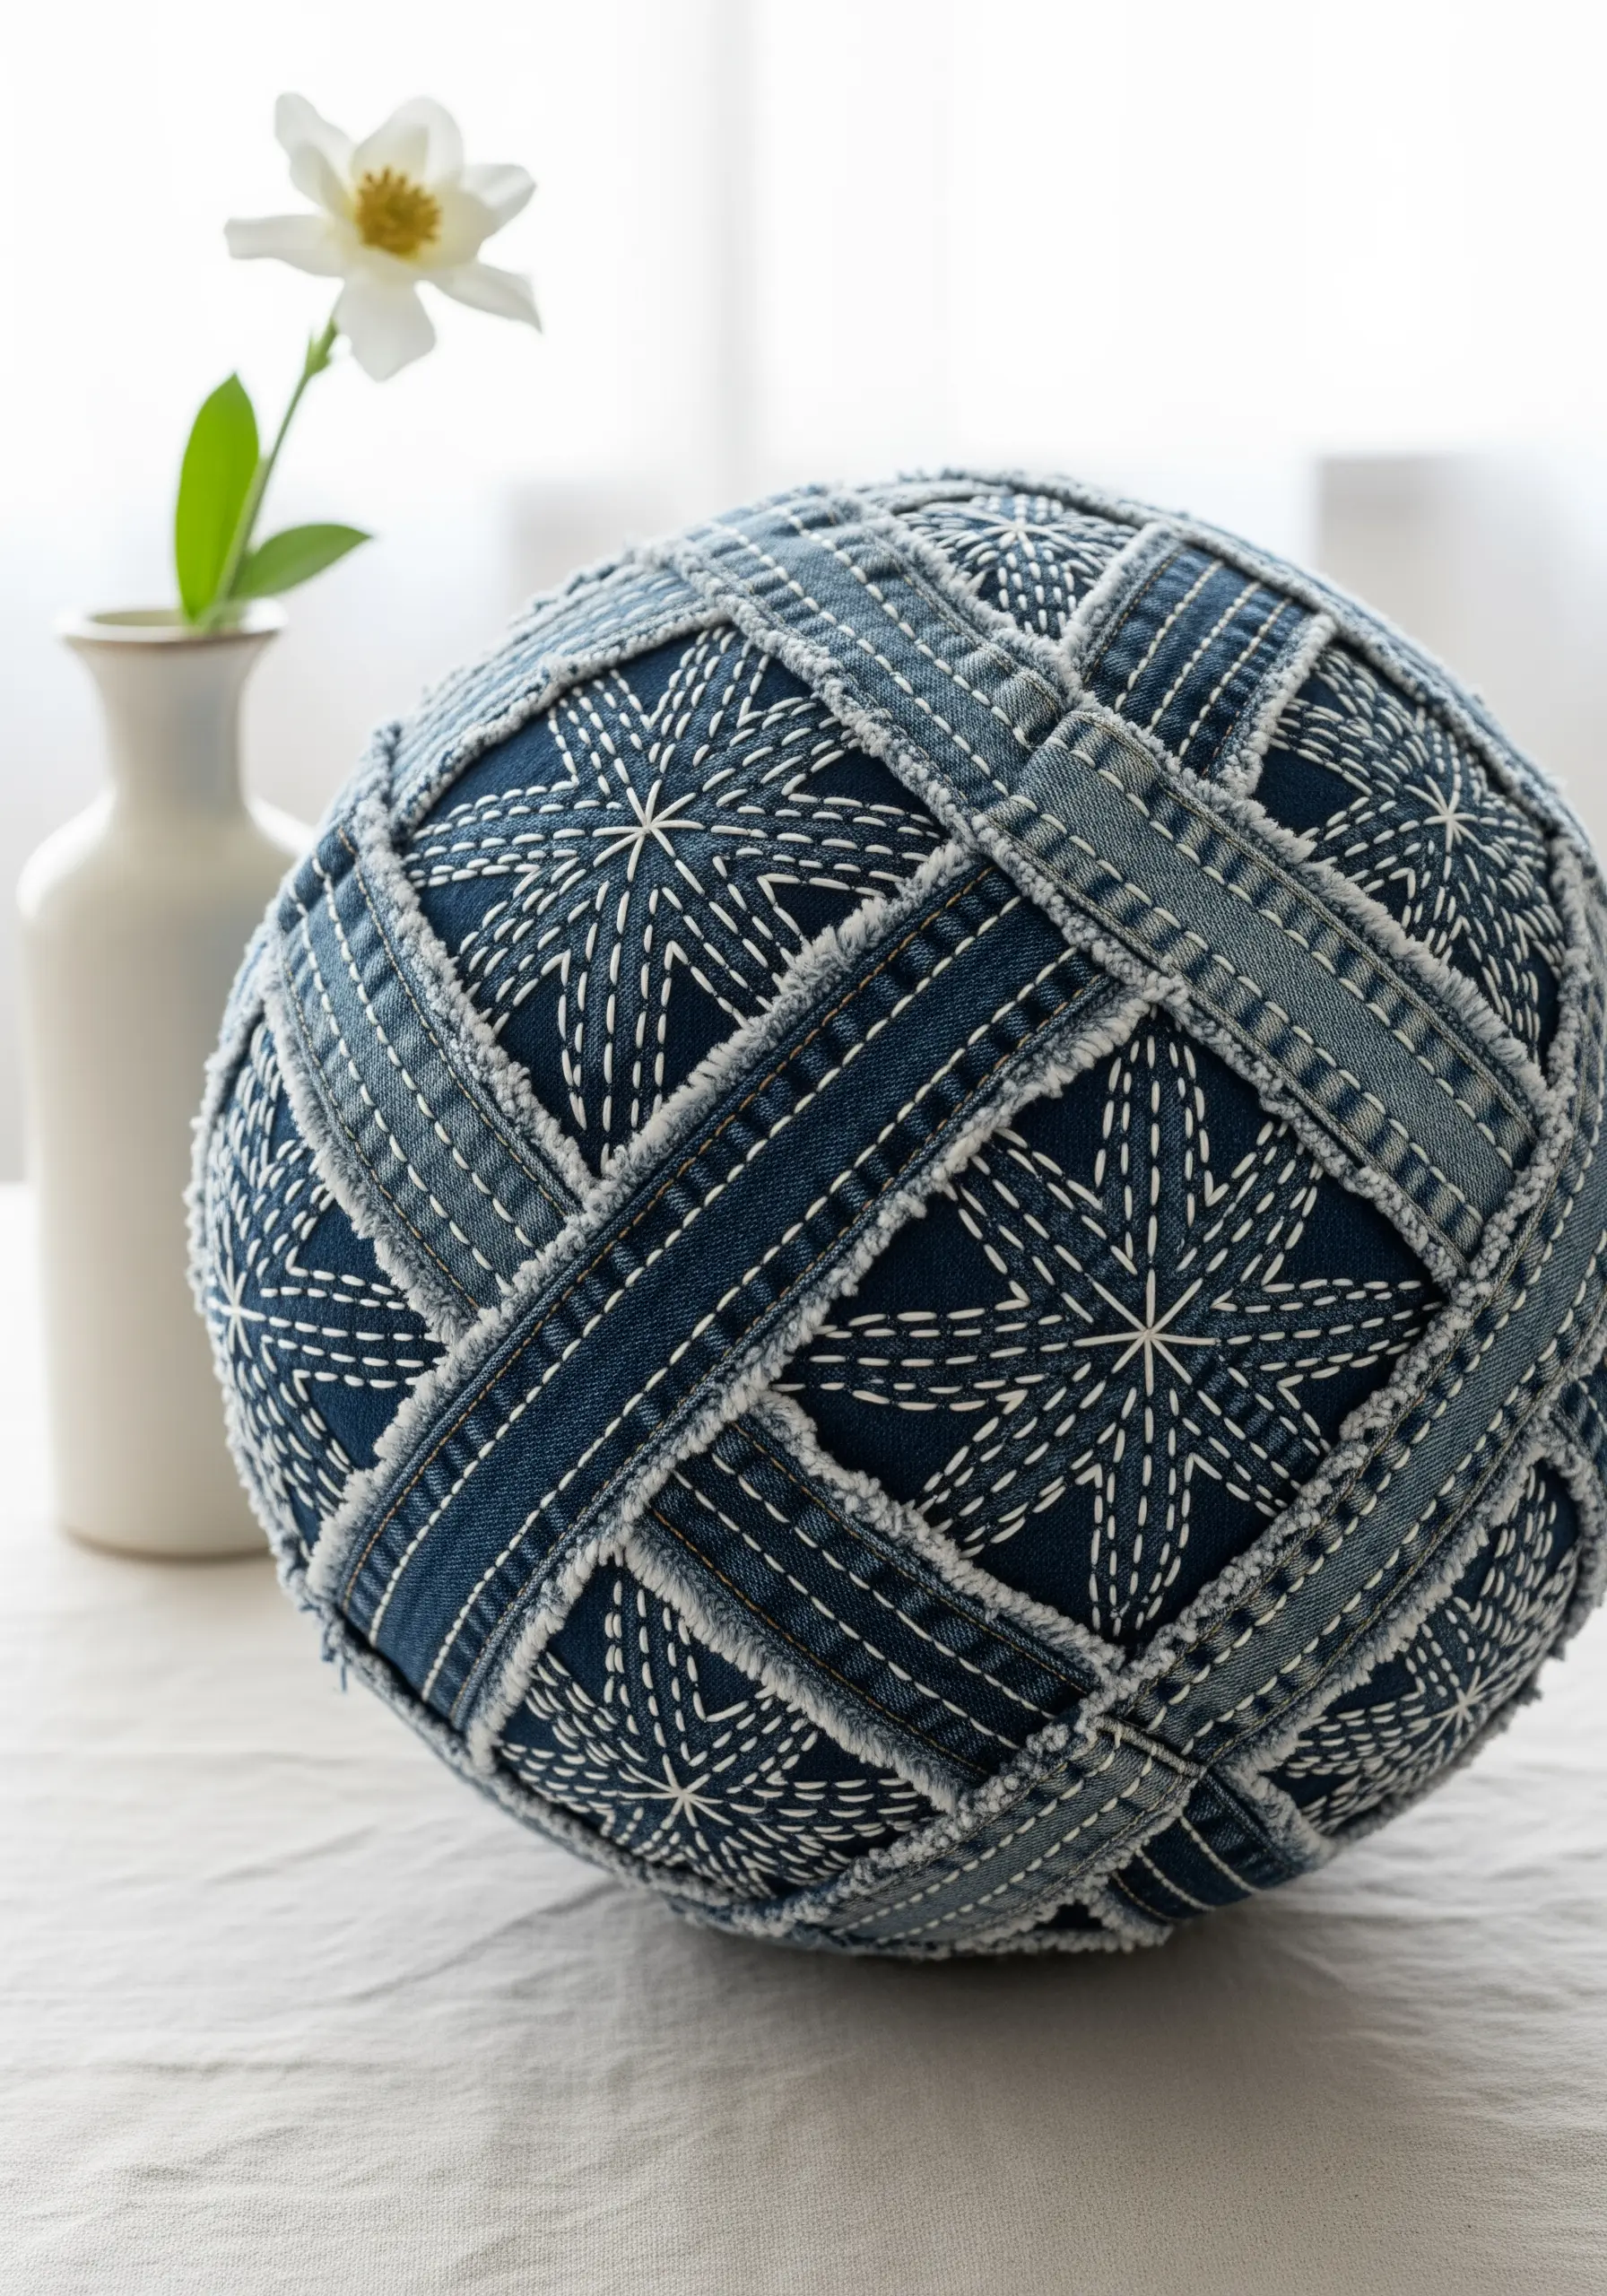
Take a classic surface embroidery technique, like Japanese Sashiko, and apply it to a three-dimensional object.
Cover a spherical form with fabric panels—denim works beautifully for its durability and texture.
Use traditional Sashiko thread and a long needle to stitch the iconic geometric patterns across the curved surface, connecting the different panels.
Allowing the fabric edges to fray slightly before stitching them down adds another layer of texture that enhances the graphic quality of the white-on-indigo stitches.
13. Weave Soft Textures onto a Wire Frame
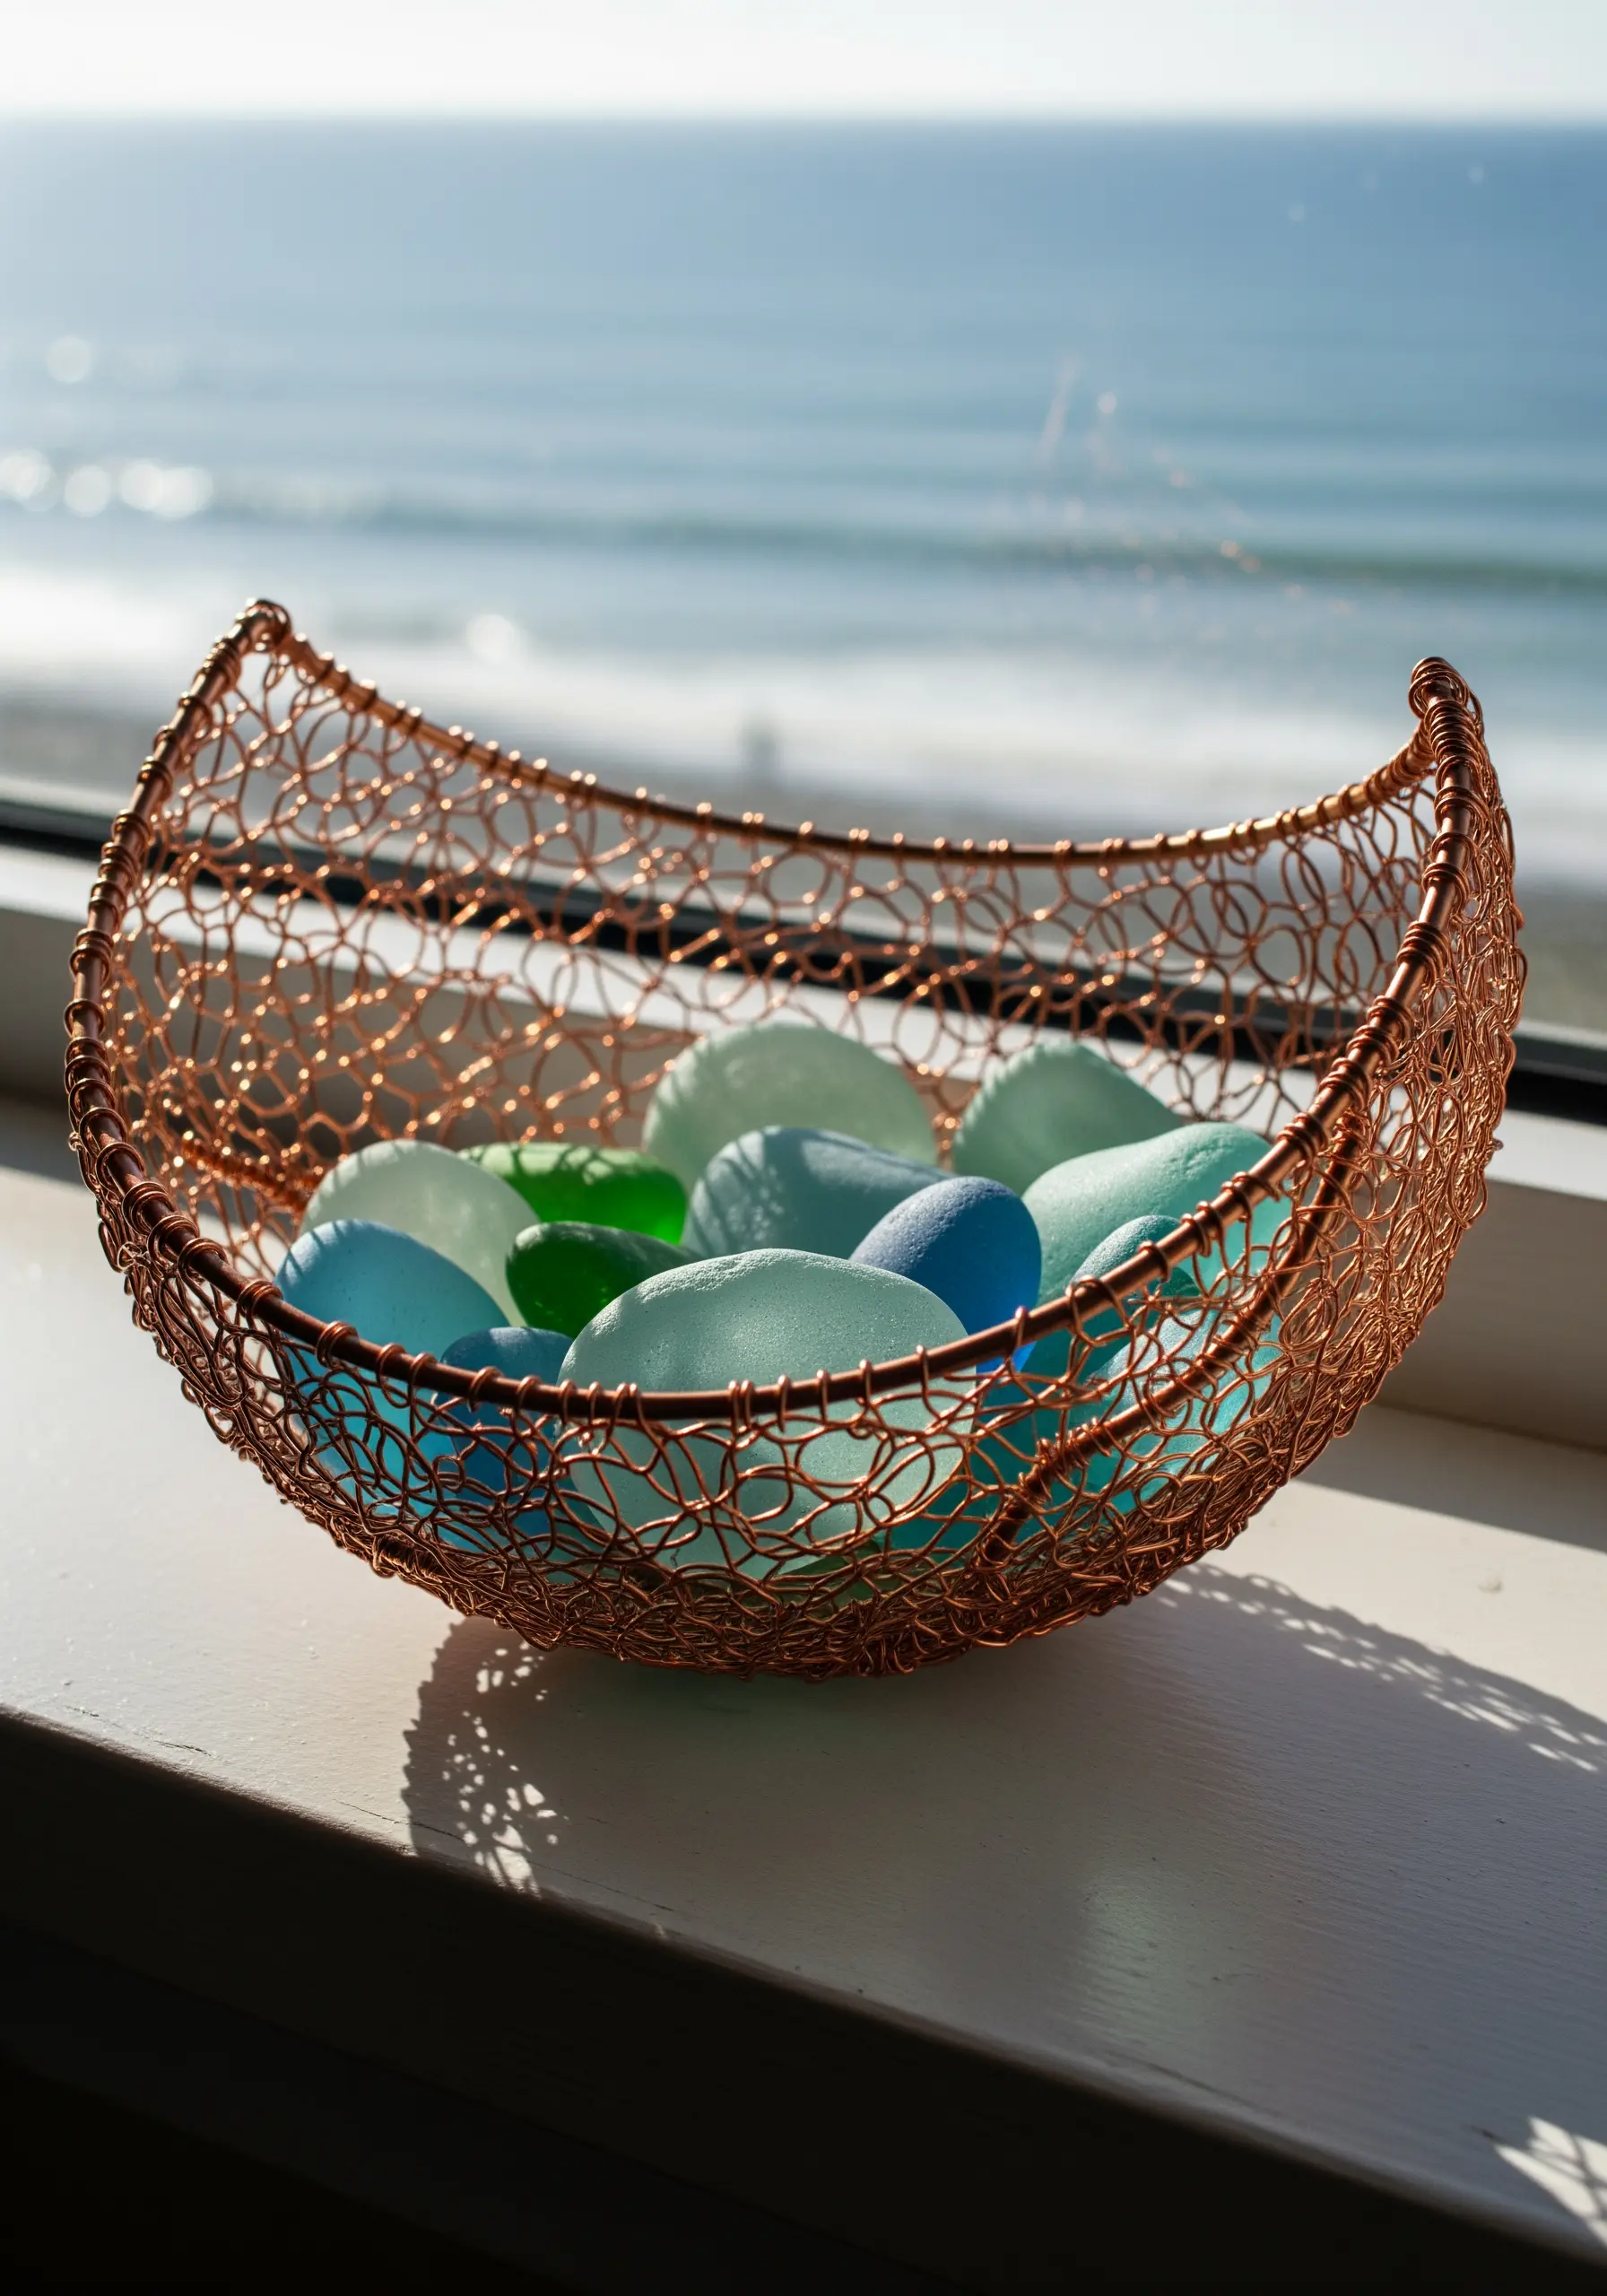
Create delicate, lightweight sculptures by using a wire armature as a loom for your threads.
Shape a piece of malleable wire, like copper or aluminum, into your desired form—a bowl, a leaf, a bird.
Then, use yarn or embroidery floss to weave, wrap, or net across the frame, creating a semi-transparent ‘skin’ of thread.
This technique allows you to create airy, graceful forms that play with light and shadow, capturing a sense of fragility and strength simultaneously.
14. Activate Negative Space in Modular Art
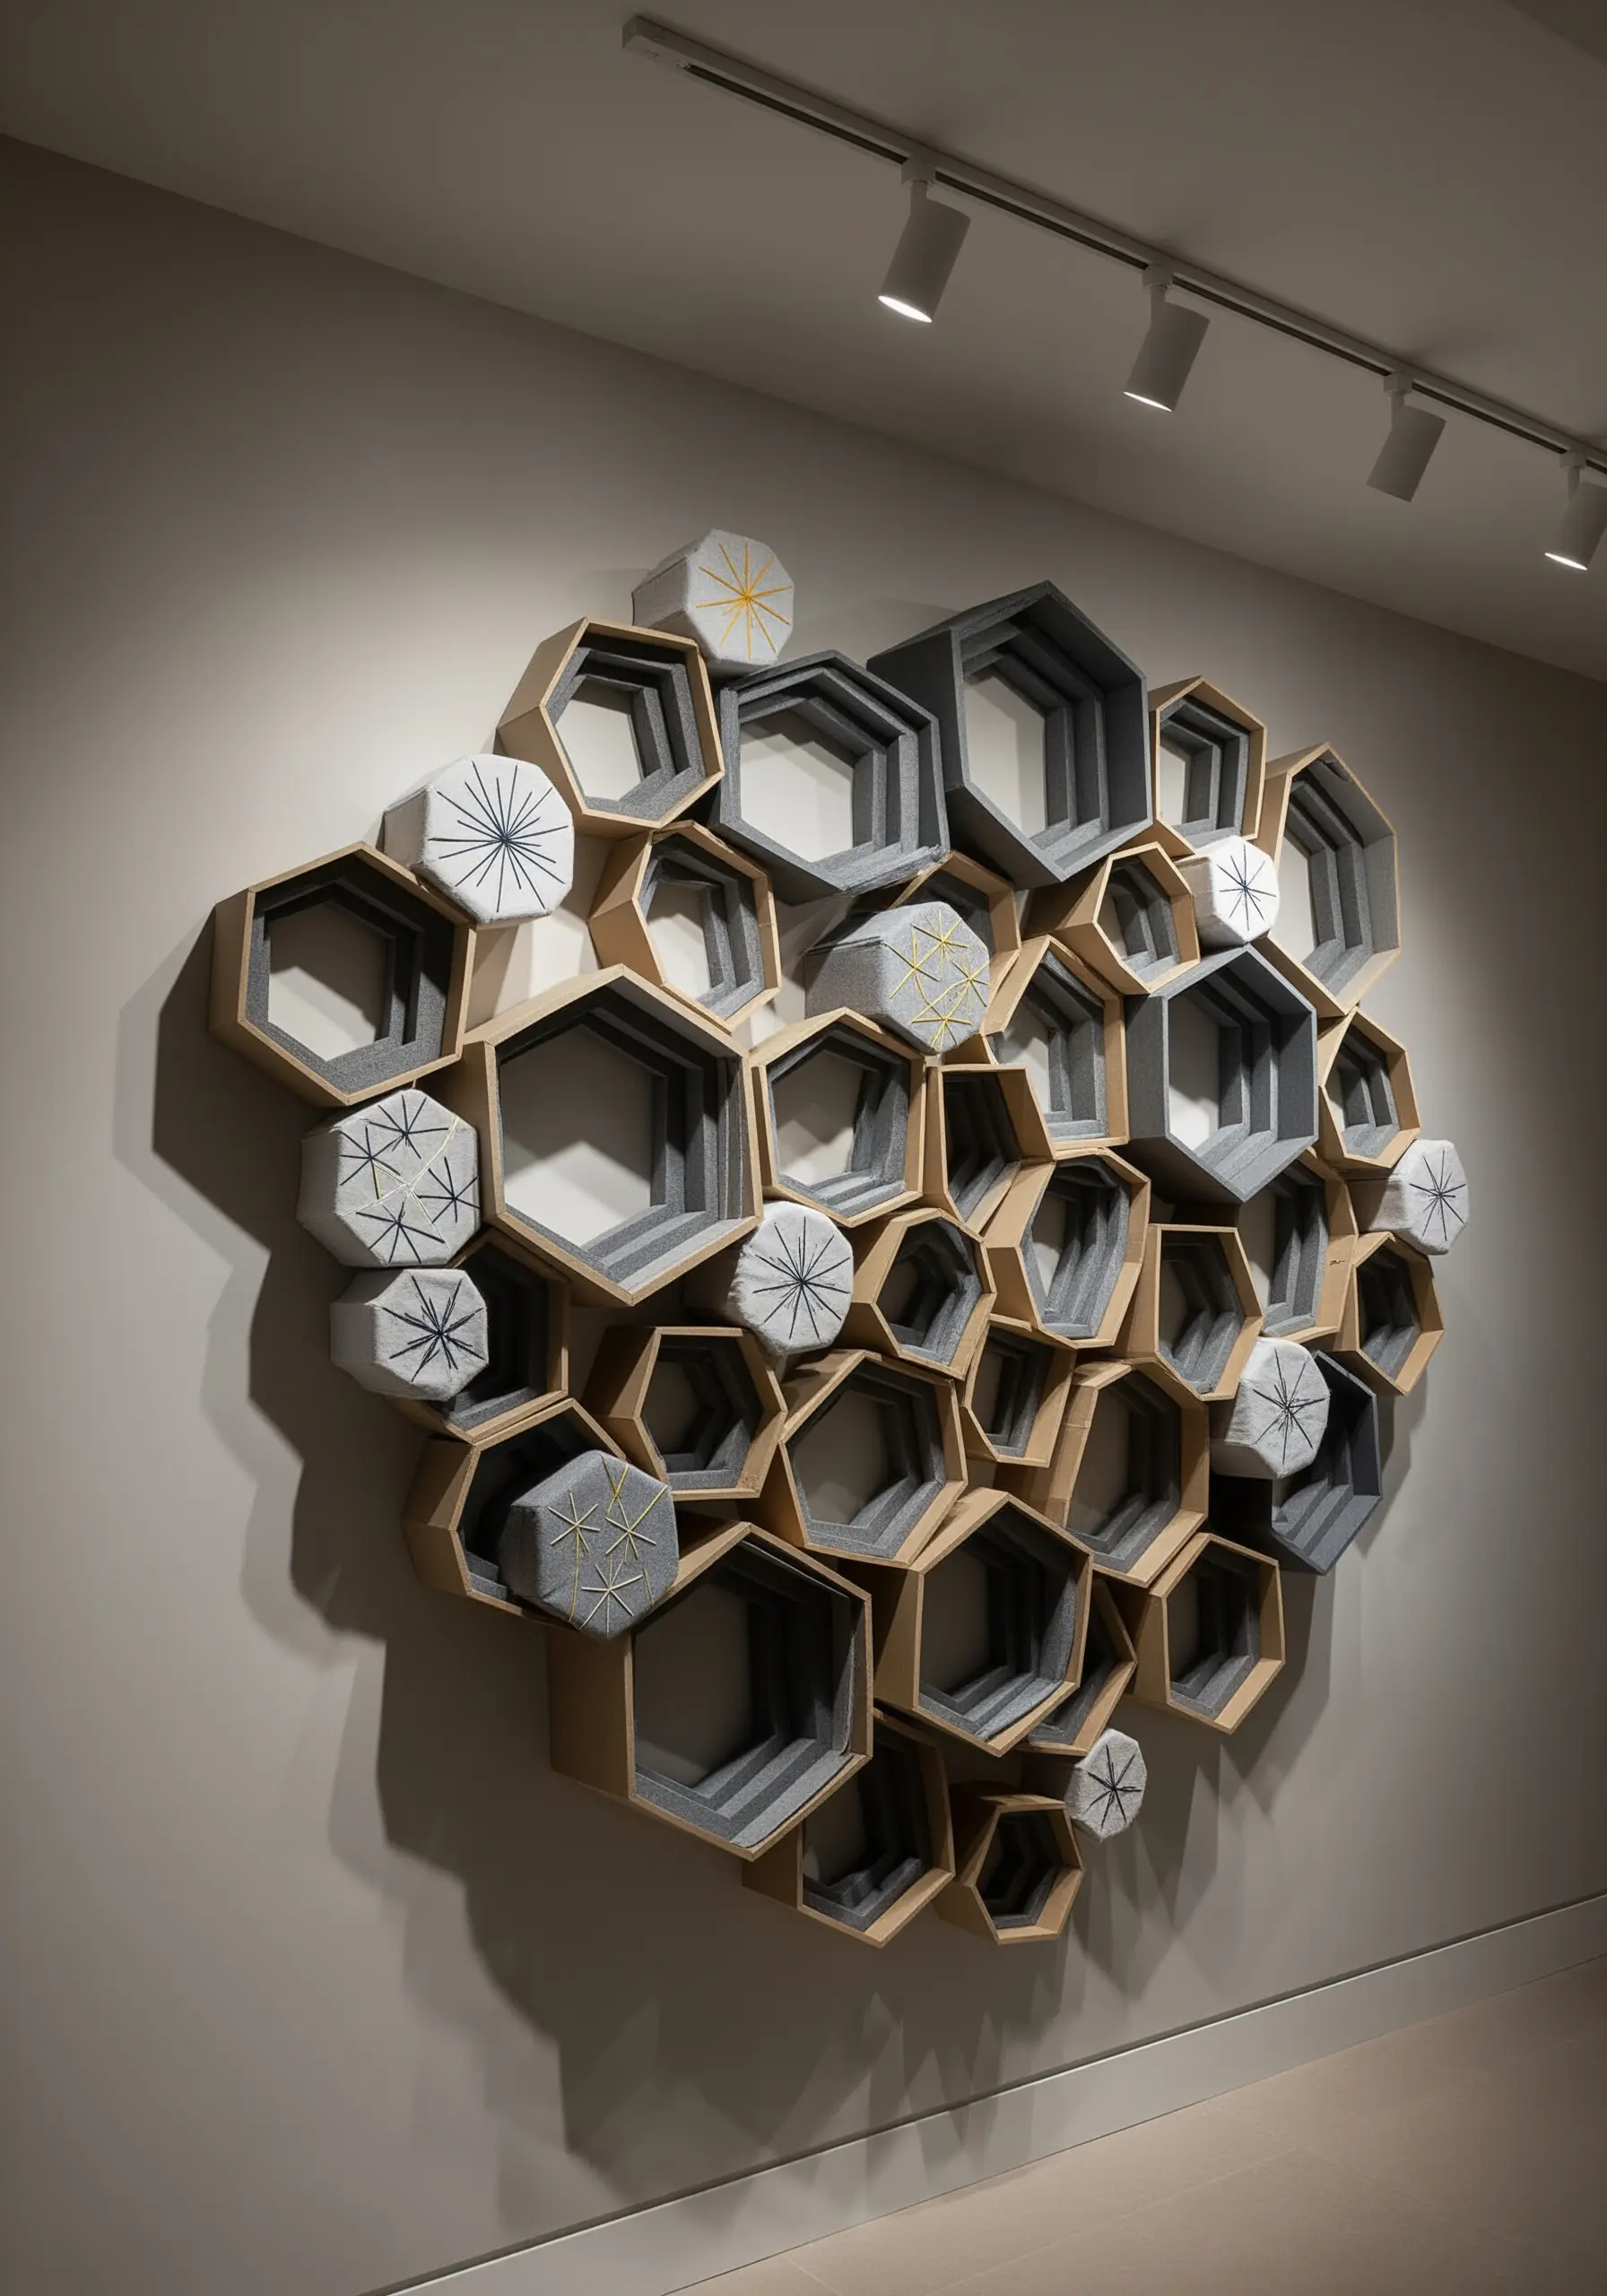
Build a large-scale wall installation by combining stitched elements with empty space.
Create a series of simple wooden frames, like hexagons or squares, in various sizes.
Stretch fabric across some of the frames and leave others empty. On the fabric-covered modules, stitch minimalist geometric designs—radiating lines or starbursts—that echo the shape of the frame.
Arrange the filled and empty modules together on a wall. The interplay between texture, thread, and open space creates a sophisticated, dynamic piece of modern minimalist textile wall art.
15. Build Miniature Worlds with Fiber Textures

Create charming dioramas by using various fiber techniques to replicate natural textures on a small scale.
Use needle felting with roving wool to form the soft caps of mushrooms and the mossy ground cover.
Enhance the mossy effect by adding clusters of French knots and seed stitches in different shades of green embroidery floss.
You can also wrap the mushroom stems with plain cotton twine to mimic their fibrous texture. Combining these techniques results in a rich, tactile, and enchanting miniature scene.
16. Embellish Coiled Rope with Thread Wrapping
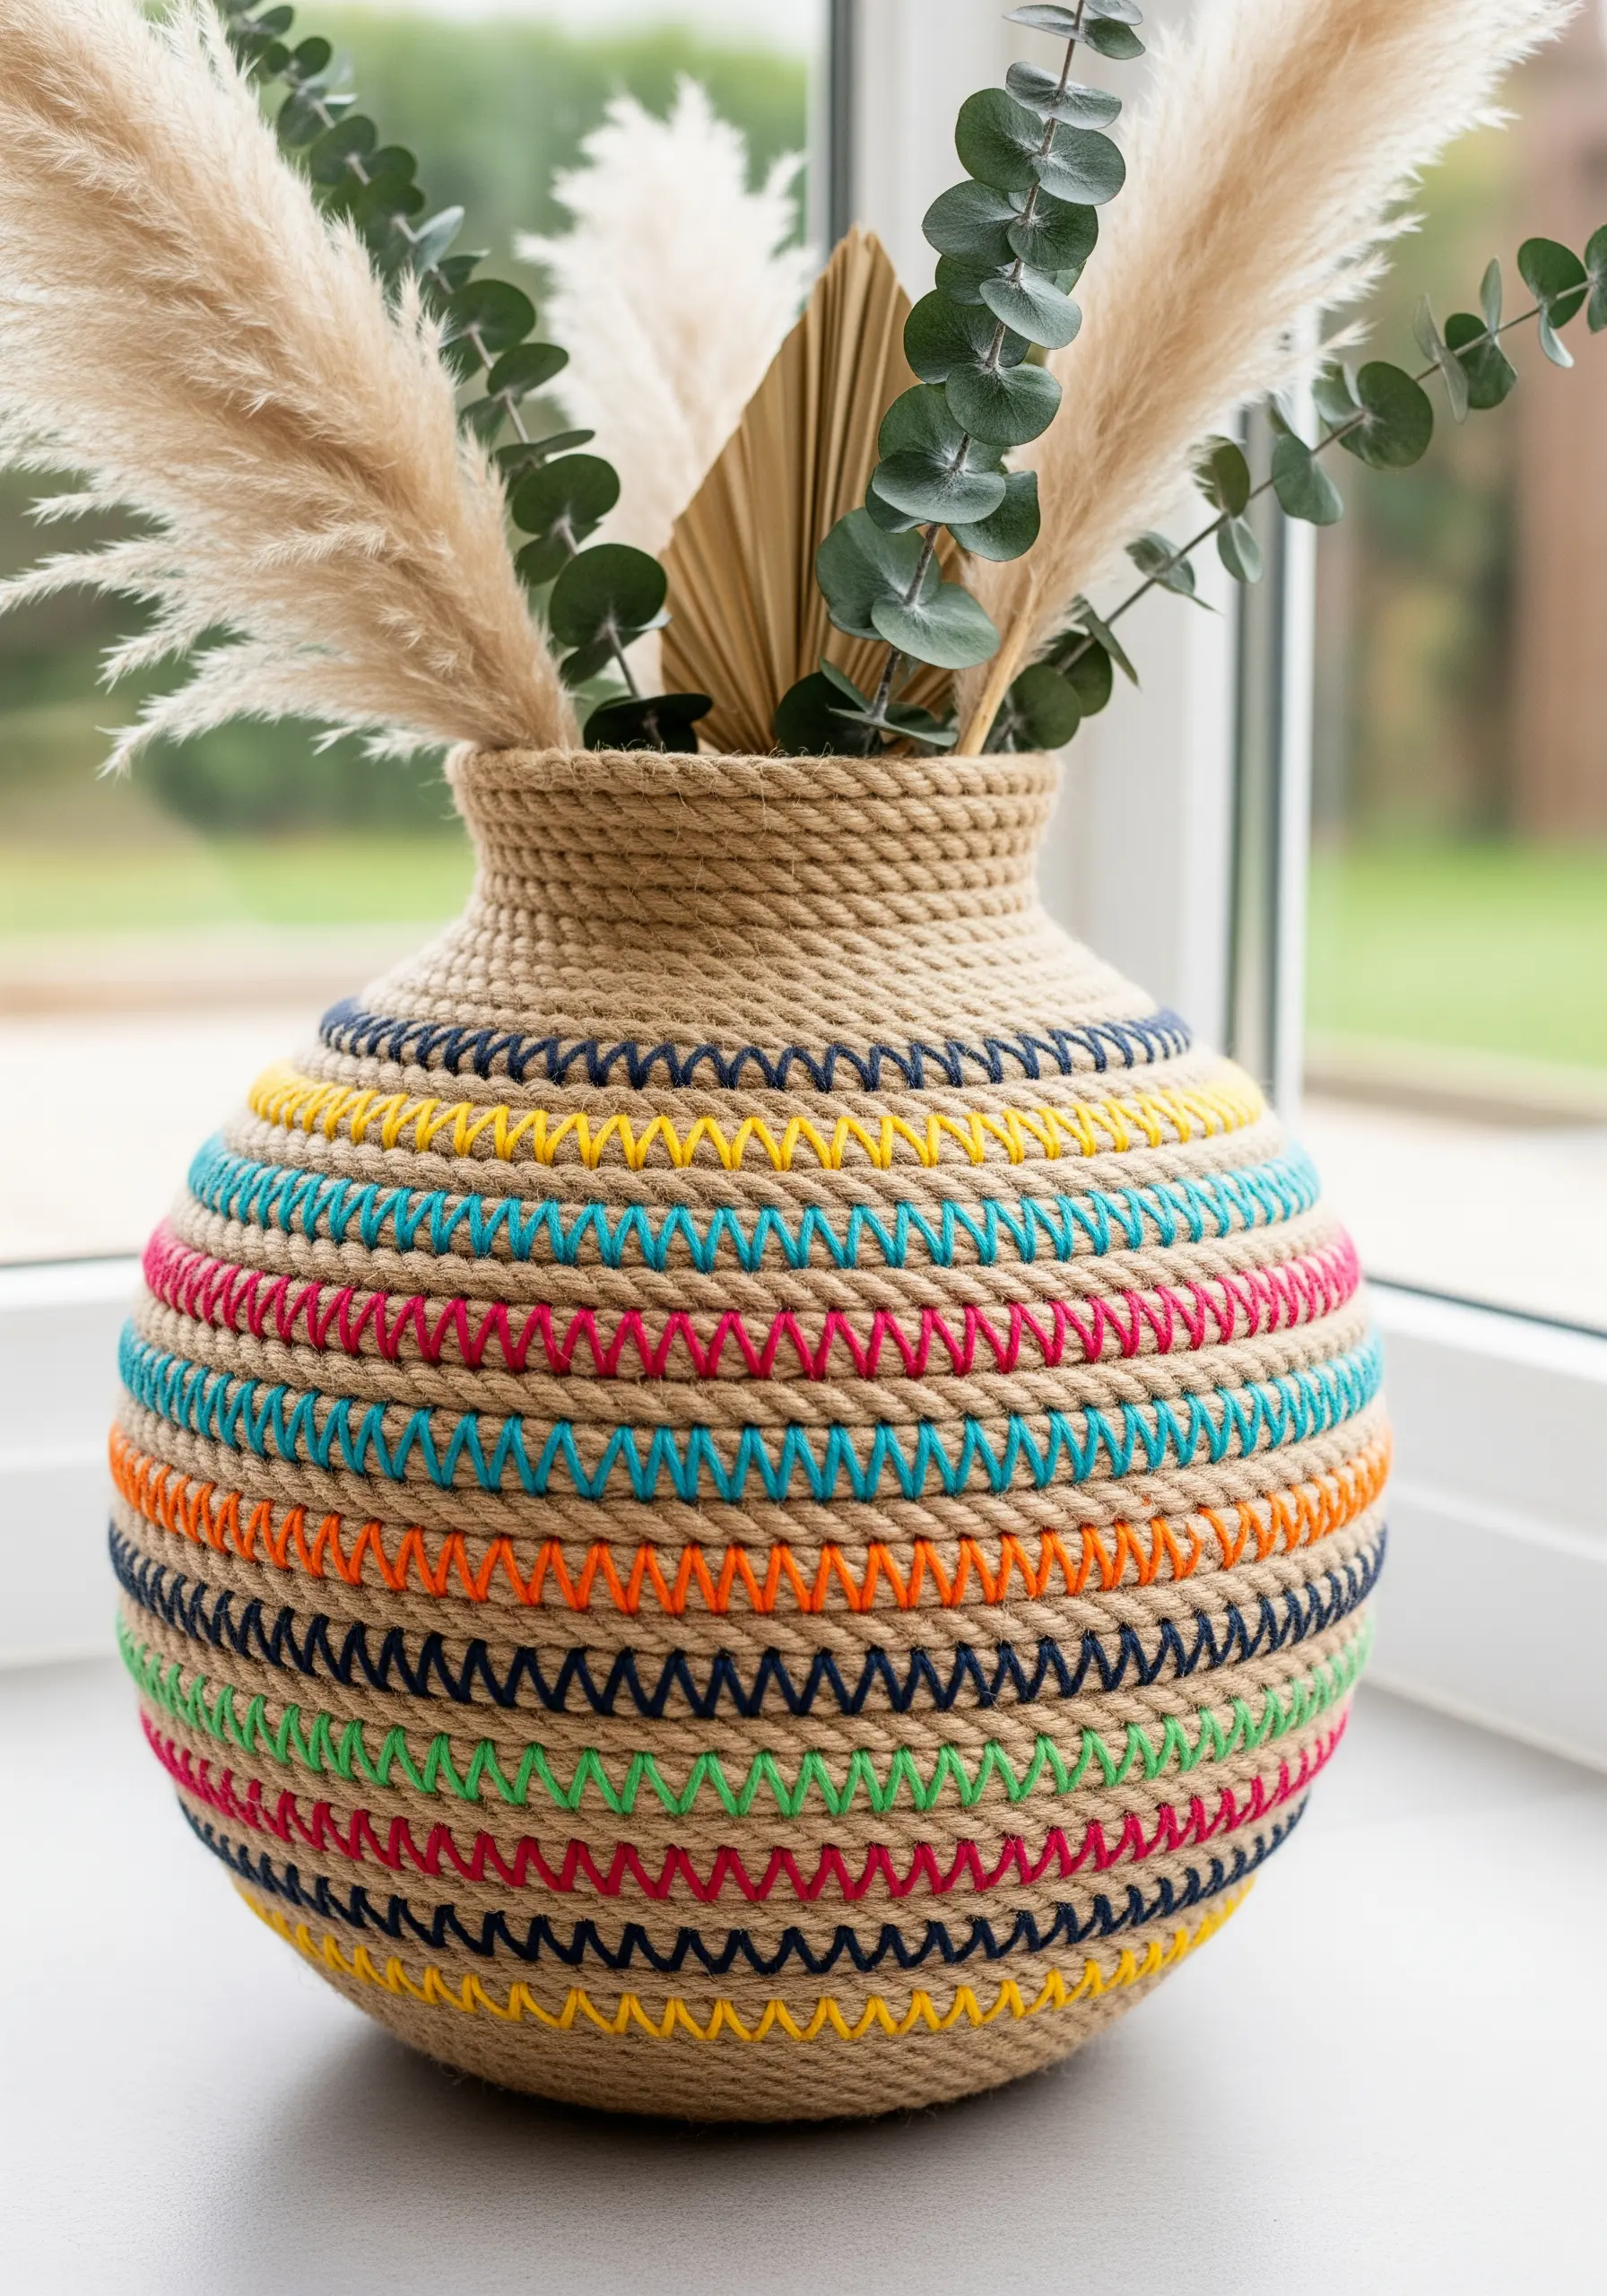
Transform a simple rope-wrapped object, like a vase or bowl, into a vibrant piece of art with decorative thread wrapping.
As you coil the main rope to build your form, introduce colorful embroidery floss to create patterns.
Wrap sections of the main rope with floss before gluing it down to create color blocking, or use a tapestry needle to whipstitch around the coils, creating chevron and diamond patterns.
This technique adds intricate detail and energy to an otherwise neutral base, making the thread the star of the show.
17. Suspend Threads in Resin for a Modern Look
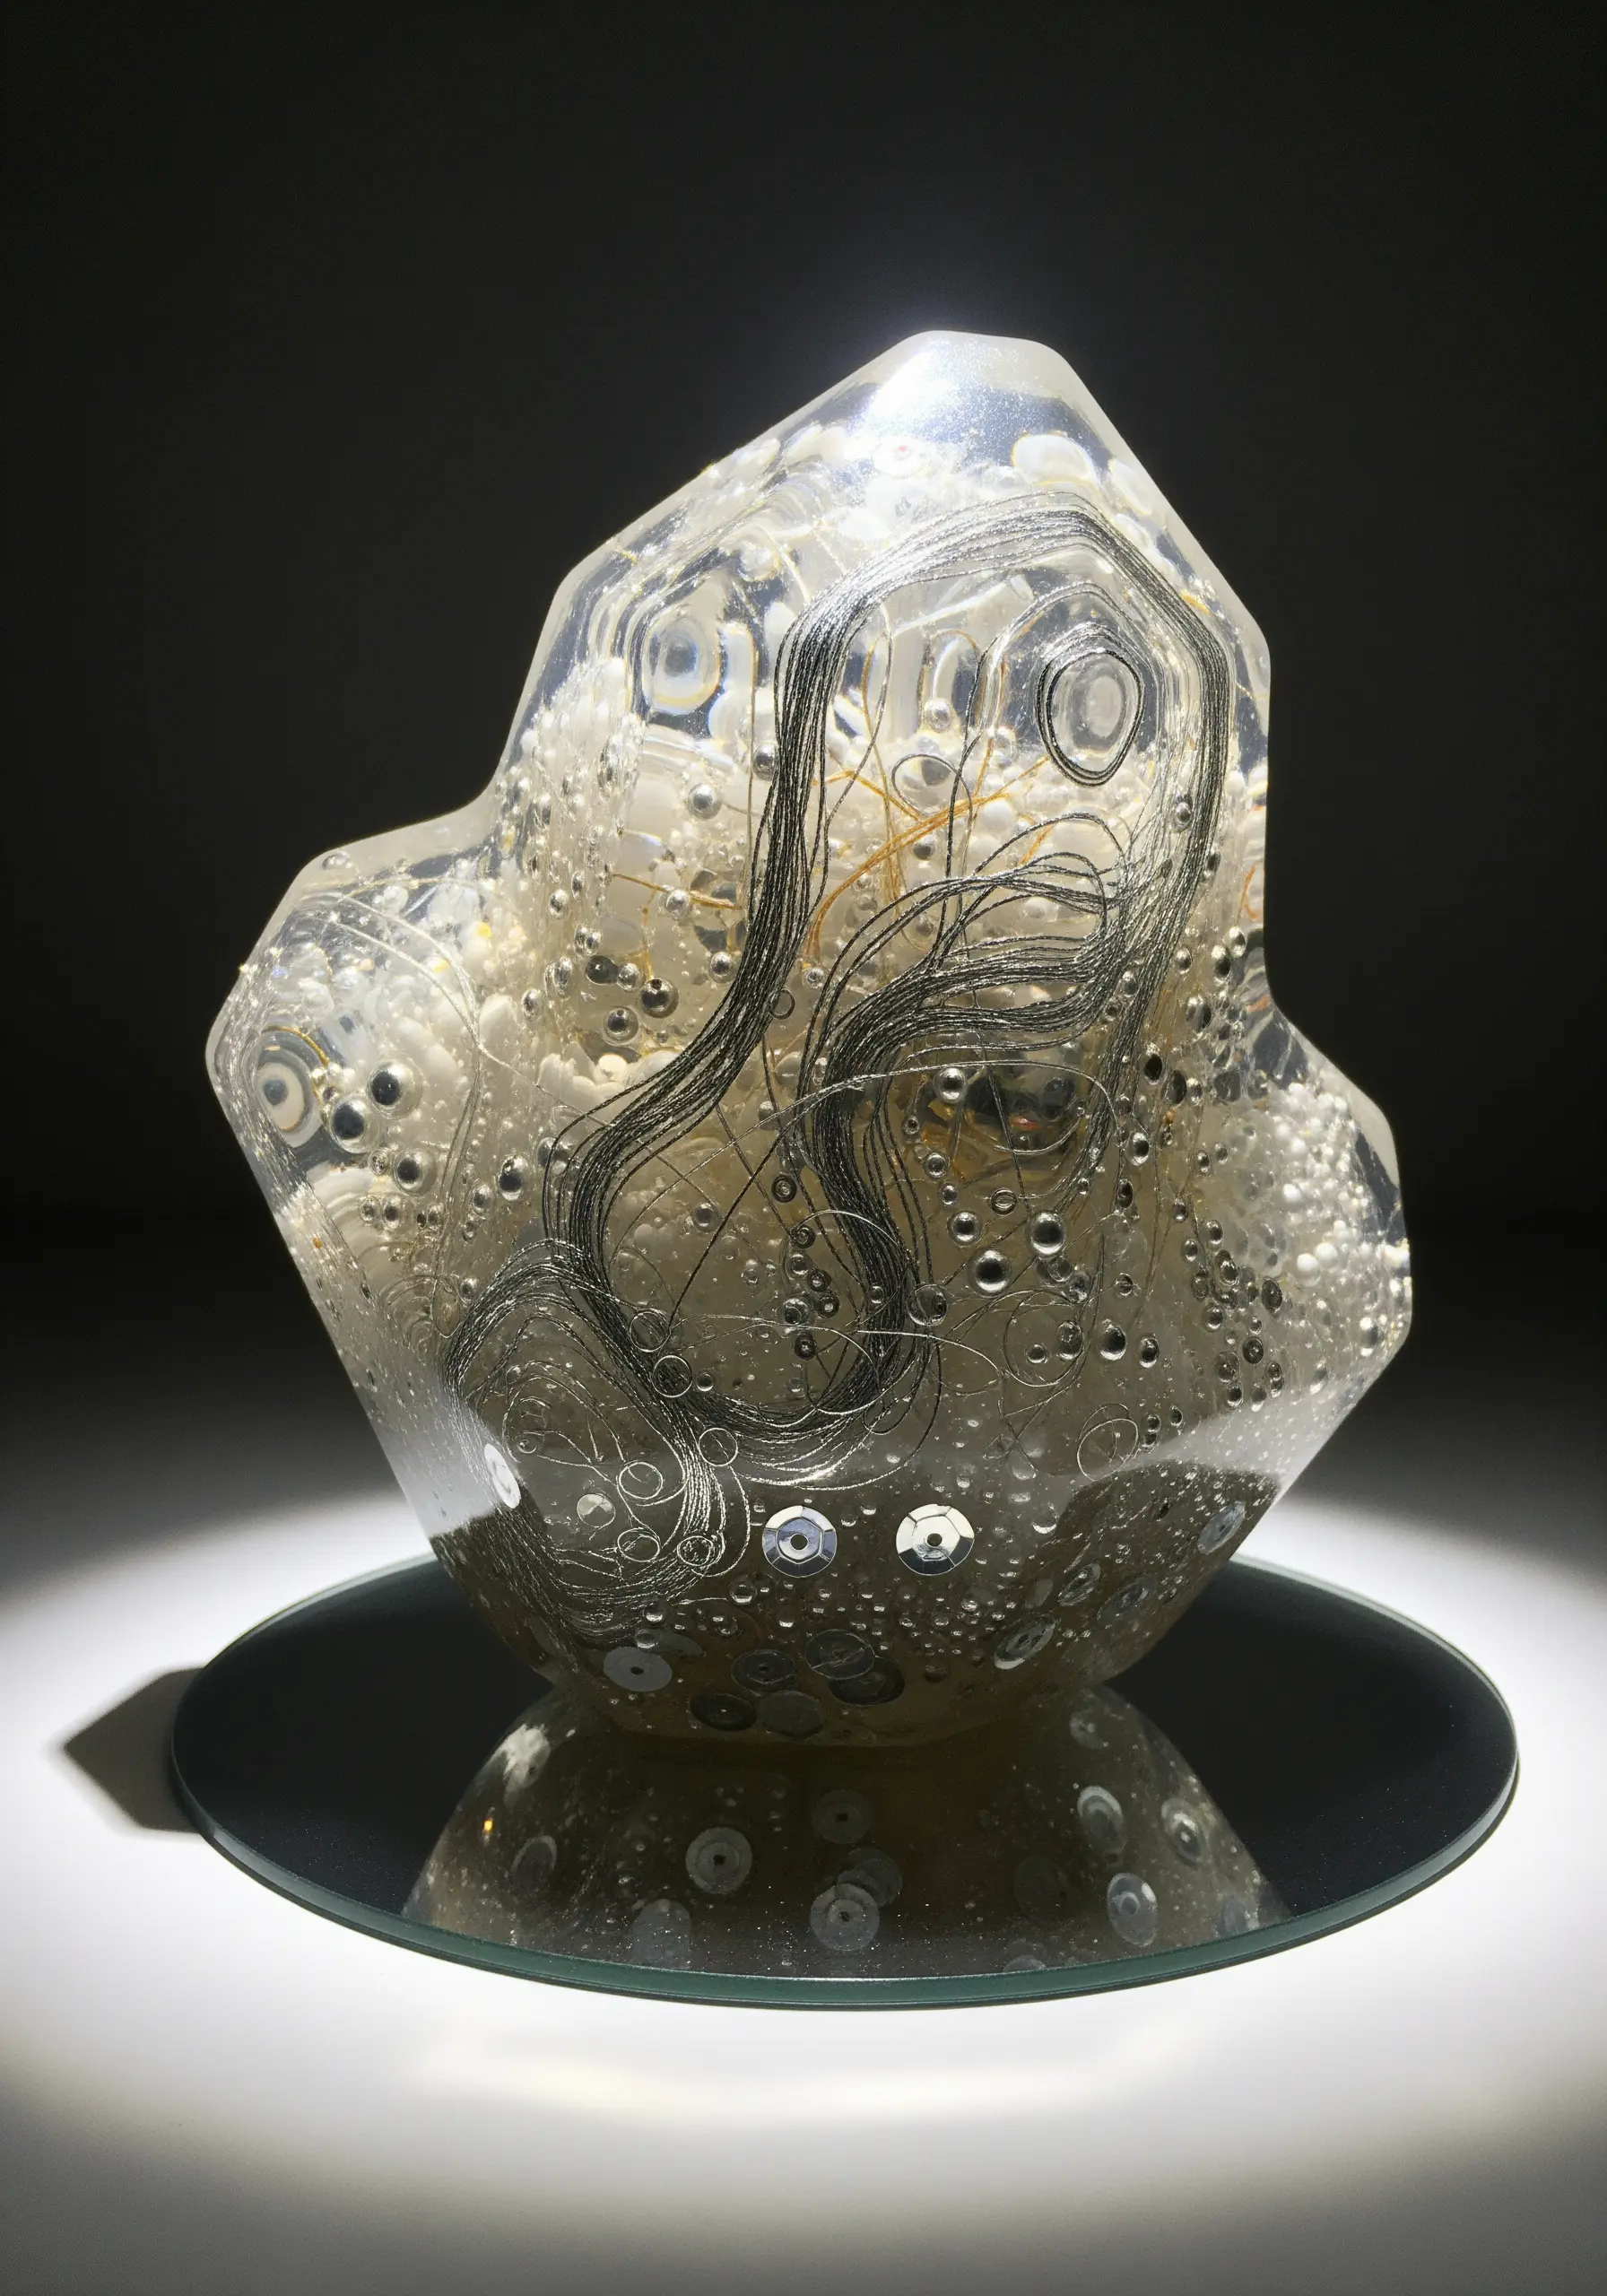
Capture the delicate motion of thread by encasing it in clear resin.
In a silicone mold of your desired shape, carefully arrange layers of thread, beads, sequins, or even tiny scraps of fabric.
Use a toothpick to gently swirl threads or create interesting compositions. Slowly pour clear casting resin over your arrangement, taking care to avoid bubbles.
Once cured, the resin creates a solid, glass-like object that magnifies the intricate details of the fibers within, resulting in trendy, glossy, high-fashion art pieces.
18. Construct a Cityscape from Sewing Supplies
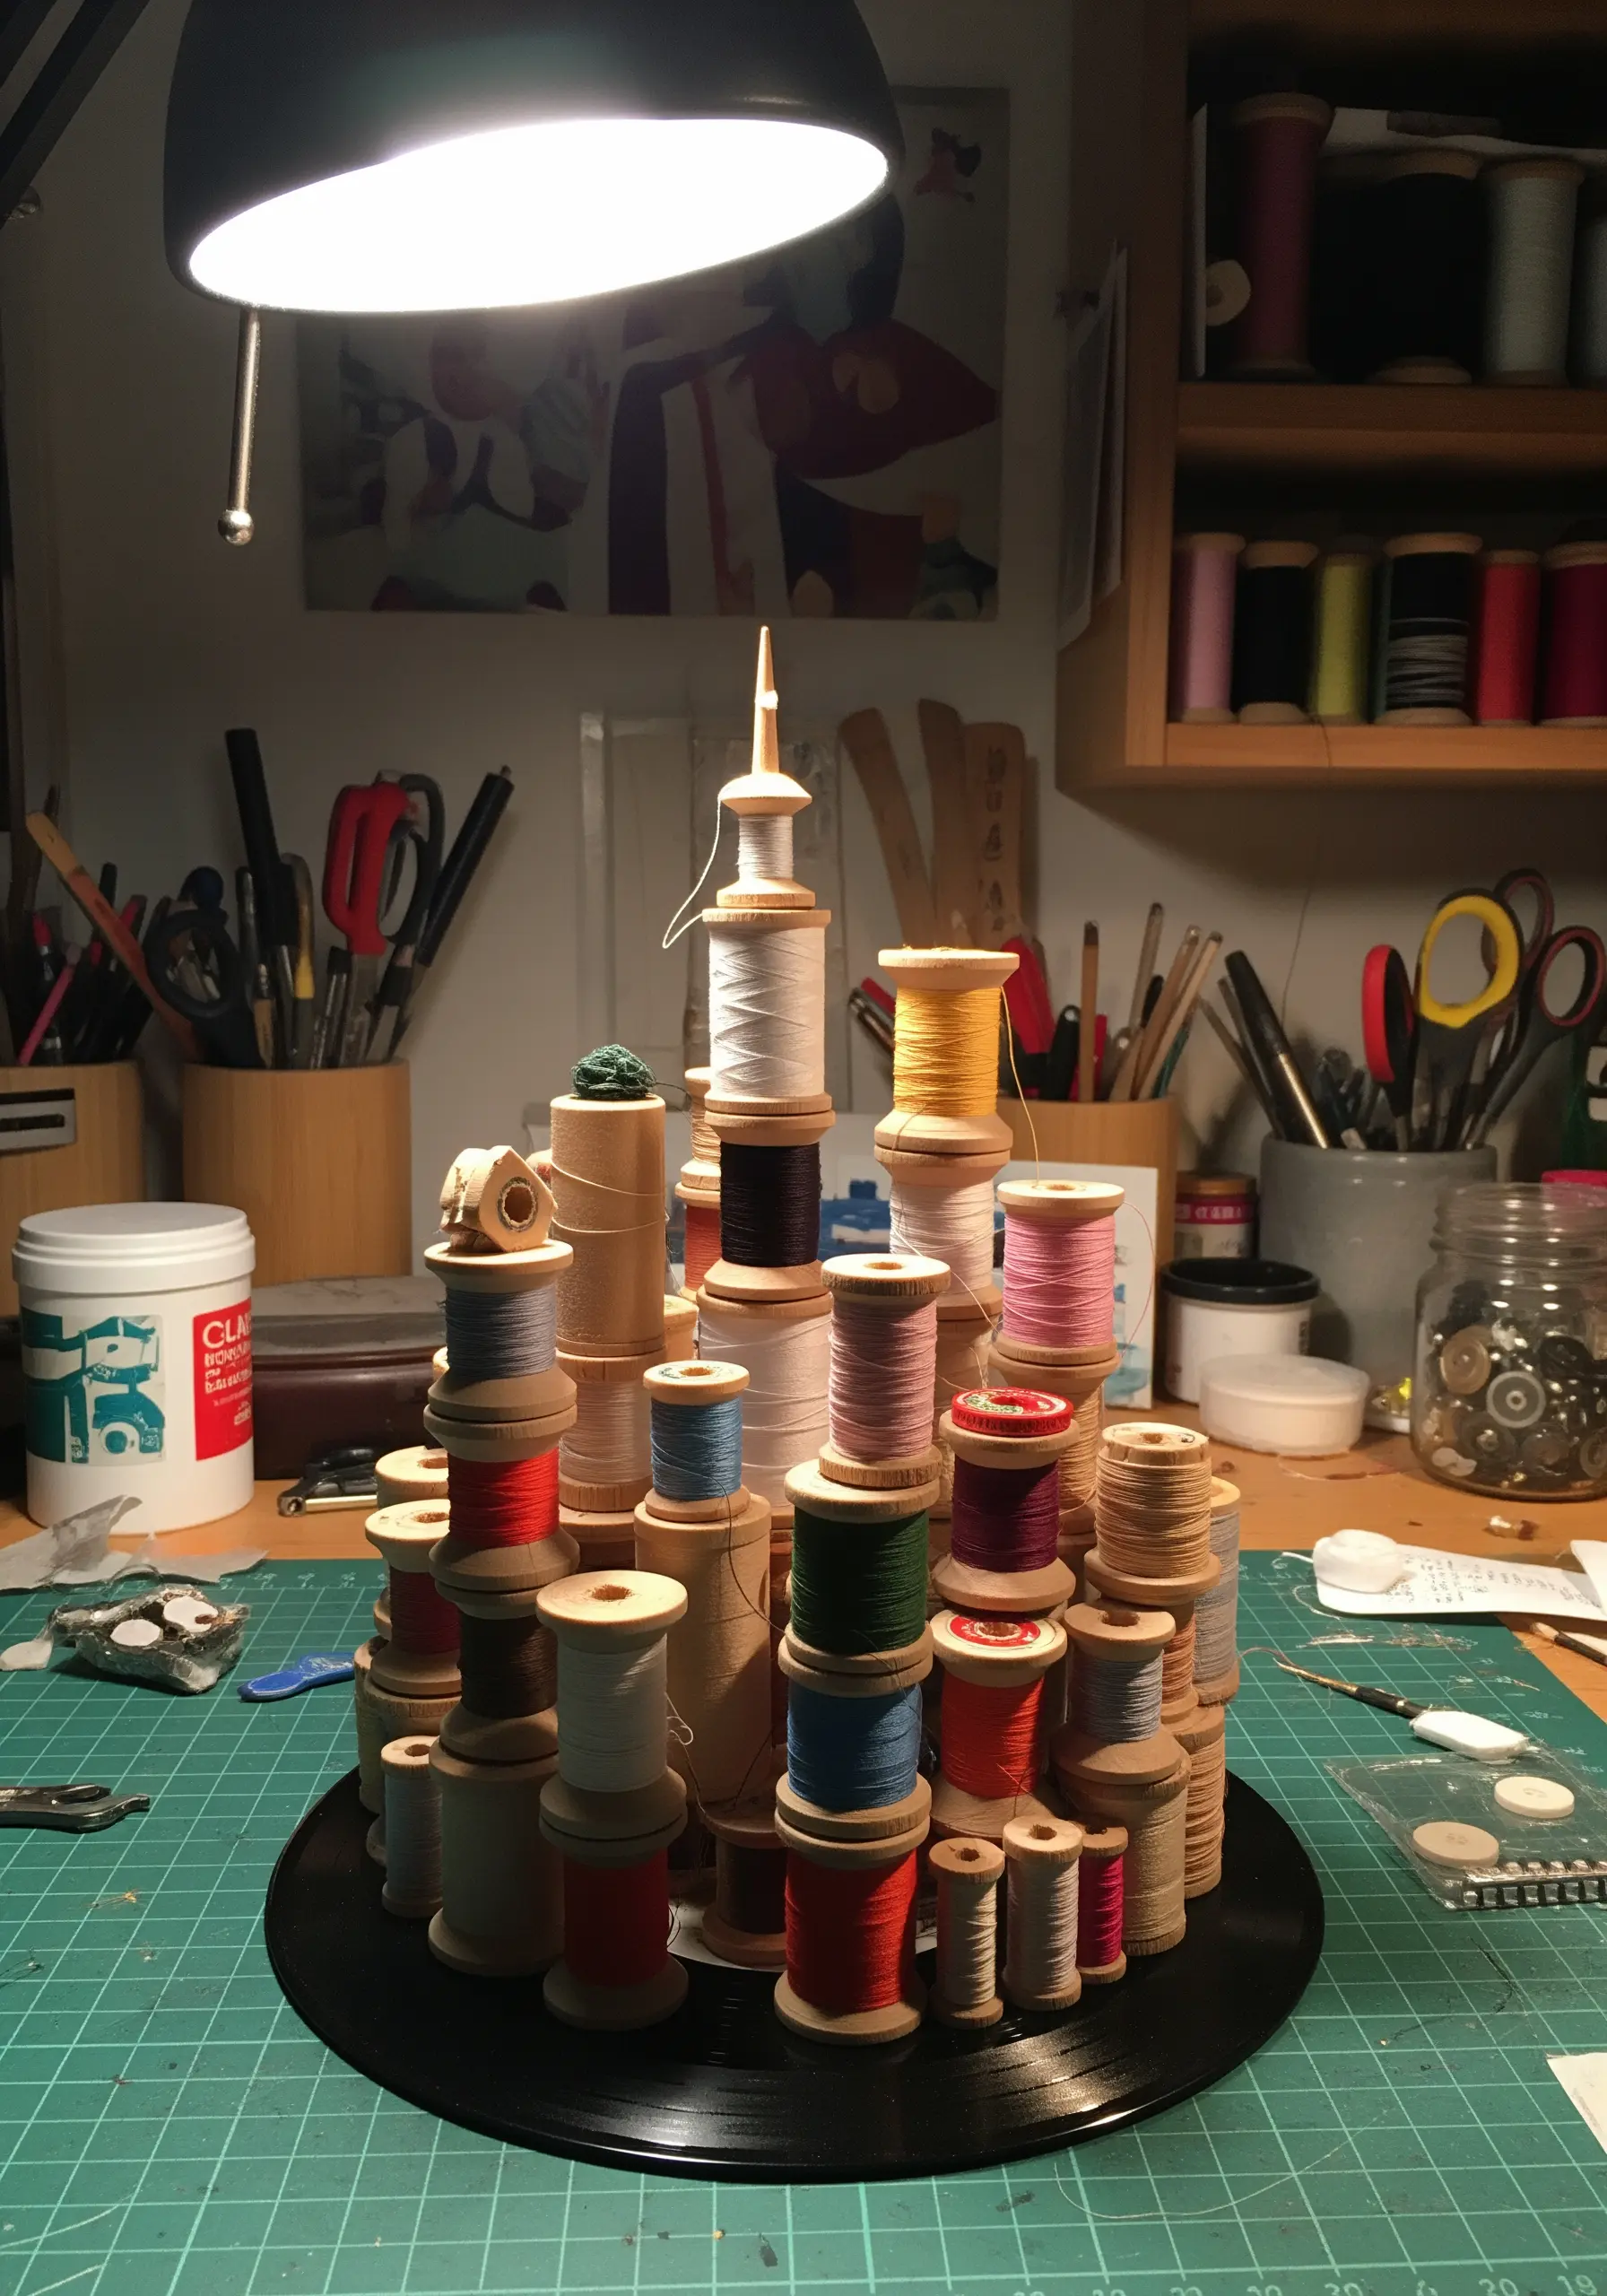
Celebrate the tools of your craft by transforming them into a miniature architectural sculpture.
Use wooden thread spools of various sizes as the primary building blocks for your cityscape.
Stack and glue them to create towers and buildings on a stable base, like an old vinyl record or piece of wood.
You can leave the threads on for color and texture, or use the spools bare. This playful assemblage pays homage to the very materials that make embroidery possible.
19. Define 3D Forms with a Bold Blanket Stitch
Give soft sculptures a clean, graphic finish by highlighting their seams with a decorative stitch.
After stuffing your felt or fabric shape, use a thick, high-contrast thread like perle cotton or wool yarn to stitch the final seam.
A perfectly even blanket stitch not only closes the opening securely but also creates a bold, handcrafted outline that defines the object’s silhouette.
This simple finishing touch elevates a basic stuffed object into a polished and intentional piece of fiber art.
20. Use Structural Stitching on Rigid Materials
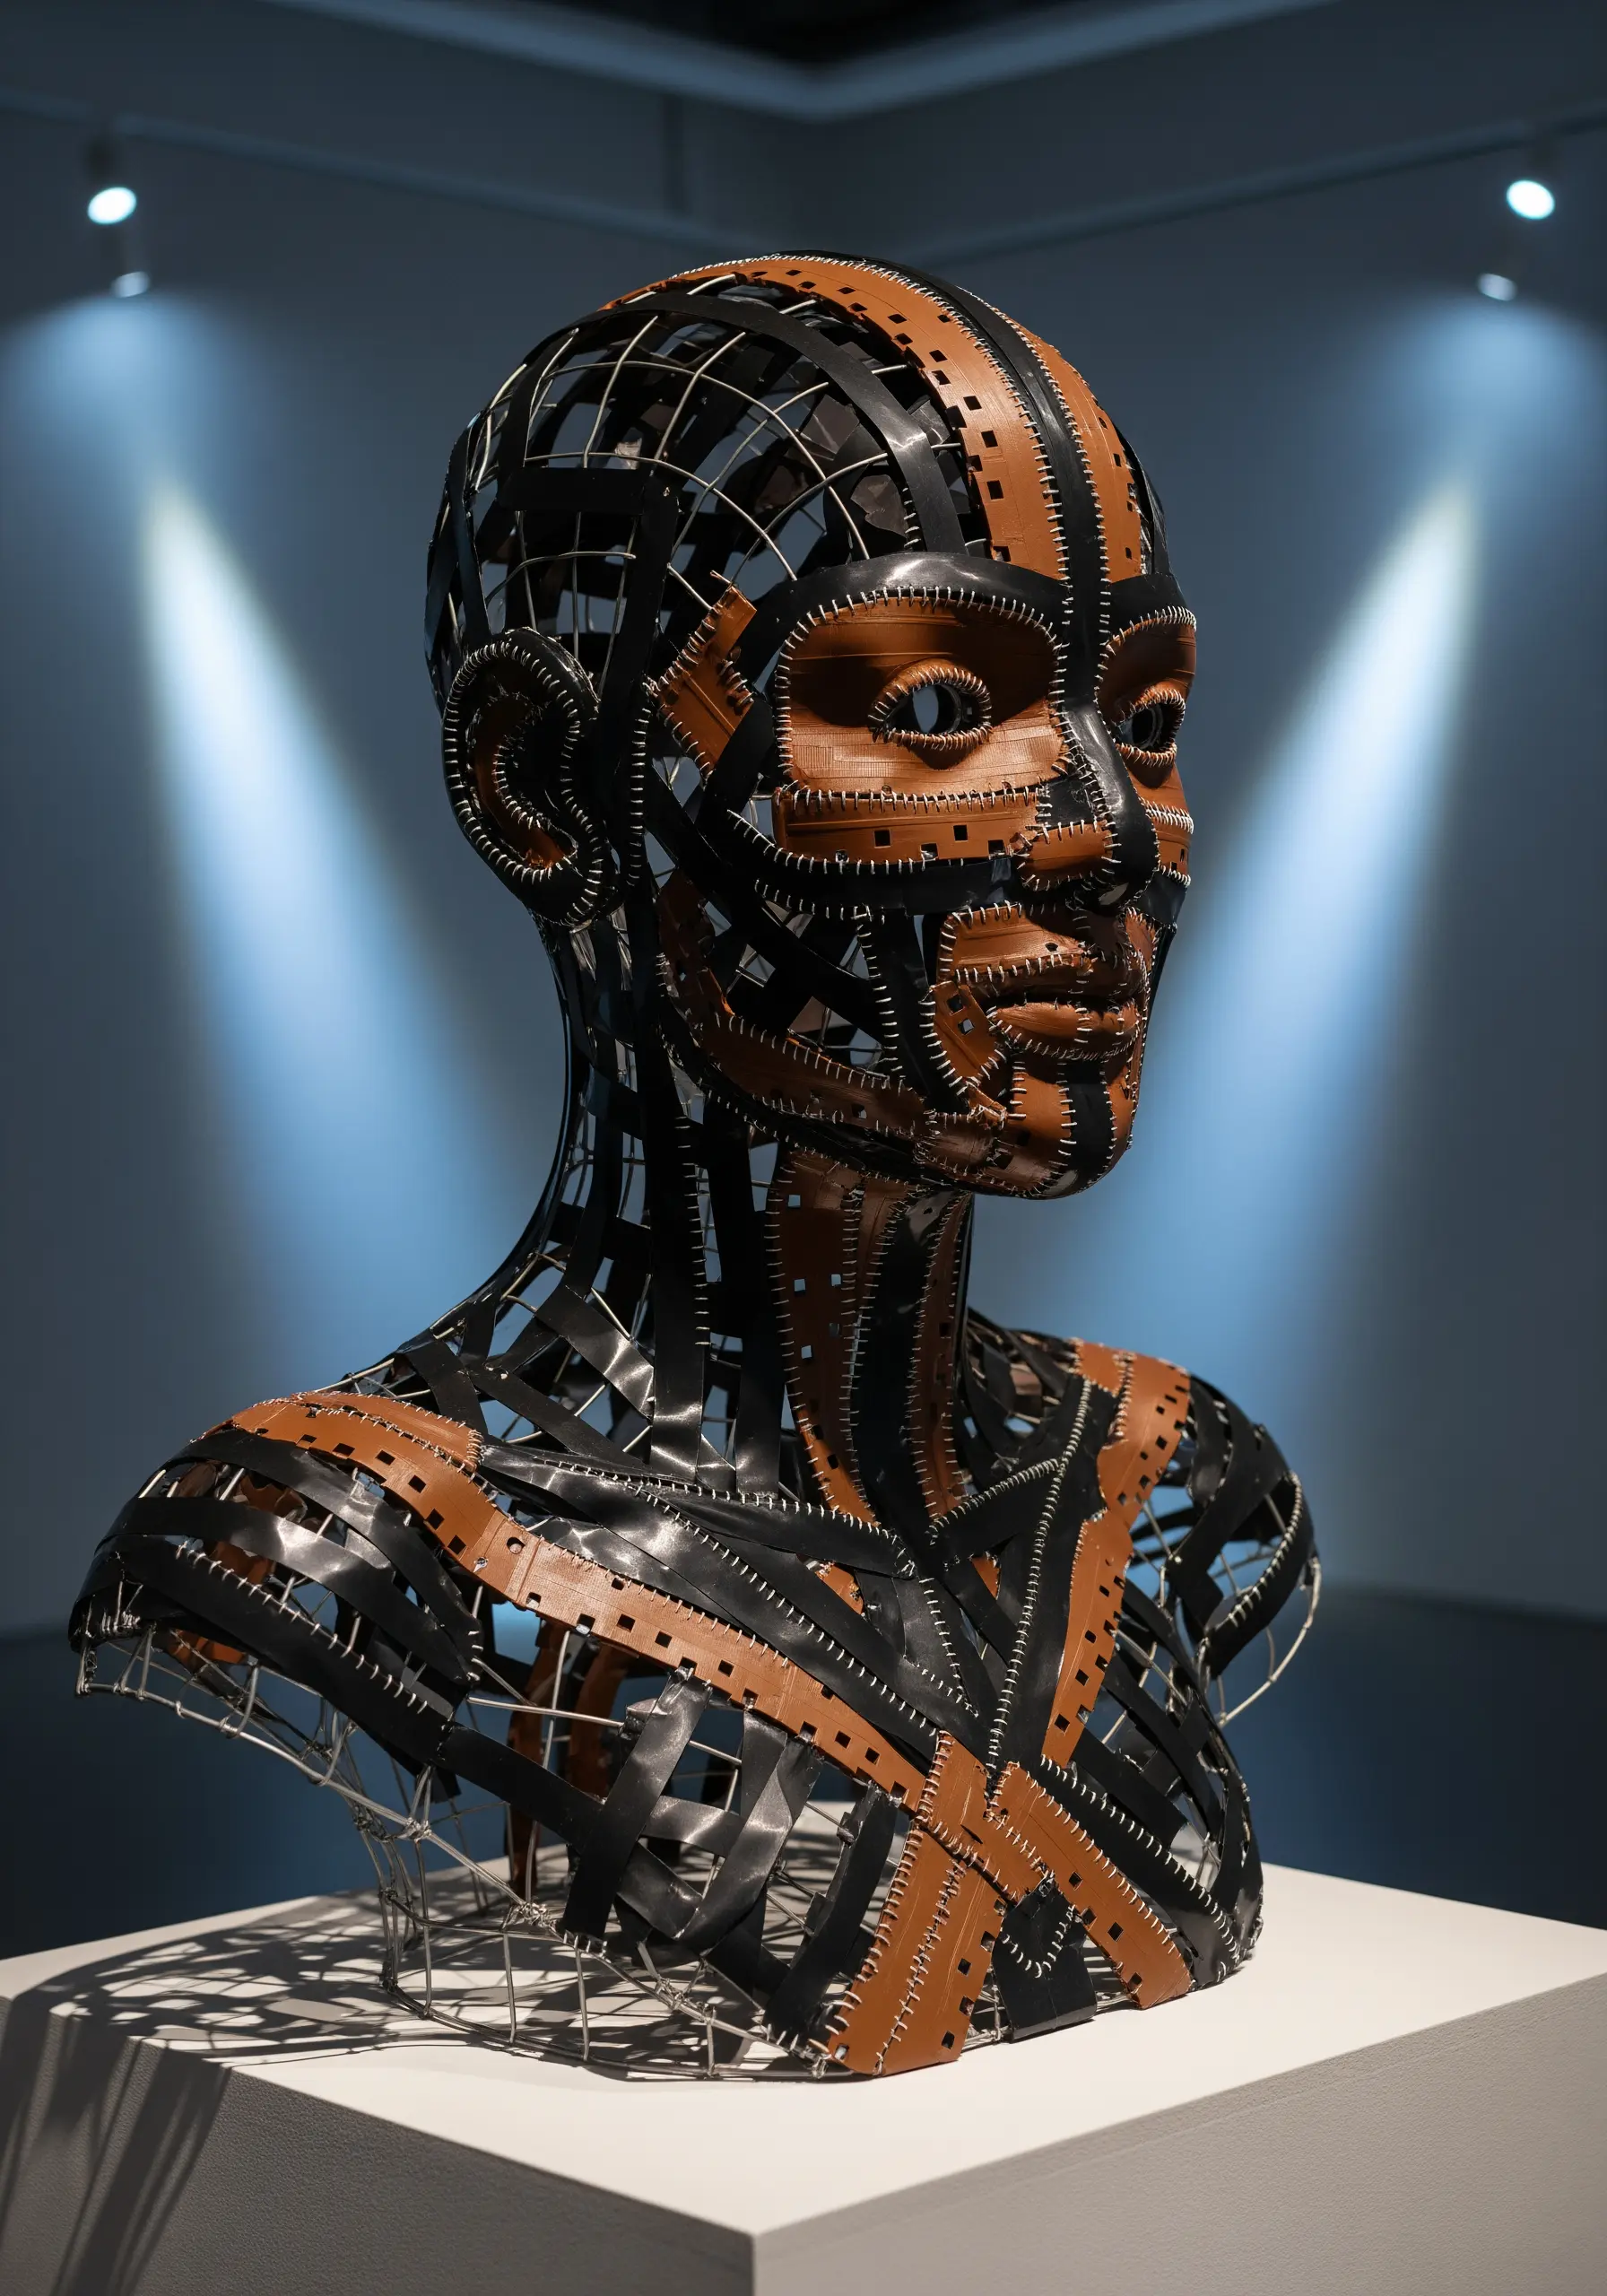
Move beyond decorative stitching and use thread as a primary construction method for rigid sculptures.
Create a wireframe armature and attach strips of a sturdy, non-fraying material like leather, vinyl, or stiffened felt.
Pre-punch holes along the edges of the strips with an awl or leather punch.
Then, use a strong, waxed linen thread and a blunt needle to lace the panels together with functional, visible stitches like the cross-stitch or running stitch.
Here, the thread is not an embellishment but the very glue that holds the form together.
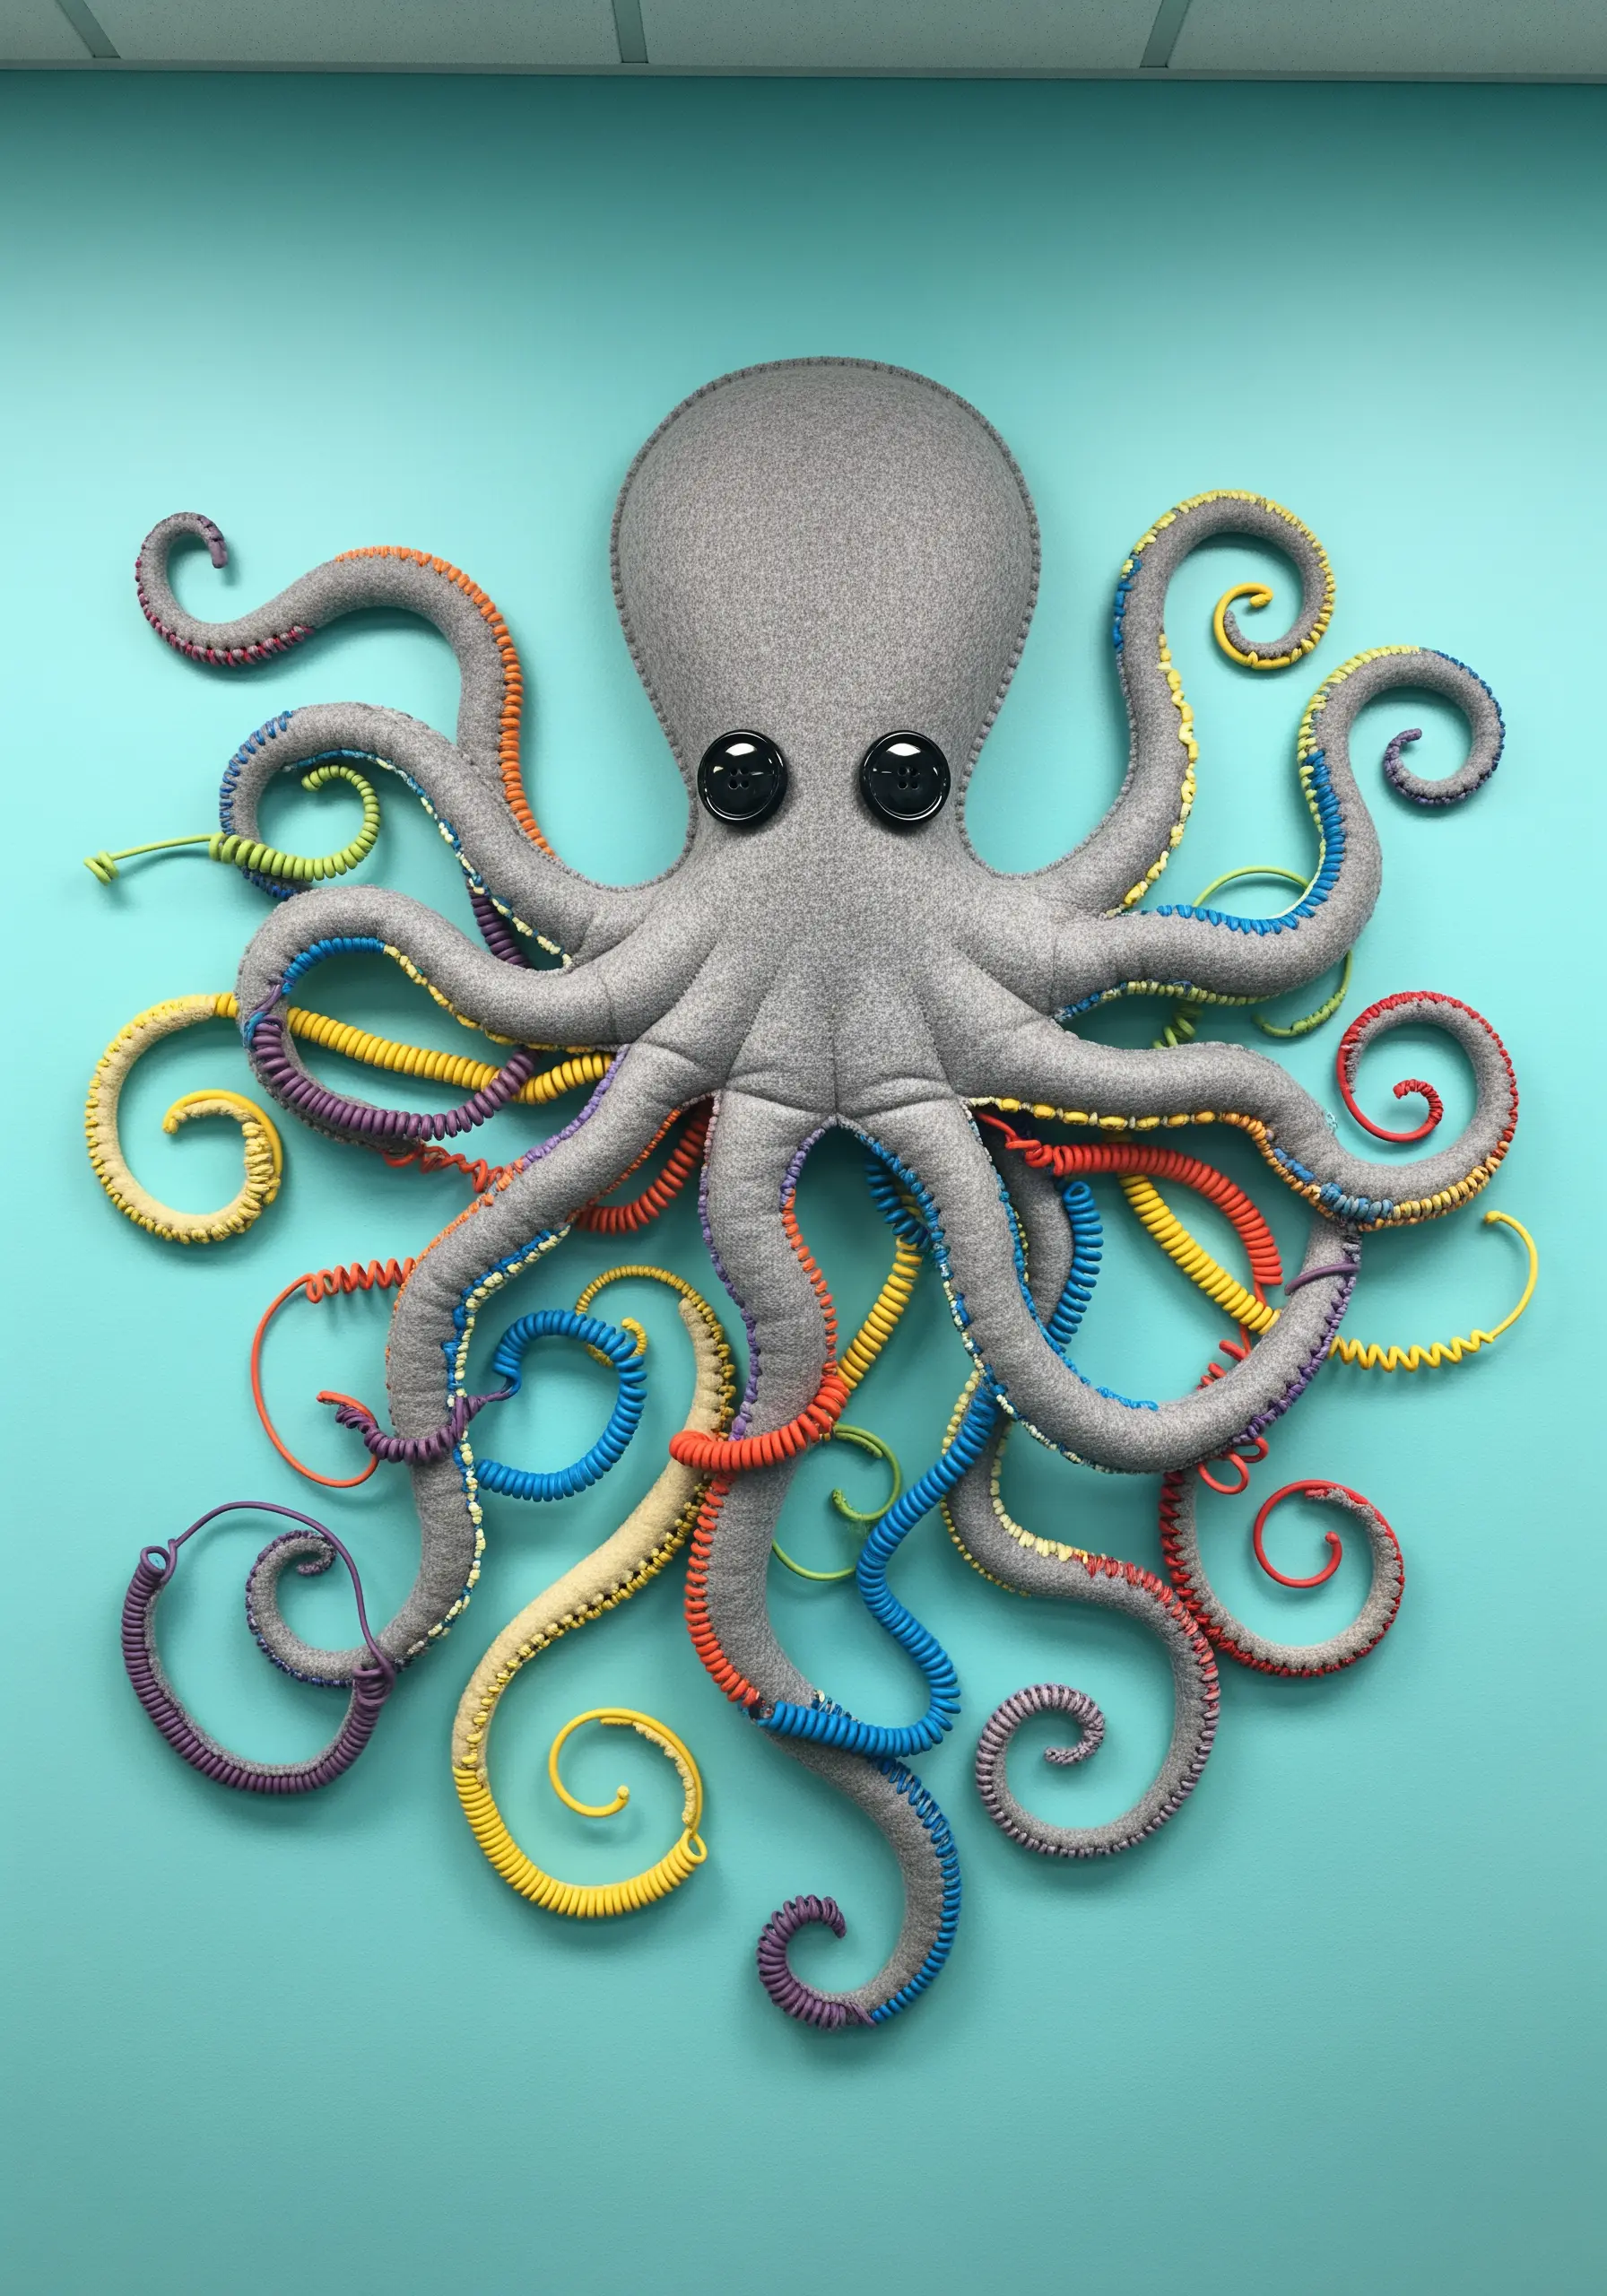
21. Create a Dimensional Mane with Turkey Work
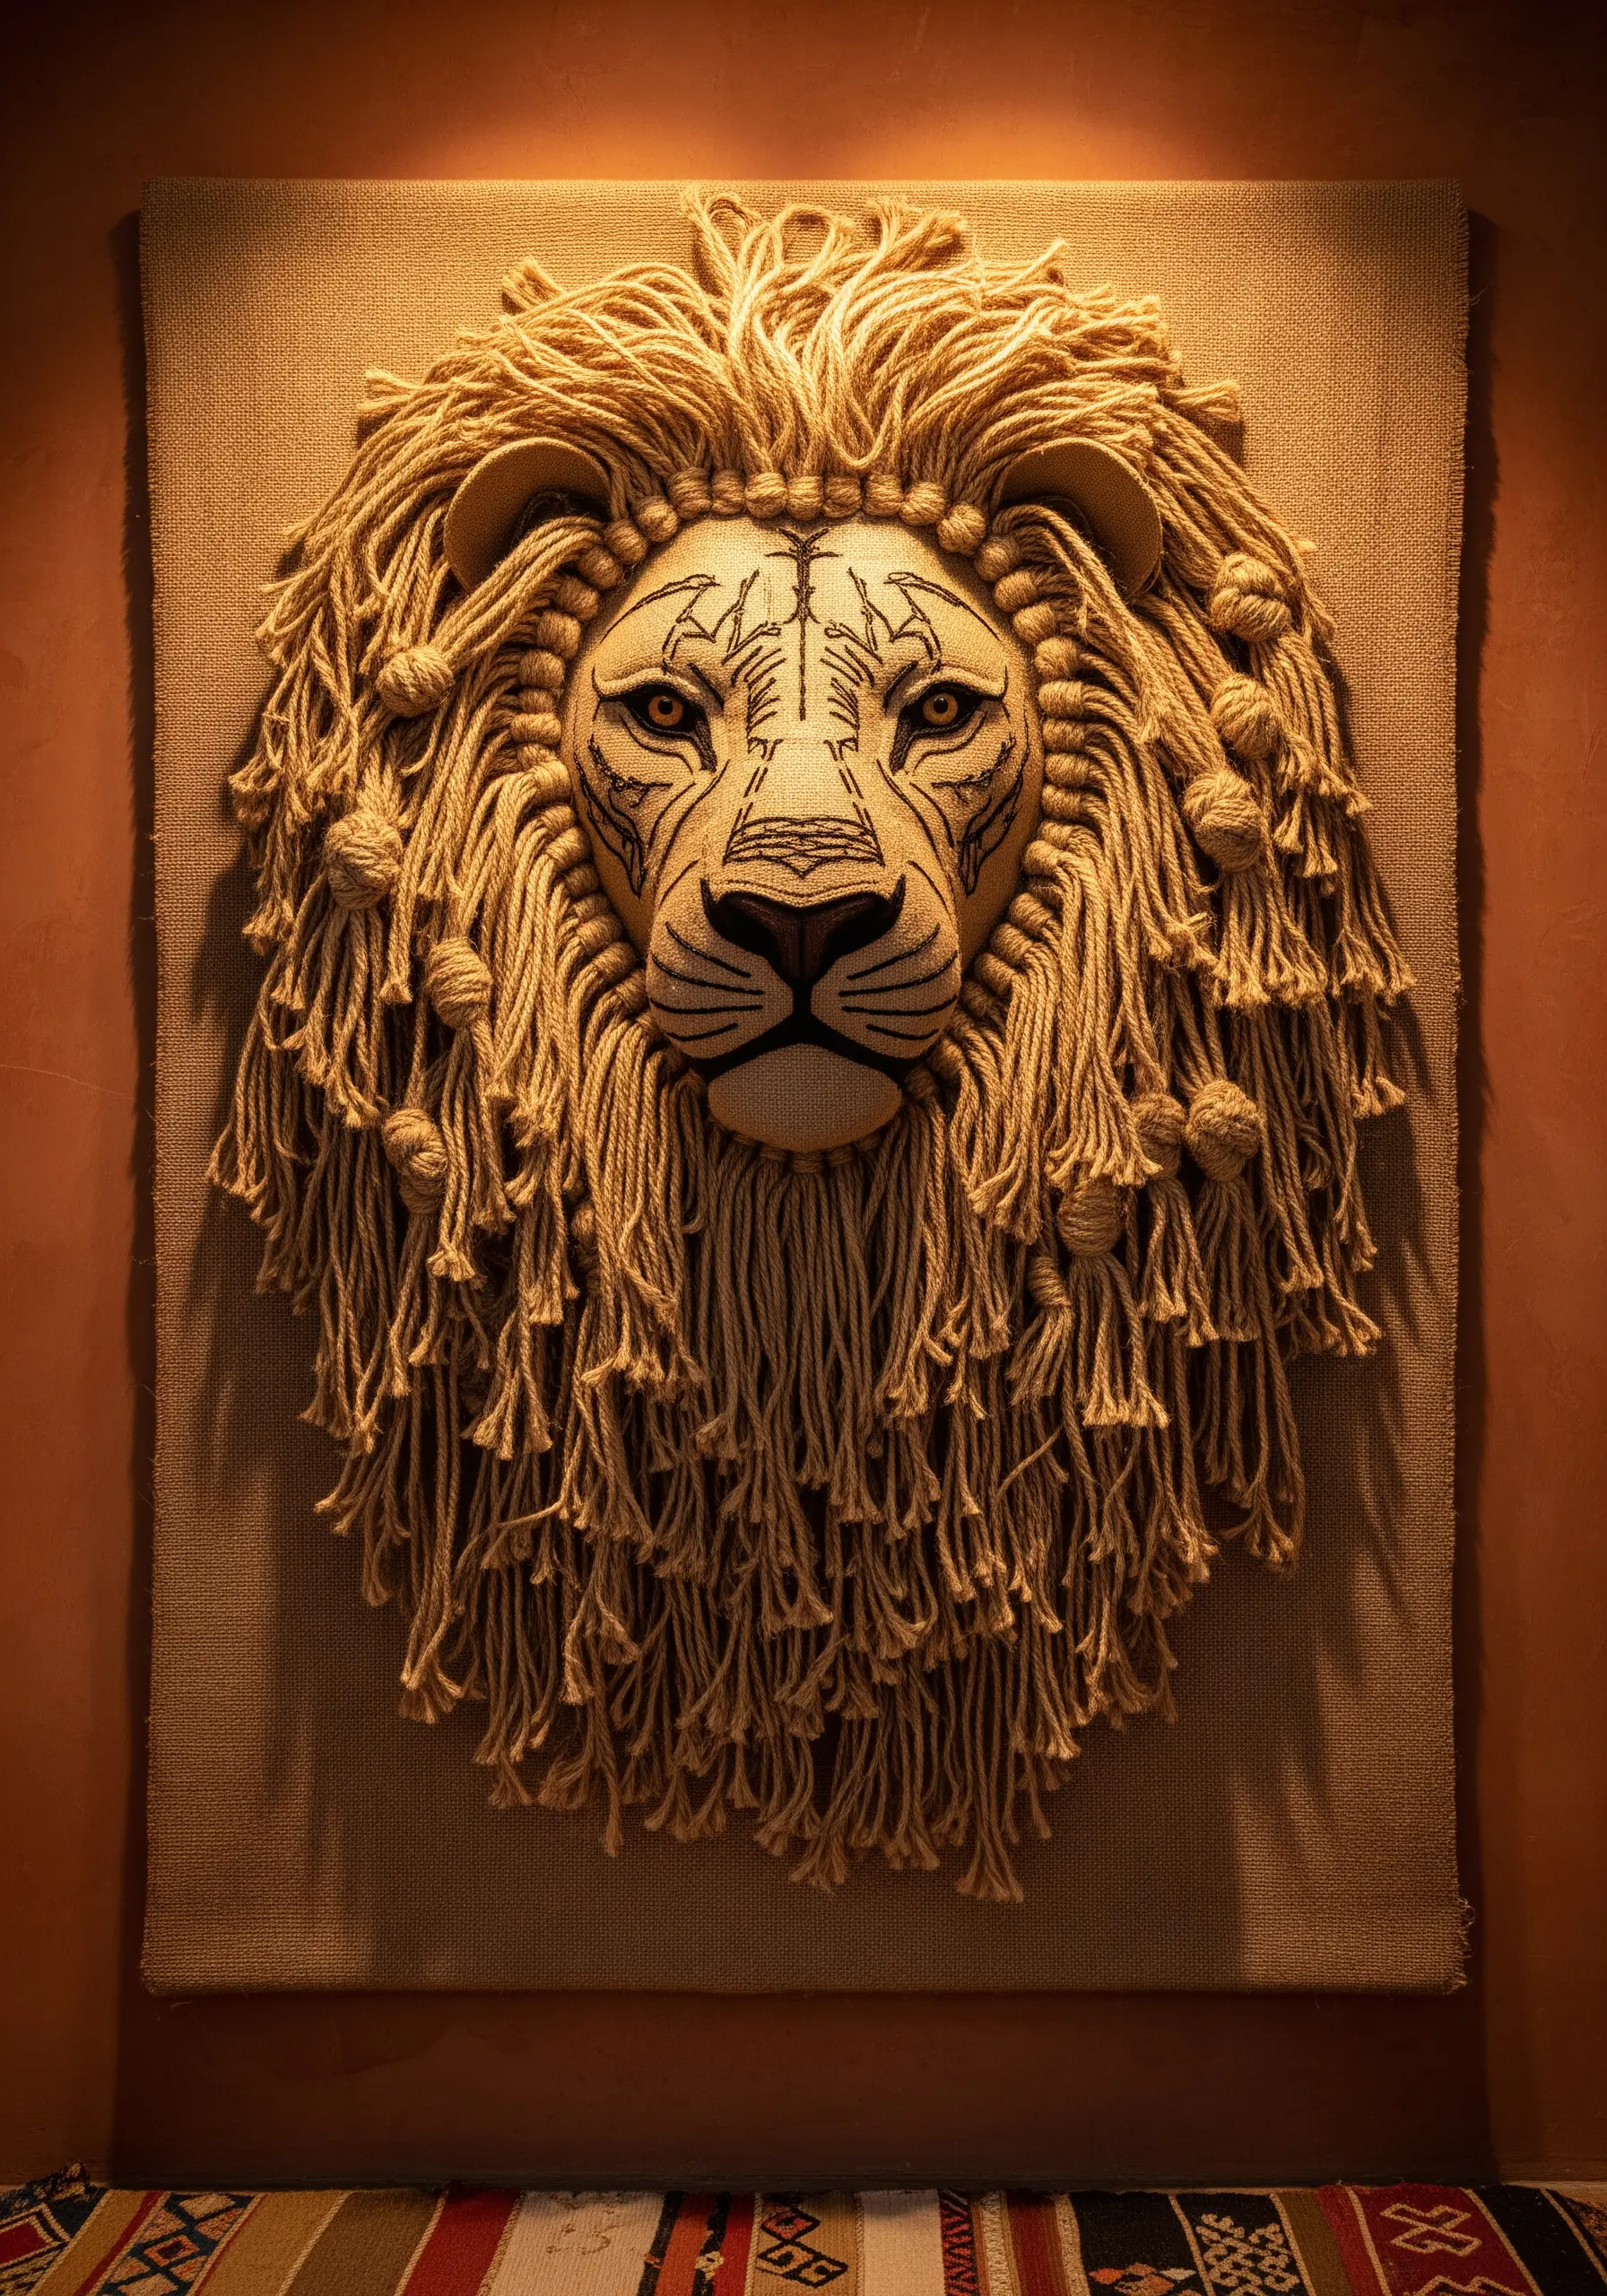
Achieve a lush, 3D texture perfect for animal fur or flowing hair by using the Turkey work stitch with thick yarn.
On a sturdy fabric base, create rows of loops using the Turkey work (or Ghiordes knot) technique.
After completing a section, trim the loops to your desired length and fluff them up to create a dense, shaggy pile.
Varying the length of the loops adds naturalistic dimension and movement. This technique transforms a flat surface into a highly tactile, sculptural feature and is central to many yarn wall art techniques.
22. Sculpt Ethereal Forms with Free-Motion Embroidery

Create delicate, thread-only sculptures that seem to float in mid-air using a sewing machine and water-soluble stabilizer.
Hoop a piece of water-soluble stabilizer and use your sewing machine’s free-motion setting to ‘draw’ with thread, building up layers to create a stable structure.
Once your design is complete, simply dissolve the stabilizer in water, leaving behind a lace-like thread sculpture.
This is perfect for creating intricate, lightweight elements like jellyfish tentacles, wings, or delicate veined leaves.
23. Combine Metallic Foil with Rustic Stitching
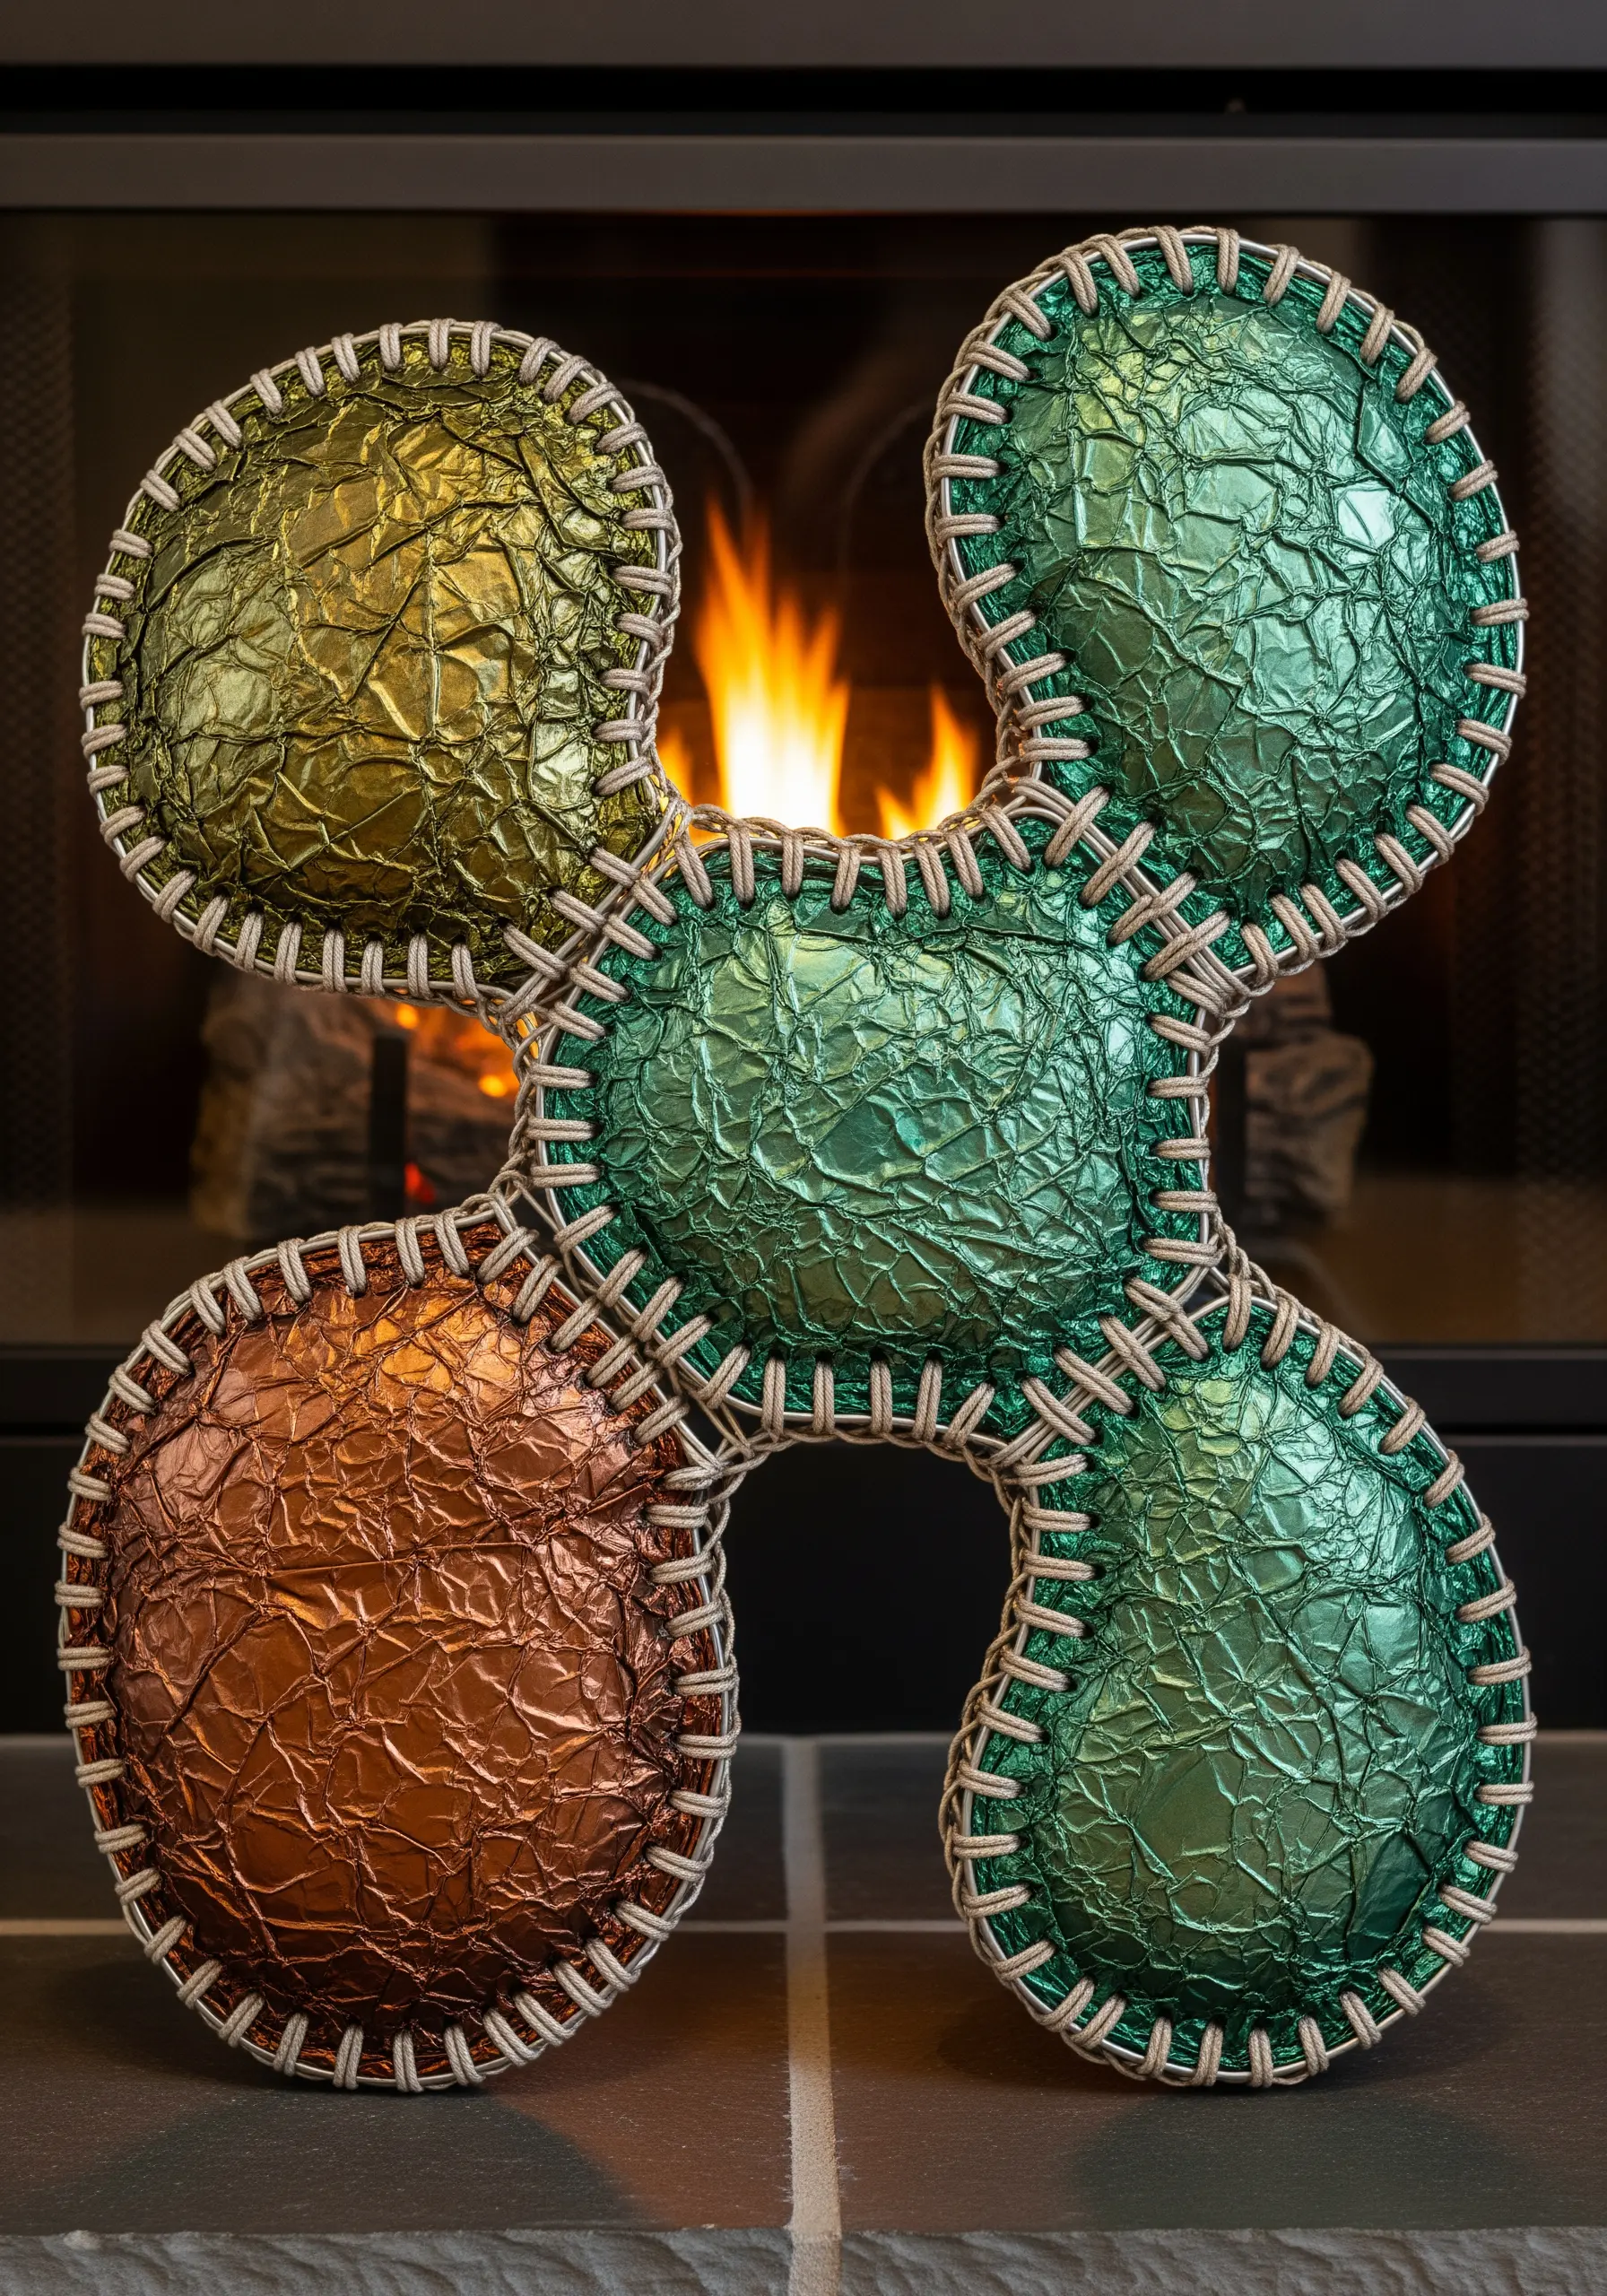
Create a sculpture that feels both futuristic and ancient by joining metallic surfaces with traditional, heavy-duty stitching.
Wrap a soft, padded form with craft foil, crinkling it slightly to create a textured, light-reflecting surface.
Instead of hiding the seams, accentuate them by punching holes and lacing the edges together with a thick, contrasting thread like twine or waxed linen.
A bold, chunky stitch like a blanket stitch or cross-stitch provides a powerful tactile and visual contrast to the sleek foil.
24. Embroider Details onto Plastic Assemblages
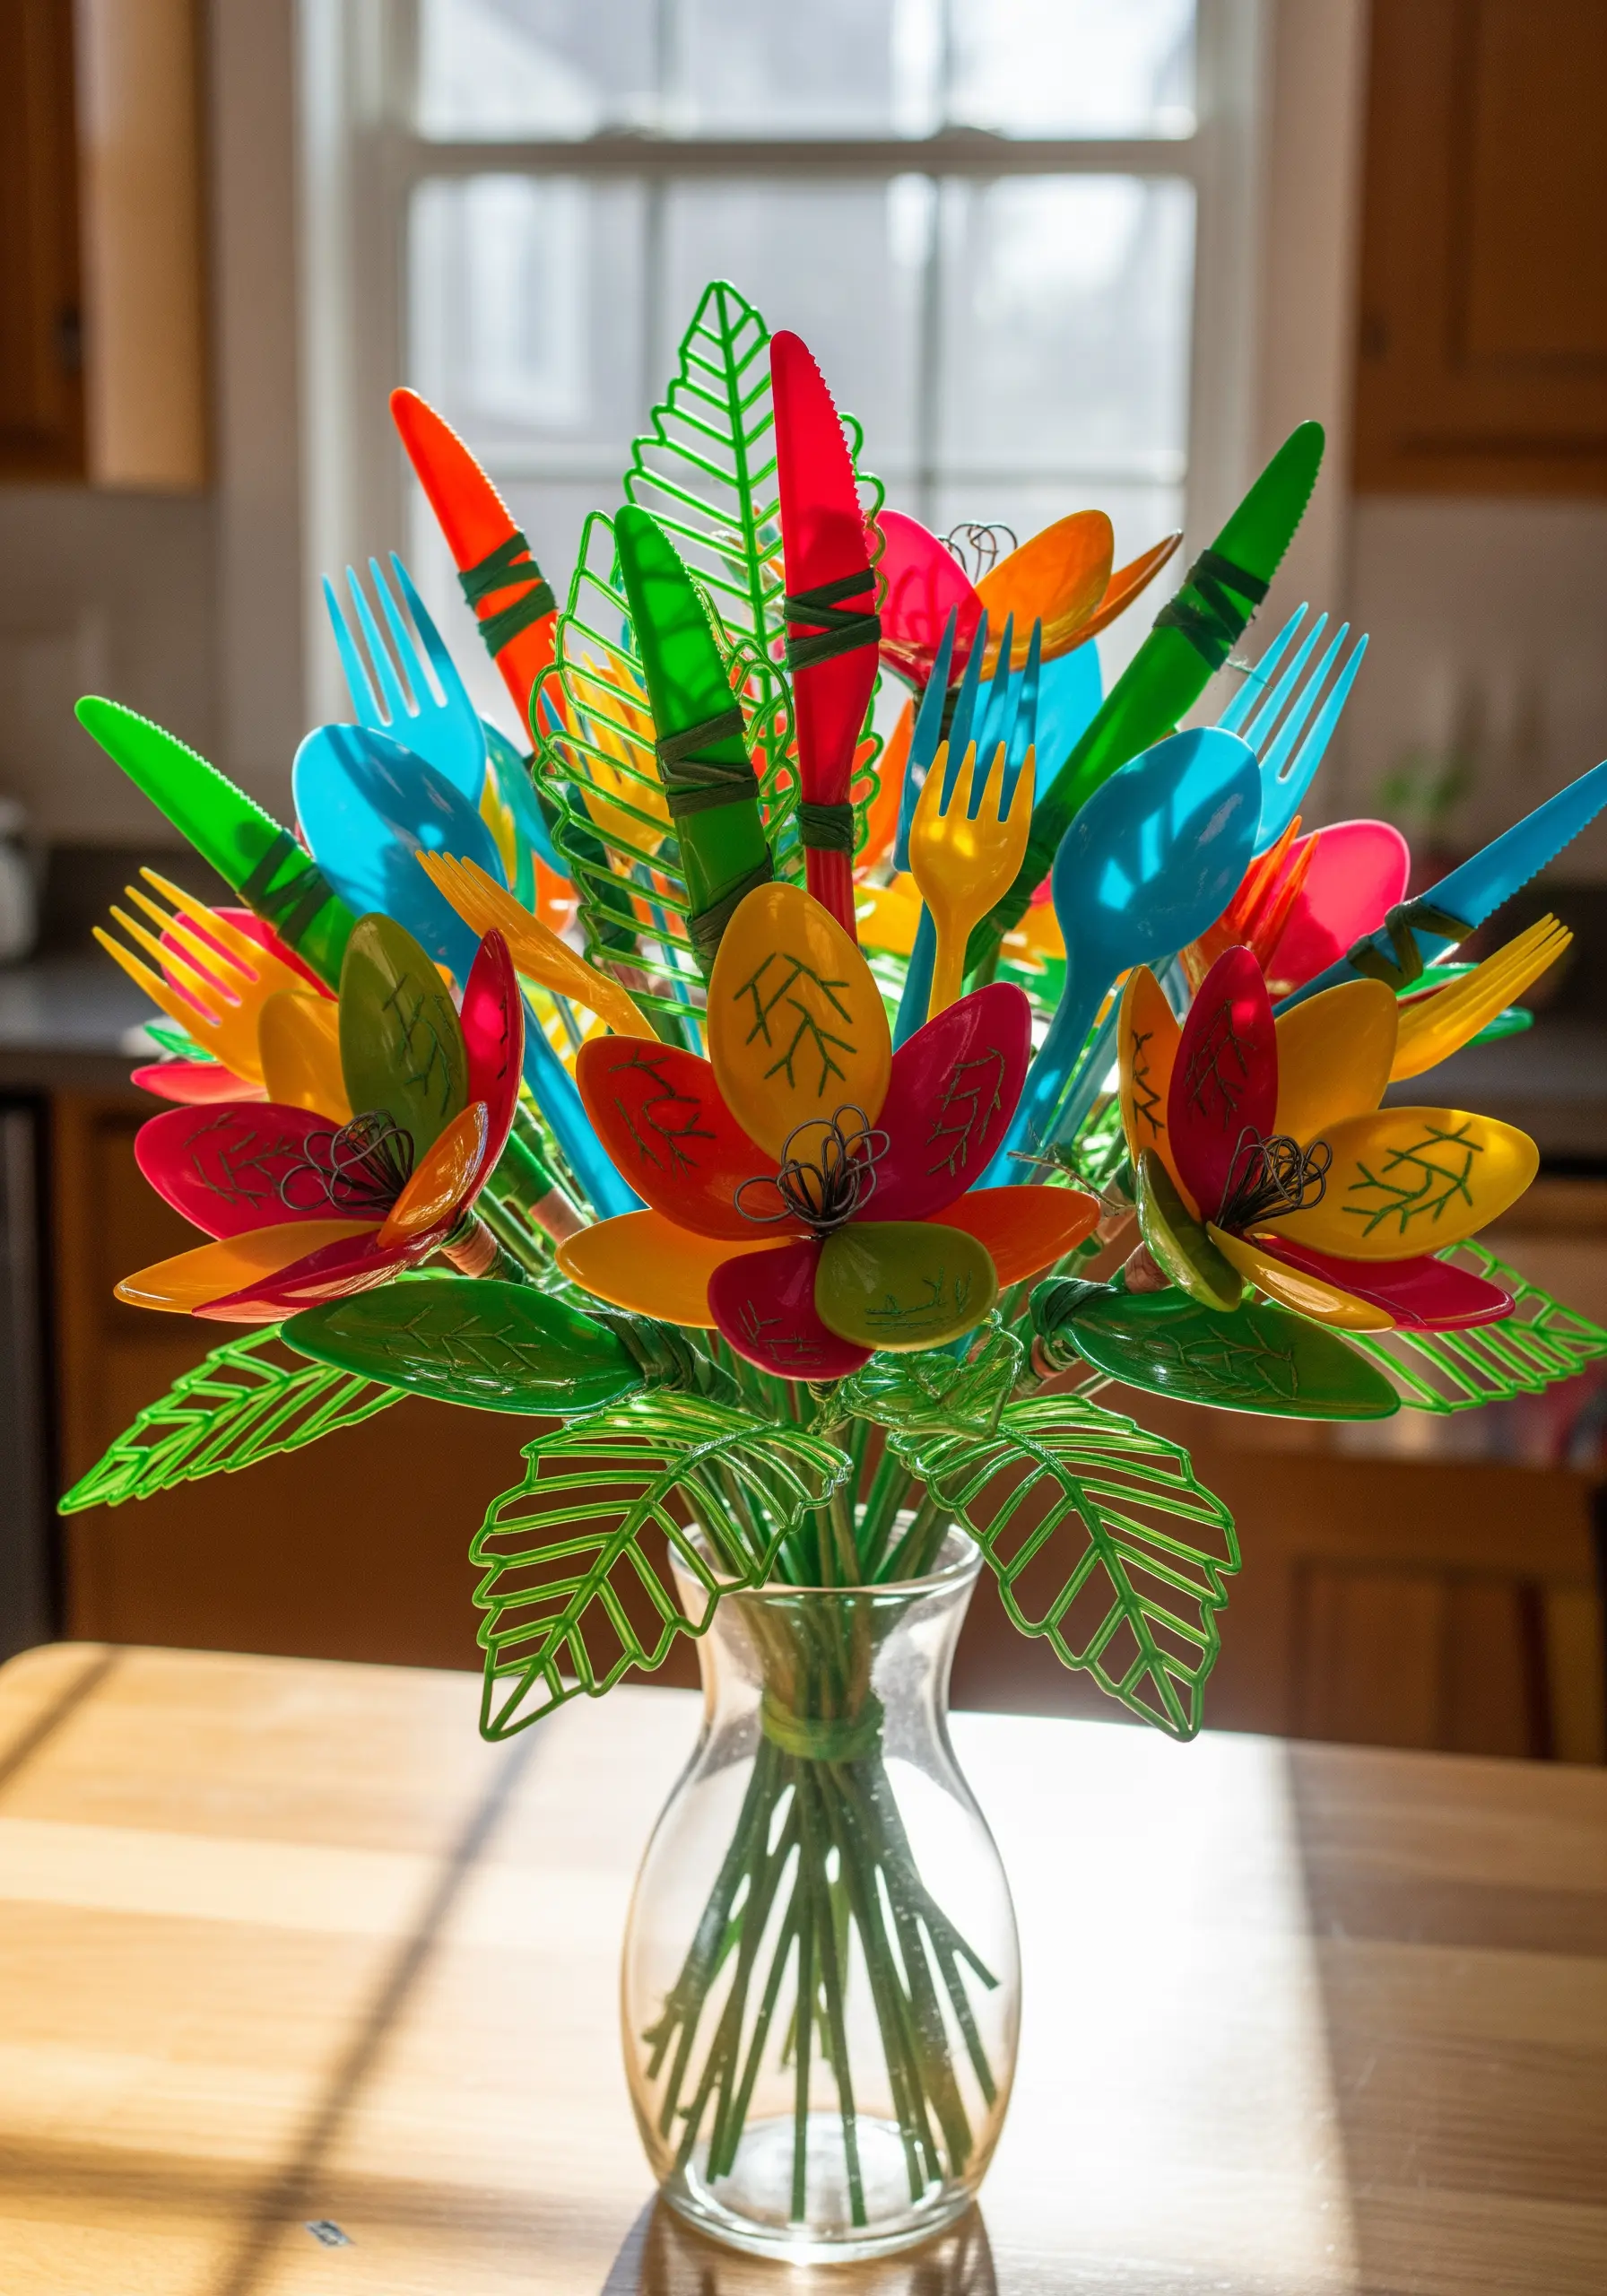
Add a layer of intricate detail to sculptures made from everyday plastic items by using thread as a fine, graphic line.
Carefully drill tiny holes into plastic cutlery or other objects to serve as your stitching points.
Use a fine, strong thread to stitch linear details, such as the veins on a leaf made from a plastic spoon or patterns on a flower petal.
This unexpected application of embroidery adds a touch of delicate, handcrafted artistry to mass-produced objects, completely transforming their character.
25. Explore Temporary Stitching on Soft Surfaces
Challenge your concept of a canvas by practicing simple embroidery on an unexpected and ephemeral material like a bar of soap.
The soft texture allows you to gently push a needle through without pre-drilling holes.
Use a few simple seed stitches to attach beads or create a small, abstract pattern on one side of the soap bar.
While not a permanent piece, this exercise encourages you to think about how thread can interact with any surface, no matter how unconventional, and to appreciate the beauty of temporary art.
26. Construct Radial Forms with Thread and Pins

Create large, airy, geometric sculptures by adapting string art techniques into a three-dimensional form.
Start with a central core and a series of radiating spokes (made from wire, skewers, or plastic rods).
Then, wrap fine, strong thread from spoke to spoke, building up layers to create a web-like, translucent structure.
The tension of the thread is what gives the sculpture its form and integrity, resulting in a piece that is both visually complex and incredibly lightweight.
27. Unify an Assemblage with Thread Wrapping
Bring harmony to a sculpture made of many small, disparate parts—like buttons—by using a consistent thread-wrapping technique.
First, build your main structure using a sturdy wire armature.
Before attaching the buttons or other small objects, completely wrap the wire armature with a single color of yarn or thick thread.
This creates a cohesive, textured base that ties the entire piece together, making the collection of individual items feel like a single, intentional sculpture.
28. Stitch onto Repurposed Paper Ephemera
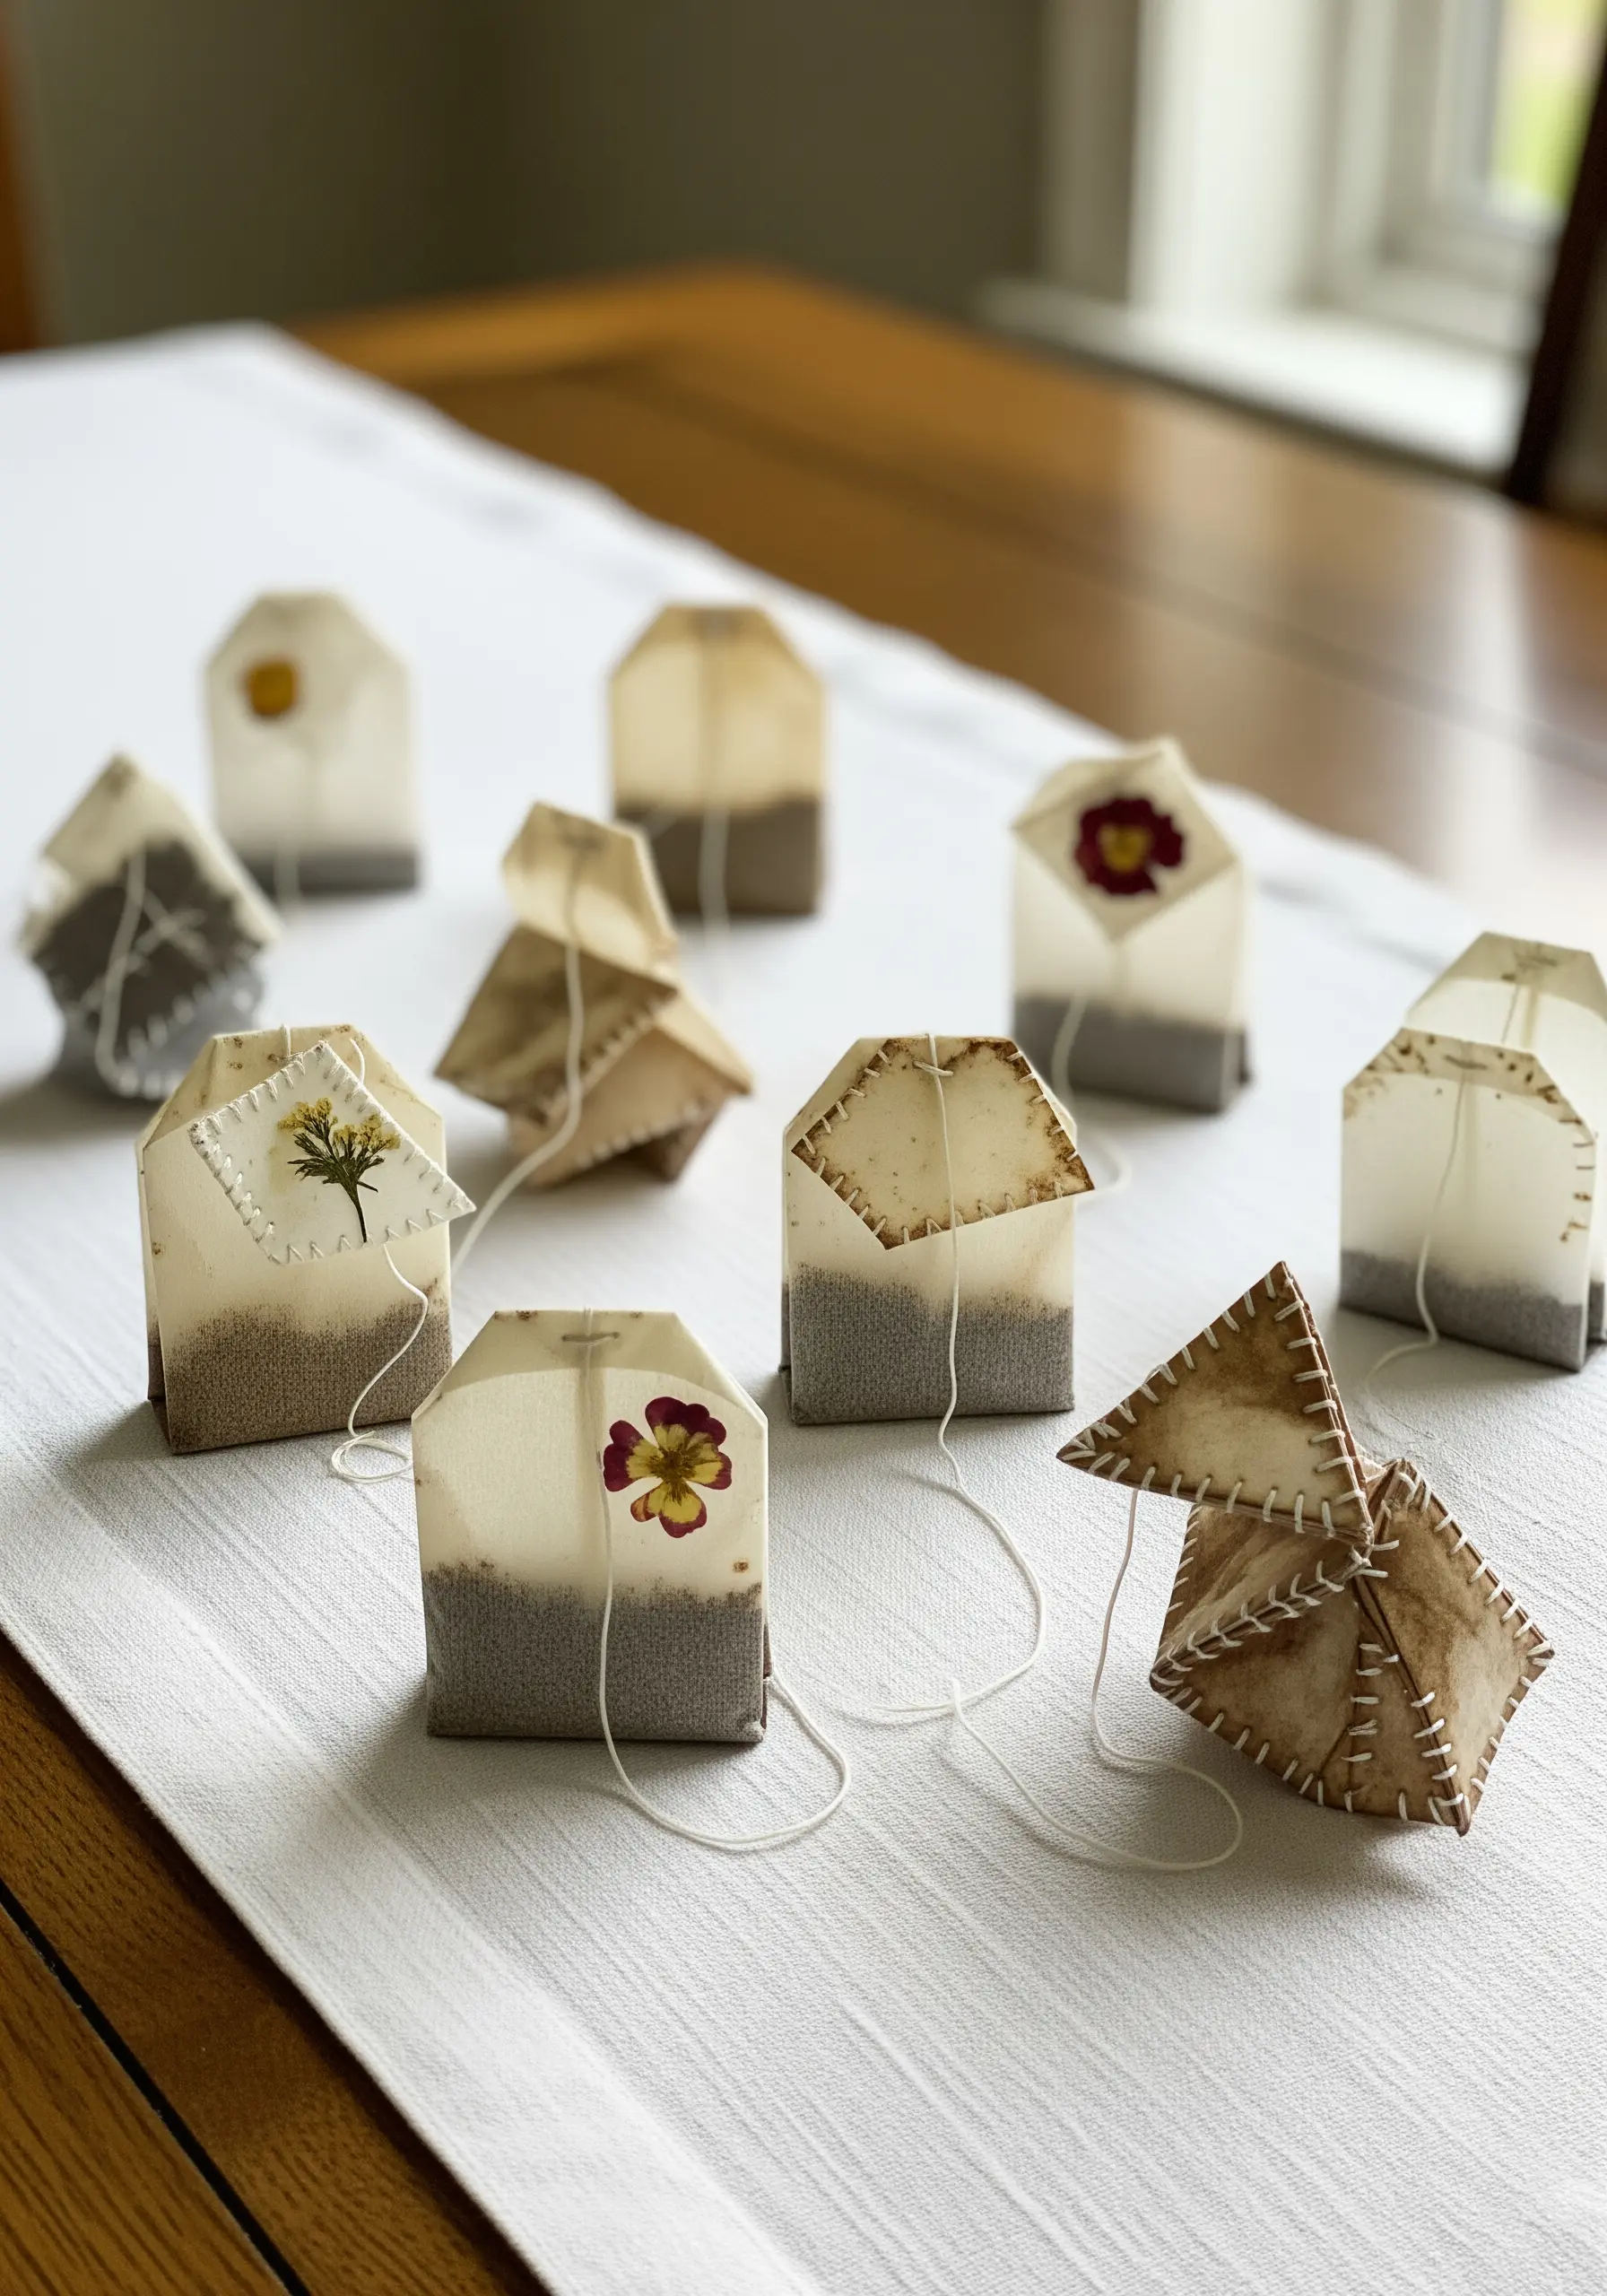
Give new life to delicate, everyday paper items like used tea bags by using them as a canvas for miniature embroidery.
Once emptied and dried, the stained paper offers a beautiful, neutral background with a unique history.
Use just a single strand of embroidery floss and a fine needle to add a tiny, simple motif—a small flower, a leaf, or a simple geometric shape.
You can also stitch pressed flowers directly onto the surface, creating a beautiful and fragile mixed-media piece.
29. Add Definition to Soft Sculptures with Line Work
Make the features of your soft sculptures pop by adding embroidered outlines and details after the main construction is complete.
On a stuffed felt animal, for instance, use a contrasting color of embroidery floss to add definition around the eyes, seams, or along the tentacles.
A simple backstitch, stem stitch, or chain stitch creates a clean, graphic line that adds personality and a professional finish to your piece.
This final layer of stitching is where the character of the sculpture truly comes to life.
30. Expose the Structure with Contrast Lacing
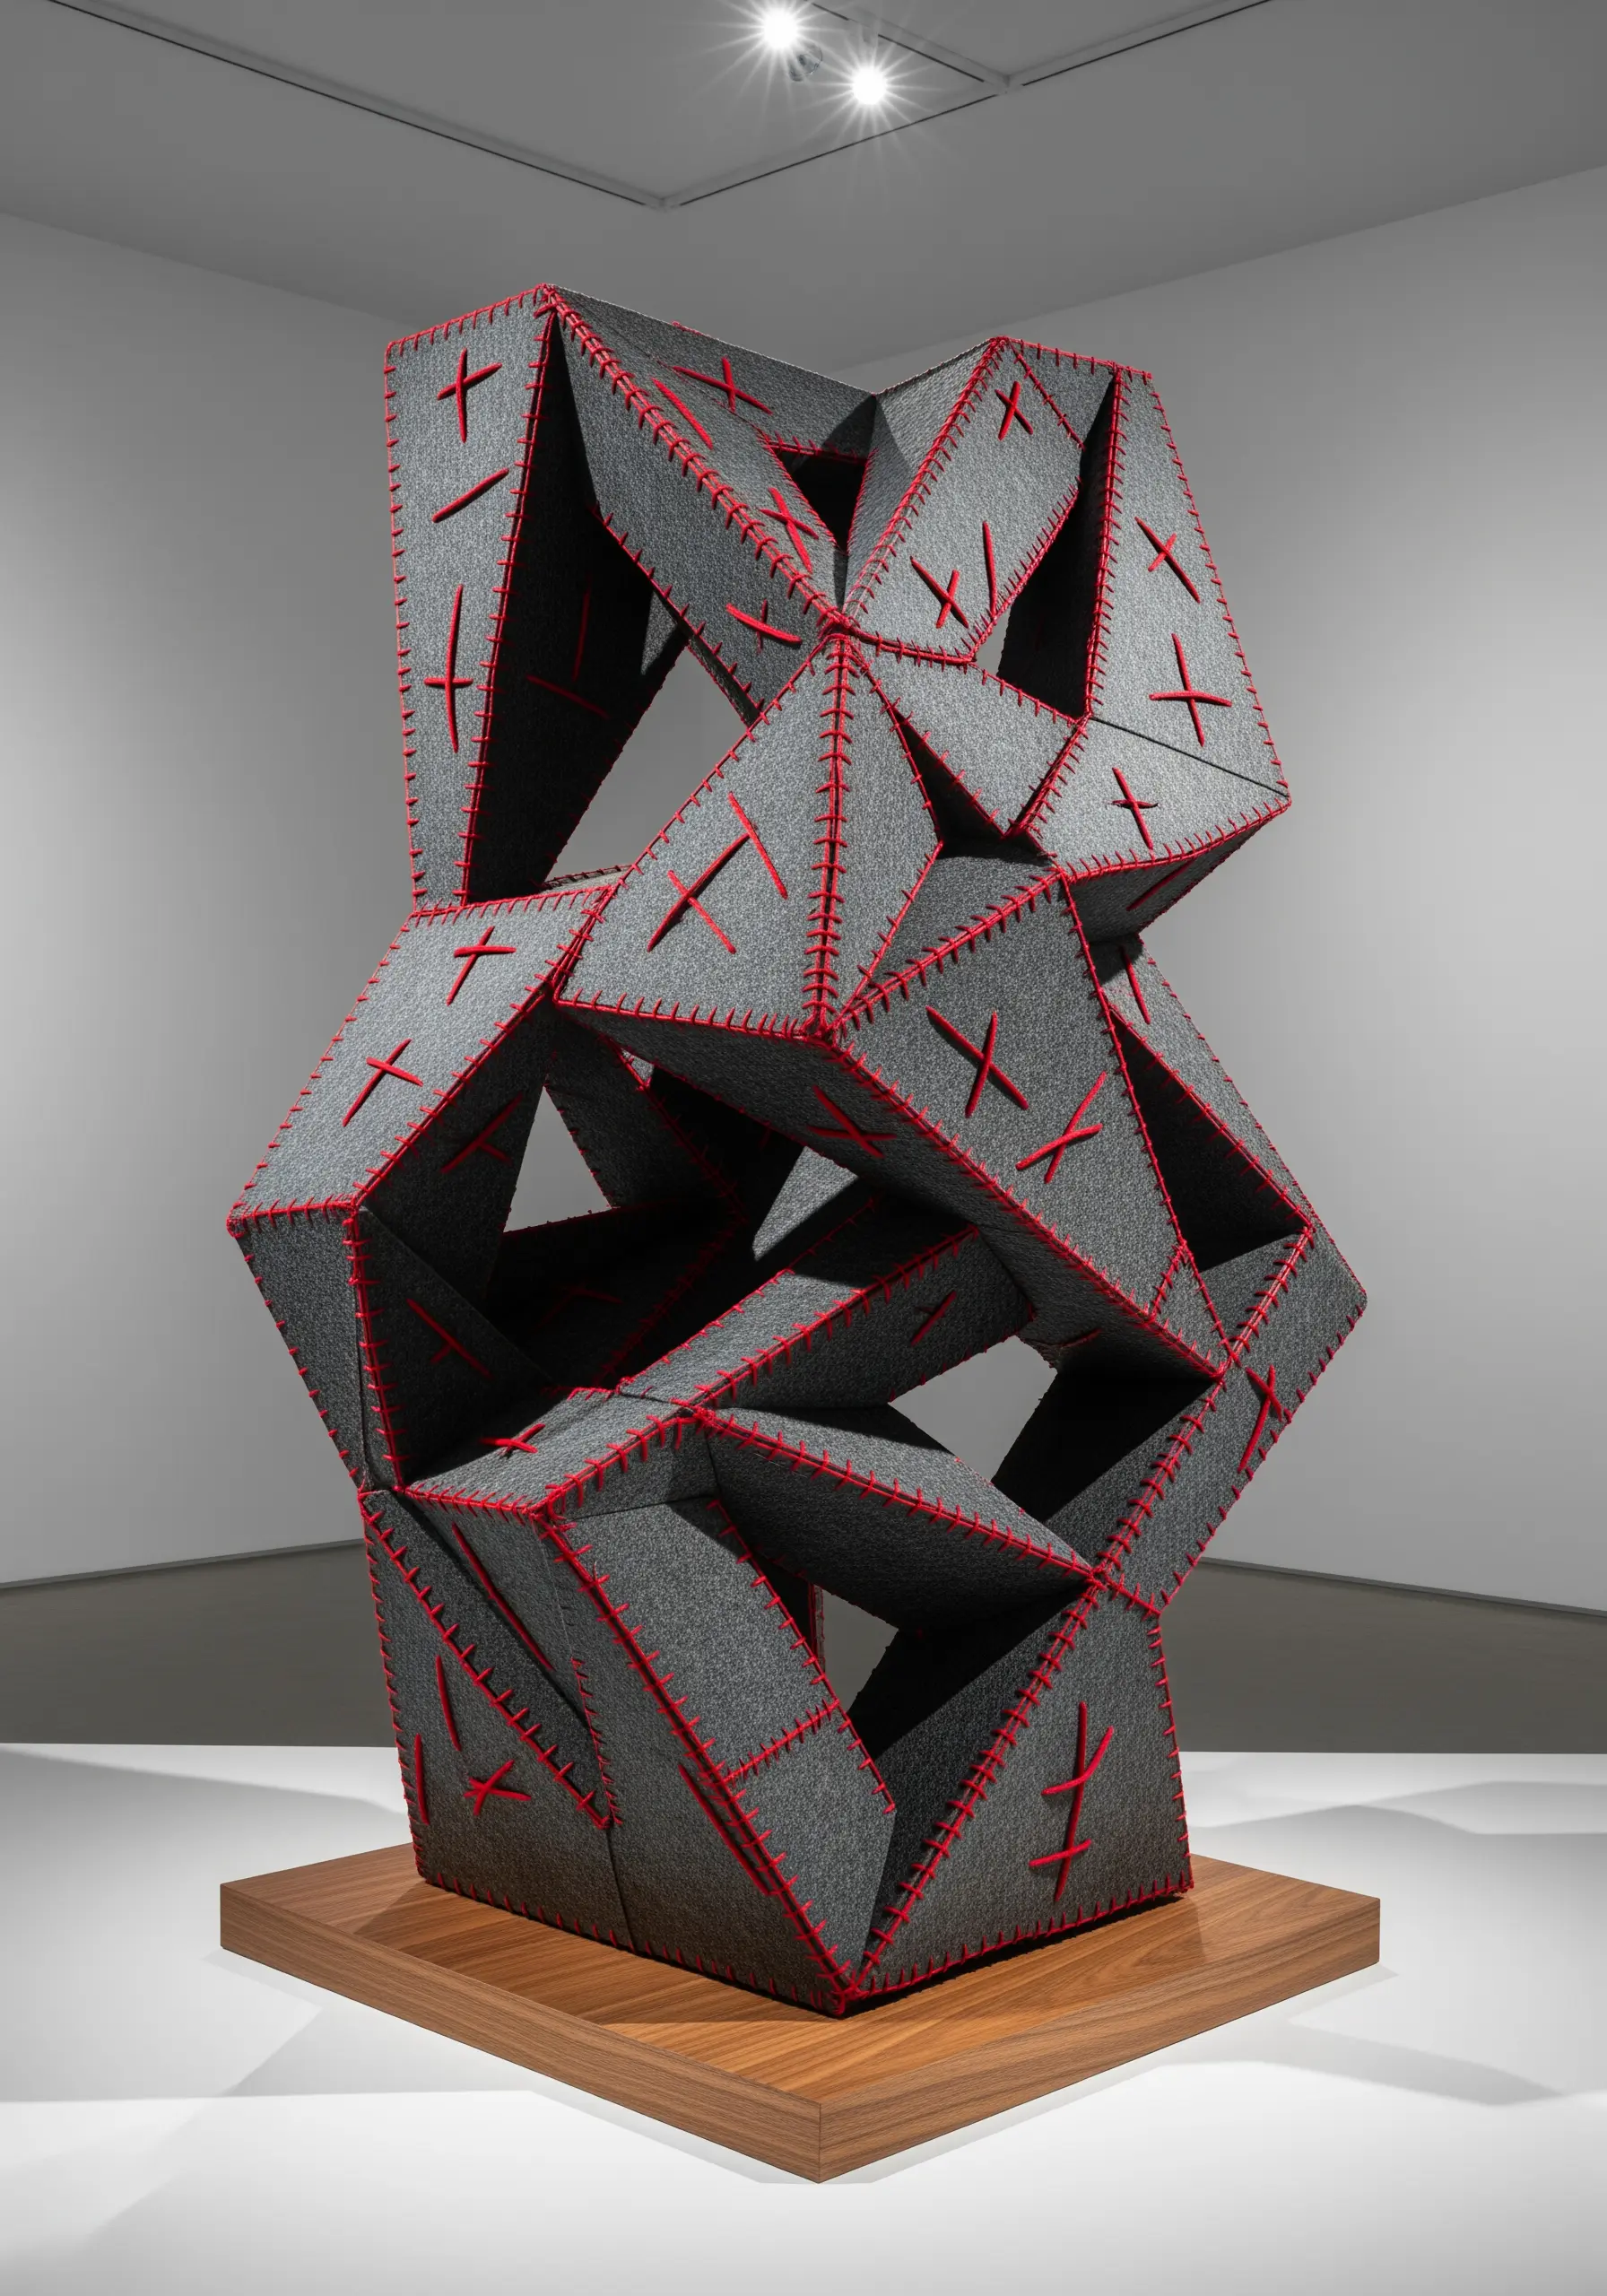
Turn the construction of your sculpture into its primary design feature by using high-contrast, visible stitching.
Cut your main forms from a neutral material like thick gray felt or cardboard.
Instead of hiding your seams, join the geometric panels with a bold, bright thread using an oversized cross-stitch or whipstitch.
This technique draws attention to the object’s construction, celebrating the seams and stitches as an integral part of the aesthetic, rather than something to be concealed.
31. Sculpt with Fabric Strips Instead of Thread
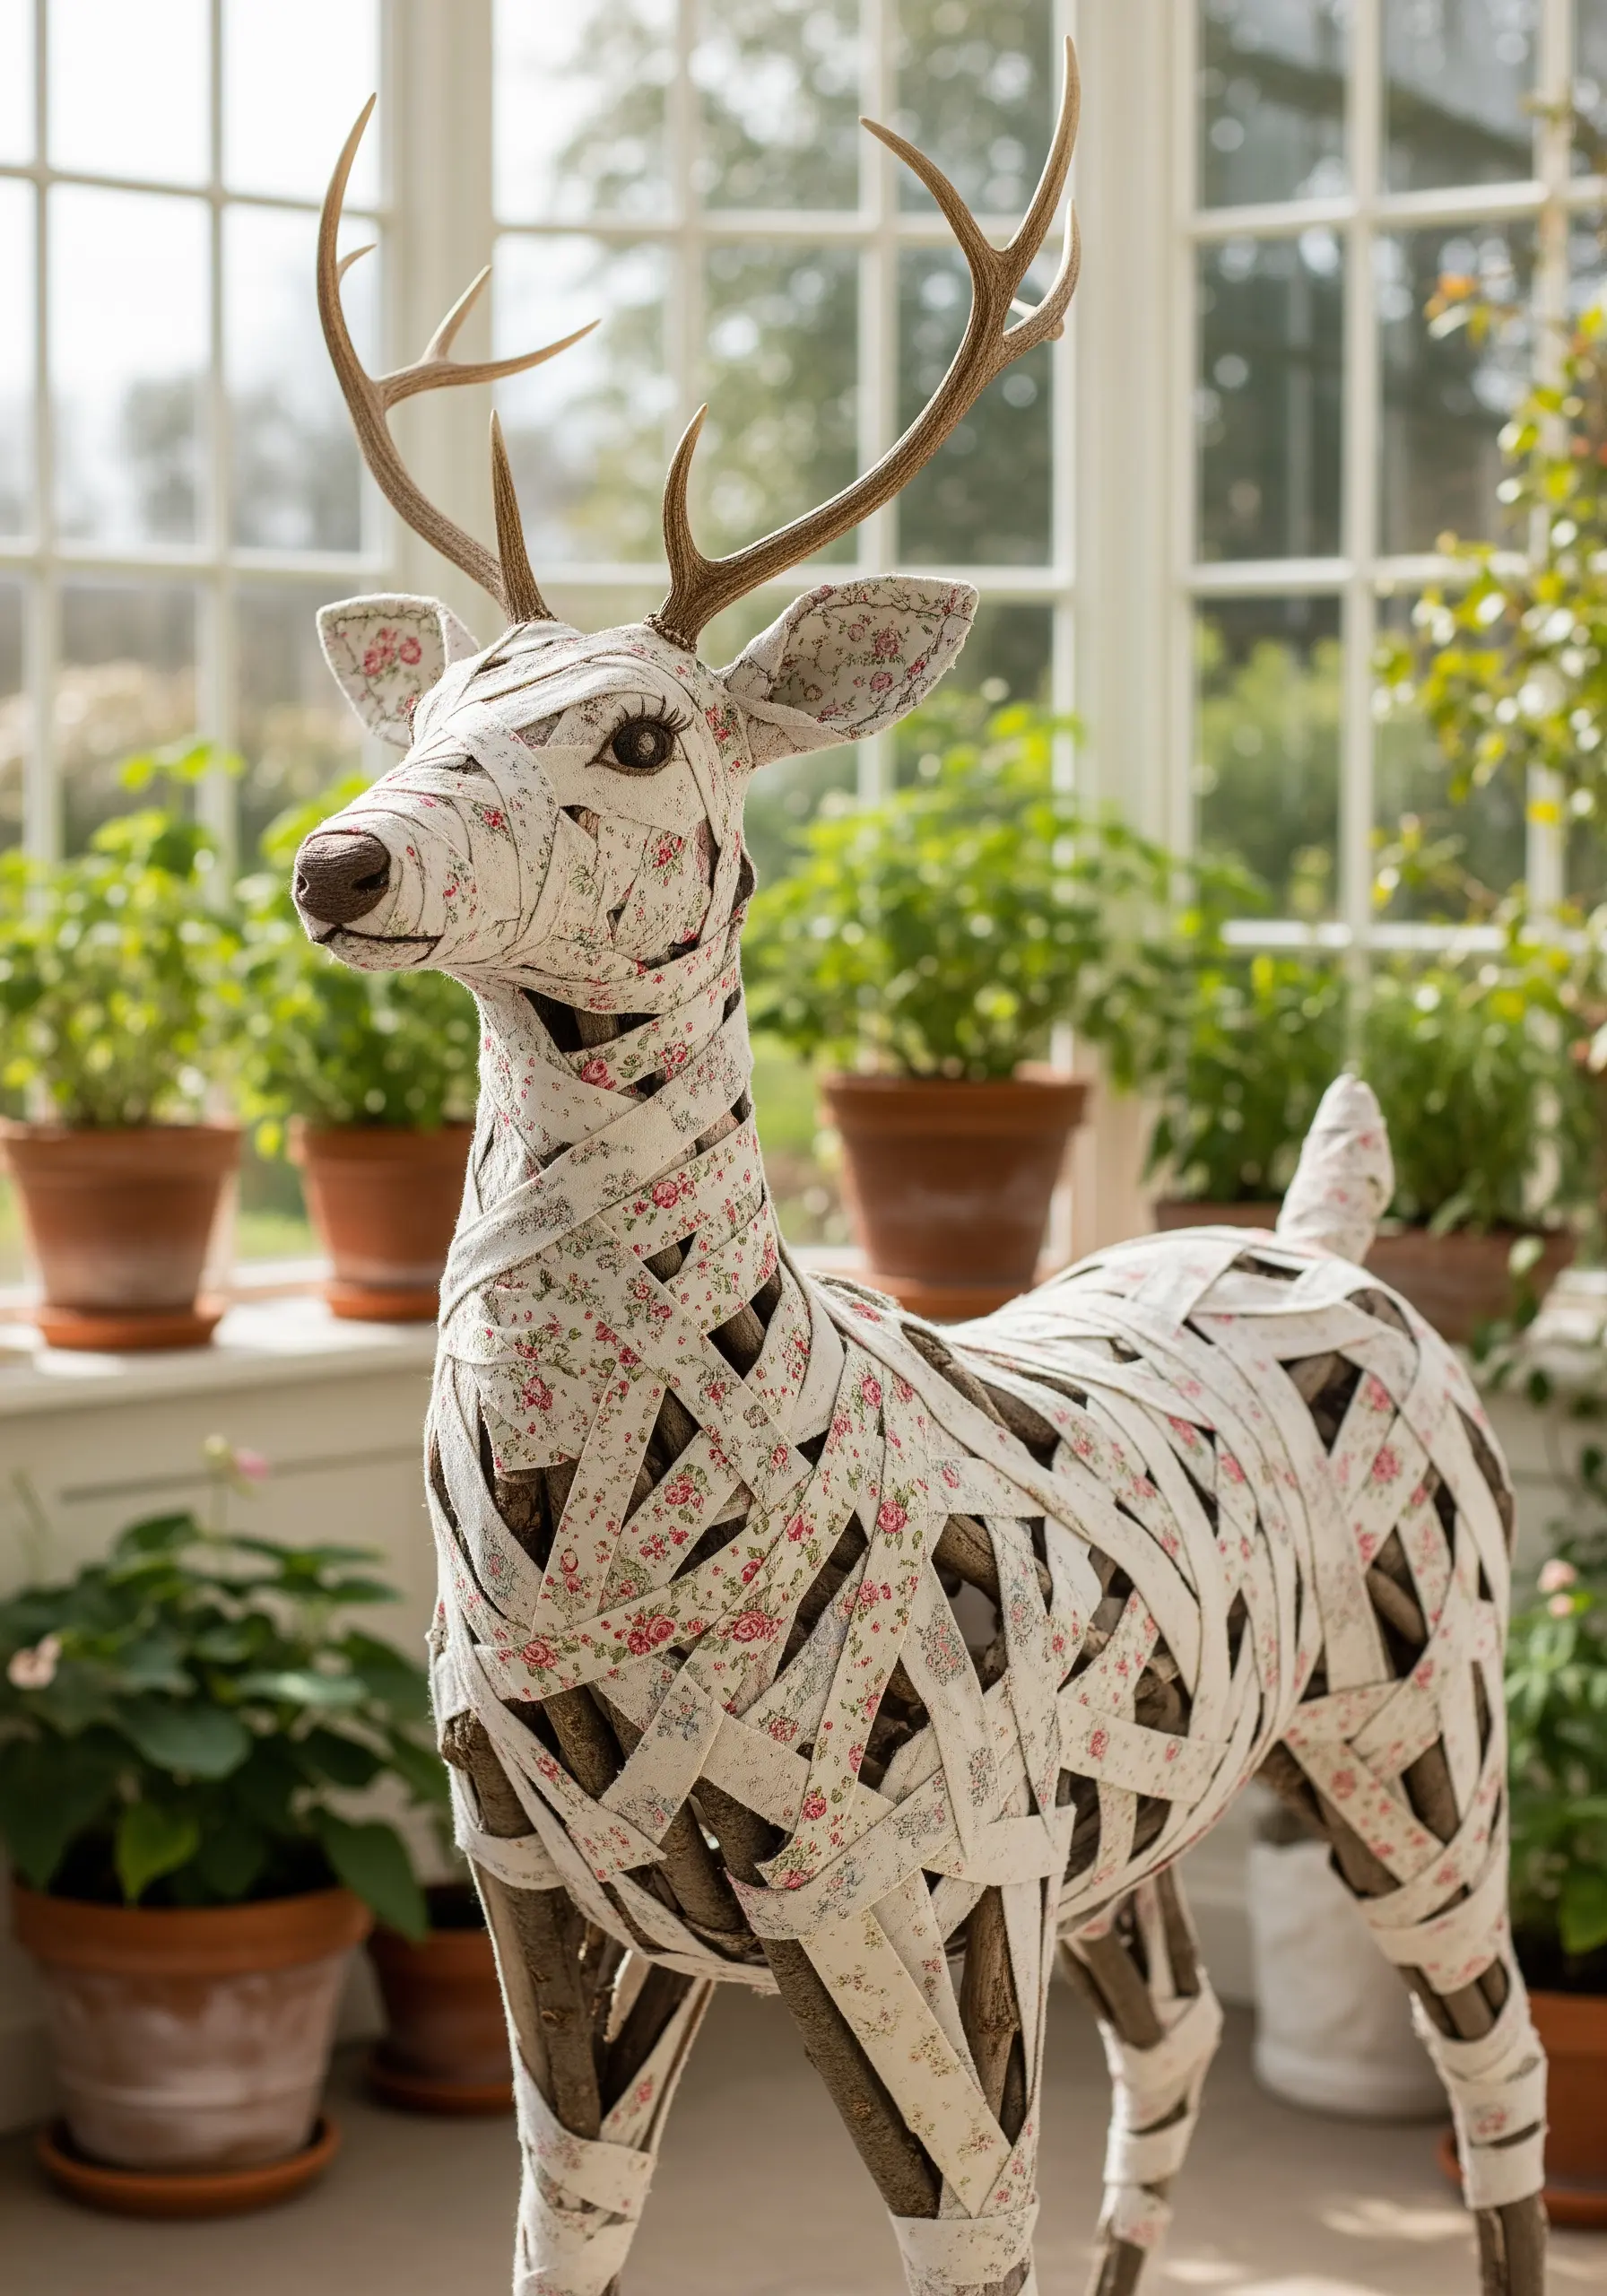
Think of fabric itself as a thick, textural thread and use it to wrap and define a three-dimensional form.
Create a basic armature from wire or salvaged branches to establish the shape of your sculpture.
Cut or rip fabric into long, thin strips, then wrap them tightly around the armature, overlapping them to build up the form.
The pattern of the fabric adds an extra layer of visual interest, creating a soft, almost painterly effect on the surface of the sculpture.


